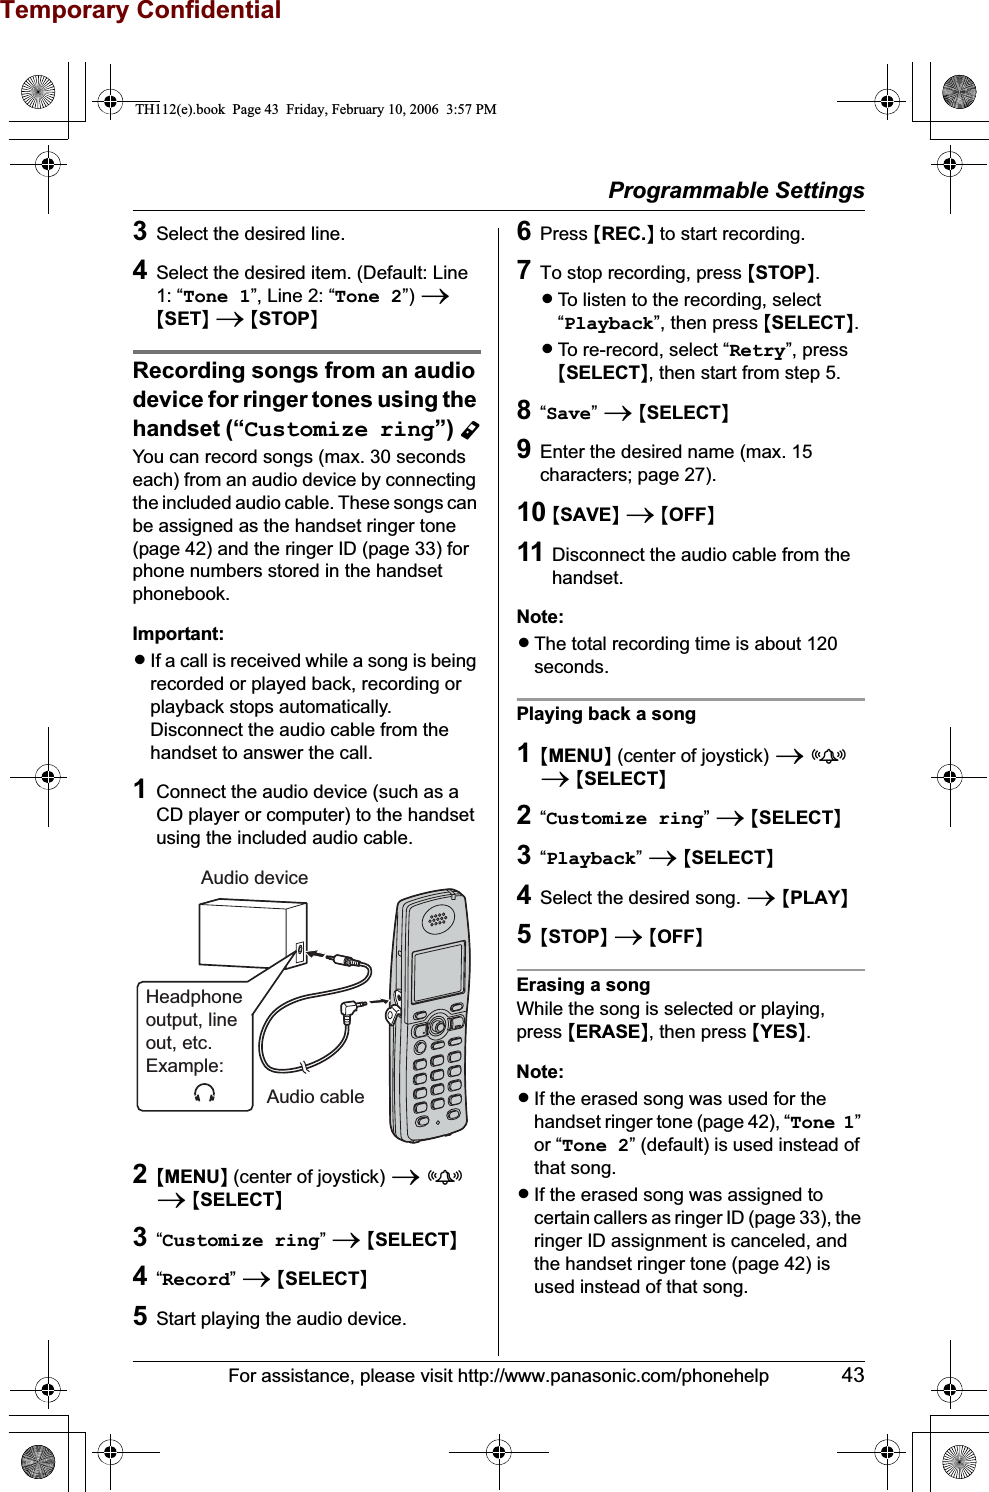
Panasonic of North America 96NKX-TH112 Panasonic 2.4 GHz FHSS Digital Cordless Telephone User Manual

Panasonic Corporation of North America Panasonic 2.4 GHz FHSS Digital Cordless Telephone Users Manual

Users Manual

Temporary ConfidentialThis unit is compatible with Caller ID. To use this feature, you must subscribe to the appropriate service offered by your service provider.Please read these Operating Instructions before using the unit and save for future reference.For assistance, visit our website:http://www.panasonic.com/phonehelp for customers in the U.S.A. or Puerto Rico.Charge the handset battery for 6 hours before initial use.2-Line Expandable Cordless Answering Systemwith Cellular ConnectionModel No. KX-TH112Operating InstructionsTH112(e).book  Page 1  Friday, February 10, 2006  3:57 PM
Temporary ConfidentialTable of Contents2For assistance, please visit http://www.panasonic.com/phonehelpIntroductionFeature highlights. . . . . . . . . . . . . . . . . . 3Accessory information  . . . . . . . . . . . . . . 4Expanding your phone system . . . . . . . . 5Important safety instructions  . . . . . . . . . 6For best performance . . . . . . . . . . . . . . . 8PreparationSetting up the base unit . . . . . . . . . . . . . 9Setting up the handset . . . . . . . . . . . . . 12Controls  . . . . . . . . . . . . . . . . . . . . . . . . 14Displays . . . . . . . . . . . . . . . . . . . . . . . . 17Symbols used in these operating instructions . . . . . . . . . . . . . . . . . . . . . . 19Setting the unit before use . . . . . . . . . . 20C Making/Answering CallsMaking calls . . . . . . . . . . . . . . . . . . . . . 22Answering calls  . . . . . . . . . . . . . . . . . . 24Useful features during a call. . . . . . . . . 24Using the other line during a call  . . . . . 26d PhonebookHandset phonebook . . . . . . . . . . . . . . . 27Base unit phonebook . . . . . . . . . . . . . . 30G Caller ID ServiceUsing Caller ID service. . . . . . . . . . . . . 32Caller list. . . . . . . . . . . . . . . . . . . . . . . . 33IntercomIntercom feature . . . . . . . . . . . . . . . . . . 36Transferring a call. . . . . . . . . . . . . . . . . 37Conference calls. . . . . . . . . . . . . . . . . . 38Call share . . . . . . . . . . . . . . . . . . . . . . . 40F MonitoringMonitoring feature  . . . . . . . . . . . . . . . . 41Audio monitor . . . . . . . . . . . . . . . . . . . . 41Programmable SettingsRinger settings . . . . . . . . . . . . . . . . . . . 42Other settings . . . . . . . . . . . . . . . . . . . . 45Registering a unit . . . . . . . . . . . . . . . . . 50i Answering SystemAnswering system feature  . . . . . . . . . . 51Setting up the answering system . . . . . 51Listening to messages using the base unit52Listening to messages using the handset53Voice memo . . . . . . . . . . . . . . . . . . . . . 55Remote operation . . . . . . . . . . . . . . . . . 55Answering system settings . . . . . . . . . . 57Using a Cellular Phone with this UnitConfiguring a cellular phone. . . . . . . . . 60Making/answering calls using a cellular line  . . . . . . . . . . . . . . . . . . . . . . . . . . . . 61Useful features during a cellular call. . . 63Cellular settings  . . . . . . . . . . . . . . . . . . 65Transferring a cellular call. . . . . . . . . . . 67Conference calls. . . . . . . . . . . . . . . . . . 68Useful InformationHeadset (Optional) . . . . . . . . . . . . . . . . 70Additional accessories . . . . . . . . . . . . . 71Error messages  . . . . . . . . . . . . . . . . . . 72Troubleshooting . . . . . . . . . . . . . . . . . . 74FCC and other information . . . . . . . . . . 80Specifications . . . . . . . . . . . . . . . . . . . . 83Customer services . . . . . . . . . . . . . . . . 84Warranty . . . . . . . . . . . . . . . . . . . . . . . . 85Direct command chart/programming index87IndexIndex. . . . . . . . . . . . . . . . . . . . . . . . . . . 90TH112(e).book  Page 2  Friday, February 10, 2006  3:57 PM
Temporary ConfidentialIntroductionFor assistance, please visit http://www.panasonic.com/phonehelp 3Feature highlightsThank you for purchasing a Panasonic cordless telephone.Telephone and monitoring featuresN2 line telephoneWhile one line is in use, you can make or answer a call using the other line.NAudio monitor (between handset and base unit)You can listen to the audio in the room where the handset or base unit is located (page 41).NCustomize ringYou can connect an audio device to the handset using the included audio cable and record songs to be used as the handset ringer tone (page 43).NChanging the device nameYou can customize the name for the handset and base unit (page 45).NCellular connectionThis feature allows you to make or answer cellular calls using the handset or base unit, if your cellular phone is Bluetooth® wireless technology compatible to the home communication system (page 60). For more information for this feature, please visit our website (page 5).TH112(e).book  Page 3  Friday, February 10, 2006  3:57 PM
Temporary ConfidentialIntroduction4For assistance, please visit http://www.panasonic.com/phonehelpAccessory informationBase unitHandsetOther additional/replacement accessoriesNote:LYou can expand your phone system by registering additional compatible Panasonic units (page 5).Sales and support informationLTo order these accessories, call 1-800-332-5368.LTTY users (hearing or speech impaired users) can call 1-866-605-1277.AAC adaptor for base unit PQLV205 (Order No. PQWETH102M)A4-wire telephone line cord with green plugs(Order No. PQJA10088Z)A2-wire telephone line cord with transparent plugs(Order No. PQJA10075Z)ABattery(Order No. HHR-P104)AHandset cover(Order No. PQYNTHA11R)AAudio cable(Order No. PQJA10172Z)Accessory item Order numberRechargeable nickel metal hydride (Ni-MH) batteryHHR-P104Corded headset KX-TCA60, KX-TCA86, KX-TCA88HA, KX-TCA91, KX-TCA92, KX-TCA98Belt clip PQKE10404Z1Wall-mounting adaptor PQKL10078ZA1T-adaptor KX-J662-line splitter KX-J42TH112(e).book  Page 4  Friday, February 10, 2006  3:57 PM
Temporary ConfidentialIntroductionFor assistance, please visit http://www.panasonic.com/phonehelp 5Expanding your phone systemYou can expand the phone system by registering the following units to a single base unit:max. 18Note:LHeadset and cellular phone must have Bluetooth capability and must be compatible to the home communication system. For more details and the list of compatible cellular phones, please visit: www.panasonic.com/MultiTalkVLReferences in these operating instructions to “a charger” or “other handsets” are for accessory handset users only. KX-TH112 Handsets: max. 8Cordless handsetKX-THA19(Monochrome display type)+Other Bluetooth compatible devices (Optional): max. 10HeadsetCellular phone:max. 5TH112(e).book  Page 5  Friday, February 10, 2006  3:57 PM
Temporary ConfidentialIntroduction6For assistance, please visit http://www.panasonic.com/phonehelpImportant safety instructionsWhen using the product, basic safety precautions should always be followed to reduce the risk of fire, electric shock, or personal injury.1. Read and understand all instructions.2. Follow all warnings and instructions marked on the product.3. Unplug the product from power outlets before cleaning. Do not use liquid or aerosol cleaners. Use a moist cloth for cleaning.4. Do not use the product near water, for example near a bathtub, wash bowl, kitchen sink, etc.5. Place the product securely on a stable surface. Serious damage and/or injury may result if the product falls.6. Do not cover slots and openings on the product. They are provided for ventilation and protection against overheating. Never place the product near radiators, or in a place where proper ventilation is not provided.7. Use only the power source marked on the product. If you are not sure of the type of power supplied to your home, consult your dealer or local power company.8. Do not place objects on the power cord. Install the product where no one can step or trip on the cord.9. Do not overload power outlets and extension cords. This can result in the risk of fire or electric shock.10. Never push any objects through slots in the product. This may result in the risk of fire or electric shock. Never spill any liquid on the product.11. To reduce the risk of electric shock, do not disassemble the product. Take the product to an authorized service center when service is required. Opening or removing covers may expose you to dangerous voltages or other risks. Incorrect reassembly can cause electric shock when the product is subsequently used.12. Unplug the product from power outlets and refer servicing to an authorized service center when the following conditions occur:A. When the power cord is damaged or frayed.B. If liquid has been spilled into the product.C. If the product has been exposed to rain or water.D. If the product does not work normally by following the operating instructions. Adjust only controls covered by the operating instructions. Improper adjustment may require extensive work by an authorized service center.E. If the product has been dropped or physically damaged.F. If the product exhibits a distinct change in performance.13. During thunderstorms, avoid using telephones except cordless types. There may be a remote risk of an electric shock from lightning.14. Do not use the product to report a gas leak, when in the vicinity of the leak.SAVE THESE INSTRUCTIONSCAUTION:InstallationLNever install telephone wiring during a lightning storm.LNever install telephone jacks in wet locations unless the jack is specifically designed for wet locations.LNever touch uninsulated telephone wires or terminals unless the telephone line has been disconnected at the network interface.LUse caution when installing or modifying telephone lines.TH112(e).book  Page 6  Friday, February 10, 2006  3:57 PM
Temporary ConfidentialIntroductionFor assistance, please visit http://www.panasonic.com/phonehelp 7LDo not touch the plug with wet hands.LThe AC adaptor is used as the main disconnect device. Ensure that the AC outlet is installed near the product and is easily accessible.BatteryTo reduce the risk of fire or injury to persons, read and follow these instructions.LUse only the battery(ies) specified.LDo not dispose of the battery(ies) in a fire. They may explode. Check with local waste management codes for special disposal instructions.LDo not open or mutilate the battery(ies). Released electrolyte is corrosive and may cause burns or injury to the eyes or skin. The electrolyte may be toxic if swallowed.LExercise care when handling the battery(ies). Do not allow conductive materials such as rings, bracelets or keys to touch the battery(ies), otherwise a short circuit may cause the battery(ies) and/or the conductive material to overheat and cause burns.LCharge the battery(ies) provided, or identified for use with the product only, in accordance with the instructions and limitations specified in this manual.WARNING:LTo prevent the risk of fire or electrical shock, do not expose the product to rain or any type of moisture.LUnplug the product from power outlets if it emits smoke, an abnormal smell, or makes an unusual noise. These conditions can cause fire or electric shock. Confirm that smoke has stopped emitting and contact the Panasonic Call Center at 1-800-211-PANA (1-800-211-7262).MedicalLConsult the manufacturer of any personal medical devices, such as pacemakers or hearing aids, to determine if they are adequately shielded from external RF (radio frequency) energy. (The product operates in the frequency range of 2.402 GHz to 2.48 GHz, and the power output is 125 mW (max.).) Do not use the product in health care facilities if any regulations posted in the area instruct you not to do so. Hospitals or health care facilities may be using equipment that could be sensitive to external RF (radio frequency) energy.TH112(e).book  Page 7  Friday, February 10, 2006  3:57 PM
Temporary ConfidentialIntroduction8For assistance, please visit http://www.panasonic.com/phonehelpFor best performanceBase unit location/noiseThe base unit and other compatible Panasonic units use radio waves to communicate with each other.For maximum distance and noise-free operation, we recommend the following:LPlacing the base unit in a HIGH and CENTRAL location with no obstructions such as walls.LRaising the antennas vertically.LPlacing the product away from electrical appliances.LIf you use the handset near other electrical appliances (microwave, wireless LAN appliance, etc.), noise may be heard. Move away from those appliances and closer to the base unit.LIf you use the handset near another cordless phone’s base unit, noise may be heard. Move away from the other cordless phone’s base unit and closer to your base unit.EnvironmentLKeep the product away from electrical noise generating devices, such as fluorescent lamps and motors.LThe product should be kept free from excessive smoke, dust, high temperature, and vibration.LThe product should not be exposed to direct sunlight.LDo not place heavy objects on top of the product.LWhen you leave the product unused for a long period of time, unplug the product from the power outlet.LThe product should be kept away from heat sources such as heaters, kitchen stoves, etc. It should not be placed in rooms where the temperature is less than 5 °C (41 °F) or greater than 40 °C (104 °F). Damp basements should also be avoided.LThe maximum calling distance may be shortened when the product is used in the following places: Near obstacles such as hills, tunnels, underground, near metal objects such as wire fences, etc.LOperating near 2.4 GHz electrical appliances may cause interference. Move away from the electrical appliances.Routine careLWipe the outer surface of the product with a soft moist cloth. Do not use benzine, thinner, or any abrasive powder.TH112(e).book  Page 8  Friday, February 10, 2006  3:57 PM
Temporary ConfidentialPreparationFor assistance, please visit http://www.panasonic.com/phonehelp 9Setting up the base unitOverview1Connect the AC adaptor.2Connect the telephone line cord.Refer to one of the following methods depending on your situation.LTo connect to a 2-line telephone jack: page 10LTo connect to 2 single-line telephone jacks: page 10LTo connect to a single-line telephone jack: page 10For DSL service subscribers:LTo connect to a 2-line telephone jack: page 11LTo connect to 2 single-line telephone jacks: page 11Connecting the AC adaptorConnect the AC adaptor, then raise the antennas.LUse only the included Panasonic AC adaptor PQLV205.Note:LThe AC adaptor must remain connected at all times. (It is normal for the adaptor to feel warm during use.)LThe AC adaptor should be connected to a vertically oriented or floor-mounted AC outlet. Do not connect the AC adaptor to a ceiling-mounted AC outlet, as the weight of the adaptor may cause it to become disconnected.LThe unit will not work during a power failure. We recommend connecting a standard telephone to the same telephone line or to the same telephone jack using a Panasonic T-adaptor (page 4). (120 V AC, 60 Hz)HookTH112(e).book  Page 9  Friday, February 10, 2006  3:57 PM
Temporary ConfidentialPreparation10 For assistance, please visit http://www.panasonic.com/phonehelpConnecting the telephone line cordConnect the telephone line cord until it clicks into the telephone jack.To connect to a 2-line telephone jackTo connect to 2 single-line telephone jacksTo connect to a single-line telephone jackNote:LMake sure you connect the telephone line cord into LINE1/2 telephone jack.To 2-line telephone jack (RJ14C)4-wire telephone line cord with green plugsLine 1Line 2To single-line telephone jacks (RJ11C)2-wire telephone line cord with transparent plugs4-wire telephone line cord with green plugs2-wire telephone line cord with transparent plugsTo single-linetelephone jack (RJ11C)TH112(e).book  Page 10  Friday, February 10, 2006  3:57 PM
Temporary ConfidentialPreparationFor assistance, please visit http://www.panasonic.com/phonehelp 11If you subscribe to a DSL servicePlease attach a noise filter (contact your DSL provider) to the telephone line between the base unit and the telephone line jack in the event of the following:– Noise is heard during conversations.– Caller ID features (page 32) do not function properly.To connect to a 2-line telephone jackFor this connection, please purchase a Panasonic 2-line splitter (page 4).Example: DSL line is line 2To connect to 2 single-line telephone jacksExample: DSL line is line 2LINE 2LINE 12-linesplitter2-wire telephone line cord with transparent plugs4-wire telephone line cord with green plugsTo 2-line telephone jack (RJ14C)Noise filterLine 1Line 2To single-line telephone jacks (RJ11C)Noise filter2-wire telephone line cord with transparent plugs4-wire telephone line cord with green plugsTH112(e).book  Page 11  Friday, February 10, 2006  3:57 PM
Temporary ConfidentialPreparation12 For assistance, please visit http://www.panasonic.com/phonehelpSetting up the handsetBattery installation/replacement1Press the notch of the handset cover firmly, and slide it in the direction of the arrow.LIf necessary, remove the old battery.2Insert the battery (A), and press it down until it snaps into position (B).Then close the handset cover (C,D).Important:LUse only the rechargeable Panasonic battery noted on page 4.Attention:A nickel metal hydride battery that is recyclable powers the product you have purchased.Please call 1-800-8-BATTERY (1-800-822-8837) for information on how to recycle this battery.Battery chargePlace the handset on the base unit for 6hours before initial use.While charging, the charge indicator on the handset lights in amber. When the battery is fully charged, the indicator lights in green.Base unitNote:LIf you want to use the handset immediately, charge the battery for at least 15 minutes.LTo ensure that the battery charges properly, clean the charge contacts of the handset, base unit, and charger with a soft, dry cloth once a month. Clean more often if the unit is subject to the exposure of grease, dust, or high humidity.ABCDTH112(e).book  Page 12  Friday, February 10, 2006  3:57 PM
Temporary ConfidentialPreparationFor assistance, please visit http://www.panasonic.com/phonehelp 13Battery levelNote:LWhen the battery needs to be charged, the handset beeps intermittently while it is in use.Panasonic battery performanceNote:LBattery operating time may be shortened over time depending on usage conditions and surrounding temperature.LBattery power is consumed whenever the handset is off the base unit, even when the handset is not in use. The longer you leave the handset off the base unit, the less time you may actually talk using the handset.LAfter the handset is fully charged, displaying “Charge completed”, it may be left on the base unit without any ill effect on the battery.LThe battery level may not be displayed correctly after you replace the battery. In this case, place the handset on the base unit and let charge for 6 hours.Battery icon Battery level1Fully charged2Medium3LowFlashing: needs to be recharged.4EmptyOperation Operating timeWhile in use (talking)Up to 5 hoursWhile not in use (standby)Up to 11 daysWhile using the clarity booster feature (page 25)Up to XX hoursTH112(e).book  Page 13  Friday, February 10, 2006  3:57 PM
Temporary ConfidentialPreparation14 For assistance, please visit http://www.panasonic.com/phonehelpControlsBase unitA{LINE1}B{LINE2}C{CONF} (Conference)D{HOLD}E{MEMO}F{LINE SELECT}G{ANSWER ON}ANSWER ON indicatorH{EDIT}I{ERASE}J{STOP}K{MESSAGE}LAntennaMSpeakerN{TRANSFER}{INTERCOM}OIN USE indicatorPDisplayQCELLULAR SELECT {1},{2},{3},{4},{5}RCharge contactsS{*} (TONE)T{PAUSE}{REDIAL}U{SP-PHONE} (Speakerphone)V{MUTE}W{FLASH}{CALL WAIT}XMIC (Microphone)YNavigator keyZ{MENU}{SET}ABCDEF G LMNO P QLRSUVXZYHIJ KTWTH112(e).book  Page 14  Friday, February 10, 2006  3:57 PM
Temporary ConfidentialPreparationFor assistance, please visit http://www.panasonic.com/phonehelp 15HandsetUsing the joystickASpeakerBDisplayCHeadset jack/Audio jackD{C} (TALK)EJoystickF{s} (SP-PHONE)G{*} (TONE)H{PAUSE}{REDIAL}IMicrophoneJRinger indicator/Message indicatorKReceiverLSoft keysM{OFF}N{MUTE}{CLEAR}O{HOLD}{INTERCOM}P{FLASH}{CALL WAIT}QCharge contactsThe handset joystick can be used to navigate through menus and to select items shown on the display, by pushing it up, down, left, or right.It can also be used to select the center soft key icon (page 18), by pressing down on the center of the joystick.BCDEFGHIJKMLNOPQATH112(e).book  Page 15  Friday, February 10, 2006  3:57 PM
Temporary ConfidentialPreparation16 For assistance, please visit http://www.panasonic.com/phonehelpUnderstanding the indicatorsBase unit line buttonsThe line buttons ({LINE1},{LINE2}) show the status of each line as follows.Base unit CELLULAR SELECT {1},{2},{3},{4},{5} buttonThe CELLULAR SELECT {1},{2},{3},{4},{5} button shows the status as follows.Status MeaningLight off The line is free.Light on The line is in use.Flashing rapidly A call is being received.Flashing A call is put on hold on another unit or the answering system is answering a call.Status MeaningLight off The cellular line is free.Light on The cellular line is in use.Flashing rapidly A cellular call is being received.Flashing A cellular call is put on hold or the answering system is answering a call.TH112(e).book  Page 16  Friday, February 10, 2006  3:57 PM
Temporary ConfidentialPreparationFor assistance, please visit http://www.panasonic.com/phonehelp 17DisplaysBase unit display itemsHandset display itemsDisplayed itemMeaningFlashes when the date and time need to be set.Ringer for both line 1 and line 2 on the base unit is off.Line 1 or line 2 ringer on the base unit is off.Call privacy mode is on.The line icon is displayed when the displayed line is selected for the answering system.Flashing:– the answering system is answering a call on that line.– you have new messages on that line.Flashes when message memory is full.You are using a cellular line. The number of bars indicates the signal strength of the cellular line. Depending on a connected cellular phone’s capability, these bars may not be displayed.1This icon is displayed in the lower right representing a connected cellular phone’s battery level. It may not be displayed depending on the cellular phone’s capability.L2L1L2L1,ANSWERL1 L2MESSAGEFULLDisplayed itemMeaning1– Battery level indicator for the handset (located in the upper right of the display)– This icon is also displayed in the lower right representing a connected cellular phone’s battery level. It may not be displayed depending on the cellular phone’s capability.klThe line is in use.Flashing:– the call is put on hold on that line.– the answering system is answering a call on that line.Flashing rapidly: a call is being received on that line.Example: Handset extension numberVoice enhancer is on.Speaker is on.Call privacy mode is on.Ringer for both line 1 and line 2 on the handset is off.Line 1 or line 2 ringer on the handset is off.(displayed in the top center)The cellular line is in use.Flashing: a cellular call is put on hold. Flashing rapidly: a cellular call is being received.VEL2L1L2L1,CELLTH112(e).book  Page 17  Friday, February 10, 2006  3:57 PM
Temporary ConfidentialPreparation18 For assistance, please visit http://www.panasonic.com/phonehelpHandset soft keysThe handset features 2 soft keys and a joystick. By pressing a soft key, or by pressing the center of the joystick, you can select the feature or operation indicated by the soft key icon shown directly above it.Menu iconsWhen in standby mode, pressing {MENU}(center of joystick) on the handset or {MENU} on the base unit reveals the main menu. From here you can access various features and settings.Note:LThe menu icons shown in these operating instructions vary slightly from the actual icons shown on the display.You are using a cellular line. The number of bars indicates the signal strength of the cellular line. Depending on a connected cellular phone’s capability, these bars may not be displayed.Displayed itemMeaningLINE1 LINE2Base unitMenu icon Menu/featuredPhonebookGCaller listASet answeringfRinger settingsFAudio monitorhOther itemsHandsetMenu icon Menu/featuredPhonebookGCaller listiMessage playbackfRinger settingsFAudio monitorhOther itemsTH112(e).book  Page 18  Friday, February 10, 2006  3:57 PM
Temporary ConfidentialPreparationFor assistance, please visit http://www.panasonic.com/phonehelp 19Symbols used in these operating instructionsSymbols used at the end of titlesSymbols used for operations Symbol Meaning^Operate with the base unit.YOperate with the handset.Symbol Meaningd,G,A,f,F,hThe symbols to the left represent the base unit menu icons.Example: dPress the navigator key of the base unit up, down, left, or right to select that menu icon shown on the display.d,G,i,f,F,hThe symbols to the left represent the handset menu icons.Example: dPush the joystick of the handset up, down, left, or right to select that menu icon shown on the display.Example: “Ringervolume”Push the joystick of the handset or press the navigator key of the base unit up or down to select the words in quotations shown on the display.iProceed to the next operation.Example: {MENU}The words in the brackets show button names on the handset and base unit.{^},{V} Push the joystick of the handset or press the navigator key of the base unit up or down to scroll through the displayed items.{<},{>}Push the joystick of the handset or press the navigator key of the base unit left or right to select the desired items.Symbol MeaningTH112(e).book  Page 19  Friday, February 10, 2006  3:57 PM
Temporary ConfidentialPreparation20 For assistance, please visit http://www.panasonic.com/phonehelpSetting the unit before useDisplay language Y^1{MENU} (center of joystick) ihi{SELECT}2“Change language”i{SELECT}3Select the desired setting. (Default: “English”)4Press the center of joystick to save. i{OFF}Note:LIf you select a language you cannot read, press the center of joystick, {#}{1}{1}{0}{1}, and {SAVE} to change the display language to English.1{MENU}ihi{SET}2“Change language”i{SET}3Select the desired setting. (Default: “English”) i{SET}i{STOP}Note:LIf you select a language you cannot read, press {MENU},{#}{1}{1}{0}{1},and {SET} to change the display language to English.Dialing mode Y^If you cannot make calls, change this setting depending on your telephone line service.“Tone”: For tone dial service.“Pulse”: For rotary pulse dial service.LYou only need to program this setting once, using either the handset or base unit.1{MENU} (center of joystick) ihi{SELECT}2“Set tel line”i{SELECT}3“Set dial mode”i{SELECT}4Select the desired setting. (Default: “Tone”) i{SAVE}i{OFF}1{MENU}ihi{SET}2“Set tel line”i{SET}3“Set dial mode”i{SET}4Select the desired setting. (Default: “Tone”) i{SET}i{STOP}HandsetBase unitHandsetBase unitTH112(e).book  Page 20  Friday, February 10, 2006  3:57 PM
Temporary ConfidentialPreparationFor assistance, please visit http://www.panasonic.com/phonehelp 21Date and time Y^LYou only need to program this setting once, using either the handset or base unit.1{MENU} (center of joystick) ihi{SELECT}2“Date and time”i{SELECT}3Enter the current month, day, and year by selecting 2 digits for each.Example: May 15, 2006{0}{5}{1}{5}{0}{6}4Enter the current hour and minute (12-hour clock format) by selecting 2 digits for each.Example: 9:30{0}{9}{3}{0}5Press {*} to select “AM” or “PM”.6{SAVE}i{OFF}1{MENU}ihi{SET}2“Date and time”i{SET}3Enter the current month, day, and year by selecting 2 digits for each.Example: May 15, 2006{0}{5}{1}{5}{0}{6}4Enter the current hour and minute (12-hour clock format) by selecting 2 digits for each.Example: 9:30{0}{9}{3}{0}5Press {*} to select “AM” or “PM”.6{SET}i{STOP}Note for handset and base unit:LIf you make a mistake when entering the date and time, press {^},{V},{<}, or {>} to move the cursor, then make the correction.HandsetBase unitTH112(e).book  Page 21  Friday, February 10, 2006  3:57 PM
Temporary ConfidentialC Making/Answering Calls22 For assistance, please visit http://www.panasonic.com/phonehelpMaking callsUsing the handset Y1Lift the handset and dial the phone number.LTo correct a digit, press {CLEAR}.2{C}LAn available line is automatically selected and the line number is displayed.3When you finish talking, press {OFF}.Note:LYou can also select a line by pressing {LINE1} or {LINE2} in step 2.LTo change the line selection, see page 47.Using the speakerphoneImportant:LYou can place the handset on the base unit or charger while using the speakerphone. The call is not disconnected.1Lift the handset, dial the phone number, and press {s}.LSpeak alternately with the other party.2When you finish talking, press {OFF}.Note:LUse the speakerphone in a quiet environment.LTo switch to the receiver, press {C}.Adjusting the receiver/speaker volumePush {^} or {V} while talking.Making a call using the redial listThe last 10 phone numbers dialed are stored in the redial list.1{REDIAL}2Push {^} or {V} to select the desired number.LTo erase the displayed number, press {CLEAR}.3{C}PAUSE button (for PBX/long distance service users)A pause is sometimes required when making calls using a PBX or long distance service. When storing a calling card access number and/or PIN in the phonebook, a pause is also needed (page 28).For example, if you need to dial the line access number “9” when making outside calls with a PBX:1{9}i{PAUSE}i Dial the phone number.2{C}Note:LA 3.5 second pause is inserted each time {PAUSE} is pressed. Press repeatedly to insert longer pauses.TH112(e).book  Page 22  Friday, February 10, 2006  3:57 PM
Temporary ConfidentialC Making/Answering CallsFor assistance, please visit http://www.panasonic.com/phonehelp 23Using the base unit ^1Dial the phone number.LTo correct a digit, press {ERASE}.2{SP-PHONE}LAn available line is automatically selected and {LINE1} or {LINE2}lights.3When the other party answers, speak into the MIC.LSpeak alternately with the other party.4When you finish talking, press {SP-PHONE}.Note:LYou can also select a line by pressing {LINE1} or {LINE2} in step 2.LTo change the line selection, see page 47.LUse the speakerphone in a quiet environment.LWhile on a call, you can switch from the base unit to the handset:– If the handset is off the base unit, press {LINE1} or {LINE2} on the handset, then press {SP-PHONE} on the base unit.– If the handset is on the base unit, simply lift it.Adjusting the speaker volumePress {^} or {V} while talking.Making a call using the redial listThe last 10 phone numbers dialed are stored in the redial list.1{REDIAL}2Press {^} or {V} to select the desired number.LTo erase the displayed number, press {ERASE}.3{SP-PHONE}PAUSE button (for PBX/long distance service users)A pause is sometimes required when making calls using a PBX or long distance service.For example, if you need to dial the line access number “9” when making outside calls with a PBX:1{9}i{PAUSE}i Dial the phone number.2{SP-PHONE}Note:LA 3.5 second pause is inserted each time {PAUSE} is pressed. Press repeatedly to insert longer pauses.TH112(e).book  Page 23  Friday, February 10, 2006  3:57 PM
Temporary ConfidentialC Making/Answering Calls24 For assistance, please visit http://www.panasonic.com/phonehelpAnswering callsUsing the handset Y1Lift the handset and press {C} or {s}.LThe called line is automatically selected.LYou can also answer the call by pressing any button except the joystick or {OFF}.(Any key talk feature)2When you finish talking, press {OFF}.Note:LYou can also answer the call by pressing {LINE1} or {LINE2} in step 1.LTo change the line selection, see page 47.Auto talkThis feature allows you to answer a call by simply lifting the handset off the base unit. You do not need to press {C}. To activate this feature, see page 46.Temporary ringer offWhile the handset is ringing for an outside call, you can turn the ringer off temporarily by pressing {OFF}.Using the base unit ^1{SP-PHONE}LThe called line is automatically selected.2Speak into the MIC.3When you finish talking, press {SP-PHONE}.Note:LYou can also answer the call by pressing {LINE1} or {LINE2} in step 1.LTo change the line selection, see page 47.Useful features during a callHOLD button Y^This feature allows you to put an outside call on hold.Press {HOLD} 2 times during an outside call.LTo release the hold, press {LINE1} or {LINE2} that is flashing on the handset.Press {HOLD} during an outside call.LTo release the hold, press {LINE1} or {LINE2} that is flashing on the base unit.Note for handset and base unit:LIf a call is kept on hold for more than 6 minutes, an alarm tone starts to sound. After 4 additional minutes on hold, the call is disconnected.MUTE button Y^While mute is turned on, you can hear the other party, but the other party cannot hear you.To mute your voice, press {MUTE}.LTo return to the conversation, press {MUTE} or {C}.To mute your voice, press {MUTE}.LTo return to the conversation, press {MUTE} or {SP-PHONE}.HandsetBase unitHandsetBase unitTH112(e).book  Page 24  Friday, February 10, 2006  3:57 PM
Temporary ConfidentialC Making/Answering CallsFor assistance, please visit http://www.panasonic.com/phonehelp 25FLASH button Y^Pressing {FLASH} allows you to use special features of your host PBX such as transferring an extension call, or accessing optional telephone services such as Call Waiting. Note:LTo change the flash time, see page 47.For Call Waiting service users Y^To use Call Waiting, you must subscribe to your telephone service provider’s Call Waiting service.This feature allows you to receive calls while you are already talking on the phone. If you receive a call while on the phone, you will hear a Call Waiting tone. Please contact your telephone service provider for details and availability of this service in your area.Press {CALL WAIT} to answer the 2nd call after the tone.LTo switch between calls, press {CALLWAIT}.Temporary tone dialing (for rotary/pulse service users) Y^You can temporarily switch the dialing mode to tone when you need to access touch tone services (for example, answering services, telephone banking services, etc.).Press {*} (TONE) before entering access numbers which require tone dialing.Handset clarity booster YThis feature can improve sound clarity when the handset is used in an area where there may be interference. During an outside call, this feature is turned on automatically when necessary. You can also turn this feature on or off manually.1Press {MENU} (center of joystick) during an outside call.2To turn this feature on, select “Boosteron”.To turn this feature off, select “Boosteroff”.3{SELECT}Note:LWhile this feature is turned on;– the battery operating time is shortened (page 13).– the maximum number of extensions that can be used at a time may decrease.Handset voice enhancer YThis feature clarifies the voice of the person you are talking to, reproducing a more natural-sounding voice that is easier to hear and understand (page 45).1Press {MENU} (center of joystick) during an outside call.2To turn this feature on, select “Voiceenhancer”.To turn this feature off, select “V.E.off”.3{SELECT}Note:LDepending on the condition and quality of your telephone line, this feature may emphasize existing line noise. If it becomes difficult to hear, turn this feature off.TH112(e).book  Page 25  Friday, February 10, 2006  3:57 PM
Temporary ConfidentialC Making/Answering Calls26 For assistance, please visit http://www.panasonic.com/phonehelpUsing the other line during a callWhen a call is being received on the other line during a conversation, the interrupt tones sound (page 44). k or l on the handset, or {LINE1} or {LINE2} on the base unit flashes rapidly. You can answer the 2nd call while holding the 1st call.You can also make a call without ending the 1st call.Example: If you are using line 11Press {HOLD} 2 times to put the 1st call (line 1) on hold.2Press {LINE2} to make or answer a 2nd call.LTo hold the 2nd call, press {HOLD} 2 times.3To return to the 1st call (line 1), press {LINE1}.Example: If you are using line 11Press {HOLD} to put the 1st call (line 1) on hold.2Press {LINE2} to make or answer a 2nd call.LTo hold the 2nd call, press {HOLD}.3To return to the 1st call (line 1), press {LINE1}.Note for handset and base unit:LIf you subscribe to Caller ID, the 2nd caller’s information is displayed when a call is being received on the other line (page 32).HandsetBase unitTH112(e).book  Page 26  Friday, February 10, 2006  3:57 PM
Temporary Confidentiald PhonebookFor assistance, please visit http://www.panasonic.com/phonehelp 27Handset phonebookYou can add 50 items to the handset phonebook and search for phonebook items by name. Each item can be assigned a name, phone number, ringer ID, and light-up ID. Ringer ID and light-up ID features (page 33) are available for Caller ID subscribers.Adding items to the handset phonebook Y1{MENU} (center of joystick) idi{SELECT}2{ADD}3Enter the name (max. 16 characters). i{NEXT}4Enter the phone number (max. 32 digits). i{NEXT}5Select the desired ringer ID (page 33). i{NEXT}6Select the desired light-up ID (page 33). i{NEXT}i{SAVE}LTo add other items, repeat from step 2.7{OFF}Note:LTo assign a song as ringer ID, you can record it from an audio device (page 43).LIf you select “No Ringer ID” (default), the handset uses the ringer tone you selected on page 42 when a call is received from that caller.LIf you select “No Light-up ID”(default), the handset uses the ringer indicator color you selected on page 44 when a call is received from that caller.Character table for entering namesNote:LTo enter another character that is located on the same dial key, first push {>} to move the cursor to the next space.Editing/correcting a mistakeUse the joystick to move the cursor to the character or number you want to erase, then press {CLEAR}. Enter the appropriate character or number.Note:LPress and hold {CLEAR} to erase all characters or numbers.Key Character{1}&’ (),–./ 1{2}abcABC2{3}def DEF3{4}ghi GHI 4{5}jklJKL5{6}mn o MN O6{7}pqr sPQRS7{8}tuvTUV8{9}wxyzWXYZ9{0}0Space{*} ;{#} #TH112(e).book  Page 27  Friday, February 10, 2006  3:57 PM
Temporary Confidentiald Phonebook28 For assistance, please visit http://www.panasonic.com/phonehelpFinding and calling a handset phonebook item YPhonebook items can be searched for alphabetically by scrolling through the phonebook items or by initial.Once you have found the desired item, press {C} to dial the phone number.LYou can also make a call by pressing {LINE1} or {LINE2}.LIf you have registered a cellular phone to the base unit (page 60), you can make a call by pressing {CALL}, then pressing {LINE1} or {LINE2}.Searching for a name alphabetically by scrolling through all items1{MENU} (center of joystick) idi{SELECT}2Push {^} or {V} to select the desired item.LTo display further information for the selected item, push {>}. To return to the list, push {<}.Searching for a name by initial1{MENU} (center of joystick) idi{SELECT}2Press the dialing button ({0} to {9},{#}, or {*}) that corresponds to the first letter you are searching for.Example: “LISA”Press {5} repeatedly to display the first phonebook entry starting with the initial “L” and go to step 3.LIf there is no item corresponding to the letter you selected, the next item is displayed.3Push {V} to select the desired item.Editing items in the handset phonebook Y1Find the desired item (page 28). i{EDIT}2Edit the name if necessary (page 27). i{NEXT}3Edit the phone number if necessary. i{NEXT}4Select the desired ringer ID. i{NEXT}5Select the desired light-up ID. i{NEXT}i{SAVE}i{OFF}Erasing items in the handset phonebook Y1Find the desired item (page 28).2{CLEAR}i{YES}i{OFF}Chain dial YThis feature allows you to dial phone numbers in the handset phonebook while you are on a call. This feature can be used,for example, to dial a calling card access number or bank account PIN that you have stored in the handset phonebook, without having to dial manually.1During an outside call, press {MENU}(center of joystick).2“Phonebook”i{SELECT}3Find the desired item (page 28). i{CALL}Note:LWhen storing a calling card access number and your PIN in the phonebook as one phonebook item, press {PAUSE}to add pauses after the number and PIN as necessary (page 22).TH112(e).book  Page 28  Friday, February 10, 2006  3:57 PM
Temporary Confidentiald PhonebookFor assistance, please visit http://www.panasonic.com/phonehelp 29LIf you have rotary or pulse service, you need to press {*} before pressing {MENU} in step 1 to change the dialing mode temporarily to tone.Copying handset phonebook items YYou can copy one or all of the phonebook items from the handset to the phonebook of the base unit or a compatible Panasonic handset (KX-THA19).Important:LIn order to correctly copy a ringer ID as a phonebook item, the same melodies must be stored in identical order in the memories of both units involved. If the melody order in memory is different in the copy destination unit from the sending unit, the ringer ID will not be copied properly.  (This is not necessary if the ringer ID is set to use a preset melody.)LLight-up ID settings for phonebook items are not copied to the base unit.LThe melodies and songs for ringer ID are not copied to the base unit.Copying an item1{MENU} (center of joystick) idi{SELECT}2{COPY}3“Copy 1 item”i{SELECT}4Select the destination unit. i{SELECT}5Find the desired item (page 28). i{SEND}6Press {OFF} after “Complete” is displayed.Copying all items1{MENU} (center of joystick) idi{SELECT}2{COPY}3“Copy all items”i{SELECT}4Select the destination unit. i{SEND}5Press {OFF} after “Complete” is displayed.TH112(e).book  Page 29  Friday, February 10, 2006  3:57 PM
Temporary Confidentiald Phonebook30 For assistance, please visit http://www.panasonic.com/phonehelpBase unit phonebookYou can add 50 items to the base unit phonebook and search for phonebook items by name. Each item can be assigned a name, phone number, and ringer ID. The ringer ID feature (page 33) is available for Caller ID subscribers.Adding items to the base unit phonebook ^1{MENU}idi{SET} 2 times2“Add phonebook”i{SET}3Enter the name (max. 16 characters; page 27). i{SET}4Enter the phone number (max. 32 digits). i{SET}5Select the desired ringer ID (page 33). i{SET} 2 timesLTo add other items, repeat from step 2.6{STOP}Note:L If you select “No Ringer ID” (default), the base unit uses the ringer tone you selected on page 42 when a call is received from that caller.Editing/correcting a mistakePress {<} or {>} to move the cursor to the character or number you want to erase, then press {ERASE}. Enter the appropriate character or number.Note:LPress and hold {ERASE} to erase all characters or numbers.Finding and calling a base unit phonebook item ^Phonebook items can be searched for alphabetically by scrolling through the phonebook items or by initial.Once you have found the desired item, press {SP-PHONE} to dial the phone number.LYou can also make a call by pressing {LINE1} or {LINE2}.Searching for a name alphabetically by scrolling through all items1{MENU}idi{SET}2Press {^} or {V} to select the desired item.Searching for a name by initial1{MENU}idi{SET}2Press the dialing button ({0} to {9},{#}, or {*}) that corresponds to the first letter you are searching for.Example: “LISA”Press {5} repeatedly to display the first phonebook entry starting with the initial “L” and go to step 3.LIf there is no item corresponding to the letter you selected, the next item is displayed.3Press {V} to select the desired item.TH112(e).book  Page 30  Friday, February 10, 2006  3:57 PM
Temporary Confidentiald PhonebookFor assistance, please visit http://www.panasonic.com/phonehelp 31Editing items in the base unit phonebook ^1Find the desired item (page 30). i{EDIT}2Edit the name, if necessary. i{SET}3Edit the phone number, if necessary. i{SET}4Change the ringer ID, if necessary. i{SET} 2 times i{STOP}Erasing items in the base unit phonebook ^1Find the desired item (page 30).2{ERASE}i{>}i{STOP}Chain dial ^This feature allows you to dial phone numbers in the base unit phonebook while you are on a call. This feature can be used,for example, to dial a calling card access number or bank account PIN that you have stored in the base unit phonebook, without having to dial manually.1During an outside call, press {MENU}.2“Phonebook”i{SET}3Find the desired item (page 30). i{SET}Note:LWhen storing a calling card access number and your PIN in the phonebook as one phonebook item, press {PAUSE}to add pauses after the number and PIN as necessary (page 23).LIf you have rotary or pulse service, you need to press {*} before pressing {MENU} in step 1 to change the dialing mode temporarily to tone.Copying base unit phonebook items ^You can copy one or all of the phonebook items from the base unit to the phonebook of a compatible Panasonic handset (KX-THA19).Copying an item1{MENU}idi{SET} 2 times2“Copy phonebook”i{SET}3“Copy 1 item”i{SET}4Select the destination unit. i{SET}5Find the desired item (page 30). i{SET}6Press {STOP} after “Complete” is displayed.Copying all items1{MENU}idi{SET} 2 times2“Copy phonebook”i{SET}3“Copy all items”i{SET}4Select the destination unit. i{SET}5Press {STOP} after “Complete” is displayed.TH112(e).book  Page 31  Friday, February 10, 2006  3:57 PM
Temporary ConfidentialG Caller ID Service32 For assistance, please visit http://www.panasonic.com/phonehelpUsing Caller ID serviceThis unit is Caller ID compatible. To use Caller ID features, you must subscribe to your telephone service provider’s Caller ID service.Caller ID featuresWhen an outside call is being received, the calling party’s name and telephone number are displayed.Caller information for the last 50 different callers is logged in the caller list, allowing you to return missed calls. Caller information is stored by the most recent call to the oldest.LGenerally caller information is displayed from the 2nd ring.LIf the unit cannot receive caller information, the following is displayed:–“Out of area”: The caller dialed from an area which does not provide Caller ID service.–“Private caller”: The caller requested not to send caller information.–“Long distance”: The caller called you long distance.LIf the unit is connected to a PBX system, caller information may not be received properly. Consult your PBX supplier.Private name displayWhen caller information is received and it matches a phone number stored in the phonebook, the stored name is displayed and logged in the caller list.Call Waiting Caller ID displayIf you subscribe to both Caller ID and Call Waiting with Caller ID services, the 2nd caller’s information is displayed after you hear a Call Waiting tone (page 25).Note:LPlease contact your telephone service provider for details and availability of this service in your area.Talking Caller ID YThis feature lets you know who is calling without looking at the display. When a call comes in, the handset announces the caller’s name displayed on the handset following every ring.To use this feature, you must subscribe to your telephone service provider’s Caller ID service.LName pronunciation may vary. This feature may not pronounce all names correctly.LCaller ID supports names of up to 15 letters. If the caller’s name has more than 15 letters, the name is not displayed or announced correctly.LUsually the handset announces the caller’s name after the 2nd ring. If you turn on the answering system and set the ring count to “2 rings” (page 57), the handset does not announce the caller’s name. If “Toll saver” is selected and there is a new message, the handset does not announce the caller’s name.LWhen you receive a call while on the phone, the 2nd caller’s name is not announced even if you subscribe to both Caller ID and Call Waiting with Caller ID services.LThis feature can be turned on or off (page 46).Ann555-321-5555TH112(e).book  Page 32  Friday, February 10, 2006  3:57 PM
Temporary ConfidentialG Caller ID ServiceFor assistance, please visit http://www.panasonic.com/phonehelp 33Ringer ID Y^This feature can help you identify who is calling by using different ringers for different callers stored in the phonebook (page 27, 30). You can assign a different ringer to each phonebook item. When a call is received from a caller stored in the phonebook, the ringer is used after Caller ID information is displayed.Light-up ID YThis feature can help you identify who is calling by using different ringer indicator colors for different callers stored in the handset phonebook (page 27). You can assign a different indicator color to each handset phonebook item. When a call is received from a caller stored in the handset phonebook, the indicator color is used after Caller ID information is displayed.Caller listCaller information for the last 50 different callers is logged in the caller list. You can use this list to return missed calls.Missed callsIf a call is not answered, the unit treats the call as a missed call. The number of missed calls is shown on the display. This lets you know if you should view the caller list to see who called while you were out.Viewing the caller list and calling back Y^1{MENU} (center of joystick) iGi{SELECT}2Push {V} to search from the most recent call, or {^} to search from the oldest call.3{C}Note:LIf the indicated line is already being used or you want to select the other line, select the desired line by pressing {LINE1} or {LINE2}.LIf you have registered a cellular phone to the base unit (page 60), you can make a call by pressing {CALL}, then pressing {LINE1} or {LINE2}.1{MENU}iGi{SET}2Press {V} to search from the most recent call, or {^} to search from the oldest call.3{SP-PHONE}HandsetBase unitTH112(e).book  Page 33  Friday, February 10, 2006  3:57 PM
Temporary ConfidentialG Caller ID Service34 For assistance, please visit http://www.panasonic.com/phonehelpNote:LIf the indicated line is already being used or you want to select the other line, select the desired line by pressing {LINE1} or {LINE2}.Displayed symbolsLm and n indicate which line the caller information was received from.LIf the same caller calls more than once, it is displayed with the number of times the caller called (“×2” to “×9”). Only the date and time of the most recent call is stored.LAQ is displayed next to items which have already been viewed or answered.Editing a caller’s phone number before calling back Y^You can edit a phone number in the caller list by removing its area code and/or the long distance code “1”.1{MENU} (center of joystick) iGi{SELECT}2Select the desired item.3Press {EDIT} repeatedly until the phone number is shown in the desired format. 1Local phone number2Area code – Local phone number31 – Area code – Local phone number4{C}1{MENU}iGi{SET}2Select the desired item.3Press {EDIT} repeatedly until the phone number is shown in the desired format. 1Local phone number2Area code – Local phone number31 – Area code – Local phone number4{SP-PHONE}Caller ID number auto edit featureOnce you call back an edited number, the unit can automatically edit other incoming phone numbers each time you receive a call.For example, you can use this feature to set the unit to ignore the area code of callers in your area code, so that you can call these local numbers using caller information without dialing the area code.To activate this feature, you must edit an item in the caller list, then call that number. After that, phone numbers from that caller’s area code are edited automatically. This feature can be turned on or off (page 46). The default setting is “On”.Note:LPhone numbers from the 4 most recently edited area codes are automatically edited.LIf you move to another area, you can turn this feature off to erase previously edited area codes. To use this feature again, turn it on and reprogram the area codes you want to edit once again.HandsetExample:Example:Example:321-5555555-321-55551-555-321-5555Base unitExample:Example:Example:321-5555555-321-55551-555-321-5555TH112(e).book  Page 34  Friday, February 10, 2006  3:57 PM
Temporary ConfidentialG Caller ID ServiceFor assistance, please visit http://www.panasonic.com/phonehelp 35Storing caller information into the phonebook Y^1{MENU} (center of joystick) iGi{SELECT}2Select the desired item.LTo edit the number, press {EDIT}repeatedly until the phone number is shown in the desired format.3{>} to save.LEnter the name if necessary (page 27).i{NEXT}4Select the desired ringer ID. i{NEXT}5Select the desired light-up ID. i{NEXT}i{SAVE}i{OFF}1{MENU}iGi{SET}2Select the desired item.LTo edit the number, press {EDIT}repeatedly until the phone number is shown in the desired format.3{>} to save.LEnter the name if necessary (page 27).i{SET}4Change the ringer ID, if necessary. i{SET} 2 times i{STOP}Erasing caller information Y^Erasing a selected item1{MENU} (center of joystick) iGi{SELECT}2Select the desired item.3{CLEAR}i{OFF}1{MENU}iGi{SET}2Select the desired item.3{ERASE}i{STOP}Erasing all items1{MENU} (center of joystick) iGi{SELECT}2{ERASE}i{YES}3Press {OFF} after “All erased” is displayed.1{MENU}iGi{SET}2{ERASE}i{>}3Press {STOP} after “All erased” is displayed.HandsetBase unitHandsetBase unitHandsetBase unitTH112(e).book  Page 35  Friday, February 10, 2006  3:57 PM
Temporary ConfidentialIntercom36 For assistance, please visit http://www.panasonic.com/phonehelpIntercom featureIntercom calls can be made between the handset and the base unit, and between 2 handsets.Making intercom calls Y^1{INTERCOM}2To page the base unit, press {0}.To page another handset, enter its extension number ({1} to {8}).LThe destination unit beeps for 1 minute.LTo stop paging, press {OFF}.3When you finish talking, press {OFF}.1{INTERCOM}2To page a handset, enter its extension number ({1} to {8}).To page all handsets, press {0}.LThe handset(s) beeps for 1 minute.LTo stop paging, press {INTERCOM}.LEven if you call all handsets, only the handset user who answers first can take the intercom call.3When you finish talking, press {INTERCOM}.Note:LYou can also locate a misplaced handset by paging it (handset locator).Answering intercom calls Y^When the unit is being paged, it rings and displays the extension number of the paging party.1Press {C} to answer the page.2When you finish talking, press {OFF}.1Press {INTERCOM} to answer the page.2When you finish talking, press {INTERCOM}.Note for handset and base unit:LThe ringer volume for intercom calls follows the higher volume level of the 2 lines (page 42).LWhen the ringer volume is set to off for both lines, the handset and base unit will ring at the low level for intercom calls.HandsetBase unitHandsetBase unitTH112(e).book  Page 36  Friday, February 10, 2006  3:57 PM
Temporary ConfidentialIntercomFor assistance, please visit http://www.panasonic.com/phonehelp 37Transferring a callOutside calls can be transferred between the handset and the base unit, and between 2 handsets.Transferring calls Y^1During an outside call, press {INTERCOM} to put the call on hold.2To page the base unit, press {0}.To page another handset, enter its extension number ({1} to {8}).LIf you do not wish to announce the transfer, skip to step 4.3Wait for the paged party to answer.LIf the paged party does not answer, press {LINE1} or {LINE2} that is flashing to return to the outside call.4To complete the transfer, press {OFF}.1During an outside call, press {TRANSFER} to put the call on hold.2To page a handset, enter its extension number ({1} to {8}).To page all handsets, press {0}.LIf you do not wish to announce the transfer, skip to step 4.LEven if you call all handsets, only the handset user who answers first can take the transferred call.3Wait for the paged party to answer.LIf the paged party does not answer, press {LINE1} or {LINE2} that is flashing to return to the outside call.4To complete the transfer, press {SP-PHONE}.Note for handset and base unit:LIf the paged party does not answer within 1 minute after you hang up, your phone rings and the call is returned to your phone. You can speak to the caller again by pressing {LINE1} or {LINE2}on the handset or {LINE1} or {LINE2}on the base unit.Answering transferred calls Y^Press {C} to answer the page.LAfter the paging party hangs up the call, you can talk to the outside caller.Press {INTERCOM} to answer the page.LAfter the paging party hangs up the call, you can talk to the outside caller.Note for handset and base unit:LIf the paging party hangs up before you answer the page, “Incoming call” is displayed. Press {LINE1} or {LINE2} on the handset or {LINE1} or {LINE2} on the base unit to take the transferred call.HandsetBase unitHandsetBase unitTH112(e).book  Page 37  Friday, February 10, 2006  3:57 PM
Temporary ConfidentialIntercom38 For assistance, please visit http://www.panasonic.com/phonehelpTransferring a call to the answering system Y^When you answer a call and the caller wants to talk to someone who is not available, you can transfer the caller to the answering system, where the caller can leave a message.Tell the outside caller you will transfer him or her to the answering system.1During an outside call, press {INTERCOM} to put the call on hold.2Press {9} to hang up the call.1During an outside call, press {TRANSFER} to put the call on hold.2Press {9} to hang up the call.Note for handset and base unit:LAfter you press {9}, the caller hears the greeting message (page 51) and can leave a message after the beep.Conference callsConference call with 2 outside calls Y^While you are talking with an outside caller, you can make or answer a 2nd call on the other line, and then combine the calls to establish a conference call.1During an outside call, press {HOLD} 2 times.2To answer a 2nd call, press {LINE1} or {LINE2}.To make a 2nd call, press {LINE1} or {LINE2}, then dial the phone number.3When the 2nd call is connected, press {CONF} to make a conference call.LTo hang up only one line, press {LINE1} or {LINE2} for the party with which you want to continue talking.LTo put both lines on hold, press {HOLD}. To talk with only one caller, press {LINE1} or {LINE2} for the party with which you want to continue talking. To resume both lines, press {CONF}.1During an outside call, press {HOLD}.2To answer a 2nd call, press {LINE1} or {LINE2}.To make a 2nd call, press {LINE1} or {LINE2}, then dial the phone number.3When the 2nd call is connected, press {CONF} to make a conference call.LTo hang up only one line, press {LINE1} or {LINE2} for the party with which you want to continue talking.LTo put both lines on hold, press {HOLD}. To talk with only one caller, HandsetBase unitHandsetBase unitTH112(e).book  Page 38  Friday, February 10, 2006  3:57 PM
Temporary ConfidentialIntercomFor assistance, please visit http://www.panasonic.com/phonehelp 39press {LINE1} or {LINE2}. To resume both lines, press {CONF}.Note for handset and base unit:LMultiple parties can join a conference call. The possible number of participating parties depends on the resources available for wireless communication. When another participating party cannot join a conversation, “System is busy. Please try again later.” is displayed.Conference call with an outside call and an intercom call Y^While you are talking with an outside caller, one more extension can join the conversation and establish a conference call.1During an outside call, press {INTERCOM}.2To page the base unit, press {0}.To page another handset, enter its extension number ({1} to {8}).3When the paged party answers, press {CONF} to make a conference call.LTo leave the conference, press {OFF}. The other 2 parties can continue the conversation.1During an outside call, press {INTERCOM}.2To page a handset, enter its extension number ({1} to {8}).To page all handsets, press {0}.3When the paged party answers, press {CONF} on the base unit to make a conference call.LTo leave the conference, press {SP-PHONE}. The other 2 parties can continue the conversation.Note for handset and base unit:LThe outside call can be put on hold by pressing {HOLD}. Only the person who placed the call on hold can resume the full conference by pressing {CONF} on the handset or {CONF} on the base unit.LMultiple parties can join a conference call. The possible number of participating parties depends on the resources available for wireless communication. When another participating party cannot join a conversation, “System is busy. Please try again later.” is displayed.HandsetBase unitTH112(e).book  Page 39  Friday, February 10, 2006  3:57 PM
Temporary ConfidentialIntercom40 For assistance, please visit http://www.panasonic.com/phonehelpCall shareThis feature allows the handset or base unit to join an existing outside call.Joining a conversation Y^Join the conversation by pressing {LINE1}or {LINE2} to select the line that is being used by another extension for an outside call.L“Conference” is displayed.Join the conversation by pressing {LINE1}or {LINE2} to select the line that is being used by another extension for an outside call.L“Conference” is displayed.Note for handset and base unit:LMultiple parties can join a conference call. The possible number of participating parties depends on the resources available for wireless communication. When another participating party cannot join a conversation, “System is busy. Please try again later.” is displayed.Call privacy Y^Call privacy allows you to prevent other users from joining your conversations with outside callers. To allow other users to join your conversations, leave this feature off.1Press {MENU} (center of joystick) during an outside call.2To turn this feature on, select “Privacyon”.To turn this feature off, select “Privacyoff”.3{SELECT}1Press {MENU} during an outside call.2To turn this feature on, select “Privacyon”.To turn this feature off, select “Privacyoff”.3{SET}Note for handset and base unit:LThis feature will turn off after you hang up the call.HandsetBase unitHandsetBase unitTH112(e).book  Page 40  Friday, February 10, 2006  3:57 PM
Temporary ConfidentialF MonitoringFor assistance, please visit http://www.panasonic.com/phonehelp 41Monitoring featureThis feature allows you to monitor the room where a unit is located. The monitored unit does not ring, allowing you to easily monitor a baby’s room, for example, from different areas of the house.Note:LYou can place the handset on the base unit while monitoring using the speakerphone.Enabling monitoring access Y^To use the monitoring feature, you need to set the destination unit to be monitored beforehand. –“Permit”: allows the unit to be monitored.–“Deny”: denies access from other units.1{MENU} (center of joystick) ihi{SELECT}2“Monitor access”i{SELECT}3Select the desired setting. (Default: “Deny”) i{SAVE}i{OFF}1{MENU}ihi{SET}2“Monitor access”i{SET}3Select the desired setting. (Default: “Deny”) i{SET}i{STOP}Audio monitorThis feature allows you to listen to the audio in the room where the handset or base unit is located.Monitoring audio in the room Y^1{MENU} (center of joystick) iFi{SELECT}2Select the desired unit. i{SELECT}LYou can listen to the audio.3Press {OFF} to stop monitoring.1{MENU}iFi{SET}2Select the desired unit. i{SET}LYou can listen to the audio.3Press {INTERCOM} to stop monitoring.Note for handset and base unit:LTo start monitoring quickly, press {INTERCOM}, then press {*} instead of step 1.HandsetBase unitBefore using this feature, allow access to the destination unit by selecting “Permit” in the monitor access setting (page 41).HandsetBase unitTH112(e).book  Page 41  Friday, February 10, 2006  3:57 PM
Temporary ConfidentialProgrammable Settings42 For assistance, please visit http://www.panasonic.com/phonehelpRinger settingsRinger volume Y^1{MENU} (center of joystick) ifi{SELECT}2“Ringer volume”i{SELECT}3Select the desired line.4Select the desired volume. (Default: High)LTo turn the ringer off, push {V}repeatedly until “Off ?” is displayed.5{SAVE}i{OFF}1{MENU}ifi{SET}2“Ringer volume”i{SET}3Select the desired line.4Select the desired volume. (Default: High)LTo turn the ringer off, press {V}repeatedly until “Off ?” is displayed.5{SET}i{STOP}Note for handset and base unit:LWhen the ringer volume is set to off for a line, “Ringer off” is displayed and the handset or base unit does not ring for outside calls received on that line.Ringer tone Y^You can change the ringer tone heard when an outside call is received.Important:LYou can record songs for the handset ringer tone from an audio device (page 43).1{MENU} (center of joystick) ifi{SELECT}2“Ringer tone”i{SELECT}3Select the desired line.4Select the desired item. (Default: Line 1: “Tone 1”, Line 2: “Tone 2”) i{SAVE}i{OFF}Note:LIf you subscribe to a distinctive ring service (such as IDENTA-RING), select a tone (tone 1 to 3) for the handset ringer tone. If you select a melody or a song, you cannot distinguish lines by their ringers.LIf you select a melody or a song for the handset ringer tone, the ringer continues to sound for several seconds if:– the caller hangs up before you answer the call.– another person answers the call using another phone connected on the same line.LThe preset song “Melody 1” in this product is used with the permission of © 2005 Speed Crazy.LThe preset songs “Tone 4”, “Tone 5”,and “Melody 2” in this product are used with the permission of © 2005 M-ZoNE Co., Ltd.1{MENU}ifi{SET}2“Ringer tone”i{SET}HandsetBase unitHandsetBase unitTH112(e).book  Page 42  Friday, February 10, 2006  3:57 PM
Temporary ConfidentialProgrammable SettingsFor assistance, please visit http://www.panasonic.com/phonehelp 433Select the desired line.4Select the desired item. (Default: Line 1: “Tone 1”, Line 2: “Tone 2”) i{SET}i{STOP}Recording songs from an audio device for ringer tones using the handset (“Customize ring”) YYou can record songs (max. 30 seconds each) from an audio device by connecting the included audio cable. These songs can be assigned as the handset ringer tone (page 42) and the ringer ID (page 33) for phone numbers stored in the handset phonebook.Important:LIf a call is received while a song is being recorded or played back, recording or playback stops automatically. Disconnect the audio cable from the handset to answer the call.1Connect the audio device (such as a CD player or computer) to the handset using the included audio cable.2{MENU} (center of joystick) ifi{SELECT}3“Customize ring”i{SELECT}4“Record”i{SELECT}5Start playing the audio device.6Press {REC.} to start recording.7To stop recording, press {STOP}.LTo listen to the recording, select “Playback”, then press {SELECT}.LTo re-record, select “Retry”, press {SELECT}, then start from step 5.8“Save”i{SELECT}9Enter the desired name (max. 15 characters; page 27).10 {SAVE}i{OFF}11 Disconnect the audio cable from the handset.Note:LThe total recording time is about 120 seconds. Playing back a song1{MENU} (center of joystick) ifi{SELECT}2“Customize ring”i{SELECT}3“Playback”i{SELECT}4Select the desired song. i{PLAY}5{STOP}i{OFF}Erasing a songWhile the song is selected or playing, press {ERASE}, then press {YES}.Note:LIf the erased song was used for the handset ringer tone (page 42), “Tone 1”or “Tone 2” (default) is used instead of that song.LIf the erased song was assigned to certain callers as ringer ID (page 33), the ringer ID assignment is canceled, and the handset ringer tone (page 42) is used instead of that song.Audio device Audio cableHeadphoneoutput, lineout, etc. Example:TH112(e).book  Page 43  Friday, February 10, 2006  3:57 PM
Temporary ConfidentialProgrammable Settings44 For assistance, please visit http://www.panasonic.com/phonehelpChanging the name of a song1{MENU} (center of joystick) ifi{SELECT}2“Customize ring”i{SELECT}3“Edit title”i{SELECT}4Select the desired song. i{EDIT}5Edit the name (max. 15 characters; page 27).6{SAVE}i{OFF}Ring color YYou can change the ringer indicator color used when an outside call is received.1{MENU} (center of joystick) ifi{SELECT}2“Ring color”i{SELECT}3Select the desired color. (Default: “Color 1”) i{SAVE}i{OFF}Interrupt tone Y^This tone lets you know when you receive a call while you are on the other line, on an intercom call, or monitoring a room.–“2”: The tone sounds 2 times.–“On”: The tone sounds for as long as the line rings.–“Off”: Turns this feature off.1{MENU} (center of joystick) ifi{SELECT}2“Interrupt tone”i{SELECT}3Select the desired setting. (Default: “2”)i{SAVE}i{OFF}1{MENU}ifi{SET}2“Interrupt tone”i{SET}3Select the desired setting. (Default: “2”)i{SET}i{STOP}HandsetBase unitTH112(e).book  Page 44  Friday, February 10, 2006  3:57 PM
Temporary ConfidentialProgrammable SettingsFor assistance, please visit http://www.panasonic.com/phonehelp 45Other settingsTime adjustment (Caller ID subscribers only) Y^This feature allows the unit to automatically adjust the date and time setting when caller information is received. To turn this feature on, select “Caller ID[auto]”. To turn this feature off, select “Manual”.LYou only need to program this setting once, using either the handset or base unit.Important:LTo use this feature, set the date and time manually first (page 21).1{MENU} (center of joystick) ihi{SELECT}2“Time adjustment”i{SELECT}3Select the desired setting. (Default: “Caller ID[auto]”) i{SAVE}i{OFF}1{MENU}ihi{SET}2“Time adjustment”i{SET}3Select the desired setting. (Default: “Caller ID[auto]”) i{SET}i{STOP}Changing the handset/base unit name Y^Each handset and the base unit can be given a customized name (“Bob”, “Kitchen”, etc.), this is useful when you have multiple units.1{MENU} (center of joystick) ihi{SELECT}2“Device name”i{SELECT}3Enter the desired the name (max. 10 characters; page 27). (Default: “Handset”)4{SAVE}i{OFF}1{MENU}ihi{SET}2“Device name”i{SET}3Enter the desired name (max. 10 characters; page 27). (Default: “BaseTH112”)4{SET}i{STOP}Handset voice enhancer YYou can turn the voice enhancer feature on or off for the handset.1{MENU} (center of joystick) ihi{SELECT}2“Voice enhancer”i{SELECT}3Select the desired setting. (Default: “Off”) i{SAVE}i{OFF}HandsetBase unitHandsetBase unitTH112(e).book  Page 45  Friday, February 10, 2006  3:57 PM
Temporary ConfidentialProgrammable Settings46 For assistance, please visit http://www.panasonic.com/phonehelpHandset Talking Caller ID YYou can turn the Talking Caller ID feature on or off for the handset.1{MENU} (center of joystick) ihi{SELECT}2“Talking CallerID”i{SELECT}3Select the desired setting. (Default: “On”) i{SAVE}i{OFF}Display contrast Y^1{MENU} (center of joystick) ihi{SELECT}2“LCD contrast”i{SELECT}3Select the desired setting. (Default: Level 3) i{SAVE}i{OFF}1{MENU}ihi{SET}2“LCD contrast”i{SET}3Select the desired setting. (Default: Level 3) i{SET}i{STOP}Handset key tone YYou can select whether or not key tones are heard when keys are pressed. Key tones include confirmation tones and error tones.1{MENU} (center of joystick) ihi{SELECT}2“Key tone”i{SELECT}3Select the desired setting. (Default: “On”) i{SAVE}i{OFF}Handset auto talk YWhen this feature is turned on, you can answer a call by lifting the handset off the base unit or charger without pressing {C}.1{MENU} (center of joystick) ihi{SELECT}2“Auto talk”i{SELECT}3Select the desired setting. (Default: “Off”) i{SAVE}i{OFF}Note:LIf you subscribe to Caller ID service and want to view the caller’s information on the handset display after lifting up the handset to answer a call, turn off this feature.LIf you set the line selection mode from “Auto” to “Line1” or “Line2” (page 47), the auto talk feature functions for that line only. If the other line receives a call, the auto talk feature does not function.Caller ID number auto edit Y^You can turn the Caller ID number auto edit feature on or off.1{MENU} (center of joystick) ihi{SELECT}2“Caller ID edit”i{SELECT}3Select the desired setting. (Default: “On”) i{SAVE}i{OFF}1{MENU}ihi{SET}2“Caller ID edit”i{SET}3Select the desired setting. (Default: “On”) i{SET}i{STOP}HandsetBase unitHandsetBase unitTH112(e).book  Page 46  Friday, February 10, 2006  3:57 PM
Temporary ConfidentialProgrammable SettingsFor assistance, please visit http://www.panasonic.com/phonehelp 47Setting telephone line Y^Line selectionThe line selection mode determines which line is selected when you press {C}.–“Auto”: When making a call, line 1 is selected. If that line is unavailable, line 2 is selected. When answering a call, the ringing line is selected.–“Line1”: Line 1 is selected.–“Line2”: Line 2 is selected.1{MENU} (center of joystick) ihi{SELECT}2“Set tel line”i{SELECT}3“Line select”i{SELECT}4Select the desired setting. (Default: “Auto”) i{SAVE}i{OFF}Note:LYou can select a line manually regardless of the line selection mode by pressing {LINE1} or {LINE2}.1{MENU}ihi{SET}2“Set tel line”i{SET}3“Line select”i{SET}4Select the desired setting. (Default: “Auto”) i{SET}i{STOP}Note:LYou can select a line manually regardless of the line selection mode by pressing {LINE1} or {LINE2}.Flash timeThe flash time depends on your telephone exchange or host PBX.LYou only need to program this setting once, using either the handset or base unit.Important:LThe setting should stay at 700 ms unless pressing {FLASH} fails to pick up the Call Waiting call.1{MENU} (center of joystick) ihi{SELECT}2“Set tel line”i{SELECT}3“Set flash time”i{SELECT}4Select the desired line.5Select the desired setting. (Default: “700ms”) i{SAVE}i{OFF}1{MENU}ihi{SET}2“Set tel line”i{SET}3“Set flash time”i{SET}4Select the desired line.5Select the desired setting. (Default: “700ms”) i{SET}i{STOP}Note for handset and base unit:LIf the unit is connected via a PBX, certain PBX functions (call transferring, etc.) may not work correctly. Consult your PBX supplier for the correct setting.HandsetBase unitHandsetBase unitTH112(e).book  Page 47  Friday, February 10, 2006  3:57 PM
Temporary ConfidentialProgrammable Settings48 For assistance, please visit http://www.panasonic.com/phonehelpLine modeGenerally, the line mode setting should not be adjusted.When another phone connected to the same line is in use, and–if k or l is not displayed on the handset, or–if {LINE1} or {LINE2} button light is off on the base unit,you need to change the line mode to “A”.LYou only need to program this setting once, using either the handset or base unit.1{MENU} (center of joystick) ihi{SELECT}2“Set tel line”i{SELECT}3“Set line mode”i{SELECT}4Select the desired line.5Select the desired setting. (Default: “B”)i{SAVE}i{OFF}1{MENU}ihi{SET}2“Set tel line”i{SET}3“Set line mode”i{SET}4Select the desired line.5Select the desired setting. (Default: “B”)i{SET}i{STOP}Changing the PIN (personal identification number) ^For security, the PIN must be entered when changing certain settings such as registering units. The default setting is “7262”.Important:LIf you change the PIN, please make note of your new PIN. The unit does not reveal the PIN to you.1{MENU}ihi{SET}2“Set PIN”i{SET}3To change the PIN for the first time, skip to step 4.To change the PIN, enter the current 4-digit PIN. i{SET}4Enter the new 4-digit PIN. i{SET}5Enter the new 4-digit PIN again. i{SET}i{STOP}If you forget the PIN (resetting the base unit to its default settings)If you set the PIN and you cannot remember it, you can reset the base unit using the following procedures.Base unit:{MENU}i{MUTE}i{#}{9}{0}{0}{0}Note:LThe following items are reset to their default settings:– Settings checked in the base reset column on page 87– Answering system: On– Line selection for answering system: Line 1 and line 2LIf you have registered a cellular phone, the following cellular phone settings are also reset to their default settings.–“Assign Base/HS” (Allows you to select which unit to ring for cellular calls, page 66): “All”HandsetBase unitTH112(e).book  Page 48  Friday, February 10, 2006  3:57 PM
Temporary ConfidentialProgrammable SettingsFor assistance, please visit http://www.panasonic.com/phonehelp 49–“TAD (cell)” (Answering system for cellular phone, page 66): “Off”–“TAD ring count” (Ring count of answering system for cellular phone, page 66): “4”Call reservation ^The resources available for wireless communication (making or answering calls with a handset, etc.) are limited. When this feature is turned on, the system will limit data communications and reserve enough resources so that 1 handset can always make or answer outside calls. When this feature is turned off, data communications will not be limited, but it is possible that calls cannot be made or answered with a handset when data traffic is heavy.1{MENU}ihi{SET}2“Call reservation”i{SET}3Select the desired item. (Default: “On”)i{SET}i{STOP}Customer support Y^The handset and base unit can display the Internet address where you can download the operating instructions or get further information for this product using your computer.1{MENU} (center of joystick) ihi{SELECT}2“Customer support”i{SELECT}LThe Internet address is displayed.3{OFF}1{MENU}ihi{SET}2“Customer support”i{SET}LThe Internet address is displayed.3{STOP}HandsetBase unitTH112(e).book  Page 49  Friday, February 10, 2006  3:57 PM
Temporary ConfidentialProgrammable Settings50 For assistance, please visit http://www.panasonic.com/phonehelpRegistering a unitRegistering the handset Y^The included handset and base unit are preregistered. If for some reason the handset is not registered to the base unit, register the handset.Important:LBefore registering a compatible Panasonic unit to the base unit, we recommend you change the PIN (page 48) so that other Bluetooth devices in the area are not accidentally registered at the same time.LIf you have already canceled the handset registration at the previous base unit, perform steps 2 and 3 only.1Handset:{MENU} (center of joystick) ihi{SELECT}i “Registration”i{SELECT}i “Registration”i{SELECT}2Base unit:Press and hold {INTERCOM} until it starts flashing and a beep sounds.LAfter {INTERCOM} starts flashing, the rest of the procedure must be completed within 2 minutes.3Handset:Press {OK}, then wait until the handset beeps.LIf you have changed the PIN, enter it and press {OK}, then wait until the handset beeps.Deregistering a unitDeregistering a handsetA handset can cancel its own registration.1{MENU} (center of joystick) ihi{SELECT}2“Registration”i{SELECT}3“Deregistration”i{SELECT}4{3}{3}{5}i{OK}Deregistering another deviceThe base unit can cancel a registered unit (Bluetooth cellular phone, Bluetooth headset).1{MENU}ihi{SET}2“Deregistration”i{SET}3Select the desired device. i{SET}4{3}{3}{5}i{SET}i{STOP}HandsetBase unitTH112(e).book  Page 50  Friday, February 10, 2006  3:57 PM
Temporary Confidentiali Answering SystemFor assistance, please visit http://www.panasonic.com/phonehelp 51Answering system featureImportant:LOnly 1 person can access the answering system (listen to messages, record a greeting message, etc.) at a time.LWhen callers leave messages, the unit records the day and time of each message. Make sure the date and time have been set (page 21).Memory capacityThe total recording capacity (including your greeting message, caller messages, and voice memos) is about 60 minutes. A maximum of 99 messages (including a greeting message) can be recorded.LIf the message memory becomes full, the ANSWER ON indicator flashes rapidly (if the answering system is turned on).To record additional messages, erase unnecessary messages (page 53).LIf less than 10 minutes of recording time is available, the unit announces the remaining recording time when operating the answering system.LMessages are retained even if a power failure occurs.Setting up the answering systemTurning the answering system on ^Press {LINE SELECT} repeatedly to select the desired line(s). i{ANSWERON}LThe ANSWER ON indicator lights.Turning the answering system offPress {ANSWER ON}.LThe ANSWER ON indicator turns off.Screening your callsWhile a caller is leaving a message, you can listen to the call through the base unit’s speaker. To adjust the speaker volume, press {^} or {V}.Note:LTo answer the call, press {LINE1} or {LINE2} being called on the base unit or {LINE1} or {LINE2} being called on the handset.LTo turn this feature off, see page 58.Recording your greeting message ^You can record your own greeting message (max. 2 minutes) that is played when the answering system answers a call.The greeting messages can be recorded:– for each line.– for both lines using a common greeting.If you do not record a greeting message, a pre-recorded greeting message is used.1{MENU}iAi{SET}2“Greeting record”i{SET}3Select the desired line(s). i{SET}TH112(e).book  Page 51  Friday, February 10, 2006  3:57 PM
Temporary Confidentiali Answering System52 For assistance, please visit http://www.panasonic.com/phonehelp4After the base unit beeps, speak clearly about 20 cm (8 inches) away from the MIC.5To stop recording, press {STOP}.Playing back the greeting message1{MENU}iAi{SET}2“Greeting check”i{SET}3Select the desired line.Erasing your greeting message1{MENU}iAi{SET}2“Greeting check”i{SET}3Select the desired line.4Press {ERASE} while your greeting message is playing.Pre-recorded greeting messageIf you erase or do not record your own greeting message, the unit can play a prerecorded greeting message for callers and ask them to leave messages. If the message recording time (page 58) is set to “Greeting only”, caller messages are not recorded and the unit plays a different prerecorded greeting message asking callers to call again.Listening to messages using the base unitWhen new messages have been recorded, the MESSAGE indicator on the base unit flashes.Press {MESSAGE}.LThe base unit plays new messages including memo messages.LWhen you have no new messages, the base unit plays back all messages.Playing back messages for the desired line(s)Press {LINE SELECT} repeatedly to select the desired line(s), then press {MESSAGE}.Note:LAfter selecting the line(s), memo messages do not play.Adjusting the speaker volumePress {^} or {V} while listening to a message.Useful features during playback ^Repeating a messagePress {<}.LIf pressed within the first 5 seconds of a message, the previous message will be played.Skipping a messagePress {>}.Pausing a messagePress {STOP}.LTo resume playback, press {MESSAGE}.LTo stop playback completely, press {STOP} again.TH112(e).book  Page 52  Friday, February 10, 2006  3:57 PM
Temporary Confidentiali Answering SystemFor assistance, please visit http://www.panasonic.com/phonehelp 53Calling back (Caller ID subscribers only)If Caller ID information was received for the call, you can call the caller back while listening to the message.Press {SP-PHONE} during playback.Note:LTo edit the number before calling back, press {EDIT} to select the desired format (page 34).Erasing messages ^Erasing a messagePress {ERASE} during playback.Erasing all messagesPress {ERASE} 2 times while the base unit is not being used.LTo erase the messages for the desired line, press {LINE SELECT} repeatedly to select the desired line(s), then press {ERASE} 2 times.Listening to messages using the handsetWhen new messages have been recorded:–“New message” is displayed.– The message indicator on the handset slowly flashes if the message alert feature is turned on (page 59).1{MENU} (center of joystick)2ii{SELECT}LThe handset plays new messages including memo messages.LWhen you have no new messages, the handset plays back all messages.3Press {OFF} when finished.Note:LTo switch to the receiver, press {C}.Adjusting the receiver/speaker volumePush {^} or {V} while listening to a message.Voice guidanceIf you do not press any buttons after the last message is played back, the unit’s voice guidance starts. Operate the answering system by following the guidance as necessary.TH112(e).book  Page 53  Friday, February 10, 2006  3:57 PM
Temporary Confidentiali Answering System54 For assistance, please visit http://www.panasonic.com/phonehelpUseful features during playback YCalling back (Caller ID subscribers only)If Caller ID information was received for the call, you can call the caller back while listening to the message.Press {LINE1} or {LINE2} during playback.Note:LTo edit the number before calling back, press {EDIT} to select the desired format (page 34).Answering system commandsYou can also select the desired line(s) and press dial keys to access certain answering system functions using the handset during playback.1{MENU} (center of joystick) iii{SELECT}2Select the desired line(s) if necessary.For line 1: {#}{1}For line 2: {#}{2}For line 1 and line 2: {#}{0}3Press the desired dial keys.*1 If pressed within the first 5 seconds of a message, the previous message is played.*2 To resume operation, press a command key within 15 seconds, or the voice guidance will start.Note:LAfter selecting the line(s), memo messages do not play.Key Command{1} or {<}Repeat message (during playback).*1{2} or {>}Skip message (during playback).{4}Play new messages.{5}Play all messages.{9}Stop playback.*2{0}Turn answering system off.{*}{4} or {CLEAR}Erase this message (during playback).{*}{5}Erase all messages.{#}{1}{8}Turn answering system on for line 1 only.{#}{2}{8}Turn answering system on for line 2 only.{#}{0}{8}Turn answering system on for both line 1 and line 2.Key CommandTH112(e).book  Page 54  Friday, February 10, 2006  3:57 PM
Temporary Confidentiali Answering SystemFor assistance, please visit http://www.panasonic.com/phonehelp 55Voice memoRecording a voice memo ^You can use the base unit to leave a voice memo (voice message) for yourself or someone else (max. 3 minutes). This memo can be played back later, either directly with the base unit or remotely.1{MEMO}2After the base unit beeps, speak clearly about 20 cm (8 inches) away from the MIC.3To stop recording, press {STOP}.Remote operationUsing a touch tone phone, you can call your phone number from outside and access the unit to listen to messages. The unit’s voice guidance prompts you to press certain dial keys to perform different operations.Important:LIn order to operate the answering system remotely, you must first set a remote code (page 57). This code must be entered each time you operate the answering system remotely.Using the answering system remotely1Dial your phone number from a touch tone phone.2After the greeting message starts, enter your remote code.LThe unit plays back new messages, including memo messages.3After 3 seconds, the voice guidance starts. Follow the voice guidance as necessary.4When finished, hang up.Note:LYou can ignore the voice guidance and control the unit using remote commands (page 56).Voice guidanceDuring remote operation, the unit’s voice guidance prompts you to press {1} to perform a specific operation, or press {2}to listen to more available operations. Operations are presented by voice guidance in the following order:– Play back all messages– Play back new messagesTH112(e).book  Page 55  Friday, February 10, 2006  3:57 PM
Temporary Confidentiali Answering System56 For assistance, please visit http://www.panasonic.com/phonehelp– Record a message– Erase all messages– Record your greeting messageNote:LIf you do not press any dial keys within 10 seconds after a voice guidance prompt, the unit disconnects your call.LIf less than 10 minutes of recording time is available, the unit announces the remaining recording time after the last message is played back.Remote commandsYou can select the desired line(s) and press dial keys to access certain answering system functions without waiting for the voice guidance to prompt you.1Select the desired line(s) while you are accessing the answering system if necessary.For line 1: {#}{1}For line 2: {#}{2}For line 1 and line 2: {#}{0}2Press the desired dial keys.Key Remote command{1}Repeat message (during playback).*1{2}Skip message (during playback).{4}Play new messages.{5}Play all messages.{9}Stop recording/playback.*2{0}Turn answering system off.{*}{4}Erase this message (during playback).{*}{5}Erase all messages.{#}{1}{7}Record a greeting message for line 1 only.{#}{2}{7}Record a greeting message for line 2 only.{#}{0}{7}Record a common greeting message for both line 1 and line 2.{#}{1}{8}Turn answering system on for line 1 only.{#}{2}{8}Turn answering system on for line 2 only.{#}{0}{8}Turn answering system on for both line 1 and line 2.TH112(e).book  Page 56  Friday, February 10, 2006  3:57 PM
Temporary Confidentiali Answering SystemFor assistance, please visit http://www.panasonic.com/phonehelp 57*1 If pressed within the first 5 seconds of a message, the previous message is played.*2 To resume operation, enter a remote command within 15 seconds, or the voice guidance will start.Note:LAfter selecting the line(s), memo messages do not play.Turning on the answering system remotelyIf the answering system is off, you can turn it on remotely by calling the line selected in “Turning the answering system on ^” on page 51.1Dial your phone number.2Let the phone ring 15 times.LThe unit answers your call with the greeting message.LYou can hang up, or if you call from a touch tone phone, you can enter your remote code and begin remote operation (page 55).Skipping the greeting message to leave a messageYou can leave a message just as any outside caller can. Call your phone number, then press {*} to skip the greeting message and record your message after the beep.Answering system settingsRemote code ^A remote code must be entered when operating the answering system remotely. This code prevents unauthorized parties from listening to your messages remotely.1{MENU}iAi{SET}2“Remote code”i{SET}3Enter the desired 2-digit remote code. (Default: “11”)4{SET}i{STOP}Ring count ^You can change the number of times the phone rings before the unit answers calls.“Toll saver”: The unit answers on the 2nd ring when new messages have been recorded, and on the 4th ring when there are no new messages. If you call your phone from outside to listen to new messages (page 55), you will know that there are no new messages when the phone rings for the 3rd time. You can then hang up without being charged for the call.1{MENU}iAi{SET}2“Ring count”i{SET}3Select the desired line.4Select the desired setting. (Default: “4rings”) i{SET}i{STOP}TH112(e).book  Page 57  Friday, February 10, 2006  3:57 PM
Temporary Confidentiali Answering System58 For assistance, please visit http://www.panasonic.com/phonehelpFor Voice Mail service subscribersIf you subscribe to a flat-rate bundle service that includes Caller ID, Call Waiting, Voice Mail, and unlimited local/regional/long distance calls, please note the following:LTo use the Voice Mail service provided by your telephone service provider rather than the unit’s answering system, turn off the answering system (page 51).This unit does not have an indicator to indicate if there are new messages in your mailbox service.LTo use this unit’s answering system rather than the Voice Mail service provided by your telephone service provider, please contact your telephone company to deactivate your Voice Mail service.If your telephone service provider cannot do this:– Set this unit’s “Ring count” setting so that this unit’s answering system answers calls before your telephone service provider’s Voice Mail service tries to answer your calls. It is necessary to check the ring count required to activate the Voice Mail service provided by your telephone service provider before changing this setting.– Change the ring count of the Voice Mail service so that the answering system can answer the call first. To do so, consult your telephone service provider.Caller’s recording time ^You can change the maximum message recording time allotted to each caller.“Greeting only”: The unit plays the greeting message but does not record caller messages.1{MENU}iAi{SET}2“Recording time”i{SET}3Select the desired line.4Select the desired setting. (Default: “3min”) i{SET}i{STOP}Note:LIf the message memory becomes full, the unit automatically switches to the “Greeting only” mode. New messages will not be recorded.Recording mode ^You can select a recording mode. Enhanced recording provides improved sound quality, but the total recording capacity is reduced.1{MENU}iAi{SET}2“Recording mode”i{SET}3Select the desired item. (Default: “Standard recording 60min”) i{SET}i{STOP}Call screening ^This feature allows you to monitor a message from the speaker when the answering system is recording the message.1{MENU}iAi{SET}2“Call screening”i{SET}3Select the desired item. (Default: “On”)i{SET}i{STOP}TH112(e).book  Page 58  Friday, February 10, 2006  3:57 PM
Temporary Confidentiali Answering SystemFor assistance, please visit http://www.panasonic.com/phonehelp 59Message alert YYou can select whether or not the message indicator on the handset slowly flashes in amber when new messages are recorded (page 53).1{MENU} (center of joystick) ihi{SELECT}2“Message alert”i{SELECT}3Select the desired setting. (Default: “Off”) i{SAVE}i{OFF}Note:LWhile message alert is on, battery operating time will be shortened (page 13).TH112(e).book  Page 59  Friday, February 10, 2006  3:57 PM
Temporary ConfidentialUsing a Cellular Phone with this Unit60 For assistance, please visit http://www.panasonic.com/phonehelpConfiguring a cellular phoneIf your cellular phone is Bluetooth wireless technology compatible to the home communication system, you can use the handset or base unit to make or answer calls using a cellular line.This feature is useful for maximizing the benefits of cellular services (such as free unlimited nights and weekends, or cellular to cellular calling plans) by utilizing unused peak minutes with your home phone.To use this feature you must first:– register your cellular phone to the base unit (page 60).– turn on discoverable mode (page 60).– connect the cellular phone to the base unit (page 61).Important:LThe following procedures must be performed using the base unit.LUp to 5 cellular phones can be registered (when other Bluetooth devices are not registered). There can be only one active Bluetooth connection at a time.LTo keep the cellular line stable between the base unit and cellular phone, we recommend you use a cellular phone within the range of the base unit.LWhile you are on a cellular call, the battery of your cellular phone is being consumed. We recommend you place your cellular phone on its base unit during the call.Registering a cellular phone ^Important:LFor more details and the list of compatible cellular phones, please visit: www.panasonic.com/MultiTalkVLBefore registering a Bluetooth device to the base unit, we recommend you change the PIN (page 48).1Base unit:Press the desired CELLULAR SELECT button ({1} to {5}).2“Registration”i{SET}LAfter pressing {SET}, the rest of the procedure must be completed within 2 minutes.3Your cellular phone:Follow the instructions of your cellular phone to enter the registration mode.LDepending on your cellular phone, it may ask you to enter the base unit PIN (Default: “7262”).Note:LTo cancel a cellular phone from the base unit, see “Deregistering another device” on page 50.Turning on the discoverable mode ^When discoverable mode is turned on, this unit may be seen by other Bluetooth devices.1{MENU}ihi{SET}2“Bluetooth”i{SET}3“Discoverable”i{SET}4Select the desired setting. (Default: “On”) i{SET}i{STOP}TH112(e).book  Page 60  Friday, February 10, 2006  3:57 PM
Temporary ConfidentialUsing a Cellular Phone with this UnitFor assistance, please visit http://www.panasonic.com/phonehelp 61Connecting the cellular phone ^You need to connect to a registered cellular phone to the base unit before you can use this feature.1Press the desired CELLULAR SELECT button ({1} to {5}).2“Connection”i{SET}3Select the desired cellular phone. i{SET}LThe selected cellular phones are indicated by “Q”.4{STOP}Note:LIn step 3, the base unit requires your cellular phone to accept the connection. Depending on your cellular phone, it may ask you if you accept the connection requirement from the base unit. Refer to the operating instructions of your cellular phone for further operations.Making/answering calls using a cellular lineLBefore making or answering calls, confirm that you have connected your cellular phone to the base unit (page 61).Making calls Y^Important:LYou can place the handset on the base unit while using the speakerphone. The call is not disconnected.1Dial the phone number. i{CELL}LIf you registered only one cellular phone, skip to step 4.2Select the desired cellular phone.3{SELECT}4When you finish talking, press {OFF}.1Dial the phone number. i Press the desired CELLULAR SELECT button ({1} to {5}).LIf you registered only one cellular phone, skip to step 4.2Select the desired cellular phone.3{SET}4When you finish talking, press {SP-PHONE}.Answering calls Y^1Press {C} or {CELL}.2When you finish talking, press {OFF}.HandsetBase unitHandsetTH112(e).book  Page 61  Friday, February 10, 2006  3:57 PM
Temporary ConfidentialUsing a Cellular Phone with this Unit62 For assistance, please visit http://www.panasonic.com/phonehelpWhen a call is being received to the registered cellular phone, the corresponding number of CELLULAR SELECT button flashes rapidly.1Press {SP-PHONE} or the desired CELLULAR SELECT button ({1} to {5}).2When you finish talking, press {SP-PHONE}.Making calls using the phonebook Y^1{MENU} (center of joystick) idi{SELECT}2Push {^} or {V} to select the desired item.3{CALL}i{CELL}LIf you registered only one cellular phone, skip to step 5.4Select the desired cellular phone. i{SELECT}5When you finish talking, press {OFF}.1{MENU}idi{SET}2Press {^} or {V} to select the desired item.3Press the desired CELLULAR SELECT button ({1} to {5}).LIf you registered only one cellular phone, skip to step 5.4Select the desired cellular phone. i{SET}5When you finish talking, press {SP-PHONE}.Viewing the caller list and calling back Y^If you receive a call via cellular line, caller information is logged in the caller list with y.1{MENU} (center of joystick) iGi{SELECT}2Push {^} or {V} to select the desired caller information indicated by y.3{CALL}i{CELL}LIf you registered only one cellular phone, skip to step 5.4Select the desired cellular phone. i{SELECT}5When you finish talking, press {OFF}.Note:LIf the cellular line is already being used or you want to select the land line, select the desired line by pressing {LINE1} or {LINE2} instead of {CELL}.1{MENU}iGi{SET}2Press {^} or {V} to select the desired caller information indicated by y.3Press the desired CELLULAR SELECT button ({1} to {5}).LIf you registered only one cellular phone, skip to step 5.4Select the desired cellular phone. i{SET}5When you finish talking, press {SP-PHONE}.Note:LIf the cellular line is already being used or you want to select the land line, select the desired line by pressing {LINE1} or Base unitHandsetBase unitHandsetBase unitTH112(e).book  Page 62  Friday, February 10, 2006  3:57 PM
Temporary ConfidentialUsing a Cellular Phone with this UnitFor assistance, please visit http://www.panasonic.com/phonehelp 63{LINE2} instead of pressing the desired CELLULAR SELECT button ({1} to {5}). Useful features during a cellular callPutting a cellular call on hold Y^Press {HOLD} 2 times during a cellular call.LTo return to the call, press {C}.Press {HOLD} during a cellular call.LTo return to the call, press the desired CELLULAR SELECT button ({1} to {5}).Note for handset and base unit:LIf a call is kept on hold for more than 6 minutes, an alarm tone starts to sound. After 4 additional minutes on hold, the call is disconnected.Using the land line during a cellular call Y^Holding a cellular call to make or answer a land line callExample: If you are on a cellular line call1To put the cellular call on hold, press {HOLD} 2 times.2To make a land line call, dial the phone number, then press {LINE1} or {LINE2}.To answer a land line call, press {LINE1} or {LINE2}.3When you finish talking, press {OFF} to end the land line call.4To return to the cellular call, press {C}.HandsetBase unitHandsetTH112(e).book  Page 63  Friday, February 10, 2006  3:57 PM
Temporary ConfidentialUsing a Cellular Phone with this Unit64 For assistance, please visit http://www.panasonic.com/phonehelp1To put the cellular call on hold, press {HOLD}.2To make a land line call, dial the phone number, then press {LINE1} or {LINE2}.To answer a land line call, press {LINE1} or {LINE2}.3When you finish talking, press {SP-PHONE} to end the land line call.4To return to the cellular call, press the desired CELLULAR SELECT button ({1} to {5}).Holding a land line call and make or answer a cellular callExample: If you are on a land line call1To put the land line call on hold, press {HOLD} 2 times.2To make a cellular call– If you have registered only one cellular phone, dial the phone number, then press {CELL}.– If you have registered more than one cellular phone, dial the phone number, then press {CELL}. Select the desired cellular phone, then press {SELECT}.To answer a cellular callPress {CELL}.3To return to the land line call, press the line button that is flashing on the handset.LThe cellular call ends.1To put the land line call on hold, press {HOLD}.2To make a cellular call– If you have registered only one cellular phone, dial the phone number, then press the desired CELLULAR SELECT button ({1} to {5}).– If you have registered more than one cellular phone, dial the phone number, then press the desired CELLULAR SELECT button ({1} to {5}). Select the desired cellular phone, then press {SET}.To answer a cellular callPress the desired CELLULAR SELECT button ({1} to {5}).3To return to the land line call, press the line button that is flashing on the base unit.LThe cellular call ends.Base unitHandsetBase unitTH112(e).book  Page 64  Friday, February 10, 2006  3:57 PM
Temporary ConfidentialUsing a Cellular Phone with this UnitFor assistance, please visit http://www.panasonic.com/phonehelp 65Cellular settingsImportant:LYou must register your cellular phone to the base unit before programming.Ringer settings for cellular calls Y^Ringer volumeYou can change the ringer volume heard when a cellular call is received. You can change it for the handset and base unit individually.1{MENU} (center of joystick) ifi{SELECT}2“Ringer for cell”i{SELECT}3“Ringer volume”i{SELECT}4Select the desired volume. (Default: High) i{SAVE}i{OFF}1Press the desired CELLULAR SELECT button ({1} to {5}).2“Cellular setting”i{SET}3“Ringer volume”i{SET}4Select the desired volume. (Default: High) i{SET}i{STOP}Note for handset and base unit:LWhen the ringer volume is set to off for a cellular line, “Ringer off” is not displayed in standby mode and the handset or base unit does not ring for cellular calls.Ringer toneYou can change the ringer tone heard when a cellular call is received. You can change it for the handset and base unit individually.1{MENU} (center of joystick) ifi{SELECT}2“Ringer for cell”i{SELECT}3“Ringer tone”i{SELECT}4Select the desired item. (Default: “Tone 3”) i{SAVE}i{OFF}Note:LIf you erase a customized ring for cellular call, “Tone 3” (default) is used instead of that ringer tone.1Press the desired CELLULAR SELECT button ({1} to {5}).2“Cellular setting”i{SET}3“Ringer tone”i{SET}4Select the desired item. (Default: “Tone 3”) i{SET}i{STOP}HandsetBase unitHandsetBase unitTH112(e).book  Page 65  Friday, February 10, 2006  3:57 PM
Temporary ConfidentialUsing a Cellular Phone with this Unit66 For assistance, please visit http://www.panasonic.com/phonehelpSelecting which unit to ring ^You can select which handset or base unit rings when you receive a call from one of the registered cellular phones.1Press the desired CELLULAR SELECT button ({1} to {5}).2“Cellular setting”i{SET}3“Assign Base/HS”i{SET}4Select the desired cellular phone. i{SET}5Select the desired unit by pressing {>}.(Default: “All”)LThe selected units are indicated by “Q”.LTo cancel a selected unit, press {>}again.6{SET}i{OFF}Answering system settings for cellular calls ^Setting the answering system for a cellular callThis feature allows the base unit to answer cellular calls when you are not available to answer cellular calls.Important:LTo use this feature, you need to turn on the answering system for line 1 and/or line 2 (page 51).LIf this feature is turned on, the base unit plays the greeting message for line 1 and message is recorded on line 1.1Press the desired CELLULAR SELECT button ({1} to {5}).2“Cellular setting”i{SET}3“TAD (cell)”i{SET}4Select the desired setting. (Default: “Off”) i{SET}i{STOP}Note:L“TAD” stands for Telephone Answering Device.Ring countYou can change the number of times the cellular phone rings before the base unit answers cellular calls.1Press the desired CELLULAR SELECT button ({1} to {5}).2“Cellular setting”i{SET}3“TAD ring count”i{SET}4Select the desired number. (Default: “4”) i{SET}i{STOP}TH112(e).book  Page 66  Friday, February 10, 2006  3:57 PM
Temporary ConfidentialUsing a Cellular Phone with this UnitFor assistance, please visit http://www.panasonic.com/phonehelp 67Transferring a cellular callCellular calls can be transferred between the handset and the base unit, and between the handset and another compatible Panasonic handset (KX-THA19). You can also switch a cellular call between a cellular phone and base unit.Transferring a cellular call Y^1During a cellular call, press {INTERCOM} to put the call on hold.2To page the base unit, press {0}.To page another handset, enter its extension number ({1} to {8}).LIf you do not wish to announce the transfer, skip to step 4.3Wait for the paged party to answer.LIf the paged party does not answer, press {C} to return to the cellular call.4To complete the transfer, press {OFF}.1During a cellular call, press {TRANSFER} to put the call on hold.2To page a handset, enter its extension number ({1} to {8}).To page all handsets, press {0}.LIf you do not wish to announce the transfer, skip to step 4.3Wait for the paged party to answer.LIf the paged party does not answer, press the desired CELLULAR SELECT button ({1} to {5}) to return to the cellular call.4To complete the transfer, press {SP-PHONE}.Note for handset and base unit:LIf the paged party does not answer within 1 minute after you hang up, your extension rings and the call is returned to your phone. You can speak to the caller again by pressing {C} on the handset or the desired CELLULAR SELECT button ({1} to {5}) on the base unit.LTo transfer a cellular call to the answering system, see page 38.Answering a transferred cellular call Y^Press {C} to answer the page.LAfter the paging party hangs up the call, you can take the transferred call.Press {INTERCOM} to answer the page.LAfter the paging party hangs up the call, you can take the transferred call.Note for handset and base unit:LIf the paging party hangs up before you answer the page, “Incoming call” is displayed. Press {C} on the handset or the desired CELLULAR SELECT button ({1} to {5}) on the base unit to take the transferred call.HandsetBase unitHandsetBase unitTH112(e).book  Page 67  Friday, February 10, 2006  3:57 PM
Temporary ConfidentialUsing a Cellular Phone with this Unit68 For assistance, please visit http://www.panasonic.com/phonehelpSwitching a cellular call between a cellular phone and the base unit ^From a cellular phone to the base unitIf you answer a cellular call using a cellular phone, you can transfer it to the base unit.1During a cellular call using your cellular phone, press the desired CELLULAR SELECT button ({1} to {5}).2“Transfer to base”i{SET}3Select the desired cellular phone. i{SET}LIf you registered only one cellular phone, skip to step 4.4Follow the instructions of your cellular phone, if required.LYou may need to enter the PIN (page 48).From the base unit to a cellular phoneIf you answer a cellular call using the base unit, you can transfer it to the cellular phone that the call came in.1During a cellular call using the base unit, press the desired CELLULAR SELECT button ({1} to {5}).2“Transfer to Cell”i{SET}Conference callsConference call with a cellular call and land line call Y^While you are talking on a cellular call, you can make or answer a 2nd call on the land line, and then combine the calls to establish a conference call.1During a cellular call, press {HOLD} 2 times.2To answer a land line call, press {LINE1} or {LINE2}.To make a land line call, press {LINE1}or {LINE2}, then dial the phone number.3When the land line call is connected, press {CONF} to make a conference call.LTo hang up only one line, press the desired line button or {CELL} for the party with which you want to continue talking.LTo put both lines on hold, press {HOLD}. To talk only with the land line caller, press the desired line button. To talk only with the cellular caller, press {C}. To resume both lines, press {CONF}.1During a cellular call, press {HOLD}.2To answer a land line call, press {LINE1} or {LINE2}.To make a land line call, press {LINE1}or {LINE2}, then dial the phone number.HandsetBase unitTH112(e).book  Page 68  Friday, February 10, 2006  3:57 PM
Temporary ConfidentialUsing a Cellular Phone with this UnitFor assistance, please visit http://www.panasonic.com/phonehelp 693When the land line call is connected, press {CONF} to make a conference call.LTo hang up only one line, press the desired line button or the desired CELLULAR SELECT button ({1} to {5}) for the party with which you want to continue talking.LTo put both lines on hold, press {HOLD}. To talk with only land line caller, press the desired line button. To talk only with the cellular caller, press the desired CELLULAR SELECT button ({1} to {5}). To resume both lines, press {CONF}.Conference call with a cellular call and an intercom call Y^While you are talking on a cellular call, one more extension can join the conversation and establish a conference call.1During a cellular call, press {INTERCOM}.2To page the base unit, press {0}.To page another handset, enter its extension number ({1} to {8}).3When the paged party answers, press {CONF} to make a conference call.LTo leave the conference, press {OFF}. The other 2 parties can continue the conversation.1During a cellular call, press {INTERCOM}.2To page a handset, enter its extension number ({1} to {8}).To page all handsets, press {0}.3When the paged party answers, press {CONF} to make a conference call.LTo leave the conference, press {SP-PHONE}. The other 2 parties can continue the conversation.Note for handset and base unit:LThe cellular call can be put on hold by pressing {HOLD}. Only the person who placed the call on hold can resume the full conference by pressing {CONF} on the handset or {CONF} on the base unit.HandsetBase unitTH112(e).book  Page 69  Friday, February 10, 2006  3:57 PM
Temporary ConfidentialUseful Information70 For assistance, please visit http://www.panasonic.com/phonehelpHeadset (Optional)Setting up a Bluetooth wireless headset ^If your headset is Bluetooth wireless technology compatible to the home communication system, you can have a hands-free phone conversation by registering your headset to the base unit.Important:LThe following procedures must be performed using the base unit.LThere can only be one active Bluetooth headset connection at a time.Registering a headset1Your headset:Enter the registration mode of your headset (each headset’s instructions vary).2Base unit:{MENU}ihi{SET}3“Bluetooth”i{SET}4“Headset”i{SET}5“Registration”i{SET}6Enter the PIN of your headset. (Refer to the operating instructions provided with your headset.) i{SET}Note:LTo cancel a headset from the base unit, see “Deregistering another device” on page 50.Selecting a headsetThis setting determines which headset is active. Only 1 headset can be active at a time. When “No headset” is selected, the headset feature is turned off.1{MENU}ihi{SET}2“Bluetooth”i{SET}3“Headset”i{SET}4“Headset select”i{SET}5Select the desired headset. i{SET}i{STOP}Switching a call between headset and base unit speakerphoneTo switch to the base unit speakerphone, press {SP-PHONE}.To return to the headset, press {STOP}.Connecting the corded headset YConnecting a headset to the handset allows hands-free phone conversations. We recommend using the Panasonic headset noted on page 4.LHeadset shown is KX-TCA86.Switching a call between headset and handset speakerphoneTo switch to the handset speakerphone, press {s}.To return to the headset, press {C}.TH112(e).book  Page 70  Friday, February 10, 2006  3:57 PM
Temporary ConfidentialUseful InformationFor assistance, please visit http://www.panasonic.com/phonehelp 71Additional accessoriesSales and support informationLTo order replacement accessories, call 1-800-332-5368.LTTY users (hearing or speech impaired users) can call 1-866-605-1277.Wall mounting (optional)By purchasing the optional wall-mounting adaptor PQKL10078ZA1, you can mount the base unit on a wall.Belt clip (optional)By purchasing the optional belt clip PQKE10404Z1, you can hang the handset on your belt or pocket.TH112(e).book  Page 71  Friday, February 10, 2006  3:57 PM
Temporary ConfidentialUseful Information72 For assistance, please visit http://www.panasonic.com/phonehelpError messagesIf the unit detects a problem, one of the following messages is shown on the display.Display message Cause/solutionBusy LThe called handset or base unit is in use.LOther users are using the line(s). Wait until the line button light or the line status icon goes out.LPrivacy mode is on for the call you tried to join (page 40).LThe handset or base unit you tried to copy phonebook items to is in use.LThe handset you are calling is too far from the base unit.DeniedTurn access on at device.LThe monitor feature is turned off on the destination handset or base unit and the room cannot be monitored (page 41).Error!! LThe handset’s registration or deregistration has failed. Move the handset and the base unit away from all electrical appliances and try again.LAnother handset or base unit user tried to send phonebook items to you but there was an error. Have the other user re-send the items to you (page 29, 31).Error!!8 handsets have already been registered.L8 handsets have already been registered to the base unit. The deregistered handset number is still retained in the base unit. To register an additional handset, erase the unnecessary handset number using the base unit (page 50).---Incomplete--- LThe destination unit’s phonebook memory is full. Erase unnecessary items from the destination unit’s phonebook (page 28, 31).LThe destination unit is out of area.LThe destination unit’s user may have pressed {C} or {s} on the handset or {SP-PHONE} on the base unit.Invalid LThere is no handset registered to the base unit matching the extension number you entered.LYou selected your own extension number.Invalid.Please registerto the base unitLThe handset is not registered to the base unit. Register the handset (page 50).Memory full LThere is no space in memory to record new songs. Erase unnecessary songs (page 43).No items stored LYour phonebook or redial list is empty.L“Customize ring” is empty.TH112(e).book  Page 72  Friday, February 10, 2006  3:57 PM
Temporary ConfidentialUseful InformationFor assistance, please visit http://www.panasonic.com/phonehelp              73No link to base. Move closer to base and try again.LThe handset has lost communication with the base unit. Move closer to the base unit, and try again.LConfirm that the base unit’s AC adaptor is plugged in.LRaise the base unit antennas.LThe handset’s registration may have been canceled. Re-register the handset (page 50).LAfter registering a cellular phone to the base unit, the communication between the base unit and other units may be disconnected. You need to wait for a few minutes and try again.Phonebook full LThere is no space to store new items in the phonebook. Erase unnecessary items (page 28, 31).System is busy. Please try again later.LThe resources available for wireless communication (making or answering calls with a handset, monitoring audio in the room, etc.) are limited. Therefore, depending on the combination of wireless features being conducted at the same time, your desired operation may not be possible. Wait for other users to finish and try again.LAnother user is listening to messages. Try again later.Title error LThe title for the customized ring is not entered or the title you entered is already used for another customized ring. Enter the title for that customized ring only.Display message Cause/solutionTH112(e).book  Page 73  Friday, February 10, 2006  3:57 PM
Temporary ConfidentialUseful Information74 For assistance, please visit http://www.panasonic.com/phonehelpTroubleshootingGeneral useProgrammable settingsProblem Cause/solutionThe unit does not work. LMake sure that the battery is installed correctly and fully charged (page 12).LCheck the connections (page 9 – 11).LUnplug the base unit’s AC adaptor to reset the unit. Reconnect the adaptor and try again.LThe handset has not been registered to the base unit. Register the handset (page 50).I cannot hear a dial tone. LConfirm that the telephone line cord is properly connected (page 10).LDisconnect the base unit from the telephone line and connect a known working telephone. If the working telephone operates properly, contact our service personnel to have the unit repaired. If the working telephone does not operate properly, contact your telephone service provider.“Recharge battery” is displayed and I cannot perform the following operations:– recording or erasing a customized ringer– editing a title for a customized ringerLThe battery power is low. Fully charge the battery (page 12) and try again.Problem Cause/solutionI cannot program items. LWhile another user is listening to messages or the answering system is answering a call, you cannot program items. Try again later.While programming, the handset starts to ring.LA call is being received. Answer the call and start again after hanging up.TH112(e).book  Page 74  Friday, February 10, 2006  3:57 PM
Temporary ConfidentialUseful Information    For assistance, please visit http://www.panasonic.com/phonehelp               75Making/answering calls, intercomProblem Cause/solutionStatic is heard, sound cuts in and out. Interference from other electrical units.LMove the handset and the base unit away from other electrical appliances (microwave, wireless LAN appliance, etc.).LMove closer to the base unit.LRaise the base unit antennas.LTurn on the clarity booster feature (page 25).LIf your base unit is connected to a telephone line with DSL service, we recommend connecting a noise filter between the base unit and the telephone line jack. Contact your DSL provider for details.The handset and base unit do not ring.LThe ringer volume is turned off. Adjust it (page 42, 65).I cannot make a call. LThe dialing mode may be set incorrectly. Change the setting (page 20).LThe base unit (including answering system) or another handset is in use. Try again later.I cannot redial by pressing {REDIAL}.LIf the last number dialed was more than 48 digits long, the number will not be redialed correctly. Dial the number manually.I cannot have a conversation using the headset.LMake sure that an optional headset is connected properly (page 70).LYour optional Bluetooth headset is not registered. Register it (page 70).LIf “SP-phone” is displayed on the handset, press {C}to switch to the headset.I cannot make long distance calls.LMake sure that you have long distance service.I cannot page the handset or base unit.LThe called handset is too far from the base unit.LThe called unit is in use. Try again later.I cannot turn the clarity booster on.LThe resources available for wireless communication (making or answering calls with another handset, etc.) are limited. Wait for the other user to end the operation and try again.The interrupt tones sound while I am on an outside call or on an intercom call or monitoring a room.LA call is being received. Press {OFF} to end the call or stop monitoring, then answer the call.TH112(e).book  Page 75  Friday, February 10, 2006  3:57 PM
Temporary ConfidentialUseful Information76 For assistance, please visit http://www.panasonic.com/phonehelpPhonebookCaller IDProblem Cause/solutionCopying stopped with an item displayed.LThe destination handset may have lost communication with the base unit, or the destination unit user may have pressed {C} or {s} on the handset or {SP-PHONE}on the base unit.The displayed phonebook item was not copied to the unit. Press {OFF} on the handset or {STOP} on the base unit. Confirm that the destination unit is not in use and try again.Problem Cause/solutionThe handset or base unit does not display the caller’s name and/or phone number.LYou have not subscribed to Caller ID service. Contact your telephone service provider to subscribe.LIf your base unit is connected to any additional telephone equipment such as a Caller ID box or cordless telephone jack, disconnect the base unit from the equipment and plug the base unit directly into the wall jack.LIf your base unit is connected to a telephone line with DSL service, we recommend connecting a noise filter between the base unit and the telephone line jack. Contact your DSL provider for details.LThe name display service may not be available in some areas. Contact your telephone service provider for details.LOther telephone equipment may be interfering with this unit. Disconnect the other equipment and try again.LThe caller requested not to send caller information (page 32).LIf a call is being transferred to you, the caller information is not displayed.The handset does not announce the displayed caller names.LThe handset’s ringer volume is turned off. Adjust it (page 42).LThe Talking Caller ID feature is turned off. Turn it on (page 46).LThe ring count for the answering system is set to “2” or “Toll saver”. Select a different setting (page 57).The caller list/incoming phone numbers are not edited automatically.LThe Caller ID number auto edit feature is turned off. Turn it on and try again (page 46).LYou need to call back the edited number to activate Caller ID number auto edit.TH112(e).book  Page 76  Friday, February 10, 2006  3:57 PM
Temporary ConfidentialUseful InformationFor assistance, please visit http://www.panasonic.com/phone                     77Answering systemI cannot dial the phone number edited in the caller list.LThe phone number you dialed might have an incorrectly edited pattern (for example, the long distance “1” or the area code is missing). Edit the phone number with another pattern (page 34).The 2nd caller’s information is not displayed during an outside call.LIn order to use Caller ID, Call Waiting, or Call Waiting Caller ID (CWID), you must first contact your telephone service provider and subscribe to the desired service.After subscribing, you may need to contact your telephone service provider again to activate this specific service, even if you already subscribed to both Caller ID and Call Waiting with Caller ID services (CWID).Problem Cause/solutionI cannot listen to messages from a remote location.LA touch tone phone is required for remote operation.LEnter the remote code correctly (page 55).LThe answering system is off. Turn it on (page 57).The unit does not record new messages.LThe answering system is not turned on for the line you wish to record messages from. Select the desired line or both lines by pressing {LINE SELECT} repeatedly, then turn the answering system on (page 51, 57).LThe recording time is set to “Greeting only”. Select a different setting (page 58).LThe message memory is full. Erase unnecessary messages (page 53).LThe answering system is activated for both lines, and the 1st caller is leaving a voice message. The 2nd caller cannot leave a message, but the caller information will be stored (page 33).LIf you subscribe to the Voice Mail service, messages are recorded by the telephone service provider not your telephone (page 58).I cannot operate the answering system.LSomeone is operating the answering system.LIf someone is talking on a conference call, you cannot operate the answering system. Try again later.The message indicator on the handset slowly flashes in amber.LNew messages have been recorded. Listen to the new messages (page 53).Problem Cause/solutionTH112(e).book  Page 77  Friday, February 10, 2006  3:57 PM
Temporary ConfidentialUseful Information78 For assistance, please visit http://www.panasonic.com/phonehelpCellular connection/Bluetooth wireless headsetProblem Cause/solutionI cannot register a cellular phone to the base unit.LDepending on the compatibility of the cellular phone, you may not be able to register it to the base unit.LConfirm that your cellular phone supports the hands-free profile (HFP) specification. If it does not, you cannot register it to the base unit.LYou can register up to 5 cellular phones (when other Bluetooth devices are not registered). Confirm how many cellular phones have already been registered in “Connecting the cellular phone ^” (page 61).LConfirm that the Bluetooth feature of your cellular phone is turned on. You may need to turn this feature on depending on your cellular phone.LThe Bluetooth technology on your cellular phone may not be functioning normally. Turn off and on your cellular phone.I cannot connect a cellular phone to the base unit.LDepending on the compatibility of the cellular phone, you may not be able to connect it to the base unit.LConfirm that you have registered your cellular phone to the base unit using the cellular phone (page 60). Refer to the operating instructions of your cellular phone for registration.LConfirm that your cellular phone is turned on.LConfirm that the Bluetooth feature of your cellular phone is turned on. You may need to turn this feature on depending on your cellular phone.LThe Bluetooth technology on your cellular phone may not be functioning normally. Turn off and on your cellular phone.The registered cellular phone received a call, but I cannot take that call with the handset or base unit.LIf someone is talking on a cellular call or customizing the cellular settings, you cannot use cellular feature. There can be only one active Bluetooth connection at a time.LConfirm that your cellular phone is connected to the base unit (page 61).TH112(e).book  Page 78  Friday, February 10, 2006  3:57 PM
Temporary ConfidentialUseful Information   For assistance, please visit http://www.panasonic.com/phonehelp               79Battery rechargeI cannot make or answer cellular calls with the handset or base unit.LDepending on the cellular phone’s compatibility, you may not be able to make or answer cellular calls even if you could register and connect the cellular phone to the base unit.LConfirm that you have registered your cellular phone to the base unit using the cellular phone (page 60). Refer to the operating instructions of your cellular phone for registration.LConfirm that your cellular phone is turned on.LConfirm that your cellular phone is connected to the base unit (page 61).LConfirm that your cellular phone is placed within the range of the base unit.LIf someone is talking on a cellular call or customizing the cellular settings, you cannot use cellular feature. There can be only one active Bluetooth connection at a time.I can make or answer cellular calls but cannot hear a sound.LThe Bluetooth technology on your cellular phone may not be functioning normally. Turn off and on your cellular phone.LDisconnect and connect the base unit AC adaptor and try again.I cannot switch cellular calls between the base unit and cellular phone.LYour cellular phone may not support this feature. Refer to the operating instructions of your cellular phone.I cannot register the Bluetooth wireless headset to the base unit.LConfirm that your Bluetooth wireless headset supports the headset profile (HSP) specification. If it does not, you cannot register it to the base unit.Problem Cause/solutionI fully charged the battery, but 3 continues to flash, or 4 is displayed.LClean the charge contacts and charge again (page 12).LThe battery may need to be replaced with a new one (page 12).The handset display is blank.LConfirm that the battery is properly installed.LFully charge the battery (page 12).Problem Cause/solutionTH112(e).book  Page 79  Friday, February 10, 2006  3:57 PM
Temporary ConfidentialUseful Information80              For assistance, please visit http://www.panasonic.com/phonehelpFCC and other informationThis equipment complies with Part 68 of the FCC rules and the requirements adopted by the ACTA. On the bottom of this equipment is a label that contains, among other information, a product identifier in the format US:ACJ----------.If requested, this number must be provided to the telephone company.L Registration No   ............(found on the bottom of the unit)L Ringer Equivalence No.   (REN).......0.2BA plug and jack used to connect this equipment to the premises wiring and telephone network must comply with the applicable FCC Part 68 rules and requirements adopted by the ACTA. A compliant telephone cord and modular plug is provided with the product. It is designed to be connected to a compatible modular jack that is also compliant.The REN is used to determine the number of devices that may be connected to a telephone line. Excessive RENs on a telephone line may result in the devices not ringing in response to an incoming call. In most but not all areas, the sum of RENs should not exceed five (5.0). To be certain of the number of devices that may be connected to a line, as determined by the total RENs, contact the local telephone company. For products approved after July 23, 2001, the REN for the product is part of the product identifier that has the format US:AAAEQ##TXXXX. The digits represented by ## are the REN without a decimal point (e.g., 03 is a REN of 0.3).If this equipment causes harm to the telephone network, the telephone company will notify you in advance thattemporary discontinuance of service may be required. But if advance notice isn’t practical, the telephone company will notify the customer as soon as possible. Also, you will be advised of your right to file a complaint with the FCC if you believe it is necessary.The telephone company may make changes in its facilities, equipment, operations or procedures that could affect the operation of the equipment. If this happens the telephone company will provide advance notice in order for you to make necessary modifications to maintain uninterrupted service.If trouble is experienced with this equipment, for repair or warranty information, please contact a Factory Servicenter or other Authorized Servicer. If the equipment is causing harm to the telephone network, the telephone company may request that you disconnect the equipment until the problem is resolved.Connection to party line service is subject to state tariffs. Contact the state public utility commission, public service commission or corporation commission for information.If your home has specially wired alarm equipment connected to the telephone line, ensure the installation of this equipment does not disable your alarm equipment. If you have questions about what will disable alarm equipment, consult your telephone company or a qualified installer.This equipment is hearing aid compatible as defined by the FCC in 47 CFR Section 68.316.TH112(e).book  Page 80  Friday, February 10, 2006  3:57 PM
Temporary ConfidentialUseful InformationFor assistance, please visit http://www.panasonic.com/phonehelp                  81When you hold the phone to your ear, noise might be heard in your Hearing Aid. Some Hearing Aids are not adequately shielded from external RF (radio frequency) energy. If noise occurs, use an optional headset accessory or the speakerphone option (if applicable) when using this phone. Consult with your audiologist or Hearing Aid manufacturer about the availability of Hearing Aids which provide adequate shielding to RF energy commonly emitted by digital devices.WHEN PROGRAMMING EMERGENCY NUMBERS AND(OR) MAKING TEST CALLS TO EMERGENCY NUMBERS:1) Remain on the line and briefly explain to the dispatcher the reason for the call.2) Perform such activities in the off-peak hours, such as early morning or late evenings.The software contained in this equipment to allow user access to the network must be upgraded to recognize newly established network area codes and exchange codes as they are placed into service.Failure to upgrade the premises systems or peripheral equipment to recognize the new codes as they are established will restrict the customer and the customer’s employees from gaining access to the network and to these codes.This device complies with Part 15 of the FCC Rules. Operation is subject to the following two conditions:(1) This device may not cause harmful interference, and (2) this device must accept any interference received, including interference that may cause undesired operation.Privacy of communications may not be ensured when using this phone.CAUTION:Any changes or modifications not expressly approved by the party responsible for compliance could void the user’s authority to operate this device.NOTE:This equipment has been tested and found to comply with the limits for a Class B digital device, pursuant to Part 15 of the FCC Rules. These limits are designed to provide reasonable protection against harmful interference in a residential installation. This equipment generates, uses, and can radiate radio frequency energy and, if not installed and used in accordance with the instructions, may cause harmful interference to radio communications. However, there is no guarantee that interference will not occur in a particular installation. If this equipment does cause harmful interference to radio or television reception, which can be determined by turning the equipment off and on, the user is encouraged to try to correct the interference by one or more of the following measures:− Reorient or relocate the receiving antenna.− Increase the separation between the equipment and receiver.− Connect the equipment into an outlet on a circuit different from that to which the receiver is connected.− Consult the dealer or an experienced radio/TV technician for help.Some cordless telephones operate at frequencies that may cause interference to nearby TVs and VCRs. To minimize or prevent such interference, the base of the cordless telephone should not be placed near or on top of a TV or VCR. If interference is experienced, move the cordless telephone further away from the TV or VCR. This will often reduce, or eliminate, interference.TH112(e).book  Page 81  Friday, February 10, 2006  3:57 PM
Temporary ConfidentialUseful Information82 For assistance, please visit http://www.panasonic.com/phonehelpNoticeFCC RF Exposure Warning:The product complies with FCC radiation exposure limits set forth for an uncontrolled environment. To comply with FCC RF exposure requirements, the base unit must be installed and operated with its antenna located 20 cm (8 inches) or more between antenna and all person’s body (excluding extremities of hands, wrist and feet). The handset may be carried and operated with only the optional specific belt-clip. Other non-tested belt-clips or similar body-worn accessories may not comply and must be avoided. The product must not be collocated or operated in conjunction with any other antenna or transmitter.TH112(e).book  Page 82  Friday, February 10, 2006  3:57 PM
Temporary ConfidentialUseful InformationFor assistance, please visit http://www.panasonic.com/phonehelp            83SpecificationsGeneralBase unitHandsetNote:LDesign and specifications are subject to change without notice.LThe illustrations in these instructions may vary slightly from the actual product.TrademarksLThe Bluetooth word mark and logos are owned by the Bluetooth SIG, Inc. and any use of such marks by Panasonic is under license.Operating environment 5 °C – 40 °C (41 °F – 104 °F)Frequency 2.4 GHz – 2.48 GHzBluetooth compliance Bluetooth wireless technology 1.2Dimensions Approx. height 53 mm x width 254 mm x depth 140 mm(23/32 inches x 10 inches x 51/2 inches)Mass (Weight) Approx. 490 g (1.08 lb.)Power consumption Standby: Approx. 3.3 WMaximum: Approx. 5.5 WPower output 125 mW (max.)Power supply AC adaptor (120 V AC, 60 Hz)Dimensions Approx. height 160 mm x width 49 mm x depth 33 mm(65/16 inches x 115/16 inches x 15/16 inches)Mass (Weight) Approx. 167 g (0.37 lb.)Power output 125 mW (max.)Power supply Ni-MH battery (3.6 V, 830 mAh)TH112(e).book  Page 83  Friday, February 10, 2006  3:57 PM
Temporary ConfidentialUseful Information84 For assistance, please visit http://www.panasonic.com/phonehelpCustomer servicesCustomer Services DirectoryObtain Product Information and Operating Assistance; locate your nearest Dealer or Servicenter; purchase Parts and Accessories; or make Customer Service and Literature requests by visiting our Web Site at:http://www.panasonic.com/consumersupportor, contact us via the web at:http://www.panasonic.com/contactinfoYou may also contact us directly at: 1-800-211-PANA (1-800-211-7262),Monday-Friday 9 am-9 pm; Saturday-Sunday 10 am-7 pm, EST.TTY users (hearing or speech impaired users) can call 1-877-833-8855.TTY users (hearing or speech impaired users) can call 1-866-605-1277.Purchase Parts, Accessories and Instruction Books online for all Panasonic Products by visiting our Web Site at:http://www.pasc.panasonic.comor, send your request by E-mail to:npcparts@us.panasonic.comYou may also contact us directly at:1-800-332-5368 (Phone)  1-800-237-9080 (Fax Only) (Monday - Friday 9 am to 8 pm, EST.)Panasonic Services Company20421 84th Avenue South, Kent, WA 98032(We Accept Visa, MasterCard, Discover Card, American Express, and Personal Checks)Accessory PurchasesService in Puerto RicoPanasonic Puerto Rico, Inc.San Gabriel Industrial Park, Ave. 65 de Infantería, Km. 9.5, Carolina, Puerto Rico 00985Phone (787)750-4300, Fax (787)768-2910TH112(e).book  Page 84  Friday, February 10, 2006  3:57 PM
Temporary Confidential✄Useful InformationFor assistance, please visit http://www.panasonic.com/phonehelp 85WarrantyPANASONIC CONSUMER ELECTRONICS COMPANY, DIVISION OF PANASONIC CORPORATION OF NORTH AMERICA One Panasonic Way, Secaucus, New Jersey 07094PANASONIC PUERTO RICO, INC.San Gabriel Industrial Park, Ave. 65 de Infantería, Km. 9.5,Carolina, Puerto Rico 00985Panasonic Telephone ProductsLimited WarrantyLimited Warranty CoverageIf your product does not work properly because of a defect in materials or workmanship, Panasonic Consumer Electronics Company or Panasonic Puerto Rico, Inc. (collectively referred to as “the warrantor”) will, for the length of the period indicated on the chart below, which starts with the date of original purchase (“Limited Warranty period”), at its option either (a) repair your product with new or refurbished parts, or (b) replace it with a new or a refurbished product. The decision to repair or replace will be made by the warrantor.     Parts       Labor     One (1) Year    One (1) YearDuring the “Labor” Limited Warranty period there will be no charge for labor. During the “Parts” Limited Warranty period, there will be no charge for parts. You must mail-in your product during the Limited Warranty period. This Limited Warranty excludes both parts prepaid and labor for batteries, antennas, and cosmetic parts (cabinet). This Limited Warranty only applies to products purchased and serviced in the United States or Puerto Rico. This Limited Warranty is extended only to the original purchaser and only covers products purchased as new.Mail-In ServiceFor assistance in the continental U.S.A. in obtaining repairs please ship the product prepaid to:  Panasonic Services Company Customer Servicenter  4900 George McVay Drive Suite B Door #12 McAllen, TX 78503For assistance in Puerto Rico call Panasonic Puerto Rico, Inc. (787)-750-4300 or fax (787)-768-2910.For Limited Warranty service for headsets if a headset is included with this product please call Panasonic Call Center at 1-800-211-PANA (1-800-211-7262).When shipping the unit carefully pack, include all accessories, and send it prepaid, adequately insured and preferably in the original carton. Include a letter detailing the complaint and provide a day time phone number where you can be reached.IF REPAIR IS NEEDED DURING THE LIMITED WARRANTY PERIOD THE PURCHASER WILL BE REQUIRED TO FURNISH A SALES RECEIPT/PROOF OF PURCHASE INDICATING DATE OF PURCHASE, AMOUNT PAID AND PLACE OF PURCHASE. CUSTOMER WILL BE CHARGED FOR THE REPAIR OF ANY UNIT RECEIVED WITHOUT SUCH PROOF OF PURCHASE.TH112(e).book  Page 85  Friday, February 10, 2006  3:57 PM
Temporary ConfidentialUseful Information86 For assistance, please visit http://www.panasonic.com/phonehelpLimited Warranty Limits And ExclusionsThis Limited Warranty ONLY COVERS failures due to defects in materials or workmanship, and DOES NOT COVER normal wear and tear or cosmetic damage. The Limited Warranty ALSO DOES NOT COVER damages which occurred in shipment, or failures which are caused by products not supplied by the warrantor, or failures which result from accidents, misuse, abuse, neglect, bug infestation, mishandling, misapplication, alteration, faulty installation, set-up adjustments, misadjustment of consumer controls, improper maintenance, power line surge, lightning damage, modification, introduction of sand, humidity or liquids, commercial use such as hotel, office, restaurant, or other business or rental use of the product, or service by anyone other than a Factory Servicenter or other Authorized Servicer, or damage that is attributable to acts of God.THERE ARE NO EXPRESS WARRANTIES EXCEPT AS LISTED UNDER “LIMITED WARRANTY COVERAGE”. THE WARRANTOR IS NOT LIABLE FOR INCIDENTAL OR CONSEQUENTIAL DAMAGES RESULTING FROM THE USE OF THIS PRODUCT, OR ARISING OUT OF ANY BREACH OF THIS LIMITED WARRANTY. (As examples, this excludes damages for lost time, lost calls or messages, cost of having someone remove or re-install an installed unit if applicable, travel to and from the servicer. The items listed are not exclusive, but are for illustration only.) ALL EXPRESS AND IMPLIED WARRANTIES, INCLUDING THE WARRANTY OF MERCHANTABILITY, ARE LIMITED TO THE PERIOD OF THE LIMITED WARRANTY.Some states do not allow the exclusion or limitation of incidental or consequential damages, or limitations on how long an implied warranty lasts, so the exclusions may not apply to you.This Limited Warranty gives you specific legal rights and you may also have other rights which vary from state to state. If a problem with this product develops during or after the Limited Warranty period, you may contact your dealer or Servicenter. If the problem is not handled to your satisfaction, then write to the warrantor’s Consumer Affairs Department at the addresses listed for the warrantor.PARTS AND SERVICE, WHICH ARE NOT COVERED BY THIS LIMITED WARRANTY, ARE YOUR RESPONSIBILITY.TH112(e).book  Page 86  Friday, February 10, 2006  3:57 PM
Temporary ConfidentialUseful InformationFor assistance, please visit http://www.panasonic.com/phonehelp               87Direct command chart/programming indexImportant:LYou can program each feature directly by using feature codes.Press {MENU},{#}, then press the desired feature code.Note:LWhen you find “*1” and “*2” in the following table, refer to the corresponding note below. *1 If you program the following features using one of the units, you do not need to program the same item using another unit.*2 If you reset the base unit (page 48), the marked features are reset to their default settings.TelephoneFeature Feature codeOperating unitDefault setting Base reset*2PageAuto edit(Caller ID number auto edit){2}{1}{4}Y^On r46Auto talk {2}{0}{0}YOff –46Caller list {2}{1}{3}Y^––33Customer support{6}{8}{0}Y^––49Customize ring {1}{6}{6}Y––43Date and time*1 {1}{0}{1}Y^12.31.2006 –21Deregistration(Deregistering a handset){1}{3}{1}Y––50Deregistration(Deregistering another device){1}{3}{4}^––50Display(Display language){1}{1}{0}Y^English r20Registration(Handset registration){1}{3}{0}Y––50Interrupt tone {2}{0}{1}Y^2r44Key tone {1}{6}{5}YOn –46LCD contrast(Display contrast){1}{4}{5}Y^Level 3 r46Line select {2}{5}{0}Y^Auto r47TH112(e).book  Page 87  Friday, February 10, 2006  3:57 PM
Temporary ConfidentialUseful Information88 For assistance, please visit http://www.panasonic.com/phonehelpIntercom and monitor featuresMessage alert {3}{4}{0}YOff –59Phonebook {2}{8}{0}Y^– – 27, 30Ring color {2}{3}{5}YColor 1 –44Ringer tone {1}{6}{1}Y^Line 1: Tone 1Line 2: Tone 2r42Ringer volume {1}{6}{0}Y^High r42Set dial mode*1 {1}{2}{0}Y^Tone r20Set flash time*1 {1}{2}{1}Y^700ms r47Set line mode*1 {1}{2}{2}Y^Br48Set PIN {1}{3}{2}^7262 r48TalkingCallerID{1}{6}{2}YOn –46Timeadjustment*1{2}{2}{6}Y^Caller ID[auto]r45Voice enhancer {2}{7}{0}YOff –45Feature Feature codeOperating unitDefault setting Base reset*2PageAudio monitor {7}{2}{2}Y^––41Device name(Changing the handset/base unit name){1}{0}{4}Y^Handset:HandsetBase unit:Base TH112–45Monitor access {2}{0}{2}Y^Deny r41Feature Feature codeOperating unitDefault setting Base reset*2PageTH112(e).book  Page 88  Friday, February 10, 2006  3:57 PM
Temporary ConfidentialUseful InformationFor assistance, please visit http://www.panasonic.com/phonehelp               89Answering system featuresCellular connectionBluetooth compatible headsetFeature Feature codeOperating unitDefault setting Base reset*2PageCall screening {3}{1}{0}^On r58Greeting check {3}{0}{3}^––52Greeting record {3}{0}{2}^––51Messageplayback{3}{0}{0}Y––53Recording mode {3}{0}{9}^Standard recording 60minr58Recording time {3}{0}{5}^3min r58Remote code {3}{0}{6}^11 r57Ring count {2}{1}{1}^4 rings r57Feature Feature codeOperating unitDefault setting Base reset*2PageDiscoverable(Turning on the discoverable mode){6}{2}{0}^On r60Ringer tone(For cellular phones){6}{2}{9}Y^Tone 3 r65Ringer volume(For cellular phones){6}{2}{8}Y^High r65Feature Feature codeOperating unitDefault setting Base reset*2PageHeadset list(Selecting a headset){6}{2}{2}^––70Registration(Registering a headset){6}{2}{1}^––70TH112(e).book  Page 89  Friday, February 10, 2006  3:57 PM
Temporary ConfidentialIndex90 For assistance, please visit http://www.panasonic.com/phonehelpIndexAAnswering calls: 24Answering systemErasing messages: 53,54,56Listening to messages: 52,53,55Turning on/off: 51,54,56Audio cable: 43Auto talk: 24,46BBase unitMonitor: 41Ringer tone: 42Ringer volume: 42BatteryCharge: 12Installation: 12Level: 13Performance: 13Replacement: 12Belt clip: 4,71Bluetooth wireless technology: 60,70Booster (clarity booster): 25CCall reservation: 49Call share: 40Call Waiting: 25Call Waiting Caller ID: 32Caller ID number auto edit: 34,46Caller ID service: 32Caller listCalling back: 33Editing: 34Erasing: 35Storing: 35Viewing: 33Cellular phoneConference: 68Connection: 61Discoverable: 60Making/answering calls: 61Registration: 60Ringer tone: 65Ringer volume: 65Transferring a call: 67Conference calls: 38ConnectionsAC adaptor: 9Noise filter: 11Telephone line cord: 9,10,11Customer support: 49Customize ring: 43DDate and time: 21Deregistration: 50Device name: 45Dialing mode: 20Direct commands: 87DisplayContrast: 46Language: 20EError messages: 72FFlash: 25Flash time: 47GGreeting message: 51HHandsetMonitor: 41Ringer tone: 42Ringer volume: 42Headset: 70Hold: 24IInstallationHandset: 12Intercom: 36Interrupt tone: 44KKey tone: 46LLight-up ID: 33Line mode: 48Line selection: 47MMaking calls: 22Memo (voice memo): 55Memory capacity (message recording): 51Message alert: 59Microphone: 23,55Missed calls: 33MonitorAudio monitor: 41Monitor access: 41Mute: 24PPause: 22,23PhonebookBase unit: 30Handset: 27TH112(e).book  Page 90  Friday, February 10, 2006  3:57 PM
Temporary ConfidentialIndexFor assistance, please visit http://www.panasonic.com/phonehelp 91PIN: 48Privacy feature: 40Pulse service: 25RRecording mode: 58Recording time: 58Redial list: 22,23RegistrationCellular phone: 60Handset: 50Headset: 70Remote code: 57Remote operation: 55Ring color: 44Ring count: 57Ringer ID: 33Ringer off: 24,42Ringer tone: 42Ringer volume: 42Rotary service: 25SSoft keys: 18Specifications: 83SP-phone: 22TTAD: 66Talking Caller ID: 32,46Time adjustment: 45Toll saver: 57Tone: 25Trademarks: 83Transferring a call: 37Troubleshooting: 74TTY: 4,71,84VVE (voice enhancer): 25,45Voice guidance: 53,55Voice Mail service: 58VolumeReceiver: 22Ringer: 42Speaker: 22,23WWall-mounting: 4,71Warranty: 85TH112(e).book  Page 91  Friday, February 10, 2006  3:57 PM
Temporary ConfidentialIf you need assistance with setup or operation1Visit our website: http://www.panasonic.com/phonehelp2Contact us via the web at: http://www.panasonic.com/contactinfo3Call us at: 1-800-211-PANA (1-800-211-7262)TTY users (hearing or speech impaired users) can call 1-877-833-8855.When you ship the productLCarefully pack your unit, preferably in the original carton.LAttach a letter, detailing the symptom, to the outside of the carton.LSend the unit to Panasonic Services Company Customer Servicenter, prepaid and adequately insured.LDo not send your unit to Panasonic Consumer Electronics Company listed below or to executive or regional sales offices. These locations do not repair consumer products.We recommend keeping a record of the following information for future reference.Attach your purchase receipt here.Panasonic Consumer Electronics Company,Division of Panasonic Corporation of North AmericaOne Panasonic Way, Secaucus, New Jersey 07094Panasonic Puerto Rico, Inc.San Gabriel Industrial Park, Ave. 65 de Infantería, Km. 9.5,Carolina, Puerto Rico 00985Copyright:This material is copyrighted by Panasonic Communications Co., Ltd., and may be reproduced for internal use only. All other reproduction, in whole or in part, is prohibited without the written consent of Panasonic Communications Co., Ltd.© 2006 Panasonic Communications Co., Ltd. All Rights Reserved.Serial No. Date of purchase(found on the bottom of the base unit)Name and address of dealerPQQX15313ZA  DM0506MK0TH112(e).book  Page 92  Friday, February 10, 2006  3:57 PM

Navigation menu