Panasonic of North America 96NKX-UT248 SIP Phone User Manual
Panasonic Corporation of North America SIP Phone Users Manual
UserManual.wiki
>
Panasonic of North America
>
96NKX UT248 User Manual
Users Manual
Navigation menu
Upload a User Manual
Namespaces
Wiki Guide
HTML
PDF
Info
Views
User Manual
Discussion / Help
Navigation

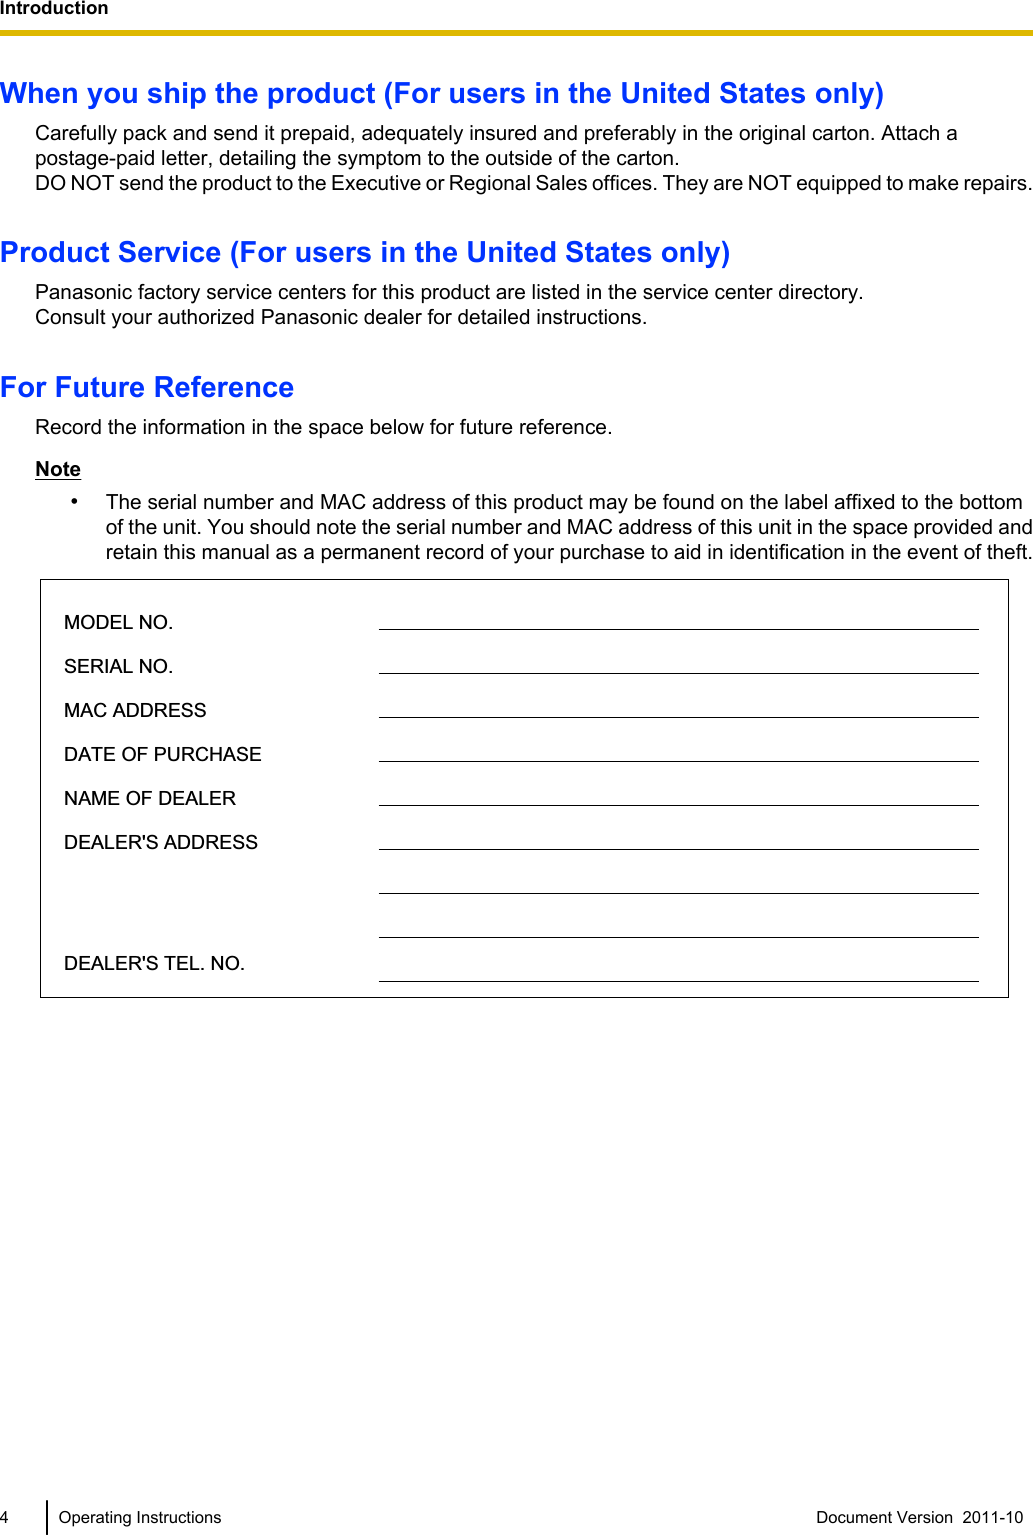
![For Your SafetyTo reduce the risk of injury, loss of life, electric shock,fire, malfunction, and damage to equipment or property,always observe the following safety precautions.Explanation of symbolsThe following symbols are used to classify and describethe level of hazard and injury caused when thedenotation is disregarded and improper use isperformed.WARNINGDenotes a potential hazard that could result inserious injury or death.CAUTIONDenotes a hazard that could result in minor injury ordamage to the unit or other equipment.The following symbols are used to classify and describethe type of instructions to be observed.This symbol is used to alert users to a specificoperating procedure that must not beperformed.This symbol is used to alert users to a specificoperating procedure that must be followed inorder to operate the unit safely.WARNINGGeneral SafetyDo not disassemble this unit. Dangerouselectrical shock could result. The unit mustonly be disassembled and repaired byqualified service technicians.Never attempt to insert wires, pins, etc. intothe vents or other holes of this unit.To prevent possible fire or electric shock, donot expose this unit to rain or moisture.Do not splash water on the AC adaptor or thepower cord, nor get them wet.Doing so can result in fire, electric shock, orinjury. If they do get wet, immediatelydisconnect the AC adaptor and power cord,and contact an authorized service center.Do not touch the AC adaptor for extendedperiods of time. Doing so can lead tolow-degree burns.Unplug this unit from the AC outlet and havethe unit serviced by qualified servicepersonnel in the following cases:A. When the power supply cord or plug isdamaged or frayed.B. If liquid has been spilled on the unit.C. If the unit has been exposed to rain orwater.D. If the unit does not work normally byfollowing the manual. Adjust only controlscovered by the manual. Improperadjustment may require repair by anauthorized service center.E. If the unit has been dropped, or damaged.F. If the unit’s performance deteriorates.If damage to the unit exposes any internalparts, immediately disconnect the cable orcord. If the power is supplied from the networkto the SIP Phone [Power-over-Ethernet],disconnect the Ethernet cables. Otherwise,disconnect the AC adaptor cord. Then returnthis unit to a service center.This handset earpiece is magnetized and mayretain small ferrous objects.The use of excessive sound volume throughearphones, headphones, or headsets maycause hearing loss.Document Version 2011-10 Operating Instructions 5For Your Safety](https://usermanual.wiki/Panasonic-of-North-America/96NKX-UT248/User-Guide-1590705-Page-5.png)

![external device, ensure that data cannot beretrieved from it by formatting the hard disk and/orrendering it physically unusable.Preventing Data Disclosure Over theNetwork•To ensure the security of private conversations,only connect the unit to a secure network.•To prevent unauthorized access, only connect theunit to a network that is properly managed.•Make sure all personal computers that areconnected to the unit employ up-to-date securitymeasures.Security Information•Security settings, such as passwords, cannot beundone at Panasonic service centers. Takemeasures to prevent passwords from being lost orforgotten.•If a password is forgotten, initialize the unit andconfigure the settings again (Page 71).•For best security, set passwords that cannot beguessed easily, and change passwordsperiodically.•If using SSL authentication, an NTP server mustalso be specified. Furthermore, if SSLauthentication is performed without specifying anNTP server, authentication will be unconditionallyvalidated without confirming the validity of the SSLcertificate.For Bluetooth HeadsetUsers (KX-UT248 only)Medical:Consult the manufacturer of any personal medicaldevices, such as pacemakers or hearing aids, todetermine if they are adequately shielded from externalRF (radio frequency) energy (the product operates inthe frequency range of 2.402 GHz to 2.480 GHz and thepower output is 2.5 mW [max.]). Do not use the productin health care facilities if any regulations posted in thearea instruct you not to do so. Hospitals or health carefacilities may be using equipment that could besensitive to external RF energy.8 Operating Instructions Document Version 2011-10 For Your Safety](https://usermanual.wiki/Panasonic-of-North-America/96NKX-UT248/User-Guide-1590705-Page-8.png)
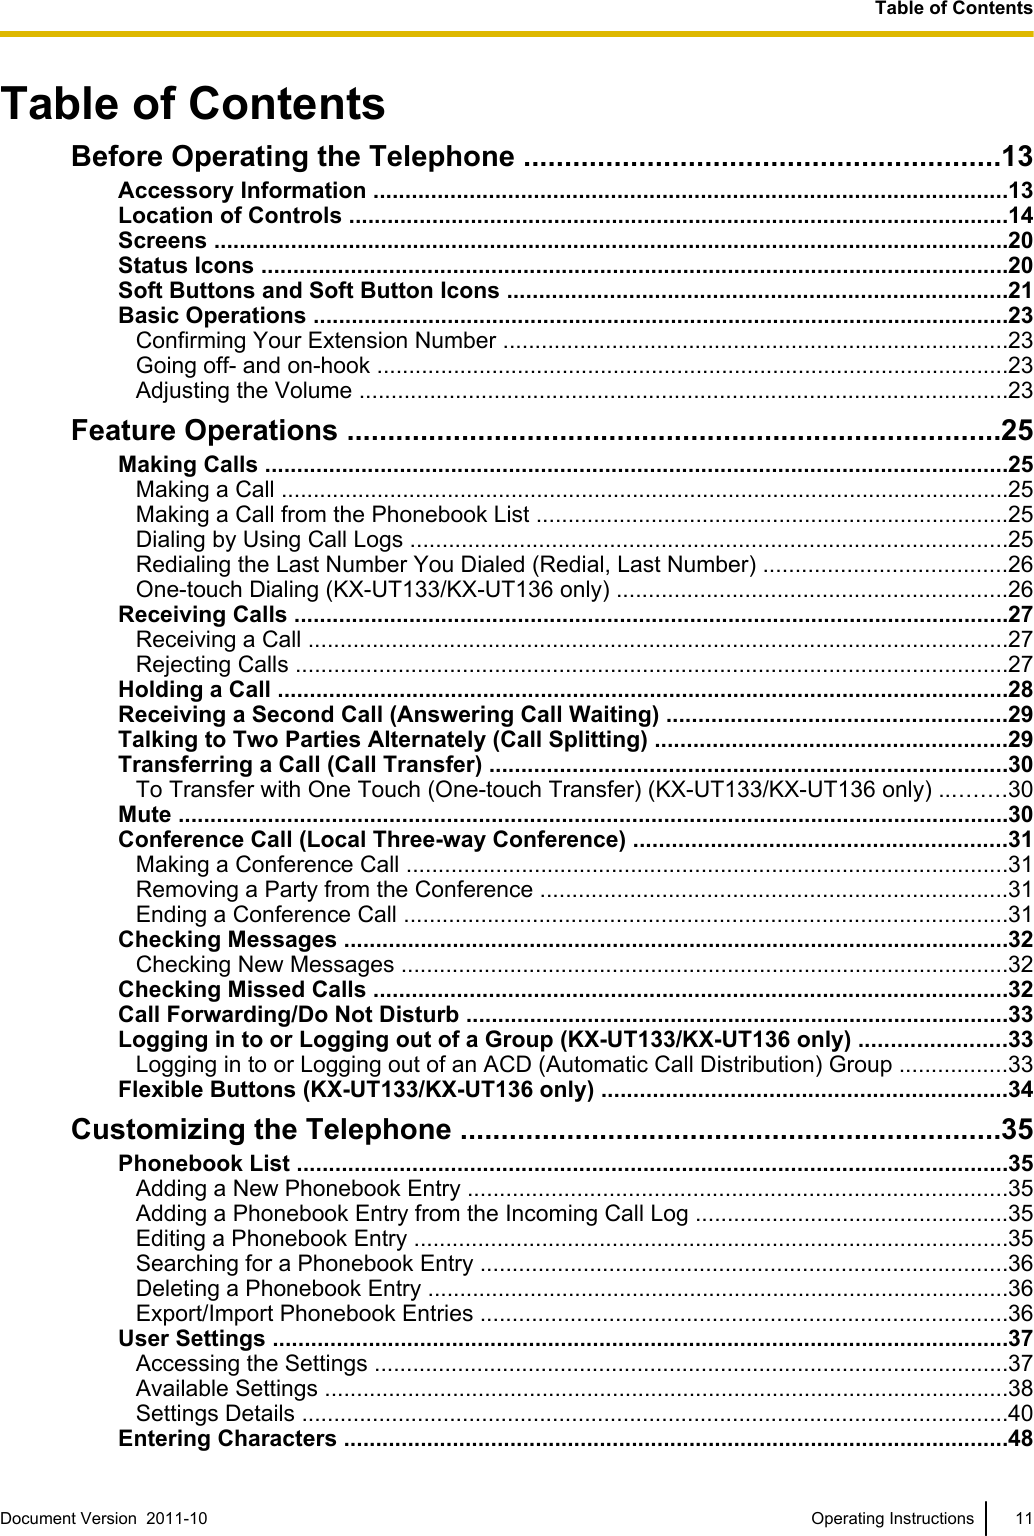
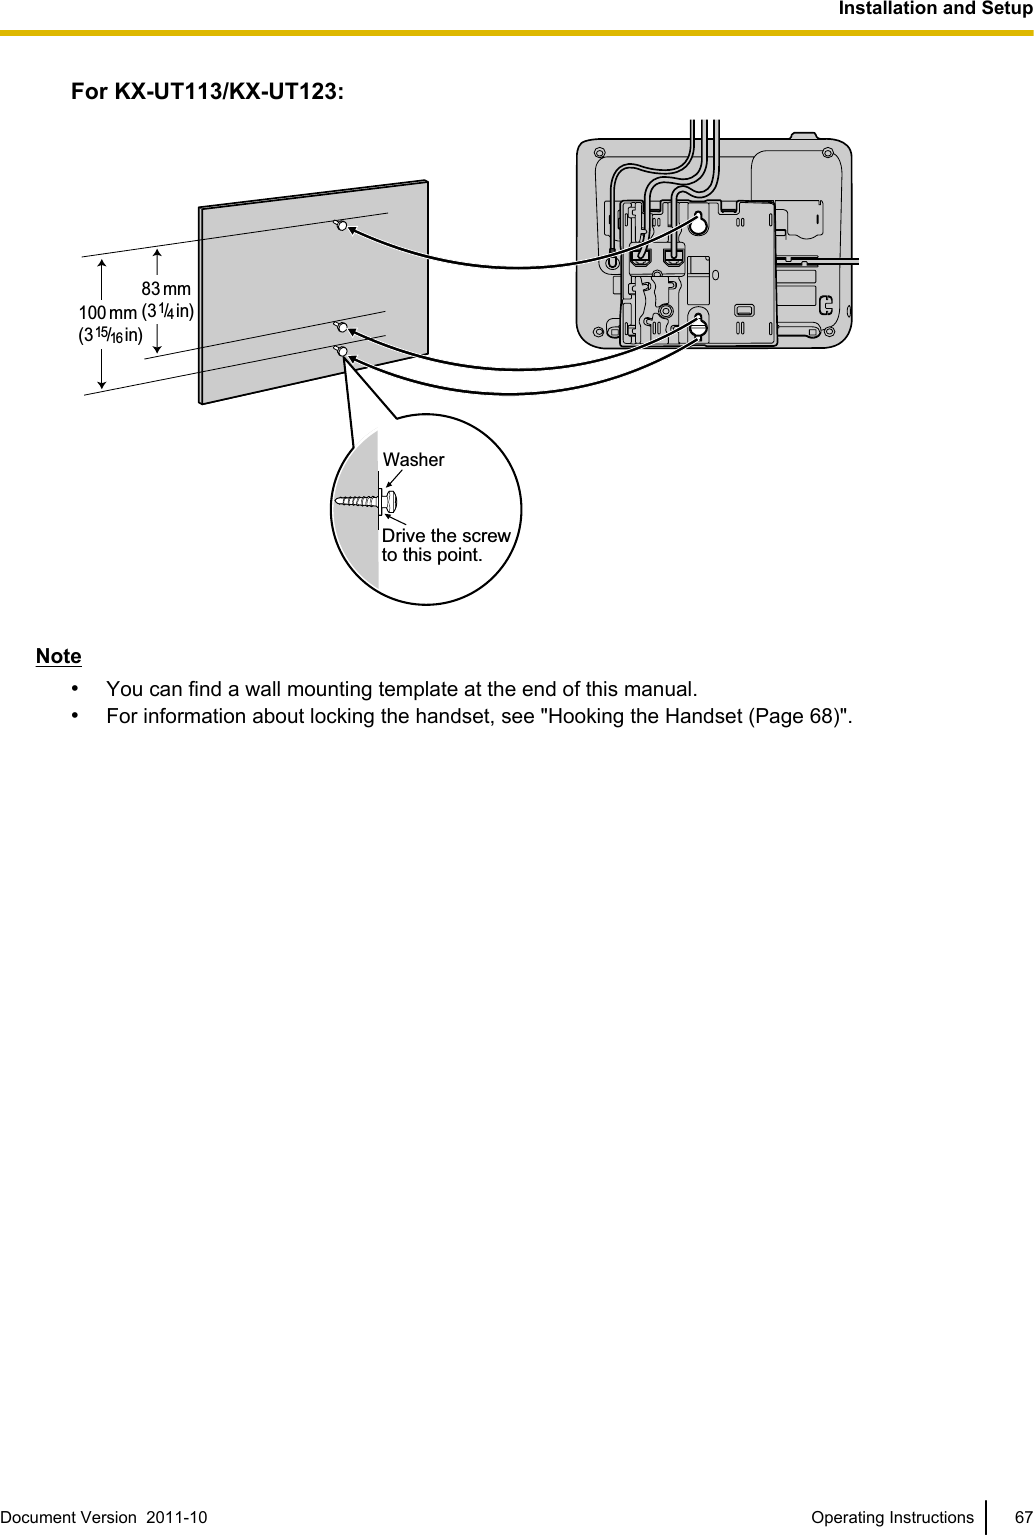
![Before Operating the TelephoneAccessory InformationIncluded Accessories*1Handset (1) Handset Cord (1)[Part No.]Black model: PNLXQ1001ZWhite model: PNLXQ1002Z[Part No.]Black model: PNJA1066ZWhite model: PNJA1067ZStand (1)For KX-UT113/KX-UT123:[Part No.]Black model: PNYLUT113BMWhite model: PNYLUT113MFor KX-UT133/KX-UT136/KX-UT248:[Part No.]Black model: PNYLUT133BMWhite model: PNYLUT133M*1 For extra orders for the accessories, call toll-free: 1-800-332-5368. (For users in the United States only)Note•The illustrations may differ from the appearance of the actual product.Optional AccessoriesOptional AC Adaptor*1 •For users in the United States: KX-A239 (PQLV206)•For users in Canada: KX-A239X (PQLV206)Wall Mount Kit •For KX-UT113/KX-UT123: KX-A432•For KX-UT133/KX-UT136/KX-UT248: KX-A433*1 To order an optional AC adaptor, please order using the "KX-A239" model number.Document Version 2011-10 Operating Instructions 13Before Operating the Telephone](https://usermanual.wiki/Panasonic-of-North-America/96NKX-UT248/User-Guide-1590705-Page-13.png)
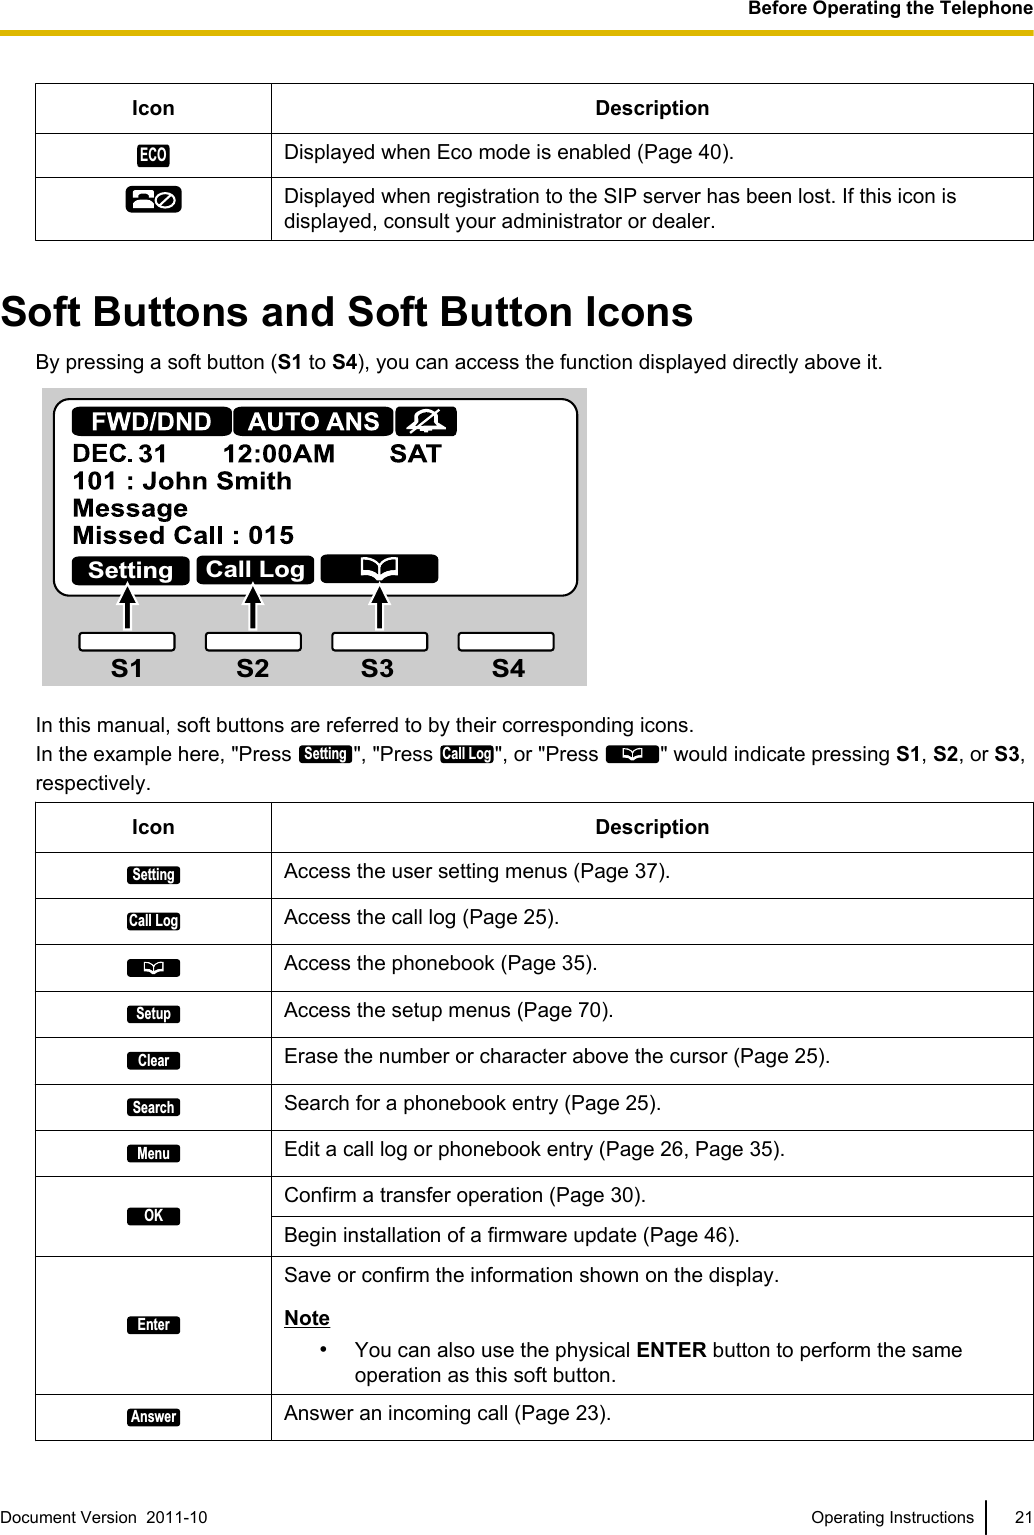
![ScreensThis section explains the buttons and icons that appear on the display.For KX-UT136:Setting Call LogFor KX-UT113/KX-UT123/KX-UT133:Setting Call LogStatus IconsIndicates the status of various features (Page 20).Soft Button IconsIndicate the functions that will be accessed when the corresponding buttons are pressed. The iconsdisplayed vary according to the state of the unit. (For example, the icons displayed while on a call aredifferent from the icons displayed while storing an entry in the phonebook).Scroll IndicatorIndicates that [], [ ], [ ], or [ ] can be pressed to display the previous or next item.Note•Although the scroll indicator is not shown in the screen sample of the KX-UT136 above, it doesappear on some screens.Status IconsIcon DescriptionFWD/DNDDisplayed when Call Forwarding or Do Not Disturb is enabled (Page 33).AUTO ANSDisplayed when Auto Answer is enabled (Page 27).Displayed when the ringer is turned off (Page 23).20 Operating Instructions Document Version 2011-10 Before Operating the Telephone](https://usermanual.wiki/Panasonic-of-North-America/96NKX-UT248/User-Guide-1590705-Page-20.png)
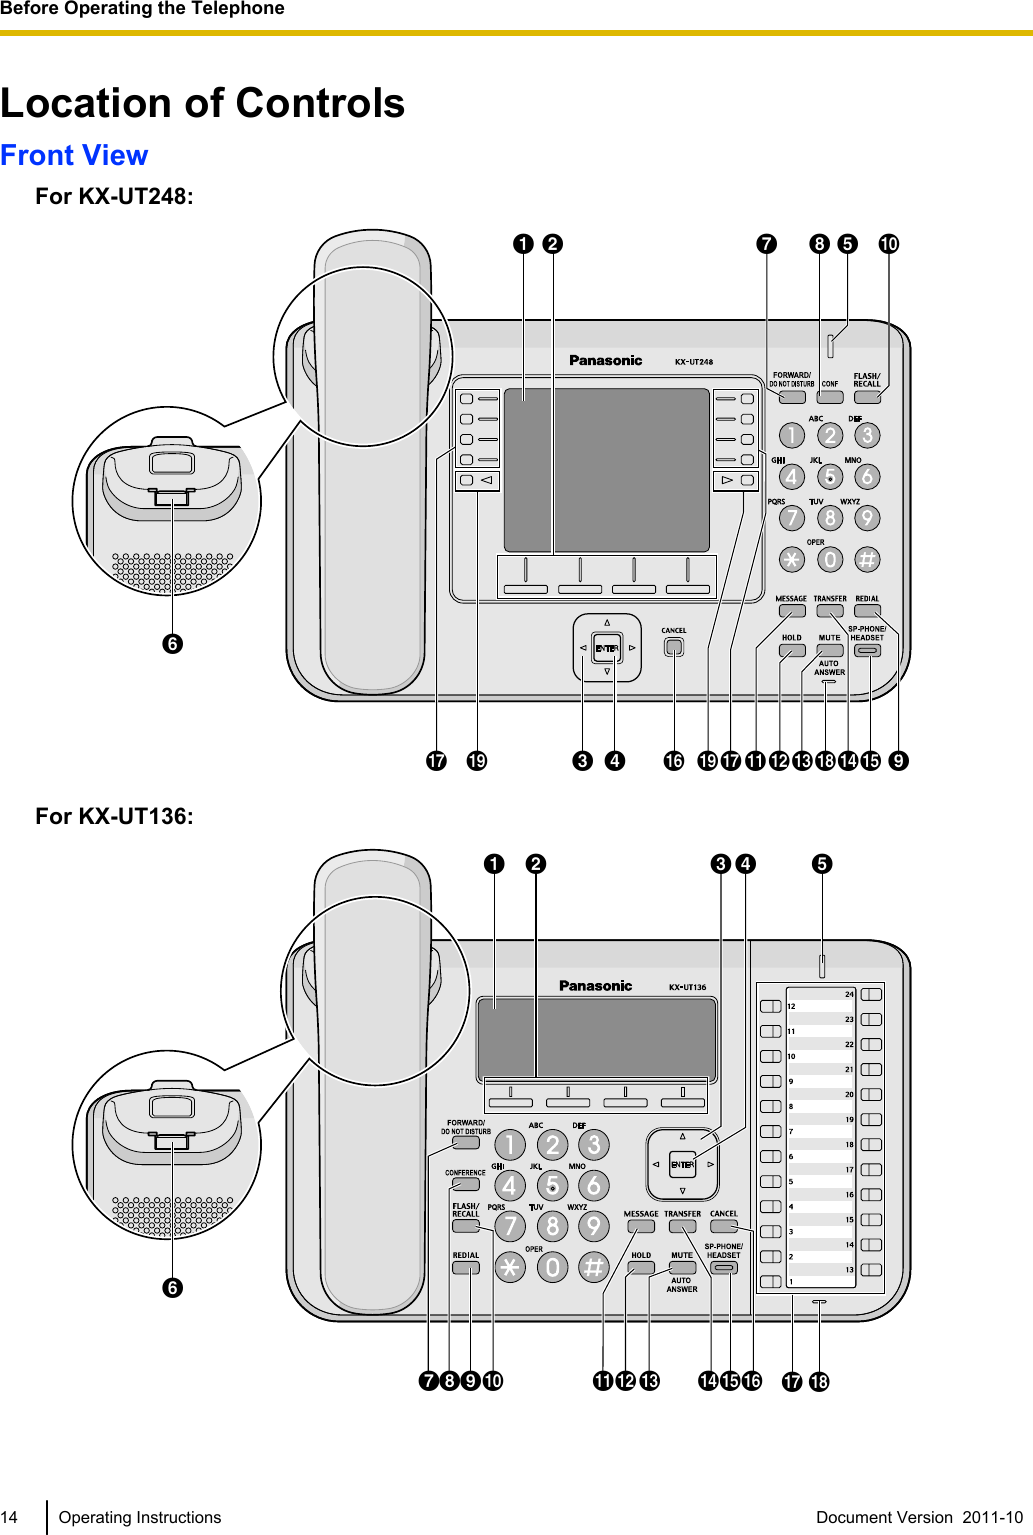
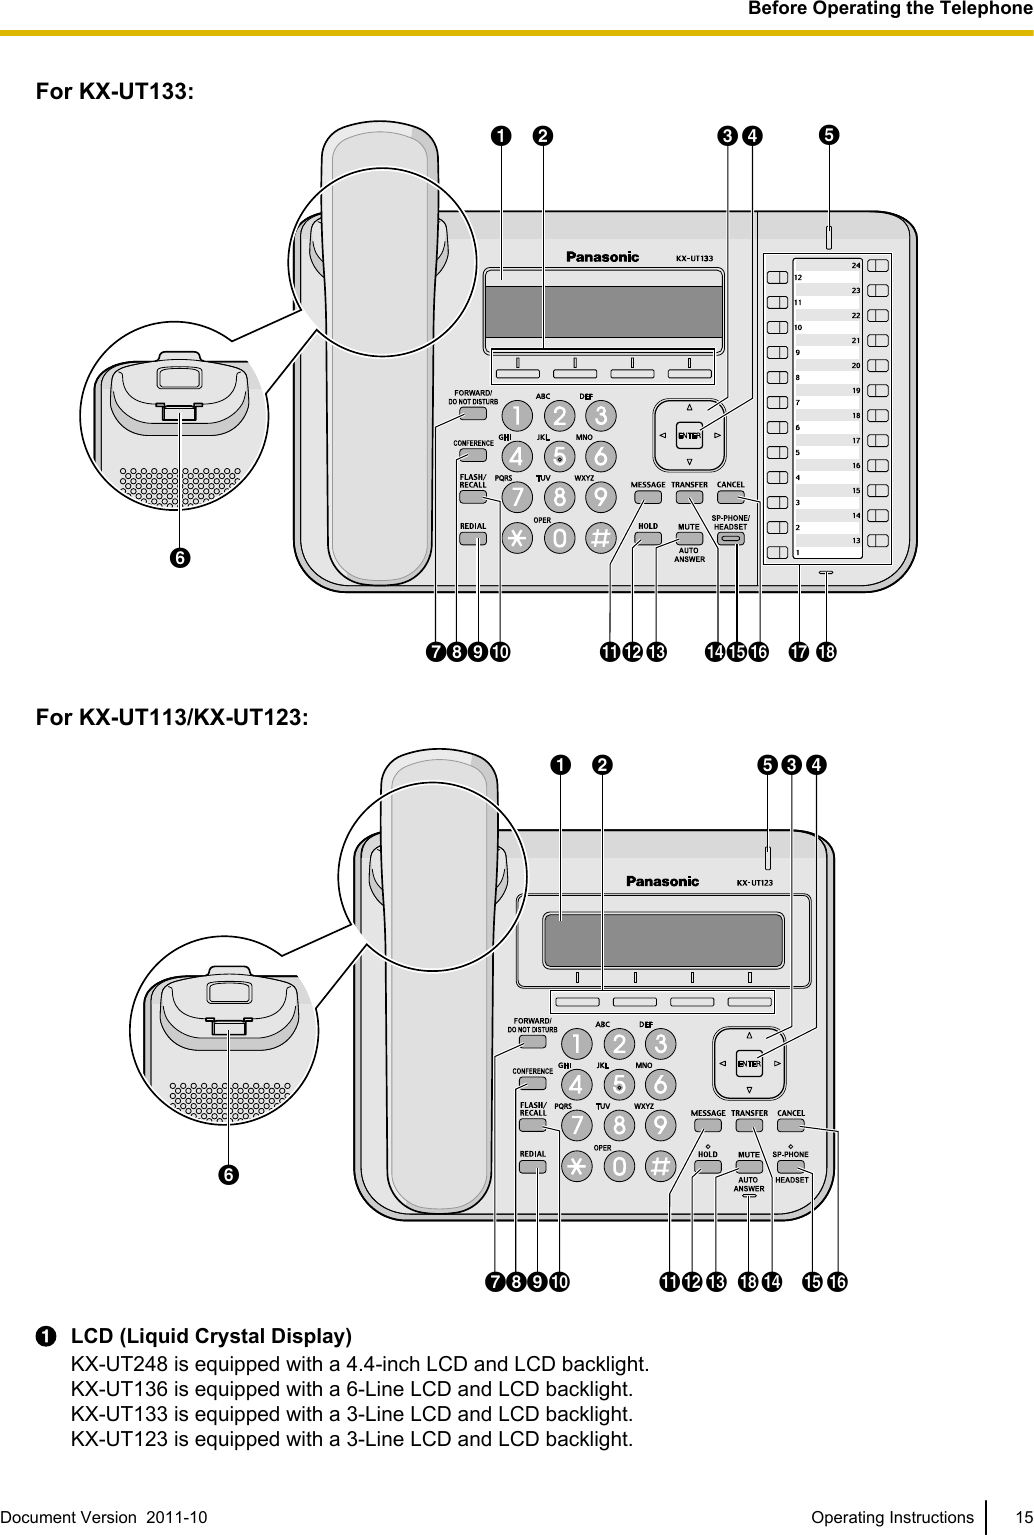
![Basic OperationsThis section explains the basics of using the unit.Confirming Your ExtensionNumberIn stand-by mode (i.e., when you do not have any activecalls), you can view the extension number and nameregistered to the unit.Going off- and on-hookThere are several ways to go off-hook and on-hook:•Using the handset•Using the [SP-PHONE] button•Using the soft buttons•For KX-UT133/KX-UT136, using a DN button(flexible button)Going off-hookIn this manual, when you see the phrase "go off-hook",you can do any of the following:•Lift the handset off of its cradle.•Press [SP-PHONE] while the handset is on itscradle. This enables hands-free mode.•For KX-UT133/KX-UT136, press a DN button(flexible button).Note•Certain soft buttons, such as Answer, functionlike the [SP-PHONE] button.•For details about DN buttons, see "FlexibleButtons (KX-UT133/KX-UT136 only)(Page 34)".Going on-hookIn this manual, when you see the phrase "go on-hook",you can do any of the following:•Replace the handset on its cradle.•Press [SP-PHONE], if you are in hands-free mode.Hands-free ModeIn hands-free mode, you can talk and hear the otherparty in a conversation without using the handset. Thismode is useful for performing other tasks during aconversation, such as writing.Enabling hands-free modeYou can enable hands-free mode in one of the followingways:•In stand-by mode, press [SP-PHONE].•During a conversation while using the handset,press [SP-PHONE]. You can then return thehandset to its cradle.•When receiving an incoming call, press Answer.•For KX-UT133/KX-UT136, in stand-by mode, pressan idle DN button (flexible button).•For KX-UT133/KX-UT136, when receiving a call orwhen a call is on hold, press the flashing green DNbutton (flexible button) that corresponds to the call.Canceling hands-free modeYou can cancel hands-free operation simply by liftingthe handset off its cradle.Note•For details about DN buttons, see "FlexibleButtons (KX-UT133/KX-UT136 only)(Page 34) ".Off-hook monitorDuring a two-party conversation with the cordedhandset, you can allow other people to listen to theconversation through the speaker while you continuethe conversation using the handset.•Press [SP-PHONE], but do not return the handsetto its cradle.•Press [SP-PHONE] again to cancel off-hookmonitor.Note•When off-hook monitor is active, replacing thehandset to its cradle enables hands-free mode.•During a conference call, pressing[SP-PHONE] simply enables hands-free mode.The handset will be disabled.Adjusting the VolumeYou can adjust the ringer, handset, headset, andspeaker volume using [] and [ ] on the Navigator key.Adjusting the ringer volumeWhen receiving a call, press [ ] or [ ].Document Version 2011-10 Operating Instructions 23Before Operating the Telephone](https://usermanual.wiki/Panasonic-of-North-America/96NKX-UT248/User-Guide-1590705-Page-23.png)
![You can also adjust the ringer volume in the settings.For details, see "Ringer (Page 40)".Note•When the ringer volume is turned all the waydown, "Off" is displayed. Also, isdisplayed when the unit is in stand-by mode.Adjusting the handset/headset/speaker volumePress [ ] or [ ] during a conversation when using thehandset, headset, or when you are in hands-free mode.24 Operating Instructions Document Version 2011-10 Before Operating the Telephone](https://usermanual.wiki/Panasonic-of-North-America/96NKX-UT248/User-Guide-1590705-Page-24.png)
![Feature OperationsMaking CallsThis section explains the basic methods for making acall.Making a Call1. In stand-by mode, go off-hook.2. Enter the number you want to call.3. Press [ENTER], or wait a few seconds for thenumber to be dialed.4. To end the call, go on-hook.Pre-dialingIn stand-by mode, you can start dialing (max. 32 digits)while still on-hook.•To delete a number you entered, press Clear.•To clear the entire number, press and hold Clear.•To connect the call, go off-hook or press [ENTER].Note•For KX-UT133/KX-UT136, you can also pressan idle DN button (flexible button) to connect thecall. For details about DN buttons, see "FlexibleButtons (KX-UT133/KX-UT136 only)(Page 34)".•For KX-UT113/KX-UT123, when pre-dialingyou can press Call instead of going off-hook.If more than one line is available at your unit,select the line to use, and then press [ENTER].•If you receive an incoming call duringpre-dialing, the display changes to the incomingcall screen. For KX-UT133/KX-UT136, you canclose the incoming call screen by pressingClose, and continue pre-dialing.Making a Call from thePhonebook ListScrolling through all entries1. Press .2. Press [ ] or [ ] to select an entry.3. Go off-hook.4. To end the call, go on-hook.Note•For KX-UT133/KX-UT136, you can also pressan idle DN button (flexible button) in step 3 toconnect the call. For details about DN buttons,see "Flexible Buttons (KX-UT133/KX-UT136only) (Page 34)".•For KX-UT113/KX-UT123, you can pressCall instead of going off-hook. If more thanone line is available at your unit, select the lineto use, and then press [ENTER].•In step 2, if multiple phone numbers are storedfor the entry, you can press Number and thenselect the phone number to call.Searching by name1. Press .2. Press Search.3. Enter the name (max. 12 characters) you want tosearch for.4. Press [ENTER].The entry that matches your search appears.5. Go off-hook.6. To end the call, go on-hook.Note•For KX-UT113/KX-UT123, you can pressCall instead of going off-hook. If more thanone line is available at your unit, select the lineto use, and then press [ENTER].•For details about entering characters, see"Entering Characters (Page 48)".•In step 4, if multiple phone numbers are storedfor the entry, you can press Number and thenselect the phone number to call.•If you do not press any buttons for 1 minute, theunit will return to stand-by mode.Dialing by Using Call LogsThe last 30 incoming calls and outgoing calls are storedin their respective logs, in order of newest to oldest call.You can make calls to the numbers listed in the call logs.1. Press Call Log.2. Press [ ] or [ ] to select the call log type, and thenpress [ENTER].3. Press [ ] or [ ] to select the desired entry.4. Go off-hook.5. To end the call, go on-hook.Document Version 2011-10 Operating Instructions 25Feature Operations](https://usermanual.wiki/Panasonic-of-North-America/96NKX-UT248/User-Guide-1590705-Page-25.png)
![Note•For KX-UT133/KX-UT136, you can also pressan idle DN button (flexible button) in step 4 toconnect the call. For details about flexiblebuttons, see "Flexible Buttons (KX-UT133/KX-UT136 only) (Page 34)".•For KX-UT113/KX-UT123, you can pressCall instead of going off-hook. If more thanone line is available at your unit, select the lineto use, and then press [ENTER].•You can add a call log entry to the phonebook.See "Adding a Phonebook Entry from theIncoming Call Log (Page 35)".Editing a phone number beforedialing from the incoming call logYou can edit a phone number in the incoming call logbefore using it to dial.1. Press Call Log.2. Press [ ] or [ ] to select "Incoming Call Log",and then press [ENTER].3. Press [ ] or [ ] to select the desired entry.4. Do one of the following, depending on your unit:For KX-UT113/KX-UT123 users•Press Menu, select "Edit", and then press[ENTER].For KX-UT133/KX-UT136 users•Press Edit.5. Edit the number, and then go off-hook or pressCall.6. To end the call, go on-hook.Redialing the Last Number YouDialed (Redial, Last Number)You can redial the last phone number that you dialed.1. Press [REDIAL].2. To end the call, go on-hook.Note•For KX-UT133/KX-UT136, to select a line to useto redial, press the appropriate DN button(flexible button) before you press [REDIAL].For details about DN buttons, see "FlexibleButtons (KX-UT133/KX-UT136 only)(Page 34)".•The unit may be configured to display theoutgoing call log instead of immediatelyredialing. You can select an entry from the calllog to make a call (Page 25). For details, consultyour administrator or dealer.One-touch Dialing (KX-UT133/KX-UT136 only)You can make a call with a One-touch operation if aOne-touch dialing button has been created for thedesired party. One-touch dialing buttons can also beconfigured to access features of your phone system, ifavailable.1. Go off-hook, and then press the One-touch dialingbutton (flexible button).2. To end the call, go on-hook.Note•A BLF (Busy Lamp Field) button (flexible button)can also be used to call an extension simply bypressing the button. For details, consult youradministrator or dealer.•For details about flexible buttons such asOne-touch dialing buttons and BLF buttons, see"Flexible Buttons (KX-UT133/KX-UT136 only)(Page 34)".26 Operating Instructions Document Version 2011-10 Feature Operations](https://usermanual.wiki/Panasonic-of-North-America/96NKX-UT248/User-Guide-1590705-Page-26.png)
![Receiving CallsThis section explains the basic methods for receiving acall.Receiving a Call1. Go off-hook.2. To end the call, go on-hook.Auto answerYou can have the unit automatically answer anincoming call. The call is connected after a programmednumber of rings.•To enable Auto Answer:In stand-by mode, press [AUTO ANSWER] until"Auto Answer On" appears.•To disable Auto Answer:In stand-by mode, press [AUTO ANSWER] until"Auto Answer Off" appears.Note•When Auto Answer is enabled, AUTO ANSappears on the display in stand-by mode.Rejecting CallsYou can reject an incoming call at your unit or set theunit to reject certain calls.Rejecting a call while receiving1. When receiving an incoming call, press Reject.Rejecting anonymous callsYou can set the unit to reject calls when the unitreceives a call without phone number.To reject anonymous calls, the Block Anonymous Callsetting must be enabled through Web user interfaceprogramming (Page 56). For details, consult youradministrator or dealer.Note•Rejected phone numbers will not be stored inthe incoming call log.•Depending on the line an incoming call isarriving on, the call may not be rejected.Rejecting specific callsYou can set the unit to reject specific phone numbers.Note•Rejected phone numbers will not be stored inthe incoming call log.Adding a phone numberYou can store a maximum of 30 phone numbers youwant to reject in the rejection list of the unit.1. In stand-by mode, press Setting.2. Press [] or [ ] to select "Call Block", and thenpress [ENTER].3. Press Add.4. Enter the telephone number (max. 32 digits), andthen press [ENTER].Note•To register additional telephone numbers,repeat the procedure from step 3.Adding a phone number from the incoming calllogYou can add a phone number by referring to theincoming call log.1. In stand-by mode, press Call Log.2. Press [] or [ ] to select "Incoming Call Log",and then press [ENTER].3. Press [] or [ ] to select the entry with the phonenumber you want to reject.4. Press Save.5. Press [ ] or [ ] to select "Call Block", and thenpress [ENTER].6. Press [ ] or [ ] to select "Yes", and then press[ENTER].Note•If you do not press any buttons for 1 minute, theunit will return to stand-by mode.Editing a stored phone number1. In stand-by mode, press Setting.2. Press [ ] or [ ] to select "Call Block", and thenpress [ENTER].3. Press [ ] or [ ] to select the phone number youwant to edit, and then press Edit.4. Edit the phone number as necessary, and thenpress [ENTER].Document Version 2011-10 Operating Instructions 27Feature Operations](https://usermanual.wiki/Panasonic-of-North-America/96NKX-UT248/User-Guide-1590705-Page-27.png)
![Note•If you do not press any buttons for 1 minute, theunit will return to stand-by mode.Deleting a stored phone number1. In stand-by mode, press Setting.2. Press [ ] or [ ] to select "Call Block", and thenpress [ENTER].3. Press [] or [ ] to select the phone number youwant to delete, and then press Erase.4. Press [ ] or [ ] to select "Yes", and then press[ENTER].Note•If you do not press any buttons for 1 minute, theunit will return to stand-by mode.Holding a CallYou can put a call on hold by holding the call at yourextension.To hold the current call1. Press [HOLD], and then go on-hook.Note•For KX-UT133/KX-UT136, if Automatic CallHold is enabled on your unit, the call willalso be put on hold if you press a DN button(flexible button) other than the one for thecurrent call. For details, consult youradministrator or dealer.To retrieve a call on hold at your extension1. Go off-hook.2. Do one of the following, depending on your unit:For KX-UT113/KX-UT123 users•Press [HOLD].For KX-UT133/KX-UT136 users•Press the green flashing DN button (flexiblebutton).Note•If a call is not retrieved within a specified time,you will hear an alarm as a reminder (HoldRecall).•For details about DN buttons, see "FlexibleButtons (KX-UT133/KX-UT136 only)(Page 34)".28 Operating Instructions Document Version 2011-10 Feature Operations](https://usermanual.wiki/Panasonic-of-North-America/96NKX-UT248/User-Guide-1590705-Page-28.png)
![Receiving a Second Call(Answering Call Waiting)During a conversation, if a second call arrives, you willhear a call waiting tone.You can answer the second call by disconnecting orholding the current call.To disconnect the current call and then talk tothe new party1. Go on-hook while hearing the call waiting tone.2. Go off-hook.To hold the current call and then talk to the newpartyFor KX-UT113/KX-UT123 users1. Press [HOLD] while hearing the call waiting tone.For KX-UT133/KX-UT136 users1. Press [HOLD] while hearing the call waiting tone.2. Press the green flashing DN button (flexible button).Note•For KX-UT133/KX-UT136, if Automatic CallHold is enabled on your unit, you do not needto press [HOLD] in step 1. The call isautomatically put on hold when you press theDN button. For details, consult youradministrator or dealer.•For details about DN buttons, see "FlexibleButtons (KX-UT133/KX-UT136 only)(Page 34)".Talking to Two PartiesAlternately (Call Splitting)When you are talking to one party and have anotherparty on hold, you can switch the call on hold and thecurrent call.1. Press [HOLD] during a conversation.2. Call the second party.3. Do one of the following, depending on your unit:For KX-UT113/KX-UT123 users•Press [HOLD].For KX-UT133/KX-UT136 users•Press [HOLD], and then press the greenflashing DN button (flexible button) thatcorresponds to the other party on hold.Note•For KX-UT133/KX-UT136, if Automatic CallHold is enabled on your unit, you do not needto press [HOLD] in step 3. The call isautomatically put on hold when you press theDN button. For details, consult youradministrator or dealer.•For details about DN buttons, see "FlexibleButtons (KX-UT133/KX-UT136 only)(Page 34)".Document Version 2011-10 Operating Instructions 29Feature Operations](https://usermanual.wiki/Panasonic-of-North-America/96NKX-UT248/User-Guide-1590705-Page-29.png)
![Transferring a Call (CallTransfer)You can transfer a call to another destination (extensionor outside party).To transfer1. Press [TRANSFER] during a conversation.2. Call the party you want to transfer the call to.3. Wait until the other party answers to announce thetransfer. (This step can be omitted.)4. Press OK.Note•If On-hook Transfer is enabled on your unit, youcan simply go on-hook in step 4 instead ofpressing OK. For details, consult youradministrator or dealer.To do a blind transfer1. Press Blind during a conversation.2. Call the party you want to transfer the call to.3. Go on-hook.To Transfer with One Touch(One-touch Transfer)(KX-UT133/KX-UT136 only)1. Press the BLF button (flexible button) during aconversation.2. Wait until the other party answers to announce thetransfer. (This step can be omitted.)3. Press OK.Note•If On-hook Transfer is enabled on your unit, youcan simply go on-hook in step 3 instead ofpressing OK. For details, consult youradministrator or dealer.•For details about flexible buttons, see "FlexibleButtons (KX-UT133/KX-UT136 only)(Page 34)".MuteYou can mute your voice during a conversation. Whilethe mute feature is turned on, you will be able to hearthe other party, but the other party will not be able tohear you.The built-in microphone, handset, and headset are allmuted when the mute feature is turned on.To mute/unmute1. Press [MUTE].30 Operating Instructions Document Version 2011-10 Feature Operations](https://usermanual.wiki/Panasonic-of-North-America/96NKX-UT248/User-Guide-1590705-Page-30.png)
![Conference Call (LocalThree-way Conference)During a conversation, you can add an additional partyto your call and establish a conference call.Notice•Your phone system may support advancedconference features, such as conference callswith four or more parties. In this case, theprocedures for handling a conference call maybe different from those explained in this section.For details about your phone system, consultyour administrator or dealer.Making a Conference Call1. Press [CONFERENCE] to put the current call onhold.2. Call the party you want to add to the conversation.3. After the called party answers, press[CONFERENCE] to begin the conference call.Removing a Party from theConferenceDuring a conference, you can remove other parties fromthe conference. However, this operation is availableonly during conference calls you initiate.For KX-UT113/KX-UT123 users1. During a conference call, press [HOLD].•The second party is put on hold, but you cancontinue talking to the first party.2. Go on-hook.•The first party is disconnected.3. Press [HOLD].•You can continue the conversation with thesecond party.Note•To disconnect the second party instead of thefirst party, press [HOLD] 2 times in step 1.•Once you have pressed [HOLD], theconference cannot be reestablished.For KX-UT133/KX-UT136 users1. During a conference call, press [HOLD].•The other parties are put on hold.2. Press the DN button (flexible button) thatcorresponds to the party you want to disconnect.•A conversation is established with the party youwant to disconnect.3. Go on-hook.•The party is disconnected.4. Press the DN button (flexible button) thatcorresponds to the remaining party.•You can continue the conversation with theremaining party.Note•Once you have pressed [HOLD], theconference cannot be reestablished.•For details about DN buttons, see "FlexibleButtons (KX-UT133/KX-UT136 only)(Page 34)".Ending a Conference Call1. Go on-hook during a conference.Document Version 2011-10 Operating Instructions 31Feature Operations](https://usermanual.wiki/Panasonic-of-North-America/96NKX-UT248/User-Guide-1590705-Page-31.png)
![Checking MessagesChecking New MessagesWhen you receive a voice message, "Message"appears on the display, and the Message/Ringer lampturns red.You can check your new messages by accessing yourmailbox.1. Press [MESSAGE].2. If the unit has multiple lines, press [] or [ ] to selectthe line on which is displayed, and then gooff-hook.Checking Missed CallsWhen there are new missed calls, "Missed Call:XXX" appears on the display. ("XXX" indicates thenumber of missed calls.)1. Press Call Log.2. Press [] or [ ] to select "Incoming Call Log",and then press [ENTER].3. Press [ ] or [ ] to select the missed call.Note•In the incoming call log, "Not Answered" isdisplayed on missed calls. For KX-UT113/KX-UT123/KX-UT133, you must press [ ] tosee this.•For details about making calls from the call log,see "Dialing by Using Call Logs (Page 25)".•A check mark is displayed next to answeredcalls and missed calls that you have alreadychecked.32 Operating Instructions Document Version 2011-10 Feature Operations](https://usermanual.wiki/Panasonic-of-North-America/96NKX-UT248/User-Guide-1590705-Page-32.png)
![Call Forwarding/Do NotDisturbYou can have incoming calls automatically forwardedto another destination. You can also have incomingcalls rejected (Do Not Disturb).Note•When Call Forwarding or Do Not Disturb isenabled, FWD/DND appears on the display instand-by mode.To access the FWD/DND settings1. In stand-by mode, press Setting or [FORWARD/DONOT DISTURB].•If you press [FORWARD/DO NOT DISTURB],continue to step 3.2. Press [ ] or [ ] to select "FWD/DND Setting", andthen press [ENTER].3. If line selection is available, press [] or [ ] to selectthe desired line, and then press [ENTER].4. Press [ ] or [ ] to select the type of FWD or DNDsetting to apply, and then press [ENTER].5. Configure the settings as necessary (Page 41).Logging in to or Loggingout of a Group(KX-UT133/KX-UT136only)Logging in to or Logging out ofan ACD (Automatic CallDistribution) GroupIf the SIP server supports ACD and you are assignedto an ACD group, you can log in to or log out of thegroup.1. In stand-by mode, press the flexible buttonassigned as the ACD Log-in/Log-out button.Note•The flexible button's light indicates the status asfollows:Off: logged in to the ACD groupRed On: logged out of the ACD groupDocument Version 2011-10 Operating Instructions 33Feature Operations](https://usermanual.wiki/Panasonic-of-North-America/96NKX-UT248/User-Guide-1590705-Page-33.png)
![Customizing the TelephonePhonebook ListAdding a New Phonebook EntryYou can add a maximum of 500 (for KX-UT123/KX-UT133/KX-UT136) or 100 (for KX-UT113)phonebook entries to the unit.To make a call from the phonebook, see "Making a Callfrom the Phonebook List (Page 25)".1. Press .2. Press Add.3. Enter a name (max. 24 characters), and then press[ENTER].4. Press [ ] or [ ] to select the phone number type(A to E) or "Ringtone X", and then press[ENTER].5. Do one of the following, depending on yourselection in the previous step:If you selected a phone number type•Enter the phone number (max. 32 digits), andthen press [ENTER].If you selected "Ringtone X"•Select a ringtone to play when you receive a callfrom this party, and then press [ENTER].6. To add another phone number to the entry, repeatthe procedure from step 4.7. Press Save.Note•If you store multiple phone numbers in the entry,you can assign the preferred number to usewhen you call this party. In step 4, select thedesired number, and then press Prefer.•If you do not press any buttons for 1 minute, theunit will return to stand-by mode.Adding a Phonebook Entry fromthe Incoming Call LogYou can add new phonebook entries from the incomingcall log.1. Press Call Log.2. Press [] or [ ] to select "Incoming Call Log",and then press [ENTER].3. Press [ ] or [ ] to select the desired call log entry,and then press Save.4. Select "Phonebook", and then press [ENTER].5. Enter a name (max. 24 characters), and then press[ENTER].6. Press [ ] or [ ] to select the phone number type(A to E) or "Ringtone X", and then press[ENTER].7. Do one of the following, depending on yourselection in the previous step:If you selected a phone number type•Enter the phone number (max. 32 digits), andthen press [ENTER].If you selected "Ringtone X"•Select a ringtone to play when you receive a callfrom this party, and then press [ENTER].8. To add another phone number to the entry, repeatthe procedure from step 6.9. Press Save.Note•If a name is stored in the call log, it isautomatically entered in step 5.•If you store multiple phone numbers in the entry,you can assign the preferred number to usewhen you call this party. In step 6, select thedesired number, and then press Prefer.•If you do not press any buttons for 1 minute, theunit will return to stand-by mode.Editing a Phonebook EntryYou can edit the information stored in phonebookentries.1. Press .2. Press [ ] or [ ] to display the desired entry, or pressSearch and search for the desired entry (Page 36).3. Do one of the following, depending on your unit:For KX-UT113/KX-UT123 users•Press Menu, select "Edit", and then press[ENTER].For KX-UT133/KX-UT136 users•Press Edit.4. Press [] or [ ] to select the item you want to edit,and then press [ENTER].Document Version 2011-10 Operating Instructions 35Customizing the Telephone](https://usermanual.wiki/Panasonic-of-North-America/96NKX-UT248/User-Guide-1590705-Page-35.png)
![5. Edit the item as necessary, and then press[ENTER].6. Press Save.Note•If you store multiple phone numbers in the entry,you can assign the preferred number to usewhen you call this party. In step 4, select thedesired number, and then press Prefer.•If you do not press any buttons for 1 minute, theunit will return to stand-by mode.Searching for a PhonebookEntryYou can search the phonebook for the desired entry.1. Press .2. Press Search.3. Enter the name you want to search for, and thenpress [ENTER].Deleting a Phonebook EntryYou can delete phonebook entries.1. Press .2. Press [ ] or [ ] to display the desired entry, or pressSearch and search for the desired entry (Page 36).3. Do one of the following, depending on your unit:For KX-UT113/KX-UT123 users•Press Menu, select "Erase", and then press[ENTER].For KX-UT133/KX-UT136 users•Press Erase.4. Press [ ] or [ ] to select "Yes", and then press[ENTER].Export/Import PhonebookEntriesYou can export the phonebook entries through the Webuser interface to your computer as a tab separatedvalue file. This makes it possible to add and editphonebook entries using a spreadsheet application ortext editor on your computer. After editing, the fileshould be imported into the unit.Also, phonebook entries exported from one unit can beimported into another, which makes it easy to sharephonebook entries.To export/import entries, consult your administrator ordealer.Notice•Entries deleted on your computer are notdeleted from the unit’s phonebook whenimporting. Erase unnecessary entries with yourunit, not through the Web user interface.•Phone calls cannot be made or received whilephonebook entries are being imported orexported.36 Operating Instructions Document Version 2011-10 Customizing the Telephone](https://usermanual.wiki/Panasonic-of-North-America/96NKX-UT248/User-Guide-1590705-Page-36.png)
![User SettingsYou can configure various settings to customize the behavior of the unit.This section explains how to configure the settings using the unit.Accessing the Settings1. In stand-by mode, press Setting.2. Press [ ] or [ ] to select the desired setting category, and then press [ENTER].3. Configure the settings as necessary.Document Version 2011-10 Operating Instructions 37Customizing the Telephone](https://usermanual.wiki/Panasonic-of-North-America/96NKX-UT248/User-Guide-1590705-Page-37.png)
![Back Light (KX-UT123/KX-UT133/KX-UT136 only)Setting Description Value Range DefaultBack Light Change the settings for the backlight. Always OnAutomaticAlways OffAutomaticIf you select "Always On" or"Automatic", press [ ] or [ ] toadjust the brightness.Level 1 to 3 Level 3Note•When "Automatic" is selected, the backlight turns off when the phone returns to an idle state.Display LockSetting Description Value Range DefaultDisplay Lock Lock access to your call log andphonebook list by entering yourextension PIN (PersonalIdentification Number).On, Off OffNote•The extension PIN can be configured through Web user interface programming. For details, consultyour administrator or dealer.FWD/DND SettingIf multiple lines are available at your unit, press [] or [ ] to select the line to apply the settings to when youselect "FWD/DND Setting".Setting Description Value Range DefaultDo Not Disturb Enable DND (Do Not Disturb) toreject all incoming calls.On, Off OffFWD All Forward all incoming calls to aspecified destination.— —On/Off Enable or disable the "FWD All"setting.On, Off OffPhone Number Specify the number to forward callsto when "FWD All" is enabled.1–32 digits —FWD Busy Forward incoming calls to a specifieddestination when you are on a call.— —On/Off Enable or disable the "FWD Busy"setting.On, Off OffDocument Version 2011-10 Operating Instructions 41Customizing the Telephone](https://usermanual.wiki/Panasonic-of-North-America/96NKX-UT248/User-Guide-1590705-Page-41.png)
![Date and TimeSetting Description Value Range DefaultDate and Time Set the date and time. Date*1: dd/mm/yyyyor mm/dd/yyyyTime*2: 00:00–23:59or 12:00–11:59 AM/PM—*1 Pressing [#] switches the date format.*2 If the time format is not assigned in the configuration data, you can change the time format (12-hour or 24-hour) by pressing [*].If the time format is set to 12-hour time in the configuration data, you can change the AM/PM setting by pressing [*].Note•Daylight-saving time can be set through Web user interface programming. For details, consult youradministrator or dealer.Information DisplaySetting Description Value Range DefaultInformation Display View a variety of information aboutthe unit. Press [ ] and [ ] to displaythe various settings. The followingsettings can be viewed:•Registration status to the SIPserver•IP address•Subnet mask address•Default gateway address•IP address of the DNS server 1•IP address of the DNS server 2•ACS status•Display lock status•Firmware version•MAC address— —Network SettingsIMPORTANTWe recommend configuring these settings with your administrator or dealer. Network settings can also beconfigured through Web user interface programming (Page 56). Contact your administrator or dealer forfurther information.Document Version 2011-10 Operating Instructions 43Customizing the Telephone](https://usermanual.wiki/Panasonic-of-North-America/96NKX-UT248/User-Guide-1590705-Page-43.png)
![Setting Description Value Range DefaultVLAN ID Specify the VLAN ID. 1–4094 2Priority Specify the priority of packets sentfrom this unit.0–7 7PC (KX-UT123/KX-UT133/KX-UT136only)Specify the necessary settings forusing a PC over a VLAN.— —VLAN ID Specify the VLAN ID. 1–4094 1Priority Specify the priority of packets sentfrom this unit.0–7 0Speed/Duplex Select the connection mode(combination of link speed andduplex mode) of the LAN port and PCport.— —LAN port Select the connection mode of theLAN port.Auto, 10M-Full,10M-Half,100M-Full,100M-HalfAutoPC port (KX-UT123/KX-UT133/KX-UT136only)Select the connection mode of thePC port.Auto, 10M-Full,10M-Half,100M-Full,100M-HalfAutoEmbedded web Enable or disable Web UserInterface Programming.On, Off Off*1 Press [ ] and [ ] to switch between these items.Network TestSetting Description Value Range DefaultNetwork Test Confirm whether other networkdevices (e.g., SIP server, routers,switching hubs) respond to networkrequests. When you select this item,enter the IP address of the device towhich you want to test theconnection.If a device does not respond, firstcheck the unit's network settings, andthen check the device's networksettings and connection.xxx.xxx.xxx.xxx —Document Version 2011-10 Operating Instructions 45Customizing the Telephone](https://usermanual.wiki/Panasonic-of-North-America/96NKX-UT248/User-Guide-1590705-Page-45.png)
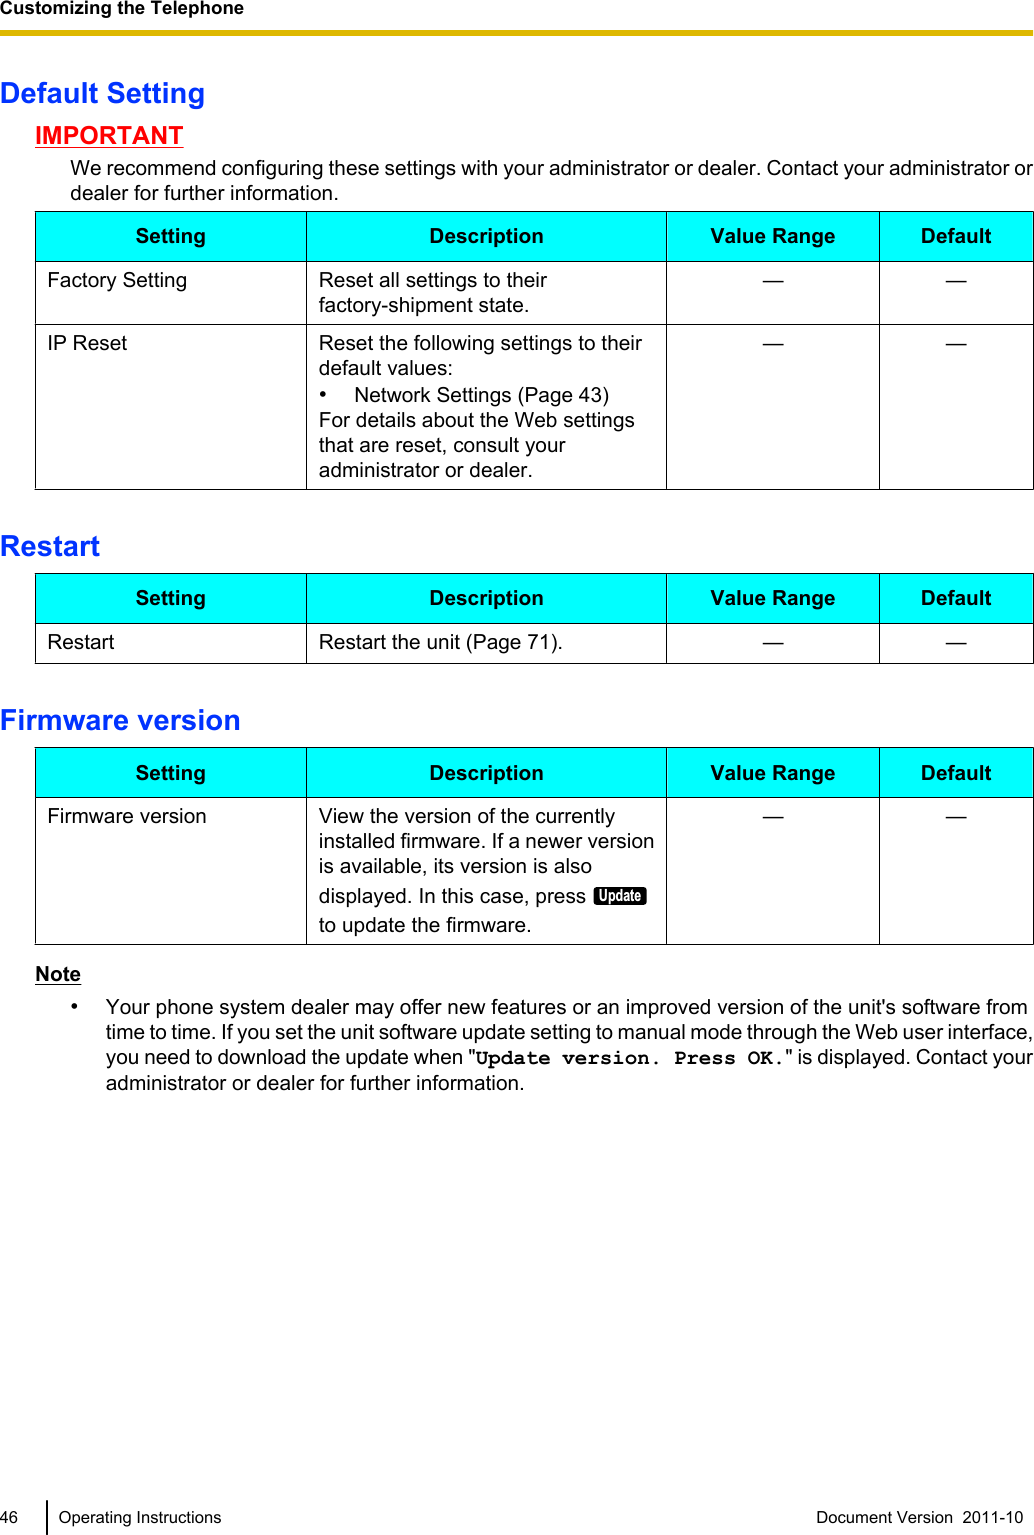
![Call BlockSetting Description Value Range DefaultCall Block Register telephone numbers so thatcalls received from those numbersare blocked. You can also deleteregistered numbers.To register1. Press Add.2. Enter the telephone number toblock, and then press [ENTER].To edit1. Press [ ] or [ ] to select theblocked telephone number toedit.2. Press Edit.3. Edit the number as necessary,and then press [ENTER].To delete1. Press [ ] or [ ] to select theblocked telephone number todelete.2. Press Erase.3. Select "Yes", and then press[ENTER].— —Document Version 2011-10 Operating Instructions 47Customizing the Telephone](https://usermanual.wiki/Panasonic-of-North-America/96NKX-UT248/User-Guide-1590705-Page-47.png)
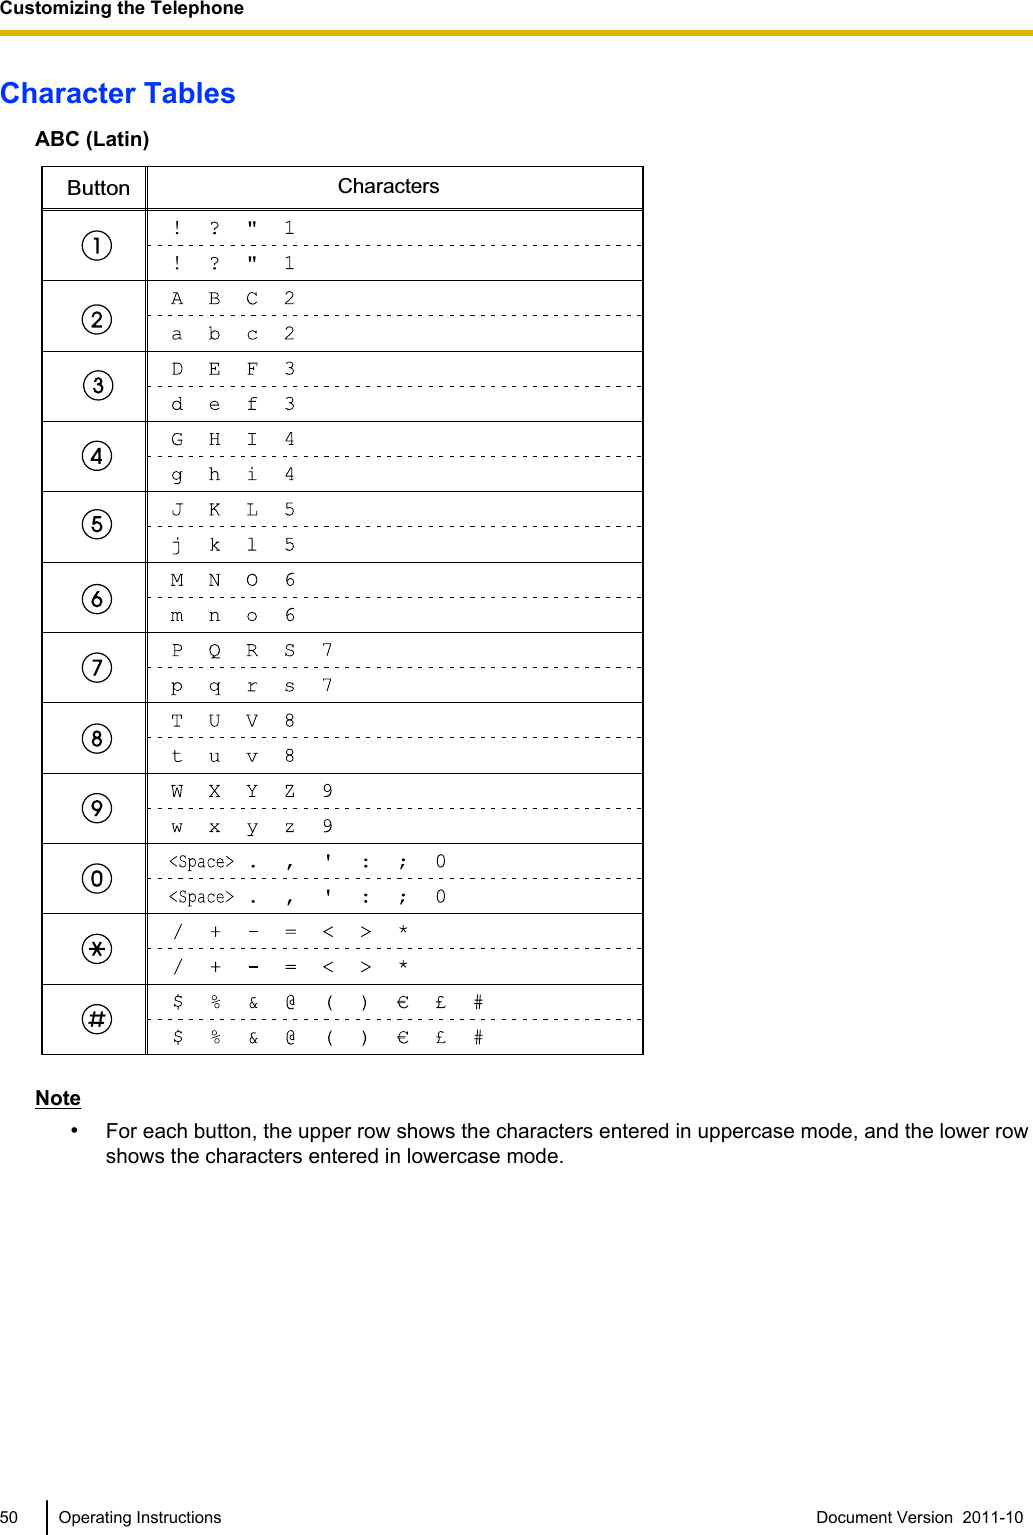
![Entering CharactersThe dial keys are used to enter characters and numbers. Each dial key has multiple characters assigned to it.(For example, A, B and C are assigned to the 1 key.)To enter a character, press the corresponding dial key until the character you want appears. To enter anothercharacter that is assigned to the same key, first press [ ] to move the cursor to the right.ExampleTo enter "DESK", press the keys as follows:Display:Input:(right)For details about the characters assigned to each key, see "Character Tables (Page 50)".Deleting charactersPress Clear to delete the last character entered.Note•Press and hold Clear to delete all entered text.Switching between uppercase and lowercasePress A/a to switch between uppercase entry and lowercase entry.Modifying entered textUse [ ] and [ ] to move the cursor to where you want to modify the text. Then, modify the text as follows:•Press Clear to delete the character under the cursor.•Press a dial key to insert a character at the cursor’s location.•Press A/a to change the case of the character under the cursor.48 Operating Instructions Document Version 2011-10 Customizing the Telephone](https://usermanual.wiki/Panasonic-of-North-America/96NKX-UT248/User-Guide-1590705-Page-48.png)
![Note•If the maximum number of characters has been entered, entering another character will overwrite thecharacter under the cursor.•If the entered texts spans two or more lines, you can also move the cursor using [] and [ ].Character entry modesThe six character entry modes let you enter a variety of characters.The following character modes are available:•Latin (ABC)•Numeric (0–9)•Greek (ΑΒΓ)•Extended 1 (AÄÅ)•Extended 2 (SŚŠ)•Cyrillic (АБВ)For details about which characters are available in each mode, see "Character Tables (Page 50)".To select a character mode1. When entering characters, press 1/A/?.2. Press [ ] or [ ] to select the desired character entry mode.3. Press [ENTER].Note•Depending on the type of information you are entering, you cannot change character modes. Forexample, when you are entering a phone number, only numeric mode is available.Document Version 2011-10 Operating Instructions 49Customizing the Telephone](https://usermanual.wiki/Panasonic-of-North-America/96NKX-UT248/User-Guide-1590705-Page-49.png)

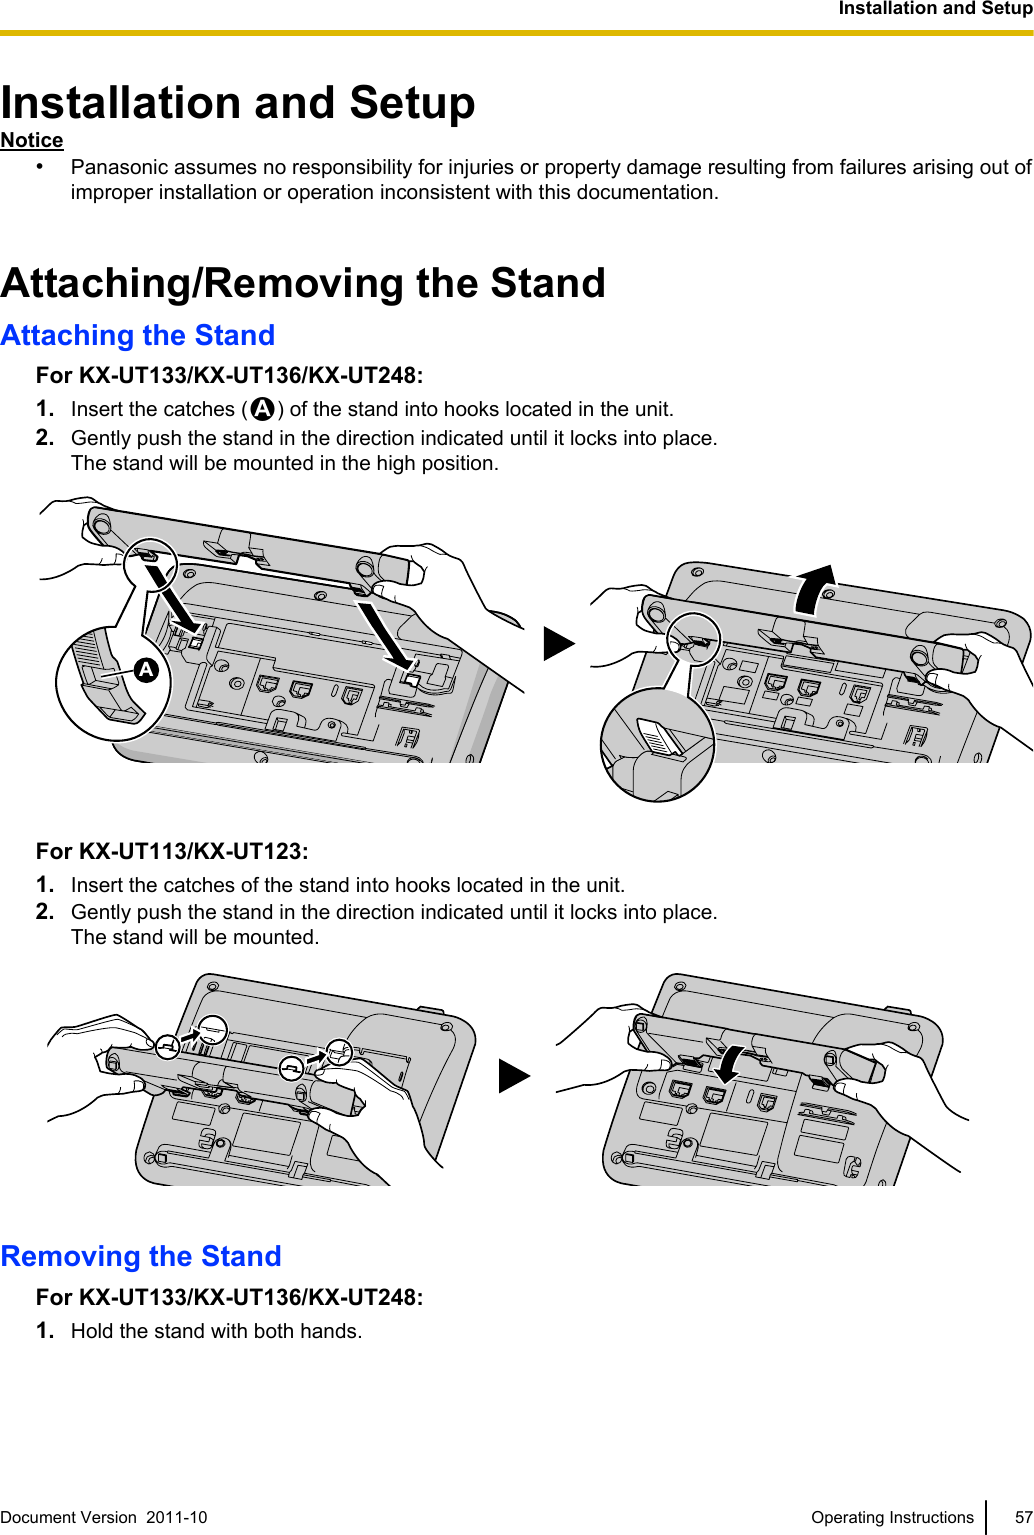
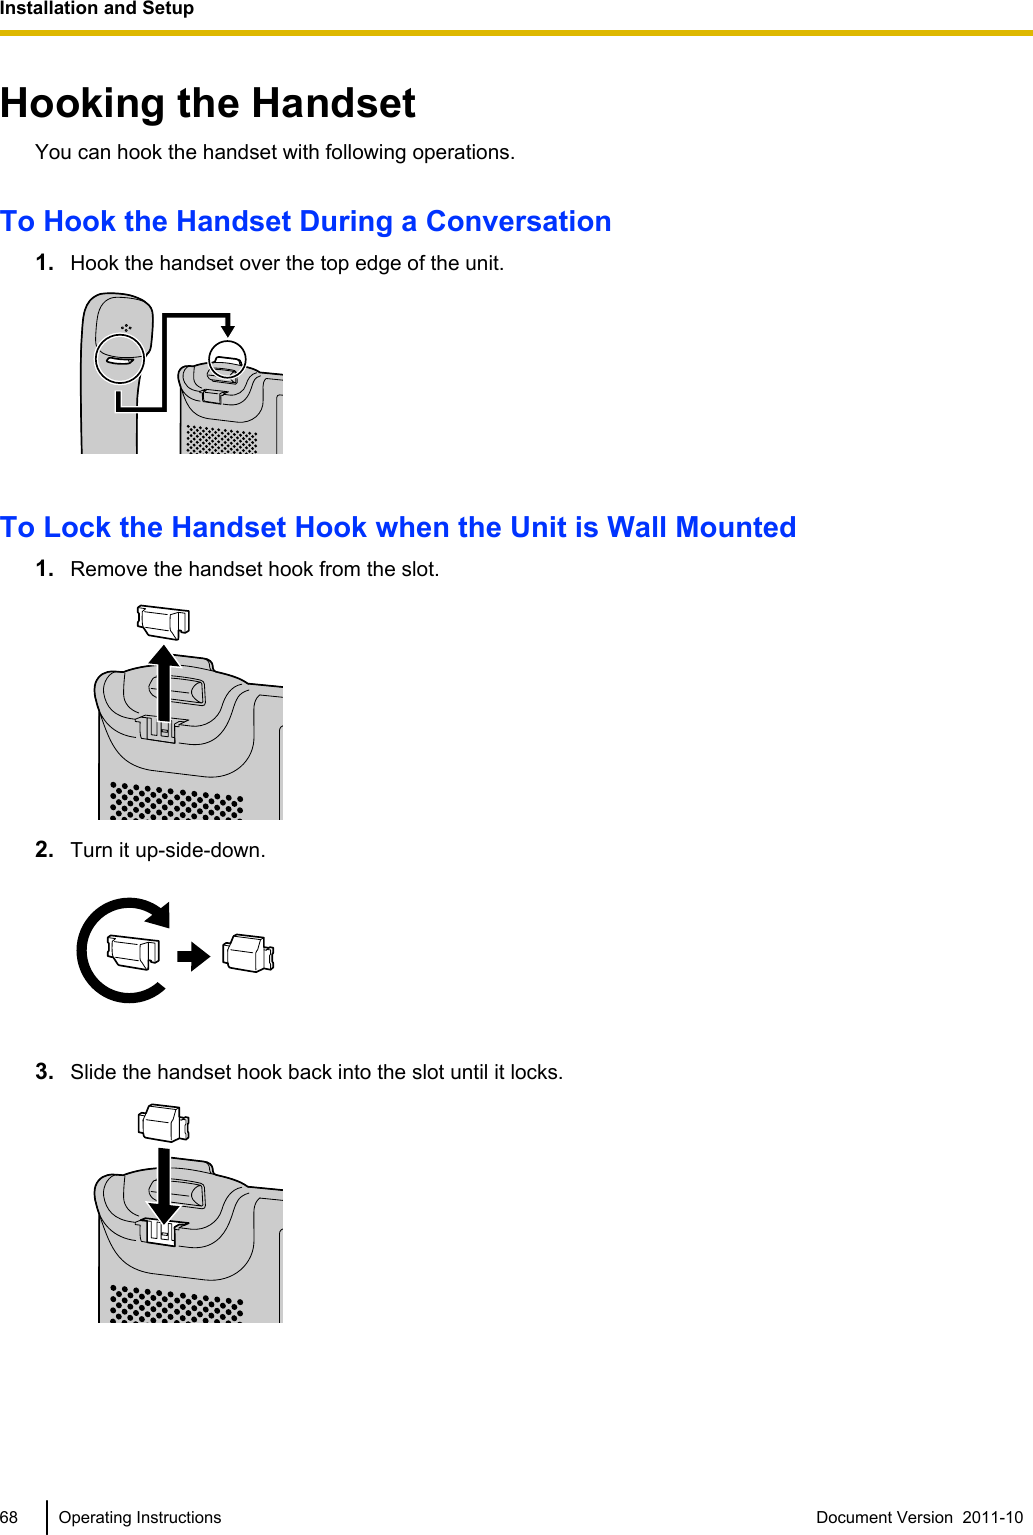
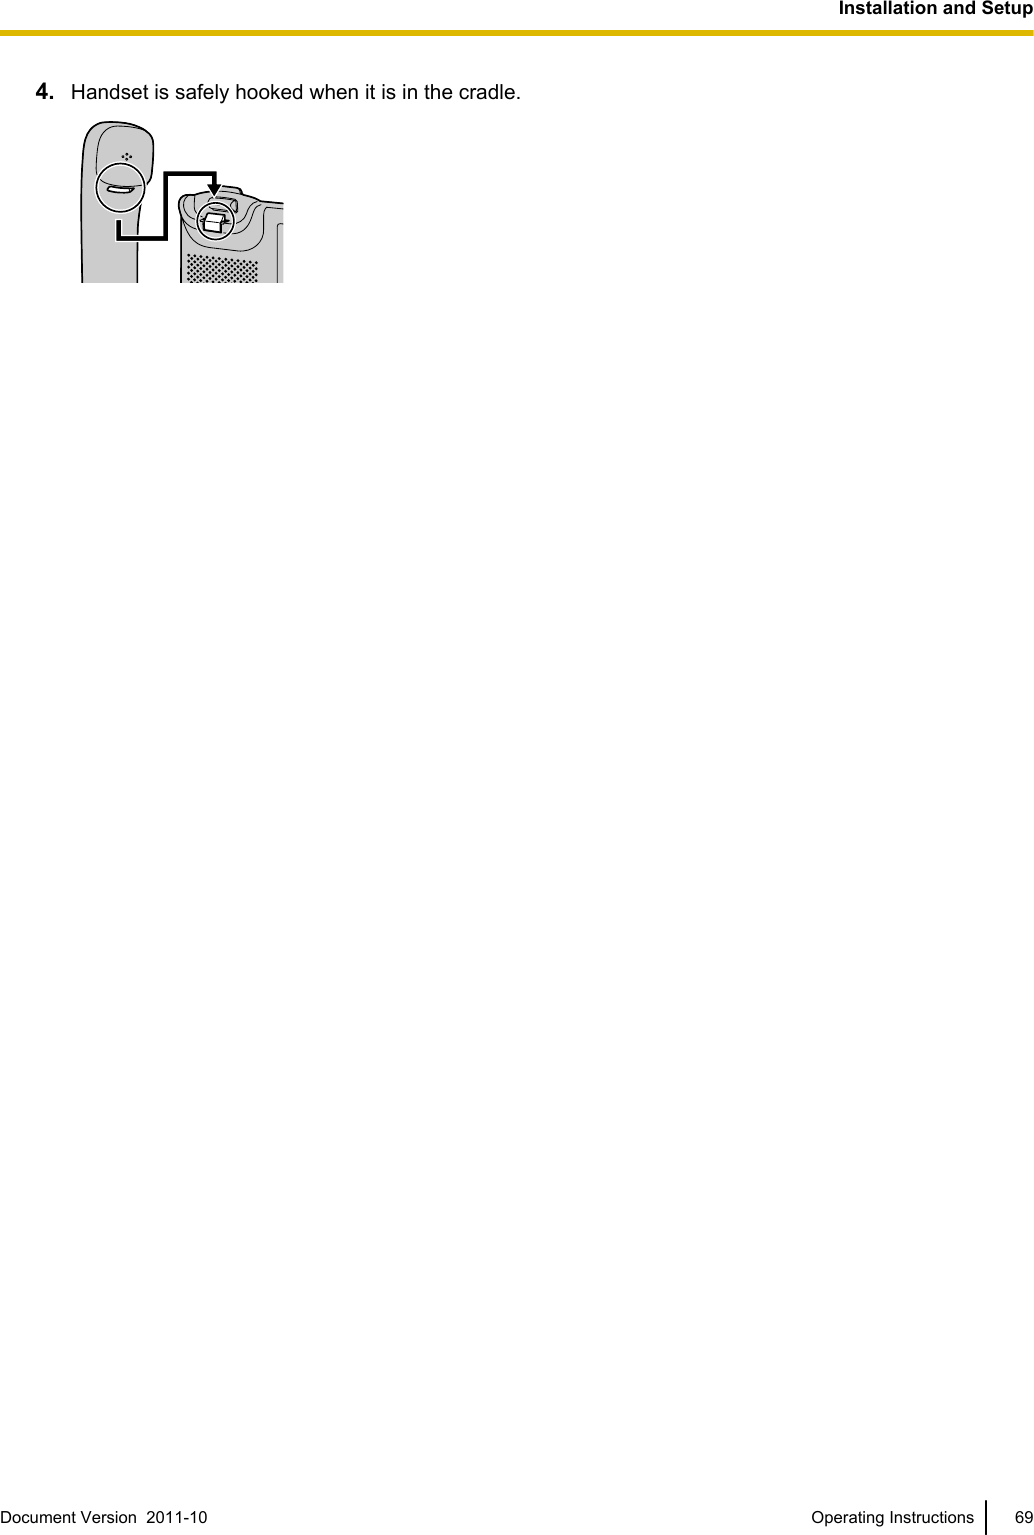
![For KX-UT113/KX-UT123:2. Fasten the wall mounting adaptor to the base with 1 screw. (Recommended torque: 0.4 N·m [4.08 kgf·cm/3.54 lbf·in] to 0.6 N·m [6.12 kgf·cm/5.31 lbf·in])For KX-UT133/KX-UT136/KX-UT248:64 Operating Instructions Document Version 2011-10 Installation and Setup](https://usermanual.wiki/Panasonic-of-North-America/96NKX-UT248/User-Guide-1590705-Page-64.png)
![Using a HeadsetFor KX-UT133/KX-UT136, if a headset is connected,you must enable Headset mode using the Headsetbutton (flexible button).To enable Headset mode, press the Headset button(flexible button). When in Headset mode,[SP-PHONE] is used for going on- and off-hook.Making a Call Using a Headset1. Press [SP-PHONE].2. Enter the number you want to call.3. Press [ENTER], or wait a few seconds for thenumber to be dialed.4. To end the call, press [SP-PHONE].Receiving a Call Using a Headset1. Press [SP-PHONE].2. To end the call, press [SP-PHONE].Note•For details about connecting a headset, see"Connections (Page 60)".•For KX-UT113/KX-UT123, the Headset mode isautomatically enabled when connecting aheadset.•The Headset button light shows the currentstatus as follows:Off: Headset mode offRed on: Headset mode on•For details about setting a flexible button as theHeadset button, consult your administrator ordealer.Setting Up the UnitThis section explains the settings that you can configurewhen you start the unit.Accessing the start-up settings1. Connect the unit to an Ethernet cable capable ofdelivering power (PoE compliant), or use anoptional AC adaptor to supply power.2. Connect the unit to the network.3. On the start-up screen, press Setup.4. Select the item for the settings you want toconfigure.Start-up menuYou can configure the following start-up settings:1. Information Display (Page 43)View a variety of information about the unit.2. Network Settings (Page 43)Assign an IP address in order to connect to thenetwork and use the unit.3. Network Test (Page 45)Confirm the connection of network devices (e.g.,the SIP server, routers, switching hubs).4. ECO Mode (Page 40)Enable ECO mode.5. Language (Page 42)If you prefer to use a language other than English,change your language settings.6. Default Setting (Page 46)Initialize the unit to reset the settings to their defaultvalues.7. Restart (Page 46)Restart the unit for new settings to take effect.8. Firmware version (Page 46)Check the firmware version of the unit.70 Operating Instructions Document Version 2011-10 Installation and Setup](https://usermanual.wiki/Panasonic-of-North-America/96NKX-UT248/User-Guide-1590705-Page-70.png)
![Maintaining the UnitInitializing the UnitDoing an initialization resets some or all settings to theirdefault values. There are two types of initialization:•Factory SettingResets all settings in the unit to their default values.This type of initialization also deletes all other dataon the unit, such as the call logs and the phonebook.Do a Factory Setting initialization beforetransferring the unit to a third party, such as formaintenance. Doing so reduces the risk of anunauthorized third party obtaining personal data.•IP ResetResets only the network settings to their defaultvalues.Do an IP Reset initialization when changing theunit's network environment.For details about doing an initialization, see "DefaultSetting (Page 46)".Restarting the UnitWhen some of the settings on the unit have beenchanged via Web user interface programming orconfiguration file programming, the unit must berestarted.1. In stand-by mode, press Setting.2. Press [ ] or [ ] to select "Restart", and then press[ENTER].3. Press [ ] or [ ] to select "Yes", and then press[ENTER].•To cancel, select "No".Cleaning the UnitClean the unit by periodically by wiping it with a soft anddry cloth.When cleaning the unit, observe the followingprecautions.When cleaning the display•Wipe the display with only the following types ofmaterials:–A soft and dry cloth.–A soft cloth with very small quantity of neutraldetergent or ethyl alcohol.•Do not press or rub the display with too much force.When cleaning the body•To avoid damaging the unit, disconnect theEthernet cable and all other cables from the unitbefore cleaning. If the unit is powered with an ACadaptor, disconnect the AC adaptor from the unitand power outlet before cleaning.•If the unit becomes particularly dirty, apply a lightkitchen cleanser to a soft cloth, wring the cloththoroughly, and then wipe the unit. When finished,dry the unit with a soft and dry cloth.•To avoid damage or discoloration, do not clean theunit with the any of following materials or withcleaners that contain any of the following materials:–Petroleum–Scouring powder–Alcohol–Paint thinner–Benzene–Wax–Hot water–Powdered soap•When using chemical cleansers, follow theinstructions on the label carefully.Document Version 2011-10 Operating Instructions 71Installation and Setup](https://usermanual.wiki/Panasonic-of-North-America/96NKX-UT248/User-Guide-1590705-Page-71.png)
![AppendixSpecificationsFor KX-UT113/KX-UT123/KX-UT133/KX-UT136ItemSpecificationsKX-UT113 KX-UT123 KX-UT133 KX-UT136Display 3 line (Nobacklight) 3 line with backlight 6 line withbacklightFlexible Buttons — 24VoIP ConnectionMethod SIPVoIP Audio Codec G.722, G.711, G.729A, G.726Ethernet Interface 10Base-T/100Base-TXIP Address Mode Automatic (DHCP), Manual (static)Speaker 1Microphone 1Ethernet Port (LAN) 1 (RJ45) 2 (RJ45)Headset Jack 1 (ø 2.5 mm [3/32 in])EHS Jack — 1 (ø 3.5 mm [1/8 in], for EHS only)Dimensions(Width ´ Depth ´ Height;handset on cradle, standattached)205 mm ´ 160 mm ´ 170 mm(8.07 in ´ 6.30 in ´ 6.69 in)"High" position:267 mm ´ 170 mm ´ 180 mm(10.5 in ´ 6.69 in ´ 7.09 in)"Low" position:267 mm ´ 187 mm ´ 155 mm(10.5 in ´ 7.36 in ´ 6.10 in)Weight (with handset,handset cord and stand) 860 g (1.90 lb) 870 g (1.92 lb) 1120 g (2.47 lb)PoE IEEE 802.3af compliantPower Consumption PoEStand-by: approx. 1.8 W (ECO mode off), approx. 1.3 W (ECO mode on)Talking: approx. 2 W (ECO mode off), approx. 1.5 W (ECO mode on)AC AdaptorStand-by: approx. 1.6 W (ECO mode off), approx. 1 W (ECO mode on)Talking: approx. 2 W (ECO mode off), approx. 1.5 W (ECO mode on)Maximum PowerConsumption 6 WOperating Environment 0 °C to 40 °C (32 °F to 104 °F)72 Operating Instructions Document Version 2011-10 Appendix](https://usermanual.wiki/Panasonic-of-North-America/96NKX-UT248/User-Guide-1590705-Page-72.png)
![For KX-UT248Item SpecificationsDisplay 4.4 inch with backlightFlexible Buttons 24VoIP ConnectionMethod SIPVoIP Audio Codec G.722, G.711, G.729A, G.726Ethernet Interface 10Base-T/100Base-TX/1000Base-TIP Address Mode Automatic (DHCP), Manual (static)Speaker 1Microphone 1Ethernet Port (LAN) 2 (RJ45)Headset Jack 1 (ø 2.5 mm [3/32 in])EHS Jack 1 (ø 3.5 mm [1/8 in], for EHS only)Bluetooth Bluetooth wireless technology 2.0Dimensions(Width ´ Depth ´ Height;handset on cradle, standattached)"High" position:267 mm ´ 170 mm ´ 180 mm(10.5 in ´ 6.69 in ´ 7.09 in)"Low" position:267 mm ´ 187 mm ´ 155 mm(10.5 in ´ 7.36 in ´ 6.10 in)Weight (with handset,handset cord and stand) 1130 g (2.49 lb)PoE IEEE 802.3af compliantPower Consumption PoEStand-by: approx. 3.0 W (ECO mode off), approx. 1.3 W (ECO mode on)Talking: approx. 4.6 W (ECO mode off), approx. 1.5 W (ECO mode on)AC AdaptorStand-by: approx. 1.6 W (ECO mode off), approx. 1 W (ECO mode on)Talking: approx. 2 W (ECO mode off), approx. 1.5 W (ECO mode on)Maximum PowerConsumption 6.5 WOperating Environment 0 °C to 40 °C (32 °F to 104 °F)Document Version 2011-10 Operating Instructions 73Appendix](https://usermanual.wiki/Panasonic-of-North-America/96NKX-UT248/User-Guide-1590705-Page-73.png)
![Making and Receiving CallsIssue Possible Cause & Solution ReferenceI cannot make calls. •Your phone system/service has disabled service for your unit.→On the Information Display screen (Page 43), if "Notregistered" is displayed in "Status", consult youradministrator or dealer.—•The phone number was entered incorrectly.→Confirm that you have entered the phone number of theother party correctly.→Consult your administrator or dealer.Page 25•The unit is downloading a firmware update.→You cannot make calls while the unit is downloadingupdates. Wait for the update to finish, and then try makinga call.—•The phonebook list is being imported or exported.→Wait a few minutes for the operation to complete.→Confirm with your administrator or dealer.—I cannot make longdistance calls. •Your telephone service does not allow you to make longdistance calls.→Make sure that you have subscribed to your telephonecompany’s long distance service.—The unit does not ringwhen a call is received. •The ringer is turned off.→Press [ ] while a call is being received, or change theringer volume setting.Page 40While talking to an outsideparty, the line isdisconnected.•Your phone system/service may impose a time limit on outsidecalls.→Consult your dealer to extend the time limit, if necessary.—Sound QualityIssue Possible Cause & Solution ReferenceThe other party cannothear my voice. •The unit is muted.→Press [MUTE] to turn off the mute feature. Page 30•If you are using the speakerphone, objects may be obstructingthe microphone.→Do not obstruct the unit's microphone during calls. Keepyour hands, as well as common objects such as folders,cups, and coffee pots away from the unit during calls.—Document Version 2011-10 Operating Instructions 75Appendix](https://usermanual.wiki/Panasonic-of-North-America/96NKX-UT248/User-Guide-1590705-Page-75.png)