Panasonic of North America 96NKX-WP1050 Wi-Fi Phone Base for Skype Service User Manual
Panasonic Corporation of North America Wi-Fi Phone Base for Skype Service
UserManual.wiki
>
Panasonic of North America
>
96NKX WP1050 User Manual
User manual
Navigation menu
Upload a User Manual
Namespaces
Wiki Guide
HTML
PDF
Info
Views
User Manual
Discussion / Help
Navigation


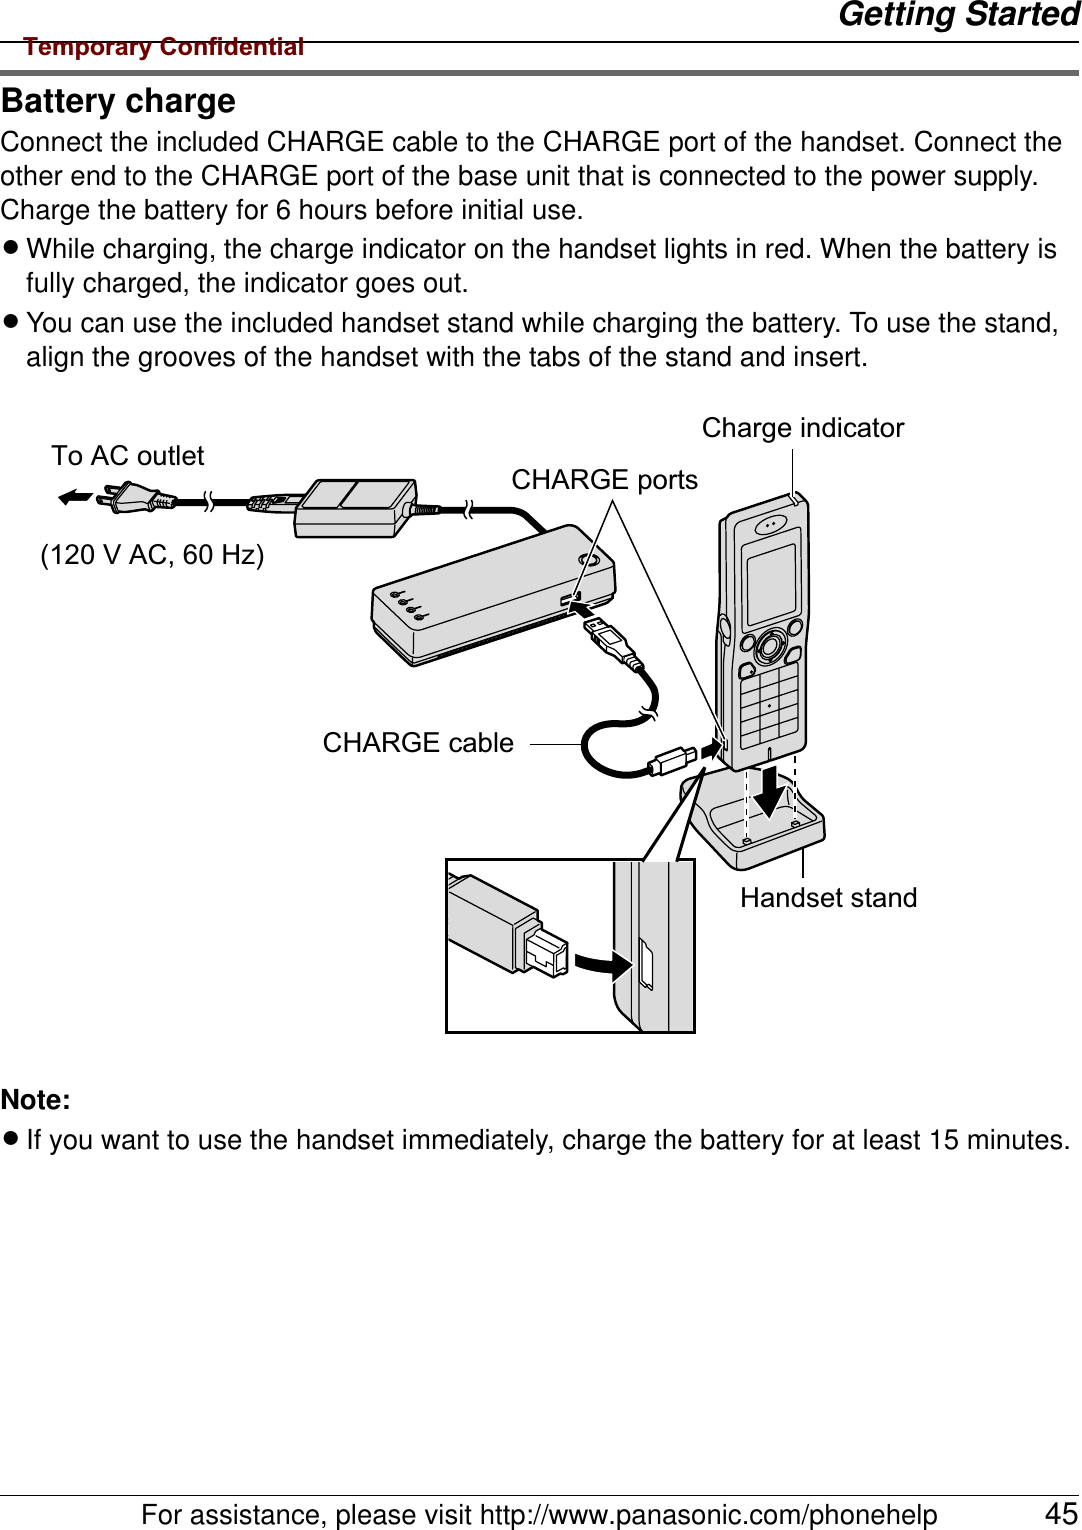
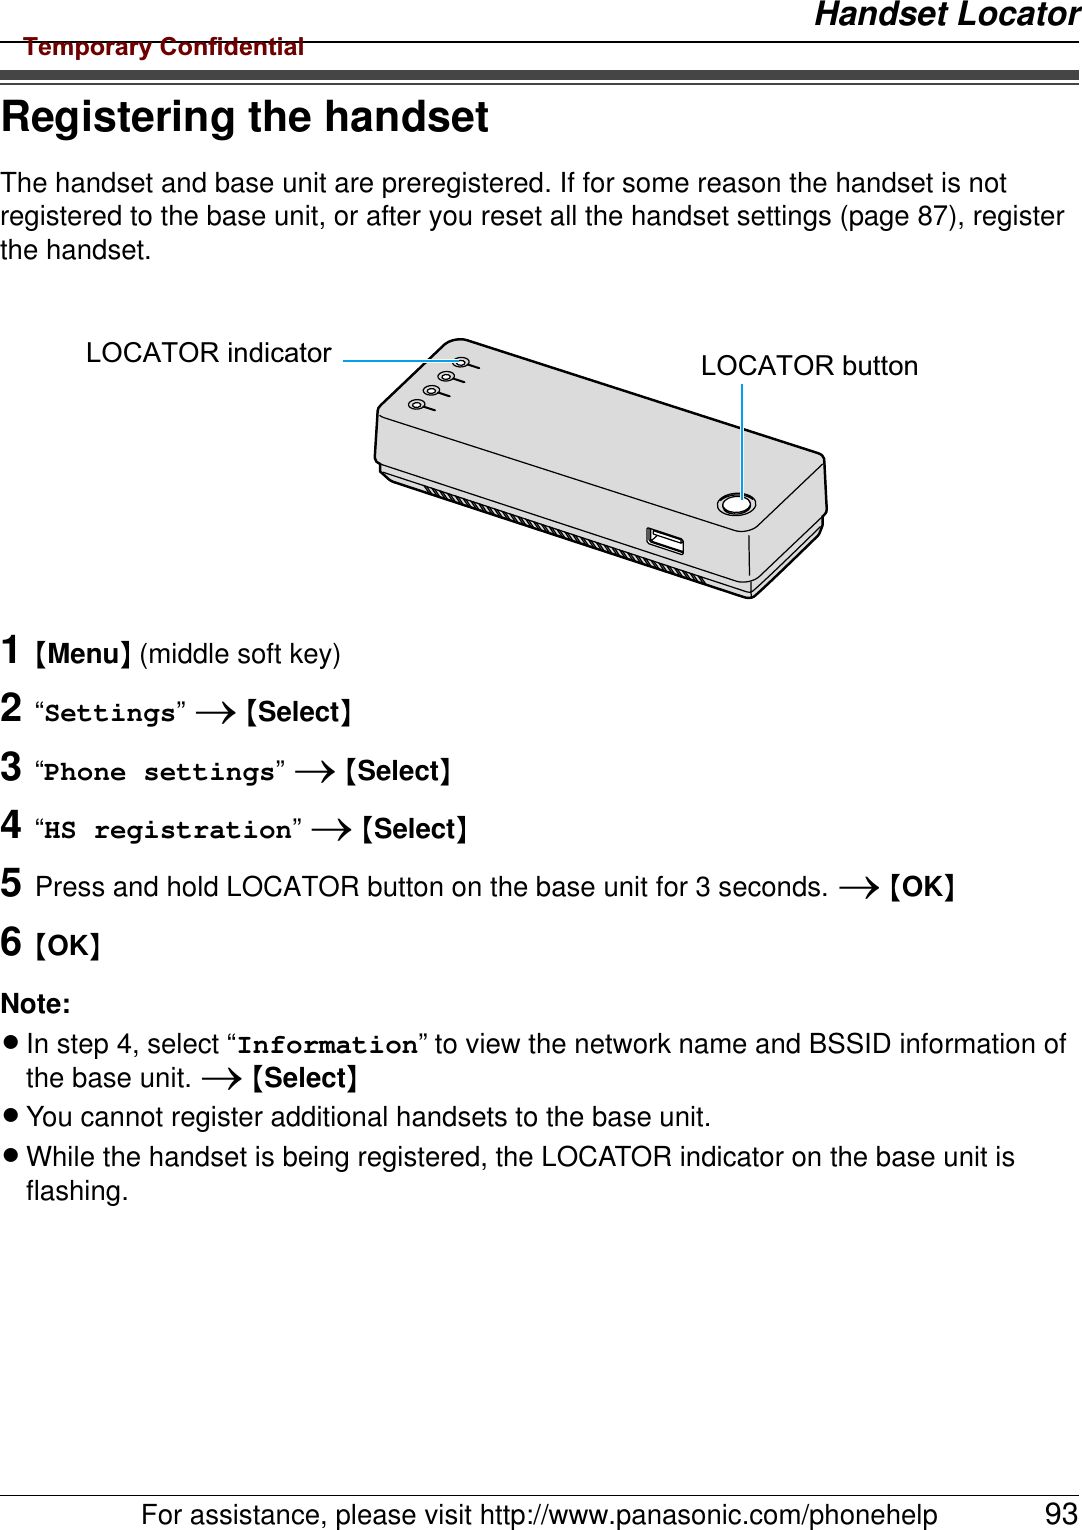
![IntroductionFor assistance, please visit http://www.panasonic.com/phonehelp 17Symbols and screen shots used in these operating instructionsSymbols used for operationsHandset:Computer:Symbol Meaning{} The words in the brackets indicate unit button names/soft key names on the handset.Example:– Unit buttons: {{}, {CONTACTS}– Soft keys: {Options}, {Menu}“ ” The words in quotations indicate menus displayed on the handset screen.Example:“Add contact”iProceed to the next operation.<Example> <Meaning>1{Menu} (middle soft key)2“Settings” i {Select}3Select the desired setting.1While in Idle mode, press {Menu} (middle soft key).2Press {^} or {V} to select “Settings”, then press {Select} (middle soft key).3Press {^} or {V} to select the desired setting.Symbol Meaning[ ] The words in the brackets indicate button names and hyperlinks displayed on the computer screen.Example:[Next>], [OK]Temporary Confidential](https://usermanual.wiki/Panasonic-of-North-America/96NKX-WP1050/User-Guide-706359-Page-17.png)
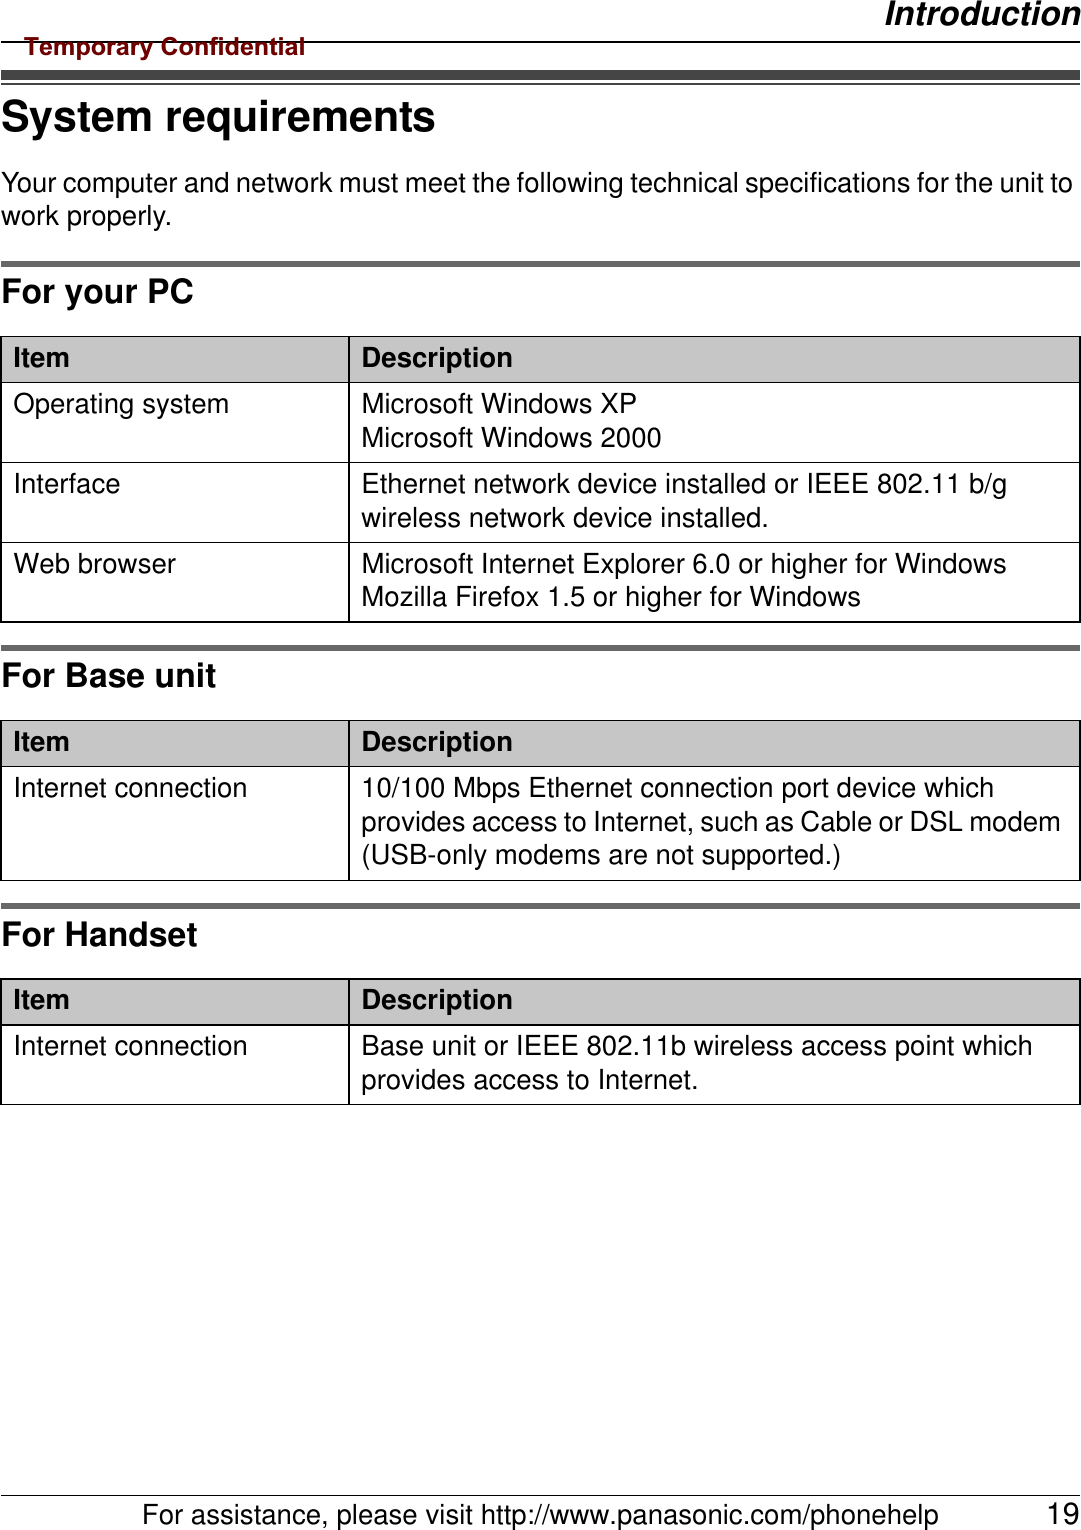
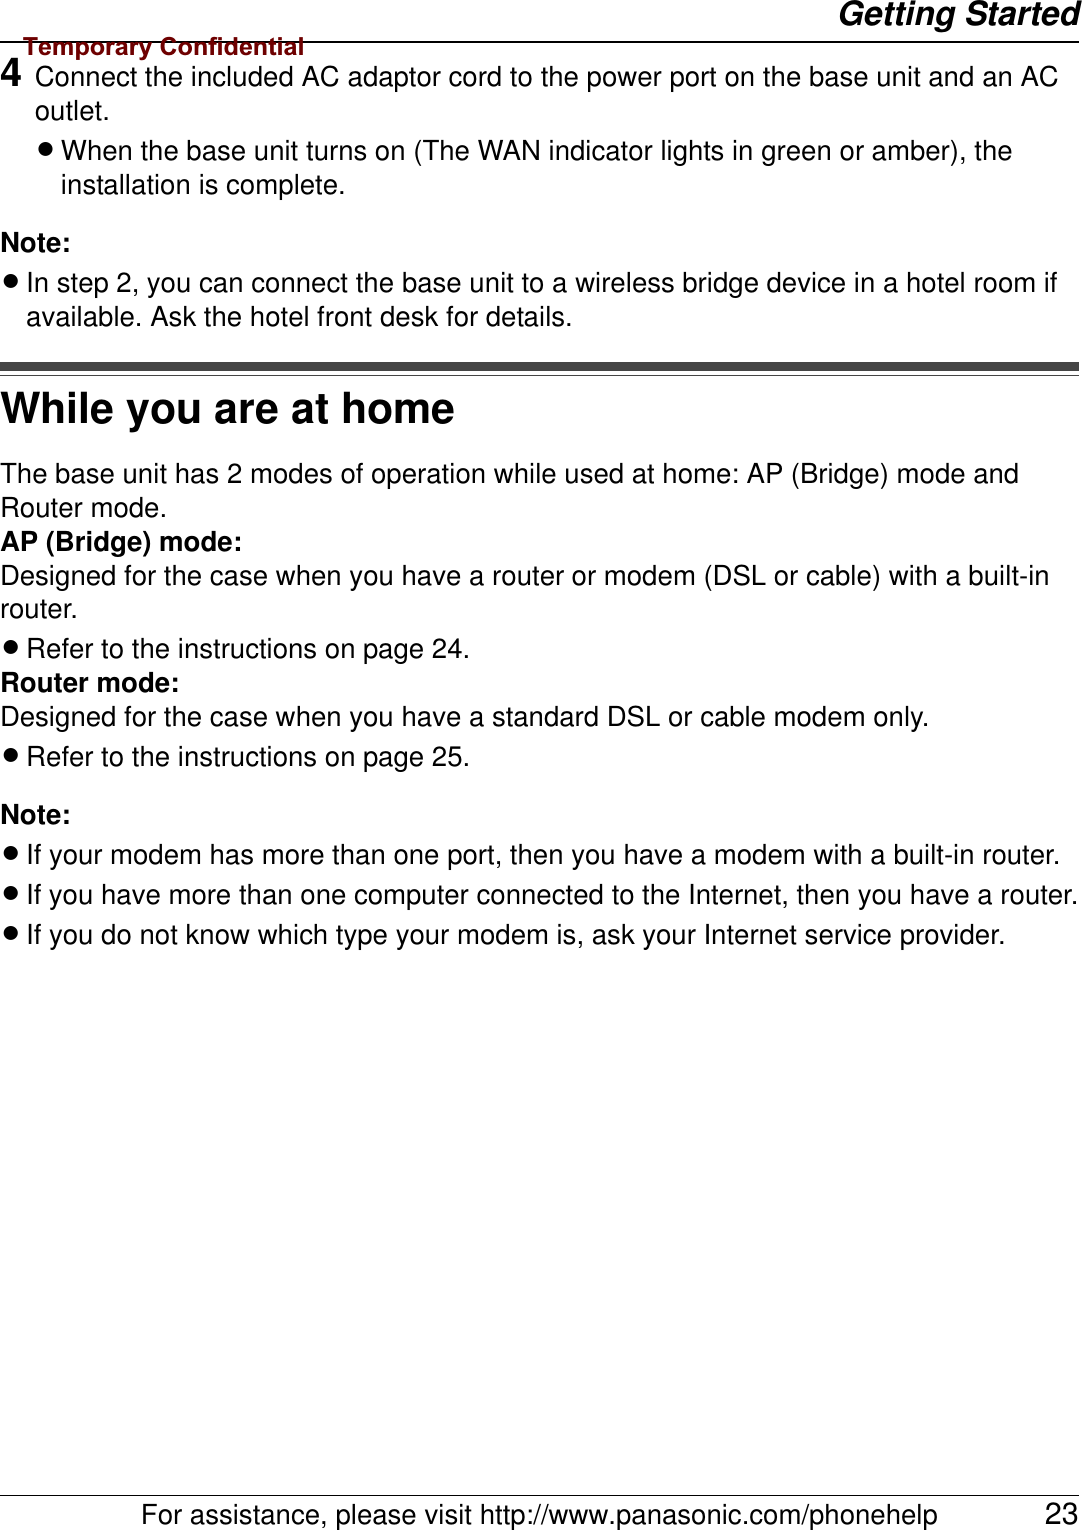
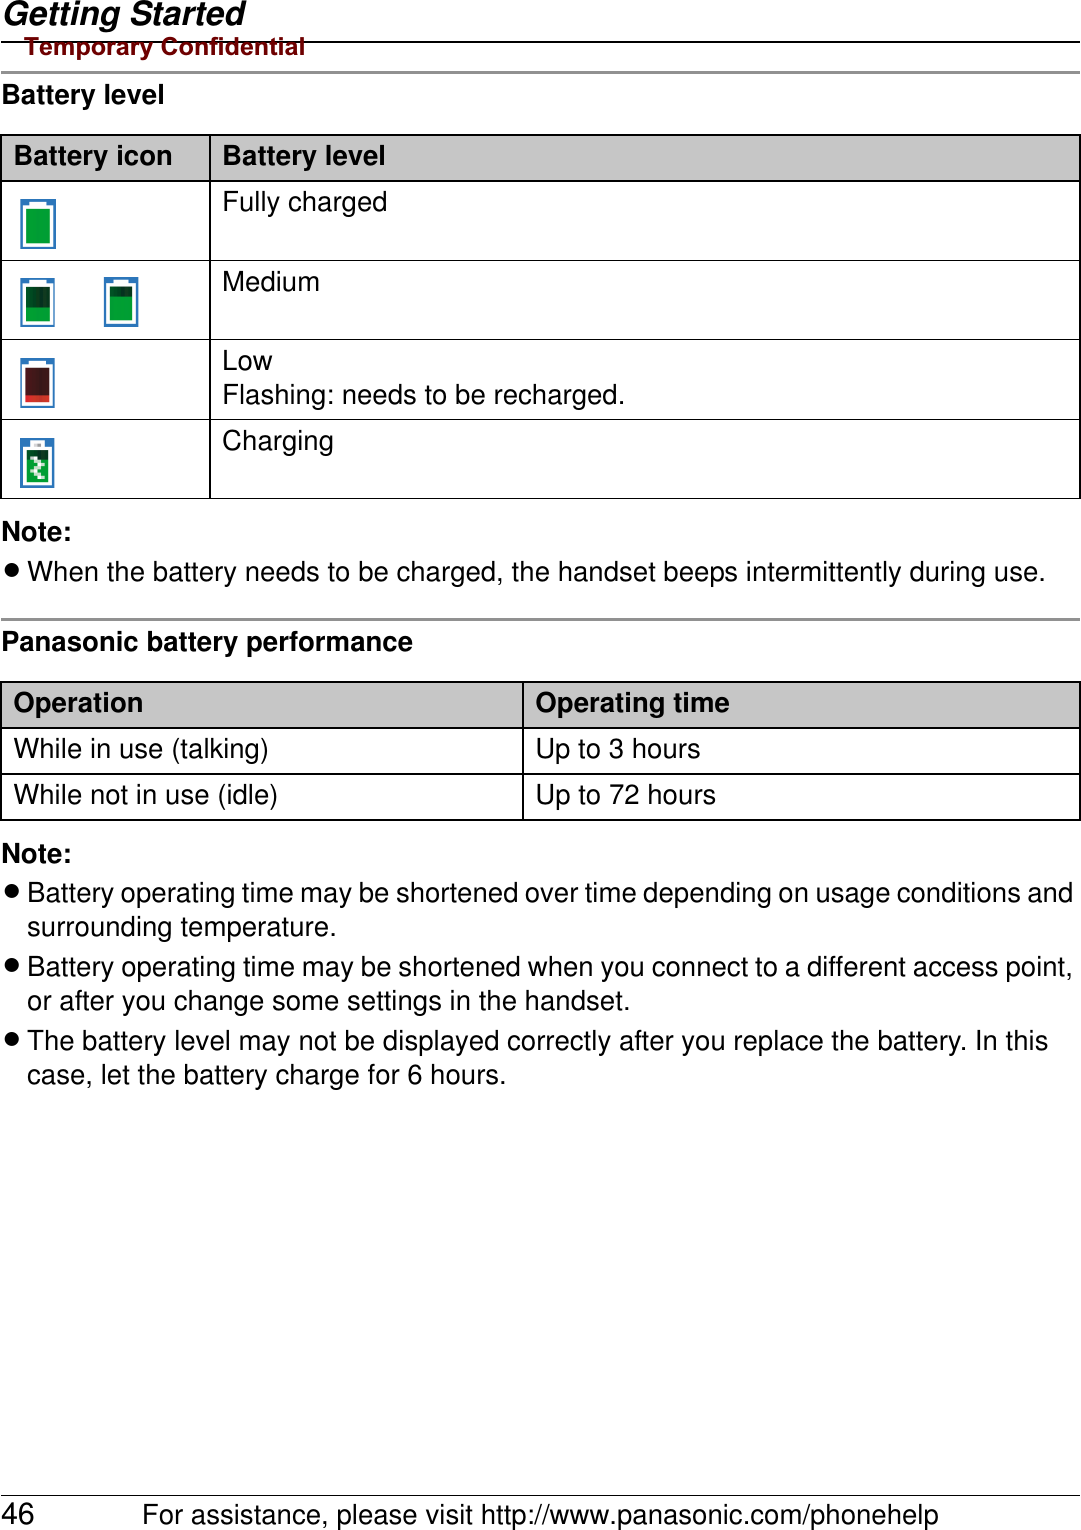
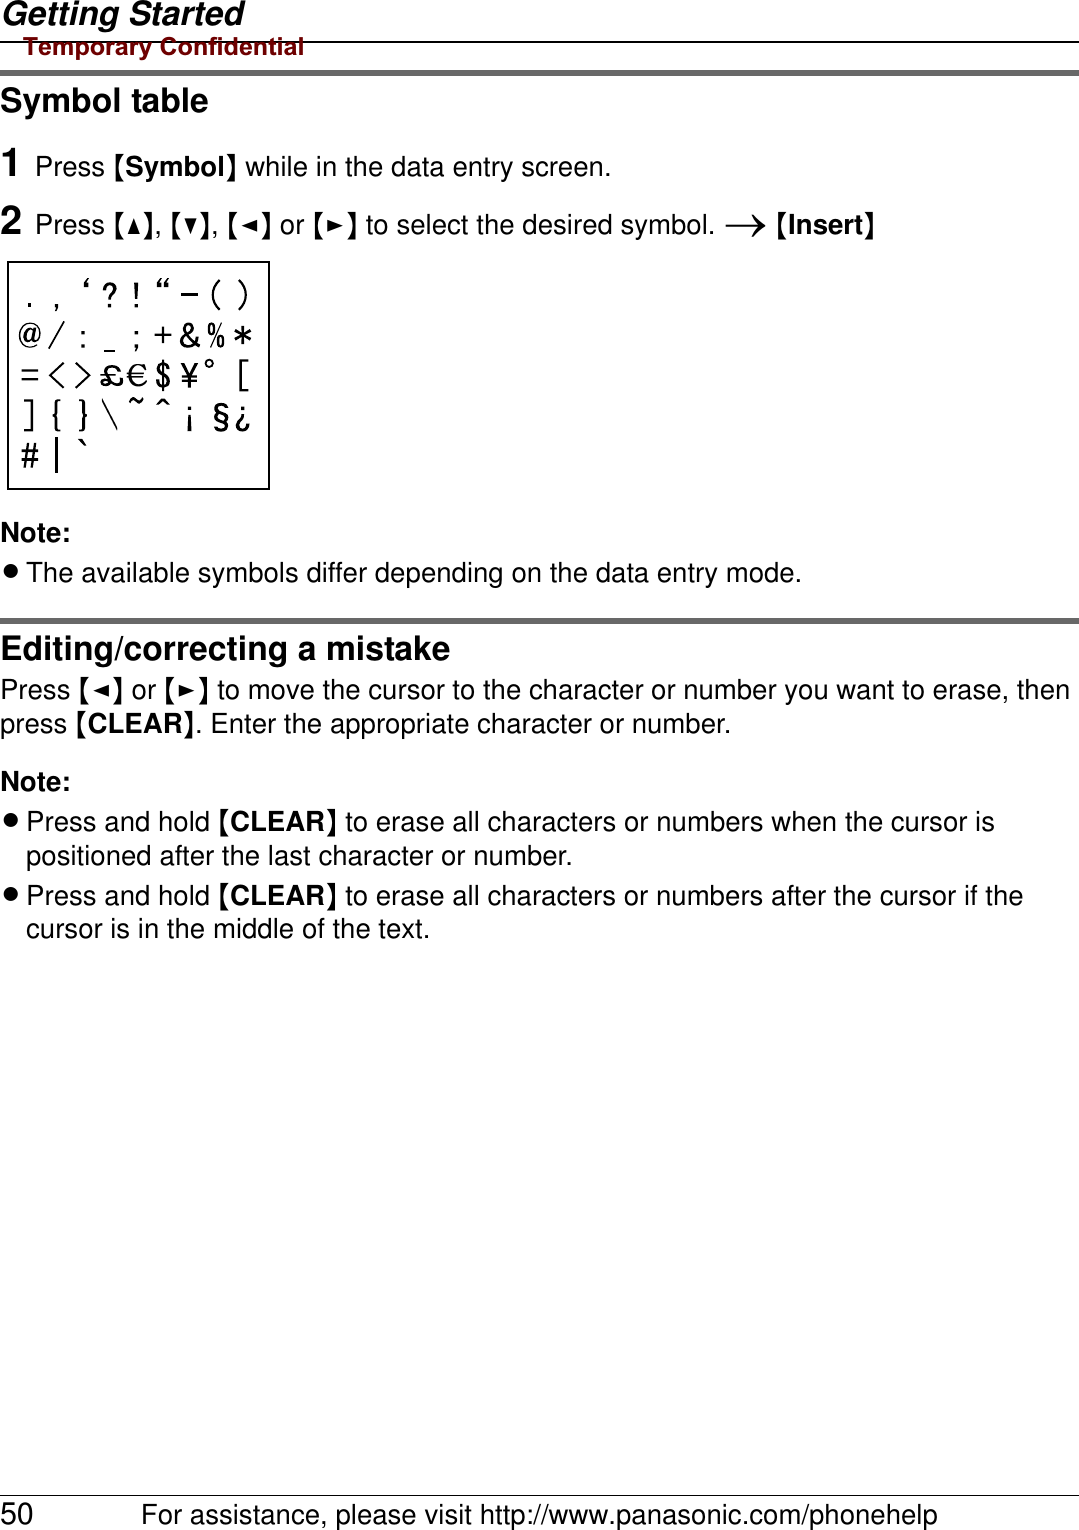
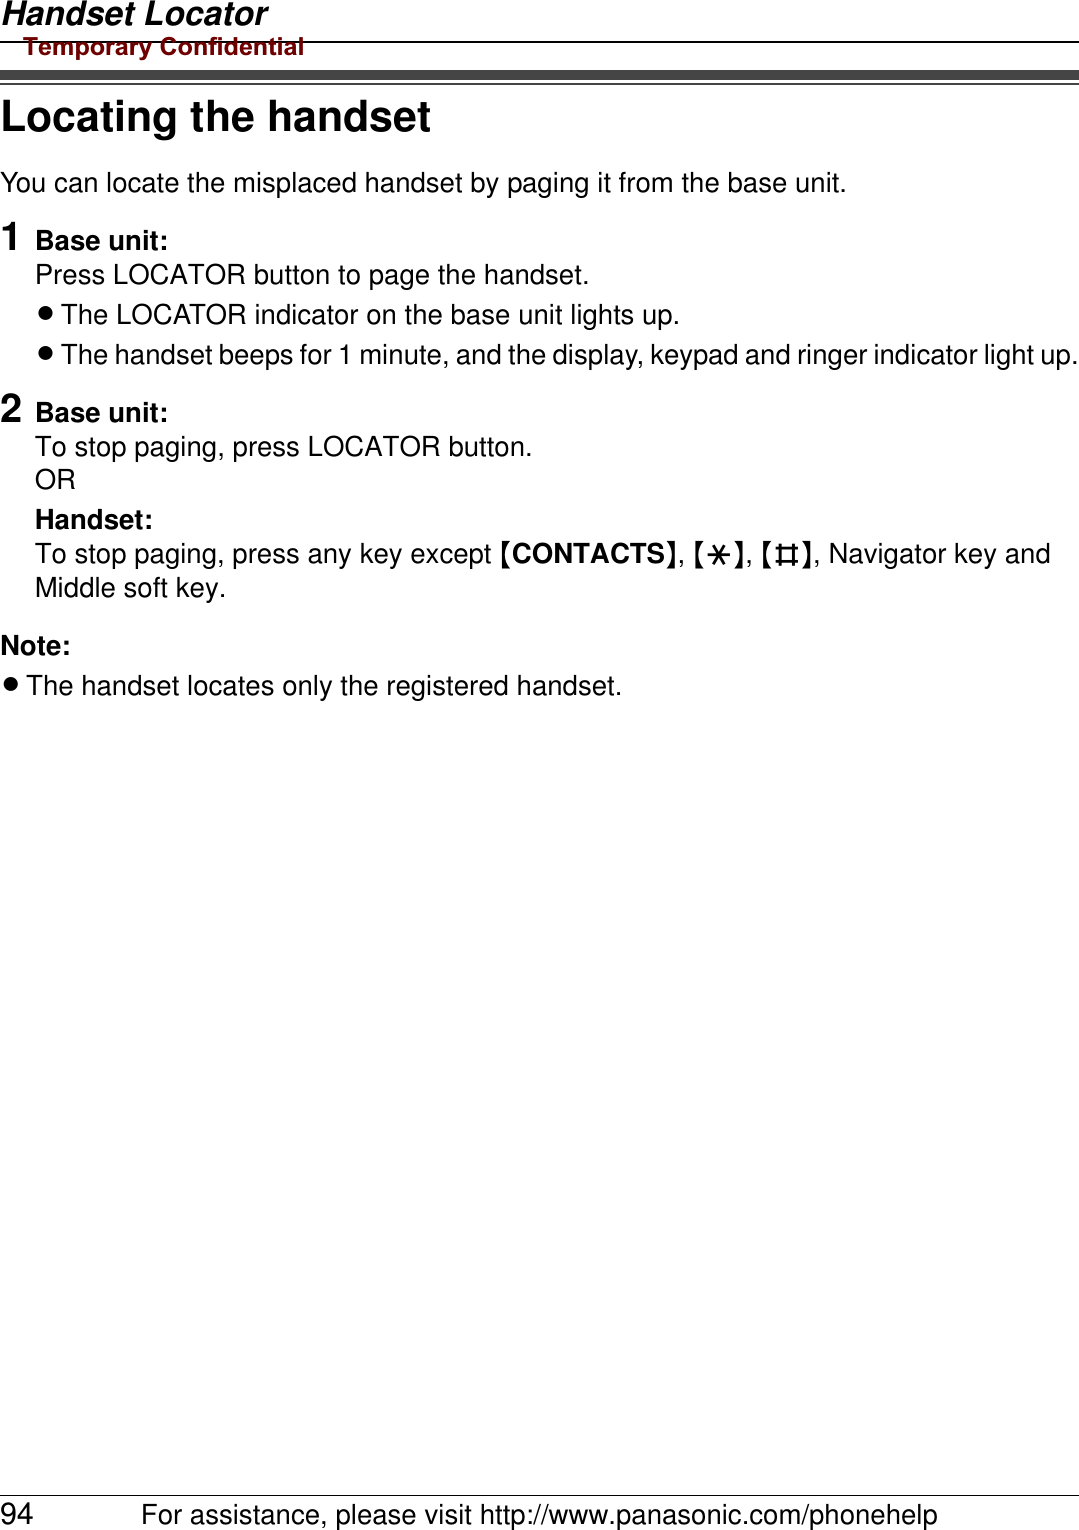
![Getting Started22 For assistance, please visit http://www.panasonic.com/phonehelpWhile you are at a hotel roomYou can use the handset while you are away by accessing the Internet at a hotel room.The hotel you are staying in may give you specific instructions as to what Internet connection type you should select. In that case, follow their instructions. Otherwise, you are suggested to select [DHCP] mode when you set Internet Connection Type in Initialization Wizard (page 27).1Switch the Mode selector to “HOTEL”.2Make sure the base unit is left unplugged. Connect the included Ethernet cable to the “WAN” port on the base unit and the Ethernet port (RJ45 jack) in the hotel room.3Connect the existing Ethernet cable to the “LAN” port on the base unit and the Ethernet (LAN) port on your computer.1WAN indicatorBase unitAC adaptorTo AC outlet(120 V AC, 60 Hz)To LAN portTo WAN portEthernet cable (not included)Ethernet cable (included)ComputerInternetTo Ethernet port(RJ45 jack)AC cordMode selector423Temporary Confidential](https://usermanual.wiki/Panasonic-of-North-America/96NKX-WP1050/User-Guide-706359-Page-22.png)
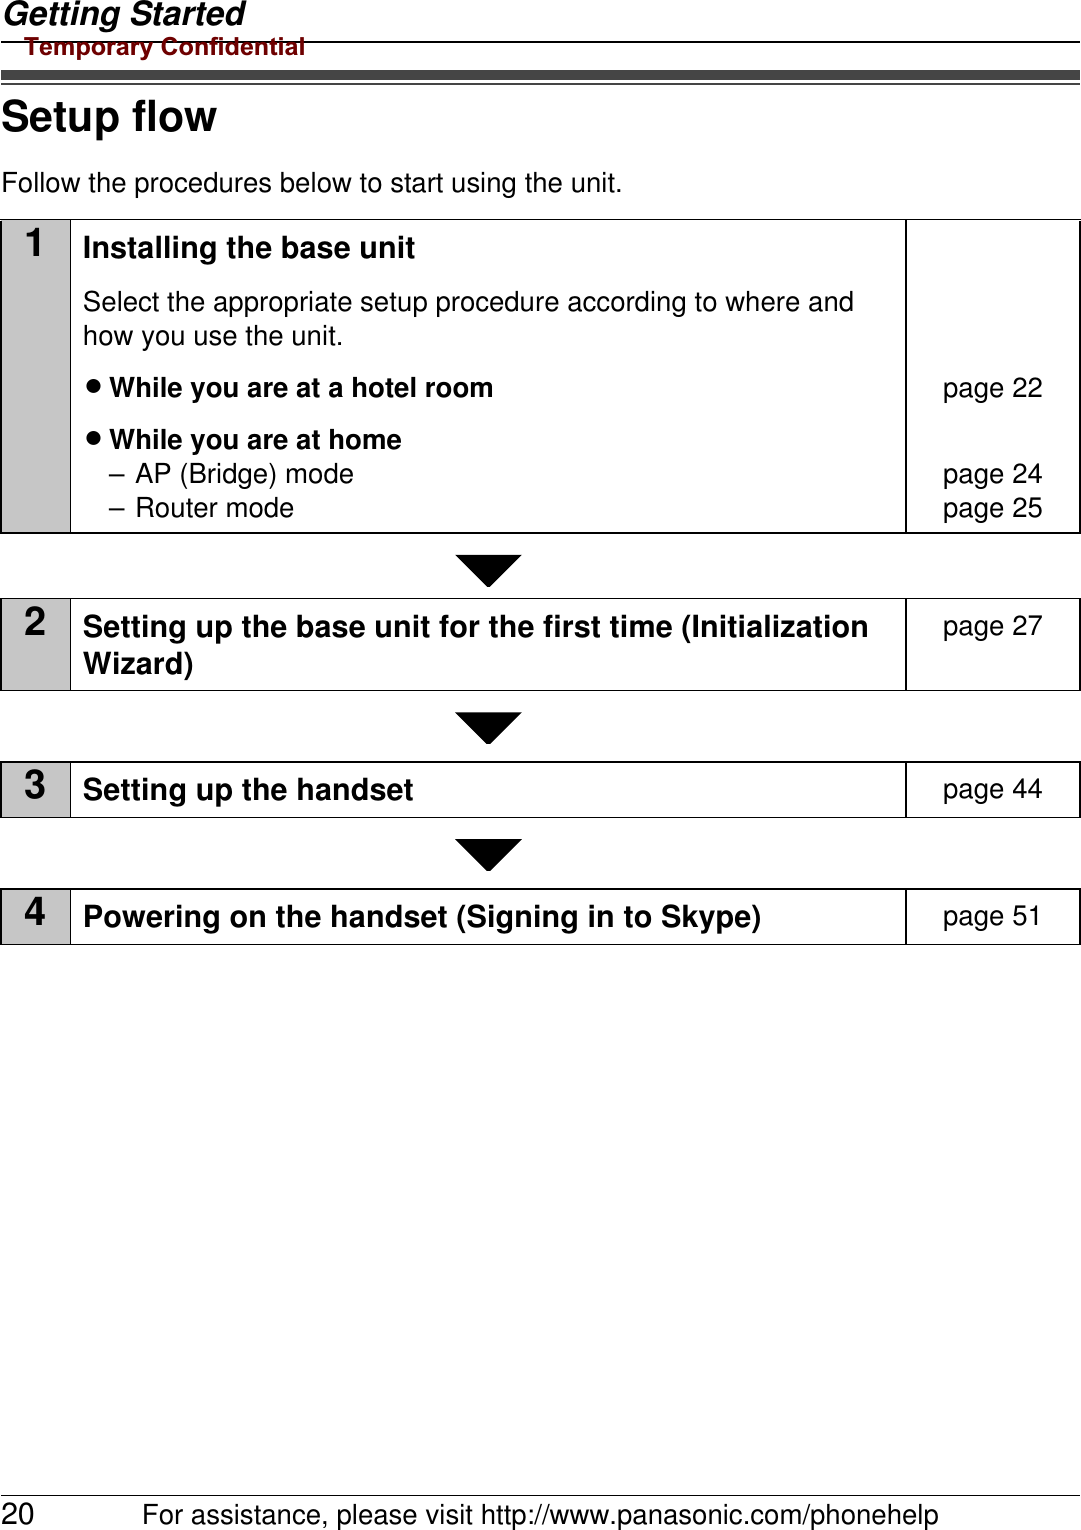
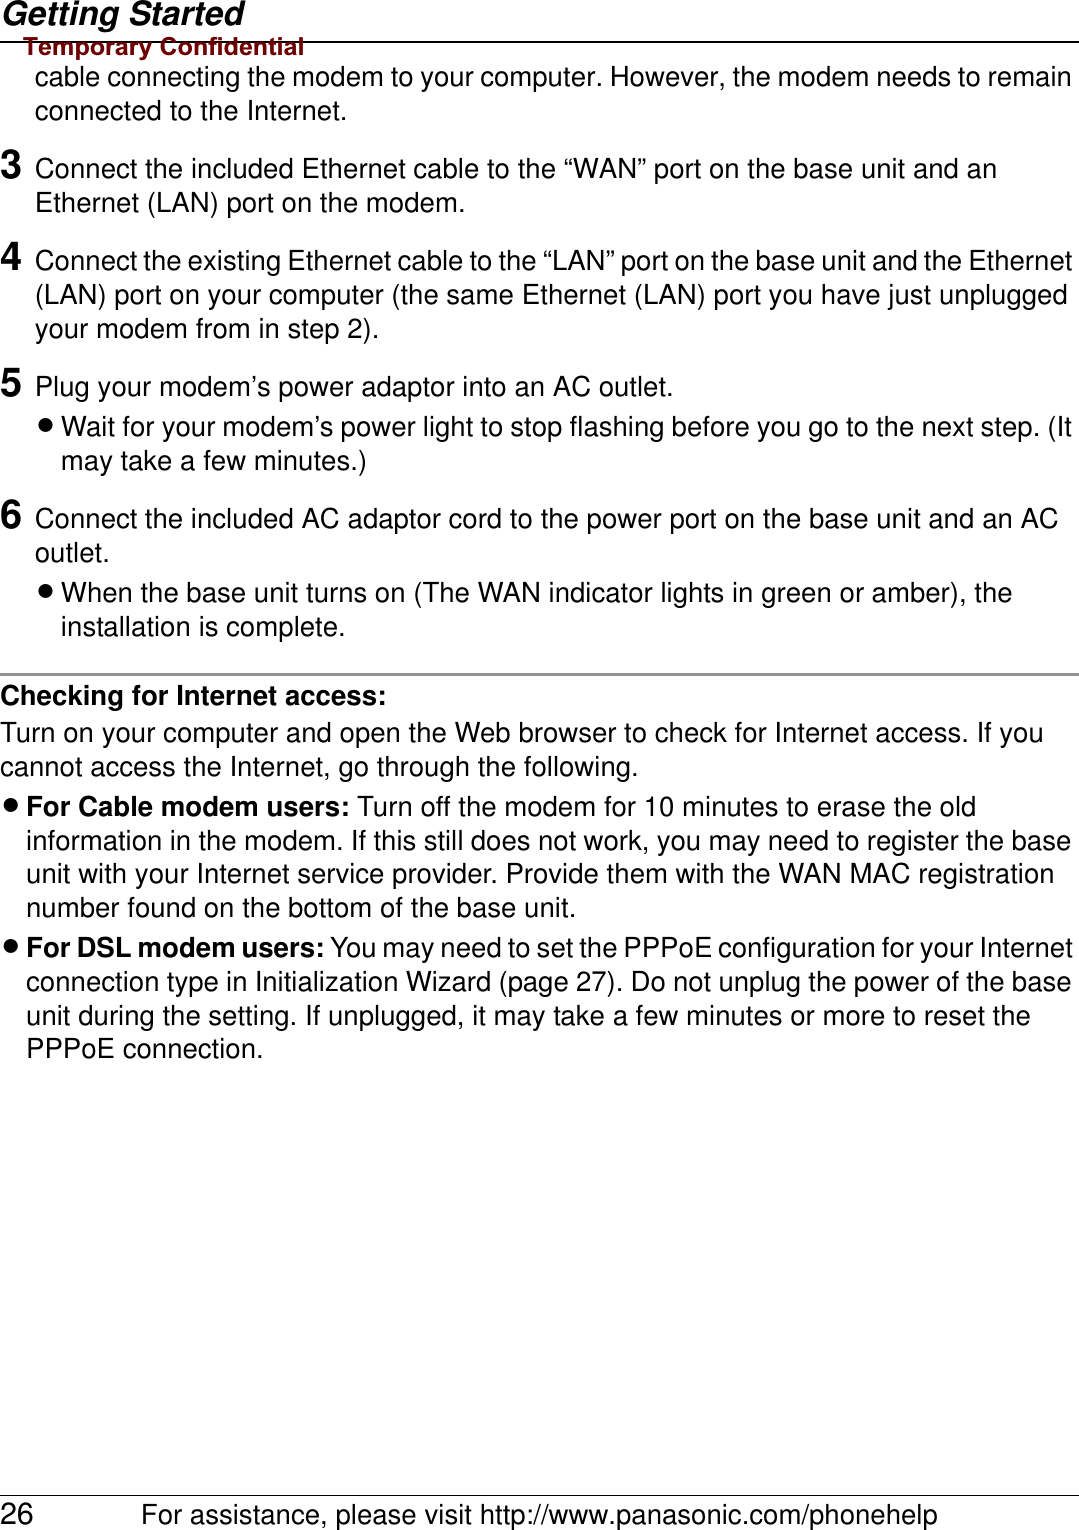
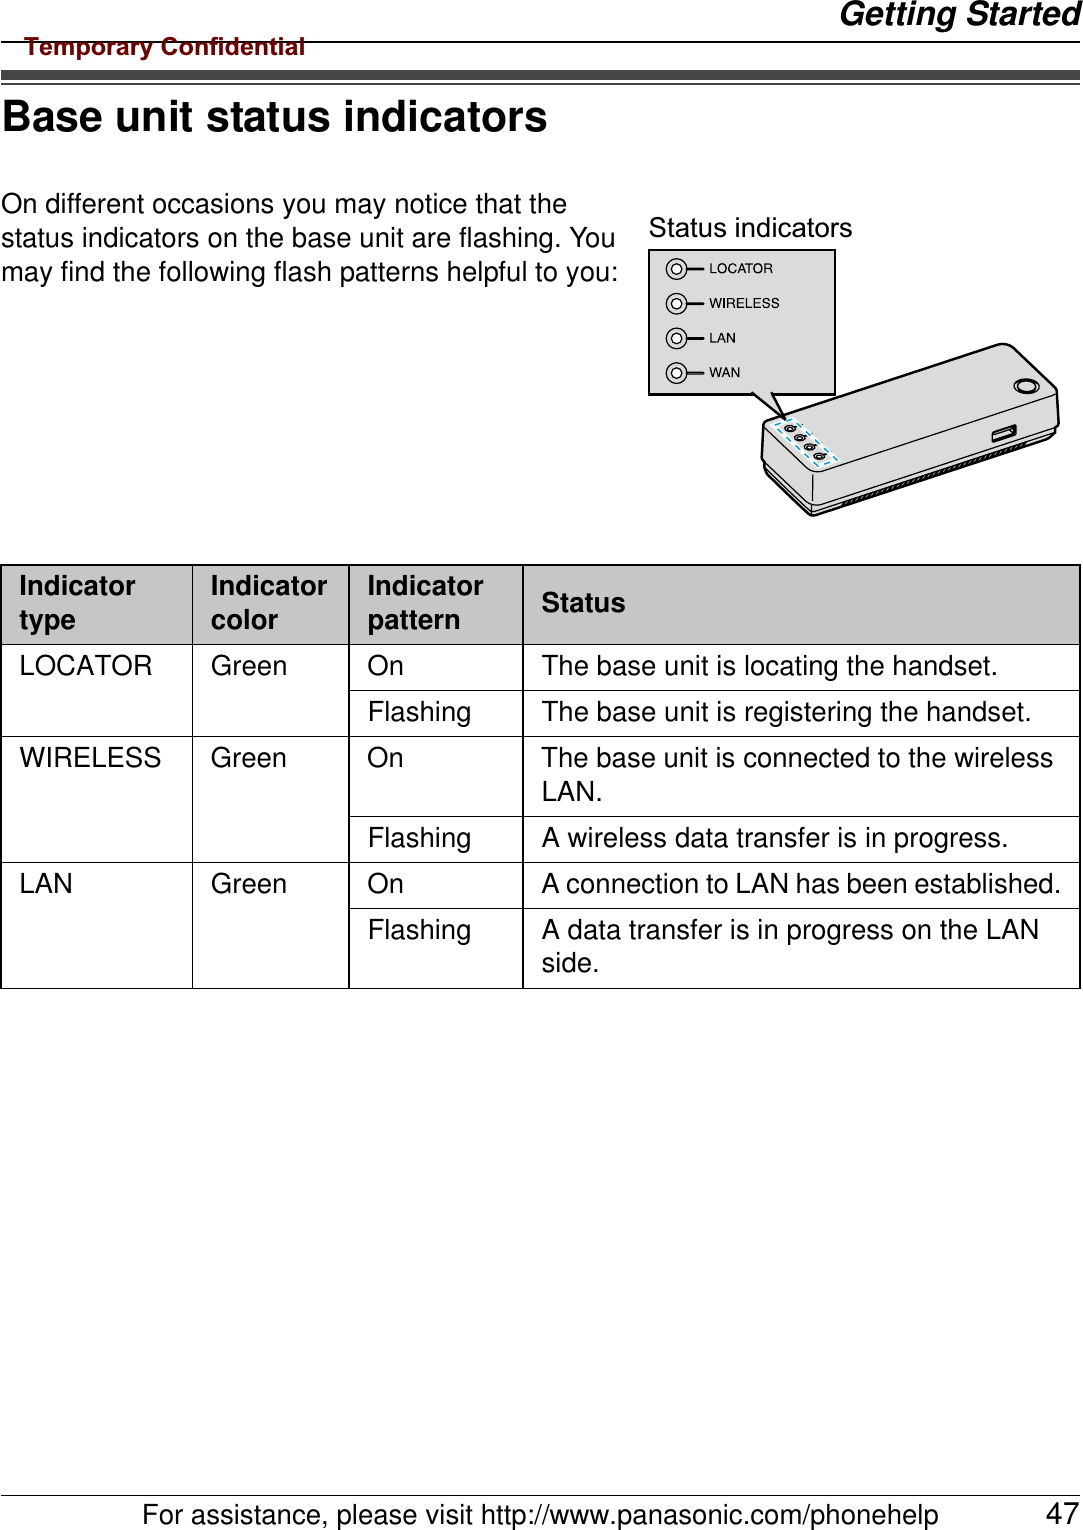
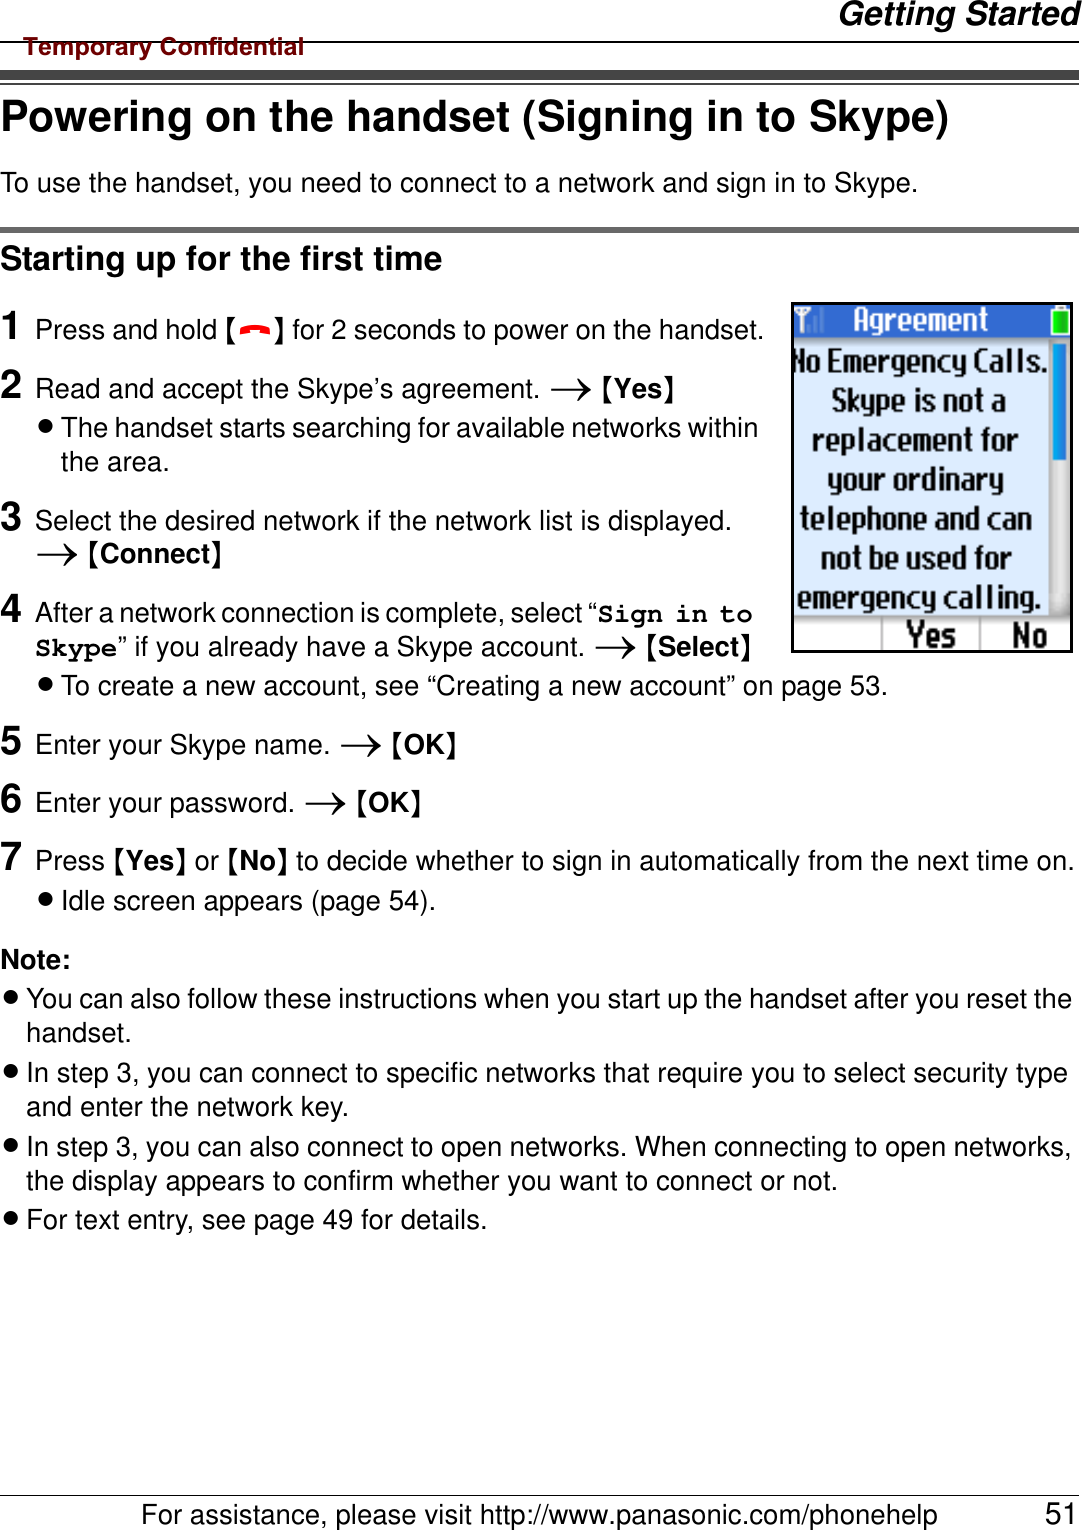
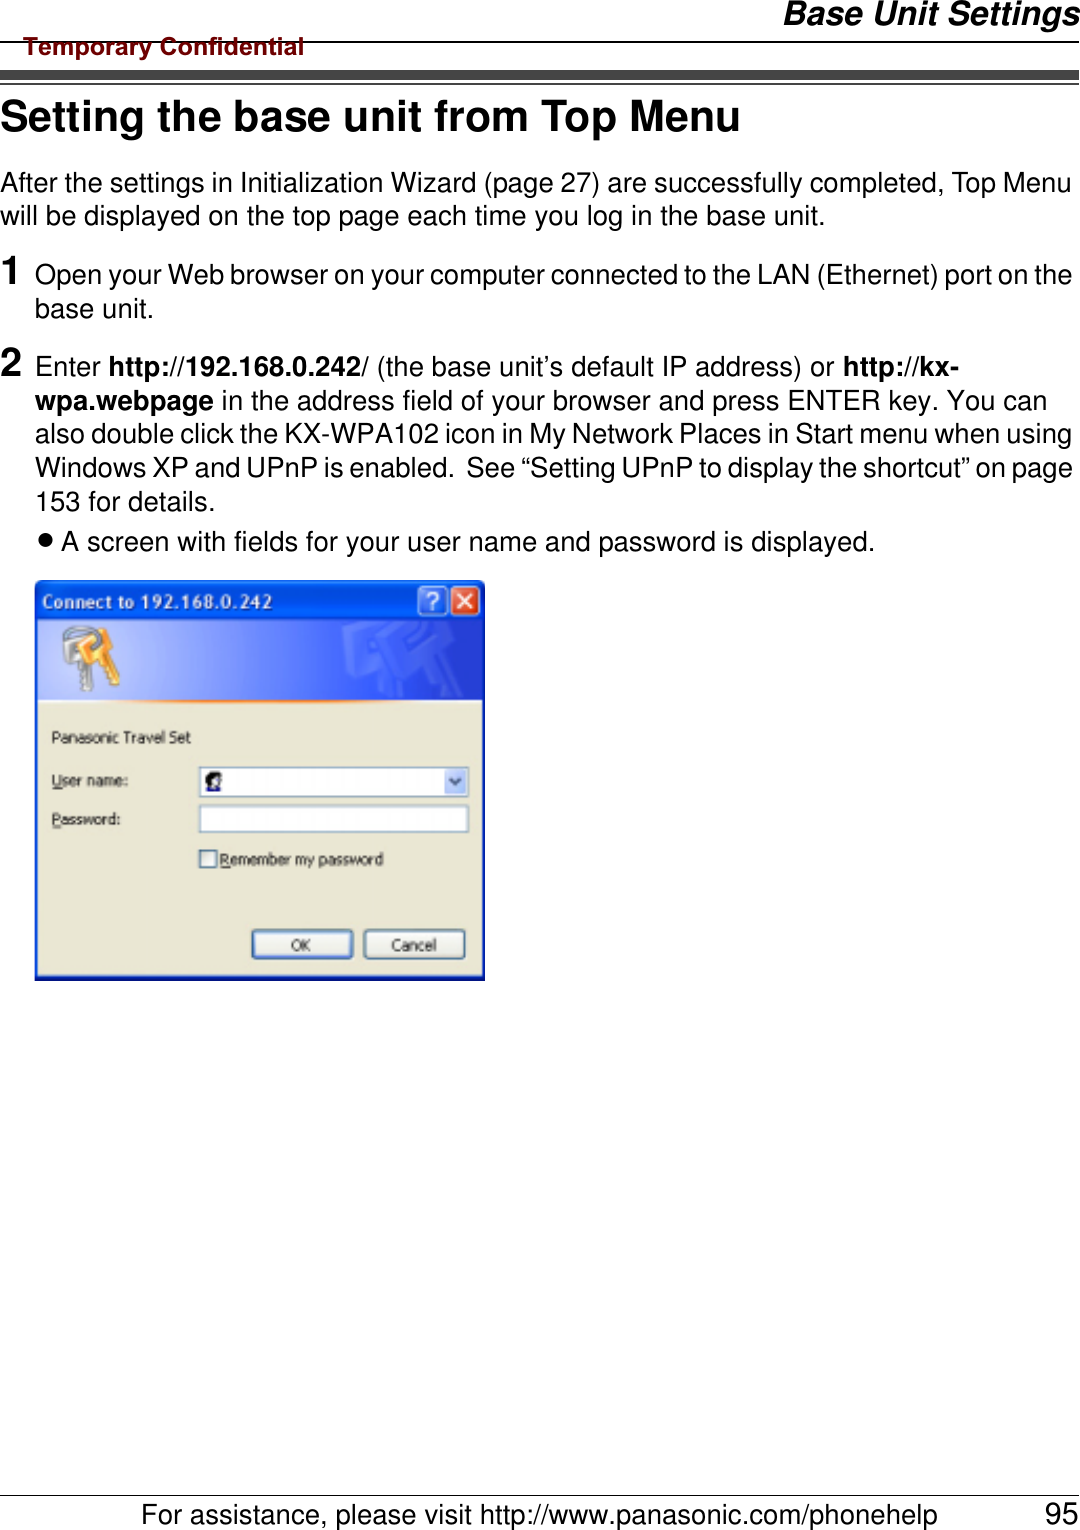
![Getting Started24 For assistance, please visit http://www.panasonic.com/phonehelpAP (Bridge) mode - With an EXISTING ROUTER or MODEM with a built-in ROUTERIf you install the base unit with your existing router or modem with a built-in router, the base unit operates in AP (Bridge) mode. Select [AP (Bridge)] mode for your Internet connection type in Initialization Wizard (page 27). In AP (Bridge) mode, the base unit connects wireless devices to one another and to the LAN, and allows wireless devices to use DHCP server on the LAN.1Switch the Mode selector to “HOME”.2Turn off your computer properly. Unplug any cable connecting your existing router (or modem with a built-in router) to your computer. However, your existing router (or modem with a built-in router) needs to remain connected to your cable or DSL modem.3Make sure the base unit is left unplugged. Connect the included Ethernet cable to the “WAN” port on the base unit and an unused Ethernet (LAN) port on your existing router or modem with a built-in router.1WAN indicatorBase unitMode selector352AC adaptorTo AC outlet(120 V AC, 60 Hz)To LAN portTo WAN portEthernet cable (not included)Existing router Cable or DSL modemEthernet cable (included)ComputerInternetAC cord4Temporary Confidential](https://usermanual.wiki/Panasonic-of-North-America/96NKX-WP1050/User-Guide-706359-Page-24.png)
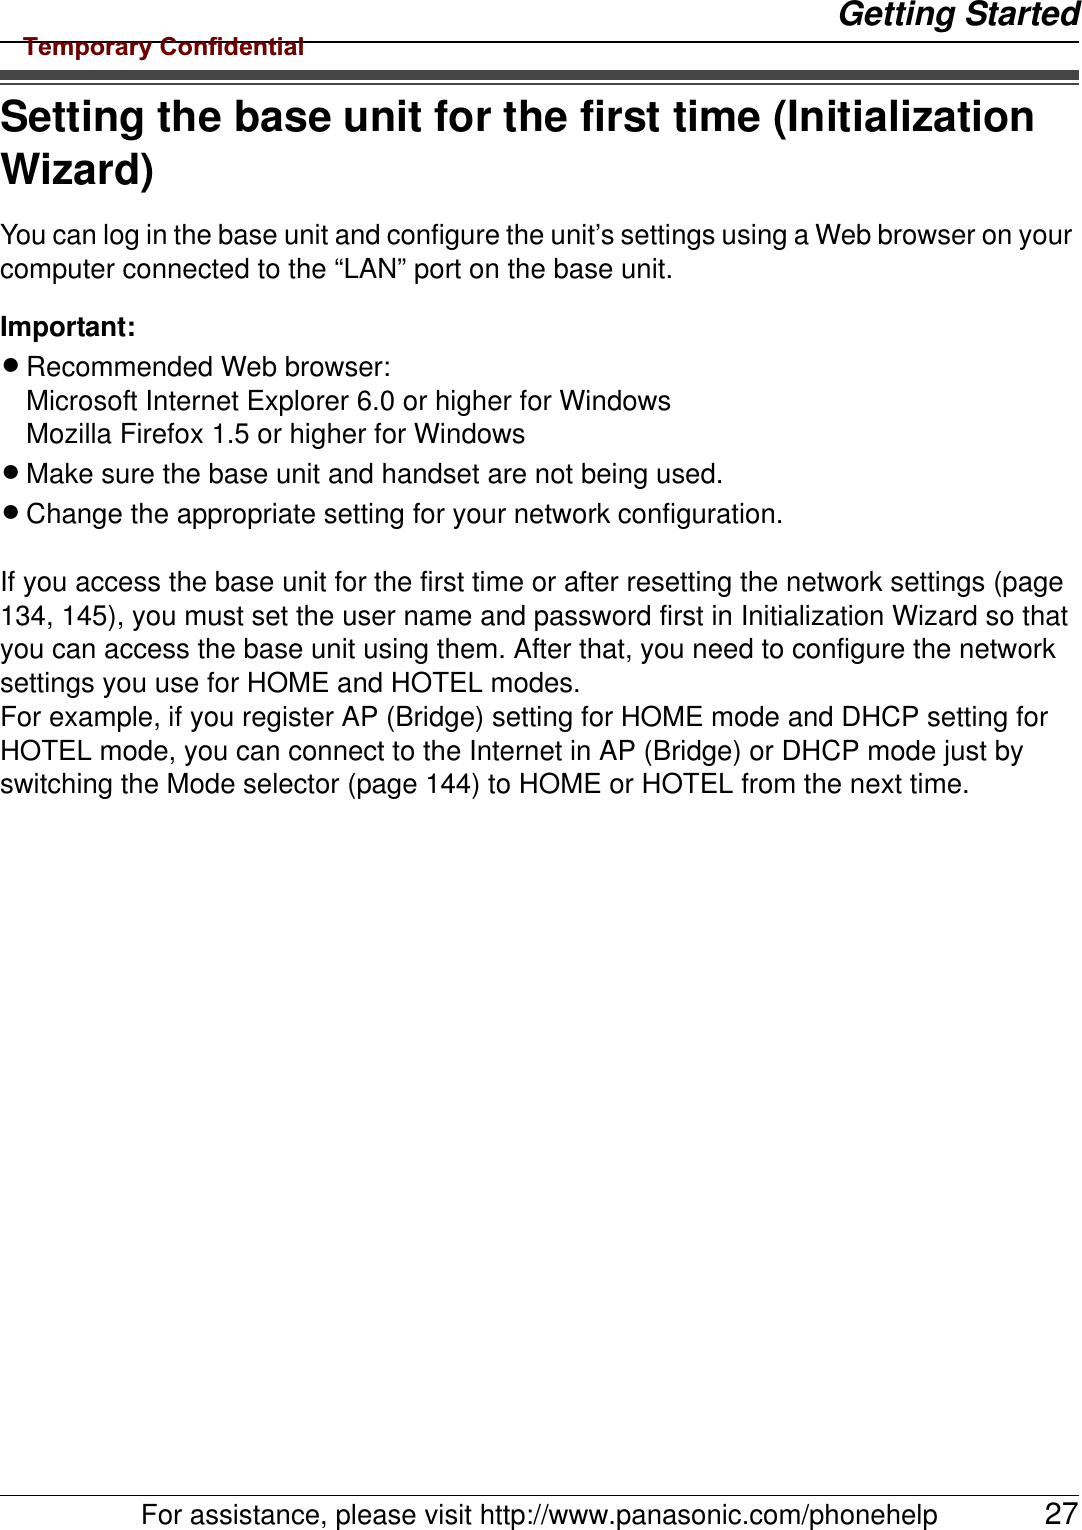
![Getting StartedFor assistance, please visit http://www.panasonic.com/phonehelp 254Connect the existing Ethernet cable to the “LAN” port on the base unit and the Ethernet (LAN) port on your computer (the same Ethernet (LAN) port you have just unplugged the router from in step 2).5Connect the included AC adaptor cord to the power port on the base unit and an AC outlet.LWhen the base unit turns on (The WAN indicator lights in green or amber), the installation is complete.Router mode - With a MODEM onlyIf you install the base unit with a modem only, the base unit operates in Router mode. In Router mode, the base unit assigns IP addresses to wireless devices as a DHCP server. It also protects the wireless devices from directly exposing to the LAN. For your Internet connection type, select [DHCP], [Static] or [PPPoE] in Initialization Wizard (page 27).1Switch the Mode selector to “HOME”.2Turn off your computer properly. Unplug your cable or DSL modem’s power cord and leave the modem turned off for at least 10 minutes to clear its memory. Unplug any AC adaptorTo AC outlet(120 V AC, 60 Hz)To WAN portEthernet cable (included) Cable or DSL modemInternetAC cord1WAN indicatorBase unitMode selectorTo LAN portEthernet cable (not included)Computer43622, 5Temporary Confidential](https://usermanual.wiki/Panasonic-of-North-America/96NKX-WP1050/User-Guide-706359-Page-25.png)
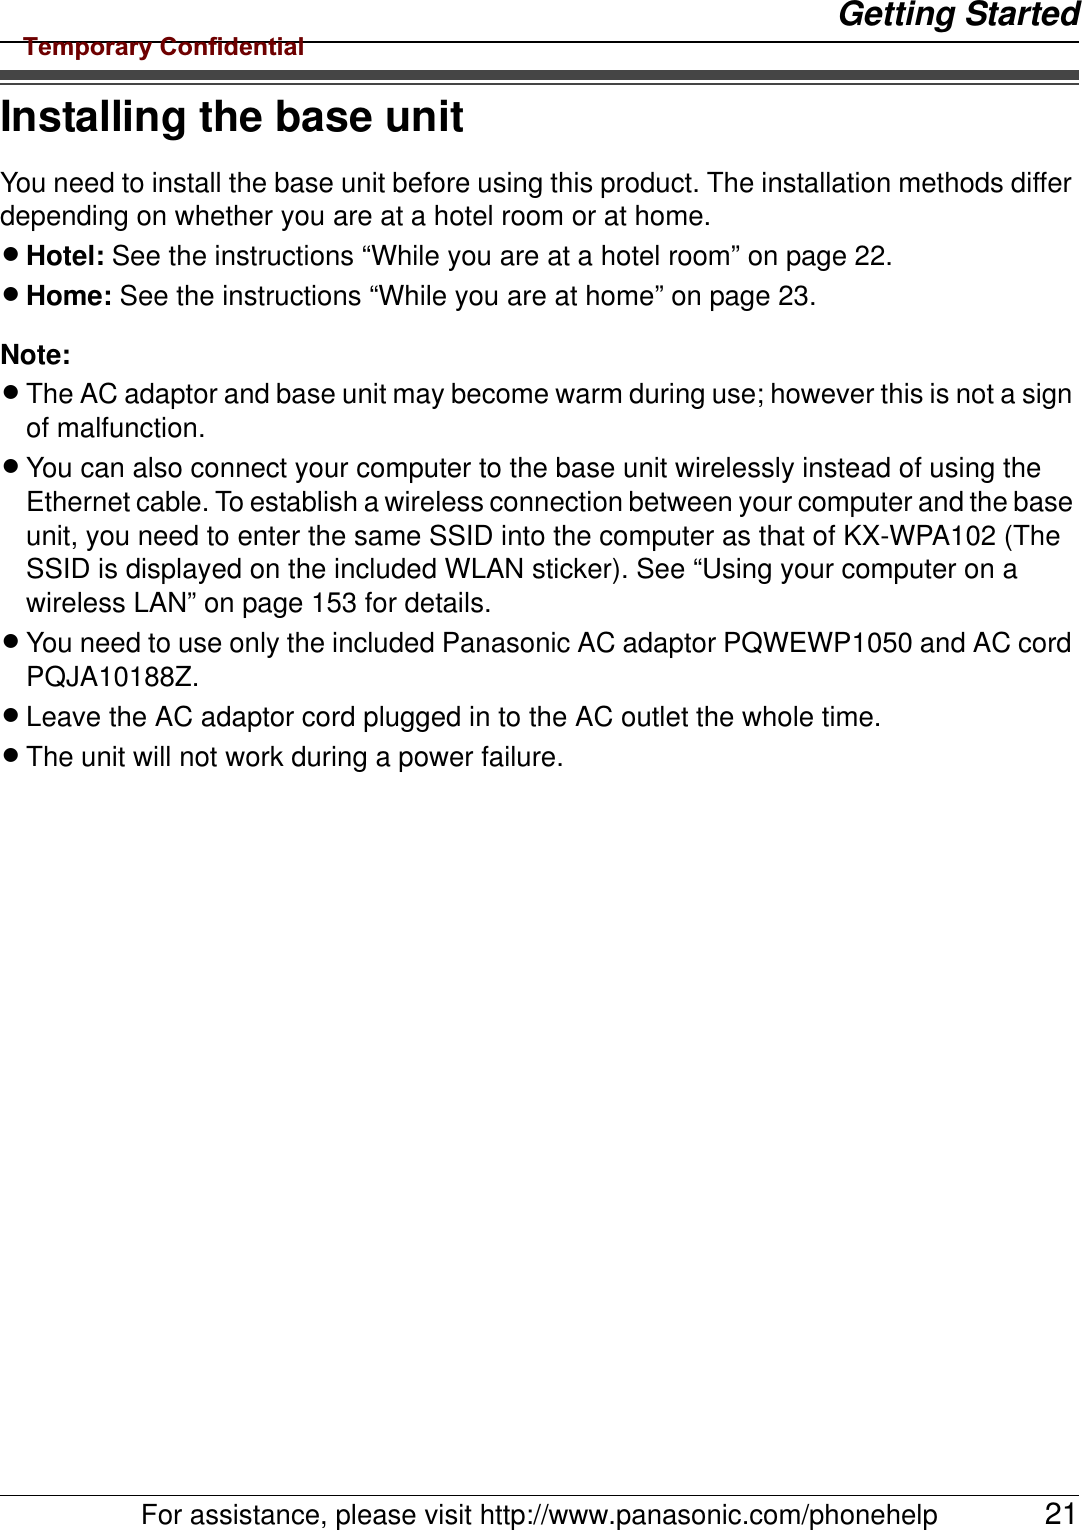
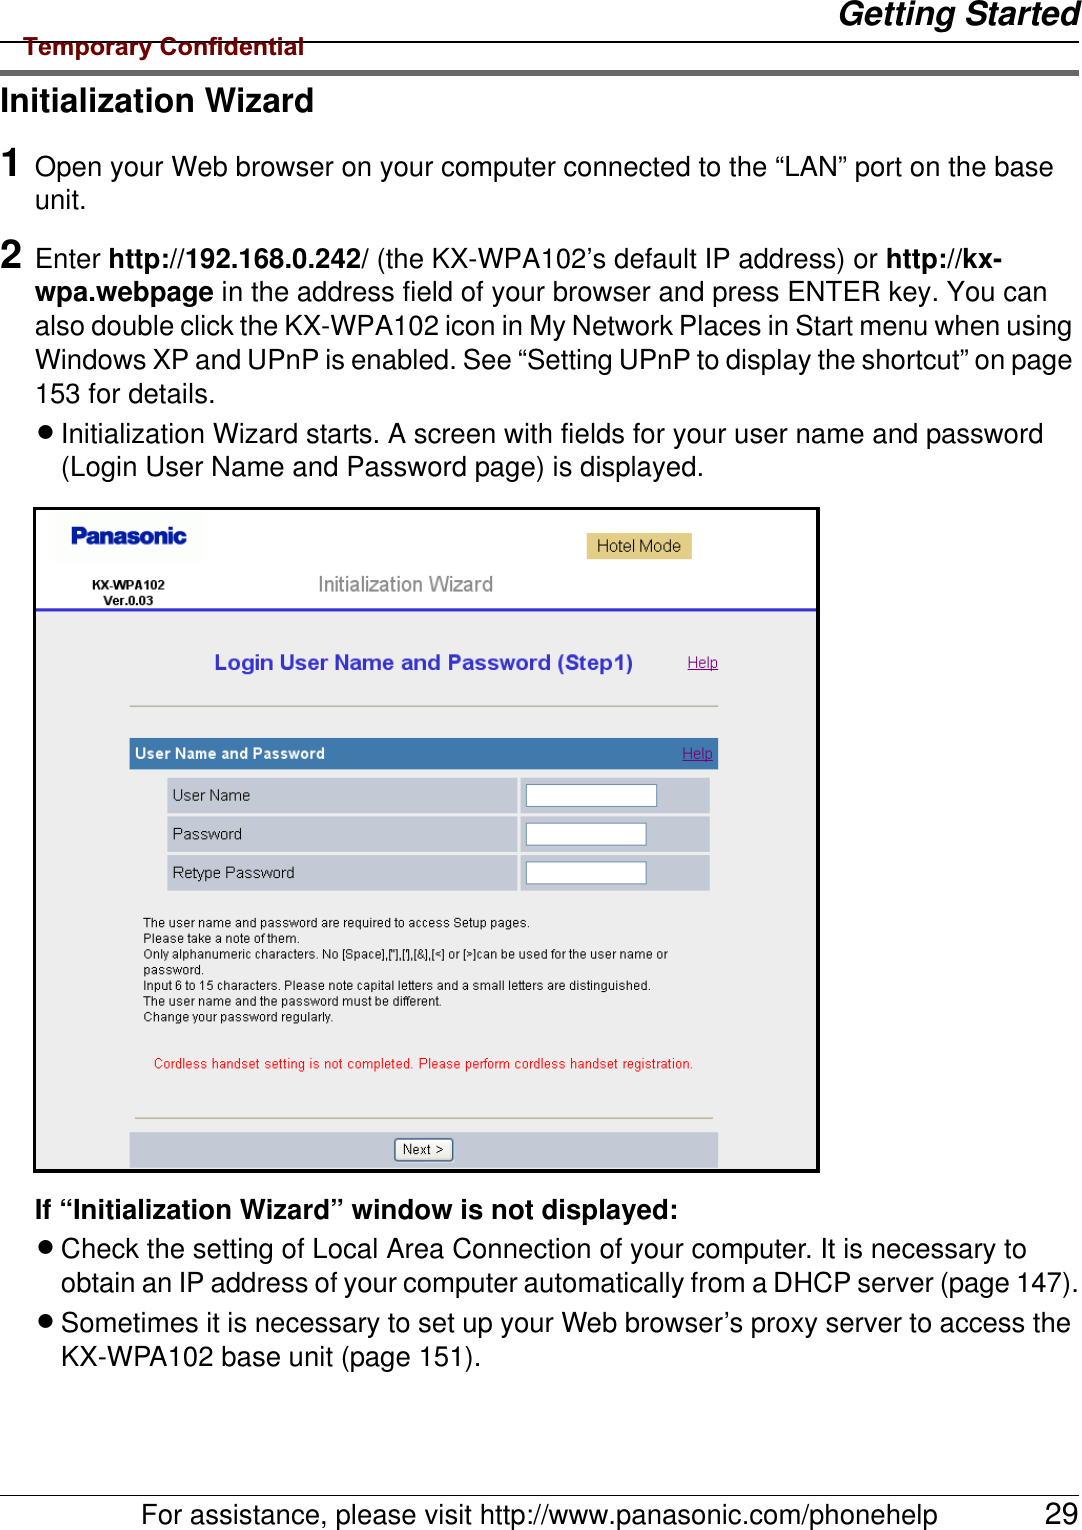
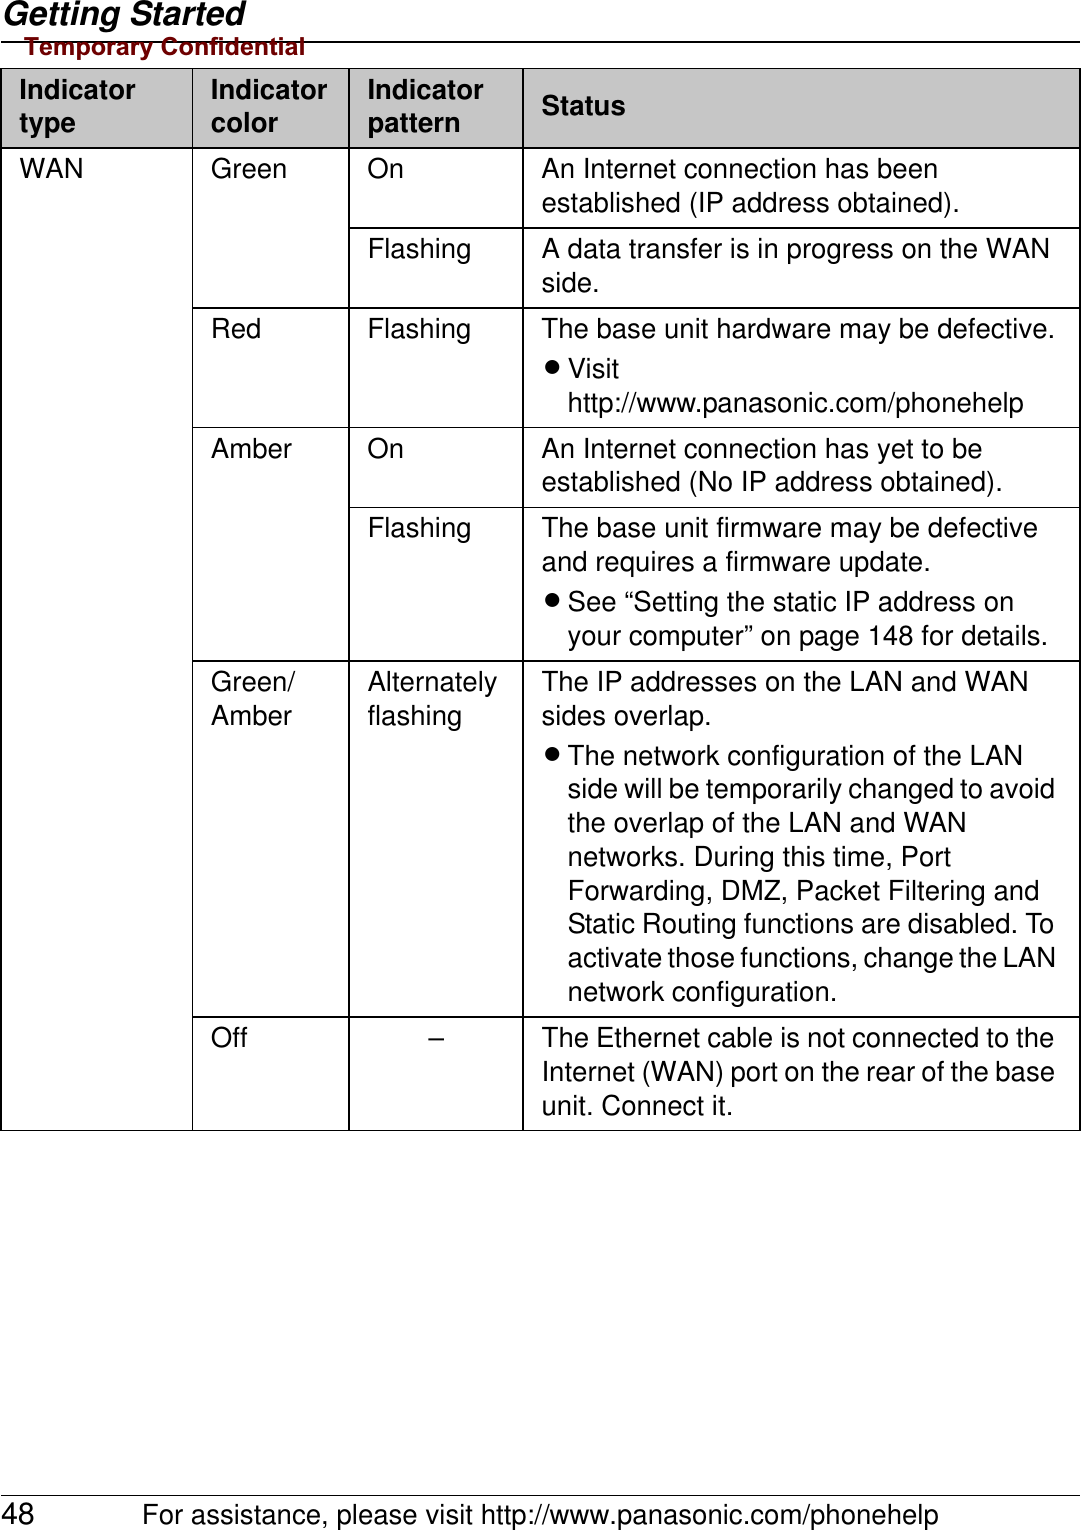
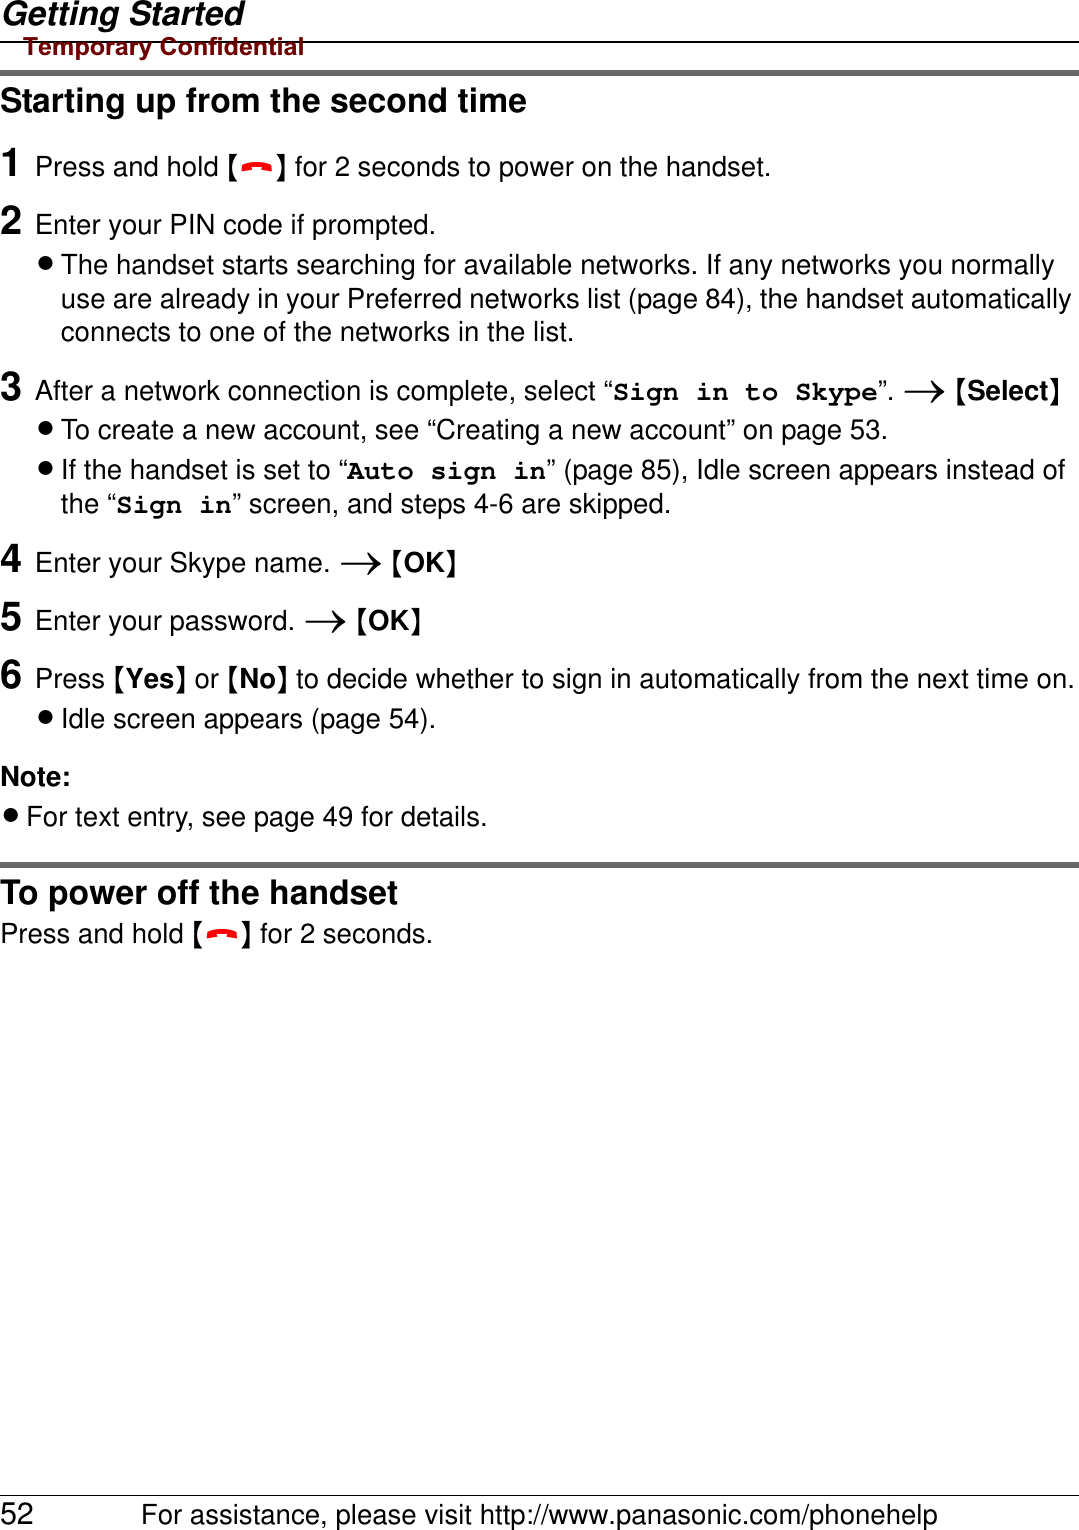
![Getting Started28 For assistance, please visit http://www.panasonic.com/phonehelpInitialization Wizard flowFollow the procedures below to set the base unit for Internet connection.If you check [Skip by setting] in stage 2, you can skip to stage 5 without configuring the Internet connection settings for the HOME mode profile. If you check [Skip by setting] in stage 5, you can skip to stage 8 without configuring the Internet connection settings for the HOTEL mode profile.1Login User Name and Password (Step 1)Set your user name and password to log in the base unit.page 292Internet Connection Setting for Home Mode (Step 2)Name the profile of the Internet connection setting for HOME mode.page 303Internet Connection TypeSelect the Internet connection type used for the HOME mode profile.(Types available: PPPoE/DHCP/Static/AP (Bridge))page 314(Internet Connection Type) ConfigurationConfigure the Internet connection type selected for the HOME mode profile. page 365Internet Connection Setting for Hotel Mode (Step 3)Name the profile of the Internet connection setting for HOTEL mode.page 336Internet Connection TypeSelect the Internet connection type used for the HOTEL mode profile. (Types available: PPPoE/DHCP/Static) page 347(Internet Connection Type) ConfigurationConfigure the Internet connection type selected for the HOTEL mode profile. page 368Save SettingsConfirm the settings you have configured in Initialization Wizard, and save.page 35Temporary Confidential](https://usermanual.wiki/Panasonic-of-North-America/96NKX-WP1050/User-Guide-706359-Page-28.png)
![Getting Started30 For assistance, please visit http://www.panasonic.com/phonehelp3Enter the desired user name and password, then click [Next>].Important:LPlease keep your user name and password securely.LThe Internet Connection Setting for Home Mode page is displayed.Setting Description[User Name] LThe user name and password can contain 6 to 15 characters (including numbers).LThe following cannot be used: [ “ ], [ ‘ ], [&], [<], [>], [(space)]LUser name and password must be different from each other.LUser name and password are case-sensitive.[Password][Retype Password]LEnter the password again.Temporary Confidential](https://usermanual.wiki/Panasonic-of-North-America/96NKX-WP1050/User-Guide-706359-Page-30.png)
![Getting StartedFor assistance, please visit http://www.panasonic.com/phonehelp 314Enter the desired profile name for the profile No. you select, then click [Next>].LIf you wish to use the default Internet connection setting (DHCP), check [Skip by setting].LThe Internet Connection Type page is displayed.Note:LIf you check [Skip by setting], the page will not be displayed.Setting Description[Profile Name] LThe profile name can contain 1 to 20 characters (including numbers). When different network connection settings are created for different network environments, a profile name should be given to each setting to distinguish one from another. Name the setting, for example, “Hotel”, “Home” or “Office”. [Profile No.] LSelect the number for the profile name.Temporary Confidential](https://usermanual.wiki/Panasonic-of-North-America/96NKX-WP1050/User-Guide-706359-Page-31.png)
![Getting Started32 For assistance, please visit http://www.panasonic.com/phonehelp5Select the desired connection type used in HOME mode, then click [Next>].LInternet connection modes vary according to the Internet service provider. Select a connection mode referring to the Internet service provider’s setup information.LSelect [PPPoE], [DHCP] or [Static] if the base unit is installed in Router mode. Select [AP (Bridge)] if the base unit is installed in AP (Bridge) mode.LA screen with fields for configuring the connection type you select in this step is displayed. See “Configuring the Internet connection settings” on page 36.Setting Description[PPPoE] LThis connection mode is usually required for use with DSL modems.[DHCP] LAllows the base unit to receive an IP address automatically from a DHCP server. This connection mode is usually required for use with cable modems.[Static] LAllows the base unit to assign a specific IP address.[AP (Bridge)] LAllows the base unit to work as an access point when you have a router at home. ([AP (Bridge)] is not available in HOTEL mode.)Temporary Confidential](https://usermanual.wiki/Panasonic-of-North-America/96NKX-WP1050/User-Guide-706359-Page-32.png)
![Getting StartedFor assistance, please visit http://www.panasonic.com/phonehelp 336Configure the settings, then click [Next>].LThe Internet Connection Setting for Hotel Mode page is displayed.Temporary Confidential](https://usermanual.wiki/Panasonic-of-North-America/96NKX-WP1050/User-Guide-706359-Page-33.png)
![Getting Started34 For assistance, please visit http://www.panasonic.com/phonehelp7Enter the desired profile name for the profile No. you select, then click [Next>].LIf you wish to use the default Internet connection setting (DHCP), check [Skip by setting].LSee step 4 on page 31 for details.LThe Internet Connection Type page is displayed.Note:LIf you check [Skip by setting], the Internet Connection Type page will not be displayed.8Select the desired connection type used in HOTEL mode, then click [Next>].L[DHCP] mode (default setting for hotel Internet connection type) is often used in hotel rooms.Setting Description[PPPoE] LThis connection mode is usually required for use with DSL modems.[DHCP] LAllows the base unit to receive an IP address automatically from a DHCP server. This connection mode is usually required for use with cable modems.[Static] LAllows the base unit to assign a specific IP address.Temporary Confidential](https://usermanual.wiki/Panasonic-of-North-America/96NKX-WP1050/User-Guide-706359-Page-34.png)
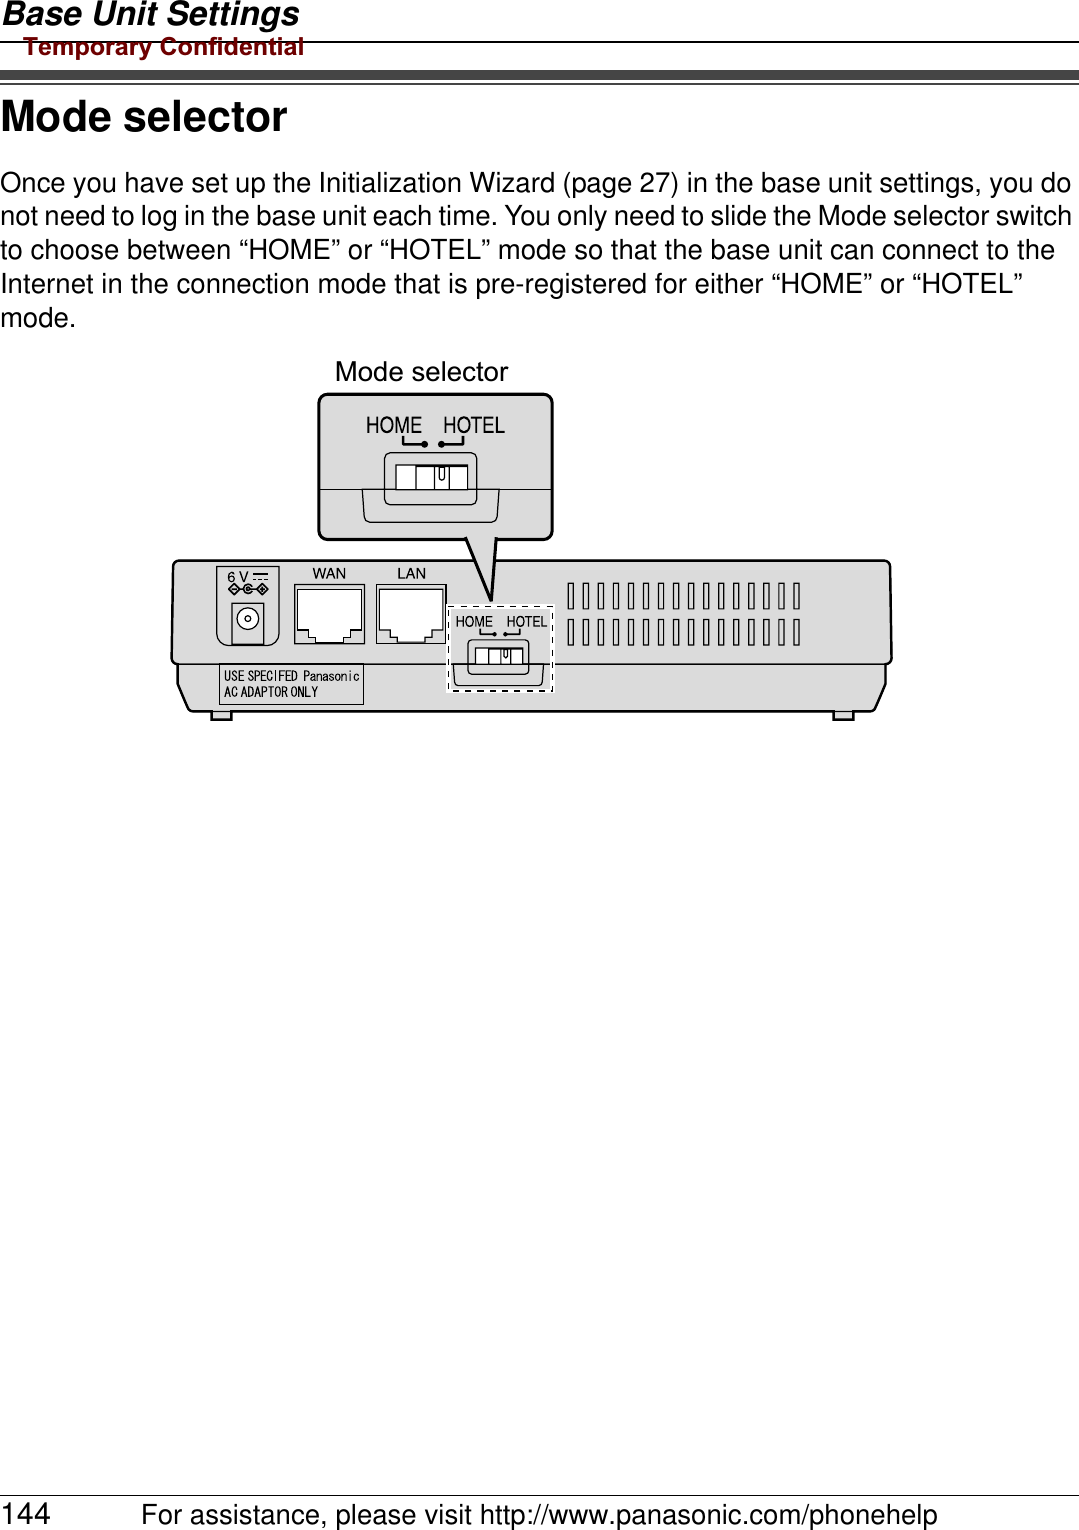
![Getting StartedFor assistance, please visit http://www.panasonic.com/phonehelp 35LA screen with fields for configuring the connection type you select in this step is displayed. See “Configuring the Internet connection settings” on page 36.9Configure the settings, then click [Next>].LThe Save Settings page is displayed.10 Confirm the settings you are about to save, then click [Save].LThe base unit begins restarting.Note:LYou can change the user name and password after logging in to the base unit (page 131).LOnce you have configured the settings in Initialization Wizard, you can connect to the Internet in the connection mode that is registered as HOME or HOTEL mode just by switching the Mode selector (page 144) to HOME or HOTEL from the next time.Temporary Confidential](https://usermanual.wiki/Panasonic-of-North-America/96NKX-WP1050/User-Guide-706359-Page-35.png)
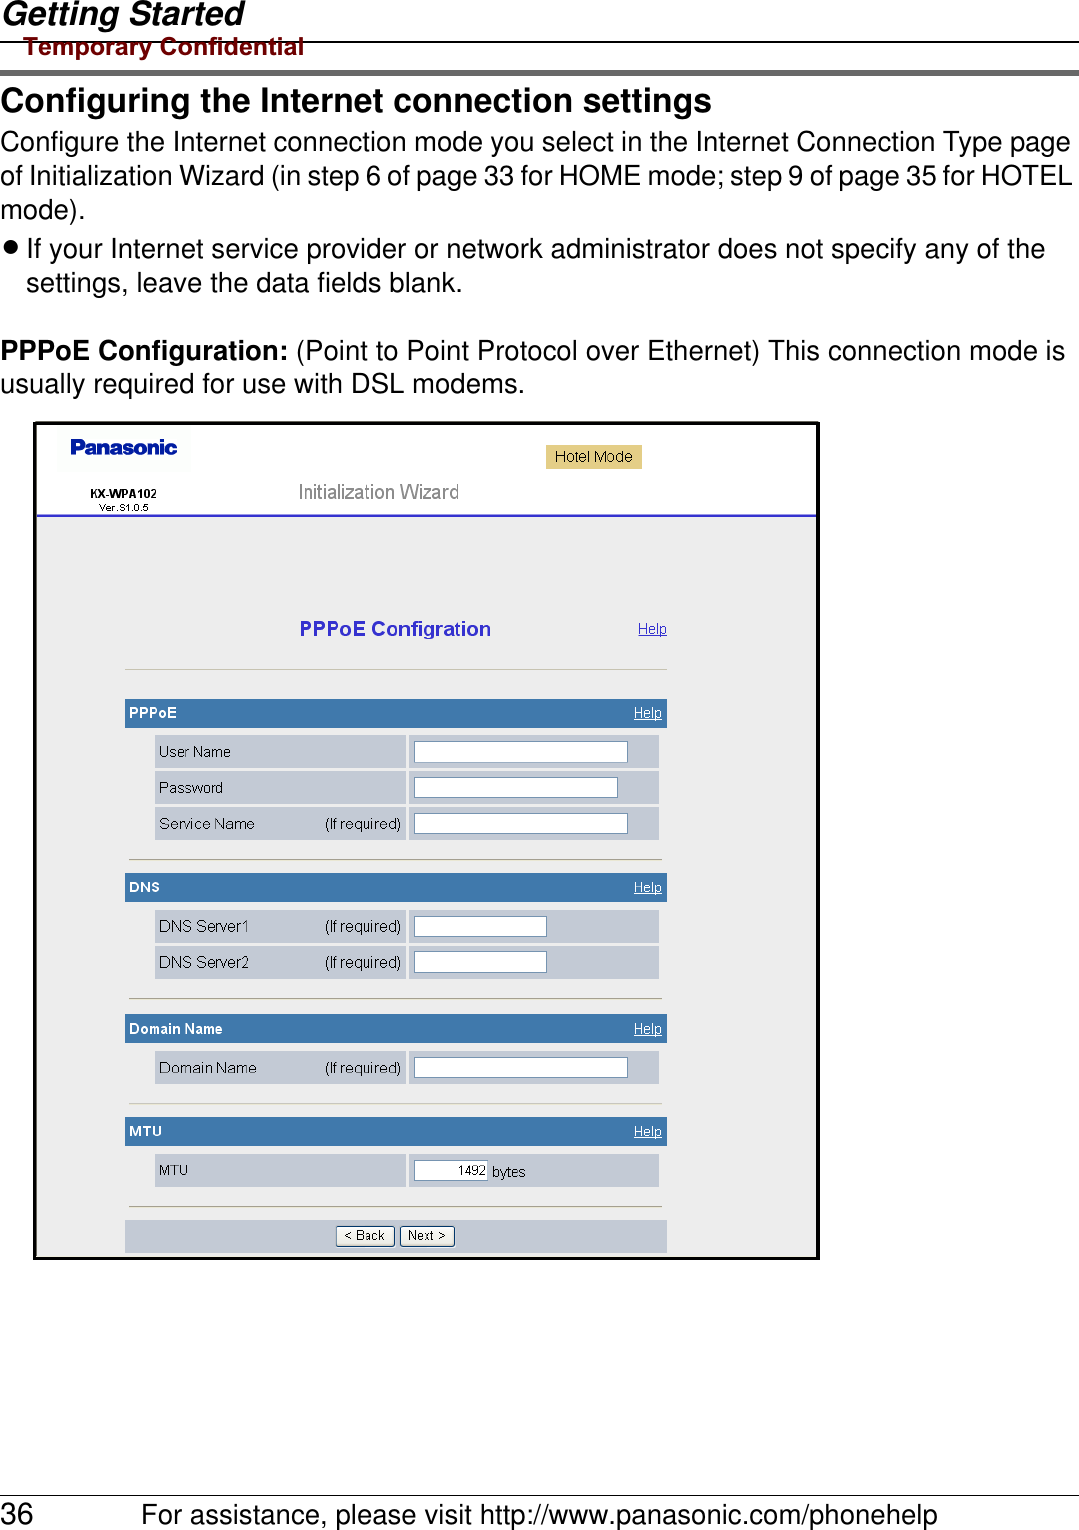
![Getting StartedFor assistance, please visit http://www.panasonic.com/phonehelp 37Setting Description[User Name] LEnter your User Name (1 – 63 characters) provided by your Internet service provider in this data field.[Password] LEnter your Password (1 – 63 characters) provided by your Internet service provider in this data field.[Service Name] LEnter your Service Name (1 – 63 alphanumeric characters) provided by your Internet service provider in this data field if required.[DNS Server 1] LIf you have the DNS (Domain Name System) server addresses assigned by your Internet service provider or network administrator, enter them in this data field. They usually have two addresses.LSet 4 digits (0 – 255) and 3 periods such as “192.168.0.253”. But “0.0.0.0” and “255.255.255.255” are not available.[DNS Server 2][Domain Name] LEnter your Domain Name provided by your Internet service provider in this data field if required.[MTU] LEnter the maximum size of packet that can be sent.Temporary Confidential](https://usermanual.wiki/Panasonic-of-North-America/96NKX-WP1050/User-Guide-706359-Page-37.png)
![Getting Started38 For assistance, please visit http://www.panasonic.com/phonehelpDHCP Configuration: Allows the base unit to receive an IP address automatically from a DHCP server. This connection mode is usually required for use with cable modems. DHCP configuration is often used in hotel rooms. Ask the hotel front desk for details.Setting Description[DNS Server 1] LIf you have the DNS (Domain Name System) server addresses assigned by your Internet service provider or network administrator, enter them in this data field. They usually have two addresses.LSet 4 digits (0 – 255) and 3 periods such as “192.168.0.253”. But “0.0.0.0” and “255.255.255.255” are not available.[DNS Server 2][Host Name] LEnter your Host Name (1 – 31 characters) provided by your Internet service provider in this data field if required.[Domain Name] LEnter your Domain Name provided by your Internet service provider in this data field if required.[MTU] LEnter the maximum size of packet that can be sent.Temporary Confidential](https://usermanual.wiki/Panasonic-of-North-America/96NKX-WP1050/User-Guide-706359-Page-38.png)
![Getting StartedFor assistance, please visit http://www.panasonic.com/phonehelp 39Static Configuration: Allows the base unit to assign a specific IP address.Setting Description[IP Address] LIf your Internet service provider specifies the IP address and subnet mask, enter them in each data field.LSet 4 digits (0 – 255) and 3 periods such as “192.168.0.253”. But “0.0.0.0” and “255.255.255.255” are not available.[Subnet Mask][Default Gateway] LIf you have the Default Gateway address assigned by your Internet service provider or network administrator, enter it in this data field.LSet 4 digits (0 – 255) and 3 periods such as “192.168.0.253”. But “0.0.0.0” and “255.255.255.255” are not available.Temporary Confidential](https://usermanual.wiki/Panasonic-of-North-America/96NKX-WP1050/User-Guide-706359-Page-39.png)
![Getting Started40 For assistance, please visit http://www.panasonic.com/phonehelp[DNS Server 1] LIf you have the DNS (Domain Name System) server addresses assigned by your Internet service provider or network administrator, enter them in this data field. They usually have two addresses.LSet 4 digits (0 – 255) and 3 periods such as “192.168.0.253”. But “0.0.0.0” and “255.255.255.255” are not available.[DNS Server 2][Domain Name] LEnter your Domain Name provided by your Internet service provider in this data field if required.[MTU] LEnter the maximum size of packet that can be sent.Setting DescriptionTemporary Confidential](https://usermanual.wiki/Panasonic-of-North-America/96NKX-WP1050/User-Guide-706359-Page-40.png)
![Getting StartedFor assistance, please visit http://www.panasonic.com/phonehelp 41AP Configuration: This configuration needs to be made if you have a router at home and use the base unit as an access point. (AP Configuration is not available in the HOTEL mode.)Setting Description[Connection Mode] LSelect AP-DHCP for Connection Mode if the DHCP server is operating in the router or modem with a built-in router you are using. Select AP-Static if you want to assign Static IP address.[IP Address] LSet the IP address and subnet mask corresponding to your local network.LSet 4 digits (0 – 255) and 3 periods such as “192.168.0.253”. But “0.0.0.0” and “255.255.255.255” are not available.[Subnet Mask][Default Gateway] LSet the default gateway address corresponding to your local network by entering the IP address of your existing router or modem with a built-in router, for example.LSet 4 digits (0 – 255) and 3 periods such as “192.168.0.253”. But “0.0.0.0” and “255.255.255.255” are not available.Temporary Confidential](https://usermanual.wiki/Panasonic-of-North-America/96NKX-WP1050/User-Guide-706359-Page-41.png)


![Base Unit SettingsFor assistance, please visit http://www.panasonic.com/phonehelp 97Network ConnectionCreating a new profile of network connection1Click [Network Connection] on Top Menu.2Click [New Profile] under the Network Connection heading.Temporary Confidential](https://usermanual.wiki/Panasonic-of-North-America/96NKX-WP1050/User-Guide-706359-Page-97.png)
![Base Unit Settings98 For assistance, please visit http://www.panasonic.com/phonehelp3Enter the profile name.4Select the mode, then click [Next>].5Select the connection mode, then click [Next>].6Configure the connection mode you select in step 5, then click [Next>]. LSee “Configuring the Internet connection settings” on page 36 for instructions.7Confirm the settings you are about to save, then click [Save].8Click [Restart].LThe base unit restarts in the connection mode that is registered as HOTEL or HOME mode profile you have just created (The position of the Mode selector switch determines the connection mode.).Modifying the existing network connection profile1Click [Network Connection] on Top Menu.2Click [Modify] under the Network Connection heading.Temporary Confidential](https://usermanual.wiki/Panasonic-of-North-America/96NKX-WP1050/User-Guide-706359-Page-98.png)
![Base Unit SettingsFor assistance, please visit http://www.panasonic.com/phonehelp 993Select the profile you wish to modify from the pull-down menu under the Select Profile heading, then click [Edit].LTo delete a profile, select the desired profile from the pull-down menu and click [Delete].4Configure the connection mode of the profile you select in step 3, then click [Next>].LSee “Configuring the Internet connection settings” on page 36 for instructions.5Confirm the settings you are about to save, then click [Save].6Click [Restart].LThe base unit restarts in the connection mode that is registered as HOTEL or HOME mode profile you have just created (The position of the Mode selector switch determines the connection mode). However, editing AP (Bridge) mode profile while the Mode selector is switched to “HOTEL” does not restart the base unit in AP (Bridge) mode profile.Note:LIn step 3, if you delete the profile you are currently using for HOTEL or HOME mode, the profile will be reset to the default setting (DHCP).Temporary Confidential](https://usermanual.wiki/Panasonic-of-North-America/96NKX-WP1050/User-Guide-706359-Page-99.png)
![Base Unit Settings100 For assistance, please visit http://www.panasonic.com/phonehelpModifying the wireless information1Click [Network Connection] on Top Menu.2Click [Modify] under the Wireless Information heading.3Configure the wireless connection basic settings, then click [Next>].4Configure the wireless connection security settings, then click [Save].5Click [Restart].Setting Description[Mode] LSelect your wireless network mode from the pull-down menu.[Channel] LSelect [Auto] or the desired channel from [1] to [11].[Network Name (SSID)]LEnter your wireless network name (SSID) in this data field.[Broadcast SSID] LEnable or disable the setting to broadcast your SSID.Setting Description[Security Mode] LSelect the desired Security Mode.[WPA-PSK/WPA2-PSK Data Encryption]LSelect the desired Data Encryption method.[Network key] LEnter the network key containing 10 hexadecimal, 26 hexadecimal, 5 alphanumeric or 13 alphanumeric characters.LPress [View] to display the network key.[Session-Key renewal interval]LSet the interval for refreshing the encryption key between 30 and 604800 seconds. 604800 seconds is the equivalent of one week.[Key Index] LSelect [Key 2] or [Key 3] to be used if you use WEP.Temporary Confidential](https://usermanual.wiki/Panasonic-of-North-America/96NKX-WP1050/User-Guide-706359-Page-100.png)
![Base Unit SettingsFor assistance, please visit http://www.panasonic.com/phonehelp 101Updating the firmwareTo prevent leaks of customer information, illegal operation of this product, interference or involuntary shutdown etc., update firmware regularly. The most recent firmware file can be found on Panasonic’s Support Website (http://panasonic.biz).1Click [Update Firmware] on Top Menu.2Check for the latest version by clicking the support information URL.3If the version is updated, download the updated firmware to your PC.4Enter the file name of the downloaded firmware under the “Update Firmware” heading.LYou can also click [Browse...] to select the firmware file name from the list.5Click [Update].LThe base unit automatically restarts after the firmware is updated.Temporary Confidential](https://usermanual.wiki/Panasonic-of-North-America/96NKX-WP1050/User-Guide-706359-Page-101.png)
![Base Unit SettingsFor assistance, please visit http://www.panasonic.com/phonehelp 103Advanced Setup1Click [Advanced Setup] on Top Menu.2Click the desired tab, then click the desired item from the menu on the left side.*1 While in AP (Bridge) mode, Interface Status is displayed instead of WAN Interface Status and LAN Interface Status.*2 While in AP (Bridge) mode, these menus are not available.Tab Menu Sub-menu1 Sub-menu2 PageStatus Network Status WAN Interface Status*1 106LAN Interface Status*1Routing TableARP TableDHCP Lease Table DHCP Server Status*2 107DHCP Lease Table*2UPnP Port Mapping Table UPnP Status*2 108UPnP Port Mapping Table*2Wireless Status – 108Handset Status – 109Version Information –109Save Status – 110Basic Internet Connection Profiles 111Profiles SelectionMAC Address Clone –112Temporary Confidential](https://usermanual.wiki/Panasonic-of-North-America/96NKX-WP1050/User-Guide-706359-Page-103.png)
![Base Unit Settings106 For assistance, please visit http://www.panasonic.com/phonehelpStatus1Click the [Status] tab, then click the desired item on the left.[Network Status] Shows the WAN/LAN interface status, and routing and ARP tables.Temporary Confidential](https://usermanual.wiki/Panasonic-of-North-America/96NKX-WP1050/User-Guide-706359-Page-106.png)
![Base Unit SettingsFor assistance, please visit http://www.panasonic.com/phonehelp 107[DHCP Lease Table] Shows the DHCP server status and lease table.Temporary Confidential](https://usermanual.wiki/Panasonic-of-North-America/96NKX-WP1050/User-Guide-706359-Page-107.png)
![Base Unit Settings108 For assistance, please visit http://www.panasonic.com/phonehelp[UPnP Port Mapping Table] Shows the UPnP status and port mapping table.[Wireless Status] Shows the wireless LAN status.Temporary Confidential](https://usermanual.wiki/Panasonic-of-North-America/96NKX-WP1050/User-Guide-706359-Page-108.png)
![Base Unit SettingsFor assistance, please visit http://www.panasonic.com/phonehelp 109[Handset Status] Shows the handset connection status.Note:LIt may take a while to display this screen in order to check if the handset is connected.[Version Information] Shows the firmware version information.Temporary Confidential](https://usermanual.wiki/Panasonic-of-North-America/96NKX-WP1050/User-Guide-706359-Page-109.png)
![Base Unit Settings110 For assistance, please visit http://www.panasonic.com/phonehelp[Save Status] Allows you to save the status.Temporary Confidential](https://usermanual.wiki/Panasonic-of-North-America/96NKX-WP1050/User-Guide-706359-Page-110.png)
![Base Unit SettingsFor assistance, please visit http://www.panasonic.com/phonehelp 111Basic settingInternet Connection:This feature allows you to select and configure the Internet connection mode.1Click [Advanced Setup] on Top Menu.2Click the [Basic] tab, then click [Internet Connection].3Under the Profiles heading, click the entry number of the desired Internet connection profile to configure the Internet connection mode of the desired profile.4Click the desired Internet connection mode under the Connection Mode heading.5Configure the Internet connection mode you select in step 4, then click [Save].LSee “Configuring the Internet connection settings” on page 36.6Click [Restart].Note:LIn step 3, you can set both the Home and Hotel modes to the desired profile by selecting the profile from the respective pull-down menus under the Profile Selection heading.Temporary Confidential](https://usermanual.wiki/Panasonic-of-North-America/96NKX-WP1050/User-Guide-706359-Page-111.png)
![Base Unit Settings112 For assistance, please visit http://www.panasonic.com/phonehelpLIn step 5, if you click [Save] after creating or modifying the profile currently selected for HOME or HOTEL mode, the profile setting screen will be displayed.MAC Address Clone:MAC (Media Access Control) Address Clone allows you to clone the MAC address of your PC’s network adaptor onto this product.A MAC address is a 12-digit code assigned to a unique piece of hardware for identification. Some Internet service providers require that you register the MAC address of your computer’s network adaptor, which was connected to your cable or DSL modem during installation.1Click [Advanced Setup] on Top Menu.2Click the [Basic] tab, then click [MAC Address Clone].3Configure the settings, then click [Save].4Click [Restart].Setting Description[MAC Address Clone] LSelect whether the MAC address clone feature is enabled or disabled.[Original MAC Address] LBase unit’s MAC address is displayed.[Cloned MAC Address] LEnter MAC address to be cloned.Temporary Confidential](https://usermanual.wiki/Panasonic-of-North-America/96NKX-WP1050/User-Guide-706359-Page-112.png)
![Base Unit SettingsFor assistance, please visit http://www.panasonic.com/phonehelp 113Advanced settingLAN / DHCP Server:This feature allows you to configure the local network settings and DHCP server settings.1Click [Advanced Setup] on Top Menu.2Click the [Advanced] tab, then click [LAN / DHCP Server].Temporary Confidential](https://usermanual.wiki/Panasonic-of-North-America/96NKX-WP1050/User-Guide-706359-Page-113.png)
![Base Unit Settings114 For assistance, please visit http://www.panasonic.com/phonehelp3Configure the settings, then click [Save].Note:LIf you change the LAN side network settings or DHCP server settings, the entries in Static DHCP table will be deleted.4Click [Restart].Setting Description[IP Address] LIf your network administrator specifies the private IP address and subnet mask, enter them in each data field.LSet 4 digits (0 – 255) and 3 periods such as “192.168.0.253”. But “0.0.0.0” and “255.255.255.255” are not available.[Subnet Mask][DHCP Server] LDHCP server assigns IP addresses to devices on your LAN. Select whether to enable or disable this feature.[Starting IP Address]LEnter the starting IP address for the DHCP server’s IP assignment.[Number of Lease IP Address]LEnter the number of the lease IP address (maximum number: 5). The first IP address is assigned to the handset. The subsequent ones are assigned to PCs.Temporary Confidential](https://usermanual.wiki/Panasonic-of-North-America/96NKX-WP1050/User-Guide-706359-Page-114.png)
![Base Unit SettingsFor assistance, please visit http://www.panasonic.com/phonehelp 115Static DHCP (IP Address Reservation):Static DHCP function allows you to stabilize the IP address assigned to the computer by registering the computer’s MAC address.1Click [Add] under the Static DHCP (IP Address Reservation) heading in LAN / DHCP Server page (page 113), then configure the settings.LYou can also select the setting from the DHCP Server Lease Table. Click [Add] in the “Operation” column of the table.2Click [Add].3Click [Restart].Note:LWhen you edit the static DHCP setting, click the desired entry number to edit the setting. Configure the settings, then click [Save].LWhen you delete a static DHCP setting, click the desired number, then click [Delete].Setting Description[MAC Address] LEnter the LAN card’s MAC address of the corresponding computer.[IP Address] LEnter the IP address that you want to stabilize of the corresponding computer.Temporary Confidential](https://usermanual.wiki/Panasonic-of-North-America/96NKX-WP1050/User-Guide-706359-Page-115.png)
![Base Unit Settings116 For assistance, please visit http://www.panasonic.com/phonehelpPort Forwarding:This feature allows you to configure the port forwarding settings. Port Forwarding feature enables other Internet users to access services running on your LAN.Up to 10 settings can be stored.Important:LWhen setting up the port forwarding feature, there is a possibility of illegal access to the forwarding port from the Internet. For safety, set this feature only when required.1Click [Advanced Setup] on Top Menu.2Click the [Advanced] tab, then click [Port Forwarding]. Temporary Confidential](https://usermanual.wiki/Panasonic-of-North-America/96NKX-WP1050/User-Guide-706359-Page-116.png)
![Base Unit SettingsFor assistance, please visit http://www.panasonic.com/phonehelp 1173To add a new entry, click [Add] under the Portforwarding Table heading.LTo edit the setting, click the desired entry number under the Portforwarding Table heading.4Configure the settings under the Port Forwarding Setting heading, then click [Add] to add the new entry.LClick [Save] under the Port Forwarding Setting heading to save the edited settings.Setting Description[No.] LSelect the desired entry number for the port forward setting.[Status/Port Forwarding]LSelect whether the port forwarding feature is enabled or disabled.[Forwarding IP Address]LEnter the IP address of the computer that is hosting the service.LThe device registered as the forwarding IP address can be accessed from the Internet through the registered protocol and port.[Protocol] LSelect the desired protocol used to access your hosting service.Temporary Confidential](https://usermanual.wiki/Panasonic-of-North-America/96NKX-WP1050/User-Guide-706359-Page-117.png)
![Base Unit Settings118 For assistance, please visit http://www.panasonic.com/phonehelpLWhen you delete the selected setting, click [Delete].5Click [Restart].DMZ:DMZ (DeMilitarized Zone) allows you to configure the DMZ settings. The DMZ feature allows you to expose a specified computer on your LAN to the Internet.Important:LComputers specified as the DMZ host may be vulnerable to security risks.1Click [Advanced Setup] on Top Menu.2Click the [Advanced] tab, then click [DMZ].3Configure the settings, then click [Save].[Port] LEnter the forwarding port number.LIf you want to set one port, enter its port number only.LIf you want to set a range of ports, enter the port numbers in the following way: “2000 – 3000”Setting Description[DMZ] LSelect whether the DMZ feature is enabled or disabled.[DMZ Host IP Address]LEnter the IP address of the computer that is exposed to the Internet.Setting DescriptionTemporary Confidential](https://usermanual.wiki/Panasonic-of-North-America/96NKX-WP1050/User-Guide-706359-Page-118.png)
![Base Unit SettingsFor assistance, please visit http://www.panasonic.com/phonehelp 1194Click [Restart].UPnP:UPnP (Universal Plug and Play) allows you to configure the UPnP settings. UPnP feature allows the base unit to be compliant with the UPnP standard.1Click [Advanced Setup] on Top Menu.2Click the [Advanced] tab, then click [UPnP].3Select the desired setting, then click [Save].4Click [Restart].Setting Description[UPnP] LSelect whether the UPnP feature is enabled or disabled.Temporary Confidential](https://usermanual.wiki/Panasonic-of-North-America/96NKX-WP1050/User-Guide-706359-Page-119.png)
![Base Unit Settings120 For assistance, please visit http://www.panasonic.com/phonehelpPacket Filtering:The Packet Filtering allows you to configure the packet filtering settings, and to control Internet access from the specified computers on your LAN.Up to 20 settings can be stored.1Click [Advanced Setup] on Top Menu.2Click the [Advanced] tab, then click [Packet Filtering].Temporary Confidential](https://usermanual.wiki/Panasonic-of-North-America/96NKX-WP1050/User-Guide-706359-Page-120.png)
![Base Unit SettingsFor assistance, please visit http://www.panasonic.com/phonehelp 1213To add a new entry, click [Add] under the Packet Filtering Table heading.LTo edit the setting, click the desired entry number under the Packet Filtering Table heading.Temporary Confidential](https://usermanual.wiki/Panasonic-of-North-America/96NKX-WP1050/User-Guide-706359-Page-121.png)
![Base Unit Settings122 For assistance, please visit http://www.panasonic.com/phonehelp4Configure the settings under the Packet Filtering Setting heading, then click [Add] to add the new entry.LClick [Save] under the Packet Filtering Setting heading to save the edited settings.LWhen you delete the selected setting, click [Delete].5Click [Restart].Setting Description[No.] LSelect the desired entry number for the packet filtering setting.[Status/Packet Filtering]LSelect whether the packet filtering feature is enabled or disabled.[Action] LSelect whether to allow or deny IP packets that are being received.[Direction] LSelect [LiW] (filtering when sending to WAN) or [WiL] (filtering when receiving from WAN).[Source IP Address]LEnter the packet source IP address to be filtered.LIf you want to set one IP address, enter the IP address only.LIf you want to set a range of IP addresses, enter the network address (e.g. 192.168.0.0/16).LIf you want to set the KX-WPA102 IP address, enter “local”.LIf you want to set all IP addresses, enter “*”.[Source Port] LEnter the packet source port to be filtered.LIf you want to set one port, enter its port number only.LIf you want to set a range of ports, enter the port numbers in the following way: “2000 – 3000”.[Destination IP Address]LEnter the packet destination IP address to be filtered.LThe entry is the same as the Source IP Address.[Destination Port] LEnter the packet destination port number to be filtered.LThe entry is the same as the Source Port.[Protocol] LSelect the desired protocol used.[Log Output] LSet whether to display the temporarily saved packet information on the [Packet Filtering Log] (page 138).Temporary Confidential](https://usermanual.wiki/Panasonic-of-North-America/96NKX-WP1050/User-Guide-706359-Page-122.png)
![Base Unit SettingsFor assistance, please visit http://www.panasonic.com/phonehelp 123Easy Security:This feature allows you to easily set up packet filtering.1Click [Advanced Setup] on Top Menu.2Click the [Advanced] tab, then click [Easy Security].Temporary Confidential](https://usermanual.wiki/Panasonic-of-North-America/96NKX-WP1050/User-Guide-706359-Page-123.png)
![Base Unit Settings124 For assistance, please visit http://www.panasonic.com/phonehelp3Configure the settings, then click [Save].LCheck the box in the “Log Output” column to create a log of each action.4Click [Restart].RoutingThis feature allows you to set static routing destinations.1Click [Advanced Setup] on Top Menu.2Click the [Advanced] tab, then click [Routing].Setting Description[Transmission/reception of Packets with private IP addresses via WAN interface]LSelect whether to deny or allow packets to be sent or received when the source of an incoming (from WAN side) packet and the destination of an outgoing (to WAN side) packet are private addresses. This feature is valid when the WAN IP address is global. The default is set to Deny.[Stateful Packet Inspection]LSelect whether to enable or disable the stateful packet inspection feature.LSome E-mail servers authenticate clients using ident packets which use TCP port 113. If E-mail feature does not work well, select “Enable (Except Ident Packet)”, which is the default setting for this feature.[Attack Detection] LSelect whether to enable or disable the attack detection feature.Temporary Confidential](https://usermanual.wiki/Panasonic-of-North-America/96NKX-WP1050/User-Guide-706359-Page-124.png)
![Base Unit SettingsFor assistance, please visit http://www.panasonic.com/phonehelp 1253To add a new entry, click [Add] under the Static Routing Table heading.LTo edit the setting, click the desired number under the Static Routing Table heading.4Configure the settings under the Routing Setting heading, then click [Add].LClick [Save] under the Routing Setting heading to save the edited setting.5Click [Restart].Setting Description[Status] LSelect whether to enable or disable the routing setting.[Destination Network/Mask]LEnter the network/mask for the destination IP address.[Gateway] LEnter the gateway IP address.Temporary Confidential](https://usermanual.wiki/Panasonic-of-North-America/96NKX-WP1050/User-Guide-706359-Page-125.png)
![Base Unit Settings126 For assistance, please visit http://www.panasonic.com/phonehelpWirelessWireless Basic:Wireless Basic allows you to set the wireless mode and SSID.1Click [Advanced Setup] on Top Menu.2Click the [Wireless] tab, then click [Wireless Basic].3Configure the settings, then click [Save].4Click [Restart].Setting Description[Mode] LSelect your wireless network mode from the pull-down menu.[Channel] LSelect [Auto] or the desired channel from 1 to 11.[Network Name (SSID)]LEnter your wireless network name (SSID) in this data field.[Broadcast SSID] LEnable or disable the setting to broadcast your SSID.Temporary Confidential](https://usermanual.wiki/Panasonic-of-North-America/96NKX-WP1050/User-Guide-706359-Page-126.png)
![Base Unit SettingsFor assistance, please visit http://www.panasonic.com/phonehelp 127Authentication/Encryption:This feature allows you to set security measures for connecting to wireless LAN.1Click [Advanced Setup] on Top Menu.2Click the [Wireless] tab, then click [Authentication/Encryption].3Configure the settings, then click [Save].Setting Description[Security Mode] LSelect the desired Security Mode.[WPA-PSK/WPA2-PSK Data Encryption]LSelect the desired Data Encryption method.Temporary Confidential](https://usermanual.wiki/Panasonic-of-North-America/96NKX-WP1050/User-Guide-706359-Page-127.png)
![Base Unit Settings128 For assistance, please visit http://www.panasonic.com/phonehelp4Click [Restart].Note:LIf you change either Network Name (SSID) or Network key, you need to register the handset to the base unit once again. See “Registering the handset” on page 93.[Network key] LEnter the network key containing 10 hexadecimal, 26 hexadecimal, 5 alphanumeric or 13 alphanumeric characters.LPress [View] to display the network key.[Session-Key renewal interval]LSet the interval for refreshing the encryption key between 30 and 604800 seconds. 604800 seconds is the equivalent of one week.[Key Index] LSelect [Key 2] or [Key 3] to be used if you use WEP.Setting DescriptionTemporary Confidential](https://usermanual.wiki/Panasonic-of-North-America/96NKX-WP1050/User-Guide-706359-Page-128.png)
![Base Unit SettingsFor assistance, please visit http://www.panasonic.com/phonehelp 129MAC Address Filtering:This feature allows you to configure MAC address filtering settings so that devices without the particular MAC address will be filtered.MAC address filtering is available only for wireless devices.1Click [Advanced Setup] on Top Menu.2Click the [Wireless] tab, then click [MAC Address Filtering].LTo add a new MAC address entry, click [Add] under the MAC Address Filtering Table heading. Enter the desired MAC address under the MAC Address Filtering Setting heading, then click [Add].LTo edit a MAC address entry, click the desired entry number under the MAC Address Filtering Table heading. Edit the MAC address under the MAC Address Filtering Setting heading, then click [Save].Temporary Confidential](https://usermanual.wiki/Panasonic-of-North-America/96NKX-WP1050/User-Guide-706359-Page-129.png)
![Base Unit Settings130 For assistance, please visit http://www.panasonic.com/phonehelp3Configure the setting, then click [Save].4Click [Restart].Setting Description[MAC Address Filtering]LSelect whether to enable or disable the MAC address filtering feature.LIf MAC Address Filtering is enabled, only the wireless device with the registered MAC address can send/receive data.The registered handset is automatically listed in MAC Address Filtering Table.Temporary Confidential](https://usermanual.wiki/Panasonic-of-North-America/96NKX-WP1050/User-Guide-706359-Page-130.png)
![Base Unit SettingsFor assistance, please visit http://www.panasonic.com/phonehelp 131MaintenancePassword:This feature allows you to change the user name and password that are required to access the base unit.Important:LMake a note of the user name and password so that you will not forget them.1Click [Advanced Setup] on Top Menu.2Click the [Maintenance] tab, then click [Password].3Configure the settings, then click [Save].Setting Description[User Name] LThe user name and password can contain 6 to 15 characters (including numbers).LThe following cannot be used: [ “ ], [ ‘ ], [&], [<], [>], [(space)]LUser name and password must be different from each other.LUser name and password are case-sensitive.[Password][Retype Password]LEnter the password again to verify.Temporary Confidential](https://usermanual.wiki/Panasonic-of-North-America/96NKX-WP1050/User-Guide-706359-Page-131.png)
![Base Unit Settings132 For assistance, please visit http://www.panasonic.com/phonehelp4Click [Restart].Update Firmware:This feature allows you to update the firmware to the latest version.1Click [Advanced Setup] on Top Menu.2Click the [Maintenance] tab, then click [Update Firmware].3Check for the latest version by clicking the support information URL.4If the version is updated, download the updated firmware to your PC.5Enter the file name under the “Update Firmware” heading.LClick [Browse...] to select the desired file name from the list.Temporary Confidential](https://usermanual.wiki/Panasonic-of-North-America/96NKX-WP1050/User-Guide-706359-Page-132.png)
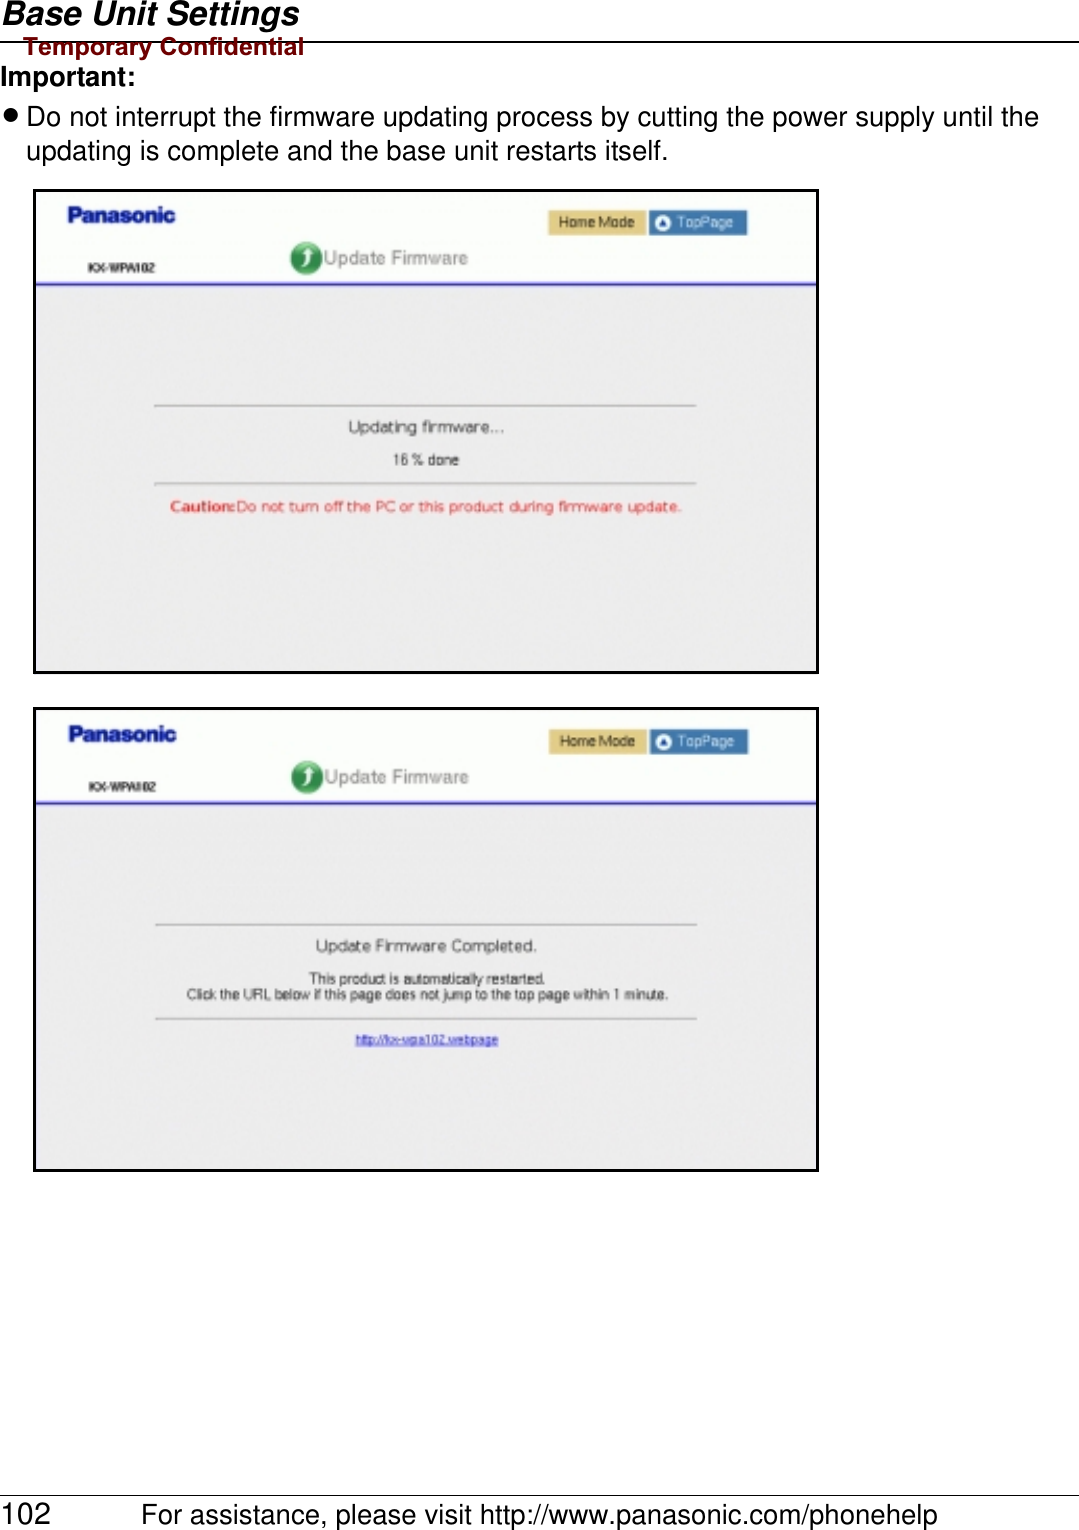
![Base Unit SettingsFor assistance, please visit http://www.panasonic.com/phonehelp 1336Click [Update].LThe base unit automatically restarts after the firmware is updated.Important:LDo not interrupt the firmware updating process by cutting the power supply until the updating is complete and the base unit restarts itself.Temporary Confidential](https://usermanual.wiki/Panasonic-of-North-America/96NKX-WP1050/User-Guide-706359-Page-133.png)
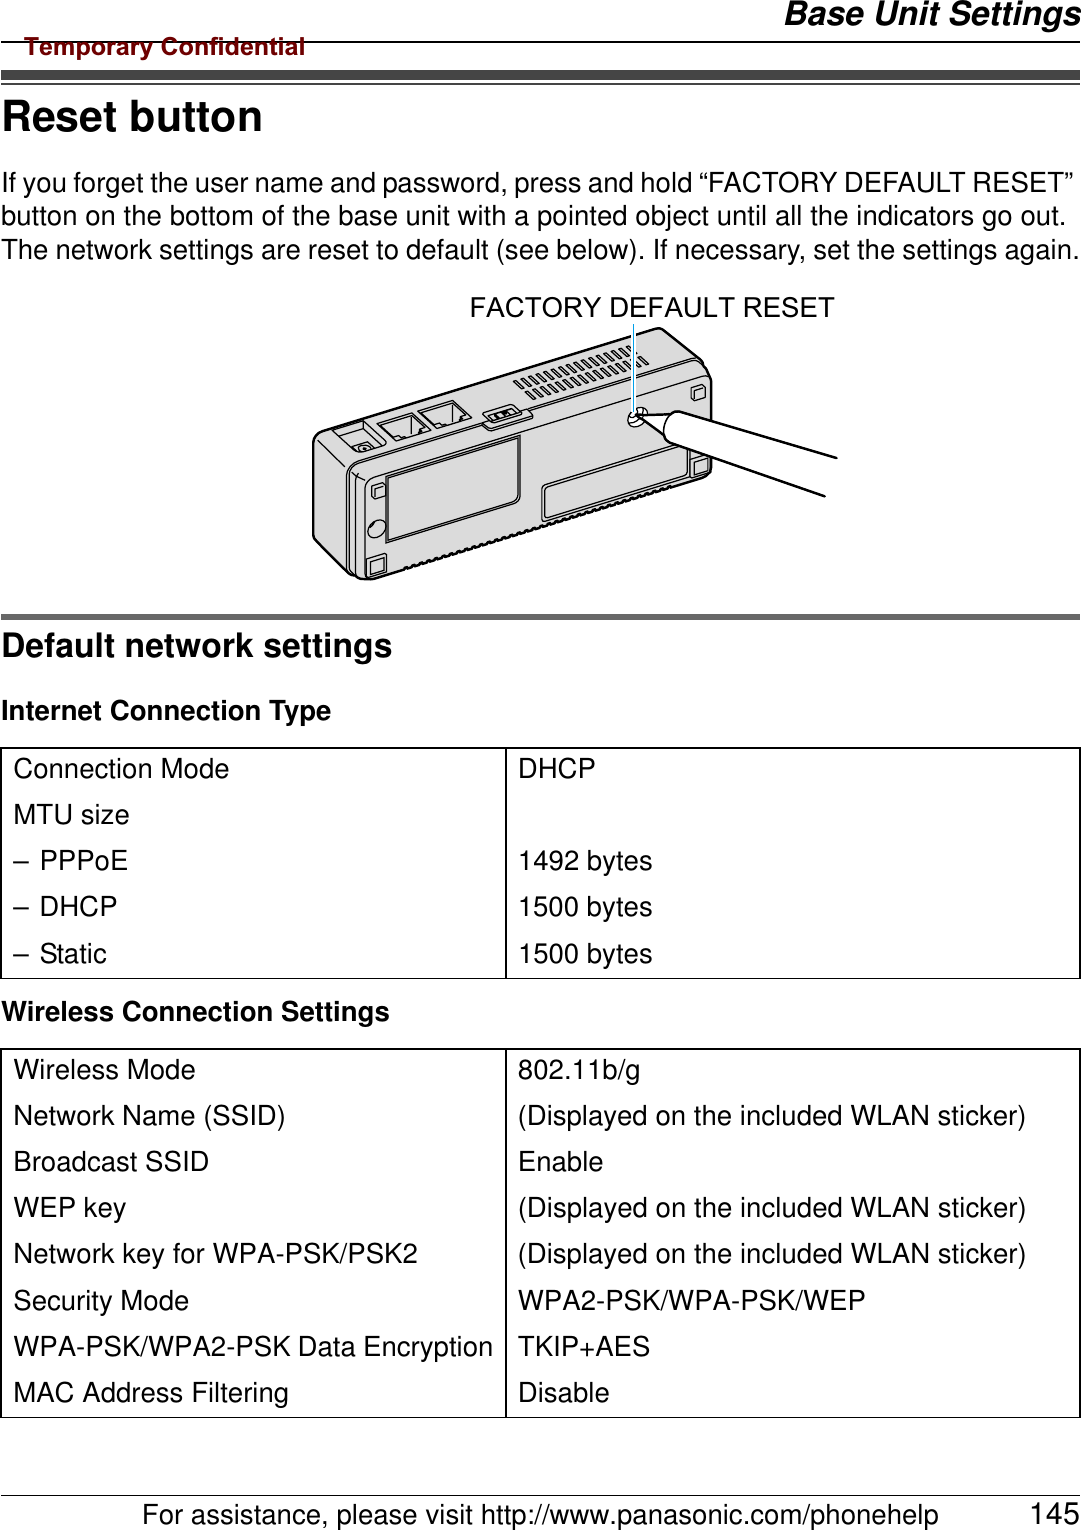
![Base Unit Settings134 For assistance, please visit http://www.panasonic.com/phonehelpReset to Factory Default:The base unit settings can be reset to the base unit’s factory default. See page 145 for the default network settings.1Click [Advanced Setup] on Top Menu.2Click the [Maintenance] tab, then click [Reset to Factory Default].3Click [Reset to Factory Default] to reset the base unit settings.4Click [OK].LThe base unit begins to restart.Temporary Confidential](https://usermanual.wiki/Panasonic-of-North-America/96NKX-WP1050/User-Guide-706359-Page-134.png)
![Base Unit SettingsFor assistance, please visit http://www.panasonic.com/phonehelp 135Save Settings:A backup file can be saved on your computer. You can load the base unit settings from the backup file on “Load Settings” page (page 136).1Click [Advanced Setup] on Top Menu.2Click the [Maintenance] tab, then click [Save Settings].3Click [Save].4Specify the location and enter the file name, and click [Save] on the Save As dialog box.Temporary Confidential](https://usermanual.wiki/Panasonic-of-North-America/96NKX-WP1050/User-Guide-706359-Page-135.png)
![Base Unit Settings136 For assistance, please visit http://www.panasonic.com/phonehelpLoad Settings:The base unit settings can be loaded from a backup file. If you reset the base unit settings to factory default, the Load Settings page can load its settings from the backup file.Note:LThe backup file has network settings. When the settings are loaded, the network settings except for the user name and password are also changed as they were saved.1Click [Advanced Setup] on Top Menu.2Click the [Maintenance] tab, then click [Load Settings].3Enter the file name or click [Browse...] then select the backup file on the Choose file dialog box, and click [Open].4Click [Load].5Click [Restart].Temporary Confidential](https://usermanual.wiki/Panasonic-of-North-America/96NKX-WP1050/User-Guide-706359-Page-136.png)
![Base Unit SettingsFor assistance, please visit http://www.panasonic.com/phonehelp 137Restart:The Restart page can restart the base unit.1Click [Advanced Setup] on Top Menu.2Click the [Maintenance] tab, then click [Restart].3Click [Restart].4Click [OK].Temporary Confidential](https://usermanual.wiki/Panasonic-of-North-America/96NKX-WP1050/User-Guide-706359-Page-137.png)
![Base Unit Settings138 For assistance, please visit http://www.panasonic.com/phonehelpPacket Filtering Log:This feature displays the packet filtering logs that are temporarily saved, and saves the logs on your computer. This feature is enabled if [Log Output] in [Packet Filtering Setting] (page 122) is set to on.1Click [Advanced Setup] on Top Menu.2Click the [Maintenance] tab, then click [Packet Filtering Log].LPacket filtering logs are displayed.3Click [Save].4Specify the location and enter the file name, and click [Save] on the Save As dialog box.Temporary Confidential](https://usermanual.wiki/Panasonic-of-North-America/96NKX-WP1050/User-Guide-706359-Page-138.png)
![Base Unit SettingsFor assistance, please visit http://www.panasonic.com/phonehelp 139UPnP Port Mapping Log:UPnP Port Mapping Log displays the temporarily saved logs of port mapping additions, deletions and failures, and save the logs on your computer. This feature is enabled if [UPnP] (page 119) is set to Enable.1Click [Advanced Setup] on Top Menu.2Click the [Maintenance] tab, then click [UPnP Port Mapping Log].LUPnP port mapping logs are displayed.3Click [Save].4Specify the location and enter the file name, and click [Save] on the Save As dialog box.Temporary Confidential](https://usermanual.wiki/Panasonic-of-North-America/96NKX-WP1050/User-Guide-706359-Page-139.png)
![Base Unit Settings140 For assistance, please visit http://www.panasonic.com/phonehelpConnection Log:Connection Log displays the temporarily saved logs of connection, disconnection and authentication during PPPoE or DHCP connection, and saves the logs on your computer.1Click [Advanced Setup] on Top Menu.2Click the [Maintenance] tab, then click [Connection Log].LConnection logs are displayed.3Click [Save].4Specify the location and enter the file name, and click [Save] on the Save As dialog box.Temporary Confidential](https://usermanual.wiki/Panasonic-of-North-America/96NKX-WP1050/User-Guide-706359-Page-140.png)
![Base Unit SettingsFor assistance, please visit http://www.panasonic.com/phonehelp 141SupportHelp:The Help page describes each feature of the following items:1. Initialization Wizard2. Network Connection3. Update Firmware4. Advanced Setup5. Link for handset6. Status7. Basic8. Advanced9. Wireless10. Maintenance1Click [Advanced Setup] on Top Menu.2Click the [Support] tab, then click [Help].3Click [View].4Click the desired item to view its help page.Note:LYou can also view help by clicking [Help] on each setup page.Temporary Confidential](https://usermanual.wiki/Panasonic-of-North-America/96NKX-WP1050/User-Guide-706359-Page-141.png)
![Base Unit Settings142 For assistance, please visit http://www.panasonic.com/phonehelpSupport Link:Support Link allows you to get product and support information from the Internet.1Click [Advanced Setup] on Top Menu.2Click the [Support] tab, then click [Support Link].3Click the URL for the desired information.Temporary Confidential](https://usermanual.wiki/Panasonic-of-North-America/96NKX-WP1050/User-Guide-706359-Page-142.png)
![Base Unit SettingsFor assistance, please visit http://www.panasonic.com/phonehelp 143Link for handsetThis feature displays the registered handset's status of wireless connection to the base unit and the handset's MAC address and IP address when connected to the base unit.1Click [Link for hand-set] on Top Menu.LThe handset status is displayed when the registered handset is wirelessly connected to the base unit.Note:LIt may take a while to display the screen.Temporary Confidential](https://usermanual.wiki/Panasonic-of-North-America/96NKX-WP1050/User-Guide-706359-Page-143.png)
![Base Unit SettingsFor assistance, please visit http://www.panasonic.com/phonehelp 147Setting your computerObtaining an IP address automatically on your computerWhen you cannot log in the base unit by using the computer connected to the Ethernet (LAN) port on the base unit, check the setting of Local Area Connection of the computer. It is necessary to obtain an IP address automatically from a DHCP server.LYou must be logged in as an administrator in order to set the Local Area Connection.1Click [Start], then click [Control Panel].2Click [Network and Internet Connections], then click [Network Connections].3Right-click the Local Area Connection icon connected to the base unit, then select [Properties].4Select [Internet Protocol (TCP/IP)], then click [Properties].Temporary Confidential](https://usermanual.wiki/Panasonic-of-North-America/96NKX-WP1050/User-Guide-706359-Page-147.png)
![Base Unit Settings148 For assistance, please visit http://www.panasonic.com/phonehelp5Select [Obtain an IP address automatically].6Click [OK].7Click [OK], then close the Network Connection window.Setting the static IP address on your computerWhen you log in the base unit with its firmware being defective, the firmware update screen will be displayed. In this case, a static IP address needs to be set on your computer.1Click [Start], then click [Control Panel].2Click [Network and Internet Connections], then click [Network Connections].3Right-click the Local Area Connection icon connected to the base unit, then select [Properties].Temporary Confidential](https://usermanual.wiki/Panasonic-of-North-America/96NKX-WP1050/User-Guide-706359-Page-148.png)
![Base Unit SettingsFor assistance, please visit http://www.panasonic.com/phonehelp 1494Select [Internet Protocol (TCP/IP)], then click [Properties].5Select [Use the following IP address].Temporary Confidential](https://usermanual.wiki/Panasonic-of-North-America/96NKX-WP1050/User-Guide-706359-Page-149.png)
![Base Unit Settings150 For assistance, please visit http://www.panasonic.com/phonehelp6Enter the IP address.LThe IP address must be within the range of 192.168.0.1-192.168.0.254 except for 192.168.0.242 (the default IP address of the base unit on the LAN interface).7For Subnet mask, enter 255.255.255.0.8Click [OK].9Click [OK], then close the Network Connection window.10 On the Web browser, enter http://192.168.0.24211 Click [Advanced Setup] on Top Menu.12 Click the [Maintenance] tab, and then click [Update Firmware].13 Check for the latest version by clicking the support information URL.14 If the version is updated, download the updated firmware to your computer.15 Specify the file name.You can also click [Browse...] to select the desired file name from the list.16 Click [Update].LThe base unit automatically restarts after the firmware is updated.Important:LDo not interrupt the firmware updating process by cutting the power supply until the progress indicator reaches 100% and the base unit restarts itself.17 Confirm that WAN Indicator is not flashing in amber, then set your computer setting back to the previous condition.Temporary Confidential](https://usermanual.wiki/Panasonic-of-North-America/96NKX-WP1050/User-Guide-706359-Page-150.png)
![Base Unit SettingsFor assistance, please visit http://www.panasonic.com/phonehelp 151Changing the proxy server settings on Web browserIf your Internet service provider uses the proxy server, you cannot log in the base unit. Change the proxy server settings on your Web browser.1Open your Web browser. (The example is Internet Explorer 6.0.)2Click [Tools], then select [Internet Options...].3Click [Connections] tab, then click [LAN Settings…].Temporary Confidential](https://usermanual.wiki/Panasonic-of-North-America/96NKX-WP1050/User-Guide-706359-Page-151.png)
![Base Unit Settings152 For assistance, please visit http://www.panasonic.com/phonehelp4See if the “Use a proxy server for your LAN” check box is checked or not.NIf checked, click [Advanced…] and go to step 5.NIf not checked, click [Cancel] then close the Internet Options window. Proxy server settings are not required.5Enter the base unit’s IP address into the “Do not use proxy server for addresses beginning with:” data field.6Click [OK].7Click [OK], then close the Internet Options window.Temporary Confidential](https://usermanual.wiki/Panasonic-of-North-America/96NKX-WP1050/User-Guide-706359-Page-152.png)
![Base Unit SettingsFor assistance, please visit http://www.panasonic.com/phonehelp 153Setting UPnP to display the shortcutTo display the KX-WPA102 shortcut in the My Network Places folder, Windows component should be added. Enable UPnP (Universal Plug and Play) following the steps below.1Click [Start], then click [Control Panel].2Click [Add or Remove Programs], then click [Add or Remove Windows Components].3Select [Network Service], then click [Details…].4Check [Universal Plug and Play], then click [OK].5Click [Next>].Note:LIf you are using Windows XP Service Pack 2, check [Internet Gateway Device Discovery and Control Client] and [UPnP User Interface] in step 4.Using your computer on a wireless LANThe 15 character device-specific Network name (SSID), 13 alphanumeric character 128 bit encryption Network key (WEP) and 16 alphanumeric character Network key (WPA-PSK/WPA2-PSK) are set as factory default. These factory default setting values are displayed on the included WLAN sticker. If you use your computer on a wireless LAN, use the values on the sticker to set the wireless LAN configuration of your computer. To set your computer to be used on a wireless LAN, see the manual for the computer you use.Note:LTo use your computer on a wireless LAN, a wireless LAN card needs to be installed on your computer.Temporary Confidential](https://usermanual.wiki/Panasonic-of-North-America/96NKX-WP1050/User-Guide-706359-Page-153.png)