Panasonic of North America 96NKX-WP1050 Wi-Fi Phone Base for Skype Service User Manual
Panasonic Corporation of North America Wi-Fi Phone Base for Skype Service
User manual
Please read these Operating Instructions before using the unit and save for
future reference.
Charge the handset battery for 6 hours before initial use.
Operating Instructions
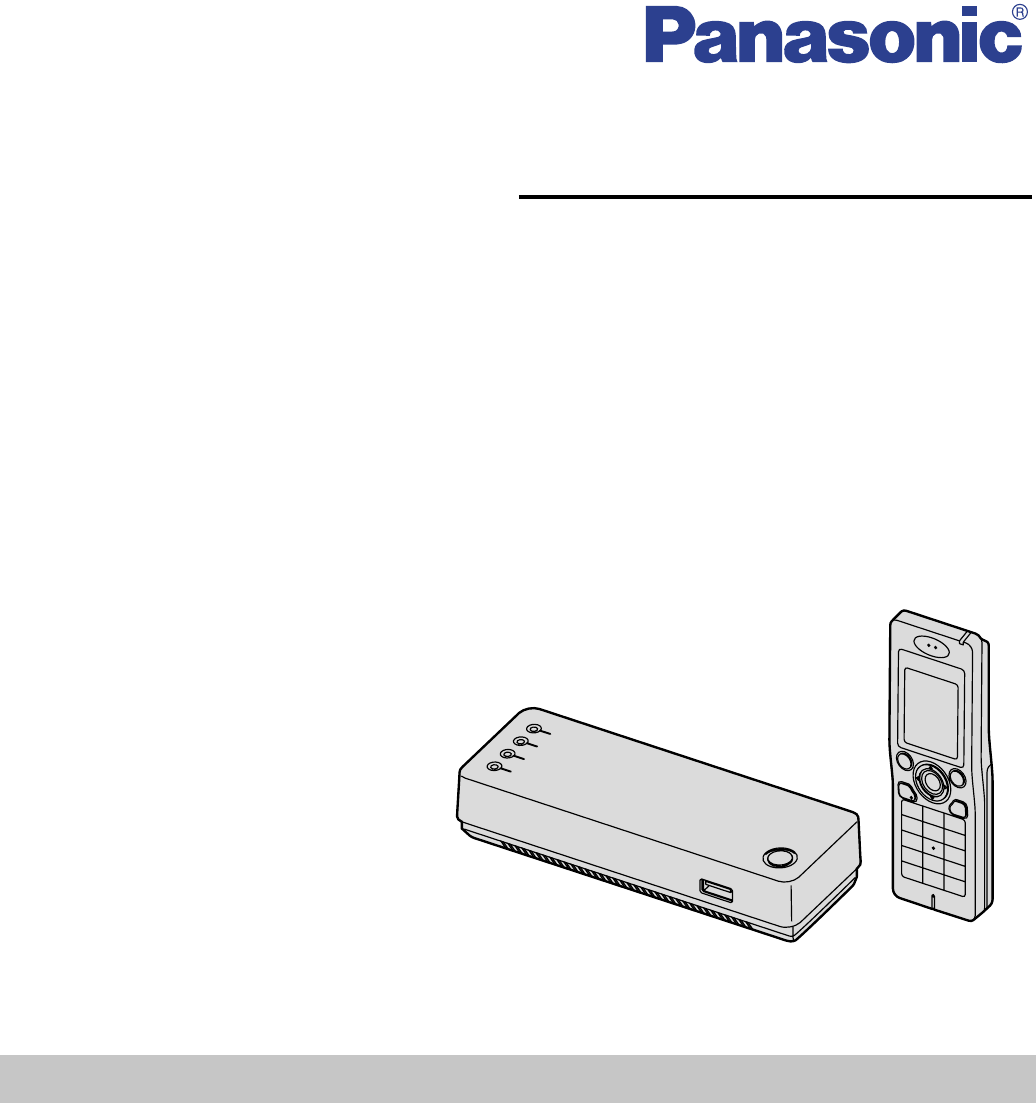
Wi-Fi Phone for Skype
Executive Travel Set
Model No. KX-WP1050
Temporary Confidential

Table of Contents
2For assistance, please visit http://www.panasonic.com/phonehelp
Introduction
Feature highlights. . . . . . . . . . . . . . . . . . . . . . . . . . . . . . . . . . . . . . . . . . . . . . . . . . . . . . . 4
Important safety instructions . . . . . . . . . . . . . . . . . . . . . . . . . . . . . . . . . . . . . . . . . . . . . . 6
Security caution . . . . . . . . . . . . . . . . . . . . . . . . . . . . . . . . . . . . . . . . . . . . . . . . . . . . . . . .8
Countries permitted to use this product . . . . . . . . . . . . . . . . . . . . . . . . . . . . . . . . . . . . . . 9
For best performance. . . . . . . . . . . . . . . . . . . . . . . . . . . . . . . . . . . . . . . . . . . . . . . . . . . 10
Accessory information . . . . . . . . . . . . . . . . . . . . . . . . . . . . . . . . . . . . . . . . . . . . . . . . . . 11
Controls . . . . . . . . . . . . . . . . . . . . . . . . . . . . . . . . . . . . . . . . . . . . . . . . . . . . . . . . . . . . . 14
Symbols and screen used in these operating instructions . . . . . . . . . . . . . . . . . . . . . . . 17
System requirements . . . . . . . . . . . . . . . . . . . . . . . . . . . . . . . . . . . . . . . . . . . . . . . . . . . 19
Getting Started
Setup flow. . . . . . . . . . . . . . . . . . . . . . . . . . . . . . . . . . . . . . . . . . . . . . . . . . . . . . . . . . . .20
Installing the base unit . . . . . . . . . . . . . . . . . . . . . . . . . . . . . . . . . . . . . . . . . . . . . . . . . . 21
While you are at a hotel room . . . . . . . . . . . . . . . . . . . . . . . . . . . . . . . . . . . . . . . . . . . . 22
While you are at home . . . . . . . . . . . . . . . . . . . . . . . . . . . . . . . . . . . . . . . . . . . . . . . . . . 23
Setting the base unit for the first time (Initialization Wizard) . . . . . . . . . . . . . . . . . . . . . 27
Troubleshooting for installation . . . . . . . . . . . . . . . . . . . . . . . . . . . . . . . . . . . . . . . . . . . 42
Setting up the handset . . . . . . . . . . . . . . . . . . . . . . . . . . . . . . . . . . . . . . . . . . . . . . . . . . 44
Base unit status indicators . . . . . . . . . . . . . . . . . . . . . . . . . . . . . . . . . . . . . . . . . . . . . . . 47
Text entry . . . . . . . . . . . . . . . . . . . . . . . . . . . . . . . . . . . . . . . . . . . . . . . . . . . . . . . . . . . .49
Powering on the handset (Signing in to Skype) . . . . . . . . . . . . . . . . . . . . . . . . . . . . . . . 51
Handset displays . . . . . . . . . . . . . . . . . . . . . . . . . . . . . . . . . . . . . . . . . . . . . . . . . . . . . . 54
Main menu . . . . . . . . . . . . . . . . . . . . . . . . . . . . . . . . . . . . . . . . . . . . . . . . . . . . . . . . . . . 57
Power screen . . . . . . . . . . . . . . . . . . . . . . . . . . . . . . . . . . . . . . . . . . . . . . . . . . . . . . . . . 59
Setting the time and date . . . . . . . . . . . . . . . . . . . . . . . . . . . . . . . . . . . . . . . . . . . . . . . . 60
Managing Contacts
Contacts list . . . . . . . . . . . . . . . . . . . . . . . . . . . . . . . . . . . . . . . . . . . . . . . . . . . . . . . . . .61
Adding contacts . . . . . . . . . . . . . . . . . . . . . . . . . . . . . . . . . . . . . . . . . . . . . . . . . . . . . . . 62
Searching for Skype contacts. . . . . . . . . . . . . . . . . . . . . . . . . . . . . . . . . . . . . . . . . . . . . 64
Contacts list options . . . . . . . . . . . . . . . . . . . . . . . . . . . . . . . . . . . . . . . . . . . . . . . . . . . . 65
Viewing a contact profile . . . . . . . . . . . . . . . . . . . . . . . . . . . . . . . . . . . . . . . . . . . . . . . . 66
Blocking contacts . . . . . . . . . . . . . . . . . . . . . . . . . . . . . . . . . . . . . . . . . . . . . . . . . . . . . . 67
Making/Answering Calls
Making calls . . . . . . . . . . . . . . . . . . . . . . . . . . . . . . . . . . . . . . . . . . . . . . . . . . . . . . . . . .68
Answering calls . . . . . . . . . . . . . . . . . . . . . . . . . . . . . . . . . . . . . . . . . . . . . . . . . . . . . . . 70
Diverting calls. . . . . . . . . . . . . . . . . . . . . . . . . . . . . . . . . . . . . . . . . . . . . . . . . . . . . . . . .71
Skype Voicemail. . . . . . . . . . . . . . . . . . . . . . . . . . . . . . . . . . . . . . . . . . . . . . . . . . . . . . . 73
Useful features during a call. . . . . . . . . . . . . . . . . . . . . . . . . . . . . . . . . . . . . . . . . . . . . . 75
Temporary Confidential

Table of Contents
For assistance, please visit http://www.panasonic.com/phonehelp 3
Managing History
History . . . . . . . . . . . . . . . . . . . . . . . . . . . . . . . . . . . . . . . . . . . . . . . . . . . . . . . . . . . . . . 77
Personal Skype Status and Settings
Personal Skype status and profile . . . . . . . . . . . . . . . . . . . . . . . . . . . . . . . . . . . . . . . . . 79
Personal Skype settings. . . . . . . . . . . . . . . . . . . . . . . . . . . . . . . . . . . . . . . . . . . . . . . . . 81
Handset Settings
Wi-Fi network settings . . . . . . . . . . . . . . . . . . . . . . . . . . . . . . . . . . . . . . . . . . . . . . . . . . 83
General settings . . . . . . . . . . . . . . . . . . . . . . . . . . . . . . . . . . . . . . . . . . . . . . . . . . . . . . . 85
Services
Service information. . . . . . . . . . . . . . . . . . . . . . . . . . . . . . . . . . . . . . . . . . . . . . . . . . . . . 92
Handset Locator
Registering the handset . . . . . . . . . . . . . . . . . . . . . . . . . . . . . . . . . . . . . . . . . . . . . . . . . 93
Locating the handset . . . . . . . . . . . . . . . . . . . . . . . . . . . . . . . . . . . . . . . . . . . . . . . . . . . 94
Base Unit Settings
Setting the base unit from Top Menu . . . . . . . . . . . . . . . . . . . . . . . . . . . . . . . . . . . . . . . 95
Network Connection. . . . . . . . . . . . . . . . . . . . . . . . . . . . . . . . . . . . . . . . . . . . . . . . . . . . 97
Updating the firmware . . . . . . . . . . . . . . . . . . . . . . . . . . . . . . . . . . . . . . . . . . . . . . . . . 101
Advanced Setup. . . . . . . . . . . . . . . . . . . . . . . . . . . . . . . . . . . . . . . . . . . . . . . . . . . . . . 103
Link for handset . . . . . . . . . . . . . . . . . . . . . . . . . . . . . . . . . . . . . . . . . . . . . . . . . . . . . . 143
Mode selector. . . . . . . . . . . . . . . . . . . . . . . . . . . . . . . . . . . . . . . . . . . . . . . . . . . . . . . . 144
Reset button. . . . . . . . . . . . . . . . . . . . . . . . . . . . . . . . . . . . . . . . . . . . . . . . . . . . . . . . . 145
Setting your computer . . . . . . . . . . . . . . . . . . . . . . . . . . . . . . . . . . . . . . . . . . . . . . . . . 147
Useful Information
Additional accessories . . . . . . . . . . . . . . . . . . . . . . . . . . . . . . . . . . . . . . . . . . . . . . . . . 154
Error messages . . . . . . . . . . . . . . . . . . . . . . . . . . . . . . . . . . . . . . . . . . . . . . . . . . . . . . 155
FCC and other information. . . . . . . . . . . . . . . . . . . . . . . . . . . . . . . . . . . . . . . . . . . . . . 156
Industry Canada (IC) and other information. . . . . . . . . . . . . . . . . . . . . . . . . . . . . . . . . 158
Règles d’Industrie Canada et autres renseignements . . . . . . . . . . . . . . . . . . . . . . . . . 159
For European Union (EU). . . . . . . . . . . . . . . . . . . . . . . . . . . . . . . . . . . . . . . . . . . . . . . 160
Specifications . . . . . . . . . . . . . . . . . . . . . . . . . . . . . . . . . . . . . . . . . . . . . . . . . . . . . . . . 162
Customer services . . . . . . . . . . . . . . . . . . . . . . . . . . . . . . . . . . . . . . . . . . . . . . . . . . . . 165
Index
Index. . . . . . . . . . . . . . . . . . . . . . . . . . . . . . . . . . . . . . . . . . . . . . . . . . . . . . . . . . . . . . . 166
Temporary Confidential
Introduction
4For assistance, please visit http://www.panasonic.com/phonehelp
Feature highlights
Thank you for purchasing a Panasonic Wi-Fi Phone for Skype Executive
Travel Set.
LWi-Fi handset with embedded Skype*1
– Enjoy Free or Low-Cost calling
– No Fixed Monthly Charges
– Hands Free speaker phone
LPortable base unit with Wireless Router
– For Use in 6 countries
– Wireless LAN for IEEE 802.11b
*1 Skype offers subscription-based services such as Skype Voicemail, SkypeIn and
SkypeOut. For more information, visit the Skype homepage: http://www.skype.com/
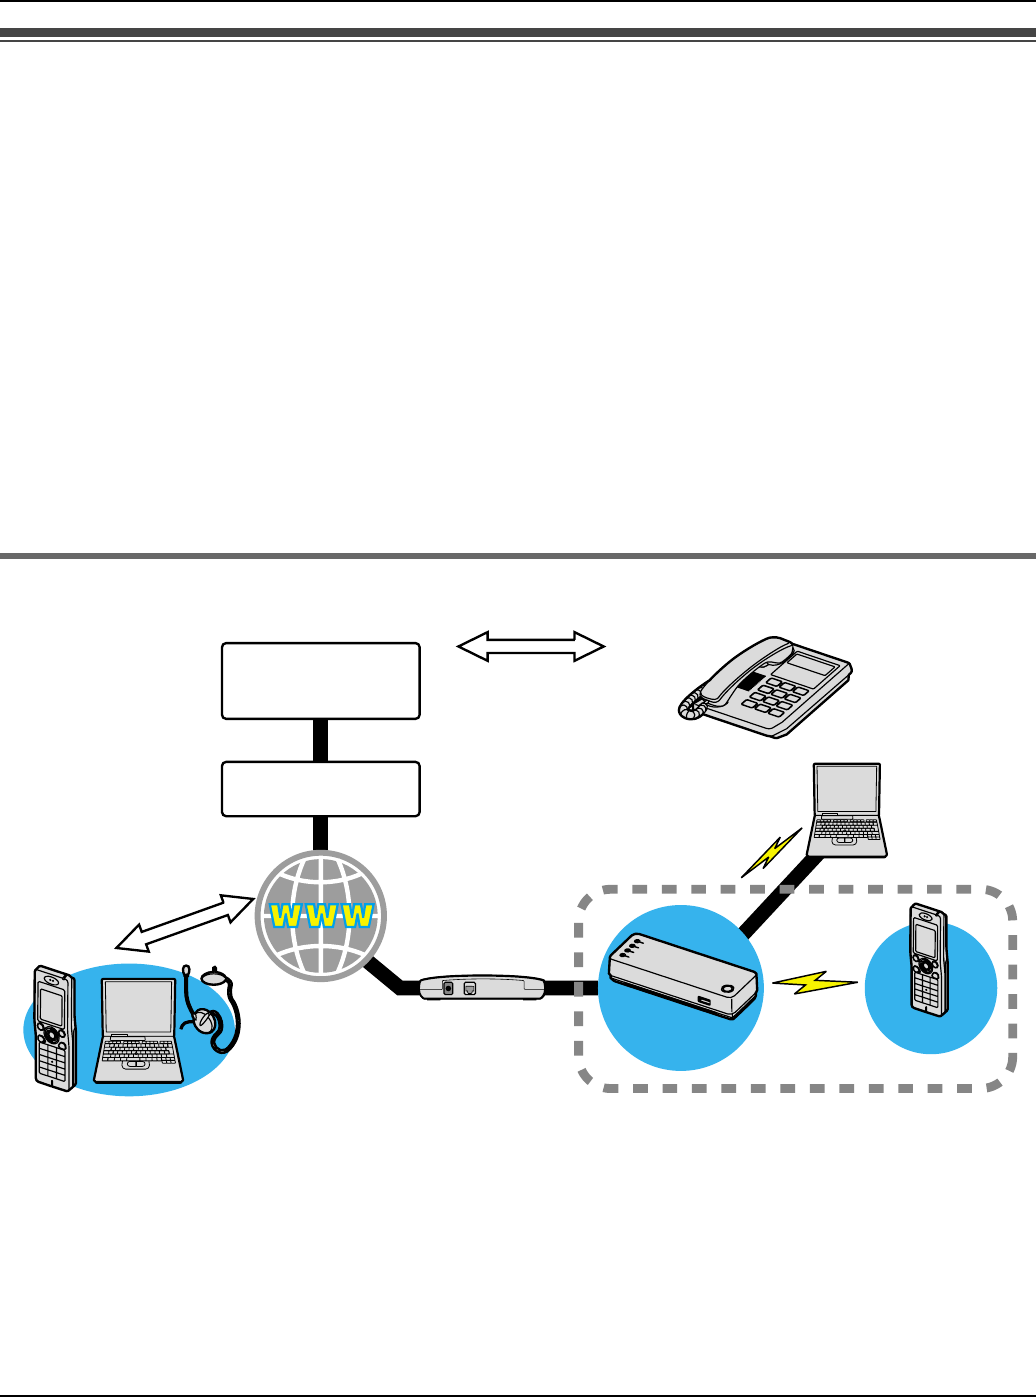
How does Skype work?
The KX-WP1050 Wi-Fi Phone for Skype Executive Travel Set consists of KX-WPA102
base unit with a router/wireless access point functionality and KX-WPA100 wireless
handset. It enables you to make and answer Skype-to-Skype calls with its handset
anywhere an Internet connection is available. In order to make Skype-to-Skype calls, the
handset needs to be wirelessly connected to the base unit which provides an access to the
Internet. You also need to sign in to Skype with your Skype account to make Skype-to-
Internet
Skype-to-Skype
calls
Skype
phone Headset+PC (Skype installed)
Modem /
Router KX-WPA102
KX-WP1050
Computer
Landline
telephone
Optional Services
-SkypeIn calls
-SkypeOut calls
-Skype Voicemail
KX-WPA100
Skype System
Telephone
Network
Temporary Confidential

Introduction
For assistance, please visit http://www.panasonic.com/phonehelp 5
Skype calls. You can create your Skype account with the handset, or use your existing
Skype account from the PC version of Skype.
What is Skype?
With Skype, you can make free calls over the Internet to any Skype users all over the
world.
The Skype program is already installed in the KX-WPA100 handset so that you can start
using it easily.
Skype also offers additional features, including:
All of these features are available at http://www.skype.com/
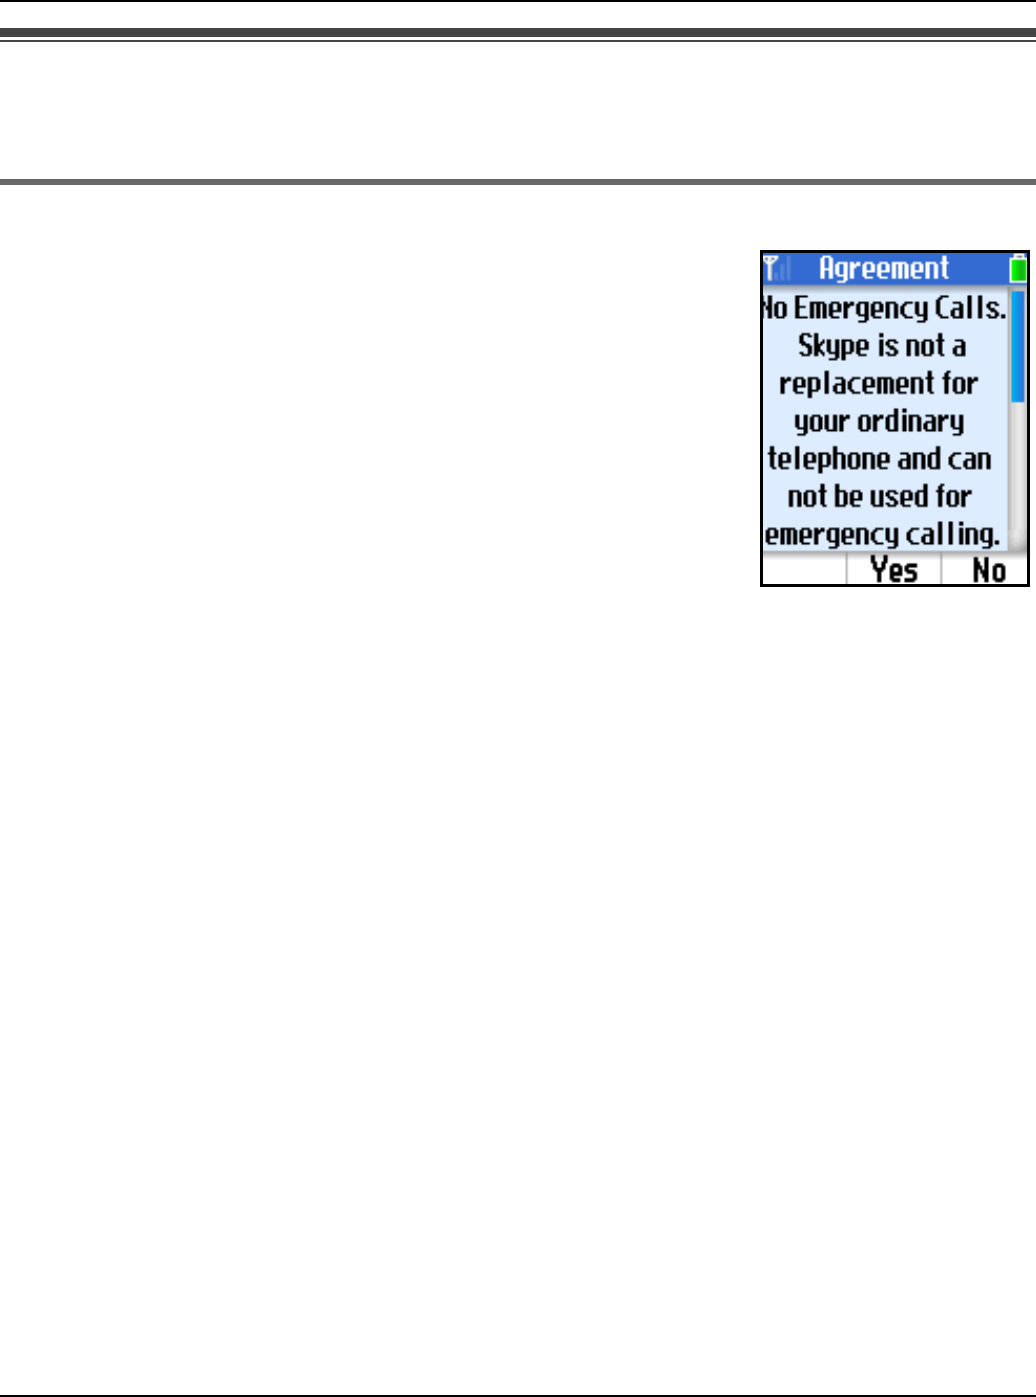
No emergency calls (No 911 service): Skype is not a replacement for your ordinary
telephone and cannot be used for emergency calling.
LFor information about Skype, please visit the Skype homepage:
http://www.skype.com/
LSpecifications are subject to change without notice.
Trademarks
LMicrosoft®, Windows® and Microsoft Internet Explorer® are either registered
trademarks or trademarks of Microsoft Corporation in the United States and/or other
countries.
LUPnP™ is a trademark of the UPnP™ Implementers Corporation.
LSkype, SkypeIn, SkypeOut and the S logo are trademarks of Skype Limited.
LWi-Fi is a trademark of the Wi-Fi Alliance.
LMozilla® and Firefox® are trademarks of the Mozila Foundation.
LAll other trademarks identified herein are the property of their respective owners.
SkypeOut SkypeOut allows you to place calls to traditional landline and
mobile phones.
SkypeIn SkypeIn is a subscription feature that provides you with a
traditional phone number for receiving Skype calls on your
handset from traditional landlines and mobile phones.
Skype Voicemail Skype Voicemail allows you to send and receive Voicemail
messages and record a greeting.
Temporary Confidential

Introduction
6For assistance, please visit http://www.panasonic.com/phonehelp
Important safety instructions
When using the product, basic safety precautions should always be followed to reduce the
risk of fire, electric shock, or personal injury.
1. Read all instructions carefully.
2. Follow all warnings and instructions marked on the product.
3. Unplug the product from power outlets before cleaning. Do not use liquid or aerosol
cleaners. Use a moist cloth for cleaning.
4. Do not use the product near water, for example near a bathtub, wash bowl, kitchen
sink, etc.
5. Place the product securely on a stable surface. Serious damage and/or injury may
result if the product falls.
6. Do not cover slots and openings on the product. They are provided for ventilation and
protection against overheating. Never place the product near radiators, or in a place
where proper ventilation is not provided.
7. Use only the power source marked on the product. If you are not sure of the type of
power supplied to your home, consult your dealer or local power company.
8. Do not place objects on the power cord. Install the product where no one can step or
trip on the cord.
9. Do not overload power outlets and extension cords. This can result in the risk of fire or
electric shock.
10. Never push any objects through slots in the product. This may result in the risk of fire
or electric shock. Never spill any liquid on the product.
11. To reduce the risk of electric shock, do not disassemble the product. Take the product
to an authorized service center when service is required. Opening or removing covers
may expose you to dangerous voltages or other risks. Incorrect reassembly can cause
electric shock when the product is subsequently used.
12. Unplug the product from power outlets and take to an authorized service center when
the following conditions occur:
A. When the power cord is damaged or frayed.
B. If liquid has been spilled into the product.
C. If the product has been exposed to rain or water.
D. If the product does not work normally by following the operating instructions. Adjust
only controls covered by the operating instructions. Improper adjustment may
require extensive work by an authorized service center.
E. If the product has been dropped or physically damaged.
F. If the product exhibits a distinct change in performance.
13. Do not touch the units, the AC adaptor cord and AC cord, or CHARGE cable during
lightning storms.
14. Do not use the product to report a gas leak, when in the vicinity of the leak.
Temporary Confidential

Introduction
For assistance, please visit http://www.panasonic.com/phonehelp 7
15. Do not use the units on airplanes, in hospitals, or in other locations where wireless LAN
signals may affect the operation of devices in the vicinity.
LAbide by instructions regarding use in airplanes and hospitals.
SAVE THESE INSTRUCTIONS
CAUTION:
Installation
LDo not touch the plug with wet hands.
LThe AC adaptor is used as the main disconnect device. Ensure that the AC outlet is
installed near the product and is easily accessible.
Battery
To reduce the risk of fire or injury to persons, read and follow these instructions.
LUse only the battery(ies) specified.
LDo not dispose of the battery(ies) in a fire. They may explode. Check with local waste
management codes for special disposal instructions.
LDo not open or mutilate the battery(ies). Released electrolyte is corrosive and may
cause burns or injury to the eyes or skin. The electrolyte may be toxic if swallowed.
LExercise care when handling the battery(ies). Do not allow conductive materials such as
rings, bracelets or keys to touch the battery(ies), otherwise a short circuit may cause the
battery(ies) and/or the conductive material to overheat and cause burns.
LCharge the battery(ies) provided, or identified for use with the product only, in
accordance with the instructions and limitations specified in this manual.
WARNING:
LTo prevent the risk of fire or electrical shock, do not expose the product to rain or any
type of moisture.
LUnplug the product from power outlets if it emits smoke, an abnormal smell, or makes an
unusual noise. These conditions can cause fire or electric shock. Confirm that smoke
has stopped emitting and contact the Panasonic Call Center at 1-800-211-PANA (1-800-
211-7262).
Medical:
LConsult the manufacturer of any personal medical devices, such as pacemakers or
hearing aids, to determine if they are adequately shielded from external RF (radio
frequency) energy. (The product operates in the frequency range of 2.412 GHz to 2.462
GHz, and the power output is 15 dBm (max.).) Do not use the product in health care
facilities if any regulations posted in the area instruct you not to do so. Hospitals or
health care facilities may be using equipment that could be sensitive to external RF
energy.
Temporary Confidential

Introduction
8For assistance, please visit http://www.panasonic.com/phonehelp
Security caution
When using this product, take appropriate measures to avoid the following security
breaches.
LLeaks of private information via this product
LIllegal use of this product by a third party
LInterference or suspension of the use of this product by a third party
Take the following measures to avoid security breaches:
LTo prevent illegal access, keep the update firmware (If you do not have the latest version
of firmware, this can lead to blocked access or information leaks).
LWhen downloading data from the Internet, ensure that viruses or illegal programs are
not inadvertently downloaded.
LYou are responsible for the security settings, such as user name and password, to
access this product. This information should not be made available to any third parties
outside the user group.
LPlace this product where it is unlikely to be stolen.
LYou are responsible for this product’s user information, such as Contacts list, Internet
settings etc. This information should not be made available to any third parties outside
the user group.
LWhen sending this product to be repaired with a company not related to Panasonic,
make a back-up file of the base unit settings, if necessary, and reset this product to
factory default.
LWhen transferring this product to another party, make a back-up file of the base unit
settings, if necessary, and reset this product to factory default.
LWhen disposing of this product, reset this product to factory default, or erase information
by means of electrical deletion or physical dismantlement.
User Name and Password Protection
The use of a unique User Name and secret Password is an important tool that will help
limit unauthorized individuals from accessing the base unit. If you choose to disable this
tool, and choose not to limit access by use of a User Name and Password, this may result
in access to the base unit by unauthorized individuals. See “Password” in “Maintenance”
section on page 131.
Temporary Confidential
Introduction
For assistance, please visit http://www.panasonic.com/phonehelp 9
Countries permitted to use this product
IMPORTANT:
Temporary Confidential

Introduction
10 For assistance, please visit http://www.panasonic.com/phonehelp
For best performance
Base unit location/avoiding noise
The base unit and other compatible Panasonic units use radio waves to communicate with
each other.
For maximum distance and noise-free operation, we recommend the following:
LPlacing the product away from electrical appliances.
LPlacing the base unit in a HIGH and CENTRAL location with no obstructions such as
walls.
LIf you use the handset or base unit near a microwave oven which is being used, noise
may be heard. Move away from the microwave oven and bring the handset closer to the
base unit.
LIf you use the handset or base unit near another cordless phone’s base unit, noise may
be heard. Move away from the other cordless phone’s base unit and bring the handset
closer to your base unit.
Environment
LKeep the product away from electrical noise generating devices, such as fluorescent
lamps and motors.
LThe product should be kept free from excessive smoke, dust, high temperature, and
vibration.
LThe product should not be exposed to direct sunlight.
LDo not place heavy objects on top of the product.
LWhen you leave the product unused for a long period of time, unplug the product from
the power outlet.
LThe product should be kept away from heat sources such as heaters, kitchen stoves,
etc. It should not be placed in rooms where the temperature is less than 0 °C (32 °F) or
greater than 40 °C (104 °F). Damp basements should also be avoided.
LThe maximum calling distance may be shortened when the product is used in the
following places: Near obstacles such as hills, tunnels, underground, near metal objects
such as wire fences, etc.
LOperating the product near 2.4 GHz electrical appliances may cause interference. Move
away from the electrical appliances.
Routine care
LWipe the outer surface of the product with a soft moist cloth. Do not use benzine,
thinner, or any abrasive powder.
Temporary Confidential
Introduction
For assistance, please visit http://www.panasonic.com/phonehelp 11
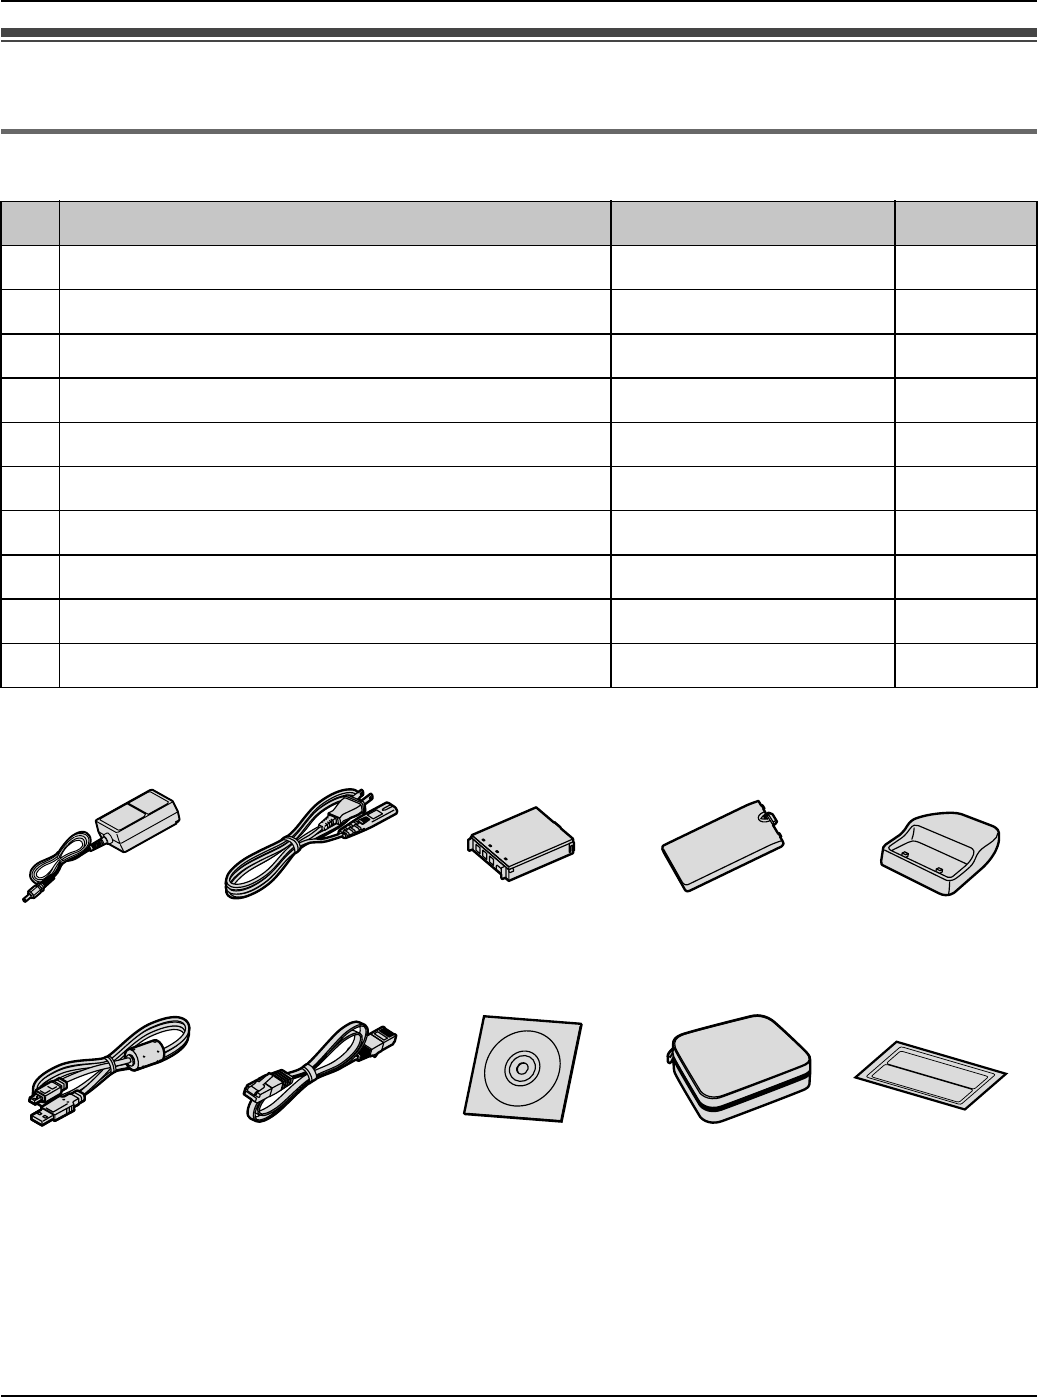
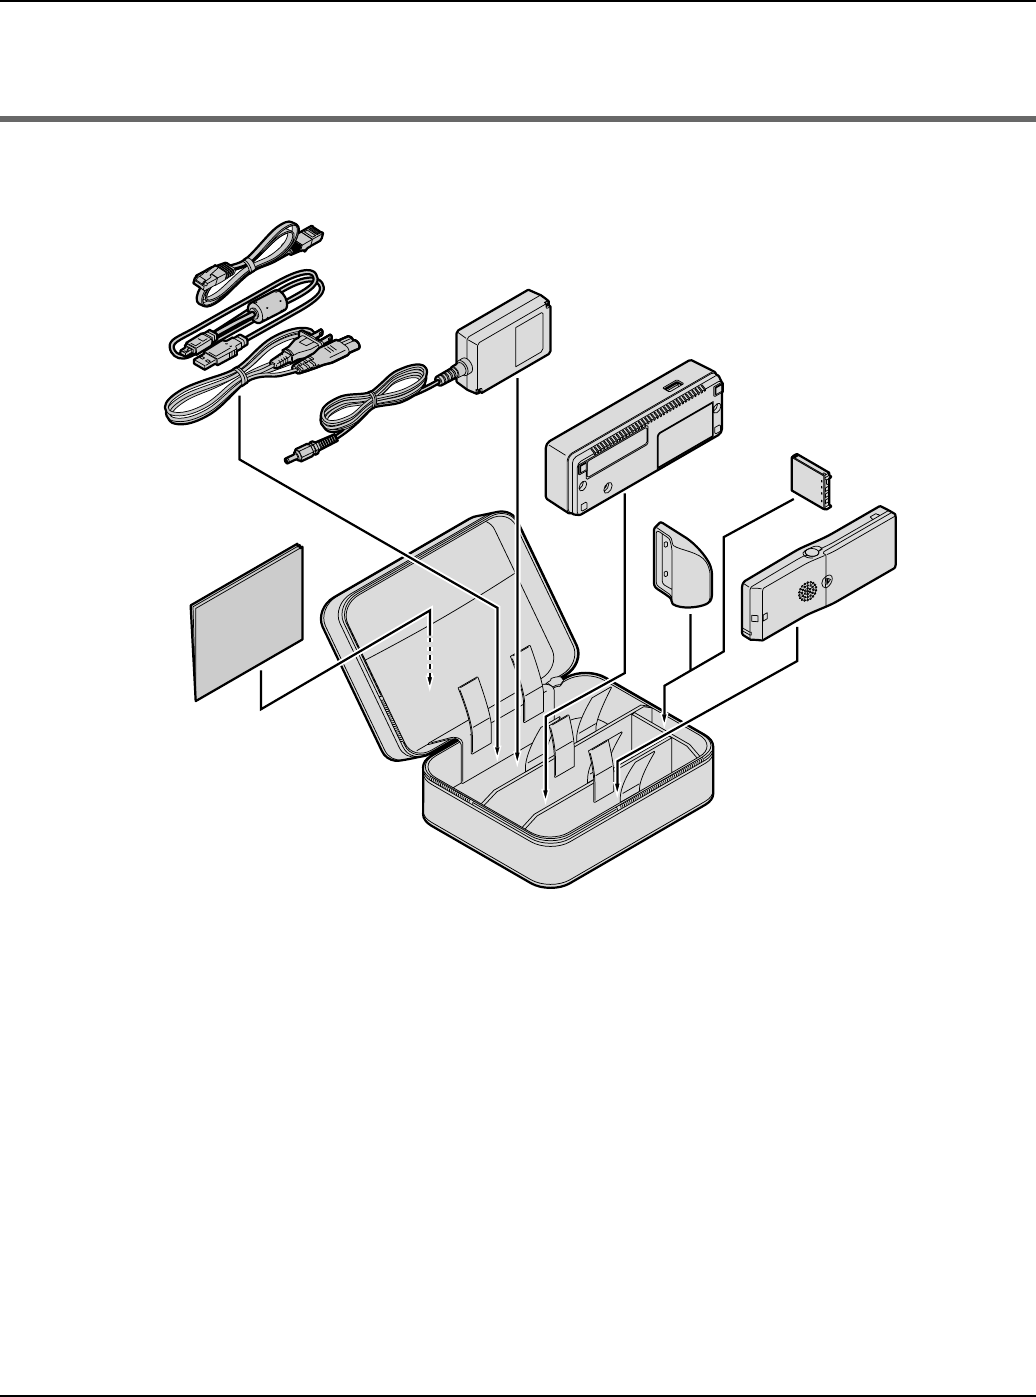
Accessory information
Included accessories
*1 You might need a separate AC cord when you use this product in other countries. See
page 13 for details.
The included AC cord is compatible with a power source up to 125 V AC.
*2 The handset cover comes attached to the handset.
*3 Operating Instructions are included.
*4 The sticker lists the factory default wireless settings for the base unit. Please attach the
sticker on the back cover of the Quick Start Guide, and store it in a safe place.
No. Accessory item Order number Quantity
1AC adaptor for base unit PQWEWP1050 1
2AC cord*1 PQJA10188Z 1
3Battery CGA-P001 1
4Handset cover*2 PQYNWPA100R 1
5Handset stand PQKE10465Z 1
6CHARGE cable PQJA10184Z 1
7Ethernet cable PQJA10185Z 1
8CD-ROM*3 PQQX15539Z 1
9Carrying case PQQD10002Z 1
jWLAN sticker*4 PQQT23321Z 1
12345
6789j
Temporary Confidential
Introduction
12 For assistance, please visit http://www.panasonic.com/phonehelp
Note:
LAll the accessory items except the CD-ROM are included in the carrying case.
Packing the accessories
Note:
LWhen packing the accessories in the carrying case, do not put the CD-ROM in the case.
Ethernet cable
CHARGE cable
AC adaptor
Base unit
Battery
Handset
Carrying case
Quick Start Guide
Handset
stand
AC cord
Temporary Confidential
Introduction
For assistance, please visit http://www.panasonic.com/phonehelp 13
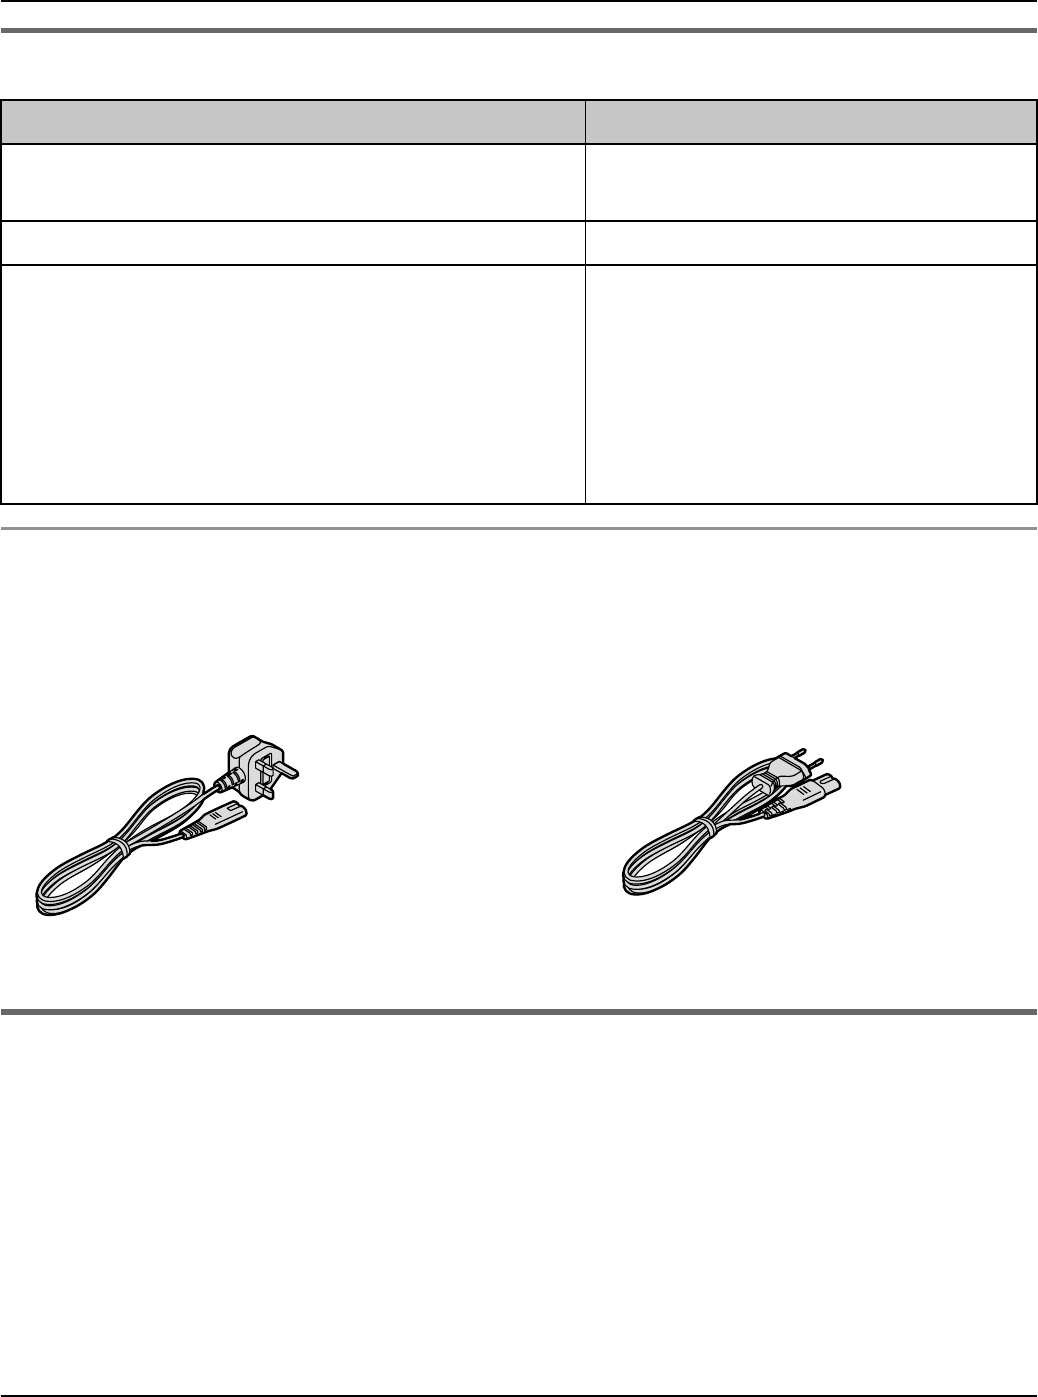
Additional/replacement accessories
Changing the AC cord while traveling:
Carry the AC cord designed for use in your destination countries when you travel. See
page 9 for information about countries permitted to use this accessory along with the main
kit.
Sales and support information
LTo order additional/replacement accessories, call 1-800-332-5368.
LTTY users (hearing or speech impaired users) can call 1-866-605-1277.
Accessory item Order number
AC cord PSJA1106Z (for UK)
PFJA02A006Z (for EU)
Rechargeable lithium-ion (Li-ion) battery CGA-P001
Headset KX-TCA88HA
KX-TCA86
KX-TCA91
KX-TCA92
KX-TCA93
KX-TCA94
KX-TCA95
(For UK) (For EU)
Temporary Confidential
Introduction
14 For assistance, please visit http://www.panasonic.com/phonehelp
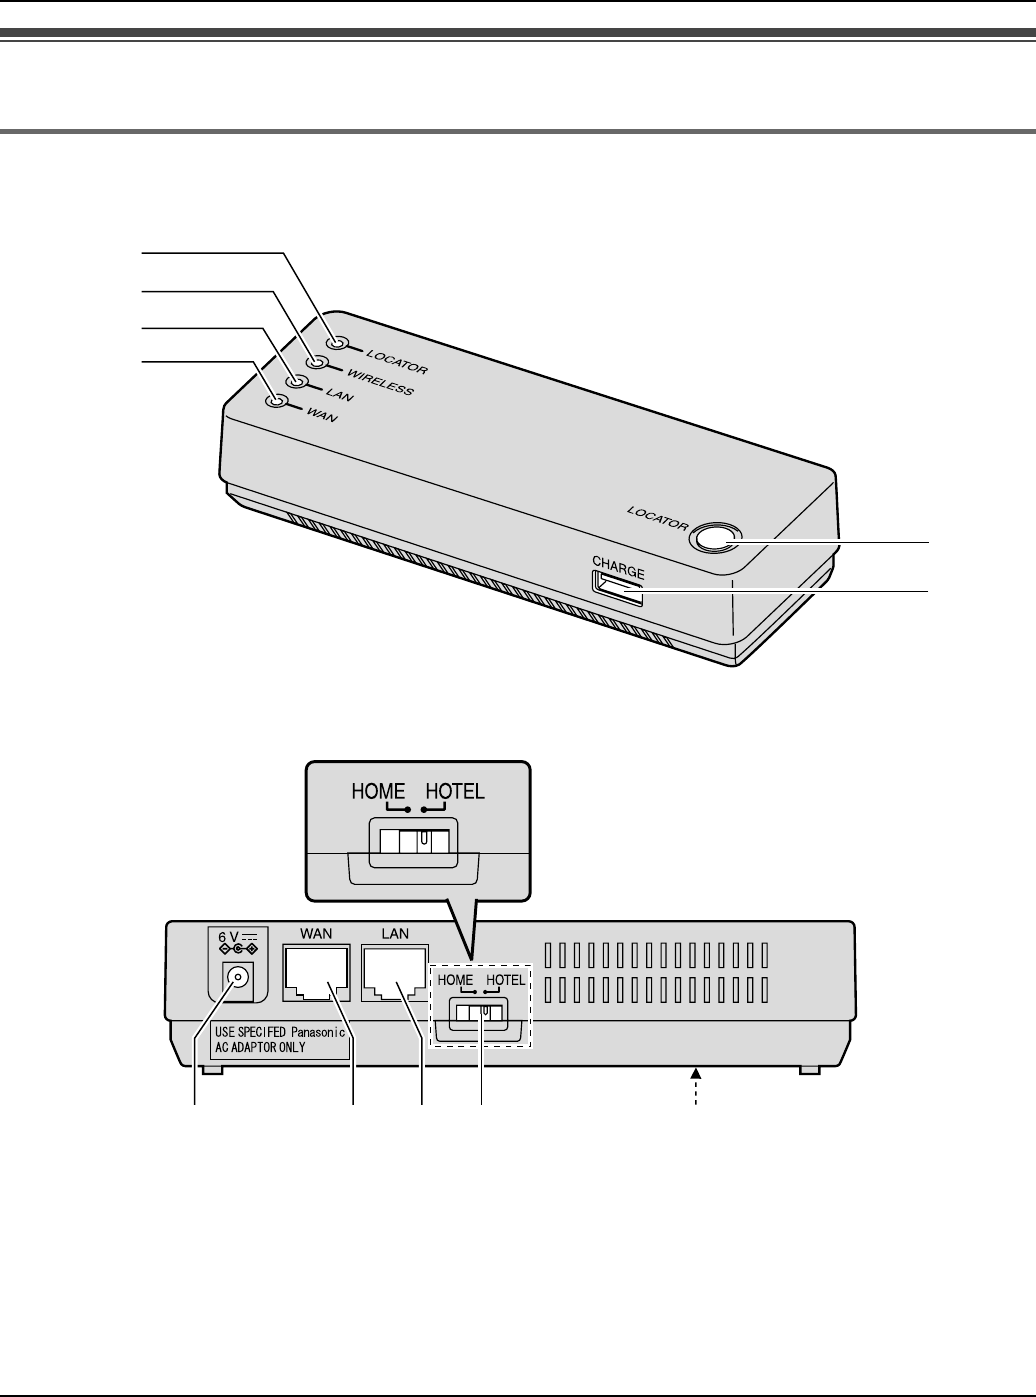
Controls
Base unit
Front view
Rear view
ALOCATOR indicator
BWIRELESS indicator
CLAN (Ethernet) indicator
DWAN (Internet) indicator
ELOCATOR button
FCHARGE port
GPower port
HWAN (Internet) port
ILAN (Ethernet) port
JMode selector (page 144)
KFACTORY DEFAULT RESET button
(page 145)
A
C
B
D
E
F
Mode selector
KGHIJ
Temporary Confidential
Introduction
For assistance, please visit http://www.panasonic.com/phonehelp 15
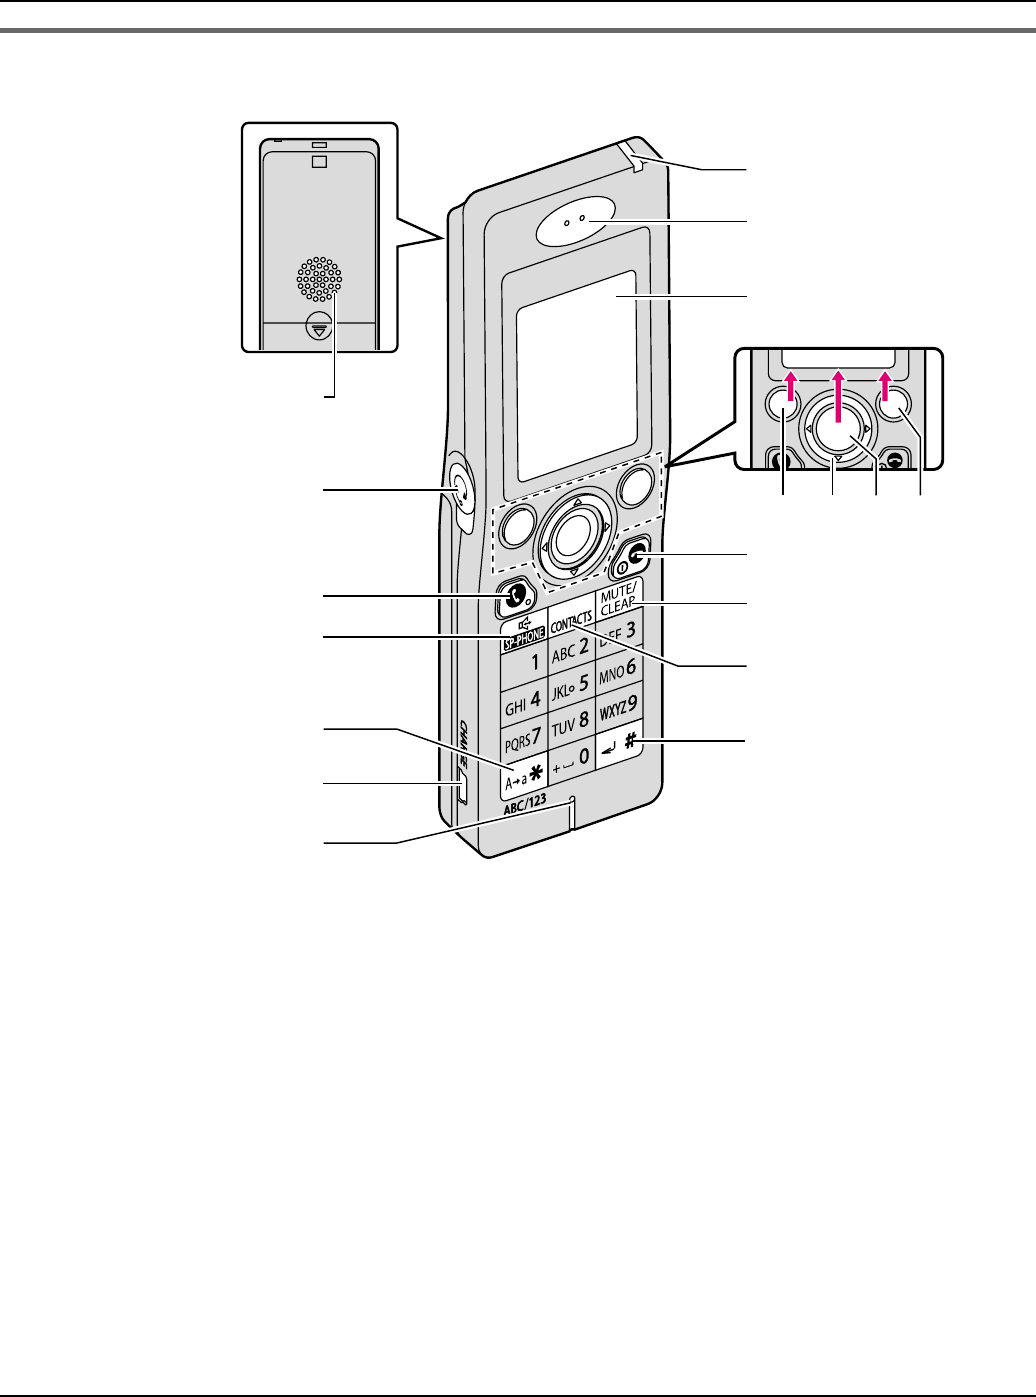
Handset
ASpeaker
BHeadset jack
C{{} (SEND)
D{s} (SP-PHONE)
E{*}
FCHARGE port
GMicrophone
HCharge/Ringer indicator
IReceiver
JDisplay
KLeft soft key
LNavigator key ({^} {V} {<} {>})
MMiddle soft key: Press the center of
the navigator key.
NRight soft key
O{}} (END)
P{MUTE} / {CLEAR}
Q{CONTACTS}
R{#}
Options Select Back
A
J
KLMN
O
Q
C
D
F
G
H
I
P
R
E
B
Temporary Confidential

Introduction
16 For assistance, please visit http://www.panasonic.com/phonehelp
Short cut keys:
You can access the useful features by using the short cut keys.
While in Idle mode, press the desired short cut key.
LTo display Idle screen, see “Powering on the handset (Signing in to Skype)” on page 51.
Keypad lock:
While in Idle mode, press and hold {Menu} (middle soft key) to lock the keypad. To
release the lock, press and hold Middle soft key again.
LDuring the keypad lock, “ ” icon is displayed on the handset display.
Key Displayed function
name Description
Right soft key {Connect}/{Sign in}Connects to network or signs in to Skype.
Left soft key {Options}Accesses Power screen menu (page 59).
{{}– Accesses Outgoing calls list. {<} or {>}
to switch to Incoming calls list or Missed
calls list.
{CONTACTS}– Accesses Contacts list.
Temporary Confidential

Introduction
For assistance, please visit http://www.panasonic.com/phonehelp 17
Symbols and screen shots used in these operating
instructions
Symbols used for operations
Handset:
Computer:
Symbol Meaning
{} The words in the brackets indicate unit button
names/soft key names on the handset.
Example:
– Unit buttons: {{}, {CONTACTS}
– Soft keys: {Options}, {Menu}
“ ” The words in quotations indicate menus displayed
on the handset screen.
Example:
“Add contact”
iProceed to the next operation.
<Example> <Meaning>
1{Menu} (middle soft key)
2“Settings” i {Select}
3Select the desired setting.
1While in Idle mode, press {Menu} (middle soft
key).
2Press {^} or {V} to select “Settings”, then
press {Select} (middle soft key).
3Press {^} or {V} to select the desired setting.
Symbol Meaning
[ ] The words in the brackets indicate button names
and hyperlinks displayed on the computer screen.
Example:
[Next>], [OK]
Temporary Confidential

Introduction
18 For assistance, please visit http://www.panasonic.com/phonehelp
Screen shots used for operations
LMicrosoft product screen shots reprinted with permission from Microsoft Corporation.
LThe screen shots in these instructions are Microsoft Windows XP and are included for
reference only.
LThe screen shots in these instructions may differ slightly from the screen shown on your
computer.
Temporary Confidential

Introduction
For assistance, please visit http://www.panasonic.com/phonehelp 19
System requirements
Your computer and network must meet the following technical specifications for the unit to
work properly.
For your PC
For Base unit
For Handset
Item Description
Operating system Microsoft Windows XP
Microsoft Windows 2000
Interface Ethernet network device installed or IEEE 802.11 b/g
wireless network device installed.
Web browser Microsoft Internet Explorer 6.0 or higher for Windows
Mozilla Firefox 1.5 or higher for Windows
Item Description
Internet connection 10/100 Mbps Ethernet connection port device which
provides access to Internet, such as Cable or DSL modem
(USB-only modems are not supported.)
Item Description
Internet connection Base unit or IEEE 802.11b wireless access point which
provides access to Internet.
Temporary Confidential
Getting Started
20 For assistance, please visit http://www.panasonic.com/phonehelp
Setup flow
Follow the procedures below to start using the unit.
1Installing the base unit
Select the appropriate setup procedure according to where and
how you use the unit.
LWhile you are at a hotel room page 22
LWhile you are at home
– AP (Bridge) mode
– Router mode page 24
page 25
2Setting up the base unit for the first time (Initialization
Wizard)
page 27
3Setting up the handset page 44
4Powering on the handset (Signing in to Skype) page 51
Temporary Confidential

Getting Started
For assistance, please visit http://www.panasonic.com/phonehelp 21
Installing the base unit
You need to install the base unit before using this product. The installation methods differ
depending on whether you are at a hotel room or at home.
LHotel: See the instructions “While you are at a hotel room” on page 22.
LHome: See the instructions “While you are at home” on page 23.
Note:
LThe AC adaptor and base unit may become warm during use; however this is not a sign
of malfunction.
LYou can also connect your computer to the base unit wirelessly instead of using the
Ethernet cable. To establish a wireless connection between your computer and the base
unit, you need to enter the same SSID into the computer as that of KX-WPA102 (The
SSID is displayed on the included WLAN sticker). See “Using your computer on a
wireless LAN” on page 153 for details.
LYou need to use only the included Panasonic AC adaptor PQWEWP1050 and AC cord
PQJA10188Z.
LLeave the AC adaptor cord plugged in to the AC outlet the whole time.
LThe unit will not work during a power failure.
Temporary Confidential
Getting Started
22 For assistance, please visit http://www.panasonic.com/phonehelp
While you are at a hotel room
You can use the handset while you are away by accessing the Internet at a hotel room.
The hotel you are staying in may give you specific instructions as to what Internet
connection type you should select. In that case, follow their instructions. Otherwise, you
are suggested to select [DHCP] mode when you set Internet Connection Type in
Initialization Wizard (page 27).
1Switch the Mode selector to “HOTEL”.
2Make sure the base unit is left unplugged. Connect the included Ethernet cable to the
“WAN” port on the base unit and the Ethernet port (RJ45 jack) in the hotel room.
3Connect the existing Ethernet cable to the “LAN” port on the base unit and the Ethernet
(LAN) port on your computer.
1
WAN indicator
Base unit
AC adaptor
To AC outlet
(120 V AC, 60 Hz)
To LAN port
To WAN port
Ethernet cable
(not included)
Ethernet cable
(included)
Computer
Internet
To Ethernet port
(RJ45 jack)
AC cord
Mode selector
4
2
3
Temporary Confidential

Getting Started
For assistance, please visit http://www.panasonic.com/phonehelp 23
4Connect the included AC adaptor cord to the power port on the base unit and an AC
outlet.
LWhen the base unit turns on (The WAN indicator lights in green or amber), the
installation is complete.
Note:
LIn step 2, you can connect the base unit to a wireless bridge device in a hotel room if
available. Ask the hotel front desk for details.
While you are at home
The base unit has 2 modes of operation while used at home: AP (Bridge) mode and
Router mode.
AP (Bridge) mode:
Designed for the case when you have a router or modem (DSL or cable) with a built-in
router.
LRefer to the instructions on page 24.
Router mode:
Designed for the case when you have a standard DSL or cable modem only.
LRefer to the instructions on page 25.
Note:
LIf your modem has more than one port, then you have a modem with a built-in router.
LIf you have more than one computer connected to the Internet, then you have a router.
LIf you do not know which type your modem is, ask your Internet service provider.
Temporary Confidential
Getting Started
24 For assistance, please visit http://www.panasonic.com/phonehelp
AP (Bridge) mode - With an EXISTING ROUTER or MODEM with a
built-in ROUTER
If you install the base unit with your existing router or modem with a built-in router, the base
unit operates in AP (Bridge) mode. Select [AP (Bridge)] mode for your Internet
connection type in Initialization Wizard (page 27). In AP (Bridge) mode, the base unit
connects wireless devices to one another and to the LAN, and allows wireless devices to
use DHCP server on the LAN.
1Switch the Mode selector to “HOME”.
2Turn off your computer properly. Unplug any cable connecting your existing router (or
modem with a built-in router) to your computer. However, your existing router (or
modem with a built-in router) needs to remain connected to your cable or DSL modem.
3Make sure the base unit is left unplugged. Connect the included Ethernet cable to the
“WAN” port on the base unit and an unused Ethernet (LAN) port on your existing router
or modem with a built-in router.
1
WAN indicator
Base unit
Mode selector
3
5
2
AC adaptor
To AC outlet
(120 V AC, 60 Hz)
To LAN port
To WAN port
Ethernet cable (not included)
Existing router Cable or
DSL modem
Ethernet cable (included)
Computer
Internet
AC cord
4
Temporary Confidential
Getting Started
For assistance, please visit http://www.panasonic.com/phonehelp 25
4Connect the existing Ethernet cable to the “LAN” port on the base unit and the Ethernet
(LAN) port on your computer (the same Ethernet (LAN) port you have just unplugged
the router from in step 2).
5Connect the included AC adaptor cord to the power port on the base unit and an AC
outlet.
LWhen the base unit turns on (The WAN indicator lights in green or amber), the
installation is complete.
Router mode - With a MODEM only
If you install the base unit with a modem only, the base unit operates in Router mode. In
Router mode, the base unit assigns IP addresses to wireless devices as a DHCP server.
It also protects the wireless devices from directly exposing to the LAN. For your Internet
connection type, select [DHCP], [Static] or [PPPoE] in Initialization Wizard (page 27).
1Switch the Mode selector to “HOME”.
2Turn off your computer properly. Unplug your cable or DSL modem’s power cord and
leave the modem turned off for at least 10 minutes to clear its memory. Unplug any
AC adaptor
To AC outlet
(120 V AC, 60 Hz)
To WAN port
Ethernet cable
(included) Cable or DSL modem
Internet
AC cord
1
WAN indicator
Base unit
Mode selector
To LAN port
Ethernet cable
(not included)
Computer
4
3
62
2, 5
Temporary Confidential

Getting Started
26 For assistance, please visit http://www.panasonic.com/phonehelp
cable connecting the modem to your computer. However, the modem needs to remain
connected to the Internet.
3Connect the included Ethernet cable to the “WAN” port on the base unit and an
Ethernet (LAN) port on the modem.
4Connect the existing Ethernet cable to the “LAN” port on the base unit and the Ethernet
(LAN) port on your computer (the same Ethernet (LAN) port you have just unplugged
your modem from in step 2).
5Plug your modem’s power adaptor into an AC outlet.
LWait for your modem’s power light to stop flashing before you go to the next step. (It
may take a few minutes.)
6Connect the included AC adaptor cord to the power port on the base unit and an AC
outlet.
LWhen the base unit turns on (The WAN indicator lights in green or amber), the
installation is complete.
Checking for Internet access:
Turn on your computer and open the Web browser to check for Internet access. If you
cannot access the Internet, go through the following.
LFor Cable modem users: Turn off the modem for 10 minutes to erase the old
information in the modem. If this still does not work, you may need to register the base
unit with your Internet service provider. Provide them with the WAN MAC registration
number found on the bottom of the base unit.
LFor DSL modem users: You may need to set the PPPoE configuration for your Internet
connection type in Initialization Wizard (page 27). Do not unplug the power of the base
unit during the setting. If unplugged, it may take a few minutes or more to reset the
PPPoE connection.
Temporary Confidential

Getting Started
For assistance, please visit http://www.panasonic.com/phonehelp 27
Setting the base unit for the first time (Initialization
Wizard)
You can log in the base unit and configure the unit’s settings using a Web browser on your
computer connected to the “LAN” port on the base unit.
Important:
LRecommended Web browser:
Microsoft Internet Explorer 6.0 or higher for Windows
Mozilla Firefox 1.5 or higher for Windows
LMake sure the base unit and handset are not being used.
LChange the appropriate setting for your network configuration.
If you access the base unit for the first time or after resetting the network settings (page
134, 145), you must set the user name and password first in Initialization Wizard so that
you can access the base unit using them. After that, you need to configure the network
settings you use for HOME and HOTEL modes.
For example, if you register AP (Bridge) setting for HOME mode and DHCP setting for
HOTEL mode, you can connect to the Internet in AP (Bridge) or DHCP mode just by
switching the Mode selector (page 144) to HOME or HOTEL from the next time.
Temporary Confidential
Getting Started
28 For assistance, please visit http://www.panasonic.com/phonehelp
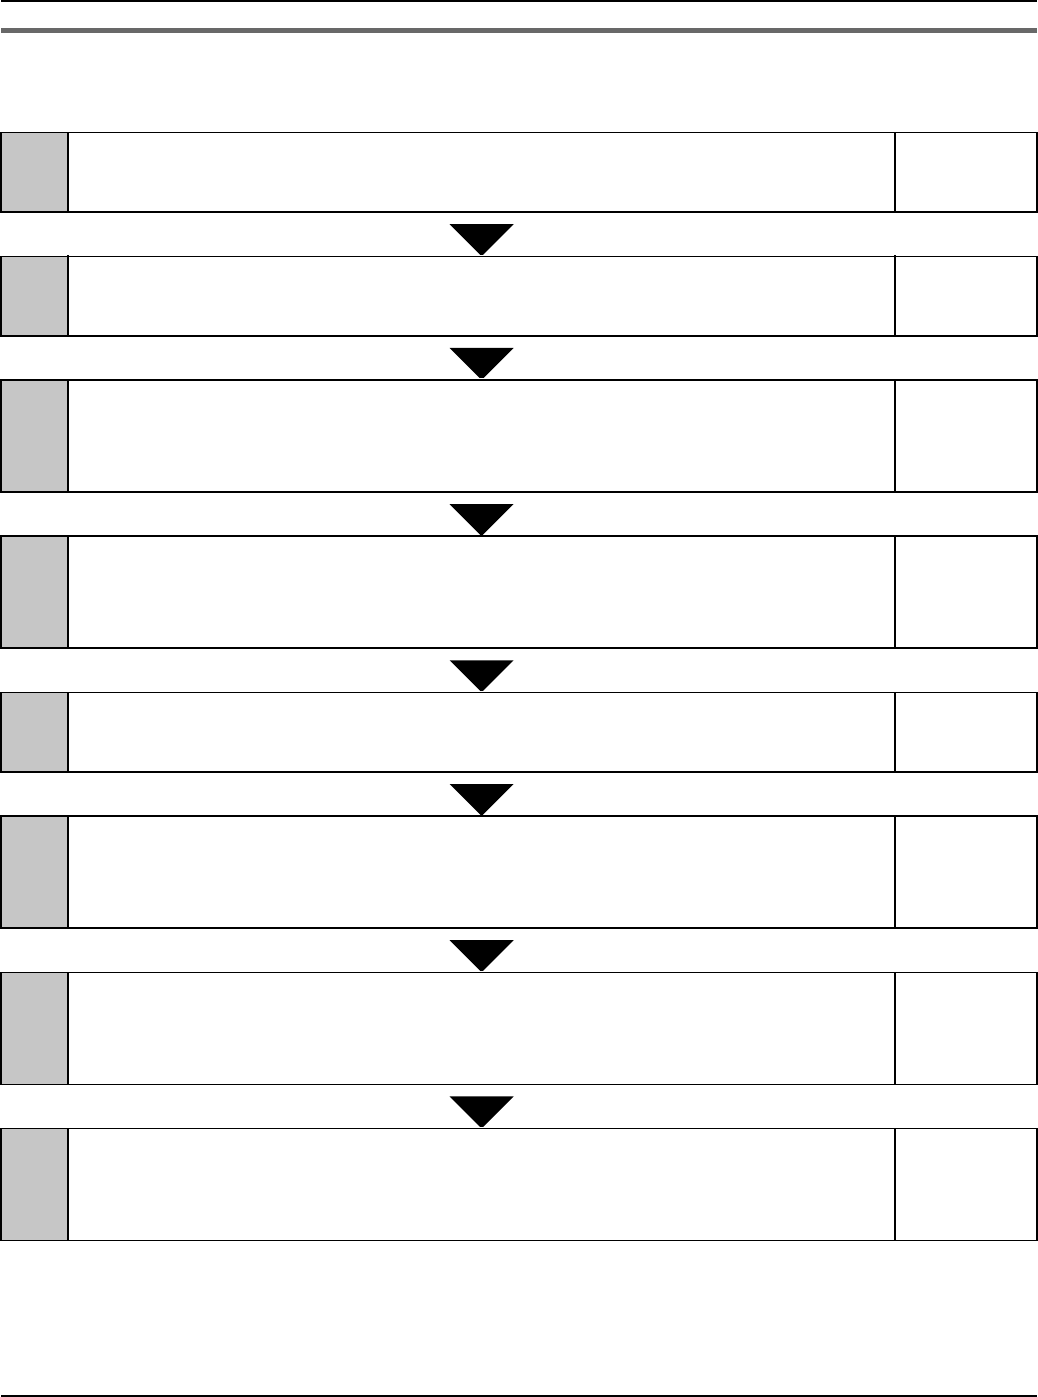
Initialization Wizard flow
Follow the procedures below to set the base unit for Internet connection.
If you check [Skip by setting] in stage 2, you can skip to stage 5 without configuring the
Internet connection settings for the HOME mode profile. If you check [Skip by setting] in
stage 5, you can skip to stage 8 without configuring the Internet connection settings for the
HOTEL mode profile.
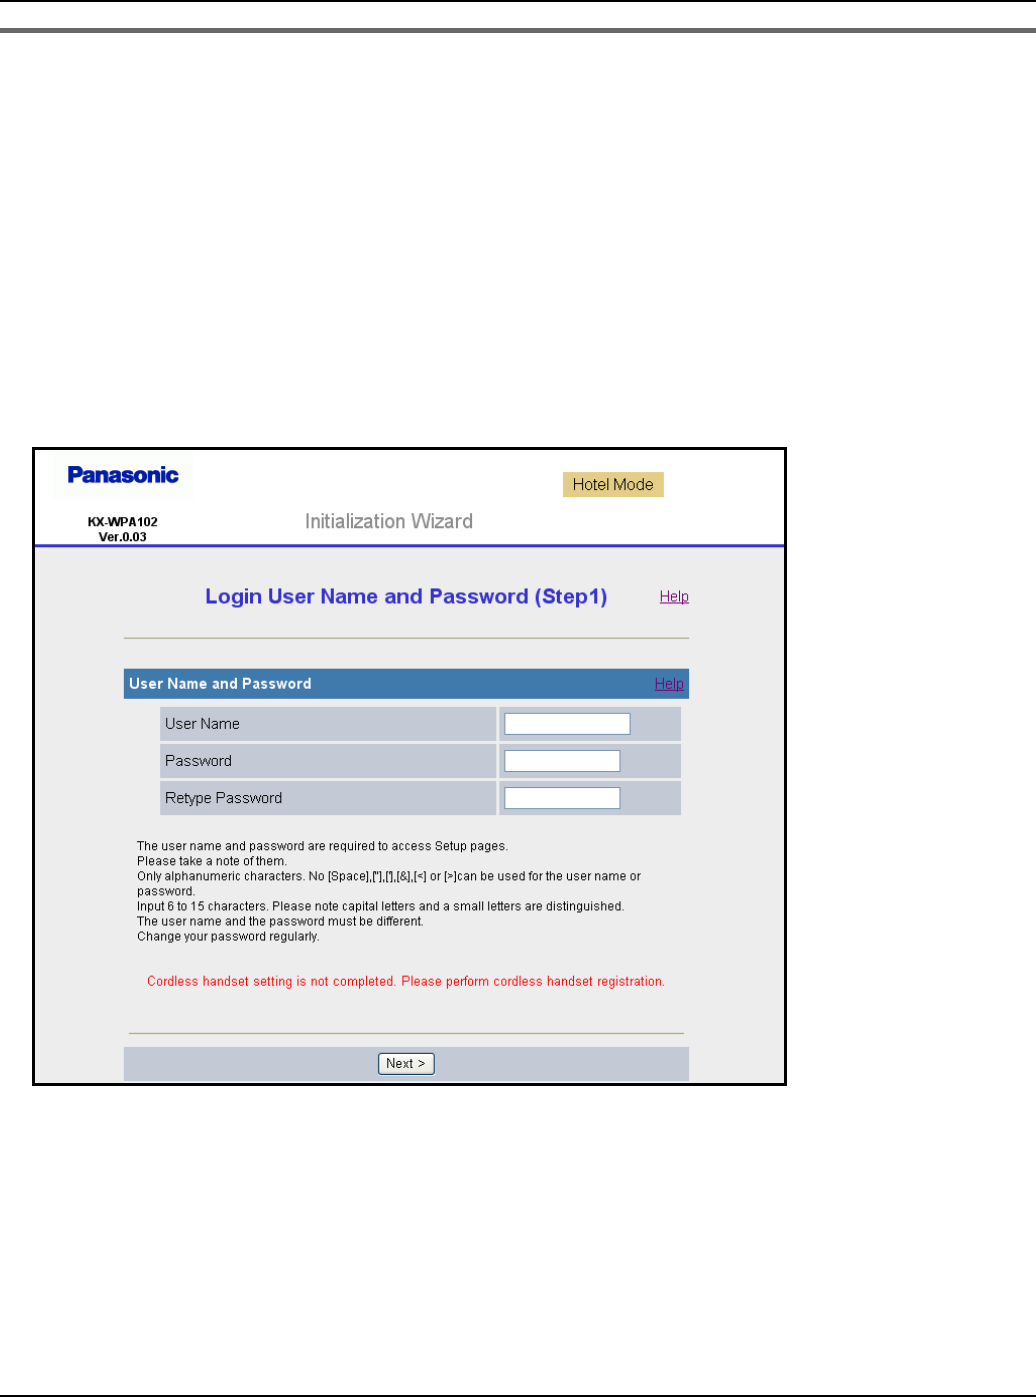
1Login User Name and Password (Step 1)
Set your user name and password to log in the base unit.
page 29
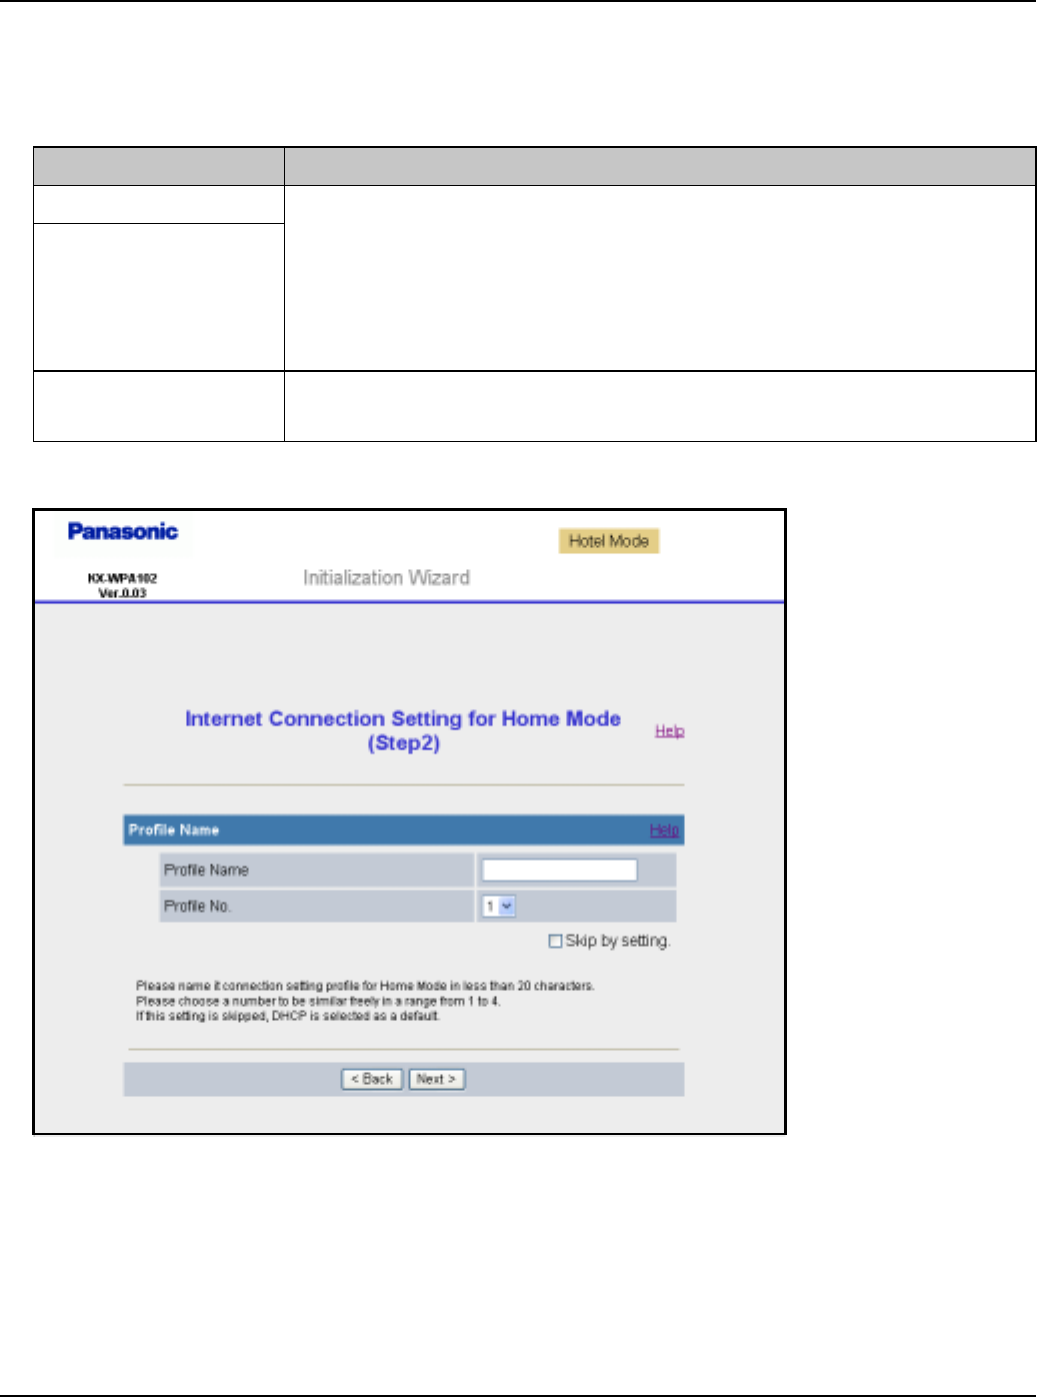
2Internet Connection Setting for Home Mode (Step 2)
Name the profile of the Internet connection setting for HOME mode.
page 30
3Internet Connection Type
Select the Internet connection type used for the HOME mode profile.
(Types available: PPPoE/DHCP/Static/AP (Bridge))
page 31
4(Internet Connection Type) Configuration
Configure the Internet connection type selected for the HOME mode
profile.
page 36
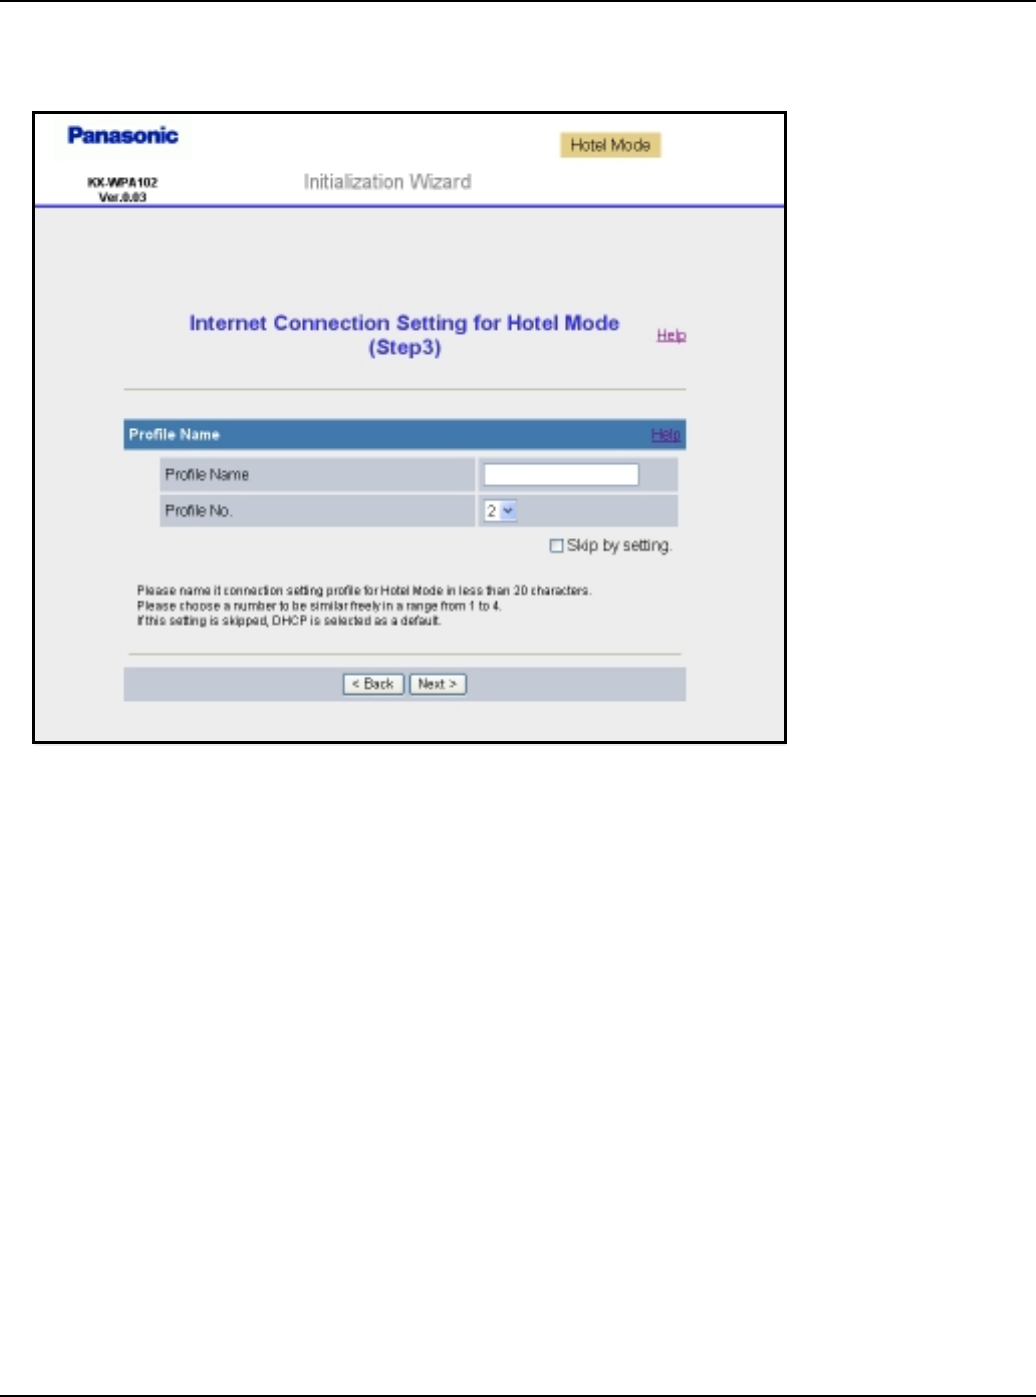
5Internet Connection Setting for Hotel Mode (Step 3)
Name the profile of the Internet connection setting for HOTEL mode.
page 33
6Internet Connection Type
Select the Internet connection type used for the HOTEL mode profile.
(Types available: PPPoE/DHCP/Static)
page 34
7(Internet Connection Type) Configuration
Configure the Internet connection type selected for the HOTEL mode
profile.
page 36
8Save Settings
Confirm the settings you have configured in Initialization Wizard, and
save.
page 35
Temporary Confidential
Getting Started
For assistance, please visit http://www.panasonic.com/phonehelp 29
Initialization Wizard
1Open your Web browser on your computer connected to the “LAN” port on the base
unit.
2Enter http://192.168.0.242/ (the KX-WPA102’s default IP address) or http://kx-
wpa.webpage in the address field of your browser and press ENTER key. You can
also double click the KX-WPA102 icon in My Network Places in Start menu when using
Windows XP and UPnP is enabled. See “Setting UPnP to display the shortcut” on page
153 for details.
LInitialization Wizard starts. A screen with fields for your user name and password
(Login User Name and Password page) is displayed.
If “Initialization Wizard” window is not displayed:
LCheck the setting of Local Area Connection of your computer. It is necessary to
obtain an IP address of your computer automatically from a DHCP server (page 147).
LSometimes it is necessary to set up your Web browser’s proxy server to access the
KX-WPA102 base unit (page 151).
Temporary Confidential
Getting Started
30 For assistance, please visit http://www.panasonic.com/phonehelp
3Enter the desired user name and password, then click [Next>].
Important:
LPlease keep your user name and password securely.
LThe Internet Connection Setting for Home Mode page is displayed.
Setting Description
[User Name] LThe user name and password can contain 6 to 15 characters
(including numbers).
LThe following cannot be used: [ “ ], [ ‘ ], [&], [<], [>], [(space)]
LUser name and password must be different from each other.
LUser name and password are case-sensitive.
[Password]
[Retype
Password]
LEnter the password again.
Temporary Confidential

Getting Started
For assistance, please visit http://www.panasonic.com/phonehelp 31
4Enter the desired profile name for the profile No. you select, then click [Next>].
LIf you wish to use the default Internet connection setting (DHCP), check [Skip by
setting].
LThe Internet Connection Type page is displayed.
Note:
LIf you check [Skip by setting], the page will not be displayed.
Setting Description
[Profile Name] LThe profile name can contain 1 to 20 characters (including
numbers). When different network connection settings are
created for different network environments, a profile name
should be given to each setting to distinguish one from
another. Name the setting, for example, “Hotel”, “Home” or
“Office”.
[Profile No.] LSelect the number for the profile name.
Temporary Confidential

Getting Started
32 For assistance, please visit http://www.panasonic.com/phonehelp
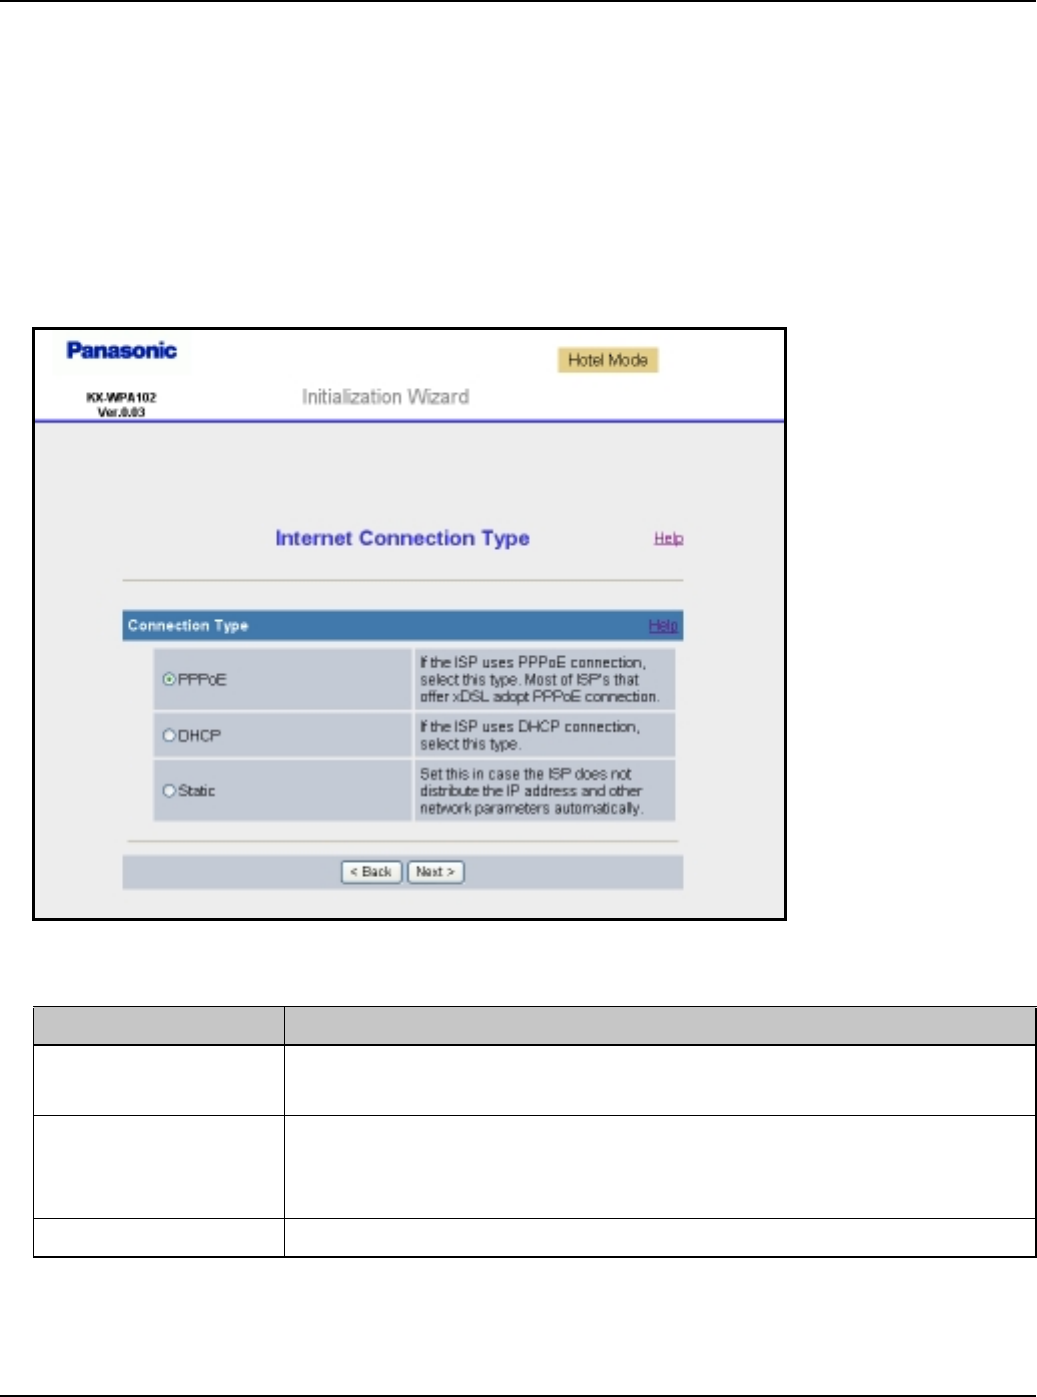
5Select the desired connection type used in HOME mode, then click [Next>].
LInternet connection modes vary according to the Internet service provider. Select a
connection mode referring to the Internet service provider’s setup information.
LSelect [PPPoE], [DHCP] or [Static] if the base unit is installed in Router mode.
Select [AP (Bridge)] if the base unit is installed in AP (Bridge) mode.
LA screen with fields for configuring the connection type you select in this step is
displayed. See “Configuring the Internet connection settings” on page 36.
Setting Description
[PPPoE] LThis connection mode is usually required for use with DSL
modems.
[DHCP] LAllows the base unit to receive an IP address automatically
from a DHCP server. This connection mode is usually
required for use with cable modems.
[Static] LAllows the base unit to assign a specific IP address.
[AP (Bridge)] LAllows the base unit to work as an access point when you
have a router at home. ([AP (Bridge)] is not available in
HOTEL mode.)
Temporary Confidential
Getting Started
For assistance, please visit http://www.panasonic.com/phonehelp 33
6Configure the settings, then click [Next>].
LThe Internet Connection Setting for Hotel Mode page is displayed.
Temporary Confidential
Getting Started
34 For assistance, please visit http://www.panasonic.com/phonehelp
7Enter the desired profile name for the profile No. you select, then click [Next>].
LIf you wish to use the default Internet connection setting (DHCP), check [Skip by
setting].
LSee step 4 on page 31 for details.
LThe Internet Connection Type page is displayed.
Note:
LIf you check [Skip by setting], the Internet Connection Type page will not be
displayed.
8Select the desired connection type used in HOTEL mode, then click [Next>].
L[DHCP] mode (default setting for hotel Internet connection type) is often used in hotel
rooms.
Setting Description
[PPPoE] LThis connection mode is usually required for use with DSL
modems.
[DHCP] LAllows the base unit to receive an IP address automatically
from a DHCP server. This connection mode is usually
required for use with cable modems.
[Static] LAllows the base unit to assign a specific IP address.
Temporary Confidential
Getting Started
For assistance, please visit http://www.panasonic.com/phonehelp 35
LA screen with fields for configuring the connection type you select in this step is
displayed. See “Configuring the Internet connection settings” on page 36.
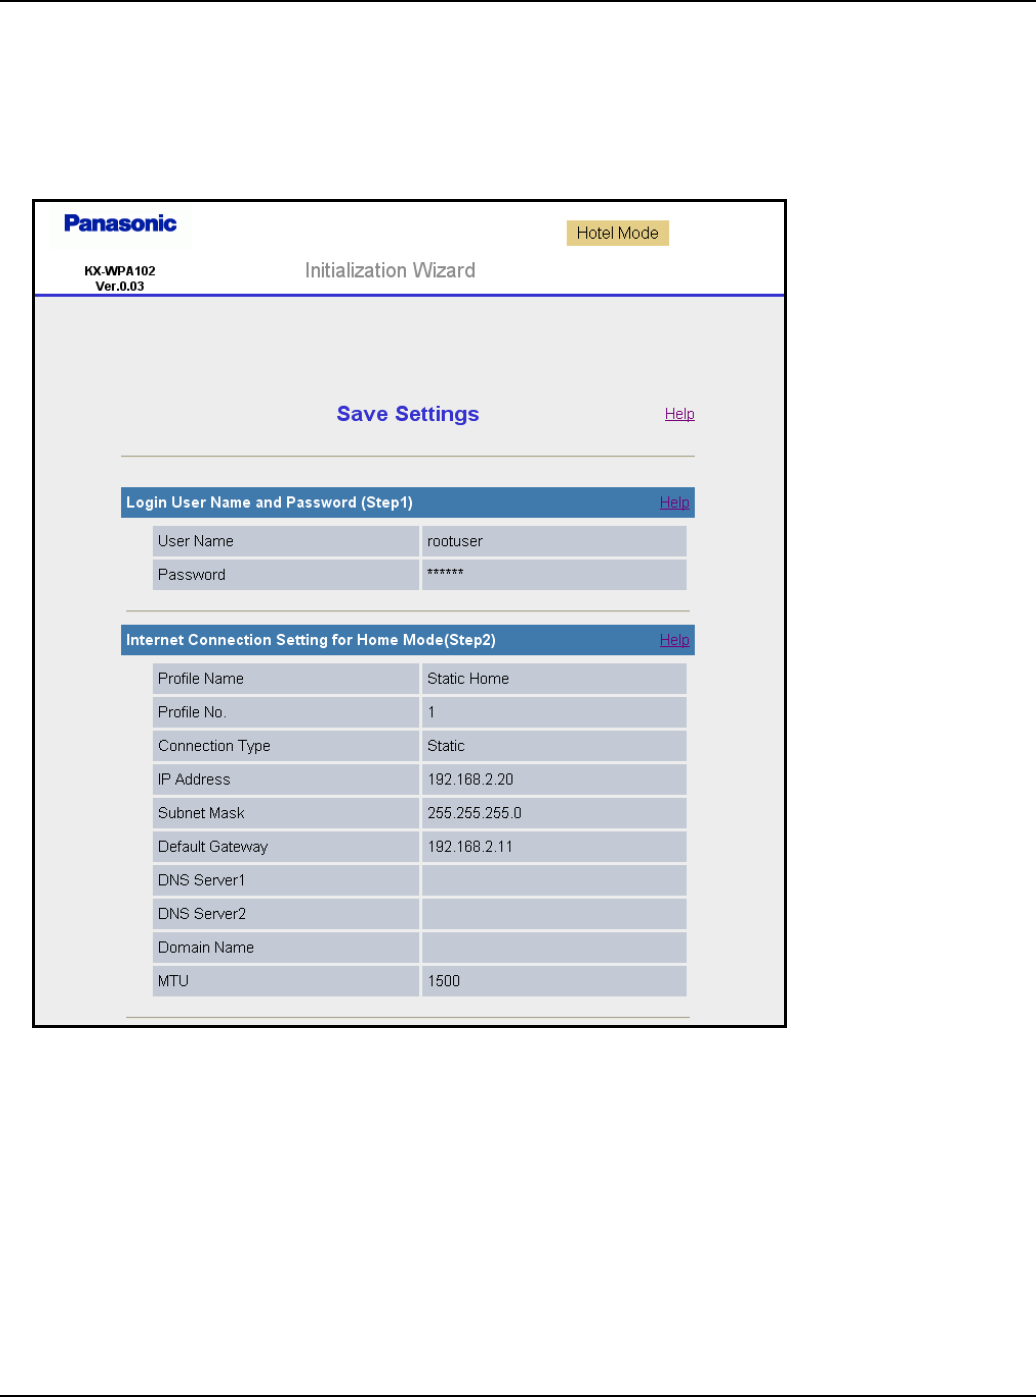
9Configure the settings, then click [Next>].
LThe Save Settings page is displayed.
10 Confirm the settings you are about to save, then click [Save].
LThe base unit begins restarting.
Note:
LYou can change the user name and password after logging in to the base unit (page
131).
LOnce you have configured the settings in Initialization Wizard, you can connect to the
Internet in the connection mode that is registered as HOME or HOTEL mode just by
switching the Mode selector (page 144) to HOME or HOTEL from the next time.
Temporary Confidential
Getting Started
36 For assistance, please visit http://www.panasonic.com/phonehelp
Configuring the Internet connection settings
Configure the Internet connection mode you select in the Internet Connection Type page
of Initialization Wizard (in step 6 of page 33 for HOME mode; step 9 of page 35 for HOTEL
mode).
LIf your Internet service provider or network administrator does not specify any of the
settings, leave the data fields blank.
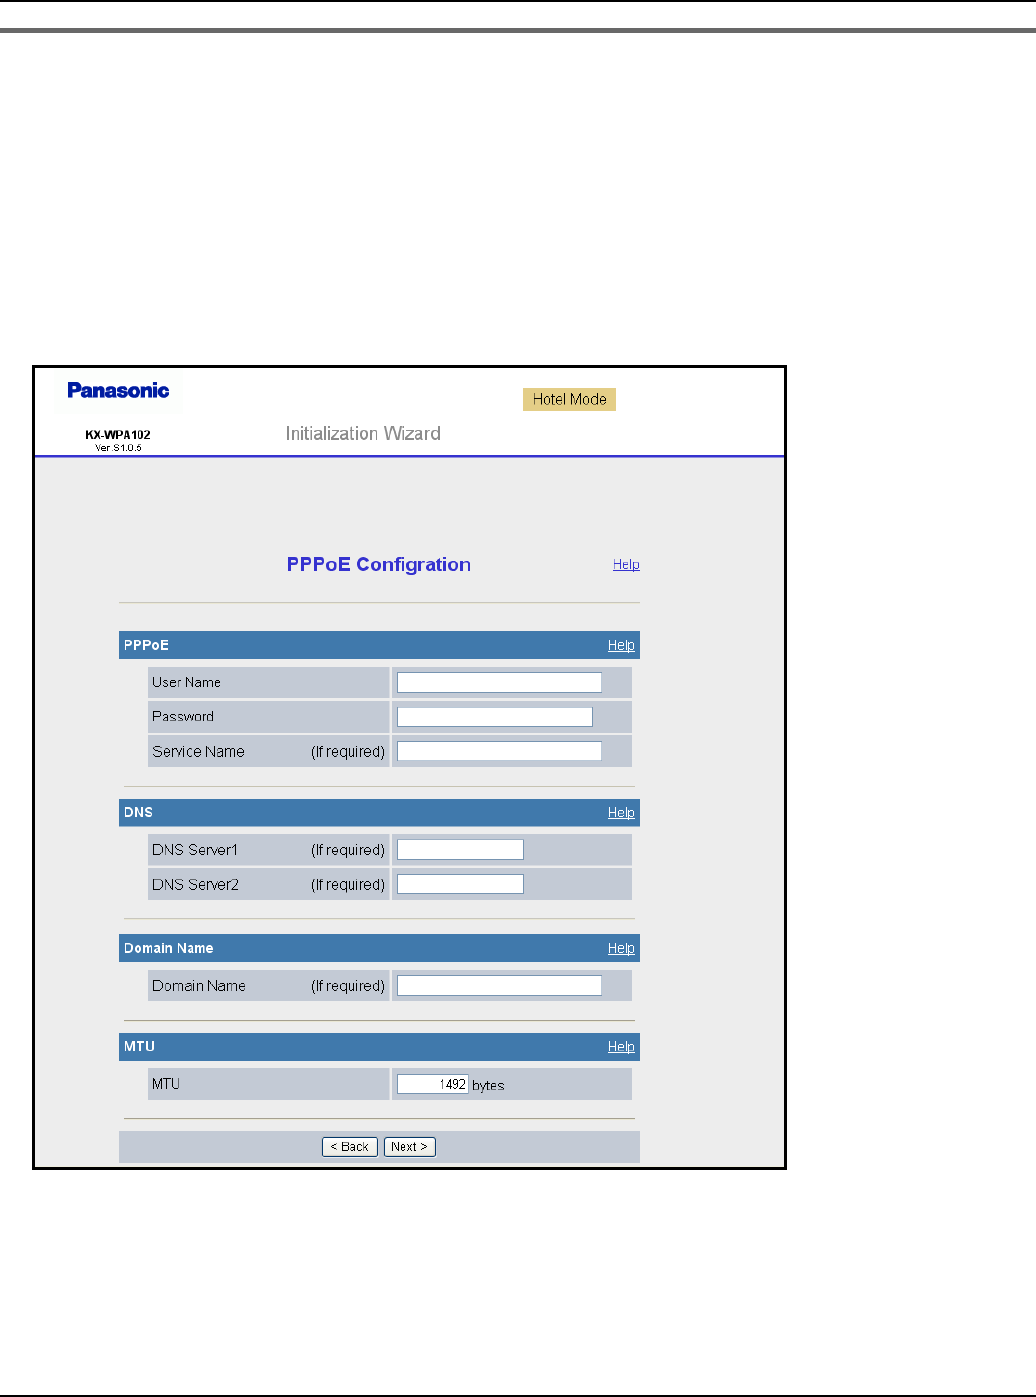
PPPoE Configuration: (Point to Point Protocol over Ethernet) This connection mode is
usually required for use with DSL modems.
Temporary Confidential

Getting Started
For assistance, please visit http://www.panasonic.com/phonehelp 37
Setting Description
[User Name] LEnter your User Name (1 – 63 characters) provided by your
Internet service provider in this data field.
[Password] LEnter your Password (1 – 63 characters) provided by your
Internet service provider in this data field.
[Service Name] LEnter your Service Name (1 – 63 alphanumeric characters)
provided by your Internet service provider in this data field if
required.
[DNS Server 1] LIf you have the DNS (Domain Name System) server
addresses assigned by your Internet service provider or
network administrator, enter them in this data field. They
usually have two addresses.
LSet 4 digits (0 – 255) and 3 periods such as “192.168.0.253”.
But “0.0.0.0” and “255.255.255.255” are not available.
[DNS Server 2]
[Domain Name] LEnter your Domain Name provided by your Internet service
provider in this data field if required.
[MTU] LEnter the maximum size of packet that can be sent.
Temporary Confidential
Getting Started
38 For assistance, please visit http://www.panasonic.com/phonehelp
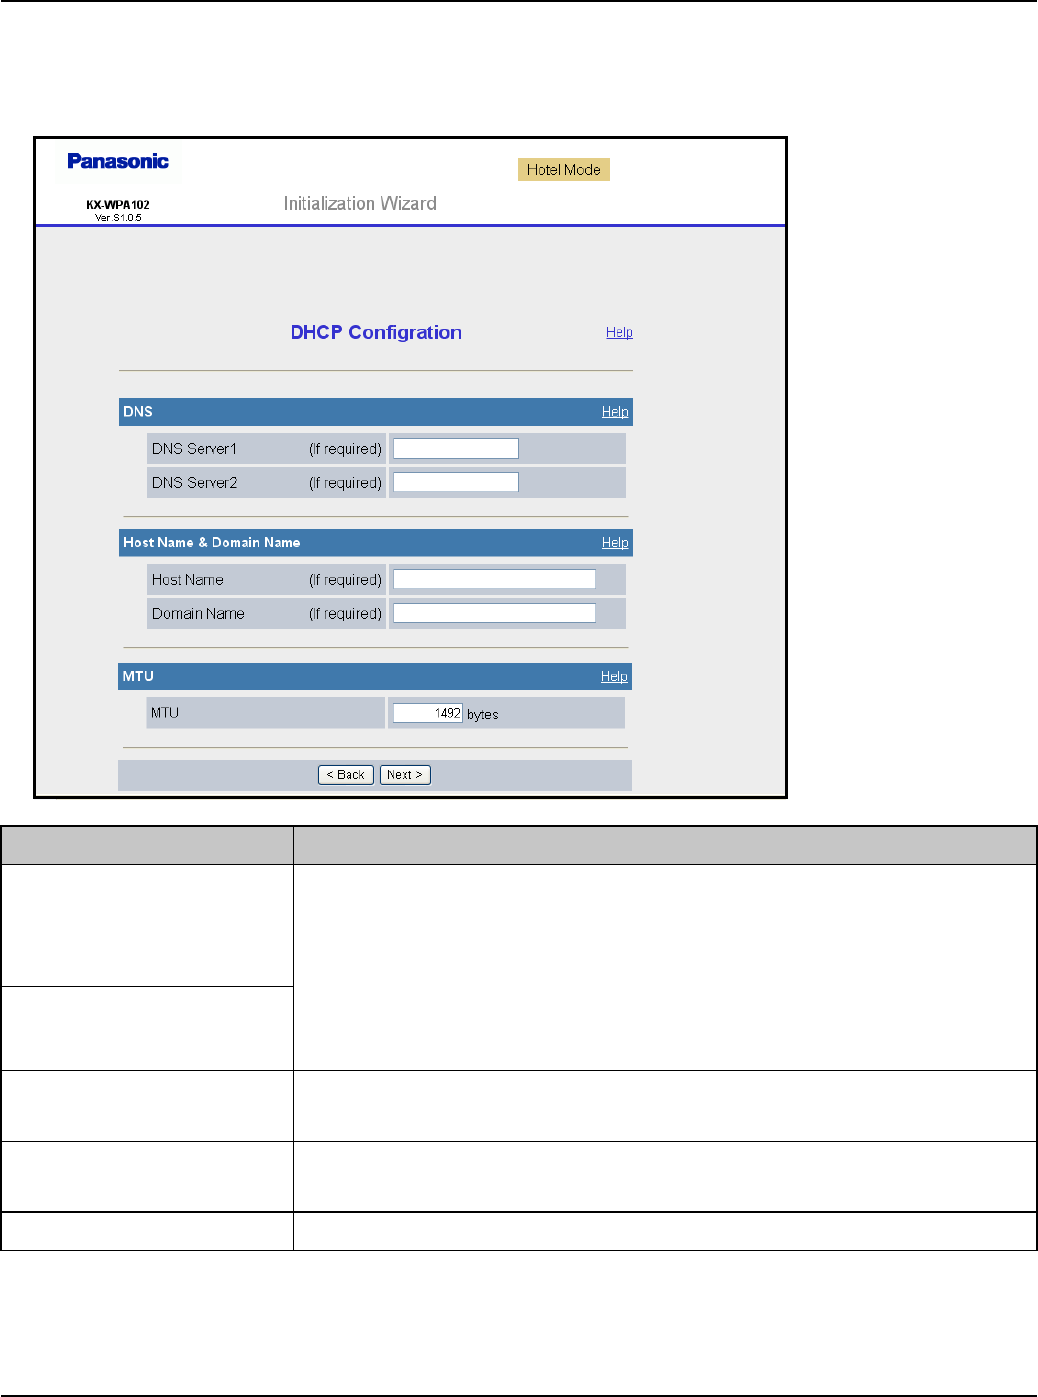
DHCP Configuration: Allows the base unit to receive an IP address automatically from a
DHCP server. This connection mode is usually required for use with cable modems.
DHCP configuration is often used in hotel rooms. Ask the hotel front desk for details.
Setting Description
[DNS Server 1] LIf you have the DNS (Domain Name System) server
addresses assigned by your Internet service provider or
network administrator, enter them in this data field. They
usually have two addresses.
LSet 4 digits (0 – 255) and 3 periods such as “192.168.0.253”.
But “0.0.0.0” and “255.255.255.255” are not available.
[DNS Server 2]
[Host Name] LEnter your Host Name (1 – 31 characters) provided by your
Internet service provider in this data field if required.
[Domain Name] LEnter your Domain Name provided by your Internet service
provider in this data field if required.
[MTU] LEnter the maximum size of packet that can be sent.
Temporary Confidential
Getting Started
For assistance, please visit http://www.panasonic.com/phonehelp 39
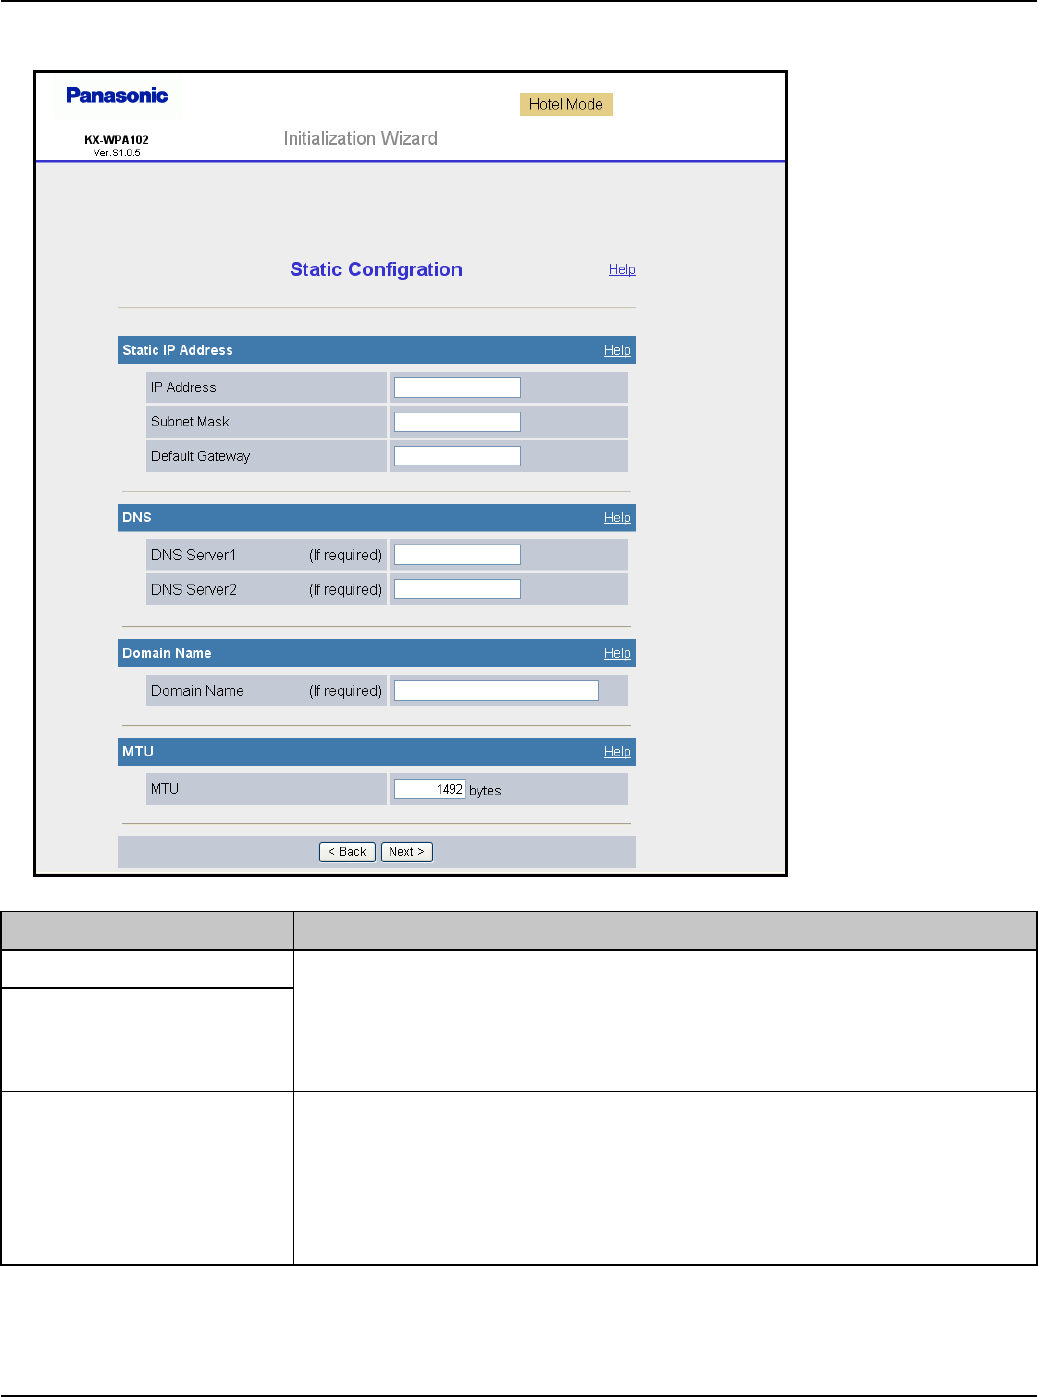
Static Configuration: Allows the base unit to assign a specific IP address.
Setting Description
[IP Address] LIf your Internet service provider specifies the IP address and
subnet mask, enter them in each data field.
LSet 4 digits (0 – 255) and 3 periods such as “192.168.0.253”.
But “0.0.0.0” and “255.255.255.255” are not available.
[Subnet Mask]
[Default Gateway] LIf you have the Default Gateway address assigned by your
Internet service provider or network administrator, enter it in
this data field.
LSet 4 digits (0 – 255) and 3 periods such as “192.168.0.253”.
But “0.0.0.0” and “255.255.255.255” are not available.
Temporary Confidential

Getting Started
40 For assistance, please visit http://www.panasonic.com/phonehelp
[DNS Server 1] LIf you have the DNS (Domain Name System) server
addresses assigned by your Internet service provider or
network administrator, enter them in this data field. They
usually have two addresses.
LSet 4 digits (0 – 255) and 3 periods such as “192.168.0.253”.
But “0.0.0.0” and “255.255.255.255” are not available.
[DNS Server 2]
[Domain Name] LEnter your Domain Name provided by your Internet service
provider in this data field if required.
[MTU] LEnter the maximum size of packet that can be sent.
Setting Description
Temporary Confidential
Getting Started
For assistance, please visit http://www.panasonic.com/phonehelp 41
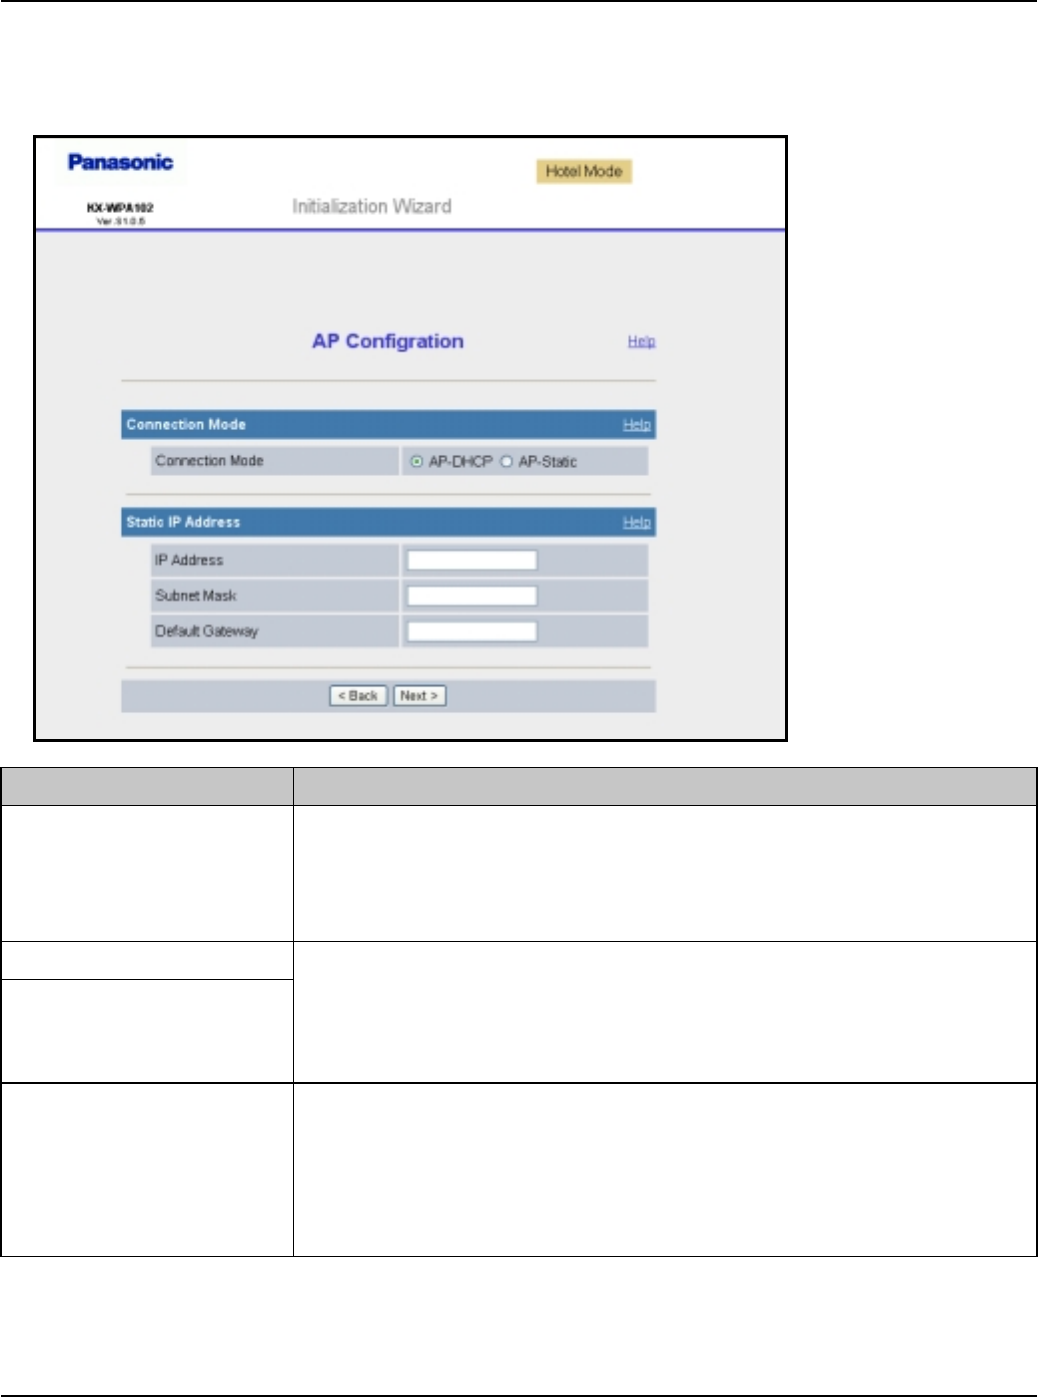
AP Configuration: This configuration needs to be made if you have a router at home and
use the base unit as an access point. (AP Configuration is not available in the HOTEL
mode.)
Setting Description
[Connection Mode] LSelect AP-DHCP for Connection Mode if the DHCP server is
operating in the router or modem with a built-in router you
are using. Select AP-Static if you want to assign Static IP
address.
[IP Address] LSet the IP address and subnet mask corresponding to your
local network.
LSet 4 digits (0 – 255) and 3 periods such as “192.168.0.253”.
But “0.0.0.0” and “255.255.255.255” are not available.
[Subnet Mask]
[Default Gateway] LSet the default gateway address corresponding to your local
network by entering the IP address of your existing router or
modem with a built-in router, for example.
LSet 4 digits (0 – 255) and 3 periods such as “192.168.0.253”.
But “0.0.0.0” and “255.255.255.255” are not available.
Temporary Confidential

Getting Started
42 For assistance, please visit http://www.panasonic.com/phonehelp
Troubleshooting for installation
If problems occur while installing the base unit, you can refer to the check list below.
Up-to-date support information can be found on the xxxxx site (http://
XXXXXXXXXXXXXXXXX). Please refer to it, along with this guide, when troubleshooting.
Connection:
Internet access:
Problem Solution
The modem is connected
but the WAN indicator is
off.
LCheck that the modem and this product are connected.
LCheck that the power of the modem and this product
are turned on.
The Ethernet is
connected but the LAN
indicator is off.
LCheck the connection of the computer.
LCheck that the power of the computer is turned on.
LCheck that the LAN card and driver are installed on the
computer.
Problem Solution
Cannot connect to the
Internet.
LCheck the connection of the modem. Also check the
connection between this product and the LAN.
LCheck the information received from the Internet
service provider regarding Internet connection.
LWhen instructed to do so by the Internet service
provider, set the web browser proxy server (page 151).
LIf the power is cut when connected to the Internet using
PPPoE, it may take a few minutes or more to reconnect
to the Internet.
LCheck that the power supply was turned on in the
following order: modem, router, base unit, computer.
When turning off the power supply, do so in the
following order: modem, base unit, router (if you have
one), computer.
Temporary Confidential

Getting Started
For assistance, please visit http://www.panasonic.com/phonehelp 43
Initialization Wizard:
Problem Solution
Initialization Wizard is not
displayed.
LDialog boxes may not be displayed immediately due to
the state of the LAN.
LCheck that LAN or WIRELESS indicator lights in green.
Also, check if the LAN card or wireless LAN card is on.
If not, check that the LAN is connected.
LCheck that the power supply was turned on in the
following order: modem, router, base unit, computer.
When turning off the power supply, do so in the
following order: modem, base unit, router (if you have
one), computer.
Temporary Confidential
Getting Started
44 For assistance, please visit http://www.panasonic.com/phonehelp
Setting up the handset
Battery installation/replacement
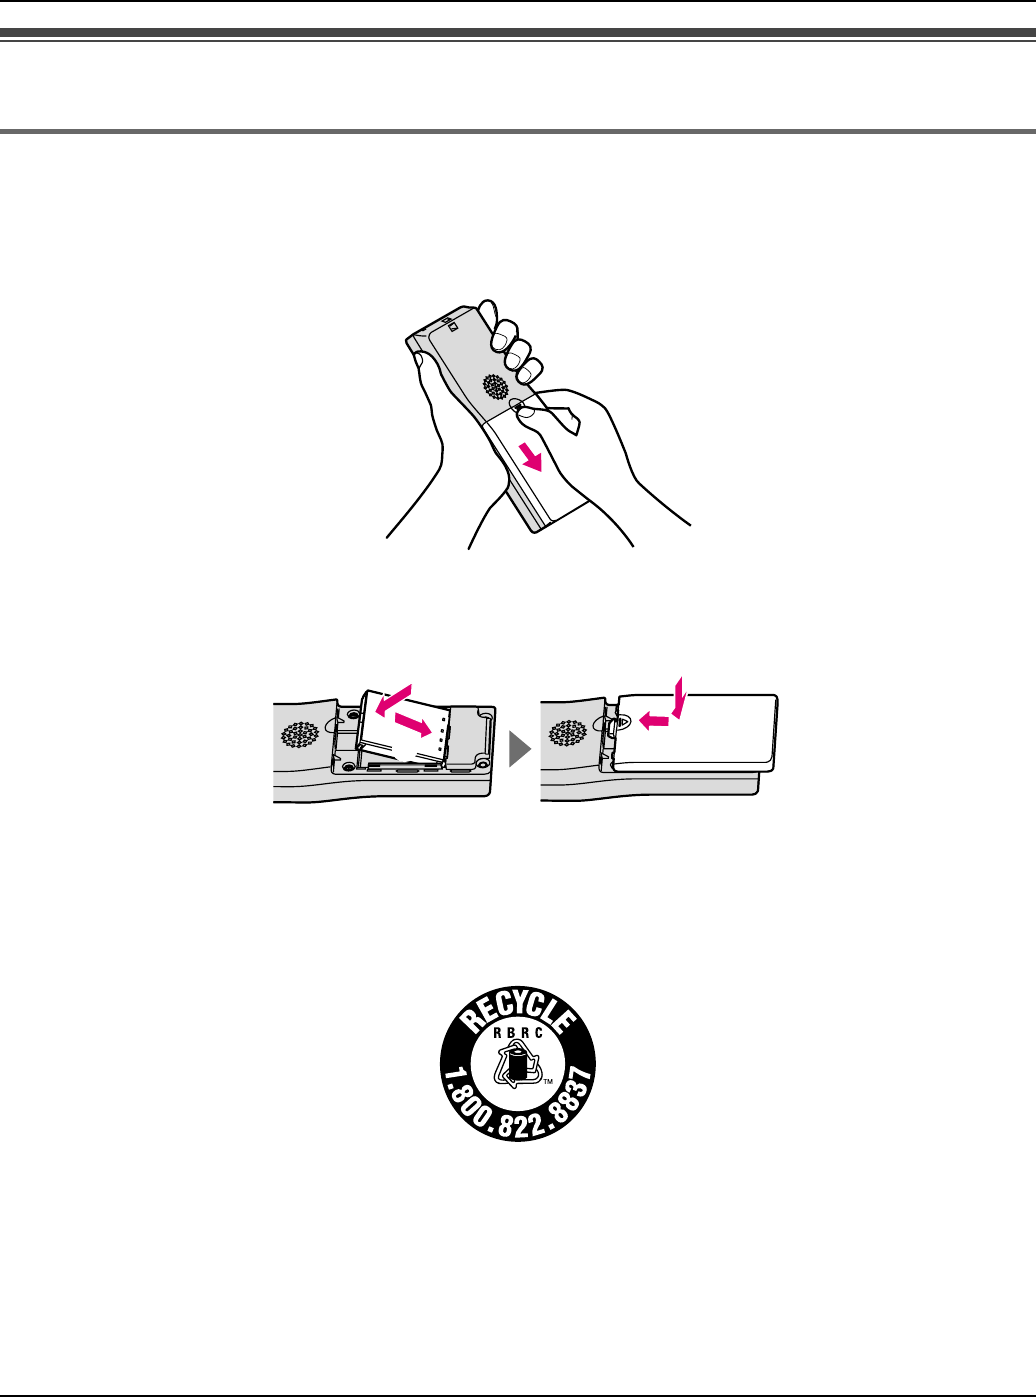
1Press the notch of the handset cover firmly, and slide it in the direction of the arrow.
LFor replacement, remove the old battery.
2Insert the battery (A), and press it down until it snaps into position (B). Then close the
handset cover (C, D).
Important:
LUse only the rechargeable Panasonic battery noted on page 13.
Attention:
A lithium-ion battery that is recyclable powers the product you have purchased.
Please call 1-800-8-BATTERY (1-800-822-8837) for information on how to recycle this
battery.
AD
BC
Li-ion
Temporary Confidential
Getting Started
For assistance, please visit http://www.panasonic.com/phonehelp 45
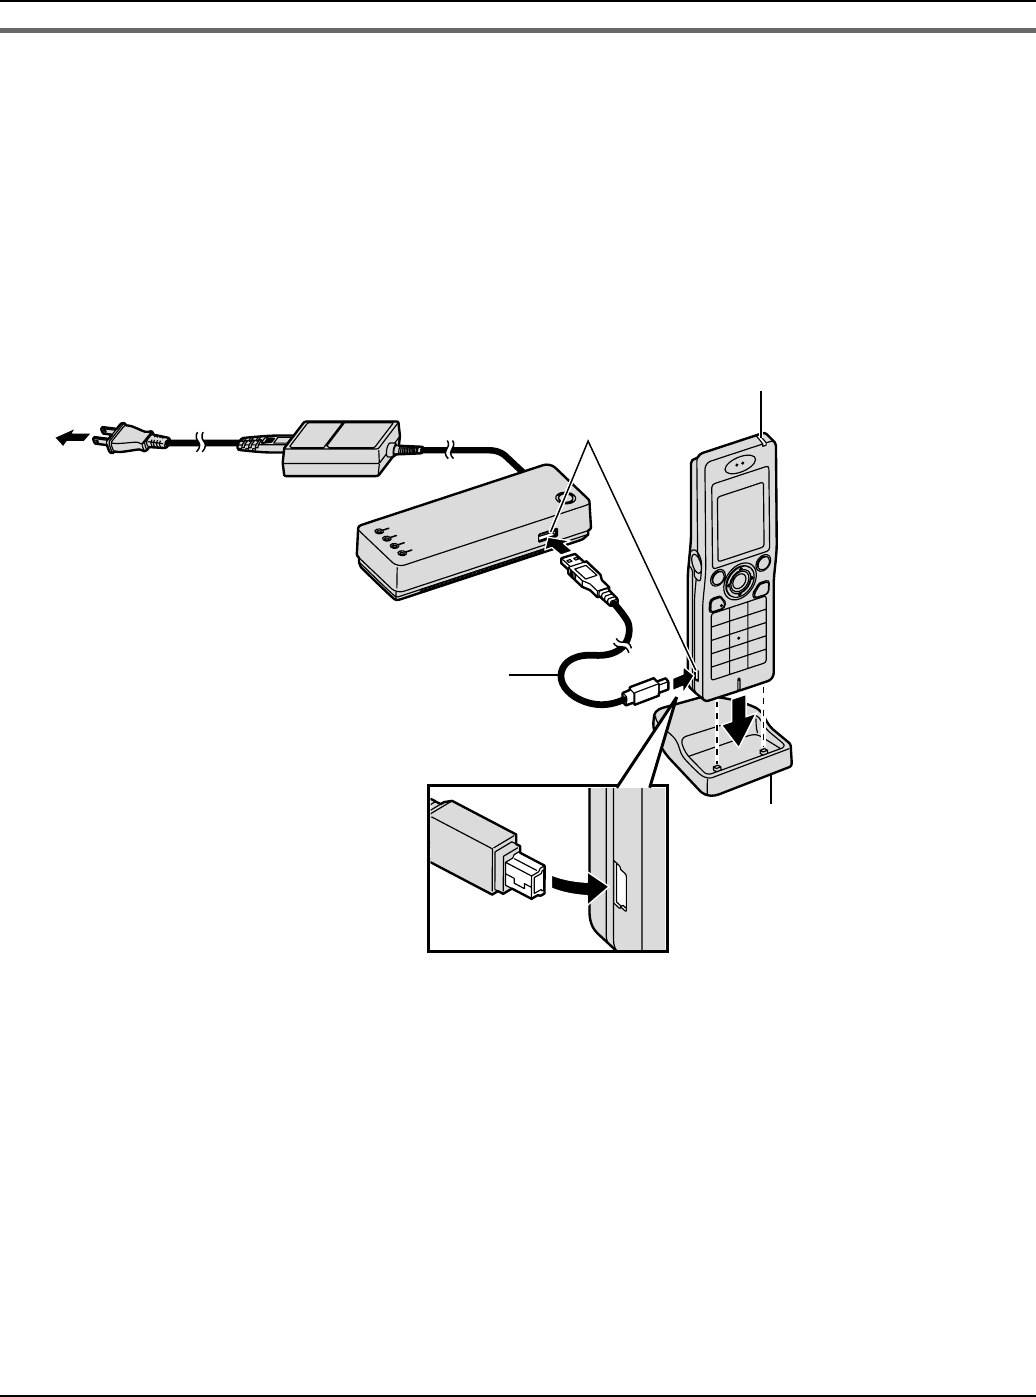
Battery charge
Connect the included CHARGE cable to the CHARGE port of the handset. Connect the
other end to the CHARGE port of the base unit that is connected to the power supply.
Charge the battery for 6 hours before initial use.
LWhile charging, the charge indicator on the handset lights in red. When the battery is
fully charged, the indicator goes out.
LYou can use the included handset stand while charging the battery. To use the stand,
align the grooves of the handset with the tabs of the stand and insert.
Note:
LIf you want to use the handset immediately, charge the battery for at least 15 minutes.
To AC outlet CHARGE ports
CHARGE cable
Charge indicator
(120 V AC, 60 Hz)
Handset stand
Temporary Confidential
Getting Started
46 For assistance, please visit http://www.panasonic.com/phonehelp
Battery level
Note:
LWhen the battery needs to be charged, the handset beeps intermittently during use.
Panasonic battery performance
Note:
LBattery operating time may be shortened over time depending on usage conditions and
surrounding temperature.
LBattery operating time may be shortened when you connect to a different access point,
or after you change some settings in the handset.
LThe battery level may not be displayed correctly after you replace the battery. In this
case, let the battery charge for 6 hours.
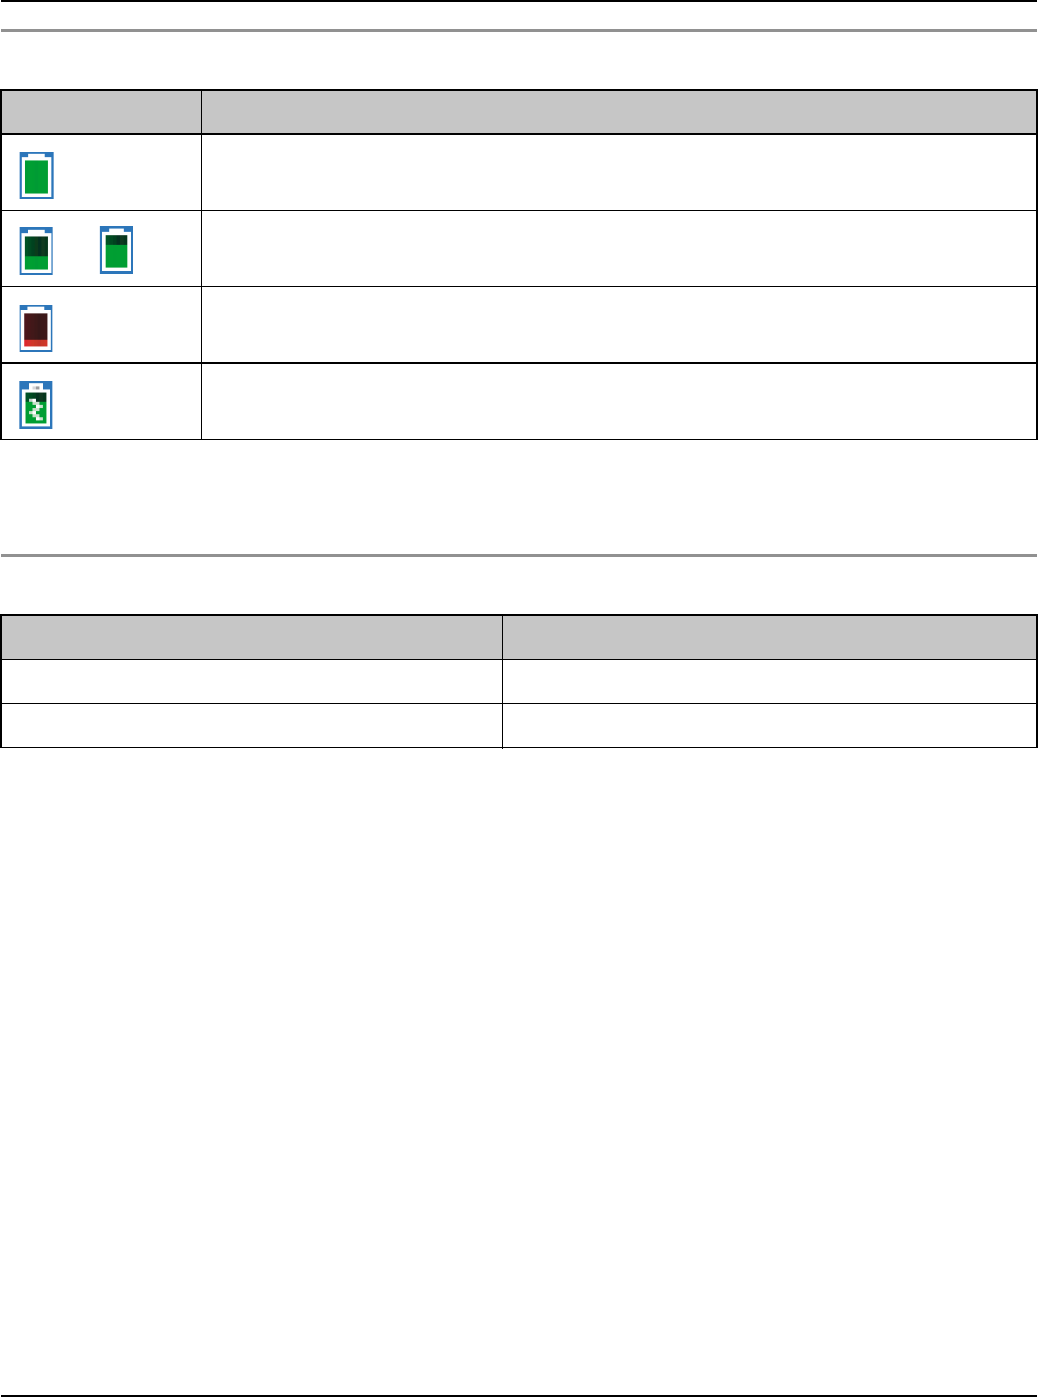
Battery icon Battery level
Fully charged
Medium
Low
Flashing: needs to be recharged.
Charging
Operation Operating time
While in use (talking) Up to 3 hours
While not in use (idle) Up to 72 hours
Temporary Confidential
Getting Started
For assistance, please visit http://www.panasonic.com/phonehelp 47
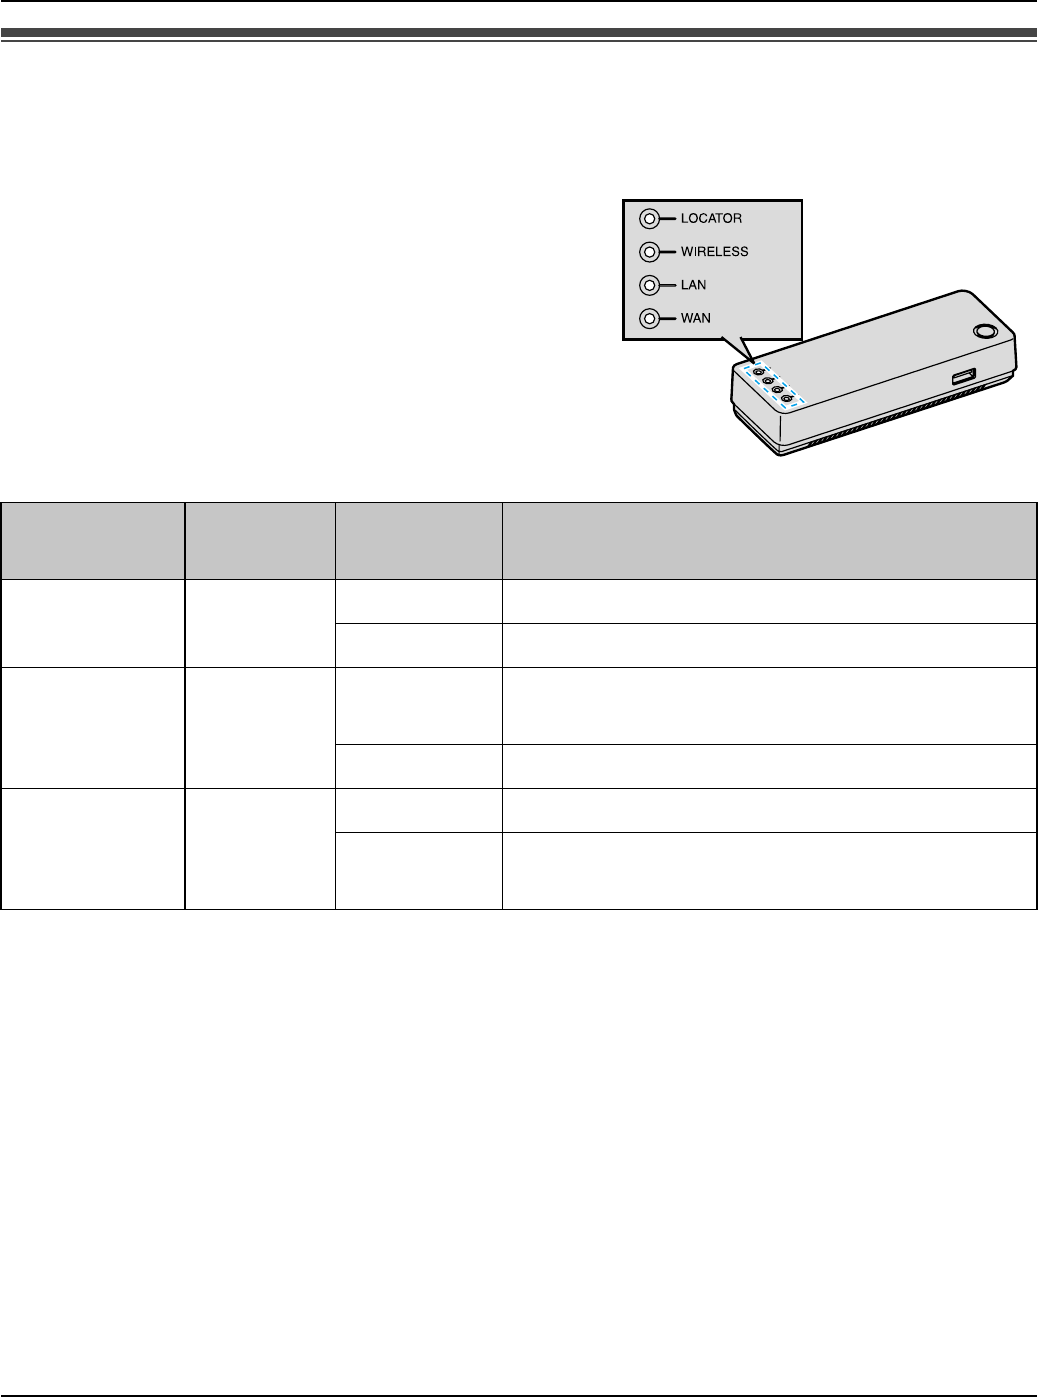
Base unit status indicators
On different occasions you may notice that the
status indicators on the base unit are flashing. You
may find the following flash patterns helpful to you:
Indicator
type Indicator
color Indicator
pattern Status
LOCATOR Green On The base unit is locating the handset.
Flashing The base unit is registering the handset.
WIRELESS Green On The base unit is connected to the wireless
LAN.
Flashing A wireless data transfer is in progress.
LAN Green On A connection to LAN has been established.
Flashing A data transfer is in progress on the LAN
side.
Status indicators
Temporary Confidential

Getting Started
48 For assistance, please visit http://www.panasonic.com/phonehelp
WAN Green On An Internet connection has been
established (IP address obtained).
Flashing A data transfer is in progress on the WAN
side.
Red Flashing The base unit hardware may be defective.
LVisit
http://www.panasonic.com/phonehelp
Amber On An Internet connection has yet to be
established (No IP address obtained).
Flashing The base unit firmware may be defective
and requires a firmware update.
LSee “Setting the static IP address on
your computer” on page 148 for details.
Green/
Amber Alternately
flashing The IP addresses on the LAN and WAN
sides overlap.
LThe network configuration of the LAN
side will be temporarily changed to avoid
the overlap of the LAN and WAN
networks. During this time, Port
Forwarding, DMZ, Packet Filtering and
Static Routing functions are disabled. To
activate those functions, change the LAN
network configuration.
Off – The Ethernet cable is not connected to the
Internet (WAN) port on the rear of the base
unit. Connect it.
Indicator
type Indicator
color Indicator
pattern Status
Temporary Confidential

Getting Started
For assistance, please visit http://www.panasonic.com/phonehelp 49
Text entry
When you enter characters or numbers, use the character and symbol tables for
reference.
Character table
Press {0} – {9}, {*} or {#}. i {OK}
Note:
LTo enter another character that is located on the same dial key, first press {>} to move
the cursor to the next space.
LTo change the input mode, press {*} to shift through Lower case (abc), Upper case
(ABC), Numeric (123) and Hexadecimal (HEX) modes (Pressing {*} to change the
input mode is invalid when you enter telephone numbers.).
LThe characters assigned to each key differ depending on the data entry mode.
Key Character
{1}1
{2}abcABC2
{3}def DEF3
{4}ghi GHI 4
{5}jklJKL5
{6}mn o MNO6
{7}pqr sPQRS7
{8}tuvTUV8
{9}wxyzWXYZ9
{0}Space 0 + (press and hold)
{*} Input mode change *
{#} Linefeed #
Temporary Confidential

Getting Started
50 For assistance, please visit http://www.panasonic.com/phonehelp
Symbol table
1Press {Symbol} while in the data entry screen.
2Press {^}, {V}, {<} or {>} to select the desired symbol. i {Insert}
Note:
LThe available symbols differ depending on the data entry mode.
Editing/correcting a mistake
Press {<} or {>} to move the cursor to the character or number you want to erase, then
press {CLEAR}. Enter the appropriate character or number.
Note:
LPress and hold {CLEAR} to erase all characters or numbers when the cursor is
positioned after the last character or number.
LPress and hold {CLEAR} to erase all characters or numbers after the cursor if the
cursor is in the middle of the text.
Temporary Confidential
Getting Started
For assistance, please visit http://www.panasonic.com/phonehelp 51
Powering on the handset (Signing in to Skype)
To use the handset, you need to connect to a network and sign in to Skype.
Starting up for the first time
1Press and hold {}} for 2 seconds to power on the handset.
2Read and accept the Skype’s agreement. i {Yes}
LThe handset starts searching for available networks within
the area.
3Select the desired network if the network list is displayed.
i {Connect}
4After a network connection is complete, select “Sign in to
Skype” if you already have a Skype account. i {Select}
LTo create a new account, see “Creating a new account” on page 53.
5Enter your Skype name. i {OK}
6Enter your password. i {OK}
7Press {Yes} or {No} to decide whether to sign in automatically from the next time on.
LIdle screen appears (page 54).
Note:
LYou can also follow these instructions when you start up the handset after you reset the
handset.
LIn step 3, you can connect to specific networks that require you to select security type
and enter the network key.
LIn step 3, you can also connect to open networks. When connecting to open networks,
the display appears to confirm whether you want to connect or not.
LFor text entry, see page 49 for details.
Temporary Confidential

Getting Started
52 For assistance, please visit http://www.panasonic.com/phonehelp
Starting up from the second time
1Press and hold {}} for 2 seconds to power on the handset.
2Enter your PIN code if prompted.
LThe handset starts searching for available networks. If any networks you normally
use are already in your Preferred networks list (page 84), the handset automatically
connects to one of the networks in the list.
3After a network connection is complete, select “Sign in to Skype”. i {Select}
LTo create a new account, see “Creating a new account” on page 53.
LIf the handset is set to “Auto sign in” (page 85), Idle screen appears instead of
the “Sign in” screen, and steps 4-6 are skipped.
4Enter your Skype name. i {OK}
5Enter your password. i {OK}
6Press {Yes} or {No} to decide whether to sign in automatically from the next time on.
LIdle screen appears (page 54).
Note:
LFor text entry, see page 49 for details.
To power off the handset
Press and hold {}} for 2 seconds.
Temporary Confidential

Getting Started
For assistance, please visit http://www.panasonic.com/phonehelp 53
Creating a new account
If you do not have your Skype account, or want to create another account, select “New
account” in step 4 in “Starting up for the first time” (page 51) or step 3 in “Starting up from
the second time” (page 52) to create a new account.
1“New account” i {Select}
2Enter a Skype name. i {OK}
3Enter a password. i {OK}
4Repeat the password. i {OK}
5Read and accept the Skype’s agreement. i {Yes}
LIdle screen appears.
Note:
LFor text entry, see page 49 for details.
Temporary Confidential
Getting Started
54 For assistance, please visit http://www.panasonic.com/phonehelp
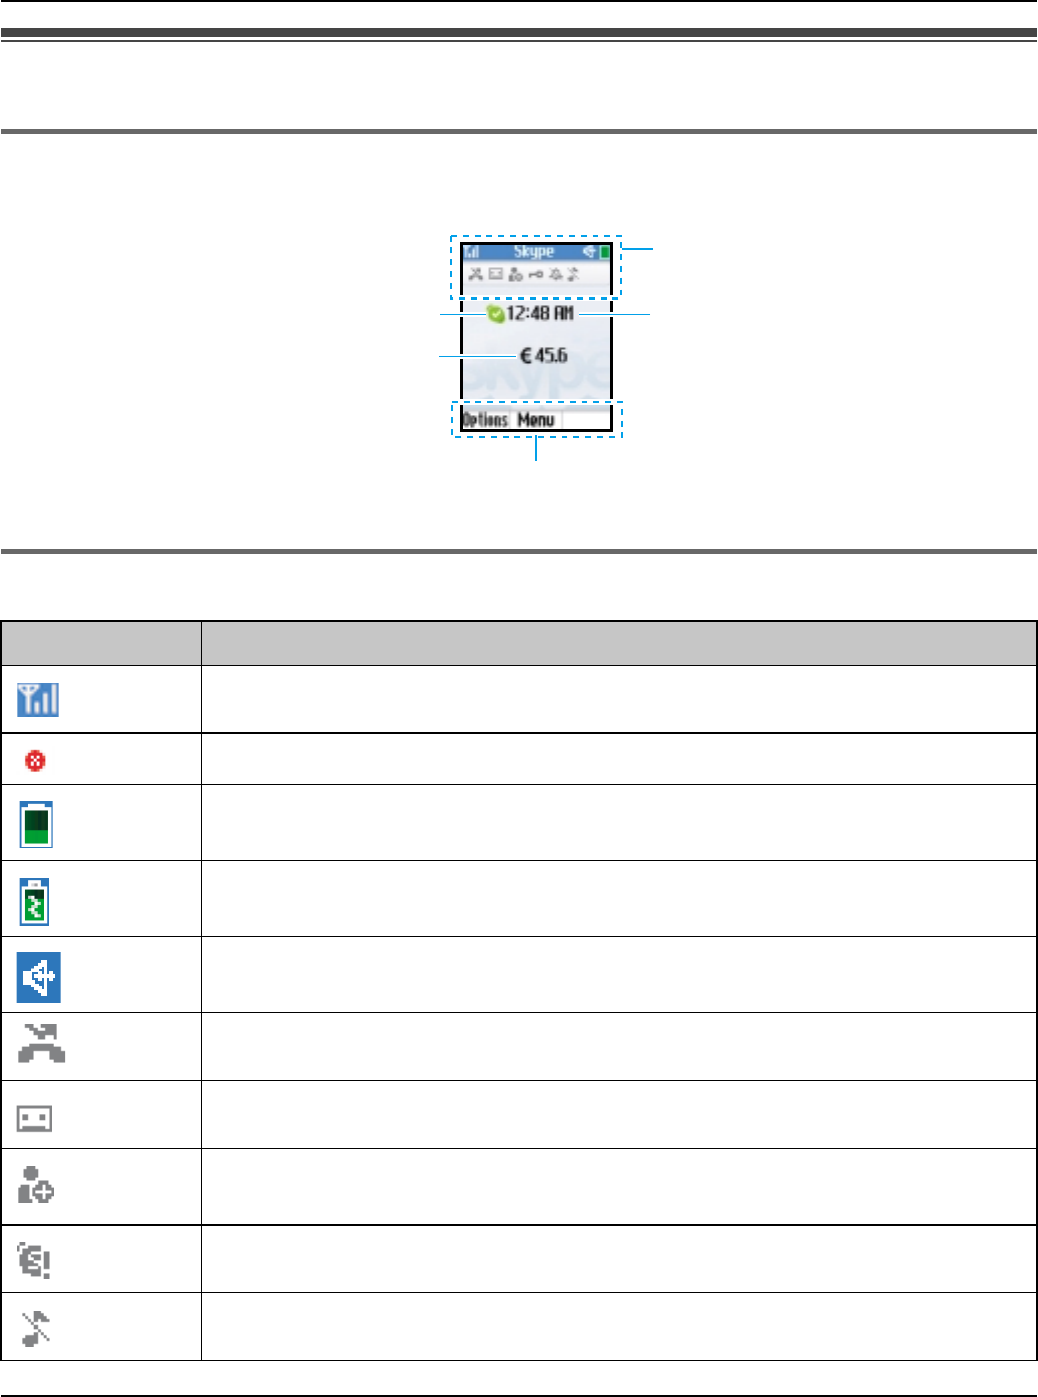
Handset displays
Idle screen
Handset status icons
Icon Meaning
Within range of the wireless LAN
Handset has no link to the wireless LAN.
Battery level
Battery is charging.
Speakerphone is on.
*1 A newly missed call has been listed in History.
*1 A newly received Voicemail has not yet been heard.
*1 A newly received Authorization request is on the pending authorization
request list in History.
*1 Skype credit is low, or any Skype service is close to expiry.
*1 Silent mode
Soft key functions
Handset status icons
Current time
Skype credit balance
Skype status
Temporary Confidential
Getting Started
For assistance, please visit http://www.panasonic.com/phonehelp 55
*1 These icons align to the left in the order of priority.
Skype status icons
While in Idle mode:
Skype status icons represent your current Skype status.
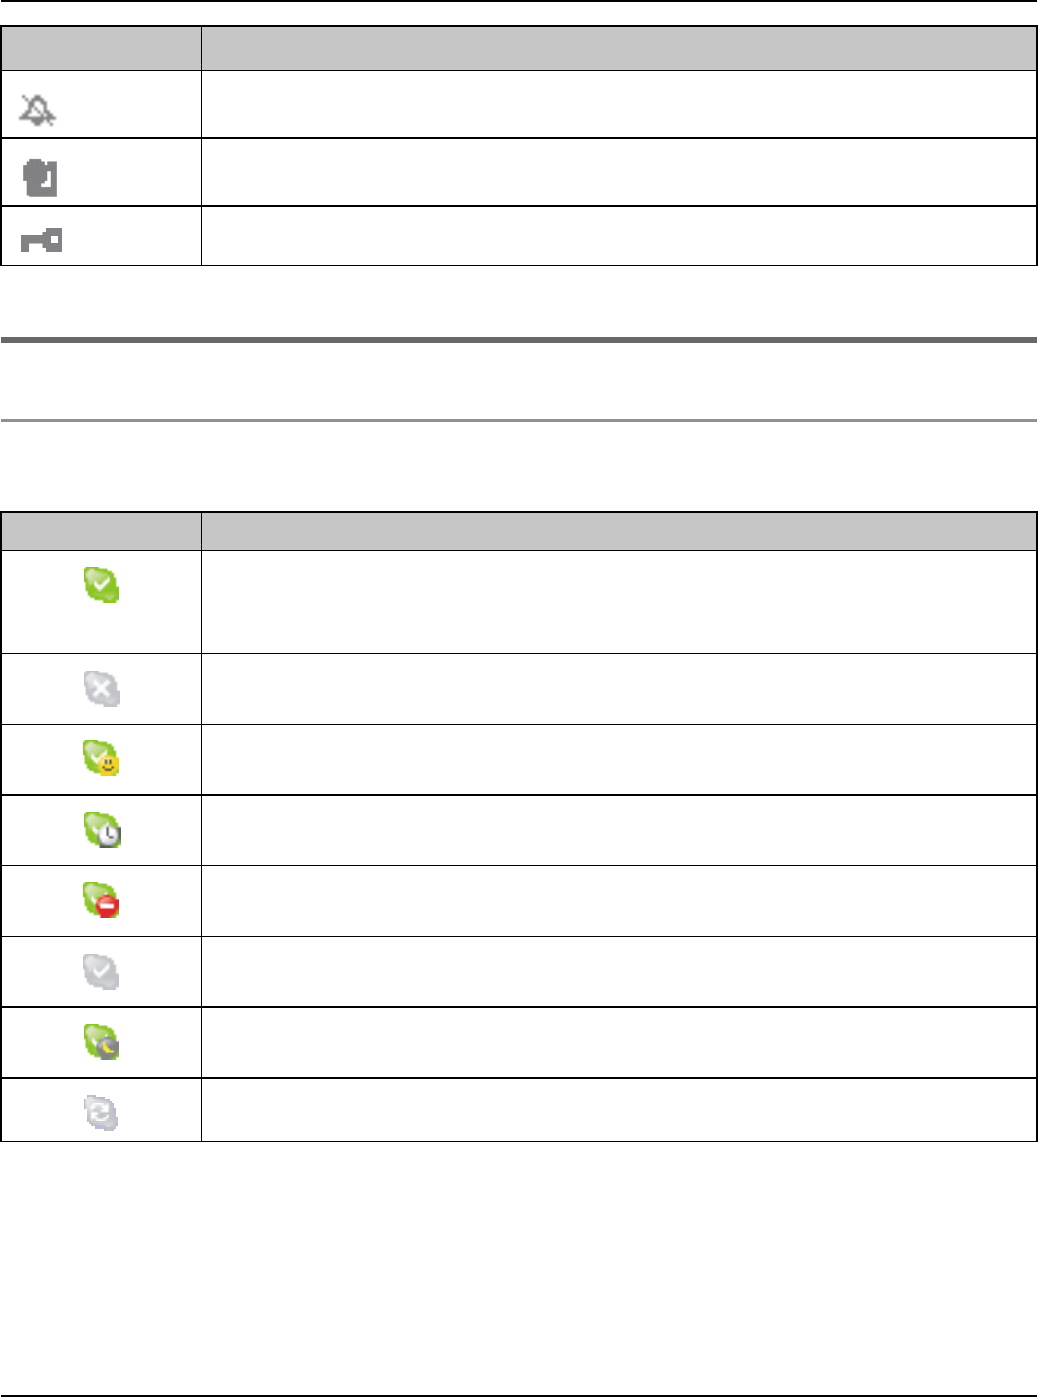
*1 Handset ringer is off.
*1 Keypad locked
*1 PIN locked
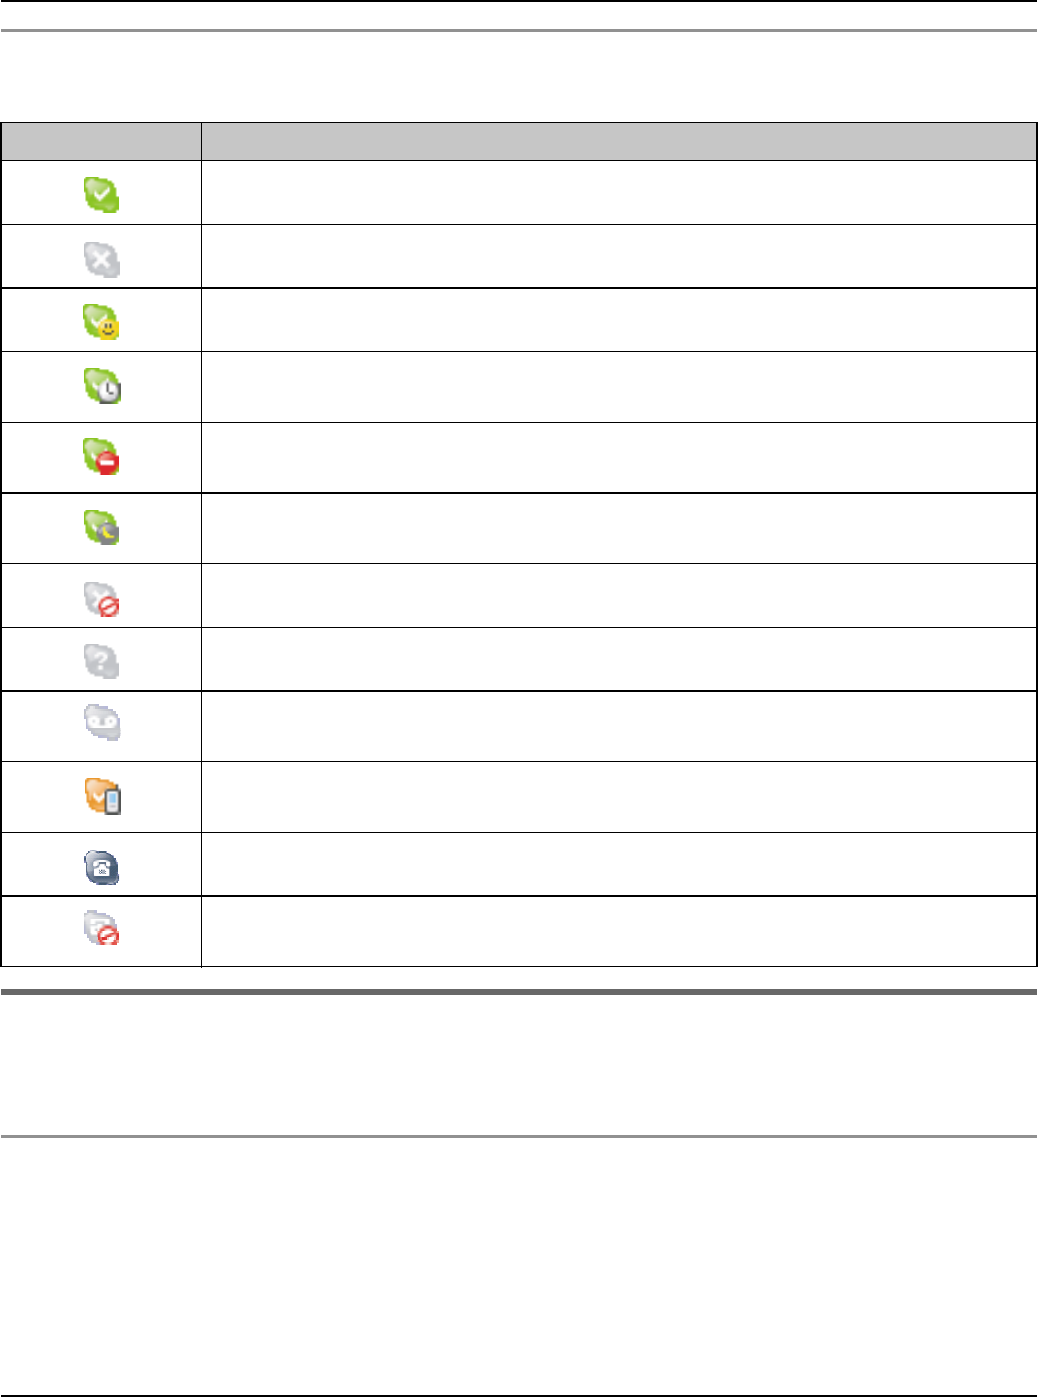
Icon Status
Online: Indicates that you are signed in to Skype and online. You can
make calls and accept calls that are allowed by your Privacy settings
(page 82).
Offline: Indicates that you are not connected to Skype, but you have
still been authenticated as a Skype user.
Skype Me: Indicates that you are available for anyone to call. This
mode temporarily disables your Privacy settings (page 82).
Away: Indicates that you are currently away from phone, but you are
still signed in to Skype and can make calls.
Do Not Disturb: Indicates that you are signed in to Skype, but do not
want to receive calls. In this mode, the ringer tone is set to be silent.
Invisible: Indicates that you are offline, but you are still signed in to
Skype and can make calls.
Not Available: Indicates that you are currently not available, but you
are still signed in to Skype and can make calls.
Connecting: Indicates that you are connecting to Skype.
Icon Meaning
Temporary Confidential
Getting Started
56 For assistance, please visit http://www.panasonic.com/phonehelp
While in Contacts list:
Skype status icons represent the current Skype status of the contacts in Contacts list.
Display back light
After 10 seconds of inactivity, the display back light is turned off in order to preserve the life
of the battery.
To turn on the display back light
To use the handset when the display back light is turned off, press any key to turn the
display back light on again.
Icon Status
Online: Indicates that the contact is signed in to Skype and online.
Offline: Indicates that the contact is not signed in to Skype.
Skype Me: Indicates the contact is available for calls from anyone.
Away: Indicates that the contact is signed in to Skype but currently
away.
Do Not Disturb: Indicates that the contact is signed in to Skype but
does not want to receive calls.
Not Available: Indicates that the contact is signed in to Skype but is
currently not available.
Blocked: The contact is blocked and cannot contact you.
Pending: Indicates that the contact is pending your authorization.
Offline Voicemail: Indicates that the contact is not signed in to Skype
but can receive Voicemails.
Calls Forwarded: Indicates that the calls are forwarded to a specified
number.
SkypeOut: Indicates the contact is a SkypeOut contact.
SkypeOut Blocked: Indicates the SkypeOut contact is blocked and
cannot contact you.
Temporary Confidential
Getting Started
For assistance, please visit http://www.panasonic.com/phonehelp 57
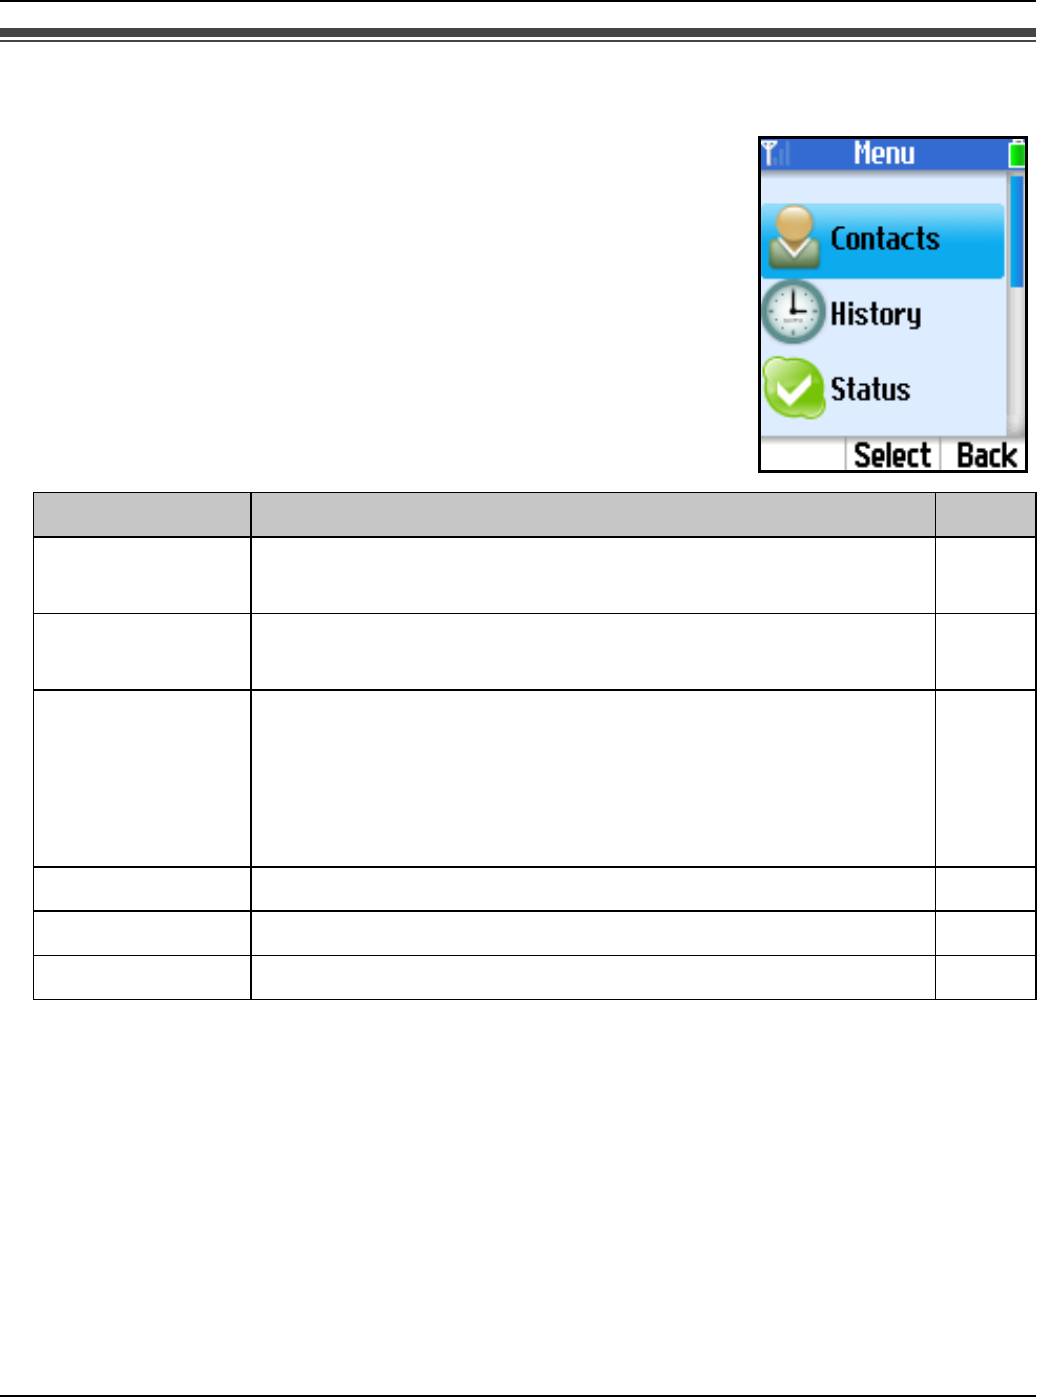
Main menu
Skype’s Main menu provides 7 menus as shown below.
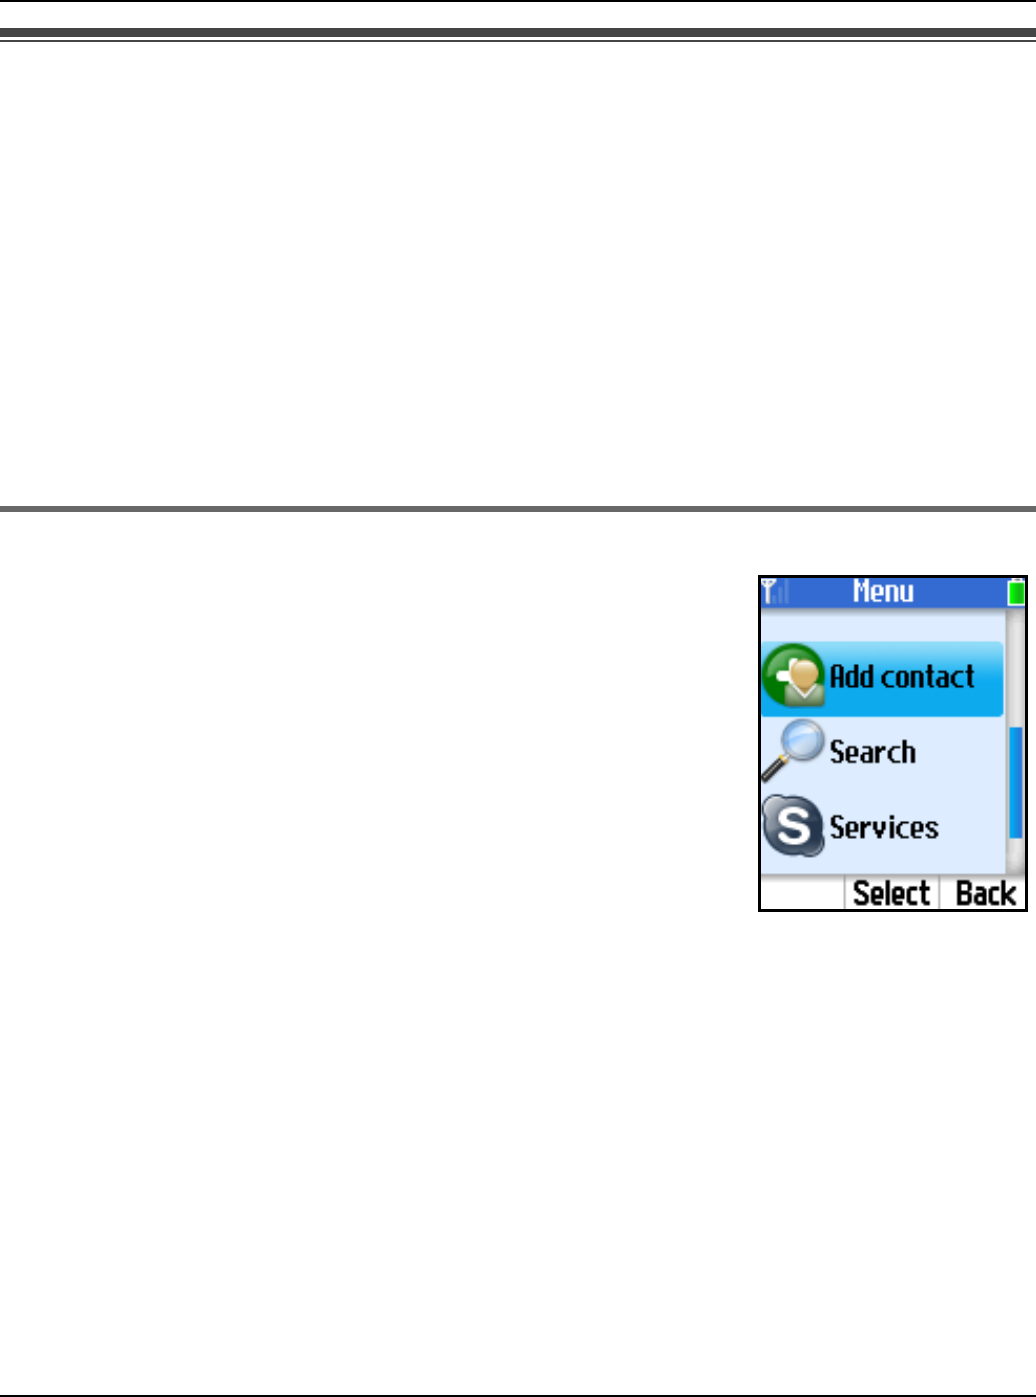
1While in Idle mode, press {Menu} (middle soft key).
2Select the desired menu. i {Select}
Menu Description Page
Contacts Lists Skype and SkypeOut contacts, and shows their
current Skype status. 61
History Lists missed calls, incoming calls, outgoing calls,
Voicemails and Authorization requests. 77
Status Defines your personal Skype settings.
Change status: Changes your Skype online status. 79
My profile: Changes your Skype profile details. 79
Sign out: Signs you out of Skype. 80
Add contact Adds Skype and SkypeOut contacts to your Contacts list. 62
Search Searches for Skype contacts over the Internet. 64
Services Shows Skype credit, SkypeIn and Voicemail information. 92
Temporary Confidential

Getting Started
58 For assistance, please visit http://www.panasonic.com/phonehelp
The following sub menus in “Settings” menu are available even when you are not
signed in to Skype.
LNetwork
LSoftware updates (in “General”)
LReset (in “General”)
LKeypad tone (in “Tones”)
LTime and Date
LPhone settings
LInformation
LAdvanced
Settings Configures handset settings. 81
Network: Searches for networks, manages preferred
networks, and sets auto-connection to open networks. 83
General: Changes your password, sets auto sign-in,
updates software, and resets handset settings. 85
Call divert: Sets call forwarding, Voicemail and
welcome messages. 71
Privacy: Restricts incoming calls to those you specify. 82
Tones: Sets the ringer type, tones and volume. 88
Time and Date: Sets the time and date. 60
Blocked users: Shows blocked users list and unblocks
users you desire. 67
Phone settings: Locks the handset, changes the
handset PIN code, registers the handset to the base unit,
adjusts the brightness of the handset display, and allows
you to decide whether to save the battery.
89
Information: Shows the handset information such as
product ID, software/firmware versions and MAC
address.
90
Advanced: Sets the notification for a software update,
and sets network proxy. 91
Menu Description Page
Temporary Confidential
Getting Started
For assistance, please visit http://www.panasonic.com/phonehelp 59
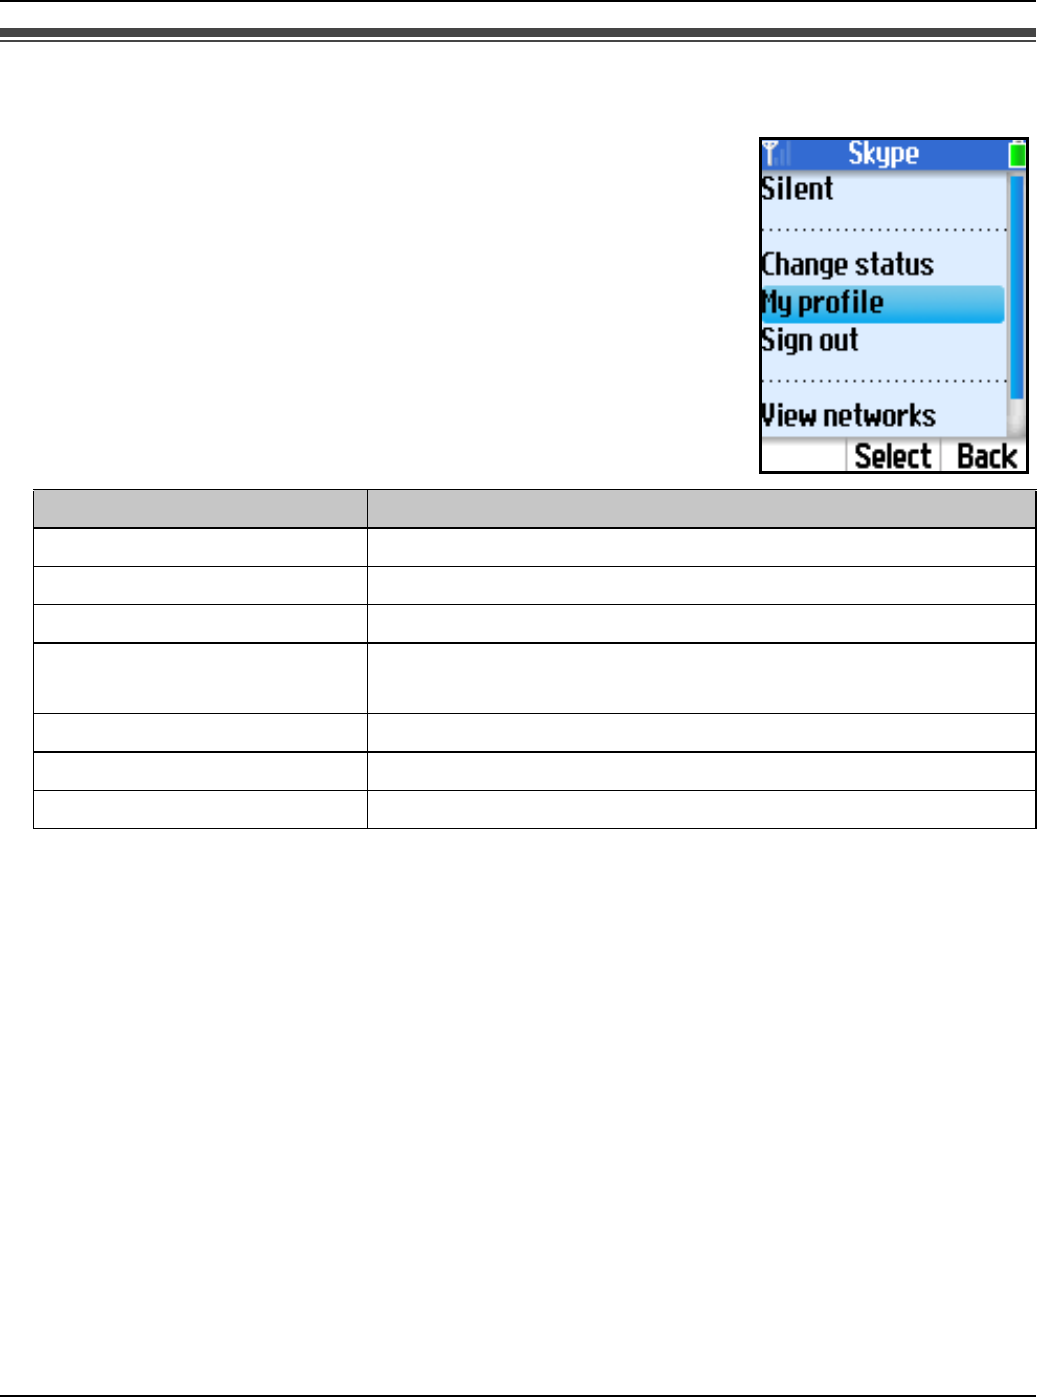
Power screen
Power screen is another main menu that provides different
functions such as turning the silent mode on or off, viewing the list
of networks, changing your profile details and Skype status, etc.
Functions available in the menu depend on whether you are
signed in to Skype.
1While in Idle mode, press {Options}.
2Select the desired menu. i {Select}
*1 Available only when you are signed in to Skype.
Menu Description
Silent Sets the silent mode to on.
Sounds on Sets the silent mode to off.
Change status*1 Changes your Skype online status.
My profile*1 Changes your Skype profile details. See page 79 for
details.
Sign out*1 Signs you out of Skype.
View networks Shows a list of networks found in the area.
Network details Shows network connection information.
Temporary Confidential

Getting Started
60 For assistance, please visit http://www.panasonic.com/phonehelp
Setting the time and date
Set the correct date and time before you start using the handset.
1{Menu} (middle soft key)
2“Settings” i {Select}
3“Time and Date” i {Select}
4Select the desired setting.
Note:
LIf you make a mistake when entering the date and time, press {<} or {>} to move the
cursor, then make the correction.
LChanging “Time zone” and “Daylight saving” sets the displayed time forward or
backward. When you set the time and date for the first time, set the time after all the
other Time and Date settings.
Time Enter the current hour and minute (12-hour clock
format) by selecting 2 digits for each. Press {*} to
select “AM” or “PM”. i {OK}
Time zone Select the desired item. i {Select}
Daylight saving Select “Standard” or “Daylight saving”. i
{Select}
Date Enter the current month, day and year by selecting 2
digits for month and day, and 4 digits for year. i
{Select}
Date format Select the desired format. i {Select}
Temporary Confidential

Managing Contacts
For assistance, please visit http://www.panasonic.com/phonehelp 61
Contacts list
Your Contacts list displays all of the names you can make calls to. If you have an existing
Skype account, your Contacts list is automatically downloaded when you sign in. If you are
new to Skype and have just created an account, your Contacts list will be empty. You will
need to add contacts to your list (page 62).
Skype protects the privacy of users by requiring authorization on names that you wish to
add to your Contacts list. When you add a name to your list, an authorization request is
sent to the user. The user can accept or deny the request. When a request is accepted,
you can see when the contact is online and make calls to them. You can also view their
personal profile details.
1While in Idle mode, press {CONTACTS}.
2Select the desired contact.
LTo view the contact’s profile, press {Select}.
LTo call the contact, press {{} or {s}.
LTo access options, press {Options} and select the desired
option. i {Select}
Note:
LIn step 1, you can also press {Menu} (middle soft key). i
“Contacts” i {Select}
Temporary Confidential
Managing Contacts
62 For assistance, please visit http://www.panasonic.com/phonehelp
Adding contacts
You can add up to 500 contacts to your Skype Contacts list and search for contacts by
name.
Important:
LYou can not add any more than 500 contacts; otherwise the Contacts list in your handset
cannot be synchronized with the PC version of Skype Contacts list. If you happen to add
more than 500 contacts to the PC version of Skype Contacts list, you need to delete the
unwanted contacts only from the PC version of Skype Contacts list.
LYour Contacts list also includes the blocked user contacts. If your Contacts list exceeds
the limit, you may want to delete the blocked user contacts before deleting other
contacts. To delete the unwanted contacts, see “Contacts list options” on page 65.
Adding Skype contacts
1{Menu} (middle soft key)
2“Add contact” i {Select}
3“Skype” i {OK}
4Enter the Skype name (max. 32 characters). i {OK}
5Press {Yes} to add the contact to your list and to authorize the
contact to see when you are online.
LPress {No} to add the contact without the authorization.
6Press {OK} to send an Authorization request to the added contact.
7Enter text to send with the request (max. 200 characters). i {OK}
8{OK}
Note:
LYou can also search and add Skype contacts from “Search” menu (page 64).
LIn step 6, the Authorization request is sent to the newly added contact so that the person
will allow you to see when the person is online.
LFor text entry, see page 49 for details.
Temporary Confidential

Managing Contacts
For assistance, please visit http://www.panasonic.com/phonehelp 63
Adding SkypeOut numbers
You can add non-Skype (SkypeOut) numbers to your Contacts list. SkypeOut numbers
are listed with “ ” icon in your Contacts list.
1{Menu} (middle soft key)
2“Add contact” i {Select}
3“SkypeOut number” i {OK}
4“Contact’s name” i {Select}
5Enter the name (max. 50 characters). i {OK}
6“Phone number” i {Select}
7Enter the phone number (max. 20 digits). i {OK}
LThe phone number should start with the country code.
8{Save}
9{OK}
Note:
LFor text entry, see page 49 for details.
LIn step 7, enter the phone number in the following way (even for local calls):
“country code” + “area code” + “local phone number”
Example (using the country code “1” for calling USA):
+ 1 555 321 5555
– “+” (international prefix) is automatically added.
– In case of some countries, delete “0” at the first digit of the area code.
– To correct a digit, press {CLEAR}.
Temporary Confidential
Managing Contacts
64 For assistance, please visit http://www.panasonic.com/phonehelp
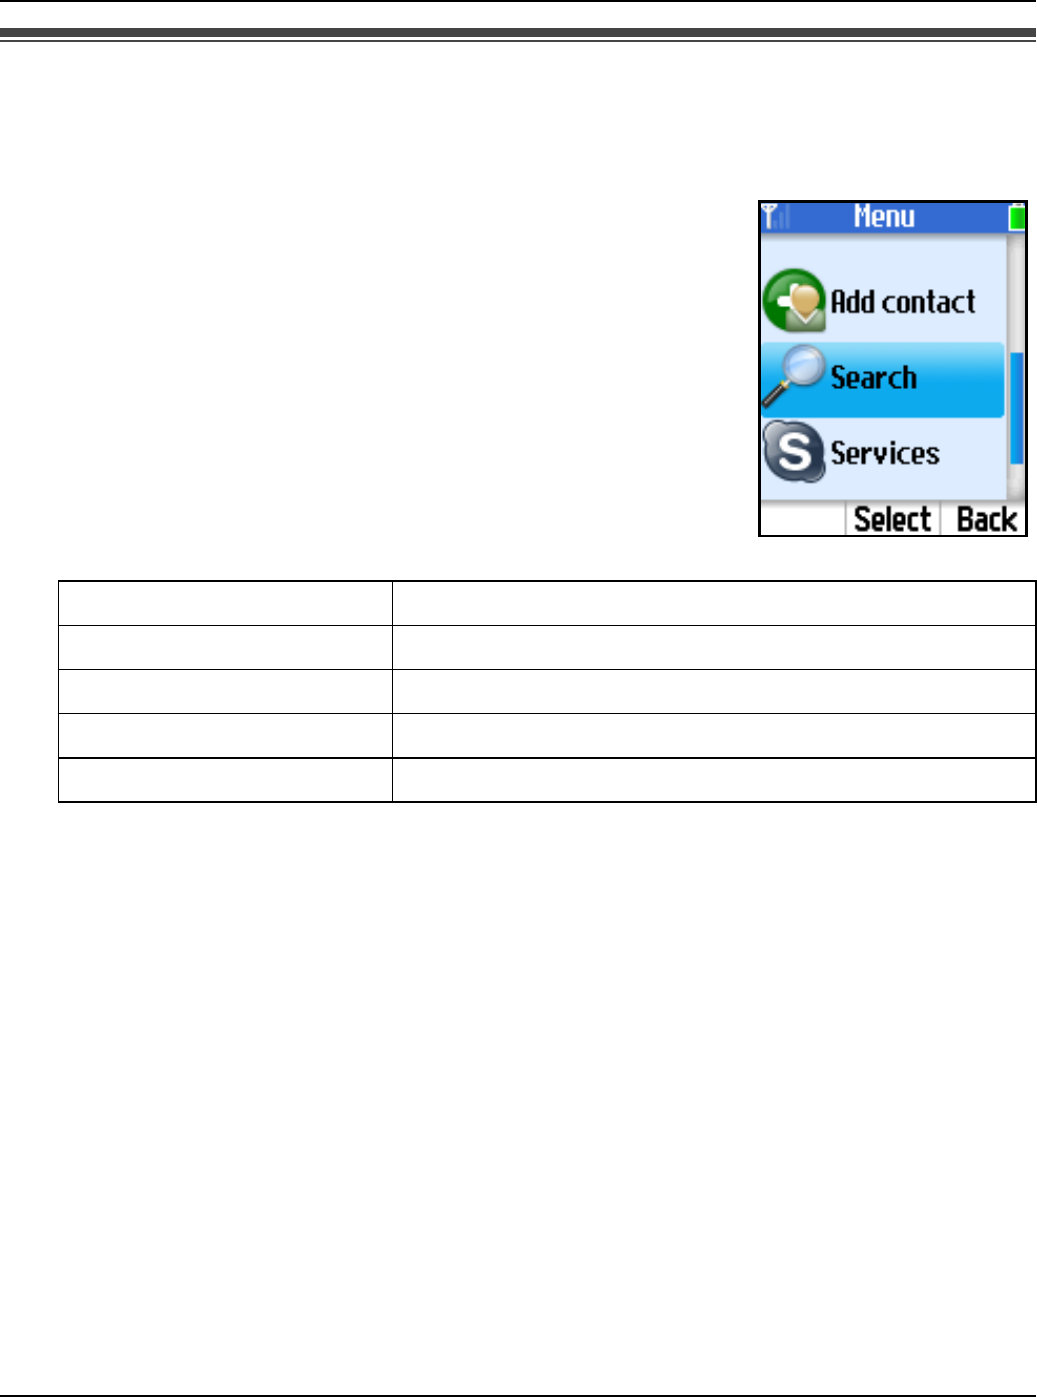
Searching for Skype contacts
You can search the Skype directory for your desired Skype contacts over the Internet so
that you can call, add to your Contacts list, or view the profiles of the contacts.
1{Menu} (middle soft key)
2“Search” i {Select}
3Enter the name or email address to search for. i {OK}
4Select the desired Skype contact.
LTo view the contact’s profile, press {Select}.
LTo call the contact, press {{} or {s}.
LTo access options, press {Options} and select the desired
option. i {Select}
Note:
LFor text entry, see page 49 for details.
More results Shows the next 20 results.
Previous results Shows the previous 20 results.
Search again Searches again with another keyword.
Add to contacts Adds the contact to your Contacts list.
View profile Shows the profile of the contact.
Temporary Confidential

Managing Contacts
For assistance, please visit http://www.panasonic.com/phonehelp 65
Contacts list options
You can access the option menu while viewing the Contacts list.
1While in Idle mode, press {CONTACTS}.
2Select the desired contact. i {Options}
3Select the desired option. i {Select}
*1 Available only for Skype contacts.
*2 Available only for SkypeOut contacts.
Note:
LIn step 1, you can also press {Menu} (middle soft key). i “Contacts” i {Select}
LYou can also access the Contacts list options when viewing a contact profile.
In step 2, press {Select} after finding the desired contact to view the contact profile.
Then, press {Options} to access the options.
LContacts are listed alphabetically in the following order:
– Online Skype contacts
– Offline Skype contacts with call forwarding number and SkypeOut contacts
– Offline and unauthorized Skype contacts
LIn step 2, you can also search for a contact by initial. Press the dial key ({0} – {9}) that
corresponds to the first letter(s) of the contact you are searching for. When the list of
contacts is displayed, select the desired contact.
Call*1 Calls the contact. Select the desired phone number to
call. i {Select}/{{}/{s}
Send Voicemail*1 Sends Voicemail to the contact.
Rename*1 Renames the display name of the contact.
Remove Removes the contact from your Contacts list. Select
“Remove and block” or “Remove only”.
Block user Blocks or unblocks the contact (Skype status icon
changes after setting).
Unblock user
Request auth.*1 Sends an Authorization request to the contact (page 62).
Options are not available if a request is already sent.
Add SkypeOut*1 Adds a SkypeOut contact to your Contacts list.
Edit*2 Edits the SkypeOut contact’s name and phone number.
Temporary Confidential

Managing Contacts
66 For assistance, please visit http://www.panasonic.com/phonehelp
Viewing a contact profile
You can view the profile of the contact you select.
1While in Idle mode, press {CONTACTS}.
2Select the desired contact. i {Select}
Note:
LIn step 1, you can also press {Menu} (middle soft key). i “Contacts” i {Select}
LThe display name of the contact may not be properly displayed due to the fact that the
name is entered in the type of writing other than the Roman alphabet. In this case, press
{Options}, and select “Rename” to change the name.
LYou can also view the profile by pressing {CONTACTS}. i Select the desired contact.
i {Options} i “View profile”
Temporary Confidential

Managing Contacts
For assistance, please visit http://www.panasonic.com/phonehelp 67
Blocking contacts
Blocking contacts
You can block contacts that you do not wish to receive calls from in your Contacts list.
1While in Idle mode, press {CONTACTS}.
2Select the desired contact. i {Options}
3“Block user” i {Select}
Unblocking contacts
You can unblock contacts that are blocked in your Contacts list.
1While in Idle mode, press {CONTACTS}.
2Select the desired contact. i {Options}
3“Unblock user” i {Select}
To unblock contacts that are removed and blocked:
Contacts that are removed and blocked from Contacts list go to the blocked users list.
You can release the blocked contacts from the blocking status.
1{Menu} (middle soft key)
2“Settings” i {Select}
3“Blocked users” i {Select}
4Select the desired user. i {Unblock}
Temporary Confidential
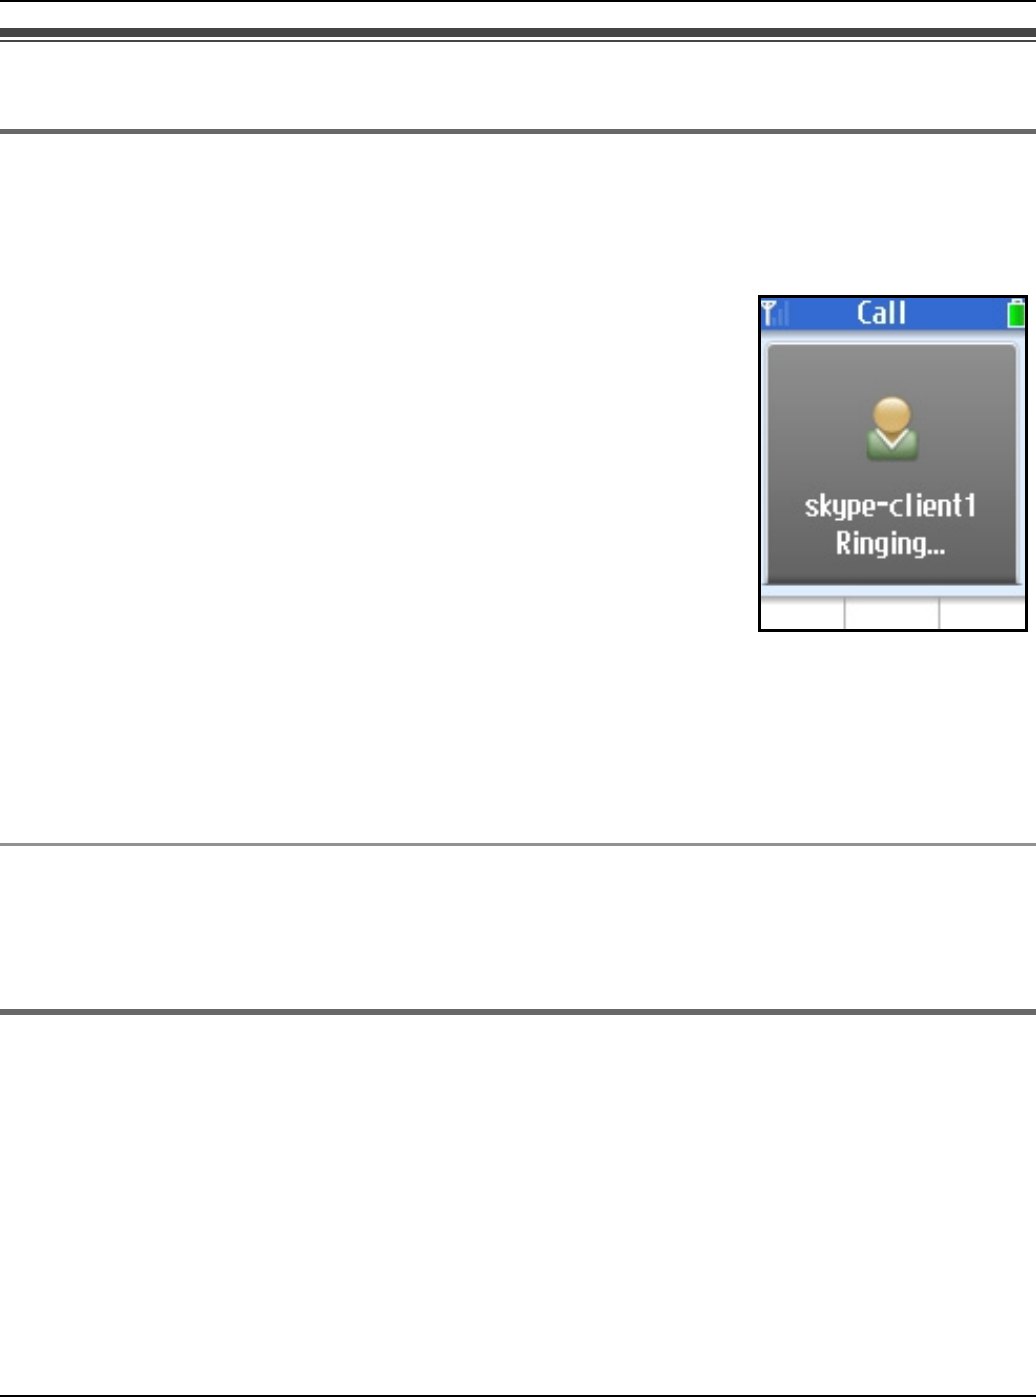
Making/Answering Calls
68 For assistance, please visit http://www.panasonic.com/phonehelp
Making calls
Using the Contacts list
You can make a Skype call by selecting a Skype contact from the Skype Contacts list.
You must add Skype contacts in the Contacts list beforehand by using your handset
or PC version of Skype. See “Adding contacts” on page 62.
1While in Idle mode, press {CONTACTS}.
2Select the desired Skype contact.
LSkype contact and its current status icon (page 55) are
displayed.
3{{}
LTo make a call using the speakerphone, press {s}.
4When you finish talking, press {}}.
Note:
LIn step 1, you can also press {Menu} (middle soft key). i “Contacts” i {Select}
LIn step 2, you can also search for a contact by initial. Press the dial key ({0} – {9}) that
corresponds to the first letter(s) of the contact you are searching for. When the list of
contacts is displayed, select the desired contact.
To call from the contact’s profile
You can also make a call while viewing the contact’s profile. In step 2, press {Select} to
display the contact’s profile after you select the desired Skype contact, then press {{} or
{s}.
Using History
The following are logged in History: last 50 missed calls, 20 incoming calls, 20 outgoing
calls, 100 Voicemails and 20 Authorization requests.
1{Menu} (middle soft key)
2“History” i {Select}
3Select the desired list. i {Select}
4Select the desired log.
Temporary Confidential

Making/Answering Calls
For assistance, please visit http://www.panasonic.com/phonehelp 69
5{{}
LTo make a call using the speakerphone, press {s}.
6When you finish talking, press {}}.
Note:
LIn step 1, you can also press {{} to access Outgoing calls list i {<} or {>} to switch
between Outgoing calls, Incoming calls and Missed calls list, then skip to step 4.
Making regular phone calls (SkypeOut)
SkypeOut is a way to make calls from Skype to persons who use landline telephones or
mobile phones. Making SkypeOut calls is not free of charge. Before using the SkypeOut,
purchase the Skype credit on your Skype account page. For more information about
SkypeOut, see the Skype website (http://www.skype.com/).
1While in Idle mode, enter the phone number in the following way (even for local calls):
“country code” + “area code” + “local phone number”
Example (using the country code “1” for calling USA):
+ 1 555 321 5555
L“+” (international prefix) is automatically added.
LIn case of some countries, delete “0” at the first digit of the area code.
LTo correct a digit, press {CLEAR}.
2{{}
LTo make a call using the speakerphone, press {s}.
3When you finish talking, press {}}.
Using the speakerphone
1During a conversation, press {s} to turn on the speakerphone.
2When you finish talking, press {}}.
Note:
LUse the speakerphone in a quiet environment.
LTo switch to the receiver, press {{}.
Adjusting the receiver/speaker volume
Press {^} or {V} repeatedly while talking.
Temporary Confidential

Making/Answering Calls
70 For assistance, please visit http://www.panasonic.com/phonehelp
Answering calls
When a call is being received, the handset rings and the ringer indicator on the handset
flashes rapidly.
1Press {{} or {s}.
2When you finish talking, press {}}.
Note:
LWhen a call is received while you are in the “Do Not Disturb” mode of the online Skype
status (page 55), the handset does not ring. To change the Skype status, see “Change
status” on page 59.
LThe handset does not ring when the handset ringer is set to off or silent mode is set to
on.
Temporary ringer off
While the handset is ringing, you can turn the ringer off temporarily by pressing {Silent}.
Adjusting the ringer volume
1{Menu} (middle soft key)
2“Settings” i {Select}
3“Tones” i {Select}
4“Ring volume” i {Select}
5Press {^} or {V} repeatedly to select the desired volume. i {OK}
Rejecting the call
While the handset is ringing, press {}}.
Note:
LPressing {}} to reject a call saves the log in Incoming calls list.
Temporary Confidential

Making/Answering Calls
For assistance, please visit http://www.panasonic.com/phonehelp 71
Diverting calls
This feature diverts incoming calls to the Voicemail box or other phone numbers that have
been registered as the call divert destinations when you cannot answer the call within a
certain amount of time or when you are offline.
Setting the call divert destination
You need to set specific phone numbers or the Voicemail box as the call divert destination
in advance.
Note:
LIf no phone numbers are set as the call divert destination, unanswered calls are
forwarded to the Voicemail box.
LIf both other phone numbers and the Voicemail box are set as the destination, the
unanswered calls will be forwarded to the other phone numbers first.
LYou need to subscribe to the Skype Voicemail service to divert calls to the Voicemail
box. You also need to subscribe to the SkypeOut service if you want to divert calls to
landline or mobile phone numbers (SkypeOut numbers). If you do not subscribe to the
Skype Voicemail and SkypeOut services, you can only divert incoming calls to a Skype
contact.
Diverting to other numbers:
1{Menu} (middle soft key)
2“Settings” i {Select}
3“Call divert” i {Select}
4“Call forwarding” i {Select}
5“Yes” i {Select}
6Select the desired destination number field. i {Select}
7Enter the Skype name or SkypeOut number. i {OK}
8{OK}
Note:
LFor text entry, see page 49 for details.
Temporary Confidential

Making/Answering Calls
72 For assistance, please visit http://www.panasonic.com/phonehelp
Diverting to Voicemail box:
Voicemail is an automatic answering service offered by Skype. After you subscribe to this
service, Skype Voicemail system will answer calls for you when you are offline or
unavailable to answer the phone within about 15 seconds. Messages are recorded in
Skype Voicemail box, not your handset. To listen to Voicemail messages, see “Listening to
Voicemail messages” on page 73.
Note:
LPlease visit the Skype homepage for details: http://www.skype.com/
1{Menu} (middle soft key)
2“Settings” i {Select}
3“Call divert” i {Select}
4“Voicemail” i {Select}
5“Yes” i {Select}
To record a new Welcome message:
1{Menu} (middle soft key)
2“Settings” i {Select}
3“Call divert” i {Select}
4“Welcome message” i {Select}
5{Options}
6“Record new” i {Select}
7Record your message after the beep (max. 1 minute).
8Press {End} when finished.
9{OK}
Note:
LTo play back the welcome message, press {Play} in step 5.
LIn step 6, you can reset the Welcome message to default by selecting “Reset to
default”. i {Select}
Temporary Confidential

Making/Answering Calls
For assistance, please visit http://www.panasonic.com/phonehelp 73
Skype Voicemail
You can receive Voicemail messages if you subscribe to Skype Voicemail service.
You can also send Voicemail messages to contacts who have Skype Voicemail service.
To receive Voicemail messages, you must set the call divert destination to “Voicemail”
(page 72).
Listening to Voicemail messages
The handset lets you know that you have new Voicemail messages in the following ways:
– Charge/Ringer indicator flashes for about 5 seconds.
– A new Voicemail notification is displayed.
– “ ” is displayed in Idle screen.
– An incoming message tone is heard.
1While a new Voicemail notification is displayed on the screen, press {View} to access
the Voicemail list in “History”.
2Select the desired Voicemail log. i {Options}
3“Play” i {Select}
LThe handset starts playing back the message.
LPress {s} to switch to the speakerphone.
LPress {{} to switch to the receiver if you are on the speakerphone.
LPress {^} or {V} to adjust the volume.
LPress {Stop} to stop the message.
Note:
LIn step 1, you can also access the Voicemail list by pressing the following:
–{Menu} i “History” i {Select} i “Voicemails” i {Select}
Temporary Confidential

Making/Answering Calls
74 For assistance, please visit http://www.panasonic.com/phonehelp
Sending Voicemail messages
You can send Voicemail messages using your Contacts list or Voicemail history.
1{Menu} (middle soft key)
2“Contacts” i {Select}
3Select the desired contact. i {Select}
4{Options}
5“Send Voicemail” i {Select}
6After the greeting message is played and the beep sounds, record your message.
7Press {End} when you finish recording.
8{OK}
Note:
LIn step 2, you can also select “History”. i {Select} i “Voicemail” i {Select}
Temporary Confidential

Making/Answering Calls
For assistance, please visit http://www.panasonic.com/phonehelp 75
Useful features during a call
Hold
This feature allows you to put a call on hold.
1Press {Hold} during a call.
2To release the hold, press {Resume} or {{}.
LTo release the hold while on the speakerphone, press {Resume} or {s}.
Mute
While mute is turned on, you can hear the other party, but the other party cannot hear you.
To mute your voice, press {MUTE}.
LTo return to the conversation, press {MUTE} or {{}.
LTo return to the conversation on the speakerphone, press {MUTE} or {s}.
Call Waiting
This feature allows you to receive calls while you are already talking on the phone. If you
receive a call while on the phone, you will hear a Call Waiting tone.
1Press {Answer} to answer the 2nd call after the tone.
2To switch between calls, press {Switch}.
3To resume conversation, press {Resume}.
Conference
You can have a conversation with more than one person at the same time.
When you receive a conference call, press {{} or {s}.
LThe status bar at the top of the screen shows “Conference”.
LTo reject the conference call, press {}}.
Note:
LYou cannot be a host in conference calls but can only be a guest.
Temporary Confidential

Making/Answering Calls
76 For assistance, please visit http://www.panasonic.com/phonehelp
DTMF
You can send DTMF tones while on a call in order to access paging, computerized home
banking, etc.
While on a call, press {0} – {9}, {*} or {#}.
Temporary Confidential
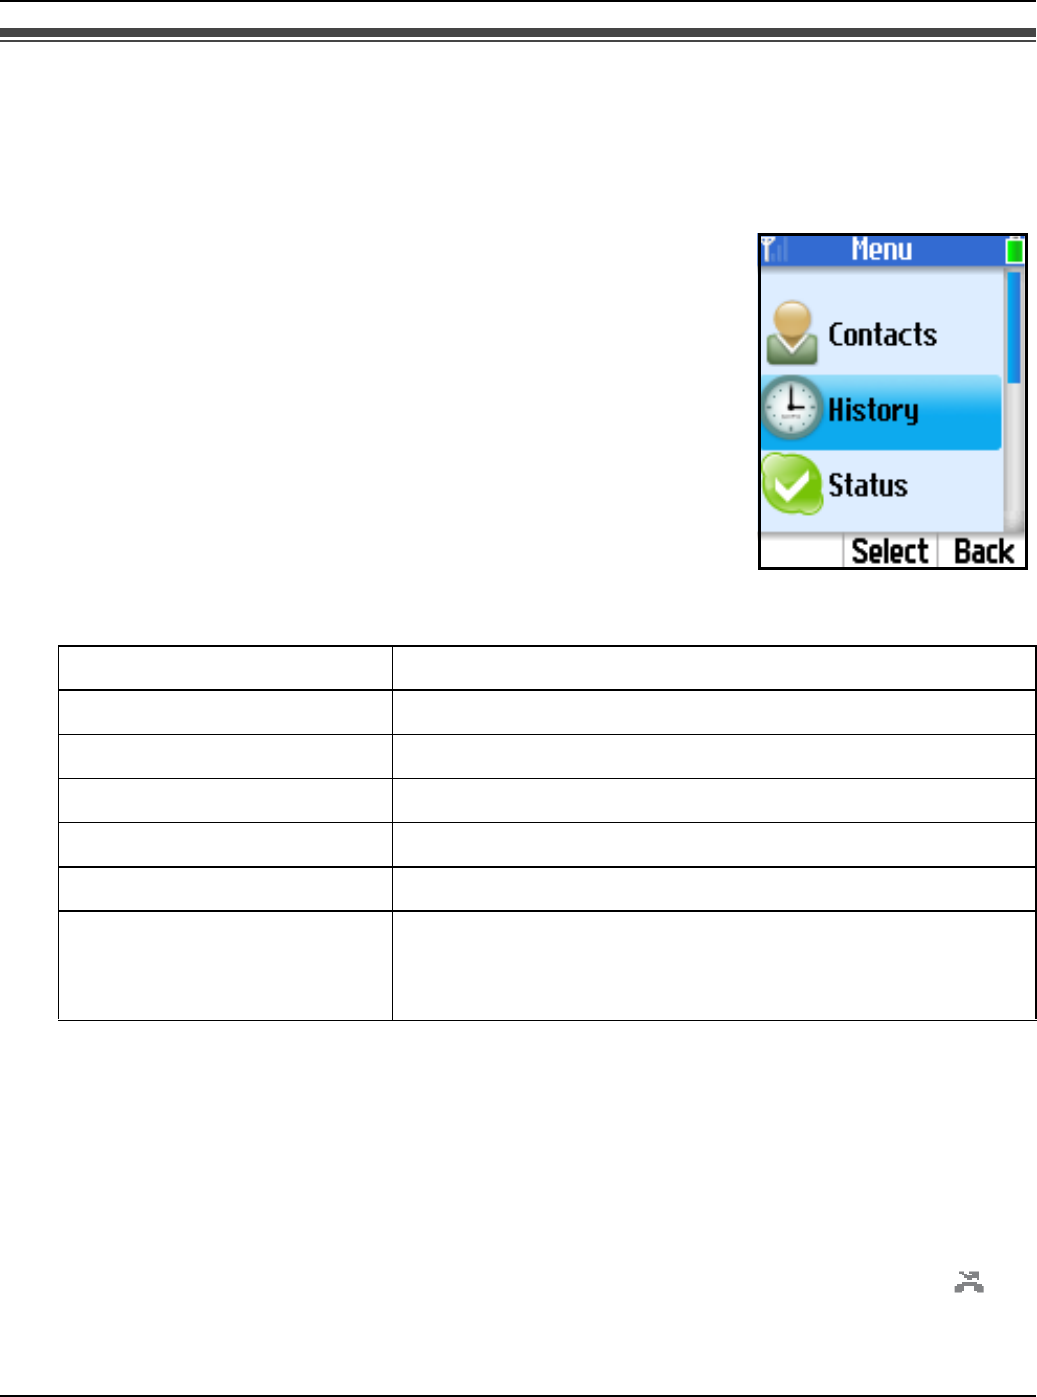
Managing History
For assistance, please visit http://www.panasonic.com/phonehelp 77
History
The following events are logged in History: 50 missed calls, 20 incoming calls, 20 outgoing
calls, 100 Voicemails and 20 Authorization requests. These logged events are listed in the
chronological order, most recent first.
1{Menu} (middle soft key).
2“History” i {Select}
3Select the desired list. i {Select}
4Press {V} to search from the most recent log, or {^} from the
oldest.
LTo view the log, press {Select}.
LTo call back, press {{} or {s}.
LTo access options, press {Options} and select the desired
option. i {Select}
*1 Not available for Authorization logs.
*2 Not available for Voicemail logs.
*3 Available only for Voicemail logs.
Note:
LIn step 1, you can also press {{} to access Outgoing calls list. i {<} or {>} to switch
between Outgoing calls, Incoming calls and Missed calls list, then skip to step 4.
LThe logs that have not been viewed are displayed with a new missed call icon “ ”.
Send Voicemail*1 Sends Voicemail to the contact.
Delete*1 Deletes the log.
View profile*1 Shows the profile of the contact.
Add to contacts*1 Adds the contact to your Contacts list.
Clear list*1*2 Deletes the entire list.
Play*3 Plays the Voicemail (page 73).
My greeting*3 Plays back the Voicemail welcome message. Press
{Options} for more options: “Record new” and
“Reset to default”.
Temporary Confidential

Managing History
78 For assistance, please visit http://www.panasonic.com/phonehelp
LTo access options while viewing the Voicemail or Authorization log, press {Options}
and select the desired option. i {Select}
*1 Available only for Voicemail logs.
*2 Available only for Authorization logs.
Block user*1 Blocks the contact.
Unblock user*1 Unblocks the contact.
Request auth.*1 Sends an Authorization request to the contact.
Accept*2 Accepts the Authorization request from the contact.
Decline*2 Declines the Authorization request from the contact.
Temporary Confidential
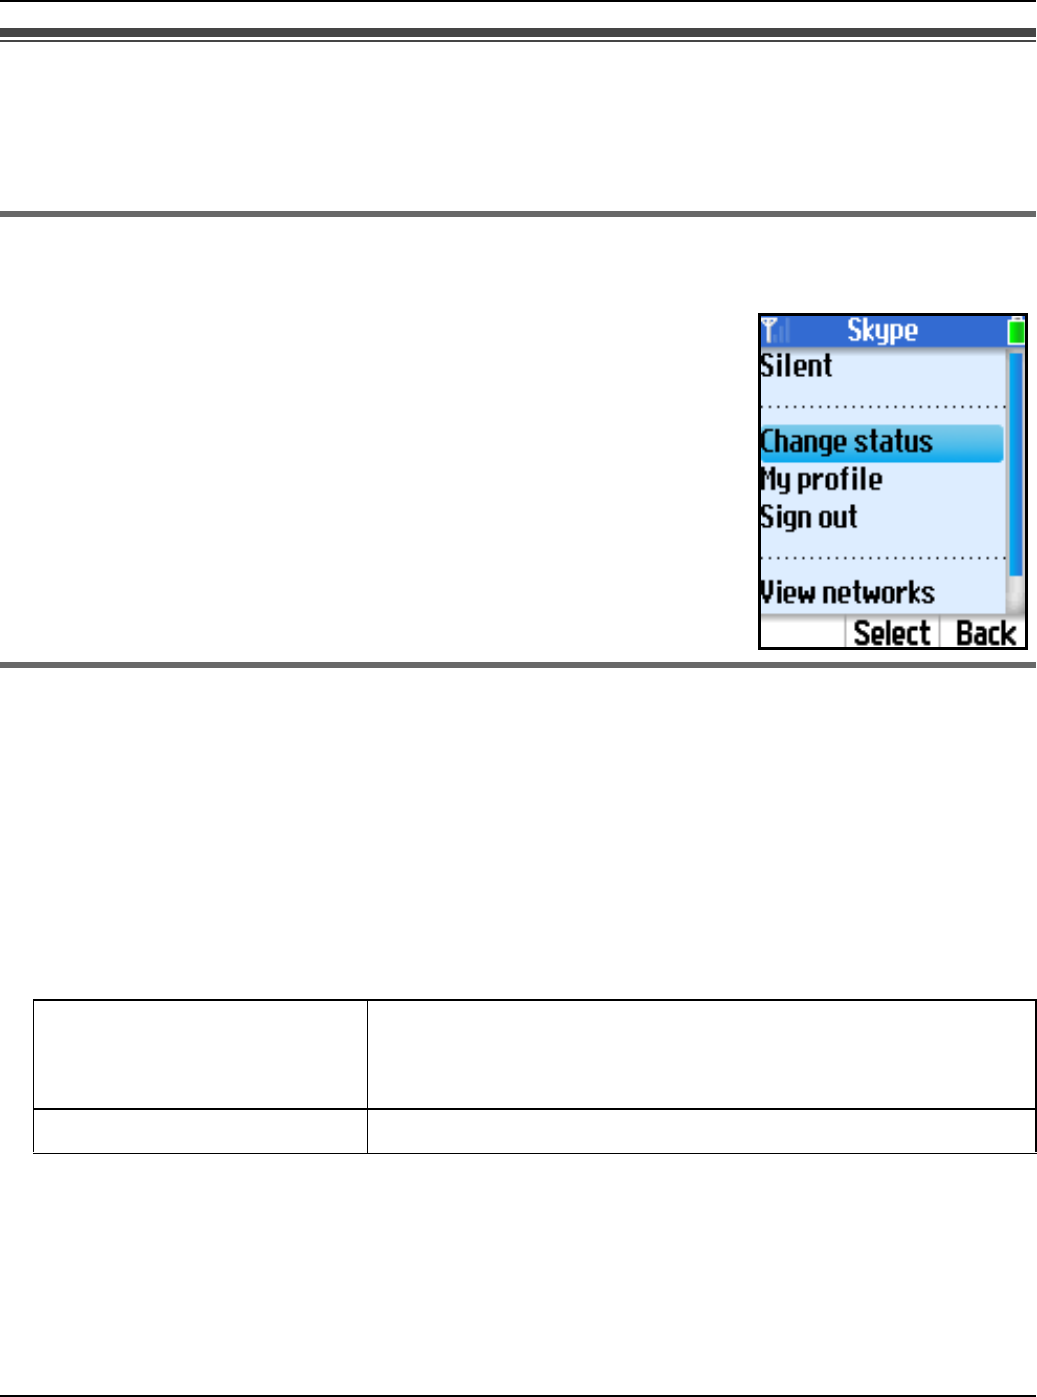
Personal Skype Status and Settings
For assistance, please visit http://www.panasonic.com/phonehelp 79
Personal Skype status and profile
Skype status and profile features allow you to define your Skype online status and
personal profile details, and to sign out of Skype.
Changing your status
You can change your Skype online status to let other users know when to call you.
1While in Idle mode, press {Options}.
2“Change status” i {Select}
3Select the desired Skype status. i {Select}
LSee the Skype status icon list on page 55.
Note:
LIn step 1, you can also press {Menu} (middle soft key). i
{Select} i “Status” i {Select}
Setting your profile
You can enter your profile data in My profile. In your public profile, you do not need to fill
in all the fields; however, your country and city information will be helpful for others to
identify you.
1While in Idle mode, press {Options}.
2“My profile” i {Select}
3Select the desired setting. i {Select}
4Fill in the fields or select the desired item of My profile information. i {OK}/{Select}
Note:
LIn step 1, you can also press {Menu} (middle soft key). i {Select} i “Status” i
{Select}
LYou need to sign in to Skype to access “My profile”.
Details shown to all Allows you to enter your profile details open to public.
Set your profile so that other Skype users can identify
you.
Private details Allows you to enter your private details.
Temporary Confidential

Personal Skype Status and Settings
80 For assistance, please visit http://www.panasonic.com/phonehelp
LFor text entry, see page 49 for details.
Signing out of Skype
This feature signs you out of Skype. However, if you sign out, your Contacts list will not be
available.
1While in Idle mode, press {Options}.
2“Sign out” i {Select}
3Press {OK} when confirmation message appears.
Note:
LIn step 1, you can also press {Menu} (middle soft key). i {Select} i “Status” i
{Select}
Temporary Confidential
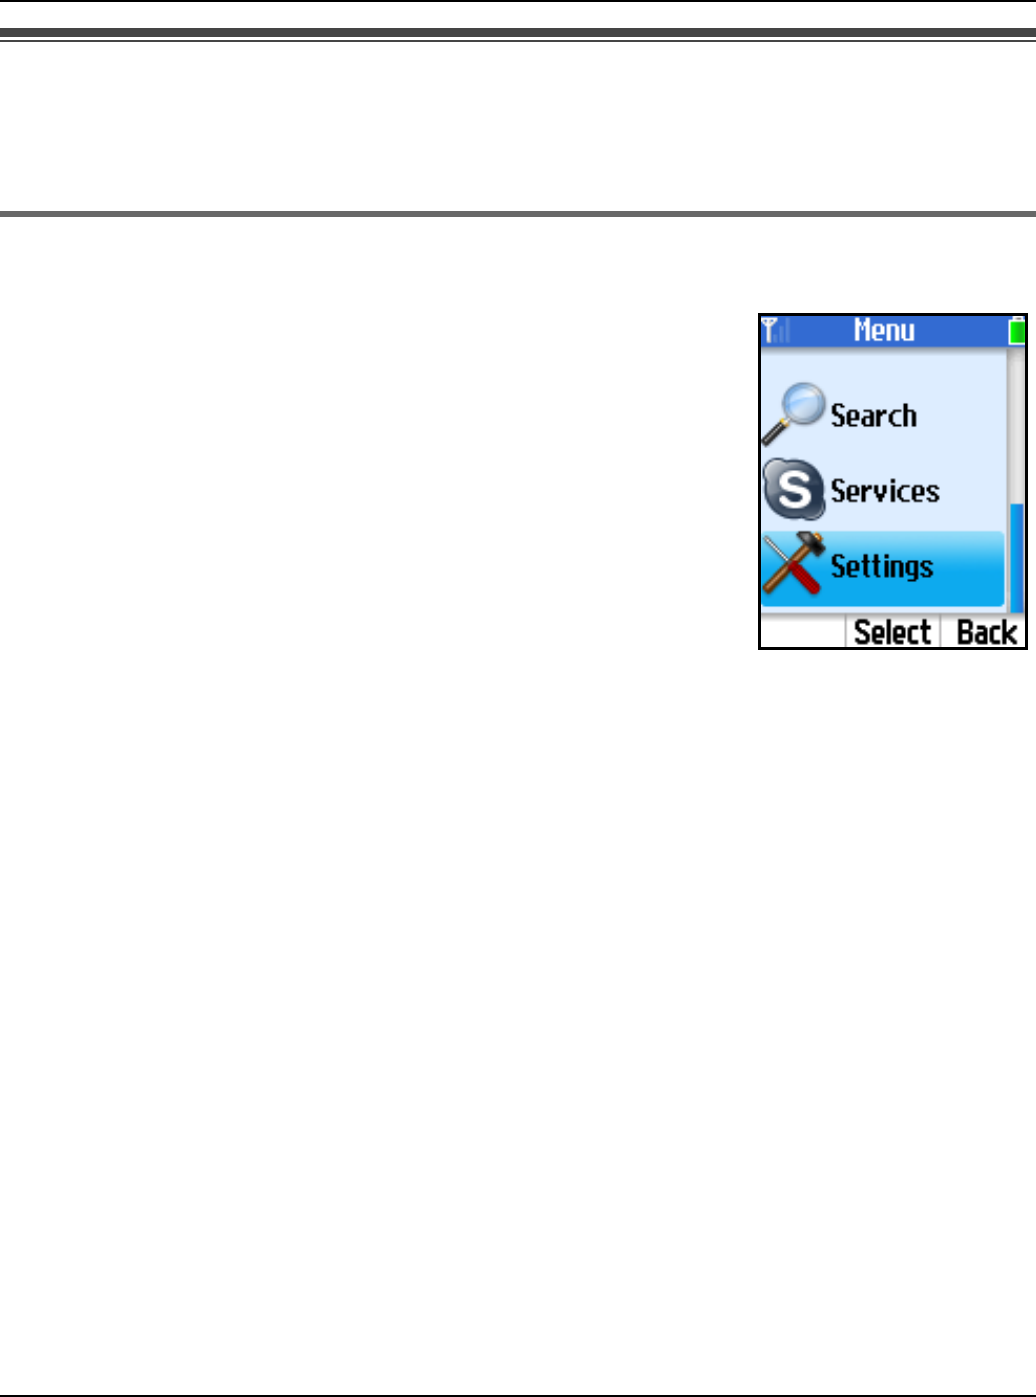
Personal Skype Status and Settings
For assistance, please visit http://www.panasonic.com/phonehelp 81
Personal Skype settings
Personal Skype settings allow you to define your password, and protect your privacy by
restricting incoming calls to only the specified types of calls.
Changing your password
This feature changes the password to sign in to Skype.
1{Menu} (middle soft key)
2“Settings” i {Select}
3“General” i {Select}
4“Change password” i {Select}
5Enter your current password. i {OK}
6Enter your new password. i {OK}
7Repeat the new password. i {OK}
Important:
LPlease keep your password securely.
Note:
LFor text entry, see page 49 for details.
Temporary Confidential
Personal Skype Status and Settings
82 For assistance, please visit http://www.panasonic.com/phonehelp
Privacy settings
This feature allows you to restrict incoming calls to only those from the specified types of
callers.
1{Menu} (middle soft key)
2“Settings” i {Select}
3“Privacy” i {Select}
4Select “Calls” or “SkypeIn calls”. i {Select}
5Select the desired type of callers that you want to receive calls from. i {Select}
When you select “Calls” in step 4:
Anyone All Skype users
Only contacts Only Skype contacts listed in your Contacts list
Only authorized Only authorized Skype contacts listed in your Contacts
list
When you select “SkypeIn calls” in step 4:
Anyone All SkypeIn callers
Known numbers Only SkypeIn callers notifying of their numbers
Only contacts Only non Skype contacts listed in your Contacts list
Temporary Confidential

Handset Settings
For assistance, please visit http://www.panasonic.com/phonehelp 83
Wi-Fi network settings
Network menu allows you to set the handset to connect to wireless networks when the
handset is powered on. You need to configure network settings only when you want to use
an access point other than the KX-WPA102 base unit.
Finding wireless networks
The handset searches for networks within the area to connect to the desired network.
1{Menu} (middle soft key)
2“Settings” i {Select}
3“Network” i {Select}
4“Networks in range” i {Select}
5Select the desired network. i {Connect}
LThe padlock icon indicates a secure network.
LWhile viewing the list, you can also press {Options} to
select the desired setting. i {Select}
Note:
LIn step 1, you can also press {Options} while in Idle mode to access the list of networks
in range, then skip to step 5.
Network details Shows the selected network details.
Search again Searches for other networks in range.
Add manually Adds the network to your Preferred networks list.
Preferred networks Shows your Preferred networks list.
Temporary Confidential

Handset Settings
84 For assistance, please visit http://www.panasonic.com/phonehelp
Preferred networks
Preferred networks manages the networks stored in the handset and allows you to
connect to the network you usually use.
1{Menu} (middle soft key)
2“Settings” i {Select}
3“Network” i {Select}
4“Preferred networks” i {Select}
5Select the desired network. i {Select} to view the network properties.
LWhile viewing the list, you can also press {Options} to select the desired setting. i
{Select}
Auto-connect to open networks
Auto-connect allows you to decide whether to connect to open networks automatically.
An open network is one that is not encrypted, so that anyone within the vicinity can
connect to the network without any password.
1{Menu} (middle soft key)
2“Settings” i {Select}
3“Network” i {Select}
4“Auto-connect” i {Select}
5Select {Yes} or {No} to decide whether you want to auto-connect to open networks.
i {Select}
Add current Adds the currently connected network to your
Preferred networks list.
Add manually Adds networks manually to the list.
Move up Moves the selected network up in the list.
Move to top Moves the selected network to the top of the list.
Move down Moves the selected network down in the list.
Remove network Removes the selected network from the list.
Remove all networks Removes all the networks from the list.
Temporary Confidential
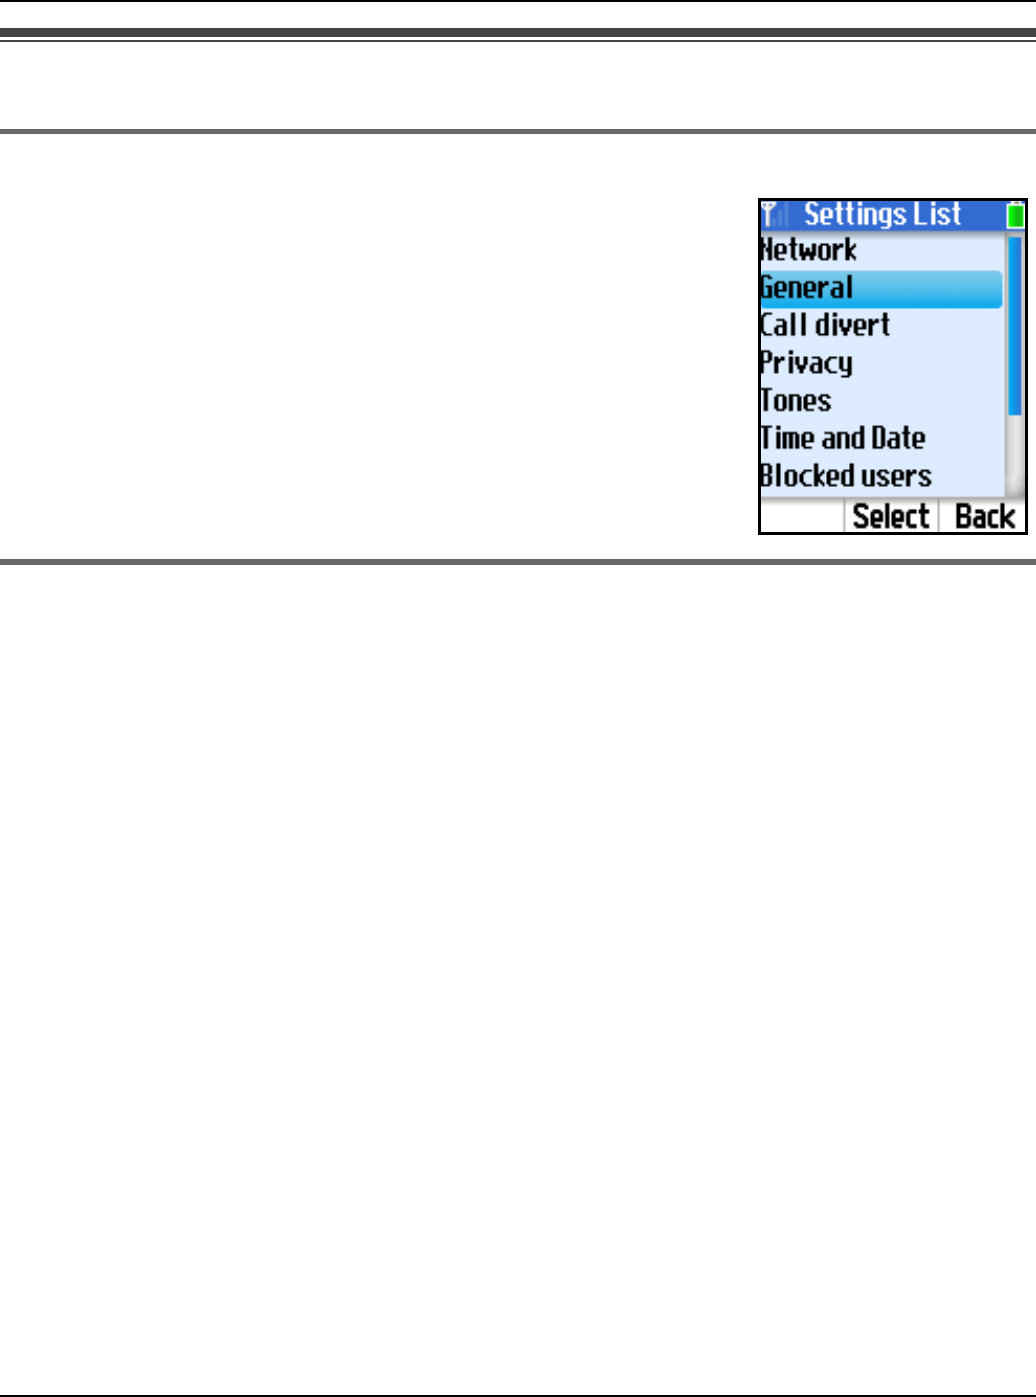
Handset Settings
For assistance, please visit http://www.panasonic.com/phonehelp 85
General settings
Auto sign in
Auto sign in allows you to sign in to Skype automatically when the
handset is starting up.
1{Menu} (middle soft key)
2“Settings” i {Select}
3“General” i {Select}
4“Auto sign in” i {Select}
5Select “Automatically” or “Manually”. i {Select}
Updating software
This feature updates the Skype application or Panasonic firmware in the handset.
1{Menu} (middle soft key)
2“Settings” i {Select}
3“General” i {Select}
4“Software updates” i {Select}
To update the Skype application:
5Press {OK} to update the application if a new version is available.
6Plug the CHARGE cable into the handset and the base unit for battery charging (page
45) if the battery is not fully charged. i {OK}
7Read and accept the Skype agreement. i {Yes}
8{OK}
LThe handset begins to restart.
To update the Panasonic firmware:
5Start up the Web browser on your computer connected to the LAN port on the base
unit.
Temporary Confidential

Handset Settings
86 For assistance, please visit http://www.panasonic.com/phonehelp
6Handset:
Press {OK} to update the firmware if a new version is available.
7Handset:
Plug the CHARGE cable into the handset and the base unit for battery charging (page
45) if the battery is not fully charged. i {OK}
8Handset:
Enter your PIN code if prompted.
9Computer:
Enter the URL displayed on the handset in the address field of your browser and press
ENTER key.
10 Computer:
Enter the user name and the password (shown on the handset display) when
prompted.
11 Computer:
Follow the on-screen instructions of the Web Update Firmware page on your browser.
LThe handset starts downloading the updated Panasonic firmware.
12 Handset:
Press {OK} to restart the handset.
LThe handset begins to restart.
To receive software update notification:
You can allow the handset to notify you of software updates.
1{Menu} (middle soft key)
2“Settings” i {Select}
3“Advanced” i {Select}
4“Software updates” i {Select}
5Select “Yes” or “No”. i {Select}
Temporary Confidential

Handset Settings
For assistance, please visit http://www.panasonic.com/phonehelp 87
Reset
This feature resets all the handset settings or all except the network settings.
1{Menu} (middle soft key)
2“Settings” i {Select}
3“General” i {Select}
4“Reset” i {Select}
5Select “Keep network” or “Reset all”. i {Select}
6{Yes}
7Enter your handset PIN code if prompted. i {OK}
LThe handset begins to restart after 3 seconds.
Note:
LIf you select “Reset all” in step 5, you need to register the handset to the base unit.
See “Registering the handset” on page 93 for details.
Keep network Resets all the handset settings except “Preferred
networks”, “Auto-connect” and “Network proxy”.
Reset all Resets all the handset settings. However, the contacts
stored on your PC version of Skype Contacts list will be
downloaded and displayed on your handset’s Contacts
list when you sign in to Skype with the handset.
Temporary Confidential

Handset Settings
88 For assistance, please visit http://www.panasonic.com/phonehelp
Tones
You can change the handset’s ringer type, tone and volume, and other types of tones.
1{Menu} (middle soft key)
2“Settings” i {Select}
3“Tones” i {Select}
4Select the desired setting. i {Select}
5Select the desired item. i {Select} or change the setting by pressing {^} or {V}. i
{OK}
Ring type Sets the ringer type: “Ringing” or “Ring once”.
Ring tone Sets the desired ringer tone.
Ring volume Adjusts the ringer volume.
Notification tone Sets the notification tone to “On” or “Off”.
Keypad tone Sets the keypad tone to “On” or “Off”.
Out of service tone Sets the out-of-service tone to “On” or “Off”.
Hold tone Sets the desired hold tone.
Temporary Confidential

Handset Settings
For assistance, please visit http://www.panasonic.com/phonehelp 89
Phone settings
Handset PIN locked:
This feature locks the handset with the PIN code for security purpose.
1{Menu} (middle soft key)
2“Settings” i {Select}
3“Phone settings” i {Select}
4“HS PIN locked” i {Select}
5Enter the handset PIN code (4 digits).
6{Yes}
LThe handset is locked.
7{OK}
Note:
LThe default PIN code is “0000”.
Changing handset PIN:
This feature changes the handset PIN code.
1{Menu} (middle soft key)
2“Settings” i {Select}
3“Phone settings” i {Select}
4“Change HS PIN” i {Select}
5Enter the current handset PIN code.
6Enter the new handset PIN code (4 digits).
7Repeat the new handset PIN code.
8{OK}
Temporary Confidential

Handset Settings
90 For assistance, please visit http://www.panasonic.com/phonehelp
Brightness:
This feature adjusts the brightness of the screen.
1{Menu} (middle soft key)
2“Settings” i {Select}
3“Phone settings” i {Select}
4“Brightness” i {Select}
5Press {<} or {>} to adjust the brightness.
6{OK}
Battery saving:
This feature allows you to decide whether you want to save the battery.
1{Menu} (middle soft key)
2“Settings” i {Select}
3“Phone settings” i {Select}
4“Battery saving” i {Select}
5Select {Yes} or {No} to decide whether you want to save the battery.
Note:
LIn step 5, selecting {No} may reduce talk delay, but shortens talking time.
Handset Information
Information shows the device information such as product ID, software/firmware version
and MAC address.
1{Menu} (middle soft key)
2“Settings” i {Select}
3“Information” i {Select}
Temporary Confidential

Handset Settings
For assistance, please visit http://www.panasonic.com/phonehelp 91
Advanced settings
Network proxy:
Network proxy allows you to decide whether you want to use proxy servers on the LAN for
Skype traffic.
1{Menu} (middle soft key)
2“Settings” i {Select}
3“Advanced” i {Select}
4“Network proxy” i {Select}
5Select the desired item. i {Select}
6Enter the information. i Press {OK} or select the desired item. i {Select}
7{Save}
Note:
LFor text entry, see page 49 for details.
Proxy type Selects the proxy server type from “None”, “HTTP/
HTTPS” or “SOCKS5”.
Host Specifies the proxy server name (max. 100 characters).
Port Specifies the proxy port number used by the proxy
server (value: 1–65535).
Authentication Enables or disables the proxy authentication which
requires the user name and password to access the
Internet.
User name Specifies the user name for proxy host authentication
(max. 127 characters).
Password Specifies the password for proxy host authentication
(max. 127 characters).
Temporary Confidential

Services
92 For assistance, please visit http://www.panasonic.com/phonehelp
Service information
You can view the information of the following optional services by Skype: Skype credit,
SkypeIn and Skype Voicemail.
Note:
LSkypeIn numbers are regular phone numbers sold on a
subscription basis. If your friends who are not using Skype
want to call you, they can call your SkypeIn number and you
receive the call in Skype.
If you buy a SkypeIn number, you get a free Skype Voicemail
subscription along with it.
LTo purchase Skype credit or SkypeIn with Skype Voicemail,
visit http://www.skype.com/
Viewing the service information
1{Menu} (middle soft key)
2“Services” i {Select}
3Select the desired item. i {Select}
4If you select “Skype credit” or “Voicemail”, view the information. i Press {V} to
scroll down for more information.
If you select “SkypeIn”, select the desired number. i {Select} i View the
information. i Press {V} to scroll down for more information.
Skype credit Shows the remaining Skype credit available and the
expiration date.
SkypeIn Shows the list of the SkypeIn numbers you subscribe to.
If you subscribe to only one SkypeIn number, the
number is displayed with its expiration date.
Voicemail Shows the expiration date of the Skype Voicemail
service.
Temporary Confidential
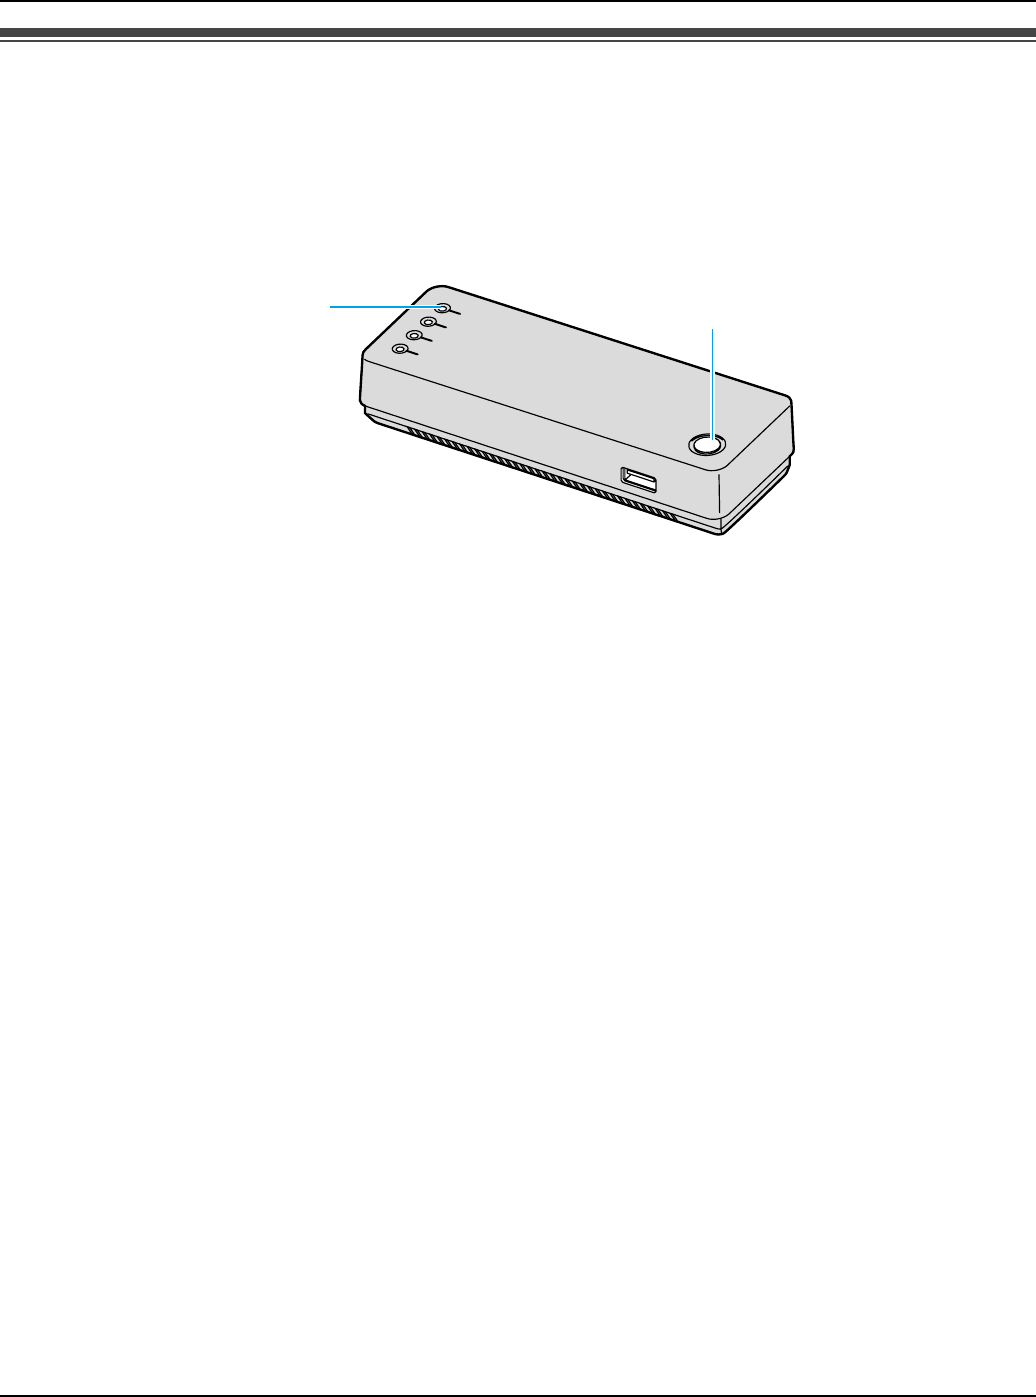
Handset Locator
For assistance, please visit http://www.panasonic.com/phonehelp 93
Registering the handset
The handset and base unit are preregistered. If for some reason the handset is not
registered to the base unit, or after you reset all the handset settings (page 87), register
the handset.
1{Menu} (middle soft key)
2“Settings” i {Select}
3“Phone settings” i {Select}
4“HS registration” i {Select}
5Press and hold LOCATOR button on the base unit for 3 seconds. i {OK}
6{OK}
Note:
LIn step 4, select “Information” to view the network name and BSSID information of
the base unit. i {Select}
LYou cannot register additional handsets to the base unit.
LWhile the handset is being registered, the LOCATOR indicator on the base unit is
flashing.
LOCATOR button
LOCATOR indicator
Temporary Confidential

Handset Locator
94 For assistance, please visit http://www.panasonic.com/phonehelp
Locating the handset
You can locate the misplaced handset by paging it from the base unit.
1Base unit:
Press LOCATOR button to page the handset.
LThe LOCATOR indicator on the base unit lights up.
LThe handset beeps for 1 minute, and the display, keypad and ringer indicator light up.
2Base unit:
To stop paging, press LOCATOR button.
OR
Handset:
To stop paging, press any key except {CONTACTS}, {*}, {#}, Navigator key and
Middle soft key.
Note:
LThe handset locates only the registered handset.
Temporary Confidential
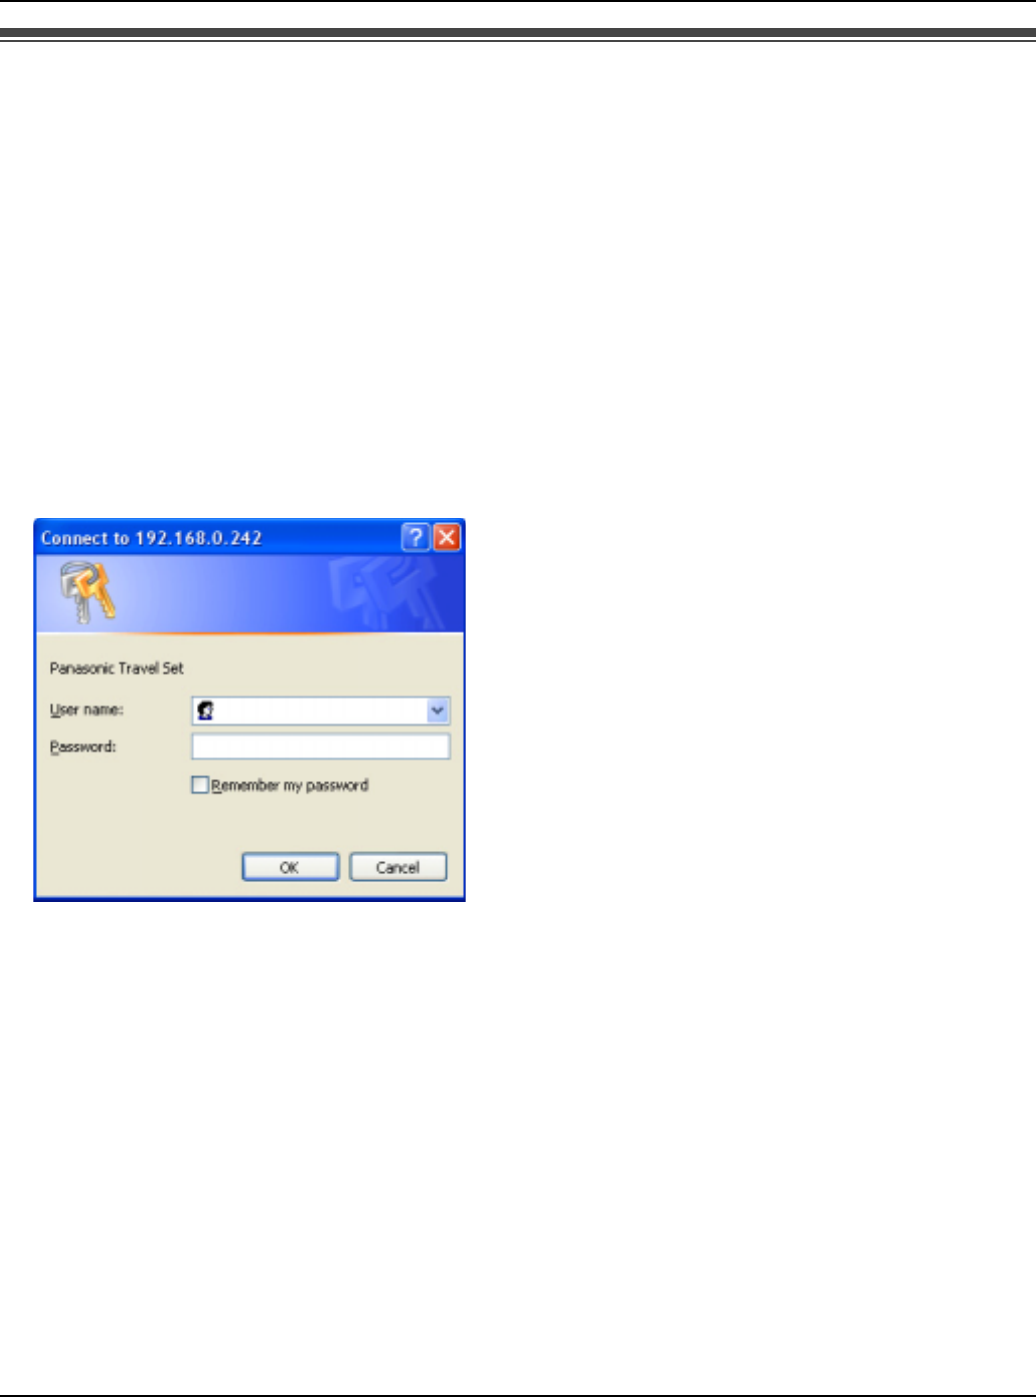
Base Unit Settings
For assistance, please visit http://www.panasonic.com/phonehelp 95
Setting the base unit from Top Menu
After the settings in Initialization Wizard (page 27) are successfully completed, Top Menu
will be displayed on the top page each time you log in the base unit.
1Open your Web browser on your computer connected to the LAN (Ethernet) port on the
base unit.
2Enter http://192.168.0.242/ (the base unit’s default IP address) or http://kx-
wpa.webpage in the address field of your browser and press ENTER key. You can
also double click the KX-WPA102 icon in My Network Places in Start menu when using
Windows XP and UPnP is enabled. See “Setting UPnP to display the shortcut” on page
153 for details.
LA screen with fields for your user name and password is displayed.
Temporary Confidential
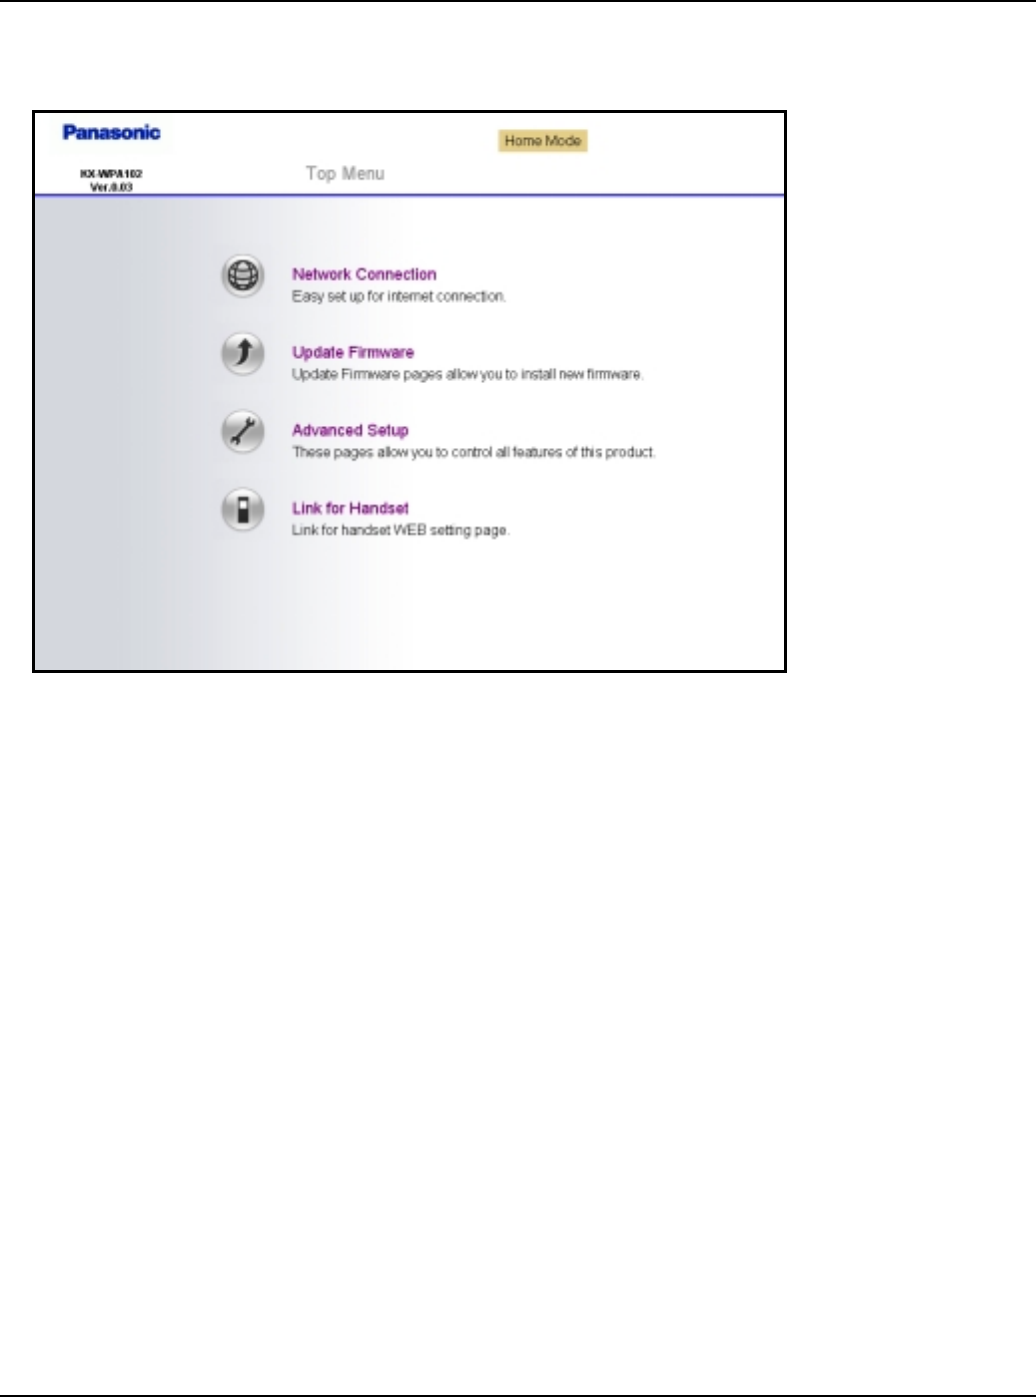
Base Unit Settings
96 For assistance, please visit http://www.panasonic.com/phonehelp
3Enter the user name and password you set in Initialization Wizard.
LTop Menu is displayed.
Temporary Confidential
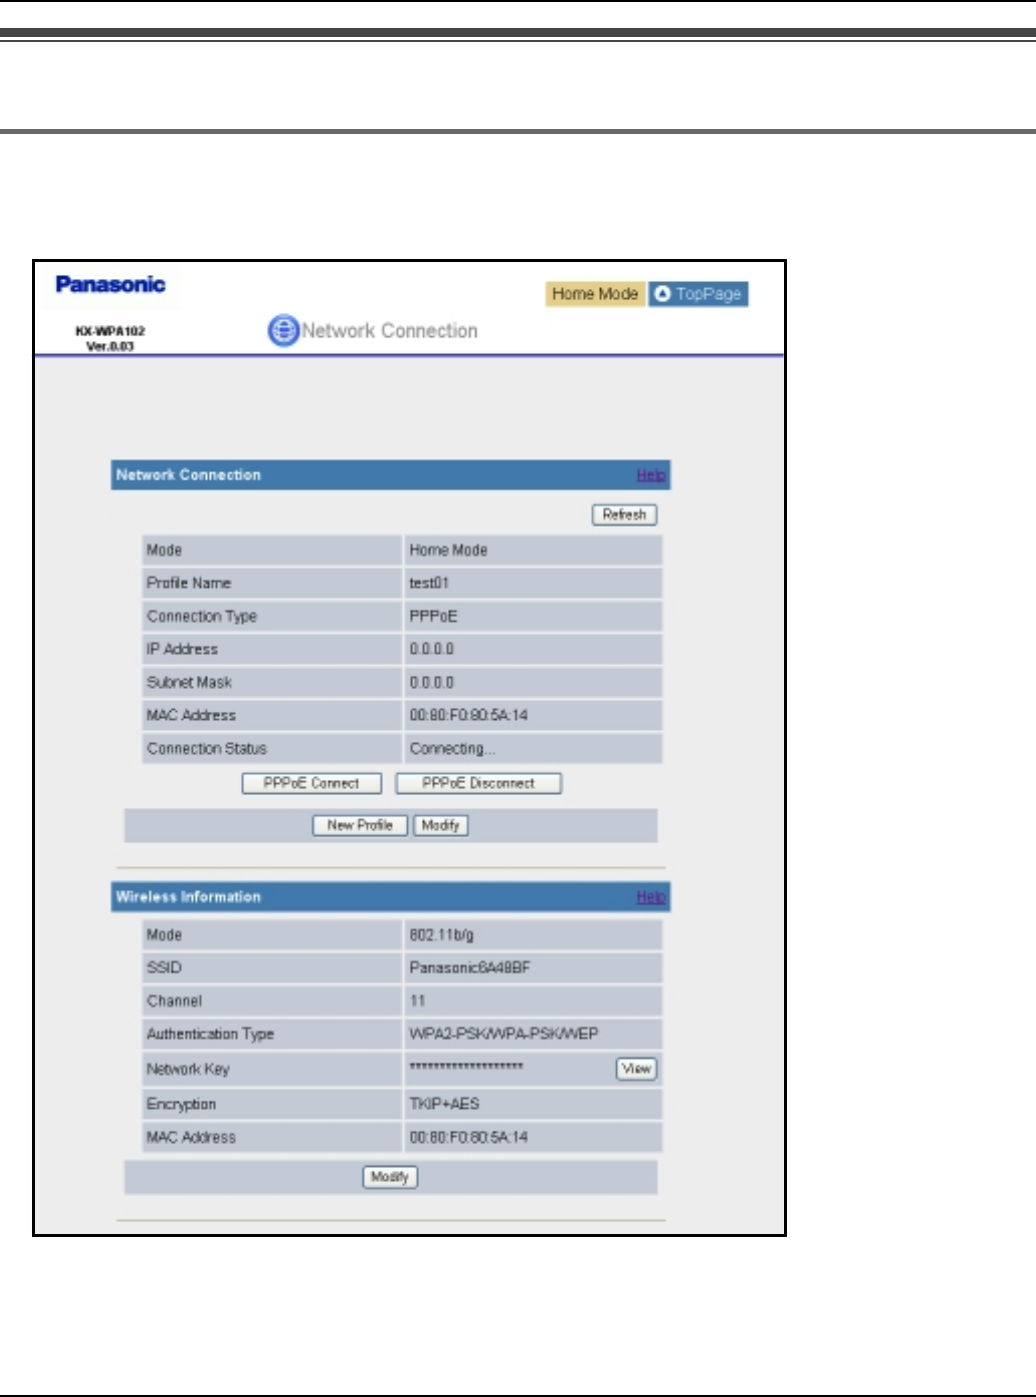
Base Unit Settings
For assistance, please visit http://www.panasonic.com/phonehelp 97
Network Connection
Creating a new profile of network connection
1Click [Network Connection] on Top Menu.
2Click [New Profile] under the Network Connection heading.
Temporary Confidential
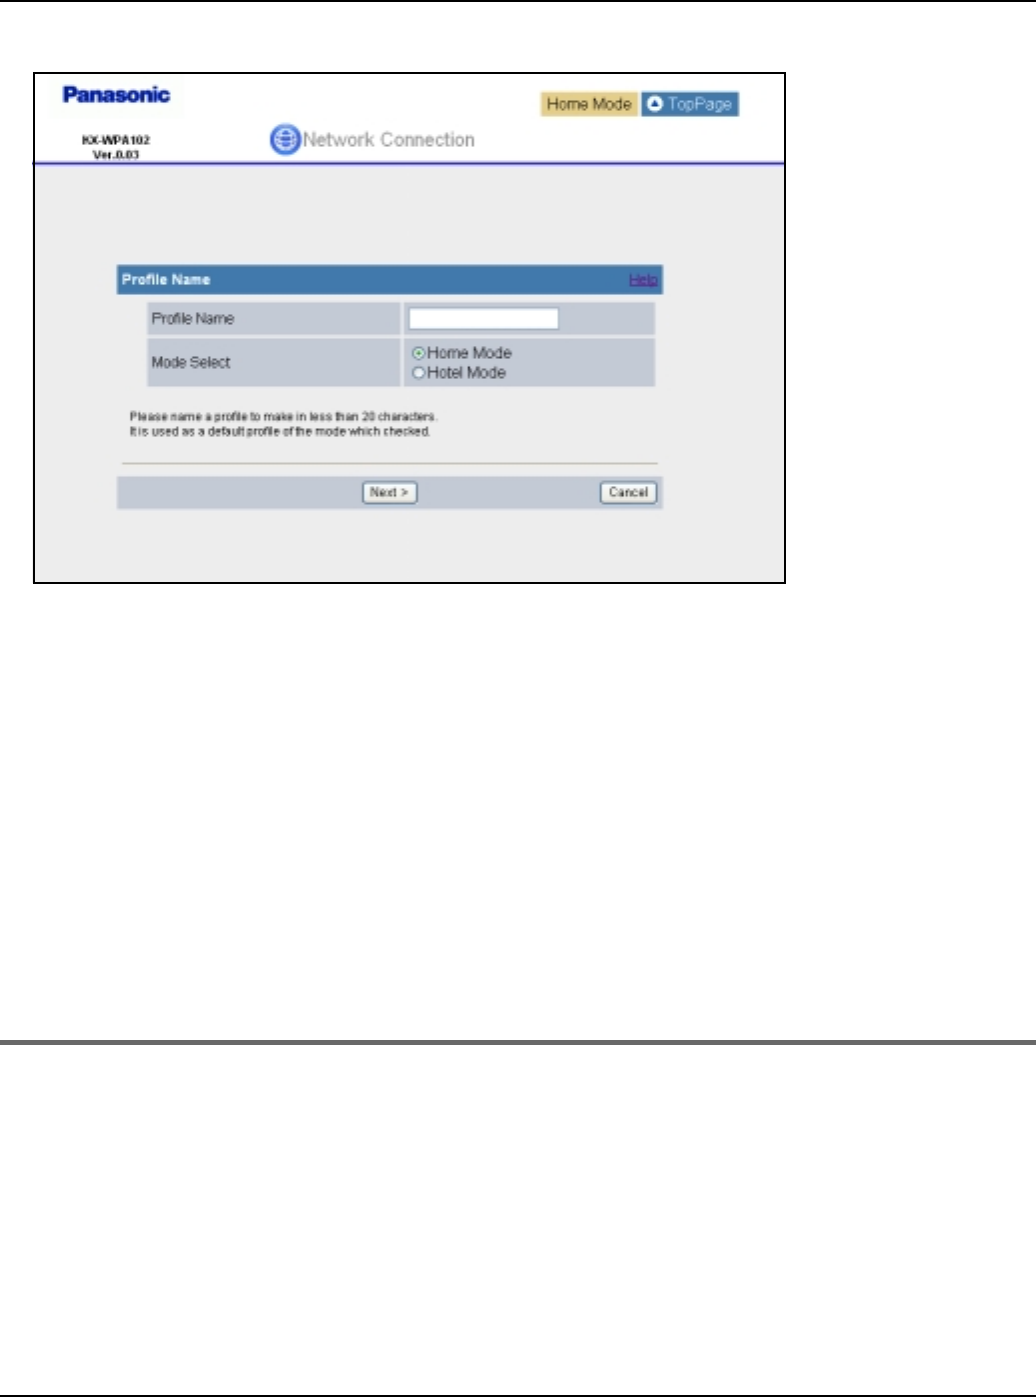
Base Unit Settings
98 For assistance, please visit http://www.panasonic.com/phonehelp
3Enter the profile name.
4Select the mode, then click [Next>].
5Select the connection mode, then click [Next>].
6Configure the connection mode you select in step 5, then click [Next>].
LSee “Configuring the Internet connection settings” on page 36 for instructions.
7Confirm the settings you are about to save, then click [Save].
8Click [Restart].
LThe base unit restarts in the connection mode that is registered as HOTEL or HOME
mode profile you have just created (The position of the Mode selector switch
determines the connection mode.).
Modifying the existing network connection profile
1Click [Network Connection] on Top Menu.
2Click [Modify] under the Network Connection heading.
Temporary Confidential
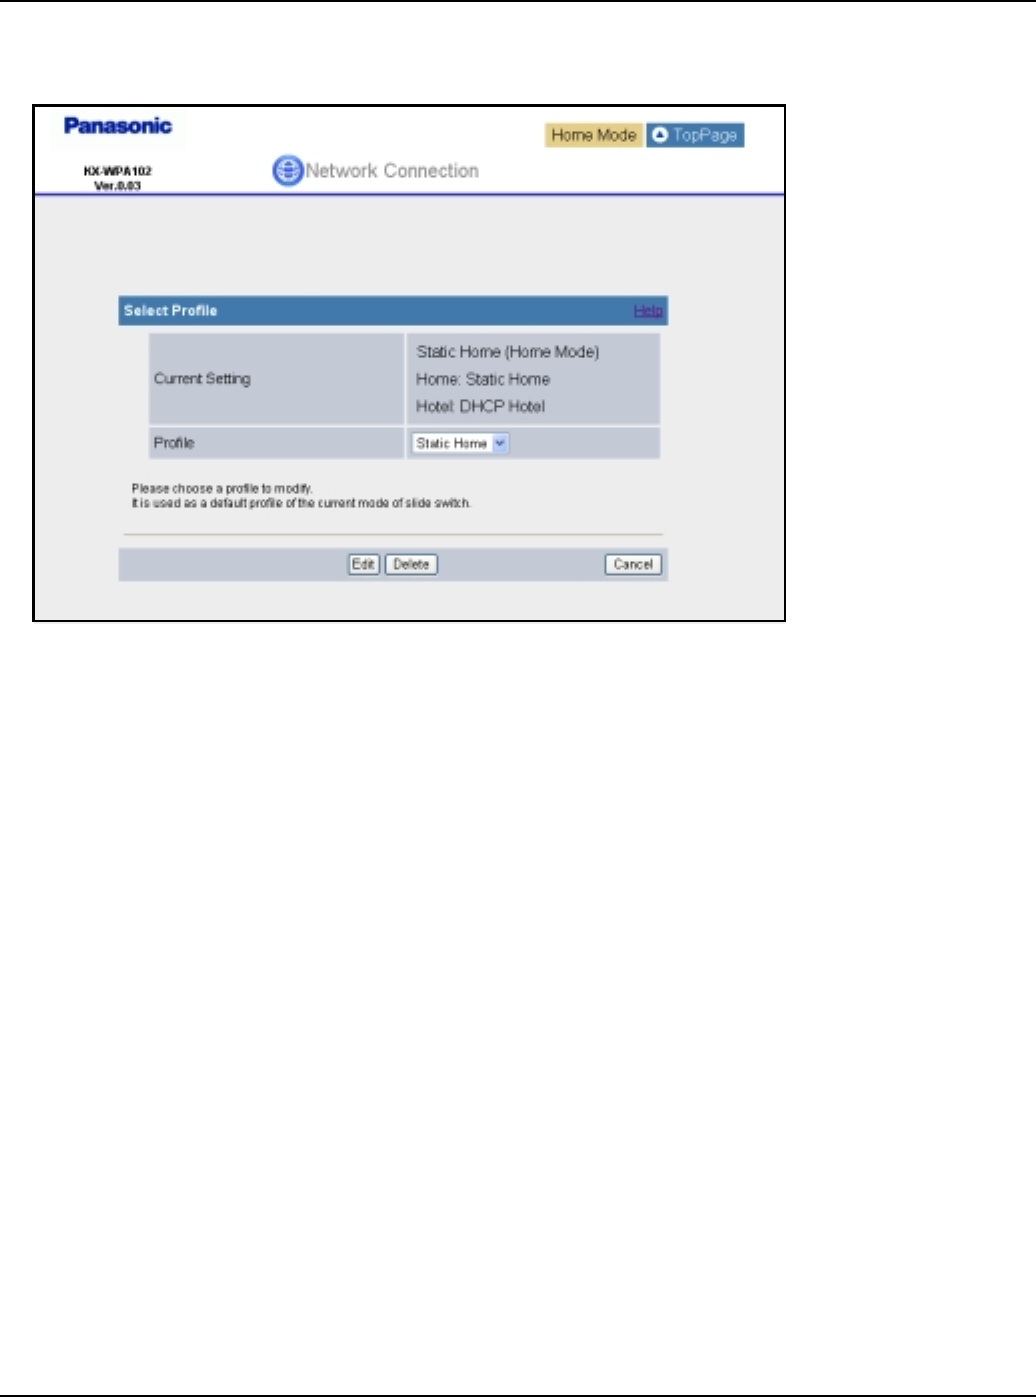
Base Unit Settings
For assistance, please visit http://www.panasonic.com/phonehelp 99
3Select the profile you wish to modify from the pull-down menu under the Select Profile
heading, then click [Edit].
LTo delete a profile, select the desired profile from the pull-down menu and click
[Delete].
4Configure the connection mode of the profile you select in step 3, then click [Next>].
LSee “Configuring the Internet connection settings” on page 36 for instructions.
5Confirm the settings you are about to save, then click [Save].
6Click [Restart].
LThe base unit restarts in the connection mode that is registered as HOTEL or HOME
mode profile you have just created (The position of the Mode selector switch
determines the connection mode). However, editing AP (Bridge) mode profile while
the Mode selector is switched to “HOTEL” does not restart the base unit in AP
(Bridge) mode profile.
Note:
LIn step 3, if you delete the profile you are currently using for HOTEL or HOME mode, the
profile will be reset to the default setting (DHCP).
Temporary Confidential

Base Unit Settings
100 For assistance, please visit http://www.panasonic.com/phonehelp
Modifying the wireless information
1Click [Network Connection] on Top Menu.
2Click [Modify] under the Wireless Information heading.
3Configure the wireless connection basic settings, then click [Next>].
4Configure the wireless connection security settings, then click [Save].
5Click [Restart].
Setting Description
[Mode] LSelect your wireless network mode from the pull-down menu.
[Channel] LSelect [Auto] or the desired channel from [1] to [11].
[Network Name
(SSID)]
LEnter your wireless network name (SSID) in this data field.
[Broadcast SSID] LEnable or disable the setting to broadcast your SSID.
Setting Description
[Security Mode] LSelect the desired Security Mode.
[WPA-PSK/WPA2-
PSK Data
Encryption]
LSelect the desired Data Encryption method.
[Network key] LEnter the network key containing 10 hexadecimal, 26
hexadecimal, 5 alphanumeric or 13 alphanumeric
characters.
LPress [View] to display the network key.
[Session-Key
renewal interval]
LSet the interval for refreshing the encryption key between 30
and 604800 seconds. 604800 seconds is the equivalent of
one week.
[Key Index] LSelect [Key 2] or [Key 3] to be used if you use WEP.
Temporary Confidential
Base Unit Settings
For assistance, please visit http://www.panasonic.com/phonehelp 101
Updating the firmware
To prevent leaks of customer information, illegal operation of this product, interference or
involuntary shutdown etc., update firmware regularly. The most recent firmware file can be
found on Panasonic’s Support Website (http://panasonic.biz).
1Click [Update Firmware] on Top Menu.
2Check for the latest version by clicking the support information URL.
3If the version is updated, download the updated firmware to your PC.
4Enter the file name of the downloaded firmware under the “Update Firmware” heading.
LYou can also click [Browse...] to select the firmware file name from the list.
5Click [Update].
LThe base unit automatically restarts after the firmware is updated.
Temporary Confidential
Base Unit Settings
102 For assistance, please visit http://www.panasonic.com/phonehelp
Important:
LDo not interrupt the firmware updating process by cutting the power supply until the
updating is complete and the base unit restarts itself.
Temporary Confidential
Base Unit Settings
For assistance, please visit http://www.panasonic.com/phonehelp 103
Advanced Setup
1Click [Advanced Setup] on Top Menu.
2Click the desired tab, then click the desired item from the menu on the left side.
*1 While in AP (Bridge) mode, Interface Status is displayed instead of WAN Interface
Status and LAN Interface Status.
*2 While in AP (Bridge) mode, these menus are not available.
Tab Menu Sub-menu1 Sub-menu2 Page
Status Network Status WAN Interface Status*1 106
LAN Interface Status*1
Routing Table
ARP Table
DHCP Lease Table DHCP Server Status*2 107
DHCP Lease Table*2
UPnP Port
Mapping Table UPnP Status*2 108
UPnP Port Mapping Table*2
Wireless Status – 108
Handset Status – 109
Version
Information –109
Save Status – 110
Basic Internet
Connection Profiles 111
Profiles Selection
MAC Address
Clone –112
Temporary Confidential

Base Unit Settings
104 For assistance, please visit http://www.panasonic.com/phonehelp
Advanced LAN/DHCP Server LAN 113
DHCP Server
Static DHCP (IP Address
Reservation) 115
Port Forwarding Port Forwarding
Table Port Forwarding
Setting 116
DMZ – 118
UPnP – 119
Packet Filtering Packet Filtering
Table Packet Filtering
Setting 120
Easy Security Easy-To-Use Filtering 123
Routing Static Routing
Table Routing Setting 124
Wireless Wireless Basic Wireless Mode 126
SSID
Authentication/
Encryption Authentication/Encryption 127
Network Key (WPA-PSK/WPA-PSK)
Network Key (WEP)
MAC Address
Filtering MAC Address Filtering 129
MAC Address
Filtering Table MAC Address
Filtering Setting
Tab Menu Sub-menu1 Sub-menu2 Page
Temporary Confidential

Base Unit Settings
For assistance, please visit http://www.panasonic.com/phonehelp 105
Maintenance Password – 131
Update Firmware – 132
Reset to Factory
Default –134
Save Settings – 135
Loading Settings – 136
Restart – 137
Packet Filtering
Log –138
UPnP Port
Mapping Log –139
Connection Log – 140
Support Help – 141
Support Link – 142
Tab Menu Sub-menu1 Sub-menu2 Page
Temporary Confidential
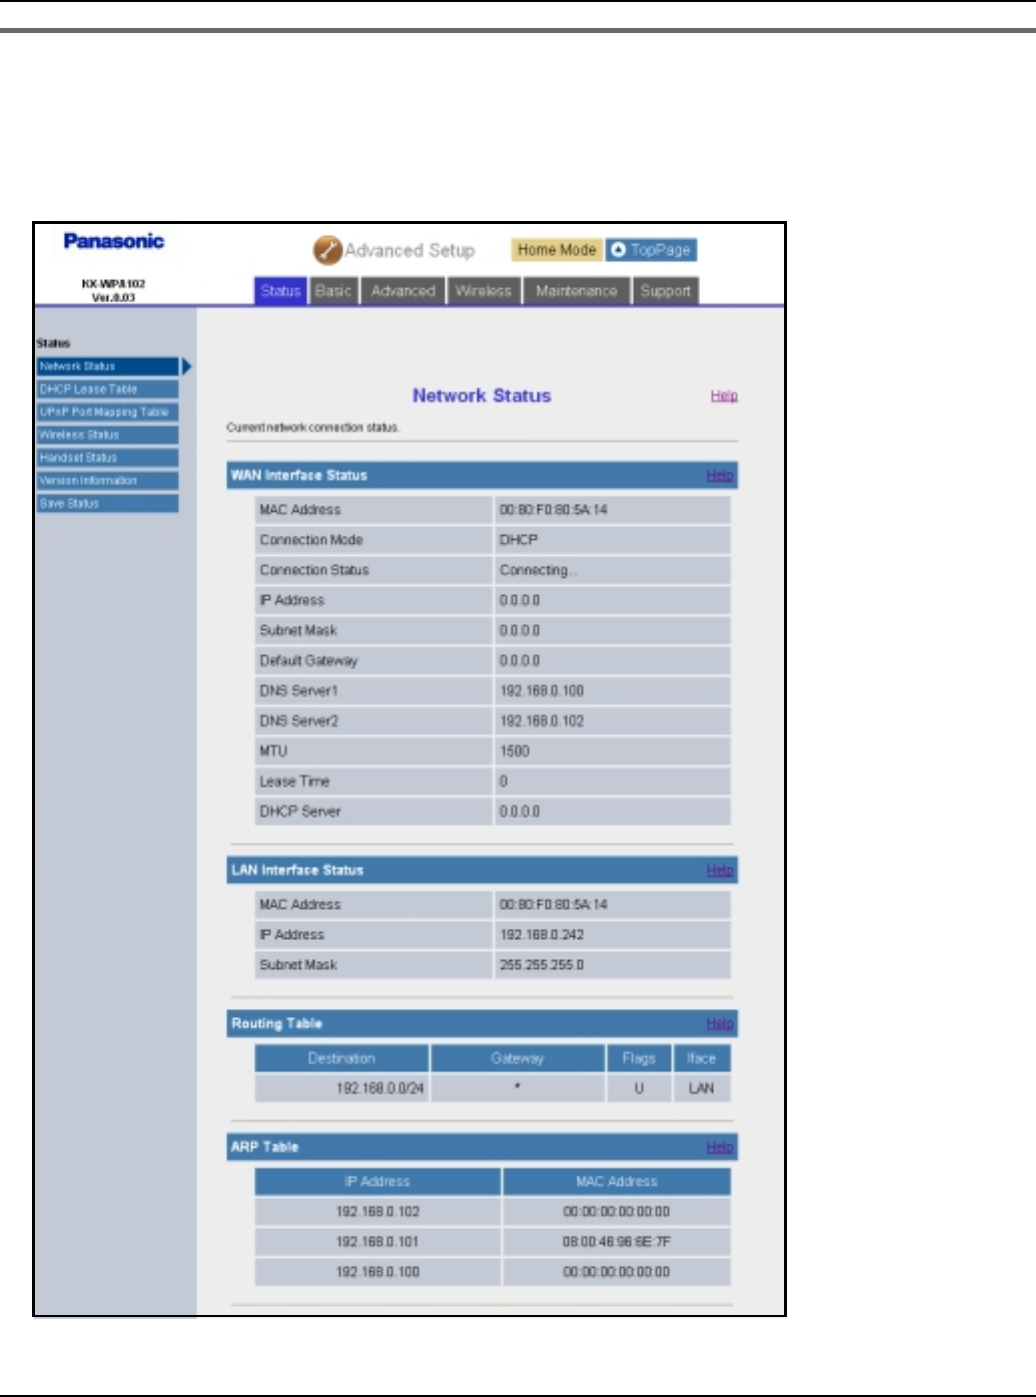
Base Unit Settings
106 For assistance, please visit http://www.panasonic.com/phonehelp
Status
1Click the [Status] tab, then click the desired item on the left.
[Network Status] Shows the WAN/LAN interface status, and routing and ARP tables.
Temporary Confidential
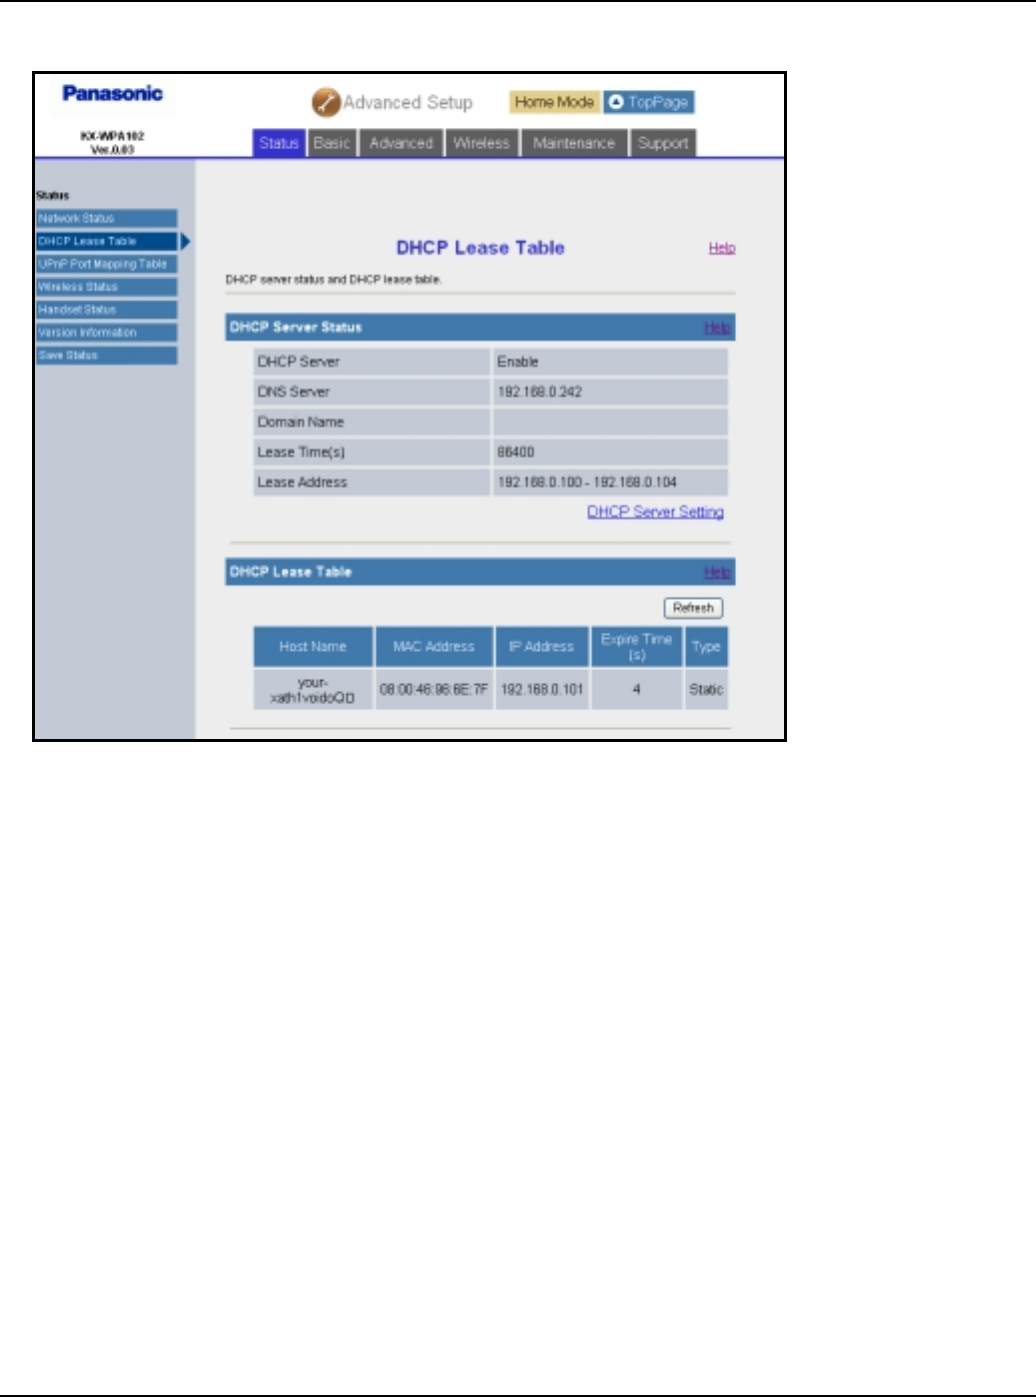
Base Unit Settings
For assistance, please visit http://www.panasonic.com/phonehelp 107
[DHCP Lease Table] Shows the DHCP server status and lease table.
Temporary Confidential
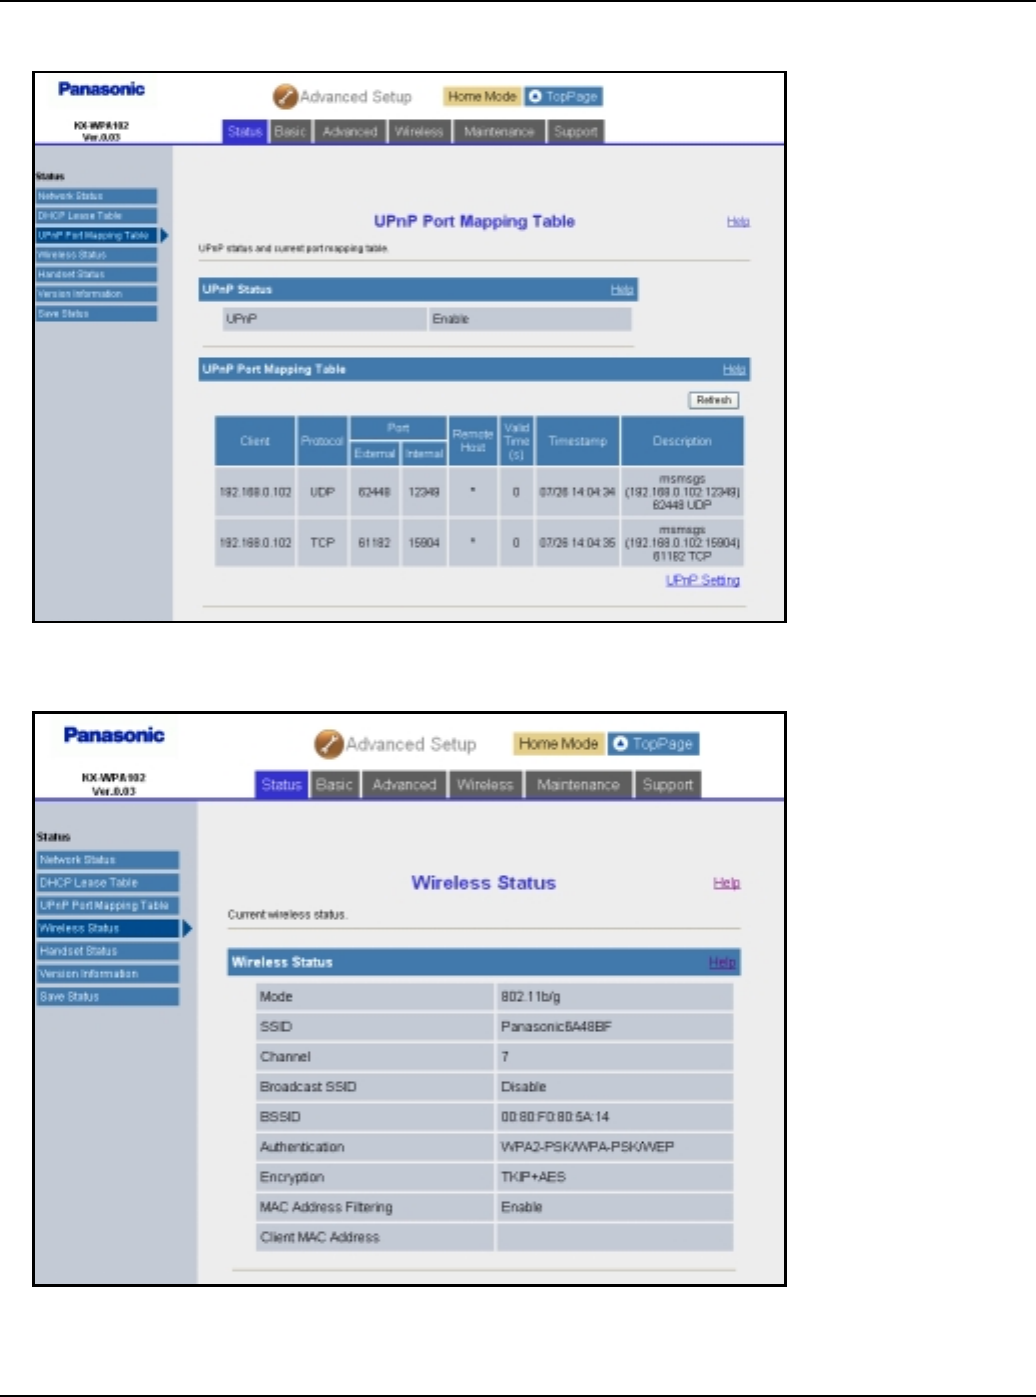
Base Unit Settings
108 For assistance, please visit http://www.panasonic.com/phonehelp
[UPnP Port Mapping Table] Shows the UPnP status and port mapping table.
[Wireless Status] Shows the wireless LAN status.
Temporary Confidential
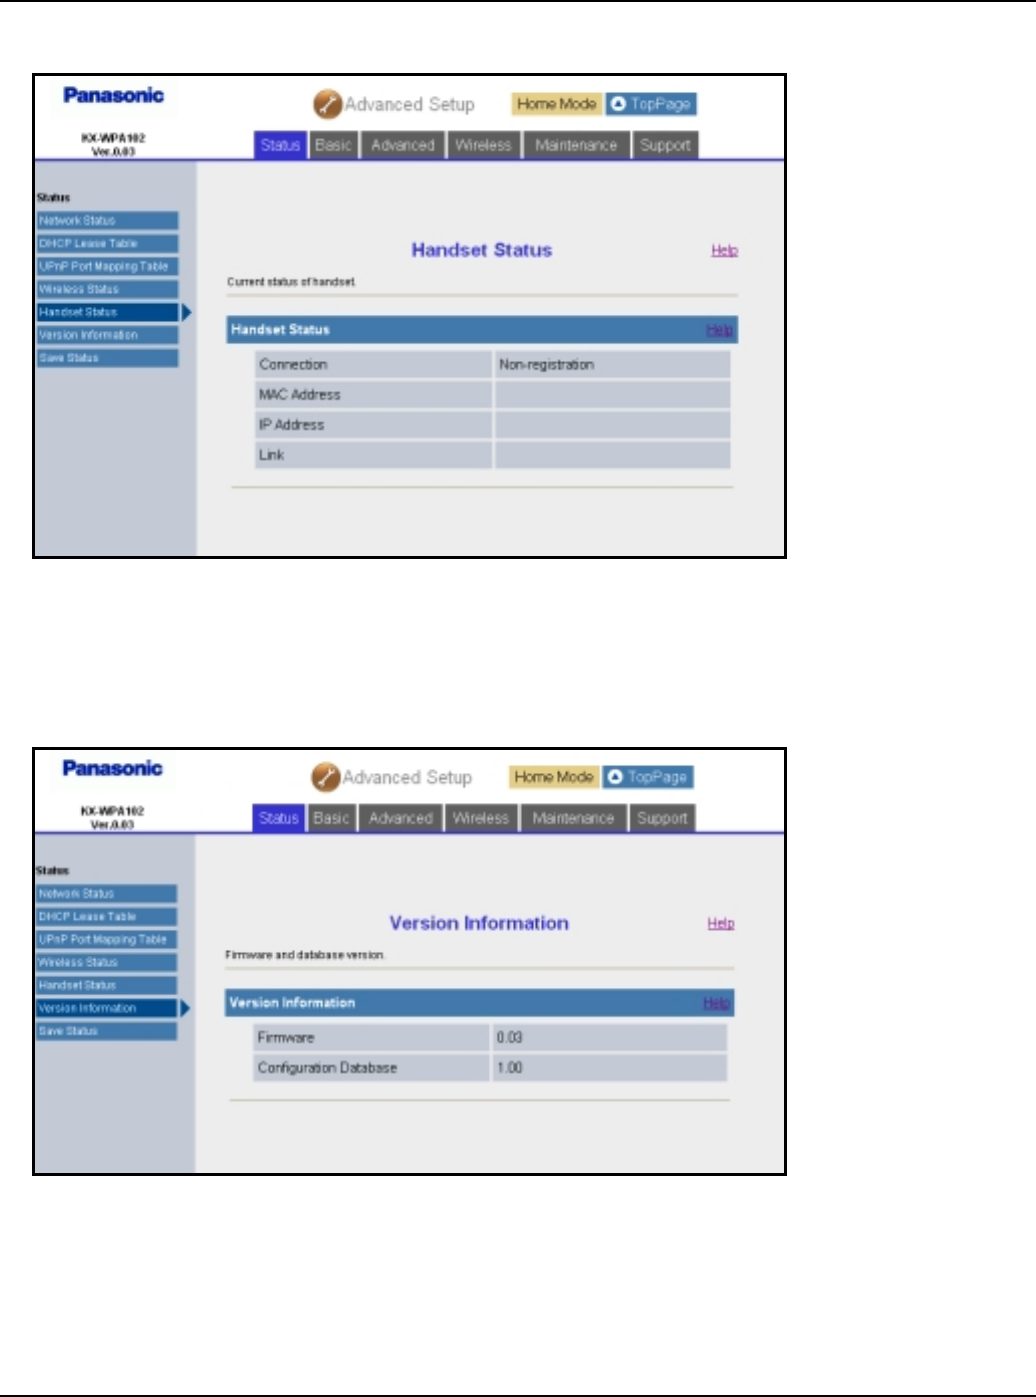
Base Unit Settings
For assistance, please visit http://www.panasonic.com/phonehelp 109
[Handset Status] Shows the handset connection status.
Note:
LIt may take a while to display this screen in order to check if the handset is connected.
[Version Information] Shows the firmware version information.
Temporary Confidential

Base Unit Settings
110 For assistance, please visit http://www.panasonic.com/phonehelp
[Save Status] Allows you to save the status.
Temporary Confidential
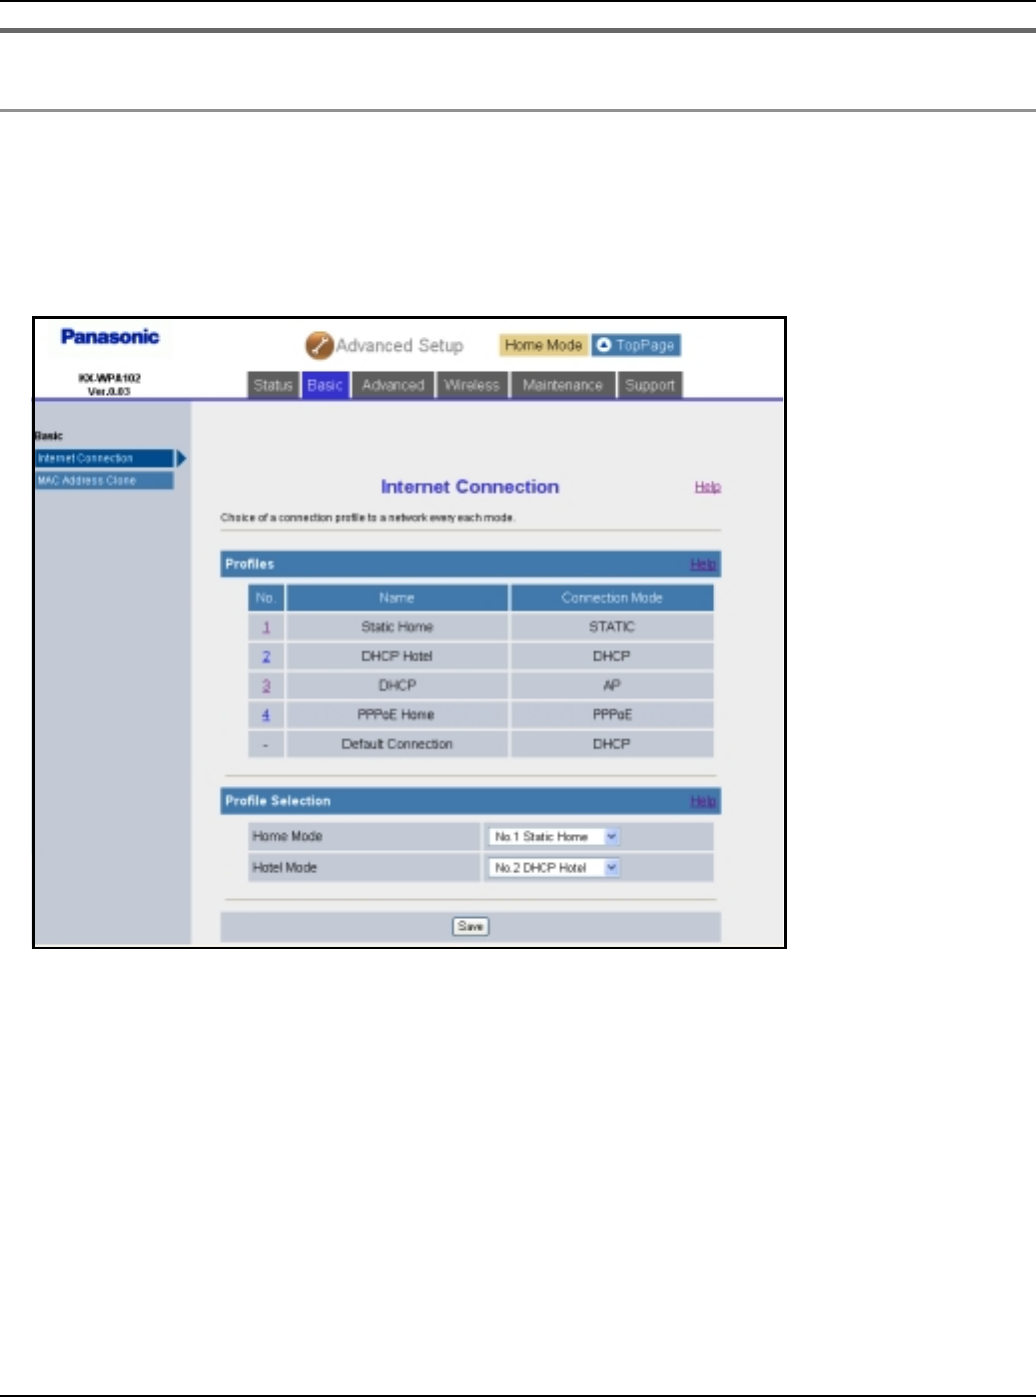
Base Unit Settings
For assistance, please visit http://www.panasonic.com/phonehelp 111
Basic setting
Internet Connection:
This feature allows you to select and configure the Internet connection mode.
1Click [Advanced Setup] on Top Menu.
2Click the [Basic] tab, then click [Internet Connection].
3Under the Profiles heading, click the entry number of the desired Internet connection
profile to configure the Internet connection mode of the desired profile.
4Click the desired Internet connection mode under the Connection Mode heading.
5Configure the Internet connection mode you select in step 4, then click [Save].
LSee “Configuring the Internet connection settings” on page 36.
6Click [Restart].
Note:
LIn step 3, you can set both the Home and Hotel modes to the desired profile by selecting
the profile from the respective pull-down menus under the Profile Selection heading.
Temporary Confidential
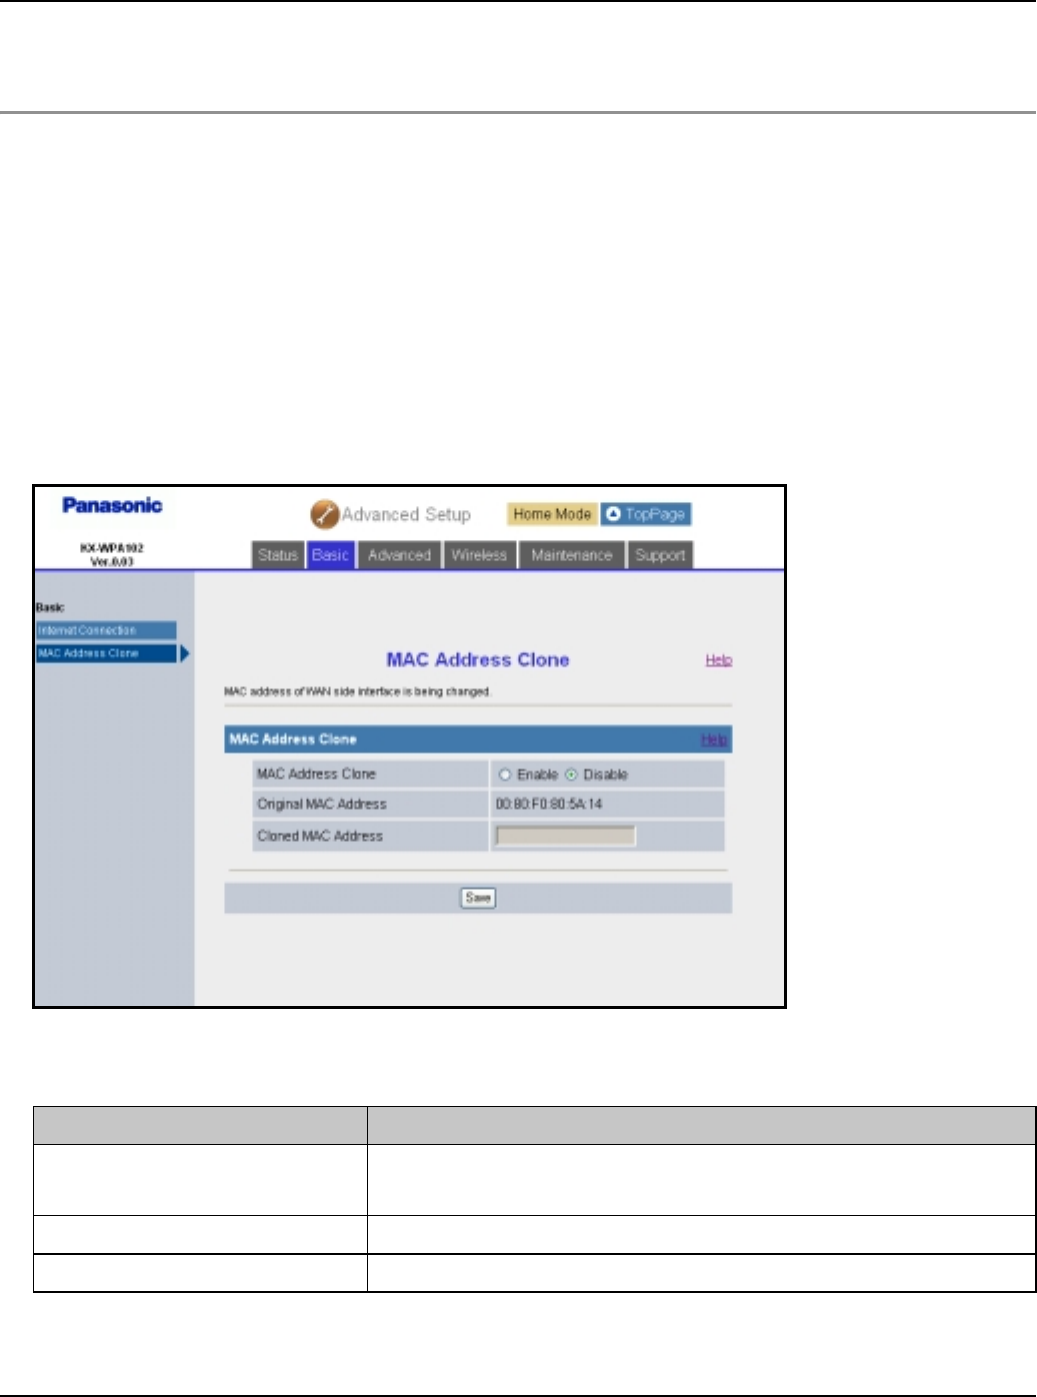
Base Unit Settings
112 For assistance, please visit http://www.panasonic.com/phonehelp
LIn step 5, if you click [Save] after creating or modifying the profile currently selected for
HOME or HOTEL mode, the profile setting screen will be displayed.
MAC Address Clone:
MAC (Media Access Control) Address Clone allows you to clone the MAC address of your
PC’s network adaptor onto this product.
A MAC address is a 12-digit code assigned to a unique piece of hardware for identification.
Some Internet service providers require that you register the MAC address of your
computer’s network adaptor, which was connected to your cable or DSL modem during
installation.
1Click [Advanced Setup] on Top Menu.
2Click the [Basic] tab, then click [MAC Address Clone].
3Configure the settings, then click [Save].
4Click [Restart].
Setting Description
[MAC Address Clone] LSelect whether the MAC address clone feature is
enabled or disabled.
[Original MAC Address] LBase unit’s MAC address is displayed.
[Cloned MAC Address] LEnter MAC address to be cloned.
Temporary Confidential
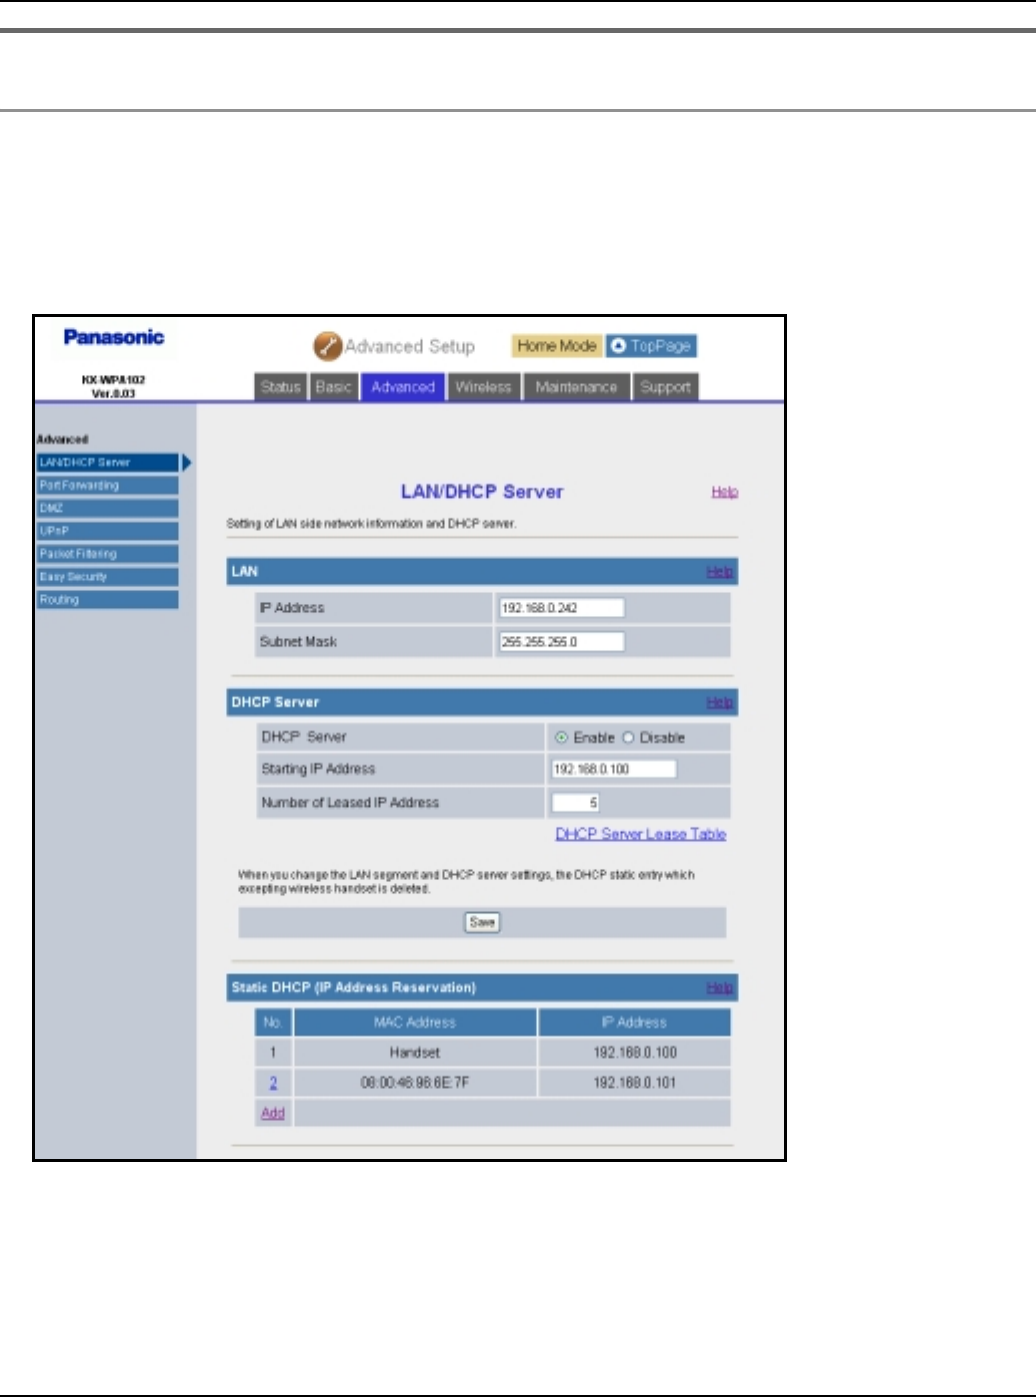
Base Unit Settings
For assistance, please visit http://www.panasonic.com/phonehelp 113
Advanced setting
LAN / DHCP Server:
This feature allows you to configure the local network settings and DHCP server settings.
1Click [Advanced Setup] on Top Menu.
2Click the [Advanced] tab, then click [LAN / DHCP Server].
Temporary Confidential

Base Unit Settings
114 For assistance, please visit http://www.panasonic.com/phonehelp
3Configure the settings, then click [Save].
Note:
LIf you change the LAN side network settings or DHCP server settings, the entries in
Static DHCP table will be deleted.
4Click [Restart].
Setting Description
[IP Address] LIf your network administrator specifies the private IP address
and subnet mask, enter them in each data field.
LSet 4 digits (0 – 255) and 3 periods such as “192.168.0.253”.
But “0.0.0.0” and “255.255.255.255” are not available.
[Subnet Mask]
[DHCP Server] LDHCP server assigns IP addresses to devices on your LAN.
Select whether to enable or disable this feature.
[Starting IP
Address]
LEnter the starting IP address for the DHCP server’s IP
assignment.
[Number of Lease
IP Address]
LEnter the number of the lease IP address (maximum
number: 5). The first IP address is assigned to the handset.
The subsequent ones are assigned to PCs.
Temporary Confidential
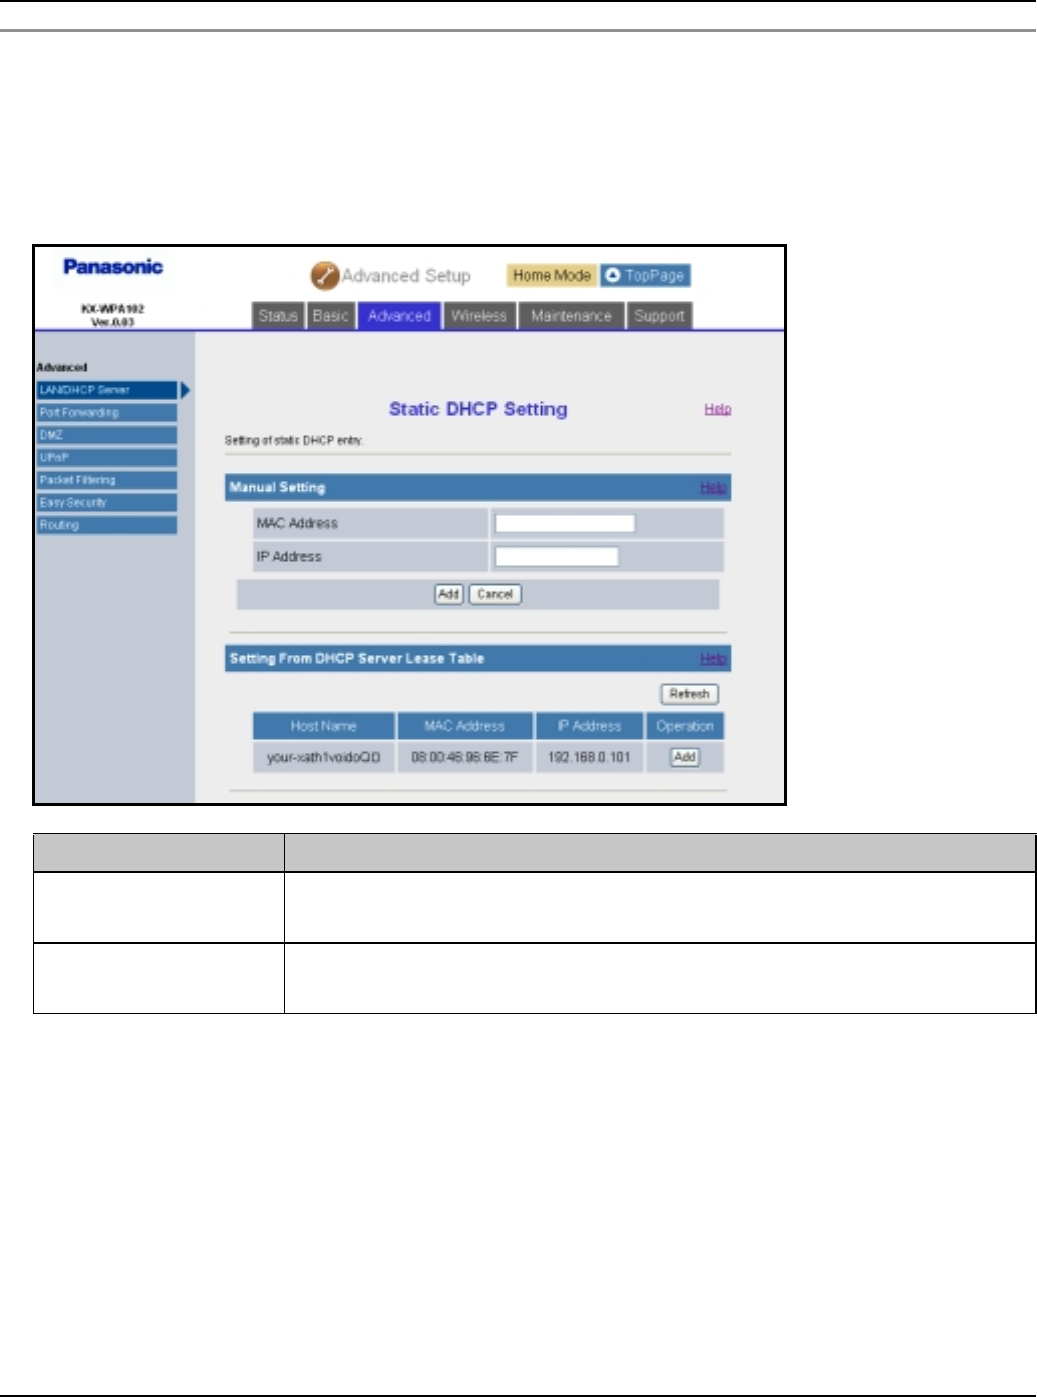
Base Unit Settings
For assistance, please visit http://www.panasonic.com/phonehelp 115
Static DHCP (IP Address Reservation):
Static DHCP function allows you to stabilize the IP address assigned to the computer by
registering the computer’s MAC address.
1Click [Add] under the Static DHCP (IP Address Reservation) heading in LAN / DHCP
Server page (page 113), then configure the settings.
LYou can also select the setting from the DHCP Server Lease Table. Click [Add] in the
“Operation” column of the table.
2Click [Add].
3Click [Restart].
Note:
LWhen you edit the static DHCP setting, click the desired entry number to edit the setting.
Configure the settings, then click [Save].
LWhen you delete a static DHCP setting, click the desired number, then click [Delete].
Setting Description
[MAC Address] LEnter the LAN card’s MAC address of the corresponding
computer.
[IP Address] LEnter the IP address that you want to stabilize of the
corresponding computer.
Temporary Confidential
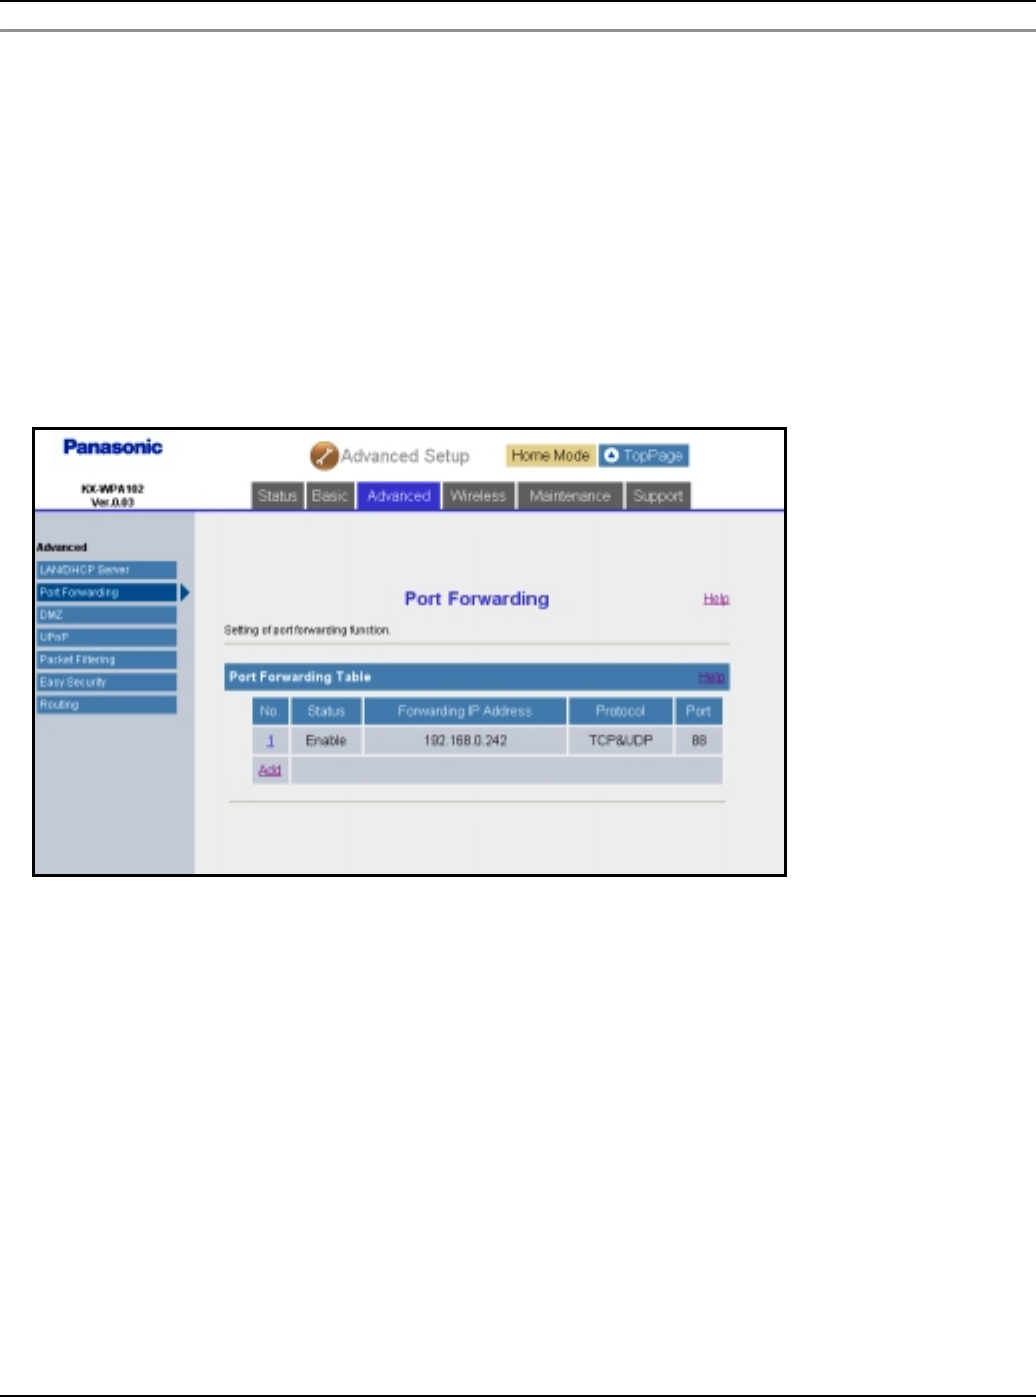
Base Unit Settings
116 For assistance, please visit http://www.panasonic.com/phonehelp
Port Forwarding:
This feature allows you to configure the port forwarding settings. Port Forwarding feature
enables other Internet users to access services running on your LAN.
Up to 10 settings can be stored.
Important:
LWhen setting up the port forwarding feature, there is a possibility of illegal access to the
forwarding port from the Internet. For safety, set this feature only when required.
1Click [Advanced Setup] on Top Menu.
2Click the [Advanced] tab, then click [Port Forwarding].
Temporary Confidential
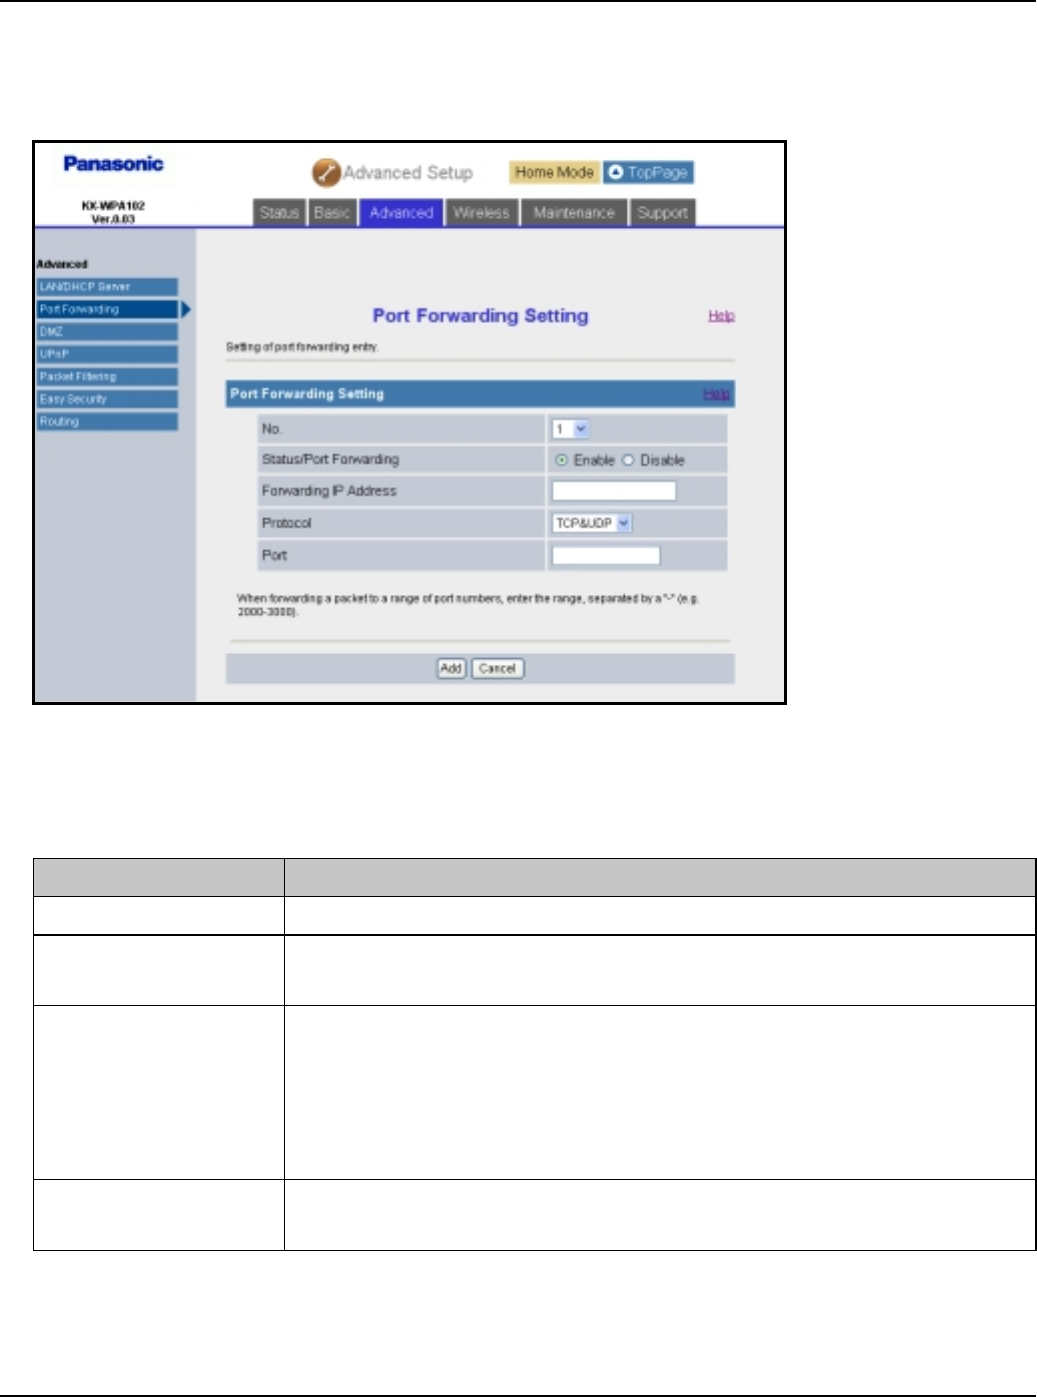
Base Unit Settings
For assistance, please visit http://www.panasonic.com/phonehelp 117
3To add a new entry, click [Add] under the Portforwarding Table heading.
LTo edit the setting, click the desired entry number under the Portforwarding Table
heading.
4Configure the settings under the Port Forwarding Setting heading, then click [Add] to
add the new entry.
LClick [Save] under the Port Forwarding Setting heading to save the edited settings.
Setting Description
[No.] LSelect the desired entry number for the port forward setting.
[Status/Port
Forwarding]
LSelect whether the port forwarding feature is enabled or
disabled.
[Forwarding IP
Address]
LEnter the IP address of the computer that is hosting the
service.
LThe device registered as the forwarding IP address can be
accessed from the Internet through the registered protocol
and port.
[Protocol] LSelect the desired protocol used to access your hosting
service.
Temporary Confidential
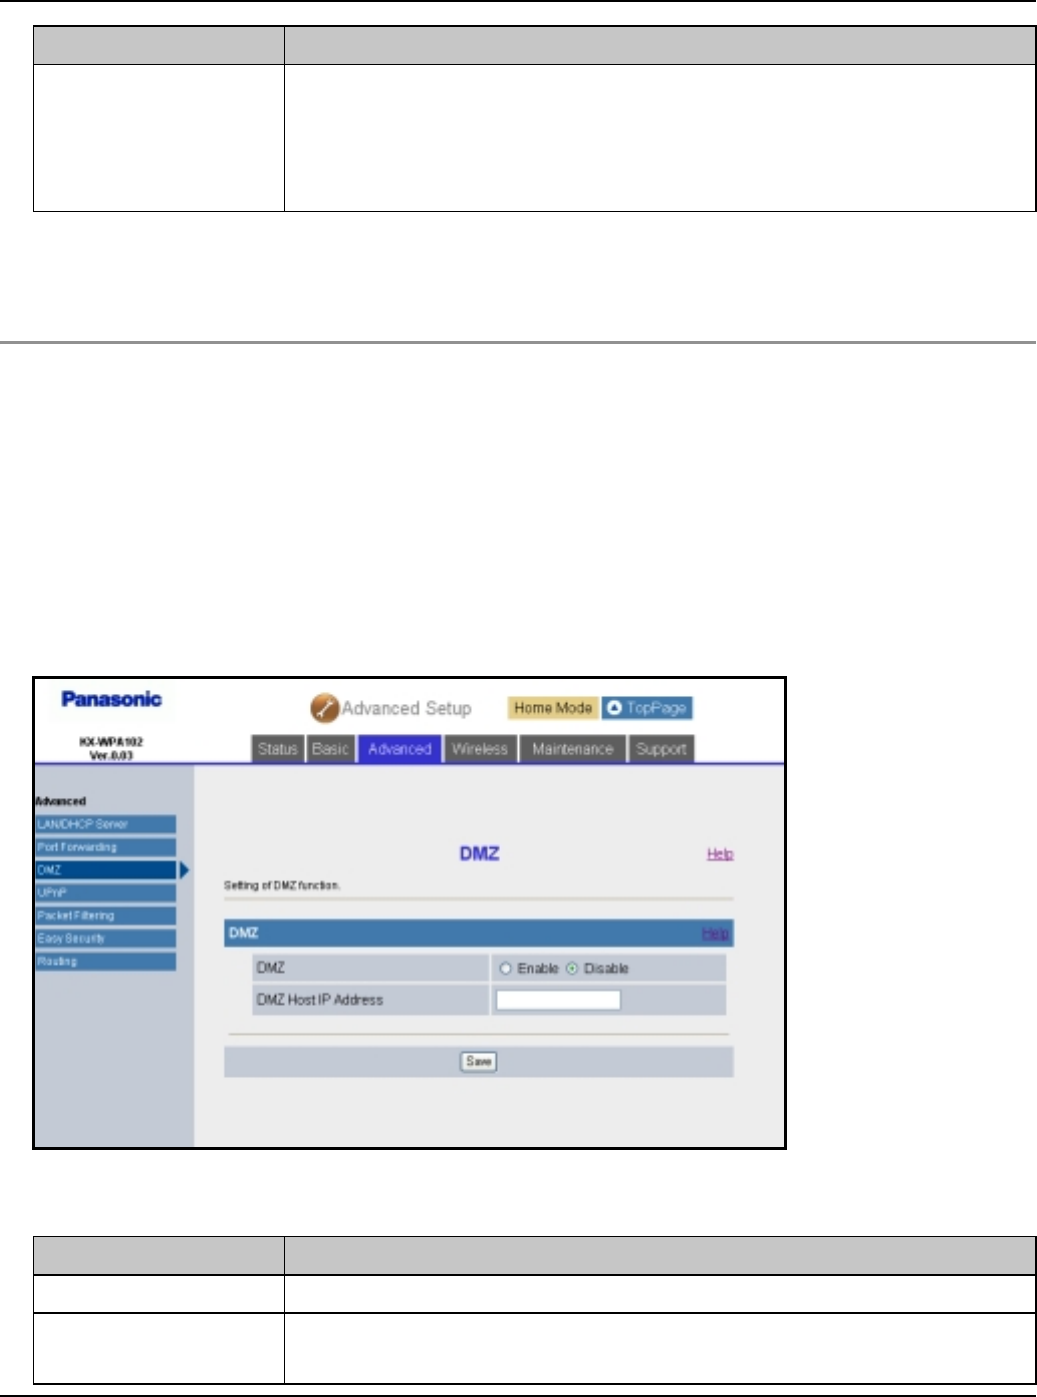
Base Unit Settings
118 For assistance, please visit http://www.panasonic.com/phonehelp
LWhen you delete the selected setting, click [Delete].
5Click [Restart].
DMZ:
DMZ (DeMilitarized Zone) allows you to configure the DMZ settings. The DMZ feature
allows you to expose a specified computer on your LAN to the Internet.
Important:
LComputers specified as the DMZ host may be vulnerable to security risks.
1Click [Advanced Setup] on Top Menu.
2Click the [Advanced] tab, then click [DMZ].
3Configure the settings, then click [Save].
[Port] LEnter the forwarding port number.
LIf you want to set one port, enter its port number only.
LIf you want to set a range of ports, enter the port numbers in
the following way: “2000 – 3000”
Setting Description
[DMZ] LSelect whether the DMZ feature is enabled or disabled.
[DMZ Host IP
Address]
LEnter the IP address of the computer that is exposed to the
Internet.
Setting Description
Temporary Confidential
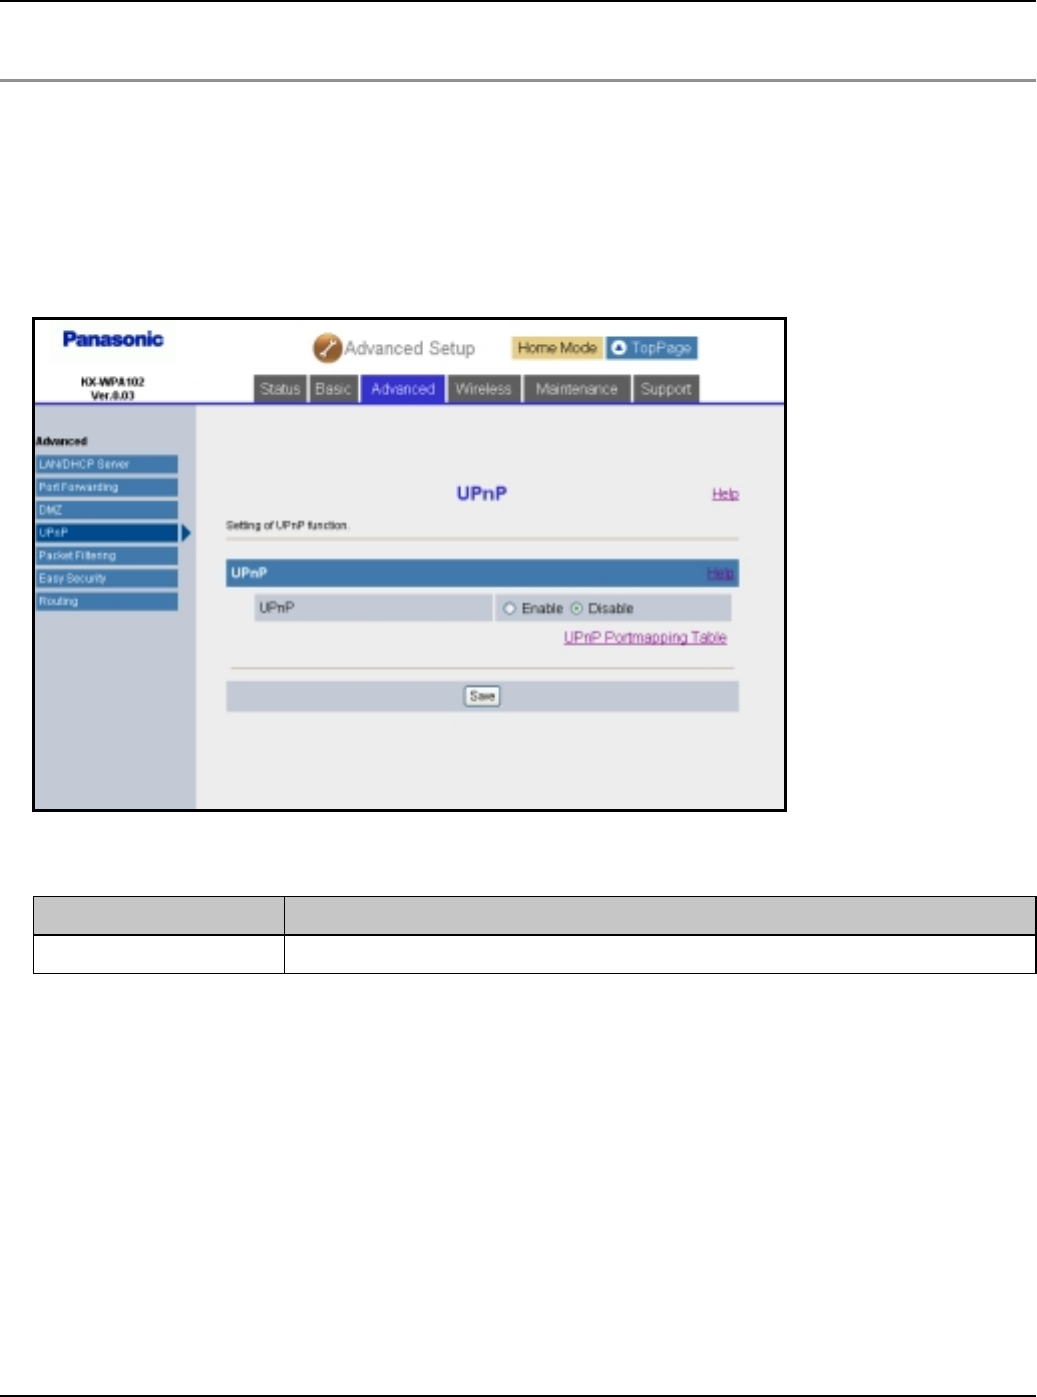
Base Unit Settings
For assistance, please visit http://www.panasonic.com/phonehelp 119
4Click [Restart].
UPnP:
UPnP (Universal Plug and Play) allows you to configure the UPnP settings. UPnP feature
allows the base unit to be compliant with the UPnP standard.
1Click [Advanced Setup] on Top Menu.
2Click the [Advanced] tab, then click [UPnP].
3Select the desired setting, then click [Save].
4Click [Restart].
Setting Description
[UPnP] LSelect whether the UPnP feature is enabled or disabled.
Temporary Confidential
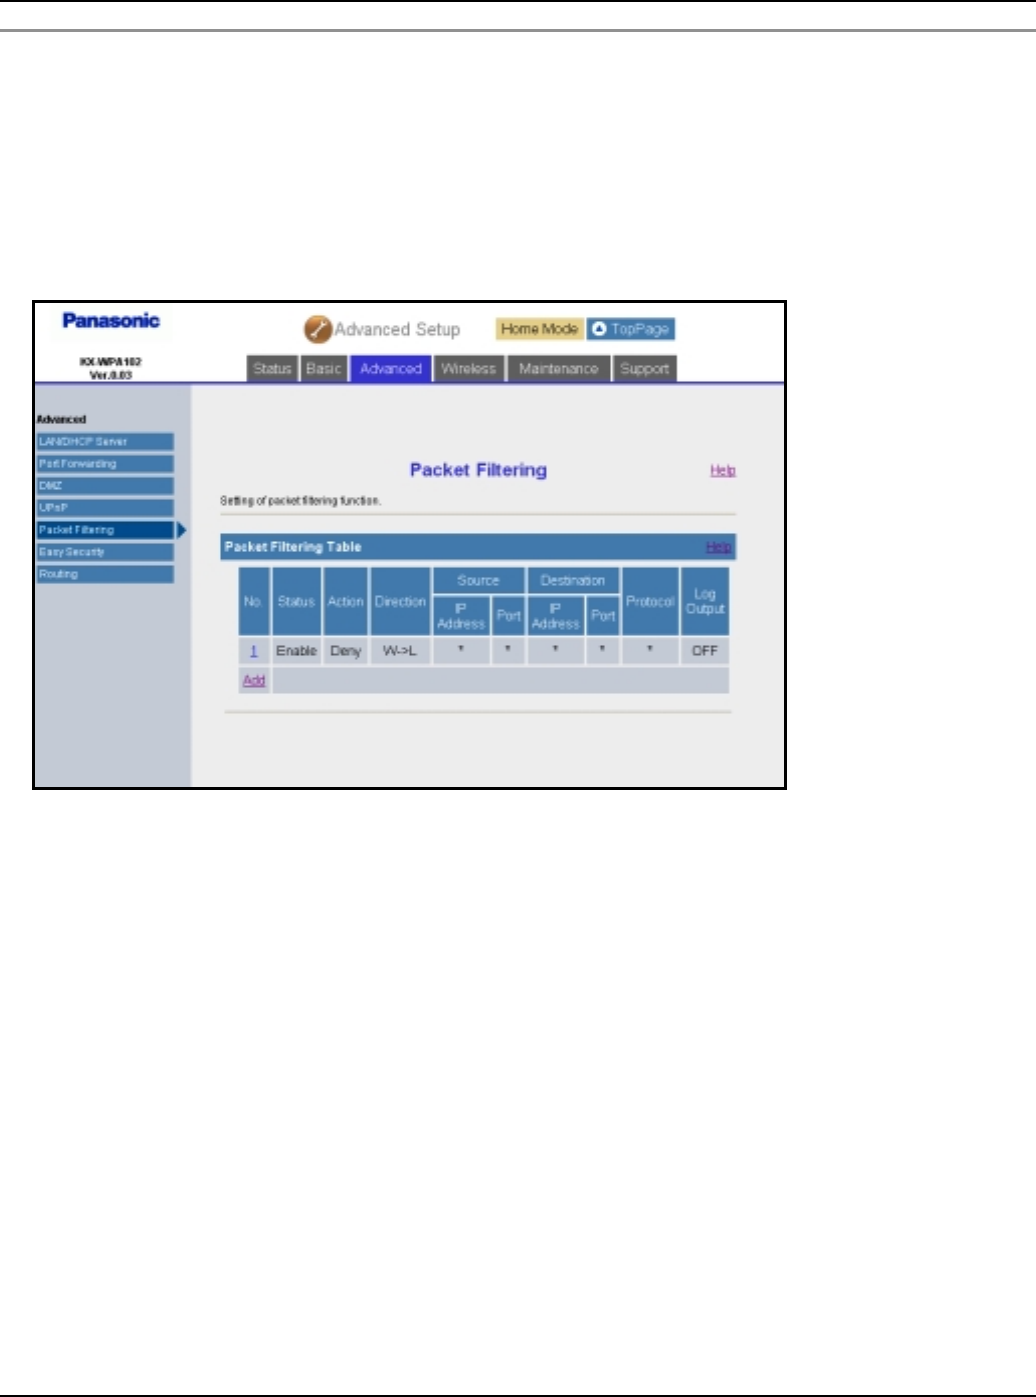
Base Unit Settings
120 For assistance, please visit http://www.panasonic.com/phonehelp
Packet Filtering:
The Packet Filtering allows you to configure the packet filtering settings, and to control
Internet access from the specified computers on your LAN.
Up to 20 settings can be stored.
1Click [Advanced Setup] on Top Menu.
2Click the [Advanced] tab, then click [Packet Filtering].
Temporary Confidential
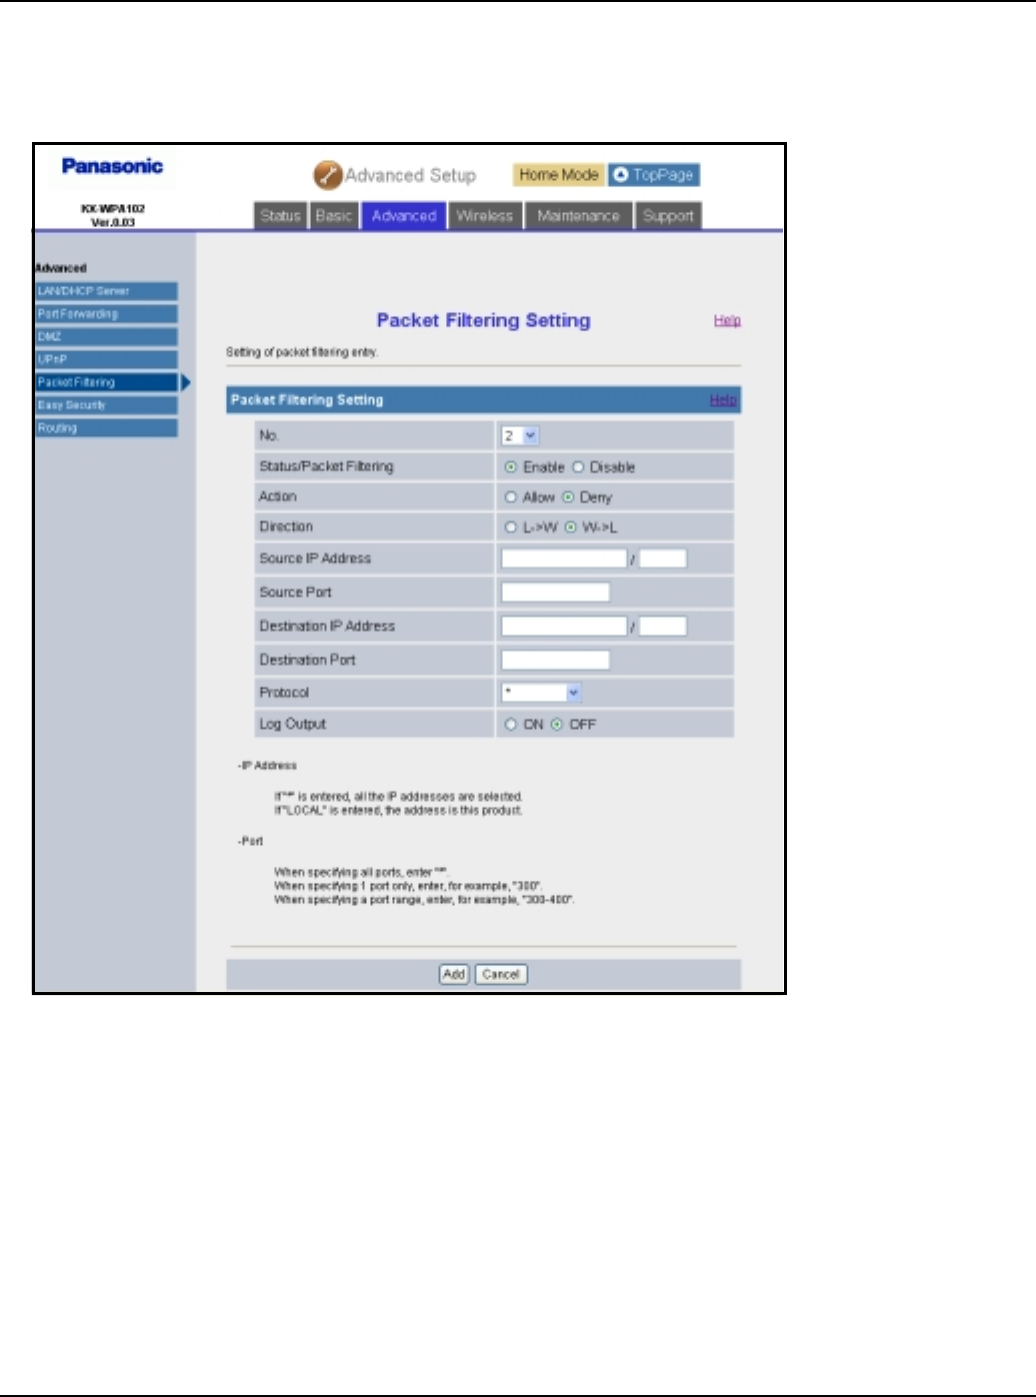
Base Unit Settings
For assistance, please visit http://www.panasonic.com/phonehelp 121
3To add a new entry, click [Add] under the Packet Filtering Table heading.
LTo edit the setting, click the desired entry number under the Packet Filtering Table
heading.
Temporary Confidential

Base Unit Settings
122 For assistance, please visit http://www.panasonic.com/phonehelp
4Configure the settings under the Packet Filtering Setting heading, then click [Add] to
add the new entry.
LClick [Save] under the Packet Filtering Setting heading to save the edited settings.
LWhen you delete the selected setting, click [Delete].
5Click [Restart].
Setting Description
[No.] LSelect the desired entry number for the packet filtering
setting.
[Status/Packet
Filtering]
LSelect whether the packet filtering feature is enabled or
disabled.
[Action] LSelect whether to allow or deny IP packets that are being
received.
[Direction] LSelect [LiW] (filtering when sending to WAN) or [WiL]
(filtering when receiving from WAN).
[Source IP
Address]
LEnter the packet source IP address to be filtered.
LIf you want to set one IP address, enter the IP address only.
LIf you want to set a range of IP addresses, enter the network
address (e.g. 192.168.0.0/16).
LIf you want to set the KX-WPA102 IP address, enter “local”.
LIf you want to set all IP addresses, enter “*”.
[Source Port] LEnter the packet source port to be filtered.
LIf you want to set one port, enter its port number only.
LIf you want to set a range of ports, enter the port numbers in
the following way: “2000 – 3000”.
[Destination IP
Address]
LEnter the packet destination IP address to be filtered.
LThe entry is the same as the Source IP Address.
[Destination Port] LEnter the packet destination port number to be filtered.
LThe entry is the same as the Source Port.
[Protocol] LSelect the desired protocol used.
[Log Output] LSet whether to display the temporarily saved packet
information on the [Packet Filtering Log] (page 138).
Temporary Confidential
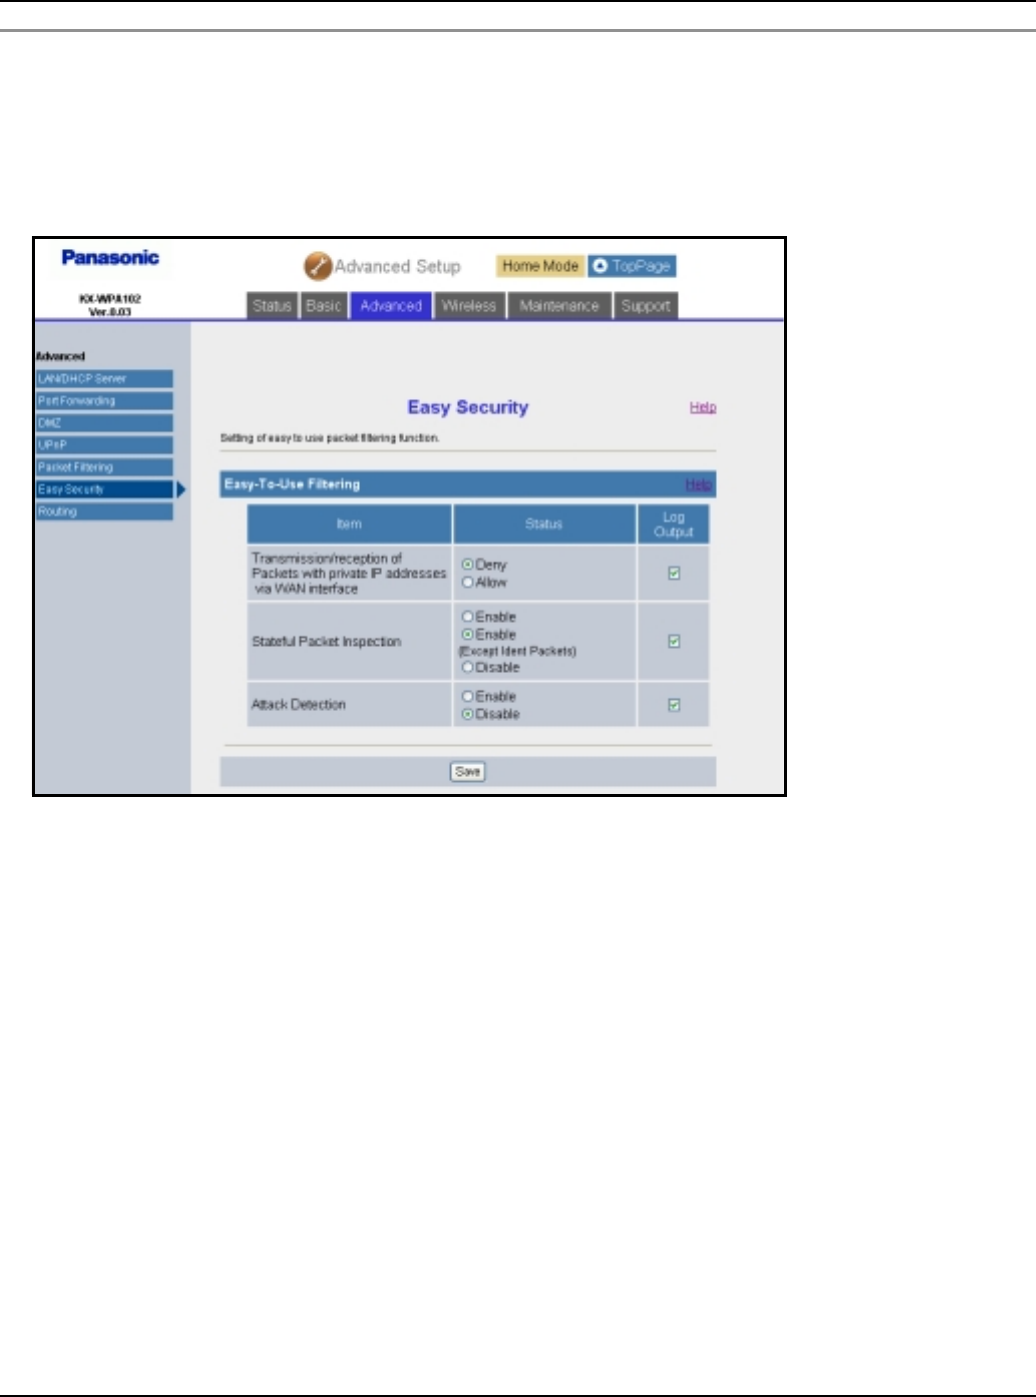
Base Unit Settings
For assistance, please visit http://www.panasonic.com/phonehelp 123
Easy Security:
This feature allows you to easily set up packet filtering.
1Click [Advanced Setup] on Top Menu.
2Click the [Advanced] tab, then click [Easy Security].
Temporary Confidential
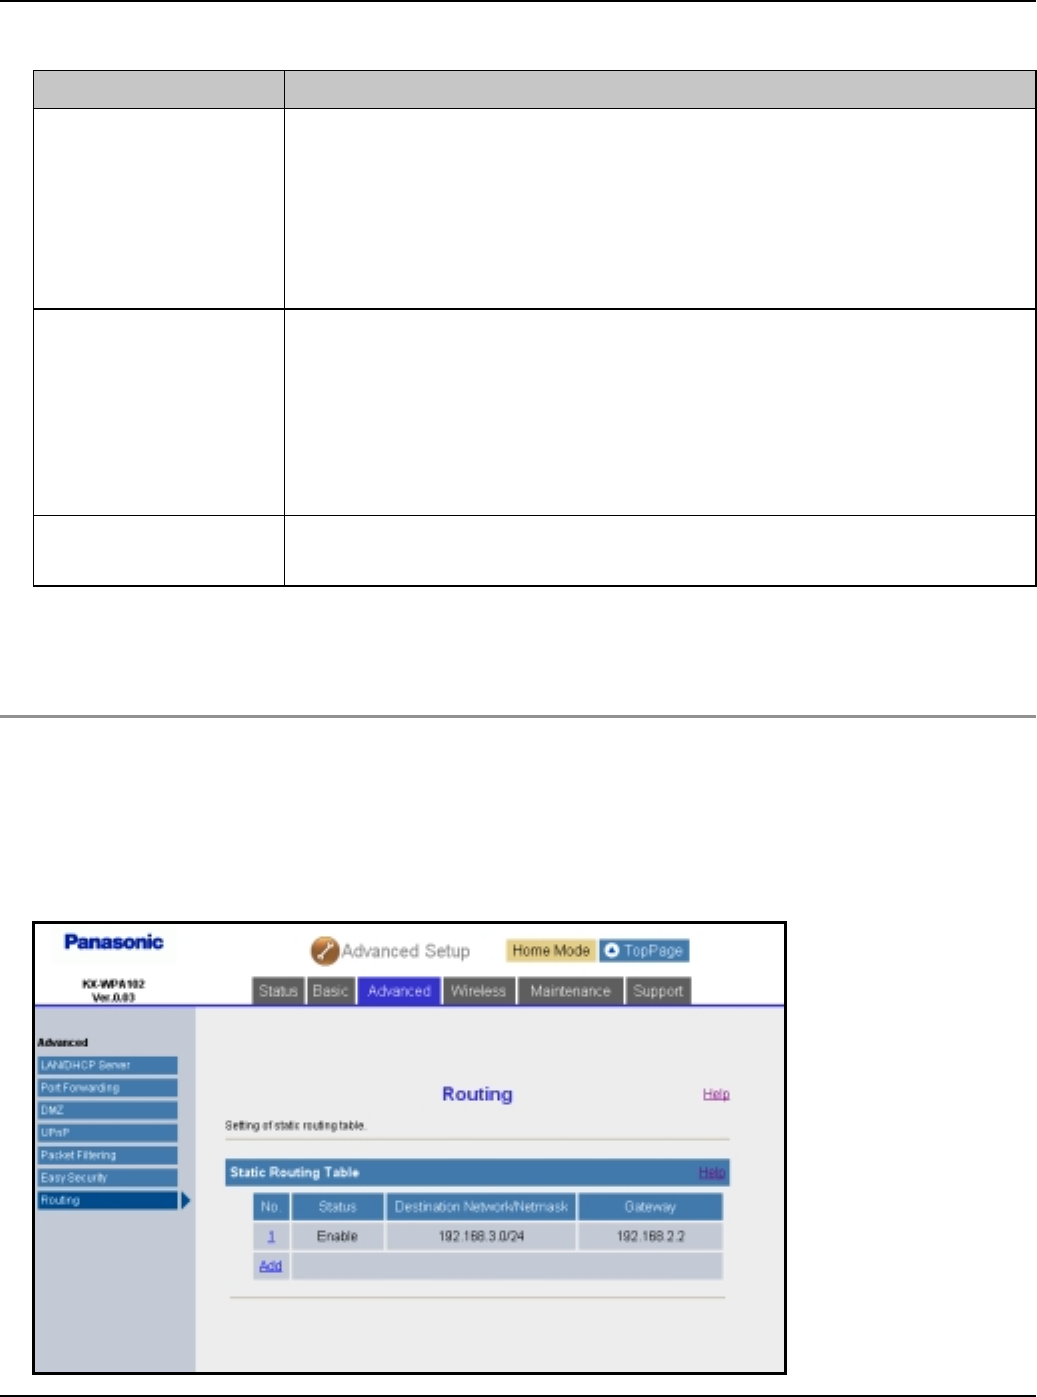
Base Unit Settings
124 For assistance, please visit http://www.panasonic.com/phonehelp
3Configure the settings, then click [Save].
LCheck the box in the “Log Output” column to create a log of each action.
4Click [Restart].
Routing
This feature allows you to set static routing destinations.
1Click [Advanced Setup] on Top Menu.
2Click the [Advanced] tab, then click [Routing].
Setting Description
[Transmission/
reception of
Packets with
private IP
addresses via
WAN interface]
LSelect whether to deny or allow packets to be sent or
received when the source of an incoming (from WAN side)
packet and the destination of an outgoing (to WAN side)
packet are private addresses. This feature is valid when the
WAN IP address is global. The default is set to Deny.
[Stateful Packet
Inspection]
LSelect whether to enable or disable the stateful packet
inspection feature.
LSome E-mail servers authenticate clients using ident packets
which use TCP port 113. If E-mail feature does not work well,
select “Enable (Except Ident Packet)”, which is the default
setting for this feature.
[Attack Detection] LSelect whether to enable or disable the attack detection
feature.
Temporary Confidential
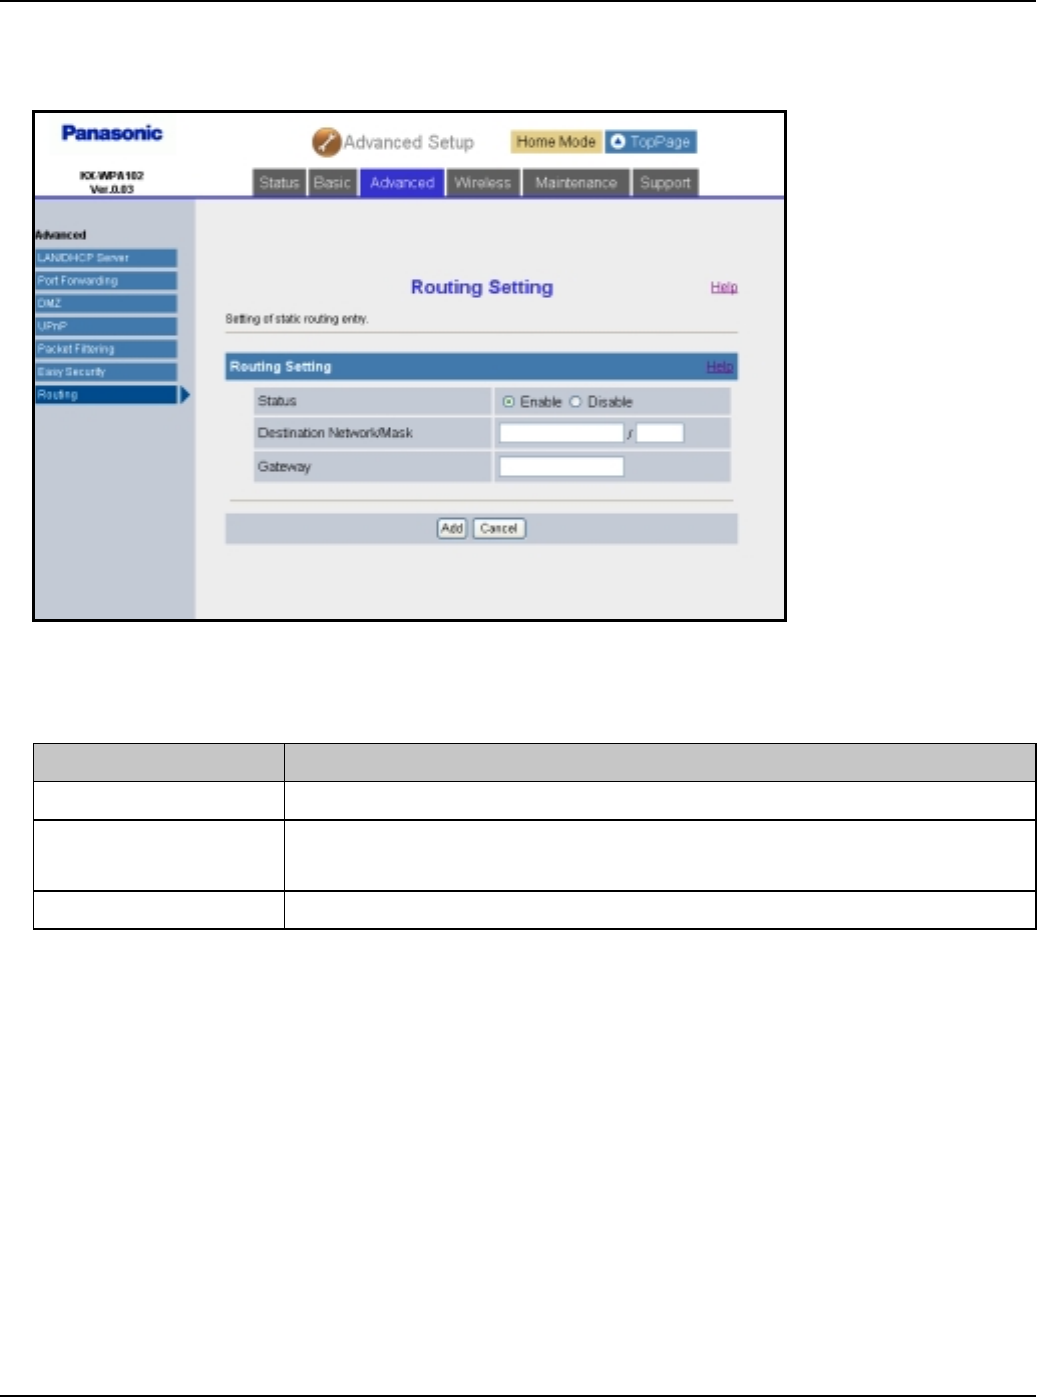
Base Unit Settings
For assistance, please visit http://www.panasonic.com/phonehelp 125
3To add a new entry, click [Add] under the Static Routing Table heading.
LTo edit the setting, click the desired number under the Static Routing Table heading.
4Configure the settings under the Routing Setting heading, then click [Add].
LClick [Save] under the Routing Setting heading to save the edited setting.
5Click [Restart].
Setting Description
[Status] LSelect whether to enable or disable the routing setting.
[Destination
Network/Mask]
LEnter the network/mask for the destination IP address.
[Gateway] LEnter the gateway IP address.
Temporary Confidential
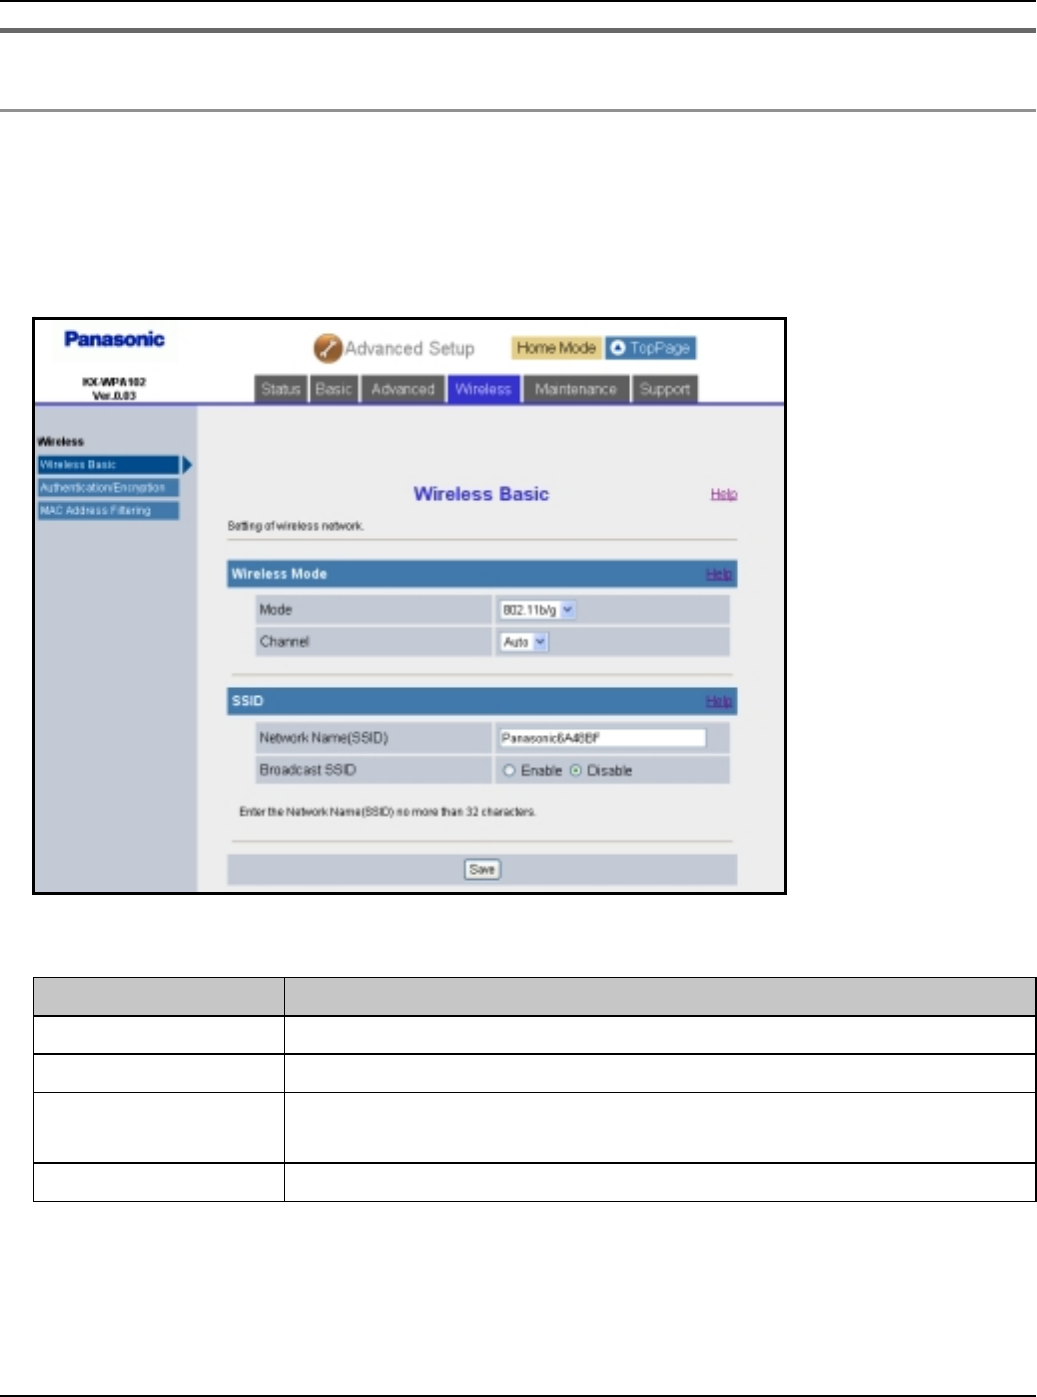
Base Unit Settings
126 For assistance, please visit http://www.panasonic.com/phonehelp
Wireless
Wireless Basic:
Wireless Basic allows you to set the wireless mode and SSID.
1Click [Advanced Setup] on Top Menu.
2Click the [Wireless] tab, then click [Wireless Basic].
3Configure the settings, then click [Save].
4Click [Restart].
Setting Description
[Mode] LSelect your wireless network mode from the pull-down menu.
[Channel] LSelect [Auto] or the desired channel from 1 to 11.
[Network Name
(SSID)]
LEnter your wireless network name (SSID) in this data field.
[Broadcast SSID] LEnable or disable the setting to broadcast your SSID.
Temporary Confidential

Base Unit Settings
For assistance, please visit http://www.panasonic.com/phonehelp 127
Authentication/Encryption:
This feature allows you to set security measures for connecting to wireless LAN.
1Click [Advanced Setup] on Top Menu.
2Click the [Wireless] tab, then click [Authentication/Encryption].
3Configure the settings, then click [Save].
Setting Description
[Security Mode] LSelect the desired Security Mode.
[WPA-PSK/WPA2-
PSK Data
Encryption]
LSelect the desired Data Encryption method.
Temporary Confidential

Base Unit Settings
128 For assistance, please visit http://www.panasonic.com/phonehelp
4Click [Restart].
Note:
LIf you change either Network Name (SSID) or Network key, you need to register the
handset to the base unit once again. See “Registering the handset” on page 93.
[Network key] LEnter the network key containing 10 hexadecimal, 26
hexadecimal, 5 alphanumeric or 13 alphanumeric
characters.
LPress [View] to display the network key.
[Session-Key
renewal interval]
LSet the interval for refreshing the encryption key between 30
and 604800 seconds. 604800 seconds is the equivalent of
one week.
[Key Index] LSelect [Key 2] or [Key 3] to be used if you use WEP.
Setting Description
Temporary Confidential
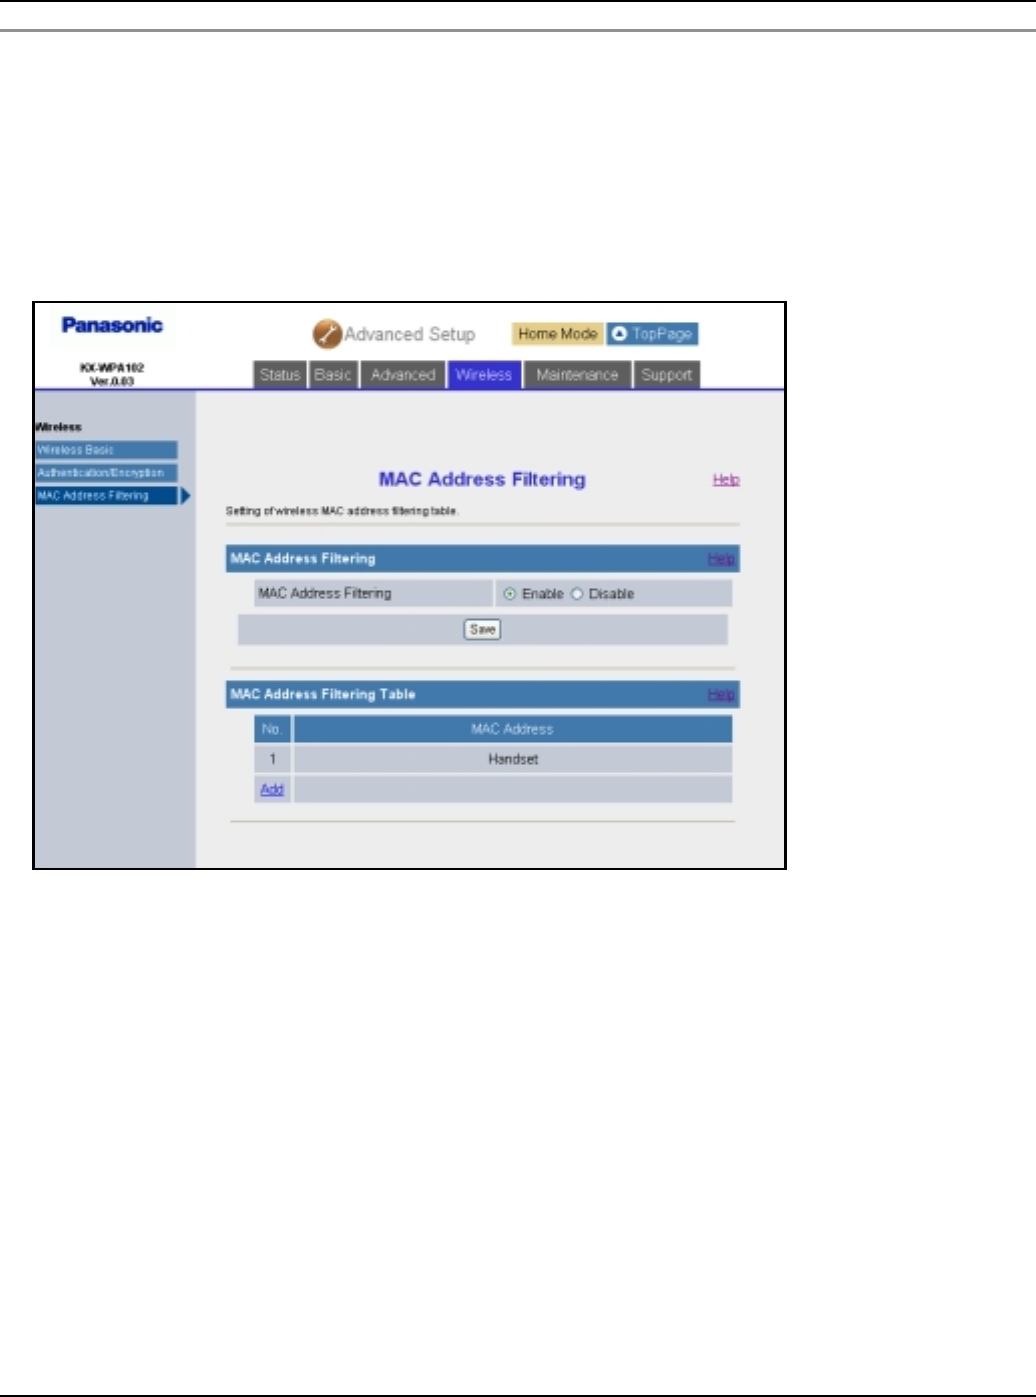
Base Unit Settings
For assistance, please visit http://www.panasonic.com/phonehelp 129
MAC Address Filtering:
This feature allows you to configure MAC address filtering settings so that devices without
the particular MAC address will be filtered.
MAC address filtering is available only for wireless devices.
1Click [Advanced Setup] on Top Menu.
2Click the [Wireless] tab, then click [MAC Address Filtering].
LTo add a new MAC address entry, click [Add] under the MAC Address Filtering Table
heading. Enter the desired MAC address under the MAC Address Filtering Setting
heading, then click [Add].
LTo edit a MAC address entry, click the desired entry number under the MAC Address
Filtering Table heading. Edit the MAC address under the MAC Address Filtering
Setting heading, then click [Save].
Temporary Confidential

Base Unit Settings
130 For assistance, please visit http://www.panasonic.com/phonehelp
3Configure the setting, then click [Save].
4Click [Restart].
Setting Description
[MAC Address
Filtering]
LSelect whether to enable or disable the MAC address filtering
feature.
LIf MAC Address Filtering is enabled, only the wireless device
with the registered MAC address can send/receive data.
The registered handset is automatically listed in MAC
Address Filtering Table.
Temporary Confidential
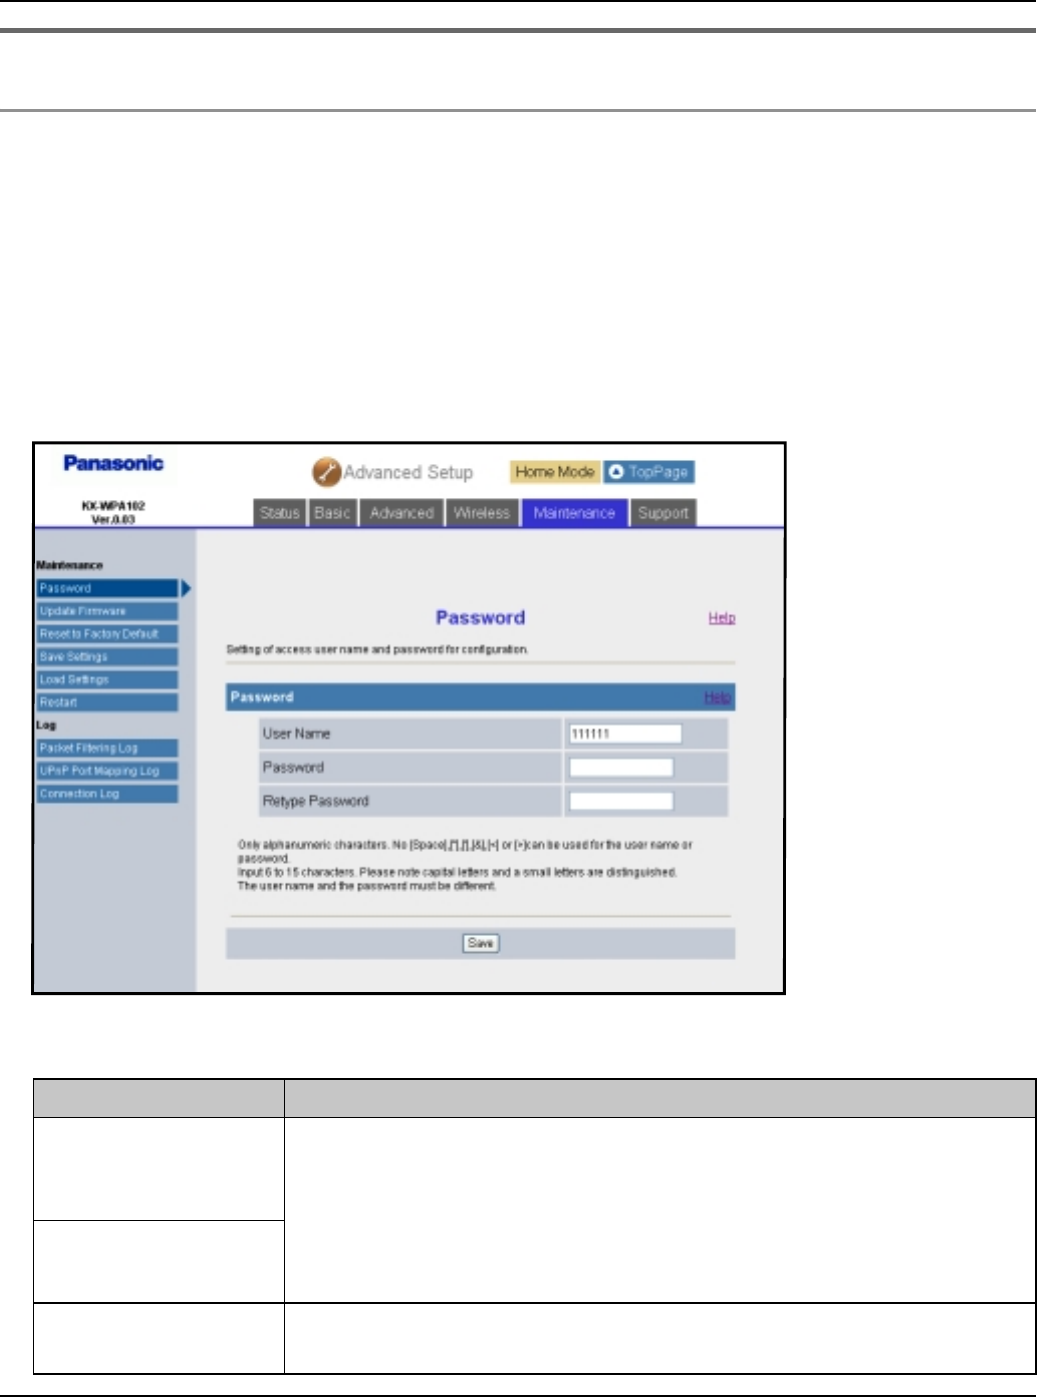
Base Unit Settings
For assistance, please visit http://www.panasonic.com/phonehelp 131
Maintenance
Password:
This feature allows you to change the user name and password that are required to
access the base unit.
Important:
LMake a note of the user name and password so that you will not forget them.
1Click [Advanced Setup] on Top Menu.
2Click the [Maintenance] tab, then click [Password].
3Configure the settings, then click [Save].
Setting Description
[User Name] LThe user name and password can contain 6 to 15 characters
(including numbers).
LThe following cannot be used: [ “ ], [ ‘ ], [&], [<], [>], [(space)]
LUser name and password must be different from each other.
LUser name and password are case-sensitive.
[Password]
[Retype
Password]
LEnter the password again to verify.
Temporary Confidential
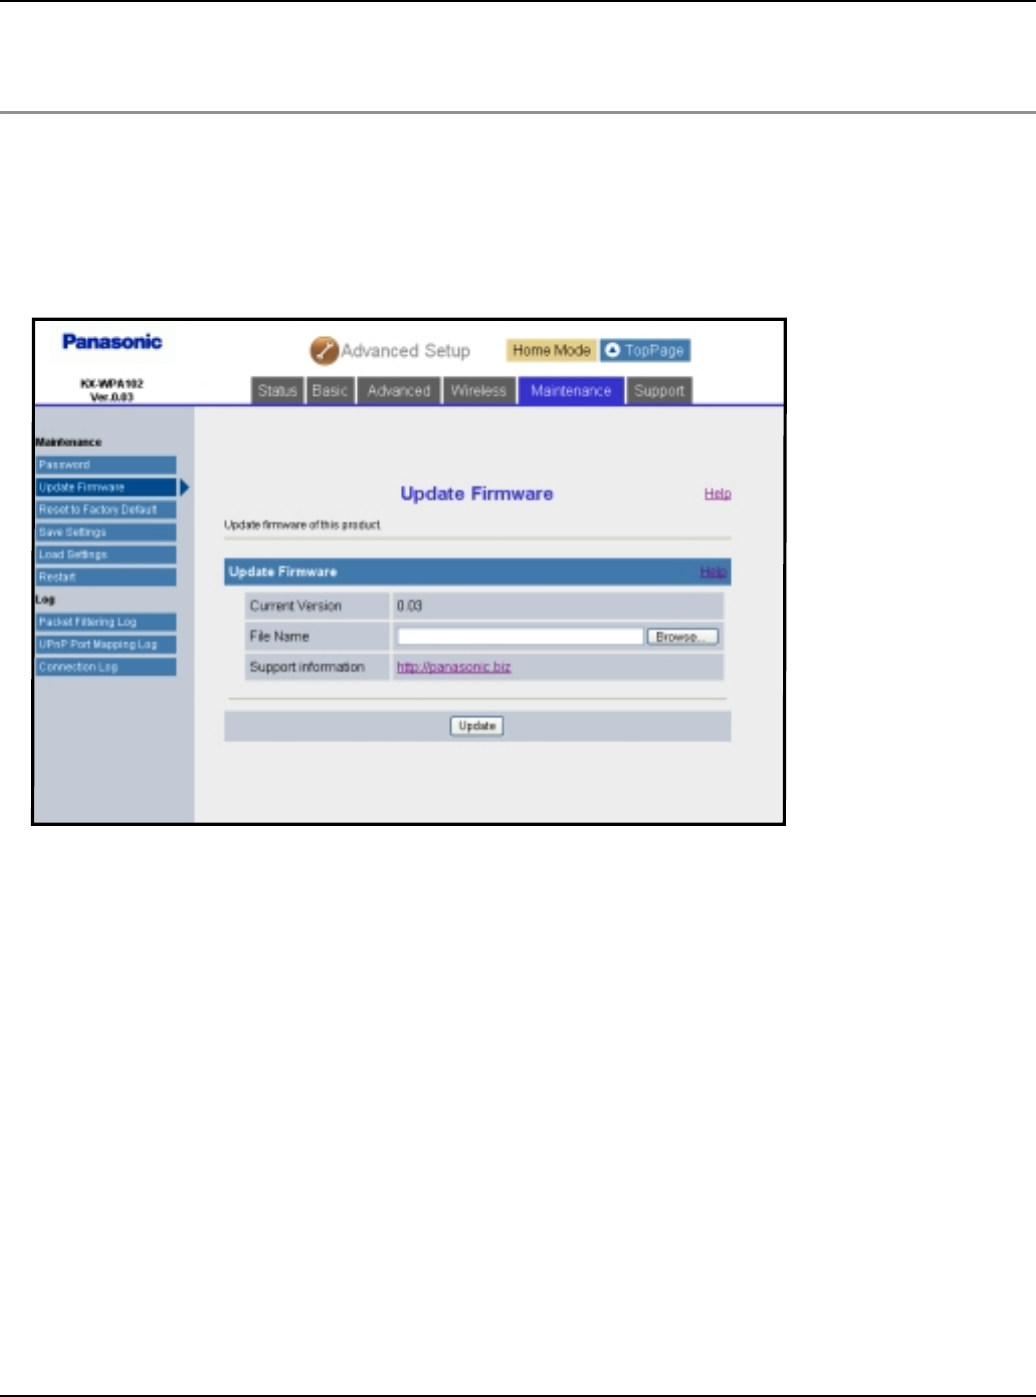
Base Unit Settings
132 For assistance, please visit http://www.panasonic.com/phonehelp
4Click [Restart].
Update Firmware:
This feature allows you to update the firmware to the latest version.
1Click [Advanced Setup] on Top Menu.
2Click the [Maintenance] tab, then click [Update Firmware].
3Check for the latest version by clicking the support information URL.
4If the version is updated, download the updated firmware to your PC.
5Enter the file name under the “Update Firmware” heading.
LClick [Browse...] to select the desired file name from the list.
Temporary Confidential
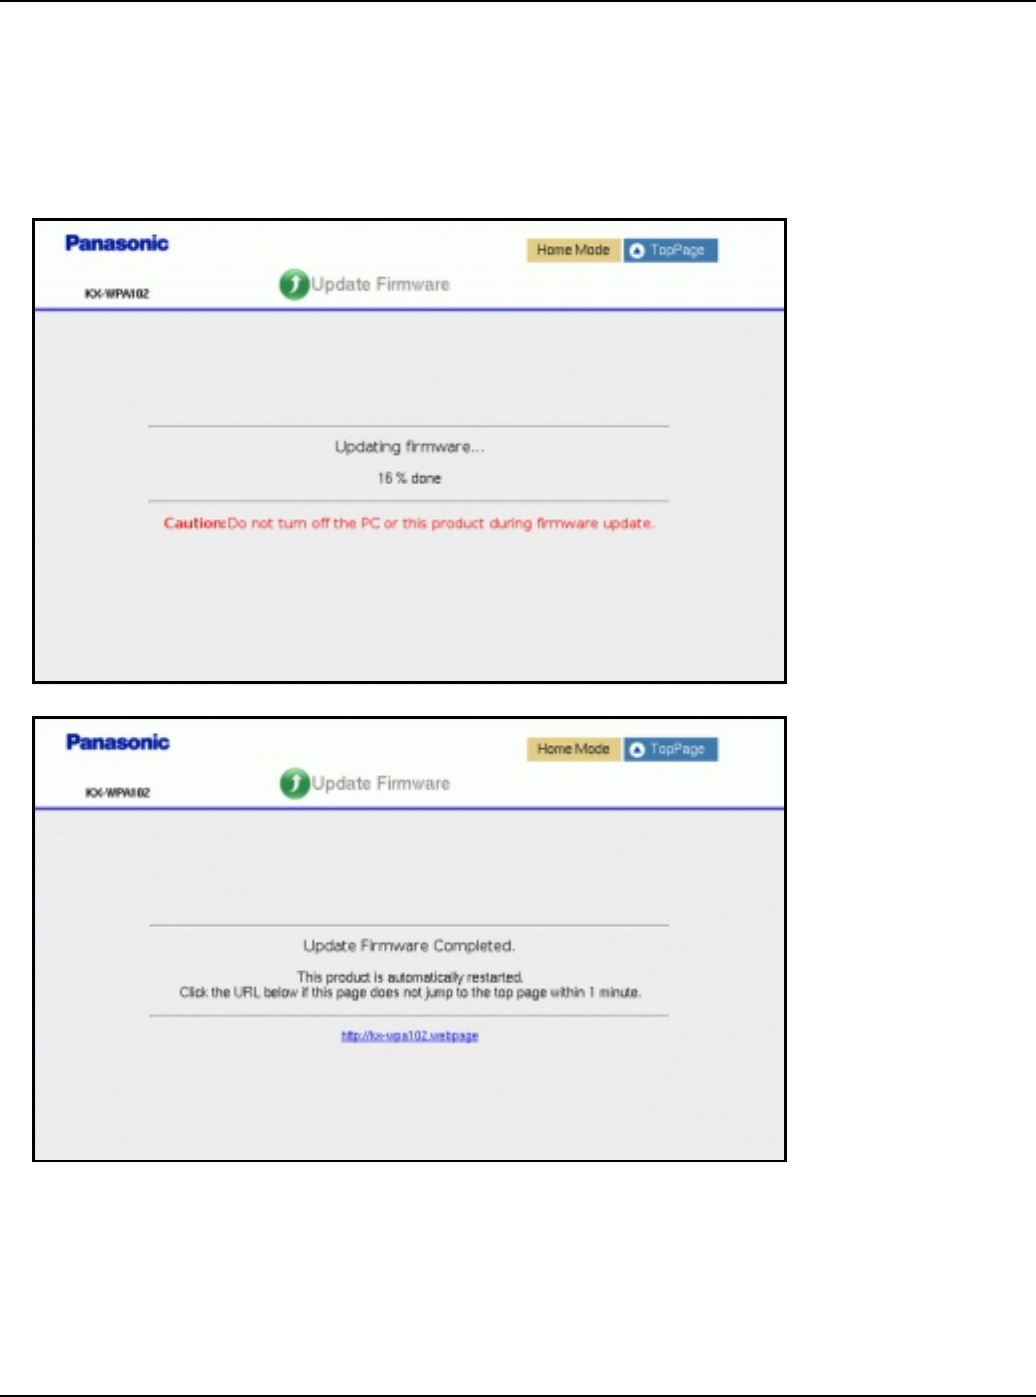
Base Unit Settings
For assistance, please visit http://www.panasonic.com/phonehelp 133
6Click [Update].
LThe base unit automatically restarts after the firmware is updated.
Important:
LDo not interrupt the firmware updating process by cutting the power supply until the
updating is complete and the base unit restarts itself.
Temporary Confidential
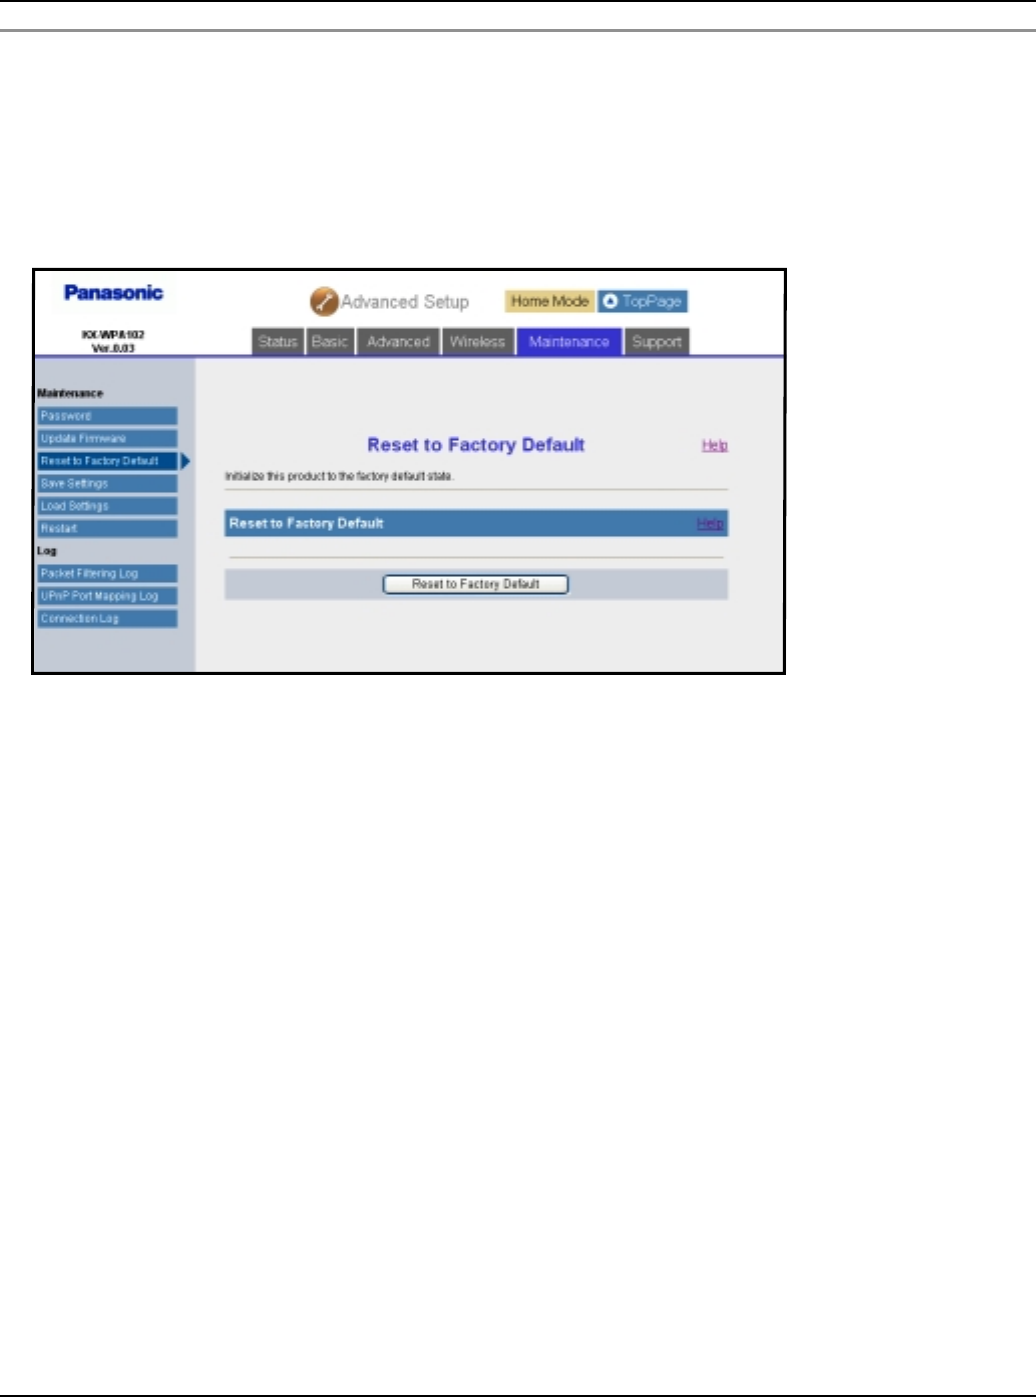
Base Unit Settings
134 For assistance, please visit http://www.panasonic.com/phonehelp
Reset to Factory Default:
The base unit settings can be reset to the base unit’s factory default. See page 145 for the
default network settings.
1Click [Advanced Setup] on Top Menu.
2Click the [Maintenance] tab, then click [Reset to Factory Default].
3Click [Reset to Factory Default] to reset the base unit settings.
4Click [OK].
LThe base unit begins to restart.
Temporary Confidential
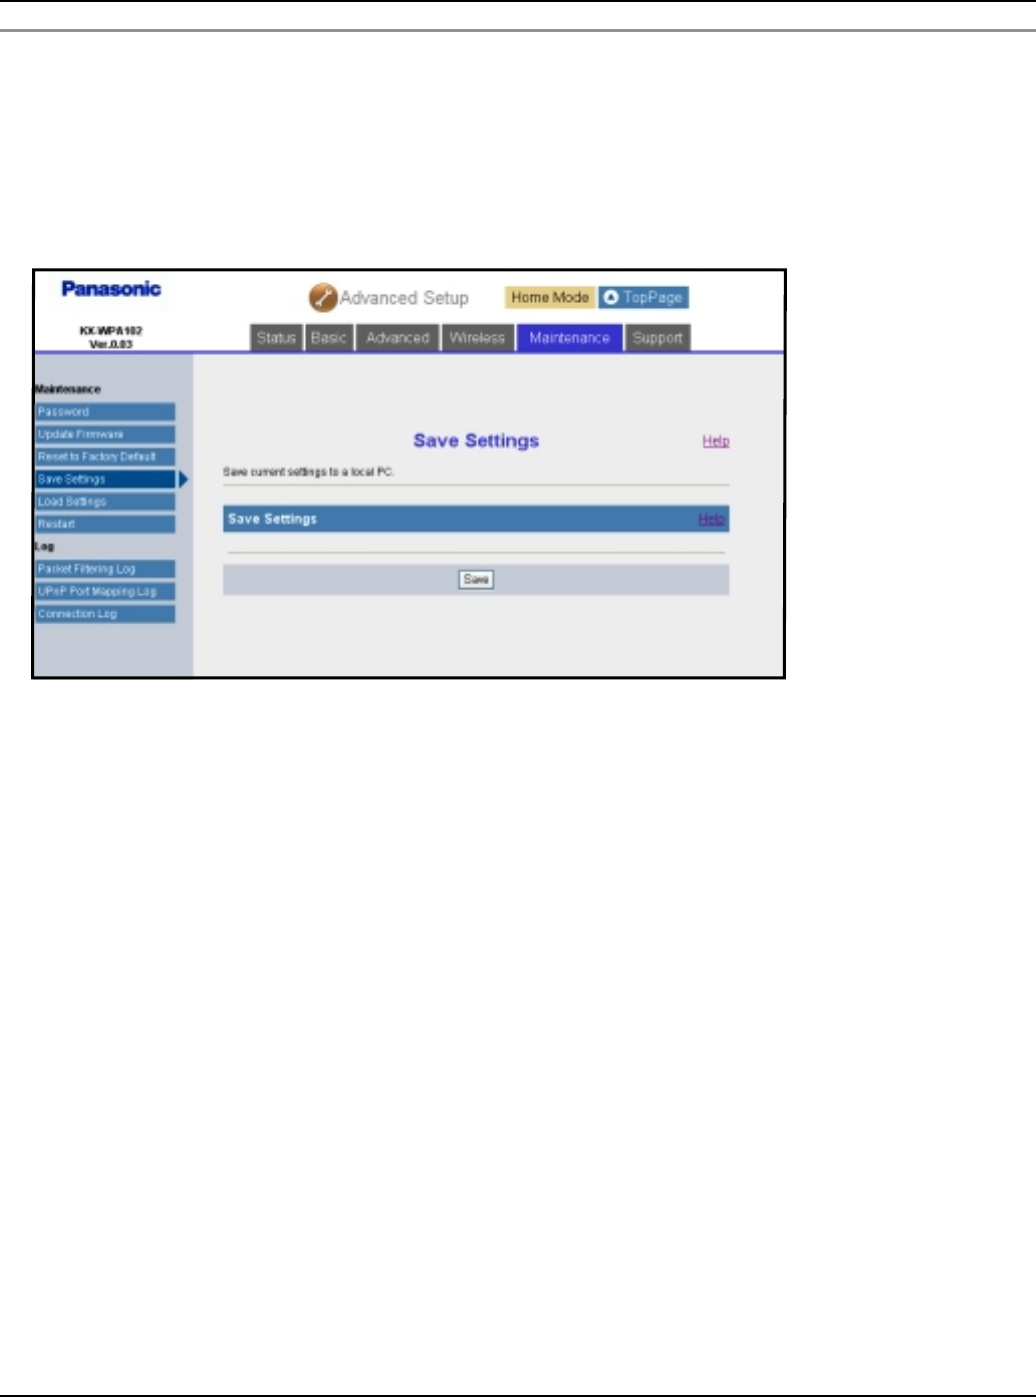
Base Unit Settings
For assistance, please visit http://www.panasonic.com/phonehelp 135
Save Settings:
A backup file can be saved on your computer. You can load the base unit settings from the
backup file on “Load Settings” page (page 136).
1Click [Advanced Setup] on Top Menu.
2Click the [Maintenance] tab, then click [Save Settings].
3Click [Save].
4Specify the location and enter the file name, and click [Save] on the Save As dialog
box.
Temporary Confidential
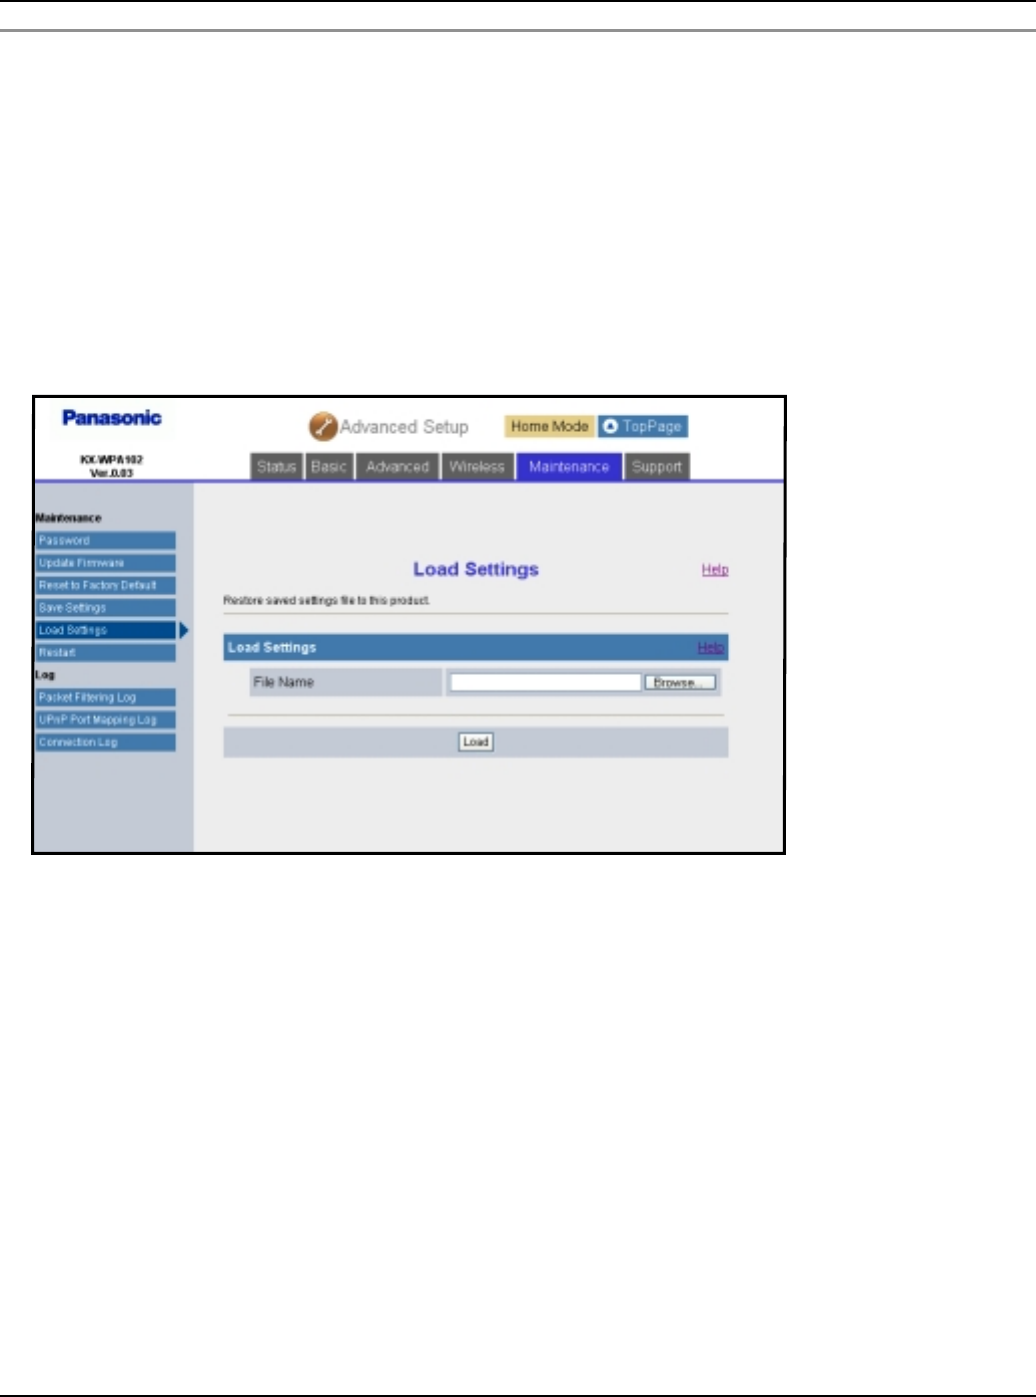
Base Unit Settings
136 For assistance, please visit http://www.panasonic.com/phonehelp
Load Settings:
The base unit settings can be loaded from a backup file. If you reset the base unit settings
to factory default, the Load Settings page can load its settings from the backup file.
Note:
LThe backup file has network settings. When the settings are loaded, the network
settings except for the user name and password are also changed as they were saved.
1Click [Advanced Setup] on Top Menu.
2Click the [Maintenance] tab, then click [Load Settings].
3Enter the file name or click [Browse...] then select the backup file on the Choose file
dialog box, and click [Open].
4Click [Load].
5Click [Restart].
Temporary Confidential

Base Unit Settings
For assistance, please visit http://www.panasonic.com/phonehelp 137
Restart:
The Restart page can restart the base unit.
1Click [Advanced Setup] on Top Menu.
2Click the [Maintenance] tab, then click [Restart].
3Click [Restart].
4Click [OK].
Temporary Confidential
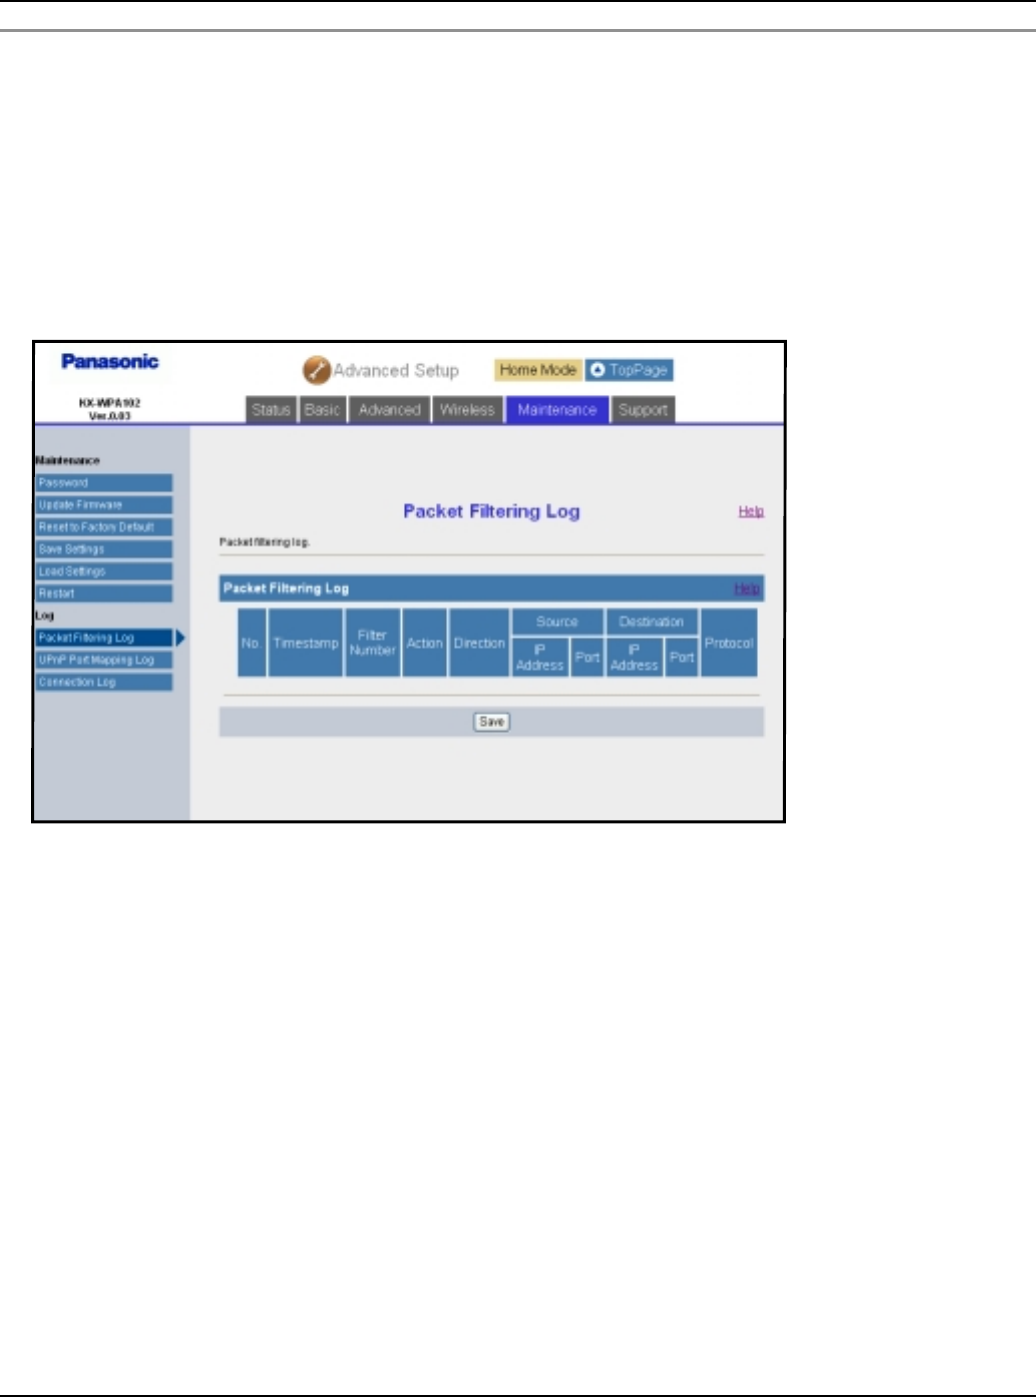
Base Unit Settings
138 For assistance, please visit http://www.panasonic.com/phonehelp
Packet Filtering Log:
This feature displays the packet filtering logs that are temporarily saved, and saves the
logs on your computer. This feature is enabled if [Log Output] in [Packet Filtering
Setting] (page 122) is set to on.
1Click [Advanced Setup] on Top Menu.
2Click the [Maintenance] tab, then click [Packet Filtering Log].
LPacket filtering logs are displayed.
3Click [Save].
4Specify the location and enter the file name, and click [Save] on the Save As dialog
box.
Temporary Confidential
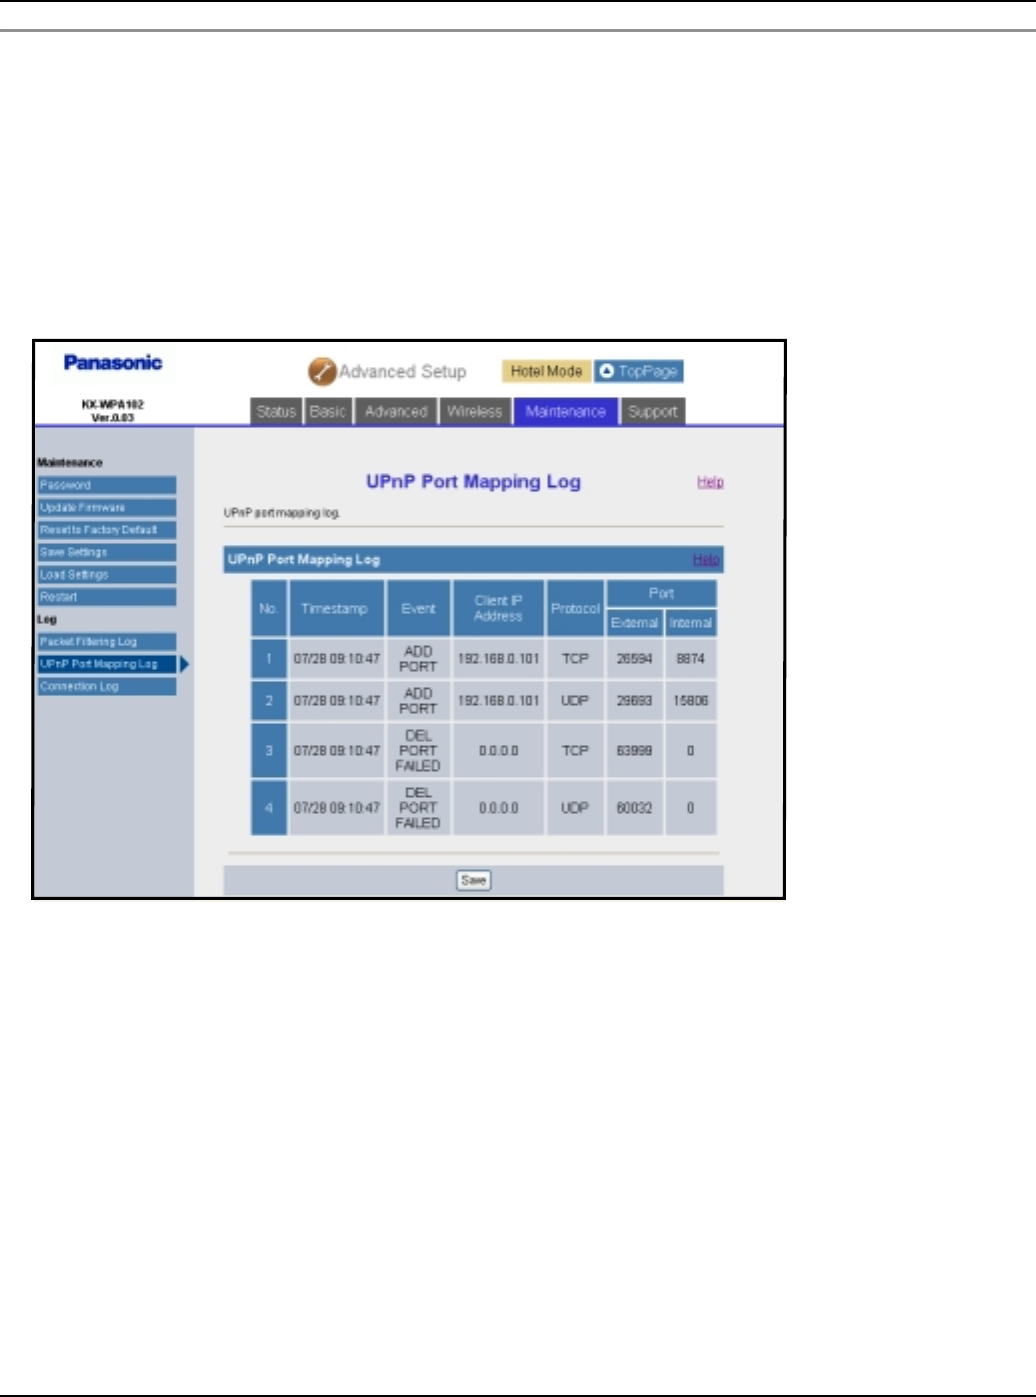
Base Unit Settings
For assistance, please visit http://www.panasonic.com/phonehelp 139
UPnP Port Mapping Log:
UPnP Port Mapping Log displays the temporarily saved logs of port mapping additions,
deletions and failures, and save the logs on your computer. This feature is enabled if
[UPnP] (page 119) is set to Enable.
1Click [Advanced Setup] on Top Menu.
2Click the [Maintenance] tab, then click [UPnP Port Mapping Log].
LUPnP port mapping logs are displayed.
3Click [Save].
4Specify the location and enter the file name, and click [Save] on the Save As dialog
box.
Temporary Confidential
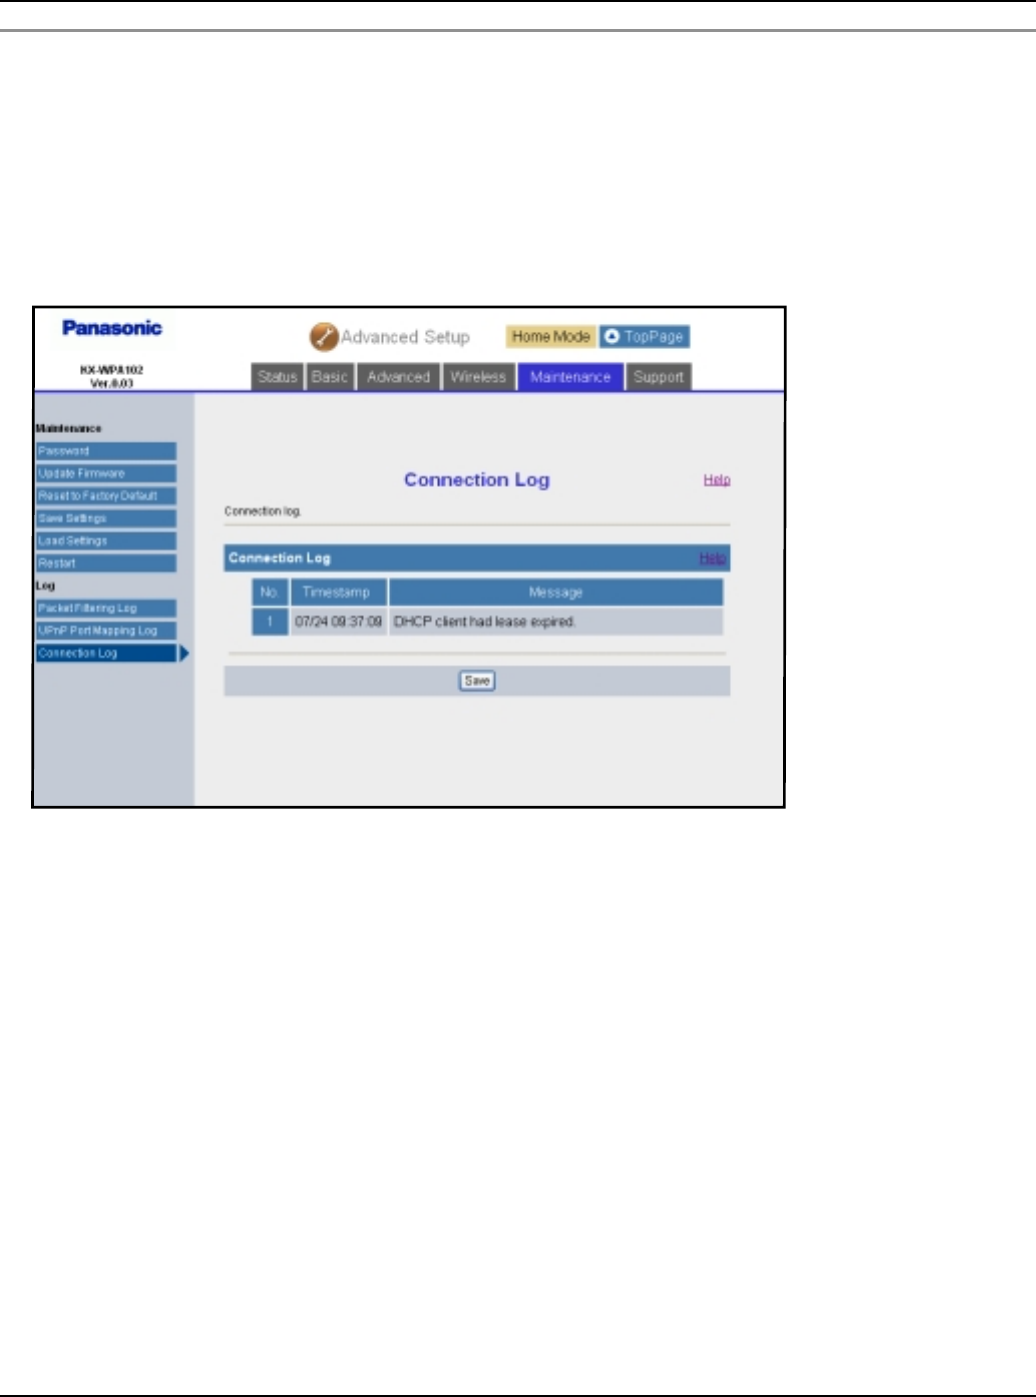
Base Unit Settings
140 For assistance, please visit http://www.panasonic.com/phonehelp
Connection Log:
Connection Log displays the temporarily saved logs of connection, disconnection and
authentication during PPPoE or DHCP connection, and saves the logs on your computer.
1Click [Advanced Setup] on Top Menu.
2Click the [Maintenance] tab, then click [Connection Log].
LConnection logs are displayed.
3Click [Save].
4Specify the location and enter the file name, and click [Save] on the Save As dialog
box.
Temporary Confidential
Base Unit Settings
For assistance, please visit http://www.panasonic.com/phonehelp 141
Support
Help:
The Help page describes each feature of the following items:
1. Initialization Wizard
2. Network Connection
3. Update Firmware
4. Advanced Setup
5. Link for handset
6. Status
7. Basic
8. Advanced
9. Wireless
10. Maintenance
1Click [Advanced Setup] on Top Menu.
2Click the [Support] tab, then click [Help].
3Click [View].
4Click the desired item to view its help page.
Note:
LYou can also view help by clicking [Help] on each setup page.
Temporary Confidential

Base Unit Settings
142 For assistance, please visit http://www.panasonic.com/phonehelp
Support Link:
Support Link allows you to get product and support information from the Internet.
1Click [Advanced Setup] on Top Menu.
2Click the [Support] tab, then click [Support Link].
3Click the URL for the desired information.
Temporary Confidential
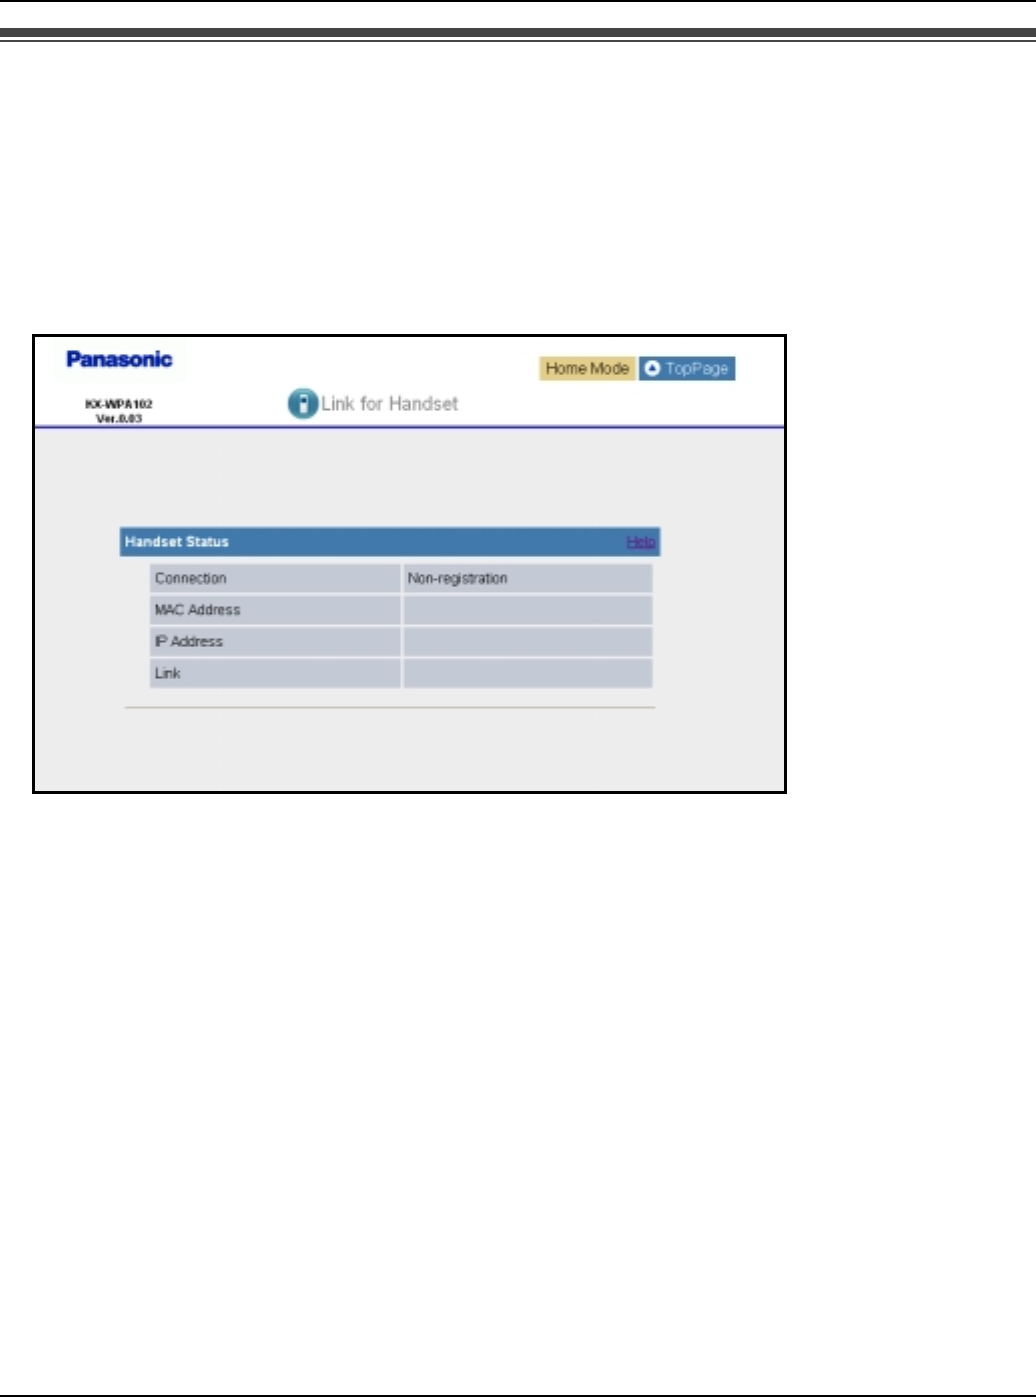
Base Unit Settings
For assistance, please visit http://www.panasonic.com/phonehelp 143
Link for handset
This feature displays the registered handset's status of wireless connection to the base
unit and the handset's MAC address and IP address when connected to the base unit.
1Click [Link for hand-set] on Top Menu.
LThe handset status is displayed when the registered handset is wirelessly connected
to the base unit.
Note:
LIt may take a while to display the screen.
Temporary Confidential
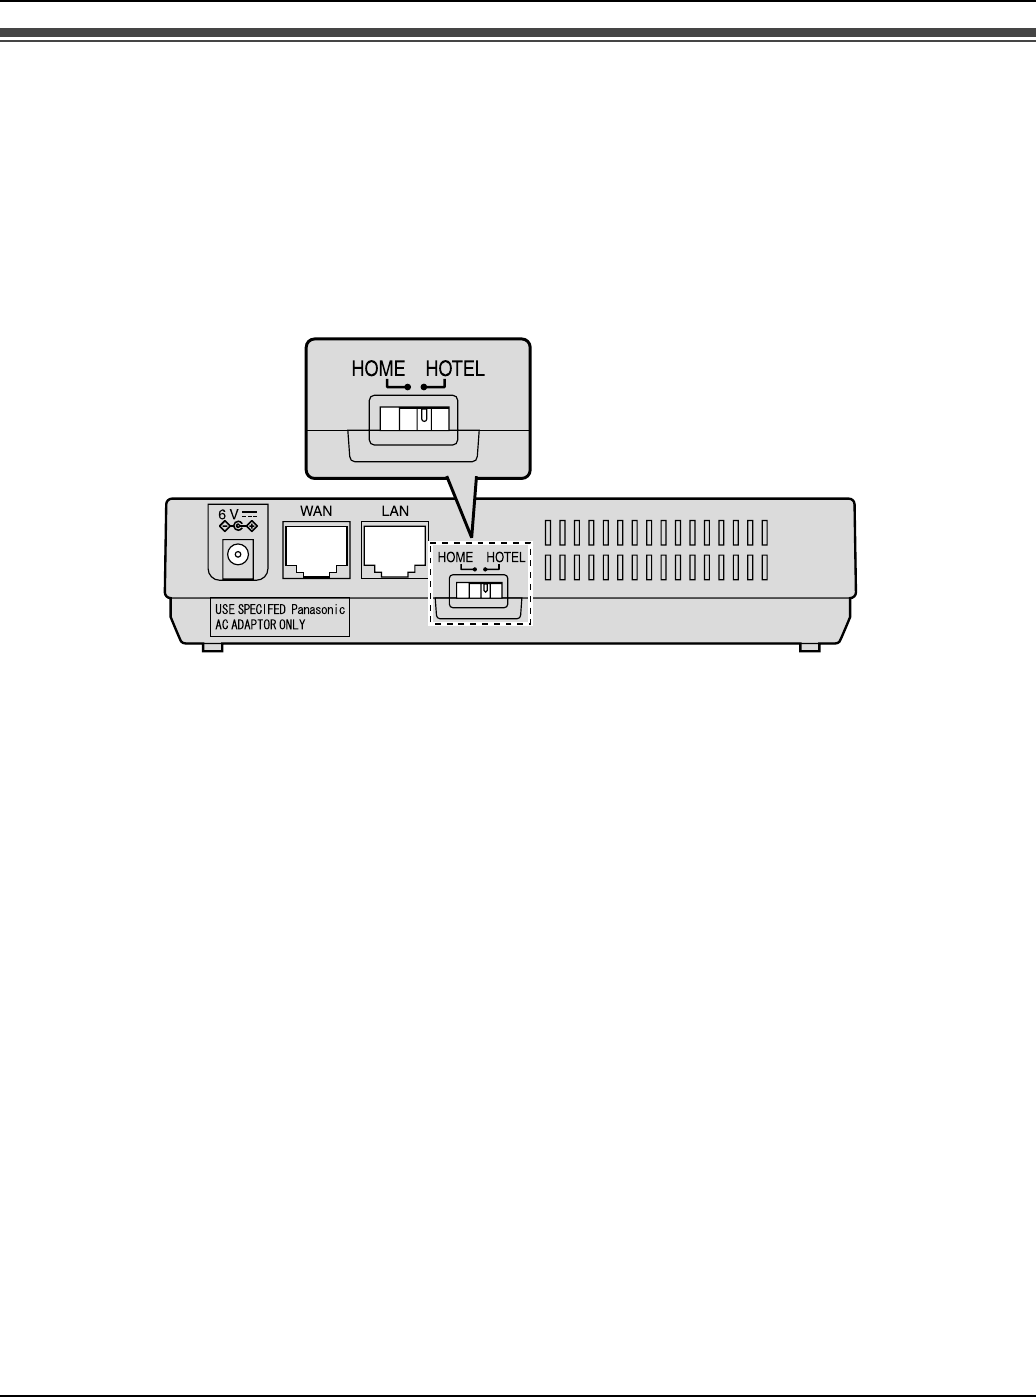
Base Unit Settings
144 For assistance, please visit http://www.panasonic.com/phonehelp
Mode selector
Once you have set up the Initialization Wizard (page 27) in the base unit settings, you do
not need to log in the base unit each time. You only need to slide the Mode selector switch
to choose between “HOME” or “HOTEL” mode so that the base unit can connect to the
Internet in the connection mode that is pre-registered for either “HOME” or “HOTEL”
mode.
Mode selector
Temporary Confidential
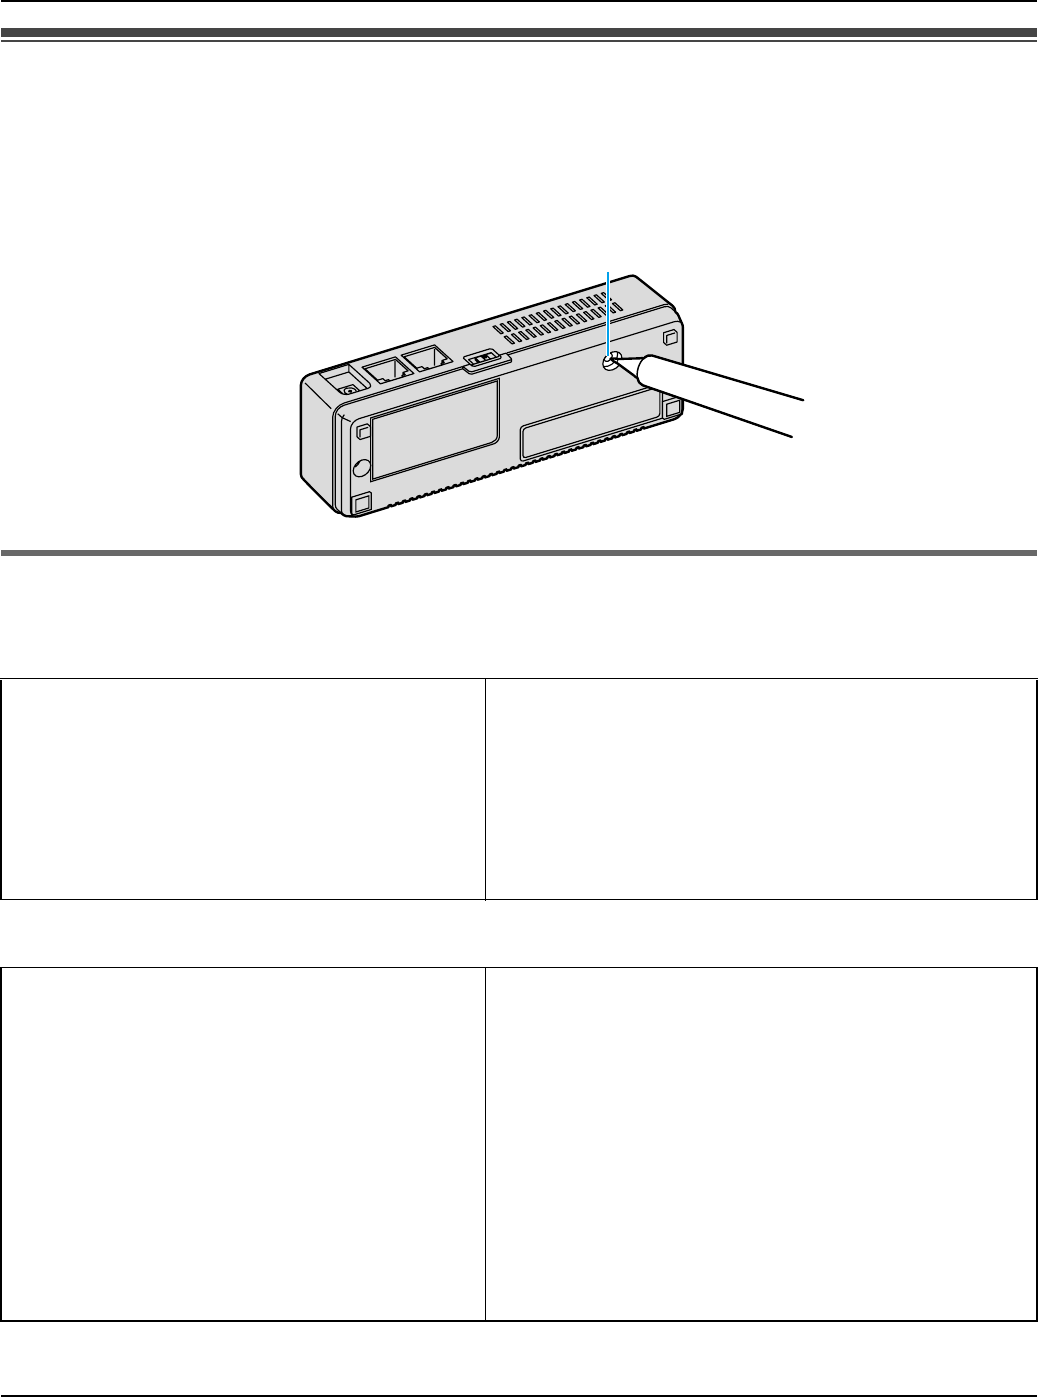
Base Unit Settings
For assistance, please visit http://www.panasonic.com/phonehelp 145
Reset button
If you forget the user name and password, press and hold “FACTORY DEFAULT RESET”
button on the bottom of the base unit with a pointed object until all the indicators go out.
The network settings are reset to default (see below). If necessary, set the settings again.
Default network settings
Internet Connection Type
Wireless Connection Settings
Connection Mode DHCP
MTU size
– PPPoE 1492 bytes
– DHCP 1500 bytes
– Static 1500 bytes
Wireless Mode 802.11b/g
Network Name (SSID) (Displayed on the included WLAN sticker)
Broadcast SSID Enable
WEP key (Displayed on the included WLAN sticker)
Network key for WPA-PSK/PSK2 (Displayed on the included WLAN sticker)
Security Mode WPA2-PSK/WPA-PSK/WEP
WPA-PSK/WPA2-PSK Data Encryption TKIP+AES
MAC Address Filtering Disable
FACTORY DEFAULT RESET
Temporary Confidential

Base Unit Settings
146 For assistance, please visit http://www.panasonic.com/phonehelp
Advanced Setup
LAN
– IP Address 192.168.0.242
– Subnet Mask 255.255.255.0
DHCP Server
– DHCP Server Enable
– Starting IP Address 192.168.0.100
– Number of Lease IP Address 5 (One of which is assigned to the
handset)
DMZ
– DMZ Disable
– DMZ Host IP Address (Blank)
UPnP Enable
Packet Filtering Unset
Easy Security
– Sends/Receives packets to/from IP
address Deny
– Stateful Packet Inspection Enable (Except Ident Packets)
– Attack Detection Disable
Routing
– Static Routing Unset
Temporary Confidential
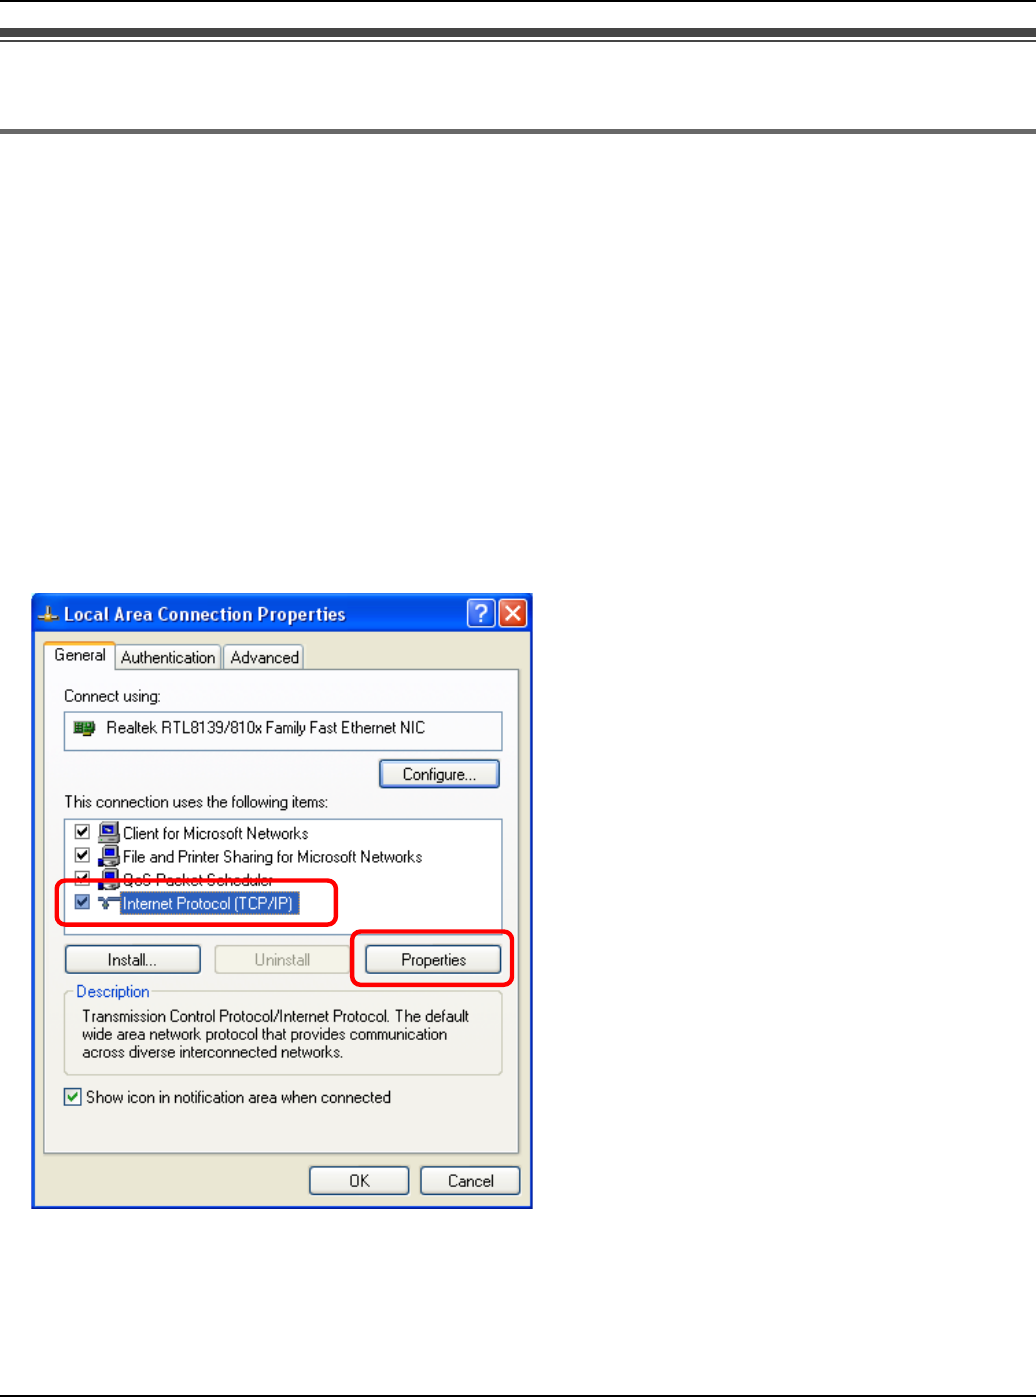
Base Unit Settings
For assistance, please visit http://www.panasonic.com/phonehelp 147
Setting your computer
Obtaining an IP address automatically on your computer
When you cannot log in the base unit by using the computer connected to the Ethernet
(LAN) port on the base unit, check the setting of Local Area Connection of the computer.
It is necessary to obtain an IP address automatically from a DHCP server.
LYou must be logged in as an administrator in order to set the Local Area Connection.
1Click [Start], then click [Control Panel].
2Click [Network and Internet Connections], then click [Network Connections].
3Right-click the Local Area Connection icon connected to the base unit, then select
[Properties].
4Select [Internet Protocol (TCP/IP)], then click [Properties].
Temporary Confidential
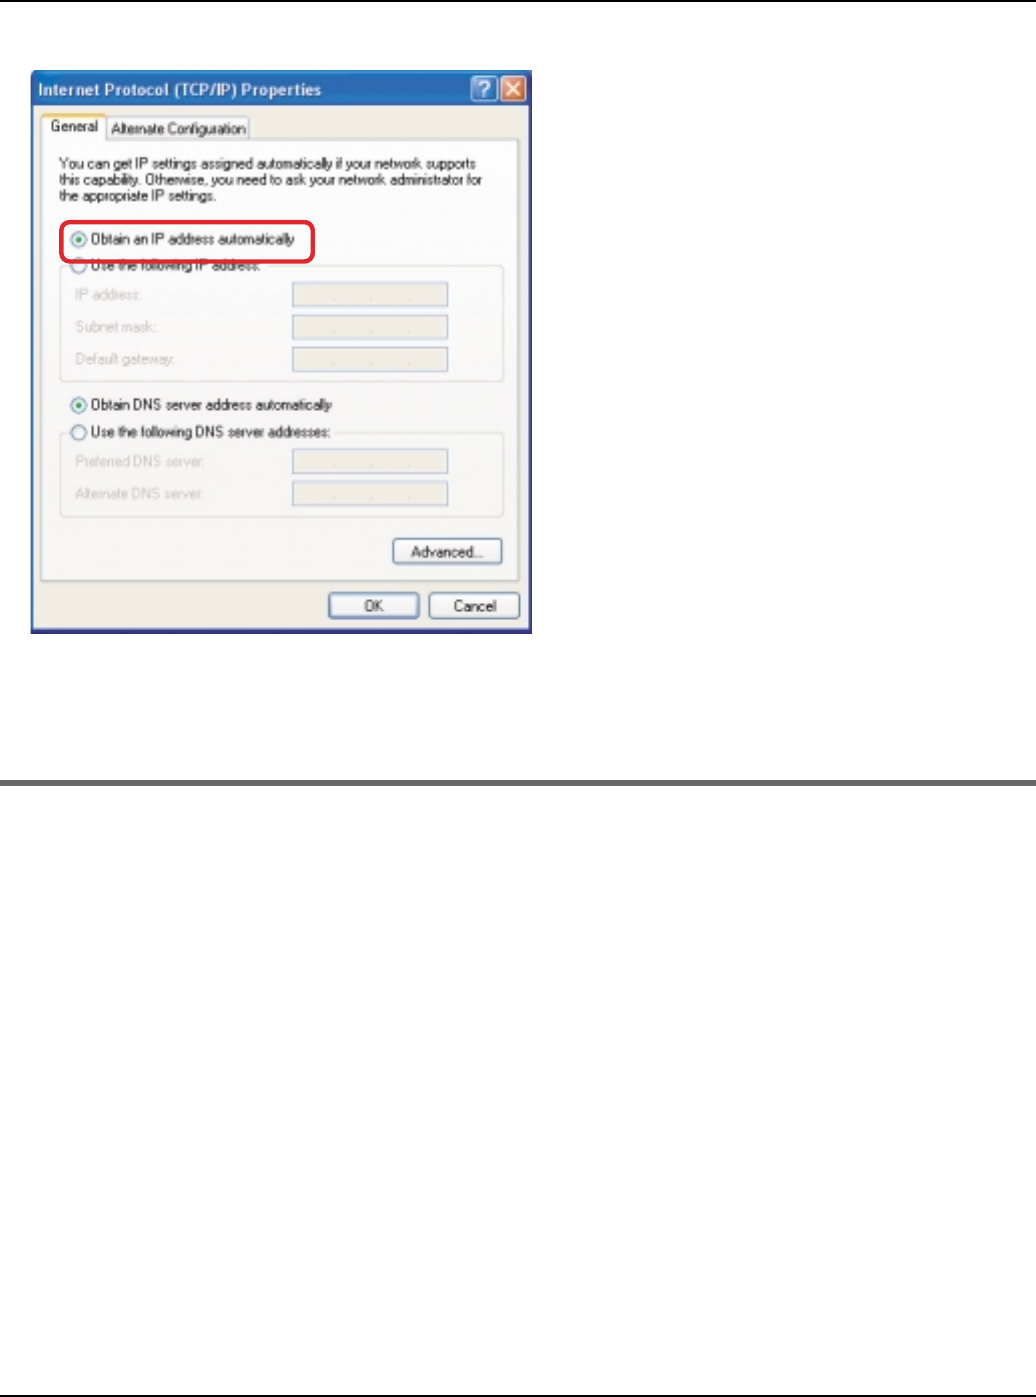
Base Unit Settings
148 For assistance, please visit http://www.panasonic.com/phonehelp
5Select [Obtain an IP address automatically].
6Click [OK].
7Click [OK], then close the Network Connection window.
Setting the static IP address on your computer
When you log in the base unit with its firmware being defective, the firmware update
screen will be displayed. In this case, a static IP address needs to be set on your
computer.
1Click [Start], then click [Control Panel].
2Click [Network and Internet Connections], then click [Network Connections].
3Right-click the Local Area Connection icon connected to the base unit, then select
[Properties].
Temporary Confidential
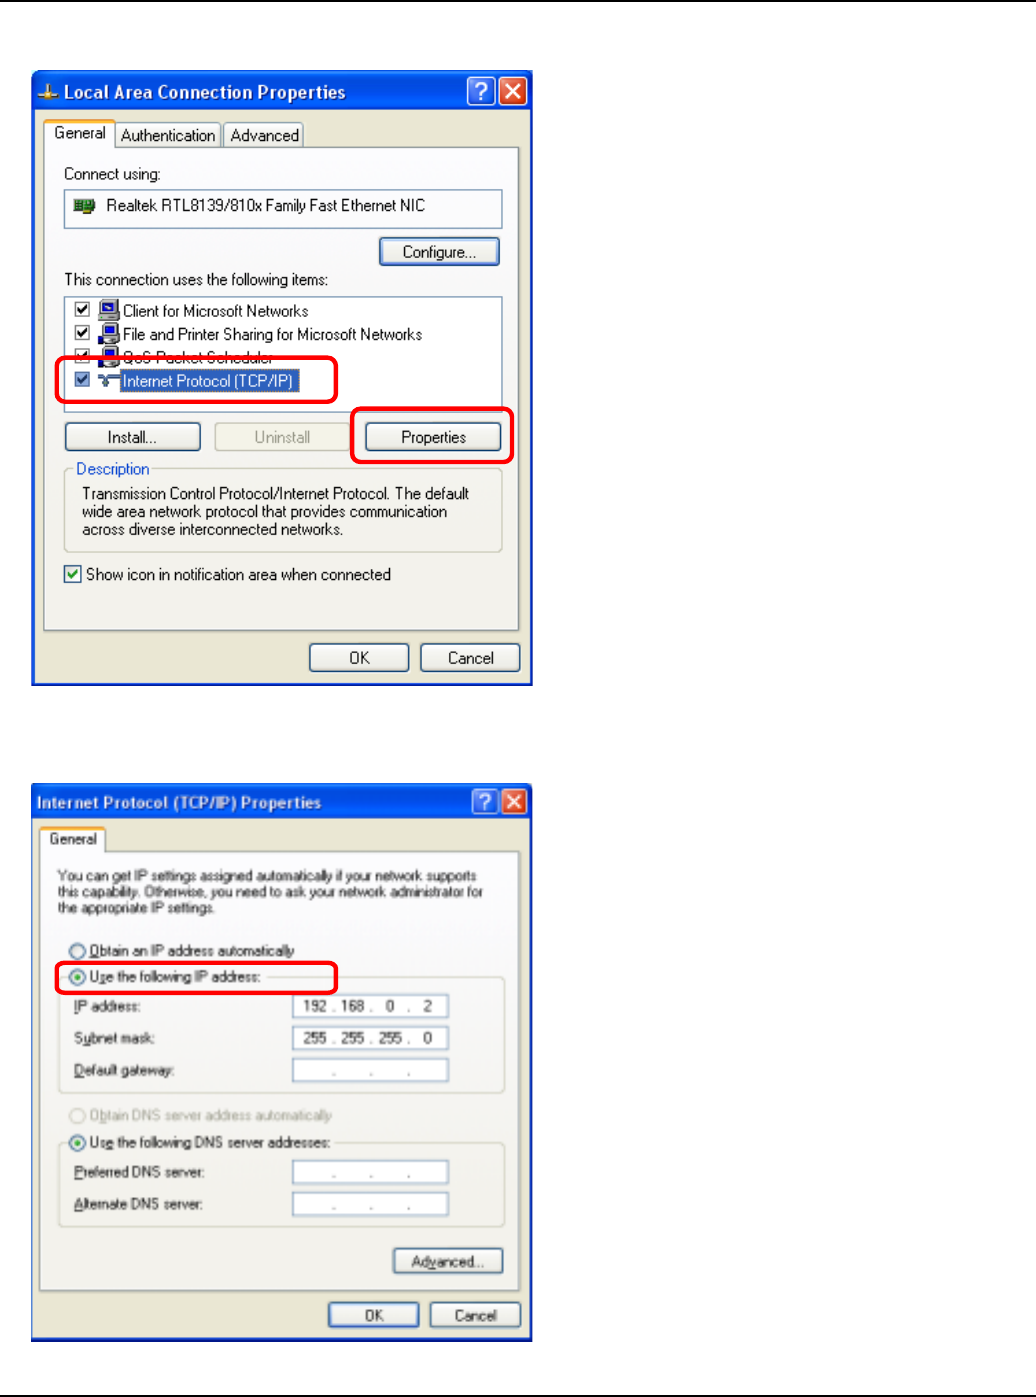
Base Unit Settings
For assistance, please visit http://www.panasonic.com/phonehelp 149
4Select [Internet Protocol (TCP/IP)], then click [Properties].
5Select [Use the following IP address].
Temporary Confidential

Base Unit Settings
150 For assistance, please visit http://www.panasonic.com/phonehelp
6Enter the IP address.
LThe IP address must be within the range of 192.168.0.1-192.168.0.254 except for
192.168.0.242 (the default IP address of the base unit on the LAN interface).
7For Subnet mask, enter 255.255.255.0.
8Click [OK].
9Click [OK], then close the Network Connection window.
10 On the Web browser, enter http://192.168.0.242
11 Click [Advanced Setup] on Top Menu.
12 Click the [Maintenance] tab, and then click [Update Firmware].
13 Check for the latest version by clicking the support information URL.
14 If the version is updated, download the updated firmware to your computer.
15 Specify the file name.
You can also click [Browse...] to select the desired file name from the list.
16 Click [Update].
LThe base unit automatically restarts after the firmware is updated.
Important:
LDo not interrupt the firmware updating process by cutting the power supply until the
progress indicator reaches 100% and the base unit restarts itself.
17 Confirm that WAN Indicator is not flashing in amber, then set your computer setting
back to the previous condition.
Temporary Confidential
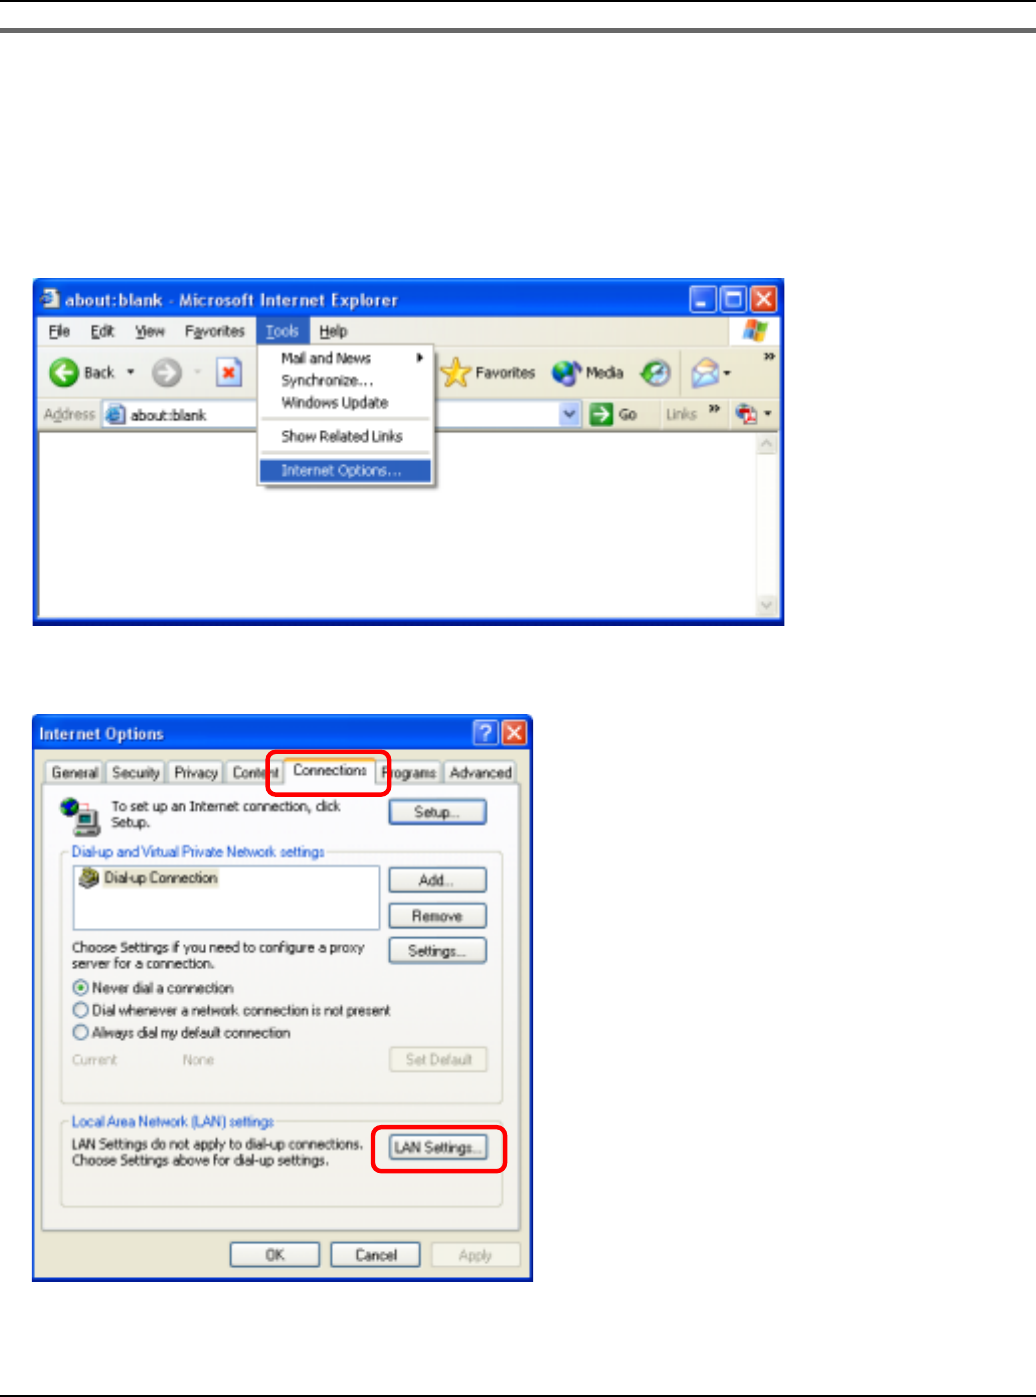
Base Unit Settings
For assistance, please visit http://www.panasonic.com/phonehelp 151
Changing the proxy server settings on Web browser
If your Internet service provider uses the proxy server, you cannot log in the base unit.
Change the proxy server settings on your Web browser.
1Open your Web browser. (The example is Internet Explorer 6.0.)
2Click [Tools], then select [Internet Options...].
3Click [Connections] tab, then click [LAN Settings…].
Temporary Confidential
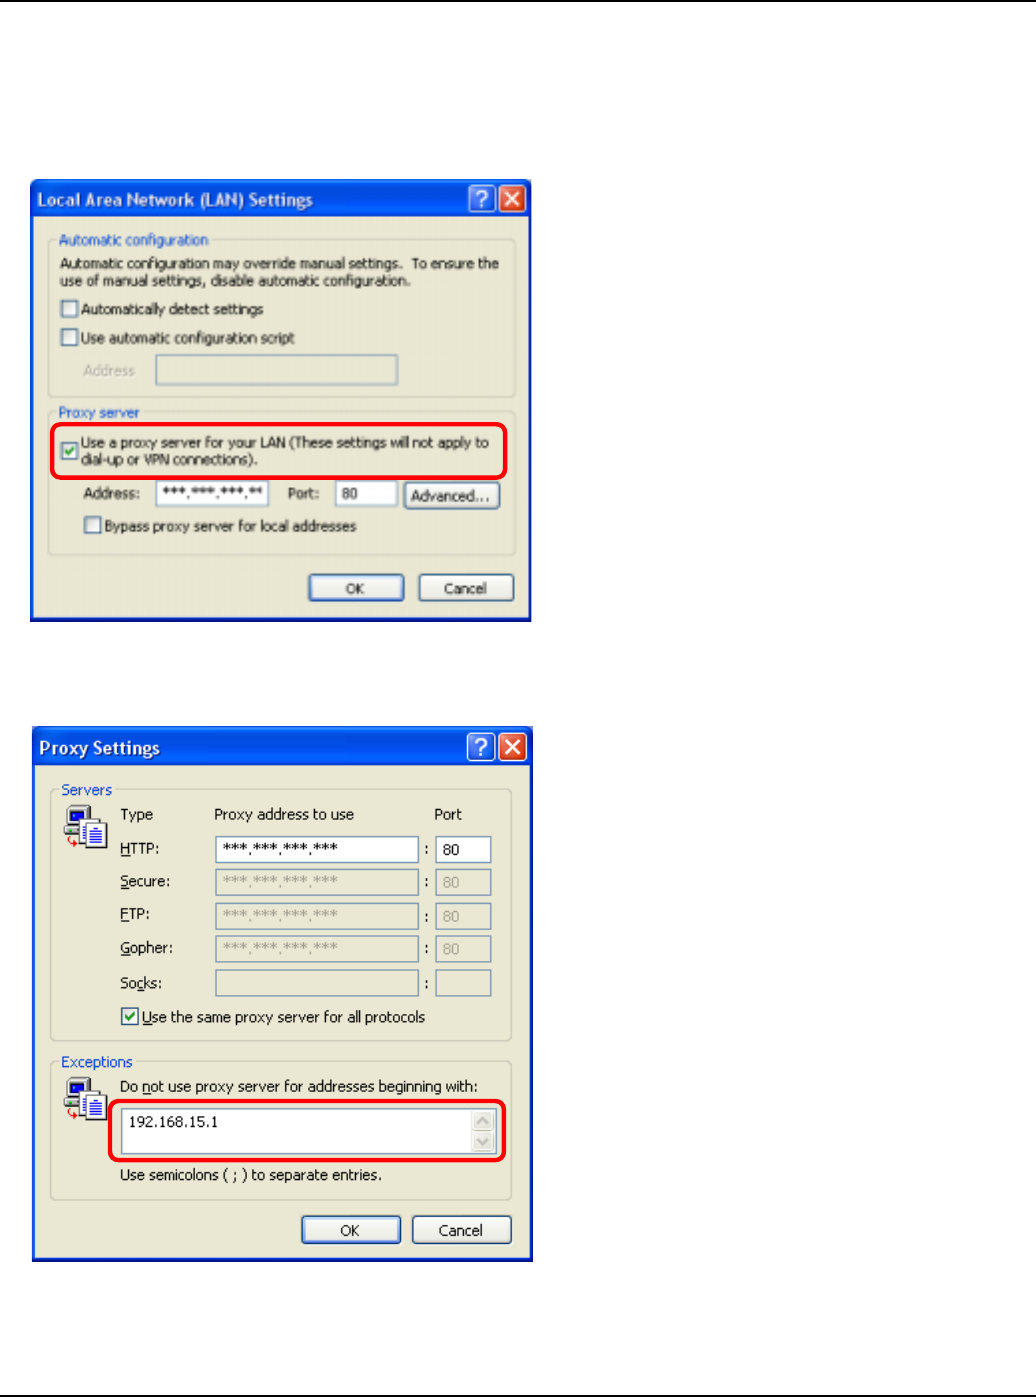
Base Unit Settings
152 For assistance, please visit http://www.panasonic.com/phonehelp
4See if the “Use a proxy server for your LAN” check box is checked or not.
NIf checked, click [Advanced…] and go to step 5.
NIf not checked, click [Cancel] then close the Internet Options window. Proxy server
settings are not required.
5Enter the base unit’s IP address into the “Do not use proxy server for addresses
beginning with:” data field.
6Click [OK].
7Click [OK], then close the Internet Options window.
Temporary Confidential

Base Unit Settings
For assistance, please visit http://www.panasonic.com/phonehelp 153
Setting UPnP to display the shortcut
To display the KX-WPA102 shortcut in the My Network Places folder, Windows component
should be added. Enable UPnP (Universal Plug and Play) following the steps below.
1Click [Start], then click [Control Panel].
2Click [Add or Remove Programs], then click [Add or Remove Windows
Components].
3Select [Network Service], then click [Details…].
4Check [Universal Plug and Play], then click [OK].
5Click [Next>].
Note:
LIf you are using Windows XP Service Pack 2, check [Internet Gateway Device
Discovery and Control Client] and [UPnP User Interface] in step 4.
Using your computer on a wireless LAN
The 15 character device-specific Network name (SSID), 13 alphanumeric character 128
bit encryption Network key (WEP) and 16 alphanumeric character Network key (WPA-
PSK/WPA2-PSK) are set as factory default. These factory default setting values are
displayed on the included WLAN sticker. If you use your computer on a wireless LAN, use
the values on the sticker to set the wireless LAN configuration of your computer. To set
your computer to be used on a wireless LAN, see the manual for the computer you use.
Note:
LTo use your computer on a wireless LAN, a wireless LAN card needs to be installed on
your computer.
Temporary Confidential
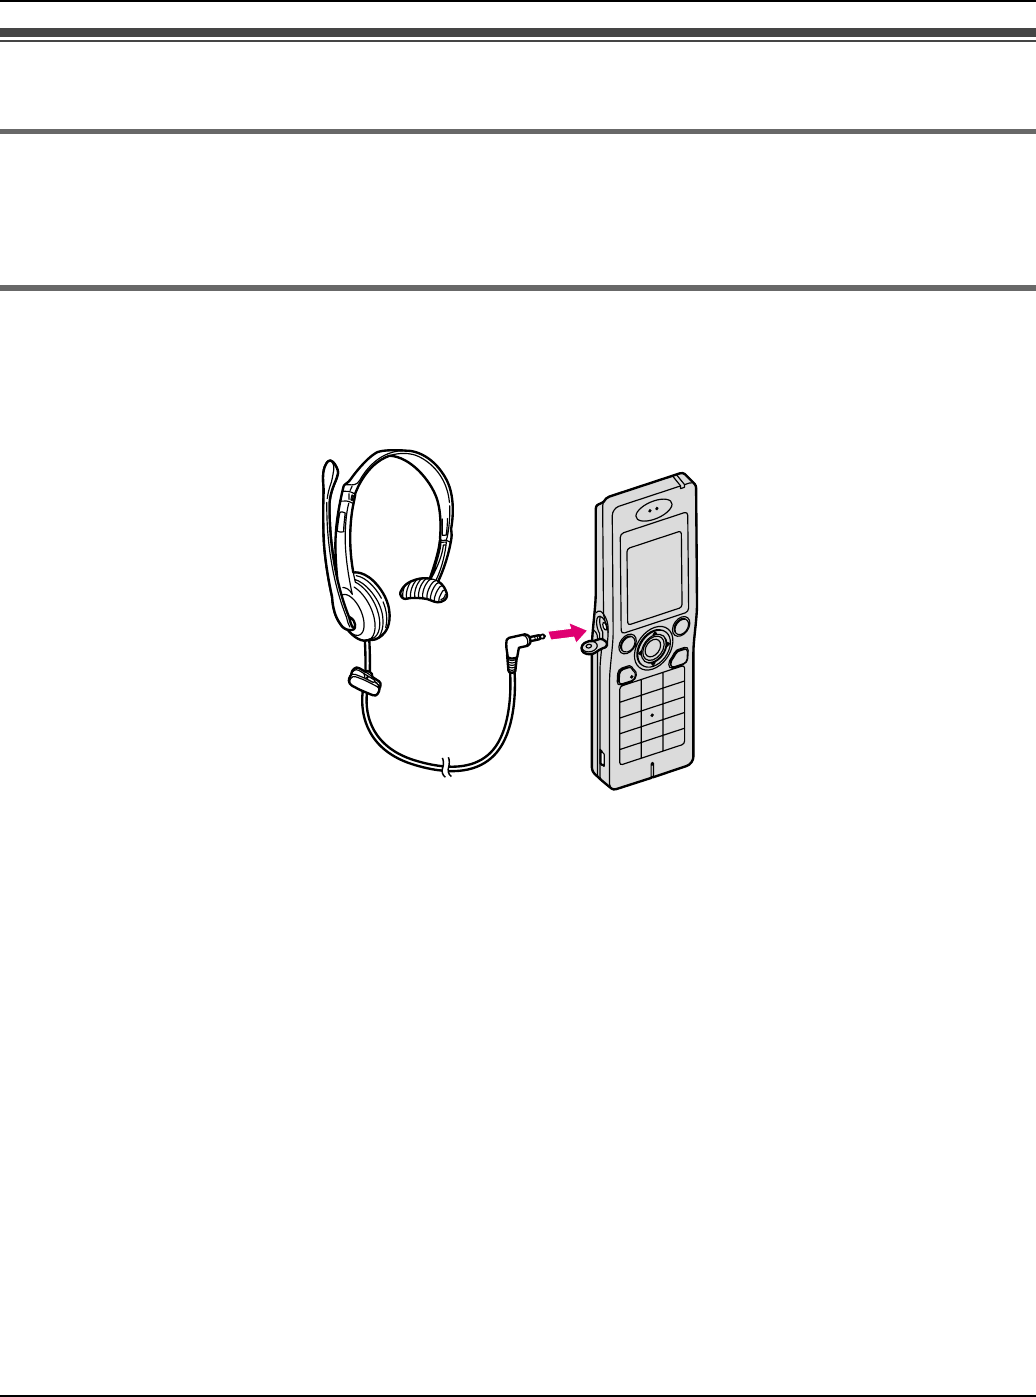
Useful Information
154 For assistance, please visit http://www.panasonic.com/phonehelp
Additional accessories
Sales and support information
LTo order additional accessories, call 1-800-332-5368.
LTTY users (hearing or speech impaired users) can call 1-866-605-1277.
Headset (optional)
Connecting a headset to the handset allows hands-free phone conversations. We
recommend using the Panasonic headset shown below.
LThe headset model numbers compatible with KX-WPA100 handset:
KX-TCA88HA
KX-TCA86
KX-TCA91
KX-TCA92
KX-TCA93
KX-TCA94
KX-TCA95
Temporary Confidential

Useful Information
For assistance, please visit http://www.panasonic.com/phonehelp 155
Error messages
If the unit detects a problem, one of the following messages is shown on the display.
Display message Cause/solution
Networks were not
found.
LMove closer to the base unit, or move to the Wi-Fi
coverage area of the hotspot.
LPress {Retry} to search for networks again.
LPress {Options}. i Select “Add manually” or
“Preferred networks”.
Could not connect
to <SSID name>
LA network connection is failed.
LPress {OK} to search for networks again.
Your skype name and
password were not
recognized.
LThe Skype name and password you enter are incorrect.
LPress {Retry} and enter the correct name and
password.
Sign in was not
successful.
LCheck to see if your ISP is having network connection
issues in your area.
Network connection
lost.
LThe handset has lost communication with the base unit
or hotspot.
LMove closer to the base unit, or move to the Wi-Fi
coverage area of the hotspot.
LPress {OK}. i Select “Find network”.
Please try again
later.
LAn unexpected error has occurred.
LPress {OK} to return to Idle screen or the previous
screen.
Failed. Try again
later.
LYour authorization request has been failed.
LPress {OK} and try again.
Invalid password. LYour password is not within 4 – 20 characters.
LEnter your password again.
The Handset could
not register.
Please try again.
LPress {OK}. i Press and hold the Handset locator on
the base unit for 3 seconds again.
Temporary Confidential

Useful Information
156 For assistance, please visit http://www.panasonic.com/help
FCC and other information
This device complies with Part 15 of the FCC Rules. Operation is subject to the following
two conditions:
(1) This device may not cause harmful interference, and (2) this device must accept any
interference received, including interference that may cause undesired operation.
Privacy of communications may not be ensured when using this phone.
CAUTION:
Any changes or modifications not expressly approved by the party responsible for
compliance could void the user’s authority to operate this device.
NOTE:
This equipment has been tested and found to comply with the limits for a Class B digital
device, pursuant to Part 15 of the FCC Rules. These limits are designed to provide
reasonable protection against harmful interference in a residential installation. This
equipment generates, uses, and can radiate radio frequency energy and, if not installed
and used in accordance with the instructions, may cause harmful interference to radio
communications. However, there is no guarantee that interference will not occur in a
particular installation. If this equipment does cause harmful interference to radio or
television reception, which can be determined by turning the equipment off and on, the
user is encouraged to try to correct the interference by one or more of the following
measures:
– Reorient or relocate the receiving antenna.
– Increase the separation between the equipment and receiver.
– Connect the equipment into an outlet on a circuit different from that to which the receiver
is connected.
– Consult the dealer or an experienced radio/TV technician for help.
FCC RF Exposure Warning:
LThis product complies with FCC radiation exposure limits set forth for an uncontrolled
environment.
LTo comply with FCC RF exposure requirements, the base unit must be installed and
operated 20 cm (8 inches) or more between the base unit and all person’s body
(excluding extremities of hands, wrist and feet).
LThis product may not be collocated or operated in conjunction with any other antenna or
transmitter.
Temporary Confidential

Useful Information
For assistance, please visit http://www.panasonic.com/help 157
LFor body-worn operation, the handset must be used only with a non-metallic accessory.
Use of other accessories may not ensure compliance with FCC RF exposure
requirements.
Responsible party:
Panasonic Corporation of North America
One Panasonic Way,
Secaucus, New Jersey 07094
Phone number: 1-800-211-PANA (1-800-211-7262)
FCC Warning:
To ensure compliance with FCC emissions limits, use only the included charge cable
with the ferrite core when connecting the handset to the base unit.
Temporary Confidential

Useful Information
158 For assistance, please visit http://www.panasonic.com/help
Industry Canada (IC) and other information
The term “IC:” before the radio certification number only signifies that Industry Canada
radio technical specifications were met.
Notice:
Operation is subject to the following two conditions: (1) this device may not cause
interference, and (2) this device must accept any interference, including interference that
may cause undesired operation of the device.
RF Exposure Warning:
LThis product complies with IC radiation exposure limits set forth for an uncontrolled
environment.
LTo comply with IC RF exposure requirements, the base unit must be installed and
operated 20 cm (8 inches) or more between the base unit and all person's body
(excluding extremities of hands, wrist and feet).
LThis product may not be collocated or operated in conjunction with any other antenna or
transmitter.
LFor body-worn operation, the handset must be used only with a non-metallic accessory.
Use of other accessories may not ensure compliance with IC RF exposure
requirements.
Environment:
Do not install the unit where the temperature is less than 0 °C (+32 °F) or greater than +40
°C (+104 °F). Allow 10 cm (4 inches) clearance around the unit for proper ventilation.
Avoid excessive smoke, dust, mechanical vibration, shock, or direct sunlight.
Routine care:
Wipe the unit with a soft cloth. Do not use benzine, thinner, or any abrasive powder. When
you leave the unit unused for a long period of time, disconnect the AC adaptor from the
outlet.
CAUTION:
Any changes or modifications not expressly approved by the party responsible for
compliance could void the user’s authority to operate this device.
No responsibility will be taken by our company with respect to consequences resulting
from the inappropriate use, damage or both of the unit.
Temporary Confidential

Useful Information
For assistance, please visit http://www.panasonic.com/phonehelp 159
Règles d’Industrie Canada et autres renseignements
L’acronyme « IC » placé devant le numéro d’homologation indique seulement que
l’appareil satisfait aux spécifications de Industrie Canada.
Avis:
L’utilisation de ce dispositif est autorisée seulement aux conditions suivantes:
(1) il ne doit pas produire de brouillage et (2) l’utilisateur du dispositif doit être prêt à
accepter tout brouillage radioélectrique reçu, même si ce brouillage est susceptible de
compromettre le fonctionnement du dispositif.
Avertissement de risque d’exposition au rayonnement radiofréquence:
Ce produit est conforme aux normes d’Industrie Canada concernant les limites
d’exposition au rayonnement radiofréquence en milieu non contrôlé. Pour assurer la
conformité aux exigences de IC quant à l’exposition au rayonnement RF, l’appareil doit
être installé et opéré de manière que son appareil soit à une distance d’au moins 20 cm
(8 pouces) de toute personne (à l’exclusion des extrémités des mains, des poignets et des
pieds). L’appareil ne doit être installé ni opéré de concert avec aucune autre antenne ni
aucun autre émetteur.
Conditions ambiantes:
Ne pas installer l’appareil dans un endroit où la température est inférieure à 0 °C (+32 °F)
ou supérieure à +40 °C (+104 °F).
Prévoir un jeu d’au moins 10 cm (4 po) autour de l’appareil en vue d’assurer une aération
adéquate. Éviter l’exposition à la fumée, la poussière, la vibration, les chocs et aux rayons
solaires directs.
Entretien de routine:
Essuyer l’appareil avec un linge doux. Ne jamais utiliser de benzène, solvant ou toute
poudre abrasive.
S’il est prévu que l’appareil ne sera pas utilisé pendant une période prolongée,
débrancher l’adaptateur secteur.
MISE EN GARDE:
Toute modification non expressément approuvée par la partie responsable de la
conformité de l’appareil pourrait entraîner la révocation du privilège d’utiliser l’appareil.
Notre compagnie n’assume aucune responsabilité quant aux conséquences résultant
de l’utilisation de l’appareil ou de tout dommage subi par l’appareil.
Temporary Confidential
Useful Information
160 For assistance, please visit http://www.panasonic.com/phonehelp
For European Union (EU)
Declaration of Conformity:
Panasonic Communications Co., Ltd. declares that this equipment is in compliance with
the essential requirements and other relevant provisions of Radio & Telecommunications
Terminal Equipment (R&TTE) Directive 1999/5/EC.
Declarations of Conformity for the relevant Panasonic products described in this manual
are available for download by visiting:
http://www.doc.panasonic.de
Contact:
Panasonic Services Europe
a Division of Panasonic Marketing Europe GmbH
Panasonic Testing Centre
Winsbergring 15, 22525 Hamburg, Germany
Important Safety Information:
Use only the included Panasonic AC adaptor (model no.PQWEWP1050).
English This 2.4 GHz Wireless LAN equipment is intended for use in the following
countries in the EU: the United Kingdom, Germany, and France.
French Cet équipement LAN sans fil de 2,4 GHz a été conçu pour être utilisé dans
les pays suivants de l’Union Européenne: Royaume-Uni, Allemagne, et
France.
German Dieses Zubehör für die Einrichtung eines 2,4-GHz-Wireless LAN ist für die
Verwendung in folgenden EU-Ländern vorgesehen: Großbritannien (UK),
Deutschland, und Frankreich.
Temporary Confidential
Useful Information
For assistance, please visit http://www.panasonic.com/phonehelp 161
Information on Disposal for Users of Waste Electrical & Electronic
Equipment (private households)
This symbol on the products and/or accompanying documents means that
used electrical and electronic products should not be mixed with general
household waste.
For proper treatment, recovery and recycling, please take these products to
designated collection points, where they will be accepted on a free of charge
basis. Alternatively, in some countries you may be able to return your
products to your local retailer upon the purchase of an equivalent new
product.
Disposing of this product correctly will help to save valuable resources and prevent any
potential negative effects on human health and the environment which could otherwise
arise from inappropriate waste handling. Please contact your local authority for further
details of your nearest designated collection point.
Penalties may be applicable for incorrect disposal of this waste, in accordance with
national legislation.
For business users in the European Union
If you wish to discard electrical and electronic equipment, please contact your dealer or
supplier for further information.
Information on Disposal in other Countries outside the European Union
This symbol is only valid in the European Union.
If you wish to discard this product, please contact your local authorities or dealer and ask
for the correct method of disposal.
Temporary Confidential

Useful Information
162 For assistance, please visit http://www.panasonic.com/help
Specifications
Base unit:
Router feature WAN connection mode: DHCP, PPPoE, Static
DHCP server: Yes (max. 5 clients, including 1
for handset)
DNS relay (DNS Proxy): Yes
IP packet filtering: Yes (max. 20)
UPnP: Internet Gateway Device (IGD)
Address translation: IP masquerade, port forwarding
(max. 10), DMZ
AP (Bridge) feature Connection mode: DHCP, Static
UPnP: Basic Device
Network Interface
feature WAN: 10Base-T/100Base-TX Ethernet
RJ-45 connector x 1
LAN: 10Base-T/100Base-TX Ethernet
RJ-45 connector x 1
Wireless: IEEE 802.11b, IEEE 802.11b/g
Wireless feature Transmission speed*1: IEEE 802.11b: 11/5.5/2/1 Mbps
IEEE 802.11g: 54/48/36/24/18/
12/9/6 Mbps
Data transfer mode: IEEE 802.11b: Direct Sequence
Spectrum Spread (DS-SS),
IEEE 802.11g: Orthogonal
Frequency Division Multiplexing
(OFDM)
Frequency range: 2.412 – 2.462 GHz (center
frequency)
Number of channels: 11 channels (1–11)
Security: SSID, WEP(64/128 bit), WPA-
PSK (TKIP, AES), WPA2-PSK
(TKIP, AES), Broadcast SSID,
MAC address filtering
Temporary Confidential

Useful Information
For assistance, please visit http://www.panasonic.com/help 163
*1 The figures shown are theoretical maximums and not the actual figures when using the
product.
Handset:
Other feature Indicators: WAN, LAN, WIRELESS,
LOCATOR
Buttons: LOCATOR, FACTORY
DEFAULT RESET, Mode
selector
Dimension (HWD): Approx. 33 mm x 148 mm x
51 mm (11/4 inches x 57/8 inches
x 2 inches)
Mass (Weight): Approx. 150 g (0.33 lb.)
Power consumption: Standby: Approx. (TBD) W
Maximum: Approx. (TBD) W
Power output: 30 mW
Power supply: AC adaptor:
Input: 100–240 V AC, 50–60 Hz
Output: 6 V DC, 1.5A
Operating environment
temperature: 0 °C – 40 °C (32 °F – 104 °F)
Skype feature Calls: Skype-to-Skype calls
SkypeIn calls
SkypeOut calls
Conference calls (guest only)
Call waiting
Skype Voicemail: Yes
Contacts list: Yes (max. 500)
History: Incoming calls (max. 20)
Outgoing calls (max. 20)
Missed calls (max. 50)
Voicemails (max. 100)
Authorizations (max. 20)
Temporary Confidential

Useful Information
164 For assistance, please visit http://www.panasonic.com/help
*1 The figures shown are theoretical maximums and not the actual figures when using the
product.
Note:
LDesign and specifications are subject to change without notice.
LThe illustrations in these instructions may vary slightly from the actual product.
Network feature Connection mode: DHCP, Static
Preferred networks: Yes (max. 21, including 1 for
base unit)
Network Interface
feature Wireless: IEEE 802.11b/g
Wireless feature Transmission speed*1: 11/5.5/2/1 Mbps
Data transfer mode: Direct Sequence Spectrum
Spread (DS-SS)
Frequency range: 2.412 – 2.462 GHz (center
frequency)
Number of channels: 11 channels (1–11)
Security: SSID, WEP (64/128 bit), WPA-
PSK (TKIP), WPA2-PSK (AES)
Other feature Indicators: Charge/Ringer
Display: 1.8 inch TFT LCD, 65k colors
Dimension (HWD): Approx. 142 mm x 45 mm x 20
mm (55/8 inches x 13/4 inches x
3/4 inch)
Mass (Weight): Approx. 100 g (0.22 lb.)
Power consumption: Standby: Approx. (TBD) W
Maximum: Approx. (TBD) W
Power output: 30 mW
Power supply: Li-Ion battery (3.6 V, 730 mAh)
Operating environment
temperature: 0 °C – 40 °C (32 °F – 104 °F)
Temporary Confidential
Useful Information
For assistance, please visit http://www.panasonic.com/phonehelp 165
Customer services
Customer Services Directory
Obtain Product Information and Operating Assistance; locate your nearest Dealer or
Servicenter; purchase Parts and Accessories; or make Customer Service and
Literature requests by visiting our Web Site at:
http://www.panasonic.com/consumersupport
or, contact us via the web at:
http://www.panasonic.com/contactinfo
You may also contact us directly at: 1-800-211-PANA (1-800-211-7262),
Monday-Friday 9 am-9 pm; Saturday-Sunday 10 am-7 pm, EST.
TTY users (hearing or speech impaired users) can call 1-877-833-8855.
TTY users (hearing or speech impaired users) can call 1-866-605-1277.
Purchase Parts, Accessories and Instruction Books online for all Panasonic
Products by visiting our Web Site at:
http://www.pasc.panasonic.com
or, send your request by E-mail to:
npcparts@us.panasonic.com
You may also contact us directly at:
1-800-332-5368 (Phone) 1-800-237-9080 (Fax Only)
(Monday - Friday 9 am to 9 pm, EST.)
Panasonic Services Company
20421 84th Avenue South, Kent, WA 98032
(We Accept Visa, MasterCard, Discover Card, American Express, and Personal
Checks)
Accessory Purchases
Service in Puerto Rico
Panasonic Puerto Rico, Inc.
San Gabriel Industrial Park, Ave. 65 de Infantería, Km. 9.5,
Carolina, Puerto Rico 00985
Phone (787)750-4300, Fax (787)768-2910
Temporary Confidential

Index
166 For assistance, please visit http://www.panasonic.com/phonehelp
Index
A Answering calls: 70
AP Configuration: 41
Authentication: 127
Auto sign in: 85
B Base unit
Setting: 27
Battery
Charge: 45
Installation: 44
Level: 46
Performance: 46
Replacement: 44
C Call forwarding: 71
Call History: 68, 77
Call Waiting: 75
Character table: 49
Conference: 75
Contacts list: 68
D Default network settings: 145
DHCP Configuration: 38
DHCP Lease Table: 107
DMZ: 118
DNS Server: 37, 38, 40
DTMF: 76
E Encryption: 127
Error messages: 155
H Handset registration: 93
Handset Status: 109
Headset, optional: 154
Help: 142
Hold: 75
I Idle screen: 54
Initialization Wizard: 29
Internet connection: 36, 111
IP Address: 39, 41
L LAN / DHCP Server: 113
Load Settings: 136
Log
Connection: 140
Packet Filtering: 138
UPnP Port Mapping: 139
M MAC Address Clone: 112
MAC Address Filtering: 129
Main menu: 57
Making calls: 68
Mute: 75
N Network: 83
Network Connection: 97
Network Status: 106
P Packet Filtering: 120
Password: 29, 81, 131
PIN code: 89
Port Forwarding: 116
Power screen: 59
PPPoE Configuration: 36
R Reset: 87, 134
Reset button: 145
Ringer off: 70
Routing: 124
S Short cut keys: 16
Skype credit: 92
SkypeIn: 92
SkypeOut: 63, 69
Software updates: 85, 86
Speakerphone: 69
Static Configuration: 39
Status icons: 55
Status indicators: 47
Subnet Mask: 39, 41
Support: 141
System requirements: 19
T Time and Date: 60
Tones: 88
Top Menu: 95
Troubleshooting for installation: 42
TTY: 13, 154, 165
U Update Firmware: 101, 132
Temporary Confidential

Index
For assistance, please visit http://www.panasonic.com/phonehelp 167
UPnP: 119
UPnP Port Mapping Table: 108
User name: 29
V Version Information: 109
Voicemail: 72
Volume
Receiver: 69
Ringer: 70
Speaker: 69
W Wireless: 126
Wireless Status: 108
Temporary Confidential
If you need assistance with setup or operation
1Visit our website: http://www.panasonic.com/phonehelp
2Contact us via the web at: http://www.panasonic.com/contactinfo
3Call us at: 1-800-211-PANA (1-800-211-7262)
TTY users (hearing or speech impaired users) can call 1-877-833-8855.
When you ship the product
LCarefully pack your unit, preferably in the original carton.
LAttach a letter, detailing the symptom, to the outside of the carton.
LSend the unit to Panasonic Services Company Customer Servicenter, prepaid and
adequately insured.
LDo not send your unit to Panasonic Consumer Electronics Company listed below or to
executive or regional sales offices. These locations do not repair consumer products.
Panasonic Consumer Electronics Company,
Division of Panasonic Corporation of North America
One Panasonic Way, Secaucus, New Jersey 07094
Panasonic Puerto Rico, Inc.
San Gabriel Industrial Park, Ave. 65 de Infantería, Km. 9.5,
Carolina, Puerto Rico 00985
Copyright:
This material is copyrighted by Panasonic Communications Co., Ltd., and may be
reproduced for internal use only. All other reproduction, in whole or in part, is prohibited
without the written consent of Panasonic Communications Co., Ltd.
© 2006 Panasonic Communications Co., Ltd. All Rights Reserved.
PQQX15539ZA-CD DJ1006SK0
Temporary Confidential