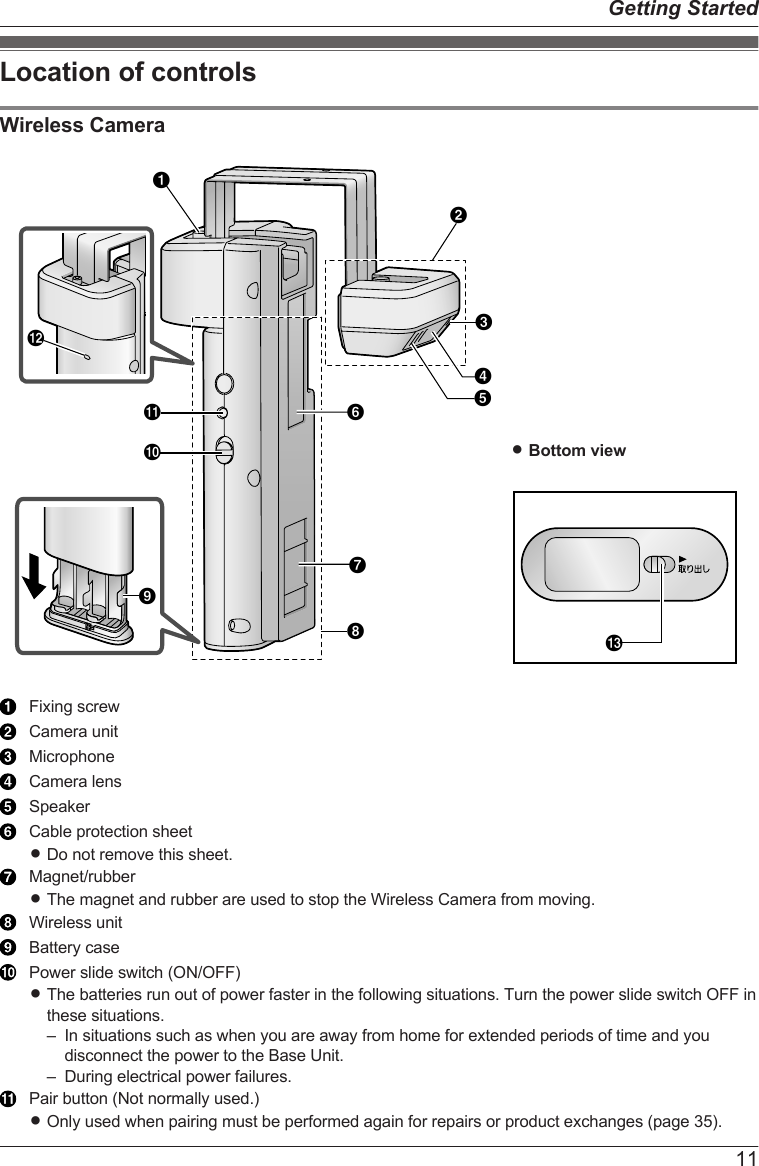
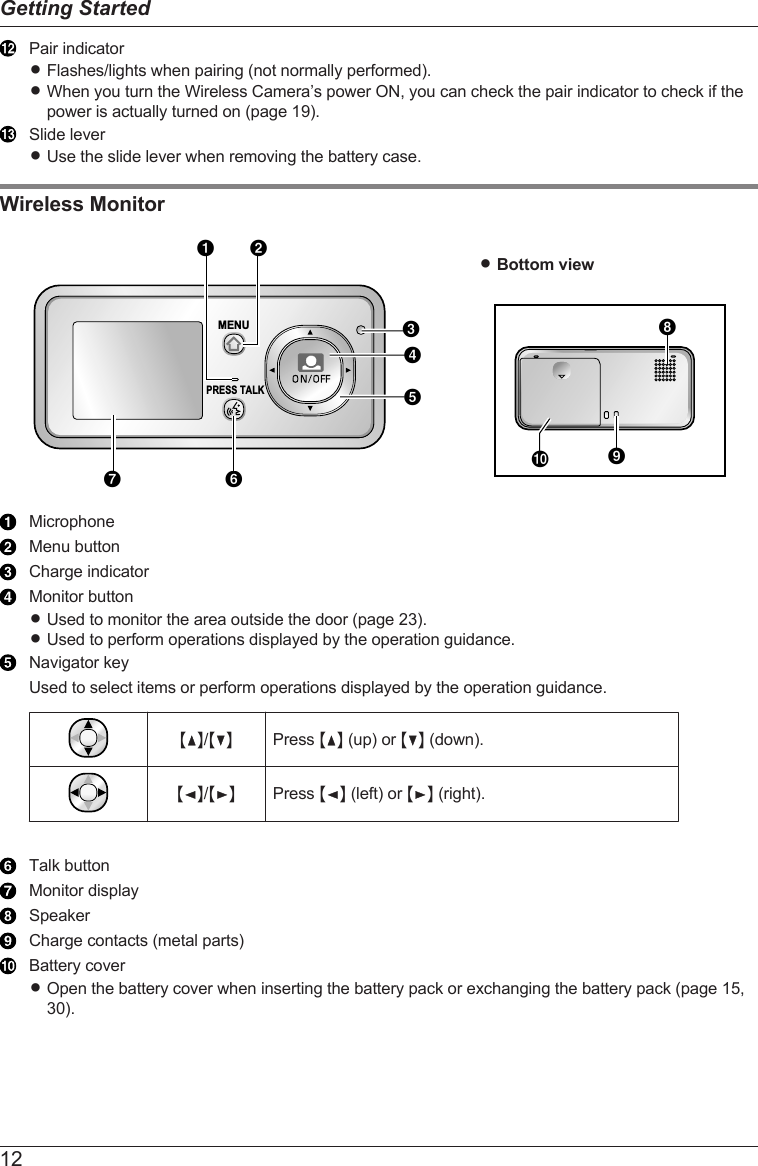
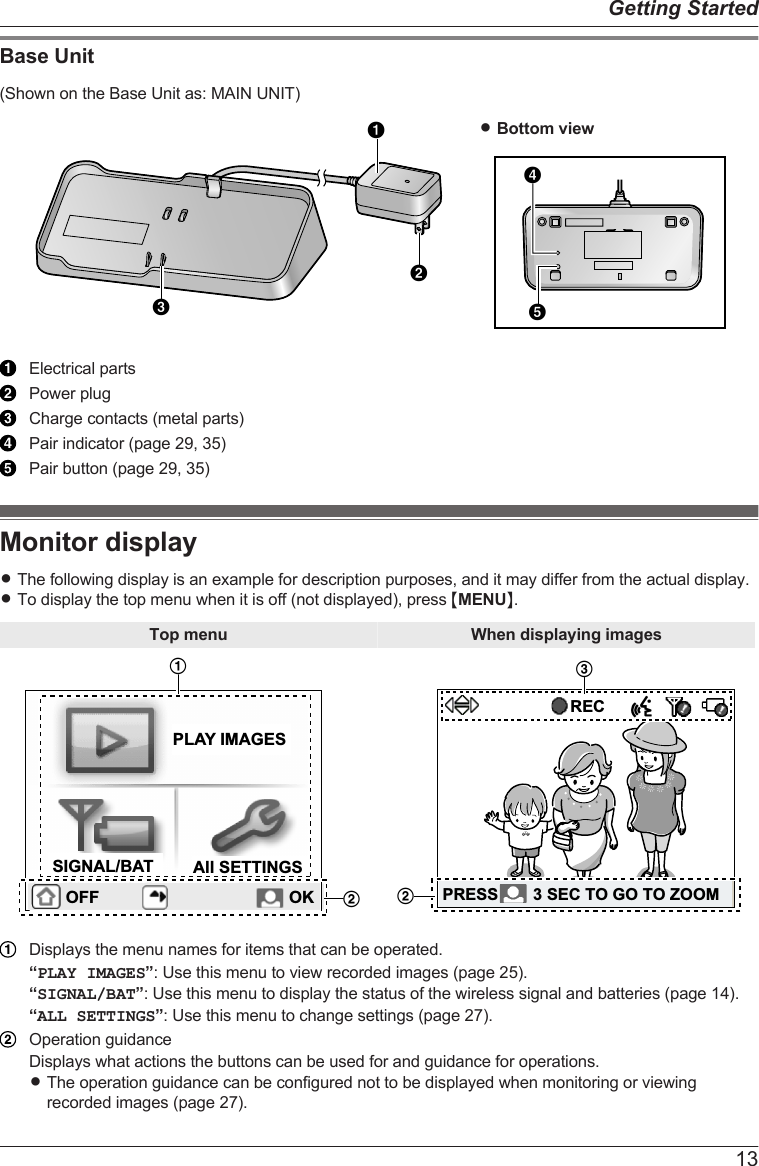
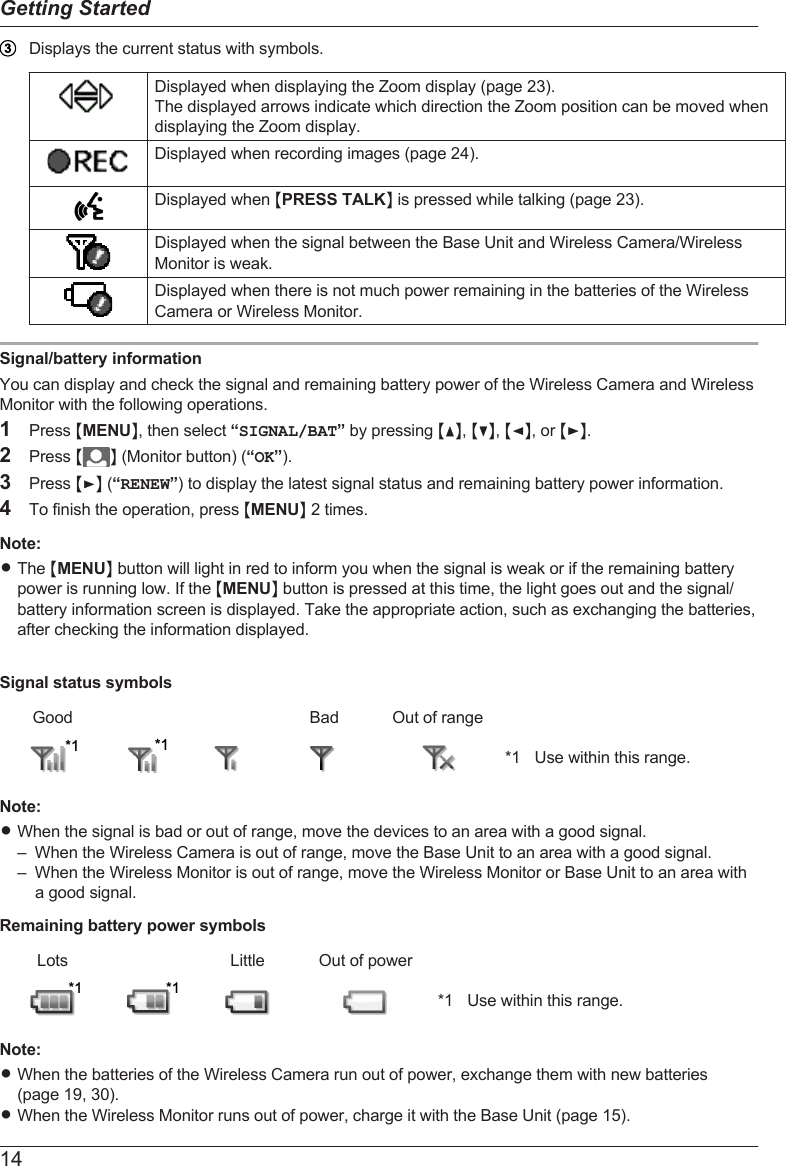
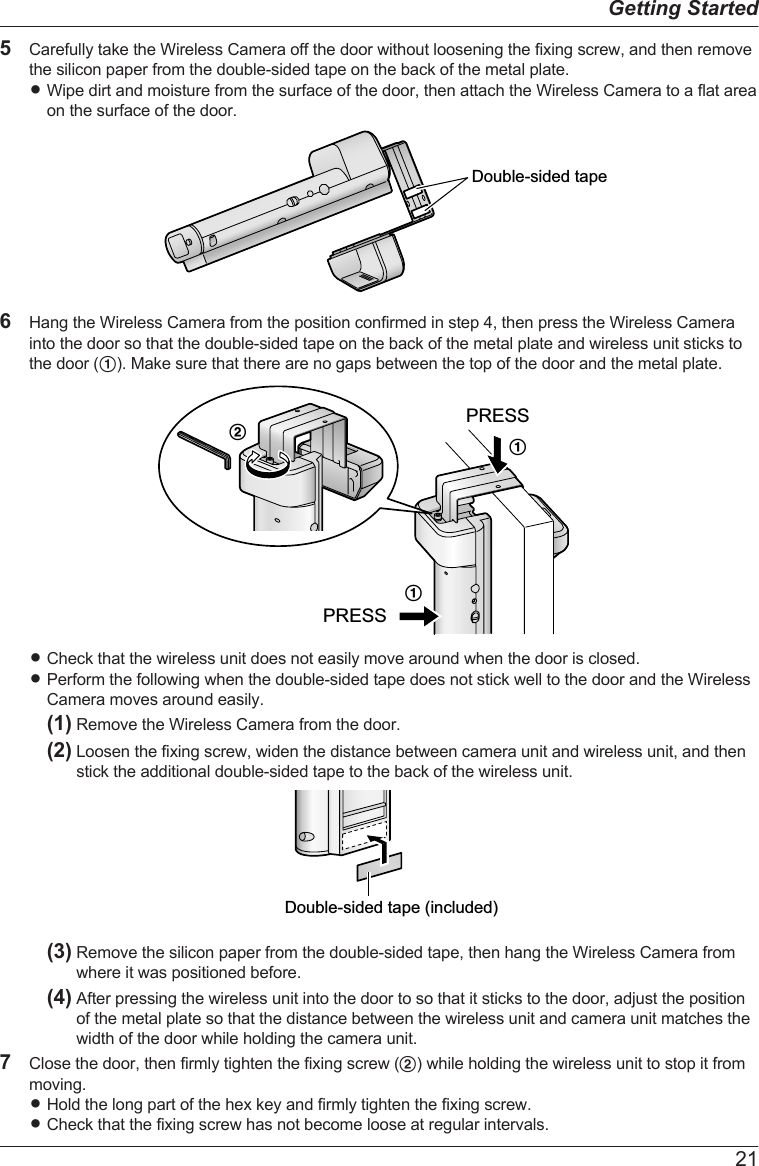
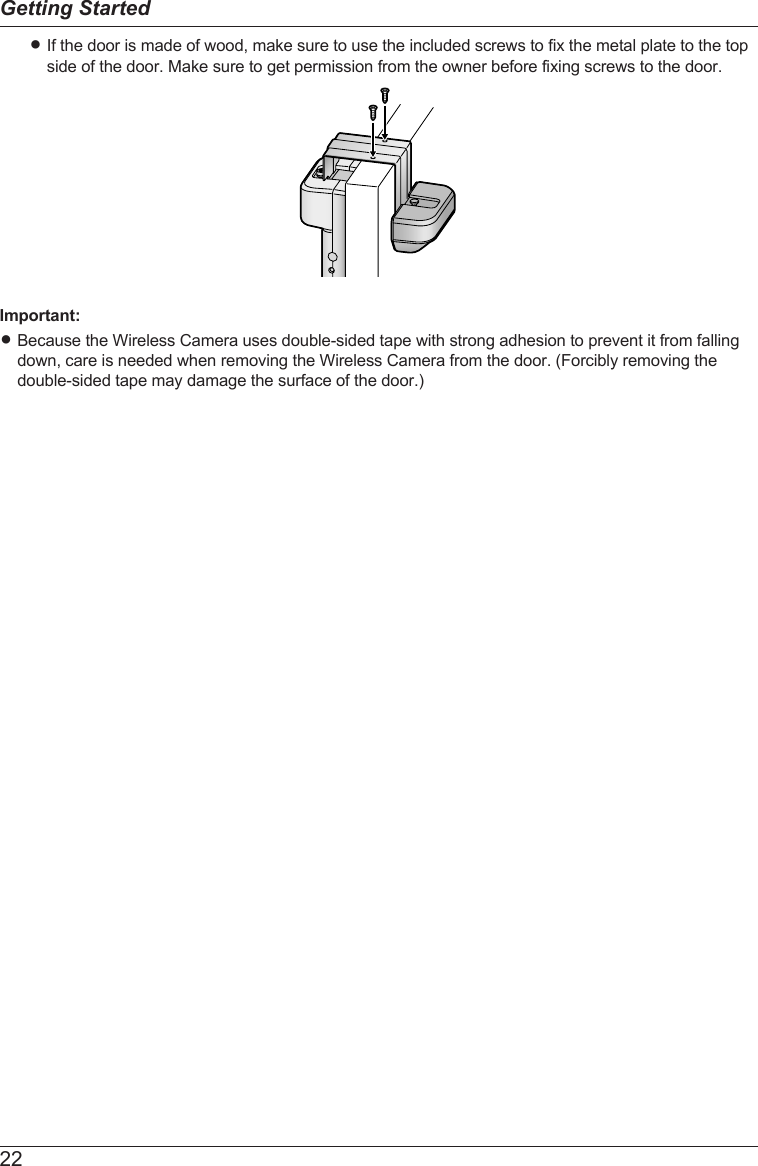
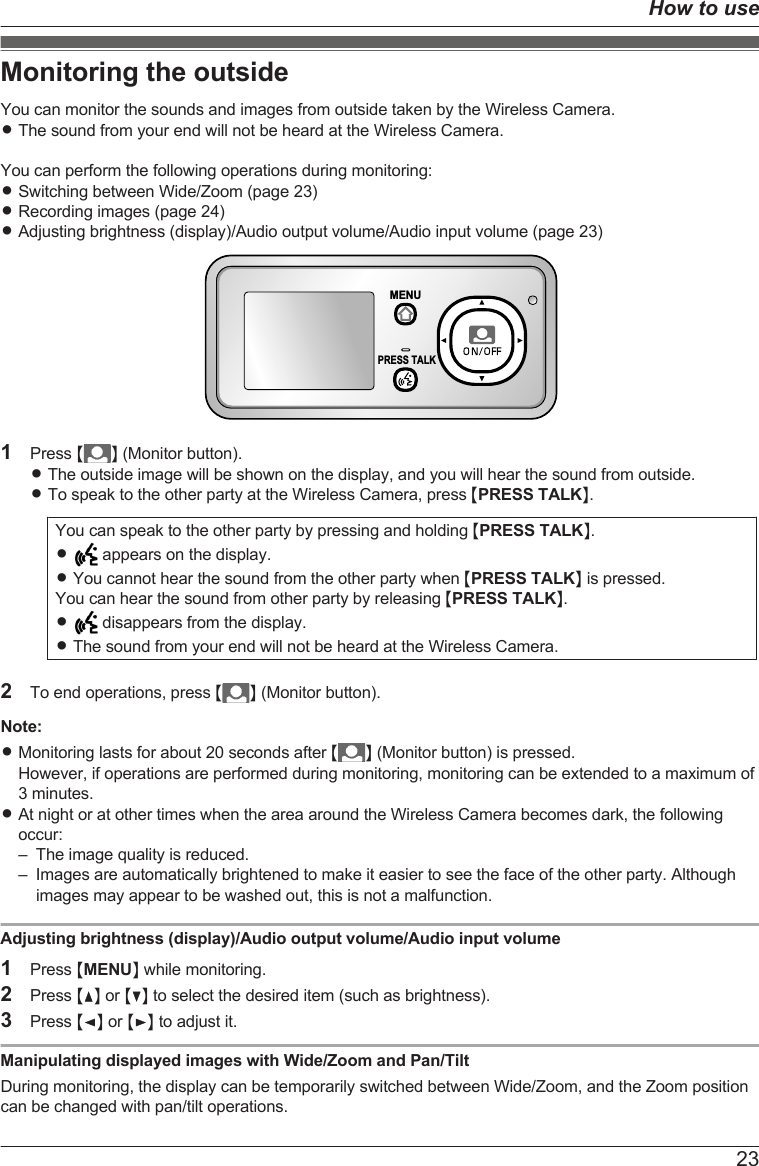
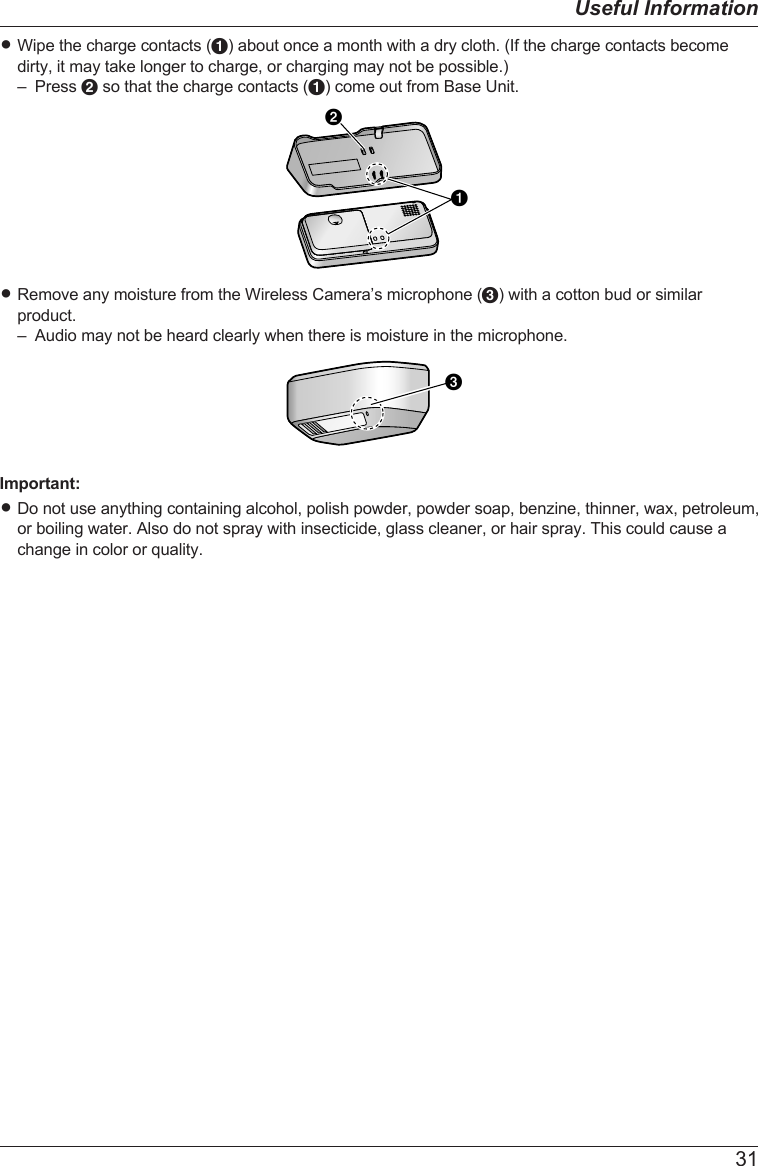
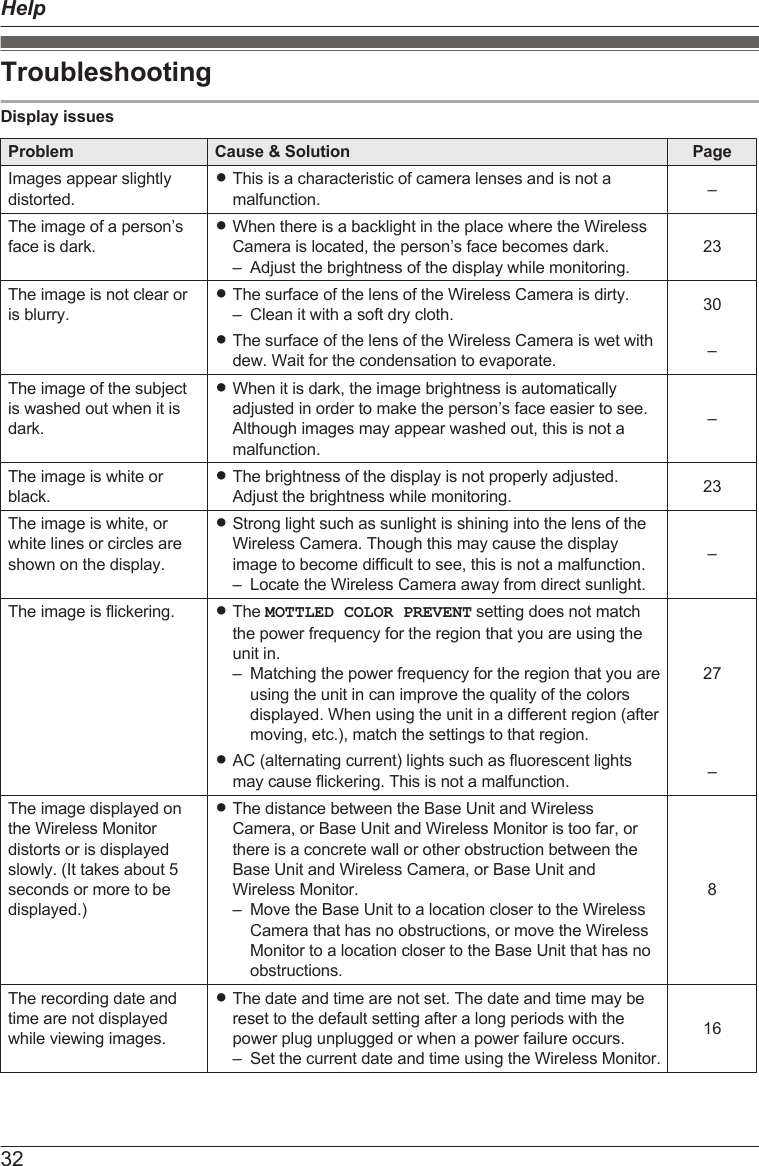
Panasonic of North America 96NVL-MDM200A DECT Main Station for Wireless Door Camera System, Model VL-SDM200A User Manual Operating Instructions English

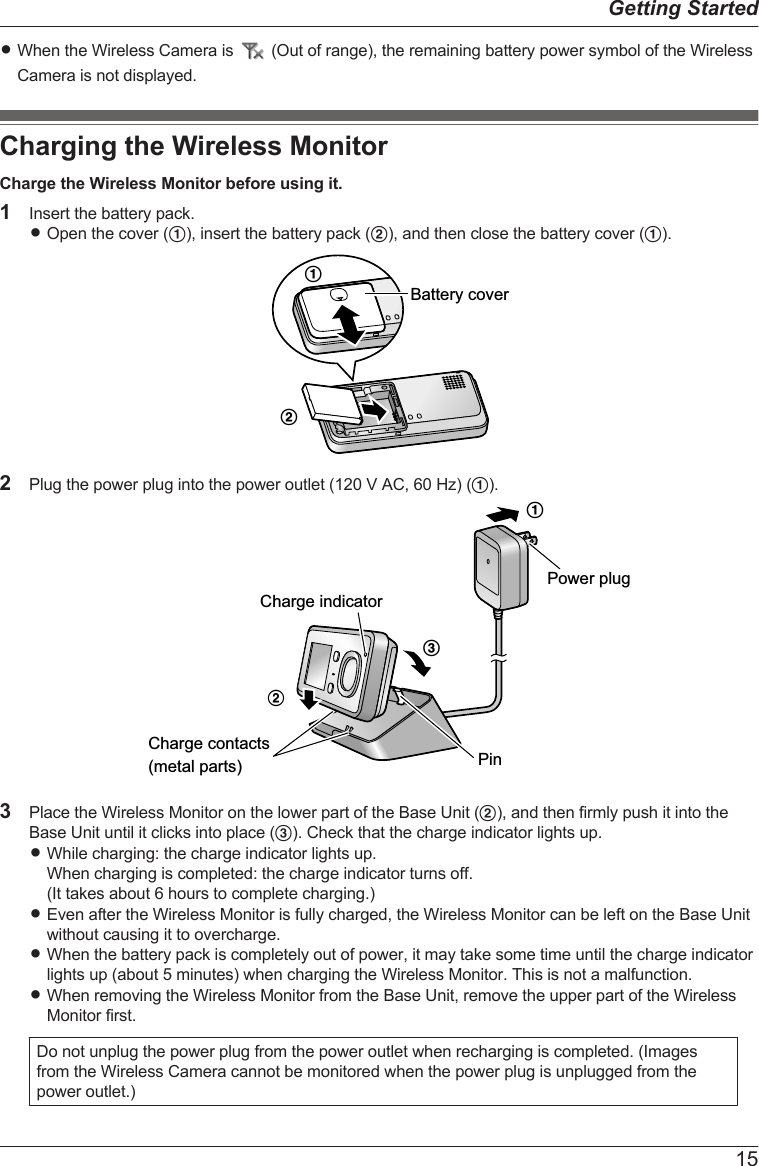
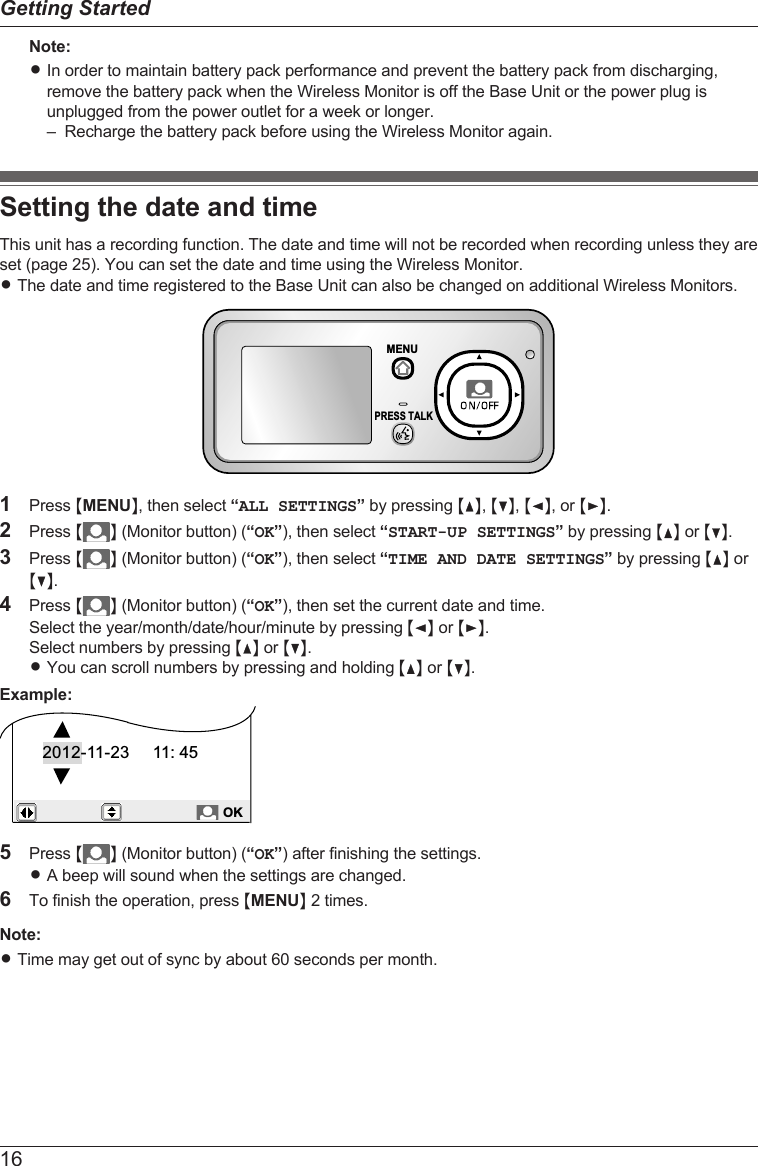
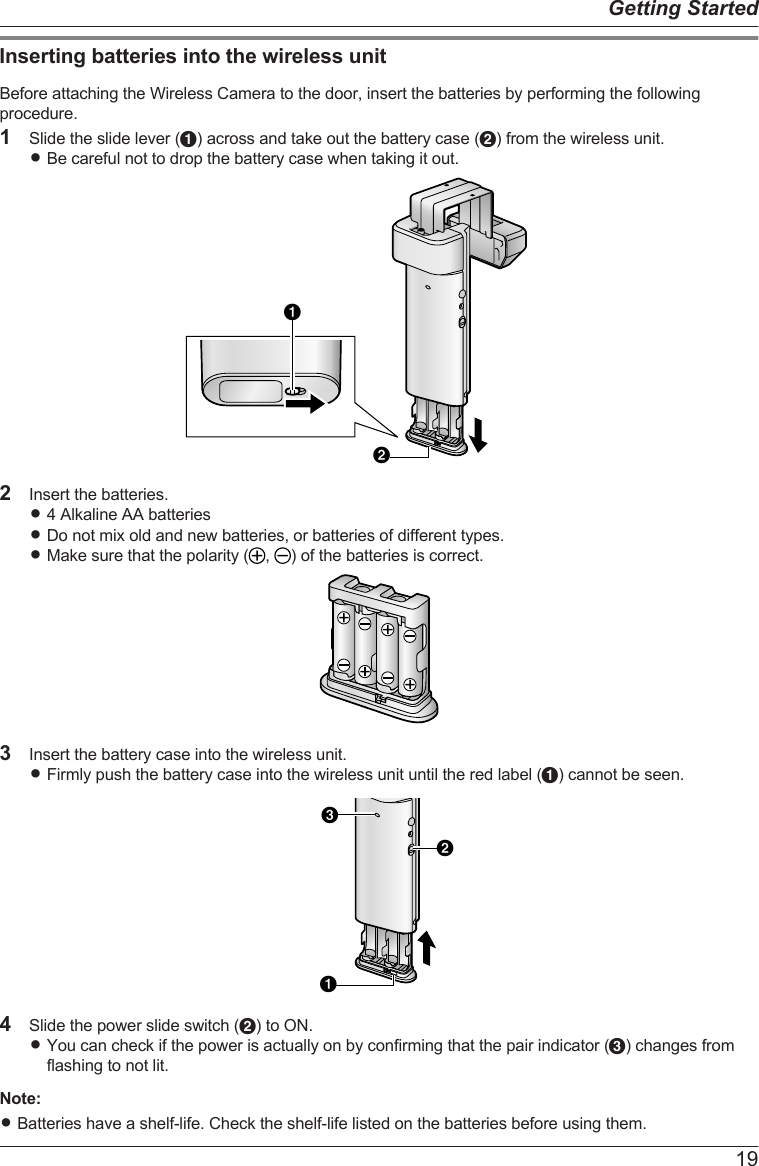
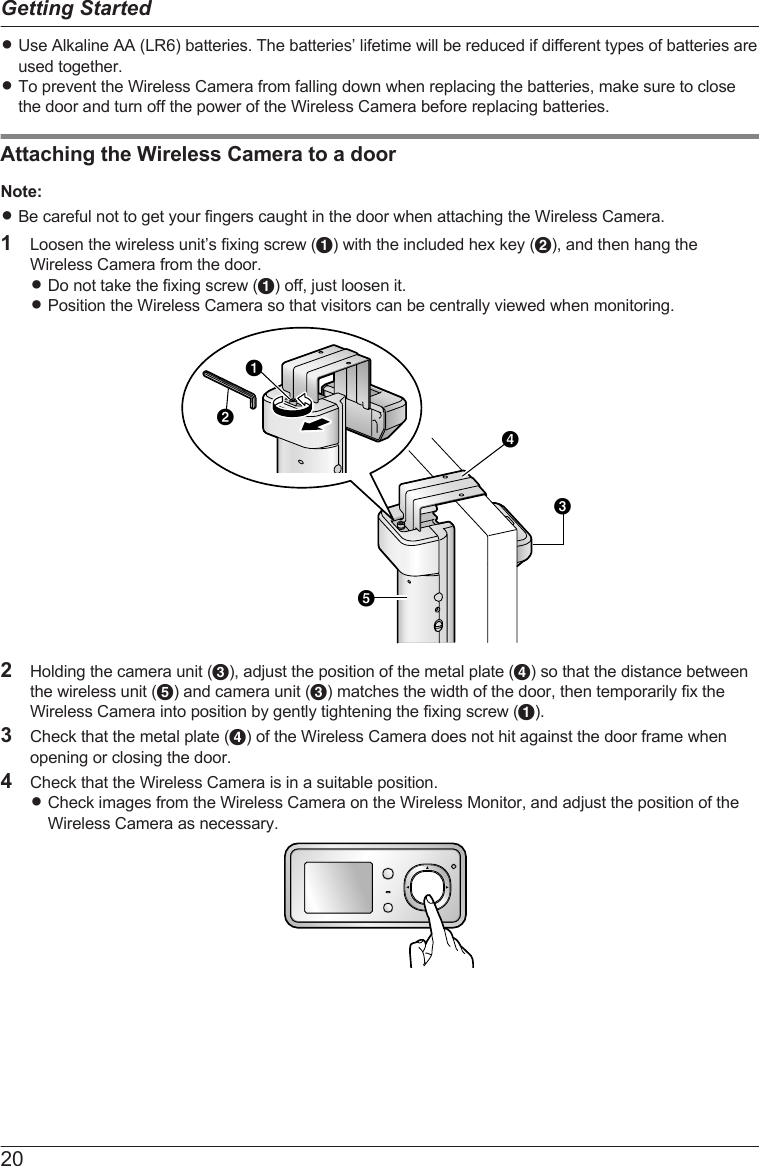
Panasonic Corporation of North America DECT Main Station for Wireless Door Camera System, Model VL-SDM200A Operating Instructions English
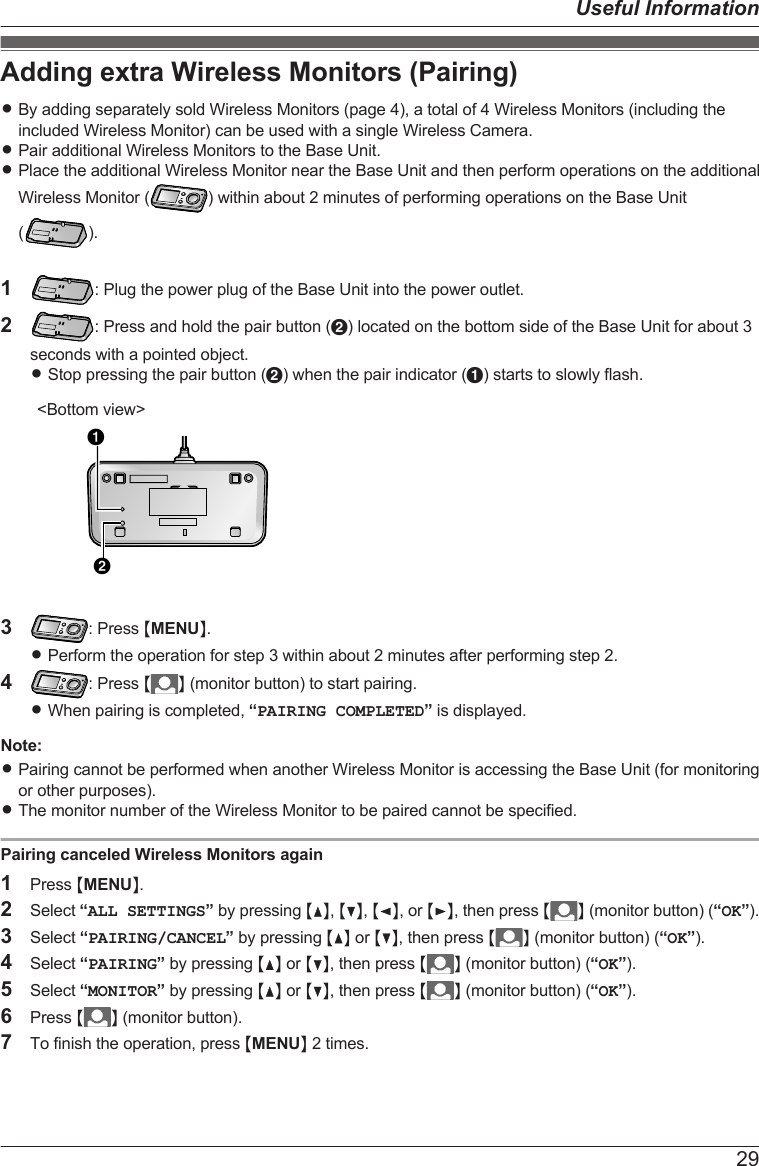
User manual

VL-CM851A VL-DM200A VL-MDM200AOperating InstructionsModel No. VL-SDM200AIncluding: VL-DM200AVL-MDM200AVL-CM851AWireless Door CameraThank you for purchasing a Panasonic product.Please read this manual before using the unit and save for future reference.
IntroductionProduct descriptions ...........................................3Accessory information ........................................4Important InformationFor your safety ....................................................5Important safety instructions ...............................7For best performance .........................................8Other information ................................................9Getting StartedLocation of controls ...........................................11Monitor display ..................................................13Charging the Wireless Monitor .........................15Setting the date and time ..................................16Attaching the Wireless Camera ........................17How to useMonitoring the outside ......................................23Recording displayed images .............................24Viewing recorded images .................................25Programming function settings .........................27Useful InformationAdding extra Wireless Monitors(Pairing) ............................................................29Canceling unused Wireless Monitors ...............30Replacing batteries or battery packs ................30Cleaning ............................................................30HelpTroubleshooting ................................................32Error messages ................................................35General InformationSpecifications ....................................................37For users in the United States Only (FCC and otherinformation) .......................................................40For users in Canada Only (Industry CanadaNotices and other information) ..........................41Quick Reference Guide (in Spanish)Quick Reference Guide (in Spanish) ................42AppendixCustomer services (For United States) .............45Warranty (For United States) ............................46Warranty (For Canada) .....................................48IndexIndex..................................................................502Table of Contents
Product descriptionsProduct figureVL-CM851A*1 VL-MDM200A*2 VL-DM200A*3Description in thismanual Wireless Camera Base Unit Wireless Monitor*1 The Wireless Camera is used by attaching it to the front door of a house or apartment (page 17).*2 The Base Unit is needed in order to view images from the Wireless Camera on the Wireless Monitor.Always use the Base Unit with it connected to a power supply.*3 The Wireless Monitor is portable, allowing you to easily check your front door with images from theWireless Camera. Including the included Wireless Monitor, a total of 4 Wireless Monitors can beused with a single Wireless Camera. For information on additional accessories, see page 4.Flow of images and audioimagesaudioimagesaudioWireless Camera Wireless MonitorBase UnitImportant:RImages cannot be viewed on the Wireless Monitor if the Base Unit is not connected to a power supply.3Introduction
Accessory informationSupplied accessoriesADouble-sided tape*1 … ´ 1Order No. PNHX1536ZABHex key*1 … ´ 1 CScrews*1 … ´ 2DBattery pack*2 … ´ 1 EOperating Instructions*3 … ´ 1*1 Used for the Wireless Camera and for installation.*2 Used for the Wireless Monitor.*3 Containing English Operating Instructions, French Operating Instructions, and Spanish QuickReference Guide.Additional/replacement accessories– Wireless Monitor: VL-DM200A*1– Battery pack for Wireless Monitor: CGA-LB102*1*1 As of August, 2012.Note:RDesign and specifications are subject to change without notice.RThe illustrations in these instructions may vary slightly from the actual product.License:RPortions of this software are based in part on the work of the Independent JPEG Group.Trademarks:RAll other trademarks identified herein are property of their respective owners.This product is not designed to be used to prevent theft or intrusions. Panasonic assumes noliability for any accidents or damages occurring in such cases.4Introduction
For your safetyTo prevent severe injury and loss of life/property, read this section carefully before using the product toensure proper and safe operation of your product.WARNINGPower connectionRUse only the power source marked on the unit. If you are not sure of the type of power supplied to yourhome, consult your dealer or local power company.RDo not overload power outlets and extension cords. This can result in the risk of fire or electric shock.RCompletely insert the power plug into the power outlet. Failure to do so may cause electric shock and/or excessive heat resulting in a fire.RRegularly remove any dust, etc. from the power plug by pulling it from the power outlet, then wipingwith a dry cloth. Accumulated dust may cause an insulation defect from moisture, etc. resulting in a fire.RIf the unit emits smoke or an abnormal smell, or makes an unusual noise, immediately unplug thepower plug from the power outlet and remove the battery pack. These conditions can cause fire orelectric shock. Confirm that smoke has stopped and contact an authorized service center.RNever touch the plug with wet hands. Danger of electric shock exists.InstallationRDo not use the unit in areas that are exposed to rain, moisture, steam, or oily smoke, or areas thathave excessive dust. This may cause fire or electric shock.RDo not install or use this product near automatically controlled devices such as automatic doors andfire alarms. Radio waves emitted from this product may cause such devices to malfunction resulting inan accident.RDo not perform any actions (such as damaging, altering, exposing to heat sources, or placing heavyobjects on the electrical parts and the power plug) that may damage the electrical parts and the powerplug. Using the unit with damaged electrical parts or a damaged power plug may cause electric shock,short circuits, or fire. Contact an authorized service center for repairs.Operating safeguardsRTo reduce the risk of electric shock, do not disassemble this unit. Refer servicing to an authorizedservice center when service is required. Opening covers may expose you to dangerous voltages orother risks. Incorrect reassembly can cause electric shock when the unit is subsequently used.RDo not touch the Base Unit, electrical parts, or the power plug during an electrical storm. There may bea remote risk of electric shock from lightning.RNever put metal objects inside the unit. This may cause fire or electric shock. If metal objects enter theunit, immediately unplug the power plug from the power outlet and refer servicing to an authorizedservice center.RNever spill any liquids on the unit or get the unit wet in any way. This may cause fire, electric shock, orinjury. If the unit becomes wet, immediately unplug the power plug from the power outlet and referservicing to an authorized service center.RNever spill any liquids on the electrical parts or power plug, or get the electrical parts or power plug wetin any way. This may cause fire, electric shock, or injury. If the electrical parts or power plug becomeswet, immediately unplug the power plug from the power outlet and refer servicing to an authorizedservice center.RUnplug this unit from power outlets and refer servicing to an authorized service center when thefollowing conditions occur:– If the power cord is damaged or frayed.– If metal objects have been dropped inside the Base Unit.5Important Information
– If the Base Unit or the Wireless Monitor has been exposed to rain or water, or liquid has been spilledinto the unit, do not use a microwave oven to speed up the drying process of any parts of the unit toavoid permanent damage.– If the unit has been dropped or physically damaged.RDo not place the unit in a microwave oven or other devices such as electromagnetic cookers. This maycause heat or smoke to be generated, fire, or an explosion.MedicalRConsult the manufacturer of any personal medical devices, such as pacemakers or hearing aids, todetermine if they are adequately shielded from external RF (radio frequency) energy. (The unitoperates in the frequency range of 1.92 GHz to 1.93 GHz, and the RF transmission power is 115 mW(max.).)RDo not use the unit in health care facilities if any regulations posted in the area instruct you not to doso. Hospitals or health care facilities may be using equipment that could be sensitive to external RF(radio frequency) energy.Installation and relocationRThe power plug is used as the main disconnect device. Ensure that the power outlet is installed nearthe product and is easily accessible.RMake sure to have sure footing when attaching or taking off the unit. Tripping over or falling down maycause injury.Battery pack (Wireless Monitor)RCharge the battery provided, or identified for use with the product only, in accordance with theinstructions and limitations specified in this manual.RIn order to prevent the risk of heat generation, fire, an explosion, or leaking liquids, do not do thefollowing.– Use a battery other than the specified battery.– Disassemble or reconstruct the battery.– Carry or store the battery together with rings, bracelets, keys, or similar objects.– Use the included battery pack with other devices.– Use a charger other than the specified charger (Base Unit), or tamper with the charger (Base Unit).– Dispose of the unit in a fire, heat up the unit, or get the unit wet with any type of liquid.– Use, charge, or leave the battery near a fire or stove, or in places with high temperatures such asplaces that receive direct sunlight.– Connect metal objects to battery terminals.– Heat the battery in a microwave oven.RExercise care when handling the battery. Do not allow conductive materials such as rings, bracelets,keys, or similar objects to touch the battery, otherwise a short circuit may cause the battery and/or theconductive material to overheat and cause burns.RDo not open, puncture, crush, or drop the battery. A damaged battery must not be used. This canresult in the risk of fire, explosion, overheating, and leaking of the electrolyte.RDo not come into contact with the electrolyte from the battery or let it get in your eyes if liquid is leakingfrom the battery. This may cause damage to your eyes. Should the electrolyte from the battery get intoyour eyes, do not rub your eyes. Immediately flush your eyes with clean water and see a doctor formedical treatment as soon as possible.Dry-cell battery (Wireless Camera)RDo not come into contact with the electrolyte from the batteries or let it get in your eyes if liquid isleaking from the batteries. This may cause loss of sight. Should the electrolyte from the batteries getinto your eyes, do not rub your eyes. Immediately flush your eyes with clean water and see a doctor formedical treatment as soon as possible.6Important Information
RIn order to prevent the risk of heat generation, fire, an explosion, or leaking liquids, do not do thefollowing.– Charge, heat up, or disassemble batteries, or dispose of batteries in the fire.– Connect metal objects to batteries’ terminals.– Carry or store the batteries together with rings, bracelets, keys, or similar objects.– Use old and new batteries or batteries of different types together.RDo not place the batteries within reach of children. There is a risk that children may swallow batteries.If you suspect that a child has swallowed a batteries immediately seek consultation with a medicalpractitioner.RIn order to prevent the risk of heat generation, an explosion, or leaking liquids, immediately removebatteries that cannot be used, remove batteries when not using the unit for extended periods, and donot insert batteries with incorrect polarities.CAUTIONInstallation and relocationRIn order to prevent the risk of injury from the unit falling, do the following.– Always follow the attachment procedures listed in this manual.– Attach the Wireless Camera securely to the door.– Make sure that the battery case does not fall when exchanging batteries.– Do not use excessive force when closing the door.– Never use the unit in an unstable place or a place that is exposed to strong vibrations.Battery (Wireless Monitor)Attention:A lithium ion/polymer battery that is recyclable powers the product you havepurchased. Please call 1-800-8-BATTERY for information on how to recycle thisbattery.Dry-cell battery (Wireless Camera)ROnly use specified batteries. Using unspecified batteries may cause leaking fluids, heat generation, oran explosion.Important safety instructionsWhen using this unit, basic safety precautions should always be followed to reduce the risk of fire,electric shock, or personal injury.RDo not use this unit near water. For example, near a bathtub, wash bowl, kitchen sink, or laundry tub,in a wet basement, or near a swimming pool, and the like.RUse only the battery pack indicated in this manual.RDo not dispose of the battery(ies) in a fire. They may explode. Check with local waste managementcodes for special disposal instructions.SAVE THESE INSTRUCTIONS7Important Information
For best performanceBefore usingRIt is prohibited to disassemble or modify this unit. Contact the dealer where you purchased this unit forrepair.RWhen power fails, this unit cannot be used.RFor the recorded images:The recorded images may be lost when:– The unit is mishandled.– Electric shock or radio wave interference occurs.– The power is turned off during use.(We might not be liable for the damage.)RPanasonic may not be liable for damages due to external factors such as power failures.Location/avoiding noise (Base Unit/Wireless Camera/Wireless Monitor)The Base Unit (A), Wireless Camera (B), and Wireless Monitor (C) use radio waves to communicatewith each other.use within 70 m(229 ft 8 in.)(with no obstructions)ACBuse within 70 m(229 ft 8 in.)(with no obstructions)RFor maximum distance and noise-free operation, we recommend the following:Placing the Base Unit and Wireless Monitor away from electrical appliances such as:– TVs– Radios– Personal computers– Air conditionersRCoverage and voice quality depends on the local environmental conditions.EnvironmentRKeep the unit away from electrical noise generating devices, such as fluorescent lamps and motors.RThe unit should be kept away from excessive smoke, dust, high temperature and vibration.RThe unit should not be exposed to direct sunlight.RDo not install the Wireless Camera in areas where there is a backlight (the visitors’ faces appear darkand are hard to recognize), or areas that create hydrogen sulfide (this may cause a malfunction).RDo not install the Wireless Camera in areas where it can be directly exposed to the elements (this maycause a malfunction).RDo not place heavy objects on top of the unit.RWhen you leave the unit unused for a long period of time, unplug it from the power outlet. In thissituation, we recommend that you turn the power for the Wireless Camera off in order to conserve thebatteries’ energy.RThe unit should be kept away from heat sources such as heaters, kitchen stoves, etc. It should not beplaced in rooms where the temperature is less than 5 °C (41 °F) or greater than 40 °C (104 °F). Dampbasements should also be avoided. To avoid damage, charge the battery only in temperatures rangingfrom 5 °C (41 °F) to 40 °C (104 °F).8Important Information
REven when the Wireless Monitor and Wireless Camera are within 70 m (229 ft 8 in.) and not used tooclose together, if there obstructions such as the ones below, problems such as signals becomingweak, noise, interrupted transmissions, distorted images, and slow image refresh rates may occur,causing the Wireless Monitor and Wireless Camera to not be able to be used together. (See page 14for information about the signal display.)– walls with an insulation material that contains aluminum foil– walls made of concrete or galvanized iron– when each device (Base Unit, Wireless Camera, and Wireless Monitor) is used on a different floor– double insulating glass or metallic shutters– places where several walls are separated by open spaceRSome types of hearing aids may receive noise from wireless communications between the Base Unit,Wireless Camera, and Wireless Monitor.RWhen the Wireless Monitor and Wireless Camera are too close together, feedback may occur.ROperating the product near electrical appliances may cause interference. Move away from theelectrical appliances.Other informationCautionRRisk of explosion if battery is replaced by an incorrect type. Dispose of used batteries according to theinstructions.Privacy and rights of portraitWhen installing or using the Wireless Camera, please take into consideration the rights of others withregard to privacy.RIt is generally said that “Privacy” means the ability of an individual or group to stop information aboutthemselves from becoming known to people other than those whom they choose to give theinformation. “Rights of portrait” means the right to be safe from having your own image taken and usedindiscriminately without consent.OthersRPanasonic assumes no liability for injuries or property damage resulting from failures arising out ofimproper installation or operation inconsistent with the Operating Instructions.RIf you stop using the Wireless Camera, remove the Wireless Camera from the door to prevent themfrom falling off.Personal informationRThe unit records the following personal information. Panasonic assumes no liability for any unforeseendamages arising from the exposure of the recorded information.– Data recorded on the Base Unit:Recorded data containing images of visitors, or other images.RDisclaimerRecorded data may be altered or deleted as a result of incorrect operations, exposure to staticelectricity, accidents, malfunction, repairs or other operations. Panasonic assumes no liability for anydirect or indirect damages resulting from the loss or alteration of recorded images.Requesting repairs for the unitRThe data recorded on the Base Unit cannot be exported. Before requesting repairs, check the currentlyrecorded images as necessary.RAfter checking the recorded data, delete the data recorded on the Base Unit by performing “RESET +DEL ALL PICS” with the Wireless Monitor (page 28).9Important Information
– Even if the unit is sent for repairs without performing “RESET + DEL ALL PICS”, the memory(including recorded data and contents of the settings) of the Base Unit may be cleared and set tofactory default after repair.RIf operations cannot be performed with the Wireless Monitor because of damage to the unit, consultwith the place of purchase for the appropriate action.Note for product disposal, transfer, or returnRThis product can store your private/confidential information. To protect your privacy/confidentiality, werecommend that you erase the information (recorded images) from the memory before you dispose of,transfer or return the product.RDelete the data recorded to the Base Unit by performing “RESET + DEL ALL PICS” with theWireless Monitor (page 28).Notice (for users in the United States Only)10Important Information
Location of controlsWireless CameraBJKCDEHFGILARBottom viewMFixing screwCamera unitMicrophoneCamera lensSpeakerCable protection sheetRDo not remove this sheet.Magnet/rubberRThe magnet and rubber are used to stop the Wireless Camera from moving.Wireless unitBattery casePower slide switch (ON/OFF)RThe batteries run out of power faster in the following situations. Turn the power slide switch OFF inthese situations.– In situations such as when you are away from home for extended periods of time and youdisconnect the power to the Base Unit.– During electrical power failures.Pair button (Not normally used.)ROnly used when pairing must be performed again for repairs or product exchanges (page 35).11Getting Started
Pair indicatorRFlashes/lights when pairing (not normally performed).RWhen you turn the Wireless Camera’s power ON, you can check the pair indicator to check if thepower is actually turned on (page 19).Slide leverRUse the slide lever when removing the battery case.Wireless MonitorABFGMENUPRESS TALKDCERBottom viewHIJMicrophoneMenu buttonCharge indicatorMonitor buttonRUsed to monitor the area outside the door (page 23).RUsed to perform operations displayed by the operation guidance.Navigator keyUsed to select items or perform operations displayed by the operation guidance.MDN/MCNPress MDN (up) or MCN (down).MFN/MENPress MFN (left) or MEN (right).Talk buttonMonitor displaySpeakerCharge contacts (metal parts)Battery coverROpen the battery cover when inserting the battery pack or exchanging the battery pack (page 15,30).12Getting Started
Base Unit(Shown on the Base Unit as: MAIN UNIT)CABRBottom viewDEElectrical partsPower plugCharge contacts (metal parts)Pair indicator (page 29, 35)Pair button (page 29, 35)Monitor displayRThe following display is an example for description purposes, and it may differ from the actual display.RTo display the top menu when it is off (not displayed), press MMENUN.Top menu When displaying imagesAll SETTINGSPLAY IMAGESSIGNAL/BATOFF OK 2123PRESS 3 SEC TO GO TO ZOOMPRESS 3 SEC TO GO TO ZOOMRECDisplays the menu names for items that can be operated.“PLAY IMAGES”: Use this menu to view recorded images (page 25).“SIGNAL/BAT”: Use this menu to display the status of the wireless signal and batteries (page 14).“ALL SETTINGS”: Use this menu to change settings (page 27).Operation guidanceDisplays what actions the buttons can be used for and guidance for operations.RThe operation guidance can be configured not to be displayed when monitoring or viewingrecorded images (page 27).13Getting Started
Displays the current status with symbols.Displayed when displaying the Zoom display (page 23).The displayed arrows indicate which direction the Zoom position can be moved whendisplaying the Zoom display.RECDisplayed when recording images (page 24).Displayed when MPRESS TALKN is pressed while talking (page 23).Displayed when the signal between the Base Unit and Wireless Camera/WirelessMonitor is weak.Displayed when there is not much power remaining in the batteries of the WirelessCamera or Wireless Monitor.Signal/battery informationYou can display and check the signal and remaining battery power of the Wireless Camera and WirelessMonitor with the following operations.1Press MMENUN, then select “SIGNAL/BAT” by pressing MDN, MCN, MFN, or MEN.2Press M N (Monitor button) (“OK”).3Press MEN (“RENEW”) to display the latest signal status and remaining battery power information.4To finish the operation, press MMENUN 2 times.Note:RThe MMENUN button will light in red to inform you when the signal is weak or if the remaining batterypower is running low. If the MMENUN button is pressed at this time, the light goes out and the signal/battery information screen is displayed. Take the appropriate action, such as exchanging the batteries,after checking the information displayed.Signal status symbolsGood Bad Out of range*1*1*1 Use within this range.Note:RWhen the signal is bad or out of range, move the devices to an area with a good signal.– When the Wireless Camera is out of range, move the Base Unit to an area with a good signal.– When the Wireless Monitor is out of range, move the Wireless Monitor or Base Unit to an area witha good signal.Remaining battery power symbolsLots Little Out of power*1*1*1 Use within this range.Note:RWhen the batteries of the Wireless Camera run out of power, exchange them with new batteries(page 19, 30).RWhen the Wireless Monitor runs out of power, charge it with the Base Unit (page 15).14Getting Started
RWhen the Wireless Camera is   (Out of range), the remaining battery power symbol of the WirelessCamera is not displayed.Charging the Wireless MonitorCharge the Wireless Monitor before using it.1Insert the battery pack. ROpen the cover (A), insert the battery pack (B), and then close the battery cover (A).Battery coverAB2Plug the power plug into the power outlet (120 V AC, 60 Hz) (A).C2APinCharge contacts (metal parts)Charge indicatorPower plug3Place the Wireless Monitor on the lower part of the Base Unit (B), and then firmly push it into theBase Unit until it clicks into place (C). Check that the charge indicator lights up.RWhile charging: the charge indicator lights up.When charging is completed: the charge indicator turns off.(It takes about 6 hours to complete charging.)REven after the Wireless Monitor is fully charged, the Wireless Monitor can be left on the Base Unitwithout causing it to overcharge.RWhen the battery pack is completely out of power, it may take some time until the charge indicatorlights up (about 5 minutes) when charging the Wireless Monitor. This is not a malfunction.RWhen removing the Wireless Monitor from the Base Unit, remove the upper part of the WirelessMonitor first.Do not unplug the power plug from the power outlet when recharging is completed. (Imagesfrom the Wireless Camera cannot be monitored when the power plug is unplugged from thepower outlet.)15Getting Started
Note:RIn order to maintain battery pack performance and prevent the battery pack from discharging,remove the battery pack when the Wireless Monitor is off the Base Unit or the power plug isunplugged from the power outlet for a week or longer.– Recharge the battery pack before using the Wireless Monitor again.Setting the date and timeThis unit has a recording function. The date and time will not be recorded when recording unless they areset (page 25). You can set the date and time using the Wireless Monitor.RThe date and time registered to the Base Unit can also be changed on additional Wireless Monitors.MENUPRESS TALK1Press MMENUN, then select “ALL SETTINGS” by pressing MDN, MCN, MFN, or MEN.2Press M N (Monitor button) (“OK”), then select “START-UP SETTINGS” by pressing MDN or MCN.3Press MN (Monitor button) (“OK”), then select “TIME AND DATE SETTINGS” by pressing MDN orMCN.4Press MN (Monitor button) (“OK”), then set the current date and time.Select the year/month/date/hour/minute by pressing MFN or MEN.Select numbers by pressing MDN or MCN.RYou can scroll numbers by pressing and holding MDN or MCN.Example:2012-11-23     11: 45OK5Press M N (Monitor button) (“OK”) after finishing the settings.RA beep will sound when the settings are changed.6To finish the operation, press MMENUN 2 times.Note:RTime may get out of sync by about 60 seconds per month.16Getting Started
Attaching the Wireless CameraBefore attaching the Wireless Camera (Installation preparation)Wireless Camera rangeRViews when the camera is set “WIDE” (default).When using with a door with a height of 2 m (6 ft 7 in.)Side view Top viewapprox. 90approx. 50 cm(1 ft 8 in.)approx. 120approx. 180 cm(5 ft 11 in.)approx. 50 cm (1 ft 8 in.)Attaching the Wireless Camera to a doorInner side of the doorInside OutsideWireless unit Camera unitSurface of the doorRAttach the Wireless Camera to a door in a protected area that is not directly exposed to the elements,such as under a roof or eave.RConnect the Base Unit to the power outlet and turn it on.RAttach the Wireless Camera to a flat area on the surface on the door.RWipe dirt and moisture from the surface of the door where the Wireless Camera will be attached.RRemove the protection film from rear side of the wireless unit.17Getting Started
Doors the Wireless Camera can be attached toRSteel doors that open to the inside that meet the following requirements.– A gap of 2.5 mm (3/32 in.) or more for A and 3 mm (1/8 in.) or more for B between the door anddoor frame.– A door with a thickness of between 32 mm - 63 mm (1 1/4 in. - 2 1/2 in.) (C).45 mm (1 3/4 in.) or lessCamera unitSide of the doorDoor thickness between 32 mm - 63 mm (1 1/4 in. - 2 1/2 in.)CWireless unitA gap of 2.5 mm (3/32 in.) or moreAA gap of 3 mm (1/8 in.) or moreBOutsideInsideDoor frameView from the sideNote:RThe Wireless Camera cannot be attached to the following doors.– Sliding doors– Doors that open to the outside– A door with a protrusion such as a guard plate, or a cavitySide of the door18Getting Started
Inserting batteries into the wireless unitBefore attaching the Wireless Camera to the door, insert the batteries by performing the followingprocedure.1Slide the slide lever (A) across and take out the battery case (B) from the wireless unit.RBe careful not to drop the battery case when taking it out.AB2Insert the batteries.R4 Alkaline AA batteriesRDo not mix old and new batteries, or batteries of different types.RMake sure that the polarity ( ,  ) of the batteries is correct.3Insert the battery case into the wireless unit.RFirmly push the battery case into the wireless unit until the red label (A) cannot be seen.BCA4Slide the power slide switch (B) to ON.RYou can check if the power is actually on by confirming that the pair indicator (C) changes fromflashing to not lit.Note:RBatteries have a shelf-life. Check the shelf-life listed on the batteries before using them.19Getting Started
RUse Alkaline AA (LR6) batteries. The batteries’ lifetime will be reduced if different types of batteries areused together.RTo prevent the Wireless Camera from falling down when replacing the batteries, make sure to closethe door and turn off the power of the Wireless Camera before replacing batteries.Attaching the Wireless Camera to a doorNote:RBe careful not to get your fingers caught in the door when attaching the Wireless Camera.1Loosen the wireless unit’s fixing screw (A) with the included hex key (B), and then hang theWireless Camera from the door.RDo not take the fixing screw (A) off, just loosen it.RPosition the Wireless Camera so that visitors can be centrally viewed when monitoring.CDEAB2Holding the camera unit (C), adjust the position of the metal plate (D) so that the distance betweenthe wireless unit (E) and camera unit (C) matches the width of the door, then temporarily fix theWireless Camera into position by gently tightening the fixing screw (A).3Check that the metal plate (D) of the Wireless Camera does not hit against the door frame whenopening or closing the door.4Check that the Wireless Camera is in a suitable position.RCheck images from the Wireless Camera on the Wireless Monitor, and adjust the position of theWireless Camera as necessary.20Getting Started
5Carefully take the Wireless Camera off the door without loosening the fixing screw, and then removethe silicon paper from the double-sided tape on the back of the metal plate.RWipe dirt and moisture from the surface of the door, then attach the Wireless Camera to a flat areaon the surface of the door.Double-sided tape6Hang the Wireless Camera from the position confirmed in step 4, then press the Wireless Camerainto the door so that the double-sided tape on the back of the metal plate and wireless unit sticks tothe door (A). Make sure that there are no gaps between the top of the door and the metal plate.ABPRESSPRESSARCheck that the wireless unit does not easily move around when the door is closed.RPerform the following when the double-sided tape does not stick well to the door and the WirelessCamera moves around easily.(1) Remove the Wireless Camera from the door.(2) Loosen the fixing screw, widen the distance between camera unit and wireless unit, and thenstick the additional double-sided tape to the back of the wireless unit.Double-sided tape (included)(3) Remove the silicon paper from the double-sided tape, then hang the Wireless Camera fromwhere it was positioned before.(4) After pressing the wireless unit into the door to so that it sticks to the door, adjust the positionof the metal plate so that the distance between the wireless unit and camera unit matches thewidth of the door while holding the camera unit.7Close the door, then firmly tighten the fixing screw (B) while holding the wireless unit to stop it frommoving.RHold the long part of the hex key and firmly tighten the fixing screw.RCheck that the fixing screw has not become loose at regular intervals.21Getting Started
RIf the door is made of wood, make sure to use the included screws to fix the metal plate to the topside of the door. Make sure to get permission from the owner before fixing screws to the door.Important:RBecause the Wireless Camera uses double-sided tape with strong adhesion to prevent it from fallingdown, care is needed when removing the Wireless Camera from the door. (Forcibly removing thedouble-sided tape may damage the surface of the door.)22Getting Started
Monitoring the outsideYou can monitor the sounds and images from outside taken by the Wireless Camera.RThe sound from your end will not be heard at the Wireless Camera.You can perform the following operations during monitoring:RSwitching between Wide/Zoom (page 23)RRecording images (page 24)RAdjusting brightness (display)/Audio output volume/Audio input volume (page 23)MENUPRESS TALK1Press M N (Monitor button).RThe outside image will be shown on the display, and you will hear the sound from outside.RTo speak to the other party at the Wireless Camera, press MPRESS TALKN.You can speak to the other party by pressing and holding MPRESS TALKN.R appears on the display.RYou cannot hear the sound from the other party when MPRESS TALKN is pressed.You can hear the sound from other party by releasing MPRESS TALKN.R disappears from the display.RThe sound from your end will not be heard at the Wireless Camera.2To end operations, press M N (Monitor button).Note:RMonitoring lasts for about 20 seconds after M N (Monitor button) is pressed.However, if operations are performed during monitoring, monitoring can be extended to a maximum of3 minutes.RAt night or at other times when the area around the Wireless Camera becomes dark, the followingoccur:– The image quality is reduced.– Images are automatically brightened to make it easier to see the face of the other party. Althoughimages may appear to be washed out, this is not a malfunction.Adjusting brightness (display)/Audio output volume/Audio input volume1Press MMENUN while monitoring.2Press MDN or MCN to select the desired item (such as brightness).3Press MFN or MEN to adjust it.Manipulating displayed images with Wide/Zoom and Pan/TiltDuring monitoring, the display can be temporarily switched between Wide/Zoom, and the Zoom positioncan be changed with pan/tilt operations.23How to use
Wide display (default setting) Zoom display1Press and hold M N (Monitor button) for about 3 seconds when in the Wide display.RThe display is switched to the Zoom display.RTo switch back to the Wide display, press and hold MN (Monitor button) for about 3 secondsagain.2To change the Zoom position with Pan/Tilt, press MDN, MCN, MFN, or MEN when in the Zoom display.RThe Zoom position changes each time MDN, MCN, MFN, or MEN is pressed.Example:BAIn the illustration above, the Zoom position is shown in gray.– Press MFN 1 time: the Zoom position is moved to (A).– Press MCN 1 time: the Zoom position is moved to (B).RThe Zoom position can be moved in the direction of the symbols shown on the screen.Note:RPerforming the above operations only temporarily switches between Wide/Zoom displays. Therefore,images will be displayed according to the default settings the next time images are monitored. Tochange the default settings, change “WIDE/ZOOM SETTINGS” (page 27).RWhen the Zoom position is changed, it is retained and used the next time images are monitored.Recording displayed imagesImages being monitored can be recorded.REach recorded picture records 1 still image picture. (A maximum of 10 recorded pictures can berecorded.)24How to use
RRecorded images are saved to the Base Unit.RImages recorded by additional Wireless Monitors are also saved to the Base Unit.1Press MMENUN while monitoring images.2Press MEN (“RECORD”).RREC is displayed on the screen.Note:RImages are recorded according to the current display setting. When in Wide display, Wide displayimages are recorded, and when in Zoom display, images of the zoomed in area are recorded. (Whenviewing recorded images, the display setting (Wide or Zoom) and the Zoom position cannot bechanged.)RThere may be a delay from when recording operations are performed to when recording starts.Accordingly, the actual recorded images may differ from the images monitored when recordingoperations were performed.When the recording memory is full (automatic overwriting):RIn order to record new images when the recording memory is full, existing recorded images areautomatically deleted in order from the oldest image. In this way recorded images do not have tobe manually deleted, and recording can be performed at anytime. You can use the picture protectionsetting to protect images that you do not want to be deleted from being deleted (page 25).Viewing recorded imagesImages recorded during monitoring can be viewed with the following operations.RWhile viewing images, you can protect images that you do not want to be deleted, and deleteunnecessary images (page 25). (A maximum of 5 images can be protected.)1Press MMENUN, then select “PLAY IMAGES” by pressing MDN or MCN.2Press M N (Monitor button) (“OK”).RThe image with the most recent date and time is displayed.RWhen there is more than 1 image, press MFN to view the next image. Each time you press MFN,images are displayed in chronological order starting from the most recently recorded image to theoldest recorded image.RYou can hide the guidance (date and time, and the operation guidance) by pressing MCN. Theguidance is temporarily hidden, but it is displayed again when an operation is performed.3To finish the operation, press MN (Monitor button) (“OFF”).Protecting and deleting picturesHow to protect images (or remove protection)1Press MMENUN while viewing images.2Select “SET/REMOVE PROTECTION” by pressing MDN or MCN, then press M N (Monitor button)(“OK”).RWhen an image is configured to be protected, a protection symbol “   ” is displayed for theimage. When the protection setting is removed, the symbol disappears.How to delete images1Press MMENUN while viewing images.2Select “DELETE 1 PICTURE” by pressing MDN or MCN, then press MN (monitor button) (“OK”).3Select “YES” by pressing MDN or MCN, then press MN (monitor button) (“OK”).25How to use
Note:RA maximum of 5 images can be protected. If you want to protected an image when 5 images arealready protected, you must remove protection from 1 of the images.RProtected images cannot be deleted. Remove the protection in order to delete protected images.26How to use
Programming function settingsYou can change the function settings to suit your needs.How to change the function settings1Press MMENUN, then select the “ALL SETTINGS” by pressing MDN, MCN, MFN, or MEN.2Press MN (monitor button) (“OK”), then select the desired item by pressing MDN or MCN.3Press M N (monitor button) (“OK”).4Press MDN or MCN to select the desired setting, then press M N (monitor button) (“OK”).RThis step may vary depending on the feature being programmed.5Press MDN or MCN to select the desired setting, then press MN (monitor button) (“OK”).6To finish the operation, press MMENUN 2 times.Note:RWhen no operation is performed for about 60 seconds during settings, the setting function quits.Function listIn the following list, < > indicates the default settings.Item Function SettingSTART-UPSETTINGSMOTTLED COLORPREVENT*1<POWER FREQUENCY (60Hz)> / POWER FREQUENCY(50Hz)RTo prevent mottled or uneven color from beingdisplayed, set the power frequency to match the area inwhich you use the unit.TIME AND DATESETTINGS*1You can set the current date and time (page 16).LANGUAGESELECTION<ENGLISH> / FRENCH / SPANISH / ARABICDISPLAY/SOUNDSETTINGSWIDE/ZOOMSETTINGS*1<WIDE> / ZOOMRSelect how images are initially displayed: Wide or Zoom.CONTRAST When it is difficult to see the monitor display, you canadjust the display contrast. 5 levels are available.OPERATIONGUIDANCE<YES> / NORSelect NO if you do not want the operation guidance(page 13, 25) to be displayed when viewing WirelessCamera images or recorded images.CONFIRMATIONSOUND<ON> / OFFRWhen OFF is selected, all sounds (apart from audiofrom talking) are turned off.SAVE CAMERABATTERIES*1–<OFF> / ONRSelect ON to lengthen the time that the batteries can beused for. (However, by selecting ON, the time it takes todisplay images when monitoring may increase.)27How to use
Item Function SettingRESET + DELALL PICSONLY DELETEALL PICS*1DELETE ALL PICTURES / DEL NON-PROTECTED PICSRImages saved on the Base Unit are deleted.RESET + DELALL PICS*1*2YES / NORIf YES is selected, all images recorded to the Base Unit(including protected images) are deleted, and the entireWireless Door Camera system settings, including theWireless Monitor settings, are reset.ONLY RESETSETTINGS*1*2YES / NORIf YES is selected, the entire Wireless Door Camerasystem settings, including the Wireless Monitor settings,are reset.PAIRING/CANCEL PAIRING Pairs the Wireless Monitor to the Base Unit (page 29).CANCELATION Removes the pairing of the Wireless Monitor from theBase Unit (page 30).*1 These settings are related to the entire Wireless Door Camera system. If these settings are changedin the Wireless Monitor, the settings for all the additional Wireless Monitors are also changed.*2 Pairing for the Wireless Monitor paired to Base Unit is not changed when the unit is reset.– Even when the Wireless Monitor is within signal range, if the Wireless Camera is out of signalrange, the unit cannot be reset. Only reset the unit when all devices are within signal range.28How to use
Adding extra Wireless Monitors (Pairing)RBy adding separately sold Wireless Monitors (page 4), a total of 4 Wireless Monitors (including theincluded Wireless Monitor) can be used with a single Wireless Camera.RPair additional Wireless Monitors to the Base Unit.RPlace the additional Wireless Monitor near the Base Unit and then perform operations on the additionalWireless Monitor ( ) within about 2 minutes of performing operations on the Base Unit().1: Plug the power plug of the Base Unit into the power outlet.2: Press and hold the pair button (B) located on the bottom side of the Base Unit for about 3seconds with a pointed object.RStop pressing the pair button (B) when the pair indicator (A) starts to slowly flash.<Bottom view>AB3: Press MMENUN.RPerform the operation for step 3 within about 2 minutes after performing step 2.4: Press M N (monitor button) to start pairing.RWhen pairing is completed, “PAIRING COMPLETED” is displayed.Note:RPairing cannot be performed when another Wireless Monitor is accessing the Base Unit (for monitoringor other purposes).RThe monitor number of the Wireless Monitor to be paired cannot be specified.Pairing canceled Wireless Monitors again1Press MMENUN.2Select “ALL SETTINGS” by pressing MDN, MCN, MFN, or MEN, then press MN (monitor button) (“OK”).3Select “PAIRING/CANCEL” by pressing MDN or MCN, then press M N (monitor button) (“OK”).4Select “PAIRING” by pressing MDN or MCN, then press M N (monitor button) (“OK”).5Select “MONITOR” by pressing MDN or MCN, then press MN (monitor button) (“OK”).6Press M N (monitor button).7To finish the operation, press MMENUN 2 times.29Useful Information
Canceling unused Wireless MonitorsRThese operations are performed on the included Wireless Monitor, and can also be performed on theadditionally paired Wireless Monitor.RThe pairing of the Wireless Monitor performing operations cannot be canceled.1Press MMENUN.2Select “ALL SETTINGS” by pressing MDN, MCN, MFN, or MEN, then press MN (monitor button) (“OK”).3Select “PAIRING/CANCEL” by pressing MDN or MCN, then press M N (monitor button) (“OK”).4Select “CANCELATION” by pressing MDN or MCN, then press MN (monitor button) (“OK”).5Select “MONITOR” by pressing MDN or MCN, then press M N (monitor button) (“OK”).6Select the Wireless Monitor to cancel by pressing MDN or MCN, then press M N (monitor button)(“OK”).RIn the following situations, Wireless Monitors are displayed in gray and cannot be canceled.– when trying to cancel the pairing of a Wireless Monitor that is performing operations.– when there is a Wireless Monitor that has not been paired.7To finish the operation, press MMENUN 2 times.Important:RIn order to prevent false operations, remove the battery packs from canceled Wireless Monitors.Replacing batteries or battery packsn Batteries used in the Wireless CameraWhen the batteries of the Wireless Camera run out of power ( ), exchange them with new batteries.RONLY USE Alkaline AA batteries.RRefer to page 19 for information on how to insert batteries.RTo prevent the Wireless Camera from falling down, make sure to close the door and turn off thepower of the Wireless Camera before replacing batteries.n Battery pack used in the Wireless MonitorWhen the Wireless Monitor’s battery pack runs out of power soon after being charged, exchange it with anew battery pack.RUse the separately sold CGA-LB102 for a replacement battery pack (page 4).– Battery specifications: lithium ion battery, DC 3.7 V, 940 mAh.RRefer to page 15 for information on how to insert battery packs.CleaningRClean the unit with a soft, dry cloth. For excessive dirt, wipe the unit with a slightly damp cloth.RWhen cleaning the Base Unit, electrical parts, and power plug, make sure to unplug the power plugfrom the power outlet.30Useful Information
RWipe the charge contacts (A) about once a month with a dry cloth. (If the charge contacts becomedirty, it may take longer to charge, or charging may not be possible.)– Press B so that the charge contacts (A) come out from Base Unit.ABRRemove any moisture from the Wireless Camera’s microphone (C) with a cotton bud or similarproduct.– Audio may not be heard clearly when there is moisture in the microphone.CImportant:RDo not use anything containing alcohol, polish powder, powder soap, benzine, thinner, wax, petroleum,or boiling water. Also do not spray with insecticide, glass cleaner, or hair spray. This could cause achange in color or quality.31Useful Information
TroubleshootingDisplay issuesProblem Cause & Solution PageImages appear slightlydistorted.RThis is a characteristic of camera lenses and is not amalfunction. –The image of a person’sface is dark.RWhen there is a backlight in the place where the WirelessCamera is located, the person’s face becomes dark.– Adjust the brightness of the display while monitoring.23The image is not clear oris blurry.RThe surface of the lens of the Wireless Camera is dirty.– Clean it with a soft dry cloth. 30RThe surface of the lens of the Wireless Camera is wet withdew. Wait for the condensation to evaporate. –The image of the subjectis washed out when it isdark.RWhen it is dark, the image brightness is automaticallyadjusted in order to make the person’s face easier to see.Although images may appear washed out, this is not amalfunction.–The image is white orblack.RThe brightness of the display is not properly adjusted.Adjust the brightness while monitoring. 23The image is white, orwhite lines or circles areshown on the display.RStrong light such as sunlight is shining into the lens of theWireless Camera. Though this may cause the displayimage to become difficult to see, this is not a malfunction.– Locate the Wireless Camera away from direct sunlight.–The image is flickering. RThe MOTTLED COLOR PREVENT setting does not matchthe power frequency for the region that you are using theunit in.– Matching the power frequency for the region that you areusing the unit in can improve the quality of the colorsdisplayed. When using the unit in a different region (aftermoving, etc.), match the settings to that region.27RAC (alternating current) lights such as fluorescent lightsmay cause flickering. This is not a malfunction. –The image displayed onthe Wireless Monitordistorts or is displayedslowly. (It takes about 5seconds or more to bedisplayed.)RThe distance between the Base Unit and WirelessCamera, or Base Unit and Wireless Monitor is too far, orthere is a concrete wall or other obstruction between theBase Unit and Wireless Camera, or Base Unit andWireless Monitor.– Move the Base Unit to a location closer to the WirelessCamera that has no obstructions, or move the WirelessMonitor to a location closer to the Base Unit that has noobstructions.8The recording date andtime are not displayedwhile viewing images.RThe date and time are not set. The date and time may bereset to the default setting after a long periods with thepower plug unplugged or when a power failure occurs.– Set the current date and time using the Wireless Monitor.1632Help
Base Unit/Wireless MonitorProblem Cause & Solution PageEven when the WirelessMonitor is placed on theBase Unit (or the chargerof additional WirelessMonitors), the chargeindicator does not light up.RThe power plug is unplugged from the power outlet.– Plug the power plug into the power outlet firmly. 15RThe Wireless Monitor is not placed on the Base Unitcorrectly.– Replace it securely. (The charge indicator lights in red.)15RThe charge contacts are dirty.– Wipe them with a soft dry cloth. 31If there is no change after performing the above actions,contact our service personnel. –Even if the WirelessMonitor has beencharged,   flashesafter using it a few times.RThe battery pack is at the end of its life.– Replace the battery pack with a new one. 30The Wireless Monitor orthe Base Unit (or thecharger of additionalWireless Monitors) iswarm.RThis is normal. (It may feel a little warmer in summer thanin winter.)– If it feels very hot, unplug the power plug from the poweroutlet and remove the battery pack, then contact ourservice personnel.–OthersProblem Cause & Solution PageThe Wireless Camera’sbatteries run out of powerquickly.RThe Wireless Camera is out of range of the Base Unit.– When the Wireless Camera is out of range of the BaseUnit, it repeatedly searches for the Base Unit whichcauses the batteries’ power to be consumed faster.Move the Base Unit so that it is within range of theWireless Camera.14RThe power plug is unplugged from the power outlet.– When the Base Unit is disconnected from the poweroutlet it causes the Wireless Camera to become out ofrange from the Base Unit. This causes the WirelessCamera to repeatedly search for the Base Unit whichresults in the batteries’ power being consumed faster.When unplugging the power plug of the Base Unit, turnthe slide switch of the Wireless Camera to OFF.–RYou are using rechargeable batteries.– Depending on the capacity of the rechargeable batteries,their life span may become shorter. This is not amalfunction.–There is a power failure. RThe unit does not work during a power failure. The dateand time may be reset to the default setting after a powerfailure.– In this case, set the date and time again using theWireless Monitor.1633Help
Problem Cause & Solution PageThe unit does not workwith correct operations.(The unit does not workproperly.)RPerform the following operations.Wireless Camera:Replace the batteries. 30Wireless Monitor:Remove the battery pack and insert it again.– Program settings are not affected.15Base Unit:Disconnect it from the power outlet and then reconnect itagain.34Help
Error messagesProblem Cause & Solution PageCANNOT CONNECT TOCAMERAThe following may be causing the problem.RThe Wireless Camera is turned off.– Turn the Wireless Camera on. 11RThe batteries of the Wireless Camera have run out ofpower.– Replace the batteries.30RThe Wireless Camera is turned on, but the WirelessCamera is out of range from the Base Unit.– Move the Base Unit to an area close to the WirelessCamera that has no obstructions between the WirelessCamera and Base Unit. (When the Wireless Camera isin range of the Base Unit it can connect to the Base Unit.)– Turn the power for the Wireless Camera off then on.(When the Wireless Camera is in range of the Base Unitit can connect to the Base Unit.)– When using a replacement Wireless Camera whenservicing your original Wireless Camera, thereplacement Wireless Camera must be paired to theBase Unit. Refer to the following for instructions on howto pair the Wireless Camera.811n How to pair Wireless CamerasAfter performing operations on the Base Unit, performoperations on the Wireless Camera within about 2 minutes.Base Unit operations:A Press and hold the pair button located on the rear bottomside of the Base Unit for about 13 seconds (until the pairindicator flashes quickly) with a pointed object.RThe pair indicator will start to slowly flash after about 3seconds of pressing the pair button, after about anadditional 10 seconds the pair indicator starts flashingquickly (enters CAMERA PAIRING MODE).Wireless Camera operations:B Insert the batteries (page 19).C Turn the power for the Wireless Camera on while pressingthe pair button with a pointed object (keep pressing the pairbutton until the pair indicator starts flashing).RThe pair indicator starts flashing quickly.–The pair indicator changes in the following mannerwhen pairing is successfully completed:flash quickly ® light for about 10 seconds ® go out–The pair indicator changes in the following mannerwhen pairing fails (Pairing must be performedagain.):flash quickly ® go outProtected pic.Remove protection.RThe images are protected and therefore cannot be deleted.– Remove the protection to delete protected images. 2535Help
Problem Cause & Solution PageProtected picsfull.Can’t protect pics.RThe maximum number of protected images (5 images) hasalready been reached.– Remove the protection from other images before settingprotection for the current image. Images that had theirprotection removed will be deleted in order as newimages are recorded.2525IN USE RAnother Wireless Monitor is being used.– Try again when the other Wireless Monitor is not beingused.–CANNOT PAIR RPairing failed because pairing operations were notperformed on the Wireless Monitor within the specified time(about 2 minutes).– Perform pairing again from the start after checking thepower and connections for the Wireless Monitor to bepaired.29CANNOT CONNECT TOBASERThe Wireless Monitor is too far from the Base Unit, or thereis a concrete wall or other obstruction between theWireless Monitor and Base Unit.– Move the Wireless Monitor to an area close to the BaseUnit that has no obstructions between the WirelessMonitor and Base Unit.836Help
SpecificationsWireless Monitor (VL-DM200A)n Power supply:Lithium ion battery (part number: CGA-LB102), @DC 3.7 V, 940 mAh@n Dimensions (Height ´ Width ´ Depth):Approx. 21 mm (13/16 in.) ´ 126 mm (4 15/16 in.) ´ 59 mm (2 5/16 in.) @(excluding protruding sections)@– When using the Base Unit: approx. @51 mm (2 in.) ´ @132 mm (5 3/16 in.) ´ @79.5 mm (3 1/8 in.)@(excluding protruding sections)@n Weight:@Approx. 200 g (0.44 lb) @(including the battery pack)n Operating temperature:5 °C to 40 °C (41 °F to 104 °F)n Operating humidity:Up to 90 % RH (Relative Humidity) non condensingn Display:2.2" color TFT LCD monitorn Wireless transmission method:1.9 GHz TDMA-WBn Talking methodHalf-duplex transmission (Press-talk)n Usage time (with continuous use)*1:Monitor: approx. 2.5 hoursStandby: approx. 100 hours*1 @When the battery pack is fully charged and the temperature is 20 °C (68 °F).n Charging time:Approx. 6 hoursn Transmission frequency:1921.536 MHz - 1928.448 MHzn Transmitting range:Approx. 70 m (229 ft 8 in.) (line-of-sight distance)Base Unit (VL-MDM200A)n Power supply:120 V AC, 60 Hzn Power consumption:@During standby: approx. 1 W@During operations: approx. 2 W (when used with the Wireless Monitor disconnected from the Base Unit)@During charging: approx. 5 Wn Dimensions (Height ´ Width ´ Depth):Approx. 41 mm (1 5/8 in.) ´ 132 mm (5 3/16 in.) ´ 75 mm (2 15/16 in.) @(excluding protruding sections)@n Weight:Approx. 175 g (0.39 lb)37General Information
n Operating temperature:5 °C to 40 °C (41 °F to 104 °F)n Operating humidity:Up to 90 % RH (Relative Humidity) non condensingn Wireless transmission method:1.9 GHz TDMA-WBn Transmission frequency:1921.536 MHz - 1928.448 MHzn Transmitting range:Approx. 70 m (229 ft 8 in.) (line-of-sight distance)Wireless Camera (VL-CM851A)n Power supply:Alkaline AA battery ´ 4n Battery life:Maximum 6 months*1*1 When used 5 times a day (displaying images for about 20 seconds each time) with a temperature of20 °C (68 °F).n Dimensions (Height ´ Width ´ Depth):RWireless unit:Approx. 190 mm (7 1/2 in.) ´ 78 mm (3 1/16 in.) ´ 58 mm (2 5/16 in.) @(excluding protruding sections)RCamera unit:Approx. 37 mm (1 7/16 in.) ´ 87.5 mm (3 7/16 in.) ´ 40 mm (1 9/16 in.) @(excluding protruding sections)n Weight:Approx. 390 g (0.86 lb) (excluding batteries)n Operating temperature:RWireless unit (used indoors):0°C to 40 °C (32 °F to 104 °F)RCamera unit (used outdoors):-20°C to 50 °C (-4 °F to 122 °F)n Operating humidity:Up to 90 % RH (Relative Humidity) non condensingn Installation method:Attached to a doorn Wireless transmission method:1.9 GHz TDMA-WBn Minimum illuminance:3 lxn Water resistant proprieties:IPx3 equivalent (Camera unit)*1*1 IPX-3 specifies protection against spraying water and water spraying up to 60° from vertical.@n Viewing angle:RHorizontal: approx. 120°RVertical: approx. 90°38General Information
n Transmission frequency:1921.536 MHz - 1928.448 MHzn Transmitting range:Approx. 70 m (229 ft 8 in.) (line-of-sight distance)39General Information
For users in the United States Only (FCC and otherinformation)This device complies with Part 15 of the FCC Rules.Operation is subject to the following two conditions:(1) This device may not cause harmful interference, and(2) this device must accept any interference received, including interference that may cause undesiredoperation.CAUTION:Any changes or modifications not expressly approved by the party responsible for compliance could voidthe user’s authority to operate this device.NOTE:This equipment has been tested and found to comply with the limits for a Class B digital device, pursuantto Part 15 of the FCC Rules. These limits are designed to provide reasonable protection against harmfulinterference in a residential installation. This equipment generates, uses, and can radiate radio frequencyenergy and, if not installed and used in accordance with the instructions, may cause harmful interferenceto radio communications. However, there is no guarantee that interference will not occur in a particularinstallation. If this equipment does cause harmful interference to radio or television reception, which canbe determined by turning the equipment off and on, the user is encouraged to try to correct theinterference by one or more of the following measures:– Reorient or relocate the receiving antenna.– Increase the separation between the equipment and receiver.– Connect the equipment into an outlet on a circuit different from that to which the receiver is connected.– Consult the dealer or an experienced radio/TV technician for help.FCC RF Exposure WarningRThis product complies with FCC radiation exposure limits set forth for an uncontrolled environment.RTo comply with FCC RF exposure requirements, the unit must be installed and operated 20 cm (8inches) or more between the product and all person’s body (excluding extremities of hands, wrist andfeet).RThis product may not be collocated or operated in conjunction with any other antenna or transmitter.Notice:FCC ID can be found on the bottom of the Wireless Camera and Wireless Monitor, and on the electricalparts of the Base Unit.40General Information
For users in Canada Only (Industry Canada Notices andother information)NOTICE:This product meets the applicable Industry Canada technical specifications.RF Exposure Warning:RThis product complies with IC radiation exposure limits set forth for an uncontrolled environment.RTo comply with IC RF exposure requirements, the unit must be installed and operated 20 cm (8inches) or more between the product and all person’s body (excluding extremities of hands, wrist andfeet).RThis product may not be collocated or operated in conjunction with any other antenna or transmitter.This Class B digital apparatus complies with Canadian ICES-003.41General Information
Quick Reference Guide (in Spanish)AFixing screwBCamera unitCMicrophoneDCamera lensESpeakerFWireless unitGMagnet/rubberHPower slide switch (ON / OFF)IPair buttonJPair indicatorKSlide leverVL-CM851AQuick Reference GuideLocation of controlsBottom viewBKCDEHFGILMLMBattery caseCable protection sheetAJ42Quick Reference Guide (in Spanish)
Bottom viewONVL-DM200AAMonitor displayBMenu buttonCCharger indicatorDMonitor buttonENavigator keyFTalk buttonGHBattery coverIJCharge contacts (metal parts)KCharge contacts (metal parts)LMPower plugNPair indicatorVL-MDM200AKLMOPair buttonABMENUPRESS TALKDCEFGHIJMicrophoneSpeakerElectrical partsBottom view43Quick Reference Guide (in Spanish)
To monitor(Monitor button) (D). to finish.To switch the displayed image between Wide display and Zoom display(The default is wide.) (D) for about 3 seconds to switch between To talkPress and hold MPRESS TALKNwhile monitoring.(You cannot hear the sound from the other party while pressing MPRESS TALKN.)To record the displayed imagePress MMENUNwhile monitoring.   Press  (E). To view recorded imagesPress MMENUN (B).   Select “PLAY IMAGES” using or (E).  The number after the button shows the location of the button described in the previous page.Basic OperationsPress MNWide display and Zoom display.(Monitor button)Press MN(Monitor button)Press MNEMNMNDMNC(Monitor button) (D). to finish.Press MN(Monitor button)Press MN (F) (B)44Quick Reference Guide (in Spanish)
Customer services (For United States)45Appendix
Warranty (For United States)46Appendix
47Appendix
Warranty (For Canada)48Appendix
49Appendix
IndexAAdjusting the display brightness:  23Adjusting the volumeListening volume:  23Talking volume:  23BBatteries (Alkaline batteries/batterypack):  4, 19, 30Battery case:  11, 19Battery cover:  12, 15Battery pack:  4, 15, 30CCamera lens:  11Camera unit:  11, 17, 18, 20Canceling Wireless Monitors:  30Changing the zoom position (pan/tilt):  24Charge contacts (metal parts):  13, 15, 31Charge indicator:  12, 15Charging:  33Cleaning:  30Contrast:  27DDate and time settings:  16Deleting all pictures:  28Deleting imagesDeleting 1 picture:  25Deleting all pictures:  28Display:  12, 13EElectrical parts:  13GGuidance:  13, 25, 27IImagesDeleting images:  25Protecting images (removingprotection):  25Recording images:  24Viewing images:  25LListening volume:  23MMenu button:  12When lit in red:  14Microphone:  11, 12, 31Monitoring (the outside):  23Adjusting the display brightness:  23Adjusting the listening volume:  23Adjusting the talking volume:  23Recording an image:  24Switching between Wide/Zoom view:  24Switching zoom position (Pan/Tilt):  24Talking to visitors:  23NNavigator key:  12OOperation guidance:  13, 25, 27PPair buttonBase Unit:  13, 29, 35Wireless Camera:  11, 35Pair indicator:  12, 13, 19, 29, 35Pairing (Wireless Monitor):  29Pan/Tilt (switching zoom position):  24Power slide switch:  11, 19Protecting images (removing protection):  25QQuick Reference Guide:  42RRecording:  24Recording an image:  24Remaining battery power (Alkaline batteries/battery pack):  13, 14Resetting function settings:  28SSignal status display (Wireless Monitor/Wireless Camera):  13, 14Slide lever:  12, 19Slide switch:  11, 19Speaker:  11, 12Specifications:  37Switching between Wide/Zoom view:  24Changing the default display settings:  27Switching while monitoring:  23Symbols:  14, 25TTalk button:  12, 23Talking volume:  23VViewing images:  25WWide display:  23Wireless Monitors (Additional/replacementaccessories):  4, 29Wireless unit:  11, 19ZZoom display:  2350Index
51Notes
For your future referenceDate of purchaseSerial number (found on the bottom of the Base Unit)Dealer’s name and addressDealer’s telephone numberAttach your sales receipt here.For customers in Canada:5770 Ambler Drive, Mississauga, Ontario L4W 2T3For customers in the U.S.A:One Panasonic Way, Secaucus, New Jersey 07094For assistance, visit our website:http://www.panasonic.comfor customers in the U.S.A. and Puerto Rico.© Panasonic System Networks Co., Ltd. 2012Printed in Vietnam*SDM200A**SDM200A* PNQX5704ZA  CC0812MM0

Navigation menu