Panasonic of North America 9TAWX-CH2050 Part 90, Subpart C, Section 90.217 User Manual WX CH2050P 3TR001649AAA
Panasonic Corporation of North America Part 90, Subpart C, Section 90.217 WX CH2050P 3TR001649AAA
UserManual.wiki
>
Panasonic of North America
>
9TAWX CH2050 User Manual
User Manual
Navigation menu
Upload a User Manual
Namespaces
Wiki Guide
HTML
PDF
Info
Views
User Manual
Discussion / Help
Navigation
![Before attempting to connect or install this product,please read these instructions carefully and save this manual for future use.All-in-One HeadsetModel No. WX-CH2050INTRODUCTIONThe WX-CH2050 is an all-in-one headset designed for usein wireless communication systems, which are use in Drive-thru menu boards, etc. It incorporates such necessarydevices as the battery compartment and control buttonsbesides the microphone and earphone. The built-in anten-nas, transmitter, and receiver enable you to communicatewith other store personnel and the customer by audio.FEATURES• Compatible center modules: WX-C1010, WX-C1011,and WX-CC2010• Less noise and interference thanks to the use of UHFband• Easy frequency setting by use of phase locked loop(PLL)• A/B channel selection available for convenience of dou-ble drive-through (DDT)• Talk mode selectable between talk-lock and press-to-talk• Page mode selectable between page-lock and press-to-talk• Easy-to-replace cushions: head pad cushion, earphonecushion, and windproof cushionThe serial number of this product may be found in the bat-tery compartment of the unit.You should note the serial number of this unit in the spaceprovided and retain this book as a permanent record of yourpurchase to aid identification in the event of theft.Model No. WX-CH2050Serial No.CAUTIONIt is a violation of Federal Law to begin operating this sys-tem prior to obtaining an FCC Radio License. The FCC IDnumber for this radio equipment is listed below.FCC ID: ACJ9TAWX-CH2050CONTENTSINTRODUCTION ..................................................................1FEATURES ...........................................................................1PRECAUTIONS ....................................................................2NAMES & FUNCTIONS ........................................................2OPERATING PROCEDURES................................................4●Preparations .................................................................4●Communications with Customers [TALK] ....................5●Communications with Other Store Personnel [PAGE] .....................5BATTERY LOADING & REPLACEMENT ..............................6MAINTENANCE....................................................................6TROUBLESHOOTING ..........................................................7SPECIFICATIONS ................................................................7STANDARD ACCESSORIES ................................................7OPTIONAL ACCESSORIES..................................................7SETUP PROCEDURES.........................................................8●Opening the Switch Pocket..........................................8●Channel Group Selection .............................................8●DIP Switch Setup..........................................................9●Channel Interference Check ........................................9●Operation Mode Setup...............................................10ATTENTION:A lithium-ion battery that is recyclable powersthe product you have purchased. Please call 1-800-8-BATTERY for information on how to recy-cle this battery.](https://usermanual.wiki/Panasonic-of-North-America/9TAWX-CH2050/User-Guide-326111-Page-1.png)
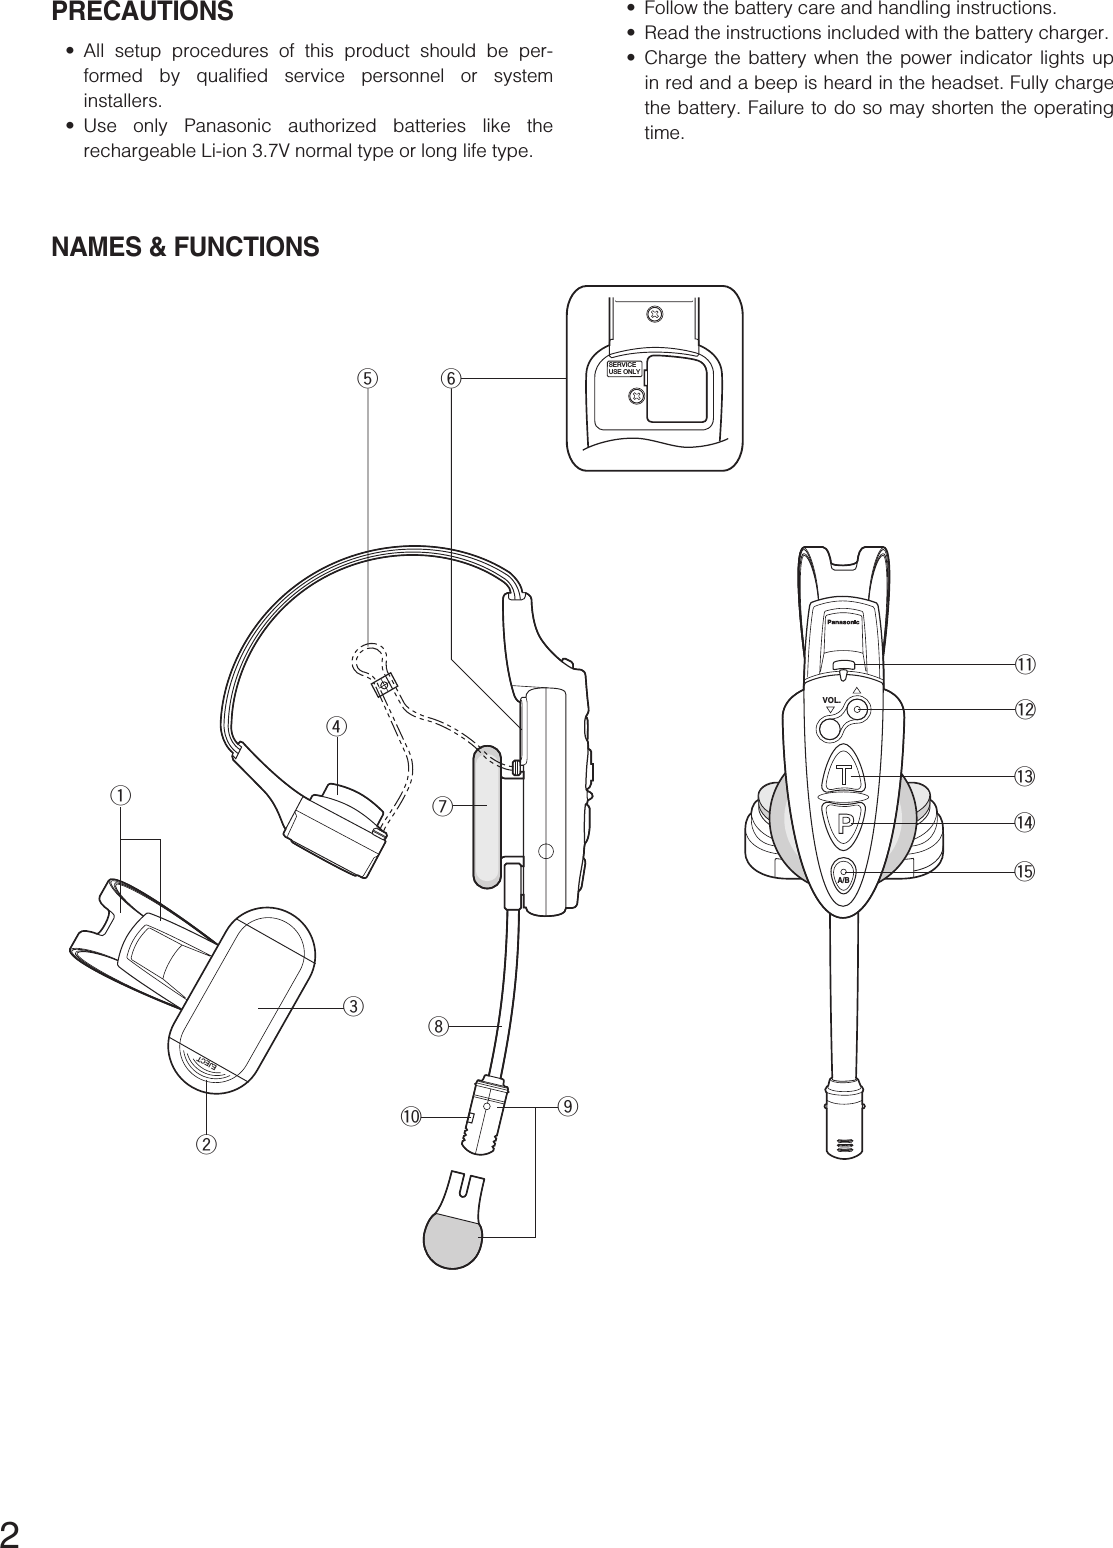
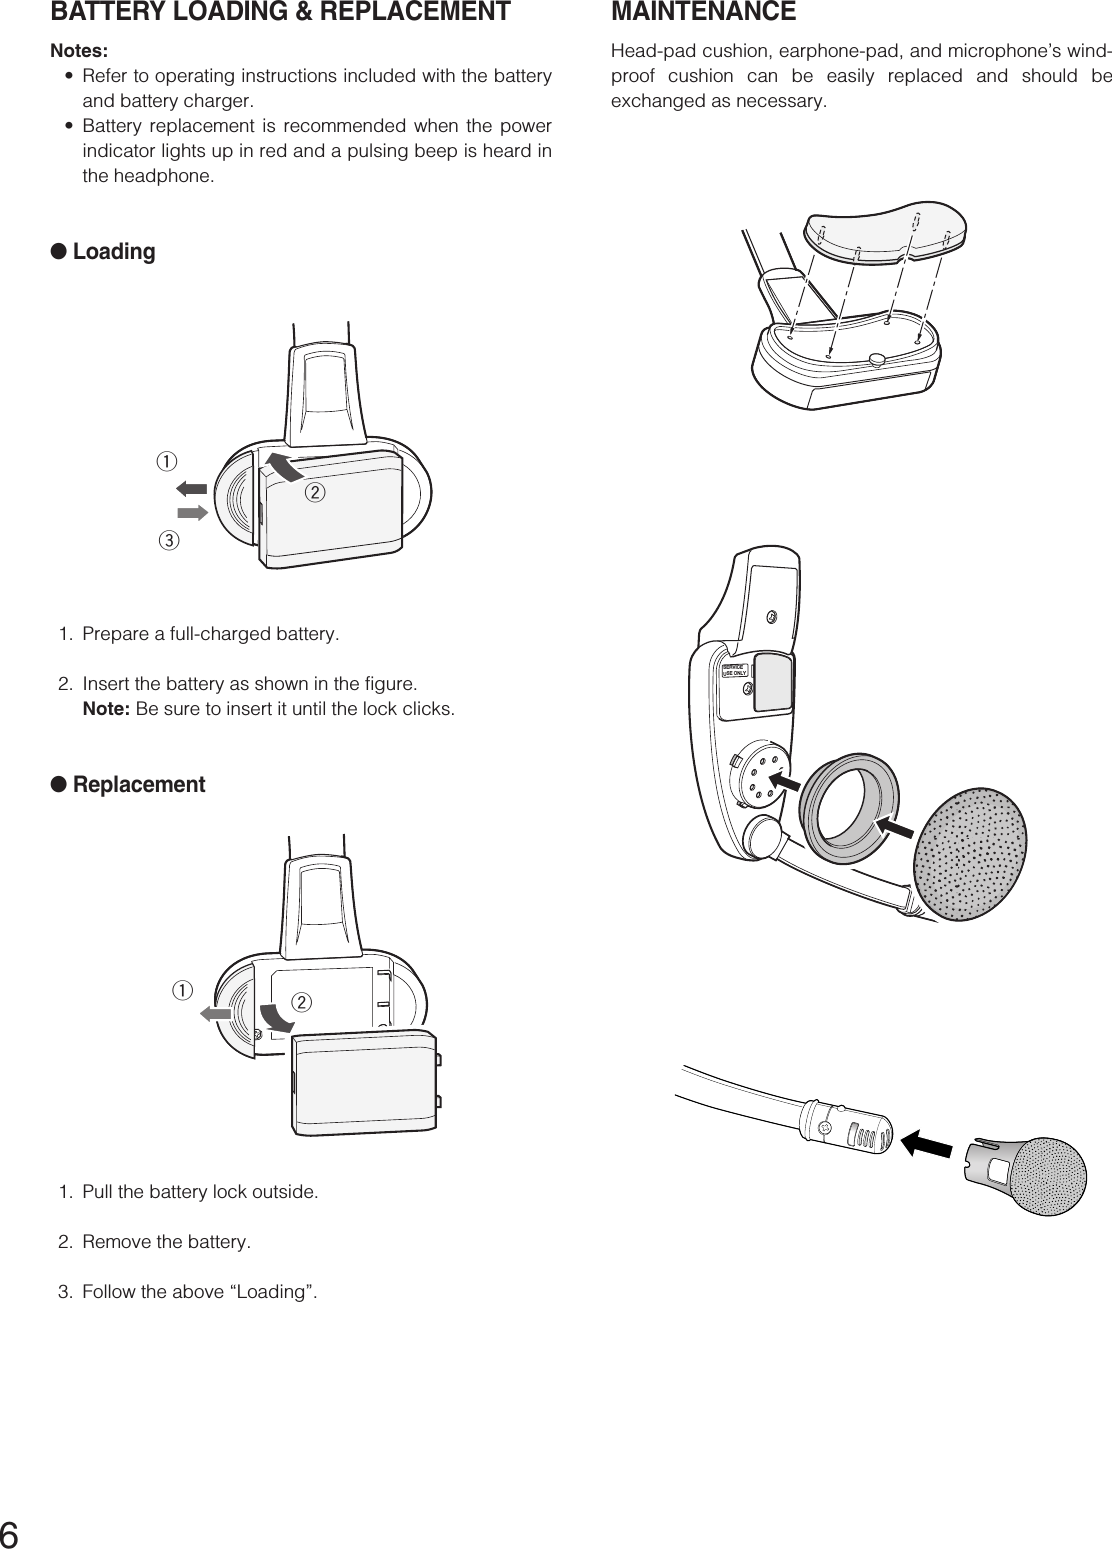
![3qHead Band and Head PadAdjustable to your head by sliding the head padwBattery Lock [EJECT]When removing the battery, slide the lock to the out-side.When loading a new battery, insert the battery until thelock clicks.eBattery (Optional accessory)See PRECAUTIONS.rHead Pad CushiontStrap (Standard accessory)ySwitch PocketDo not open the lid. Only qualified service personnel orsystem installers are allowed to change switch settings.uEarphone PadiMicrophone BoomAdjustable to your mouth position by rotating and bend-ing the boomoMicrophone and Windproof Cushion (Standardaccessory)!0 Channel IndicatorSteadily lights up to indicate the operating channel indifferent colors.Red: Is lit when channel A is selected.Green: Is lit when channel B is selected.Blinks to indicate the Talk or Page mode.Constant Blink: Talk modeRandom Blink: Page mode!1 Power Button and Indicator [POWER]Pressing the button for one second will turn on or off theheadset.The indicator shows the status as follows.Green On: Power is supplied, and the headsetoperates.Red On: The battery requires recharging.Red Blink: The channel selector is set to a wrongposition.!2 Volume Control Buttons [VOL ▲▼]Pressing the respective buttons will increase ordecrease the sound level.!3 Talk Button [T]This button controls communications with the customer.When the button is released, you can hear the cus-tomer who is at the menu-board.While the button is held down in the press-to-talkmode, you can speak to the customer.When the button is pressed in the talk-lock mode, youcan speak to the customer until you press the buttonthe second time.!4 Page Button [P]This button controls communications with store person-nel.When the button is released, you can hear the commu-nications among store personnel.While the button is held down in the press-to-talkmode, you can speak to store personnel.When the button is pressed in the page-lock mode,you can speak to the store personnel until you press thebutton the second time.!5 A/B Channel Selection Button [A/B]This button switches frequencies from channel A to Band vice versa. The channel indicator displays theselected channel in red (A) or green (B).](https://usermanual.wiki/Panasonic-of-North-America/9TAWX-CH2050/User-Guide-326111-Page-3.png)
![4OPERATING PROCEDURESNotes:•Transmission using the talk [T] or page [P] button isallowed for a single headset at a time. A continuousbeep or distorted sound will be heard in the headsetthat tries to transmit while another person is operating.•Distance a headset more than 0.3m (1 foot) from theorder taker, or more than 1m (3 ft) from the center mod-ule.●PreparationsPrior to operating the headset, confirm that the systemsetup has been performed for the headset, center module,and other devices.1. If necessary, attach the supplied strap on to the head-set. There are two strap buttons on the headset: one isat the lower part of the head pad, and the other isbehind the ear cushion. •Hook the tabs of the strap to the two strap buttonson the headset.2. Install a battery to the battery compartment, referring toBATTERY LOADING & REPLACEMENT.3. Wear the headset and route the strap behind your neck.4. Adjust the head pad so that the earphone is placed onyour ear.5. Rotate and bend the microphone boom so that themicrophone is placed near your mouth.6. Press the power button to turn on the headset.A/BVOL.A/BVOL.qewA/BVOL.](https://usermanual.wiki/Panasonic-of-North-America/9TAWX-CH2050/User-Guide-326111-Page-4.png)
![5●Communications with Customers [TALK]Any store personnel wearing the headset can bi-directional-ly communicate with the customer who is at the menuboard. 1. Select a proper sound level by pressing the [▲] or [▼]button.2. You will hear a tone in the headset when a vehiclearrives at the menu board.Note: The tone duration varies depending on the set-tings made in the center module. <When the talk-lock mode is preset>1. Press the talk [T] button and speak to the customer.A short beep repeats in the headset.2. Press the button again to release the lock and listen tothe customer.<When the press-to-talk mode is preset>1. Hold down the talk [T] button and speak to the cus-tomer.A short beep repeats in the headset.2. Release the button and listen to the customer.●Communications with Other Store Personnel[PAGE]Store personnel wearing the headset can communicatewith each other without being heard by customers.<When the page-lock mode is preset>1. Press the page [P] button and speak into the micro-phone at a normal level. A short beep repeats in the headset to notify all storepersonnel that the system operates in the page mode.2. Press the page [P] button again to release the lock andlisten to the response from other store personnel.<When the press-to-talk mode is preset>1. Hold down the page [P] button and speak into themicrophone at a normal level. A short beep repeats in the headset to notify all storepersonnel that the system operates in the page mode.2. Release the button and listen to the response fromother store personnel.VOLPressPress againHold downReleasePressPress againHold downRelease](https://usermanual.wiki/Panasonic-of-North-America/9TAWX-CH2050/User-Guide-326111-Page-5.png)

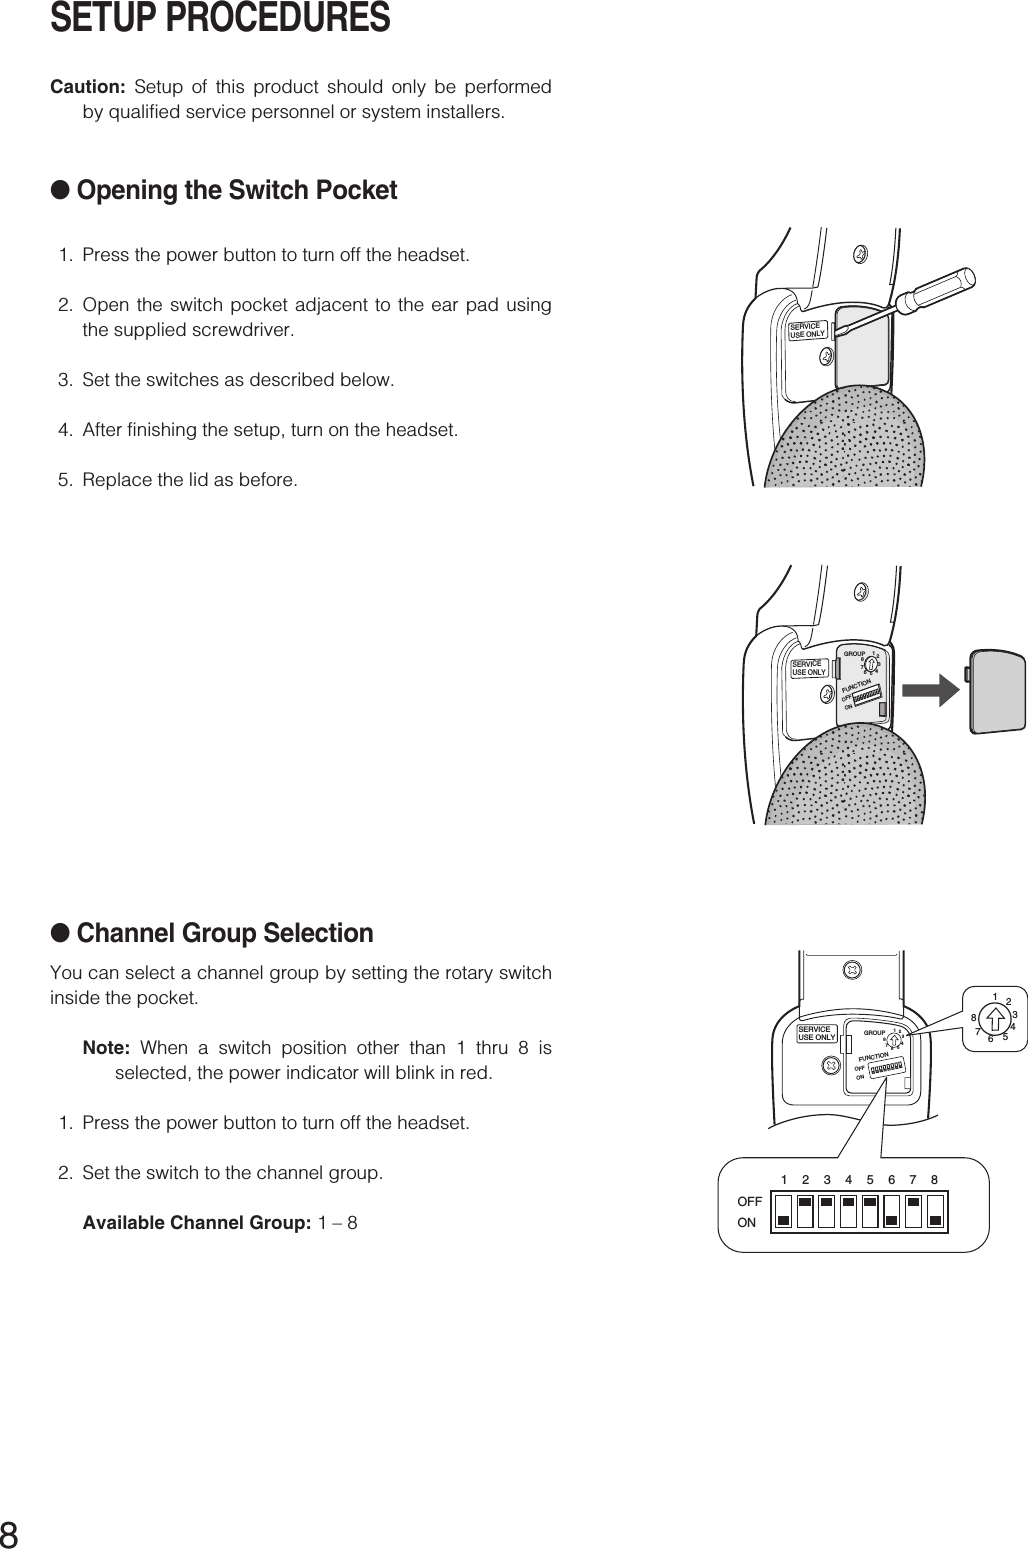
![9●DIP Switch SetupAn eight-bit DIP switch is provided for system setups. Theinitial setting is marked with an asterisk *.1. Press the power button to turn off the headset.2. Set the switches as follows.SW#1: Selection for a radio frequency matching to thelocationON: Applies the US frequency to the headset.OFF: Applies the Canadian frequency.SW#2: Refer to the Operating Instructions included withthe WX-CC2010.SW#3: Refer to the Operating Instructions included withthe WX-CC2010.SW#4: Refer to the Operating Instructions included withthe WX-CC2010.SW#5: Refer to the Operating Instructions included withthe WX-CC2010.SW#6: Tone squelch function is enabled or disabled.ON: Outputs the audio after detecting the tonesquelch.OFF: Outputs the audio regardless of the tonesquelch.Notes: • Set the switch normally to the position ON. Payattention to a high level noise that may be outputwhen set to OFF.• The SW#6 and SW#8 are used for channel interfer-ence check while turning on the headset. Seebelow.1SW#2345678LocationFunctionDDT/SDTManager ModeRole AssignmentArea ExpansionTone SquelchTalk Lock ResumptionCompatibilityUSA*ONDouble Drive ThruONManagerExpandON*ONWX-C1010/WX-C1011*CANADAOFFSingle Drive Thru*OFF(Normal)*Assistant*Normal*OFFOFF*WX-CC2010SW#7: While talking with a customer in the TALK lockmode, you may need to contact store personnel inthe PAGE mode that interrupts the TALK mode. Thisswitch specifies the status of the interrupted TALKlock mode after ending the PAGE mode.ON: Resumes the TALK lock mode.OFF: Releases the TALK lock mode.SW#8: The system compatibility is specified.ON: Is compatible with the center modules WX-C1010 and WX-C1011.OFF: Refer to the Operating Instructions includedwith the WX-CC2010.Note: The SW#8 and SW#6 are used for channelinterference check while turning on the headset.See below.●Channel Interference CheckThe SW#6 and SW#8 perform a special role to checkwhether or not there is radio wave interference in the select-ed channel group.1. Press the power button to turn off the headset.<When WX-C1010 or WX-C1011 is used>2. Set the switches as follows, and turn on the headset. A loud noise will be heard in the headset.SW#6: OFFSW#8: ON3. Listen to the sound while repeatedly pressing the [A/B]button.Only random noise will be heard if there is no interfer-ence. If any foreign sound is heard, it is an interference.<When WX-CC2010 is used>2. Set the switches as follows, and turn on the headset.A loud noise will be heard in the headset.SW#6: OFFSW#8: OFF3. Listen to the sound.For details, refer to the operating instructions includedwith the WX-CC2010.4. Re-arrange the channel group selection if there is anyinterference.](https://usermanual.wiki/Panasonic-of-North-America/9TAWX-CH2050/User-Guide-326111-Page-9.png)
![10● Operation Mode SetupThe three operation modes can be set up to adapt the headset to your requirements.•Default channel setup •Talk lock/ Talk PTT (press to talk)•Page lock/Page PTTIndicatorSelected Mode Selection Transition ExitOffPower A/B channelRed GreenDefault Channel SetupChannel Selected A/B ButtonABEnableDisableTalk SetupTalk LockTalk PTTPage SetupPage PTTPage LockPTT stands for "press to talk."The default settings are enclosed with bold lines in the table.Blink OnBlinkBlinkOnOn OnOnOnBlinkBlinkABEnableDisablePress [POWER].——— ———————While holding down and buttons,press [POWER]. TP—TTP——A/B](https://usermanual.wiki/Panasonic-of-North-America/9TAWX-CH2050/User-Guide-326111-Page-10.png)
![111. Press the power button to turn off the headset.2. While holding down the talk [T] and page [P] buttonssimultaneously, press the power button to turn on theheadset. The headset enters the setup mode where the indica-tors and buttons perform differently from the normaloperation. 3. Select a default channel setup from four options, press-ing the [T] button.4. Press the [A/B] button to move to the talk setup andpage setup.5. Select a talk mode, pressing the [T] button.6. Select a page mode, pressing the [P] button.7. Confirm that the indicators show the selected threemodes for the default channel, talk and page, by press-ing the [A/B] button.8. Press the power button to turn off the headset, and turnon again. The newly selected operation mode will beapplied to the headset.](https://usermanual.wiki/Panasonic-of-North-America/9TAWX-CH2050/User-Guide-326111-Page-11.png)