Panasonic of North America 9TAWX-CH2050A Wireless Communication System Headset User Manual THIS IS NOT THE FINAL DRAFT
Panasonic Corporation of North America Wireless Communication System Headset THIS IS NOT THE FINAL DRAFT
UserManual.wiki
>
Panasonic of North America
>
9TAWX CH2050A User Manual
Users Manual
Navigation menu
Upload a User Manual
Namespaces
Wiki Guide
HTML
PDF
Info
Views
User Manual
Discussion / Help
Navigation
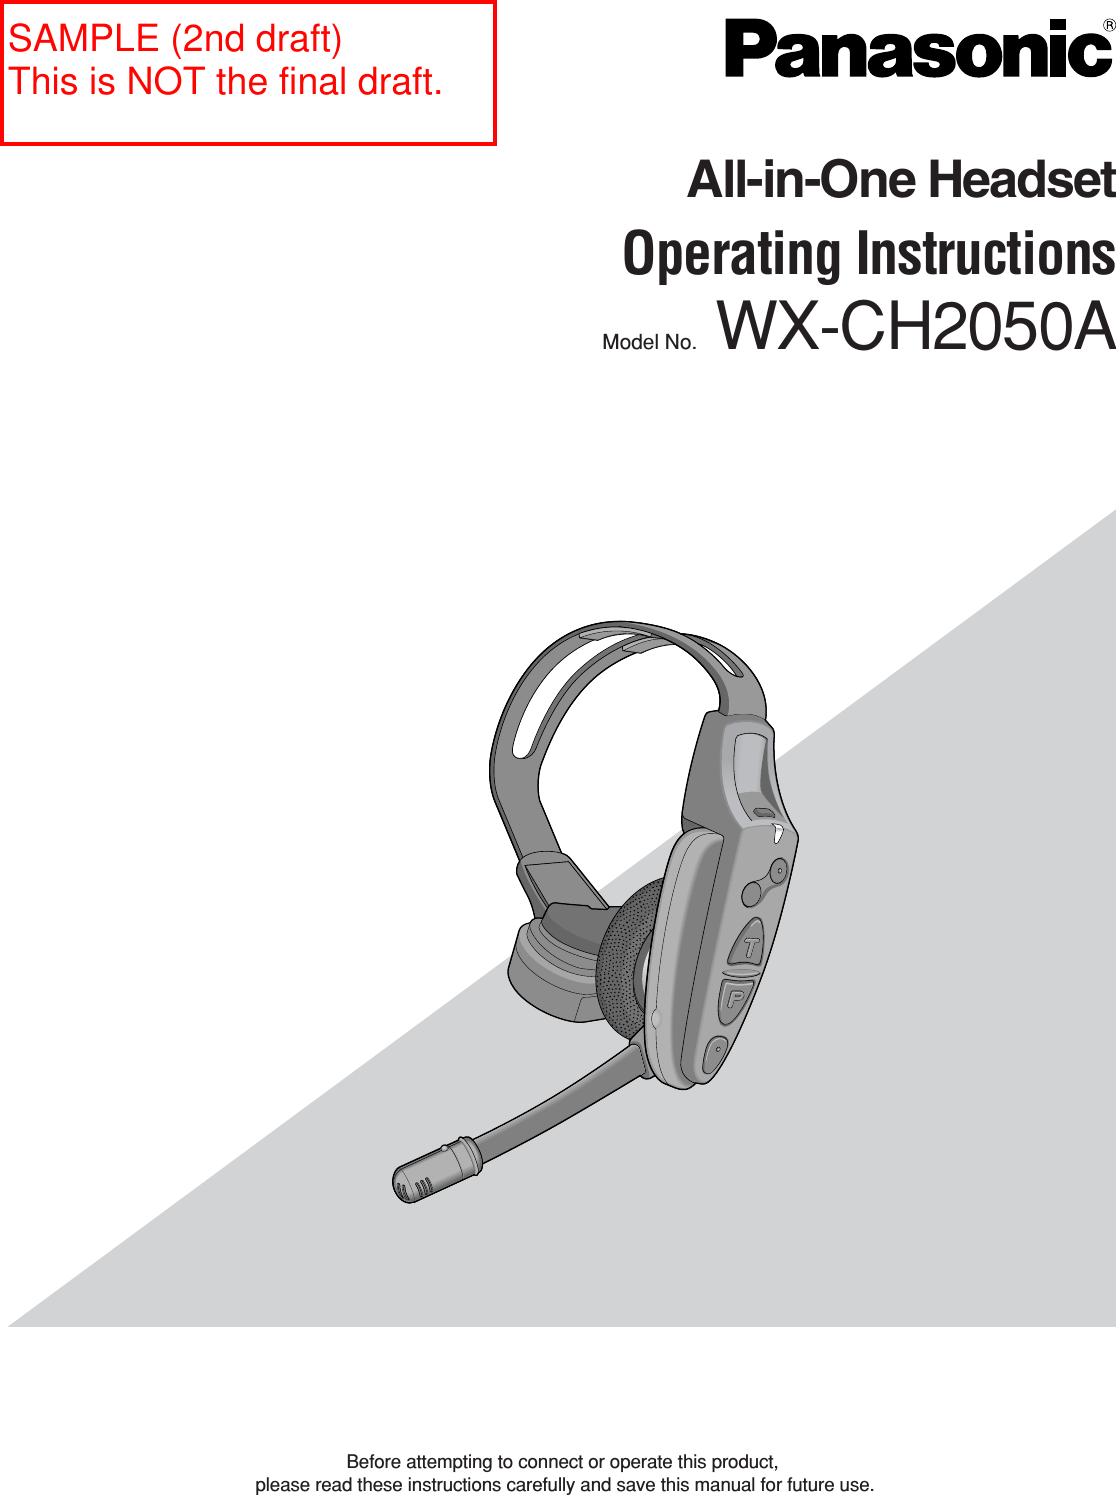

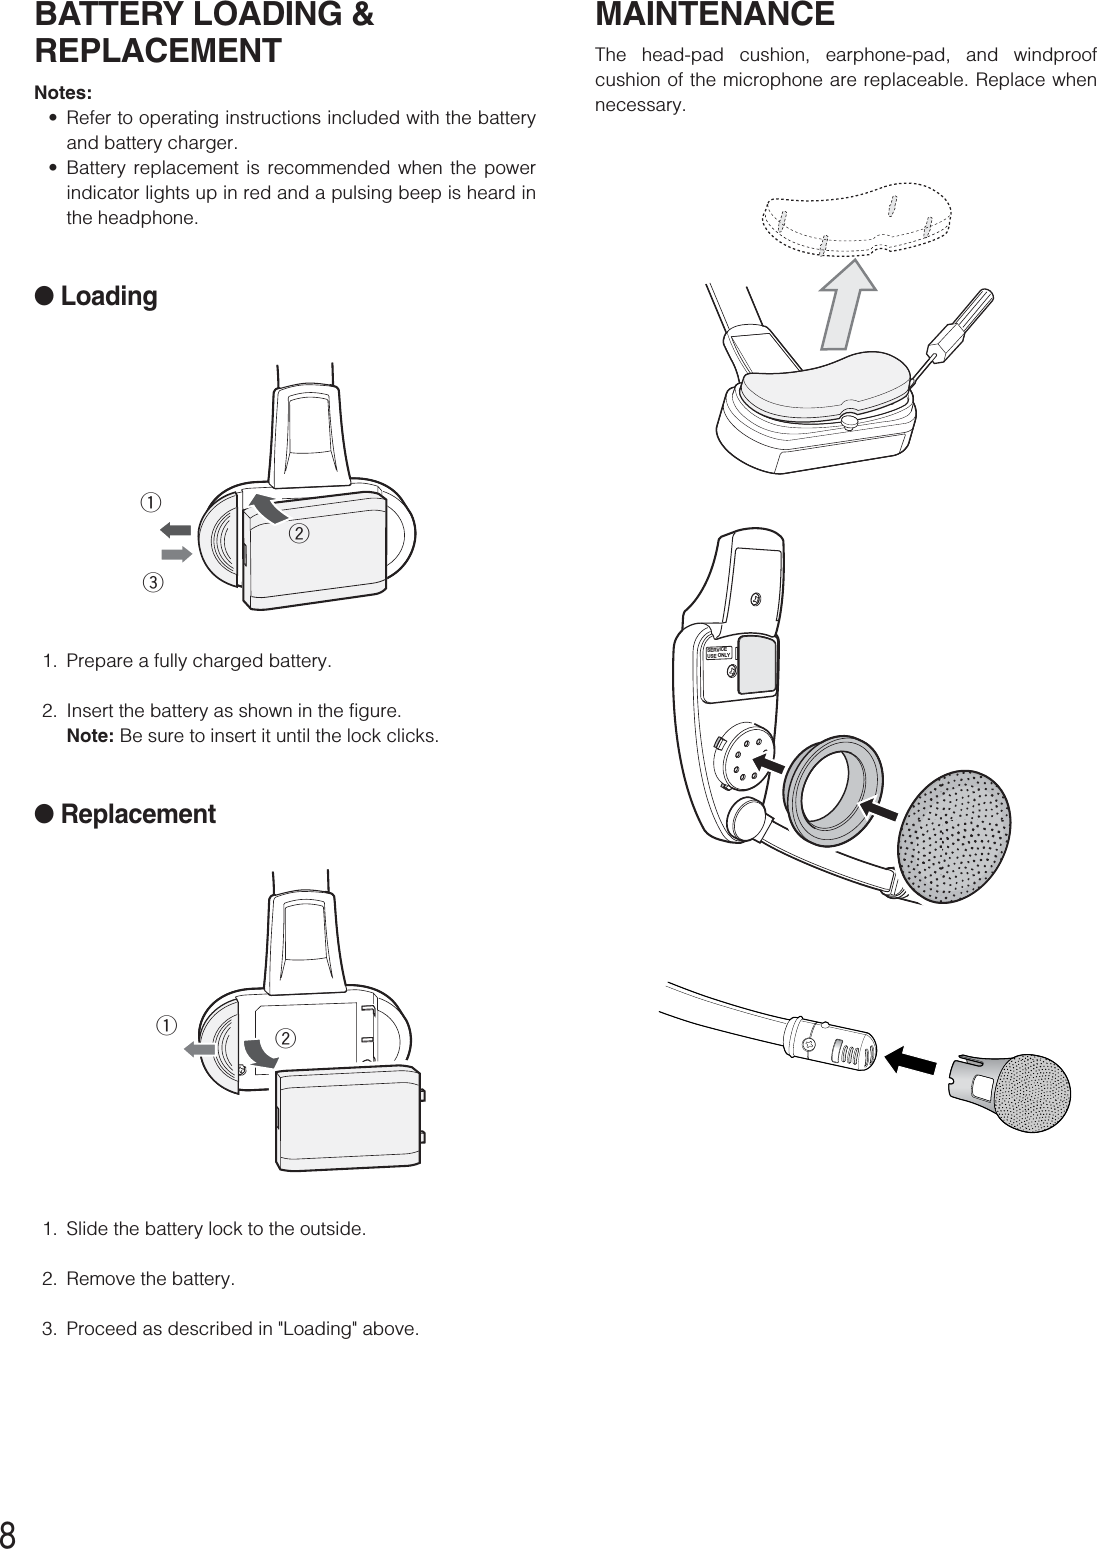
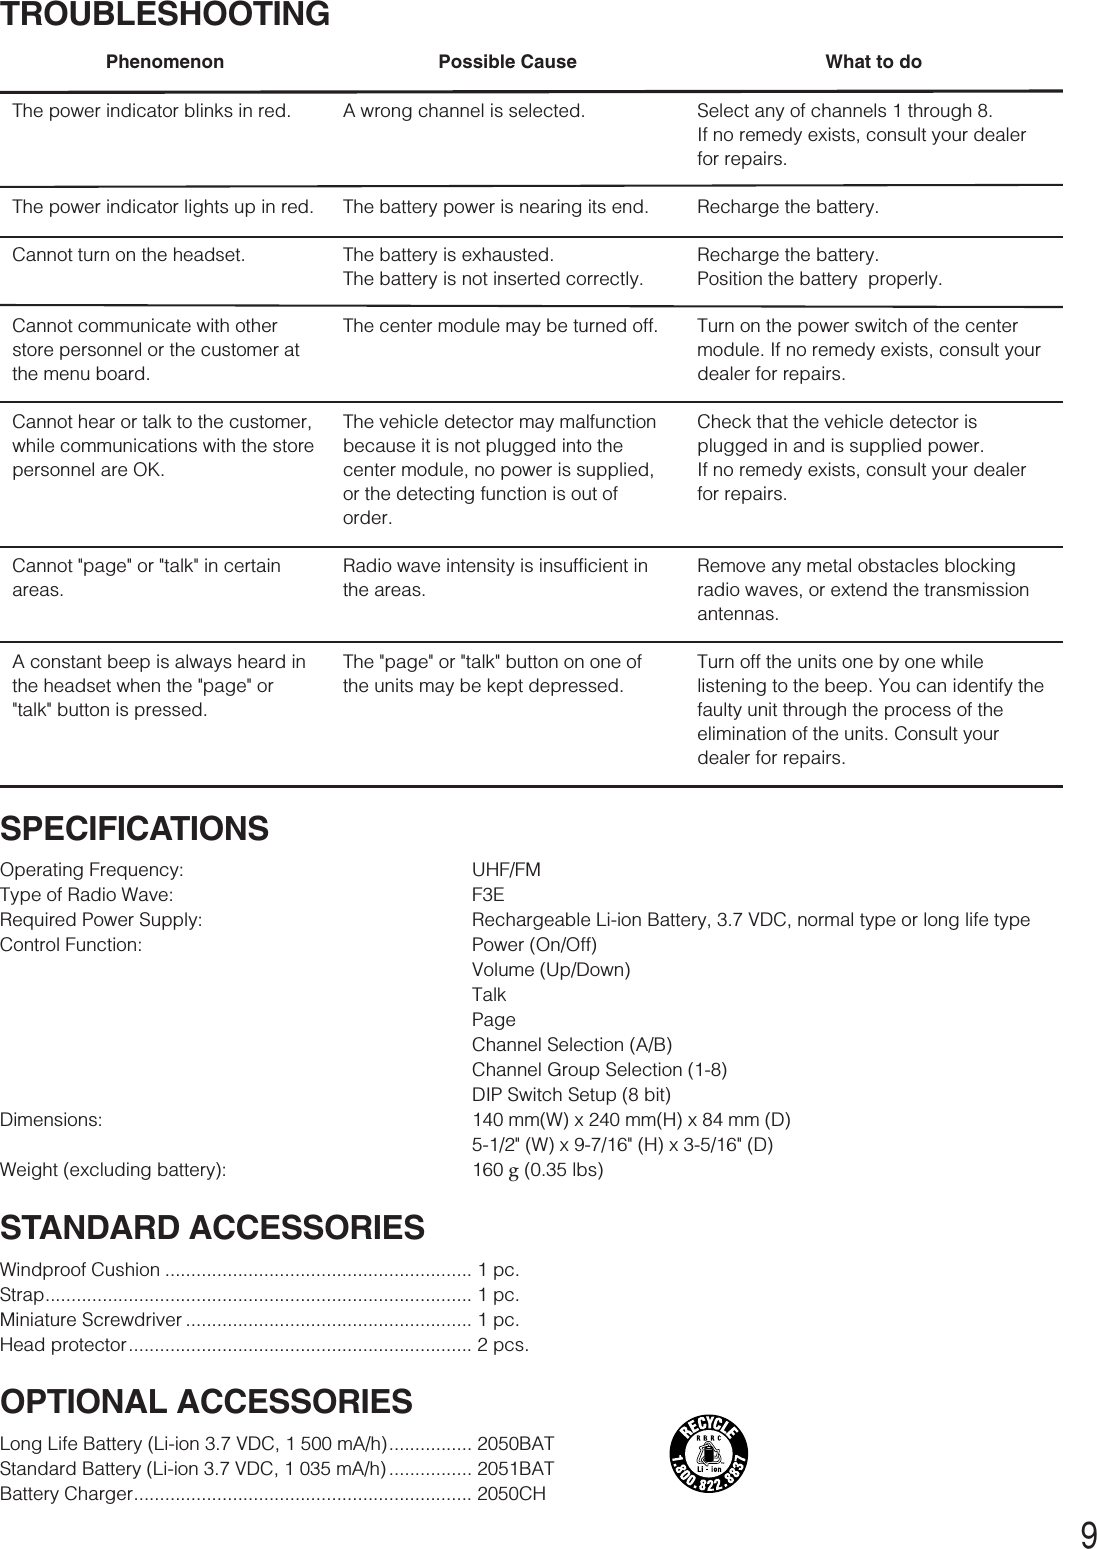
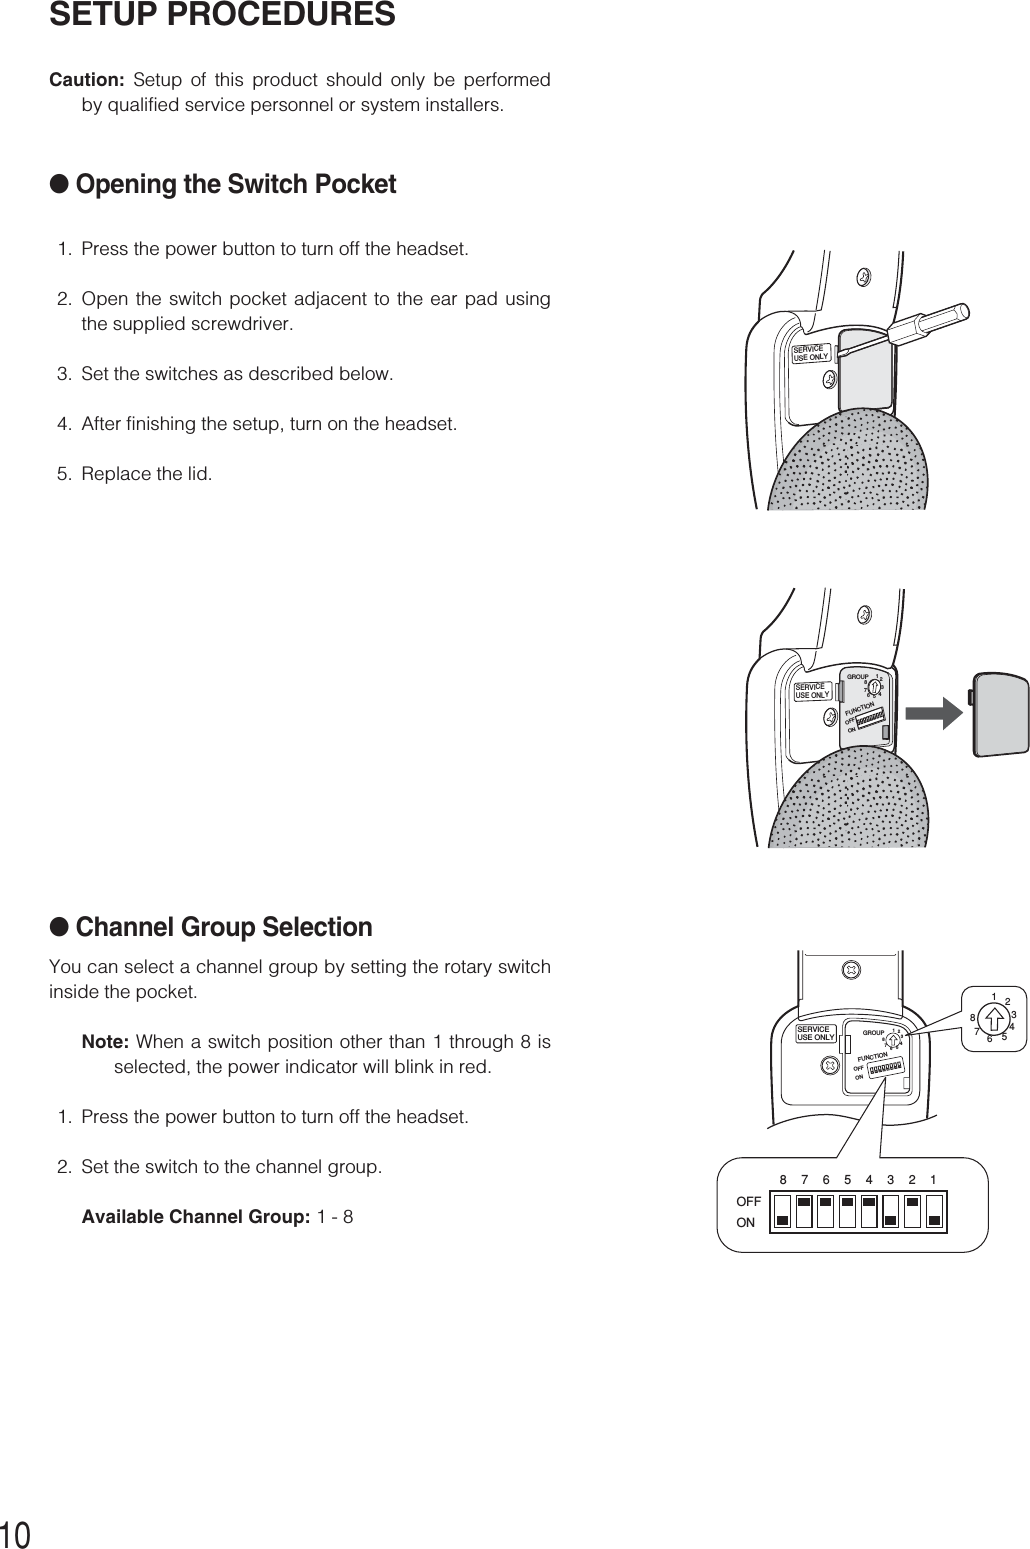
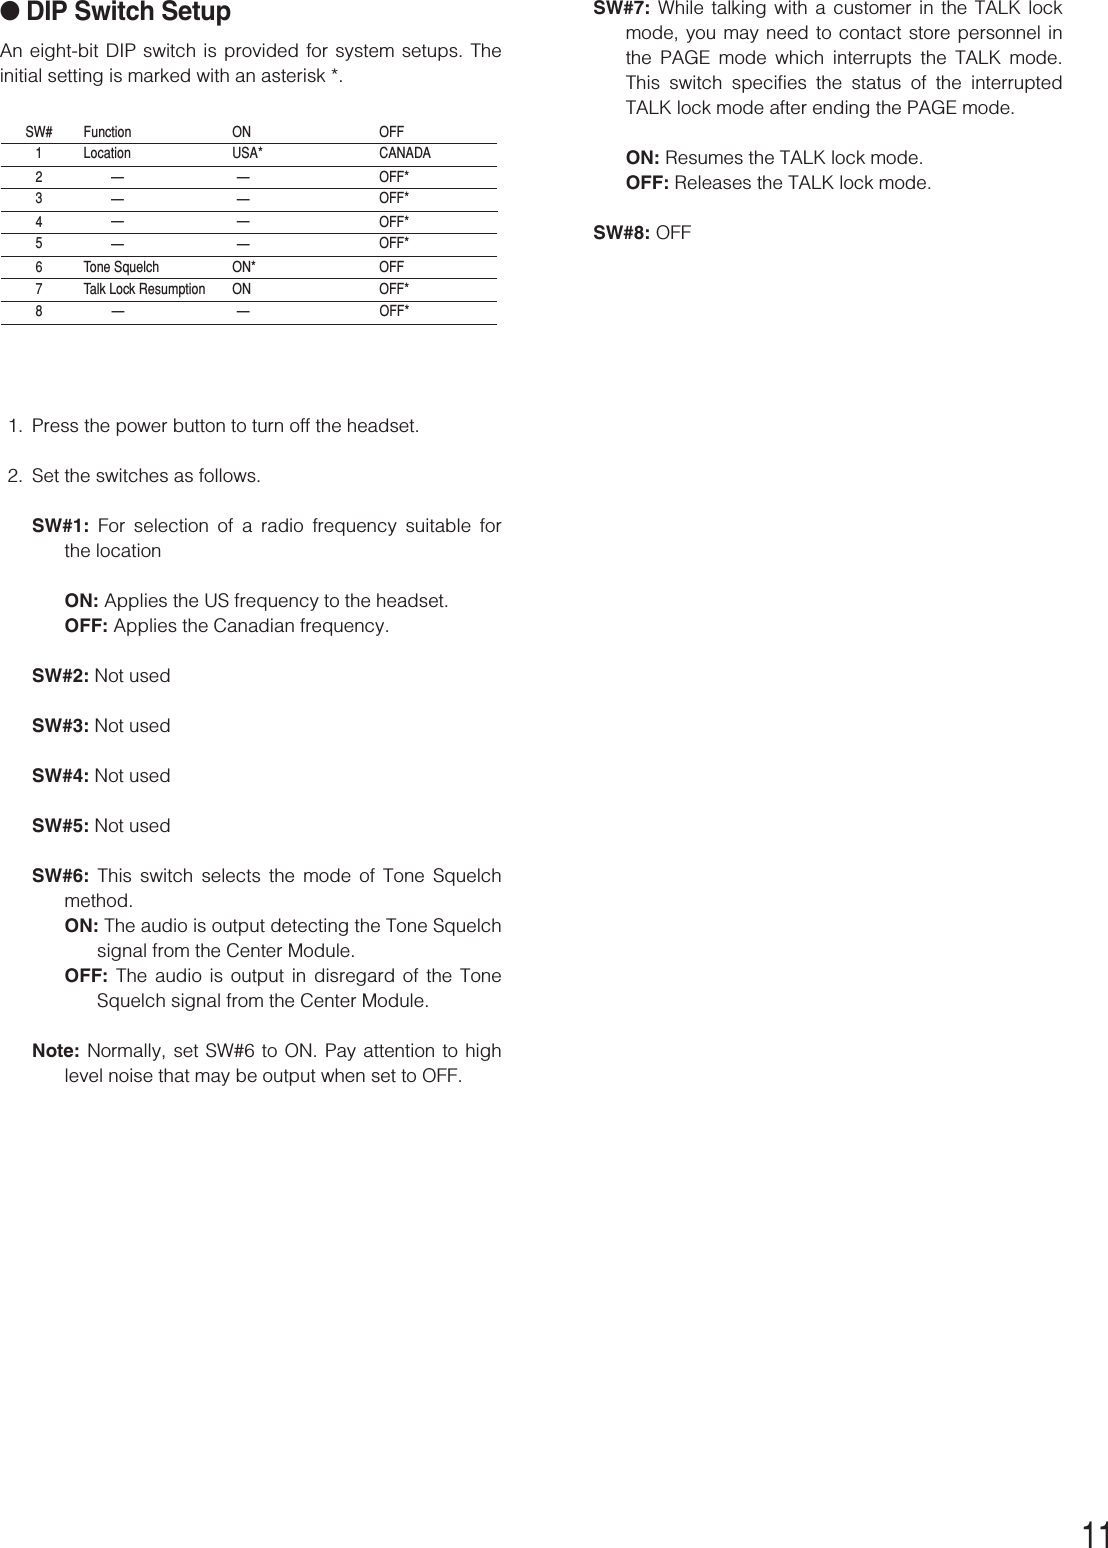
![3INTRODUCTIONThe WX-CH2050A is an all-in-one headset designed for use in wireless communication systems, which are use in Drive thrumenu boards, etc. It incorporates such necessary devices as a microphone and earphone, as well as a battery compartmentand control buttons. With the built-in antennas, transmitter, and receiver you can communicate by voice with other store per-sonnel and the customer.FEATURES•Compatible center modules: WX-C1010 and WX-C1011•Less noise and interference thanks to the use of UHF band•Easy frequency setting by use of phase locked loop (PLL)•A/B channel selection available for convenience of double drive-through (DDT)•Talk mode selectable between talk-lock and press-to-talk•Page mode selectable between page-lock and press-to-talk•Easy-to-replace cushions: head pad cushion, earphone cushion, and windproof cushionPRECAUTIONS•All setup procedures of this product should be performed by qualified service personnel or system installers.•Use only Panasonic authorized batteries like the rechargeable Li-ion 3.7 V normal type or long life type.•Follow the battery care and handling instructions.•Read the instructions included with the battery charger.•Charge the battery when the power indicator lights up in red and a beep is heard in the headset. Fully charge the battery.Failure to do so may shorten the operating time.CONTENTSINTRODUCTION.............................................................................................................................................3FEATURES......................................................................................................................................................3PRECAUTIONS...............................................................................................................................................3NAMES & FUNCTIONS ..................................................................................................................................4OPERATING PROCEDURES ..........................................................................................................................6●Preparations ...........................................................................................................................................6●Communications with Customers [TALK]...............................................................................................7●Communications with Other Store Personnel [PAGE] ............................................................................7BATTERY LOADING & REPLACEMENT.........................................................................................................8●Loading ..................................................................................................................................................8●Replacement ..........................................................................................................................................8MAINTENANCE ..............................................................................................................................................8TROUBLESHOOTING ....................................................................................................................................9SPECIFICATIONS...........................................................................................................................................9STANDARD ACCESSORIES...........................................................................................................................9OPTIONAL ACCESSORIES ............................................................................................................................9SETUP PROCEDURES .................................................................................................................................10●Opening the Switch Pocket ..................................................................................................................10●Channel Group Selection .....................................................................................................................10●DIP Switch Setup..................................................................................................................................11●Operation Mode Setup .........................................................................................................................12](https://usermanual.wiki/Panasonic-of-North-America/9TAWX-CH2050A/User-Guide-505555-Page-4.png)
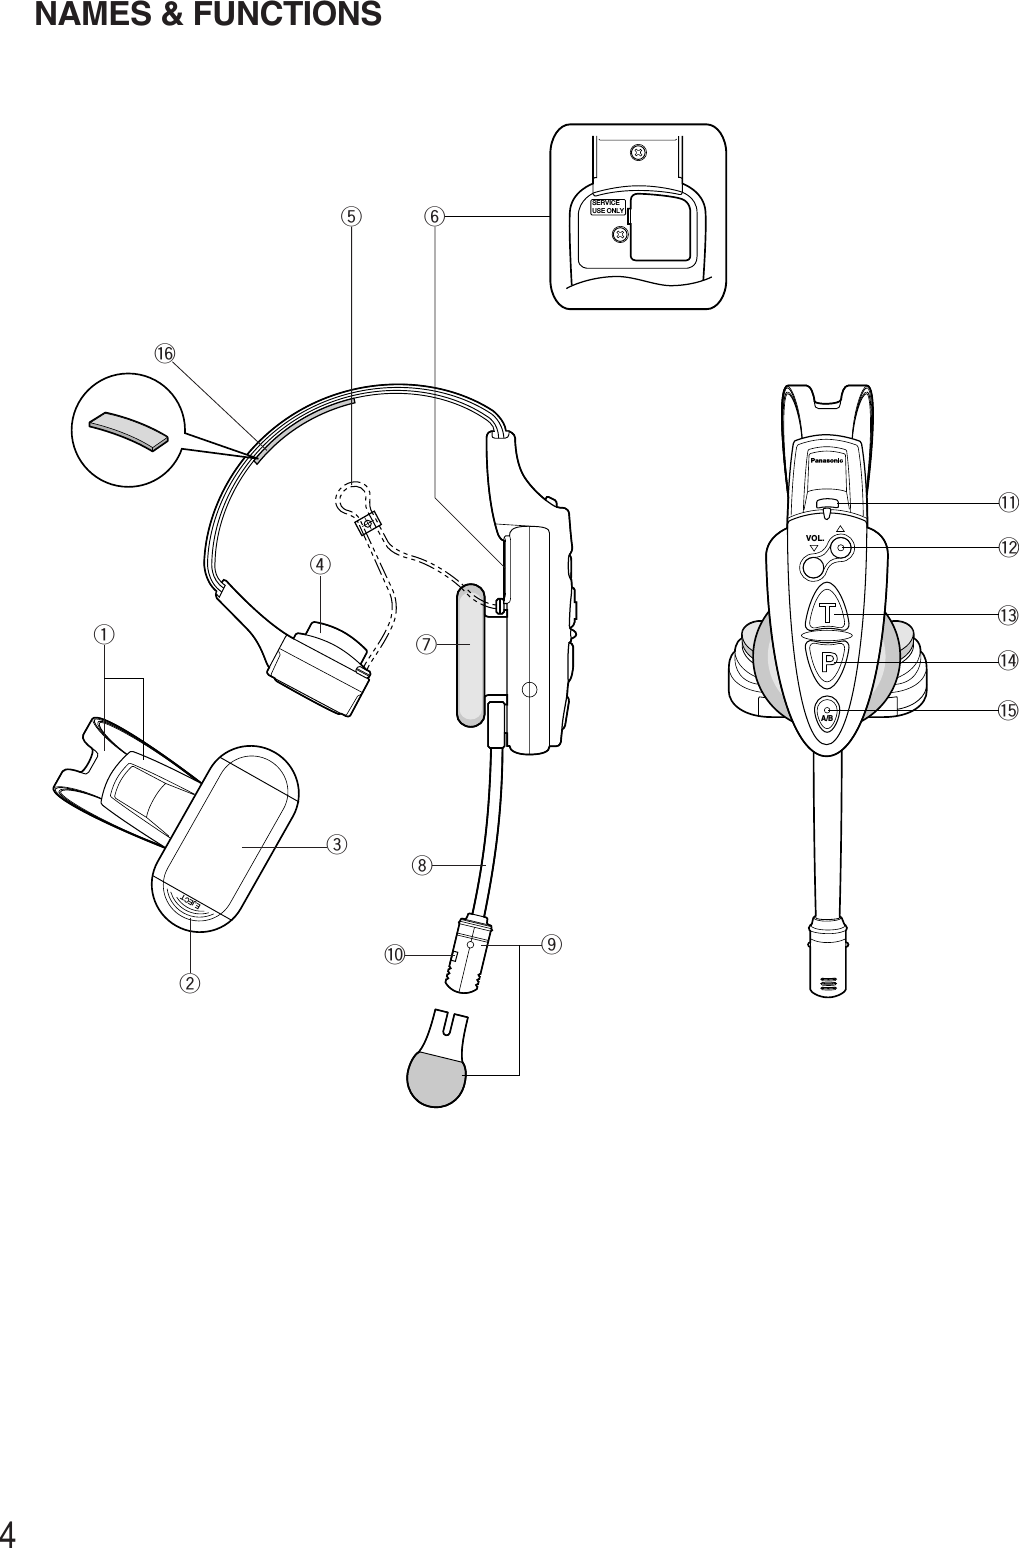
![5qHead Band and Head PadAdjustable to your head by sliding the head pad.wBattery Lock [EJECT]When removing the battery, slide out the lock.When loading a new battery, insert the battery until thelock clicks.eBattery (Optional accessory)Refer to p. 3 PRECAUTIONS.rHead Pad CushiontStrap (Standard accessory)ySwitch PocketDo not open the lid. Should be opened only by qualifiedservice personnel or system installers.uEarphone PadiMicrophone BoomAdjust the microphone position to your mouth by rotat-ing and bending the boom.oMicrophone and Windproof Cushion (Standardaccessory)!0 Channel IndicatorStead red and green light indicates which channel is inoperation.Red: Is lit when channel A is selected.Green: Is lit when channel B is selected.Blinks to indicate the Talk or Page mode.Constant Blink: Talk modeRandom Blink: Page mode!1 Power Button and Indicator [POWER]Pressing the button for one second will turn the headseton or off.The indicator shows the status as follows.Green On: The headset is supplied power and inoperation.Red On: The battery requires recharging.Red Blink: The channel selector is set to the wrongposition.!2 Volume Control Buttons [VOL ▲▼]Pressing the respective buttons will increase ordecrease the sound level.!3 Talk Button [T]This button controls communications with the customer.When the button is released, you can hear any cus-tomer who is at the menu-board.While the button is held down in the press-to-talkmode, you can speak to the customer.When the button is pressed in the talk-lock mode, youcan speak to the customer until you press the button asecond time.!4 Page Button [P]This button controls communications with store person-nel.When the button is released, you can hear the commu-nications among store personnel.While the button is held down in the press-to-talkmode, you can speak to store personnel.When the button is pressed in the page-lock mode,you can speak to the store personnel until you press abutton a second time.!5 A/B Channel Selection Button [A/B]This button switches the frequencies used from channelA to B and vice versa. The channel indicator will displaythe currently selected channel in red (A) or green (B).!6 Head protectors (Standard accessory)](https://usermanual.wiki/Panasonic-of-North-America/9TAWX-CH2050A/User-Guide-505555-Page-6.png)
![6OPERATING PROCEDURESNotes:•Transmission using the talk [T] or page [P] button isallowed for a single headset at a time. A continuousbeep or distorted sound will be heard in a headset thattries to transmit while another person is operating.•Maintain a distance of more than 0.3 m (1 ft) betweenthe headset and the order taker, or more than 1 m (3 ft)between the headset and the center module.●PreparationsPrior to operating the headset, confirm that the systemsetup for the headset, center module, and other deviceshas been completed.1. Hook the tabs of the strap to the two strap buttons onthe headset. There are two strap buttons on the head-set: one is at the lower part of the head pad, and theother is behind the ear cushion.2. Attach the supplied head protectors under the headband as needed.3. Install a battery in the battery compartment, referring top. 8 BATTERY LOADING & REPLACEMENT.4. Wear the headset, and route the strap behind yourneck.5. Adjust the head pad so that the earphone is placed onyour ear.6. Rotate and bend the microphone boom so that themicrophone is placed near your mouth.7. Press the power button to turn on the headset.A/BVOL.Head protectorStrapA/BVOL.qewA/BVOL.](https://usermanual.wiki/Panasonic-of-North-America/9TAWX-CH2050A/User-Guide-505555-Page-7.png)
![7●Communications with Customers[TALK]Any store personnel wearing the headset can communicatebidirectionally with any customer who is at the menu board.1. Select a proper sound level by pressing the [▲] or [▼]button.2. You will hear a tone in the headset when a vehiclearrives at the menu board.Note: The tone duration varies depending on the set-tings made in the center module. <When the talk-lock mode is preset>1. Press the talk [T] button and speak to the customer.A short beep repeats in the headset.2. Press the button again to release the lock and listen tothe customer.<When the press-to-talk mode is preset>1. Hold down the talk [T] button and speak to the cus-tomer.A short beep repeats in the headset.2. Release the button and listen to the customer.●Communications with Other StorePersonnel [PAGE]Store personnel wearing the headset can communicatewith each other without being heard by customers.<When the page-lock mode is preset>1. Press the page [P] button and speak into the micro-phone at a normal level. A short beep repeats in the headset to notify all storepersonnel that the system operates in the page mode.2. Press the page [P] button again to release the lock andlisten to the response from other store personnel.<When the press-to-talk mode is preset>1. Hold down the page [P] button and speak into themicrophone at a normal level. A short beep repeats in the headset to notify all storepersonnel that the system operates in the page mode.2. Release the button and listen to the response fromother store personnel.VOLPressPress againHold downReleasePressPress againHold downRelease](https://usermanual.wiki/Panasonic-of-North-America/9TAWX-CH2050A/User-Guide-505555-Page-8.png)
![12● Operation Mode SetupThree operation modes can be set up to adapt the headset to your requirements.•Default channel setup •Talk lock/ Talk PTT (press to talk)•Page lock/Page PTTIndicatorSelected Mode Selection Transition ExitOffPower A/B channelRed GreenDefault Channel SetupSelectedChannel A/B ButtonABEnableDisableTalk SetupTalk LockTalk PTTPage SetupPage PTTPage LockPTT stands for "press to talk".The default settings are enclosed in bold lines in the table.Blink OnBlinkBlinkOnOn OnOnOnBlinkBlinkABEnableDisablePress[POWER].——— ———————While holding down and buttons,press [POWER]. TP—TTP——A/B](https://usermanual.wiki/Panasonic-of-North-America/9TAWX-CH2050A/User-Guide-505555-Page-13.png)
![131. Press the power button to turn off the headset.2. While holding down the talk [T] and page [P] buttonssimultaneously, press the power button to turn on theheadset. The headset enters the setup mode where the indica-tors and buttons have different functions than in normaloperation.3. Select a default channel setup from four options, press-ing the [T] button.4. Press the [A/B] button to move to the talk setup andpage setup.5. Select a talk mode, pressing the [T] button.6. Select a page mode, pressing the [P] button.7. Press the [A/B] button to confirm that the indicatorsshow the three modes selected for the default channel,talk and page.8. Press the power button to turn off the headset, then turnit on again. The newly selected operation mode will beapplied to the headset.](https://usermanual.wiki/Panasonic-of-North-America/9TAWX-CH2050A/User-Guide-505555-Page-14.png)