Panasonic of North America 9TAWX-CT420 DECT 6.0 Belt Pack User Manual
Panasonic Corporation of North America DECT 6.0 Belt Pack Users Manual
Users Manual
Operating Instructions
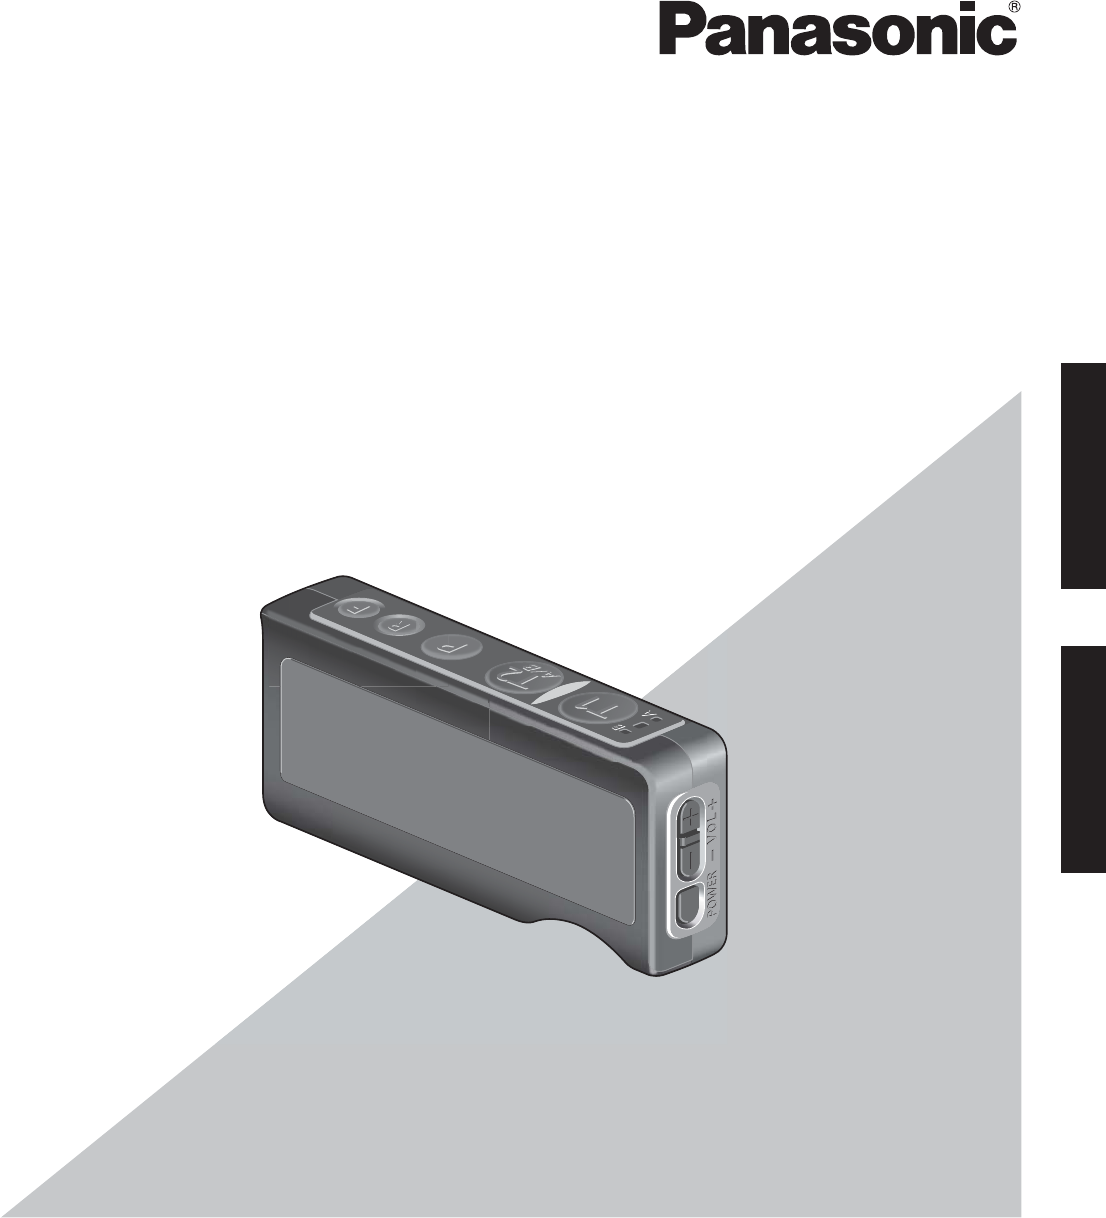
Belt Pack
Model No. WX-CT420
English Français
Before attempting to connect or operate this product,
please read these instructions carefully and save this manual for future use.
No model number suffix is shown in this Operating Instructions.

2
FEDERAL COMMUNICATIONS COMMISSION INTERFERENCE STATEMENT
This equipment has been tested and found to comply with the limits for a Class A digital device, pursuant to part 15 of the
FCC Rules. These limits are designed to provide reasonable protection against harmful interference when the equipment
is operated in a commercial environment. This equipment generates, uses, and can radiate radio frequency energy and, if
not installed and used in accordance with the instruction manual, may cause harmful interference to radio communications.
Operation of this equipment in a residential area is likely to cause harmful interference in which case the user will be required
to correct the interference at his own expense.
This transmitter must not be co-located or operated in conjunction with any other antenna or transmitter.
The available scientific evidence does not show that any health problems are associated with using low power wireless
devices. There is no proof, however, that these low power wireless devices are absolutely safe. Low power Wireless devices
emit low levels of radio frequency energy (RF) in the microwave range while being used. Whereas high levels of RF can
produce health effects (by heating tissue), exposure of low-level RF that does not produce heating effects causes no known
adverse health effects. Many studies of low-level RF exposures have not found any biological effects. Some studies have
suggested that some biological effects might occur, but such findings have not been confirmed by additional research.
WX-CT420 has been tested and found to comply with FCC/IC radiation exposure limits set forth for an uncontrolled
environment and meets the FCC radio frequency (RF) Exposure Guidelines in Supplement C to OET65 and RSS-102 of the
IC radio frequency (RF) Exposure rules.
Changes or modifications not expressly approved by the party responsible for compliance could void the user’s authority to
operate the equipment.
This device complies with Part 15 of FCC Rules and Industry Canada licence-exempt RSS standard(s). Operation is subject
to the following two conditions: (1) this device may not cause interference, and (2) this device must accept any interference,
including interference that may cause undesired operation of this device.
WARNING:
p To reduce the risk of fire or electric shock, do not expose this apparatus to rain or moisture.
p The apparatus should not be exposed to dripping or splashing and that no objects filled with liquids, such as vases, should
be placed on the apparatus.
p All work related to the installation of this product should be made by qualified service personnel or system installers.
p The risk of hearing impairment due to exposure to excessive sound levels may be reduced by listening at lower volumes
and for shorter durations.
p Operating near 2.4 GHz electrical appliances may cause interference. Move away from the electrical appliances.
p This transmitter must not be co-located or operated in conjunction with any other antenna or transmitter.
p MEDICAL:
Consult the manufacturer of any personal medical devices, such as pacemakers, to determine if they are adequately
shielded from external RF (radio frequency) energy. (The unit operates in the frequency range of 2.412 GHz to 2.462 GHz,
and the power output level is 0.1 watts.)
Do not use the unit in health care facilities if any regulations posted in the area instruct you not to do so. Hospitals or health
care facilities may be using equipment that could be sensitive to external RF (radio frequency) energy.
p Batteries (battery pack or batteries installed) shall not be exposed to excessive heat such as sunshine, fire or the like.
Safety precautions
ENGLISH VERSION
WARNING:
The belt pack may be carried and operated with only the optional dedicated belt pouch. Other non-tested belt pouches
or similar body-worn accessories may not comply and must be avoided.

3
Safety precautions
CAUTION:
The FCC ID number for this radio equipment is listed
below.
For U.S.A.
FCC ID: ACJ9TAWX-CT420
CAUTION:
p Danger of explosion if battery is incorrectly replaced.
Replace only with the same or equivalent type.
p These servicing instructions are for use by qualified
service personnel only. To reduce the risk of electric
shock do not perform any servicing other than that
contained in the operating instructions unless you are
qualified to do so.
p Any changes or modifications not expressly approved
by the party responsible for compliance could void the
user’s authority to operate the equipment.
p Shielded (STP) LAN cables must be used with this unit
to ensure compliance with EMC standards.
ICES-003
CAN ICES-3(A)/NMB-3(A)
For Canada
A lithium-ion battery that is recyclable
powers the product you have purchased.
Please call 1-800-8-BATTERY for information
on how to recycle this battery.
1) Read these instructions.
2) Keep these instructions.
3) Heed all warnings.
4) Follow all instructions.
5) Do not use this apparatus near water.
6) Clean only with dry cloth.
7) Do not install near any heat sources such as radiators, heat registers, stoves, or other apparatus (including amplifiers) that
produce heat.
8) Only use attachments/accessories specified by the manufacturer.
IMPORTANT SAFETY INSTRUCTIONS
RSS-Gen
p Under Industry Canada regulations, this radio
transmitter may only operate using an antenna of a
type and maximum (or lesser) gain approved for the
transmitter by Industry Canada. To reduce potential
radio interference to other users, the antenna type
and its gain should be so chosen that the equivalent
isotropically radiated power (e.i.r.p.) is not more than
that necessary for successful communication.
For Canada
The model number and serial number of this product may
be found on the surface of the unit.
You should note the model number and serial number of
this unit in the space provided and retain this book as a
permanent record of your purchase to aid identification in
the event of theft.
Model No.
Serial No.
For U.S.A.
English

4
Contents
Safety precautions ........................................................... 2
Before use ......................................................................... 5
Preface ........................................................................... 5
Features ......................................................................... 5
System diagram ............................................................. 5
Limitation of Liability ....................................................... 6
Disclaimer of Warranty ................................................... 6
Precautions ....................................................................... 7
Major Operating Controls and Their Functions ............. 8
Battery Loading & Replacement ................................... 10
Loading ........................................................................ 10
Replacement ................................................................ 10
Connecting and Disconnecting the Headset Plug ...... 11
Operating Procedures
..................................................... 12
Preparations ................................................................. 12
Volume adjustment ....................................................... 13
Communications with Customers (TALK)
...................... 13
Communications with Other Store Personnel (PAGE)
... 13
Alert notification ........................................................... 14
External Device Control ............................................... 14
Dual lane operation ...................................................... 14
Internet Telephone Service
(Only when this product is set to manager mode) ....... 15
Communication limitations ........................................... 15
Out of communication range ........................................ 15
Battery .......................................................................... 15
Turning off the power ................................................... 15
Setting the Unit ............................................................... 16
Manager Mode ............................................................. 16
Canceling the Manager Mode ...................................... 16
Auto-Talk-Lock setup .................................................... 17
ID Registration ............................................................. 17
Deletion of ID ............................................................... 18
Voice Prompt language switchover .............................. 18
Searching for the center module .................................. 19
Initialization .................................................................. 19
Setup Procedures ........................................................... 20
Switch compartment .................................................... 20
DIP Switch Setup ......................................................... 20
Troubleshooting .............................................................. 21
Specifications ................................................................. 22
Accessories .................................................................... 23
Standard Accessories .................................................. 23
Optional Accessories ................................................... 23
5
Before use
w Preface
Order Taker WX-CT420 is exclusively designed for Panasonic Wireless Communication System, which is used with drive-thru
menu boards, etc. By using optional Headset WX-CH427, users can communicate with other store personnel and customers.
w Features
p This Belt Pack can be used with Center Module WX-C3010, WX-CC411, WX-CC412.
p 1.9 GHz DECT* is used with this Order Taker to prevent the interference from microwave ovens or wireless LAN used with
2.4 GHz DECT.
* Digital Enhanced Cordless Telecommunications
p Manager mode
It is possible to set the manager mode to one of the Order Takers registered in the center module. A person using this Order
Taker has the priority of communication.
p It is possible to select Direct Lane or A/B Lane according to dual lane layouts.
p It is possible to select the Talk-Lock or Press-To-Talk mode.
p It is possible to select the Page-Lock or Press-To-Page mode.
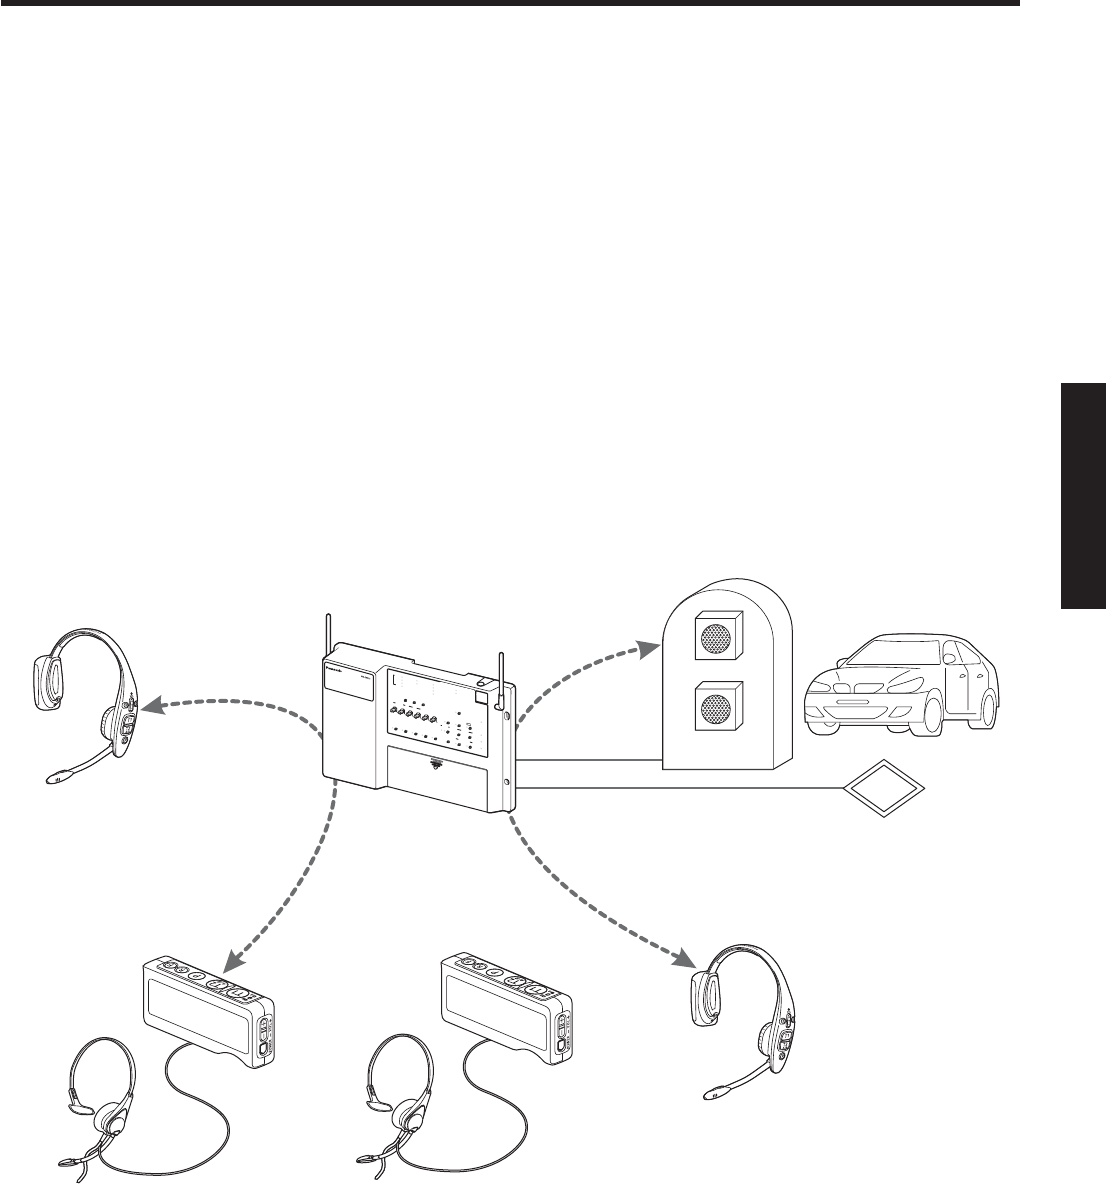
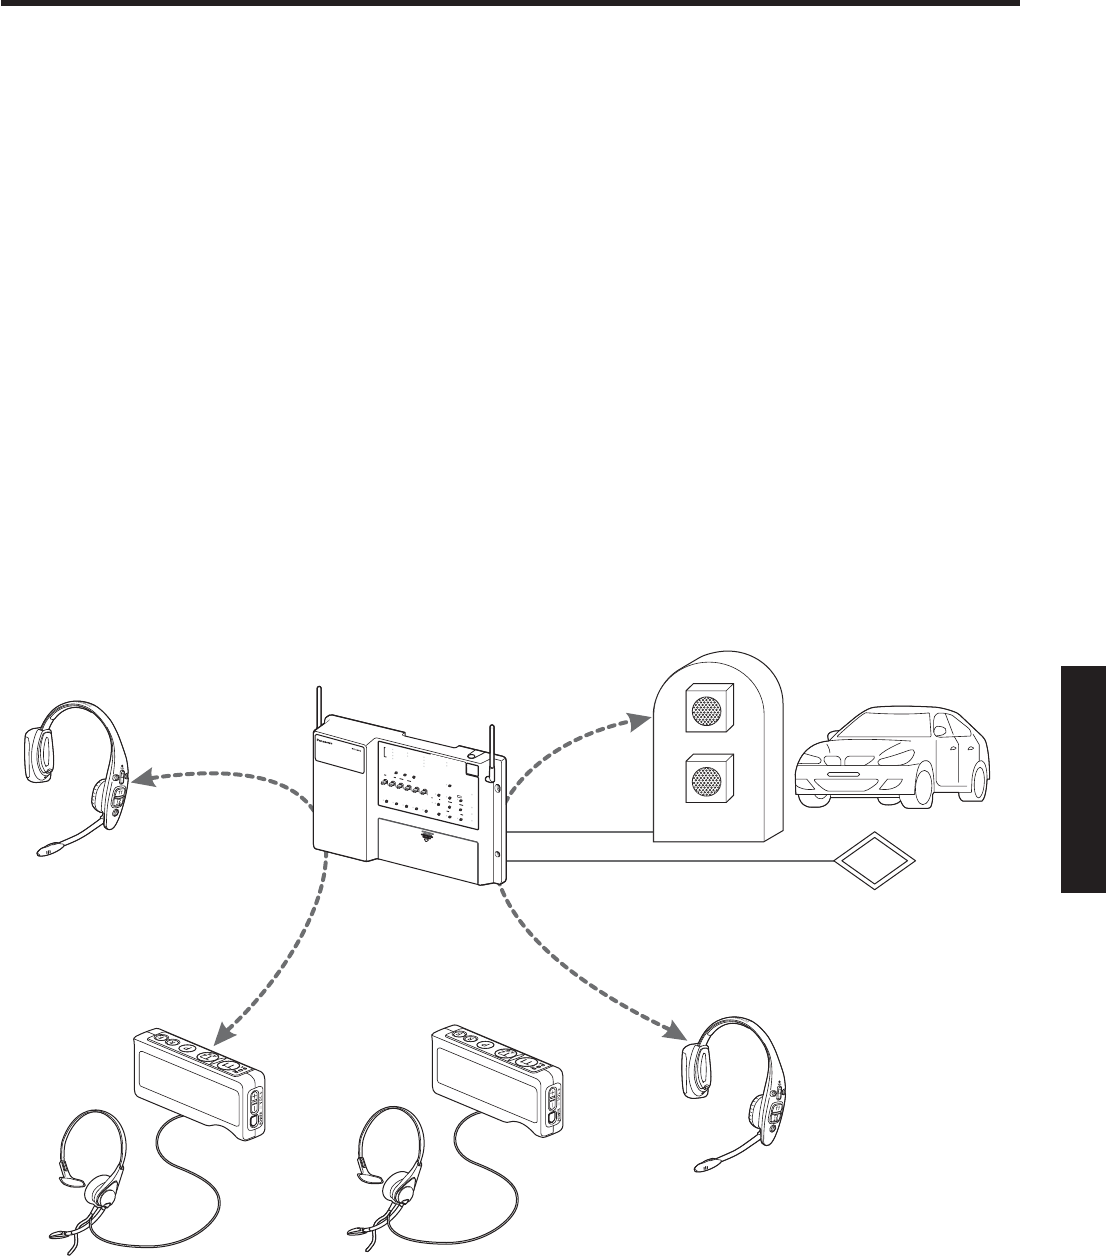
w System diagram
Product users and the All-in-One Headset can communicate with each other and with customers at the menu board by
connecting wirelessly to the center module.
INSTALL SYSTEM SETTING
OPERATIONAL SETTING
ID REGISTRATION
GREETER
POWER
TELEPHONE
CONTROL OUT
START
DELAY
ON
DOWN
PREV
ECHO CANCELLER
DNR LEVEL
DUAL LANE
LANE SELECT
POS REMOTE
TX POWER
RED MAX
YELLOW MD
GREEN LOW
OFF OFF
SEL
AUX
SP
AUX IN
TALK
PAGE
BEEP
NEXT
OUTSIDE
SPEED
TEAM BEEP
DAY/NIGHT
ON:DAY
OUTSIDE
SP LEVEL
ON:DAY
V/DET
OVERRIDE T/P
RELEASE
SP MIC SP MIC
AUX BEEP POS
AUDIO
UP
12
REC
TALK
PAGE
VEHICLE
DETECTOR
SELECT VOLUME
DESTINATION
AUX HEADSET
HEADSET
PLAYBACK
All-in-One Headset
Belt Pack
(or Order Taker)
Center Module
All-in-One Headset
Vehicle Detector
Menu Board
Microphone
Speaker
TALK
(Communications with
customers)
PAGE
(Communications with
other store personnel)
Belt Pack
(or Order Taker)
English

6
Before use
w Limitation of Liability
THIS PUBLICATION IS PROVIDED “AS IS” WITHOUT WARRANTY OF ANY KIND, EITHER EXPRESS OR IMPLIED,
INCLUDING BUT NOT LIMITED TO, THE IMPLIED WARRANTIES OF MERCHANTABILITY, FITNESS FOR ANY PARTICULAR
PURPOSE, OR NON-INFRINGEMENT OF THE THIRD PARTY’S RIGHT.
w Disclaimer of Warranty
IN NO EVENT SHALL Panasonic Corporation BE LIABLE TO ANY PARTY OR ANY PERSON, EXCEPT FOR REPLACEMENT
OR REASONABLE MAINTENANCE OF THE PRODUCT, FOR THE CASES, INCLUDING BUT NOT LIMITED TO BELOW:
(1) ANY DAMAGE AND LOSS, INCLUDING WITHOUT LIMITATION, DIRECT OR INDIRECT, SPECIAL, CONSEQUENTIAL OR
EXEMPLARY, ARISING OUT OF OR RELATING TO THE PRODUCT;
(2) PERSONAL INJURY OR ANY DAMAGE CAUSED BY INAPPROPRIATE USE OR NEGLIGENT OPERATION OF THE
USER;
(3) UNAUTHORIZED DISASSEMBLE, REPAIR OR MODIFICATION OF THE PRODUCT BY THE USER;
(4) ANY PROBLEM, CONSEQUENTIAL INCONVENIENCE, OR LOSS OR DAMAGE, ARISING OUT OF THE SYSTEM
COMBINED BY THE DEVICES OF THIRD PARTY.

7
Precautions
p This unit is for indoor use only.
It cannot be used outdoors.
Avoid installation in a location where the unit will be exposed to direct sunlight for extended periods or near a cooling or
heating appliance.
Otherwise, deformation, discoloration, malfunctioning and/or problems in operation may result. Operate the unit where it will
not be splashed or sprayed by water.
p Handle the unit carefully. This product uses parts that may be damaged by improper handling or storage.
p Use only Battery WX-B3030.
In combination with this product, refer to Battery Charger WX-Z3040A Operating Instructions.
p Do not expose the battery to excessive heat, such as direct sunlight or fire.
p Follow the instructions of battery for care and handling.
p Use only headsets exclusively designed for use with this product. Otherwise, voice may become distorted or you may have
difficulty in hearing the voice.
p Do not use this product if you use an implanted electric medical equipment. That may cause the equipment to malfunction.
p Turn off the headset when not in use, in order to save the battery life.
p When storing this Belt Pack, disconnect the headset to prevent damage.
p When not using for long periods of time, do not leave the battery in the unit. Be sure to remove it.
English
8
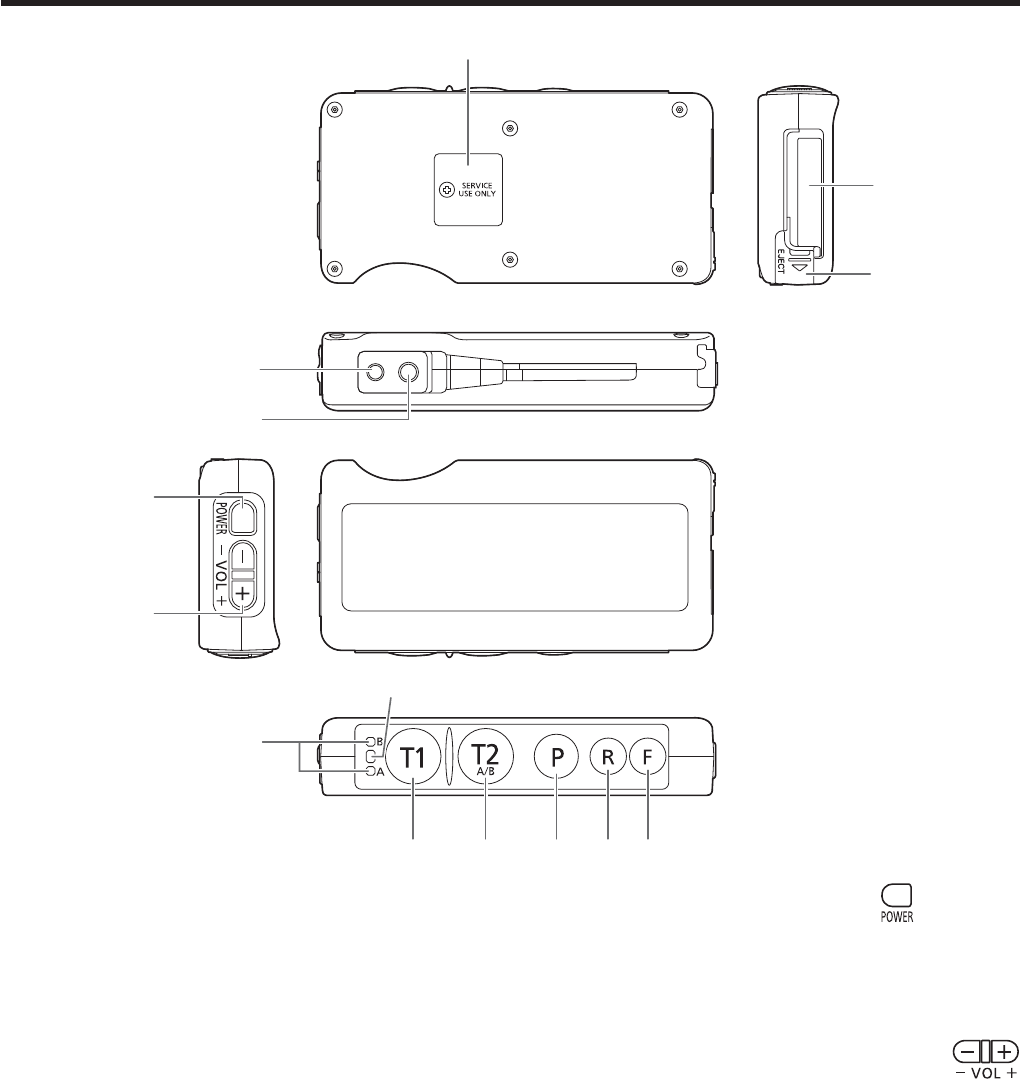
Major Operating Controls and Their Functions
Switch Compartment
Do not open the cover of this compartment. It should be
opened only by qualified service personnel or system
installers.
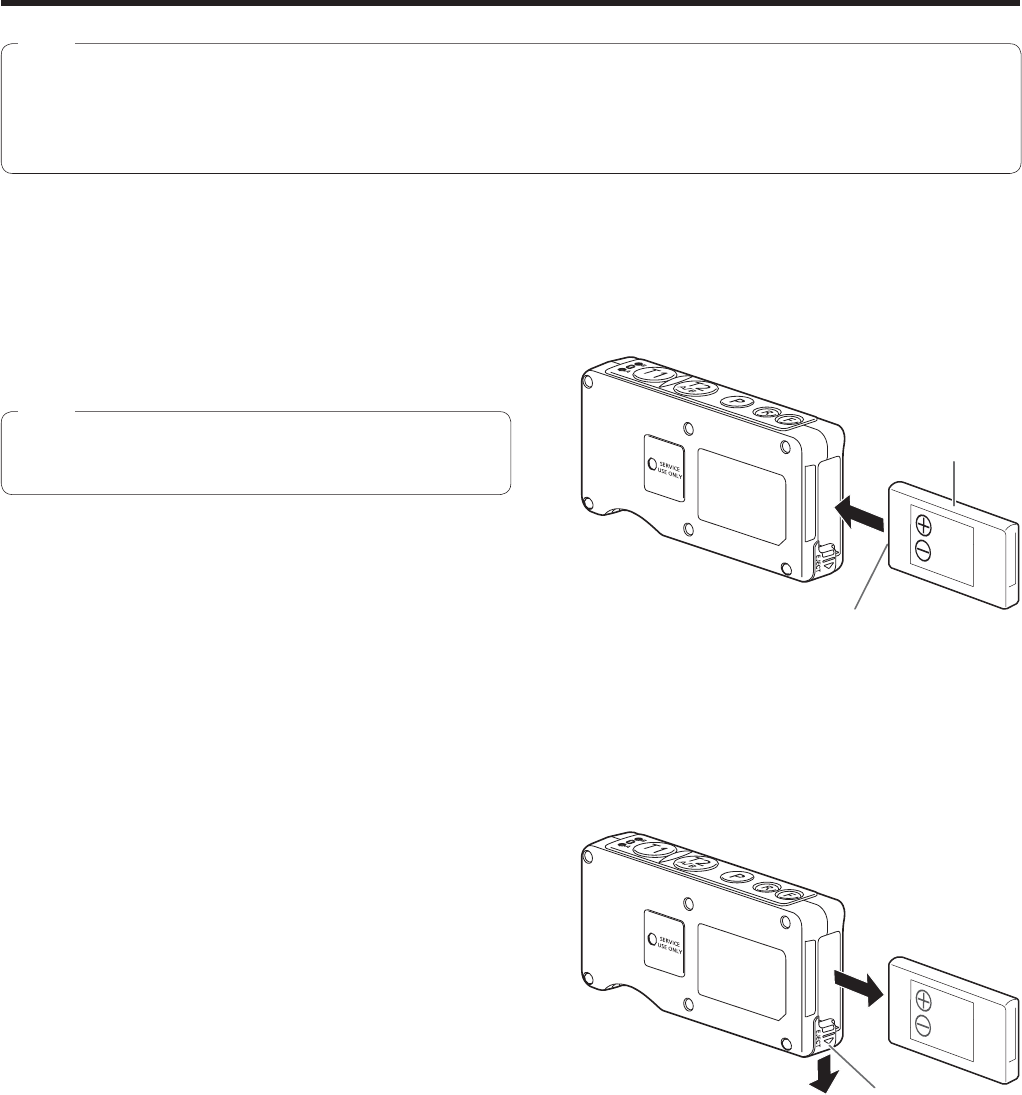
Battery (Optional accessory)
Insert a battery for use with this Belt Pack. (Refer to p. 10
“Battery Loading & Replacement”.)
Battery Lock [EJECT]
When removing the battery, slide out the lock.
When loading a battery, insert the battery until the lock
clicks.
Please note the direction that inserts the battery.
Microphone Input Jack
This jack is used for connection with the Panasonic
WX-CH427 Headset.
Earphone Output Jack
This jack is used for connection with the Panasonic
WX-CH427 Headset.
Power Button [POWER]
Pressing the button will turn the belt pack on.
Pressing the button again for 2 seconds or more will turn
the belt pack off.
Volume Control Buttons [VOL + – ]
Use this button to adjust the volume of the headset’s
earphone.
Press the [+] button to increase the sound level. Each
time the button is pressed, a beep notifies the user that
the volume is being increased. If you try to increase the
volume over the upper limit, two beeps notify the user of
a prohibited action.
Press the [–] button to reduce the sound level. Each time
the button is pressed, a beep notifies the user that the
volume is being reduced. If you try to reduce the volume
below the lower limit, two beeps notify the user of a
prohibited action.
9
Lane Indicator
Lights orange or green to indicate which lane is in
operation.
Orange: Lane A is selected.
Green: Lane B is selected.
Orange blinking: Lane A is being selected, and either
the Talk or Page mode is activated.
Green blinking: Lane B is being selected, and either the
Talk or Page mode is activated.
Power Indicator
The indicator shows the status as follows.
Green: Power is supplied and the unit is operating.
Green blinking: Power is supplied and Manager mode is
activated.
Red: The battery is almost exhausted. Replace the
battery with a charged one.
Red blinking: An error has occurred.
Talk 1 Button [T1]
This button controls communications with the customer.
The function of this button changes depending on the DIP
switch setting. (Refer to p. 20 “DIP Switch Setup”.)
)RU'LUHFW/DQH6HOHFWVHWXSLQ3UHVV7R7DON377PRGH
!
While the [T1] button is being pressed, you can talk with
a customer at the Lane A menu board.
)RU1RUPDOVHWXSLQ3UHVV7R7DON377PRGH
!
While the [T1] button is being pressed, you can talk with
a customer at the menu board of the connected lane.
Talk 2 / A/B Lane Selection Button [T2, A/B]
This button can be set to two functions by the DIP switch
setting. (Refer to p. 20 “DIP Switch Setup”.)
[T2]
This button controls communications with the customer.
<
)RU'LUHFW/DQH6HOHFWVHWXSLQ3UHVV7R7DON377PRGH
>
While the [T2] button is being pressed, you can talk with
a customer at the Lane B menu board.
<
)RU1RUPDOVHWXSLQ3UHVV7R7DON377PRGH
>
While holding down the [T2] button, you can talk with a
customer at the menu board of another lane.
<)RU'LUHVW/DQH6HOHFWVHWXSLQ7DON/RFNPRGH>
When you press the [T2] button once, you can talk with
a customer at the Lane B menu board. Press the button
again to end the call.
<)RU1RUPDOVHWXSLQ7DON/RFNPRGH>
When you press the [T2] button once, you can talk with
a customer at the menu board of another lane. Press the
button again to end the call.
[A/B]
When WX-CC412 is used as the center module, this
button switches the connection from Lane A to Lane B (or
vice versa) of the dual lane.
Page Button [P]
This button controls communications with store
personnel.
<When the Press-To-Page (PTP) mode is preset>
While the [P] button is held down, you can speak to store
personnel.
<When the Page-Lock mode is preset>
When the [P] button is pressed, you can speak to the
store personnel until you press the button a second time.
Phone Button [R]
This function is activated only when this product is set to
manager mode.
You can place phone calls via the center module.
Alert Button [F]
Functions vary depending on the center module to which
the user is connected.
<When connected to WX-CC411, WX-CC412>
Hold down this button for 2 seconds or more to send a
Security Alert to the center module.
The action taken when an Alert is sent depends on the
center module setting, and can include TALK & PAGE
Recording, Send E-mail, etc.
<When connected to WX-C3010>
The [F] button functions as the External Device Control
Button. While it is pressed, an External Device is kept
ON.
English
10
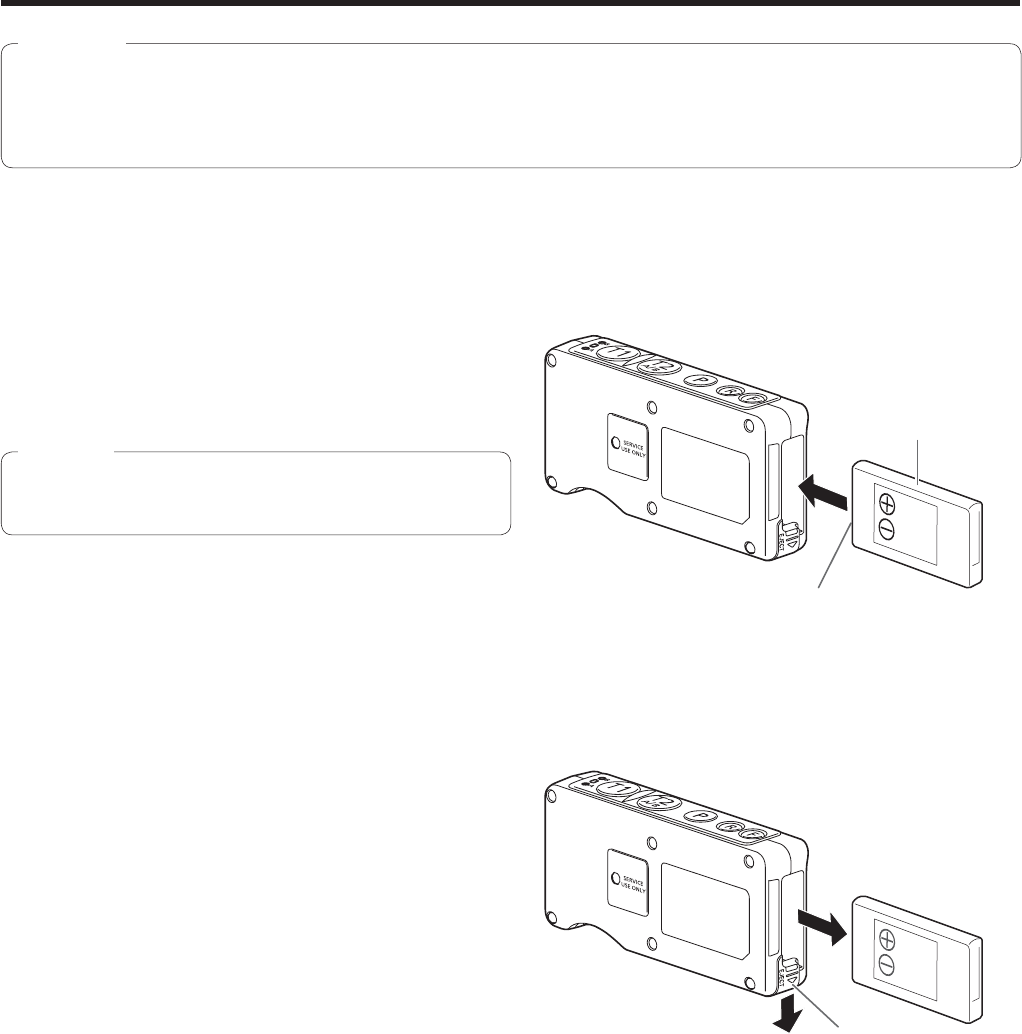
Battery Loading & Replacement
p Refer to operating instructions included with the battery and battery charger.
p Be sure to prepare a fully charged battery.
p It is recommended to replace the battery when the power indicator of this product turns red and the voice message
“Battery low” is heard from the speaker of the headset.
Notes
w Loading
Install the battery as shown in the figure to the right.
Battery
Terminals
p When inserting the battery, make sure that the terminals
are correctly directed.
Note
w Replacement
Slide the battery lock as shown in the figure to the right.
Battery Lock
Remove the battery.
11
English
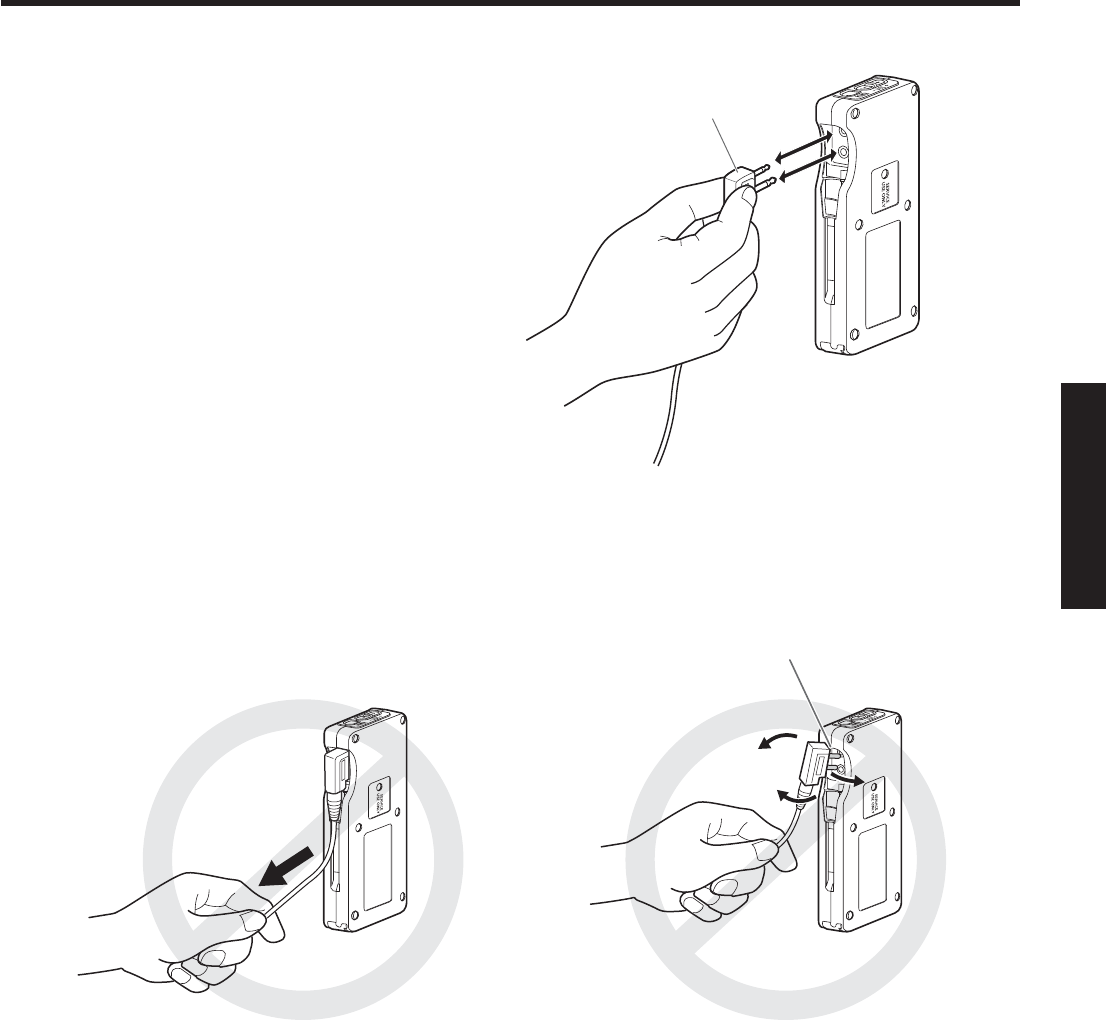
Connecting and Disconnecting the Headset Plug
When connecting the headset plug to this
product, hold the plug and push it straight
into the earphone output jack and microphone
input jack.
When disconnecting the headset plug from
this product, hold the plug and pull it straight
out.
Do not hold the cable. Do not pull this part up and down.
Pull/insert the plug straight,
holding this part.

12
Operating Procedures
w Preparations
Prior to operating the belt pack, confirm that the system
setup for the belt pack, center module, and other devices
has been completed.
Attach the battery to the Belt Pack.
(Refer to p. 10 “Battery Loading & Replacement”.)
Connect the headset to the Belt Pack.
(Refer to p. 11 “Connecting and Disconnecting the
Headset Plug”.)
Wear the Belt Pack and the headset.
p Wear the Belt Pack around your waist and the
headset on yourhead.
Adjust the head pad so that the earphone is
placed on your ear.
Rotate and bend the microphone boom so that
the microphone is placed near your mouth.
Press the [POWER] button of the Belt Pack to
turn the power on.
p When the power is turned on, the voice messages
“Hello”, “Headset xx” (xx: ID number registered in
the center module) and “Lane x” (x: Connected Lane
number) are heard from the speaker of the headset.

13
w Volume adjustment
Wear the headset, and press the volume control buttons
on the Belt Pack to adjust the volume of the headset to the
proper level.
w Communications with
Customers (TALK)
Any store personnel wearing the headset can communicate
bidirectionally with any customer who is at the menu board.
p You will hear a beep in the headset when a vehicle
arrives at the menu board.
When the Press-To-Talk (PTT) mode is preset
Hold down the [T1] button.
p A beep is heard from the speaker of the headset to
confirm that communication has been established.
In this state, you can talk with a customer at the
menu board by speaking into the microphone of the
headset.
Release the [T1] button.
p Communication is interrupted and the conversation
is ended.
When the Talk-Lock mode is preset
Press the [T1] button.
p A beep is heard from the speaker of the headset to
confirm that communication has been established.
In this state, you can talk with a customer at the
menu board by speaking into the microphone of the
headset.
Press the [T1] button again.
p Communication is interrupted and the conversation
is ended.
w Communications with Other
Store Personnel (PAGE)
Store personnel wearing the headset can communicate with
each other without being heard by customers.
When the Press-To-Page (PTP) mode is preset
Hold down the [P] button.
p A beep is heard from the speaker of the headset to
confirm that communication has been established.
In this state, you can talk with a store personnel by
speaking into the microphone of the headset.
Release the [P] button.
p Communication is interrupted and the conversation
is ended.
When the Page-Lock mode is preset
Press the [P] button.
p A beep is heard from the speaker of the headset to
confirm that communication has been established.
In this state, you can talk with a store personnel by
speaking into the microphone of the headset.
Press the [P] button again.
p Communication is interrupted and the conversation
is ended.
English

14
Operating Procedures
w Alert notification
When the center module is WX-CC411 or WX-CC412, store
personnel wearing this product can send a Security Alert to
the center module.
Hold down the [F] button for 2 seconds or
more.
p A beep is heard from the speaker of the headset,
indicating that the transmission is complete, and a
Security Alert is sent to the center module.
When the center module receives a Security
Alert from this product, it performs the preset
operations (TALK & PAGE Recording, Send
E-Mail, alert message play back, Camera
monitoring, etc.).
w External Device Control
When the center module is WX-C3010, you can control the
External Device Control terminal of the center module using
this product.
Hold down the [F] button.
p A short beep is heard from the speaker of the
headset and the External Device Control terminal of
the center module enters the ON state.
Release the [F] button.
p 2 short beeps are heard from the speaker of the
headset and the External Device Control terminal of
the center module enters the OFF state.
w Dual lane operation
In dual lane operation, this product must select a lane for
communication.
For Normal setup
Switching to Lane B
When a connection is made to Lane A, the lane indicator is
lit in orange.
Press the [T2] button.
p A voice of “Lane B” is heard from the speaker of the
headset and the lane indicator is lit in green. The
connection is changed to Lane B.
Switching to Lane A
When a connection is made to Lane B, the lane indicator is
lit in green.
Press the [T2] button.
p A voice of “Lane A” is heard from the speaker of the
headset and the lane indicator is lit in orange. The
connection is changed to Lane A.
For Direct Lane Select setup
Switching to Lane B
When a connection is made to Lane A, the lane indicator is
lit in orange.
Press the [T2] button.
p A voice of “Lane B” is heard from the speaker of the
headset and the lane indicator blinks green. The
connection is changed to Lane B. You can talk with a
customer at the menu board of Lane B.
Switching to Lane A
When a connection is made to Lane B, the lane indicator is
lit in green.
Press the [T1] button.
p A voice of “Lane A” is heard from the speaker of the
headset and the lane indicator blinks orange. The
connection is changed to Lane A. You can talk with a
customer at the menu board of Lane A.

15
w Internet Telephone Service
(Only when this product is set
to manager mode)
This product can receive calls from on-line communication
software such as Skype.
Press the [R] button while a call tone is heard
from the speaker of the headset.
p The Internet Telephone Service is connected and you
can make a call.
Press the [R] button while the Internet
Telephone Service is connected.
p The service is disconnected and the call is ended.
p When you hold down the [R] button for 2 seconds or more
while the Internet Telephone Service is disconnected, you
can make a call through the Internet Telephone Service.
p Software must be installed in the center module in
order to use the Internet Telephone Service. For
details, contact a sales shop.
Note
w Communication limitations
Up to 4 units of this product or the All-in-One Headset can
be used per lane.
If a 5th unit tries to talk or page, an error beep and the voice
message “Cannot connect” are heard from the speaker of
the headset, and access is rejected.
However, the 5th and subsequent units can hear talk or
page communications.
w Out of communication range
When a store personnel wearing this product moves out of
communication range, an error beep and the voice message
“Out of range” are heard from the speaker of the headset
and communication is disconnected.
When returning to communication range, a beep is heard
and communication becomes possible.
w Battery
When the battery charge becomes low, an error beep
and the voice message “Battery Low” are heard from the
speaker of the headset, and the power indicator blinks red
at the same time. When this occurs, immediately replace the
battery with a fully charged one.
w Turning off the power
Hold down the [POWER] button for 2 seconds
or more.
p The voice message “Goodbye” is heard from the
speaker of the headset, the power is turned off, and
the power indicator goes off.
English

16
Setting the Unit
w Manager Mode
p The manager can interrupt store personnel’s TALK or
PAGE at any time by monopolizing one channel by
priority.
p Only 1 unit of this product or the All-in-One Headset can
be set to manager mode. Complete ID Registration, to do
this setting.
Hold down the [POWER] button for 2 seconds
or more to turn off the belt pack.
Press the [POWER] button for 1 second or
more while holding down the [R] and [T1]
buttons to turn on the power.
p You can hear “Connecting center module A” and
power indicator blinks red and green alternately. Also
the Lane indicator blinks orange.
In dual lane operation
Settings for Lane B must also be performed.
Press the [POWER] button for 1 second or
more while holding down the [R] and [T2]
buttons to turn on the power.
p You can hear “Connecting center module B” and
power indicator blinks red and green alternately. Also
the Lane indicator blinks green.
If manager mode setting is successful, you can
hear “Manager” and the power indicator blinks
green.
p If there is a problem setting the manager mode
settings, an error beep and the voice message
“Failed” are heard from the speaker of the
headset, and the power indicator blinks red to
alert the user the abnormal state. If that happens,
retry from STEP 1.
p Only 1 unit of this product or the All-in-One Headset
can be set to manager mode per center module. If
a second unit is set to manager mode, the manager
mode setting on the first unit is automatically
cancelled.
Note
w Canceling the Manager Mode
Turn off the belt pack that has been set for the
manager mode.
Press the [POWER] button for 1 second or
more while holding down the [R] and [T1]
buttons to turn on the power.
p You can hear “Connecting center module A” and
power indicator blinks red and green alternately. Also
the Lane indicator A blinks orange.
In dual lane operation
Canceling of the manager mode should be performed.
Press the [POWER] button for 1 second or
more while holding down the [R] and [T2]
buttons to turn on the power.
p You can hear “Connecting center module B” and
power indicator blinks red and green alternately. Also
the Lane indicator blinks green.
When manager mode is cancelled, the unit
returns to the normal condition, and the power
indicator turns green.
p If there is a problem canceling the manager mode
settings, an error beep and the voice message
“Failed” are heard from the speaker of the
headset, and the power indicator blinks red to
alert the user the abnormal state. If that happens,
retry from STEP 1.

17
Setting
w Auto-Talk-Lock setup
For a belt pack where Auto-Talk-Lock is set up, it has a
function to select “Talk” automatically when the vehicle
detector has become active, and you can talk with the
customer at the menu board. One unit of this product or the
All-in-One Headset can be set to Auto-Talk-Lock setup per
lane.
p Complete ID Registration, to do this setting.
p You can set only the unit with its DIP switch #1 in the
ON position.
(Refer to p. 20 “DIP Switch Setup”.)
Press the [POWER] button to turn on the
power.
p When the power is turned on, the voice messages
“Hello”, “Headset xx” (xx: ID number registered in
the center module) and “Lane x” (x: Connected Lane
number) are heard from the speaker of the headset.
Press the [T1] button* while the power
indicator blinks green and red alternately for 3
seconds.
p Auto-Talk-Lock registration is performed to Lane A.
When registration is complete, the voice message
“Auto Talk ON” is heard from the speaker of the
headset, and the power indicator stops blinking
alternately.
p When the [T1] button of this product is not pressed
within 3 seconds after the power is turned on, the
voice message “Auto Talk OFF” is heard from the
speaker of the headset, and the unit starts as usual.
* Use the [T2] button to register Auto-Talk-Lock for
Lane B.
p If there is a problem registering Auto-Talk-Lock,
an error beep and the voice message “Failed” are
heard from the speaker of the headset, and the
power indicator blinks red to alert the user the
abnormal state. If that happens, retry from STEP
2.
p If the power of the belt pack is turned OFF, all the
setting conditions for Auto-Talk-Lock will be canceled.
This setting should be carried out without fail when
the power supply is started up.
Note
w ID Registration
Before using this product, the unit ID must be registered in
the center module. After the ID is registered in the center
module, wireless communication between this product and
the center module is enabled.
Set the center module to “ID Registration”
mode.
(Refer to the operating instructions of the center
module.)
Hold down the power button for 2 seconds or
more to turn off the belt pack.
Press the [POWER] button for 1 second or
more while holding down the [T1] and [T2]
buttons to turn on the power.
p The belt pack enters the ID Registration setting
mode. You will hear “Registration Mode” and the
power indicator will blink orange.
Press the [T1] button.
p You can hear “Connecting center module A” and the
lane Indicator will blink orange.
p When the center module is WX-CC412, ID
registration for Lane B is automatically started, the
voice message “Connecting Center module B” is
heard from the speaker of the headset, and the lane
indicator blinks orange.
p When the ID Registration succeeds, you will hear
“Registration complete”, “Headset xx” (xx: ID number
registered in the center module), and the power
indicator stops blinking and stays on.
p If ID registration fails, an error beep and the voice
message “Failed” are heard from the speaker of
the headset, and the power indicator blinks red to
indicate an abnormal state. If that happens, retry
from STEP 2.
When the ID registration is complete, cancel
“ID Registration” of the center module.
p When this is done, “ID Registration” of this product is
cancelled and the power indicator turns green.
English

18
Setting
w Deletion of ID
When the center module is WX-C3010, delete the ID of this
product according to the following procedure.
Hold down the [POWER] button for 2 seconds
or more to turn off the belt pack.
For deleting an ID registered in the center module of Lane A
Press the [POWER] button for 1 second or
more while holding down the [F] and [T1]
buttons to turn on the power.
p The unit starts in “Delete ID mode”. The power
indicator blinks orange.
For deleting an ID registered in the center module of Lane B
Press the [POWER] button for 1 second or
more while holding down the [F] and [T2]
buttons to turn on the power.
p The unit starts in “Delete ID mode”. The power
indicator blinks orange.
Press the [P] button.
p The ID is deleted instantly, the voice message “ID not
registered” is heard from the speaker of the headset,
and the power indicator blinks red to indicate an
abnormal state.
p If Deletion of ID fails, an error beep and the voice
message “Failed” are heard from the speaker of
the headset, and the power indicator blinks red to
indicate an abnormal state. If that happens, retry
from STEP 1.
p When the number of ID registrations of this product or
the All-in-One Headset exceeds the center module’s
upper limit, the center module deletes some IDs
automatically. If a unit of this product or the All-in-One
Headset is not used for an extended time after being
registered, its ID may be deleted.
Important
w Voice Prompt language
switchover
You can change the language used for Voice Prompt. You
can select one from English, French, Spanish, and No Voice
Prompt as the language for Voice Prompt.
Hold down the [POWER] button for 2 seconds
or more to turn off the belt pack.
Press the [POWER] button for 1 second or
more while holding down the [P] button to turn
on the power.
p The power indicator blinks orange and the lane
indicator remains off.
Press the [T1] button to change the language.
When the [T2] button is pressed, the Voice
Prompt message starts in the language
selected after a beep.
English: “Hello”
French: “Bonjour”
Spanish: “Buenos Dias”
No Voice Prompt: –
Press the [P] button.
p The currently selected language is set, and this
product restarts automatically.

19
w Searching for the center
module
This product searches for an accessible center module via
the center module in which the ID is already registered.
When an accessible center module is found, this product is
connected to that center module.
p To use this function, it is necessary to register the ID in
multiple center modules in advance.
Hold down the [POWER] button for 2 seconds
or more to turn off the belt pack.
Press the [POWER] button for 1 second or
more while holding down the [R] and [+]
buttons to turn on the power.
p The power indicator blinks red and green alternately
and the lane indicator blinks orange.
When an accessible center module is found,
the power indicator blinks red and green
alternately, and the lane indicator blinks
orange.
p After 5 seconds, this product restarts automatically
and accesses the center module searched for.
p The ID of 1 unit of this product can be registered
in up to 30 center modules. The center module not
accessed for the longest time is overwritten when the
ID is registered in the 31st center module.
Note
w Initialization
You can initialize this product to the factory settings.
Hold down the [POWER] button for 2 seconds
or more to turn off the belt pack.
Press the [POWER] button for 1 second or
more while holding down the [+] and [–]
buttons to turn on the power.
p The power indicator lights up in green and the lane
indicator remains off.
When the [POWER] button is released,
initialization starts.
p When initialization is finished, this product restarts
automatically.
p When initialization is finished, the ID is not registered,
the power indicator blinks red, and the lane indicator
turns orange.
Note
English
20
Setup Procedures
Setup of this product should only be performed by
qualified service personnel or system installers.
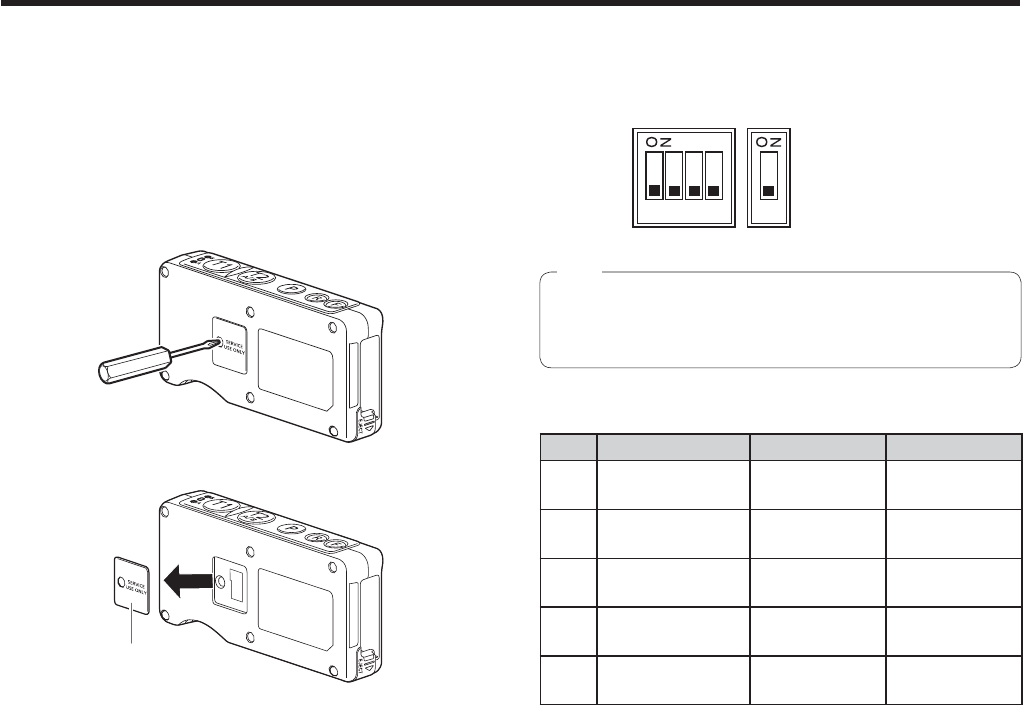
w Switch compartment
Unscrew the screw and open the switch
compartment when the power of the belt pack
is OFF.
Cover
Set the switches as described below.
After finishing the setup, replace the cover.
w DIP Switch Setup
Remove the switch cover and you will see a 4-bit DIP switch
and a 1-bit DIP switch.
Initial Setting
1
3
4
5
p Be sure to turn off the belt pack. Otherwise, the DIP
Switch will not be activated until you turn the power off
and on again.
Note
SW# Function ON OFF
1Auto TALK Lock
ON/OFF ON OFF
2 T2 Button Setting Direct Lane
Select Normal
3Talk/Page Button
Setting
TALK Lock
PAGE Lock
PTT
PTP
4Center module
model selection WX-C3010 WX-CC411
WX-CC412
5 Unused – Normal
operation
SW#1 Auto TALK Lock ON/OFF
ON: Auto Talk Lock ON
OFF: Auto Talk Lock OFF
SW#2 T2 Button Setting
Set the lane selection method for the dual lane
operation.
ON: Direct Lane Select Mode
The T1 button is for lane A, the T2 button is for
lane B.
OFF: Normal
Press the [T2] button to select lane A or B.
SW#3 Setting button operations for talking
ON: Talk for Talk-Lock, Page for Page-Lock
OFF: Talk for PTT, Page for PTP
SW#4 Center module model selection
ON: WX-C3010
OFF: WX-CC411, WX-CC412
SW#5 Unused
Always set to OFF.

21
Troubleshooting
Check the following before requesting repair.
Consult your sales shop if these measures do not resolve a problem, if symptoms not listed here occur, or if you have a question
related to engineering.
Symptom Cause/solution Reference pages
The power indicator blinks
red.
p The ID of this product is not yet registered in the center
module and a wireless connection cannot be made.
¬Register ID in the center module of the target.
P.17
The power indicator lights
red.
p The battery is almost exhausted.
¬ Replace the battery with a charged one. –––
Cannot turn on the belt pack.
p The battery is exhausted.
The battery is not inserted correctly.
¬Replace the battery with a charged one.
Position the battery properly.
P.10
Cannot communicate with
other store personnel or the
customer at the menu board.
p The center module may be turned off.
¬Turn on the power switch of the center module. If no remedy
exists, consult your dealer for repairs.
Operating
instructions of the
center module
p The headset ID is not registered in the center module of the
target.
¬ Register ID in the center module of the target.
P.17
Cannot hear or talk
to the customer, but
communications with the
store personnel are OK.
p The vehicle detector may be malfunctioning because the
detector is not plugged into the center module, no power is
supplied, or the detecting function is out of order.
¬ Check that the vehicle detector is plugged in and has power. If
no remedy exists, consult your dealer for repairs.
Operating
instructions of the
center module
Cannot “Page” or “Talk” in
certain areas.
p Radio waves cannot reach the area.
¬ Remove any metal obstacles blocking radio waves. –––
Talk or page operation is
impossible from the belt
pack set in the manager
mode.
p The unit in manager mode is receiving a phone call.
¬ When the phone call is ended, “Talk” or “Page” operation is
enabled.
–––
English

22
Specifications
Frequency Characteristic 1920 MHz to 1930 MHz
Power Supply DC 3.7 V (Rechargeable Li-ion Battery)
Dimensions 121 mm (W) × 61 mm (H) × 24 mm (D)
{4-3/4LQFKHV (W) × 2-13/32LQFKHV (H) × 15/16LQFKHV (D)}
Weight Approx J {0.2 lbs} (without Batter\)
Operating Temperature Range -10 °C to +50 °C {14 °F to 122 °F}
Input Connector Type ø2.5 stereo jack
Nominal Input Level -45 dBV
Output
Connector Type ø3.5 monaural jack
Nominal Output Level -16 dBV (35 ohms)
Frequency Response 300 Hz to 3 kHz
Output Volume Control +6 dB to -18 dB, 3 dB step

23
Accessories
w Standard Accessories
Operating Instructions (this manual) .............................. 1 pc.
w Optional Accessories
Battery (Li-ion 3.7 V DC 1,100 mAh) ................. WX-B3030
Battery Charger ................................................. WX-Z3040A
Headset ...............................................................WX-CH427
English
Dedicated Belt Pouch

24
DÉCLARATION DE LA COMMISSION FÉDÉRALE DES TÉLÉCOMMUNICATIONS (FCC)
SUR LES INTERFÉRENCES
Cet équipement a été testé et déclaré conforme aux spécifications de la Classe A des appareils numériques, suivant le
chapitre Part 15 des Règles FCC. Ces limites sont prévues pour assurer une protection suffisante contre les interférences
nuisibles dans une installation commerciale. Cet équipement génère, utilise et peut émettre de l’énergie radiofréquence, et,
s’il est installé sans tenir compte des recommandations du mode d’emploi, peut causer des interférences nuisibles dans les
communications radio. L’utilisation de cet équipement dans une zone résidentielle risque fort de provoquer des interférences
nuisibles, auquel cas il sera demandé à l’utilisateur de remédier à ces interférences à ses frais.
Cet émetteur ne doit pas être installé ou utilisé en conjonction avec d’autres antennes ou d’autres émetteurs.
Les connaissances scientifiques dont nous disposons n’ont mis en évidence aucun problème de santé associé à l’usage
des appareils sans fil à faible puissance. Nous ne sommes cependant pas en mesure de prouver que ces appareils sans fil à
faible puissance sont entièrement sans danger. Les appareils sans fil à faible puissance émettent une énergie radioélectrique
(RF) très faible dans le spectre des micro-ondes lorsqu’ils sont utilisés. Alors qu’une dose élevée de RF peut avoir des effets
sur la santé (en chauffant les tissus), l’exposition à de faibles RF qui ne produisent pas de chaleur n’a pas de mauvais effets
connus sur la santé. De nombreuses études ont été menées sur les expositions aux RF faibles et n’ont découvert aucun effet
biologique. Certaines études ont suggéré qu’il pouvait y avoir certains effets biologiques, mais ces résultats n’ont pas été
confirmés par des recherches supplémentaires.
WX-CT420 a été testé et jugé conforme aux limites d’exposition aux rayonnements énoncées pour un environnement non
contrôlé et respecte les règles les radioélectriques (RF) de la FCC lignes directrices d’exposition dans le Supplément C à
OET65 et d’exposition aux fréquences radioélectriques (RF) CNR-102 de l’IC.
Les changements ou modifications non expressément approuvés par la partie responsable de la conformité peuvent
entraîner l’annulation du droit d’utiliser l’équipement.
Le présent appareil est conforme aux la partie 15 des règles de la FCC et CNR d’Industrie Canada applicables aux
appareils radio exempts de licence. L’exploitation est autorisée aux deux conditions suivantes : (1) l’appareil ne doit
pas produire de brouillage, et (2) l’utilisateur de l’appareil doit accepter tout brouillage radioélectrique subi, même si le
brouillage est susceptible d’en compromettre le fonctionnement.
AVERTISSEMENT:
p Afin de réduire le risqué d’incendie ou de choc électrique, ne pas exposer cet appareil à la pluie ou à l’humidité.
p L’appareil ne devrait pas être exposé à des éclaboussures ou des projections d’eau et aucun récipient rempli de liquide tels
que des vases ne devraient être posé sur l’appareil.
p Tout travail lié à l’installation de ce produit doit être effectué par le personnel de service ou des installateurs de système
qualifiés.
p Le risque de déficience auditive due à l’exposition à des niveaux de bruit excessifs peut être réduit par l’écoute à volume
plus bas et sur des périodes plus courtes.
p L’utilisation près d’appareils électriques 2,4 GHz peut causer de l’interférence. Éloigner des appareils électriques.
p Cet émetteur ne doit pas être installé ou utilisé en conjonction avec d’autres antennes ou d’autres émetteurs.
p MÉDICAL:
S’informer auprès du fabricant des appareils médicaux personnels tels que les stimulateurs cardiaques pour savoir s’ils
sont adéquatement isolés contre l’énergie des fréquences radio externes. (Cet appareil fonctionne sur la gamme de
fréquences 2,412 GHz à 2,462 GHz, et son niveau de puissance de sortie est de 0,1 watt.)
Ne pas utiliser l’appareil dans les établissements de soins là où des règlements affichés l’interdissent. Les hôpitaux et
autres établissements de soins peuvent utiliser des équipements sensibles à l’énergie des fréquences radio externes.
p Les batteries (le bloc-pile ou les batteries insérées) ne doivent pas être exposées à une chaleur excessive telle que celle
du soleil ou d’un feu.
VERSION FRANÇAISE
(FRENCH VERSION)
Consignes de sécurité

25
Consignes de sécurité
ATTENTION:
p Risque d’explosion si la batterie n’est pas correctement
remplacée. Ne remplacer qu’avec une batterie de type
identique ou équivalent.
p Les présentes instructions de service ne doivent être
utilisées que par le personnel de service qualifié. Pour
réduire les risques de décharge électrique, n’effectuer
aucune tâche d’entretien autre que celles indiquées
dans ce manuel d’instructions, à moins d’être dûment
qualifié.
p Tout changement ou modification non expressément
approuvée par la partie responsable de la conformité
pourraient annuler l’autorité de l’utilisateur à utiliser cet
équipement.
p Des câbles LAN blindés (à paire torsadée blindée)
doivent être utilisés avec cet appareil pour assurer la
conformité aux normes CEM.
ICES-003
CAN ICES-3(A)/NMB-3(A)
Pour Canada
L’appareil que vous vous êtes procuré est
alimenté par une batterie au lithium-ion.
Pour des renseignements sur le recyclage
de la batterie, veuillez composer le
1-800-8-BATTERY.
1) Veiller à lire ces instructions.
2) Conserver ces instructions.
3) Tenir compte de tous les avertissements.
4) Se conformer à toutes les instructions.
5) Ne pas utiliser cet appareil près de lieux en présence d’eau.
6) Nettoyer uniquement avec un chiffon sec.
7) Ne pas utiliser à proximité de sources de chaleur telles que des radiateurs, des bouches de chauffage, des appareils de
chauffage ou tout autre appareil (y compris les amplificateurs) produisant de la chaleur.
8) Utiliser uniquement les fixations ou les accessoires spécifiés par le fabricant.
Instructions de sécurité importantes
CNR-Gen
p Conformément à la réglementation d’Industrie Canada,
le présent émetteur radio peut fonctionner avec une
antenne d’un type et d’un gain maximal (ou inférieur)
approuvé pour l’émetteur par Industrie Canada.
Dans le but de réduire les risques de brouillage
radioélectrique à l’intention des autres utilisateurs, il
faut choisir le type d’antenne et son gain de sorte que
la puissance isotrope rayonnée équivalente (p.i.r.e.) ne
dépasse pas l’intensité nécessaire à l’établissement
d’une communication satisfaisante.
Pour Canada
Français

26
Sommaire
Consignes de sécurité ................................................... 24
Avant utilisation .............................................................. 27
Préface ......................................................................... 27
Caractéristiques dominantes ....................................... 27
Schéma du système .................................................... 27
Limitation de responsabilité ......................................... 28
Déni de la garantie ....................................................... 28
Mesures de précaution .................................................. 29
Principaux organes de commande et fonctions .......... 30
Chargement et remplacement de la batterie ................ 32
Chargement ................................................................. 32
Remplacement ............................................................. 32
Branchement et débranchement de la fiche de combiné
microcasque d’écoute
..................................................... 33
Modes d’utilisation
.......................................................... 34
Préparatifs .................................................................... 34
Réglage du volume ...................................................... 35
Communications avec les clients (TALK)
...................... 35
Communication avec d’autres membres du personnel du
magasin (PAGE)
........................................................... 35
Notification d’alerte ...................................................... 36
Commande de périphérique externe ........................... 36
Mode double passage .................................................. 36
Service de téléphonie Internet
(Seul ce produit est réglé sur le mode de gérant) ........ 37
Limitations de communication ...................................... 37
Hors de portée de communication ............................... 37
Batterie ......................................................................... 37
Éteindre l’appareil ........................................................ 37
Configuration de l’appareil ............................................ 40
Mode de gérant ............................................................ 38
Annulation du mode gérant .......................................... 38
Configuration de la fonction de verrouillage
automatique pour parler
................................................. 39
Enregistrement d’identification ..................................... 39
Suppression d’une identification .................................. 40
Basculement de langue de message vocal .................. 40
Recherche du module central ...................................... 41
Réinitialisation .............................................................. 41
Procédures de configuration ......................................... 42
Logement d’interrupteur ............................................... 42
Configuration d’interrupteur DIP .................................. 42
Dépannage ...................................................................... 43
Caractéristiques techniques ......................................... 44
Accessoires .................................................................... 45
Accessoires standard ................................................... 45
Accessoires optionnels ................................................ 45
27
Avant utilisation
w Préface
Le module de commande pour ceinture WX-CT420 est exclusivement conçu pour être utilisé avec les systèmes de
communication à liaison radio Panasonic dont on se sert dans les tableaux de menu de service clientèle de passage, etc. En
utilisant le combiné microcasque d’écoute WX-CH427 optionnel, les utilisateurs peuvent communiquer avec d’autres éléments
du personnel du magasin et les clients.
w Caractéristiques dominantes
p Ce module de commande pour ceinture peut être utilisé avec le module central WX-C3010:;&&:;&&
.p 1,9 GHz DECT* est employé avec le module de commande pour ceinture afin d’empêcher toute interférence par les fours à
micro-ondes ou le réseau local sans fil utilisés avec 2,4 GHz DECT.
*Télécommunications sans fil améliorées par numérique
p Mode administrateur
Il est possible de régler le mode de gérant sur un des preneurs de commande enregistrés dans le module central. Une
personne se servant du preneur de commande a la priorité de communication.
p Il est possible de sélectionner le passage direct ou le passage A/B selon les dispositions de système double de service
clientèle de passage.
p Il est possible de sélectionner le mode de verrouillage pour parler ou mode presser pour parler.
p Il est possible de sélectionner le mode de verrouillage page ou le mode presser pour page.
w Schéma du système
Les utilisateurs de ce produit et du casque d’écoute tout-en-un peuvent communiquer entre eux et avec les clients à la hauteur
du tableau de menu par une connexion sans fil au module central.
INSTALL SYSTEM SETTING
OPERATIONAL SETTING
ID REGISTRATION
GREETER
POWER
TELEPHONE
CONTROL OUT
START
DELAY
ON
DOWN
PREV
ECHO CANCELLER
DNR LEVEL
DUAL LANE
LANE SELECT
POS REMOTE
TX POWER
RED MAX
YELLOW MD
GREEN LOW
OFF OFF
SEL
AUX
SP
AUX IN
TALK
PAGE
BEEP
NEXT
OUTSIDE
SPEED
TEAM BEEP
DAY/NIGHT
ON:DAY
OUTSIDE
SP LEVEL
ON:DAY
V/DET
OVERRIDE T/P
RELEASE
SP MIC SP MIC
AUX BEEP POS
AUDIO
UP
12
REC
TALK
PAGE
VEHICLE
DETECTOR
SELECT VOLUME
DESTINATION
AUX HEADSET
HEADSET
PLAYBACK
Casque d’écoute tout-en-un Module central
Détecteur de véhicule
Tableau de menu
Microphone
Haut-parleur
TALK
(Communications avec
les clients)
PAGE
(Communication avec
d’autres membres du
personnel du magasin)
Casque d’écoute tout-en-un
Module de commande
pour ceinture
(ou preneur de
commande)
Module de commande
pour ceinture
(ou preneur de
commande)
Français

28
Avant utilisation
w Limitation de responsabilité
CETTE PUBLICATION EST FOURNIE “COMME TEL” SANS GARANTIE DE TOUTE SORTE, EXPRÈS OU IMPLICITE, ÉTANT
INCLUSE MAIS NON LIMITÉE AUX GARANTIES IMPLICITES DE LA VALEUR MARCHANDE, ADAPTATION POUR TOUT
BUT PARTICULIER OU NON-INFRACTION DES DROITS D’UN TIERS.
w Déni de la garantie
EN AUCUN CAS Panasonic Corporation NE SERA TENU POUR RESPONSABLE POUR TOUTE PARTIE OU TOUTE
PERSONNE, À L’EXCEPTION DU REMPLACEMENT OU D’UNE MAINTENANCE RAISONNABLE DE CE PRODUIT POUR
LES CAS CITÉS, INCLUS MAIS NON LIMITÉS À CE QUI SUIT:
(1) TOUT DÉGÂT ET PERTE, Y COMPRIS SANS LIMITATION, DIRECT OU INDIRECT, SPÉCIAL, IMPORTANT OU
EXEMPLAIRE, SURVENANT OU CONCERNANT LE PRODUIT;
(2) BLESSURE PERSONNELLE OU TOUT DÉGÂT CAUSÉS PAR UN USAGE NON APPROPRIÉ OU UNE UTILISATION
NÉGLIGENTE DE L’UTILISATEUR;
(3) DÉMONTAGE, RÉPARATION OU MODIFICATION NON AUTORISÉS DU PRODUIT EFFECTUÉS PAR L’UTILISATEUR;
(4) TOUT PROBLÈME, INCOMMODITÉ IMPORTANTE OU PERTE OU ENDOMMAGEMENT, SURVENANT DU SYSTÈME
COMBINÉ PAR LES APPAREILS DE TIERS.

29
Mesures de précaution
p L’appareil est destiné à une utilisation seulement interne.
Il ne peut pas s’utiliser en extérieur.
Éviter d’installer dans un emplacement où l’unité sera exposée à l’ensoleillement direct pour de longues périodes, ou à
proximité d’un appareil de climatisation ou de chauffage.
Sinon, une déformation, une décoloration, un dysfonctionnement et/ou des problèmes d’utilisation risque d’en résulter.
Utilisez l’appareil à l’abri d’éclaboussures ou de goutelettes d’eau.
p Manipulez l’unité avec précaution. Ce produit utilise des pièces qui peuvent être endommagées par une manipulation ou un
rangement inadéquat.
p Utiliser seulement la batterie WX-B3030.
En combination avec ce produit, se référer aux instructions d’utilisation du chargeur de batterie WX-Z3040A.
p Ne pas exposer la batterie à une chaleur excessive telle que la lumière directe du soleil ou un feu.
p Se conformer aux instructions de précaution et d’utilisation de la batterie.
p Utiliser seulement les combinés microcasques conçus pour l’utilisation avec ce produit. Autrement, la voix risque d’être
déformée ou l’on peut éprouver des difficultés à entendre la voix.
p Ne pas utiliser ce produit si vous utilisez un équipement médical électrique implanté. Ceci peut provoquer un
dysfonctionnement de l’équipement.
p Arrêter le combiné microcasque d’écoute quand celui-ci n’est pas utilisé de manière à économiser la vie de la batterie.
p Avant de ranger ce module de commande pour ceinture, déconnecter le combiné microcasque pour prévenir tout dommage.
p Lorsque le produit doit rester inutilisé pour une période prolongée, ne pas laisser la batterie dans l’appareil. Penser à la
retirer.
Français
30
Principaux organes de commande et fonctions
Logement d’interrupteur
Ne pas ouvrir le couvercle de ce logement. Ne doit
être ouvert que par un technicien professionnel ou des
installateurs de système qualifiés.
Batterie (accessoire optionnel)
Insérer la batterie à utiliser avec ce module de
commande pour ceinture. (Se référer à p.32 à “Chargement
et remplacement de la batterie”.)
Verrouillage de batterie [EJECT]
Faire coulisser le verrouillage pour retirer la batterie.
Lors du chargement d’une batterie, introduire la batterie
jusqu’à ce que le verrouillage émette un déclic.
Veuiller noter le sens pour insérer la batterie.
Prise d’entrée de microphone
Cette prise est utilisée pour le raccordement au combiné
microcasque d’écoute WX-C+27.
Prise de sortie d’écouteur
Cette prise est utilisée pour le raccordement au combiné
microcasque d’écoute WX-C+27.
Bouton d’alimentation [POWER]
Le fait d’appuyer sur le bouton met le module de
commande pour ceinture en marche.
Une autre pression du bouton pendant au moins
2 secondes permet d’arrêter le module de commande
pour ceinture.
Boutons de réglage de volume [VOL + – ]
Utiliser ce bouton pour régler le volume de l’écouteur du
combiné microcasque.
Appuyer sur le bouton [+] pour augmenter le niveau
du son. À chaque pression sur le bouton, une tonalité
informe l’utilisateur que le volume est augmenté. Si
l’utilisateur essaie d’augmenter le volume au-delà de la
limite supérieure, deux tonalités l’informent que cette
action est interdite.
Appuyer sur le bouton [–] pour réduire le niveau du son.
À chaque pression sur le bouton, une tonalité informe
l’utilisateur que le volume est réduit. Si l’utilisateur essaie
de réduire le volume en deçà de la limite inférieure, deux
tonalités l’informent que cette action est interdite.

31
Indicateur de passage
S’allume en orange ou en vert pour indiquer le passage
en service.
Orange : Le passage A est sélectionné.
Vert : Le passage B est sélectionné.
Clignotement orange : Le passage A est sélectionné, et
le mode Parler ou Page est activé.
Clignotement vert : Le passage B est sélectionné, et le
mode Parler ou Page est activé.
Indicateur d’alimentation
L’indicateur montre l’état actuel comme suit.
Vert :
L’alimentation est appliquée et l’appareil est en fonction.
Clignotement vert : L’alimentation est appliquée et le
mode de gérant est activé.
Rouge : La batterie est presque épuisée. Remplacer la
batterie par une batterie chargée.
Clignotement rouge : Une erreur s’est produite.
Bouton Parler 1 [T1]
Ce bouton contrôle les communications avec le client.
La fonction de ce bouton change suivant le réglage
de l’interrupteur DIP. (Se référer à p.42 à “Configuration
d’interrupteur DIP”.)
3RXUXQHFRQILJXUDWLRQGHVpOHFWLRQGLUHFWHGH
SDVVDJHHQPRGH3UHVVHUSRXUSDUOHU377!
Pendant que le bouton [T1] est enfoncé, il est possible
de parler à un client à la hauteur du tableau de menu du
passage A.
3RXUXQHFRQILJXUDWLRQQRUPDOHHQPRGH3UHVVHU
SRXUSDUOHU377!
Pendant que le bouton [T1] est enfoncé, il est possible
de parler à un client à la hauteur du tableau de menu du
passage connecté.
3RXUXQHFRQILJXUDWLRQGHVpOHFWLRQGLUHFWHGHSDVVDJH
HQ
PRGHGHYHUURXLOODJHSRXUSDUOHU!
En appuyant une fois sur le bouton [T1], il est possible
de parler à un client à la hauteur du tableau de menu
du passage A. Appuyer de nouveau sur le bouton pour
terminer l’appel.
3RXUXQHFRQILJXUDWLRQQRUPDOHHQPRGHGH
YHUURXLOODJHSRXUSDUOHU!
En appuyant une fois sur le bouton [T1], il est possible
de parler à un client à la hauteur du tableau de menu du
passage connecté. Appuyer de nouveau sur le bouton
pour terminer l’appel.
Bouton de sélection Parler 2 / Passage A/B [T2, A/B]
Ce bouton peut être réglé sur deux fonctions suivant le
réglage de l’interrupteur à positions multiples. (Se référer
à p.42 à “Configuration d’interrupteur DIP”.)
[T2]
Ce bouton contrôle les communications avec le client.
<3RXUXQHFRQILJXUDWLRQGHVpOHFWLRQGLUHFWHGH
SDVVDJHHQPRGH3UHVVHUSRXUSDUOHU377>
Pendant que le bouton [T2] est enfoncé, il est possible
de parler à un client à la hauteur du tableau de menu du
passage B.
<3RXUXQHFRQILJXUDWLRQQRUPDOHHQPRGH3UHVVHU
SRXUSDUOHU377>
Pendant que le bouton [T2] est enfoncé, il est possible de
parler à un client à la hauteur du tableau de menu d’un
autre passage.
<3RXUXQHFRQILJXUDWLRQGHVpOHFWLRQGLUHFWHGH
SDVVDJHHQPRGHGHYHUURXLOODJHSRXUSDUOHU>
En appuyant une fois sur le bouton [T2], il est possible
de parler à un client à la hauteur du tableau de menu
du passage B. Appuyer de nouveau sur le bouton pour
terminer l’appel.
<3RXUXQHFRQILJXUDWLRQQRUPDOHHQPRGHGH
YHUURXLOODJHSRXUSDUOHU>
En appuyant une fois sur le bouton [T2], il est possible de
parler à un client à la hauteur du tableau de menu d’un
autre passage. Appuyer de nouveau sur le bouton pour
terminer l’appel.
[A/B]
Lorsque le WX-CC412 est utilisé comme module central,
ce bouton commute la connexion du passage A au
passage B (ou vice-versa) des passages doubles.
Bouton Page [P]
Ce bouton contrôle les communications avec le
personnel du magasin.
<
Lorsque le mode presser pour page (PTP) est préréglé
>
Alors que le bouton [P] est maintenu pressé, il est
possible de parler au personnel du magasin.
<Lorsque le mode de verrouillage page est préréglé>
Alors que le bouton [P] est maintenu pressé, il est
possible de parler au personnel du magasin jusqu’à ce
que le bouton soit pressé une seconde fois.
Bouton Téléphone [R]
Cette fonction n’est activée que lorsque ce produit est
réglé sur le mode de gérant.
Il est possible de faire des appels téléphoniques via le
module central.
Bouton d’alerte [F]
Les fonctions varient suivant le module central auquel
l’utilisateur est connecté.
<Lorsque connecté au WX-CC411, WX-CC412>
Maintenir ce bouton enfoncé pendant 2 secondes ou plus
pour envoyer une alerte de sécurité au module central.
L’action prise lorsqu’une alerte est envoyée dépend
du réglage du module central, et peut comprendre
Enregistrement TALK et PAGE, Envoyer courriel, etc.
<Lorsque connecté au WX-C>
Le bouton [F] fonctionne en tant que le bouton de
commande de périphérique externe. Le périphérique
externe demeure activé tant que ce bouton est enfoncé.
Français
32
Chargement et remplacement de la batterie
p Se référer aux manuel d’utilisation qui accompagnent la batterie et le chargeur de batterie.
p Penser à préparer une batterie complètement chargée.
p Il est recommandé de remplacer la batterie lorsque le témoin d’alimentation de ce produit s’allume en rouge et que le
message vocal “Battery low” est entendu par le haut-parleur du combiné microcasque d’écoute.
Remarques
w Chargement
Installer la batterie tel qu’illustré sur la figure
de droite.
p En insérant la batterie, s’assurer que les bornes sont
orientées dans le bon sens.
Remarque
w Remplacement
Faire coulisser le verrouillage tel qu’illustré
sur la figure de droite.
Retirer la batterie.
Batterie
Borne
Verrouillage de
batterie

33
Branchement et débranchement de la fiche de combiné microcasque d'écoute
Au moment de brancher la fiche du combiné
microcasque d'écoute à ce produit, maintenir
la fiche et la pousser directement dans la
prise de sortie d'écouteur et la prise d'entrée
de microphone. Pour débrancher la fiche
de raccordement du combiné microcasque
d'écoute de cet appareil, saisir la prise et la
dégager tout droit.
Ne pas saisir le câble.
Ne pas dégager cette partie
vers le haut ou vers le bas.
Français

34
Modes d’utilisation
w Préparatifs
Avant d’utiliser le module de commande pour ceinture,
confirmer que la configuration du système pour le module
de commande pour ceinture, le module central et d’autres
périphériques est complètement terminée.
Fixer la batterie au module de commande pour
ceinture.
(Se référer à p.32 à “Chargement et remplacement de la
batterie”.)
Connecter le combiné microcasque au module
de commande pour ceinture.
(Se référer à p.33 à “Branchement et débranchement de
la fiche de combiné microcasque d’écoute”.)
Porter le module de commande pour ceinture
et le combiné microcasque sur la tête.
p Porter le module de commande pour ceinture autour
de la taille et le combiné microcasque sur la tête.
Ajuster le rembourrage de casque pour que
l’écouteur soit placé sur l’oreille.
Faire pivoter et replier la perche de
microphone pour que le microphone soit placé
près de la bouche.
Appuyer sur le bouton [POWER] du module
de commande pour ceinture pour le mettre en
marche.
p Au moment de la mise en marche, les messages
vocaux “Hello”, “Headset xx” (xx : le numéro
d’identification enregistré dans le module central)
et “Lane x” (x : numéro du passage connecté)
seront entendus par le haut-parleur du combiné
microcasque d’écoute.

35
w Réglage du volume
Mettre le combiné microcasque, et appuyer sur les boutons
de réglage de volume du module de commande pour
ceinture pour régler le volume du combiné microcasque sur
le niveau adéquat.
w Communications avec les
clients (TALK)
Tout membre du personnel portant un combiné microcasque
peut communiquer en mode bidirectionnel avec n’importe
quel client qui se trouve à la hauteur du tableau de menu.
p Une tonalité est entendue dans le combiné
microcasque quand un véhicule arrive à la hauteur
du tableau de menu.
Lorsque le mode presser pour parler (PTT) est préréglé
Presser et immobiliser le bouton [T1].
p Une tonalité est entendue par le haut-parleur du
combiné microcasque d’écoute pour confirmer que
la communication est établie. Dans cet état, il est
possible de communiquer avec un client à la hauteur
du tableau de menu en parlant dans le microphone
du combiné microcasque d’écoute.
Libérer le bouton [T1].
p La communication est coupée et la conversation
prend fin.
Lorsque le mode de verrouillage pour parler est préréglé
Presser le bouton [T1].
p Une tonalité est entendue par le haut-parleur du
combiné microcasque d’écoute pour confirmer que
la communication est établie. Dans cet état, il est
possible de communiquer avec un client à la hauteur
du tableau de menu en parlant dans le microphone
du combiné microcasque d’écoute.
Presser le bouton [T1] encore une fois.
p La communication est coupée et la conversation
prend fin.
w Communication avec d’autres
membres du personnel du
magasin (PAGE)
Tous les membres du personnel portant un combiné
microcasque peuvent communiquer entre eux sans être des
clients.
Lorsque le mode presser pour page (PTP) est préréglé
Presser et immobiliser le bouton [P].
p Une tonalité est entendue par le haut-parleur du
combiné microcasque d’écoute pour confirmer
que la communication est établie. Dans cet état, il
est possible de communiquer avec un membre du
personnel en parlant dans le microphone du combiné
microcasque d’écoute.
Libérer le bouton [P].
p La communication est coupée et la conversation
prend fin.
Lorsque le mode de verrouillage page est préréglé
Presser le bouton [P].
p Une tonalité est entendue par le haut-parleur du
combiné microcasque d’écoute pour confirmer
que la communication est établie. Dans cet état, il
est possible de communiquer avec un membre du
personnel en parlant dans le microphone du combiné
microcasque d’écoute.
Presser le bouton [P] encore une fois.
p La communication est coupée et la conversation
prend fin.
Français

36
Modes d’utilisation
w Notification d’alerte
Lorsque le module central est le WX-CC411 ou le
WX-CC412, les membres du personnel qui portent ce
produit peuvent envoyer une alerte de sécurité au module
central.
Presser et immobiliser le bouton [F] pendant
au moins 2 secondes.
p Une tonalité est entendue par le haut-parleur du
combiné microcasque d’écoute pour indiquer que la
transmission est achevée, et une alerte de sécurité
est envoyée au module central.
Lorsque le module central reçoit une alerte
de sécurité de ce produit, il effectue les
opérations prédéfinies (Enregistrement TALK
et PAGE, Envoyer courriel, lecture de message
d’alerte, Surveillance par caméra, etc.).
w Commande de périphérique
externe
Lorsque le module central est le WX-C3010, il est possible
de commander la borne de commande de périphérique
externe à l’aide de ce produit.
Presser et immobiliser le bouton [F].
p Une courte tonalité est entendue par le haut-parleur
du combiné microcasque d’écoute, et la borne de
commande de périphérique externe passe en mode
actif.
Libérer le bouton [F].
p 2 courtes tonalités sont entendues par le haut-
parleur du combiné microcasque d’écoute, et la
borne de commande de périphérique externe passe
en mode d’arrêt.
w Mode double passage
En mode double passage, ce produit doit sélectionner un
passage pour la communication.
Pour une configuration normale
Commutation sur le passage B
Quand une connexion est établie au passage A, l’indicateur
de passage s’allume en orange.
Presser le bouton [T2].
p Une voix “Lane B” est entendue par le haut-parleur
du combiné microcasque d’écoute et l’indicateur de
passage s’allume en vert. La connexion passe au
passage B.
Commutation sur le passage A
Quand une connexion est établie au passage B, l’indicateur
de passage s’allume en vert.
Presser le bouton [T2].
p Une voix “Lane A” est entendue par le haut-parleur
du combiné microcasque d’écoute et l’indicateur de
passage s’allume en orange. La connexion passe au
passage A.
Pour une configuration de sélection directe de passage
Commutation sur le passage B
Quand une connexion est établie au passage A, l’indicateur
de passage s’allume en orange.
Presser le bouton [T2].
p Une voix “Lane B” est entendue par le haut-parleur
du combiné microcasque d’écoute et l’indicateur de
passage clignote en vert. La connexion passe au
passage B. Il est possible de parler à un client à la
hauteur du tableau de menu du passage B.
Commutation sur le passage A
Quand une connexion est établie au passage B, l’indicateur
de passage s’allume en vert.
Presser le bouton [T1].
p Une voix “Lane A” est entendue par le haut-parleur
du combiné microcasque d’écoute et l’indicateur de
passage clignote en orange. La connexion passe au
passage A. Il est possible de parler à un client à la
hauteur du tableau de menu du passage A.

37
w Service de téléphonie Internet
(Seul ce produit est réglé sur le
mode de gérant)
Ce produit peut recevoir les appels d’un logiciel de
communication en ligne tel que Skype.
Appuyer sur le bouton [R] pendant qu’une
tonalité d’appel est entendue par le haut-
parleur du combiné microcasque d’écoute.
p Le service de téléphonie Internet est alors connecté
et il est possible de faire un appel.
Appuyer sur le bouton [R] pendant que le
service de téléphonie Internet est connecté.
p Le service se déconnecte et l’appel prend fin.
p Lorsque le bouton [R] est maintenu enfoncé pendant
2 secondes ou plus pendant que le service de téléphonie
Internet est déconnecté, il est possible de faire un appel
par le service de téléphonie Internet.
p Le logiciel doit être installé dans le module central
pour pouvoir utiliser le service de téléphonie Internet.
Pour plus de détails, contacter un revendeur.
Remarque
w Limitations de communication
Jusqu’à 4 appareils de ce produit ou du casque d’écoute
tout-en-un peuvent être utilisés par passage.
Si un cinquième appareil essaie de parler à un client ou
de communiquer avec un membre du personnel, une
tonalité d’erreur et le message vocal “Cannot connect” sont
entendus par le haut-parleur du combiné microcasque
d’écoute et l’accès est refusé.
Par contre, le cinquième appareil et les suivants peuvent
entendre les conversations avec les clients ou les
communications avec les membres du personnel.
w
Hors de portée de communication
Lorsqu’un membre du personnel qui porte ce produit n’est
plus à portée de communication, une tonalité d’erreur
et le message vocal “Out of range” sont entendus par
le haut-parleur du combiné microcasque d’écoute et la
communication est déconnectée.
Lorsqu’il revient à portée de communication, une tonalité est
entendue et la communication devient possible.
w Batterie
Lorsque la batterie devient faible, une tonalité d’erreur et
le message vocal “Battery Low” sont entendus par le haut-
parleur du combiné microcasque d’écoute, et le témoin
d’alimentation clignote en rouge en même temps. Lorsque
cela se produit, remplacer immédiatement la batterie par
une batterie complètement chargée.
w Éteindre l’appareil
Presser et immobiliser le bouton [POWER]
pendant au moins 2 secondes.
p Le message vocal “Goodbye” est entendu par le
haut-parleur du combiné microcasque d’écoute,
l’appareil s’éteint et le témoin d’alimentation s’éteint.
Français

38
Configuration de l’appareil
w Mode de gérant
p Le gérant peut interrompre le mode TALK ou PAGE
de tout membre du personnel à tout moment en
monopolisant un canal par priorité.
p Seulement 1 appareil de ce produit ou de casque
d’écoute tout-en-un peut être réglé sur le mode de
gérant. Effectuer l’enregistrement d’identification, pour
faire ce réglage.
Appuyer et immobiliser le bouton [POWER]
pendant au moins 2 secondes pour arrêter le
module de commande pour ceinture.
Appuyer sur le bouton [POWER] pendant 1
seconde ou plus tout en maintenant enfoncés
les boutons [R] et [T1] pour mettre l’appareil
en marche.
p Il est possible d’entendre “Connecting center
module A” et le témoin d’alimentation clignote
alternativement du rouge au vert. En outre,
l’indicateur de passage clignote en orange.
En mode de passage double
Les réglages du passage B doivent aussi être effectués.
Appuyer sur le bouton [POWER] pendant 1
seconde ou plus tout en maintenant enfoncés
les boutons [R] et [T2] pour mettre l’appareil
en marche.
p Il est possible d’entendre “Connecting center
module B” et le témoin d’alimentation clignote
alternativement du rouge au vert. En outre,
l’indicateur de passage clignote en vert.
Si le réglage de mode de gérant se déroule
avec succès, il est possible d’entendre
“Manager” et le témoin d’alimentation clignote
en vert.
p S’il y a un problème lors de la configuration des
réglages de mode de gérant, une tonalité d’erreur
et le message vocal “Failed” sont entendus par le
haut-parleur du combiné microcasque d’écoute,
et le témoin d’alimentation clignote en rouge
pour alerter l’utilisateur de l’état anormal. Si cela
se produit, réessayer depuis l’ÉTAPE 1.
p Seulement 1 appareil de ce produit ou de casque
d’écoute tout-en-un peut être réglé sur le mode de
gérant pour chaque module central. Si un deuxième
appareil est réglé sur le mode de gérant, cela annule
automatiquement le réglage du mode de gérant sur le
premier appareil.
Remarque
w Annulation du mode gérant
Couper l’alimentation du module de
commande pour ceinture qui a été réglé pour
le mode de gérant.
Appuyer sur le bouton [POWER] pendant
1 seconde ou plus tout en maintenant
enfoncés les boutons [R] et [T1] pour mettre
l’appareil en marche.
p Il est possible d’entendre “Connecting center
module A” et le témoin d’alimentation clignote
alternativement du rouge au vert. En outre,
l’indicateur de passage clignote en orange.
En mode de passage double
L’annulation du mode de gérant doit être effectuée.
Appuyer sur le bouton [POWER] pendant
1 seconde ou plus tout en maintenant
enfoncés les boutons [R] et [T2] pour mettre
l’appareil en marche.
p Il est possible d’entendre “Connecting center
module B” et le témoin d’alimentation clignote
alternativement du rouge au vert. En outre,
l’indicateur de passage clignote en vert.
Lorsque le mode de gérant est annulé,
l’appareil revient en condition normale et le
témoin d’alimentation s’allume en vert.
p S’il y a un problème lors de l’annulation des
réglages de mode de gérant, une tonalité d’erreur
et le message vocal “Failed” sont entendus par le
haut-parleur du combiné microcasque d’écoute,
et le témoin d’alimentation clignote en rouge
pour alerter l’utilisateur de l’état anormal. Si cela
se produit, réessayer depuis l’ÉTAPE 1.

39
w Configuration de la fonction de
verrouillage automatique pour
parler
Pour un module de commande pour ceinture où la fonction
de verrouillage automatique pour parler est configurée, il
a une fonction pour sélectionner “Talk” automatiquement
quand le détecteur de véhicule est devenu actif, et si l’on
parle avec le client au tableau de menu. Pour chaque
passage, il est possible de régler 1 appareil de ce produit
ou le casque d’écoute tout-en-un sur la configuration de la
fonction de verrouillage automatique pour parler.
p Effectuer l’enregistrement d’identification, pour faire ce
réglage.
p Il n’est possible de régler que l’appareil dont
l’interrupteur DIP N° 1 est sur la position ON.
(Se référer à p.42 à “Configuration d’interrupteur DIP”.)
Appuyer sur le bouton [POWER] pour mettre
l’appareil en marche.
p Au moment de la mise en marche, les messages vocaux
“Hello”, “Headset xx” (xx : le numéro d’identification
enregistré dans le module central) et “Lane x” (x : numéro
du passage connecté) seront entendus par le haut-
parleur du combiné microcasque d’écoute.
Appuyer sur le bouton [T1]* pendant que le
témoin d’alimentation clignote alternativement
en vert et en rouge pendant 3 secondes.
p L’enregistrement de la fonction de verrouillage
automatique pour parler est effectué sur le
passage A. Une fois l’enregistrement terminé, le
message vocal “Auto Talk ON” est entendu par le
haut-parleur du combiné microcasque d’écoute, et le
témoin d’alimentation cesse de clignoter de manière
alternée.
p Si l’on n’appuie pas sur le bouton [T1] de ce produit
dans les 3 secondes qui suivent sa mise en marche,
le message vocal “Auto Talk OFF” est entendu par le
haut-parleur du combiné microcasque d’écoute, et
l’appareil démarre comme d’ordinaire.
* Utiliser le bouton [T2] pour enregistrer la fonction de
verrouillage automatique pour parler sur le passage B.
p S’il y a un problème lors de l’enregistrement de
la fonction de verrouillage automatique pour
parler, une tonalité d’erreur et le message vocal
“Failed” sont entendus par le haut-parleur du
combiné microcasque d’écoute, et le témoin
d’alimentation clignote en rouge pour alerter
l’utilisateur de l’état anormal. Si cela se produit,
réessayer depuis l’ÉTAPE 2.
p Si le courant d’alimentation du module de commande
pour ceinture est coupé, toutes les conditions de réglage
pour la fonction de verrouillage automatique pour parler
seront annulées. Ce réglage devrait être effectué sans
faute quand l’alimentation électrique est appliquée.
Remarque
w Enregistrement d’identification
Avant d’utiliser ce produit, l’ID d’appareil doit être enregistré
dans le module central. Une fois l’ID enregistré dans le
module central, la communication sans fil entre ce produit et
le module central est activée.
Régler le module central sur le mode
“Enregistrement ID”.
(Se reporter au manuel d’instructions du module
central.)
Appuyer et immobiliser le bouton [POWER]
pendant au moins 2 secondes pour arrêter le
module de commande pour ceinture.
Appuyer sur le bouton [POWER] pendant
1 seconde ou plus tout en maintenant
enfoncés les boutons [T1] et [T2] pour mettre
l’appareil en marche.
p Le module de commande pour ceinture passe
en mode de paramétrage d’enregistrement
d’identification. On entend alors “Registration Mode”
et le témoin d’alimentation clignote en orange.
Presser le bouton [T1].
p On entend alors “Connecting center module A” et
l’indicateur de passage clignote en orange.
p Lorsque le module central est le WX-CC412,
l’enregistrement ID pour le passage B est
automatiquement lancé, le message vocal
“Connecting Center module B” est entendu par le
haut-parleur du combiné microcasque d’écoute, et
l’indicateur de passage clignote en orange.
p Quand l’enregistrement d’identification a réussi avec
succès, on entend alors “Registration complete”,
“Headset xx” (xx : le numéro d’identification
enregistré dans le module central), et le témoin
d’alimentation cessent de clignoter et restent
allumés.
p Si l’enregistrement ID échoue, une tonalité
d’erreur et le message vocal “Failed” sont
entendus par le haut-parleur du combiné
microcasque d’écoute, et le témoin d’alimentation
clignote en rouge pour indiquer un état anormal.
Si cela se produit, réessayer depuis l’ÉTAPE 2.
Une fois l’enregistrement ID terminé, annuler
“Enregistrement ID” du module central.
p Lorsque cela est fait, “Enregistrement ID” de ce
produit est annulé et le témoin d’alimentation
s’allume en vert.
Français

40
Configuration de l’appareil
w Suppression d’une
identification
Si le module central est le WX-C3010, supprimer l’ID de ce
produit en procédant comme suit.
Appuyer et immobiliser le bouton [POWER]
pendant au moins 2 secondes pour arrêter le
module de commande pour ceinture.
Pour supprimer un ID enregistré
dans le module central du passage A
Maintenir enfoncés simultanément les boutons
[F], [T1] et [POWER] pendant 1 seconde ou
plus.
p L’appareil démarre en “Mode suppression ID”. Le
témoin d’alimentation clignote en orange.
Pour supprimer un ID enregistré
dans le module central du passage B
Maintenir enfoncés simultanément les boutons
[F], [T2] et [POWER] pendant 1 seconde ou
plus.
p L’appareil démarre en “Mode suppression ID”. Le
témoin d’alimentation clignote en orange.
Presser le bouton [P].
p Cet identifiant est supprimé instantanément, le
message vocal “ID not registered” est entendu par le
haut-parleur du combiné microcasque d’écoute, et le
témoin d’alimentation clignote en rouge pour indiquer
un état anormal.
p Si la suppression de l’ID échoue, une tonalité
d’erreur et le message vocal “Failed” sont
entendus par le haut-parleur du combiné
microcasque d’écoute, et le témoin d’alimentation
clignote en rouge pour indiquer un état anormal.
Si cela se produit, réessayer depuis l’ÉTAPE 1.
p Lorsque le nombre d’Enregistrements ID de ce
produit ou du casque d’écoute tout-en-un dépasse la
limite supérieure du module central, celui-ci supprime
automatiquement certains ID. Si un appareil de ce
produit ou de casque d’écoute tout-en-un demeure
inutilisé pour une période prolongée après avoir été
enregistré, il se peut que son ID soit supprimé.
Important
w Basculement de langue de
message vocal
Il est possible de changer la langue utilisée pour le message
vocal. Il est possible de sélectionner Anglais, Français,
Espagnol ou Pas de message vocal comme langue de
message vocal.
Appuyer et immobiliser le bouton [POWER]
pendant au moins 2 secondes pour arrêter le
module de commande pour ceinture.
Appuyer sur le bouton [POWER] pendant 1
seconde ou plus tout en maintenant enfoncé le
bouton [P] pour mettre l’appareil en marche.
p Le témoin d’alimentation clignote en orange et
l’indicateur de passage reste éteint.
Appuyer sur le bouton [T1] pour changer la
langue.
Lorsque le bouton [T2] est enfoncé, le
message vocal commence dans la langue
sélectionnée après une tonalité.
Anglais: “Hello”
Français: “Bonjour”
Espagnol: “Buenos Dias”
Pas de message vocal: –
Presser le bouton [P].
p La langue actuellement sélectionnée est paramétrée,
et ce produit redémarre automatiquement.

41
w Recherche du module central
Ce produit cherche un module central accessible via le
module central sur lequel l’ID est déjà enregistré.
Lorsqu’il trouve un module central accessible, ce produit s’y
connecte.
p Pour utiliser cette fonction, il est nécessaire d’enregistrer
à l’avance l’ID sur plusieurs modules centraux.
Appuyer et immobiliser le bouton [POWER]
pendant au moins 2 secondes pour arrêter le
module de commande pour ceinture.
Appuyer sur le bouton [POWER] pendant 1
seconde ou plus tout en maintenant enfoncés
les boutons [R] et [+] pour mettre l’appareil en
marche.
p Le témoin d’alimentation clignote alternativement du
rouge au vert et l’indicateur de passage clignote en
orange.
Lorsqu’un module central accessible est
trouvé, le témoin d’alimentation clignote
alternativement en rouge et en vert, et
l’indicateur de passage clignote en orange.
p Au bout de 5 secondes, ce produit redémarre
automatiquement et accède au module central
trouvé.
p L’ID de 1 appareil de ce produit peut être enregistré
sur jusqu’à 30 modules centraux. Le module central
resté le plus longtemps sans accès est remplacé
lorsque l’ID est enregistré sur le 31e module central.
Remarque
w Réinitialisation
Il est possible de réinitialiser ce produit pour rétablir les
réglages d’usine.
Appuyer et immobiliser le bouton [POWER]
pendant au moins 2 secondes pour arrêter le
module de commande pour ceinture.
Appuyer sur le bouton [POWER] pendant 1
seconde ou plus tout en maintenant enfoncés
les boutons [+] et [–] pour mettre l’appareil en
marche.
p Le témoin d’alimentation s’allume en vert et
l’indicateur de passage reste éteint.
Lorsque le bouton [POWER] est libéré, la
réinitialisation commence.
p Une fois la réinitialisation terminée, ce produit
redémarre automatiquement.
p Une fois la réinitialisation terminée, l’ID n’est pas
enregistré, le témoin d’alimentation clignote en rouge
et l’indicateur de passage s’allume en orange.
Remarque
Français
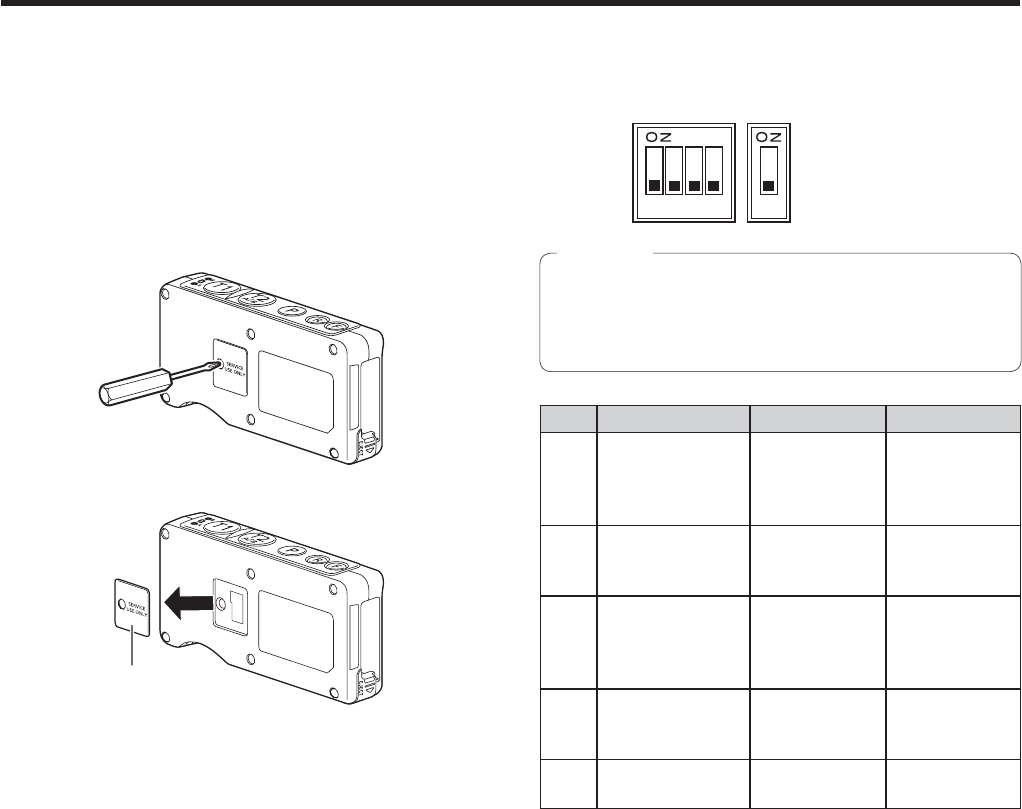
42
Procédures de configuration
La configuration de ce produit doit être exécutée par un
personnel de dépannage qualifié ou des installateurs
professionnels.
w Logement d’interrupteur
Dévisser la vis et ouvrir le logement
d’interrupteur lorsque le module de commande
pour ceinture est éteint.
Couvercle
Régler les commutateurs comme indiqué
ci-dessous.
Après avoir positionné l’interrupteur, remonter
le couvercle.
w
Configuration d’interrupteur DIP
Le retrait du couvercle d’interrupteurs rendra visibles un
interrupteur DIP 4 bits et un interrupteur DIP 1 bit.
Paramétrage
initial
1
3
4
5
p Ne pas oublier de couper l’alimentation du module de
commande pour ceinture. En ne procédant pas ainsi,
l’interrupteur à positions multiples ne sera pas activé
tant que l’alimentation ne sera pas coupée puis rétablie.
Remarque
SW# Fonction ON OFF
1
Verrouillage
automatique pour
parler activée/
désactivée
ON OFF
2Paramétrage de
bouton T2
Sélection
directe
de passage
Normal
3
Réglage du
bouton Parler/
Page
Verrouillage
pour parler
Verrouillage
page
PTT
PTP
4
Sélection du
modèle de
module central
WX-C3010 WX-CC411
WX-CC412
5 Non utilisé –
Fonctionnement
normal
SW#1 Verrouillage automatique pour parler activée/
désactivée
ON: Fonction de verrouillage automatique pour
parler activée
OFF: Fonction de verrouillage automatique pour
parler désactivée
SW#2 Paramétrage de bouton T2
Paramétrer la méthode de sélection de passage pour
le fonctionnement en passage double.
ON: Mode de sélection directe de passage
Le bouton [T1] est pour le passage A, le
bouton [T2] est pour le passage B.
OFF: Normal
Appuyer sur le bouton [T2] pour sélectionner
le passage A ou B.
SW#3 Paramétrage des commandes de bouton pour
parler
ON: Parler pour Mode de verrouillage pour parler,
Page pour mode de verrouillage page
OFF: Parler pour PTT, Page pour PTP
SW#4 Sélection du modèle de module central
ON: WX-C3010
OFF: WX-CC411, WX-CC412
SW#5 Non utilisé
Toujours régler sur OFF.

43
Dépannage
Avant de faire une demande de réparation, vérifier les points suivants.
Consulter le revendeur si ces mesures ne règlent pas le problème, si des symptômes non mentionnés se produisent, ou pour
toute question d’ingénierie.
Symptôme Origine/Solution Pages de
référence
Le témoin d’alimentation
clignote en rouge.
p L’ID de ce produit n’est pas encore enregistré dans le module
central et la connexion sans fil ne peut être établie.
¬L’identification du combiné microcasque d’écoute n’est pas
enregistrée dans le module central ciblé.
P.39
Le témoin d’alimentation
s’allume en rouge.
p La batterie est presque épuisée.
¬ Remplacer la batterie par une batterie chargée. –––
Impossibilité de mettre le
module de commande pour
ceinture en marche.
p La batterie est épuisée.
La batterie n’est pas introduite correctement.
¬Remplacer la batterie par une batterie chargée.
Orienter correctement la batterie.
P.32
Impossibilité de
communiquer avec les
autres membres du
personnel du magasin ou
avec le client qui se trouve
à la hauteur du tableau de
menu.
p Le module central est peut être arrêté.
¬Mettre le module central sous tension avec l’interrupteur
d’alimentation. S’il n’existe aucun moyen de rectifier, consulter
le distributeur pour qu’il effectue les réparations nécessaires.
Manuel
d’instructions du
module central
p L’identification du combiné microcasque d’écoute n’est pas
enregistrée dans le module central ciblé.
¬ L’identification du combiné microcasque d’écoute n’est pas
enregistrée dans le module central ciblé.
P.39
Impossibilité d’entendre
ni de parler au client alors
que la communication avec
les autres membres du
personnel du magasin est
normale.
p Le détecteur de véhicule est peut être en dysfonctionnement
parce qu’il n’est pas branché dans le module central ou bien
parce que l’alimentation n’est pas fournie ou encore que la
fonction de détection est déréglée.
¬ Vérifier que le détecteur de véhicule est branché et est
alimenté. S’il n’existe aucun moyen de rectifier, consulter le
distributeur pour qu’il effectue les réparations nécessaires.
Manuel
d’instructions du
module central
Impossibilité de passer en
mode “page” ou en mode
“parler” dans certaines
zones.
p Les ondes radio ne peuvent pas atteindre la zone.
¬ Retirer les obstacles métalliques bloquant les ondes radio. –––
L’opération parler ou
recherche de personne
à partir du module de
commande pour ceinture
en mode de gérant est
impossible.
p L’appareil en mode de gérant reçoit un appel téléphonique.
¬ Une fois la conversation téléphonique terminée, le
fonctionnement en mode “Parler” ou “Page” est activé.
–––
Français

44
Caractéristiques techniques
Caractéristique de fréquence 1920 MHz à 1930 MHz
Alimentation CC 3,7 V (batterie au lithium-ion rechargeable)
Dimensions 121 mm (L) x 61 mm (H) x 24 mm (P)
{4-3/4SRXFHV(L) x 2-13/32SRXFHV(H) x 15/16SRXFHV(P)}
Poids Environ J {0,2 lbs} (sans batterLe)
Températures de fonctionnement -10 °C à +50 °C {14 °F à 122 °F}
Entrée Type de connecteur Prise stereo ø2,5
Niveau d’entrée nominal - 45 dBV
Sortie
Type de connecteur Prise monaurale ø3,5
Niveau de sortie nominal -16 dBV (35 ohms)
Réponse en fréquence 300 Hz à 3 kHz
Commande du volume de
sortie +6 dB à -18 dB, par incréments de 3 dB

45
Accessoires
w Accessoires standard
Manuel d’utilisation (cette documentation) ..................... 1 él.
w Accessoires optionnels
Batterie (Li-ion 3,7 V c.c., 1 100 mAh) ................. WX-B3030
Chargeur de batterie ......................................... WX-Z3040A
Casque d’écoute ..................................................WX-CH427
Français

© Panasonic System Networks Co., Ltd. 2013 Fd1213-0 PGQX1ZA PrLnted in China