Panasonic of North America 9TGCF-081 Panasonic Handheld Display with WLAN & Bluetooth User Manual CF 08
Panasonic Corporation of North America Panasonic Handheld Display with WLAN & Bluetooth CF 08
UserManual.wiki
>
Panasonic of North America
>
9TGCF 081 User Manual
Users Manual
Navigation menu
Upload a User Manual
Namespaces
Wiki Guide
HTML
PDF
Info
Views
User Manual
Discussion / Help
Navigation


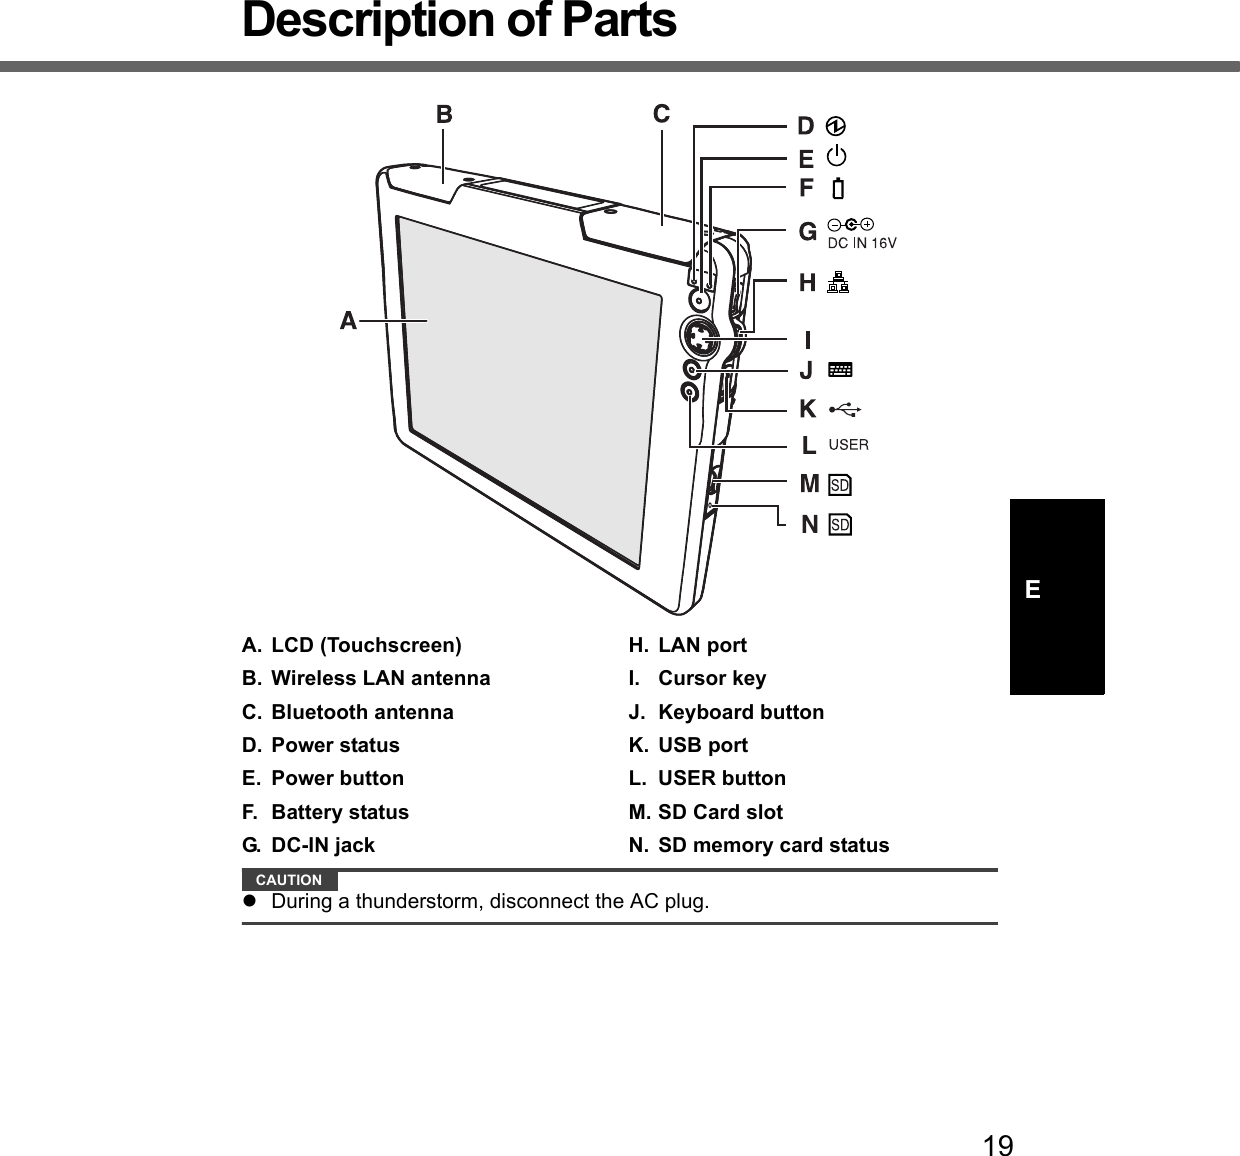
![15EPrecautionsUsageWireless DisplayAvoid Extreme Heat and ColdDo not store or use the wireless display in loca-tions exposed to heat, direct sunlight, or extreme cold.Avoid moving the wire-less display between locations with large tem-perature difference.Operation: 5 °C to 35 °C {41 °F to 95 °F}Storage: -20 °C to 60 °C {-4 °F to 140 °F}Avoid Direct Sunlight on the LCD PanelThe LCD panel should not be exposed to direct sunlight or ultraviolet light.Avoid Humidity, Liquids and DustDo not store or use the wireless display in loca-tions exposed to high humidity, liquids (includ-ing rain) or dust.Prevent ShockAvoid subjecting the wire-less display to severe vibrations or impact. Do not place the wireless display inside a car trunk.Avoid Radio Fre-quency InterferenceDo not place the wireless display near a television or radio receiver.Avoiding Low-tempera-ture BurnsAvoid more than casual contact with any heat producing area of the wireless display, AC adaptor, and any option or accessory you use with it. Even low heat, if warmer than body tem-perature, can cause a burn, if the skin is exposed to the heat source for a long enough period of time.If the LAN port is con-nected to a network such as the ones listed below, a fire or electric shock may result.• Networks other than 100BASE-TX or 10BASE-T.• Phone lines [Tele-phone lines, inter-nal phone lines (on-premise switches), digital public phones, etc.]](https://usermanual.wiki/Panasonic-of-North-America/9TGCF-081/User-Guide-637676-Page-15.png)

![24First-time OperationE4 Calibrate the touchscreen.Touch the “+” mark on the calibration screen with the stylus (included) for about one second.After the calibration procedure is executed (e.g., after the twelve “+” marks are touched), the pro-cedure ends when the center of the cursor key (A) is pressed.5 Make the date and time setting.The [Date/Time Properties] screen will appear automatically.Set the current time and time zone, and then tap .zYou can use the software keyboard when you set the time. For information about how to use the Software Keyboard: Îpage 37If the [Date/Time Properties] screen does not appear automaticallyDouble-tap on the desktop, and double-tap [Date/Time].The [Date/Time Properties] screen will appear.CAUTIONzTo take effect this setting when you start the wireless display next time, you have to perform Flash Backup to save this setting. (Îpage 31)](https://usermanual.wiki/Panasonic-of-North-America/9TGCF-081/User-Guide-637676-Page-24.png)
![26LCD (Touchscreen)EHandling the TouchscreenzUse the provided stylus with CF-08. Do not use an implement other than the stylus that comes with the wireless display.zDo not place any object on the surface or press down forcefully with sharp-pointed objects (e.g., nails), or hard objects that can leave marks (e.g., pencils and ball point pens).zDo not operate the wireless display when such things as dust are on the LCD. Do not allow substances such as oil to contact the LCD. The cursor may not work properly in such cases.Aligning the touchscreenAlign the touchscreen if the cursor does not correctly move to the position where the stylus touches the touchscreen of the wireless display.ADouble-tap on the desktop, and double-tap [Stylus].BTap [Calibration] tab, and tap [Recalibrate].](https://usermanual.wiki/Panasonic-of-North-America/9TGCF-081/User-Guide-637676-Page-26.png)
![29ENetwork and Dial-up ConnectionsSets properties for installed network adaptors (LAN, wireless LAN). Network Informa-tionConfirms network status when the wire-less display is connected to a server. Power Displays remaining power in the main battery, and sets power conservation properties.Printers Sets properties for the local printer con-nected to the wireless display.Quick Menu Sets the applications allocated to Quick Menu. (Îpage 35)Remove Programs Allows you to uninstall programs that were installed earlier. ROM Update Îpage 33Rotate Allows you to rotate the screen. Using [0 degrees (landscape)] as the standard, you can rotate the screen [90 degrees], [180 degrees] or [270 degrees] either clockwise or counterclockwise. To take effect the screen rotation, tap [Rotate].Security (Supervi-sor/User)Îpage 43Stylus Sets the intervals for double taps and cal-ibrates the stylus pad.](https://usermanual.wiki/Panasonic-of-North-America/9TGCF-081/User-Guide-637676-Page-29.png)
![31EBacking up / Deleting / Copying DataTo back up data from CF-08 RAM to Flash ROM, perform Flash Backup by follow-ing the instructions below.ADouble-tap on the desktop and double-tap [Flash Backup].BConnect your wireless display to a power outlet. (Îpage 23)CTap [Start Backup].Backing up data will start.DWhen the message “Backup successful.” appears, tap .To delete backup data, perform Flash Delete by following the instructions below.ADouble-tap on the desktop and double-tap [Flash Delete].BConnect your wireless display to a power outlet. (Îpage 23)CTap [Delete Backup].When the confirmation message appears, tap [Yes].Deleting data will start.DWhen the message “Backup data has been deleted.” appears, tap .CAUTIONzWhen you turn on the wireless display for the first time after deleting data, cali-brate the touchscreen (Îpage 24).To copy data from CF-08 RAM to the media (SD Memory Card, etc.), perform Flash Copy by following the instructions below.ADouble-tap on the desktop and double-tap [Flash Copy].BConnect your wireless display to a power outlet. (Îpage 23)CInsert the copy destination media, and select the media in “Copy To.”Backing up dataDeleting dataCopying data](https://usermanual.wiki/Panasonic-of-North-America/9TGCF-081/User-Guide-637676-Page-31.png)
![32Backing up / Deleting / Copying DataEDEnter the file name and tap [Copy Backup].Copying data will start.zThe file that has already existed cannot be overwritten. In this case, tap , change the file name, and tap [Copy Backup]. EWhen the message “Copy successful.” appears, tap .How to update data: Îpage 33To return the wireless display to the default conditionPerform the following procedure.zWhen turning on the wireless display, turn it off.AConnect your wireless display to a power outlet. (Îpage 23)BTurn on the wireless display. (Îpage 23)CPress and hold the keyboard button and USER button (Îpage 34) until the message “Reset to device to factory default...” appears.DSelect [Yes].](https://usermanual.wiki/Panasonic-of-North-America/9TGCF-081/User-Guide-637676-Page-32.png)
![33EROM UpdateTo update the copied data, perform “ROM Update” by following the instructions below.ADouble-tap on the desktop and then double-tap [ROM Update].BConnect your wireless display to a power outlet. (Îpage 23)CInsert the media with “.pkg” file copied, and then tap [Brouse].DSelect the file and tap .ETap [Next].FTap [Update Start].GWhen the confirmation message appears, tap [Yes].ROM Update will start.When ROM Update terminates, the wireless display will restart and the [Date/Time Properties] screen will appear automatically. (Îpage 24)](https://usermanual.wiki/Panasonic-of-North-America/9TGCF-081/User-Guide-637676-Page-33.png)
![34EButtonsYou can display screens for frequently used functions and applications by pressing specified keyboard button or USER button on this wireless display.Two functions can be assigned to each button; one that starts up with a short push (less than 2 seconds) and one that starts up with a long push (more than 2 seconds).At the time of purchase, this wireless display is set so that the screens for the fol-lowing functions are displayed.Settings can be changed using the following procedure.ADouble-tap on the desktop and then double-tap [Buttons].BWhen the [Buttons] screen appears, tap and select the function name in accordance with the button positions and short/long push that you want to set.CTap .*1 To execute the right click operation:ATap [Buttons] in [Control Panel], and set [Right Click] according to the position and push length (long/short) for the button that you want to use. BPress the button that you set in A. You can use the right click once. Each time after this, before using the right click once, execute operation B above. You can also execute the right click operation using Quick Menu (Îpage 35). Button short push long pushKeyboard button Input Panel Input Panel SelectorUSER button Quick Menu (Îpage 35)Right Click*1](https://usermanual.wiki/Panasonic-of-North-America/9TGCF-081/User-Guide-637676-Page-34.png)
![35EQuick MenuQuick Menu is used to display information about the wireless display, or to enable frequently used applications and functions to be launched quickly without going through Control Panel. At the time of purchase, Quick Menu can be launched with a short push of the USER button .How to change Quick Menu launching method: Îpage 34A.Display remaining battery level ([Power] in Control Panel Îpage 29)B.Display status of wireless LANC.Set and change sound volumes ([Volume & Sounds] in Control Panel Îpage 30)D.Set and change display backlight brightness ([Backlight] in Control Panel Îpage 27)E.Start up frequently used applica-tions and functionsAt the time of purchase, [Right Click]*1, [Input Panel Selector], [Control Panel] and [Stylus Calibla-tion] are set in Quick Menu. You can change these settings using the following procedure. ADouble-tap on the desktop and double-tap [Quick Menu]. The [QuickMenu Application Assignment] screen will appear.BTap the button for the application/function you want to change, and then tap the application/function you want to assign to that button location. CTap .](https://usermanual.wiki/Panasonic-of-North-America/9TGCF-081/User-Guide-637676-Page-35.png)
![36Quick MenuE*1 To execute the right click operation:ASet [Right Click] in the [QuickMenu Application Assignment] screen.BLaunch Quick Menu and tap [Right Click].You can use the right click once. Each time after this, before using the right click once, execute operation B above. You can also execute the right click operation by pressing the keyboard button or USER button. (Îpage 34)](https://usermanual.wiki/Panasonic-of-North-America/9TGCF-081/User-Guide-637676-Page-36.png)
![37ESoftware KeyboardTo show or hide the Software KeyboardzPress and hold the keyboard button or USER button . (Îpage 34)There are five input methods. “Numeric keyboard” and “Full keyboard” can be selected as either large or small panels.To change the input method, use any of the following methods.zPress and hold the keyboard button or USER button (Îpage 34) or tap [Input Panel Selector] in the [Quick Menu] screen (Îpage 35), and select the input method that you want to use on the [Input Panel Selector] screen.zDouble-tap [Input Panel] in [Control Panel], select [Key-board] or [Transcriber] in “Current Input Method” and tap .• If you select [Keyboard], tap [Options] to change the input method or panel size. • To use Transcriber Îpage 39](https://usermanual.wiki/Panasonic-of-North-America/9TGCF-081/User-Guide-637676-Page-37.png)
![39ETranscriberTranscriber is a function that enables you to input letters, characters or symbols by writing directly on the touchscreen using the stylus.To display the [Transcriber: Options] screen, tap .Tap on the various tabs to set the following functions.[Quick Settings] TabRecognition: Change the language of therecognition engine. Writing Direction: Change the handwritinginput direction. Intro screen: If the check mark is added, the Help screen will be displayed when theTranscriber starts up. Sound: If the check mark is added, you will hear a sound when the Transcriber starts up. The volume of this sound will be the same as the volume set in Quick Menu (Îpage 35) or in [Volume & Sounds] (Îpage 30). A. Option settingsDisplays the [Transcriber: Options] screen of Transcriber option set-tings. (Î below) B. Change recognition modeRunning hand/block letter (charac-ter (Alphabet/symbol/numeric)).C. Display symbol input panelDisplays the screen for symbol input.D. Change Upper/Lower/symbol modeChanges input mode to Upper/Lower/symbol mode.E. SpaceInputs space.F. Re turnInputs return code.G. Left moveMoves cursor to left.H. Right moveMoves cursor to right.I. BSBackspace (delete one character)J. HelpDisplays help screen.](https://usermanual.wiki/Panasonic-of-North-America/9TGCF-081/User-Guide-637676-Page-39.png)
![40Software KeyboardE[Inking] TabRecognition Delay: Slide the bar to set the timefor recognition of handwritten characters. Add space after: If the check mark is added,when handwritten characters are recognized and displayed on the screen, a single space will also be displayed at the end of eachcharacter. Pen: Tap to set the width and color of the ink.[Advanced] TabShorthand: Register shorthandThe following functions can be assignedfor handwriting input. zText expansionAllows you to display words, phrases, orsentences by inputting handwrittenabbreviations. e.g.: Input “xyz” in handwriting J Displays “I am a student.” zFunctionAllows you to display dates, names, or other information by inputting handwrit-ten abbreviations.e.g.: Input “ABC” in handwriting J Displays company name.zRun programAllows you to start up a program by inputting handwritten characters. e.g.: Input “abc” in handwriting J Starts up [Control Panel]. Functions can be registered using the following procedure. 1Tap [Settings] to the right of “Shorthand.” 2 Tap [Add]. After you tap [Finish] in step 4, the screen will return to step 2. To register two or more functions in succession, repeat step 2 and 3. 3 Select the function that you want to register ([Text expan-sion], [Function] or [Run program]) and tap [Next]. 4 To register shorthand in [Text expansion]:](https://usermanual.wiki/Panasonic-of-North-America/9TGCF-081/User-Guide-637676-Page-40.png)
![41EAInput “xyz” in handwriting on the screen. “xyz" will be displayed in the “Shorthand” box. BTap the “Text expansion” box once, and then input “I am a student” in handwriting on the screen. “I am a student” will be displayed in the “Text expansion” box. CTap [Finish]. The screen will automatically return to step 2. To register shorthand in [Function]: AInput “ABC” in handwriting on the screen.“ABC” will be displayed in the “Shorthand” box.BTap in the “Function” box, and a list of information will appear; select one of these, and tap [Finish]. The screen will automatically return to step 2.To register shorthand in [Run program]: AInput “abc” in handwriting on the screen.“abc” will be displayed in the “Shorthand” box.BTap in the “Run program” box, and a list of bootable programs will appear; select one of these, and tap [Finish]. The screen will automatically return to step 2.5Tap .Dictionaries: Select a dictionary.](https://usermanual.wiki/Panasonic-of-North-America/9TGCF-081/User-Guide-637676-Page-41.png)
![42ESignature CaptureSignature Capture operates on CF-08, supporting input of signatures in applica-tions running on the connection destination server.How to launch Signature capture:ADouble-tap , and double-tap [Windows].BDouble-tap [Programs], and tap [Signature Capture].You can set the wireless display to launch Signature Capture using the Quick Menu (Îpage 35), keyboard button or USER button (Îpage 34). You can set the thickness of the writing or the size of the bitmap data to be saved by tapping and then tapping [Setting]. Tap [Capture] to temporarily save the handwritten image on the server computer clipboard.To view the handwritten image while connected to the server: ATap [start] - [Run].BInput [Clipbrd.exe] and tap [OK].The [CLIP BOOK] screen will appear.](https://usermanual.wiki/Panasonic-of-North-America/9TGCF-081/User-Guide-637676-Page-42.png)
![43ESecurity MeasuresYou can set the password and/or enable/disable some functions for security pur-pose.You can set two types of users with different operating authorities. Supervisor: Changes settings related to the wireless display operations, and con-trols the operations of regular users. Set the Supervisor Password in advance using the [Supervisor] tab in Security Settings (Supervisor) (Î below). User: Executes only operations that have been limited by the Supervisor. ADouble-tap on the desktop.BDouble-tap [Security (Supervisor)]. CTap the [Supervisor], [User] or [Device Permission] tab.zFor information on the tab:[Supervisor] tab Îpage 44[User] tab Îpage 44[Device Permission] tab Îpage 45<When you tap [Supervisor] or [User] tab>DEnter your password in [New Password].zWhen the password has been set, you need to enter your password in [Current Password].zTo disable the password, leave the input field empty.EEnter your password again in [Confirm Password] and tap .FAt the confirmation message, tap [Yes].When the message that recommends executing Flash Backup appears, tap .CAUTIONzDo not forget your password. If you forget your Supervisor Password, you will not be able to use your wireless display. Contact Panasonic Technical Support.zSoon after you create or change the setting, perform Flash Backup (Îpage 31). If you do not do so, the setting will not be reflected next time when you turn on the power for the wireless display.NOTENOTEzThe password will not be displayed on the screen.zYou can use up to 40 alphanumeric characters (excluding spaces).zDisabling the Supervisor Password also disables the User Password.](https://usermanual.wiki/Panasonic-of-North-America/9TGCF-081/User-Guide-637676-Page-43.png)
![44Security MeasuresESecurity Settings (Supervisor)The Supervisor can make security settings using the following procedure after log-ging on with the Supervisor Password, or when no password has been set.zWhen you log on as a Supervisor, press and hold the power button with the USER button pressed, and enter the password when the [Enter Password] screen appears. If you do not do so, even when you enter the Supervisor Pass-word, the wireless display will run in the User operating environment.[Supervisor] tab[User] tab(Set when Supervisor and User log on separately. Supervisor can make settings for Users after the Supervisor password is set in the [Supervisor] tab.) Item After the check mark is addedAuto Launch When you select an application, that application will automatically start up when the wireless display is started. For example, if the connection settings for Remote Desktop Connection or ICA Client have been made in advance (Îpage 50), you can set these applications to start up automatically. Wait Network Connec-tionAn application set in [Auto Launch] will launch after the network connection is built up.Item After the check mark is addedSkip Password Dialog Allows Users to log on without entering a password. The password input screen is not displayed. (If you press and hold the power button with the USER button pressed, the [Enter Password] screen will be displayed, and the User can log on with the User Password.)Allow Connection Con-figurationAllows creation and changes of connection settings after logging on. Double-tap or on the desktop to display the connection setting screen.](https://usermanual.wiki/Panasonic-of-North-America/9TGCF-081/User-Guide-637676-Page-44.png)
![45E[Device Permission] tab(Same settings for Supervisor and User.) Allow Application AssignmentAllocates applications to the keyboard button or USER button (Îpage 34) or Quick Menu (Îpage 35).File Explorer Enables viewing of files via Windows Explorer after logging on.Double-tap on the desktop. Internet Explorer Allows access to the Web browser, and enables cre-ation of/changes to connection settings after logging on. Double-tap on the desktop. Control Panel When the User is using the wireless display, items displayed in the Control Panel can be selected using the following procedure. ATap [Permission] to display the [Permission] screen. BAdd the check mark for only the items to be displayed in the [Control Panel] screen, and tap .Allow Change Auto LaunchAllows users to change Auto Launch setting.Allow Launch Îpage 44Wait Network Connec-tionÎpage 44ExplanationOf the following devices, only those with a check mark can be used. •Ethernet • Wireless LAN • Bluetooth • SD Memory • USB Memory](https://usermanual.wiki/Panasonic-of-North-America/9TGCF-081/User-Guide-637676-Page-45.png)
![46Security MeasuresESecurity Settings (User)Users can make security settings in the following cases. zAfter logging on with a User Password. zWhen you add the check mark for [Skip Password Dialog].zWhen the User Password has not been set, and the User has logged on with-out entering a password. How to start up the [Security Setting] screen:ADouble-tap on the desktop.BDouble-tap [Security (User)]. The following screen will be displayed.[User] tabzIf a User Password has not been set in the [User] tab of Security Settings (Supervisor) (Îpage 44), a password cannot be changed, deleted or newly created here. Item After the check mark is addedAuto Launch Îpage 44Wait Network Connec-tionÎpage 44](https://usermanual.wiki/Panasonic-of-North-America/9TGCF-081/User-Guide-637676-Page-46.png)
![48EBattery PowerNOTENOTEzOnce the battery is fully charged, the wireless display performs recharging only when the battery level becomes less than approximately 95%, so overcharging is avoided.You can check the remaining battery charge using any of the following methods.zDouble-tap on the desktop, double-tap [Power] and tap [Battery] tab.zPress and hold the keyboard button or USER button (Îpage 34) and run Quick Menu (Îpage 35).Battery IndicatorBattery indicator Battery statusNot lit The battery pack is not inserted or not being charged. Pulsing orange Charging is in progress. Green The battery is fully-charged.Red The remaining battery is approximately 9% or less.Blinking red The battery pack or the charging circuit is not operating normally.Blinking orange The battery cannot be charged temporarily due to the fol-lowing reasons: zIts internal temperature is out of the acceptable range. zThe power supply is not enough because software applications or peripheral devices are consuming a large amount of power.Checking the Remaining Battery Charge](https://usermanual.wiki/Panasonic-of-North-America/9TGCF-081/User-Guide-637676-Page-48.png)
![49EYou can reduce power consumption using the following method.When using the battery, the wireless display can be used for a longer period of time.Power conservation effects can be achieved even when the AC adaptor is connected.zDouble-tap on the desktop, dou-ble-tap [Power] and tap [Schemes] tab.Power consumption can also be mini-mized with detailed settings; for exam-ple, by reducing the time setting for [Turn off LCD].The battery pack is a consumable item so the replacement (CF-VZSU44) will be necessary. If the battery operation time becomes noticeably short, replace with a new battery.How to remove/insert the battery pack:Îpage 21Replacing the Battery Pack](https://usermanual.wiki/Panasonic-of-North-America/9TGCF-081/User-Guide-637676-Page-49.png)
![50EConnecting to a Computer / ServerEither a LAN or wireless LAN can be used for connection.Before making connection settings, perform the following procedure.zAfter completing the computer/server settings (IP address, subnet mask, etc.), perform wireless display settings.ADouble-tap on the desktop, and then double-tap [Network and Dial-up Connections].B<When making connection with a LAN>Double-tap [ETHERNET1].<When making connection with a wireless LAN>Double-tap [WIRELESS LAN1].CTap the [IP Address] tab, select [Specify an IP address], and enter the IP Address, Subnet Mask, and Default Gateway to match with the computer/server connected.DTap .1-1 ConnectionsWhen connecting to Microsoft® Windows® XP ProfessionalFollow the instructions below to connect using Remote Desktop Connection.zAfter completing the computer settings (IP address, subnet mask, etc.), per-form wireless display settings.1 Connect the necessary devices, and turn the power on for the computer. 2 Turn on the power for the wireless display.(Perform step A-C only when making connections with a wireless LAN.)ADouble-tap on the desktop, and then tap [Wireless LAN]. BTap the [Wireless Information] tab, and then tap the access point from the list.Now, select settings as follows according to your own network environment.CTap [Connect].](https://usermanual.wiki/Panasonic-of-North-America/9TGCF-081/User-Guide-637676-Page-50.png)
![51E3 Double-tap on the desktop.4 Tap [Options]. Enter the Computer (IP address or computer/server name for the connec-tion destination), User name (account name for the computer/server to be connected), and Password (the password required to log on to the com-puter/server to be connected).zTap [Save As], enter the file name, select the save destination, and tap . An “rdp.” file will be created, and the data entered in the above pro-cedure will be saved. In this way, the next time you want to use the Remote Desktop (and any time after that), you can display the server desktop screen by double-tapping the “rdp.” file.5 Tap [Connect].The server desktop screen will be displayed.Connecting multiple clientsWhen connecting to a Microsoft® Windows® 2000 Server / Microsoft® Windows® 2003 ServerFor information on how to connect using Remote Desktop Connection, refer to step 1-5 of “1-1 Connections” (Îpage 50).When connecting to a server computer running Citrix® MetaFrame® Pre-sentation ServerFollow the instructions below to connect using Citrix® ICA® Client.zFor information on Citrix® server, refer to the manual of the server.1 Turn on the power for the wireless display.2 Double-tap on the desktop, and tap [Accept].3 Connect the necessary devices, and turn the power on for the server.(Perform step A-C only when making connections with a wireless LAN.)](https://usermanual.wiki/Panasonic-of-North-America/9TGCF-081/User-Guide-637676-Page-51.png)
![52Connecting to a Computer / ServerEADouble-tap on the desktop, and then double-tap [Wireless LAN]. BTap the [Wireless Information] tab, and then tap the access point from the list.Now, select settings as follows according to your own network environment.CTap [Connect].4 Double-tap on the desktop, and tap [Create New Connection].5 Enter the IP address or server name for the connection destination in “Server or Published Application”, and tap [Save]. The name entered above will be displayed in the Main screen of the ICA Cli-ent.6 Select the name entered in step 5, and tap [Edit]. 7 Tap [Edit Logon Information], enter Username and Pass-word (and Domain, if required), and tap [Save]. 8 Tap [Main] at the top of the screen. 9 Select the name entered in step 5 and tap [Edit].10 Tap [Edit Title], add the check mark for [Create a Desktop shortcut], and tap [Save], then tap .*1 will appear on the desktop. 11 Double-tap *1 the desktop. The server desktop screen will be displayed.*1 The name entered in step 5 will be displayed.Perform the following operations.zTap [start] - [Log Off] - [log Off].Terminating the connection](https://usermanual.wiki/Panasonic-of-North-America/9TGCF-081/User-Guide-637676-Page-52.png)
![53Ez<Only when using Remote Desktop Connection>Tap , then tap .If you tap [start] - [Shut Down], the power for the server itself will be turned off.](https://usermanual.wiki/Panasonic-of-North-America/9TGCF-081/User-Guide-637676-Page-53.png)
![54EBluetoothTo launch the [Bluetooth] screenADouble-tap on the desktop.BDouble-tap [Bluetooth Device Properties].To turn the power on/off BluetoothTap [General] tab, and add the check mark for [Enable Bluetooth].A. Set the device name for BluetoothB. Set the passkey used when connecting to the opposing Bluetooth device. C. Set the Bluetooth power status when the CF-08 starts up.D. Set whether the opposing Bluetooth device is able to detect the CF-08 when the Bluetooth device is detected.To set operations in Serial Port ProfileTap [Serial Port] tab.To set operations in DialUp Network ProfileTap [DialUp Network] tab.To show information about BluetoothTap [About] tab.](https://usermanual.wiki/Panasonic-of-North-America/9TGCF-081/User-Guide-637676-Page-54.png)