Panasonic of North America 9TGCF-281 Notebook Personal Computer User Manual Manual
Panasonic Corporation of North America Notebook Personal Computer Manual
UserManual.wiki
>
Panasonic of North America
>
9TGCF-281 User Manual
>
Manual
Contents
1.
Manual
2.
Revised Manual and Statement
Manual
Navigation menu
Upload a User Manual
Namespaces
Wiki Guide
HTML
PDF
Info
Views
User Manual
Discussion / Help
Navigation
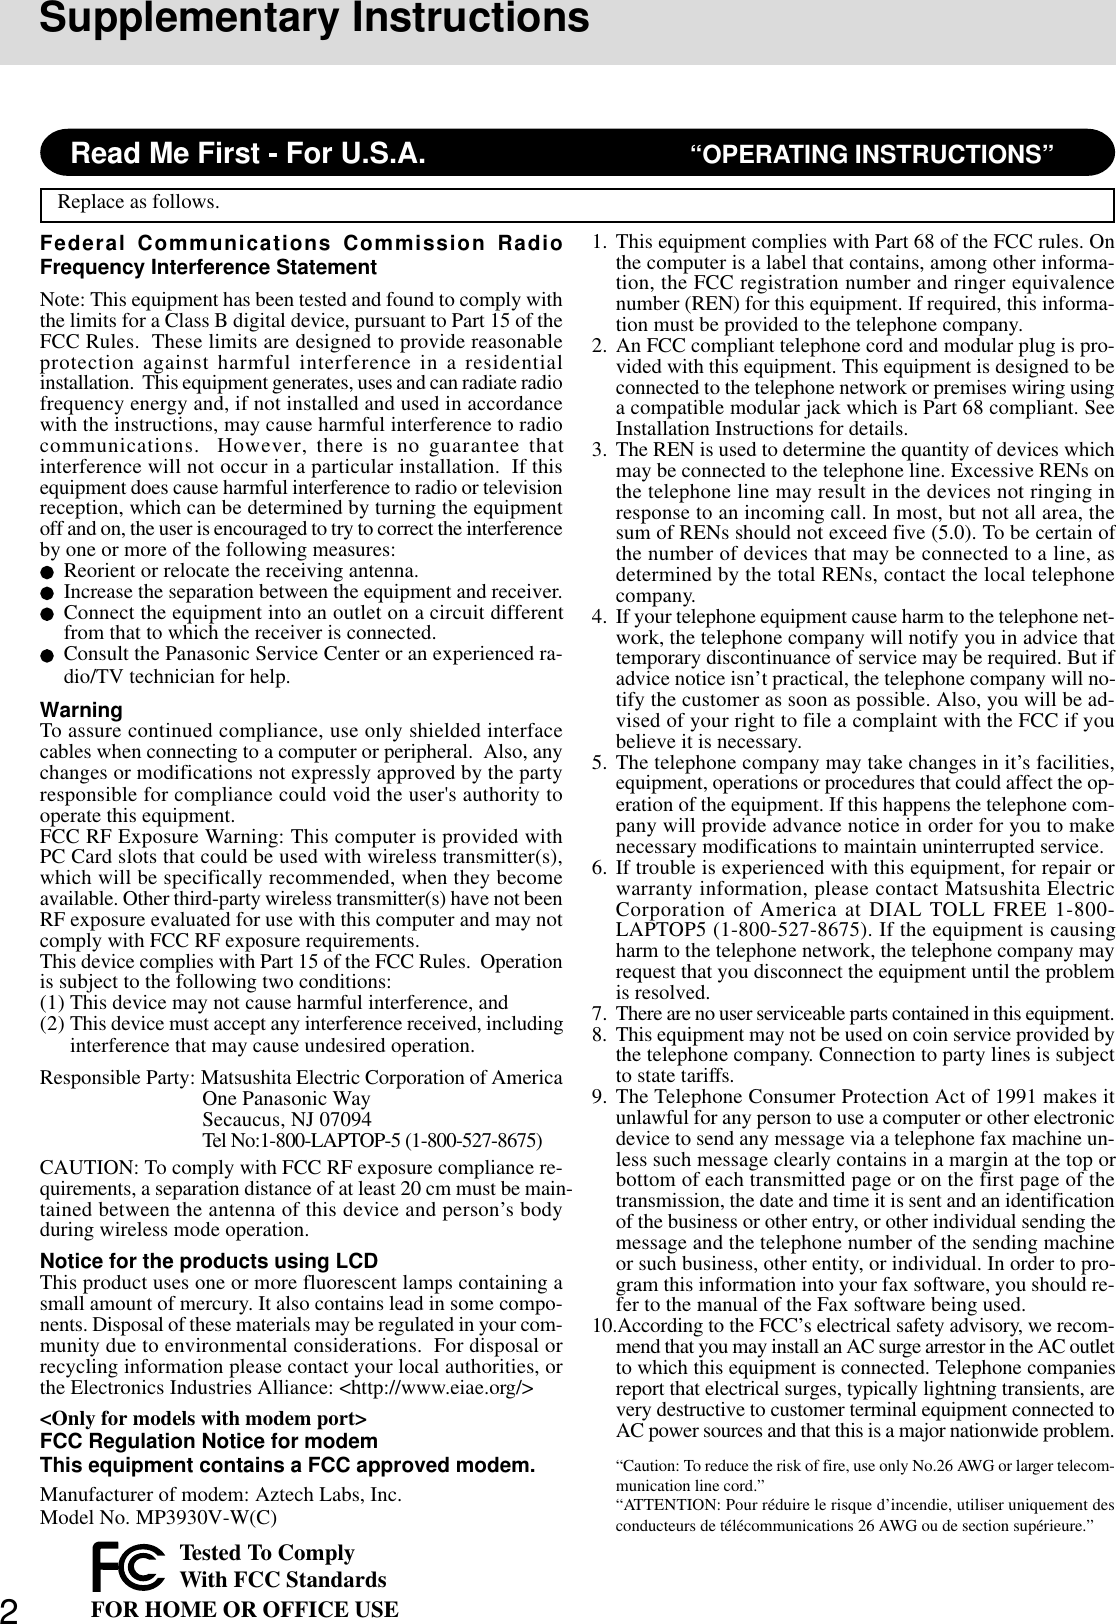
![3Replace the floppy disk drive with the optional CD drive1Turn your computer over and open the cover by sliding the latch A.2Slide and hold the latch B on the MP release lever, then turn the MP release lever.3Remove the floppy disk drive by holding both sides of the drive.4Gently insert the CD drive into the multimedia pocket by pushing on both cornersuntil it clicks into place.First-time Operation “OPERATING INSTRUCTIONS ”<Only for models with the CF-WWL282 Driver CD-ROM>Insert the CD drive into the multimedia pocket with the following procedure before turning the computer on for the first time.Turn your computer on and setup Windows Windows 981Rotate the power switch clockwise and hold it for ap-proximately one second until the power indicator turnson before releasing it.Each time [Add New Hardware Wizard] isdisplayed, select [Cancel].The display will ask you to restart Windows, select[No].2Select settings for your region and your keyboard lay-out, then press [Next].(for U.S.A.: United States 101)3Enter your name, then press [Next].4Select [Skip] at the [Using Your Modem to Connect].5Select [Yes] at the [Cancel Dialing], then press [Next].The License Agreement will be displayed.6After reading the License Agreement, select [I acceptthis agreement] or [I do not accept the agreement], thenpress [Next].NOTEMoving the cursor ( ) or clicking buttons can beperformed with the touch pad.If a driver is updated, the computer may skip somesteps. If you notice that a step has been skipped,simply follow the instructions on the screen. If youare unsure about how to proceed, ask your systemadministrator or the person in charge of the network.CAUTIONDo not install the drive upside-down.The bottom of the drive may become disfigured.CoverLatch AMP Release LeverInstall the drive with the plastic sideon top.Latch B1234If [I do not accept the agreement] is selected,the Windows setup will be aborted.<During the setup procedure after reinstall-ing only>After you accept the agreement, the [WindowsProduct Key] may be displayed. In this case,input the Product Key and then select [Next].NOTEAfter turning the computer on for the first time, perform the Windows setup procedure shown below.(Be sure to follow the steps below and not the “Windows Setup” procedure in the “Operating Instructions”.)7Press [Finish].8Input the correct date, time and time zone and press[Close]. You can also complete these settings at a latertime.9<Only for models with the CF-WWL282 Driver CD-ROM>If the CD drive is not installed at this time, turn thecomputer off, install the CD drive, and then turn thecomputer on.Each time [Add New Hardware Wizard] isdisplayed, select [Cancel].1) Set the CF-WWL282 Driver CD-ROM in the CDdrive.Create“c:\util\drivers\aironet” folder. Select [Start] -[Programs] - [MS-DOS Prompt] and input the following.xcopy L:\*.* c:\util\drivers\aironet /s Enter(“L” is the CD drive letter. You can change the letterto suit your preference.)](https://usermanual.wiki/Panasonic-of-North-America/9TGCF-281.Manual/User-Guide-219614-Page-3.png)
![4Supplementary InstructionsWindows NT1Rotate the power switch clockwise and hold it for ap-proximately one second until the power indicator turnson before releasing it.2The License Agreement will be displayed. After read-ing the agreement, select [I accept this Agreement].7Select [Finish]. Windows will restart.8Following the display, press Ctrl + Alt + Del .Input the password set in step 6 and select [OK], thenselect [Close] at the [Welcome] display.As the computer starts up, it will be necessary toinput the password set in step 6 .If [Service Control Manager] is displayed duringthe subsequent operation, press [OK]. Install Ser-vice Pack 6 after the Windows setup completes ( “Technical Information”).9Add the check mark to [Install system provided driverfor this card] and press [OK].Follow the on-screen instructions.10<Only for models with the CF-WWL282 Driver CD-ROM>1) Set the CF-WWL282 Driver CD-ROM in the CDdrive.Create“c:\util\drivers\aironet” folder. Select [Start] -[Programs] - [Command Prompt] and input the following.xcopy d:\*.* c:\util\drivers\aironet /s Enter(“d” is the CD drive letter. You can change the letter tosuit your preference.)2) Close [Command Prompt].11Install the Aironet Client Utility (ACU).The Aironet Client Utility (ACU) is used to configureyour client adapter for use in a wireless enterprise andperform user-level diagnostics on your client adapter.In [Start]-[Run], input [c:\util\drivers\aironet\utilities\acu\setup.exe]and press [OK]. Follow the on-screen instructions.12<Only for models with LAN port>1) Select [Add] in [Start] - [Settings] - [Control Panel] -[Network] - [Adapters].2) Select [Have Disk].3) Input [c:\util\drivers\lan], then select [OK].4) Select [Intel(R) PRO Adapter] and then select [OK].5) Select [Close] and follow the on-screen instructions.13In [Start]-[Settings]-[Control Panel]-[Network], makenecessary change.The settings will vary for different network environ-ments depending on the network system being used.For more details, ask your system administrator or theperson in charge of the network.14Set the correct settings for all items in [Control Panel]-[Regional Settings] and [Date/Time] etc.( “Common Notes for Windows 98/Windows NT/Windows 2000” on page 6)Remember this password! If the password is for-gotten, Windows NT cannot be operated.NOTE2)Remove the CD-ROM and turn the computer off,and then replace the CD drive with floppy diskdrive. Turn the computer on.10<Perform this step when [Add New Hardware Wiz-ard] for Intel 8255x-base PCI Ethernet Adapter (10/100) is displayed.>(Go on to the next step when [Add New Hardware Wiz-ard] for Intel 8255x-base PCI Ethernet Adapter (10/100)is not displayed.)1) In [Add New Hardware Wizard] for Intel 8255x-based PCI Ethernet Adapter (10/100), press [Next].2) Select [Search for the best driver for your device], press[Next].3) Input [c:\util\drivers\lan], then press [Next].4) Select [The update driver (Recommended)] and thenpress [Next], then press [Next].5) Press [Finish].11At [Add New Hardware Wizard] for Cisco Systems-340/350 Series Wireless LAN Adapter, press [Next].12Select [Search for the best driver for your device], press [Next].13Input [c:\util\drivers\aironet] in [Specify a location], thenpress [Next].14At [Windows driver file search for the device:], press [Next].If [Insert Disk] is displayed, select [OK] and then input[c:\util\drivers\aironet], then select [OK].Each time [Version Conflict] is displayed, select [Yes].15When the message [Windows has finished installing thesoftware that your new hardware device requires] is dis-played, press [Finish].16The display will ask you to restart Windows, press [Yes].17At [Enter Network Password], press [OK].18In [Start]-[Settings]-[Control Panel]-[Network], makenecessary change.The settings will vary for different network environmentsdepending on the network system being used. For moredetails, ask your system administrator or the person incharge of the network.19Install the Aironet Client Utility (ACU).The Aironet Client Utility (ACU) is used to configureyour client adapter for use in a wireless enterprise andperform user-level diagnostics on your client adapter.In [Start]-[Run], input [c:\util\drivers\aironet\utilities\acu\setup.exe]and press [OK].( “Common Notes for Windows 98/Windows NT/Win-dows 2000” on page 6)The display will ask you to restart Windows, select[Yes].Logon to Windows.If [Insert Disk] is displayed, press [OK] andthen input [c:\util\drivers\lan], then press [OK].Each time [Version Conflict] is displayed, select [Yes].If [I don’t accept this Agreement] is selected, theWindows setup will be aborted.3Select [Next].4Input your name and organization, then select [Next].(It is possible to omit the organization item.)5Input your computer name and select [Next].6Input an Administrator password and select [Next].CAUTION](https://usermanual.wiki/Panasonic-of-North-America/9TGCF-281.Manual/User-Guide-219614-Page-4.png)
![57Input the correct date, time and time zone and press [Next].You can also complete these settings at a later time.8<Only for models with LAN port>1) At the [Networking Settings], select [Typicalsettings], then press [Next].2) At the [Workgroup or Computer Domain], select[No, this computer is not on a network, or is on anetwork without a domain], then press [Next].9Press [Finish]. The computer will restart.10<For models with LAN port>1)At the [Network Identification Wizard], press [Next].2)At the [Users of This Computer], select [Users mustenter a user name and password to use this computer],then press [Next].3)Press [Finish].4)Logon as the administrator.5)At [Found New Hardware Wizard], select [Cancel].<For models with modem port>1)Logon as the administrator.2)At [Found New Hardware Wizard], select [Cancel].CAUTION2)Remove the CD-ROM and turn the computer off,and then replace the CD drive with floppy diskdrive. Turn the computer on.3)Logon as the Administrator.12At [Found New Hardware Wizard], press [Next].13Select [Search for a suitable driver for my device] andpress [Next].14Select [Specify a location] and press [Next].15Input [c:\util\drivers\aironet] and press [OK].16Press [Next] and press [Finish].17Install the Aironet Client Utility (ACU).The Aironet Client Utility (ACU) is used to configureyour client adapter for use in a wireless enterprise andperform user-level diagnostics on your client adapter.In[Start]-[Run], input [c:\util\drivers\aironet\utilities\acu\setup.exe]and press [OK].Follow the on-screen instructions.18<Only for models with LAN port>1)Select [Device Manager] in [Start] - [Settings] -[Control Panel] - [System] - [Hardware].2)Double-click [Intel 8255x-based PCI Ethernet Adapter(10/100)] in [Network adapters].3)Select [Driver] and press [Update Driver].4)Press [Next], then press [Next]5)Add the check mark for [Specify a location] andpress [Next].6)Input [c:\util\drivers\lan] and press [OK].7)Add the check mark for [Install one of the otherdrivers] and press [Next].8)Select the driver for which the [Provider] is [Intel],and then press [Next].9)Press [Finish] and press [Close].19In [Start]-[Settings]-[Control Panel]-[Network andDial-up Connections], make necessary change.The settings will vary for different network environ-ments depending on the network system being used.For more details, ask your system administrator or theperson in charge of the network.( “Common Notes for Windows 98/Windows NT/Win-dows 2000” on next page)Each time [Digital Signature Not Found] is dis-played, press [Yes].NOTEAt the steps 8 and 10 , we recommend askingyour system administrator or the person in chargeof the network.4Select settings for your region, then press [Next].5Enter your name and organization, then press [Next].6Enter your computer name and administrator password,then press [Next].Remember this password! If the password is for-gotten, Windows 2000 cannot be operated. Windows 20001Rotate the power switch clockwise and hold it for ap-proximately one second until the power indicator turnson before releasing it.2At the [Welcome to the Windows 2000 Setup Wizard],press [Next].3After reading the License Agreement, select [I acceptthis agreement] or [I don't accept this agreement], thenpress [Next].CAUTIONDo not press any key or move the touch pad un-til the Windows setup screen is displayed.NOTEIf [I do not accept the agreement] is selected, theWindows setup will be aborted.<During the setup procedure after reinstalling only>After you accept the agreement, the[Windows Product Key] may be displayed. In thiscase, input the Product Key and then select [Next].NOTE11<Only for models with CF-WWL282 Driver CD-ROM>If the CD drive is not installed at this time, turn thecomputer off, install the CD drive, and then turn thecomputer on.If [Found New Hardware Wizard] is displayed, select[Cancel].1)Set the CF-WWL282 Driver CD-ROM.Create“c:\util\drivers\aironet” folder. Select [Start]- [Programs] - [Accessories] - [Command Prompt]and input the following.xcopy d:\*.* c:\util\drivers\aironet /s Enter(“d” is the CD drive letter. You can change the letter to suit your preference.)](https://usermanual.wiki/Panasonic-of-North-America/9TGCF-281.Manual/User-Guide-219614-Page-5.png)
![6Supplementary Instructions1The Software License Agreement will be displayed.After reading the agreement, select [I Agree].2Select [Next].3Input your name and organization, then select [Next].(It is possible to omit the organization item.)4Input the Product ID written down in the column“Customer’s record” ( “Operating Instructions”)then select [Next].To move the cursor to a particular item, press Tab or click the desired box.5Input your computer name and select [Next].6Input an Administrator password and select [Next].7Select [Next].8Select [Do not connect this computer to a network atthis time], then select [Next].(Settings can be made for a network even after Win-dows starts up. In this case, be sure to read [WhenAdding New Software or Hardware Components] inthe Reference Manual [Technical Information].)If [I Disagree] is selected, the Windows setupwill be aborted.Moving the cursor ( ) or clicking buttons canbe performed with the touch pad.<Only for CF-28M series Windows NT model>NOTECAUTION9Press [Restart Computer].10Select “Windows NT Workstation Version 4.00” andpress Enter .11Following the display, press Ctrl + Alt + Del . Input the password set in step 6 and select[OK], then select [Close] at the [Welcome] display.As the computer starts up, it will be necessary toinput the password set in step 6 .Following this, if [Press any key to continue ...] isdisplayed on the MS-DOS screen, press Enter .12Install Intel (R) Speed Step (TM).(At the [Welcome], select [Next]. When the installa-tion completes, select [No, I will restart my computerlater], select [Finish].)13Follow the on-screen instructions and install ESS Alle-gro1 Utility.(At the [Welcome], select [Next]. Confirm [UpgradeDrivers] is selected, then select [Next]. When the in-stallation completes, select [No. I will restart my com-puter later], then select [Finish].)ReinstallingDuring Windows setup following reinstallation, follow the on-screen instructions while referring to the Supplementary In-structions “Turn your computer on and setup Windows”.For CF-28M series Windows NT model, refer to the procedure below.NOTECommon Notes for Windows 98/Windows NT/Windows 2000If the cursor can not be pointed correctly with your finger, perform [Calibration] in [Start]-[Settings]-[Control Panel]-[Mouse]-[TouchScreen].If necessary, install the utility program with the following procedure.When installing the program, see “c:\util\drivers\aironet\documentation” for a detailed explanation.Installing the IP Setup Utility (IPSU):The IP Setup Utility (IPSU) is used to get the IP address of a wireless ethernet device based on the device MAC ID.In [Start]-[Run], input [c:\util\drivers\aironet\utilities\ipsu\setup.exe] and press [OK].For information about the other utilities and documentation, access the following URL.http://www.cisco.com/public/sw-center/sw-wireless.shtmlUsing the Computer as a Network ComputerWhen using the computer as a network computer, some additional settings may have to be made depending on theusage conditions. We recommend asking your system administrator or the person in charge of the network.Remember this password! If the password is for-gotten, Windows NT cannot be operated.The driver for the internal LAN port is in[c:\util\drivers\lan]. Be sure to select [Intel(R)PRO Adapter].It takes several minutes for the necessary files tobe copied. If the computer enters the ECO mode,the power to the LCD is automatically turned off.In this case, press a key unrelated to the directtriggering of a selection, like Ctrl .NOTEWhen establishing settings for a network:The settings will vary for different network envi-ronments depending on the network system beingused. For more details, ask your system adminis-trator or the person in charge of the network. Fol-low the on-screen instructions.](https://usermanual.wiki/Panasonic-of-North-America/9TGCF-281.Manual/User-Guide-219614-Page-6.png)
![7If the cursor can not be pointed correctly withyour finger, perform [Calibration] in [Start]-[Set-tings]-[Control Panel]-[Mouse]-[TouchScreen].NOTE14<For models with LAN port>Select [Cancel].<For models with modem port>Follow the on-screen instructions and install modemdriver.(At the [Modem Board Installation Wizard], select[Next]. Confirm [MP3930V-W(C) Modem] is dis-played when “The wizard will install the modem drivershown below” is displayed on the screen and select[Next], then select [Finish].15Follow the on-screen instructions and install PhoenixAPM 2.0 for Windows NT.When the installation completes, select [Don’t Restartnow].16Follow the on-screen instructions and install PhoenixCard Executive for Windows NT.When the installation completes, select [Restart now].17When the message [Press <F2> to enter SETUP] is dis-played, press F2 and then run the Setup Utility.If the password has been set, enter the Supervisor Pass-word.18Press F9 .At the confirmation message, select [Yes] and press Enter . (The Setup Utility settings will return to theirdefault values. Even the security settings with the ex-ception of the password(s) will return to their defaultvalues.)Change the settings where necessary.19Press F10 .At the confirmation message, select [Yes] and press Enter .20The [Begin Logon] display will appear. Perform theoperation in step11 .21Press Fn + Tab on viewing [Card Executive 2.0for NT Diagnostics] and check whether is displayed.If so, select [Next].22Select [Next], then select [Finish].Windows will restart.23The [Begin Logon] display will appear. Perform theoperation in step11 .24Add the check mark to [Install system provided driverfor this card] and press [OK].Follow the on-screen instructions.If [Service Control Manager] is displayed, press [OK].Install Service Pack 6 after the Windows setup com-pletes ( “Technical Information”).25Select [Change] in [Start] - [Settings] - [Control Panel]- [Mouse] - [General].26Press [Have Disk] and input [c:\util\drivers\mouse], thenpress [OK].27Confirm [Touchpad/Touchscreen] is selected, then press[OK].If [Confirm Device Install] is displayed, press [Yes].28Press [Close].The display will ask you to restart Windows, press [Yes].29The [Begin Logon] display will appear. Perform theoperation in step11 .30Double-click the [Internet Explorer] icon to installInternet Explorer.31Select [I accept the agreement], then select [Next].32Select [Install Minimal, or customize your browser],then select [Next].33Select [Full] by clicking , then select [Next].34At the [Restart Computer], select [Finish].35The [Begin Logon] display will appear. Perform theoperation in step11 .36Set the correct settings for all items in [Control Panel]-[Regional Settings] and [Date/Time] etc.37Install the Acrobat Reader. ( “Operating Instruc-tions”)38Turn the computer off and replace the floppy disk drivewith CD drive.39Turn the computer on and logon as the Administrator.40Set the CF-WWL282 Driver CD-ROM in the CD drive.Create“c:\util\drivers\aironet” folder. Select [Start] -[Programs] - [Command Prompt] and input the follow-ing.xcopy d:\*.* c:\util\drivers\aironet /s Enter(“d” is the CD drive letter. You can change the letterto suit your preference.)41Install the Aironet Client Utility (ACU).The Aironet Client Utility (ACU) is used to configureyour client adapter for use in a wireless enterprise andperform user-level diagnostics on your client adapter.In [Start]-[Run], input [c:\util\drivers\aironet\utilities\acu\setup.exe]and press [OK].42<Only for models with LAN port>1) Select [Add] in [Start] - [Settings] - [Control Panel] -[Network] - [Adapters] .2) Select [Have Disk].3) Input [c:\util\drivers\lan] and then select [OK].4) Select [Intel(R) PRO Adapter] and then select [OK].5) Select [Close] and follow the on-screen instructions.43In [Start]-[Settings]-[Control Panel]-[Network], makenecessary change.The settings will vary for different network environmentsdepending on the network system being used. For moredetails, ask your system administrator or the person incharge of the network.44Remove the CD-ROM and turn the computer off, thenreplace the CD drive with floppy disk drive.](https://usermanual.wiki/Panasonic-of-North-America/9TGCF-281.Manual/User-Guide-219614-Page-7.png)
![8Supplementary InstructionsSpecifications “OPERATING INSTRUCTIONS ”LAN IEEE 802.3 10Base-TIEEE 802.3u 100Base-TXWireless LAN IEEE 802.11b compliantFrequency 2.4GHz bandAdd the following information.CardBus Controller B*1DisableEnableLAN (Only for models with LAN port) DisableEnableBoot up from LAN*2DisableEnableWake up from LAN*3DisableEnableSetup Utility “REFERENCE MANUAL”Replace the “Advanced Menu” for the following.Parameters ( : Default)Device Configuration: [BIOS]Serial Port A: [Auto]Serial Port B: [Disable]IrDA Port: [Auto]MP Serial Port : [Disable]Parallel Port: [Auto] Mode: [ECP]Sound Controller: [Enable]CardBus Controller A: [Enable]CardBus Controller B: [Enable]Modem: [Enable]LAN: [Enable]Boot up from LAN: [Disable]Wake up from LAN: [Disable]*1In [CardBus Controller B], set the Wireless LAN to enable/disable.*2This function may not be displayed depending on model.[Disable] is automatically set when [LAN] is set to [Disable].*3[Disable] is automatically set when [LAN] is set to [Disable].Wake up function works on Windows 98 or Windows 2000 irrespective of the [Wake up from LAN]setting.When the [Wake up from LAN] has been enabled;In the OFF state, if you are not recharging your battery pack or if the pack is fully charged, your computerconsumes approximately 3.0 W.](https://usermanual.wiki/Panasonic-of-North-America/9TGCF-281.Manual/User-Guide-219614-Page-8.png)
![9LAN Port WARNINGDo not insert a telephone line connector (including aPBX internal phone) into the LAN port. Doing somay cause fire or electric shock.Using LANThis model has an internal LAN port.When using the LAN, set [LAN] to [Enable]* in the Setup Utility. (* Default)<Only for models with LAN port>NOTEDo not use standby or hibernation functions during communications.Unable to connect to network (When the indicator of your HUB unit does not light): Windows 981Select [Network] in [Start] - [Settings] - [Control Panel].2Select [Intel 8255x-based PCI Ethernet Adapter (10/100)].3Select [Properties].4Select [Advanced].5Select [Link Speed & Duplex] from [Property], set [Value] to the communication speed (10Mbps or 100 Mbps) suitable for your network environment, and then press [OK]. Windows NT1Select [Adapters] in [Start] - [Settings] - [Control Panel] - [Network].2Select [Intel 8255x-based PCI Ethernet Adapter (10/100)].3Select [Properties] - [Advanced].4Select [Link Speed & Duplex] from [Setting], set [Value] to the communication speed (10 Mbpsor 100 Mbps) suitable for your network environment, and then press [OK]. Windows 20001Select [Device Manager] in [Start] - [Settings] - [Control Panel] - [System] - [Hardware].2Select [Intel 8255x-based PCI Ethernet Adapter (10/100)] from [Network adapters].3Select [Action] - [Properties].4Select [Advanced].5Select [Link Speed & Duplex] from [Property], and set [Value] to the communication speed (10Mbps or 100 Mbps) suitable for your network environment, and then press [OK].](https://usermanual.wiki/Panasonic-of-North-America/9TGCF-281.Manual/User-Guide-219614-Page-9.png)
![10Be sure to connect the AC adaptor, and enable the supply of power.Make settings to allow the use of a Local Area Network.When the Wake up from LAN function is being used, data protection using the Access Key is notpossible since the power of the computer is on even without rotating the power switch.Windows 98 Windows 2000When using the Wake up from LAN function, delete the check mark for [Prompt for password whencomputer goes off standby] in [Start] - [Settings] - [Control Panel] - [Power Management]* - [Ad-vanced].* Windows 2000 : [Power Options]The Wake up from LAN function will not operate under the following conditions:- When the computer has been shut down.- When both the battery pack and the AC adaptor has been removed and connected again.-Windows 98When the computer has been placed in standby or hibernation mode from MS-DOS mode.This works on Windows 98 or Windows 2000 irrespective of the [Wake up from LAN] setting of theSetup Utility. Windows NTThe Wake up from LAN function will not operate under the following conditions:- When the computer has been shut down by rotating the power switch for more than four seconds (thisis when [Standby] or [Hibernation] has been set for [Power Switch] of the [Power] menu in the SetupUtility).- When the password has been input incorrectly, and the computer has returned to standby, hiberna-tion, or power off status.- When both the battery pack and the AC adaptor has been removed and connected again.When using the Wake up from LAN function, the password is not necessary even if the password hasbeen set in the Setup Utility.NOTE<Only for models with LAN port>This is a function to automatically power ON the computer from a network server. To use this function,it is necessary to have a network environment that accommodates Wake up from LAN.To use this function:Windows 98 Windows 20001Select [Device Manager]*1 in [Start] - [Settings] - [Control Panel] - [System].2Select [Intel 8255x-based PCI Ethernet Adapter (10/100)] from [Network adapters].3Select [Properties]*2.4Select [Power Management] and add the check mark for [Allow this device to bring the computerout of standby], and then press [OK].*1 Windows 2000: [Hardware] - [Device Manager]*2 Windows 2000: [Action] - [Properties]Windows NTSet [Wake up from LAN] to [Enable] with the Setup Utility. ( page 8)Wake up from LANSupplementary Instructions](https://usermanual.wiki/Panasonic-of-North-America/9TGCF-281.Manual/User-Guide-219614-Page-10.png)