Panasonic of North America 9TGCF-P21 Handheld Computer CF-P2 User Manual
Panasonic Corporation of North America Handheld Computer CF-P2
UserManual.wiki
>
Panasonic of North America
>
9TGCF-P21 User Manual
>
User Manual
Contents
1.
User Manual
2.
User Manual FCC Markings
3.
CF P2 User Manual
4.
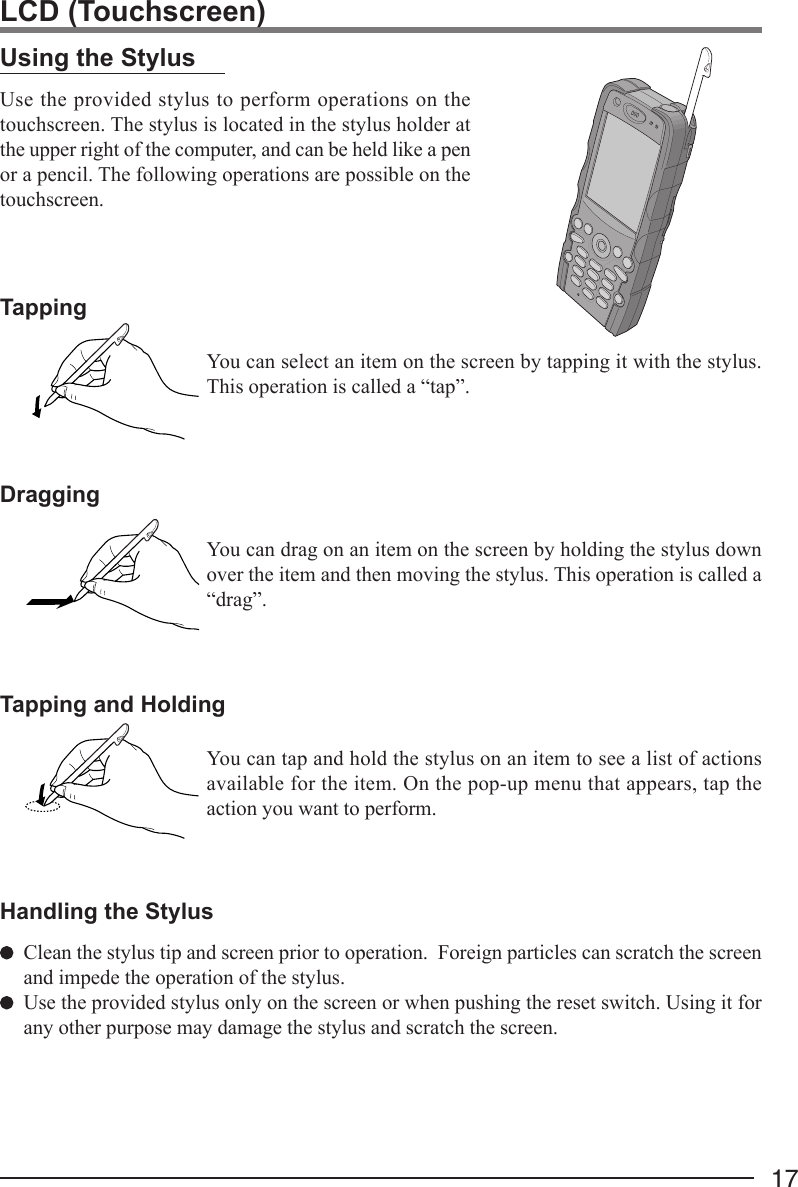
CF P2 USer Manual FCC Warning Notices
User Manual
Navigation menu
Upload a User Manual
Namespaces
Wiki Guide
HTML
PDF
Info
Views
User Manual
Discussion / Help
Navigation
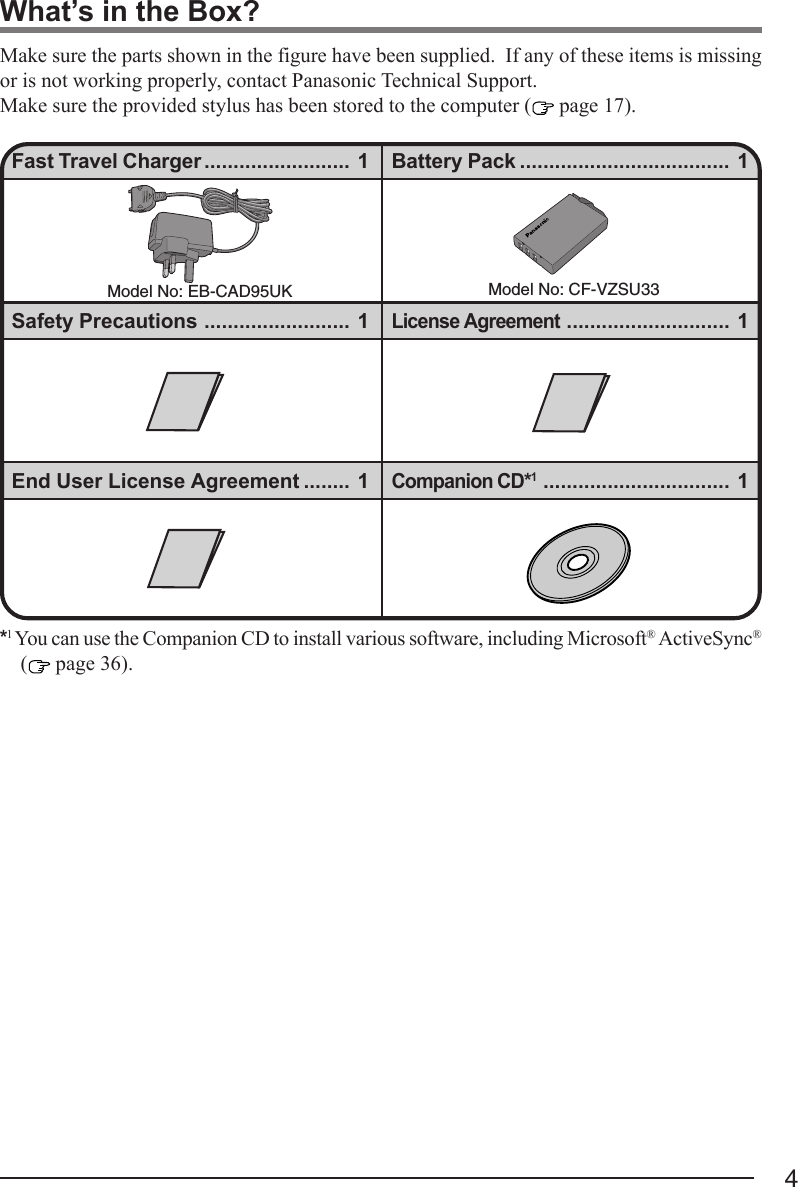
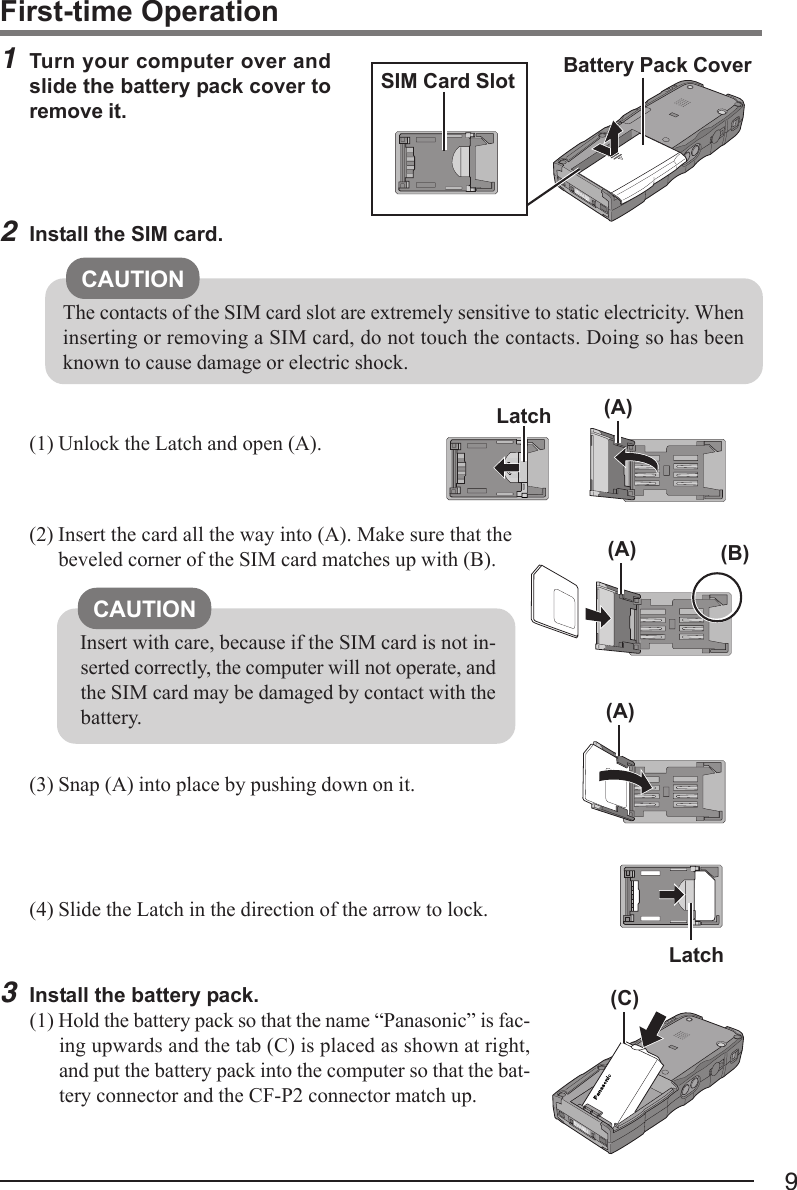
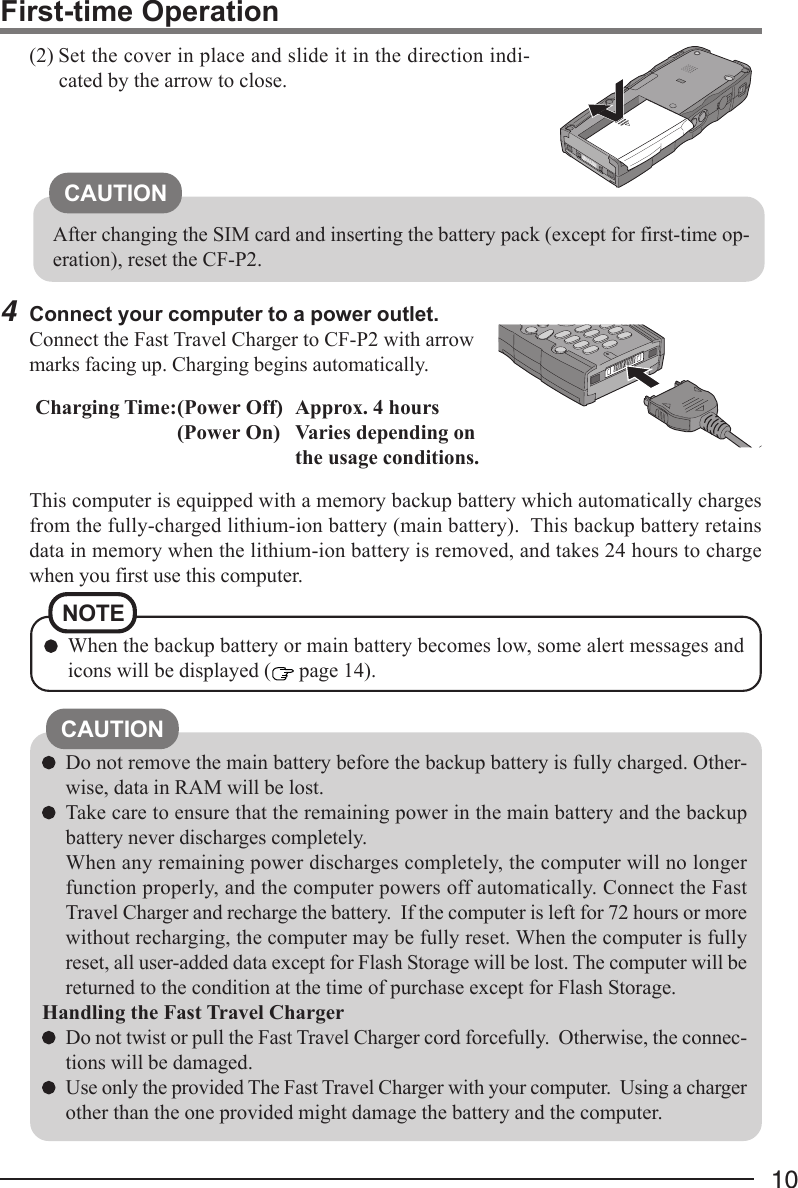
![2Customer's RecordSerial No.orModel No.*Code No.Dealer's NameDealer's AddressDate of Purchase*For the Model No., insert the 12 digit number (for example, CF-P2T1FDF7E) located on the back ofthe computer.NOTE:NOTE provides a useful fact or helpful information.CAUTION:CAUTION indicates a condition that may result in minor or mod-erate injury. - [Programs]: This illustration means to tap at the top of the screen, then totap [Programs]. : Where to go for referred information.Some of the illustrations in this manual may differ slightly in shape from the actualitems in order to make the explanation easier to understand.IntroductionThank you for purchasing the Panasonic Handheld Computer. Read the operating instruc-tions thoroughly for proper operation of your new computer.Illustrations and Terminology in this Manual](https://usermanual.wiki/Panasonic-of-North-America/9TGCF-P21.User-Manual/User-Guide-575517-Page-2.png)
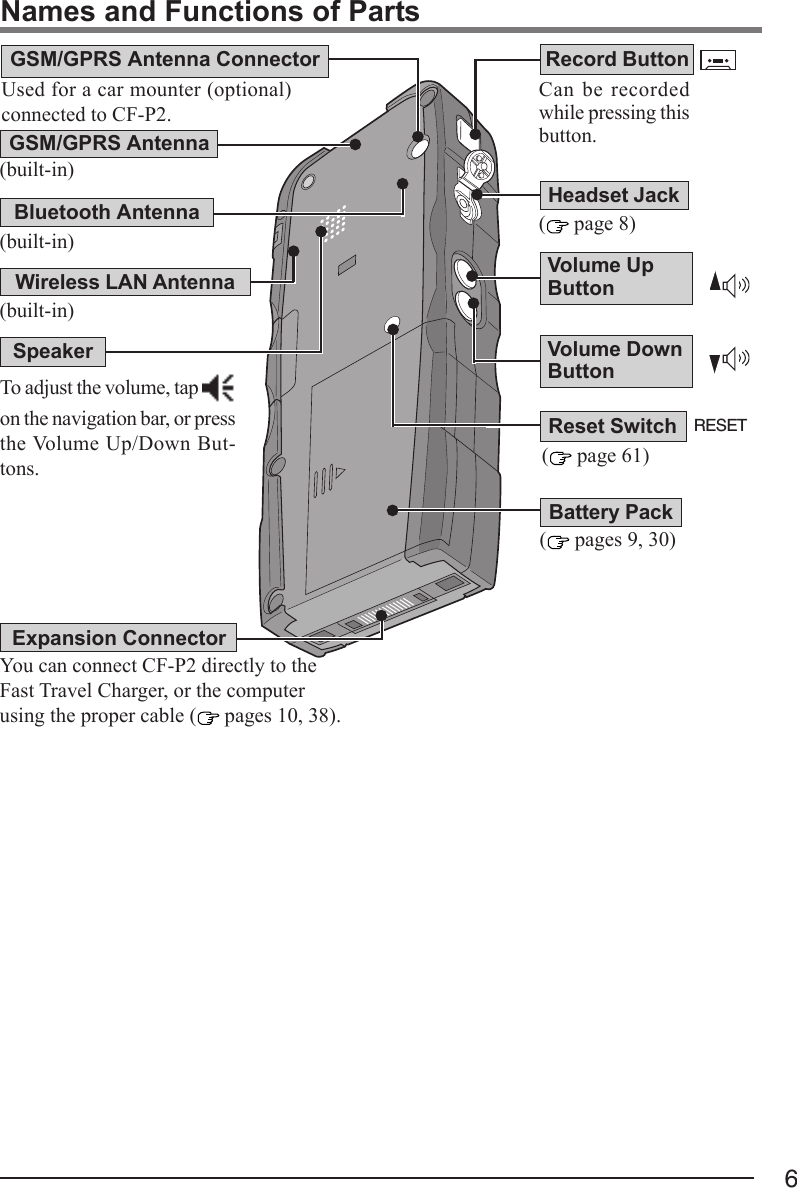
![5Names and Functions of PartsThe illustrations shown may differ from the actual physical appearances.For detailed settings, tap - [Settings] - [System] tab- [Audio] ( page 59).Power Switch ( page 18)LCD (Touchscreen)By pressing the programbutton, the program as-signed to the button isstarted up ( page 26). ( page 17)StylusWireless Power LEDIndicatorNotification LEDIndicator ( page 31)When wireless power is on, LEDindicator is blinking green.SD Card LEDIndicatorWhen the SD card orMultiMedia card is ac-cessed, LED indicator islighting green.Backspace ButtonInternal MicrophoneLight SensorBrightness of backlightchanges according tolevel of ambient light( page 19).Turns GSM/GPRS(Phone) orWireless LAN or Bluetoothpower ON/OFF ( page 39).This button also functions asone of the program buttons( page 26).Wireless PowerButton ON Hook (End)Button ( pages 53)( page 7)SD Card/MultiMediaCard SlotReceiverProgram ButtonsCursor Control ( page 8)OFF Hook (Talk)Button ( pages 53)SDAccessoryConnector ( page 25)Numeric Keypad](https://usermanual.wiki/Panasonic-of-North-America/9TGCF-P21.User-Manual/User-Guide-575517-Page-5.png)
![7Names and Functions of PartsStatusNot connected to the Fast Travel Chargeror unable to recharge outside the allowabletemperature range.Connected to the Fast Travel Charger(No charging)• Connected to the Fast Travel Charger• Connected to USB cable, and add acheck mark for [Supply power from PC byusing USB] ( page 29).(Charging in progress) Notification LED IndicatorNoneNot litGreenOrangeGiven*1Blinking GreenBlinking GreenBlinking Orange( page 5)Notification*1Examples of notification are shown below.When the alarm is set in - [Settings] - [System] tab - [Clock & Alarms] - [Alarms]tab and the alarm is ringing.When you miss phone calls, etc.](https://usermanual.wiki/Panasonic-of-North-America/9TGCF-P21.User-Manual/User-Guide-575517-Page-7.png)
![8Names and Functions of Parts Headset and 3.5 DIA plug adaptorOnly the CF-VHSP11W (sold separately) can connect to the headset jack.CF-VHSP11W includes A and B. When using a 3.5 DIA plug, B is required. This adaptorcan be connected to stereo headphones.Audio output from the internal speaker is disabled when the headset or the 3.5 DIA plugadaptor is connected.*1Answer switch MicrophoneFront Back 3.5 DIA plugA. Headset B. 3.5 DIA plug adaptor*1 Press for about one second to answer/hang up voice calls. Function will notoperate if the switch is not pressedlong enough.Using the cursor control, the following operations can be performed.“Press Center” Operation:Executes a selected item from a menu, or a selected icon. Forexample, after an item within a menu is selected, center of thecursor control can be pressed to execute this selected item.“Press Up/Down Right/Left” Operations:Performs the same function as the up/down right/left cursorcontrol. For example, the “Press Up” operation can be performedto select an item towards the top within a menu.Changing the Cursor Control SettingsThe cursor control settings allow you to adjust the interval between the waiting time until therepetition of an input begins (from the first input to the second input) if the cursor control isheld down, and the repeat of the input (from the second input and on).1Tap - [Settings] - [Personal] tab - [Buttons] - [Up/Down Control] tab.2Customize the way your cursor control repeats.3Tap [ok]. Cursor Control](https://usermanual.wiki/Panasonic-of-North-America/9TGCF-P21.User-Manual/User-Guide-575517-Page-8.png)
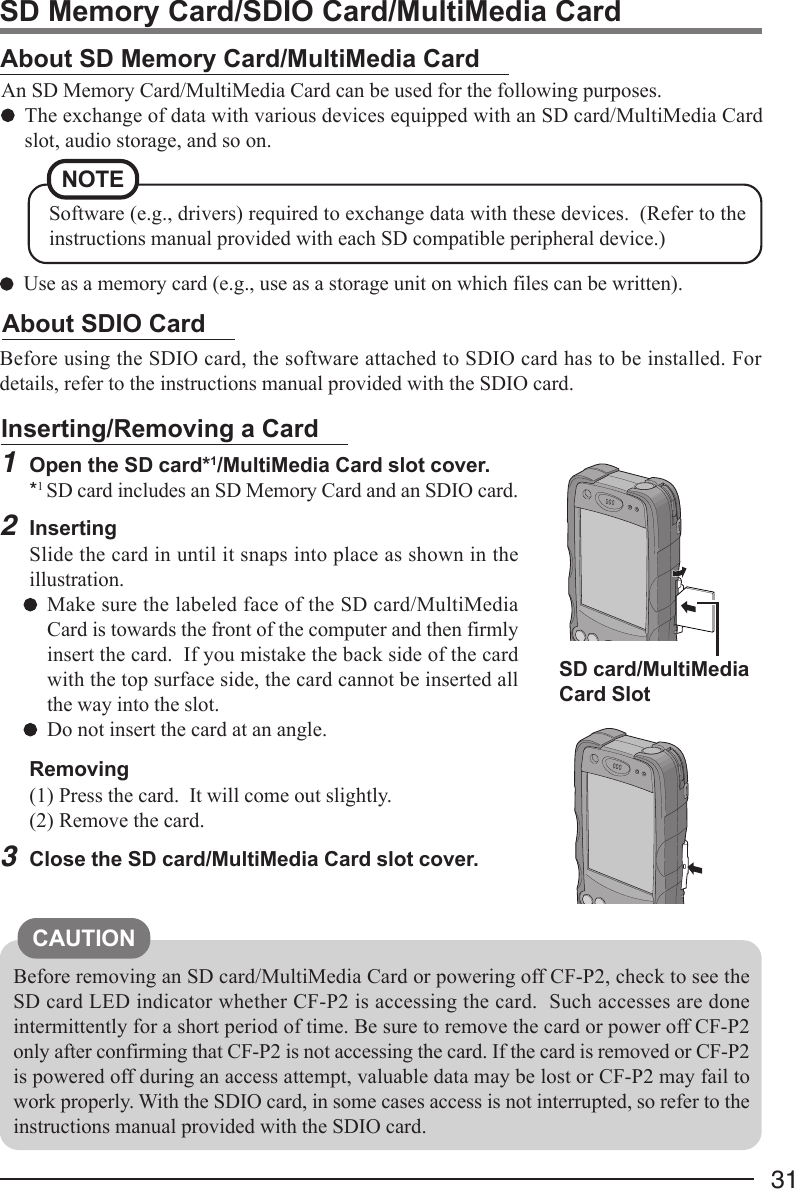
![115Turn your computer on(1) Using the provided stylus ( page 17), push the center of thereset switch straight in for 1 second while holding down on thepower switch ( page 12).(2) Tap the screen to set up your Pocket PC.The Windows*1 alignment screen is displayed.*1 This computer uses Microsoft® Windows MobileTM 2003 Second Edition Softwarefor Pocket PC, Premium with Phone Edition.(3) Align the touchscreen.(For alignment, tapping operations are required. For informa-tion on tapping, refer to page 17.)"+" is displayed in the center, upper left, lower left, lower right,and upper right portions of the touch screen, in that order. Eachtime the "+" mark is displayed, tap the center of the "+" markwith the stylus.(4) At [complete], tap the screen to begin using CF-P2.6Set the time and date(1) Tap - [Settings] - [System] tab - [Clock & Alarms].(2) Set the time zone, time and date.(3) Tap [ok].Reset SwitchThis concludes the first-time use operation guidelines.NOTEYou can also set the date and time by tapping on [Today] screen ( page 15).When the battery pack is not fully charged, if the Fast TravelCharger is connected, CF-P2 may not turn on.Use only the provided stylus to push the reset switch.Do not push the reset switch with any other sharp-pointedobjects, i.e. pencils, and ball point pens. The reset switchor other parts may become damaged.CAUTIONFirst-time OperationNOTEIn this operation, the "+" mark may not move smoothly. Thisis not a malfunction. Continue the operation.](https://usermanual.wiki/Panasonic-of-North-America/9TGCF-P21.User-Manual/User-Guide-575517-Page-11.png)
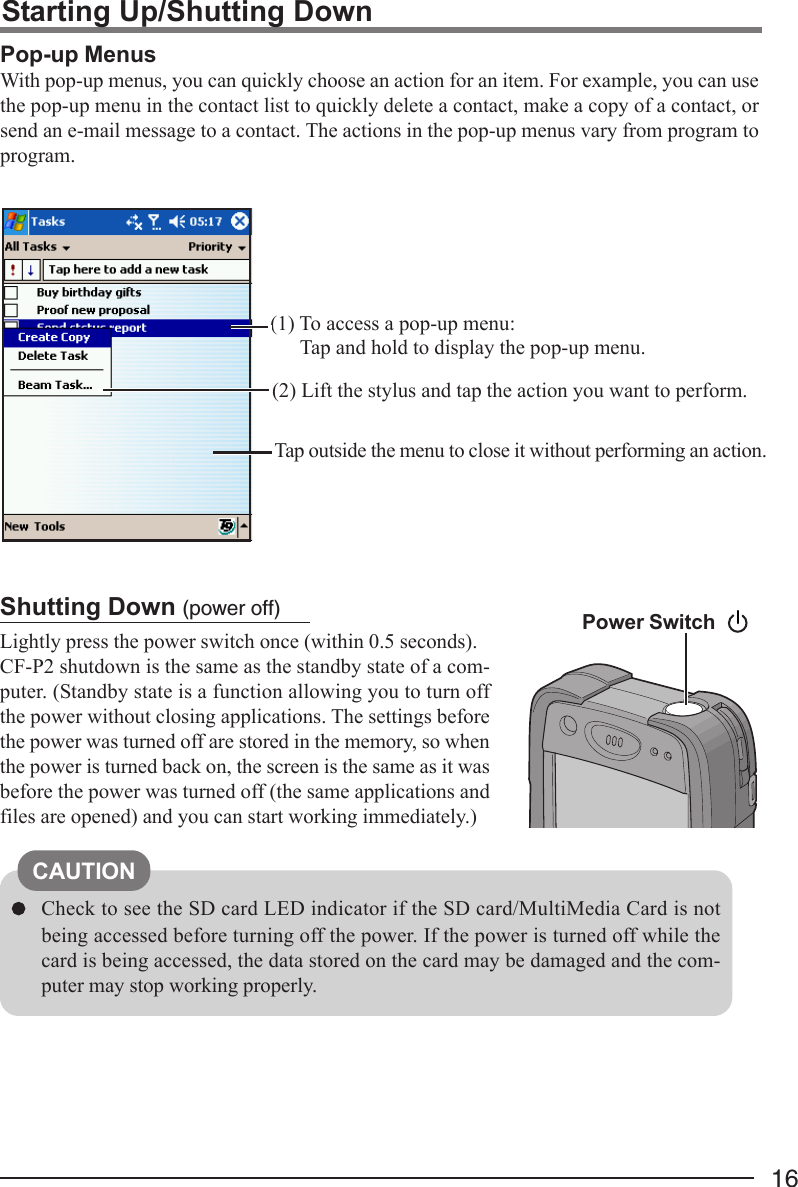
![13The Navigation Bar and Command BarThe navigation bar is located at the top of the screen. It displays the active program andcurrent time, and allows you to switch to programs and close screens.Use the command bar at the bottom of the screen to perform tasks in programs. The commandbar includes menu names, buttons, and the input panel button. or may be displayed dependingon the program that is running.Status Icon ( page 14)New ButtonMenu NamesButtons (Example for [Notes])Input Panel ButtonTap to quickly select a program you have recently used.Tap to select a program.Tap to see additional programs.Tap to customize CF-P2 ( pages 58-60).Starting Up/Shutting Down](https://usermanual.wiki/Panasonic-of-North-America/9TGCF-P21.User-Manual/User-Guide-575517-Page-13.png)
![15Starting Up/Shutting DownToday ScreenYou’ll see the Today screen when you turn on the computer for the first time each day (orafter 4 hours of inactivity*1). The Today screen can be displayed by tapping - [Today].On the Today screen, you can see at a glance important information for the day.*1To change the setting, tap - [Settings] - [Personal] tab - [Today] - [Items] tab.Tap to switch to a program.Tap to create a new item.Tap to change date and time.Tap to open an item.Your day at a glance.Displayed when synchronizing with a hostcomputer using Microsoft® ActiveSync®.Tap to view connection status. is displayed when Panasonic Bluetooth hasstarted.](https://usermanual.wiki/Panasonic-of-North-America/9TGCF-P21.User-Manual/User-Guide-575517-Page-15.png)
![18Align the touchscreen if the cursor does not correctly move to the position where the stylustouches the touchscreen of the computer.1Tap - [Settings] - [System] tab - [Screen]and tap [Align Screen].You can also align the screen when + centerof the cursor control are pressed.2"+" is displayed in the center, upper left, lowerleft, lower right, and upper right portions ofthe touchscreen, in that order.Each time the "+" mark is displayed, tap the center ofthe "+" mark with the stylus.The alignment procedure is executed after the five"+" marks are touched.Handling the TouchscreenUse the provided stylus with CF-P2. Do not use an implement other than the stylus pro-vided with the computer.Do not place any object on the surface or press down forcefully with sharp-pointed objects(e.g., nails), or hard objects that may become damaged (e.g., pencils and ball point pens).Do not operate the computer when such things as dust are on the LCD. Do not allowsubstances such as oil to contact the LCD. The cursor may not work properly in suchcases.Aligning the TouchscreenLCD (Touchscreen)When performing a full reset, the "+" mark may not move smoothly in this opera-tion. This is not a malfunction. Continue the operation.NOTE](https://usermanual.wiki/Panasonic-of-North-America/9TGCF-P21.User-Manual/User-Guide-575517-Page-18.png)
![19Adjust the LCD BrightnessScreen brightness can be adjusted in accordance with the usage conditions.1Tap - [Settings] - [System] tab - [Backlight].2Tap the [Brightness] tab and adjust the bright-ness with the slider.3Tap [ok].Backlight SettingsSettings of the Backlight AutomaticallyThe backlight can be set automatically.1Tap - [Settings] - [System] tab - [Backlight].2Tap the [Advanced] tab.3Tap [ok].Add the check mark so that when LCD backlight turnson, keyboard backlight turns on automatically at darkplace.Add the check mark so that the sensor detects theamount of light, and the backlight automatically be-come dimmer so that the LCD screen is not too brightwhen using CF-P2 in a car or other dark places.Add the check mark so that the sensor detects theamount of light, and the backlight automatically turnoff at bright places.CAUTIONIf there are check marks at [Advanced] tab (seebelow), this function may not work. In such acase, remove those check marks and adjust thebrightness with the slider.Add the check mark so that the dimming function isenabled only when CF-P2 is docked in its car mounter’scradle.](https://usermanual.wiki/Panasonic-of-North-America/9TGCF-P21.User-Manual/User-Guide-575517-Page-19.png)
![20Setting of the LCD BacklightThe LCD backlight can be set to turn off automatically (e.g., for conserve power) by settingthe timeout function. Individual settings can be made for battery use and The Fast TravelCharger use.1Tap - [Settings] - [System] tab - [Backlight].2Battery use setting: Tap the [Battery Power] tab.The Fast Travel Charger use setting: Tap the [External Power] tab.3Tap [ok].Add a check mark so that when the device is not oper-ated, the LCD backlight switches off automaticallywhen the timeout expires.Add a check mark so that tapping the screen turns theLCD backlight on.(Example for [Battery Power])TimeoutBacklight SettingsLCD Backlight ON/OFFTurn on CF-P2, and press the power switch until the LCD backlight goes on/off and releasethe switch. (Depending on the setting under the [Advanced] tab, the LCD backlight may notbe turned on.)](https://usermanual.wiki/Panasonic-of-North-America/9TGCF-P21.User-Manual/User-Guide-575517-Page-20.png)
![21Entering InformationYou can use the following options to enter information:Use the numeric keypad to input typed text by using T9 ( below) or the number shownon the key top.Use the input panel to input typed text, either by using the soft keyboard or other inputmethod.Write directly on the screen.*1Draw pictures on the screen.*1Speak into the internal microphone to record a message.*1Use Microsoft® ActiveSync® to synchronize or copy information from a host computer toCF-P2. For more information on Microsoft® ActiveSync®, see ActiveSync® Help on thehost computer ( page 36).*1 For more information, tap - [Help] - [Settings] - [Input].With T9® Text Input software, you can enter text easier and faster than with the “Multitap”method of text entry. Instead of pressing a key repeatedly to enter a letter, you press a keyonly once for each letter.The current mode is indicated at (B).CF-P2 has four text entry modes:(T9): Used to enter letters,numbers, and symbols.You press a key only once for each letter.(ABC): Used to enter letters and numbers. You press keys repeatedly tocycle to the desired character.(123): Used to enter numbers.(Symbols): Used to enter symbols and punctuation marks.To change the text entry mode, press for more than one second or tap (B)repeatedly until the icon of the mode you want is displayed.Using T9® Text Input Changing the text entry mode(1) Tap the arrow (A) and tap [Alphabetic T9].(2) Tap (B) and select a text entry mode. (B)(A)Help](https://usermanual.wiki/Panasonic-of-North-America/9TGCF-P21.User-Manual/User-Guide-575517-Page-21.png)
![22 Entering Letters in T9 ModeImportant T9 concepts:• Type to the end of the word if it does not appear after you enter the first few letters.• Don’t be concerned about what appears on screen while entering a word.• Press the up/down cursor control to scroll through word choices.• You can enter words that contain capital letters ( page 23 “Changing the Shift State”).• You can use the Smart Punctuation feature to quickly add punctuation to words ( page23 “Entering Symbols”).(1) Press the corresponding number key one time. For example, to enter the letter c, press2abc once. Although each key represents several letters, T9 determines from the keysyou press which letter you want.(2) If the word displayed is the one you want, press # to add a space and begin the nextword.(3) Press center of the cursor control to enter the word.The following section describes what to do if T9 doesn’t display the word you want.When the Word You Want Isn’t on ScreenSometimes the word T9 displays isn’t the one you want. For example, to enter “cat” youwould press the keys 2abc 2abc 8tuv . For this key sequence, however, “act” is the mostlikely matching word. Although T9 displays “act”, it has prepared a list of all the wordsthat match the key sequence.To view the next matching words, press the up/down cursor control. Pressing this cursorcontrol replaces the current word with the next matching word.When the Word Isn’t in T9’s ListSometimes the word you want to enter isn’t in T9’s list of matching words. In this situation,you can switch to ABC mode by pressing until is displayed and enter the word.Return to T9 mode by pressing until is displayed. T9 automatically also addswords input in ABC mode to its dictionary.*1Entering Completed Words*1Sometimes T9 places in the selection list completed words. Completed words match thekeys you’ve entered but contain additional characters. If the completed word isn’t the oneyou want, just keep entering letters. T9 will remove the completed portion of the word foryou automatically. If the completed word is the one you want, press # to add a spaceand begin the next word.*1 This setting can be changed as follows.1 Tap the arrow on the command bar.2 Tap [Options] - [Input Method] tab - tap [Options].3 Add/remove a check mark from each setting.4 Tap [ok].Entering Information](https://usermanual.wiki/Panasonic-of-North-America/9TGCF-P21.User-Manual/User-Guide-575517-Page-22.png)
![23 Entering Letters in ABC ModeTo enter a letter, press the corresponding number key repeatedly until you cycle around tothe desired letter. For example, to enter an s, press 7pqrs four times.Entering Predicted Words*1Sometimes T9 places in the selection list predicted words. Predicted words are words T9thinks you may want to enter, based on text you’ve recently entered. Available in both T9and ABC mode, predicted words are underlined.If the predicted word you see isn’t the one you want, press the up/down cursor control toview additional predicted words. When you find the one you want, press # to add aspace and begin the next word.If none of the predicted words in the selection list is the word you want, just keep enteringletters. T9 will remove the predicted word for you automatically.*1 This setting can be changed as follows.1 Tap the arrow on the command bar.2 Tap [Options] - [Input Method] tab - tap [Options].3 Add/remove a check mark from each setting.4 Tap [ok].Changing the Shift StateT9 has three shift states:• Lowercase—letters are in lowercase.• Single-character uppercase—the next letter you enter is in uppercase. T9 then automati-cally returns to lowercase.• Uppercase—letters are in uppercase.To switch from one shift state to the next, press key:You can see which mode is active by looking at the next to T9 mode indication. You maysee one of these icons:: Indicates single-character uppercase.: Indicates uppercase.If you do not see either icon, CF-P2 is in lowercase. Entering SymbolsThere are two ways to enter symbols. If CF-P2 is in T9 mode, you can press 1 (alsoknown as the Smart Punctuation key) to enter a symbol and then continue adding letters.For example, to enter “I’ll”, press 4ghi 1 5jkl 5jkl. After you press 4ghi 1 ,the display reads I., but once you press 5jkl, the display changes to “I’l”. If the displayedsymbol isn’t the one you want, press the up/down cursor control to see other choices.You can also enter symbols by setting CF-P2 to Symbols mode (by pressing until is displayed). When CF-P2 is in Symbols mode, symbols appear in the selection list. If yousee the symbol you want, select it using the cursor control, and the symbol will be added.If you don’t see the symbol you want, press the up/down cursor control to see the next pageof symbols. After you enter a symbol, CF-P2 returns to the mode it was in before you set itto Symbols mode.Entering Information](https://usermanual.wiki/Panasonic-of-North-America/9TGCF-P21.User-Manual/User-Guide-575517-Page-23.png)
![24Select an input methodInput Panel ButtonTap to see your choiceUse the input panel to enter information in any program on CF-P2. You can either type usingthe soft keyboard or write using Letter Recognizer, Block Recognizer, or Transcriber. Ineither case, the characters appear as typed text on the screen.To show or hide the input panel, tap the input panel button. Tap the arrow next to the inputpanel button to see your choices.Using the Input PanelTo type with the soft keyboard:(1) Tap here and then [Keyboard].(2) On the soft keyboard that is displayed,tap the keys with your stylus.Tap [123] to allow the keyboard to input $,{}, %, etc.Entering Information Entering NumbersThere are two ways to enter numbers. If CF-P2 is in ABC or T9 mode, you can enter anumber by pressing the corresponding number key until a number is displayed. The num-ber is entered, but CF-P2’s text entry mode doesn’t change.You can also enter numbers by setting CF-P2 to 123 mode (by pressing # until isdisplayed). Setting CF-P2 to 123 mode is useful if you want to enter more than one or twonumbers—for example, street addresses or phone numbers. After setting CF-P2 to 123mode, enter numbers by pressing the corresponding number keys. When you’re finished,set CF-P2 back to previous mode (by pressing until previous mode is displayed).Moving the CursorYou can move the cursor by pressing the right/left cursor control. However, the number ofcharacters that the cursor moves can vary—within T9 mode it generally moves word byword and within ABC mode it moves letter by letter.Deleting TextYou can delete text by pressing . Each key press deletes the character left of the cursor.(Example for [Keyboard])](https://usermanual.wiki/Panasonic-of-North-America/9TGCF-P21.User-Manual/User-Guide-575517-Page-24.png)
![252369580#41abc defmnowxyzjklghituv7pqrsEntering InformationPress a key to input the number shown on the key top.OFF Hook (Talk) Button: page 53.ON Hook (End) Button: page 53.Wireless Power Button*1: page 39.ok Button*1:This key works the same as the tapping [ok] on the screen.Cursor Control: page 8.Backspace Key: This key works the same as the Backspace key of a com-puter.Numeric Keypad: Use when making phone calls. Characters and numbers canalso be input using T9 ( page 22).*1These are the settings at the time of purchase. You can change the assignment of theseprogram buttons ( page 26).ok ButtonNumericKeypadBackspace KeyON Hook (End)ButtonOFF Hook (Talk)ButtonWireless PowerButtonUsing the KeyboardCursor Control](https://usermanual.wiki/Panasonic-of-North-America/9TGCF-P21.User-Manual/User-Guide-575517-Page-25.png)
![26Changing the Assignment of Program ButtonsPrograms are assigned to the buttons shown below at the time of purchase. If either of thebuttons is pressed after the computer has started up, the program assigned for that button isstarted up. These buttons are called program buttons.You can change the assignment of the program buttons following the procedure.1Tap - [Settings] - [Personal] tab - [Buttons].2Choose each setting.Setting to ResumeYou can resume the computer with the program buttons and OFF Hook (Talk)/ON Hook(End) Buttons.1Tap - [Settings] - [Personal] tab - [Buttons] - [Wakeup] tab.2Add a check mark to resume when the program buttons and OFF Hook (Talk)/ON Hook (End) Buttons are pressed.3Tap [ok].3Tap [ok].(1)Tap one button.(2)Tap under [Assign a program] and select a pro-gram from the list.(E)23695841abc defmnowxyzjklghi7pqrs(C)(B) (D)(A)(F)(A) - Quick Menu (B) - Contacts (C) - Context Menu (D) - OK/Close(E) - Record (F) - Wireless Power](https://usermanual.wiki/Panasonic-of-North-America/9TGCF-P21.User-Manual/User-Guide-575517-Page-26.png)

![28 Changing the Assignment of Quick Menu1Press the program button that is assigned to the Quick Menu and tap [As-sign].[Program Assignment] will be displayed.Changing the Assignment of Program Buttons(2)Tap under [Assign a program:] and select a pro-gram from the list.When selecting <None>, the menu assignmentwill be none.When selecting [(...Free command)], the follow-ing screen will be displayed.1 Tap and select a folder.(1)Tap one item.3 Tap folders and select a program from the list.If the [Restore Default] is tapped, the assignmentswill return to the default settings.2Tap [ok].CAUTIONDo not delete or move assigned programs using the File Explorer or other function.An assigned program cannot be started up if it has been deleted or moved.NOTE2 Tap and select type of files.](https://usermanual.wiki/Panasonic-of-North-America/9TGCF-P21.User-Manual/User-Guide-575517-Page-28.png)
![29Battery PowerCAUTIONEnsure that the backup battery is fully charged before replacing the battery pack andreplace the battery pack within 30 minutes; otherwise the data in RAM will be lost.Do not touch the terminals of the battery pack. The battery pack may no longer functionproperly if the terminals are dirty or damaged.Do not expose the battery pack to water, or allow it to become wet.The battery pack is not charged when CF-P2 is first purchased. Be sure to charge itbefore using it for the first time. When the Fast Travel Charger is connected to CF-P2,charging begins automatically.Use only the specified battery pack (CF-VZSU33U) with CF-P2.Do not install or remove the battery pack while CF-P2 is on.Remaining BatteryTap - [Settings] - [System] tab - [Power] - [Battery] tab.The recharging state is displayed.When the Remaining Battery Charge Becomes LowPlug in the Fast Travel Charger, and fully charge your battery.Use a spare battery if you have one.If you have neither the Fast Travel Charger nor a spare battery, power off your computer.Setting for Auto Powering OffYou can set CF-P2 power to turn off automatically after a specified period of time.Tap - [Settings] - [System] tab - [Power] - [Advanced] tab.Add a check mark so that when CF-P2 is not operated,CF-P2 turns off automatically when the timeout ex-pires.Add a check mark so that when the Fast Travel Chargeris connected, CF-P2 turns off automatically when thetimeout expires.TimeoutAdd a check mark to supply power from another computervia USB.NOTEPower may not be supplied, depending on thecondition of CF-P2 or the other computer.](https://usermanual.wiki/Panasonic-of-North-America/9TGCF-P21.User-Manual/User-Guide-575517-Page-29.png)
![30Removing the battery pack(1) To turn off [Phone], lightly press the Wireless PowerButton (within 0.5 seconds) to display [Wireless PowerStatus] screen. (For details, page 39.)(2) Turn off your computer.(3) Turn your computer over and slide the battery pack coverto remove it.(4) Remove the battery pack in the direction shown in thefigure.Installing the battery pack(1) Refer to page 9 about installing the battery pack.(2) Turn your computer on.*1(3) Save the unsaved data and push the reset switch.*1 When [Phone] is still on and the battery pack is replaced, the message [Phone function isdisabled. Please reset] may appear.Replacing the Battery PackWhen the charge provided by your battery pack is supplied for only a short period of time,even after full charging according to the instructions, it may be time to replace your batterypack. The battery pack is a consumable item and therefore requires replacement (CF-VZSU33U).Battery PowerBattery Pack CoverCAUTION Ensure that the Fast Travel Charger is removed when replacing the battery pack.](https://usermanual.wiki/Panasonic-of-North-America/9TGCF-P21.User-Manual/User-Guide-575517-Page-30.png)
![32Using the backup function, you can back up data from the CF-P2 RAM to an SD MemoryCard, MultiMedia Card, or Flash Storage, or restore data backed up on those storage area tothe CF-P2 RAM.Panasonic BackupCAUTION The data in [Messaging] may not be backed up correctly. When you back up and re-store data, some mail contents may be lost. If you need to save the mail data, leave iton the server.Do not do the following during the procedure:• Touching the power switch, any keyboard and touchscreen.Disable the connection with the host computer, for example by disconnecting the cable.Confirm that battery remaining is at least 50%, disable all power management, andstop any other programs that may be running.When backing up to an SD Memory Card, be sure to insert the SD Memory Cardfirst, and wait for a moment, then start [Panasonic Backup]. (See below)NOTEBackup processing cannot be executed manually during Auto Backup or Auto Restore.We recommend that each media be formatted as shown below when backing up.Media Recommended FormatSD Memory Card SD Format (use SD Formatter)MultiMedia Card FAT16Flash storage Not required.1Reset CF-P2 ( page 61).2When backing up to an SD Memory Card, insert the SD Memory Card.3Tap - [Programs] - [Panasonic Backup] - [Backup] tab.4Tap to select the storage area to back upthe data.5Tap [Backup Start].If the warning message is displayed, select [YES] toconfirm after carefully reading the message.6Input the Backup file name.Add a check mark for [Set Password] and set a pass-word if required.7Tap [ok].Follow the on-screen instructions.The progress screen will be displayed. To stop the op-eration, tap [Abort].“Backup successful” will be displayed when the backupis complete. Tap [ok].Manual Backup](https://usermanual.wiki/Panasonic-of-North-America/9TGCF-P21.User-Manual/User-Guide-575517-Page-32.png)
![331Tap - [Programs] - [Panasonic Backup].2Tap [Tools] on the command bar and select [Auto Backup Settings].A warning message will be displayed. Tap [ok].3Tap [File] tab.(1) Tap to choose the storage area for Auto Backup.(2) Change the settings in [Settings].4Make a setting for Auto Backup. When making a setting at the time and day*1:(1) Tap [Schedule] tab.(2) Add a check mark for [Scheduling backup].(3) Set the time and day to back up at [Backup Schedule]. When making a setting to start Auto Backup when the remaining battery power is low*1:(1) Tap [Battery] tab.(2) Add a check mark for [Backup when battery is low].(3) Set the threshold.*1 [Scheduling backup] and [Battery] can be set simultaneously. When setting a password for backup files:(1) Tap [Password] tab.(2) Add a check mark for [Set Password].(3) Set password for backup files.5Tap [ok].Auto BackupPanasonic BackupCAUTIONIf there is a check mark in [Stop other application before backup], some appli-cations currently being executed may or may not save their active files, andmay not shut down properly.NOTE If power is off, the amount of battery power remaining cannot be checked so thatthis function cannot work.](https://usermanual.wiki/Panasonic-of-North-America/9TGCF-P21.User-Manual/User-Guide-575517-Page-33.png)
![34Auto Restore1Full reset CF-P2 ( page 61 step (1) - (4)).[Panasonic Backup] screen will be displayed.2Select a file for restore, and tap [OK].If a password has been set, a message will be displayed.Enter the password and press [OK]. Restore will start.The progress screen will be displayed. When the re-store is complete, CF-P2 resets automatically.Panasonic Backup](https://usermanual.wiki/Panasonic-of-North-America/9TGCF-P21.User-Manual/User-Guide-575517-Page-34.png)
![35You can connect to Internet service provider (ISP), and use the connection to send and re-ceive e-mail messages and view Web or WAP pages.Getting ConnectedThe settings will vary for different network environments. Ask your system administrator orthe person in charge of the network and make settings using the followings.1Tap - [Settings] - [Connections] tab - [Connections] in order.2Set up or change connection information On the [Tasks] tab:(1) Tap one of the followings:Add a new modem connection (My ISP)Add a new modem connection (My Work Network)Add a new VPN server connection (My Work Network)Set up my proxy server (My Work Network)(2) Enter the necessary information. On the [Advanced] tab:Tap [Select Networks], [Dialing Rules] or [Exceptions] and set up if required.For details, tap - [Help].To run Pocket Internet ExplorerTap - [Internet Explorer].Pocket Internet ExplorerFavorites ButtonHome ButtonRefresh Button](https://usermanual.wiki/Panasonic-of-North-America/9TGCF-P21.User-Manual/User-Guide-575517-Page-35.png)
![36Use Microsoft® ActiveSync® to synchronize a host computer and CF-P2 information, to transferfiles between a host computer and CF-P2, or to backup and restore data.Connecting to Your ComputerCAUTIONTo ensure that synchronization functions properly, install Microsoft® ActiveSync® 3.7from companion CD into the host computer before connecting CF-P2 and the hostcomputer for the first time.The USB cable can be used to connect the CF-P2 with a host computer.Installing ActiveSync®1Set the Companion CD into the host computer.The opening screen is displayed automatically.• When the opening screen is not automatically displayed. In [Start] - [Run], input [x:\setup] and select [OK].(“x” is the drive letter. You can change the letter to suit your preference.)2Select [Start Here].3Select [Install ActiveSync] and read the on-screen instructions andselect [Install].4At [Installation Message], select [OK].[File Download] will be displayed. This screen varies depending on the hostcomputer’s software (e.g. Internet Explorer version).•When [Run] is displayed on [File Download], select [Run]. If the confirmation mes-sage is displayed, select [Run] again.• When [Open] is displayed on [File Download], select [Open].• When [Run this program from its current location] is displayed on [File Download],select it and then select [OK].5At [Microsoft ActiveSync], select [Next].6At [Select Installation Folder], select [Next].When Windows XP SP2 is installed in the host computer, when ActiveSync® is per-formed by USB connection or Bluetooth connection for the first time, a securitywarning message may be displayed. In this case, refer to Security Center Help. Somefunctions may be limited depending on the Firewall setting in the Security Center.If the opening screen of the companion CD is not displayed correctly, connect to theInternet and restart the companion CD.If the message to install the Macromedia Flash Player is displayed, follow the on-screen instructions to install it.NOTE](https://usermanual.wiki/Panasonic-of-North-America/9TGCF-P21.User-Manual/User-Guide-575517-Page-36.png)
![37To change the synchronization settings, tap, in order, - [ActiveSync] - [Tools] -[Options]. Be sure to disconnect the cable when changing the synchronization settings.Disconnect and connect the cable again if communications do not start.For information about the Microsoft® ActiveSync®, refer to the Microsoft® ActiveSync®Help.NOTECAUTIONWhile performing communications, avoid the following:• Connect/disconnect the cable.• Turn on/off the CF-P2 and the host computer.When adding a check mark for [Use mobile schedule to sync with this PC] in -[ActiveSync] - [Tools] - [Options] - [PC] tab of CF-P2, be sure to check that Microsoft®ActiveSync® can be connected (for example, when the host computer’s power is on). IfMicrosoft® ActiveSync® can not be connected, a situation may arise whereby evenwhen the CF-P2’s power is switched off, only the power to the LCD turns off, but thepower to the main unit remains on (input from the keyboard is still possible). In thiscase, enable the Microsoft® ActiveSync® connection, and synchronize with the hostcomputer again. If this situation occurs frequently, remove the check mark from [Usemobile schedule to sync with this PC].Connecting to Your Computer7At [Get Connected], read the on-screen instructions and connect the CF-P2 with a host computer.(Refer to page 38 to connect the CF-P2 with a host computer.)•Change the setting for the host computer or CF-P2, depending on the connection tothe host computer. For details, refer to the ActiveSync® Help of CF-P2, and also referto Help displayed on the host computer during the installation.•At the time of purchase, when the USB cable is connected, power is supplied to CF-P2 from the host computer. If you do not want power to be supplied, remove thecheck mark from [Supply power from PC by using USB] in - [Settings] - [Sys-tem] tab - [Power] - [Advanced] tab ( page 29).8At [Set up a Partnership], select the partnership and follow the on-screeninstructions.](https://usermanual.wiki/Panasonic-of-North-America/9TGCF-P21.User-Manual/User-Guide-575517-Page-37.png)
![38Connecting to Your ComputerWhen Connecting the CF-P2 Directly with a ComputerUSB Autosync CableExpansion Connector of the CF-P2RemovingCAUTIONTo ensure that synchronization functions properly, install Microsoft® ActiveSync® 3.7before connecting CF-P2 and the host computer for the first time.Turn off the CF-P2, the connected computer, and all connected peripherals beforeconnecting or disconnecting the cable.Backup/Restore data using ActiveSync®Backup(1) At [Microsoft ActiveSync] on the host computer, select [Tools] - [Backup/Restore] -[Backup] tab.(2) Select [Full backup] or [Incremental backup] and then select [Back Up Now].(3) At [Backup Complete], select [OK].Restore(1) After Backup procedure, at [Microsoft ActiveSync] on the host computer, select[Tools] - [Backup/Restore] - [Restore] tab, and select [Restore Now].(2) Follow the on-screen instructions and restore data.](https://usermanual.wiki/Panasonic-of-North-America/9TGCF-P21.User-Manual/User-Guide-575517-Page-38.png)
![39Wireless FunctionsThe following wireless functions are in CF-P2.• GSM/GPRS(Phone) ( page 40)• Wireless LAN ( page 43)• Bluetooth ( page 49)Changing the Wireless Power StatusDisplay the screen on the right, and confirm the switchingand status of the GSM/GPRS(Phone), Wireless LAN andBluetooth power supply.1Turn on CF-P2.2Lightly press the Wireless Power Button (within0.5 seconds) to display [Wireless Power Status]screen.When also tapping - [Programs] - [Wireless Power],[Wireless Power Status] is displayed.If you change the program button assignment in -[Settings] - [Personal] tab - [Buttons], [Wireless PowerStatus] screen cannot be displayed.3Tap the icon for the function that you want to turn ON/OFF.The icon will change as follows. Power is on. Power is off.How to turn the Wireless power on/off using the Wireless Power ButtonDisplay [Wireless Power Status] screen, and press the Wireless Power Button ( page 5)more than 2 seconds.•When there are wireless functions turned on, if you press the Wireless Power Button fortwo seconds or more, all the wireless functions turned on will switch off. After that,pressing the Wireless Power Button again for two seconds or more will turn on anywireless function that were previously turned off. In this operation, only wireless func-tions that were originally turned on will be returned to the “on” status. The wireless power status may not be able to change immediately after the computerresumes operations. When turning a wireless function on/off, the wireless power status cannot be changedeven if you press the Wireless Power Button for two seconds or more.NOTE](https://usermanual.wiki/Panasonic-of-North-America/9TGCF-P21.User-Manual/User-Guide-575517-Page-39.png)
![40(3) Enter the suitable connection name and then select [Cel-lular Line (GPRS)] at [Select a modem:], then tap[Next].The settings may vary with the local service provider. This information has to be requestedfrom the local provider. (The following sample screenshots illustrate the setup procedure.)1Turn your computer on ( page 11).2Set up the Remote Network.(1) Tap, in order, - [Settings] - [Connections] tab -[Connections].(2) Tap [Add a new modem connection] at [My ISP].Setting Up the Remote Network for GPRSWireless Functions(4) Enter Access point name.(5) Tap [Next].](https://usermanual.wiki/Panasonic-of-North-America/9TGCF-P21.User-Manual/User-Guide-575517-Page-40.png)
![41(6) Enter the user name and password, and enter domain ifprovided by ISP or network administrator.(Check with your network manager or the operator forthe SIM you are using to confirm the information to berequested).(7) Tap [Finish].Wireless Functions3Set up the authentication type.(1) Tap - [Settings] - [Connections] tab - [RF Set-tings].(2) Tap [Authentication] tab.Select [PAP and CHAP] or [PAP].The settings for the CSD are the same as the GPRS, except forthe following:• Select [Cellular Line] instead of [Cellular Line (GPRS)].• Set the number.• Set the user name, password and the domain for the requested ISP.(3) Tap [ok].](https://usermanual.wiki/Panasonic-of-North-America/9TGCF-P21.User-Manual/User-Guide-575517-Page-41.png)
![424Connect /Disconnect to GPRS networkConnectingMake sure that one of the five icons ( , , , , )is displayed on the navigation bar.Tap to display the Connectivity bubble (A).Make sure that the name of the setting in step 2 (3)( page 40) is displayed and tap [Connect GPRS].The connection will start.DisconnectingTap to display the Connectivity bubble and tap [Dis-connect].When multiple connection settings have been created,the desired setting may not be selected using only theoperations described above. In this case, use the fol-lowing settings.(1) Tap or on the navigation bar then tap [Set-tings] - [Connections] tab - [Connections] to display[Connections] screen*1.*1 You can also tap - [Settings] - [Connections]tab - [Connections].(2) Tap [Manage existing connections]*2 at [My ISP].*2 This appears after setting the remote network ( page 40-41).(3) Change the setting from [Auto pick] to a desiredsetting (in this case, select GPRS).Wireless Functions(A)NOTE When pressing the ON Hook (End) Button, the GPRS network is also disconnected.](https://usermanual.wiki/Panasonic-of-North-America/9TGCF-P21.User-Manual/User-Guide-575517-Page-42.png)
![43Wireless FunctionsConnecting to Wireless LANAfter finishing the first-time operation, make a connection setting for Wireless LAN us-ing the following procedure.Automatic network detectionA connection manager periodically scans wireless networks for available connections. Ifany networks are detected and no networks are connected yet, the connection managerwill try to connect with a more favorable network first. If such a network cannot be usedor the connection manager cannot connect with any suitable network due to an invalidWEP key, the connectivity bubble (A) is displayed for manual network connection.(below)If you don’t see the suitable network, tap [Settings] ( page 44, step (3)) to display thedetailed configuration window.Wireless LAN communications are done via an antenna. Do not shield this antennawith the hand, etc. This will negatively effect the performance of your wireless LANcommunications.NOTEIf the connection manager is able to connect to a network automatically, the connec-tivity bubble ( below) will not appear, and you can follow the steps described inpage 44 step (3) to access the connection manager.NOTEConnect to a Wireless LAN(1) Select a network to connect to and what the networkwill connect to, then tap [Connect] from the connectiv-ity bubble. (A)](https://usermanual.wiki/Panasonic-of-North-America/9TGCF-P21.User-Manual/User-Guide-575517-Page-43.png)
![44Wireless Functions(2) If the connectivity bubble pops up as shown at right,enter the WEP key, then tap [Connect].(3) Tap to display the connectivity bubble.(4) Tap [Settings] - [Network Cards]*1.*1You can also tap - [Settings] - [Connections] tab- [Network Cards].](https://usermanual.wiki/Panasonic-of-North-America/9TGCF-P21.User-Manual/User-Guide-575517-Page-44.png)
![45Wireless Functions(5) At [Networks to access], select [All Available] or [Onlyaccess points].(6) Tap on the access point you want to connect to from thelist.[Configure Wireless Network] screen will appear.(7) Tap [Network Key] tab and select [Authentication].If WEP is enabled:Select [WEP] at [Data Encryption].Enter the key string in [Network key] and select [Keyindex], then tap [ok].If WEP is not enabled:Tap [ok] to return to the previous screen.(8) Tap and hold on the access point you want to connectto, and tap [Connect] on the popup menu.](https://usermanual.wiki/Panasonic-of-North-America/9TGCF-P21.User-Manual/User-Guide-575517-Page-45.png)
![46Wireless Functions(9) The screen will be updated to show the new connection.(10) If the CF-P2 is not connected with a host computer via async cable, then on the navigation bar normally in-dicates the Wireless LAN connection is properly estab-lished.You can also check on [Network Adapters] tab to checkif the IP address obtained from DHCP is correct.(11) Tap [Panasonic Pegasus WLAN CF Module] to see theIP address information.](https://usermanual.wiki/Panasonic-of-North-America/9TGCF-P21.User-Manual/User-Guide-575517-Page-46.png)
![47Wireless Functions Peer to peer modeThe Peer-to-peer mode is also known as the “Ad-Hoc” mode. There are two ways to con-nect CF-P2 with other devices in the peer-to-peer mode. The first way is to create an Ad-Hoc network on CF-P2, then allow other devices to connect to CF-P2 by joining the net-work. The second way is simply by connecting CF-P2 to an existing ad-hoc network if thepeer device has already created such a network.(1) Display [Configure Wireless Networks] screen ( page44 step (4)). At [Networks to access], select [Only com-puter-to-computer].(2) Select [Add New… ] from the list.](https://usermanual.wiki/Panasonic-of-North-America/9TGCF-P21.User-Manual/User-Guide-575517-Page-47.png)
![48Wireless Functions(3) Type in the network name in [Network name] (CF-P2test,for example). Then add a checkmark for [This is a de-vice-to-device (ad-hoc) connection].Ad-hoc channel is assigned automatically.(4) Tap [ok] to return to the previous screen.(5) Tap and hold the network name and tap [connect].(6) Now the new ad-hoc network has been created, and it is visible to other Wireless LAN devices.CF-P2 is connected to the ad-hoc network.](https://usermanual.wiki/Panasonic-of-North-America/9TGCF-P21.User-Manual/User-Guide-575517-Page-48.png)
![50Setting with the host computer(1) Conduct steps 1 to 7 to install ActiveSync® ( page 36).After step 7, at [Set up a Partnership], select [Guest partnership] and follow the on-screen instructions.(2) After completing installation of ActiveSync®, disconnect the cable.(3) On the ActiveSync® screen, select [File] - [Connection Settings].(4) Add a check mark for [Allow serial cable or infrared connection to this COM port:].(5) Select the same number for the COM port displayed as the following procedure.Select [start] - [All Programs] - [My Bluetooth Places], then select [Bluetooth] (dis-played under the title bar) - [Advanced Configuration] - [Local Services] - [BluetoothSerial Port].(6) Restart the computer.Setting with the CF-P2(1) Make sure that Bluetooth is powered on.(2) Tap - [Programs] - [Panasonic Bluetooth] - [My Device] - [My Services].Be sure to remove the check mark from [Network Type ActiveSync], and add a checkmark for [Serial Port Type ActiveSync], then tap [OK].(3) Tap on the command bar to return to the previous screen.(4) Tap (Refresh Button) on the command bar to search for devices within range.(5) Tap on the host computer that is going to be connected.(6) Tap and hold [Bluetooth Serial Port] and tap [Use to connect for ActiveSync].If you use ActiveSync® via a USB Autosync cable, tap or - [Disconnect] onthe command bar to disconnect the Bluetooth connection.(7) Enter the PIN code.After entering the passkey in CF-P2, a message will appear in the host computer,indicating that Bluetooth PIN code is required. Follow the on-screen instructions inthe message and enter the same code in the host computer.PIN Code (= passkey)A PIN Code is a password for which you can set up to 16 alphanumeric characters.When establishing security settings, the PIN Code for the device to be connected(slave) must be the same as the PIN Code for the device where the connectionoriginates (master).NOTE(8) Synchronization will start in ActiveSync®.Wireless Functions Serial Port Type ActiveSync®](https://usermanual.wiki/Panasonic-of-North-America/9TGCF-P21.User-Manual/User-Guide-575517-Page-50.png)
![51(1) Make sure that Bluetooth is powered on.(2) Tap, in order, - [Programs] - [PanasonicBluetooth].(3) Tap (Refresh Button) on the command bar to searchfor devices within range.(4) Tap the target device from a device list.(5) Tap (This icon indicates a serial port) from a ser-vice list to connect the target device via the serial port.(6) This message at right will be displayed.Tap [ok] and tap on the command bar to discon-nect the Bluetooth connection.(7) Start an appropriate software. (i.e. printer application)(8) Set the COM port to COM9 (default).(9) Open the COM port using the software.The Bluetooth connection with the target device willbe automatically established.NOTECF-P2 can be connected to the device from next time with-out the need to set steps (1) to (6) again.Use this setting when using Bluetooth intermittently (i.e. Printer application).Wireless Functions Establishing the Bluetooth Connection by Opening the COM PortIf (ActiveSync® icon) is displayed at [BluetoothSerial Port], tap and hold [Bluetooth Serial Port]and then tap [Do not use to Connect to ActiveSync]to display .NOTE](https://usermanual.wiki/Panasonic-of-North-America/9TGCF-P21.User-Manual/User-Guide-575517-Page-51.png)
![52(1) Refer to page 51 and conduct steps (1) to (4).(2) Tap and hold (This icon indicates a serial port) froma service list.(3) Tap [Add Short Cut] to set a short cut.(4) Tap on the command bar and then, tap [Auto Con-nection].(5) Tap the target device.After starting up Panasonic Bluetooth next time, theBluetooth connection with the target device will be au-tomatically established.Use this setting when using Bluetooth continuously after starting up CF-P2 (i.e.GPS application).Wireless Functions Establishing the Bluetooth Connection by setting ‘Auto Connection’](https://usermanual.wiki/Panasonic-of-North-America/9TGCF-P21.User-Manual/User-Guide-575517-Page-52.png)
![53Dialer and TelephonyYou can send and receive phone calls or messages using CF-P2. This section explainsMessaging, phone settings, and how to make and receive phone calls.For details, tap - [Help] - [Phone].: If pressed when the [Phone] screen is not displayed, the [Phone] screenwill be displayed. If pressed when the [Phone] screen is displayed,you can send a call.: When pressed during the call, the call is hung up. When using this inother cases, [Today] screen is displayed.Numeric KeypadPress or tap - [Phone] to display the [Phone] screen shown below.Back one characterCall HistorySpeed DialMake call buttonCreate NewNoteView ContactsMute/UnmuteContacts maintains a list of friends, colleaguesand customers so that you can easily find the in-formation you are looking for.Tap - [Contacts] to create or change a con-tact, or add a note to a contact. For details, tap - [Help] - [Contacts].( )Off Hook (Talk)Button( )On Hook (End)ButtonWhen pressing this key for a longer period, theinput words will be erased.NOTEIf you cannot adjust the volume by tapping on the navigation bar when making andreceiving calls, press the Volume Up/Down Buttons.](https://usermanual.wiki/Panasonic-of-North-America/9TGCF-P21.User-Manual/User-Guide-575517-Page-53.png)
![54Dialer and TelephonySetting of the phoneTap - [Settings] - [Personal] tab - [Phone]. [Phone] tab: Select the type and tone of ring or vibration you want to receive for anincoming call. Choose to hear touch tones or beeps when you press thekeyboard.You can also protect your phone from unauthorized use. For security, adda check mark for [Require PIN when phone is used].• When inputting the PIN code, if the [Cancel] button is tapped, the Phonefunction cannot be used. To use the Phone function, perform the follow-ing.• Press the Wireless Power Button to display [Wireless Power Status]and tap [Phone] to turn the power off. Tap [Phone] again to turn thepower on. [Service] tab: Set for Call Barring, Caller ID, Call Forwarding, Call Waiting, Voice Mailand SMS. [Network] tab: Select [Automatic] to seek out available networks or select [Manual] toselect them yourself. [More] tab: Select time before answering incoming calls automatically. (Only use whenconnected to a headset or car kit.) Also, set whether system sounds will bemuted during phone calls.](https://usermanual.wiki/Panasonic-of-North-America/9TGCF-P21.User-Manual/User-Guide-575517-Page-54.png)
![55Dialer and TelephonyMaking callsYou can make phone calls using any of the following four methods.• Using the keyboard• Using Speed Dial• From Call History• From Contacts For details, tap - [Help] - [Phone].The phone function starts when you press a number key if the [Today] screen is displayed. Using the keyboard1Press to display [Phone] screen( page 53).2Enter a phone number using the numerickeypad.3Press . Using Speed DialYou need to add Speed dial before using this function ( page 57).• Using a keyboard1Press to display [Phone] screen ( page 53).2Press the registered number for more than one second.• Using cursor control1Press to display [Phone] screen ( page 53).2Press the down cursor control to display [Speed Dial], and select a phone numberusing up/down cursor control.3Press center of the cursor control. From Call History1Press to display [Phone] screen ( page 53).2Press the up cursor control to display [Call History], and select a phone number usingup/down cursor control.3Press center of the cursor control.31](https://usermanual.wiki/Panasonic-of-North-America/9TGCF-P21.User-Manual/User-Guide-575517-Page-55.png)
![56Dialer and Telephony From ContactsTap - [Contacts] ( page 53).You can also display Contacts by pressing andtap .Tap and hold on the person you want to call, and tapthe field from work, home or mobile phone numberyou want to call. (depending on which fields have beenfilled in.)Tap on the person you want to call; you can then selecta number from among those displayed, and tap on thenumber you want to call.Receiving callsWhen receiving a call, the phone will ring and/or vibrateas configured, and a notification bubble will pop up withcaller-ID information.When you answer the phone, press or tap[Answer].When you ignore the phone, press or tap[Ignore].MessagingYou can receive Internet e-mail messages and text messages in Messaging. Internet e-mailmessages are sent by using and address you receive from your Internet service provider (ISP)or your employer. Text messages are sent and received through your wireless phone serviceprovider by using a phone number as the message address.](https://usermanual.wiki/Panasonic-of-North-America/9TGCF-P21.User-Manual/User-Guide-575517-Page-56.png)
![57Dialer and TelephonyTo add Speed Dial From Contacts(1) Tap - [Contacts], and tap and hold the contactwho you want to add.(2) Tap [Add to Speed Dial...].Change the settings if required, and tap [ok]. From Phone(1) On the [Phone] screen, tap [Speed Dial] - [New].(2) Tap one of the contacts who you want to add.Change the settings if required, and tap [ok].Speaker PhoneIf is pressed down for more than 2 seconds during a phone call, it becomes a speakerphone. To return to previous setting, press more than 2 seconds again.*1• When the speakerphone is on, will appear on the navigation bar and the message [Speakerphone is on] will appear.• When a speakerphone is off, will disappear from the navigation bar and the message[Speakerphone is off] will appear.*1 When connected to such an external audio device as a Bluetooth headset, car kit, etc., the speaker-phone will not work.](https://usermanual.wiki/Panasonic-of-North-America/9TGCF-P21.User-Manual/User-Guide-575517-Page-57.png)
![58Customizing the ComputerIf you want information on the various individual settings of the computer, tap - [Set-tings] and then tap the item (icon) you want to check.(For details, tap - [Help] - [Settings].)ButtonsProgram buttons and the cursor control settings.InputInput panel (soft keyboard or letter recognizer, etc.) settings.MenusSelect programs to be displayed in , or items to be displayed in [New]in the Today screen.Owner InformationRegistration (or changing) of the user’s (owner’s) personal information.You can choose to display the registered owner information on the screenwhen CF-P2 is turned on.PasswordPassword enable/disable, and a password hint setting.If a password is set, it has to be input in order to open the passwordscreen. When the wrong password is input four times, the set hint is dis-played. At times certain characters, such as á and ü, cannot be input fromthe numeric keypad. Use the soft keyboard.PhoneCustomize phone settings, such as the ring type and ring tone to beused for incoming calls, and the numeric keypad tone to be used whenentering phone numbers. You can also protect your phone from unau-thorized use.Sounds & NotificationsOperation sound setting.Specific sound settings to be generated in a wide range of situations.TodayDesktop display setting.Personal](https://usermanual.wiki/Panasonic-of-North-America/9TGCF-P21.User-Manual/User-Guide-575517-Page-58.png)
![59AboutDisplay of release version and copyrights, and device ID setting.AudioMute car audio when playing sound*1. Select the check box to use Head-set/Headphone*2, using built-in microphone. On [Record] tab, select [UseALC] radio button when you use Automatic Level Control (ALC), orselect [Manual] radio button and move the slider to select the record gainlevel.*1 Use this setting when installed to the car kit (sold separately).*2 This setting does not apply to Bluetooth headset.BacklightLCD backlight timeout function, tap-induced backlight on and LCDbrightness adjustment manually or automatically.CertificatesAdd and delete personal certificates and root certificates.ClearType TunerMake a text clear by moving the slider.Clock & AlarmsTime/date settings and alarm settings.MemoryComputer memory assignment possible (assignment of memory for datamemory and memory for program execution). Display of total storagecard memory if it is installed. Activate or stop the running programs.PowerCurrent battery charge status and automatic power off time setting, andset the power supply from PC by USB cable when using ActiveSync®.Regional SettingsDisplay methods of the region, number system, currency, time, and date.Customizing the ComputerSystem](https://usermanual.wiki/Panasonic-of-North-America/9TGCF-P21.User-Manual/User-Guide-575517-Page-59.png)
![60ConnectionsRemove ProgramsRemove programs in storage memory.ScreenScreen orientation. Touchscreen alignment ( page 18), ClearType andtext size settings.ConnectionsInternet connection and Intranet connection settings ( page 35).Network CardsSet up a wireless network.RF SettingsSelect a radio button for GPRS authentication with [Authentication] tab.You can confirm the radio driver version and stack version with the[Version] tab.Customizing the ComputerNOTECF-P2 does not support IrDA. For example, the connection will not work even ifyou select [Beam File…] from the Context menu.](https://usermanual.wiki/Panasonic-of-North-America/9TGCF-P21.User-Manual/User-Guide-575517-Page-60.png)
![61Performing a ResetThis selection saves all stored records and entries and then restartsthe computer.Unsaved data in open windows may be lost.If possible, turn off the computer and push the center of the resetswitch straight in.Push the reset switch within 1 second using the stylus.Resetting the computer may cause the clock to malfunction.After resetting the computer, check the time and correct the clocksettings if necessary.Performing a Full ResetThis selection erases all stored records except for Flash storage and entries and then restartsthe computer.Therefore, never perform a full reset unless a reset does not solve your problem.(1) Using the provided stylus ( page 17), push the center of the reset switch straight infor 1 second while holding down on the power switch ( page 12).(2) Tap the screen to set up your Pocket PC.The Windows alignment screen is displayed.(3) Align the touchscreen ( page 18 step 2).(4) At [complete], tap the screen to begin using CF-P2.If the [Panasonic Backup] screen is displayed, follow the on-screen instructions.(5) Set the time and date.Tap - [Settings] - [System] tab - [Clock & Alarms] to set the time and date, and tap[ok].Resetting Your ComputerWhen the computer fails to respond to an operation, reset your computer. There are twomethods for resetting the computer.Dealing with ProblemsUse only the provided stylus to push in the reset switch.Do not push the reset switch with any other sharp-pointed objects, i.e. pencils, and ballpoint pens. The reset switch or other parts may become damaged.CAUTIONReset SwitchNOTE After resetting CF-P2, it takes maximum 30 seconds until CF-P2 can be used again.](https://usermanual.wiki/Panasonic-of-North-America/9TGCF-P21.User-Manual/User-Guide-575517-Page-61.png)
![62Dealing with ProblemsTroubleshootingStarting UpCheck to see if a fully charged battery pack is properlyinstalled.The power does not go on unless the Fast Travel Chargeris connected:The battery level is too low. Charge the battery with theFast Travel Charger. (Make sure that the battery neverdischarges completely and that it is charged periodically.)Push the reset switch to restart CF-P2.If the power does not turn on when the above operationsare performed, the battery pack must be replaced.You can set the date and time through [Clock &Alarms] in - [Settings] - [System] tab.If you continue to experience problems, the backupbattery maintaining the clock may need to be replaced.Contact Panasonic Technical Support.This computer will not correctly recognize the dateand time starting from the year 2085 A.D.The battery level may be too low. If the battery levelgoes below a certain threshold, CF-P2 automatically shutsdown. In such cases, connect the Fast Travel Chargerand charge the battery. (After the Fast Travel Charger isconnected to CF-P2, it may take a maximum of 20 min-utes before CF-P2 can be turned on.)The computer may have entered a locked state. If this isthe case, connect the Fast Travel Charger and push thereset switch. Check the remaining battery level and makesure that multiple applications are not running simulta-neously. Close all applications that are not being used.The computer may be turned off automatically when us-ing File Explorer. To prevent this, change the time set-ting to a longer time in - [Settings] - [System] tab -[Power] - [Advanced] tab.CF-P2 does not turn on.Or, there is no displaywhen CF-P2 is turned on.The date and time are in-correct.CF-P2 shuts down auto-matically.The data cannot be copied.The computer locks upduring the execution of anapplication, or the execu-tion speed becomes notice-ably slower.Application SoftwareConnect the Fast Travel Charger and push the resetswitch. Check the remaining battery level and make surethat multiple applications are not running simultaneously.Close all applications that are not being used.](https://usermanual.wiki/Panasonic-of-North-America/9TGCF-P21.User-Manual/User-Guide-575517-Page-62.png)
![63Dealing with ProblemsDisplayThe LCD backlight may have automatically turned offdue to the power-saving function. Turn on the LCD back-light by holding down the power switch until the back-light goes on.Adjust the backlight brightness.1 Tap - [Settings] - [System] tab - [Backlight].2 Tap the [Brightness] tab and adjust the brightness withthe slider.Move the upper slider to select the LCD backlight bright-ness level. By using the lower slider, you can make mi-nor adjustments when LCD backlight has been auto-matically dimmed.You can not adjust the brightness while automatic back-light settings are used. Remove the check marks from[Advanced] tab and adjust the brightness with the slider.When the CF-P2 is operated under battery power, if theremaining battery power is low, the backlight will dim.At that time, connect the Fast Travel Charger and re-charge the battery.Push the reset switch to restart.Align the screen ( page 18).Enable the Microsoft® ActiveSync® connection, and syn-chronize CF-P2 with the host computer. If this situationoccurs frequently, tap - [ActiveSync] - [Tools] -[Options] - [PC] tab to remove the check mark from [Usemobile schedule to sync with this PC] and reset.It is hard to view the LCD.The cursor cannot be con-trolled.The cursor does not prop-erly correspond to a stylustap.Even when the CF-P2’spower is switched off, onlythe power to the LCD turnsoff, but the power to themain unit remains on (in-put from the keyboard isstill possible).A host computer does notrecognize CF-P2.Confirm that Microsoft® ActiveSync® 3.7 (or a later ver-sion) has been installed in the host computer.Check to see if a fully charged battery pack is properlyinstalled to CF-P2.Confirm that CF-P2’s power is on.Push the reset switch to restart.If a cable is being used for the connection, recheck theconnection to the host computer.Connecting a Host PC](https://usermanual.wiki/Panasonic-of-North-America/9TGCF-P21.User-Manual/User-Guide-575517-Page-63.png)
![64SoundsProgram ButtonsWhen the program display of a start menu is changedafter assigning a program, if you press a button, that pro-gram may not start. In that case, tap - [Settings] -[Personal] tab - [Buttons] - [Program Buttons] tab, andre-assign the program.The program assigned tothe button does not start.Quality of recorded soundis poor.Noise in recording or play-back sound.A music file cannot playback.Tap - [Settings] - [Personal] tab - [Input] - [Options] tab- [Voice recording format], and select a higher frequency.If a load is applied during recording or playback, forexample when the SD Memory Card is disconnected orconnected, then noise in the recording or playback willresult. In this event, stop the recording or playback, andrestart after closing other applications.Some music files may not be able to play back.Dealing with ProblemsPeripheral is not recog-nized even after driver isinstalled.Connecting PeripheralsRemove cards or other peripherals, and push the resetswitch.Cannot connect to the net-work.Check the server information and network settings.NetworkPhoneWhen the remaining power in the battery discharges, thePhone function may turn off suddenly. (In this case,“Phone function is disabled. Please re-charge the bat-tery.” is displayed.)If the Volume Up/Down Button is pressed while thephone is ringing, the phone ringer will stop.Phone function is dis-abled automatically.The phone ringer stops.BluetoothTurn the Bluetooth function off and then turn it on again.If this function still does not work properly, reset theCF-P2 and turn the Bluetooth on.When connection orcommunication withBluetooth is not smooth.](https://usermanual.wiki/Panasonic-of-North-America/9TGCF-P21.User-Manual/User-Guide-575517-Page-64.png)
![65Dealing with ProblemsDiagnostic ToolYou can use the Diagnostic Tool to check the CF-P2’s usage status, and use this informa-tion when calling your technical support office for advice.1Start the Diagnostic Tool.Tap - [Programs] - [Diagnostic Tool] - [Self Test]tab.The screen shown at the right will be displayed.2Add the check mark for the item you want tocheck.[Option]: If you add the check mark for [Make aTestLog.txt file into My Documents folder], the checkresult is output to the file. If you add the check markfor [Reset device before test], CF-P2 will reset be-fore starting the check.The following items will be checked.Touch ScreenNo deviation between display coordinates and stylus coordinates.•KeyHardware buttons are functioning properly. Numeric keypad is functioning prop-erly.LEDThree LEDs are flashing or lit (confirm each LED).BacklightLCD backlight and keyboard backlight control. AudioSystem alarm sounds correctly. Sound is recorded correctly from the microphone,and played back from the receiver or speaker.Color PatternColor patterns are displayed correctly.VibratorVibrator operates correctly.Light SensorLight sensor operates correctly.Read/Write FileFiles are read and written correctly (RAM/SD/Flash).](https://usermanual.wiki/Panasonic-of-North-America/9TGCF-P21.User-Manual/User-Guide-575517-Page-65.png)
![66Dealing with Problems Tap [Information] tab.The device information is displayed.Tap [State] tab.Information indicating the CF-P2’s usage status isdisplayed.3Tap [Self Test] tab - [Start].Each item is checked in order; when the check is complete, CF-P2 is automaticallyreset.Status information is given before the Diagnos-tic Tool starts. If the status has been changedsince the Diagnostic Tool was turned on, thechange will not be displayed.NOTE](https://usermanual.wiki/Panasonic-of-North-America/9TGCF-P21.User-Manual/User-Guide-575517-Page-66.png)