Panasonic of North America 9TGCF-T11 CF-T1 Notebook w/ Agere Mini-PCI WLAN User Manual
Panasonic Corporation of North America CF-T1 Notebook w/ Agere Mini-PCI WLAN Users Manual
UserManual.wiki
>
Panasonic of North America
>
9TGCF T11 User Manual
Users Manual
Navigation menu
Upload a User Manual
Namespaces
Wiki Guide
HTML
PDF
Info
Views
User Manual
Discussion / Help
Navigation
![3Precautions●Do not use wireless LAN on airplanes, in hospitals, or in otherlocations where wireless LAN signals may affect the operation ofdevices in the vicinityIf you intend to use the computer in the environments described above, turn the wireless LANoff using the following procedure:1Windows 2000Select [Start] - [Settings] - [Control Panel] - [System] - [Hardware] - [Device Manager] -[Network adapters].Windows XPSelect [start] - [Control Panel] - [Performance and Maintenance] - [System] - [Hardware] -[Device Manager] - [Network adapters].2Select the network adaptor name (wireless LAN) you are using.3Select [Do not use this device (disable)] in [Device usage] to disable the wireless LANfunction.Windows 2000At the time of purchase, the profile for the wireless LAN has not been set. Set the profile usingthe following procedure.The settings will vary for different network environments depending on the network systembeing used. For more details, ask your system administrator or the person in charge of the net-work.1Select [Start] - [Settings] - [Control Panel] - [Wireless Network]2Select [Add][Profile Name]Input the optical profile name.[Network Type]Select [Access Point] or [Peer-to-Peer Group].(To next page)無線無線無線無線無線LANによるデータの盗聴:ハードディスク内への侵入防止のためによるデータの盗聴:ハードディスク内への侵入防止のためによるデータの盗聴:ハードディスク内への侵入防止のためによるデータの盗聴:ハードディスク内への侵入防止のためによるデータの盗聴:ハードディスク内への侵入防止のためににににに・お買い上げ時の状態では無線LANにセキュリティ機能が設定されていません。ネットワークを経由して、ハードディスク内のデータを盗聴されたり、共有しているファイルなどにアクセスされるおそれがあります。・無線LAN機能をお使いになる際は、セキュリティのため、データの暗号化などを設定してお使いいただくことをおすすめします。SettingsSet profiles after logging on with the administrator authority.Be sure to set profiles using the following procedure. Do not use any other methods.CAUTION](https://usermanual.wiki/Panasonic-of-North-America/9TGCF-T11/User-Guide-306213-Page-3.png)
![4Some additional settings may have to be made depending on the usage conditions. We recom-mend asking your system administrator or the person in charge of the network.Windows XP3Select [Next][Network Name]When [Access Point] has been selected, set the name of the network that has been set as theaccess point.When [Peer-to-Peer Group] has been selected, set the name of the network that will act as thereceiving party in communications.4Select [Next][Enable Data Security]When making security settings, add the check mark here, and then set the security key usingeither 13 alphanumeric characters or 26 alphanumeric characters representing hexadecimaldigits.We recommend the use of security functions to prevent unauthorized access to the network.(The use of security functions does not guarantee that such access will be completely pre-vented.)5Select [Next]6Select [Next][Renew IP Address when selecting this profile]If you want to use the DHCP server to update the IP address when switching networks, addthe check mark here.7Select [Finish]8Select [OK]1Select [start] - [All Programs] - [Accessories] - [Communications]- [Network Connections]2Select [Wireless Network Connections] that you are using withthe right button, select [Properties] from the menu, and select[Wireless Networks]1From [Available Networks], select the access point which is to be connected.If you are using a recommended wireless LAN access point, the name of the access pointwill appear as “Wired MAC address + GROUP” with the initial setting.If the name of the access point to be connected is not displayed, select [Refresh].2<With a connection to an existing network>Select [Configure].<With a first-time connection to a network>Select [Add].Supplementary Instructions](https://usermanual.wiki/Panasonic-of-North-America/9TGCF-T11/User-Guide-306213-Page-4.png)
![53Perform the necessary settings, and select [OK]For use in a network environment that uses the IEEE 802.1X standard, add the check markfor [Enable IEEE 802.1x authentification for this network] on [Authentification] screen.Check the network environment carefully.[Network name (SSID)]<With a connection to an existing network>The name selected in step 2 is displayed.<With a first-time connection to a network>Input the network name.[Data encryption (WEB enabled)]To enable encryption (WEP), add the check mark here.[Network Authentification (Shared mode)]To use the shared key, add the check mark here.[Network key/Confirm network key]If the cipher key has been set for the equipment to be connected, input the cipher key.“40 bits (5 characters)”, “104 bits (13 characters)” for ASCII characters“40 bits (10 digits)”, “104 bits (26 digits)” for hexadecimal notation[Key index (advanced)]Select 1, 2, 3 or 4 for the index.Normally “1” is selected.[The key is provided for me automatically]In an environment where the network key is provided, add the check mark here.[This is a computer- to computer (ad hoc) network; wireless access points arenot used]When connecting one computer to another, add the check mark here.4Check that the device name selected in [Preferred networks] un-der [Wireless Network Connection Properties] screen has beenadded5After selecting the IP address for TCP/IP and performing all othernecessary protocol settings in [General] - [Internet Protocol (TCP/IP)] - [Properties], select [OK] on [Wireless Network ConnectionProperties] screenIn a few moments, the “Wireless connection available” message appears at the bottom rightof the screen.6Set the IP address of the access point, etcThe setting procedure differs depending on the access point used. Refer to the operationmanual of the access point.](https://usermanual.wiki/Panasonic-of-North-America/9TGCF-T11/User-Guide-306213-Page-5.png)
![6If the function fails to operate correctlyThe access point fails to be displayed in [Usable Networks][Computer-to-computer (ad hoc) network only] in [Wireless Network Connection Proper-ties] - [Wireless Networks] - [Advanced] may have been selected. In this case, select [Anyavailable network (access point preferred)].The access point cannot be accessedThe network key setting may not conform to the access point.Check the network key setting of the access point and, if necessary, set it again correctly.The computer’s protocol setting may be incorrect.Select [Wireless Network Connection Properties] - [General] - [Internet Protocol (TCP/IP)] and, if necessary, set the IP address and other protocol settings again correctly.Depending on the access point and settings, access may not be accepted unless thecomputer’s MAC address is registered beforehand. In this case, check the computer’sMAC address and register it according to the operation manual of the access point usingthe following procedure.1 Select [start] - [Run].2 Input [cmd], and select [OK].3 Input [ipconfig/all], and press Enter .4 Make a note of the 12 alphanumeric characters displayed on “Physical Address” lineon the wireless LAN side. Then input [exit], and press Enter .The IP address of the access point is wrongFollowing the operation manual of the access point, set the IP address of the access pointagain correctly.Check the communication statusWindows 2000Select on the taskbar, and then refer to “Wireless Client Manager”.Windows XPSelect * on the taskbar.*If the cursor is over , a box appears displaying “Wireless Network Connections”.Setup Utility “REFERENCE MANUAL”Replace “Advanced” menu for the following.Modem: [Enable]LAN: [Enable]Boot up from LAN: [Enable]Wireless LAN: [Enable]Legacy USB Support: [Enable]Video Power Saving Mode:[Battery Optimized]Supplementary InstructionsWindows XP](https://usermanual.wiki/Panasonic-of-North-America/9TGCF-T11/User-Guide-306213-Page-6.png)
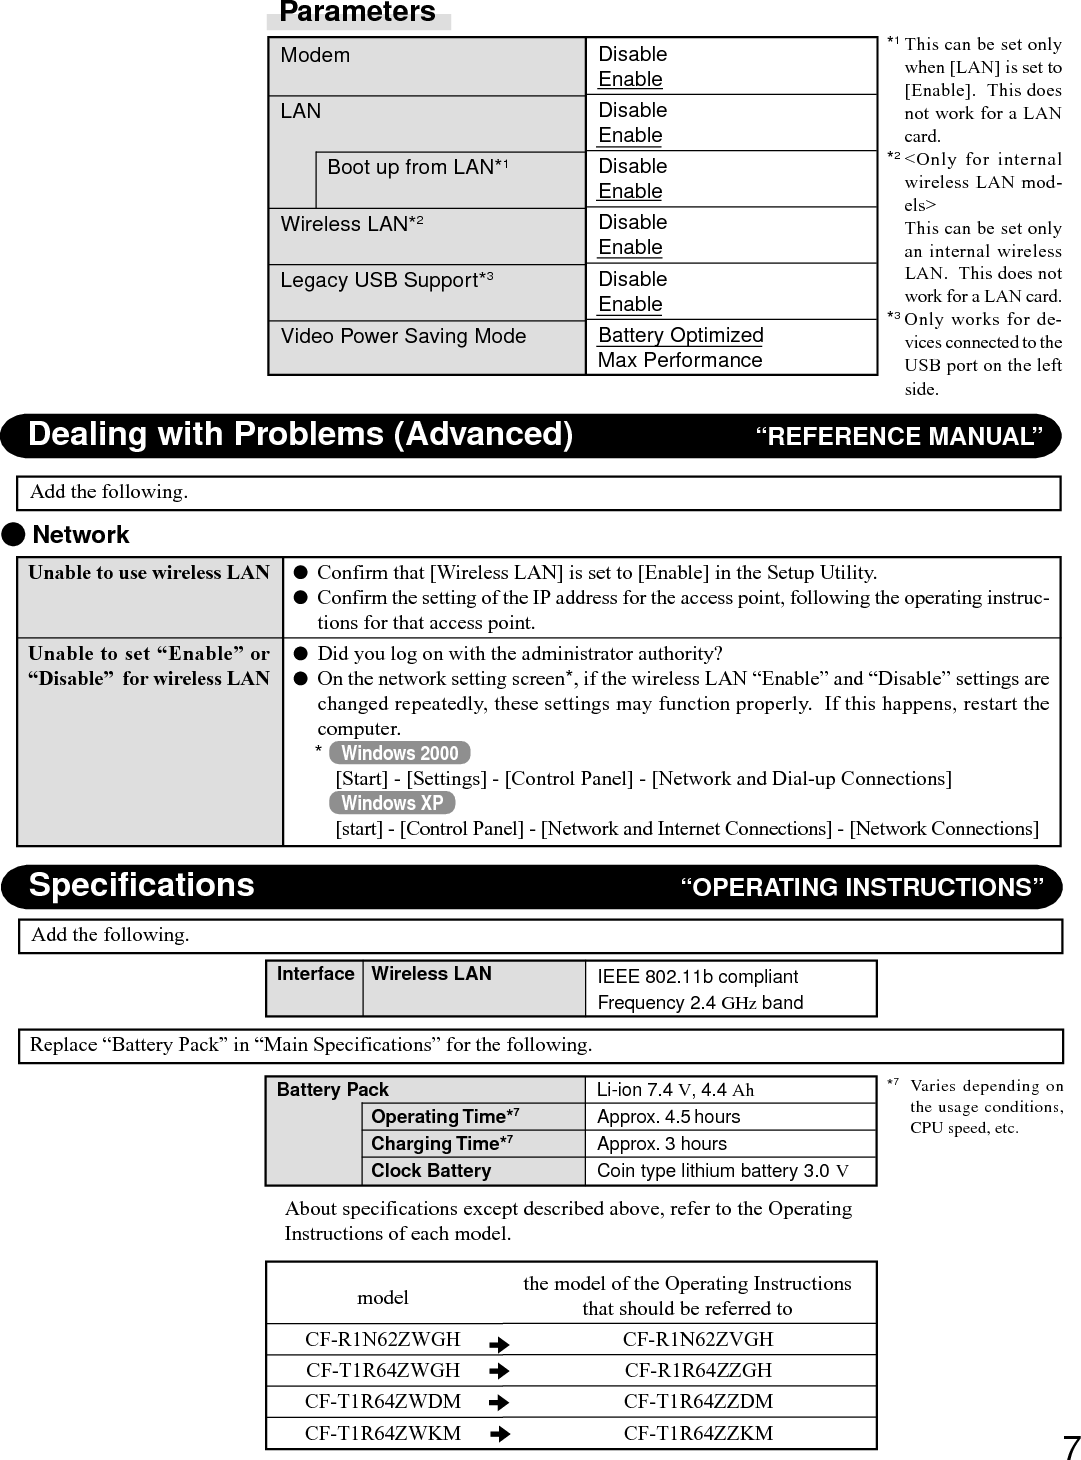
![7DisableEnableDisableEnableDisableEnableDisableEnableDisableEnableBattery OptimizedMax PerformanceParametersModemLANBoot up from LAN*1Wireless LAN*2Legacy USB Support*3Video Power Saving ModeDealing with Problems (Advanced) “REFERENCE MANUAL”Add the following.Confirm that [Wireless LAN] is set to [Enable] in the Setup Utility.Confirm the setting of the IP address for the access point, following the operating instruc-tions for that access point.Did you log on with the administrator authority?On the network setting screen*, if the wireless LAN “Enable” and “Disable” settings arechanged repeatedly, these settings may function properly. If this happens, restart thecomputer.*Windows 2000[Start] - [Settings] - [Control Panel] - [Network and Dial-up Connections]Windows XP[start] - [Control Panel] - [Network and Internet Connections] - [Network Connections] NetworkUnable to use wireless LANUnable to set “Enable” or“Disable” for wireless LAN*1This can be set onlywhen [LAN] is set to[Enable]. This doesnot work for a LANcard.*2<Only for internalwireless LAN mod-els>This can be set onlyan internal wirelessLAN. This does notwork for a LAN card.*3Only works for de-vices connected to theUSB port on the leftside.Specifications “OPERATING INSTRUCTIONS”Replace “Battery Pack” in “Main Specifications” for the following.Battery PackOperating Time*7Charging Time*7Clock Battery*7Varies depending onthe usage conditions,CPU speed, etc.Li-ion 7.4 V, 4.4 AhApprox. 4.5 hoursApprox. 3 hoursCoin type lithium battery 3.0 VInterface Wireless LAN IEEE 802.11b compliantFrequency 2.4 GHz bandAdd the following.the model of the Operating Instructionsthat should be referred toCF-R1N62ZVGHCF-R1R64ZZGHCF-T1R64ZZDMCF-T1R64ZZKMmodelCF-R1N62ZWGHCF-T1R64ZWGHCF-T1R64ZWDMCF-T1R64ZWKMAbout specifications except described above, refer to the OperatingInstructions of each model.](https://usermanual.wiki/Panasonic-of-North-America/9TGCF-T11/User-Guide-306213-Page-7.png)