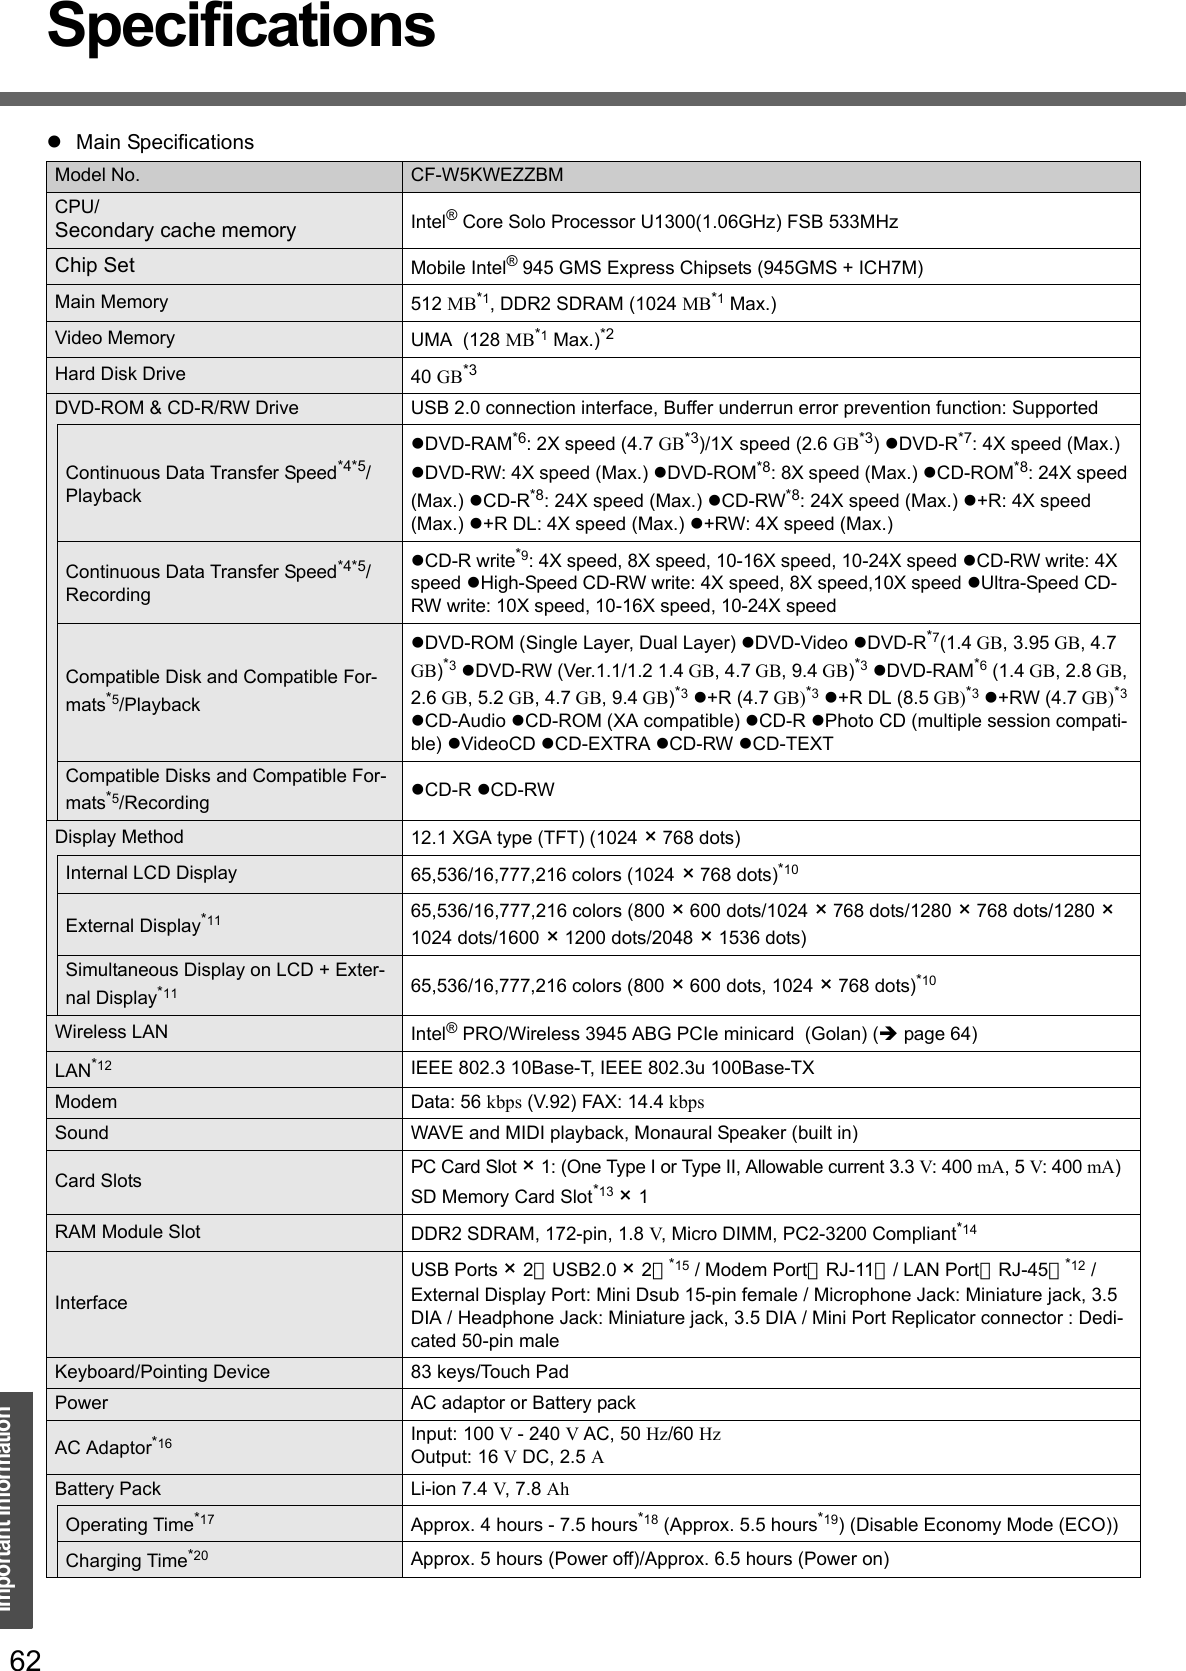
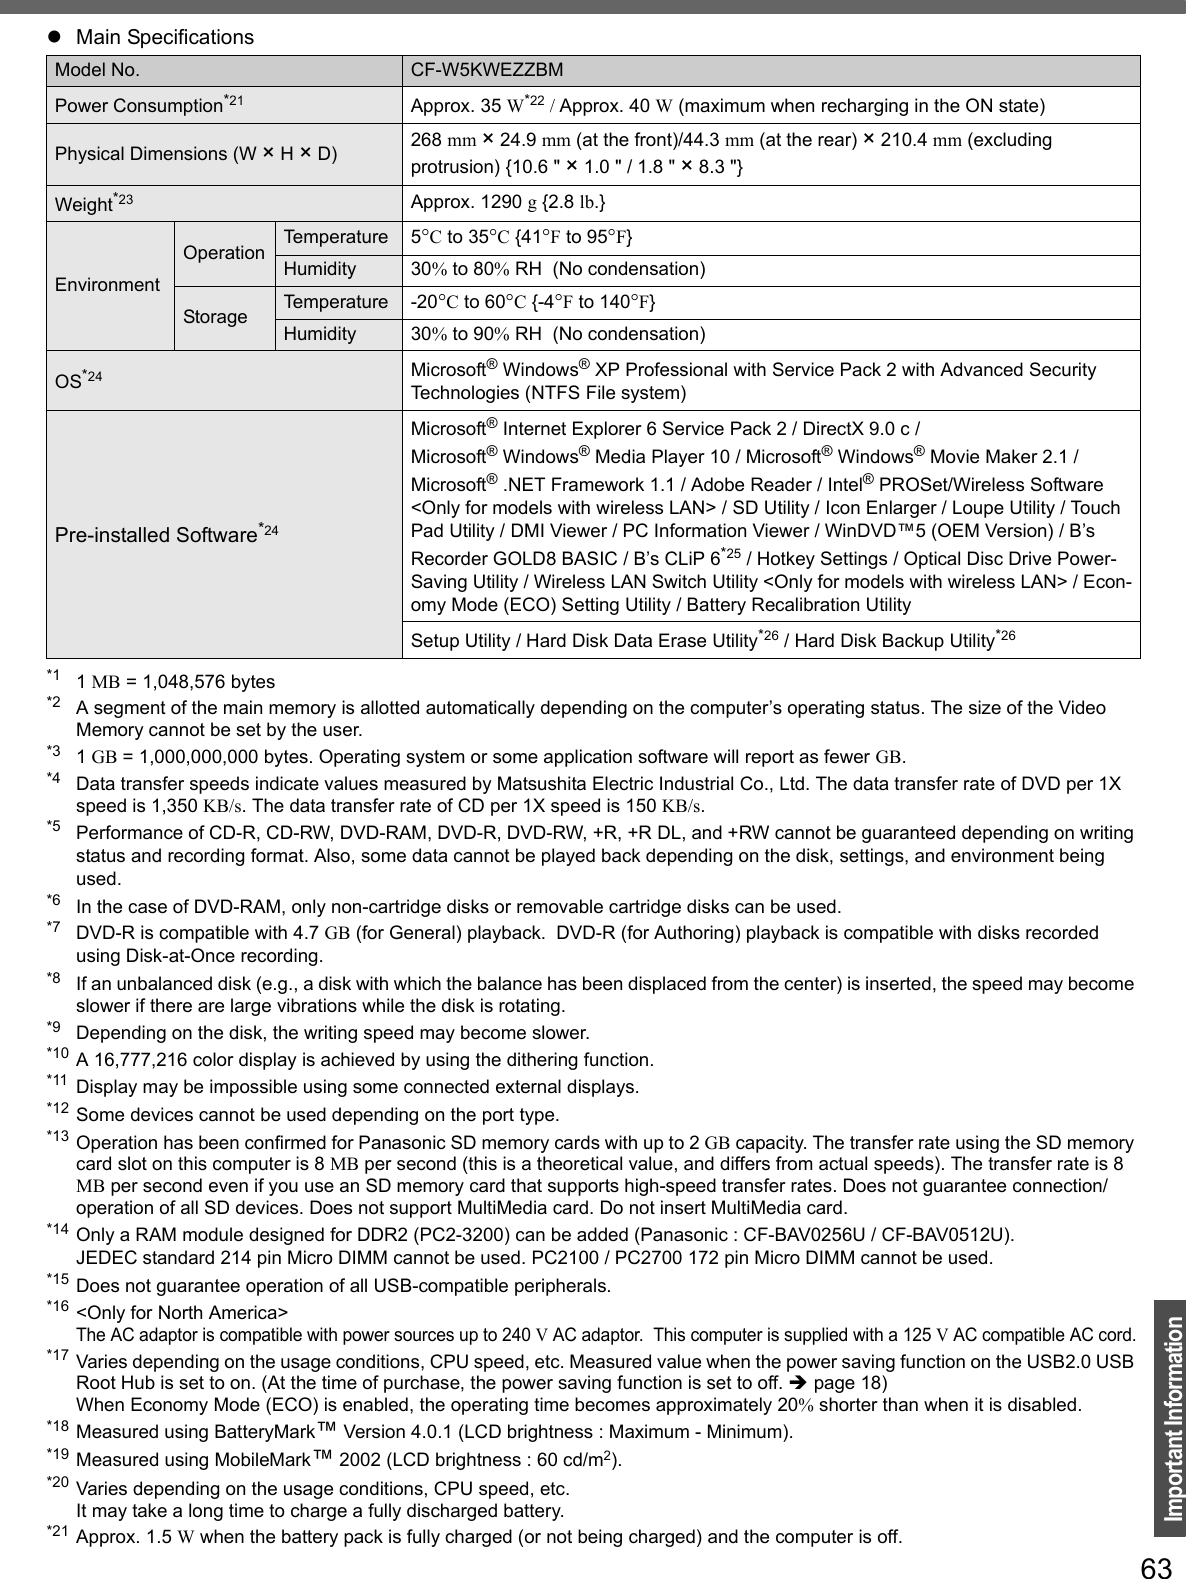
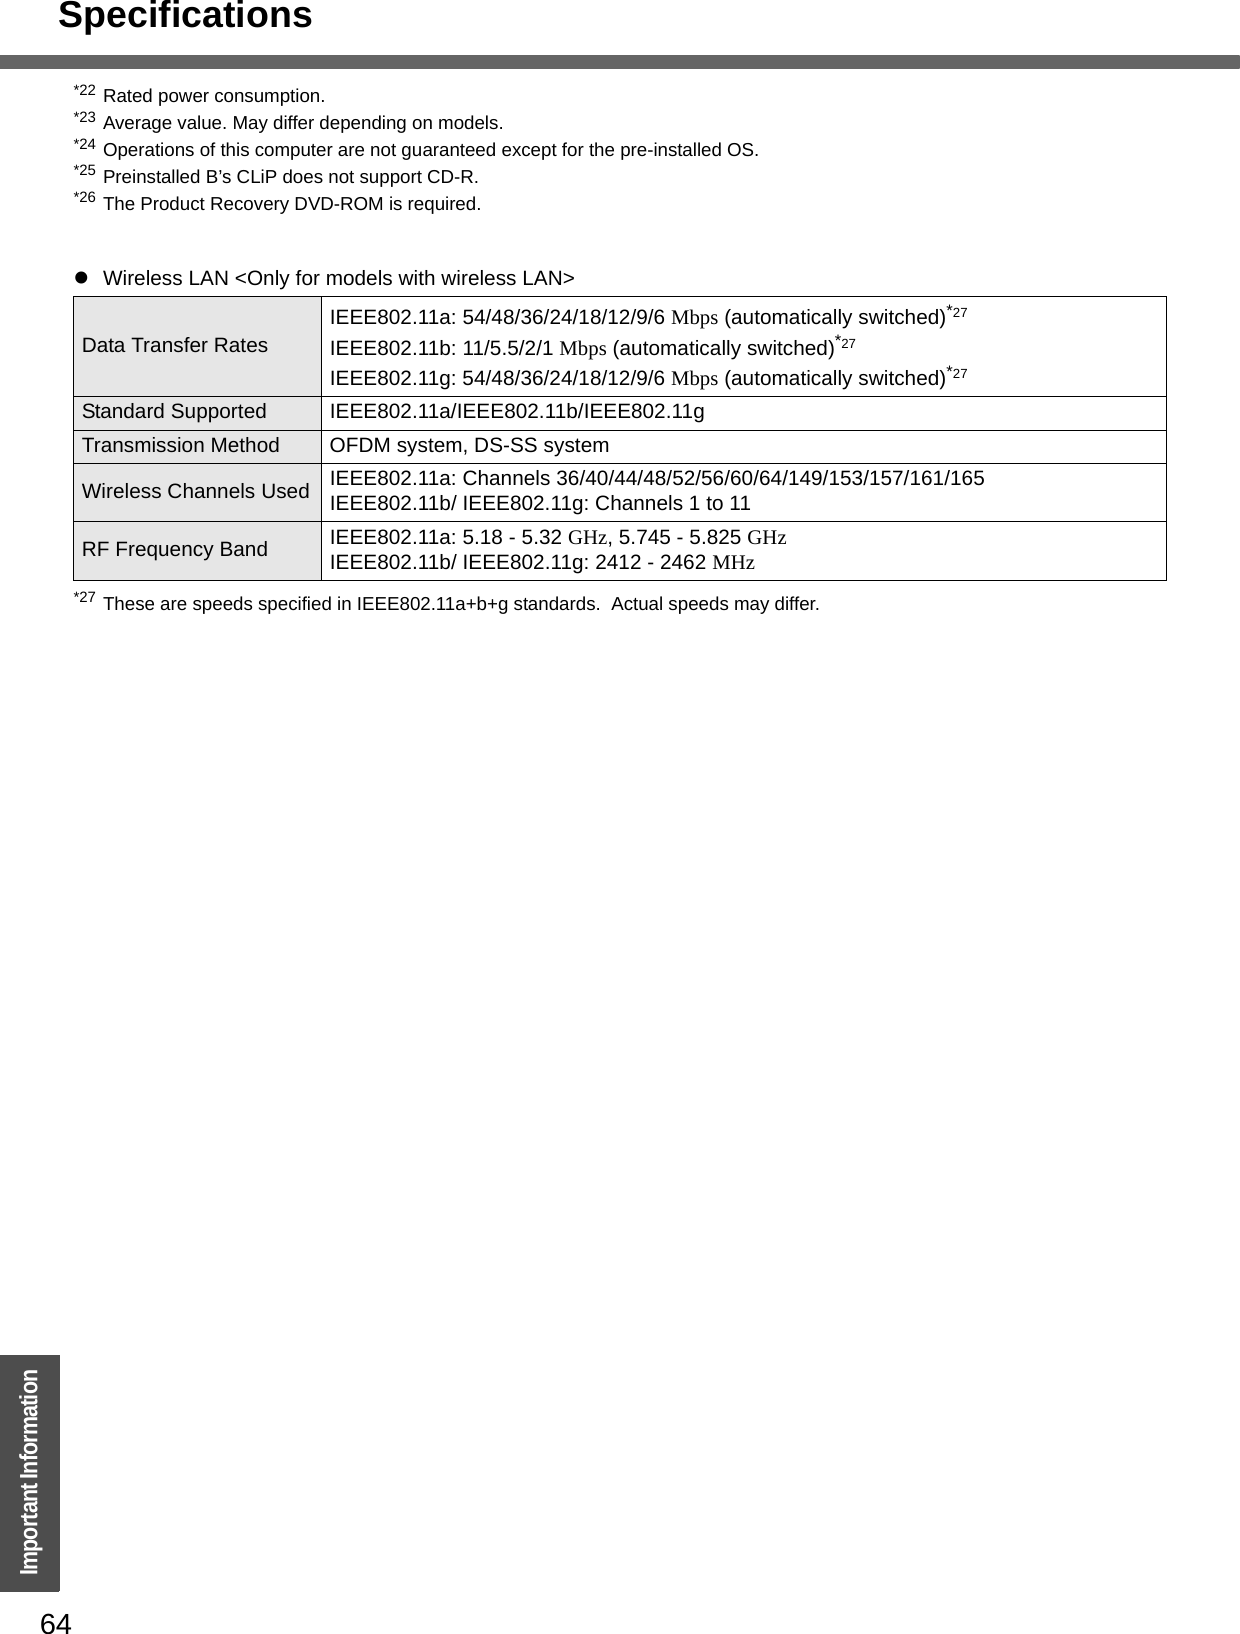
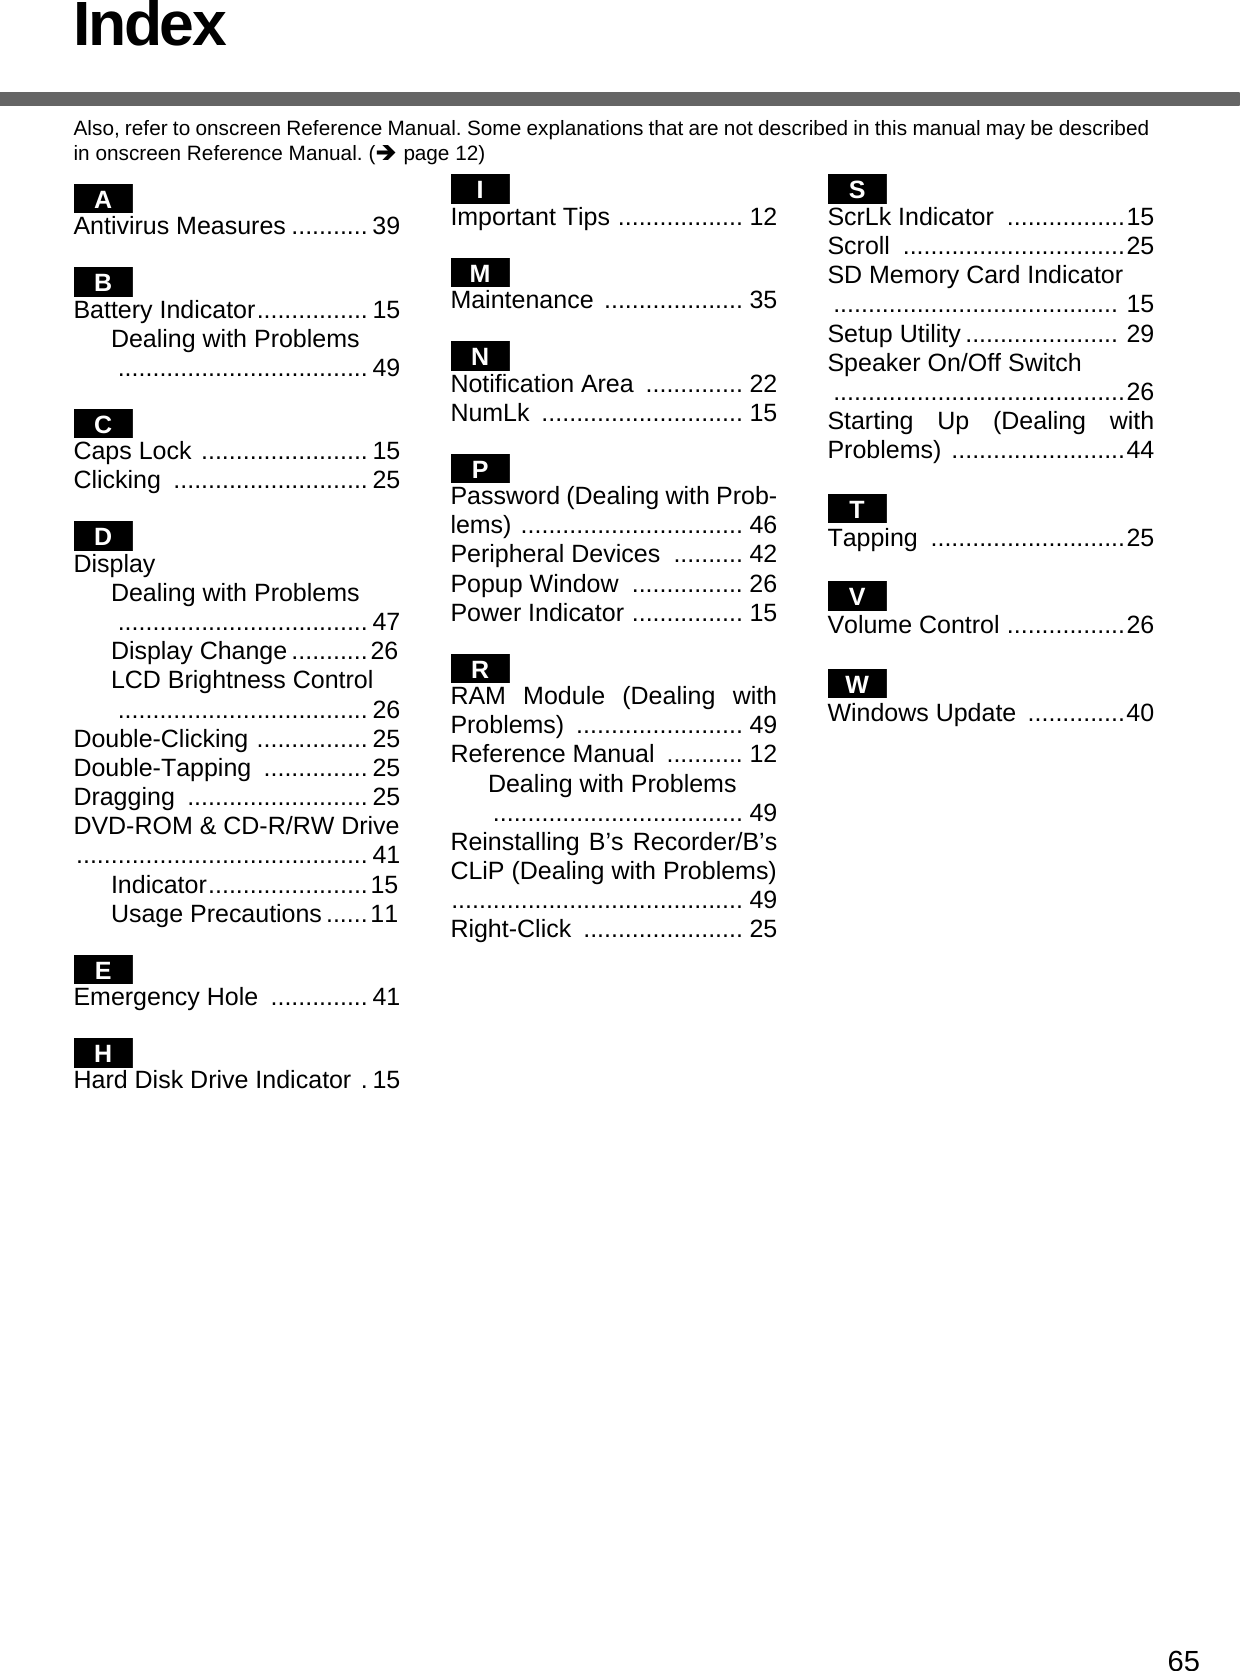
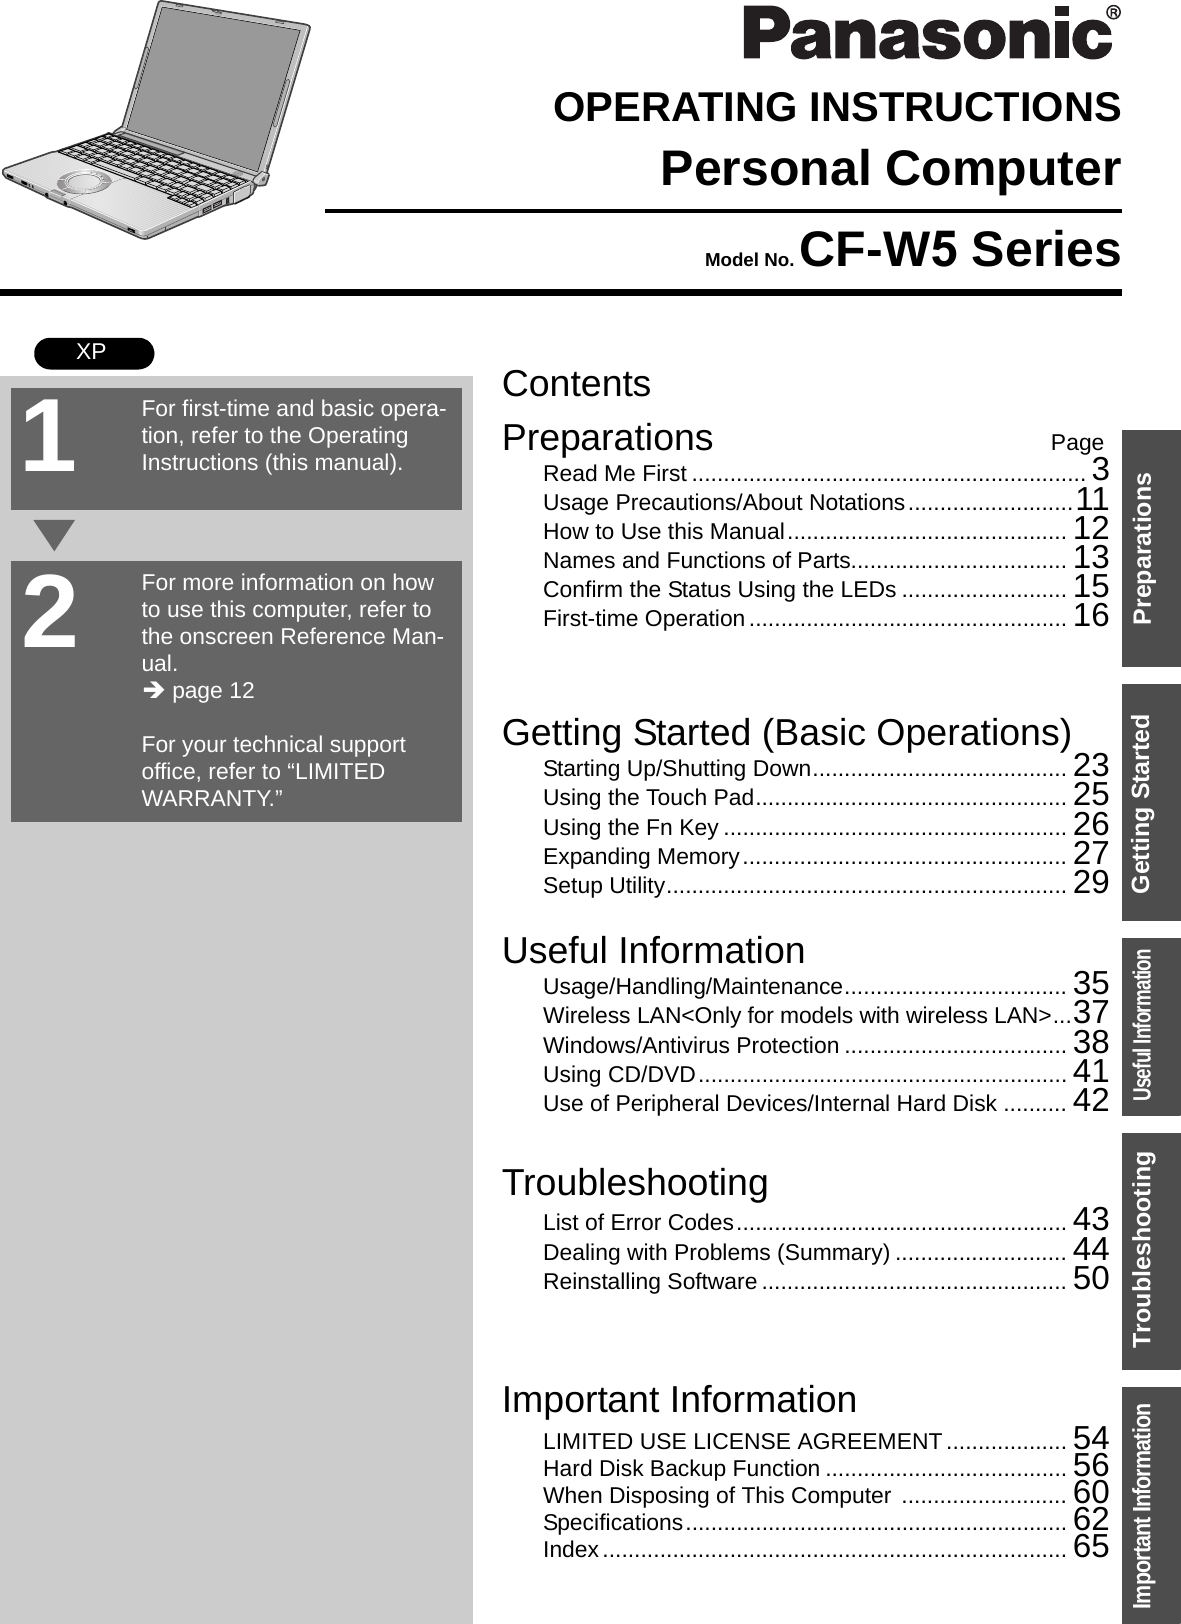
Panasonic of North America 9TGCF-W52 CF-W5 Notebook Computer with WLAN(a+b+g) and HSDPA User Manual Operating Instructions
Panasonic Corporation of North America CF-W5 Notebook Computer with WLAN(a+b+g) and HSDPA Operating Instructions
Contents
User Manual CF W5
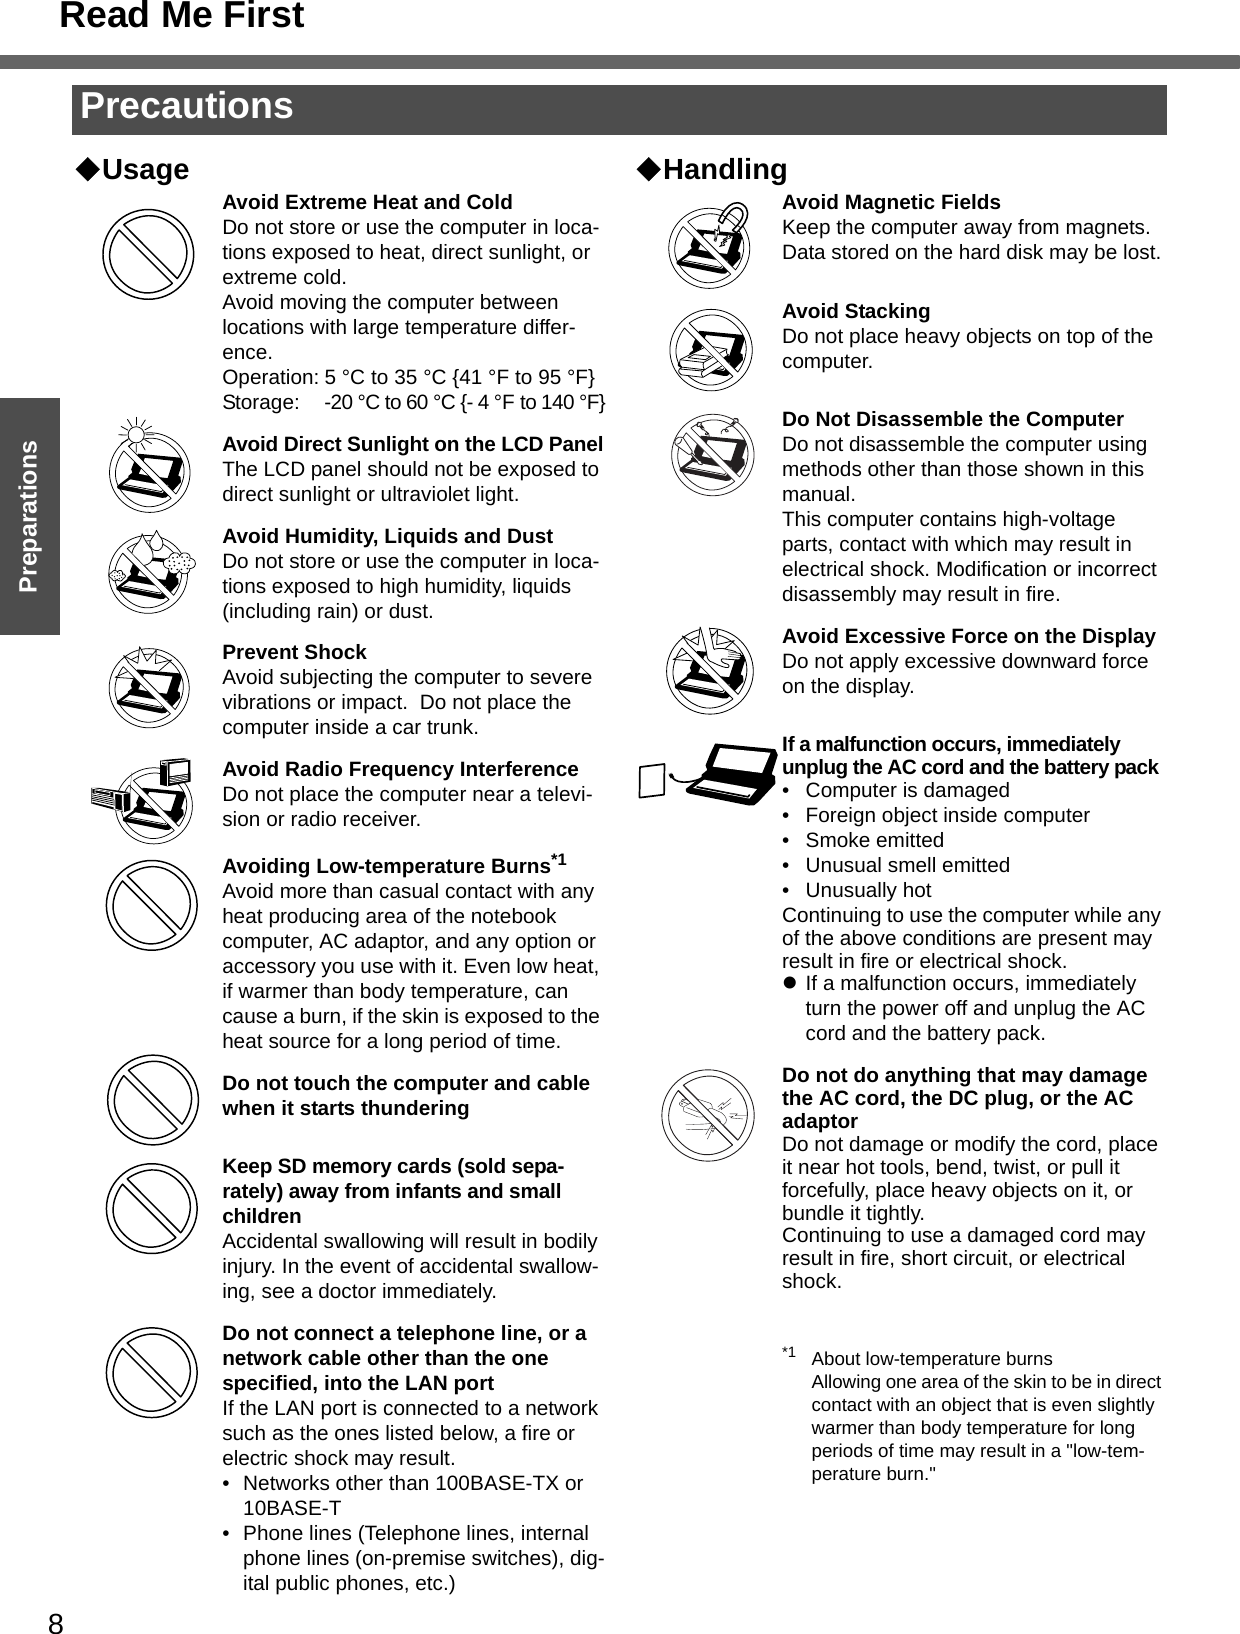
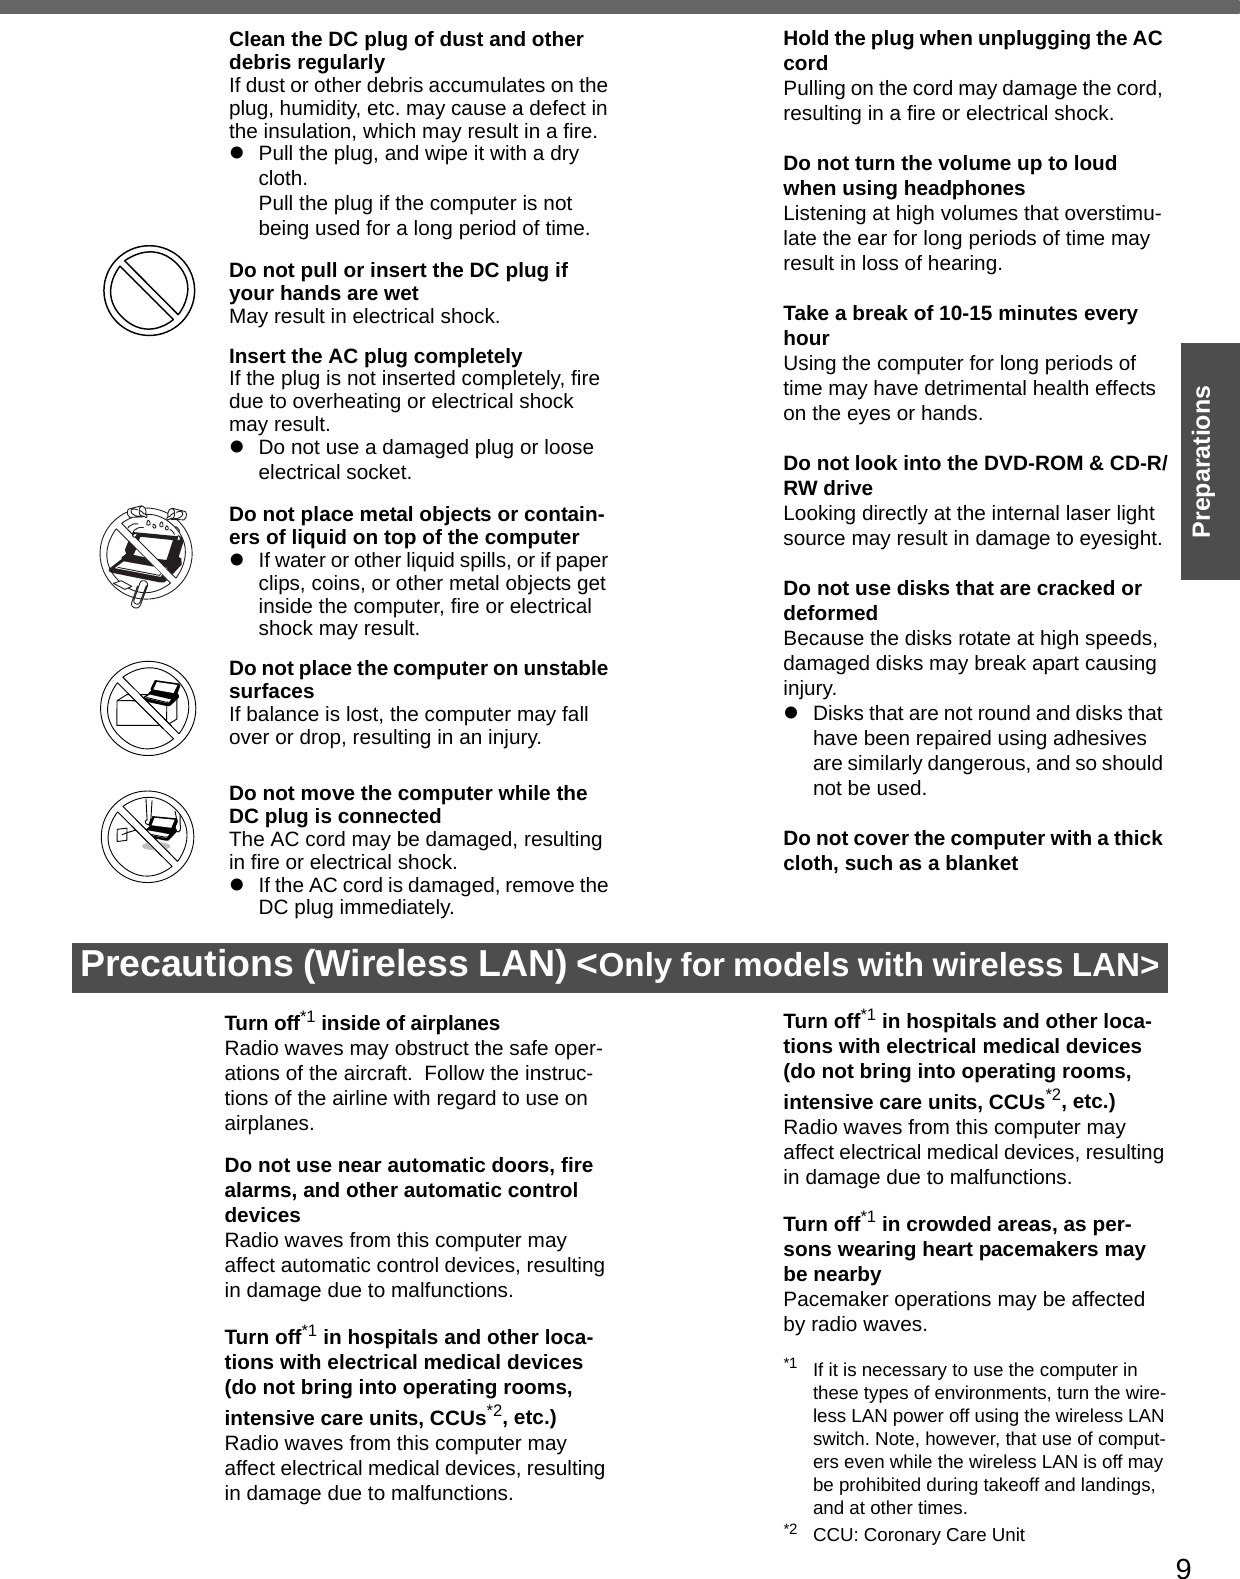
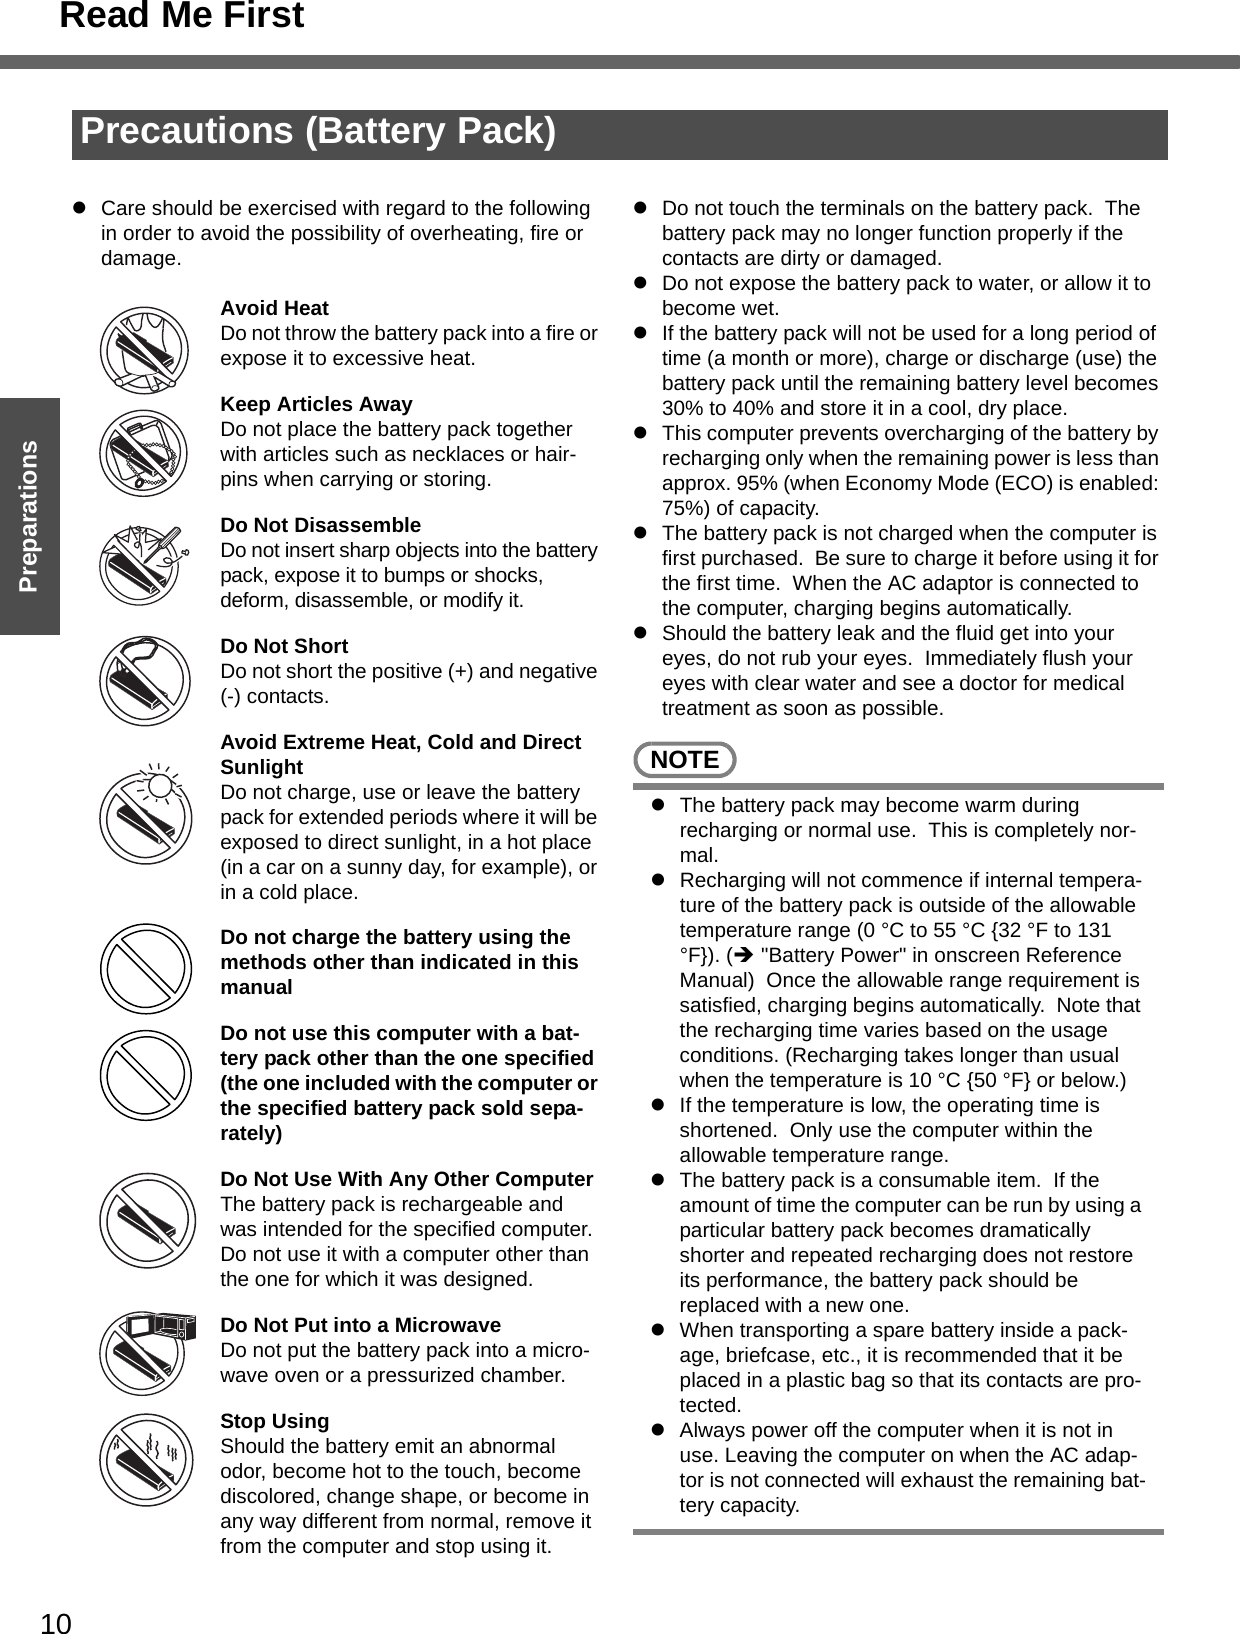
![11PreparationsGetting StartedUsage Precautions / About NotationsWhen closing the disk coverzPress down near the drive power/open switch (position of the arrow) to ensure that the cover is locked.zSome of the illustrations in this manual may differ slightly in shape from the actual items on your computer. This should make the explanation easier to understand.zIf a user has logged on to Windows without the Administrator Authority, some func-tions may not be executable, and some screens may not be displayed as shown in this manual.If this happens, log-on to Windows with the Administrator Authority to enable these functions.zIn this manual, “Microsoft® Windows® XP Professional Service Pack 2 with Advanced Security Technologies” is indicated as “Windows” or “Windows XP.”zIn this manual, the following software packages are described as follows:• "WinDVD™ 5 (OEM Version)" as "WinDVD"• "B's Recorder GOLD8 BASIC" as "B's Recorder"• "B's CLiP 6" as "B's CLiP"zOptional Products or AccessoriesConfirm the latest information on optional products or accessories from other sources.Usage PrecautionsAbout NotationsNotations MeaningsNOTE NOTE provides a useful fact or helpful information.CAUTION CAUTION indicates a condition that may result in minor or a moderate degree of injury.EnterThis illustration means pressing the Enter key.Fn+F5This illustration refers to pressing and holding the Fn key, then pressing the F5 key.When using with the Fn and Ctrl functions interchanged (Îpage 31), read with Fn and Ctrl reversed.[start] - [Run] This illustration tells you to click [start], then to click [Run].Î This symbol indicates related pages.](https://usermanual.wiki/Panasonic-of-North-America/9TGCF-W52.User-Manual-CF-W5/User-Guide-683558-Page-11.png)
![12PreparationsGetting StartedHow to Use this ManualThe manual is saved in the computer's hard disk. To view the manual, start up the computer after completing the settings for "First-time Operation" (Îpage 16).zWhen the manuals in PDF format (see above) are accessed for the first time, the License Agreement of the Adobe Reader may be displayed. If it is displayed, after reading the agreement, click [Accept].zRefer to Acrobat Reader Help to use the Acrobat Reader.How to access the Reference Manual1Click [start] then click [Reference Manual].How to access the Important Tips1Double-click the icon on the desktop.Important Tips can also be accessed from [start] - [All Programs] - [Pana-sonic] - [On-Line Manuals] - [Important Tips].How to access Windows Help1Log on to Windows with the administrator authority and click [start] - [Help and Support].NOTEzIf a user has logged on to Windows without the administrator authority, some parts in [Help and Support] cannot be displayed.Manual Types and ContentsUsing the hard copy Operating Instructions(This manual) This manual explains startup methods and basic operations required when using the computer for the first time.Using the onscreen manualReference Manual(PDF format)The Reference Manual explains functions for you to make greater use of the computer, such as how to add peripheral devices, how the Setup Utility works, and other useful information. Important Tips(PDF format)Important Tips provides information on how to maximize use of the battery pack, which is necessary for computing away from your home or office.Windows Help Windows Help explains operations and functions about Windows.How to Use the Onscreen ManualContents of the Reference Manual](https://usermanual.wiki/Panasonic-of-North-America/9TGCF-W52.User-Manual-CF-W5/User-Guide-683558-Page-12.png)
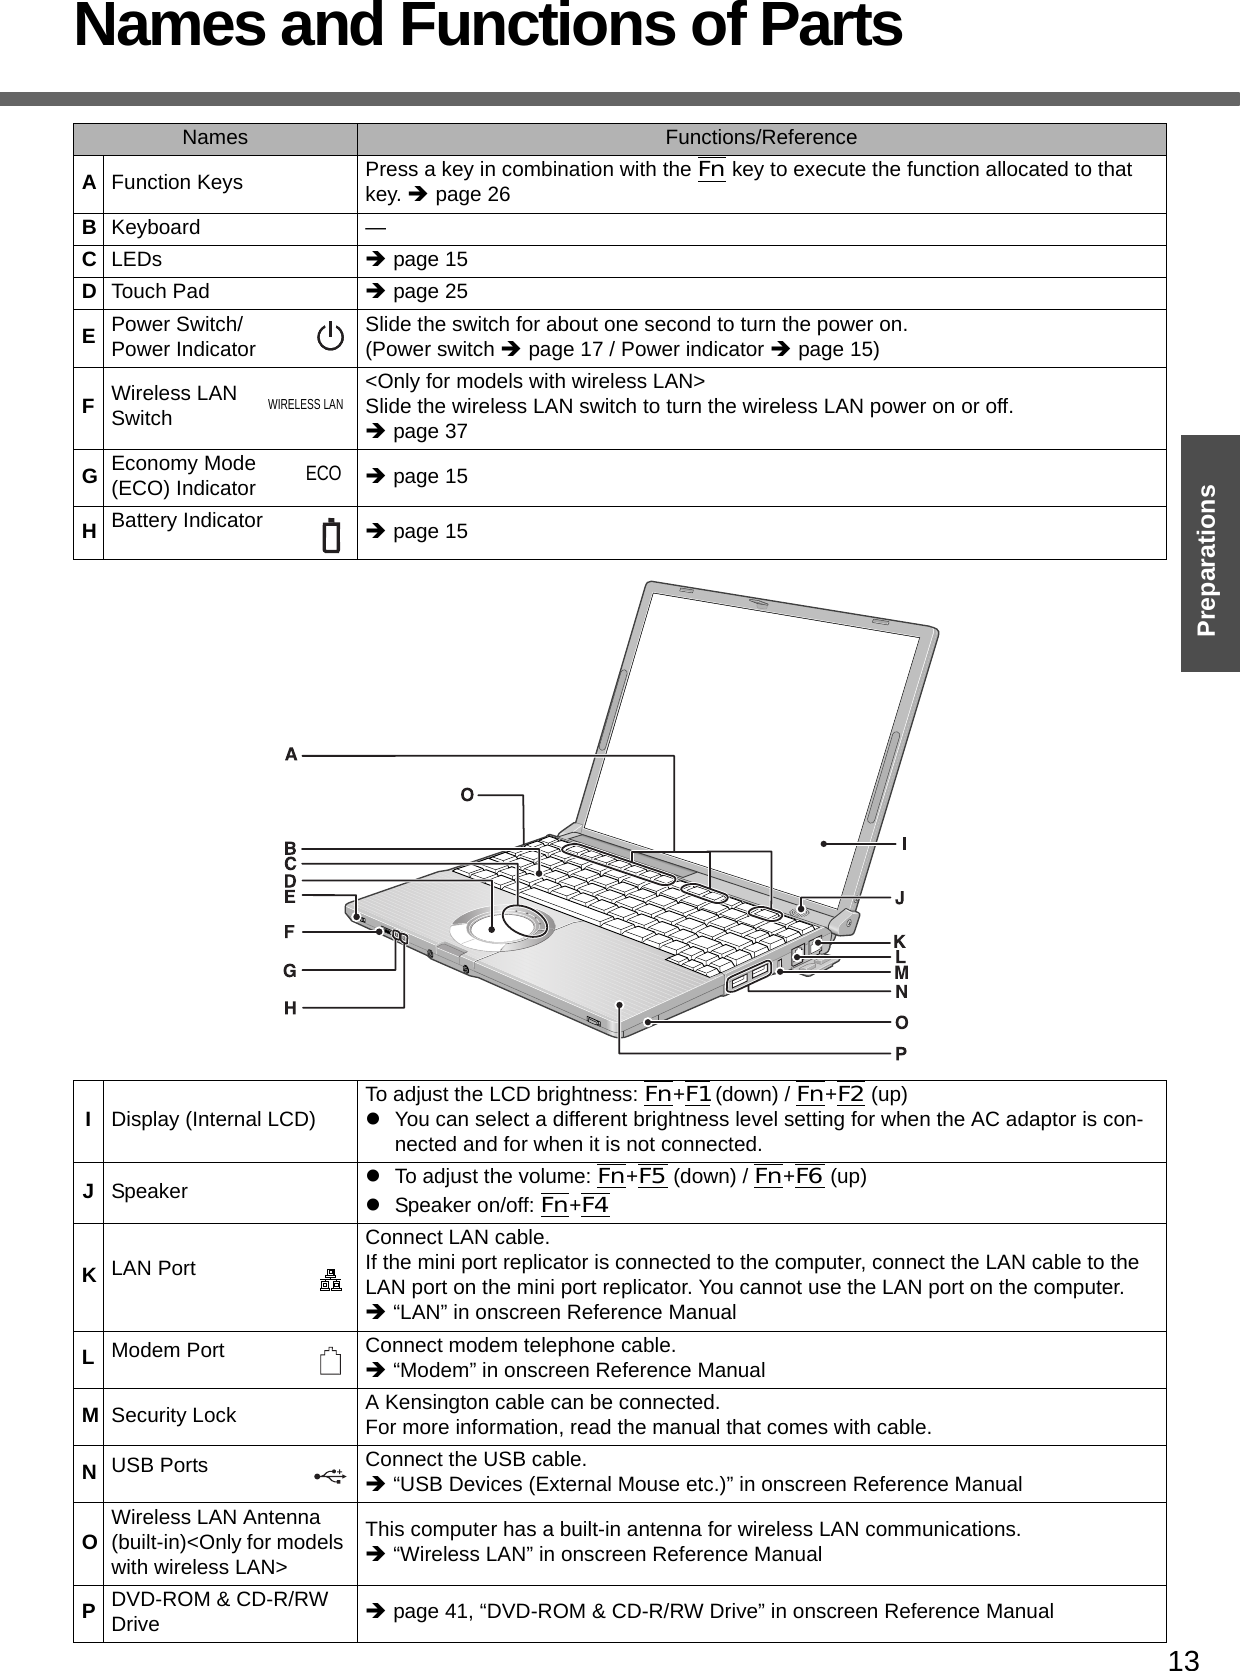
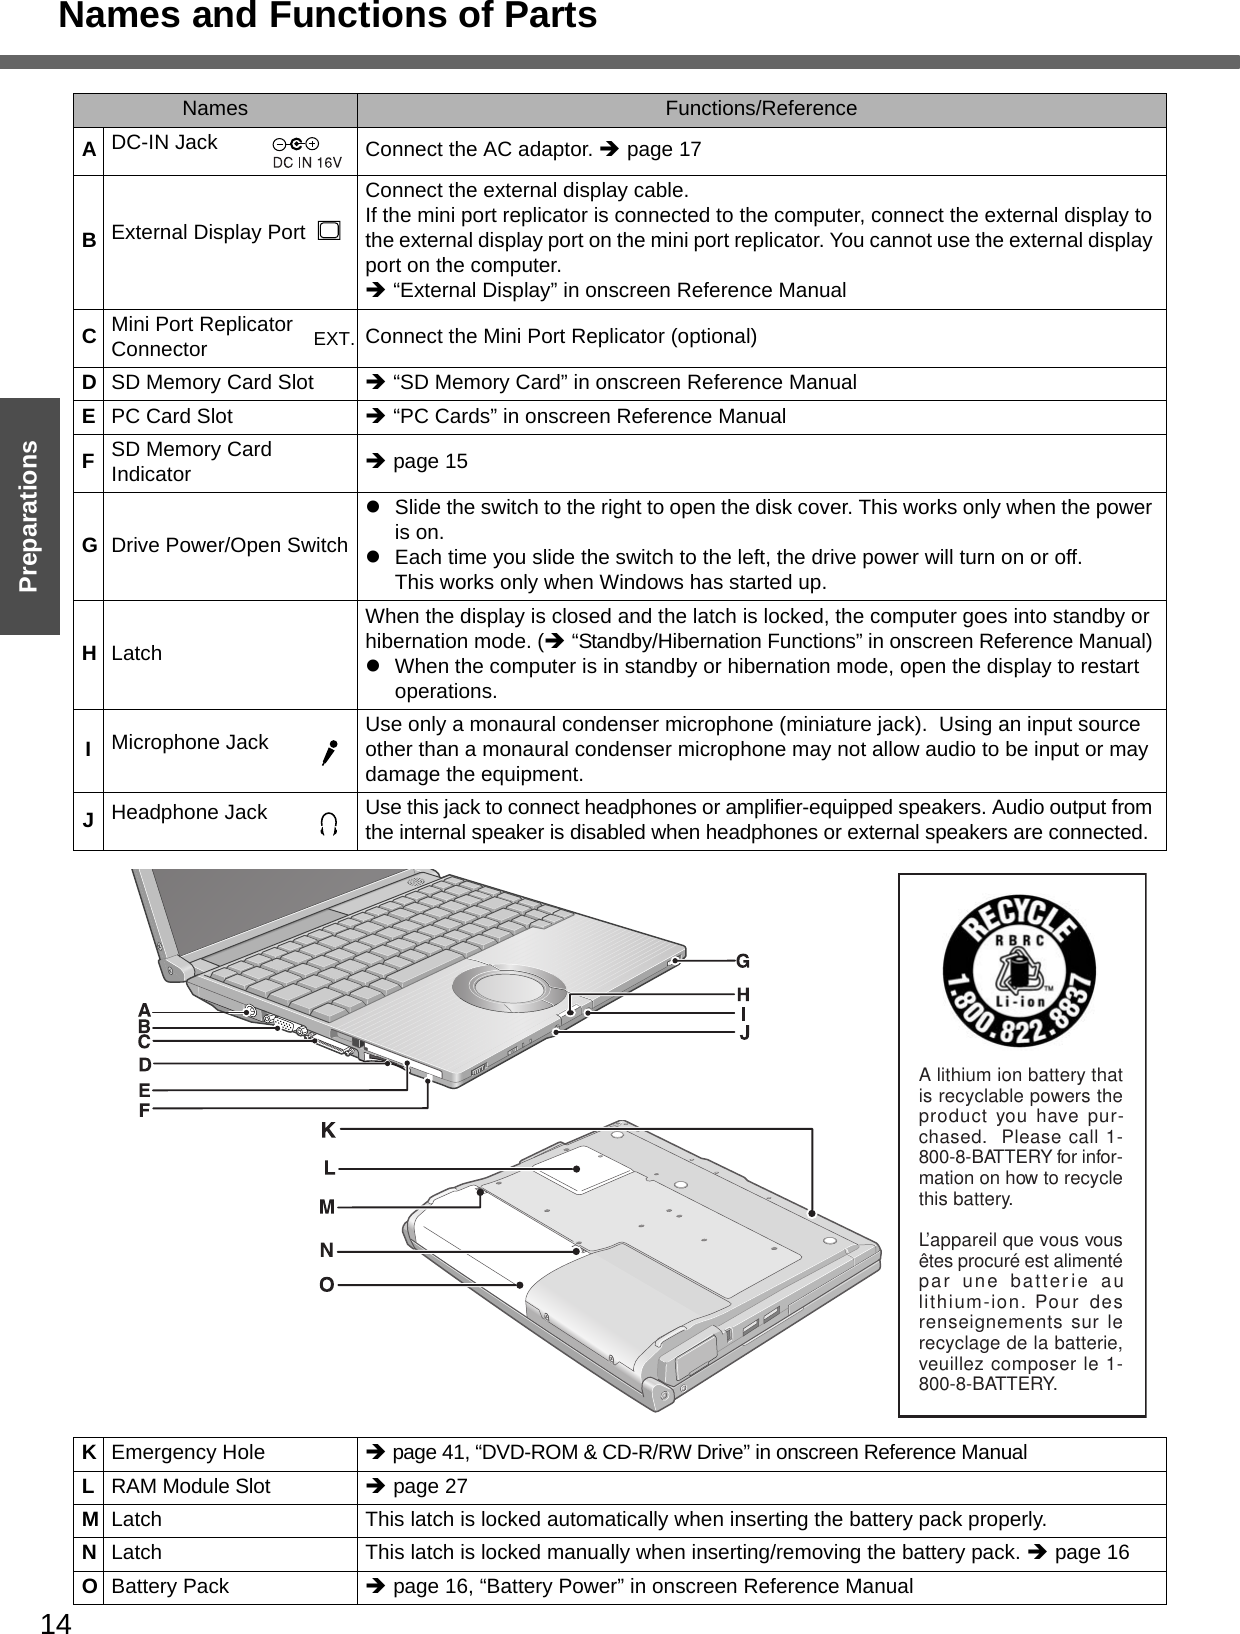
![15PreparationsGetting StartedConfirm the Status Using the LEDsIndicators Indicator Name/StatusCaps Lock indicatorzThis indicator lights green when the CapsLock key is pressed: Subse-quent non-shifted input is capitalized.NumLk indicator (Ten-key mode)zThis indicator lights green when the NumLk key is pressed: Part of the keyboard (see figure below) will function as a ten-key numeric input. When the green light is on, if the Fn key is pressed along with keys on certain other segments of the keyboard, then those keys will operate as numeric keys. The [Enter] key functions differently depending on the application. To dis-able, press the NumLk key once more (the indicator will turn off).zWhen the NumLk indicator is on: the fol-lowing functions will operate:ScrLk indicator (Scroll lock)zThis indicator lights green when the Fn+NumLk (ScrLk) key are pressed: Scroll lock functions differently depend-ing on the application.Hard disk drive indicatorzLighted: This indicator lights when the hard disk drive is accessed.Indicators Indicator Name/StatusPower indicatorzNot lit: Power off / Hibernation modezGreen: Power onzBlinking green: Standby modeECO Economy Mode (ECO) indicatorzNot lit: Economy Mode (ECO) disabledzGreen: Economy Mode (ECO) enabledzBlinking green: Economy Mode (ECO) enabled (Discharging until the remaining battery power is 80 % or less)Battery indicatorzNot lit: Battery pack is not connected or no charging.zOrange*1: Charging in progress. (If [Bat-tery Charging Indicator] in the [Main] menu of the Setup Utility is set to [Flash-ing], the indicator will alternately become lighter and darker (Flashing)).zGreen: Fully charged.zRed: The battery level is very low (the charge is approx. 9% or less).zBlinking red: Battery pack or charging circuit may not be working properly.zBlinking orange*1: The battery cannot be recharged temporarily when the internal temperature of the battery pack is outside the acceptable temperature range for recharging or when software applications and peripheral devices (USB devices, etc.) are consuming too much power.*1 The orange display light has three modes: on, flashing and blinking. Note the difference between flashing and blinking.A (above)DVD-ROM & CD-R/RW drive indicatorzNot lit: Drive power is off.zGreen: Drive power is on, but the DVD-ROM & CD-R/RW drive is not accessed.zBlinking green: Drive power is on, and the DVD-ROM & CDR/RW drive is being accessed.How to switch the drive power on/off: ΓDVD-ROM & CD-R/RW Drive” in onscreen Reference ManualSD memory card indicatorzLighted: This indicator lights when the SD memory card is accessed.](https://usermanual.wiki/Panasonic-of-North-America/9TGCF-W52.User-Manual-CF-W5/User-Guide-683558-Page-15.png)
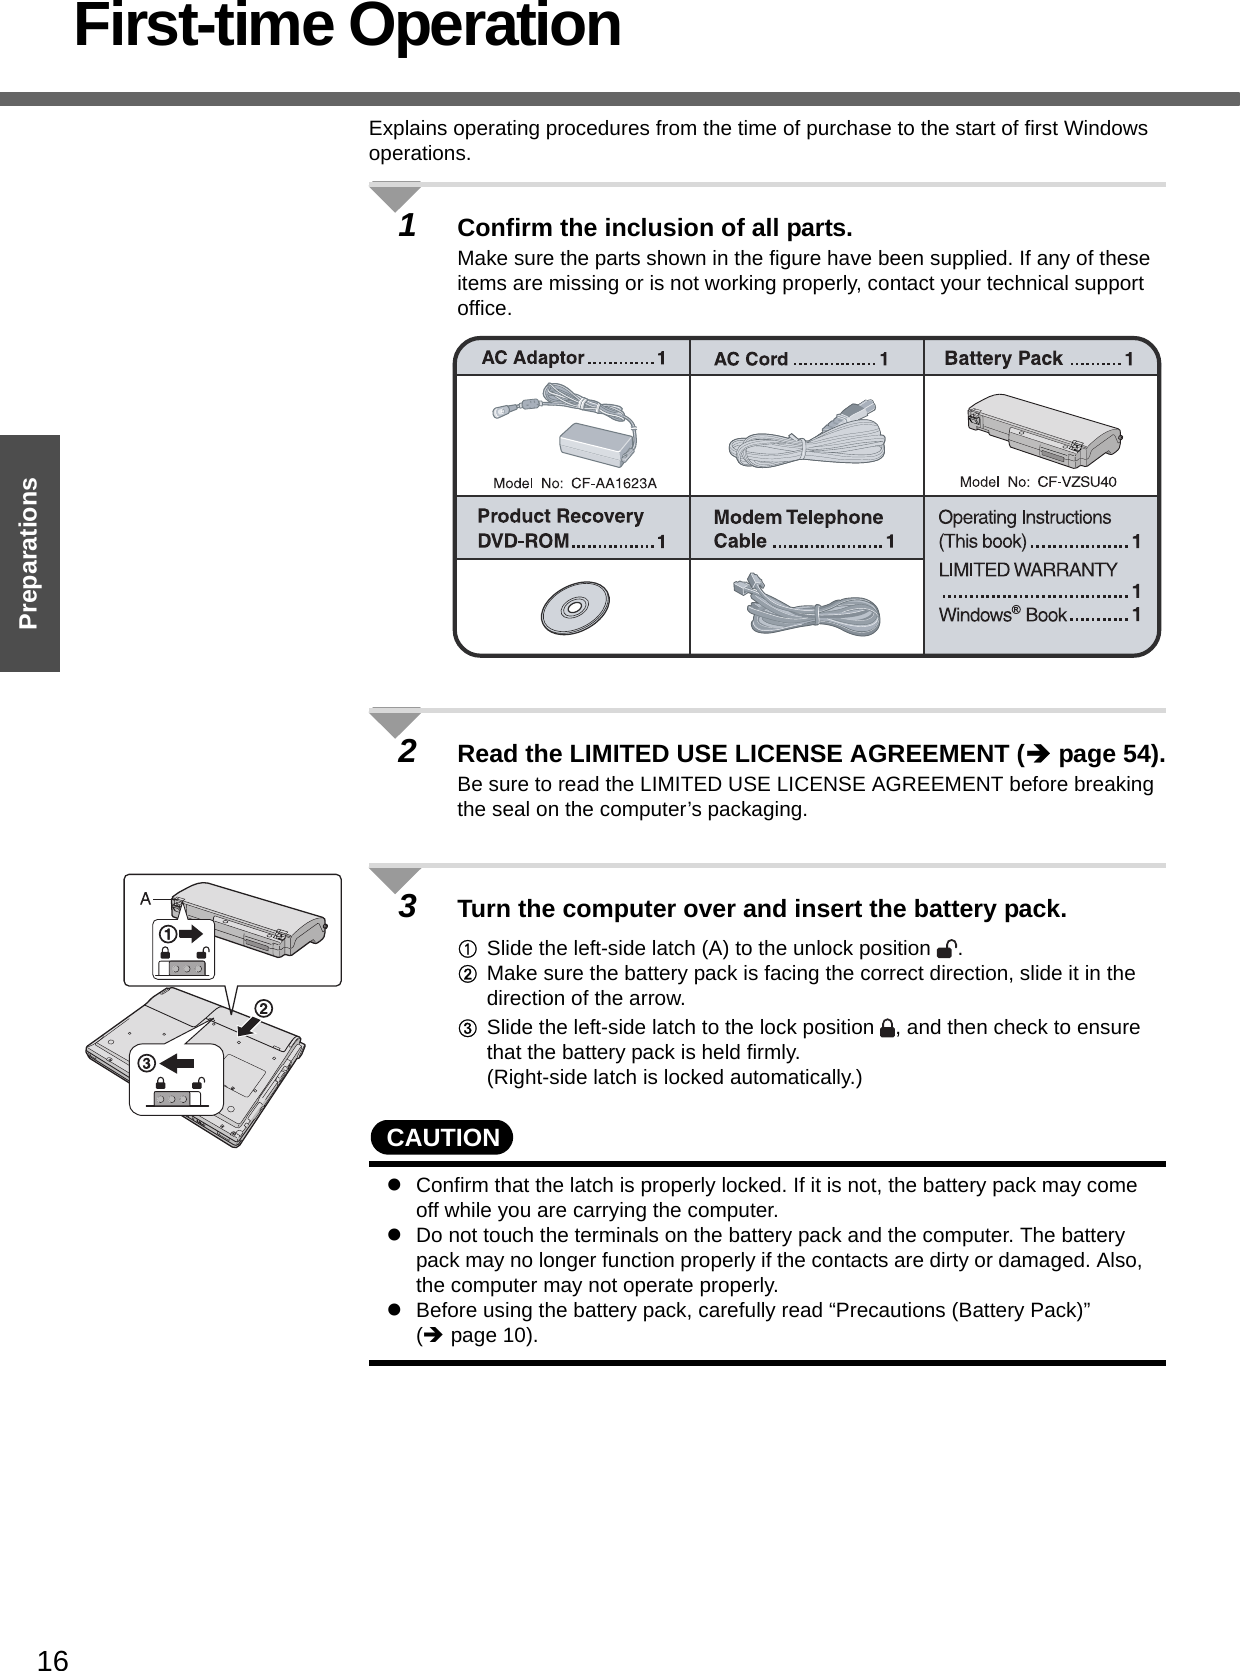
![17Preparations4Open the display.APress and hold the latch (B) located at the front.BLift open the display.zDo not open the display wider than necessary (140° or more), and do not apply excessive pressure to the LCD. Do not open or close the computer holding the edge of the LCD segment. Hold the C (below) segment to open or close the computer.5Connect your computer to a power outlet. zBe sure the AC adaptor is connected until completing the first-time use operation.zThe battery pack will be charged automatically.Charging Time: Approx. 5 hours (Power off), Approx. 6.5 hours (Power on) (Varies depending on the usage conditions.)zWhen using the computer for the first time, do not connect any peripheral device except the battery pack and AC adaptor to the computer.CAUTIONHandling the AC adaptorzDo not subject the AC adaptor to any strong impact.Using the AC adaptor after a strong impact such as being dropped may result in electrocution, short circuit, or fire. zUse only the specified AC adaptor with your computer. Using an AC adaptor other than the one supplied might damage the battery and/or the computer.zProblems such as sudden voltage drops may arise during periods of thunder and lightning. Since this could adversely affect your computer, an uninterrupt-ible power source (UPS) is highly recommended unless running from the battery pack alone.6Turn your computer on.zSlide the power switch and hold it for approximately one second until the power indicator turns on before releasing it.CAUTIONzDo not slide the power switch and hold it for more than four seconds; this will cause the power to be turned off forcibly.zDo not slide the power switch repeatedly.zDo not press any keys or touch the touch pad, until [Windows XP Professional Setup] is displayed.zDo not change the Setup Utility until completing step 7. If you do so, Windows setup may not operate properly.](https://usermanual.wiki/Panasonic-of-North-America/9TGCF-W52.User-Manual-CF-W5/User-Guide-683558-Page-17.png)
![First-time Operation18Getting StartedPreparations7Setup Windows.Moving the cursor or clicking buttons can be performed with the touch pad (A) and left button (B).zDuring operations, it may take some time before the next screen is dis-played.Wait, and do not press any keys, or touch the touch pad, etc.AAt [Welcome to the Windows XP Setup Wizard], click [Next].BAfter reading the agreement, click [I accept this agreement], then click [Next].zIf [I don’t accept this agreement] is selected, the Windows setup will be aborted.CSelect settings for your region, then click [Next].DEnter your name and then click [Next]. (You do not need to enter your organization.)EEnter your computer name and administrator password and then click [Next]. z"Computer name" is for recognizing this computer when multiple com-puters are connected via the network.zRemember this password! This password may be needed to manage the computer.zEven if you go on to the next step without setting the password, you can set the password in the [Control Panel] after Windows setup is completed. FEnter the correct date, time and the time zone, then click [Next].zClick or to set.zIf set properly, click [Next].GEnter your password set in step E and click .zWhen inputting the password, confirm that character input is not set to “Caps Lock” or “NumLk.” (Îpage 15)NOTEzWhen Windows setup is completed• The following message will be displayed at the bottom right of the screen: "Your computer might be at risk." Continue to the next step.The message is generated by the [Security Center] function in [Control Panel], and does not indicate an error or malfunction. For more information about [Security Center]: Îpage 39zIt may take some time before the computer restarts. Wait, and do not press any keys, or touch the touch pad, etc.zAfter being set automatically, the computer will restart automatically, and Windows will start.](https://usermanual.wiki/Panasonic-of-North-America/9TGCF-W52.User-Manual-CF-W5/User-Guide-683558-Page-18.png)
![19Preparations8Create "User Accounts" to recognize this computer's user.zIf you make mail settings or execute other operations (password reset disk (Îpage 21) etc.) before creating the user account, you will be unable to use mail history or settings. Create the user account at this time.AClick [start]*1 - [Control Panel] - [User Accounts] - [Create a new account]. *1 Immediately after Windows setup, the screen may show a display as though [start] has been clicked (i.e., [All Programs] and other menus may be shown above [start]).BEnter a new name for the new account, then click [Next].(For example: Matsushita)zThe following character strings cannot be used as an account name because they are already being used by the computer system. CON, PRN, AUX, CLOCK$, NUL, COM1 - COM9, LPT1 - LPT9CClick [Create Account].zWhen you create the first new account, you can only select [Computer administrator].Once a “Computer Administrator” account has been created, you can create additional limited user accounts.DSet the password.zWhen sharing this computer with multiple users, we recommend set-ting a password for your own account.zWhen setting password, click the account for which you will set the password, click [Create a password], and the password following the onscreen instructions, and click [Create Password].• Remember the password you have set. It is useful to input a hint in [password hint] in case you forget your password. In addition, we rec-ommend that you create a password reset disk beforehand (Îpage 21).Refer to “When the administrator password is forgotten” (Îpage 46) in “Dealing with Problems (Summary).”EClick [start] - [Turn Off Computer] - [Restart] to restart the computer.FAt the Welcome screen, click the created user (user icon) to log-on.zIf the password has been set, enter the password and click . You cannot operate the computer until the proper password is entered.Confirm that character input is not set to "Caps Lock" or "NumLk." (Îpage 15)zNote also that only the added user account will be displayed in the Welcome screen. The account for the administrator created during Windows setup will not be displayed.](https://usermanual.wiki/Panasonic-of-North-America/9TGCF-W52.User-Manual-CF-W5/User-Guide-683558-Page-19.png)
![First-time Operation20Getting StartedPreparations9Change the drive letter*1 for the internal DVD-ROM & CD-R/RW drive.In some cases, the drive letters for the DVD-ROM & CD-R/RW drive or con-nected devices (SD memory cards, external drives, etc.) may change when the DVD-ROM & CD-R/RW drive power is turned on or off. To prevent these letters from changing, we recommend that you allocate the drive letter for the DVD-ROM & CD-R/RW drive from the latter half of the alphabet (e.g., "L drive").zAt the time of purchase, the DVD-ROM & CD-R/RW drive is allocated D drive.zChange the drive letter before installing the application.The procedure shown below is an example for allocating the L drive to the DVD-ROM & CD-R/RW drive. ALog on to Windows with the administrator authority.BClick [start] - [Control Panel] - [Performance and Maintenance] - [Adminis-trative Tools], and then double-click [Computer Management].CClick [Disk Management] on [Storage].DRight-click [CD-ROM 0]*2, and then click [Change Drive Letter and Paths...].If the name of the DVD-ROM & CD-R/RW drive is not displayed, the drive power may be turned off. Turn on the drive power.EClick [Change] at [Change Drive Letter and Paths...].You cannot set this as the C drive. If you want to set a drive letter that is allocated to an SD memory card or external drive which is currently in use, disconnect the card or external drive. FClick [Assign the following drive letter] and select [L], then click [OK].GAt the confirmation message, click [Yes].NOTEzThe drive letter for the SD memory card cannot be changed or fixed.*1 The drive letter is a single character A to Z allocated to storage devices (drives) by Windows. You cannot change this to the A drive, B drive, or C drive. You also cannot use a drive letter that is currently being used by another device, or a drive letter that has already been allo-cated to a network drive.*2 Numbers may differ if an SD memory card or external drive is connected. When changing drive letters, we recommend that you disconnect any SD memory cards or external drives.This concludes the first-time use operation guidelines.NOTEzAbout the Icon Enlarger:• If the characters or icons on the screen are too small and difficult to see, after completing step 9, click [start] - [All Programs] - [Panasonic] - [Icon Enlarger]. This will allow you to magnify the display of characters and icons on the screen. (ΓIcon Enlarger” in onscreen Reference Manual)• The [Icon Enlarger] can be set separately for each account.zYou can also use [Loupe Utility], which enlarges a part of the screen. (ΓLoupe Utility” in onscreen Reference Manual)zTo improve the security of the computer, be sure to refer to "Windows Security Center" (Îpage 39) and "Windows Update" (Îpage 40).zIf you use the wireless LAN, be sure to refer to "Wireless LAN" (Îpage 37).zAt the time of purchase, the power saving function on the USB2.0 USB Root Hub is set to off. To extend battery operation time, turn the power saving func-tion on using the following procedure:](https://usermanual.wiki/Panasonic-of-North-America/9TGCF-W52.User-Manual-CF-W5/User-Guide-683558-Page-20.png)
![21PreparationsAClick [start] - [Control Panel] - [Performance and Maintenance] - [System] - [Hardware] - [Device Manager].BClick [View] - [Devices by connection].CClick for the following items in order. [ACPI Uniprocessor PC] Î [Microsoft ACPI-Compliant System] Î [PCI bus] Î [Intel(R) 82801FB/FBM USB2 Enhanced Host Controller - 265C]DRight-click [USB Root Hub] (displayed below [Intel(R) 82801FB/FBM USB2 Enhanced Host Controller - 265C], and click [Properties].EClick [Power Management] and add a checkmark to [Allow the computer to turn off this device to save power].FClick [OK].• If a mini port replicator is connected, remove the checkmark from this item. If the checkmark is added, it may be impossible to use the USB ports (2a, 2b, 2c) on the mini port replicator. If this occurs, remove the checkmark, then restart the computer.When you have forgotten a Windows log-on passwordWindows XP has a function to reset a current password and to set a new password.To use this function, you need to create a password reset disk beforehand following the steps below.AConnect the USB floppy disk drive (optional: CF-VFDU03) to your com-puter. Or insert the SD memory card into the computer's SD memory card slot.BClick [start] - [Control Panel] - [User Accounts].CClick the account you have logged on, and click [Prevent a forgotten pass-word] from [Related Tasks] menu.Create a password reset disk following the onscreen instructions, and store the password reset disk in a safe place.zOnly the log-on password for each account can be reset. The pass-word set in the Setup Utility cannot be reset.The screen displayed first when powering on the computer and logging on to Windows, is called the “desktop.” (These screens and icons are only examples.)Icons on the desktopWhen you double-click icons, the software application will run and the window will open.[start] menuWhen you click [start], the menu will be displayed.Select the software application, etc. that you want to use from the menu, and click it.Notification area (see the bottom right on the screen)zIf the icon on the notification area being explained in this manual is hidden and not displayed, click the icon to display all icons.zThe notification area icons used in this manual are only examples. The actual dis-play of the order and types of icons may differ depending on your computer environ-ment (various function settings, devices connected, etc.).Password Reset FunctionScreen Displayetc.](https://usermanual.wiki/Panasonic-of-North-America/9TGCF-W52.User-Manual-CF-W5/User-Guide-683558-Page-21.png)
![22Getting StartedPreparationsRoles of Icons on the Notification AreaThe notification area icons below are only examples.Icons Names and roles ReferenceIntel® Graphics Media Accelerator Driver for Mobile icon(Use for screen settings) - or Intel® PROSet/Wireless Software icon(Turn wireless LAN on/off and use to set wireless LAN connections)Îpage 37 or Wireless LAN icon(Use to confirm the status of the wireless LAN power and to switch IEEE802.11a between enable/disable.)Îpage 37Pointing device icon(Use to make various touch pad settings) -Scroll icon(Use to make settings and confirm status for the Touch Pad utility)Î"Using the Touch Pad" in onscreen Reference ManualVolume icon(Set volume) ÎWindows help or <Only for models with wireless LAN>Wireless LAN network connection icon(Use to set wireless LAN connections)Î"Wireless LAN" in onscreen Reference Manual or LAN network connection icon(Use to set LAN connections) Î"LAN" in onscreen Reference ManualB's CLiP icon(Use to make various B's CLiP settings)Î"Writing to CDs (B’s Recorder/B’s CLiP)" in onscreen Reference Manual or Drive power icon(Turn the DVD-ROM & CD-R/RW drive power on/off)Î"DVD-ROM & CD-R/RW Drive" in onscreen Reference Manual or Economy Mode (ECO) icon(Use to confirm the status of the Economy Mode (ECO) and to switch the mode between enable/disable.)Î"Battery Power" in onscreen Reference ManualBattery meter iconIt is displayed when disconnecting the AC adaptor. (Use to make various battery settings)Î"Battery Power" in onscreen Reference Manual or Windows security icon(Use to make or confirm security settings) Îpage 39 or Fn key iconIt is only displayed when adding the checkmark for [Show status on screen] on the [Hotkey Settings] screen. (Use to confirm whether the Fn key is locked)Î"Using the Fn Key" in onscreen Reference Manual Loupe iconIf the characters, images, or other items are too small and difficult to see on the screen, enlarge the part of the screen you want to see as if using a loupe.Î"Loupe Utility" in onscreen Reference ManualFirst-time Operation](https://usermanual.wiki/Panasonic-of-North-America/9TGCF-W52.User-Manual-CF-W5/User-Guide-683558-Page-22.png)
![23Getting StartedStarting Up/Shutting Down1Open the display.APress and hold the latch (A) located at the front.BLift open the display.zDo not open the display wider than necessary (140° or more), and do not apply excessive pressure to the LCD. Do not open or close the computer holding the edge of the LCD segment. 2Turn your computer on.Slide the power switch and hold it for approximately one second until the power indicator turns on before releasing it.zDo not slide the power switch and hold it for more than four seconds; this will cause the power to be turned off forcibly.zWhile booting, avoid the following until the hard disk drive indicator has turned off.• Connecting or disconnecting the AC adaptor.• Touching the power switch.• Performing any keyboard, touch pad, or external mouse operations.• Closing the display.• Sliding the drive power/open switch.zDo not slide the power switch repeatedly.zOnce the computer is powered off, you must wait at least ten seconds before powering it on again.3Log-on to Windows.After confirming that the hard disk drive indicator has turned off, click the user (user's icon).zInput the password, then click . Until the correct password is entered, the computer will not operate. Confirm that character input is not set to “Caps Lock” or “NumLK.” (Îpage 15)zThis operation may differ according to [Use the Welcome screen] setting (Îpage 38).zWhen only one user has been created and no password has been set, the screen for selecting the user will not be displayed (automatic log-on).4Select your application.Run various software applications, etc. and operate them.NOTEzThe power saving function is factory set, so if no key is pressed or if no device has been accessed for a certain interval of time:• The power to the LCD and hard disk may be turned off. The LCD will resume operation when the touch pad or an external mouse (when one is connected) is used or a key is pressed.The power to the LCD may be turned off even when an application software is being installed. In this case, because it is conceivable that a selection dialog box will be shown, do not press the Space key or the Enter key to attempt to resume from this condition as doing so may trigger a selection, but instead, press a key unrelated to the direct triggering of a selection, like the Ctrl key.In addition, when the computer is left alone, it automatically enters the standby or hibernation mode. The computer will resume by sliding the power switch. (Î “Standby/Hibernation Functions” in onscreen Reference Manual)Starting Up](https://usermanual.wiki/Panasonic-of-North-America/9TGCF-W52.User-Manual-CF-W5/User-Guide-683558-Page-23.png)
![Starting Up/Shutting Down24Getting Started• If there is no disk set in the DVD-ROM & CD-R/RW drive, the drive power will be turned off. (Î “DVD-ROM & CD-R/RW Drive” in onscreen Reference Manual)zWhen the CPU temperature rises, the computer may not power on to prevent the CPU from overheating. Should this happen, allow the computer to cool down then switch the power on again.If the computer still does not power on, contact your technical support office.If the screen on the left is displayed immediately after you turn on the power...A password has been set to ensure the computer's security.Enter your password*1 and press the Enter key.zWhen the correct password is input, the computer will start.zWhen three incorrect password attempts or nothing is input for one minute, the com-puter will power off.*1 Supervisor Password or User Password set in the Setup Utility (not the Windows password).1Save necessary data and close each application.2Display the shutdown screen.Click [start] - [Turn Off Computer].3Click [Turn Off].Your computer will power off automatically.zRestarting your computer (without shutting down): click [Restart].To shut down using the keyboard:APress the key, the U key, and select [Turn Off] with the Î Í Ï Ð key.BPress the Enter key.CAUTIONzDo not do the following during the shutdown/restart procedure.• Connecting or disconnecting the AC adaptor.• Touching the power switch.• Performing any keyboard, touch pad or external mouse operations.• Closing the display.• Sliding the drive power/open switch.NOTEzWhen the DC plug is not connected to the computer, disconnect the AC cord from your AC wall outlet. About 1.5 W of power is consumed simply by having the AC adaptor plugged into an electrical outlet.zNote that the computer consumes electricity even when the computer power is off. If the battery pack is fully charged, the battery will fully discharge in Approx. 3 weeks. When you leave the computer or interrupt your work...If you use the “Standby” or “Hibernation” function, then when you turn on the power next time, the application software and files you were using before will be displayed, and you can restart the same operations. (Î “Standby/Hibernation Functions” in onscreen Reference Manual)Shutting Down (power off your computer)](https://usermanual.wiki/Panasonic-of-North-America/9TGCF-W52.User-Manual-CF-W5/User-Guide-683558-Page-24.png)
![25Getting StartedUsing the Touch PadUse the touch pad to move the cursor on the screen and perform computer operations.A. Work Surface (touch pad) B. Left Button C. Right ButtonNOTEzYou can change the speed of the double-click or the operations of mouse but-tons using [Mouse Properties] screen.• To display [Mouse Properties]: Click [start] - [Control Panel] - [Printers and Other Hardware] - [Mouse].zWhen using the touch pad, keep the following in mind.• By design the touch pad is to be used with a finger tip only. Do not place any object or press down forcefully with sharp-pointed objects, i.e. finger nails, pencils, or pens on the work surface.• Try to avoid having any harmful substances, such as oil, come in contact with the touch pad. The cursor may not work properly in such cases.When the cursor doesn’t move the way you want it tozSensitivity when touching the touch pad can be adjusted.(Î “Using the Touch Pad” in onscreen Reference Manual)zWhen an external mouse is connected and the cursor does not operate properly:In the [Main] menu of the Setup Utility, set [Touch Pad] to [Disable]. When you want to use the touch pad again, return the setting to [Enable]. (Îpage 31)Function OperationMoving the Cursor Move the tip of your finger lightly over the work surface.Tapping/Clickingtapping or clickingzA right-click: Can only be performed by clicking the right but-ton.Double-Tapping/Double-Clickingdouble-tapping or double-clickingDraggingTwo quick taps, but on the second tap leave your finger down (applying pressure) and move it on the work surface.orWhile holding down the button, move your finger on the work sur-face.Vertical Scroll /Horizontal ScrollTrace a circle around the touch pad. A setting is required before using the horizontal scrolling function. (Î “Using the Touch Pad” in onscreen Reference Manual)](https://usermanual.wiki/Panasonic-of-North-America/9TGCF-W52.User-Manual-CF-W5/User-Guide-683558-Page-25.png)
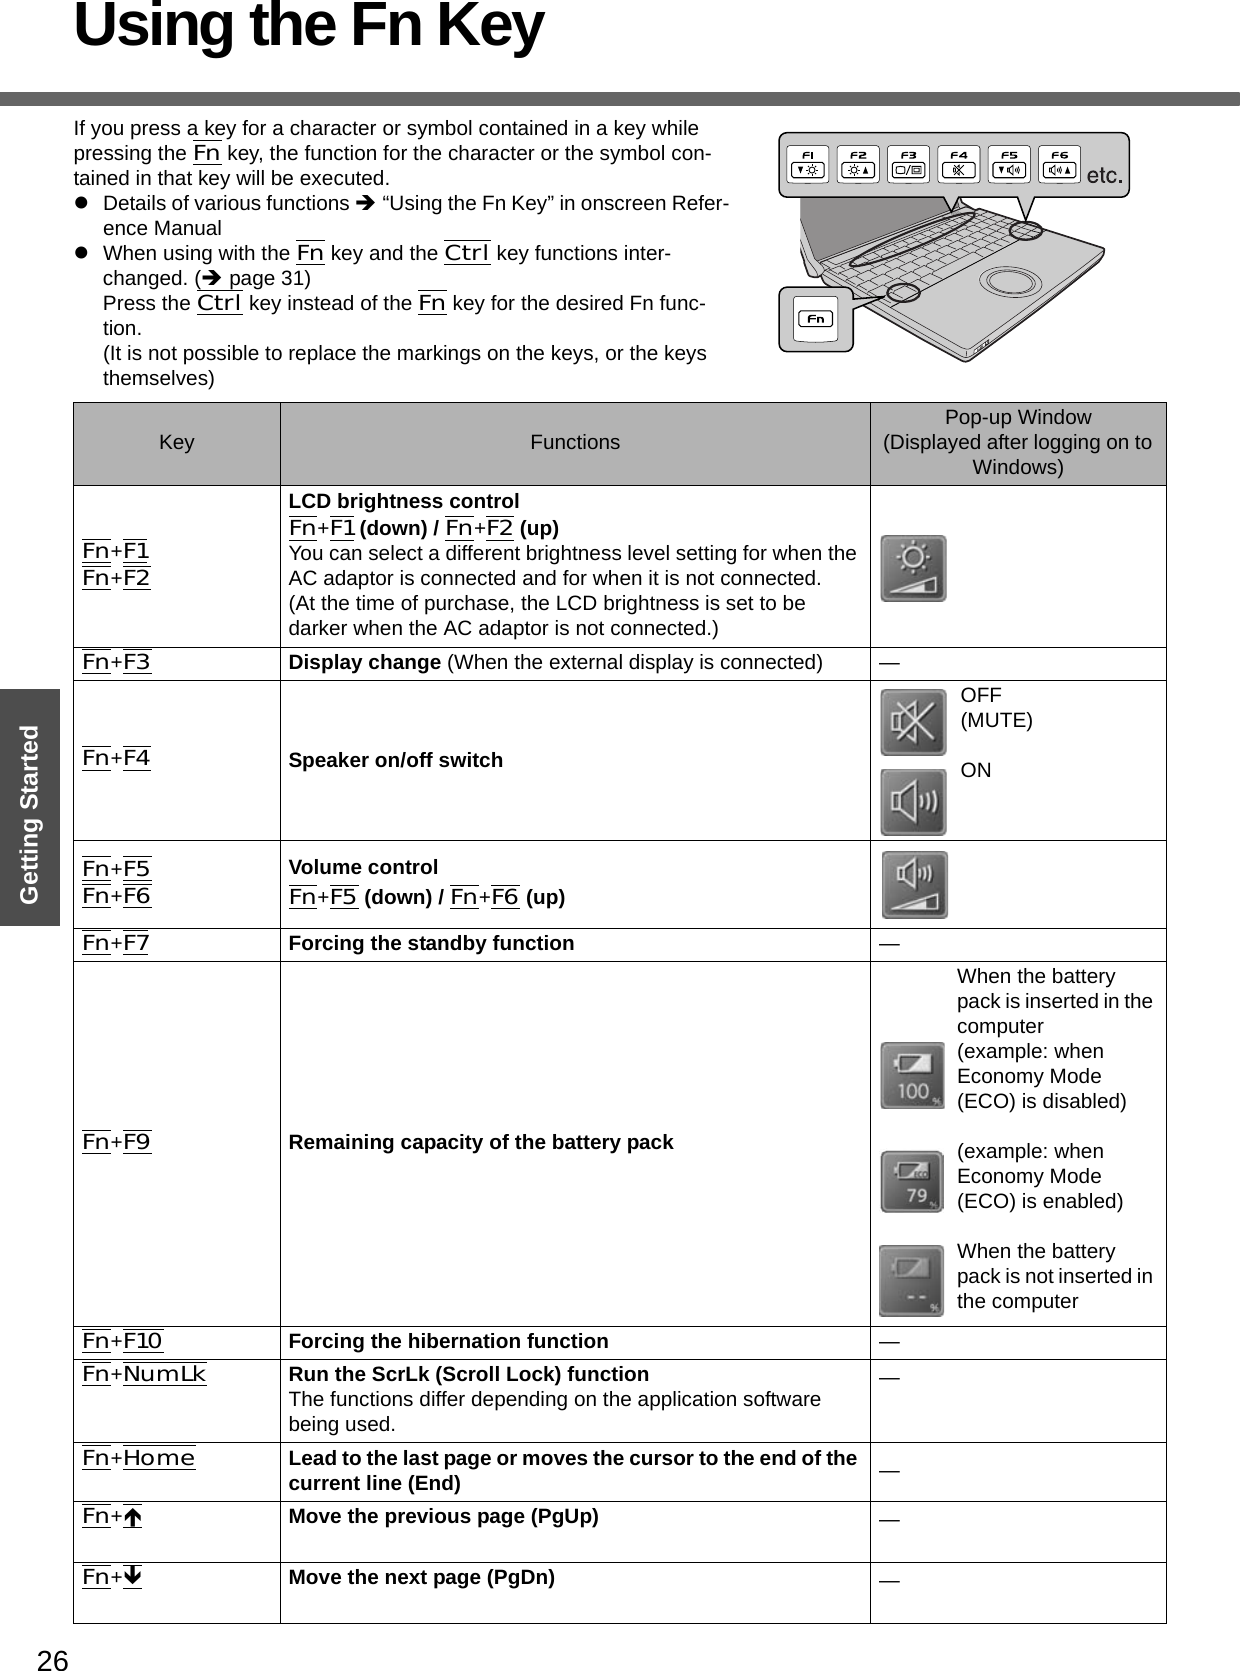
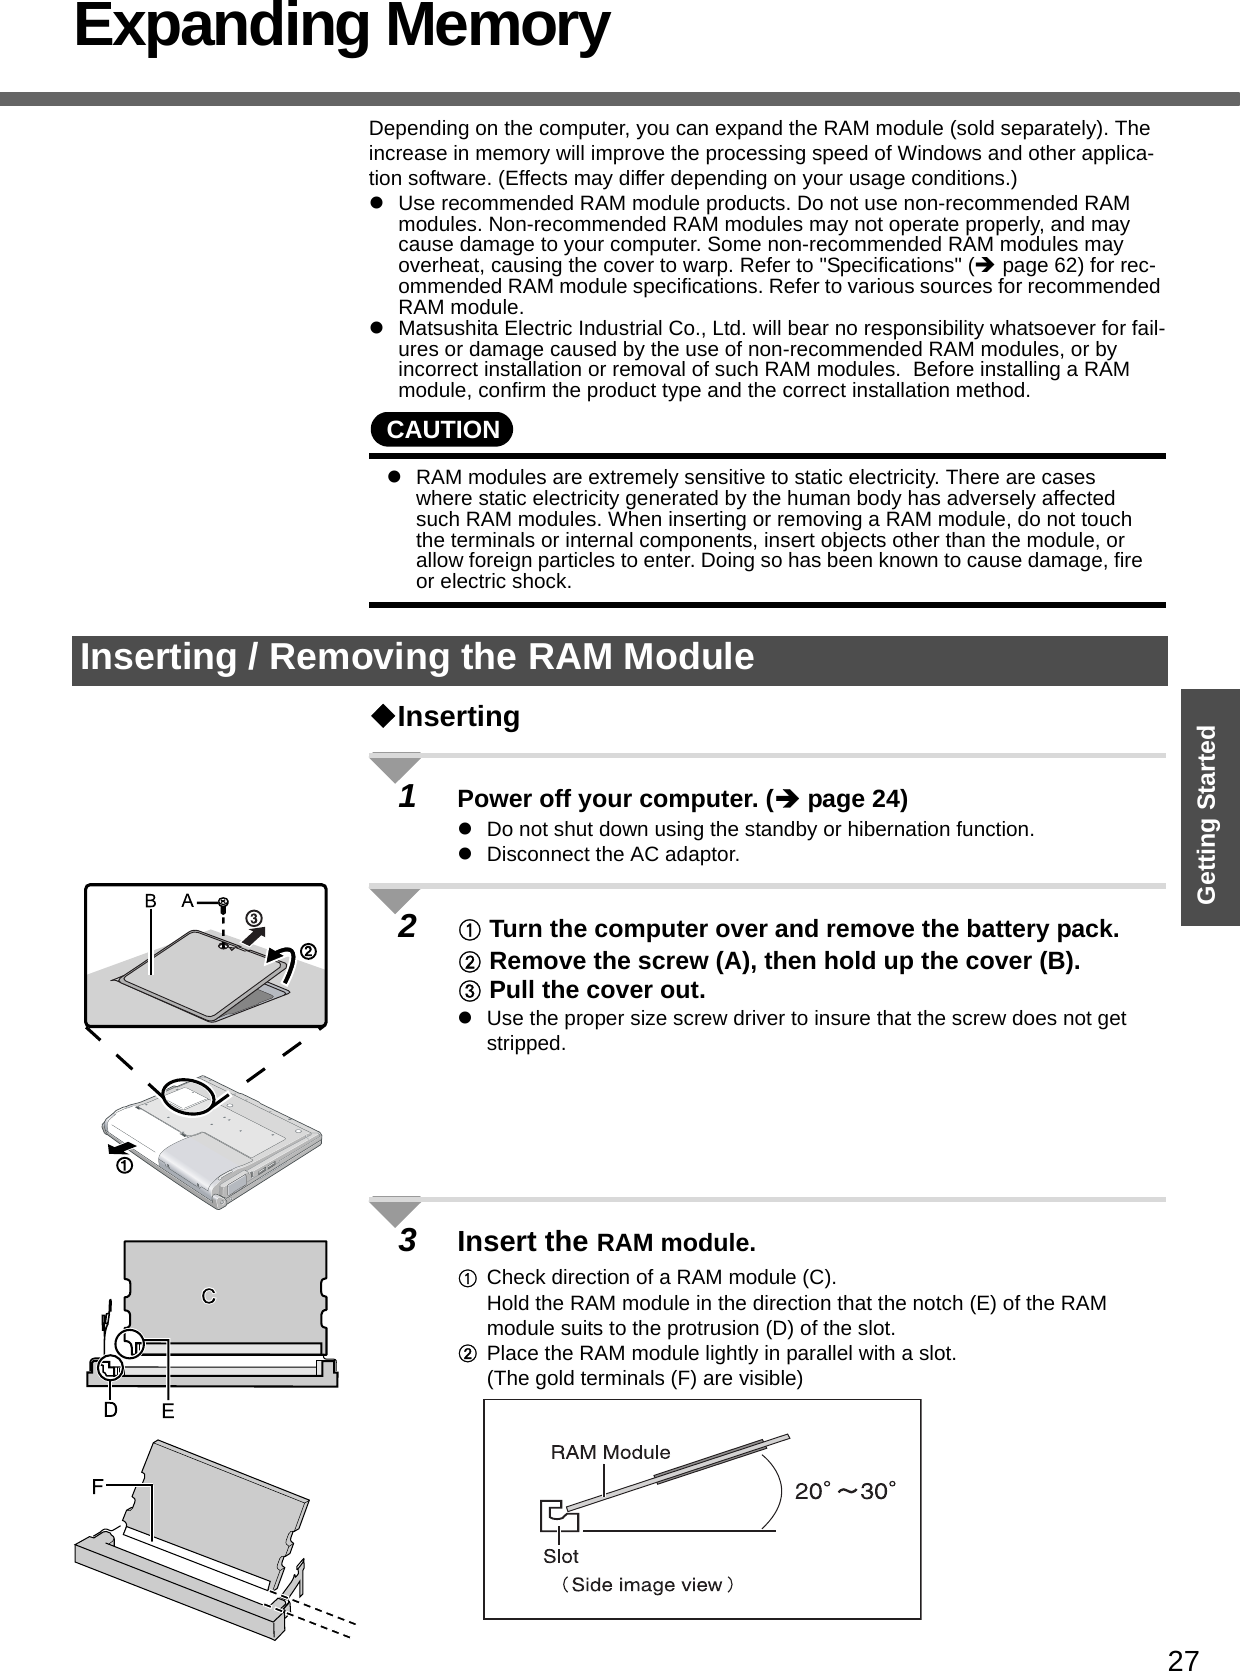
![Expanding Memory28Getting StartedCInsert the module parallel to the slot and press firmly until the gold termi-nals are no longer visible.zIf the RAM module is difficult to insert, do not force it. Check once more to ensure that the module is positioned correctly.zThe slot may be damaged if the following procedure is performed with-out inserting the module firmly.DPress the RAM module down until the right and left hooks (G) lock into place.zWhen pressing down the module, the right and left hooks will open slightly and will return after locking.zIf the RAM module is difficult to press down, do not force it. Check once more to ensure that the module is positioned correctly.4Put the cover and battery pack back in place.AInsert the cover at an angle, then fit it into place.BFasten the screw.CPut the battery pack back in place.NOTEzIf the RAM module has not been inserted properly, or if a RAM module other than one matching the specifications has been inserted, a beep will sound and the message “Extended RAM Module Failed” will be displayed when turning the power on. In this case, turn the power off, confirm that the RAM module meets the specifications, and reinsert it.zWhether the RAM module is properly recognized or not can be confirmed in [Information] menu of the Setup Utility (Îpage 31).RemovingAfter making the settings in step 1 to 2 of “Inserting,” remove the RAM module as fol-lows.AGently open the left and right hooks (H).The RAM module will be raised at an angle.BGently remove the RAM module from the slot.CPut the cover back in place.Refer to step 4 of “Inserting.”](https://usermanual.wiki/Panasonic-of-North-America/9TGCF-W52.User-Manual-CF-W5/User-Guide-683558-Page-28.png)
![29Getting StartedSetup UtilityThe Setup Utility sets the computer's boot-up operating environment, i.e. passwords, startup drive, etc. The following six menu items are available:[Information], [Main], [Advanced], [Security], [Boot], [Exit]1Turn on or restart the computer.2Press the F2 key while [Panasonic] boot screen is displayed soon after the computer begins the startup procedure.When the password is set, the screen shown at left will be displayed. Enter your password, and press the Enter key.When inputting the Supervisor PasswordzYou can register all items of the Setup Utility.When inputting the User PasswordzOn the [Advanced] and the [Boot] menu:• You can view the settings, but cannot change it.zOn the [Security] menu:• The following will not be displayed: [Clear registered SD card], [Set Supervisor Password] and [Hard Disk Lock].• The following will be displayed, but cannot be set: [Execute-Disable Bit Capability], [Password on boot], [SD Startup], [SD Setting Method], [Setup Utility Prompt], [Boot First Menu], and [User Pass-word Protection].• The User Password can be changed only when [User Password Pro-tection] has been set to [No Protection]. The User Password cannot be deleted.zOn the [Exit] menu:• [Get Default Values] option will not be displayed. zThe F9 key does not work.NOTEzCannot display the Setup Utility screen in simultaneous display.By pressing the Fn+F3 key, display destinations can be changed either exter-nal display or the internal LCD.zWhen [Password on boot] in the Setup Utility is set to [Disable]:• When the computer is started up, entering a password is not necessary.• When the Setup Utility is started up: The password becomes necessary. This alternative can prevent the contents of the Setup Utility from being changed.zIf you fail to press the F2 key at the right moment, the Setup Utility will not start up. In this case, let the computer fully boot up, and then perform a shutdown or restart from Windows.zTo close the Setup Utility:APress the Esc key.BSelect the exiting method from the [Exit] menu and press the Enter key.CSelect [Yes] and then press the Enter key.Running the Setup Utility](https://usermanual.wiki/Panasonic-of-North-America/9TGCF-W52.User-Manual-CF-W5/User-Guide-683558-Page-29.png)
![Setup Utility30Getting StartedHow to use the screenA. You can select menu items by moving the cursor with the Í key and the Î key.B. If there are several selectable items, you can choose the desired item by pressing the Ï key and the Ð key. The color of the selected item will change.C. You can display the submenu by pressing the Enter key on the item shown in reverse display.D. When the submenu is displayed, you can select items by pressing the Ï key and the Ð key.E. The keys that can be used for settings are displayed in the Setup Utility screen.Key OperationszF1To display the corresponding "help" file (Press the Ï key or the Ð key to scroll the help screen one line at a time. Press the F1 key to return to the original screen.)zEscTo display the [Exit] menuzÏ ÐTo move among the items (Use these keys when selecting the item.)zÍ ÎTo move among the menus (Use these keys when the [Information], [Main], [Advanced], [Security], [Boot], or [Exit] menu is selected.)zF5 Select previous item (Use this key when changing setting values.)zF6Select next item (Use this key when changing setting values.)zEnterTo display submenu of each item (Use this key after selecting the item by using the Ï key or the Ð key. Close the submenu by using the Esc key.)zF9To set default settings (except the password, System Time and System Date.)zF10To save the settings and exit](https://usermanual.wiki/Panasonic-of-North-America/9TGCF-W52.User-Manual-CF-W5/User-Guide-683558-Page-30.png)
![31Getting StartedInformation Menu(An underline indicates the factory default settings)Language• Select the language for displaying the Setup Utility. EnglishJapaneseModel No.Serial No.CPU TypeCPU SpeedBIOSEmbedded ControllerSystem MemoryPrimary MasterTo display and con-firm information. These items cannot be selected or changed.Optical Drive• When [CD/DVD Drive Power] has been set to [Off] in [Main] menu, [Power Off] is dis-played.Accumulative Operating TimeMain Menu(An underline indicates the factory default settings)System Time• Time is shown in 24-hr. style.•The Tab key can be used to move hour/minute/second. Numerical values can be adjusted using the F5 key and the F6 key.[xx:xx:xx]System Date• Date is shown in order of Month/Day/Year.•The Tab key can be used to move Month/Day/Year. Numerical values can be adjusted using the F5 key and the F6 key.[xx/xx/xxxx]Touch Pad• Select whether to use the touch pad ([Enable]) or not ([Disable]). DisableEnableFn/Ctrl Key• Select whether to switch the Fn key with the Ctrl key functions, and vice versa on the internal keyboard.• Do not attempt to replace the markings on the keys, or the keys themselves.NormalReplaceDisplay• The display destination in cases where Windows is not running is set here.• If an external display is not connected, all information will appear on the internal LCD even if [External Monitor] is selected.After Windows starts up, the screen is displayed on the display destination set in the fol-lowing menu.[start] - [Control Panel] - [Other Control Panel Options] - [Intel(R) GMA Driver for Mobile] - [Devices]External MonitorInternal LCDDisplay Expansion• Select whether to have the display expanded when not using the native screen resolution. DisableEnable](https://usermanual.wiki/Panasonic-of-North-America/9TGCF-W52.User-Manual-CF-W5/User-Guide-683558-Page-31.png)
![Setup Utility32Getting StartedNOTEzThe [Advanced] menu cannot be changed when the Setup Utility is started up with the User Password.NOTEzWhen the Setup Utility is started up with the User Password, only a limited number of items can be displayed and set. (Îpage 29)z[SD Startup], [SD Setting Method] and [Clear registered SD card] will be displayed only when an SD memory card has been registered.zWhen starting up the computer, if the message [Hard disk access is prohibited “Hard Disk Lock”] appears, start up the Setup Utility, and reset the details to match the settings when [Hard Disk Lock] was set.CD/DVD Drive Power• You can set the drive power to [On] or [Off] when the computer is started up.• When set to [Off]:• From the next time you start the computer, you will be unable to start up from DVD-ROM & CD-R/RW drive. The disk cover cannot be opened until Win-dows has started. To start up from the DVD-ROM & CD-R/RW drive (give preference to [USB CDD] (internal DVD-ROM & CD-R/RW drive) in the [Boot] menu), set this to [On].• If operations are resumed from hibernation mode while a disk is set, it may take about 20 seconds for operations to resume.• The drive power cannot be turned on/off with the drive power/open switch until Windows starts, regardless of the current on/off status.OffOnBattery Charging Indicator• Set the battery indicator to turn on or flash while the battery pack is recharging. On ContinuousFlashing(An underline indicates the factory default settings)Advanced Menu(An underline indicates the factory default settings)Modem• Select whether to use the internal modem function ([Enable]) or not ([Disable]). (This does not work for the external modem.)DisableEnableLAN• Select whether to use the internal LAN function ([Enable]) or not ([Disable]).(This does not work for the external LAN card.)DisableEnableWireless LAN• Select whether to use the internal wireless LAN function ([Enable]) or not ([Disable]). (This does not work for the external wireless LAN card.)DisableEnableLegacy USB Support• Select whether to use the function that makes the computer recognize internal DVD-ROM & CD-R/RW drive, USB keyboard and USB floppy disk ([Enable]) or not ([Disable]) before starting Windows.DisableEnableSecurity Menu(An underline indicates the factory default settings)Execute-Disable Bit Capability• When [Execute-Disable Bit Capability] is set to [Enable], it means that this computer sup-ports hardware-based Data Execution Prevention (DEP). It should usually be set to [Enable]. DEP is a set of hardware and software technologies that perform additional checks on memory to help prevent malicious code from running on a system.DisableEnable](https://usermanual.wiki/Panasonic-of-North-America/9TGCF-W52.User-Manual-CF-W5/User-Guide-683558-Page-32.png)
![33Getting StartedIn the [Boot] menu, the names of the connected devices (including internal devices) will be displayed."USB CDD: MATSHITA UJDA7XX" is the internal DVD-ROM & CD-R/RW drive.To move a device up by one, select the device in [Boot priority order] using the Ï or Ð key, and press the F6 key. To move a device down by one, select the device in [Boot priority order] using the Ï or Ð key, and press the F5 key.zPanasonic USB floppy disk drive (CF-VFDU03 (optional)) can be used for startup (recommended).zTo return the startup order to the default settings, press the 1 key. (The order of default settings is: USB FDD->IDE HDD->USB CDD->PCI LAN)Password on boot• Select whether you will need to input ([Enable]) or not ([Disable]) the Supervisor Password or the User Password on booting.DisableEnableSD Startup• Select whether to use an SD memory card instead of entering the password on booting ([Enable]) or not ([Disable]).• When registered SD memory card, this is set to [Enable].• Cannot be set when [Password on boot] is set to [Disable].DisableEnableSD Setting Method• Select whether to set an SD memory card to [Leave Set] or [Set and Eject] when an SD memory card is used instead of entering the password.• This can be set only if [SD Startup] has been set to [Enable].• Cannot be set when [Password on boot] is set to [Disable].Leave SetSet and EjectClear registered SD card• Clear the registration from all registered SD memory cards not to be used instead of enter-ing the password on booting.To the sub-menuSet Supervisor Password• Set a Supervisor Password if you wish to prevent any unauthorized changes to the Setup Utility settings, also if you require a password on boot, set [Password on boot] to [Enable] after you set Supervisor Password.To the sub-menuSetup Utility Prompt• Select whether to display ([Enable]) or not to display ([Disable]) the message “Press F2 for Setup/F12 for LAN” shown on the bottom of the [Panasonic] boot screen that is displayed after starting this computer.DisableEnableBoot First Menu• Select whether to display “Boot Menu” ([Enable]) or not ([Disable]). (Îpage 34). DisableEnableHard Disk Lock• Select whether to enable ([Enable]) or not disable ([Disable]) the [Hard Disk Lock]. • This function will not work without the Supervisor Password being set.DisableEnableUser Password Protection• Select whether to permit changing the User Password ([Protected]) or not ([No Protec-tion]).No ProtectionProtectedSet User Password• Set User Password when multiple users use this computer, etc.For example, when the system administrator sets Supervisor Password and User Pass-word and lets other users know only the User Password, other users cannot change some of the settings in Setup Utility.• This function will not work without the Supervisor Password being set.To the sub-menuBoot Menu(An underline indicates the factory default settings)](https://usermanual.wiki/Panasonic-of-North-America/9TGCF-W52.User-Manual-CF-W5/User-Guide-683558-Page-33.png)
![Setup Utility34Getting StartedNOTEzWhen starting up from the internal DVD-ROM & CD-R/RW drive, confirm the following settings.• [CD/DVD Drive Power] is [On] in the [Main] menu.• [Legacy USB Support] is [Enable] in the [Advanced] menu.The computer cannot be booted from the DVD-ROM & CD-R/RW drive if the above settings are [Off] or [Disable].zWhen starting up from a device connected by a USB port• Check to make sure that [Legacy USB Support] is [Enable] in the [Advanced] menu.zThe [Boot] menu cannot be changed when the Setup Utility is started up with the User Password.zIf more than one of the same device is connected, only one device name will be displayed.zBoot MenuThe device for starting up the operating system can also be selected during computer start-up. After the computer is turned on and the Esc key is pressed at [Panasonic] boot screen, [Boot Menu] (the device selection screen) will appear. When the [Boot Menu] setting is changed, the selection screen display will also change. [Boot Menu] is displayed only when [Boot First Menu] in the [Security] menu is set to [Enable].zThe computer cannot be booted from devices listed in [Excluded from boot order]. For this reason, the order of pri-ority cannot be changed in this list.zBootable CD created using the B’s Recorder in the CF-W2 and CF-Y2 series cannot be used on this computer. If you want to share bootable CD with those series, create a new bootable CD.zThis computer does not support startup operations from CD/DVD drives other than the internal DVD-ROM & CD-R/RW drive.zTo move a device from [Excluded from boot order] to [Boot priority order] (or vice versa):Select the device using the Ï or Ð key, and press the X key. The device you have moved will appear at the end of the list when moving a device from [Excluded from boot order] to [Boot priority order]. Set the boot order as required.Exit MenuSave Values & Exit Exit the Setup Utility and save your changes to CMOS.Exit Without Saving Changes Exit the Setup Utility without saving your changes to CMOS.Get Default Values Set the Setup Utility to the default settings.• This item is not displayed when starting up the Setup Utility with the User Password.Load Previous Values Load previous values from CMOS for all Setup items.Save Current Values Save your changes to CMOS.](https://usermanual.wiki/Panasonic-of-North-America/9TGCF-W52.User-Manual-CF-W5/User-Guide-683558-Page-34.png)
![37OperationUseful InformationWireless LAN <Only for models with wireless LAN>Do not use wireless LAN on airplanes, in hospitals, or in other locations where wireless LAN signals may affect the operation of devices in the vicinityzAbide by instructions regarding use in airplanes and hospitals.zIf you intend to use the computer in the environments described above, turn off the wireless LAN power. (below)Prevent theft of data or unauthorized access to the hard disk via a wireless LANzWhen using the wireless LAN function, there is a danger that data may be stolen from the hard disk, or that shared files may be accessed. If you plan to use wireless LAN functions, we recommend that you do so only after making the appropriate security settings, such as for encryption.zBefore using a wireless LAN, turn it on using the wireless LAN switch.zAfter turning the wireless LAN power on or off, it may take some time before the [Available Networks] screen is renewed.1Slide the wireless LAN switch (A) to turn the wireless LAN power on or off. zTo turn the power on, slide the switch to the right. The wireless LAN icon will show. zTo turn the power off, slide the switch to the left. The wireless LAN icon will show.Enable/Disable Wireless LAN Standard IEEE802.11aIn some countries, communication using IEEE802.11a (5 GHz wireless LAN) standard is restricted by law. Comply with the laws in the country concerned. (Îpage 3)1Click the icon (when the wireless LAN is on) or the icon (when the wireless LAN is off) on the notification area.2To disable IEEE802.11a:zClick [802.11a Disabled].To enable IEEE802.11a:zClick [802.11a Enabled].Even when IEEE802.11a is enabled or disabled, or will not change.PrecautionsTurning on/off the Wireless LAN Power](https://usermanual.wiki/Panasonic-of-North-America/9TGCF-W52.User-Manual-CF-W5/User-Guide-683558-Page-37.png)
![38OperationUseful InformationWindows/Antivirus ProtectionDepending on the settings in Windows, installed applications, drivers, menus and other displays may be inoperable.In some cases, certain functions, such as the password reset disk (Îpage 21), may not operate. In this case, refer to the items below, and the applied items from the prob-lem-solving section of this manual and onscreen Reference Manual, Windows Help (Îpage 12), and the software application and driver’s operating instructions, etc.Change the Way Users Log on or offIf the checkmark is added for [Use the Welcome screen] or [Use Fast User Switching] in [start] - [Control Panel] - [User Accounts] - [Change the way users log on or off], the operation differs as follows.Use the Welcome screenThe operations when starting up or shutting down Windows differ depending on whether this item has a checkmark or not.• At the time of purchase, it is set with the checkmark added.• When [Use when logging on to Windows] is set in [SD Card Setup] (Î “SD Mem-ory Card Security Function” in the onscreen Reference Manual), the Welcome screen cannot be used. Use Fast User SwitchingWhen adding the checkmark for this setting, you can change to another user without logging on again when multiple users use the computer.This manual explains the procedure for cases where the checkmark is added.In the following case, Fast User Switching cannot be used.zWhen the checkmark is not added for [Use the Welcome screen]zWhen joining the network domainzWhen the [Use when logging on to Windows] is set in [SD Card Setup] (Î “SD Memory Card Security Function” in the onscreen Reference Manual)Depending on the software application, the computer may not work properly if this func-tion is used.When switching to a different user with the Fast User Switching function, it may not be possible to set the display settings. In this case, log-off all users, and retry the opera-tion.Windows](https://usermanual.wiki/Panasonic-of-North-America/9TGCF-W52.User-Manual-CF-W5/User-Guide-683558-Page-38.png)
![39OperationUseful InformationUse the Windows Security Center function to protect Windows from damage by com-puter viruses, etc.Windows Security CenterzWhat is Windows Security Center?The Windows Security Center allows centralized management of Windows security information, and monitors antivirus measures and other Windows security settings to ensure optimum safety.Use the Windows Security Center function to protect your computer from damage by viruses, etc.Click [start] - [Control Panel] - [Security Center] to display the current settings for the following security functions.• Windows FirewallA security system for protecting the computer from unauthorized access via the Internet or other external networks.The firewall regulates the data exchanged between the computer and the net-work, so that only approved data can pass through.At the time of purchase, the Windows Firewall is set to be enabled.• Automatic UpdatesIf your computer is connected to the Internet, this function regularly checks whether security updates and other important updates for Windows have been made available, and automatically installs these updates in their latest conditions.• Virus ProtectionThis function regularly checks whether antivirus software has been installed in the computer, and whether the version of that software is the latest version available.NOTEzSome network-related software and some online network games do not operate normally if the Windows Firewall is enabled. Ask the software manufacturer about the Windows Firewall in the case of using such software.zFor further details on the Windows Firewall, see the help displayed by the fol-lowing methods:AClick [start] - [Help and Support] and input [Windows Firewall] into [Search].BClick [Windows Firewall overview].If the message "Your computer might be at risk" is displayedRead the message, click the (red) on the notification area, and make the appropri-ate settings.This message, which the Windows Security Center displays to confirm the security-related settings regularly, will be displayed until the settings are made more properly.NOTEzThis message does not indicate an error. You can use the computer while the message is displayed. However, in order to operate the computer more safely, we recommend making the appropriate measures to reduce damage from virus and other attacks, thus avoiding the appearance of this message.Security Center/Antivirus Protection](https://usermanual.wiki/Panasonic-of-North-America/9TGCF-W52.User-Manual-CF-W5/User-Guide-683558-Page-39.png)
![Windows/Antivirus Protection40OperationUseful InformationThe Pop-up BlockerIn Windows XP, security functions have been strengthened with regard to Web con-tents.One of these is the "Pop-up Blocker," which may prevent some Web pages from being displayed.Computer VirusesUsers are advised to purchase the latest versions of virus protection software and use them regularly.We recommend you run the software:zWhen booting your computer.zAfter receiving data.We recommend that you check data received on disks or from external sources, such as data downloaded from the Internet, e-mail, etc. (For compressed files, uncompress them before running a check).For Data Execution Prevention (DEP), you can make one of the settings in the follow-ing menu. [start] - [Control Panel] - [Performance and Maintenance] - [System] - [Advanced] - [Settings] (in [Performance]) - [Data Execution Prevention].For more information, refer to Windows help.Windows UpdateYou can use the latest patches and service packs for Windows with the following menus.Do not apply “Driver Updates” even if a message to update a driver appears. If a driver update is required, contact your technical support office.[start] - [All Programs] - [Windows Update].](https://usermanual.wiki/Panasonic-of-North-America/9TGCF-W52.User-Manual-CF-W5/User-Guide-683558-Page-40.png)
![41OperationUseful InformationUsing CD/DVDBefore using the drivezDo not expose the DVD-ROM & CD-R/RW drive to excessive smoke that may leave a residue, e.g. oil smoke, or tobacco smoke. Doing so could shorten the life of the drive lens.About opening or closing the disk cover/cleaning the drive lenszWhen the computer is on, be sure to use the drive power/open switch on the front right of the computer or perform the ejecting operation through Windows.When using B’s Recorder or B’s CLiP, you cannot open the cover using the drive power/open switch. Refer to “Writing to CDs (B’s Recorder/B’s CLiP)” in onscreen Reference Manual.zTo remove a disk when the disk cover cannot be opened or when the computer is powered off, insert a pointed object (e.g., the bent-out tip of a paper clip, or the tip of a ballpoint pen) into the emergency hole (A), and move in the direction of the arrow.zBe careful not to do any of the following when the disk cover is open:• Do not close the display.Be sure to close the display only after confirming the disk cover is closed. If the disk cover is open, the LCD may become damaged.• Never insert foreign objects such as paper clips into the DVD-ROM & CD-R/RW drive. This could cause it to malfunction.zThe disk cover can be opened up to an angle of 80 degrees. Do not force the cover open any further.If a hand or other object touches the disk cover and accidentally opens it wider than 80 degrees, pull it forward slowly until the stopper holds the cover in its proper posi-tion.zDo not leave the disk cover in the open position or touch the lens.Over time, dust may build up on the lens, or on a disk. This may result in a read or write malfunction.zInsert the disk securely. If the disk cover is closed without inserting the disk securely, it may become damaged.zDo not access the drive until after the disk cover is closed and the DVD-ROM & CD-R/RW drive indicator is off.zWe recommend cleaning the drive lens (B) with an air puffer used for camera lenses(Do not use any spray lens cleaning products.)Internal DVD-ROM & CD-R/RW drive connection inter-facezThe internal DVD-ROM & CD-R/RW drive uses a USB connection. When removing PC Cards, SD memory cards, or other USB devices, the internal DVD-ROM & CD-R/RW drive is displayed as one of the [USB Mass Storage Device]. The internal DVD-ROM & CD-R/RW drive cannot be removed, so do not select [Stop].While the DVD-ROM & CD-R/RW drive is being accessedzDo not open the DVD-ROM & CD-R/RW drive or move the computer while the DVD-ROM & CD-R/RW drive is being accessed.Doing so could cause the disk to shift position, which may damage the disk, or cause the DVD-ROM & CD-R/RW drive to malfunction.After running an application involving access to a disk, do not open the DVD-ROM & CD-R/RW drive until after the application has been closed.zDo not apply excessive force on the disk cover.zDo not operate the drive power/open switch.zDo not shock the computer by removing or inserting cables and cards, etc. This may result in a read or write malfunction.About recognition of mediazIt may take about 30 - 40 seconds for an image recorded to a rewritable media to be played back.](https://usermanual.wiki/Panasonic-of-North-America/9TGCF-W52.User-Manual-CF-W5/User-Guide-683558-Page-41.png)
![42OperationUseful InformationUse of Peripheral Devices/Internal Hard DiskPay strict attention to the following points to avoid damage to the computer, peripheral devices, cables, etc.Also, in addition to following this manual and the onscreen Reference Manual, carefully read the instruction manuals for the peripheral devices being used.zUse only peripheral devices that conform to the computer’s specifications.zConnect the devices properly, paying close attention to the condition and position of the connectors.zIf a connection cannot be made easily, do not apply undue force; check once more to confirm the condition and position of the connector (alignment of pins, etc.).zIf the connector has holding screws, fasten the screws firmly.zDo not carry the computer with cables attached, and do not pull on the cables force-fully.To Protect DataKeep the following.zDo not expose your computer to shock.Use care when handling your computer, shock may damage your hard disk or make your software applications, and data unusable.zDo not power off your computer while software applications are running or hard disk drive indicator is on. Properly shut Windows down from the [start] menu to avoid problems. (Îpage 24)zDo not place the computer close to objects that emit electromagnetic waves (magnets, electromagnetic bracelets, etc.).The data saved on the hard disk may be erased.zImportant data in the hard disk should be backed up regularly (e.g., in case of failures, unexpected data updates, erasure, etc.).Regular backups are recommended as a means of minimizing damages in the event of trouble.zUse the security function for all important data.(Î “Security Measures” and “SD Memory Card Security Function” in onscreen Ref-erence Manual)NOTEzYou may hear a mechanical “click” shortly after the hard disk indicator has turned off when there has been no input from a key or device operation, when the computer enters the standby or hibernation mode, or when Windows is shut down. This is the sound of the head shifting positions, to reduce power con-sumption or to protect the hard disk from shocks. This sound does not indicate a malfunction. When Changing Hard Disk PartitionszDuring reinstallation, you can divide the hard disk space into two partitions by exe-cuting: [Make two partitions, for the operating system and data, and reinstall Win-dows to the operating system partition].Confirm the minimum partition size required for the OS by checking the screen dur-ing the reinstallation.If you want to create three or more partitions, after creating an OS partition and a data partition during the reinstallation, start up Windows, erase the second partition once using [Disk Management], and then create the partitions in the open space.zWhen using the hard disk backup function, divide the hard disk into partitions when backup area is created (Îpage 56). If you divide the hard disk into partitions before creating the backup area, the backup area cannot be created.When Using Peripheral DevicesInternal Hard Disk](https://usermanual.wiki/Panasonic-of-North-America/9TGCF-W52.User-Manual-CF-W5/User-Guide-683558-Page-42.png)
![43TroubleshootingList of Error CodesWhen turning on the computer, if one of the following error codes or messages is displayed, follow the instructions shown below.If the problem persists, or if the error code or message displayed is not shown here, contact your technical support office.Error Code/Message Action0211: Keyboard error zIf an external keyboard is connected, disconnect these devices.0251: System CMOS checksum bad - Default configuration used An error has occurred in the memory that stores the Setup Utility settings. This error occurs when the memory content is changed through some inadvertent operation by a program or other function. zRun the Setup Utility and load the default values, then change the settings to the appropriate values as needed. (Îpage 29)zIf the problem persists, the internal clock battery may need to be replaced. Contact your technical support office.0271: Check date and time set-tings The date and time setting are incorrect.zSet the date and time correctly in the [Main] menu of the Setup Utility. (Îpage 31)zIf the problem persists, the internal clock battery may need to be replaced. Contact your technical support office.0280: Previous boot incomplete - Default configuration used Startup has failed repeatedly, so the Setup Utility settings have been returned to their default values, and the computer has been booted.zRun the Setup Utility and load the default values, then change the settings to the appropriate values as needed. (Îpage 29)Press <F2> to Setup zWrite down the error details and press the F2 key to run the Setup Utility. Con-firm the settings, and change the settings to the appropriate values as needed. (Îpage 29)Operating System not found The OS is not properly installed on the floppy disk or the hard disk that you are trying to boot from.zIf the computer cannot be booted from the floppy disk, check the floppy disk drive to ensure that the disk is in fact bootable, and change it to another if not.zIf the computer cannot be booted from the hard disk, confirm whether the hard disk is properly recognized in the [Information] menu of the Setup Utility. (Îpage 31)• If the hard disk is recognized (“xx GB” is displayed), perform the reinstal-lation procedure. • If the hard disk is not recognized (“none” is displayed), contact your technical support office.zIf a device is connected to the USB port, disconnect the device, or run the Setup Utility and set [Legacy USB Support] in the [Advanced] menu to [Dis-able]. (Îpage 32)](https://usermanual.wiki/Panasonic-of-North-America/9TGCF-W52.User-Manual-CF-W5/User-Guide-683558-Page-43.png)
![44TroubleshootingDealing with Problems (Summary)When a problem occurs, refer to this page. The “Reference Manual” also contains detailed information. If a problem appears to be related to a software application, read the software related manual. If you still cannot troubleshoot the problem, contact Panasonic technical support office. You can use the PC Information Viewer to check the computer’s usage status. (Î “Dealing with Problems” in onscreen Reference Manual)Problems with Starting Up, Shutting Down, and Standby and Hibernation ModeThe computer does not power on/The battery indicator is not litzCheck that the AC adaptor or a fully-charged battery pack is correctly con-nected.zReconnect the AC adaptor or battery pack.zCheck that the battery pack latch (the manually operated latch for locking or unlocking) is in the locked position ( ), and is firmly locked in position.zIf an additional RAM module has been inserted, remove the RAM module and turn on the computer again. If the computer turns on when the RAM module is removed, there may be a problem with the RAM module. • Power off your computer, check that the RAM module is the recom-mended module, and insert it correctly. • Confirm the specifications for the RAM module.For details regarding the RAM module, refer to "Expanding Memory" (Îpage 27) or "Specifications" (Îpage 62). The computer does not start up zIf there is a peripheral connected, remove the peripheral.• If there are USB devices connected, set [Legacy USB Support] to [Dis-able] in the [Advanced] menu of the Setup Utility. • If the computer starts when the peripheral is removed, there may be a problem with the peripheral. Consult the peripheral manufacturer.zUsing the following procedure, start up in Safe Mode, and check the error details.ATurn on the computer, and when the [Panasonic] boot screen disappears (after entering the password*1 if one is set) hold down the F8 key.BRelease the key when the Windows Advanced Options Menu appears, and with the Ï key or the Ð key, select [Safe Mode], then press the Enter key.Follow the onscreen instructions.*1 Supervisor Password or User Password set with the Setup UtilityzWhen the power indicator is lit, after sliding the power switch for at least four seconds to turn off, turn on again.zRestore the Setup Utility's settings to their default values.zIf an additional RAM module has been inserted, remove the RAM module and turn on the computer again. Refer to item 4 in "The computer does not power on/The battery indicator is not lit" above.There is a beep sound, and either "Extended RAM Module Failed" or "Standard RAM Failed" appearszIf "Extended RAM Module Failed" appears, the RAM module is not correctly inserted. Turn off the computer, check that the RAM module is a recom-mended module, then insert it correctly.zIf "Standard RAM Failed" appears, contact your technical support office.Cannot log on to Windows with the SD memory cardzSince the Windows user name and password are not set correctly on the SD memory card, log on from the SD memory card is not possible.Enter the Windows user name and password without using the SD memory card.After logging on to Windows, set the same user name and the password on the SD memory card and Windows, using the following operation:• Change the setting of the SD memory card side by [SD Card Setup]For how to make the change, refer to "SD Memory Card Security Function" (Î "SD Memory Card Security Function" in onscreen Reference Manual).[Executing Battery Recalibration] screen is displayedzWhen Windows is shut down during the Battery Recalibration procedure, if you select [Cancel] in the [End Program] screen, Windows shutdown is aborted. In this case, Battery Recalibration will begin the next time the com-puter is started. To start up Windows, turn off the computer by sliding the power switch, and then turn it back on again.](https://usermanual.wiki/Panasonic-of-North-America/9TGCF-W52.User-Manual-CF-W5/User-Guide-683558-Page-44.png)
![45TroubleshootingCannot boot from internal DVD-ROM & CD-R/RW drivezCheck to make sure that the bootable CD is set properly.zRun the Setup Utility, and confirm the following settings.• [Legacy USB Support] is set to [Enable] in the [Advanced] menu.• [CD/DVD Drive Power] is set to [On] in the [Main] menu.• [USB CDD] is the first device shown in [Boot priority order] in the [Boot] menu.zBootable CD created using B’s Recorder in the CF-W2 and CF-Y2 series cannot be used on this computer. If you want to share bootable CD with those series, create a new bootable CD.zWhen an external CD/DVD drive is connected, you cannot boot from the internal DVD-ROM & CD-R/RW drive. "Remove disks or other media. Press any key to restart" is displayedzCheck whether a floppy disk not allowing system booting is inserted in the floppy disk drive. If it is inserted, remove, then press any key.zIf a USB device is connected, remove the USB device, or set [Legacy USB Support] to [Disable] in the [Advanced] menu of the Setup Utility. zIf after all the checks, the same message still appears, there may be a prob-lem with the hard disk.Perform the reinstallation procedure and return the hard disk to its condition at the time of purchase. (Îpage 50)Windows startup is slow zRestore the Setup Utility's settings to their default values.*1zIf you install resident software after purchasing this computer, disable the resident software.zThis problem may be eliminated by adding more memory.*1*1 The processing speed depends on the application software used, so this operation may not cause the processing speed to increase.The computer does not enter standby or hibernation modezIf a peripheral is connected, first remove the peripheral, then enter the standby or hibernation mode. If this still fails to enter standby or hibernation mode, restart the computer.zIt may take a minute or two to enter standby or hibernation mode. Wait for a moment.zThe computer may not enter standby mode properly and seems to be fro-zen in the mode that the computer is communicating via the modem. When you cannot execute operations, slide the power switch for four seconds or more to forcibly turn your computer off.zWhen the internal LCD is closed, the computer may not enter system standby or system hibernation mode.*2In order to activate standby or hibernation, set [Touch Pad] to [Disable] in the [Main] menu of the Setup Utility. *2 Functions that cause the computer to automatically enter standby or hibernation mode after a certain time interval has passed.zAt the time of purchase, the computer is set so that the computer cannot enter standby or hibernation mode if a disk formatted with B’s CLiP is inserted into the DVD-ROM & CD-R/RW drive (while the icon is dis-played on the notification area).Right-click the icon and click [Eject] to remove the disk.The computer does not resume from standby or hibernation modezOne of the following operations may have been carried out.• In standby mode, the AC adaptor or battery pack was disconnected, or a peripheral was connected or disconnected.• The power switch was slid for four seconds or more to forcibly turn off the computer.Slide the power switch to turn on the computer. Data not saved is lost.zIf the [CD/DVD Drive Power] is set to [Off] in the [Main] menu of the Setup Utility, it may take about few seconds to resume from hibernation mode while a disk is set in the DVD-ROM & CD-R/RW drive. Wait for a moment.Problems with Starting Up, Shutting Down, and Standby and Hibernation Mode](https://usermanual.wiki/Panasonic-of-North-America/9TGCF-W52.User-Manual-CF-W5/User-Guide-683558-Page-45.png)
![Dealing with Problems (Summary)46TroubleshootingThe computer does not power off (Windows does not shut down)zIf a peripheral is connected, disconnect it, and then shut down.If it is possible to shut down when the peripheral is disconnected, then there may be a problem with the peripheral. Consult the peripheral manufacturer.zAlso check the items in "No response". (Îpage 48)zIf it is no longer possible to shut down Windows after installing application software, click [start] - [Control Panel] - [Add or Remove Programs], and remove the installed application.If it is possible to shut down when the application is removed, then consult the application software manufacturer.zCheck a disk error using the following procedure:AClick [start] - [My Computer], right-click [Local Disk(C:)] and click [Properties].BClick [Tools] - [Check Now].CIn [Check disk options], add the checkmark for [Automatically fix file system errors] and [Scan for and attempt recovery of bad sec-tors], and click [Start].The time taken to check the disk depends on the settings in [Check disk options].If the disk check does not solve the problem, perform the reinstalla-tion procedure and return the hard disk to its condition at the time of purchase. (Îpage 50)Problems with Passwords and MessagesEven after entering the password, [Type your password] is displayed againzThe computer may be in “ten-key” mode.If lights up, press the NumLk key to disable the ten-key mode, and then input (Îpage 15).zThe computer may be in Caps Lock mode.If lights up, press the CapsLock key to disable the Caps Lock mode, and then input (Îpage 15).[Enter Password] is displayed zInput your Supervisor Password or User Password. If you have forgotten it, contact your technical support office.When resuming from the standby or hibernation mode, [Enter Password] does not appearzEven when a password has been set in the [Security] menu of the Setup Utility, and [Password on boot] is set to [Enable], [Enter Password] does not appear when the computer resumes from the standby or hibernation mode. Set the Windows password with the following procedure, and make input of the Windows password required.AClick the account to change in [start] - [Control Panel] - [User Accounts] and set the password.BAdd the checkmark for [Prompt for password when computer resumes from standby] in [Control Panel] - [Performance and Maintenance] - [Power Options] - [Advanced].When the administrator password is forgottenzCheck whether you have created a password reset disk.• If you have:A message is displayed when you fail to correctly enter the password. Follow the message's instructions and set the password again.• If you have not:Perform the reinstallation procedure and return the hard disk to its condi-tion at the time of purchase, then set up Windows and reset the pass-word.Windows does not start up and num-bers or messages appearzThis is a system startup error. Refer to "List of Error Codes" (Îpage 43)zIf “Remove disks or other media. Press any key to restart” is displayed: Îpage 45Problems with Starting Up, Shutting Down, and Standby and Hibernation Mode](https://usermanual.wiki/Panasonic-of-North-America/9TGCF-W52.User-Manual-CF-W5/User-Guide-683558-Page-46.png)
![47TroubleshootingProblems with DisplayScreen is too dark or becomes darkerzPress the Fn+F2 key. This makes the screen lighter.zIf the screen becomes darker after disconnecting the AC adaptor:The computer has different set brightness levels for when the AC adaptor is connected and for when it is not connected. If you press the Fn+F2 key to increase the brightness when the AC adaptor is not connected, this bright-ness is maintained, and determines the brightness next time the AC adap-tor is disconnected.(Making the display brighter shortens the battery operating time.)An afterimage appears (e.g., the key green, red, and blue dots remain on the display) or there are dots not dis-playing the correct colorszIf an image is displayed for a prolonged period of time, an afterimage may appear. This is not a malfunction. The afterimage will disappear when a dif-ferent screen is displayed.zHigh-precision and advanced technologies are used in the production of color liquid crystal displays (color LCDs). Therefore, if 0.002% or less of the picture’s elements either fail to light or remain constantly lit (that means that more than 99.998% of the elements are functioning properly), this is not considered a defect.Nothing is displayed on the screen zCheck if the power-saving mode is active.• If the power indicator is lit:The display is turned off. Press a key with no independent effect, such as the Ctrl key or the Shift key.Do not use a key that may make a selection (Enter, Space, Esc, Y, N, numeric keys, and so on).• If the power indicator is blinking or is not lit:The standby mode or hibernation mode is entered. Slide the power switch.zThe display destination may be set to the external display.Try changing the display destination by pressing the Fn+F3 key.If you want to switch the display destination repeatedly by pressing the Fn+F3 key, make sure that the display destination has switched com-pletely each time before pressing the Fn+F3 key again.zThe screen may become darker. Press the Fn+F2 key to make the screen brighter.There is an afterimage zDisplay a different screen.If the same screen is displayed for a long time, this may leave an afterim-age.The screen becomes disordered zThe screen display may become distorted if the resolution or number of col-ors is changed, or if an external display is connected or disconnected while the computer is operating. Restart the computer.Switching between internal and external displays does not workzThe display destination cannot be switched while a video such as an MPEG file and a DVD video are playing. Stop playing the video before switching the display destination.A blue background appears on the screen with the MPEG image or DVD VideozDid you open the DVD-ROM & CD-R/RW drive or remove the disk while it was operating?Insert the removed disk, and close the disk cover.The LCD brightness changes a few times when the AC adaptor is dis-connectedzIf [Intel(R) Display Power Saving Technology] is active, the LCD brightness changes automatically. (Î "Computing on the Road" in onscreen Refer-ence Manual).Image colors are not reproduced as expected when displaying photo-graphs or other imageszWe recommend removing the checkmark from [Intel(R) Display Power Sav-ing Technology]. (Î "Computing on the Road" in onscreen Reference Man-ual).](https://usermanual.wiki/Panasonic-of-North-America/9TGCF-W52.User-Manual-CF-W5/User-Guide-683558-Page-47.png)
![Dealing with Problems (Summary)48TroubleshootingNothing appears on the external dis-play, or the display is not correctzCheck that the external display cables are correctly connected.zCheck that the external display is turned on.zCheck that the external display settings are correct.zWhen an external display not compatible with the power-saving mode is used with the computer, the display may not function correctly when the computer enters the power-saving mode. In this case, turn on the external display again.However, in the case of some external displays, the screen display may be distorted or the mouse cursor may not be properly displayed depending on the settings. In this case, try setting the number of colors, screen area (res-olution), and refresh rate to smaller values.To use both the external display and the internal LCDzConnect the external display, then press the Fn + F3 key to switch the dis-play.If this does not switch the display, use the following procedure.AClick [start] - [Control Panel], from the [See Also] area click [Other Control Panel Options], then click [Intel(R) GMA Driver for Mobile] - [Devices]. BClick the display destination, and click [OK].• When the screen is displayed to a simultaneous display: [Intel(R) Dual Display Clone]• When Extended Desktop mode is set: [Extended Desktop] zWhen [Command Prompt] is set to "Full Screen" by pressing the Alt + Enter key, the screen is displayed on one of the displays only. Press the Alt + Enter key to return to the window display.zSimultaneous display cannot be used until Windows startup is complete (during Setup Utility, etc.).Problems with Operation during UseSome applications may not work properlyzWhen switching to a different user with the Fast User Switching function, the following problems may occur:• Some applications may not work properly.• Key combination with the Fn key may not work.• It may not be possible to set the settings of the display.• The wireless LAN cannot be used. <Only for models with wireless LAN function>• The B’s CLiP icon will no longer be shown on the notification area and CD-RW disk cannot be written.In this case, log off all users without using Fast User Switching function, and try the operation once more. If the problem persists, restart the com-puter.zSome software applications installed after the time of purchase are not compatible with Windows XP Service Pack 2. Refer to software maker’s homepage or other sources.No response zIs there an input screen (e.g., password input screen at startup) hidden behind another window? Use the Alt+Tab key to check for other windows being displayed.zPress the Ctrl+Shift+Esc key to open Task Manager and close the soft-ware application which is not responding.zAfter sliding the power switch for at least four seconds to turn off the com-puter, turn on again.If Windows runs correctly, but the application software does not start, click [start] - [Control Panel] - [Add or Remove Programs] and remove the failing application software, then reinstall the application software.Problems with Display](https://usermanual.wiki/Panasonic-of-North-America/9TGCF-W52.User-Manual-CF-W5/User-Guide-683558-Page-48.png)
![49TroubleshootingProblems with BatteryThe battery indicator is lights red zThe battery level is very low (the charge is approx. 9% or less).zConnect the AC adaptor. You can use the computer when the indicator light is orange. If you do not have an AC adaptor, save your data and power off your computer. After replacing the battery pack with a fully charged one, turn your computer on again.The battery indicator is blinking zIf blinking red:Quickly save your data and power off your computer. Remove the battery pack and disconnect the AC adaptor, then connect them again. If the prob-lem persists, contact your technical support office. The battery pack or charging circuit may be defective.zIf blinking orange:• Battery cannot be recharged temporarily because the internal tempera-ture of the battery pack is outside the acceptable temperature range for recharging. Your computer can be used normally in this state. Once the range requirement is satisfied, charging begins automatically.• Software applications and peripheral devices (USB devices, etc.) are con-suming too much power. Exit the software applications currently running. Once the range requirement is satisfied, charging begins automatically.The battery indicator is flashing zThe battery is recharging. If [Battery Charging Indicator] in [Main] menu of the Setup Utility is set to [Flashing], the indicator will alternately become lighter and darker.Problems with Onscreen Reference ManualThe Reference Manual is not dis-playedzIs Adobe Reader installed?If you have uninstalled Adobe Reader, install using the following proce-dures.ALog on to Windows with the administrator authority.BClick [start] - [Run], input [c:\util\reader\AdbeRdr70_enu_full.exe], then click [OK].Install Adobe Reader by following the instructions on the screen.CUpdate Adobe Reader to its latest version.If your computer is connected to the Internet, start up Adobe Reader and click [Help] - [Check for updates now...].Reinstalling B’s Recorder/B’s CLiPWhen reinstalling, you will be asked for a serial numberzInput the following serial number.B’s Recorder: B’s CLiP:Problems with Expanding MemoryYou do not know the available RAM moduleÎpage 62To check if the additional RAM mod-ule has been installed successfullyzIf the installation is successful, the main memory and total RAM module size appears in the [Information] menu of the Setup Utility.zIf the RAM module is not confirmed:• Turn the computer off and reinsert the RAM module.• Confirm the recommended specifications.Regarding the RAM module, refer to “Expanding Memory" or "Specifica-tions."](https://usermanual.wiki/Panasonic-of-North-America/9TGCF-W52.User-Manual-CF-W5/User-Guide-683558-Page-49.png)
![51Troubleshooting1Connect the AC adaptor.Do not interrupt the reinstallation procedure before completion, for example by turning off the computer or pressing the Ctrl + Alt + Del key, as this may prevent Windows from starting up, or may cause data to be lost so that the reinstallation procedure cannot be executed.2Change the settings in the Setup Utility.Make the following settings.zReturn settings to the status at the time of purchase.zChange settings to enable startup from DVD-ROM & CD-R/RW drive.If you change the settings from that at the time of purchase, we recommend that you make a note of the settings that are changed.ATurn on the computer, and press the F2 key while [Panasonic] boot screen is displayed.The Setup Utility will start up.zIf the password has been set, enter the Supervisor Password, and press the Enter key.BPress the F9 key.At the confirmation message, select [Yes] and press the Enter key.CSelect the [Boot] menu, then select [USB CDD] and press the F6 key until [USB CDD] is at the top of [Boot priority order].DPlace the Product Recovery DVD-ROM into the DVD-ROM & CD-R/RW drive.zWhen the disk cover does not open:[CD/DVD Drive Power] has been set to [Off] in the [Main] menu. Per-form the following procedure.Press the F10 key. At the confirmation message, select [Yes] and press the Enter key. (The computer will restart)Press the F2 key while [Panasonic] boot screen is displayed.Place the Product Recovery DVD-ROM, and execute step E.EPress the F10 key. At the confirmation message, select [Yes] and press the Enter key.The Setup Utility will close, and the computer will restart.zIf the password has been set, enter the Supervisor Password, and press the Enter key.3Use the Product Recovery DVD-ROM to execute reinstalla-tion.APress the 1 key to execute [1. [Recovery]].(All of the screens below are only examples.)Reinstalling](https://usermanual.wiki/Panasonic-of-North-America/9TGCF-W52.User-Manual-CF-W5/User-Guide-683558-Page-51.png)
![Reinstalling Software52Troubleshooting<When the hard disk backup function has been enabled>When the message [The Backup function has been enabled. If [Recovery] or [Erase HDD] is executed, the Backup function will be disabled, and your Backup data will be lost.] appears, press the Y key.BIf you agree, press the 1 key.If you do not agree, press the 2 key.zIf you press the 1 key the menu will be displayed.zIf you press the 2 key the reinstallation will be canceled.CMake a selection from the menu.zTo return the computer to its status at the time of purchasePress the 1 key.zTo divide the hard disk into two partitions (for OS and data)Press the 2 key.Enter the basic partition size (GB) for the operating system installation and press the Enter key.• You can cancel this operation by pressing the 0 key.• The data partition size is the remainder after subtracting the basic partition size. (Data partition: 1 GB or more)Maximum settable size differs depending on the model.zTo reinstall Windows in the first partition without changing the partition configurationPress the 3 key.• The first partition size must be 6 GB or more of the hard disk size. Reinstallation cannot be performed with a small partition size.<When the hard disk backup function has been enabled>If you select [1] or [2], the message [The Backup function has been enabled. If [Recovery] is executed, the Backup function will be disabled, and your Backup data will be lost.] appears. In this case, press the Y key.If the message [Computer must be rebooted in order to execute [Recovery]] appears, press the R key.DAt the confirmation message, press the Y key.zThe operation of reinstallation for the hard disk starts automatically. (The operations take about 20 minutes.)zDo not interrupt the reinstallation procedure before completion, for example by turning off the computer or pressing the Ctrl + Alt + Del key, as this may prevent Windows from starting up, or may cause data to be lost so that the reinstallation procedure cannot be executed.](https://usermanual.wiki/Panasonic-of-North-America/9TGCF-W52.User-Manual-CF-W5/User-Guide-683558-Page-52.png)
![53TroubleshootingEThe message "[Recovery] is complete" will be displayed. Remove the Prod-uct Recovery DVD-ROM, and press any key to shut down the computer.4Return the Setup Utility settings to their default values.Return the Setup Utility to its settings at the time of purchase to ensure proper setup of Windows.ATurn on the computer, and press the F2 key while [Panasonic] boot screen is displayed.The Setup Utility will start up.If the password has been set, enter the Supervisor Password, and press the Enter key.BPress the F9 key.At the confirmation message, select [Yes] and press the Enter key.CPress the F10 key.At the confirmation message, select [Yes] and press the Enter key.The Setup Utility will close, and the computer will restart.5Setup Windows. (Îpage 18)6Run the Setup Utility and change the settings where neces-sary.(The Setup Utility settings will return to their default values. Even the security settings with the exception of the password(s), date and time will return to their default values.)7If you can connect to the Internet, perform Windows Update.(Î “To Update this Computer to its Latest Version” in onscreen Reference Manual)Changing the drive letterYou can change the drive letter for the DVD-ROM & CD-R/RW drive or hard disk drive by the following steps.zThe C drive cannot be changed.zDVD-ROM & CD-R/RW drive is the D drive at the time of purchase.zWe recommend that you make these changes before installing applications.AClick [start] - [Control Panel] - [Performance and Maintenance] - [Admin-istrative Tools] and double-click [Computer Management].BClick [Disk Management] on [Storage].CRight-click the partition of the hard disk or the name of the DVD-ROM & CD-R/RW drive and click [Change Drive Letter and Paths...].DClick [Change].EClick [Assign the following drive letter] and select the new drive letter, and then click [OK].FAt the confirmation message, click [Yes].](https://usermanual.wiki/Panasonic-of-North-America/9TGCF-W52.User-Manual-CF-W5/User-Guide-683558-Page-53.png)
![56Important InformationHard Disk Backup FunctionThe hard disk backup function creates a backup area (storage area) on the hard disk. This area is to back up (store) hard disk contents or restore backed up contents to their original locations.By backing up the data on your hard disk to a backup area, you can protect your data from loss or damage resulting from operational errors or other factors. Also, you can back up or restore hard disk contents using this computer alone, without having to use other media or peripheral devices.At the time of purchase, the hard disk backup function is disabled. If you follow the procedure below to create a backup area, the hard disk backup function will be enabled, and you will be able to back up your data. Note, that once the backup function has been enabled, you will have to perform the reinstallation procedure to disable it again.PreparingzYou will need the Product Recovery DVD-ROM (included).zDisconnect or remove all peripheral devices (including a mini port replicator), SD memory cards. Take care to disconnect the USB floppy disk drive, as the backup area may not be created properly while these devices are connected.zBe sure the AC adaptor is connected to the computer.zIf the hard disk malfunctions, it will be impossible to read the data stored on it. We recommend that you also back up important data to a location other than the hard disk (an external hard disk or other media).zExecute a disk error check using the following procedure.ADisplay [Local Disk(C:) Properties].Right-click [Local Disk(C:)] in [start] - [My Computer], and click [Proper-ties].BClick [Check Now] from [Tools].CIn [Check Disk Local Disk], click [Start] without adding a checkmark beside any of the items.If a message is displayed indicating that there is an error in the disk, dis-play [Check Disk Local Disk], and add a checkmark for [Automatically fix file system errors] and [Scan for and attempt recovery of bad sectors], click [Start], and check for disk errors again.PrecautionszTo divide the partition, make the selection when the backup area is created (Îpage 57 step G).zA backup area cannot be created if the hard disk is already divided into several par-titions. Return the computer to its condition at the time of purchase (one partition only), and create the backup area.zIf the partition configuration is changed (partitions created, size changed, etc.) after the backup area has been created, it will no longer be possible to execute the backup function. To change the configuration, it is necessary to return the computer to its condition at the time of purchase, and then create the backup area again.zThe hard disk backup function will only work for the internal hard disk. This function does not work with an external hard disk.zBackup and restore functions will not operate if the hard disk has been damaged.zDo not use the NTFS file system compression function, as this may result in insuffi-cient capacity of the backup area.zThe hard disk backup function does not accommodate dynamic disks. Do not con-vert the hard disk to a dynamic disk.NOTEzRegarding backup areaThe hard disk backup function cannot back up or restore data properly if there is a problem with the hard disk when the data is backed up or restored. Note that if an error occurs while data is being restored, whether as a result of an unexpected malfunction, incorrect operation, or other reason, the data in the hard disk (data before restoration) may be lost.Matsushita Electric Industrial Co., Ltd. will bear no responsibility for any damages suffered by the user (including loss of data) as a result of the use of this function.Before Using a Hard Disk Backup Function](https://usermanual.wiki/Panasonic-of-North-America/9TGCF-W52.User-Manual-CF-W5/User-Guide-683558-Page-56.png)
![57Important Information• Requires availability of at least half of the entire hard disk. Without sufficient space available, the backup area cannot be created.• When the backup area is created, the usable hard disk capacity will be reduced to less than half.• The backup area cannot be accessed from Windows. For this reason, backed up data cannot be copied to CD-R or other removable disk media.• When the hard disk backup function is executed, data in the backup area will be overwritten. If newly created or edited data is backed up later, data stored previously in the backup area will be lost.ATurn the computer on, and press the F2 key while [Panasonic] boot screen is displayed.The Setup Utility will start up.If a password has been set, enter the Supervisor Password.You cannot register [Boot] menu with a User Password.BSelect the [Boot] menu, then select [USB CDD] and press the F6 key until [USB CDD] is at the top of [Boot priority order].CPlace the Product Recovery DVD-ROM into the DVD-ROM & CD-R/RW drive.• When the disk cover does not open:[CD/DVD Drive Power] has been set to [Off] in the [Main] menu. Perform the following procedure.Set [CD/DVD Drive Power] to [On]. Press the F10 key. At the confirmation message, select [Yes] and press the Enter key.The computer will restart.Press the F2 key while [Panasonic] boot screen is displayed.Place the Product Recovery DVD-ROM, and execute step D. DPress the F10 key.At the confirmation message, select [Yes] and press the Enter key.The computer will restart. If [Enter Password] is displayed during the fol-lowing procedures, input the Supervisor Password or the User Password.This screen should appear.EPress the 3 key to execute [3. [Backup]].CAUTIONzWhen dividing the hard disk into partitions Do not execute [1. [Recovery]] to divide the hard disk into partitions. The hard disk backup function cannot be enabled after the hard disk has been partitioned. Use step G to divide the hard disk.FAt the confirmation message, press the Y key.GSelect how to divide the hard disk from the menu.<To create a backup area and enable the backup function without dividing the hard disk>Select [1].Create a Backup Area](https://usermanual.wiki/Panasonic-of-North-America/9TGCF-W52.User-Manual-CF-W5/User-Guide-683558-Page-57.png)
![Hard Disk Backup Function58Important Information<To create a backup area and divide hard disk into two partitions, for OS and data>Select [2], enter the partition size (GB), and press the Enter key. • You can cancel this operation by pressing the 0 key.• The data partition size will be the maximum settable size less the number entered above.The maximum settable size will differ depending on models.HAt the confirmation message, press the Y key.The backup area is then created.IWhen the message [You must reboot in order to enable the Backup func-tion.] appears, remove the Product Recovery DVD-ROM, and press any key to restart the computer. The computer is restarted, then the backup process will begin.JWhen the message [[Backup] is complete] appears, press the Ctrl + Alt + Del key to restart the computer.zDo not press the Ctrl + Alt + Del key until the message is displayed.KAfter logging on to Windows, a message will appear advising that a new device has been installed and that the computer must be restarted to enable the settings. Select [Yes] to restart the computer.NOTEzThe [Boot] menu in the Setup Utility is set to start up from the DVD-ROM & CD-R/RW drive. Change this setting if necessary.zThe next time the backup or restore functions are executed, follow the proce-dure for [Backing Up and Restoring Data].CAUTIONzBefore executing the backup function, execute a disk error check (Îpage 56).zDo not interrupt the backup or restore functions before completion, for example by turning off the power or pressing the Ctrl + Alt + Del key, as this may pre-vent Windows from starting up, or may cause data to be lost so that the backup and restore functions cannot be executed.ATurn the computer on, and press the F2 key while [Panasonic] boot screen is displayed.The Setup Utility will start up.If a password has been set, enter the Supervisor Password or the User Password.Backing Up and Restoring Data](https://usermanual.wiki/Panasonic-of-North-America/9TGCF-W52.User-Manual-CF-W5/User-Guide-683558-Page-58.png)
![59Important InformationBSelect [Exit] menu, then select [Hard Disk Backup / Restore] and press the Enter key.At the confirmation message, select [Yes], and press the Enter key.CSelect the operation to be executed from the menu.<To back up hard disk contents to the backup area>(1) Press the 1 key to execute [1. [Backup]].(When dividing the hard disk into two partitions, select the backup method at next screen.)(2) At the confirmation message, press the Y key.The backup process will begin.<To restore backed up contents to the hard disk>(1) Press the 2 key to execute [2. [Restore]].(When data is backed up in two partitions, select the restore method at next screen.)(2) At the confirmation message, press the Y key.The restore process will begin.NOTEzThe time required to complete the backup or restore process differs depending on the data volume.DWhen the message [[Backup] is complete] or [[Restore] is complete] is displayed, press the Ctrl + Alt + Del key to restart the computer.• If the backup or restore process was interrupted before completion, for example if the power was turned off, execute the process again.• When a new device is installed and a message appears advising that the computer must be restarted to enable the settings, select [Yes] to restart the computer.CAUTIONzWhen the hard disk backup function has been enabled, the backed up data will not be erased even if a commercial data erasing utility or similar software is used to erase all data from user-accessible area. You can use the hard disk data erase utility included in this computer (Îpage 60) to erase all data on the hard disk, including backed up data. Use this hard disk data erase utility before disposing of or transferring ownership of this computer.zOccasionally, the message [#1805 cannot write image file] will be displayed, and the backup function will be interrupted. If this error occurs, execute the backup function again. After this, if the backup function is completed properly, then there is no problem in the hard disk.zTo disable the hard disk backup functionPerform the reinstallation procedure. All data in the backup area and the hard disk will be erased.Conduct steps 1-3 C for [Reinstalling Software] (Îpage 51). Select [1] or [2] to execute the reinstallation at the screen for executing the reinstallation.• When [1] is selected, the hard disk backup function can be disabled.• When [2] is selected, the hard disk backup function can be disabled, but in this case, because the hard disk has been divided into partitions, the hard disk backup function cannot be re-enabled (Îpage 42).• When [3] is selected, the hard disk backup function cannot be disabled.](https://usermanual.wiki/Panasonic-of-North-America/9TGCF-W52.User-Manual-CF-W5/User-Guide-683558-Page-59.png)
![60Important InformationWhen Disposing of This ComputerWhen disposing of or transferring ownership of this computer, erase all data on the hard disk in order to prevent the theft of hard disk data. Even if you delete data or initialize the hard disk through normal Windows commands, data can still be read using special software. In order to erase all data, either have the data erased by a specialist (at a charge) or use the hard disk data erase utility (included). (Note that this hard disk data erase utility does not guarantee that data will be completely erased.)Also, note that if you transfer ownership of this computer without deleting commercial software that you have installed to the hard disk, you may be in violation of the licensing agreement for that software.This computer is equipped with a utility for erasing hard disk data.When disposing of or transferring ownership of this computer, erase all data on the hard disk in order to prevent the theft of hard disk data following the steps below.Before Erasing DataPreparingzYou will need the Product Recovery DVD-ROM (included).Confirm the followingszBe sure the AC adaptor is connected until the procedure is completed.zThis utility can only be used for internal hard disk. It cannot be used to erase data from external hard disks.zThis utility cannot erase data from damaged disk.zThis utility cannot erase data for specific partitions.zAfter executing this utility, the computer cannot be booted from the hard disk.zThe backup area and the data in the backup area will be erased.Completely Erasing DataATurn the computer on, and press the F2 key while [Panasonic] boot screen is displayed. The Setup Utility will start up.If the password has been set, enter the Supervisor Password, and press the Enter key. The [Boot] menu cannot be changed with User Pass-word.BSelect the [Boot] menu, then select [USB CDD] and press the F6 key until [USB CDD] is at the top of [Boot priority order].CPlace the Product Recovery DVD-ROM into the DVD-ROM & CD-R/RW drive.zWhen the disk cover does not open:[CD/DVD Drive Power] has been set to [Off] in the [Main] menu. Per-form the following procedure.Set [CD/DVD Drive Power] to [On]. Press the F10 key.At the confirmation message, select [Yes] and press the Enter key.The computer will restart.Press the F2 key while [Panasonic] boot screen is displayed.The Setup Utility will start up.Hard Disk Data Erase UtilityThe hard disk data erase utility erases data using an overwriting method, but there is a possibility that due to malfunc-tions or other operational errors, data may not be completely erased. There are also specialized devices that may be able to read data that has been erased using this method. If you need to erase highly confidential data, we recom-mend that you contact a company that specializes in this process. Matsushita Electric Industrial Co., Ltd. will bear no responsibility for losses or damages suffered as a result of the use of this utility.](https://usermanual.wiki/Panasonic-of-North-America/9TGCF-W52.User-Manual-CF-W5/User-Guide-683558-Page-60.png)
![61Important InformationSet the Product Recovery DVD-ROM, and execute step D.DPress the F10 key.At the confirmation message, select [Yes] and press the Enter key.The Setup Utility will close, and the computer will restart.If [Enter Password] is displayed during the following procedure, enter the Supervisor Password or User Password.<When the hard disk backup function has been enabled>When the message [The Backup function has been enabled...] appears, press the Y key.EWhen the message "Select a number" is displayed, press the 2 key and perform [2. [Erase HDD]].(You can cancel this operation by pressing the 0 key.)The confirmation message will be displayed.<When the hard disk backup function has been enabled>When the message [The Backup function has been enabled...] appears, press the Y key.When the message [Computer must be rebooted in order to execute [Erase HDD]] appears, press the R key.FPress the Y key.Hard Disk Data Erase Utility will start.GWhen [<<<Start menu>>>] is displayed, press the Enter key.HThe approximate time required for erasing data will be displayed.Press the Space key.IAt the confirmation message, press the Enter key.The operation of erasing the hard disk starts.zIf necessary, the “hard disk data erase” operation can be cancelled after it has begun by pressing the Ctrl+C key. If the operation is cancelled before being completed, a part of data will not be erased.JThe message "Hard disk data has been deleted" will be displayed. Remove the Product Recovery DVD-ROM, and press any key to shut down the computer.zIf a problem occurred during the operation, an error message will be displayed.](https://usermanual.wiki/Panasonic-of-North-America/9TGCF-W52.User-Manual-CF-W5/User-Guide-683558-Page-61.png)
