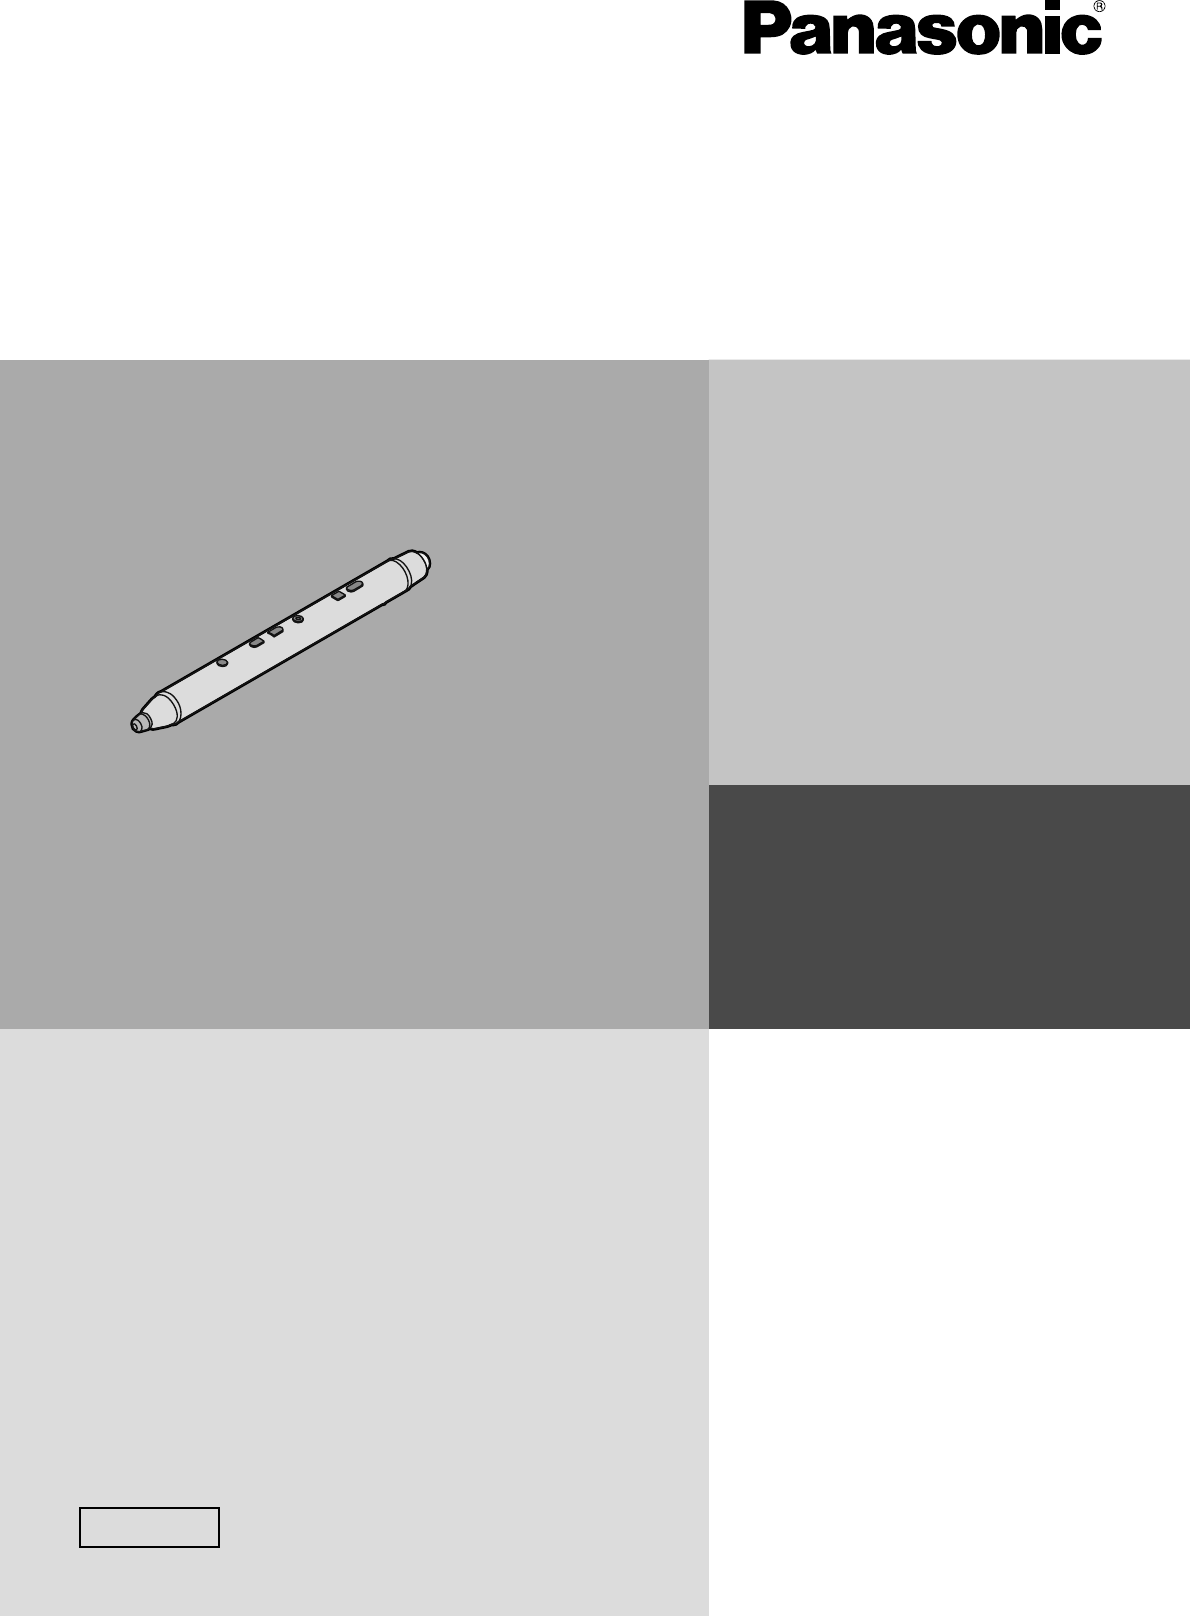
Panasonic of North America DKBDP13 Electronic Pen for Interactive Plasma Display User Manual
Panasonic Corporation of North America Electronic Pen for Interactive Plasma Display
User Manual
Model No.
TH-50PB2U
TH-65PB2U
Operating Instructions
Electronic Pen Operations
Interactive Plasma Display
Before connecting, operating or adjusting this product,
please read these instructions completely.
Please keep this manual for future reference.
English
Electronic Pen Model No. DKB-DP13
Electronic Pen Adapter Model No. SSR-RFNANO
Charger Model No. N0HZZY000003
2
Introduction
Abbreviations
Windows® refers to the Microsoft® Windows® operating system.
Windows® XP refers to the Microsoft® Windows® XP operating system.
Windows Vista® refers to the Microsoft® Windows Vista® operating system.
Windows® 7 refers to the Microsoft® Windows® 7 operating system.
Windows® 8 refers to the Microsoft® Windows® 8 operating system.
Trademarks
Microsoft, Microsoft• ® .NET Framework, Windows, Windows XP, Windows Vista, Windows RT, Windows 7,
Windows 8, PowerPoint, and Internet Explorer are either registered trademarks or trademarks of Microsoft
Corporation in the United States and/or other countries.
IBM is a trademark of International Business Machines Corporation in the United States, other countries, or •
both.
Intel and Intel Core 2 are trademarks of Intel Corporation in the U.S. and other countries.•
All other trademarks identifi ed herein are the property of their respective owners.•
System Requirements
Computer IBM PC/AT compatible
CPU Intel Core 2 processor or later
Operating System
Windows XP Service Pack 3 (except for Media Center and Tablet PC
versions)
Windows Vista Service Pack 2 (except for Starter and Home Basic
versions)
Windows 7 Service Pack 1 (except for Starter and Home Basic versions)
Windows 8 (except for Windows RT version)
Language: Japanese, English, German, French, Italian, Spanish, Chinese,
and Russian
Interface USB 2.0
Memory 32-bit version: 2GB or more
64-bit version: 4GB or more
Disk Space
250MB or more of free space
(Additional 1.5 GB may be necessary for installing Microsoft .NET
Framework.)
Display
Resolution: XGA (1024x768) - FHD (1920x1080)
Colors: 32 bit or more
• Only the primary monitor is supported when using multiple monitors.
Web Browser Internet Explorer 8.0 or later
Microsoft .NET Framework .NET Framework 3.5.1 or later
Microsoft Offi ce PowerPoint PowerPoint 2007, PowerPoint 2010 (32bit)
Note
Even when the system requirements are met, the Interactive Plasma Display response may be delayed or •
the electronic pen may malfunction if other applications, anti-virus software, etc. are active.

3
FCC and IC STATEMENT
This equipment has been tested and found to comply with the limits for a Class B digital device, pursuant to Part
15 and Part 18 of the FCC Rules. These limits are designed to provide reasonable protection against harmful
interference in a residential installation. This equipment generates, uses and can radiate radio frequency energy
and, if not installed and used in accordance with the instructions, may cause harmful interference to radio
communications. However, there is no guarantee that interference will not occur in a particular installation. If this
equipment does cause harmful interference to radio or television reception, which can be determined by turning
the equipment off and on, the user is encouraged to try to correct the interference by one or more of the following
measures:
Reorient or relocate the receiving antenna.•
Increase the separation between the equipment and receiver.•
Connect the equipment into an outlet on a circuit different from that to which the receiver is connected.•
Consult the Panasonic Service Center or an experienced radio/TV technician for help.•
FCC Caution: To assure continued compliance, follow the attached installation instructions and use only
shielded interface cable when connecting to computer or peripheral devices. Any changes or modifi cations
not expressly approved by Panasonic Corp. of North America could void the user’s authority to operate this
device.
Under Industry Canada regulations, this radio transmitter may only operate using an antenna of a type and
maximum (or lesser) gain approved for the transmitter by Industry Canada. To reduce potential radio interference
to other users, the antenna type and its gain should be so chosen that the equivalent isotropically radiated power
(e.i.r.p.) is not more than that necessary for successful communication.
FCC Declaration of Conformity
Models: DKB-DP13, SSR-RFNANO, N0HZZY000003
Responsible Party: Panasonic Corporation of North America
One Panasonic Way, Secaucus, NJ 07094
Contact Source: Panasonic System Communications Company of North America
Panasonic North America 3 Panasonic Way 7D-6, Secaucus NJ 07094
Telephone:+1-855-772-8324
http://panasonic.com/business/fl at-panel-displays/
This device complies with Part 15 and Part 18 of the FCC Rules and all applicable IC RSS standards. Operation
is subject to the following two conditions: (1) This device may not cause harmful interference, and (2) this device
must accept any interference received, including interference that may cause undesired operation.

4
Table of Contents
Safety Precautions ..............................................................................................5
Requests regarding handling .............................................................................7
Accessories Supplied .........................................................................................8
Names and Uses of the Parts .............................................................................9
How to Charge ...................................................................................................11
About Electronic Pen ........................................................................................13
Using Electronic pen with “Easy WhiteBoardˮ ..............................................15
Using Electronic Pen with Panasonic WhiteBoard Software ........................19
Registering Electronic Pen ...............................................................................20
Maintenance and Adjustment ..........................................................................21
Disposal .............................................................................................................25
Specifi cations ....................................................................................................28
5
Safety Precautions
Danger
About Prohibition of Heating
■ Do not put Electronic Pen in fi re, heat it or leave it in places that can get hot.
Electronic Pen contains a lithium-ion polymer rechargeable battery, so heating may result in combustion or
rupture that may cause burns or fi re.
Warning
About Prohibition of Disassembly
■ Do not disassemble or modify the Electronic Pen.
When disposing this product, refer “Disposal” (page 25) and disassemble properly for removing the rechargeable
battery.
About Charging
■ Use the included charger cable and charger for charging.
Charging with other devices may result in battery leakage, heating or rupture.
■ Do not use the included charging cable and charger for uses other than charging Electronic Pen.
Doing so may result in heating, combustion or damage.
About Electronic pen, Electronic pen adapter, Charger
■ Do not use near medical equipment.
(Do not bring into a surgery room, intensive care unit, critical care unit, etc.)
Electromagnetic waves generated by this device can affect equipment, and can cause equipment to malfunction.
■ Do not use near automatic doors, smoke detectors and other automatically controlled equipment.
Electromagnetic waves generated by this device can affect equipment, and can cause equipment to malfunction.
■ Use at least 22 cm (9 in.) away from pacemakers.
Electromagnetic waves generated by this device can affect the operation of pacemakers.
■ Keep the pen tip, eraser tip, clamper, electronic pen adapter, optical attachment and screws out of reach
of children to prevent swallowing.
■ You must not aim the optical attachment lens at the Sun or an intense light source, or look at the Sun
or an intense light source through the optical attachment lens. To do so may cause vision loss. Never
look at the Sun or other intense light sources through the lens. Also, if you aim the lens at the Sun or an
intense light source, the lens could focus light to a fl ammable item and cause a fi re.
Caution
■ Do not drop, exert pressure on, or step on the Electronic Pen.
Doing so may damage the Electronic Pen, which may result in injury.
■ Be careful of the tips of the Electronic Pen.
Accidentally inserting the tip of the Electronic Pen into the eye may cause injury.
■ Always keep the Electronic Pen in a cool, dry place.
Failure to do so may cause fi re or electric shock.
■ Do not bring magnetically susceptible objects (e.g. cash card, passbook) close to the charger
The magnetic line from the charger may make magnetically susceptible objects unusable.

6
Precautions
Any changes or modifi cations not expressly approved by the party responsible for compliance could void the user’s
authority to operate this device.
Other Information
Usage Note
Operating the electronic pen and the electronic pen adapter near electrical appliances may cause interference.
Move away from the electrical appliances such as TVs, radios, cordless phone, or wireless devices.
MEDICAL
Consult the manufacturer of any personal medical devices, such as pacemakers, to determine if they are
adequately shielded from external RF (radio frequency) energy. (The unit operates in the frequency range of
2.405 GHz to 2.480 GHz, and the power output level is 1 milliwatts.) Do not use the unit in health care facilities
if any regulations posted in the area instruct you not to do so. Hospitals or health care facilities may be using
equipment that could be sensitive to external RF (radio frequency) energy.
No responsibility will be taken by our company with respect to consequences resulting from the use,
damage or both of the equipment.

7
Requests regarding handling
Do not press on the pen tip and eraser tip of the electronic pen more strongly than necessary.•
If there is surface contamination of the electronic pen, wipe it off with a soft cloth.•
For heavy contamination, wipe it off with a soft cloth dampened with a mild soap solution after squeezing water
out of the cloth, and then dry the surface with a soft, dry cloth. Ingress of water droplets may cause a failure.
Do not drop the electronic pen or the optical attachment because it may get broken or malfunction.•
Do not use the pen tip or eraser tip if foreign material is adhering to it or if it is deformed or damaged.•
Doing so may dirty or scratch the screen.
Be careful not to hit or scratch with the pen tip of electronic pen because it is protruding. Also note that •
the electronic pen will not function correctly if the pen tip cannot receive the light from the display.
Do not use the electronic pen for other purposes than operating the Interactive Plasma Display.•
Do not aim the optical attachment lens at the Sun or other intense light sources. To do so may cause a •
malfunction.
When optical attachment, detached from the electronic pen, is not in use, keep it in such a manner as to •
prevent dust from entering inside.
Do not use optical attachment for any electronic pen other than the supplied electronic pen.•
Do not put scissors, a screwdriver or any other metal object in the charger.•
Doing so may result in damage of the charger.
During inductive charging, please leave more than 20cm from the charger.•
8
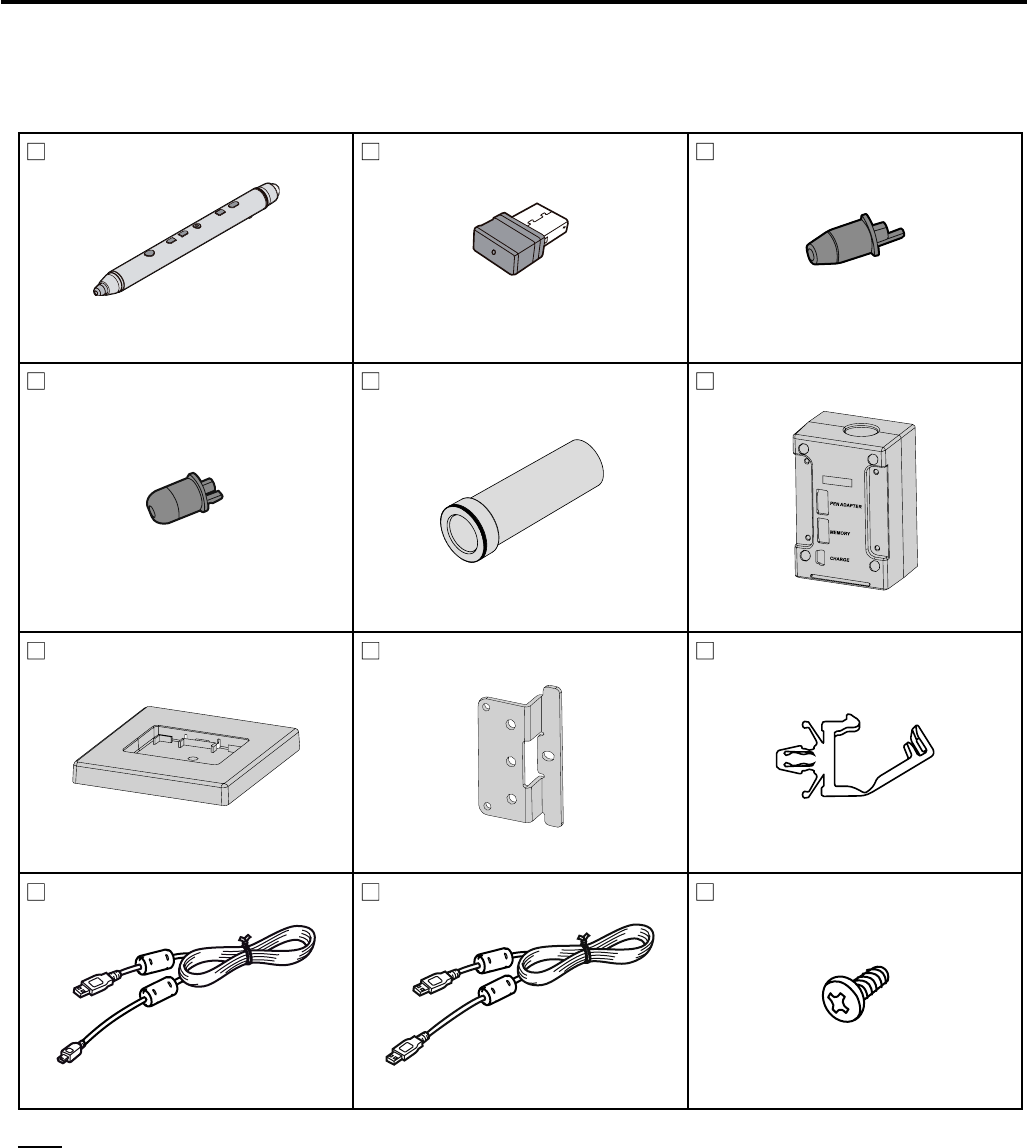
Accessories Supplied
Check that all of the following items are included with your Interactive Plasma Display.
In the event that an item is missing, please contact your dealer.
List of Accessories (Electronic Pen set)
Electronic pen (1) Electronic pen adapter (1) Pen tip (1)
Model No. DKB-DP13
Parts No. N2FZ00000025
Model No. SSR-RFNANO
Parts No. N5EDZ0000010 TKKL55591
Eraser tip (1) Optical attachment (1) Charger (1)
TO DISPLAY
TKKL55601 TGAD003 N0HZZY000003
Stand (1) Mounting plate (1) Clamper (1)
TMWX0841 TXFUW041JHJ TMME190
Charger cable (1) Cable (2) Screw (2)
K1HY05YY0098 K1HY05YY0099 XTV3+12GFJK
Note
Store the extra pen tip and eraser tip along with this operating instructions.•

9
Names and Uses of the Parts
Pen tip
Touch the screen with this part to draw something.
Pen tip cover
Select button
Press this button and then touch a character, picture or image with the pen tip to select it and move, scale,
rotate or delete it.*1
Plus button
Scale up an object or forward the page.
Minus button
Scale down an object or return the page.
Power button
Turn the power of the electronic pen on/off. To turn the power off, press and hold the button one second or
more. The Power Button lights as below according to the status of the electronic pen.
Off Power “off”
Lighting green Power “on”
Blinking green Low battery
Blinking green (rapid
blinking)
With optical attachment
inserted
Lighting red Charging
Blinking red Charging error
Blinking green and red
alternately
Registering the
electronic pen
Blinking orange and red
alternately
Unregistering
Lighting orange Unregistration completed
Charging port
Connect the included charger cable when charging.*2
*1 This button is not used if the electronic pen is used with the preinstalled “Easy WhiteBoard” software.
*2 It is not used if the electronic pen is charged with the charger.
10
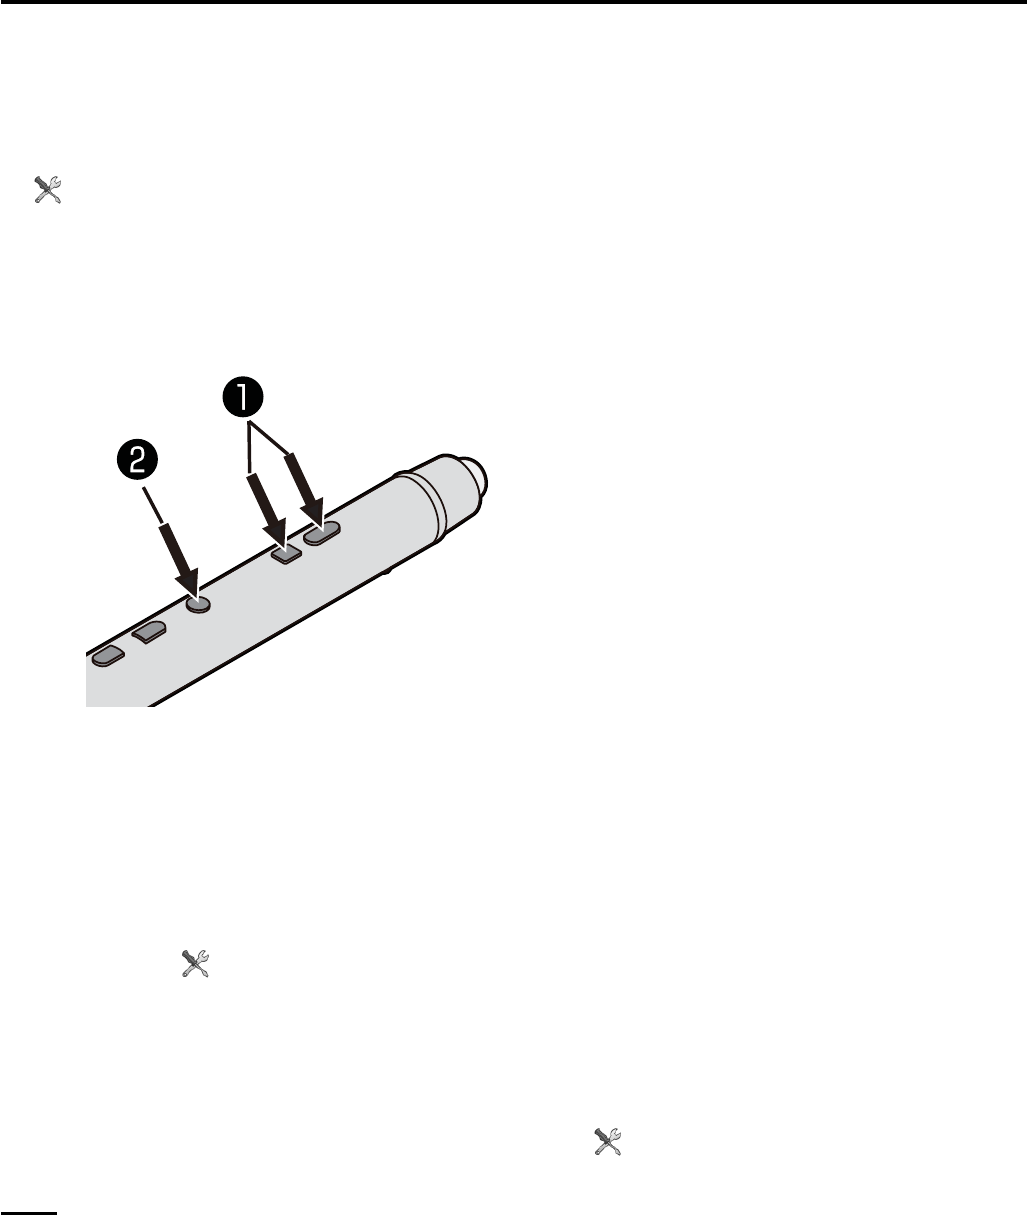
Remote erase button
During remote operation with the optical attachment attached, you can erase a drawn character or picture by
pressing the button and moving the electronic pen.
Remote draw button
During remote operation with the optical attachment attached, you can draw a character or picture by pressing
the button and moving the electronic pen.
Strap loop
Use it for attaching a strap.
Eraser tip cover
Eraser tip
Touch the screen with this part to erase a drawn character or picture.
Notice
Check that the power button is green when using the electronic pen.•
Using the electronic pen with the wireless module (ET-WM200U) connected may result in malfunction of the •
electronic pen due to radio wave interference as an example. In that case, set “WIRELESS LAN” to “OFF”
before using the electronic pen. (See Network Operations of the operating instructions)
Notes
When 30 minutes have passed without operation, the electronic pen automatically turns off. Press the •
power button again to turn on the power.
When performing desktop operations of a computer without starting Panasonic WhiteBoard Software, •
the pen tip serves as the left click of a mouse and select button as the right click of a mouse.
11
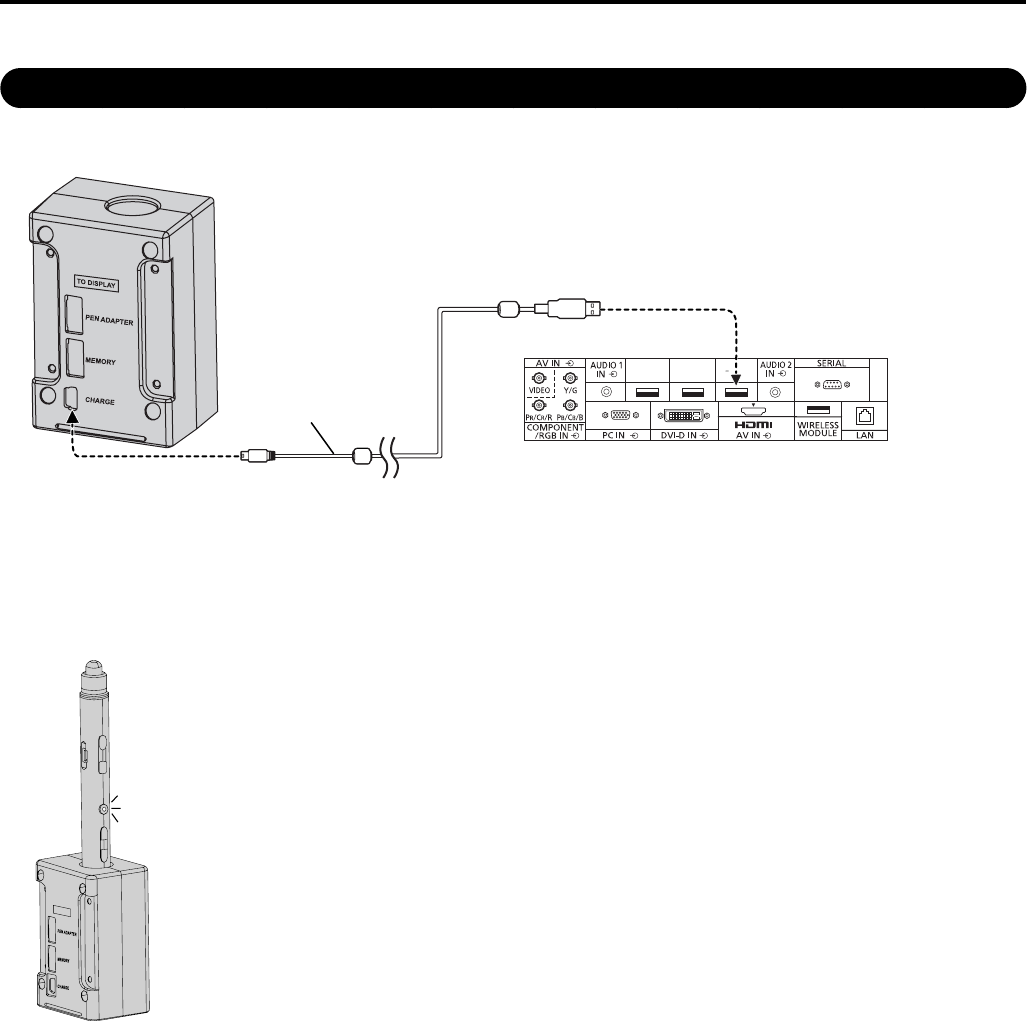
How to Charge
Charge the battery before use.
Charging with Charger
1. Connect the included charger and the display with the included charger cable.
PEN
ADAPTER
MEMORY
/(CHARGE) CHARGE
Connect to the CHARGE port
on the rear of the charger.
Charger cable
Connect to the CHARGE port
of the display
External input ports on the rear of the display
2. Turn the pen tip down and set the electronic pen in the charger
TO DISPLAY
The power button lights red and charging starts. When charging is •
completed, the power button lights green.
12
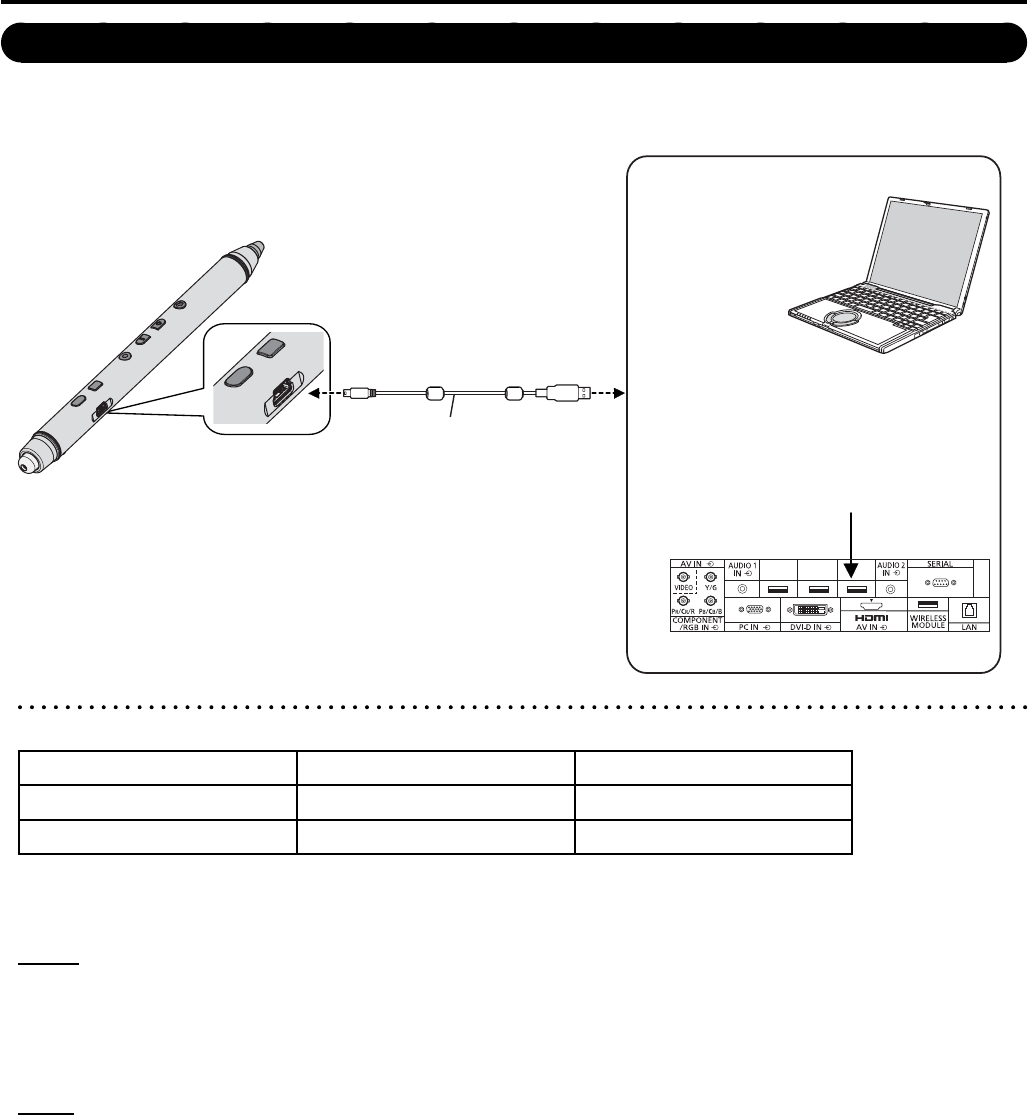
Charging with Charger cable
Connect the charging port of the electronic pen to the CHARGE or MEMORY/(CHARGE) port of the display or the
USB port of the computer with the included charger cable
The power button lights red and charging starts. (It turns off when charging is completed.)•
PEN
ADAPTER
MEMORY
/(CHARGE) CHARGE
Connect to the
charging port of the
electronic pen
External input ports on the rear of the display
Computer
Connect to the USB
port of the computer
Connect to the CHARGE or
MEMORY/(CHARGE) port of the
display
Or
Charger cable
■ Guide of charging time and duration time
Charging time Operation time
Charging with charger Approximately 4 h*1Approximately 5 h*2
Charging with charger cable Approximately 4 h*1Approximately 5 h*2
*1 The time to fully charge the empty battery.
*2 The duration time may become shorter depending on the condition of use.
Notice
Do not connect the charger cable to the WIRELESS MODULE port or PEN ADAPTER port of the display.•
When you store the electronic pen for a long period of time, avoid full charge*• 3 and turn the power off.
*3 The electronic pen is not fully charged if the power button lights red when the electronic pen is set in the
charger or connected to the charger cable.
Notes
It is possible to use the electronic pen even during charging with the charger cable.•
If you charge the electronic pen by connecting it to the display, turn the power of the display on or set the •
display to standby.
If you charge while the display is in standby, set the “STANDBY PEN CHARGING MODE” of the “TOUCH-•
PEN SETTINGS” to other than “OFF”. (See Display Operations of the operating instructions.)
The battery life is approximately 4 years when it is charged approximately 5 times in a day (note that the •
warranty period is one year).
If the operation time became substantially short even when charged correctly, it is considered as due to the
end of the battery life. (The battery life greatly differs depending on its use and storage conditions.)
13
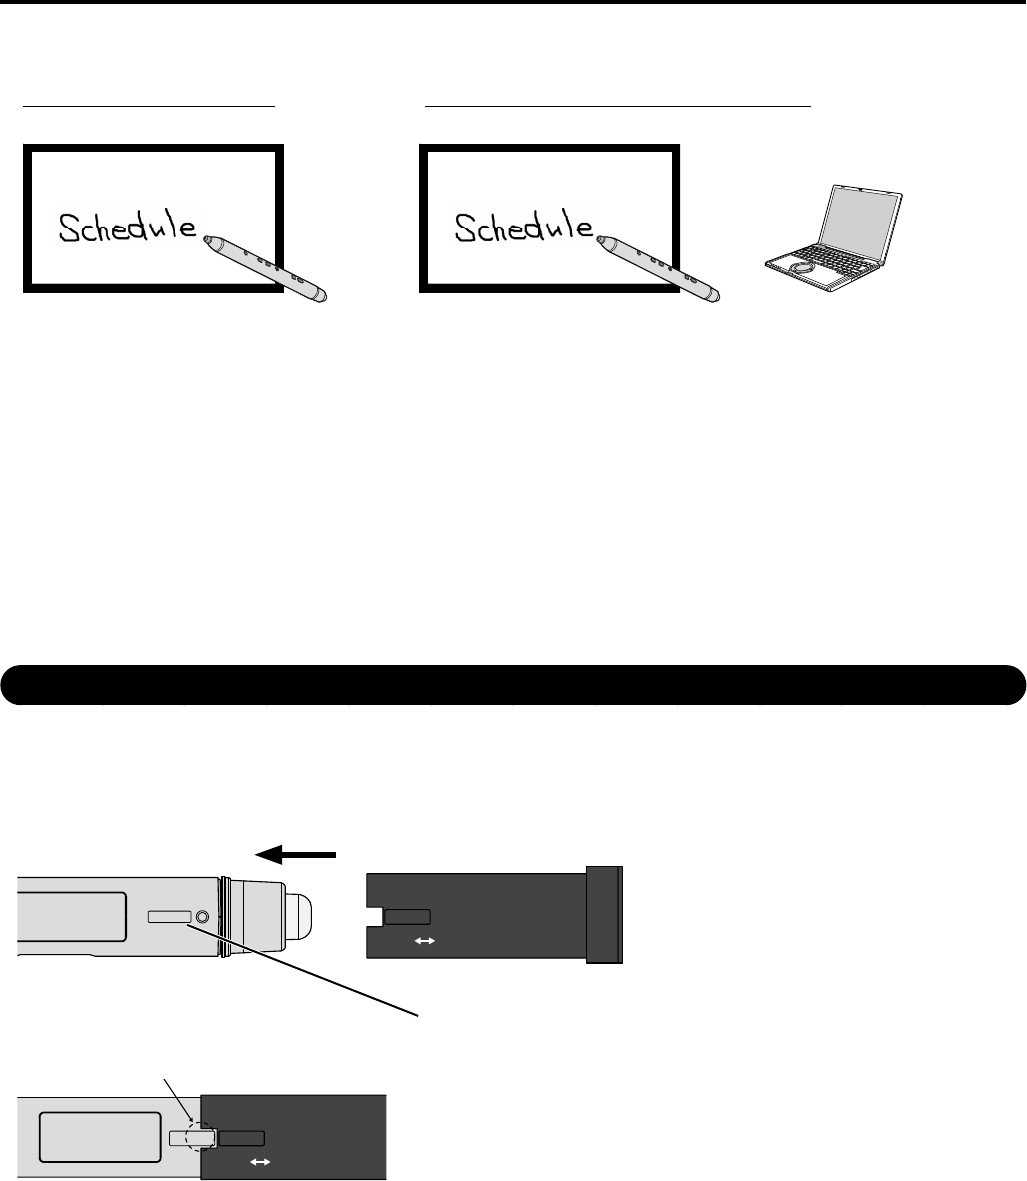
About Electronic Pen
The electronic pen can be used with Easy WhiteBoard preinstalled in the display or the included Panasonic
WhiteBoard Software. In addition, you can perform desktop operations of a computer without starting the software.
Using with Easy WhiteBoard
(See 15 page)
Using with Panasonic WhiteBoard Software
(See 19 page)
Handy drawing without a computer Rich functions
The following functions are possible with the electronic pen.
Drawing You can draw a character or picture by touching the screen with the pen tip of the electronic
pen.
Selecting* You can select a character or picture drawn with the electronic pen or an image imported
from a fi le.
Dragging* You can move the selected character or picture or the image imported from a fi le using the
electronic pen.
Desktop operation* You can operate the desktop functions shown on the screen or other software using the
electronic pen.
* Not available with the Easy WhiteBoard.
Remote Operation (Remote Pointer)
If you attach the included optical attachment to the electronic pen, you can draw, select or drag an object without
touching the screen with the electronic pen and also use the electronic pen as a laser pointer.
1. Set the optical attachment to the eraser side of the electronic pen.
Align the positions for strap loop when setting.•
SET REMOVE
Strap loop position
Insert until the strap loop of the electronic pen fi ts the cutout of the optical attachment.•
SET REMOVE
The power button blinks green four times when the optical attachment is inserted or removed.•
2. Set “TOUCH-PEN MODE” of “TOUCH-PEN SETTINGS” in the display’s “SETUP” menu to “TOUCH &
REMOTE”.
See Display Operations of the operating instructions.
14
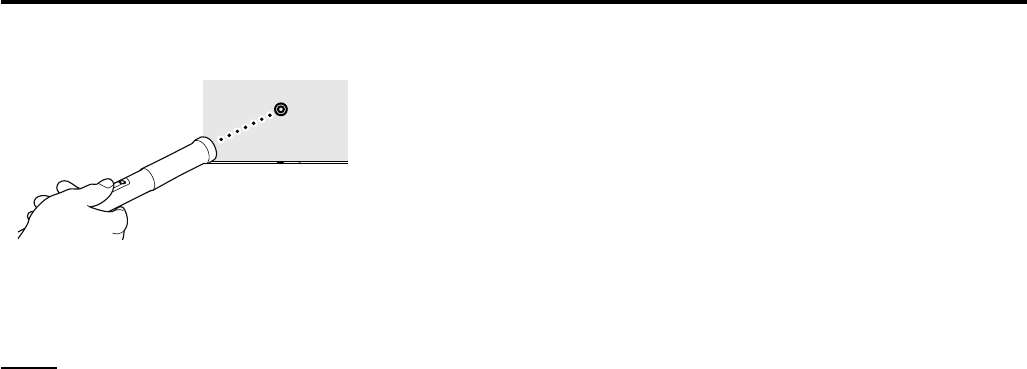
3. Point the tip of the optical attachment toward the display screen.
A pointer is displayed on the screen.•
During remote operation, you can draw a character or other object by moving the pointer with the remote draw •
button held down, and erase it by moving the pointer with the remote erase button held down.
The pointer can be changed with the menu of Panasonic WhiteBoard Software.•
Notes
The electronic pen can be used for drawing with its pen tip even when the optical attachment is attached. •
When you use the eraser, detach the optical attachment.
Display and the remote pointer are not far enough apart from each other, the on-screen pointer will be slightly •
shifted towards the screen edge, and, away from the location to which the remote pointer is actually pointing.
The pointer cannot be changed with Easy WhiteBoard.•
The hole on the optical attachment is used for tagging in order to prevent it from being lost. The electronic pen •
may slip from the optical attachment. Strap the optical attachment and do not swing it with the electronic pen
set in it.
15
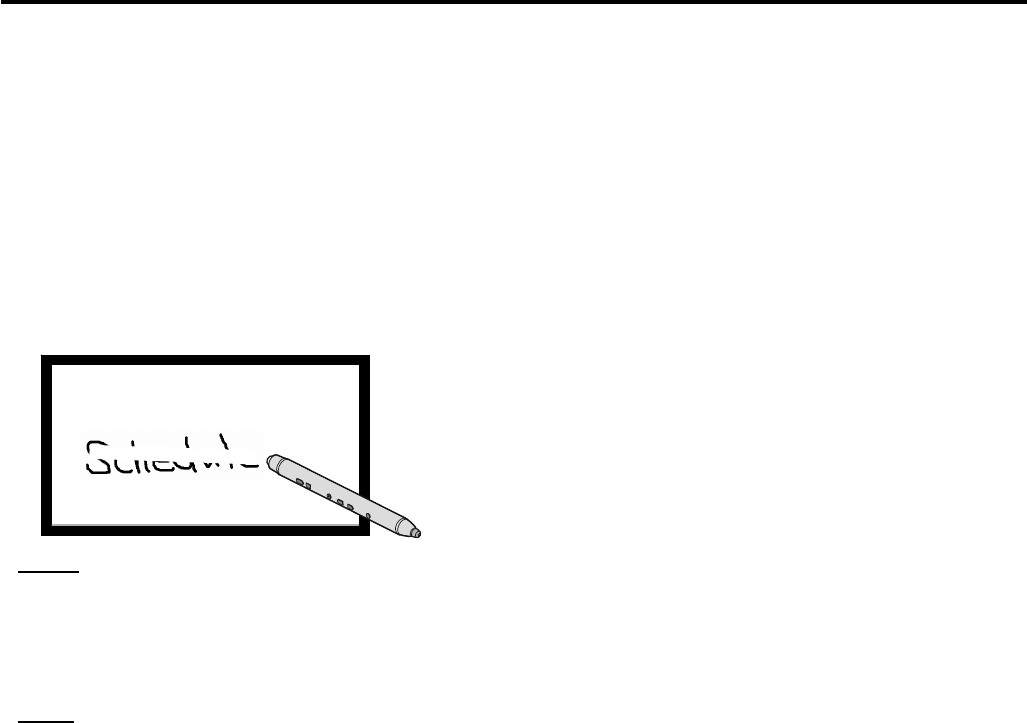
Using Electronic pen with “Easy WhiteBoardˮ
The “Easy WhiteBoard” software preinstalled in the display allows you to use the electronic pen without connecting
the display to a computer.
Preparation
1. Connect the PEN ADAPTER port on the rear (the side with the “TO DISPLAY” indication) of the charger to
the PEN ADAPTER port of the display, and the MEMORY port on the rear of the charger to the MEMORY/
(CHARGE) port of the display with the included cables
PEN
ADAPTER
MEMORY
/(CHARGE) CHARGE
External input
ports on the rear
of the display
Cable
Long
Long
Short
Short Cable
2. Connect the electronic pen adapter to the PEN ADAPTER IN port on the front of the charger, and the
recording medium compatible with USB2.0 to the MEMORY port on the front of the charger
PEN CHARGER
Electronic pen adapter
Recording medium compatible with
USB2.0
Note
Connect a recording medium when saving the drawn characters and other objects. (See 18 page)•
3. Register the electronic pen to the electronic pen adapter
See 20 page
4. Make the display settings to use the electronic pen
Make the setting of “TOUCH-PEN SETTINGS” in the “SETUP” menu of the display and select the input
See Display Operations of the operating instructions
5. Touch the display screen with the electronic pen
The main menu of Easy WhiteBoard is displayed.•
The WHITEBOARD input does not require this operation.•
Notice
When connecting the electronic pen adapter, recording medium and cables, make sure of the direction of their •
terminals and insert or remove them straight.
Notes
With Easy WhiteBoard, more than one electronic pen cannot be used simultaneously.•
Once the electronic pen is registered, reregistration is not necessary as long as it is not unregistered.•
16
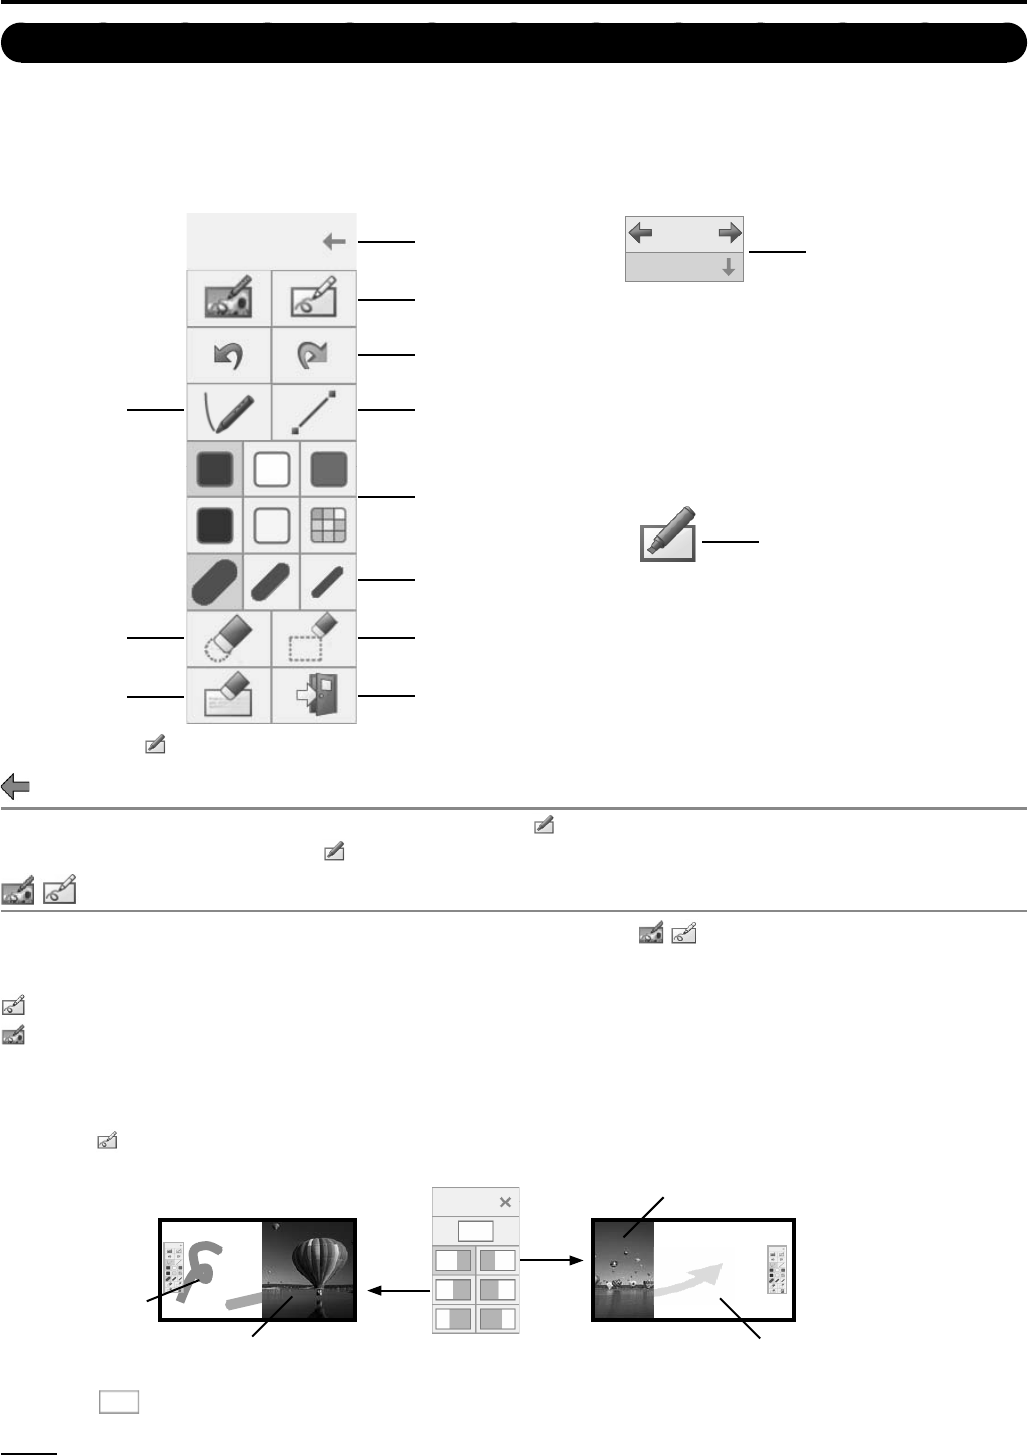
About Main Menu
When “WHITEBOARD FUNCTION” of the display is set to “ON”, selecting the WHITEBOARD input will display the
main menu of the preinstalled “Easy WhiteBoard” software. For other inputs than the WHITEBOARD input, touching
the screen with the electronic pen will display the menu.
The menu has various function buttons for changing the color and width of the marker and other controls.
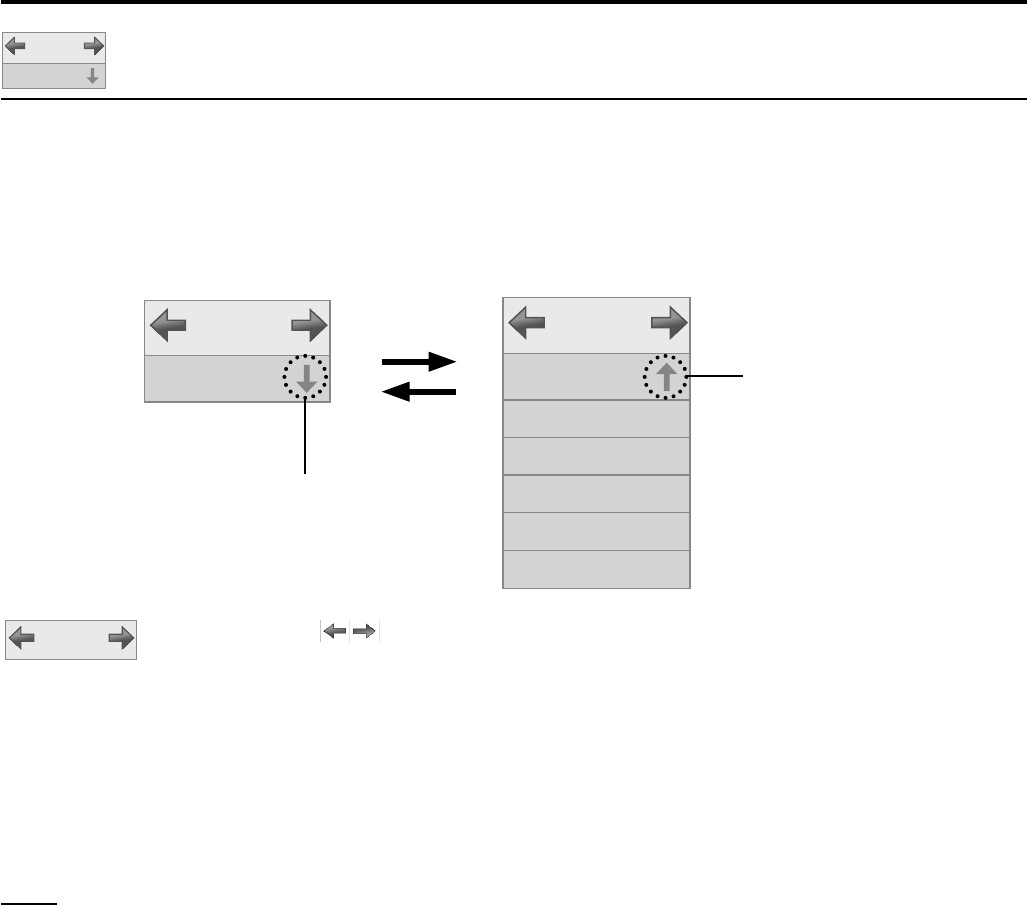
005 / 005
Page Menu
Page Menu*
* Displayed only when a
USB compatible recording
medium is connected.
Close the menu
Switch the mode
Undo/Redo
Straight lineMarker
Eraser
Erase all
Color
Width
Erase selected area
Exit
Main menu Page operation
menu
Menu display
tab
Display the main menu
Clicking the tab on the screen will display the menu on the side clicked.
Close the menu
Clicking “close the menu” closes the menu and displays the tab.
To display the menu again, click the tab.
Switch the mode
The software has two modes that are switched to each other by clicking when the main menu is started
from other inputs than WHITEBOARD. The characters drawn in each mode are not deleted even when the mode is
switched.
: WhiteBoard mode. An object will be drawn on the white background.
: Transparent mode. The image of each input will be displayed on the background.
When the input is switched, the drawn characters disappear once, but they will appear again when you touch the •
screen with the electronic pen.
■ Split screen display
Clicking in the WhiteBoard mode will display the submenu of split screen display, allowing you to display the image
of each input and the WhiteBoard mode screen on the split areas according to a clicked icon in the submenu.
WhiteBoard
mode screen
image of each
input
WhiteBoard mode
screen
image of each input
Clicking will return the screen to the full screen display of WhiteBoard mode.
Notes
Only the WhiteBoard mode is available in the WHITEBOARD input.•
Split screen display is not available in the WHITEBOARD input.•
17
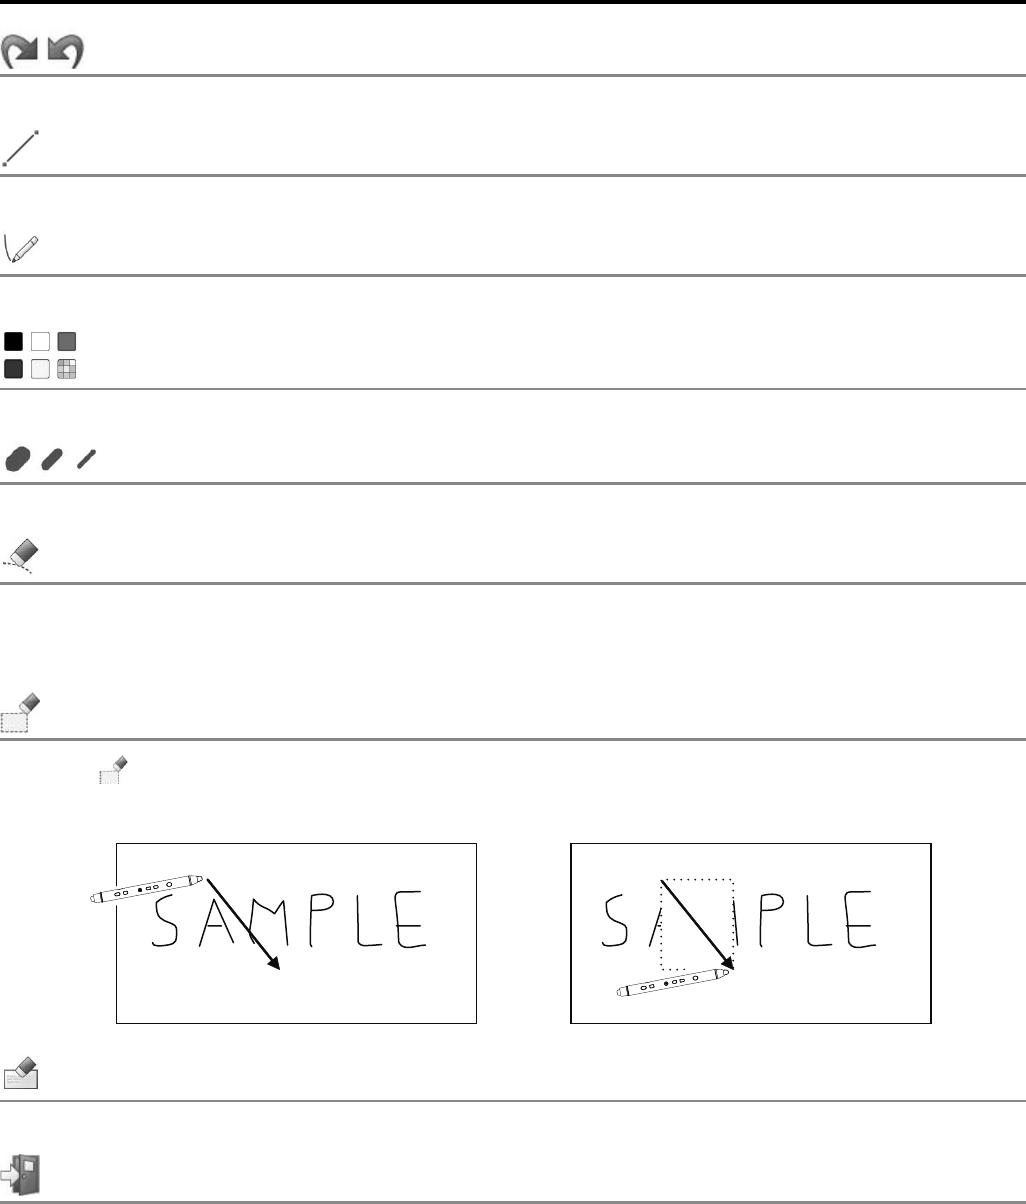
Undo/Redo
You can cancel drawing or other operation or recover the canceled operation only once.
Straight line
Draws a straight line.
Marker
Draws a free-form line such as a character and picture.
Color
Changes the color of the selected marker or the background color of the WhiteBoard mode.
Width
Changes the width of the selected marker.
Eraser
Erases a part of the character or other object drawn on the screen.
Some parts may be left in the surrounding area on the screen. Use the eraser again to ease them or erase the •
entire screen.
Erase selected area
If you click and then move the electronic pen in an oblique direction keeping it touched to the screen, an area
whose diagonal line corresponds to the oblique movement is selected and you can erase the character or other
object in the selected area.
Erase all
Erases all the characters or other objects drawn on the screen.
Exit the application
Exits the application. To restart it, touch the screen with the electronic pen.
18
005 / 005
Page Menu
Page Menu
The page menu is displayed when a USB compatible recording medium is connected.
In the page menu, you can save a screen with drawn characters or other objects in a recording medium or import
the drawing data saved in a recording medium as a page. Each page is managed as a fi le. A JPEG fi le and PING
fi le for internal processing are saved for each page and a page number will be refl ected to the fi le name. (Example:
When a page is recorded in the WhiteBoard mode, page 3 will be named as WB_003.JPG and WB_003.PNG and
page 5 as WB_005.JPEG and WB_005.PNG when saved.)
005 / 005
Page Menu
005 / 005
Page Menu
New page
Save
Save as a new page
Delete this page
Remove USB Memory
Click
Click
005 / 005 : Clicking
switches the pages of drawing data saved in a recording medium on the
screen. The left number is the current page and the right is the last page.
The total number of saved pages is not displayed.•
New page : Creates a new page.
Save : Overwrites and saves the current page.
Save as a new page : The current page is left as before drawing is made and the image with drawn objects is
saved as a new page.
Delete this page : The page currently displayed is deleted and the next page is displayed.
Remove USB Memory : A recording medium becomes ready to be removed. Always perform this operation
before removing a recording medium.
Notes
If a recording medium is not connected initially and then connected during drawing, the image currently drawn •
will be displayed as a new page.
The characters and other objects will be saved with the white background when drawn in the WhiteBoard mode •
or WHITEBOARD input, with the background of the image at the time of saving when drawn in the NETWORK
input (JPEG fi le), and with the black background when drawn in the other inputs.
The drawing in the White Board mode or WHITEBOARD input will be the smoothest and clearest.•
Format the recording medium with FAT or FAT32 on the computer before use.•
If drawing data in a recording medium is imported and writing is prohibited or there is no space for writing, •
“Viewing Mode” will be displayed below “Page Menu”.
19
Using Electronic Pen with Panasonic WhiteBoard Software
The electronic pen can be used with the included Panasonic WhiteBoard Software. Panasonic WhiteBoard Software
provides various functions including object selection and dragging.
Preparation
1. Connect the display to the computer
For connection of a computer and the display, see Display Operations of the operating instructions.
■ Before using the electronic pen, make the settings below on the display. For how to make the
settings, see Display Operations of the operating instructions.
Adjust “POS./SIZE” so that the screen of the computer can be correctly displayed on the screen of the •
display.
Set “TOUCH-PEN SETTINGS” in the “SETUP” menu of display.•
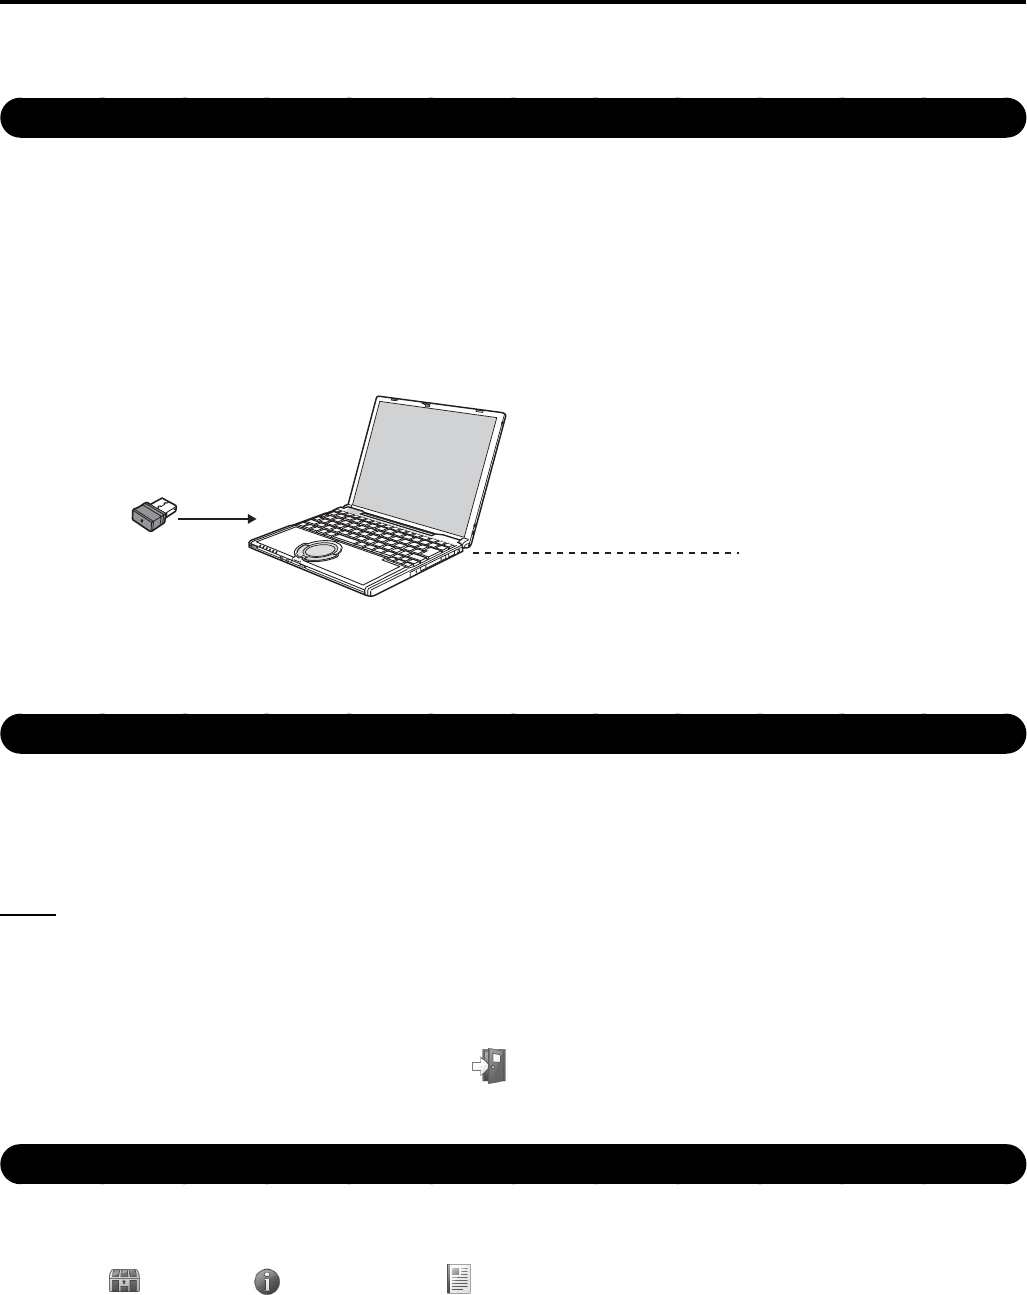
2. Connect the included electronic pen adapter to the USB port of computer.
Connect to the USB port
Computer
Connect to the display
3. Register the electronic pen to the electronic pen adapter.
See 20 page
* Once the electronic pen is registered, reregistration is not necessary as long as it is not unregistered.
Starting up Panasonic WhiteBoard Software
You do not have to install the Panasonic WhiteBoard Software since the software can be run directly on your
computer as an executable fi le.
1. Copy “WhiteBoardSoft” folder contained in the supplied CD-ROM to your computer desktop.
2. Double-click “WhiteBoard.exe” fi le in the copied “WhiteBoardSoft” folder with the left mouse button.
Notes
For more information on how to operate Panasonic WhiteBoard Software, see the instruction manual for •
Panasonic WhiteBoard Software. (see below)
Before running Panasonic WhiteBoard Software, always make sure that the screen resolution of your computer •
falls within the acceptable range set for Panasonic WhiteBoard Software.
For display placed in portrait orientation, rotate the computer screen display accordingly.*• 1
To exit Panasonic WhiteBoard Software, select • [Exit the application] in the main menu.
*1 Panasonic WhiteBoard Software cannot be used upright on Windows XP and Windows Vista.
Referring to the instruction manual for Panasonic WhiteBoard Software
To refer to the help information of Panasonic WhiteBoard Software, follow the procedure below.
1. Double-click “WhiteBoard.exe” fi le with the left mouse button to run Panasonic WhiteBoard Software.
2. Choose “Utility” → “Information” → “Operating Instructions” from the main menu*2.
*2 Select Detailed Menu for the main menu.
20
Registering Electronic Pen
To use the electronic pen, you need to register it to the electronic pen adapter.
Pairing Tool is used for the registration of the second and subsequent electronic pens.
The pairing tool can be started from “SETUP” of the display or the main menu of Panasonic WhiteBoard Software.
Only Step 3 and Step 4 needs to be performed when registering the fi rst electronic pen. Perform Step 1 onward to •
register a second, third or fourth electronic pen.
1. Select “PAIRING” of “TOUCH-PEN SETTINGS” in the “SETUP” menu of the display, or select
[Settings] → [Start Pairing Tool] from the main menu* of Panasonic WhiteBoard Software
The pairing tool will be started. Select [OK] when the confi rmation screen is displayed.•
2. Select [Pairing]
To stop registration, select [Close].•
3. Press and hold the remote draw button and remote erase button simultaneously () and press the
power button ()
The power button blinks green and red alternately.•
4. Bring the electronic pen to within 2 m from the electronic pen adapter (remove any obstacle between
them)
Registration will be completed in a second. When registration is completed, the power button lights green.•
If a registration error has occurred, the power button lights red for approximately one second. Turn off the •
electronic pen and perform registration again.
5. When registration of the electronic pen is completed, the pairing completion screen will be displayed.
Select [OK] or [Back].
■ To unregister the electronic pen
To unregister the electronic pen, select “PAIRING” of “TOUCH-PEN SETTINGS” in the “SETUP” menu of the
display, or select
[Settings] → [Start Pairing Tool] from the main menu* of Panasonic WhiteBoard Software
and select [Unpairing All].
During unregistration, the power button blinks orange and red alternately.•
When unregistration of the electronic pen is completed, the power button lights orange and the unpairing all •
completion screen is displayed. Select [OK].
When an electronic pen is unregistered, all of the registered electronic pens will be unregistered.•
■ Check the number of registered electronic pens
To check the number of current electronic pens registered, click [Settings] → [Start Pairing Tool] in
Panasonic WhiteBoard Software’s main menu*, and choose [Check Status].
Notes
No more than four electronic pens can be registered for one electronic pen adapter.•
The registered electronic pen can only be used on the registered electronic pen adapter.•
Electronic pens may malfunction if multiple displays are used close together.•
Turn off nearby displays when registering or unregistering electronic pens.•
* Select Detailed Menu for the main menu.
21
Maintenance and Adjustment
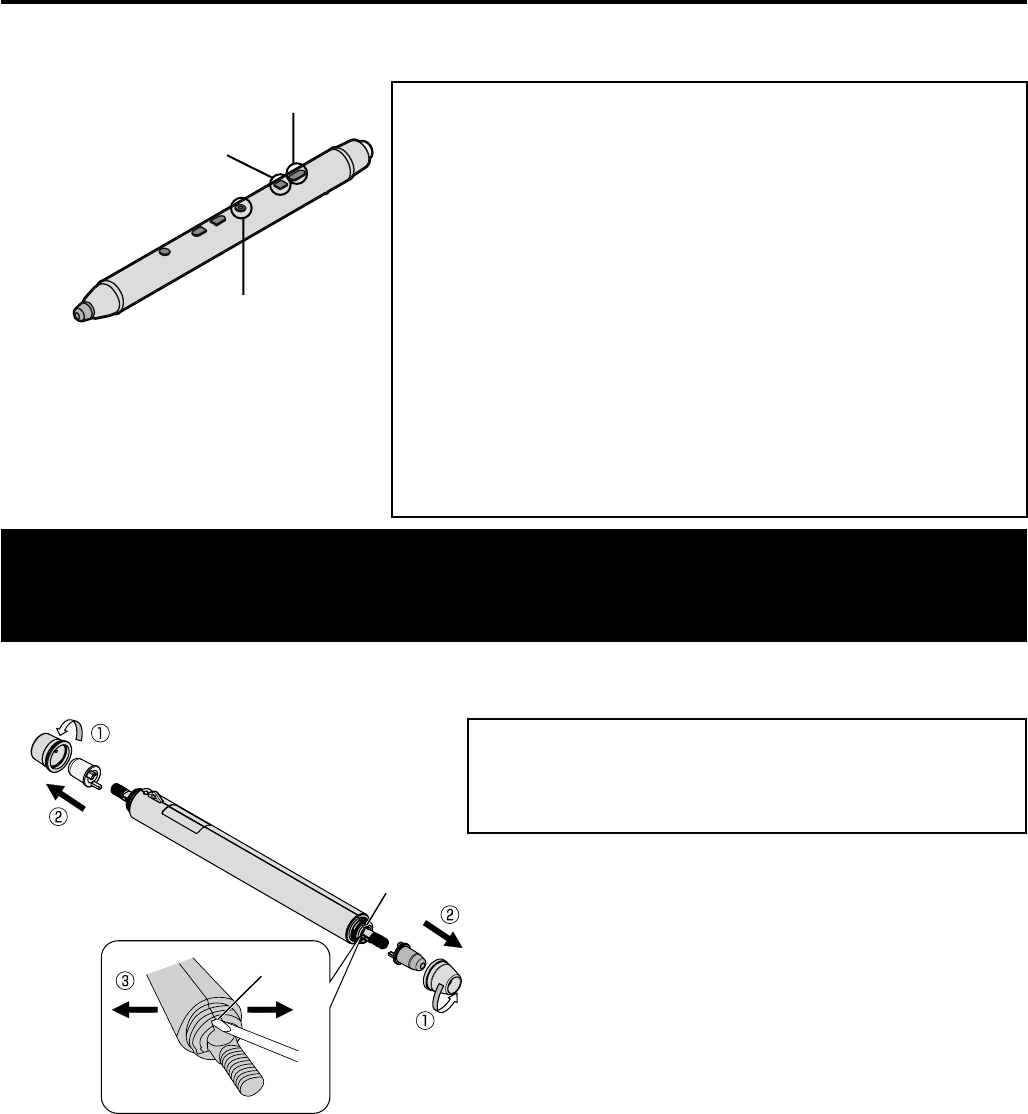
Replacing Pen Tip and Eraser Tip of Electronic Pen
If the pen tip and eraser tip of the electronic pen are worn, they do not slide smoothly. Replace them with new ones
as soon as possible because keeping using them may cause a scratch on the display or malfunction.
Notice
Turn off the electronic pen before replacing the pen tip / eraser tip.
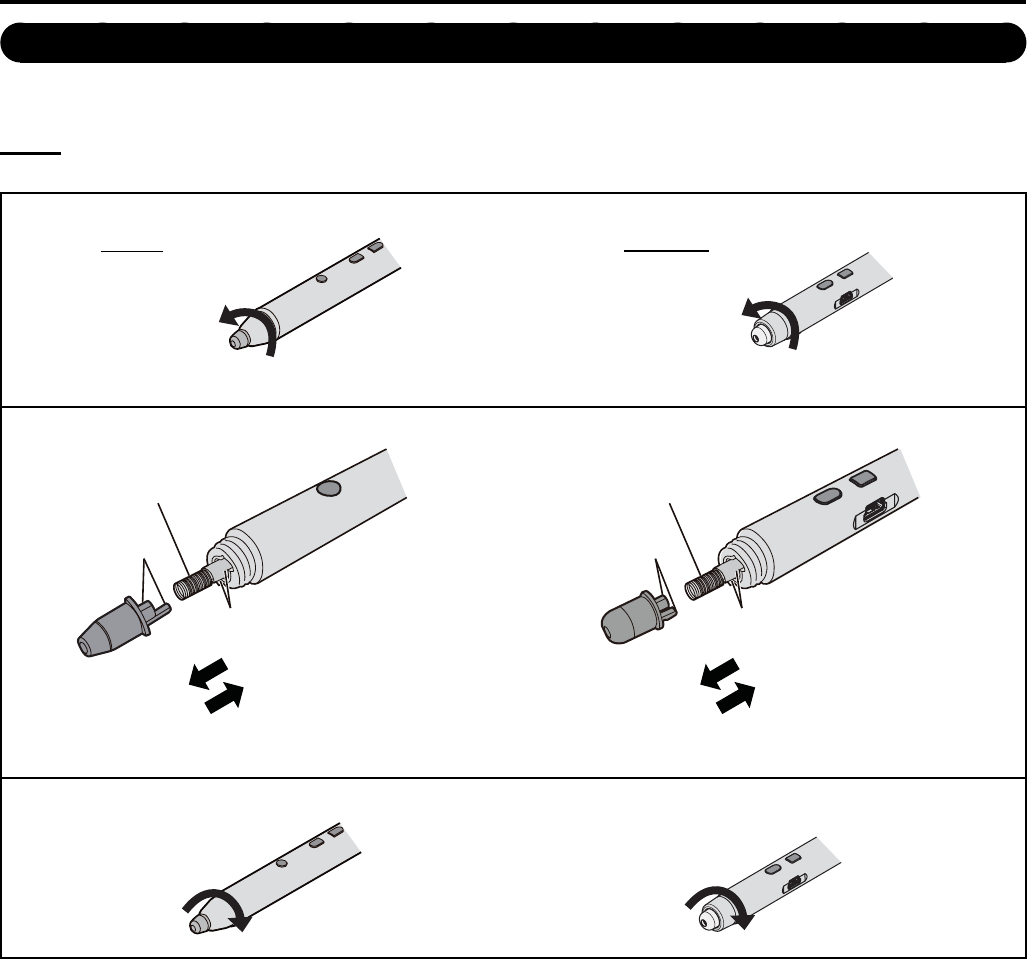
1. Remove the pen tip cover / eraser tip cover
Pen tip Eraser tip
Raising the pen makes replacement easier.•
2. Remove the used pen tip / eraser tip and attach the new pen tip / eraser tip
Remove the used pen tip
Attach the new pen tip
Projections
Cutouts
Spring
Remove the used eraser tip
Attach the new eraser tip
Projections
Cutouts
Spring
Align the projection of pen tip / eraser tip with the cutout of pen body.•
Be careful not to lose the spring when replacing the pen tip / eraser tip.•
3. Attach the pen tip cover / eraser tip cover
22
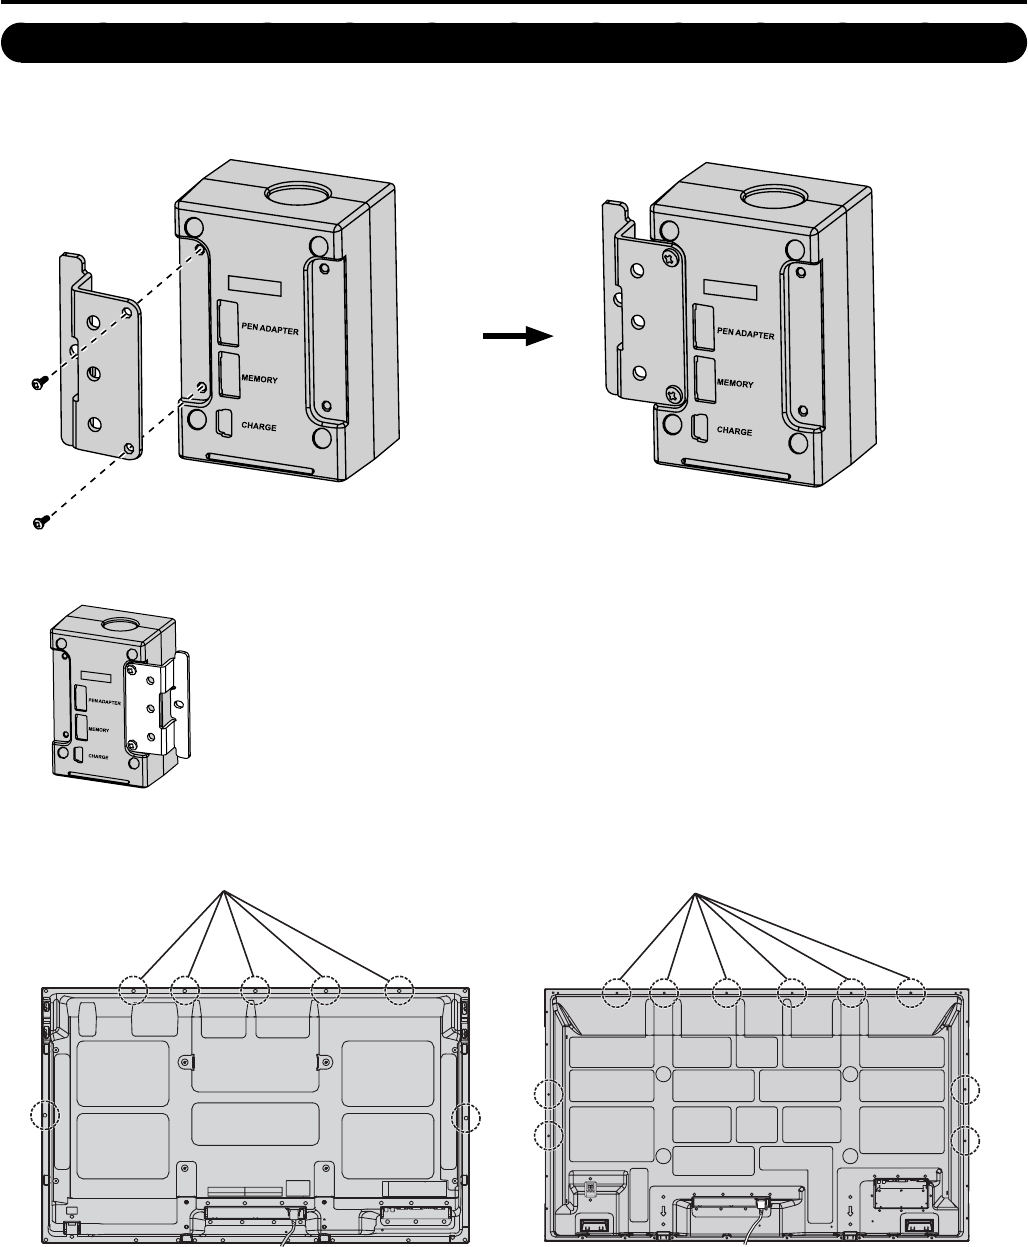
Mounting Charger to Display
The charger can be mounted on the display with the included mounting plate.
1. Attach the mounting plate to the charger with the included screws
TO DISPLAY
TO DISPLAY
The illustration shows the case that the charger is attached to the left side of display when seen from the front. •
To attach it to the right side, reverse the mounting plate.
TO DISPLAY
2. Among the screws shown below, remove the screw of the position where you mount the charger.
TH-50PB2U TH-65PB2U
For portrait installationFor portrait installation
23
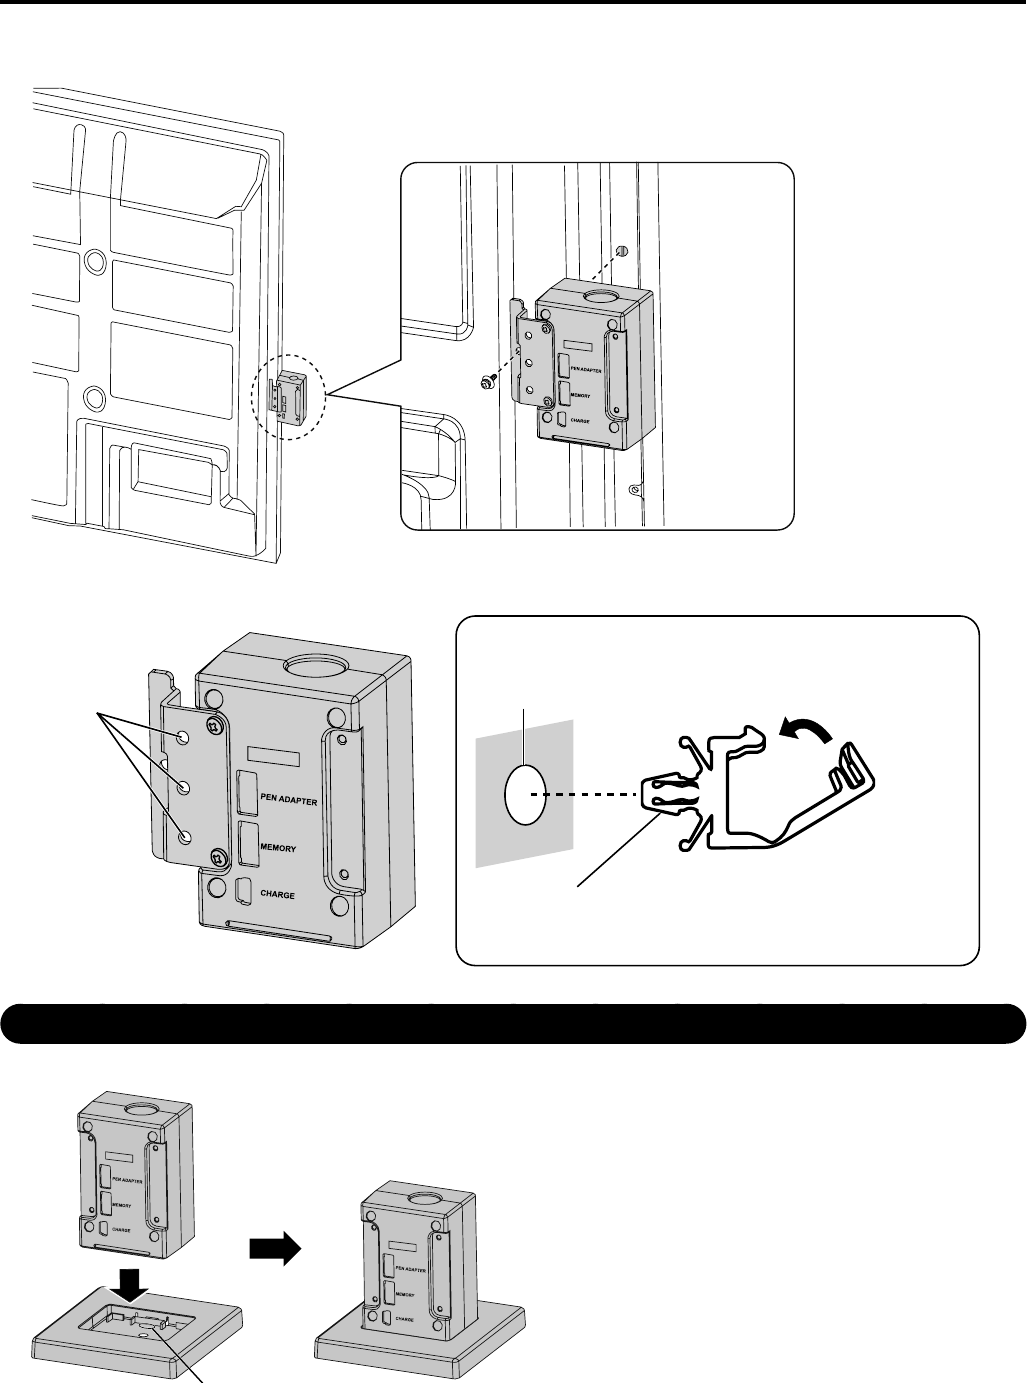
3. Mount the charger to the position where you removed the screw.
Mount the charger with the screw you removed.•
TO DISPLAY
■ If necessary, use the included clamper to clamp the cables.
TO DISPLAY
Mounting hole
Close after bundling
the cables.
Insert the projection
into the mounting
hole
Mounting hole
Attach Stand to Charger
Attach the stand when placing the charger on the table.
TO DISPLAY
TO DISPLAY
“FRONT” mark

24
Troubleshooting
When experiencing problems, please refer to the table below for possible solutions. If the problem persists,
contact your dealer.
Symptom Possible cause and solution See page
The power button blinks
red
There is contact failure of the charger cable, or the electronic
pen or charger is broken
→ Check connection of the charger cable and charge directly
with the charger cable. The charger is broken if charging is
completed successfully, and the electronic pen is broken if
the power button blinks red. Contact your dealer.
9, 12
The power button blinks
red and green alternately
The electronic pen is not registered to the electronic pen
adapter.
→ Register the electronic pen to the electronic pen adapter.
9, 20
Drawing response is slow • Other applications or anti-virus software are active.
→ Shut down the other applications and anti-virus software. —
The electronic pen or the
optical attachment loses
the functions.
(Buttons are
unresponsive.)
(Cannot draw)
(Lines written with the
electronic pen are broken
or colors change.)
• Check that the electronic pen adapter is correctly connected. 15, 19
• Check that the electronic pen is correctly registered to the
electronic pen adapter. 20
• Display is not in TOUCH-PEN MODE.
→ Set “TOUCH-PEN SETTINGS” of the display. 15, 19
• Other applications or anti-virus software are active.
→ Shut down the other applications and anti-virus software. —
• The rechargeable battery in the electronic pen is low.
→ Charge the electronic pen. 11,12
• The electronic pen is used with the wireless module
(ETWM200U) connected.
→ Using the electronic pen with the wireless module
(ETWM200U) connected may result in malfunction of
the electronic pen due to radio wave interference as an
example. In that case, set “WIRELESS LAN” to “OFF”
before using the electronic pen.
See Network
Operations of
the Interactive
Plasma Display
operating
instructions
• Turn the power off and then on again. 9
The electronic pen
adapter does not
recognize the electronic
pen
• The electronic pen adapter is not connected.
→ Connect the electronic pen adapter to the charger or
computer.
15, 19
• Connection is made via a USB hub or extension cable.
→ Do not use a USB hub or extension cable but connect
directly to the computer.
19
• The electronic pen adapter is damaged.
→ Please consult your purchasing dealer. —
While in remote pointer
mode, the pointer does
not appear on the screen
• Optical attachment has not been connected properly to the
electronic pen.
→ Set the optical attachment completely until its cutout fi ts
the strap loop of the electronic pen. When the optical
attachment is connected properly, the power button blinks
green four times.
13
• The lens for remote pointer becomes soiled, or condensation
is forming on the lens.
→ Wipe off dirt or dust with a soft, dry cloth.
—
• The lens for remote pointer is damaged.
→ Please consult your purchasing dealer. —
• The display is not in the touch & remote mode.
→ Set “TOUCH-PEN MODE” of “TOUCH-PEN SETTINGS”
in the “SETUP” menu of the display to “TOUCH &
REMOTE”.
13

25
Disposal
A lithium-ion polymer rechargeable battery is built in to the electronic pen. Please discard according to local
regulations.
When disposing this product, disassemble properly by following the procedure on the next page, and remove the
internal rechargeable battery.
Do not disassemble this product except when disposing of it.
Danger
■ As the rechargeable battery is specifi cally for this product, do not use it for any other
device.
Do not charge the removed battery.
• Do not throw the battery in a fi re, or apply heat to it.
• Do not pierce the battery with a nail, subject it to an impact, or dismantle or modify it.
• Do not let the wires touch any other metal or each other.
• Do not carry or store the battery with a necklace, hair pin, or the like.
• Do not charge, use, or leave the battery in a hot location such as near a fi re or under the hot sun.
Doing so may cause the battery to generate heat, ignite, or rupture.
Warning
■ Do not place the removed battery, screws, and other items within reach of infants.
Accidental swallowing of such an item may have an adverse effect on the body.
• In the event that you think such an item has been swallowed, consult a doctor immediately.
■ In the event of fl uid leaking from the rechargeable battery, take the following measure,
and do not touch the fl uid with bare hands.
• Fluid entering into an eye may cause loss of eyesight.
Wash the eye with water immediately without rubbing it, and then consult a doctor.
• Fluid getting on your body or clothes may cause infl ammation of the skin or injury.
Suffi ciently rinse with clean water, and then consult a doctor.
26
■ To remove the rechargeable battery
Completely exhaust the battery in the following procedure before disassembling.
Remote draw button
Remote erase button
Power button
While the power of the electronic pen is off, press and hold
the “remote draw button” and press the power button,
release both the buttons, and press and hold the “remote
erase button” 5 seconds.
(Keep pressing until the power button starts blinking
orange.)
Check that the power button repeats 5 times of orange
blinks.
If it does not blink orange, press and hold the power button to •
turn the power off (light off) and perform the procedure again.
Leave the electronic pen untouched while the power button
repeats blinking
When the battery is exhausted, the power button stops blinking •
and you can disassemble the electronic pen.
It may take approximately 5 hours at most to exhaust the •
battery.
Do not disassemble this product except when disposing of it.
The following fi gures are intended to explain
how to dispose of the product, not for describing how to repair.
The product cannot be repaired once it has been disassembled.
How to disassemble
Remove the rechargeable battery in the steps to
Cutout
Cutout
Turn and remove the pen tip cover and eraser tip cover
Remove the pen tip and eraser tip
Insert the slotted screwdriver into the cutout to open the
main body
27
Remove the screw
Insert the slotted screwdriver into between the
battery case and base plate and remove the
battery case while unhooking the hooks.
Remove the rechargeable battery from the
battery case.
Cut the two cords attached to the battery one
by one with scissors.
Insulate the cord part of the removed •
rechargeable battery with vinyl tape to prevent
the metal parts inside the cord from contacting
each other.
Rechargeable battery
Battery case
Hook
Hook
Base plate
Screw
Cord
Notice
Be extremely careful not to get injured.•
Do not damage or disassemble the rechargeable battery.•
Dispose of other parts than the rechargeable battery in accordance with the local regulations.•
ATTENTION:
A lithium ion battery that is recyclable powers the product you
have purchased. Please call 1-800-8-BATTERY for information
on how to recycle this battery.
28
Specifications
Type Electronic pen
Transmission system 2.4 GHz radio transmission
External dimensions (L x H) 7.92” (201.2 mm) x 0.84” (21.3 mm)
9.42” (239.2 mm) x 1.00” (25.4 mm) (with optical attachment)
Weight Approx. 0.09 lb. (Approx. 43 g)
Approx. 0.12 lb. (Approx. 55 g) (with optical attachment)
Operable distance of remote
pointer
In front: 16 feet (5 m) At an angle of 45°: 9.8 feet (3 m)
Battery Lithium-ion polymer rechargeable battery
DC 3.7 V, 200 mAh
Operation time*1: Approx. 5 hours
Charging time*1: Approx. 4 hours
*1 Operation time/charging time
The battery deteriorates after repeated use, and the operation time eventually becomes short. The fi gures •
above are at shipping from the factory, and are not a guarantee of performance.
Replacement / repair of the battery only is not supported.•
For warranty and service, see Display Operations of the operating instructions.•

Customer’s Record
The model number and serial number of this product can be found on the body. You should note this serial
number in the space provided below and retain this book, plus your purchase receipt, as a permanent record of
your purchase to aid in identifi cation in the event of theft or loss, and for Warranty Service purposes.
Model Number Serial Number
USA Only:
Disposal may be regulated in your community due to environmental considerations. For disposal or recycling
information, please visit Panasonic website:
http://www.panasonic.com/environmental or call 1-888-769-0149.
© Panasonic Corporation 2013
Panasonic System Communications Company of North America
Unit of Panasonic Corporation of North America
Executive Offi ce :
Three Panasonic Way 2F-5, Secaucus, NJ 07094
Panasonic Canada Inc.
5770 Ambler DriveMississauga, Ontario
L4W 2T3