Panasonic of North America HX-A1M Wearable Camera User Manual
Panasonic Corporation of North America Wearable Camera
UserManual.wiki
>
Panasonic of North America
>
HX A1M User Manual
Users Manual.pdf
Navigation menu
Upload a User Manual
Namespaces
Wiki Guide
HTML
PDF
Info
Views
User Manual
Discussion / Help
Navigation
![14SQT0885 (ENG)Charging and recording time∫Charging/Recording time≥Temperature: 25 oC (77 oF)/humidity: 60%RH≥“h” is an abbreviation for hour, “min” for minute and “s” for second.≥These times are approximations.≥The indicated charging time is for when the battery has been discharged completely. Charging time and recordable time vary depending on the usage conditions such as high/low temperature.≥The actual recordable time refers to the recordable time when repeatedly starting/stopping recording, turning this unit on/off, etc.≥The power lamp flashes (Flashing with approx. 0.5 second period (off for approx. 0.25 second, on for approx. 0.25 second)) when the remaining battery time becomes low.You can check the battery level by looking at the “Image App” screen (l26) or the recording mode lamps (l16).≥This unit heats up after use or charging. This is not a malfunction.≥For information about charging with a mobile USB charger or an AC adaptor, check the support site.http://panasonic.jp/support/global/cs/e_cam/index.html(This site is English only.)Flashing with approx. 0.5 second period (off for approx. 0.25 second, on for approx. 0.25 second):≥Check that the USB terminals of this unit or the connecting device, such as PC are not dirty or covered with a foreign object, and reconnect correctly. If a foreign object or dirt is present, turn off this unit before removing.≥The environment is at an extremely high or low temperature. Wait until the temperature has returned to an appropriate level and try charging again. If you are still unable to charge, there may be a fault in this unit or the connecting device.Flashing with approx. 4 second period (off for approx. 2 seconds, on for approx. 2 seconds):≥When the battery is over discharged or the temperature of the battery is too high or low. It can be charged, but it may take a few hours to complete the charging normally.≥It will flash in approx. 2 second intervals when normal charging resumes. Even in such cases, it may start flashing in approx. 4 second intervals until charging is completed depending on the conditions of use.Off:≥Charging has finished.Charging time Picture size/Frame rate Maximum continuous recordable timeActual recordable time4h30min[1920k1080/30p][1280k720/60p][1280k720/30p][848k480/30p][1280k720/60fps][848k480/120fps]The socket outlet shall be installed near the equipment and shall be easily accessible.When the Power lamp is flashing during chargingHX-A1M-SQT0885_mst.book 14 ページ 2015年3月6日 金曜日 午後8時12分](https://usermanual.wiki/Panasonic-of-North-America/HX-A1M/User-Guide-2563308-Page-14.png)
![18SQT0885 (ENG)Install the “Image App”The “Image App” allows you to change this unit’s settings and record and play back images.* The supported OS versions are current as of March 2015 and subject to change.≥Use the latest version.≥Refer to [Help] in the “Image App” menu about how to operate.≥The service may not be able to be used properly depending on the type of smartphone being used. For information on the “Image App”, check the support website below.http://panasonic.jp/support/global/cs/e_cam/index.html(This Site is English only.)≥When downloading the app on a mobile network, high packet communication fees may be incurred depending on the details of your contract.About the “Image App”The “Image App” is an application provided by Panasonic.For Android apps For iOS appsOS Android 4.0 or later*iOS 6.0 or later*(iPhone 3GS is not supported.)Installation procedure1 Connect your Android device to a network.2 Select “Google Play™ Store”.3 Enter “Panasonic Image App” into the search box.4 Select “Panasonic Image App” and install it.≥The icon will be added to the menu.1 Connect your iOS device to a network.2 Select “App StoreSM”.3 Enter “Panasonic Image App” into the search box.4 Select “Panasonic Image App” and install it.≥The icon will be added to the menu.HX-A1M-SQT0885_mst.book 18 ページ 2015年3月6日 金曜日 午後8時12分](https://usermanual.wiki/Panasonic-of-North-America/HX-A1M/User-Guide-2563308-Page-18.png)
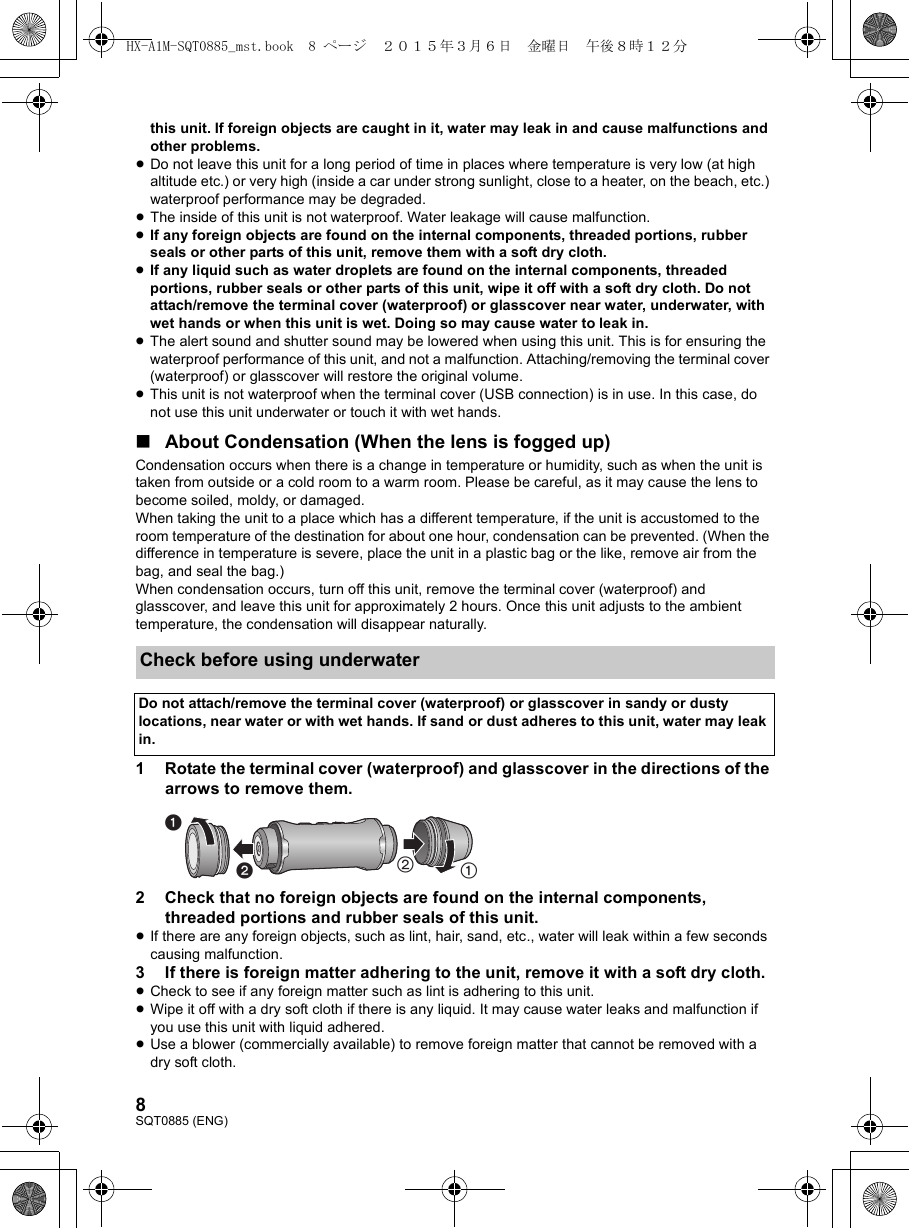
![19(ENG) SQT0885∫Preparations before connection1 Install the smartphone application “Image App” on your smartphone. (l18)2 Turn on the Wi-Fi function of your smartphone.≥For further details, please read the operating instructions for the smartphone.Setting up a Wi-Fi connection to a smartphone≥Check that the Wi-Fi lamp is off.1Press and hold the recording mode/Wi-Fi button until the Wi-Fi lamp of this unit flashes red.2Tap the SSID of this unit (below) on the Wi-Fi network screen of the smartphone.≥Password entry screen is displayed.3Enter password (below).≥When the connection is complete, the Wi-Fi lamp of this unit will light red.Use your smartphone to set up this unit.Preparation:1 Set up a Wi-Fi connection between this unit and the smartphone. (l19)2 Start up the smartphone application “Image App”.≥If a connection attempt to this unit fails, turn off and on the Wi-Fi function using the setup menu of the smartphone, and then retry the connection.≥For more information, refer to the [Help] in the “Image App” menu.PreparationConnecting to a smartphoneDefault settingSSID:Password:A1-wearablepaR9We58nPreparationSetting up this unit≥When you start “Image App” connecting with this unit for the first time, a message asking you to set the date and time will appear. (This message will also be displayed if this unit remains unused for a long period of time.)Follow the message to set the date and time.≥When you turn on this unit for the first time, a message asking you to change the SSID/Password will appear. Be sure to change them. Otherwise, third parties may intercept your information or use it for malicious purposes.HX-A1M-SQT0885_mst.book 19 ページ 2015年3月6日 金曜日 午後8時12分](https://usermanual.wiki/Panasonic-of-North-America/HX-A1M/User-Guide-2563308-Page-19.png)
![20SQT0885 (ENG)Setting date and timeThe date and time setting of this unit is synchronised with that of the smartphone.Synchronise to adjust the clock, etc.1Tap # [Camera setup].2Tap [Date & time].≥When you want to adjust the clock, change the time of the smartphone first, and then synchronise the time with this unit.≥It may take approximately 60 seconds to synchronise the time of the smartphone with that of this unit.≥When the built-in battery of this unit runs down, the date and time setting returns to the default state. Leave the built-in battery of this unit in a charged state for approximately 24 hours and the date and time setting will be stored for approximately 4 months.≥The setting range from 1 January 2015 through 31 December 2039 is available for time synchronisation with the smartphone.Initialising the network settingsTo reset the network settings to the default, after turning off this unit, press the power button (l16) and recording start/stop button (l27) simultaneously to turn it on again and continue to hold them down for approximately 3 seconds. When the Wi-Fi lamp flashes alternately in red and green, the network settings are initialised.≥After initialising the settings, turn off and on this unit.≥The following settings will be reset to the default:jAn SSID/password for this unit set after the purchase([Camera Wi-Fi settings] # [Camera SSID settings] in the “Image App”)jSSID/Password of Main Camera that was connected to this unitHX-A1M-SQT0885_mst.book 20 ページ 2015年3月6日 金曜日 午後8時12分](https://usermanual.wiki/Panasonic-of-North-America/HX-A1M/User-Guide-2563308-Page-20.png)


![26SQT0885 (ENG)Check before recordingWhen you connect this unit and a smartphone and start up the “Image App”, you can check the image from this unit on the live view screen.≥We recommend that you make a test recording to check the angle of view mode, [White Balance] setting and other settings before recording.≥Attach this unit to the Multi Mount or Tripod Mount (l21) and check the image on the live view screen.≥You can use [Shooting guidelines] as a guide for checking the balance of a composition.≥Depending on your OS or the version of the smartphone application “Image App”, the screen may differ from the one above.≥The live view screen disappears approximately 30 seconds after you start recording a motion picture. If you tap the screen while recording, the screen will be displayed again for approximately 30 seconds.≥Also outputs sound from the microphone of this unit.≥Still pictures will be recorded with a picture size of 2.1 M (standard) or 2.7 M (wide).≥Refer to [Help] in the “Image App” menu about how to operate.BasicRecordingExample of the screen display: 1Live view≥Displays an image from this unit.2Remaining number of recordable pictures/remaining recordable time of the microSD card in this unit3Remaining battery power of this unit≥As the battery level decreases, the display changes as follows: # # # # If the battery discharges, then will flash red.4Angle of view mode≥It can be switched between standard and wide views.5Menu display6Playback mode selector7Recording mode selector (Remote view)8Recording start/stop9Motion Picture/Still Picture toggle button:Name of the connected devicexxxxxxxxxx WIDE 10:301080/30pHX-A1M-SQT0885_mst.book 26 ページ 2015年3月6日 金曜日 午後8時12分](https://usermanual.wiki/Panasonic-of-North-America/HX-A1M/User-Guide-2563308-Page-26.png)
![27(ENG) SQT0885Recording with this unitRecord images with this unit.≥You can record images even when this unit is not connected to a smartphone.1Press the recording mode/Wi-Fi button to switch to the desired recording mode.≥The recording mode changes each time you press the button. The recording mode lamps will light (or flash).Motion Picture Recording Mode # Slow Motion Recording Mode # Still Picture Recording Mode*1 You need to set [Recording Mode] of the “Image App” to [Loop Recording].*2 You need to select a setting other than [OFF] for [Interval rec mode] of the “Image App”.2Press the recording start/stop button.In Motion Picture Recording Mode/Slow Motion Recording Mode:The access lamp will light red and recording will start.≥If you press the recording start/stop button again, the recording will stop. While data is being recorded, the access lamp will flash. Do not remove the microSD card until the access lamp goes off.In Still Picture Recording Mode:Recording still pictures.≥In [Interval rec mode], the access lamp will light red and recording will start. If you press the recording start/stop button again, the recording will stop.Please refer to the operating instructions (PDF format) for details.Recording Mode Recording mode lamp Recording methodMotion Picture Recording ModeLit [Normal Shooting]:Recording motion pictures.Flashing[Loop Recording]*1:No matter how long you record, you can only record motion pictures for the last 1 hour to microSD card.Slow Motion Recording Mode Lit[Slow Motion]:This records motion pictures in slow motion by setting a high frame rate (increasing the number of frames).Still Picture Recording ModeLit Normal still picture recording:Recording a still picture.Flashing [Interval rec mode]*2:This is for recording still pictures at a set interval.HX-A1M-SQT0885_mst.book 27 ページ 2015年3月6日 金曜日 午後8時12分](https://usermanual.wiki/Panasonic-of-North-America/HX-A1M/User-Guide-2563308-Page-27.png)
![28SQT0885 (ENG)Motion pictures or still pictures stored in this unit are played back with the smartphone.≥For more information, refer to the [Help] in the “Image App” menu.≥Depending on your OS or the version of the smartphone application “Image App”, the screen may differ from the one above.1Tap .≥The thumbnails of motion pictures or still pictures recorded on this unit will be displayed.2Tap ( ).≥To play back a motion picture, tap ; to play back a still picture, tap .3Tap the thumbnail of motion picture or still picture you want to play back.≥The playback screen will be displayed.≥If you have tapped a still picture, you can play back the previous or next picture by dragging (swiping) the screen left or right.4(For playing back motion pictures)Tap the playback icon on the screen to play back motion pictures.≥Tapping or dragging the slide bar will start playback from the desired position of a motion picture file.BasicPlaybackPreparation: Connect this unit with the smartphone and start Image App. (l19)Example of the motion picture playback screen display:1Camera function2Upload3Number of motion picture/still picture scenes4Remaining battery power of this unit5Delete6Copy7Name of the connected device8Information display for the motion picture/still pictureXXXXXXXXX 1/16MP4_0001 2014/12/15 15:30:5000:20 03:10ASlide barHX-A1M-SQT0885_mst.book 28 ページ 2015年3月6日 金曜日 午後8時12分](https://usermanual.wiki/Panasonic-of-North-America/HX-A1M/User-Guide-2563308-Page-28.png)
![29(ENG) SQT0885∫It is not a malfunction in following casesPlease refer to the operating instructions (PDF format) for details.OthersTroubleshootingThe lens fogs up. ≥This is due to condensation. It is not a malfunction. Please refer to page 8.Problem Check pointsThis unit cannot be turned on.This unit does not stay on long enough.Battery runs down quickly.≥Charge the battery again to ensure it is sufficiently charged. (l13)≥In cold places, the battery using time becomes shorter.≥If the operating time is very short even after the battery has been recharged sufficiently, the battery has worn out.Colour balance of images is strange when recording in a place such as a gymnasium.≥In a place with multiple light sources, such as a gymnasium or a hall, set the [White Balance] setting to [Indoor 2]. If you cannot record clearly with the [Indoor 2], set it with [Custom].Recorded motion pictures flicker.Horizontal lines appear in recorded images.≥If you record an image with [1280k720/60fps] or [848k480/120fps] in [Slow Motion], flickering or horizontal lines may appear under fluorescent lighting.The Wi-Fi connection is not possible between this unit and a smartphone.≥Make sure the smartphone is properly connected to this unit by checking the Wi-Fi settings of the smartphone.≥Make sure the SSID and Password have been correctly input.≥Make sure the smartphone is not connected to the wireless access point. If it is connected to the wireless access point, change the Wi-Fi access point using the smartphone’s Wi-Fi set up.The Wi-Fi connection is disconnected immediately.≥If there is a setting for avoiding unnecessary connections in the Wi-Fi setting menu of the Android device, turn it off. HX-A1M-SQT0885_mst.book 29 ページ 2015年3月6日 金曜日 午後8時12分](https://usermanual.wiki/Panasonic-of-North-America/HX-A1M/User-Guide-2563308-Page-29.png)
![32SQT0885 (ENG)Wearable cameraInformation for your safetyOthersSpecificationsPower source: INPUT: DC 5.0 V, 1 ARechargeable Li-ion Battery Pack:DC 3.7 V, 480 mAh (1.78 Wh)Power consumption: Recording; 4.3 WCharging; 2.3 WMotion picture recording format:MPEG-4 AVC file format compliant (.MP4)≥For picture size, recordable time and transfer rate of a motion picture, refer to the operating instructions (PDF format).Motion picture compression:MPEG-4 AVC/H.264Audio compression:AACStill picture recording format:JPEG (Design rule for Camera File system, based on Exif 2.2 standard)≥For picture size of a still picture and number of recordable pictures, refer to the operating instructions (PDF format).Recording media:microSD card (512 MB/1 GB/2 GB), microSDHC card (4 GB/8 GB/16 GB/32 GB)microSDXC card (48 GB/64 GB)Image sensor:1/2.3z 1MOS image sensorTotal; Approx. 12760 KEffective pixels;Motion picture; Approx. 9030 K (16:9)*1Still picture; Approx. 8340 K (16:9)*2Lens:F2.8Focal length; 3.4 mmAngle of view; Up to approx.160 o *1Minimum focus distance; Approx. 50 cm*1*2Shutter speed:Motion picture; 1/30 to 1/12000Still picture; 1/8 to 1/12000Microphone:MonauralMinimum required illumination:Approx. 6 lxApprox. 1 lx with the Night Mode functionUSB:Reader functionmicroSD card; Read only (No copyright protection support)Web camera functionHi-Speed USB (USB 2.0), USB terminal Type micro-BBattery charging function (Charges from USB terminal when the main unit is off)Dimensions:26.5 mm (W)k26.5 mm (H)k68.5 mm (D)[1.04 q (W)k1.04 q (H)k2.70 q (D)]Mass (Weight):Approx.31 g (Approx. 0.069 lbs.)Mass (Weight) in operation:Approx. 185 g (Approx. 0.408 lbs.)[with a microSD card (optional)]Operating temperature:0°Cto40°C (32°Fto104°F)Operating humidity:10%RH to 80%RHWaterproof/Dustproof performance:Equivalent to IEC 60529 “IP68”Anti-shock performance:Compliant with MIL-STD 810F Method 516.5-Shock. (l7)This is not a guarantee of protection against damage and malfunction under all conditions.Battery operation time:See page 14HX-A1M-SQT0885_mst.book 32 ページ 2015年3月6日 金曜日 午後8時12分](https://usermanual.wiki/Panasonic-of-North-America/HX-A1M/User-Guide-2563308-Page-32.png)
![33(ENG) SQT0885Wireless transmitter:Compliance standard; IEEE802.11b/g/nFrequency range used;Central frequency 2412 MHz to 2462 MHz [11ch]Encryption method; Wi-Fi compliant WPA™/WPA2™/WEPAccess method; Infrastructure modeHX-A1M-SQT0885_mst.book 33 ページ 2015年3月6日 金曜日 午後8時12分](https://usermanual.wiki/Panasonic-of-North-America/HX-A1M/User-Guide-2563308-Page-33.png)