Panasonic of North America SC-C70 Compact Stereo System User Manual basic sc c70pp Eng indb
Panasonic Corporation of North America Compact Stereo System basic sc c70pp Eng indb
UserManual.wiki
>
Panasonic of North America
>
SC C70 User Manual
Users Manual
Navigation menu
Upload a User Manual
Namespaces
Wiki Guide
HTML
PDF
Info
Views
User Manual
Discussion / Help
Navigation


![08 Control reference guide 01 Standby/on switch ( )• Press to switch the unit from on to standbymode or vice versa. In standby mode, theunit is still consuming a small amount ofpower. 02 Top cover• The top cover can slide to the both sides.• The magnet is built-in to keep the top coverclosing.• Do not apply too much force to the topcover when sliding it. Doing so may causemalfunction.• Do not leave the top cover open for aprolonged period. Doing so will cause thelens to become dirty. ( 17) 03 Power indicator• Blue: The unit is on.• Off: The unit is in standby mode. 04 Headphones jack• When a plug is connected, the speakers donot output sound.• Excessive sound pressure from earphonesand headphones can cause hearing loss.• Listening at full volume for long periodsmay damage the user’s ears. 05 Remote control signal sensor• Reception distance: Within approx. 7 m (23 ft) directly in front• Reception angle: Approx. 30° left and right 06 Display• Input source, clock, playback status, etc.are displayed. 07 Touch switches• [FAV]: Select the favorite radio station or playlist(FM / AM / Internet Radio / Spotify)• [SELECT]: Switch the input source• [ ], [ ], [ ], [ ]: Playback operation buttons (e.g. “CD”) Stop Pause • Press again toresume. Skip Search Press and hold [ ] or [].• Each time you press the switch, a beepsound will be heard.• Do not put any objects on the top panel ofthis unit. 08 Adjust volume• 0 (min) to 100 (max) This unit (front)](https://usermanual.wiki/Panasonic-of-North-America/SC-C70/User-Guide-3490794-Page-8.png)
![10 Control reference guide (Continued) 01 []: Standby/on switch • Press to switch the unit from on to standby mode or vice versa. In standby mode, the unit is still consuming a small amount of power. 02 [CD]/[RADIO]/[ -PAIRING]: Select the device to be operated ( 17, 18, 19) 03 [>SELECT<]: Switch the input source 04 [MENU]: Enter menu ( 17, 18, 19) 05 [SETUP]: Enter setup menu 06 [+VOL-]: Adjust the volume • 0 (min) to 100 (max) 07 [MUTE]: Mute the sound • Press [MUTE] again to cancel. “MUTE” is also cancelled when you adjust the volume or when you turn the unit to standby. 08 Playback operation buttons 09 [FAV]: Select the favorite radio station or playlist (FM / AM / Internet Radio / Spotify). • You can register up to 5 favorite stations. To register, press and hold [FAV] while the favorite station or playlist is played back, select the number to register and then press [OK]. 10 [INFO]: View content information • Press this button to display the track, artist, and album names, file type, sampling frequency, and other information. (The information varies depending on the input source.) 11 [], [ ], [ ], [ ]/[OK]: Selection/OK 12 [RETURN]: Return to the previous display 13 [DIMMER]: Adjust the brightness of the display, etc. • When the display is turned off, it will light up for a few seconds only when you operate this unit. Before the display turns off, “Display Off” will be displayed for a few seconds. • Press repeatedly to switch the brightness. 14 [PGM]: Set the program function 15 Numeric buttons, etc. • To select a 2-digit number Example: 16: [ 10] > [1] > [6] • To select a 4-digit number Example: 1234: [ 10] > [ 10] > [ 10] > [1] > [2] > [3] > [4] • [CLEAR]: Clear the entered value. ■ Using the remote control 21 R03/LR03, AAA (Alkaline or manganese batteries) Note • Insert the battery so the terminals ( and ) match those in the remote control. • Point it at the remote control signal sensor on this unit. ( 8) • Keep the batteries out of reach of children to prevent swallowing. Remote control](https://usermanual.wiki/Panasonic-of-North-America/SC-C70/User-Guide-3490794-Page-10.png)
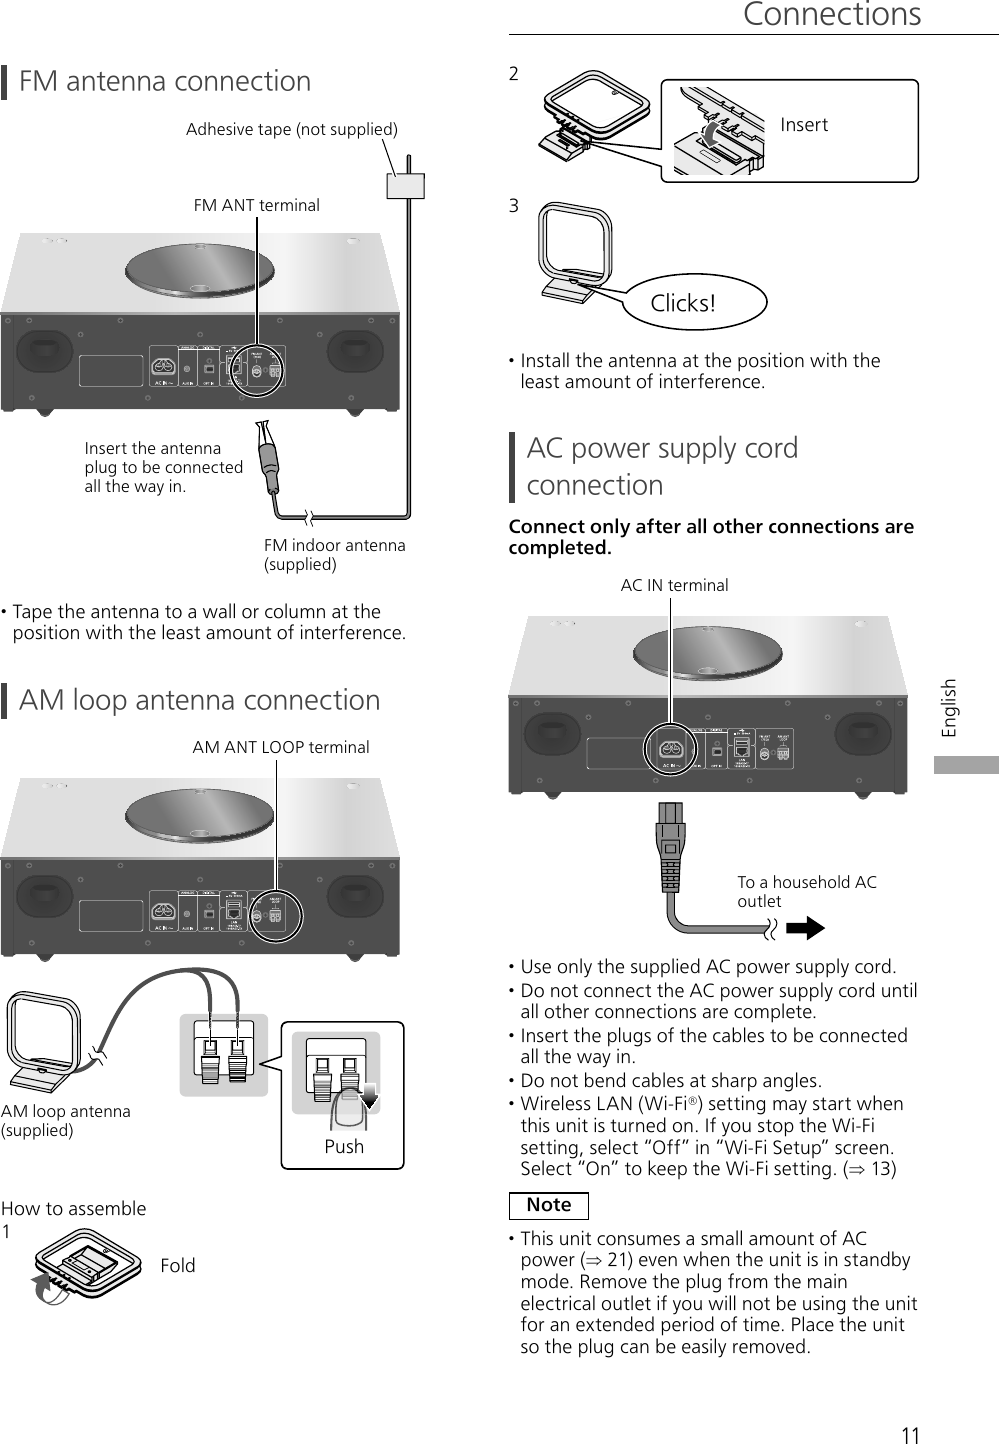
![12 Network settings You can stream music from an iOS device (iPhone/iPad/iPod), an Android™ device or a PC (Mac/Windows) to this unit by using the AirPlay or DLNA feature. To use these features, this unit must join the same network as the AirPlay compatible device or the DLNA compatible device. This unit can be connected to a router using a LAN cable or built-in Wi-Fi®. For a stable connection to the network, a wired LAN connection is recommended. Note • If you try to change the network settings immediately after turning on this unit, it may take some time until the network setup screen is displayed. • If “Firmware update is available” is displayed after the network connection is set up, the firmware for this unit is available. - For the update information, refer to the following website. www.technics.com/support/firmware/ Wired LAN connection Broadband router, etc. LAN cable (not supplied) 1 Disconnect the AC power supply cord. 2 Connect this unit to a broadband router, etc. using a LAN cable. 3 Connect the AC power supply cord to this unit, and press [ ]. ( 11) • When the connection is established, “” is displayed. Note • While the AC power supply cord is disconnected, the LAN cable must be connected or disconnected. • Use category 7 or above straight LAN cables (STP) when connecting to peripheral devices. • Inserting any cable other than a LAN cable in the LAN port can damage the unit. • When a LAN cable is connected, the Wi-Fi function may be disabled.](https://usermanual.wiki/Panasonic-of-North-America/SC-C70/User-Guide-3490794-Page-12.png)
![English13 Wireless LAN connection ■ Preparation Disconnect the AC power supply cord. Disconnect the LAN cable. Enable the 2.4 GHz frequency band on the wireless router. Place this unit as close to the wireless router as possible. Connect the AC power supply cord to this unit. ( 11) Note • The setting will be cancelled after the set time limit. In that case, try the setting again. • To cancel this setting in the middle, press [ ] or turn the unit to standby mode. ■ Settings for the first time 1 Press [ ] to turn this unit on. • “Wi-Fi Setup” is displayed. 2 Press [ ], [ ] to select “On” and then press [OK]. • “WAC Mode for iOS” automatically starts. 3 (For “WAC Mode for iOS”) Proceed to step 2 of “Using the WAC (Wireless Accessory Configuration)” ( 14). (For other network setting method) Choose a network setting method. Note • When this unit is switched to standby mode and turned on before the Wi-Fi setting is complete, “Wi-Fi Setup” is displayed. Perform the Wi-Fi setting or select “Off”. ■ Choose a network setting method Are you using an iPod touch/iPhone/iPad? Yes Using the WAC (Wireless Accessory Configuration) ( 14) No Does your wireless network router support WPS (Wi-Fi Protected Setup™)? Yes (WPS button) Using the WPS button ( 14) (WPS PIN code) Using the WPS PIN code ( 15) No Are you using an Android device? Yes Using “Technics Music App” ( 15) No Using an internet browser ( 16) ■ Settings using [SETUP] menu 1 Press [SETUP]. 2 Press [ ], [ ] repeatedly to select “Network” and then press [OK]. • When “Wi-Fi” screen is displayed, press [OK]. 3 Press [ ], [ ] to select “On” and then press [OK]. (The wireless LAN function is enabled.) 4 Choose a network setting method.](https://usermanual.wiki/Panasonic-of-North-America/SC-C70/User-Guide-3490794-Page-13.png)
![14 Network settings (Continued) ■ Using the WAC (Wireless Accessory Configuration) “WAC Mode for iOS” You can send its Wi-Fi configuration to this unit using an iPhone/iPad/iPod touch. • Supported devices: iPhone/iPad/iPod touch (iOS version 7.0 or later) • The following explanations are based on an iPhone. • Make sure your iPhone is connected to your home wireless network beforehand. • This unit uses the 2.4 GHz frequency band only. Check your iPhone is connected using 2.4 GHz band. 1 Press [ ], [ ] on the remote control to select “WAC Mode for iOS” and then press [OK]. • “Setting” is displayed. 2 Go to Wi-Fi settings on your iPhone. 3 Select “Technics SC-C70 ******” under the “SET UP NEW AIRPLAY SPEAKER...” on your iPhone. • “******” stands for a character that is unique to each set. 4 The “AirPlay Setup” screen appears on your iPhone. • This unit will be displayed as “Technics SC-C70 ******”. To change the name, enter a new name to replace the existing one. You can also do the renaming after the network connection is set up. • You can set a password for this unit under “SPEAKER PASSWORD”. (You will need this password if you make network settings by internet browser next time.) 5 Select “Next” to apply the settings. • “Linking” is displayed. • When the connection is established, “Success” is displayed. - “Fail” may be displayed if the connection was not complete. Try this method again from [SETUP] menu. If “Fail” is still displayed, try other methods ( 13). 6 Press [OK] on the remote control to exit the setting. • “ ” is displayed. Note • Mac (OS X 10.9 or later, with AirPort Utility 6.3.1. or later) also supports the WAC (Wireless Accessory Configuration). ■ Using the WPS button “WPS Push” If your wireless router supports WPS, you can set up a connection by pressing the WPS button. • A compatible wireless router may have the WPS identifier mark. 1 Press [ ], [ ] on the remote control to select “WPS Push” and then press [OK]. • “WPS” is displayed. Complete step 2 within 2 minutes. 2 After “WPS” is displayed, press the WPS button on the wireless router. Example: • “Linking” is displayed. • When the connection is established, “Success” is displayed. - “Fail” may be displayed if the connection was not complete. Try this method again from [SETUP] menu. If “Fail” is still displayed, try other methods ( 13). 3 Press [OK] on the remote control to exit the setting. • “ ” is displayed.](https://usermanual.wiki/Panasonic-of-North-America/SC-C70/User-Guide-3490794-Page-14.png)
![English15 ■ Using the WPS PIN code “WPS PIN” If your wireless router supports WPS, you can set up a connection by entering the WPS PIN code. • For details on how to enter the PIN code, refer to the operating instructions of the wireless router. 1 Press [ ], [ ] on the remote control to select “WPS PIN” and then press [OK]. • The PIN code is displayed. Complete step 2 within 2 minutes. 2 Enter the PIN code into the wireless router from PC, etc. • “Linking” is displayed. • When the connection is established, “Success” is displayed. - “Fail” may be displayed if the connection was not complete. Try this method again from [SETUP] menu. If “Fail” is still displayed, try other methods ( 13). 3 Press [OK] on the remote control to exit the setting. • “ ” is displayed. Note • Depending on a router, other connected devices may temporarily lose their connection. • For details, refer to the operating instructions of the wireless router. ■ Using “Technics Music App” “Setup from Browser” If you install the dedicated app “Technics Music App” (free of charge) on your Android device, you can set up a connection using the application. • If you’re using an Android device, download the app at Google Play™. • Check the password for your home wireless network. • Make sure your Android device is connected to your home wireless network beforehand. • This unit uses the 2.4 GHz frequency band only. Check your Android device is connected using 2.4 GHz band. 1 Press [ ], [ ] on the remote control to select “Setup from Browser” and then press [OK]. • “Setting” is displayed. 2 Start “Technics Music App” on the Android device. 3 Select “ ” and go to Wi-Fi settings. 4 Enter the password for your home wireless network. 5 Select “Next” to apply the settings. • “Linking” is displayed. • When the connection is established, “Success” is displayed. - “Fail” may be displayed if the connection was not complete. Try this method again from [SETUP] menu. If “Fail” is still displayed, try other methods ( 13). • Depending on the device, the connection complete screen may not be displayed. 6 Make sure to connect your Android device back to your home wireless network. 7 Press [OK] on the remote control to exit the setting. • “ ” is displayed.](https://usermanual.wiki/Panasonic-of-North-America/SC-C70/User-Guide-3490794-Page-15.png)
![16 Network settings (Continued) ■ Using an internet browser “Setup from Browser” You can access this unit’s network settings from the internet browser on iOS device (iOS version 6.1.6 or earlier), Android device, PC, etc. • This unit uses the 2.4 GHz frequency band only. Check the device can be connected using 2.4 GHz band. • The following explanations are based on an Android device. 1 Press [ ], [ ] on the remote control to select “Setup from Browser” and then press [OK]. • “Setting” is displayed. 2 Go to Wi-Fi settings on your compatible device and select “00 Setup ******” to connect to this unit. • “******” stands for a character that is unique to each set. 3 Start the internet browser and type “http://192.168.1.12/” into the URL address field and display the page. • Examples of internet browsers - iOS device/Mac: Safari - Android device: Google Chrome™ - PC: Windows Internet Explorer • If the page is not displayed, refer to the following website. www.technics.com/support/ 4 Select “Search wireless network”. 5 Select your home wireless network name (Network name (SSID)) and type the password for this network. 6 Select “JOIN” to apply the settings. • “Linking” is displayed. • When the connection is established, “Success” is displayed. - “Fail” may be displayed if the connection was not complete. Try this method again from [SETUP] menu. If “Fail” is still displayed, try other methods ( 13). • Depending on the device, the connection complete screen may not be displayed. 7 Make sure to connect your compatible device back to your home wireless network. 8 Press [OK] on the remote control to exit the setting. • “ ” is displayed. Note • Enable JavaScript and Cookies in your browser settings. • If known by a third party, the password will be at risk of being used for fraud. Manage your password securely with your responsibility. Panasonic does not accept any responsibility for damage caused by fraud.](https://usermanual.wiki/Panasonic-of-North-America/SC-C70/User-Guide-3490794-Page-16.png)
![English17 Playing back CDs 1 Press [ ] to turn this unit on. 2 Press [CD]. 3 Open the top cover with a sliding motion and then insert the CD. • The top cover can slide to the both sides. • Place the CD with its label facing up, and push the center of the CD until a clicking sound is heard. 4 Close the top cover with a sliding motion. • This unit cannot play back the CD while the top cover is open. 5 Press [ ]. ■ To eject the CD Open the top cover with a sliding motion. Eject the CD. • Be careful not to hit the CD with the top cover. • Eject the CD after the CD has stopped turning. Lens Note • Be careful not to get your finger caught in the top cover when opening/closing it. • Be careful not to touch the lens with your fingers. • The lens lights when the following operations are performed with no CD inserted. This is not a malfunction. - When turning the power on - When selecting “CD” as the input source - When opening and closing the top cover ■ Repeat Playback/Random repeat playback Press [MENU]. Press [ ], [ ] repeatedly to select “Repeat”/“Random” and then press [OK]. Press [ ], [ ] repeatedly to an item and then press [OK]. • During random playback, you cannot skip to the previous track. ■ Program playback Press [PGM] in the stop mode. • “Program Mode” screen is displayed. Press the numeric buttons to select tracks. • Repeat this step to make further selections. Press [ ] to start playback. • Press [ ] or [ ] in the stop mode to check the programmed order. • Press [CLEAR] in the stop mode to clear the last track. • Press [PGM] in the stop mode to cancel the program mode, and the program memory will be stored. • Press [ ] in the stop mode and select “Yes” to cancel the program mode. (The program memory will be cleared.) Note • The program memory is cleared when replacing the CD. • The program mode is cancelled when the random repeat playback is set.](https://usermanual.wiki/Panasonic-of-North-America/SC-C70/User-Guide-3490794-Page-17.png)
![18 Listening to FM/AM Radio Storing FM/AM stations You can preset up to 30 channels for FM and 15 channel for AM. • A station previously stored is overwritten when another station is selected for the same channel by presetting. 1 Press [RADIO] repeatedly to select “FM”. 2 Press [MENU]. 3 Press [ ], [ ] repeatedly to select “Auto Preset” and then press [OK]. 4 Press [ ], [ ] to select an item and then press [OK]. Lowest: To begin the auto preset with the lowest frequency (FM 87.50/87.90, AM 520). Current: To begin the auto preset with the current frequency. • The tuner starts to preset all the stations it can receive into the channels in ascending order. • The factory default is “Lowest”. ■ To listen to preset FM/AM channel Press [MENU]. Press [ ], [ ] repeatedly to select “Tuning Mode” and then press [OK]. Press [ ], [ ] to select “Preset” and then press [OK]. Press [ ], [ ] or numeric buttons to select the channel.](https://usermanual.wiki/Panasonic-of-North-America/SC-C70/User-Guide-3490794-Page-18.png)
![English19 Using Bluetooth® Pairing a Bluetooth® device • Turn on the Bluetooth® feature of the device and place the device near this unit. • If a Bluetooth® device is already connected, disconnect it. 1 Press [ -PAIRING]. • When “Pairing” is indicated on the display, proceed to step 5. 2 Press [MENU]. 3 Press [ ], [ ] repeatedly to select “Pairing” and then press [OK]. 4 Press [ ], [ ] to select “Yes” and then press [OK]. • “Pairing” is displayed, and this unit waits for registering. 5 Select “SC-C70” from the Bluetooth® device’s menu. • The name of the connected device is indicated on the display. • The MAC address “******” (“******” stands for a character that is unique to each set.) may be displayed before “SC-C70” is displayed. Note • You can also enter pairing mode by pressing and holding [ -PAIRING] when the input source is “Bluetooth”. • If prompted for the passkey, input “0000”. • You can register up to 8 devices with this unit. If a 9th device is paired, the device that has not been used the longest will be replaced. Listening to music stored on a Bluetooth® device 1 Press [ -PAIRING]. • “Ready” or “Pairing” is indicated on the display. 2 Select “SC-C70” from the Bluetooth® device’s menu. • The name of the connected device is indicated on the display. 3 Start playback on the Bluetooth® device. Note • Refer to the operating instructions of the Bluetooth® device for details. • This unit can only be connected to one device at a time. • When “Bluetooth” is selected as the input source, this unit will automatically try and connect to the last connected Bluetooth® device. (“Linking” is displayed during this process.) Disconnecting a Bluetooth® device 1 Press [MENU]. 2 Press [ ], [ ] repeatedly to select “Disconnect?” and then press [OK]. 3 Press [ ], [ ] to select “Yes” and then press [OK]. Note • The Bluetooth® device will be disconnected if a different audio source is selected. Bluetooth® device](https://usermanual.wiki/Panasonic-of-North-America/SC-C70/User-Guide-3490794-Page-19.png)