Panasonic of North America SU-C500 CD STEREO SYSTEM User Manual full sc c500pp Eng p6 52 indb
Panasonic Corporation of North America CD STEREO SYSTEM full sc c500pp Eng p6 52 indb
UserManual.wiki
>
Panasonic of North America
>
SU C500 User Manual
Users Manual
Navigation menu
Upload a User Manual
Namespaces
Wiki Guide
HTML
PDF
Info
Views
User Manual
Discussion / Help
Navigation


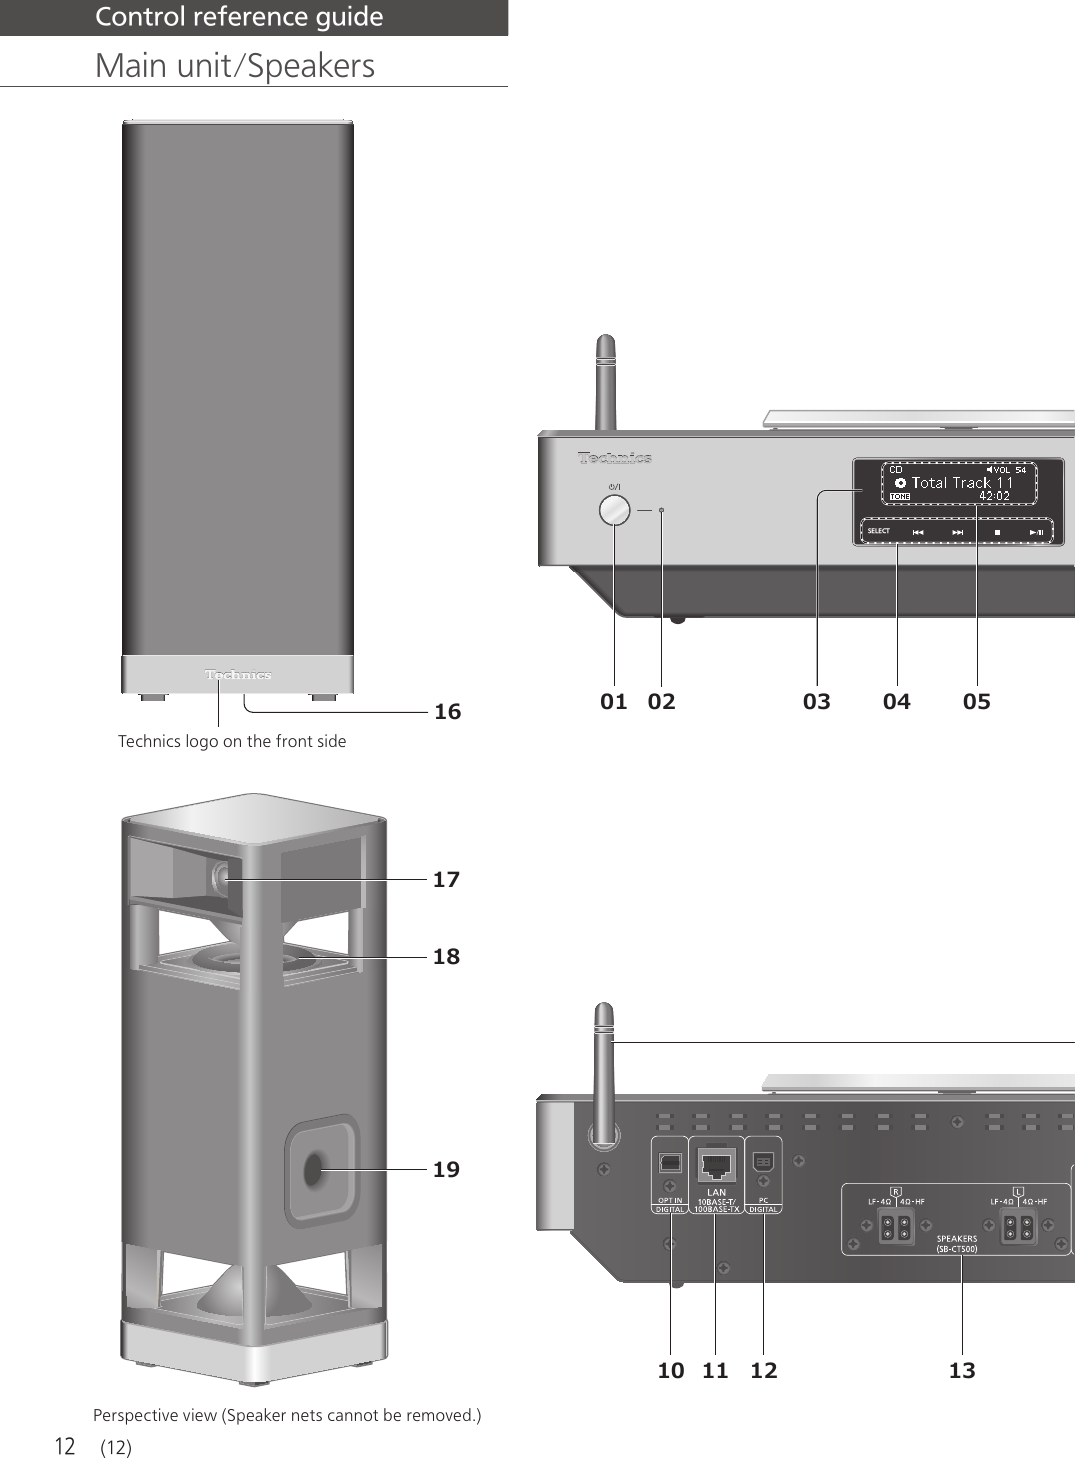
![13EnglishEnglish Control reference guide 01 Standby/on switch ( ) • Press to switch the unit from on to standby mode or vice versa. In standby mode, the unit is still consuming a small amount of power. 02 Power indicator • Blue: The unit is on. • Red: The unit is in standby mode with the following status. - Network standby function is available. ( 37) - Charging an iPhone/iPad/iPod ( 27) • Off: The unit is in standby mode with no function available. 03 Remote control signal sensor • Distance: Within approx. 7 m (23 ft) directly in front • Angle: Approx. 30° left and right 04 [SELECT]/[ ], [ ], [ ], [ ]: Switch the input source ( 30, 31, 32)/Basic control buttons ( 24) • These switches work just by touching the marks. Each time you touch the switch, there will be a beep sound. ( 36) 05 Display • Input source, playback status, etc. are displayed. For details, visit: www.technics.com/support/ 06 USB-A terminal • Port for iPhone/iPad/iPod and USB devices ( 26, 27) 07 Headphones jack • When a plug is connected, the speakers do not output sound. • Excessive sound pressure from earphones and headphones can cause hearing loss. • Listening at full volume for long periods may damage the user’s ears. 08 Adjust volume • 0 (min) to 100 (max) 09 Top cover ( 24) 10 Optical digital input terminal ( 30) 11 LAN terminal ( 18) 12 USB-B terminal • For connecting to a PC, etc. ( 31) 13 Speaker output terminals ( 16) 14 AC IN terminal ( 17) 15 Wireless LAN antenna ( 19) 16 Speaker input terminals • The terminals are on the bottom surface. 17 Multi-angled Tweeters 18 Symmetrically Placed Woofers 19 Bass reflex port (13)](https://usermanual.wiki/Panasonic-of-North-America/SU-C500/User-Guide-2807868-Page-13.png)
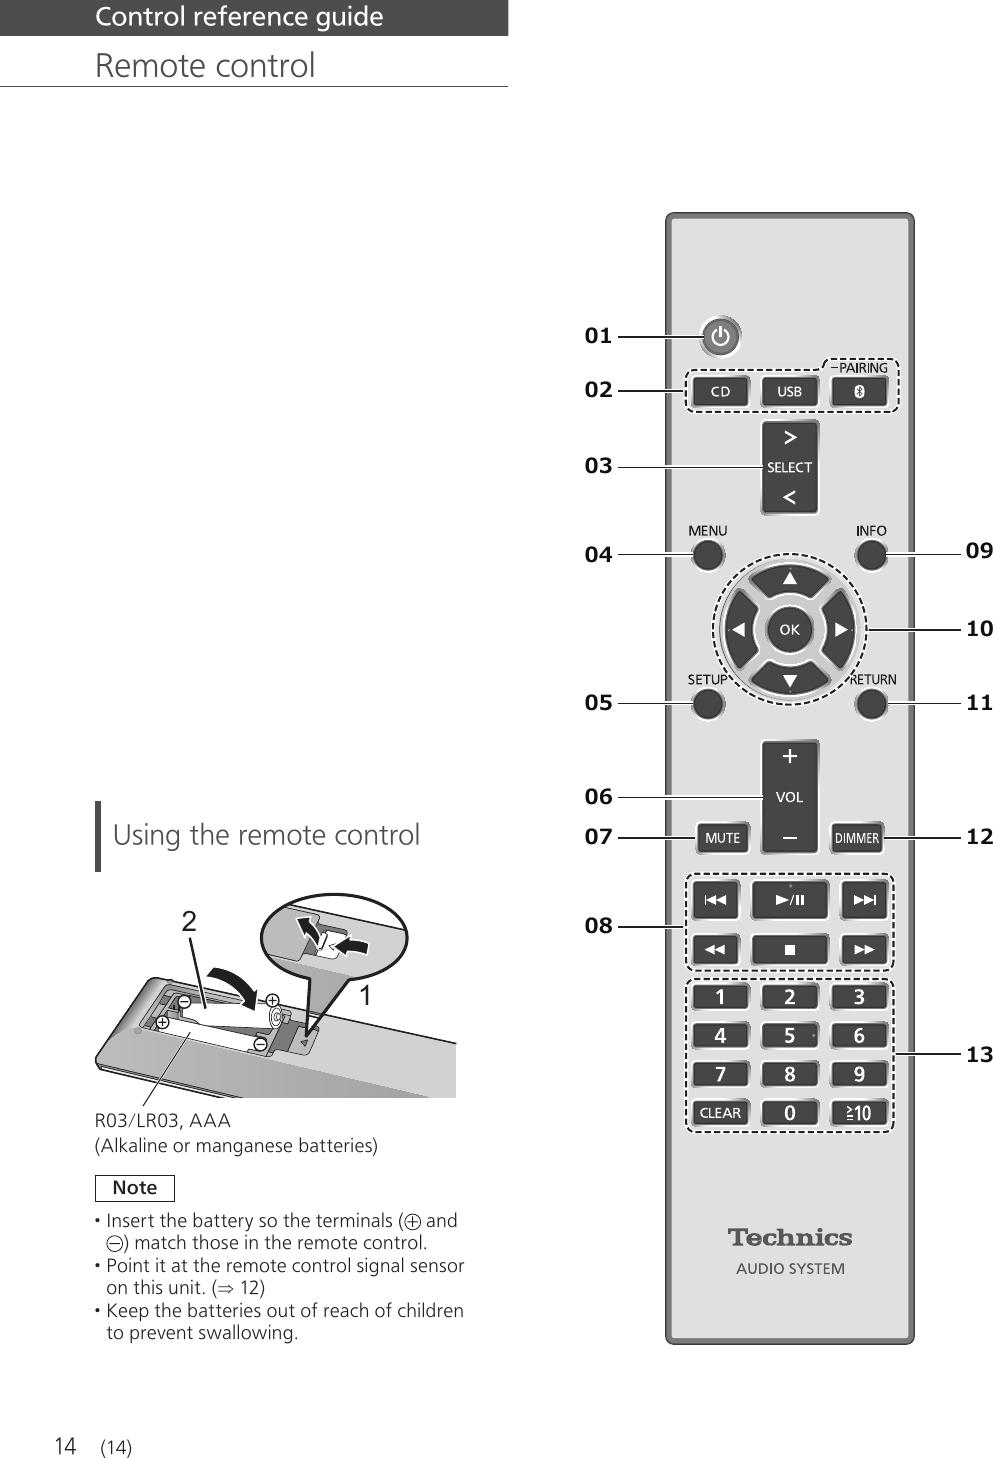
![15EnglishEnglish Control reference guide Remote control code When other equipment responds to the supplied remote control, change the remote control code. • The factory default is “Mode 1”. 1 Press [SETUP]. 2 Press [ ], [ ] to select “Remote Control” and then press [OK]. • The current remote control code of this unit is displayed. 3 When “Set Mode 1/2” is displayed, set the remote control code of the remote control. To set “Mode 1”: Press and hold [OK] and [1] for at least 4 seconds. To set “Mode 2”: Press and hold [OK] and [2] for at least 4 seconds. 4 Point the remote control at this unit, and press and hold [OK] for at least 4 seconds. • When the remote control code is changed, the new code will appear on the display for a few seconds. ■ When “Remote 1” or “Remote 2” is displayed When “Remote 1” or “Remote 2” is displayed, the remote control codes of this unit and remote control are different. Perform step 3 above. 01 []: Standby/on switch • Press to switch the unit from on to standby mode or vice versa. In standby mode, the unit is still consuming a small amount of power. 02 [CD]/[USB]/[ -PAIRING]: Select the device to be operated ( 24, 26, 27, 28, 29) 03 [>SELECT<]: Switch the input source ( 30, 31, 32) 04 [MENU]: Enter menu ( 24, 26, 28, 32, 35) 05 [SETUP]: Enter setup menu ( 36) 06 [+VOL-]: Adjust the volume • 0 (min) to 100 (max) 07 [MUTE]: Mute the sound • Press [MUTE] again to cancel. “MUTE” is also cancelled when you adjust the volume or when you turn the unit to standby. 08 Basic playback control buttons 09 [INFO]: View content information • Press this button to display the track, artist, and album names, file type, sampling frequency, and other information. (The information varies depending on the input source.) 10 [], [ ], [ ], [ ]/[OK]: Selection/OK 11 [RETURN]: Return to the previous display 12 [DIMMER]: Adjust the brightness of the display, etc. • When the display is turned off, it will light up only when you operate this unit. Before the display turns off again, “Display Off” will be displayed for a few seconds. (Basic control buttons on this unit are not turned off.) • Press repeatedly to switch the brightness. 13 Numeric buttons, etc. • To select a 2-digit number Example: 16: [ 10] > [1] > [6] • To select a 4-digit number Example: 1234: [ 10] > [ 10] > [ 10] > [1] > [2] > [3] > [4] • [CLEAR]: Clear the entered value. (15)](https://usermanual.wiki/Panasonic-of-North-America/SU-C500/User-Guide-2807868-Page-15.png)
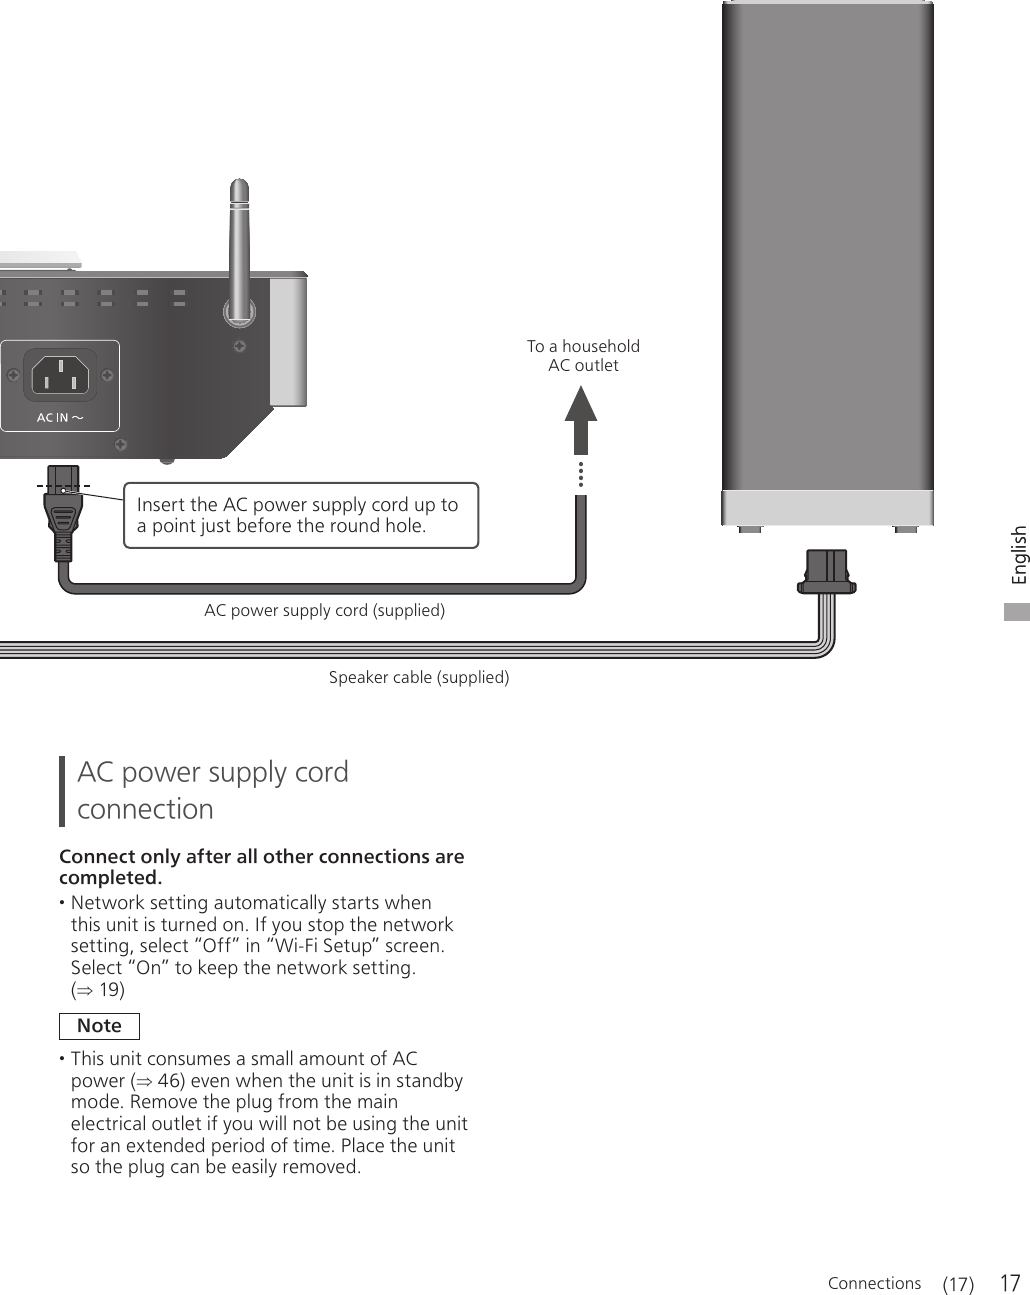
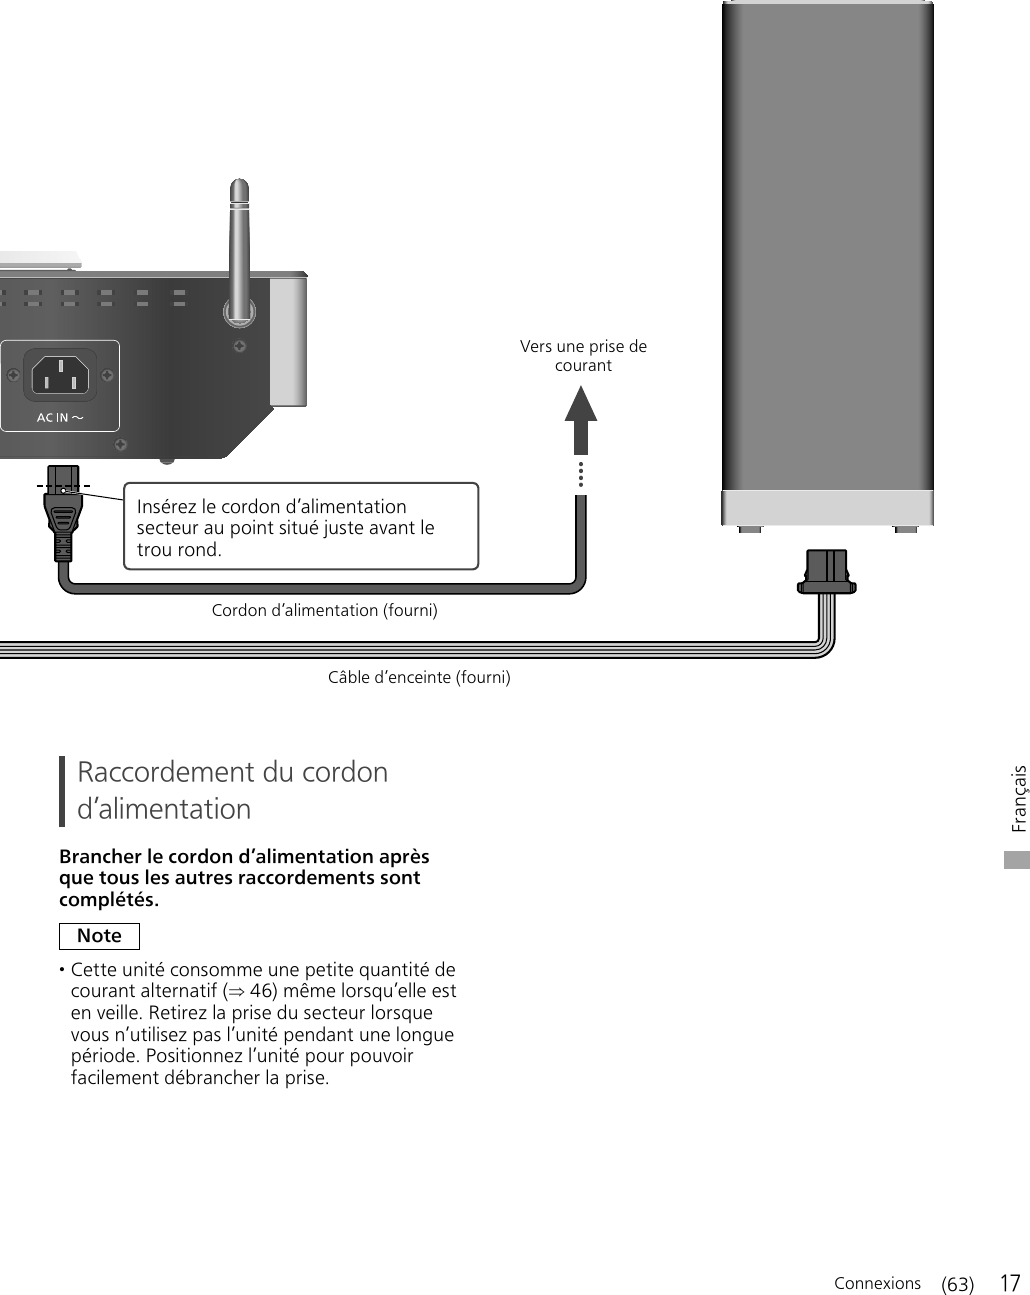
![18 Connections Network settings Note • If you try to change the network settings immediately after turning on this unit, it may take some time until the network setup screen is displayed. You can stream music from an iOS device (iPhone/iPad/iPod), an Android™ device or a PC (Mac/Windows) to this unit by using the AirPlay or DLNA feature. ( 32, 34) To use these features, this unit must join the same network as the AirPlay compatible device or the DLNA compatible device. This system can be connected to a router using a LAN cable or built-in Wi-Fi®. For a stable connection to the network, a wired LAN connection is recommended. Wired LAN connection Broadband router, etc. LAN cable (not supplied) 1 Disconnect the AC power supply cord. 2 Connect this unit to a broadband router, etc. using a LAN cable. 3 Connect the AC power supply cord to this unit, and press [ ]. ( 17) • When the connection is established, “” is displayed. Note • While the AC power supply cord is disconnected, the LAN cable must be connected or disconnected. • Use category 7 or above straight LAN cables (STP) when connecting to peripheral devices. • Inserting any cable other than a LAN cable in the LAN port can damage the unit. • If the LAN cable is disconnected, the network-related settings return to default. Make the settings again. • When a LAN cable is connected, the Wi-Fi function may be disabled. (18)](https://usermanual.wiki/Panasonic-of-North-America/SU-C500/User-Guide-2807868-Page-18.png)
![19EnglishEnglish Connections Wireless LAN connection ■ Preparation Disconnect the AC power supply cord. Disconnect the LAN cable. (When a LAN cable is connected, the Wi-Fi function may be disabled.) Place this unit as close to the wireless router as possible. Point up the antenna on the rear of this unit as shown in the figure. Connect the AC power supply cord to this unit. ( 17) Note • Do not perform the following: - Applying too much force to the antenna - Carrying this unit by holding the antenna • The setting will be cancelled after the set time limit. In that case, try the setting again. • To cancel this setting in the middle, press [ ] or turn the unit to standby mode. ■ Settings for the first time 1 Press [ ] to turn this unit on. • “Wi-Fi Setup” is displayed. 2 Press [ ], [ ] to select “On” and then press [OK]. • “WAC Mode for iOS” automatically starts. 3 (For “WAC Mode for iOS”) Proceed to step 2 of “Using the WAC (Wireless Accessory Configuration)” ( 20). (For other network setting method) Choose a network setting method. Note • When this unit is switched to standby mode and turned on before the Wi-Fi setting is complete, “Wi-Fi Setup” is displayed. Perform the Wi-Fi setting or select “Off”. ■ Choose a network setting method Are you using an iPod touch/iPhone/iPad? Yes (iOS version 7.0 or later) Using the WAC (Wireless Accessory Configuration) ( 20) (iOS version 5.0 or later) Using iPhone/iPad/iPod ( 20) No Does your wireless network router support WPS (Wi-Fi Protected Setup™)? Yes (WPS button) Using the WPS button ( 21) (WPS PIN code) Using the WPS PIN code ( 21) No Are you using an Android device? Yes Using “Technics Music App” ( 22) No Using an internet browser ( 22) ■ Settings using [SETUP] menu 1 Press [SETUP]. 2 Press [ ], [ ] repeatedly to select “Network” and then press [OK]. • When “Wi-Fi” screen is displayed, press [OK]. 3 Choose a network setting method. (19)](https://usermanual.wiki/Panasonic-of-North-America/SU-C500/User-Guide-2807868-Page-19.png)
![20 Connections Network settings (Continued) Using the WAC (Wireless Accessory Configuration) “WAC Mode for iOS” You can send its Wi-Fi configuration to this system using an iPhone/iPad/iPod touch. • Supported device: iPhone/iPad/iPod touch (iOS version 7.0 or later), or Mac (OS X 10.9 or later, with AirPort Utility 6.3.1. or later) • The following explanations are based on an iPhone. • Make sure your iPhone is connected to your home wireless network beforehand. 1 Press [ ], [ ] on the remote control to select “WAC Mode for iOS” and then press [OK]. • “Setting” is displayed. 2 Go to Wi-Fi settings on your iPhone. 3 Select “Technics SC-C500 ******” under the “SET UP NEW AIRPLAY SPEAKER…” on your iPhone. • “******” stands for a character that is unique to each set. 4 The “AirPlay Setup” screen appears on your iPhone. • This system will be displayed as “Technics SC-C500 ******”. To change the name, enter a new name to replace the existing one. You can also do the renaming after the network connection is set up. ( 23) • You can set a password for this system under “SPEAKER PASSWORD”. (You will need this password if you make network settings by internet browser next time.) 5 Select “Next” to apply the settings. • “Linking” is displayed. • When the connection is established, “Success” is displayed. - “Fail” may be displayed if the connection was not complete. Try this method again from [SETUP] menu. If “Fail” is still displayed, try other methods ( 19). 6 Press [OK] on the remote control to exit the setting. • “ ” is displayed. Using iPhone/iPad/iPod “With iPod” With this method you will share the wireless network settings of your iPod/iPhone/iPad with this system. • Supported device: iPhone/iPad/iPod touch (iOS version 5.0 or later) • The following explanations are based on an iPhone. • Make sure your iPhone is connected to your home wireless network beforehand. USB cable (supplied with iPhone/iPad/iPod) 1 Connect the iPhone to this unit with the USB cable. • Use the USB cable supplied with iPhone/iPad/iPod. • Unlock your iPhone before connecting. 2 Press [ ], [ ] on the remote control to select “With iPod” and then press [OK]. • “Connecting Wi-Fi” is displayed. 3 Allow the iPhone to share the wireless network settings. • When the connection is established, “Success” is displayed. - “Fail” may be displayed if the connection was not complete. Try this method again from [SETUP] menu. If “Fail” is still displayed, try other methods ( 19). 4 Press [OK] on the remote control to exit the setting. • “ ” is displayed. (20)](https://usermanual.wiki/Panasonic-of-North-America/SU-C500/User-Guide-2807868-Page-20.png)
![21EnglishEnglish Connections Using the WPS PIN code “WPS PIN” If your wireless router supports WPS, you can set up a connection by entering the WPS PIN code. 1 Press [ ], [ ] on the remote control to select “WPS PIN” and then press [OK]. • The PIN code is displayed. Complete step 2 within 2 minutes. 2 Enter the PIN code into the wireless router. • “Linking” is displayed. • When the connection is established, “Success” is displayed. - “Fail” may be displayed if the connection was not complete. Try this method again from [SETUP] menu. If “Fail” is still displayed, try other methods ( 19). 3 Press [OK] on the remote control to exit the setting. • “ ” is displayed. Note • Depending on a router, other connected devices may temporarily lose their connection. • For details, refer to the operating instructions of the wireless router. Using the WPS button “WPS Push” If your wireless router supports WPS, you can set up a connection by pressing the WPS button. • A compatible wireless router may have the WPS identifier mark. 1 Press [ ], [ ] on the remote control to select “WPS Push” and then press [OK]. • “WPS” is displayed. Complete step 2 within 2 minutes. 2 After “WPS” is displayed, press the WPS button on the wireless router. Example: • “Linking” is displayed. • When the connection is established, “Success” is displayed. - “Fail” may be displayed if the connection was not complete. Try this method again from [SETUP] menu. If “Fail” is still displayed, try other methods ( 19). 3 Press [OK] on the remote control to exit the setting. • “ ” is displayed. (21)](https://usermanual.wiki/Panasonic-of-North-America/SU-C500/User-Guide-2807868-Page-21.png)
![22 Connections Network settings (Continued) Using an internet browser “Setup from Browser” You can access this unit’s network settings from the internet browser on iOS device (iOS version 6.1.6 or earlier), Android device, PC, etc. • The following explanations are based on an Android device. 1 Press [ ], [ ] on the remote control to select “Setup from Browser” and then press [OK]. • “Setting” is displayed. 2 Go to Wi-Fi settings on your compatible device and select “00 Setup ******” to connect to this system. • “******” stands for a character that is unique to each set. 3 Start the internet browser and type “http://192.168.1.12/” into the URL address field and display the page. • Examples of internet browsers - iOS device/Mac: Safari - Android device: Google Chrome™ - PC: Windows Internet Explorer 4 Select “Search wireless network”. 5 Enter your home wireless network name (Network Name (SSID)) and password for this network. 6 Select “JOIN” to apply the settings. • “Linking” is displayed. • When the connection is established, “Success” is displayed. - “Fail” may be displayed if the connection was not complete. Try this method again from [SETUP] menu. If “Fail” is still displayed, try other methods ( 19). • Depending on the device, the connection complete screen may not be displayed. 7 Make sure to connect your compatible device back to your home wireless network. 8 Press [OK] on the remote control to exit the setting. • “ ” is displayed. Note • Enable Java and Cookies in your browser settings. Using “Technics Music App” “Setup from Browser” If you install the dedicated app “Technics Music App” (free of charge) on your Android device, you can set up a connection using the application. • If you’re using an Android device, download the app at Google Play™. • Check the password for your home wireless network. • Make sure your Android device is connected to your home wireless network beforehand. 1 Press [ ], [ ] on the remote control to select “Setup from Browser” and then press [OK]. • “Setting” is displayed. 2 Start “Technics Music App” on the Android device. 3 Select “ ” and go to Wi-Fi settings. 4 Enter the password for your home wireless network. 5 Select “Next” to apply the settings. • “Linking” is displayed. • When the connection is established, “Success” is displayed. - “Fail” may be displayed if the connection was not complete. Try this method again from [SETUP] menu. If “Fail” is still displayed, try other methods ( 19). • Depending on the device, the connection complete screen may not be displayed. 6 Make sure to connect your compatible device back to your home wireless network. 7 Press [OK] on the remote control to exit the setting. • “ ” is displayed. (22)](https://usermanual.wiki/Panasonic-of-North-America/SU-C500/User-Guide-2807868-Page-22.png)
![23EnglishEnglish Connections This unit’s name on the network “Friendly Name” You can change this unit’s name on the network (e.g. “Room 1” or “Living Room” etc.). 1 Press [SETUP]. 2 Press [ ], [ ] repeatedly to select “Network” and then press [OK]. 3 Press [ ], [ ] repeatedly to select “Friendly Name” and then press [OK]. • The current name of this unit is displayed. Press [OK] to edit. 4 Press [ ], [ ], [ ], [ ] to input the friendly name. • Only ASCII characters can be used. • “A” can be added when you press the [ ] at the time of the last letter of the Friendly Name is selected. • Press [CLEAR] to delete a letter. • Press [ 10] to insert a letter “A”. • Default name is “Technics SC-C500 ******”. “******” stands for a digit that is unique to each set. 5 Press [OK] to apply the settings. 6 Press [RETURN] repeatedly to exit the settings. To make network-related settings You can set specific IP address, subnet mask, default gateway, primary DNS, etc. • Do not play back music while changing these settings. 1 Press [SETUP]. 2 Press [ ], [ ] repeatedly to select “Network” and then press [OK]. 3 Select and input the details. 4 Press [OK] to apply the settings. 5 Press [RETURN] repeatedly to exit the settings. 6 Press [ ] to switch the unit to standby. • Wait until “Please Wait” disappears. 7 Perform the network setting. ( 18) (23)](https://usermanual.wiki/Panasonic-of-North-America/SU-C500/User-Guide-2807868-Page-23.png)
![24 Operations Playing back CDs Insert the CD for music playback. • Refer to “Notes on CDs” ( 44) for information about the discs this unit can play back. 1 Press [ ] to turn this unit on. 2 Press [CD]. 3 Open the top cover with a sliding motion and then insert a CD. • Place label up and push the center of a CD until a click is heard. 4 Close the top cover with a sliding motion. • This unit cannot play back a CD while the top cover is open. 5 Press [ ]. Note • Be careful not to get your finger caught in the top cover when opening/closing it. • Do not apply too much force to the top cover when sliding it. Doing so may cause malfunction. • Do not leave the top cover open for prolonged periods of time. This will cause the lens to get dirty. • Be careful not to touch the lens with your fingers. • The lens lights when the following operations are performed with no CD inserted. This is not a malfunction. - Turn the power on - Select “CD” as the input source - Open or close the top cover Lens Operations during playback Stop Pause • Press again to restart play. Skip Search • On the unit: touch and hold [ ] or [ ]. Viewing available information [INFO] Repeat playback “Repeat” 1 Press [MENU]. 2 Press [ ], [ ] repeatedly to select “Repeat” and then press [OK]. 3 Press [ ], [ ] to select an item and then press [OK]. 1-Track: Only plays the selected track. (“1 ” is displayed.) All: All tracks are repeated. (“ ” is displayed.) • Setting is available even when the input source is switched to “USB” ( 26) or “DMP” ( 32). (24)](https://usermanual.wiki/Panasonic-of-North-America/SU-C500/User-Guide-2807868-Page-24.png)
![25EnglishEnglish Operations Random repeat playback “Random” 1 Press [MENU]. 2 Press [ ], [ ] repeatedly to select “Random” and then press [OK]. 3 Press [ ], [ ] to select “On” and then press [OK]. • All tracks are repeated randomly. (“RND” and “ ” are displayed.) • Setting is available even when the input source is switched to “USB” ( 26) or “DMP” ( 33). Program playback “Program” 1 Press [MENU]. 2 Press [ ], [ ] repeatedly to select “Program” and then press [OK]. 3 Press [ ], [ ] to select “On” and then press [OK]. • “Program Mode” screen is displayed. 4 Press the numeric buttons to select tracks. • Repeat this step to make further selections. 5 Press [ ] to start playback. Stop Press [ ]. • Programed content is maintained. Check the programed order Press [ ] or [ ] in the stop mode. Add tracks Do step 4 in the stop mode. Clear the last track Press [CLEAR] in the stop mode. • It is not possible to select and clear the desired programed track. • To cancel program mode (The program memory will be cleared.) Press [ ] in the stop mode. Press [ ], [ ] to select “Yes” and then press [OK]. • To cancel program mode (The program memory won’t be cleared.) Press [MENU]. Press [ ], [ ] repeatedly to select “Program” and then press [OK]. Press [ ], [ ] to select “Off” and then press [OK]. Note • The program memory is cleared when replacing a CD. • The program mode is cancelled when random repeat playback is set. (25)](https://usermanual.wiki/Panasonic-of-North-America/SU-C500/User-Guide-2807868-Page-25.png)
![26 Operations Using USB device 1 Connect a USB device to the unit. 2 Press [USB]. • The folder/content selection screen will be displayed. 3 Press [ ], [ ] to select an item and then press [OK]. • Repeat this step to make further selections. • Press [RETURN] to return to the previous folder. Operations during playback Stop Pause • Press again to restart play. Skip Search • On the unit: touch and hold [ ] or [ ]. Viewing available information [INFO] • This operation may not be available for some formats. Repeat playback “Repeat” 1 Press [MENU]. 2 Press [ ], [ ] repeatedly to select “Repeat” and then press [OK]. 3 Press [ ], [ ] to select an item and then press [OK]. 1-Track: Only plays the selected track. (“1 ” is displayed.) All: All tracks in the folder are repeated. (“ ” is displayed.) • Setting is available even when the input source is switched to “CD” ( 24) or “DMP” ( 32). Random repeat playback “Random” 1 Press [MENU]. 2 Press [ ], [ ] repeatedly to select “Random” and then press [OK]. 3 Press [ ], [ ] to select “On” and then press [OK]. • All tracks in the folder are repeated randomly. (“RND” and “ ” are displayed.) • During random playback, you cannot skip to tracks which have been played, and tracks may be played more than once. • Setting is available even when the input source is switched to “CD” ( 25) or “DMP” ( 33). Connect a USB device to the unit, and you can play back music stored on the USB device. • Refer to “USB” ( 44) for information about the USB device this unit can play back. USB device (26)](https://usermanual.wiki/Panasonic-of-North-America/SU-C500/User-Guide-2807868-Page-26.png)
![27EnglishEnglish Using iPhone/iPad/iPod Operations 1 Connect an iPhone/iPad/iPod to the unit. 2 Press [USB]. • The display will automatically change to “iPod_Port” when a compatible iPhone/iPad/iPod is connected to the USB-A terminal. 3 Start playback on the iPhone/iPad/iPod. Operations during playback Stop Pause • Press again to restart play. Skip Search • On the unit: touch and hold [ ] or [ ]. • For “Repeat” and “Shuffle”. ( 35) Note • Compatibility depends on the software version. Update your iPhone/iPad/iPod to the latest software before using it with this unit. • Operation results may vary depending on the iPhone/iPad/iPod models or the iOS version. Charging an iPhone/iPad/iPod During unit on, charging starts when an iPhone/iPad/iPod is connected to this unit. • To continue charging from the USB cable connection during standby mode, make sure the iPhone/iPad/iPod has started charging before turning the unit to standby mode. • Check the iPhone/iPad/iPod to see if the battery is fully charged. Once fully charged, remove the iPhone/iPad/iPod. Note • When this unit is in standby mode, “iPod Charging” is displayed and the power indicator lights red. • Charging stops when the battery is fully charged. The battery will deplete naturally. • When charging an iPhone/iPad/iPod whose battery is depleted, do not turn this unit to standby mode until the iPhone/iPad/iPod becomes operational. Connect an iPhone/iPad/iPod to the unit using USB cable*, and you can play back music stored on iPhone/iPad/iPod or charge iPhone/iPad/iPod. • Refer to “iPhone/iPad/iPod” ( 44) for information about the iOS device this unit can play back. * : Use the USB cable supplied with iPhone/iPad/iPod. USB cable (supplied with iPhone/iPad/iPod) iPhone/iPad/iPod (27)](https://usermanual.wiki/Panasonic-of-North-America/SU-C500/User-Guide-2807868-Page-27.png)
![28 Operations Using Bluetooth® ■ Pairing a Bluetooth® device • Turn on the Bluetooth® feature of the device and place the device near this unit. • If a Bluetooth® device is already connected, disconnect it. ( 29) 1 Press [ -PAIRING]. 2 Press [MENU]. 3 Press [ ], [ ] repeatedly to select “Pairing” and then press [OK]. 4 Press [ ], [ ] to select “Yes” and then press [OK]. • “Pairing” is displayed, and this unit waits for registering. 5 Select “SC-C500” from the Bluetooth® device’s menu. • The name of the connected device is indicated on the display. • MAC address may be displayed before “SC-C500” appears. (e.g. 6C:5A:B5:B3:1D:0F) Note • You can also enter pairing mode by pressing and holding [ -PAIRING] when the input source is “Bluetooth”. • If prompted for the passkey, input “0000”. • You can register up to 8 devices with this unit. If a 9th device is paired, the device that has not been used the longest will be replaced. You can listen to the sound from the Bluetooth® audio device from this unit wirelessly. • Refer to the operating instructions of the Bluetooth® device for details. ■ Listening to music stored on a Bluetooth® device 1 Press [ -PAIRING]. • “Ready” is indicated on the display. 2 Select “SC-C500” from the Bluetooth® device’s Bluetooth® menu. • The name of the connected device is indicated on the display. 3 Start playback on the Bluetooth® device. Note • This unit can only be connected to one device at a time. • When “Bluetooth” is selected as the input source, this unit will automatically try and connect to the last connected Bluetooth® device. (“Linking” is displayed during this process.) (28)](https://usermanual.wiki/Panasonic-of-North-America/SU-C500/User-Guide-2807868-Page-28.png)
![29EnglishEnglish Operations Operations during playback Stop Pause • Press again to restart play. Skip Search • On the unit: touch and hold [ ] or [ ]. Note • To use this unit’s remote control/basic control buttons with a Bluetooth® device, the Bluetooth® device must support AVRCP (Audio Video Remote Control Profile). Depending on the status of the device, some controls may not work. • When enjoying video contents with this function, the video audio output may not be synchronized. Bluetooth® transmission mode You can change the transmission mode to prioritize transmission quality or sound quality. 1 Press [ -PAIRING]. • If a Bluetooth® device is already connected, disconnect it. 2 Press [MENU]. 3 Press [ ], [ ] repeatedly to select “Link Mode” and then press [OK]. 4 Press [ ], [ ] to select the mode and then press [OK]. Mode 1: Emphasis on connectivity Mode 2: Emphasis on sound quality (default) Note • Select “Mode 1” if the sound is interrupted. Disconnecting a Bluetooth® device 1 Press [MENU]. 2 Press [ ], [ ] repeatedly to select “Disconnect?” and then press [OK]. 3 Press [ ], [ ] to select “Yes” and then press [OK]. Note • The Bluetooth® device will be disconnected if a different audio source is selected. Bluetooth® device (29)](https://usermanual.wiki/Panasonic-of-North-America/SU-C500/User-Guide-2807868-Page-29.png)
![30 Operations Using digital audio output device 1 Disconnect the AC power supply cord. 2 Connect this unit and a DVD player etc. 3 Connect the AC power supply cord to this unit. ( 17) 4 Press [ ] to turn this unit on. 5 Press [>SELECT<] repeatedly to select “OPT”. 6 Start playback on the connected device. Note • The digital audio input terminals of this unit can only detect linear PCM signals. For details, refer to the operating instructions of the device. - Sampling frequency: 32/44.1/48/88.2/96 kHz - Bit rate Number of quantization bits: 16/24 bit You can input digital audio signals to this unit and play back music. Optical digital audio cable (not supplied) DVD player, etc. (30)](https://usermanual.wiki/Panasonic-of-North-America/SU-C500/User-Guide-2807868-Page-30.png)
![31EnglishEnglish Operations Using PC, etc. You can connect the USB-B terminal and a PC, etc. with a USB cable and play back music on the PC, etc. with this unit. Note Connecting to a PC • Before connecting to a PC, follow the steps below. • Refer to the following for the recommend OS versions for your PC (as of November 2015): - Windows 7, Windows 8, Windows 8.1, Windows 10 - OS X 10.7, 10.8, 10.9, 10.10 Download and install the dedicated driver to the PC. (Only for Windows OS) • Download and install the driver from the website below. www.technics.com/support/ Download and install the dedicated app “Technics Audio Player” (free of charge) on your PC. • Download and install the app from the website below. www.technics.com/support/ 1 Disconnect the AC power supply cord. 2 Connect this unit and a PC, etc. 3 Connect the AC power supply cord to this unit. ( 17) 4 Press [ ] to turn this unit on. 5 Press [>SELECT<] repeatedly to select “PC”. 6 Start playback using the dedicated app “Technics Audio Player” on the connected PC. Note • About supported format, refer to “File format” ( 48) PC, etc. USB 2.0 cable (not supplied) (31)](https://usermanual.wiki/Panasonic-of-North-America/SU-C500/User-Guide-2807868-Page-31.png)
![32 Operations Playing back music files on the DLNA server You can share music files stored in the DLNA Certified media server (PC, Network Attached Storage, etc.) connected to your home network, and enjoy the contents with this unit. ■ Preparation • Complete the network settings. ( 18) • Connect the device to be used to the same network as this unit. • To use Windows Media® Player - Add the contents and folder to the libraries of the Windows Media® Player 11 or 12, or a smartphone, etc. - Playlist of Windows Media® Player can play back only the contents that are stored in the libraries. - To use Windows Media® Player for streaming, you need to configure it in advance. Playing back content stored on the DLNA server by controlling it from this unit 1 Press [>SELECT<] repeatedly to select “DMP”. • The server selection screen will be displayed. 2 Press [ ], [ ] to select a DLNA server on the network, and then press [OK]. • The folder/content selection screen will be displayed. Repeat this step to make further selections. • Folders/content may be displayed in different order from the order on the server, depending on its specifications. 3 Press [ ], [ ] to select an item and then press [OK]. Note • The connected server may not be displayed properly depending on its condition. (e.g. soon after adding the contents to the server, etc.) Please try again later. For details, refer to the operating instructions of the device. Operations during playback Stop Pause • Press again to restart play. Skip Search • On the unit: touch and hold [ ] or [ ]. Viewing available information [INFO] Repeat playback “Repeat” 1 Press [MENU]. 2 Press [ ], [ ] repeatedly to select “Repeat” and then press [OK]. 3 Press [ ], [ ] to select an item and then press [OK]. (32)](https://usermanual.wiki/Panasonic-of-North-America/SU-C500/User-Guide-2807868-Page-32.png)
![33EnglishEnglish Operations Operations using the dedicated app “Technics Music App” If you install the dedicated app “Technics Music App” (free of charge) on your tablet/smartphone, you can control this unit and the SC-C500 using a wide variety of functions. For details, visit: www.technics.com/support/ Playing back content stored on the DLNA server by controlling it from a DMC By controlling a DMC (Digital Media Controller) compatible device, you can play back music stored on the DLNA server on this unit (DMR—Digital Media Renderer). 1 Press [ ] to turn this unit on. 2 Operate the DMC compatible device and connect to this unit. • The device name of this unit will be displayed as “Technics SC-C500 ******”*1, 2. • For details on how to use DMC compatible devices, refer to the operating instructions of the devices or the software. Note • You cannot use random repeat playback in combination with other playback modes. • When you operate DMC, playback of other audio sources will stop and DLNA output will have priority. • Depending on the contents and the connected equipment, operations or playback may not be possible. • This unit does not guarantee connection with all DMC applications. Use the dedicated app “Technics Music App”. * 1: “******” stands for a digit that is unique to each set. * 2: The device name can be changed from “This unit’s name on the network”. ( 23) 1-Track: Only plays the selected track. (“1 ” is displayed.) All: All tracks are repeated. (“ ” is displayed.) • Setting is available even when the input source is switched to “CD” ( 24) or “USB” ( 26). Random repeat playback “Random” 1 Press [MENU]. 2 Press [ ], [ ] repeatedly to select “Random” and then press [OK]. 3 Press [ ], [ ] to select “On” and then press [OK]. • All tracks in the folder are repeated randomly. (“RND” and “ ” are displayed.) • During random playback, you cannot skip to tracks which have been played, and tracks may be played more than once. • Setting is available even when the input source is switched to “CD” ( 25) or “USB” ( 26). (33)](https://usermanual.wiki/Panasonic-of-North-America/SU-C500/User-Guide-2807868-Page-33.png)
![35EnglishEnglish Operations Repeat playback “Repeat” 1 Press [MENU]. 2 Press [ ], [ ] repeatedly to select “Repeat” and then press [OK]. 3 Press [ ], [ ] to set, and press [OK]. • Refer to the connected device to verify the selected setting. • You can also set on the connected iOS device/PC. Random repeat playback “Shuffle” 1 Press [MENU]. 2 Press [ ], [ ] repeatedly to select “Shuffle” and then press [OK]. 3 Press [ ], [ ] to set, and press [OK]. • Refer to the connected device to verify the selected setting. • You can also set on the connected iOS device/PC. (35)](https://usermanual.wiki/Panasonic-of-North-America/SU-C500/User-Guide-2807868-Page-35.png)
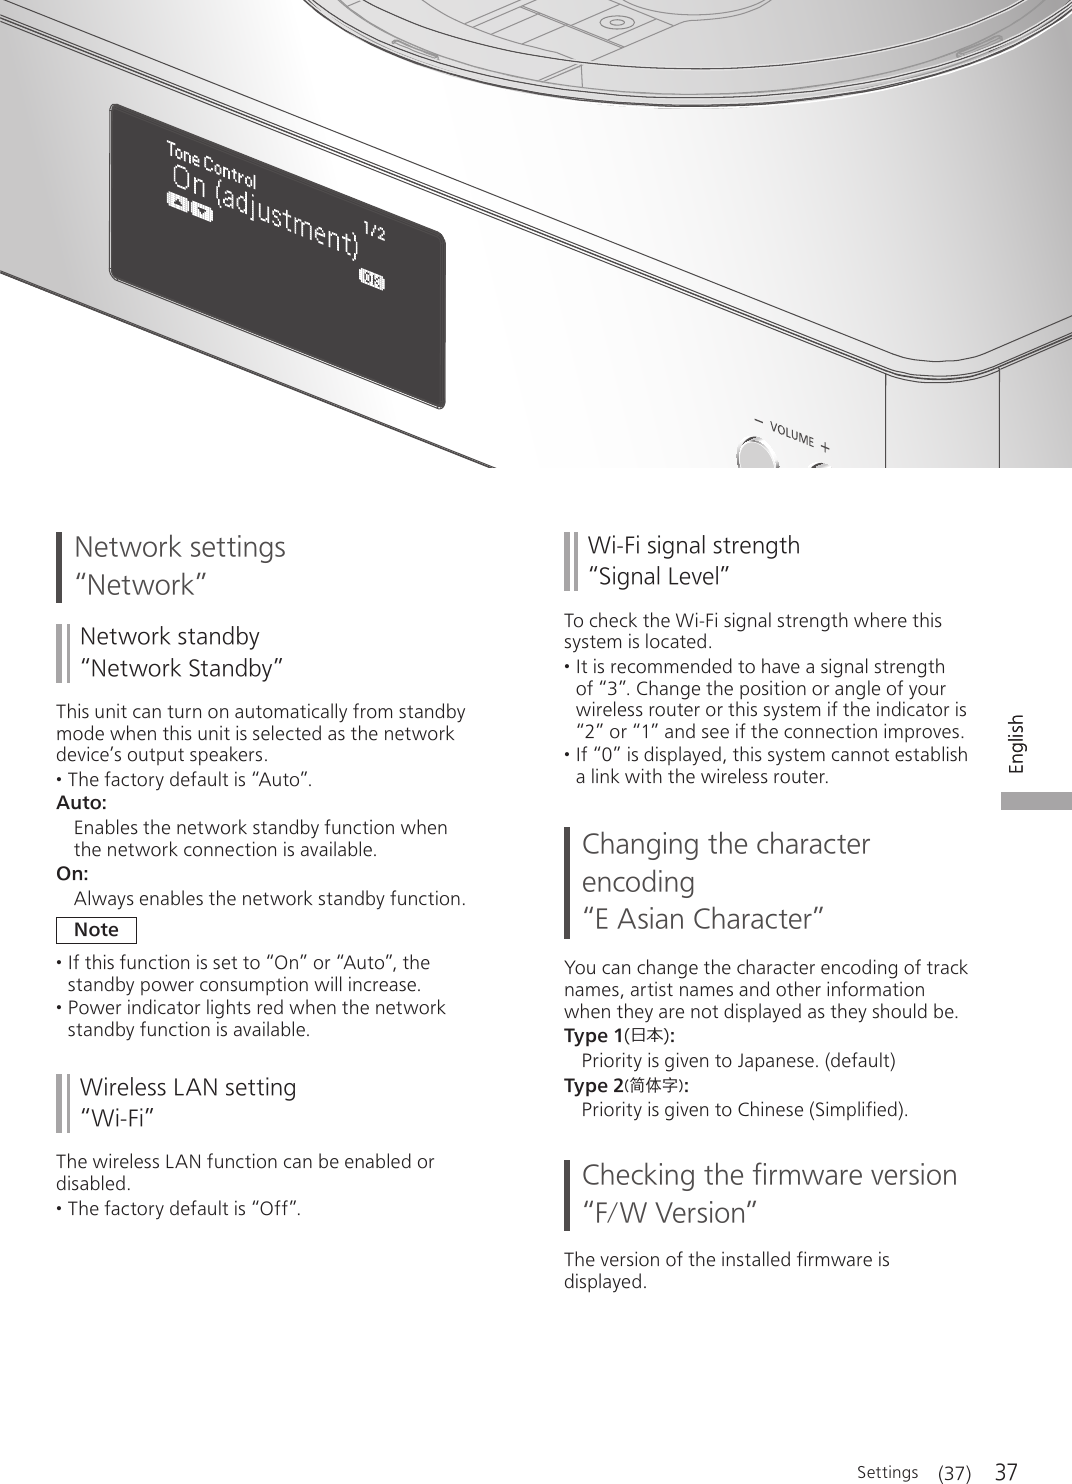
![36 Settings Sound adjustment, Other settings 1 Press [SETUP]. 2 Press [ ], [ ] repeatedly to select the menu and then press [OK]. 3 Press [ ], [ ], [ ], [ ] to set, and press [OK]. Language setting “Language” Select “English” or “Français” for the display. • The factory default is “English”. Adjusting Bass/Middle/Treble “Tone Control” You can adjust the tone of this unit. Each tonal range (Bass/Middle/Treble) can be adjusted. • To enable this function, select “On (adjustment)”. • Each level can be adjusted between “- 10” and “+ 10”. • “TONE” is displayed after setting. Sleep timer “SLEEP” The sleep timer can turn the unit to standby mode after a set time. (30 minutes/60 minutes/90 minutes/120 minutes/Off) Auto off function “AUTO OFF” This unit is designed to conserve its power consumption and save energy. The unit has been left unused for about 20 minutes and will enter standby mode within a minute. Press any button to cancel it. • The factory default is “On”. To disable this function, select “Off”. Note • The auto off function works unless you turn it off, even if you turn this unit to standby mode and on. Illumination on the top cover and bottom of the unit “ILLUMINATION” The top cover and bottom of the unit illuminate when this unit is turned on. (Lights of the top cover turns off when the top cover is opened.) • The factory default is “Mode2”. To disable this function, select “Off”. Mode1: The top cover and bottom of the unit always illuminate. Mode2: The top cover illuminates only when a playable CD is inserted and the input source is “CD”. The bottom of this unit always illuminates. Off: The top cover and bottom of the unit do not illuminate. Operation sound setting “Beep” You can turn the beep sound on/off. • The factory default is “On”. To disable this function, select “Off”. The sound effects and other settings can be set up. (36)](https://usermanual.wiki/Panasonic-of-North-America/SU-C500/User-Guide-2807868-Page-36.png)
![38 Settings Sound adjustment, Other settings (Continued) Firmware updates “F/W Update” Occasionally, Panasonic may release updated firmware for this unit that may add or improve the way a feature operates. These updates are available free of charge. Downloading takes approx. 15 minutes. Do not disconnect the AC power supply cord or turn this unit to standby while updating. • The progress is displayed as “Updating %” while updating. ( stands for a number.) Note • During the update process, no other operations can be performed. • If there are no updates, “Firmware is Up To Date” is displayed after step 3. Update via Internet ■ Preparation • Connect this unit to the network. ( 18) - Make sure that the network is connected to the Internet. 1 Press [SETUP]. 2 Press [ ], [ ] repeatedly to select “F/W Update” and then press [OK]. 3 Press [ ], [ ] to select “Internet” and then press [OK]. 4 Press [ ], [ ] to select “Yes” and then press [OK]. • The progress is displayed as “Updating %” while updating. ( stands for a number.) • When the update has finished successfully, “Success” is displayed. 5 Disconnect the AC power supply cord and reconnect it after 3 minutes. Note • Downloading may take longer or may not work properly depending on the connection environment. Update via USB flash memory ■ Preparation • Download the latest firmware on the USB flash memory. For details, refer to the following website. www.technics.com/support/firmware/ 1 Connect the USB flash memory with new firmware. 2 Press [SETUP]. 3 Press [ ], [ ] repeatedly to select “F/W Update” and then press [OK]. 4 Press [ ], [ ] to select “USB” and then press [OK]. 5 Press [ ], [ ] to select “Yes” and then press [OK]. • The progress is displayed as “Updating %” while updating. ( stands for a number.) • When the update has finished successfully, “Success” is displayed. 6 Disconnect the AC power supply cord and reconnect it after 3 minutes. Note • Downloading may take longer depending on the USB flash memory. (38)](https://usermanual.wiki/Panasonic-of-North-America/SU-C500/User-Guide-2807868-Page-38.png)
![39English Settings / Troubleshooting Troubleshooting Heat buildup of this unit. This unit becomes warm when used for a long time. This is not a malfunction. Do you have the latest firmware installed? Panasonic is constantly improving the unit’s firmware to ensure that our customers are enjoying the latest technology. ( 38) To return all settings to the factory defaults When the following situations occur, reset the memory: • There is no response when buttons are pressed. • You want to clear and reset the memory contents. 1 Press [SETUP]. 2 Press [ ], [ ] repeatedly to select “Initialization” and then press [OK]. 3 Press [ ], [ ] to select “Yes” and then press [OK]. • All the settings are set back to the factory defaults. It is necessary to set the memory items again. 4 Press [ ], [ ] to select “Yes” and then press [OK] again. Before requesting service, make the following checks. If you are uncertain about some of the check points, or if the solutions indicated in the following guide does not resolve the issue, then consult your dealer for instructions. (39)](https://usermanual.wiki/Panasonic-of-North-America/SU-C500/User-Guide-2807868-Page-39.png)
![40 Troubleshooting General A “humming” sound can be heard during playback. • An AC power supply cord or fluorescent light is near the cables. Keep other appliances and cords away from the cables of this unit. • A strong magnetic field near a TV or other device may adversely affect the audio quality. Keep this unit away from such devices. • The speakers may output noise when a device nearby is emitting powerful radio waves, such as when a mobile phone is on a call. The unit does not work. • One of the unit’s safety devices may have been activated. Press [ ] on the unit to switch the unit to standby. • If the unit does not switch to standby, press [ ] on the unit for at least 5 seconds. The unit is forcibly switched to standby. Alternatively, disconnect the AC power supply cord, wait for at least 3 minutes, then reconnect it. Press [ ] on the unit to switch on. If the unit still cannot be operated, consult the dealer. No sound. • Check the volume of this unit. • Check to see if the cable connections to the input and output terminals are incorrect. If this is the case, turn this unit to standby and reconnect the cables correctly. • Check to see if the correct input source is selected. • Insert the plugs of the cables to be connected all the way in. • Playback of multi-channel content is not supported. • The digital audio input terminals of this unit can only detect linear PCM signals. For details, refer to the operating instructions of the device. Playback does not start. • Depending on your environment or connected devices, it may take some time. • Check to see if the format of the file is supported. About supported format, refer to “File format”. ( 48) The unit turns to standby mode automatically. • Is the auto off function turned on? ( 36) • This unit incorporates a protection circuit to prevent damage caused by heat buildup. When you use this unit at a high volume level for a long period of time, it may turn off automatically. Wait for this unit to cool down before turning on this unit again. (For approximately 3 minutes) Disc Incorrect display or play does not start. • Make sure that the disc is compatible with this unit. ( 44) • There is moisture on the lens. Wait for about an hour and then try again. • Unfinalized CD-R and CD-RW cannot be played back. • WMA/MP3 is not supported. Refer to “Notes on CDs” ( 44) for information about the discs this unit can play back. Playback takes time to start. • It may take some time for the disc to load if there are a lot of tracks on it. USB The USB drive or its contents cannot be read. • The USB drive format or its contents is/are not compatible with the unit. ( 44) No response when [ ] is pressed. • Disconnect the USB device and then reconnect it. Alternatively, turn the unit to standby and on again. Slow operation of the USB flash drive. • Large file size or high memory USB flash drive takes longer time to read. • It may take some time if there are a lot of files or folders on it. (40)](https://usermanual.wiki/Panasonic-of-North-America/SU-C500/User-Guide-2807868-Page-40.png)
![42 Troubleshooting Playback does not start. The sound is interrupted. • Try to place the speakers further away from this unit. • If using the 2.4 GHz band on the wireless router, simultaneous use with other 2.4 GHz devices, such as microwaves, cordless telephones, etc., may result in connection interruptions. Increase the distance between this unit and these devices. - If your wireless router supports 5 GHz band, try using the 5 GHz band. To change to the 5 GHz band, redo the network settings using an internet browser ( 22). On the step 5, make sure to select your network name (SSID) for the 5 GHz band. • Do not place this system inside a metal cabinet, for it might block the Wi-Fi signal. • If the playback stops, check the playback status on the device. • Place this system closer to the wireless router. • If several wireless devices are simultaneously using the same wireless network as this unit, try turning off the other devices or reducing their wireless network usage. • Reconnect the devices to the network. • Turn the wireless router off and then on. • With some iOS and iTunes versions, it may not be possible to restart the AirPlay playback if the selector is changed (e.g. “CD”) or this unit is in standby mode, during the AirPlay playback. In this case, select a different device from the AirPlay icon of the Music App or iTunes and then re-select this system as the output speakers. ( 34) • Try a wired LAN connection. ( 18) Remote control The remote control does not work properly. • The batteries are depleted or inserted incorrectly. ( 14) • To avoid interference, please do not put any objects in front of signal sensor. ( 12) • Change the remote control code if other products react to this remote control. ( 15) Messages • The selected file cannot be played back. • Select the playable file. - About supported format, refer to “File format” ( 48) AUTO OFF • The unit has been left unused for about 20 minutes and will shut down within a minute. Press any button to cancel it. Checking Device • The unit is checking the connected iPhone/iPad/iPod or a USB device. After this display has disappeared, start operating. Download Fail • The firmware download has failed. Press any button to exit. Please try again later. • The server cannot be found. Press any button to exit. Make sure that the network is connected to the internet. Empty • The selected folder is empty. Move tracks into the folder and retry the operation. • The server is not found on the network. Check to see if the server is connected to the same network as this unit, and retry the connection to this unit. ( 18) Error • Incorrect operation is performed. Read the instructions and try again. Fail • Network connection is not complete. Try the setting again. ( 18) Firmware update is available • The firmware (free of charge) for this unit is available. Press [OK]. Press [ ], [ ] to select “Yes” and then press [OK]. • The progress is displayed as “Updating %” while updating. ( stands for a number.) • Do not disconnect the AC power supply cord or turn this unit to standby while updating. ( 38) • When the update has finished successfully, “Success” is displayed. Disconnect the AC power supply cord and reconnect it after 3 minutes. (42)](https://usermanual.wiki/Panasonic-of-North-America/SU-C500/User-Guide-2807868-Page-42.png)
![43English Troubleshooting “F ” (“ ” stands for a number.) • There is a problem with this unit. - Is the volume extremely high? If so, lower the volume. - Is this unit placed in an extremely hot place? If so, move this unit to a cooler place and wait a few moments and then try to turn it on again. If the problem persists, write down the displayed number, disconnect the AC power supply cord and consult your dealer. Load Fail • The firmware on the USB flash memory cannot be found. • Download the latest firmware on the USB flash memory and try again. ( 38) No Device • No USB device is connected. • Connect the USB device to be played. ( 26) No Disc • No CD is inserted. • Insert the disc to be played ( 24). No Network Available • This unit is not connected to the network. • Check the network connection. ( 18) No Play • The disc cannot be played back. • Insert the disc to be played ( 44). Not valid • The function you have tried to use is not available with the current settings. Check the steps and settings. PGM Full • The number of programed tracks is more than 24. Please Wait • This is displayed, for example, when this unit is turned to standby/on. (For up to approx. 1 minute and 30 seconds) Reading • The unit is checking the CD information. After this display has disappeared, start operating. “Remote ” (“ ” stands for a number.) • The remote control and this unit are using different codes. Change the code on the remote control. ( 15) Searching • The unit is checking the DLNA server on the network. Unlocked • “PC” is selected, but a PC is not connected. Check the connection with the PC. ( 31) • Audio signals, such as sampling frequency components, are not input correctly. - About supported format, refer to “File format” ( 48) USB Over Current Error • The iPhone/iPad/iPod or USB device is drawing too much power. Disconnect the iPhone/iPad/iPod or USB device and turn the unit to standby and on again. Wi-Fi Setup • Select “On” and press [OK] to enter the network setting. ( 19) - To exit the network setting, select “Off” and press [OK]. Hub Device Not Supported/Not Supported/Device Not Recognized/USB Device Not Supported • You have connected an iPhone/iPad/iPod or USB device that is not supported. - If the iPhone/iPad/iPod is compatible, turn it on and connect it correctly. • The format of the file on the iPhone/iPad/iPod or USB device is not supported. - About supported format, refer to “File format” ( 48) (43)](https://usermanual.wiki/Panasonic-of-North-America/SU-C500/User-Guide-2807868-Page-43.png)
![44 Others Playable media Notes on CDs ■ Compatible CD • A disc with the CD Logo. • This unit can play back discs that conform to the CD-DA format. • The unit may not be able to play some discs due to the condition of the recording. • Before playback, finalize the disc on the device it was recorded on. USB • This unit does not guarantee connection with all USB devices. • FAT16 and FAT32 file systems are supported. • This unit supports USB 2.0 high speed. • USB devices may not be recognized by this unit when connected using the following: - a USB hub - a USB extension cable • It is not possible to use USB card reader/writers. • This unit cannot record music to a USB device. • Not all files on the USB device may be read if there are some files not supported. • About supported format, refer to “File format” ( 48) iPhone/iPad/iPod • Please be aware that Panasonic accepts no responsibility for the loss of data and/or information. • Compatible iPhone/iPad/iPod (as of June 2015) iPhone 6 Plus / iPhone 6 / iPhone 5s / iPhone 5c / iPhone 5 / iPhone 4s / iPad Air 2 / iPad Air / iPad (3rd and 4th generation) / iPad 2 / iPad mini 3 / iPad mini 2 / iPad mini / iPod touch (5th generation) / iPod nano (7th generation) Note • Do not connect the following models to the port: - iPod classic, iPod [4th (color display), and 5th (video) generation], iPod nano (1st generation) • Unexpected behavior may occur. (44)](https://usermanual.wiki/Panasonic-of-North-America/SU-C500/User-Guide-2807868-Page-44.png)


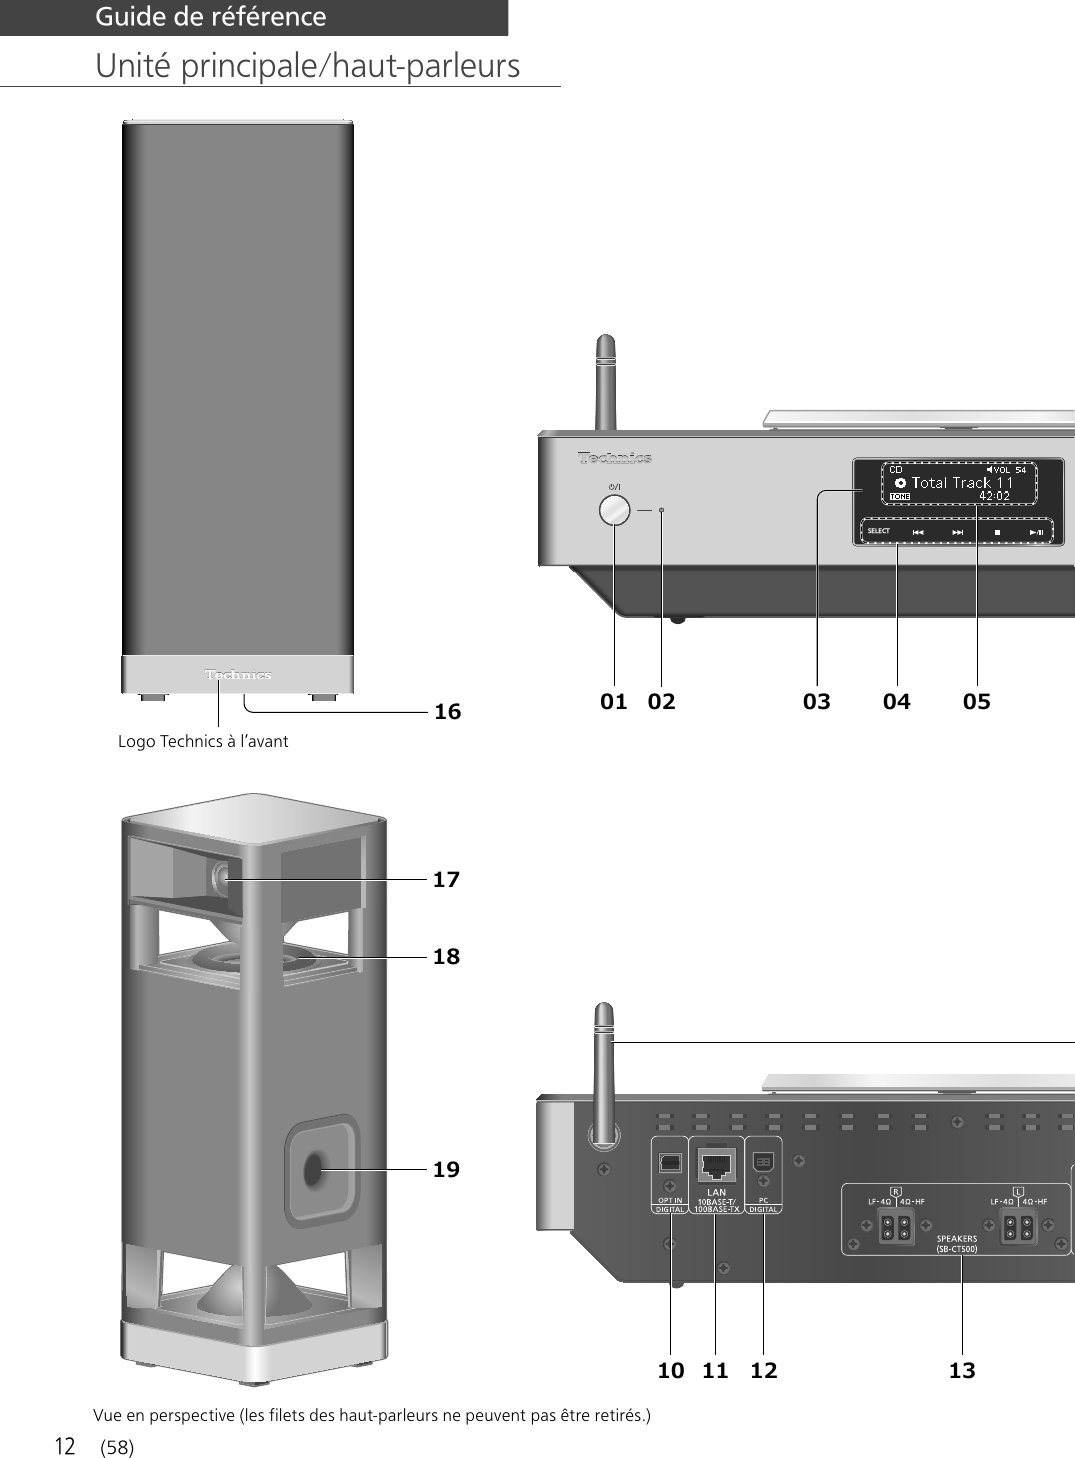
![13Français Guide de référence 01 Interrupteur d’attente/marche ( ) • Appuyer sur cet interrupteur pour commuter l’appareil du mode d’attente au mode de marche et vice versa. En mode d’attente, l’appareil continue de consommer une petite quantité de courant. 02 Voyant d’alimentation • Bleu : L’unité est allumée. • Rouge : L’unité est en veille dans l’état suivant. - La fonction Veille réseau est disponible. ( 37) - Chargement d’un iPhone/iPad/iPod ( 27) • Off : L’unité est en veille sans aucune fonction disponible. 03 Capteur de signal de télécommande • Distance : À l’intérieur d’environ 7 m (23 pi), directement en avant • Angle : environ 30° vers la gauche ou la droite 04 [SELECT]/[ ], [ ], [ ], [ ] : Commuter la source d’entrée ( 30, 31, 32)/Touches de contrôle basiques ( 24) • Ces touches fonctionnent par une simple pression sur les marques. Chaque fois que la touche est effleurée, un bip sonore se fera entendre. ( 36) 05 Afficheur • Source d’entrée, État de la lecture, etc..sont affichés. Pour plus de détails, accédez à : www.technics.com/support/ 06 Borne USB-A • Port pour iPhone/iPad/iPod et les appareils USB ( 26, 27) 07 Prise des écouteurs • Lorsqu’une fiche est branchée, les enceintes n’émettent pas de son. • Une pression sonore excessive provenant d’écouteurs ou d’un casque audio peut provoquer une perte auditive. • L’écoute prolongée à volume élevé peut endommager l’audition de l’utilisateur. 08 Réglage du volume • 0 (min) à 100 (max) 09 Capot supérieur ( 24) 10 Borne d’entrée optique numérique ( 30) 11 Borne LAN ( 18) 12 Borne USB-B • Pour brancher à un PC, etc. ( 31) 13 Bornes de sortie du haut-parleur ( 16) 14 Prise d’alimentation c.a. ( 17) 15 Antenne LAN sans fil ( 19) 16 Bornes d’entrée du haut-parleur • Les bornes sont sur la surface inférieure. 17 Tweeters multi-angle 18 Woofers positionnés de façon symétrique 19 Port Bass reflex (59)](https://usermanual.wiki/Panasonic-of-North-America/SU-C500/User-Guide-2807868-Page-59.png)

![15Français Guide de référence Code de télécommande Si d’autres appareils répondent au signal de la télécommande fournie, modifier le code de la télécommande. • Par défaut, cette fonction est réglée sur “Mode 1”. 1 Appuyer sur [SETUP]. 2 Appuyer sur [ ], [ ] pour sélectionner “Cont. distance”, puis appuyer sur [OK]. • Le code actuel de la télécommande de cette unité est affiché. 3 Lorsque “Régler mode 1/2” est affiché, paramétrez le code de la télécommande. Pour paramétrer le “Mode 1” : Maintenez enfoncé [OK] et [1] pendant au moins 4 secondes. Pour paramétrer le “Mode 2” : Maintenez enfoncé [OK] et [2] pendant au moins 4 secondes. 4 Pointez la télécommande vers cette unité et maintenez enfoncé [OK] pendant au moins 4 secondes. • Lorsque le code de la télécommande est modifié, le nouveau code s’affichera à l’écran pendant quelques secondes. ■ When “Télécom.1” or “Télécom.2” is displayed Lorsque “Télécom.1” ou “Télécom.2” est affiché, les codes de télécommande de cette unité et de la télécommande sont différents. Effectuez l’étape 3 ci-dessus. 01 [] : Interrupteur d’attente/marche • Appuyer sur cet interrupteur pour commuter l’appareil du mode d’attente au mode de marche et vice versa. En mode d’attente, l’appareil continue de consommer une petite quantité de courant. 02 [CD]/[USB]/[ -PAIRING] : Pour sélectionner l’appareil à utiliser ( 24, 26, 27, 28, 29) 03 [>SELECT<] : Pour sélectionner la source ( 30, 31, 32) 04 [MENU] : Pour accéder au menu ( 24, 26, 28, 32, 35) 05 [SETUP] : Enter setup menu ( 36) 06 [+VOL-] : Réglage du volume • 0 (min) à 100 (max) 07 [MUTE] : Mise en sourdine • Appuyez de nouveau sur [MUTE] pour annuler. “MUTE” est également annulé lorsque vous réglez le volume ou mettez l’unité en veille. 08 Touches de commande des fonctions de lecture de base 09 [INFO] : Pour voir les informations du contenu • Appuyez sur ce bouton pour afficher le nom de la piste, de l’artiste et de l’album, le type de fichier, la fréquence d’échantillonnage et d’autres informations. (Les informations varient en fonction de la source d’entrée). 10 [], [ ], [ ], [ ]/[OK] : Sélection/OK 11 [RETURN] : Retour à l’affichage précédent 12 [DIMMER] : Réglage de la luminosité de l’affichage, etc. • Lorsque l’affichage est éteint, il ne s’allumera que lorsque vous utilisez cet appareil. Avant que l’affichage ne s’éteigne à nouveau, “Affichage éteint” s’affichera pendant quelques secondes. (Les boutons de commande de base de cette unité ne sont pas désactivés) • Appuyez plusieurs fois pour changer la luminosité. 13 Touches numériques, etc. • Pour sélectionner un numéro à 2 chiffres Exemple : 16 : [ 10] > [1] > [6] • Pour sélectionner un numéro à 4 chiffres Exemple : 1234 : [ 10] > [ 10] > [ 10] > [1] > [2] > [3] > [4] • [CLEAR] : Pour supprimer la valeur saisie. (61)](https://usermanual.wiki/Panasonic-of-North-America/SU-C500/User-Guide-2807868-Page-61.png)
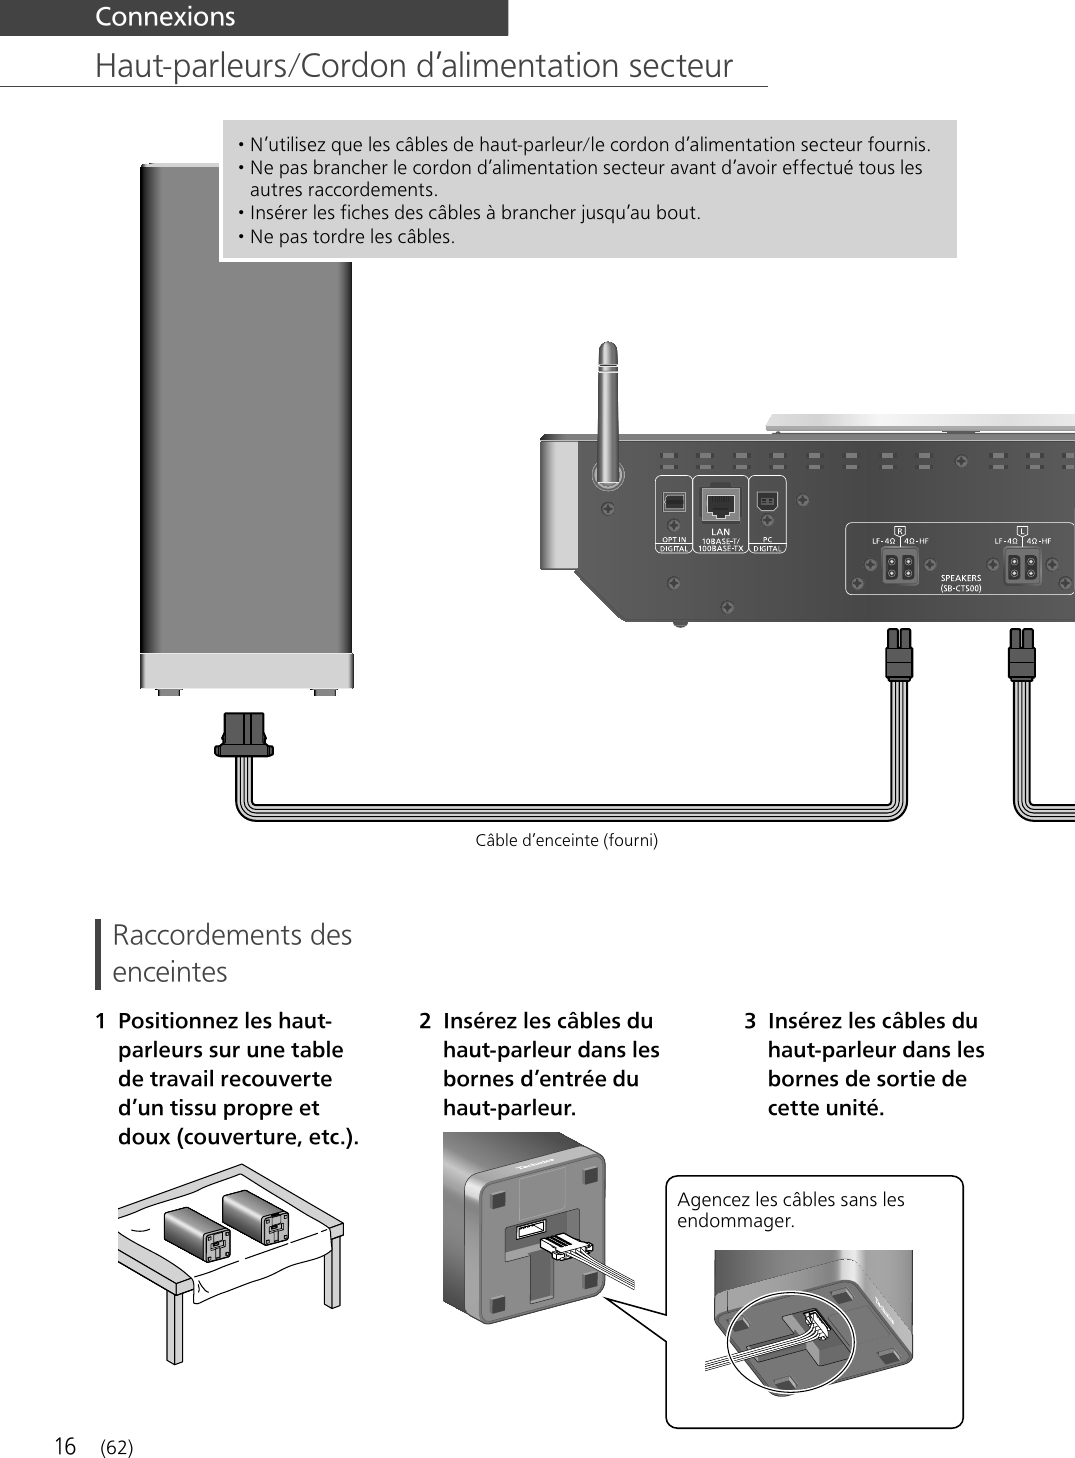
![18 Connexions Réglages réseau Remarque • Si vous tentez de modifier les paramètres réseau immédiatement après avoir allumer cette unité, l’apparition de l’écran de configuration du réseau peut prendre du temps. Vous pouvez lire en continu de la musique provenant d’un dispositif iOS (iPhone/iPad/iPod), d’un Android™ ou d’un ordinateur (Mac/Windows) sur cet appareil grâce aux fonctions AirPlay ou DLNA. ( 32, 34) Pour utiliser ces fonctions, cet appareil doit être sur le même réseau que l’appareil compatible avec AirPlay ou que l’appareil compatible avec DLNA. Ce système peut être connecté à un routeur à l’aide d’un câble réseau ou du Wi-Fi® intégré. Pour obtenir une connexion au réseau stable, une connexion LAN filaire est préférable. Connexion au réseau local branché Routeur à large bande, etc. Câble réseau local (non fourni) 1 Débrancher le cordon d’alimentation secteur. 2 Connecter cet appareil à un routeur à large bande, etc., à l’aide d’un câble réseau local. 3 Branchez le cordon d’alimentation secteur de cette unité et appuyez sur []. ( 17) • Une fois la connexion établie, “ ” est affiché à l’écran. Remarque • Tandis que le cordon d’alimentation secteur est débranché, le câble réseau doit être branché ou débranché. • Utilisez des câbles réseau locaux de catégorie 7 ou supérieure (STP) lors de leur connexion à des appareils périphériques. • Si vous insérez un câble autre qu’un câble réseau local dans la prise réseau, vous pourriez endommager l’unité. • Si le câble LAN est débranché, les paramètres liés au réseau reviennent aux paramètres par défaut. Réeffectuez alors le paramétrage. • La fonction Wi-Fi peut être désactivée lorsque le câble réseau est raccordé. (64)](https://usermanual.wiki/Panasonic-of-North-America/SU-C500/User-Guide-2807868-Page-64.png)
![19Français Connexions Connexion LAN sans fil ■ Préparatifs Débrancher le cordon d’alimentation secteur. Débrancher le câble réseau. (La fonction Wi-Fi peut être désactivée lorsque le câble réseau est raccordé.) Rapprochez cette unité aussi près que possible du routeur sans fil. Faites pointer l’antenne à l’arrière de cette unité comme indiqué sur la figure. Branchez le cordon d’alimentation secteur de cette unité. ( 17) Remarque • Ne faites jamais ce qui suit : - Forcer sur l’antenne - Porter cette unité en la tenant par son antenne • Le paramétrage est annulé une fois la limite de temps définie écoulée. Dans ce cas, recommencez le paramétrage. • Pour annuler ce paramétrage au milieu, appuyez sur [ ] ou mettez l’unité en veille. ■ La première fois 1 Appuyez sur [ ] pour allumer cette unité. • “Conf. Wi-Fi” s’affiche. 2 Appuyer sur [ ], [ ] pour sélectionner “Activé”, puis appuyer sur [OK]. • “Mode WAC pr iOS” démarre automatiquement. 3 (Pour “Mode WAC pr iOS”) Procédez à l’étape 2 de “Utilisation de la configuration WAC” ( 20). (Pour les autres méthodes de paramétrage réseau) Choisir une méthode de paramétrage réseau. Remarque • Lorsque cette unité est mise en veille et allumée avant que le paramétrage Wi-Fi ne soit terminé, “Conf. Wi-Fi” s’affiche. Effectuez le paramétrage Wi-Fi ou choisissez “Désactivé”. ■ Choisir une méthode de paramétrage réseau Utilisez-vous un iPod touch/iPhone/iPad ? Oui (Version iOS 7.0 ou ultérieure) Utilisation de la configuration WAC ( 20) (Version iOS 5.0 ou ultérieure) Utilisation de l’iPhone/iPad/iPod ( 20) Non Votre routeur réseau sans fil prend-il en charge le WPS (Wi-Fi Protected Setup™) ? Oui (Touche WPS) En utilisant le bouton WPS ( 21) (Code PIN WPS) En utilisant le code PIN WPS ( 21) Non Utilisez-vous un appareil Android ? Oui Utilisation de “Technics Music App” ( 22) Non En utilisant un navigateur Internet ( 22) ■ Paramétrage avec le menu [SETUP] 1 Appuyer sur [SETUP]. 2 Appuyer à répétition sur [ ], [] pour sélectionner “Réseau”, puis appuyer sur [OK]. • Lorsque l’écran “Wi-Fi” s’affiche, appuyez sur [OK]. 3 Choisir une méthode de paramétrage réseau. (65)](https://usermanual.wiki/Panasonic-of-North-America/SU-C500/User-Guide-2807868-Page-65.png)
![20 Connexions Réglages réseau (suite) Utilisation de la configuration WAC “Mode WAC pr iOS” Vous pouvez envoyer sa configuration Wi-Fi à ce système en utilisant un iPhone/iPad/iPod touch. • Périphériques pris en charge : iPhone/iPad/iPod touch (iOS version 7.0 ou supérieure), ou Mac (OS X 10.9 ou supérieur, avec utilitaire AirPort 6.3.1. ou supérieur) • Les explications qui suivent concernent un iPhone. • Assurez-vous au préalable que votre iPhone est connecté à votre réseau domestique sans fil. 1 Appuyez sur [ ], [ ] sur la télécommande pour choisir “Mode WAC pr iOS” puis appuyez sur [OK]. • “Réglage” s’affiche. 2 Accédez aux paramètres Wi-Fi sur votre iPhone. 3 Choisissez “Technics SC-C500 ******” dans “SET UP NEW AIRPLAY SPEAKER…” sur votre iPhone. • “******” représente un caractère unique pour chaque système. 4 L’écran “AirPlay Setup” apparaît sur votre iPhone. • Ce système apparaît en tant que “Technics SC-C500 ******”. Pour changer le nom, saisissez-le pour remplacer l’existant. Vous pouvez aussi renommer lorsque la connexion réseau est configurée. ( 23) • Vous pouvez définir un mot de passe pour ce système dans “SPEAKER PASSWORD”. (Vous aurez besoin de ce mot de passe la prochaine fois que vous paramétrerez le réseau en utilisant un navigateur Internet.) 5 Choisissez “Next” pour appliquer les paramètres. • “Liaison” s’affiche. • Une fois la connexion établie, “Réussite” est affiché à l’écran. - “Échec” peut s’afficher si la connexion n’a pas été effectuée. Essayez à nouveau cette méthode depuis le menu [SETUP]. Si “Échec” s’affiche à nouveau, essayez d’autres méthodes ( 19). 6 Appuyez sur [OK] sur la télécommande pour quitter le paramétrage. • “ ” s’affiche. Utilisation de l’iPhone/iPad/iPod “Avec iPod” Grâce à cette méthode vous partagez les paramètres de réseau sans fil de votre iPod/iPhone/iPad avec ce système. • Périphériques pris en charge : iPhone/iPad/iPod touch (iOS version 5.0 ou supérieure) • Les explications qui suivent concernent un iPhone. • Assurez-vous au préalable que votre iPhone est connecté à votre réseau domestique sans fil. Câble USB (fourni avec l’iPhone/iPad/iPod) 1 Raccordez l’iPhone à cette unité à l’aide du câble USB. • Utilisez le câble USB fourni avec l’iPhone/iPad/iPod. • Déverrouillez votre iPhone avant de le raccorder. 2 Appuyez sur [ ], [ ] sur la télécommande pour choisir “Avec iPod” puis appuyez sur [OK]. • “Connecting Wi-Fi” s’affiche. 3 Autorisez l’iPhone à partager les paramètres de réseau sans fil. • Une fois la connexion établie, “Réussite” est affiché à l’écran. - “Échec” peut s’afficher si la connexion n’a pas été effectuée. Essayez à nouveau cette méthode depuis le menu [SETUP]. Si “Échec” s’affiche à nouveau, essayez d’autres méthodes ( 19). 4 Appuyez sur [OK] sur la télécommande pour quitter le paramétrage. • “ ” s’affiche. (66)](https://usermanual.wiki/Panasonic-of-North-America/SU-C500/User-Guide-2807868-Page-66.png)
![21Français Connexions En utilisant le code PIN WPS “PIN WPS” Si votre routeur sans fil prend en charge le WPS, vous pouvez configurer une connexion en saisissant le code PIN WPS. 1 Appuyez sur [ ], [ ] sur la télécommande pour choisir “PIN WPS” puis appuyez sur [OK]. • Le code PIN est affiché. 2 Entrez le code PIN dans le routeur sans fil. • “Liaison” s’affiche. • Une fois la connexion établie, “Réussite” est affiché à l’écran. - “Échec” peut s’afficher si la connexion n’a pas été effectuée. Essayez à nouveau cette méthode depuis le menu [SETUP]. Si “Échec” s’affiche à nouveau, essayez d’autres méthodes ( 19). 3 Appuyez sur [OK] sur la télécommande pour quitter le paramétrage. • “ ” s’affiche. Remarque • En fonction du routeur, les autres périphériques connectés peuvent momentanément perdre leur connexion. • Pour plus de détails, référez-vous au mode d’emploi du routeur sans fil. En utilisant le bouton WPS “Push WPS” Si votre routeur sans fil prend en charge le WPS, vous pouvez configurer une connexion en appuyant sur le bouton WPS. • Il se peut qu’un routeur sans fil compatible dispose de l’identifiant WPS. 1 Appuyez sur [ ], [ ] sur la télécommande pour choisir “Push WPS” puis appuyez sur [OK]. • “WPS” s’affiche. Terminez l’étape 2 dans les 2 minutes. 2 Une fois que “WPS” est affiché, appuyez sur le bouton WPS du routeur sans fil. Exemple : • “Liaison” s’affiche. • Une fois la connexion établie, “Réussite” est affiché à l’écran. - “Échec” peut s’afficher si la connexion n’a pas été effectuée. Essayez à nouveau cette méthode depuis le menu [SETUP]. Si “Échec” s’affiche à nouveau, essayez d’autres méthodes ( 19). 3 Appuyez sur [OK] sur la télécommande pour quitter le paramétrage. • “ ” s’affiche. (67)](https://usermanual.wiki/Panasonic-of-North-America/SU-C500/User-Guide-2807868-Page-67.png)
![22 Connexions Réglages réseau (suite) En utilisant un navigateur Internet “Conf. dep. navig.” Vous pouvez accéder aux paramètres réseau de cette unité depuis un navigateur Internet sur un appareil iOS (version iOS 6.1.6 ou antérieure), Android, PC, etc. • Les explications qui suivent concernent un appareil Android. 1 Appuyez sur [ ], [ ] sur la télécommande pour choisir “Conf. dep. navig.” puis appuyez sur [OK]. • “Réglage” s’affiche. 2 Allez dans les paramètres du Wi-Fi de votre appareil compatible et sélectionnez “00 Setup ******” pour connecter à ce système. • “******” représente un caractère unique pour chaque système. 3 Démarrez le navigateur Internet et saisissez “http://192.168.1.12/” dans la barre d’adresse et lancez la page. • Exemples de navigateurs Internet - Périphérique iOS/Mac : Safari - Périphérique Android : Google Chrome™ - PC : Windows Internet Explorer 4 Sélectionnez “Recherche d’un réseau sans fil”. 5 Saisissez le nom de votre réseau domestique sans fil (Nom de réseau (SSID)) et le mot de passe pour ce réseau. 6 Choisissez “JOIN” pour appliquer les paramètres. • “Liaison” s’affiche. • Une fois la connexion établie, “Réussite” est affiché à l’écran. - “Échec” peut s’afficher si la connexion n’a pas été effectuée. Essayez à nouveau cette méthode depuis le menu [SETUP]. Si “Échec” s’affiche à nouveau, essayez d’autres méthodes ( 19). • En fonction du périphérique, il se peut que l’écran de connexion réussie ne soit pas affiché. 7 Assurez-vous de bien reconnecter votre périphérique compatible à votre réseau domestique sans fil. 8 Appuyez sur [OK] sur la télécommande pour quitter le paramétrage. • “ ” s’affiche. Remarque • Activez Java et les cookies dans les paramètres de votre navigateur. Utilisation de “Technics Music App” “Conf. dep. navig.” Si vous installez l’application dédiée “Technics Music App” (gratuite) sur votre appareil Android, vous pouvez configurer une connexion avec l’application. • Si vous utilisez un appareil Android, téléchargez l’application sur Google Play™. • Vérifiez le mot de passe de votre réseau domestique sans fil. • Assurez-vous au préalable que votre appareil Android est connecté à votre réseau domestique sans fil. 1 Appuyez sur [ ], [ ] sur la télécommande pour choisir “Conf. dep. navig.” puis appuyez sur [OK]. • “Réglage” s’affiche. 2 Lancez “Technics Music App” sur l’appareil Android. 3 Sélectionnez “ ” et allez dans les paramètres du Wi-Fi. 4 Saisissez le mot de passe de votre réseau domestique sans fil. 5 Choisissez “Next” pour appliquer les paramètres. • “Liaison” s’affiche. • Une fois la connexion établie, “Réussite” est affiché à l’écran. - “Échec” peut s’afficher si la connexion n’a pas été effectuée. Essayez à nouveau cette méthode depuis le menu [SETUP]. Si “Échec” s’affiche à nouveau, essayez d’autres méthodes ( 19). • En fonction du périphérique, il se peut que l’écran de connexion réussie ne soit pas affiché. 6 Assurez-vous de bien reconnecter votre périphérique compatible à votre réseau domestique sans fil. 7 Appuyez sur [OK] sur la télécommande pour quitter le paramétrage. • “ ” s’affiche. (68)](https://usermanual.wiki/Panasonic-of-North-America/SU-C500/User-Guide-2807868-Page-68.png)
![23Français Connexions Nom de cette unité sur le réseau “Nom convivial” Vous pouvez modifier le nom de cette unité sur le réseau (par exemple, “Chambre 1” ou “Salon”, etc.). 1 Appuyer sur [SETUP]. 2 Appuyer à répétition sur [ ], [] pour sélectionner “Réseau”, puis appuyer sur [OK]. 3 Appuyer à répétition sur [ ], [ ] pour sélectionner “Nom convivial”, puis appuyer sur [OK]. • Le nom actuel de cette unité est affiché. Appuyez sur [OK] pour modifier. 4 Appuyez sur [ ], [ ], [ ], [ ] pour saisir le nom personnalisé. • Seuls des caractères ASCII peuvent être utilisés. • “A“ peut être ajouté lorsque vous appuyez sur [ ] lorsque la dernière lettre du nom personnalisé est sélectionnée. • Appuyez sur [CLEAR] pour supprimer une lettre. • Appuyez sur [ 10] pour insérer une lettre “A”. • Le nom par défaut est “Technics SC-C500 ******”. “******” représente un chiffre unique pour chaque système. 5 Appuyer sur [OK] pour appliquer les paramètres. 6 Appuyer sur [RETURN] à plusieurs reprises afin de quitter l’écran des paramètres. Pour effectuer des réglages de réseau Vous pouvez configurer une adresse IP spécifique, un masque de sous-réseau, une passerelle par défaut, un DNS principal, etc. • Ne pas lire de musique lors de la modification de ces paramètres. 1 Appuyer sur [SETUP]. 2 Appuyer à répétition sur [ ], [] pour sélectionner “Réseau”, puis appuyer sur [OK]. 3 Sélectionner et saisir les détails. 4 Appuyer sur [OK] pour appliquer les paramètres. 5 Appuyer sur [RETURN] à plusieurs reprises afin de quitter l’écran des paramètres. 6 Appuyez sur [ ] pour mettre l’unité en veille. • Attendre que “Patienter” disparaisse. 7 Paramétrage réseau. ( 18) (69)](https://usermanual.wiki/Panasonic-of-North-America/SU-C500/User-Guide-2807868-Page-69.png)
![24 Fonctionnement Lecture des CD Insérez le CD pour lire de la musique. • Consulter “Remarques sur les CD” ( 44) pour avoir des informations sur les disques que cet appareil peut lire. 1 Appuyez sur [ ] pour allumer cette unité. 2 Appuyer sur [CD]. 3 Ouvrez le capot supérieur en le faisant coulisser et insérez un CD. • Placez l’étiquette vers le haut et enfoncez le centre du CD jusqu’à entendre un clic. 4 Refermez le capot supérieur en le faisant coulisser. • Cette unité ne peut pas lire de CD quand le capot supérieur est ouvert. 5 Appuyer sur [ ]. Remarque • Prenez garde à ne pas vous coincer les doigts dans le capot au moment de l’ouverture/la fermeture. • Ne forcez pas trop sur le capot en le faisant coulisser. Cela pourrait provoquer un dysfonctionnement. • Ne laissez pas le capot ouvert trop longtemps. Cela salirait la lentille. • Veillez à ne pas toucher la lentille. • La lentille s’allume lorsque les opérations suivantes sont réalisées alors qu’aucun disque n’est inséré. Il ne s’agit pas d’un dysfonctionnement. - Mettez l’alimentation sous tension - Sélectionner “CD” comme source entrante. - Ouvrez ou fermez le capot supérieur Lentille Commandes durant la lecture Arrêt Pause • Appuyer de nouveau pour poursuivre la lecture. Saut Recherche • Sur l’unité : maintenez enfoncé [ ] ou [ ]. Viewing available information [INFO] Lecture en reprise “Répéter” 1 Appuyer sur [MENU]. 2 Appuyer à répétition sur [ ], [ ] pour sélectionner “Répéter”, puis appuyer sur [OK]. 3 Appuyer sur [ ], [ ] pour sélectionner une rubrique, puis appuyer sur [OK]. Piste1: Lecture de la piste sélectionnée seulement. (“1 ” s’affiche.) Tous: Toutes les pistes sont répétées. (“ ” s’affiche.) • Le paramétrage est disponible même lorsque la source d’entrée est commutée sur “USB” ( 26) ou “DMP” ( 32). (70)](https://usermanual.wiki/Panasonic-of-North-America/SU-C500/User-Guide-2807868-Page-70.png)
![25Français Fonctionnement Lecture en reprise aléatoire “Aléatoire” 1 Appuyer sur [MENU]. 2 Appuyer à répétition sur [ ], [ ] pour sélectionner “Aléatoire”, puis appuyer sur [OK]. 3 Appuyer sur [ ], [ ] pour sélectionner “Activé”, puis appuyer sur [OK]. • Toutes les pistes sont répétées de façon aléatoire. (“ALÉAT.” et “ ” sont affichés à l’écran.) • Le paramétrage est disponible même lorsque la source d’entrée est commutée sur “USB” ( 26) ou “DMP” ( 33). Lecture programmée “program.” 1 Appuyer sur [MENU]. 2 Appuyer à répétition sur [ ], [ ] pour sélectionner “program.”, puis appuyer sur [OK]. 3 Appuyer sur [ ], [ ] pour sélectionner “Activé”, puis appuyer sur [OK]. • L’écran “Mode program.” s’affiche. 4 Appuyez sur les touches numériques pour sélectionner des pistes. • Répéter cette étape pour effectuer plus de choix. 5 Appuyer sur [ ] pour lancer la lecture. Arrêt Appuyer sur [ ]. • Le contenu programmé est conservé. Vérifier l’ordre programmé Appuyer sur [ ] ou [ ] dans le mode arrêt. Ajouter des pistes Effectuez l’étape 4 en mode Arrêt. Supprimer la dernière piste Appuyer sur [CLEAR] dans le mode arrêt. • Il n’est pas possible de sélectionner et de supprimer la piste programmée désirée. • Pour annuler le mode Programmation (La mémoire du programme est effacée). Appuyer sur [ ] dans le mode arrêt. Appuyer sur [ ], [ ] pour sélectionner “Oui”, puis appuyer sur [OK]. • Pour annuler le mode Programmation (La mémoire du programme n’est pas effacée). Appuyer sur [MENU]. Appuyer à répétition sur [ ], [ ] pour sélectionner “program.”, puis appuyer sur [OK]. Appuyer sur [ ], [ ] pour sélectionner “Désactivé”, puis appuyer sur [OK]. Remarque • La mémoire du programme est effacée lorsque vous changez de CD. • Le mode Programmation est annulé lorsque la lecture répétée aléatoire est activée. (71)](https://usermanual.wiki/Panasonic-of-North-America/SU-C500/User-Guide-2807868-Page-71.png)
![26 Fonctionnement Avec un dispositif USB 1 Brancher un dispositif USB à l’appareil. 2 Appuyer sur [USB]. • L’écran de sélection du fichier/contenu s’affichera. 3 Appuyer sur [ ], [ ] pour sélectionner une rubrique, puis appuyer sur [OK]. • Répéter cette étape pour effectuer plus de choix. • Appuyez sur [RETURN] pour revenir au dossier précédent. Commandes durant la lecture Arrêt Pause • Appuyer de nouveau pour poursuivre la lecture. Saut Recherche • Sur l’unité : maintenez enfoncé [ ] ou [ ]. Afficher les informations disponibles [INFO] • Il est possible que cette opération ne soit pas disponible pour certains formats. Lecture en reprise “Répéter” 1 Appuyer sur [MENU]. 2 Appuyer à répétition sur [ ], [ ] pour sélectionner “Répéter”, puis appuyer sur [OK]. 3 Appuyer sur [ ], [ ] pour sélectionner une rubrique, puis appuyer sur [OK]. Piste1: Lecture de la piste sélectionnée seulement. (“1 ” s’affiche.) Tous: All tracks in the folder are repeated. (“ ” s’affiche.) • Le paramétrage est disponible même lorsque la source d’entrée est commutée sur “CD” ( 24) ou “DMP” ( 32). Lecture en reprise aléatoire “Aléatoire” 1 Appuyer sur [MENU]. 2 Appuyer à répétition sur [ ], [ ] pour sélectionner “Aléatoire”, puis appuyer sur [OK]. 3 Appuyer sur [ ], [ ] pour sélectionner “Activé”, puis appuyer sur [OK]. • Toutes les pistes du dossier sont répétées de façon aléatoire. (“ALÉAT.” et “ ” sont affichés à l’écran). • Lors de la lecture aléatoire, vous ne pouvez pas passer directement à des pistes qui ont été lues et certaines pistes peuvent être lues plusieurs fois. • Le paramétrage est disponible même lorsque la source d’entrée est commutée sur “CD” ( 25) ou “DMP” ( 33). Connectez un périphérique USB à l’unité et vous pouvez lire la musique stockée sur le périphérique USB. • Consulter “USB” ( 44) pour avoir des informations sur les disques que cet appareil peut lire. L’appareil USB (72)](https://usermanual.wiki/Panasonic-of-North-America/SU-C500/User-Guide-2807868-Page-72.png)
![27Français Utilisation de l’iPhone/iPad/iPod Fonctionnement 1 Raccordez un iPhone/iPad/iPod à l’unité. 2 Appuyer sur [USB]. • L’affichage passe automatiquement sur “iPod_Port“ lorsqu’un iPhone/iPad/iPod compatible est connecté à la borne USB-A. 3 Lancez la lecture sur l’iPhone/iPad/iPod. Commandes durant la lecture Arrêt Pause • Appuyer de nouveau pour poursuivre la lecture. Saut Recherche • Sur l’unité : maintenez enfoncé [ ] ou [ ]. • Pour “Répéter” et “Aléatoire”. ( 35) Remarque • La compatibilité dépend de la version du logiciel. Installez le tout dernier logiciel sur votre iPhone/iPad/iPod avant de l’utiliser avec cette unité. • Les résultats de cet action peuvent varier en fonction des modèles iPhone/iPad/iPod ou de la version de l’iOS. Chargement d’un iPhone/iPad/iPod Lorsque l’appareil est en marche, le chargement commence lorsqu’un iPhone/iPad/iPod est branché à cet appareil. • Pour poursuivre la charge depuis une connexion par câble USB en mode veille, assurez-vous que l’iPhone/iPad/iPod a démarré la charge avant que l’unité ne soit mise en veille. • Vérifier sur l’iPhone/iPad/iPod que la batterie est entièrement rechargée. Une fois qu’il est entièrement rechargé, retirer l’iPhone/iPad/iPod. Remarque • Lorsque cette unité est en veille, “Charge iPod” est affiché à l’écran et le voyant d’alimentation est allumé en rouge. • Le chargement s’arrête lorsque la batterie est entièrement rechargée. La batterie s’épuisera naturellement. • Lors du chargement d’un iPhone/iPad/iPod dont la batterie est épuisée, ne pas mettre cet appareil en mode veille tant que l’iPhone/iPad/iPod ne fonctionne pas à nouveau. Branchez un iPhone/iPad/iPod à l’unité avec le câble USB* et vous pouvez écouter la musique stockée sur l’iPhone/iPad/iPod ou charger l’iPhone/iPad/iPod. • Consultez “iPhone/iPad/iPod” ( 44) pour avoir des informations sur les appareils iOS que cette unité peut lire. * : Utilisez le câble USB fourni avec l’iPhone/iPad/iPod. Câble USB (supplied with iPhone/iPad/iPod) iPhone/iPad/iPod (73)](https://usermanual.wiki/Panasonic-of-North-America/SU-C500/User-Guide-2807868-Page-73.png)
![28 Fonctionnement Utilisation de Bluetooth® ■ Appairage d’un périphérique Bluetooth® • Activer la fonction Bluetooth® sur le dispositif et le placer à proximité de l’appareil. • Si un dispositif Bluetooth® est déjà connecté, le déconnecter. ( 29) 1 Appuyer sur [ -PAIRING]. 2 Appuyer sur [MENU]. 3 Appuyer à répétition sur [ ], [ ] pour sélectionner “Pairage”, puis appuyer sur [OK]. 4 Appuyer sur [ ], [ ] pour sélectionner “Oui”, puis appuyer sur [OK]. • “Pairage” s’affiche à l’écran et l’unité attend l’enregistrement. 5 Sélectionner “SC-C500” à partir du menu Bluetooth® du dispositif Bluetooth®. • Le nom de l’appareil connecté s’affiche à l’écran. • L’adresse MAC s’affiche avant que “SC-C500” n’apparaisse. (par exemple, 6C:5A:B5:B3:1D:0F) Remarque • Vous pouvez également entrer en mode Appairage en maintenant enfoncé [ -PAIRING] si la source d’entrée est “Bluetooth”. • Sur demande du mot de passe, entrer “0000”. • Il est possible d’enregistrer jusqu’à 8 dispositifs auprès de cet appareil. Si un 9e dispositif est couplé, il remplacera le dispositif n’ayant pas été utilisé depuis le plus longtemps. Vous pouvez écouter le son provenant du dispositif audio Bluetooth® depuis cet appareil, et ce sans fil. • Se reporter au manuel d’utilisation du dispositif Bluetooth® pour de plus amples instructions sur comment connecter un tel dispositif. ■ Écouter de la musique stockée sur un périphérique Bluetooth® 1 Appuyer sur [ -PAIRING]. • “Prêt” apparaît sur l’afficheur. 2 Sélectionner “SC-C500” à partir du menu Bluetooth® du dispositif Bluetooth®. • Le nom de l’appareil connecté s’affiche à l’écran. 3 Commencer la lecture sur le dispositif Bluetooth®. Remarque • Cet appareil ne peut être connecté qu’à un dispositif à la fois. • Lorsque “Bluetooth” est sélectionné comme source d’entrée, l’unité tente automatique de se connecter au dernier appareil Bluetooth® connecté. (“Liaison” s’affiche pendant le processus.) (74)](https://usermanual.wiki/Panasonic-of-North-America/SU-C500/User-Guide-2807868-Page-74.png)
![29Français Fonctionnement Commandes durant la lecture Arrêt Pause • Appuyer de nouveau pour poursuivre la lecture. Saut Recherche • Sur l’unité : maintenez enfoncé [ ] ou [ ]. Remarque • Pour utiliser la télécommande/les boutons de commande de base de cette unité avec un périphérique Bluetooth®, il faut que le périphérique Bluetooth® soit compatible AVRCP (Audio Video Remote Control Profile/Profil de Commande Audio Video à Distance). En fonction de l’état du périphérique, il se peut que certaines commandes ne fonctionnent pas. • Lorsque vous regardez un contenu vidéo avec cette fonction, il se peut que la sortie audio de la vidéo ne soit pas synchronisée. Mode de transmission Bluetooth® Vous pouvez changer le mode de transmission afin de donner la priorité à la qualité de transmission ou à la qualité sonore. 1 Appuyer sur [ -PAIRING]. • Si un dispositif Bluetooth® est déjà connecté, le déconnecter. 2 Appuyer sur [MENU]. 3 Appuyer à répétition sur [ ], [ ] pour sélectionner “Mode lien”, puis appuyer sur [OK]. 4 Appuyer sur [ ], [ ] pour sélectionner le mode, puis appuyer sur [OK]. Mode 1 : Accent sur la connectivité Mode 2 : Accent sur la qualité audio (paramètre par défaut) Remarque • Sélectionner “Mode 1” si le son s’arrête. Déconnexion d’un dispositif Bluetooth® 1 Appuyer sur [MENU]. 2 Appuyer à répétition sur [ ], [] pour sélectionner “Déconnect.?”, puis appuyer sur [OK]. 3 Appuyer sur [ ], [ ] pour sélectionner “Oui”, puis appuyer sur [OK]. Remarque • Si une source audio différente est sélectionnée, le dispositif Bluetooth® se déconnecte. Appareil Bluetooth® (75)](https://usermanual.wiki/Panasonic-of-North-America/SU-C500/User-Guide-2807868-Page-75.png)
![30 Fonctionnement Utilisation d’un périphérique de sortie audio numérique 1 Débrancher le cordon d’alimentation secteur. 2 Raccordez cette unité et un lecteur DVD etc. 3 Branchez le cordon d’alimentation secteur de cette unité. ( 17) 4 Appuyez sur [ ] pour allumer cette unité. 5 Appuyer plusieurs fois sur [>SELECT<] pour sélectionner “OPT.”. 6 Démarrez la lecture sur l’appareil connecté. Remarque • Les bornes d’entrée audio numérique de cette unité ne peuvent détecter que les signaux PCM linéaires. Pour plus de détails, référez-vous au mode d’emploi du périphérique. Fréquence d’échantillonnage 32/44.1/48/88.2/96 kHz Nombre du débit de bits de quantification 16/24 bits Vous pouvez envoyer des signaux audio numériques à cet appareil et lire de la musique. Câble audio numérique optique (non fourni) Lecteur DVD, etc. (76)](https://usermanual.wiki/Panasonic-of-North-America/SU-C500/User-Guide-2807868-Page-76.png)
![31Français Fonctionnement Avec un PC, etc. Vous pouvez raccorder la borne USB-B à un PC, etc. à l’aide d’un câble USB et lire la musique provenant du PC, etc. avec cette unité. Remarque Branchement à un PC • Avant de se brancher à un PC, suivre les étapes ci-dessous. • Référez-vous à ce qui suit concernant les versions OS recommandées pour votre PC (depuis novembre 2015) : - Windows Vista, Windows 7, Windows 8, Windows 8.1, Windows 10 - OS X 10.7, 10.8, 10.9, 10.10 Télécharger et installer le pilote dédié sur le PC. (Seulement pour le SE Windows) • Télécharger et installer le pilote dédié à partir du site internet ci-dessous. www.technics.com/support/ Télécharger et installer l’appli dédiée “Technics Audio Player” (sans frais) sur votre PC. • Télécharger et installer l’appli dédiée à partir du site internet ci-dessous. www.technics.com/support/ 1 Débrancher le cordon d’alimentation secteur. 2 Brancher un PC, etc. à cet appareil. 3 Branchez le cordon d’alimentation secteur de cette unité. ( 17) 4 Appuyez sur [ ] pour allumer cette unité. 5 Appuyer plusieurs fois sur [>SELECT<] pour sélectionner “PC”. 6 Lancez la lecture en utilisant l’application dédiée “Technics Audio Player” sur l’ordinateur connecté. Remarque • Pour en savoir plus sur le format pris en charge, consulter “Format du fichier” ( 48) PC, etc. Câble USB 2.0 (non fourni) (77)](https://usermanual.wiki/Panasonic-of-North-America/SU-C500/User-Guide-2807868-Page-77.png)
![32 Fonctionnement Lecture de fichiers de musique sur le serveur DLNA Vous pouvez partager les fichiers musicaux stockés sur le serveur de média certifié DLNA (ordinateur, stockage connecté en réseau, etc.) connecté à votre réseau domestique et bénéficier du contenu à l’aide de cette unité. ■ Préparatifs • Effectuer les réglages réseau. ( 18) • Connecter le dispositif à utiliser au même réseau que cet appareil. • Utilisation du lecteur Windows Media® Player - Ajouter le contenu et le fichier aux bibliothèques du lecteur Windows Media® 11 ou 12, ou à celles d’un téléphone intelligent, etc. - La liste de lecteur Windows Media® ne peut lire que le contenu stocké dans les bibliothèques. - Afin d’utiliser le lecteur Windows Media® pour lire en continu, vous devrez d’abord le configurer. Lecture du contenu enregistré sur le serveur DLNA en le contrôlant depuis cet appareil 1 Appuyer plusieurs fois sur [>SELECT<] pour sélectionner “DMP”. • L’écran de sélection du serveur s’affichera. 2 Appuyer sur [ ], [ ] pour sélectionner un serveur DLNA sur le réseau, puis appuyer sur [OK]. • L’écran de sélection du fichier/contenu s’affichera. Répéter cette étape pour effectuer plus de choix. • Les fichiers/le contenu peuvent s’afficher dans un ordre différent de celui du serveur, en fonction de leurs caractéristiques. 3 Appuyer sur [ ], [ ] pour sélectionner une rubrique, puis appuyer sur [OK]. Remarque • Selon l’état, le serveur connecté risque de ne pas s’afficher correctement. (par exemple, peu de temps après avoir ajouté le contenu sur le serveur, etc.) Veuillez réessayer plus tard. Pour plus de détails, référez-vous au mode d’emploi du périphérique. Commandes durant la lecture Arrêt Pause • Appuyer de nouveau pour poursuivre la lecture. Saut Recherche • Sur l’unité : maintenez enfoncé [ ] ou [ ]. Afficher les informations disponibles [INFO] Lecture en reprise “Répéter” 1 Appuyer sur [MENU]. 2 Appuyer à répétition sur [ ], [ ] pour sélectionner “Répéter”, puis appuyer sur [OK]. 3 Appuyer sur [ ], [ ] pour sélectionner une rubrique, puis appuyer sur [OK]. (78)](https://usermanual.wiki/Panasonic-of-North-America/SU-C500/User-Guide-2807868-Page-78.png)
![33Français Fonctionnement Contrôle à l’aide de l’appli dédiée “Technics Music App” Si vous installez l’appli dédiée “Technics Music App” sur votre tablette/téléphone intelligent, vous pouvez contrôler cet appareil et le SC-C500 à l’aide d’un grand nombre de fonctions. Pour plus de détails, consulter : www.technics.com/support/ Lecture du contenu enregistré sur le serveur DLNA en le contrôlant depuis un DMC En contrôlant un dispositif compatible avec DMC (Contrôleur de média numérique), vous pouvez lire de la musique enregistrée sur le serveur DLNA de cet appareil (DMR—Rendu de média numérique). 1 Appuyez sur [ ] pour allumer cette unité. 2 Utiliser le périphérique compatible avec DMC et se connecter à cet appareil. • Le nom de dispositif de cet appareil s’affichera en tant que “Technics SC-C500 ******”*1, 2. • Pour en savoir plus sur l’utilisation des périphériques compatibles avec DMC, se reporter au manuel d’utilisation des périphériques ou des logiciels concernés. Remarque • Vous ne pouvez pas utiliser la lecture en reprise aléatoire en combinaison avec d’autres modes de lecture. • Lorsque vous contrôlez DMC, la lecture d’autres sources audio s’arrêtera et la lecture de DLNA aura la priorité. • Selon le contenu et l’équipement connecté, il est possible que les opérations ou la lecture soient impossibles à effectuer. • Cette unité ne garantit pas la connexion avec toutes les applications DMC. Utilisez l’application dédiée “Technics Music App”. * 1 : “******” représente un chiffre unique à chaque appareil. * 2 : Le nom du périphérique peut être modifié à partir de “Pour effectuer des réglages de réseau”. ( 23) Piste1 : Lecture de la piste sélectionnée seulement. (“1 ” s’affiche.) Tous : Toutes les pistes sont répétées. (“ ” s’affiche.) • Le paramétrage est disponible même lorsque la source d’entrée est commutée sur “CD” ( 24) ou “USB” ( 26). Lecture en reprise aléatoire “Aléatoire” 1 Appuyer sur [MENU]. 2 Appuyer à répétition sur [ ], [ ] pour sélectionner “Aléatoire”, puis appuyer sur [OK]. 3 Appuyer sur [ ], [ ] pour sélectionner “Activé”, puis appuyer sur [OK]. • Toutes les pistes du dossier sont répétées de façon aléatoire. (“ALÉAT.” et “ ” sont affichés à l’écran). • Lors de la lecture aléatoire, vous ne pouvez pas passer directement à des pistes qui ont été lues et certaines pistes peuvent être lues plusieurs fois. • Le paramétrage est disponible même lorsque la source d’entrée est commutée sur “CD” ( 25) ou “USB” ( 26). (79)](https://usermanual.wiki/Panasonic-of-North-America/SU-C500/User-Guide-2807868-Page-79.png)
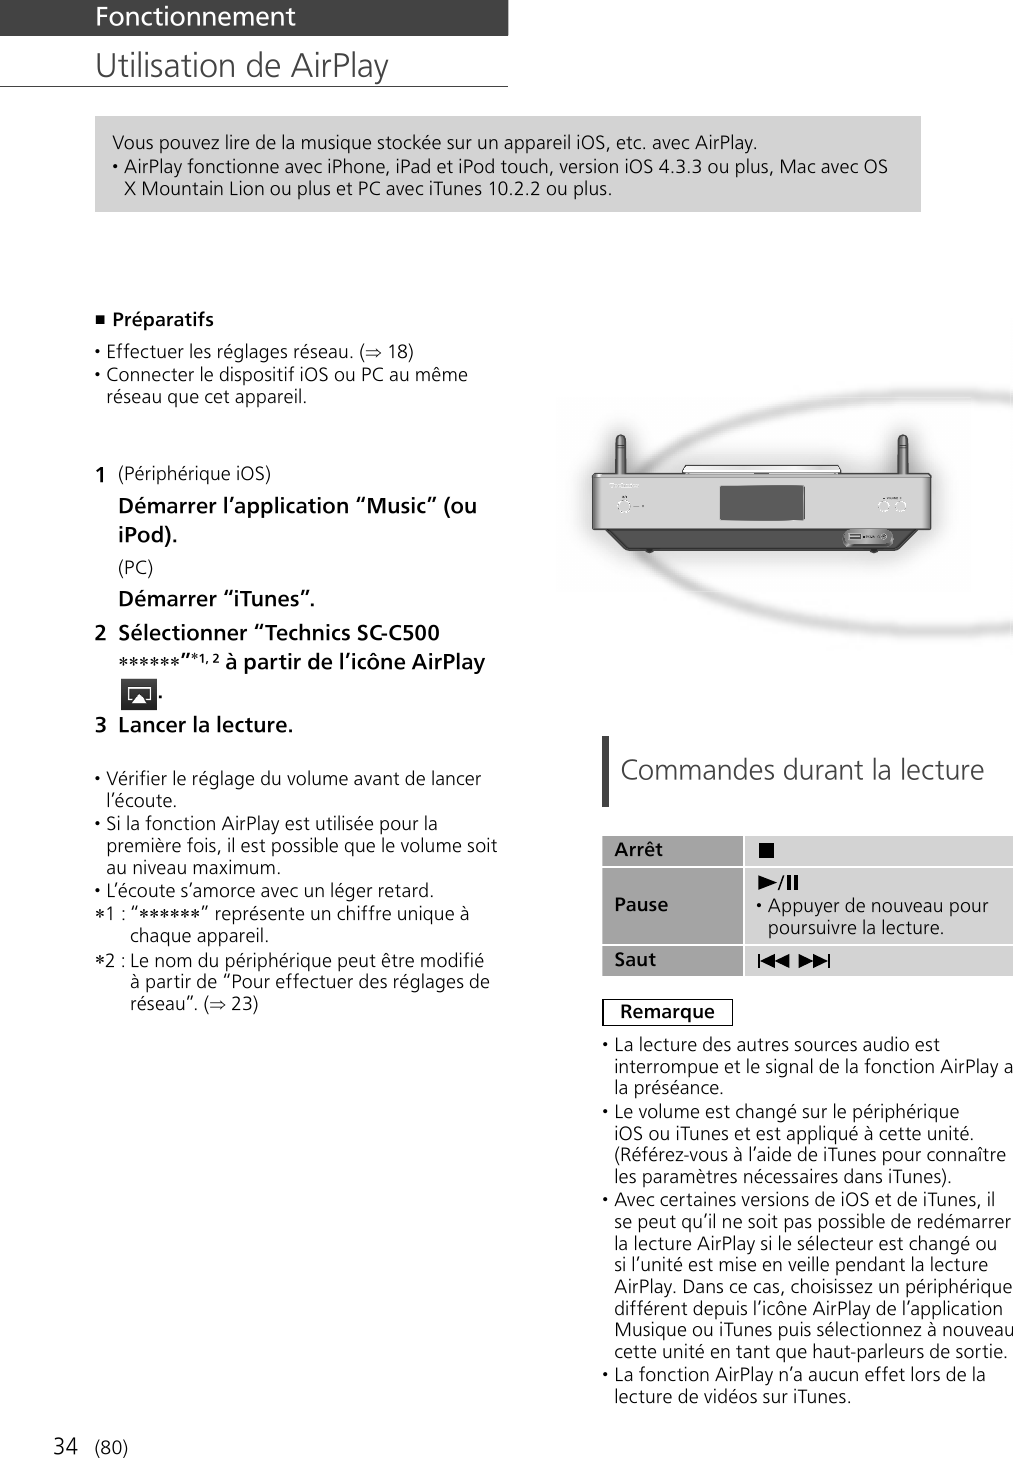
![35Français Fonctionnement Lecture en reprise “Répéter” 1 Appuyer sur [MENU]. 2 Appuyer à répétition sur [ ], [ ] pour sélectionner “Répéter”, puis appuyer sur [OK]. 3 Appuyez sur [ ], [ ] pour configurer et appuyez sur [OK]. • Référez-vous à l’appareil connecté pour vérifier le paramètre sélectionné. • Vous pouvez aussi configurer sur l’appareil iOS/le PC connecté. Lecture en reprise aléatoire “Aléatoire” 1 Appuyer sur [MENU]. 2 Appuyer à répétition sur [ ], [ ] pour sélectionner “Aléatoire”, puis appuyer sur [OK]. 3 Appuyez sur [ ], [ ] pour configurer et appuyez sur [OK]. • Référez-vous à l’appareil connecté pour vérifier le paramètre sélectionné. • Vous pouvez aussi configurer sur l’appareil iOS/le PC connecté. (81)](https://usermanual.wiki/Panasonic-of-North-America/SU-C500/User-Guide-2807868-Page-81.png)
![36 Paramètres Réglage du son, autres paramètres 1 Appuyer sur [SETUP]. 2 Appuyez sur [ ], [ ] de façon répétée pour choisir le menu puis appuyez sur [OK]. 3 Appuyez sur [ ], [ ], [ ], [ ] pour configurer et appuyez sur [OK]. Réglage de la langue “Langue” Sélectionner “English” ou “Français” pour l’affichage. • Par défaut, cette fonction est réglée sur “English”. Réglage des graves/des médiums/des aigus “Com. tonalité” Vous pouvez régler la tonalité de cette unité. Chaque plage de tonalité (Basses/Milieu/Aigus) peut être réglée. • Pour activer cette fonction, choisissez “Activé(réglage)”. • Chaque niveau peut être réglé entre “- 10” et “+ 10”. • “TON.” est affiché après les réglages. Minuterie-sommeil “SOMMEIL” La minuterie de sommeil peut mettre l’unité en veille après un délai défini. (30 minutes/60 minutes/90 minutes/120 minutes/Désactivé) Fonction de mise hors marche automatique “H/M AUTO” Cet appareil est conçu pour minimiser sa consommation en électricité et ainsi économiser de l’énergie. L’appareil n’a pas été utilisé pendant environ 20 minutes et passera en mode veille dans une minute. Appuyer sur une touche pour annuler. • Le mode d’usine par défaut est “Activé”. Pour désactiver cette fonction, choisissez “Désactivé”. Remarque • La fonction d’arrêt automatique marche sauf si vous la désactivez, même si vous mettez cette unité en veille puis en marche. Éclairage du capot supérieur et du bas de l’unité “ILLUMINATION” Le capot supérieur et le bas de l’unité s’éclairent lorsque cette unité est allumée. (Les lumières du capot supérieur s’éteignent lorsque le capot est ouvert). • Par défaut, cette fonction est réglée sur “Mode2”. Pour désactiver cette fonction, choisissez “Désactivé”. Mode1 : Le capot supérieur et le bas de l’unité sont toujours éclairés. Mode2 : Le capot supérieur s’allument uniquement si un CD lisible est inséré et que la source d’entrée est “CD”. Le bas de l’unité est toujours éclairé. Désactivé : Le capot supérieur et le bas de l’unité ne s’éclairent pas. Paramétrage du son de fonctionnement “Bip” Vous pouvez activer/désactiver le bip sonore. • Le mode d’usine par défaut est “Activé”. Pour désactiver cette fonction, choisissez “Désactivé”. Les effets sonores et les autres paramètres peuvent être réglés. (82)](https://usermanual.wiki/Panasonic-of-North-America/SU-C500/User-Guide-2807868-Page-82.png)
![38 Paramètres Réglage du son, autres paramètres (suite) Mises à jour du micrologiciel “MàJ microl.” Panasonic diffuse à l’occasion des mises à jour du micrologiciel de cet appareil qui peuvent ajouter des fonctionnalités ou améliorer celles en place. Ces mises à jour sont mises à votre disposition sans frais. Le téléchargement nécessite environ 15 minutes. Ne débranchez pas le cordon d’alimentation secteur et ne mettez pas cette unité en veille pendant la mise à jour. • La progression est affichée en tant que “Updating %” pendant la mise à jour. ( représente un nombre.) Remarque • Durant la mise à jour, aucune autre opération ne peut être effectuée. • S’il n’y a aucune mise à jour, “Firmware is Up To Date” s’affiche après l’étape 3. Mise à jour via Internet ■ Préparatifs • Connectez cet appareil au réseau. ( 18) - Assurez-vous que le réseau sans fil est relié à Internet. 1 Appuyer sur [SETUP]. 2 Appuyer à répétition sur [ ], [ ] pour sélectionner “MàJ microl.”, puis appuyer sur [OK]. 3 Appuyer sur [ ], [ ] pour sélectionner “Internet”, puis appuyer sur [OK]. 4 Appuyer sur [ ], [ ] pour sélectionner “Oui”, puis appuyer sur [OK]. • La progression est affichée en tant que “Updating %” pendant la mise à jour. ( représente un chiffre.) • Une fois la mise à jour faite, “Réussite” s’affiche. 5 Débranchez le cordon d’alimentation secteur et rebranchez-le après 3 minutes. Remarque • Le téléchargement peut prendre plus de temps ou ne pas fonctionner correctement en fonction de l’état de la connexion. Mise à jour via mémoire flash USB ■ Préparatifs • Téléchargez le micrologiciel le plus récent sur une mémoire USB. Pour plus de détails, référez-vous au site Internet suivant. www.technics.com/support/firmware/ 1 Connectez la mémoire USB avec le nouveau micrologiciel. 2 Appuyer sur [SETUP]. 3 Appuyer à répétition sur [ ], [ ] pour sélectionner “MàJ microl.”, puis appuyer sur [OK]. 4 Appuyer sur [ ], [ ] pour sélectionner “USB”, puis appuyer sur [OK]. 5 Appuyer sur [ ], [ ] pour sélectionner “Oui”, puis appuyer sur [OK]. • La progression est affichée en tant que “Updating %” pendant la mise à jour. ( représente un chiffre.) • Une fois la mise à jour faite, “Réussite” s’affiche. 6 Débranchez le cordon d’alimentation secteur et rebranchez-le après 3 minutes. Remarque • Le téléchargement peut être plus long en fonction de la mémoire USB. (84)](https://usermanual.wiki/Panasonic-of-North-America/SU-C500/User-Guide-2807868-Page-84.png)
![39Français Paramètres / Guide de dépannage Guide de dépannage Accumulation de chaleur de cet appareil. Cet appareil chauffe lorsque le volume est élevé. Il ne s’agit pas d’une erreur de fonctionnement. La plus récente version du micrologiciel est-elle installée? Panasonic améliore sans cesse le micrologiciel de cet appareil afin que ses clients puissent profiter des technologies les plus récentes. ( 38) Rétablissement de tous les paramètres par défaut Dans les situations suivantes, réinitialiser la mémoire : • Absence de réponse aux pressions sur les touches. • Pour vider la mémoire et en réinitialiser le contenu. 1 Appuyer sur [SETUP]. 2 Appuyer à répétition sur [ ], [ ] pour sélectionner “Initialisation”, puis appuyer sur [OK]. 3 Appuyer sur [ ], [ ] pour sélectionner “Oui”, puis appuyer sur [OK]. • Tous les paramètres sont à nouveau réglés sur les paramètres par défaut. Il est nécessaire de régler à nouveau les mémoires. 4 Appuyer sur [ ], [ ] pour sélectionner “Oui” puis appuyer à nouveau sur [OK]. Avant de demander de l’aide, procédez aux vérifications suivantes. Si vous n’êtes pas sûr de certains points de vérification, ou si les solutions indiquées dans ce guide ne résolvent pas le problème, consulter votre revendeur. (85)](https://usermanual.wiki/Panasonic-of-North-America/SU-C500/User-Guide-2807868-Page-85.png)
![40 Guide de dépannage Généralité Un “bourdonnement” se fait entendre à la lecture. • Un cordon d’alimentation secteur ou une lampe fluorescente se trouve près des câbles. Éloignez les autres appareils et les autres cordons des câbles de ce système. • Un fort champ magnétique situé près d’un téléviseur ou d’un autre dispositif pourrait réduire la qualité de l’audio. Éloigner cet appareil de tels dispositifs. • Il est possible que les enceintes émettent un son lorsqu’un dispositif proche émet de fortes ondes radio, comme lorsqu’un téléphone cellulaire reçoit un appel. L’unité ne fonctionne pas. • L’un des appareils de sécurité de l’unité est peut-être désactivé. Appuyez sur [ ] sur l’unité pour la mettre en veille. • Si l’unité ne se met pas en veille, appuyez sur [ ] sur l’unité pendant au moins 5 secondes. La mise en veille de l’unité est forcée. Sinon, déconnectez le cordon d’alimentation secteur, attendez au moins 3 minutes, puis rebranchez-le. Appuyez sur [ ] sur l’unité pour la mettre en marche. Si l’unité ne fonctionne toujours pas, consultez le concessionnaire. Aucun son. • Vérifiez le volume de cette unité. • Vérifier que les raccordements de câbles sur les prises entrantes et sortantes ne sont pas incorrects. Si c’est le cas, mettez cette unité en veille et rebranchez correctement les câbles. • Vérifier que la source entrante correcte est sélectionnée. • Insérer les fiches des câbles à brancher jusqu’au bout. • La lecture de contenu multicanal n’est pas prise en charge. • Les prises d’entrée audio numérique de cet appareil peuvent seulement détecter les signaux PCM linéaires. Pour plus de détails, référez-vous au mode d’emploi du périphérique. La lecture ne se lance pas. • Selon votre environnement ou vos dispositifs branchés, il est possible que cela prenne un certain temps. • Check to see if the format of the file is supported. Pour en savoir plus sur le format pris en charge, consulter “Format du fichier”. ( 48) Cette unité se met automatiquement en veille. • La fonction de mise hors contact automatique est-elle activée? ( 36) • Cet appareil contient un circuit de protection afin d’éviter tout endommagement dû à une accumulation de chaleur. Lorsque vous utilisez cet appareil à un niveau de volume élevé pendant une période prolongée, il est possible qu’il se mette automatiquement hors marche.Attendez que cet appareil refroidisse avant de le mettre à nouveau en marche. (Pendant environ 3 minutes) Disque Problème d’affichage ou de lecture. • S’assurer que le disque est compatible avec cet appareil. ( 44) • Il y a de l’humidité sur la lentille. Attendre environ une heure et réessayer. • Les CD-R et CD-RW ne peuvent pas être lus. • Les formats WMA/MP3 ne sont pas pris en charge. Consulter “Remarques sur les CD” ( 44) pour avoir des informations sur les disques que cet appareil peut lire. La lecture prend du temps pour démarrer. • Cela peut prendre du temps pour que le disque se charge s’il possède beaucoup de pistes. USB L’appareil USB ou son contenu ne peut pas être lu. • Le format de l’appareil USB ou de son contenu n’est pas compatible avec le système. ( 44) Il ne se passe rien en appuyant sur [ ]. • Débrancher le dispositif USB et le rebrancher. Sinon, mettez l’unité en veille et rallumez-la. L’appareil USB fonctionne au ralenti. • Les fichiers lourds et les appareils USB à grande mémoire prennent plus de temps à être lus. • Cela peut prendre du temps s’il y a beaucoup de pistes ou de dossiers dessus. (86)](https://usermanual.wiki/Panasonic-of-North-America/SU-C500/User-Guide-2807868-Page-86.png)
![42 Guide de dépannage La lecture ne se lance pas. Le son est interrompu. • Éloignez si possible les haut-parleurs de cette unité. • Si vous utilisez la bande 2,4 GHz sur le routeur sans fil, en même temps que d’autres périphériques 2,4 GHz, comme des micro-ondes, des téléphones sans fil, etc., il est possible que des interruptions de connexion se produisent. Augmentez la distance entre cette unité et les appareils en question. - Si votre routeur sans fil prend en charge la bande 5 GHz, essayez d’utiliser la bande 5 GHz. Pour passer à la bande 5 GHz, paramétrez à nouveau le réseau en utilisant un navigateur Internet ( 22). Lors de l’étape 5, assurez-vous de sélectionner le nom de votre réseau (SSID) pour la bande 5 GHz. • Ne placez pas ce système à l’intérieur d’une armoire métallique, elle pourrait bloquer le signal Wi-Fi. • Si la lecture s’arrête, vérifiez l’état de la lecture sur le périphérique. • Rapprochez ce système du routeur sans fil. • Si plusieurs dispositifs sans fil sont utilisés simultanément sur le même réseau sans fil que cet appareil, essayez d’éteindre les autres dispositifs ou de réduire leur utilisation du réseau sans fil. • Reconnectez les périphériques au réseau. • Éteignez le routeur sans fil avant de le rallumer. • Avec certaines versions de iOS et de iTunes, il se peut qu’il ne soit pas possible de redémarrer la lecture AirPlay si le sélecteur est changé (ex “CD”) ou si cette unité est en veille pendant la lecture AirPlay. Dans ce cas, choisissez un périphérique différent depuis l’icône AirPlay de l’application Musique ou iTunes puis sélectionnez à nouveau ce système en tant que haut-parleurs de sortie. ( 34) • Essayez avec une connexion LAN filaire. ( 18) Télécommande La télécommande ne fonctionne pas adéquatement. • Les batteries sont déchargées ou mal insérées. ( 14) • Afin de prévenir le risque d’interférence, ne pas placer d’objets devant le capteur de signal de télécommande. ( 12) • Modifier le code de la télécommande lorsque d’autres appareils répondent à cette télécommande. ( 15) Messages • Le fichier sélectionné ne peut pas être lu. • Choisissez un fichier lisible. - Pour en savoir plus sur le format pris en charge, consulter “Format du fichier” ( 48) H/M AUTO • Cette unité est restée inactive pendant environ 20 minutes et elle va s’éteindre d’ici une minute. Appuyez sur n’importe quel bouton pour annuler. Vérification appareil • L’appareil est en train de vérifier l’iPhone/iPad/iPod ou un dispositif USB branchés. Une fois ce message disparu, commencer l’utilisation. Échec téléch. • Le téléchargement du logiciel a échoué. Appuyer sur n’importe quelle touche pour sortir. Réessayer à un autre moment. • Le serveur est introuvable. Appuyer sur n’importe quelle touche pour quitter. Assurez-vous que le réseau sans fil est relié à Internet. Vide • Le dossier sélectionné est vide. Déplacez des pistes dans le dossier, et retentez l’opération. • Le serveur est introuvable sur le réseau. Vérifiez que le serveur est bien connecté au même réseau que cet appareil, puis réessayez d’établir la connexion à cet appareil. ( 18) Erreur • L’opération effectuée était la mauvaise. Se reporter aux instructions, puis recommencer. Échec • La connexion au réseau n’a pas été effectuée. Recommencez le paramétrage. ( 18) Une mise à jour du micrologiciel est disponible • Le micrologiciel (gratuit) pour cette unité est disponible. Appuyer sur [OK]. Appuyer sur [ ], [ ] pour sélectionner “Oui”, puis appuyer sur [OK]. • La progression est affichée en tant que “Updating %” pendant la mise à jour. ( représente un nombre.) • Ne débranchez pas le cordon d’alimentation secteur et ne mettez pas cette unité en veille pendant la mise à jour. ( 38) • Une fois la mise à jour faite, “Réussite” s’affiche. Débranchez le cordon d’alimentation secteur et rebranchez-le après 3 minutes. (88)](https://usermanual.wiki/Panasonic-of-North-America/SU-C500/User-Guide-2807868-Page-88.png)
![43Français Guide de dépannage “F ” (“ ” représente un chiffre.) • Il y a un problème avec cet appareil. - Le volume est-il extrêmement élevé? Si c’est le cas, baissez le volume. - Cet appareil est-il placé dans un endroit extrêmement chaud? Si c’est le cas, déplacez cet appareil vers un endroit moins chaud et attendez un moment, puis essayez à nouveau de le mettre en marche. Si le problème persiste, notez le numéro affiché, débranchez le cordon d’alimentation secteur et consultez votre vendeur. Éch chrg. • Le micrologiciel présent sur la mémoire USB ne peut pas être trouvé. • Téléchargez le micrologiciel le plus récent sur la mémoire USB et essayez à nouveau. ( 38) Pas périph. • Aucun appareil USB n’est connecté. • Branchez l’appareil USB à lire. ( 26) Aucun disque • Aucun CD à l’intérieur. • Insérez le disque à lire ( 44). Pas de réseau disponible • L’appareil n’est pas connecté au réseau. • Vérifiez la connexion réseau. ( 23) Aucune lecture • Le disque ne peut pas être lu. • Insérez le disque à lire ( 44). Non valide • La fonction que vous avez essayé d’utiliser n’est pas disponible avec les paramètres actuels. Vérifiez les étapes et les paramètres. Prog. comp. • Le nombre de pistes programmées est supérieur à 24. Patienter • Ceci s’affiche, par exemple, lorsque cette unité est en veille/allumée. (Pendant environ 1 minute et 30 secondes) Lecture • L’appareil contrôle les informations du CD. Après la disparition de cet affichage, démarrez l’opération. “Télécom. ” (“ ” représente un chiffre.) • La télécommande et l’appareil n’utilisent pas les mêmes codes de commande. Modifier le code sur la télécommande. ( 15) Recherche • L’appareil vérifie le serveur DLNA sur le réseau. Déverr. • “PC” est sélectionné, mais aucun PC n’est connecté. Vérifiez la connexion avec le PC. ( 31) • Les signaux audio, tels que les composants de fréquence d’échantillonnage, ne sont pas saisis correctement. - Pour en savoir plus sur le format pris en charge, consulter “Format du fichier” ( 48) Erreur de surintensité USB • L’iPhone/iPad/iPod ou le périphérique USB consomme trop de courant. Débranchez l’iPhone/iPad/iPod ou le périphérique USB puis mettez l’unité en veille et rallumez-la. Conf. Wi-Fi • Sélectionnez “Activé”et appuyez sur [OK] pour accéder aux paramètres réseau. ( 19) - Pour quitter les paramètres réseau, sélectionnez “Désactivé” et appuyez sur [OK]. Concentrat. non p en ch/Non pris en charge/Appareil non reconnu/Appareil USB non pris en charge • Vous avez branché un iPhone/iPad/iPod ou un dispositif USB qui n’est pas pris en charge. - Si l’iPhone/iPad/iPod est compatible, le mettre en marche avant de l’insérer dans l’appareil. • Le format du fichier sur l’iPhone/iPad/iPod ou sur le dispositif USB n’est pas pris en charge. - Pour en savoir plus sur le format pris en charge, consulter “Format du fichier” ( 48) (89)](https://usermanual.wiki/Panasonic-of-North-America/SU-C500/User-Guide-2807868-Page-89.png)
![44 Autres Supports lisibles Remarques sur les CD ■ CD compatibles • Les disques identifiés par le logo illustré ci-dessous : • Cet appareil prend en charge les disques au format CD-DA. • Il est possible que cet appareil ne puisse lire certains disques en raison du type d’encodage utilisé à l’enregistrement. • Avant la lecture, finaliser le disque sur l’appareil ayant servi à l’enregistrement. USB • Cet appareil ne garantit pas la connexion avec tous les dispositifs USB. • Les systèmes de fichiers FAT16 et FAT32 sont pris en charge. • Cet appareil prend en charge le USB 2.0 pleine vitesse. • Il est possible que certains dispositifs USB ne soient pas reconnus par cet appareil lorsqu’ils sont branchés à l’aide des raccordements suivants : - un concentrateur USB - un câble d’extension USB • Il est également possible d’utiliser des lecteurs/graveurs de carte USB. • Cet appareil ne peut pas enregistrer de la musique sur un dispositif USB. • Certains fichiers ne pourront pas être lus si le dispositif USB comporte des fichiers non pris en charge. • Pour en savoir plus sur le format pris en charge, consulter “Format du fichier” ( 48) iPhone/iPad/iPod • Panasonic n’assume aucune responsabilité pour la perte de données et(ou) d’informations. • iPhone/iPad/iPod compatibles (à compter de juin 2015) iPhone 6 Plus / iPhone 6 / iPhone 5s / iPhone 5c / iPhone 5 / iPhone 4s / iPad Air 2 / iPad Air / iPad (3e et 4e génération) / iPad 2 / iPad mini 3 / iPad mini 2 / iPad mini / iPod touch (5e génération) / iPod nano (7e génération) • Ne branchez pas les modèles suivants : - iPod classic, iPod [4e (affichage couleur), et 5e (vidéo) générations], iPod nano (1re génération) • Certains incidents imprévus pourraient se produire. (90)](https://usermanual.wiki/Panasonic-of-North-America/SU-C500/User-Guide-2807868-Page-90.png)