Panasonic of North America UN-W700 MULTIMEDIA SYSTEM User Manual
Panasonic Corporation of North America MULTIMEDIA SYSTEM
UserManual.wiki
>
Panasonic of North America
>
UN W700 User Manual
manual
Navigation menu
Upload a User Manual
Namespaces
Wiki Guide
HTML
PDF
Info
Views
User Manual
Discussion / Help
Navigation
![6Unit overviewCamera lensMicrophoneOperation panelReturn [ ]Return to the previous screen. You can go back to as far as the Home screen from the setting menu, etc.Home [ ]Display the Home screen (>13).Menu [ ]Display available options for the screen you are viewing now.Sound volume [T] [U]Adjust the volume.Operation indicatorLights up only during battery charging (>8).SpeakerTouchscreen/Display screenThis touchscreen detects pressure. Apply a little extra pressure if response is poor.Camera angle adjustment leverUse this lever to adjust the camera angle up and down.Power/Display on/off button [¦/I]Reset button [RESET]Use a paper clip, etc., to press the button if this unit does not operate correctly, like when you cannot turn off/on the power.Brightness sensorStandpThe serial number is written at the bottom of the stand.DC IN terminal (>7)/USB terminal (>7)Card slotHeadphone jack (3.5 mm stereo mini jack)7092A8369AOUVDQQMࡍࠫ㧞㧜㧝㧞ᐕ㧡㧝㧝ᣣޓ㊄ᦐᣣޓඦ೨㧥ᤨ㧝㧢ಽ](https://usermanual.wiki/Panasonic-of-North-America/UN-W700/User-Guide-1721434-Page-6.png)
![8Turning on /off this unitPress and hold [¦/I] until the Panasonic logo appears on the screen.pIt takes several tens of seconds until the Home screen appears. (>13)pWhen you turn on this unit for the first time after the purchase, theinitial setting screen appears.Press [¦/I].wTo turn on the screen againPress [¦/I].1Press and hold [¦/I] until the confirmation screen is displayed.2Select “OK” on the confirmation screen.pIn the default setting of “Wi-Fi sleep policy”, the wireless LAN connection is turned off in standby mode to save power when this unit is not connected to a power source. If you want to receive calls from “ Skype” in standby mode, use the AC adaptor as a power source.Using the touchscreenDirectly touch your finger to the screen (touchscreen) to operate this unit.pThe touchscreen of this unit is finger-pressure sensitive. Apply a little extra pressure when touching if you are using commercially available protection sheet or if you feel it is not responding well.pOperate the touchscreen while supporting this unit with one hand to prevent falling.To turn on this unitTo switch to standby modeTo turn off this unitTap Drag Swipe Touch and holdUsed for selecting icons, options, etc.Used for sliding the Seekbar during a music or video playback, etc.Used for skipping the file or quickly scrolling through the screen.Used for moving icons and displaying sub-menus.7092A8369AOUVDQQMࡍࠫ㧞㧜㧝㧞ᐕ㧡㧝㧝ᣣޓ㊄ᦐᣣޓඦ೨㧥ᤨ㧝㧢ಽ](https://usermanual.wiki/Panasonic-of-North-America/UN-W700/User-Guide-1721434-Page-8.png)
![13OperationBasic Home screen operationsThe Home screen is the starting point for all operations. Select an icon to use various applications.1Press [ ] on this unit.The Home screen appears.2Select an application you want to use.Three Home screens are available according to the scenes.Tap “ ” or “ ” to switch the screen.pThis manual describes the operations from the Home screen in the middle.pTurn on this unit and activate the screen. (>8)Switching the Home screenHome screenApplications you can start running from the Home screen are only a fraction of all available ones.Select “ ” at the bottom of the screen.pSwipe up or down to display the icons that run off the screen.pIcon positions on the launcher screen illustrated in this manual may differ from the actual ones as they vary by the content of the installed applications.To return to the Home screenSelect “ ” at the bottom of the screen.To display all applications (To display the launcher screen)Launcher screen (example)7092A8369AOUVDQQMࡍࠫ㧞㧜㧝㧞ᐕ㧡㧝㧝ᣣޓ㊄ᦐᣣޓඦ೨㧥ᤨ㧝㧢ಽ](https://usermanual.wiki/Panasonic-of-North-America/UN-W700/User-Guide-1721434-Page-13.png)
![14pNames, icons, contents and services of applications may be changed with no prior notice.pApplications with “ ” are not pre-installed. To install, connect this unit to a router with the internet connection, and then select an application from the Home screen or the launcher screen.pIf you have any quesitons regarding the applications with “*”, consult the Panasonic’s Customer Service Center (>31) or your nearest dealer. List of applicationsAdobe ReaderView PDF files.Application Lock*Restrict the internet content that are not desirable for children.BrowserView websites.CalculatorCalculate.CalendarEnter events to manage your schedule.CameraTake photos or videos.ClockDisplay a clock and set a alarm.ContactsAdd email addresses, etc.DLNA*Connect with DLNA-compatible devices on the network, and play back or transfer files.DownloadsManage the files you downloaded in the Browser and others.EmailReceive/send emails.Facebook Log into Facebook and enjoy communicating with people.Flash Player SettingsYou can make the settings of Flash Player.pUsually, no changes to the default settings are requiredGalleryView videos or photos stored in the internal memory or the SD card.GmailGoogle Account’s free email service is available.pAfter start-up, press [ ] on this unit, and then select “More” “Help” to read a detailed instruction.Google+ [Only[for[U.S.A.]Sign into Google+ and enjoy communicating with people.pAfter start-up, press [ ] on this unit, and then select “Help” to read a detailed instruction.Latitude ( Google Latitude )Share location information with your friends.LUMIX CLUB* (>21)Download files that are addressed to this unit from the photo and video sharing website operated by Panasonic, and you can view them on this unit.Maps ( Google Maps )View the maps and satellite photos around the world.pAfter start-up, press [ ] on this unit, and then select “Help” to read a detailed instruction.MessengerSign into Google+ and send/receive messages.Music Player*Play back songs stored in the internal memory of this unit or the SD card.Navigation ( Google Map Navigation )Use the navigation to search for a route.News & WeatherView the news and weather.7092A8369AOUVDQQMࡍࠫ㧞㧜㧝㧞ᐕ㧡㧝㧝ᣣޓ㊄ᦐᣣޓඦ೨㧥ᤨ㧝㧢ಽ](https://usermanual.wiki/Panasonic-of-North-America/UN-W700/User-Guide-1721434-Page-14.png)
![15OperationOwner’s Manual* (>22)View Owner’s Manual for advanced features (PDF file) for this unit’s advanced features.pAvailable in the Adobe Reader.Photo Frame* (>20)View desired photos on this unit’s internal memory, the SD card, or the devices on the network. You can also view photos as a slideshow.Photo Receiver*This unit can receive photos from a wireless LAN compatible digital camera.Places (Google Places ) You can find stores and other facilities in your area, or search desired places by keyword or genre and rate them etc.Play Books ( Google Play ) [Only[for[U.S.A.]Use Google’s electronic book service.pAfter start-up, press [ ] on this unit, and then select “Help” to read a detailed instruction.Play Movies ( Google Play ) [Only[for[U.S.A.]Use an online video rental service.pAfter start-up, press [ ] on this unit, and then select “Help” to read a detailed instruction.Play Music ( Google Play ) [Only[for[U.S.A.]Play back music on the SD card or this unit’s internal memory. You can also play back the music you have uploaded on the internet.pAfter start-up, press [ ] on this unit, and then select “Help” to read a detailed instruction.Play Store ( Google Play ) Add, update or perform other operations of applications.Search (Google Search ) Google’s search service is available.SettingsChange various settings of this unit.pThe settings can also be changed if you press [ ] on this unit while the Home screen is displayed, then select “Settings”.Skype (>16)Make voice calls or video calls via the internet.Sound RecorderRecord a voice.Talk ( Google Talk )Send instant messages to your friends or family.pAfter start-up, press [ ] on this unit, and then select “More” “Help” to read a detailed instruction.TuneIn Radio Listen to radios from around the world via the internet.Video Player*View videos stored in the internal memory or the SD card.Twitter Sign into Twitter and enjoy communicating with people.Voice Search ( Google Voice Search )Just by speaking keywords to this unit you can use Search.YouTubePlay back videos on the video sharing website or upload videos on it.Confirm the terms of use and the operation method before using each application or service. You may need to create a new account for each service. When creating a new account, you may also need your cell phone number or cell phone email address.7092A8369AOUVDQQMࡍࠫ㧞㧜㧝㧞ᐕ㧡㧝㧝ᣣޓ㊄ᦐᣣޓඦ೨㧥ᤨ㧝㧢ಽ](https://usermanual.wiki/Panasonic-of-North-America/UN-W700/User-Guide-1721434-Page-15.png)
![16Skype is an application that allows you to make phone calls or video calls.pConnect this unit to an active wireless LAN router.wSign up for Skype1Press [ ] on this unit.2Select “ Skype” on the Home screen.3Tap “Continue”.4Tap “Continue”.5Select “Accept”.Using SkypeTM 6Select “Create an account”.pIf you have an account, enter “Skype Name” and “Password”, and go to step 8 after selecting “Sign in”.7Enter necessary items, and tap “Create an account”.pKeep a memo of your account information in case you forget.8Tap “Continue”.The Skype home screen appears.7092A8369AOUVDQQMࡍࠫ㧞㧜㧝㧞ᐕ㧡㧝㧝ᣣޓ㊄ᦐᣣޓඦ೨㧥ᤨ㧝㧢ಽ](https://usermanual.wiki/Panasonic-of-North-America/UN-W700/User-Guide-1721434-Page-16.png)
![17OperationwThe Skype home screenYou can select various functions and set a mood message.pTap the the Skype logo in the top left corning of the screen, to return to the Skype home screen from any screen.wAdd contactsIn order to have a video conversation, both you and your friend need to add each other to a contact list. Accept a contact requestWhen another Skype user adds you to his or her contacts, you will receive a contact request.1Select “Recent”.pThe number of contact requests or missed calls, etc. are indicated by “ ”.2Select a request.13Select “ ”.To search for people and add to your contactsWhen you search for other Skype users and add them to your contacts, they will receive a contact request.1Select “Contacts”.2Press [ ] on this unit and select “Add contacts”.3Enter a name, email address or Skype name of the person you want to add, and tap “ ”.4Select a contact you want to add.5Tap “Add”.6Tap “Add contacts”.7092A8369AOUVDQQMࡍࠫ㧞㧜㧝㧞ᐕ㧡㧝㧝ᣣޓ㊄ᦐᣣޓඦ೨㧥ᤨ㧝㧢ಽ](https://usermanual.wiki/Panasonic-of-North-America/UN-W700/User-Guide-1721434-Page-17.png)
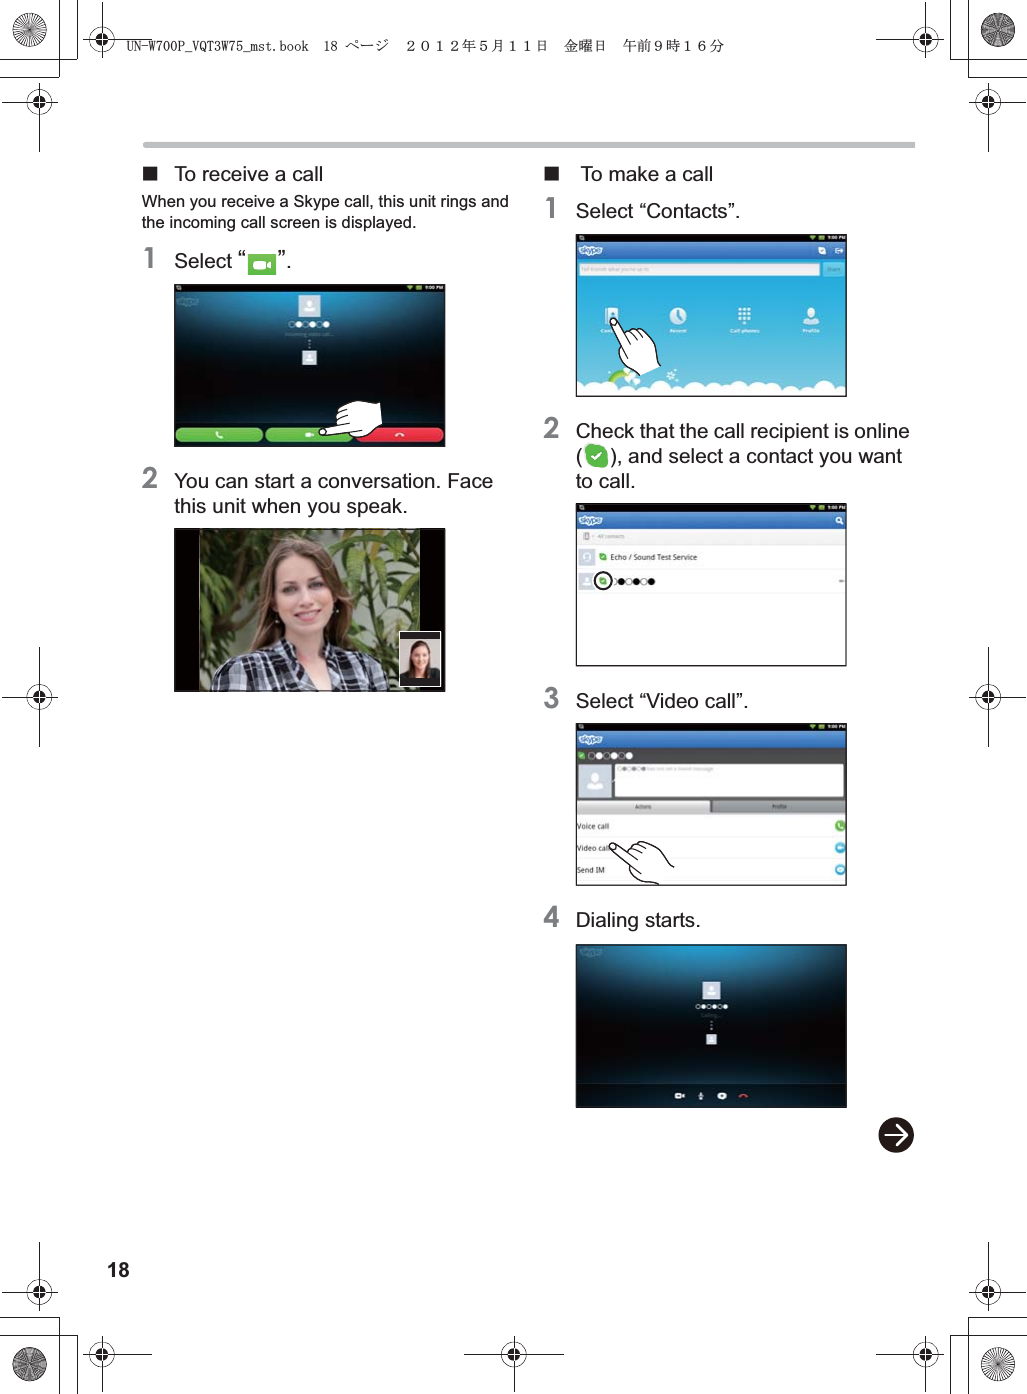
![19Operation5You can start a conversation when a recipient answers the call.To adjust the angle of the cameraPress the top or the bottom of the camera angle adjustment lever.To end the callTap the screen to select “”.About Skype status: Online :Away: Do not disturb : Invisible/OfflineBackground operations“ Skype” runs in background when signed in even if you return to the Home screen by pressing [ ] on this unit or run other applications (standby mode).When the program is running, an icon appears on the status bar (e.g., ).If you want to shut down the program, return to the “ Skype” screen and sign out.pWhile this unit is in standby mode (with the screen light off) and disconnected from a power source, the wireless connection is turned off to save power in the default setting. Under these conditions, this unit cannot receive Skype calls.If you want to receive Skype calls while the screen light is off, connect this unit to a power source using the AC adaptor or change “Wi-Fi sleep policy” to “Never”. For details, refer to the Owner’s Manual for advanced features (PDF file).pࠕࡊࠤ࡚ࠪࡦࠍᦝᣂߒߚ႐วߪޔ৻ᐲᧄᯏߩ㔚Ḯࠍಾߞߡ߆ࠄޔౣᐲ㔚Ḯࠍࠇߡ߅ߚߛߊߎߣࠍ߅൘ߒ߹ߔޕNo emergency calls with SkypeSkype is not a replacement for your telephone and can't be used for emergency calling.7092A8369AOUVDQQMࡍࠫ㧞㧜㧝㧞ᐕ㧡㧝㧝ᣣޓ㊄ᦐᣣޓඦ೨㧥ᤨ㧝㧢ಽ](https://usermanual.wiki/Panasonic-of-North-America/UN-W700/User-Guide-1721434-Page-19.png)
![20wTo prepare photosMake a wireless LAN connection, and transfer photos from any of the following to the SD card or the internal memory.pTransfer from LUMIX CLUBpTransfer from Panasonic’s Wi-Fi compatible digital camerapTransfer from a DLNA-compatible devicepInsert an SD card with photos taken by a digital camera, etc.pTransfer from a PC to this unit’s internal memory using the USB cable (supplied).wSlideshow/Single view1Press [ ] on this unit.2Select “ Photo Frame” on the Home screen.A photo is displayed.pWhen using this function for the first time after the purchase, pre-installed photos are displayed.Using this unit as a photo frameOperations during photo playbackTap or swipe on the screen to operate.Switch to the next/previous photopYou can also switch by swiping right and left.To start/stop a slideshowSelect a desired photoSelect a desired photo from the listTo zoom in/zoom out(Only during a slideshow pause)Jump to a photo sharing service page(Only while displaying a photo on the photo sharing service page) 7092A8369AOUVDQQMࡍࠫ㧞㧜㧝㧞ᐕ㧡㧝㧝ᣣޓ㊄ᦐᣣޓඦ೨㧥ᤨ㧝㧢ಽ](https://usermanual.wiki/Panasonic-of-North-America/UN-W700/User-Guide-1721434-Page-20.png)
![21OperationThe LUMIX CLUB is a website you can organize, share or publish photos taken with a digital camera.pConnect this unit to an active wireless LAN router.1Press [ ] on this unit.2Select “ ” to display the launcher screen, and then select “ LUMIX CLUB”.3Select “Yes”.4Register this unit.Using the LUMIX CLUBRead the terms of use and select “Agree”.Select “Yes”.Select “OK”.5Set an access number.6Enter required information for uploading.7Select “OK”.Select “Yes”.Enter an access number (4-digit number) and select “OK”.Select “OK”.Select “Yes”.Enter a recipient address and a message, etc., and select “OK”.Confirm the entered contents, and select “OK”.pYou can let your friends and family know how to send their photos to this unit via LUMIX CLUBAccess numberIn addition to the address number displayed in step 4, the access number is required for transferring photos and videos to this unit from the browser of a PC or other devices.7092A8369AOUVDQQMࡍࠫ㧞㧜㧝㧞ᐕ㧡㧝㧝ᣣޓ㊄ᦐᣣޓඦ೨㧥ᤨ㧝㧢ಽ](https://usermanual.wiki/Panasonic-of-North-America/UN-W700/User-Guide-1721434-Page-21.png)
![22View Owner’s Manual for advanced features (PDF file)1Press [ ] on this unit.2Select “ ” to display the launcher screen, and then select “ Owner’s Manual”.The Owner's Manual for advanced features (PDF file) appears.Swipe the screen up and down to scroll through the pages.Tap the screen to display the operation icons.Find a desired pageSearch by keywordsIf you enter a keyword and select “ ”, you will jump to the pages that includes the keyword.Find a desired page with the SeekbarIf you drag right and left, you can quickly move to a desired page.Find a desired page from the bookmarksBookmarks refers to the table of contents panel made up of the titles. If you select a desired title, the corresponding page is displayed.If you select , detailed titles of the table of contents are displayed.7092A8369AOUVDQQMࡍࠫ㧞㧜㧝㧞ᐕ㧡㧝㧝ᣣޓ㊄ᦐᣣޓඦ೨㧥ᤨ㧝㧢ಽ](https://usermanual.wiki/Panasonic-of-North-America/UN-W700/User-Guide-1721434-Page-22.png)
![23OperationOthersOthersTroubleshootingThe items below are the excerpts from the Owner’s Manual for advanced features (PDF file).For complete information, refer to the Owner’s Manual for advanced features (PDF file).pIs the battery charged?Charge the battery sufficiently or connect the AC adaptor.pUse such an object as a clip to press the [RESET] button (>6). (If an SD card is inserted in this unit, first remove the SD card.)pIs the environmental temperature particularly high or low?Charge the battery in the environmental temperature range of 5 to 35QC (K41 QF to K95 QF).pIf you connect this unit to the AC adaptor in standby mode, it may take tens of seconds until the operation indication lamp turns on. If it still does not light up after a minute, press the [RESET] button.pᧄᯏߪ Bluetooth® ኻᔕࡋ࠶࠼࠶࠻ߦߪኻᔕߒߡ߹ߖࠎޕCautions for useCare of this unitDo not drop or hit this unit, and do not apply heavy pressure to this unit.A strong impact may cause a failure and malfunction due to the damage to the LCD monitor or the exterior.This unit is not waterproof. Do not use it in a wet place such as a bathtub.Clean this unitAfter powering off this unit (>8), wipe down with a soft dry cloth. If you have used it with the AC adaptor, pull the plug from the socket.pWhen this unit is soiled badly, wipe the dirt off with a wrung wet cloth, and then wipe with a dry cloth.pDo not use solvents such as benzine, thinner, alcohol, kitchen detergents, etc., to clean the camera, as the exterior covering may deteriorate or the coating may come off.Care of an SD card (Optional)Do not leave the card in a location subject to high temperature, direct sunlight, electromagnetic waves or static electricity.Do not bend or drop the card.pThe card may be damaged or the recorded content may be damaged or deleted.pPut the card in a card case or a storage bag when storing, carrying or not using the card.pDo not allow dirt, dust or water to get into the terminal on the back of the card and do not touch the terminal with your finger.Cannot turn on the power/Cannot operate/Cannot turn off the powerCannot charge the battery.Bluetooth®ኻᔕࡋ࠶࠼࠶࠻߇߃ߥ7092A8369AOUVDQQMࡍࠫ㧞㧜㧝㧞ᐕ㧡㧝㧝ᣣޓ㊄ᦐᣣޓඦ೨㧥ᤨ㧝㧢ಽ](https://usermanual.wiki/Panasonic-of-North-America/UN-W700/User-Guide-1721434-Page-23.png)
![27OthersThis product incorporates the following software:(1) the software developed independently by or for Panasonic Corporation,(2) the software owned by third party and licensed to Panasonic Corporation,(3) the software developed by the Independent JPEG Group,(4) the software developed by the Freetype Project,(5) the software licensed under the GNU General Public License, Version 2 (GPL v2),(6) the software licensed under the GNU LESSER General Public License (LGPL) and/or,(7) open sourced software other than the software licensed under the GPLv2 and/or LGPL.For the software categorized as (5) and (6), please refer to the terms and conditions of GPLv2 and LGPL, as the case may be. atޓhttp://www.gnu.org/licenses/old-licenses/gpl-2.0.htmlhttp://www.gnu.org/licenses/old-licenses/lgpl-2.1.htmlIn addition, the software categorized as (5) and (6) are copyrighted by several individuals. Please refer to the copyright notice of those individuals athttp://panasonic.net/avc/oss/dmp/The GPLv2/LGPL software is distributed in the hope that it will be useful, but WITHOUT ANY WARRANTY, without even the implied warranty of MERCHANTABILITY or FITNESS FOR A PARTICULAR PURPOSE.At least three (3) years from delivery of products, Panasonic will give to any third party who contact us at the contact information provided below, for a charge no more than our cost of physically performing source code distribution, a complete machine-readable copy of the corresponding source code covered under GPLv2/LGPL.Contact Informationoss-cd-request@gg.jp.panasonic.comSource code covered under GPLv2/LGPL is also freely available to you and any other member of the public via our website below.http://panasonic.net/avc/oss/dmp/To view the predetermined conditions of the software categorized as (5), (6) and (7), display the setting menu on the Home screen, then select “About device” “Legal information” “Open source licenses”.This product contains the following software (collectively, “Software”) provided or licensed from Adobe Systems Incorporated or Adobe Systems Software Ireland Limited (collectively, “Adobe”)pAdobe Flash® PlayerpAdobe Reader®Your use of the whole or any part of the Software shall be conclusively deemed to constitute your acceptance of all terms and conditions of this end user license agreement (“Agreement”) including, without limitation, following restrictions and disclaimer.In the event of your acceptance of this Agreement, this Agreement shall be legally binding on you and any legal entity which obtains and uses for its own profit the Software.If you do not agree to this Agreement, do not use the Software.[Terms and conditions]1. You shall not distribute or copy the Software.2. You shall not modify or make derivative works of the Software.3. You shall not decompile, reverse engineer, disassemble or otherwise reduce the Software to the human-perceivable form.4. You expressly acknowledge and agree that, to the maximum extent permitted by any applicable law, ADOBE DISCLAIMS INDIRECT, SPECIAL, INCIDENTAL, PUNITIVE, AND CONSEQUENTIAL DAMAGE SUFFERED BY YOU.THE ABOVE DISCLAIMER SHALL APPLY EVEN IF ADOBD HAS BEEN ADVISED OF THE POSSIBILITY OF SUCH DAMAGE.5. You expressly acknowledge and agree that Adobe’s total cumulative liability for all claims arising out of or related to this Agreement shall not in any event exceed the total amount of fees received by Adobe from you under this Agreement, provided, however, that this limitation of liability shall not apply to any liability for death or bodily injury of you in the consequence of Adobe’s negligence or tort (fraud).6. You expressly acknowledge and agree that you may not access to all contents depending on the version of the Software.7092A8369AOUVDQQMࡍࠫ㧞㧜㧝㧞ᐕ㧡㧝㧝ᣣޓ㊄ᦐᣣޓඦ೨㧥ᤨ㧝㧢ಽ](https://usermanual.wiki/Panasonic-of-North-America/UN-W700/User-Guide-1721434-Page-27.png)
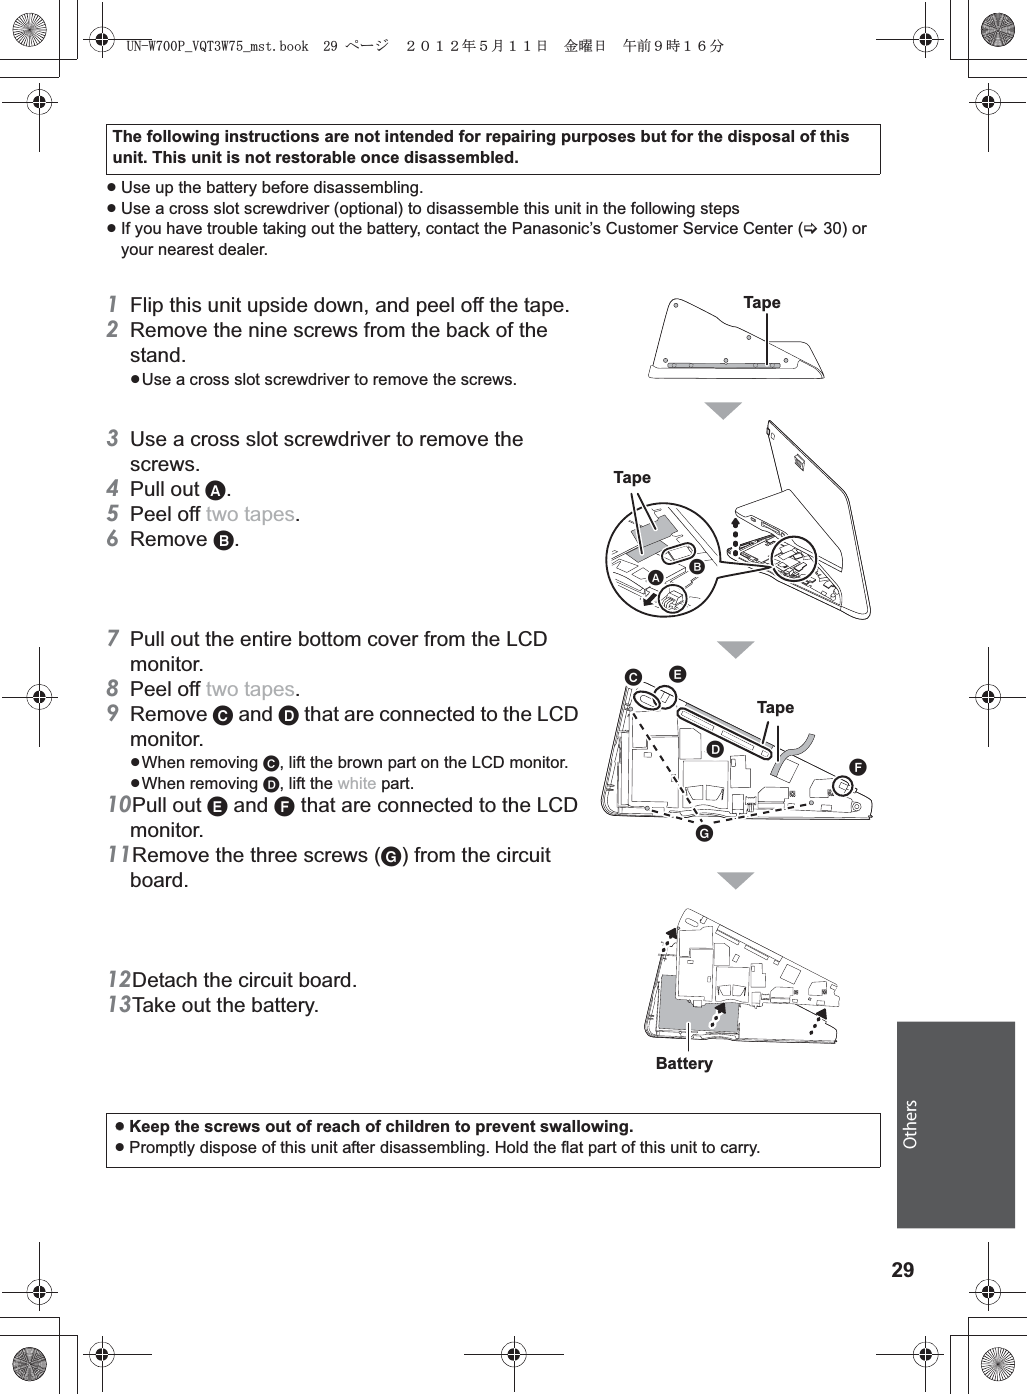
![28Requests when disposing of this unitTake out the battery from this unit upon disposal to support battery recycling.pWhen disposing the batteries, please contact your local authorities or dealer and ask for the correct method of disposal.The rechargeable battery is intended for use with this unit only. Do not use any other rechargeable batteries except the supplied one.Do not recharge the battery after removing it from this unitpDo not heat or expose to flame.pDo not drive a nail, subject to impact, disassemble or modify.pDo not rip or peel off the exterior stickers.pDo not touch the terminals (T and U) with metal objects.pDo not store or carry with necklaces or hairpins, etc.pDo not heat in a microwave or an oven, etc.pDo not charge, use or leave in hot places such as next to fires or in extremely hot weather.pDo not immerse in the water, as this may cause leaking, overheating, fire or rupture.If a leak should occur, by no means touch the liquid with bare hands.pIf the liquid gets on the body or clothes, wash well with water. If the liquid gets into your eyes, there is a danger of blindness. Do not rub the eyes; after washing immediately with clean water, consult your physician.Keep removed screws etc. out of the reach of small children.If accidentally ingested there will be adverse physical effects.pShould you suspect that such an object has been ingested, consult your physician immediately.Used battery disposalInsulate the terminals with cellophane tape or the like.Do not disassembleBattery used for this unitName: Lithium ion (Li-ion) rechargeable batteryNominal voltage: DC 3.7 VwTo remove the batteryFollow the steps below to erase the data completely when disposing of this unit.Press [ ] on this unit, and then tap “ ” to switch the screen.Select “ Settings” “Storage” “Erase all data from internal memory”, and checkmark “Erase all data from internal memory” on the confirmation screen, and then follow the on-screen instructions to erase the data of the internal memory.pThe format is complete.Press [ ] on this unit.Select “ Settings” “Privacy” “Factory data reset”, and then follow the on-screen instructions to return this unit to the default setting.Never disassemble this unit except when disposing of this unit.7092A8369AOUVDQQMࡍࠫ㧞㧜㧝㧞ᐕ㧡㧝㧝ᣣޓ㊄ᦐᣣޓඦ೨㧥ᤨ㧝㧢ಽ](https://usermanual.wiki/Panasonic-of-North-America/UN-W700/User-Guide-1721434-Page-28.png)