Panasonic of North America UN-W700 MULTIMEDIA SYSTEM User Manual
Panasonic Corporation of North America MULTIMEDIA SYSTEM
manual
ComenzarPreparacionOperacionOtros
Thank you for purchasing this product.
For optimum performance and safety, please read these instructions carefully.
Please keep this manual for future reference.
More detailed instructions on the operation of this unit are contained in
“Owner’s Manual for advanced features (PDF format)” in the internal memory of
this unit.
pTo view “Owner’s Manual for advanced features (PDF format)”, refer to page 22.
If you have any questions contact
1-800-211-PANA(7262)
Register online at : www.Panasonic.com/register
(U.S. customers only)
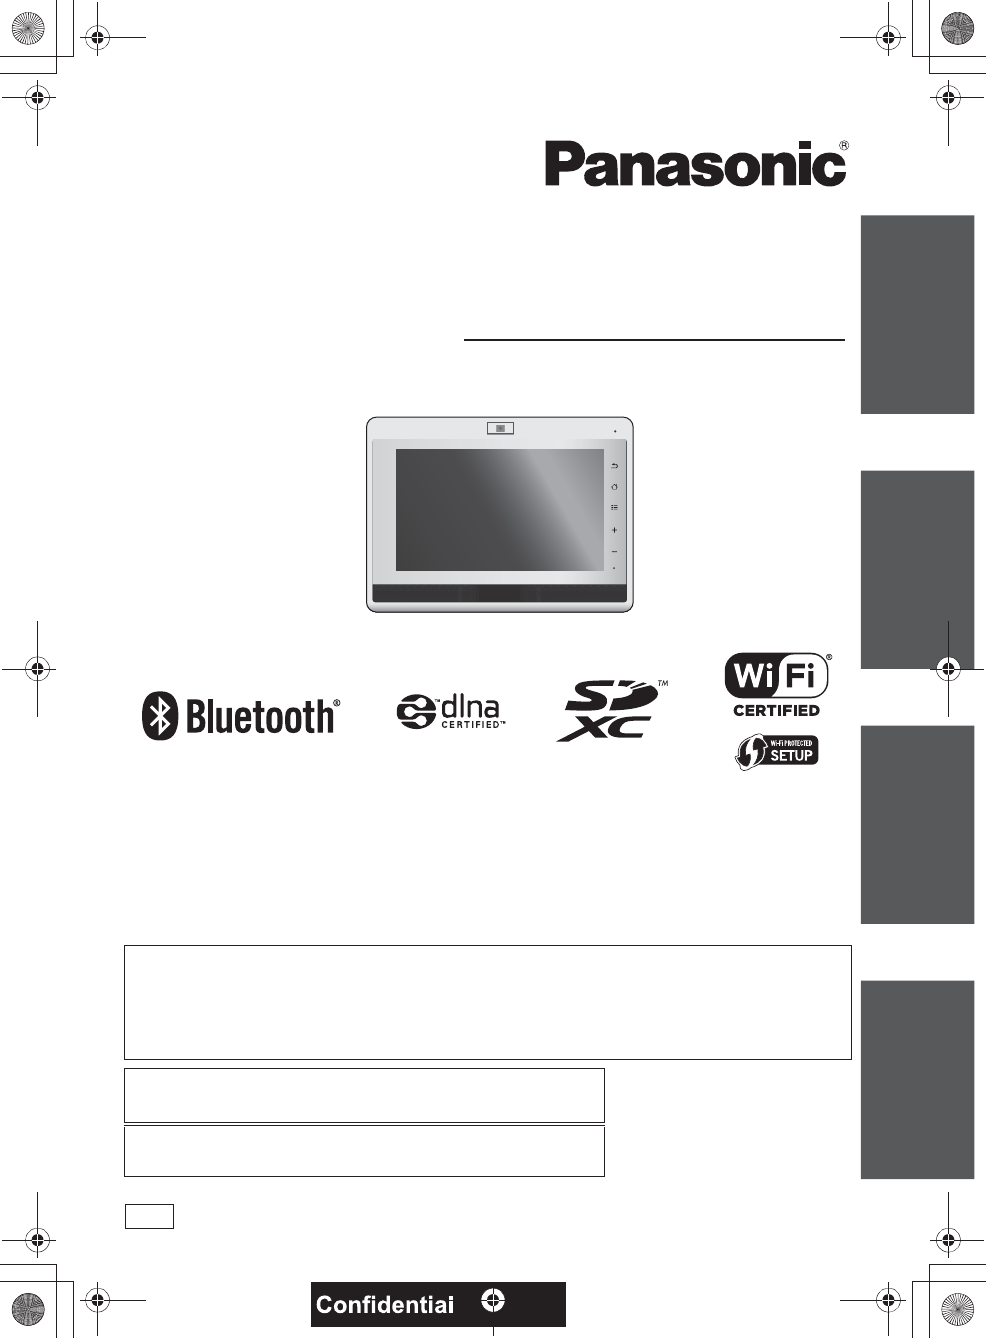
Basic Owner’s Manual
Multimedia system
Model No. UN-W700
VQT3W75
P
until
2012/7/9
7092A8369AOUVDQQMࡍࠫ㧞㧜㧝㧞ᐕ㧡㧝㧝ᣣޓ㊄ᦐᣣޓඦ೨㧥ᤨ㧝㧢ಽ
2
Getting starte d
IMPORTANT SAFETY
INSTRUCTIONS
Read these operating instructions carefully before using
the unit. Follow the safety instructions on the unit and the
applicable safety instructions listed below. Keep these
operating instructions handy for future reference.
1 Read these instructions.
2 Keep these instructions.
3 Heed all warnings.
4 Follow all instructions.
5 Do not use this apparatus near water.
6 Clean only with dry cloth.
7 Do not block any ventilation openings. Install in
accordance with the manufacturer’s instructions.
8 Do not install near any heat sources such as radiators,
heat registers, stoves, or other apparatus (including
amplifiers) that produce heat.
9 Do not defeat the safety purpose of the polarized or
grounding-type plug. A polarized plug has two blades
with one wider than the other. A grounding-type plug
has two blades and a third grounding prong. The wide
blade or the third prong are provided for your safety. If
the provided plug does not fit into your outlet, consult
an electrician for replacement of the obsolete outlet.
10 Protect the power cord from being walked on or
pinched particularly at plugs, convenience
receptacles, and the point where they exit from the
apparatus.
11 Only use attachments/accessories specified by the
manufacturer.
12 Use only with the cart, stand, tripod,
bracket, or table specified by the
manufacturer, or sold with the
apparatus. When a cart is used, use
caution when moving the cart/
apparatus combination to avoid injury
from tip-over.
13 Unplug this apparatus during lightning storms or when
unused for long periods of time.
14 Refer all servicing to qualified service personnel.
Servicing is required when the apparatus has been
damaged in any way, such as power-supply cord or
plug is damaged, liquid has been spilled or objects
have fallen into the apparatus, the apparatus has
been exposed to rain or moisture, does not operate
normally, or has been dropped.
Unit
To reduce the risk of fire, electric shock or product
damage,
pDo not expose this unit to rain, moisture, dripping or
splashing.
pDo not place objects filled with liquids, such as vases,
on this unit.
pUse only the recommended accessories.
pDo not remove covers.
pDo not repair this unit by yourself. Refer servicing to
qualified service personnel.
SD card
pKeep the Memory Card out of reach of children to
prevent swallowing.
Unit
pProduct Identification Marking is located on the bottom
of unit.
Batteries
pDo not heat or expose to flame.
pDo not leave the battery(ies) in a car exposed to direct
sunlight for a long period of time with doors and
windows closed.
WARNING
CAUTION
Keep this unit as far away as possible from
electromagnetic equipment (such as
microwave ovens, TVs, video games etc.).
pIf you use this unit on top of or near a TV, the
pictures and/or sound on this unit may be disrupted
by electromagnetic wave radiation.
pDo not use this unit near cell phones because doing
so may result in noise adversely affecting the
pictures and/or sound.
pRecorded data may be damaged, or pictures may be
distorted, by strong magnetic fields created by
speakers or large motors.
pElectromagnetic wave radiation generated by
microprocessors may adversely affect this unit,
disturbing the pictures and/or sound.
pIf this unit is adversely affected by electromagnetic
equipment and stops functioning properly, turn this
unit off and press the RESET button. Then turn this
unit on.
Do not use this unit near radio transmitters
or high-voltage lines.
pIf you record near radio transmitters or high-voltage
lines, the recorded pictures and/or sound may be
adversely affected.
Install this unit so that the power cord can be
unplugged from the socket outlet immediately if
any problem occurs.
7092A8369AOUVDQQMࡍࠫ㧞㧜㧝㧞ᐕ㧡㧝㧝ᣣޓ㊄ᦐᣣޓඦ೨㧥ᤨ㧝㧢ಽ
3
Getting started
VQT3W75 (ENG)
THE FOLLOWING APPLIES ONLY IN THE
U.S.A
FCC Note:
This equipment has been tested and found to comply
with the limits for a Class B digital device, pursuant to
Part 15 of the FCC Rules. These limits are designed to
provide reasonable protection against harmful
interference in a residential installation. This equipment
generates, uses, and can radiate radio frequency
energy and, if not installed and used in accordance with
the instructions, may cause harmful interference to
radio communications. However, there is no guarantee
that interference will not occur in a particular
installation. If this equipment does cause harmful
interference to radio or television reception, which can
be determined by turning the equipment off and on, the
user is encouraged to try to correct the interference by
one or more of the following measures:
pReorient or relocate the receiving antenna.
pIncrease the separation between the equipment and
receiver.
pConnect the equipment into an outlet on a circuit
different from that to which the receiver is
connected.
pConsult the dealer or an experienced radio/TV
technician for help.
FCC Caution: To assure continued compliance, follow
the attached installation instructions and use only
shielded interface cables with ferrite core when
connecting to computer or peripheral devices.
Any changes or modifications not expressly approved
by the party responsible for compliance could void the
user’s authority to operate this equipment.
Declaration of Conformity
Trade Name: Panasonic
Model No.:UN-W700
Responsible Party:
Panasonic Corporation of North America
One Panasonic Way, Secaucus, NJ 07094
Support Contact:
Panasonic Consumer Marketing Company of North
America
1-800-211-PANA (7262)
This device complies with Part 15 of the FCC Rules.
Operation is subject to the following two conditions: (1)
This device may not cause harmful interference, and
(2) this device must accept any interference received,
including interference that may cause undesired
operation.
The available scientific evidence does not show that
any health problems are associated with using low
power wireless devices.
There is no proof, however, that these low power
wireless devices are absolutely safe.
Low power wireless devices emit low levels of radio
frequency energy (RF) in the microwave range while
being used.
Whereas high levels of RF can produce health effects
(by heating tissue), exposure of low-level RF that does
not produce heating effects causes no known adverse
health effects.
Many studies of low-level RF exposures have not found
any biological effects.
Some studies have suggested that some biological
effects might occur, but such findings have not been
confirmed by additional research.
UN-W700 contains built-in WLAN and BT transceivers
and has been tested and found to comply with FCC
radiation exposure limits set forth for an uncontrolled
environment and meets the FCC radio frequency (RF)
Exposure Guidelines in Supplement C to OET65.
This product requires a minimum of 20 cm (8 inches)
spacing must be maintained between antenna and all
person’s body (excluding extremities of hands, wrist
and feet) during wireless modes of operation.
This product may not be co-located or operated with
any other antenna or transmitter.
A lithium ion battery that is recyclable
powers the product you have purchased.
Please call 1-800-8-BATTERY for
information on how to recycle this
battery.
7092A8369AOUVDQQMࡍࠫ㧞㧜㧝㧞ᐕ㧡㧞㧤ᣣޓᦐᣣޓඦ೨㧝㧝ᤨ㧟㧜ಽ
4
Contents
Getting started
IMPORTANT SAFETY INSTRUCTIONS . . . . . . . . . . . . . . . . . . . . . . . . . . . . . . . . . . . . . 2
Accessories . . . . . . . . . . . . . . . . . . . . . . . . . . . . . . . . . . . . . . . . . . . . . . . . . . . . . . . . . . .4
Please read this page first . . . . . . . . . . . . . . . . . . . . . . . . . . . . . . . . . . . . . . . . . . . . . . . . 5
Unit overview . . . . . . . . . . . . . . . . . . . . . . . . . . . . . . . . . . . . . . . . . . . . . . . . . . . . . . . . . .6
Preparation
Connecting to an AC power source . . . . . . . . . . . . . . . . . . . . . . . . . . . . . . . . . . . . . . . . . 7
Turning on /off this unit . . . . . . . . . . . . . . . . . . . . . . . . . . . . . . . . . . . . . . . . . . . . . . . . . . . 8
Using the touchscreen . . . . . . . . . . . . . . . . . . . . . . . . . . . . . . . . . . . . . . . . . . . . . . . . . . . 8
Operation
Initial setup . . . . . . . . . . . . . . . . . . . . . . . . . . . . . . . . . . . . . . . . . . . . . . . . . . . . . . . . . . . . 9
Basic Home screen operations. . . . . . . . . . . . . . . . . . . . . . . . . . . . . . . . . . . . . . . . . . . . 13
View Owner’s Manual for advanced features (PDF file) . . . . . . . . . . . . . . . . . . . . . . . . . 22
Others
Troubleshooting . . . . . . . . . . . . . . . . . . . . . . . . . . . . . . . . . . . . . . . . . . . . . . . . . . . . . . . 23
Cautions for use . . . . . . . . . . . . . . . . . . . . . . . . . . . . . . . . . . . . . . . . . . . . . . . . . . . . . . . 23
Specifications . . . . . . . . . . . . . . . . . . . . . . . . . . . . . . . . . . . . . . . . . . . . . . . . . . . . . . . . .24
Requests when disposing of this unit . . . . . . . . . . . . . . . . . . . . . . . . . . . . . . . . . . . . . . . 28
Limited Warranty (ONLY FOR U.S.A. AND PUERTO RICO) . . . . . . . . . . . . . . . . . . . . . 30
Customer Service (Only For MEXICO). . . . . . . . . . . . . . . . . . . . . . . . . . . . . . . . . . . . . . 32
Accessories
Check the supplied accessories. Product numbers correct as of May 2012. These may be subject to
change.
To order accessories, refer to “Accessory Purchases (United States and Puerto Rico)” (>31).
pDo not use the AC adaptor and USB cable with other equipment.
AC adaptor (VSK0784)
USB cable (XXXXXX)
7092A8369AOUVDQQMࡍࠫ㧞㧜㧝㧞ᐕ㧡㧝㧝ᣣޓ㊄ᦐᣣޓඦ೨㧥ᤨ㧝㧢ಽ
5
Getting started
Please read this page first
wInstructions consist of the two manuals
Basic Owner’s Manual (this book):
Provides necessary information for the initial setup right after the purchase and how to view “Owner’s
Manual for advanced features (PDF format)”.
Owner’s Manual for advanced features (PDF format) (>22):
Provides necessary information to operate this unit, including instructions, notes, and so forth for each
function.
wData stored in this product cannot be compensated
pPanasonic does not take any responsibility for any damage of the data in this product.
pPanasonic does not take any responsibility for any memory loss caused by the failure of this product,
the internal memory of this unit or an SD card.
pIt is recommended that you regularly back up the data in case the internal memory loses the data by a
malfunction, a repair, etc.
wNever perform illicit modifications to the basic software
pPanasonic may regard such modifications as a software modification and may reject the repair service
request.
wAbout applications
pApplications (including the pre-installed applications on this unit) and their related services and content, etc. (hereafter
referred to as the “applications, etc.”) are provided and operated by the respective service providers and are subject to
updates or terminations with no prior notice at the discretion of the service providers. Updated applications, etc. may
lose their compatibility with this product. Panasonic does not take any responsiblity for the damage or loss caused by
the updates or terminations of the applications, etc.
pPlease be advised that Panasonic does not take any responsibility even if any of the applications, etc. incurs a
malfunction of this unit, other types of detriment to the customer or third persons, or the partial or total loss of
compatibility of the applications, etc. with this product.
pShould you encounter any malfunctions or have any concerns, etc. regarding the applications, etc., contact the
corresponding application service provider.
p
Please be advised that Panasonic does not offer any refunds on purchased applications, etc. from Google Play and does not take
any responsibility for the matters concerning the purchase of the applications, etc. from Google Play.
pConfirm that each of the applications, etc. you want to install or update is safe, and download it at your own risk. There
are dangers of virus infections, damage to the data, and other related risks. Please also keep in mind of a possible
volume setting update, which may cause a sudden output of a loud sound.
pSome applications, etc. automatically communicate over the internet. Please be aware that data charges may rise
sharply as a result of the communications depending on the connection method to the internet.
wAbout copyright
pUnder copyright law, your video and audio recordings cannot be used without permission of the owner except for your
personal use. Note that photography may be restricted even if the purpose is for your personal use only.
pUnauthorized duplication, broadcast, public performance and rental of copyrighted materials are prohibited by law.
wAbout the descriptions and illustrations in this Owner’s Manual
pThe drawings, illustrations, and screenshots, etc. used in this Owner’s Manual are somewhat different
from the actual product.
pGoogleTM, the Google logo, AndroidTM, Google+TM, the Google+ logo, Google PlayTM, the Google Play logo,
GmailTM, the Gmail logo, Google MapsTM, the Google Maps logo, Google Maps NavigationTM, the Google Maps
Navigation logo, Google TalkTM, the Google Talk logo, Google LatitudeTM, the Google Latitude logo, Google
PlacesTM, the Google Places logo, Google SearchTM, the Google Search logo, Google Voice SearchTM, the Google
Voice Search logo, YouTubeTM, the YouTube logo, PicasaTM and the Picasa logo are trademarks or registered
trademarks of Google Inc.
pThe Android robot is reproduced or modified from work created and shared by Google and used according to terms
described in the Creative Commons 3.0 Attribution License.
Names, icons, contents and services of applications may be changed with no prior notice. Please note that they may
differ from the descriptions of this Owner’s Manual.
7092A8369AOUVDQQMࡍࠫ㧞㧜㧝㧞ᐕ㧡㧝㧝ᣣޓ㊄ᦐᣣޓඦ೨㧥ᤨ㧝㧢ಽ
6
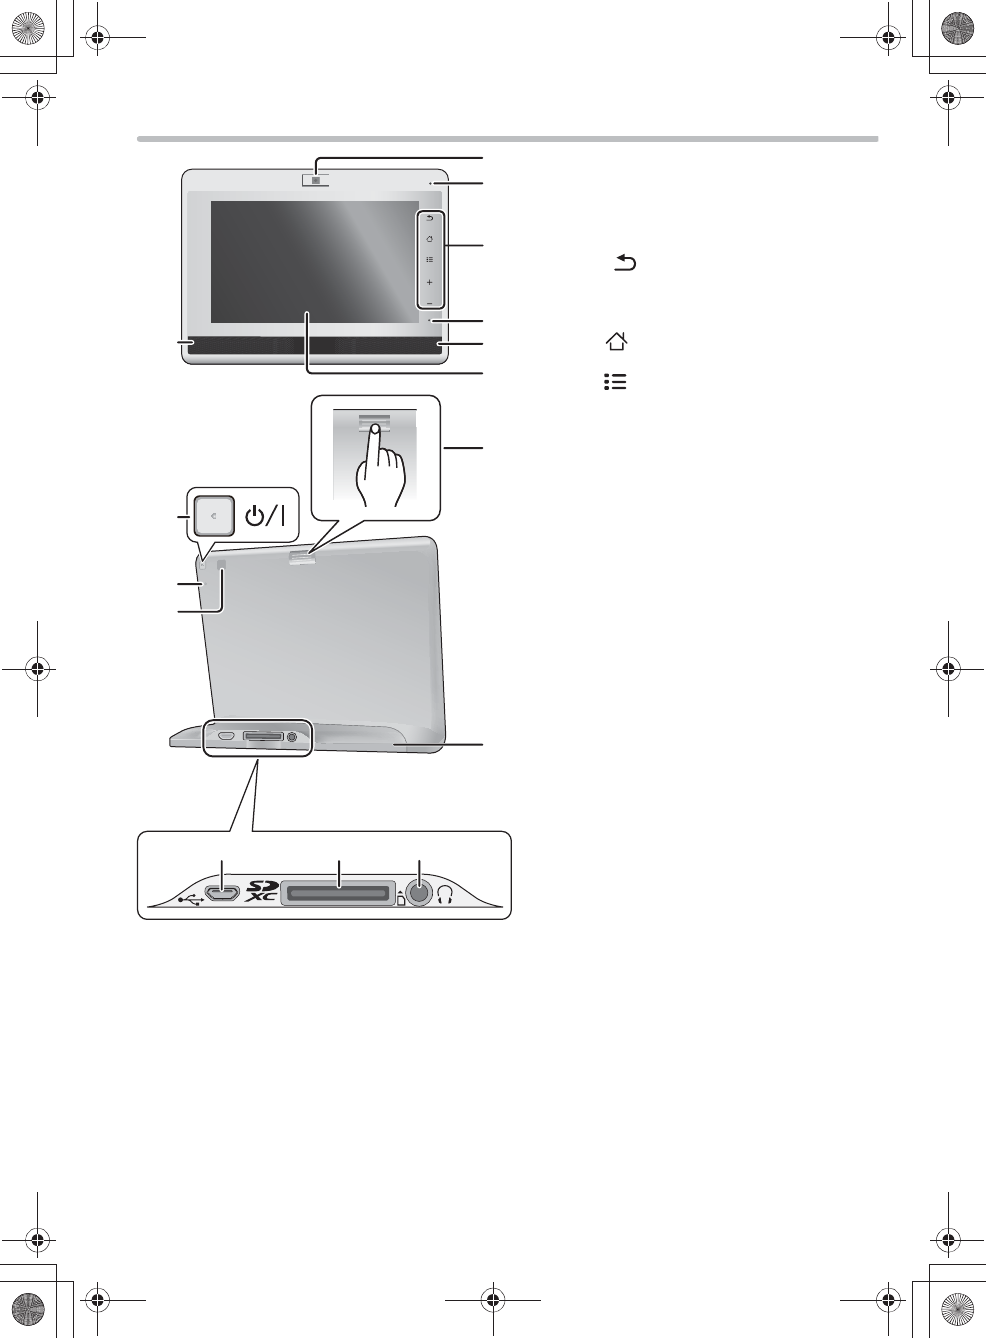
Unit overview
Camera lens
Microphone
Operation panel
Return [ ]
Return to the previous screen. You can go
back to as far as the Home screen from the
setting menu, etc.
Home [ ]
Display the Home screen (>13).
Menu [ ]
Display available options for the screen you
are viewing now.
Sound volume [
T
] [
U
]
Adjust the volume.
Operation indicator
Lights up only during battery charging (>8).
Speaker
Touchscreen/Display screen
This touchscreen detects pressure. Apply a
little extra pressure if response is poor.
Camera angle adjustment lever
Use this lever to adjust the camera angle up
and down.
Power/Display on/off button
[
¦
/I]
Reset button [RESET]
Use a paper clip, etc., to press the button if
this unit does not operate correctly, like when
you cannot turn off/on the power.
Brightness sensor
Stand
pThe serial number is written at the bottom
of the stand.
DC IN terminal (>7)/
USB terminal (>7)
Card slot
Headphone jack (
3.5 mm stereo
mini jack)
7092A8369AOUVDQQMࡍࠫ㧞㧜㧝㧞ᐕ㧡㧝㧝ᣣޓ㊄ᦐᣣޓඦ೨㧥ᤨ㧝㧢ಽ
7
Getting startedPreparation
Preparatio n
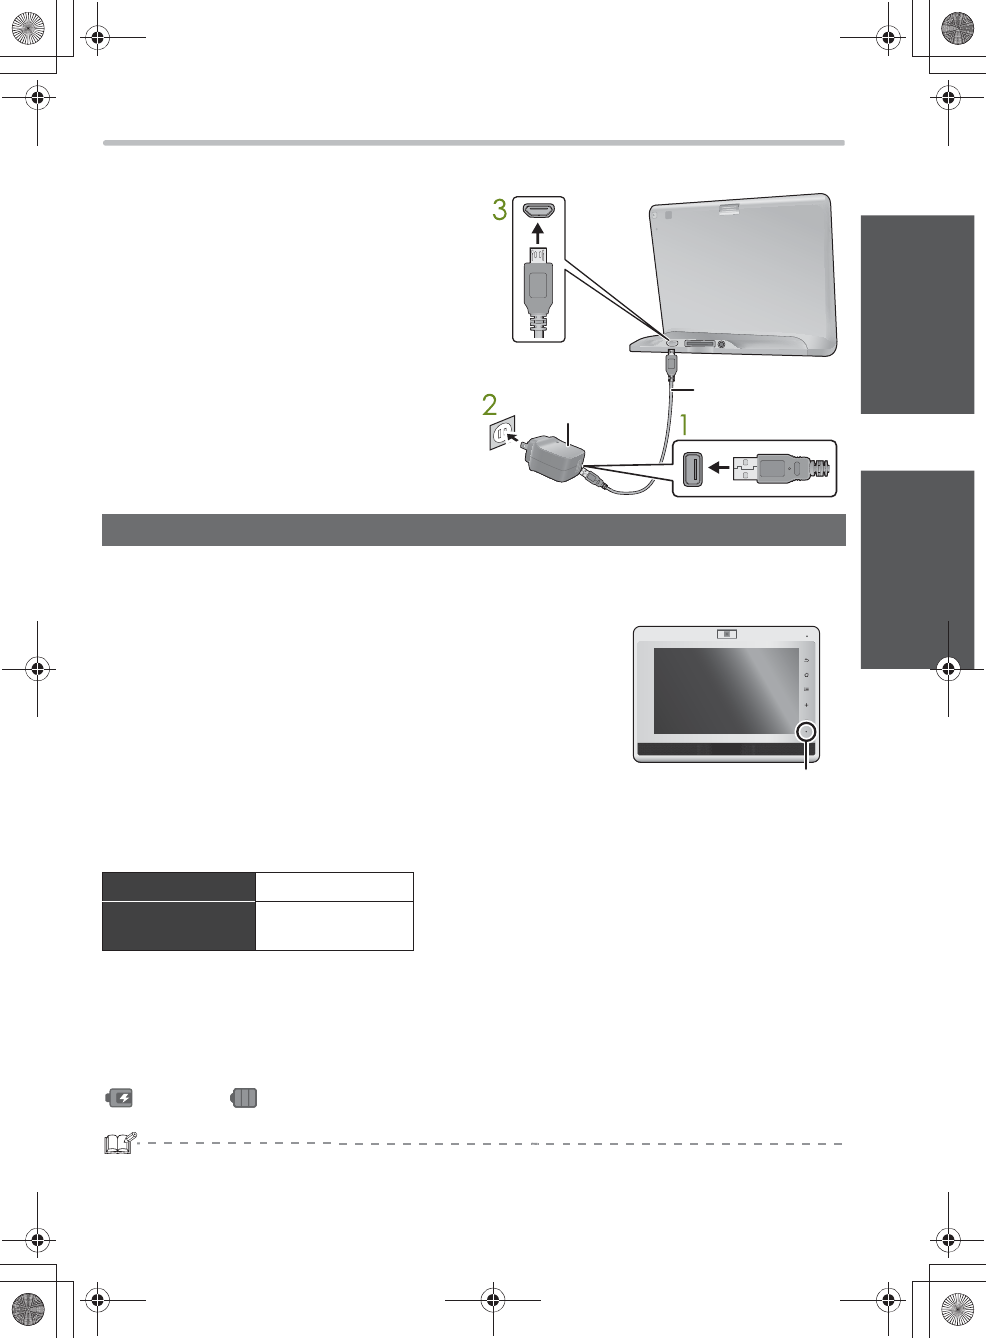
Connecting to an AC power source
Using the AC adaptor allows you to use this unit without being worried about the remaining
battery level.
1Connect the USB cable to the AC
adaptor.
pCheck that the plug portion of the AC
adaptor is not loose or misaligned.
2Connect the AC adaptor to a power
outlet.
3Connect the USB cable to this unit.
The battery is not charged at the time of purchase. Charge before initial use.
pA rechargeable lithium ion battery is built into this unit. Do not remove the battery except for the time of
disposal.
Connect this unit to the AC adaptor while this unit is
turned off.
p↹㕙߇ὐἮߒޔPanasonic ࡠࠧ߇␜ߐࠇߚߣޔల㔚㐿ᆎࠍ
ߔ㔚ᳰࠕࠗࠦࡦ߇ࠕ࠾ࡔ࡚ࠪࡦ␜ߐࠇ߹ߔޕᢙ⑽ᓟޔ↹㕙ߪ
⥄േ⊛ߦᶖἮߒ߹ߔޕ
p㔚ᳰ߇චಽߦల㔚ߐࠇߡࠆ႐วޔ↹㕙ߪὐἮߒ߹ߖࠎޕ
The operation indicator ()
When charging : lights up / When fully charged : turns off
wAbout charging time
wCharging the battery in standby mode or during use
Although charging is performed while this unit is in standby mode (the screen is turned off) or in use,
charging may take longer or may not be completed. Furthermore, if you continuously use the functions
with large power consumption, the battery may be depleted even during charging.
Battery level display during charging
: Charging / : Fully charged
pDo not use any other AC adaptors and USB cables except the supplied ones.
pYou do not have to use up the battery before recharge.
p
It is recommended to charge the battery in the temperature
of
between 5
Q
C and 35
Q
C (
K
41
Q
F and
K
95
Q
F).
AC adaptor
(supplied)
USB cable
(supplied)
Charging
Charging time* About 3.5 hours * When charging at the surrounding temperature of 25 QC (K75 QF)
while this unit is turned off or is in standby mode after the battery
depletion.
Rechargeable
number
About 500 times
7092A8369AOUVDQQMࡍࠫ㧞㧜㧝㧞ᐕ㧡㧝㧝ᣣޓ㊄ᦐᣣޓඦ೨㧥ᤨ㧝㧢ಽ
8
Turning on /off this unit
Press and hold [¦/I] until the Panasonic logo
appears on the screen.
pIt takes several tens of seconds until the Home screen
appears. (>13)
pWhen you turn on this unit for the first time after the purchase,
theinitial setting screen appears.
Press [¦/I].
wTo turn on the screen again
Press [¦/I].
1Press and hold [¦/I] until the confirmation screen is displayed.
2Select “OK” on the confirmation screen.
pIn the default setting of “Wi-Fi sleep policy”, the wireless LAN connection is turned off in standby mode
to save power when this unit is not connected to a power source. If you want to receive calls from
“ Skype” in standby mode, use the AC adaptor as a power source.
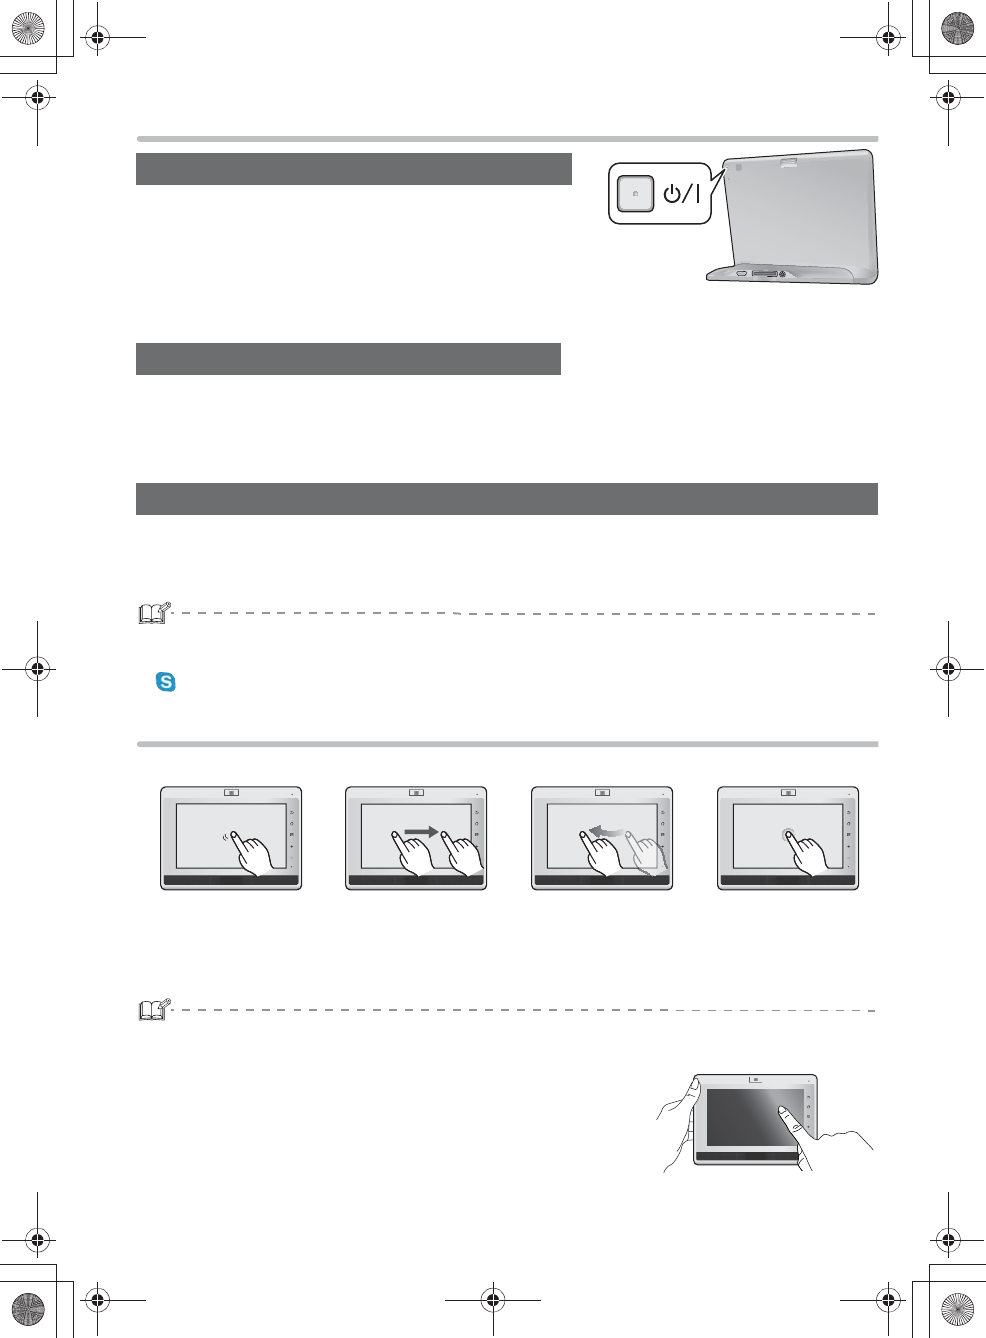
Using the touchscreen
Directly touch your finger to the screen (touchscreen) to operate this unit.
pThe touchscreen of this unit is finger-pressure sensitive. Apply a little extra pressure when touching if
you are using commercially available protection sheet or if you feel it is not responding well.
pOperate the touchscreen while supporting this unit with one hand to
prevent falling.
To turn on this unit
To switch to standby mode
To turn off this unit
Tap Drag Swipe Touch and hold
Used for selecting icons,
options, etc.
Used for sliding the
Seekbar during a music
or video playback, etc.
Used for skipping the file
or quickly scrolling
through the screen.
Used for moving icons
and displaying sub-
menus.
7092A8369AOUVDQQMࡍࠫ㧞㧜㧝㧞ᐕ㧡㧝㧝ᣣޓ㊄ᦐᣣޓඦ೨㧥ᤨ㧝㧢ಽ
9
PreparationOperation
Operation
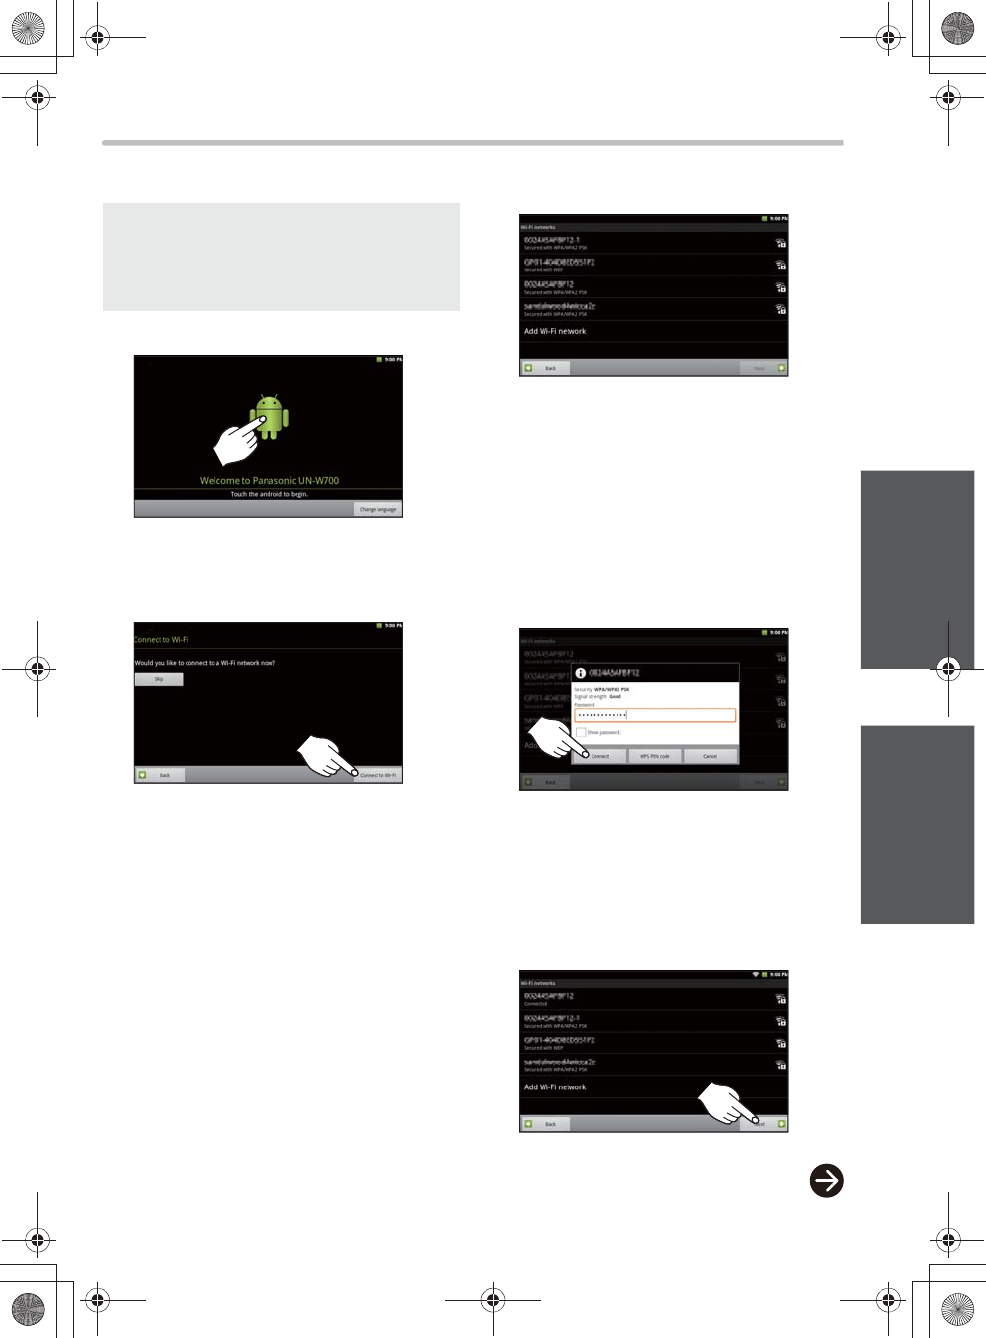
Initial setup
When you turn on this unit for the first time after
the purchase, the initial setting screen appears.
1Tap the screen.
pSelect “Change language”, to change the
display language as needed.
2Select “Connect to Wi-Fi”.
p If you are not connecting to a wireless LAN,
select “Skip” and follow on-screen
instructions to compleate the initial setting.
pIf you are using a wireless broadband router
(an access point) that supports WPS (Wi-Fi
Protected Setup™), you can make the
settings with WPS. Refer to page 11.
A wireless broadband router (an access
point) is required for the initial setup.
pA wireless connection is required when setting
up the Google Account.
pYou can use this unit with no Google Account.
3Select a network you want to
connect to.
pFor more information on network names,
refer to the manual of the wireless
broadband router (an access point) or ask it
to the network administrator.
p If the network you want to connect to does
not appear, select “Add Wi-Fi network” and
enter required information.
4Tap a text field and enter the
password, and then select
“Connect”.
pFor password-related information, refer to
the manual of the wireless broadband router
(an access point) or ask it to the network
administrator.
pFor information on how to enter characters,
go to page 12.
5Select “Next”.
7092A8369AOUVDQQMࡍࠫ㧞㧜㧝㧞ᐕ㧡㧝㧝ᣣޓ㊄ᦐᣣޓඦ೨㧥ᤨ㧝㧢ಽ
10
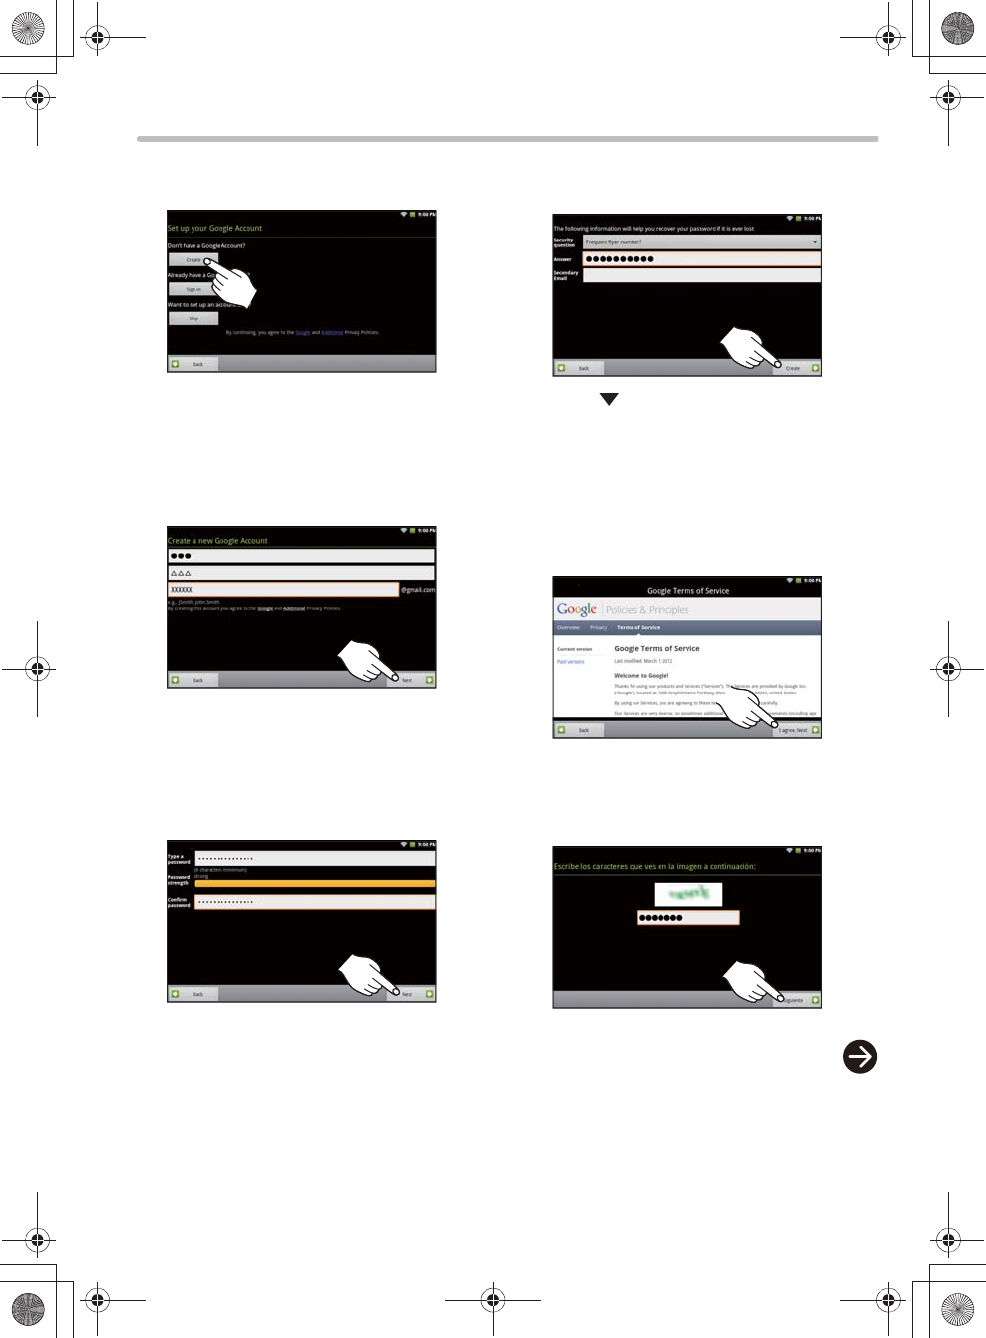
6Select “Create” on the Google
Account settings screen.
pTo use the Google Account you already
have, select “Sign in”, enter the account, and
then go to step 12 .
7Enter a name and a user name, and
then select “Next”.
pIf the entered user name is already taken,
enter another one.
8Enter a preferred password in the
entry field and the confirmation field,
and then select “Next”.
9Set the security question and
answer, and then select “Create”.
pTap “ ” in “Security question”, and then
enter a preferred “Answer”.
pIf you already have an email address, enter
the address in the “Secondary Email” field.
10Select the language, read the terms
of use, and then select “I Agree,
Next”.
11Enter the authentification code (the
character string on the screen), and
then select “Next”.
7092A8369AOUVDQQMࡍࠫ㧞㧜㧝㧞ᐕ㧡㧝㧝ᣣޓ㊄ᦐᣣޓඦ೨㧥ᤨ㧝㧢ಽ
11
Operation
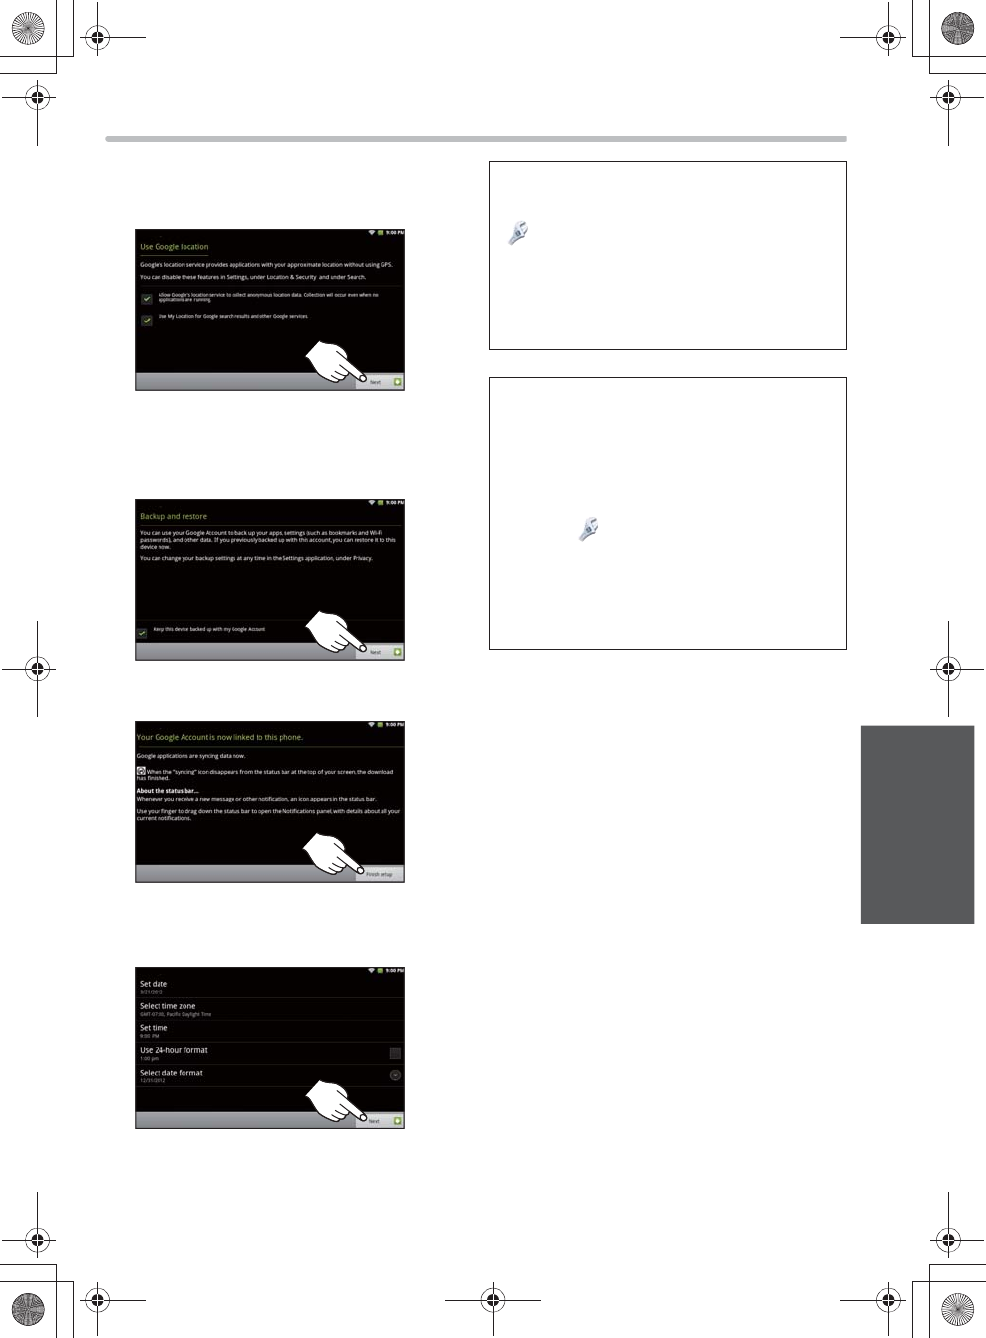
12Read the information of Google’s
location service, and then select
“Next”.
13Read the content of the backup and
data restoration screen, and then
select “Next”.
14Select “Finish setup”.
15Confirm the date setting, and then
select “Next”.
pWhen the date and time are wrong, select
the items to make the right settings.
pThe initial setup is complete.
If you have selected “Skip” in the middle of
the initial settings.
Select the following items from
“ Settings” on the Home screen
pWireless LAN settings (steps 2-4)
“Wireless & networks” “Wi-Fi”
pGoogle Account settings (steps 6-14)
“Accounts & sync” “Add account”
“Google”
When using a wireless broadband router (an
access point) that supports WPS
Connecting to the wireless LAN is simple with
WPS.
Select “Skip” in step 2 “Skip” in step 6.
Perform step 12 and 15 according to the
on-screen instructions.
Select “ Settings” on the Home screen,
and then select “Wireless & networks”
“Wi-Fi”.
Select “WPS settings”.
Select “Push Button” or “PIN Code”, and
then follow the on-screen instructions.
7092A8369AOUVDQQMࡍࠫ㧞㧜㧝㧞ᐕ㧡㧝㧝ᣣޓ㊄ᦐᣣޓඦ೨㧥ᤨ㧝㧢ಽ
12
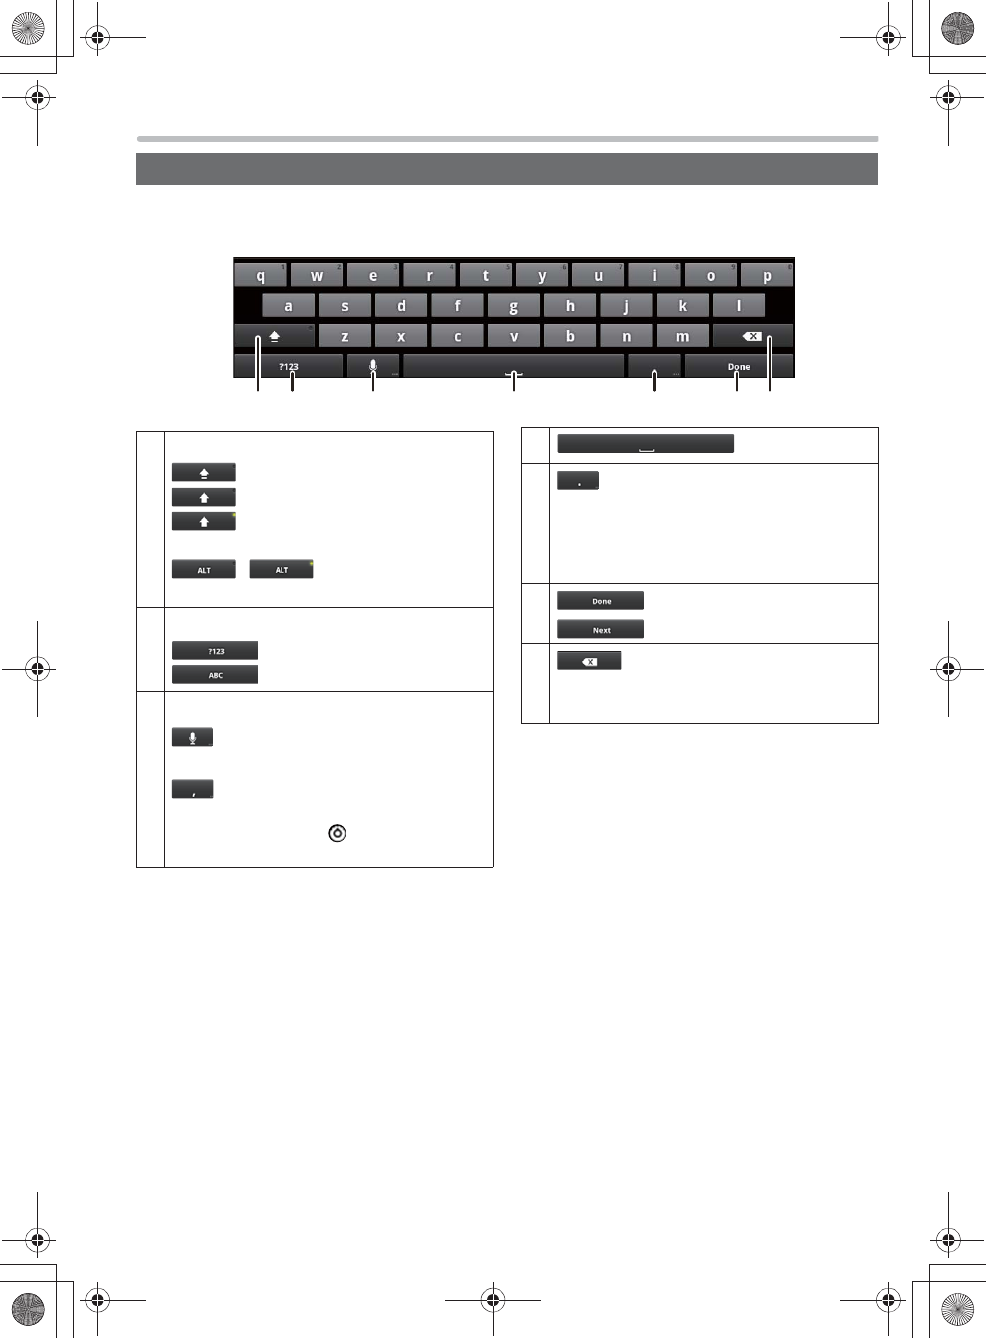
Tap a text field to display the keyboard, and tap the keyboard to enter text.
Tap the keys to enter text.
wTo enter special characters
1Touch and hold a vowel or the C, N, or S key.
A small window with the accented vowel or other letters appears.
pDo not not remove your finger from this unit even when the small window is displayed.
2Drag your finger to a desired character, then remove your finger.
Entering text
When the alphabet keyboard is displayed
: Lower case
: Caps
: All caps
When the numeric keyboard is displayed
/
Switch the types of symbols.
Tap to switch between the keyboards.
: Switch to ABC
: Switch to Symbols/Numbers
When the alphabet keyboard is displayed
: Voice input
When the numeric keyboard is displayed
: Comma
pTouch and hold for display the setup menu.
Drag your finger to “ ”, then remove the
finger.
: Space
: Period
pTouch and hold the key to show other
commonly used symbols. Drag your finger
to a desired symbol, then remove your
finger.
: Done
: Next
: Delete
pDelete a character in front of the cursor.
pTouch and hold the key to keep deleting.
7092A8369AOUVDQQMࡍࠫ㧞㧜㧝㧞ᐕ㧡㧝㧝ᣣޓ㊄ᦐᣣޓඦ೨㧥ᤨ㧝㧢ಽ
13
Operation
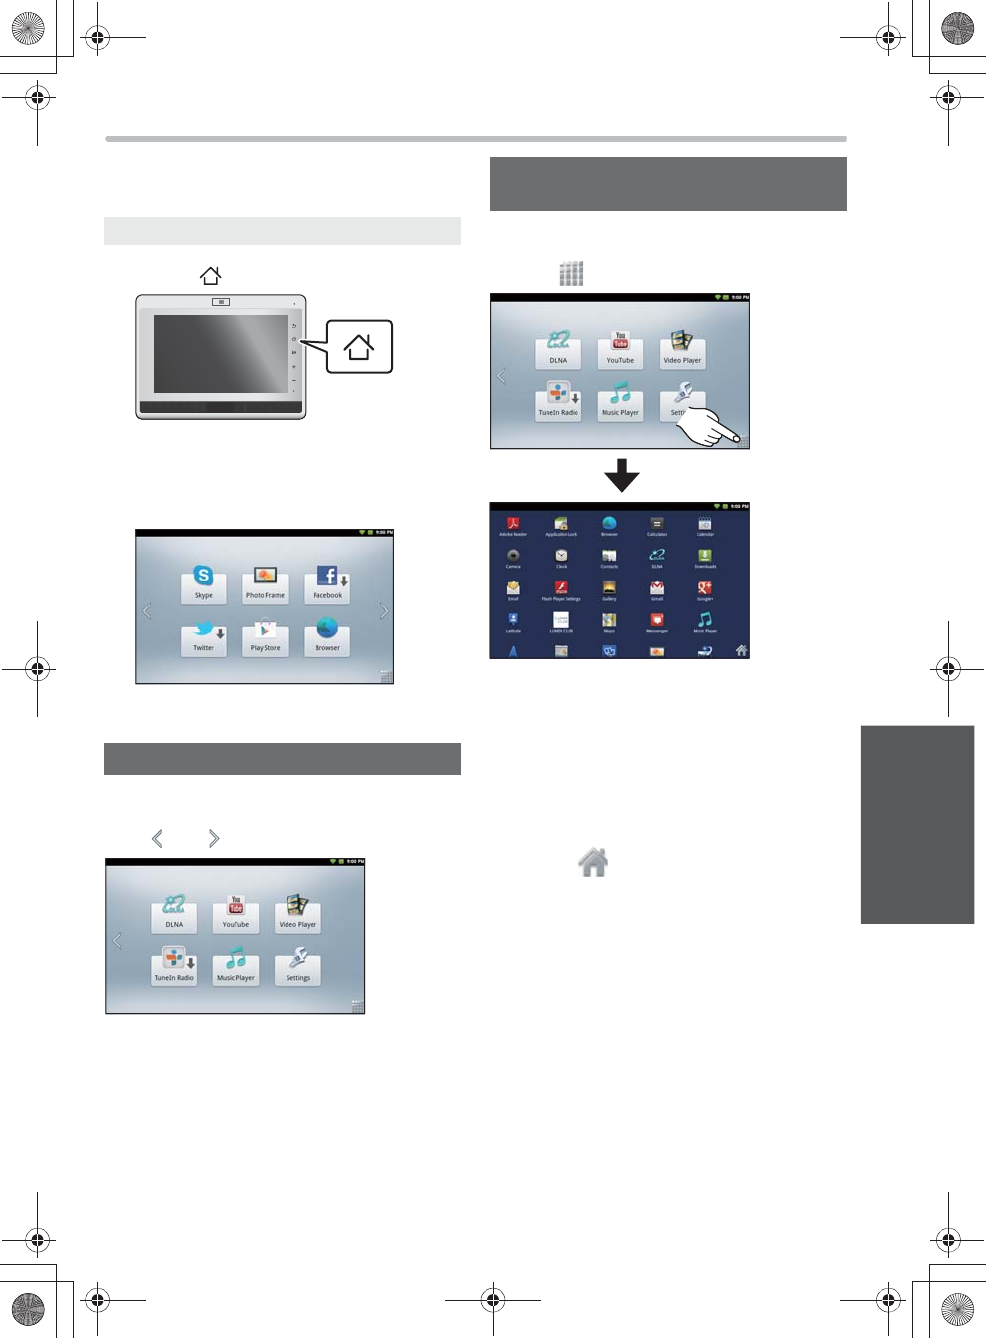
Basic Home screen operations
The Home screen is the starting point for all
operations. Select an icon to use various
applications.
1Press [ ] on this unit.
The Home screen appears.
2Select an application you want to
use.
Three Home screens are available according to
the scenes.
Tap “ ” or “ ” to switch the screen.
pThis manual describes the operations from the
Home screen in the middle.
pTurn on this unit and activate the screen. (>8)
Switching the Home screen
Home screen
Applications you can start running from the Home
screen are only a fraction of all available ones.
Select “ ” at the bottom of the screen.
pSwipe up or down to display the icons that run
off the screen.
pIcon positions on the launcher screen illustrated
in this manual may differ from the actual ones as
they vary by the content of the installed
applications.
To return to the Home screen
Select “ ” at the bottom of the screen.
To display all applications
(To display the launcher screen)
Launcher screen (example)
7092A8369AOUVDQQMࡍࠫ㧞㧜㧝㧞ᐕ㧡㧝㧝ᣣޓ㊄ᦐᣣޓඦ೨㧥ᤨ㧝㧢ಽ
14
pNames, icons, contents and services of
applications may be changed with no prior
notice.
pApplications with “ ” are not pre-installed. To
install, connect this unit to a router with the
internet connection, and then select an
application from the Home screen or the
launcher screen.
p
If you have any quesitons regarding the applications
with “*”, consult the Panasonic’s Customer Service
Center (
>
31) or your nearest dealer.
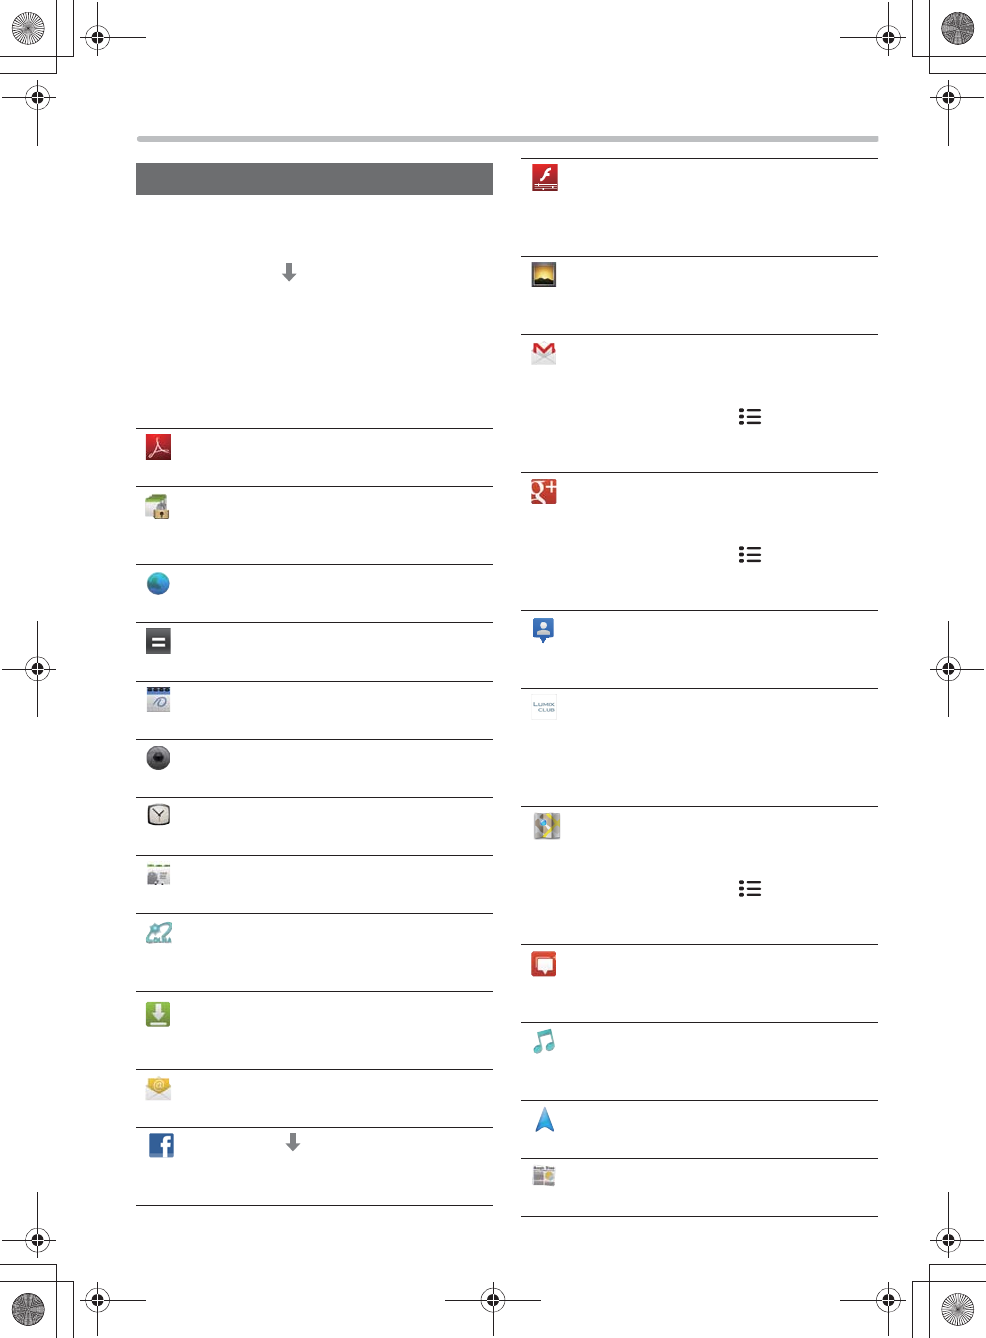
List of applications
Adobe Reader
View PDF files.
Application Lock*
Restrict the internet content that are not
desirable for children.
Browser
View websites.
Calculator
Calculate.
Calendar
Enter events to manage your schedule.
Camera
Take photos or videos.
Clock
Display a clock and set a alarm.
Contacts
Add email addresses, etc.
DLNA*
Connect with DLNA-compatible devices on
the network, and play back or transfer files.
Downloads
Manage the files you downloaded in the
Browser and others.
Email
Receive/send emails.
Facebook
Log into Facebook and enjoy
communicating with people.
Flash Player Settings
You can make the settings of Flash Player.
pUsually, no changes to the default
settings are required
Gallery
View videos or photos stored in the internal
memory or the SD card.
Gmail
Google Account’s free email service is
available.
pAfter start-up, press [ ] on this unit,
and then select “More” “Help” to read
a detailed instruction.
Google+ [Only[for[U.S.A.]
Sign into Google+ and enjoy
communicating with people.
pAfter start-up, press [ ] on this unit,
and then select “Help” to read a detailed
instruction.
Latitude ( Google Latitude )
Share location information with your
friends.
LUMIX CLUB* (>21)
Download files that are addressed to this
unit from the photo and video sharing
website operated by Panasonic, and you
can view them on this unit.
Maps ( Google Maps )
View the maps and satellite photos around
the world.
pAfter start-up, press [ ] on this unit,
and then select “Help” to read a detailed
instruction.
Messenger
Sign into Google+ and send/receive
messages.
Music Player*
Play back songs stored in the internal
memory of this unit or the SD card.
Navigation ( Google Map Navigation )
Use the navigation to search for a route.
News & Weather
View the news and weather.
7092A8369AOUVDQQMࡍࠫ㧞㧜㧝㧞ᐕ㧡㧝㧝ᣣޓ㊄ᦐᣣޓඦ೨㧥ᤨ㧝㧢ಽ
15
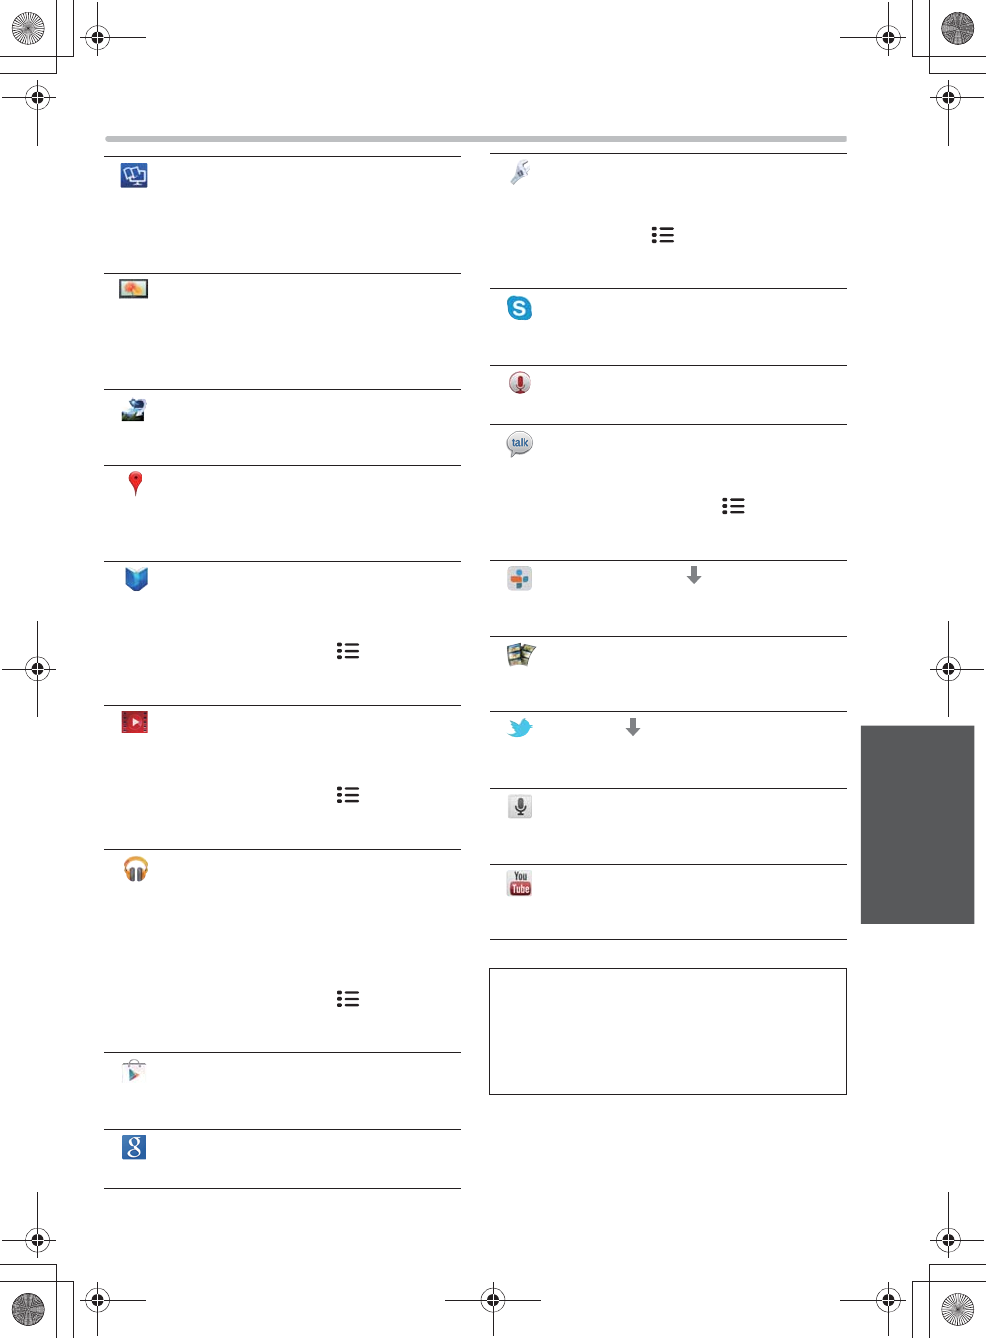
Operation
Owner’s Manual* (>22)
View Owner’s Manual for advanced
features (PDF file) for this unit’s
advanced features.
pAvailable in the Adobe Reader.
Photo Frame* (>20)
View desired photos on this unit’s
internal memory, the SD card, or the
devices on the network. You can also
view photos as a slideshow.
Photo Receiver*
This unit can receive photos from a
wireless LAN compatible digital camera.
Places (Google Places )
You can find stores and other facilities in
your area, or search desired places by
keyword or genre and rate them etc.
Play Books ( Google Play )
[Only[for[U.S.A.]
Use Google’s electronic book service.
pAfter start-up, press [ ] on this unit,
and then select “Help” to read a
detailed instruction.
Play Movies ( Google Play )
[Only[for[U.S.A.]
Use an online video rental service.
pAfter start-up, press [ ] on this unit,
and then select “Help” to read a
detailed instruction.
Play Music ( Google Play )
[Only[for[U.S.A.]
Play back music on the SD card or this
unit’s internal memory. You can also play
back the music you have uploaded on
the internet.
pAfter start-up, press [ ] on this unit,
and then select “Help” to read a
detailed instruction.
Play Store ( Google Play )
Add, update or perform other operations
of applications.
Search (Google Search )
Google’s search service is available.
Settings
Change various settings of this unit.
pThe settings can also be changed if
you press [ ] on this unit while the
Home screen is displayed, then select
“Settings”.
Skype (>16)
Make voice calls or video calls via the
internet.
Sound Recorder
Record a voice.
Talk ( Google Talk )
Send instant messages to your friends or
family.
pAfter start-up, press [ ] on this unit,
and then select “More” “Help” to
read a detailed instruction.
TuneIn Radio
Listen to radios from around the world via
the internet.
Video Player*
View videos stored in the internal
memory or the SD card.
Twitter
Sign into Twitter and enjoy
communicating with people.
Voice Search ( Google Voice Search )
Just by speaking keywords to this unit
you can use Search.
YouTube
Play back videos on the video sharing
website or upload videos on it.
Confirm the terms of use and the operation
method before using each application or service.
You may need to create a new account for each
service. When creating a new account, you may
also need your cell phone number or cell phone
email address.
7092A8369AOUVDQQMࡍࠫ㧞㧜㧝㧞ᐕ㧡㧝㧝ᣣޓ㊄ᦐᣣޓඦ೨㧥ᤨ㧝㧢ಽ
16
Skype is an application that allows you to make
phone calls or video calls.
pConnect this unit to an active wireless LAN
router.
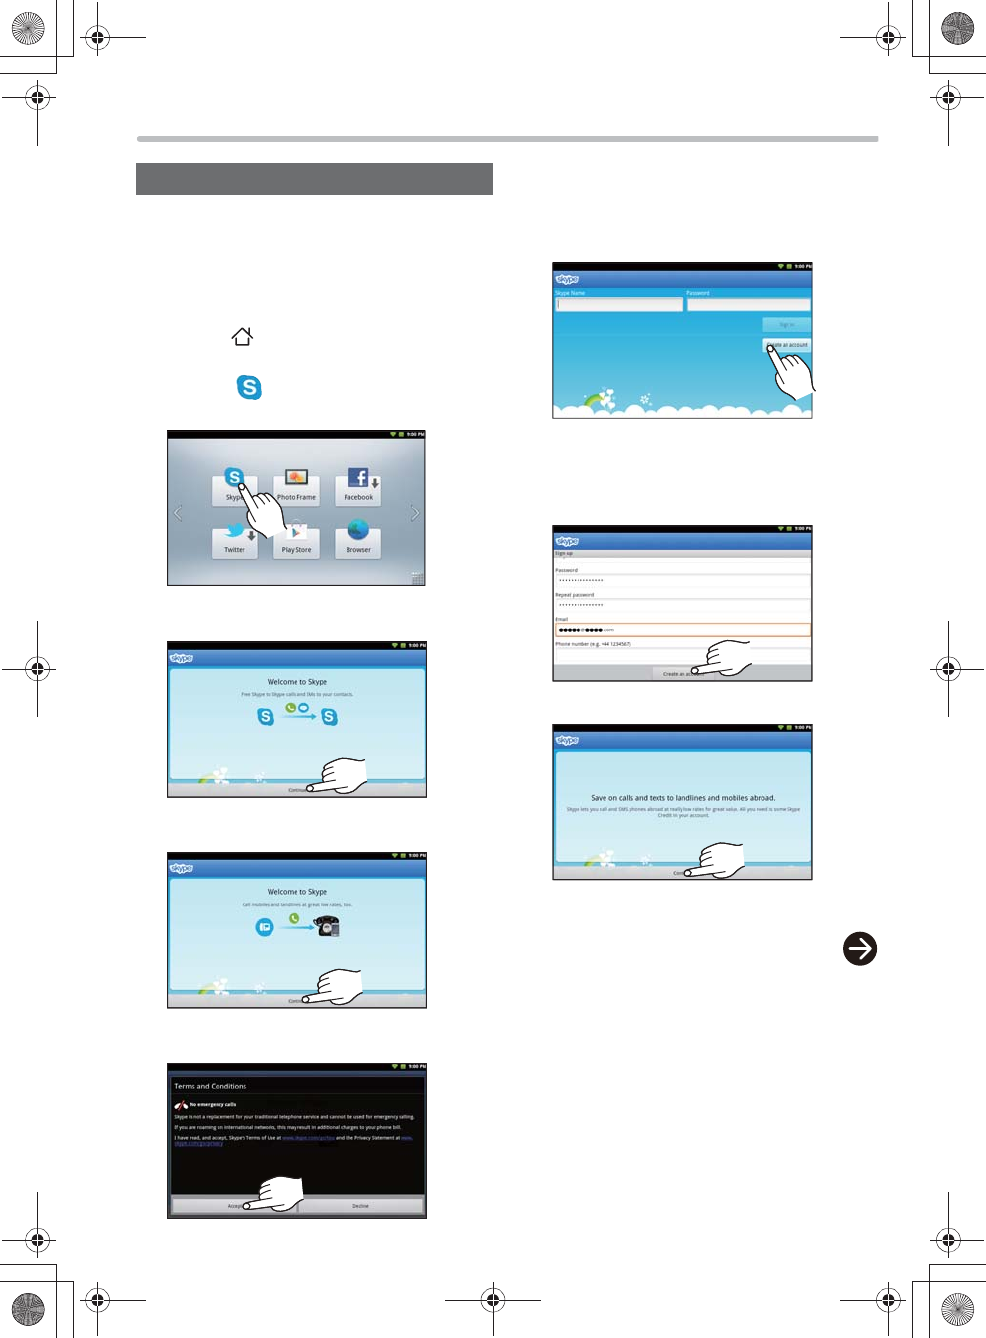
wSign up for Skype
1Press [ ] on this unit.
2Select “ Skype” on the Home
screen.
3Tap “Continue”.
4Tap “Continue”.
5Select “Accept”.
Using SkypeTM 6Select “Create an account”.
pIf you have an account, enter “Skype Name”
and “Password”, and go to step 8 after
selecting “Sign in”.
7Enter necessary items, and tap
“Create an account”.
pKeep a memo of your account information in
case you forget.
8Tap “Continue”.
The Skype home screen appears.
7092A8369AOUVDQQMࡍࠫ㧞㧜㧝㧞ᐕ㧡㧝㧝ᣣޓ㊄ᦐᣣޓඦ೨㧥ᤨ㧝㧢ಽ
17
Operation
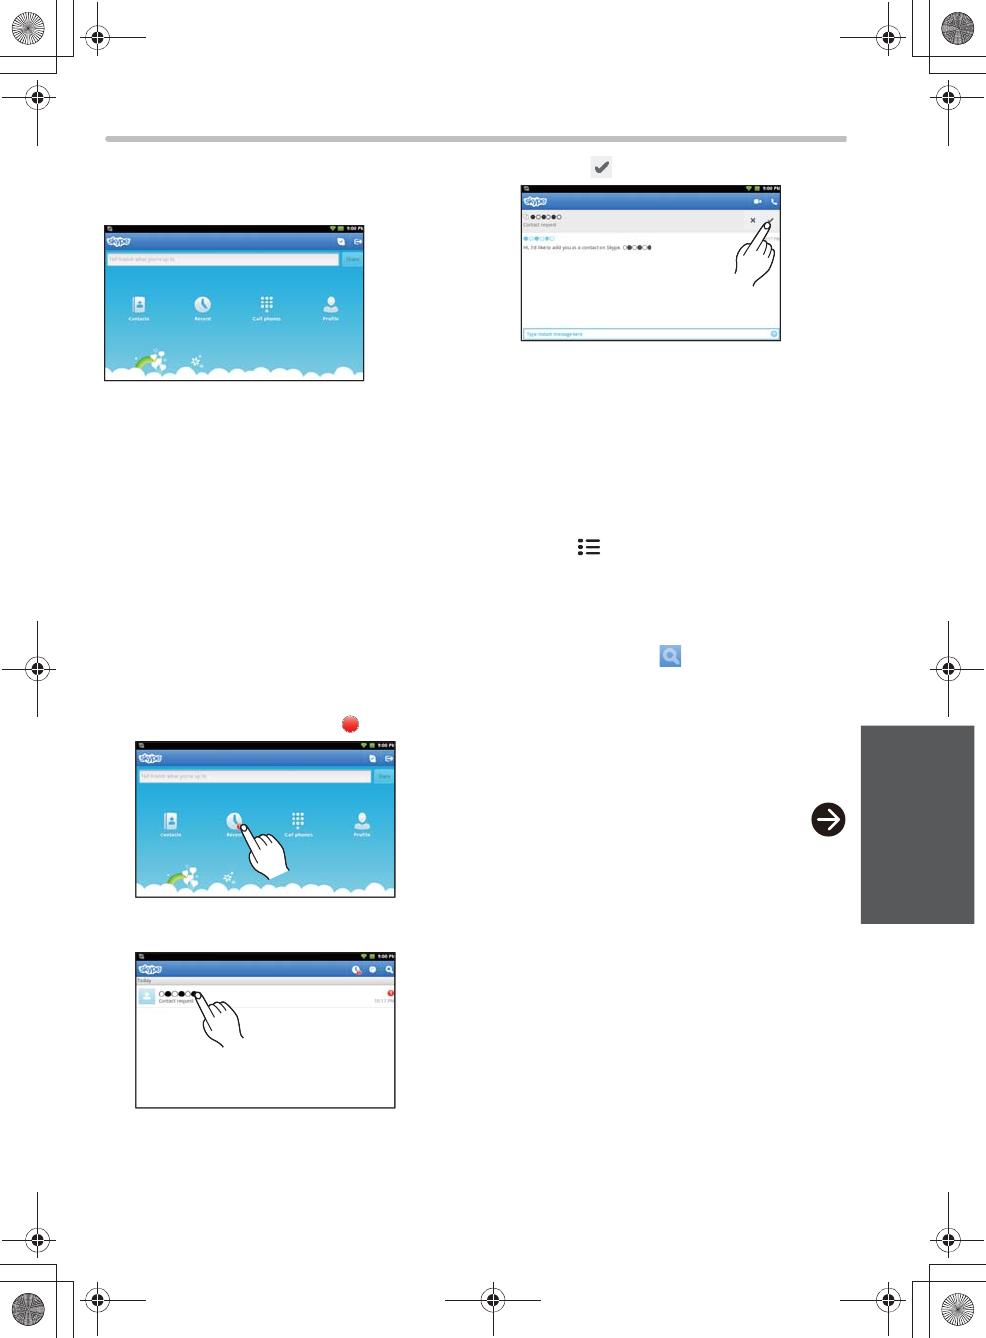
wThe Skype home screen
You can select various functions and set a mood
message.
pTap the the Skype logo in the top left corning of
the screen, to return to the Skype home screen
from any screen.
wAdd contacts
In order to have a video conversation, both you
and your friend need to add each other to a
contact list.
Accept a contact request
When another Skype user adds you to his or her
contacts, you will receive a contact request.
1Select “Recent”.
pThe number of contact requests or missed
calls, etc. are indicated by “ ”.
2Select a request.
1
3Select “ ”.
To search for people and add to your
contacts
When you search for other Skype users and add
them to your contacts, they will receive a contact
request.
1Select “Contacts”.
2Press [ ] on this unit and select
“Add contacts”.
3Enter a name, email address or
Skype name of the person you want
to add, and tap “ ”.
4Select a contact you want to add.
5Tap “Add”.
6Tap “Add contacts”.
7092A8369AOUVDQQMࡍࠫ㧞㧜㧝㧞ᐕ㧡㧝㧝ᣣޓ㊄ᦐᣣޓඦ೨㧥ᤨ㧝㧢ಽ
18
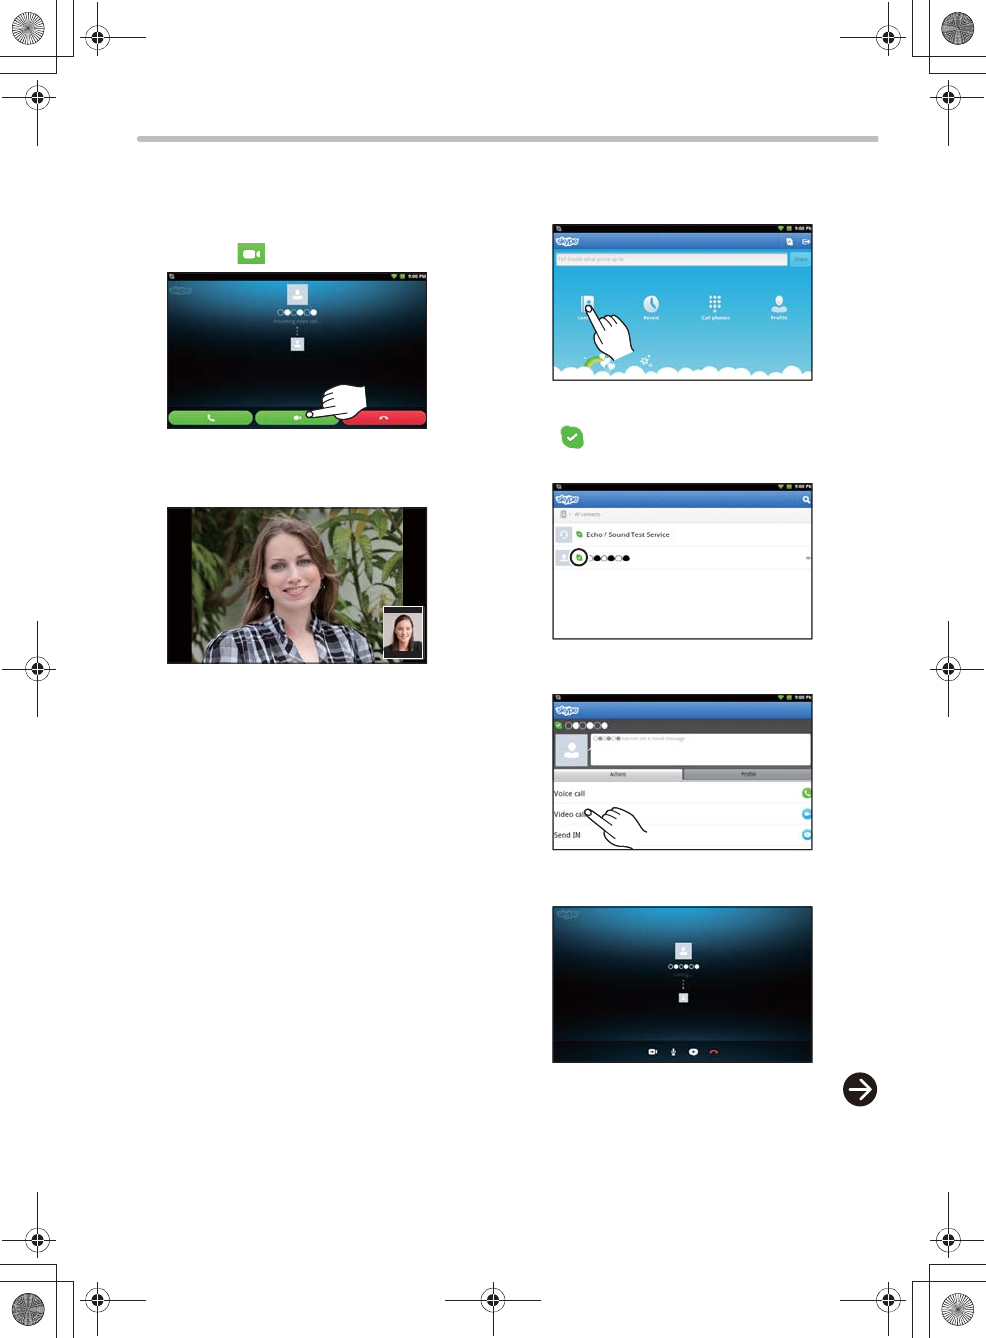
wTo receive a call
When you receive a Skype call, this unit rings and
the incoming call screen is displayed.
1Select “”.
2You can start a conversation. Face
this unit when you speak.
w To ma k e a ca l l
1Select “Contacts”.
2Check that the call recipient is online
( ), and select a contact you want
to call.
3Select “Video call”.
4Dialing starts.
7092A8369AOUVDQQMࡍࠫ㧞㧜㧝㧞ᐕ㧡㧝㧝ᣣޓ㊄ᦐᣣޓඦ೨㧥ᤨ㧝㧢ಽ
19
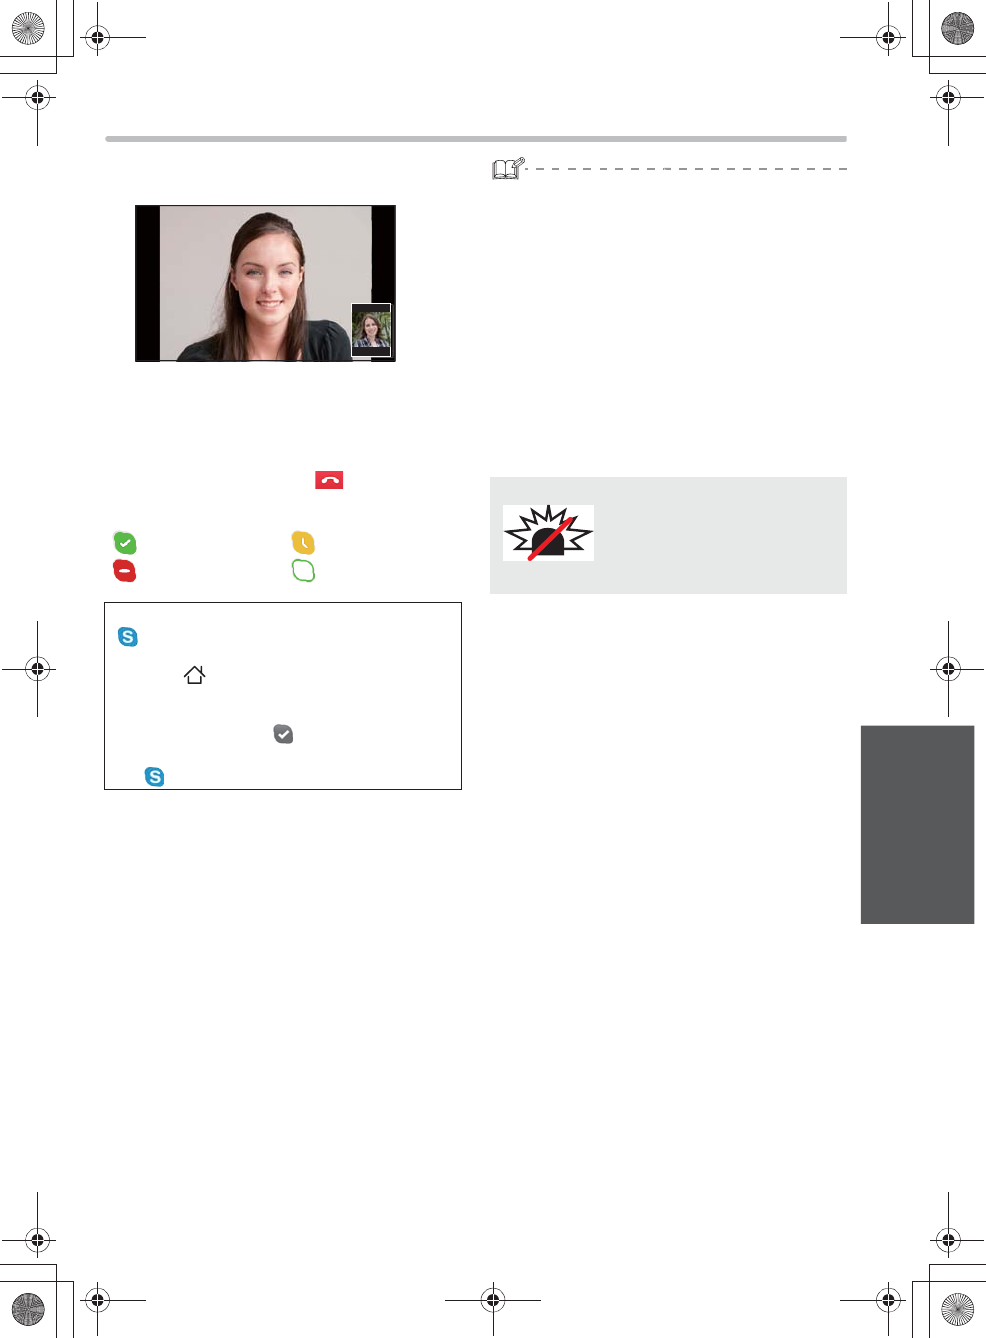
Operation
5You can start a conversation when a
recipient answers the call.
To adjust the angle of the camera
Press the top or the bottom of the camera
angle adjustment lever.
To end the call
Tap the screen to select “”.
About Skype status
: Online :Away
: Do not disturb : Invisible/Offline
Background operations
“ Skype” runs in background when signed in
even if you return to the Home screen by
pressing [ ] on this unit or run other
applications (standby mode).
When the program is running, an icon appears
on the status bar (e.g., ).
If you want to shut down the program, return to
the “ Skype” screen and sign out.
pWhile this unit is in standby mode (with the
screen light off) and disconnected from a power
source, the wireless connection is turned off to
save power in the default setting. Under these
conditions, this unit cannot receive Skype calls.
If you want to receive Skype calls while the
screen light is off, connect this unit to a power
source using the AC adaptor or change “Wi-Fi
sleep policy” to “Never”. For details, refer to the
Owner’s Manual for advanced features (PDF
file).
pࠕࡊࠤ࡚ࠪࡦࠍᦝᣂߒߚ႐วߪޔ৻ᐲᧄᯏ
ߩ㔚Ḯࠍಾߞߡ߆ࠄޔౣᐲ㔚Ḯࠍࠇߡ߅
ߚߛߊߎߣࠍ߅൘ߒ߹ߔޕ
No emergency calls with
Skype
Skype is not a replacement for
your telephone and can't be
used for emergency calling.
7092A8369AOUVDQQMࡍࠫ㧞㧜㧝㧞ᐕ㧡㧝㧝ᣣޓ㊄ᦐᣣޓඦ೨㧥ᤨ㧝㧢ಽ
20
wTo prepare photos
Make a wireless LAN connection, and transfer
photos from any of the following to the SD card or
the internal memory.
pTransfer from LUMIX CLUB
pTransfer from Panasonic’s Wi-Fi compatible
digital camera
pTransfer from a DLNA-compatible device
pInsert an SD card with photos taken by a digital
camera, etc.
pTransfer from a PC to this unit’s internal memory
using the USB cable (supplied).
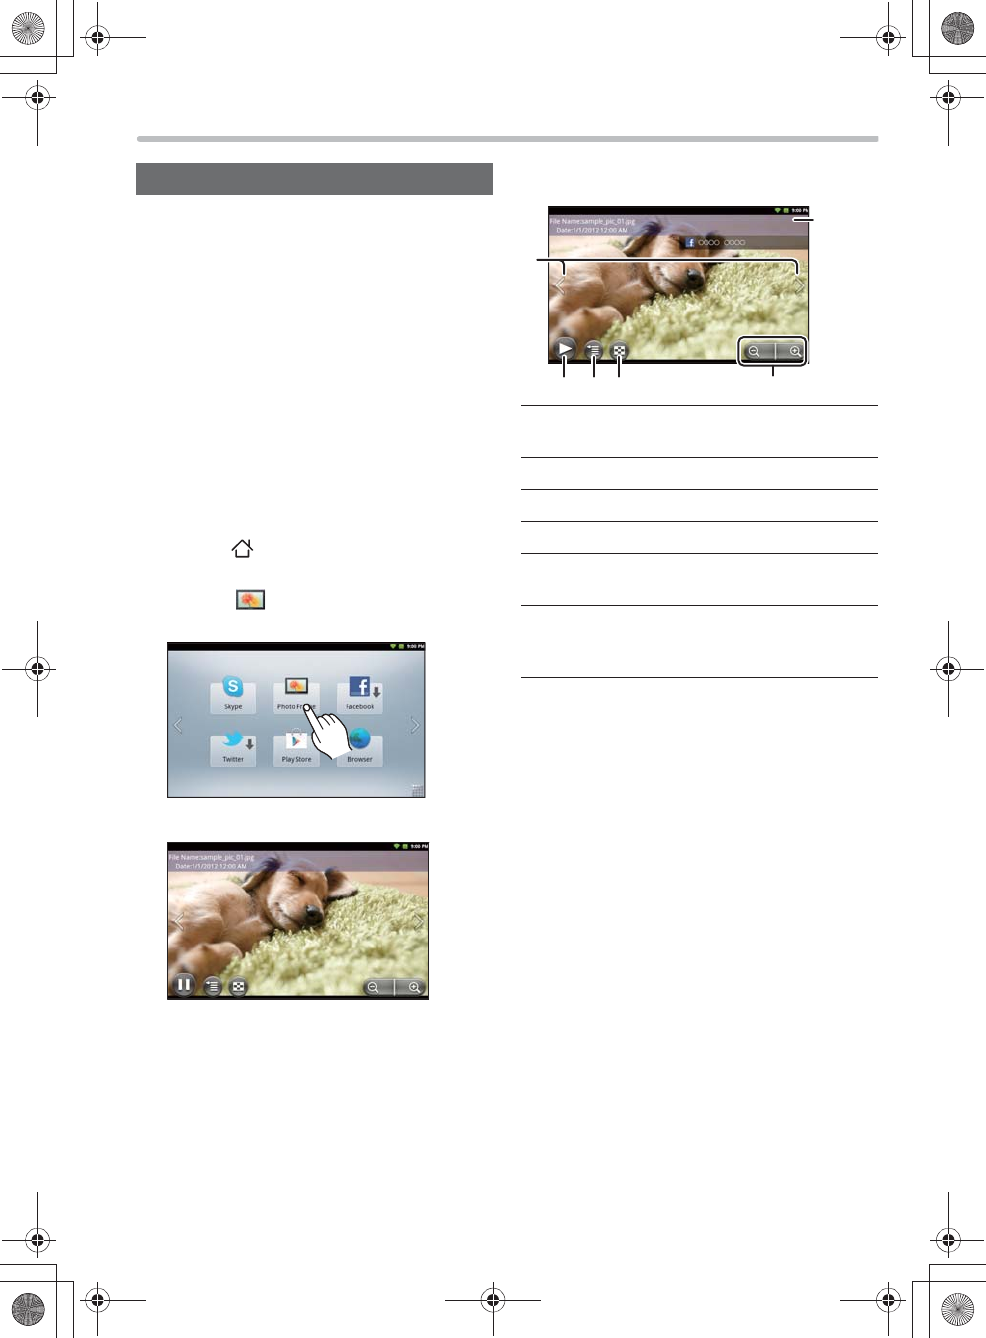
wSlideshow/Single view
1Press [ ] on this unit.
2Select “ Photo Frame” on the
Home screen.
A photo is displayed.
pWhen using this function for the first time
after the purchase, pre-installed photos are
displayed.
Using this unit as a photo frame
Operations during photo playback
Tap or swipe on the screen to operate.
Switch to the next/previous photo
pYou can also switch by swiping right and left.
To start/stop a slideshow
Select a desired photo
Select a desired photo from the list
To zoom in/zoom out
(Only during a slideshow pause)
Jump to a photo sharing service page
(Only while displaying a photo on the photo
sharing service page)
7092A8369AOUVDQQMࡍࠫ㧞㧜㧝㧞ᐕ㧡㧝㧝ᣣޓ㊄ᦐᣣޓඦ೨㧥ᤨ㧝㧢ಽ
21
Operation
The LUMIX CLUB is a website you can organize,
share or publish photos taken with a digital
camera.
pConnect this unit to an active wireless LAN
router.
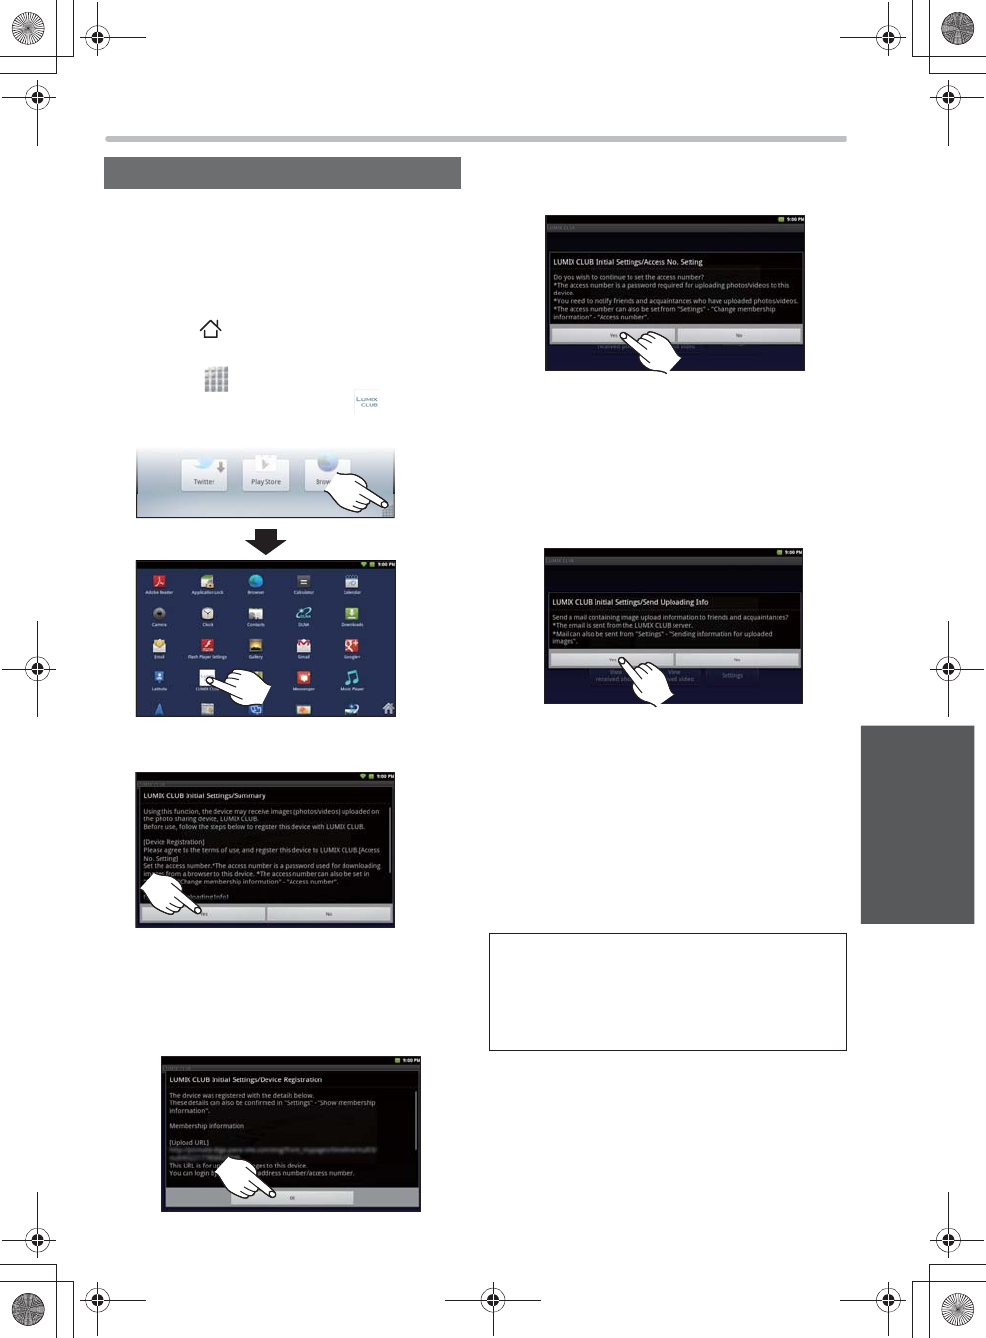
1Press [ ] on this unit.
2Select “ ” to display the launcher
screen, and then select “ LUMIX
CLUB”.
3Select “Yes”.
4Register this unit.
Using the LUMIX CLUB
Read the terms of use and select “Agree”.
Select “Yes”.
Select “OK”.
5Set an access number.
6Enter required information for
uploading.
7Select “OK”.
Select “Yes”.
Enter an access number (4-digit number)
and select “OK”.
Select “OK”.
Select “Yes”.
Enter a recipient address and a message,
etc., and select “OK”.
Confirm the entered contents, and select
“OK”.
pYou can let your friends and family know
how to send their photos to this unit via
LUMIX CLUB
Access number
In addition to the address number displayed in
step 4, the access number is required for
transferring photos and videos to this unit from
the browser of a PC or other devices.
7092A8369AOUVDQQMࡍࠫ㧞㧜㧝㧞ᐕ㧡㧝㧝ᣣޓ㊄ᦐᣣޓඦ೨㧥ᤨ㧝㧢ಽ
22
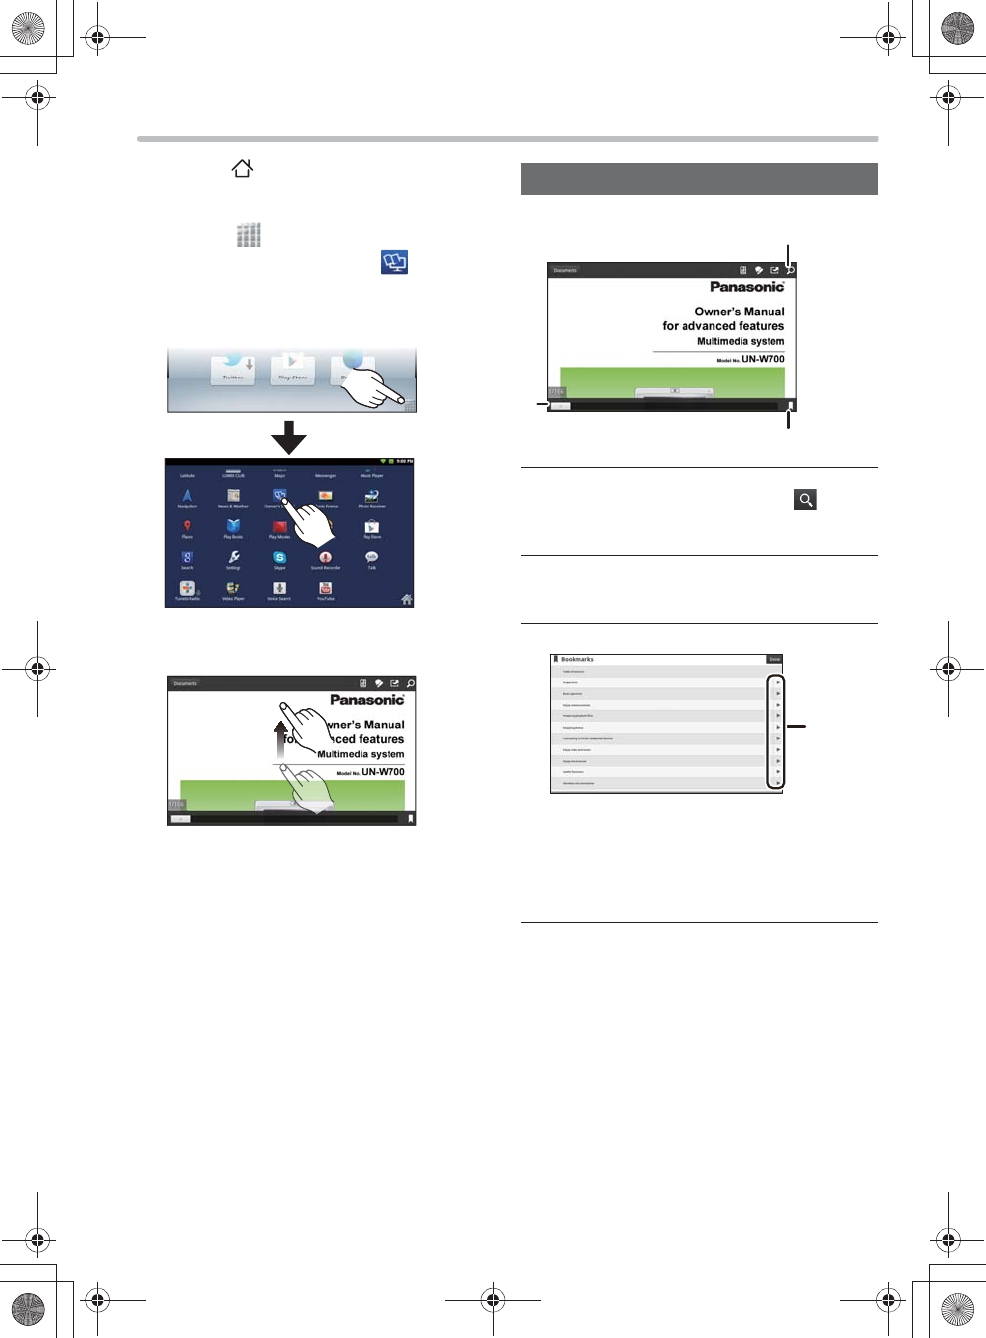
View Owner’s Manual for advanced features (PDF file)
1Press [ ] on this unit.
2Select “ ” to display the launcher
screen, and then select “ Owner’s
Manual”.
The Owner's Manual for advanced features
(PDF file) appears.
Swipe the screen up and down to scroll
through the pages.
Tap the screen to display the operation icons.
Find a desired page
Search by keywords
If you enter a keyword and select “ ”, you
will jump to the pages that includes the
keyword.
Find a desired page with the Seekbar
If you drag right and left, you can quickly move
to a desired page.
Find a desired page from the bookmarks
Bookmarks refers to the table of contents
panel made up of the titles. If you select a
desired title, the corresponding page is
displayed.
If you select , detailed titles of the table of
contents are displayed.
7092A8369AOUVDQQMࡍࠫ㧞㧜㧝㧞ᐕ㧡㧝㧝ᣣޓ㊄ᦐᣣޓඦ೨㧥ᤨ㧝㧢ಽ
23
OperationOthers
Others
Troubleshooting
The items below are the excerpts from the Owner’s Manual for advanced features (PDF file).
For complete information, refer to the Owner’s Manual for advanced features (PDF file).
pIs the battery charged?
Charge the battery sufficiently or connect the AC adaptor.
pUse such an object as a clip to press the [RESET] button (>6). (If an SD card is inserted in this unit,
first remove the SD card.)
pIs the environmental temperature particularly high or low?
Charge the battery in the environmental temperature range of 5 to 35QC (K41 QF to K95 QF).
pIf you connect this unit to the AC adaptor in standby mode, it may take tens of seconds until the
operation indication lamp turns on. If it still does not light up after a minute, press the [RESET] button.
pᧄᯏߪ Bluetooth® ኻᔕࡋ࠶࠼࠶࠻ߦߪኻᔕߒߡ߹ߖࠎޕ
Cautions for use
Care of this unit
Do not drop or hit this unit, and do not apply heavy pressure to this unit.
A strong impact may cause a failure and malfunction due to the damage to the LCD monitor or the
exterior.
This unit is not waterproof. Do not use it in a wet place such as a bathtub.
Clean this unit
After powering off this unit (>8), wipe down with a soft dry cloth. If you have used it with the AC adaptor,
pull the plug from the socket.
pWhen this unit is soiled badly, wipe the dirt off with a wrung wet cloth, and then wipe with a dry cloth.
pDo not use solvents such as benzine, thinner, alcohol, kitchen detergents, etc., to clean the camera, as
the exterior covering may deteriorate or the coating may come off.
Care of an SD card (Optional)
Do not leave the card in a location subject to high temperature, direct sunlight, electromagnetic
waves or static electricity.
Do not bend or drop the card.
pThe card may be damaged or the recorded content may be damaged or deleted.
pPut the card in a card case or a storage bag when storing, carrying or not using the card.
pDo not allow dirt, dust or water to get into the terminal on the back of the card and do not touch the
terminal with your finger.
Cannot turn on the power/Cannot operate/Cannot turn off the power
Cannot charge the battery.
Bluetooth®
ኻᔕࡋ࠶࠼࠶࠻߇߃ߥ
7092A8369AOUVDQQMࡍࠫ㧞㧜㧝㧞ᐕ㧡㧝㧝ᣣޓ㊄ᦐᣣޓඦ೨㧥ᤨ㧝㧢ಽ
24
Specifications
This manual lists only a part of the specifications. For complete information, refer to the Owner’s Manual
for advanced features (PDF file).
pThe specifications are subject to change for upgrading purposes.
Photo (Depending on the conditions, this unit may not play photos that satisfy the requirements below.)
ή✢
LAN
* Transfer rates are theoretical values; however, actual communication rate will vary according to communication
environment or connected equipment.
Power source DC 3.7 V (When using the internal battery)/
DC 5 V, 1 A (When using the AC adaptor)
Power consumption 3.0 W
ల㔚ᤨ㑆
㧔࿐᷷ᐲ
25
͠ߢల㔚ᤨ㧕
ㅢᏱల㔚㧦⚂ 3.5 ᤨ㑆
pల㔚ߪ࿐᷷ᐲ 5͠㨪 35 ͠ߢⴕߞߡߊߛߐޕ
ផᅑേ᷷ᐲ
0 QC to 40 QC
ᶧ᥏࠺ࠖࠬࡊࠗ
㧔ࠕࠬࡍࠢ࠻Ყ
16:9
㧕
7V ဳ 㧔Vဳߪല↹㕙ߩኻⷺኸᴺࠍၮḰߣߒߚᄢ߈ߐߩ⋡ߢߔ㧕
↹⚛ᢙ㧦ᮮ 800 ❑ 480
Speaker 300 mW+300 mW㧔8 ǡ㧕
ធ⛯┵
ሶ
ࡋ࠶࠼ࡎࡦ┵ሶ
3.0 mW+3.0 mW㧔16 ǡᤨ㧕ޔ‰3.5 mm ࠬ࠹ࠝࡒ࠾ࠫࡖ࠶ࠢ
USB
┵ሶ
USB 2.0 (High Speed)
ᄖᒻኸ
ᴺ
ᧄኸᴺ
191.5mm 㜞ߐ 131mm ᅏⴕ 16.6mm
ᦨᄢኸᴺ
191.5mm 㜞ߐ 131mm ᅏⴕ 21.2mm
Mass (Weight) ⚂476 g
ࡊ࠶࠻ࡈࠜࡓ
Android 2.3
CPU ࠢࠕ࡞ࠦࡓ 1 GHz
ࠪࠬ࠹ࡓࡔࡕ
512 MB
ౝ⬿ࡔࡕ
⒓㧦4GB(ౝ࡙ࠩ㗔ၞ㧦1.94 GB)
ኻᔕ⸥㍳ࡔ࠺ࠖࠕ
SD ࡔࡕࠞ࠼㧔8MB㨪2GB㧕ޔSDHC ࡔࡕࠞ࠼㧔4 GB 㨪
32 GB㧕
SDXC ࡔࡕࠞ࠼㧔48 GBޔ64 GB㧕
ౣ↢น⢻ࡈࠔࠗ࡞ᒻᑼ
JPEG ࡌࠬࠗࡦᣇᑼޔDCF ḰޔExif2.2 Ḱ
Standard Vompliance IEEE802.11n /IEEE802.11g / IEEE802.11b Ḱ
Traqnsmission system OFDM system, DSSS system
Frequency Range/
࠴ࡖࡦ
ࡀ࡞
㧔ਛᔃᵄᢙ㧕
2.412 GHz - 2.472 GHz/1 - 13 ch
Transfer rate (standard)* IEEE802.11g: Tx Max. 54 Mbps, IEEE802.11b: Tx Max. 11 Mbps
Access Mode Infrastructure mode
Security WPATM / WPA2TM㧔ᥧภൻᣇᑼ㧦TKIP / AESޔ⸽ᣇᑼ㧦PSK㧕
WEP㧔64 bit/128 bit㧕
8369`DQF[AOUVHOࡍࠫ㧞㧜㧝㧞ᐕ㧡㧝㧝ᣣޓ㊄ᦐᣣޓඦ೨㧥ᤨ㧞㧜ಽ
25
Others
AC adaptor
Lithium-ion battery (internal)
Battery run time
ߩ⋡
Compatible operating systems
pMicrosoft® Windows® XP Home Edition/Professional Service Pack 3
pMicrosoft® Windows Vista® Home Basic/Home Premium/Business/Ultimate
Service Pack 1, 2
pMicrosoft® Windows® 7 Starter/Home Premium/Professional/Ultimate
or Service Pack 1
* The above compatibility does not guarantee that all PCs that are compatible with this unit are trouble-free.
Input AC 120 V, 60 Hz
Output DC 5 V, 1 A
Voltage/capacity
(minimum) DC 3.7 V, 2150 mAh
pThe durations in the table are calculated
according to the conditions specified in
the Owner’s Manual for advanced
features.
Minimum
brightness
Maximum
brightness
Photo ⚂Xᤨ㑆 XX ಽ⚂Xᤨ㑆 XX ಽ
Video ⚂Xᤨ㑆 ⚂ Xᤨ㑆 XX ಽ
YouTube ⚂Xᤨ㑆 XX ಽ⚂Xᤨ㑆
Music ⚂XX ᤨ㑆㧔↹㕙ᶖἮᤨ㧕
Operating environment
7092A8369AOUVDQQMࡍࠫ㧞㧜㧝㧞ᐕ㧡㧝㧝ᣣޓ㊄ᦐᣣޓඦ೨㧥ᤨ㧝㧢ಽ
26
pSDXC Logo is a trademark of SD-3C, LLC.
pMicrosoft, Windows and Windows Vista are either registered trademarks or trademarks of Microsoft Corporation in
the United States and/or other countries.
pThis product is protected by certain intellectual property rights of Microsoft Corporation and third parties. Use or
distribution of such technology outside of this product is prohibited without a license from Microsoft or an authorized
Microsoft subsidiary.
pThe Wi-Fi CERTIFIED Logo is a certification mark of the Wi-Fi Alliance.
pThe Wi-Fi Protected Setup Mark is a mark of the Wi-Fi Alliance.
p“Wi-Fi”, “Wi-Fi Protected Setup”, “WPA” and “WPA2” are marks or registered marks of the Wi-Fi Alliance.
pThe Bluetooth® word mark and logos are owned by the Bluetooth SIG, Inc. and any use of such marks by
Panasonic Corporation is under license. Other trademarks and trade names are those of their respective owners.
pDLNA, the DLNA Logo and DLNA CERTIFIED are trademarks, service marks, or certification marks of the Digital
Living Network Alliance.
pThe Skype name, associated trade marks and logos and the “S” logo are trade marks of Skype or related entities.
pContains Adobe® Flash® Player and Reader® technology by Adobe Systems Incorporated. Contains Adobe®
Flash® Player and Adobe® Reader® software under license from Adobe Systems Incorporated, Copyright C 1995-
2011 Adobe Systems Incorporated. All rights reserved. Adobe, Flash and Reader are trademarks of Adobe
Systems Incorporated.
pMPEG Layer-3 audio coding technology licensed from Fraunhofer IIS and Thomson.
pOther names of systems and products mentioned in these instructions are usually the registered trademarks or
trademarks of the manufacturers who developed the system or product concerned. Note that the TM and ® symbols
are omitted from some of the text.
This product is licensed under the AVC patent portfolio license for the personal and non-commercial use of a
consumer to (i) encode video in compliance with the AVC Standard (“AVC Video”) and/or (ii) decode AVC Video that
was encoded by a consumer engaged in a personal and non-commercial activity and/or was obtained from a video
provider licensed to provide AVC Video. No license is granted or shall be implied for any other use. Additional
information may be obtained from MPEG LA, LLC.
See http://www.mpegla.com.
7092A8369AOUVDQQMࡍࠫ㧞㧜㧝㧞ᐕ㧡㧝㧝ᣣޓ㊄ᦐᣣޓඦ೨㧥ᤨ㧝㧢ಽ
27
Others
This product incorporates the following software:
(1) the software developed independently by or for Panasonic Corporation,
(2) the software owned by third party and licensed to Panasonic Corporation,
(3) the software developed by the Independent JPEG Group,
(4) the software developed by the Freetype Project,
(5) the software licensed under the GNU General Public License, Version 2 (GPL v2),
(6) the software licensed under the GNU LESSER General Public License (LGPL) and/or,
(7) open sourced software other than the software licensed under the GPLv2 and/or LGPL.
For the software categorized as (5) and (6), please refer to the terms and conditions of GPLv2 and LGPL, as the case
may be. atޓ
http://www.gnu.org/licenses/old-licenses/gpl-2.0.html
http://www.gnu.org/licenses/old-licenses/lgpl-2.1.html
In addition, the software categorized as (5) and (6) are copyrighted by several individuals. Please refer to the copyright
notice of those individuals at
http://panasonic.net/avc/oss/dmp/
The GPLv2/LGPL software is distributed in the hope that it will be useful, but WITHOUT ANY WARRANTY, without
even the implied warranty of MERCHANTABILITY or FITNESS FOR A PARTICULAR PURPOSE.
At least three (3) years from delivery of products, Panasonic will give to any third party who contact us at the contact
information provided below, for a charge no more than our cost of physically performing source code distribution, a
complete machine-readable copy of the corresponding source code covered under GPLv2/LGPL.
Contact Information
oss-cd-request@gg.jp.panasonic.com
Source code covered under GPLv2/LGPL is also freely available to you and any other member of the public via our
website below.
http://panasonic.net/avc/oss/dmp/
To view the predetermined conditions of the software categorized as (5), (6) and (7), display the setting menu on the
Home screen, then select “About device” “Legal information” “Open source licenses”.
This product contains the following software (collectively, “Software”) provided or licensed from Adobe Systems
Incorporated or Adobe Systems Software Ireland Limited (collectively, “Adobe”)
pAdobe Flash® Player
pAdobe Reader®
Your use of the whole or any part of the Software shall be conclusively deemed to constitute your acceptance of all
terms and conditions of this end user license agreement (“Agreement”) including, without limitation, following
restrictions and disclaimer.
In the event of your acceptance of this Agreement, this Agreement shall be legally binding on you and any legal entity
which obtains and uses for its own profit the Software.
If you do not agree to this Agreement, do not use the Software.
[Terms and conditions]
1. You shall not distribute or copy the Software.
2. You shall not modify or make derivative works of the Software.
3. You shall not decompile, reverse engineer, disassemble or otherwise reduce the Software to the human-perceivable
form.
4. You expressly acknowledge and agree that, to the maximum extent permitted by any applicable law, ADOBE
DISCLAIMS INDIRECT, SPECIAL, INCIDENTAL, PUNITIVE, AND CONSEQUENTIAL DAMAGE SUFFERED BY YOU.
THE ABOVE DISCLAIMER SHALL APPLY EVEN IF ADOBD HAS BEEN ADVISED OF THE POSSIBILITY OF SUCH
DAMAGE.
5. You expressly acknowledge and agree that Adobe’s total cumulative liability for all claims arising out of or related to
this Agreement shall not in any event exceed the total amount of fees received by Adobe from you under this
Agreement, provided, however, that this limitation of liability shall not apply to any liability for death or bodily injury of
you in the consequence of Adobe’s negligence or tort (fraud).
6. You expressly acknowledge and agree that you may not access to all contents depending on the version of the
Software.
7092A8369AOUVDQQMࡍࠫ㧞㧜㧝㧞ᐕ㧡㧝㧝ᣣޓ㊄ᦐᣣޓඦ೨㧥ᤨ㧝㧢ಽ
28
Requests when disposing of this unit
Take out the battery from this unit upon disposal to support battery recycling.
pWhen disposing the batteries, please contact your local authorities or dealer and ask for the correct
method of disposal.
The rechargeable battery is intended for use with this unit only. Do not use any other rechargeable
batteries except the supplied one.
Do not recharge the battery after removing it from this unit
pDo not heat or expose to flame.
pDo not drive a nail, subject to impact, disassemble or modify.
pDo not rip or peel off the exterior stickers.
pDo not touch the terminals (T and U) with metal objects.
pDo not store or carry with necklaces or hairpins, etc.
pDo not heat in a microwave or an oven, etc.
pDo not charge, use or leave in hot places such as next to fires or in extremely hot weather.
pDo not immerse in the water, as this may cause leaking, overheating, fire or rupture.
If a leak should occur, by no means touch the liquid with bare hands.
pIf the liquid gets on the body or clothes, wash well with water. If the liquid gets into your eyes, there is a
danger of blindness. Do not rub the eyes; after washing immediately with clean water, consult your
physician.
Keep removed screws etc. out of the reach of small children.
If accidentally ingested there will be adverse physical effects.
pShould you suspect that such an object has been ingested, consult your physician immediately.
Used battery disposal
Insulate the terminals with cellophane tape or the like.
Do not disassemble
Battery used for this unit
Name: Lithium ion (Li-ion) rechargeable battery
Nominal voltage: DC 3.7 V
wTo remove the battery
Follow the steps below to erase the data completely when disposing of this unit.
Press [ ] on this unit, and then tap “ ” to switch the screen.
Select “ Settings” “Storage” “Erase all data from internal memory”, and checkmark “Erase all
data from internal memory” on the confirmation screen, and then follow the on-screen instructions to
erase the data of the internal memory.
pThe format is complete.
Press [ ] on this unit.
Select “ Settings” “Privacy” “Factory data reset”, and then follow the on-screen instructions to
return this unit to the default setting.
Never disassemble this unit except when disposing of this unit.
7092A8369AOUVDQQMࡍࠫ㧞㧜㧝㧞ᐕ㧡㧝㧝ᣣޓ㊄ᦐᣣޓඦ೨㧥ᤨ㧝㧢ಽ
29
Others
pUse up the battery before disassembling.
pUse a cross slot screwdriver (optional) to disassemble this unit in the following steps
pIf you have trouble taking out the battery, contact the Panasonic’s Customer Service Center (>30) or
your nearest dealer.
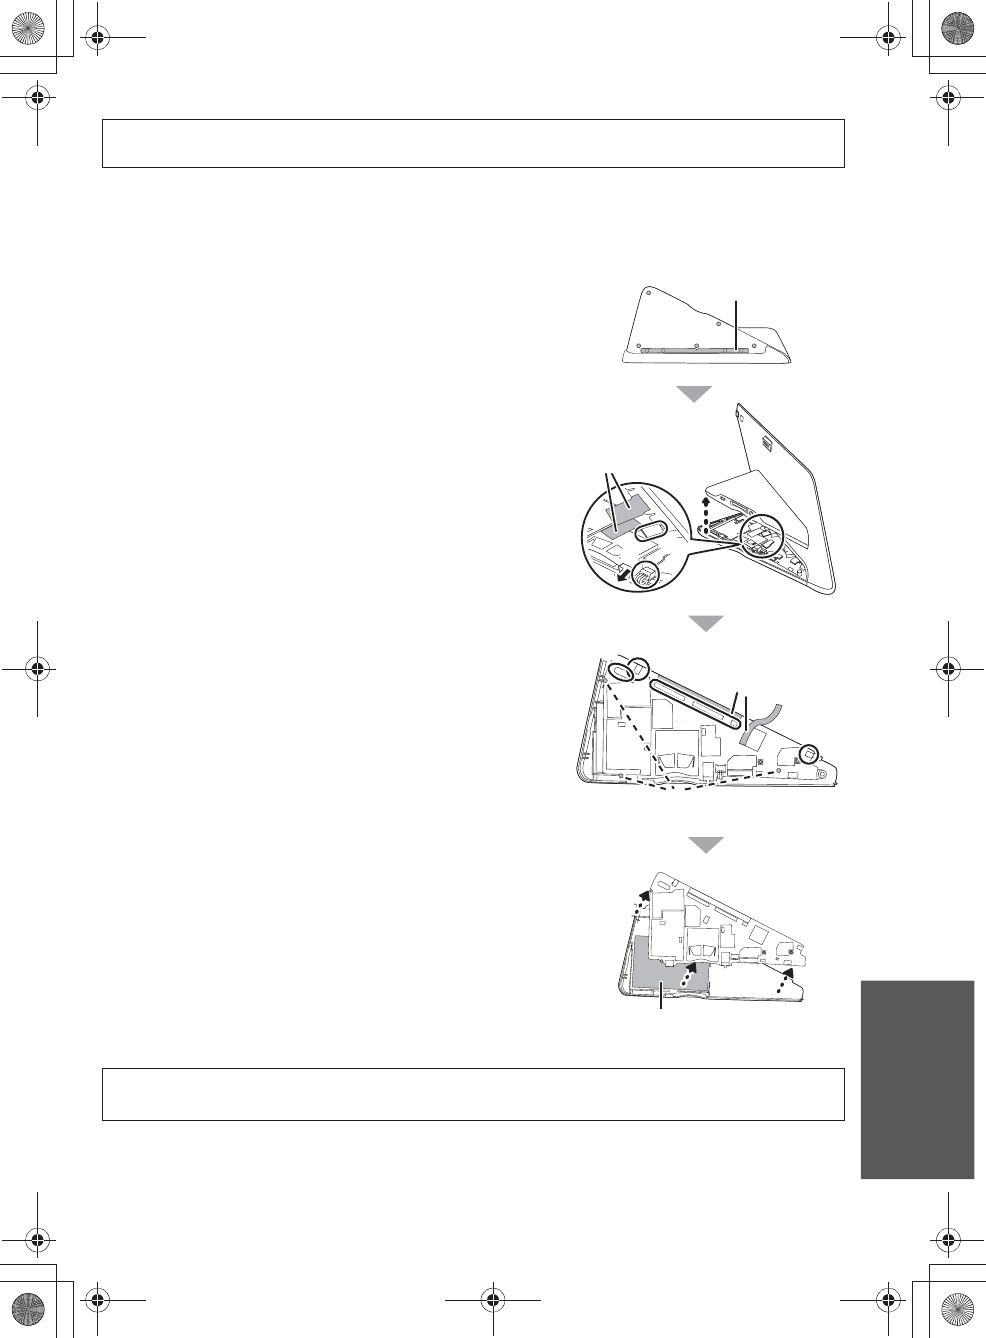
1Flip this unit upside down, and peel off the tape.
2Remove the nine screws from the back of the
stand.
pUse a cross slot screwdriver to remove the screws.
3Use a cross slot screwdriver to remove the
screws.
4Pull out .
5Peel off two tapes.
6Remove .
7Pull out the entire bottom cover from the LCD
monitor.
8Peel off two tapes.
9Remove and that are connected to the LCD
monitor.
pWhen removing , lift the brown part on the LCD monitor.
pWhen removing , lift the white part.
10Pull out and that are connected to the LCD
monitor.
11Remove the three screws () from the circuit
board.
12Detach the circuit board.
13Take out the battery.
The following instructions are not intended for repairing purposes but for the disposal of this
unit. This unit is not restorable once disassembled.
Tape
Tape
Tape
Battery
p
p
Keep the screws out of reach of children to prevent swallowing.
pPromptly dispose of this unit after disassembling. Hold the flat part of this unit to carry.
7092A8369AOUVDQQMࡍࠫ㧞㧜㧝㧞ᐕ㧡㧝㧝ᣣޓ㊄ᦐᣣޓඦ೨㧥ᤨ㧝㧢ಽ
30
Limited Warranty (ONLY FOR U.S.A. AND PUERTO RICO)
Panasonic Consumer Marketing Company of North America,
Division of Panasonic Corporation of North America
One Panasonic Way, Secaucus, New Jersey 07094
Panasonic Video Products Limited Warranty
Limited Warranty Coverage
(For USA and Puerto Rico Only)
If your product does not work properly because of a defect
in materials or workmanship, Panasonic Consumer
Marketing Company of North America (referred to as “the
warrantor”) will, for the length of the period indicated on
the chart below, which starts with the date of original
purchase (“warranty period”), at its option either (a) repair
your product with new or refurbished parts, (b) replace it
with a new or a refurbished equivalent value product, or
(c) refund your purchase price. The decision to repair,
replace or refund will be made by the warrantor.
During the “Labor” warranty period there will be no charge
for labor. During the “Parts” warranty period, there will be
no charge for parts. This Limited Warranty excludes both
parts and labor for non-rechargeable batteries, antennas,
and cosmetic parts (cabinet). This warranty only applies to
products purchased and serviced in the United States or
Puerto Rico. This warranty is extended only to the original
purchaser of a new product which was not sold “as is”.
Carry-In or Mail-In Service
To find a service center please visit http://
www.panasonic.com/help or call 1-800-211-PANA (7262).
When shipping the unit, carefully pack, include all
supplied accessories listed in the Owner’s Manual, and
send it prepaid, adequately insured and packed well in a
carton box. When shipping Lithium Ion batteries please
visit our Web Site at www.panasonic.com/BatteryHandling
as Panasonic is committed to
providing the most up to date information. Include a letter
detailing the complaint, a return address and provide a
daytime phone number where you can be reached. A
valid registered receipt is required under the Limited
Warranty.
IF REPAIR IS NEEDED DURING THE WARRANTY
PERIOD, THE PURCHASER WILL BE REQUIRED TO
FURNISH A SALES RECEIPT/PROOF OF PURCHASE
INDICATING DATE OF PURCHASE, AMOUNT PAID
AND PLACE OF PURCHASE. CUSTOMER WILL BE
CHARGED FOR THE REPAIR OF ANY UNIT
RECEIVED WITHOUT SUCH PROOF OF PURCHASE.
Limited Warranty Limits And Exclusions
This warranty ONLY COVERS failures due to defects in
materials or workmanship, and DOES NOT COVER
normal wear and tear or cosmetic damage. The warranty
ALSO DOES NOT COVER damages which occurred in
shipment, or failures which are caused by products not
supplied by the warrantor, or failures which result from
accidents, misuse, abuse, neglect, mishandling,
misapplication, alteration, faulty installation,
set-up adjustments, misadjustment of consumer controls,
improper maintenance, power line surge, lightning
damage, modification, introduction of sand, humidity or
liquids, commercial use such as hotel, office, restaurant,
or other business or rental use of the product, or service
by anyone other than a Factory Service Center or other
Authorized Servicer, or damage that is attributable to acts
of God.
THERE ARE NO EXPRESS WARRANTIES EXCEPT AS
LISTED UNDER “LIMITED WARRANTY COVERAGE”.
THE WARRANTOR IS NOT LIABLE FOR INCIDENTAL
OR CONSEQUENTIAL DAMAGES RESULTING FROM
THE USE OF THIS PRODUCT, OR ARISING OUT OF
ANY BREACH OF THIS WARRANTY.
(As examples, this excludes damages for lost time, travel
to and from the servicer, loss of or damage to media or
images, data or other memory or recorded content. The
items listed are not exclusive, but for illustration only.)
ALL EXPRESS AND IMPLIED WARRANTIES,
INCLUDING THE WARRANTY OF MERCHANTABILITY,
ARE LIMITED TO THE PERIOD OF THE LIMITED
WARRANTY.
Some states do not allow the exclusion or limitation of
incidental or consequential damages, or limitations on
how long an implied warranty lasts, so the exclusions may
not apply to you.
This warranty gives you specific legal rights and you may
also have other rights which vary from state to state. If a
problem with this product develops during or after the
warranty period, you may contact your dealer or Service
Center. If the problem is not handled to your satisfaction,
then write to the warrantor’s Consumer Affairs
Department at the addresses listed for the warrantor.
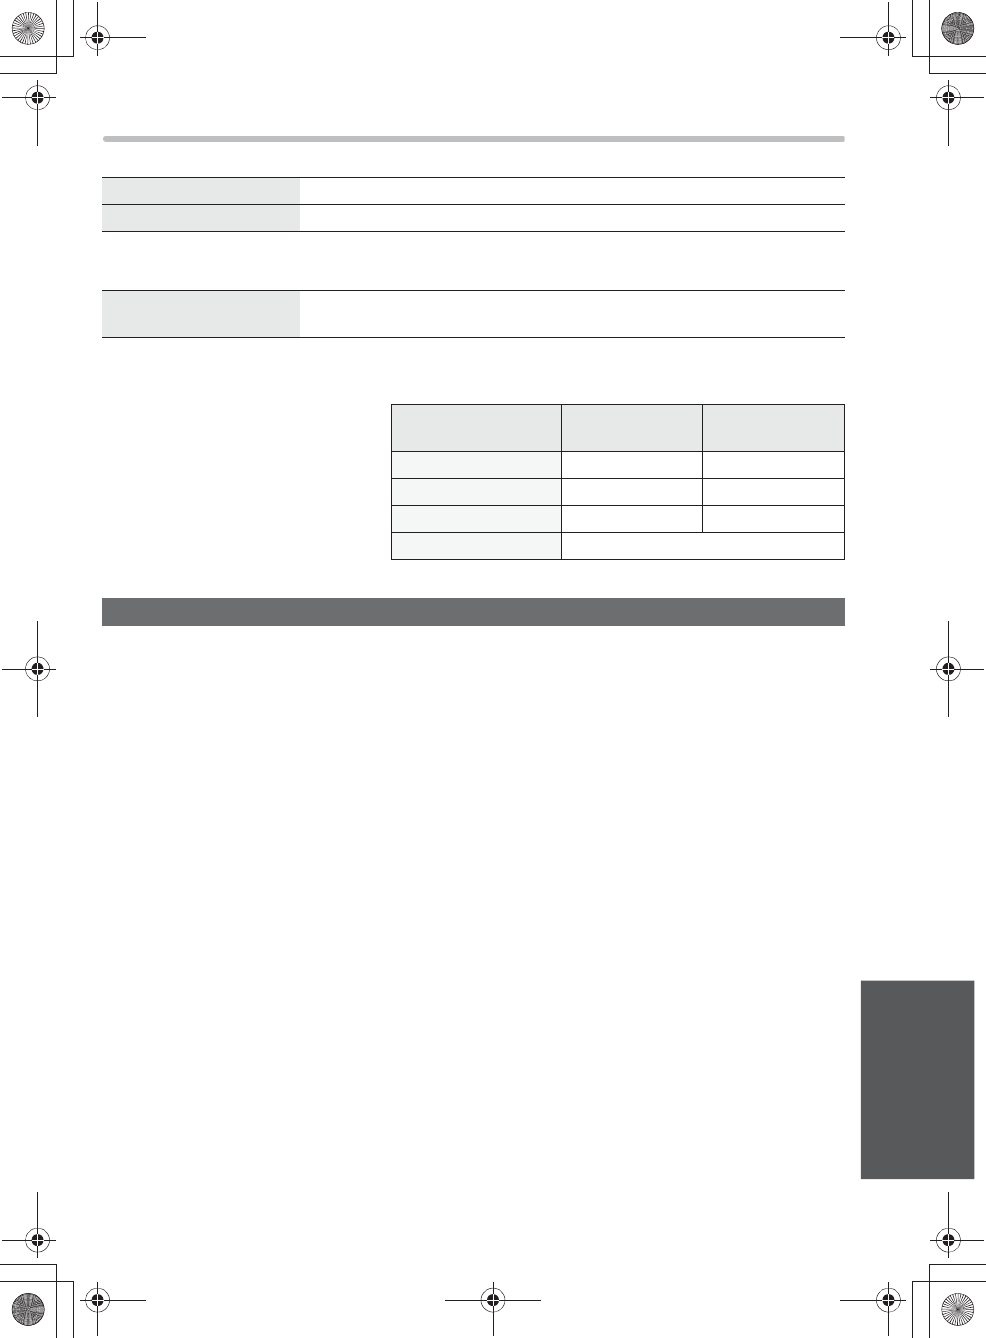
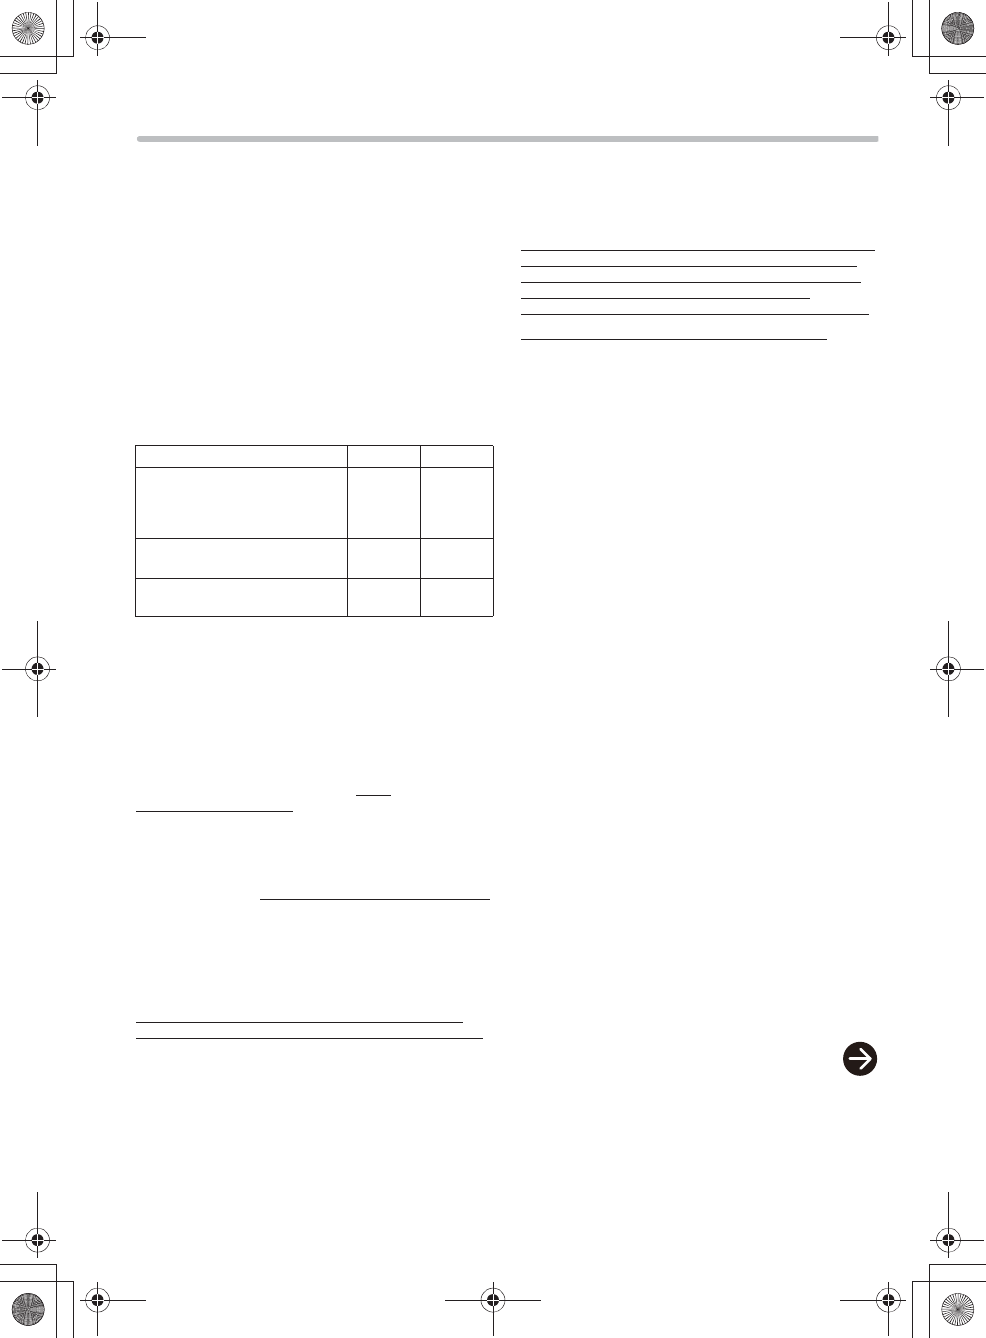
Product or Part Name Parts Labor
Blu-ray Disc Player, Portable
Blu-ray Disc Player, DVD Player,
Portable DVD Player, DVD
Recorder
1 year 90 days
Blu-ray Home Theater System
and Multimedia System
1 year 1 year
Rechargeable Batteries 90 days Not
Applicable
7092A8369AOUVDQQMࡍࠫ㧞㧜㧝㧞ᐕ㧡㧝㧝ᣣޓ㊄ᦐᣣޓඦ೨㧥ᤨ㧝㧢ಽ
31
Others
PARTS AND SERVICE, WHICH ARE NOT COVERED BY THIS LIMITED WARRANTY, ARE YOUR RESPONSIBILITY.
As of May 2012
Customer Services Directory (United States and Puerto Rico)
Obtain Product Information and Operating Assistance; locate your nearest Dealer or Service
Center; purchase Parts and Accessories; or make Customer Service and Literature requests by
visiting our Web Site at:
http://www.panasonic.com/help
or, contact us via the web at:
http://www.panasonic.com/contactinfo
You may also contact us directly at:
1-800-211-PANA (7262)
Monday-Friday 9am-9pm,
Saturday-Sunday 10am-7pm EST
For hearing or speech impaired TTY users, TTY: 1-877-833-8855
Accessory Purchases (United States and Puerto Rico)
Purchase Parts, Accessories and Instruction Books online for all Panasonic Products by visiting our Web Site at:
http://www.pstc.panasonic.com
Or, send your request by E-mail to:
npcparts@us.panasonic.com
You may also contact us directly at:
1-800-332-5368 (Phone) 1-800-237-9080 (Fax Only)
(Monday-Friday 9am-9pm EST)
Panasonic National Parts Center
20421 84th Ave. S., Kent, WA 98032
(We accept Visa, MasterCard, Discover Card, American Express)
For hearing or speech impaired TTY users, TTY: 1-866-605-1277
7092A8369AOUVDQQMࡍࠫ㧞㧜㧝㧞ᐕ㧡㧝㧝ᣣޓ㊄ᦐᣣޓඦ೨㧥ᤨ㧝㧢ಽ
Information on Disposal in other Countries outside the
European Union
This symbol is only valid in the European Union.
If you wish to discard this product, please contact
your local authorities or dealer and ask for the
correct method of disposal.
Panasonic Consumer Marketing Company of North
America,
Division of Panasonic Corporation of North America
One Panasonic Way, Secaucus, New Jersey 07094
http://www.panasonic.com
Panasonic Corporation 2012
G
VQT3W75
F0512SK0
8369`$%QXGTAOUVHOࡍࠫ㧞㧜㧝㧞ᐕ㧡㧝㧝ᣣޓ㊄ᦐᣣޓඦ೨㧥ᤨ㧞㧞ಽ