Pantech Co BLADE Dual-Band CDMA Phone with Bluetooth User Manual Manual III
Pantech Co Ltd Dual-Band CDMA Phone with Bluetooth Manual III
Contents
Manual III
50
51
02
03
01
04
05
06
07
08
MY VERIZON
My Verizon allows you to check your account information and get available Verizon
services.
1. Unlock the screen and tap
My Verizon
.
2. When the phone is connected to the My Verizon page, follow the on-screen
prompts.
VOICE COMMANDS
Your phone is equipped with an Advanced Voice Commands (AVC) feature. This feature
allows you to make calls or use the phone’s functions by simply using your voice. All you
have to do is to talk into the phone and then the phone will recognize your voice and
perform tasks by itself.
1. Unlock the screen, tap
Tools
and then tap
Voice Commands
.
Shortcut
: Slide the phone up and press the Voice Commands Key .
2. The phone displays the Voice Commands menu and prompts you to say the
name of the command you want to use. To complete your task, simply follow
the voice prompts. You can speak the name of the command after you hear
a beep.
3. Say or select one of the following commands;
Call <Name or #>
/
Send <Message Type>
/
Go To <Menu>
/
Check
<Item>
/
Contact <Name>
/
Search
/
Redial
/
Play <All songs Playlist
name>
/
My Verizon
/
Help
To view information about each option, tap Info. Tap Settings to access voice
commands settings. Please refer to page 68 for more details on Voice Commands
Settings.
4. When it recognizes one of these commands, the phone launches the associated
application. If the phone does not hear a command within a specified time,
AVC mode will turn itself off.
CALL <NAME OR #>
Use the Call command to voice dial a name from your Contacts or a phone number.
When dialing a number, pronounce each digit, but do not pause noticeably between
the digits.
1. You will hear “
Please say a command
“ and the Voice Commands menu will
be displayed.
2. If calling a contact from your Contact List, say “
Call <Name>
.” Your phone will
ask you to confirm the name you said. Say “
Yes
“ if it was repeated correctly.
That phone number will be dialed. If there is more than one number saved for
that contact, you will be asked to confirm which number to dial.
Examples: Call John Work
SEND <MESSAGE TYPE>
Use the Send command to send a text or other type of message to a specified name
or number.
1. You will hear “
Please say a command
“ and the Voice Commands menu will
be displayed.
2. Say “
Send
“ followed immediately by one of the following items:
Text
/
Picture
/
Video
/
Voice
3.
Say the desired contact or group name, or the number of the message recipient.
GO TO <MENU>
Use the Go To command to open an application on your phone. You can say “
Go To
”
by itself and be prompted to say the application name, or you can skip the prompt by
saying ”
Go To
” followed by the application name.
1. You will hear “
Please say a command
“ and the Voice Commands menu will
be displayed.
2. Say “
Go To
” followed immediately by one of the menus in the list.
Examples: “Go To Calendar”. If no menu option is stated, a list of options will
be provided.
52
53
02
03
01
04
05
06
07
08
CHECK <ITEM>
The Check command lets you check status information for your phone. You can say
“
Check
” or “
Check Status
” to see and hear all status information.
1. You will hear “
Please say a command
“ and the Voice Commands menu will
be displayed.
2. Say “
Check
” followed immediately by one of the following items:
Status
/
Voicemail
/
Messages
/
Missed Calls
/
Time
/
Signal Strength
/
Battery Level
/
Volume
/
Balance
/
Minutes
/
Payment
/
My Number
CONTACT <NAME>
Use the Contact command to retrieve and display information for any name stored in
your Contact List.
1. You will hear “
Please say a command
“ and the Voice Commands menu will
be displayed.
2. Say “
Contact <Name>
” to retrieve and display the contact information:
Call
/
Readout
/
Create New
/
Modify
/
Erase
Examples: Contact Bob Smith and follow the voice prompts.
SEARCH
Use the Search command to search for information over the Internet.
1. You will hear “
Please say a command
“ and the Voice Commands menu will
be displayed.
2. Say “
Search
.” Your phone will make a web connection.
REDIAL
Use the Redial command to make a call to the last number you dialed.
1. You will hear “
Please say a command
“ and the Voice Commands menu will
be displayed.
2. Say “
Redial
.” Your phone will make a call to the last number you dialed.
PLAY <ALL SONGS PLAYLIST NAME>
Say “
Play
” followed by a playlist title and then your phone will play back the
recognized playlist for you.
1. You will hear “
Please say a command
“ and the Voice Commands menu will
be displayed.
2. Say “
Play <All songs Playlist name>
” to play back individual playlist or say
“
Play All Songs
” to play back all songs saved in your phone.
MY VERIZON
Use the My Verizon command to access information about your Verizon account.
1. You will hear “
Please say a command
“ and the Voice Commands menu will
be displayed.
2. Say “
My Verizon
.” Your phone will make a web connection.
HELP
Use the Help command to view how to use the Voice Commands.
1. You will hear “
Please say a command
“ and the Voice Commands menu will
be displayed.
2. Say “
Help
.” The Help guide will be displayed on your phone.
CALCULATOR
The Calculator allows you to perform simple mathematical calculations. To access the
calculator:
1. Unlock the screen, tap
Tools
and then tap
Calculator
.
2. Use the virtual keys that correspond to the calculator display to perform basic
mathematical operations.
3. To reset the calculator, tap
Clear All
.

54
55
02
03
01
04
05
06
07
08
TIP CALCULATOR
Allows you to calculate the tip and determine how much each person should pay for
the bill.
1. Unlock the screen, tap
Tools
and then tap
Tip Calculator
.
2. Enter the amount in the
Total Bill
field by using the number keypad.
3. Scroll to the percentage of tip in the
% Tip
field. The amount of a tip will be
displayed in the
Tip ($)
field.
4. Scroll to the number of attendees in the
People
field. The tip amount per each
person is shown in the
Each
field.
5. To reset the tip calculator, tap
Reset
.
CALENDAR
The Calendar tool provides easy and convenient access to your schedule. Simply store
your appointments and your phone will alert you.
CREATING A NEW EVENT
1. Unlock the screen, tap
Tools
and then tap
Calendar
.
2. Tap
New
.
3. Tap the
Subject
field.
4. Enter the subject and tap
Save
.
5. Enter the event information by using the following options:
•
Start Date
: Enters the starting date of the event.
•
Start Time
: Enters the starting time of the event.
•
End Date
: Enters the ending date of the event.
•
End Time
: Enters the ending time of the event.
•
Recurrence
: Sets the recurrence of the event (
None
/
Daily
/
Every X Days
/
Weekly
/
Monthly
/
Yearly
).
•
Alert Tone
: Selects a ringtone for the event alarm.
•
Vibrate
: Sets the phone to vibrate for alerting you to the event.
•
Alert Time
: Sets the alert time before the event takes place (
On Time
/
15 minutes
before
/
30 minutes before
/
45 minutes before
/
1 hour before
/
3 hours before
/
5 hours
before
/
1 day before
).
•
Reminder
: Sets the phone to remind you of the event (
Off
/
Once
/
Every 2 minutes
/
Every
15 minutes
).
6. Tap
Save
to save the event. The date of the event will be marked as the yellow
triangle on your calendar.
VIEWING AN EVENT
1. Unlock the screen, tap
Tools
and then tap
Calendar
.
2. Tap a date with a scheduled event.
3. Tap an event to view details.
DELETING AN EVENT
1. Unlock the screen, tap
Tools
and then tap
Calendar
.
2. Tap a date with a scheduled event.
3. Tap an event to be deleted.
4. Tap
More
and then tap
Erase
.
5. Tap
Yes
to confirm.
DELETING ALL EVENTS
1. Unlock the screen, tap
Tools
and then tap
Calendar
.
2. Tap
More
and then tap
Erase All
.
3. Tap
Yes
to confirm.
DELETING ALL PAST EVENTS
Allows you to delete all past events from today.
1. Unlock the screen, tap
Tools
and then tap
Calendar
.
2. Tap
More
and then tap
Erase All Old
.
3. Tap
Yes
to confirm.

56
57
02
03
01
04
05
06
07
08
ALARM CLOCK
The Alarm Clock tool allows you to set up to three alarms. When you set an alarm, the
current time is displayed at the top of the screen. When the alarm goes off,
ALARM
will
be displayed on the screen and the alarm will sound.
SETTING AN ALARM
1. Unlock the screen, tap
Tools
and then tap
Alarm Clock
.
2. Tap an alarm (1, 2, or 3).
3. Set the following options:
•
Set Time
: Sets the alarm time.
•
Repeat
: Selects an alarm frequency (
Once
/
Daily
/
Mon - Fri
/
Weekends
).
•
Ringtone
: Selects a ringtone for the alarm.
4. Tap
Save
to save the alarm.
The Alarm icon appears on the Menu mode display area.
STOPPING AN ALARM
When an alarm sounds,
•
Tap
Snooze
to delay the alarm for an additional 5 minutes.
•
Tap
Dismiss
to stop the alarm.
DEACTIVATING AN ALARM
1. Unlock the screen, tap
Tools
and then tap
Alarm Clock
.
2. Tap
ON
next to the alarm you want to deactivate. You will see the indicator
slide to
OFF
.
RESETTING AN ALARM SETTING
1. Unlock the screen, tap
Tools
and then tap
Alarm Clock
.
2. Tap an alarm to reset.
3. Tap
Reset
.
4. Tap
Yes
to confirm.
RESETTING ALL ALARM SETTINGS
1. Unlock the screen, tap
Tools
and then tap
Alarm Clock
.
2. Tap
Reset All
.
3. Tap
Yes
to confirm.
STOP WATCH
Simultaneously times up to twenty different events. To operate the stopwatch:
1. Unlock the screen, tap
Tools
and then tap
Stop Watch
.
2. Tap
Start
to start the stopwatch.
3. Tap
Lap
to record lap times.
4. Tap
Stop
to the stop recording lap times.
5. Tap
Resume
to restart recording lap times or tap
Reset
to clear recorded times.
WORLD CLOCK
World Clock allows you to view the time in another country and city.
VIEWING WORLD CLOCKS
1. Unlock the screen, tap
Tools
and then tap
World Clock
.
2. Scroll through the world map and tap a continent.
3. Tap a city. You can also select a city from the list by tapping
Cities
.
SETTING DAYLIGHT SAVING TIME (DST)
1. Unlock the screen, tap
Tools
and then tap
World Clock
.
2. Scroll through the world map and tap a continent.
3. Tap a city. You can also select a city from the list by tapping
Cities
.
4. Tap
DST
to set the city as Daylight Saving Time.
58
59
02
03
01
04
05
06
07
08
UNIT CONVERTER
The Unit Converter allows you to convert units of measurement from one to another.
1. Unlock the screen, tap
Tools
and then tap
Unit Converter
.
2. Scroll up or down to select the measurement and units of the measurement in
the appropriate fields.
3. Enter the value you want to convert from in the
From
field. As you enter the
value, the converted value is shown in the
To
field.
NOTEPAD
Your phone includes an internal notepad that can be used to compose and store
reminders and notes.
CREATING A NEW NOTE
1. Unlock the screen, tap
Tools
and then tap
Notepad
.
2. Tap
Yes
to create a new note. If there are already saved notes, tap
New
.
3. Enter the note text and tap
Done
.
VIEWING A NOTE
1. Unlock the screen, tap
Tools
and then tap
Notepad
.
2. Tap the desired a note to view details.
DELETING A NOTE
1. Unlock the screen, tap
Tools
and then tap
Notepad
.
2. Tap next to the note you want to delete.
3. Tap
Yes
to confirm.
DELETING ALL NOTES
To delete all saved memos:
1. Unlock the screen, tap
Tools
and then tap
Notepad
.
2. Tap
Erase All
.
3. Tap
Yes
to confirm.
USB MASS STORAGE
USB Mass Storage allows you to transfer files to or from your PC. In order to use this
function, you must insert a microSDTM card. Use this function with the 1GB microSDTM
card that is pre-installed in your phone.
1. Connect your phone to a PC with the USB cable.
2. Unlock the screen, tap
Tools
and then tap
USB Mass Storage
.
3. When a pop-up window appears on your PC, open a folder to view files.
4. Copy files from the PC to the memory card.
AIRPLANE MODE
In Airplane mode, all menu functions can be accessed except making calls, receiving
calls, data connection and Bluetooth®. Activating Airplane mode will disable all wireless
communications including Location service.
1. Unlock the screen and tap
Settings
.
2. Tap
OFF
next to
Airplane Mode
. You will see the indicator slide to
ON
.
MUSIC ONLY MODE
Music Only mode allows you to disable all wireless functions of your phone, such as calls
and messages while playing music.
1. Unlock the screen and tap
Settings
.
2. Tap
OFF
next to
Music Only Mode
. You will see the indicator slide to
ON
.
60
61
02
03
01
04
05
06
07
08
BLUETOOTH
Bluetooth® technology connectivity enables wireless connections between electronic
devices. If connected with a Bluetooth handsfree device, you can use your phone more
freely. Since devices with Bluetooth connectivity communicate using radio waves, your
phone and the other device do not need to be in direct line-of-sight. The two devices
only need to be within 10 meters (30 feet) of each other. The connection can be subject
to interference from obstructions such as walls or other electronic devices. This device
is compliant with Bluetooth specification 3.0, supporting the following profiles: Dial
Up Networking, Handsfree, Headset, Sync, Basic Imaging, Basic Printing, File Transfer,
Object Push for vCard and Stereo. To ensure interoperability between other devices
supporting Bluetooth technology, use approved enhancements for this model. Check
with the manufacturers of other devices to determine their compatibility with this
phone. There may be restrictions on using Bluetooth technology in some locations.
Check with your local authorities or Verizon Wireless.
If you want more information on this function, visit the Bluetooth Technology
organization Web site: https://www.bluetooth.org/.
Important:
Features using Bluetooth technology, or allowing such features to run in
the background while using other features, increase the demand on battery power
and reduce the battery life.
TURNING ON THE BLUETOOTH FEATURE
1. Unlock the screen and tap
Settings
.
2. Tap
OFF
next to
Bluetooth Radio
. You will see the indicator slide to
ON
.
ADDING A NEW DEVICE
Pairing is the process that allows your phone to locate, establish and register a 1-to-1
connection with the target device.
1. Unlock the screen, tap
Settings
and then tap
Bluetooth Settings
.
2. Tap
Add New Devices
.
3. The phone will prompt you with the following message on the screen:
“
Place device you are connecting to in discoverable mode.
” Tap
Next
.
4. The device will appear in the
Search for Devices
menu. Tap the device you
wish to pair with and tap
Pair Device
.
5. The handset may prompt you for the passkey. Consult the Bluetooth accessory
(sold separately) instructions for the appropriate passkey (typically “0000”— 4
zeroes). Enter the passkey and tap
Done
.
• You may not need to input the passkey for pairing when the passkey of the
Bluetooth headset or hands-free kit is 0000.
• If the Bluetooth version of your headset is the same as your phone’s Bluetooth
version, tap Yes without entering the passkey.
6. Tap
Always Ask Before Connect
if you want the phone to ask you before
connecting to the device.
7. Once connected, you will see the device listed in the
Bluetooth Settings
menu.
TRANSFERRING FILES
1. Unlock the screen, tap
Settings
and then tap
Bluetooth Settings
.
2. Tap the paired device in the list.
3. With Discovery Mode On for the paired device, select one of the following
options:
•
Send Name Card
: Allows you to send a contact as the name card.
•
Send Picture
: Allows you to send photos to the device.
•
Send Video
: Allows you to send videos to the device.
•
Send Calendar Event
: Allows you to send calendar events to the device.
•
Get Name Card
: Allows you to get name cards from the device.
•
Exchange Name Card
: Allows you to send your name card and receive a name card from
the device.
•
Browse/Get Files:
Allows you to search and get files from the device.
•
Transfer Image:
Allows you to transfer images to the device.
•
Print Picture:
Allows you to send photos to the printer.
•
Print Name Card:
Allows you to send your name card to the printer.
4. Tap the desired file(s) to transfer to or from the device and tap
Done
, if
necessary.
62
63
02
03
01
04
05
06
07
08
BLUETOOTH SETTINGS
MY PHONE NAME
To edit the Bluetooth® name of your phone:
1. Unlock the screen, tap
Settings
and then tap
Bluetooth Settings
.
2. Tap
Settings
.
3. Tap
My Phone Name
.
4. Tap and enter a name.
5. Tap
Done
to save the name.
DISCOVERY MODE
To set whether your device is able to be searched for by other Bluetooth devices in
the area:
1. Unlock the screen, tap
Settings
and then tap
Bluetooth Settings
.
2. Tap
Settings
.
3. Tap
OFF
next to
Discovery Mode
. You will see the indicator slide to
ON
.
If Bluetooth is not on, it will be turned on automatically.
SUPPORTED PROFILES
To view brief descriptions of the profiles supported by the phone:
1. Unlock the screen, tap
Settings
and then tap
Bluetooth Settings
.
2. Tap
Settings
.
3. Tap
Supported Profiles
.
4. Scroll to the profile information you want to view.
AUTO PAIR HANDSFREE
To set your phone to pair with a handsfree device automatically:
1. Unlock the screen, tap
Settings
and then tap
Bluetooth Settings
.
2. Tap
Settings
.
3. Tap
OFF
next to
Auto Pair Handsfree
. You will see the indicator slide to
ON
.
SOUND SETTINGS
Allows you to customize the sound settings of your phone.
MASTER VOLUME
1. Slide the phone up, tap
Settings
and then tap
Sounds Settings
.
2. Tap the volume level below
Master Volume
.
3. Tap or to adjust the volume level.
To hear the volume level, tap
Play
.
4. To set to vibrate when your phone rings, tap
OFF
next to
Vibrate While
Ringing
.
5. Tap
Set
.
RINGTONES
1. Slide the phone up, tap
Settings
and then tap
Sounds Settings
.
2. From the
Ringtones
menu, select one of the following settings:
•
Incoming Call
: Selects a ringtone for incoming calls.
•
Text Msg.
: Selects a ringtone for new text messages.
•
Multimedia Msg.
: Selects a ringtone for new picture or video messages.
•
Voicemail
: Selects a ringtone for new voicemails.
•
Missed Call
: Selects a ringtone for missed call notifications.
3. To play a ringtone, tap the Key.
4. To select a ringtone, tap the name of the tone in the
Change to
field.
CALLER ID READOUT
1. Unlock the screen, tap
Settings
and then tap
Sounds Settings
.
2. Scroll down and tap the option next to
Caller ID Readout
.
3. Tap an option in the
Change to
field to select.
64
65
02
03
01
04
05
06
07
08
EMERGENCY TONE
1. Unlock the screen, tap
Settings
and then tap
Sounds Settings
.
2. Scroll down and tap
Off
next to
Emergency Tone
.
3. Tap an alert type in the
Change to
field to select.
ALERT VIBRATE
Allows you to set the phone to vibrate when calls or messages come in.
1. Unlock the screen, tap
Settings
and then tap
Sounds Settings
.
2. From the
Alert Vibrate
menu, tap
OFF
next to the setting you want to change
to
ON
.
ALERTS REMINDER
Allows you to set the phone to remind you of new messages and missed calls.
1. Unlock the screen, tap
Settings
and then tap
Sounds Settings
.
2. From the
Alerts Reminder
menu, tap
Off
next to the setting you want to
change.
3. Tap a reminder option in the
Change to
field to select.
POWER ON/OFF SOUND
Allows you to set the phone to play sounds when the phone is turned on and off.
1. Unlock the screen, tap
Settings
and then tap
Sounds Settings
.
2. Scroll down, then tap
ON
or
OFF
next to
Power On
or
Power Off
.
SERVICE ALERTS
1. Unlock the screen, tap
Settings
and then tap
Sounds Settings
.
2. From the
Service Alerts
menu, select one of the following settings:
•
Enhanced Roaming Indicator
: Allows you to set the phone to sound when the phone is
connected to the network, calls are connected, or the service is not available.
•
Minute Beep
: Allows you to set the phone to sound every minute during a call.
•
Call Connect
: Allows you to set the phone to sound when an outgoing call is connect.
•
Software Update
: Allows you to set the phone to sound when your phone’s software is
updated.
3. Tap
ON
or
OFF
next to the desired option to adjust to the other setting.
TOUCH AUDIO FEEDBACK
Allows you to set the phone to play sounds when you tap the touch screen.
1. Unlock the screen, tap
Settings
and then tap
Sounds Settings
.
2. Tap
ON
or
OFF
next to
Touch Audio Feedback
.
DIGIT DIAL READOUT
Allows you to set the phone to read digits when you enter a phone number from the
dial screen.
1. Slide the phone up, tap
Settings
and then tap
Sounds Settings
.
2. Scroll down and tap
OFF
next to
Digit Dial Readout
. You will see the indicator
slide to
ON
.
DEVICE CONNECT
1. Unlock the screen, tap
Settings
and then tap
Sounds Settings
.
2. Scroll down, then tap
ON
or
OFF
next to
Device Connect
.
DISPLAY SETTINGS
Allows you to customize the display of your touch screen.
WALLPAPER
To select a wallpaper to be displayed on the phone:
1. Unlock the screen, tap
Settings
and then tap
Display Settings
.
2. Tap
Lock Screen
or
Home Screen
.
3. Tap
Select Picture
or
Select Video
.
4. Tap a picture or video.
5. Tap
Set As Wallpaper
.
66
67
02
03
01
04
05
06
07
08
BANNERS
To set your Personal or ERI banner:
PERSONAL BANNER
The Personal Banner can be up to 16 characters and is displayed on your phone’s
display screen from idle mode.
1. Unlock the screen, tap
Settings
and then tap
Display Settings
.
2. Tap
None
next to
Personal
.
3. Enter the banner text (up to 16 characters) and tap
Save
.
ERI BANNER
If you use ERI Service, ERI text is shown on the sub banner.
1. Unlock the screen, tap
Settings
and then tap
Display Settings
.
2. Tap
OFF
or
ON
next to
ERI
.
MAIN MENU SETTINGS
To change Main Menu layout and type:
1. Unlock the screen, tap
Settings
and then tap
Display Settings
.
2. Scroll down to
Main Menu Settings
.
3. Select one of the following options and change the setting:
•
Position Menu Items
: Allows you to move menus to a different position.
•
Replace Menu Items
: Allows you to replace menus with desired menus.
•
Change Menu Layout
: Allows you to change the menu layout.
•
Reset Menu Settings
: Allows you to reset Main Menu Settings.
4. Tap
Save
to save the desired Main Menu layout and type.
BACKLIGHT TIMER
To set the duration of the backlight:
1. Unlock the screen, tap
Settings
and then tap
Display Settings
.
2. Scroll down and tap the option next to
Backlight Timer
.
3. Tap a backlight time in the
Change to
field to select.
BACKLIGHT BRIGHTNESS
To adjust the brightness of the backlight:
1. Unlock the screen, tap
Settings
and then tap
Display Settings
.
2. Scroll down and tap the option next to
Backlight Brightness
.
3. To adjust the brightness automatically, tap
OFF
in the
Auto Brightness
menu.
To adjust the brightness manually, tap the brightness level you want to
change.
4. Tap
Done
.
DISPLAY THEME
To choose the background screen:
1. Unlock the screen, tap
Settings
and then tap
Display Settings
.
2. Scroll down and tap the option in the
Display Theme
.
3. Tap a theme in the
Change to
field to select.
4. Tap
Set As Display Theme
.
FONT TYPE
To set the font type:
1. Unlock the screen, tap
Settings
and then tap
Display Settings
.
2. Scroll down and tap the option next to
Font Type
.
3. Tap a font type in the
Change to
field to select.
DIAL FONTS
To set the dial font size:
1. Unlock the screen, tap
Settings
and then tap
Display Settings
.
2. Scroll down and tap the option next to
Dial Fonts
.
3. Tap a font size in the
Change to
field to select.
68
69
02
03
01
04
05
06
07
08
MENU FONT SIZE
To set the menu font size:
1. Unlock the screen, tap
Settings
and then tap
Display Settings
.
2. Scroll down and tap the option next to
Menu Font Size
.
3. Tap a font size in the
Change to
field to select.
CLOCK FORMAT
To set the clock type to be displayed on the idle screen:
1. Unlock the screen, tap
Settings
and then tap
Display Settings
.
2. Scroll down and tap the option next to
Clock Format
.
3. Tap a clock format in the
Change to
field to select.
4. Tap
Set Clock Format
.
TOUCH SETTINGS
Allows you to set the phone to vibrate when you touch the screen and set the vibration
level.
1. Unlock the screen, tap
Settings
and then tap
Touch Settings
.
2. Tap
OFF
or
ON
next to
Touch Vibrate Feedback
.
3. If you set to
ON
, tap the option next to
Vibrate Level
. Tap a vibrate level in the
Change to
field to select.
PHONE SETTINGS
Allows you to customize the phone settings of your phone.
VOICE COMMANDS SETTINGS
Allows you to set options for Voice Commands.
CONFIRM CHOICES
When the phone does not recognize your voice command, it will ask you to repeat
your voice command. If it does not recognize the name or number, it will display a
list of up to three choices and speak each one in turn. You can control how often the
phone asks you to confirm the recognized name or number.
1. Unlock the screen, tap
Settings
and then tap
Phone Settings
.
2. Tap
Voice Commands Settings
and then tap
Confirm Choices
.
To view information about each option, tap Info.
3.
Tap a confirmation choice in the
Change to
field to select.
SENSITIVITY
The Sensitivity setting allows you to adjust the sensitivity monitoring of voice tones.
If you frequently experience the messages “
Please try again
” or “
COMMAND
NOT RECOGNIZED Try again?
”, adjust the sensitivity toward
Less Sensitive
. If you
frequently experience false activations (when the phone recognizes a name you
didn’t say), adjust the sensitivity toward
More Sensitive
.
1. Unlock the screen, tap
Settings
and then tap
Phone Settings
.
2. Tap
Voice Commands Settings
and then tap
Sensitivity
.
3. Tap
Automatic
,
More Sensitive
, or
Less Sensitive
in the
Change to
field
to select.
ADAPT VOICE
Voice Commands are speaker independent, which means that no training
or adaptation is required. Some users with heavy accents or unusual voice
characteristics may find difficulty in achieving high accuracy with speaker
independent Voice Commands, so the Adapt Voice feature allows users to
dramatically improve the recognition accuracy after adapting their voices.
Users who get acceptable recognition accuracy will find no additional benefit to
performing the Adapt Voice feature.
1. Unlock the screen, tap
Settings
and then tap
Phone Settings
.
2. Tap
Voice Commands Settings
and then tap
Adapt Voice
.
3. Tap
Train Voice
.
•
Train Voice
: Requires that you make recordings of your voice to customize the voice
recognition system. It will take a few minutes.
70
71
02
03
01
04
05
06
07
08
•
Reset Voice
:
Once you finish the adaptation process, you can reset the adaptation to
the factory default. The Reset Voice option only appears after you finish the Train Voice
process.
4. Tap
OK
to begin.
5. Wait for the beep, and then repeat the sentences using a normal tone of
voice.
6. When you are finished with a full session, you will reach a screen that reads
“
Adaptation complete
.”
PROMPTS
Allows you to select voice command system characteristics.
1. Unlock the screen, tap
Settings
and then tap
Phone Settings
.
2. Tap
Voice Commands Settings
and then tap
Prompts
.
3. Tap one of the following options and then tap the desired submenu option
in the
Change to
field to select:
•
Mode
: Tap the voice command system mode from the following:
-
Prompts
: For handset to prompt for required information.
-
Tones Only
: For handset to provide beeps only for audio guidance.
•
Audio Playback
: Allows audio playback to play through the speakerphone or earpiece.
Tap
Speakerphone
or
Earpiece
.
•
Timeout
: Tap a period of time either
5 seconds
or
10 seconds
which the system listens
for a command before timing out.
ABOUT
1. Unlock the screen, tap
Settings
and then tap
Phone Settings
.
2. Tap
Voice Commands Settings
and then tap
About
.
3. View the version information about Nuance.
LANGUAGE
To set the language of the display:
1. Unlock the screen, tap
Settings
and then tap
Phone Settings
.
2. Tap
Language
.
3. Tap a language in the
Change to
field to select.
LOCATION
The Location (GPS) service allows the network to detect and find your current location.
1. Unlock the screen, tap
Settings
and then tap
Phone Settings
.
2. Tap
Location
.
3. Tap
Full Detection
to allow the network to detect your location.
To detect your location only in E911 mode, tap
E911 Only
.
When Lock Setting is set for Location Setting under Restrictions on the Security menu,
you will need to enter a lock code. The default lock code is the last 4 digits of your
phone number.
CURRENT COUNTRY
Allows you to set the country of your current location so that your phone works properly
while you travel.
1. Unlock the screen, tap
Settings
and then tap
Phone Settings
.
2. Tap
Current Country
.
3. Tap a country in the
Change to
field to select.
SECURITY
The Security menu allows you to electronically secure the phone. To access this menu,
you must enter the 4-digit lock code. The default lock code is the last 4 digits of your
phone number.
EDIT CODES
To change the lock code:
1. Unlock the screen, tap
Settings
and then tap
Phone Settings
.
2. Tap
Security
.
3. Enter the 4-digit lock code.
4. Tap
Edit Codes
.
5. Tap one of the following settings:
72
73
02
03
01
04
05
06
07
08
•
Phone Only
: Allows you to edit the lock code for Security.
•
Calls & Services
: Allows you to edit the lock code for Restrictions.
6. If you selected
Phone Only
, enter the new 4-digit lock code. Enter the new
4-digit lock code again to confirm your input.
If you selected
Calls & Services
, enter the new 4-digit lock code. Enter the
new 4-digit lock code again to confirm your input.
RESTRICTIONS
Use the following procedure to configure Location Setting, Calls and Messages
restrictions.
1. Unlock the screen, tap
Settings
and then tap
Phone Settings
.
2. Tap
Security
.
3. Enter the 4-digit lock code.
4. Tap
Restrictions
.
5. Tap one of the following settings to select:
•
Location Setting
:
Unlock Setting
/
Lock Setting
.
•
Calls
:
Incoming Calls
/
Outgoing Calls
.
For Incoming Calls, set
Allow All
,
Contacts Only,
or
Block All
.
For Outgoing Calls, set
Allow All
,
Contacts Only,
or
Block All
.
•
Messages
:
Incoming Messages
/
Outgoing Messages
.
For Incoming Messages, set
Allow All
or
Block All
.
For Outgoing Messages, set
Allow All
or
Block All
.
•
Dial-Up Modem
:
Allow
/
Block
PHONE LOCK SETTING
This setting specifies whether the phone should be locked whenever it is turned on.
Lock mode prevents the unauthorized use of your phone. Once the phone is locked, it
is in restricted mode until the lock code is entered. You can still make emergency calls.
1. Unlock the screen, tap
Settings
and then tap
Phone Settings
.
2. Tap
Security
.
3. Enter the 4-digit lock code.
4. Tap
Phone Lock Setting
.
5. Tap one of the following settings to select:
•
Unlocked
: Phone is unlocked.
•
On Power Up
: Phone will be locked when it is turned on.
LOCK PHONE NOW
Allows you to lock your phone immediately.
1. Unlock the screen, tap
Settings
and then tap
Phone Settings
.
2. Tap
Security
.
3. Enter the 4-digit lock code.
4. Tap
Lock Phone Now
.
5. To unlock the phone, enter the 4-digit lock code.
RESTORE PHONE
To delete all user data and restore all settings to their default values:
1. Unlock the screen, tap
Settings
and then tap
Phone Settings
.
2. Tap
Security
.
3. Enter the 4-digit lock code.
4. Tap
Restore Phone
.
5. Tap
Yes
to confirm.
6. Tap
Next
.
7. Enter the 4-digit lock code. The phone will turn off and then back on
automatically.
SYSTEM SELECT
You can set your phone to search or roam on another network when you are not in your
home area. Leave this setting as default unless you want to alter the system selection as
instructed by your service provider.
1. Unlock the screen, tap
Settings
and then tap
Phone Settings
.
2. Tap
System Select
.
74
75
02
03
01
04
05
06
07
08
3. Tap one of the following settings to select:
•
Automatic
: Scans radio channels based on the automatic setting.
•
Home Only
: Network is available only within your home area or home affiliated area.
NAM SELECT
Enables Auto NAM (Number Assignment Modules) or selects a NAM manually.
AUTO NAM
Automatically switches the phone to proper NAM when you have multiple NAM
registrations.
1. Unlock the screen, tap
Settings
and then tap
Phone Settings
.
2. Tap
NAM Select
.
3. Tap
OFF
next to
Auto NAM
. You will see the indicator slide to
ON
.
CHANGE NAM
1. Unlock the screen, tap
Settings
and then tap
Phone Settings
.
2. Tap
NAM Select
.
3. Tap the option next to
Change NAM
.
4. Tap one of the following settings to select:
•
NAM1
: Set the phone to save the phone information that is set by default.
•
NAM2
:
Set the phone to save the phone information that is set for the other phone number.
This setting is available only when you register two cell phone numbers on your phone.
CALL SETTINGS
Allows you to customize the call settings of your phone.
HOME KEY TO ANSWER
Allows you to answer incoming calls when you press the Home key.
1. Unlock the screen, tap
Settings
and then tap
Call Settings
.
2. Tap
ON
or
OFF
next to
Home Key to Answer
.
AUTO ANSWER WITH HANDSFREE
Allows you to answer incoming calls via handsfree. This feature is available only when
the phone is connected to a headset or handsfree device.
1. Unlock the screen, tap
Settings
and then tap
Call Settings
.
2. Tap
OFF
next to
Auto Answer with Handsfree
. You will see the indicator slide
to
ON
.
AUTO RETRY
To set a period of time the phone waits before automatically redialing when an
attempted call fails:
1. Unlock the screen, tap
Settings
and then tap
Call Settings
.
2. Tap
Off
next to
Auto Retry
.
3. Tap one of the following settings to select:
Off
/
10 Seconds
/
30 Seconds
/
60 Seconds
TTY MODE
You can attach a TTY device to your phone enabling you to communicate with parties
also using a TTY device. A phone with TTY support is able to translate typed characters
to voice. Voice can also be translated into characters and then displayed on the TTY.
1. Unlock the screen, tap
Settings
and then tap
Call Settings
.
2. Tap
TTY Off
next to
TTY Mode
.
3. Tap one of the following settings to select:
TTY OFF
/
TTY Full
/
TTY + Talk
/
TTY + Hear
VOICE PRIVACY
Voice Privacy provides advanced voice encryption to prevent eavesdropping.
To turn the voice privacy feature on or off:
1. Unlock the screen, tap
Settings
and then tap
Call Settings
.
2. Tap
OFF
next to
Voice Privacy
. You will see the indicator slide to
ON
.
76
77
02
03
01
04
05
06
07
08
DTMF TONES
To set the key tone length:
1. Unlock the screen, tap
Settings
and then tap
Call Settings
.
2. Tap the option next to
DTMF Tones
.
3. Tap one of the following settings to select:
•
Normal
: Sends out a tone for a fixed period of time even if you continue to press the key.
•
Long
: Sends out a continuous tone for the duration the key is pressed and held.
ASSISTED DIALING
Assisted Dialing allows you to easily make international calls just by entering an
international call code “+” and a phone number without a country code.
1. Unlock the screen, tap
Settings
and then tap
Call Settings
.
2. Tap ON or OFF to set
Assisted Dialing
.
3. If you set to
ON
, tap an option next to
Reference Country
.
4. Tap a country where you frequently make international calls.
5. Tap
Set
.
MEMORY
Allows you to customize the memory settings of your phone.
SAVE OPTIONS
To select whether to save to the phone memory or to the card memory when saving
files:
1. Unlock the screen, tap
Settings
and then tap
Memory
.
2. Tap the option next to
Pictures
,
Videos
,
or
Sounds
in the
Save Options
menu.
3. Tap
Phone Memory
or
Card Memory
to select.
PHONE MEMORY
Allows you to manage the memory usage for media files and contacts on your phone’s
memory.
PHONE MEMORY USAGE
To check the memory usage for the phone memory:
1. Unlock the screen, tap
Settings
and then tap
Memory
.
2. Tap
Phone Memory
and then tap
Phone Memory Usage
.
3. View the details for the memory usage.
MANAGING FILES
To copy, move, or delete files from the phone memory:
1. Unlock the screen, tap
Settings
and then tap
Memory
.
2. Tap
Phone Memory
.
3. Tap
My Pictures
,
My Videos
,
My Ringtones
,
My Music
,
My Sounds
, or
My
Contacts
.
4. Tap
More
.
5. Tap one of the following options to select:
•
Move To Card
: Allows you to move files from the phone memory to the memory card.
•
Copy To Card
: Allows you to copy files from the phone memory to the memory card,
if applicable.
•
Erase
: Allows you to delete files in the phone menory.
The Copy To Card option is available only when you copy contacts.
MOVING ALL FILES
To move all files saved in the phone memory to the card memory:
1. Unlock the screen, tap
Settings
and then tap
Memory
.
2. Tap
Phone Memory
and then tap
Move All to Card
.
3. Tap
Yes
to confirm.
Do not remove the memory card from the phone while files are being moved to the
card memory.
CARD MEMORY
Allows you to manage the memory usage for media files and contacts on your card
memory. The microSDTM card must be inserted to the phone to perform these functions.

78
79
02
03
01
04
05
06
07
08
Use these functions with the 1GB microSDTM card that is pre-installed in your phone.
CARD MEMORY USAGE
To check the memory usage for the memory card:
1. Unlock the screen, tap
Settings
and then tap
Memory
.
2. Tap
Card Memory
and then tap
Card Memory Usage
.
3. View the details for the memory usage.
To format the memory card, tap
More
and then tap
Format card
.
MANAGING FILES
To copy, move, or delete files from the memory card:
1. Unlock the screen, tap
Settings
and then tap
Memory
.
2. Tap
Card Memory
.
3. Tap one of
My Pictures
,
My Videos
,
My Ringtones
,
My Music
,
My Sounds
,
and
My Contacts
.
4. Tap
More
.
5. Select one of the following options:
•
Move To Phone
:
Allows you to move files from the memory card to the phone memory.
•
Copy To Phone
: Allows you to copy files from the memory card to the phone memory,
if applicable.
•
Erase
: Allows you to delete files in the card menory.
The Copy To Phone option is available only when you copy contacts.
MOVING ALL FILES
To move all files saved in the card memory to the phone memory:
1. Unlock the screen, tap
Settings
and then tap
Memory
.
2. Tap
Card Memory
.
3. Tap
Move All to Phone
.
4. Tap
Yes
to confirm.
Do not remove the memory card from the phone while files are being moved to the
card memory.
USB MODE
USB mode allows you to transfer data between the phone and a PC.
Important
: To activate your device for data transfer, select USB Mode before
connecting the USB data cable.
1. Unlock the screen, tap
Settings
and then tap
USB Mode
.
2. Tap one of the following settings to select:
•
Media Sync Mode
: Allows you to sync your music files with the Windows Media Player.
•
Modem Mode
: Allows you to use your phone as a modem.
•
Mass Storage
: Allows you to connect your phone to a PC as a removable disk via the USB
cable. Use this option to move files to and from your phone. This setting is only available
when a memory card is installed.
•
Ask On Plug
: Allows you to select USB Mode whenever the USB data cable is connected
between the PC and your phone.
•
Even if Ask On Plug is set for USB Mode, you may not be asked to select USB Mode
while receiving/making a call, using Bluetooth®, transferring data, etc.
•
To use End User Upgrade Tool, tap Modem Mode for USB Mode.
PHONE INFO
MY NUMBER
To view your phone number:
1. Unlock the screen, tap
Settings
and then tap
Phone Info
.
2. Tap
My Number
.
SW/HW VERSION
To view your hardware and software version information:
1. Unlock the screen, tap
Settings
and then tap
Phone Info
.
2. Tap
SW/HW Version
.
3. View the version information of your phone.

80
CDM8992
ICON GLOSSARY
To view all the icons and their meanings:
1. Unlock the screen, tap
Settings
and then tap
Phone Info
.
2. Tap
Icon Glossary
.
Please refer to Display Indicators on page 12 for more details about the icons.
SOFTWARE UPDATE
The Software Update allows you to download and update the software in your
phone automatically. Only the internal software is updated; Contacts entries or other
information saved to your phone will NOT be deleted.
STATUS
To check the latest software download/update status:
1. Unlock the screen, tap
Settings
and then tap
Phone Info
.
2. Tap
Software Update
.
3. Tap
Status
.
CHECK NEW
To check the download server for new software updates:
1. Unlock the screen, tap
Settings
and then tap
Phone Info
.
2. Tap
Software Update
.
3. Tap
Check New
.
OPERATING SYSTEM
To view information about your phone’s operating system:
1. Unlock the screen, tap
Settings
and then tap
Phone Info
.
2. Tap
Operating System
.
TAKING A PHOTO
VIEWING PHOTOS
USING PHOTO OPTIONS
RECORDING A VIDEO
VIEWING VIDEOS
USING VIDEO OPTIONS
USING CAMERA AND CAMCORDER SETTINGS
CHAPTER 5. CAMERA
5
Your phone has the built-in camera that
allows you to take photos and record videos.
This chapter addresses the camera and camcorder functions:
CAMERA
82
02
03
01
04
05
06
07
08
83
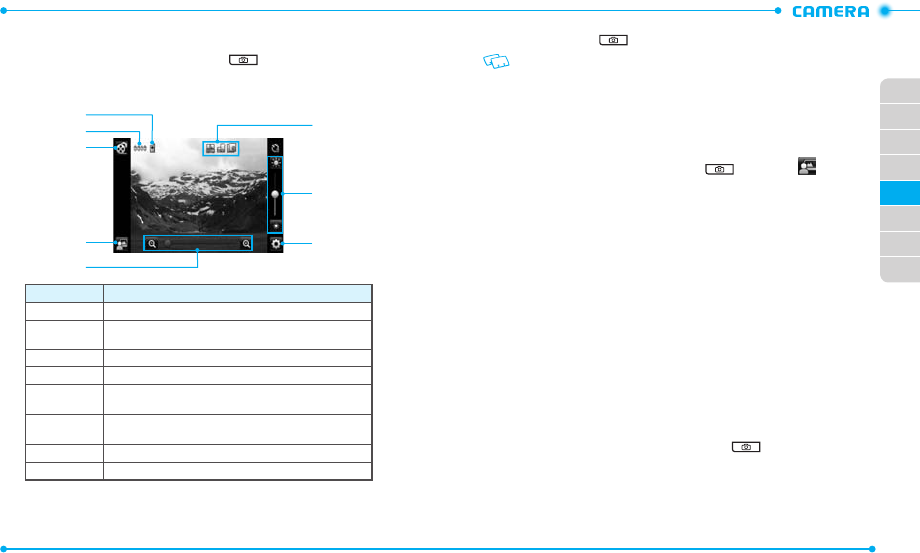
TAKING A PHOTO
1. Unlock the screen and press the Camera Key to turn on the camera.
2. Rotate the phone counter-clockwise to landscape view, if necessary.
3. Aim the lens at the subject and make any necessary adjustments.
3
2
1
4
5
6
7
8
Number Function
1 Allows you to view the memory location for saving photos.
2Allows you to view the number of photos you can take. The number of
photos may differ depending on the picture resolution.
3 Switches to the camcorder.
4 Allows you to view photos in the My Pictures menu.
5Zooms in or out. This function is only available when the picture
resolution is set under 2048x1536 (1536x2048).
6Allows you to check the camera status and settings such as
resolution, camera view mode, and multi-shot number.
7 Adjusts the brightness.
8 Allows you to change the camera settings.
4. Press the Camera Key to take a photo. The photo is automatically saved.
If Auto Save is set to off, the following options are available after taking a picture:
•
Erase: Deletes the captured photo.
• Save: Saves the captured photo.
• Set As: Sets the captured photo as wallpaper or picture ID image.
• Send: Sends the captured photo.
VIEWING PHOTOS
1. Unlock the screen and press the Camera Key and then tap .
2. Tap the photo you want to view.
3. Drag your finger left or right to view other photos saved recently.
4. To send the photo, tap
Send
.
To set the photo as wallpaper or picture ID image, tap
Set As
.
USING PHOTO OPTIONS
While viewing a photo, tap
More
to use the following options:
•
Move To Card
/
Move To Phone
: Moves the photo to the memory card or the phone
memory.
•
Lock
: Locks the photo. This option is available only for the photos saved in phone
memory.
•
Erase
: Deletes the photo.
•
Camera
: Switches to the camera.
•
File Info
: Allows you to view the properties of the photo.
RECORDING A VIDEO
1. Unlock the screen, press and hold the Camera Key to turn on the
camcorder.
2. Rotate the phone counter-clockwise to landscape view, if necessary.
3. Aim the lens at the subject and make any necessary adjustments.

84
02
03
01
04
05
06
07
08
85
3
4
2
1
5
6
7
8
Number Function
1 Allows you to view the memory location for saving videos.
2 Switches to the camera.
3 Mutes or unmutes the audio.
4 Allows you to view videos in the
My Videos
menu.
5 Zooms in or out.
6Allows you to check the camcorder status and settings such as
resolution, camcorder view mode, and video quality.
7 Adjusts the brightness.
8 Allows you to change the camcorder settings.
4. Press the Camera Key to start recording.
5. When you are finished, press the Camera Key to stop recording. The
video is automatically saved.
If
Auto Save
is set to off, the following options are available after recording a video:
•
Erase
: Deletes the recorded video.
•
Save
: Saves the recorded video.
•
Set As Wallpaper
: Sets the recorded video as wallpaper.
•
Send
: Sends the recorded video.
VIEWING VIDEOS
1. After recording a video, tap .
2. Tap the video you want to view and tap to play.
3. After viewing the video, drag your finger left or right to view other videos
saved recently.
4. To send the video, tap
Send
.
To set the video as wallpaper, tap
Set As Wallpaper
.
USING VIDEO OPTIONS
While viewing a video, tap
More
to use the following options:
•
Move To Card
/
Move To Phone
: Moves the video to the memory card or phone memory.
•
Lock
: Locks the video. This option is available only for the videos saved in the phone
memory.
•
Erase
: Deletes the video.
•
Camera
: Switches to the camcorder.
•
File Info
: Allows you to view the properties of the video file.
86
02
03
01
04
05
06
07
08
87
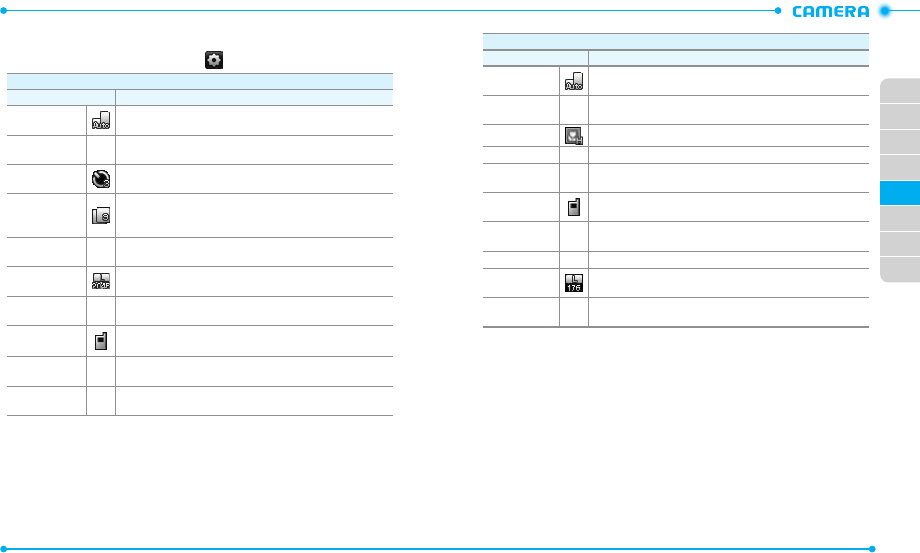
USING CAMERA AND CAMCORDER SETTINGS
While using the camera or camcorder, tap to access the following settings:
Camera
Setting Description
Capture mode
Changes the display view in the camera
(
Auto
/
Landscape
/
Portrait
).
White Balance
–Adjusts the color balance according to your lighting conditions
(
Auto
/
Sunny
/
Cloudy
/
Tungsten
/
Fluorescent
/
Darkness
).
Self Timer
Selects the length of the time delay before the camera takes a
photo (
Off
/
3 Seconds
/
5 Seconds
/
10 Seconds
).
Multi-shot
Selects a number of photos for taking a multi-shot photo. This
function is only available when the picture resolution is set to
640x480, 320x240, and 160x120 (
0
/
3
/
6
/
9
).
Shutter Sound
–Selects the shutter release sound (
Shutter
/
Silent
/
Say Cheeze
/
Ready! 123
).
Picture
Resolution
Changes the image resolution (
2048X1536
/
1600X1200
/
1280x960
/
640x480
/
320x240
/
160x120
).
Color Effects
–Changes the color effect (
Normal
/
Antique
/
Black & White
/
Negative
).
Save Options
Selects the default memory location for saving photos (
Phone
Memory
/
Card Memory
).
Auto Save
–Allows you to set the phone to automatically save photos after
taking them (
ON
/
OFF
).
Restore Factory
Settings –Restores all camera settings to their default values (
YES
/
NO
).
Camcorder
Setting Description
Display Mode
Changes the display view in the camcorder (
Auto
/
Landscape
/
Portrait
).
White Balance
–Adjusts the color balance according to your lighting conditions
(
Auto
/
Sunny
/
Cloudy
/
Tungsten
/
Fluorescent
/
Darkness
).
Video Quality
Changes the video resolution (
High
/
Medium
/
Low
).
Recording Time
–Allows you to set the video recording time (
For Send
/
For Save
).
Color Effects
–Changes the color effect (
Normal
/
Antique
/
Black & White
/
Negative
).
Save Options
Selects the default memory location for saving videos (
Phone
Memory
/
Card Memory
).
Auto Save
–Allows you to set the phone to automatically save videos after
recording them (
ON
/
OFF
).
Shutter Sound
–Selects the shutter release sound (
Shutter
/
Silent
).
Video
Resolution
Changes the video resolution (
176X144
/
320x240
).
Restore Factory
Settings
–Restores all camcorder settings to their default values (
YES
/
NO
).

CDM8992
CDM8992
USING A microSD
TM
CARD
SEARCH
MUSIC & TONES
PICTURE & VIDEO
APPS
CHAPTER 6. MEDIA CENTER
6
Your phone provides a unique feature - Media Center - that enables
you to download ringtones, wallpapers, games and more from your
network to your phone. Please contact your service provider for the
availability of these services.
MEDIA CENTER