Pantech Co CDMAPTL21 GSM/WCDMA/CDMA Phone with Bluetooth/WLAN/NFC User Manual
Pantech Co Ltd GSM/WCDMA/CDMA Phone with Bluetooth/WLAN/NFC
UserManual.wiki
>
Pantech Co
>
CDMAPTL21 User Manual
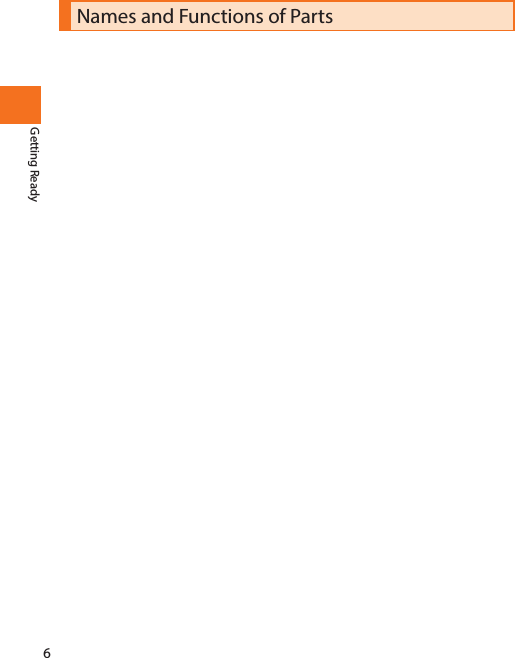
user manual
Navigation menu
Upload a User Manual
Namespaces
Wiki Guide
HTML
PDF
Info
Views
User Manual
Discussion / Help
Navigation

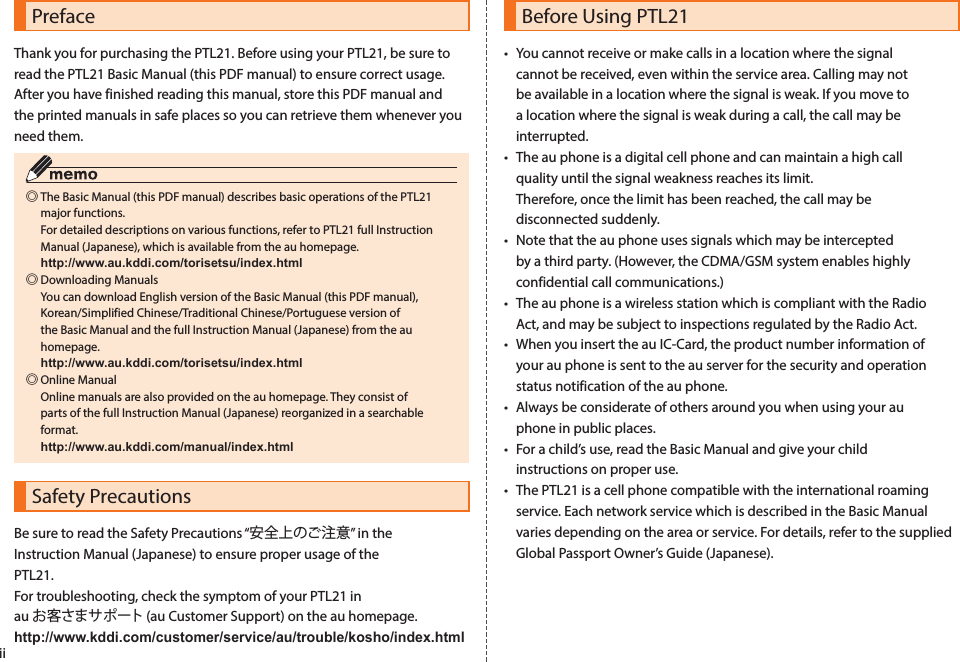
![9Getting ReadyCharging time: Approx. 160 min1 Connect the microUSB plug of the common AC adapter 03 (sold separately) to the PTL21.Open the external connection jack cover, confirm the shape of the connector and insert the plug straight. 2 Insert the power plug of the common AC adapter 03 (sold separately) into a power outlet.The PTL21 charging indicator illuminates in red and the battery level icon changes to the charging icon on the display. The charging indicator goes out when the charging is finished. 3 After the charging if finished, pull the microUSB plug of the common AC adapter 03 (sold separately) straight out of the PTL21.4 Close the PTL21 external connection jack cover.5 Pull the power plug of the common AC adapter 03 (sold separately) out of the outlet.Turning On/Off the PowerTurning On the Power1 Hold down p for at least 1 second.The logo is displayed. Wait a little for the unlock screen to appear. Drag to the circle in the center of the screen to unlock. If screen lock is set, the pattern/PIN/password entry screen is displayed. Drag a different icon to the circle in the center of the screen to directly activate the corresponding application. <Unlock screen> ◎When you turn on the PTL21 for the first time, the initial setting screen is displayed after you unlock the screen. Turning Off the Power1 Hold down p for at least 0.5 second.The phone options screen is displayed. 2 [Power off] → [OK]Sleep ModeIf no operation is made for a while, the screen is turned off temporarily and the sleep mode is set. You can also press p at any time to set the sleep mode.](https://usermanual.wiki/Pantech-Co/CDMAPTL21/User-Guide-1778738-Page-11.png)
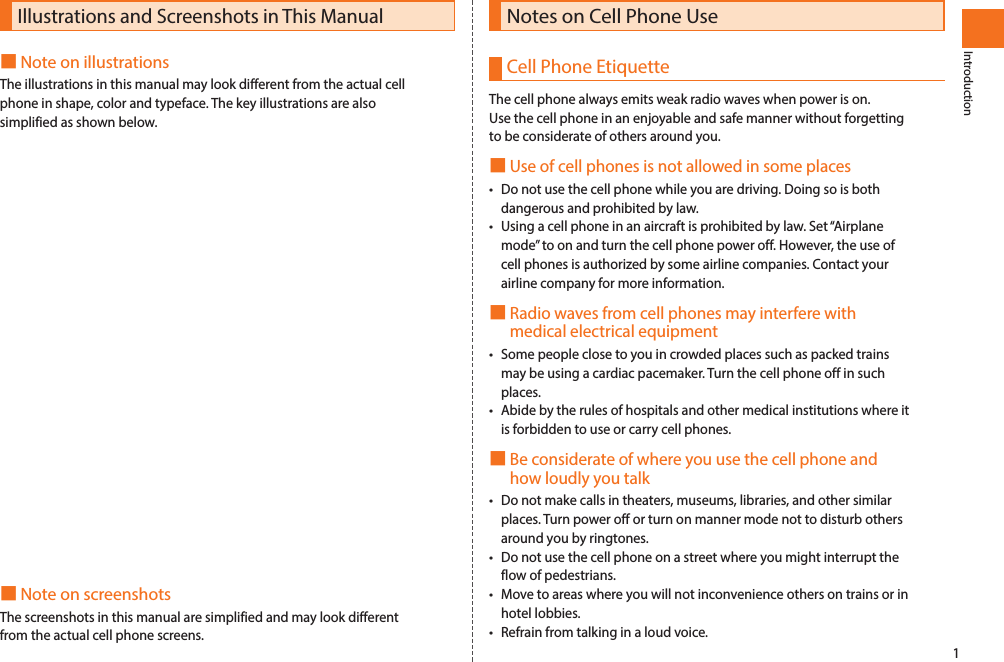
![10Getting Ready■Canceling the sleep mode1 Press p while the sleep mode is set.The unlock screen is displayed.Initial SetupWhen you turn on the PTL21 for the first time, or after changing the IC-Card or performing a factory data reset, the initial setting screen is displayed after you unlock the screen. Setting Google AccountSet up a Google account to use the online services provided by Google.1 [言語変更] (Change language)2 Select a language.3 Tap the Android robot icon.■If you do not have a Google account4 [Create]5 Enter your first name, last name and a username → [Next]Follow the instructions displayed on the screen to complete the account creation and setup. ■If you already have a Google account4 [Sign in]5 Enter your username and password → [Sign in]Follow the instructions displayed on the screen to complete the account setup. ◎If you did not set up a Google account by tapping [Skip] on the initial setting screen, you can still set up an account in “Accounts & sync” or when activating for the first time applications requiring to have a Google account. Switching the Display Language to EnglishYou can switch the display language for function names and other items to English.A part or all the contents may not be displayed in English depending on the application.1 On the Home screen, [ ] → [設定] (Settings) → [言語とキーボード] (Language & keyboard) → [言語を選択(Select language)]2 [English] ◎The language can also be switched by tapping [言語変更] (Change Language) on the initial setting screen.Initial Setup of E-mailWhen performing initial setup, an e-mail address is automatically set. You can change this e-mail address. 1 On the Home screen, [ ]The E-mail screen is displayed.](https://usermanual.wiki/Pantech-Co/CDMAPTL21/User-Guide-1778738-Page-12.png)
![11Getting Ready2 [OK]When the e-mail setup is completed, your e-mail address is displayed. Setting au one-IDYou can register a new au one-ID or one you have obtained beforehand. Set the au one-ID in common in your PTL21 and PCs, and save the ID and password in your PTL21. By acquiring and saving an au one-ID, you can use a variety of services provided by au, such as “au kantan payment method”. 1 On the Home screen, [ ] → [Settings] → [au one-ID setting]A screen about packet communication charges is displayed. 2 [OK] → [auone-IDの設定・保存] (au one-ID setting and saving)Tap “auone-IDとは?” (“What is au one-ID?”) to display an explanation in the browser. 3 Enter the security code → [OK]The security code is the four-digit number you wrote on your subscription form. If the security code is incorrectly entered three times consecutively during a single day, the setting operation will be disabled until the next day. ■When registering your phone number as a new au one-ID4 Enter the password → [利用規約に同意して登録] (Iaccept the terms of service and register)■When registering a new au one-ID different from you phone number4お好きなauone-IDを登録したい方はこちら (To register an au one-ID of your choice)Follow the instructions displayed on the screen to perform a new registration. The newly registered au one-ID is set in common in the PTL21 and the PCs. 取得済みのauone-IDを設定したい方はこちら (To set an au one-ID you already obtained)Your au one-ID is set in common in the PTL21 and the PCs. Follow the instructions displayed on the screen to complete the procedure. 5 [設定画面へ] (Go to setting screen) → Follow the instructions displayed on the screen.Set the necessary information to reissue a password. au IC-CardAn au IC-Card records your personal information such as phone numbers. ◎Follow the precautions below when handling the au IC-Card, otherwise it may cause a malfunction or damage to the au IC-Card. • Do not touch the IC (metal surface) part of the au IC-Card, or the IC-Card terminal on the PTL21. • Confirm the orientation before inserting the au IC-Card. • Do not forcibly insert or remove the au IC-Card. ◎Be careful not to lose the au IC-Card after when removing it. Removing au IC-CardTurn off the power and remove the battery pack before removing or](https://usermanual.wiki/Pantech-Co/CDMAPTL21/User-Guide-1778738-Page-13.png)
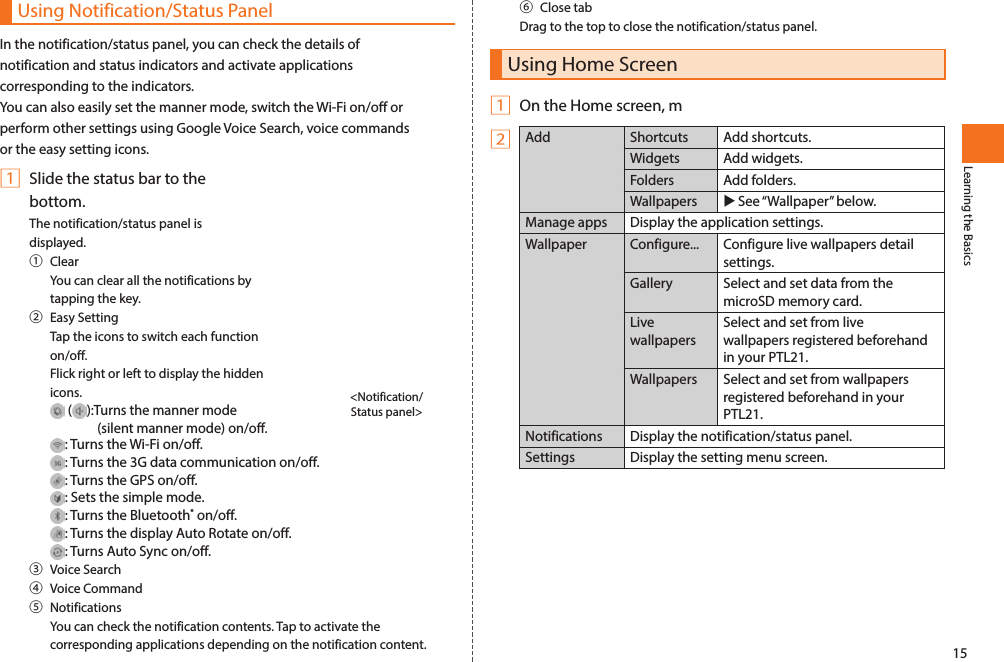
![16Learning the BasicsSwitching Home ScreenSlide or flick the Home screen to the left or right to switch between Home screens. 7 Home screens are available. Shortcuts, widgets and folders can be added and used on each Home screen. The current displayed position can be checked with the locator on the top of the screen. ■Using blind homeUse the blind home function to hide all icons on the Home screen. This function is convenient when you want to see the wallpaper you have set. 1 Pinch out the Home screen.All the icons on the Home screen disappear. Pinch in the Home screen to make the icons appear again. ■Using home preview screen1 Tap the locator on the Home screen.The home preview screen is displayed. Flick to the top, bottom, right or left to rotate or tilt the Home screens displayed in 3D.2 Tap a Home screen displayed in 3D.The tapped Home screen is displayed.Using WidgetsWidgets are simple applications that can be activated on the Home screen. ■Adding widgets1 On the Home screen,m→ [Add] → [Widgets]■When adding Android widgets2 [Android Widgets]3 Select a widget.■When adding Pantech widgets2 [Pantech Widgets]3 Select a widget.A style and detail items selection screen is displayed depending on the widget. Follow the instructions displayed on the screen. ■Removing widgets1 Long-touch the widget you want to remove on the Home screen.The PTL21 vibrates indicating that the widget can be moved. 2 Drag the widget to at the bottom of the screen and then drop it.](https://usermanual.wiki/Pantech-Co/CDMAPTL21/User-Guide-1778738-Page-22.png)
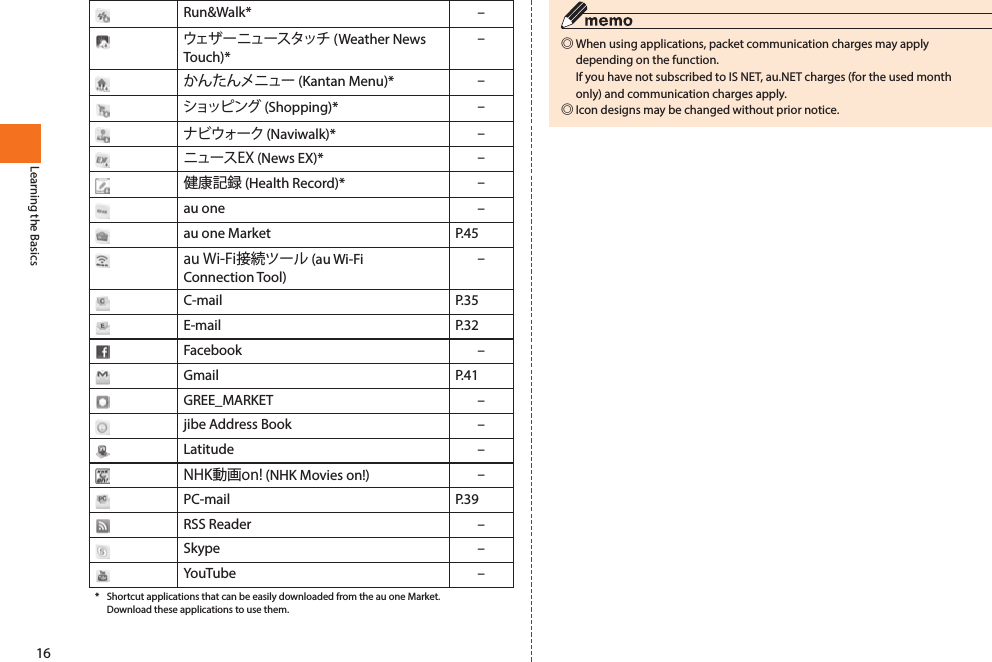
![15Learning the BasicsUsing Launcher MenuInstalled applications are displayed as icons in the launcher menu. Activate an application by tapping the corresponding icon. Displaying Launcher Menu1 On the Home screen, [ ]The launcher menu is displayed. Slide or flick the launcher menu screen to the left or right to switch between launcher menu screens. <Launcher menu screen>Icon Application PageAlarm/Clock –Web P.42Camera P.43Calendar –Gallery P.44Compass –Downloads –Talk –Document Viewer –Navigation –News & Weather –Video Player –Places –Profile –Market P.45Maps –Music Player –Voice Command –Voice Memo –Voice Search –Google Search –Clock Tools –Sketch Pad –IrDA –Settings P.47Converter –Call log P.30Weather –Calculator –Phone P.28Contacts P.31Camcorder P.44Handy Memo –GREE* –LISMO Book Store* –](https://usermanual.wiki/Pantech-Co/CDMAPTL21/User-Guide-1778738-Page-23.png)
![15Learning the BasicsA simple mode is available with your PTL21 to operate easily the functions you often use.Switching to Simple Mode1 Slide the status bar to the bottom.2 [Simple Mode] in Easy Setting → [Yes] ◎When switching to simple mode, some settings may be disabled, changed or temporarily canceled. Switching to Normal Mode1 On the simple mode Home screen, [Menu]2 [Settings] → [Normal mode] → [Yes] ◎When switching to normal mode, some settings may be disabled, changed or temporarily canceled. Using Power Control WidgetBy using the power control widget, you can easily turn on/off the Wi-Fi, Bluetooth®, GPS and auto sync functions, and adjust the screen brightness. The battery will last longer if unused functions are turned off and the screen is set to a darker brightness.1 On the Home screen, m → [Add] → [Widgets]2 [Android Widgets]3 [Power Control]The power control widget is added to the Home screen.4 Tap the function switching icon.Closing the ApplicationsThe amount of memory used and battery consumption can be reduced by closing unused applications.1 Hold down h for at least 0.5 second.The running applications list screen is displayed.2 [ ] on the top right corner of the application to close.Reducing Power Consumption Using Simple Mode](https://usermanual.wiki/Pantech-Co/CDMAPTL21/User-Guide-1778738-Page-25.png)
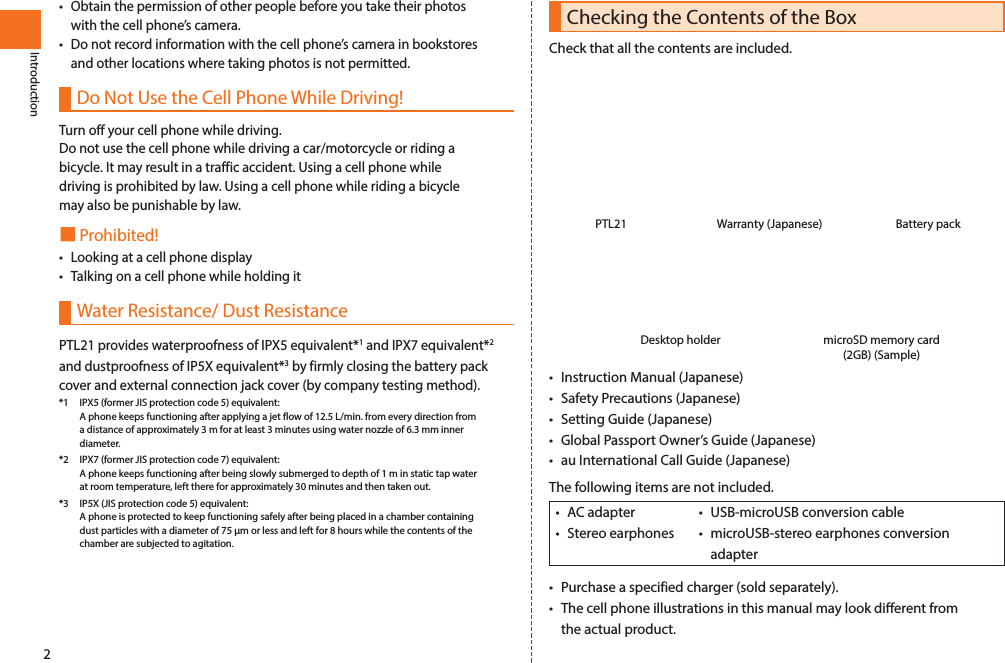
![24Character InputHow to Input the CharactersTap the character entry field on the PTL21 to display a keyboard (software keyboard) on the screen, and enter characters by tapping the keys on the screen. The “Android keyboard”, “DioPen KOR/CHN/PO IME”, “iWnn IME” and “LaLa Stroke” are available on the PTL21.The following explains how to input characters using “iWnn IME”. <Character entry screen “10-key”> <Character entry screen “QWERTY”>① Character entry mode icons: Hiragana-Kanji: Full-width Katakana: Half-width Katakana: Full-width Alphabet: Half-width Alphabet: Full-width Numeric: Half-width Numeric: Voice Input② Character entry area③ Normal conversion candidates list/Prediction candidates list/Relational prediction candidates list Enter characters and tap [ ] to display the normal conversion candidates list. If the word prediction function is enabled, the prediction candidates list is displayed when characters are entered. The relational prediction candidates list is displayed when an entry is selected from the prediction candidates list. You can enlarge the candidates list display area by tapping [ ]. Tap [ ] to return to the original display. ④ Back key/Undo key: Displays the preceding character assign to the key (back function).: Returns the determined character to the undermined state.⑤ Software keyboard You can enter the characters assigned to each key. ⑥ Cursor key Moves the cursor to the right or left and changes the range of characters when converting characters. ⑦ Emoji, Symbol, and Emoticon key/Alphanumeric, Kana key: Displays the list of Emoji, Symbols, and Emoticons. : Switches conversion candidates of input characters to alphabet and kana. ⑧ Entry mode switch key Switches the character entry mode. When switching the entry mode, the display changes as follows. : Hiragana-Kanji: Full-width Katakana: Half-width Katakana: Full-width Alphabet: Half-width Alphabet: Full-width NumericCharacter Input](https://usermanual.wiki/Pantech-Co/CDMAPTL21/User-Guide-1778738-Page-26.png)
![25Character Input: Half-width Numeric: Voice Input⑨ DEL key Deletes the selected character or the character on the left of the cursor. Long-touch to delete characters continuously. ⑩ Handwriting key/Conversion key: Switches to handwriting entry. : Displays the normal conversion candidates list. ⑪ OK key/Enter key: Determines the entered characters. : Inserts a line feed at the cursor position. ⑫ Uppercase/Lowercase characters switch key: When entering hiragana or katakana, switches the entered character between uppercase and lowercase, or adds dakuten or handakuten. : When entering alphabetic characters, switches the entered character between uppercase and lowercase. ⑬ Shift key: Lowercase character entry: Uppercase character entry: Uppercase character entry lock ◎Displayed icons and functions that can be used may differ depending on the application or the screen. Switching Character Entry Mode1 On the character entry screen, long-touch the entry mode switch key → [Input Mode]2 Select a character type. ◎The character type is switched in order of “Hiragana-Kanji” → “Half-width Alphabet” → “Half-width Numeric” → “Voice Input” each time you type the input mode key. ◎Some characters cannot be used depending on the application or the screen. Switching Software Keyboards“10-key” and “QWERTY” software keyboards are available. 1 On the character entry screen, long-touch the entry mode switch key → [10-key ⇔ QWERTY]Entering Hiragana/Kanji/Katakana/Alphanumeric■Entering hiragana/kanji/katakanaSwitch the entry mode to “Hiragana-Kanji”. When the software keyboard is set to “10-key”, tap the assigned keys to enter characters. When the software keyboard is set to “QWERTY”, use romaji to enter characters.■Entering alphabetSwitch the entry mode to “Full-width Alphabet” or “Half-width Alphabet”. When the software keyboard is set to “10-key”, tap the assigned keys to enter characters. When the software keyboard is set to “QWERTY”, tap the keys directly.](https://usermanual.wiki/Pantech-Co/CDMAPTL21/User-Guide-1778738-Page-27.png)
![24Character Input■Entering numericSwitch the entry mode to “Full-width Numeric” or “Half-width Numeric”. Tap the keys directly with either software keyboard. With the software keyboard set to “QWERTY”, tap the shift key to switch between available symbols. ■Flick inputWhen the software keyboard is “10-key”, you can enter a desired character by flicking the key up, down, right or left without tapping the key repeatedly. By long-touching a key, the candidates that can be entered by flicking entry are displayed. Flick the key in the direction of a desired character to enter that character. Example: To enter “あ”, tap [ ], and to enter “お”, flick [ ] down.Correcting Characters■Back functionWhen the software keyboard is “10-key”, tap [ ] when you tapped a key too many times and went beyond the desired character to return to the previous character. Example: If “く” is displayed while you want to enter “き”, you can tap [] to return to “き”. ◎The back function cannot be used with flick input. ■Undo functionWhen the software keyboard is “10-key”, tap [ ] after a character has been determined to return it to the undetermined state. Entering Emoji/Symbol/EmoticonDisplay the Emoji/Symbol/Emoticon list and enter these characters on the character entry screen. Tap [ ] when there is no conversion target on the character entry screen. Tap the “Emoji”, “Symbol” or “Emoticon” tab on the top of the list to switch between the corresponding lists. : Returns to the character entry screen. / : Displays the previous/next page. : Deletes the selected character or the character on the left of the cursor. ◎Emoji can be used only with e-mail, C-mail and Handy Memo. ◎D-Emoji can be used only with e-mail. ◎Some Emoji/Symbol/Emoticon cannot be used depending on the application or the screen. Using Voice Input1 On the character input screen, long-touch the entry mode switch key → [Input Mode] → [Voice Input]2 [Voice Input Start]Voice input is activated. 3 Say any keyword in front of the microphone.Characters are entered when the processing is finished.](https://usermanual.wiki/Pantech-Co/CDMAPTL21/User-Guide-1778738-Page-28.png)
![25Character InputUsing Handwriting InputHandwriting input is possible by using the “LaLa Stroke” software keyboard. 1 On the character input screen, [ ]The handwriting entry screen is displayed. ① Cursor key Moves the cursor to the right or left and changes the range of characters when converting characters. ② Keyboard key Switches to the iWnn IME input. ③ Entry mode switch key Switches the entry mode. When switching the entry mode, the display changes as follows. : Hiragana-Kanji (Kanji cannot be entered directly. Enter hiragana then convert them to kanji) : Katakana: Symbol: Numeric: Alphabet<Handwriting entry screen>④ Conversion/Space key Displays the normal conversion candidates list / Enters a space ⑤ DEL key Deletes the selected character or the character on the left of the cursor. Long-touch to delete characters continuously. ⑥ Character entry field⑦ OK key/Enter key Determines the entered characters / Inserts a line feed at the cursor position. 2 Write characters in the character entry field.Switching Input Software1 On the character entry screen, long-touch the character entry area → [Input Method]2Android keyboardInput software used mainly to enter alphanumeric characters. Can also be used to write in Portuguese. • CannotbeusedtowriteinJapanese.DioPen KOR/CHN/PO IMEInput software used to write in English, Korean, Chinese (simplified and traditional), and Portuguese. • CannotbeusedtowriteinJapanese.• Tap / / / to switch the input language. • SetChinesetoSimplifiedorTraditionalonthe Home screen [ ] → [Settings] → [Language & keyboard] → [DioPen KOR/CHN/PO IME] → [Language settings] → [Chinese detail settings] → [Set Chinese character] iWnn IME Input software used mainly to enter hiragana, kanji and katakana. LaLa Stroke Input software to handwrite in Japanese and English.](https://usermanual.wiki/Pantech-Co/CDMAPTL21/User-Guide-1778738-Page-29.png)
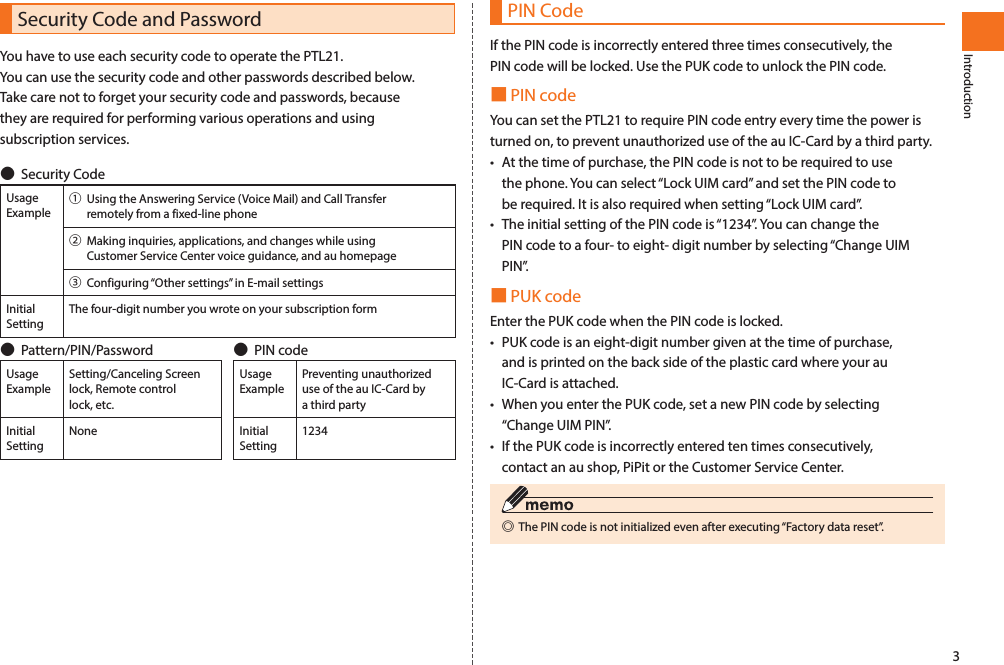
![28PhoneMaking a Call1 On the Home screen, [ ]The phone number entry screen is displayed. 2 Enter a phone number.When calling to a fixed-line phone, enter the phone number starting with the area code even if you are in the same area.3 [ ] → Talk → [End]Press v during a call to adjust the sound level (other party’s voice). ◎If you cover the screen while dialing or calling, the display is turned off to prevent erroneous operation. ◎Dial services available from au phones• Call with fixed-line phones all over Japan• Call with cell phones, PHS, and car phones all over Japan• 001 (001 international call service: Subscription is unnecessary)• 171 (Disaster Emergency Message Dial)• 177 (Weather forecast: The area code is necessary)• 117 (Time signal)• 104 (Directory assistance)• 115 (Sending telegram)• 110 (Emergency call to Police)★• 119 (Emergency call to Fire and Ambulance)★• 118 (Emergency call to Regional Coast Guard Headquarters)★• 157 (Customer Service Center)• Maritime telephone* The numbers with ★ are emergency call numbers. PTL21 notifies your present location to the emergency call destination with a signal from a base station when you call the Police, Fire and Ambulance, or Regional Coast Guard Headquarters.* The following NTT services are unavailable. Collect call, message service, dial Q2, 116 (NTT business information)■Using the special number key on the phone number entry screen1 On the phone number entry screen, [ ]2Add 184 Add “184 (Hide Caller ID Notification)” Cancel 184 Cancel “184 (Hide Caller ID Notification)” Add 186 Add “186 (Display Caller ID Notification)” Cancel 186 Cancel “186 (Display Caller ID Notification)” Add P Make a phone call with P (pause) dial. Add + Add “+ (001 international access code)” Cancel + Cancel “+ (001 international access code)” International call Add “+ (001 international access code)” and the country code for each country. ◎“184” and “186” cannot be added at the same time. ◎“Area Settings” is configure to something else than “Japan”, “184” and “186” cannot be added. Phone](https://usermanual.wiki/Pantech-Co/CDMAPTL21/User-Guide-1778738-Page-30.png)
![29PhoneAnswering a Call1 Slide to the right during an incoming call.2 Talk → [End]■Display when receiving a callThe following content is displayed when receiving a call. • If the other party’s phone number is sent, the number is displayed. • If the other party’s phone number and name are registered in Contacts, their name and other information are displayed. If a picture is set for the other party, it is also displayed on the screen. • If the other party’s phone number has not been sent, the reason is displayed as follows. “ID Unsent”, “Pay Phone” or “Not Support”*.* The other party is calling from a phone that does not support ID sending. When the call was not answered ◎ is displayed on the status bar. Open the notification/status panel to check the calling time, the phone number, and the name if registered with the phone number. Tap the notification content to display the call log screen. Using International Call ◎The international access code differs depending on the country. Making an International Call (001International Call Service)International call from the PTL21 can be made without any special procedure. Example: To call 212-123-XXXX in the USA1 On the phone number entry screen, enter the international access code, country code, area code and phone number → [ ]International access code*1 ➡Country code (USA) ➡Area code*2➡Phone number001010 1 212 123XXXX*1 Long-touch “0” to enter “+”, and “001010” is entered automatically when calling. *2 If the area code starts with “0”, dial it without including the “0”. (There are some exceptions such as fixed-line phones in Italy or Moscow.) ◎International call charges are billed together with monthly charges. ◎Application can be made to disable the 001 International Call Service for those who do not want to use it. For more information on 001 International Call Service, dial either of the following numbers: From au phones (toll free): 157 (area code not required) From fixed-line phones: 0077-7-111(toll-free) Open from 9:00 to 20:00 everyday](https://usermanual.wiki/Pantech-Co/CDMAPTL21/User-Guide-1778738-Page-31.png)
![30PhoneReturning a Call (Incoming Log/Outgoing Log)Incoming Call/Outgoing Call log can be used to make phone calls. 1 On the Home screen, [ ] → [Call log]: Incoming call: Missed call: Blocked call: Outgoing call: Incoming C-mail: Outgoing C-mail: If a log contains several consecutive calls with the same number, tap it to display the details. 2 Tap the log you want to call.The Incoming Call/Outgoing Call detail screen is displayed.Tapping a C-mail log displays the thread detail screen.3 [Call]Setting the Manner ModeTurn on the manner mode while driving or in public spaces to not disturb others with phone and mail ringtones. In manner mode, all sound levels are set to 0, except music, video and other media sounds and alarm tones. 1 Hold down p for at least 0.5 second.2 [Manner mode]To turn off the manner mode, hold down p once more until the option screen is displayed and tap “Manner mode”. ◎The use of cell phone while driving is dangerous and prohibited by law. Set the manner mode while driving. ◎To set the vibrator, on the Home screen, [ ] → [Settings] → [Sound] → [Vibrate].](https://usermanual.wiki/Pantech-Co/CDMAPTL21/User-Guide-1778738-Page-32.png)
![31ContactsSaving a Contact ◎Using “Accounts & sync”, contacts information of a Google account saved in a server can be synchronized with the Contacts in the PTL21. 1 On the Home screen, [ ] → [Contacts]2 m → [New contact]The contact edit screen is displayed. When you register multiple accounts, the screen to select an account is displayed. Select an account to save a contact in. 3 Select and fill each item.4 [Done] ◎If the phone number is a fixed-line phone, enter the phone number starting with the area code. ◎Tap [ ]/[ ] to add/delete an item. Editing Contacts1 On the Home screen, [ ] → [Contacts]2 Long-touch a contact → [Edit contact]3 Select and edit an item.4 [Done]Using ContactsYou can use Contacts entries to easily make phone calls and send mail messages. 1 On the Home screen, [ ] → [Contacts]2 Select a contact.: Makes a call Special numbers can also be added. : Creates a C-mail : Sends e-mail, PC-mail or Gmail messages: Uses a chat : Displays Google map * Displayed icons may differ depending on the items registered in the contact and the PTL21 settings. Contacts](https://usermanual.wiki/Pantech-Co/CDMAPTL21/User-Guide-1778738-Page-33.png)
![32MailE-mail (XXX@ezweb.ne.jp) is a service to exchange e-mails with other cell phones that support e-mail, and with PC. In addition to text messages, you can also send photos and movies by e-mail. ◎You must subscribe to IS NET to use e-mails. If you did not subscribe at the time of purchase, contact an au shop or the Customer Service Center. ◎E-mails can also be used overseas. For details, refer to the Global Passport Owner’s Guide (Japanese) ◎The packet communication charges for sending and receiving e-mails vary depending on the amount of data sent and received. When using e-mails overseas, high charges may be incurred. For details, refer to the au comprehensive catalog or au homepage. ◎Sending and receiving e-mails may take time depending on the attached data and the area signal strength. Sending E-mail1 On the Home screen, [ ]The E-mail screen is displayed. 2 [New]3 Select the enter destination field.4 Select/Enter a destination.Contacts Selects from the mail addresses registered in Contacts. Received Record Select a mail address from the received record. Sent Record Select a mail address from the sent record. Direct Input Enter a mail address directly. My E-mail address Your e-mail address is input. 5 Select the subject entry field → Enter a subject.6 Select the message entry field → Enter a message.7 [Send]8 [Yes]Receiving E-mail1 An e-mail message is received.When an e-mail message is received, is displayed on the status bar, and the e-mail ring tone sounds. 2 Slide the status bar to the bottom.3 Select e-mail information.4 Select the received e-mail.Viewing Received E-mailsSent and received e-mails, as well as e-mail saved without being sent are saved in each mail box. 1 On the Home screen, [ ]2 Select a folder.3 Select an e-mail.MailUsing E-mail](https://usermanual.wiki/Pantech-Co/CDMAPTL21/User-Guide-1778738-Page-34.png)
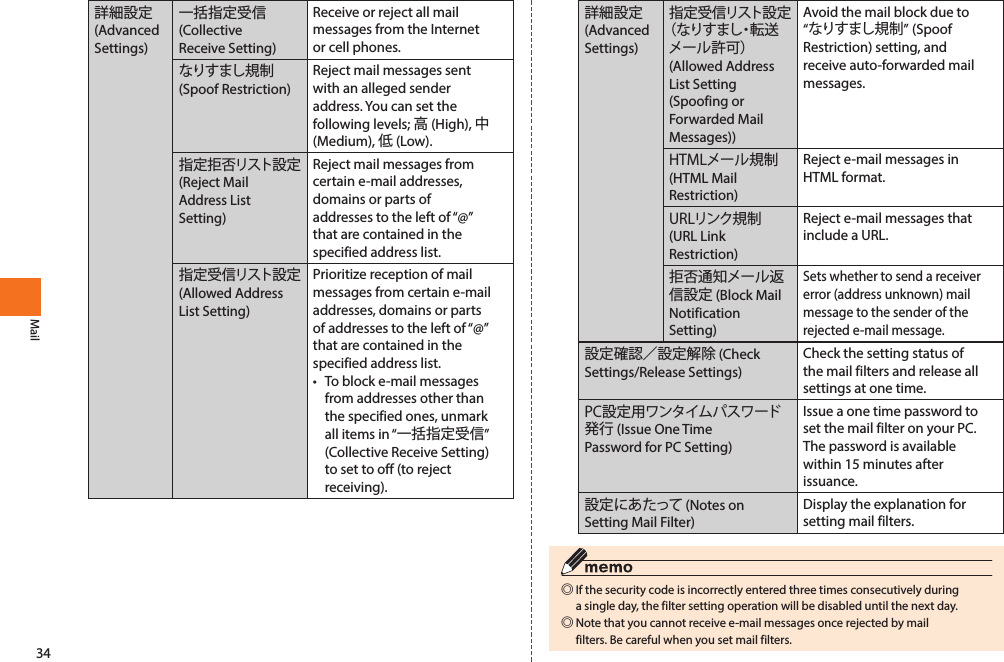
![33MailChanging Your E-mail AddressThe e-mail address is automatically set when the E-mail is initialized, but you can change the e-mail address after the initial settings.1 On the e-mail screen/mail box screen/folder list screen, [Setting] → [E-mail settings]The e-mail settings screen is displayed.2 [Other settings] → [OK]3 [Eメールアドレスの変更] (Change e-mail address) → Select (Entry field) → Enter your security code → [送信] (Send)4 [承諾する] (Accept)5 Select (Entry field) → Enter the part of the address to the left of “@” (variable part).6 [送信] (Send) → [OK] ◎You can input up to 30-byte alphanumeric characters, including “-”, “.”, and “_” for the part of the e-mail address that can be changed. However, you can not use consecutive “.” or use them for the first or last character. Also, you cannot use “0” as the first character. ◎Note that immediately after changing your e-mail address, you may be not be able to receive e-mails for a short time. ◎If the e-mail address that you input is already being used, a message appears requesting that you input a different e-mail address. Input a new address. ◎It is possible to change your e-mail address three times within a single day. ◎If the security code is incorrectly entered three times consecutively during a single day, the changing operation will be disabled until the next day.Setting Mail FiltersMail filters have functions to receive and reject specific e-mail messages and to reject messages spoofing cells phones or PHSs. 1 On the e-mail screen/mail box screen/folder list screen, [Setting] → [E-mail settings]The e-mail settings screen is displayed. 2 [Other settings] → [OK]■Setting the mail filter as recommended3 [オススメの設定はこちら] (See Recommended Settings) → [登録] (Register)Set the mail filter that enables to reject spoofing and auto-forwarded mail messages, and to receive mail messages from cell phones, PHSs or PCs. ■Setting details of the mail filter3 [迷惑メールフィルター] (Mail Filter) → Select (Entry field) → Enter your security code → [送信](Send)4カンタン設定 (Simple Settings)1 . 「携帯」「PHS」「PC」メールを受信 (1. Receive Mail Messages from Cell Phone, PHS or PC)Reject spoofing or auto-forwarded mail messages, and receive mail messages from cell phones, PHSs or PCs. 2.「携帯」「PHS」メールのみを受信 (2. Receive only Mail Messages from Cell Phone or PHS)Reject mail messages from PCs, spoofing mail messages or auto-forwarded mail messages, and receive mail messages from cell phones or PHSs.](https://usermanual.wiki/Pantech-Co/CDMAPTL21/User-Guide-1778738-Page-35.png)
![33MailC-mail is a service that uses phone numbers as addresses to exchange messages between cell phones. C-mail messages can be sent and received also between cell phones from other companies. ◎For using C-mails overseas, refer to the Global Passport Owner’s Guide (Japanese). Sending C-mailYou can send a message consisting of kanji, hiragana, katakana, alphanumeric, symbols, emoji and emoticon. 1 On the Home screen, [ ] → [C-mail]2 [Create New]3 Select the destination entry field → Enter a destination.4 Select the message entry field → Enter a message.The maximum length of the message is 70 full-width/140 half-width characters.5 [Send] ◎C-mail messages of more than 51 full-width/101 half-width characters may be divided and received in 2 C-mail messages depending on the destination. Receiving C-mail1 A C-mail message is received.When a C-mail message is received from the C-mail center, is displayed on the status bar, and the C-mail ring tone sounds. 2 Slide the status bar to the bottom.3 Select C-mail information. ◎Charges do not apply when receiving C-mails. ◎C-mail messages of more than 51 full-width/101 half-width characters are divided and received in 2 C-mail messages. ◎Messages may not be displayed properly depending on the content. Viewing Received C-mailsC-mail messages received from the other party and C-mail messages sent to them are displayed together in the same thread. A thread list is displayed on the C-mail screen. 1 On the Home screen, [ ] → [C-mail]2 Select a thread.Using C-mail](https://usermanual.wiki/Pantech-Co/CDMAPTL21/User-Guide-1778738-Page-37.png)

![33Mail ◎For more details about the Japan Meteorological Agency Earthquake Early Warning, refer to the Japan Meteorological Agency homepage. http://www.jma.go.jp/ (for PC)When an Earthquake Early Warning is ReceivedWhen an Earthquake Early Warning is received, a special warning tone will sound and the phone will vibrate along with a notice on the screen.1 An Earthquake Early Warning is received.When an Earthquake Early Warning is received, a warning tone (cannot be changed) sounds and is displayed in the status bar.2 Slide the status bar to the bottom.3Select the Earthquake Early Warning information. ◎Earthquake Early Warning cannot be received when in a call, and in some cases when receiving or sending a C-mail/e-mail or when using the browser or other applications. ◎Earthquake Early Warning cannot be received in some cases when the power to the mobile phone is turned off, or when in an area with poor signal quality (such as in tunnels or below ground). In these cases, missed Earthquake Early Warning cannot be received again. ◎This system is not the same as those that distribute Earthquake Early Warning to TV, radio, or other forms of media and therefore the time when such notifications are received may vary from those other media sources. ◎In some cases you may receive information regarding a region different from that of your current location. ◎You cannot change the Earthquake Early Warning tone or adjust its volume.Setting Up the Earthquake Early Warning1 On the C-mail screen, m → [Settings]The C-mail settings screen is displayed.2Receive Setting Set whether or not you want to receive Earthquake Early Warning.[Receive] [Not Receive]Check Ring/Vib This option allows you to hear the warning tone that is played when an Earthquake Early Warning is received and feel the vibration that occurs.Sound in manner modeSet the warning tone when in manner mode. The phone vibrates regardless of the current [Vibrate] setting.[Noti. with ringtone & vibration] [Noti. with only vibration]•When set to [Noti. with ringtone & vibration], the warning tone will play and the phone will vibrate, even when the phone is set to manner mode or silent mode. • Whensetto[Noti.withonlyvibration],thephone will only vibrate without a warning tone when set to manner mode or silent mode.](https://usermanual.wiki/Pantech-Co/CDMAPTL21/User-Guide-1778738-Page-39.png)
![38MailSelect ringtone Set the ring tone to play when a new C-mail is received.Vibrate Set the type of vibration when a new C-mail is received.Setting Receiving Filter1 On the C-mail screen, m → [Settings] → [Receiving filter settings]2Specified No. setupSpecify a particular phone number to block incoming C-mails. Specified No. listThe specified number list is displayed. • Registeraphonenumbertoblockincoming C-mails by pressing m and selecting the entry mode from “Quote Contacts”, “Quote Outgoing call log”, “Quote Incoming call log”, “Quote C-mail log”, and “Direct input”. • Taparegisteredphonenumber→ “Edit No.” to edit a phone number. • Taparegisteredphonenumber→ “Delete No.” to delete a phone number. • Youcanregisterupto20phonenumbers.• If“184(HideCallerIDNotification)”or“186(Display Caller ID Notification)” is added before a phone number, delete “184” or “186” before registering the phone number. • Thesenderreceiveanormalconfirmationeven if the C-mail message is rejected by the filter. Normal charges are applied. Unregistered ContactsBlock C-mails from all phone numbers that are not registered in your Contacts. Setting Up C-mail1 On the C-mail screen, m → [Settings]The C-mail settings screen is displayed.2Delete old messagesSets whether to delete C-mails in a thread, starting from the oldest, when the maximum number of text messages set via the [Text message limit] setting is reached.Text message limitSet the maximum number of C-mails to display in a thread.Edit signature Set the text that you can insert at the end of your text messages.Signature auto-appendSet whether to automatically insert the signature you have set at the end of all your text messages.Store function Set whether to automatically store C-mail messages that failed to be sent in the C-mail Message Center.Select & Store: Select whether to store messages individually.Automatically: Automatically store in the C-mail Message Center.Receiving filter settingsSet up filters for incoming mail.Receive Setting Settings for the Earthquake Early Warning.Check Ring/VibSound in manner modeNotifications Set whether to display a notification icon in the status bar when a C-mail is received.](https://usermanual.wiki/Pantech-Co/CDMAPTL21/User-Guide-1778738-Page-40.png)
![33MailPC-mail can be used from your PTL21 by setting your mail account used with au one mail or on your PC. • A PC-mail account must be set in advance to use PC-mail. • To use au one mail in PC-mail, au one mail must be set in advance by acquiring an au one mail account, enabling IMAP setting (initial setting), and setting a mail password. * Mail messages saved in the PTL21 may be lost if au one mail POP download setting is enabled and a POP3 server is set for the PC-mail in the PTL21. Setting Up PC-mail AccountA mail server can be set automatically for several mail addresses, including au one mail addresses, and settings can be configured easily. If the mail server is not set automatically, or if you want to configure the settings manually, select “Manual setup” and specify a user name and a mail server. For details about mail server setting values, contact your service provider or your mail account administrator beforehand. 1 On the Home screen, [ ] → [PC-mail]If no mail account is registered in PC-mail, the mail account registration screen is displayed. 2 Select the mail address field → Enter a mail address.3 Select the password field → Enter a password.4 [Next]The mail server is set automatically. Depending on the mail address, the mail server may not be set automatically. If the mail server is not set automatically, or if you selected “Manual setup”, specify a user name and a mail server. Using PC-mail 5 Select the account name entry field → Enter a account name.6 Select the your name entry field → Enter your name.7 [Done] ◎When registering your second mail account, after step 1, press m → [More] → [Accounts] → m → [Add account]. ◎From the third mail account, after step 1, press m → [Add account]. ◎When registering a Exchange account in PC-mail, a confirmation/setting screen regarding security remote management is displayed during or after the settings. Follow the instructions displayed on the screen. ◎When setting the Exchange in “Accounts & sync”, the exchange account is set automatically in PC-mail.Sending PC-mail1 On the Home screen, [ ] → [PC-mail]If multiple mail accounts are registered, the PC-mail screen is displayed. Select a mail account. 2 [Create new message]3 Select the destination entry field → Enter a destination.4 Select the subject entry field → Enter a subject.5 Select the message entry field → Enter a message.6 [Send]](https://usermanual.wiki/Pantech-Co/CDMAPTL21/User-Guide-1778738-Page-41.png)
![40MailReceiving PC-mail1 A PC-mail message is received. is displayed on the status bar, and the PC-mail ring tone sounds.2 Slide the status bar to the bottom.3 Select PC-mail information.4 Select the received PC-mail.Viewing Received PC-mailsSent and received PC-mail messages, as well as PC-mail messages saved without being sent are saved in each mail box. 1 On the Home screen, [ ] → [PC-mail]If multiple mail accounts are registered, the PC-mail screen is displayed. Select a mail account. 2 m→ [Mailbox]3 Select a folder.4 Select a PC-mail.](https://usermanual.wiki/Pantech-Co/CDMAPTL21/User-Guide-1778738-Page-42.png)
![33MailReceiving Gmail1 A Gmail message is received.When a Gmail message is received, is displayed on the status bar, and the Gmail ring tone sounds. 2 Slide the status bar to the bottom.3 Select Gmail information.4 Select the received mail.Viewing Received GmailsSent and received Gmail messages, as well as Gmail messages saved without being sent are saved and managed with labels. 1 On the Home screen, [ ] → [Gmail]When multiple Google accounts are registered and synchronized with Gmail, the inbox of the Google account used the last time is displayed. To change the account, m → [Accounts] → Select an account. 2 m → [Go to labels]3 Select a label.4 Select a mail.Gmail is a mail service provided by Google. You can send and receive Gmail messages with your PTL21. Mail data can be shared using Gmail between a PC and the PTL21 browsers. • A Google account is required to use Gmail. • For details about Gmail, refer to the Google homepage.• The service content may change without prior notice. Sending Gmail1 On the Home screen, [ ] → [Gmail]2 m → [Compose]3 Select the destination entry field → Enter a destination.4 Select the subject entry field → Enter a subject.5 Select the message entry field → Enter a message.6 [ ]Using Gmail](https://usermanual.wiki/Pantech-Co/CDMAPTL21/User-Guide-1778738-Page-43.png)
![42InternetPC websites can be viewed with the browser. Depending on websites, the screen size may be automatically adapted to smart phones or the site may already be designed for smart phones. Viewing Sites1 On the Home screen, [ ] → [Web]The browser basic operations are as follows• Tap:Selects/executesalinkorakey.• Slide:Scrollsthescreen.• Pinchin/Pinchout:Reduce/Enlargethescreen. Double-tap and [ ]/[ ] are also used. ([ ]/[ ] appears when the screen is slid.) * Some operations may not be available or may differ depending on the website. Using Address BarYou can enter keywords to make a search and enter URL to display websites. 1 On the browser screen, select the address bar.2 Enter a keyword/URL.3 Select an item from the search candidate list / Tap [ ] on the right of the address bar. ◎Google Voice Search can be used by tapping [ ] after step 1. Using Bookmarks/HistoryBookmarking a Web Page1 On the browser screen, m → [More] →[Add bookmark]The name and the URL can be edited. 2 [OK]Using Bookmarks/History1 On the browser screen, m → [Bookmarks]2 [Bookmarks] / [Most visited] / [History]3 Select a bookmark/history.InternetUsing Browser](https://usermanual.wiki/Pantech-Co/CDMAPTL21/User-Guide-1778738-Page-44.png)
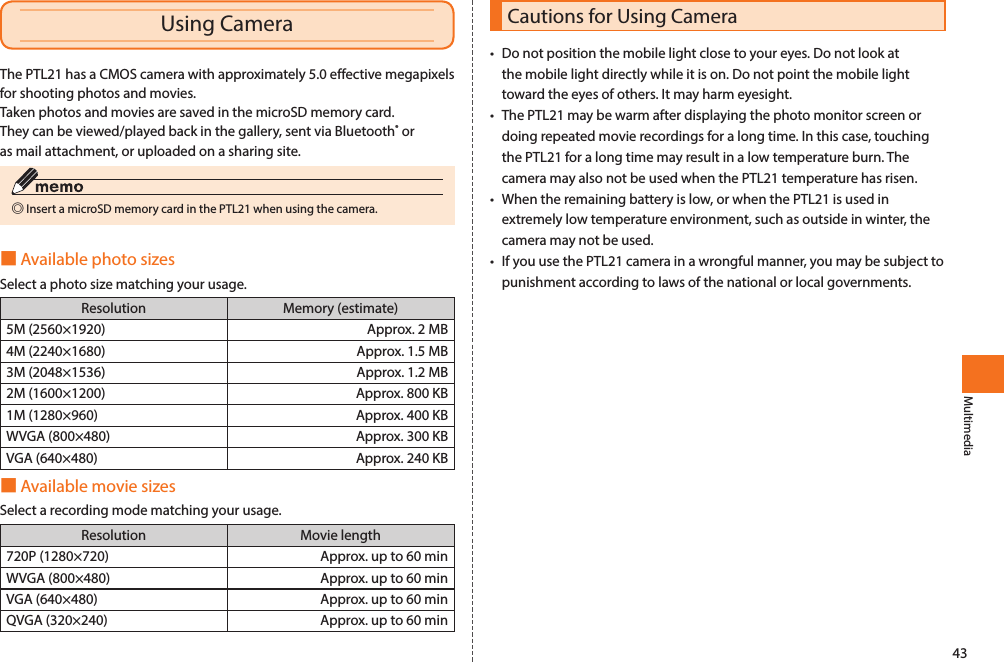
![44MultimediaIn the gallery, you can display, play back and share images and movies saved in the microSD memory card and edit images. Viewing Photos/Movies1 On the Home screen, [ ] → [Gallery]2 Select an album.3 Select an image/movie.When you select an image, the one image display screen is displayed.When you select a video, the video player is launched and the movie is played back. Using GalleryTaking a Photo1 On the Home screen, [ ] → [Camera]2 [ ]After the PTL21 has auto focused, the shutter sounds and the photo preview is displayed on the screen. The shot image data is automatically saved. Recording a Movie1 On the Home screen, [ ] → [Camcorder]2 [ ]3 [ ]/Elapsed recording time.A video preview is displayed on the screen. Recorded data is automatically saved.](https://usermanual.wiki/Pantech-Co/CDMAPTL21/User-Guide-1778738-Page-46.png)
![45ApplicationsUsing Android MarketAndroid Market is an application distribution service managed by Google. You can download free and fee-based applications to use them on your PTL21.• A Google account is required to use Android Market. • For details, visit the Google homepage or see the Android Market help section on the Android Market screen, m→ [Help]. • The service content may change without prior notice. 1 On the Home screen, [ ] → [Market]When you activate Android Market for the first time, the terms of service are displayed. Tap “Accept” after confirming the contents. ◎Some applications may not be available when a microSD memory card is not inserted. ◎Some applications make the display keep turned on or run in the background, weakening the battery. ◎You can uninstall an application when you do not need it anymore. Using au one Marketau one Market is an application distribution site managed by KDDI (au) for smart phones running Android. You can download free and fee-based applications to use them on your PTL21. You can search the desired applications by categories, keywords or ranking. • An au one-ID is required to use some functions. 1 On the Home screen, [ ] → [au one Market]The au one Market screen is displayed. When you activate au one Market for the first time, the terms of service are displayed. Tap “同意” (Agree) after confirming the contents. ◎Follow the terms of service to use au one Market. Procedures for downloading applications and making payment for fee-based applications differ depending on the distributor. ◎Some applications may not be available when a microSD memory card is not inserted. Applications](https://usermanual.wiki/Pantech-Co/CDMAPTL21/User-Guide-1778738-Page-47.png)
![46ApplicationsManaging ApplicationsYou can configure application general settings, delete downloaded applications and display detailed information on each application. 1 On the Home screen, [ ] → [Settings] →[Applications]2Unknown sourcesSets whether to authorize installation of applications downloaded from unknown sources. Manage applicationsDownloaded Select an application to display detailed information and perform operations such as uninstall, erase data, send to microSD, erase cache and stop forcefully depending on the application. AllOn microSDRunningRunning servicesA list of running services is displayed. You can select a service to stop it. Storage use The application size, data size, cache size, default settings and access authorization can be checked for each application. Data, cache and settings can also be erased. Battery use Displays the battery use percentage for each running component. Select a component to display its detailed information, hints on reducing power consumption and setting items names. Development USB debuggingSet debugging mode when a USB cable is connected. Stay awake Prevents the PTL21 from entering the sleep mode when recharging with the AC or DC adapter or when a USB cable is connected. Allow mock locationsSets whether to authorize the use of mock locations information data.](https://usermanual.wiki/Pantech-Co/CDMAPTL21/User-Guide-1778738-Page-48.png)
![47SettingsViewing the Setting Menu1 On the Home screen, [ ] → [Settings]The setting menu screen is displayed. Checking Your ProfileYou can check the phone number and e-mail address registered automatically in your PTL21, and register additional information, such as a phone number for your home, a Gmail address or a name. 1 On the setting menu screen, [Profile]2Edit Edits name, phone number or mail address.Send via IrDA Sends the profile via IrDA.Changing the Ring Tone1 On the setting menu screen, [Sound] → [Phone ringtone]2 Select a melody → [OK]Using the Remote Control LockIn case of loss of your PTL21, you can activate the Remote control lock by calling your PTL21 a set number of times from a specific phone number to lock the screen of your PTL21 in order to prevent others from using it. You can activate the Remote control lock on your PTL21 even if you did not set up the Remote control lock beforehand by calling the Customer Service Center or performing the necessary procedure on the au Customer Support site (Security Lock Service). ◎We recommend setting a pattern, PIN or password beforehand in “Set up screen lock”. ◎If “None” is set in “Set up screen lock”, the Remote control lock is activated with “1234” as a PIN. ■Setting up the Remote control lock1 On the setting menu screen, [Location & Security]2 [Remote control lock]When the screen has been locked, the unlock screen is displayed. Enter the set pattern, PIN, or password to unlock the screen. If “Remote control lock” is disabled in “Select device administrators”, “Activate device administrator?” is displayed. Tap “Activate” if you want to configure the Remote control lock. 3 Set [Remote control lock].After the Remote control lock has been set, “Valid Caller ID”, “Specified period” and “Incoming call count” can be configured. Settings](https://usermanual.wiki/Pantech-Co/CDMAPTL21/User-Guide-1778738-Page-49.png)
![48Settings4Valid Caller ID You can register up to three phone numbers. You can directly input a phone number or select from Contacts or the call log. You can also select “Payphone”. Specified period Set the time limit in which the number of calls set in “Incoming call count” should be received. Set from 1 to 10 minutes. Incoming call countSet the number of incoming calls until the Remote control lock is activated. Set from 3 to 10. ◎You can tap a set Valid Caller ID and select “Change phone number”, “Remove this phone number”, or “Remove all”. ■To activate the Remote control lock1 Call your PTL21 from a phone registered in “Valid Caller ID” as many times as set in “Incoming call count” within the “Specified period”. ◎Be sure to send your phone number when calling. ◎The Remote control lock cannot be activated if your PTL21 is turned off, is outside the service area, or if “Airplane mode” is turned on. The Remote control lock may also fail if your PTL21 is in an area with poor signal quality. ◎The Remote control lock cannot be activated if no au IC-Card, or if a IC-Card which is not yours is inserted in your PTL21. ◎If “Area Settings” is set to something else than “Japan”, the Remote control lock activation is not guaranteed. ■Unlocking the Remote control lockUnlock the screen lock with your PTL21. ◎If “Set up screen lock” is set to “None”, you can enter “1234” and tap [OK] after sliding to unlock in order to unlock the Remote control lock. ■Activating the Remote control lock using the Security Lock ServiceYou can activate the Remote control lock on your PTL21 even if you did not set the Remote control lock beforehand by calling the Customer Service Center or by submitting the necessary information from a PC. However, “Remote control lock” under “Select device administrators” must be activated to use this feature (it is disabled at the time of purchase). The Security Lock Service is available free of charge. ■Activate the Remote control lock by calling the Customer Service Center From au cell phones (toll-free): 113 (area code not required) From any other cell phone or fixed-line phone (toll-free): 0077-7-113• Available24hoursaday.• Followtheautomatedvoicepromptstocompletetheprocedure.■Activate the Remote control lock through au Customer Support (https://cs.kddi.com/) Log in au Customer Support (https://cs.kddi.com/) and follow the instructions on the screen to complete the procedure.](https://usermanual.wiki/Pantech-Co/CDMAPTL21/User-Guide-1778738-Page-50.png)
![47Settings ◎You must submit an application if using the Security Lock Service for the first time. (This can be submitted even after losing your phone.) ◎The Remote control lock cannot be activated if your PTL21 is turned off, is outside the service area, or if “Airplane mode” is turned on. The Remote control lock may also fail if your PTL21 is in an area with poor signal quality. ◎The Remote control lock cannot be activated if no au IC-Card, or if a IC-Card which is not yours is inserted in your PTL21. ■Unlocking the Remote control lock activated through au Customer SupportEven if you activated the Remote control lock using the Security Lock Service, you can unlock your PTL21 screen after you retrieve it.Initializing PTL21You can reset the settings of all functions to their factory default. Note that all data saved in the PTL21 internal memory is deleted. 1 On the setting menu screen, [Privacy]2 [Factory data reset] → [Reset phone]If the screen lock is set, the unlock screen is displayed. Enter the pattern, PIN or password to unlock the screen. 3 [Erase everything]](https://usermanual.wiki/Pantech-Co/CDMAPTL21/User-Guide-1778738-Page-51.png)
![50Wi-FiActivating/Inactivating Wi-Fi [ Caution ] 1 On the Home screen, [ ] → [Settings] → [Wireless & In the United States, 5180 ~ 5240MHz Band is restricted to indoor-networks] use only. Outdoor operation on this band is a strict viloation of the 2 [Wi-Fi] FCC rules and can harmful interference to commercial radar When the Wi-Fi function is turned on, the PTL21 starts scanning for communications. For outdoor operation, channel in 5180 ~ 5240MHz networks. If a SSID of a network to which the PTL21 has been connected band must not be used. If using automatic channel assignment, add before is found, the connection is made to that network. channels in this band to the automatic channel exclusion list. is displayed in the status bar when connected. Registering/Connecting to the Access Point1 On the Home screen, [ ] → [Settings] → [Wireless & networks]2 [Wi-Fi settings]3 Turn on [Wi-Fi]4 Select a network SSID.■When connecting to an open wireless network5 [Connect] is displayed in the status bar when connected. ■When connecting to a secure wireless network5 Enter the password.6 [Connect] is displayed in the status bar when connected. Wi-Fi](https://usermanual.wiki/Pantech-Co/CDMAPTL21/User-Guide-1778738-Page-52.png)
![51Global FunctionFor Overseas Use without AnxietyThe overseas network conditions are available on the au homepage. Make sure to check the conditions before leaving Japan. http://www.au.kddi.com/service/kokusai/tokomae/■When your PTL21 is stolen or lost• If your PTL21 is lost or stolen while overseas, please contact the Customer Service Center immediately to suspend phone service. Be aware that any calling charges or packet communication charges incurred after theft or loss of a phone are the responsibility of the customer. • If the au IC-Card inserted into your PTL21 is stolen or lost, the card may be inserted into another cell phone (including cell phones for overseas use) by a third party. So, it is recommended to change the PIN code and to use the lock function to protect from improper use by a third party. ■Using the PTL21 properly by knowing about calling and communication services overseas• Charges differ depending on the country and region. • Discount services and packet communications flat rate do not apply to calling charges and packet communications charges incurred while overseas. • Calling charges are also incurred when receiving calls overseas. • Depending on the country and region, calling charges may be incurred from the time you tap [ ]. Global Passport is an international roaming service to use your PTL21 overseas without any additional application. The PTL21 can connect to GSM networks, UMTS networks and CDMA networks depending on your destination. • You can use GSM networks, UMTS networks and CDMA networks worldwide without changing your phone number. • Calling charges are billed together with your monthly charges and do not require any special application or separate daily payment. For more information about countries using Global Passport GSM/UMTS or Global Passport CDMA, charges, and other service details, visit the au homepage or contact the Customer Service Center. Global FunctionUsing Global Passport](https://usermanual.wiki/Pantech-Co/CDMAPTL21/User-Guide-1778738-Page-53.png)
![52Global FunctionConfiguring the Overseas SettingsTo use your PTL21 overseas, you are required to change to the telecommunications carrier's networks that you connect to at your travel destination. Obtain the latest PRL (Preferred Roaming List) before traveling. Obtaining the PRL (Preferred Roaming List)The PRL (Preferred Roaming List) contains information on roaming areas of overseas partner providers who have signed an international roaming contract with KDDI (au). 1 On the Home screen, [ ] → [Settings] → [Wireless & networks] → [Mobile networks]2 Set [Data enabled]3 [Roaming Settings] → [PRL Settings] → [Update PRL version]4 [PRLダウンロード] (PRL Download) → [最新ファイルはこちら] (Latest file) ◎Be sure to set the latest PRL before leaving Japan. ◎You may not be able to communicate with your PTL21 overseas depending on the area if you use old PRL data. Be sure to download the latest PRL data. ◎When you download the PRL data, packet communication charges apply. Setting the AreaYou can set the area where you use your PTL21 when you arrive at destination. 1 On the Home screen, [ ] → [Settings] → [Wireless & networks] → [Mobile networks]2 [Roaming Settings] → [Area Settings]3Japan Set for use in Japan. Overseas (CDMA)Set when using Global Passport CDMA overseas (automatic setting according to PRL). Overseas Auto (GSM/UMTS)Set when using Global Passport GSM/UMTS overseas (automatic setting according to PRL). Overseas Manual (GSM/UMTS)Set when using Global Passport GSM/UMTS overseas while selecting the overseas telecommunications carrier manually. Select a network name. ◎The country selection screen may be displayed when “Overseas (CDMA)” is set. Select the travel country. Setting the Data RoamingConfigure this setting to use packet communication at destination (while roaming). 1 On the Home screen, [ ] → [Settings] → [Wireless & networks] → [Mobile networks]](https://usermanual.wiki/Pantech-Co/CDMAPTL21/User-Guide-1778738-Page-54.png)
![51Global Function2 Enable [Data roaming] → [OK] ◎“Area Settings” must be set to “Overseas (CDMA)”, “Overseas Auto (GSM/UMTS)”, or “Overseas Manual (GSM/UMTS)” in advance to enable Data roaming. ◎If you have not subscribed to IS NET, au.NET charges (525 yen for the used month only) and communication charges apply. Setting the TimeWhen “Date & Time” is set to “Automatic” (factory default setting), the PTL21 correct the time difference by acquiring time information from the telecommunications carrier's network it is connected to. With GSM/UMTS roaming, “Automatic” can be disabled and the time can be set manually using “Set date”, “Select time zone” and “Set time”. With CDMA roaming, manual setting is not available. ◎The time difference may not be corrected properly depending on the telecommunications carrier's network. ◎The time needed to correct the time differ depending on the telecommunications carrier. ◎In country using daylight saving time, check that the real time and the time displayed on your PTL21 are the same. Daylight saving time may not be supported depending on the telecommunications carrier. Making a Call at Your Travel DestinationMaking a Call to Another Country (Including Japan) from Your Travel DestinationYou can make a call to Japan or another country from your travel destination. Example: To call 212-123-XXXX in the USA from Korea1 On the Home screen, [ ]2 Enter the international access code of your destination, and the country code, area code and phone number of the recipient → [ ]International access code (Korea)*1➡Country code*2 (USA) ➡Recipient area code*3 ➡Recipient phone number002 1 212 123XXXX*1 Long-touch “0” to enter “+” and the international access code of your ravel destination is automatically added when calling. *2 If the person you are calling uses Global Passport, enter “81” (Japan) for the country code regardless of their location. *3 If the area code starts with “0”, dial it without including the “0”. There are some exceptions such as fixed-line phones in Italy or Moscow.](https://usermanual.wiki/Pantech-Co/CDMAPTL21/User-Guide-1778738-Page-55.png)
![54Global FunctionMaking a Call within the Same Country While OverseasYou can call to general fixed-line phones and cell phones with the same method as when calling in Japan. There are some exceptions such as when calling in the USA mainland, Hawaii, Saipan or Mexico using Global Passport CDMA. 1 On the Home screen, [ ]2 Enter the recipient area code and phone number → [ ]■For USA mainland, Hawaii, Saipan (when using CDMA)2 “1” → Recipient area code and phone number → [ ]■For Mexico local calls (when using CDMA)2 Enter the recipient phone number → [ ]■For Mexico long distance calls (when using CDMA)2 “01” → Recipient area code → Recipient phone number → [ ]Receiving a Call at Your Travel DestinationYou can receive calls with the same method as when receiving calls in Japan. 1 Slide to the right during an incoming call. ◎If you receive a call while overseas, the call is forwarded from Japan no matter where the call is made from. Call charges to Japan are incurred by the caller and receiving charges by the receiver (PTL21). ■Having calls made to your travel destination from JapanPeople calling you can use the same method as when you are in Japan. ■Having call made to your travel destination from countries other than JapanThe call is forwarded to Japan no matter the destination so the country code is “81” (Japan). Example: Someone calling your “090-1234-XXXX” PTL21 in Korea from the USA1 Enter the international access code of the caller's country, Japan country code, your PTL21 phone number without the first “0” → CallInternational access code (USA) ➡Japan country code ➡PTL21 phone number (without the first “0”)011 81 901234XXXX](https://usermanual.wiki/Pantech-Co/CDMAPTL21/User-Guide-1778738-Page-56.png)
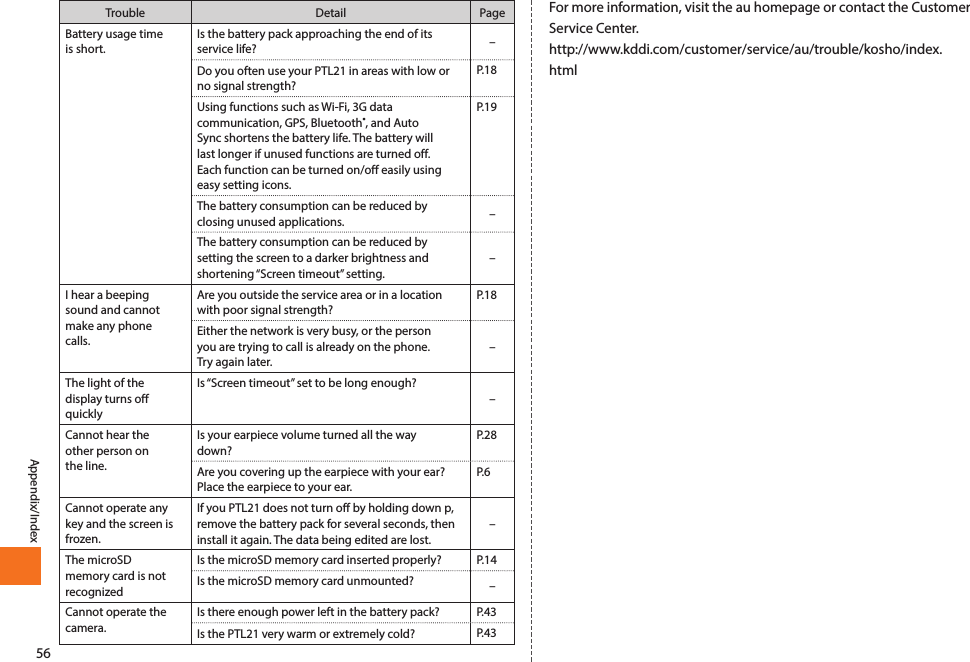
![55Appendix/IndexTroubleshootingTrouble Detail PageCannot turn on by pressing p.Is the battery pack charged? P. 8Is the battery pack properly installed? –Are the contacts on the battery pack clean? –Do you hold down p for at least 1 second? P. 9The power is turned off automatically.Has the battery run out? P. 8The power is turned off while the wake-up screen is displayed.Is there enough power left in the battery pack? * If the remaining power is low, the screen turns off soon after wake-up screen is displayed. P. 8Cannot make any phone calls.Is your PTL21 turned on? P. 9Is the au IC-Card inserted? P.11Is the phone number you entered correct? (Did you start with the area code first?) P.28Did you tap [ ] after entering the phone number? P.28Did you set correct setting in “Area Settings”? P.52Is your PTL21 in “Airplane mode”? –Cannot receive any phone calls.Do you have sufficient signal strength? P.18Are you outside the service area? P.18Is your PTL21 turned on? P. 9Is the au IC-Card inserted? P.11Did you set correct setting in “Area Settings”? P.52Did you set “Call Block”? –Is your PTL21 in “Airplane mode”? –Is the call forwarding service set? –Trouble Detail PageThe “out of service area” indicator is displayed.Are you outside the service area or in a location with poor signal strength? P.18Are you covering the built-in antenna with your fingers or hand? P. 6Did you set correct setting in “Area Settings”? P.52Cannot connect with Wi-Fi.Is your PTL21 receiving a signal from the wireless access point? P.18Did you configure your Wi-Fi settings? P.50I cannot hear any ring tone.Is the volume set to “0”? –Is your PTL21 in manner mode? P.30Cannot charge the battery pack.Is the charger connected properly? P. 8Is the battery pack properly installed? –Are the terminals of the desktop holder or PTL21 clean? –Cannot charge from a PC via a microUSB cable. –Cannot perform any key/touch panel operations.Is your PTL21 turned on? P. 9Did you unlock the screen? P. 9Is your PTL21 in sleep mode? P. 9“auIC Card(UIM) error” is displayed.Is the au IC-Card inserted? P.11Is a card different from the au IC-Card used? P.11A message indicating “Please connect charger” appears and an alarm sounds.The battery pack is almost empty. P. 8Appendix/Index](https://usermanual.wiki/Pantech-Co/CDMAPTL21/User-Guide-1778738-Page-57.png)