Pantech Co P2050 GSM/WCDMA Phone with Bluetooth User Manual
Pantech Co Ltd GSM/WCDMA Phone with Bluetooth
user manual

User Guide
Thank you for choosing the Pantech P2050.
The Pantech P2050 has many features
designed to enhance your mobile experience.
From its EZ to read menus, to its sleek, stylish
design, we know you will enjoy the entire P2050
experience.
This User Guide contains important and useful
information that will maximize your familiarity
with all that the Pantech P2050 has to offer.
P2050

32
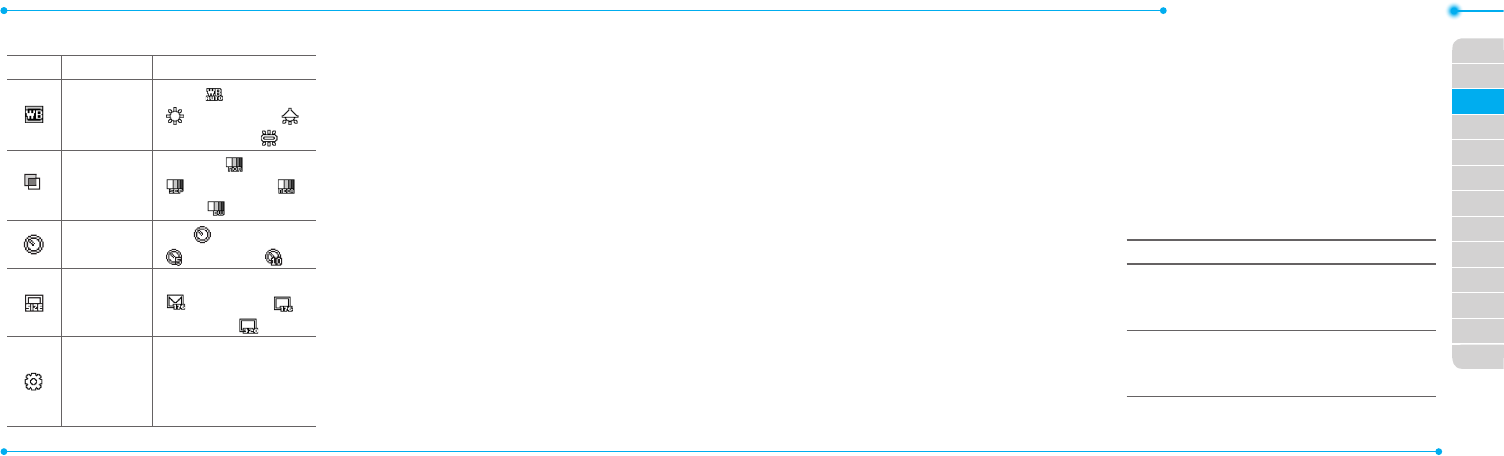
Specifications
Design
Clamshell phone with internal
and external display
Displays
•260KColorsTFTLCDwith3”
internal display
•65KColorsCSTNLCDwith1.44”
external display
•7linesfortextinbasicmode
with16pointfont
•Twosoftkeysandfour-way
scroll and pressing
Melodies
MIDI,i-Melody,MP3,AMR,WAV,
AAC,AAC+,WMA
Camera
Integrated3MCMOSCamera
•
Resolutionupto1280x1024
(1.3Mpixels)
•3GPVideorecording/playingup
to15f/s(QVGAsize)
•Self-timerfunction(5seconds
or10seconds)
•Photoalbumandvideoalbum
Dimensions & Weight
Weight:102 g (with standard
battery)
Dimensions:106.5mmx53mm
x17.4mm
Power Management
(Performance)
Battery
Type Capacity Standby
Time
Talk
Time
Standard
Lithium-
Ion
(Li-ion)
Up to
920mAh
Up to
250
hours
Up to
3hours
Operating Frequency
•GSM850Mhz,GSM900Mhz,
DCS1800Mhz,andPCS
1900MhznetworksinNorth
America,SouthAmerica,
Europe,Africa,andAsia-Pacic
where these networks are
supported
•Automaticbandswitching

Contents
54
Specifications ..............................2
Phone overview ...........................8
Using Shortcuts ......................... 10
Menu overview ............................ 11
Quick & Easy ............................... 14
SIM card and battery ................ 17
Turning the phone on/off ....... 20
Essential display indications . 20
Setting the phone mode..........23
Entering text ...............................24
EZ quick call keys ...................... 26
PC Suite ........................................ 27
Memory card ..............................28
Memo ............................................ 32
Breeze Mode
1. Calls and address book
Making,receivingandendinga
call .........................................................34
Optionsduringacall .....................36
Checking all calls ............................39
Speeddialing ...................................42
Using address book ......................43
Using your headset .......................45
Serviceandxeddialing
number ............................................... 46
2. Messaging
Receivingmessages.....................48
Creating and sending text
messages ..........................................49
Creating multimedia messages
..49
Managing messaging memory
... 55
Email ....................................................56
3. Multimedia
Camera ...............................................58
Photo album ..................................... 64
Videoalbum .....................................66
4. Useful Features
Magnier ............................................70
Calendar.............................................70
Alarmclock ........................................ 71
PillReminder..................................... 72
User Guide ........................................ 74
Calculator .......................................... 74
Tip calculator ................................... 75
Stopwatch ........................................ 75
SayaCommand ............................. 76
ReadoutMode ................................. 77
5. Connectivity
Bluetooth ...........................................80
UsingMobileWeb .......................... 82
6. Settings
Phone status ....................................84
Sounds&alerts ............................... 84
Displaysettings...............................85
Voicecommandsetting .............85
Advanced Mode
1. Calls and address book
Making,receivingandendinga
call ......................................................... 88
Call settings ...................................... 93
Checking all calls ............................93
Speeddialing ...................................96
Using address book ...................... 97
Using your headset .......................99
Serviceandxeddialing
number .............................................100
Calleridentication ...................... 101

Contents
76
2. Messaging
Receivingmessages...................104
Creating and sending text
messages ........................................106
Creating multimedia
messages ........................................ 107
Message templates .......................112
Message settings .......................... 113
Managing messaging
memory ............................................. 115
Email ....................................................117
Using instant messenger............117
3. Multimedia
Camera .............................................120
Photo album ................................... 126
Videoalbum ................................... 128
Audioalbum ...................................130
Music player .....................................132
Music player settings ................... 137
Media player ................................... 138
Otherles ........................................140
Managing memory ......................140
Playing games ................................ 141
AppCenter ....................................... 141
4. Useful Features
Calendar...........................................144
Alarmclock ..................................... 145
PillReminder...................................146
User Guide ...................................... 147
Calculator ........................................ 148
Tip calculator .................................148
Stopwatch ......................................149
Notepadandvoicememo ....... 149
Worldtime ........................................ 151
Converter ......................................... 151
Timer ..................................................152
SayaCommand ............................152
ReadoutMode ............................... 154
5. Connectivity
Bluetooth ......................................... 156
UsingMobileWeb ........................ 159
Using the web browser .............. 159
Settingproles ............................... 161
6. Settings
Language.........................................164
Time and date ................................164
Voicecommandsetting ...........164
Soundsandalerts ........................ 165
Displaysettings............................. 165
Security ............................................ 167
Updating software .......................168
Reset ..................................................169
TTY ..................................................... 170
Appendix
Alertmessage ................................174
Troubleshooting checklist ........175
Safetyinformation ....................... 178
Safetyprecautions ...................... 179
Aboutthebatteryusage ............ 181
FCCHearing-AidCompatibility
(HAC)regulationsforwireless
devices.............................................. 185
FCCRegulatoryCompliance .. 189
Warranty ........................................... 193
SpeakerPhone&Noise
Cancel ..............................................200
DynamicNoiseSuppression
fromAudience ..............................201
earSmart™technology ............. 202
Earpiece
Internal display
Left/Right Soft key
Perform the functions shown at the
bottom line of the display
OK key or access Mobile Web
Press to enter menu system
Camera key
Power on & off / Menu exit / End key
Turnsphoneon/off,endscalls,exit
menus
Clear key and Calendar
Returnstopreviousscreenordeletes
charactersintextmode.Access
Calendar menu
EZ Quick Call Keys
Navigation key
Scrollthroughthe
menu options
Voice Command
Send key
Voicemail
Vibrate mode
Microphone 1
External Display Camera
LED Indicators
Message, Call,
Battery
Internal antenna
area
Microphone 2
Speaker
Micro USB
(Ear Mic. &
Charger)
note:Holdingthedevicebytheinternalantennaareamightaffectthequalityofallcalls.
98
Phone overview Volume up /
down

1110
Address Book
Contacts
Groups
Favorites
Settings
FixedDial
Numbers
My Phone
Number
SService
Numbers
Messaging
Inbox
Create Message
SentMessages
VoiceMail
Mobile Email
Camera
Take a Picture
RecordaVideo
My Pictures
MyVideos
xxxx Services
SayaCommand
xxxxNavigator
MyCastWeather
MobileWeb
Games&Apps
MyAccount
Tools
Magnier
Calendar
AlarmClock
PillReminder
User Guide
Calculator
Tip Calculator
StopWatch
Settings
PhoneStatus
Sounds&Alerts
Bluetooth
FontSize
Wallpaper
Phone Mode
VoiceCommand
Setting
Menu overview
Breeze mode
menu
note: The phone has integrated
advancednoisesuppressiontechnology.
Toensurevoicequality,pleasedonot
covermicrophoneentriesasindicated.
Using Shortcuts
Numberedmenuitems,suchas
menus,sub-menus,andoptions
canbequicklyaccessedby
using their shortcut numbers.
In Menu mode, Main Menus
can be accessed by pressing
thenumberkeys(1to#)
corresponding to their location
on the screen.
Example:AccessingthePhone
Mode menu.
1.SelectMenu.
2. Press 6 for Settings.
3.Press6 for Phone Mode.
4.PresstheU/D scroll key to
select the mode.
note:Thestepsmayvarybymodeand
thismanualprovidesinstructionsfor
both Breeze Mode and Advanced Mode
respectively. SSIMdependent

1312
Advanced mode menu
Address
Book
Contacts
Groups
Favorites
Settings
FixedDial
Numbers
My Phone
Number
SService
Numbers
Messaging
Conversations
Create
Message
Mobile Email
IM
Outbox
Drafts
VoiceMail
Settings
Templates
UsedSpace
IM Mobile
Email
Mobile
Web
AppCenter xxxx GPS
xxxx
Navigator
ShopGPS
xxxx
FamilyMap
Where
AllSportGPS
YPmobile My Stuff
Applications
Audio
Games
Picture
Video
Tools
OtherFiles
UsedSpace
xxxx Music
Music Player
ShopMusic
xxxxRadio
Shazam
my xxxx Settings
Phone Mode
Proles
Display
NCall
Phone
Network
Connections
Connectivity
SSecurity
Nxxxx
Software
Update
Reset
TTY
Phone
Information
SSIMdependentNNetworkdependent

1514
Quick & Easy
Keys Functions
Perform the functions shown at the bottom line of the display
by using these soft keys.
ScrollthroughthemenuoptionsinMenumode.Instandby
mode,
LeftScroll:AccessMobile Email menu
RightScroll:AccessIM menu
UpScroll:AccessCreate Message menu
DownScroll:AccessAddress Book menu
Selectamenufunctionorstoreuser-inputinformation,such
asnames.Alsousethiskeyforconrmation.
LaunchtheMobile Web directly if pressed in standby mode.
Deletecharactersintextmode,orreturntopreviousmenu.
OpenCalendarviewifpressedquicklyinstandbymode.
Keys Functions
Makeorreceiveacall.Showtherecentcalllistinstandbymode.
Re-dialthelastcallnumberifpressedandheldinstandby
mode.
Completethecurrentcall.Turnon/offthephoneifpressed
and held. Cancel user input and return to standby mode while
in Menu mode.
Quicklyconnecttothevoicemailserverifpressedand
held in standby mode.
Enters numbers, letters or special characters. Go to the dial
screen if pressed in standby mode.
Assignsthenumberasaspeeddialwhenitispressedand
held.
Enterorexitfromvibratemodeifpressedandheldinstandby
mode.Showthesymbolinputscreenifpressed in text input
mode.

1716
Keys Functions
Enterthe+signprexforinternationaldialingifpressedand
held.
Enter the space character in text input mode.
Changevarioustextinputmodesifpressed atthetext-editing
screen.
Adjusttheearpiecevolumewhilemakingacall.
ControltheRingtonevolume,vibratemodeandsilentallmode
in standby.
Mute the ringtone of an incoming call.
Rejecttheincomingcallifpressedandheldwhenyoureceive
an incoming call.
Turn camera capture mode on.
Workasacamerashutterincapturemode.
TurntheVoiceCommandson.
SIM card and battery
About your SIM card
Whenyousubscribetoyour
networkoperator,youreceivea
SIM(SubscriberIdentityModule)
card containing your registration
information,PINcode,etc.
Likeacreditcard,itshould
be kept secure and handled
carefully.Donotbend,scratch
orexposeittomoisture.Avoid
static electricity.
ToavoidcorruptingyourSIM
card’s memory, always switch off
yourphonebeforeremovingor
insertingyourSIMcard.
About your battery
YourphoneusesaLi-Ionbattery.
Make sure to use an authorized
battery and charger only. For
moredetails,pleaseinquireat
your nearest dealer.
note: Your phone is powered by a
LithiumIon(Li-Ion)battery.Thismeans
that, unlike other forms of battery
technology, you can recharge your
battery while some charge remains
without reducing your phone’s
autonomy due to the “battery memory
effect”inherentinthosetechnologies.

Getting started
1918
Installing/removing SIM card
and battery
1.Removethe
batterycover
from the unit.
Totthebattery
cover,putiton
the guide rail and
push up.
2.InserttheSIMcard
into the slot.
The gold contacts
oftheSIMcard
should go against
the metal contacts
of the phone.
Put the contacts of
the battery into the
hole located at the
bottom of the unit
and then insert
and press the upper side of
the battery until you hear
the“click”. Make sure you
align the gold contacts at the
battery end with contacts on
the phone. If the contacts at
the battery are not properly
aligned, damage could occur
to the phone and the battery.
3.Toremovethe
battery, push the
bottom of the
battery to upwards
(1)andremove(2)
the battery.
PushtheSIMcard
in the arrow direction as shown.
To charge your
battery
1.Tocharge,
connect the
charger adapter
as shown right.
Getting started
2120
2.Toremove
the adapter
connecting, pull
the adapter
away as shown
right.
Turning the phone on/off
To turn on
1.PressandholdE.
To turn off
1.PressandholdE.
Essential display
indications
Signalstrength.Thegreaterthe
number of bars, the stronger
thesignal.Whennetworkisin
searching mode is displayed.
Flightmodeisactive.
Acallisbeingmade.When
youareinnoservicearea, is
displayed.
Call forwardingNSisactive.
Incoming calls set to ring only
(Normal).
Incoming calls set to Vibrate
and Ring.
Incoming calls set to Vibrate
Only.
Incoming calls set to Silent.
Receivedoneormoretext
messages.
Receivedoneormore
multimedia messages.
ReceivedoneormoreWAPpush
messages.
Receivedoneormoreother
messages.
Receivedoneormorevoice
messages.
Inbox is full.
Amessageisbeingsent.
Amessageisbeingreceived.
Analarmisset.
Bluetoothisactive.
Bluetoothhands-freeheadsetis
connected.
BluetoothA2DPheadsetis
connected.
Bluetoothhands-free+A2DP
headset is connected.
DatatransferviaBluetooth.
Headset is connected.
USBisconnected.
Getting started
2322
External memory card is
inserted.
Anerroroccurredonthe
external memory card.
TTYisactive.
PillReminderisset.
AnEDGEsignalisavailable.It
is displayed when there is an
activeEDGEsession
.
AGPRSsignalisavailable.Itis
displayedwhenthereisanactive
GPRSsession.
A3Gsignalisavailable.Itis
displayedwhenthereisanactive
3Gsession.
WAPisconnected.Whenthe
security is set is displayed.
Batterystrength.Whenthe
battery charge is low, is
displayed.
Available,Away,InvisibleStatus
ofAIM
Online,Away,Busy,OfineStatus
ofMSN
Available,Busy,InvisibleStatus
ofYAHOO
Youhavereceivedoneormore
IM messages
SSIMdependent NNetworkdependent
Setting the phone mode
Your phone has two customized
modes,BreezeandAdvanced.
The default is set to Breeze mode
whichprovidesEZaccesstothe
functionsusedmostfrequently.
IntheBreezemode,youcanview
anabbreviatedmenu:Address
Book, Messaging, Camera, xxxx
Services, Tools and Settings. The
Advanced Mode allows access to
all menu items.
Breeze Mode Advanced
Mode
To change the phone mode
1.SelectMenu > Settings >
Phone Mode.
2.SelectBreeze Mode or
Advanced Mode.
Getting started
2524
Assigning the menu
You can set the most commonly
used menu in Shortcuts in
standby mode.
1.SelectShortcuts in standby
mode > Unassigned.
2.SelectAdd.
3.Selectthemenuandsub
menu.
4.SelectSave.
Entering text
Youcanentertextwithmulti-tap,
predictive,numericorsymbol.
Useful keys
Displaysymbols.
Addingaspace.
Press to toggle from initial caps
to all caps, to lower case, or to
numeric entries.
Press to change the text entry
functionsfromABCmodeto
predictivemode,ornumber
mode.
ABC Mode dbc (lower
case/initialcaps/allcaps)
Predictive Mode gef
(lowercase/initialcaps/all
caps)
Number Mode a
Key characters by language
Each of the following keys will
scrollthroughthesesequential
options listed by language.
Key English French Spanish
.,-?!/'@:
abc ç à ä á ã ç
def é è é
ghi í
jkl
mno ö ñ ó ñ
pqrs ß
tuv ù ü ú ü
wxyz
ABC mode
Press the key labeled with the
targetletteroncefortherst
letter; press it twice for the
second letter, and so on.
1.Press to change the
modeasmulti-tap.
2. Press 2 to 9 to input text
repeatedly. To write the letter
“C”,press23times.Towrite
number 2, press 24times.
Predictive mode (T9)
Thepredictivemode
automatically compares your
keystrokes with an internal
linguistic dictionary to determine

Getting started
2726
the correct word. It will display
the most commonly used
rst.Tosaveawordnotlisted
in phone’s dictionary, select
Options > Predictive Settings >
My Words.
1.Press to change the
modetopredictive.
2. Press 2 to 9 to input text.
For example, to write ‘hello’,
press 43556.
Number mode
You can input numbers in this
mode.
1.Press to change the
modeto123.
2. Press 1 to 9 and 0 to
input numbers.
Symbol mode
You can input symbols.
1.Press*toviewthesymbols.
2. Press U/D/L/R to select a
symbol and select Insert.
EZ quick call keys
Getting in touch with those you
callmostisnowasEZas1-2-3.
note: The following direction is an
example with using x key. The usage
of y and z keys will be same as the
following.
To assign a contact to Quick
Call
1.Pressx.
2.SelectQuick Call > Assign.
3.Selectacontact > Select.
To make a call using one
touch key
1.Pressx.
2.SelectCall.
To send a message using
one touch key
1.Pressx.
2.SelectOptions > Send
Message.
PC Suite
PCsuiteisaWindows-based
PC program that allows you
to easily manage personal
dataandmultimedialesby
connecting your Phone to a PC.
The PC suite application can be
downloaded at
http://www.pantechusa.com.
System requirements
•MicrosoftWindows2000orXP
familyandVista32bit
•Atleast300MBoffreedisk
space

Getting started
2928
•InterfacedevicessuchasUSB
or Bluetooth for the connection
with the phone
PC Suite features
•ContactManager
•PCSync
•MessageManager
•FileManager
•MMSPCComposer
•InternetAccess
Memory card
YoucanuseamicroSDcardasa
memorycard.Itgivesyoumore
spacetosavepictures,videos,
music, etc.
Inserting a memory card
1.Removethe
batterycover
and the battery
from the unit.
2. Unlock the
microSDcard
slot by carefully
sliding it up. The
metalcover
should now be
easily lifted up.
3.Insertthemicro
SDcardintothe
slot. The gold
contacts of the
microSDcard
should go
against the
metal contacts of the phone.
4.Closethemetal
coverandslide
down to lock the
microSDcardin
place. The
icon will be
displayed when
the phone is turned on.
Using a memory card
Youcansave,moveanddelete
thelesinyourphoneand
external memory card. You can
alsomoveandcopythelesto
computer from your phone.
To copy a file to the memory
card
1.Selectale > Options > Copy
to External Memory.
2.Tocopythelebacktothe
phone, select Options > Copy
to Phone.

Getting started
3130
To move a file to the memory
card
1.Selectale > Options > Move
to External Memory.
2.Tomovethelebacktothe
phone, select Options > Move
to Phone.
To delete a file from the
memory card
1.Selectalefromthecard >
Options > Delete.
In Advanced Mode,youhave
access to all of the features of
P2050 including the features
providedby Breeze Mode.
To move the file from the
card to the computer
1.Connectthedatacablewith
mobile and the computer.
2.SelectMenu > Settings >
Connectivity.
3.SelectSelect USB Mode.
4.SelectMusic Player,
Mass Storage or Ask on
Connection.
5. Follow the instructions on your
computer screen.
note:SelectMusic Player when you
want to add music to the playlist in
yourdevice.WhenyouselectAskon
Connection, it will ask you to select
either the Music Player or MassStorage
everytimeyouconnectyourdevicewith
your computer.
Resetting a memory card
1.SelectMenu > Settings >
Reset.
2. Enter the password > select
External Memory Reset.
note:Thedefaultpasswordis‘1234’.

1
Making, receiving and ending a call
Options during a call
Checking all calls
Speed dialing
Using address book
Using your headset
Service and fixed dialing number
Calls and address book
3332
Memo

Breeze Mode - Calls and address book
3534
03
04
05
06
01
02
03
04
05
06
07
01
02
Making, receiving and
ending a call
Making a call
1.Entertheareacodeand
phone number.
2. PressS.
Answering a call
1.PressSor select Accept.
Ending a call
1.PressE.
Oncethecalliscompleted,acall
summary is displayed.
Rejecting a call
PressEor select Ignore.
Making a call using the call list
Your phone logs up to 20
dialed,receivedandmissedcall
numbers.
1.PressS to display the recent
calls list.
2.SelectAll Calls, Missed Calls,
Received Calls, Dialed Calls
or Call Ranking by pressing
L/R.
3.Selectanumber.
4.PressS to dial the selected
number.
note: To redial the last number, press
and holdS in standby mode.
Making a call during a call
1.Enterthephonenumber
or select Options > View
Contacts.
2. PressS to dial the second
call.
Therstcallisautomatically
put on hold.
Switching between two calls
1.SelectOptions > Swap.
Making an international call
1.Pressandhold0 for the
internationalprexuntilthe
‘+’,characterappears.
2. Type the country code, area
code, and phone number.
3.PressS.
Making an emergency call
1.Youcanmakeemergency
callsevenifyourphonedoes
nothaveaSIMcard.
2.PressEmergencyNumber,or
select SOS if your phone does
nothaveaSIMcard.
3.PressS.
Replying to a missed call
1.PressS to display the calls
list.

Breeze Mode - Calls and address book
3736
03
04
05
06
01
02
03
04
05
06
07
01
02
2.SelectMissed Calls by
pressing L/R.
3.Selectanumbertocallby
pressing U/D.
4.PressS.
Answering a second call N
1.PressS.Therstcallis
automatically put on hold.
2. PressEto end the second
call. The call on hold is
automatically reconnected.
note: For answering a second call, you
shouldactivate Call Waiting inadvance.
(Select Menu > Settings > Call > Call
Waiting > ActivateinAdvancedMode.)
Options during a call
Microphone off and on
Switching your phone’s
microphone off
1.SelectOptions > Mute [ ].
Switching your phone’s
microphone back on
1.SelectOptions > Unmute.
Talking on speaker
1.Select[ ].
Removing background noise
You can eliminate background
noisefromconversationsand
improvethevoicequalityof
communications by setting
NoiseSuppressiontoOn.
1.SelectOptions> Noise
Suppression.
Putting a call on hold and
returning N
Putting a call on hold
1.SelectOptions > Hold or
pressS.
Returning to a held call
1.SelectOptions > Unhold or
pressS again.
Multi-party calls N
You can talk with more than one
personorhaveaconferencecall.
Making a multi-party call
1.Calltherstparticipant.
2. Call the second participant.
Therstcallisautomatically
put on hold.
3.SelectOptions > Join.
Having a private
conversation with one
participant
1.SelectOptions > Split.
2.Selectaparticipant>Select.

Breeze Mode - Calls and address book
3938
03
04
05
06
01
02
03
04
05
06
07
01
02
Removing one participant
from a multi-party call
1.SelectOptions > End.
2.Selectthenumberassociated
with the call you wish to end or
End All to end all calls.
Searching for a number in
address book during a call
1.Select Options > View
Contacts.
2.Selectanumber, and then
press S.
Searching for a name or
group in address book
Entertherstlettersofthename
forNameSearch.Theentriesare
displayedstartingwiththerst
entry matching your input.
Finding a name manually in
address book
1.PressU/D.
Viewing the details of
highlighted entry in address
book
1.SelectSelect.
For details on address book, see
page43.
Reading a message during a
call
1.SelectOptions > View
Message.
2.Selectaconversation > Open.
3.Selectamessage > View.
Sending a message during a
call
1.SelectOptions > Send
Message.
For details on creating a text
message,seepage49.
Mobile Web N
1.SelectOptions > Mobile Web.
Viewing the calendar during
a call
1.SelectOptions > View
Calendar.
Making a note during a call
1.SelectOptions > Notepad.
Voice recording
1.SelectOptions > Voice
Recording.
Checking all calls
Youcanviewinformationabout
all calls simply by pressingS.
For more options for all, missed,
received,dialedcalls,andcall

Breeze Mode - Calls and address book
4140
03
04
05
06
01
02
03
04
05
06
07
01
02
ranking, select an entry and
Options.
Viewing missed calls
1.SelectShortcuts in standby
mode.
2.SelectRecent Calls > Missed
Calls.
Viewing received calls
1.SelectShortcuts in standby
mode.
2.SelectRecent Calls >
Received Calls.
Viewing dialed calls
1.SelectShortcuts in standby
mode.
2.SelectRecent Calls > Dialed
Calls.
Viewing call rankings
1.SelectShortcuts in standby
mode.
2.SelectRecent Calls > Call
Ranking.
Deleting call logs
1.SelectShortcuts in standby
mode.
2.SelectRecent Calls > Delete
Call Logs.
3.Select All Calls, Missed Calls,
Received Calls, or Dialed
Calls.
note: If no logs exist, the message “No
Call Exist”appears.
Viewing call time
1.SelectShortcuts in standby
mode.
2.SelectRecent Calls > Call
Time.
3.Last Call, Received Calls,
Dialed Calls, and Total Calls
are displayed.
Resetting all call times
1.SelectShortcuts in standby
mode.
2.SelectRecent Calls > Call
Time.
3.SelectReset > Yes.
note:Thedefaultpasswordis‘1234’.
Viewing data transmitted
information
1.SelectShortcuts in standby
mode.
2.SelectRecent Calls > Packet
Counter.
•Current Info:Youcanview
transmitted data in the
currentsession,inKilobytes.
Sent, Received and Total
information are also
available.
•Last Info:Youcanview
Sent, Received, Total and

Breeze Mode - Calls and address book
4342
03
04
05
06
01
02
03
04
05
06
07
01
02
Duration transmitted
inprevioussessions,in
Kilobytes.
•Total Info:Youcanviewall
Sent, Received, Total and
Duration transmitted data in
Kilobytes.
•Clear Logs:Thedefault
passwordis‘1234’.
Speed dialing
Youcandialquicklyusingspeed
dialing.Upto8phonenumbers
can be programmed using
numbers 2 to 9.
1:Voicemail
0:Prexforinternationalcall
Setting speed dial
1.SelectMenu > Address Book >
Settings.
2.SelectSpeed Dial > an empty
entry and select Add.
3.Selectacontact>Select.
Changing speed dial contact
1.SelectMenu > Address Book >
Settings.
2.SelectSpeed Dial and select a
number.
3.SelectChange.
4.SelectSelect > Yes.
Removing from speed dial
1.SelectMenu > Address Book >
Settings.
2.SelectSpeed Dial and select a
number.
3.SelectRemove > Yes.
Using address book
Youcansavenames,phone
numbers, and information on the
SIMorphone.Numberofentries
can depend on the capacity of
theSIMcard.
Adding a contact
1.SelectMenu > Address Book >
Contacts > Options > Add
New Contact.
2.SelectPhone or SIM.
3.Inputtheelds.
4.SelectSave.
Viewing the contact list
1.PressD or select Menu >
Address Book > Contacts.
Searching for a phone
number
1.PressD or select Menu >
Address Book > Contacts.
2.Inputtherstletterortwoof
the person’s name and scroll
with U/D.

Breeze Mode - Calls and address book
4544
03
04
05
06
01
02
03
04
05
06
07
01
02
3.SelectSelect toviewdetail
information.
4.Toupdateinformation,select
Options > Edit Contact.
Calling from contact list
1.PressD or select Menu >
Address Book > Contacts.
2.Selectacontacttocall.
3.PressS.
Sending a contact
1.PressD or select Menu >
Address Book > Contacts.
2.Selectacontact > Options >
Send Contact Info > All
Contact Info, Personal
Contact, or Business
Contact.
3.Youcansendthecontact
using Message or Bluetooth.
Deleting a contact
1.PressD or select Menu >
Address Book > Contacts.
2.Selectacontact > Options >
Delete > Yes.
Making groups
1.PressD, R or select Menu >
Address Book > Groups.
2.SelectOptions > Add New
Group.
3.SelectPhone or SIM.
Fora2GSIMcard,thisstepisnot
needed.
4.Enteragroupnameand
select Save.
Editing groups
1.PressD, R or select Menu >
Address Book > Groups.
2.Selectagroup>Options >
Add New Group, Rename
Group, or Delete Group.
Adding to favorites or
groups
1.PressD or select Menu >
Address Book > Contacts.
2.Selectacontact> Options >
Add to.
3.SelectFavorites or Groups.
Using your headset
Youcanmakeorreceiveacall
usingyourheadset.Whenyou
connect your headset to the jack,
the button on the headset works
as follows.
note: You must use the headset
designedforthisdevice.Itisanoptional
item.Notallheadsetwillhaveabutton.
While in standby mode
1.Pressthebuttononce to list
recent calls.
2. Press the button twice to
redial the last call.

4746
2
Receiving messages
Creating and sending text messages
Creating multimedia messages
Managing messaging memory
Email
Messaging
While the phone is closed
1.Pressthebuttononce to
receiveanincomingcall.
2. Press and hold the button
once to end the call.
Service and fixed dialing
number
Calling your service
numbers S
Youcanseetheservicenumber
toreachtheserviceprovider.
1.SelectMenu > Address Book >
Service Numbers.
2.Selectanumber and
pressS.
Viewing fixed dialing number
list
Fixeddialingnumberisaservice
thatlimitsyouraccesstospecic
numbers in the address book
listrecordedontheSIM.Input
thePIN2tosetuporcancelthis
service.
1.SelectMenu > Address Book >
Fixed Dial Numbers.
note:PIN2mustbecorrectlyentered
within3attempts.Ifyouinputincorrect
codethreetimesinarow,thePIN2
codewillbeblocked.IfthePIN2code
isblocked,pleasecontactyourservice
provider.YourPIN2codeissuppliedwith
theSIMcard.

Breeze Mode - Messaging
4948
01
04
05
06
01
02
03
04
05
06
07
02
03
Receiving messages
Viewing a new message
1.SelectView.
Reading a message from the
inbox
1.SelectMenu > Messaging >
Inbox.
2.Selectareceivedmessage >
View.
Saving the contact
information from a received
message
1.Selectareceivedmessage >
View.
2.SelectOptions > Save.
3.SelectNew Contact or
Update Contact.
Saving the object in a
received multimedia
message
1.Openamultimediamessage.
2.Selectanobject.
3.SelectOptions > Use > Save.
Itwillbesavedinoneofthe
categories in the My Stuff folder.
For details on Photo album, see
page64.
Listening to voice messages
1.Pressandhold1 or select
Menu > Messaging > Voice
Mail.
Itwillautomaticallycallthevoice
mail center.
Creating and sending
text messages
Sending a text message
1.PressU or select Menu >
Messaging > Create
Message.
2. Enter a message.
3.SelectSend to and a contact
to send the message and
select Select.
4.SelectSend.
Replying to a message
1.Selectamessage > Reply or
select a message > Options >
Reply.
Creating multimedia
messages
You can create and send
multimedia messages. Capacity
is100KB,300KBor600KB.An
error message will alert you
once the message exceeds the
capacity.

Breeze Mode - Messaging
5150
01
04
05
06
01
02
03
04
05
06
07
02
03
Adding a saved picture to
the message
1.PressU or select Menu >
Messaging > Create
Message.
2. Enter a message.
3.SelectInsert > Picture >
Picture > Camera.
4.Scrolltothesavedpictureand
select Select.
5.Topreviewthemessage,
select Options > Preview >
Current or Whole Message.
6.Toeditthetextmessage,
press U/D to select the text
box and edit your message.
7.SelectSend to > a contact >
Select > Send.
Adding a new picture to the
message
1.PressU or select Menu >
Messaging > Create
Message.
2. Enter a message.
3.SelectInsert > Take New
Picture.
4.Focusontheobject.
5. Press orQ.
6.Topreviewthemessage,
select Options > Preview >
Current or Whole Message.
To go back to text editor page,
select Stop.
7.Toeditthetextmessage,
press U/D to select the text
box and edit your message.
8.SelectSend to > a contact >
Select > Send.
For details on taking a picture,
seepage60.
Adding a saved video to the
message
1.PressU or select Menu >
Messaging > Create
Message.
2. Enter a message.
3.SelectInsert > Video > Video.
4.Scrolltothesavedvideoclip
and select Select.
5.Topreviewthemessage,
select Options > Preview >
Current or Whole Message.
To go back to text editor page,
select Stop.
6.Toeditthetextmessage,
press U/D to select the text
box and edit your message.
7.SelectSend to > a contact >
Select > Send.

Breeze Mode - Messaging
5352
01
04
05
06
01
02
03
04
05
06
07
02
03
Adding a new video to the
message
1.PressU or select Menu >
Messaging > Create
Message.
2. Enter a message.
3.SelectInsert > Record New
Video.
4.Focusontheobject.
5. Press orQ, or select Options
> Record.
6.Tostopandsavethe
recording, select Stop.
7.Topreviewthemessage,
select Options > Preview >
Current or Whole Message.
To go back to text editor page,
select Stop.
8.Toeditthetextmessage,
press U/D to select the text
box and edit your message.
9.SelectSend to > a contact >
Select > Send.
Fordetailsonrecordingavideo,
seepage62.
Adding a recorded voice
memo to the message
1.PressU or select Menu >
Messaging > Create
Message.
2. Enter a message.
3.SelectInsert > Sound > Audio
> My Voice.
4.Scrolltothesavedaudioclip
and select Select.
5.Topreviewthemessage,
select Options > Preview >
Current or Whole Message.
6.SelectPause to stop listening
thevoicememo.SelectStop
to go back to text editor page.
7.Toeditthetextmessage,
press U/D to select the text
box and edit your message.
8.SelectSend to > a contact >
Select > Send.
Adding a new voice memo to
the message
1.PressU or select Menu >
Messaging > Create
Message.
2. Enter a message.
3.SelectInsert > Record New
Sound.
4.SelectRecord to record the
sound.
5.Tostopandsavethe
recording, select Stop.
6.Topreviewthemessage,
select Options > Preview >
Current or Whole Message.

Breeze Mode - Messaging
5554
01
04
05
06
01
02
03
04
05
06
07
02
03
7.SelectPause to stop listening
thevoicememo.SelectStop
to go back to text editor page.
8.Toeditthetextmessage,
press U/D to select the text
box and edit your message.
9.SelectSend to > a contact >
Select > Send.
FordetailsonRecordingavoice
memo,seepage150.
Adding other files to the
message
1.PressU or select Menu >
Messaging > Create
Message.
2. Enter a message.
3.SelectInsert > Other Files >
Other Files.
4.Selectale>Select.
5.Topreviewthemessage,
select Options > Preview >
Current or Whole Message.
To go back to text editor page,
select Stop.
6.Toeditthetextmessage,
press U/D to select the text
box and edit your message.
7.SelectSend to > a contact >
Select > Send.
Managing messaging
memory
Up to 200 messages can be
stored in the phone memory,
additional messages will be
savedtotheSIMcard.When
the message box is full, the
messagesfulliconwillappear.All
messages share memory.
Icon Descriptions
Textmessageisfull(SIMand
phonemessages).
Deleting a message in the
inbox
1.Selectamessage > Options >
Delete > Yes.
Deleting multiple messages
in the inbox
1.SelectOptions > Delete >
Multiple.
2.SelectSelect or Deselect
to select or deselect the
message.
3.SelectOptions > Delete > Yes.

5756
3
Camera
Photo album
Video album
Multimedia
Email
Youcanreceiveemailsfromyour
serviceprovider.
Receiving an email
1.PressL or select Menu >
Messaging > Mobile Email.
2.Selectanemail.
3.SelectSelect.

Breeze Mode - Multimedia
5958
01
02
05
06
01
02
03
04
05
06
07
03
04
Camera
Youcantakepicturesandrecordmoviesusingthebuilt-incamera.
Thephotosandvideoclipscanbesavedandsentviamultimedia
messages,OnlineLocker,orBluetooth.
Zoom Zoom
Picture
remaining
Brightness Brightness
SelfTimer SelfTimer
Effect Effect
White
Balance
White
Balance
Size Size
Camera
mode
Video
mode
note:Whenyousetthephotosizeto1280x1024,thezoomfunctionisnotavailable.
Setting camera settings
1.PressQin standby mode or
select Menu > Camera > Take
a Picture.
2.SelectOptions > Settings to
change settings prior to taking
a picture.
Camera options
Icon Name Descriptions
White
Balance
Auto( ),DayLight
( ),Tungsten( ),
Fluorescent ( )
Effect
Normal( ),Sepia
( ),Negative( ),
B&W( )
Icon Name Descriptions
SelfTimer Off( ),5secs
( ),10secs( )
Size
1280x1024( ),
1024x768( ),
640x480( ),
320x240( ),
240x320( )
Advanced
PictureQuality,Save
Location,Shutter
Sound,Timer
Sound
Breeze Mode - Multimedia
6160
01
02
05
06
01
02
03
04
05
06
07
03
04
Video camera options
Icon Name Descriptions
White
Balance
Auto( ),DayLight
( ),Tungsten( ),
Fluorescent ( )
Effect
Normal( ),Sepia
( ),Negative( ),
B&W( )
SelfTimer Off( ),5secs
( ),10secs( )
Size
176x144(MMS)
( ),176x144( ),
320x240( )
Advanced
VideoQuality,
SoundRecording,
SaveLocation,
TimerSound
Zoom in and out
1.PressU/D.
Itrangesfrom1xto4x.
Increasing or decreasing the
brightness
1.PressL/R.
Itrangesfrom-2to+2.
Taking a picture
1.PressQin standby mode or
select Menu > Camera > Take
a Picture.
2. Focus on the object.
3.PressorQ, or select Options >
Capture.
Changing to video camera
mode
1.PressQin standby mode or
select Menu > Camera > Take
a Picture.
2.SelectOptions while camera
modeisactivated.
3.SelectVideo Camera Mode.
In camera mode, press and
hold
Q
tochangetovideo
camera mode.
4.Focusontheobject.
5. Press orQ, or select Options >
Record.
6.SelectStop to stop recording.
Viewing the taken picture
1.PressQin standby mode or
select Menu > Camera > Take
a Picture.
2.SelectOptions > Photo
Album.
3.Selectapicture > View.
After taking pictures
To Press
Sendusing
a multimedia
message
Options > Send > as
Multimedia Message
Sendusing
OnlineLocker
Options > Send >
Send to Online
Locker
Breeze Mode - Multimedia
6362
01
02
05
06
01
02
03
04
05
06
07
03
04
To Press
Sendusing
Bluetooth
Options > Send > via
Bluetooth
Setas
wallpaper
Options > Set as >
Wallpaper
SetasCallerID Options > Set as >
Caller ID
Delete Options > Delete
Rename Options > Rename
Viewphoto
information Options > Properties
Recording a video
1.SelectMenu > Camera >
Record a Video.
2. Focus on the object.
3PressorQ, or select Options >
Record.
4.SelectStop to stop recording.
5.SelectOptions > Play to play
thevideoclip.
6.PressC to go back to
previewmode.
Changing to camera mode
1.SelectMenu > Camera >
Record a Video.
2.SelectOptionswhilevideo
modeisactivated.
3.SelectCamera Mode.
Invideocameramode,press
an hold
Q
to change to camera
mode.
For details on taking a picture,
seepage60.
Viewing the recorded video
clip
1.SelectMenu > Camera >
Record a Video.
2.SelectOptions > Video
Album.
3.Selectthevideoclip > Play.
After recording video clips
To Press
Sendusing
a multimedia
message
Options > Send > as
Multimedia Message
Sendusing
OnlineLocker
Options > Send > Send
to Online Locker
Sendusing
Bluetooth
Options > Send > via
Bluetooth
To Press
Viewrecorded
videoclip Options > Play
Delete Options > Delete
Rename Options > Rename
Viewvideoclip
information Options > Properties
During recording a video clip
To Press
Receive
an incoming call S or
Pause and record
continuously Pause
Stoprecording Stop

Breeze Mode - Multimedia
6564
01
02
05
06
01
02
03
04
05
06
07
03
04
Photo album
The My Pictures menu allows
youtoviewallthepicturesyou
havetaken,saveselectedimages
to your phone or an external
memory card and share the
photos with others. JPEG format
is supported, and other formats
aresavedinthePicture folder.
note: To access Picture, select Menu >
My Stuff > PictureinAdvancedmode.
Viewing the saved pictures
1.SelectMenu > Camera > My
Pictures.
2.Selectapicture>View.
Setting as wallpaper in the
display
1.SelectMenu > Camera > My
Pictures.
2.Selectapicture.
3.SelectOptions > Set as >
Wallpaper.
Setting as caller identification
1.SelectMenu > Camera > My
Pictures.
2.Selectapicture.
3.SelectOptions > Set as >
Caller ID.
Sending pictures using
multimedia message
1.SelectMenu > Camera > My
Pictures.
2.Selectapicture.
3.SelectOptions > Send > as
Multimedia Message.
For details on creating
multimedia messages, see page
49.
Deleting multiple pictures
1.SelectMenu > Camera > My
Pictures.
2.SelectOptions > Multiple
Select.
3.SelectSelect to select more
than one picture.
4.SelectDeselect to cancel
your selection.
5.SelectOptions > Delete.
Viewing a file information
1.SelectMenu > Camera > My
Pictures.
2.Selectapicture.
3.SelectOptions > Properties.
Breeze Mode - Multimedia
6766
01
02
05
06
01
02
03
04
05
06
07
03
04
Video album
The My Videos menu allows you
toplay,send,saveanddelete
videos.Thesupportedformats
areMP4,WMA,3GPand3G2.
Playing the saved video clips
1.SelectMenu > Camera > My
Videos.
2.Selectavideoclip.
3.SelectPlay.
Using video player controls
To Press
Pause/Play
Rewind Hold U
Fast forward Hold D
Control
volume
Sidekeyupordown
or L/R
Sending a video clip using
multimedia message
1.SelectMenu > Camera > My
Videos.
2.Selectavideoclip.
3.SelectOptions > Send > as
Multimedia Message.
For details on creating multimedia
messages,seepage49.
Sending a video clip using
Online Locker
1.SelectMenu > Camera > My
Videos.
2.Selectavideoclip.
3.SelectOptions > Send > Send
to Online Locker.
Sending a video clip via
Bluetooth
1.SelectMenu > Camera > My
Videos.
2.Selectavideoclip.
3.SelectOptions > Send > via
Bluetooth.
Deleting multiple video clips
1.SelectMenu > Camera > My
Videos.
2.SelectOptions > Multiple
Select.
3.SelectSelect to select more
than one picture.
4.SelectDeselect to cancel
your selection.
5.SelectOptions > Delete.

6968
4
Calendar
Alarm clock
Pill Reminder
User Guide
Calculator
Tip calculator
Stop watch
Say a command
Readout Mode
Useful Features
Memo

Breeze Mode - Useful features
7170
01
02
03
06
01
02
03
04
05
06
07
04
05
Magnifier
Magnierhelpsyoutoseeany
small thing and to take a picture.
Zoom in and out
1.SelectMenu > Tools >
Magnifier.
2.Pressup/downorleft/right.It
rangesfrom1xto4x.
Increasing or decreasing the
brightness
1.PressL/R.Itrangesfrom-2to
+2.
Taking a picture
1.PressOKorCamera.
Turning the light on/off
1 Pressleftsoftkey.Ifyouwant
to turn off, press again.
Calendar
Calendar helps you
manage your
schedule including
your time for calls or
special days. You can
set a reminder on
anygivendatewith
this function.
Viewing calendar
1.SelectMenu > Tools >
Calendar.
note: You can also access Calendar by
pressing C in standby mode. View by
Month is default setting for Calendar.
In the monthly view
To Press
Moveto
another day
LforPrevious
RforNext
Moveto
another week
UforPrevious
DforNext
Viewother
month
Sidekeydownfor
Previous
SidekeyupforNext
Creating a new event
1.Selectadayandselect
Options > New Event.
2.SelectAppointment, Task or
Note.
3.Inputtheeventandselect
Save.
note:Youcancreateeventsfordates
from01/01/2000to12/31/2099.
Alarm clock
Setting an alarm
1.SelectMenu > Tools > Alarm
Clock.
2.SelectCreate New for new
alarm.
3.SettheCycle, Time, Alarm
Sound, Alarm Alert Type,
Alarm Volume, Snooze and
Power Alarm.
4.SelectSave.

Breeze Mode - Useful features
7372
01
02
03
06
01
02
03
04
05
06
07
04
05
Editing existing alarms
1.SelectMenu > Tools > Alarm
Clock.
2.Selectanalarm>Edit or select
Optionstoaccessfollowing:
Create New, Delete and
Delete All.
Setting a simple alarm
1.SelectMenu > Tools > Alarm
Clock.
2.SelectSimple Alarm and
select Edit.
3.Setthealarmscheduleand
select Save.
Pill Reminder
PillRemindersets
your schedule to
take pill, and alarm
pop-upwillappear
on the setting time.
You can select to
acceptthereminderorhavethe
reminderpop-upagainafter15
minutes.
Creating a new pill reminder
1.SelectMenu > Tools > Pill
Reminder > Create New.
2.SelectTake and then, take a
picture.
For details on taking picture, see
page60.
3.InputName and Dosage.
4.SelectTime > Create.
5.Setadesiredtime>OK > Back.
6.SelectPeriod > Begins.
7.Setthebeginningtimeofthe
dosage on the calendar.
8. SelectReminders and set the
reminding period.
9. SelectDaily, Every 2 days,
or Monthly.Whenselecting
Every 2 days, you can set
desired days for period.
10. Entermoreinformation.
11. SelectSave.
Checking Today's Pill
Reminder
1.SelectMenu
> Tools > Pill
Reminder
> Options >
Today's Pill.
2.Scrollandselecta
pill reminder item to check the
detail.
Editing a pill reminder
1.SelectMenu > Tools > Pill
Reminder.
2.Selectapillreminder > Edit.
3.EditName, Dosage, Time,
Period or More Information.

Breeze Mode - Useful features
7574
01
02
03
06
01
02
03
04
05
06
07
04
05
4.SelectSave.
Deleting reminders
1.SelectMenu > Tools > Pill
Reminder.
2.Selectapillreminder>
Options > Delete or Delete
All.
User Guide
User Guide helps users to learn
how to use the phone easily in
itself.
1.SelectMenu > Tools > User
Guide.
2.Selectafunctiontocheckin
detail.
Calculator
1.SelectMenu > Tools
> Calculator.
2. Input the numbers
with the numeric
keypad and enter
the operators with
L/R/U/D/ to calculate.
3.Press* to use the decimal
point.
4.PressC to cancel your
input.
5.SelectReset to reset.
Tip calculator
1.SelectMenu > Tools
> Tip Calculator.
2.Enterthevalues
forallthevariable
elds(Bill($),
Tip(%), Split)
and then the corresponding
calculationelds(Tip($),
Total($), You Pay)are
updated automatically.
3.Press* to use the decimal
point.
4.SelectReset to reset.
Stop watch
1.SelectMenu > Tools
> Stop Watch.
2.SelectStart to
start.
3.SelectStop to stop.
4.SelectContinue to
restart or select Reset to clear.
5. To check split times, select
Mode > Split Time Mode.
6.Tochecklaptimes,select
Mode > Lap Time Mode.
note: In Basic Mode, when you exit the
stop watch menu, or become idle, the
stop watch will continue running and
will be indicated by a clock icon. You can

Breeze Mode - Useful features
7776
01
02
03
06
01
02
03
04
05
06
07
04
05
accessthestopwatchbyre-entering
the stop watch menu.
Say a Command
Yourphoneisequippedwith
anAdvancedVoiceCommand
(AVC)feature.Thisfeatureallows
you to make calls or use the
phone functions by simply using
yourvoice.Allyouhavetodois
talk into the phone and then the
phonewillrecognizeyourvoice
and complete tasks by itself.
1.Instandbymode,simply
pressNto access Say a
Command.
OrselectMenu > xxxx
Services > Say a Command.
2.Atthevoiceprompt,saya
command and simply follow
thevoiceprompts.
Thefollowinglistshowsavailable
voicecommands.
Call <Name or #>:Voicedials
a name or phone number in
your address book. If multiple
numbers exist, say the name and
the number type (i.e. mobile,
home,work,orother).
Send Message <Name or #>:
DisplaytheCreateMessage
screenwiththecontactyouhave
spoken.
Contact <Name>:Retrieveand
display the contact information
stored in the address book.
Go To <Menu>:Openan
application on your phone.
Check <Item>:Checkthestatus
information of your phone
(Status,Voicemail,Messages,
MissedCalls,Time,Signal
strength, Battery, My Phone
Number,andVolume).
Readout Mode
ReadoutModemakesyour
phone a useful companion when
youcan’tordon’thavetheability
to read the phone screen.
WhenReadoutmodeis
activated,thephonewill
announcekeyalert,navigation,
andcontentinformationverbally.
•Providesverbalalertsofthe
following:
– Missed Call
– NewMessagereceived
– LowBattery
– MessageSentandother
conrmationnotications

7978
5
Bluetooth
Using Mobile Web
Connectivity
•Announceshighlighteditems
inMenusasusernavigatesthe
phone
•Announcesnumbersasthey
are pressed on keypad
•Readsouttextmessage
content
To turn on Readout Mode
1.SelectMenu > Settings >
Voice Command Setting.
2.SelectAudio Modes >
Readout mode.
Breeze Mode - Connectivity
8180
01
02
03
04
01
02
03
04
05
06
07
05
06
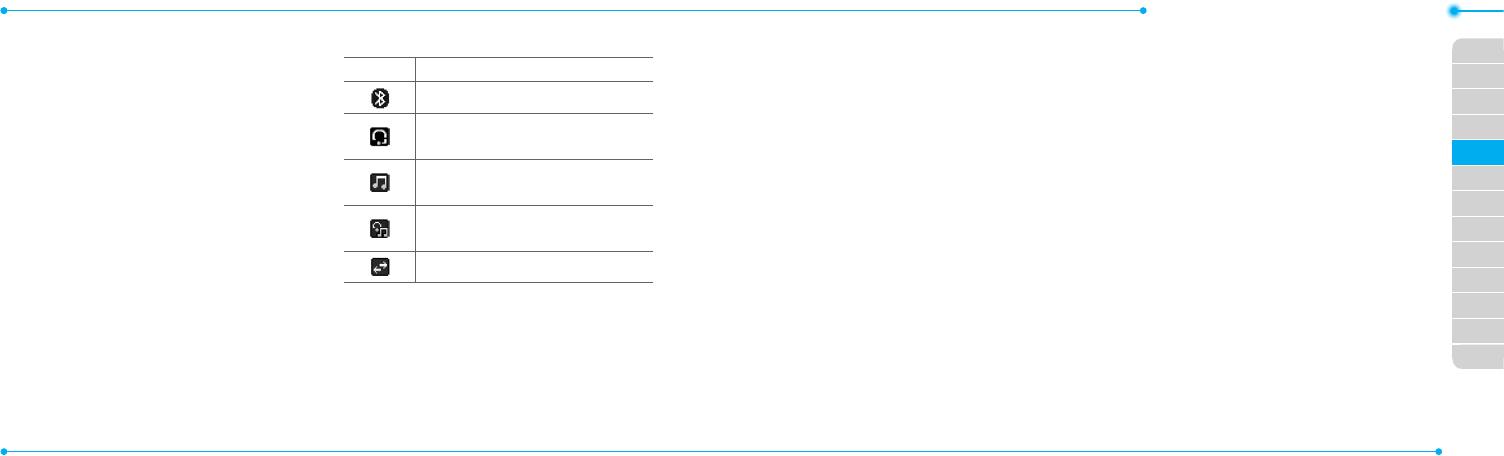
Bluetooth
Bluetooth technology enables
free wireless connections
betweenelectronicdevices
withinamaximumrangeof33
feet(10meters).Bluetooth
connections can be used to send
images, text, business cards,
calendarevents,ortoconnect
to computers using Bluetooth
technology.
Yourmobilephonesupports:
•ConnecttoPCtoaccessinternet.
•ConnecttoHands-Free.
•Connecttoelectronicdevices.
Bluetooth Icon
Icon Descriptions
Bluetoothisactive.
Bluetoothhands-free
headset is connected.
BluetoothA2DPheadsetis
connected.
Bluetoothhands-free+
A2DPheadsetisconnected.
DatatransferviaBluetooth.
note:AdvanceAudioDistribution
Prole(A2DP)isaBluetoothprole
(mode)whichisdesignedtotransfera
uni-directional2-channelstereoaudio
stream to a headset or car audio.
Activating Bluetooth
1.
SelectMenu > Settings >
Bluetooth > Activation.
2.SelectOn or Off.
Adding a device
1.SelectMenu > Settings >
Bluetooth > My Devices.
2.SelectSearch for Devices >
Search.
3.Theavailabledevicewillbe
displayed.
4.Selectadeviceandselect
Select.
5. Enter password and press.
note:Thetargetdevicemustbein
discoverablemode.
Sending files
1.Afterpairingwiththetarget
device,selectOptions > Send
Files.
2.Selectale(s)fromAudio,
Picture, Video or Other Files.
note:Ifthetargetdevicerequests
pairing,theleissentafterpairing
iscompleted.Lockedlesorones
containing original rights may not be
transmitted.
Receiving files
Thereceiptshouldbeapproved
beforereceivingale(s).
Thereceivedle(s)willbesaved
in the corresponding folder.

8382
Forexample,ifyoureceived
contacts information from the
sender,itwillbesavedinyour
phone’s memory.
1.Afterpairingwiththetarget
device,selectOptions > Take
Files.
2.Theavailableleswillbe
displayed.
3.Selectaleandselect
Options > Copy.
Setting the visibility
1.SelectMenu > Settings >
Bluetooth > Visibility.
2.SelectShow or Hide.
3.SelectOK.
Naming the phone
1.SelectMenu > Settings >
Bluetooth > My Bluetooth Info.
2.SelectName > Edit.
3.Enterthenewnameand
select Save.
note:Thedevicenameiswhatidenties
your phone to Bluetooth network.
Using Mobile Web
Accessing Mobile Web
1.Pressinstandbymodeor
select Menu > xxxx Services >
Mobile Web.
note:ItwillaccesstheMobileWeb
homepage.
6
Phone status
Sounds and alerts
Display settings
Voice Command Setting
Settings

8584
01
02
03
04
05
03
04
05
06
07
02
06
01
Breeze Mode - Settings
Phone status
ThismenuallowsyoutoviewMy
Phone Number, Signal Strength
and Battery Remaining.
1.SelectMenu > Settings >
Phone Status.
Sounds & alerts
The Sounds & Alerts menu
allows you to specify a ringer
type, message alert sound, key
volumeandsoon.
1.SelectMenu > Settings >
Sounds & Alerts.
2.SelectNormal, Vibrate
and Ring, Vibrate Only,
Silent, Flight mode or Noise
Suppression.
3.SelectEdit to specify a
selected option.
4.Selectanoptionforeacheld
and select Save. To reset to
factory defaults, select Reset.
note: You can specify the options only
when Normal or Vibrate and Ring
prolesarehighlighted.
Display settings
Setting the font size
1.SelectMenu > Settings > Font
Size.
2.SelectMedium, Large or Very
Large.
3.SelectSelect.
Setting the wallpaper
1.SelectMenu > Settings >
Wallpaper.
2.
SelectImages or Camera
and select a desired image.
3.SelectSelect.
Voice command setting
1.SelectMenu > Settings >
Voice Command Setting.
2.SelectConfirmation,
Adaptation, Audio Modes,
Speakerphone or About and
select Select.
3.Selectanoption>Select.
4.Toimprovetherecognition
accuracy, select Adaptation >
Adapt Voice > Start.
note: You can check the details for each
setting option by selecting Help on the
option setting screen.

8786
Memo
Making, receiving and ending a call
Call settings
Checking all calls
Speed dialing
Using address book
Using your headset
Service and fixed dialing number
Caller identification
Calls and address book
with Advanced Mode
1

Advanced Mode - Calls and address book
8988
03
04
05
06
01
02
03
04
05
06
07
01
01
02
AdvancedModeoffersadditional
features and functionality
associated with making calls and
using address book.
Making, receiving and
ending a call
Making a call
1.Entertheareacodeand
phone number.
2. PressS.
Answering a call
1.PressSor select Accept.
Ending a call
1.PressE.
Oncethecalliscompleted,acall
summary is displayed.
Rejecting a call
Press E or select Ignore.
Making a call using the call
list
Your phone logs up to 20
dialed,receivedandmissedcall
numbers.
1.PressS to display the recent
calls list.
2.SelectAll Calls, Missed Calls,
Received Calls, Dialed Calls
or Call Ranking by pressing
L/R.
3.Selectanumber.
4.PressS to dial the selected
number.
note: To redial the last number, press
and holdS in standby mode.
Making a call during a call
1.Enterthephonenumber
or select Options > View
Contacts.
2. PressS to dial the
secondcall.Therstcallis
automatically put on hold.
Switching between two calls
1.SelectOptions > Swap.
Making an international call
1.Pressandhold0 key for the
internationalprexuntilthe
‘+’,characterappears.
2. Type the country code, area
code, and phone number.
3.PressS in standby mode.
Making an emergency call
1.Youcanmakeemergency
callsevenifyourphonedoes
nothaveaSIMcard.
2.PressEmergencyNumber,or
select SOS if your phone does
nothaveaSIMcard.
3.PressS.

Advanced Mode - Calls and address book
9190
03
04
05
06
01
02
03
04
05
06
07
01
01
02
Replying to a missed call
1.PressS to display the calls
list.
2.SelectMissed Calls by
pressing L/R.
3.Selectanumbertocallby
pressing U/D.
4.PressS.
Answering a second call N
1.PressS.Therstcallis
automatically put on hold.
2. PressE to end the second
call. The call on hold is
automatically reconnected.
note: For answering a second call, you
shouldactivateCall Waitinginadvance.
(Select Menu > Settings > Call > Call
Waiting > Activate inAdvancedmode.)
Putting a call on hold and
returning N
Putting a call on hold
1.SelectOptions > Hold or
pressS.
Returning to a held call
1.SelectOptions > Unhold or
pressS again.
Multi-party calls N
You can talk with more than one
personorhaveaconferencecall.
Making a multi-party call
1.Calltherstparticipant.
2. Call the second participant.
Therstcallisautomatically
put on hold.
3.SelectOptions > Join.
Having a private
conversation with one
participant
1.SelectOptions > Split.
2.Selecttheparticipant>
Select.
Removing one participant
from a multi-party call
1.SelectOptions > End.
2.Selectthenumberassociated
with the call you wish to end or
End All to end all calls.
Searching for a number in
address book during a call
1.Select Options > View
Contacts.
2.Selectanumber >S.
Searching for a name or
group in address book
Entertherstlettersofthename
forNameSearch.Theentriesare
displayedstartingwiththerst
entry matching your input.

Advanced Mode - Calls and address book
9392
03
04
05
06
01
02
03
04
05
06
07
01
01
02
Finding a name manually in
address book
1.PressU/D.
Viewing the details of
highlighted entry in address
book
1.SelectSelect.
For details on address book, see
page97.
Reading a message during a
call
1.SelectOptions > View
Message.
2.Selectaconversation>Open.
3.Selectamessage>View.
Sending a message during a
call
1.SelectOptions > Send
Message.
For details on creating a text
message,seepage106.
Mobile WebN
1.SelectOptions > Mobile Web.
Viewing the calendar during
a call
1.SelectOptions > View
Calendar.
Making a note during a call
1.SelectOptions > Notepad.
Voice recording
1.SelectOptions > Voice
Recording.
Call settings
Answering with any key press
1.SelectMenu > Settings > Call
> Answer Mode.
2.SelectPress any key.
note: You can answer with any key
except E and Ignore.
Setting auto redial N
1.SelectMenu > Settings > Call
> Auto Redial.
2.SelectOn or Off.
Checking all calls
Youcanviewinformationabout
all calls simply by pressingS.
For more options for all, missed,
received,dialedcalls,andcall
ranking, select an entry and
Options.
Viewing missed calls
1.SelectMenu > My Stuff >
Tools.

Advanced Mode - Calls and address book
9594
03
04
05
06
01
02
03
04
05
06
07
01
01
02
2.SelectRecent Calls > Missed
Calls.
Viewing received calls
1.SelectMenu > My Stuff >
Tools.
2.SelectRecent Calls >
Received Calls.
Viewing dialed calls
1.SelectMenu > My Stuff >
Tools.
2.SelectRecent Calls > Dialed
Calls.
Viewing call rankings
1.SelectMenu > My Stuff >
Tools.
2.SelectRecent Calls > Call
Ranking.
Deleting call logs
1.SelectMenu > My Stuff >
Tools.
2.SelectRecent Calls > Delete
Call Logs.
3.SelectAll Calls, Missed Calls,
Received Calls, or Dialed
Calls.
note: If no logs exist, the message “No
CallExist” appears.
Viewing call time
1.SelectMenu > My Stuff >
Tools.
2.SelectRecent Calls > Call
Time.
3.Last Call, Received Calls,
Dialed Calls, and Total Calls
are displayed.
Resetting all call times
1.SelectMenu > My Stuff >
Tools.
2.SelectRecent Calls > Call
Time.
3.SelectReset > Yes.
note:Thedefaultpasswordis‘1234’.
Viewing data transmitted
information
1.SelectMenu > My Stuff >
Tools.
2.SelectRecent Calls > Packet
Counter.
•Current Info:Youcanview
transmitted data in the
currentsession,inKilobytes.
Sent, Received and Total
information are also
available.
•Last Info:Youcanview
Sent, Received, Total and
Duration transmitted
inprevioussessions,in
Kilobytes.

Advanced Mode - Calls and address book
9796
03
04
05
06
01
02
03
04
05
06
07
01
01
02
•Total Info:Youcanviewall
Sent, Received, Total and
Duration transmitted data in
Kilobytes.
•Clear Logs:Thedefault
passwordis‘1234’.
Speed dialing
Youcandialquicklyusingspeed
dialing.Upto8phonenumbers
can be programmed using
numbers 2 to 9.
1:Voicemail
0:Prexforinternationalcall
Setting speed dial
1.SelectMenu > Address Book >
Settings.
2.SelectSpeed Dial > an empty
entry and select Add.
3.Selectacontact>Select.
Changing speed dial contact
1.SelectMenu > Address Book >
Settings.
2.SelectSpeed Dial and select a
number.
3.SelectChange.
4.Selectacontact>Select > Yes.
Removing from speed dial
1.SelectMenu > Address Book >
Settings.
2.SelectSpeed Dial and select a
number.
3.SelectRemove > Yes.
Using address book
Youcansavenames,phone
numbers, and information on the
SIMorphone.Numberofentries
can depend on the capacity of
theSIMcard.
Adding a contact
1.SelectMenu > Address Book >
Contacts > Options > Add
New Contact.
2.SelectPhone or SIM.
3.Inputtheelds.
4.SelectSave.
Viewing the contact list
1.PressD or select Menu >
Address Book > Contacts.
Searching for a phone
number
1.PressD or select Menu >
Address Book > Contacts.
2.Inputtherstletterortwoof
the person’s name and scroll
with U/D.
3.SelectSelect toviewdetail
information.

Advanced Mode - Calls and address book
9998
03
04
05
06
01
02
03
04
05
06
07
01
01
02
4.Toupdateinformation,select
Options > Edit Contact.
Calling from contact list
1.PressD or select Menu >
Address Book > Contacts.
2.Selectacontacttocall.
3.PressS.
Sending a contact
1.PressD or select Menu >
Address Book > Contacts.
2.Selectacontact > Options >
Send Contact Info > All
Contact Info, Personal
Contact, or Business
Contact.
3.Youcansendthecontact
using Message or Bluetooth.
Deleting a contact
1.PressD or select Menu >
Address Book > Contacts.
2.Selectacontact > Options >
Delete > Yes.
Making groupsS
1.PressD, R or select Menu >
Address Book > Groups.
2.SelectOptions > Add New
Group.
3.SelectPhone or SIM.
Fora2GSIMcard,thisstepisnot
needed.
4.Enteragroupnameand
select Save.
Editing groups
1.PressD, R or select Menu >
Address Book > Groups.
2.Selectagroupandselect
Options > Add New Group,
Rename Group, or Delete
Group.
Adding to favorites or
groups
1.PressD or select Menu >
Address Book > Contacts.
2.Selectacontactandselect
Options > Add to.
3.SelectFavorites or Groups.
Using your headset
Youcanmakeorreceiveacall
usingyourheadset.Whenyou
connect your headset to the jack,
the button on the headset works
as follows.
note: You must use the headset
designedforthisdevice.Itisanoptional
item.Notallheadsetwillhaveabutton.
While in standby mode
1.Pressthebuttononce to list
recent calls.
2. Press the button twice to
redial the last call.

Advanced Mode - Calls and address book
101100
03
04
05
06
01
02
03
04
05
06
07
01
01
02
While the phone is closed
1.Pressthebuttononce to
receiveanincomingcall.
2. Press and hold the button
once to end the call.
Service and fixed dialing
number
Calling your service
numbers S
Youcanseetheservicenumber
toreachtheserviceprovider.
1.SelectMenu > Address Book >
Service Numbers.
2.Selectanumber > pressS.
Viewing fixed dialing number
list
Fixeddialingnumberisaservice
thatlimitsyouraccesstospecic
numbers in the address book
listrecordedontheSIM.Input
thePIN2tosetuporcancelthis
service.
1.SelectMenu > Address Book >
Fixed Dial Numbers.
note:PIN2mustbecorrectlyentered
within3attempts.Ifyouinputincorrect
codethreetimesinarow,thePIN2
codewillbeblocked.IfthePIN2code
isblocked,pleasecontactyourservice
provider.YourPIN2codeissuppliedwith
theSIMcard.
Caller identification
Caller identification N
1.SelectMenu > Settings > Call
> Display My Number.
2.SelectNetwork Default, Show
or Hide > Select.

P2000
103102
Memo
Receiving messages
Creating and sending text messages
Creating multimedia messages
Message templates
Message settings
Managing messaging memory
Email
Using instant messenger
Messaging
with Advanced Mode
2

Advanced Mode - Messaging
105104
01
04
05
06
01
02
03
04
05
06
07
02
02
04
03
Whenyourphoneissetto
AdvancedMode,youcan
use additional features and
functionality associated with
messaging.
Receiving messages
Viewing a new message
1.SelectView.
Reading a message from the
conversation
1.SelectMenu > Messaging >
Conversations.
2.Selectaconversation > Open.
Saving the contact
information from a received
message
1.Selectareceivedmessage >
View.
2.SelectOptions > Save.
3.SelectNew Contact or
Update Contact.
Saving the object in a
received multimedia
message
1.Openamultimediamessage.
2.Selectanobject.
3.SelectOptions > Use > Save.
Itwillbesavedinoneofthe
categories in the My Stuff folder.
For details on Photo album, see
page126.
Listening to voice messages
1.Pressandhold1 or select
Menu > Messaging > Voice
Mail.
Itwillautomaticallycallthevoice
mail center.
Launching URL in the
message
1.SelectMenu > Messaging >
Conversations.
2.Selectamessagewhich
includesanURL.
3.SelecttheURLandselect
Options > Use.
Saving connection settings
using Configuration
message
1.SelectMenu > Messaging >
Conversations.
2.Selectanovertheair(OTA)
message.
3.SelectOptions > Install.

Advanced Mode - Messaging
107106
01
04
05
06
01
02
03
04
05
06
07
02
02
04
03
Creating and sending
text messages
Sending a text message
1.PressU or select Menu >
Messaging > Create
Message.
2. Enter a message.
3.Tosavethemessageasa
draft, select Options > Save to
Drafts.
4.SelectSend to and select a
contact to send the message
and select Select.
5.SelectSend.
6.Toviewthesentmessage,
select Menu > Messaging >
Conversations.
note:Allsuccessfullysentmessages
willbesavedinConversations while the
messagesfailedtobesentwillbesaved
in Outbox.
Finding all sent messages
1.SelectMenu > Messaging >
Conversations.
Replying to a message
1.Selectamessage>Reply or
select a message > Options >
Reply.
Creating multimedia
messages
You can create and send
multimedia messages. Capacity
is100KB,300KBor600KB.An
error message will alert you
once the message exceeds the
capacity.
Adding a saved picture to
the message
1.PressU or select Menu
> Messaging > Create
Message.
2. Enter a message.
3.SelectInsert > Picture >
Picture > Camera.
4.Scrolltothesavedpictureand
select Select.
5.Topreviewthemessage,
select Options > Preview >
Current or Whole Message.
6.Toeditthetextmessage,
press U/D to select the text
box and edit your message.
7.SelectSend to and select a
contact to send the message
and select Select.
8.SelectSend.

Advanced Mode - Messaging
109108
01
04
05
06
01
02
03
04
05
06
07
02
02
04
03
Adding a new picture to the
message
1.PressU or select Menu >
Messaging > Create
Message.
2. Enter a message.
3.SelectInsert > Take New
Picture.
4.Focusontheobject.
5 Press orQ.
6.Topreviewthemessage,
select Options > Preview >
Current or Whole Message.
To go back to text editor page,
select Stop.
7.Toeditthetextmessage,
press U/D to select the text
box and edit your message.
8.SelectSend to > a contact >
Select > Send.
For details on taking a picture,
seepage122.
Adding a saved video to the
message
1.PressU or select Menu >
Messaging > Create
Message.
2. Enter a message.
3.SelectInsert > Video > Video.
4.Scrolltothesavedvideoclip
and select Select.
5.Topreviewthemessage,
select Options > Preview >
Current or Whole Message.
To go back to text editor page,
select Stop.
6.Toeditthetextmessage,
press U/D to select the text
box and edit your message.
7.SelectSend to > a contact >
Select > Send.
Adding a new video to the
message
1.PressU or select Menu >
Messaging > Create
Message.
2. Enter a message.
3.SelectInsert > Record New
Video.
4.Focusontheobject.
5. Press orQ, or select Options >
Record.
6.Tostopandsavethe
recording, select Stop.
7.Topreviewthemessage,
select Options > Preview >
Current or Whole Message.
To go back to text editor page,
select Stop.
8.Toeditthetextmessage,
press U/D to select the text
box and edit your message.

Advanced Mode - Messaging
111110
01
04
05
06
01
02
03
04
05
06
07
02
02
04
03
9.SelectSend to > a contact >
Select > Send.
Fordetailsonrecordingavideo,
seepage124.
Adding a recorded voice
memo to the message
1.PressU or select Menu >
Messaging > Create
Message.
2. Enter a message.
3.SelectInsert > Sound > Audio
> My Voice.
4.Scrolltothesavedaudioclip
and select Select.
5.Topreviewthemessage,
select Options > Preview >
Current or Whole Message.
6.SelectPause to stop listening
thevoicememoorselect
Stop to go back to text editor
page.
7.Toeditthetextmessage,
press U/D to select the text
box and edit your message.
8.SelectSend to > a contact >
Select > Send.
Adding a new voice memo to
the message
1.PressU or select Menu >
Messaging > Create
Message.
2. Enter a message.
3.SelectInsert > Record New
Sound.
4.SelectRecord to record the
sound.
5.Tostopandsavethe
recording, select Stop.
6.Topreviewthemessage,
select Options > Preview >
Current or Whole Message.
7.SelectPause to stop listening
thevoicememoorselect
Stop to go back to text editor
page.
8.Toeditthetextmessage,
press U/D to select the text
box and edit your message.
9.SelectSend to > a contact >
Select > Send.
FordetailsonRecordingavoice
memo,seepage150.
Adding other files to the
message
1.PressU or select Menu >
Messaging > Create
Message.

Advanced Mode - Messaging
113112
01
04
05
06
01
02
03
04
05
06
07
02
02
04
03
2. Enter a message.
3.SelectInsert > Other Files >
Other Files.
4.SelectaleandselectSelect.
5.Topreviewthemessage,
select Options > Preview >
Current or Whole Message.
To go back to text editor page,
select Stop.
6.Toeditthetextmessage,
press U/D to select the text
box and edit your message.
7.SelectSend to > a contact >
Select > Send.
Message templates
Whenyouoftenusethesame
phrases,youcansavethe
message under message
templates.
Adding the message as a
template
1.SelectMenu > Messaging >
Templates.
2.SelectOptions > Add New.
3.Writethefrequentlyused
message > Options > Save.
Sending a message with
template
1.SelectMenu > Messaging >
Templates.
2.Selectamessagetosend.
3.SelectSend to add more
messages.
4.SelectSend to > a contact >
Select > Send.
note: You can add a template while
enteringamessage.Writeamessage>
Insert > Templates.Selectatemplateto
add.
Message settings
Setting text message
1.SelectMenu > Messaging >
Settings.
2.SelectText Massage.
3.EnternewCenter Address.
4.EnternewEmail Gateway.
5.SelectSave.
Setting profiles for
multimedia message
1.SelectMenu > Messaging >
Settings.
2.SelectMultimedia Message >
MMS Profiles.

Advanced Mode - Messaging
115114
01
04
05
06
01
02
03
04
05
06
07
02
02
04
03
3.Selectaproleandselect
Select.
Setting sending options for
multimedia message
1.SelectMenu > Messaging >
Settings.
2.SelectMultimedia Message >
Sending Settings.
3.SelectCreation Mode or Max
Message Size > Select.
4.Selectadesiredoption>
Select.
Setting receiving options for
multimedia message
1.SelectMenu > Messaging >
Settings.
2.SelectMultimedia Message
> Receiving Settings >
Automatic Download.
3.SelectOn or Off > Select.
Setting receiving options for
voice message
1.SelectMenu > Messaging >
Settings.
2.SelectVoice Mail.
3.Enterthenumberofthevoice
mail center > Save.
note:Thisnumbermaybepre-
conguredbytheserviceproviderupon
activation.
Setting default edit mode
1.SelectMenu > Messaging >
Settings.
2.SelectDefault Edit Mode.
3.SelectAlphabet or Predictive
and select Select.
Setting auto delete old
message
Whenmessagememory
capacity(Max.200messages)
is full, the oldest message will be
deleted automatically.
1.SelectMenu > Messaging >
Settings.
2.SelectAuto Delete Old
Message.
3.SelectOn or Off > Select.
Managing messaging
memory
Up to 200 messages can be
stored in the phone memory,
additional messages will be
savedtotheSIMcard.When
the message box is full, the
messagesfulliconwillappear.All
messages share memory.
Advanced Mode - Messaging
117116
01
04
05
06
01
02
03
04
05
06
07
02
02
04
03
Icon Descriptions
Textmessageisfull(SIMand
phonemessages).
Moving a message to SIM
1.SelectMenu > Messaging >
Conversations.
2.Selectamessage > Options >
Move to SIM.
Deleting a message in the
inbox
1.Selectamessage > Options >
Delete > Yes.
Viewing memory space
information
1.SelectMenu > Messaging >
Used Space.
2. Press L/RtoviewSIM and
Phone memory.
Email
Youcanreceiveemailsfromyour
serviceprovider.
Receiving an email
1.PressL or select Menu >
Messaging > Mobile Email.
2.Selectanemail.
3SelectSelect.
Using instant messenger
UseInstantMessenger(IM)to
sendandreceiveshort,simple
messagesthataredelivered
immediately.
Starting an instant
messenger
1.SelectMenu > IM.
2.SelectanIMapplication >
Select.
3.Enterscreennameand
password > Sign In.
Viewing the conversation log
Youcanviewthelogofyour
conversationsintheInstant
MessengerSavedConversations.

119118
Memo
Camera
Photo album
Video album
Audio album
Music player
Music player settings
Media player
Other files
Managing memory
Playing games
AppCenter
Multimedia
with Advanced Mode
3
Advanced Mode - Multimedia
121120
01
02
05
06
01
02
03
04
05
06
07
03
03
05
04
InAdvancedMode,youcanusethefullfeaturesofmultimediathat
P2050 offers.
Camera
Youcantakepicturesandrecordmoviesusingthebuilt-incamera.
Thephotosandvideoclipscanbesavedandsentviamultimedia
messages,OnlineLocker,orBluetooth.
Zoom Zoom
Picture
remaining
Brightness Brightness
SelfTimer SelfTimer
Effect Effect
White
Balance
White
Balance
Size Size
Camera
mode
Video
mode
note:Whenyousetthephotosizeto
1280x1024,thezoomfunctionisnot
available.
Setting camera settings
1.PressQin standby mode or
select Menu > My Stuff > Tools
> Camera.
2.SelectOptions > Settings to
change settings prior to taking
a picture.
Camera options
Icon Name Descriptions
White
Balance
Auto( ),DayLight
( ),Tungsten( ),
Fluorescent ( )
Icon Name Descriptions
Effect
Normal( ),Sepia
( ),Negative( ),
B&W( )
SelfTimer Off( ),5secs( ),
10secs( )
Size
1280x1024( ),
1024x768( ),
640x480( ),
320x240( ),
240x320( )
Advanced
PictureQuality,Save
Location,Shutter
Sound,TimerSound
Advanced Mode - Multimedia
123122
01
02
05
06
01
02
03
04
05
06
07
03
03
05
04
Video camera options
Icon Name Descriptions
White
Balance
Auto( ),DayLight
( ),Tungsten( ),
Fluorescent ( )
Effect
Normal( ),Sepia
( ),Negative( ),
B&W( )
SelfTimer Off( ),5secs( ),
10secs( )
Size
176x144(MMS)
( ),176x144( ),
320x240( )
Advanced
VideoQuality,
SoundRecording,
SaveLocation,
TimerSound
Zoom in and out
1.PressU/D.
Itrangesfrom1xto4x.
Increasing or decreasing the
brightness
1.PressL/R.
Itrangesfrom-2to+2.
Taking a picture
1.PressQin standby mode
or select Menu > My Stuff >
Tools > Camera.
2. Focus on the object.
3.PressorQ, or select Options >
Capture.
note:Yourphotowillbesaved
automatically in MyStuff> Picture >
Camera.
Changing to video camera
mode
1.PressQin standby mode
or select Menu > My Stuff >
Tools > Camera.
2.SelectOptions while camera
modeisactivated.
3.SelectVideo Camera Mode.
In camera mode, press and
hold
Q
tochangetovideo
camera mode.
4.Focusontheobject.
5. Press orQ, or select Options
> Record.
6.SelectStop to stop recording.
note:Yourvideowillbesaved
automatically in MyStuff > Video.
Viewing the taken picture
1.PressQin standby mode
or select Menu > My Stuff >
Tools > Camera.
2.SelectOptions > Photo
Album.
3.Selectapicture > View.

Advanced Mode - Multimedia
125124
01
02
05
06
01
02
03
04
05
06
07
03
03
05
04
After taking pictures
To Press
Sendusing
a multimedia
message
Options > Send >
as Multimedia
Message
Sendusing
OnlineLocker
Options > Send >
Send to Online
Locker
Sendusing
Bluetooth
Options > Send > via
Bluetooth
Setas
wallpaper
Options > Set as >
Wallpaper
SetasCallerID Options > Set as >
Caller ID
Delete Options > Delete
Rename Options > Rename
Viewphoto
information Options > Properties
Recording a video
1.SelectMenu > My Stuff > Tools
> Video Camera.
2. Focus on the object.
3.Press orQ, or select Options
> Record.
4.SelectStop to stop recording.
5.SelectOptions > Play to play
thevideoclip.
6.PressC to go back to
previewmode.
Changing to camera mode
1.SelectMenu > My Stuff > Tools
> Video Camera.
2.SelectOptionswhilevideo
modeisactivated.
3.SelectCamera Mode.
Invideocameramode,press
an hold
Q
to change to camera
mode.
For details on taking a picture,
seepage122.
Viewing the recorded video
clip
1.SelectMenu > My Stuff >
Tools > Video Camera.
2.SelectOptions > Video
Album.
3.Selectthevideoclip > Play.
After recording video clips
To Press
Sendusing
a multimedia
message
Options > Send > as
Multimedia Message
Sendusing
OnlineLocker
Options > Send >
Send to Online
Locker
Sendusing
Bluetooth
Options > Send > via
Bluetooth
Viewrecorded
videoclip Options > Play
Delete Options > Delete
Rename Options > Rename
Viewvideoclip
information Options > Properties

Advanced Mode - Multimedia
127126
01
02
05
06
01
02
03
04
05
06
07
03
03
05
04
During recording a video clip
To Press
Receive
an incoming call S or
Pause and record
continuously Pause
Stoprecording Stop
Photo album
The Picture menu allows you
toshopgraphicusingtheWAP
browser. You can download
desired images and graphics and
savethemtoyourphone.You
canalsoviewallthepicturesyou
havetaken,saveselectedimages
to your phone or an external
memory card, and share the
photos with others. JPEG format
is supported, and other formats
aresavedinthePicture folder.
note: To access Picture, select Menu >
MyStuff > Picture.
Viewing the saved pictures
1.SelectMenu > My Stuff >
Picture > Camera.
2.Selectapicture.
3.SelectView.
Setting as wallpaper in the
display
1.SelectMenu > My Stuff >
Picture > Camera.
2.Selectapicture.
3.SelectOptions > Set as >
Wallpaper.
Setting as caller
identification
1.SelectMenu > My Stuff >
Picture > Camera.
2.Selectapicture.
3.SelectOptions > Set as >
Caller ID.
Sending pictures using
multimedia message
1.SelectMenu > My Stuff >
Picture > Camera.
2.Selectapicture.
3.SelectOptions > Send > as
Multimedia Message.
For details on creating
multimedia messages, see page
107.
Deleting multiple pictures
1.SelectMenu > My Stuff >
Picture > Camera.
2.SelectOptions > Multiple
Select.
3.SelectSelect to select more
than one picture.
4.SelectDeselect to cancel
your selection.
5.SelectOptions > Delete.

Advanced Mode - Multimedia
129128
01
02
05
06
01
02
03
04
05
06
07
03
03
05
04
Viewing a file information
1.SelectMenu > My Stuff >
Picture > Camera.
2.Selectapicture.
3.SelectOptions > Properties.
Video album
The Video menu allows you to
shopvideoclipsusingtheWAP
browser. You can download
desiredvideoclipsandplaywith
thebuilt-invideoplayer.You
canalsosend,save,anddelete
videos.Thesupportedformats
areMP4,WMA,3GPand3G2.
Playing the saved video clips
1.SelectMenu > My Stuff >
Video.
2.Selectavideoclip.
3.SelectPlay.
Using video player controls
To Press
Pause/Play
Rewind Hold U
Fast forward Hold D
Control
volume
Sidekeyupordown
or L/R
Sending a video clip using
multimedia message
1.SelectMenu > My Stuff >
Video.
2.Selectavideoclip.
3.SelectOptions > Send > as
Multimedia Message.
For details on creating
multimedia messages, see page
107.
Sending a video clip using
Online Locker
1.SelectMenu > My Stuff >
Video.
2.Selectavideoclip.
3.SelectOptions > Send > Send
to Online Locker.
Sending a video clip via
Bluetooth
1.SelectMenu > My Stuff >
Video.
2.Selectavideoclip.
3.SelectOptions > Send > via
Bluetooth.
Deleting multiple video clips
1.SelectMenu > My Stuff >
Video.
2.SelectOptions > Multiple
Select.

Advanced Mode - Multimedia
131130
01
02
05
06
01
02
03
04
05
06
07
03
03
05
04
3.SelectSelect to select more
thanonevideocliple.
4.SelectDeselect to cancel
your selection.
5.SelectOptions > Delete.
Audio album
The Audio menu allows you to
shop tones and answer tones
usingtheWAPbrowser.Youcan
downloaddesiredaudiolesand
playwiththebuilt-inaudioplayer.
Youcanalsosend,save,and
deleteaudioles.Thesupported
leformatsareMIDI,i-Melody,
MP3,AMR,WAV,AAC,AAC+,
WMA.
Listening to the recorded
sound
1.SelectMenu > My Stuff >
Audio > My Voice.
2.Selectarecordedsound.
3.SelectPlay.
Using audio player controls
To Press
Pause/Play
Stop Stop
Rewind Hold L
Fast forward Hold R
Control
volume
Sidekeyupordown
or U/D
Setting as a ring tone
1.SelectMenu > My Stuff > Audio.
2.Selectasound.
3.SelectOptions > Set as Ring
Tone.
note:Themaximumringtonelesizeis
300KB.
Moving or copying multiple
sound to External Memory
1.SelectMenu > My Stuff >
Audio.
2.Selectasoundle.
3.SelectOptions > Multiple
Select.
4.SelectSelect to select more
thanoneaudiole.
5.SelectDeselect to cancel
your selection.
6.SelectOptions > Copy to
External Memory or Move
to External Memory. The
selected sound will be copied
ormovedtotheAudio folder
in external memory card.
Sending sound file using
multimedia message
1.SelectMenu > My Stuff >
Audio.
2.Selectasoundle.
3.SelectOptions > Send > as
Multimedia Message.
Advanced Mode - Multimedia
133132
01
02
05
06
01
02
03
04
05
06
07
03
03
05
04
Music player
The Music Player is an application
thatcanplayMP3andaudioles.
Thesupportedleformatsare
MIDI,i-Melody,MP3,AMR,WAV,
AAC,AAC+,WMA.
Icon Descriptions
Music is playing.
Music is paused.
Music is stopped.
note:AmicroSDcardmustbeinserted
to transfer music to your phone.
Adding music from Windows
Media Player™
1.ConnecttheUSBcabletothe
deviceandthecomputer.
2.SelectMusic Player > Select.
3.OpentheSynctabinWindows
MediaPlayer™inyour
computer.
4.Selectthemusicfromthelist
and drag and drop to your
phone.
note:WindowsMediaPlayer™11and
WindowsXPversionisrequired.
Playing music
1.SelectMenu > xxxx Music >
Music Player.
2.Selectacategory(All Music,
Playlists, Albums, Artists,
Genres)>Select.
3.SelectAll > Play to play all
songs in the All Music.
4.SelectOptions > Stop to stop
playing.
note:Musicwillpausewhenyoureceive
an incoming call and Music will resume
when the call ends.
Icon Descriptions
Volumelevel7
Pause
Play
Rewindwithlongpress
Fast Forward with long press
Icon Descriptions
Previoustrackwithshortpress
Nexttrackwithshortpress
Repeatalltracks
Repeatsingletrack
Repeatoff
ShufeOn:thecurrentlistof
songsarerandomlyshufed
for playback
ShufeOff:songsareplayedin
orderandnotshufed
Making a playlist
1.SelectMenu > xxxx Music >
Music Player.
2.SelectPlaylists > New Playlist.

Advanced Mode - Multimedia
135134
01
02
05
06
01
02
03
04
05
06
07
03
03
05
04
3.InputPlaylistNameandselect
Save.
4.SelectAll Music, Albums,
Artists or Genres.
5.Selectamusicle(s)and
select Select to add to the
playlist.
6.SelectDone.
Using a playlist
1.Toaddtrackstoaplaylist,
select Menu > xxxx Music >
Music Player > Playlists.
2.Selectaplaylisttoaddmusic
and select Options > Add
Tracks.
3.SelectAll Music, Albums,
Artists or Genres.
4.Selectamusicle(s)>Select
> Done.
5.Toremovetracksfromthe
playlist, select Options >
Remove Tracks > a music
le(s)>Select > Remove.
6.Torenametheplaylist,select
Options > Rename Playlist >
inputnewPlaylistNameand
select Save.
7.Todeletetheplaylist,select
Options > Delete > Yes.
Listening music with
Bluetooth headset
1.Whilemusicisplayinginthe
standby mode, select Menu >
xxxx Music > Music Player.
2.SelectNow Playing > Options
> Transfer to B/T Headset.
Viewing a music file
information
1.Whilemusicisplayinginthe
player mode, select Options >
Properties.
2. Use U/DtoviewTrack
Number, Title, Artist, Album,
Genre, Duration, Filename,
File Size, Location, Format,
Bit Rate, Created, License
and Sharing.
Setting as ring tone
1.SelectMenu > xxxx Music >
Music Player.
2.Selectacategory(All Music,
Playlists, Albums, Artists,
Genres)>Select.
3.Selectale.
4.SelectOptions > Set as Ring
Tone.
note:Youcannotsetthemusiclewhile
itisplaying.Ifamusicleislargerthan
300KB,thelewillbedeactivatedfor
setting ring tone.

Advanced Mode - Multimedia
137136
01
02
05
06
01
02
03
04
05
06
07
03
03
05
04
Deleting music
1.SelectMenu > xxxx Music >
Music Player.
2.Selectacategory(All Music,
Playlists, Albums, Artists,
Genres)>Select.
3.Selectale.
4.SelectOptions > Delete.
note:Ifthemusicleisplaying,you
cannot delete it.
Shopping music
1.SelectMenu > xxxx Music >
Shop Music.
2.Toreturntothepreviouspage,
press C.
Listening the radio
1.SelectMenu > xxxx Music >
xxxx Radio.
Using music identification
1.SelectMenu > xxxx Music >
Shazam.
3.Holdthephonecloseto
music. Your phone will analyze
the music and display the
artist, title, and album.
note: For the cost plan, contact your
nearestserviceprovider.
Music player settings
Shuffling music
1.SelectMenu > xxxx Music >
Music Player.
2.SelectSettings > Shuffle.
3.SelectShuffle On or Shuffle
Off > Select.
Repeating music
1.SelectMenu > xxxx Music >
Music Player.
2.SelectSettings > Repeat.
3.SelectRepeat All Tracks,
Repeat Single Track or
Repeat Off.
4.SelectSelect.
Setting equalizer
1.SelectMenu > xxxx Music >
Music Player.
2.SelectSettings > Equalizer.
3.Selectacategory>Select.
Auto Full Screen
1.SelectMenu > xxxx Music >
Music Player.
2.SelectSettings > Auto Full
Screen.
3.SelectOn or Off and select
Select.
Removing
1.SelectMenu > xxxx Music >
Music Player.
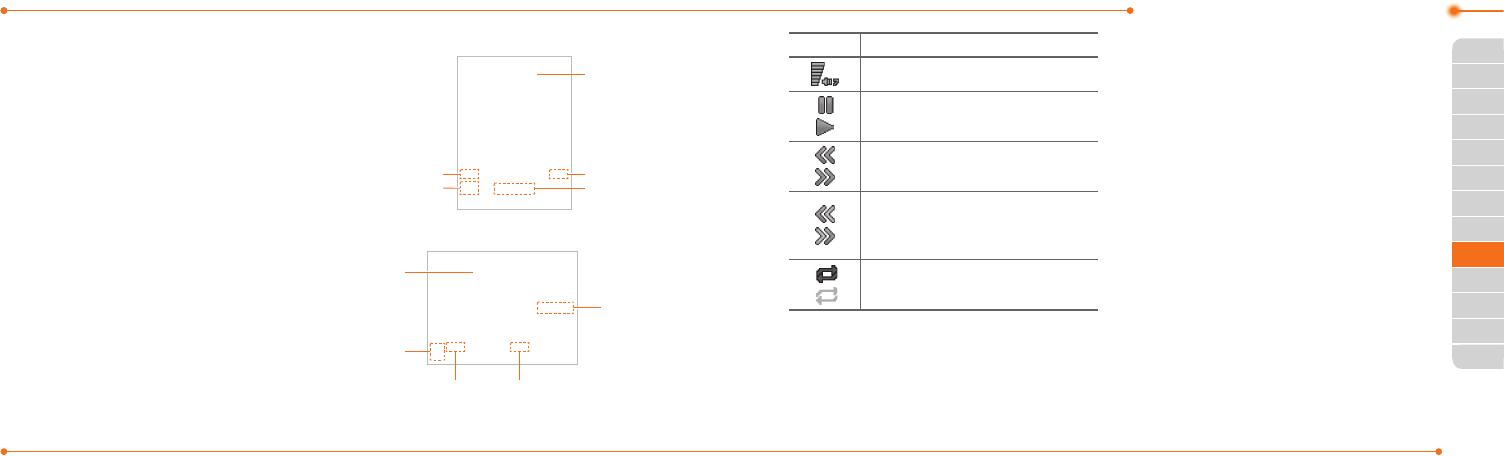
Advanced Mode - Multimedia
139138
01
02
05
06
01
02
03
04
05
06
07
03
03
05
04
2.SelectSettings > Remove.
3.SelectLicense Data File or All
Music Contents.
4.SelectSelect > Yes.
Media player
Youcanplayvideoclipswiththe
media player.
note:Donotusethisfeatureillegally.
Soundandvideocanbeprotectedby
copyright. It is illegal to copy such sound
/videotracksforthepurposeofselling
or distribution. Pantech does not in any
way support the unauthorized use of
content on your phone media player.
<Audioplayer>
Playing time
Volume
controls
Duration
Player
controls
Back
ground
skin
<Videoplayer>
Volume
controls
Playing time
Player
controls
Video
image
Duration
Icon Descriptions
Volumelevel7
Pause
Play
Rewindwithlongpress
Fast Forward with long press
Previoustrackwithshort
press
Nexttrackwithshortpress
Repeaton
Repeatoff
Playing the video clip
1.SelectMenu > My Stuff > Tools
> Media Player > Video.
2.Selectale>Play.
3.Beforeplayingavideoclip,
select Options to access the
followings:Send, Rename,
Multiple Select, Delete,
Delete All, Copy to External
Memory, Move to External
Memory, Properties or View
by Grid.
Playing the audio file
1.SelectMenu > My Stuff > Tools
> Media Player > Audio.
2.Selectaleorselectafolder,
thenale.
3.SelectPlay.
For details on audio player
contols,seepage130.

Advanced Mode - Multimedia
141140
01
02
05
06
01
02
03
04
05
06
07
03
03
05
04
Setting Mobile Video
1.SelectMenu > My Stuff > Tools
> Media Player > MV Settings.
2.Selectaproleorselect
Options > Create.
Other files
You can manage unsupported
leformatsthataresavedon
yourphone.Italsolistsles
receivedviaBluetoothfrom
otherdevices.
Viewing the list of the files
1.SelectMenu > My Stuff >
Other Files.
Managing memory
Viewing memory status
1. SelectMenu > My Stuff > Used
Space.
2. Press L/RtoviewPhoneor
External memory information.
Playing games
You can download games to
play with. It is easy to download
andyoucanpreviewthem
beforehand. You will only be able
toviewgamesthatareavailable
on your mobile.
Shop games
1.SelectMenu > My Stuff >
Games > Shop Games.
2. Play the demo and select BUY
to download the complete
game.
AppCenter
AppCenter
1.SelectMenu > AppCenter.
Shopping Applications
1.SelectMenu > My Stuff >
Applications > Shop
Applications.
Shopping Tones
1.SelectMenu > My Stuff >
Audio > Shop Tones.
2.SelectMenu > My Stuff >
Audio > Answer Tones >
Shop Answer Tones, Manage
Answer Tones, or About
Answer Tones.

143142
Shopping Games
1.SelectMenu > My Stuff >
Games > Shop Games.
Shopping Wallpapers
1.SelectMenu > My Stuff >
Picture > Shop Wallpapers.
Shopping Videos
1.Select Menu > My Stuff >
Video > Shop Videos.
Shopping Music
1.SelectMenu > xxxx Music >
Shop Music.
5
Calendar
Alarm clock
Pill Reminder
User Guide
Calculator
Tip calculator
Stop watch
Notepad and voice memo
World time
Converter
Timer
Say a command
Readout Mode
Useful Features
with Advanced Mode
4

Advanced Mode - Useful features
145144
01
02
03
06
01
02
03
04
05
06
07
04
04
06
05
InAdvancedMode,youcan
utilize all useful features that
P2050provides.
Calendar
Calendar helps
you manage your
schedule including
your time for calls or
special days. You can
set a reminder on any
givendatewiththis
function.
Viewing calendar
1.SelectMenu > My Stuff >
Tools > Calendar.
note: You can also access Calendar by
pressing C in standby mode. Viewby
Month is default setting for Calendar.
In the monthly view
To Press
Moveto
another day
LforPrevious
RforNext
Moveto
another week
UforPrevious
DforNext
Viewother
month
Sidekeydownfor
Previous
SidekeyupforNext
Creating a new event
1.Selectaday>Options > New
Event.
2.SelectAppointment, Task or
Note.
3.Inputtheeventandselect
Save.
note:Youcancreateeventsfordates
from01/01/2000to12/31/2099.
Alarm clock
Setting an alarm
1.SelectMenu > My Stuff >
Tools > Alarm Clock.
2.SelectCreate New for new
alarm.
3.SettheCycle, Time, Alarm
Sound, Alarm Alert Type,
Alarm Volume, Snooze and
Power Alarm.
4.SelectSave.
Editing existing alarms
1.SelectMenu > My Stuff >
Tools > Alarm Clock.
2.Selectanalarm>Edit or select
Optionstoaccessfollowing:
Create New, Delete and
Delete All.
Setting a simple alarm
1.SelectMenu > My Stuff >
Tools > Alarm Clock.
2.SelectSimple Alarm and
select Edit.
3.Setthealarmscheduleand
select Save.

Advanced Mode - Useful features
147146
01
02
03
06
01
02
03
04
05
06
07
04
04
06
05
Pill Reminder
PillRemindersets
your schedule to
take pill, and alarm
pop-upwillappear
on the setting time.
You can select to
acceptthereminderorhavethe
reminderpop-upagainafter15
minutes.
Creating a new pill reminder
1.SelectMenu > My Stuff > Tools
> Pill Reminder > Create New.
2.SelectTake and then, take a
picture.
For details on taking picture, see
page122.
3.InputName and Dosage.
4.SelectTime > Create.
5.Setadesiredtime>OK > Back.
6.SelectPeriod > Begins.
7.Setthebeginningtimeofthe
dosage on the calendar.
8. SelectReminders and set the
reminding period.
9. SelectDaily, Every 2 days,
or Monthly.Whenselecting
Every 2 days, you can set
desired days for period.
10. Entermoreinformation.
11. SelectSave.
Checking Today's Pill
Reminder
1.SelectMenu >
My Stuff > Tools
> Pill Reminder
> Options >
Today's Pill.
2.Scrollandselecta
pill reminder item to check the
detail.
Editing a pill reminder
1.SelectMenu > My Stuff > Tools
> Pill Reminder.
2.Selectapillreminder > Edit.
3.EditName, Dosage, Time,
Period or More Information.
4.SelectSave.
Deleting reminders
1.SelectMenu > My Stuff > Tools
> Pill Reminder.
2.Selectapillreminder >
Options > Delete or Delete
All.
User Guide
User Guide helps users to learn
how to use the phone easily in
itself.
1.SelectMenu > My Stuff > Tools
> User Guide.
2.Selectafunctiontocheckin
detail.

Advanced Mode - Useful features
149148
01
02
03
06
01
02
03
04
05
06
07
04
04
06
05
Calculator
1.SelectMenu >
My Stuff > Tools >
Calculator.
2. Input the numbers
with the numeric
keypad and enter
the operators with L/R/U/D to
calculate.
3.Press* to use the decimal
point.
4.PressC to cancel your
input.
5.SelectReset to reset.
Tip calculator
1.SelectMenu > My
Stuff > Tools > Tip
Calculator.
2.Enterthevalues
forallthevariable
elds(Bill($),
Tip(%), Split)andthenthe
corresponding calculation
elds(Tip($), Total($),
You Pay)areupdated
automatically.
3.Press* to use the decimal
point.
4.SelectReset to reset.
Stop watch
1.SelectMenu > My
Stuff > Tools >
Stop Watch.
2.SelectStart to
start.
3.SelectStop to stop.
4.SelectContinue to restart or
select Reset to clear.
5. To check split times, select
Mode > Split Time Mode.
6.Tochecklaptimes,select
Mode > Lap Time Mode.
note: In Basic Mode, when you exit the
stop watch menu, or become idle, the
stop watch will continue running and
will be indicated by a clock icon. You can
accessthestopwatchbyre-entering
the stop watch menu.
Notepad and voice
memo
Using a notepad
1.SelectMenu > My Stuff > Tools
> Notepad.
2.SelectCreate New.
3.Enternewmemoandselect
Save.
4.Toeditasavedmemo,select
the memo and select Edit.

Advanced Mode - Useful features
151150
01
02
03
06
01
02
03
04
05
06
07
04
04
06
05
5. To place a note on wallpaper,
select a note and select
Options > Place on
Wallpaper.
6.Ifyouwantremovethenote
from wallpaper, select the
note and select Options >
Remove from Wallpaper.
Recording a voice memo
1.SelectMenu > My
Stuff > Tools >
Voice Memo.
2.SelectNew Record.
3.SelectRecord.
4.SelectStop to stop
recording.ItissavedinMy
Voice automatically.
5.SelectPlaytolistenthevoice
memo.
Listening the recorded
sound
1.SelectMenu > My Stuff.
2.SelectAudio > My Voice or
select Tools > Voice Memo.
3.Selectarecordedmemoand
select Play.
To Press
Play/Pause
Stop Stop
Rewind L
To Press
Fast forward R
Control
volume
Sidekeyupordown
or U/D
World time
1.SelectMenu > My
Stuff > Tools >
World Time.
2.Selectacity>
Select.
3.PressL/R to select
a different city and select
Save.
note: If you want to set dual time in idle
screen, select Menu > Settings > Display
> HomeScreen > Clock Type > Internal
Clocks > ClockType5 > Save.
Converter
1.SelectMenu > My Stuff > Tools
> Converter.
2. Press L/R to select Length,
Area, Volume, Weight or
Temperature.
3.Selectacurrentunitandenter
thevalue.
4.Theresultwillbedisplayedin
all other units.

Advanced Mode - Useful features
153152
01
02
03
06
01
02
03
04
05
06
07
04
04
06
05
Timer
1.SelectMenu > My Stuff > Tools
> Timer.
2.SelectSet and input the
hours, minutes and seconds.
3.Select OK.
4.SelectStart.
5.SelectRestart to restart.
Say a Command
Yourphoneisequippedwith
anAdvancedVoiceCommand
(AVC)feature.Thisfeatureallows
you to make calls or use the
phone functions by simply using
yourvoice.Allyouhavetodois
talk into the phone and then the
phonewillrecognizeyourvoice
and complete tasks by itself.
1.Instandbymode,simply
press
N
to access Say a
Command.OrselectMenu >
My Stuff > Tools > Say a
Command.
2.Atthevoiceprompt,saya
command and simply follow
thevoiceprompts.
Thefollowinglistshowsavailable
voicecommands.
Call <Name or #>:Voicedials
a name or phone number in
your address book. If multiple
numbers exist, say the name and
the number type (i.e. mobile,
home,work,orother).
Send Message <Name or #>:
DisplaytheCreateMessage
screenwiththecontactyouhave
spoken.
Contact <Name>:Retrieveand
display the contact information
stored in the address book.
Go To <Menu>:Openan
application on your phone.
Check <Item>:Checkthestatus
information of your phone
(Status,Voicemail,Messages,
MissedCalls,Time,Signal
strength, Battery, My Phone
Number,andVolume).

155154
Bluetooth
Using Mobile Web
Using the web browser
Setting profiles
Connectivity
with Advanced Mode
5
Readout Mode
ReadoutModemakesyour
phone a useful companion when
youcan’tordon’thavetheability
to read the phone screen.
WhenReadoutmodeis
activated,thephonewill
announcekeyalert,navigation,
andcontentinformationverbally.
•Providesverbalalertsofthe
following:
– Missed Call
– NewMessagereceived
– LowBattery
– MessageSentandother
conrmationnotications
•Announceshighlighteditems
inMenusasusernavigatesthe
phone
•Announcesnumbersasthey
are pressed on keypad
•Readsouttextmessage
content
To turn on Readout Mode
1.SelectMenu > Settings >
Voice Command Setting.
2.SelectAudio Modes >
Readout mode.
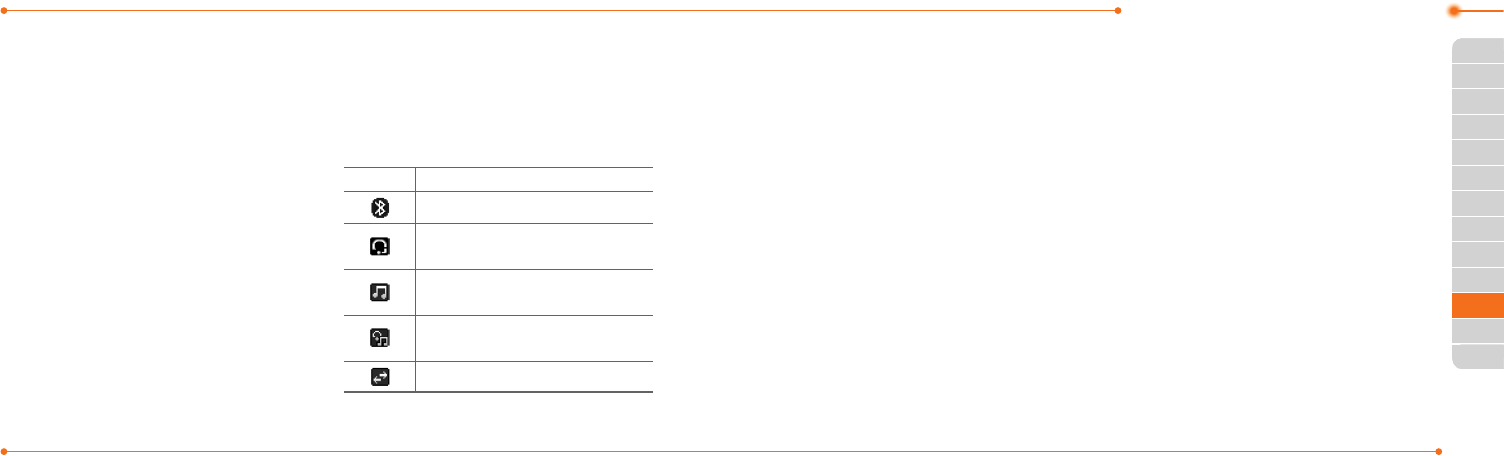
Advanced Mode - Connectivity
157156
01
02
03
04
01
02
03
04
05
06
07
05
05
06
Whenyourphoneissetto
AdvancedMode,youcan
use functionality associated
withconnectivityandsetthe
connectionproles.
Bluetooth
Bluetooth technology enables
free wireless connections
betweenelectronicdevices
withinamaximumrangeof33
feet(10meters).Bluetooth
connections can be used to send
images, text, business cards,
calendarevents,ortoconnect
to computers using Bluetooth
technology.
Yourmobilephonesupports:
•ConnecttoPCtoaccessinternet.
•ConnecttoHands-Free.
•Connecttoelectronicdevices.
Bluetooth Icon
Icon Descriptions
Bluetoothisactive.
Bluetoothhands-free
headset is connected.
BluetoothA2DPheadsetis
connected.
Bluetoothhands-free+
A2DPheadsetisconnected.
DatatransferviaBluetooth.
note:AdvanceAudioDistribution
Prole(A2DP)isaBluetoothprole
(mode)whichisdesignedtotransfera
uni-directional2-channelstereoaudio
stream to a headset or car audio.
Activating Bluetooth
1.SelectMenu > Settings >
Connectivity > Bluetooth >
Activation.
2.SelectOn or Off.
Adding a device
1.SelectMenu > Settings >
Connectivity > Bluetooth >
My Devices.
2.SelectSearch for Device.
3.Theavailabledevicewillbe
displayed.
4.Selectadevice>Select.
5. Enter password and press.
note:Thetargetdevicemustbein
discoverablemode.
Sending files
1.Afterpairingwiththetarget
device,selectOptions > Send
Files.
2.Selectale(s)fromAudio,
Picture, Video or Other Files.
note:Ifthetargetdevicerequests
pairing,theleissentafterpairing
iscompleted.Lockedlesorones
containing original rights may not be
transmitted.

Advanced Mode - Connectivity
159158
01
02
03
04
01
02
03
04
05
06
07
05
05
06
Receiving files
Thereceiptshouldbeapproved
beforereceivingale(s).
Thereceivedle(s)willbesaved
in the corresponding folder.
Forexample,ifyoureceived
contacts information from the
sender,itwillbesavedinyour
phone’s memory.
1.Afterpairingwiththetarget
device,selectOptions > Take
Files.
2.Theavailableleswillbe
displayed.
3.Selectale>Options > Copy.
Setting the visibility
1.SelectMenu > Settings >
Connectivity > Bluetooth >
Visibility.
2.SelectShow or Hide.
3.SelectOK.
Naming the phone
1.SelectMenu > Settings >
Connectivity > Bluetooth >
My Bluetooth Info.
2.SelectName > Edit.
3.Enterthenewnameand
select Save.
note:Thedevicenameiswhatidenties
your phone to Bluetooth network.
Using Mobile Web
Accessing Mobile Web
1.Pressinstandbymodeor
select Menu > Mobile Web.
note:ItwillaccesstheMobileWeb
homepage.
Using the web browser
Accessing browser
1.SelectMenu > My Stuff >
Applications > Browser >
Home.
note:Itwillaccessyourservice
provider’shomepage.
Using bookmarks
1.SelectMenu > My Stuff >
Applications > Browser >
Bookmarks.
Adding bookmarks
1. SelectMenu > My Stuff >
Applications > Browser >
Bookmarks.
2.SelectNew.
3.Enteranamefornew
bookmarkinTitleeldand
webaddressinURLeld.
4.SelectSave.

Advanced Mode - Connectivity
161160
01
02
03
04
01
02
03
04
05
06
07
05
05
06
Entering web address
1.SelectMenu > My Stuff >
Applications > Browser >
Enter Address.
2.EntertheURL.
3.SelectGo.
Viewing history
1.SelectMenu > My Stuff >
Applications > Browser >
History.
Setting advanced options
1.
SelectMenu > My Stuff >
Applications > Browser >
Manage > Options.
2.SelectRendering Mode, Full
Screen, Thumbnail, Cache,
Cookies or Security Warning.
3.Selectanoption>Select.
Managing private data
1.SelectMenu > My Stuff >
Applications > Browser >
Manage > Private Data.
2. To clear the cache, select
Clear Cache > Yes.
3.Toclearthecookies,select
Clear Cookies > Yes.
4.Toclearthehistory,select
Clear History > Yes.
Viewing certificates
1.SelectMenu > My Stuff >
Applications > Browser
> Manage > Security >
Certificates.
Viewing download status
1.SelectMenu > My Stuff >
Applications > Browser
> Manage > Download
Manager.
Setting profiles
Youcanviewacurrent
connectionproleorcreatenew
prolesbycustomizingProfile
Name, Home URL, Connection
Type, Proxy Address, and Proxy
Port.
Adding profiles
1.SelectMenu > My Stuff >
Applications > Browser >
Manage > Profiles.
2.SelectOptions > Create.
3.Entervaluesorselectan
optionforeacheldand
select Save.

163162
Editing profiles
1.SelectMenu > My Stuff >
Applications > Browser >
Manage > Profiles.
2.Selectaprole>Options >
Edit.
3.Edittheparametersand
select Save.
note:Thedefaultproleisnoteditable.
Viewing profiles
1.SelectMenu > My Stuff >
Applications > Browser >
Manage > Profiles.
2.Selectaprole>Options >
View.
Deleting profiles
1.SelectMenu > My Stuff >
Applications > Browser >
Manage > Profiles.
2.Selectaprole>Options >
Delete > Yes.
note:Thedefaultprolecannotbe
deleted.
Language
Time and date
Voice command setting
Sounds and alerts
Display settings
Security
Updating software
Reset
TTY
Settings
with Advanced Mode
6

165164
01
02
03
04
05
03
04
05
06
07
02
06
06
01
Advanced Mode - Settings
InAdvancedMode,youcan
change and customize sounds
settings, call handling, display
settings, security settings, and
other settings associated with
your phone.
Language
1.SelectMenu > Settings >
Phone > Language.
2.SelectScreen Text or
Predictive and select Select.
3.Selectalanguage>Select.
Time and date
1.SelectMenu > Settings >
Phone > Time & Date.
2.SelectAuto Update, Time,
Time Format, Date or Date
Format > Select.
3.Selectanoption>Select.
note:OnlywhensettingAutoUpdateto
Off,youcansetTimeandDate.
Voice command setting
1.SelectMenu > Settings >
Phone > Voice Command
Setting.
2.SelectConfirmation,
Adaptation, Audio Modes,
Speakerphone or About and
select Select.
3.Selectanoption>Select.
4.Toimprovetherecognition
accuracy, select Adaptation >
Adapt Voice > Start.
note: You can check the details for each
setting option by selecting Help on the
option setting screen.
Sounds and alerts
The Profiles menu allows you to
specify a ringer type, message
alertsound,keyvolumeandsoon.
1.SelectMenu > Settings >
Profiles.
2.SelectNormal, Vibrate
and Ring, Vibrate Only,
Silent, Flight mode or Noise
Suppression.
3.SelectEdit to specify a
selected option.
4.Selectanoptionforeacheld
and select Save. To reset to
factory defaults, select Reset.
note: You can specify the options only
when Normal or VibrateandRingproles
are highlighted.
Display settings
Setting the wallpaper
1.SelectMenu > Settings >
Display > Home Screen >
Wallpaper.
2.
SelectPicture > a desired
image.

167166
01
02
03
04
05
03
04
05
06
07
02
06
06
01
Advanced Mode - Settings
3.SelectSelect.
Setting the home screen
1.SelectMenu > Settings >
Display > Home Screen.
2.SelectClock Type or Text.
3.Selectanoptionoradjust
values.
4.SelectSave.
Setting the menu type
1.SelectMenu > Settings >
Display > Menu Type.
2.SelectGrid or List.
3.SelectSave.
Setting the color theme
1.SelectMenu > Settings >
Display > Color Theme.
2.SelectOcean or Emerald.
3.SelectSave.
Setting font style
1.SelectMenu > Settings >
Display > Font Style.
2.Selectadesiredfontstyle>
Select.
Setting the font size
1.SelectMenu > Settings >
Display > Font Size.
2.SelectSmall, Medium or
Large.
3.SelectSelect.
Setting the brightness
1.SelectMenu > Settings >
Display > LCD Brightness.
2.AdjustbrightnesslevelofLCD.
3SelectSave.
note: Modifying brightness may affect
your battery life.
Setting the backlight timer
1.SelectMenu > Settings >
Display > Backlight Timer.
2.PressLCDorKeypad.
3.Selectdesiredtime>Select.
note: Modifying backlight timer may
affect your battery life.
Security
Locking the phone
1.SelectMenu > Settings >
Security > Phone Lock.
2.SelectPhone Lock > ON >
Select.
note:Thedefaultpasswordis‘1234’.
To change the password, select Menu
> Settings > Security > PhoneLock >
Change Password.
Locking the PIN
ThePersonalIdentication
Number(PIN)isthesecurity
code that protects the phone or
SIMagainstunauthorizeduse.

169168
01
02
03
04
05
03
04
05
06
07
02
06
06
01
Advanced Mode - Settings
1.SelectMenu > Settings >
Security > PIN > PIN Lock.
2.SelectYesandenterPINcode.
3.SelectOK.
note:TochangethePINcode,select
Menu > Settings > Security > PIN >
ChangePIN.
Changing PIN 2
1.SelectMenu > Settings >
Security > Change PIN2.
2.EnterPIN2codeandselect
OK.
Setting fixed dialing number
1.SelectMenu > Settings >
Security > FDN.
2.SelectOn > Select.
3.EnterPIN2codeandselect
OK.
Fordetailsonxeddialing,see
page100.
Updating software
You can update your software
withoutvisitingyournearest
dealer.
To update the software
1.SelectMenu > Settings > xxxx
Software Update.
2.SelectCheck for Update >
Yes.
note:Afterdownloadingthesoftware,
thedevicewillaskyouwhethertoupdate
the software now or later. If you choose
to update the software now, it will restart
the handset. If you postpone updating
the software, you can select between 30
mins, 1hour or 4hours in the Options.
Afterselectingtheupdatingtime,you
will be sent back to standby mode. If you
go to SoftwareUpdate while you are in
postponing, select Continue Update.
To view the version of
software
1.SelectMenu > Settings >
Phone Information.
2.ScrolldowntoSoftware
Version.
Reset
Resetting the phone
1.SelectMenu > Settings >
Reset.
2. Enter password.
3.SelectOK > Master Reset >
Yes.
note: It will reset your phone to its
default settings. The default password
is‘1234’.
Clearing the phone
1.SelectMenu > Settings >
Reset.
2. Enter password.

171170
01
02
03
04
05
03
04
05
06
07
02
06
06
01
Advanced Mode - Settings
3SelectOK > Master Clear >
Yes.
note: It will reset your phone to its
default setting and delete all personal
data.Thedefaultpasswordis‘1234’.
Resetting the external
memory
1.SelectMenu > Settings >
Reset.
2. Enter password.
3.SelectOK > External Memory
Reset > Yes.
TTY
Theteletypewriter(TTY)isa
telecommunicationsdevice
that allows people who are deaf
orhardofhearing,orwhohave
speech or language disabilities,
tocommunicateviaatelephone.
Setting teletypewriter
1.SelectMenu > Settings > TTY.
2.SelectDisable, TTY Full, TTY
Talk or TTY Hear.
• Disable:TTYmodeis
disabled.
• TTY Full:Userswhocannot
talk and hear, can send and
receivetextmessages.
• TTY Talk:Userswhocantalk
butcannothear,canreceive
text messages and reply with
voicemessages.
• TTY Hear:Userswhocanhear
but cannot talk, can send text
messagesandreceivevoice
messages.
note: Make sure to connect a headset
to the phone after selecting one of the
TTY modes. Then, you can use the TTY
function.

173172
Memo
Alert message
Troubleshooting checklist
Safety information
Safety precautions
About the battery usage
FCC Hearing-Aid Compatibility (HAC)
regulations for wireless devices
FCC regulatory compliance
Warranty
Speaker Phone & Noise Canel
Dynamic Noise Suppression from Audience
earSmart™ technology
Appendix
7

175174
01
02
03
04
05
06
01
02
03
04
05
06
Appendix
07
Alert message
If you experience any problem
while using your mobile phone,
please refer to the following
checklist. If the problem still
persists, contact your dealer or
nearest carrier.
When the
“Insert SIM Card”
message appears:
MakesuretheSIMcardis
correctly installed. Check to see if
theSIMcardisworkingproperly.
If it does not work, try to clean the
contact points of the card with a
dry cloth. If it is out of order, take
ittoyourserviceprovider.
When the
“Messages full”
message appears:
Thereceivedorsavedmessages
are full in your phone memory.
You need to delete the message
toreceiveorsendmessages.
When the
“Phone and SIM
messages is full. Delete
Messages”
message appears:
Thereceivedorsavedmessages
arefullinyourphoneandSIM
card memory. You need to delete
themessagetoreceiveorsend
messages.
When the
“Password”
message
appears in Phone locked state:
Enter the phone password. The
defaultpasswordis”1234”.Ifyou
cannot remember the password,
contact the nearest carrier.
When the
“Enter PIN1”
message
appears:
InputPIN1.Ifyoucannot
remember it, contact your
serviceprovider.Youcanstill
receivecallsevenifyourmobile
phone becomes locked after
enteringtheincorrectPIN1on
threeconsecutiveattempts.
When the
“No Service”
or
“Network Search”
appears:
Ifyoucannotmake/receivea
call when you are indoors or
undergrounds where the signal
strengthispoor,movetoward
a window or go out to an open
area. If you still cannot make a
connection,contactyourservice
provider.
Troubleshooting
checklist
When audio quality is poor:
End a call and try again.

177176
01
02
03
04
05
06
01
02
03
04
05
06
Appendix
07
When the other party cannot
hear you speaking:
Your phone may be set to MUTE.
DisabletheMUTEfunction.Or
yourhandmaybecoveringthe
microphone located below the
# key.
When battery lifetime is shorter
than usual:
This may happen when you are in
an area with low signal strength.
Turn off your phone when it is not
in use. Change the battery when
battery energy is exhausted.
When your mobile phone does
not turn on:
Make sure your battery is
charged. Check to see if your
phone works while recharging
the battery.
When you are unable to send a
message:
Either you are not registered to
receiveanSMSservice,oryou
may be in an area where your
networkserviceprovidercannot
providesuchaservice.
When you are unable to make a
call:
Your phone may be set to “Fixed
DialingNumber(FDN)”mode.
Cancelthe“FDN”mode.
When you are unable to charge
the battery:
This may be the result of one of
the following three cases.
1.Yourchargermaybeoutof
order. Contact your nearest
dealer.
2. You may be attempting to use
thephoneinanoverlyhot/cold
temperature. Try changing the
chargingenvironment.
3.Yourbatterymayhavenot
been connected to the
charger properly. Check the
connector.
When you are unable to input
data into your Address Book:
YourAddressBookmemorymay
be full. Try deleting some entries
fromyourAddressBook.
When you are unable to select a
certain function:
Youmaynothavesubscribedto
that function, or your network
serviceprovidermaybeinan
areawheresuchservicecannot
beprovided.Contactyourlocal
serviceprovider.

179178
01
02
03
04
05
06
01
02
03
04
05
06
Appendix
07
Safety information
The following list shows how to
maintain your mobile phone,
together with precautions to
take.
–Keepyourmobilephoneandits
accessories out of the reach of
children and pets.
– Maintain your mobile phone
in dry conditions and keep
it within normal operating
temperatures. Temperatures
higherthan55°C(131°F)or
lowerthan-20°C(-4°F)may
damage your phone.
–Donottrytodryyourphone
inamicrowaveoven.Ifnot,
sparks can occur and cause an
explosionorre.
–Donotuseorstoreyourmobile
phone in dusty, dirty areas.
–Donotattempttodisassemble
your mobile phone.
–Donotdroporcausesevere
impact to your mobile phone.
–Donotusechemicalproducts,
cleaningsolventsordetergents
to clean your mobile phone.
– If your mobile phone does not
work properly, contact your
dealer immediately.
– Use only authorized batteries,
battery chargers and
accessories.Anymalfunction
or damage caused by the use
of unauthorized batteries,
battery chargers and
accessorieswillvoidthelimited
product warranty.
– Ensure that the battery and
battery charger do not come
incontactwithconductive
objects.
Safety precautions
Using a mobile phone while
driving may be prohibited.
Please check local laws and
regulations with regard to the
prohibition of mobile phone use
whiledriving,andcomplywith
them.
Use of your phone while you
aredrivingmaydisturbyour
concentration and so cause an
accident.Alwaysswitchyour
phoneofftodrivesafely.
You should use your phone in an
emergency, either use a hands
freedevicebuiltintoyourcaror
pulloverinasafeplacerst.
181180
01
02
03
04
05
06
01
02
03
04
05
06
Appendix
07
Switch off in restricted areas
Alwaysswitchyourphoneoffin
areas where mobile phone use is
restricted.
Switch off in explosive or
dangerous areas
Alwaysswitchyourphone
offinareaswithexplosiveor
dangerous materials (such
as fuels, fuel stations or areas
containingchemicalgoods)and
obey any instructions or signals.
Donotremoveyourmobile
phone’s battery in such areas.
Switch off in aircraft
Alwaysswitchyourphoneoffor
select Flight Mode on (select
Menu > Settings > Profiles >
Flight Mode in Advanced Mode.
In Breeze Mode, select Menu >
Settings > Sounds & Alerts >
Flight Mode)whenyouareinan
aircraft. The electromagnetic
wavesemittedbyyourphone
may affect the electronic
navigationequipmentinthe
aircraft.
Switch off in hospitals and
near medical equipment
Alwaysswitchyourphone
off in hospitals, and obey the
regulations or rules of the
hospital.Switchyourphoneoff
whenusingmedicalequipment
forprivatepurposes,ifpossible.
Alwaysconsultwiththemedical
equipment’smanufactureroran
expert regarding phone use near
themedicalequipment.
Installing a hands free device
in your vehicle
Installvehiclehandsfreedevices
away from the steering wheel
and airbag expansion area,
otherwise injury may result.
Mobile phones and other
electronic devices
Mobile phones emit
electromagneticwavesthat
may affect nearby electronic
devices.Whenitisswitchedon,
do not place your phone close to
delicateelectronicequipment.
About the battery
usage
Your phone is powered by a
LithiumIon(Li-Ion)battery.
This means that, unlike other
forms of battery technology,
you can recharge your battery
while some charge remains
without reducing your phone’s
autonomy due to the “battery
memoryeffect”inherentinthose
technologies.

183182
01
02
03
04
05
06
01
02
03
04
05
06
Appendix
07
–Donotuseadamagedbattery
or charger.
–Donotdisassembleoropen
crush, bend or deform,
puncture or shred.
–Donotmodifyor
remanufacture, attempt to
insert foreign objects into the
battery, immerse or expose to
waterorotherliquids,expose
tore,explosionorother
hazard.
–Donotputyourbatteryinto
contactwithconductive
objects.
–Disposeofandrecycleused
batteries in accordance
withlocalregulations.Do
not dispose of batteries by
burning; they may explode.
–Donotuseanunauthorized
charger.Onlyusethebattery
forthedeviceforwhichitis
specied.
–Onlyusethebatterywith
achargingdevicethathas
beenqualiedwiththedevice
per this standard. Use of an
unqualiedbatteryorcharger
maypresentariskofre,
explosion, leakage, or other
hazard.
–Donotshortcircuitabattery
orallowmetallicconductive
objects to contact battery
terminals.
–Replacethebatteryonly
with another battery that
hasbeenqualiedwiththe
deviceperthisstandard,
IEEE-Std-1725-2006.Useof
anunqualiedbatterymay
presentariskofre,explosion,
leakage or other hazard.
– Promptly dispose of used
batteries in accordance with
local regulations.
– Battery usage by children
shouldbesupervised.
–Avoiddroppingthephoneor
battery. If the phone or battery
is dropped, especially on a hard
surface, and the user suspects
damage,takeittoaservice
center for inspection.
– Use your battery for the
speciedpurposeonly.
– The closer you are to your
network’s base station, the
longer your phone usage time
because less battery power is
consumed for the connection.
– The battery recharging time
variesdependingonthe
remaining battery capacity and
the battery and charger type

185184
01
02
03
04
05
06
01
02
03
04
05
06
Appendix
07
you use.
–Batterylifeinevitablyshortens
overtime.
– Use an authorized battery and
charger only.
–Sinceoverchargingmay
shortenbatterylife,remove
the phone from its charger
once it is fully charged. Unplug
the charger, once charging is
complete.Leavingthebattery
in hot or cold places, especially
inside a car in summer or
winter, may reduce the
capacity and life of the battery.
Alwayskeepthebatterywithin
normal temperatures.
–Topreventinjuryorburns,
ensure that no metal objects
comeintocontactwiththe+
and – terminals of the battery.
FCC Hearing-Aid
Compatibility (HAC)
regulations for wireless
devices
OnJuly10,2003,theU.S.Federal
Communications Commission
(FCC)ReportandOrderin
WTDocket01-309modied
the exception of wireless
phonesundertheHearingAid
CompatibilityActof1988(HAC
Act)torequiredigitalwireless
phones be compatible with
hearing-aids.
TheintentoftheHACActisto
ensure reasonable access to
telecommunicationsservicesfor
persons with hearing disabilities.
Whilesomewirelessphonesare
usednearsomehearingdevices
(hearing aids and cochlear
implants),usersmaydetecta
buzzing, humming, or whining
noise.Somehearingdevices
are more immune than others
to this interference noise, and
phonesalsovaryintheamount
of interference they generate.
The wireless telephone industry
hasdevelopedaratingsystem
for wireless phones, to assist
hearingdeviceusersndphones
that may be compatible with

187186
01
02
03
04
05
06
01
02
03
04
05
06
Appendix
07
theirhearingdevices.Notall
phoneshavebeenrated.Phones
thatareratedhavetheratingon
their box or a label located on the
box.
The ratings are not guarantees.
Resultswillvarydependingon
theuser’shearingdeviceand
hearing loss. If your hearing
devicehappenstobevulnerable
to interference, you may not
be able to use a rated phone
successfully. Trying out the
phonewithyourhearingdevice
isthebestwaytoevaluateitfor
your personal needs.
•M-Ratings:PhonesratedM3or
M4meetFCCrequirements
and are likely to generate less
interferencetohearingdevices
than phones that are not
labeled.M4isthebetter/higher
of the two ratings.
•T-Ratings:PhonesratedT3or
T4meetFCCrequirements
and are likely to generate less
interferencetohearingdevices
than phones that are not
labeled.T4isthebetter/higher
of the two ratings.
Hearingdevicesmayalsobe
rated.Yourhearingdevice
manufacturer or hearing health
professional may help you
ndthisrating.Higherratings
meanthatthehearingdeviceis
relativelyimmunetointerference
noise. The hearing aid and
wirelessphoneratingvalues
arethenaddedtogether.Asum
of 5 is considered acceptable
fornormaluse.Asumof6is
considered for best use.
Intheaboveexample,ifahearing
aidmeetstheM2levelrating
and the wireless phone meets
theM3levelrating,thesumof
thetwovaluesequalM5.Thisis
synonymous for T ratings. This
shouldprovidethehearingaid
userwith“normalusage”while
using their hearing aid with
the particular wireless phone.
“Normalusage”inthiscontextis
denedasasignalqualitythatis
acceptable for normal operation.
The M mark is intended to be
synonymous with the U mark.
The T mark is intended to
be synonymous with the UT
mark. The M and T marks are
recommendedbytheAlliance
for Telecommunications
IndustriesSolutions(ATIS).The
U and UT marks are referenced

189188
01
02
03
04
05
06
01
02
03
04
05
06
Appendix
07
inSection20.19oftheFCC
Rules.TheHACratingand
measurement procedure are
describedintheAmerican
NationalStandardsInstitute
(ANSI)C63.19standard.
ToensurethattheHearingAid
Compatibility rating for your
phone is maintained, secondary
transmitters such as Bluetooth
andWLANcomponentsmustbe
disabledduringacall.Seepage81
for instructions to disable these
components.
This phone has been tested
and rated for use with hearing
aids for some of the wireless
technologies that it uses.
However,theremaybesome
newer wireless technologies
usedinthisphonethathave
not been tested yet for use with
hearing aids. It is important
to try the different features of
this phone thoroughly and in
different locations, using your
hearing aid or cochlear implant,
to determine if you hear any
interfering noise. Consult your
serviceprovideraboutitsreturn
and exchange policies and
for information on hearing aid
compatibility.
FCC Regulatory
Compliance
FCC Regulatory Compliance
ThisdevicecomplieswithPart
15oftheFCCRules.Operation
is subject to the following two
conditions:(1)thisdevicemay
not cause harmful interference,
and(2)thisdevicemustaccept
anyinterferencereceived,
including interference that may
cause undesired operation.
Yourmobiledeviceisalowpower
radiotransmitterandreceiver.
WhenitisON,itreceivesandalso
sendsoutradiofrequency(RF)
signals.
InAugust1996,theFederal
Communications Commission
(FCC)adoptedRFexposure
guidelineswithsafetylevelsfor
mobiledevices.
Those guidelines are consistent
withsafetystandardspreviously
setbybothU.S.andinternational
standardsbodies:American
NationalStandardInstitute
(ANSI),NationalCouncilof
RadiationProtectionand
Measurements(NCRP),and
International Commission
onNon-IonizingRadiation
Protection(ICNRP).Those

191190
01
02
03
04
05
06
01
02
03
04
05
06
Appendix
07
standards were based on
comprehensiveandperiodic
evaluationsoftherelevant
scienticliterature.Thedesign
of your phone complies with the
FCC guidelines and applicable.
Statement according to FCC
part 15.105
NOTE:Thisequipmenthas
been tested and found to
comply with the limits for a
ClassBdigitaldevice,pursuant
toPart15oftheFCCRules.
These limits are designed to
providereasonableprotection
against harmful interference
in a residential installation. This
equipmentgeneratesusesand
canradiateradiofrequency
energy and, if not installed
and used in accordance with
the instructions, may cause
harmful interference to radio
communications.However,there
is no guarantee that interference
will not occur in a particular
installation.Ifthisequipment
does cause harmful interference
toradioortelevisionreception,
which can be determined by
turningtheequipmentoffand
on, the user is encouraged to
try to correct the interference
by one or more of the following
measures:
Reorientorrelocatethereceiving
antenna.
Increase the separation between
theequipmentandreceiver.
Connecttheequipmentinto
an outlet on a circuit different
fromthattowhichthereceiveris
connected.
Consult the dealer or an
experiencedradio/TVtechnician
for help.
Statement according to FCC
part 15.21
Modicationsnotexpressly
approvedbythiscompany
couldvoidtheuser’sauthorityto
operatetheequipment.
RF exposure FCC
For body worn operation, to
maintain compliance with FCC
RFexposureguidelines,use
only accessories that contain
no metallic components and
provideaseparationdistance
of20mm(0.7inches)tothe
body. Use of other accessories
mayviolateFCCRFexposure
guidelines and should be
avoided.
Thisdeviceanditsantennamust
notbeco-locatedoroperating
in conjunction with any other
antenna or transmitter.

193192
01
02
03
04
05
06
01
02
03
04
05
06
Appendix
07
Health and Safety
Information FCC
This EUT has been shown to be
capable of compliance for localized
specicabsorptionrate(SAR)
foruncontrolledenvironment/
general population exposure
limitsspeciedinANSI/IEEEStd.
C95.1-1992andhadbeentestedin
accordance with the measurement
proceduresspeciedinFCC/
OETBulletin65SupplementC
(2001)andIEEEStd.1528-2003
MinistryofHealth(Canada),Safety
Code6.Thestandardsincludea
substantial safety margin designed
to assure the safety of all persons,
regardless of age and health. The
exposure standard for wireless
mobile phones employs a unit
of measurement known as the
SpecicAbsorptionRate,orSAR.
TheSARlimitsetbytheFCCis
1.6W/kg*.
*IntheU.S.andCanada,the
SARlimitformobilephones
usedbythepublicis1.6watts/
kg(W/kg)averagedoverone
gram of tissue. The standard
incorporates a substantial
marginofsafetytogive
additional protection for the
public and to account for any
variationsin.
Warranty
Protect Your Warranty
ReadyourWarrantycarefully,
with the special consideration to
paragraphsevenoftheLimited
Warrantyforyourunit.
“Warrantydoesnotapplyto...or
to any product or part thereof
which has suffered through
alteration... mishandling, misuse,
neglectoraccident”.
Many companies are making
look alike accessories and in
some cases, promoting that their
productisequaltoorbetterthan
the Pantech product. Be careful.
Someoftheseproductsmay
not be compatible to use with
your Pantech product and may
damage the unit or cause it to
malfunction.
Ifserviceisrequiredonyour
unit and it is determined that
anon-Pantechaccessoryhas
created the problem with your
unit,theWarrantywillnotapply.
In addition, if the unit has already
sufferedirreversibledamage
byreasonofanon-compatible
accessory,theWarrantywillbe
voided.ToprotectyourWarranty,
use only compatible accessories
which cannot damage or

195194
01
02
03
04
05
06
01
02
03
04
05
06
Appendix
07
interfere with the functioning of
your Pantech product.
12 Month Limited Warranty
PantechWireless,Inc.(the
Company)warrantstothe
original retail purchaser of this
Pantech handheld portable
cellular telephone, that should
this product or any part thereof
during normal consumer
usage and conditions, be
provendefectiveinmaterial
or workmanship that results in
productfailurewithintherst
twelve(12)monthsperiodfrom
the date of purchase, such
defect(s)willberepairedor
replaced (with new or rebuilt
parts)attheCompany’soption,
without charge for parts or labor
directlyrelatedtothedefect(s).
The antenna, keypad, display,
rechargeable battery and
battery charger, if included, are
similarlywarrantedfortwelve(12)
months from date of purchase.
ThisWarrantyextendsonlyto
consumers who purchase the
productintheUnitedStatesor
Canada and it is not transferable
or assignable.
This Warranty does not apply
to:
(a) Productsubjectedto
abnormal use or conditions,
accident, mishandling,
neglect, unauthorized
alteration, misuse, improper
installation or repair or
improper storage;
(b)Productwhosemechanical
serial number or electronic
serial number has been
removed,alteredordefaced.
(c) Damagefromexposureto
moisture,humidity,excessive
temperatures or extreme
environmentalconditions;
(d)Damageresultingfrom
connection to, or use of any
accessory or other product
notapprovedorauthorized
by the Company;
(e) Defectsinappearance,
cosmetic,decorativeor
structural items such as
framingandnon-operative
parts;
(f) Productdamagedfrom
externalcausessuchasre,
ooding,dirt, sand, weather
conditions, battery leakage,
blown fuse, theft or improper
usage of any electrical
source.

197196
01
02
03
04
05
06
01
02
03
04
05
06
Appendix
07
The Company disclaims liability
forremovalorreinstallationof
the product, for geographic
coverage,forinadequatesignal
reception by the antenna or
for communications range or
operation of the cellular system
as a whole.
To obtain repairs or replacement
withinthetermsofthisWarranty,
theproductshouldbedelivered
withproofofWarrantycoverage
(e.g.datedbillofsale),the
consumer’s return address,
daytimephonenumberand/
or fax number and complete
description of the problem,
transportation prepaid, to
the Company by calling the
number listed below or to the
place of purchase for repair or
replacement processing.
TolocatePantechAuthorized
ServiceCenter,call:(800)962-
8622oremailHandsetHelp@
Pantech.com.
Pleasehavethefollowing
informationavailzablewhenyou
sendthephoneinforrepair:
–AvalidoriginalProofof
Purchase
–Returnaddress
–Daytimephonenumberorfax
number
–Model#
–IMEI#(Lookforthe15digitIMEI
#behindthebatteryofthe
device.)
– Complete description of the
problem
– Transportation prepaid
Other Warranty Program
Youmayhaveotherwarranty
program with your purchase,
such as warranty exchange. If
so,pleaserefertoequipment
package or the original point of
sale.
THEEXTENTOFTHE
COMPANY’SLIABILITYUNDER
THISWARRANTYISLIMITEDTO
THEREPAIRORREPLACEMENT
PROVIDEDABOVEAND,
INNOEVENT,SHALLTHE
COMPANY’SLIABILITYEXCEED
THEPURCHASEPRICEPAID
BYPURCHASERFORTHE
PRODUCT.
ANYIMPLIEDWARRANTIES,
INCLUDINGANY
IMPLIEDWARRANTYOF
MERCHANTABILITYORFITNESS
FORAPARTICULARPURPOSE,
SHALLBELIMITEDTOTHE
DURATIONOFTHISWRITTEN

199198
01
02
03
04
05
06
01
02
03
04
05
06
Appendix
07
WARRANTY.ANYACTIONFOR
BREACHOFANYWARRANTY
MUSTBEBROUGHTWITHIN
APERIODOF18MONTHS
FROMDATEOFORIGINAL
PURCHASE.INNOCASESHALL
THECOMPANYBELIABLEFOR
ANYSPECIALCONSEQUENTIAL
ORINCIDENTALDAMAGES
FORBREACHOFTHISORANY
OTHERWARRANTY,EXPRESS
ORIMPLIED,WHATSOEVER.
THECOMPANYSHALLNOT
BELIABLEFORTHEDELAYIN
RENDERINGSERVICEUNDER
THISWARRANTYORLOSSOF
USEDURINGTHETIMETHE
PRODUCTISBEINGREPAIRED
ORREPLACED.
Nopersonorrepresentativeis
authorized to assume for the
Company any liability other than
expressed herein in connection
with the sale of this product.
Somestatesorprovincesdo
not allow limitations on how
long an implied warranty lasts
or the exclusion or limitation
ofincidentalorconsequential
damagesotheabovelimitation
or exclusions may not apply to
you.ThisWarrantygivesyou
speciclegalrights,andyoumay
alsohaveotherrightswhichvary
fromstatetostateorprovinceto
province.
FortechnicalsupportintheU.S.
&Canada,call(800)962-8622.
Oremail:HandsetHelp@
Pantech.com.
Orvisitthewebsite:
www.pantechusa.com
Forallotherinquiry,writeto:
PANTECH WIRELESS, INC.
5607GlenridgeDr.Suite500
Atlanta,GA30342
Speaker Phone & Noise
Cancel
•Whenusingthephonein
speakerphone mode with
noise suppression turned on,
it is recommended that you
hold the phone in the opened
position with the microphone
below the keypad facing you.
Inthisposition,thehigher-
performingadvancednoise
suppression utilizing two
microphones (one located
below the external display
andtheLEDindicatorsand
the other located below the

201200
01
02
03
04
05
06
01
02
03
04
05
06
Appendix
07
keypad)willbeused.
•Ifyouprefertonotholdthe
phone (e.g. to place it on your
desk or in the cup holder of your
car)whileitisbeingusedin
speakerphone mode, the phone
should be put in the closed
position. Your call will continue
and the external microphone
(below the external display and
theLEDindicators)withthe
lower-performingbasicnoise
suppression will pick up your
voice.
Dynamic Noise
Suppression from
Audience
Yourphoneisequippedwithan
advancedvoiceprocessingchip
thatdeliversclearmobilecallsby
suppressing background noise,
intermittent sounds (like a siren
ornearbyconversation),and
echoes,
allowing you to hear and be
heard nearly anywhere.
How Does It Work?
Based on the intelligence of
the human hearing system, the
technology:
•Captures,evaluatesand
distinguishes all the sound
signals surrounding your phone,
and the person you’re speaking
with.
•Thenisolatestheprimaryvoice
inconversationandltersout
the background noise – so the
person you’re calling hears only
yourvoice,withoutdisturbing
background noise.
•Dynamicallyequalizes
andadjustsvoicevolume
to optimize your calling
experience, so you can hear
clearly and don’t need to
speakloudertoovercome
surrounding noise.
The noise suppression
technologyisbuilt-inand
already enabled in your new
mobilephone.Soit’sreadyto
provideunsurpassedvoice
claritywitheverycall.
earSmart™ technology
Your phone features
earSmart™,an
intelligentvoice
processorthatdeliversaclear
voiceexperience,allowingyou
tohearandbeheard™innearly

PB202
environment.
earSmarttechnologyusesthe
science of human hearing to
distinguish sounds, identify your
voiceandsuppresssurrounding
noise,forclearconversations
just about anywhere.
How Does it Work?
•TheearSmartvoiceprocessor
in your phone captures your
voiceandallthesoundsaround
you.
•Workinglikethehumanear,it
processes and distinguishes
these sounds, isolates your
voiceconversation,and
removesbackgroundnoise–
from both ends of a call.
•Italsoautomaticallyequalizes
andadjustsvoicevolumeso
you can hear and talk naturally,
eveninthenoisiestplaces.
•WithearSmarttechnology,you
can talk where you want, and
haveclearconversationsfor
mobilecalls,videochats,even
speakerphone calls, without
worrying about surrounding
noise.