Pantech PC-7300SU Single- Mode CDMA Phone User Manual
Pantech Co., Ltd. Single- Mode CDMA Phone
UserManual.wiki
>
Pantech
>
PC 7300SU User Manual
Manual
Navigation menu
Upload a User Manual
Namespaces
Wiki Guide
HTML
PDF
Info
Views
User Manual
Discussion / Help
Navigation


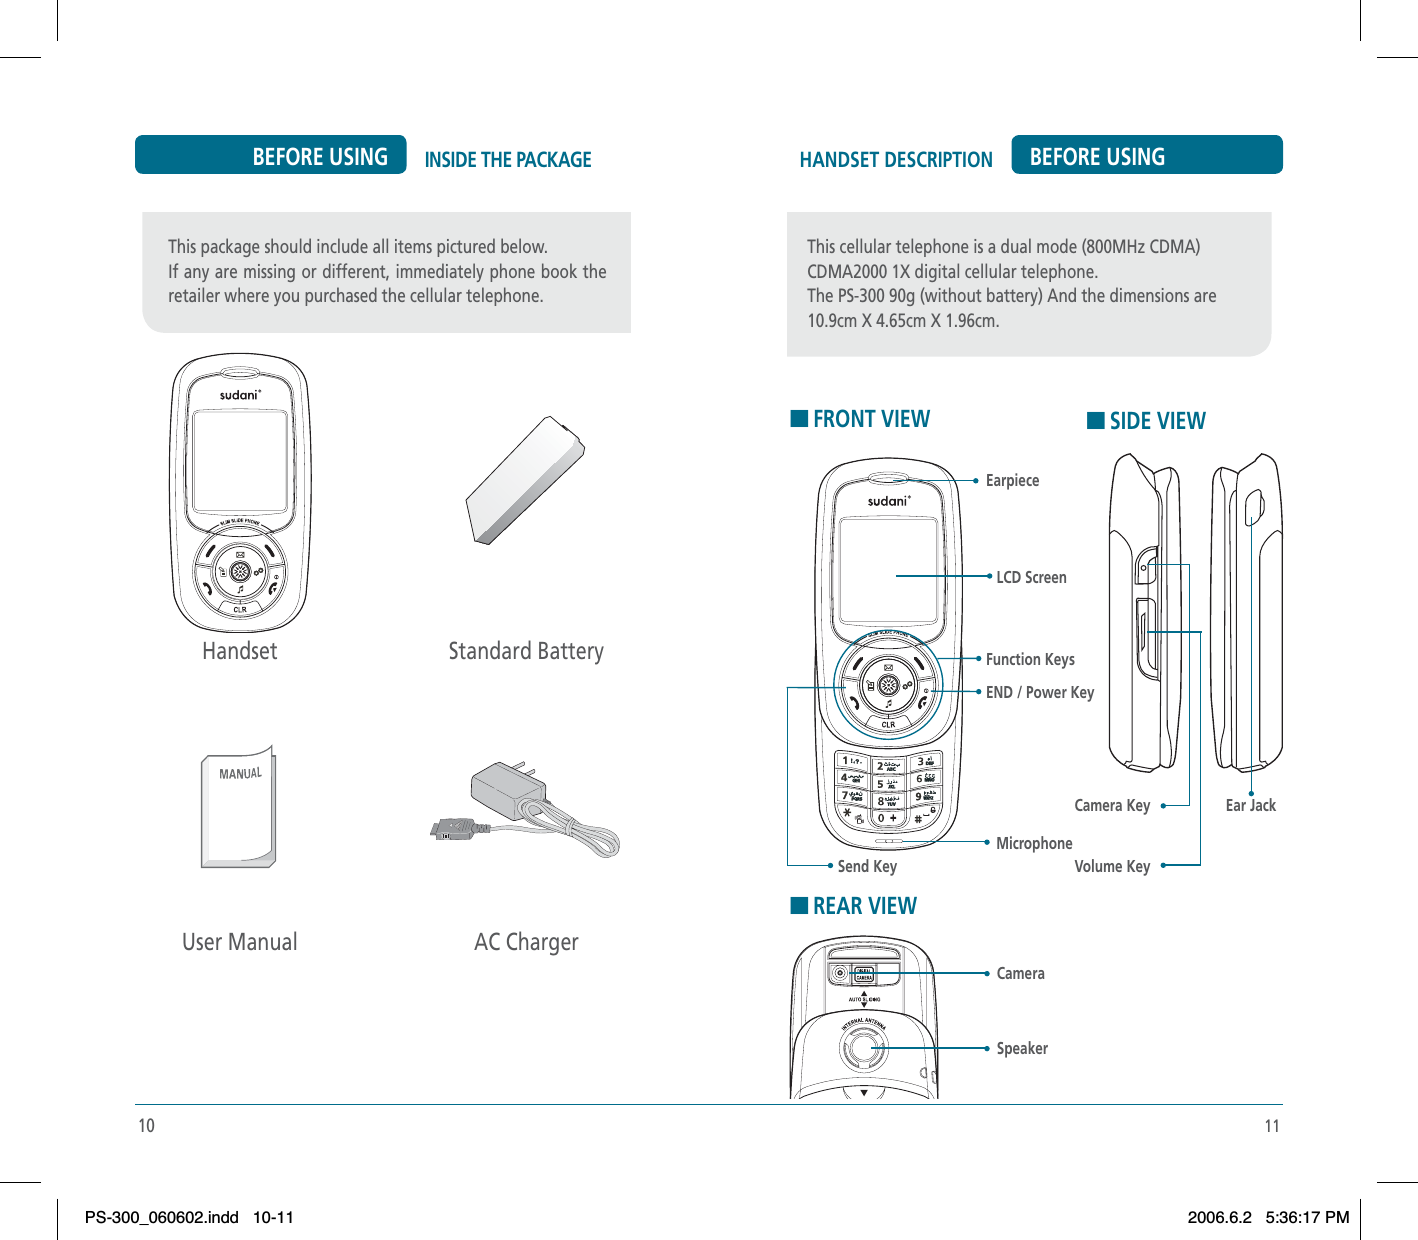
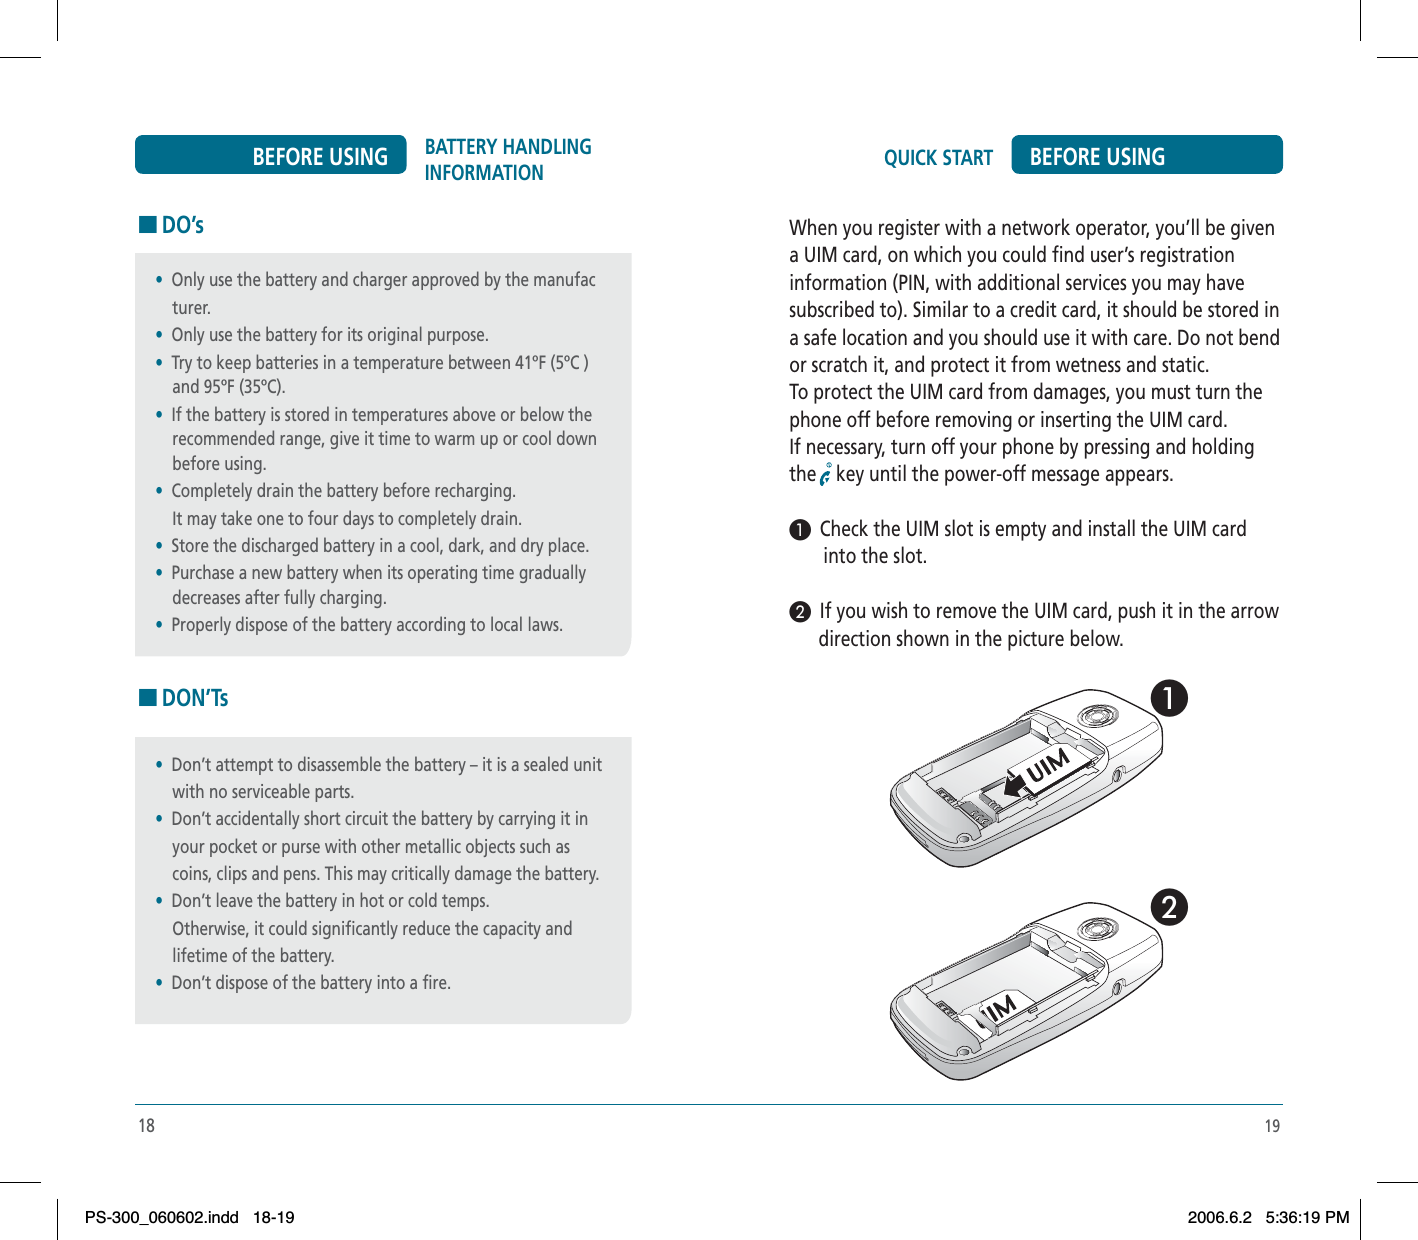
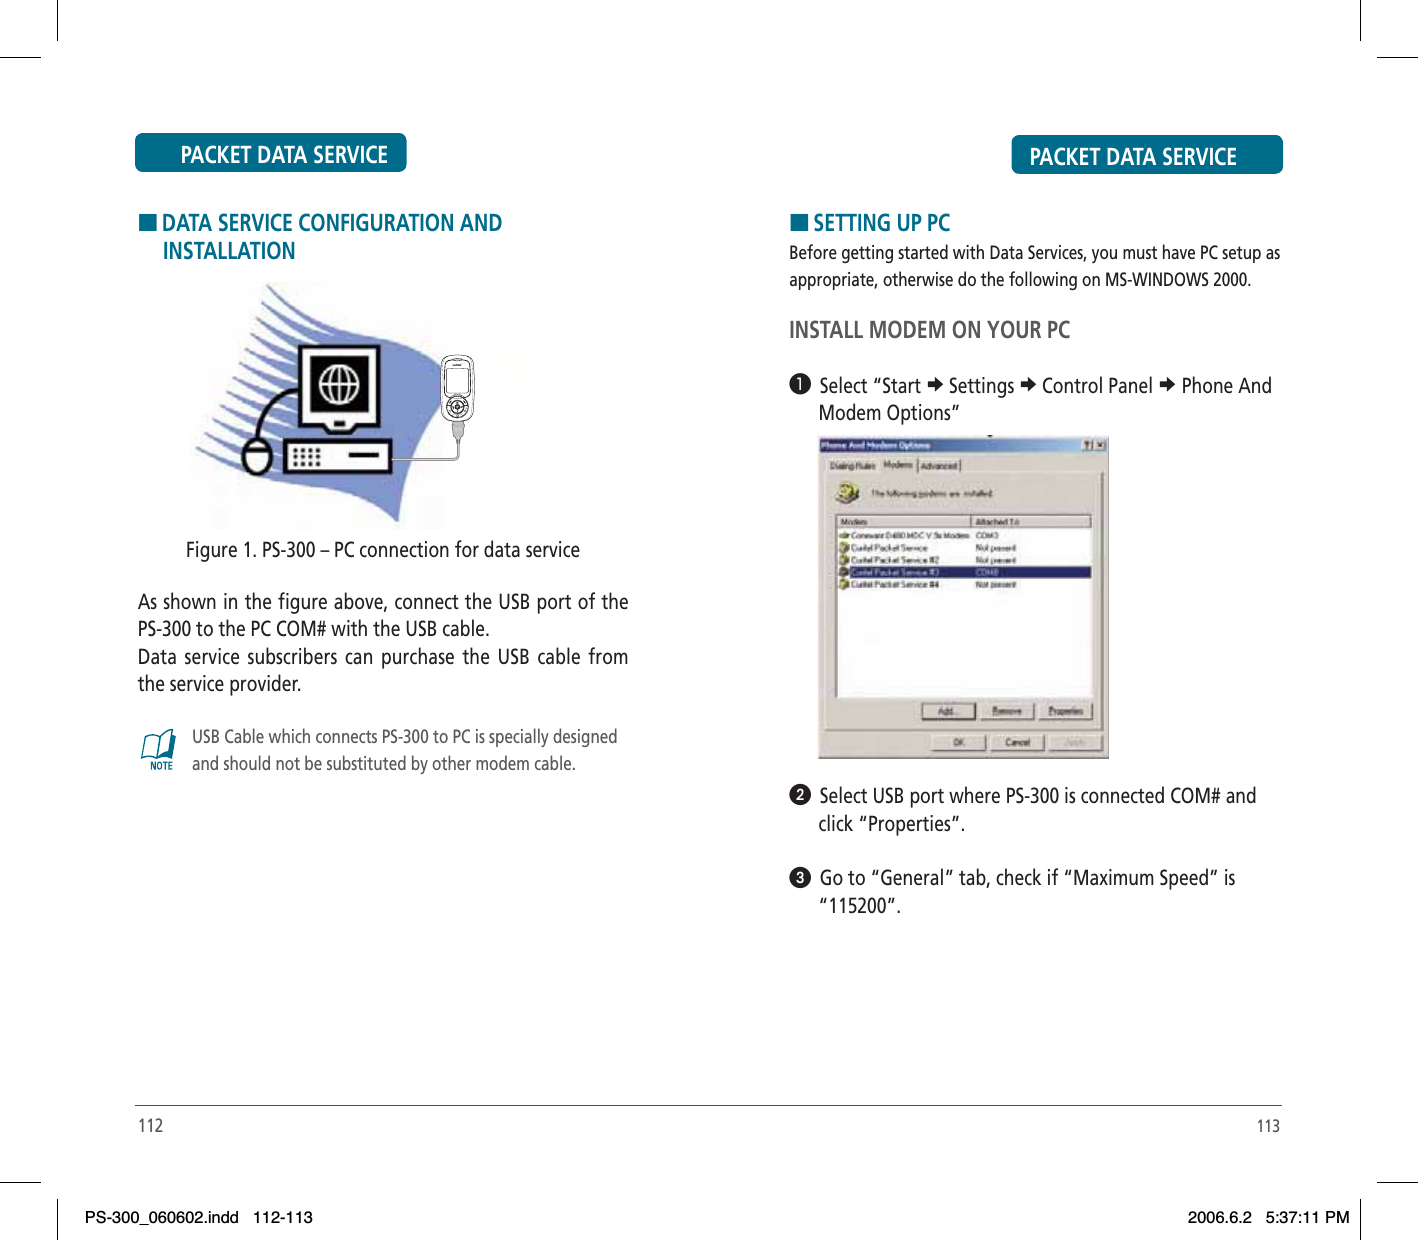
![23ACCESSING THE MENU BASIC OPERATION³ To access the menu in the idle mode, press [MENU].ᕢ Use the Navigation key to scroll through the menu.ᕣ To return to the previous page, press . To exit the current menu and return to the idle mode, press .ᕤ Press the Navigation key to enter a function when its main page is displayed or press its assigned number to have direct access to the function.HotkeyIn idle mode, move the Navigation Key as follows to access these functions:•Upward movement : Messages•Long press : Voice Mail Access•Downward movement : Ring tone•Rightward movement : Profiles•Leftward movement : MemoYour phone can be customized via the menu. Each function can be accessed by scrolling with the Navigation key or by pressing the number that corresponds with the menu item.• To search through the menu in numerical order, press down.Your phone can be customized via the menu. Each function can be accessed by scrolling with the Navigation key or by pressing the number that corresponds with the menu item.22TURNING THE PHONE ON / OFFBASIC OPERATIONHTURNING THE PHONE ON³ Press and hold , until Logo appears and the tone sounds.•To select a logo, refer to page 63 for more details.(Display >Theme) for more detail.• If your cellular telephone is locked when “Password”appears on the display, enter your 4-digit password to unlock your cellular celephone.• The default password is the last 4 digits of your phone number.HTURNING THE PHONE OFF³ Press and hold , until your Logo appears.• Immediately change or recharge the battery when “Low Battery! Phone is turning off” appears on the display. Memory may possibly be damaged if the phone turns off due to the battery completely draining.• Turn the phone off before removing or replacing the bat tery. If the phone is on, unsaved data may be lost.PS-300_060602.indd 22-23PS-300_060602.indd 22-232006.6.2 5:36:20 PM2006.6.2 5:36:20 PM](https://usermanual.wiki/Pantech/PC-7300SU/User-Guide-667521-Page-13.png)
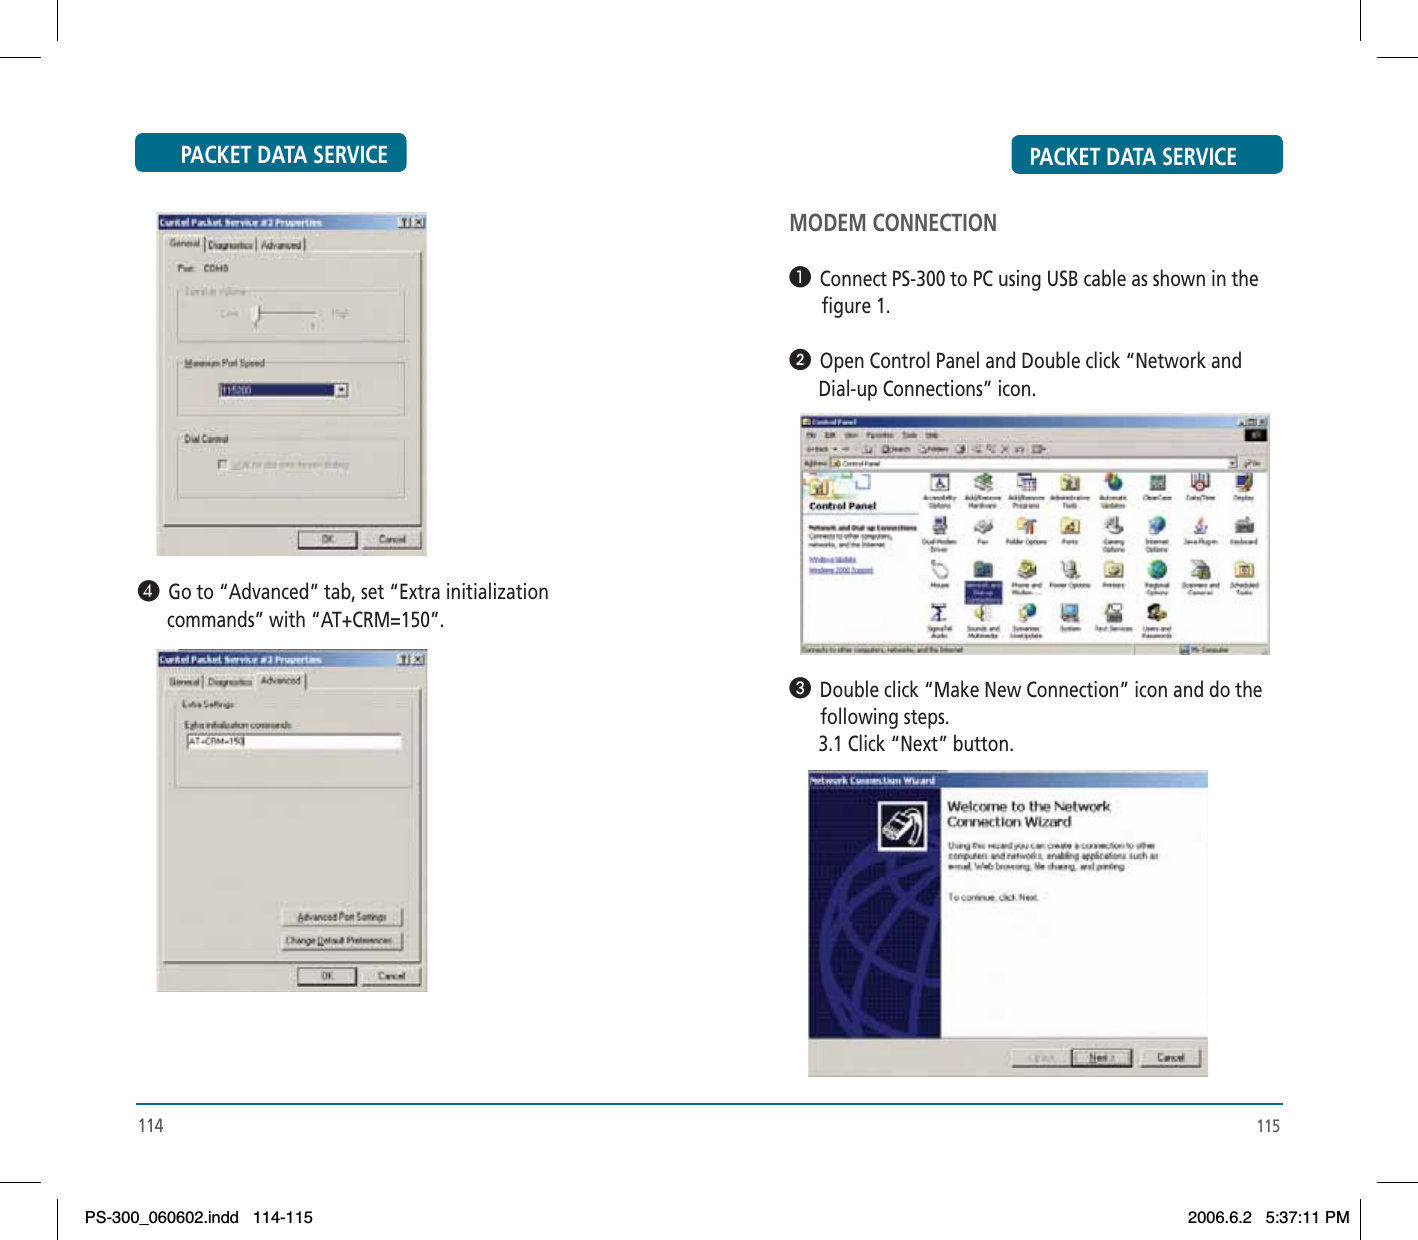
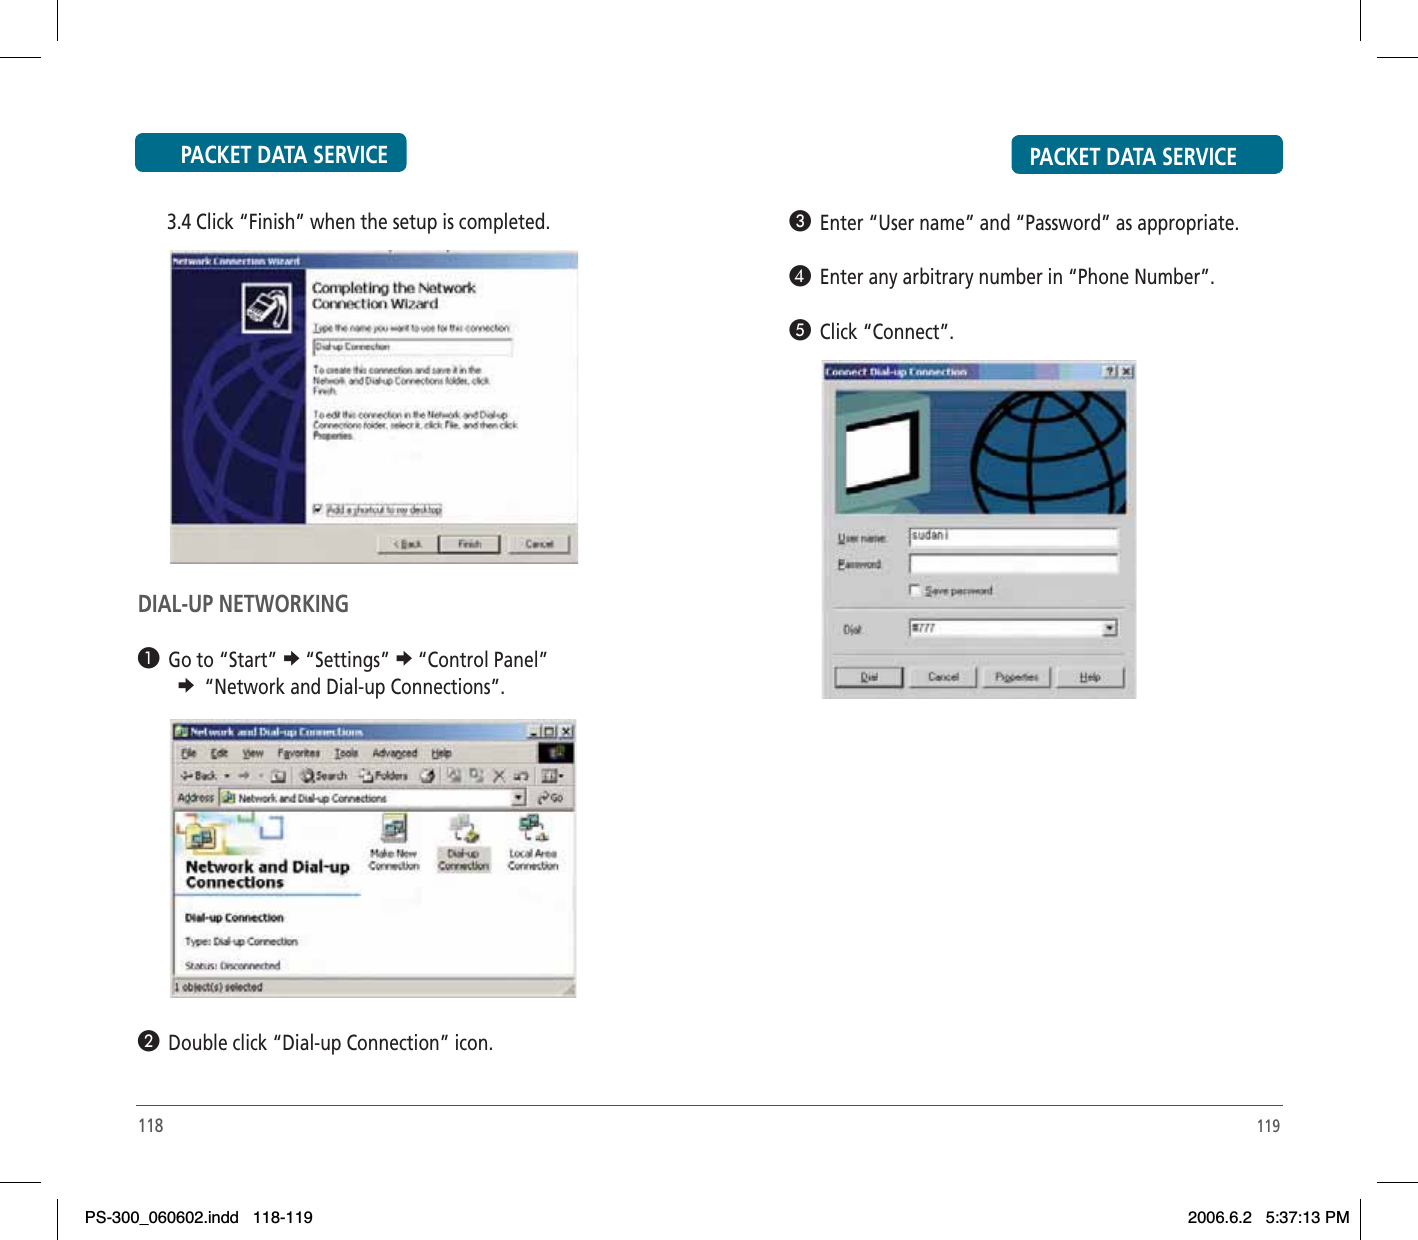
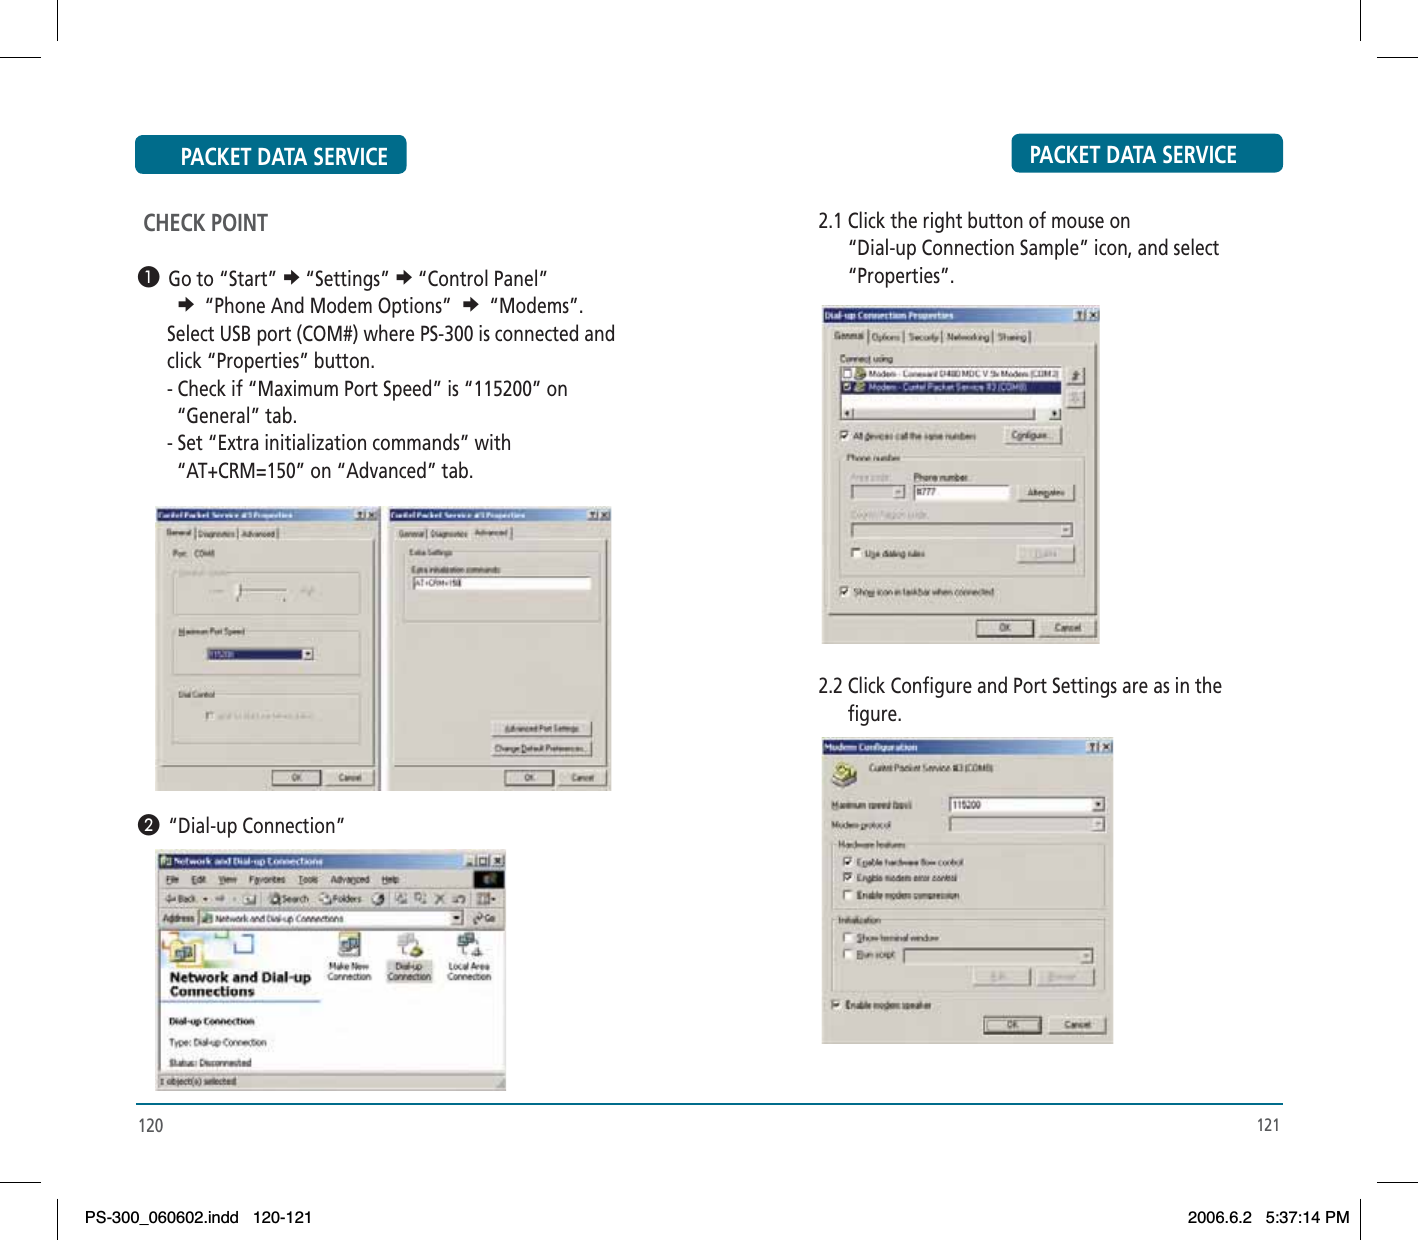
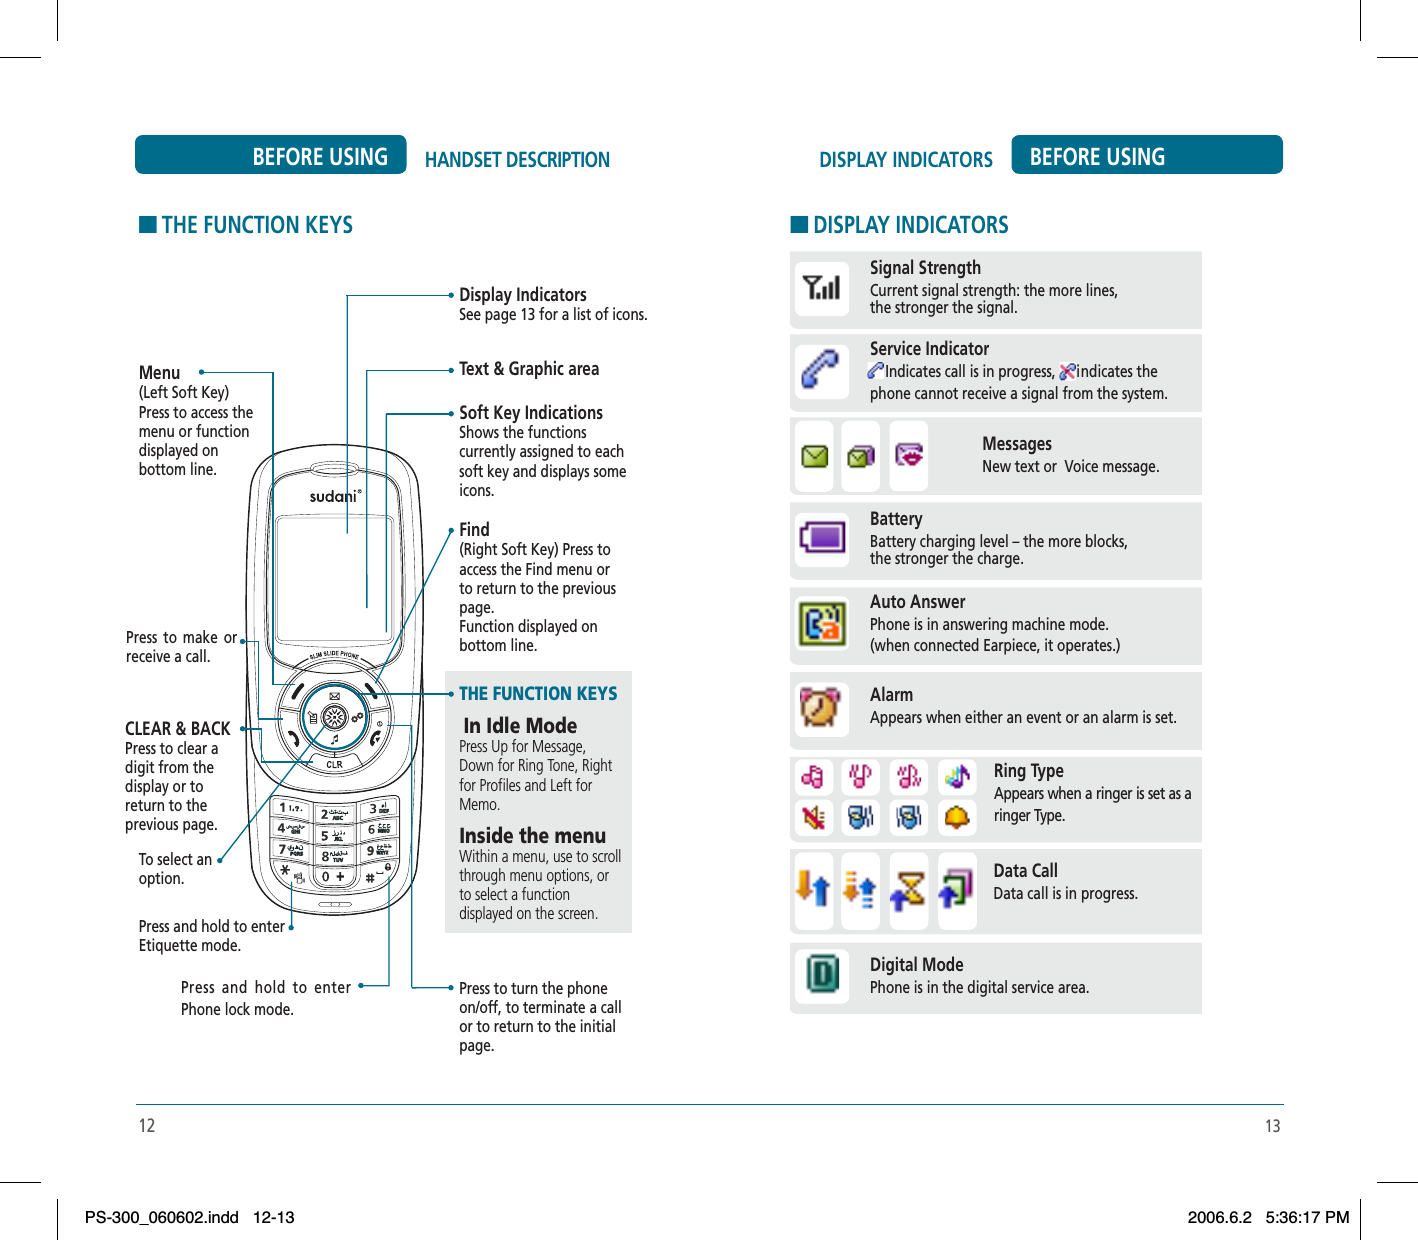
![29BASIC FUNCTIONS BASIC OPERATIONHMAKING A CALL³ Enter a phone number.To modify the phone number you have entered :•To delete one digit at a time press .•To delete the entire number, press and hold .ᕢ Press .The indicator, appears on the display.•If you activate the “AUTO REDIAL” function, the phone will automatically redial for the number of times you have selected. (Refer to page 68).•When you place or receive a call from stored phone numbers, both the name and phone number will be displayed.ᕣ To end a call, press .MAKING INTERNATIONAL CALLS³ Press and hold the key for the international prefix. The ‘+’ character can be replaced with the international access code.ᕢ Enter the country code, area code, and the phone number.» Press the key.28BASIC FUNCTIONSBASIC OPERATIONHPAUSE FEATUREPauses are used for automated systems (i.e., voice mail, calling cards). Insert a pause after a phone number then enter another group of numbers. The second set of numbers is dialed automati-cally after the pause. This feature is useful for dialing into systems that require a code.³ To insert a pause, enter a phone number thenpress [OPTIONS]. Select either a Hard Pause or a Timed Pause .ᕢ Press to dial the number and to store thenumber.HANSWERING A CALL³ To answer a call, press any key except .ᕢ To end the call, press .In Auto Answer Mode a call is automatically answered after a preset number of ring tones. See page 68 for more details.• In the Settings menu, you can select either “Send Key, Any Key or Slide Open” to answer a call. lf “Send Key” is selected, the phone can only be answered by pressing . See page 68 for more information.NUMBERP or TPS-300_060602.indd 28-29PS-300_060602.indd 28-292006.6.2 5:36:21 PM2006.6.2 5:36:21 PM](https://usermanual.wiki/Pantech/PC-7300SU/User-Guide-667521-Page-16.png)
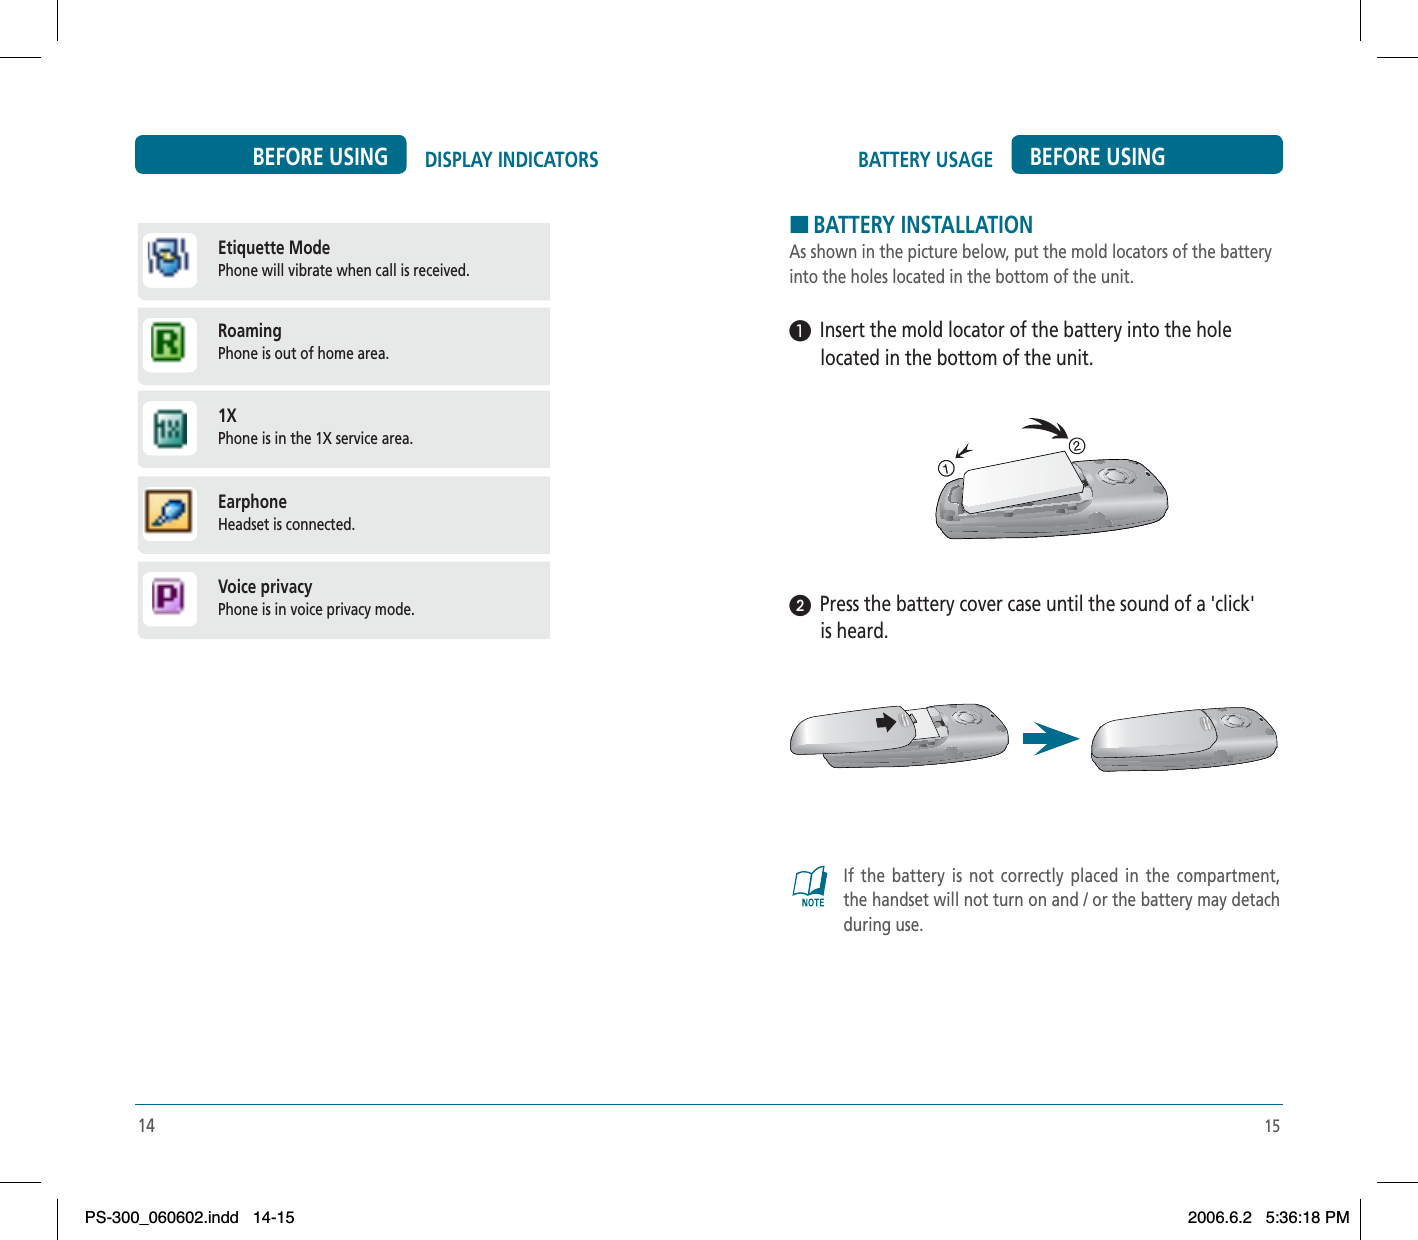
![31BASIC FUNCTIONS BASIC OPERATIONHCALLER ID FUNCTIONIdentifies caller by displaying their phone number. If the caller’s name and number are already stored in your Phone books, they both will appear.The caller ID is stored in the Calls.HCALL WAITING FUNCTIONNotifies you of an incoming call when you are already on a call by sounding a beep tone and displaying the caller’s phone number.³ To answer another call while on the phone, press . This places the first call on hold. To switch back to the first caller, press again.Call Waiting is a system dependent feature. Please phone book your service provider for details.HADJUSTING VOLUMEAdjust the volume of the ringer, key beep and speaker.³ Press [MENU] , EDIT - General or Outdoor or Meeting or Profile 1 or Profile 2 then select one of the following.ᕢ Adjust volume then press to save it.To adjust earpiece volume during a call move the Navigation Key up or down.•Ring Type•Ring Tone•Ringer Volume•Key Volume30BASIC FUNCTIONSBASIC OPERATION•Earpiece Volume•Speaker Volume•Speaker ModeHETIQUETTE MODEMutes key tones and activates the vibration mode to alert you of an incoming call or message.³ To turn Etiquette Mode on/off, press and hold . will be displayed to indicate Etiquette Mode is active.HPHONE LOCKThe phone lock feature of your cellular telephone locks the phone to protect when the phone is turned on and no call is in progress. You can still answer or silence an incoming call.³ To lock the phone, press and hold .ᕢ To unlock the phone, press any key then input the password.•Lock feature will deactivate when the phone is powered off. Upon next power up, you will need to press to lock phone again.PS-300_060602.indd 30-31PS-300_060602.indd 30-312006.6.2 5:36:22 PM2006.6.2 5:36:22 PM](https://usermanual.wiki/Pantech/PC-7300SU/User-Guide-667521-Page-17.png)
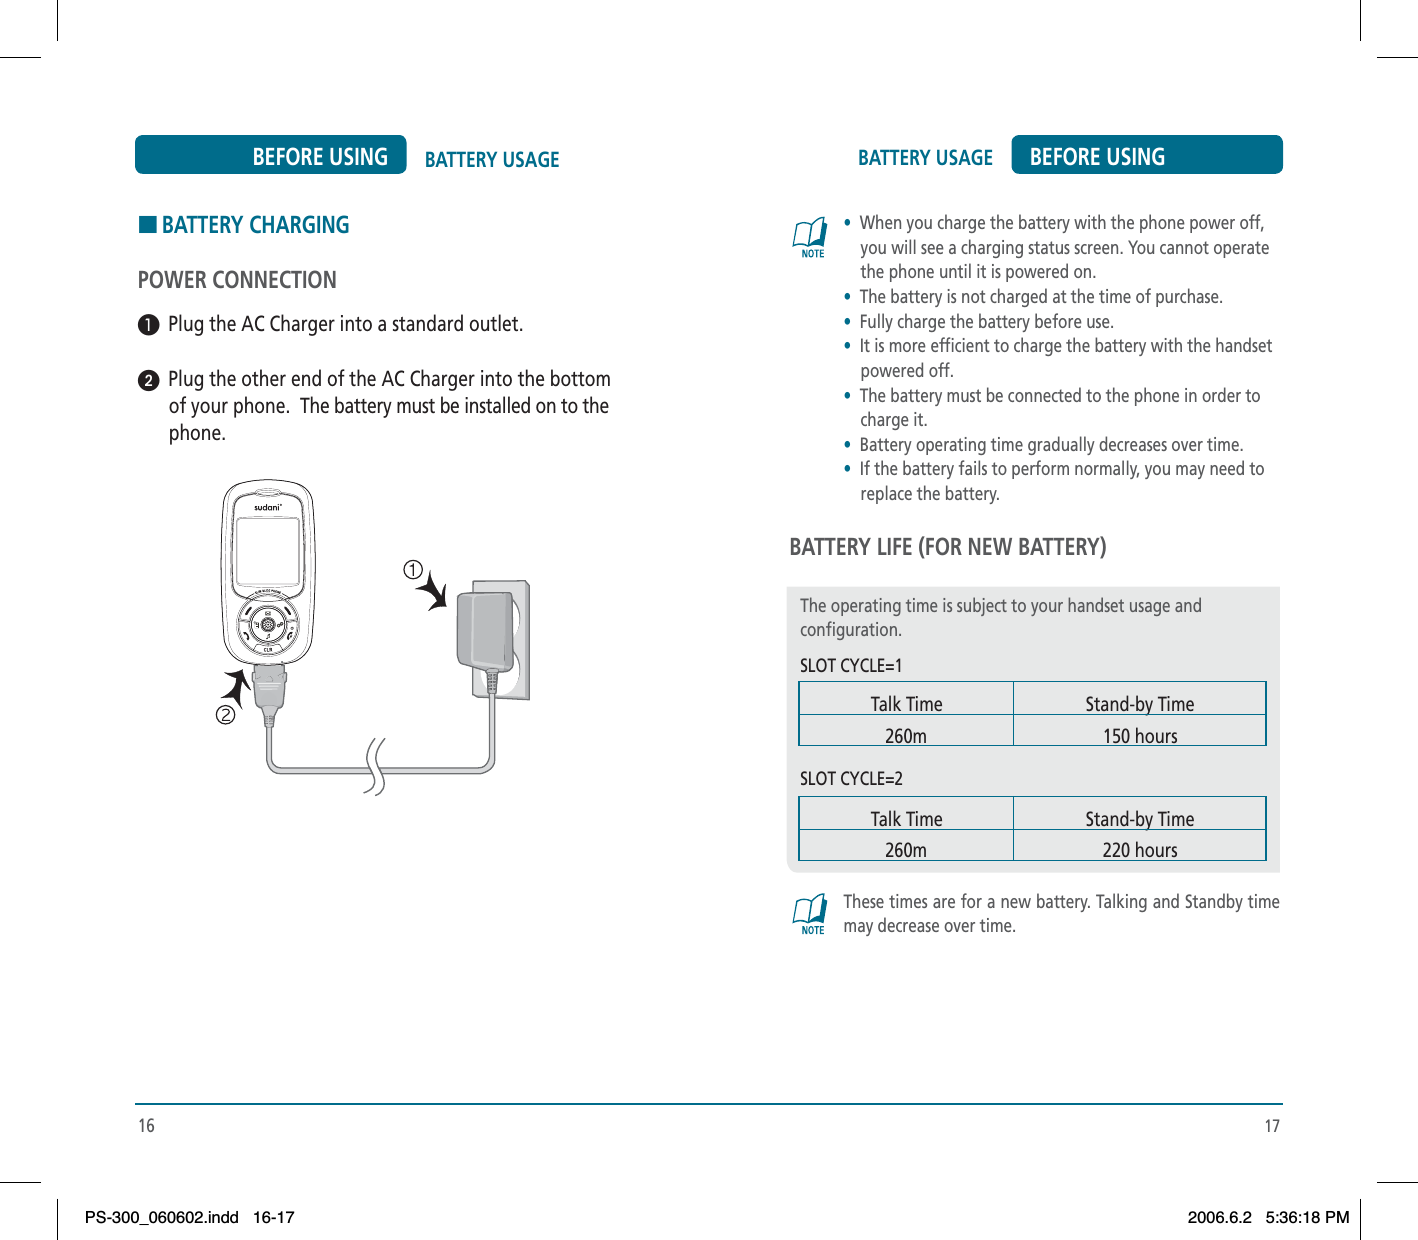
![33DURING A CALL BASIC OPERATIONTo display menu options during a call, press [OPTIONS].HMUTE (UNMUTE)The caller cannot hear you or any sounds from your side but you can still hear them.³ Press [OPTIONS] .HSCRATCH PADStores a new phone number during a call without the calling party hearing the key pad tones.³ Press [OPTIONS] .•To deactivate, press [OPTIONS] .•The phone will automatically unmute in Emergency Call or Callback mode.•Press [OPTIONS] to deactivate it.32DURING A CALLBASIC OPERATIONHMESSAGESEnables you to send a message (SMS) during a call.(Refer to page 97 for more details.)³ Press [OPTIONS] .HPHONE BOOKDisplay the Phone book menu.³ Press [OPTIONS] .HCALL HISTORYDisplay the call history.³ Press [OPTIONS] .PS-300_060602.indd 32-33PS-300_060602.indd 32-332006.6.2 5:36:23 PM2006.6.2 5:36:23 PM](https://usermanual.wiki/Pantech/PC-7300SU/User-Guide-667521-Page-18.png)
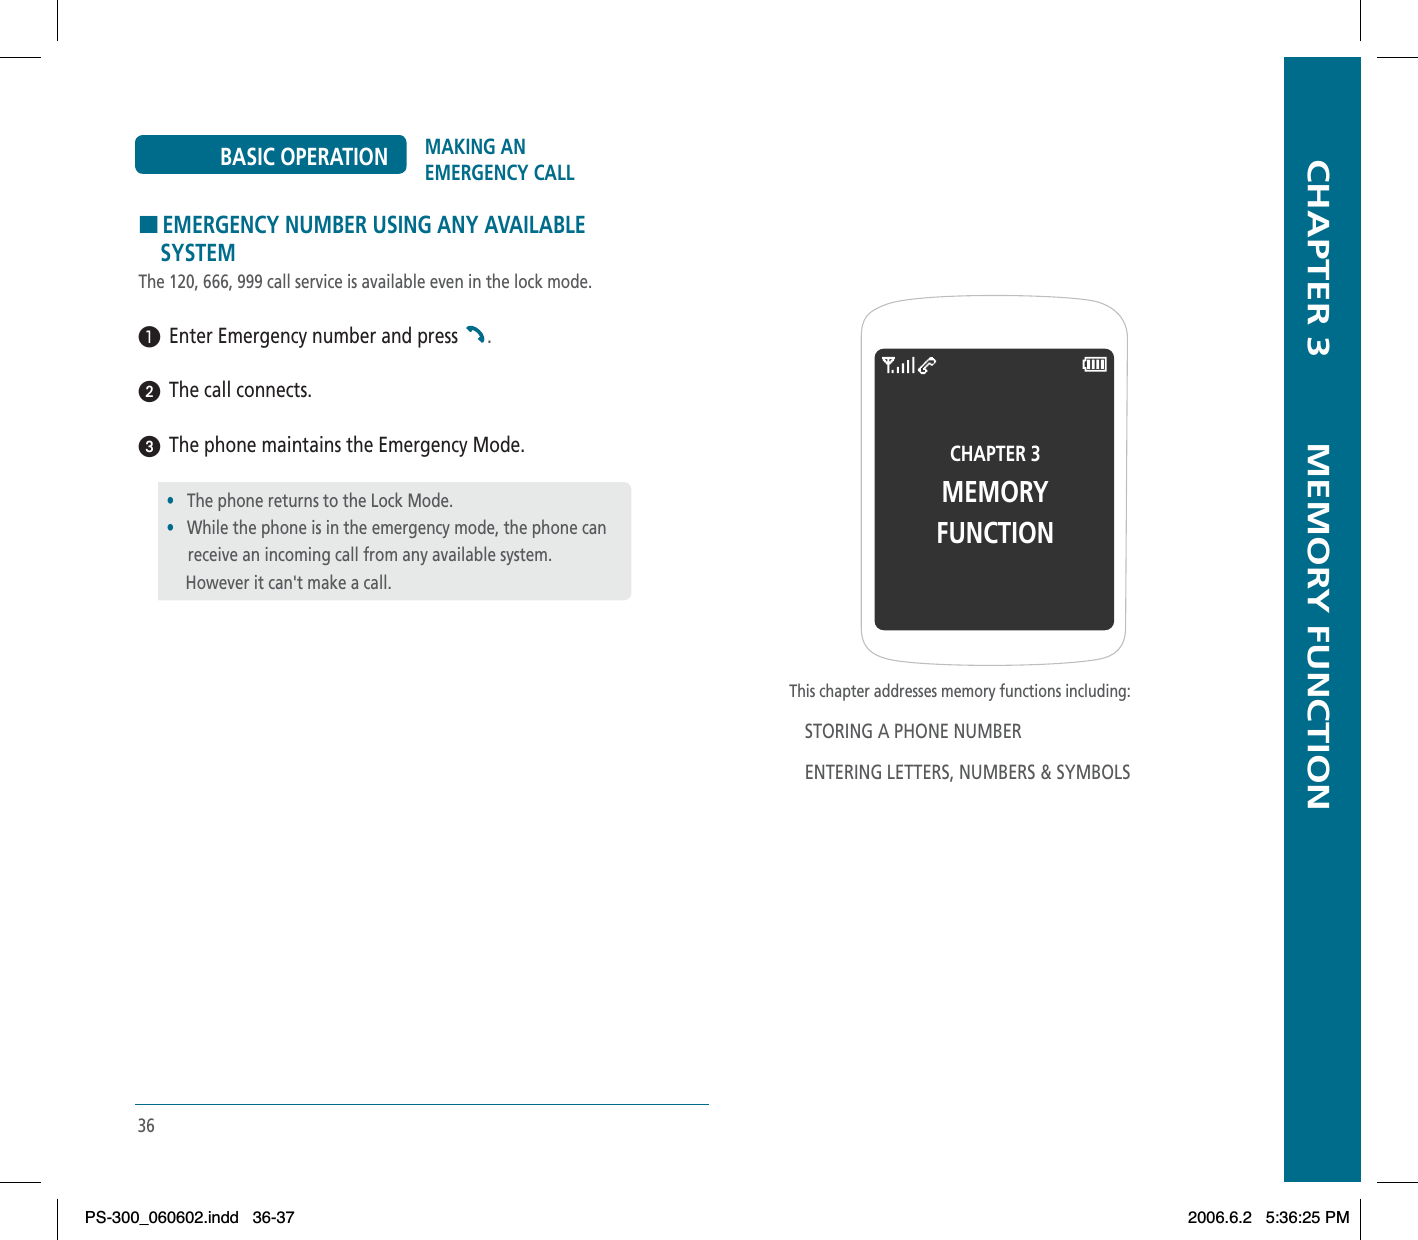
![35HVOICE PRIVACYEnhances voice privacy during a call.³ Press [OPTIONS] .HPHONE INFO.Enables you to view hardware version or software version while on a call.³ Press [OPTIONS] .34DURING A CALLBASIC OPERATION MAKING AN EMERGENCY CALL BASIC OPERATIONThe Emergency Call feature puts your phone in the Emergency Call Mode when you dial the preprogrammed emergency numbers, 120, 666, 999. It also operates in the lock mode and out of the service area.HEMERGENCY NUMBER IN LOCK MODEThe Emergency number call service is available even in the lock mode.³ Enter Emergency number and press .ᕢ The call connects.ᕣ The phone exits the Lock Mode.EmergencyNumber•When the call ends, the phone returns to the Lock Mode.PS-300_060602.indd 34-35PS-300_060602.indd 34-352006.6.2 5:36:25 PM2006.6.2 5:36:25 PM](https://usermanual.wiki/Pantech/PC-7300SU/User-Guide-667521-Page-19.png)
![39STORING A PHONE NUMBER MEMORY FUNCTIONᕥ To store the entry, press .“New Phonebook is added!“ or “Phonebook is edited!“ will be displayed. • Office • Pager•Others•E-mail•Ringer.•Secret : Lock, Unlock.•Photo•No Name•Memo•The other fields are set to Numeric mode as a default.38STORING A PHONE NUMBERMEMORY FUNCTIONThe Phone books stores up to 500 entries.³ Enter phone number and press .ᕢ Select “Phone” or “UIM”. ᕣ Choose “New” or “Existing”.Press to select.ᕤ The Phone # will appear next to a list of icons.The name of the icon is displayed above the list. Use the Navigation key to choose the type of # you’re adding, as indicated by the icon. Press to select.´ Enter a name and press .Please refer to page 40 for more details on entering letters, numbers & symbols.To change the input mode, press [Abc].Press the navigation key down to select the group.Press the navigation key down to select other options (secret.email, ringer, photo, no name, memo). NUMBERPhoneorUIM•Name•Group : No Group, Family, Relatives, Friends, Business, Colleagues, School, Club, VIP, Others•Mobile•HomeNeworExistingPS-300_060602.indd 38-39PS-300_060602.indd 38-392006.6.2 5:36:26 PM2006.6.2 5:36:26 PM](https://usermanual.wiki/Pantech/PC-7300SU/User-Guide-667521-Page-21.png)
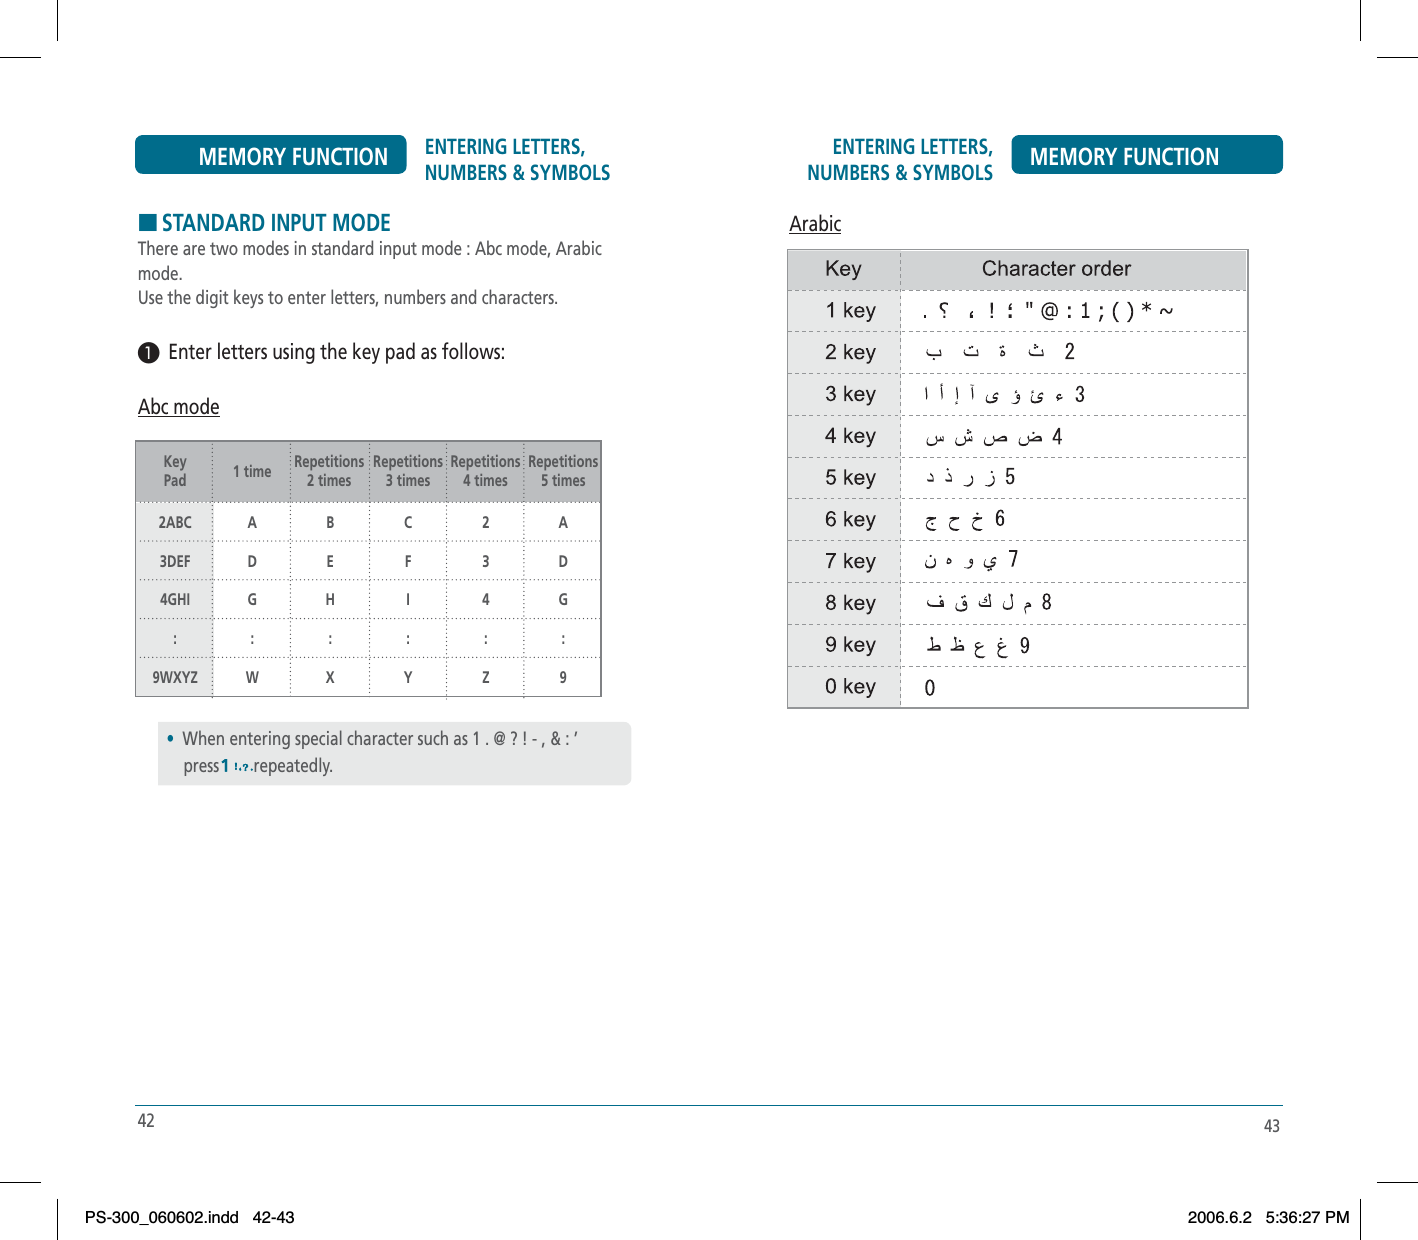
![41ENTERING LETTERS, NUMBERS & SYMBOLS MEMORY FUNCTIONThe following illustrates the function assigned to each key in the Alpha Editor.KEY FUNCTIONMode Press to change mode. [T9 Abc][Abc][NUM][Symbols]Next Press to view the next matching word if the highlighted word is not the word you intended.Space Press to accept a word and add a space.Caps Lock Press to select a letter case of the standard text input or T9 text input mode. [Abc], [ABC], and [abc] indicate the standard text input. [T9 Abc], [T9 ABC], and [T9 abc] indicate the predictive text input. ClearPress to delete a character to the left of the cursor.40ENTERING LETTERS, NUMBERS & SYMBOLSMEMORY FUNCTIONThe input mode (Alpha editor) will be automatically activated when necessary to enter letters and numbers. As shown below, there are 4 available modes. Standard input Mode(Abc, Arabic), T9 input mode(T9 Abc, T9 Arabic), Numeric mode(NUM), Symbol mode(Symbols).The input mode indicator appears on the upper right of the display when letters and numbers are entered. To select the desired input mode among the 6 modes below, press [MODE], then enter letters and numbers. Input mode indicator•T9 Abc : T9 mode•Abc : Standard mode•T9 Arabic : T9 mode•Arabic : Standard mode•NUM : Number mode•Symbols : Symbol modePS-300_060602.indd 40-41PS-300_060602.indd 40-412006.6.2 5:36:27 PM2006.6.2 5:36:27 PM](https://usermanual.wiki/Pantech/PC-7300SU/User-Guide-667521-Page-22.png)
![45ENTERING LETTERS, NUMBERS & SYMBOLS MEMORY FUNCTIONSelect Arabic mode, by press and hold [Mode]and select “Arabic”.When you select this mode, the appears as a visual confirmation.•Find the key that corresponds to the letter you want to enter.•Press it as many times as needed for the letter to appear on the screen. •To enter the name “ ”:Press [ , , ]Press [ ]Press [ , , ]Press [ ]Press [ , , , , ,, , ]44ENTERING LETTERS, NUMBERS & SYMBOLSMEMORY FUNCTIONTo change the input mode, press [Abc].ᕢ To enter a space, press .The cursor will automatically move to the next column.ᕣ Repeat until letters are entered.ᕤ To delete one digit, press [CLEAR].To delete the entire entry, press and hold [CLEAR]. ᕥ To change from lowercase to uppercase, press .Select Abc mode, by pressing [Abc].When you select this mode, the Abc icon appears as a visual confirmation. •Find the key that corresponds to the letter you want to enter.•Press it as many times as needed for the letter to appear on the screen. •To enter the name “John”: Press [ ]J Press [ , , ]o Press [ ,]h Press [ ,]nPS-300_060602.indd 44-45PS-300_060602.indd 44-452006.6.2 5:36:28 PM2006.6.2 5:36:28 PM](https://usermanual.wiki/Pantech/PC-7300SU/User-Guide-667521-Page-24.png)
![47ENTERING LETTERS, NUMBERS & SYMBOLS MEMORY FUNCTIONHNUMERIC MODEAllows you to enter numbers.³ Press [Abc] until the current input mode changes to the “NUM (Numeric mode)”.ᕢ To enter a number, press a digit key.HSYMBOL MODEAllows you to enter symbols.³ Press [Abc] until the “Symbols (Symbol mode)” appears.ᕢ Select the symbol you want to enter with the Navigation Key.Press [ ,], or Press [ ,].•Use the Navigation Key to view a different line of symbols.46ENTERING LETTERS, NUMBERS & SYMBOLSMEMORY FUNCTIONHT9 INPUT MODEThere are standard input mode : Abc mode.The T9 input mode incorporates a built-in-dictionary to determine a word based on the entered characters. A word can be entered more quickly by pressing a key once per character.ᕡ Select the T9 Abc mode by pressing [Abc].ᕢ Press a digit key once to enter the character you want and enter all the characters to input the word you want.ᕣ To view the next matching word, press .ᕤ To accept matching word and enter a space, press .To enter a compound word.•Enter the first part of the word and press to accept it.•Enter the last part of the word and press to enter the word.To enter “Phone Book” in the T9 input mode.•Press [Abc] to select the T9 input mode and to choose the small letter case (T9abc).•Press , , , , and you will see “phone” highlighted. Press to select it.•Press , , , and you will see “cool” highlighted and press to view the next matching word “book”. Press to select the compound word and enter a space.PS-300_060602.indd 46-47PS-300_060602.indd 46-472006.6.2 5:36:30 PM2006.6.2 5:36:30 PM](https://usermanual.wiki/Pantech/PC-7300SU/User-Guide-667521-Page-25.png)
![CHAPTER 4 MENU FUNCTIONThis chapter addresses accessing the menu and using its functionsand features to customize your phone.PHONE BOOKMESSAGESCALL HISTORYPROFILESDISPLAYSETTINGSORGANISERGAMECHAPTER 4MENU FUNCTION48ENTERING LETTERS, NUMBERS & SYMBOLSMEMORY FUNCTIONHSPEED DIALIn idle mode, calls can be placed to numbers stored in speed dial bypressing & holding the location number on the key pad.For a 2-digit location number, press the first number, then press andhold the second number. You can setting up speed dial entries fromsaved in your phone’s memory.³ To assign a phone number to a location, select the location then press [SET].· Select the entry with the Navigation Key and press .•If a phone number is already assigned to the location, press [OPTIONS] and [BACK].•To edit it, press [OPTIONS], then select “Edit”. To delete it, press [OPTIONS], then select “Delete”.•If the entry is set to secret, you will be asked for your password.PS-300_060602.indd 48-49PS-300_060602.indd 48-492006.6.2 5:36:32 PM2006.6.2 5:36:32 PM](https://usermanual.wiki/Pantech/PC-7300SU/User-Guide-667521-Page-26.png)
![51PHONE BOOK MENU FUNCTIONᕣ 3.1 To save the entry, press . 3.2 To return to the previous page, press [BACK].HFINDRetrieves an entry by name and calls by simply pressing .You can review all the entries stored in your phone book list or findan entry quickly by entering a name or its character string.BY NAME³ Press [MENU] , , .ᕢ The list of names in your phone book is displayed alpha betically. Use Navigation key to select the name.ᕣ Enter a name or its character string or scroll through the list with the Navigation Key. Please refer to page 40 for more detatils on entering letters, numbers & symbols.¿ All matching entries will be displayed. Highlight an entry. Press to edit the entry. Press [OPTIONS] to 1. Edit, 2.Send Message., 3. Prepend 4. To UIM, 5. Delete.´ To call the selected number, press .50PHONE BOOKMENU FUNCTIONHADD NAMEAdds a new entry.PHONE³ To add a new entry to the phone’s memory.ᕢ To enter a name or number, use the Navigation Key to select the phone book field. Please refer to page 40 for more detatils on entering letters, numbers & symbols.ᕣ 3.1 To save the entry, press . 3.2 To return to the previous page, press [BACK].Stores up to 500 entries, each of which can be assigned to a group.Entries can be retrieved by name or group.UIM³ To add a new entry to the UIM card.ᕢ To enter a name or number, use the Navigation Key to select the phone book field.•PHONE BOOK FIELD :Name/Groups/Mobile/Home/Office/Pager/Others/E-Mail/ Ringer/Secret/Photo/No name(You can edit name.)/Memo•If the entry is set to secret, you will be asked for your password. (Refer to page 72 for password information.)PS-300_060602.indd 50-51PS-300_060602.indd 50-512006.6.2 5:36:32 PM2006.6.2 5:36:32 PM](https://usermanual.wiki/Pantech/PC-7300SU/User-Guide-667521-Page-27.png)
![BY GROUPYou can search for the data of saved in your phone’s memory.³ Press [MENU] , , .ᕢ The list of phone numbers saved in your phone book will be displayed in group order.» Select one of the following groups (No Group, Family, Relatives, Friends, Business, Colleagues, School, Club, VIP, Others) with .¿ All matching entries will be displayed. Highlight an entry. Press to edit the entry. Press [OPTIONS] to 1. Edit, 2.Send Message., 3. Prepend 4. To UIM, 5. Delete.´ To call the selected number, press .PHONE BOOK MENU FUNCTION5352PHONE BOOKMENU FUNCTIONBY NUMBER³ Press [MENU] , , .ᕢ The list of phone numbers saved in your phone book will be displayed in numeric order.» Enter the phone number or scroll through the list with the Navigation Key. The name associated with that number will be displayed at the bottom of the screen.¿ All matching entries will be displayed. Highlight an entry. Press to edit the entry. Press [OPTIONS] to 1. Edit, 2.Send Message., 3. Prepend 4. To UIM, 5. Delete.´ To call the selected number, press .•Press [MENU] to deactivate it.•If the entry is set to secret, you will be asked for your password.PS-300_060602.indd 52-53PS-300_060602.indd 52-532006.6.2 5:36:33 PM2006.6.2 5:36:33 PM](https://usermanual.wiki/Pantech/PC-7300SU/User-Guide-667521-Page-28.png)
![55PHONE BOOK MENU FUNCTIONGROUP RINGER³ Select an existing group name with the Navigation Key.ᕢ Press [OPTIONS] to select “Default”, “Change”.ᕣ Select a ring.¿ Press to save it.HSPEED DIALIn idle mode, calls can be placed to numbers stored in speed dial bypressing & holding the location number on the key pad.For a 2-digit location number, press the first number, then press andhold the second number. You can setting up speed dial entries fromsaved in your phone’s memory.³ To assign a phone number to a location, select the location then press [SET].· Select the entry with the Navigation Key and press .54PHONE BOOKMENU FUNCTIONHGROUPPhone entries into groups. Existing groups include No Group,Family, Relatives, Friends, Business, Colleagues, School, Club, VIP,Others.RENAME³ Select an existing group name with the Navigation Key.· Press [EDIT] to select “Rename”.» Input a new group name.¿ Press to save it.•If a phone number is already assigned to the location, press [OPTIONS] and [BACK].•To edit it, press [OPTIONS], then select “Edit”. To delete it, press [OPTIONS], then select “Delete”.•If the entry is set to secret, you will be asked for your password.PS-300_060602.indd 54-55PS-300_060602.indd 54-552006.6.2 5:36:34 PM2006.6.2 5:36:34 PM](https://usermanual.wiki/Pantech/PC-7300SU/User-Guide-667521-Page-29.png)
![57CALL HISTORY MENU FUNCTIONHMISSEDDisplay information about the 30 most recently missed calls. Place acall to a missed call number by simply pressing .³ To see a list of the 30 most recent missed calls, Press [MENU] , . If the number is already stored in your phone book, name and num appears. If the number is not stored, only the phone number appears.ᕢ To view missed call details, press .Call details include date, time, and phone number.ᕣ Press [OPTIONS] to following items is displayed:After 30 Received, Dialled or Missed calls, the oldest call willautomatically be deleted from the history.56PHONE BOOKMENU FUNCTIONHPHONEBOOK COPYAllows you to copy the number to another location, either Phone orUIM.PHONE TO UIM³ Press [MENU] , , . You can copy all of the names stored on the phone’s memory to the UIM card.UIM TO PHONE³ Press [MENU] , , . You can copy all of the names stored on the UIM card to the phone’s memory.SETTINGS³ Press [MENU] , , .ᕢ Select one of the Phonebook Copy options:ᕣ To check, press .¿ To save, press .•Check Duplicate•Delete After Copy•Save : Stores the phone number in your phone book.•Send Message : Sends a message to the phone number.•Prepend : The user may add the desired number before the number.•Delete : To delete missed calls list.•Delete All : To delete all missed calls list.PS-300_060602.indd 56-57PS-300_060602.indd 56-572006.6.2 5:36:35 PM2006.6.2 5:36:35 PM](https://usermanual.wiki/Pantech/PC-7300SU/User-Guide-667521-Page-30.png)
![59CALL HISTORY MENU FUNCTION58CALL HISTORYMENU FUNCTIONHRECEIVEDDisplays information about the 30 most recently Received calls. Placea call to a incoming call number by simply pressing .³ To see a list of the 30 most recent Received calls, Press [MENU] , . If the number is already stored in your phone book, name and num appears. If the number is not stored, only the phone number appears.ᕢ To view incoming call details, press .Call details include date, time, and phone number.ᕣ Press [OPTIONS] to following items is displayed:After 30 Received, Dialled or Missed calls, the oldest call willautomatically be deleted from the history.•Save : Stores the phone number in your phone book.•Send Message : Sends a message to the phone number.•Prepend : The user may add the desired number before the number.•Delete : To delete missed calls list.•Delete All : To delete all missed calls list.HDIALLEDDisplays information about the 30 most recently Dialled calls.Place a call to a outgoing call number by simply pressing .³ To see a list of the 30 most recent Dialled calls, Press [MENU] , . If the number is already stored in your phone book, name and num appears. If the number is not stored, only the phone number appears.ᕢ To view outgoing call details, press .Call details include date, time, and phone number.ᕣ Press [OPTIONS] to following items is displayed:After 30 Received, Dialled or Missed calls, the oldest call willautomatically be deleted from the history.•Save : Stores the phone number in your phone book.•Send Message : Sends a message to the phone number.•Prepend : The user may add the desired number before the number.•Delete : To delete missed calls list.•Delete All : To delete all missed calls list.PS-300_060602.indd 58-59PS-300_060602.indd 58-592006.6.2 5:36:36 PM2006.6.2 5:36:36 PM](https://usermanual.wiki/Pantech/PC-7300SU/User-Guide-667521-Page-31.png)
![63DISPLAY MENU FUNCTIONHTHEMETo select an LCD display:STANDBY³ Press [MENU] , , .· Select Default to choose a standby display, or Downloads or Saved to Phone to choose a display you have down loaded to your phone.» To save it, press .POWER ON³ Press [MENU] , , .· Select Default to choose a pre-installed display, display, or Downloads or Saved to Phone to choose a display you have downloaded to your phone.» To save it, press .62PROFILESMENU FUNCTIONProfile 1/Profile 2, General, Outdoor, and Meeting mode can be edited. 1 Press and hold the star key to change to the vibrate only mode.Messages : Sets the tone of the text message. (Tone 1~5)Voce mail : Sets the tone of the voice mail. (Tone 1~5)Ringer Volume : Sets the volume of the ringtone. (Mute/Level1~5)Key Volume : Sets the volume of the keytone. (Off,Level1~5)Earpiece Volume : Adjusts the volume of earpiece. (Level1~5) - during a callSpeaker Volume : Adjusts the speaker volume of the speaker mode. (Level1~5) - during a callSpeaker Mode : Sets the speaker mode. (On/Off)PS-300_060602.indd 62-63PS-300_060602.indd 62-632006.6.2 5:36:38 PM2006.6.2 5:36:38 PM](https://usermanual.wiki/Pantech/PC-7300SU/User-Guide-667521-Page-33.png)
![65DISPLAY MENU FUNCTIONHLANGUAGESelects the language in which letters are displayed on screen.HBANNERTo input a personal greeting:³ Select “Message”, “Font Color” or “Entry Message” with the Navigation Key and press .64DISPLAYMENU FUNCTIONPOWER OFF³ Press [MENU] , , .· Select Default to choose a pre-installed display, display, or Downloads or Saved to Phone to choose a display you have downloaded to your phone.» To save it, press .RECEIVED CALL³ Press [MENU] , , .· Select Default to choose a pre-installed display, or Downloads or Saved to Phone to choose a display you have downloaded to your phone.» To save it, press .DIALLED CALL³ Press [MENU] , , .· Select Default to choose a pre-installed display, display, or Downloads or Saved to Phone to choose a display you have downloaded to your phone.» To save it, press .•Arabic•English•Message : On/Off•Font Color : Black/Blue/Green/Magenta/Maroon•Entry Message : Enter message.PS-300_060602.indd 64-65PS-300_060602.indd 64-652006.6.2 5:36:39 PM2006.6.2 5:36:39 PM](https://usermanual.wiki/Pantech/PC-7300SU/User-Guide-667521-Page-34.png)
![HCONTRASTTo adjust the display contrast:³ Use , or , to select a contrast level.HBACKLIGHTBacklights the display for easy viewing in dark places.³ Select “Backlight” then select the duration with the Navigation Key and press .66DISPLAYMENU FUNCTION•CONTRAST LEVEL : 1~5•LCD : 7 Secs / 15 Secs / 30 Secs / 60 Secs / Always On•KEYPAD : 7 Secs / 15 Secs / 30 Secs / 60 Secs / Always On / Always OffSETTINGS MENU FUNCTIONHCALLCALL WAITINGNotifies you of an incoming call when you’re on a call by sounding abeep and displaying the caller’s phone number on the screen.³ Press [MENU] , , .CALL FORWARDINGThis network service enables incoming calls to be rerouted to anumber that you specify.³ Press [MENU] , , .67•Enable : If you select enable, you can accept a waiting (receiving) call.•Disable : If you select disable, you cannot recognize the waiting (receiving) call.•Edit Feature Code : If you select edit feature code, you can edit code.•Uncondition : To forward all incoming calls to a specified number.•Busy : To forward calls when your phone is busy.•No Answer : To forward all calls that you do not answer within a specified period of time.•Busy/No Answer : Calls are diverted when you do not answer the phone or phone is busy.PS-300_060602.indd 66-67PS-300_060602.indd 66-672006.6.2 5:36:40 PM2006.6.2 5:36:40 PM](https://usermanual.wiki/Pantech/PC-7300SU/User-Guide-667521-Page-35.png)
![69SETTINGS MENU FUNCTIONANSWER MODETo select an answer mode:³ Press [MENU] , , .ᕢ Press and select “Send Key”, “Any Key”or “Slide Open” with the navigation key.AUTO REDIALAutomatically redial a call up to 5 times after a set time interval.³ Press [MENU] , , .ᕢ Select redial time and select a time interval option (Off, 3, 5, 7, 10 Secs) with the Navigation key.ᕣ Select repeat and select a time interval option (1time, 3times, 5times) with the Navigation key.¿ To save, press .•Send key : Press only send key to answer a call. •Any Key : Press any key to answer an incoming call except “CLR”, “END Key” and “OK Key”.•Slide Open : Set the phone to answer a call with slide open.SETTINGSMENU FUNCTIONVOICE PRIVACYThe voice Privacy feature encrypts the voice channel so that noone can eavesdrop on your phone conversations.³ Press [MENU] , , .ᕢ Select one of the Voice Privacy options:» To save, press .CALL TIMEREnable option to see the amount of time spent on a call.³ Press [MENU] , , .ᕢ Select Off or On option with th navigation key.» To save, press .AUTO ANSWERAutomatically answers a call after a preset number of rings.An ideal setting for the hands-free car kit.³ Press [MENU] , , .ᕢ Select one of the Auto Answer options:» To save, press .•Standard •Enhanced•Off/5 Secs/10 Secs/18 Secs68PS-300_060602.indd 68-69PS-300_060602.indd 68-692006.6.2 5:36:41 PM2006.6.2 5:36:41 PM](https://usermanual.wiki/Pantech/PC-7300SU/User-Guide-667521-Page-36.png)
![71SETTINGS MENU FUNCTIONTONE LENGTHTo adjust tone length:³ Press [MENU] , , .ᕢ Select “Normal” or “Long” with the Navigation Key then press to save it.CONNECT ALERTSet the phone to beep when an outgoing call is connected to the system.³ Press [MENU] , , .ᕢ Select “On” or “Off” with the Navigation Key then press to save it.DISCONNECT ALERTSet the phone to beep when a call is disconnected.³ Press [MENU] , , .ᕢ Select “On” or “Off” with the Navigation Key then press to save it.MINUTE ALERTSet the phone to beep every minute during a call.³ Press [MENU] , , “Minute Alert”.ᕢ Select “On” or “Off” with the Navigation Key then press to save it.70SETTINGSMENU FUNCTIONSIGNAL FADE ALERT³ Press [MENU] , , “Signal Fade Alert”.ᕢ Select “On” or “Off” with the Navigation Key then press to save it.HPHONEDATA SETTINGSAllows you to transfer data when your cellular telephone isconnected to a PC.³ Press [MENU] , , .ᕢ Select one of the following item.•Receive Mode : Voice Call/Data Only/Fax Only•Data Speed : 19200 bps/115200 bps/230400 bps•Port : NULL PORT/RS232C/USB DATAPS-300_060602.indd 70-71PS-300_060602.indd 70-712006.6.2 5:36:43 PM2006.6.2 5:36:43 PM](https://usermanual.wiki/Pantech/PC-7300SU/User-Guide-667521-Page-37.png)
![73SETTINGS MENU FUNCTIONSLIDE ALERTuse this menu to select the tone that the phone sounds when you open or close the phone.³ Press [MENU] , , .ᕢ Select “On” or “Off” with the Navigation Key then press to save it.PHONE INFO³ Press [MENU] , , .ᕢ You are to see the version of My Phone Number, S/W Version and H/W Version and others.» To return to the previous page, press .HSECURITYPrevents unauthorized use of your cellular telephone. The followingsettings can be restricted:72SETTINGSMENU FUNCTIONPHONE LOCKPrevents the phone from being used without entering the passwordfirst.³ Press [MENU] , , then enter “Password”.The default password is the last 4 digits of your phonenumber.ᕢ Press then select“Lock Now”, “Lock On Power Up” or “Off” and press .CHANGE CODEChanges your 4-digit password.³ Press [MENU] , , then enter “Password”.The default password is the last 4 digits of your phonenumber.ᕢ Press .» Enter a new password then press .¿ Enter the new password again and press .•Lock Now : Lock the phone now.•Lock On Power Up : Do not lock the phone now, but it is automatically locked when power recycled.•Off : Do not lock the phone.PS-300_060602.indd 72-73PS-300_060602.indd 72-732006.6.2 5:36:44 PM2006.6.2 5:36:44 PM](https://usermanual.wiki/Pantech/PC-7300SU/User-Guide-667521-Page-38.png)
![75SETTINGS MENU FUNCTIONUIMUIM LOCKBlocks access to UIM card.ቢ Press [MENU] , , then enter “Password”.ባ Press , then select “Enable PIN” or “Disable PIN” with the Navigation Key and press .PIN CODE CHANGEChange the pincode.ቢ Press [MENU] , , then enter “Password”.ባ Press , .ቤ Enter a new PIN code then press .ብ Enter the new PIN code again and press .It can be changed when the PIN cord is enabled.RESTRICTPHONE BOOKBlocks access to phone book.ቢ Press [MENU] , , then enter “Password”.ባ Press , then select “Allow” or “Restrict” with the Navigation Key and press .•Allow : Allows access to the phone book.•Restrict : Restricts access to the phone book.74SETTINGSMENU FUNCTIONCALL HISTORYBlocks access to call history.ቢ Press [MENU] , , then enter “Password”.ባ Press , then select “Allow” or “Restrict” with the Navigation Key and press .OUTGOING CALLBlocks all outgoing Calls – except emergency calls – but allows an incoming call to be placed.ቢ Press [MENU] , , then enter “Password”.ባ Press , then select “Allow” or “Restrict” with the Navigation Key and press .MESSAGESBlocks access to message.ቢ Press [MENU] , , then enter “Password”.ባ Press , then select “Allow” or “Restrict” with the Navigation Key and press .•Allow : Allow access to call history.•Restrict : Restrict access to call history.•Allow : Allow access to outgoing call.•Restrict : Restrict access to outgoing call.•Allow : Allow access to message.•Restrict : Restrict access to message.PS-300_060602.indd 74-75PS-300_060602.indd 74-752006.6.2 5:36:45 PM2006.6.2 5:36:45 PM](https://usermanual.wiki/Pantech/PC-7300SU/User-Guide-667521-Page-39.png)
![77SETTINGS MENU FUNCTIONCAMERABlocks access to camera.ቢ Press [MENU] , , then enter “Password”.ባ Press , then select “Allow” or “Restrict” with the Navigation Key and press .EMERGENCY NUMBERSStores 3 phone numbers that can be called even in the lock mode.³ Press [MENU] , , then enter “Password”.The default password is the last 4 digits of your phonenumber.ᕢ Press then select a location with the Navigation Key, press .ᕢ Input a phone number, press again to save.Press the delete key to delete the saved numbers in case thenumbers are saved.•Allow : Allow access to camera.•Restrict : Restrict access to camera.76SETTINGSMENU FUNCTIONDELETE ALLClears all phone book, downloads, and photo gallery entries.³ Press [MENU] , , then enter “Password”.The default password is the last 4 digits of your phonenumber.ᕢ Press .» Check “Phone Book:Phone/Phone Book:UIM /Call History” and press to delete all the items in those categories.RESET PHONEResets phone to default settings.³ Press [MENU] , , then enter “Password”.The default password is the last 4 digits of your phonenumber.ᕢ Press .» Select “Reset” or “Clear Memory & Reset” with the Navigation key. Press .PS-300_060602.indd 76-77PS-300_060602.indd 76-772006.6.2 5:36:47 PM2006.6.2 5:36:47 PM](https://usermanual.wiki/Pantech/PC-7300SU/User-Guide-667521-Page-40.png)
![79HSCHEDULERSets a scheduled plan and reminds you of that plan.ADD EVENT³ Press [MENU] , .ᕢ Move the Navigation Key left, right, up or down tochoose a date in the calendar then press .ᕣ To select plan options, press the Navigation Keydownwards.DATEUse the key pad to change or enter the date, thenpress .TIMEUse the key pad to set a time and to select “AM”or “PM”, then press .EVENTUse the key pad to input a event message, thenpress .SETTINGSelect an alert time interval option (On Time, 10 MinBefore, 30 Min Before, 1 Hour Before, No Alarm) usingthe Navigation Key.78ORGANISER MENU FUNCTIONORGANISERMENU FUNCTIONRINGERTo set a Ringer, press [OPTIONS], then select “Default” or “Change” using the Navigation Key. To save it press .ᕤ To save it, press or [BACK] to return to the calendar.ᕥ The date of the Scheduler will be marked on yourcalendar.HALARMYou can set up to 3 alarms.³ To display alarm entries, press [MENU] , .ᕢ Select one of the entries using the Navigation Key.To set a new alarm, choose alarm 1, 2 or 3.To edit an existing alarm, select that alarm.Press .ᕣ To select alarm options, press the Navigation Key down.•Default : To set default ringer type. •Change : To set custom ringer type.PS-300_060602.indd 78-79PS-300_060602.indd 78-792006.6.2 5:36:49 PM2006.6.2 5:36:49 PM](https://usermanual.wiki/Pantech/PC-7300SU/User-Guide-667521-Page-41.png)
![81ORGANISER MENU FUNCTIONSETTINGUse the Navigation Key to select a setting for the alarm (Once, Daily, Mon-Fri, Weekly, Monthly, Off ).DATEUse the key pad to change or enter the date for the alarm then press .TIMEUse the key pad to set a time for the event and to select “AM” or “PM” then press .SNOOZINGUse the Navigation Key to select a Snoozing setting (Off, 1 Time after 5 min, 1 Time after 10 min, 3 Times by 5 min). Stoppinp the alarm ringing with End key will deactivate snoozing function.•Off•Once : Enter a date.•Daily : Select a time.•Mon - Fri •Weekly : Select “Monday”, “Tuesday”, “Wednesday”, “Thursday”, “Friday”, “Saturday”, “Sunday”.•Monthly : Select 1 ~31.80ORGANISERMENU FUNCTION•Default : To set default ringer type.•Change : To set custom ringer type.RINGERTo set a “Ringer” press [OPTIONS], then select “Default” or “Change” with Navigation Key. To save it press .ᕤ To save an alarm setting press .HMEMOYour phone includes an internal Notes pad that can be used to com-pose and store reminders and notes.³ Press [MENU] , . NEW To compose a memo (there is an 80-letter limit):³ Press [MENU] , , .ᕢ Input a new text notes.(Please refer to page 40 for more details on enteringletters, numbers and symbols.)ᕣ To save, press .PS-300_060602.indd 80-81PS-300_060602.indd 80-812006.6.2 5:36:50 PM2006.6.2 5:36:50 PM](https://usermanual.wiki/Pantech/PC-7300SU/User-Guide-667521-Page-42.png)
![83ORGANISER MENU FUNCTIONLISTTo view a saved memo:³ Press [MENU] , , .ᕢ The list of all memos, in saved order, is displayed.Select a notes then press .To add a new memo, press [OPTIONS], “Add New”.To delete a memos, press [OPTIONS], “Delete”.To delete all memos, press [OPTIONS], “Delete All”.ᕣ The selected notes will appear. To edit it, press [OPTIONS], select “Edit” and input a new text memo. ᕤ To save, press .SETTINGSTo select memo pad background image:³ Press [MENU] , , .ᕢ Select “Paper”, “Pattern”, “Sea”, “Sky”, “Flower”, “White” then press .82ORGANISERMENU FUNCTIONHCALCULATORTo access the calculator:³ Press [MENU] , .ᕢ Follow the instructions below to calculate 8*6/4-2.5 ᕣ To reset, press [RESET]. : x, : -, : ÷, : +, : ., : Reset : =.HCURRENCY CONVERTConvert converts a figure between different units i.e. Length, Area, Volume, Weight, and Temperature.³ Press [MENU] , .•Input 8.•Move the Navigation Key to the right.•Input 6 then press the Navigation Key to the left.•Input 4 then press the Navigation Key down.•Input 2 then press to input dot (.).•Press 5.•Then press and you will see the answer.PS-300_060602.indd 82-83PS-300_060602.indd 82-832006.6.2 5:36:51 PM2006.6.2 5:36:51 PM](https://usermanual.wiki/Pantech/PC-7300SU/User-Guide-667521-Page-43.png)
![85ORGANISER MENU FUNCTIONHWORLD CLOCKTo display the time and date in pre-programmed cities:³ Press [MENU] , .ᕢ Select a city.ᕣ The world map appears with the city, its date and time.As the daylight saving time is not applied, it may be different from the actual time during DST.•Use the Navigation Key to select another city.84ORGANISERMENU FUNCTIONHSTOPWATCHSimultaneously times up to six different events.To operate the Chronometer:³ Press [MENU] , .ᕢ To measure a time period:1. To start the stop watch, press [START].2. To pause it, press [STOP].3. To resume it press , to return to the previous page, press [BACK].ᕣ To time up to Five events at once:1. To start, press [START].2. To stop a time period and continue measuring another one, press [SPLIT].3. To stop the second and continue measuring a third one, press [SPLIT].4. To measure up to Five time periods, repeat the above steps.5. To stop the stop watch, press [STOP].6. To review the results, press .7. To return to the stop watch, press [BACK].8. To reset it, press .PS-300_060602.indd 84-85PS-300_060602.indd 84-852006.6.2 5:36:53 PM2006.6.2 5:36:53 PM](https://usermanual.wiki/Pantech/PC-7300SU/User-Guide-667521-Page-44.png)
![87HTAKE PHOTO³ Press to take a photo and save it. QUALITY³ Press [CAMERA KEY] and then [OPTIONS] .· Select one of the following options:RESOLUTION³ Press [CAMERA KEY] and then [OPTIONS] .· Select one of the following options:Resolution works to 128X128 in case of Frame mode setting.•High/Normal/Low•160X120/320X240/640X480CAMERA MENU FUNCTION86ORGANISERMENU FUNCTIONHSNAKE³ Press [MENU] , .HICARUS³ Press [MENU] , .PS-300_060602.indd 86-87PS-300_060602.indd 86-872006.6.2 5:36:54 PM2006.6.2 5:36:54 PM](https://usermanual.wiki/Pantech/PC-7300SU/User-Guide-667521-Page-45.png)
![89CAMERA MENU FUNCTIONFRAMES³ Press [CAMERA KEY] and then [OPTIONS] .FLASH³ Press [CAMERA KEY] and then [OPTIONS] .HALBUMTAKE PHOTO³ Press [CAMERA KEY] , and then [OPTIONS] .RENAMETo rename a picture.³ Press [CAMERA KEY] , and then [OPTIONS] .•Off/On88CAMERAMENU FUNCTIONMULTI SHOT³ Press [CAMERA KEY] and then [OPTIONS] .· Select one of the following options:TIMER³ Press [CAMERA KEY] and then [OPTIONS] .· Select one of the following options:CONTRAST³ Press [CAMERA KEY] and then [OPTIONS] .· Select one of the following options:COLOR TONE³ Press [CAMERA KEY] and then [OPTIONS] .•Off/2/3/4/5•Off/5 Secs/10 Secs•level 5•None/Black & White/Sepia/Negative/Emboss/SketchPS-300_060602.indd 88-89PS-300_060602.indd 88-892006.6.2 5:36:55 PM2006.6.2 5:36:55 PM](https://usermanual.wiki/Pantech/PC-7300SU/User-Guide-667521-Page-46.png)
![91CAMERA MENU FUNCTIONHSETTINGSDATE & TIME³ Press [CAMERA KEY] , .· Select “Show” or “Hide” then press to save it.SHUTTER SOUND³ Press [CAMERA KEY] , .· Select one of the following options:•SOUND1~5/Off90CAMERAMENU FUNCTIONSET WALLPAPERTo set for Standby, Power On, Power Off, Received Call and Dialled Call image.³ Press [CAMERA KEY] , and then [OPTIONS] .SET PHONEBOOK³ Press [CAMERA KEY] , and then [OPTIONS] .DELETETo delete a picture.³ Press [CAMERA KEY] , and then [OPTIONS] .DELETE ALLTo delete a all picture.³ Press [CAMERA KEY] , and then [OPTIONS] .INFORMATIONTo display a information in picture.³ Press [CAMERA KEY] , and then [OPTIONS] .PS-300_060602.indd 90-91PS-300_060602.indd 90-912006.6.2 5:36:57 PM2006.6.2 5:36:57 PM](https://usermanual.wiki/Pantech/PC-7300SU/User-Guide-667521-Page-47.png)
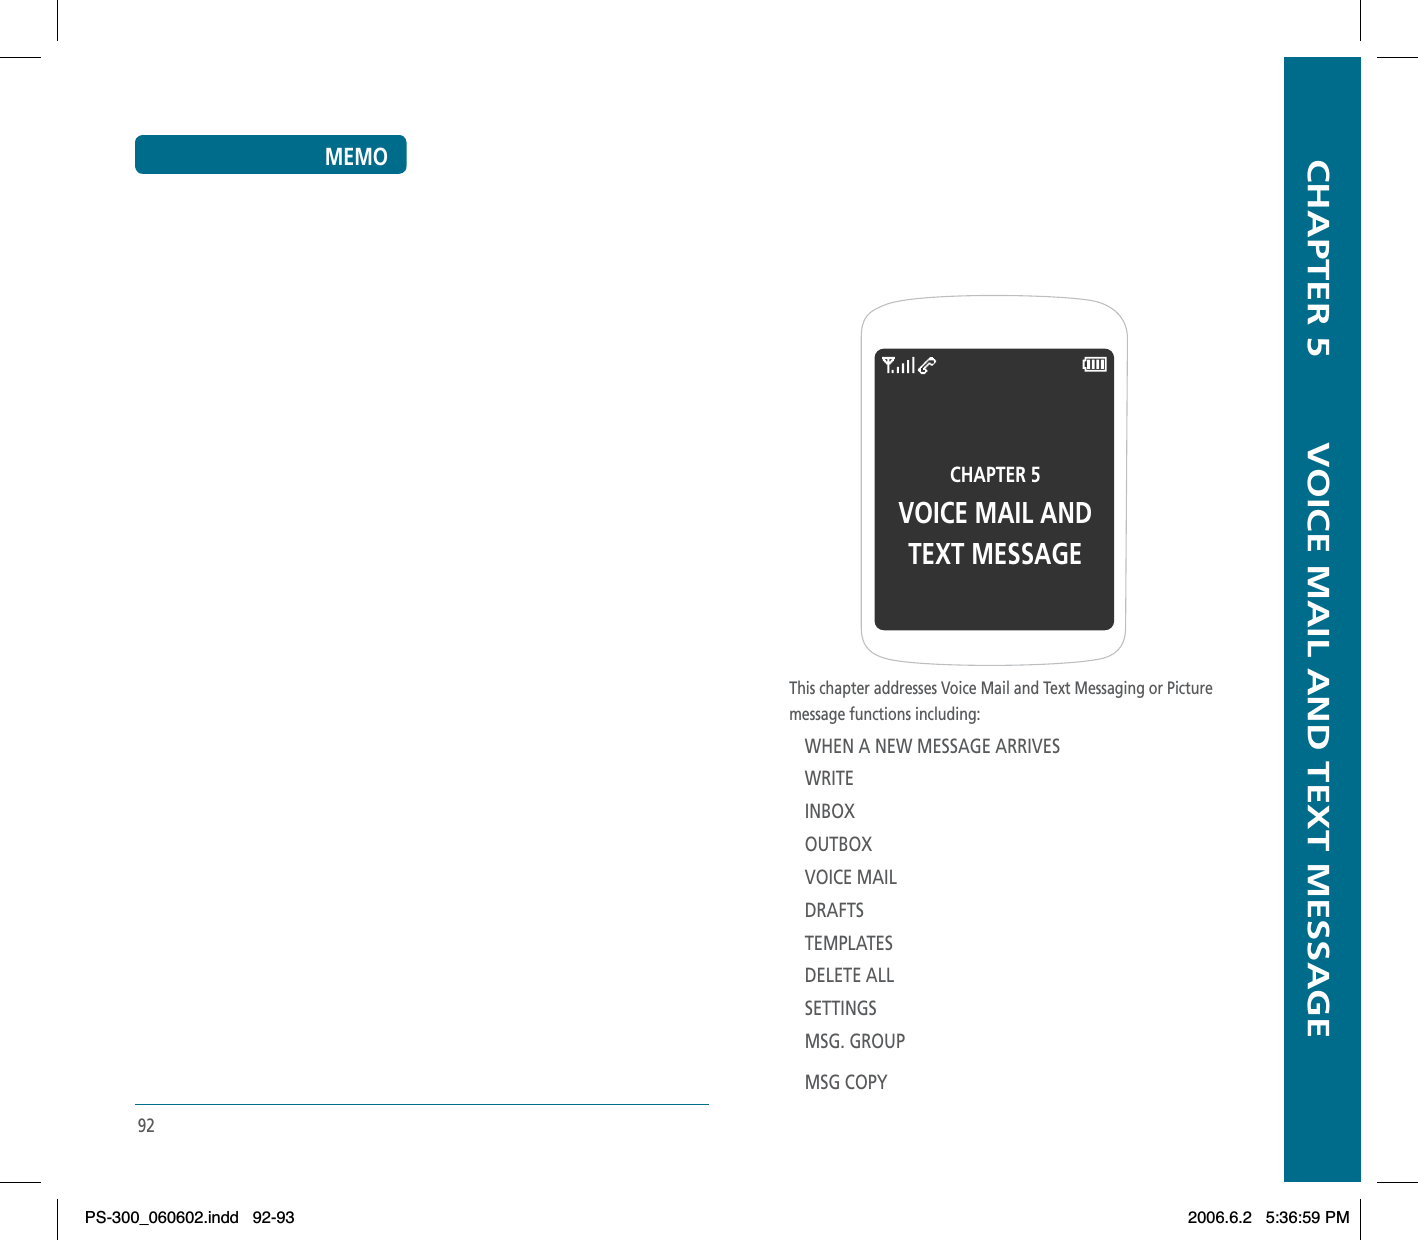
![95ᕣ Under “Message”, input a new TEXT message and press . (Please refer to page 40 for more details on entering letters, numbers and symbols.)ᕤ Press the Navigation Key down for more fields. Under “Priority”, select “Normal”, “Urgent” or “Emergency”.´ Under “Deferred Deliv.”, select “Immediate”, “After 30 Minutes”, “After 1 Hour”, “After 2 Hours”, “After 12 Hours”.² Under “Delivery Ack”, select “On” or “Off”.¶ Under “Insert Signature”, select “On” or “Off”.º To send the text message, press [OPTIONS], select the “Send”, then press .To save the text message, press [OPTIONS], select “Save Message”, then press .•By pressing [OPTIONS], in the message inputscreen you can choose from the following:1. Insert Template : Insert Templates.2. Save to Templates : Save Templates.94HTEXT MESSAGETEXT MESSAGE³ The display appears when a new message arrives. ᕢ To display the message, press [READ].VOICE MAILDisplays the number of voice mails.You can access them by pressing .³ Press [MENU] ,or press and hold .HWRITETo send a new Text message:³ Press [MENU] ,.or press , .ᕢ Under “Send To”, input the phone number.•By pressing [OPTIONS], the user can choose from the following:1. Send : Send the text message.2. Find : Allows the user to search the phone number which is stored in the Phone Book.3. Save Message : Save the text message.VOICE MAIL AND TEXT MESSAGE VOICE MAIL AND TEXT MESSAGEPS-300_060602.indd 94-95PS-300_060602.indd 94-952006.6.2 5:36:59 PM2006.6.2 5:36:59 PM](https://usermanual.wiki/Pantech/PC-7300SU/User-Guide-667521-Page-49.png)
![97ᕣ Input any text message to go along with the forwarded message, then press .ᕤ To send the text message, press [OPTIONS], then select “Send” then press .SAVE TO TEMPLATES³ To save the text message to templates, select "Save to Templates".SAVE TO PHONE BOOK³ To save the number to PHONE BOOK, select “Save to Phone book”.SAVE TO DRAFTS³ To save the text message to draft, select "Save to Drafts".LOCK & UNLOCK³ To lock or unlock the text message, select "Lock & Unlock".· Select “Lock” to lock the message or “Unlock” to unlock the message, then press .It is not displayed for stored message on UIM.96HINBOX³ Press [MENU] ,or press , .ᕢ Select a “Phone” or “UIM”.» Select a message then press . The message is displayed. To delete a message, press [Delete].¿ Press [OPTIONS]. Menu options include:REPLY³ To reply the text message, select "Reply".ᕢ Input any text message to reply, then press .ᕣ To send the text message, press [OPTIONS], then select "Send" then press .FORWARD³ To forward the text message, select “Forward”.ᕢ Input the phone number of the person you are sending the message to then press .VOICE MAIL AND TEXT MESSAGE VOICE MAIL AND TEXT MESSAGEPS-300_060602.indd 96-97PS-300_060602.indd 96-972006.6.2 5:37:1 PM2006.6.2 5:37:1 PM](https://usermanual.wiki/Pantech/PC-7300SU/User-Guide-667521-Page-50.png)
![99HOUTBOXManages sent text messages or messages waiting to be sent. ³ Press [MENU] ,or press , .ᕢ Select a message, then press . The text message is displayed.ᕣ Press [OPTIONS]. SEND TO³ To resend a text message.SAVE TO PHONE BOOK³ To save the number to Phone book, select “Save to Phone book”.SAVE TO DRAFTS³ To save the text message to draft, select "Save to Drafts".DETAIL³ To detail this message, select “Detail”.COPY TO UIM³ To copy the messages, select "COPY TO UIM".· You can copy the messages stored on the phone’s memory to the UIM card or UIM card to the phone’s memory.DELETE³ To delete this message, select “Delete”.· “Delete This Message?” will be displayed.98VOICE MAIL AND TEXT MESSAGE VOICE MAIL AND TEXT MESSAGEPS-300_060602.indd 98-99PS-300_060602.indd 98-992006.6.2 5:37:2 PM2006.6.2 5:37:2 PM](https://usermanual.wiki/Pantech/PC-7300SU/User-Guide-667521-Page-51.png)
![101HDRAFTSDraft Folder contains any draft messages or saved messages. If message composition is interrupted by a voice call or other interrupting event, the text of the current composition is automatically saved to the draft folder. ³ Press [MENU] ,or press , .ᕢ Select a message, then press .The text message is displayed.» To delete Message, press [DELETE].¿ Press .•By pressing [OPTIONS], the user can choose from the following:1. Send to : Send the text message.2. Save to Phonebook : Save the number to Phone book.3. Lock & Unlock : To Lock or Unlock the text message.4. Delete : To delete this message.LOCK & UNLOCK³ To lock or unlock the text message, select “Lock & Unlock”.· Select “Lock” to lock the message or “Unlock” to unlock the message, then press .DELETE³ To delete this message, select “Delete”.· “Delete This Message?” will be displayed.HVOICE MAILDisplays the number of voice mails and accesses them bypressing .³ To access your voice mail, press [MENU] ,or press , .100VOICE MAIL AND TEXT MESSAGE VOICE MAIL AND TEXT MESSAGEPS-300_060602.indd 100-101PS-300_060602.indd 100-1012006.6.2 5:37:2 PM2006.6.2 5:37:2 PM](https://usermanual.wiki/Pantech/PC-7300SU/User-Guide-667521-Page-52.png)
![103HSETTINGSManages messaging features through various features.SAVE SENT MSG³ Press [MENU] , , or press , , .· Select one from “Off”, “On” or “Prompt” with the Navigation Key and press .AUTO DELETEAutomatically deletes inbox/outbox messages when new messagesarrive in memory full state.INBOXቢ Press [MENU] , , or press , , .ባ Press . Select “Disable” or “Enable” with Navigation Key and press .OUTBOXቢ Press [MENU] , , or press , , .ባ Press . Select “Disable” or “Enable” with Navigation Key and press .HTEMPLATES³ Press [MENU] ,or press , .ᕢ Select a message from the list. Press [OPTIONS]. To add a new template message, select “Add New”. To edit the template message you have selected, select “Edit”. To delete the saved template message, select “Delete”.HDELETE ALL³ Press [MENU] ,or press , .ᕢ 1. To delete all the Inbox messages, press . Select “Phone” or “UIM”. Select “Read” or “All”. 2. To delete all the Outbox messages, press . 3. To delete all the Drafts messages, press . 4. To delete All Folders messages, press .102•Read : To delete all messages already read. (However, the locked Message(s) will not be deleted).•All : To delete all messages.VOICE MAIL AND TEXT MESSAGE VOICE MAIL AND TEXT MESSAGEPS-300_060602.indd 102-103PS-300_060602.indd 102-1032006.6.2 5:37:4 PM2006.6.2 5:37:4 PM](https://usermanual.wiki/Pantech/PC-7300SU/User-Guide-667521-Page-53.png)
![105DELIVERY ACKWhen this option is checked, the network informs you whether ornot your message has been delivered.³ Press [MENU] , , or press , , .· Select “On” or “Off” with the Navigation Key and press .PRIORITYYou can select the priority level of your messages.³ Press [MENU] , , or press , , .· Select “Normal”, “Urgent” or “emergency” with the Navigation key and press .ENTRY MODE³ Press [MENU] , , or press , , .· Select “T9 mode” or “Alpha mode” with the Navigation key and press .SIGNATUREWhen this option is checked, you can attach your name, phonenumber, a simple memo, or tag line as a signature.³ Press [MENU] , , or press , , .· Select “On” or “Off” with the Navigation Key and press .DIRECT VIEWIf the Direct View is set to on, the user will be able to view the mes-sage by pressing the read key. If the Direct View is set to off, the user can view the message by entering SMS Menu-> Inbox.³ Press [MENU] , , or press , , .· Select “On” or “Off” with the Navigation Key and press .104•ON : Set to read msg without entering inbox in SMS menu.•OFF : Set to read msg after entering inbox in SMS menu.VOICE MAIL AND TEXT MESSAGE VOICE MAIL AND TEXT MESSAGEPS-300_060602.indd 104-105PS-300_060602.indd 104-1052006.6.2 5:37:6 PM2006.6.2 5:37:6 PM](https://usermanual.wiki/Pantech/PC-7300SU/User-Guide-667521-Page-54.png)
![107HMSG. GROUPAllows the user to five group, each group in a directory can have upto 10 phone numbers. The user can add, change, and delete Msg.Group.ADD NEW MSG. GROUP³ To add a new group, press [MENU] ,. A maximum of five groups is allowed.· Press [OPTIONS] then select “1. Add Group”.» Input a new group name.¿ Press to save it.ASSIGN PHONE NUMBER TO MSG. GROUP³ To assign phone numbers to a Msg Group, select the Msg Group and press .· Then “unassigned” locations appear. Select a location and press [OPTIONS], to access the Find menu. Please refer to page 51 for more details.» Select the entry for the Msg Group location and press. “Saved!” will be displayed. Repeat for each location for the Msg Group.STORAGE³ Press [MENU] , , or press , , .· Select “UIM” or “Phone” with the Navigation key and press .106VOICE MAIL AND TEXT MESSAGE VOICE MAIL AND TEXT MESSAGEPS-300_060602.indd 106-107PS-300_060602.indd 106-1072006.6.2 5:37:8 PM2006.6.2 5:37:8 PM](https://usermanual.wiki/Pantech/PC-7300SU/User-Guide-667521-Page-55.png)
![109DELETE MSG. GROUP³ Press [MENU] ,. Select the group name to be delete.· Press [OPTIONS] then select “4. Delete”.DELETE ALL³ Press [MENU] ,. Select the group name to be delete.· Press [OPTIONS] then select “5.Delete All”.» Press to delete all Msg. Group.108CHANGE MSG. GROUP NAME³ Press [MENU] ,. Select an existing group name.· Press [OPTIONS] then select “2. Rename”.» Input a new group name.¿ Press to save it.There is a 16-letter limit.SEND MESSAGE³ Press [MENU] ,. Select an existing group name.· Press [OPTIONS] then select “3. Send Message”.» Scroll to Message field and enter your message. Press [OK]. Then scroll to the Priority, and Insert fields. Set each as desired.¿ Press [OPTIONS] then select “1. Send” or “2. Save Msg.”. Press . Please refer to page 94 for more details on “Write”.VOICE MAIL AND TEXT MESSAGE VOICE MAIL AND TEXT MESSAGEPS-300_060602.indd 108-109PS-300_060602.indd 108-1092006.6.2 5:37:9 PM2006.6.2 5:37:9 PM](https://usermanual.wiki/Pantech/PC-7300SU/User-Guide-667521-Page-56.png)
![110HMSG COPYAllows you to copy the message to another location, either Phoneor UIM.PHONE TO UIM³ Press [MENU] , , . You can copy all of the messages stored on the phone’s memory to the UIM card.UIM TO PHONE³ Press [MENU] , , . You can copy all of the messages stored on the UIM card to the phone’s memory.VOICE MAIL AND TEXT MESSAGE CHAPTER 6 PACKET DATA SERVICECHAPTER 6PACKET DATA SERVICEAbstract:This Document is described in based on MS-WINDOWS 2000 Professional.DATA SERVICE CONFIGURATION AND INSTALLATIONSETTING UP PCINTERNET ACCESSPS-300_060602.indd 110-111PS-300_060602.indd 110-1112006.6.2 5:37:10 PM2006.6.2 5:37:10 PM](https://usermanual.wiki/Pantech/PC-7300SU/User-Guide-667521-Page-57.png)