Pantech PX-700 Dual-Band CDMA/ EVDO USB Modem User Manual PX 700 VZ SW Manual indd
Pantech Co., Ltd. Dual-Band CDMA/ EVDO USB Modem PX 700 VZ SW Manual indd
Pantech >
Contents
- 1. HW User Manual
- 2. SW User Manual
SW User Manual

1
TABLE OF CONTENTS
CHAPTER 1
INSTALLATION AND SETUP ............................................3
THE VZACCESS MANAGER SETUP PROGRAM ................................5
THE VZACCESS MANAGER SETUP WIZARD ....................................8
CHAPTER 2
USING VZACCESS MANAGER ...................................... 13
FEATURES ......................................................................................14
GETTING STARTED .........................................................................15
CONNECTING .................................................................................16
WARNING MESSAGES ...................................................................22
USING DIAL UP CONNECTIONS .....................................................24
TXT MESSAGING ...........................................................................26
CHAPTER 3
VZACCESS MANAGER PREFERENCES ..........................29
WWAN PREFERENCES ...................................................................30
THE VPN TAB ..................................................................................34
WI-FI PREFERENCES .......................................................................36
OPTIONS ........................................................................................42
TXT MESSAGING PREFERENCES ....................................................44
UPDATES PREFERENCES ................................................................45

2
EMEMO

THE VZACCESS MANAGER SETUP PROGRAM
THE VZACCESS MANAGER SETUP WIZARD
CHAPTER 1
INSTALLATION AND
SETUP

4
INSTALLATION AND SETUP
4
This section will guide you through the installation and
setup process for VZAccess Manager. Before getting started,
you should become familiar with the documentation that
came with your wireless device.
CD'S
You purchased a UM175, there is only one CD that contains
VZAccess Manager and USB modem drivers.
GETTING STARTED
Follow these steps to install VZAccess Manager:
1
Turn on your computer and close all applications.
2
Insert the CD-ROM into your CD drive.
3
If set up does not automatically start, click the Start
button on the taskbar and choose Run. Type D:\Start
(where D is the letter of your CD-ROM drive) and click
OK.
4
Follow the steps in the next section.
@
Important: If using a USB device, VZAccess Manager software
must be installed before you insert the USB device in to the
computer for the first time. Only after the software has been
installed can Windows successfully install and configure the
USB device.
GETTING STARTED
INSTALLATION AND SETUP
5
INSTALLATION AND SETUP
■
THE VZACCESS MANAGER SETUP PROGRAM
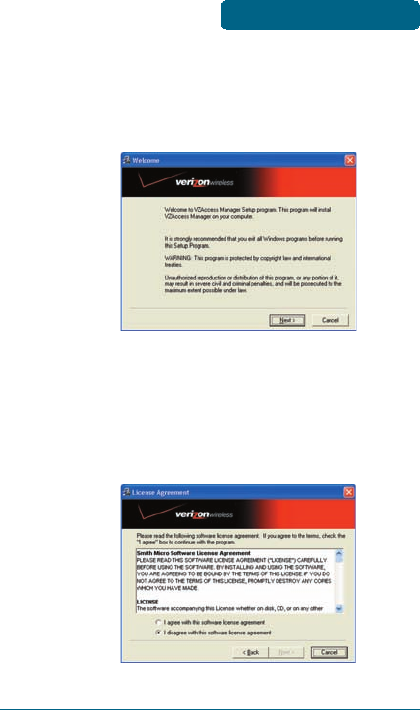
STEP 1: Click the VZAccess Manager setup program. A
“Welcome” Screen appears. Click the Next button to
continue with the installation process.
STEP 2: After the Welcome screen you will see the VZAccess
Manager License Agreement. In order to install and use this
product you must agree with the terms of this agreement.
Select “I agree with this software license agreement,” then
click the Next button to continue. If you do not agree with
this agreement, click the Cancel button to exit.
THE VZACCESS MANAGER
SETUP PROGRAM
6
INSTALLATION AND SETUP
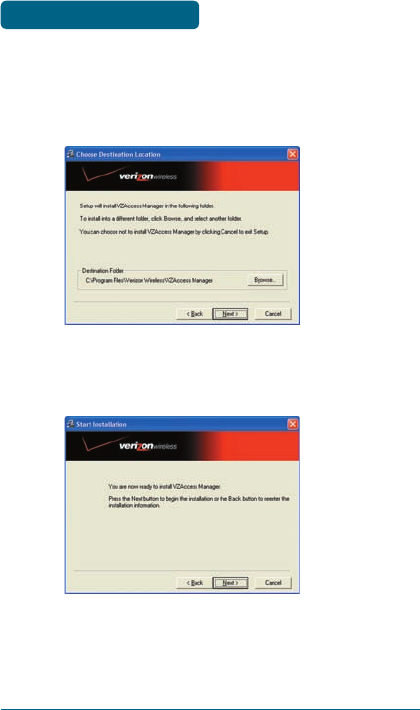
STEP 3: You are now ready to select the location on your
computer where the VZAccess Manager should be installed.
It is recommended that you do not modify the default
destination folder. Click the Next button to continue.
STEP 4: You are now ready to begin installing VZAccess
Manager components onto your computer. Click Next to
continue.
THE VZACCESS MANAGER
SETUP PROGRAM
7
INSTALLATION AND SETUP
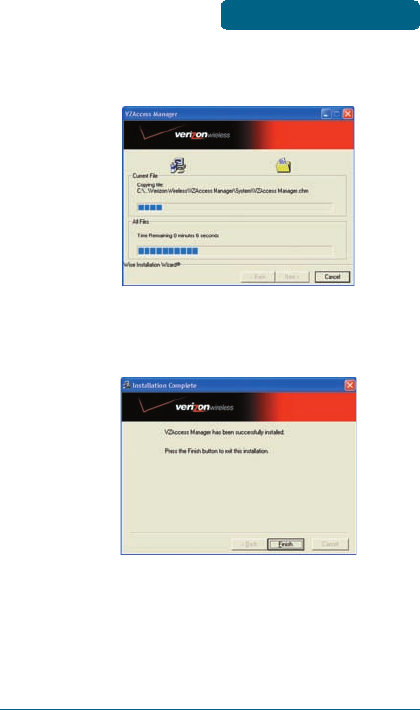
STEP 5: During this step the components of VZAccess
Manager are installed onto your computer.
STEP 6: Installation is now complete. Click the Finish button
to leave the VZAccess Manager setup program and to begin
using your new software.
The setup program will automatically create a VZAccess
Manager shortcut on your desktop.
THE VZACCESS MANAGER
SETUP PROGRAM

8
INSTALLATION AND SETUP
■
THE VZACCESS MANAGER SETUP WIZARD
After you have successfully completed the installation
process of VZAccess Manager, you are ready to start the
program and begin your initial setup. The steps in the Setup
Wizard are critical to the proper operation of VZAccess
Manager when using your WWAN or Wi-Fi device to connect
to the Internet. Do not connect/insert your wireless device
until instructed to do so.
STEP 1: Click the Start button, select the Programs menu
and choose the VZAccess Manager menu item to start the
VZAccess Manager program.
STEP 2: The first time you open VZAccess Manager, the
Setup Wizard will run automatically. You will be presented
with a Welcome screen.
If you have an Internet connection, it is recommended that
you check to see if you are running the latest version of
VZAccess Manager. Click the “Check for Updates” button to
perform this check.
Click Next to continue.
THE VZACCESS MANAGER
SETUP WIZARD
9
INSTALLATION AND SETUP
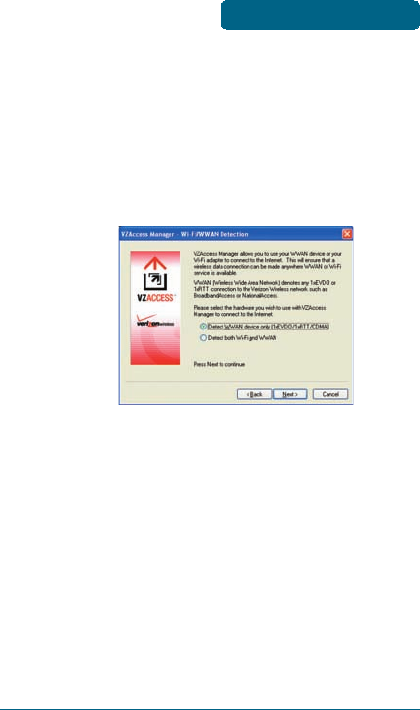
STEP 3: In this step of the Setup Wizard you must specify
the type of wireless device that you intend to use with
VZAccess Manager. Select either “Detect WWAN device
only” or “Detect both Wi-Fi and WWAN.” For the purposes
of this guide, “Detect WWAN device only” will be used.
Please note that your experience in Step 4 may be
different if you use a different selection. After making the
appropriate selection, click Next to continue.
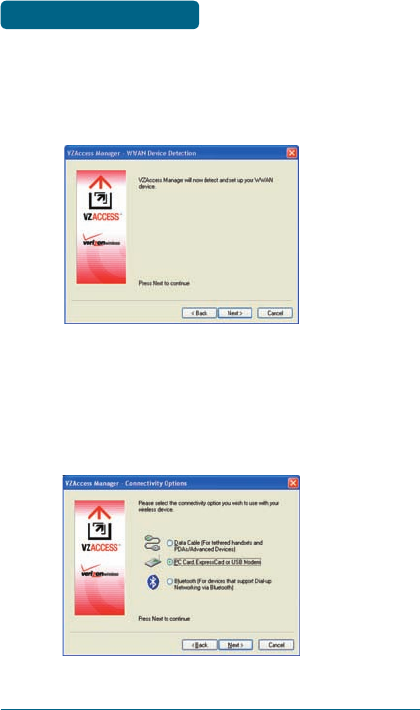
STEP 4: The VZAccess Manager will now detect and setup
your WWAN device.
THE VZACCESS MANAGER
SETUP WIZARD
10
INSTALLATION AND SETUP
“WWAN” (Wireless Wide Area Network) denotes any
UMTS, GPRS, 1xEVDO, 1xRTT or CDMA connection to the
Verizon Wireless or partner networks such as VZGlobal,
BroadbandAccess or NationalAccess. Click Next to continue.
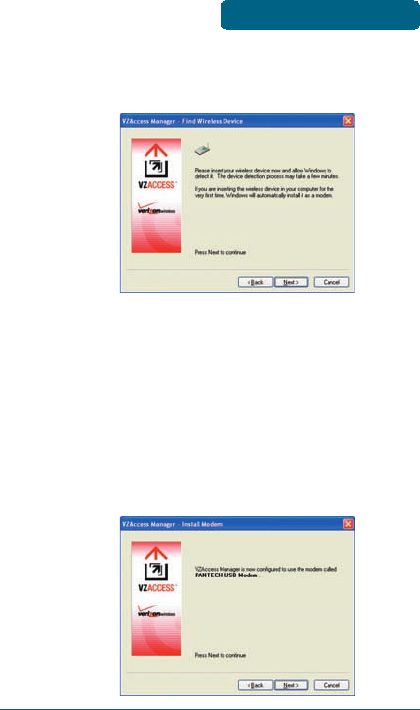
STEP 5: In this step you need to select the type of
connectivity you wish to use with your wireless device. For
the purposes of this guide, we will select “USB Modem.”
Please note that this selection may not be appropriate for
your type of wireless device. Once you have selected your
connectivity option, click Next to continue.
THE VZACCESS MANAGER
SETUP WIZARD
11
INSTALLATION AND SETUP
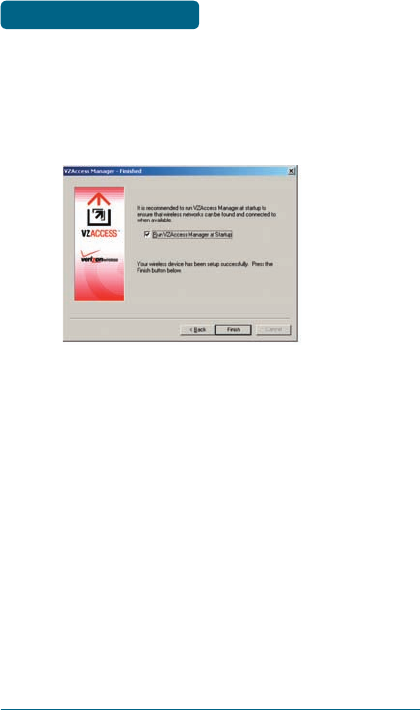
STEP 6: USB device users would insert their USB device now,
and wait for Windows to detect and install drivers for the
device.
@
NOTE FOR HANDSET USERS: If you selected USB (to connect a
phone) and have not already installed the data cable drivers
supplied with the cable, you must install them now. To
install the data cable drivers click the Cancel button below to
exit the Setup Wizard and then refer to the documentation
included with the cable. Please plug the data cable into your
wireless phone and then plug the cable into your computer.
If your wireless phone is not turned on, do so now.
If the USB device is detected, you will see the following
screen.
THE VZACCESS MANAGER
SETUP WIZARD
12
INSTALLATION AND SETUP
STEP 7: The detection and configuration process for your
wireless device is now complete. In this step you can elect
to run the VZAccess Manager automatically every time you
start up your computer. To do so, check the “Run VZAccess
Manager at Startup” checkbox. Click Finish when complete.
Please familiarize yourself with the information in the
“Using VZAccess Manager” and “Connecting to the
Internet” sections of this guide.
THE VZACCESS MANAGER
SETUP WIZARD

CHAPTER 2
USING
VZACCESS MANAGER
FEATURES
GETTING STARTED
CONNECTING
WARNING MESSAGES
USING DIAL UP CONNECTIONS
TXT MESSAGING

14
USING VZACCESS MANAGER
■
FEATURES
WWAN (WIRELESS WIDE AREA NETWORK) SPECIFIC
FEATURES
•
Configures your PC to use your wireless device as a
modem.
•
Creates a NationalAccess connection if you are using a
NationalAccess-capable wireless device which does not
support BroadbandAccess.
•
Creates BroadbandAccess connection if using a
BroadbandAccess-capable device. This connection
will automatically fall back to NationalAccess if
BroadbandAccess is unavailable.
•
Copy utility to create wireless copies of your dial-up
connections, if supported by your device.
•
Controls the Venturi compression software when using
BroadbandAccess or NationalAccess.
•
Signal strength and battery level display for most wireless
phones.
•
Features a test function for your WWAN device.
WI-FI FEATURES
•
Configures your Wi-Fi adapter (Optional) to work with
VZAccess Manager.
•
Displays Wi-Fi connections and signal strength when in a
Wi-Fi coverage area.
•
Supports both built-in Wi-Fi adapters (Optional) and USB
devices.
FEATURES

15
USING VZACCESS MANAGER
OTHER FEATURES
•
VZAccess Manager can be used to launch all of your dial-
up networking connections, if desired.
•
VZAccess Manager can launch your browser, e-mail client,
VPN or a program of your choice upon connection.
•
The application logs connections used, duration and bytes
sent and received.
•
It also supports TXT messaging.
■
GETTING STARTED
Double click on the VZAccess Manager icon on your
desktop or click on the Windows Start menu and
select VZAccess Manager from the list of Programs.
ABOUT THE NETWORKS VIEW
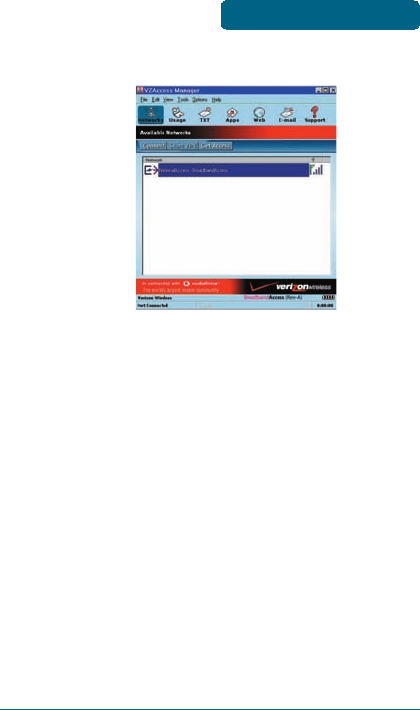
By default, VZAccess Manager opens to the “Networks”
view. The Networks view displays all currently available
network connections.
At a glance you can see the signal strength and battery
level (if applicable) of your WWAN or Wi-Fi network. Your
current connection state and the elapsed time of the
connection are displayed along the bottom of the status bar.
If your expected connection does not appear after starting
VZAccess Manager, select “Refresh Networks” from the
“Options” menu. This will cause VZAccess Manager to look
for your wireless device(s) and verify network availability. If
you have any Wi-Fi networks you manually added because
they do not broadcast their SSID, they will always be
displayed, and you will have to refer to the signal strength
displayed to know when you are in range.
GETTING STARTED

16
USING VZACCESS MANAGER
NOTICE: Note that with certain Wi-Fi adapters the signal
strength for Wi-Fi networks is not accurate until you connect
to the network.
@
NOTE: The NationalAccess connection is only created when
the WWAN option is selected during setup and if you are
using a NationalAccess capable device that does not support
the Verizon Wireless BroadbandAccess service. If you are
using a BroadbandAccess capable device a BroadbandAccess
connection will be created. This connection will use
BroadbandAccess if available and will automatically attempt
a NationalAccess connection when BroadbandAccess is not
available.
@
NOTICE: If you change wireless devices, you will need to
run the Setup Wizard again. To do this make sure that your
wireless device and cable are connected, then select “Run
Wizard” from the “Options” menu.
■
CONNECTING
Once your Wi-Fi or WWAN device is properly configured,
connecting to the Internet is as simple as selecting the
network connection type shown in the list and clicking
the Networks button. Note that the Networks button
immediately above the list will change to “Connect” or
“Connect Wi-Fi” based on the current selection in the
networks list.
1
If you are outside the US, Canada or Puerto Rico
and using the USB device, select the “VZGlobal”
connection. If in the US and using the device for
the domestic network, select one of the following
connections: “NationalAccess – BroadbandAccess” or
“NationalAccess.”
@
CONNECTING
17
USING VZACCESS MANAGER
2
Click the “Connect” button when it becomes enabled.
Once connected, the “Connect” button will change
to “Disconnect.” Simply click this to end your current
connection. To connect to any other network shown, select
it, and then select “Connect.”
THE STATUS BAR
Information regarding your current network connection can
be seen in the status bar along the bottom of the VZAccess
Manager interface.
@
NOTE: If you are using a WWAN device that supports the
Verizon Wireless dial-up data service and you made wireless
copies of your dial-up accounts, they will also appear.
See the section “Creating Wireless Copies of your Dial-Up
Connections.” Optionally you can have all dial-up connections
appear in VZAccess Manager and use it to launch any dial-
up networking connection. If you are in the presence of a
private Wi-Fi network (such as one at work or at home) it will
also appear if you selected the Wi-Fi option during setup. If
CONNECTING
18
USING VZACCESS MANAGER
the number of connections exceeds what can be displayed, a
vertical scroll bar will appear to the right of the connections.
Scroll down to see them all.
@
NOTICE: The first time you connect to BroadbandAccess,
NationalAccess, or a private Wi-Fi connection,a connectivity
warning message will appear. You have the option to
suppress these warning messages when they are displayed.
VZAccess Manager will display status information at the
bottom of the window during the connection process as
well as while connected. When not connected, the status
text in the lower left corner will display “Not connected”
for the currently selected network. The timer will display
“00:00:00.” Once connected, the status text will display
“Connected” and the elapsed timer will begin to run. When
a connection is active, its name will appear as bold text.
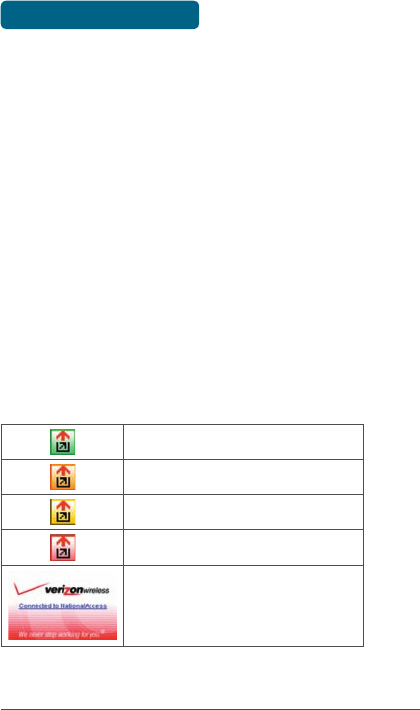
The status is also reflected in the Task Tray icon.
Connected
Idle - Not Connected
Connecting
Disconnecting
A window will also slide out of the
tray showing when you connect and
disconnect from networks.
CONNECTING
19
USING VZACCESS MANAGER
The pop up status can be turned off, if desired, by selecting
“Tools,” “Preferences,” “Options” tab, and un-checking
“Show pop-up status windows by tray.” Right clicking on
the tray icon provides various options and double clicking
on it will always show the application. Placing your cursor
on it will display the current connection status.
Based on your preferences, your browser or e-mail or
VPN program can be launched automatically, or you can
launch whatever software you want to use. You can also
determine if all connections show in the drop down list or
only your wireless ones.
@
NOTE: Always use VZAccess Manager when connecting via
BroadbandAccess or NationalAccess.
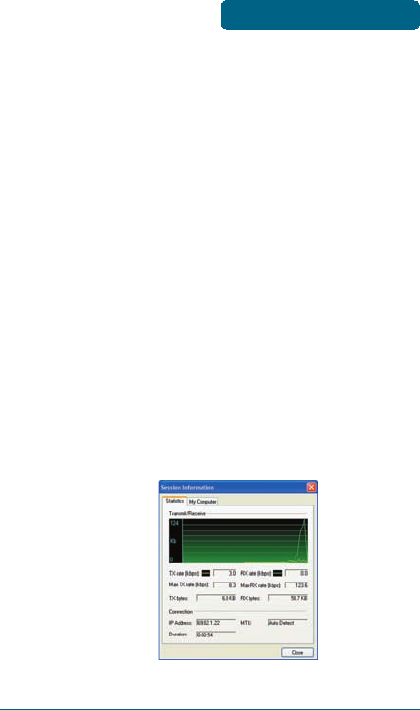
At any time during your connection you can check your
current connection speed and throughput stats in the
Statistics tab of the Session Information window.
To see this window, select “Statistics” from the “Options”
menu.
CONNECTING

20
USING VZACCESS MANAGER
The Session Information window will also contain a My
Computer tab and a Statistics tab. The My Computer tab
contains detailed information about your computer. This
information is helpful when troubleshooting a problem.
NDIS Status : The following icons also appear on the status
bar to indicate your device’s NDIS status:
NDIS is enabled and connected
NDIS is enabled but disconnected
(No NDIS image) NDIS is disabled
Additional information when using the NationalAccess
connection:
By default, VZAccess Manager enables the Venturi
compression software for the BroadbandAccess and
NationalAccess connections.
If you are using the BroadbandAccess or NationalAccess
connection and the call fails when you try to connect, with
VZAccess Manager returning to its idle state, you should
try to connect again. If you feel you may have incorrectly
entered your wireless account number during initial setup,
select “Options,” “Run Wizard.”
DORMANCY:
NationalAccess and BroadbandAccess data sessions become
dormant if you are not sending or receiving any data. As
soon as you resume sending or receiving data, the data
session will return to an active state.
CONNECTING

21
USING VZACCESS MANAGER
Depending on your device and your NationalAccess or
BroadbandAccess plan, your data session may disconnect
during a dormant state. See your Verizon Calling Plan
brochure for details or visit www.verizonwireless.com. If this
happens, select disconnect, and then connect again.
While dormant your wireless device may be able to receive
a voice call. If you leave your wireless phone connected to
your PC, after you finish your voice call you may be able to
resume your data session as you normally would.
ACTIVATING YOUR USB MODEM FOR THE FIRST TIME:
The application will automatically detect if the USB Modem
is activated. If you have not already signed up for service
on your USB Modem, when you attempt to connect to the
Internet for the first time you will be directed to the Verizon
Wireless activation site. You will be presented with options
to activate a two-year contract or to sign-up for daily session
service (no commitment required). Select your activation
preference and follow the online screens to complete the
order.
If you are outside the BroadbandAccess service area, or
cannot complete the activation online, you will be presented
with a phone number to call for assistance and completion
of your order. If you activate a daily session, you will be
returned to the Verizon Wireless activation site the next
time you attempt to access the network after your session
has expired. The same activation options will be presented.
CONNECTING

22
USING VZACCESS MANAGER
Once your account is set up on the Verizon Wireless website,
please click the “Quit” button to ensure your account
is set up properly. If you wish to begin using the service
please wait approximately 10 minutes for the account to be
validated, then click “Connect” again (or simply double-click
the network name).
To purchase additional connectivity, click the “Get Access”
button. You will be returned to the Verizon Wireless
activation site.
■
WARNING MESSAGES
NATIONALACCESS
The first time you connect via NationalAccess, the following
warning message will be displayed:
@
ATTENTION: You are about to establish a NationalAccess
(1xRTT) data connection. Charges apply in accordance with
your subscription to Verizon Wireless’ NationalAccess.
To see our current pricing for NationalAccess, please visit
http://www. verizonwireless.com/b2c/mobileoptions
This message will display each time you go to connect via
the NationalAccess connection until you select “Do not show
this warning again.”
WARNING MESSAGES

23
USING VZACCESS MANAGER
BROADBANDACCESS
The first time you connect via BroadbandAccess, the
following warning message will be displayed:
@
ATTENTION: You are about to establish a BroadbandAccess or
NationalAccess data connection. Charges apply in accordance
with your subscription to Verizon Wireless’ NationalAccess/
BroadbandAccess.
To see our current pricing for BroadbandAccess, please visit
http://www. verizonwireless.com/b2c/mobileoptions
This message will display each time you go to connect
via BroadbandAccess, until you select “Do not show this
warning again.”
DIAL-UP
The first time you connect via dial-up, the following
warning message will be displayed:
@
ATTENTION: Dial-Up connections may be charged differently
than NationalAccess sessions.
Please check your Calling Plan for details.
This message will display each time you go to connect via a
wireless dial-up connection, until you select “Do not show
this warning again.”
WARNING MESSAGES

24
USING VZACCESS MANAGER
WI-FI
The first time you connect to a Wi-Fi network (with an
optional WiFi adapter), you will see the following warning:
@
You are about to establish a connection to a Wi-Fi network.
Verizon Wireless does not support problems associated with
Wi-Fi networks.
Verizon Wireless Customer Care will not be able to assist you.
Please see the Help file for details.
In most cases connecting to a private Wi-Fi network is a
simple process and you can use VZAccess Manager instead
of the Wi-Fi client you would normally use. If you have any
problems doing this try the recommendations in the section
on Wi-Fi Troubleshooting.
■
USING DIAL UP CONNECTIONS
This section is only applicable if you are using a WWAN
Device that supports dial-up connections.
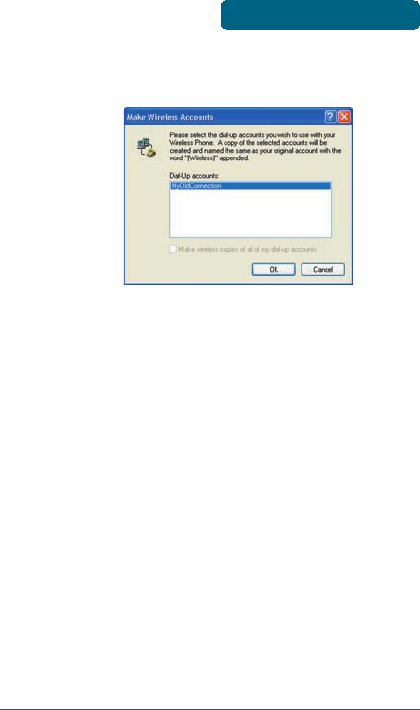
You can make wireless copies of existing dial-up accounts on
your system. This will wirelessly enable them and allow you
to connect to them wirelessly.
To launch the copy utility, select “Tools,” “Dial-up Accounts”
then “Copy.”
USING DIAL UP
CONNECTIONS
25
USING VZACCESS MANAGER
Click on the connection or connections you want to copy
and click on the “OK” button.
The new connection will have a suffix of “(Wireless)” and
will be set to use your wireless device as the modem.
If the utility is unable to automatically recognize your
existing area code and number, the existing number will
be displayed, and you will be prompted to enter the area
code and number. The utility configures the new wireless
connections to always dial 11 digits, so that they will work
locally and also in other digital data coverage areas.
If it is determined that the connection might benefit by
further optimization, an additional connection with a
“(Wireless Optimized)” suffix, will also be created. This
connection may connect faster. If you have trouble with the
“(Wireless Optimized)” connection, you can delete it from
your dial-up networking folder and use the “(Wireless)”
connection.
USING DIAL UP
CONNECTIONS
26
USING VZACCESS MANAGER
NOTE: Some applications, such as AOL and JUNO, have dial-
up networking connections that can’t be used directly from
VZAccess Manager or Dial-Up Networking. Copies of these
connections will not work with your wireless device, since the
original connections do not work by themselves. In most cases
the original connections or the software can be configured
to use your wireless device as a modem. For the easiest way
to configure AOL to work with your wireless device, see the
section on Configuring AOL.
TO DELETE CONNECTIONS:
Windows 2000, XP and Vista users can access Dial-Up
Networking from VZAccess Manager by selecting “Tools,”
“Control Panels,” “Network and Dial-up Connections,” right
click on the desired connection and select “Delete.”
■
TXT MESSAGING
VZAccess Manager supports TXT Messaging for certain
wireless devices only.
RECEIVING TXT MESSAGES
•
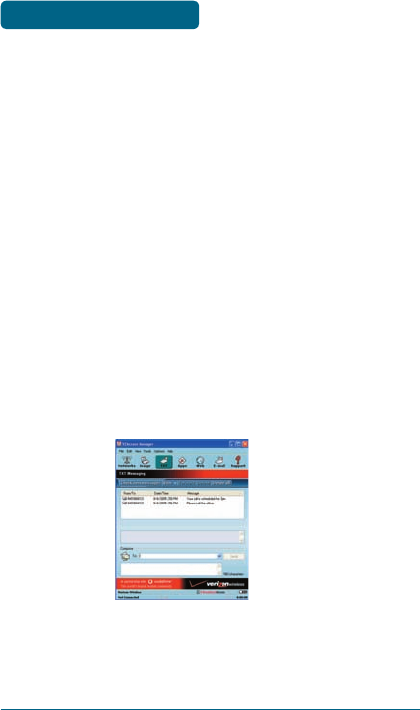
All of your TXT messages will appear in the list box at the
top of the TXT messaging view. By default, all sent and
received messages will appear.
@
TXT MESSAGING

27
USING VZACCESS MANAGER
•
To view only certain messages, click on the “View”
toolbar button and select “Received Messages,” “Sent
Messages” or “All Messages.”
•
If you are in the TXT Messaging view and a new message
arrives, the message will automatically appear in the list
formatted in bold.
•
To view a long TXT message, select the message in the list
view. The details of the message will appear below the
list.
•
If you are not in the TXT Messaging view and a new
message arrives, a TXT icon will appear in the status bar
showing that new messages are available. There is also
a TXT preference option that can automatically switch
VZAccess to the TXT view when new messages arrive. By
default, this feature is turned off.
•
To reply to an inbound message, select the message and
press the “Reply” toolbar button. The phone number
of the sender will be populated in the send area below.
Enter your new message and press the “Send” button to
send the message.
•
To forward an inbound message, select the message and
press “Forward” toolbar button. The message will be
populated in the send area below prefixed with a “FW:.”
Press the “Send” button to send the message.
•
To resend a sent message, select the message and press
the “Resend” toolbar button. The phone number and
message will be populated in the send area below. Press
the “Send” button to send the message again.
TXT MESSAGING

28
USING VZACCESS MANAGER
SENDING TXT MESSAGES
•
While using the UM175, to send a text message to:
–
a US-based wireless number, enter: +, 1, then the
wireless number.
–
a wireless number outside the US, enter: +, 011, the
country code, then the wireless number.
@
NOTE: Users can dial either a “+” or the specific exit code
prefix required to dial out of your current country.
•
To send a TXT message to one or more Verizon Wireless
subscribers, enter their 10-digit mobile numbers
separated by semi-colons in the “To...” field. (Ex: 516-555-
5555; 516-555-5556). If you use commas, the application
will automatically replace them with semi-colons.
•
With some devices that support TXT messaging contact
lists, you may be able to click on the “To...” button to
open your contact list.
•
If contacts storage is supported by your device, to send
a TXT to one of the entries in your Contact List, click
the “To” button to open the Contacts window. Simply
double click on the name of the user and that individual
will automatically be added to the “Send To” field.
Holding down the “Ctrl” key while you click names from
the lists will allow you to select multiple names at once.
•
The phone number and the message fields are required.
•
The Character counter counts up from 0 to 160 and
counts all of the characters typed in the message field.
•
Click the “Send” button.
TXT MESSAGING

CHAPTER 3
VZACCESS MANAGER
PREFERENCES
WWAN PREFERENCES
THE VPN TAB
WI-FI PREFERENCES
OPTIONS
TXT MESSAGING PREFERENCES
UPDATES PREFERENCES
30
PREFERENCES
■
WWAN PREFERENCES
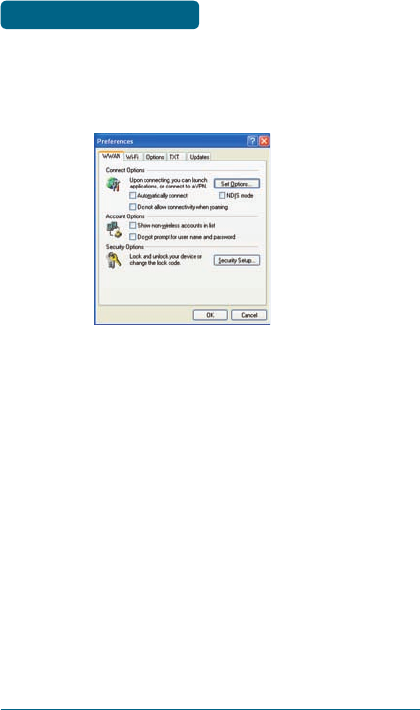
To access the WWAN preferences, click on the “Tools” menu,
then “Preferences....”
CONNECT OPTIONS
•
The “Set Options...” Button: This is used to set various
connect options. See below.
•
Automatically Connect: If desired, you can select to have
VZAccess Manager automatically connect at application
startup.
•
“Do not allow connectivity when roaming”: Enabling this
option will prevent you from connecting when roaming.
This option is disabled if using NDIS mode. VZAccess
Manager only supports this feature with certain devices;
if not supported, the option will not appear.
•
NDIS Mode: Enables/disables the NDIS feature. Please
note that NDIS is only supported by some USB devices.
It also requires either Verizon Wireless BroadbandAccess
or NationalAccess coverage, and either Windows 2000
or XP or Vista. When enabled, NDIS provides an “always
WWAN PREFERENCES

31
PREFERENCES
on” Internet connection similar to a standard Network
Interface Card (NIC). Please note that an NDIS broadband
connection will remain active even if you exit VZAccess
Manager.
ACCOUNT OPTIONS
•
Show non-wireless accounts in list: If you select this
option, all of your dial-up accounts will show up in
VZAccess Manager’s list of accounts, allowing you to
use VZAccess Manager to launch them instead of Dial-
Up Networking. With this option unchecked, the only
connections that are displayed in VZAccess Manager’s
list of accounts are Verizon Wireless connections and any
other connections you have created. If VZAccess Manager
is also configured for Wi-Fi, these connections will also be
displayed when in coverage of the hot spot.
•
Do not prompt for user name and password: If you are
only using VZGlobal, BroadbandAccess or NationalAccess,
this setting has no effect. If you created Wireless
connections to dial into other networks or have existing
connections you are going to launch using VZAccess
Manager, checking this option will skip the screen that
normally asks for your user name and password. For
this to work you will have had to connect previously,
successfully saving your user name and password.
SECURITY OPTIONS
•
The “Security Setup...” Button: Available only with some
wireless devices, this button is used to lock/unlock the
wireless device as well as change its lock code.
WWAN PREFERENCES

32
PREFERENCES
DEVICE OPTIONS
•
Show wireless device battery instead of PC battery:
(This option will only appear if you are using VZAccess
Manager with a handset.) If you are using a WWAN
device and this option is selected, the battery level of
your WWAN device will be displayed when your device
is connected and detected by VZAccess Manager, as well
as when you connect and disconnect using your WWAN
device. Battery Status cannot be updated while you are
connected to a Wireless Wide Area Network (WWAN).
You can refresh the status when you are not connected,
by selecting “Tools,” from VZAccess Manager’s main
window. Some phones fail to accurately report their
battery level to VZAccess Manager and some WWAN
devices such as USB devices do not use batteries, so you
can use this option to display the PC/notebook’s battery
instead.
THE “SET OPTIONS” BUTTON & ITS DIALOG
The Connect Tab
When you select the “Set Options” button from the
screen above, the following options will appear (“Tools,”
“Preferences,” “WWAN tab,” “Set Options...”):
WWAN PREFERENCES

33
PREFERENCES
•
Do not open my browser: With this option selected, when
you connect to a WWAN network, VZAccess Manager will
not automatically launch your default web browser.
•
Open my browser to my default home page: With this
option selected, when you connect to a WWAN network
(VZGlobal, BroadbandAccess or NationalAccess), VZAccess
Manager will automatically launch your default web
browser and your home page will load.
•
Open my browser to this URL: With this option selected,
when you connect to a WWAN network (VZGlobal,
BroadbandAccess or NationalAccess), VZAccess Manager
will automatically launch your default web browser but
do it in such a way that the URL you specify will load
instead of your home page.
•
Turn off graphics: If you select this it will turn off graphics
in Internet Explorer.
With these options off, web pages will load faster but you
will have to right click and select “show picture” for any
pictures you want to see. With the added performance
of the Venturi compression software when using
BroadbandAccess or NationalAccess, most users prefer to see
graphics, so the default setting for this option is unchecked.
•
Run program on connection: This allows you to
automatically run a program when you use VZAccess
Manager to connect to a WWAN network. Select the
browse button, , to browse to the desired application
you want to run when you connect to a WWAN network
using VZAccess Manager. The application will run for all
WWAN connections made from VZAccess Manager.
WWAN PREFERENCES
34
PREFERENCES
■
THE VPN TAB
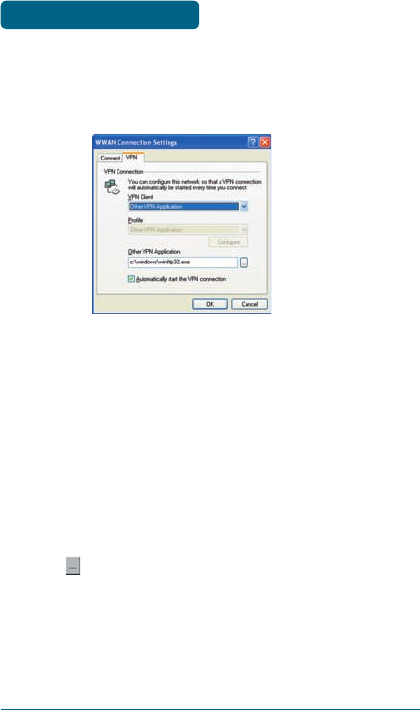
The following options exist on the VPN tab (“Tools,”
“Preferences,” “WWAN” tab, “Set Options...,” “VPN” tab):
•
VPN Client: VZAccess Manager automatically detects
if certain VPN clients like Microsoft, Cisco, CheckPoint,
etc, are installed on the computer and allows you to
select the one you wish to use. Check with your network
administrator to setup your VPN connection.
If the VPN client you wish to use does not appear in the list,
you can select Other VPN Application.
•
Other VPN Application: This allows running a VPN
program when VZAccess Manager connects to a network.
Enter the full path to an executable, or select the browse
button, , to find the path to the desired application.
THE VPN TAB
35
PREFERENCES
SECURITY SETUP
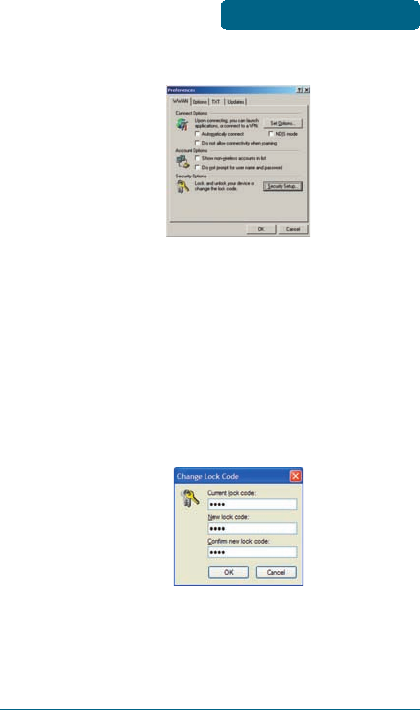
Available with some wireless devices, when you select
the “Security Setup” button from the screen above, the
following options will appear:
•
Lock code: Enter your 4 digit lock code (the default
lock code is the last four digits of your device’s phone
number) and select OK to lock or unlock the wireless
device. Warning: If you plan to use this device feature, we
recommend you change your lock code to a new number.
•
Change Lock Code: This is used to change the 4 digit lock
code on the wireless device.
•
Current lock code: Enter your current 4 digit lock code.
•
New lock code: Enter your new 4 digit lock code.
•
Confirm new lock code: Re-type the new 4 digit lock
code.
THE VPN TAB
36
PREFERENCES
■
WI-FI PREFERENCES
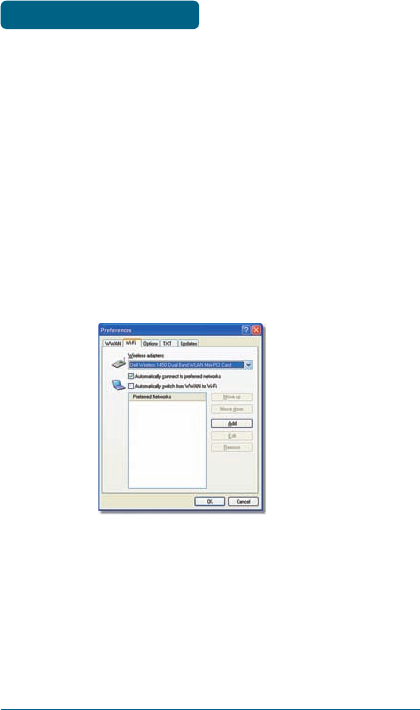
To access the Wi-Fi preferences, click on the “Tools” menu,
then “Preferences....” and select the “Wi-Fi” tab.
The following options are available if you selected “Detect
Wi-Fi” device during setup. If you have added a Wi-Fi device
after having installed VZAccess Manager, you can select
“Options,” “Run Wizard” to run the setup wizard again.
If you connect your Wi-Fi device after VZAccess Manager has
been started and you are in coverage of a Wi-Fi network,
selecting “Options,” “Refresh Networks” will allow VZAccess
Manager to recognize your Wi-Fi device (and WWAN if
connected) and scan for available networks.
•
Wireless adapters: In the rare case you have more than
one Wi-Fi adapter, you can select the Wi-Fi adapter you
are using. If your adapter does not appear, try upgrading
to the latest available drivers from the Wi-Fi device
manufacturer.
WI-FI PREFERENCES

37
PREFERENCES
•
Automatically connect to preferred networks: If desired,
you can select to have VZAccess Manager automatically
connect to your preferred Wi-Fi networks when they are
detected.
•
Automatically switch from WWAN to Wi-Fi: Requires
that “Automatically connect to preferred networks” is
selected. When you select this option to automatically
switch from WWAN to Wi-Fi, VZAccess Manager
will disconnect your WWAN connection (VZGlobal,
BroadbandAccess or NationalAccess) and automatically
connect via Wi-Fi when a preferred Wi-Fi network is
detected.
•
Preferred Networks: When you connect to or add Wi-
Fi networks they will appear in this list. If using the
“Automatically connect” feature VZAccess Manager will
try to connect to the networks in the order they appear in
this list.
•
Move Up: Changes the priority of the Wi-Fi networks
you have added or connected to in the past. This option
is only available when you have two or more Wi-Fi
networks in the Preferred list.
•
Move Down: Changes the priority of non Verizon
Wireless Wi-Fi networks you have added or connected to
in the past. This option is only available when you have
two or more Wi-Fi networks in the Preferred list.
•
Add: Use to manually add a Wi-Fi network. If you select
“Add” you will have to enter the network’s name and
indicate if it is password protected. The only time you
would need to use the “Add” feature would be if the
Access Point providing the Wi-Fi coverage does not
broadcast its network name (SSID). The easiest way to add
WI-FI PREFERENCES

38
PREFERENCES
a network that broadcasts its network name is to select
the Wi-Fi network connection when it appears, and then
select “Connect.” If it is password protected you will be
prompted to enter your WEP (Wired Equivalent Privacy)
key.
@
NOTE: If you manually add a Wi-Fi network, when VZAccess
Manager finds it, its signal strength will be displayed to the
right of the network name when you are within coverage of
that network. If you incorrectly entered the name, the signal
strength will never indicate any signal.
@
NOTICE: Note that with certain Wi-Fi adapters the signal
strength for Wi-Fi networks is not accurate until you connect
to the network.
•
Edit: If you select a connection in the Preferred Network
list, the Edit button will become active. Pressing it will
provide you with three additional tabs that will be
discussed below.
•
Remove: This will remove any other Wi-Fi networks you
have added or connected to in the past. Just select the
network, then select “Remove.”
NETWORK TAB
From the Wi-Fi tab (above, “Tools,” “Preferences,” “Wi-
Fi” tab) if you select a network listed under “Preferred
Networks” then select the “Edit” button or if you select
the “Add” button, one of the following options will be
displayed:
WI-FI PREFERENCES

39
PREFERENCES
The following options exist on the Network tab:
•
Network Name: On the Network tab, for private networks
you can edit or enter the Network name and specify if it
is a closed network. Note: The name has to match the
network to work. If the network broadcasts its SSID,
instead of manually adding it, select the Wi-Fi network
connection when it appears, and then select “Connect.”
If it is password protected you will be prompted to enter
your WEP (Wired Equivalent Privacy) key.
@
NOTICE: The name has to match the network to work. Note
that this name is case sensitive when entering it.
•
Set Password: This option allows you to modify, delete or
enter your Wi-Fi WEP keys for a private Wi-Fi network.
WI-FI PREFERENCES
40
PREFERENCES
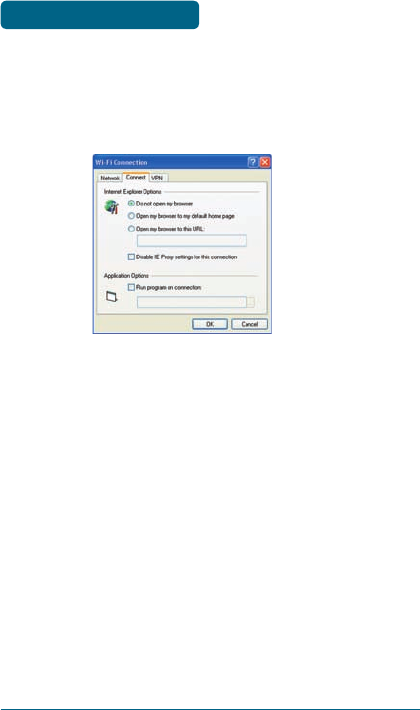
CONNECT TAB
The following options exist on the Connect tab (“Tools,”
“Preferences,” “Wi-Fi” tab, select “Add” or a network in the
“Preferred Network” list, select “Edit,” then “Connect”):
•
Do not open my browser: With this option selected, when
you connect to a Wi-Fi network, VZAccess Manager will
not automatically launch your web browser.
•
Open my browser to my default home page: With this
option selected, when you connect to a Wi-Fi network
VZAccess Manager will automatically launch your web
browser and your default home page will load.
•
Open my browser to this URL: With this option selected,
when you connect to a Wi-Fi network, VZAccess Manager
will automatically launch your web browser but do it in
such a way that the URL you specify in the field will load
instead of your home page.
•
Disable IE Proxy settings for this connection: This option
provides an automatic method to turn off proxy settings
when connecting to a Wi-Fi network. This would typically
be used if you normally use proxy settings at work to
WI-FI PREFERENCES
41
PREFERENCES
access the Internet and you wanted to access the Internet
directly via Wi-Fi without using VPN (Virtual Private
Networking) software.
•
Run program on connection: This allows automatically
running a program when you use VZAccess Manager to
connect to a Wi-Fi network. Select the browse button to
browse to the desired application you want to run when
you connect to a Wi-Fi network using VZAccess Manager.
The application will run for all Wi-Fi connections made
from VZAccess Manager.
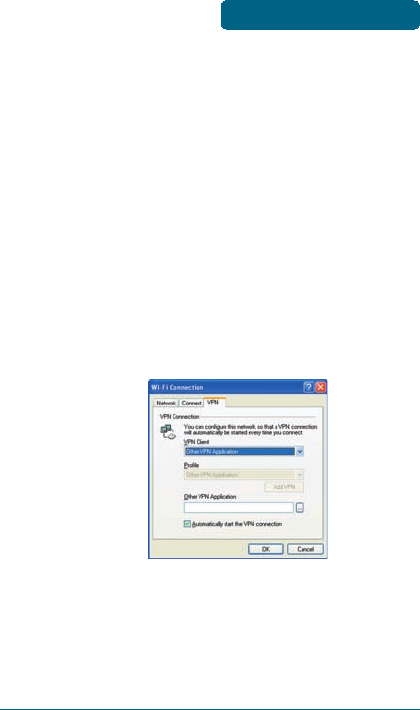
VPN TAB
The following options exist on the VPN tab (“Tools,”
“Preferences,” “Wi-Fi” tab, select “Add” or a network in the
“Preferred Network” list and “Edit,” then “VPN”):
•
VPN Client: VZAccess Manager automatically detects
if certain VPN clients like Microsoft, Cisco, CheckPoint,
etc, are installed on the computer and allows you to
select the one you wish to use. Check with your network
administrator to setup your VPN connection.
WI-FI PREFERENCES
42
PREFERENCES
If the VPN client you wish to use does not appear in the list,
you can select Other VPN Application.
•
Other VPN Application: This allows automatically running
any VPN program when you use VZAccess Manager
to connect to the Wi-Fi network you added or edited.
Select the browse button to browse to the desired VPN
application you want to run when you connect to the Wi-
Fi network you added or edited, using VZAccess Manager.
If you have a shortcut you normally use to launch your
VPN application you may want to right click on it and
select properties to see where the program is located and
how it’s named.
■
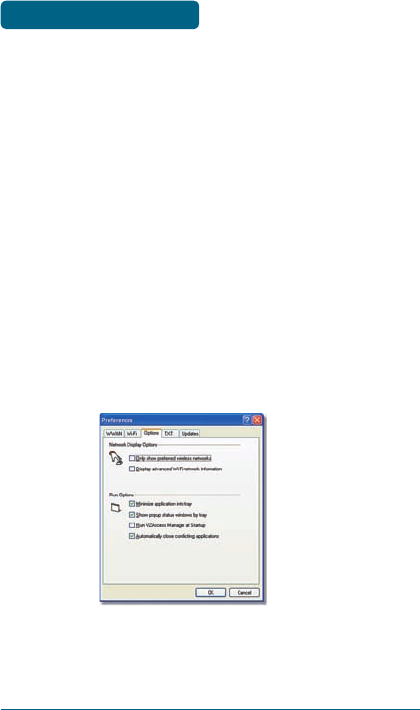
OPTIONS
To access the Options tab, click on the “Tools” menu, then
“Preferences....” and select the “Options” tab.
OPTIONS

43
PREFERENCES
NETWORK DISPLAY OPTIONS
•
Only show preferred wireless networks at start up: This
only applies to Wi-Fi networks. If checked, at startup,
only networks in your Preferred list on the Wi-Fi tab are
displayed (networks you have connected to in the past)
otherwise, all detected networks are displayed.
•
Display advanced Wi-Fi network information: This
only applies to Wi-Fi networks. If checked, additional
information will be displayed for Wi-Fi networks such as
the channel, MAC address and type of security.
RUN OPTIONS
•
Minimize Application into tray: With this option selected,
when you minimize VZAccess Manager, instead of taking
up space in your taskbar, it will just disappear. You
can get it back by double clicking on the tray icon ,
alternatively you can right click in the icon and select
“Show Application.” You can minimize the main window
of VZAccess Manager by selecting the minimize icon
( ) in the upper right corner of the main window.
•
Show pop-up status windows by tray: Enables status
notification in a pop up window above the task bar that
displays for a few seconds whenever connection status
changes.
•
Run VZAccess Manager at Startup: Selecting this option
adds VZAccess Manager to the Windows Startup group,
unchecking it removes VZAccess Manager from the
startup group.
OPTIONS
44
PREFERENCES
•
Automatically close conflicting applications: With this
option selected, VZAccess Manager will automatically
close any application it recognizes that is known to
prevent it from working correctly. For example, it may
close the client software that was supplied with your Wi-
Fi card, if it’s known to conflict with VZAccess Manager
controlling your Wi-Fi card.
■
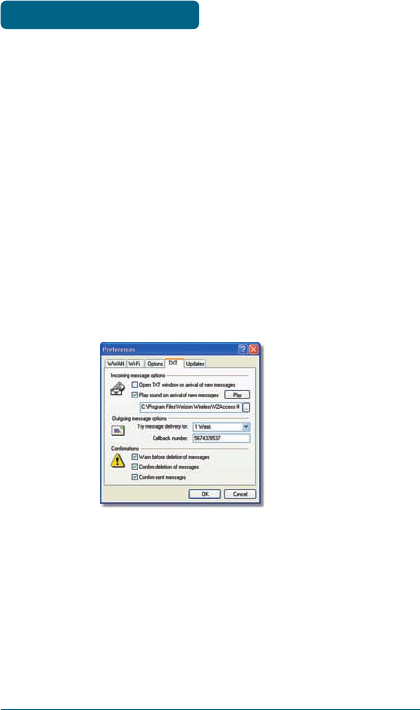
TXT MESSAGING PREFERENCES
To access the TXT preferences, click on the “Tools” menu,
then “Preferences....” and select the “TXT” tab.
VZAccess Manager supports TXT Messaging for certain
wireless devices only.
INCOMING MESSAGE OPTIONS
•
Open TXT window on arrival of new message: VZAccess
Manager will automatically switch to the TXT view when
a new message arrives.
•
Play sound on arrival of new messages: A sound file
(.WAV) can be selected to play when new messages arrive.
TXT MESSAGING
PREFERENCES
45
PREFERENCES
OUTGOING MESSAGE OPTIONS
•
Message delivery duration: The duration of time that
the Verizon Wireless network will attempt to deliver the
message. The default is a duration of 1 week.
CONFIRMATIONS
The following confirmation dialogs can be turned on or off:
•
Warn before deletion of messages.
•
Confirm deletion of messages.
•
Confirm sent messages.
■
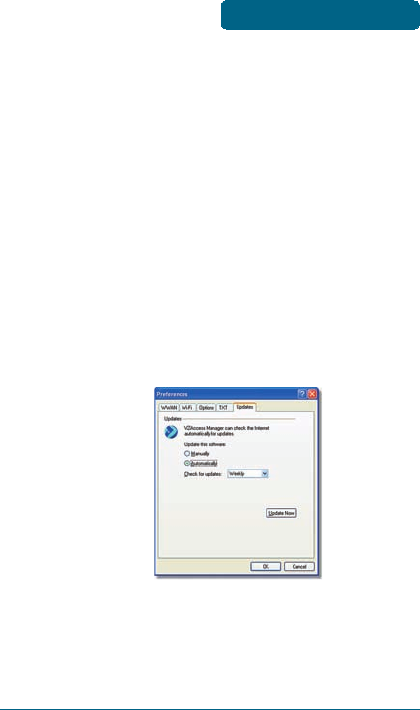
UPDATES PREFERENCES
To access the Updates preferences, click on the “Tools”
menu, then “Preferences...” and select the “Updates” tab.
This feature allows VZAccess Manager to automatically
check for software updates. If you are using NationalAccess
or BroadbandAccess and an update is available, you will be
notified of its size and approximate download times.
UPDATES PREFERENCES

46
PREFERENCES
You will be given the choice to download or cancel. If you
select download, you will be presented with a display that
shows the progress as the update is downloading with the
option to cancel if desired. You do not need to download
the updates wirelessly; you can use any connection to the
Internet.
@
NOTE: If you download the updates wirelessly, normal usage
charges apply.
You can allow the software to check automatically for
updates, daily, weekly (default), or monthly. It only checks
when the application is running and when it detects that
you are connected and able to access to the Internet. If
desired, you can select “Manually” and the software will
only check for updates when you select “Update Now”
(pictured above), or you when you select, from VZAccess
Manager’s main screen, “Help,” then “Check for Updates.”
UPDATES PREFERENCES