Pantech TX-215A Tri-Mode Dual-Band Phone (AMPS/CDMA/ PCS CDMA) User Manual TX 215VM 050225
Pantech Co., Ltd. Tri-Mode Dual-Band Phone (AMPS/CDMA/ PCS CDMA) TX 215VM 050225
Pantech >
Contents
- 1. User Manual 1
- 2. User Manual 2
- 3. User Manual 1 of 2
- 4. User Manual 2 of 2
User Manual 1
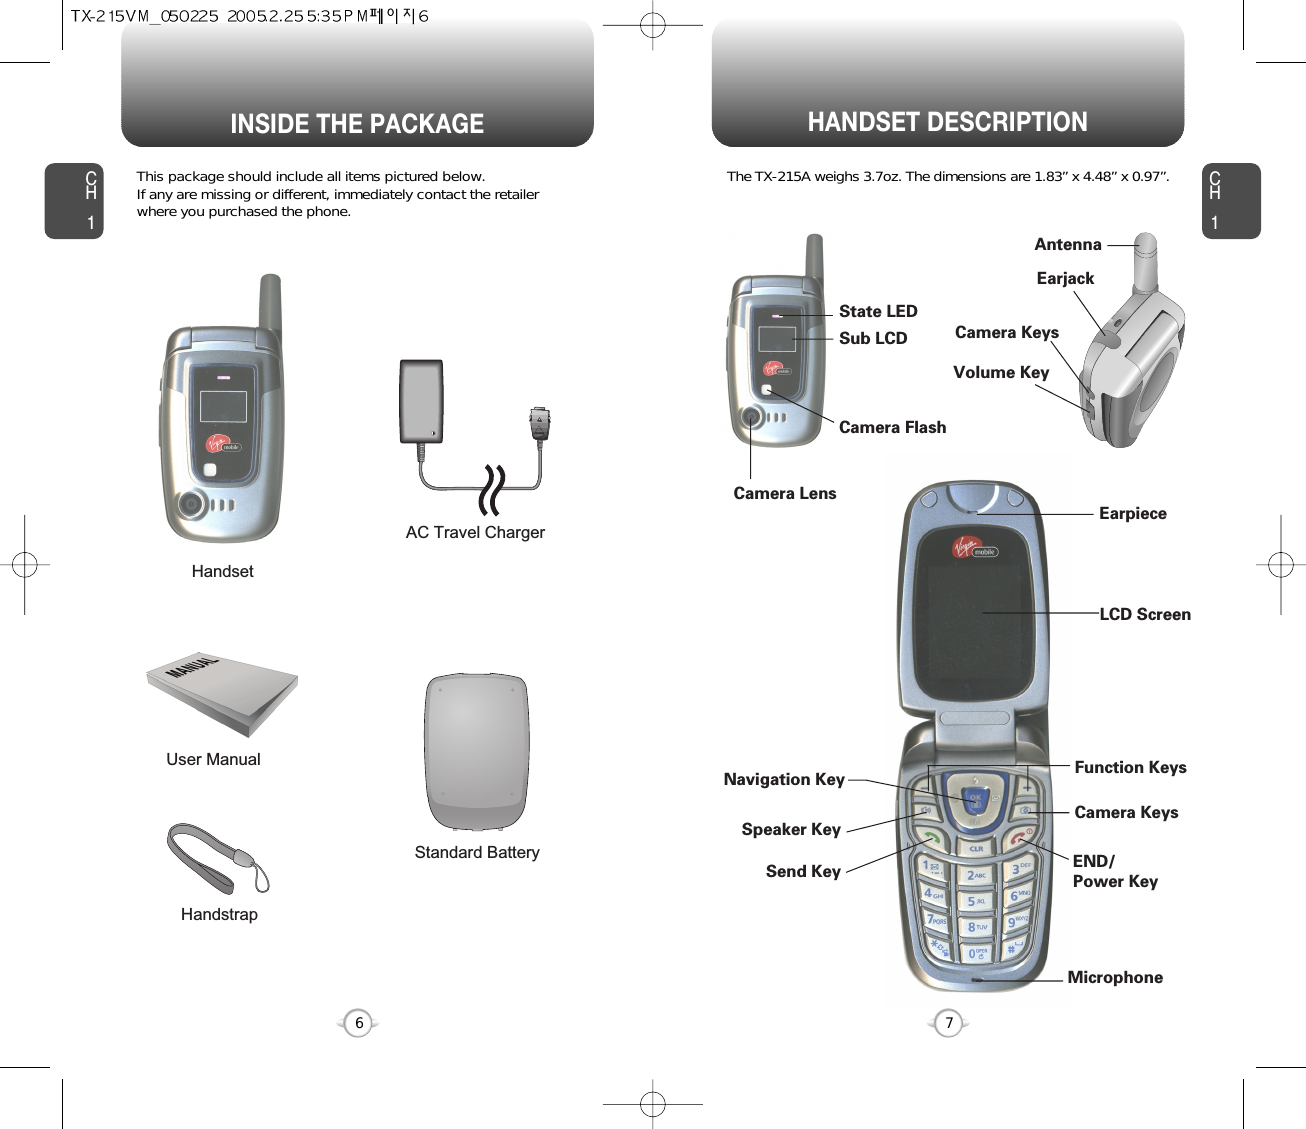

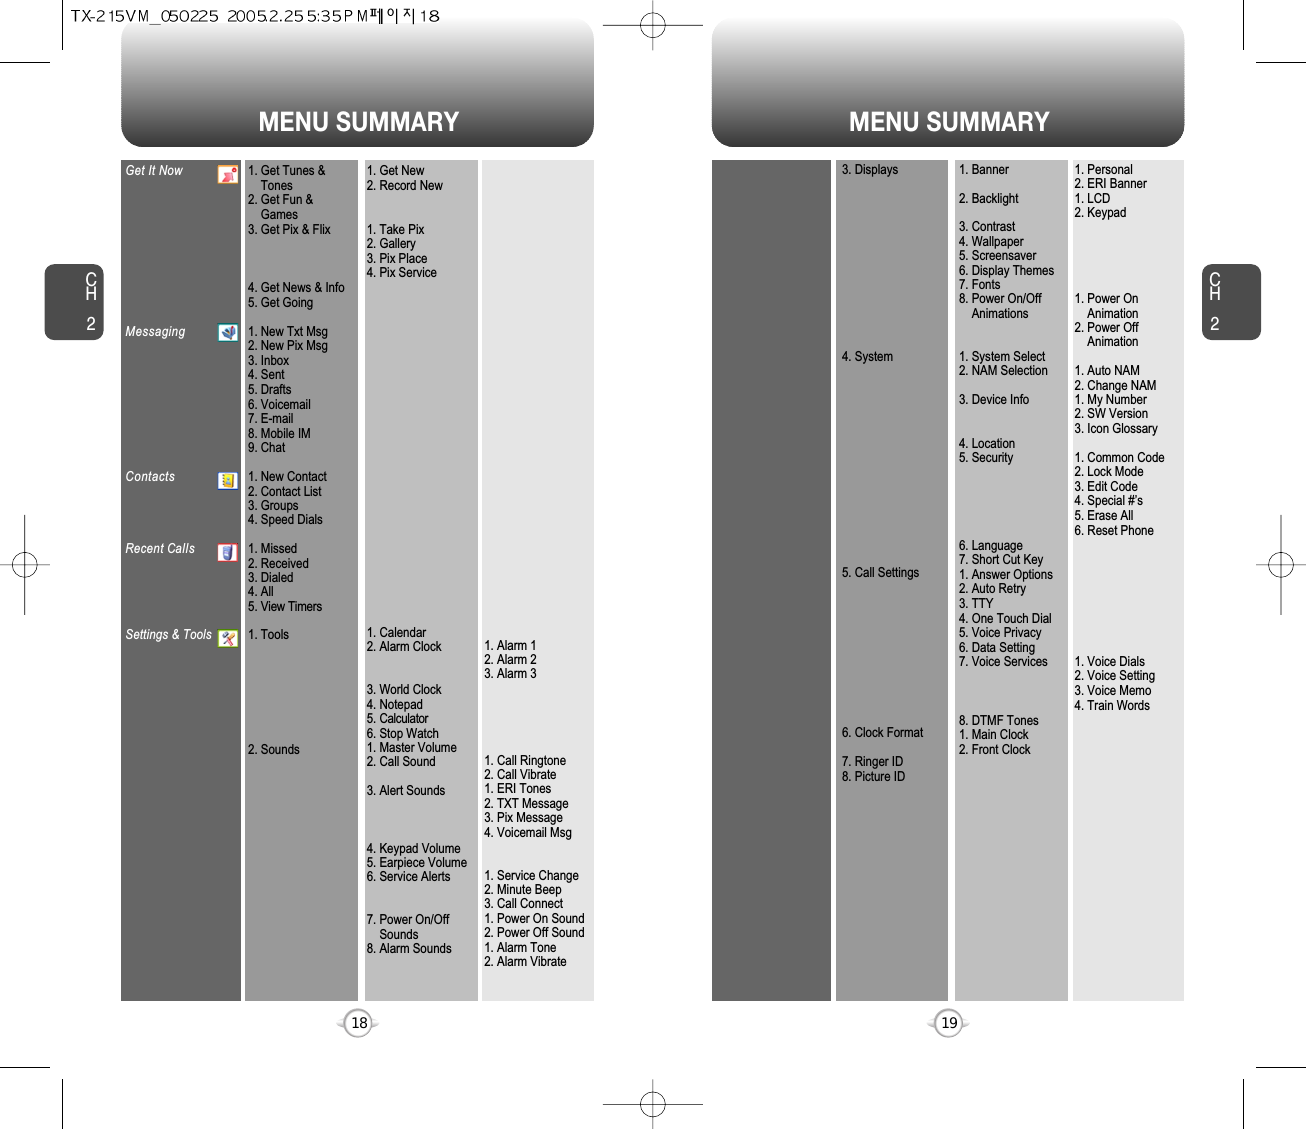
![ACCESSING THE MENUCH2Your phone can be customized via the menu. Each function can beaccessed by scrolling with the Navigation Key or by pressing thenumber that corresponds with the menu item.1To access the menu in the idle mode, press [MENU].2Use the Navigation Key to scroll through themenu.3To return to the previous page, press .To exit the current menu and return to the idlemode, press . 4Press the Navigation Key to enter a functionwhen its main page is displayed or press itsassigned number to have direct access to the function.17CH2TURNING THE PHONE ON1Press and hold until your “Power On” logo appears and the tone sounds.• To select a logo, refer to page 59 for more details.(Settings>Display>Wallpaper) for more detail.• If “Password” appears on the display enter your 4-digitpassword to unlock your phone.• The default password is the last 4 digit of your phonenumber.16TURNING THE PHONE OFF1Press and hold until your “Power Off” logoappears.• Immediately change or recharge the battery when “LOW BATTERY!! PHONE IS TURNING OFF!” appears onthe display. Memory may possibly be damaged if the phoneturns off due to the battery completely draining.• Turn the phone off before removing or replacing the battery.If the phone is on, unsaved data may be lost.Hotkey In idle mode, move the Navigation Key as follows to access these functions:• Upward movement : Web Browser• Downward movement : Short Cut Key• Rightward movement : Get It Now• Leftward movement : Get Pix & FlixTURNING THE PHONE ON / OFFlTo search through the menu in numerical order, press the Navigation Key.Get It NowMessagingContactsRecent CallsSettings & Tools](https://usermanual.wiki/Pantech/TX-215A.User-Manual-1/User-Guide-527430-Page-10.png)
![BASIC FUNCTIONSCH221CH220BASIC FUNCTIONSMAKING A CALL1Enter a phone number.To modify the phone number you have entered :• To erase one digit at a time press .• To erase the entire number, press and hold .To find the phone number with you’r contact list :• To enter a part of the phone number, then press[Options], select “Search”. Phone number display in contact listIf contact’s name field empty, then highest priority phonenumber displayed. If any phone number and name is notexist then email address diaplay. Referece “Contact displayorder”.All matching entries will be displayed. To call the selectednumber, press .To send the txt or pix message with phone number :• To enter a part of the phone number, then press[Options], select “Send Txt Msg or Send Pix Msg”. Please refer to page 99 or page 100 for more details on“Send TXT Msg or Send Pix Msg”.2Press . The indicator, , appears on the display.• If “CALL FAILED” appears on the display or the line is busy,press or . • If you activate the “AUTO RETRY” function, the phone willautomatically retry for the number of times you haveselected. (refer to page 72).• When you place or receive a call from stored phonenumbers, both the name or phone number will be displayed.• There is another way to make a call through the VR mode,which is called “VAD (Voice Activated Dialing)”. Please refer to page 74 (Voice Service) for more details.• If “Enter Lock Code” appears on the display enter your 4-digit password to unlock your phone.3To end a call, press .To ignore incoming calls, press [Ignore].ANSWERING CALLS1When your phone rings or vibrates, press to answer the incoming call. (Depending on your phone’s settings, you mayalso answer incoming calls by opening thephone or by pressing any digit key.)2To end a call, press .The speaker phone feature lets you hear audio through the speaker andtalk without holding the phone.SPEAKER PHONE1To activate the speaker phone in idle, answeringor calling modes, press and hold .2The phone returns to normal (Speaker Phone Off)after ending a call or when the phone is turned offand back on.](https://usermanual.wiki/Pantech/TX-215A.User-Manual-1/User-Guide-527430-Page-12.png)
![BASIC FUNCTIONS BASIC FUNCTIONSCH223CH222ANSWERING A CALL1To answer a call, press any key except , ,, , , or .2To end the call, press .In Auto Answer Mode a call is automatically answered after apreset number of ring tones. See page 71 for more details.If one of the people you called hangs up during your call, youand the remaining caller stay connected. If you initiated the calland are the first to hang up, all three callers are disconnected.lBy pressing [MENU] tnen select “Settings & Tools” menu,press , you can select either “Flip Open”, “Any Key”or “Send Only” to answer a call. lf “Send Only” is selected, thephone can only be answered by pressing . See page 71 for more information.With Three-Way Calling, you can talk to two people at the same time.When using this feature, the normal airtime rates will be applied foreach of the two calls.3-WAY CALLING1Enter a number you wish to call then press .2Once you have established the connection,enter the second number you wish to call thenpress .3When you’re connected to the second party,press again to begin your three-way call.Pauses are used for automated systems (i.e., voice mail, calling cards).Insert a pause after a phone number then enter another group ofnumbers. The second set of numbers is dialed automatically after thepause. This feature is useful for dialing into systems that require a code.WAIT/PAUSE FEATURE1To insert a wait/pause, enter a phone numberthen press [OPTIONS]. Select either a HardPause (“P” appears) or a Wait (“W” appears).2Press to dial or to save.Please refer to page 30 for more details about storing a phone number.Identifies caller by displaying their phone number. If the caller’s nameand number are already stored in your phone book, they both willappear. The caller ID is stored in the call history.CALLER ID FUNCTION](https://usermanual.wiki/Pantech/TX-215A.User-Manual-1/User-Guide-527430-Page-13.png)
![BASIC FUNCTIONS BASIC FUNCTIONSCH225CH224ENTER LOCK MODE1To lock the phone, press and hold .2To unlock the phone, press or [UNLOCK],then input your password, then press [OK].The lock feature will deactivate when the phone is powered off. Upon next power up, you will need to press to lock phone again.lNotifies you of an incoming call when you are already on a call bysounding a beep tone and displaying the caller’s phone number.CALL WAITING FUNCTION1To answer another call while on the phone,press . This places the first call on hold. To switch back to the first caller, pressagain.Adjusts the volume of the ringer, key beep and speaker.ADJUSTING VOLUME1Press [MENU], then select “Settings & Tools”menu, press then select one of the following.2Adjust volume then press [OK] to save it.Master Volume : Controls the ringer volume.Keypad Volume : Controls the keypad volume.Earpiece Volume : Controls the earpiece volume.lll• To adjust earpiece volume during a call, press the NavigationKey up or down.• To adjust master volume, press short side up/ down key.•In Idel Mode:Side Volume Up key Long Press: Volume key shall bring device out of silence.Side Volume Down key Long Press: Switch between on/off sound including alarm but except speaker.Call Waiting is a system dependent feature. Please contact yourservice provider for details.](https://usermanual.wiki/Pantech/TX-215A.User-Manual-1/User-Guide-527430-Page-14.png)
![DURING A CALL DURING A CALLCH227CH226Increases security during a call.VOICE PRIVACYEnables the network to locate your current location through GlobalPositioning System (GPS). (Refer to page 66 for more details.)LOCATION1Press [OPTIONS] .1Press [OPTIONS] .Enables you to send a TXT message (SMS) during a call.To display menu options during a call, press [Options].SEND TXT MSG1Press [OPTIONS] .To select the phone number in your recent calls List.RECENT CALLSAutomatically transmits your phone number to a pager during a call.(Dependent on pager service)SEND DTMFEnables you to send a Pix message (MMS) during a call.SEND PIX MSG1Press [OPTIONS] .To select the phone number in your internal Contact List.CONTACTS1Press [OPTIONS] .1Press [OPTIONS] .1Press [OPTIONS] .The caller cannot hear you or any sounds from your side but you canstill hear them.MUTE (UNMUTE)1Press [Mute].To deactivate, press [UNMUTE].The phone will automatically un-mute in Emergency Call or Callback mode.ll](https://usermanual.wiki/Pantech/TX-215A.User-Manual-1/User-Guide-527430-Page-15.png)
![Enter a name. Please refer to page 31 for more details onentering letters, numbers & symbols. To change the input mode, press [Abc]. Press the Navigation Key down to select otheroptions (Mobile1.2, E-mail1.2, etc...). If entered phone number, press [OPTIONS] to select one of the following options:STORING A PHONE NUMBERENTERING LETTERS, NUMBERS & SYMBOLSCH3The input mode (Alpha editor) will automatically be activated whennecessary to enter letters and numbers. As shown below, there are 4available modes ; Standard input mode (Abc), T9 input mode(T9Word), Numeric mode (123), and Symbol mode (Symbols).The following illustrates the function assigned to each key in theAlpha Editor.31CH.3The phone book stores up to 500 entries.1Enter phone # then press [SAVE] thenchoose “Create New” or “Update Existing”.Press [OK] to select. The input mode indicator appears on the upper right ofthe display when letters and numbers are entered. Toselect the desired input mode among the 5 modes below,press [MODE], then enter letters and numbers.2If “Create New” is selected, the phone numberwill appear above a list. Press the NavigationKey up or down to choose the type of numberyou’re adding, as indicated by the icon. Press [OK] to select. If “Update Existing” isselected, your contact list is displayed. Choosethe entry to add the phone number to, thenpress [OK]. You will then see the phonenumber listed about a list. Press [OK] to select.34To store the entry, press [SAVE]. “CONTACT SAVED” will be displayed.30ModeNextSpaceCaps LockClearSendPress to change mode.[T9Word][Abc][ABC][123][Symbols]Press to view the next matching word ifthe highlighted word is not the word youintended.Press to accept a word and add a space.Press to select a letter case of thestandard text input or T9 text input mode.[Abc], [ABC] and [abc] indicate thestandard text input.[T9Word], [T9WORD] and [T9word]indicate the predictive text input.Press and hold to change mode.Press to delete a character to the left ofthe cursor.Send the letters and numbers you enter.KEY FUNCTIONlSet Speed DiallSet Voice DiallSet As DefaultlAdd PauseInput mode indicatorT9Word : T9 modeAbc : Abc modeABC : ABC mode123 : Number modeSymbols : Symbol mode](https://usermanual.wiki/Pantech/TX-215A.User-Manual-1/User-Guide-527430-Page-17.png)
![ENTERING LETTERS, NUMBERS & SYMBOLS ENTERING LETTERS, NUMBERS & SYMBOLSCH3The T9 input mode incorporates a built-in-dictionary to determine aword based on the entered characters. A word can be entered morequickly by pressing a key once per character.T9 INPUT MODE1Select the T9Word mode by pressing [Abc].2Press a digit key once to enter the characteryou want then enter all the characters to inputthe word you want.3To view the next matching word, press .To enter a compound word:• Enter the first part of the word then press to accept it.• Enter the last part of the word then press to enter the word.Select Abc mode by pressing [Abc].When you select this mode, the Abc icon appears as a visualconfirmation.- Find the key that corresponds to the letter you want to enter.- Press it as many times as needed for the letter to appear on thescreen.- To enter the name “John”:Press [ ] JPress [ ] oPress [ ] hPress [ ] n33CH3Use the digit keys to enter letters, numbers and characters.STANDARD INPUT MODE1Enter letters using the key pad as follows:2To enter a space, press . The cursor willautomatically move to the next column.3Repeat until letters are entered. There is a 16-letter limit.4To delete one digit, press . If you press and hold , it will delete lettersword by word, and numbers in whole.To change the input mode, press [Abc].32Key Pad12ABC3DEF4GHI:9WXYZ.ADG:W@BEH:X?CFI:Y!234:Z-ADG:91 TimeRepetitions2 timesRepetitions3 timesRepetitions4 timesRepetitions5 times4To accept the matching word then enter aspace, press .5To change from lowercase to uppercase, press .To enter “Fun fare” in the T9 input mode.- After you enter the 1st letter, press [Abc] to select T9 modeand to choose the lower case (T9Word).- Press and you will see “Fun” highlighted. Press to select it.- Press and until you see “ease” highlighted. Press to select the next matching word, you will see “fare” then enter a space.](https://usermanual.wiki/Pantech/TX-215A.User-Manual-1/User-Guide-527430-Page-18.png)
![ENTERING LETTERS, NUMBERS & SYMBOLS MAKING A CALL THROUGH THE PHONE BOOKCH3NUMERIC MODE1Press [Abc] and scroll to the input mode tochanges to “Symbols (Symbol mode)”. 35CH3341Press [Abc] and scroll to the input mode tochanges to “123 (Numeric mode)”.2To enter a number, press a digit key.Press [ ],orPress [ ].2Select symbol you want to enter with theNavigation Key.lUse the Navigation Key to view a different line of symbols.SYMBOL MODEAllows you to enter numbers.Allows you to enter symbols.Ideal for frequently dialed numbers, this feature allows phone bookentries to be dialed via the keypad with only one or two key presses.ONE-TOUCH/TWO-TOUCH DIALING1-9 : Press and hold the corresponding memory number for more than 1 second.ONE-TOUCH DIALING:10-22/97-99 : Press the first digit and second digits of the memory number short and long respectively.TWO-TOUCH DIALING:• If no phone number is stored in the location entered,“Unssigned location” will appear on the screen.](https://usermanual.wiki/Pantech/TX-215A.User-Manual-1/User-Guide-527430-Page-19.png)
![CH439CH438Stores up to 500 entries, each of which can be assigned to a group.Entries can be retrieved by name or group. Retrieves an entry by name and calls by simply pressing . You can review all the entries stored in your phone book list orquickly find an entry by entering a name or its character string. CONTACT LISTCONTACTS CONTACTS12345Press [MENU], then select “Contacts” menu,then press “Contact List” or press [CONTACTS].Enter a name or its character string or scrollthrough the list with the Navigation Key. Please refer to page 31 for more details onentering letters, numbers & symbols.The list of names in your phone book isdisplayed alphabetically.To edit the entry, press [EDIT]. To show detail the entry, press [VIEW]. Press [OPTIONS] to 1. New Contact, 2. Erase,3. Send Txt Msg, 4. Send Pix Msg or 5. Call.To call the selected number, press [OPTIONS]then select “Call” or press .12Press [MENU], then select “Contacts” menu,then press “New Contact”.Adds a new entry.NEW CONTACTTo enter a name or number, use the NavigationKey to select the phone book field.Please refer to page 31 for more details on enteringletters, numbers & symbols.33.1 To save the entry, press [SAVE]. 3.2 To return to the previous page, press .PHONE BOOK FIELDS :Name/Mobile1/Home/Work/E-Mail1/Group/Picture/Ringtone/Mobile2/Fax/E-Mail2.Under “Mobile 1” or “Mobile 2”, input the phone number,then by press [OPTIONS], you can choose from thefollowing:1. Set Speed Dial2. Set Voice Dial3. Set As Default4. Add PauseUnder “Picture”, to select image, then by press [SET].(Please refer to page 93 “Pix Gallery” for more details.)Under “Ringtone”, to select tone, then by press [SET].(Please refer to page 50 “Call Sounds” for more details.)llll• If user not input at least one field among number, e-mail thendisplay “Please insert at least one of phone number or E-mail”in dialogue box.• If name field is empty in edit contact but one of phone numberfield inserted then saved so display phone number in contactslist.](https://usermanual.wiki/Pantech/TX-215A.User-Manual-1/User-Guide-527430-Page-21.png)
![CH4CH440CONTACTS CONTACTS41CHANGE GROUP NAME2Select an existing group name that you haveadded with the Navigation Key.4Input a new group name.5To save it, press [SAVE].3To select “Rename”, press [OPTIONS].1Press [MENU], then select “Contacts” menu,then press “Groups”.GROUPSAllows you to classify phone entries into groups. Existing groupsinclude FAMILY, WORK. A maximum of 30 groups is allowed.Predefined group that can’t rename or Erase. User can add group max28 group. Allows the user to add group up to 10 phone number. Theuser can add, change, and erase Group.13Press [MENU], then select “Contacts” menu,then press “Groups”.ADD NEW GROUPInput a new group name.4To save it, press [SAVE].2To select “New”, press [NEW].1Press [MENU], then select “Contacts” menu,then press “Groups”.13To assign phone numbers to a Group, select “Add”, press [OPTION].ASSIGN PHONE NUMBER TO GROUPSelect the contact for the group thenpress [DONE]. “Contact Added to (GroupName)” will be displayed.Repeat for each location for the Group.2“unassigned” locations appear. Select a location and press [OK]. Your phone book entries will be displayed inalphabetical order.SEND TXT MSG. GROUP2Select an existing group name with theNavigation Key.4Input a “Message”, press [OPTION] toselect “Save as Drafts”, “Priority Level” and“Call Back #”.53To select “Send Txt Msg.”, press [OPTIONS].5.1. To send the text message, press [SEND].5.2. To save the text message, press [OPTIONS]then select “Save as Drafts”, then press [OK].](https://usermanual.wiki/Pantech/TX-215A.User-Manual-1/User-Guide-527430-Page-22.png)
![CH4CH442CONTACTS CONTACTS43In idle mode, calls can be placed to numbers stored in speed dial bypressing & holding the location number on the key pad. For a 2-digitlocation number, press the first number, then press and hold thesecond number.SPEED DIALS12To assign a phone number to a location, selectthe location then press [SET].3Select the contact with the Navigation Key thenpress [OK].4“SPEED DIAL SET” will be displayed.• “Unassigned” appears if the location is available.• To call an assigned number, press & hold the last digit of thespeed dial #.ERASE GROUP2Select an existing group name with theNavigation Key.3To select “Erase”, press [OPTIONS].4Select “Yes” to erase it, press [OK].1Press [MENU], then select “Contacts” menu,then press “Groups”.SEND PIX MSG. GROUP1Press [MENU], then select “Contacts” menu,then press “Groups”.2Select an existing group name with theNavigation Key.4Input a “Text”, “Picture”, “Sound”, “Subject”,press [OPTION] to select “Preview”, “Add Quick Text”, “Save as Drafts” and“Priority Level”.53To select “Send Pix Msg”, press [OPTIONS].5.1. To send the pix message, press [SEND].5.2. To save the pix message, press [OPTIONS] then select “Save as Drafts”, then press [OK].Press [MENU], then select “Contacts” menu,then press “Speed Dials”.](https://usermanual.wiki/Pantech/TX-215A.User-Manual-1/User-Guide-527430-Page-23.png)
![CH445CH444RECENT CALLS RECENT CALLSDisplays information about the 20 most recently missed calls. Place a call to a missed call number by simply pressing . To see a list of the 20 most recently missed calls, press [MENU], then select “RecentCalls” menu, press “Missed”. If thenumber is already stored in your phone book,only the name appears. If the number is notstored, only the phone number appears.MISSED12To view missed call details, press [OPEN].Call details include date, time and phone number.• After 20 missed calls, the oldest call will automatically be erased from the history.• Press [MESSAGE], to send the Txt or Pix message.3Save : To store the phone number in your phone book.Details : To view the caller’s information.Erase : To erase a missed calls list.Lock/Unlock : To lock or unlock missed calls list.Erase All : To erase all missed calls list.View Timers : To display usage time.llllllPress [OPTIONS] and select “SAVE” tosave it or select “Erase” to delete it.Call details include date, time and phone number.• After 20 received calls, the oldest call will automatically be erased from the history.• Press [MESSAGE], to send the Txt or Pix message.Displays information about the 20 most recently answered calls. Place a call to a received call by simply pressing .RECEIVED1To see a list of the 20 most recently answeredcalls, press [MENU], then select “RecentCalls” menu, press “Received”. If thenumber is already stored in your phone book,only the name appears. If the number is notstored, only the phone number appears.2To view incoming call details, press [OPEN].3Save : To store the phone number in your phone book.Details : To view the caller’s information.Erase : To erase a received calls list.Lock/Unlock : To lock or unlock received calls list.Erase All : To erase all received calls list.View Timers : To display usage time.llllllPress [OPTIONS] and select “SAVE” tosave it or select “Erase” to delete it.](https://usermanual.wiki/Pantech/TX-215A.User-Manual-1/User-Guide-527430-Page-24.png)
![CH447CH446RECENT CALLS RECENT CALLSCall details include type of call, date, time and phone number.• After 20 dialed calls, the oldest call will automatically be erased from the history.• Press [MESSAGE], to send the Txt or Pix message.Displays information about the 20 most recently dialed numbers.Place a call to a dialed call by simply pressing .DIALED1To see a list of the 20 most recently dialednumbers, press [MENU], then select“Recent Calls” menu, press “Dialed”. If the number is already stored in your phonebook, only the name appears. If the number isnot stored, only the phone number appears.2To view dialed call details, press [OPEN].3Save : To store the phone number in your phone book.Details : To view the caller’s information.Erase : To erase a dialed calls list.Lock/Unlock : To lock or unlock dialed calls list.Erase All : To erase all dialed calls list.View Timers : To display usage time.llllllPress [OPTIONS] and select “SAVE” tosave it or select “Erase” to delete it.Call details include type of call, date, time and phone number.• After the 20 received, dialed or missed calls, the oldest callwill automatically be erased from the history.• Press [MESSAGE], to send the Txt or Pix message.Displays information about the most recent incoming, outgoing andmissed calls.ALL1To see a list of the 60 most recent incoming,outgoing and missed calls, press [MENU], then select “Recent Calls” menu, press “All”. If the number is already stored in your phone book,only the name appears. If the number is not stored,only the phone number appears.23To view details, press [OPEN].Save : To store the phone number in your phone book.Details : To view the caller’s information.Erase : To erase a recent calls list.Lock/Unlock : To lock or unlock recent calls list.Erase All : To erase all recent calls list.View Timers : To display usage time.llllllPress [OPTIONS] and select “SAVE” tosave it or select “Erase” to delete it.](https://usermanual.wiki/Pantech/TX-215A.User-Manual-1/User-Guide-527430-Page-25.png)
![CH44948CH4SETTINGSRECENT CALLSChecks the usage time and manages your calls within the limit youset. The 11 timers include (Last Call, All Calls, Received Calls, Dialed Calls, Roaming, Transmit Kilobytes, Received Kilobytes, Total Kilobytes, Last Reset, Lifetime Calls, Lifetime Data Counter):VIEW TIMERSPress [MENU], then select “Recent Calls”menu, press “View Timers”.To reset the timer, press [RESET], then select “Yes”, press .To return to the previous page, press [OK].12Controls the Ringer volume and alerts you to incoming calls in themodes listed in the gray box below.Customizes your phone and optimizes performance through a varietyof settings.SOUNDSMASTER VOUME2Select one of the following options by pressingthe Navigation Key to the right.3Select one of the available ring types.To confirm, press [OK].1Press [MENU], then select “Settings & Tools”menu, press “Sounds” then select“Master Volume”.All OffAlarm OnlyVibrate OnlyLow, Med Low, Med, Med High, High.Press to play sound.](https://usermanual.wiki/Pantech/TX-215A.User-Manual-1/User-Guide-527430-Page-26.png)
![CH451CH450SETTINGS50SETTINGSTo select a ringer type for incoming calls:CALL SOUND2Select your desired ringer type.3Select one of the available ring types.To confirm, press [OK].1Press [MENU], then select “Settings & Tools”menu, press “Sounds” then select “Call Sound”, press “Call Ringtone”.Up or Down key : Select “Ringer”.Press Play/Pause to Play/Pause the ringer.CALL RINGTONE2Select “On” or “Off” with the Navigation Key thenpress [OK] to save it.1Press [MENU], then select “Settings & Tools”menu, press “Sounds” then select “Call Sound”, press “Call Vibrate”.CALL VIBRATEWhen selected, this setting alerts you to the following handset changes:ALERT SOUNDS1Press [MENU], then select “Settings & Tools”menu, press “Sounds” then select “Alert Sounds”, press “ERI Tones”.ERI TONES2Select “Beep”, “Voice” or “Off” with theNavigation Key then press [OK] to save it.1Press [MENU], then select “Settings & Tools”menu, press “Sounds” then select “Alert Sounds”, press “TXT Message”.TXT MESSAGE2Select “Tone”, “Vibrate” or “Reminder” with theNavigation Key then select one of the followingoptions by pressing the Navigation Key.Tone : Select your desired ringer type.Vibrate : Select “On” or “Off”.Reminder : Select “Once”, “Every 2 Minutes”, “Every 15 Minutes” or “Off”.3To save, press [OK].](https://usermanual.wiki/Pantech/TX-215A.User-Manual-1/User-Guide-527430-Page-27.png)
![CH453CH452SETTINGS52SETTINGS1Press [MENU], then select “Settings & Tools”menu, press “Sounds” then select “Alert Sounds”, press “Pix Message”.PIX MESSAGE2Select “Tone”, “Vibrate” or “Reminder” with theNavigation Key then select one of the followingoptions by pressing the Navigation Key.Tone : Select your desired ringer type.Vibrate : Select “On” or “Off”.Reminder : Select “Once”, “Every 2 Minutes”, “Every 15 Minutes” or “Off”.3To save, press [OK].1Press [MENU], then select “Settings & Tools”menu, press “Sounds” then select “Alert Sounds”, press “Voicemail Msg”.VOICEMAIL MSG2Select “Tone”, “Vibrate” or “Reminder” with theNavigation Key then select one of the followingoptions by pressing the Navigation Key.Tone : Select your desired ringer type.Vibrate : Select “On” or “Off”.Reminder : Select “Once”, “Every 2 Minutes”, “Every 15 Minutes” or “Off”.3To save, press [OK].To adjust key pad tone:KEYPAD VOLUME2Select one of the following options by pressingthe Navigation Key to the right.3Select one of the available ring types.To confirm, press [OK].1Press [MENU], then select “Settings & Tools”menu, press “Sounds” then select“Keypad Volume”.OffLow, Med Low, Med, Med High, HighTo adjust earpiece volume:EARPIECE VOLUME2Select one of the following options by pressingthe Navigation Key to the right.3Select one of the available ring types.To confirm, press [OK].1Press [MENU], then select “Settings & Tools”menu, press “Sounds” then select“Earpiece Volume”.Low, Med Low, Med, Med High, High](https://usermanual.wiki/Pantech/TX-215A.User-Manual-1/User-Guide-527430-Page-28.png)
![SETTINGS SETTINGSCH455CH454Sounds an alert when leaving a service area and entering a roamingservice area.SERVICE ALERTS1Press [MENU], then select “Settings & Tools”menu, press “Sounds” then select “Service Alerts”, press “Service Change”.SERVICE CHANGE2Select “On” or “Off” with the Navigation Key thenpress [OK] to save it.Sounds an alert every minute during a call.1Press [MENU], then select “Settings & Tools”menu, press “Sounds” then select “Service Alerts”, press “Minute Beep”.MINUTE BEEP2Select “On” or “Off” with the Navigation Key thenpress [OK] to save it.Notifies you that a call has been successfully placed.1Press [MENU], then select “Settings & Tools”menu, press “Sounds” then select “Service Alerts”, press “Call Connect”.CALL CONNECT2Select “On” or “Off” with the Navigation Key thenpress [OK] to save it.Allows you to activate/deactivate the power on tones.POWER ON/OFF SOUNDS1Press [MENU], then select “Settings & Tools”menu, press “Sounds” then select “Power On/Off Sounds”, press “Power On Sound”.POWER ON SOUND2Select “On” or “Off” with the Navigation Key thenpress [OK] to save it.Allows you to activate/deactivate the power off tones.1Press [MENU], then select “Settings & Tools”menu, press “Sounds” then select “Power On/Off Sounds”, press “Power Off Sound”.POWER OFF2Select “On” or “Off” with the Navigation Key thenpress [OK] to save it.](https://usermanual.wiki/Pantech/TX-215A.User-Manual-1/User-Guide-527430-Page-29.png)
![SETTINGS SETTINGSCH457CH456To select a ringer type for alarm sound:ALARM SOUNDS2Select your desired ringer type.3Select one of the available ring types.To confirm, press [OK].1Press [MENU], then select “Settings & Tools”menu, press “Sounds” then select “Alarm Sounds”, press “Alarm Tone”.ALARM TONE2Select “On” or “Off” with the Navigation Key thenpress [OK] to save it.1Press [MENU], then select “Settings & Tools”menu, press “Sounds” then select “Alarm Sounds”, press “Alarm Vibrate”.ALARM VIBRATEAllows you to customize the display.DISPLAYSTo input a personal/ERI banner greeting:The text greeting can be up to 16 characters and is displayed onyour phone’s screen in standby mode.BANNER2Enter a new personal greeting.To change the input mode, press [Abc]. To return to the previous page, press[CANCEL].3Press [OK] to save it.1Press [MENU], then select “Settings & Tools”menu, press “Displays” then select “Banner”, press “Personal”.PERSONAL2Select “On” or “Off” with the Navigation Key thenpress [OK] to save it.1Press [MENU], then select “Settings & Tools”menu, press “Displays” then select “Banner”, press “ERI Banner”.ERI BANNERUp or Down key : Select “Ringer”.Press Play/Pause to Play/Pause the ringer.](https://usermanual.wiki/Pantech/TX-215A.User-Manual-1/User-Guide-527430-Page-30.png)
![SETTINGS SETTINGSCH459CH458Backlights the display and key pad and activates dimming for easyviewing in dark places.BACKLIGHT2Select one of the following options with theNavigation Key.3Press [OK] to save it.1Press [MENU], then select “Settings & Tools”menu, press “Displays” then select “Backlight”, press “LCD”.LCDAlways On, Always Off, 5 Seconds, 15 Seconds, 30 Seconds.2Select one of the following options with theNavigation Key.3Press [OK] to save it.1Press [MENU], then select “Settings & Tools”menu, press “Displays” then select “Backlight”, press “Keypad”.KEYPADAlways On, Always Off, 5 Seconds, 15 Seconds, 30 Seconds.To adjust the display contrast:CONTRAST3Press [OK] to save it.1Press [MENU], then select “Settings & Tools”menu, press “Displays” then select “Contrast”.2Select “Main LCD” or “Sub LCD” then select oneof the following options with the Navigation Key.Leve 1 ~ Leve 5WALLPAPER1Press [MENU], then select “Settings & Tools”menu, press “Displays” then select “Wallpaper”.2Select Default to choose a pre-installed display,Downloads or Pix # to choose a display youhave downloaded to your phone.To launch “BREW”, press [GET NEW]. To expand selected image, press [VIEW].3Select a display from the Animation and theGraphic list using the Navigation Key and press [SET] to save it.](https://usermanual.wiki/Pantech/TX-215A.User-Manual-1/User-Guide-527430-Page-31.png)
![SETTINGS SETTINGSCH461CH460DISPLAY THEMES3Press [OK] to save it.1Press [MENU], then select “Settings & Tools”menu, press “Displays” then select “Display Themes”.2Select one of the following options with theNavigation Key.Theme 1 ~ Theme 4SCREENSAVER1Press [MENU], then select “Settings & Tools”menu, press “Displays” then select “Screensaver”.2Select Default to choose a pre-installed display,Downloads or Pix # to choose a display youhave downloaded to your phone.To launch “BREW”, press [GET NEW]. To expand selected image, press [VIEW].3Select a display from the Animation and theGraphic list using the Navigation Key and press [SET] to save it.FONTS1Press [MENU], then select “Settings & Tools”menu, press “Displays” then select “Fonts”.2Select “Normal” or “Large” with the NavigationKey then press [OK] to save it.Allows you to the power on animation.POWER ON/OFF ANIMATIONS1Press [MENU], then select “Settings & Tools”menu, press “Displays” then select “Power On/Off Animations”, press “Power On Animation”.POWER ON ANIMATIONAllows you to the power off animation.1Press [MENU], then select “Settings & Tools”menu, press “Displays” then select “Power On/Off Animations”, press “Power Off Animation”.POWER OFF ANIMATION3Press [OK] to save it.2Select one of the following options with theNavigation Key.Animation 1Animation 23Press [OK] to save it.2Select one of the following options with theNavigation Key.Animation 1Animation 2](https://usermanual.wiki/Pantech/TX-215A.User-Manual-1/User-Guide-527430-Page-32.png)
![SETTINGS SETTINGSCH463CH462SYSTEMSelects the Preferred System.SYSTEM SELECT1Press [MENU], then select “Settings & Tools”menu, press “System” then select “System Select”.3Press [OK] to save it.2Select one of the following options with theNavigation Key.Automatic BAutomatic AHome OnlyEnables Auto NAM (Number Assignment Modules) or manuallyselects a NAM.NAM SELECTION1Press [MENU], then select “Settings & Tools”menu, press “System” then select “NAM Selection”, press “Auto NAM”.3Press [OK] to save it.2Select one of the following options with theNavigation Key.NAM 1 - VERIZONNAM 2 - VERIZONAutomatically switches phone to proper NAM when you have multipleNAM registrations.AUTO NAM2Select “On” or “Off” with the Navigation Key thenpress [OK] to save it.1Press [MENU], then select “Settings & Tools”menu, press “System” then select “NAM Selection”, press “Change NAM”.Changes the NAM used by the phone when you have multipleregistrations.CHANGE NAM](https://usermanual.wiki/Pantech/TX-215A.User-Manual-1/User-Guide-527430-Page-33.png)
![SETTINGS SETTINGSCH465CH464Displays the information of your phone:DEVICE INFO1Press [MENU], then select “Settings & Tools”menu, press “System” then select “Device Info”, press “My Number”.Displays the your phone number (MDN/MIN number and provider) :MY NUMBER3To return to the previous page, press [OK].3To return to the previous page, press [OK].1Press [MENU], then select “Settings & Tools”menu, press “System” then select “Device Info”, press “SW Version”.Displays the (Software/PRL/ERI/Browser/Get It Now) version.SW VERSION2You are to see the Indicator Icons of yourcellular telephone.2You are to see the version of software,hardware and others.2You are to see the MDN/MIN number andprovider name.3To return to the previous page, press [OK].1Press [MENU], then select “Settings & Tools”menu, press “System” then select “Device Info”, press “Icon Glossary”.Displays the Indicator Icons of your cellular telephone.ICON GLOSSARYTo determine whether or not the network system can detect yourposition:LOCATION1Press [MENU], then select “Settings & Tools”menu, press “System” then select “Location”.3Press [OK] to save it.2Select one of the following options with theNavigation Key.Location On911 Only](https://usermanual.wiki/Pantech/TX-215A.User-Manual-1/User-Guide-527430-Page-34.png)
![SETTINGS SETTINGSCH467CH4664Press [OK] to save it.Device : Lock, Unlock, On Power UpLocation : Lock, UnlockPrevents unauthorized use of your phone. The following settings canbe restricted:Prevents the phone from being used without entering the password first.SECURITY1Press [MENU], then select “Settings & Tools”menu, press “System” then select “Security”, then enter your password, press [OK].3Select “On” or “Off” with the Navigation Keythen press [OK] to save it.2Select “Common Code”.COMMON CODEThe default password is the last 4 digit of your phone number.1Press [MENU], then select “Settings & Tools”menu, press “System” then select “Security”, then enter your password, press [OK].3Select “Device” or “Location” then select one ofthe following options with the Navigation Key.2Select “Lock Mode”.LOCK MODEThe default password is the last 4 digit of your phone number.4Enter a “New Lock Code” then press [OK]. 5Enter a “Confirm Lock Code” then press [OK]to save it. 1Press [MENU], then select “Settings & Tools”menu, press “System” then select “Security”, then enter your password, press [OK].3Select “Device” or “Location” then select one ofthe following options with the Navigation Key.2Select “Edit Code”.EDIT CODEThe default password is the last 4 digit of your phone number.Changes your Device/Location 4-digit password.](https://usermanual.wiki/Pantech/TX-215A.User-Manual-1/User-Guide-527430-Page-35.png)