Pantech TX-25B Tri-Mode Dual-Band Analog/PCS Phone (AMPS/CDMA) User Manual attachments
Pantech Co., Ltd. Tri-Mode Dual-Band Analog/PCS Phone (AMPS/CDMA) attachments
UserManual.wiki
>
Pantech
>
TX 25B User Manual
Users Manual
Navigation menu
Upload a User Manual
Namespaces
Wiki Guide
HTML
PDF
Info
Views
User Manual
Discussion / Help
Navigation


![7 When the battery is not in use, store it uncharged in a cool, dark anddry place.The battery is a sealed unit with no serviceable parts. Do not attemptto open the case.It is recommended that you allow your battery to fully discharge beforeyou recharge it.The battery can be charged and discharged hundreds of times but willeventually wear out. When the operating time is shorter than normal,it is time to buy a new battery.Do not dispose of a battery in a fire!Dispose of used batteries in accordance with local regulations.Recycle!CHAPTER 2BASIC OPERATION1. Turning the Phone On and Off2. How to Use the Menu3.3. Menu Summary4. Basic Functions5. Functions During a CallTURNING THE PHONE ON AND OFFTURNING THE PHONE ON1 Press [END/P]The phone is locked if “PASSWORD” is displayedon the screen. When “PASSWORD”is displayed, enter the 4-digit password to unlockthe phone.The default password is the last 4 digits ofyour phone number.TURNING THE PHONE OFF1 Press [END/P]until “Power Off” is displayed.• If the “LOW BATTERY WARNING POWEROFF”s displayed and the power goes off, there is a possibility of damaging the memory. Change or charge the battery immediately • If the battery is removed while the phone is on, it may erase last call information.HOW TO USE THE MENU1 In the standby screen, press and hold [· ·].2 Use the navigation keys or the volume keys to view the menuPress and hold down the keys to scroll through the menu3 To go back to previous screen, press [···].To the exit menu, press [END/P]4 To go into submenu press the correspondingnumber or select the desired item using thescroll key.5 [· ·], [···], and [t/u/ / /*/#] can be used while using the menu.](https://usermanual.wiki/Pantech/TX-25B/User-Guide-165836-Page-9.png)
![9 6:CLEAR 1:CLR PHONEBOOK 2:CLR SCHEDULE 3:CLR CALL LOGS 4:CLR HOME CALLS 5:CLR ROAM CALLS7:VERSIONBASIC FUNCTIONSMAKING A CALL1 Enter the phone number. How to modify the phone number You have entered: To erase the last number entered: Press , To erase all numbers entered and start again: Press and hold for more than half of a second.2 Press [SEND]. “CALL FAILED” message is displayed when the call does not connect.If the line is busy, press [END/P].Retry by pressing [SEND]. If you select the AUTO RETRY function, the call will be retried automatically for the time you have selected. Press [END/P] to end the call.BASIC FUNCTIONSPAUSE FEATUREPauses are used for automated systems (i.e., voice mail andcalling cards). To insert Pauses:1 Enter phone number, then press .2 Select desired pause.- When idling status; - When Receiving call status;1 : STORE 1:STORE 2 : BY NUMBER 2:SEND PHONE#3: HARD PAUSE 3:SCRATCH PAD4:ONE HYPHEN 4:MUTE 5:VIEW PHONE# 6:HARD PAUSE 7:ONE HYPHEN 8:VOICE PRIVACY Pause Definitions HARD PAUSE: If you enter the pause character (P). the number entered after the Pause character will be sent after the number dialed.3 Press [SEND] to dial or [1] to store.BASIC FUNCTIONSHOW TO ANSWER CALLS1 When phone rings or LED blinks press any keyexcept Volume or up , down.2 To end the call, press [END/P].If you set up the AUTO ANSWER function inadvance, the call will be answered after theselected number of rings. (Refer to page 21)CALLER ID FUNCTIONwhen there is an incoming call, thecaller’s phone number is displayedon the screen.The Caller ID number is saved in the call log.CALL WAITING FUNCTIONThis function notifies you there is an incoming call when youare on the phone. To answer the call, press [SEND] when you hear the beep. To switch back to the first caller, press [SEND] again.XXX-XXXX-XXXX CALL](https://usermanual.wiki/Pantech/TX-25B/User-Guide-165836-Page-11.png)
![10 BASIC FUNCTIONSMISSED CALL DISPLAY1 Displays the number of missedcalls and the time the call was missed.The message will be clearedwhen you press the or[END/P] key.HOW TO ADJUST VOLUMEYou can adjust the volume in two ways: by using the volumecontrol keys on the side of the handset, or by using the menu.1 Adjust volume by using the volume control keysduring the following operation. During a Call: Earpiece volume adjustment. Standby Status : Ringer volume adjustment. When the Phone Rings : Ringer volume adjustment. Call status in hands-free : Hands-free volume adjustment. Press [END/P] when the phone rings and it will mute the ringer.VIBRATENot an option-needs to be added to the phone.This function disables the ringer and vibrates the phone anytime an incoming call is in process. To enable this functionpress , [3], [1] and select VIBRATE or by pressingthe “up” and “down” keys at the left upper side of the phone.FUNCTIONS DURING A CALLSENDING YOUR NUMBER TO A PAGERThis function enables the phone number of the handset to betransmitted automatically to a pager, depending on pager service.1 After calling a pager, when you are asked toenter your number, press and hold then [1] “SEND PHONE #”SCRATCH PAD1 While in a call press and hold ,then [2] “SCRATCH PAD”2 Enter the phone number, then press FUNCTIONS DURING A CALLMUTE1 Press , then [3] “Mute”. To unmute, press , then [3] “Mute” again.](https://usermanual.wiki/Pantech/TX-25B/User-Guide-165836-Page-12.png)
![11 CHAPTER 3MEMORY FUNCTION1 How to Store a Phone Number2 How to Make a Call Using a Stored Phone Number3. How to Find Your Call Logs4 How to Find Your Phone BookHOW TO STORE A PHONE NUMBERYou can store up to 100 frequently used phone numbers in memory.1 Enter the phone number( more 3 digits)you want to store and press . then [1]“Store”.The first available Initial empty memory location number is displayed.If there is no empty location, “MEMORY IS FULL!” is displayed with awarning sound.If there is a desired memory location number, enter the number.2 If the “XX LOCATION IS USED” messageappears after entering the memory locationnumber, it means there is another storedphone number in that location already.3 Enter the person’s name and press .4 Search mobil/office/home type andthen press 5 To make secret, select Yes. It canthen be displayed only when the lock onlycode is entered.HOW TO STORE A PHONE NUMBERHOW to enter letters and characters using the dial buttons1. Select characters you wish to enter using the keypad.Key Pad 1Repetition 2Repetition 3Repetition 4Repetition 5Repetition1 12ABC AB C 23DEF DEF34GHI G H I4 LOCATION : XX XXX-XXXX-XXXXXX LOCATIONIS USEDLOCATION : XXNAME?PHONE_NUM TYPE ?4MOBILEMAKE SECRET4NO](https://usermanual.wiki/Pantech/TX-25B/User-Guide-165836-Page-13.png)
![12 You can changed the character mode by pressing .2. When entering any special characters such as 0.,?!@_+-=()*#:;%/,press numeric key associated with it in special mode where specialcharacters are displayed on the top of the screen3. Press [ ] / [ ] key different special characters.4. Press [##] to enter the next character. Cursor moves to the next column automatically in two seconds5. Repeat until all the characters you want are entered. You can store up to 16 characters.6. Erasing Entry: To erase one letter, press [CLR] To erase the entire entry, press and hold [CLR]HOW TO MAKE A CALL USING ASTORED PHONE NUMBERONE TOUCH/TWO TOUCH DIALINGThis feature allows the phone book entries to be dialed via the keypad.ONE TOUCH DIALING:1-9 : Press corresponding memory number and hold for more than 1 second.TWO TOUCH DIALING:00, 10-99 : press the first digit and second digits of the memory numbershort and long respectively. If no phone number is stored in the location depressed, “EmptyLocation” will appear on the screen. If a phone number is stored in the secret location, the number isnot displayed when making a call.One touch dialing must be turned on in thehandset. See page 22.HOW TO FIND YOUR CALL LOGSYour phone can display the 10 most recent missed, incoming,outgoing calls. You can call those numbers without dialingtheir whole number.MISSED CALLS1 Press then [1] then [1] then [1]2 Press to check the detail informationabout phone number.The last missed call, its phone number,time and date are displayed.3 To check your missed calls using the scroll keys:[[*]] Scrolls up the phone numbers.[##] Scrolls down the phone numbers.4 Press [SEND] to dial desired missed call numberHOW TO FIND YOUR CALL LOGSANSWERED CALLS1 Press then [1] then [1] then [2].( Refer to previous page)Press [SEND] to dial desired answered call number (Refer to previous page)h The last answered call, its phone number, time and date are displayed.DIALED CALLS1 Press then [1] then [1] then [3]. Press [SEND] to dial desired dialed call number (Refer to previous page)h The last outgoing call, its phone number, time and date are displayed.4[01] XXXXXXXX4[02] XXXXXXXXXX4[03] XXXXX10/14, 13:14[01]XXX-XXX-XXXXMISSED CALL](https://usermanual.wiki/Pantech/TX-25B/User-Guide-165836-Page-14.png)
![13 HOW TO FIND YOUR PHONE BOOKRECALLING BY MEMORY LOCATION NUMBER1 Press then [1] then [2].2 Enter the memory location number.If you don’t enter a specific memory locationnumber, use the scroll key to search from thefirst memory location number.3 Search phone numbers using scroll key.[55]/[66] scrolls up the phone numbers. edit the phone #. erase the phone #.[**]/ [##] search mobile/office/home number.4 Press [SEND] to dial desired phone book number.HOW TO FIND YOUR PHONE BOOKRECALLING BY NAME1 Press then [1] then [3]2 Enter the alpha (or part of the alpha).Then press .3 To locate the phone number using the scroll key.[**]/ [##] search phone number. edit the phone #. erase the phone #.[55]/[66] search mobil/office/home number4 Press [SEND] to dialCHAPTER 4MENUPlease read this chapter before using this product.1. Settings2. Backlight3. Display4. Tone5. Timers6. Alerts7. Data Service8. Change System9. Phone InfoSEARCHLOCATION ?SEARCHRECALL NAME ?](https://usermanual.wiki/Pantech/TX-25B/User-Guide-165836-Page-15.png)
![14 SETTINGSAUTO RETRYWhen a call is not connected, this function retries the callautomatically at a set interval or amount or retries.INTERVAL1 Press then [2] then [1] then [1]2 Select the parameter (OFF, 5, 10, 20, 30 seconds) by using the scroll,Key Press .REPEAT1 Press then [2] then [1] then [2]2 Select the parameter (1, 5, 10 times) by using the scroll,Key Press .SETTINGSAUTO ANSWERThis function answers an incoming call automatically after anumber of rings that the user sets.1 Press then [2] then [2]2 Select the parameter(NO USE, 1, 3 RINGS)by using the scroll keys.Press to set.Auto answer function does notwork if you select lamp.SETTINGSONE TOUCH DIALINGThis function allows the phone book entries to be dialed viathe keypad.1 Press then [2] then [3]2 Select the parameter(NO,YES)by using the scroll keys. Press .VOICE PRIVACY1 Press then [2] then [4]2 Select the parameter (STANDARD, ENHANCED)by using the scroll keys. Press .AUTO ANSWER4 NO USE](https://usermanual.wiki/Pantech/TX-25B/User-Guide-165836-Page-16.png)
![15 BACKLIGHTLIGHTING LENGTHThis function allows you to adjust time to light up the screen, so thatyou can conveniently use the phone even in dark places.1 Press then [2] then [5]2 Select the parameter (OFF, OFF IN DAY, 10 SECS, 5 SECS,SECS) by using the scroll keys. Press . DISPLAYLCD CONTRASTThis function adjusts the LCD screen contrast1 Press then [2] then [6]2 Select the contrast levelby using the scroll keys Press .LANGUAGEThis function changes the language of the phone1 Press then [2]then [7]2 Select the parameter (ENGLISH, SPANISH)by using the scroll keys. Press .TONERINGER MODE1 Press then [3] then [1]2 Select the parameter (RINGER, SLIDE BELL, VIBRATOR,SILENT, BELL AFTER VIB) by using the scroll keys.3 Press .RINGER TYPE1 Press then [3] then [2]2 Select the parameter (1-18) by usingthe scroll keys.6 Different tones (1-6).12 Different melodies (7-18).3 Press TONELANGUAGE4ENGLISH LCD CONTRAST4<<<oooo](https://usermanual.wiki/Pantech/TX-25B/User-Guide-165836-Page-17.png)
![16 KEYPAD1 Press then [3] then [3] the volume of for keypad If the warning alarm sounds because of lowbattery, the sound will not be heard even ifthe user presses the button.2 Select the volume level by using the scroll keys.[[##]/[55] scroll up to increase volume.[**]/[66] scroll down to lower volume, or setting to Silent.3 Press CALL TIMERSLAST CALL1 Press then [4] then [1]ALL CALLS1 Press then [4] then [2]HOME CALLS1 Press then [4] then [3]ROAM CALLS1 Press then [4] then [4]ALERTSMIN ALERT1 Press then [6] then [1]This function sounds an alert inevery minute, letting you knowthe call elapse time.Select the parameter (RELEASE, SETTING) by using thescroll keys. Press .ROAM ALERTThis function sounds an alert and gives out a message when thehandset enters a new service area, when it enters another servicearea, or when it leaves the user service area.1 Press then [6] then [2]2 Select the parameter (RELEASE, SETTING) by using thescroll keys. Press .ALERTSFADE ALERTThis function sounds alert when the phone can make calls MIN ALERT4SETTING ROAM ALERT4SETTING](https://usermanual.wiki/Pantech/TX-25B/User-Guide-165836-Page-18.png)
![17 due to poor signal strength during an idle state.1 Press then [6] then [3]2 Select the parameter (RELEASE, SETTING) by using thescroll keys. Press .LOW SIGNAL ALERTThis function sounds alert when the signal of a received call is weakduring a call.1 Press then [6] then [4]2 Select the parameter (RELEASE, SETTING) by using thescroll keys. Press .ALERTSCONNECT ALERTThis function sounds an alert when the signal of a received call is weak.1 Press then [6] then [5]2 Select the parameter (Off , Low, Mid, High) by using thescroll keys. Press .DATA SERVICERECEIVE MODE1 Press then [7] then [1]2 Select the parameter (Inactive, Data, Fax) by using thescroll keys. Press .Inactive : When you use telephoneData : When you use dataFax : When you use faxCHANGE SYSTEMPREFERRED SYSTEMThis is function selects the Preferred system.1 Press then [8] then [1] FADE ALERT4SETTING LOW SIG ALERT4SETTING Connect Tone4Off Receive Mode4Inactive Pref System4Automatic A](https://usermanual.wiki/Pantech/TX-25B/User-Guide-165836-Page-19.png)
![18 2 Select the system (Automatic A, Automatic B, Home only) by using thescroll keys. Press .CHANGE NAMThis is a function changes the NAM.1 Press then [8] then [2]2 Select the NAM (NAM1, NAM2) by using thescroll keys. Press .CHANGE SYSTEMAUTO NAMThis function activate AUTO NAM.1 Press then [8] then [3]PRL IDThis function identifiles the current Preferred Roaming List ID.1 Press then [8] then [4]FORCE ANALOGThis function changes FORCE ANALOG.1 Press then [8] then [5]PHONE INFOCHECKING MY NUMBERThis is a function to check the telephone number of the handsetcurrently in use.1 Press then [9]CHAPTER 5SECURITY FEATURES1. How to Lock Your Phone2. How to Change Your Banner3. How to Restrict Your Phone4. How to Reset Your Phone5. How to Clear Your Phone Memory DIGITAL 000 000-0000NAM1 Auto NAM4NoPRL ID0](https://usermanual.wiki/Pantech/TX-25B/User-Guide-165836-Page-20.png)
![19 HOW TO LOCK YOUR PHONEAUTO LOCKThis function prevents any other person from using the handset withoutpermission. When it is locked, the handset can be used to dialor use any other function.1 Press then [0] thenenter [PASSWORD] then [1]The default password is thelast 4 digits of your phone number.2 Select the parameter (OFF, POWER ON, ON)parameter by using the scroll keys. Press .”POWER ON? “ locks the handset upon poweringon the handset each time.”OFF?” unlocks the handset and leaves itunlocked. Incoming calls, emergency dialing and alarm functionsare enabled when the handset is locked.HOW TO LOCK YOUR PHONELOCK CODE CHANGEThis function is used to change the 4-digit lock code.1 Press then [0] then enter[PASSWORD] then [2]The default password is the last 4 digits ofyour phone number.2 Enter 4-digit new “PASSWORD”.3 Re-enter the new “PASSWORD”. Press .4 The display will read “PASSWORD “ changed.HOW TO CHANGE YOUR BANNERBANNER CHANGEThis function changes the banner displayed on the LCD.You can enter a banner up to 16 characters long.1 Press then [0]then [PASSWORD]then [3]2 Enter a banner using instructions for alpha keys on page 17. AUTO LOCK ?4OFF BANNERXXXXXXX](https://usermanual.wiki/Pantech/TX-25B/User-Guide-165836-Page-21.png)
![20 HOW TO RESTRICT YOUR PHONERESTRICTION FUNCTIONS You can restrict six different functions1 Press then [0] thenenter [PASSWORD] then [4].The default password is thelast 4 digits of your phone number.2 Using the scroll buttons, select” YES”Press .TO RESTRICT INCOMING CALLSWhen this function is enabled, the phone does not respond to incomingcalls. However, outgoing calls can still be made.1 Press key [1] “INCOMING”2 Select the parameter by using the scroll keys.RESTRICT: to restrict incoming calls.ALLOW: to allow incoming calls.3 Press .HOW TO RESTRICT YOUR PHONERESTRICTING OUTGOING CALLS When this function is enabled, incoming calls can be answered, butoutgoing calls cannot be made. It is still possible to make emergencycalls.1 Press key [2] “OUTGOING?2 Select the parameter by using the scroll keys.RESTRICT: to restrict outgoing calls.ALLOW: to allow outgoing calls.3 Press .RESTRICTING THE PHONE BOOKThis function blocks the storage of phone numbers or the use ofstored phone numbers.RESTRICTING THE PHONE BOOK1 Press key [3] “MEMORY ONLY”The default password is the lastdigits of your phone number.2 Select the parameter by using the scroll keys.RESTRICT: restricts phone book.ALLOW: allows phone book use.3 Press .HOW TO RESTRICT YOUR PHONERESTRICTING LONG DISTANCE CALLS1 Press key [4] “LONG DISTANCE”2 Select the parameter by using the scroll keys.RESTRICT: restricts long distance calls.ALLOW: allows long distance calls.3 Press . RESTRICT ?4 YES INCOMING ?4 ALLOW OUTGOING ?4 ALLOW MEMORY ONLY ?4 ALLOW LONG DISTANCE ?4 ALLOW](https://usermanual.wiki/Pantech/TX-25B/User-Guide-165836-Page-22.png)
![21 RESTRICT CALLS TO 900 NUMBERSRESTRICT CALLS TO 900 NUMBERS1 Press key [5] “900 #’s”2 Select the parameter by using the scroll keys.RESTRICT: restricts 900 service.ALLOW: allows 900 service.3 Press .The message “THIS Phone’s RESTRICTED” isdisplayed on the screen.HOW TO RESET YOUR PHONE This function resets each value set in the memory to its default value.1 Press then [0] then[PASSWORD] then [5].2 Select the parameter by using the scrollkeys. Press .If you select “YES” thefollowing screen is displayed,and then the phone will beautomatically turned off.HOW TO CLEAR YOUR PHONE MEMORYCLEARING STORED PHONE NUMBERS This function clears all stored numbers.1 Press then [0] then enter[PASSWORD] then [6] then [1].The default password is the last 4digits of your phone number.2 Select the parameter (NO, YES) byusing the scroll keys. Press .CLEARING STORED PHONE NUMBERSCLEARING SCHEDULESThis function clears air time used in other service areas1 Press then [0] then enter[PASSWORD] then [6] then [2].The default password is the last 4digits of your phone number.2 Select the parameter (NO, YES) byusing the scroll keys. Press . 900#’S ?4 ALLOW RESET SETTING ?4 NO CLR PHONE NO ?4 NO CLR SCHEDULE?4 NO](https://usermanual.wiki/Pantech/TX-25B/User-Guide-165836-Page-23.png)
![22 MEMORY CLEARING FUNCTIONCLEARING DIALED NUMBER IN CALLLOGSThis function clears dialed number in call logs1 Press then [0] then enter[PASSWORD] then [6] then [3]The default password is the last 4digits of your phone number.2 Select the parameter (NO, YES) byusing the scroll keys. Press .CLEARING AIR TIME IN HOME SERVICE AREAThis function clears air time used in home service area1 Press then [0] then enter[PASSWORD] then [6] then [4]The default password is the last 4digits of your phone number.2 Select the parameter (NO, YES) byusing the scroll keys. Press .MEMORY CLEARING FUNCTIONCLEARING ROAM CALLSThis function clears air time used in other service areas1 Press then [0] then enter[PASSWORD] then [6] then [5].The default password is the last 4digits of your phone number.2 Select the parameter (NO, YES) byusing the scroll keys. Press . CLR CALL LOGS?4 NO CLR HOME?4 NO CLR ROAM?4 NO](https://usermanual.wiki/Pantech/TX-25B/User-Guide-165836-Page-24.png)
![23 CHAPTER 6SUPPLEMENTARY FUNCTIONS1. Schedule2. Stopwatch3. Calculator4. Bio-RhythmSCHEDULEVIEW SCHEDULE LIST1 Press then [5] then [1], then [1].By pressing the , you can view more details about eachitemINPUT SCHEDULE1 Press then [5] then [1], then [2].2 Select the date in calendar and press the [55]/[66] : month input[]/[ ], numeric key : day input.3 Press [1], and select the alarm type parameter(one timeor day)To set the schedule title, press [2] and input theschedule title.To set reserved call, press [3] and input the phonenumber.](https://usermanual.wiki/Pantech/TX-25B/User-Guide-165836-Page-25.png)
![24 Then press .SCHEDULEPAUSE ALL SCHEDULE1 Press then [5] then [1], then [3].2 Select the parameter(No, Yes) by using thenavigation key. press](https://usermanual.wiki/Pantech/TX-25B/User-Guide-165836-Page-26.png)
![25 STOPWATCH1 Press then [5] then [2].2 Press / to control the stopwatch. controls Start / Stop Split / SplitRelease / Initiate / Previous.The time unit displayed on the LCD in1/ 100 of a second.3 Press [END] to exitand return to the initial display.CALCULATION1 Press then [5] then [3].2 Using the calculator. - Definitions+ : [55], - : [66], : [[*]]: [ # ], = : , . : [SEND]- Up to 7To express a negative number, use ‘0-value’.There are no decimal points to enter.You can only enter integer numbers- EXAMPLETo calculate 128 32 =1. Enter 1282. Press [[*]]3. Enter 324. Press CALCULATOR 0.0 : 00 : 00 : 00](https://usermanual.wiki/Pantech/TX-25B/User-Guide-165836-Page-27.png)
![26 BIO-RHYTHMThis function identifies the biorhythms of today or a specific day usingsolar calendar.1 Press then [5] then [4].2 Press [3] “BIRTHDAY?”. Enter your solar calendar birthdayin year/month/date, and thenpress .3 . To find out today bio-rhythm, select TODAYTo find out biorhythm of a specific day, select SOMEDAY. Bio-rhythm function is available onlywhen the phone can register thecurrent time from the network system. For Some Day Bio, you cannot enterthe dates before your birthday.. For Birthday, you cannot enter thedates later than today’s date. Physical, Emotional and intelligent quotients appear with a number showing how many dayshave passed since your birthdate for the date you want to find out Bio-rhythm displayed on thetop portion of the screen.. What is Bio-rhythm?Biorhythm is a life rhythm, which is governed by three rhythm curves called physical, emotional,and intelligent and starts from our body from our birth to death.1 Physical rhythm :- This rhythm controls wide-ranging physical elements related to resistance to diseases, physicalstrength, adjustment of muscle exercise, speed, physiology and other basic physical functionswith a cycle of 23 days.2 Emotional rhythm. : This rhythm adjusts creativity, sensitivity, mental health and recognition aboutworld and humanswith a cycle of 28 days.3 Intelligent rhythm. :- This rhythm affects our memory, susceptibility to fright, acceptance of knowledge and logical andanalytic power with a cycle of 33 days.CHAPTER 7VOICE MAIL AND TEXT MESSAGESThis chapter describes convenient functions that allow you to checkvoice mail and receive text messages with the handset.1. Receiving a Message2. Voice mail3. Send New(Sending Message)4. Inbox(Checking Received Message)5. Outbox(Checking Sent Message)6. Setting7. Filed8. Erase Message 9. ReferenceRECEIVING A MESSAGE1 When a message is received, the followingmessage. Displayed.2 Press [SEND] to display the receivedmessage. 1:TODAY 2:SOMEDAY 3:BIRTHDAYXX NEW TEXTXX VOICEFR: XXX-XXX-XXXX :Test1 :Test2](https://usermanual.wiki/Pantech/TX-25B/User-Guide-165836-Page-28.png)
![27 VOICE MAILCHECKING RECEIVED VOICE MAIL MESSAGE1 Press , then press [1] “voice mail”the number of voice mail messagescurrently received in your voice mailboxis receved.To access your voice mailbox,press [SEND]SEND NEWSENDING TEXT MESSAGE1 Press then press [2] ”Send New”2 Input phone number,Then press [STO]3 Input text message,Then press [Next].4 4.1 To send the next message,press [SEND] or [1] “Send”if message sending is fails, you choose auto retry sendingfunction. Then press [YES]4.2 If you want to change recipient, then press [2] “Edit Recipient”.Input phone number, then press [NEXT]Input text message, then press [NEXT]SEND NEW4.3 To change the text message, press [3] “Edit Message:.Input text message, then press [NEXT]4.4 To sent urgent message, then press [4]“priority”.Then select the parameter (Normal/ Urgent)by using the navigation key. Press [SEL]4.5 To change call back number, press[5],“Call back”.Input call back number, then press [NEXT]4.6 To save the text message, then press[6] “Save”.4.7 To confirm the sending message, press[7] “Delivery Ack”.Then select the parameter (Yes/No) byusing the navigation key. Press [SEL]INBOXCHECKING RECEIVED TEXT MESSAGE1 Press then press [3] ”Inbox”1 Voice Mail12/29 AM 08:47To LISTEN Press [SEND]CB : *86 Sending message MESSAGE?TestSend To 12312345678Delivery FailedRetry in 3 mins?Send To 12312345678 MESSAGE?TestPriority?4 Normal MESSAGE?TestCall back No.?xxxxxxxxxxDelivery Ack4 NoMessage savedIn ‘outbox’folder](https://usermanual.wiki/Pantech/TX-25B/User-Guide-165836-Page-29.png)
![28 : Urgent New Message : New Message : Old Msg(read) : Lock (read)2 Press [SEL].Then press [OPTS]3 3.1 The text message, press [1] “Reply”.Then press [Next].3.2 To erase the text message, press [2],then press [YES]1: Reply2: Erase3: Forward4: Save5: Save address :Test1 :Test2 : Text Message Test1FR : XXX-XXX-XXXX02/20 09:36AM MESSAGE?EraseThis Message?This MessageIs Erased](https://usermanual.wiki/Pantech/TX-25B/User-Guide-165836-Page-30.png)
![29 INBOX3.3 To forward the text message, press [3]then input the phone number and textmessage.3.4 To save the text message, press [4]3.5 To save address the text message’s Call backNO. in a memory location, press [5].(phone book storing flows)3.6 To lock or unlock the text message,press [6].Then select the parameter(Lock/ Unlock) by usingthe navigation key, then press [SEL]OUTBOXCHECKING SENT TEXT MAIL MESSAGE1 Press then press [4] ”Outbox”select the stores message by usingnavigation key. Then, press [SEL] : Pending and will besent later : Not deliverd : Sent to BS : Receives recipient : Not sent2 Press [SEL].The text message is displayed.Then press [OPTS]3 3.1 To resend the text message, press [1] .INBOX3.2 To erase the text message, press [2] thenpress [SEL]. MESSAGE?SMS Test :OUTBOXTest1 :OUTBOXTest2 :OUTBOXTest3 : Text Message OUTBOXTest1To : XXX-XXX-XXXXCB: 123456789002/20 09:36AMSending Message Message is SentSend To 123 :Test1 :Test2 :Message saved in‘filed’ folder :Test1 :Test2 :Message Lock?4Lock :OUTBOXTest1 :OUTBOXTest2EraseThis Message?](https://usermanual.wiki/Pantech/TX-25B/User-Guide-165836-Page-31.png)
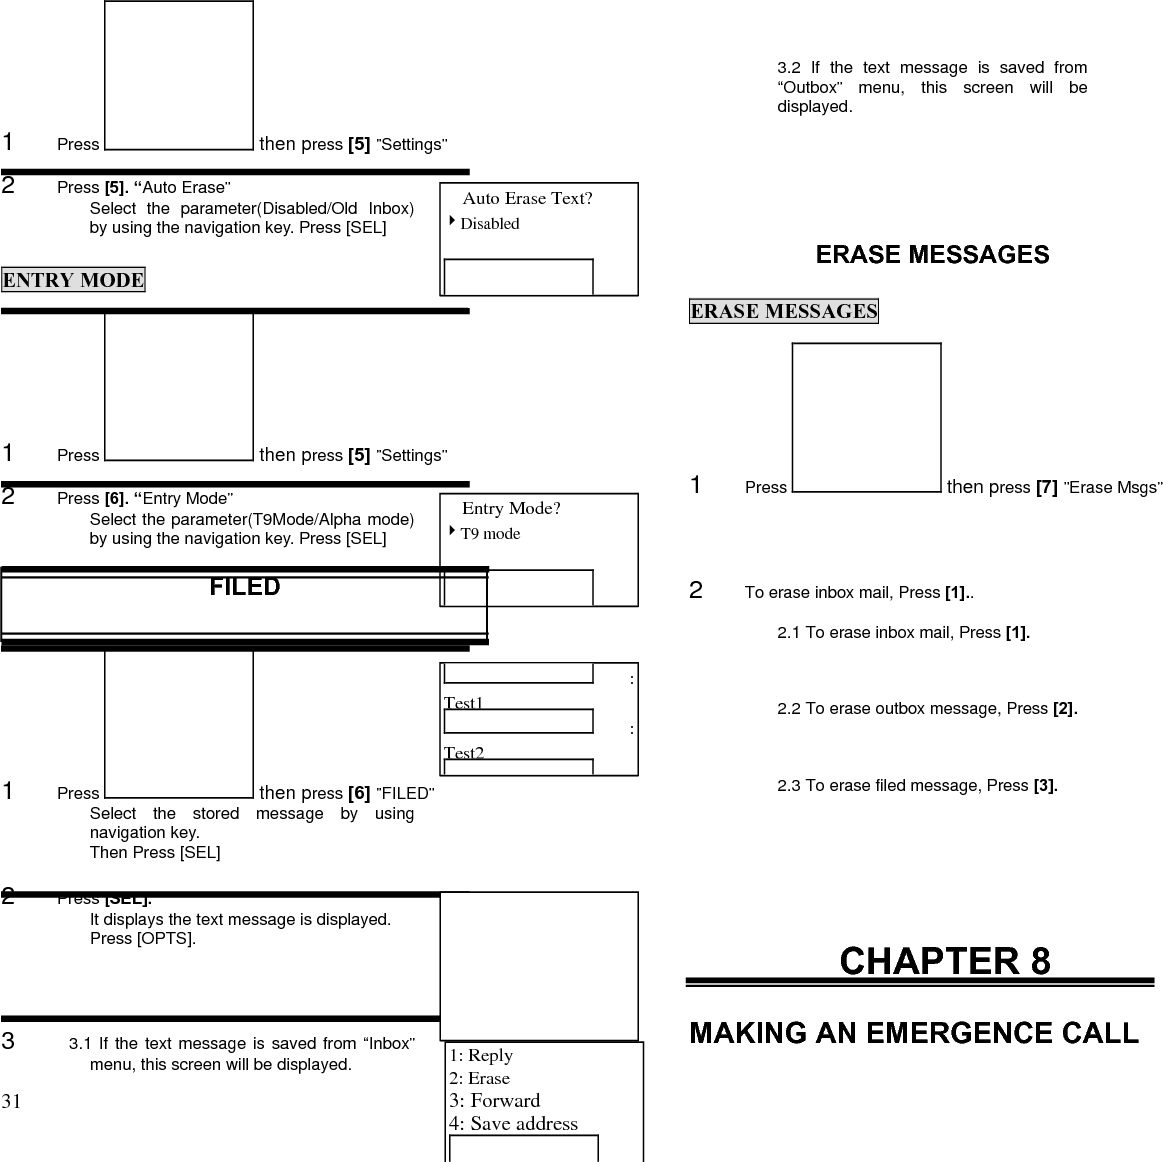
![30 3.3 To send to the text message, press [3].Then in the phone number and text message.3.4 To save the text message, press [4]3.5 To display sent message state, press [5].SETTINGSSAVE SENT MESSAGE1 Press then press [5] ”Settings”2 Press [1]. “save sent Msg?”.Select the parameter(No / Yes / Prompt)by using the navigtaion keys.Press [SEL].DEFAULT CALL BACK NUMBER1 Press then press [5] ”Settings”2 Press [2]. “Default CB#?”.Write Callback number, thenPress [NENT].MESSAGE ALERT1 Press then press [5] ”Settings”2 Press [3] “Message Alert”Select the parameter(Ringer/Silent/Vibrate)by using the navigation key. Press [SEL]DELIVERY ACK1 Press then press [5] ”Settings”2 Press [4]. “Delivery Ack”Select the parameter(Yes/No) by using thenavigation key. Press [SEL]AUTO ERASE MESSAGE?OutboxTest5Send To 1231234567Message saved in‘filed’ folder :OUTBOXTest1 :OUTBOXTest2 :OUTBOXTest3 :Cause_code : XXError_class : XXSave sent Message?4NOCallback No?XXXXXXXXXXSet Bell?4RingerDelivery Ack?4No](https://usermanual.wiki/Pantech/TX-25B/User-Guide-165836-Page-32.png)
![31 1 Press then press [5] ”Settings”2 Press [5]. “Auto Erase”Select the parameter(Disabled/Old Inbox)by using the navigation key. Press [SEL]ENTRY MODE1 Press then press [5] ”Settings”2 Press [6]. “Entry Mode”Select the parameter(T9Mode/Alpha mode)by using the navigation key. Press [SEL]FILED1 Press then press [6] ”FILED”Select the stored message by usingnavigation key.Then Press [SEL]2 Press [SEL].It displays the text message is displayed.Press [OPTS].3 3.1 If the text message is saved from “Inbox”menu, this screen will be displayed.3.2 If the text message is saved from“Outbox” menu, this screen will bedisplayed.ERASE MESSAGESERASE MESSAGES1 Press then press [7] ”Erase Msgs”2 To erase inbox mail, Press [1]..2.1 To erase inbox mail, Press [1].2.2 To erase outbox message, Press [2].2.3 To erase filed message, Press [3].CHAPTER 8MAKING AN EMERGENCE CALLAuto Erase Text?4DisabledEntry Mode?4T9 mode :Test1 :Test2 :1: Reply2: Erase3: Forward4: Save address Text Message Test1FR : XXX-XXX-XXXX02/20 09:36AM1: Reply2: Erase3: Send To4: State1: Inbox (XX)2: Outbox (XX)3: FiledErase Inbox?4NoErase Outbox?4NoErase filed?4No](https://usermanual.wiki/Pantech/TX-25B/User-Guide-165836-Page-33.png)
![33 Making an Emergence callThis is the enhanced 911 feature.E911 IN LOCK MODE1 Enter 911 and press [SEND].When a call ends, the phone returns to the emergency mode..2 Reserve Emergency modeduring 5 minutes.Making an Emergence callE911 USING ANY AVAILBLE SYSTEM1 Enter 911 and press [SEND].When a call ends, the phone returns to the emergency mode.The phone tries to make anemergency call using any available system.2 Reserve Emergency modeduring 5 minutes.CHAPTER 9SAFETY1. Safety information for Wireless Handheld Phones2. Safety Information for FCC RF Exposure](https://usermanual.wiki/Pantech/TX-25B/User-Guide-165836-Page-35.png)