Pantech TX-50C Tri-Mode Dual Band Cellular Phone User Manual
Pantech Co., Ltd. Tri-Mode Dual Band Cellular Phone
UserManual.wiki
>
Pantech
>
TX 50C User Manual
User Manual
Navigation menu
Upload a User Manual
Namespaces
Wiki Guide
HTML
PDF
Info
Views
User Manual
Discussion / Help
Navigation
![AUDIOVOX AUDIOVOX [CDM-8500][CDM-8500][Dual/Tri Mode] Digital [CDMA/Amps]Handheld Portable TelephoneIn today’s fast paced world, it has become a necessity tohave access to real time information. Your communicationstools must provide you with this access from anywhereat anytime. With that in mind, Audiovox developed the[CDM-8500], a [dual/tri mode] handset with [web brows-ing and voice activated dialing] features.Operating on the [800 MHz Amps/CDMA and 1900 MHzPCS] frequencies, the [CDM-8500] allows for seamlessnationwide coverage as well as offering state-of-the-art,user-friendly features. [Voice activated dialing and 2-wayspeakerphone] are great for enhancing [hands-free use]of this phone. [T9TM Text Input, vibrating alert and a 7-lineLCD display] make the [CDM-8500] easier to use. Several optional accessories are available for the [CDM-8500], including: [hands-free devices (installed, earphonemicrophone, cigarette lighter charger), charging devices(vehicle, travel, desktop, AC), data interface cables, beltclips, and of course user-changeable faceplates.]Your new [CDM-8500] provides you with something onlyan Audiovox phone can: the proven reliability that hasmade us a leading wireless handset provider. Pleasetake a few moments to read the following pages of theowner’s manual. It will help you make the most efficientuse of this valuable communications tool.Preface 50Bmanual template7/26 2002.7.26 5:35 PM Page 1](https://usermanual.wiki/Pantech/TX-50C/User-Guide-262532-Page-1.png)
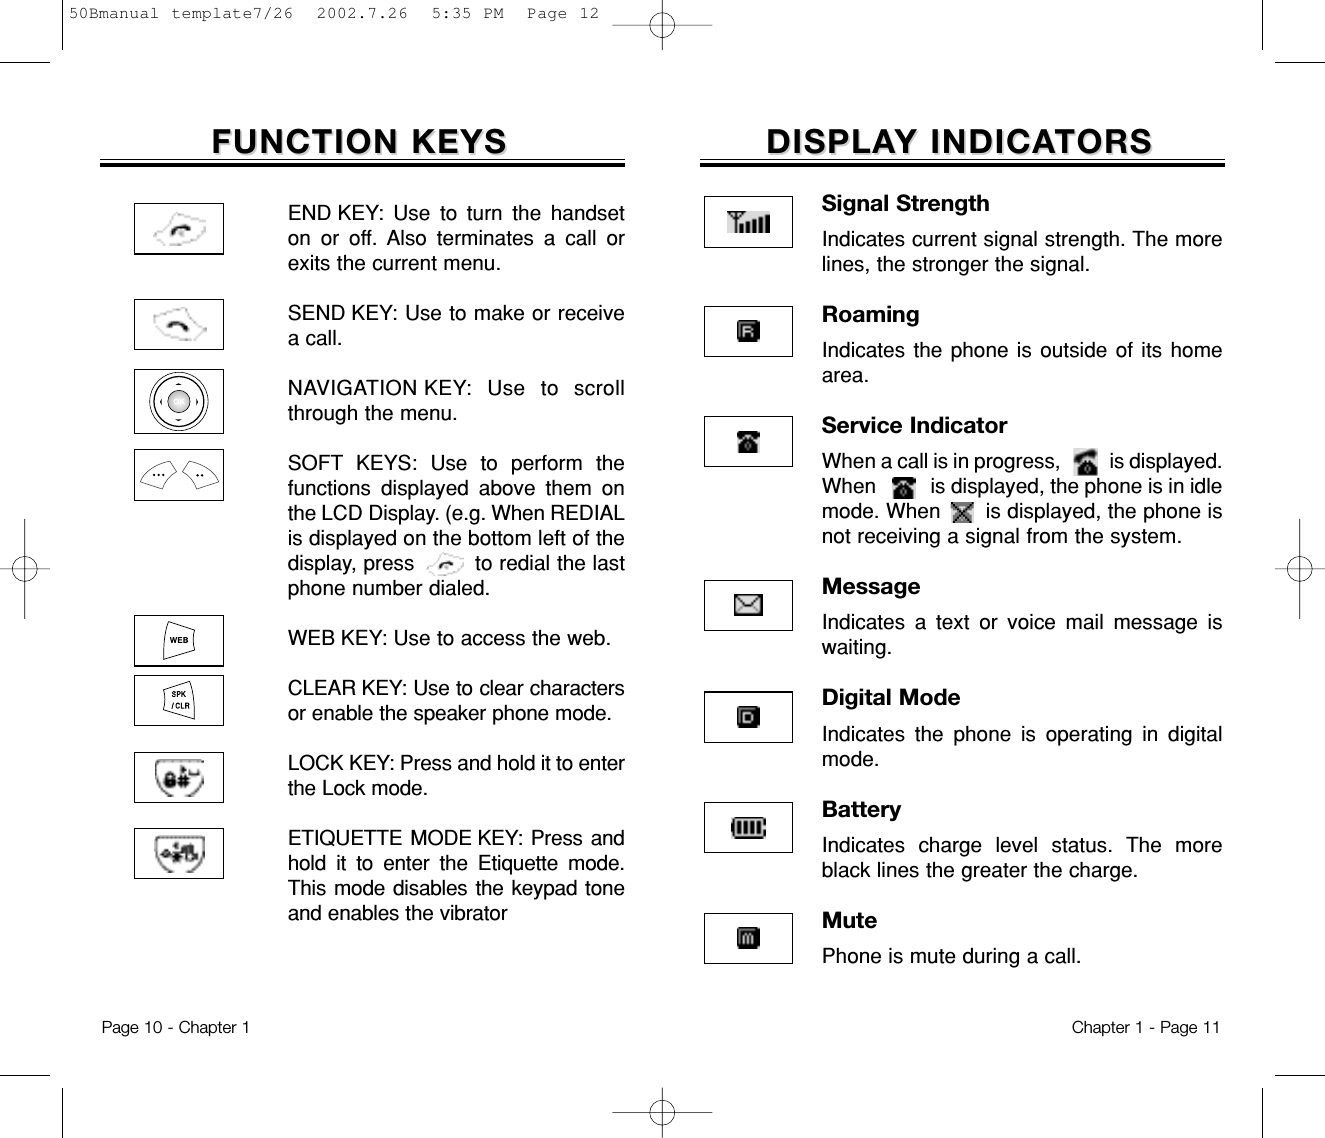
![HANDSET DESCRIPTIONHANDSET DESCRIPTIONVolumeButtonAdjusts theearpieceand ringervolume.EarpieceFunctionKeysKeypadMicrophoneThis phone is a [dual] mode [(800 Amps/800CDMA)][CDMA] digital phone [with data and web browsingcapabilities]. The [CDM-8500] weighs ___ oz. and thedimensions are ___ x ___ x ___.Chapter 1 - Page 9PPACKAGE CONTENTSACKAGE CONTENTSThank you for purchasing the [CDM-8500] wireless hand-set. The phone’s giftbox contains all of the items listedbelow.NOTE: Report any product defects to the place ofpurchase immediately.User Manual Desktop ChargerHand strapHandsetStandard BatteryPage 8 - Chapter 1AntennaFor best callquality, extendthe antenna during the call.LCDDisplay50Bmanual template7/26 2002.7.26 5:35 PM Page 10](https://usermanual.wiki/Pantech/TX-50C/User-Guide-262532-Page-6.png)
![TEXT INPUT METHODSTEXT INPUT METHODSKey Pad12ABC3DEF4GHI:9WXYZ1 Repetition1ADG:W2 RepetitionsBEH:X3 RepetitionsCFI:Y4 Repetitions234:Z5 Repetitions:9ENTERING CHARACTERS Your phone offers several text input methods for convenienttext entry of memory location names and messagecomposition. Alpha mode [ABC] allows you to enterwords by tapping the corresponding key repeatedly untilthe desired character is displayed. T9TM mode [T9ABC]allows you to tap each key only once and predicts theword you are entering. Numeric mode [123] allows youto enter numbers only and Symbol mode [SYM] allowsyou to enters symbols like @, #, %.- Cursor moves to the next column automatically twoseconds after character input. - To erase one letter, press .- To erase the entire entry, press and hold .- To switch between lowercase to uppercase letters,press .Alpha Mode [ABC]To choose Alpha mode, press then choose [ABC]. Thechart below outlines the key presses needed to displayeach letter or number in this mode.Chapter 3 - Page 332. Enter the person’s name and press .3. To mark the phone number as Secret, select Yes. - Marking a phone number as Secret means that thenumber can only be displayed after the lock code hasbeen entered.STORING PHONE NUMBERSSTORING PHONE NUMBERSYou can store up to XX frequently used phone numbersinto your phone’s memory.1. Enter the phone number, including area code andpress .- The next available empty memory location number isdisplayed. If there are no empty locations, “MEMORYISFULL!” is displayed with a warning sound.- If you wish to save the phone number into a specificmemory location, enter that number when the locationnumber is highlighted.NOTE:If “XX LOCATION IS USED” appears on the displayafter entering the memory location number, itmeansthere is another stored phone number in thatlocation already.Page 32 - Chapter 350Bmanual template7/26 2002.7.26 5:35 PM Page 34](https://usermanual.wiki/Pantech/TX-50C/User-Guide-262532-Page-18.png)
![1. Press each key once for each letter of the word youare writing.-To write John with the English dictionary selected:1. Press 5 once - (for J)2. Press 6 once - (for o)3. Press 4 once - (for h)4. Press 6 once - (for n)2. Press until the correct word is displayed.3. Press to select the correct word.TEXT INPUT METHODSTEXT INPUT METHODSNOTE:The display shows the above words for each keypressed.Chapter 3 - Page 35TEXT INPUT METHODSTEXT INPUT METHODSMode[0]Next[#]SpaceClearLeft, RightPress to change text input mode:[T9Abc][Abc][123][Sym]Select [T9Abc] for predictive textinput.Press to view the next matchingword if the underlined word is notthe word you intended.Press once to accept a word andadd a space.Press once to delete the characterto the left of the cursor.To move cursor.KEY FUNCTIONT9TM Predictive Text Mode [T9ABC]To choose T9 mode, press then choose [T9ABC].This mode predicts the words you are entering using abuilt-in dictionary. With T9 predictive text input, you presseach key only once for each letter. The chart below outlineshow to use T9TM text input.Page 34 - Chapter 350Bmanual template7/26 2002.7.26 5:35 PM Page 36](https://usermanual.wiki/Pantech/TX-50C/User-Guide-262532-Page-19.png)
![SPEED DIALINGSPEED DIALINGONE-TOUCH/TWO-TOUCH DIALINGThis feature allows phone book entries to be dialed viathe keypad with only one or two key presses. This featureis good for frequently used phone numbers.ONE-TOUCH DIALING:1-9 : Press the corresponding memory number and holdfor more than 1 second.TWO-TOUCH DIALING:00, 10-20 : Press the first digit and second digits of thememory number short and long respectively.- If no phone number is stored in the location entered,“Empty Location” will appear on the screen.- If a phone number is stored in secret, the number is notdisplayed when making the call.NOTE: One-touch dialing must be turned on in the handset.See page XX.Chapter 3 - Page 37Numeric Mode [123]Numeric mode allows you to add a number to yourentry/message. To choose numeric mode, press thenchoose [123].TEXT INPUT METHODSTEXT INPUT METHODSSymbol Mode [SYM]Symbol mode allows you to add various symbols to yourentry. Whether you are adding an email address to yourphonebook or sending an expressive message, symbolsmake these entries easier. To choose symbol mode,press then choose [SYM]. The symbols will appearon the display. The corresponding key number for thatsymbol will appear with as well. You can press the keyto select the symbol or use the navigation key to highlightthe symbol, then press . Press to move tothe next screen of symbols.Page 36 - Chapter 350Bmanual template7/26 2002.7.26 5:35 PM Page 38](https://usermanual.wiki/Pantech/TX-50C/User-Guide-262532-Page-20.png)
![INCOMING CALLS1. Press , then [1], then [2]. The list of the 10 most recent answered calls will be dis-played with the most recent call being listed first.2. Scroll through the list of answered calls using thenavigation key. Select the desired phone number thenpress to check the detail information about theselected phone number.- Detail information includes the phone number, its lognumber, time and date of the call.3. Press to dial desired missed call number.CALL LOGSCALL LOGSOUTGOING CALLS1. Press , then [1], then [1]. The list of the 10 most recent dialed calls will be dis-played with the most recent call being listed first.2. Scroll through the list of dialed calls using the navigationkey. Select the desired phone number then press tocheck the detail information about the selected phonenumber.- Detail information includes the phone number, its lognumber, time and date of the call.3. Press to dial desired missed call number.Chapter 3 - Page 39CALL LOGSCALL LOGSYour phone keeps a log of the 10 most recent missed,answered (incoming), and dialed (outgoing) calls. You canrecall them, view time and date information about each logand call each number without having to dial the number.Page 38 - Chapter 350Bmanual template7/26 2002.7.26 5:35 PM Page 40](https://usermanual.wiki/Pantech/TX-50C/User-Guide-262532-Page-21.png)
![Chapter 3 - Page 41Page 40 - Chapter 3CALL LOGSCALL LOGSMISSED CALLS1. Press , then [1], then [3]. The list of the 10 most recent missed calls will be dis-played with the most recent call being listed first. 2. Scroll through the list of missed calls using thenavigation key. Select the desired phone number thenpress to check the detail information about theselected phone number. - Detail information includes the phone number, its lognumber, time and date of the call.3. Press to dial desired missed call number.CALL TIMESCALL TIMESLAST CALLThis function displays the total amount of time of yourlast call.1. Press , then [1], then [4]. then [1].ALL CALLSThis function displays the total amount of time of all yourcalls.1. Press , then [1], then [4]. then [2].HOME CALLSThis function displays the total amount of time of all yourcalls from within your home area.1. Press , then [1], then [4]. then [3].ROAM CALLSThis function displays the total amount of time of all yourcalls from outside your home area.1. Press , then [1], then [4]. then [4].ACCUMULATE CALLSDisplays talk time of cumulate calls1. Press , then [1], then [4]. then [5].50Bmanual template7/26 2002.7.26 5:35 PM Page 42](https://usermanual.wiki/Pantech/TX-50C/User-Guide-262532-Page-22.png)
![Chapter 3 - Page 43Page 42 - Chapter 3USING YOUR PHONEBOOKUSING YOUR PHONEBOOKEDITING YOUR PHONEBOOKAfter you have searched and found a memory locationnumber, you can edit or erase that location number andits contents.RECALLING BY LOCATION NUMBERYou can recall phone numbers saved in your phonebookby searching for the location number. Search results willshow you the name and phone number saved to thatmemory location number.1. Press , then [2], then [1], then [3].2. Enter the memory location number.3. Press to dial the phone number.ADD NEW ENTRY1. Press , then [2], then [2], then [1] to add a newentry to the phonebook.2. Move to a field of phonebook entry with the joystickkey and enter a name or a number as required in thefield.3. Press to save it or to return to the previ-ous page.RECALLING BY GROUP1. Press , then [2], then [1], then [1].2. Select one of the following options(Family, Friends,Work, Etc, All) with the joystick key.3. Press to retrieve the phonebook by the group.4. All the entries under the group are to be displayed.You can either delete or view an entry by pressing or respectively when it is selected.5. Press to make a call when a phone number isselected.RECALLING BY NAME1. Press , then [2], then [1], then [2].2. Enter a name or its character string and pressto sort out the phonebook and display names in analphabetical order regardless of letter case. (Please refer to page 31 about the usage of AlphaEditor)3. All the related entries are to be displayed. You caneither delete or view an entry by pressing or respectively when it is selected.4. Press to make a call when a phone number isselected.USING YOUR PHONEBOOKUSING YOUR PHONEBOOK50Bmanual template7/26 2002.7.26 5:35 PM Page 44](https://usermanual.wiki/Pantech/TX-50C/User-Guide-262532-Page-23.png)
![Chapter 3 - Page 45Page 44 - Chapter 3USING YOUR PHONEBOOKUSING YOUR PHONEBOOKCHANGE GROUP BELL1. Press , then [2], then [3], then [3] to change a groupbell.2. Select the group, the bell of which to change.3. Select one of the bell options with the joystick key.4. Press to save it.CHANGE GROUP COLOR1. Press , then [2], then [3], then [4] to delete an exist-ing group.2. Select a group to delete with the joystick key.3. Select one of the group color with the joystick key.4. Press to save it.CHANGE GROUP NAME1. Press , then [2], then [3], then [2] to change agroup name.2. Select an existing group name with the joystick key3. Input a new name.4. Press to save it.5. Press to confirm it.EDIT GROUPAdds, changes and deletes a group. USING YOUR PHONEBOOKUSING YOUR PHONEBOOKADD NEW GROUP1. Press , then [2], then [3], then [1] to add a newgroup to the 5 existing groups. You are to have the maximum 7 groups.2. Input a new group name.3. Press to save it.EDIT EXISTING ENTRY1. Press , then [2], then [2], then [2] to edit an exist-ing entry.- You are to see 5 groups, by which all the entries aredivided.2. Select one of the following groups with the joystickkey.- Family, Friends, Work, Etc, All3. Select an entry under the group with the joystickkey. And press to view and edit the entry orto delete the entry.50Bmanual template7/26 2002.7.26 5:35 PM Page 46](https://usermanual.wiki/Pantech/TX-50C/User-Guide-262532-Page-24.png)
![Chapter 3 - Page 47Page 46 - Chapter 3SPEED DIALLinks a phone number of phonebook entry to a locationnumber and enables you to make a call simply by press-ing its location number in the idle mode.1. Press , then [2], then [4]. 2. Select a location and press to link a phonenumber to the location.- Press and the joystick key to delete it when aphone number already exists in the location.3. Select the group, under which you have the phone-book entry where the phone number is saved. Andpress .4. Select the entry and press .5. Select the phone number and press .USING YOUR PHONEBOOKUSING YOUR PHONEBOOKMY PROFILESaves and edits your personal information.1. Press , then [2], then [5] to review and edit yourpersonal information as follows. (Name, My Phone num-ber, Birthday, Blood Type, Address, Home, E-Mail, WorkPhone #, Meno, Set Secret). 2. Press to edit on item when selected.3. Press to confirm and save it.USING YOUR PHONEBOOKUSING YOUR PHONEBOOKCLEAR GROUP1. Press , then [2], then [3], then [5] to delete an exist-ing group.2. Select a group to delete with the joystick key.3. Press to delete it.4. Press again to confirm it.50Bmanual template7/26 2002.7.26 5:35 PM Page 48](https://usermanual.wiki/Pantech/TX-50C/User-Guide-262532-Page-25.png)
![Chapter 4 - Page 51Page 50 - Chapter 4Scans the channels to stay connected to any availablesystem of VERIZON.SET MODESelects the Preferred System. 1. Press , then [4], then [1].2. Select one of the following options(AutomaticA/Automatic B/Home only) with the joystick key andpress .- Auto A : Scan the radio channels based on theAutomatic A setting.- Auto B : Scan the radio channels based on theAutomatic B setting.- Home only : Only within your home area or homeaffiliated area.FORCE ANALOGTemporarily forces phone to use Analog mode – modeautomatically ends in 10 minutes.1. Press , then [4], then [2].2. Select “Yes” or “No” with the joystick key and press to activate it.SETTINGSETTINGNAM SETTINGEnables Auto NAM or changes a NAM manually.SETTINGSETTINGAUTO NAMAutomatically switches phone to proper NAM when youhave multiple NAM registrations.1. Press , then [4], then [3], then [1].2. Select “Yes” or “No”, then press to save it.CHANGE NAMChanges the NAM (Number Assignment Modules) usedby the phone when you have multiple registrations.1. Press , then [4], then [3], then [2].2. Select a NAM(NAM1,NAM2) with the joystick keyand press to save it.50Bmanual template7/26 2002.7.26 5:35 PM Page 52](https://usermanual.wiki/Pantech/TX-50C/User-Guide-262532-Page-27.png)
![Page 52 - Chapter 4SETTINGSETTINGCALL PROMPTNatifies you whether you are to be charged for anincoming call in roaming service area.1. Press , then [4], then [4].2. Select one of the following options and press toconfirm it.- Off : Not display [TO BE CHARGED].- On : Display [TO BE CHARGED] until the useranswer an incoming call.- 7 seconds : Display [TO BE CHARGED] for only 7seconds and return to normal.PRL IDDisplays the phone’s PRL (Preferred Roaming List).1. Press , then [4], then [5].ERI (Enhanced Roaming Indicator)Cellular systems are identified by a number called the System IdentificationNumber or SID. Your phone is equippedwith a Preferred Roaming LIst (PRL) whichcan be programmed by your Carrier totake advantage of the families of cellularsystems (SIDs) that your Carrier owns orhas special billing arrangements with invarious cities.Chapter 4 - Page 53SETTINGSETTINGSOUNDSYou are to set Ringer type, Ringer mode, Volume, Alert,Roam Ringer and Tone length.RINGER TYPESelects a ringer type to alert you of an incoming call.1. Press , then [5], then [1], then [1].2. Select one ringer type that best fits your favor.There are 40 melodies and 10 ringer types available.3. Press to confirm it.RINGER MODEAlerts you to incoming calls in the following modes:1. Press , then [5], then [1], then [2].2. Select one of the following options with the joystickkey.- Ringer- Ringer after Vibrate – The ringer sounds off aftervibration.- Vibrator- Silent – Mute the ringer3. Press to confirm it.PRL ID1ERI VERSION0000050Bmanual template7/26 2002.7.26 5:35 PM Page 54](https://usermanual.wiki/Pantech/TX-50C/User-Guide-262532-Page-28.png)
![SETTINGSETTINGVOLUMEControls the volume of the following items. The volumecan be adjusted in 5 steps.RINGERControls the Ringer volume.1. Press , then [5], then [1], then [3], then [1].2. Adjust the ringer volume with the joystick key.3. Press to save it.KEYControls the keypad tone.1. Press , then [5], then [1], then [3], then [2].2. Adjust the keypad tone with the joystick key.3. Press to save it.VOICE CALLControls the earpiece volume1. Press , then [5], then [1], then [3], then [3].2. Adjust the earpiece volume with the joystick key..3. Press to save it.Chapter 4 - Page 55Page 54 - Chapter 4SETTINGSETTINGALERTGives you an alert to any change occurring on thephone.MINUTE ALERTSounds an alert every minute of a phone call.1. Press , then [5], then [1], then [4], then [1].2. Select “OFF” or “ON” with the joystick key andpress to save it.ROAM ALERTSounds an alert when leaving a service area andentering a roaming service area.1. Press , then [5], then [1], then [4], then [2].2. Select “OFF” or “ON” with the joystick key andpress to save it.CONNECT ALERTNotifies you that a call has been successfully placed.1. Press , then [5], then [1], then [4], then [3].2. Select “OFF” or “ON” with the joystick key andpress to save it.50Bmanual template7/26 2002.7.26 5:35 PM Page 56](https://usermanual.wiki/Pantech/TX-50C/User-Guide-262532-Page-29.png)
![SETTINGSETTINGFADE ALERTSounds an alert entering an area where calls cannotbe made due to weak signal strength. The alert soundsin standby mode.1. Press , then [5], then [1], then [4], then [4].2. Select “OFF” or “ON” with the joystick key andpress to save it.LOW SIGNAL ALERTSounds an alert when you encounter low signalstrength during a call.1. Press , then [5], then [1], then [4], then [5].2. Select “OFF” or “ON” with the joystick key andpress to save it.Chapter 4 - Page 57Page 56 - Chapter 4SETTINGSETTINGROAM RINGERSounds a different ringer from what is set in ringertype, when you have a call in roaming service area.This function reminds you that you are in a roamingservice area, by sounding a different ringer from whatyou set as voice call in Ringer type.1. Press , then [5], then [1], then [5].2. Select “Distinctive” or “Normal” with the joystickkey and press to save it.- Distinctive – Sounds a different ringer type- Normal – Sounds the same ringer type as used inHome area.TONE LENGTHWith this function, you are to adjust the tone length.1. Press , then [5], then [1], then [6].2. Select “Normal” or “Long” with the joystick keyand press to save it.50Bmanual template7/26 2002.7.26 5:35 PM Page 58](https://usermanual.wiki/Pantech/TX-50C/User-Guide-262532-Page-30.png)
![SETTINGSETTINGDISPLAYWith this function, you will customize the display to bestfit your favor.ANIMATION SETTINGSelects your favorite LCD display in the followingmodesIDLE DISPLAY1. Press , then [5], then [2], then [1], then [1].2. Select one from the Animation List to use in theidle mode by moving the joystick key up, down, leftand right.3. Press to save it.POWER ON1. Press , then [5], then [2], then [1], then [2].2. Select one from the Animation List to displaywhen you turn on the handset by moving the joystickkey up, down, left, and right.3. Press to save it.Chapter 4 - Page 59Page 58 - Chapter 4SETTINGSETTINGPOWER OFF1. Press , then [5], then [2], then [1], then [3].2. Select one from the Animation List to displaywhen you turn off the handset by moving the joystickkey up, down, left, and right.3. Press to save it.MAIN DISPLAY SETTINGSelects your favorite LCD display in the followingmodesGREETING INPUTInputs a personal greeting on edits an existing one.1. Press , then [5], then [2], then [2], then [1].2. Press the joystick key to edit the greeting.3. Input your personal greeting, using the AlphaEditor.4. Press to save it.50Bmanual template7/26 2002.7.26 5:35 PM Page 60](https://usermanual.wiki/Pantech/TX-50C/User-Guide-262532-Page-31.png)
![SETTINGSETTINGIDLE CLOCKDisplays a clock on the LCD in four different types.1. Press , then [5], then [2], then [2], then [2].2. Select one of the following options and press to save it.- Digital Clock- Analog Clock- Greeting Clcok- Animation ClockLCD SETTINGControls backlight and LCD contrast for better view andefficient use.BACKLIGHTINGBacklights the display and keypad for easy viewing indark places.1. Press , then [5], then [2], then [3], then [1].2. Select one of the following options; 5sec, 10 sec,20 sec, Off.Press to save it.- Off : Turn the backlight off.- 5 sec, 10 sec, 20 sec : Backlight on for 5, 10, or 20seconds respectively after a touch of the keypad.Chapter 4 - Page 61Page 60 - Chapter 4SETTINGSETTINGCONTRASTThe LCD display contrast can be controlled in 7 levels.1. Press , then [5], then [2], then [3], then [2].2. Adjust the LCD contrast for better view.3. Press to save it.LCD COLORBacklights the display and keypad for easy viewing indark places.1. Press , then [5], then [2], then [3], then [3].2. Select one of the following options; Automatic,Red, Green, Deep Green, Purple, White.Press to save it.- Automatic- Red- Green- Deep Green- Purple- White50Bmanual template7/26 2002.7.26 5:35 PM Page 62](https://usermanual.wiki/Pantech/TX-50C/User-Guide-262532-Page-32.png)
![SETTINGSETTING SETTINGSETTINGSUB LCD SETTINGControls backlight and SUb LCD contrast for betterview and efficient use.SUB LCD CLOCKBacklights the display and keypad for easy viewing indark places.1. Press , then [5], then [2], then [4], then [1].2. Select one of the following options; Analog Clock,Digital Clock.Press to save it.- Analog Clock- Digital ClockSUB LCD CONTRASTThe Sub LCD display contrast can be controlled in 5 lev-els.1. Press , then [5], then [2], then [4], then [2].2. Adjust the Sub LCD contrast for better view.3. Press to save it.Chapter 4 - Page 63Page 62 - Chapter 4OTHERSIncludes all the useful functions for optimum use of thehandset.ANSWER MODESelects an Answer mode as follows.1. Press , then [5], then [4], then [1].2. Select “Any Key” or “Send Key” with the joystickkey- Any Key – Press any key to answer an incoming callexcept , , and .- Send Key – Press only to answer a call.3. Press to save it.ACTIVE FLIPSelects an Answer mode as follows.1. Press , then [5], then [4], then [2].2. Select “On” or “Off” with the joystick key3. Press to save it.50Bmanual template7/26 2002.7.26 5:35 PM Page 64](https://usermanual.wiki/Pantech/TX-50C/User-Guide-262532-Page-33.png)
![SETTINGSETTINGAUTO ANSWERAutomatically answers a call after a preset number ofrings. An ideal setting for the hands-free car kit.1. Press , then [5], then [4], then [4].2. Select one from the following items with the joy-stick key.- Off/5/10/18 seconds.3. Press to save it.VOICE PRIVACYEnhances voice privacy and avoids tapping during acall.1. Press , then [5], then [4], then [5].2. Select “Standard” or “Enhanced”, if available.- “Enhanced” - Make it more difficult to wire tap.3. Press to save it.Chapter 4 - Page 65SETTINGSETTINGAUTO RETRYAutomatically retries a call up to 5 times after a settime interval.RETRY TIME1. Press , then [5], then [4], then [3], then [1].2. Select a time interval option (Off,3,5,7,10 sec-onds) with the joystick key. Press to save it.REPEATPrevents others from using your phone without permis-sion. When locked, the menu can not be accessed with-out password.1. Press , then [5], then [4], then [3], then [2].2. Select one of the options (1 time,3 times,5 times)with the joystick key. Press to save it.Page 64 - Chapter 4NOTE: This function will not be activated when youselect Vibrate, Silent,or Ringer after vib as a ringer mode.50Bmanual template7/26 2002.7.26 5:35 PM Page 66](https://usermanual.wiki/Pantech/TX-50C/User-Guide-262532-Page-34.png)
![SETTINGSETTINGWEB IDLE TIMEThis function disconnects your phone from a networkwhen there is no key input for a certain time period.1. Press , then [5], then [4], then [8].2. Use the joystick key to set the web idle timer orpress digit keys one by one to enter the time.- Not exceed three digits.3. Press to save it.S/W VERSIONDisplays the version of your phone.1. Press , then [5], then [4], then [9].2. You are to see the version of software and hard-ware.UP PROXY IPThe phone can have up to 3 sets of the server IP(Internet Protocal) addresses and Port numbers toaccess your service provider’s website. These mayalready be preset or be separately programmed byyour service provider. Please noted that any change tothese settings may disable the Web access capability.1. Press , then [5], then [5].Chapter 4 - Page 67SETTINGSETTINGKEY GUARD1. Press , then [5], then [4], then [6].2. Select “On” or “Off” with the joystick key.- On – Prevent unintended press of the keypad. Tounlock the key guard, please press , , .- Off – Not set the key guard.3. Press to save it.LANGUAGESelects the language in which letters are displayed onscreen.1. Press , then [5], then [4], then [7].2. Select either “English” or “Spanish”.3. Press to save it.Page 66 - Chapter 450Bmanual template7/26 2002.7.26 5:35 PM Page 68](https://usermanual.wiki/Pantech/TX-50C/User-Guide-262532-Page-35.png)
![VS MENUVS MENUCALL ANSWERSets and operates the answering machine.1. Press .2. Press [2].3. Select one of the following options with the joy-stick key and press .Chapter 4 - Page 73VS MENUVS MENUVOICE MEMO1. Press to start VS menu.2. Press [1] to enter the voice memo menu.3. Press [1] to record a voice memo and you will seethe instruction displayed and hear “Please record itat the tone”.4. Press to stop recording a memo.5. You could PEVIEW, RE-RECORD, or SAVE it afterrecording a voice memo.Page 72 - Chapter 4Press [2] to view and play voice memos.Press [3] to erase all the voice memos. ON/OFF : Turns the Auto Answering machine on/off.INBOX : Play or erase a recorded memo.GREETING : Recoras, Plays and Erases your personalizedgreeting. You have the maximum 30 seconds to record agreeting.CALL SPEAKER ON (OFF) : You can(not)hear the caller’svoice being recorded in the answering machine.WAIT TIME : No Ringer, 5s, 10s, 18s. The answeringmachine will be operated in a specific time.ICONS IN THE STORED MEMO LIST: A recorded memo in Answering machine that you have not checked yet.: A recorded memo in Answering machine that you havealready checked.✓NOTE: Press to pause, then press to resume.NOTE:RECORDING LIMITATION :You have a limit of 10 voice memos including those inAnswering Machine. Each voice memo has the time limit of60 seconds.50Bmanual template7/26 2002.7.26 5:35 PM Page 74](https://usermanual.wiki/Pantech/TX-50C/User-Guide-262532-Page-38.png)
![VS MENUVS MENUWAKE UPUse the Wake-Up to train or untrain the VR with thecontrol word, wake up.1. Press .2. Press [3][2].3. Select one of the following options with the joy-stick key and press .Chapter 4 - Page 75Page 74 - Chapter 4LIST WORDS : Display the list of control words in the wakeup set.You will select a control word from the list, press . You are to either train, untrain or view the status ofcontrol word. To train with a word, press [1] and follow thevoice prompts.TRAIN ALL : Train Wake-up set to recognize your voice.UNTRAIN ALL : Untrain Wake-up set not to recognizetrained control words.VS MENUVS MENUVOICE COMMANDTrains the VR with a category of control words as fol-lows.YES/NO1. Press .2. Press [3][1].3. Select one of the following options with the joy-stick key and press .LIST WORDS : Display the list of control words in theYes/No set.You will select a control word from the list,press . You are to either train, untrain or view the sta-tus of control word. To train with a word, press [1] and fol-low the voice prompts.TRAIN ALL : Train Yes/No set to recognize your voice.UNTRAIN ALL : Untrain Yes/No set not to recognize trainedcontrol words.50Bmanual template7/26 2002.7.26 5:35 PM Page 76](https://usermanual.wiki/Pantech/TX-50C/User-Guide-262532-Page-39.png)
![VS MENUVS MENUDIGIT DIALUse the Digit dial to train or untrain the VR with thecontrol words (1 to 9, Zero, Oh, Verify, Clear, Call).1. Press .2. Press [3][4].3. Select one of the following options with the joy-stick key and press .Chapter 4 - Page 77Page 76 - Chapter 4LIST WORDS 1,2 : Display the list of control words in thedigit dial set.You will select a control word from the list,press . You are to either train, untrain or view the sta-tus of control word. To train with a word, press [1] and fol-low the voice prompts.TRAIN ALL : Train Digit dial set to recognize your voice.UNTRAIN ALL : Untrain Digit dial set not to recognizetrained control words.VS MENUVS MENUTOP LEVELUse the Top Level to train or untrain the VR with yourcontrol words. (Dial, Redial, Voice memo, Phonebook,Cancel).1. Press .2. Press [3][3].3. Select one of the following options with the joy-stick key and press .LIST WORDS : Display the list of control words in the toplevel set.You will select a control word from the list, press . You are to either train, untrain or view the status ofcontrol word. To train with a word, press [1] and follow thevoice prompts.TRAIN ALL : Train Top level set to recognize your voice.UNTRAIN ALL : Untrain Top level set not to recognizetrained control words.50Bmanual template7/26 2002.7.26 5:35 PM Page 78](https://usermanual.wiki/Pantech/TX-50C/User-Guide-262532-Page-40.png)
![VS MENUVS MENUADD1. Press .2. Press [4][2] to add a voice tag to phonebook entry.3. Select one group with the joystick key and press .4. Select a phone number with the joystick key andpress .5. Speak a name to add a voice tag to the number.CLEAR ALL1. Press .2. Press [4][3] to erase all voice tags in the list.3. You will see “Removing all voice tags proceed?”.4. Press and you will see a message.5. Press to clear all voice tags.Chapter 4 - Page 79Page 78 - Chapter 4OK : Proceed to erase all the voice tags.CNCL : Return to the previous page.VS MENUVS MENUVOICE DIALLists, adds and erases voice tags of phonebook entryLIST1. Press .2. Press [4][1] to list phonebook entries that havevoice tags attached.3. Select one with the joystck key and press .4. Press to play a voice tag or to edit anexisting voice tag.5. Select one of the following options and press .EDIT : Retrain / Voice Setting / ClearPLAY : Voice tag play.1) Retrain - You will see “Retrain Voice Name?” displayed.Press , then speak a neme.2) Voice Setting - You will see “Change?”.Press , and select a phone number, then press again.3) Clear - You will see “Removing Voice Names Proceed?” Press and all voice tags were deleted successfully.50Bmanual template7/26 2002.7.26 5:35 PM Page 80](https://usermanual.wiki/Pantech/TX-50C/User-Guide-262532-Page-41.png)
![VS MENUVS MENUPLAY1. Press .2. Press [5][3].3. You could PEVIEW it after recording a voice alertmessage.Chapter 4 - Page 81Page 80 - Chapter 4CLEAR1. Press .2. Press [5][4] to erase voice alert message.3. Select “No” or “Yes” with the joystick key andpress .VS MENUVS MENUVOICE ALERTSets the voice alert in a way that you feel comfortableON/OFF1. Press .2. Press [5][1].3. Select “On” or “Off” with the joystick key andpress .RECORD1. Press .2. Press [5][2].3. You will see the instruction displayed and recorda voice alert message.4. Press to stop recording a memo.50Bmanual template7/26 2002.7.26 5:35 PM Page 82](https://usermanual.wiki/Pantech/TX-50C/User-Guide-262532-Page-42.png)
![VS MENUVS MENUChapter 4 - Page 83Page 82 - Chapter 4VS MENUVS MENUVOICE SETTINGSets the voice service menu in a way that you feel comfortableUNTRAIN ALL1. Press .2. Press [6][1].3. Select “Yes” or “No” with the joystick key and press .PROMPT MODEUse the prompt mode to select either beginner or expert mode.The expert mode consists of shorter texts and just beeps asopposed to the beginner mode that gives full instructions.1. Press .2. Press [6][2].3. Select one from Beginner/Expert with the joystickkey. Press .<Beginner mode>1st prompt : “Main menu ”followed by a short beep.2nd prompt : “Speak a name to call, or say dial, redial, voicememo, phone book, or cancel”, followed by a short beep.<Expert mode>1st prompt : A sequence of low tone and high tone.2nd prompt : “Main menu”.NOTE:The VR times out and the phone returns to the standbymode after the 1st and 2nd prompts are heard, andnothing said.DIGIT MODEUse the digit mode to select one of the followingoptions ; ECHO, BEEP, ECHO+BEEP.1. Press .2. Press [6][3].3. Select one option with the joystick key and press .HFK MODEHFK stands for hands-Free car kit. With this function,you can activate and utilize the VR feature when thephone is in hands free car kit.1. Press .2. Press [6][4].3. Select “Off” or “On” with the joystick key andpress .ECHO : A digit echoes back when you enter the digit in theVR mode.BEEP : A digit just beeps when you enter the digit in theVR mode.ECHO+BEEP : A digit echoes and beeps when you enterthe digit in the VR mode.NOTE: Once you speak”Wake Up” and the phone recog-nizes your voice, you will hear a beep.The second time you say “Wake Up”, your phone turns toVR mode.50Bmanual template7/26 2002.7.26 5:35 PM Page 84](https://usermanual.wiki/Pantech/TX-50C/User-Guide-262532-Page-43.png)
![This chapter describes how to lock and unlock youphone, restrict calls to certain types of phone numbers,and clear your phonebook’s memory.1. Security FeaturesCHAPTER 5CHAPTER 5SECURITY FEATURESChapter 5 - Page 85Page 84 - Chapter 4VS MENUVS MENUSET ACTIVE1. Press .2. Press [6][5].3. Select “VR Key” or “Active Flip” with the joystickkey and press .50Bmanual template7/26 2002.7.26 5:35 PM Page 86](https://usermanual.wiki/Pantech/TX-50C/User-Guide-262532-Page-44.png)
![SECURITY FEASECURITY FEATURESTURESChapter 5 - Page 87SECURITY FEASECURITY FEATURESTURESPage 86 - Chapter 5INCOMING CALLBlocks all incoming calls but allows outgoing calls to beplaced.1. Press , then [5], then [3] and enter “PASSWORD”.2. Press and select “Allow” or “Restrict” withthe joystick key.- Restrict : Restrict an incoming call- Allow : Allow an incoming call3. Press to save it.OUTGOING CALLBlocks all outgoing calls except emergency calls frombeing placed, but allows incoming calls to be answered.1. Press , then [5], then [3] and enter “PASSWORD”.2. Press and select “Allow” or “Restrict” withthe joystick key.- Restrict : Restrict an outgoing calls.- Allow : Allow an outgoing calls.3. Press to save it.SECURITYPrevents others from using the phone without permis-sion and allows an access to a security features onlyafter pasword input.RESTRICTThis function enables you to restrict a certain featureswith the password. You are to unlock it to use the fea-tures.AUTOMATIC LOCKPrevents others from using your phone without permis-sion. When locked, the menu can not be accessed with-out password.1. Press , then [5], then [3] and enter “PASSWORD”.2. Press and select “Off”, “Lock Now” or“Power Up”.- Off – Do not lock the phone- Lock Now – Lock the phone now- Lock On Power Up – Lock the phone whenever it isturned on.3. Press to save it.50Bmanual template7/26 2002.7.26 5:35 PM Page 88](https://usermanual.wiki/Pantech/TX-50C/User-Guide-262532-Page-45.png)
![SECURITY FEASECURITY FEATURESTURESChapter 5 - Page 89SECURITY FEASECURITY FEATURESTURESPage 88 - Chapter 5PHONEBOOKBlocks access to, and protects data in your phonebook.1. Press , then [5], then [3] and enter “PASSWORD”.2. Press and select “Allow” or “Restrict” withthe joystick key.- Restrict : Restrict access to the phonebook- Allow : Allow access to the phonebook.3. Press to save it.DATA CALLRestricts data calls from being placed.1. Press , then [5], then [3] and enter “PASSWORD”.2. Press and select “Allow” or “Restrict” withthe joystick key.- Restrict : Restrict a data call- Allow : Allow a data call3. Press to save it.INCOMING CALL HISTORY1. Press , then [5], then [3] and enter “PASSWORD”.2. Press and select “Allow” or “Restrict” withthe joystick key.- Restrict : Restrict an incoming call history- Allow : Allow an incoming call history3. Press to save it.OUTGOING CALL HISTORY1. Press , then [5], then [3] and enter “PASSWORD”.2. Press and select “Allow” or “Restrict” withthe joystick key.- Restrict : Restrict access to the outgong call history.- Allow : Allow access to the outgong call history.3. Press to save it.MENUBlocks access to the menu to prevent any change.1. Press , then [5], then [3] and enter “PASSWORD”.2. Press and select “Allow” or “Restrict” withthe joystick key.- Restrict : Restrict access to the menu- Allow : Allow access to the menu3. Press to save it.50Bmanual template7/26 2002.7.26 5:35 PM Page 90](https://usermanual.wiki/Pantech/TX-50C/User-Guide-262532-Page-46.png)
![SECURITY FEASECURITY FEATURESTURESChapter 5 - Page 91SECURITY FEASECURITY FEATURESTURESPage 90 - Chapter 5SPECIAL#’sStores 3 phone numbers to allas to be dialed even inrock mode.1. Press , then [5], then [3] and enter “PASSWORD”.2. Press and select one from three blanks withthe joystick key3. Press and input a phone number4. Press again to save it.CLEAR PHONEBOOKClears all phonebook entries.1. Press , then [5], then [3] and enter “PASSWORD”.2. Press .3. Select “Yes” or “No” with the joystick key. Press .900#SRestricts calling 900 dial service numbers.1. Press , then [5], then [3] and enter “PASSWORD”.2. Press and select “Allow” or “Restrict” withthe joystick key.- Restrict : Restrict a 900-dial service- Allow : Allow a 900-dial service3. Press to save it.LONG DISTANCE CALLSRestricts calling long distance numbers – the phone islimited to calling numbers within the area.1. Press , then [5], then [3] and enter “PASSWORD”.2. Press and select “Allow” or “Restrict” withthe joystick key.- Restrict : Restrict a long distance call- Allow : Allow a long distance call3. Press to save it.NOTE: “This phone is restricted” appears on the displaywhen you attempt to make a restricted call.NOTE: The default password is the last 4 digits of yourphone number.NOTE: A phone number over 7 digits is to be restricted.50Bmanual template7/26 2002.7.26 5:35 PM Page 92](https://usermanual.wiki/Pantech/TX-50C/User-Guide-262532-Page-47.png)
![SECURITY FEASECURITY FEATURESTURESPage 92 - Chapter 5RESET PHONEResets phone to default settings.1. Press , then [5], then [3]and enter “PASSWORD”.2. Press .3. Select “Yes” or “No” with the joystick key. Press .- When you select “Yes”, you will see “Wait amoment” on the display and the phone will return toidle mode.CHANGE PASSWORDClears all phonebook entries.1. Press , then [5], then [3]and enter “PASSWORD”.2. Press .3. Enter a new password and press . 4. Enter the new password again and press .NOTE: The default password is the last 4 digits of yourphone number.This chapter describes how to use the phone’s scheduleto alert you of upcoming appointments, how to use thestopwatch and other addition features.1. Schedule2. Calculator3. World Clock4. StopwatchCHAPTER 6CHAPTER 6SUPPLEMENTARY FUNCTIONSChapter 6 - Page 9350Bmanual template7/26 2002.7.26 5:35 PM Page 94](https://usermanual.wiki/Pantech/TX-50C/User-Guide-262532-Page-48.png)
![Chapter 6 - Page 95Page 94 - Chapter 6Sets an event or anniversary in the phone and remindsyou through time setting when the time comes.EVENT1. Press , then [3], then [1] to display a calendar. 2. Move the joystick key to choose a date in the calen-dar and press .- Day to Day movement – move the joystick key leftward and rightward.- Week to Week movement – move the joystick key downward and upward.3.1. Press to set a time for an event. - You are choose one of the followings in the first line(On time, 10 Min before, 30 Min before, 1 Hour before,No alarm)- You are to change the date and time also in the sec-ond line by moving to year, month, day, time input withthe joystick key.3.2. Press to set a melody for the event.Choose one of the best melodies with the joystickkey. 4. Press to save it or to return to the calen-dar.SCHEDULESCHEDULE5. You will see “Save complete” displayed.- You will also see a day marked to indicate an eventwhen you return to the calendar.ALARM1. Press , then [3], then [2] to display three alarmentries. 2. Select one of the entries with the joystick key.3. Press to edit the existing alarm or set a newalarm.- To delete the existing one, press .4.1. Press to set a time. - You are to choose an alarm freguency.(Once, Daily,Weekly, Monthly, Yearly) with the joystick movement.press to save it.4.2. Press to set a melody.- Select one and press .4.3. Press to set a snooze.- Select one of the following and press .(No use, 1Time after 3minutes~)SCHEDULESCHEDULENOTE: It doesn’t snooze if an alarm is stopped within aminute, but it will snooze in a minute an alarm goes off.50Bmanual template7/26 2002.7.26 5:35 PM Page 96](https://usermanual.wiki/Pantech/TX-50C/User-Guide-262532-Page-49.png)
![WORLD CLOCKWORLD CLOCKWORLD CLOCKShows what time it is in a specific city that is already pre-programmed.1. Press , then [6], then [2] for WORLD CLOCK.2. Select a city with the joystick key and press .3. The world map is to be displayed with the city, itsdate and time.- You are to move to another city using the joystick key.Chapter 6 - Page 97Page 96 - Chapter 6CALCULACALCULATORTORCALCULATORThis function allows you to use your phone as a calculator.This calculator will perform basic mathematic functions(addition, subtraction, multiplication, division).1. Press , then [6], then [1] for CALCULATOR.2. Use the keypad to enter the numbers to be calculated.3. Follow the instructions below to calculate (8*6)/4-2.5- Input 8Move the joystick key leftwardInput 6 and press the joystick keyMove it rightwardInput 4 and press the joystick keyMove it downwardInput 2 and press the to input(.) Press 5, then .4. Press to reset.NOTE: 1. Up to 7 integer digits and up to 2 decimals canbe displayed. If the calculated result has morethan 7 digits, the result is displayed in 7 digitlogarithm.2. There is no (-)sign. To express a negative number,use ‘0-value’.50Bmanual template7/26 2002.7.26 5:35 PM Page 98](https://usermanual.wiki/Pantech/TX-50C/User-Guide-262532-Page-50.png)
![STOPWSTOPWAATCHTCHSTOPWATCHThis function allows you to use your phone as a stopwatch.The stopwatch displays time in hours, minutes, seconds,and 1/100 of a second.1. Press , then [6], then [3] for STOPWATCH. 2. To measure a time period.- Press to start the stopwatch.- Press to pause it.- Press to resume it or to return to the previouspage.3. To measure more than one,- Press to start.- Press to stop a time period and continue meas-uring another one.- Press to stop the second and continue measur-ing a third one.- And keep repeating the above to measure up to 6time periods.- Press to stop it and to view the results.- Press or to return to the stopwatch.- Press to reset it.Page 98 - Chapter 6VOICE MAIL AND TEXT MESSAGESThis chapter describes how to check voice mail messagesas well as send and receive text messages with thehandset.1. Two-Way SMS2. Checking Messages 3. Sending Text Messages 4. Inbox 5. Outbox6. Settings7. Filed8. Erase AllCHAPTER 7CHAPTER 7Chapter 7 - Page 9950Bmanual template7/26 2002.7.26 5:35 PM Page 100](https://usermanual.wiki/Pantech/TX-50C/User-Guide-262532-Page-51.png)
![CHECKING MESSAGESCHECKING MESSAGESCHECKING RECEIVED VOICE MAIL MESSAGE 1. Press , then press [1] for Voice Mail.2. The number of voice mail messages currentlyreceived in your mailbox is displayed. To access yourvoice mailbox, press .CHECKING RECEIVED TEXT MESSAGE1. Press , then press [3] “Inbox”.2. Highlight the message you want to view and press . The text message is displayed. 3. Press to view the inbox message menu. You canreply, erase, save, or forward the message.Chapter 7 - Page 101RECEIVED MESSAGE NOTIFICATIONWhen your phone has received a message, the screendisplays the number of new text messages and voicemail messages.1. Press the key under to display the received mes-sage.TWO-WTWO-WAAY SMSY SMSYour Audiovox wireless handset features Two-WayShort Message Service (SMS). This feature sends andreceives text messages through your phone. Voice mailnotification is also supported.: Urgent New Msg: Urgent Read Msg: New Msg (unread): Old Msg (read): Lock (read)MESSAGE INDICATORSThe following symbols indicate the status of messagereceived by your phone. These symbols appear forvoice mail and text messages.Page 100 - Chapter 750Bmanual template7/26 2002.7.26 5:35 PM Page 102](https://usermanual.wiki/Pantech/TX-50C/User-Guide-262532-Page-52.png)
![EDIT MESSAGE1. To change the text message, press [3] EDITMESSAGE.2. Input text message, then press .PRIORITY1. To send an urgent message, press [4] PRIORITY.2. Select the priority (NORMAL/URGENT) by using thenavigation key then press .CALL BACK NUMBER1. To change the call back number, press [5] CALLBACK.2. Input call back number, then press .SAVE1. To save the text message, press [6] SAVE.SENDING TEXT MESSAGESSENDING TEXT MESSAGESDELIVERY ACKNOWLEDGEMENT1. To confirm the message was sent, press [7]DELIVERY ACK.2. Select the parameter (YES/NO) by using the navigationkey, then press .Chapter 7 - Page 103SENDING TEXT MESSAGESSENDING TEXT MESSAGESSENDING NEW TEXT MESSAGES1. Press then press [2] SEND NEW.2. Input text message, then press .3. Input the phone number, then press to display theoutbox message menu.NOTE:If the message failed to reach the other party,the display will read “Delivery Failed. Retryin3 seconds?”. Press YES to have the phonesendthe message again automatically.SEND1. To send the text message, press or [1] SEND.EDIT RECIPIENT1. To change the recipient, press [2] EDIT RECIPIENT.2. Input the phone number, then press .3. Input new text message (if necessary), then press .Page 102 - Chapter 750Bmanual template7/26 2002.7.26 5:35 PM Page 104](https://usermanual.wiki/Pantech/TX-50C/User-Guide-262532-Page-53.png)
![LOCK/UNLOCK MESSAGE1. To lock or unlock the text message, press [6]MESSAGE LOCK.2. Then select LOCK to lock the message or UNLOCKto unlock the message, then press .SAVE CALLBACK NUMBER1. To save the Callback number from the text message,press [5] SAVE CALLBACK. 2. Follow procedure for STORING PHONE NUMBERSon page 28 to save the call back number into a memorylocation.INBOX INBOX Chapter 7 - Page 105ERASE1. To erase the text message, press [2] ERASE. 2. Press to erase the message from your Inbox.SAVE MESSAGE1. To save the text message in your phone, press [4]SAVE.2. Press .INBOX MENUFollow procedure for CHECKING RECEIVED TEXTMESSAGES on page XX to enter the INBOX menu.REPLY1. To reply to the text message, press [1] REPLY.2. Enter your message then press .INBOX INBOX FORWARD1. To forward the text message, press [3] FORWARD.2. Input the phone number of the person you are sendingthe message to and press .3. Enter the text message and press .Page 104 - Chapter 750Bmanual template7/26 2002.7.26 5:35 PM Page 106](https://usermanual.wiki/Pantech/TX-50C/User-Guide-262532-Page-54.png)
![OUTBOXOUTBOXSAVE1. To save the message, press [4] SAVE.2. Press .STATE1. Press [5] to display the state of the sent message. 3. Input any text message to go along with the forwardedmessage then press .Chapter 7 - Page 107OUTBOXOUTBOXRESEND1. To reply to the message, press [1] RESEND.2. Press , then write your reply message and press.ERASE1. To erase the message, press [2] ERASE.2. Press .FORWARD1. To forward the message to another recipient, press[3] FORWARD.2. Input the phone number of the person to receive themessage then press .OUTBOX MENU1. To enter the OUTBOX menu, press then [4] OUT-BOX.2. Select the stored message then press . The textmessage will be displayed.3. Press to enter the OUTBOX menu. You canresend, erase, forward, save, display the sent messagestatus.Page 106 - Chapter 750Bmanual template7/26 2002.7.26 5:35 PM Page 108](https://usermanual.wiki/Pantech/TX-50C/User-Guide-262532-Page-55.png)
![SETTINGSSETTINGSAUTO ERASE1. Press [5] AUTO ERASE.AUTO ERASE INBOX1. Press [1].2. Select (OLD INBOX/DISABLED) using the navigationkey, then press .AUTO ERASE OUTBOX1. Press [2].2. Select (OLD OUTBOX/DISABLED) using the navigationkey, then press .ENTRY MODE1. Press [6] ENTRY MODE.2. Select (ALPHA MODE/T9 MODE) using the navigationkey, then press .Chapter 7 - Page 109SETTINGSSETTINGSSETTINGS MENU1. To enter the SETTINGS menu, press then [5]SETTINGS.SAVE SENT MESSAGE1. Press [1] SAVE SENT MSG?.2. Select (NO/YES/PROMPT) using the navigation key,then press .DISPLAY DELIV. ACK1. Press [4] DELIVERY ACK.2. Select (NO/YES) using the navigation key, then press .DEFAULT CALL BACK NUMBER1. Press [2] DEFAULT CB#.2. Input the call back number, then press .ALERT1. Press [3] MESSAGE ALERT.2. Select the alert type (RINGER/VIBRATE/SILENT/RINGER & REMIND/VIBRATE & REMIND) using thenavigation key, then press .Page 108 - Chapter 750Bmanual template7/26 2002.7.26 5:35 PM Page 110](https://usermanual.wiki/Pantech/TX-50C/User-Guide-262532-Page-56.png)
![ERASE ALLERASE ALLERASE MESSAGES1. Press and [7].2.1. Press[1] to erase the inbox messages. 2.2. Press[2] to erase the outbox messages.2.3. Press[3] to erase the filed messages. 3. Select “Yes” or “No” with or .Chapter 7 - Page 111FILEDFILEDFILEDManages saved messages from the Inbox/Outbox.1. Press and [6].Select a text message with the navigationkey.Press .2. The text message is displayed. Press .3. If the text message is saved from “Inbox” menu, thisscreen will be displayed.If the text message is saved from “Outbox ” menu, this screen will be displayed.4. Select one by pressing .Page 110 - Chapter 7NOTE:You are to erase “Entire inbox” or “Old inbox”.50Bmanual template7/26 2002.7.26 5:35 PM Page 112](https://usermanual.wiki/Pantech/TX-50C/User-Guide-262532-Page-57.png)
![INTERNET BROWSERCHAPTER 9CHAPTER 9This chapter describes convenient functions that allowyou to access the Wireless internet with the handset.1. Start Internet Browser2. Browser MenuChapter 9 - Page 115E911 CALLINGThis function allows you to place emergency calls, evenwhen the phone is locked. Emergency calls are placedon any available system.1. Enter 911 and press [ ]. 2. The call will connect.- When a call ends, the phone returns to the EmergencyMode for 5 minutes.EMERGENCY CALLINGEMERGENCY CALLINGPage 114 - Chapter 850Bmanual template7/26 2002.7.26 5:35 PM Page 116](https://usermanual.wiki/Pantech/TX-50C/User-Guide-262532-Page-59.png)
![BROWSER MENUBROWSER MENUBROWSER MENUThe browser menu is a list of actions necessary for fulloperation of the browser.1. To enter the browser menu, press .RELOADWhen Reload is selected from the browser menu, thecurrent page is reloaded. 1. Press to select Reload.HOMEWhen Home is selected from the browser menu, theHome Page is displayed.1. Press to select Home.BOOKMARKSWhen Bookmarks is selected from the browser menu,your bookmark list is displayed.1. Press to select Bookmarks.MARK SITEWhen Mark Site is selected from the browser menu, thecurrent web page is added to your bookmark list.1. Press to select Mark Site.Chapter 9 - Page 117WIRELESS INTERNETYour [CDM-8500] wireless handheld telephone allowsyou to visit various Internet websites directly from yourphone. This gives you access to up-to-date informationsuch as news, sports, weather and stock quotes whenyou subscribe to Internet service with your serviceprovider. Please contact your service provider for a listof available websites and service details. 1. To access wireless internet network, press .- You can access the Internet from your phone when itis in digital mode, as indicated by the Nsymbol on your phone’s display.2. The Internet browser will launch.3. To access the Internet, press . Your service provider’shome page will be displayed.4. You can scroll the page using .5. Press or to select the options at the bottomof the display.6. To return to the previous page, press .7. To exit the Internet, press .STSTARART INTERNET BROWSERT INTERNET BROWSERPage 116 - Chapter 950Bmanual template7/26 2002.7.26 5:35 PM Page 118](https://usermanual.wiki/Pantech/TX-50C/User-Guide-262532-Page-60.png)
![DADATTA SVCA SVCDATA SPEEDYou are to choose a connection speed depending on theusage of handset.1. Press then [7] then [2].2. Select one of the following connection modes with thejoystick key.- 19200 BPS- 115200 BPS- 230400 BPS3. Press to save it.NOTE:This function is available only when the phone isconnected to data cable.Chapter 10 - Page 123DADATTA SVCA SVCPage 122 - Chapter 10CONNECTIONYou are to choose a connection mode depending on theusage of handset.1. Press then [7] then [1].2. Select one of the following connection modes with thejoystick key.- Voice Call : To receive a voice call- Data Only : To receive data when connected to PC.- Fax Only : To function as a fax when connected toPC.3. Press to save it.NOTE:This function is available only when the phone isconnected to data cable.50Bmanual template7/26 2002.7.26 5:35 PM Page 124](https://usermanual.wiki/Pantech/TX-50C/User-Guide-262532-Page-63.png)
![SAFETY INFORMATIONuSafety Information for Wireless Handheld PhonesvSafety Information for FCC RF ExposurewSAR InformationxFDA Consumer UpdateCHAPTER 11CHAPTER 11Chapter 11 - Page 125LOCALOCATIONTIONSETTINGDecides whether you allow the network system to detectyour position or not.1. Press then [8] then [2].2. Press any key when you see a message.3. Select “Location On” or “911 Only” with the joystickkey.- 911 Only - Your location will be hidden from network& application except 911- Location On – Your location is now available to thenetwork.Page 124 - Chapter 1050Bmanual template7/26 2002.7.26 5:35 PM Page 126](https://usermanual.wiki/Pantech/TX-50C/User-Guide-262532-Page-64.png)