Pantech X1 Single-Band CDMA PCS Phone with Bluetooth User Manual CDM8074 X1 080227 indd
Pantech Co., Ltd. Single-Band CDMA PCS Phone with Bluetooth CDM8074 X1 080227 indd
UserManual.wiki
>
Pantech
>
X1 User Manual
>
Manual
Contents
1.
Users Manual
2.
Manual
3.
BT Manual
Manual
Navigation menu
Upload a User Manual
Namespaces
Wiki Guide
HTML
PDF
Info
Views
User Manual
Discussion / Help
Navigation
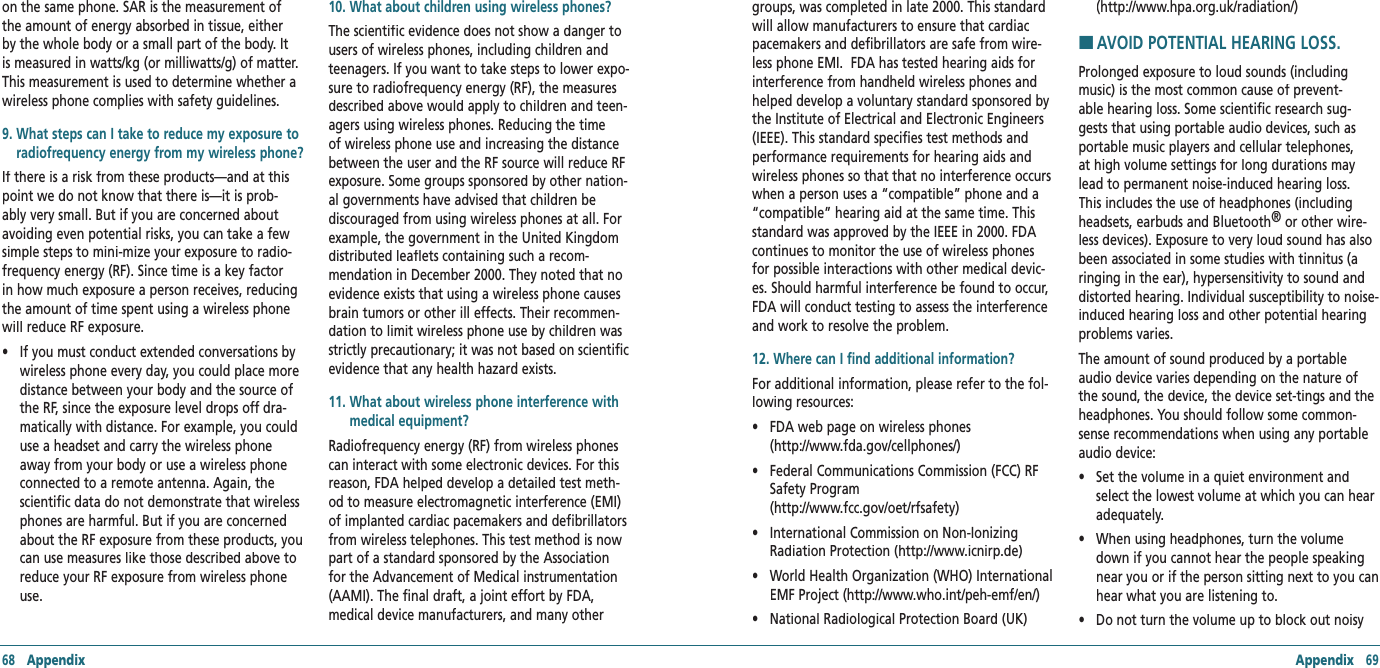
![HTURN ON/OFF THE PHONETo turn on1. Press and hold [].To turn off1. Press and hold [].HDISPLAY ICONSDisplay indicatorsIcon NameSignal strength or AirplaneCalling/No Service/Emergency/Speaker/Data*Ring type (Ringtone/Vibrate_Ring/Silent/Vibrate)Text, Voice, Picture, WAP, Multi, Email, IM (Instant Message)Alarm/ScheduleBluetooth (On/Connected/Pairing)TTY/GPS (Location)/Lock ModeBattery (Strength/Charging)* Network dependent HENTERING TEXT The input mode (Alpha editor) will automatically be activated when necessary to enter letters and numbers. As shown below, there are 4 available modes ; Standard input mode (Abc), Input mode (T9Abc), Numeric mode (123) and Symbols. The input mode indicator appears on the upper right of the display when letters and numbers are entered. To select the desired input mode among the 5 modes below, press Options and then select input mode.Useful keysKey FunctionPress to accept a word and add a space.In T9Abc Mode, press to view the next matching word if the highlighted word is not the word you intended.Press to delete a character to the left of the cursor.Confirm the letters and numbers you entered. Press to select a letter case of the standard text input or text input mode. and indicate the standard text input. and indicate the predictive text input. 8 Getting Started Getting Started 9To enter text using the keypadKey English Spanish1 Key . @ ? ! - , & : ’ / 12 Key a b c 2 a á b c 23 Key d e f 3 d e é f 34 Key g h i 4 g h i í 45 Key j k l 56 Key m n o 6 m n ñ o ó 67 Key p q r s 78 Key t u v 89 Key w x y z 90 Key 0Predictive mode (T9Abc)T9 mode automatically compares your keystrokes with an internal dictionary to determine the correct word. The most commonly used word will appear first. To use T9Abc mode, press Options > T9Abc.1. Press Options > change the mode Options > change the mode OptionsT9Abc.2. Press [] to input text. For example, to write ‘hello’ press [] [] [].3. Press [ ] key to search for the word.Multi-tap input modePress the key labeled with the target letter once for the first letter; press it twice for the second letter, and so on. 1. Press Options > change the mode Options > change the mode OptionsAbc.2. Press [] to [] to input text repeatedly. To write the letter “C”, press [] 3 times.Numeric modeYou can input numbers in this mode.1. Press Options > change the mode Options > change the mode Options123.2. Press [] to [] to input numbers.Symbol modeAllows you to enter symbols.1. Press Options > change the mode Options > change the mode OptionsSymbols.2. Press the number for the symbol, and the symbol appears in the text input screen.3. To display more symbols, press [ / ].](https://usermanual.wiki/Pantech/X1.Manual/User-Guide-913863-Page-5.png)
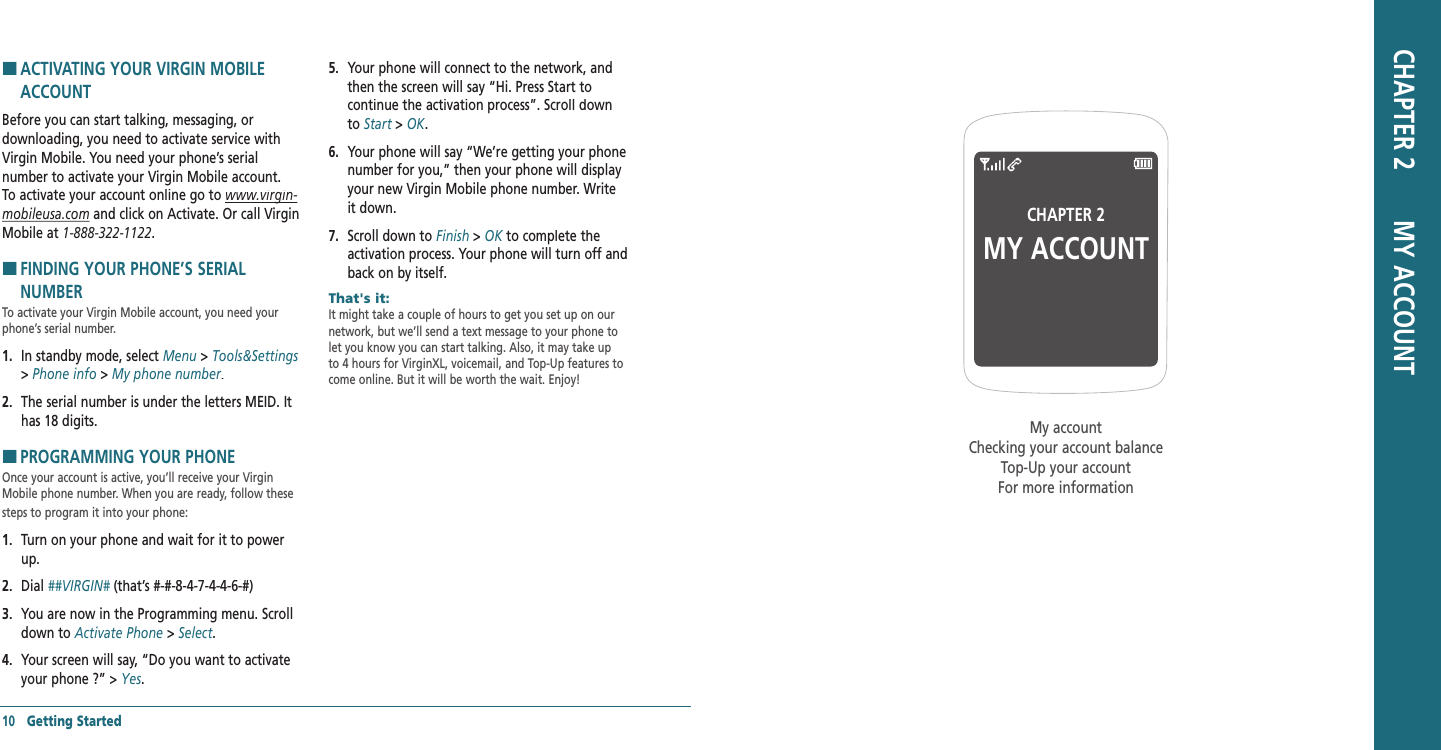
![HMY ACCOUNTYou can manage your Virgin Mobile account directly from your phone. The basic tasks are summarized in this chapter. For more information about your account, go to www.virginmobileusa.www.virginmobileusa.com.HCHECKING YOUR ACCOUNT BALANCEYou can check your Virgin Mobile account status two ways: In standby mode, press [] key or in standby mode, select Menu > My Account. Your account information appears with Top-Up information relative to your selected plan. When your account is low or empty, you receive anotification to Top-Up.HTOP-UP YOUR ACCOUNTTop-Up is how you add money to your Virgin Mobile account. You can Top-Up your Virgin Mobile account right from your phone. First, buy a Top-Up card at the thousands of retailers that carry them or register your debit card, credit card, or PayPal account at www.virginmobileusa.comwww.virginmobileusa.com. When your balance is low, you can Top-Up your account from your phone.Note: Additional charges may apply for multiple balance checks in one day. Visit www.virginmobileusa.com for more details.Top-Up with a Top-Up Card1. In standby mode, press Menu > My Account.2. Scroll down to the Top‐Up link and press OKkey.3. Enter your Account Pin (vKey) and press OK key.OK key.OK4. Scroll down to select Login and press OK key.OK key.OK5. Enter your Top-Up card’s PIN number and press OK key.OK key.OK6. Scroll down to select Top‐Up Now and press Top‐Up Now and press Top‐Up NowOK key.OK key.OK7. You are now topped up. Press [ ] to exit.Top-Up with a Debit Card, Credit Card, or PayPal AccountBefore you can Top-Up from your phone with a debit card, credit card, or PayPal account, you need to register the card or PayPal account at www.virginmobileusa.com. 1. In standby mode, press Menu > My Account.2. Scroll down to the Top‐Up link and press OKkey.3. Enter your Account Pin (vKey) and press OK key.OK key.OK4. Scroll down to select Login and press OK key.OK key.OK5. Scroll down and select Credit Card or Credit Card or Credit CardPayPal.6. Enter the amount you want to Top-Up and press OK key. You can OK key. You can OKTop‐Up in amounts of $20, $30, $50, or $90.7. Scroll down to select Top‐Up Now and press Top‐Up Now and press Top‐Up Now12 My Account My Account 13OK key.OK key.OK8. At the confirmation screen, select Yes.9. You are now topped up. Press [ ] to exit.Note: You can also Top-Up at www.virginmobileusa.com.HFOR MORE INFORMATIONFor more information about your Virgin Mobile account or Virgin Mobile service, visit www.virgin‐www.virgin‐mobileusa.com.](https://usermanual.wiki/Pantech/X1.Manual/User-Guide-913863-Page-7.png)
![Calls & Contacts 17HMAKING, RECEIVING & ENDING A CALLTo make a call1. Enter the area code and phone number.2. Press [] key.To answer a call1. Press [].To end a call1. Press [].Once the call is completed, a call summary is displayed.To reject a call1. Press [] or Ignore.To make a call using call listYour phone logs up to 270 outgoing, received and missed call numbers.1. In standby mode, press [] to display the Recent Calls list.Recent Calls list.Recent Calls2. Select a number.3. Press [] to dial the selected number.Note: • To redial the last number in the Recent Calls list, press [ ]. • After 270 received, outgoing or missed calls, the oldest call will automatically be erased from the history.To make a call using contacts1. In standby mode, press Contacts to access the contacts list. Select the desired phone number and press [].To make a call during a call1. Enter the phone number or look it up in Contacts.2. Press [] to dial the second call. The first call is automatically put on hold.To adjusting the call volume1. In standby mode, press Side volume key up or down to adjust the earpiece volume.To insert a Time/Hard Pause featureInsert a pause after a phone number and then enter another group of numbers. The second set of numbers is dialed automatically after the pause.1. Enter a phone number and then press Options. Select either Hard Pause (“P”) or a Time Pause (“T”).To switch between two calls1. Press [].To reply to a missed call**1. Press View to display the list of missed calls.View to display the list of missed calls.View2. Select a number to call by pressing the [/] key.3. Press [].16 Calls & ContactsTo answer a second call**1. Press []. The first call is automatically put on hold.2. Press [] to end the second call.The call on hold is automatically reconnected.HCALLER IDENTIFICATIONIdentifies caller by displaying their phone number. If the caller’s name and number are already stored in your contact list, name will appear. The caller ID is stored in the Recent Calls Menu.HCALL WAITING FUNCTIONNotifies you of an incoming call when you are already on a call by sounding a beep tone and displaying the caller’s phone number.To answer another call while on the phone, press []. This places the first call on hold. To switch back to the first caller, press [] again.HSPEAKER PHONEThe Speaker Phone feature lets you hear audio through the speaker and talk without holding the phone.To activate the Speaker Phone in idle mode or while on a call, press [].HVIBRATE ON/OFF MODEIn standby mode, press and hold to turn vibrate mode On/Off.HMAKING AN EMERGENCY CALLThe 911 feature automatically places the phone in Emergency Call Mode when you dial the preprogrammed emergency number, 911.To making an call 911 in lock mode1. Enter “911” and then press [].2. The phone maintains the Emergency Mode for 5 minutes. To making an call 911 using any available system1. Enter “911” and then press [].2. The phone will stay in Emergency Mode for 5 minutes. While the phone is in Emergency Mode for 5 minutes, the phone can receive an incoming call from any available system or you can make outgoing calls even in the Emergency Callback Mode.HOPTIONS DURING A CALLMicrophone off and onTo switch your phone’s microphone off1. Press Mute.To switch your phone’s microphone back on1. Press Unmute.](https://usermanual.wiki/Pantech/X1.Manual/User-Guide-913863-Page-9.png)
![18 Calls & Contacts Calls & Contacts 19To talk on speaker1. Press Speaker.To put a call on hold and return**To put a call on hold1. Press [].To return to a held call1. Press [] again.To save a number in contacts list during a call1. Press Options > Options > OptionsSave.To search a number in contact list during a call1. Press Options > Options > OptionsContacts > Contacts > ContactsContact List.2. Select a number > [].To search for a name or group in contact listEnter the first letters of the name for Name Search. The entries are displayed starting with the first entry matching your input.To find a name manually in contact list1. Press the [] key.To view the details of highlighted entry in contact list1. Press OK. For contacts, see page 20.To search a number in recent calls during a call1. Press Options > Options > OptionsRecent Calls.To read a message during a call1. Press Options > Options > OptionsMessaging > Inbox > select a Inbox > select a Inboxmessage.To write a text message during a call1. Press Options > Options > OptionsMessaging > Send Text Msg.For creating message, see page 28.Note: During the call, you can only send text messages. Multimedia messages cannot be sent, but can be saved.HCALL SETTINGTo set call reminder1. In standby mode, press Menu > Tools&Settings> Call options > Call reminder.2. Select Every 2 Minutes, Every 10 Minutes or Off> Select.To set auto answer1. In standby mode, press Menu > Tools&Settings> Call options > Auto answer.2. Select 5 Seconds, 10 Seconds, 20 Seconds or Off> Select.To answer with any key press1. In standby mode, press Menu > Tools&Settings> Call options > Call answer.2. Select Flip open + any Key > Flip open + any Key > Flip open + any KeySelect.Note: You can answer with any key except [ ] and Reject.HCHECKING ALL CALLSYou can view information about all Recent Calls. For more options for all, missed, received and outgoing calls press Options.To view all calls1. In standby mode, press Menu > Recent Calls > All calls.2. Select the call list and press OK to view the OK to view the OKdetails.To view missed calls1. In standby mode, press Menu > Recent Calls > Missed calls.2. Select the missed call and press OK to view the OK to view the OKdetails.To view received calls1. In standby mode, press Menu > Recent Calls > Received calls.2. Select the received call and press OK to view OK to view OKthe details.To view outgoing calls1. In standby mode, press Menu > Recent Calls > Outgoing calls.2. Select the outgoing call and press OK to view OK to view OKthe details.To send a message with recent call list1. Press Options.2. Select Send text msg or Send pic msg.3. Write the message > Send.To delete call logs1. Press Options > Erase > Yes.Note: If no logs exist, the message “No Call exist” appears.To view total call time1. In standby mode, press Menu > Recent Calls > Call timers.2. Select Last call or Last call or Last callRecent calls > Recent calls > Recent callsSelect.3. Displays usage time of last call or recent calls > Done.](https://usermanual.wiki/Pantech/X1.Manual/User-Guide-913863-Page-10.png)
![20 Calls & Contacts Calls & Contacts 21HSPEED DIALINGYou can dial quickly using speed dialing. Nineteen numbers from 2 to 10 can be saved.To set speed dial1. In standby mode, press Menu > Contacts > Speed dial.2. Select an empty entry > Assign.3. Select a person > Select phone number > Done.To update speed dial1. Select a number and press Reassign > Yes.2. Select a person > Select phone number > Done.To remove from speed dial1. Select a number and press Erase > Yes.HUSING CONTACTSYou can save names, phone numbers, and up to 500 contacts in the phone.To add a contact1. In standby mode, press Menu > Contacts > Add new.2. To edit a new contact > Save.To view contact list1. In standby mode, press Menu > Contacts > Find name.To search for a phone number1. In standby mode, press Menu > Contacts > Find name.2. Input a name.3. Press OK to view the details.OK to view the details.OKTo call from contact list1. In standby mode, press Menu > Contacts > Find name.2. Select a contact > [].To forward contact details1. In standby mode, press Menu > Contacts > Find name.2. Select a contact > Send msg.3. You can send the information via Send text msgor Send pic msg.4. Write the message > Send.To delete a contact1. In standby mode, press Menu > Contacts > Find name.2. Select a contact > Options > Options > OptionsErase.To make groups1. In standby mode, press Menu > Contacts > Groups.2. Select an empty entry > Edit.3. To edit a group options > Save.To send a group message1. In standby mode, press Menu > Contacts > Groups.2. Select an existing group and press Options > Options > OptionsSend text msg or Send pic msg > OK.3. Write the message > Send.To add member in group1. In standby mode, press Menu > Contacts > Groups.2. Select an existing group and press Options > Options > OptionsAdd member.3. Select wish to add member > Select.To erase a group1. In standby mode, press Menu > Contacts > Groups.2. Select an existing group and press Options > Options > OptionsErase > Yes.To view your phone number1. In standby mode, press Menu > Contacts > My phone number.HVOICE COMMANDS (AVR)Your phone is equipped with an AVR (Advanced Voice Recognition) feature. This feature allows you to make calls or use the phone’s functions by simply using your voice. All you have to do is talk into the phone, and the phone will recognize your voice and complete tasks by itself.To using AVR (Advanced Voice Recognition)1. In standby mode, press Menu > Tools&Settings > Tools > Voice command. Or, in standby mode, press the Side AVR Key.2. The phone displays the Command menu and prompts you to say the name of the command you want to use. To complete your task, simply follow the voice prompts. You can say the name of the command after you hear a beep.Call <Name or #>1. Say Call <Name>. Your phone will ask you to confirm the name you said. Say Yes if it was repeated correctly. That phone number will be dialed. If there is more than one number saved for that contact, you will be asked to confirm which number to dial.Send text <Name or #>1. Say Send Text <Name>. (Examples: - Send Text Tom Smith)Follow instructions for sending a new message on page 26.](https://usermanual.wiki/Pantech/X1.Manual/User-Guide-913863-Page-11.png)
![Messaging 27HMESSAGINGYou can send, receive and save text messages and multimedia messages. Your phone supports unified messaging system. Unified messaging is the handling of voice, fax, and regular text messages as objects in a single mailbox. You can attach objects to message as multimedia message. To delete message in each mailbox 1. Select a message > Options > Erase > Yes.To reply the message1. Select a message > Select > View > Reply.HRECEIVED MESSAGETo view new received message1. Press View or press View or press ViewOK.To read message using inbox 1. In standby mode, press Menu > Messaging > Inbox > Inbox > InboxOK.2. Select a received message > OK.To save new numbers from received message1. Select the new number of the received message.2. Press Options > Options > OptionsSave Contact. 3. Select New entry or New entry or New entryExisting entry.4. Edit contacts list > Save. To launch email address from the received message1. Open the message with email address is in.2. Select the email address in the message. 3. Press Options > Options > OptionsLaunch URL. To save the object in the received multimedia message1. Open the multimedia message.2. Select the object > Options > Save attached.Note: It will be saved in one of the categories in My Stuff. For My Stuff, see page 33.To listen to receive voice message1. In standby mode, press Menu > Messaging > Voicemail. It will automatically call the voice-mail center.HVOICEMAILNew voicemail alerts are sent via an SMS text message. These messages indicate how many new and urgent voicemails are in your voicemail box. Open the text message to view the number of new voice messages in your voicemail. If a caller leaves a callback number, this number will also be sent via an SMS text message. Displays the number of voice mails and accesses them by pressing and holding the [ ]To setup your voicemailBefore your phone can receive voicemail messages, you must set up a 4-10 digit passcode and record a personal 26 Messagingvoicemail greeting. When you have set up your voicemail, all unanswered calls to your phone are automatically transferred to voicemail, even if your phone is in use or turned off.1. In standby mode, press Menu > Messaging > Voicemail or press and holdVoicemail or press and holdVoicemail [].2. Follow the system prompts to setup your password and record a greeting.To access your voicemail box1. In standby mode, press Menu > Messaging > Voicemail or press and holdVoicemail or press and holdVoicemail [].2. Follow the system prompts to enter your password and retrieve your messages.HSENT MESSAGETo resend a sent message1. In standby mode, press Menu > Messaging > Sent.2. Select a sent message > View > View > ViewSend. To edit a sent message1. In standby mode, press Menu > Messaging > Sent.2. Select a sent message > View > View > ViewOptions > Options > OptionsEdit. 3. To edit a message > Send. To call with a sent message1. In standby mode, press Menu > Messaging > Sent.2. Select a sent message > View > Options > Call or []. To forward message to other recipient number1. In standby mode, press Menu > Messaging > Sent.2. Select a sent message > View > View > ViewOptions > Options > OptionsForward. 3. Enter phone number > Done > Send. To save sent message1. In standby mode, press Menu > Messaging > Sent.2. Select a sent message > View > Options > Save msg. Note: It will be saved in Saved folder. To save new numbers from sent message1. In standby mode, press Menu > Messaging > Sent.2. Select a sent message > View > View > ViewOptions > Options > OptionsSave Contact. 3. Select New entry or New entry or New entryExisting entry.4. Edit contacts list > Save.](https://usermanual.wiki/Pantech/X1.Manual/User-Guide-913863-Page-14.png)
![28 Messaging Messaging 29HCREATING AND SEND NEW MESSAGETo send new text message1. In standby mode, press Menu > Messaging > Send text msg.2. Enter phone number or press Options > Contacts. 3. Find the recipient and check the box by pressing Mark > Mark > MarkOK > Done.4. Write the message > Send.5. To view sent message press Menu > Messaging> Sent.Note: All successful or failed messages will be saved in Sent.To find all sent messages1. In standby mode, press Menu > Messaging > Sent. HMESSAGE TEMPLATESWhen you often use same phrases you can save the message as a template message.To save the message as a template1. In standby mode, press Menu > Messaging > Msg settings > Msg settings > Msg settingsAuto text > Auto text > Auto textOptions > Options > OptionsNew.2. Write a message > Save. To edit the saved template message1. In standby mode, press Menu > Messaging > Msg settings > Msg settings > Msg settingsAuto text.2. Select the message. 3. Press Options > Options > OptionsEdit. 4. Edit a message > Save.H �CREATE AND SEND NEW MULTIMEDIA MESSAGEYou can add picture, sound and other file to text message. When you add the object it will change to multimedia message. If message exceeds 300Kb an error message will pop up.To send new multimedia message1. In standby mode, press Menu > Messaging > Send pic msg.2. Enter phone number or press Options > Contacts.3. Find the recipient and check the box by pressing Mark > Mark > MarkOK > Done.4. Write the Subject > Text > Image > Audio > Send. 5. To view sent message press Menu > Messaging > Sent.Note: All successful or failed messages will be saved in Sent.To add saved picture in the message1. Press Navigation Key down to select under Image window.2. Press Pictures.3. Select a saved image > Select.To add new picture in the message1. Press Navigation Key down to select under Image window.2. Press Pictures > Camera.3. Take the picture.To add saved sound in the message1. Press Navigation Key down to select under Audio window.2. Press Audio.3. Select a saved sound > Select.To add new sound in the message1. Press Navigation Key down to select under Audio window.2. Press Audio > Record.3. Record the sound. H �CREATE AND SEND NEW EMAIL MESSAGEYou can send and receive email messages from your phone. Check Virgin Mobile’s web site at www.virginmobi‐leusa.com for availability and pricing.To send new email message1. In standby mode, press Menu > Messaging > Send email msg.To launch mobile email 1. In standby mode, press Menu > My Stuff > My other stuff > Mobile Email.H �CREATE AND SEND NEW INSTANT MESSAGEYou can send and receive instant messages (IMs) from your phone. Check Virgin Mobile’s Web site at www.virginmobi‐leusa.com for availability and pricing.To send new instant message1. In standby mode, press Menu > Messaging > Send IM.To launch instant message 1. In standby mode, press Menu > My Stuff > My other stuff > Mobile IM.2. Scroll through items and highlight to select one.To end instant message 1. In standby mode, press Menu > My Stuff > My other stuff > Mobile IM.2. Press []. H �VIRGIN ALERTSTo review the Virgin Alerts you’ve received1. In standby mode, press Menu > Messaging > Virgin Alerts > Go to.](https://usermanual.wiki/Pantech/X1.Manual/User-Guide-913863-Page-15.png)
![Multimedia 33HCAMERAYou can take pictures using built-in camera. The photos can be saved and sent using multimedia message.To set camera settings1. In standby mode, press Menu > Pictures > Take a picture.2. Press Options before you take a picture.Options before you take a picture.OptionsIcons for cameraIcon Menu OptionsResolutionDisplay photo resolution 640x480, 320x240, 160x120, 128x96 Zoom 1x, 2x, 4xBrightness +2, +1 0 -1, -2Settings for cameraMenu Sub Menu OptionsSelf portraitSelf timer Off, 5 Seconds, 10 Seconds, 15 SecondsFun framesNone, I love you, Clown, Mona Lisa, I miss you, Punch, Happy bus, Frame, Happy birthday, Monkey, RabbitImage controls White balanceAuto, Sunny, Cloudy, Tungsten, FluorescentContrast Level -2 ~ +2Color effect Normal, Gray, Sepia, NegativeSettingsResolution 640x480, 320x240, 160x120, 128x96 Picture Quality High, Medium, LowShutter soundOff, Default, Say “Cheese”, “Ready! 123” To increase or decrease the brightness1. Press [].To zoom in and out1. Press [].BrightnessZoomFile SizeSelf timer32 MultimediaTo take a picture1. In standby mode, press Menu > Pictures > Take a picture. 2. Focus on the object > OK.Note: Your picture will be saved automatically to My Stuff > My graphics > My pictures or Menu > Pictures > My pictures.To view the taken picture1. In standby mode, press Menu > Pictures > My pictures. 2. Select the picture > View.3. To use options > Options.After taking picturesFunctions ProcessSet a photo for a specific contact Options > Assign > Caller IDSet as screensaver Options > Assign > ScreensaverSet as standby screen Options > Assign > WallpaperTo upload web site Options > Upload to webDelete the picture Options > EraseTake a new picture Options > Take PicRename the picture Options > RenameLock/Unlock the picture Options > Lock/UnlockView the information Options > File InfoDelete all pictures Options > Erase AllTo send pictures using multimedia message1. In standby mode, press Menu > Pictures > Send pic msg. 2. Select a picture.3. Write the message, press Send.HPICTURES AND IMAGE ALBUMYou can view, assign, delete the saved pictures. The supported formats are JPEG, GIF, BMP, WBMP and PNG.To view the downloaded or saved image and pictures1. In standby mode, press Menu > My Stuff > My graphics > My pictures.2. Select the picture > View.To set as wallpaper in the display1. In standby mode, press Menu > My Stuff > My graphics > Wallpaper.2. Select a picture > Assign.3. Select Caller ID, Wallpaper or Screensaver > Select.](https://usermanual.wiki/Pantech/X1.Manual/User-Guide-913863-Page-17.png)
![34 Multimedia Multimedia 35To set as screensaver in the display1. In standby mode, press Menu > My Stuff > My graphics > Screensaver.2. Select a picture > Assign.3. Select Caller ID, Wallpaper or Screensaver > Select.HMUSIC AND SOUND ALBUMYou can play, delete to phone the saved sounds. The supported formats are MIDI, SMAF, iMelody, MP3, WAV and AMR.To listen the recorded sound1. In standby mode, press Menu > My Stuff > My ringtones.2. Select a sound > Options > Play.To set as a ringtone1. In standby mode, press Menu > My Stuff > My ringtones.2. Select a sound > Assign.3. Select Contact, Contact, ContactGroup, All contacts or All callers > Select.HTHEMES ALBUMTo set as the theme1. In standby mode, press Menu > My Stuff > My themes.2. Select an image > Select.HOTHER FILESYou can manage files in unsupported formats saved on your phone. It also lists files received via Bluetooth from other devices. To view the list of the files1. In standby mode, press Menu > My Stuff > My other stuff.other stuff.other stuffTo save the event to the calendar 1. In standby mode, press Menu > My Stuff > My other stuff.other stuff.other stuff2. Select the .vcs file (V-Calendar) > Options > Save to calendar. You can check the event in the calendar.For calendar, see page 38.To save the contact to the contacts 1. In standby mode, press Menu > My Stuff > My other stuff.other stuff.other stuff2. Select the .vcs file (V-Calendar) > Options > Save to contact. You can check the address in the contacts.For contacts, see page 20.To send sound file using multimedia message 1. In standby mode, press Menu > My Stuff > My other stuff.other stuff.other stuff2. Select a file > Options > Send by > MMS. HPLAYING GAMEYour phone contains game to play. To play the game1. In standby mode, press Menu > My Stuff > My games.2. Select a game > Run.To end the game1. Press [] > Yes.To set the game optionsTo set the game volume1. In standby mode, press Menu > Tools&Settings > Game settings > Volume. 2. Select Silent orSilent orSilent Level 1 ~ Level 5 > Select.To set the game backlight1. In standby mode, press Menu > Tools&Settings > Game settings > Backlight. 2. Select Disabled, Disabled, Disabled 5 Seconds, 10 Seconds, 30 Seconds or Always On > Select.To display a receive messaging during aplaying game1. In standby mode, press Menu > Tools&Settings > Game settings > Messaging. 2. Select Icon & Message or Icon only > Select.](https://usermanual.wiki/Pantech/X1.Manual/User-Guide-913863-Page-18.png)

![HCALENDARCalendar helps you manage your schedule including your time for calls or special days. You can set alarm service on a set date with this function.To view calendar1. In standby mode, press Menu > Tools&Settings > Tools > Calendar.Note: Monthly view is displayed as default.In the monthly viewTo PressMove to another day[] for Previous for Next Move to another week for Previous [] for Next To create a new event1. In standby mode, press Menu > Tools&Settings > Tools > Calendar.2. Select a day > New.3. On the Edit schedule screen, select and input an event item by item for registration > Save.To edit a event1. In standby mode, press Menu > Tools&Settings > Tools > Calendar.2. Select a saved event > Edit.3. On the Edit schedule screen, select and edit an event item by item for registration > Save.To erase a saved event1. In standby mode, press Menu > Tools&Settings > Tools > Calendar.2. Select a saved event > Erase > Yes.HALARM CLOCKTo set an alarm1. In standby mode, press Menu > Tools&Settings > Tools > Alarm clock.2. Select location > Select > Edit a new alarm > Select > Edit a new alarm > SelectSave.To view the saved alarms1. In standby mode, press Menu > Tools&Settings > Tools > Alarm clock.To edit existing alarms1. In standby mode, press Menu > Tools&Settings > Tools > Alarm clock.2. Select an existing alarm > Select > Edit an alarm Select > Edit an alarm Select> Save.H �CALCULATOR, TIP CALCULATOR, STOPWATCH & WORLD CLOCKTo use the calculatorUse the Calculator for basic mathematical equations.38 Useful Features Useful Features 391. In standby mode, press Menu Tools&Settings > Tools > Calculator.2. Enter the first number and use [//].3. Enter the second number and press OK to OK to OKcalculate.Use [] to use the decimal point, [] to use the change positive or negative.To use tip calculatorThe Tip Calculator helps you calculate how much tip to include with a bill.1. In standby mode, press Menu > Tools&Settings > Tools > Tip calculator.2. Enter the amount of your bill and move the next field Tip(%).3. Enter the percentage amount to tip and move the next field Split.4. Enter the amount of split number. The new bill amount is shown.To use the stopwatchThe Stopwatch counts the time your spend for an activity.1. In standby mode, press Menu > Tools&Settings > Tools > Stopwatch.2. Press Start to start stopwatch.Start to start stopwatch.Start3. Press Cont to save Lap time (Max eight Lap Cont to save Lap time (Max eight Lap Conttime).4. Press Stop to stop stopwatch.5. Press Reset to reset stopwatch.Reset to reset stopwatch.ResetTo use world clock1. In standby mode, press Menu > Tools&Settings > Tools > World clock.2. Use [///] to select different cities.3. To set daylight saving, press DST.DST.DST4. Edit a DST item by item for registration > Save. HVOICE MEMOTo record voice memo1. In standby mode, press Menu > Tools&Settings > Tools > Voice memo > New.2. To stop recording, press Save.To listen to the recording voice memo1. In standby mode, press Menu > Tools&Settings > Tools > Voice memo.2. Select recorded voice memo > OK.To send voice memo using multimedia message1. In standby mode, press Menu > Tools&Settings > Tools > Voice memo.2. Select a voice memo > Options > Send Message.3. Write the message > Send.](https://usermanual.wiki/Pantech/X1.Manual/User-Guide-913863-Page-20.png)
![HUSING THE INTERNETTo access internet 1. In standby mode, press Menu > Surf the Web.Note: It will access your Wireless Web service provider’s homepage.To view visited sites1. In standby mode, press Menu > Surf the Web > Menu > History.2. To open, press Options > Options > OptionsOpen.3. To list by category, press Options > Sort. To set new bookmarks1. In standby mode, press Menu > Surf the Web > Menu > Mark Page.2. Press Options > Options > OptionsCreate New.3. To edit, press Save. To view bookmarks 1. In standby mode, press Menu > Surf the Web > Menu > Mark Page.2. Press Options > Options > OptionsView.3. To send via text message, press Send by Msg. To search web site1. In standby mode, press Menu > Surf the Web > Menu > Search.To refresh the current page1. In standby mode, press Menu > Surf the Web > Menu > Reload.To show the image on the current page1. In standby mode, press Menu > Surf the Web > Menu > Show Link.To access the web site directly by entering the address1. In standby mode, press Menu > Surf the Web > Menu > Goto Page.2. Enter the web address > GO.To go to the homepage1. In standby mode, press Menu > Surf the Web > Menu > Home.To send messages using the WAP server 1. In standby mode, press Menu > Surf the Web > Menu > Send Link.To set enable/disable download objects1. In standby mode, press Menu > Surf the Web > Menu > Settings > Downloads.To restart web browser 1. In standby mode, press Menu > Surf the Web > Menu > Settings > Restart Browser.50 Connectivity Connectivity 51To clear cache memory1. In standby mode, press Menu > Surf the Web > Menu > Settings > Clear > Check Clear Cache > Clear.To clear saved history1. In standby mode, press Menu > Surf the Web > Menu > Settings > Clear > Check Clear History > Clear.To clear saved cookies1. In standby mode, press Menu > Surf the Web > Menu > Settings > Clear > Check Clear Cookies > Clear.To clear autofill1. In standby mode, press Menu > Surf the Web > Menu > Settings > Clear > Check Autofill > Clear.HVirginXLTo access VirginXL1. In standby mode, press Menu> VirginXL.With VirginXL, you can access music, entertain-ment, and information services from your phone. Download games, ringtones, wallpaper, screen savers, and other content; surf the web; and more. Check Virgin Mobile’s Web site at www.virginmobileusa.com for availability and pricing, or check directly from your phone using VirginXL. Charges apply.Note: You cannot receive incoming calls during a VirginXL ses-sion. All incoming calls are automatically sent to your voicemail.Note: A scroll bar on the right side of the screen indicates that there is more text. Scroll down to go to the next screen of text. Press the CLR key to move back one screen.Ending a VirginXL session1. Press [ ].HMY STUFFTo access my ringtones1. In standby mode, press Menu > My Stuff > My ringtones > Get more ringtones > Go.To access my graphics1. In standby mode, press Menu > My Stuff > My graphics > Get more graphics > Select.To access my games1. In standby mode, press Menu > My Stuff > My games > Get more games > Go.To download other stuff1. In standby mode, press Menu > My Stuff > My other stuff > Get more stuff > Go.](https://usermanual.wiki/Pantech/X1.Manual/User-Guide-913863-Page-26.png)

![64 Appendix Appendix 65“normal usage” while using their hearing aid with the particular wireless phone. “Normal usage” in this context is defined as a signal quality that is acceptable for normal operation. The M mark is intended to be synonymous with the U mark. The T mark is intended to be synonymous with the UT mark. The M and T marks are recommended by the Alliance for Telecommunications Industries Solutions (ATIS). The U and UT marks are referenced in Section 20.19 of the FCC Rules. The HAC rating and measure-ment procedure are described in the American National Standards Institute (ANSI) C63.19 standard. For information about hearing aids and digital wireless phone • Fcc Hearing Aid Compatibility and Volume Control http://www.fcc.gov/cgb/dro/hearing.html• Gallaudet University, RERC http://tap.gallaudet.edu/voice• Self Help for Hard of Hearing People Inc. [SHHH] http://www.hearingloss.org• The Hearing Aid Compatibility FCC Order http://hraunfoss.fcc.gov/edocs_public/attach‐match/FCC‐03‐168A1.pdfH �FDA CONSUMER UPDATEU.S. Food and Drug Administration - Center for Devices and Radiological Health Consumer Update on Wireless Phones 1. Do wireless phones pose a health hazard?The available scientific evidence does not show that any health problems are associated with using wireless phones. There is no proof, however, that wireless phones are absolutely safe. Wireless phones emit low levels of radiofrequency energy (RF) in the microwave range while being used. They also emit very low levels of RF when in the stand-by mode. Whereas high levels of RF can pro-duce health effects (by heating tissue), exposure to low level RF that does not produce heating effects causes no known adverse health effects. Many studies of low level RF exposures have not found any biological effects. Some studies have suggest-ed that some biological effects may occur, but such findings have not been con-firmed by additional research. In some cases, other researchers have had difficulty in reproducing those studies, or in deter-mining the reasons for inconsistent results.2. What is FDA’s role concerning the safety of wireless phones?Under the law, FDA does not review the safety of radiation-emitting consumer products such as wireless phones before they can be sold, as it does with new drugs or medical devices. However, the agency has authority to take action if wireless phones are shown to emit radiofrequency energy (RF) at a level that is hazardous to the user. In such a case, FDA could require the manufacturers of wireless phones to notify users of the health hazard and to repair, replace or recall the phones so that the hazard no longer exists. Although the existing scientific data do not justify FDA regula-tory actions, FDA has urged the wireless phone industry to take a number of steps, including the following: • Support needed research into possible biologi-cal effects of RF of the type emitted by wireless phones; • Design wireless phones in a way that minimizes any RF exposure to the user that is not neces-sary for device function; and • Cooperate in providing users of wireless phones with the best possible information on possible effects of wireless phone use on human health. FDA belongs to an interagency working group of the federal agencies that have responsibility for different aspects of RF safety to ensure coordi-nated efforts at the federal level. The following agencies belong to this working group: • National Institute for Occupational Safety and Health • Environmental Protection Agency• Federal Communications Commission • Occupational Safety and Health Administration • National Telecommunications and Information Administration The National Institutes of Health participates in some inter-agency working group activities, as well. FDA shares regulatory responsibilities for wireless phones with the Federal Communications Commission (FCC). All phones that are sold in the United States must comply with FCC safety guide-lines that limit RF exposure. FCC relies on FDA and other health agencies for safety questions about wireless phones. FCC also regulates the base sta-tions that the wireless phone networks rely upon. While these base stations operate at higher power than do the wireless phones themselves, the RF exposures that people get from these base stations are typically thousands of times lower than those they can get from wireless phones. Base stations are thus not the subject of the safety questions discussed in this document. 3. What kinds of phones are the subject of this update?The term “wireless phone” refers here to hand-held wireless phones with built-in antennas, often called “cell,” “mobile,” or “PCS” phones. These types of wireless phones can expose the user to measurable radiofrequency energy (RF) because of the short distance between the phone and the user’s head. These RF exposures are limited by Federal Communications Commission safety guidelines that were developed with the advice of FDA and other federal health and safety agencies. When the phone is located at greater distances from the user, the exposure to RF is drastically lower because a person’s RF exposure decreases rapidly with increasing distance from the source. The so-called “cordless phones,” which have a base unit connected to the telephone wiring in a house, typically operate at far lower power levels, and thus produce RF exposures far below the FCC safety limits.](https://usermanual.wiki/Pantech/X1.Manual/User-Guide-913863-Page-33.png)