ParemTech PTLEVEL20R PTLevel Wireless level monitor User Manual Instructions v2 copy
ParemTech PTLevel Wireless level monitor Instructions v2 copy
User Manual
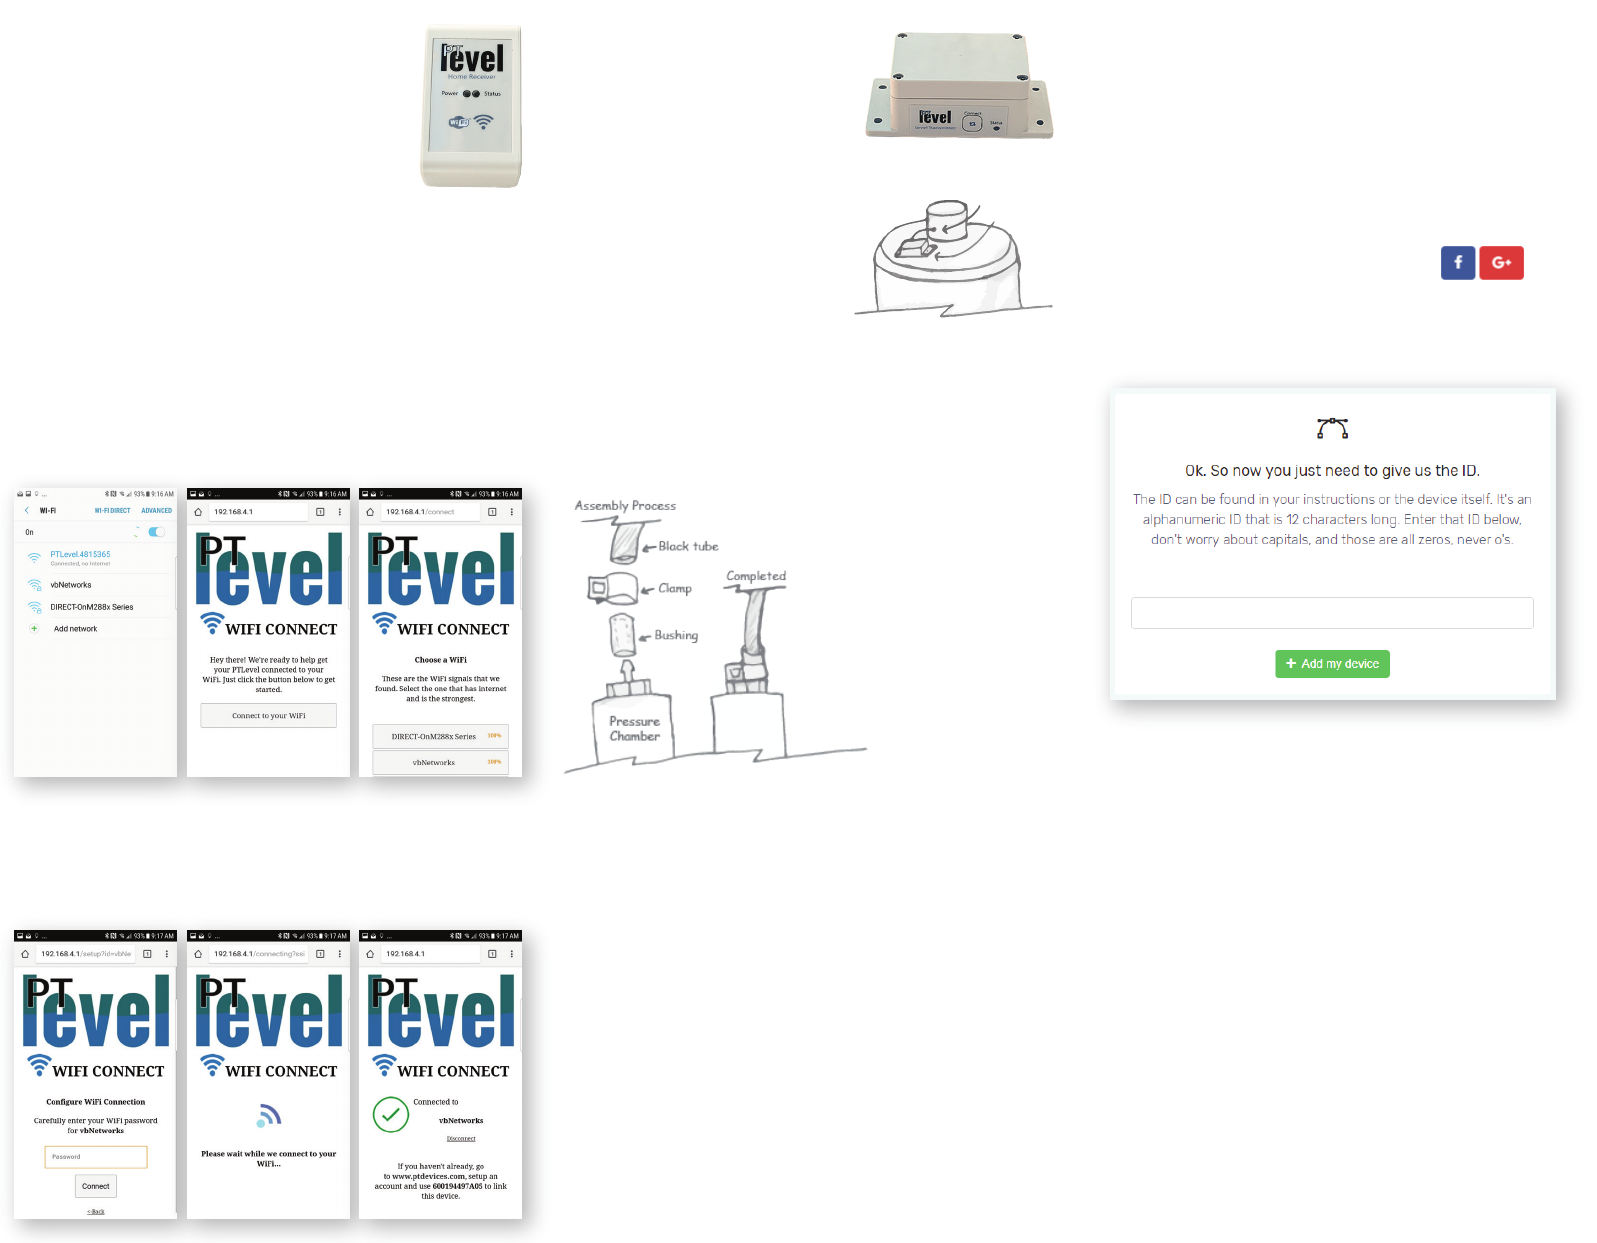
1Connect the Home Receiver
Placement
Place the receiver somewhere inside where there is a
power outlet and WiFi signal.
Use a phone or
tablet or PC to
connect to
PTLevel WiFi
Open a browser
and enter in
192.168.4.1 into
the address bar
Select the
strongest WiFi
signal that has
internet
Enter the
password for the
selected WiFi
Wait for the
PTLevel to
connect
When you see the
screen below,
you’re done! If not,
try again or see
troubleshooting.
2Setup the Transmitter
Mount the transmitter onto the
tank you would like to
measure/monitor. Use screws or
other means to mount it properly.
Pic 1 is an example for a typical
cistern.
Mounting the transmitter
PTLevel
transmitter
Drill hole for
tubing
Cistern
WiFi Connection Setup
Pic 1
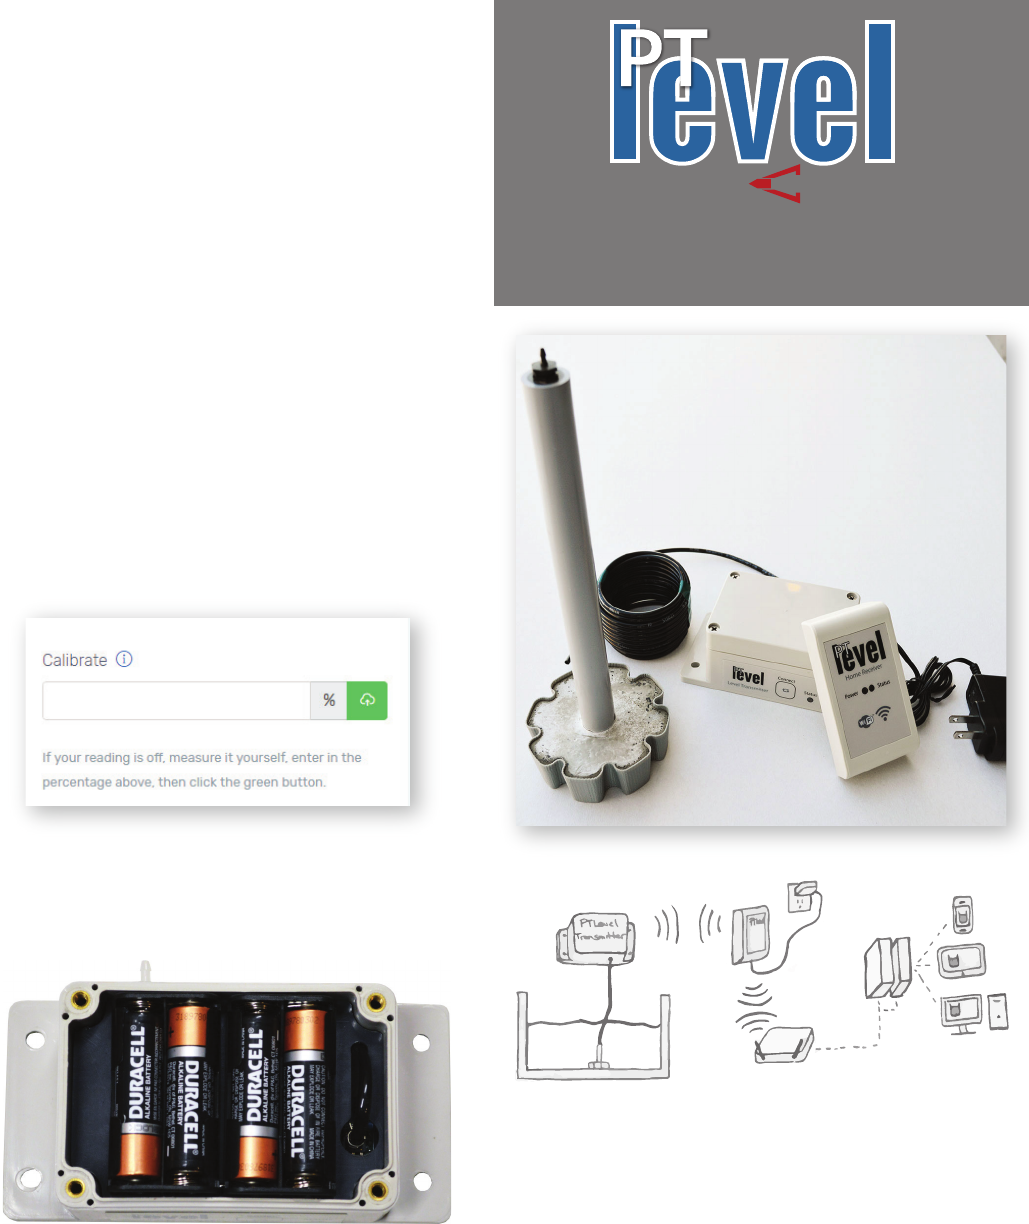
Setup the pressure chamber
Below is an illustration on how to connect the pressure
chamber using the provided clamp, bushing, and tube.
After the PTLevel is mounted, run the black tube through
any necessary holes before proceeding to the next step.
Depending on the device you are using, find where you
can see the list of available WiFi signals. If you need
more help with this, see our YouTube videos.
Lower the pressure chamber
Once the black tubing is fully connected and sealed
tight, lower the pressure chamber into the liquid volume
and allow it to lower to the bottom slowly.
See the Overview on the other side.
Note: Do not drop the chamber in an empty tank or it
could break.
Note: You can cut the black tube shorter if you need, just
pull it out of the liquid before you disconnect any of the
tubing.
Check the wireless connection
Press the connect button on the side of the PTLevel
transmitter. If the status LED blinks three times slowly,
you are connected! See the troubleshooting on the other
side if the LED does not blink three times slowly.
3Setup Online
Create an account
Visit www.ptdevices.com and select “Sign Up” if you
don’t already have an account. Fill out the required
inputs or click on a social login option for a simpler
process.
Final setup!
If everything setup properly, you should see a level
reading online. Press the connect button on the
transmitter for a more recent reading.
After you have selected the “Add my device” button, you
should see a “Waiting for device to connect” screen. If
the PTLevel receiver is all setup properly, the waiting
screen should disappear within a minute. If it does not,
click on the “Remove this” and try adding it again. If it
still does not work, try connecting the WiFi again.
Click on the “Please Setup” button near the level
reading. Enter in the full depth of the tank and configure
anything else.
Congratulations!
You should be all setup. See the calibration section on
the other side to do your first calibration.
Add your device
Once in your account, select “Add PTLevel” from the
menu or “Connect It” from the dashboard. On the next
screen, add the following ID of the PTLevel.
Note: Make sure all
tubing connections
are setup and
sealed properly or
the PTLevel will not
read accurately.
level
BY
PAREMTEC
H
English Manual
Let’s get started!
PTDevices.com
Servers
110v Power
PTLevel
Receiver
Home Router
WiFi
Long Range
Wireless
Connection
5/32”
Black
Tubing
Pressure
Chamber
Cistern,
Well,
Tank, Etc..
Quick Troubleshooting Maintenance
Calibration
Can’t connect to WiFi
• Check the strength of the WiFi signal. Try moving the receiver closer
to your WiFi router.
• Ensure that the password you are entering is correct during the
setup. You can check by trying the password with another device.
Note: WiFi passwords are case sensitive.
Level is not reading accurately
• Pull the weight out of the liquid volume, let it drain and replace it
back in the liquid. This resets the air pressure.
• Check for any possible air leaks along the tubing and connections.
• Check for any water in the small back tube by applying a slight
vacuum to it.
Transmitter status conditions
• Three blinks slowly after pressing the connect button.
Successful connection
• Two quick flashes after pressing the connect button.
Cannot find/connect to the receiver. See below.
Receiver and Transmitter not connecting
• Check the distance and the objects in between. Try moving the
transmitter closer to see if a connection can be established.
• Transmitter and receiver may not be linked for some reason. Please
contact us about this.
We recommend that once a season you remove the
pressure chamber from the liquid volume, let it drain,
then replace it into the liquid again. This resets the air
pocket and will keep the reading as accurate as
possible. Press the “connect” button on the transmit-
ter to update the online level. You should also
re-calibrate.
1. Measure the amount of liquid in the tank.
2. Divide that measurement by the full empty depth
of the tank.
Ie: 72” of water / 144” tank height = 0.5
3. Multiply the above result with 100 to get the
current percentage.
Ie: 0.5 * 100 = 50%
4. Enter the result from step 3 into the calibration
input online.
5. Press the “Connect” button on the Transmitter to
ensure that the calibration is updated online.
Make sure that your device is functioning and
connected online first.
Battery Replacement
Simply remove the four screws on the PTLevel
transmitter lid. Pull off the lid and the batteries will be
visible.
Need Assistance?
Visit www.ptlevel.com/need_help
Need Assistance?
Visit www.ptlevel.com/need_help
FCC Regulatory Compliance
Warning: changes or modifications not expressly approved by the party responsible for
compliance could void the user’s authority to operate the equipment.
Note: This equipment has been tested and found to comply with the limits for a Class B digital
device, pursuant to Part 15 of the FCC Rules. These limits are designed to provide reasonable
protection against harmful interference in a residential installation. This equipment generates,
uses and can radiate radio frequency energy and, if not installed and used in accordance with
the instructions, may cause harmful interference to radio communications. However, there is no
guarantee that interference will not occur in a particular installation.
If this equipment does cause harmful interference to radio or television reception, which can be
determined by turning the equipment off and on, the user is encouraged to try to correct the
interference by one or more of the following measures:
-- Reorient or relocate the receiving antenna.
-- Increase the separation between the equipment and receiver.
-- Connect the equipment into an outlet on a circuit different from that to which the receiver is
connected.
-- Consult the dealer or an experienced radio/TV technician for help.
This equipment complies with FCC radiation exposure limits set forth for an uncontrolled
environment. This equipment should be installed and operated with minimum distance 20cm
between the radiator and your body. This transmitter must not be co-located or operating in
conjunction with any other antenna or transmitter.
ISED Regulatory Compliance
This device contains licence-exempt transmitters that comply with Innovation, Science and
Economic Development Canada’s licence-exempt RSS(s).
Operation is subject to the following two conditions:
1.This device may not cause interference.
2. This device must accept any interference, including interference that may cause undesired
operation of the device.
L’émetteur exempt de licence contenu dans le présent appareil est conforme aux CNR
d’Innovation, Sciences et Développement économique Canada applicables aux appareils radio
exempts de licence. L’exploitation est autorisée aux deux conditions suivantes :
1.L’appareil ne doit pas produire de brouillage;
2.L’appareil doit accepter tout brouillage radioélectrique subi, même si le brouillage est
susceptible d’en compromettre le fonctionnement.
This equipment complies with IC RSS-102 radiation exposure limits set forth for an
uncontrolled environment. This equipment should be installed and operated with minimum
distance 20cm between the radiator and your body.
Cet équipement est conforme aux limites d'exposition aux radiations IC CNR-102 établies pour
un environnement non contrôlé. Cet équipement doit être installé et utilisé avec une distance
minimale de 20 cm entre le radiateur et votre corps.