Parts Express PMA8 Speaker Box User Manual 716 1708046 PMA8 A3
Parts Express International Inc. Speaker Box 716 1708046 PMA8 A3
User Manual

User Manual
Model:
PMA8
Talent PMA8 8-Channel Powered Mixer
with Bluetooth MP3 Player
Please read all the safety and operating instructions carefully before using this product.
5-Year Warranty
See talentaudio.com for details
© Talent Sound & LightingTM 4Last Revised: 11/22/2017
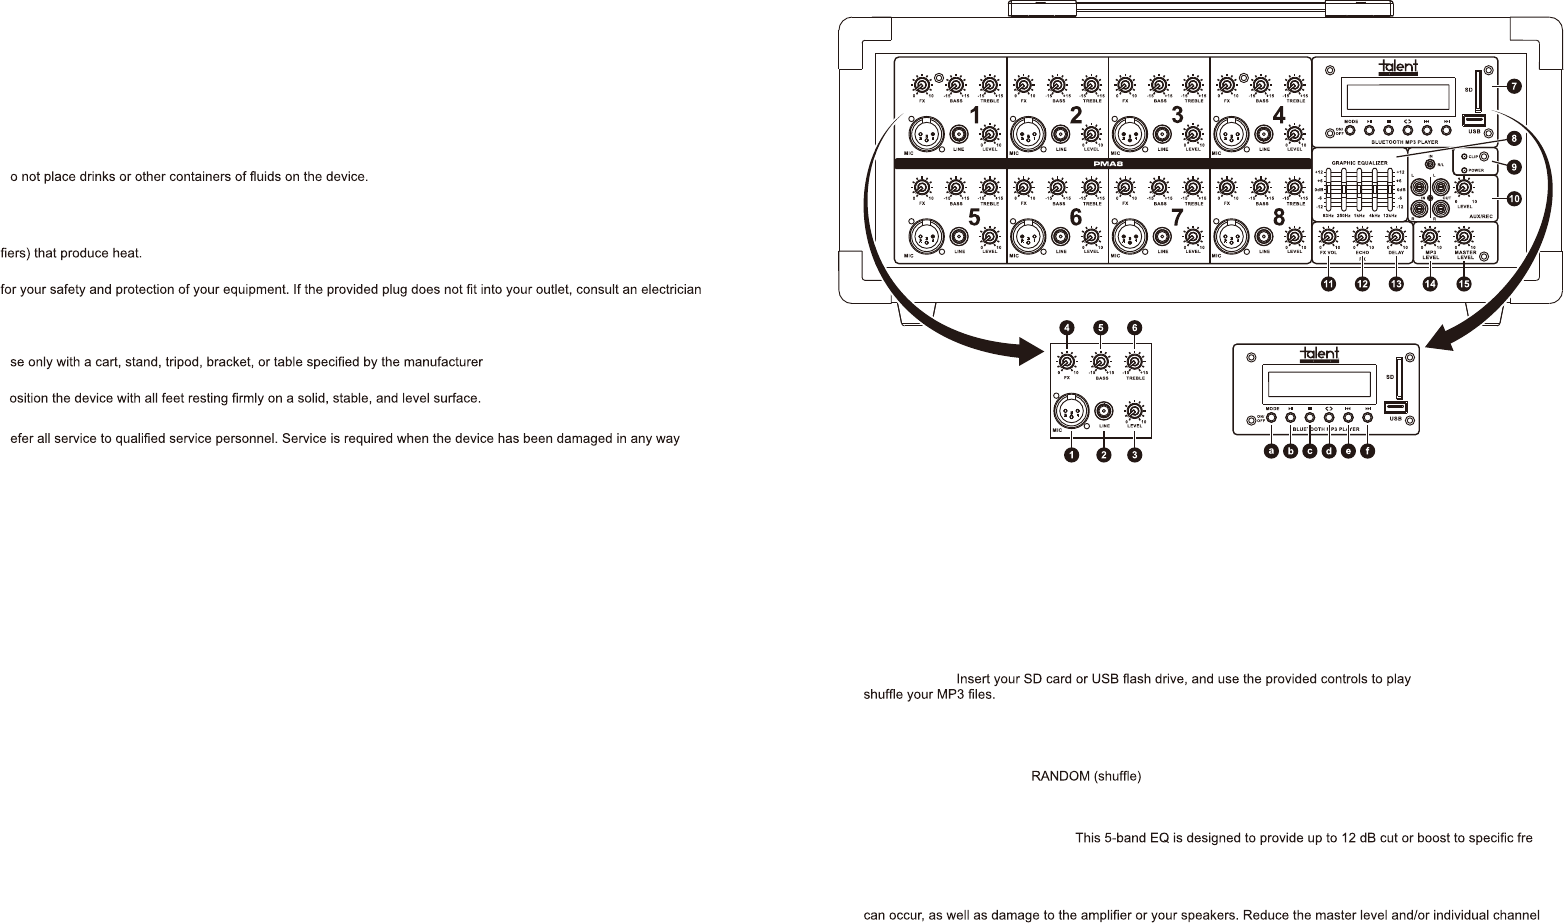
10. AUXILIARY/RECORD SECTION: The RCA jacks marked “IN” are input jacks for line level devices such as CD
players. The 3.5 mm stereo jack marked “IN, R/L” is intended for portable media devices like cell phones, tablets,
and laptop computers. The knob marked “LEVEL” controls the level of the AUX and RETURN input signals. The RCA
jacks marked “OUT” can be used to send your pre-master (no effects, no master EQ, no AUX input) stereo mix to an
outboard device such as a recorder.
11. EFFECTS LEVEL: This knob controls the overall level of effects sent to the channels. To increase the level, turn the
knob to the right. To decrease the level, turn the knob to the left.
12. ECHO LEVEL: This knob controls the reverberation level of the ECHO effect. To increase the level, turn the knob to
the right. To decrease the level, turn the knob to the left.
13. DELAY LEVEL: This knob controls the delay time of the DELAY effect. To increase the time, turn the knob to the right.
To decrease the time, turn the knob to the left.
14. MP3 LEVEL: This knob controls the level of the SD/USB MP3 and Bluetooth player. To increase the level, turn the
knob to the right. To decrease the level, turn the knob to the left.
15. MASTER OUTPUT LEVEL: This knob controls the overall level of output to your speakers. To increase the level, turn
the knob to the right. To decrease the level, turn the knob to the left.
IMPORTANT: Turn this knob all the way to the left before powering up or connecting anything to the mixer. After all con-
nections are made, turn the mixer on and turn this knob to about one third volume (10 o’ clock position). Gradually turn it
to the right to increase the volume of the overall output only after all channels have been adjusted to appropriate levels.
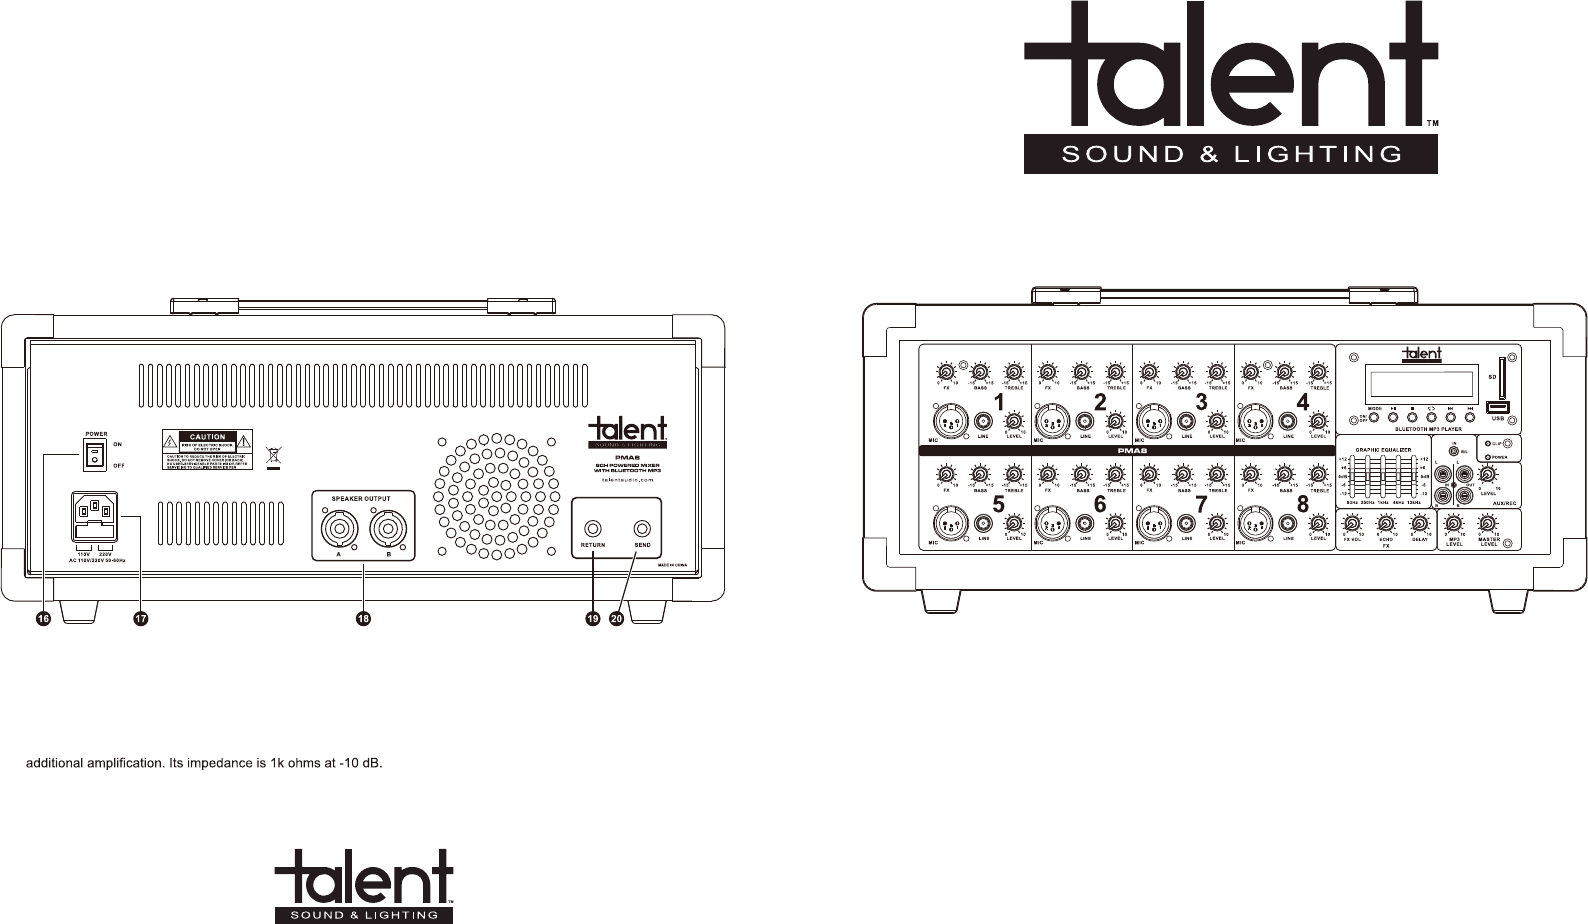
REAR PANEL
16. POWER SWITCH: This switch is used to turn the unit on or off.
17. IEC POWER CABLE RECEPTACLE: Connect the included AC power cable here. Do NOT attempt to defeat the
ground pin. Disconnect the cable when replacing the fuse, just below the cable receptacle.
18. SPEAKER OUTPUTS: Connect your PA speakers to these jacks with standard twist-lock (speakON- or HPC-type)
connectors. Do not use speakers with impedance lower than 8 ohms each.
19. RETURN: This 1/4" jack can be used for adding other line level sources. Its impedance is 10k ohms at -10 dB.
20. SEND: This 1/4" jack will send a line level signal which mirrors the main outputs to an outboard recording device or

2
Thank you for purchasing the Talent PMA8 powered mixer. The power and versatility of the PMA8 makes it the perfect
choice for virtually any type of sound reinforcement application. With standard mic and line level inputs, as well as an SD/
USB MP3 player, Bluetooth, and auxiliary inputs, the PMA8 can be the center of your professional multimedia sound system.
Output power is 150 watts RMS x 2, 300 watts peak x 2; minimum speaker impedance is 8 ohms (per output channel).
WARNING: When using electrical products, basic cautions should always be followed, including the following:
1. Read all instructions thoroughly before operating this device.
2. Keep these instructions for future reference.
3. Heed all warnings and follow all instructions as outlined here. Failure to do so can result in injury to yourself or others,
and/or damage to your equipment.
4. Do not use this device near water or in environments with high humidity, or anywhere it can otherwise become wet.
5. D
6. Clean only with clean compressed air, and/or a dry cloth.
7. Do not block any of the ventilation openings.
8. Do not install or use near any heat sources such as radiators, heat registers, stoves or other devices (including ampli-
9. Do not defeat the grounding-type plug on this device. The plug has two blades and a third grounding plug, provided
for replacement of the obsolete outlet.
10. Protect the power cord from being walked or driven on, from being tripped over, or from being otherwise compromised
in any way.
11. U , or sold with the device. When a
cart is used, use caution when moving the cart/device combination to avoid injury from tip-over.
12. P
13. Unplug this device during lightning storms or when unused for long periods of time.
14. R ,
e.g., the power cord or plug is damaged, liquid has been spilled or objects have fallen into the device, the device has
been exposed to rain or moisture, does not operate normally, or has been dropped.
15. Do not open this device’s case; there are no user serviceable parts inside.
16. Never break off the ground pin. Connect only to a power supply of the type marked on the unit adjacent to the power cord.
17. If this product is to be mounted in an equipment rack, rear support should be provided.
18. This device is sold with a standard U.S.-style IEC power cord. For use in other areas a different kind of cord may be
required, and may be purchased locally.
19. The on/off switch in this unit does not break both sides of the primary mains. Hazardous electrical current can be
present inside the chassis, even when the on/off switch is in the off position.
3
CONTROLS, CONNECTIONS, AND FUNCTIONS
FRONT PANEL:
1. MICROPHONE INPUT: Balanced 3-pin XLR jack for low impedance microphones.
2. LINE INPUT: Unbalanced 1/4" input for high impedance microphones or other line level devices such as keyboards.
3. CHANNEL LEVEL CONTROL: Level control for the individual channel; turn this knob all the way to the left before
connecting anything to the channel, then gradually turn it to the right to increase the output level of the individual
channel after all connections have been made.
4. CHANNEL FX LEVEL: Level control for the effects on the individual channel; turn this knob to the left for less effects,
or to the right for more effects.
5. CHANNEL LOW FREQUENCY EQ: This knob should generally be set in the center (12 o’ clock) position to start with.
To increase low frequency response from the individual channel, turn this knob to the right. For less low frequency
impact, turn the knob to the left.
6. CHANNEL HIGH FREQUENCY EQ: This knob should generally be set in the center (12 o’ clock) position to start
with. To increase high frequency response from the individual channel, turn this knob to the right. To reduce the high
frequencies, turn the knob to the left.
7. MP3 PLAYER: , pause, stop, skip, or
a) Mode: USB
→
SD card
→
Bluetooth (BT network name: PMA8). Press and hold for 3 seconds to turn the MP3
player on/off.
b) Play/Pause
c) Stop
d) Repeat mode / Folder:
→
RONE (repeat the currently playing track)
→
RALL (repeat all tracks
in order). Press and hold 5 seconds to access folder function; use skip back/forward buttons to select folder.
e) Skip Back
f) Skip Forward
8. MASTER GRAPHIC EQUALIZER: -
quencies as indicated below each slider. The master GEQ is used to make minor adjustments which will affect the
overall mix and should be used sparingly.
9. CLIP AND POWER INDICATORS: The “POWER” LED will be lit when power is engaged and the unit is on. The
“CLIP” LED will be lit when the output signal is being overdriven. This should be avoided, as distortion in your sound
levels so that the CLIP indicator lights up only infrequently, if at all.
FCC warning:
Any Changes or modifications not expressly approved by the party responsible for compliance could void the user's
authority to operate the equipment.
Note: This equipment has been tested and found to comply with the limits for a Class B digital device, pursuant to part 15
of the FCC Rules. These limits are designed to provide reasonable protection against harmful interference in a residential
installation. This equipment generates uses and can radiate radio frequency energy and, if not installed and used in
accordance with the instructions, may cause harmful interference to radio communications. However, there is no guarantee
that interference will not occur in a particular installation. If this equipment does cause harmful interference to radio or
television reception, which can be determined by turning the equipment off and on, the user is encouraged to try to correct
the interference by one or more of the following measures:
-Reorient or relocate the receiving antenna.
-Increase the separation between the equipment and receiver.
-Connect the equipment into an outlet on a circuit different from that to which the receiver is connected.
-Consult the dealer or an experienced radio/TV technician for help.
This equipment complies with FCC radiation exposure limits set forth for an uncontrolled environment. This equipment
should be installed and operated with minimum distance 20cm between the radiator & your body.