Passtime USA DDD1RX Dock device User Manual
Passtime USA Dock device
User manual
INSTALLATION DIAGRAM
Page 1
© 2017 Distracted Driving Device, LLC.
No party may republish, copy, redistribute, sell or offer for sale to any third party this material or any part of it without express written
permission of the authors.
If you are making the connecons directly at the baery, you MUST use a 3A size inline fuse
(as shown). This is a safety precauon in the case of a nicked or pinched wire contacng
metal.
POTENTIAL INSTALLATION LOCATIONS
The Comm Device (PTE-5) should be
installed as high in the dash as possible to
ensure the best performance and to help
prevent tampering.
• Above or behind instrument cluster
• Above any accessible air vents
• Above or behind the radio
Note: When mounng the device, the LED’s must be facing up and the device should not be obstructed by metal.
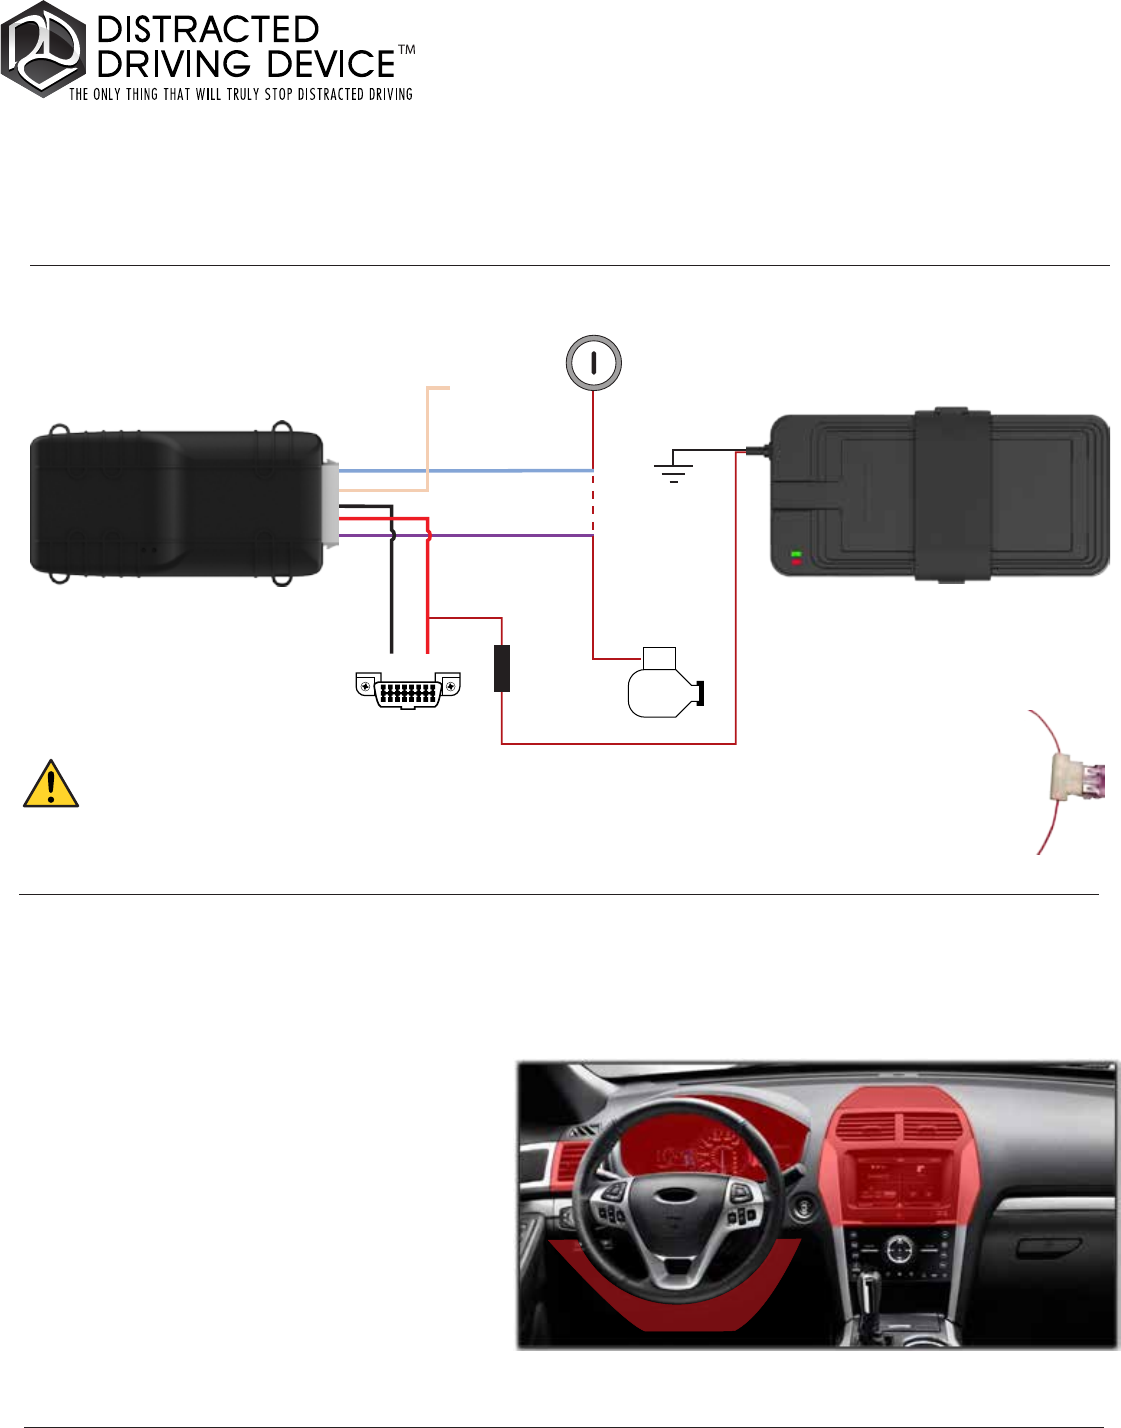
WIRING DIAGRAM
The Distracted Driving Device (DDD) system is comprised of two separate devices, the DDD
Communication Device (PTE-5) and the DDD Handset Dock (DDD-1). Both devices will need to be
installed in the vehicle as shown in this document.
Starter
OBDII
Purple (Starter Out)
Starter Control Circuit
Red (12v Constant)
(Cut)
Black (Ground)
Blue (Starter In)
Pink (Ignition)
hot while engine
cranking
Key
Fuse
Pin16Pin 4
Comm Device (PTE-5) Dock (DDD-1)
STEP 1: INSTALL COMM DEVICE
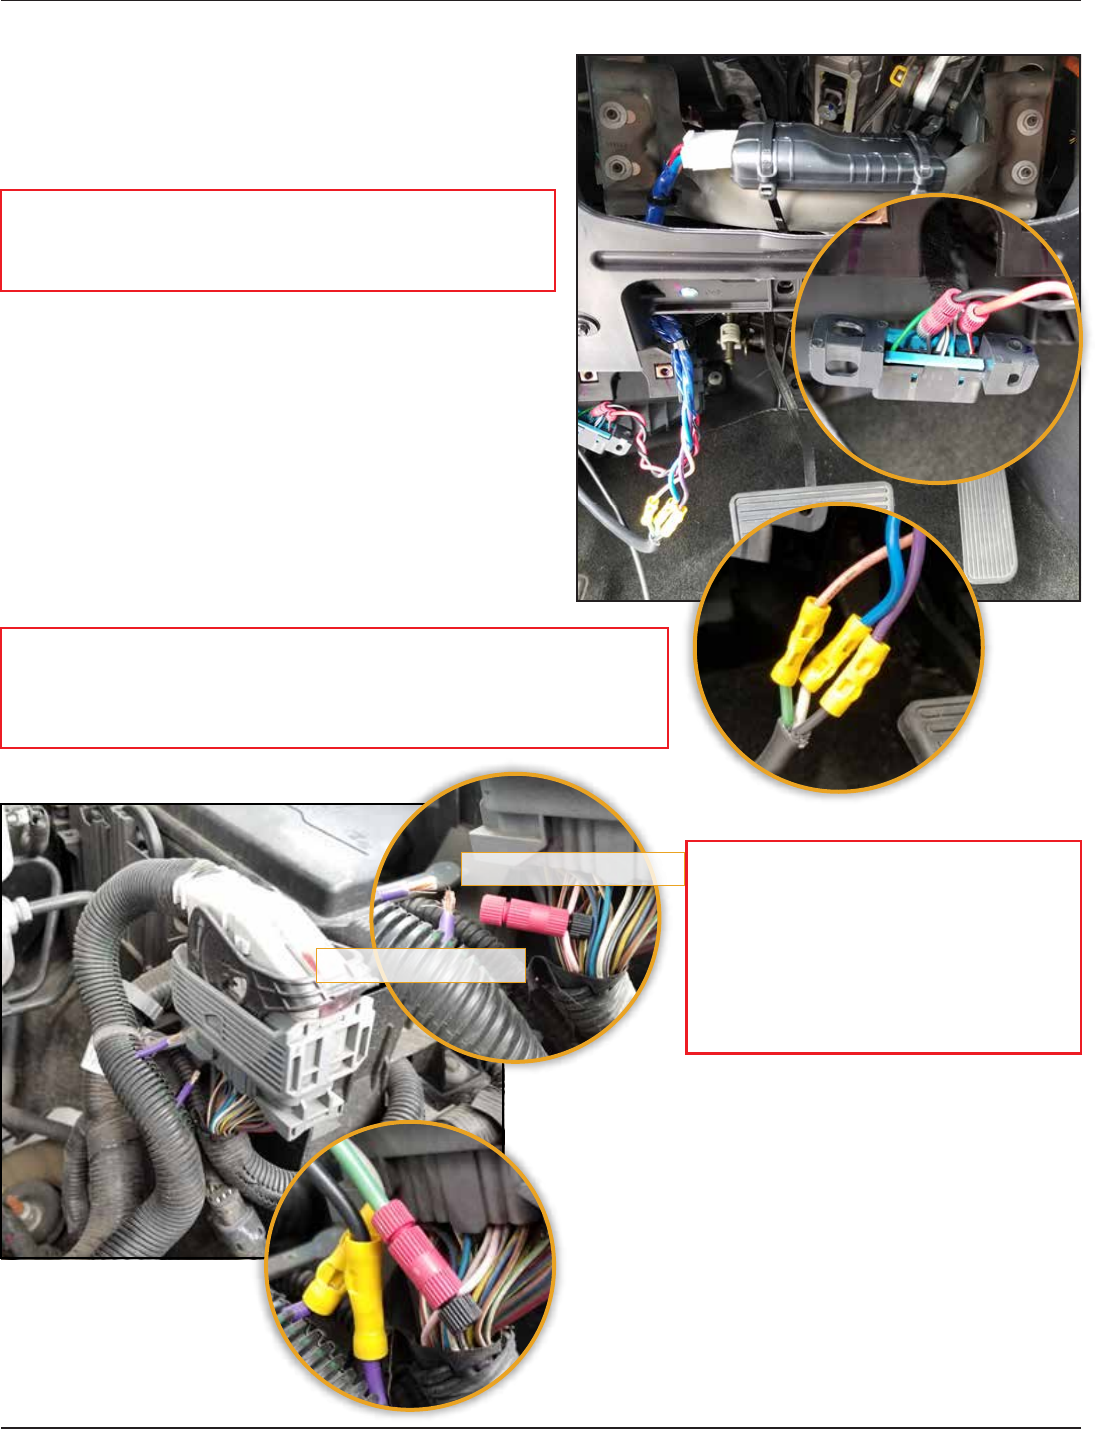
GROUND - Aach to a secured bare metal chassis
ground locaon such as to a new or exisng threaded
fastener, or to a grounded circuit such as Pin 4 of the
OBDII connector (as shown).
12v CONSTANT - Any 12v constant source, that is not
being monitored by the computer for voltage draw, can
be used, like Pin 16 of the OBDII connector (as shown).
Use inline fuse if going direct to the baery.
DEVICE HARNESS ELECTRICAL
CONNECTIONS
Page 2
© 2017 Distracted Driving Device, LLC.
No party may republish, copy, redistribute, sell or offer for sale to any third party this material or any part of it without express written
permission of the authors.
IGNITION WIRE- a wire with 12V in “key on” and
“crank” posions.
STARTER WIRE - the wire with 12V in “crank”
posion only. Once the starter wire is cut,
connect Harness blue wire to key side of starter.
Connect Harness purple wire to solenoid side.
STARTER WIRE
IGNITION WIRE
NOTE: For all connections, soldering is recommended.
Posi-tap and butt connectors are also acceptable (as
shown).
NOTE: In late model vehicles, starter and ignition connections
should be made under hood, near main fuse relay. If harness wires
are not long enough, use 3-in-1 wire or equivalent to extend
harness (as shown).
NOTE: When making these
connecons, use grommets if wires
must penetrate the firewall and
use adequate looming if placing
wires in the engine compartment
to protect from hot metal surfaces
and corrosive liquids.
Page 3
© 2017 Distracted Driving Device, LLC.
No party may republish, copy, redistribute, sell or offer for sale to any third party this material or any part of it without express written
permission of the authors.
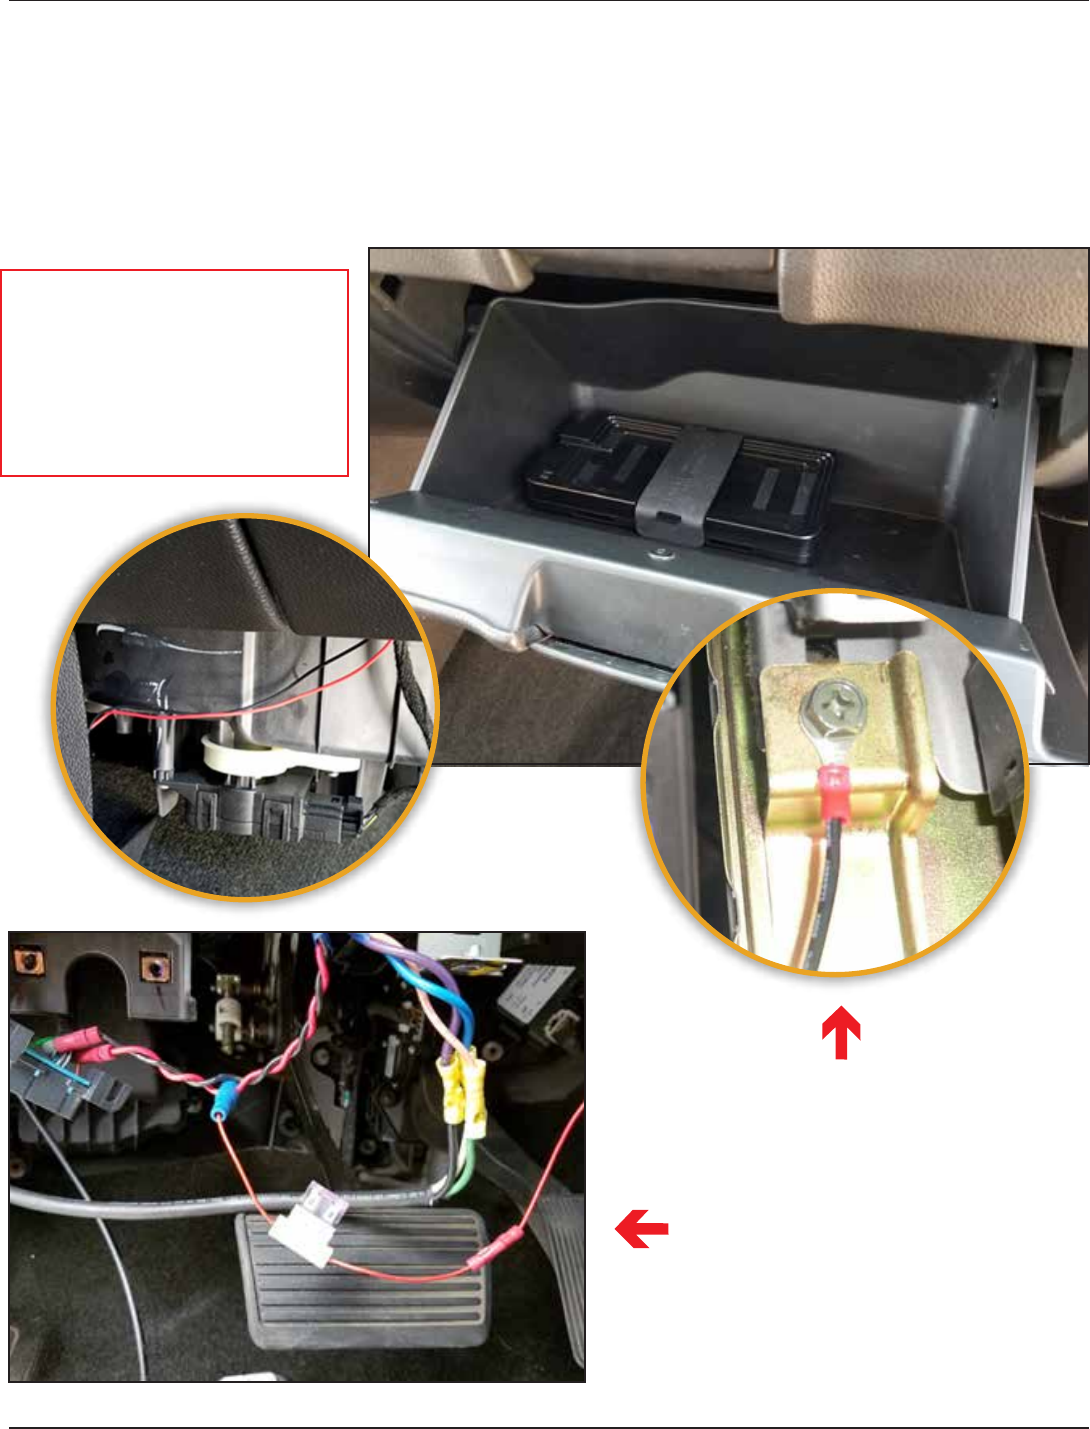
Install Dock in glove compartment (as shown). Make small hole near Dock locaon for Ground & 12V Constant
wires to pass through. Zip-e wires underneath glove compartment to secure Dock and prevent removal from
mounted locaon.
STEP 2: INSTALL DOCK
Dock Ground Wire- Bare metal or a common
ground connecon is recommended on the
passenger side of vehicle (as shown).
Dock 12V Constant Wire- Connect Dock 12V
Constant to inline fuse (size 3A). Then connect
inline fuse to Harness 12V Constant connecon
as made previously at OBDII connector.
Note: Please ensure Dock
locaon and placement will
allow unrestricted access by
the user to insert their handset
into the Dock and easily
secure it using the rubber
strap.

Page 4
© 2017 Distracted Driving Device, LLC.
No party may republish, copy, redistribute, sell or offer for sale to any third party this material or any part of it without express written
permission of the authors.
STEP 3: ACCOUNT SETUP
Need Help?
Visit: DistractedDrivingDevice.com or Call 1-800-579-9077
Use of the Distracted Driving Device requires the installaon of the Distracted Driving Device
Applicaon on the user’s handsets (smart phones). The Applicaon can be quickly located by
scanning the following QR Code.
A) Download the App
During the setup of the Application, the user will need to enter the serial numbers of the Comm Device
(PTE-5) and the Dock (DDD-1). These serial numbers can be located on the bottom of the devices as well as
on the outside of the box as shown below.
B) Find the labels
DDD-1
DockSN 00000000
PTE-5
EliteSN 00000000
Following the in-App instructions, scan the barcode (or manually enter
serial number) for each device.
C) Scan the barcodes
Follow the instructions in the App to complete the device pairing and account setup.
D) Complete Account Setup
The Emergency Override is failsafe to be used in the event the required phone has been lost, has a dead baery
or is otherwise malfunconing. When the Emergency Override is used to start the vehicle, a message will be sent
to the vehicle owner advising of its use. The DDD system may be bypassed by turning the key to the ignion
posion and then off 5 mes in succession. The vehicle will then be permied to start without a docked handset.
EMERGENCY OVERRIDE: