NAVODILA ZA UPORABO SL Gorenje SMO 20
Gorenje Smo-20 1 Gorenje_SMO-20_1 Gorenje_SMO-20_1 instruction upload idei74 3:
2012-05-28
: Pdf Gorenje Smo-20 Gorenje_SMO-20 instruction upload
Open the PDF directly: View PDF ![]() .
.
Page Count: 174 [warning: Documents this large are best viewed by clicking the View PDF Link!]

SMO 20 DGW
0SMO 2 DGB
Mikrovalovna pečica
Mikrovalovna pećnica
Mikrotalasna rerna
Микробрановата печка
Microwave oven
Mikrowellengerät
Micro-ondes
Mikrohullámú sütő
Kuchenka mikrofalowa
Microunde
Microondas
Mikrovlnná rúra
Mikrovlnná trouba
Микровълновата фурна
Мікрохвильова піч
Микроволновая печь
Mikrobřlgeovn
Mikrobřlgeoven
Mikrovĺgsugnen
Mikroaaltouuni
Mikrovilnu krasnij
Mikrobangu krosnele
Mikrolaineahi
Navodila za uporabo
Upute za uporabu
Uputstvo za upotrebu
Упатства за употреба
Instruction manual
Gebrauchsanweisung
Notice d'utilisation
Használati utasítás
Instrukcja obsługi
Instruçőes de utilizçăo
Návod na obsluhu
Návod na použití
Инструкции за употреба
I
Инструкция по эксплуатации
Brugsanvisning
Bruksanvisning
Bruksanvisning
Käyttöohje
Manual de utilizare
нцтрукція з експлуатації
Lietotaja rokasgramata
Naudojimo instrukcija
Kasutusjuhend
DK
SE
NO
FI
LV
LT
EE
SI
BIH HR
BIH SRB MNE
MK
GB
D
F
H
PL
RO
P
SK
CZ
BG
UA
RUS
2
SL Navodila za uporabo .............................................. 3
HR Upute za uporabu ................................................ 10
SRB MNE Uputstvo za upotrebu ......................................... 17
MK ........................................ 24
EN Instruction manual .............................................. 33
DE Gebrauchsanweisung ......................................... 40
FR Notice d'utilisation .............................................. 49
HU .............................................. 57
PL ............................................... 65
RO Manual de utilizare ............................................... 74
PT ........................................ 81
SK ............................................... 88
CZ .................................................. 95
BG ................................. 102
UK ................................. 110
RU ......................... 118
DK Brugsanvisning ................................................ 126
SE Bruksanvisning .................................................. 133
NO Bruksanvisning ................................................. 140
FI K ......................................................... 147
LV .............. 154
LT Naudojimo instrukcija ........................................ 161
EE Kasutusjuhend ................................................... 168

3
NAVODILA ZA UPORABO SI
Pozorno preberite navodila in jih shranite!
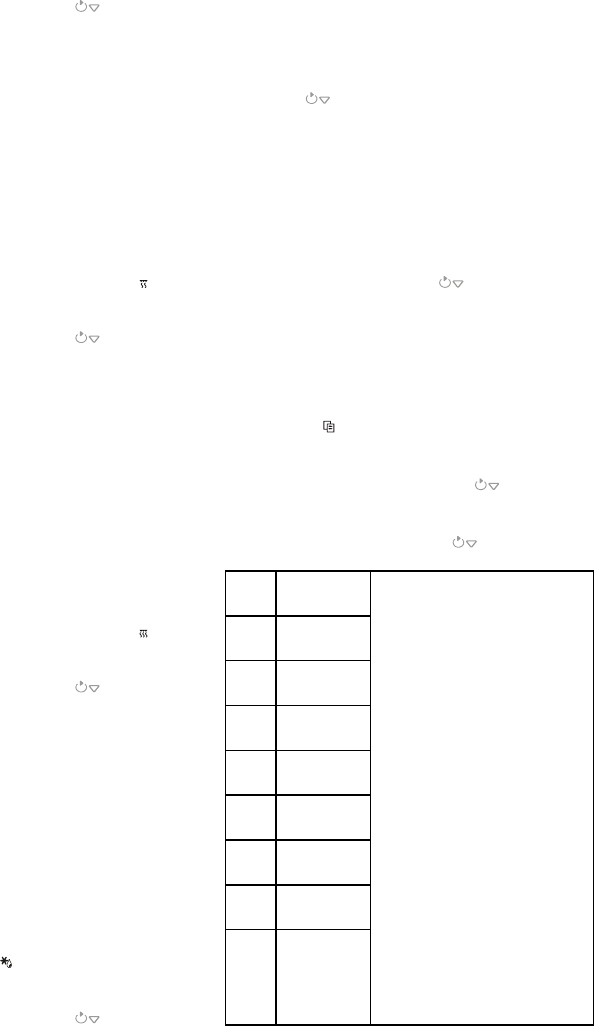
Specifikacije
Poraba el. Energije ............................... 230V~50Hz,1200W
................................................................................................................................ 700W
: ............................................................................................................................. 900W
Delovna frekvenca: ................................................................................................................ 2450MHz
Zunanje mere: ............................................................................ (V) X 364mm(G)
Mere komore (notranjosti) p ............................................... ) X 297mm(G)
.................................................................................................................. 20 litrov
...................................................................................................11,3 kg
Raven hrupa: .................................................................................................................. Lc < 58 dB (A)
1.
a) Pr
b)
prekinjen na glavni varovalkina
varovalkah ni videti napake, preskusite
2.
oddaja mikrovalovne energije:
a)
pravilno nastavljena.
b)
niso, se mikrovalovna energija ne bo
Opomba:
gospodinjstvu, in sicer za segrevanje hrane
energije. Aparat uporabljajte le v zaprtih
prostorih.
Radijske motnje (interference)
sprejemniku
a)
b) Postavite radijski sprejemnik, TV sprejemnik
c) Za radijski sprejemnik, TV sprejemnik itd.
Namestitev
1.
2.
primer:
- nagnjena vrata,
-
- udrtine ali luknje v steklu (oknu) na vratih
ter na zaslonu,
-
n
3. Mi11,3 kg;
4.
temperature in pare.
5.
6. enje, naj bo
njo pa 10cm.
7. Ne odstranjujte pogonske gredi vrtljivega
podstavka.
8. Kot pri vseh drugih aparatih je tudi pri tem
potreben skrben nadzor, ko ga uporabljajo
otroci.
evropsko smernico 2002/96/EG o odpadni
ronski opremi (waste
electrical and electronic equipment -
WEEE). Smernica opredeljuje zahteve za
in elektronsko opremo, ki veljajo v celotni
Evropski Uniji.

4
OPOZORILO: TA APARAT JE
POTREBNO OZEMLJITI.
9.
10. 1,2 kVA
posvetujete s serviserjem oz. ustreznim
strokovnjakom.
POZOR:
varovalko 250V, 10A.
Pomembna varnostna
navodila
OPOZORILO: Ko aparat deluje v
zelo visokih temperatur, ki nastajajo,
uporabljati aparat le pod skrbnim nadzorom
OPOZORILO:
dokler ga ne popravi za to usposobljena
oseba.
OPOZORILO: Popravilo aparata sme
OPOZORILO:
segrevajte v zaprtih oz. zatesnjenih
ta eksplodira.
OPOZORILO: Aparat ni namenjen, da bi ga
sposobnostmi in tudi
n
nadzoruje
ali jim svetuje oseba, ki je odgovorna za
njihovo varnost.
Otroci naj se ne igrajo z aparatom.
bo
vsaj 8cm prostora, ob straneh vsaj 10cm,
Ko segrevate hrano ali papirnati
oz. posodi, nadzorujte proces
zato v tem primeru ravnajte posebej
previdno.
temperaturo vsebine.
lupini ali celih trdo kuhanih jajc, saj lahko
eksplodirajo, tudi potem, ko je segrevanje v
a (ne
z gobo ali mehko krpo.
morebitne ostanke hrane.
lahko pride do obrabe
negativno vpliva n
apa
njegovi uporabi.
izogib nevarnosti zamenjati le proizvajalec,
usposobljen strokovnjak.
stikalo ali sistem za daljinsko upravljanje,
Varnostna navodila za
nekateri varnostni ukrepi, ki jih, podobno kot pri
1.
valj vedno na svojem mestu.
2.
v njej
POMEMBNO
pomen:
Zeleno-rumena: ozemljitveni vod
Modra: nevtralni vod
Rjava: fazni vod
odgovarjajo barvnim oznakam na terminalih
- -
E
ali s simbolom za ozemljitev.
-
N.
-
L.
5
obleke, papirja ali drugih predmetov in je ne
uporabljajte za sterilizacijo.
3.
4.
npr. papirja, kuharskih knjig ipd.
5. Ne kuhajte hrane, ki je obdana z
vilicami.
6. Ne vstavljajte nobenih predmetov v odprtine
7. Nikoli ne odstranjujt
8. Ne kuhajte hrane neposredno na steklenem
podstavku. Preden hrano postavite v
POMEMBNO:
ne smete uporabljati v mi
- Ne uporabljajte kovinskih ponev ali
- Ne uporabljajte posode s kovinsko
obrobo.
- Ne uporabljajte posode iz melamina,
saj vsebujejo material, ki vsrkava
mikrovalovno energijo. To lahko
razpoka ali se
segrevanje / kuhanje.
- Ne uporabljajte posode brez
ustreznega premaza za uporabo v
-
posodi, ki
steklenici, saj lahko ta med
-
le termometre, ki so namenjeni prav
9.
uporabljajte le v skladu z navodili njihovega
proizvajalca.
10.
11.
v
kateri se ta nahaja. M je, da potem, ko
12. Pred uporabo vedno preverite temperaturo
porazdeli.
13.
Tako bos
14. Pri pripravi hrane bodite pozorni, da se
marmelada ali mleto meso, segrejejo zelo
hitro. Ko segrevate ali kuhate hrano z
visoko vsebnostjo masti ali sladkorja, ne
15.
To velja
boste morda potrebovali kuhinjske rokavice.
16.
a) Pazite, da hrane ne kuhate predolgo.
Skrbno nadzorujte potek segrevanja,
papirja, plastike ali drugih lahko
vnetljivih oz. gorljivih materialov.
b)
c) ci vname, pustite
varovalkami.
6
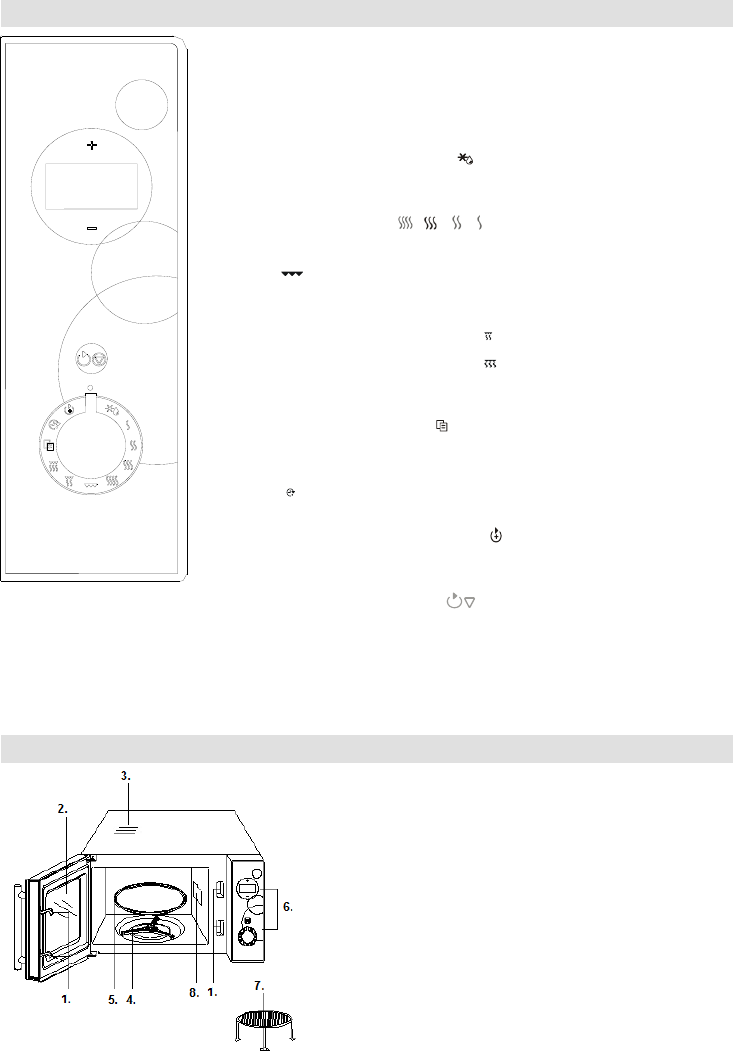
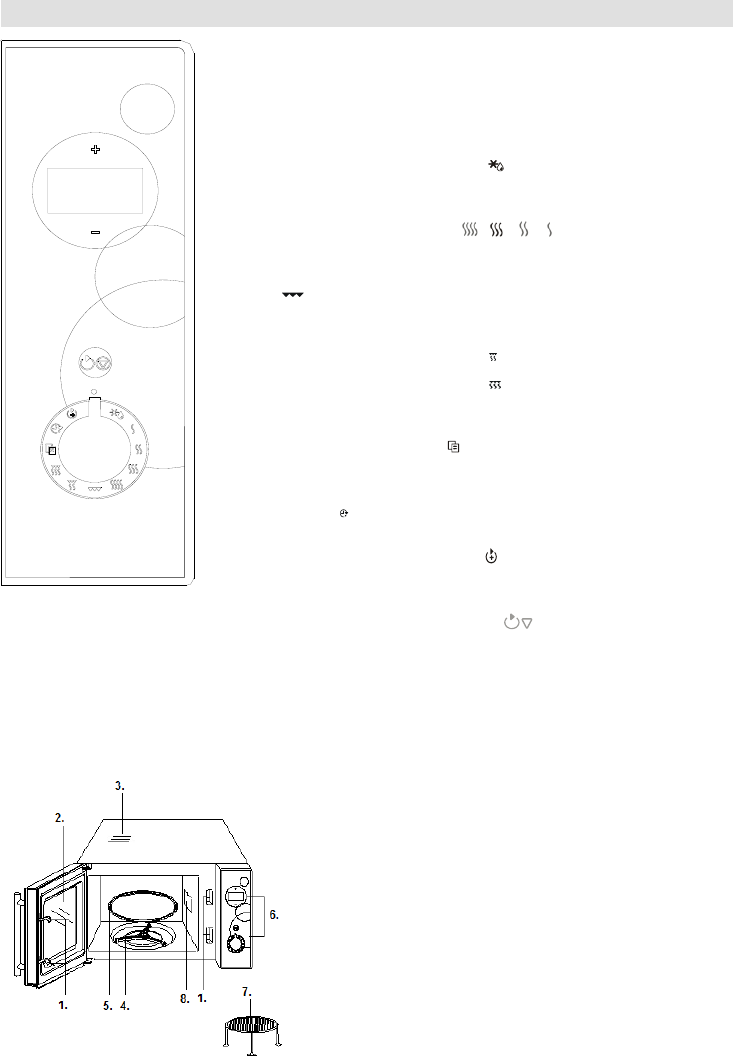
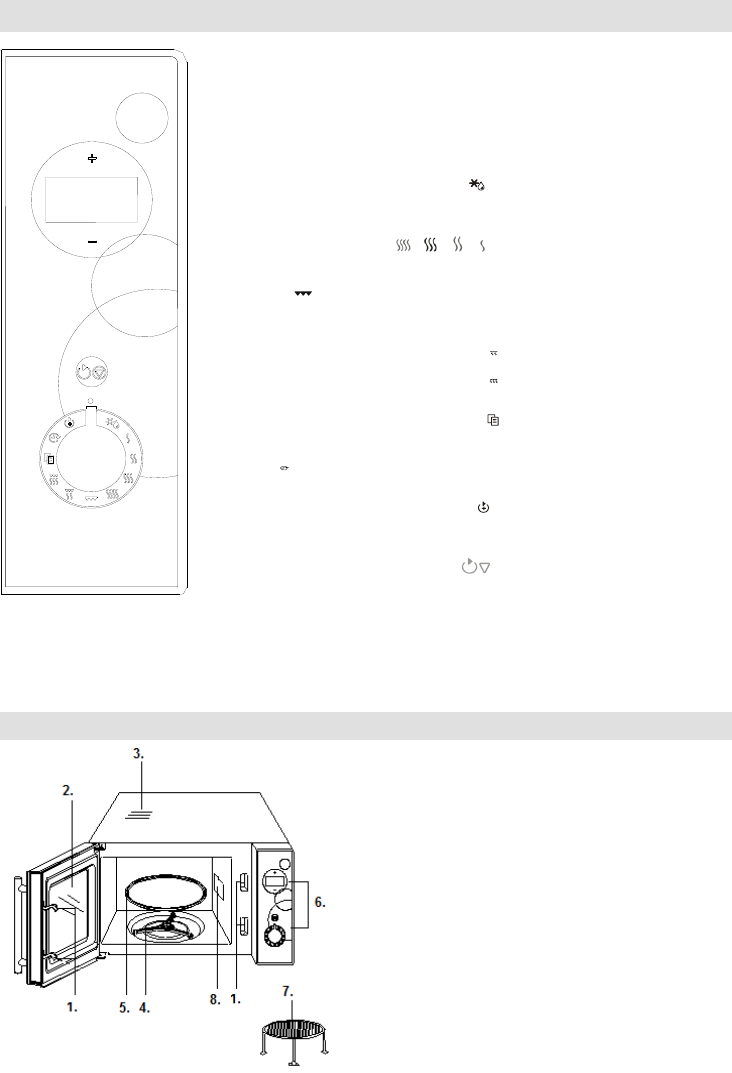
Diagram funkcij in sestavnih delov
1. Zapiralo vrat
2.
3.
4.
5. Stekleni pladenj
6.
7.
8. Valovno vodilo (prosimo, ne odstranjujte
no vodilo).
PRIKAZOVALNIK
+-
SAMODEJNO ODTAJANJE
Obrnite gumb, da nastavite program odtajanja na podlagi vnesene
(, , , )
trajanju do 95 minut.
KOMBINIRANO DELOVANJE 1
KOMBINIRANO DELOVANJE 2
Obrnite gumb, da nastavite kombinirano delovanje z mikrovalovi ter
SAMODEJNI PROGRAM
Obrnite gumb, da izberete samodejni program za pripravo
URA
PROGRAMIRANO DELOVANJE
START / STOP / PREKLIC
varnostno zaklepanje pred otroki. P
7
Navodila za uporabo
1. Nastavitev digitalne ure
/12-urnem ciklu.
Na primer
8:30.
1.
, nato pa s pritiskom na +
12 ali 24-urnem ciklu.
2. Enkrat pritisnite na tipko , da potrdite
nastavitev.
3. S pritiskom na + ali nastavite uro na 8.
4. Enkrat pritisnite na tipko , da potrdite
nastavitev ure.
5. S pritiskom na + ali nastavite minute na
30.
6. Za potrditev nastavitve ure, pritisnite na
tipko .
Opomba: Med kuhanjem lahko z
preverite, koliko je ura.
2. Kuhanje / peka z mikrovalovi
Za segrevanje z mikrovalovi obrnite gumb na
(, . , ), nato
pa s tipkama + in
je 95 minut.
Prikaz
100%
P100 1-S
80%
P-80 1-S
60%
P-60 1-S
40%
P-40 1-S
1.
2.
( ), da se na prikazovalniku pojavi oznaka
P-60.
3. S tipkama + ali
4. Pritisnite tipko .
Opomba:
1.
pritisnite tipko ; nato lahko s ponovnim
pritiskom na tipko nadaljujete s
kuhanjem, rekinitvijo
5
2.
ekranu pa je izpisano "End" ("Konec").
Pritisnite katero koli tipko ali odprite vrata
lahko izberete novo funkcijo.
veljata tudi za vse ostale programe kuhanja
oz. peke.)
3.
v stanju
pripravljenosti tako, da obrnete gumb za
(, . , ).
3. Hitri vklop
nite tipko
4.
je posebej primerna za tanke rezine mesa,
zrezke, kotlete, nabodala, klobase, ali kose
minut:
1.
2. Ob .
3. S tipkama + ali
4. Pritisnite tipko .
5. Kombinirano delovanje 1
95 minut.
pa z
pripravo rib ali gratiniranih jedi.
delovanje za 25 minut, storite naslednje:
1.
2. Obrnite .
3. S tipkama + ali
4. Pritisnite tipko .
6. Kombinirano delovanje 2
95 minut.
z
krompirja ter perutnine.

8
delovanje za 25 minut, storite naslednje:
1.
2.
3. S tipkama + ali 25:00.
4. Pritisnite tipko .
7. Samodejno odtajanje
delovanja med odtajanjem ter
hrane za odtajanje lahko nastavite med 100 g in
1800 g.
NA PRIMER:
1. .
2. S tipkama + ali
3. Pritisnite tipko .
Opomba:
zaustavil, da uporabnika opomni, da obrne kos
hrane. Ko to storite, zaprite vrata mikrovalovne
pritisnite tipko , da nadaljujete s
postopkom odtajanja.
8. Samodejno kuhanje
vna
ritisku na tipko
.
Na primer
1.
AUTO COOK .
2. S tipkama "+" ali "" izberite A-2.
3. Potrdite izbiro s pritiskom na tipko .
4. S tipkama "+" ali ""
5. Pritisnite tipko .
Oznaka
Vrsta hrane
ekranu po pritisku na tipko
"+" ali "-" namesto mase
Pri kuhanju oz. peki mesa
se bo med delovanjem
da vas opomni, da obrnete
hrano, da bi bila ta kuhana
enakomerno.
Rezultati pri samodejnem
kuhanju so odvisni od
dejavnikov kot je nihanje
napetosti, oblika in velikost
osebnega okusa, kako
oz. kuhana, kot tudi
postavitev kosa hrane v
niste povsem zadovoljni,
prosimo, da ustrezno
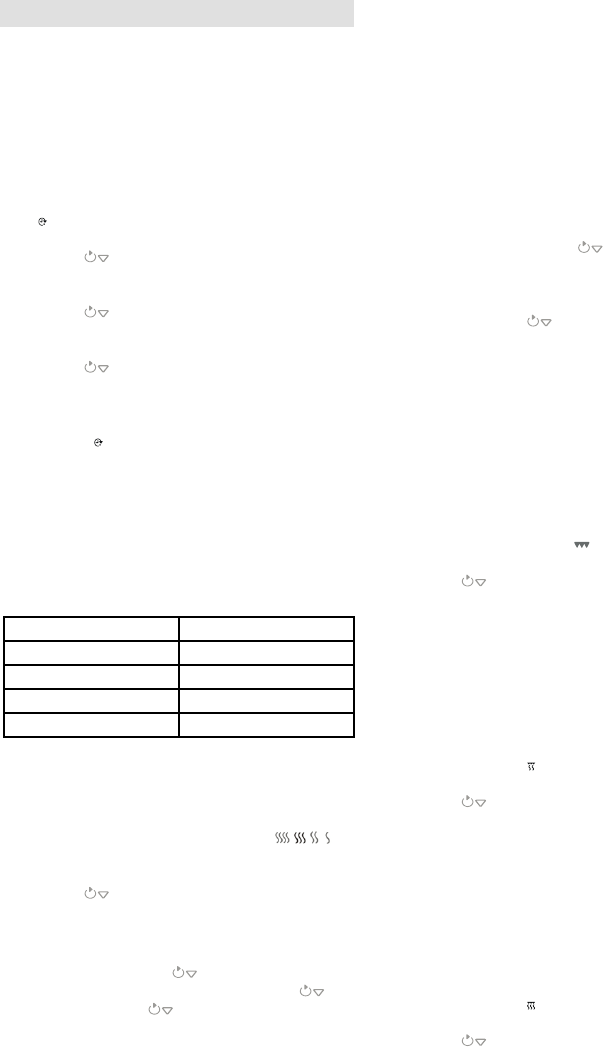
A1
(200ml/
skodelica)
A2
Pizza (g)
A3
Testenine (g)
A4
Krompir (230g /
porcijo)
A5
Pogrevanje (g)
A6
Zelenjava (g)
A7
Odtajanje pizze (g)
A8
Meso (g)
9. Zaklepanje pred otroki
To funkcijo uporabite, da ne bi majhni otroci brez
zaklepanje pred otroki se bo prikazal na ekranu,
dokler bo funkcija aktivirana.
Za nastavitev zaklepanja pred otroki:
tipko START/STOP/ CANCEL (START / STOP /
PREKLIC) 5 sekund. Oglasil se
pojavil indikator zaklepanja.
Za priklic zaklepanja pred otroki:
Pritisnite tipko START/STOP/ CANCEL (START
/ STOP / PREKLIC) 5 sekund oz.
dokler indikator zaklepanja na prikazovalniku ne
ugasne.
10. Programska ura
Preden uporabite to funkcijo, je potrebno
Primer:
minut:
9
1.
.
2. S pritiskom na + ali nastavite uro, za
potrdite pa pritisnite tipko .
3. S pritiskom na + ali nastavite minute, za
potrdite pa pritisnite tipko .
4. ,da nastavite
5. S pritiskom na + ali nastavite
5 minut.
6. Za potrditev pritisnite tipko .
OPOMBA:
1.
programa dva piska in
mi
delovanjem.
2. Ko nastavite programsko uro, lahko
obrnite gumb na in na
bo prikazal.
3.
programske ure.
Skrb z
1.
2.
-
te obri
3.
4.
detergentov, grobih (abrazivnih) sredstev ali
5.
mehko krpo. Do tega lahko pride, ko
6.
vodi z nekaj detergenta ali v pomivalnem
stroju.
7.
v
topli vodi z nekaj detergenta ali v
hlapi od kuhanja, vendar to ne vpliva na
njegovo delova
ponovno namestili.
8.
odstranite tako, da v globoko posodo za
ete
limone. Posodo nato za pet minut postavite
-to vklopite. Po
krpo.
9. i,
se, prosimo, obrnite na prodajalca.
OKOLJE
za recikliranje. Tako pripomorete k ohranitvi
okolja.
GARANCIJA IN SERVIS
lokalnega Gorenjevega prodajalca ali Gorenjev
oddelek za male gospodinjske aparate.
Samo za osebno uporabo!
spletni strani:
http://microwave.gorenje.com

10
UPUTE ZA UPORABU HR
Pozorno proučite upute, te ih sačuvajte.
Specifikacija
Potr .............................................................................................. 230V~50Hz,1200W
Radna snaga ............................................................................................................................... 700W
........................................................................................................................................... 900W
Radna frekvencija: ................................................................................................................. 2450MHz
Vanjske dimenzije: ...................................................................... 364mm(G)
Dimenzije otv ................................ mm(G)
..................................................................................................................... 20 litara
..................................................................................................11,3 kg
Razina buke: .................................................................................................................. Lc < 58 dB (A)
Prije nego pozovete servisera
1.
a)
te nakon 10 sekundi ponovno ga
b)
2.
odaje mikrovalnu energiju:
a) Provjerite, da li je programski sat
pravilno postavljen.
b)
tijesno zatvorena i sigurnosna brava
Ukoliko uz gore navedene upute
niste uspjeli otkloniti neprilike,
serviseru.
Napomena:
koristite samo u zatvorenom prostoru.
Radijske smetnje
(interferencija)
a)
b) Postavite radio prijamnik, TV prijamnik itd.
c) Za radio prijamnik, TV prijamnik itd.
Postavljanje
1.
2.
o ste primjetili vidljiva
- vrata koja vise,
-
-
(prozoru) vrata ili na ekranu,
-
Ukoliko opazite bilo koje od gore
UPOTREBLJAVAJTE. Mikrovalovna
11,3 kg; postavite je na
3.
temperature ili pare.
4.
5. Kako bi osigurali kvalitetno provjetravanje,
a nad njom 10 cm.
6. NE skidajte vodilice okretnog pladnja.
7.
upotrebljavaju dijeca.
UPOZORENJE: OVAJ UREĐAJ MORA
BITI UZEMLJEN.
8.

11
9. Za djelovanje
1,2
posavjetujete sa serviserom ili
POZOR:
Zeleno- uzemljenje
Plava: neutralna
struja
Ukoliko boja vodi
- -
slovom E ili simbolom za uzemljenjem.
- terminal na
N ili je
crne boje.
-
L ili je
crvene boje.
UPOZORENJE:
isoke
temperature, koja se razvija, dijeca smije
UPOZORENJE: Ukoliko su vrata ili brtva
osoba.
UPOZORENJE: Svaki popravak ili servis,
servisera, a pri kojem je potrebno odstraniti
isijavanja, je opasno i nesigurno.
UPOZORENJE:
zagrijavajte u zatvorenim odnosno
lagano eksplodirati.
UPOZORENJE: Ovaj aparat nije
sposobnostima niti osobama koje nemaju
dovoljno iskustva i znanja, osim ako im je
osoba odgovorna za njihovu sigurnost dala
8cm prostora, sa strane
bar 1010cm. Ne
odstranj
nadzirite proces zagrijavanja radi sigurnosti,
da
zapali.
plamen.
provreti i iskipiti,
Da bi izbjegli opekline, prije uporebe
ljus
tkaninom.
Ukoliko
Kako biste izbjegli opasne situacije, aparat
kojim
upravlja mjer
daljinskog upravljanja.
uporabu
elovanje
12
1.
svom mjestu.
2.
njoj tkanine, papir ili druge predmete i ne
upotrebljavajte ju za sterilizaciju.
3.
4.
npr. papir, knjige o kuhanju itd.
5.
probodete vilicom.
6. Ne stavljajte nikakve predmete u otvore s
7.
nogice, zasun, vijke td.
8. Ne kuhajte hranu neposredno na staklenom
postolju. Prije nego hranu postavite u
Kuhinjska pomagala, koje ne
-
- Ne upotrebljavajte
okvirom.
-
upijaju mikrovalnu energiju. Moglo bi
zapali, pored toga usporava
zagrijavanje/kuhanje
- z
-
staklenki, jer bi se za vrijeme grijanja
mogla raspuknuti.
-
termometre za meso ili slatstice.
9.
upotrebljavajte u skladu s uputama njihovog
10.
11.
, iako
12. Prije uporabe stvarno provjerite
temperatura ravnomjerno razdijelila.
13.
izlazak
14. Pri pripremanju hrane budite oprezni, da se
marmelada ili mljeveno meso, zagriju
veoma brzo. Kada zagrijavate ili kuhate
15. Pomagala, koje koristite kod pripremanja
om ili
kuhanje.
16.
a) Pazite, da hranu ne kuhate predugo.
Pozorno nadzirite proces zagrijavanja,
utna pomagala
od papira, plastike ili drugih lako
gorivih materijala.
b)
c)
13
1. Sigurnosni sustav za zatvaranje vrata
2.
3. Otvor za proz
4.
5. Stakleni pladanj
6.
7.
8. Vodilica valova (
koja prekriva vodilicu valova)
ZASLON S PODACIMA
.
+-
.
VANJE
program
.
SNAGA MIKROVALOVA (, , , )
Gumbom birate stupanj snage kuhanja mikrovalovima.
GRIL
95
minuta.
KOMBINIRAN RAD 1
KOMBINIRAN RAD 2
mi.
AUTOMATSKI PROGRAM
.
SAT
.
PROGRAMIRAN RAD
.
Pr
privremeno prekidate kuhanje, a 3 sekunde dugim pritiskom
.
sigurnosne blokade.
stupnju snage.
14
Uputstva za upravljanje
digitalnog sata
a digitalnim satom.
Pritiskom na gumb sata u stanju pripremljenosti
/12-satnom
.
Primjer:
vrijeme 8:30.
1.
mbola , zatim pritisnite
+ da bi izabrali 24
2. Jednom pritisnite gumb
.
3. Pritiskom + ili podesite brojku 8.
4. Ponovno pritisnite gumb i potvrdite
izbor sati.
5. Pritiskom + ili izaberite brojku 30 za
minute.
6. Pritiskom gumba
.
Napomena:
simbola .
2. Kuhanje mikrovalovima
tako
stupanj snage mikrovalova, a zatim uporabom
gumba + ili
95
minuta.
S
gumb na pojedine simbole.
Stupanj snage
Zaslon
100%
P100 1-S
80%
P-80 1-S
60%
P-60 1-S
40%
P-40 1-S
1.
zatvorite vrata.
2. Gumbom izaber
snage kuhanja (
mikrovalova P-60.
3. Pritiskom + ili izaberite 10:00.
4. Pritisnite gumb .
Napomena:
1.
jednom pritisnite gumb ; kuhanje
pritiskom istog gumba ; ako pak tijekom
privremenog prekida pritisnete gumb i
5 sekundi, time u
kuhanja.
2.
signal, koji se javlja svake 2 minute, a na
zaslonu se pojavi natpis End. Prije izbora
nove funkcije morate pritisnuti bilo koji
to stanje (1 i 2
programe kuhanja).
3.
(, . , ).
3.
10 minuta.
U stanju pripre brzim
snage mikrovalova.
4.
Priprema
nar
, kobasice, ili komade piletine.
Primjer
minuta.
1. Otvorite vrata, postavite h
zatvorite vrata.
2. Okrenite gumb na simbol GRILL .
3. Pritiskom + ili izaberite vrijeme 12:00.
4. Pritisnite gumb .
5. Kombinacija 1
Kombinacija je sastavljena iz 30% vremena
kuhanja mikrovalovima i 70%
Koristi se za pripremu ribe ili za gratiniranje.
Primjer
25 minuta.
1. O
zatvorite vrata.
2. Okrenite gumb na simbol .
3. Pritiskom + ili izaberite vrijeme 25:00.
4. Pritisnite gumb .
15
6. Kombinacija 2
Kombinacija je sastavljena iz 55% vremena
kuhanja mikrovalovima i 45% .
Koristite je za pudinge, omlete,
.
Primjer
12 minuta.
1. O
zatvorite vrata.
2. Okrenite gumb na simbol .
3. Pritiskom + ili izaberite vrijeme 12:00.
4. Pritisnite gumb .
7. Autorane
.
100g~1800g.
PRIMJER: 600g zamrznutih
1. Okrenite gumb na simbol Auto defrost .
2. Pritiskom + ili izaberite masu.
3. Pritisnite gumb .
Napomena:
zaustavi i opomene korisnika da okrene hranu;
nakon toga morate za nastavak procesa
.
8. Automatsko kuhanje
.
te
spremiti.
pritisnuli gumb .
Primjer: 150 g.
1. U stanju pripremljenosti okrenite gumb na
funkciju AUTO COOK .
2. Pritiskom +ili -izaberit A-2.
3. Potvrdite izbor pritiskom gumba .
4. Pritiskom +ili -
.
5. Pritisnite gumb .
Oznaka
Vrsta hrane
pritiskom na +ili -umjesto
mase hrane pokazivati broj
porcija.
nekom trenutku prekinuti rad,
.
Rezultati automatske pripreme
osobni ukus glede stupnja
kuhanja.
A1
(200ml/)
A2
Pica (g)
A3
Tjestenine (g)
A4
Krumpir (230g
/ porcija)
A5
Podgrijavanje
(g)
A6
(g)
A7
Odmrzavanje
pice (g)
A8
Meso (g)
9.
djecu)
djece. Kad je funkcija aktivna na zaslonu se
.
Funkciju CHILD LOCK
:
pritisnut gumb START/STOP/CANCEL 5
sek
upali se natpis.
Funkciju CHILD LOCK
pritisnete gumb START/STOP/CANCEL i
5 sekundi, sve dok se natpis
na zaslonu ne ugasi.
10. Programski sat
Ova vam funkcija omogu
trajanju 5 minuta.
1. U stanju pripremljenosti okrenite gumb na
simbol PRESET .
2. +-
i to potvrdite pritiskom na gumb .
3. +-
kom na
gumb .
4. .
16
5. +-
kuhanja na 5:00 minuta.
6. Program uputite pritiskom na .
NAPOMENA:
1.
djelovati.
2.
kad provjeriti izabrano vrijeme kuhanja, tako
da gumb okrenete na simbol . Funkciju
, ili
okretanjem izbornog gumba udesno.
3. U programu AUTO DEFROST (automatsko
1.
2.
curi iz nje, ili raz
3.
4.
5.
6. Povremeno izvadite i stakleni pladanj te ga
7.
prilikom djelova
uporabom nakupi se vlaga, koja izlazi iz
8.
posudu, prikladnu za uporabu u mikrovalnoj
jednog limuna. Zatuim posudu stavite u
mikroval
9.
osposobljenim serviserom.
Okolina
Simbol na proizvodu ili na njegovoj
proizvodom ne smije postupiti kao s
Ispr
proizvoda. Za detaljnije informacije o recikliranju
ovog proizvoda molimo Vas
proizvod.
Garancija i servis
trgovcu Gorenja, ili odjelu Gorenja za male
Nije za profesionalnu uporabu!
PRI UPORABI
mikrovalovima i grilom, te korisne savjete,
http://microwave.gorenje.com

17
UPUTSTVO ZA UPOTREBU SRB MNE
Pažljivo pročitajte uputstva i sačuvajte ih.
Specifikacije
ije: ............................................................................................. 230V~50Hz,1200W
Izlazna snaga: ............................................................................................................................. 700W
: .......................................................................................................................................... 900W
Radna frekvencija: ................................................................................................................. 2450MHz
Dimenzije: ................................................................................... (V) X 364mm(G)
.................................. mm(G)
..................................................................................................................... 20litara
....................................................................................................11,3 kg
: ................................................................................................................... Lc < 58 dB (A)
servisera
1. ne radi, ako se na
ugasi:
a)
b) Proverite da li je na elek
prekinut dovod struje na glavnom
aparatom.
2.
emituje mikrotalasnu energiju:
a) Proverite da li je tajmer za
programiranje starta i rada pravilno
b)
zatvorena i sigurnosne brave
Napomena:
elektromagnetne energije. Aparat koristite
samo u zatvorenim prostorijama.
Radio-smetnje (interferencije)
-prijemnika, TV
a)
b) Stavite radio-
c) Za radio-prijemnik, TV prijemnik itd. koristite
Postavljanje
1. Proverite da li ste iz unutra
2.
na primer:
- iskrivljena vrata,
-
-
vratima, kao i na ekranu,
-
Ako primetite bilo koje od gore
3. 11,3 kg; postavite
4. postavite dalje od izvora visoke
temperature i pare.
5.
6. Da biste obezbedili dovoljnu ventilaciju,
10cm.
7. NEMOJTE skidati pogonsku osovinu
rotacionog tanjira.

18
8. Kao kod svih drugih aparata, i ovde je
deca.
UPOZORENJE: ZA OVAJ APARAT JE
POTREBNO UZEMLJENJE.
9.
10. 1,2 kVA ulazne snage.
Zeleno- vod za uzemljenje
Plava: neutralni vod
Braon:
odgovaraju oznakama u boji na terminalima
- -
en slovom E ili
simbolom za uzemljenje.
-
N ili je crne
boje.
-
L ili je
crvene boje.
nu
upotrebu
UPOZORENJE: Kada aparat deluje u
kombinovanom modu, zbog veoma visokih
temperatura koje nastaju, deca smeju
nadzorom odraslih (samo za aparate sa
UPOZORENJE: Ako su vrata ili zaptivci na
UPOZORENJE: Svaka popravka ili servis
UPOZORENJE:
nemojte pripremati u zatvorenim odnosno
zaptivenim posudama ili zaptivenoj
UPOZORENJE: Ovaj aparat nije namenjen
nzornim ili
mentalnim sposobnostima, ili nedostatkom
iskustva i znanja, osim pod nadzorom ili na
osnovu instrukcija za upotrebu aparata
datih od strane osobe koja odgovara za
njihovu bezbednost.
Deca moraju da budu pod nadzorom da se
ne bi igrala sa aparatom.
8cm prostora, sa strane bar 10cm, a iznad
ventilaciju.
Koristite samo pomagala adekvatna za
kori
nadgledajte proces pripreme zbog
posuda na zapali.
izvadite kabl iz
plamen.
kotina, pre upotrebe
bebe ili teglica sa hranom za bebe i
jaja u ljusci ili cela tvrdo kuvana jaja, jer
je u
eventualne ostatke hrane.
upotrebe.
samo
Da se ne biste izlagali opasnosti, aparat

19
kontrolisan tajmerom niti na sistem sa
daljinskom kontrolom.
uputstva za bezbednu
upotrebu
U daljem tekstu nabrojana su neka pravila i neke
aparata i koje treba uzimati u obzir radi
1.
a valjak treba da su
uvek na svom mestu.
2.
svrhe osim za pripremu hrane, nemojte
nemojte je koristiti za sterilizaciju.
3.
pr
4.
5. Nemojte kuvati hranu sa opnom, npr.
6. Nemojte stavljati nikakve predmete u otvore
7.
zavrtnje itd.
8. Nemojte kuvati hranu neposredno na
stav
-
- Nemojte koristiti posude sa metalnom
ivicom.
- Nemojte koristiti posude od melamina,
prouzrokovati da se posuda raspukne ili
oprlji, a pored toga usporava grejanje /
kuvanje.
- Nemojte koristiti posudu bez
-
- a
koristiti samo termometre koji su
namenjeni upravo upotrebi u
9.
samo u skladu sa uputstvima njihovog
10.
11.
da sam poklopac posude nije vreo.
12. Pre upotrebe, uvek proverite temperaturu
namirnica, posebno ako hranu dajete deci.
e da bi se temperatura
13.
npr. osnova za supu, treba da posle
14. U pripremi namirnica, imajte na umu da se
marmelada ili mleveno meso veoma brzo
pripremaju. Kada grejete ili kuvate
15.
zagrejati jer hrana emituje toplotu. To
pokriveni plastikom. Kada hvatate takve
rukavice.
16.
a) Pazite da hranu ne kuvate predugo.
drugih lako zapaljivih materijala.
b)
c)

20
1. Sigurnosni sistem za zatvaranje vrata
2.
3. Ventilacioni otvori ili ventilator za
provetravanje
4. Rotacioni tanjir
5. Stakleni tanjir
6. Kontrolna tabla
7.
8.
koja prekriva vodilicu talasa)
EKRAN S PODACIMA
vnik s im vremenom.
+-
AUTOMATSKO ODMRZAVANJE
Okretanjem dugmeta birate program odmrzavanja prema unesenoj
SNAGA MIKROTALASA (, , , )
Dugmetom birate stepen snage kuvanja mikrotalasima.
GRIL
Dugmetom bira
minuta.
KOMBINOVAN RAD 1
KOMBINOVAN RAD 2
AUTOMATSKI PROGRAM
Okretanjem ovog dugmeta bir
o vreme rerne.
PROGRAMIRAN RAD
privremeno prekidate kuvanje, a 3 sekunde dugim pritiskom
aktiviranje
bezbednos
stepenu snage.
21
Rukovanje aparatom
1. Regulisa
regulisati vreme na
/12-
Primerstaviti na o
vreme 8:30.
1.
, zatim
pritisnite + da bi izabrali 24
2. Jednom pritisnite dugme
3. Pritiskom + ili izaberite brojku 8.
4. Ponovno pritisnite dugme i potvrdite
a.
5. Pritiskom + ili izaberite brojku 30 za
minute.
6. Pritiskom dugmeta
regulisanog og vremena.
Napomena:
kad u toku kuvanja pritiskom na dugme simbola
.
2. Kuvanje mikrotalasima
stepen snage mikrotalasa, a zatim upotrebom
dugmeta + ili
minuta.
dugme na pojedine simbole.
Stepen snage
Ekran
100%
P100 1-S
80%
P-80 1-S
60%
P-60 1-S
40%
P-40 1-S
Na primervati 10 minuta na 60%
snage mikrotalasa, uradite slede
1. Otvorite vrata, postavite hranu u rernu i
zatvorite vrata.
2.
SNAGE KUVANJA ( , . ,
mikrotalasa P-60.
3. Pritiskom + ili izaberite 10:00.
4. Pritisnite dugme .
Napomena:
1.
jednom pritisnite dugme ; kuvanje
pritiskom istog dugmeta ; no ako u toku
privremenog prekida pritisnete dugme i
kuvanja.
2.
signal, koji se javlja svaka 2 minuta, a na
ekranu se pojavi natpis End. Pre izbora
nove funkcije morate pritisnuti bilo koje
dugme ili otvoriti vrata rerne i time izbrisati
to stanje (ta
programe kuvanja).
3. Regulisani stepen da
proverite u bilo kom momentu
dugmepena
regulacije (, . , ).
3.
U stanju pripremljenosti pritiskajte dugme
brzim redosledom, i izaberite vreme kuvanja;
rerna zsmesta
stupnju snage mikrotalasa.
Pritiskanjem dugmeta u toku kuvanja
4. (gril)
hrane na
narezane p, kotlete,
Primeru 12
minuta.
1. Otvorite vrata, postavite hranu u rernu i
zatvorite vrata.
2. Obrnite dugme na simbol GRILL .
3. Pritiskom + ili izaberite vreme 12:00.
4. Pritisnite dugme .
5. Kombinacija 1
Kombinacija je sastavljena iz 30% vremena
kuvanja mikrotalasima i 70% pripreme na u.
Koristi se za pripremu ribe ili za gratiniranje.
Primerda kuvate kombinacijom 1 u
periodu 25 minuta.
1. Otvorite vrata, postavite hranu u rernu i
zatvorite vrata.
2. Okrenite dugme na simbol .
22
3. Pritiskom + ili izaberite vreme 25:00.
4. Pritisnite dugme .
6. Kombinacija 2
Kombinacija je sastavljena iz 55% vremena
kuvanja mikrotalasima i 45% pripreme na u.
Koristite je za pudinge, kajganompir i
Primervati kombinacijom 1 u periodu
12 minuta.
1. Otvorite vrata, postavite hranu u rernu i
zatvorite vrata.
2. Okrenite dugme na simbol .
3. Pritiskom + ili izaberite vreme 12:00.
4. Pritisnite dugme .
7. Automatsko odmrzavanje hrane
Rern
delovanja i vreme odmrzavanja automatski se
PRIMERmrznuti 600g zamrznutih
pi (kozica).
1. Okrenite dugme na simbol Auto defrost .
2. Pritiskom + ili izaberite masu.
3. Pritisnite dugme .
Napomena:
U toku programa odmrzavanja sistem se
zaustavi i opomene korisnika da okrene hranu;
nakon toga morate za nastavak procesa
odmrzavanja ponovno pritisnuti dugme .
8. Automatsko kuvanje
Slede
epena
te
.
Primer:
1. U stanju pripremljenosti okrenite dugme na
funkciju AUTO COOK .
2. +--2.
3. Potvrdite izbor pritiskom dugmeta .
4. +-
5. Pritisnite dugme .
Oznaka
Vrsta hrane
ompira ekran
+
-umesto mase hrane
pokazivati broj porcija.
Kod pripreme mesa rerna
momentu
vas da okrenete meso za
Rezultati automatske
promene u naponu struje,
i ukus u vezi
stepen
hranu u rernu. Ukoliko
kuvanja.
A1
olja)
A2
Pica (g)
A3
Makaroni (g)
A4
Krompir (230g /
porcija)
A5
Podgrejavanje
(g)
A6
A7
Odmrzavanje pice
(g)
A8
Meso (g)
9. Bezbednos
decu)
Kad je funkcija aktivna na ekranu se pojavi
uputiti sve dok je funkcija aktivna.
Funkciju CHILD LOCK aktivirate na slede
pritisnut dugme START/STOP/CANCEL 5
upali se natpis.
pritisnete dugme START/STOP/CANCEL i
na ekranu ne ugasi.
ava i
ak programa kuhanja.
Pre koristite ovu funkciju,
morate obavezno regulisati ta
.
Naprimer, sada je 9.00
rerna u 10.30
hrane na u u trajanju 5 minuta.
1. U stanju pripremljenosti obrnite dugme na
simbol PRESET .
2. Pritisko+-
.
23
3. +-
dugme .
4. .
5. +- te vreme
kuvanja na 5:00 minuta.
6. Program uputite pritiskom na .
NAPOMENA:
1. U izabrano vreme, dakle u 10:30 ,
izabrani program automatski .
2. Kad je programski ,
kuvanja, tako da dugme obrnete na simbol
pritiskom na START/STOP/CANCEL, ili
obrtanjem izbornog dugmeta udesno.
3. U programu AUTO DEFROST (automatsko
odmrzavanje)
regulisati unapred.
mikrotalasne
rerne
1.
2.
eba grubih
3.
u ventilacione otvore.
4. Nemojte dopustiti da se kontrolna tabla
5.
mikrotalasnu rernu koristite u veoma
rerne.
6. Povremeno treba izvaditi i stakleni tanjir i
sudova.
7.
vodom ili sredstvom za
na njegovo delovanje. Kada vadite rotacioni
rerne), pazite da ga pravilno vratite.
8.
posudu za pripremu namirnica u
i dodati
iseckanu koru jednog limuna. Posudu zatim
krpom.
9. Ako treba zameniti sijalicu u rerni, molimo
Vas da se obratite servisu.
ita okoline
Simbol na proizvodu ili na njegovoj
proizvodom ne sme postupati kao sa
.
potencijalne negativne posledice na
otpadom ovog proizvoda. Za dobijanje detaljnih
informacija o tretmanu, odbacivanju I ponovnom
kojoj ste kupili ovaj proizvod.
Garancija i servis
se
prodavcu Gorenja, ili odelu Gorenja za male
Nije za komercialnu upotrebu!
VAM
Za dodatne preporuke
savetima na internet strani:
http://microwave.gorenje.com

24
.
............................................................................. 230V~50Hz,1200W
.............................................................................................................................. 700W
: ............................................................................................................................. 900W
.......................................................................................................... 2450MHz
............................................................ 452mm262mm(V) X 364mm(G)
........................................................ 315mmX 198mm(V) X 297mm(G)
............................................................................................................ 20
............................................................................................ 11,3 kg
: ............................................................................................................. Lc < 58 dB (A)
1.
a)
2.
a)
-
a)
-
-
1.
2.
-
-
-
electrical and electronic equipment -
WEEE).

25
-
3.
4. 11,3
5.
6.
7.
8
8.
9.
10.
11.
1,2
-
- -
E
-
N
-
L
8 cm
0 cm,
1

26
1.
2.
3.
4.
5.
6.
7.
8.
-
-
-
-
-
-
9.
10.
11.
12.
27
13.
14.
15.
16.
a)
)
28
1.
2.
3.
4.
5.
6.
7.
8. (
/ ,
+-
(, , , )
/
/ .
29
1.
/12-
:
8:30.
1.
, +
-
2. ,
3. +
4. ,
5.
6. ,
2.
+
/
100%
P100 1-S
80%
P-80 1-S
60%
P-60 1-S
40%
P-40 1-S
60 %
1.
2.
, .,
-60.
3.
10:00.
4. .
1.
;
5
2.
"End" ("").
3.
(, . , ).
3.
;
.
.
4.
.
:
1.
2. .
3. +
12:00.
30
4. .
5. 1
1.
2. .
3. +
25:00.
4. .
6. 2
1.
2. .
3. +
12:00.
4. .
7.
100 g 1800 g.
: 600 g
1.
.
2. +
3. .
:
,
8.
.
150 g:
1.
AUTO
COOK .
2. +" " -2.
3.
.
4. +" "
5. .
"+"
"-"
A1
(200ml/ )
A2
(g)
A3
(g)
A4
(230g /
)
A5
(g)
A6
(g)
A7
(g)
A8
(g)
31
9.
START/STOP/
CANCEL ( / / )
: START/STOP/
CANCEL ( / / )
10. Preset function
This function allow you to program a cooking
program to start at a later time.
For example: Suppose the present time is 9:00,
and you want the oven to start a 5 minutes gill
cooking program at 10:30.
1. Turn the dial to PRESET .
2. +-
START/STOP/CANCEL to confirm.
3. +-
the START/STOP/CANCEL to confirm
again.
4. Turn the dial to GRILL.
5. +-
cooking time 5:00.
6. Press START/STOP/CANCEL to start.
NOTE:
1. When it is time to 10:30, the desired
cooking program start automatically.
2. In the process of presetting, turn the dial to
PRESET can check the presetting time.
Press START/STOP/CANCEL once or turn
the dial to the right can cancel the PRESET
function.
3. AUTO DEFROST can not be set in the
PRESET program.
-
1.
2.
3.
4.
5.
6.
7.
32
8.
9.
web
:
http://microwave.gorenje.com

33
OWNERS INSTRUCTION MANUAL GB
Read the Instructions carefully and Keep for Future Reference.
SPECIFICATIONS
Power consumption: ............................................................................................... 230V~50Hz,1200W
Output: ......................................................................................................................................... 700W
Grill heater: .................................................................................................................................. 900W
Operating Frequency: ............................................................................................................ 2450MHz
Outside Dimensions: .................................................................. 452mm(W) X 262mm(H) X 364mm(D)
Oven Cavity Dimensions: ........................................................... 315mm(W) X 198mm(H) X 297mm(D)
Oven Capacity: .......................................................................................................................... 20litres
Uncrated Weight: .......................................................................................................... Approx. 11,3 kg
Noise level: ...................................................................................................................... Lc < 58 dB(A)
Before you call for service
1. If the oven will not perform at all, the display
does not appear or the display disappeared:
a) Check to ensure that the oven is
plugged in securely. If it is not, remove
the plug from the outlet, wait 10
seconds and plug it in again securely.
b) Check the premises for a blown circuit
fuse or a tripped main circuit breaker.
If these seem to be operating properly,
test the outlet with another appliance.
2. If the microwave power will not function:
a) Check to see whether the timer is set.
b) Check to make sure that the door is
securely closed to engage the safety
interlocks. Otherwise, the microwave
energy will not flow into the oven.
If none of the above rectify the situation,
then contact the nearest authorized
service agent.
The appliance for household use for heating
food and beverages using electromagnetic
energy, for indoor use only.
Radio interference
Microwave oven may cause interference to your
radio, TV, or similar equipment. When
interference occurs, it may be eliminated or
reduced by the following procedures.
a) Clean the door and sealing surface of the
oven.
b) Place the radio, TV, etc. as far away from
your microwave oven as possible.
c) Use a properly installed antenna for your
radio, TV, etc. to get a strong signal
reception.
Installation
1. Make sure all the packing materials are
removed from the inside of the door.
2. Inspect the oven after unpacking for any
visual damage such as:
- Misaligned Door
- Damaged Door
- Dents or Holes in Door Window and
Screen
- Dents in Cavity
If any of the above are visible, DO NOT
use the oven.
3. This Microwave Oven weighs 11,3 kg and
must be placed on a horizontal surface
strong enough to support this weight.
4. The oven must be placed away from high
temperature and steam.
5. DO NOT place anything on top of the oven.
6. Keep the oven at least 8 cm away from both
sidewalls and 10 cm away from rear wall to
ensure the correct ventilation.
7. DO NOT remove the turn -table drive shaft.
8. As with any appliance, close supervision is
necessary when used by children.
WARNING-THIS APPLIANCE MUST BE
EARTHED.
9. The plug socket should be within easy
reach of the power cord
10. This oven requires 1.2 KVA for its input
consultation with service engineer is
suggested when installing the oven.
This appliance is marked according to the
European directive 2002/96/EC on Waste
Electrical and Electronic Equipment
(WEEE).
This guideline is the frame of a European-
wide validity of return and recycling on
Waste Electrical and Electronic
Equipment.

34
CAUTION: This oven is protected internally
by a 250V,10 Amp Fuse.
IMPORTANT
The wires in this mains lead are coloured in
accordance with the following code:
Green-and-yellow: Earth
Blue: Neutral
Brown: Live
As the colours of the wires in the mains leads
of the appliance may not correspond with the
coloured markings indentifying the terminals
in your plug, proceed as follows:
- The wire which is coloured green-and-
yellow must be connected to the terminal in
the plug which is marked with the letter E or
by the earth symbol coloured green of
green-and-yellow.
- The wire which is coloured blue must be
connected to the terminal which is marked
with the letter N or coloured black.
- The wire which is coloured brown must be
connected to the terminal which is marked
with the letter L or coloured red.
Important safety instructions
WARNING: When the appliance is
operated in the combination mode, children
should only use the oven under adult
supervision due to the temperatures
generated; (Only for the model with grill
function)
WARNING: If the door or door seals are
damaged, the oven must not be operated
until it has been repaired by a competent
person;
WARNING: It is hazardous for anyone
other than a competent person to carry out
any service or repair operation that involves
the removal of a cover which gives
protection against exposure to microwave
energy;
WARNING: liquids and other foods must
not be heated in sealed containers since
they are liable to explode.
WARNING: This appliance is not intended
for use by persons (including children) with
reduced physical, sensory or mental
capabilities, or lack of experience and
knowledge, unless they have been given
supervision or instruction concerning use of
the appliance by a person responsible for
their safety.
Children should be supervised to ensure
that they do not play with the appliance.
The oven must have sufficient air flow.
Keep 8 cm space at back; 10 cm at both
sides and 10 cms from top of the oven.
Don't remove oven's feet, do not block air
events of the oven.
Only use utensils that are suitable for use in
microwave ovens.
When heating food in plastic or paper
containers, keep an eye on the oven due to
the possibility of ignition;
If smoke is observed, switch off or unplug
the appliance and keep the door closed in
order to stifle any flames;
Microwave heating of beverages can result
in delayed eruptive boiling, therefore care
must be taken when handling the container;
The contents of feeding bottles and baby
food jars shall be stirred or shaken and the
temperature checked before consumption,
in order to avoid burns;
Eggs in their shell and whole hard-boiled
eggs should not be heated in microwave
ovens since they may explode, even after
microwave heating has ended;
When cleaning surfaces of door, door seal,
cavity of the oven, use only mild,
nonabrasive soaps, or detergents applied
with a sponge or soft cloth.
The oven should be cleaned regularly and
any food deposits removed;
Failure to maintain the oven in a clean
condition could lead to deterioration of the
surface that could adversely affect the life of
the appliance and possibly result in a
hazardous situation;
If the supply cord is damaged, it must be
replaced by the manufacturer, its service
agent or similarly qualified persons in order
to avoid a hazard.
Never connect this appliance to an external
timer switch or remote control system in
order to avoid a hazardous situation.
Safety instructions for general
use
Listed below are, as with all appliances,
certain rules to follow and safeguards to
assure top performance from this oven:
1. Always have the glass tray, roller arms,
coupling and roller track in place when
operating the oven.
2. Do not use the oven for any reason other
than food preparation, such as for drying
clothes, paper, or any other nonfood items,
or for sterilizing purposes.
3. Do not operate the oven when empty. This
could damage the oven.
35
4. Do not use the oven cavity for any type of
storage, such a papers, cookbooks, etc.
5. Do not cook any food surrounded by a
membrane,such as egg yolks, potatoes,
chicken livers, etc without first being pierced
several times with a fork.
6. Do not insert any object into the openings
on the outer case.
7. Do not at any time remove parts from the
oven such as the feet, coupling, screws,
etc.
8. Do not cook food directly on the glass tray.
Place food in/on proper cooking utensil
before placing in the oven.
IMPORTANT-COOKWARE NOT TO USE
IN YOUR MICROWAVE OVEN
- Do not use metal pans or dishes with
metal handles.
- Do not use anything with metal trim.
- Do not use melamine dishes as they
contain a material which will absorb
microwave energy. This may cause the
dishes to crack or char and will slow
down the cooking speed.
- Do not use Centura Tableware. The
glaze is not suitable for microwave use.
Corelle Livingware closed handle cups
should not be used.
- Do not cook in a container with a
restricted opening, such as a pop bottle
or salaed oil bottle, as they may explode
if heated in a microwave oven.
- Do not use conventional meat or candy
thermometers.
- There are the thermometers available
specifically for microwave cooking.
These may be used.
9. Microwave utensils should be used only in
accordance with manufacturer's
instructions.
10. Do not attempt to deep-fry foods in this
oven.
11. Please remember that a microwave oven
only heats the liquid in a container rather
than the container itself.Therefore, even
though the lid of a container is not hot to the
touch when removed from the oven, please
remember that the food/liquid inside will be
releasing the same amount of steam and/or
spitting when the lid is removed as in
conventional cooking.
12 Always test the temperature of cooked food
yourself especially if you are heating or
cooking food/liquid for babies. It is
advisable never to consume food/liquid
straight from the oven but allow it to stand
for a few minutes and stir food/liquid to
distribute heat evenly.
13. Food containing a mixture of fat and water,
e.g.stock,should stand for 30-60 seconds in
the oven after it has been turned off. This is
to allow the mixture to settle and to prevent
bubbling when a spoon is placed in the
food/liquid or a stock cube is added.
14. When preparing/cooking food/liquid and
remember that there are certain foods, e.g.
Christmas puddings, jam and mincemeat,
which heat up very quickly. When heating
or cooking foods with a high fat or sugar
content do not use plastic containers.
15. Cooking utensil may become hot because
of heat transferred from the heated food.
This is especially true if plastic wrap has
been covering the top and handles of the
utensil. Potholders may be needed to
handle the utensil.
16. To reduce the risk of fire in the oven cavity:
a) Do not overcook food. Carefully attend
microwave oven if paper, plastic, or
other combustible materials are placed
inside the oven to facilitate cooking.
b) Remove wire twist-ties from bags
before placing bag in oven.
c) If materials inside the oven should
ignite, keep oven door closed, turn the
oven off at the wall switch, or shut off
power at the fuse or circuit breaker
panel.

36
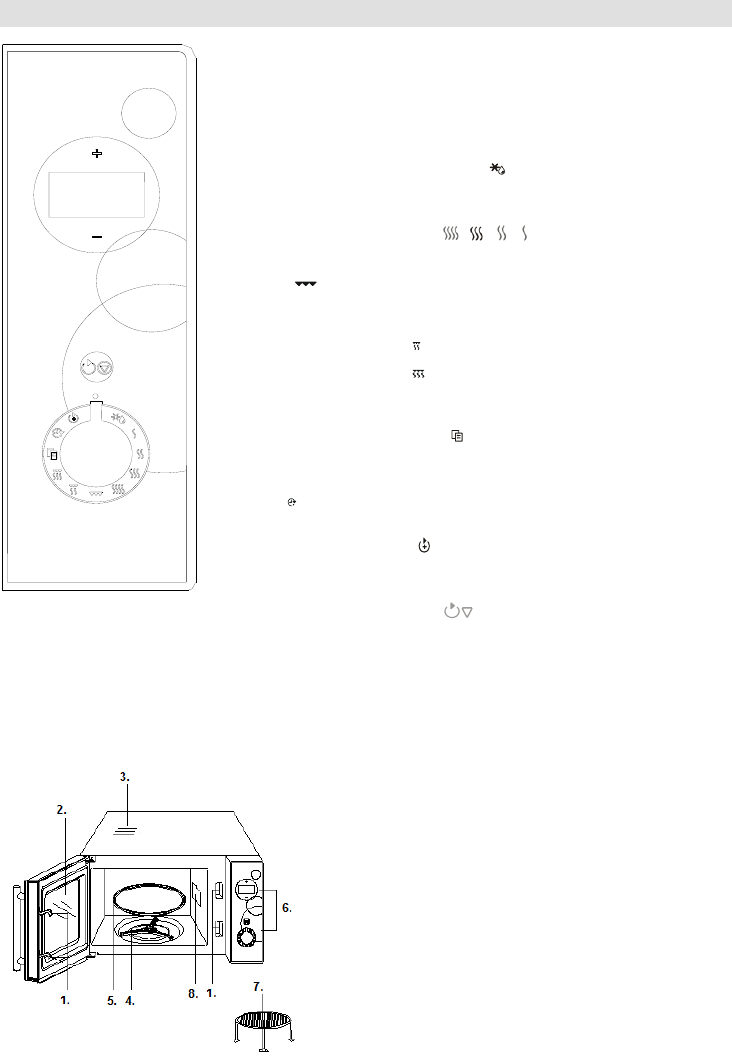
Computer control panel
Feature diagram
1. Door Safety Lock System
2. Oven Window
3. Oven Air Vent
4. Roller Ring
5. Glass Tray
6. Control Panel
7. Grill rack
8. Wave guide (please do not remove the
mica plate covering the wave guide)
MENU ACTION SCREEN
Cooking time, power, action indicators, and clock time are displayed.
+-
Turn the knob to set the time and weight and amount.
AUTO DEFROST
Turn the knob to set defrost program based on the weight entered.
POWER LEVEL (, , , )
Turn the knob to choose microwave cooking power level.
GRILL
Turn the knob to set a grill cooking program up to 95 minutes.
COMBI. 1
COMBI. 2
Turn the knob to set cooking with combinet microwave and grill power.
AUTO COOK
Turn the knob to set cooking popular food instantly.
CLOCK
Turn the knob to set oven clock.
PRESET
Turn the knob to set a cooking program which starts at an appoint time
automatically.
START / STOP / CANCEL
Press once to start a cooking program. Press once to temporarily stop
cooking, then hold 3 seconds to cancel the program. It is also used for
setting child lock. Simply press it a number of times to set cooking time
and cook immediately at full power level
37
Operation Instruction
1. Setting digital clock
The oven is equipped with a digital clock, you
can choose to set the clock time in 24/12-hour
cycle by pressing the clock button in waiting
mode.
For example: Suppose you want to set the oven
clock time to 8:30.
1. In standbay mode the oven, turn the dial to
, you can press + to select 24 hour clock
cycle
2. Press button once to confirm the hour
setting.
3. Press + or to set hour digit 8.
4. Press button once to confirm the hour
setting.
5. Press + or to set minute digit 30.
6. Press button once to confirm the hour
setting.
Note: You can check the time during cooking by
pressing the button.
2. Microwave cooking
For microwave cooking, turn the dial to different
POWER LEVEL code to select a cooking power
level, and then use + or to set a disired cooking
time. The maximum cooking time is 95 minutes.
Select power level by turing the dial to different
power level code.
Cooking power
Prikazovalnik
100%
P100 1-S
80%
P-80 1-S
60%
P-60 1-S
40%
P-40 1-S
For example, suppose you want to cook for 10
minute at 60% of microwave power.
1. Open the door and place the food into the
oven, close it.
2. Turn the dial to POWER LEVEL ( , . , )
until the screen ahows power level P-60.
3. Press + or to set 10:00.
4. Press button.
Note:
1. If you want to temporarily stop a cooking
session, press the once and then you
can start the cooking again by press ; or
press and hold for 3seconds during the
temporarily mode to cancel the cooking
program altogether.
2. After cooking program has finished, the
buzzer will sound beeps once every 2
minutes with End showing on screen, press
any button or open oven door to clear that
before setting another function. (Both note 1
and 2 are also available for other cooking
program.
3. You can check the power level by turning
the dial to the right POWER LEVEL code.
3. Quick start
This feature allows you to start the oven quickly.
The longest cooking time is 10 minutes.
In standby mode, press the button in quick
succession to set the cooking time, the oven
starts working at full power level immediately.
You can extend the cooking time during cooking
process by pressing .
4. Grill
The longest cooking time is 95 minutes. The grill
cooking is particularly useful for thin slices of
meat, steaks, chops, kebabs, sausages of piece
of chicken. It is also suitable for hot sandwiches
and au gratin dishes.
For example, suppose you want to grill for 12
minutes.
1. Open the door and place the food into the
oven, close it.
2. Turn the dial to GRILL .
3. Press + or to set the time 12:00.
4. Press button
5. Combination 1
The longest cooking time is 95 minutes.
30% time for microwave cooking, 70% for grill
cooking. Use for fish or au gratin.
Suppose you want to set combination 1 cooking
for 25 minutes.
1. Open the door and place the food into the
oven, close it.
2. Turn the dial to .
3. Press + or to set the time 25:00.
4. Press button.
6. Combination 2
The longest cooking time is 95 minutes.
55% time for microwave cooking, 45% for grill
cooking. Use for puddings omelettes, baked
potatoes and poultry.
Suppose you want to set combination 2 cooking
for 12 minutes.
1. Open the door and place the food into the
oven, close it.
2. Turn the dial to .
3. Press + or to set the time 12:00.
4. Press button.
38
7. Auto defrost
The oven allows defrosting food based on the
weight users input. The defrosting power levels
and time are automatically set once weight is
programmed. The weight of food to be defrosted
varies between 100g~1800g.
FOR EXAMPLE: Suppose you want to defrost
600g frozen shrimps
1. Turn the dial to auto defrost .
2. Press + or to indicate the desired weight.
3. Press button.
Note:
During defrosting program, the system will pause
to remind user to turn food over, and then press
to resume the defrosting.
8. Auto cooking
For the following foods or cooking operation, you
do not need to input cooking power and time. Try
to focus on telling the oven what you want to
cook and the food weighs or amounts. The oven
starts to work after you pressing the .
For example:To cook 150g of pizza.
1. In standby mode, turn the dial to AUTO
COOK.
2. +--2.
3. Press to confirm.
4. +-
weight or amount.
5. Press button.
Code
Food
For Beverage and Potatoes, the
screen will show the number of
serving instead of food weight
when pressing +-
For cooking Meat, the oven
pauses during cooking to remind
you turn the food over for uniform
cooking.
The result of auto cooking
depends on factors such as
voltage fluctuation, the shape and
size of food, your personal
preference as to the doneness of
certain foods and even how well
you happen to place food in the
oven. If you find the result at any
rate not quite satisfactory, please
adjust the cooking time a little bit
accordingly.
A1
Beverage
(200ml/cup)
A2
Pizza (g)
A3
Pasta (g)
A4
Potatoes
(230g /
portion)
A5
Reheat (g)
A6
Vegetables
(g)
A7
Pizza
defrost (g)
A8
Meat (g)
9. Child lock
Use to prevent unsupervised operation of the
oven by little children. The CHILD LOCK
indicator will show up on display screen, and the
oven can not be operated while the CHILD
LOCK is set.
To set the CHILD LOCK: In standby mode of the
oven, press and hold the button for 3
seconds, a beep sounds and lock indicator lights.
To cancel the CHILD LOCK: Press and hold the
button for 3 seconds until lock indicator on
display turns off.
10. Preset function
This function allow you to program a cooking
program to start at a later time.
For example: Suppose the present time is 9:00,
and you want the oven to start a 5 minutes gill
cooking program at 10:30.
1. Turn the dial to PRESET .
2. +-
START/STOP/CANCEL to confirm.
3. +-
the START/STOP/CANCEL to confirm
again.
4. Turn the dial to GRILL.
5. +-
cooking time 5:00.
6. Press START/STOP/CANCEL to start.
NOTE:
1. When it is time to 10:30, the desired
cooking program start automatically.
2. In the process of presetting, turn the dial to
PRESET can check the presetting time.
Press START/STOP/CANCEL once or turn
the dial to the right can cancel the PRESET
function.
3. AUTO DEFROST can not be set in the
PRESET program.
39
Care of your microwave oven
1. Turn the oven off and remove the power
plug from the wall socket before cleaning.
2. Keep the inside of the oven clean. When
food splatters of spilled liquids adhere to
oven walls,wipe with a damp cloth. The use
of harsh detergent or abrasives is not
recommended.
3. The outside oven surface should be
cleaned with a damp colth. To prevent
damage to the operating parts inside the
oven, water should not be allowed to seep
into the ventilation openings.
4. Do not allow the Control Panel to become
wet. Clean with a soft, damp cloth, Do not
use detergents, abrasives or spray-on
cleaners on the control Panel.
5. If steam accumulates inside or around the
outside of the oven door, wipe with a soft
cloth.This may occur when the microwave
oven is operated under high humidity
conditions and in no way indicates
malfunction of the unit.
6. It is occasionally necessary to remove the
glass tray for cleaning. Wash the tray in
warm sudsy water or in a dishwasher.
7. The roller ring and oven cavity floor should
be cleaned regularly to avoid excessive
noise. Simply wipe the bottom surface of
the oven with mild detergent, water or
window cleaner and dry. The roller ring may
be washed in mild sudsy water or sish
washer. Cooking vapours collect during
repeated use but in no way affect the
bottom surface or roller ring wheels.
When removing the roller ring from cavity
floor for cleaning, be sure to replace it in the
proper position.
8. Remove odors from your oven by
combining a cup of water with the juice and
skin of one lemon in a deep microwaveable
bowl. Microwave for 5 minutes, wipe
thoroughly and dry with a soft cloth.
9. When it becomes necessary to replace the
oven light, please consult a dealer to have it
replaced.
Environment
Do not throw away the appliance with the normal
household waste at the end of its life, but hand it
in at an official collection point for recycling. By
doing this, you help to preserve the environment.
Guarantee & service
If you need information or if you have a problem,
please contact the Gorenje Customer Care
Centre in your country (you find its phone
number in the worldwide guarantee leaflet). If
there is no Customer Care Centre in your
country, go to your local Gorenje dealer or
contact the Service department of Gorenje
domestic appliances.
For personal use only!
We reserve the right to any
modifications!
WISHES YOU A LOT OF PLEASURE
WHILE USING YOUR APPLIANCE
Additional recommendations for cooking with
microwave, grill and useful advices can be
found on web side:
http://microwave.gorenje.com

40
GEBRAUCHSANWEISUNG DE
Lesen Sie die Gebr
Gebrauch auf.
Technische Daten
Stromaufnahme ...................................................................................................... 230V~50Hz,1200W
Ausgangsleistung ........................................................................................................................ 700W
............................................................................................................................. 900W
Betriebsfrequenz: ................................................................................................................... 2450MHz
............................................................................. 452mm (B) X 262mm (H) X 364mm (T)
s Garraums: ................................................................ 315mm (B) X 198mm (H) X 297mm (T)
Volumen: .......................................................................................................................................... 20l
Masse ohne Verpackungsmaterial: ...................................................................................... ca. 11,3 kg
Schallpegel niveau: ...................................................................................................... Lc < 58 dB (A)
Bevor Sie den Kundendienst
anrufen
1.
funktioniert, wenn auf dem Display kein
Text sichtbar sind oder wenn das Display
erlischt:
a)
Mikrowellenherd fachgerecht an das
elektrische Versorgungsnetz
angeschlossen ist. Wenn nicht, ziehen
Sie den Stecker aus der Steckdose,
warten Sie 10 Sekunden und stecken
Sie den Stecker wieder in die
Steckdose.
b)
durchgebrannt bzw. ob der Stromkreis
an der Hauptsicherung unterbrochen
ist. Wenn an den Sicherungen keine
Steckdose mit einem anderen
elektri
Mikrowellenherd nicht heizt, d.h. wenn
er keine Mikrowellenenergie abgibt:
a)
richtig eingestellt ist.
b)
geschlossen und die
Sicherheitsverriegelung eingeschnappt
ist. Wenn das nicht der Fall ist, wird
die Mikrowellenenergie nicht
freigesetzt.
genannten Tips nicht beseitigen konnten,
wenden Sie sich bitte an den
nahegelegenen autorisierten Kundendienst.
(Interferenzen)
bei Rundfunk-, Fernseh-
vermindern:
a) Reinigen Sie die
Dichtungen am Mikrowellenherd.
b) Stellen Sie Ihr Rundfunk- oder
Mikrowellenherd auf.
c) - bzw.
mpfang
Bemerkung:
im Haushalt bestimmt und zwar zum Erhitzen
elektromagnetischer Energie. Verwenden Sie
Aufstellung
1. n Sie, ob das komplette
Verpackungsmaterial aus dem
2.
wie z.B.:
Elektro-
electrical and electronic equipment -
WEEE) gekennzeichnet. Die Richtlinie
-

41
-
-
-
Display,
-
Wenn Sie irgendeinen der oben genannten
Mikrowellenherd nicht benutzen.
3. Der Mikrowellenherd wiegt 11,3 kg; stellen
Sie ihn auf eine waagrechte Unterlage, die
auszuhalten.
4. Den Mikrowellenherd in ausreichender
Wasserdampf aufstellen.
5.
Mikrowellenherd aufbewahren.
6.
Mikrowellenherdes mindestens 8cm und
cm freier Raum zur
7. Die Antriebswelle des Drehgestells NICHT
entfernen.
8. krowellenherd nur
unter Aufsicht Erwachsener benutzen.
HINWEIS:
GEERDET WERDEN!
9. Die Steckdose, an welche der
10. 1,2 kVA
Eingangsleistung. Wir empfehlen Ihnen,
Mikrowellenherdes mit einem
Kundendienst-Fachmann oder einem
entsprechendem anderen Fachmann zu
beraten.
ACHTUNG:
250V, 10A.
WICHTIG
haben folgende Bedeutung:
-gelb: Erdungsleiter
Blau: Neutralleiter
Braun:
Leiter
eventuell nicht ganz den Kennzeichnungen
der Anschlu
entsprechen, beachten Sie bitte Folgendes:
- -gelben Leiter an
mit dem Buchstaben E oder dem
Erdungssymbol gekennzeichnet ist.
-
dem Buchstaben N oder mit schwarzer
an;
-
mit dem Buchstaben L oder mit roter Farbe
Wichtige Sicherheitshinweise
HINWEIS:
Aufsicht erwachsener Personen
Grillfunktion).
HINWEIS:
rf das
werden, bis es von einem autorisierten
Kundendienstfachmann instandgesetzt
worden ist.
HINWEIS: Jegliche Reparatur- oder
Kundendienstarbeiten, bei welchen die
von nicht autorisierten
HINWEIS:
Nahrungsmittel in dicht verschlossenen
HINWEIS:
physischen, sensorischen oder psychischen
oder Vorwissen nur dann geeignet, wenn
eine angemessene Aufsicht oder
twortliche Person
sichergestellt ist. Achten Sie darauf, dass
Luftzirkulation um den Mikrowellenherd
8 cm,
an den Seiten mindestens 10 cm und
ober 10 cm
bedecken.
mikrowellentaugliches Geschirr und
Beim Erhitzen von Speisen in Kunststoff-
oder Papierver

42
Vorgang wegen Brandgefahr
beaufsichtigen.
Bei Auftreten von Rauch den
Mikrowellenherd sofort abschalten, das
lassen, um eventuelle Flammen zu
ersticken.
deswegen immer besonders vorsichtig
verfahren.
Verzehr den Inhalt von Babyflaschen oder
Babynahrung
Im Mikrowellenherd keine rohen oder
gekochten Eier in Schale erhitzen, da diese
beendet ist.
Verwenden Sie zum Reinigen der
Garraumes nur milde (keine abrasiven)
Reinigungsmittel und tragen Sie diese mit
einem Schwamm oder einem weichen Tuch
auf.
Reinigen Sie den Mikrowellenherd und
entfernen Sie etwaige Speisereste
Wenn S
kommen, was sich negativ auf die
darf dieses nur vom Hersteller, einem
autorisierten Kundendienstfachmann oder
einem anderen, entsprechend qualifizierten
Fachmann ausgetauscht werden, um
Gefahren zu vermeiden.
Allgemeine
Sicherheitshinweise
Im nachfolgenden Text sind einige Regeln und
Sicherhei
wie beim Gebrauch anderer elektr
wird:
1.
Betriebs des Mikrowellenherdes der
2. Verwenden Sie den Mikrowellenherd nur
zum Zubereiten von Speisen und nicht zum
Sterilisieren.
3. Schalten Sie den Mikrowellenherd niemals
ein, wenn der Garraum leer ist, da dadurch
4. Bewahren Sie im Garraum keine
5. Garen Sie keine Lebensmittel, die mit einer
Membran umgeben sind, wie z.B.: Eigelb,
die Membran an mehreren Stellen mit einer
Gabel durchgestochen zu haben.
6.
Mikrowel
7.
8. Garen Sie keine Speisen direkt auf dem
Drehteller. Bevor Sie das Gargut in den
Garraum stellen, legen Sie es in einen
WICHTIG:
Mikrowellenherd nicht verwendet werden
darf:
-
Metallgriffen,
-
- Geschirr aus Melamin, da es Stoffe
absorbieren. Das kann zum Springen
-
/Garvorgang verlangsamt.
- Verwenden Sie kein Geschirr ohne
mikrowellengeeignete Beschichtung.
Verwenden Sie ebenso keine
geschlossenen Tassen mit Griffen.
- Bereiten Sie keine Speisen bzw.
bersten kann.
- Verwenden Sie im Mikrowellenherd
Thermometer verwenden, die zum
Gebrauch im Mikrowellenherd geeignet
sind.
9.
Mikrowellenherd nur unter Beachtung der
Gebrauchsanweisung des Herstellers.
10. Verwenden Sie den Mikrowellenherd
niemals zum Frittieren.
43
11. Beachten Sie,
abgibt oder aus diesem Tropfen spritzen,
obwohl der Deckel selbst nicht he
12.
Temperatur der Speise, insbesondere,
niemals unmittelbar nach dem
Herausnehmen aus dem Mikrowellenherd
zu verzehren, sondern ein paar Minuten
13. Lassen Sie Speisen, die Fett und Wasser
enthalten, z.B. Suppe, nach dem
Abschalten des Mikrowellenherdes
m
Garraum stehen. Dadurch kann sich die
Speise stabilisieren und es wird
Siedeverzug verhindert, wenn Sie in die
14.
Weihnachtspudding, Marmelade oder
Hackfleisch, sehr schnell erhitzen.
Verwenden Sie zum Erhitzen oder Garen
von Speisen mit hohem Fett- oder
15.
Speisen im Mikrowellenherd benutzen,
kann sich sehr stark erhitzen, da die Speise
Kunststoff. Verwenden Sie zum
16. Um die Brandgefahr im Garraum zu
verringern:
a)
Erhitzungsvorgang, wenn sich im
Garraum Papier-
brennbare Materiale befinden.
b) aum
stellen, zuerst die Drahtklammern
(Blitzbinder) entfernen.
c) Wenn sich ein Gegenstand im
Versorgungsnetz und schalten Sie die
Hauptsicherung in ihrem
Sicherungskasten ab.
44
Bedienungshinweise
Diagramm des Mikrowellenherdes
1.
2. Sichtfenster
3.
4. Rollenring
5. Glasteller
6. Bedienfeld
7. Grillrost
8.
abnehmen.
Display
Zeigt die Gar-/Back- und Bratzeit, den Status, die Symbole der Betriebsart und die
Zeit an.
-
einstellen.
AUTOMATISCHES ABTAUEN
Knebel drehen, um das Abtauprogramm aufgrund des eingegebenen Gewichts
einzustellen.
LEISTUNGSSTUFE ( , , , )
GRILL
von 95 Minuten einstellen.
KOMBINIERTE BETRIEBSART 1
KOMBINIERTE BETRIEBSART 2
Knebel drehen, um die Kombi-Funktion Mikrowelle und Grill - einzustellen.
AUTOMATISCHES PROGRAMM
UHR
Knebel drehen, um die Uhr des Mikrowellenherdes einzustellen.
PROGRAMMIERTE FUNKTION
Knebel drehen, um das Programm einzustellen, das sich zu einer bestimmten Zeit
automatisch einschaltet.
START / STOPP / ABBRUCH
-
ehend zu stoppen; danach drei Sekunden
hsten Leistungsstufe startet.
45
Gebrauchsanweisung
1. Einstellung der Digitaluhr
Der Mikrowellenherd ist mit einer automatischen
/12-
Zyklus einstellen.
Zum Beispiel: Wenn Sie die Zeit auf 8:30
1.
ist, drehen Sie den Knebel auf die Position
der Taste + auf die Uhrzeit im 24-
Zyklus ein.
2. , um die
3.
die Stunden auf 8 ein.
4. cken Sie einmal die Taste , um die
5.
die Minuten auf 30 ein.
6. , um die
Bemerkung:
2. Garen / Braten mit Mikrowellen
Zum Garen mit Mikrowellen drehen Sie den
n + und ein. Die maximale
Leistung durch Drehen des Knebels auf die
Koch-/Bratstufe
Anzeige
100%
P100 1-S
80%
P-80 1-S
60%
P-60 1-S
40%
P-40 1-S
Wenn Sie z.B. 10 Minuten mit 60% Leistung
1.
2. Drehen Sie den Knebel zur Einstellung der
Leistungsstufe ( , . , ), bis auf der
Anzeige die Aufschrift P-60 erscheint.
3. Stellen Sie mit der Taste + oder die Zeit
10:00 ein.
4. .
Bemerkung:
1.
Taste
ste den
Unterbrechung des Garvorgangs 5
Sekunden lang die Taste , um das
Garprogramm abzubrechen.
2. Nach Beendigung des Garprogramms
jede zwei Minuten), auf dem Display
deren Gar- bzw.
Bratprogramme).
3.
zur Einstellung der Leistungsstufe nach
rechts drehen (, . , ).
3. Schnellstart
Mikrowellenherd sofort starten. Die maximale
der Mikrowellenherd in Betriebsbereitschaft ist,
;
dadurch stellen Sie die Garzeit ein, der
Mikrowellenherd startet sofort mit max.
4. Grill
Minuten. Das Garen bzw. Braten mit Grill ist
ke, Schnitzel,
die Zubereitung von Sandwichtoasts und zum
Gratinieren von Speisen geeignet.
Beispiel:
Minuten lang grillen:
1.
2. Drehen Sie den Knebel auf die Position .
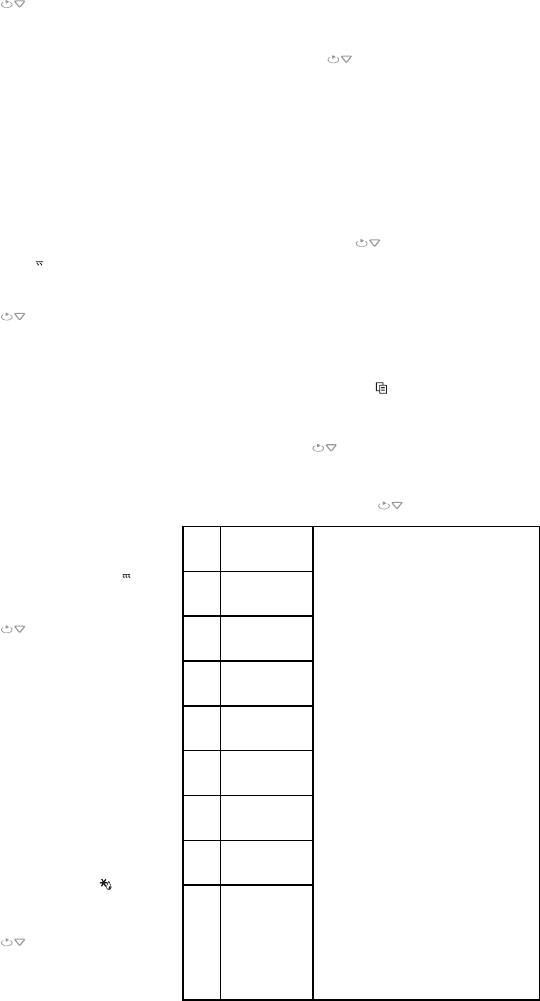
46
3. Stellen Sie mit der Taste + oder die Zeit
12:00 ein.
4. .
5. Kombinierte Betriebsart 1
Minuten. 30 Prozent der Zeit wird der
Mikrowellenherd mit Mikrowelle garen und 70
Prozent der Zeit grillen. Diese Betriebsart ist zur
Zubereitung von Fisch oder zum Gratinieren von
Speisen geeignet.
Wenn
1.
2. Drehen Sie den Knebel auf .
3. Stellen Sie mit der Taste + oder die Zeit
25:00 ein.
4. .
6. Kombinierte Betriebsart 2
Minuten. 55 Prozent der Zeit wird der
Mikrowellenherd mit Mikrowelle garen und 45
Prozent der Zeit grillen. Diese Betriebsart ist zur
1.
Speise in
2. Drehen Sie den Knebel auf die Position .
3. Stellen Sie mit der Taste + oder die Zeit
12:00 ein.
4. .
7. Automatisches Abtauen
von gefrorenen Lebensmitteln aufgrund des
des Abtauvorgangs werden die Leistungsstufe
und die Abtauzeit automatisch hinsichtlich des
Gewichte von Speisen zwischen 100 g und 1800
g einstellen.
ZUM BEISPIEL: Wenn Sie 600 g gefrorener
1. Drehen Sie den Knebel auf Abtauen .
2. Geben Sie mit der Taste + oder das
Gewicht der gefrorenen Scampi ein.
3. .
Bemerkung:
daran zu erinnern, dass er das Abtaugut wenden
Abtauguts die Taste , um mit dem
Abtauvorgang fortzufahren.
8. Automatisches Garen
Eingabe der Leistungsstufe und der Zeit nicht
notwendig. Anstatt dessen bestimmen Sie nur,
welche Speiseart und -menge Sie zubereiten
starten.
Zum Beispiel
1. Wenn sich der Mikrowellenherd im
Bereitschaftszustand befindet, drehen Sie
den Knebel auf die Position Automatisches
Garen - AUTO COOK .
2. +
3.
des Symbols .
4. +
Menge bzw. das Gewicht des Garguts.
5. .
Bez.
Art der Garguts
Bei Ge
-
Anzahl der Portionen angezeigt.
Beim Garen bzw. Braten von Fleisch
stoppt der Mikrowellenherd
erinnern, dass Sie das Fleisch
wenden sollen, damit es
wird.
Die Ergebnisse beim automatischen
Garen sind auch von anderen
Schwankungen der elektr. Spannung,
ck, wie
stark das Fleisch gebraten bzw.
gegart sein soll, wie auch von der
Aufstellung des Fleisches auf den
Drehteller. Wenn Sie mit dem
Ergebnis nicht zufrieden sind,
- bzw. Bratzeit.
A1
(200ml/Tasse)
A2
Pizza (g)
A3
Teigwaren (g)
A4
Kartoffeln
(230g/Portion)
A5
A6
A7
Pizza Abtauen
(g)
A8
Fleisch (g)

47
9. Kindersicherung
Verwenden Sie dieses Funktion, um die
unbeaufsichtigte Benutzung des
Mikrowellenherdes von Kindern zu verhindern.
Auf dem Display erscheint das Symbol der
nicht programmieren bzw. einschalten, solange
die Funktion aktiv ist.
Taste (START / STOPP / ABBRUCH) und
erscheint das Symbol der Kindersperre.
die Taste (START / STOPP / ABBRUCH)
und halten S
bzw. bis das Symbol der Kindersperre vom
Display verschwindet.
10. Zeitschaltuhr
des Starts und der Beendigung des
Garvorgangs.
e
Beispiel:
Garvorgang um 10:30 starten und zwar mit 5
Minuten Grillbetrieb:
1. Der Mikrowellenherd ist im
Bereitschaftszustand drehen Sie den
Knebel auf die Position .
2.
.
3.
.
4. Drehen Sie den Knebel auf die Position ,
um den Grillbetrieb einzustellen.
5.
die Grillzeit auf 5 Minuten ein.
6. .
BEMERKUNG:
1.
ei
das Garprogramm.
2. Nachdem Sie die Zeitschaltuhr eingestellt
Symbol drehen. Die eingestellte Zeit wird
nun angezeigt.
3. Die Zeitvorwahl kann bei der Abtaufunktion
nicht eingestellt werden.
Pflege des
1. Bevor Sie mit der Reinigung des
Mikrowellenherdes beginnen, trennen Sie
Versorgungsnetz.
2. Der Garraum sollte immer sauber gehalten
werden. Wischen Sie getrocknete
Speisereste, herausgespritzte oder
Die Verwendung von groben Reinigungs-
oder abrasiven Scheuermitteln ist nicht
empfehlenswert.
3. Wischen Sie
mit einem feuchten Tuch ab. Um
zu vermeiden, lassen Sie kein Wasser oder
4. Lassen Sie das Bedienfeld nich
werden. Reinigen Sie das Bedienfeld mit
einem weichen und feuchten Tuch.
Verwenden Sie zum Reinigen des
Bedienfeldes keine groben (abrasiven)
Reinigungsmittel oder Reinigungsmittel in
Spraydosen.
5. Bei Niederschlag von Wasserdampf an der
Innen- bzw.
wischen Sie diese mit einem weichen Tuch
der Mikrowellenherd in einer sehr feuchten
Umgebung betrieben wird und bedeutet
hat.
6. Von Zeit zu Zeit ist es notwendig, den
Glasunterteller herauszunehmen und zu
reinigen. Reinigen Sie den Drehteller in
warmem Wasser mit etwas
7.
t
Betriebs zu vermeiden. Wischen Sie den
Glasreiniger ab und reiben Sie dann alles
mit einem sauberen und trockenen Tuch
n den Rollenring in
Speisen ansammeln, was ihre Funktion
Rollenring aus der Vertiefung im Garraum
48
8.
Zitronensaft und Zitronenschalen in das
nach Beendigung der eingestellten Zeit den
Garraum mit einem weichen Tuch ab und
reiben Sie ihn trocken.
9. Falls die
ausgetauscht werden sollte, wenden Sie
Umweltschutz
Werfen Sie das Gert am Ende der Lebensdauer
nicht in den normalen Hausmll. Bringen Sie es
zum Recycling zu einer offiziellen Sammelstelle.
Auf diese Weise helfen Sie, die Umwelt zu
schonen.
Garantie und Kundendienst
Probleme auf, setzen Sie sich mit einem Gorenje
Service-Center in Ihrem Land in Verbindung
(Telefonnummer siehe internationale
Garantieschrift). Sollte es in Ihrem Land kein
Service- Center geben, wenden Sie sich bitte an
Nur zum eigenen Gebrauch!
FREUDE MIT IHREM NEUEN
MIKROWELLENHERD!
Braten mit Mikrowellen und Grill sowie
Sie auf unserer Homepage:
http://microwave.gorenje.com

49
NOTICE D'UTILISATION FR
....................................................................................... 230V~50Hz, 1200W
Puissance des micro-ondes ......................................................................................................... 700W
Puissance du gril ......................................................................................................................... 900W
............................................................................................................................. 2450MHz
Dimenppareil ............................................................... 452mm(L) x 262mm(H) x 364mm(P)
Dimensions ................................................................ 315mm(L) x 198mm(P) x 297mm(H)
Volume du four ......................................................................................................................... 20 litres
Poids net ...................................................................................................................... environ 11,3 kg
Niveau de bruit:.............................................................................................................. Lc IEC < 58 dB
Avant de contacter le service
-vente
1. Si le four ne fonctionne pas du tout,
a)
retirez la fiche de la prise secteur,
attendez 10 secondes et rebranchez le
four convenablement.
b)
fonctionnent normalement, testez la
prise murale en y raccordant un autre
appareil.
2. Si le four ne fonctionne pas en mode micro-
ondes:
a)
b)
cas contraire, le flux des micro-ondes
ne peut pas parvenir dans le four.
Si le four ne fonctionne toujours pas une
-dessus ont
-vente.
en plein air.
-
ez les mesures
suivantes.
a)
b) Placez la radio, la TV, etc. aussi loin que
possible du four.
c) Installez une antenne convenable pour
Installation
1.
four.
2.
-
- Porte e
- Entailles ou trous sur le hublot ou
-
-
dessus, le four.
3. -11,3 kg et doit
face
suffisamment solide pour supporter son
poids.
4.
vapeur.
Cet appareil est pourvu du marquage
Cette directive est applicable dans les
pour la
reprise et le recyclage des appareils

50
5. NE METTEZ RIEN sur le dessus du four.
6.
chaque 0
7.
plateau tournant.
8.
ATTENTION CET APPAREIL DOIT
9.
10. La puissance du four est de 1,2
ATTENTION :
de 250 Volts,
10
IMPORTANT
Code couleur des conducteurs composant le
:
Vert et jaune: Terre
Bleu: Neutre
Marron: Phase
Il est possible que les couleurs des
conducteurs du cordon secteur ne
correspondent pas aux marquages colo
identifiant les conducteurs sur les bornes de
votre prise murale
:
-
E ou par le
symbole de terre de couleur verte ou verte
et jaune.
-
N ou par la couleur
noire.
-
L ou par la couleur
rouge.
importantes
ATTENTION : fonctionne
disposant de la fonction gril).
ATTENTION : si la porte ou le joint de la
ATTENTION : il est dangereux pour toute
impliquant la
-ondes.
ATTENTION : il ne faut pas chauffer les
liquides et autres aliments dans des
ATTENTION :
destin
physiques, sensorielles ou intellectuelles
-ci ne
elles aient
Laissez un espace libre de 8
0cm au-dessus
Utilisez exclusivement une batterie de
cuisine et des ustensiles compatibles avec
-ondes.
Lorsqu
des barquettes en plastique ou en papier,
, -le et laissez la porte
-
les biberons, remuez le contenu des petits
la
avant consommation.
coque aux micro-ondes, car ils peuvent
Lorsque vous nettoyez la porte, le joint de

51
le faire remplacer
par un technicien -Vente
Vous trouverez ci-dessous un certain nombre de
r des performances
maximales.
1.
place.
2. Utilisez le four exclusivement pour la
de linge, du papier, ou autre chose que des
conserves.
3.
4.
espace de rangement pour des papiers,
des livres de cuisine, ou autres objets.
5. recouverts
:
terre, etc.
6. orifices de la
carrosserie.
7.
etc.
8.
directement sur le plateau en verre. Placez-
les enfourner.
IMPORTANT USTENSILES DE CUISINE
-ONDES :
-
-
- lamine,
micro-ondes. Cela ralentirait la cuisson
carboniser.
- Ne faites rien chauffer dans des
exemple les bouteilles de boissons
gazeuses
le
micro-ondes.
- un
,
choisissez-en un qui soi
-ondes. Ces
e
commerce.
9. -
ondes selon les recommandations du
fabricant.
10. Ne faites pas de fritures dans ce four.
11. Souvenez--
ent lui-
; soyez
prudent lorsque vous enlevez le couvercle.
12.
-
micro-ondes ; laissez-les reposer quelques
minutes et -
13.
de la graisse (par exemple bouillon cube)
14.
souvenez-vous que certains aliments (par
exemple pudding dconfiture, viande
contenant beaucoup de sucre ou de
en plastique.
15.
raison de la chaleur transmise par les
aliments qui cuisent. Cela est flagrant si
vous recouvrez le pl
mettre des gants de cuisine quand vous
manipulez vos .
16. et
52
a) ne prolongez pas inutilement la
cuisson. Surveillez le four tant que des
;
b) avant dfourner des aliments sous
sachets en plastique, retirez les liens
qui les ferment si ces derniers
.
c)
e,
l ou mettez-le
hors tension en fermant le disjoncteur
ou en enlevant le fusible sur le tableau
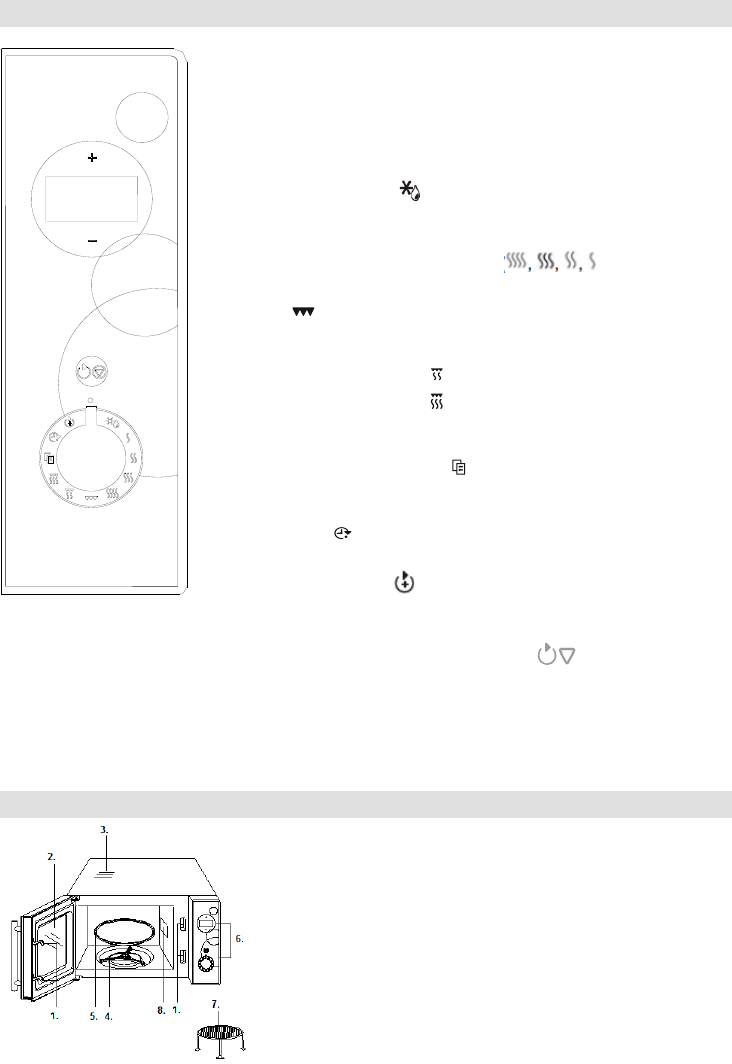
53
du four
1.
2. Hublot
3. Fentes de ventilation
4. roulettes
5. Plateau tournant en verre
6. Bandeau de commandes
7.
8.
plaque en mica recouvrant le
).
apparaissent sur cet afficheur.
"+" ; "-"
ou le nombre de portions.
PUISSANCE DES MICRO-ONDES
uissance des micro-ondes.
GRIL
Tournez le
minutes maxi).
Tournez le -ondes +
gril.
CUISSON AUTOMATIQUE
Tournez le pour choisir un programme de cuisson
HORLOGE
Tournez le
i
Effleurez une fois sur cette touche pour lancer la cuisson. Effleurez-la
une fois pour interrompre temporairement la cuisson ou maintenez votre
doigt 3 secondes sur ce
enfants. Effleurez-
54
Fonctionnement
1.
Le four
; vous pouvez choisir le format sur
24 heures quand le four est en veille.
:
1.
sur ; vous pouvez effleurer la touche +
pour choisir le format sur 24/12 heures.
2. Effleurez une fois la touche pour valider
3. Effleurez la touche + ou -
heures sur 8.
4. Effleurez une fois la touche pour valider
5. Effleurez la touche + ou -
minutes sur 30.
6. Effleurez une fois la touche pour valider
Note:
.
2. Cuisson en mode micro-ondes
Pour la cuisson aux micro-ondes, tournez le
la touche + ou -. Le temps de cuisson maximal
est de 95 minutes.
Puissance des
micro-ondes
Affichage
100%
P100 1-S
80%
P-80 1-S
60%
P-60 1-S
40%
P-40 1-S
Supposons par exemple que vous vouliez
iments pendant 10
60% de la puissance des micro-ondes.
1. Ouvrez la porte du four et introduisez les
aliments, puis refermez la porte.
2. r sur ( , , , ) pour
-60
apparaisse sur l'afficheur.
3. Effleurez la touche + ou
4. Effleurez la touche .
Note:
1. Si vous voulez interrompre temporairement
la cuisson, effleurez une fois , il vous
touche pour continuer la cuisson. Pour
effleurez 5 secondes la touche
avoir interrompu la cuisson.
2. Lorsque la cuisson est termin
sonore retentit une fois toutes les 2 minutes
Effleurez une touche quelconque ou ouvrez
autre fonction. (Les notes 1 et 2 sont
valables pour les autres programmes de
cuisson).
3. Durant la cuisson aux micro-ondes, vous
positions ( , , , ).
3.
Cette fonction vous
maximal de 10 minutes.
En mode veille, effleurez rapidement plusieurs
fois la touche
En cours de fonctionnement, vous pouvez
.
4. Gril
escalopes de poule
toasts garnis et aux gratins.
Supposons par exemple que vous vouliez cuire
des aliments au gril pendant 12 minutes:
1. Ouvrez la porte du four et introduisez les
aliments, puis refermez la porte.
2. GRIL .
3. Effleurez la touche + ou
4. Effleurez la touche .
5.
minutes.
30% du temps est imparti aux micro-ondes et
isson ou les
gratins.
1 sur 25 minutes :
1. Ouvrez la porte du four et introduisez les
aliments, puis refermez la porte.
2. .
3. Effleurez la touche + ou pour r
4. Effleurez la touche .
55
6.
95 minutes.
55% du temps est imparti aux micro-ondes et
de terre et la volaille.
S
2 sur 12 minutes.
1. Ouvrez la porte du four et introduisez les
aliments, puis refermez la porte.
2. .
3. Effleurez la touche + ou
sur 12:00.
4. Effleurez la touche .
7.
g et 1800 g.
Supposons par exemple que vous vouliez
g de crevettes :
1. .
2. Effleurez la touche + ou pour indiquer le
poids.
3. Effleurez la touche .
Note :
met en pause pour vous laisser le temps de
retourner les aliments
porte,
pour continuer le programme.
8. Cuisson automatique
-
simplement indiquer au four ce que vous voulez
eurez .
Par exemple, pour cuire une pizza de 150 g :
1.
sur cuisson automatique .
2. Effleurez la touche + ou
A-2.
3. Effleurez pour valider.
4. Effleurez la touche + ou pour indiquer le
poids ou le nombre de portions.
5. Effleurez la touche .
Code
Aliment
Pour les boissons ou les
pommes de terre, l'afficheur
indique le nombre de
des aliments lorsque vous
effleurez "+" ou "-".
Pendant la cuisson de la
viande, le four se met en
pause pour vous laisser le
temps de retourner les
aliments.
En mode cuisson
fluctuations du courant
taille des aliments, vos
des aliments dans le four. Si
de cuisson en fonction de
A1
Boissons
(200 ml ou
1 tasse)
A2
Pizza (g)
A3
A4
Pommes de
terre (230 g
ou 1 portion)
A5
e (g)
A6
A7
on pizza (g)
A8
Viande (g)
9.
Utilisez cette fonction p
enfants de se servir du four sans surveillance.
fonctionner tant que le verrouillage est actif.
: l'appareil
secondes la touche
; un
signal sono
s'allume.
effleurez 5
STOP / ANNULATION
10.
Cette fonction vous permet de programmer une
9 heures et que vous vouliez programmer une
heures 30 :
1.
.
2. Effleurez la touche + ou
/ ANNULATION
des heures.
56
3. Effleurez la touche + ou
minutes puis effleurez de nouveau
4.
5. Effleurez la touche + ou
6.
ANNULATION pour valider votre
programmation.
Note
1.
2.
D
3.
Entretien et nettoyage
1.
-le.
2.
aux parois, enlevez-
nts agressifs ou
3.
pas endommager les composants du four.
4. mandes
reste toujours sec. Essuyez-le avec un
pour nettoyer le bandeau de commande.
5.
essuyez-la avec un chiffon doux. Ce
-ondes fonctionne dans des
; cela
nullement un dysfonctionnement de
6. tirer le
plateau tournant pour le nettoyer. Vous
pouvez le laver
ou dans votre lave-vaisselle.
7.
simp
-
vaisselle. Les vapeurs de cuisson qui se
condense
du four ni les roulettes de la couronne.
place dans sa position initiale.
8.
jus de citron et de sa
peau. Faites fonctionner le four 5 minutes
en mode micro-ondes, puis passez
un torchon sec.
9. Quand il sera
fournira une nouvelle.
Environnement
-
Garantie et service
Si vous souhaitez obtenir des informations
Gorenje de votre pays (vous trouverez
Service Consommateurs Gorenje dans votre
pays, renseignez-
Service Department of Gorenje Domestic
Appliances.
VOUS SOUHAITE BEAUCOUP DE
PLAISIR
APPAREIL
Vous trouverez des informations
cuisson aux micro-ondes et au gril sur notre
site Internet:
http://microwave.gorenje.com

57
Az utasításokat olvassuk át figyelmesen és őrizzük meg!
Energia- .................................. 230V~50Hz,1200W
................................................................................................................... 700W
Grill-........................................................................................................................................ 900W
.............................................................................................................. 2450MHz
retek: ......................................................................... 452mm(Sz) X 262mm(M) X 364mm(M)
etei: ......................................................... 315mm(Sz) X 210mm(M) X 297mm(M)
- ........................................................................................................................... 20liter
.................................................................................................. Kb. 11,3 kg
: ................................................................................................................. Lc < 58 dB(A)
1.
ikapcsol:
a)
csatlakoztatva van-e az elektromos
b)
-e ki e
szakadt--
2.
a)
-
b)
be van-e csukva. Ha nincs, nem fog
-zavarok (interferencia)
- -
ilyen
a)
b) - -
c) - ill-
1.
-e minden
2. juk
-e rajta
-

58
-
-
-
3. 11,3
4. - -
5.
6.
hogy legyen.
7.
8.
FIGYELEM:
9.
legyen.
10. 1,2 kVA
javasolt sz
FIGYELEM:
FIGYELEM:
igen
FIGYELEM:
szabad haszn
FIGYELEM:
FIGYELEM:
FIGYELEM:
vagy
hivatalos sza A
0 cm,
0
ha
becsukva, hogy elfojtsuk az esetleges
sak.
FONTOS
-
Barna: -
-
- -
.
-
-

59
felrobbanhatnak, azt
kre.
ki.
be
1.
henger karjai, az
2.
3.
4.
5.
-
6.
7.
8.
FONTOS:
-
-
-
me
-
-
megrepedhet.
-
9. A mikroh
10.
11.
12.
n, ha gyerekeknek
benne.
13.
tartalmazza, pl. leves-
-
a
60
14.
-
- vagy
15.
vannak bevo
16.
a)
vannak.
b)
c)
-
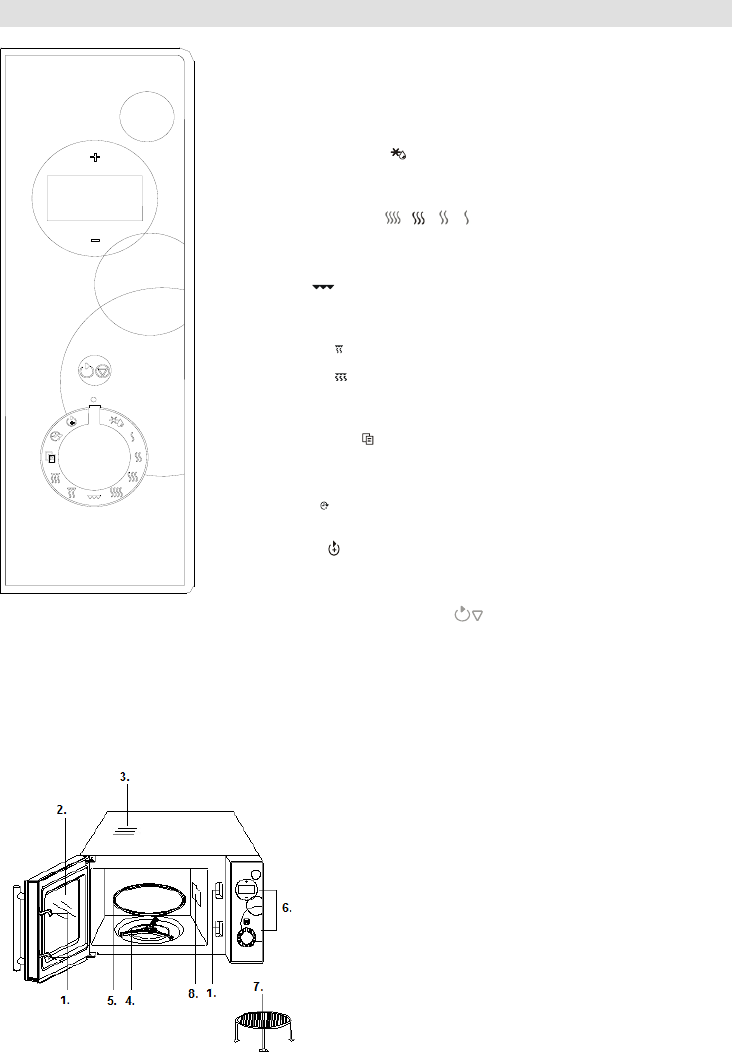
61
1 .
2 .
3 .
4 .
5 .
6 .
7. Gr
8.
+-
AUTO DEFROST
POWER LEVEL (, , , )
-
GRILL
COMBI. 1
COMBI. 2
AUTO COOK
CLOCK
PRESET
Forgassuk el gombot
START / STOP / CANCEL

62
M
1.
/12
-
1.
gombot
2.
nyomjuk meg a gombot.
3. A + vagy a
be a 8-
4. Nyomjuk meg egyszer a
5. A + vagy a
be a 30-
6. Nyomjuk meg egyszer a
A
2.
-fokozatot, majd a +
vagy a
95 perc.
-
100%
P100 1-S
80%
P-80 1-S
60%
P-60 1-S
40%
P-40 1-S
60%--
1.
2. Forgassuk el a gombot POWER LEVEL
( , . ,
nem jelenik a P--fokozat.
3. A + vagy a
10:00 percet.
4. Nyomjuk meg a gombot.
1.
gombot
egyszer, majd a
lenyomva a gombot az ideiglenesen
2.
End feliratot olvashatjuk. Nyomjuk meg
3. -
ha a gombot elforgatjuk jobbra, POWER
LEVEL (, . , )
3. Quick start
-
fokozaton.
4. Grill
-
grillezni.
1.
2. Forgassuk el a gombot GRILL
3. A + vagy a
12:00 percet.
4. Nyomjuk meg a gombot.
5. Combination 1
--
has
1.
2. Forgassuk el a gombot
3. A + vagy a
25:00 percet.
4. Nyomjuk meg a gombot.
63
6. Combination 2
--
1.
2. Forgassuk el a gombot
3. A + vagy a
12:00 percet.
4. Nyomjuk meg a gombot.
7. Auto defrost
-
1. Forgassuk el a gombot auto defrost
2. A + vagy a
3. Nyomjuk meg a gombot.
gombot a
8. Auto cooking
-
1. rgassuk el a
gombot AUTO COOK
2. +-
az A-2-t.
3.
a gombot.
4. +-
5. Nyomjuk meg a gombot.
-
e
kicsit.
A1
Ital (200ml/
A2
Pizza (g)
A3
A4
Burgonya
(230g /
adag)
A5
(g)
A6
(g)
A7
Pizza
(g)
A8
9.
START/STOP/CANCEL gombot 5
tartsuk lenyomva a START/STOP/CANCEL
: -kor
1.
gombot helyzetbe.
2. A + vagy a
3. A + vagy a
be a percet, majd a gomb
64
4.
gombot helyzetbe.
5. A + vagy a
6.
gombot.
:
1.
automatik
2.
3.
A
1.
2.
3.
ne f
4.
5.
6.
7.
ez azonba
8.
9.
Krnyezetvdelem
A feleslegess vlt kszlk szelektv
hulladkknt kezelend. Krjk, hivatalos
jrahasznost gyjthelyen adja le, gy
hozzjrul a krnyezet vdelmhez.
A modositas jogat fenntartjuk!
A
http://microwave.gorenje.com

65
INS
Instrukcję obsługi należy uważnie przeczytać i zachować.
Charakterystyki techniczne
Zasilanie elektryczne .............................................................................................. 230V~50Hz,1200W
............................................................................................................................. 700W
Mo ................................................................................................... 900W
bocza: .......................................................................................................... 2450MHz
trzne: ................................................................. 364mm(G)
ory): ....................................................... 315mm(Sz) X 198mm(V) X 297mm(G)
................................................................................................................ 20
Waga netto: ...................................................................................................................... 11,3 kg
............................................................................................................... Lc < 58 dB (A)
Przed wezwaniem serwisu
1.
a)
z gniazdka zasilania elektrycznego i po
b)
elektryczne.
2.
do emisji
a)
b)
przeciwnym razie emisja enerii
ia
problemu, mimo wykonania w/w
punktu serwisowego.
cenia w odbiorze fal
radiowych i telewizyjnych
telewizyjnych, radiowych itp. B
a)
uszczelek.
b)
jak najdalej od kuchenki mikrofalowej.
c)
pomieszczeniach.
Instalacja
1.
drzwiczek.
2.
- po
- uszkodzone drzwiczki,
- wgniecenia lub dziury w szkle (oknie) na
- wgniecenia w komorze kuchenki.
elektronicznych (waste electrical and
electronic equipment - WEEE).

66
3.
11,3
w stanie
4.
wysokich temperatur i pary.
5.
niczego.
6.
8
7. podstawy
obrotowej talerza.
8.
elektrycznych, u
mikrofalowej przez dzieci powinno
UWAGA: Podczas korzystania z funkcji
mikrofale + grill dochodzi do znacznego
wzrostu temperatury. W tym wypadku
UWAGA:
UWAGA: Wykonywanie jakichkolwiek
wisowych lub naprawczych
wykwalifikowana.
UWAGA:
UWAGA:
znymi,
sensorycznymi lub
poinstruowane na temat korzystania z tego
cm
przestrzeni, po bokach przynajmniej 10 cm
1
zabronione.
przeznaczonych do zastosowania w
kuchenkach mikrofalowych.
i w
pojemnikach plastykowych lub
Kuchenka mikrofalowa wymaga mocy 1,2
kVA
porady pracownika punktu serwisowego lub
wykwalifikowanej osoby.
UWAGA: Kuchenka mikrofalowa jest
Zieleno- uziemienie
Niebieski: neutralny
przewodnik koloru zielono-
uziemienia.
czarnym.
czerwonym.

67
one podgrzewane.
(bez
Do czyszczenia drzwiczek kuchenki,
szmatek.
systematycznie i do
uszkodzenia jej powierzchni, co z kolei
W przypadku uszkodzenia przewodu
producent, autoryzowany serwis lub
odpowiednio do tego celu wykwalifikowana
osoba.
kuchenki
Zapewni to bezpieczne i najskuteczniejsze
1.
(s
umieszczone na swoim miejscu.
2.
do procesu sterylizacji pr
3.
4.
itp.
5. cza
6.
7. Z kuchenki nie wolno usuw
8.
na szklanym talerzu.
odpowiedniego naczynia.
:
-
uchwytami.
-
.
-
przygotowywania .
-
.
-
podgrzewania .
-
zastosowania w kuchenkach mikrofalowych.
9.
zgodnie z instruk
10.
11.
68
12. P
niem
rozprowadzona.
13.
- 60
14.
ilijnego,
przygotowywaniem. Do podgrzewania
tworzyw sztucznych.
15. agrzewa
16. Aby zmniejsz
a)
t
b)
.
c) N
wtyczki z gniadzka lub przez
tablicy rozdzielczej.
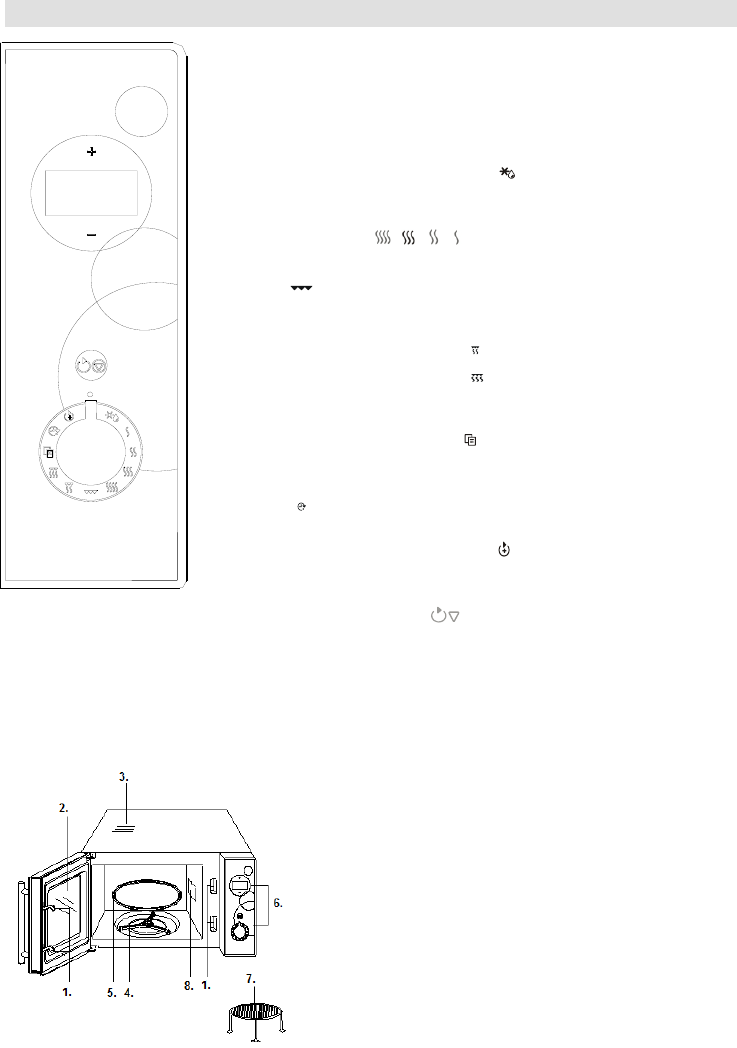
69
Opis kuchenki
1 .
2 . Okno kuchenki
3 . Odwietrznik
4 .
5 . Szklany talerz
6 .
7. Ruszt do grilowania
8. Prowadnica falowa (prosimy, aby nie
WIETLACZ
+-
ania na podstawie
wprowadzonej wagi.
(, , , )
GRILL
grillowania
maksymalnie 95 minut.
ANE 1
2
mikrofalami oraz grillem.
PROGRAM AUTOMATYCZNY
ZEGAR
START / STOP / ANULUJ
gotowania/ pieczenia
te
70
1. Nastawienie zegara elektronicznego
elektroniczny.
trybie 24/12 godzinnym.
Na : nastawianie czasu na kuchence na
8:30.
1.
,
pozycji ,
"+" w trybie 24 godzinnym.
2. Jednokro
, aby nie.
3. "
na 8.
4. Jednokrotnie
, liczby
godzin.
5.
minut na 30.
6. Jednokrotnie nale
, liczby
minut.
Uwaga: Podczas gotowania
jest godzina.
2. Gotowanie/ pieczenie z
mikrofal
i,
,
czas gotowania. Maksymaln
95 minut. Moc
na
.
Moc gotowania/
pieczenia
100 %
P100 1-S
80 %
P-80 1-S
60 %
P-60 1-S
40 %
P-40 1-S
: gotowanie 10 minut przy 60 %
mocy mikrofali.
1.
kuchenki wstaw. Za
drzwiczki kuchenki.
2.
( , . ,
P-60.
3.
4. .
Uwaga:
1. gotowanie,
;
,
podczas chwilowej przerwy w gotowaniu
przez
5 sekund, program
gotowania.
2. Po programu gotowania
(
co dwie minuty), na
"End" ("Koniec").
drzwiczki kuchenki, .
Na
(Punkty 1 i 2
).
3. Sto mikrofal
mocy (, . , ).
3.
D
, jaki
10 minut. Gdy kuchenka
jmniejszych ,
;
nastawiony zostanie czas gotowania, a
.
Czas gotowania
samego procesu gotowania,
przycisk .
4. Grill
Na
otowywania grzanek
oraz zapiekanek.
przygotowywanie potraw z grilla w
przez 12 minut:
1. i
.
drzwiczki kuchenki.
2. grill .
71
3.
na 12:00.
4. .
5. 1
95 minut. 30
mikrofalowo, a 70 procent czasu z
em grilla. T
do przygotowywania ryb lub zapiekanek.
kombinowanego na 25 minut:
1.
drzwiczki kuchenki.
2. .
3. "
na 25:00.
4. .
6. 2
o
mikrofalowo, a 45 procent czasu z
drobiu.
kombinowanego na 25 minut:
1. drzwiczki kuchenki i
drzwiczki kuchenki.
2. .
3.
na 12:00.
4. .
7.
Kuchenk
w przedziale od 100 g do 1800 g.
:
1.
.
2. "
3. .
Uwaga:
Podczas progr
,
8. Automatyczne gotowanie
.
pieczenie pizzy
wynosi 150 g:
1.
pozycji automatycznego gotowania AUTO
COOK .
2. "
mbol A-2.
3.
przycisku .
4. "
5. .
Symbol
Rodzaj
przycisku "+" lub "-", zamiast wagi
Podczas gotowania lub pieczenia
,
Rezultaty automatycznego
upodobania smakowe, to, jak
nia
prosimy, aby odpowiednio
A1
Napoje (200
ml/ )
A2
Pizza (g)
A3
Makaron (g)
A4
Ziemniaki (230
g/ )
A5
Podgrzewanie
(g)
A6
Warzywa (g)
A7
pizzy (g)
A8
(g)
72
9.
aktywna.
START/ STOP/
CANCEL (START/ STOP/ ANULUJ) i
5 se
pSTART/ STOP/
CANCEL (START/ STOP/ ANULUJ) i
ymbol blokady, widoczny
gotowania potraw.
dnio nastawiony.
: w danej chwili jest godzina 9:00;
gotowanie
godz. 10:30, z zastosowaniem 5 minutowego
grilla.
1.
pozycji .
2. + lub
zegar, a w celu potwierdzenia
.
3.
.
4. , aby
.
5.
czas gotowania 5 minut.
6. W
przycisk .
UWAGA:
1.
mikrofalowa automatycznie rozpocznie
2.
,
3.
wyprzedzeniem.
mikrofalowej czyszczenie i
konserwacja
1.
2.
onym gotowaniu
3. Powi
4.
Nale
aerosolu.
5.
powierzchniach kuchenki osiada para,
jej uszkodzenia.
6.
wodz
7.
rodkiem do mycia powierzchni szklanych.
powierzchnie kuchenki ani
73
miejsce.
8.
czynie (przystosowane do
i.
9.
sprzedawcy lub w autoryzowanym
Gwarancja i serwis naprawczy
W celu uzyskania informacji lub w razie
centrum pomocy
WIELE SATYSFAKCJI Z
KORZYSTANIA KUCHENKI
pieczenia za p
http://microwave.gorenje.com

74
MANUAL DE UTILIZARE RO
CARACTERISTICI
Consum ................................................................................................................. 230V~50Hz, 1200W
Capacitate ................................................................................................................................... 700W
Grill .............................................................................................................................................. 900W
............................................................................................................. 2450MHz
Dimensiuni exterioare .................................................................. 452mm(L) x 262mm(H) x 364mm(W)
Dimensiuni cavitate cuptor ........................................................... 315mm(L) x 198mm(H) x 297mm(W)
Capacitate cuptor .......................................................................................................................... 20litri
Greutate ....................................................................................................................... Approx. 11,3 kg
Nivel de zgomot .............................................................................................................. Lc < 58 dB [A]
(waste electrical and electronic
equipment - WEEE).
Directiva prescrie cadrul pentru o
valorificarea aparatelor vechi.
1.
a)
-
-l la loc.
b)
un alt aparat.
2.
a) -ul este setat.
b)
nu va porni.
tate de
service.
cu radio-ul, televizorul sau alte echipamente
a)
b) Pu
departe de cuptorul cu microunde;
c)
Instalare
1.
interiorul aparatului.
2.
-
-
-
-
-
3. Acest cuptor are o greutate de 11,55
-i suporta
greutatea.
4. -un loc unde
sunt temperaturi ridica
5.
6.
7. otire al platoului.
8.

75
ACEST APARAT TREBUIE
Pentru acest cuptor este nevoie de o putere
de alimentare de 1.2 KVA, de aceea este
Cuptorul este protejat de o
IMPORTANT Cablurile sunt colorate
Albastru Neutru
Maro Activ
terminalul marcat cu litera E sau cu simbolul
Cablul albastru trebuie conectat la terminalul
marcat cu litera N
maro trebuie conectat la terminalul marcat cu
litera L
importante
pentru a reduce riscul de arderi,
electrice, incendiu, accidente sau energie
1.
a utiliza cuptorul
2.
recipientele sigilate (cum ar fi, de exemplu,
pot exploda, de aceea nu este recomandat
3. Cuptorul trebuie utilizat doar pentru
4. Acest aparat nu trebuie uti
fizice, mentale sau senzoriale reduse sau
sunt lipsite de
juca cu aparatul.
5.
deteriorat.
6.
cavitatea cup
a)
inflamabile.
b)
c)
dvs.
1. -
aceasta sunt la locul lor.
2.
produse care nu sunt alimentare, sau
pentru a steriliza anumite lucruri.
3. Cuptorul nu trebuie pornit da
deoarece se poate strica.
4.
etc.
5.
conservelor, deoarece cuptoarele cu
iar alimentele care nu sunt bine conservate
6.
aproximativ un minut.
7.
8. antele de aerisire de pe
corpul aparatului.
9.

76
10.
IMPORTANT CE VASE NU TREBUIE
MICROUNDE:
-
-
-
microun
-
-
termometre speciale pentru cuptoarele cu
microunde.
11. Instrumentele pentru microunde trebuie
12.
alimentelor.
13.
-un recipient.
capacul de pe vas.
14.
lichidelo
-
temperatura.
15.
-60 de
-a oprit.
16.
plastic.
17.
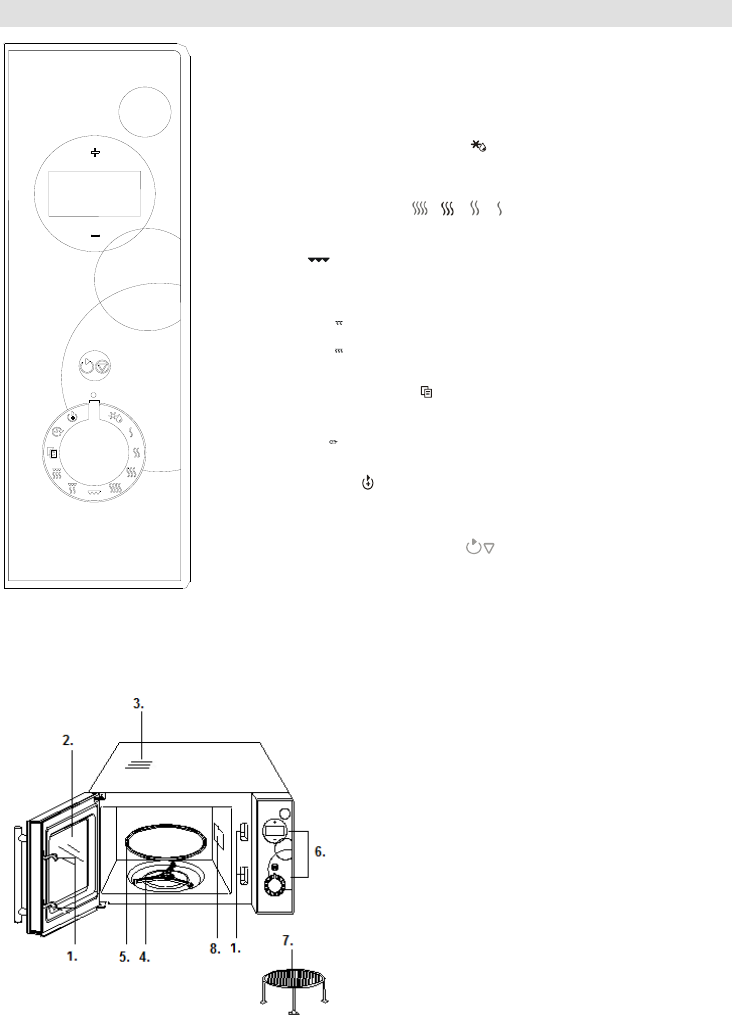
77
PANOU DE COMENZI
1. Sistem de blocare a usii
2. Geam
3. Ventilare
4. Inel rotativ
5. Tava
6. Panou de comenzi
7. Grill
8. Dispozitivul de ghidare al
ți placa
de ghidare)
1.
ECRAN MENIU
țiune, și timpul.
-
Rotiți butonul pentru a seta durata, greutatea și cantitatea.
DEZGHEȚ
Rotiți butonul pentru a seta programul de dezghețții
introduse.
NIVEL DE PUTERE ( , , , )
Rotiți butonul pentru a alege nivelul
GRILL
Rotiț
minute.
COMBI. 1
COMBI. 2
Rotițși grill.
Rotiți butonul pentru șnuite.
CEASUL
Rotiți butonul pentru a seta ceasul cuptorului.
PRESETARE
Rotiț
automat la timpul prestabilit.
START / STOP / ANULARE
țți o
șteptați 3
secunde pentru a anula programul. Se folosește de asemenea pentru
a seta funcblocare ți de
șți imediat la putere
78
1. Setarea ceasului digital
Cuptorul este utilat cu un ceas digital, puteți
ț-un interval de 24/12
de ore
așteptare.
Spre exempluț
setați ceasul cuptorului la 8:30.
1. ți cadranul la ,
puteț
de timp de 24 de ore.
2. ți butonul
a confirma setarea orei.
3. ți + sau pentru a seta butonul
digital aferent orei la 8.
4. ți butonul
a confirma setarea orei.
5. ți + sau pentru a seta butonul
digital aferent minutelor la 30.
6. ți butonul
a confirma setarea orei.
Notă: Puteț
.
2.
ți cadranul la un
nivel de PUTERE diferit pentru a selecta un nivel
și apoi folosiți + sau
Selectați nivelul de putere rotind cadranul la un
cod de putere diferit.
Afișaj
100%
P100 1-S
80%
P-80 1-S
60%
P-60 1-S
40%
P-40 1-S
țți
timp de 10 minute la 60% din puterea cuptorului.
1. Deschideți ușa și puneț
ț
2. Rotiți cadranul la NIVELUL DE PUTERE
( , . ,
de putere P-60.
3. ți + sau pentru a seta 10:00.
4. ți butonul .
Notă:
1. țți temporar cuptorul,
ți șți
ț ; sau timp
anulaț
2. -a terminat,
ți orice buton sau
deschideți ușa cuptorului pentru a o anula
ț
și 2 sunt valabile și pentru alte
3. Puteți verifica nivelul de putere rotind
cadranul la NIVELUL DE PUTERE
(, . , ).
3.
ți
este de 10 minute.
ți butonul -o
Puteți prelungi dur
.
4. Grill
pentru felii subțiri de carne, fripturi, cotlete,
ți sau pui. Este de asemenea
potrivit pentru sandvișuri fierbinți ș
gratinate.
ț
folosiți grill-ul timp de 12 minute.
1. Deschideți ușa și puneți m
ți.
2. Rotiți cadranul la GRILL .
3. ți + sau pentru a seta durata 12:00.
4. ți butonul .
5. Combinația 1
minute.
ți pentru pește sau
gratinate.
țți combinația 1
pentru 25 de minute.
1. Deschideți ușa și puneț
ți.
2. Rotiți cadranul la .
3. ți + sau pentru a seta durata 25:00.
4. ți butonul .
79
6. Combinația 2
de
minute.
ți pentru budinci,
omlete, cartofi copți ș
țți combinația de
1. Deschideți ușa și puneți alimentele
ți.
2. Rotiți cadranul la .
3. ți + sau pentru a seta durata 12:00.
4. ți butonul Press .
7. Dezgheț
Cuptorul permite dezgheț
ții acestora. Nivelul de putere a
dezgheții ș
dezgheț
SPRE EXEMPLUț
dezghețațț
1. Rotiți cadranul la dezgheț .
2. ți + sau pentru a indica greutatea
3. ți butonul .
Pe durata programului de dezghețare, sistemul
șnul
pentru a relua procesul de dezghețare.
ți, nu
ți
țți
cuptorului ce avețși
ț
funcțți butonul .
Spre exemplu: 150g de pizza.
1. ți cadranul la
.
2. ț+--2.
3. ți pentru confirmare.
4. ț+-
5. ți butonul .
Cod
Alimente
și Cartofi,
ții
alimentelor.
ți +-
Pentru
ți carnea
depinde de factori precum
fluctuații de tensiune, forma și
preferința dumneavoa
ște
prepararea anumitor alimente
șți pus
rezultatul nu vi se pare destul
reglaț
ț
A1
(200ml/ceaș
A2
Pizza (g)
A3
Pastele (g)
A4
Cartofii (230g /
porția)
A5
re(g)
A6
Legume (g)
A7
Pizza dezgheța
re (g)
A8
Carne (g)
9. Blocare acces copii
Utilizaț
re
copii. Indicatorul de BLOCARE A ACCESULUI
ajul ecranului, iar cuptorul nu va
ți și țineți butonul
START/STOP/ANULARE timp de 5 secunde,
și se aprinde
indicatorul de blocare.
Pentru a anula BLOCAREA ACCESULUI :
ți și țineți butonul
START/STOP/ANULARE timp de 5 secunde
șaj se
stinge.
10.
program de 5 minute de gatit cu grill.
1.
2. -
confirma
3. -
confirma din nou

80
4. cadranul la GRILL.
5. -
6.
NOTA:
1.
va porni automat.
2.
de la PRESET pentru a verifica
STOP / CANCEL o data sau rotirea
PRESET.
3. AUTO DECONGELAREA nu poate fi
1. Opri-
de a-
2.
-
puternici sau abrazivi.
3.
ventilare.
4. Panoul de comenzi nu t
-
sau spayuri pentru panoul de comenzi.
5.
cuptorul
-
aparatului.
6.
-
7.
Vaporii care se
8.
-un vas
9.
-l la un punct oficial de colectare pentru
-ul local Gorenje sau co
Departamentul de Service al Aparatelor
Domestice Gorenje.
NUMAI PENTRU UZ PERSONAL!
VA DORESTE SA FOLOSITI CU
PLACERE ACEST APARAT
Mai multe informatii privind gatitul la
microunde, grill si sfaturi utile puteti gasi pe:
:
http://microwave.gorenje.com

81
PT
Leia as instruções e conserve-as para futures consultas
Specifikacije
.......................... 230V~50Hz,1200W
...................................................................................................................................... 700W
Grill .............................................................................................................................................. 900W
................................................................................................ 2450MHz
: ............................................................... mm(V) X 364mm(G)
Di: ................................................................. mm(V) X 297mm(G)
Capacidade do forno:................................................................................................................ 20 litrov
: ........................................................................................................................cca 11,3 kg
: .............................................................................................................. Lc IEC: < 58 dB
Antes de chamar a
1.
se ilumina ou desapareceu:
a)
corrente. Se estiver ligado, desligue-o
-lo.
b) v
mesmo funciona
2.
a) verifique se programou o tempo
b) v
.
tico, para aquecer comida e bebidas
interior, apenas.
O microo no seu
reduzida procedendo da seguinte forma:
a) Limpe a porta e o isolamento da porta
b)
c) Use uma antena pot
TV, etc.
1. Retire todos os componentes da
embalagem do interior do microondas
2.
como por exemplo:
- porta desalinhada
- porta danificada
-
- marcas no interior
use o forno.
3. Este forno pesa 11,3 kgs e deve ser
suficiente forte para suportar este peso
4. O forno deve ser instalado longe de fontes
de calor ou de vapor.
5.
6. Mantenha o aparelho a pelo menos 8 cm
de dis
7.
8.
AVISO: O aparelho deve ser ligado à
terra.
9.
10. O forno necessita
instalada de 1,2 KVA
82
AVISOS:
Quando o aparelho funciona no modo
Se a porta ou o fecho da porta estiverem
aparelho, devem ser realizadas por
aquecidos em recipientes fechados, pois
podem explodir.
O forno deve estar bem arejado. Mantenha
0cm
de ambos os lados e 10cm
microondas
Quando aquecer comida em recipientes de
Se houver fumo desligue o aparelho da
tomada de corrente e mantenha a porta
fechada para abafar as chamas.
Aquecer bebidas no microondas pode gerar
fervura, por isso, tenha cuidado quando
Os alimentos em frascos devem ser
mexidos ou agitados, antes de serem
colocados no microondas.
desligado
para limpar o interior, a porta e o fecho do
aparelho.
O forno deve ser limpo regularmente e os
removidos.
A falta de limpeza regular pode deteriorar o
e aumenta a possibilidade de avarias.
a o substituir.
-lo
a
informadas sobre o funcionamento do
bom desempenho do seu microondas
1. Tenha sempre o prato de vidro, bem como
2.
materiais.
3.
4.
5.
exteriores, como gema de ovo, batatas,
6.
exteriores
7. parte do aparelho,
8.
IMPORTANTE:
SER USADA NO MICROONDAS
- Recipientes com asas de metal
-
-
algumas embalagens
-
-la aumentando o tempo de
cozedura ou aquecimento
- Recipientes com aberturas pequenas,
como garrafas ou frascos, pois podem
explodir devido a sobreaquecimento.
IMPORTANTE:
- verde/amarelo terra
- azul-neutro
- castanho-positivo
seguinte forma:
- o fio verde/amarelo deve ser ligado ao
terminal marcado com a letra E, ou com o
- o fio azul deve ser ligado ao terminal
marcado com a letra N ou de cor preta.
- o fio castanho deve ser ligado ao terminal
mercado com a letra L ou vermelho.
83
-
9.
fabricante.
10.
11. Lembre-se que o microondas apenas
estar muito quente os alimentos podem
estar.
12. Experimente sempre a temperatura dos
alimentos antes de servir especialmente se
consumir os alimentos logo que sejam
-los
repousar uns momentos
13. Cozinhados que contenham liquido e
gordura, devem permanecer dentro do
microondas cerca de 30-
o programa ter terminado. Isto permite que
ou salpicos quando se utilizar uma colher
para servir.
14.
bastante devido ao calor transferido pelos
recipiente c
pegas para manusear os recipientes.
15.
microondas:
a)
b)
dos sacos.
c) Se os alimentos ou os recipientes se
incendiarem dentro do microondas,
desligue-o e mantenha a porta
fechada.
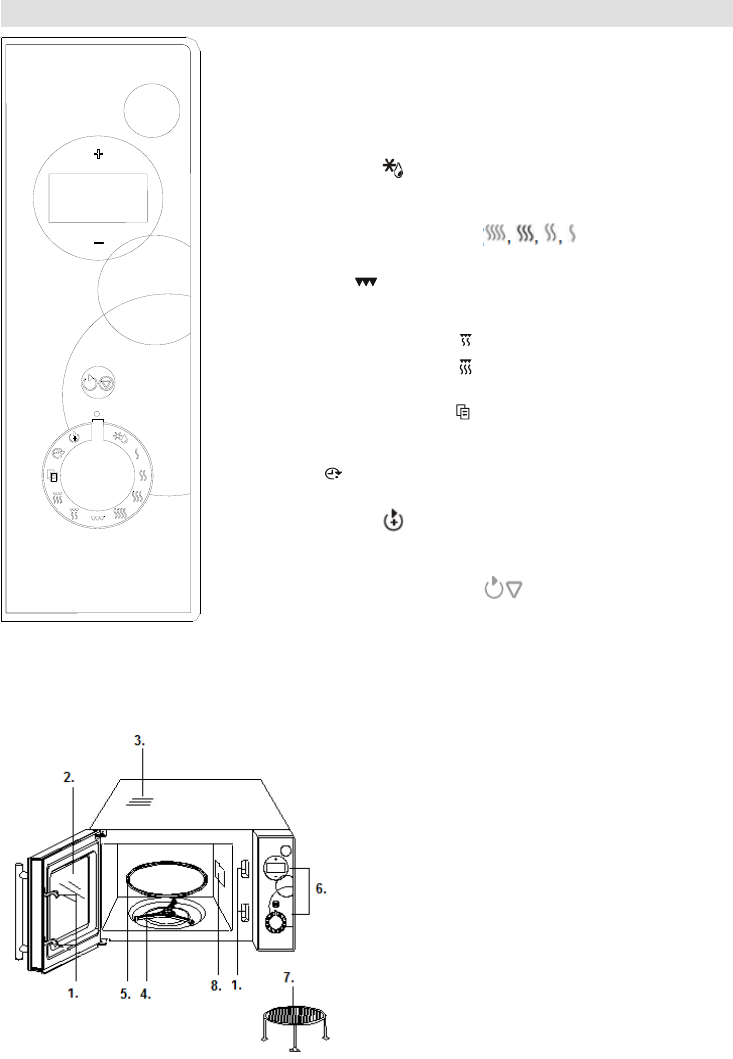
84
Painel de controlo
1 -
2 - Porta
3 -
4 - Coroa de rodinhas
5 - Tabuleiro rotativo de vidro
6 - Painel de comandos
7 -
8 -
de mica que cobre o espalhador).
"+" ; "-"
Toque nestas teclas
que especificar.
-ONDAS
Rode o selector -ondas.
GRELHADOR
Rode o selector para ajustar um programa de cozedura no grelhador (95 minutos
COZEDURA COMBINADA 1
COZEDURA COMBINADA 2
Rode o selector para ajustar a cozedura combinada em micro-ondas + grelhador.
Rode o selector -
regulado para alimentos correntes.
Rode o selector
ARRANCAR / STOP / ANULAR
Toque uma vez nesta tecla para iniciar a cozedura. Toque-a uma vez para
interromper temporariamente a cozedura ou mantenha o dedo durante 5
segundos nesta tecla para anular definitivamente o programa. Esta tecla serve
85
1.
VIS
O forno
em 24/12
-by.
do forno para as 08h30:
1. Com o forno em stand-by, rode o selector
em ; pode tocar na tecla + para escolher o
formato em 24 horas.
2. Toque uma vez na tecla para validar a
3. Toque na tecla + ou - para ajustar as horas
em 8.
4. Toque uma vez na tecla para validar o
ajuste das horas.
5. Toque a tecla + ou - para ajustar os
minutos em 30.
6. Toque uma vez na tecla para validar o
seu ajuste.
Nota: durante a cozedura, pode verificar a hora
rodando o selector em .
2. Cozedura em modo micro-ondas
Para a cozedura no micro-ondas, rode o selector
na tecla + ou -
de 95 minutos.
micro-ondas
100%
P100 1-S
80%
P-80 1-S
60%
P-60 1-S
40%
P-40 1-S
Supomos por exemplo que queria aquecer
alimentos durante 10
no micro-ondas.
1. Abra a porta do forno e introduza os
alimentos, depois feche a porta.
2. Rode o selector em ( , . , ) para
escolher a -60 no
3. Toque na tecla + ou para ajustar a
4. Toque na tecla .
Nota :
1. Se quer interromper temporariamente a
cozedura, toque uma vez em , basta
depois tocar novamente nesta tecla para
continuar a cozedura. Para anular
definitivamente o programa, toque durante
5 segundos a tecla
interrompido a cozedura.
2. Quando acabar a cozedura, houve-se tocar
um sinal sonoro uma vez de dois em dois
Toque numa tecla qualquer ou abra a porta
do forno para desligar o toque e reiniciar o
programas de cozedura).
3. Durante a cozedura no micro-ondas, pode
ncia ajustada rodando o
(, . , ).
3.
-lhe iniciar imediatamente o
10 minutos.
Em modo stand-
vezes a tecla
Durante o funcionamento, pode prolongar a
.
4. Grelhador
fatias de carne pouco espessas, bifes,
costeletas, salsichas, espetadas, ou escalopes
recheadas e aos gratinados.
Supomos por exemplo que quer cozer alimentos
no grelhador durante 12 minutos:
1. Abra a porta do forno e introduza os
alimentos, depois feche a porta.
2. Rode o selector em GRELHADOR .
3. Toque na tecla + ou para ajustar a
4. Toque na tecla .
5. Cozedura combinada 1
30% do tempo de c
micro-ondas e 70% pelo grelhador. A utilizar
para o peixe ou os gratinados.
Supomos por exemplo que quer ajustar a
cozedura combinada 1 em 25 minutos:
1. Abra a porta do forno e introduza os
alimentos, depois feche a porta.
2. Rode o selector em .
86
3. Toque na tecla + ou para ajustar a
4. Toque na tecla .
6. Cozedura combinada 2
minutos.
micro-ondas e 45% pelo grelhador. A utilizar
para os pudins, batatas e ave.
Supomos por exemplo que quer ajustar a
cozedura combinada 2 em 12 minutos.
1. Abra a porta do forno e introduza os
alimentos, depois feche a porta.
2. Rode o selector em .
3. Toque na tecla + ou para ajustar a
4. Toque na tecla .
7.
Pode utilizar o forno para descongelar os
-se
automaticamente logo
Pode ser compreendido entre 100 g e 1800 g.
Supomos por exemplo que quer descongelar
600
1. .
2. Toque na tecla + ou para indicar o peso.
3. Toque na tecla .
Nota: durante a d-se
em pausa para lhe deixar o tempo de virar os
para continuar o
programa.
8.
indicar no forno o que quer fazer e especificar o
peso dos alimentos.
.
Por exemplo, para cozer uma piza de 150 g:
1. Com o forno em stand-by, rode o selector
.
2. Toque na tecla + ou para seleccionar A-2.
3. Toque em para validar.
4. Toque na tecla + ou para indicar o peso
5. Toque na tecla .
Alimento
Para as bebidas ou as
batatas
vez do peso dos
alimentos quando toca
em "+" ou "-".
Durante a cozedura da
carne, o forno fica em
pausa para lhe deixar o
tempo de virar os
alimentos.
Em modo cozedura
pa
tamanho dos alimentos,
os seus gostos pessoais
(al dente ou bem cozido)
alimentos no forno. Se
achar os resultados
decepcionantes, ajuste a
o das suas
A1
Bebidas
(200 ml ou
1
A2
Piza (g)
A3
Massas (g)
A4
Batatas
(230 g ou
1
A5
Reaquecim
ento (g)
A6
Legumes
(g)
A7
Descongel
(g)
A8
Carne (g)
9.
BLOQUEIO estiver activado.
aparelho em stand-by, prima durante
5 segundos a tecla Arrancar/stop/anular ;
ouve-
durante 5 segundos a tecla Arrancar/stop/anular
10. In
-lhe programar uma
9 horas e que quer programar uma cozedura no
10 horas 30:
1.
DIFERIDO .
2. Toque ao leve + ou para ajustar as horas
e depois toque ao de leve ARRANCAR/
STOP/ANULAR para validar o ajuste
das horas.
87
3. Toque ao leve + ou para ajustar os
minutos e depois toque ao de leve
ARRANCAR/ STOP/ANULAR para
validar o ajuste dos minutos.
4. Rode o selector para GRELHADOR.
5. Toque ao de leve a tecla + ou para
6. Toque ao de leve ARRANCAR/
STOP/ANULAR para validar a sua
Nota :
1. ama de cozedura
arranca automaticamente.
2.
DIFERIDO para verificar a hora de
arranque programado. Para anular o
ARRANCAR/ STOP/ANULAR ou rode
o selector para a direita.
3.
Cuidados com o seu
microondas
1. desligue o microondas e retira a ficha da
tomada antes de o limpar
2. mantenha o interior do forno limpo. Se
alime
3. o exterior do forno deve ser limpo com um
4. -se.
ido, sem
5.
forno ou no interior limpe com um pano
seco.
6. de vez em quando deve retirar o prato de
-
7. o anel e o interior do forno devem ser
excessivo. Limpe a base com detergente
-vidros.
l. Quando retirar
o anel do seu lugar para limpeza, assegure-
correcta.
8. pode eliminar os odores do seu microondas
fundo. Ligue o microondas durante 5
minutos e seque cuidadosamente
9.
Ambiente
entregue-o num ponto de recolha oficial para
reciclagem-lo ajuda a preservar o
ambiente.
problema, contacte o Centro de Atendimento ao
o existir um Centro de
-se ao
distribuidor Gorenje local ou contacte o
Domestic Appliances.
DESEJA-LHE QUE TENHA MUITO PRAZER
AO UTILIZAR O NOSSO NOVO APARELHO
Reservamos-nos o direito de proceder a

88
U SK
Spotreba energie: ................................................................................................... 230V~50Hz,1200W
......................................................................................................................................... 700W
.................................................................................................................................. 900W
............................................................................................................. 2450MHz
zmery: ......................................................................364mm(H)
................................................................mm(V) X 297mm(H)
Ob ............................................................................................................................... 20 litrov
....................................................................................................................11,3 kg
: ................................................................................... < 58 dB(A)
o
a WEEE).
1.
alebo zobrazenie zmizne:
a)
b)
a
v
2. Ak mik
a)
b)
is.
a)
b)
c)
In
1.
2.
-
-
- Vydutia alebo diery v
obrazovke
-
Ak
3. 11,3 kg a
4. vysokou
teplotou a parou.
5.
predmety.
6.
a vzadu 10 cm.
7.
taniera.
8.
VAROVANIE-
9. malej vzdialenosti.
10. 2 KVA pre jej vstup,
s
UPOZORNENIE:
poistkou.

89
nasledovne:
Zem
nasledovne:
-
E alebo
zeleno-
-
N alebo
-
konektoru ozL alebo
pokyny
VAROVANIE:
v
modely s funkciou grilovania)
VAROVANIE:
osobou;
VAROVANIE:
mikrovlnnou energiou.;
VAROVANIE: Tekutiny a
WARNING:
eti
10 cm z
nevznietili;
Ak spozorujete dym, vypnite alebo odpojte
zariadenie a
pred
Vajcia v na tvrdo
neohrievajte v
ohrievania;
kaninou.
mali
zariadenia a
a
1.
spojky).
2.
ia, papiera
na sterilizovanie.
3.
4.
5. blanou, ako je
90
6.
predmety.
7.
8.
riad.
-
-
s
-
-
a
-
-
s obmedzen
-
teplomery.
-
9.
s
10. okrmy v
11.
len tekutinu v
12.
z
a
teplo.
13. Pokrm obsahuje zmes tuku a vody, napr.
-60
14.
a pam
15.
prenosu tepla z
pri riade s
16.
a)
b)
c)
y,
poistkovej skrini.

91
1.
2.
3.
4.
5. tanier
6.
7.
8.
+-
pokrmu.
(, , , )
GRIL
program pr
COMBI. 1
COMBI. 2
varenia a grilovania.
pokrmu.
HODINY
nastavte hodiny.
PROGRAM
START / STOP / CANCEL
92
Pokyny k obsluhe
1.
24/12-
1.
, s
2.
3. nastavte hodiny na 8.
4.
5.
6.
2.
potom pomocou + alebo nastav
Zobrazenie
100%
P100 1-S
80%
P-80 1-S
60%
P-60 1-S
40%
P-40 1-S
1.
dvere.
2.
( , . , -60.
3. nastavte 10:00.
4. .
1.
programu varenia.
2.
otv
3.
doprava (, . , ).
3.
4. Gril
1. Otvor
zatvorte dvere.
2. .
3.
4. .
5.
1.
zatvorte.
2. .
3. + alebo
4. St .
6.
t.
1.
zatvorte.
2. .
3. + alebo 12:00.
4. .
93
7.
1.
rozmrazovanie .
2.
3. .
8. Automatic
.
:
1.
.
2. +--2.
3.
4. +-
5. lo .
Pokrm
+-pre
A1
(200ml/cup)
A2
Pizza (g)
A3
Cesto (g)
A4
Zemiaky
(230g / porcia)
A5
Prihrievanie
(g)
A6
Zelenina (g)
A7
(g)
A8
9.
Zapnutie detskej poistky: V pohotovostnom
START/STOP/CANCEL
,
displeja nezmizne indicator detskej poistky.
10.
enie
1.
.
2. -
.
3. -
pre
potvrdenie
4. .
5. -" priamo
6.
1.
2.
,
3.
94
o
1.
2.
pokrmu a
3.
4.
5. okolo
podmienkach s vysokou
zariadenia.
6.
Umyte ho v teplej mydlovej vode alebo
v
7.
okien a
miernej mydlovej vode alebo
v
a
8. r
hlbokej
tkaninou.
9.
predajcu.
s
v
ojte so strediskom pre
predajcu Gorenje, alebo sa spojte servisn
Zastrzegamy sobie prawo do zmian!
http://microwave.gorenje.com

95
CZ
Specifikace
............................ 230V~50Hz,1200W
......................................................................................................................................... 700W
Spir ................................................................................................................................ 900W
................................................................................................................ 2450MHz
...................................................................... 452 mm mm (V) 364 mm (H)
................................... 315 mm 198 mm (V) 297 mm (H)
Objem trouby: ............................................................................................................................. 20
Hmotnost bez obalu: ..................................................................................................... 11,3kg
8dB (A).
adu s
(waste electrical and electronic equipment
-
v EU.
1. V
nefunguje, nebo displej, p
zhasne:
a) Zkontrolujte, jestli
Pokud
zast
b) Zkontrolujte, jestli je pojistka
jestli nevypadla pojistka
Pokud
2. V
a) Zkontrolujte, jestli
.
b) Zkontrolujte, jestli
Pokud
nebude fungovat.
V du
s
v
Poruc
(interference)
v
p
, n
a)
b)
c)
Instalace
1. zkontrolujte, jestli jste z ku
2. jestli
-
-
-
h nebo na displeji,
- ku trouby.
Jakmile
3. 11,3 kg;
4.
5. N
6.
7.

96
8. Pokud
musej
9.
, aby se dala snadno
it a.
10. 1,2 kVA
v
trouby poradili s
s
POZOR:
pojistkou, a to 250 V, 10 A.
Barvy
Zeleno-
- -
E nebo
-
N
barvu.
-
pL
v
s
odu ch teplot.
ho
nebezpv
k
s
ou
cm, po
s0 cm
od.
hlediska
kontrolujte
tit.
uhaste.
Pokud v
proto
V
budou z
a
, a
v
Pokud dojde k

97
V
stroj
1. Pokud je
2. ely
3.
4. V
5.
slupku
6.
trouby.
7.
8.
-
- hranami
- melaminu,
ebo se
-
ochrany, k
v
- nebo
v okrajem
-
v
9.
pouze v souladu s
10.
11. Dbejte na to, aby se v
, ve
nadh
v
12.
v
trouby.
13.
ej
v
14.
,
15.
teplo.
kry
16.
a)
b)
k
c)
98
Diagram trouby
1.
2. Okno trouby
3.
vzduchu
4.
5.
6.
7.
8. (
)
OBRAZOVKA MENU
y.
+; -
hmotnosti.
, , , )
GRIL
95 minut.
KOMBI. 1
KOMBI. 2
a grilu.
HODINY
START/STOP/
program . .
99
1.
24/12.
:
trouby nastavit na 8:30.
1.
,
+
2.
.
3. + nebo nastavte hodiny na 8.
4.
.
5. + nebo nastavte minuty na 30.
.
:
.
2. Mi
+ nebo . Maxim 95
minut.
.
Displej
100 %
P100 1-S
80 %
P-80 1-S
60 %
P-60 1-S
40 %
P-40 1-S
potraviny po dobu 10 minut
60 %.
1.
2. , , , ) tak,
-
60.
3. s 10:00.
4. .
:
1.
a jeho
po dobu 5 sekund.
2.
3.
(, , , ).
3.
pravy je 10 minut.
.
Dobu
.
4. Gril
dobu 12 minut.
1. O
.
2. GRIL .
3. + nebo nastavte 12:00.
4. .
5. Kombinace 1
30 %
1. O
.
2. .
3. + nebo nastavte 25:00.
4. .
6. Kombinace 2
95 minut.
55 % , 45 %
.
masa.
mbinaci 2
12 minut.
100
1. O
.
2. .
3. + nebo nastavte 12:00.
4. .
7. Auto
automaticky.
mezi 100 a 1800 g.
: rozmrazit
600 g
1.
.
2. + nebo
hmotnost.
3. .
:
.
8. Auto
li, co
. T
.
: 150 g pizzy
1.
na AUTO COOK
potravin).
2. nastavte A-2.
3. P .
4. nastavte
5. .
Typ
potraviny
nebo - vin
.
obracet.
tvar
.
pravy.
A1
(
200 ml)
A2
Pizza (g)
A3
(g)
A4
Brambory
(porce
230 g)
A5
(g)
A6
Zelenina
(g)
A7
Rozmra-
pizzy (g)
A8
Maso (g)
9.
(CHILD LOCK), na displeji bude zobrazen
a troubu nebude
.
: V
START/STOP/
se ukazatel pojistky.
START/STOP/ a
eji zhasl.
P
1.
PRESET .
2. + nebo -
START/STOP/CANCEL.
101
3. + nebo -
START/STOP/CANCEL.
4.
5. + nebo -
5:00.
6.
START/STOP/CANCEL.
:
1.
ky.
2.
do polohy PRESET
(PRESET
START/STOP/CANCEL nebo
3. Funkci AUTO DEFROST (automa
PRESET
nastavovat.
trouby
1.
2.
,
Nedopor
3.
te na
nevylila voda.
4.
s ho
5. Pokud s
i
o poruchu trouby.
6. trouby
myjte teplou vodou nebo v
7.
v
jem nebo
na
ste
ho zase ili.
8.
z jednoho citronu.
trouby a troubu .
9. vku v
ivotn prosted
A pstroj doslou, nevyhazujte jej do bnho
komunlnho odpadu, ale odevzdejte jej do
sbrny uren pro recyklaci. Pomete tm
chrnit ivotn prosted
Pokud byste
Domestic Appliances.
TROUBY
htpp://microwave.gorenje.com

102
BG
........................................................................................................... 230V~50Hz,1200W
...................................................................................... 700W
.................................................................................................. 900W
................................................................................................... 2450MHz
..................................................................... 452mm(W) X 262mm(H) X 364mm(D)
.............................................. 315mm(W) X 198mm(H) X 297mm(D)
....................................................................................................... 20
.............................................................................................................................. 11,3
: ................................................................................................................. Lc< 58 dB[A]
1.
a)
b)
2.
a)
b)
-
a)
b)
-
c)
1.
2.
-
-
-
-
3. 11,3

103
4.
5.
6.
-
-
7.
8.
-
9.
10.
-
F
-
N
-
L
8
0
1

104
-
1.
2.
3.
4.
5.
6.
7.
8.
-
-
-
-
-
Corelle
Livingware.
-
-
-
9.
10.
11.
12.
105
13. -60
14.
15.
-
16.
a)
b)
c)
106
1.
2.
3.
4.
5.
6.
7.
8.
+-
(, , , )
107
1.
8:30.
1.
/12
2.
3.
4.
5.
6.
.
2.
,
100%
P100 1-S
80%
P-80 1-S
60%
P-60 1-S
40%
P-40 1-S
1.
2. ( , . ,
P-60.
3.
10:00.
4. .
:
1.
;
2.
,
.
3.
(, . , ).
3.
,
.
4.
1.
2. .
3.
4.
5. 1
30%
1.
2. .
3. 25:00.
4. .
6. 2
55%
12 .
1.
2. .
3. 12:00.
108
4. .
8.
100 1800 .
:
.
1. .
2.
3. .
:
8.
.
: 150 .
1. ,
AUTO COOK .
2. + -
A-2.
3. .
4. + -
5. .
+-
A1
(200ml/cup)
A2
(g)
A3
(g)
A4
(230g /
)
A5
(g)
A6
(g)
-
A7
(g)
A8
(g)
9.
CHILD
LOCK
10.
-
.
1. PRESET
2. -
3. -
4. GRILL
5. -
6.
1.
2.
PRESET
109
3.
DEFROST)
1.
2.
3.
4.
5.
6.
7.
8.
9.
Department of Gorenje Domestic Appliances.
http://microwave.gorenje.com

110
UA
........................................................................................... 20
.................................................................................................................... 700
......................................................................................................................................... 9
................................................................................................................................ 2450
................................................................. 452262) X 364)
.................................... 315198) X 297)
..............................................................................................................................................20
.........................................................................................................................11,3
: .................................................................................................................. Lc <
1.
a)
2.
a)
a)
)
1.
2.
-
-
-
-
-
-
3.
11,3
4.
5.
electronic equipment - WEEE).
111
6.
7.
8.
9.
10. 2
1.
2.
3.
4.
5.
6.
a)
1.
2.
3.
4.
5.
-
- -
-
-
-

112
6.
7.
8. -
9.
10.
-
-
-
-
-
-
11.
12.
13.
14.
15.
-60
16.
17.
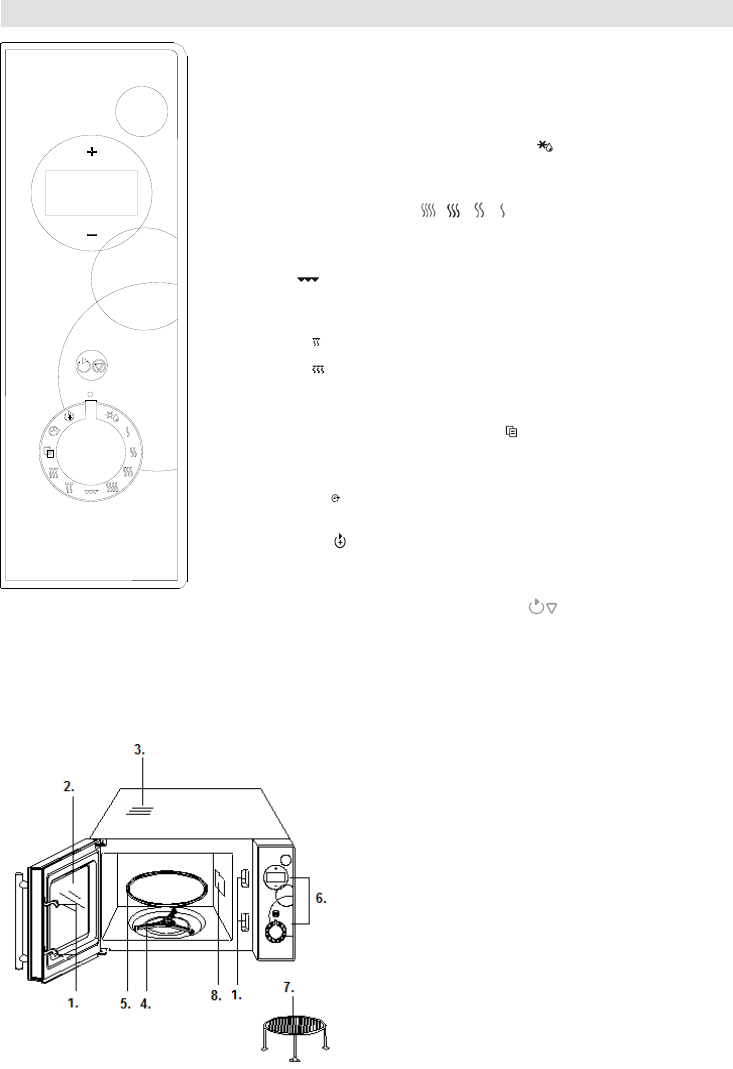
113
1.
2.
3.
4.
5.
6.
7.
8.
+-
(, , , )
114
1.
/12
1.
-
2.
3.
4.
5.
6.
.
2.
100%
P100 1-S
80%
P-80 1-S
60%
P-60 1-S
40%
P-40 1-S
1.
2.
(, . , )
-60.
3.
4. .
1.
2.
-
3.
(, . , ).
3.
10
.
4.
95
1.
2.
.
3.
4.
115
5.
95
1
1.
2. .
3.
4. .
6.
95
1.
2. .
3.
4. .
7.
1.
.
2.
3. .
.
1.
.
2. +-
-
3.
4. +-
5. .
-
A1
A2
A3
A4
A5
(g)
A6
A7
A8
9.

116
.
1.
.
2. +-
3. +-
4.
5. +-
6.
1.
2.
ВІДСТРОЧКА СТАРТУ
ВІДСТРОЧКА
СТАРТУ.
3.
1.
2.
3.
4.
5.
6.
7.
8.
9.

117
м
мо
ож
жн
на
а
з
зн
на
ай
йт
ти
и
н
на
а
в
ве
еб
б-
-с
са
ай
йт
ті
і:
:
http://microwave.gorenje.com
118
RU
.................................................................................... 200
.............................................................................................................. 7
: ......................................................................................................................................... 9
................................................................................................................................ 2
......................................................... 452262) X 364)
.................................................... 315198) X 297)
..........................................................................................................................................20
............................................................................................................... 11,3
: .............................................................................................................. Lc <
:
:.....................................................................
P : ...........................................................................................................................................
electronic equipment - WEEE).
1.
a)
2.
a)
.
a)
1.
2.
-
-
-
-
-
3.
11,3
4.

119
5.
6.
8
7.
8.
2
-
- -
E
-
-
N
-
L
1.
2.
3.
4.
5.
6.
a)
)

120
1.
2.
3.
4.
5.
6.
7.
8.
9.
10.
-
-
-
1.
2.
3.
11.
12.
13.
14.
15.
-60
16.
17.
121
1.
2.
3.
4.
5.
6.
7.
8.
(, , , )
95
.
122
1.
/12-
1.
-
2.
3.
4.
5.
6.
.
2.
100%
P100 1-S
80%
P-80 1-S
60%
P-60 1-S
40%
P-40 1-S
1.
2. , , , ),
-60.
3.
4. .
1.
2.
3.
( , , , ).
3.
10
.
4.
1.
2.
.
3.
4. .

123
5.
1
1.
2.
.
3.
4. .
6.
2
1.
2.
.
3.
4. .
7.
1.
.
2.
3. .
8.
.
1.
2. -2.
3.
4.
5. .
A1
A2
A3
A4
A5
A6
A7
A8
9.
START/STOP/CANCEL
124
10.
1.
.
2.
.
3.
.
4.
.
5.
6.
.
:
1.
2.
3.
1.
2.
3.
4.
5.
6.
7.
8.
9.
125
Appliances.д
ы
CHO1
-:
http://microwave.gorenje.com

126
BRUGSANVISNING DK
TEKNISKE DATA
.......................................................................................................... 230V~50Hz,1200W
Effekt: .......................................................................................................................................... 700W
Grillvarmelegeme: ........................................................................................................................ 900W
Driftsfrekvens: ........................................................................................................................ 2450MHz
Ydre dimensioner: ....................................................................... 452mm(B) X 262mm(H) X 364mm(D)
Indre dimensioner: ...................................................................... 315mm(B) X 198mm(H) X 297mm(D)
Ovnvolumen: .............................................................................................................................. 20 liter
.......................................................................................................................... ca. 11,3 kg
Lydniveau 58 dB (A)
Denne maskine er et avanceret apparat, som
enes af personer, som har
personer og apparat.
lad dem aldrig lege
med eller betjene apparatet.
tilkalder
1.
displayet ikke vises eller er forsvundet:
a)
kke stikket ud, vente i 10
sekunder og anbringe den i
stikkontakten igen.
b)
evt. hovedsikringen. Hvis det ikke er
i samme stikkontakt.
2. rte:
a)
b)
energi ikke flyde ind i ovnen.
AUTORISERET SERVICEAGENT.
Denne ovn er beregnet til husholdningsbrug.
opvarmning af mad- og drikkevarer gennem
elektromagnetisk energi og er udelukkende
Interference i radioudstyr
eller lignende.
a)
b)
c) Brug en ordentligt monteret antenne til din
signalmodtagelse.
Installation
1.
2. ovnen efter udpakning for synlige
skader som:
-
-
-
- Buler i ovnrummet
Ovnen bruges, hvis hvilken
som helst af de skader, der beskrives
ovenfor, er synlig.
3. Denne 11,3 kg og skal
ovnens
Dette apparat er markeret i
overensstemmelse med EU-Direktivet
og Elektronisk Udstyr (WEEE).
standard for tilbagelevering og
genvinding af Affald af Elektrisk og
Elektronisk Udstyr, der er gyldig i hele
Europa.

127
4. Anbring ikke ovnen, hvor den kan blive
5. Der anbringes noget som helst
6. Der
og venstre side og 10 cm til ovnens bagside
for at sikre korrekt ventilation.
7. FJERN IKKE drejetallerkenens drejefod.
8.
ADVARSEL DETTE APPARAT
DING.
9.
10.
1,2 KVA. Der anbefales, at du konsulterer
ADVARSEL: Denne ovn beskyttes internt
VIGTIGT
Ledningerne i netledningen er farvet efter
Jord
Nul
Brun: Fase
netledningen ikke modsvarer de farvede
markeringer, der identificerer klemmerne i
-
klemme i stikket, der er markeret med
bogstavet E eller med jordsymbolet, der er
-
stikket, der er markeret med bogstavet N
eller farven sort.
- Den brune ledning skal tilsluttes den
klemme i stikket, der er markeret med
bogstavet L
Vigtige sikkerhedsanvisninger
ADVARSEL:
grillfunktion);
ADVARSEL:
fagmand;
ADVARSEL:
repareres af andre end kvalificerede fagfolk,
aftages dele, der yder beskyttelse mod
ADVARSEL:
de muligvis kan eksplodere;
ADVARSEL: Dette apparat er ikke
beregnet til at blive brugt af personer
manglende erfaring og viden, medmindre
de er blevet vejledt eller instrueret i
apparatets anvendelse af en person, der er
sikre, at de ikke kan komme til at lege med
det.
ved installationen. 8
cm til ovnens bagside, 10 cm til
og venstre side og 10 cm til ovnens
overside.
I ovnen skal der kun bruges kogegrej, der
es
kan r
tages ud af ovnen.
Indholdet i sutteflasker eller glas med
;
og ovnrummet;
ovnens overflader beskadiges, hvilket kan
levetid og muligvis lede til en risikosituation.
Hvis netledningen er beskadiget, skal den
udskiftes af producenten, producentens
servicecenter eller personer med en
ulykke.

128
Sikkerhedsanvisninger ved
almen brug
Nedenfor er listet regler og
sikkerhedsforanstaltninger til sikring af
1.
arme, drejetappen og drejeringen altid
ovnen.
2. Brug ikke ovnen til andet end tilberedning af
-spiselige
i forbindelse med sterilisering.
3.
tom. Det kan beskadige ovnen.
4.
5.
en gaffel.
6.
7.
8.
drejetallerkenen. Brug altid egnet kogegrej.
9. n type, der
er i overensstemmelse med producentens
anvisninger.
10.
denne ovn.
11.
selv.
selvom b
fjernes, som du ville opleve med samme type
madvare ved konventionel madlavning.
12. Test altid
Det
anbefales, at du aldrig indtager mad eller
t
13.
-60 sekunder efter, at der
er slukket for ovnen. Det giver blandingen tid til
bobler op,
14.
get
hurtigt.
anvende plastikbeholdere.
15. De beholdere, du anvender ved
tilberedningen, kan blive varme fra den
opvarmede mad.
Det
16.
retningslinjer:
a)
hvis du anvender papir, plastik eller
andre brandbare materialer i forbindelse
med madlavningen i ovnen.
b)
placerer posen i ovnen.
c)
tage stikket ud af stikkontakten eller
eller HFI-
VIGTIGT
-
.
-
kant af metal.
- Brug aldrig tallerkener af melamin, da
disse indeholder et materiale, der
krakelerer eller springer, ligesom det
-
Centura. Glaceringen er ikke egnet til
ikke anvendes.
-
ikke kan slippe ud hurtigt nok.
- Anvend ikke konventionelle stege-
eller bolchetermometre i ovnen.
- Termometre direkte beregnet til brug i
Anvend i stedet et af disse.
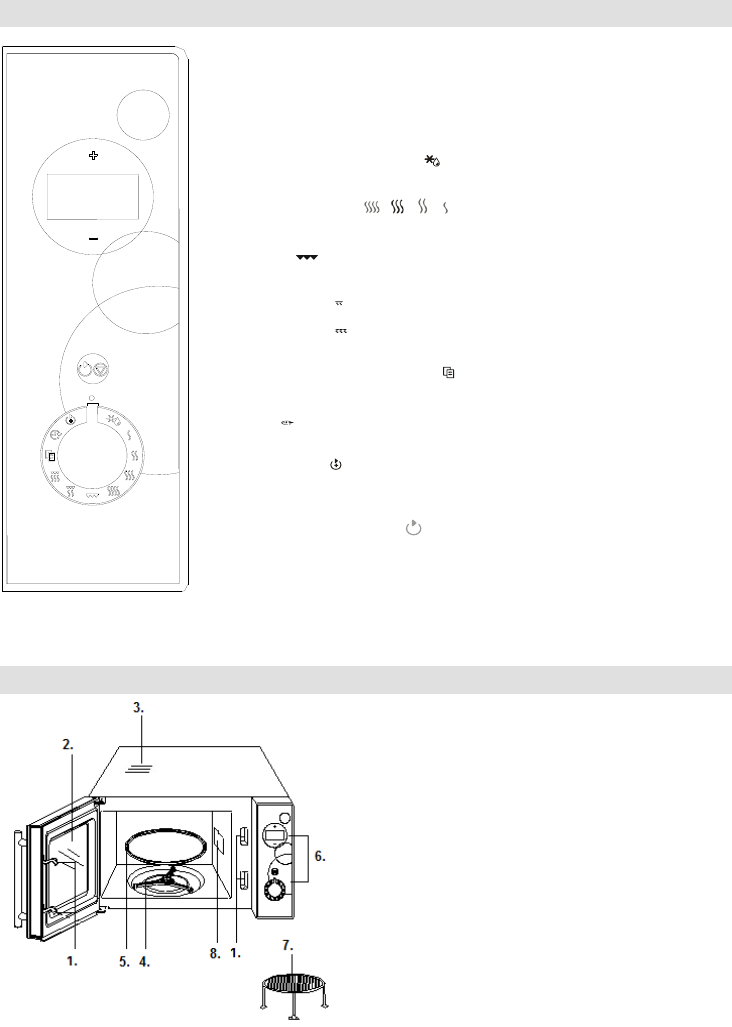
129
BETJENINGSPANEL
1.
2. Vindue
3. Ventilationshuller
4. Drejering
5. Drejetallerken
6. Kontrolpanel
7. Grillrist
8.
Visning af tilberedningstid, effekt, programsymboler og aktuel tid.
+/-
Bruges til at inds
Effektniveau (, , , )
Grill
COMBI. 1
COMBI. 2
Automatisk tilberedning
Ur
Program
forudindstillet tidspunkt.
Start/stop/annuller
knappen inde i 3 sekunder for at afbryde programmet helt.
indstille tilberedningstiden.
effekt.
130
Brugsanvisning
1. Indstille digitaluret
Ovnen er udstyret med et digitalur. Du kan
indstille uret i 24/12 timers-visning ved at trykke
Eksempel: Hvis du f.eks. vil indstille uret til
klokken 8:30.
1. Ved standby skal du dreje knappen til
positionen for at
-timers visning.
2.
3. for at indstille
timetallet til 8.
4.
5. for at indstille
minuttallet til 30.
6. nappen
under tilberedning
2.
dreje knappen til et af effektniveauerne, og
derefter indstille tilberedningstiden med
knapperne + og -. Den maksimale
tilberedningstid er 95 minutter.
Tilberedningseffekt
Display
100%
P100 1-S
80%
P-80 1-S
60%
P-60 1-S
40%
P-40 1-S
Hvis du eksempelvis vil tilberede i 10 minutter
1.
2.
( , . , ), til displayet viser P-60.
3.
knapperne + og -.
4. .
1. Hvis du midlertidigt vil afbryde
knappen . Du kan genoptage
igen, eller du kan afbryde tilberedningen
helt ved at holde knappen inde i 5
sekunder.
2.
hver andet minut, og meddelelsen END
du indstiller en ny tilberedning. (Note 1 og 2
re
tilberedningsprogrammer).
3. Du kan indstille effektniveauet ved at dreje
(, . , ).
3. Hurtigstart
Med denne funktion kan du hurtigt starte ovnen.
Den maksimale tilberedningstid er 10 minutter.
knappen flere gange hurtigt efter hinanden
for at indstille tilberedningstiden, hvorefter ovnen
.
4. Grill
Den maksimale tilberedningstid er 95 minutter.
kyllingestykker.
tilberedning af varme sandwiches og gratinering.
Hvis du eksempelvis vil grille i 12 minutter, skal
du:
1.
2. Dreje knappen til positionen .
3.
knapperne + og -.
4. .
5. Kombination 1
Den maksimale tilberedningstid er 95 minutter.
de sidste 70% tilberedes med grill. Velegnet til
fiskeretter og til gratinering.
Hvis du eksempelvis vil bruge Kombination 1 i 25
minutter, skal du:
1.
2. Dreje knappen til positionen .
3.
knapperne + og -.
4. .
6. Kombination 2
Den maksimale tilberedningstid er 95 minutter.
de sidste 45% tilberedes med grill. Velegnet til
Hvis du eksempelvis vil bruge Kombination 2 i 12
minutter, skal du:
131
1.
2. Dreje knappen til positionen .
3. lp af
knapperne + og -.
4. .
7.
indtaster.
Du kan
Eksempel: rejer skal
du:
1. Dreje knappen til positionen for automatisk
.
2.
og -.
3. .
ovnen undervejs og bipper for at minde dig om,
8. Automatisk tilberedning
tilberedningseffekt og tid. ge,
af det.
knappen .
Eksempel:
Hvis du vil tilberede 150 gram pizza, skal du:
1. Dreje knappen til symbolet for automatisk
tilberedning, .
2. r
A-2.
3. .
4.
af knapperne + og -.
5. .
Kode
Ved drikke eller kartofler vises antal
display
knapperne + og -.
undervejs og bipper for at minde dig
samt
tilberedningen. Hvis du ikke er helt
tilberedningstiden.
A1
Drikke (200
ml/kop)
A2
Pizza (g)
A3
Pasta (g)
A4
Kartofler
(230
g/portion)
A5
Genopvarmn
ing (g)
A6
(g)
A7
Opt
pizza (g)
A8
9.
skal du holde knappen inde i 5 sekunder, til
inde i 5
10. Programmering
Med denne funktion kan du programmere
Eksempel:
1. Dreje knappen til positionen PRESET .
2. +-
3. Trykke pknapperne +og -for at
indstille minuttallet, og trykke pknappen
START/STOP/CANCEL for at bekrfte.
4. Dreje knappen til positionen GRILL.
5. Trykke pknapperne +og -for at
indstille tilberedningstiden til 5:00.
6. Trykke pknappen START/STOP/CANCEL
for at aktivere programmet.
132
BEMRK:
1. Nr klokken bliver 10:30, starter det valgte
program automatisk.
2.
til positionen PRESET for at se det
knappen START/STOP/CANCEL, eller drej
3.
tilberedningsfunktion ved programmering.
vedligeholder du din
1. Sluk for ovnen og tag stikket ud af
stikkontakten, inden du begynder at
2.
ovnrummets bund eller sider, eller hvis
3.
ovnens ventilation
funktionssvigt.
4.
5. Hvis der danner sig kondens inde i
klud. Kondens kan forekomme, hvis ovnen
ejen med ovnen
6.
den i opvaskemaskinen.
7.
ovnen
vaske bunden af med en mild
Drejeringen kan vaskes med en mild
Damp fra madlavningen samles ved
gentagen brug, men d
8. vnen ved at
9.
lade ham foretage udskiftningen.
sammen med det almindelige
husholdningsaffald. Indlever det i stedet til
Garanti og service
problem med dit apparat, kan du kontakte
Gorenjes kundecenter i dit land (du finder
.
Hvis der ikke er et kundecenter i dit land, skal du
kontakte din lokale Gorenje-forhandler eller
Kun til privat brug!
Vi forbeholder os ret til at foretage
DETTE APPARAT
Yderligere anbefalinger om madlavning med
:
htpp://www.microwaves.gorenje.com

133
BRUKSANVISNING SE
TEKNISKA SPECIFIKATIONER
................................................................................................... 230V~50Hz,1200W
........................................................................................................................... 700W
Grilleffekt: .................................................................................................................................... 900W
................................................................................................................ 2450MHz
Ytt .................................................................................... 452mm(B) X 262mm(H) X 364mm(D)
Inne ................................................................................... 315mm(B) X 198mm(D) X 297mm(D)
Ugnsvolym: ................................................................................................................................. 20 liter
Nettovikt: ................................................................................................................................. . 11,3 kg
: ................................................................................................................... . (Lc IEC) < 58 dB
directive 2002/96/EC on Waste Electrical
europeisk policy om insamling och
elektroniska produkter.
rsoner som
apparat.
Innan du begr service
1.
a) Kontrollera att kontakten sitter
ordentligt i uttaget. Om inte, dra ut
sedan i den igen.
b)
dessa fungerer,
testa eluttaget med en annan produkt.
2.
a)
b)
aktiverat.
SERVICENTER.
rad
a)
b)
Installation
1.
2. ntuell
- Sned lucka
- Skadad lucka
-
- Repor eller skador inne i ugnen.
INTE ugnen.
3. 11,3 kg och ska
4.
5.
6. Se till att det finns minst 8 cm fritt utrymme
a samt 10 cm bakom ugnen
7.
roterande tallriken.

134
8. Som med de flesta elektriska produkter, se
OBS:
JORDAS.
9.
10.
med tekniskt kunnig personal vid
installationen.
OBS:
OBS
jande
Jord
Noll
Brun:
as
bokstaven E, eller med jordsymbolen, eller
N, eller med
lationer kan den vara
svart).
bokstaven L
WARNING:
ugnen
enbart modellen med inbyggd grill).
WARNING:
den har reprarerats av tekniskt kunnig
personal.
WARNING: Det ka
WARNING:
WARNING:
a
med olika funktionshinder, eller av personer
som inte har kunskap om hur apparaten
att de inte kan leka med apparaten.
cm fr
1
ockera inte heller
rkar med
.
Eftertorka med en mjuk trasa.
ugnens effekt och till och med eventuellt
av tillverkaren, dennes serviceagent eller av
bruk
1.
och att
2.
samband med sterilisering.

135
3.
tom, eftersom detta kan skada den.
4.
osv.).
5. Undvik att tillaga matvaror med hinnor, som
6.
7.
8. Til
9.
10. fett i
.
11.
m efter traditionell
12.
tillagning av barnmat. Vi rekommenderar
13.
-60
blandningen eller buljong
14.
fett-
15.
16. Undvik brandrisk i ugnen genom att:
a)
Kontrollera ugnen om papper, plast
b)
c)
genom att ta ur kontakten eller
OBS!
-
redskap med metallhandtag i ugnen.
-
metalldekorationer eller liknande.
- m
av melamin. Melaminet kan spricka
-
Livingware.
-
ex flaskor med s
de kan explodera.
- - eller
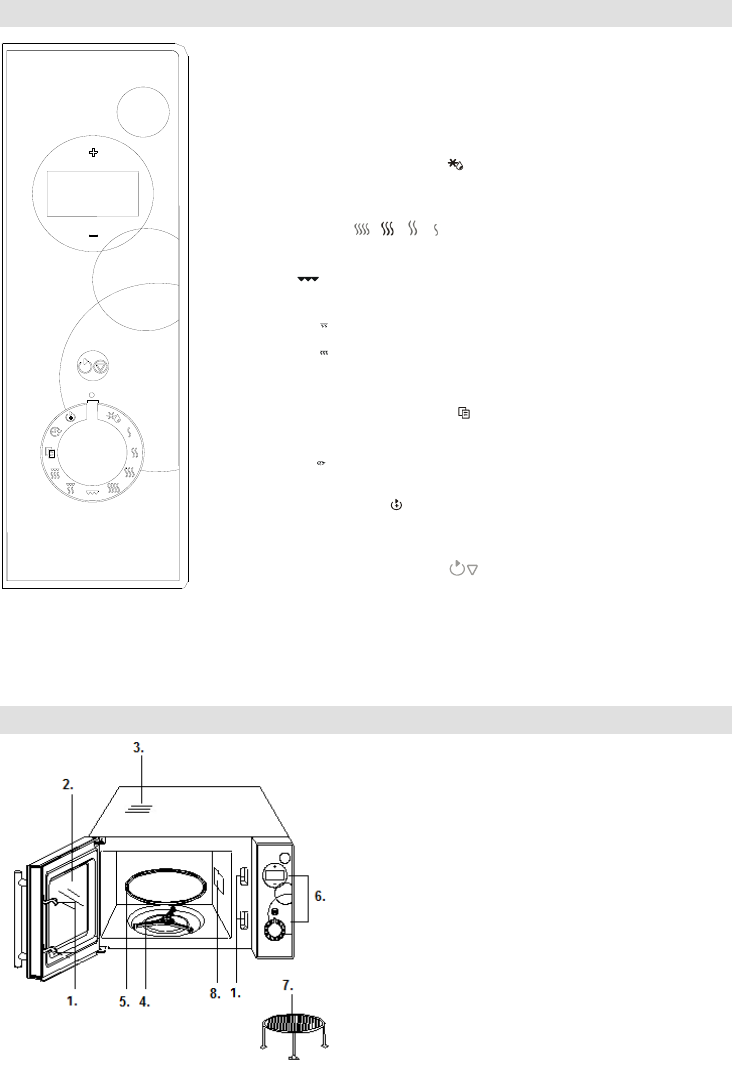
136
KONTROLLPANEL
1.
2.
3.
4. Roterande ring
5. Glastallrik
6. Kontrollpanel
7. Grillgaller
8. -plattan som
visas.
+-
AUTOMATISK UPPTINING
vikt.
(, , , )
GRILL
KOMBI. 1
KOMBI. 2
grilleffekt.
AUTOMATISK TILLAGNING
KLOCKA
START / STOPP / AVBRYT
agningstiden och tillaga
137
Bruksanvisning
1.
/12 timmarsformat
Exempel
1. Med ugnen i standby-
-
timmarsformat.
2.
3. eller
8.
4.
5.
minutsiffran 30.
6.
Obs! Du kan kontrollera tiden under tillagning
.
2.
-
Tillagningseffekt
Display
100%
P100 1-S
80%
P-80 1-S
60%
P-60 1-S
40%
P-40 1-S
1.
2. ( , . , )
-
3.
4. .
Obs!
1. Om du vill stoppa en tillagningssession
kan du starta tillagningen igen genom att
i 5 sekunder under det
tillagningsprogrammet helt.
2.
ingsprogram.)
3.
-kod
(, . , ).
3. Snabbstart
Med denna funktion kan du starta ugnen snabbt.
I standby- i snabb f
.
4. Galler
stekar, kotletter, kebaber, korvar och kyckling.
Anta att du vill grilla i 12 minuter.
1.
2. .
3. eller
12:00.
4. .
5. Kombination 1
-tillagning i
25 minuter.
1.
2. .
3.
25:00.
4. .
6. Kombination 2
kyckling.
-tillagning i
12 minuter.
138
1.
2. .
3. la in tiden
12:00.
4. .
7. Automatisk upptining
tinas upp varierar mellan 100g~1800g.
EXEMPEL: Anta att du vill du tina upp 600 g
1. .
2.
3. .
Obs!
Under upptiningsprogrammet pausas systemet
upptiningen.
8. Automatisk tillagning
ugnen vad du vill tillaga och hur mycket
.
Exempel: Tillagning av 150g pizza.
1. I standby-
AUTOMATISK TILLAGNING .
2. +--2.
3.
4. +-
5. .
Kod
Livsmedel
+
-
Resultatet av den
automatiska tillagningen
livsmedlets form och storlek,
u personligen tycker att
justerar du tillagningstiden
A1
Dryck (200
ml/kopp)
A2
Pizza (g)
A3
Pasta (g)
A4
Potatis (230
g/portion)
A5
A6
(g)
A7
Tina upp
pizza (g)
A8
9.
-
verat.
-
START/STOPP/AVBRYT i 5 sekunder. En
knappen START/STOPP/AVBRYT i 5
sekun
displayen.
10.
tillagningsprogram som ska starta vid ett senare
Till exempel:
och du vill att ugnen ska starta ett
1. .
2. +-
3. +-
OP/CANCEL
4.
5. +-
tillagningstiden 5:00.
139
6.
starta.
OBS!
1.
tillagningsprogrammet automatiskt.
2. Om vredet vrids till PRESET under
-
funktionen.
3.
PRESET-programmet.
1.
2.
av med en fuktig mjuk trasa och ett milt
ten. Eftertorka
med en mjuk trasa.
3.
4.
5.
luckans utsida, torka bort det med en mjuk
6.
gl
som handdisk eller i diskmaskin.
7. Fotringen till glastallriken och ugnsbotten
med en mjuk trasa.. Diska glastallrikens fot
som glastallriken, handdisk eller i
diskmaskin.
8. tas bort
genom att i ett glas blanda vatten med saft
blandningen i ugnen i 5 minuter, torka rent
och torrt med en mjuk trasa.
9. bytas,
llsammans med normalt
Genom
Garanti & service
kontakta Gorenje-kundcenter i ditt land (du hittar
garantibladet). Om det inte finns ett kundcenter i
-
-apparater.
modifieringar!
hemsida
http://www.microwaves.gorenje.com

140
BRUKSANVISNING NO
ppbevar den for senere bruk.
SPESIFIKASJONER
.......................................................................................................... 230V~50Hz,1200W
Effekt ........................................................................................................................................... 700W
Grillvarmer ................................................................................................................................... 900W
Frekvens: ............................................................................................................................... 2450MHz
Utvendi ........................................................................... 452mm(W) X 262mm(H) X 364mm(D)
In ......................................................................... 315mm(W) X 198mm(H) X 297mm(D)
Ovnens kapasitet: ....................................................................................................................... 20 liter
Nettovekt: ......................................................................................................................... Cirka 11,3 kg
: ............................................................................................................... (Lc IEC) < 58 dB (A)
Dette apparatet er merket i henhold til EU-
direktivet 2002/96/EC om Elektrisk og
elektronisk avfall (WEEE).
Disse retningslinjene er rammen for et
Europadekkende regelverk for returnering
og resirkulering av elektrisk og elektronisk
avfall.
Denne maskinen er et avansert apparat, som
anvisninger som er beskrevet.
apparat.
under oppsikt. La aldri barn leke med eller
betjene apparatet.
ringer service
1.
antennes ikke eller de har slukket:
a) Kontr
igjen.
b)
eventuelt hovedsikringen. Hvis disse
kontakten med et annet apparat.
2.
a) Kontrollere om tidsuret er stilt inn.
b)
sette i gang inne i ovnen.
Apparat for bruk i hjemmet til oppvarming av
mat og drikke ved hjelp av elektromagnetisk
Radiointerferens
a)
b)
c) Bruk en skikkelig installert antenne for
mottakersignal.
Installasjon
1. Forsikre deg om at alle deler av
2. Se over ovnen etter oppakking for
eventuelle synlige skader, slik som:
-
-
-
- Hakk inne i ovnen
IKKE BRUKE
ovnen.
3. 11,3 kg og
ate
4.
5. IKKE
6. Still ovnen minst 8 cm borte fra begge
sideveggene og minst 10 cm borte fra
ere korrekt
ventilasjon.
7. IKKE fjerne dreiefoten.

141
8.
ADVARSEL-
JORDES.
9.
10. Denne ovnen trenger 1.2 KVA
installerer ovnen.
ADVARSEL: Denne ovnen er beskyttet
innvendig med en 250V, 10 A sikring.
VIKTIG
Lederne i hovedkabelen er forsynt med
Jordet
Bl
fargemarkeringene som er brukt til
- Lederen som er gul-
kobles til kabelfestet som er merket med
bokstaven E eller med jordingssymbolet
-
som er merket med bokstaven N eller
farget svart.
-
som er merket med bokstaven L eller
Viktig sikkerhetsinformasjon
ADVARSEL:
av temperaturene som dannes (Kun for
modellen med grillfunksjon)
ADVARSEL: e
har blitt reparert av en kyndig tekniker;
ADVARSEL: Det er farlig for alle andre enn
-
eller reparasjonsoperasjon som involverer
fjerning av deksler som gir beskyttelse mot
ADVARSEL:
varmes opp i lukkede beholdere siden de vil
kunne eksplodere.
ADVARSEL: Dette apparatet er ikke tiltenkt
bruk av personer (inkludert barn) som har
nedsatt sanseevne eller fysisk eller psykisk
funksjonsevne, eller personer som ikke har
tilsyn eller instruksjoner om bruk av
apparatet av en person som er ansvarlig for
slik at de ikke leker med apparatet.
de
baksiden, 10 10 cm
ikke blokkere ovnens luftutganger.
u varmer opp mat i plastbeholdere,
faren for antenning;
kveles;
Oppvarming av drikker i mi
forbrenninger;
Ikke kok egg med skall eller varm hele
kan eksplodere, selv etter at oppvarmingen
en svamp eller myk klut.
eventuelle matrester fjernes;
situasjoner;
skiftes ut av produsenten, produsentens
servicetekniker eller liknende kvalifisert
Sikkerhetsinstruksjoner for
vanlig bruk
sikkerhetsanvisninger som sikrer optimal
en:
1.
bruker ovnen.
2.
eller noen som helst gjenstander som ikke
erilisere noe.

142
3.
kunne skade ovnen.
4. Ikke bruk ovnen til noen form for lagring, for
5.
mat som er omsluttet av en slags membran,
slik som eggeplommer, poteter, kyllinglever,
membranen flere ganger med en gaffel.
6.
7. Fjern aldri noen deler av ovnen, slik som
etc.
8.
du setter den inn i ovnen.
9.
brukes i overensstemmelse med
produsentens instruksjoner.
10.
11.
beholder og ikke beholderen selv. Derfor,
igst
slippe ut samme mengde damp og/eller
fjerner lokket ved tradisjonell matlaging.
12.
ler
varmer opp mat/drikke for babyer. Vi
varmen blir jevnt fordelt.
13. Mat som inneholder en blanding av fett og
vann, f.eks. kraft
i ovnen i 30-60 sekunder etter at ovnen har
du tilsetter en buljongterning.
14.
huske at det er noen typer mat, f.eks.
som varmes opp veldig fort. Ikke bruk
- eller
fettinnhold.
15.
16. brann inne i ovnen:
a)
andre brennbare materialer er plassert
b)
plasserer posen i ovnen.
c) Hvis materialer inne i ovnen skulle
hovedsikringen.
- Ikke bruk metallbeholdere eller gryter
- Ikke bruk noen gjenstander med
metalldeler.
- Ikke bruk melamintallerkener da de kan
inneholde et materiale som kan
skades og vil nedsette
tilberedingshastigheten.
-
Glaseringen er uegnet for bruk i
brukes.
-
slik som forskjellige typer flasker, da de
kan eksplodere hvis de varmes opp i en
- - eller
baketermometre.
- Det finnes termometre i handelen som
er laget spesielt for matlaging i
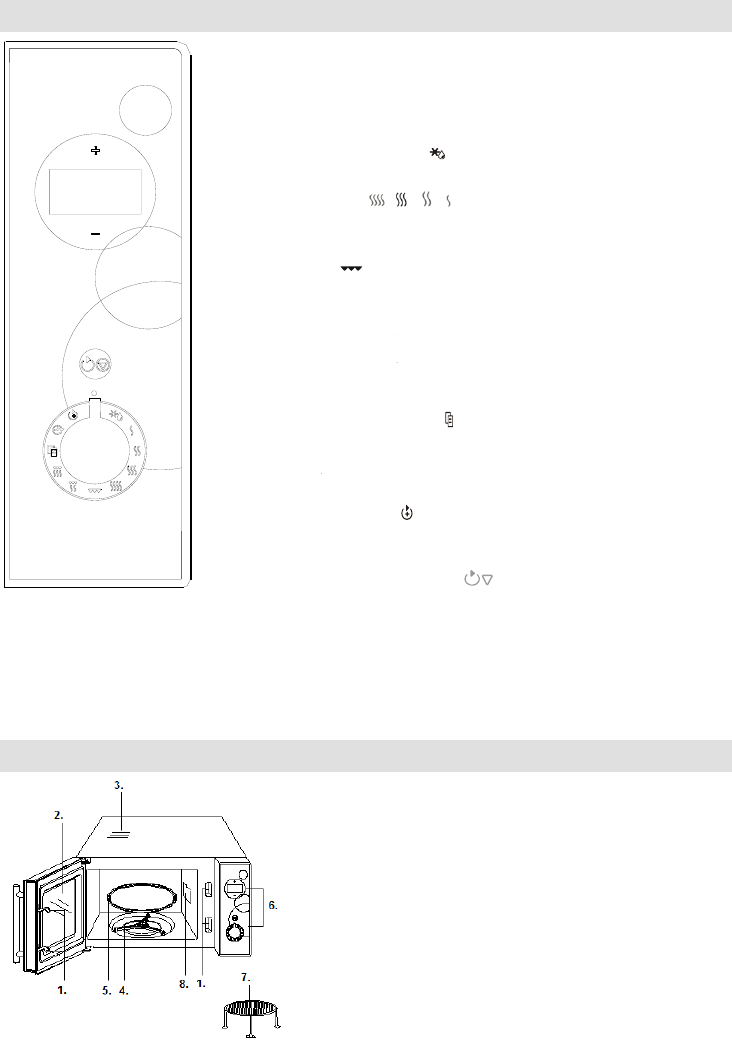
143
DATASTYRT KONTROLLPANEL
1. kring
2. Vindu
3. Luftehull
4. Dreiering
5. Glasstallerken
6. Betjeningspanel
7. Grillrist
8.
DISPLAY
Her vises tilberedningstid
+-
AUTOMATISK TINING
(, , , )
Drei programhjulet til et av disse symbo
GRILLING
minutter).
KOMBINASJON 1
KOMBINASJON 2
eff
HURTIGTILBEREDNING
KOKKE
TIDSINNSTILLING
starter automatisk til en bestemt tid.
START / STOPP / AVBRYT
deretter knappen inntrykt i tre sekunder hvis du vil avbryte programmet.
144
Bruksanvisning
1. Stille inn digital klokke
Ovnen har en digital klokke, og du kan veksle
mellom 12- og 24-timersv
klokkeknappen.
Eksempel:
1. , og trykk
-timers visning.
2.
bekrefte tidsvisningen.
3. Trykk + eller imen 8.
4.
bekrefte timen.
5. Trykk + eller
6.
bekrefte minuttene.
Merk! Du kan sjekke tiden under tilberedning
.
2.
Ve
. Maksimal
tilberedningsstid er 95 minutter.
t av
Effekt
Display
100%
P100 1-S
80%
P-80 1-S
60%
P-60 1-S
40%
P-40 1-S
EKSEMPEL: Du vil tilberede maten i 10 minutter
1.
2. Drei programhjulet
( , . , -
60.
3.
4. .
Merk!
1. Hvis du vil stoppe programmet midlertidig,
. Du kan fortsette
programmet .
inntrykt i fem
sekunder.
2.
du velger en ny funksjon. (Begge disse
tilberedningsprogram.)
3.
programhjulet til riktig effektsymbol
(, . , ).
3. Hurtigstart
Med denne funksjonen kan du starte ovnen
raskt. Maksimal tilberedningstid er 10 minutter.
knappen
trykke .
4. Grilling
Maksimal tilberedningstid er 95 minutter. Grilling
kyllingstykker.
EKSEMPEL:
minutter.
1.
2. Drei programhjulet til grilling .
3.
4. .
5. Kombinasjon 1
Maksimal tilberedningstid er 95 minutter.
grillfunksjon. Brukes til fisk og gratinering.
EKSEMPEL:
25 minutter for kombinasjon 1.
1.
2. Drei programhjulet til .
3. Tr
4. .
6. Kombinasjon 2
Maksimal tilberedningstid er 95 minutter.
grillfunksjon. Brukes til puddinger, omeletter,
bakt potet og fugl.
EKSEMPEL:
12 minutter for kombinasjon 2.
1.
145
2. Drei programhjulet til .
3.
4. .
7. Automatisk tining
Du kan tine mat ut fra vekt
vekten er programmert. Du kan tine mat som
veier 100-800 g.
EKSEMPEL: Du vil tine 600 g frosne reker.
1. Drei programhjulet til automatisk tining .
2. nsket vekt.
3. .
Merk!
8. Hurtigtilberedning
trenger du ikke angi tid el Du
matens vekt eller mengde. Ovnen starter
.
EKSEMPEL: Du vil tilberede 150 g pizza.
1. Drei programhjulet til hurtigtilberedning .
2. +- -2.
3.
4. +-
mengde.
5. .
Kode
Matvare
For drikker og poteter viser displayet
+-
Resultatet avhenger av
spenningssvingninger , matens form og
bestemte matretter og om du plasserer
maten riktig i ovnen. Hvis du ikke er helt
tilberedningstiden.
A1
drikker
(200
ml/kopp)
A2
pizza (g)
A3
pasta (g)
A4
poteter
(230
g/porsjon)
A5
oppvarmi
ng (g)
A6
er (g)
A7
tining
pizza (g)
A8
9. Barnesikring
Symbolet
Hold knappen for
START/STOPP/AVBRYT inntrykt i fem
Hold knappen
START/STOPP/AVBRYT inntrykt i fem
displayet.
10.
Med denne funksjonen kan du velge
Eksempel: La oss si at klokken er 9:00 og at du
grillprogram klokken 10:30.
1. Drei programhjulet til PRESET .
2. +-
bekrefte.
3. +-
4. Drei programhjulet til GRILL.
5. Trykk direk+-
6.
starte.
MERK!
1.
tilberedningsprogrammet automatisk.
2.
jekke
START/STOP/CANCEL, eller drei
PRESET-programmet.
3. AUTO DEFROST kan ikke velges i
PRESET-programmet.
146
din
1.
2. Hold ovnen ren innvendig. Hvis det skulle
idler.
3.
vann renne inn gjennom
4.
med en myk, fuktig klut. Ikke bruk
kontrollpanelet.
5. Hvis det skulle samle seg damp innenfor
betingelser og har ingen innvirki
funksjonen av apparatet.
6.
eller i oppvaskmaskin.
7.
nnen med et
mildt vaskemiddel, vann eller
oppvaskmaskin. Damp fra matlagingen
samles opp under bruk, men har ingen
foten fra bunnen for
plass igjen i riktig posisjon.
8.
med vann og saften og skallet av en sitron i
9.
ovnen, vennligst ta kontakt med en
Ikke kast produktet i det vanlige
husholdningsavfallet. Etter endt levetid skal det
leveres inn til et godkjent mottak for gjenvinning.
Garanti og service
produktet, tar du kontakt med Gorenje
kundesenter i ditt land (du finner
telefonnummeret i den internasjonale
garantibrosjyren). Hvis Gorenje ikke har noe
kundesenter i ditt land, henvender du deg til
forhandleren eller kontakter Gorenje
serviceavdeling for hvitevarer.
Kun for personlig bruk!
foreta
endringer!
NYE APPARATET
Flere anbefalinger for matlaging med
htpp://www.microwave.gorenje.com

147
S FI
TEKNISET TIEDOT
Virrankulutus: .......................................................................................................... 230V~50Hz,1200W
Teho: ........................................................................................................................................... 700W
Grillikuumennin: ........................................................................................................................... 900W
........................................................................................................................ 2450MHz
Ulkomitat:..................................................................................... 452mm(L) X 262mm(K) X 364mm(S)
................................................................................... 3415mm(L) X 198mm(K) X 297mm(S)
Uunin vetoisuus: ....................................................................................................................... 20 litraa
Paino ilman pakkausta: ...................................................................................................... noin 11,3 kg
: ............................................................................................................... (Lc IEC) < 58 dB (A)
tty eurooppalaisen,
- ja elektroniikkalaitteita
koskevan 2002/96/EC-direktiivin
mukaisesti.
yleiseurooppalaista sopimusta, joka
- ja
elektroniikkalaitteiden palautusta ja
Enn
valvontaa.
Ennen kuin soitat korjaajalle
1.
a) Varmista, e
ole, irrota pistoke pistorasiasta, odota
takaisin pistorasiaan.
b) Tarkista, onko sulake palanut tai
toimivat normaalisti, kokeile
laitteella.
2. Jos mikroaaltokuumennus ei toimi:
a)
b)
lukkiutunut. Muussa tapauksessa
uuniin ei virtaa mikroaaltoenergiaa.
EI RATKAISE ONGELMAA, OTA
VALTUUTETTUUN
HUOLTOLIIKKEESEEN.
Laite on tarkoitettu ruokien ja juomien
Ra
television tai vastaavan laitteen toiminnassa.
a) Puhdista uunin luukun ja tiivisteiden pinnat.
b) Sijoita radio, televisio tms. mahdollisimman
kauas mikroaaltouunista.
c)
asennettua antennia varmistaaksesi
Asennus
1.
poistettu uu
2.
-
- vaurioitunut luukku
-
ruudussa
-
uja vaurioita,
3. 11,3 kg, ja se
4.
5.
6.
ilmanvaihdon.
7.

148
8.
apsi.
VAROITUS
MAADOITETTAVA.
9.
10. 2
KVA, joten asennetaessa on suositeltavaa
VAROITUS: unia suojaa laitteen
seuraavasti:
Maadoitettu
Sininen: Neutraali
Ruskea:
istokkeesi
-
liitoskohtaan, joka on merkitty E-kirjaimella
.
-
tai N-kirjaimella merkittyyn liitoskohtaan.
-
L-kirjaimella merkittyyn liitoskohtaan.
turvaohjeita
VAROITUS:
uunia vain aikuisten valvonnassa korkeiden
takia (koskee ainoastaan
grillitoiminnolla varustettua mallia).
VAROITUS: Jos luukku tai luukun tiivisteet
korjannut laitteen.
VAROITUS:
turvallisesti huoltaa tai korjata laitetta, jos
suojaavan kuoren irrottamista.
VAROITUS:
VAROITUS: Laitetta ei ole tarkoitettu lasten
fyysinen tai henkinen toimintakyky on
rajoittunut tai joilla ei ole kokemusta tai
valvonnassa ja ohjauksessa. Pienten lasten
e
uunin taakse tilaa 8 cm, molemmille sivuille
1
ilmanvaihtoaukkoja.
otka
ovat mikroaaltouuniin sopivia.
- tai
paperiastioissa, tarkkaile uunia mahdollisen
syttymisen varalta.
luukku suljettuna tukahduttaaksesi
mahdolliset liekit.
Jos kuumennat mikroaaltouunissa juomia,
kuumennusastiaa varovasti.
Sekoita tai ravista tuttipullojen ja
palovammoja.
Puhdista luukun pinta, luukun tiivisteet ja
hankaamattomalla
liinalla.
vaaratilanteisiin.
Jos virtajohto on vaurioitunut, se on
vaihdatettava valmistajalla, valtuutetulla
ammattilaisella vaaratilanteiden
- ja turvaohjeita, joilla
voit varmistaa uunin ja muiden vastaavien
laitteiden tehokkaan toiminnan:
1.
2.
valmistukseen, esimerkiksi vaatteiden,
paperin tms. kuivaamiseen tai esineiden
sterilisoimiseen.
3.
vaurioitua.
4.
5.
kalvo, kuten munankeltuaisia, perunoita,

149
kananmaksaa tms. ennen kuin olet pistellyt
6.
ulkokuoren aukkoihin.
7.
8.
lasitarjottimella. Pane ruoka
asianmukaiseen kuumennusastiaan, ennen
kuin panet ruuan uuniin.
9.
mukaan.
10.
mikroaaltouunissa.
11.
Vaikka astian kansi ei tuntuisi kuumalta,
kun otat sen mikroaaltouunista, astian
kantta
ruuanvalmistuksessa.
12.
anna
tasaisesti.
13.
60 sekunnin ajan sen
Sekoitus tasaantuu, ja ruoka/neste ei kupli,
lihaliemikuutio.
14.
nopeasti. Kun
15. Keittoastiat voivat kuumentua, koska niihin
t on peitetty
pannulappuja.
16.
a)
mikroaaltouunia tarkasti, jos uuniin on
ruuanvalmistuksen helpottamiseksi
pantu paperia, muovia tai muita
tulenarkoja materiaaleja.
b) Poista pussinsulkija, ennen kuin panet
pussin uuniin.
c)
katkaise virta sulakkeesta tai
virrankatkaisijasta.
EI SAA PANNA MIKROAALTOUUNIIN
-
astioita, joissa on metalliset
-
viimeistelty metallilla.
-
metallilangasta valmistettuja
pussinsulkijoita.
-
-
pin
Livingwaren kuppeja, joissa on
-
suuaukko, kuten virvoitusjuoma- tai
salaatinkastikepulloja, koska ne
nissa
kuumennettaessa.
-
- Markkinoilla on erityisesti
mikroaaltokypsennykseen

150
OHJAUSPANEELI
KAAVAKUVA
1.
2. Uunin ikkuna
3. Uunin tuuletusaukko
4. Rullarengas
5. Lasitarjotin
6. Ohjauspaneeli
7. Grilliteline
8. joka on
jen merkkivalon ja kellonajan.
+-
AUTOMAATTINEN SULATUS
asettamiseksi.
TEHOTASO (, , , )
ennyksen tehotason valitsemiseksi.
GRILLI
minuuttia.
YHDIST. 1
YHDIST. 2
-
mikroaaltouunilla ja grilliteholla.
AUTOMAATTINEN KYPSENNYS
heti.
KELLO
ESIASETA
151
1. Digitaalisen kellon asettaminen
Uuni on varustettu digitaalisella kellolla, voit
asettaa kellonajan 24/12
painamalla kellon painiketta odotustilassa.
Esimerkiksi:
uunin kellon ajaksi 8:30.
1.
kohtaan , voit painaa + valitaksesi 24
2. Paina -painiketta kerran tuntiasetuksen
vahvistamiseksi.
3. Paina + tai asettaaksesi tuntinumeron 8.
4. Paina -painiketta kerran tuntiasetuksen
vahvistamiseksi.
5. Paina + tai asettaaksesi minuuttinumeron
30.
6. Paina -painiketta kerran tuntiasetuksen
vahvistamiseksi.
Huomaa: Voit tarkistaa ajan ruoanlaiton aikana
painamalla -painiketta.
2. Mikroaaltouunikypsennys
TEHOTASO-koodiin valitaksesi kypsennyksen
asettaaksesi
haluamasi kypsennysajan. Kypsennyksen
maksimiaika on 95 minuuttia.
tehotasokoodiin.
Keittoteho
100%
P100 1-S
80%
P-80 1-S
60%
P-60 1-S
40%
P-40 1-S
minuuttia 60%:n mikroaaltoteholla.
1. Avaa luukku ja laita ruoka uuniin, sulje se.
2. , . , ),
-60.
3. Paina + tai asettaessasi ajaksi 10:00.
4. Paina -painiketta.
Huomaa:
; ta 5 sekunnin
koko kypsennysohjelman.
lukee Loppu, paina jotakin painiketta tai avaa
uun
toiminnon asettamista.
oikeaan TEHOTASO-koodiin (, . , ).
3.
hdollistaa uunin
Kypsennyksen
maksimiaika on 10 minuuttia.
Paina valmiustilassa -painiketta nopeasti
kypsennysprosessin aikanakin painamalla .
4. Grilli
Kypsennyksen maksimiaika on 95 minuuttia.
ohuille lihaviipaleille, pihveille, kyljyksille,
kebabille, makkaroille ja kanapaloille. Se sopii
ja gratinoiduille
ruokalajeille.
minuuttia.
1. Avaa luukku ja laita ruoka uuniin, sulje se.
2. .
3. Paina + tai asettaaksesi ajaksi 12:00:00.
4. Paina -painiketta
5. Yhdis
Kypsennyksen maksimiaika on 95 minuuttia.
30% mikroaaltokypsennyksen aika, 70%
gratinointiin.
kypsennyksen 25 minuutiksi.
1. Avaa luukku ja laita ruoka uuniin, sulje se.
2. .
3. Paina + tai asettaaksesi ajaksi 25:00.
4. Paina -painiketta.
6.
Kypsennyksen maksimiaika on 95 minuuttia.
55% mikroaaltokypsennyksen aika, 45%
munakkaisiin, uuniperunoihin ja siipikarjaan.
kypsennyksen 12 minuutiksi.
1. Avaa luukku ja laita ruoka uuniin, sulje se.
2. .
3. Paina + tai asettaaksesi ajaksi 12:00:00.
4. Paina -painiketta.
152
7. Automaattinen sulatus
perustuvan ruoan sulatuksen. Sulatuksen
tehotasot ja aika asetetaan automaattisesti, kun
paino on ohjelmoitu. Sulatettavan ruoan paino
ESIMERKIKSI:
600 g pakastettuja katkarapuja
1.
kohtaan .
2. Paina + tai ilmoittaessasi haluamasi
painon.
3. Paina -painiketta.
Huomaa:
painamalla .
8. Automaattikypsennys
Seuraaviin ruokiin tai ruoanlaittotoimintoihin ei
antaa uunille tarkat t
Uuni
alkaa toimia, kun olet painanut .
Esimerkiksi: 150 g pizzan kypsennys.
1.
AUTOMAATTIKYPSENNYS .
2. +--2.
3. Vahvista painamalla .
4. +-
5. Paina -painiketta.
Koodi
Ruoka-aine
Juoman ja perunoiden osalta
ruoka-aineen painon sijaan
painettaessa +-.
-
kypsennyksen aikaansaamiseksi.
Automaattikypsennyksen tulos
-aineen
muoto ja koko, tiettyjen ruokien
kypsyysmieltymykset ja kuinka
hyvin satuit laittamaan ruoan
uuniin. Jos tulos ei joka
jonkin verran haluamallasi tavalla.
A1
Juoma (200
ml/kuppi)
A2
Pizza (g)
A3
Pasta (g)
A4
Perunat (230
g / annos)
A5
Uudelleenkuu
mennus (g)
A6
Vihannekset
(g)
A7
Pizzan sulatus
(g)
A8
Liha (g)
9. Lapsilukko
LAPSILUKKO-ilmaisin tulee esiin
ollessa asetettuna.
LAPSILUKON asettaminen:
painettuna valmiustilassa
-
painiketta 5 sekunnin ajan, kuuluu piippaus ja
lukituksen merkkivalo palaa.
LAPSILUKON peruuttaminen:
-painiketta 5 sekunnin ajan, kunnes
10. Esiasetustoiminto
ajankohtana.
Esimerkiksi:
kypsytysohjelman 5 minuutin ajaksi kello 10:30.
1.
(ESIASETA) .
2. +-
vahvistukseksi START/STOP/CANCEL
3. +-
paina taas vahvistukseksi
START/STOP/CANCEL
4. Knnvalitsin asentoon GRILL (GRILLI).
153
5. Paina +tai -suoraan asettamaan
kypsytysajaksi 5:00.
6. Kynnistpainamalla
START/STOP/CANCEL
(KYNNISTPYSYTPERUUTA).
HUOMAA:
1. Kun kello on 10:30, haluttu kypsytysohjelma
2.
tilaan PRESET (ESIASETA) voidaksesi
tarkistaa esiasetuksen ajan. Paina
START/STOP/CANCEL
peruuttaa PRESET (ESIASETA) -
toiminnon.
3. AUTO DEFROST (AUTOMAATTINEN
SULATUS) toimintoa ei voida asettaa
PRESET (ESIASETA) -ohjelmassa.
Mikroaaltouunin huolto
1.
pistorasiasta ennen uunin puhdistamista.
2.
kostealla liinalla. Kovien tai hankaavien
suositeltavaa.
3. Puhdista uunin ulkopinnat kostealla liinalla.
huolehdi, ettei uunin ilmanvaihtoaukkoihin
4.
ohjauspaneel
hankaavilla tai suihkutettavilla aineilla.
5.
se ei ole merkki uunin viallisesta
toiminnasta.
6.
7.
ikkunanpuhdistusaineella, ja kuivaa.
uunin
takaisin oikeaan asentoon.
8. Poista uunista hajut sekoittamalla kupillinen
kulhoon. Kuumenna mikroaaltouunissa
viiden minuutin ajan, pyyhi huolellisesti ja
9. Kun uunin lamppu
mukana s
Takuu ja huolto
Jos tarvitset tietoja, tai jos sinulla on ongelma,
asiakaspalvelukesk
puhelinnnumeron maailmanlaajuisesta
-
kotitalouslaitteiden huoltoosastoon.
TOIVOTTAA NAUTINNOLLISIA
ruuanvalmistukseen mikroaaltouunissa ja
-sivuiltamme:
htpp://www.microwaves.gorenje.com

154
LV
TEHNISKAIS RAKSTUROJUMS
..................................................................................................... 230V~50Hz,1200W
Izvade: ......................................................................................................................................... 700W
............................................................................................................................... 900W
.......................................................................................................... 2450MHz
................................................................................452mm(P) X 262mm(A) X 364mm(D)
ns d ................................................................315mm(P) X 198mm(A) X 297mm(D)
........................................................................................................................... 20 litri
Svars bez kastes iepakojuma: .......................................................................................... Apm. 11,3 kg
: .................................................................................................... (Lc IEC) < 58 dB (A)
zt un
visie
stingri aizliegts
dienestu
1. s
a)
b)
2.
a)
b)
PILNVAROTO APKOPES DIENESTU.
uz
a)
b)
c)
oram utt., lai
1.
2.
-
-
-
-
NELIETOJIET .
3. ver 11,3
tiekami

155
4.
5. NENOVIETOJIET
6.
sienas.
7.
8.
-
9. viegli
10. 2 KVA;
:
Zils:
Zemsprieguma
-
E vai ar
-
burtu N va
-
burtu L
kompetenta persona to nav salabojusi.
Personai, kas nav
cm
au
atveres.
s
dobuma virsmas, izmantojiet tikai maigas,

156
izpildi:
1.
2. N
3.
4.
5.
vistas aknas utt., ja neesat to vispirms
6.
7.
u.c.
8.
9.
10.
11.
12.
siltumu.
13.
-
ievietota karote vai pievienots buljona
14.
taukvielu vai cukura saturu, neizmantojiet
plastmasas traukus.
15.
uri
16.
a)
b)
c)
- Neizman
-
-
- Neizmantojiet Centura galda
izmantot Corelle Livingware
-
-
saldumu termometrus.
-
izmantot.
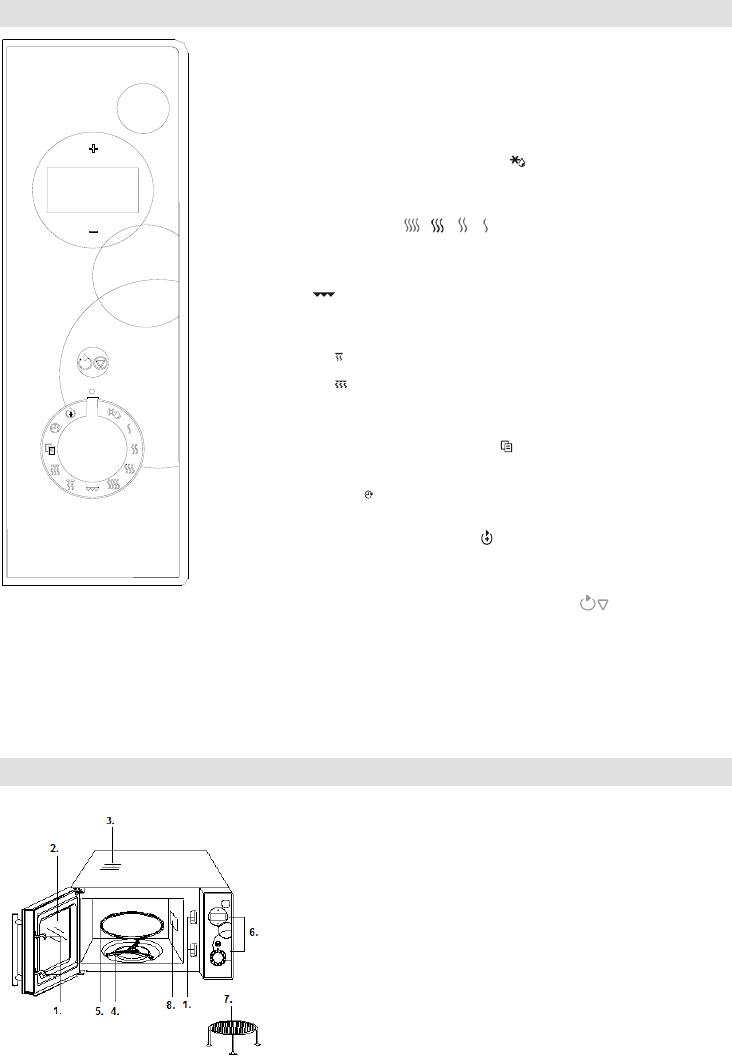
157
1.
2.
3.
4.
5.
6.
7. Grila paliktnis
8.
+-
as programmu, pamatojoties uz
(, , , )
GRILS
KOMBI. 1
KOMBI. 2
jaudu.
PULKSTENIS
IEP
158
1.
/12
1.
pagrieziet skalu uz , tad piespiediet +, lai
2. Vienu reizi piespiediet pogu , lai
3. Piespiediet + vai -, lai
8.
4. Vienu reizi piespiediet pogu , lai
5. Piespiediet + vai -
ciparu 30.
6. Vienu reizi piespiediet pogu , lai
.
2.
izmantojiet + vai -
ga
Displejs
100%
P100 1-S
80%
P-80 1-S
60%
P-60 1-S
40%
P-40 1-S
1.
2.
( , . ,
-60.
3. Piespiediet + vai -
4. Piespiediet pogu .
1.
vienu reizi piespiediet
; vai
sekundes turiet piespiestu
2.
jebkuru pogu vai atveriet ce
3.
(, . , ).
3.
pogu
jaudu.
.
4. Grils
s.
1.
2. Pagrieziet skalu uz GRILU .
3. Piespiediet + vai -iku 12:00.
4. Piespiediet pogu .
5.
ko
1.
2. Pagrieziet skalu uz .
3. Piespiediet + vai -
4. Piespiediet pogu .
6.
159
1. ielieciet gatavojamo
2. Pagrieziet skalu uz .
3. Piespiediet + vai -12:00.
4. Piespiediet pogu .
7.
pamatojoties uz lie
600
1.
.
2. Piespiediet + vai -
svaru.
3. Piespiediet pogu .
tavot, un
1.
.
2. +--2.
3. Piespiediet
4. +-
5. Piespiediet pogu .
Kods
Produkts
-
svars.
A1
(200
ml/tase)
A2
Pica (g)
A3
Pasta (g)
A4
(230 g /
porcija)
A5
na (g)
A6
(g)
A7
Picas
na (g)
A8
9.
ez
turiet piespiestu
pogu
piespiediet un 5 sekundes
turiet piespiestu
pogu
nodziest.
10.
,
1. Pagrieziet pogu uz PRESET
.
2. +-
tu, piespiediet
START/STOP/CANCEL
3. +-
START/STOP/CANCEL
4.
160
5. +-
6. Lai , piespiediet
START/STOP/CANCEL
1.
2.
START/STOP/CANCEL
kciju varat atcelt.
3.
1.
kontaktligzdas.
2.
ieteicama.
3.
4.
5.
6.
7.
8. S
9.
Vide
vidi.
Garantija un serviss
DAUDZ PRIEKA, IZMANTOJOT
htpp://www.microwaves.gorenje.com

161
NAUDOJIMO INSTRUKCIJA LT
TECHNINIAI DUOMENYS
............................................................................................... 230V~50Hz,1200W
Galia: ........................................................................................................................................... 700W
Kepintuvo galia: ........................................................................................................................... 900W
.................................................................................................................................. 2450MHz
tmenys: ..................................................................... 452mm(P) X 262mm(A) X 364mm(G)
Vidaus matmenys: ...................................................................... 315mm(P) X 198mm(A) X 297mm(G)
Talpa: ......................................................................................................................................... 20
Svoris: ............................................................................................................................... apie 11,3 kg
: ................................................................................................................ Lc < 58 dB (A)
elekt
Europos direktyva 2002/96/EC (WEEE).
pagrindas.
1. Jei prietaisas nevei
a) Patikrinkite ar prietaiso laidas gerai
b)
saugiklis; arba
tiekimas. Jei viskas gerai, patikrinkite
2. Jei mikrobangos veikia ne visu galingumu:
a) Patikrinkite, kuris laikmatis yra
nustatytas.
b)
tik vidaus
patalpose.
veiksmus:
a) darinimo
b)
c)
Montavimas
1.
2.
-
-
-
-
NENAUDOKITE prietaiso.
3. 11,3
reikia statyti ant horizontalaus tvirto
4.
tis ir garai.
5. NELAIKYKITE
6.

162
7. NENUIMKITE veleno.
8. t jie naudojasi
9.
10.
pasikonsultuoti su techninio patarnavimo
specialistais, nes krosne2
KW galios.
250V,10
SVARBU
neutralus
Rudas: energijos
-
E
-geltonu).
-
N ar juoda
spalva.
-
terminalo, kuL ar
raudona spalva.
saugos reikalavimai
kai prietaisas veikia
(tinka tik modeliams su kepintuvo funkcija)
naudoti tol, kol ji suremontuojama;
rizikinga patiems bandyti
en
remonto darbus gali tik kvalifikuotas
specialistas.
jie gali sprogti.
leiskite
ar fizine negalia, neturintiems pakankamai
atitinkamai informuoti kaip naudotis
gerai
ventiliacijai. Palikite 8 cm
cm a
0 cm
i.
krosnelei indus.
neatidarykite, kad, jei atsirado liepsnos, jos
patikrinkite maisto tempe
pasibaigus kaitinimo laikui.
padid
aptarnavimo centre kvalifikuotas
Saugumo instrukcijos
s veiks efektyviai:
1.
nukreiptuvas ir pan.
2.
3.
gali pakenkti prietaisui.

163
4.
5.
6.
7.
8.
stik
-
-o.
9.
10.
riebaluose.
11.
kaitinamas tik skystis inde, o ne pats indas.
12.
kaitinote krosnel
13.
-60
14. Prisiminkite, kad specifinis maistas, kaip,
ar
induose.
15.
16. uje:
a)
popieriniuose ar kitos lengvai
b)
metalines detales.
c)
SVARBU:
NAUDOTI INDAI
-
-
-
-
- Nekaitinkite
sprogti.
-
- Galite naudoti tik specialiai
termometrus.

164
VALDYMO SKYDELIS
1.
2.
3.
4. Sukimo ratukai
5.
6. Valdymo skydelis
7.
8.
EKRANAS
Rodomas gaminimo laikas, galia, eiga bei laikrodis.
+-
Pasukite ranken
AUTO DEFROST
AUTOMATINIS ATITIRPINIMAS
GALINGUMO LYGIS (, , , )
KEPINTUVAS
KOMBINUOTAS GAMINIMAS 1
KOMBINUOTAS GAMINIMAS 2
AUTOMATINIS GAMINIMAS
LAIKRODIS

165
Naudojimo instrukcija
1.
/12
Tarkime, kad norite nustatyti
8:30.
1. .
2.
3. Paspauskite + arba nustatydami 8
valandas.
4.
5. Paspauskite + arba nustatydami 30
6.
Pastaba:
paspausdami
2. Kepimas mikrobangomis
iki pasirinkto galingumo lygio ir naudomi + ar
lygio.
Gaminimo galia
Ekrane
100%
P100 1-S
80%
P-80 1-S
60%
P-60 1-S
40%
P-40 1-S
%
1.
2. ( , . , ), kol
-60.
3. Paspauskite + arba nustatydami 10:00.
4. Paspauskite
Pastaba:
1. Jei norite laikinai sustabdyti gaminimo
palaikysite 5 sekundes programa bus
2. Po to, kai programa pasibaigs, kas 2
signalai
3. (Abi pastabos galioja ir kitoms gaminimo
programoms.
(, . , ).
3.
kelis kartus mygtuka .
4. Kepintuvas
Maksimalus gaminimo laikas yra 95 minut
1.
2. .
3. Paspauskite + arba nustatydami 12:00.
4. Paspauskite
5. Kombinuotas gaminimas 1
Maksimalus gamini
30% laiko gaminimas mikrobangomis ir 70 %
ar apkepus.
1.
2.
3. Paspauskite + arba nustatydami 25:00.
4. Paspauskite
6. Kombinuotas gaminimas 2
55% laiko gaminimas mikrobangomis ir 45 %
gaminimas kepintuvo. Tinka naudoti kepant
1.
2.
166
3. Paspauskite + arba nustatydami 12:00.
4. Paspauskite
7. Automatinis atitirpinimas
Svoris gali buti nustatomas nuo 100g iki1800g.
Tarkime J
1. .
2. Paspauskite + arba
3. Paspauskite
Pastaba:
Atitirpinimo ciklo metu, programa bus
reikia ap
8. Automatinis gaminimas
parinkinvti gaminimo laiko ir galingumo.
Programos pritaikytos konkretiems maisto
ti
paspaudus .
1.
.
2. Paspauskite + arba pasirinkdami A-2.
3. Paspauskite
4. Paspauskite + arba
5. Paspauskite m
Kodas
Maisto
produktas
+ arba -, ekrane bus parodomas
ne maisto svoris, o porcijos.
primindama Jums, kad reikia
ai.
Automatinio kepimo rezultatai
A1
(200ml/
puodelis)
A2
Pica (g)
A3
Makaronai (g)
A4
/ porcijos)
A5
(g)
A6
A7
Picos
A8
9.
sekundes palaikykite nuspaude START/ STOP/
CANCEL
START/ STOP/ CANCEL mygtuka, kol
10.
1.
funkcijos.
2. -
valandas, paspauskite
START/STOP/CANCEL mygt
patvirtindami.
3. -
minutes, paspauskite
patvirtindami.
4.
5. -
kepimo minutes.
6. Paspauskite START/STOP/CANCEL
PASTABA:
1.
2.
.
3.
167
1.
2.
3.
d
4.
5.
Garai gali sus
6.
7.
u
ritininiam kreiptuvui ar jod dugnui.
Kai nuimsite ri
8.
9.
Aplinka
prietaiso kartu
atliekomis
.
aplinkosaugos.
Garantija ir aptarnavimas
Jei jums reikia informacijos arba jei turite
, Gorenje
aptarnavimo centru Jūsų šalyje (viso
rius rasite
. Jei
aptarnavimo centro,
Gorenje arba susisiekite su Gorenje
Prietaisas skirtas naudoti tik buityje!
Mes pasiliekame teises bet kokiems
pakeitimams!
internete, adresu:
htpp://www.microwaves.gorenje.com

168
KASUTUSJUHEND EE
TEHNILISED ANDMED
.......................................................................................................... 230V~50Hz,1200W
............................................................................................................................ 700W
............................................................................................................................ 900W
Kasutatav sagedus: ............................................................................................................... 2450MHz
............................................................................... 452mm(L) X 262mm(K) X 364mm(D)
Ahju sis ............................................................... 315mm(L) X 198mm(K) X 297mm(D)
Ahju maht: ................................................................................................................................. 20 liitrit
Kaal: ............................................................................................................................. Umbes. 11,3 kg
:............................................................................................................... (Lc IEC) < 58 dB (A)
Euroopa direktiivile 2002/96/EC kasutatud
elektrilistest ja elektroonika seadmetest
(WEEE).
kasutatud elektri- ja elektroonikaseadmete
kogumise ja taaskasutamise kohta.
See seade on komplitseeritud seade mis on
poolt, kes on tutvunud kasutusjuhendiga ja kes
selle seadmega ega kasutada seda
Enne hooldusesse helistamist
1.
kuvata midagi.
a) Kontrollige, kas seade on korrektselt
eemaldage pistik seinakontaktist,
oodake 10
b)
need tunduvad olema korras,
2.
a) Kontrollige, kas taimer t
b) Kontrollige, kas uks on korrektselt
suletud turvalukustusega. Vastasel
korral mikrolaineenergia ei liigu ahju.
PARANDANUD OLUKORDA,
a) Puhastage ahju ukse ja tihendi pinnad.
b) Paigaldage raadio, TV, jms mikrolaineahjust
c) Kasutage korrektselt paigaldatud antenni
oma raadio, TV, jms seadme signaali
Paigaldamine
1.
eemaldatud ahju seest.
2. Kontrollige, et peale pakendi eemaldamist
- s
- Vigastatud uks
-
-
vigastust, ahju kasutage.
3. See mikrolaineahi kaalub 11,3 kg ja tuleb
asetada horisontaalsele pinnale, mis on
piisavalt tugev sellise raskusega seadme
kandmiseks.
4.
temperatuuridest ja aurust.
5. asetage midagi ahju peale.
6.
korrektse ventileerimise tagamiseks.
7.
8.
HOIATUS-SEE SEADE PEAB OLEMA
MAANDATUD.

169
9.
seinakontaktist eemaldada.
10. See ahi vajab 1.2 seks,
konsulteerige ahju paigaldamisel
hooldustehnikuga.
ETTEVAATUST: Sellel ahjul on sisemine
Roheline-ja-kollane: Maa
Sinine: Neutraalne
Pruun: Faas
Kui toi
- Roheline-ja-
E
roheline.
- da
N
-
L
Olulised ohutusjuhised
HOIATUS:
temperatuuri; (Ainult grillifunktsiooniga
mudelitel)
HOIATUS:
vigastatud, ei tohi ahju kasutada kuni need
on parandatud kompetentse isiku poolt;
HOIATUS: lik on, kui
ebakompetentne isik teostab mikrolaineahju
mikrolaineenergia eest kaitsvate katete
eemaldamist;
HOIATUS: Vedelikke ja muid toiduaineid ei
tohi kuumutada kinnistes anumates, kuna
HOIATUS:
motoorikaga, vaimse puudega, ebapiisava
(kaasaarvatud lapsed), kui nad just ei
ohutuse
eest vastutava isiku poolt.
i.
cm, 10 cm
10 cm ahju peale. Kui
ventilatsiooni avasid.
Kasutage ainult mikrolaineahjus
kasutamiseks sobivaid tarvikuid.
eemaldage toitejuhe seinakontaktist ning
esile kutsuda viivitusega purskuva keemise,
Lutipudelite ja beebitoidupurkide sisu tuleb
hoolikalt segada ja raputada ning kontrollida
Tervet toorest ja keedetud muna ei tohi
kuumutada mikrolaineahjus, kuna need
Ukse pinna, ukse tihendi, ahju sisemuse
puhastamiseks kasutage pehmet lappi, mis
on niisutatud lahja, mitteabrasiivse
vahendiga.
Ahju tuleb puhastada regulaarselt ja
Kui toitejuhe on vigastatud, tohib seda
vahetada vaid tootja esindaja,
1. Ahju kasutamisel peavad ahjus alati olema
2.
steriliseerimiseks.
3. b ahju
kahjustada.
4.
kokaraamatute jms hoidmiseks.
5.
jms, need tuleb
torgata.
6.
ventilatsiooniavade ette.

170
7.
8.
usse
enne ahju paigutamist.
9. Mikrolaineahju tarvikuid tuleb kasutada vaid
vastavalt tootjapoolsetele juhistele.
10.
mikrolaineahjus.
11.
kuumutab vedelikku anumas, mitte anumat
12. Alati kontrollige valmistatud toidu
temperatuuri enne serveerimist, eriti kui
soojendate beebitoitu. Soovitatav on alati
13. Toidud, mis sisaldavad vee ja rasva segu,
nt puljong, peavad seisma ahjus peale ahju
ist veel umbes 30-60 sekundit.
puljongi kuubik.
14. Kui valmistate toite/vedelikku, mis
sisaldavad teatud toiduaineid, nt
meelde, e
Suure suhkru ja rasvasisaldusega
15.
need kuumenevad toiduainest eralduva
plastik
16.
a)
ettevaatlik, kui kasutate
ale.
b) Eemaldage plastikkottidelt enne ahju
panemist metallklambrid.
c)
eemaldage toitejuhe seinakontaktist
-
KASUTADA MIKROLAINEAHJUS
-
-
-
purunemist ning aeglustada toidu
valmimist.
-
mikrolaineahjus kasutamiseks.
Corelle Livingware tasse ei tohi
kasutada.
-
mikrolaineahjus kuumutamisel
plahvatada.
-
termomeetreid.
- Mikrolaineahjus sobivad
kasutamiseks vaid spetsiaalset
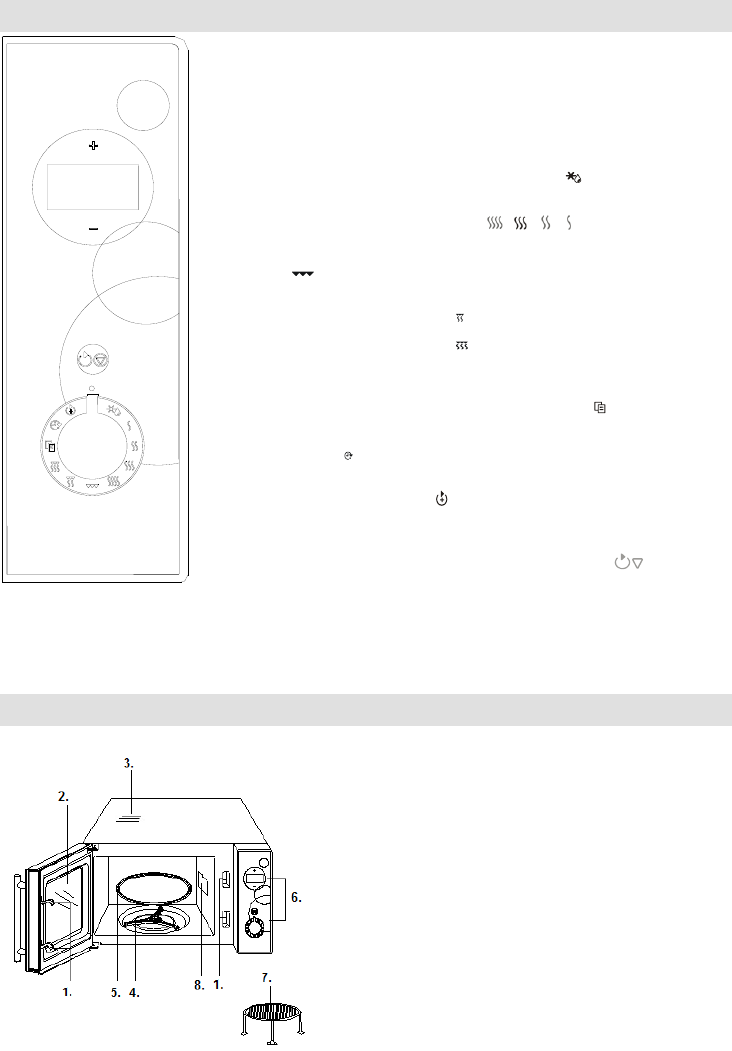
171
JUHTPANEEL
OSADE DIAGRAMM
1.
2. Ukseaken
3. Ahju ventilatsiooniavad
4.
5. Klaasalus
6. Juhtpaneel
7. Grillrest
8.
katteplaati)
kellaaeg.
+-
Automaatne sulatamine (AUTO DEFROST)
, , ,
us.
GRILL
Keerake ketast, et valida grillimisprogramm kuni 95 minutit.
Kombineeritud 1 (COMBI. 1)
Kombineeritud 2 (COMBI. 2)
Keerake ketast, et valida mikrolainetega toiduvalmistamine kombineeritult
grillimisega.
Automaatne toiduvalmistamine (AUTO COOK)
Kell (CLOCK)
Keerake ketast, et seadistada mikrolaineahju kell.
Eelseadistatud (PRESET)
ajal.
ti
vajutage lihtsalt nupule soovitud arv kordi.
172
Kasutusjuhend
1. Digitaalse kella seadistamine
Mikrolaineahi on varustatud digitaalse kellaga,
/12-tunnises
1. Kui
asendisse
24
2. Vajutage
3.
8.
4. Vajutage t kinnitada
tundide seadistus.
5.
30.
6. Vajutage
minutite seadistus.
Toiduvalmistamise ajal saate kellaaega
vaadata, kui vajutate nupule .
2. Mikrolainetega toiduvalmistamine
Mikrolainetega toidu valmistamiseks keerake
abil
soovitud aeg toiduvalmistamiseks. Maksimaalne
toiduvalmistamise aeg on 95 minutit.
vitud
Toiduvalmistamise
100%
P100 1-S
80%
P-80 1-S
60%
P-60 1-S
40%
P-40 1-S
1. Avage uks ja asetage toit ahju ning sulgege
uks.
2. Keerake ketas asendisse POWER LEVEL
( , . , ), kuni displeile kuvatakse
-60.
3.
4. Vajutage nupule.
Kui soovite ajutiselt toiduvalmistamise protsessi
katkestada, vajutage
toiduvalm
vajutage ja hoidke nuppu 5 sekundit, kui
kogu toiduvalmistamise programm.
le
muude toiduvalmistamisprogrammide kohta.
kui keerate ketast paremale POWER LEVEL
asendisse (, . , ).
3. Kiirstart
minutit.
nupule, ahi alustab
Teil
protsessi, kui vajutate nupule.
4. Grill
Maksimaalne toiduvalmistamise aeg on 95
minutit. Grillimist on eriti sobilik kasutada
b
valmistamiseks.
1. Avage uks ja asetage toit ahju ning sulgege
uks.
2. Keerake ketas asendisse GRILL .
3.
4. Vajutage nupule.
5. Kombineeritud 1
Maksimaalne toiduvalmistamise aeg on 95
minutit.
30% ajast on mikrolainetega toiduvalmistamine,
valmistamiseks.
toiduvalmistamiseks 25 minutit.
1. Avage uks ja asetage toit ahju ning sulgege
uks.
2. Keerake ketas asendisse .
3.
4. Vajutage nupule.
6. Kombineeritud 2
Maksimaalne toiduvalmistamise aeg on 95
minutit.
55% ajast on mikrolainetega toiduvalmistamine,
45% grillimine. Kasutage seda pudingite,
valmistamiseks.
173
toiduvalmistamiseks 12 minutit.
1. Avage uks ja asetage toit ahju ning sulgege
uks.
2. Keerake ketas asendisse .
3. 12:00.
4. Vajutage nupule.
7. Automaatne sulatamine
automaatselt kohe kui kaal on sisestatud.
100g~1800g.
1. Keerake ketas automaatse sulatamise
asendisse .
2. , et valida soovitud kaal.
3. Vajutage nupule.
toit umber ja vajutage sulatamise
8. Automaatne toiduvalmistamine
valimisel pole
vajutamist nupule.
1. ketas asendisse
AUTO COOK .
2. +--2.
3. Vajutage kinnitamiseks .
4. +-
5. Vajutage nupule.
Ko
od
Toit
Jookide ja kartulite puhul kuvatakse
ekraanile kaalu asemel portsjonite
arv, kui vajutate +-
Automaatse toiduvalmistamise
suurusest ja kujust, Teie isiklikest
eelistustest nagu teatud toitude
olete paigutanud toidu ahju. Kui Te
toiduvalmistamise aega vastavas
suunas.
A1
Joogid
(200ml/kl)
A2
Pitsa (g)
A3
Pasta (g)
A4
Kartulid (230g
/ portsjon)
A5
Kuumutamine
(g)
A6
Juurviljad (g)
A7
pitsa (g)
A8
Liha (g)
9. Lapselukk
le
ajal, kui lapselukk on aktiivne.
START/STOP/CANCEL nuppu 5 sekundit,
stamine: Vajutage ja hoidke
START/STOP/CANCEL nuppu 5 sekundit,
10. Eelseadistatud funktsioon
hilisemal ajal.
Oletame, et praegu on kell 9:00 ja Te
soovite, et ahi alustaks 5 minutilist
grillimisprogrammi kell 10:30.
1. Keerake ketas asendisse PRESET .
2. +-
START/STOP/CANCEL.
3. +-et seadistada
minutid
veel kord START/STOP/CANCEL.
4. Keerake ketas asendisse GRILL.
5. +-et
6.
START/STOP/CANCEL.
174
1. Kui kell saab 1
2.
kontrollida eelseadistatavat aega, kui
keerate ketta asendisse PRESET.
Vajutades
stada eelseadistatud
(PRESET) funktsioon.
3. Automaatset sulatust (AUTO DEFROST) ei
saa seadistada eelseadistatud (PRESET)
programmiga.
MIKROLAINEAHJU
HOOLDAMINE
1.
seinakontaktist.
2. Hoidke ahju sisemus puhtana.
Toidupritsmete puhastamiseks seintele,
tugevatoimelisi ja abrasiivseid aineid.
3.
vedelikel tilku
ventilatsiooniavade.
4.
Puhastage juhtpaneeli niiske pehme lapiga,
ega aerosoole.
5. Kui aur on akumuleerunud ahjuukse
tage
niiskusetaseme juures ning ei ole seadme
6.
7. ast ja ahju sisemust tuleb
niisutatud lapiga ning kuivatage. Rullikutega
Peale puhastamist asetage rullikutega
8.
on lisatud sidrunimahla ja sidrunikoort.
ahju pinnad hoolikalt kuivaks.
9. Kui osutub vajalikuks vahetada ahjulampi,
vahetamisest.
Keskkond
kaitsta keskkonda.
Garantii & hooldus
Gorenje Klienditeeninduskeskusesse (leiate selle
Kui Teie asukohamaal puudub.
Klienditee
Gorenje kodumasinate teeninduskeskusega.
Ainult eratarbimiseks!
modifikatsioonideks!
SOOVIME TEILE PALJU
NAUDINGUID OMA SEADME
KASUTAMISEL
1103002
uvalmistamiseks
mikrolainetega, grillimiseks ja muid kasulikke
:
:
htpp://www.microwaves.gorenje.com
