MAYA User Manual V2.4 Radeon Pro Render
User Manual: Pdf MAYA user manual v2.4 RadeonProRender
Open the PDF directly: View PDF ![]() .
.
Page Count: 65
Radeon ProRender plug-in
for Maya
User Guide v2.4
This document is a user and setup guide with tips and tricks on how to
render photorealistic images in real-time, set materials and lighting.

Radeon ProRender plug-in for Maya User Guide
©2018 Advanced Micro Devices, Inc. All rights reserved.
DISCLAIMER
The information contained herein is for informational purposes only and is subject to change without
notice. While every precaution has been taken in the preparation of this document, it may contain
technical inaccuracies, omissions, and typographical errors, and AMD is under no obligation to update
or otherwise correct this information. Advanced Micro Devices, Inc. makes no representations or
warranties with respect to the accuracy or completeness of the contents of this document, and
assumes no liability of any kind, including the implied warranties of non- infringement, merchantability
or fitness for particular purposes, with respect to the operation or use of AMD hardware, software or
other products described herein. No license, including implied or arising by estoppel, to any intellectual
property rights is granted by this document. Terms and limitations applicable to the purchase or use of
AMD’s products are as set forth in a signed agreement between the parties or in AMD's Standard
Terms and Conditions of Sale.
©2018 Advanced Micro Devices, Inc. All rights reserved. AMD, the AMD arrow, FirePro, Radeon Pro,
Radeon ProRender and combinations thereof are trademarks of Advanced Micro Devices, Inc. in the
United States and/or other jurisdictions. Autodesk, the Autodesk logo, and Maya are registered
trademarks or trademarks of Autodesk, Inc., and/or its subsidiaries and/or affiliates in the USA and/or
other countries. Other names are for informational purposes only and may be trademarks of their
respective owners. OpenCL and the OpenCL logo are trademarks of Apple Inc. used by permission by
Khronos. macOS and Metal are registered trademarks of Apple Inc. Linux is the registered trademark of
Linus Torvalds in the United States and other countries.

Radeon ProRender plug-in for Maya User Guide
©2018 Advanced Micro Devices, Inc. All rights reserved.
Table of Contents
What’s New in Radeon ProRender for Maya v2.3 ............................................................ 2
Supported Platforms for v2.3 ......................................................................................... 3
Software ............................................................................................................................................. 3
Operating System .............................................................................................................................. 3
Join the Discussion ............................................................................................................................ 3
Supported Platforms for v2.1.20.14 ............................................................................... 3
Software ............................................................................................................................................. 3
Operating System .............................................................................................................................. 3
Install the Radeon ProRender plug-in ............................................................................. 4
Radeon ProRender for Microsoft Windows ....................................................................................... 4
Radeon ProRender for macOS .......................................................................................................... 7
Switching to Radeon ProRender ................................................................................... 10
Render Viewports ........................................................................................................ 13
Animation cache ..................................................................................................................... 14
Clear Cache ............................................................................................................................. 14
Viewport Mode ....................................................................................................................... 14
Radeon ProRender Settings ......................................................................................... 15
Radeon ProRender Tab ................................................................................................. 15
Render Resources ............................................................................................................................ 16
Completion Criteria ......................................................................................................................... 16
Quality ......................................................................................................................... 16
Quality Presets ................................................................................................................................. 16
Render Sampling .............................................................................................................................. 17
Advanced Settings ........................................................................................................................... 18
Globals ......................................................................................................................... 19
Global Illumination ........................................................................................................................... 19
Motion Blur ....................................................................................................................................... 20
Denoiser ........................................................................................................................................... 20
Camera ............................................................................................................................................. 20
Default ..................................................................................................................................... 21
Spherical Panorama ................................................................................................................ 22
Spherical Panorama Stereo .................................................................................................... 23

Radeon ProRender plug-in for Maya User Guide
©2018 Advanced Micro Devices, Inc. All rights reserved.
Cube Map ................................................................................................................................ 24
Cube Map Stereo .................................................................................................................... 24
Render Stamp .................................................................................................................................. 24
Environment .................................................................................................................................... 25
Image Based Lighting ............................................................................................................. 25
Sky ........................................................................................................................................... 26
Ground ............................................................................................................................................. 32
Tone Mapping .................................................................................................................................. 33
Linear ...................................................................................................................................... 33
Photolinear .............................................................................................................................. 34
Reinhard02 .............................................................................................................................. 34
White-balance ......................................................................................................................... 35
Render Passes (AOV) ....................................................................................................................... 35
Working with Lights ..................................................................................................... 37
Initial Lighting of a Scene ................................................................................................................. 37
Emissive Material Lights .................................................................................................................. 37
Portals .............................................................................................................................................. 41
Working with Cameras ................................................................................................. 43
Depth of Field ................................................................................................................................... 43
VR Cameras ...................................................................................................................................... 45
Working with Materials ................................................................................................ 46
Display the Material Library ............................................................................................................. 46
Radeon ProRender Material Library ................................................................................................ 48
Radeon ProRender Material Browser .............................................................................................. 49
Assigning Basic Materials................................................................................................................. 51
Using Maya Materials ....................................................................................................................... 56
Saving .......................................................................................................................... 57
Diagnostics and Trace Files ............................................................................................................. 58

OVERVIEW
1
Radeon ProRender plug-in for Maya User Guide
©2018 Advanced Micro Devices, Inc. All rights reserved.
OVERVIEW
Radeon™ ProRender is a free un-biased rendering plug-in for your visualization
needs in Autodesk® Maya®. Using physically accurate path-tracing technology,
Radeon ProRender can produce stunning photorealistic images of your scene and
provides real-time interactive rendering and continuous effects adjustments to help
create the perfect rendered image. The Radeon ProRender plug-in is fully integrated
into Maya – it supports the Maya lights, materials, and textures and renders your
geometry accurately. Radeon ProRender also comes with a library of materials to get
you started.
This user guide will describe how to use and set up the Radeon ProRender plug-in for
Maya.

Radeon ProRender plug-in for Maya User Guide
©2018 Advanced Micro Devices, Inc. All rights reserved.
WHAT’S NEW
2
What’s New in Radeon ProRender for Maya v2.3
• Support for macOS® High Sierra 10.13.3+ using Metal® 2. eGPU devices requires macOS® High Sierra
10.13.4.
• PBR Shader and Denoiser added in the render settings.
• An additional control for setting camera exposure to allow adding more motion blur is added.
• Texture gamma settings are now handled correctly.
• Physically based lighting controls greatly improve lighting setups:
o Additional area light shapes include: Rectangle, Disk, Cylinder, and Spheres.
o Light color can be set by temperature, color, texture, or all three.
o Intensity can be set additionally with physical units.
• Maya Remap HSV and Gamma Correct nodes are supported.
• More AOV's have been added for compositing.

Radeon ProRender plug-in for Maya User Guide
©2018 Advanced Micro Devices, Inc. All rights reserved.
SUPPORTED PLATFORMS
3
Supported Platforms for v2.3
Radeon ProRender for Maya v2.3 runs on both GPUs and CPUS. OpenCL™ 1.2 is required for GPUs.
Software
• Autodesk® Maya® 2016 with Service Pack 2
• Autodesk® Maya® 2016.5
• Autodesk® Maya® 2017
• Autodesk® Maya® 2018
Operating System
• Microsoft Windows® 7 (64-bit)
• Microsoft Windows® 10 (64-bit)
• macOS® High Sierra 10.13.3+
Join the Discussion
Provide feedback here for all Radeon ProRender plug-ins.
Supported Platforms for v2.1.20.14
Radeon ProRender for Maya v2.1.20.14 runs on both GPUs and CPUS. OpenCL™ 1.2 is required for GPUs.
Software
• Autodesk® Maya® 2016 with Service Pack 2
• Autodesk® Maya® 2016.5
• Autodesk® Maya® 2017
Operating System
• CentOS 6.5 (Maya® 2016/2017)
• CentOS 7.2 (Maya® 2017)

Radeon ProRender plug-in for Maya User Guide
©2018 Advanced Micro Devices, Inc. All rights reserved.
INSTALL RADEON PRORENDER
4
Install the Radeon ProRender plug-in
Radeon ProRender for Microsoft Windows
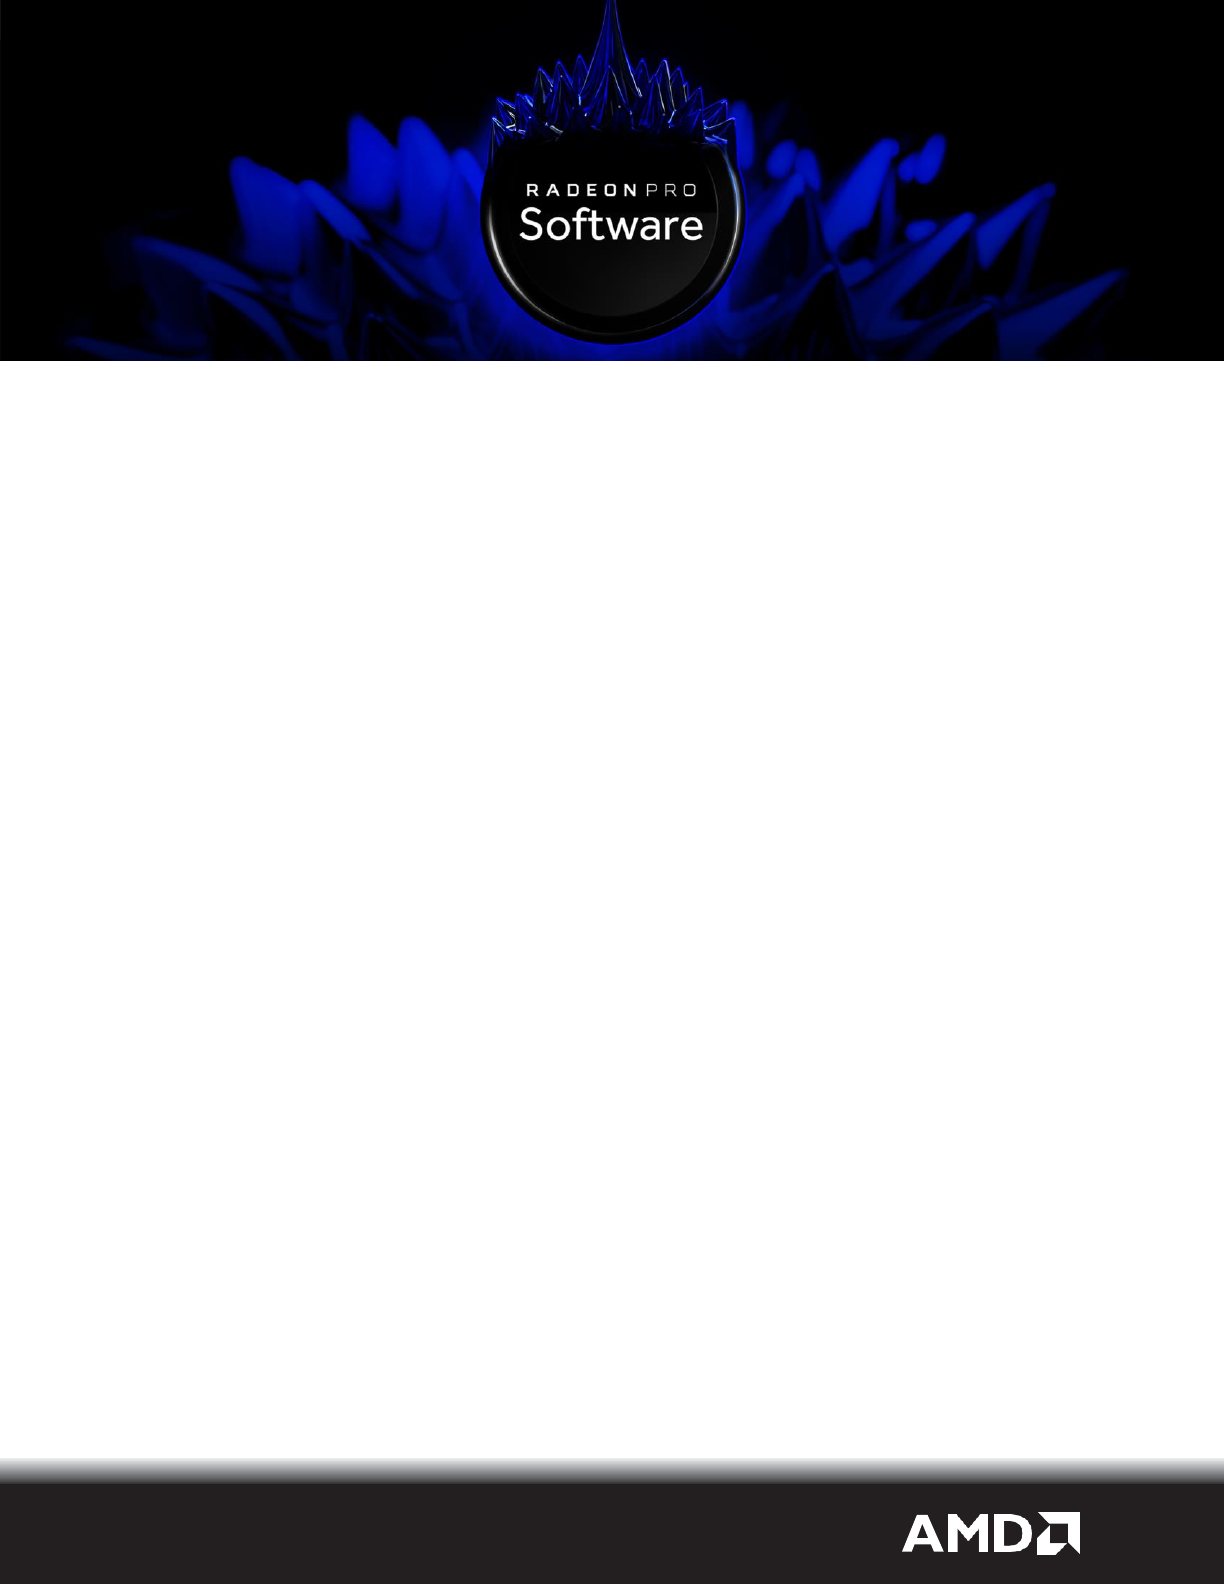
Download the Radeon ProRender plug-in for Maya for Microsoft Windows®, launch the installer and agree
to the license.
Radeon ProRender will check your hardware and software to ensure requirements, before letting you
select your installer settings.
Radeon ProRender plug-in for Maya User Guide
©2018 Advanced Micro Devices, Inc. All rights reserved.
INSTALL RADEON PRORENDER
5
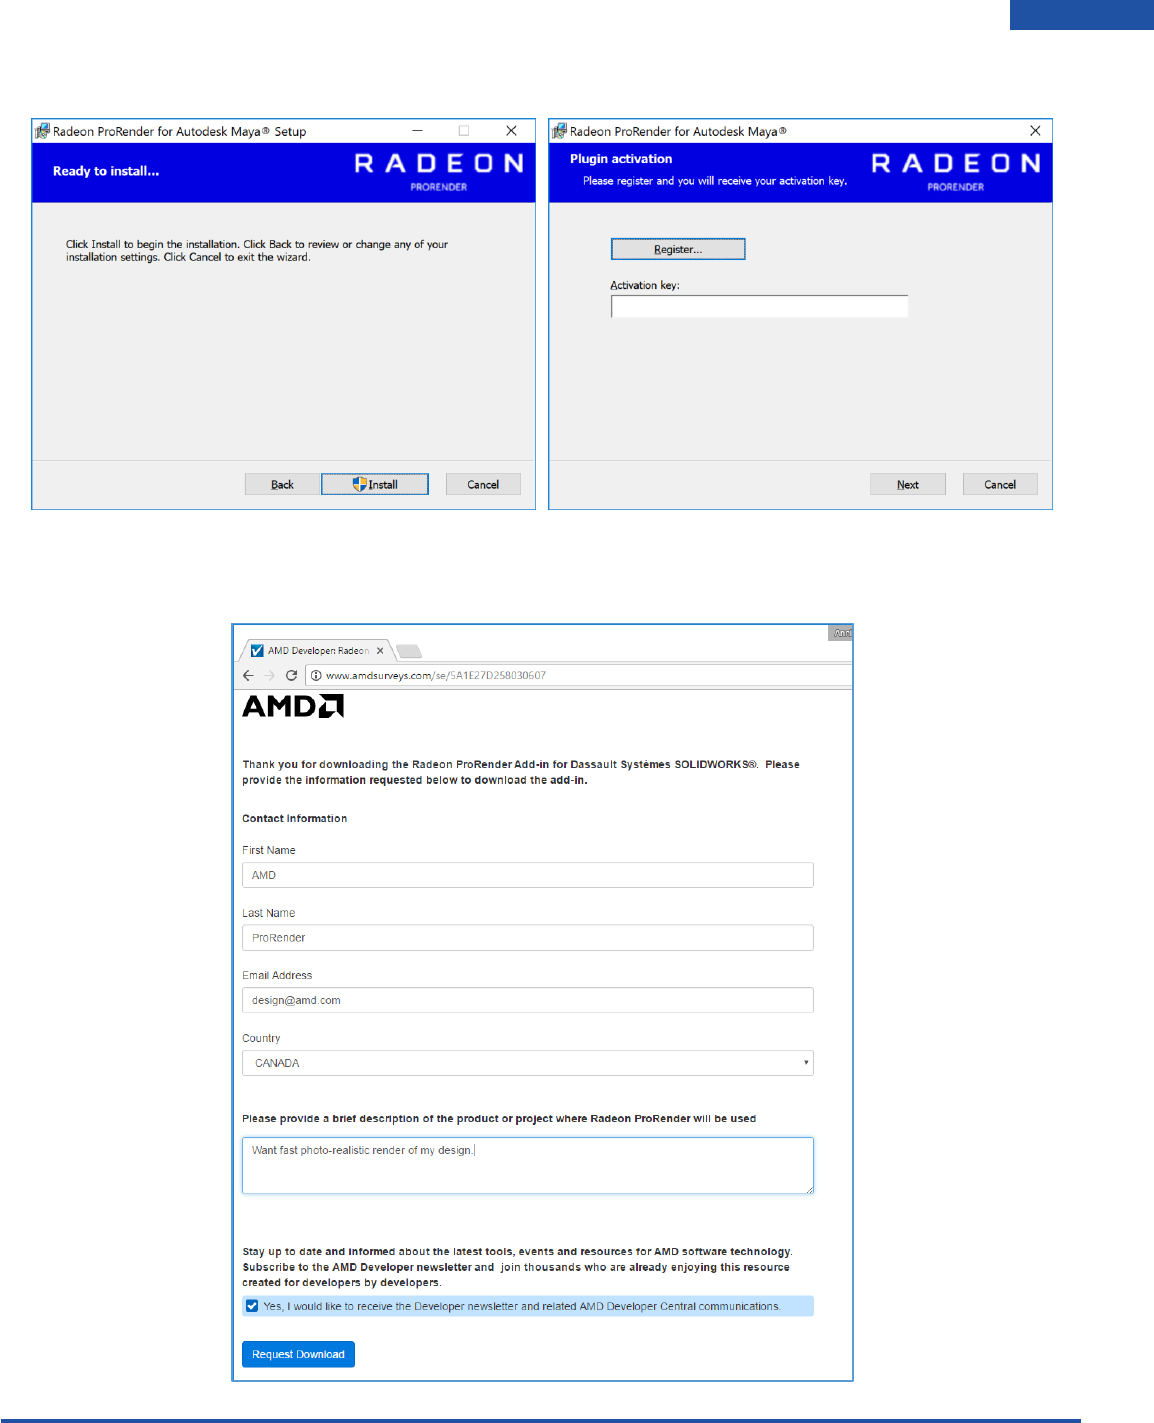
Click the Register button – it will take you to an AMD website to obtain an activation key by registering.
Register using your information. You will receive your activation key after clicking Request Download.
Enter it into the installer and continue the installation.
Radeon ProRender plug-in for Maya User Guide
©2018 Advanced Micro Devices, Inc. All rights reserved.
INSTALL RADEON PRORENDER
6
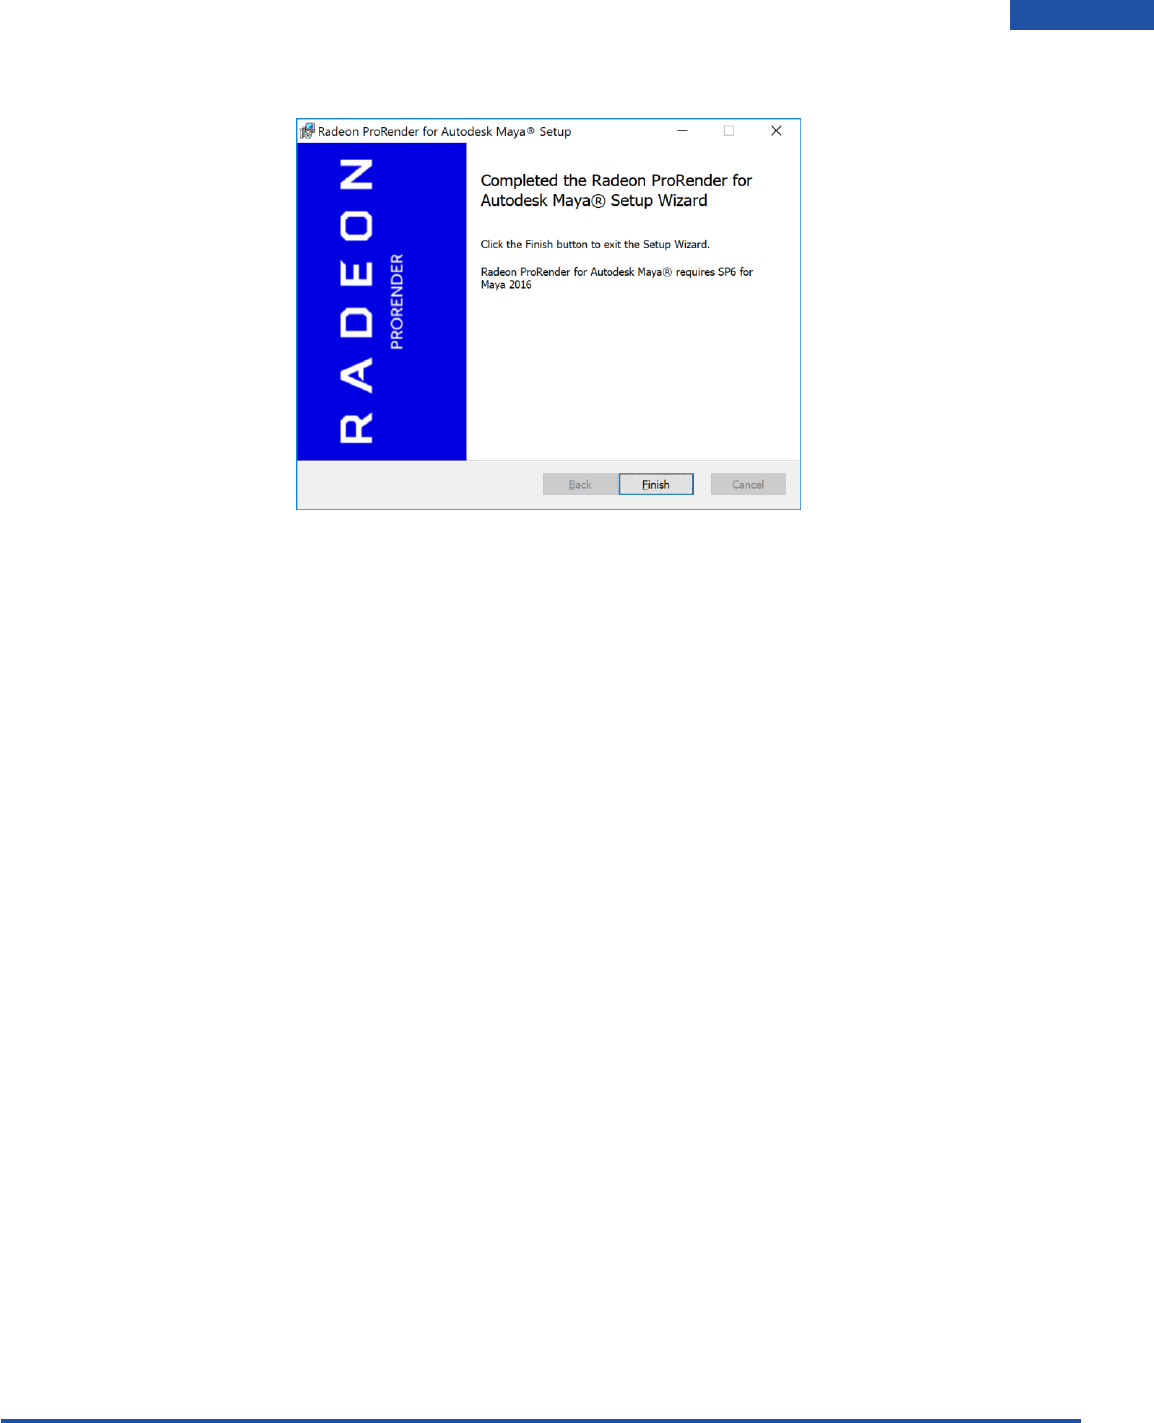
Click Finish and launch the Maya application to start rendering your images.
Radeon ProRender plug-in for Maya User Guide
©2018 Advanced Micro Devices, Inc. All rights reserved.
INSTALL RADEON PRORENDER
7
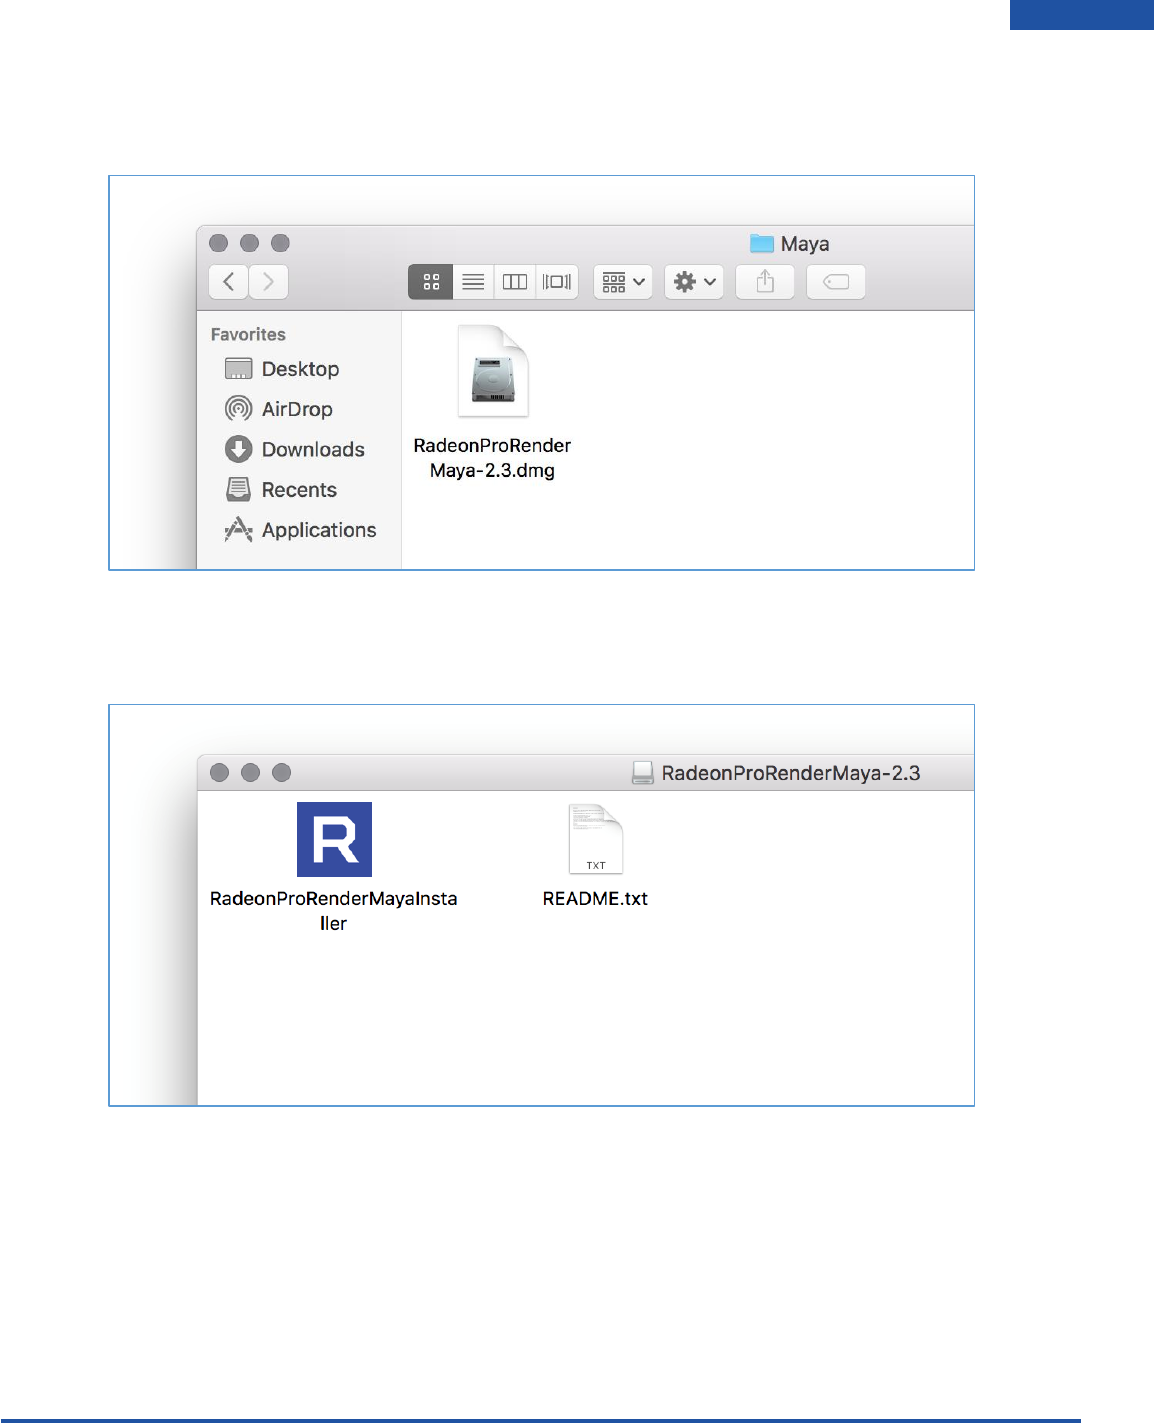
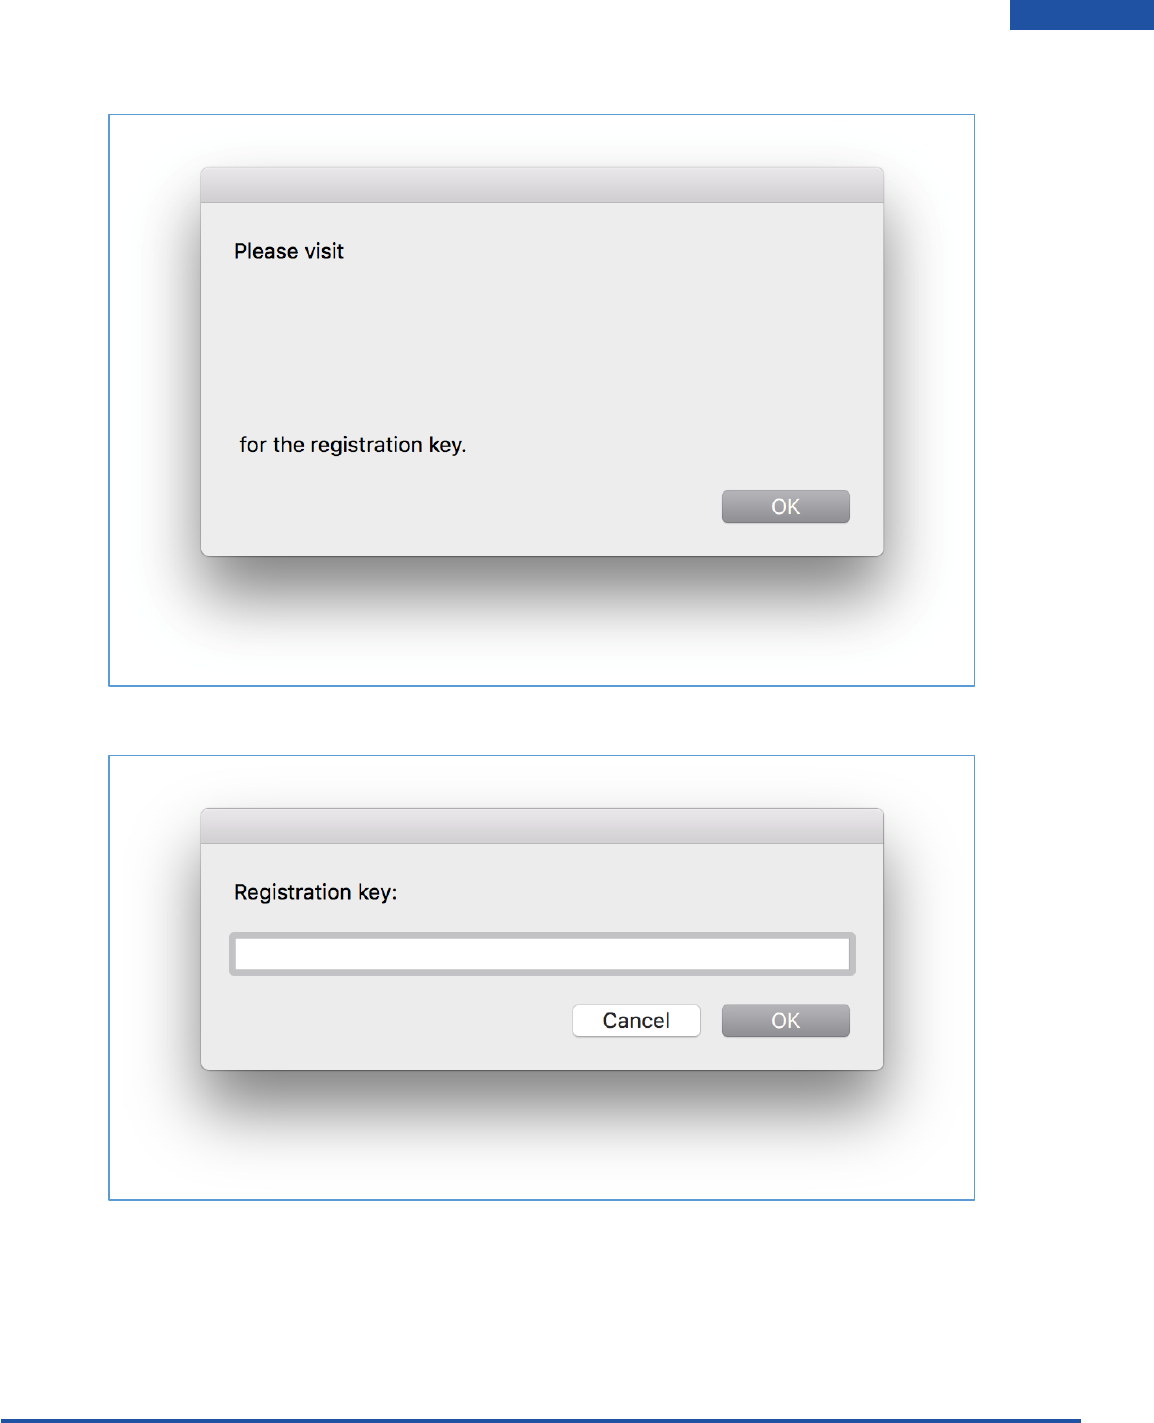
Radeon ProRender for macOS
Download ProRenderForBlender-XX.dmg. Click to open.
Open the RadeonProRenderBlenderInstaller.
Radeon ProRender plug-in for Maya User Guide
©2018 Advanced Micro Devices, Inc. All rights reserved.
INSTALL RADEON PRORENDER
8
Copy and paste the website into browser to obtain the registration key.
Enter the registration key that will be emailed to you.
Radeon ProRender plug-in for Maya User Guide
©2018 Advanced Micro Devices, Inc. All rights reserved.
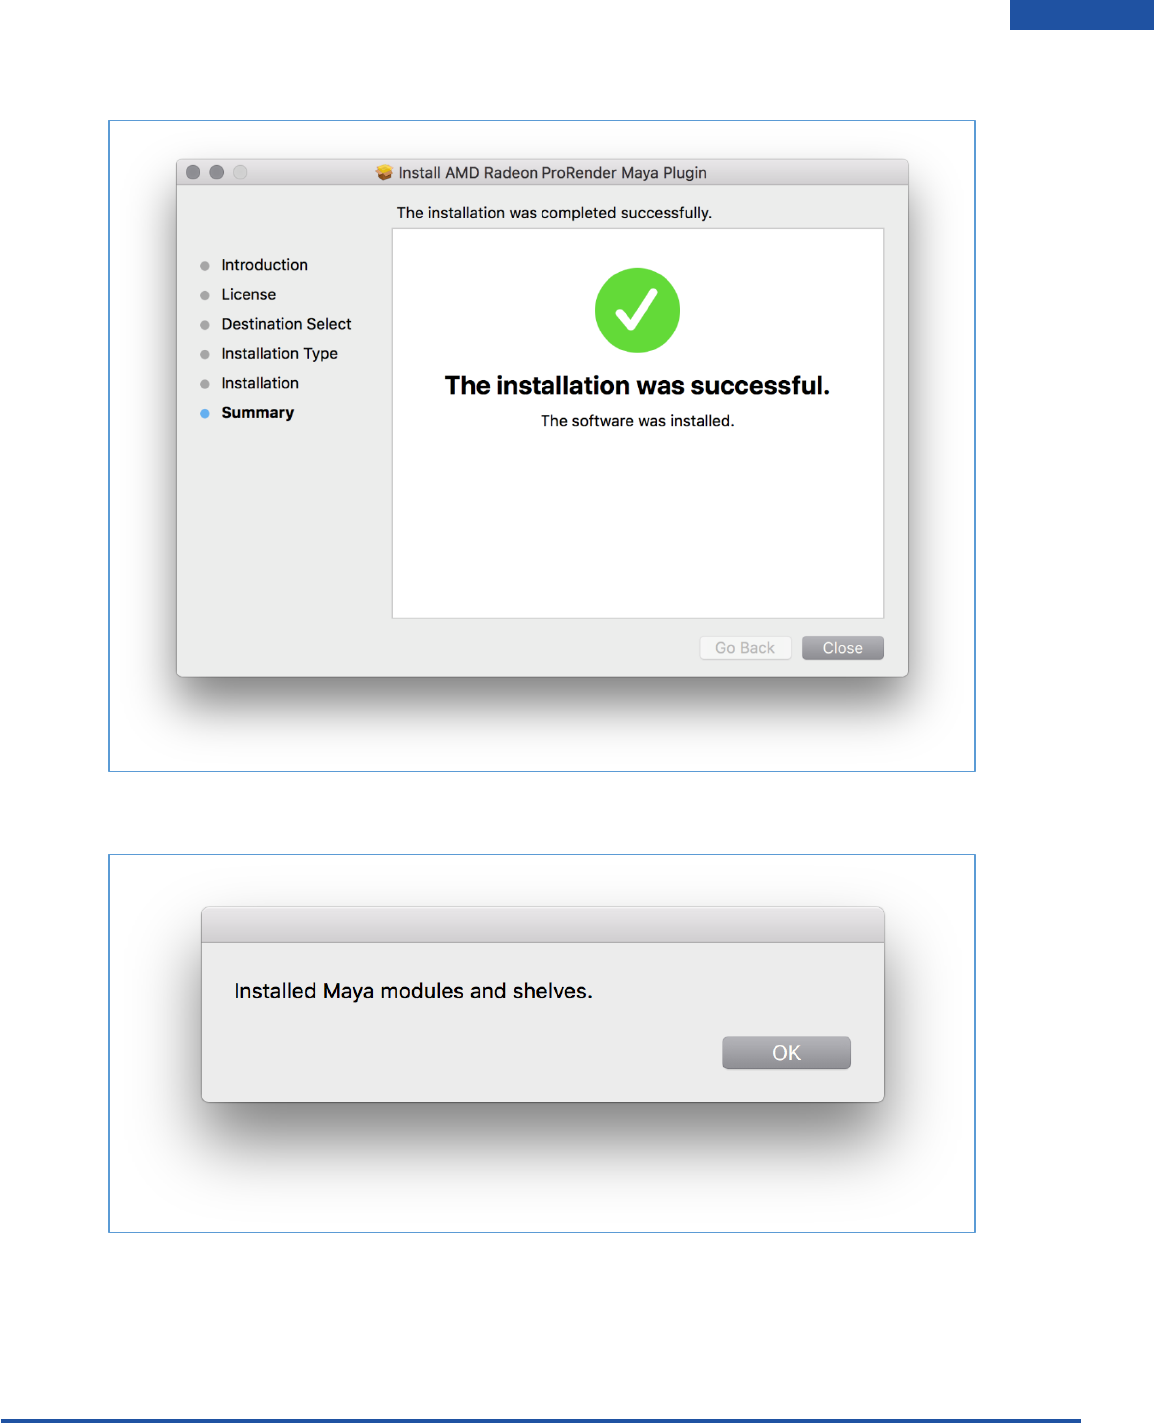
INSTALL RADEON PRORENDER
9
Continue through the installation
The Maya modules and shelves will also be installed.

Radeon ProRender plug-in for Maya User Guide
©2018 Advanced Micro Devices, Inc. All rights reserved.
RADEON PRORENDER SET UP
10
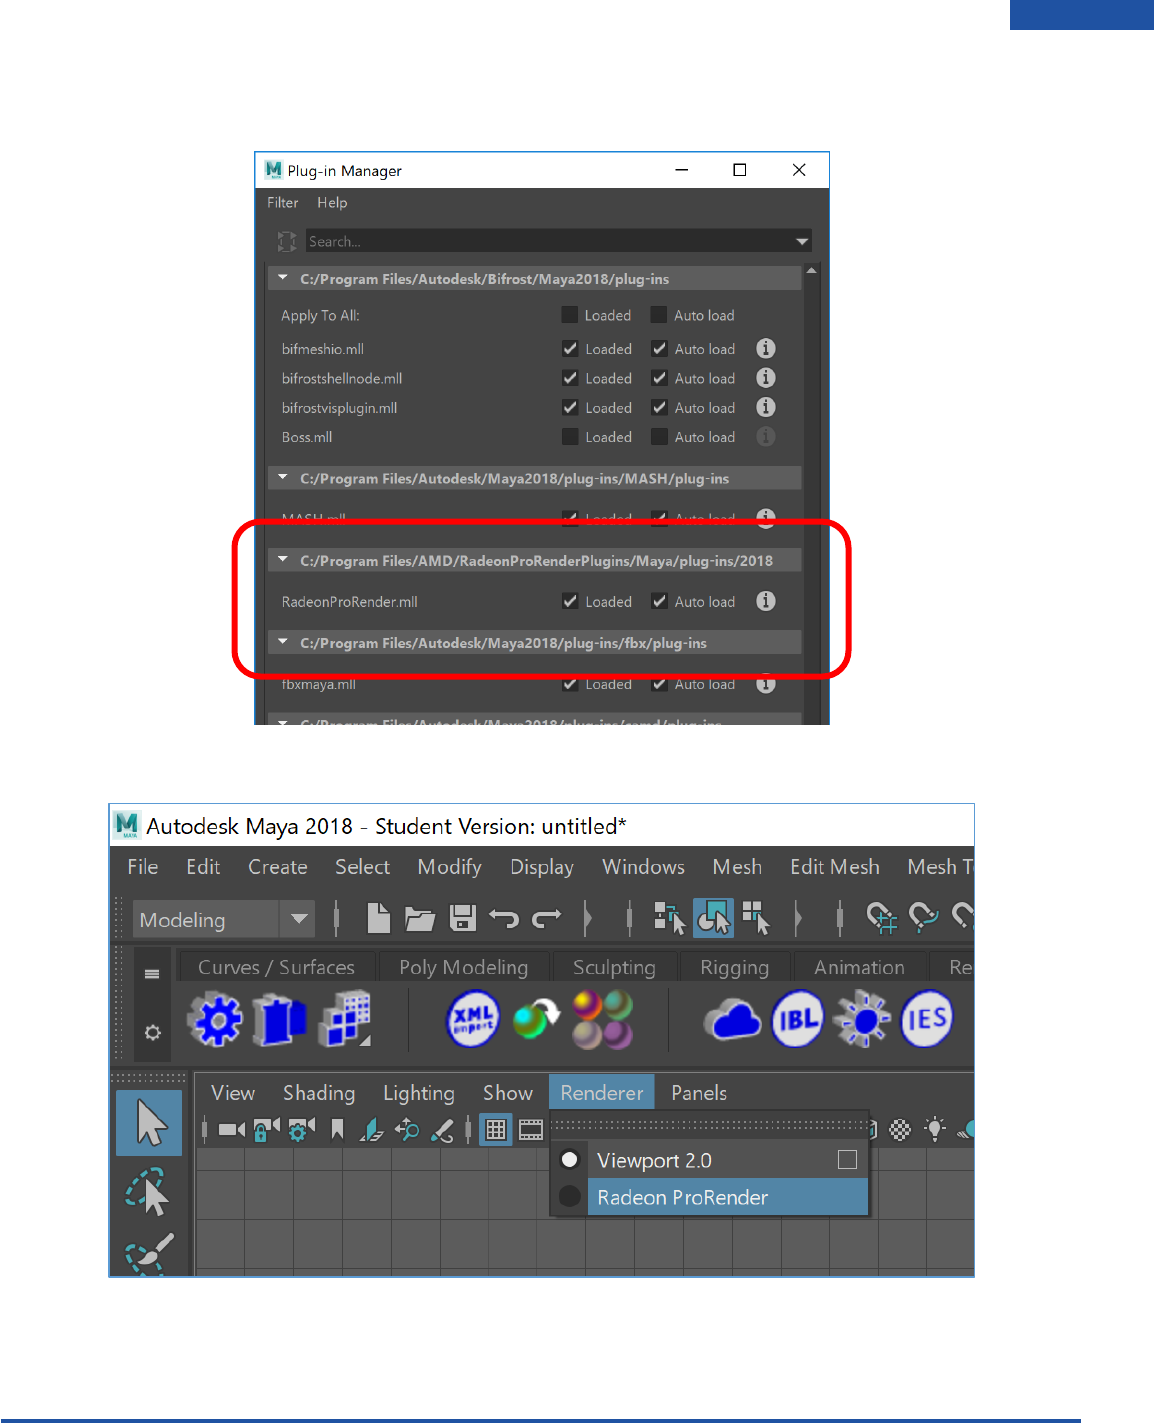
Switching to Radeon ProRender
Launch Maya. You should see menu item for Radeon ProRender, as well as a custom shelf with icons for
key functions and settings.
Go to Windows > Settings/Preferences > Plug-in Manager to set Radeon ProRender as the renderer.
Radeon ProRender plug-in for Maya User Guide
©2018 Advanced Micro Devices, Inc. All rights reserved.
RADEON PRORENDER SET UP
11
Under the Plug-in Manager, make sure the Loaded and Auto Load check boxes are ticked next to the
RadeonProRender.mll. Press Close.
You will also be able to set the 3D viewport to the rendered view using Radeon ProRender.
Radeon ProRender plug-in for Maya User Guide
©2018 Advanced Micro Devices, Inc. All rights reserved.
RADEON PRORENDER SET UP
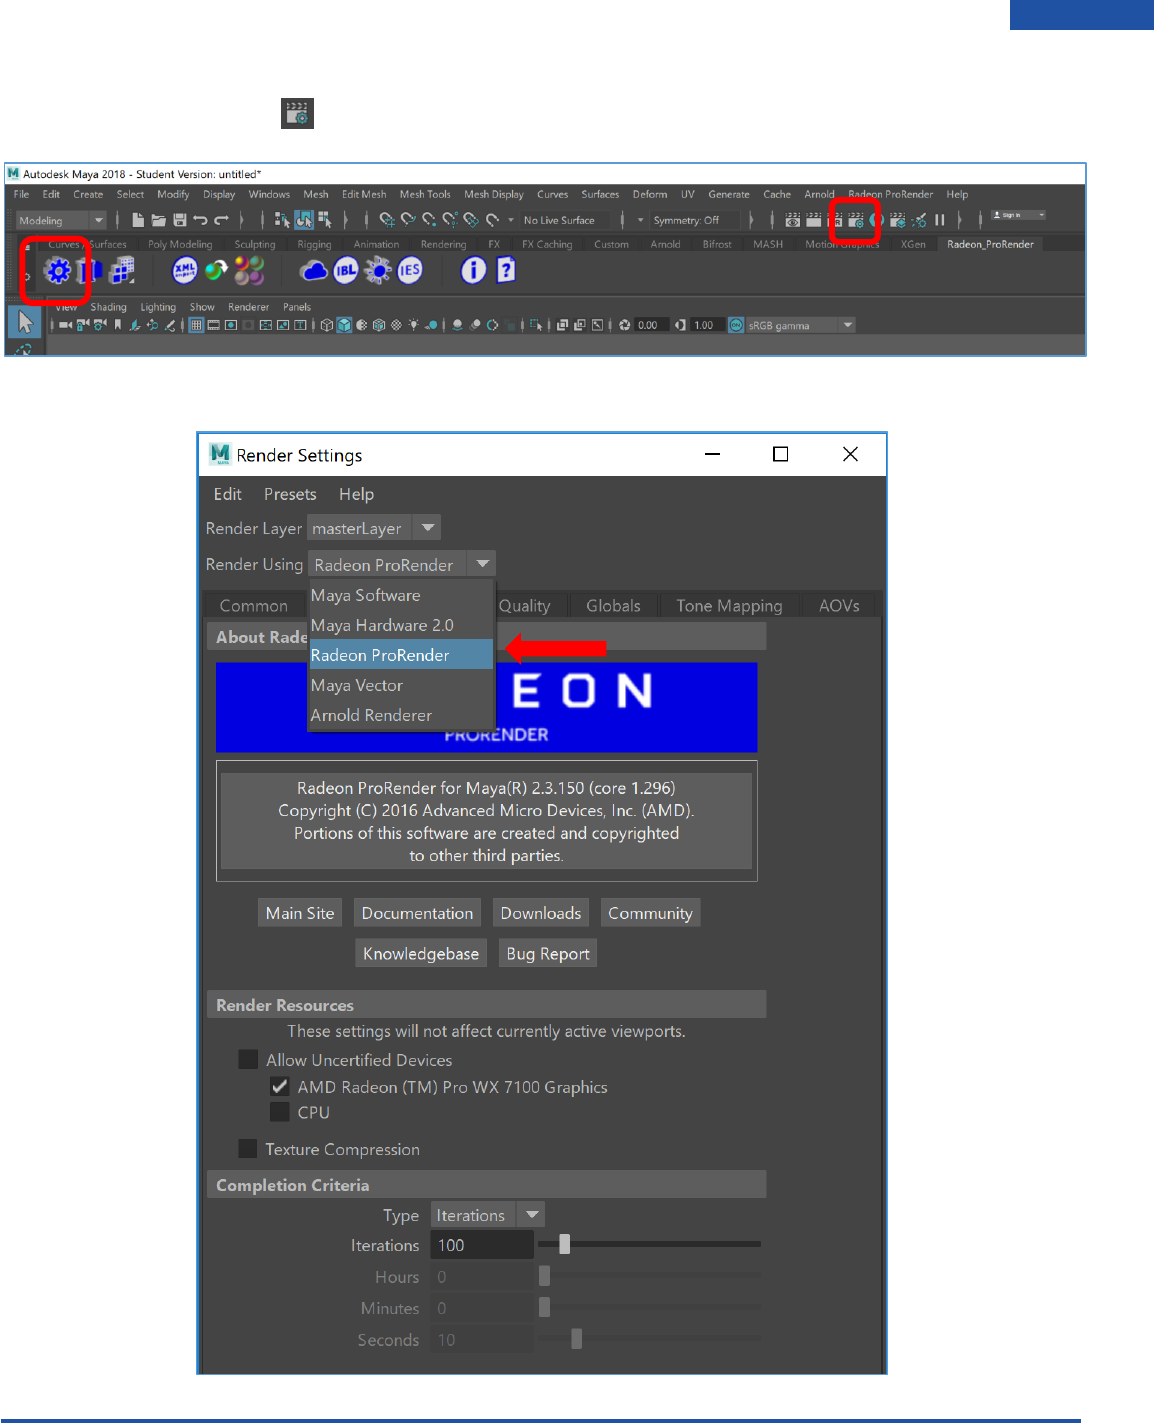
12
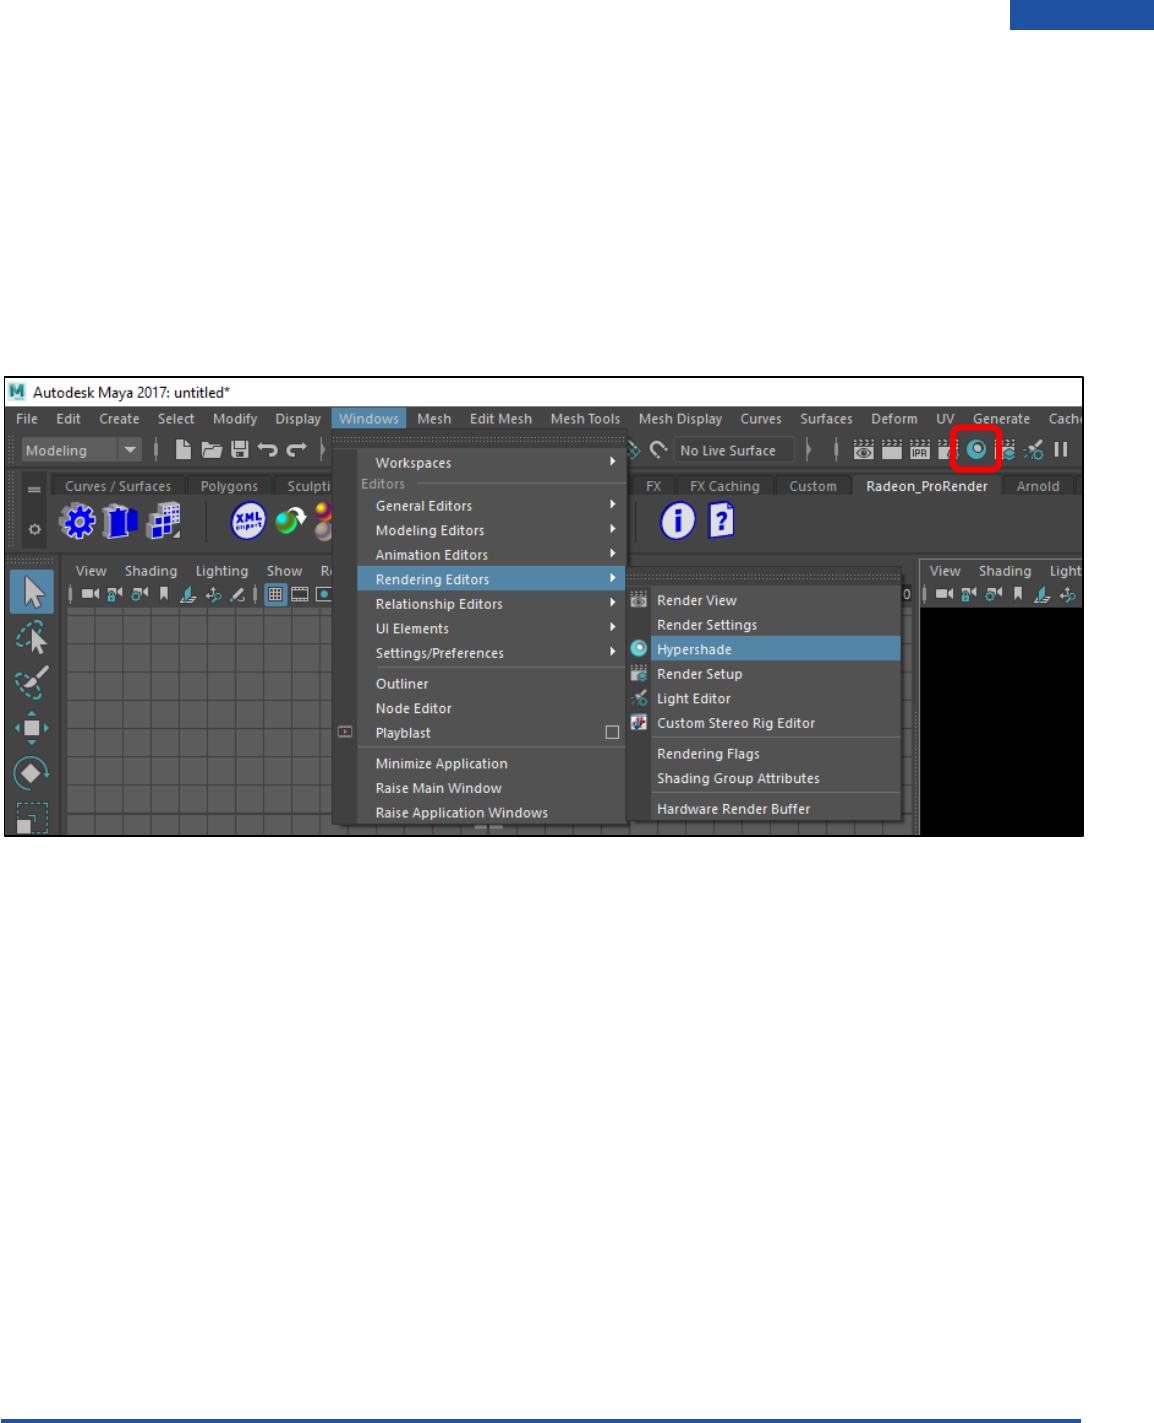
Bring up the Render Settings by clicking on the settings icon on the custom shelf in the Radeon_
ProRender tab or, click the button in the Maya tool bar to bring up the Render Settings.
In the Render Settings, change to the Radeon ProRender as the Renderer.
Radeon ProRender plug-in for Maya User Guide
©2018 Advanced Micro Devices, Inc. All rights reserved.
USER INTERFACE
13
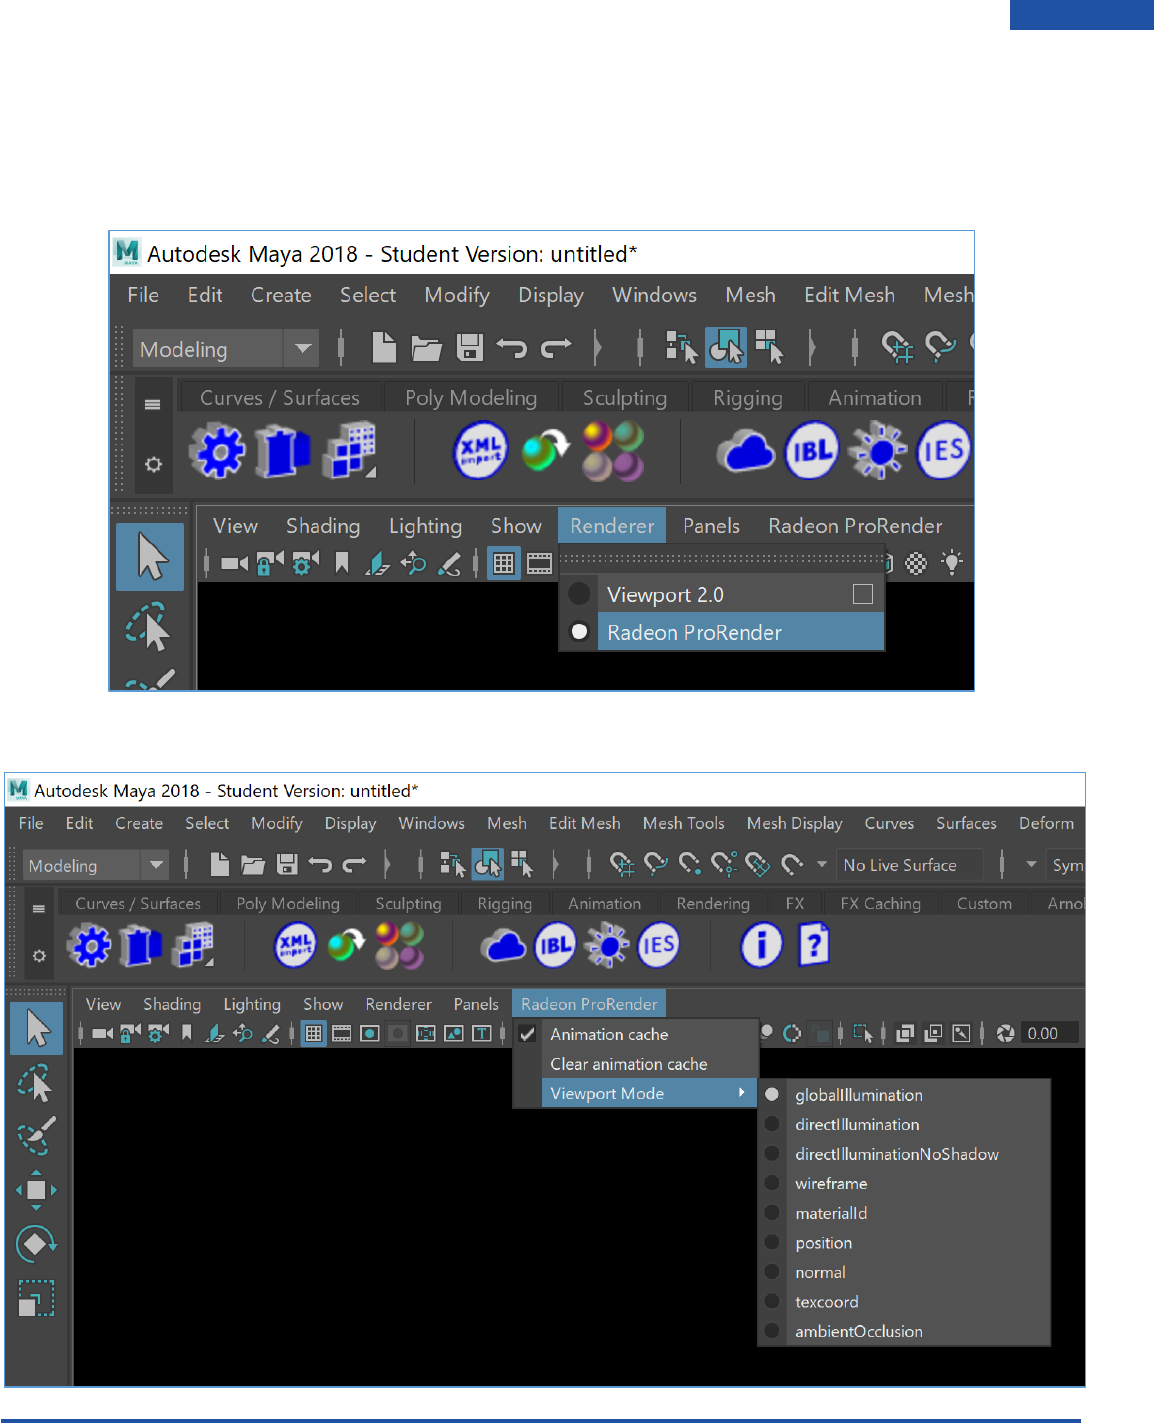
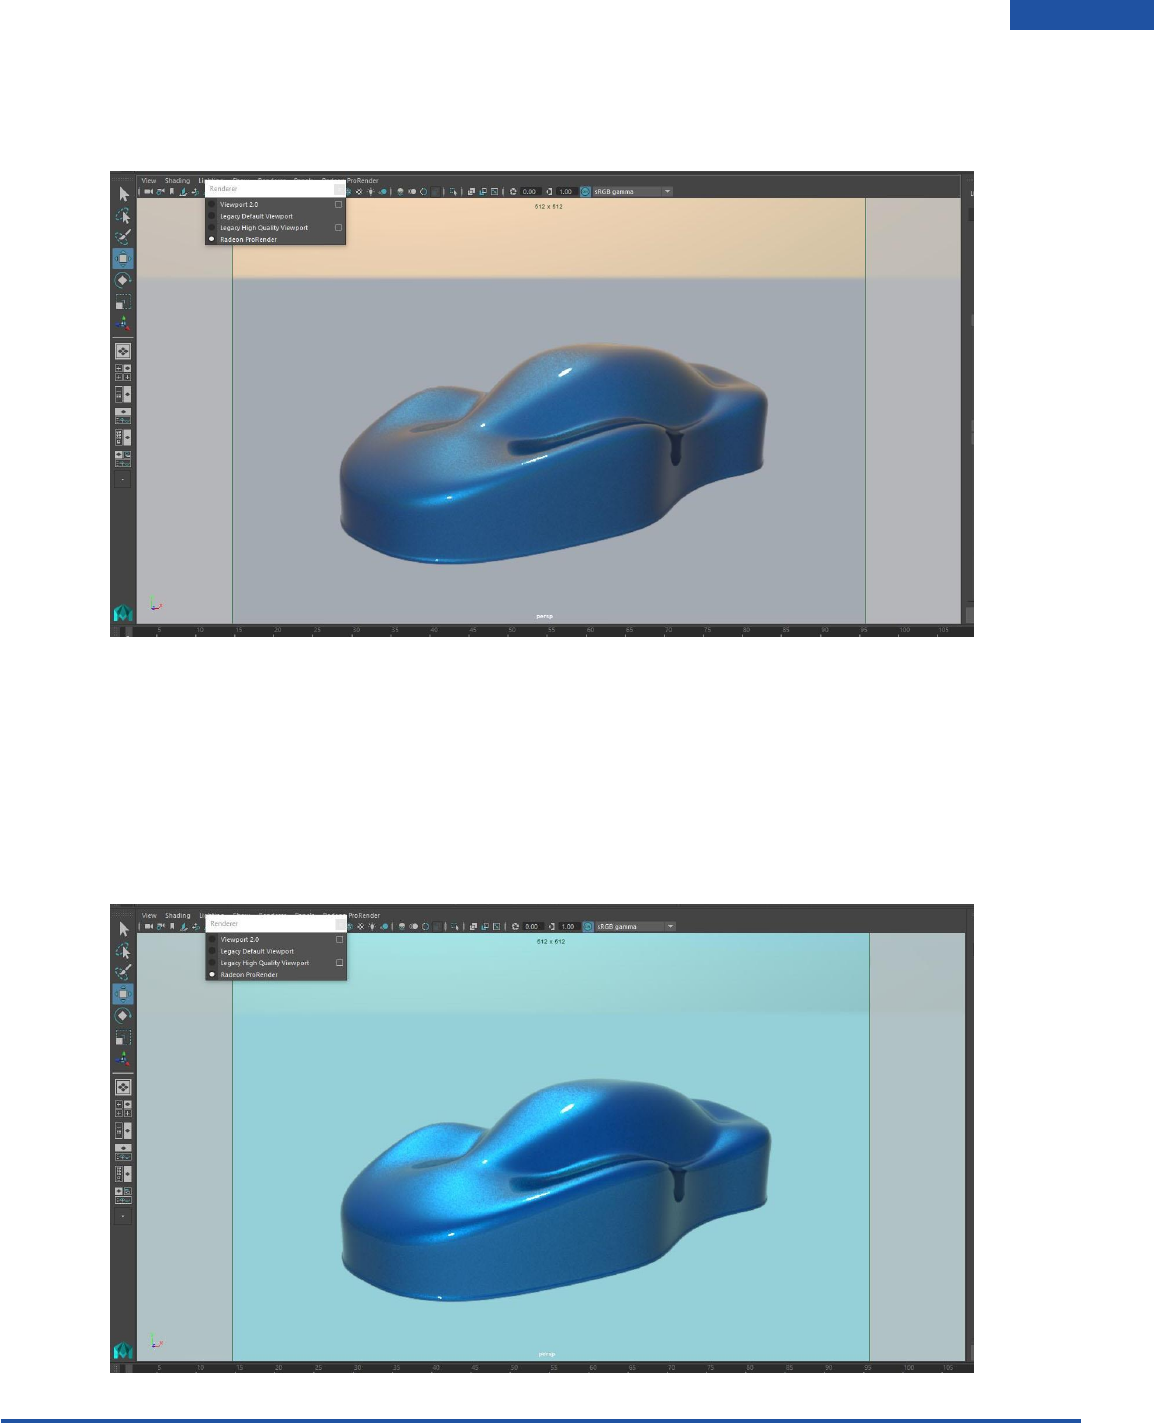
Render Viewports
After setting Radeon ProRender as our renderer, locate the Renderer dropdown on the viewport menu
and select Radeon ProRender. You should see your viewport switch to Radeon ProRender viewport.
Open the Radeon ProRender drop-down from the viewport menu.

Radeon ProRender plug-in for Maya User Guide
©2018 Advanced Micro Devices, Inc. All rights reserved.
USER INTERFACE
14
Animation cache
This is used where you can view quick previews of animated object(s) in the scene before rendering the
scene. It stores the first render iteration for each frame of the animation when the frame is first
displayed, so the next time that frame is displayed, it can show the cached version, rather than having to
render it again. This will allow you to scrub through the time-line without having to re-render the cached
frames.
Clear Cache
This is used to clear the animation cache so the render can start over or re-render.
Viewport Mode
This is like render modes which are found in the Render Settings. The render mode can be selected
without opening the Render Settings window.
Radeon ProRender plug-in for Maya User Guide
©2018 Advanced Micro Devices, Inc. All rights reserved.
USER INTERFACE
15
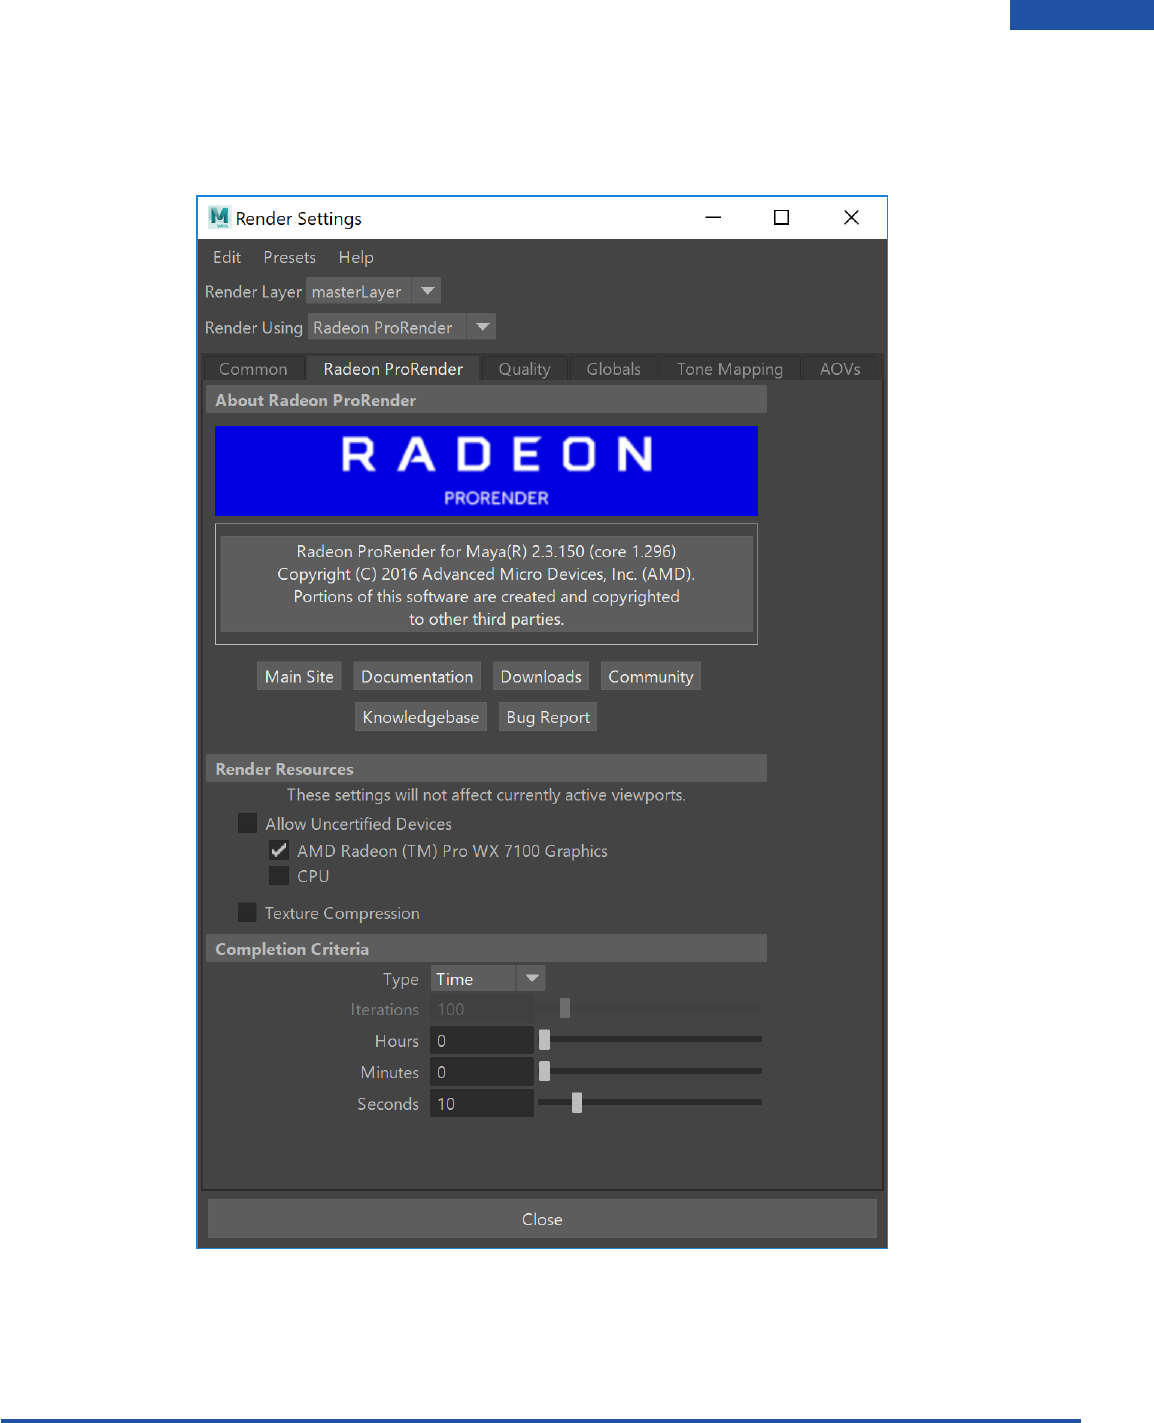
Radeon ProRender Settings
Open the Render Settings window.
Radeon ProRender Tab
Radeon ProRender plug-in for Maya User Guide
©2018 Advanced Micro Devices, Inc. All rights reserved.
USER INTERFACE
16
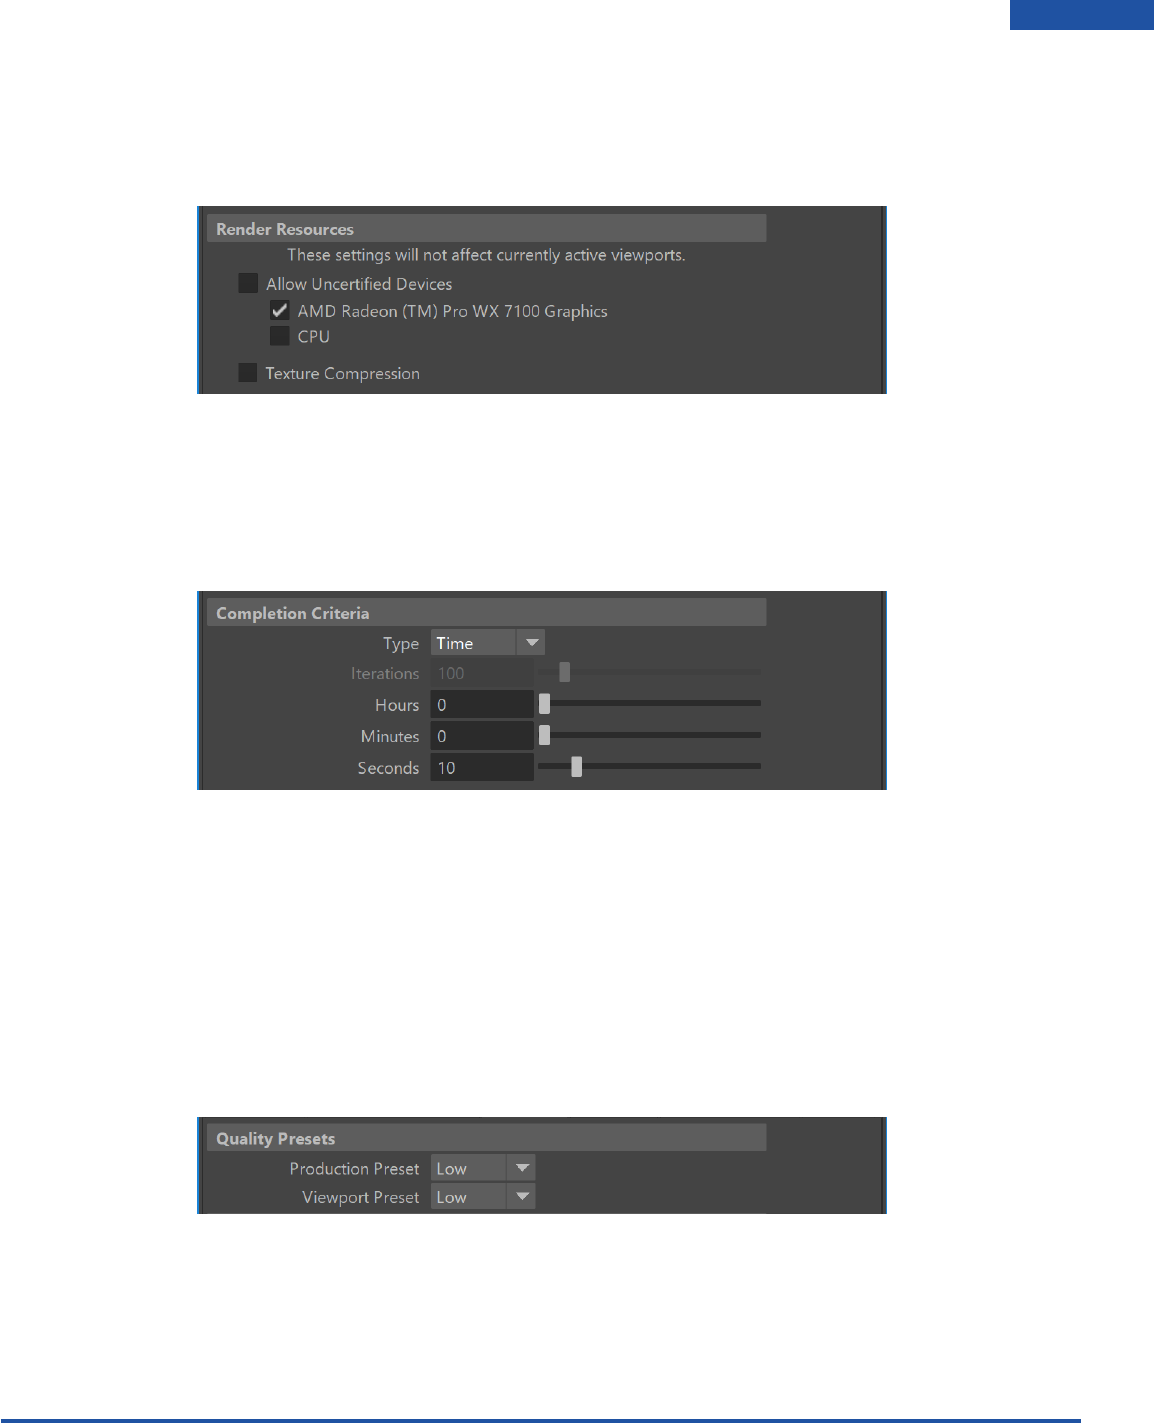
Render Resources
In the Render Resources section select your hardware to render. There are hardware options like GPU
only, CPU only, or CPU and GPU together.
Completion Criteria
In the Completion Criteria set the amount of time you want your render to complete or set the
Iterations to the desired number of passes you would like Radeon ProRender to renderer to complete to
do before finishing.
If there are no limits set for time or iterations the render will keep rendering until the user cancels the
render or closes the render window.
Quality
Quality Presets
With Radeon ProRender we have 2 sets of settings, one for the Production rendering and one for the
Viewport rendering. We can use the quality presets, these range from low to medium to high.
Radeon ProRender plug-in for Maya User Guide
©2018 Advanced Micro Devices, Inc. All rights reserved.
USER INTERFACE
17
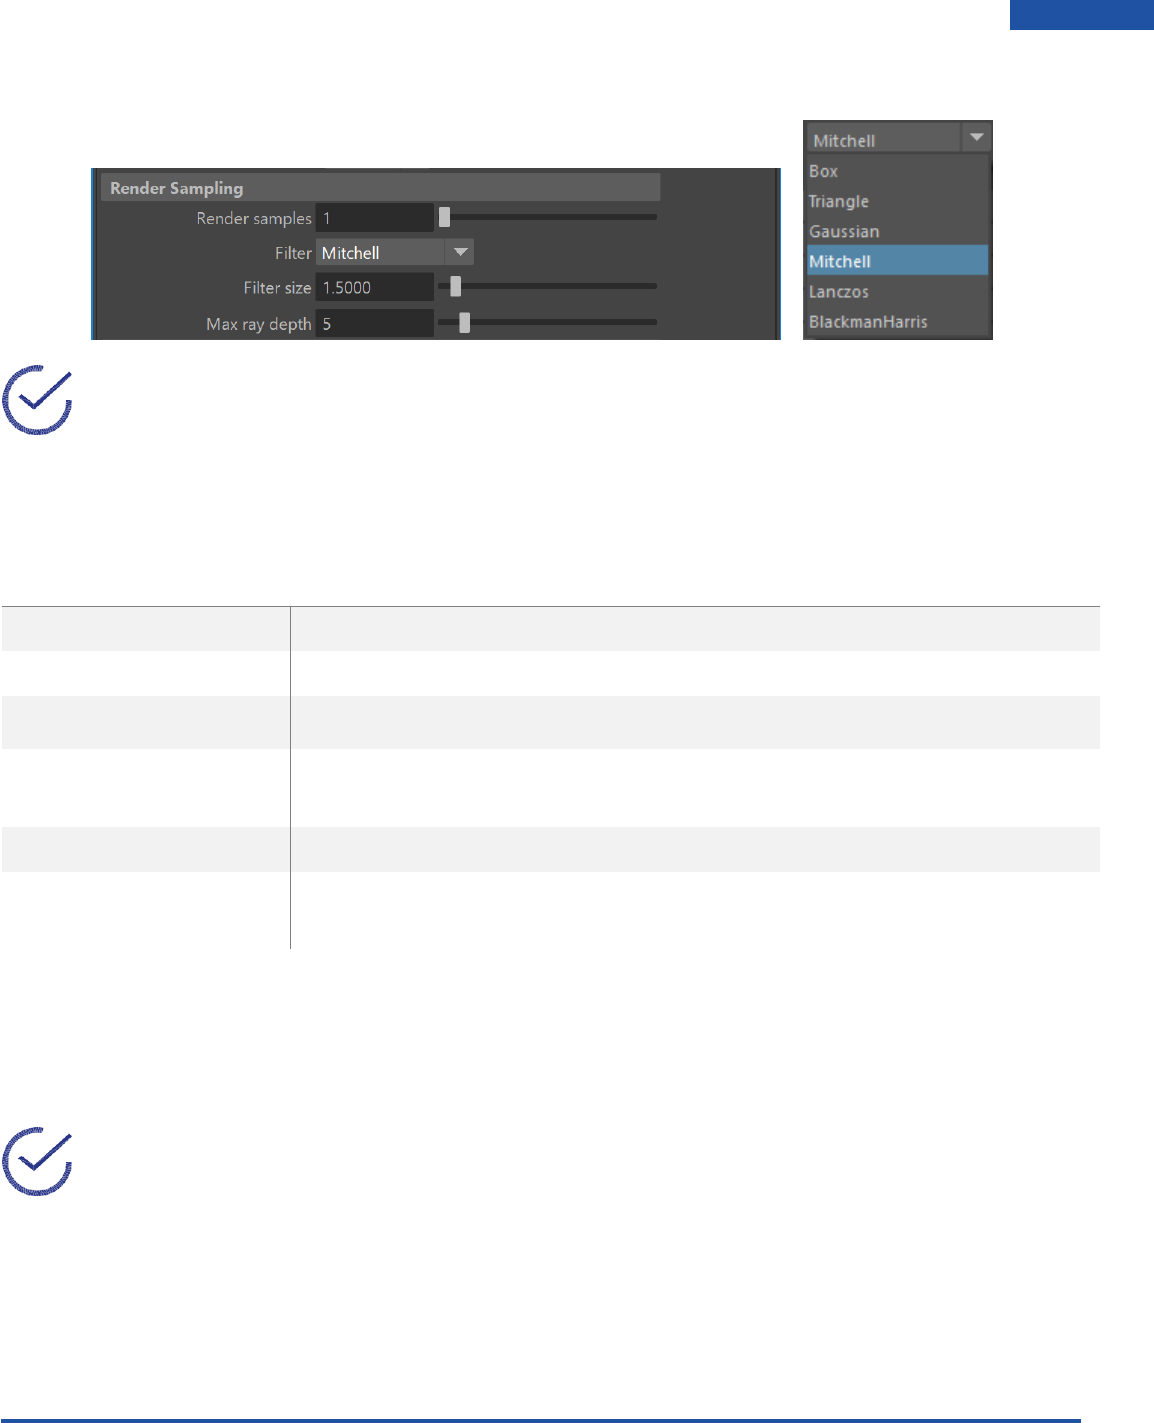
Render Sampling
Tip: A high number of samples gives you a better render at the cost of render time.
Filter is used to add a filter on a sub pixel level. Several post render image filters are also supported
including:
FILTERS
DESCRIPTION
BOX
the lowest quality Anti-Aliasing filter
TRIANGLE
for sharp results
GAUSSIAN
provides blurry Anti-Aliasing
MITCHELL
default filter, good for all-round rendering on images with no major high
contrasts
LANCZOS
a second good all-round filter
BLACKMAN HARRIS
complements the Box and Gaussian filters, and is especially effective for
Wireframe renders, as it makes edges look smoother
May ray depth allows a user to set the number of rays that will be cast and bounced around in the scene
and is especially necessary for refractive surfaces. This is done by increasing the value of the Max Ray
Depth input.
Tip: When using glass or other translucent appearances, use a high number of Ray Bounces to
fully capture all reflections (generally, a good number is 6 unless there are complex, translucent
parts).
The transparency and colour of the object is improved with more ray bounces. Improved image quality
comes at a cost to other factors.

Radeon ProRender plug-in for Maya User Guide
©2018 Advanced Micro Devices, Inc. All rights reserved.
USER INTERFACE
18
Advanced Settings
Radeon ProRender plug-in for Maya User Guide
©2018 Advanced Micro Devices, Inc. All rights reserved.
USER INTERFACE
19
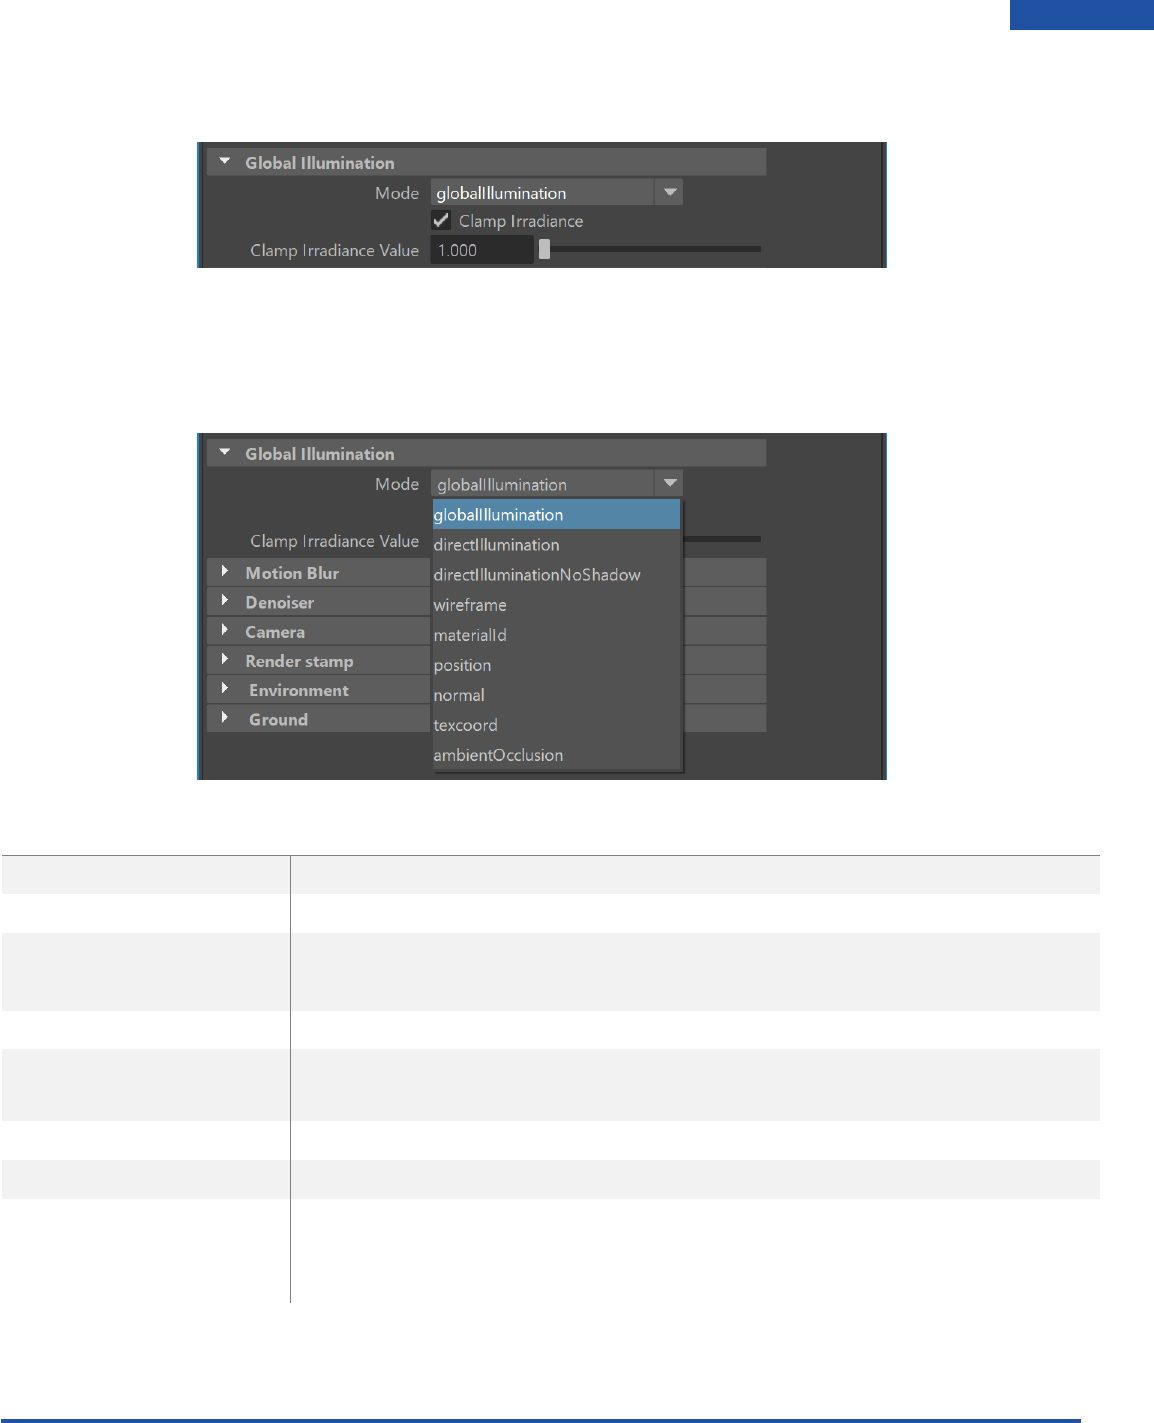
Globals
Global Illumination
Globals provide you with the option of rendering in different modes. This changes the look of the 3D
model in the viewport.You can also set the clamp irradiance value.
MODE
DESCRIPTION
GLOBAL ILLUMINATION
the full scene with full GI lighting and shadows
DIRECT ILLUMINATION
renders the scene with shadows, but no GI – gives “harsher” renders
DIRECT ILLUMINATION
NO SHADOW
direct light, no GI, gives sharper renders without any shadows or semi-
shadows
WIREFRAME
shows the wireframe of the mesh
MATERIAL ID
renders the whole scene in non-bordering colors to ease
postwork/processing
NORMAL
renders the normals of the scene
TEXCOORD
shows the current texture coordinates – UV’d or not
AMBIENT OCCLUSION
standard pass to do anything from showing off your models without
textures to using it as an overlay for contact shadows, which GI doesn’t
always catch
Radeon ProRender plug-in for Maya User Guide
©2018 Advanced Micro Devices, Inc. All rights reserved.
USER INTERFACE
20
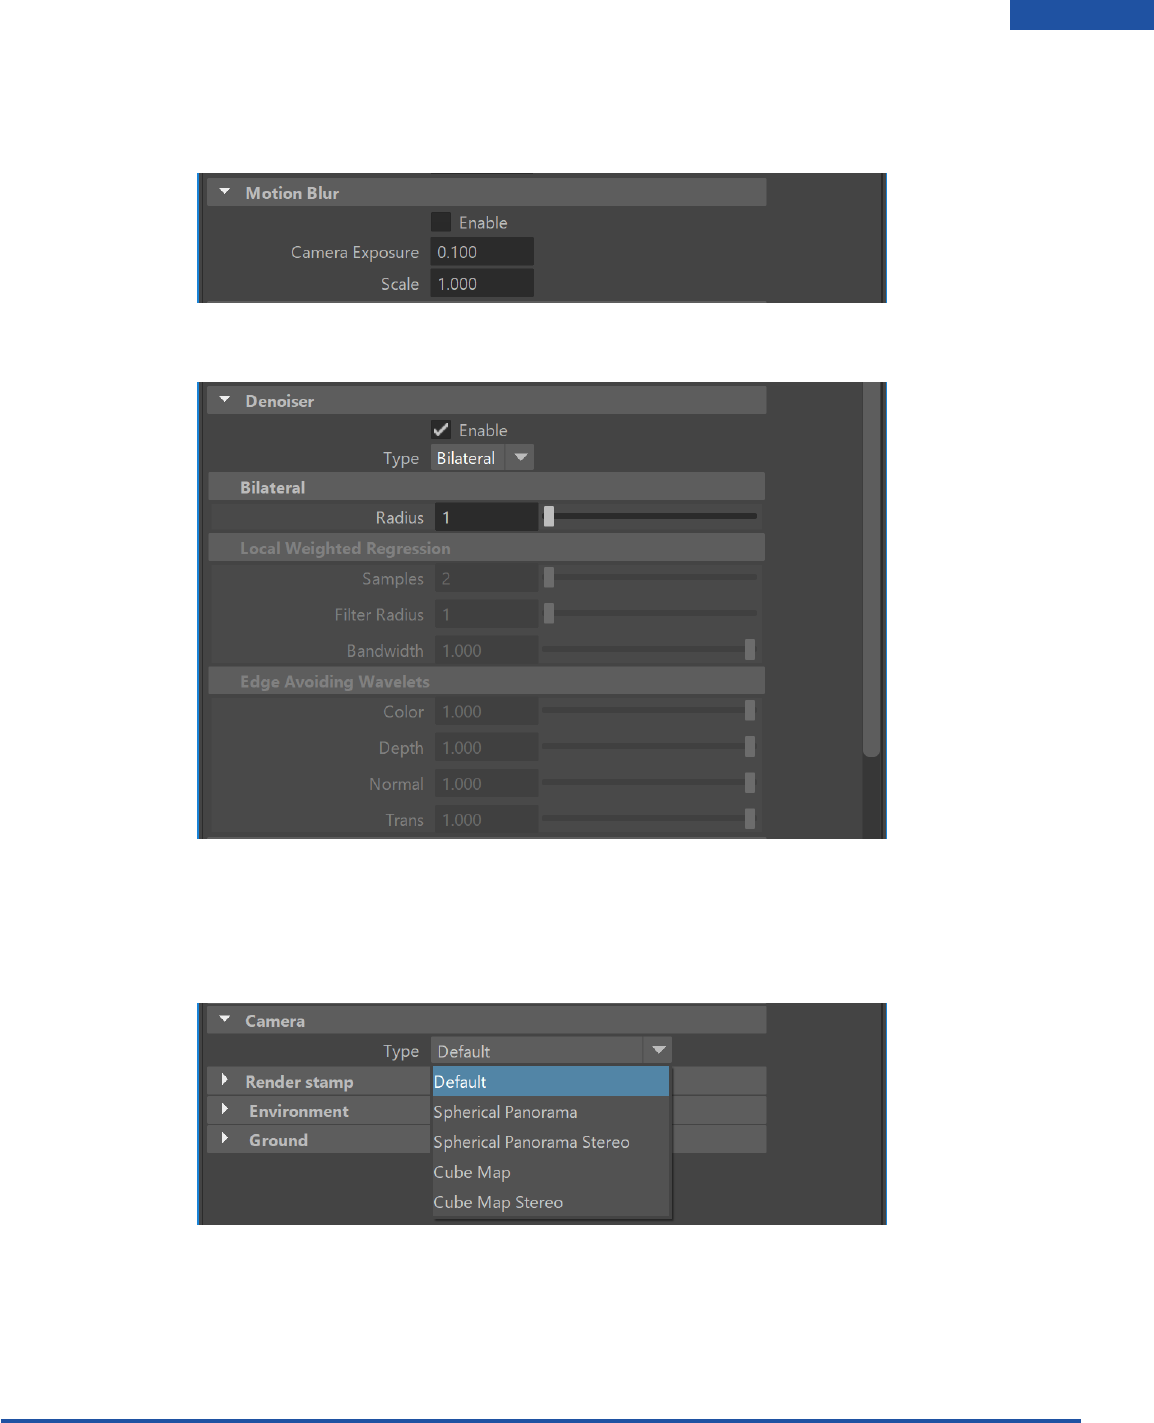
Motion Blur
Radeon ProRender’s Motion Blur will make object appear as if it’s in motion, in stills as well as animations.
Denoiser
Camera
When working with cameras We have a couple options to choose from. The options can be found in
Render Settings under the Camera section.
Radeon ProRender plug-in for Maya User Guide
©2018 Advanced Micro Devices, Inc. All rights reserved.
USER INTERFACE
21
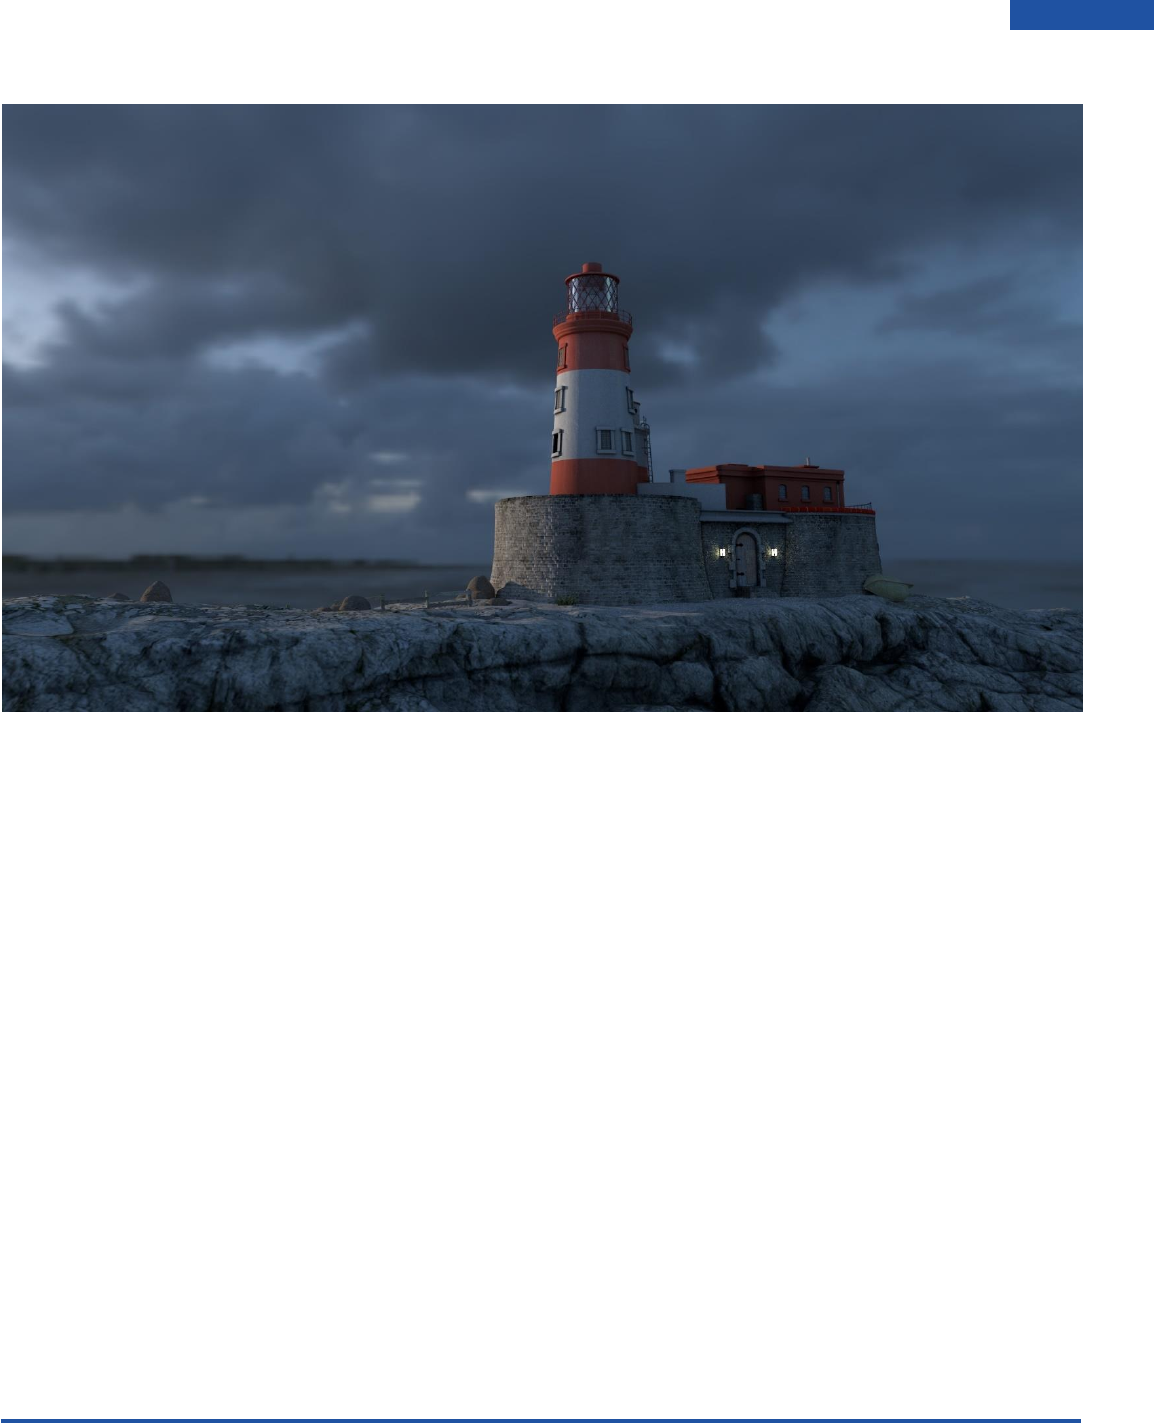
Default
Radeon ProRender plug-in for Maya User Guide
©2018 Advanced Micro Devices, Inc. All rights reserved.
USER INTERFACE
22
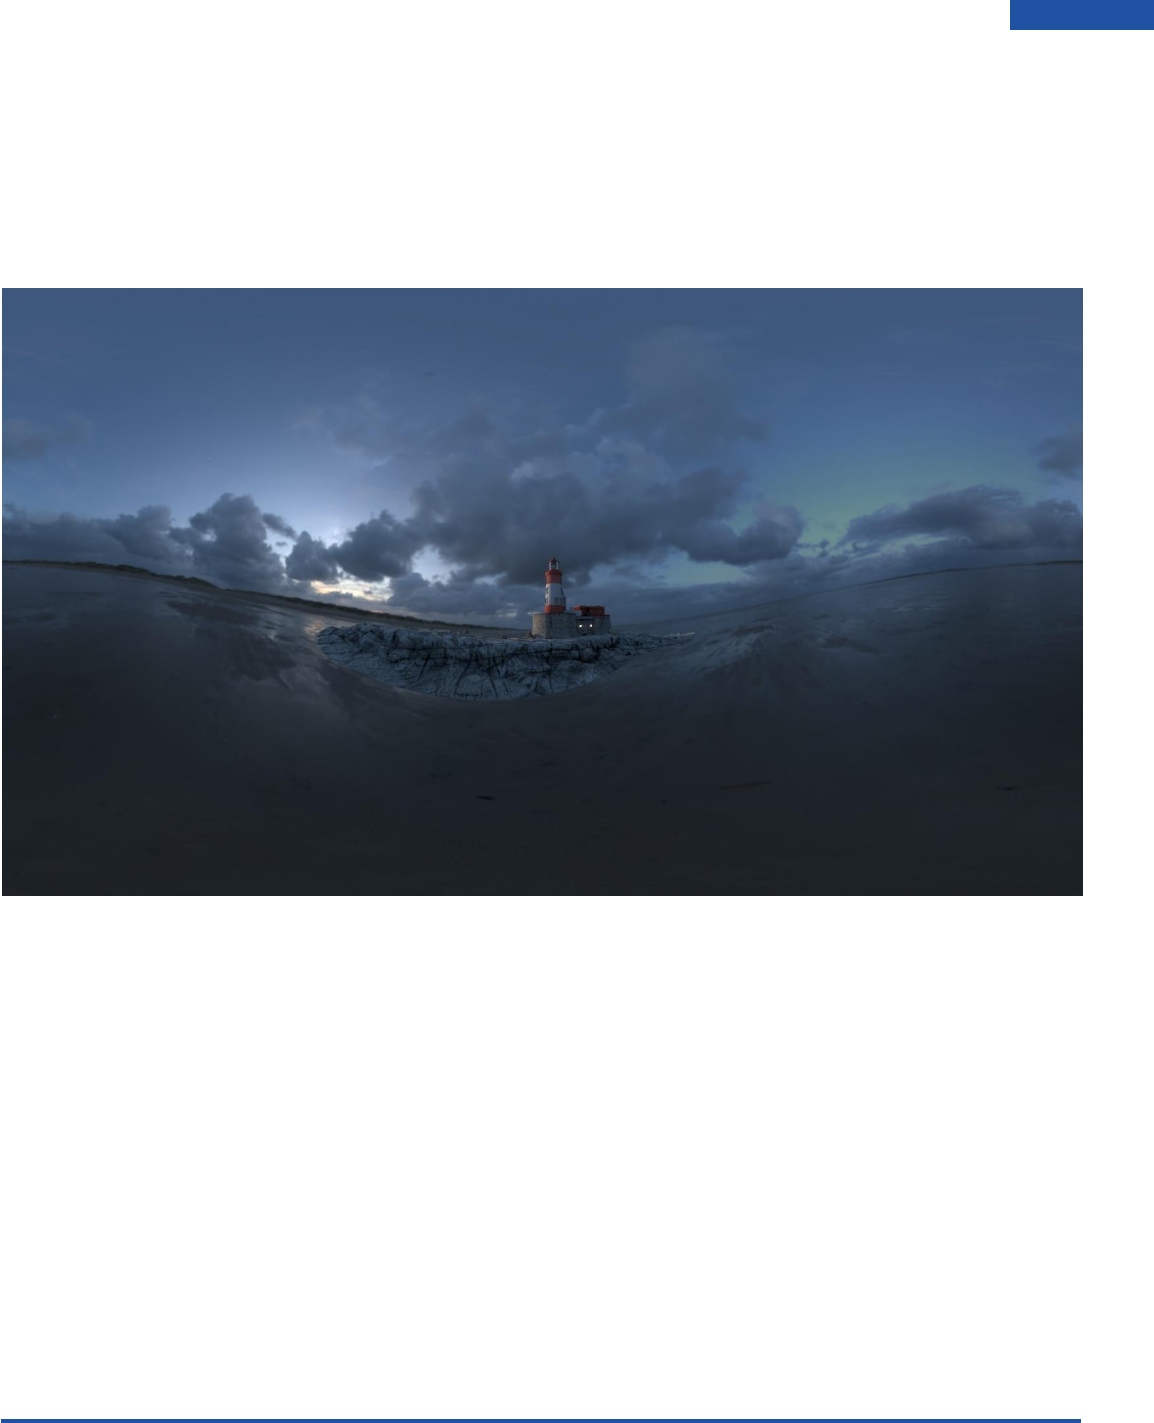
Spherical Panorama
Spherical Panorama will render a 360-degree image that wraps around your scene. This can be used to
create a 360 video of your scene that can be uploaded to YouTube and viewed. Sphere mapping (or
spherical environment mapping) is a type of reflection mapping that approximates reflective surfaces
by considering the environment to be an infinitely far-away spherical wall. This environment is stored as
a texture depicting what a mirrored sphere would look like if it were placed into the environment [1] .
Radeon ProRender plug-in for Maya User Guide
©2018 Advanced Micro Devices, Inc. All rights reserved.
USER INTERFACE
23
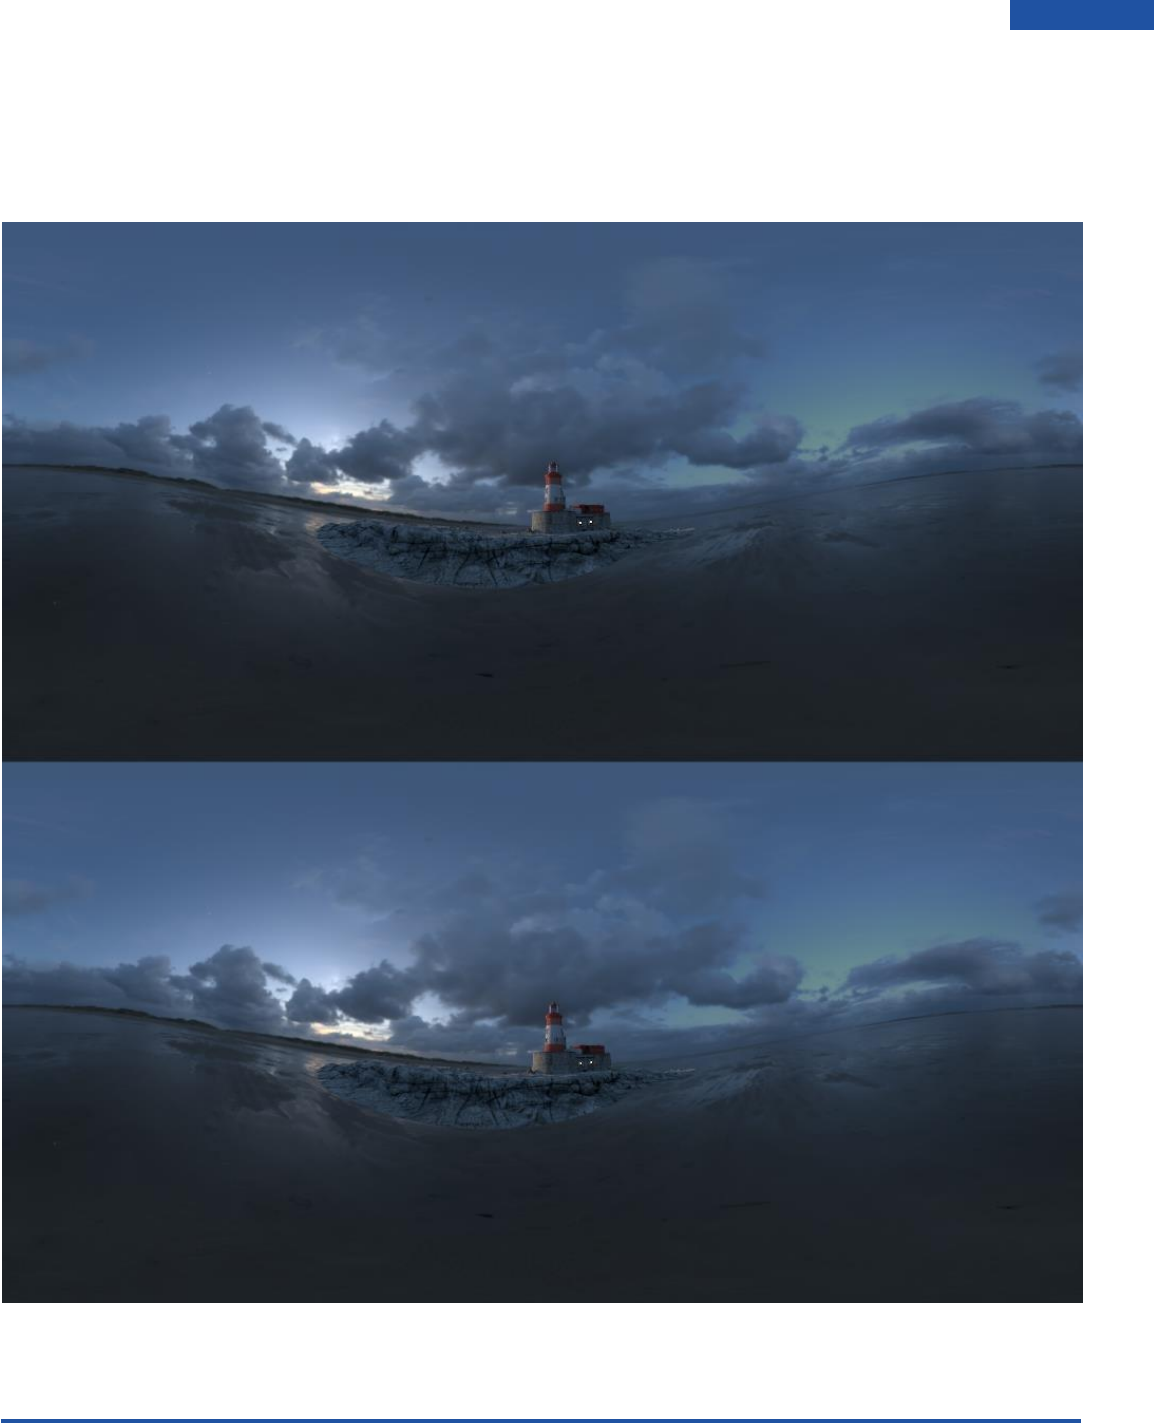
Spherical Panorama Stereo
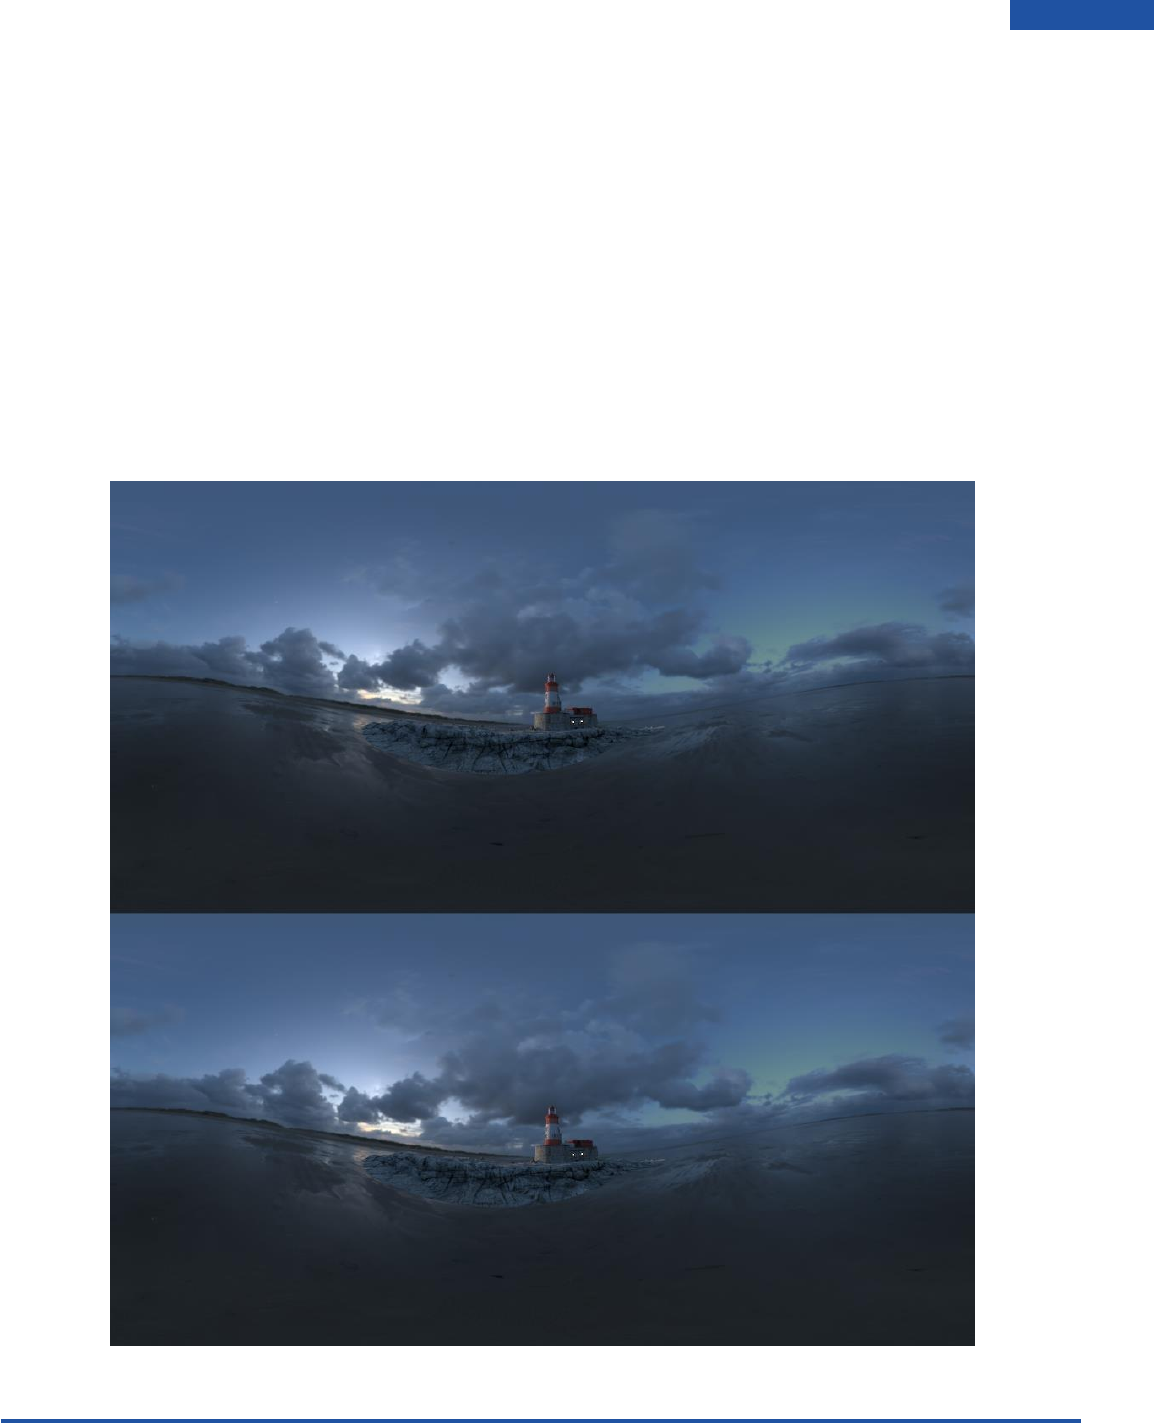
Spherical Panorama Stereo will be used to create 360 degree images to be used for VR. As you can see
the Image is split in two and the reason for this is that it is rendering an image for both the Left and Right
eye. Keep the aspect ratio to 1:1 for square pixels.
Radeon ProRender plug-in for Maya User Guide
©2018 Advanced Micro Devices, Inc. All rights reserved.
USER INTERFACE
24
Cube Map
For cube mapping you will need to times your resolution width by 6 to get square pixels e.g: 1k res = 6144
x 1024
Cube Mapping is a method of environment mapping that uses the six faces of a cube as the map shape.
The environment is projected onto the sides of a cube and stored as six square textures, or unfolded into
six regions of a single texture.
In most cases, cube mapping is preferred over the older method of sphere mapping because it eliminates
many of the problems that are inherent in sphere mapping such as image distortion, viewpoint
dependency, and computational inefficiency. Also, cube mapping provides a much larger capacity to
support real-time rendering of reflections relative to sphere mapping because the combination of
inefficiency and viewpoint dependency severely limit the ability of sphere mapping to be applied when
there is a consistently changing viewpoint.
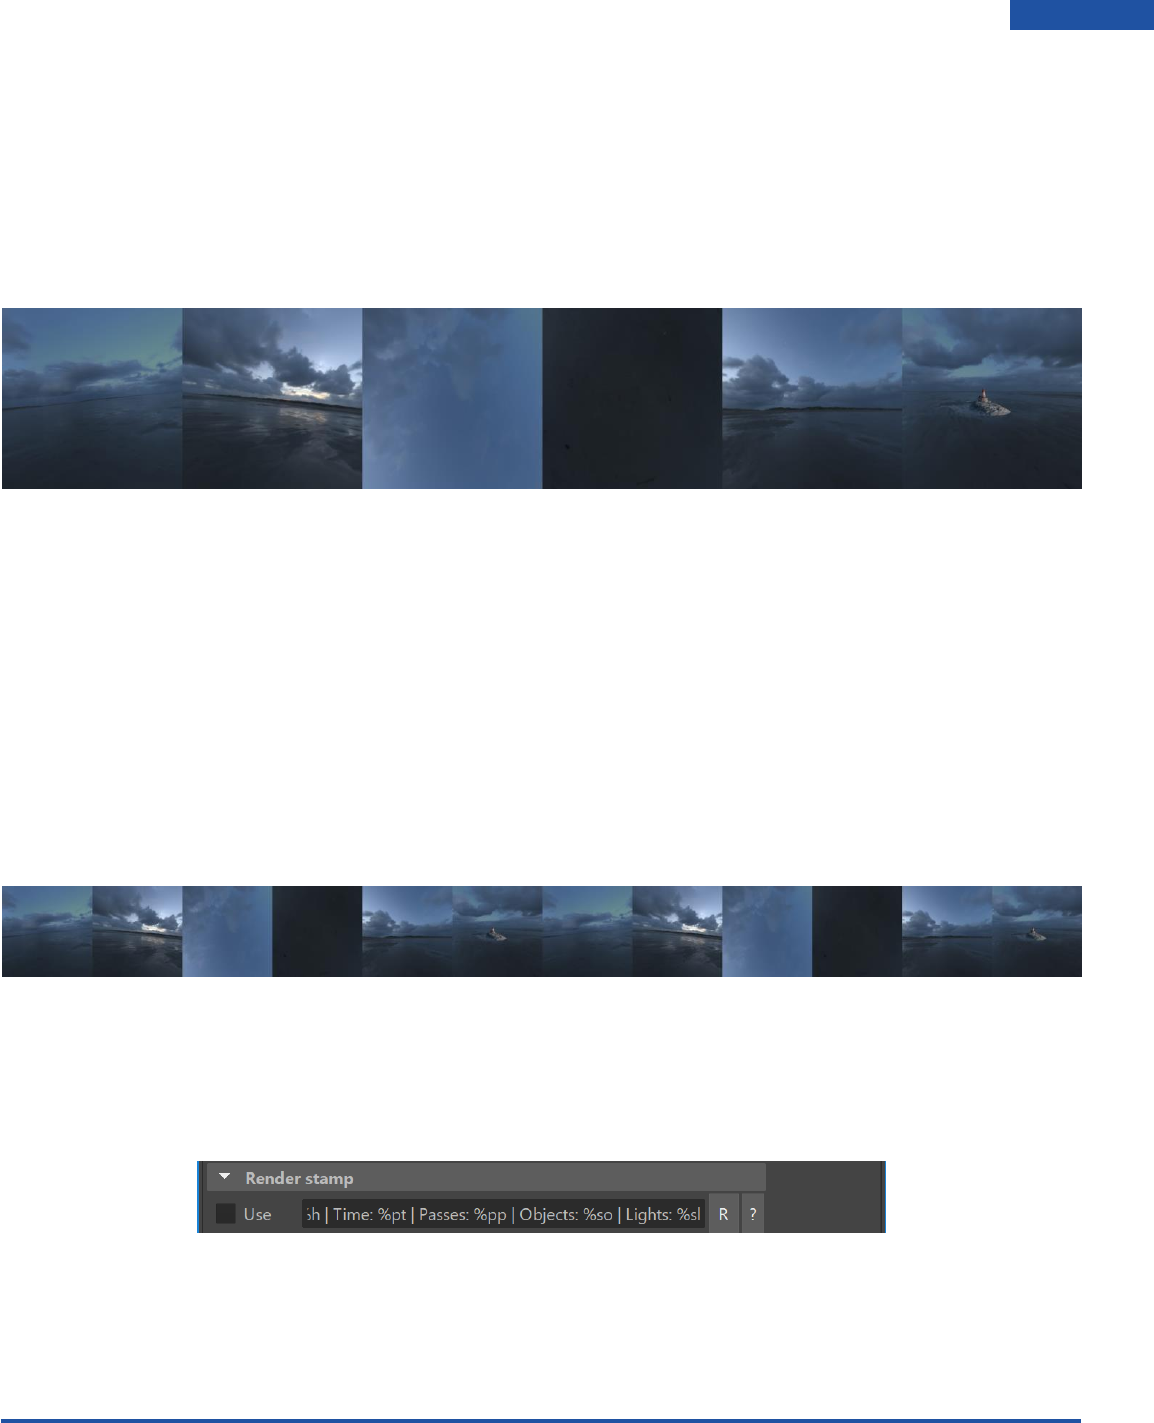
Cube Map Stereo
This is pretty much the same as cube mapping except that it splits the render into 12 blocks, 6 for the
Left eye and 6 for the Right. This is for VR. You will need to times your resolution width by 12 to get
square pixels. 1k res = 12288 x 1024.
Render Stamp
This will create stamp on final rendered image showing details of hardware and Maya scene information.

Radeon ProRender plug-in for Maya User Guide
©2018 Advanced Micro Devices, Inc. All rights reserved.
USER INTERFACE
25
Environment
There are 2 options for Environments: Image Based Lighting and Sky.
Image Based Lighting
IBL is essential for creating real world lighting. It is basically a spherical image (HDR) that is projected onto
a spherical object as your environment to simulate real world lighting.
Enable the IBL by clicking on the create button in the Environment section in Render Settings.
On the right-hand side, click on the Attribute Editor. Click on the file path and locate your HDRI file go
ahead and load it into your scene.
Radeon ProRender plug-in for Maya User Guide
©2018 Advanced Micro Devices, Inc. All rights reserved.
USER INTERFACE
26
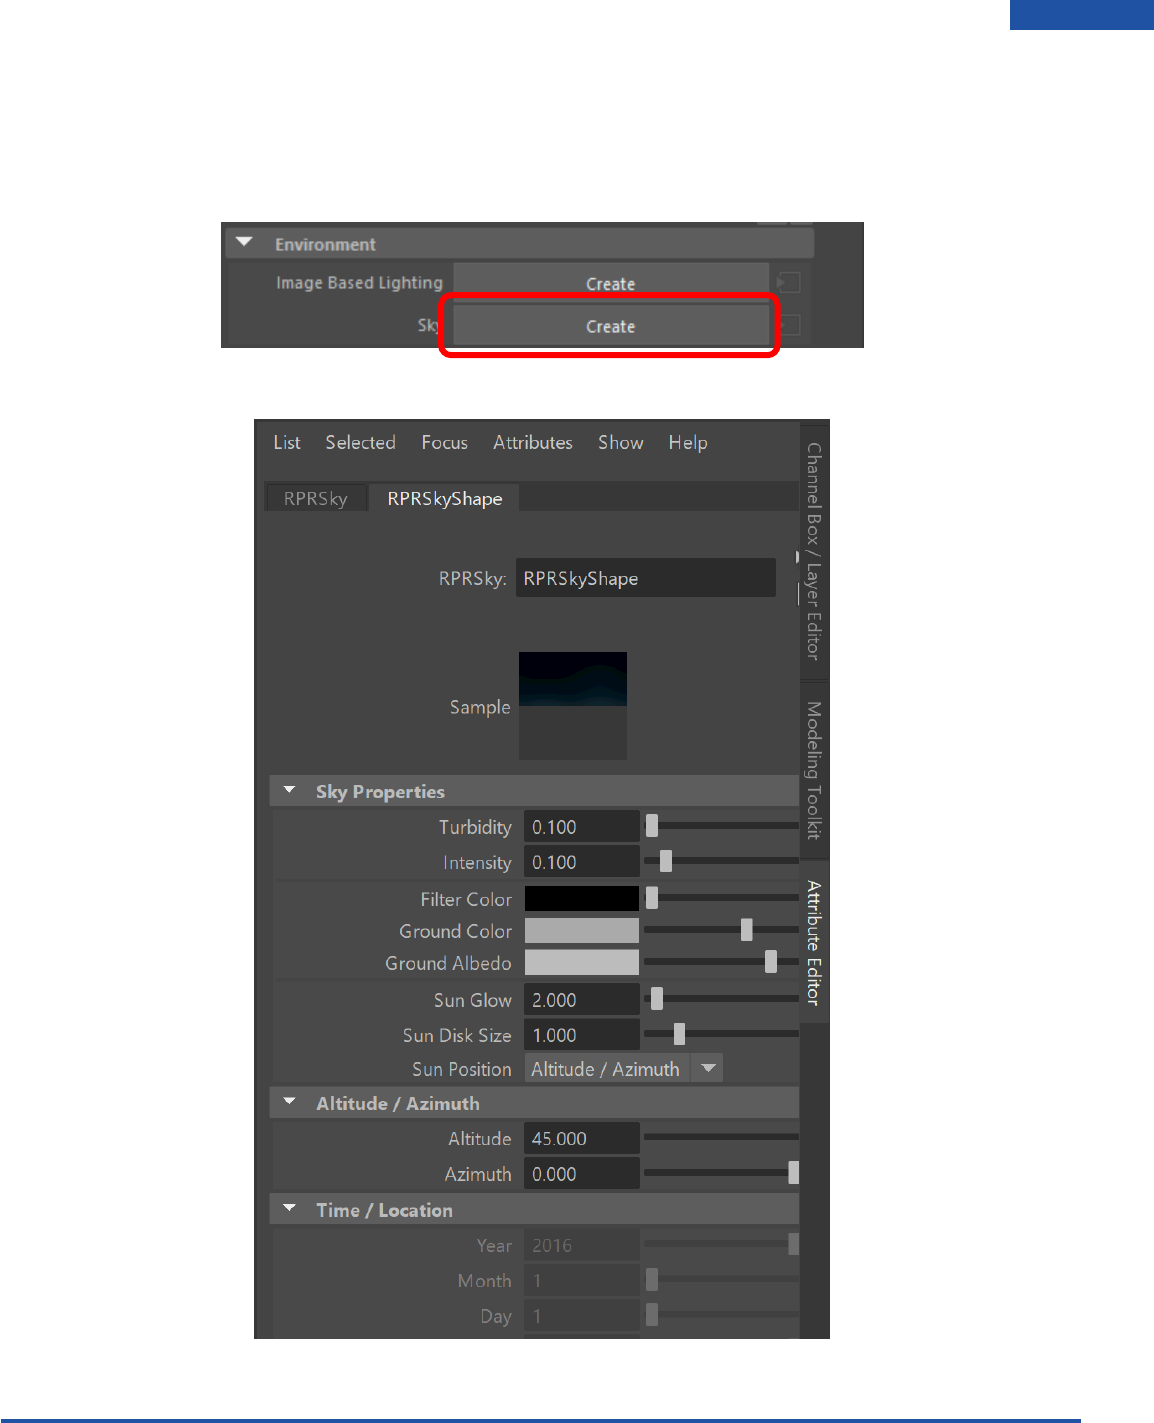
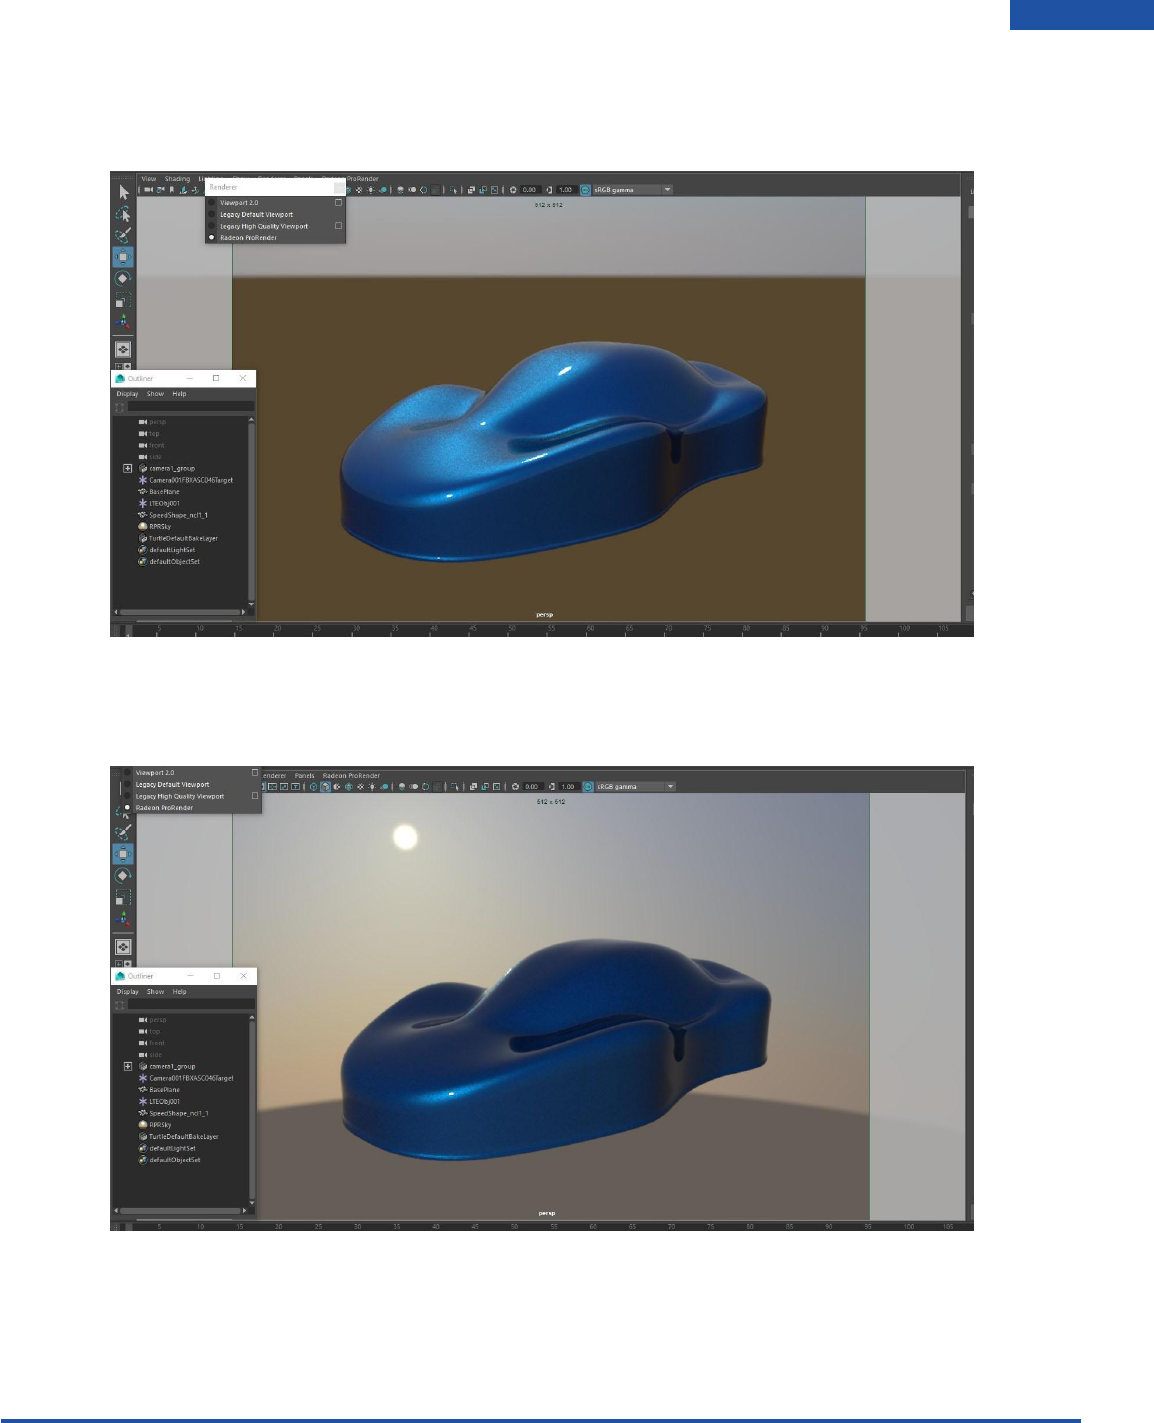
Sky
Sky is designed to enable physically plausible daylight simulations and accurate renderings of daylight
scenarios. Under the Environment section in the Render Settings, create the Sky by clicking on the
Create button (same as IBL).
With the RPRSky selected, look in the attribute editor, you will see all the sky properties.
Radeon ProRender plug-in for Maya User Guide
©2018 Advanced Micro Devices, Inc. All rights reserved.
USER INTERFACE
27
Turbidity
Increasing this value will simulate how much dust is in the air by changing the color of the sky to orange.
Intensity
This will raise or lower the intensity of the Sky.
Filter Color
This is used to add a tint of color to you Sky. By clicking on the color box, you can select a color you wish
to tint the Sky with.
Radeon ProRender plug-in for Maya User Guide
©2018 Advanced Micro Devices, Inc. All rights reserved.
USER INTERFACE
28
Ground Color
This is used to select the color for the ground by also clicking on the color box and picking a color.
Sun Glow
Changing this attribute will increase the size of the Glowing halo around the sun disk.
Radeon ProRender plug-in for Maya User Guide
©2018 Advanced Micro Devices, Inc. All rights reserved.
USER INTERFACE
29
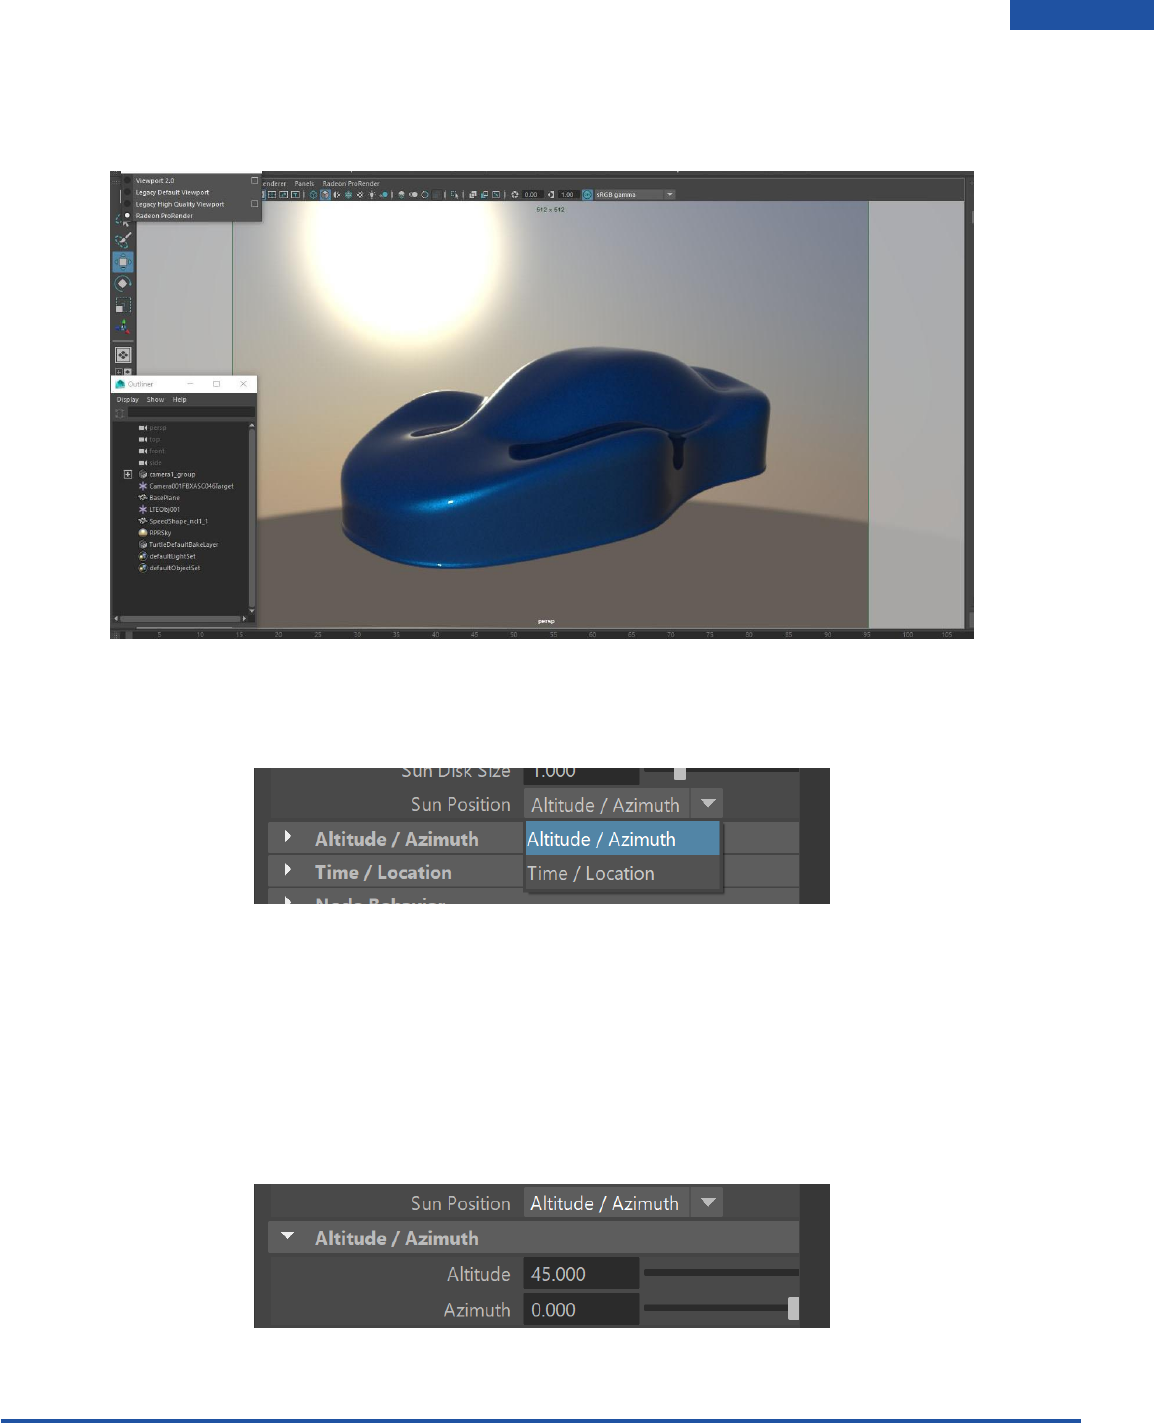
Sun Disk Size
This attribute is used to increase the size of the sun.
Sun Position
In this drop down, there are 2 options to control the Sky model:
So far, the settings are on the Altitude/Azimuth setting. By switching to Time/Location, that the
Time/Location section is available and the Altitude/Azimuth section is now greyed out and is no longer
available.
Altitude and Azimuth
These two attributes determine where the Sun is in the Sky. You will notice that if you lower or raise the
altitude value you will be able to simulate a sunset or sunrise.
Radeon ProRender plug-in for Maya User Guide
©2018 Advanced Micro Devices, Inc. All rights reserved.
USER INTERFACE
30
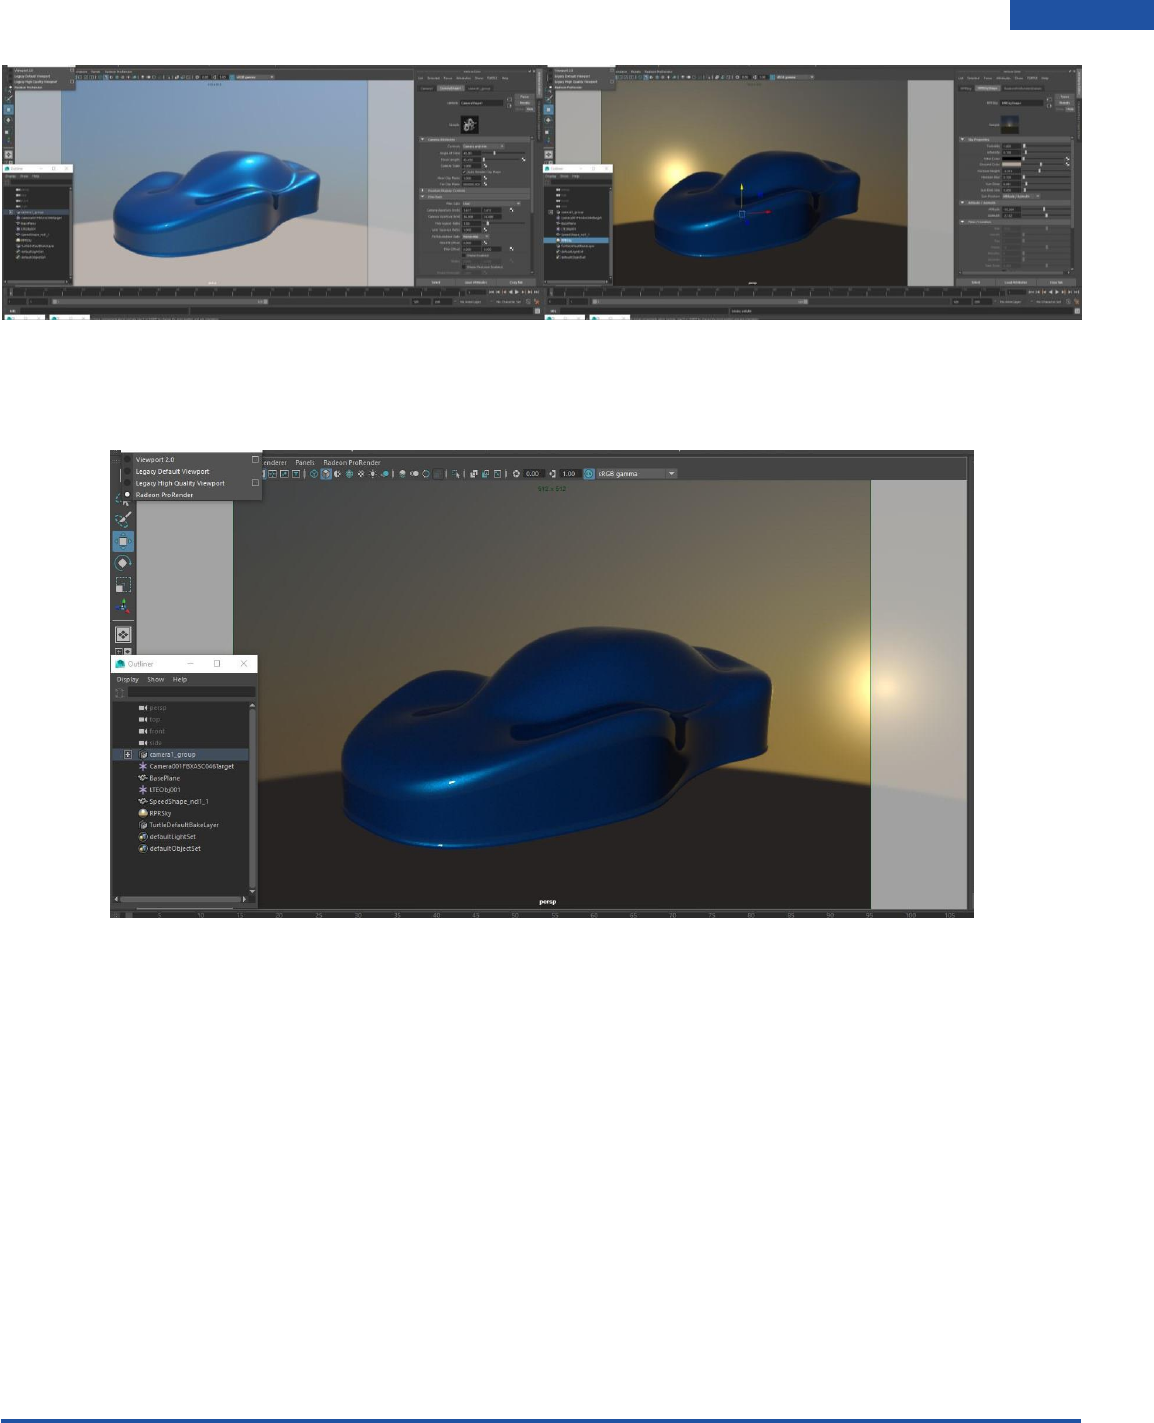
Azimuth
This attribute will change the placement of the sun by rotating the sun on the Y axis in the scene.
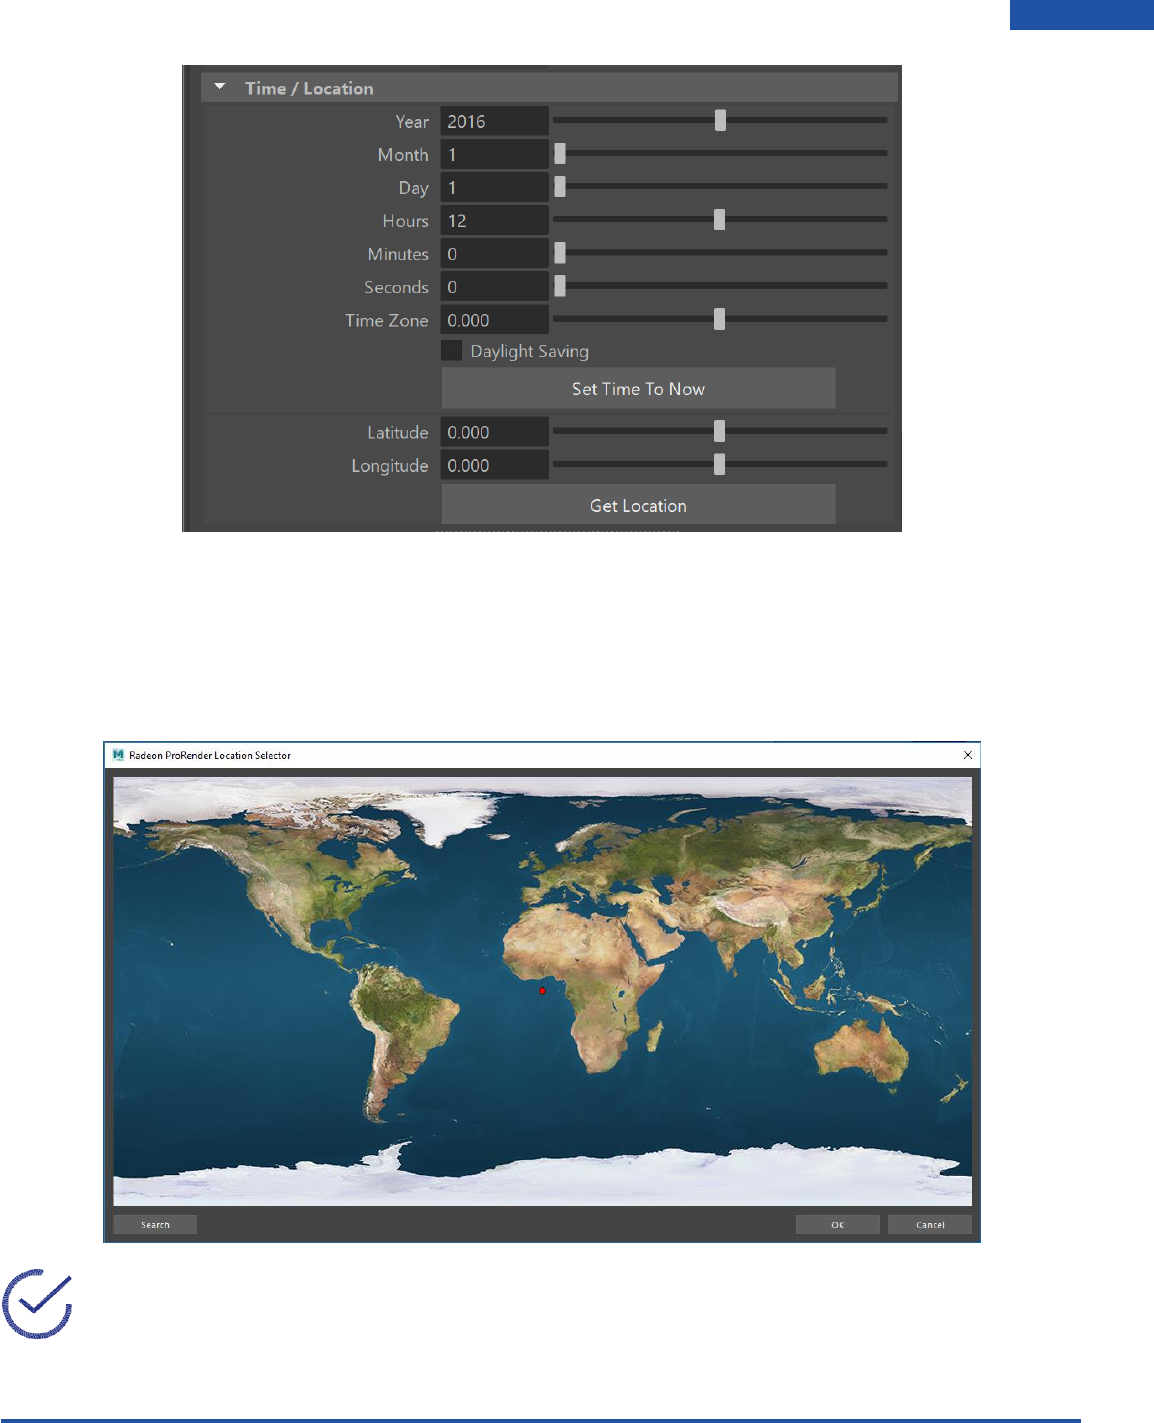
Time/Location
This used to create lighting for any place in the world at any given time. To control the Sun position, the
user has a set of options like Hours, Minutes, Seconds, Month, day, year, latitude and longitude, that
allow the user to simulate a precise sun position.
Tick the checkbox if you would like to enable Daylight savings. We are also able to automatically Set
Time To Now simply by click on the button. It will use the Time from your System Clock and set it to that.
Latitude and Longitude work very like Altitude and Azimuth in that they determine where the sun is in
the sky at any location.
Radeon ProRender plug-in for Maya User Guide
©2018 Advanced Micro Devices, Inc. All rights reserved.
USER INTERFACE
31
Get Location
Clicking on the Get Location button will display a map to pick any location on the planet.
1. You can use the mouse to pick a place anywhere on the map. You will create a red dot.
2. You can use the search option to more precisely find a certain city in any country.
Note: Most of the attributes for Sky are keyable for an artist to animate a full day cycle.
Radeon ProRender plug-in for Maya User Guide
©2018 Advanced Micro Devices, Inc. All rights reserved.
USER INTERFACE
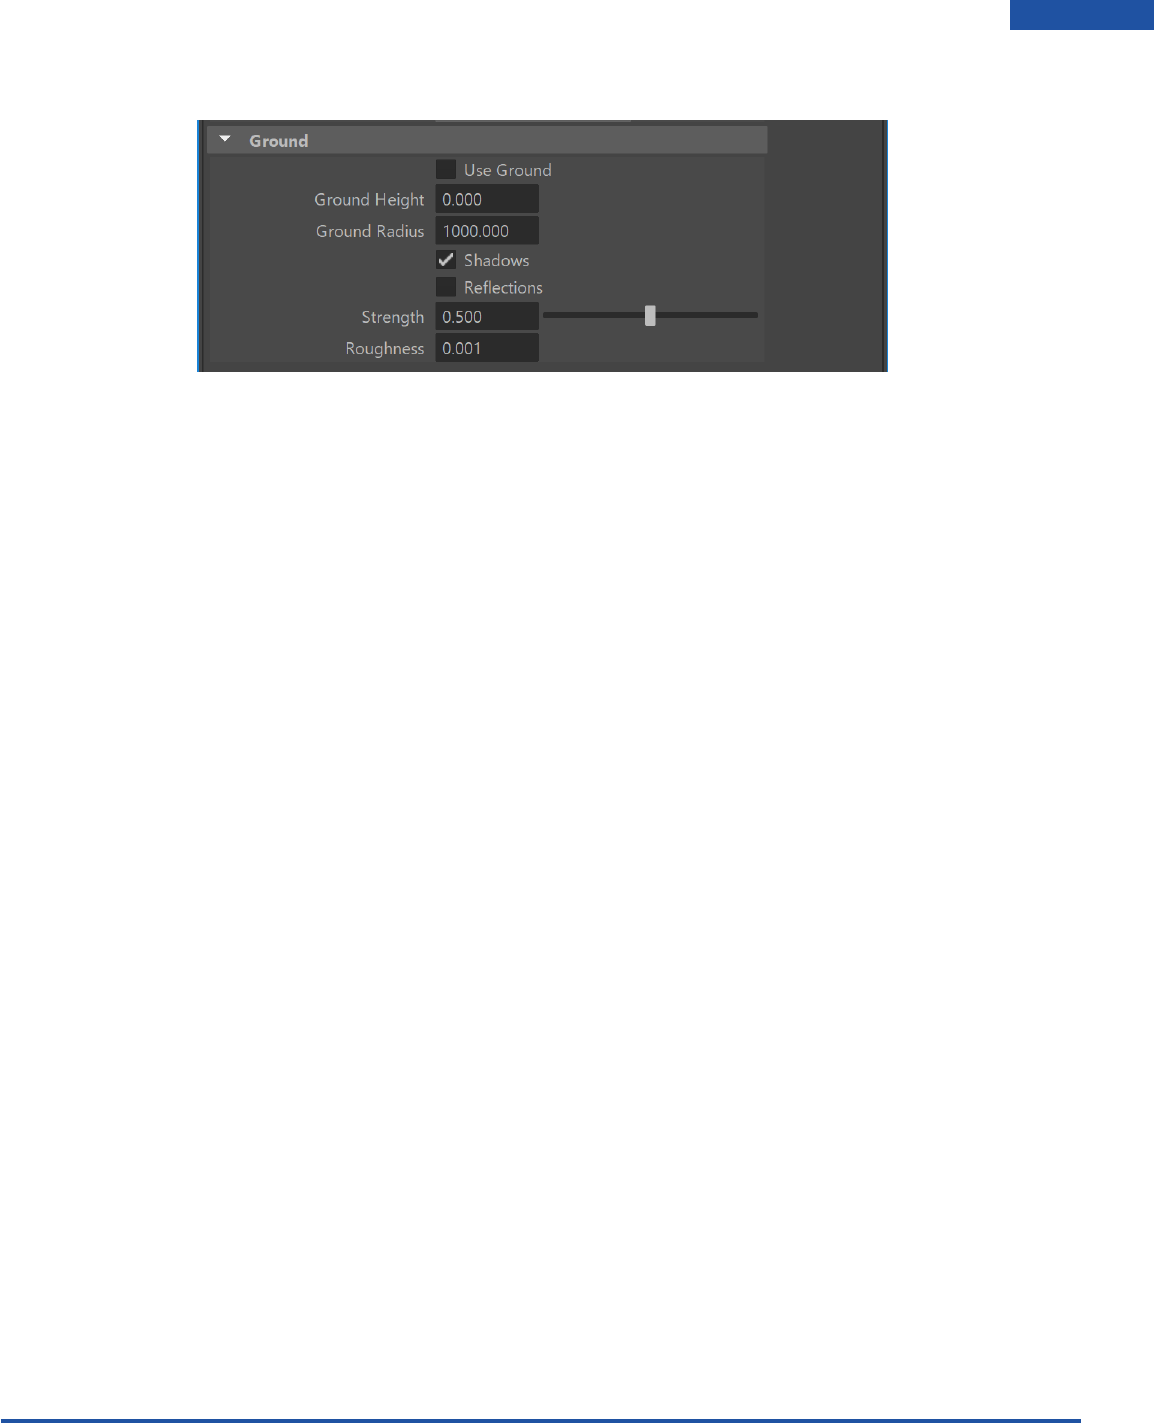
32
Ground
Radeon ProRender plug-in for Maya User Guide
©2018 Advanced Micro Devices, Inc. All rights reserved.
USER INTERFACE
33
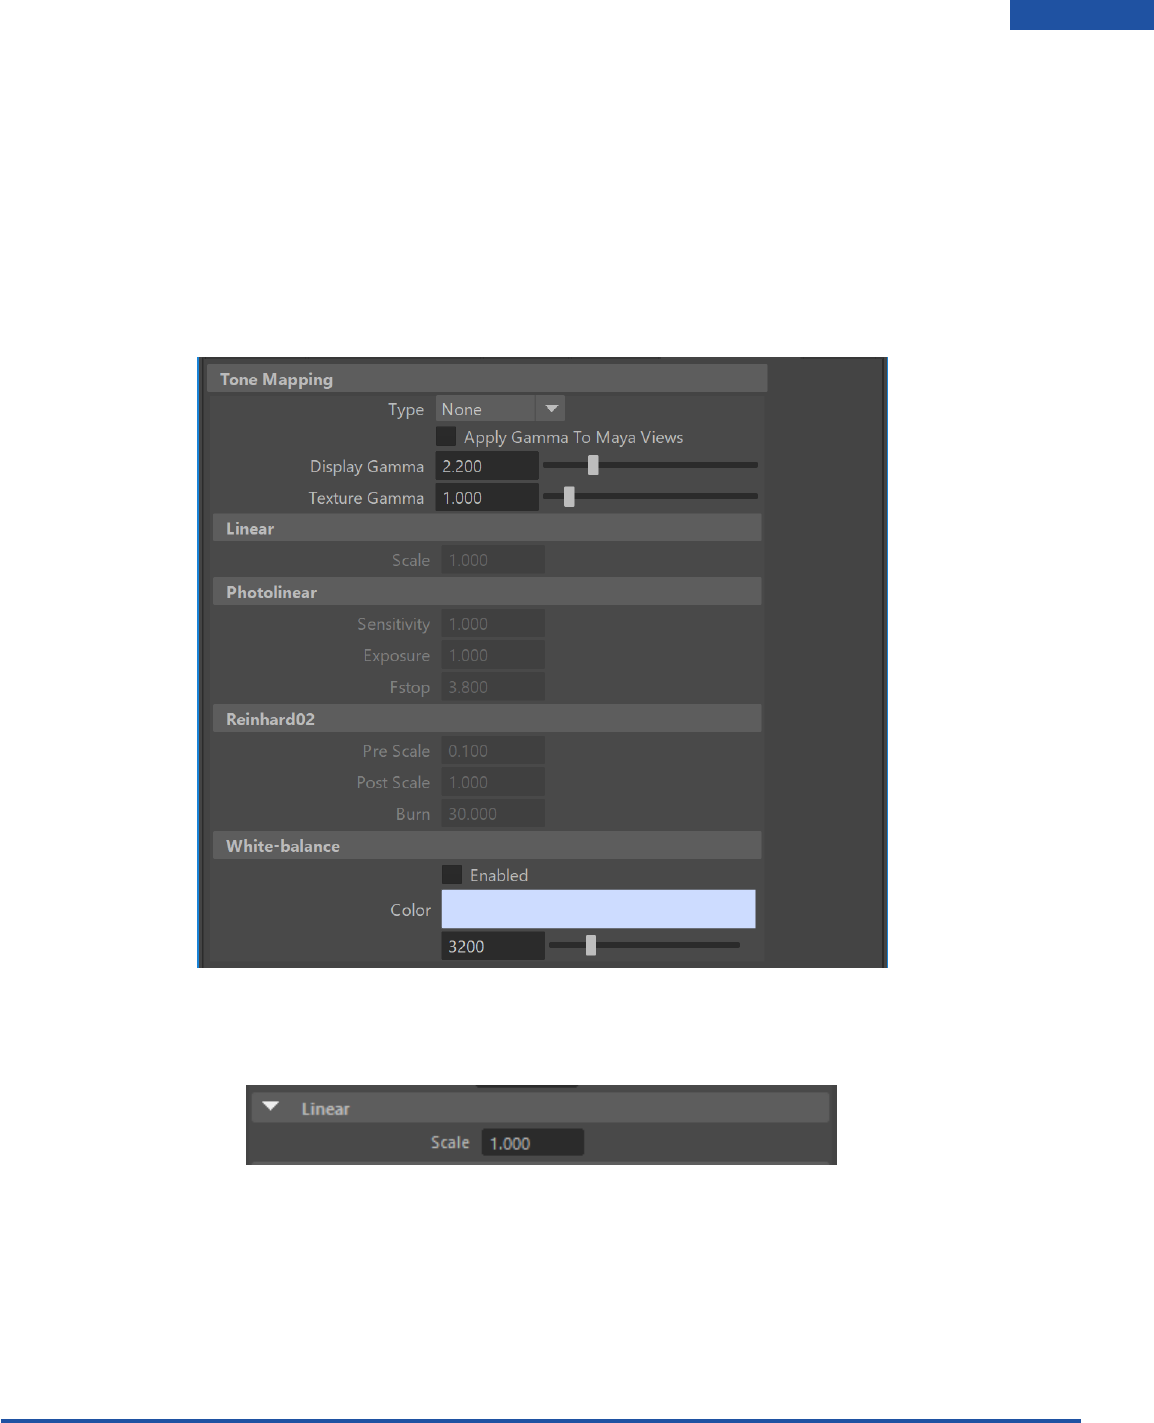
Tone Mapping
Tone mapping is a technique used in image processing and computer graphics to map one set of colors
to another to approximate the appearance of high-dynamic-range images in a medium that has a more
limited dynamic range.
With Radeon ProRender we can use the Tone Mapping section in the Render Settings to select between
five different tone mapping types: Linear, Photolinear, Autolinear, Max White and Reinhard02. You can
also adjust display and texture gamma.
Linear
Raise or lower the brightness of the scene by increasing or decreasing the Scale value.
Radeon ProRender plug-in for Maya User Guide
©2018 Advanced Micro Devices, Inc. All rights reserved.
USER INTERFACE
34
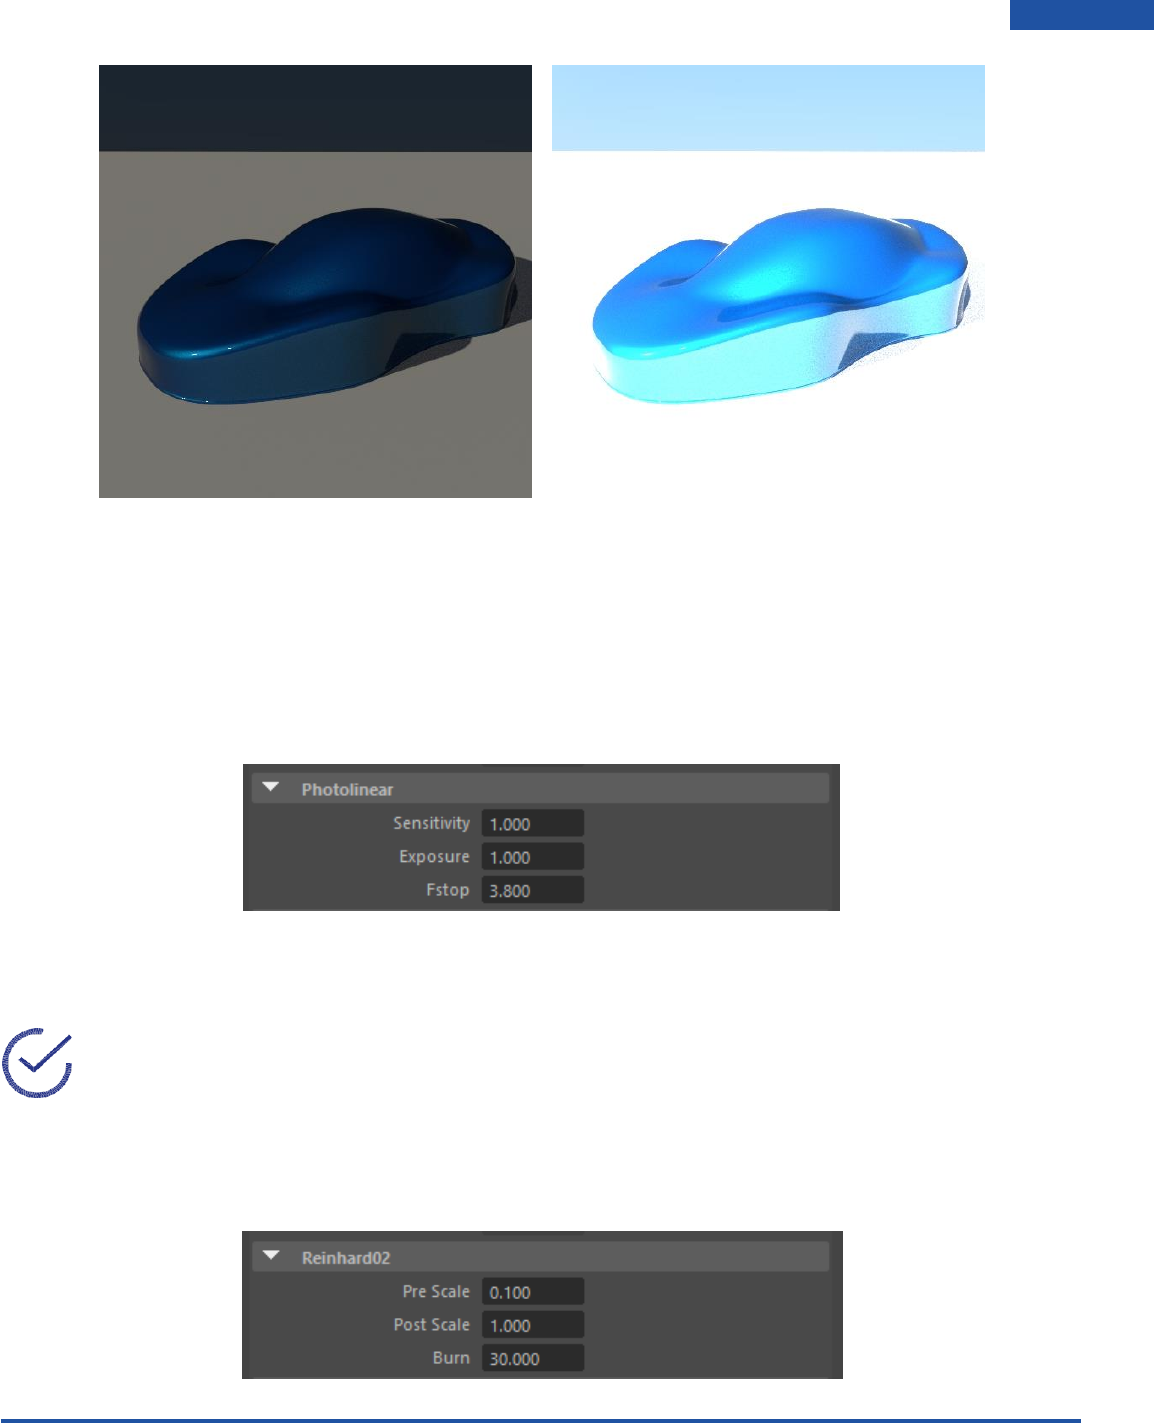
Photolinear
This is based on real-life camera settings. ISO is film speed – the higher the value, the more light is let
into the image. F-Stop is aperture width, and follows regular camera settings – the smaller the number,
the wider the aperture, and the more light will be transmitted to the film. Shutter Speed is how long the
shutter stays open to let in light, also known as exposure.
Reinhard02
This is aimed at adapting the high dynamic range of real world lighting to your screen.
Note: It does this by letting you set values for Burn, Post Scale and Pre Scale Pre Scale and Post
Scale work together, this means that if you tweak one, you’ll probably have to tweak the others.
Pre Scale controls the brightness of darker areas (i.e. shadows). Post Scale controls the final brightness
of the image and Burn is used to tweak the brightness of highlights in your image based on its darker
areas.
Radeon ProRender plug-in for Maya User Guide
©2018 Advanced Micro Devices, Inc. All rights reserved.
USER INTERFACE
35
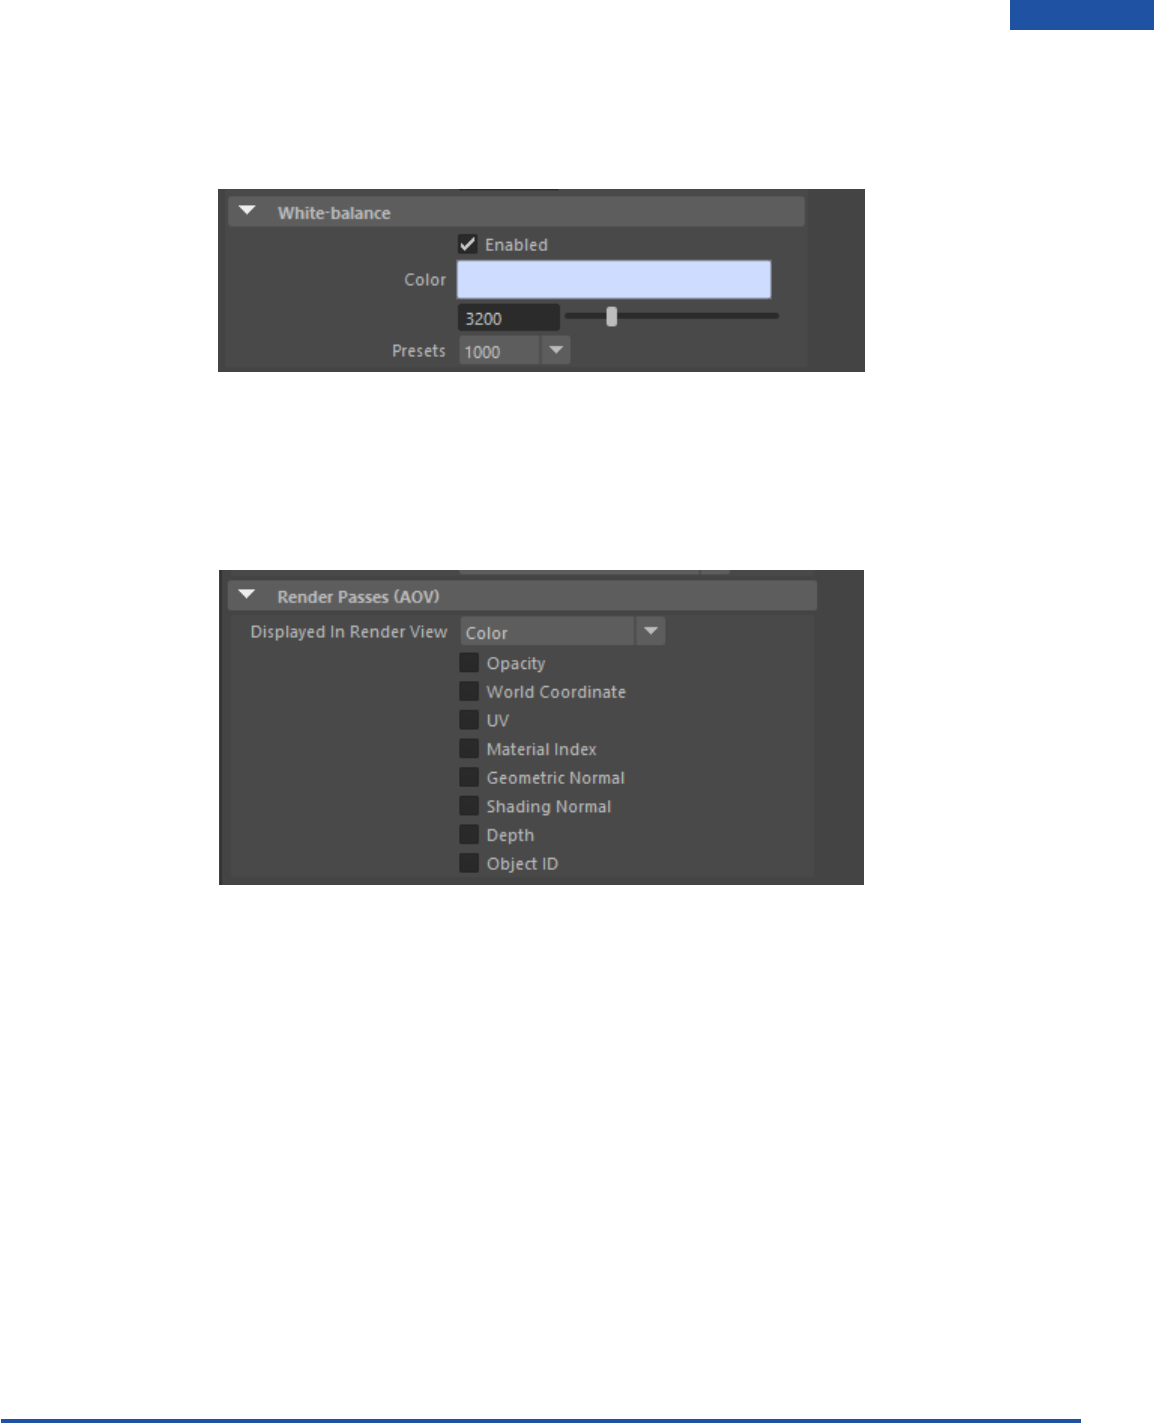
White-balance
White Balance follows the basic settings of a digital camera – lets you set the color temperature of the
light in the image.
Render Passes (AOV)
We are also able to create render passes that can be saved into a single EXR file. This can be done by
firstly checking all the render passes you would like to render in the Render passes tab in your render
settings.
To render a pass through your render viewer or Radeon ProRender viewport you will need to select the
render pass in the Displayed in Render View dropdown menu.
Radeon ProRender plug-in for Maya User Guide
©2018 Advanced Micro Devices, Inc. All rights reserved.
USER INTERFACE
36
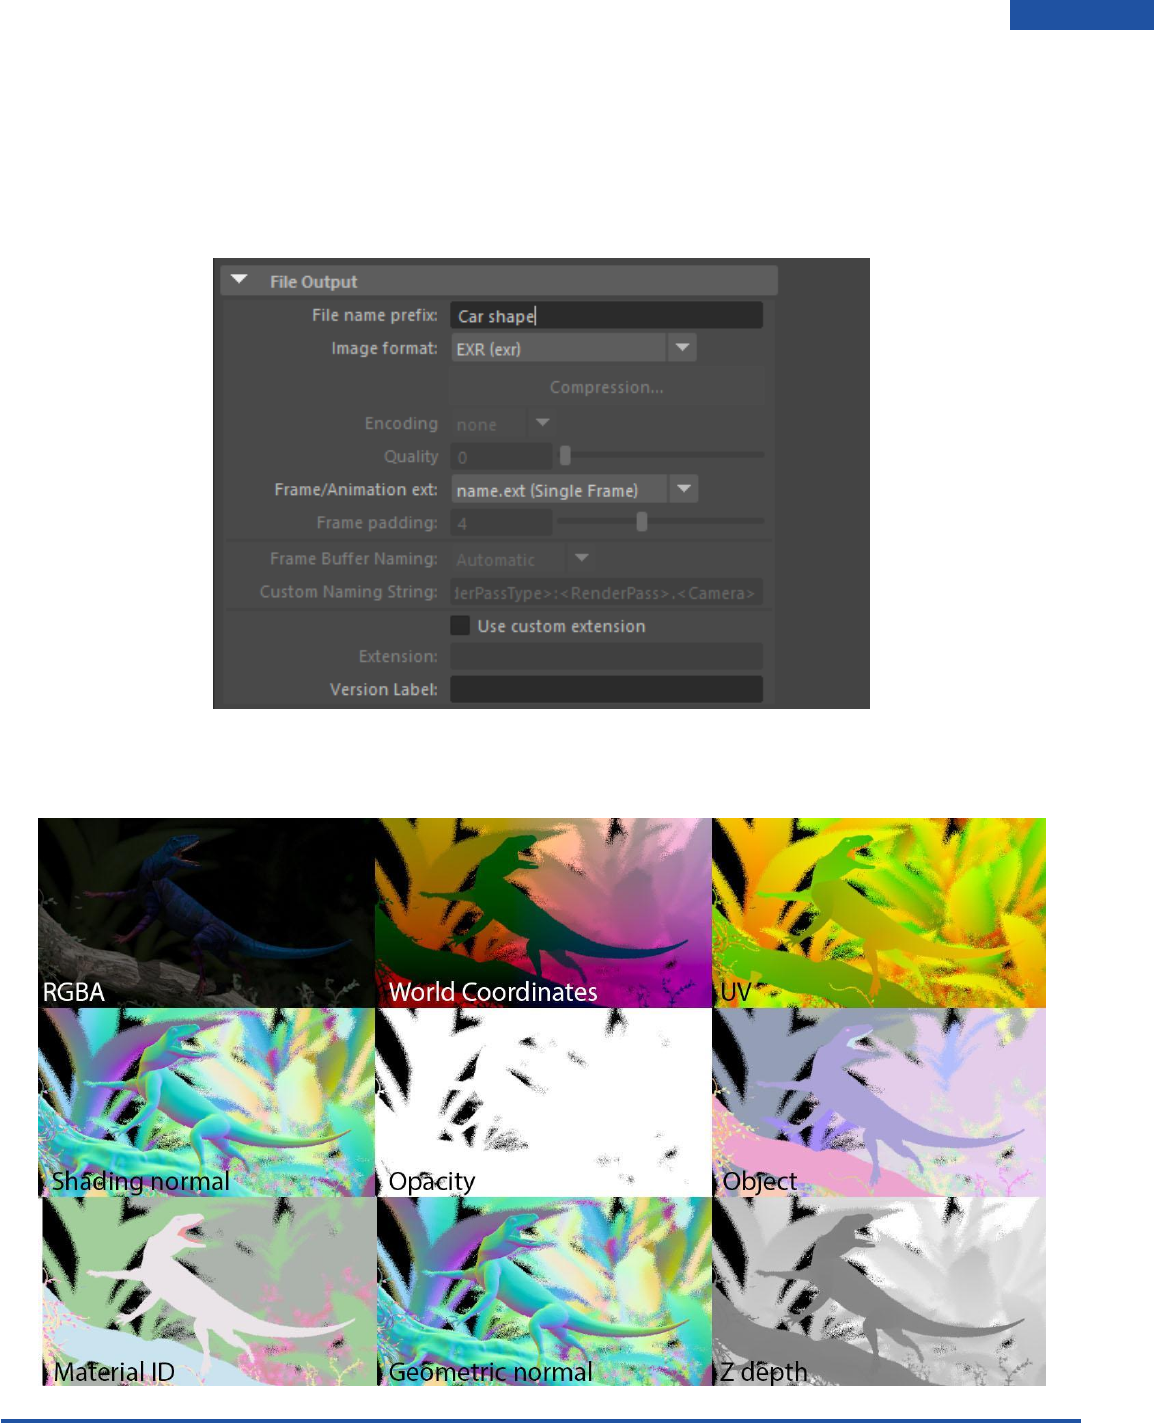
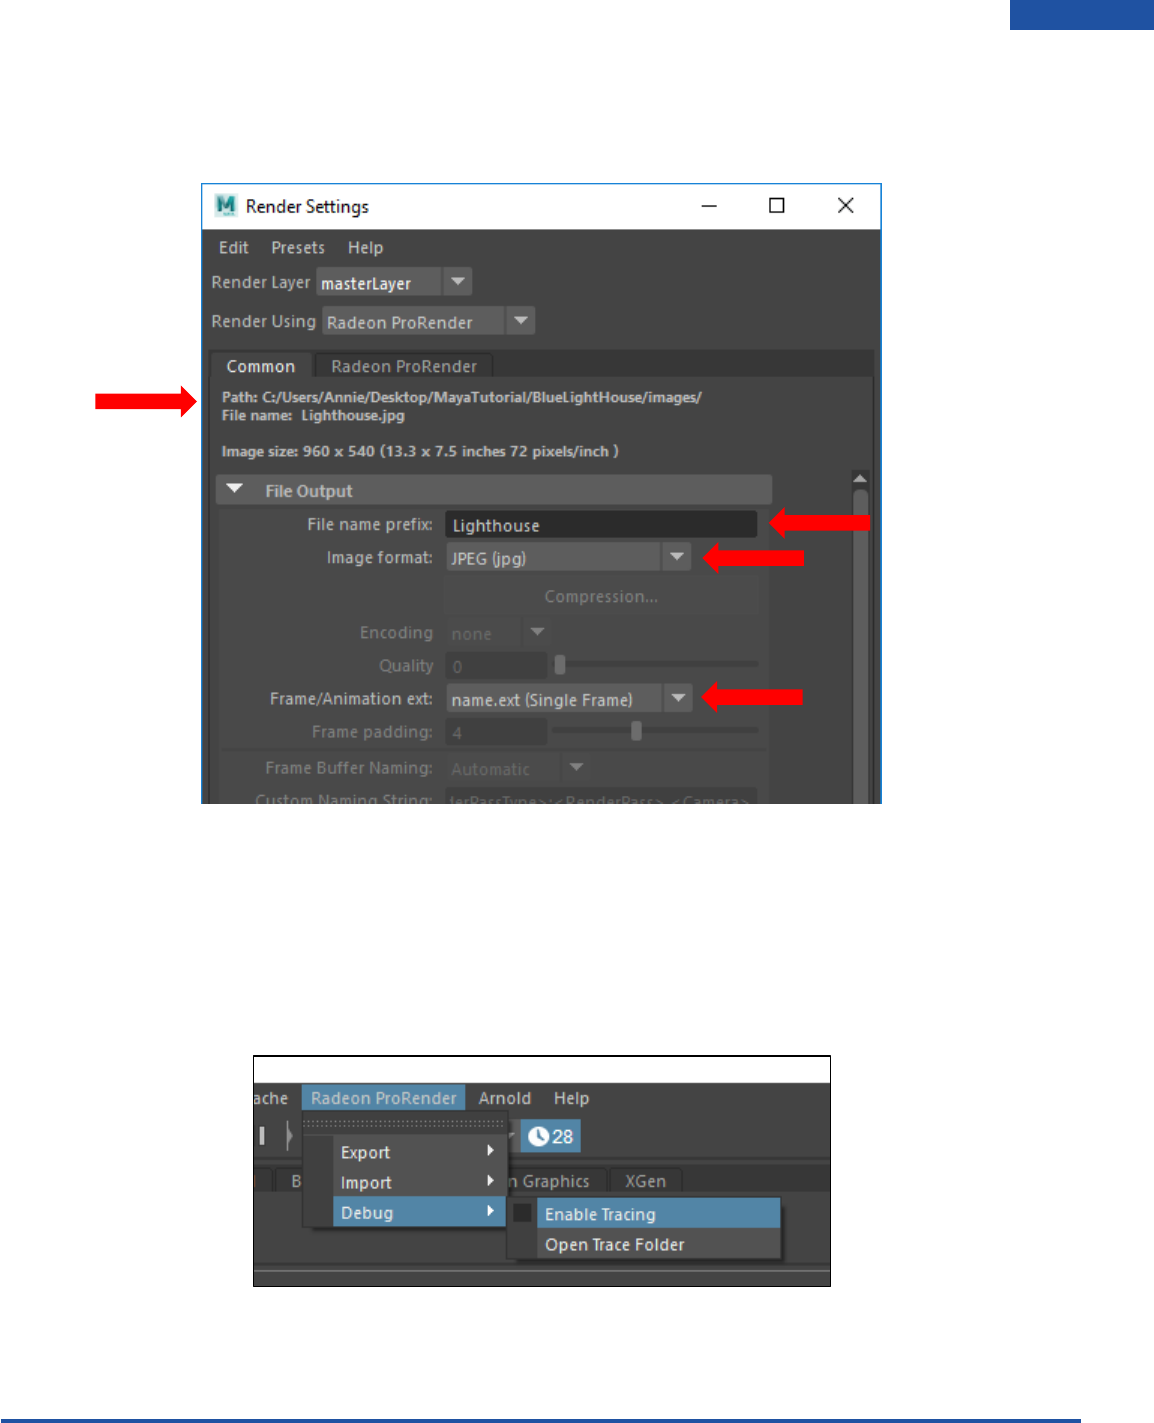
For you to render the output file as an EXR file You will need to follow these steps.
1. Make sure your Project is set correctly.
2. In the render settings, common section locate the file output tab. Give your output file a name by typing it
into the File name prefix box.
3. In the Image format dropdown menu select EXR as the file type.
Initiate a render and once it finishes open it in any image editing software. You will notice that the EXR file
when opened contains multiple layers for all the render passes you have selected.
Radeon ProRender plug-in for Maya User Guide
©2018 Advanced Micro Devices, Inc. All rights reserved.
LIGHTS
37
Working with Lights
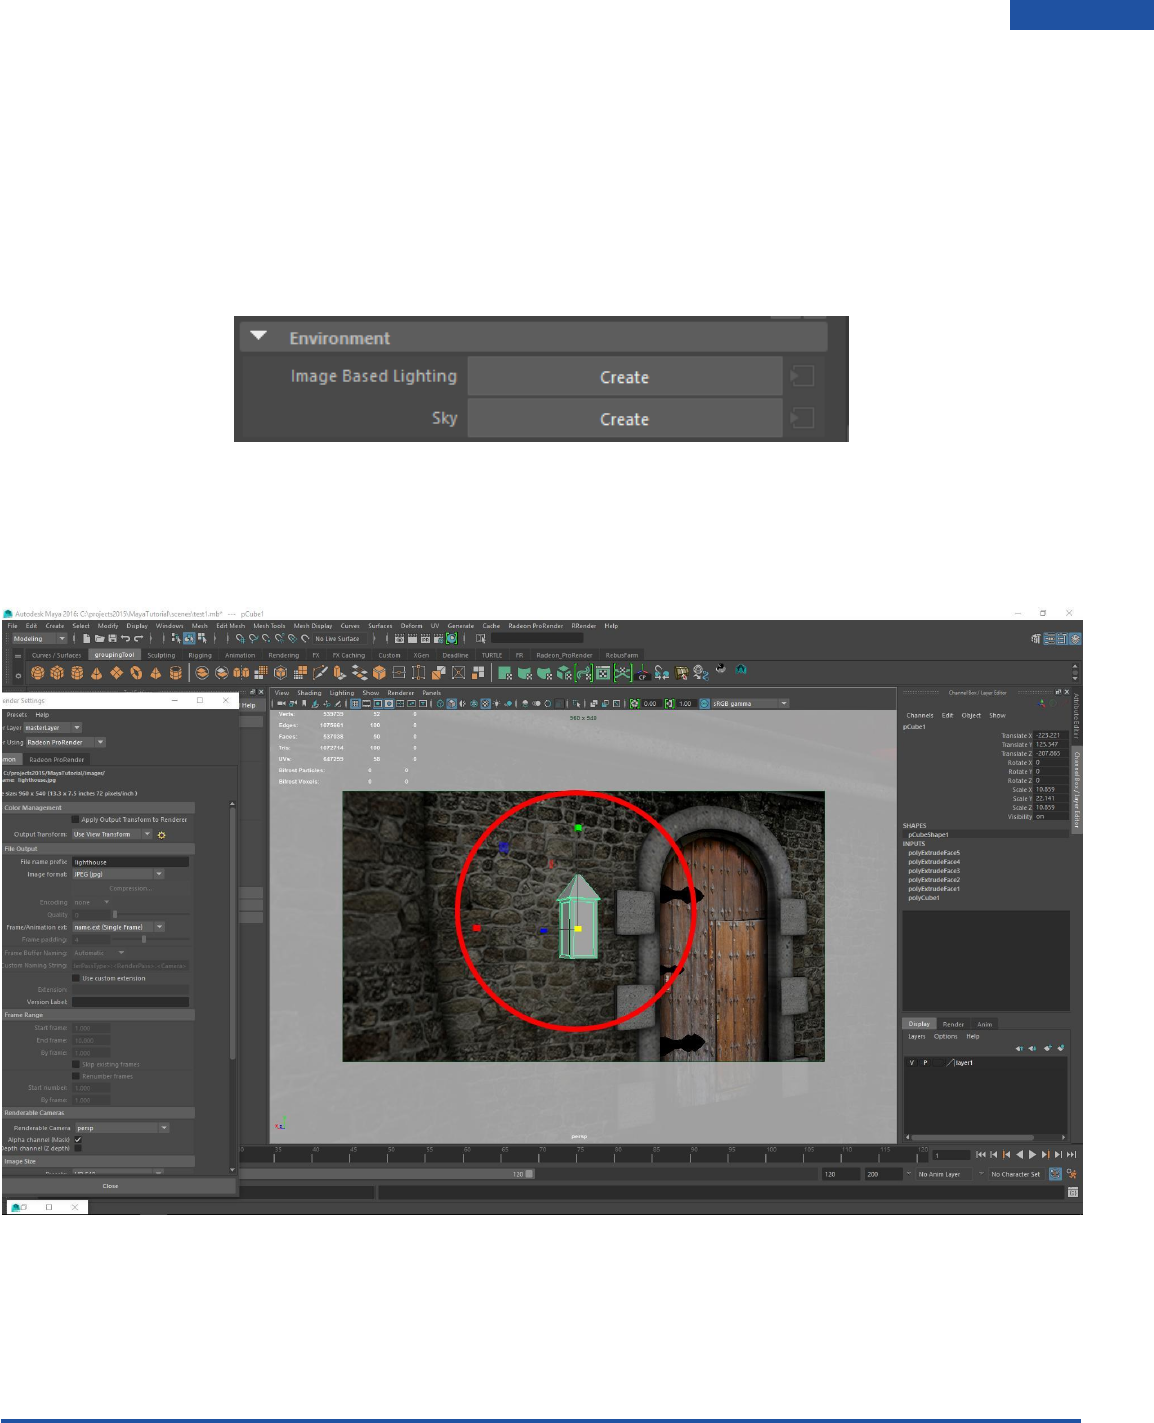
Initial Lighting of a Scene
Go to your Render Settings window, select the Radeon ProRender tab and navigate to the Environment
dropdown section. In the Environment dropdown click on the Create button next to Image Based
Lighting. This will provide lighting of the scene reflective of the surrounding environment.
Emissive Material Lights
With Radeon ProRender, we can also use objects as lights by applying an Emissive material to any 3d
object in the scene. We will be adding an emissive material to a lantern shape in the scene.
Radeon ProRender plug-in for Maya User Guide
©2018 Advanced Micro Devices, Inc. All rights reserved.
LIGHTS
38
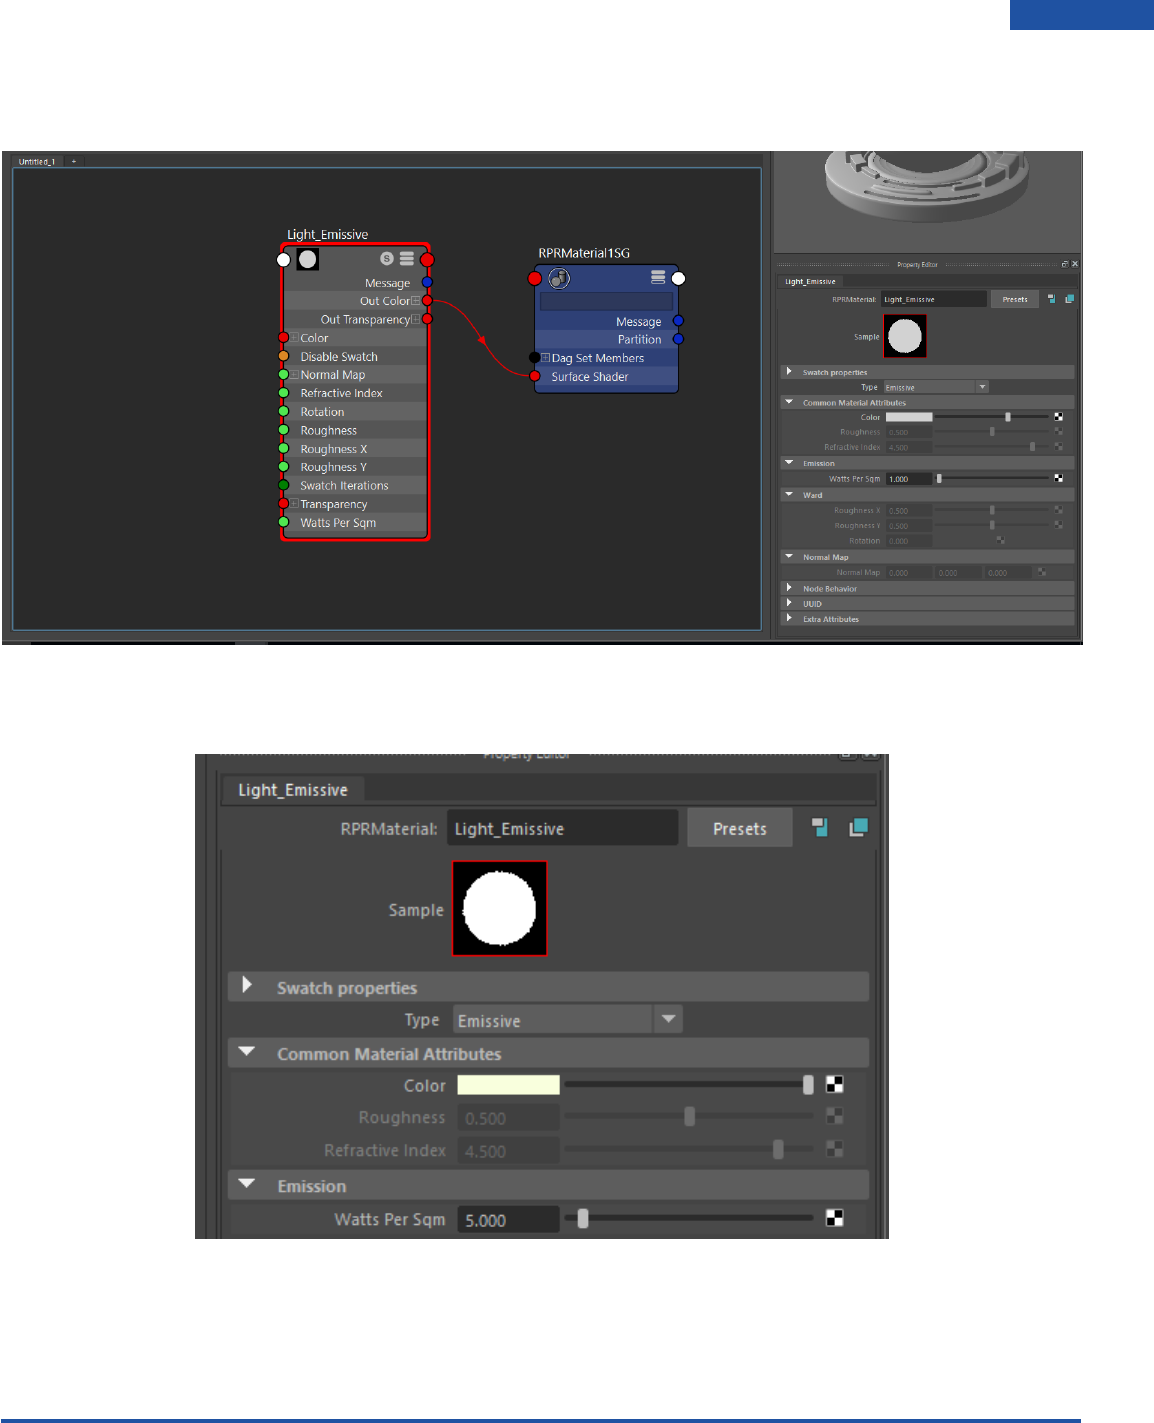
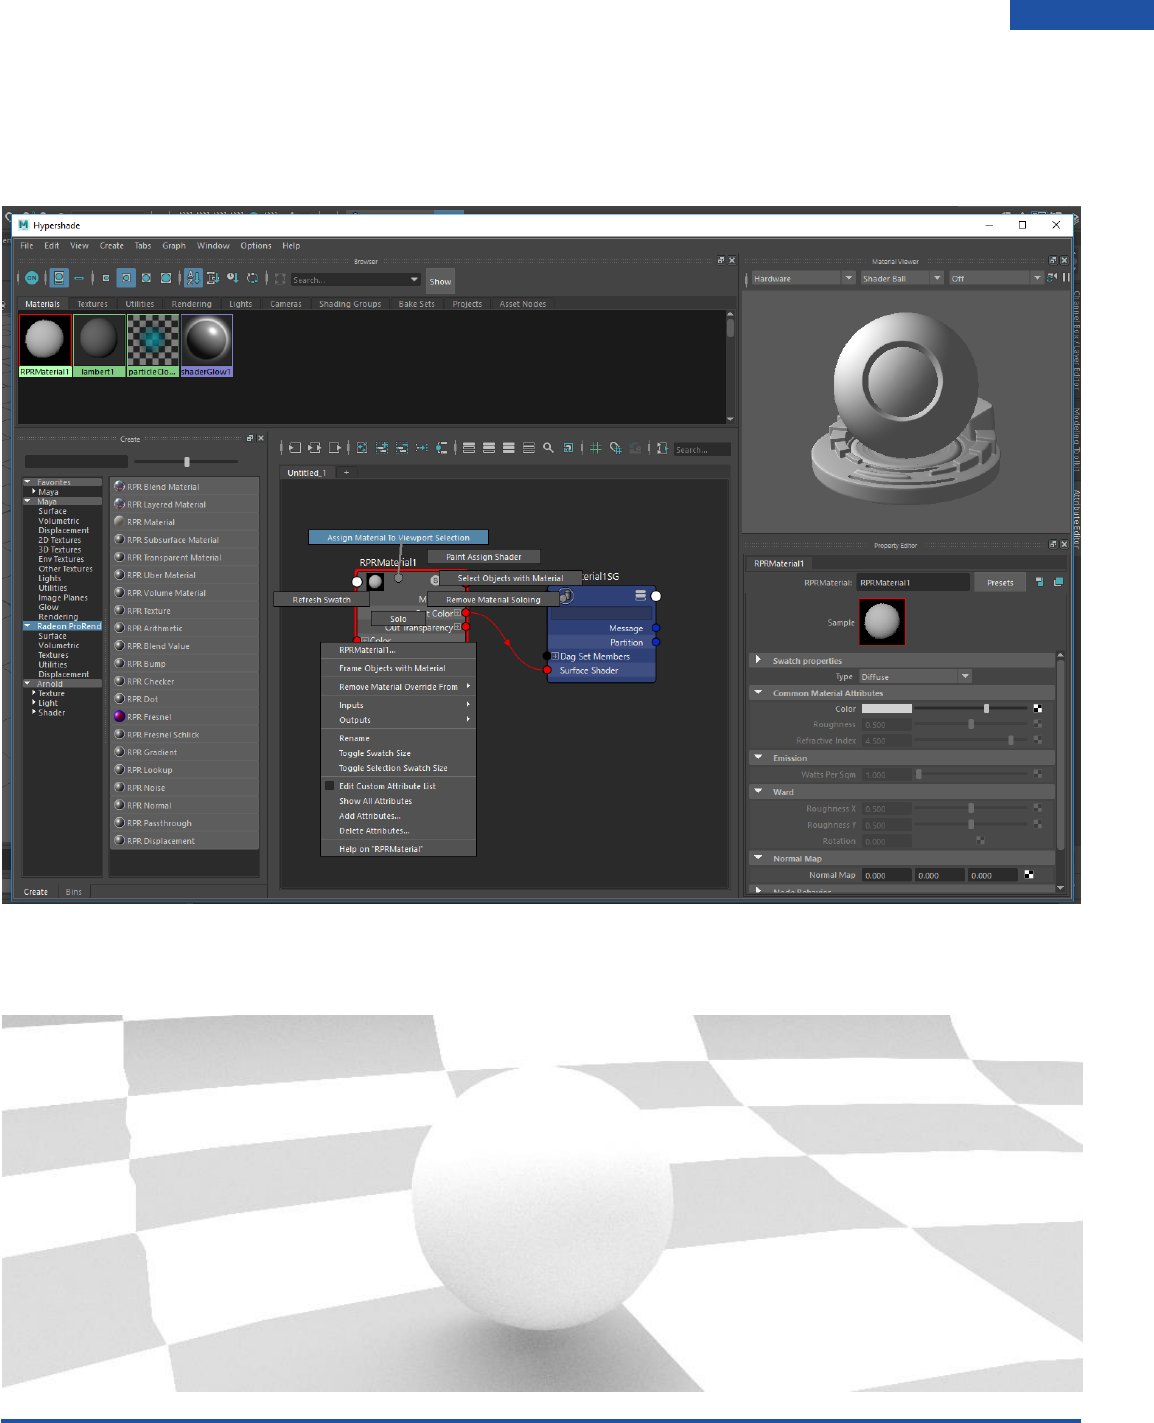
Go to your Hypershade Editor and from the Radeon ProRender materials create an RPRMaterial. You
can rename and change it from Diffuse to Emissive from the Type dropdown.
In the emissive materials properties, under the emission section,you can change the color and the watts
per sqm (brightness) of the light. Set your Emission to 5 and your color to a slightly yellow white color.
Radeon ProRender plug-in for Maya User Guide
©2018 Advanced Micro Devices, Inc. All rights reserved.
LIGHTS
39
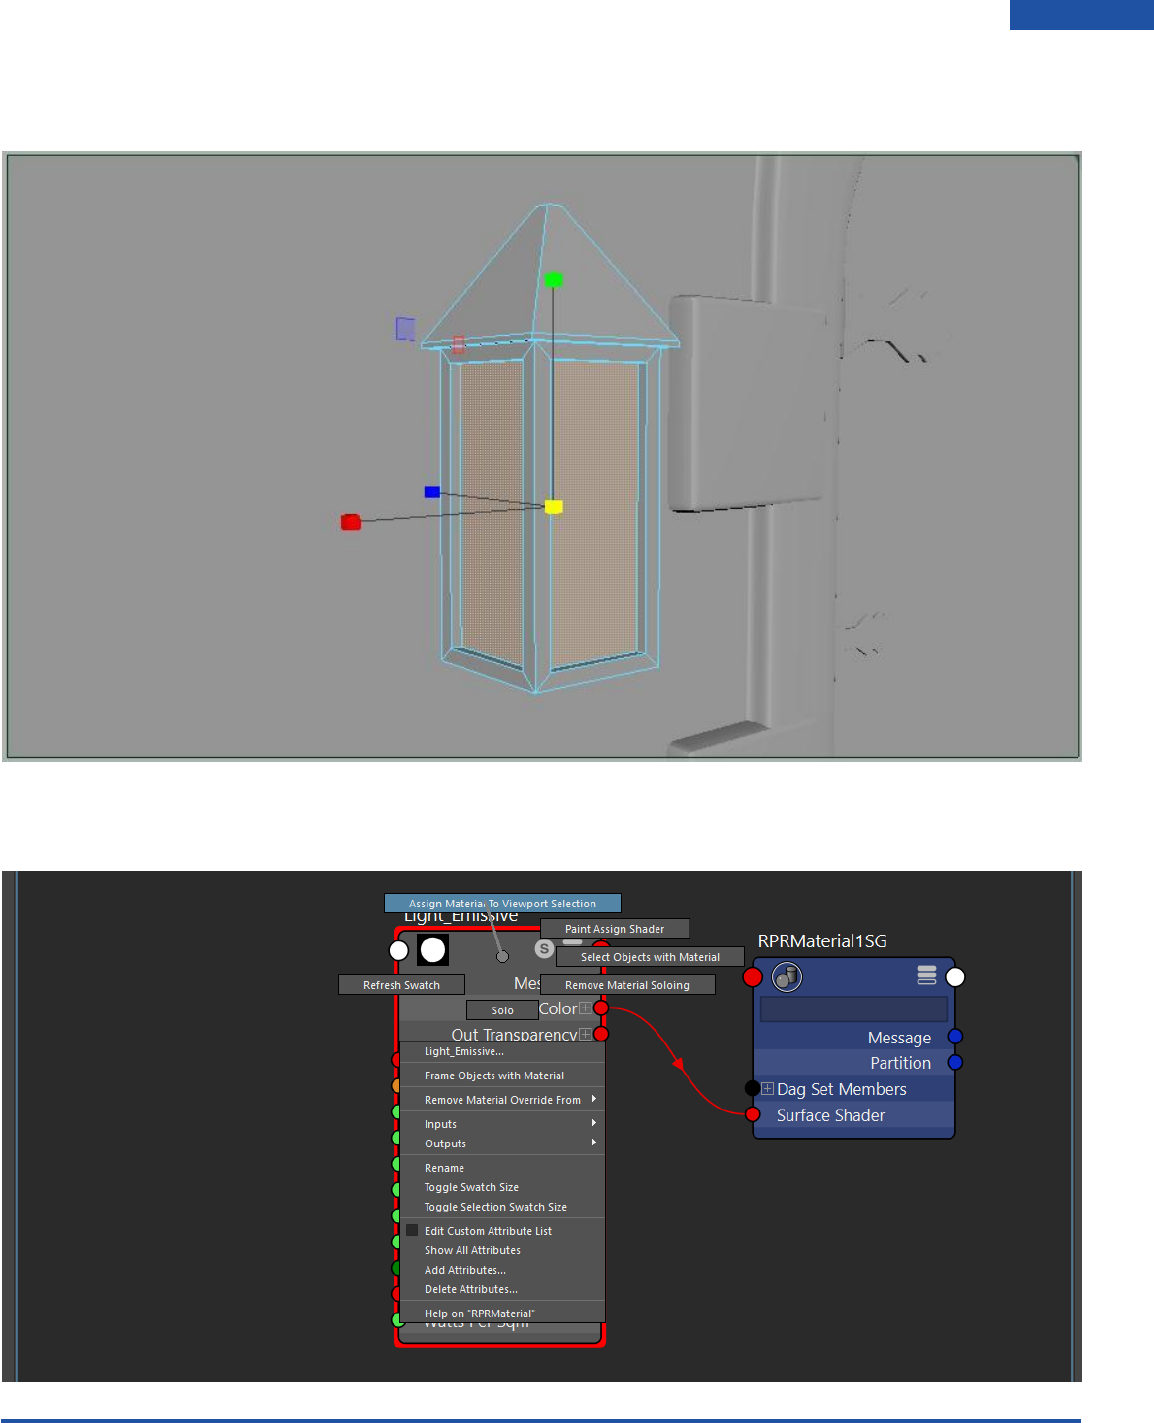
Select your geometry to apply the material. We will be applying the material to certain faces on the
lantern.
Then right click and hold over your light Emissive material in the Hypershade and select Assign Material
to Viewport Selection.
Radeon ProRender plug-in for Maya User Guide
©2018 Advanced Micro Devices, Inc. All rights reserved.
LIGHTS
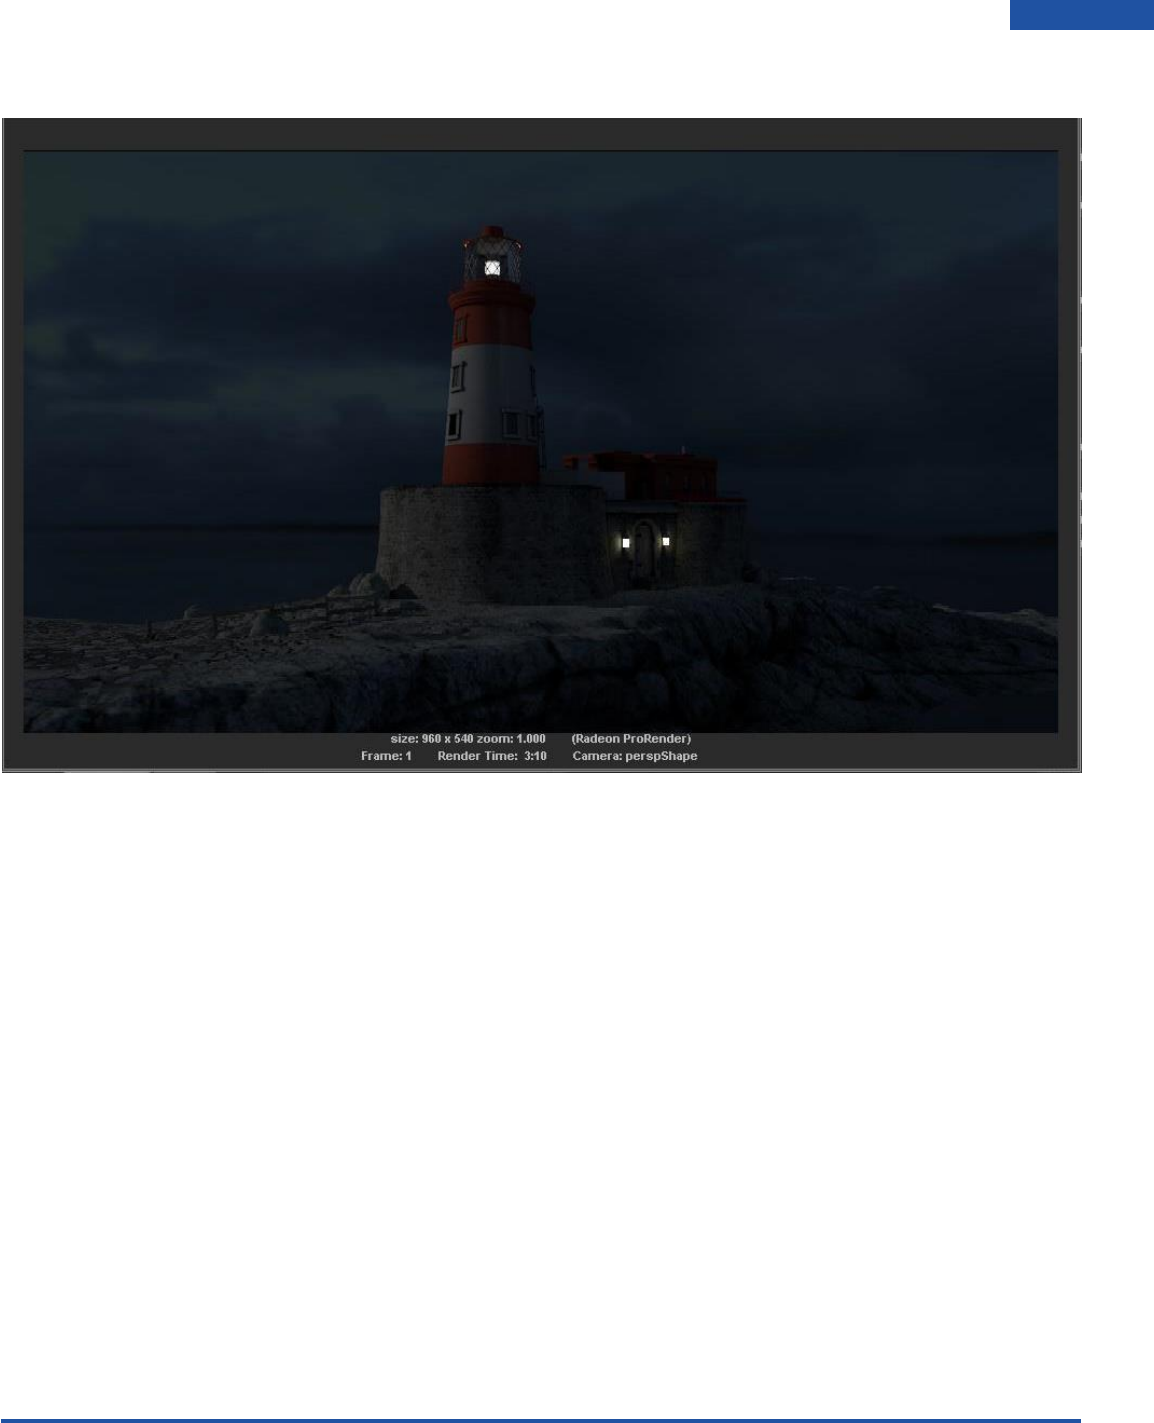
40
The rendered image will not have emissive lights

Radeon ProRender plug-in for Maya User Guide
©2018 Advanced Micro Devices, Inc. All rights reserved.
LIGHTS
41
Portals
Portals are used to limit the amount of light being cast in scene. Using portals allows a user to allocate an
exact point from where the light should come from when using a IBL or Sky instead of casting light over
the entire scene. This is only useful when lighting interior scenes.
Here we have an interior scene that is being lit by using the Sky. You can see that the light is being cast
through all the windows.
To activate the portals, create a Plane and place it in front of your windows.
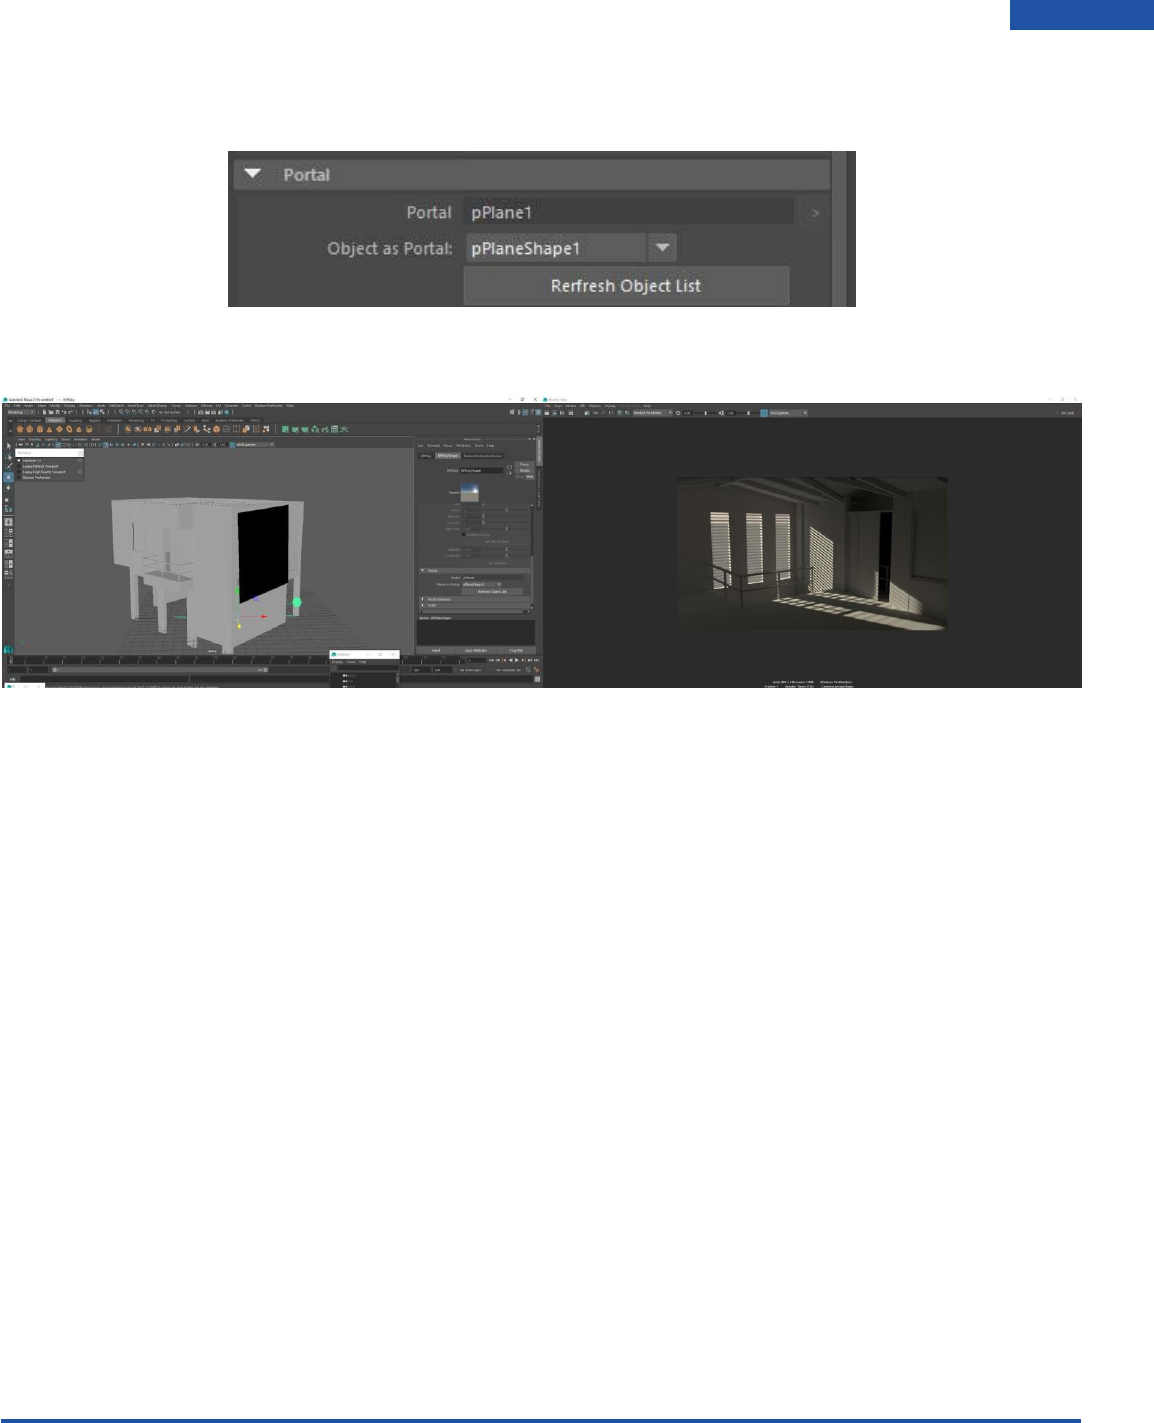
Select the sky widget from the viewport or from the outliner. Navigate to the Sky attributes panel on the
right hand side and locate the Portals dropdown. We can then select the Object As Portal dropdown and
Radeon ProRender plug-in for Maya User Guide
©2018 Advanced Micro Devices, Inc. All rights reserved.
LIGHTS
42
find the pPlane1 object we created. Make this your portal. If it is not in your list hit the Refresh Objects
List button.
Hit render and you will notice that the light is now only being cast from the plane instead of the entire
scene.
This feature will increase rendering performance.

Radeon ProRender plug-in for Maya User Guide
©2018 Advanced Micro Devices, Inc. All rights reserved.
CAMERAS
43
Working with Cameras
When working with cameras We have a couple options to choose from. The options can be found in
Render Settings under the Camera section.
When the camera type is set to default, it will render out the usual flat image to the resolution you set in
your render settings. This is what you will probably use the most when rendering.
Depth of Field
With your camera selected, go to the Attribute Editor by clicking Windows > General Editors > Attribute
Editor or by clicking the Camera attribute button.

Radeon ProRender plug-in for Maya User Guide
©2018 Advanced Micro Devices, Inc. All rights reserved.
CAMERAS
44
Locate Depth of Field. Check the box to enable DOF.
Set in your focus distance to determine how far you want your camera to focus from the lens to the
object. F-stop will determine how much blur will be added to the render. The higher the value the less
amount of blur you will see.
Radeon ProRender plug-in for Maya User Guide
©2018 Advanced Micro Devices, Inc. All rights reserved.
CAMERAS
45
VR Cameras
When working with cameras, there are a couple options to choose from. The options can be found in
Render Settings under the Camera section.
When the camera type is set to default, it will render out the usual flat image to the resolution you set in
your render settings. This is what you will probably use the most when rendering. The Spherical
Panorama Stereo camera type provides you with a 360-degree split (over and under) stereoscopic image
(one part for each eye) output suitable for viewing through VR devices.
Spherical Panorama Stereo will be used to create 360-degree images to be used for VR. As you can see
the Image is split in two and the reason for this is that it is rendering an image for both the Left and Right
eye. Keep the aspect ratio to 1:1 for square pixels.
Radeon ProRender plug-in for Maya User Guide
©2018 Advanced Micro Devices, Inc. All rights reserved.
MATERIALS
46
Working with Materials
Included within the Radeon ProRender install is the addition of Radeon ProRender materials to the Maya
material library for you to use.
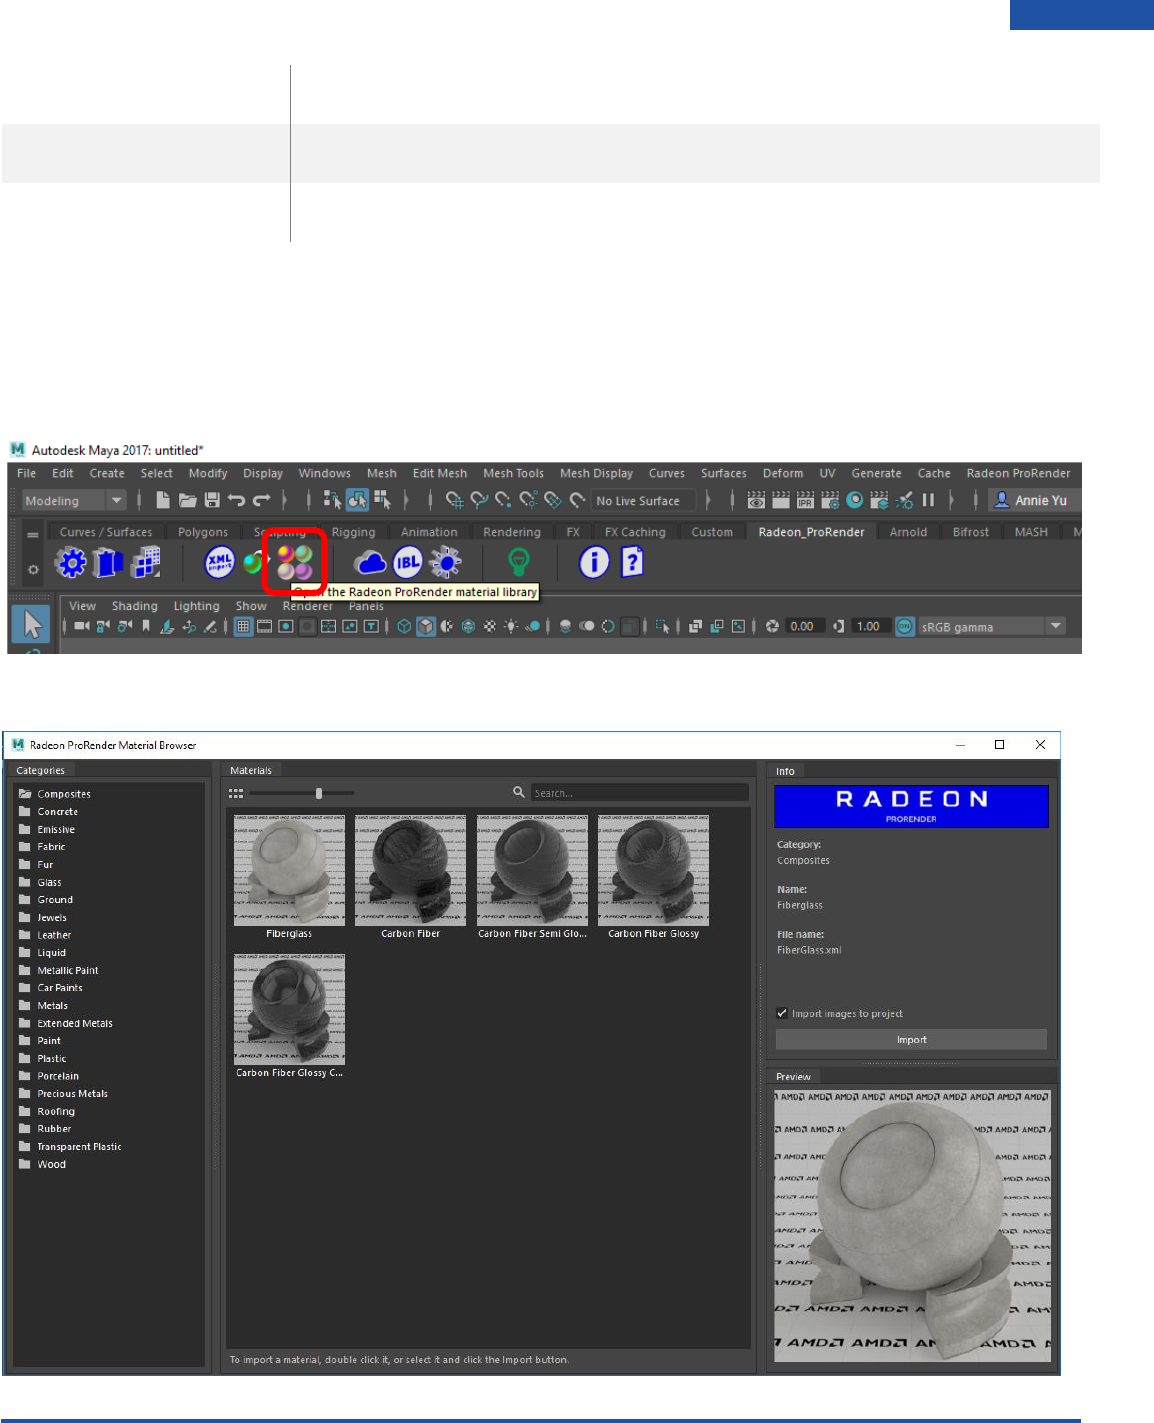
Display the Material Library
Click on the Hypershade Button in the Radeon ProRender shelf or use the Hypershade Button next to
the Render Settings button.
Radeon ProRender plug-in for Maya User Guide
©2018 Advanced Micro Devices, Inc. All rights reserved.
MATERIALS
47
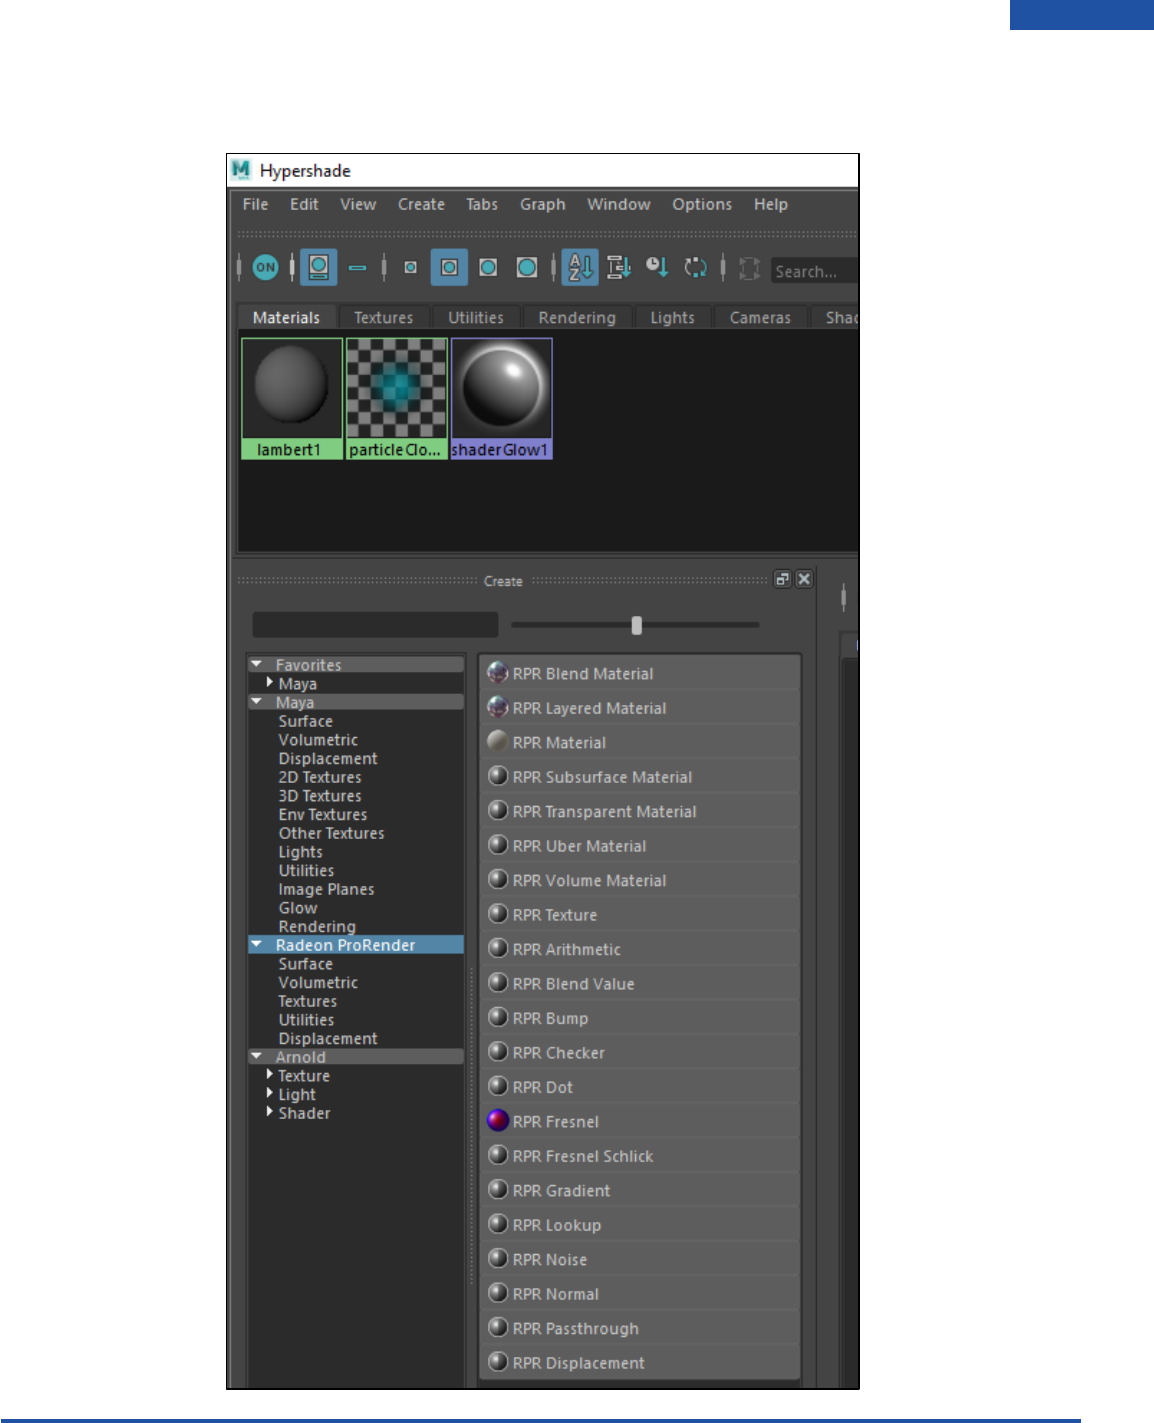
Once the Hypershade Editor window is open, navigate to the Radeon ProRender materials and select an
RPR Material. And middle click and drag it onto your object in the viewport.
Radeon ProRender plug-in for Maya User Guide
©2018 Advanced Micro Devices, Inc. All rights reserved.
MATERIALS
48
Radeon ProRender Material Library
Radeon ProRender Materials Breakdown:
MATERIALS
DESCRIPTION
RPR BLEND
used to blend 2 or more materials together
RPR LAYERED
RPR MATERIAL
RPR SUBSURFACE
used for surfaces that does not reflect light off the surface like a mirror or
water, but penetrates it a little, like candles, milk, skin or fruit, like grapes
RPR TRANSPARENT
used to generate only transparency. Will be used with Blend material to
make more advanced materials such as meshes and layered shaders
RPR UBER
combines several inputs to generate one big shader, alleviating the need to
combine and group many shader-nodes together
RPR VOLUME
used for streetlights at night, fog or mist
The installer also adds the following Maps:
MAPS
DESCRIPTION
RPR TEXTURE
RPR ARITHMETIC
RPR BLEND VALUE
RPR BUMP
RPR CHECKER
RPR DOT
RPR FRESNEL
RPR FESNEL-SCHLICK
RPR GRADIENT
RPR INPUT LOOKUP
RPR NOISE
Radeon ProRender plug-in for Maya User Guide
©2018 Advanced Micro Devices, Inc. All rights reserved.
MATERIALS
49
RPR NORMAL
RPR PASSTHROUGH
RPR DISPLACEMENT
Radeon ProRender Material Browser
The installer package adds complex materials that uses the materials above in conjunction with maps
and node connections to create a large library of pre-configured materials for you to use.
In the viewport, open the Radeon ProRender Material Library.
Double click the material to import into the Hypershade.
Radeon ProRender plug-in for Maya User Guide
©2018 Advanced Micro Devices, Inc. All rights reserved.
MATERIALS
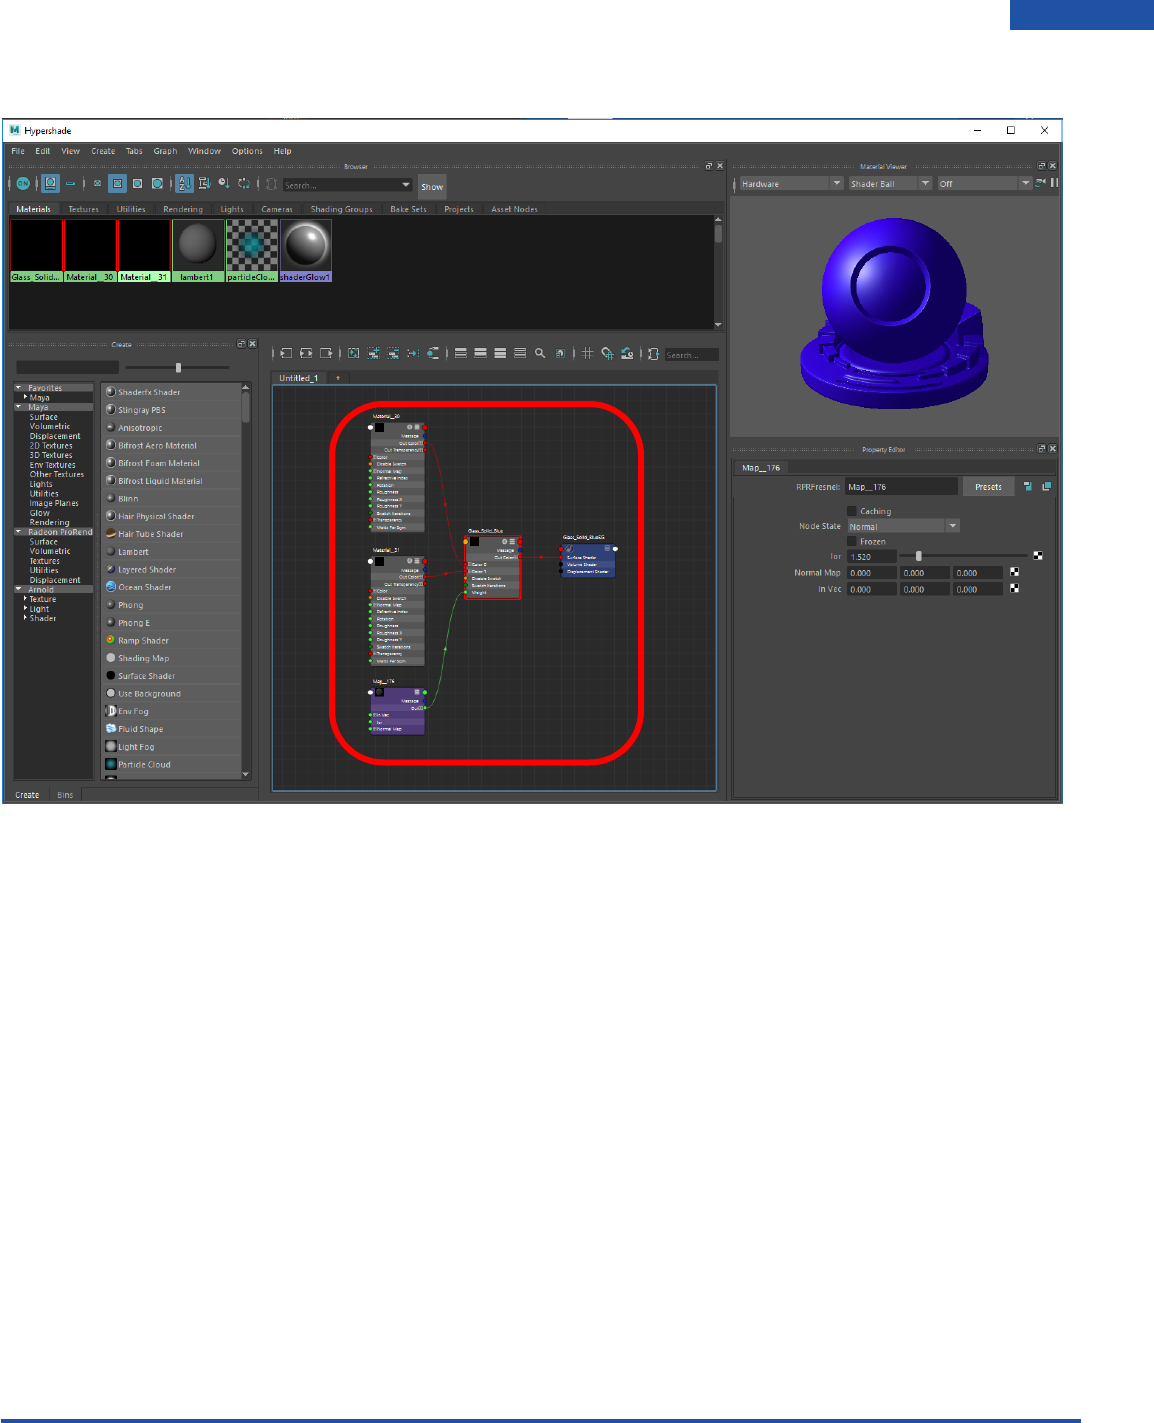
50
In the Hypershade, you will see the material, and various nodes used to create that particular material.
Radeon ProRender plug-in for Maya User Guide
©2018 Advanced Micro Devices, Inc. All rights reserved.
MATERIALS
51
Assigning Basic Materials
Click on the object in the viewport. Right click the material node in the Hypershade Editor and select
Assign Material to Viewport Selection.
Assign a IBL to your render settings and do a test render. You will notice that the RPRMaterial is set by
default to Diffuse which will give you a matte shaded finish.
Radeon ProRender plug-in for Maya User Guide
©2018 Advanced Micro Devices, Inc. All rights reserved.
MATERIALS
52
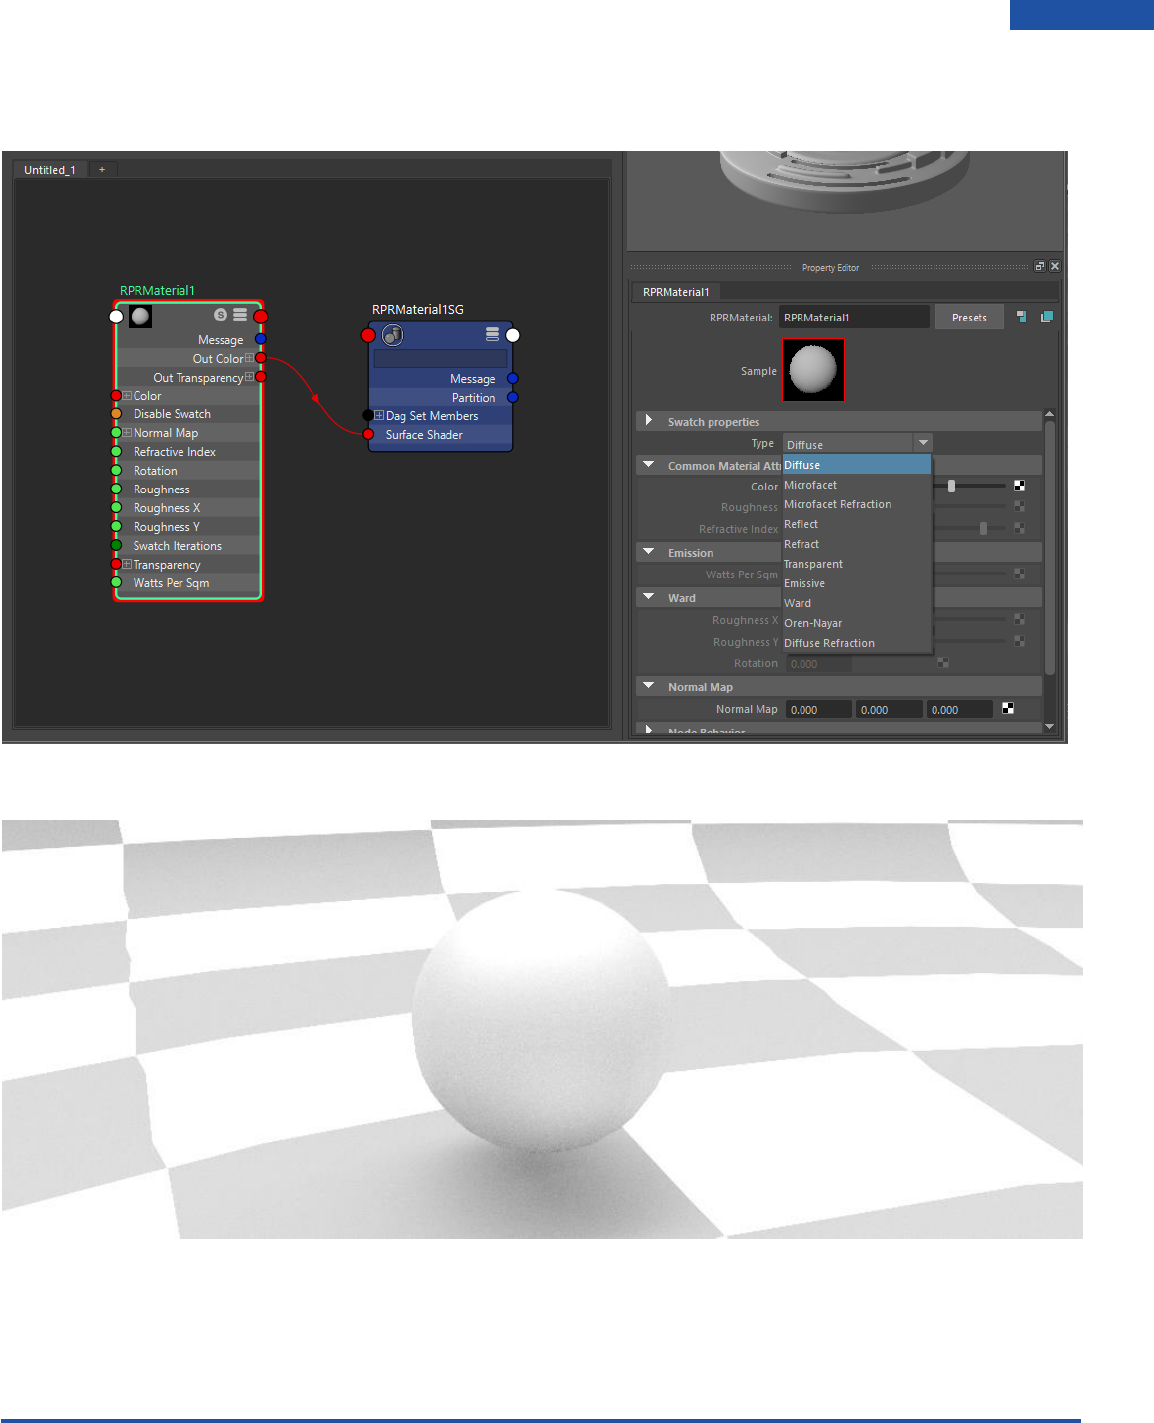
In the material attributes under Swatch Properties > Type you are able to switch between a range of
different material types.
Change your material Type to Microfacet.
Radeon ProRender plug-in for Maya User Guide
©2018 Advanced Micro Devices, Inc. All rights reserved.
MATERIALS
53
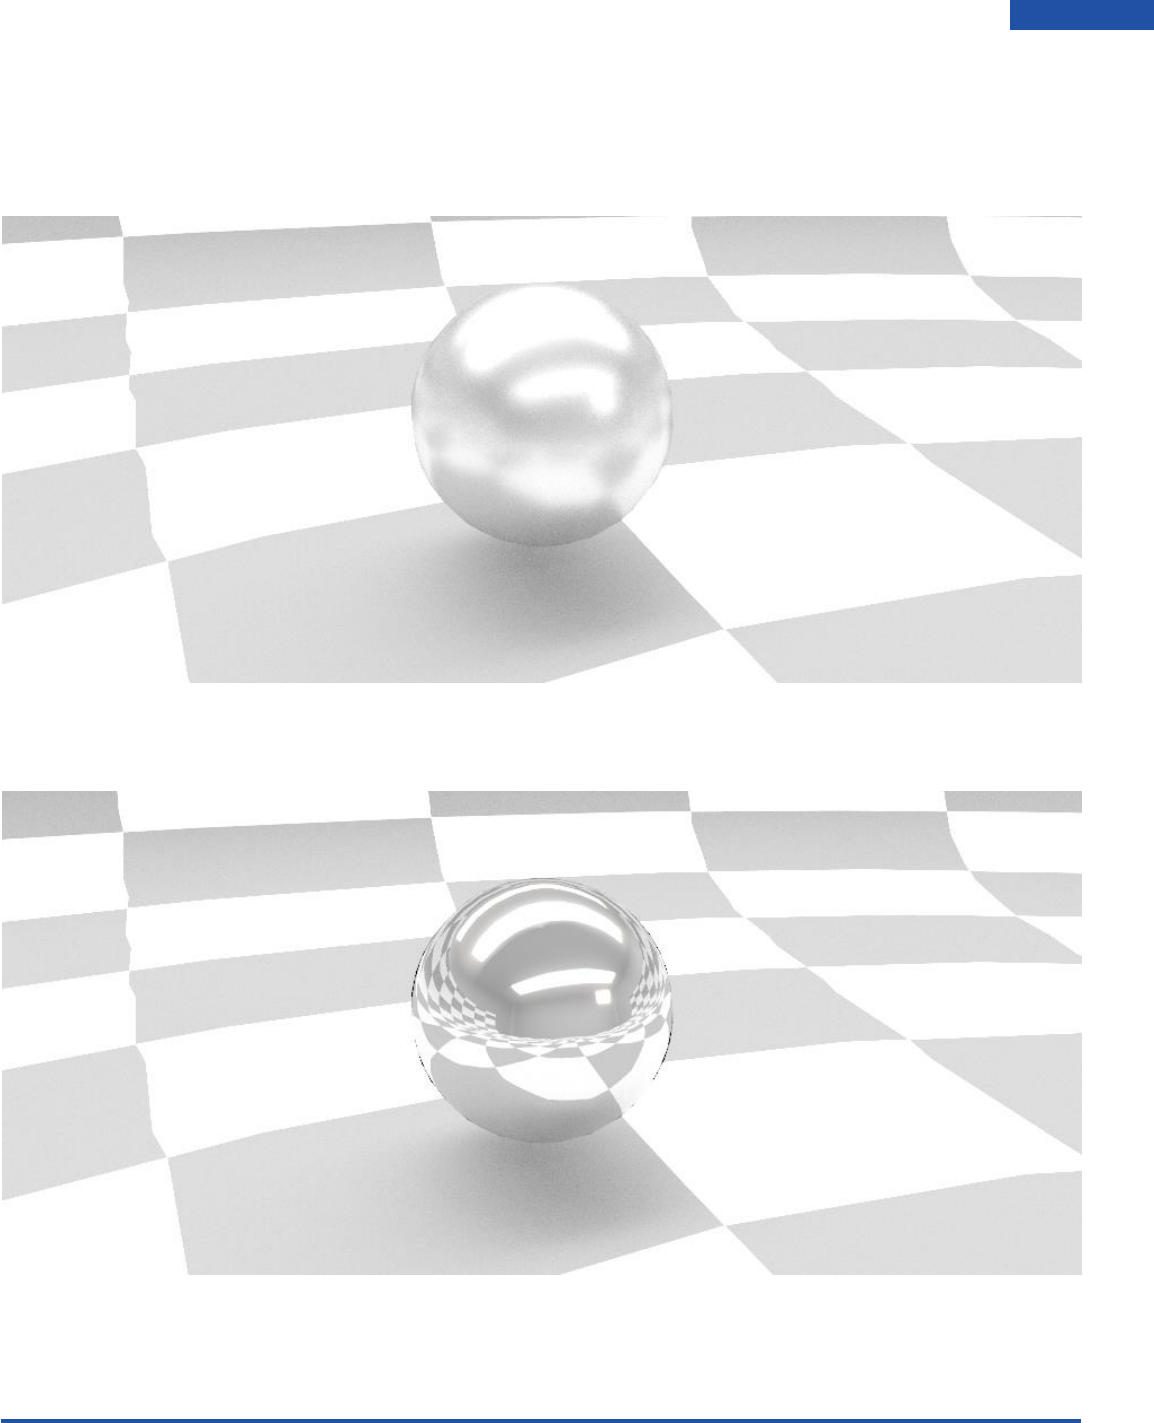
You will notice that in you Radeon ProRender material attributes there are a couple more options that
become available when changing the material type. We can change the roughness to make the material
more shiny or we can change the index of refraction. Set your roughness to 0.1 to see the material with
some reflectivity.
Material type set to Reflect, this will only give you the raw reflection of the scene and will most likely be
used in a blend material:
Radeon ProRender plug-in for Maya User Guide
©2018 Advanced Micro Devices, Inc. All rights reserved.
MATERIALS
54
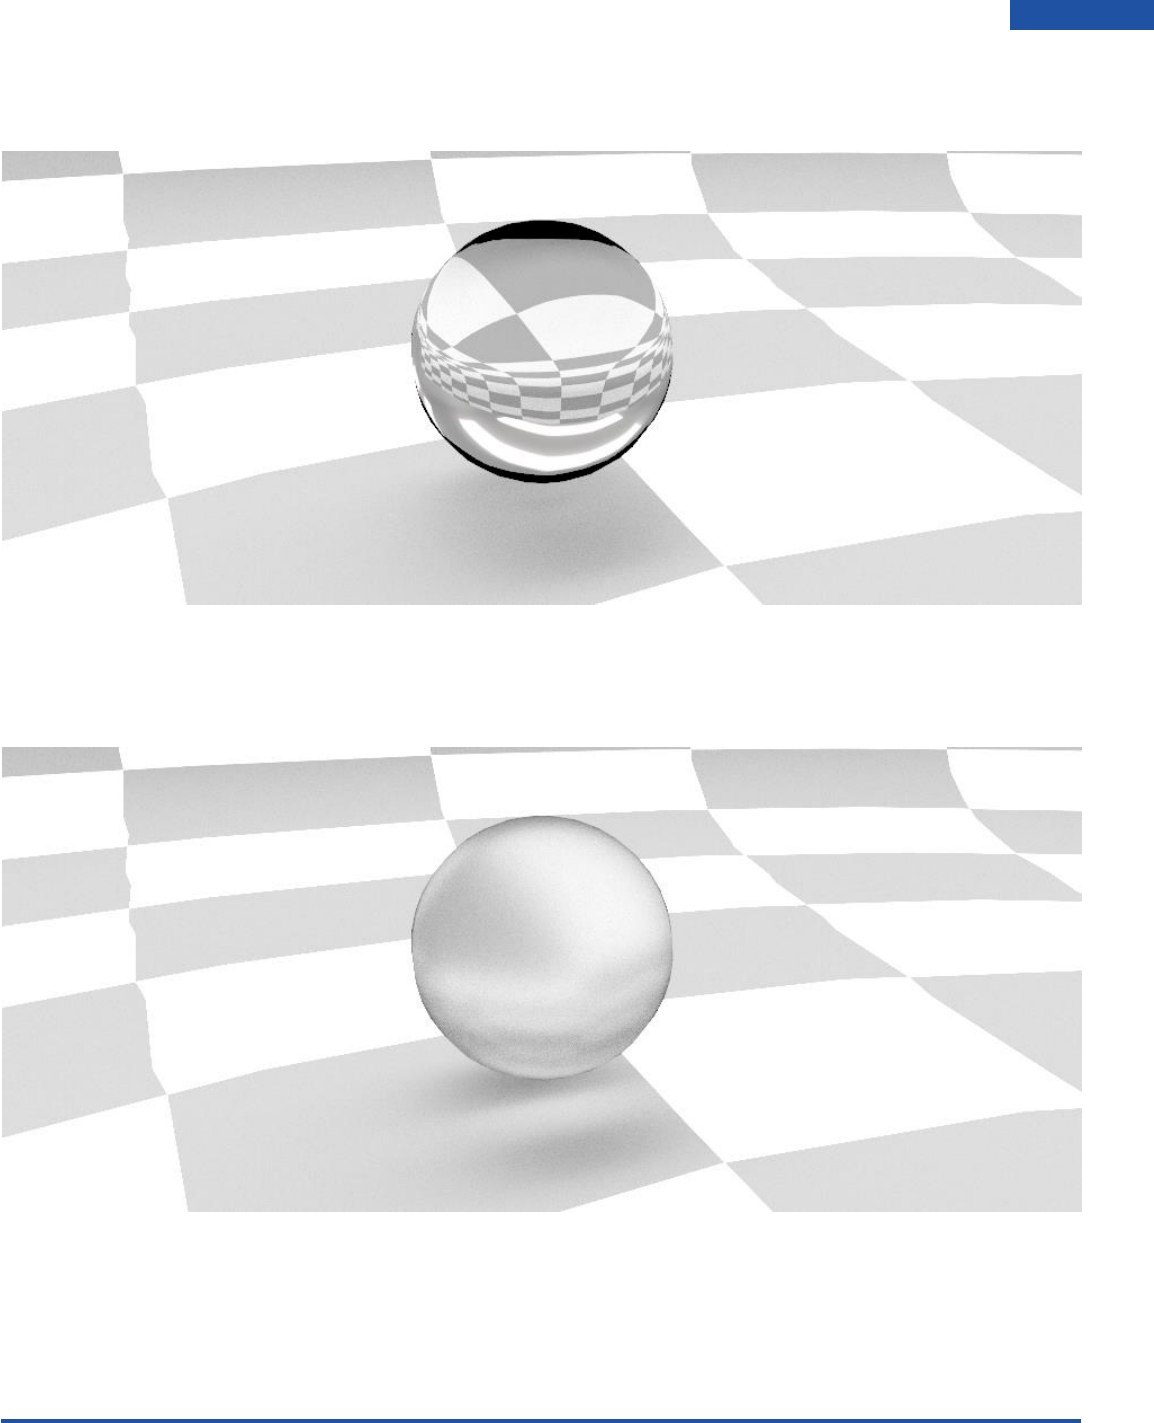
Material type set to Refract, this will give you the raw refraction of the scene and will also most likely be
used in a Blend material:
Material type set to Microfacet Refraction, this material will simulate an opaque material like the paper
on a Chinese lantern. It allows light to pass through it. You can change the amount of light that passes
through the material by lowering the IOR(index of refraction) intensity.

Radeon ProRender plug-in for Maya User Guide
©2018 Advanced Micro Devices, Inc. All rights reserved.
MATERIALS
55
Material type set to Emissive, this material will emit light from geometry which has the emissive material
applied to it:
Material type set to Ward, this material will give you more of a metal texture, it has a anisotropic quality
by means of roughness X and Y. Setting the X and Y values differently will give you different reflections
(stretched).
Default
Roughness Y set to 0.1, X set to 0.5
Roughness X set to 0.1 Y set to 0.5
Rotation set to 45

Radeon ProRender plug-in for Maya User Guide
©2018 Advanced Micro Devices, Inc. All rights reserved.
MATERIALS
56
Using Maya Materials
Like the Standard Lights many of the Standard Materials are not supported by Radeon ProRender. Many
of these materials simulate a physical effect on the surface of an object which is not required when using
a physically based material and ray-tracing renderer.
Although Radeon ProRender will attempt to render the Maya Standard Materials, the result may be
unpredictable as the renderer will only process the materials attributes that have a counterpart in the
real world.
The specific models supported by Radeon ProRender include:
• Blinn
• Metallic
• MultiLayer
• Oren-Nayar-Blinn
• Phong
• Strauss
• Translucent

Radeon ProRender plug-in for Maya User Guide
©2018 Advanced Micro Devices, Inc. All rights reserved.
SAVING
57
Saving
To save your rendered images you have 2 options. You can save the image directly from your render view
window under File > Save Image. Remember to consider that in the save image options you must set
what color management you would like to save your image in.
Radeon ProRender plug-in for Maya User Guide
©2018 Advanced Micro Devices, Inc. All rights reserved.
SAVING
58
Then we can also save the rendered image by using the File Output section in the Render Settings (this
is dependent on having your project set correctly). This is what you would use to render out batch
animations and store the files in your project directory.
Diagnostics and Trace Files
To allow developers to track down issues with the plug-in it is often necessary to provide trace files that
log what happened to the plug-in and where the plug-in may have had problems.
On the top-level menu select Radeon ProRender > Debug > Enable Tracing to activate the diagnostic
tracing feature.
Radeon ProRender plug-in for Maya User Guide
©2018 Advanced Micro Devices, Inc. All rights reserved.
SAVING
59
By default, the tracing is not set. This is to save space and assist performance. If you encounter a
problem, it is advisable to:
• Enable tracing.
• Reproduce the problem.
• Locate the trace files.
• Zip the trace files into a single .zip file.
• Complete a bug report via this link http://maya.radeonprorender.com/support/tickets.
• If you don't have an account you will need to set one up.
• Describe the procedure or steps you used to reproduce the problem.
• Attach a sample scene of where the error occurred.
• Attach the trace files .zip to the bug report.
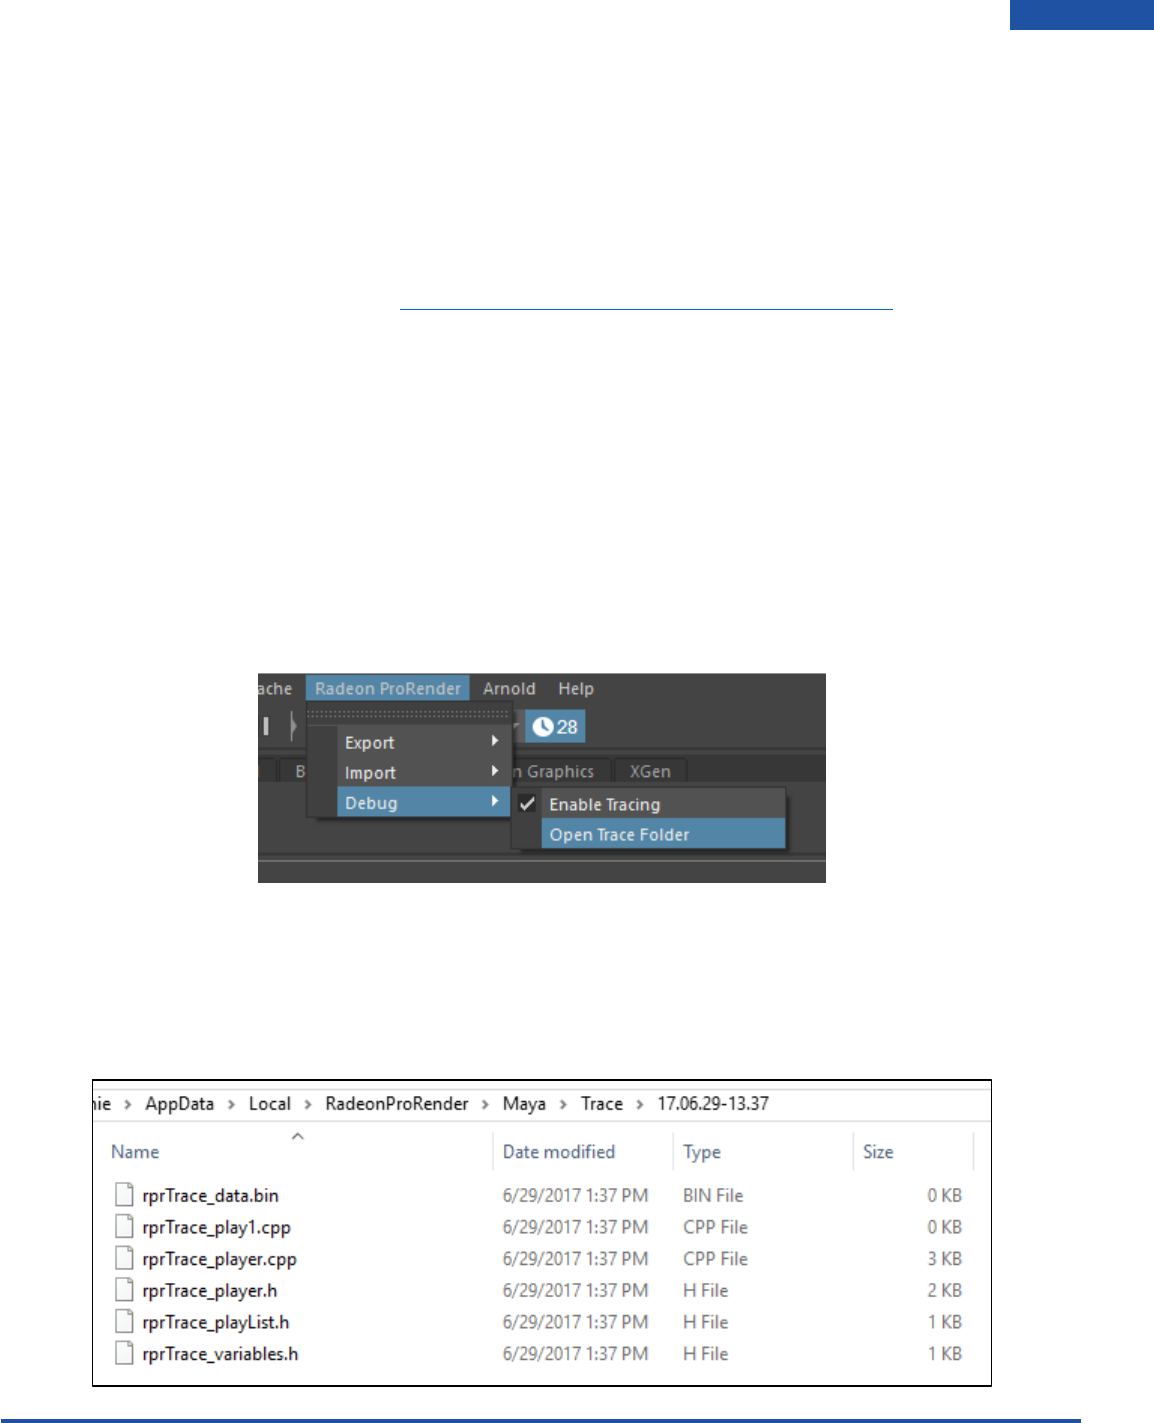
Once you have captured the trace file, repeat the selection above to disable the tracing feature. This will
stop the plug-in from recording all events and using up your valuable disk space in the future.
You will see in the top-level menu and option to Open Trace Folder. Select Radeon ProRender > Debug >
Open Trace Folder.
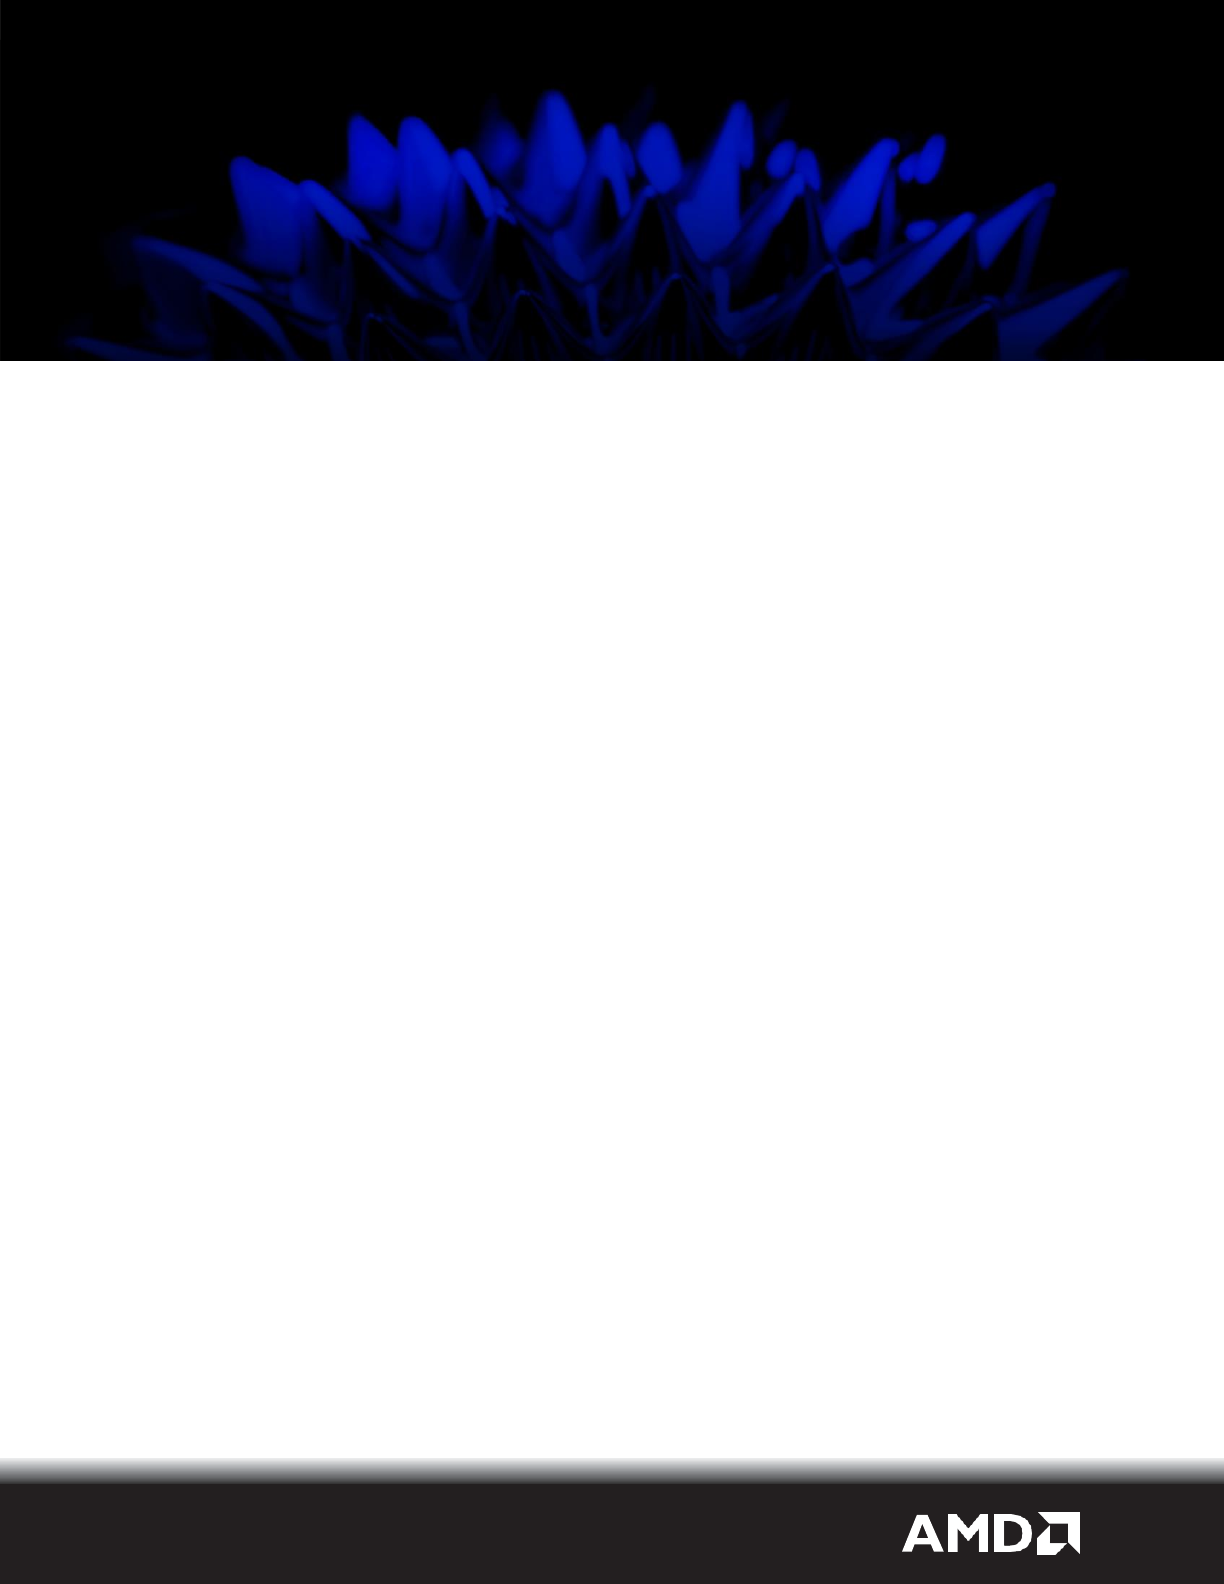
The directory location of the trace files is:
<%user%>/AppData/Local/RadeonProRender/Maya/Trace/YY.MM.DD-HH.MM
You will see there are a number of files generated by the plug-in's diagnostics system. Inside this
directory are the following files:

Radeon ProRender plug-in for Maya User Guide
©2018 Advanced Micro Devices, Inc. All rights reserved.
SAVING
60
It is advisable to zip the top level directory YY.MM.DD-HH.MM by right clicking the directory and sending
it to compressed zip file.
You can then attach this .zip file to any bug report you lodge.
Radeon ProRender plug-in
for Maya
User Guide v2.4
Written by: Annie Yu
05/09/2018
©2018 Advanced Micro Devices, Inc.
All rights reserved.
