No Starch Press Absolute Free BSD The Guide To 2nd Edition
Absolute%20FreeBSD-The%20%20Guide%20to%20FreeBSD%202nd%20Edition
User Manual: Pdf
Open the PDF directly: View PDF ![]() .
.
Page Count: 745 [warning: Documents this large are best viewed by clicking the View PDF Link!]
- Absolute FreeBSD: The Complete Guide to FreeBSD, 2nd Edition
- Foreword by Robert N.M. Watson
- Acknowledgments
- Introduction
- 1: Getting More Help
- 2: Installing FreeBSD
- 3: Start Me Up! The Boot Process
- 4: Read This Before You Break Something Else! (Backup and Recovery)
- 5: Kernel Games
- 6: The Network
- 7: Securing Your System
- 8: Disks and Filesystems
- Disk Drives 101
- Device Nodes
- The Filesystem Table: /etc/fstab
- What’s Mounted Now?
- Mounting and Unmounting Disks
- How Full Is a Partition?
- The Fast File System
- Using Foreign Filesystems
- Removable Media Filesystems
- Other FreeBSD Filesystems
- Wiring Down Devices
- Adding New Hard Disks
- Network Filesystems
- FreeBSD and CIFS
- Serving CIFS Shares
- devfs
- 9: Advanced Security Features
- 10: Exploring /etc
- /etc Across Unix Species
- /etc/adduser.conf
- /etc/amd.map
- /etc/bluetooth, /etc/bluetooth.device.conf, and /etc/defaults/bluetooth.device.conf
- /etc/crontab
- /etc/csh.*
- /etc/devd.conf
- /etc/devfs.conf, /etc/devfs.rules, and /etc/defaults/devfs.rules
- /etc/dhclient.conf
- /etc/disktab
- /etc/freebsd-update.conf
- /etc/fstab
- /etc/ftp.*
- /etc/group
- /etc/hosts
- /etc/hosts.allow
- /etc/hosts.equiv
- /etc/hosts.lpd
- /etc/inetd.conf
- /etc/localtime
- /etc/locate.rc
- /etc/login.*
- /etc/mail/mailer.conf
- /etc/make.conf
- /etc/master.passwd
- /etc/motd
- /etc/mtree
- /etc/namedb
- /etc/netstart
- /etc/network.subr
- /etc/newsyslog.conf
- /etc/nscd.conf
- /etc/nsmb.conf
- /etc/nsswitch.conf
- /etc/opie*
- /etc/pam.d/*
- /etc/pccard_ether
- /etc/periodic.conf and /etc/defaults/periodic.conf
- /etc/pf.conf
- /etc/pf.os
- /etc/phones
- /etc/portsnap.conf
- /etc/ppp
- /etc/printcap
- /etc/profile
- /etc/protocols
- /etc/rc*
- /etc/remote
- /etc/rpc
- /etc/security/
- /etc/services
- /etc/shells
- /etc/snmpd.config
- /etc/src.conf
- /etc/sysctl.conf
- /etc/syslog.conf
- /etc/termcap
- /etc/ttys
- 11: Making Your System Useful
- 12: Advanced Software Management
- 13: Upgrading FreeBSD
- 14: The Internet Road Map: DNS
- 15: Small System Services
- 16: Spam, Worms, and Viruses (Plus Email, If You Insist)
- 17: Web and FTP Services
- 18: Disk Tricks with GEOM
- 19: System Performance and Monitoring
- 20: The Fringe of FreeBSD
- 21: System (and Sysadmin) Panics and Crashes
- Afterword
- Some Interesting sysctl MIBs
- Index
- Updates

www.nostarch.com
TH E F I N EST IN G E E K E N T E RTA IN M ENT ™
SHELVE IN:
OPERATING SYSTEMS/UNIX
$59.95 ($65.95 CDN)
F R E E B S D :
N O T J U S T F O R
A L P H A G E E K S
A N Y M O R E !
F R E E B S D :
N O T J U S T F O R
A L P H A G E E K S
A N Y M O R E !
“ I LAY F L A T.”
This book uses RepKover —a durable binding that won’t snap shut.
Printed on recycled paper
FreeBSD—the powerful, flexible, and free Unix-like
operating system—is the preferred server for many
enterprises. But it can be even trickier to use than either
Unix or Linux, and harder still to master.
Absolute FreeBSD, 2nd Edition is your complete guide
to FreeBSD, written by FreeBSD committer Michael
W. Lucas. Lucas considers this completely revised and
rewritten second edition of his landmark work to be his
best work ever; a true product of his love for FreeBSD
and the support of the FreeBSD community. Absolute
FreeBSD, 2nd Edition covers installation, networking,
security, network services, system performance, kernel
tweaking, filesystems, SMP, upgrading, crash debugging,
and much more, including coverage of how to:
• Use advanced security features like packet filtering,
virtual machines, and host-based intrusion detection
• Build custom live FreeBSD CDs and bootable flash
• Manage network services and filesystems
• Use DNS and set up email, IMAP, web, and FTP
services for both servers and clients
• Monitor your system with performance-testing and
troubleshooting tools
• Run diskless systems
• Manage schedulers, remap shared libraries, and
optimize your system for your hardware and your
workload
• Build custom network appliances with embedded
FreeBSD
• Implement redundant disks, without special hardware
• Integrate FreeBSD-specific SNMP into your network
management system
Whether you’re just getting started with FreeBSD or
you’ve been using it for years, you’ll find this book to
be the definitive guide to FreeBSD that you’ve been
waiting for.
A B O U T T H E A U T H O R
Michael W. Lucas is a network engineer and system
administrator responsible for a network that stretches
across the Western Hemisphere. He is the author of the
critically acclaimed Absolute OpenBSD, Cisco Routers
for the Desperate, and PGP & GPG, all from No Starch
Press. Despite being from Detroit, Michigan, he knows
almost nothing about automobiles. He has been using
Unix systems for over 20 years and FreeBSD since 1995.
Fortunately for the rest of us, his writing keeps him too
busy to implement his plans for world domination.
With a foreword by
R O B E R T W A T S O N ,
President of
the FreeBSD Foundation
A B S O L U T E
F R E E B S D
2ND EDITION
A B S O L U T E
F R E E B S D®
2ND EDITION
T H E C O M P L E T E G U I D E T O F R E E B S D
M I C H A E L W . L U C A S
L U C A S
A B S O L U T E
F R E E B S D
2 N D E D I T I O N
A B S O L U T E
F R E E B S D
2 N D E D I T I O N

PRAISE FOR THE FIRST EDITION, ABSOLUTE BSD
“Even longtime users of FreeBSD may be surprised at the power and features
it can bring to bear as a server platform, and Absolute BSD is an excellent guide
to harnessing that power.”
—UNIXREVIEW.COM
“ . . . provides beautifully written tutorials and reference material to help you
make the most of the strengths of this OS.”
—LINUXUSER & DEVELOPER MAGAZINE
“ . . . a great resource for people new to BSD and those who have been using
it for years. Michael Lucas has a writing style which is very easy to read and
absorb.”
—FRESHMEAT
“A very fine piece of work, it isn’t about how to implement BSD solutions, but
it is about managing systems in situ.”
–;LOGIN:
“ . . . packed with a lot of information.”
—DAEMON NEWS
PRAISE FOR ABSOLUTE OPENBSD BY MICHAEL LUCAS
“Absolute OpenBSD by Michael Lucas is a broad and mostly gentle introduction
into the world of the OpenBSD operating system. It is sufficiently complete
and deep to give someone new to OpenBSD a solid footing for doing real
work and the mental tools for further exploration. . . . The potentially boring
topic of systems administration is made very readable and even fun by the
light tone that Lucas uses.”
—CHRIS PALMER, PRESIDENT, SAN FRANCISCO OPENBSD USERS GROUP
“ . . . a well-written book that hits its market squarely on target. Those new to
OpenBSD will appreciate the comprehensive approach that takes them from
concept to functional execution. Existing and advanced users will benefit from
the discussion of OpenBSD-specific topics such as the security features and
pf administration.”
—SLASHDOT
“I recommend Absolute OpenBSD to all programmers and administrators
working with the OpenBSD operating system (OS), or considering it.”
—UNIXREVIEW.COM

PRAISE FOR PGP & GPG BY MICHAEL LUCAS
“PGP & GPG is another excellent book by Michael Lucas. I thoroughly enjoyed
his other books due to their content and style. PGP & GPG continues in this
fine tradition. If you are trying to learn how to use PGP or GPG, or at least
want to ensure you are using them properly, read PGP & GPG.”
—TAOSECURITY
“The world’s first user-friendly book on email privacy. Unless you’re a
cryptographer, or never use email, you should read this book.”
—LEN SASSAMAN, CODECON FOUNDER
“ Excellent tutorial, quick read, and enough humor to make it enjoyable.”
—INFOWORLD
“An excellent book that shows the end-user in an easy to read and often
entertaining style just about everything they need to know to effectively and
properly use PGP and OpenPGP.”
—SLASHDOT
PRAISE FOR CISCO ROUTERS FOR THE DESPERATE BY MICHAEL LUCAS
“ . . . this book isn’t a reference—it’s a survival guide, a ‘break glass in case
of emergency’ safety harness. . . . What I found remarkable was how it was
obviously written for people like me—those of us who have little interest in
router management but whose jobs depend on the consistent, trusted func-
tioning of such infrastructure.
—ASP.NETPRO
“If only Cisco Routers for the Desperate had been on my bookshelf a few years
ago! It would have definitely saved me many hours of searching for config-
uration help on my Cisco routers. . . . I would strongly recommend this book
for both IT Professionals looking to get started with Cisco routers, as well as
anyone who has to deal with a Cisco router from time to time but doesn’t
have the time or technological know-how to tackle a more in-depth book
on the subject.”
—BLOGCRITICS MAGAZINE

ABSOLUTE
FREEBSD
2ND EDITION
THE COMPLETE GUIDE TO FREEBSD
by Michael W. Lucas
San Francisco
®

ABSOLUTE FREEBSD, 2ND EDITION. Copyright © 2008 by Michael W. Lucas.
All rights reserved. No part of this work may be reproduced or transmitted in any form or by any means, electronic or
mechanical, including photocopying, recording, or by any information storage or retrieval system, without the prior
written permission of the copyright owner and the publisher.
11 10 09 08 07 1 2 3 4 5 6 7 8 9
ISBN-10: 1-59327-151-4
ISBN-13: 978-1-59327-151-0
Publisher: William Pollock
Production Editors: Christina Samuell and Megan Dunchak
Cover and Interior Design: Octopod Studios
Developmental Editor: William Pollock
Technical Reviewer: John Baldwin
Copyeditor: Dmitry Kirsanov
Compositor: Riley Hoffman
Proofreader: Alina Kirsanova
Indexer: Nancy Guenther
For information on book distributors or translations, please contact No Starch Press, Inc. directly:
No Starch Press, Inc.
555 De Haro Street, Suite 250, San Francisco, CA 94107
phone: 415.863.9900; fax: 415.863.9950; info@nostarch.com; www.nostarch.com
Library of Congress Cataloging-in-Publication Data
Lucas, Michael, 1967-
Absolute FreeBSD : the complete guide to FreeBSD / Michael W. Lucas. -- 2nd ed.
p. cm.
Includes index.
ISBN-13: 978-1-59327-145-9
ISBN-10: 1-59327-145-X
1. FreeBSD. 2. UNIX (Computer file) 3. Internet service providers--Computer programs. 4. Web
servers--Computer programs. 5. Client/server computing. I. Title.
QA76.76.O63L83 2007
004'.36--dc22
2007036190
No Starch Press and the No Starch Press logo are registered trademarks of No Starch Press, Inc. Other product and
company names mentioned herein may be the trademarks of their respective owners. Rather than use a trademark
symbol with every occurrence of a trademarked name, we are using the names only in an editorial fashion and to the
benefit of the trademark owner, with no intention of infringement of the trademark.
The mark “FreeBSD” is a registered trademark of The FreeBSD Foundation and is used by Michael W. Lucas with the
permission of The FreeBSD Foundation.
The FreeBSD Logo is a trademark of The FreeBSD Foundation and is used by Michael W. Lucas with the permission
of The FreeBSD Foundation.
The BSD Daemon is copyright Marshall Kirk McKusick and is used with permission.
The information in this book is distributed on an “As Is” basis, without warranty. While every precaution has been
taken in the preparation of this work, neither the author nor No Starch Press, Inc. shall have any liability to any
person or entity with respect to any loss or damage caused or alleged to be caused directly or indirectly by the
information contained in it.
Printed on recycled paper in the United States of America

For Liz. With luck, this one is the right size to plug that dang gopher hole.

BRIEF CONTENTS
Foreword by Robert N.M. Watson ............................................................................... xxvii
Acknowledgments .......................................................................................................xxix
Introduction ....................................................................................................................1
Chapter 1: Getting More Help........................................................................................19
Chapter 2: Installing FreeBSD .........................................................................................33
Chapter 3: Start Me Up! The Boot Process........................................................................61
Chapter 4: Read This Before You Break Something Else! (Backup and Recovery)...................89
Chapter 5: Kernel Games ............................................................................................117
Chapter 6: The Network ..............................................................................................145
Chapter 7: Securing Your System..................................................................................177
Chapter 8: Disks and Filesystems ..................................................................................209
Chapter 9: Advanced Security Features .........................................................................261
Chapter 10: Exploring /etc ..........................................................................................301
Chapter 11: Making Your System Useful........................................................................315
Chapter 12: Advanced Software Management...............................................................343
Chapter 13: Upgrading FreeBSD ..................................................................................371
viii Brief Contents
Chapter 14: The Internet Road Map: DNS .....................................................................411
Chapter 15: Small System Services ...............................................................................439
Chapter 16: Spam, Worms, and Viruses (Plus Email, If You Insist).....................................467
Chapter 17: Web and FTP Services...............................................................................499
Chapter 18: Disk Tricks with GEOM..............................................................................529
Chapter 19: System Performance and Monitoring ...........................................................569
Chapter 20: The Fringe of FreeBSD...............................................................................603
Chapter 21: System (and Sysadmin) Panics and Crashes .................................................637
Afterword...................................................................................................................655
Appendix: Some Interesting sysctl MIBs..........................................................................661
Index.........................................................................................................................675
CONTENTS IN DETAIL
FOREWORD BY ROBERT N.M. WATSON xxvii
ACKNOWLEDGMENTS xxix
INTRODUCTION 1
What Is FreeBSD? .................................................................................................... 2
BSD: FreeBSD’s Granddaddy ....................................................................... 2
The BSD License .......................................................................................... 3
The AT&T/CSRG/BSDi Iron Cage Match ....................................................... 4
The Birth of FreeBSD .................................................................................... 4
FreeBSD Development ............................................................................................... 5
Committers ................................................................................................. 5
Contributors ................................................................................................ 6
Users ......................................................................................................... 7
Other BSDs ............................................................................................................. 7
NetBSD ...................................................................................................... 7
OpenBSD ................................................................................................... 7
Mac OS X .................................................................................................. 8
FreeBSD’s Children ...................................................................................... 8
Other Unixes ........................................................................................................... 8
Solaris/OpenSolaris .................................................................................... 8
AIX ............................................................................................................ 9
Linux .......................................................................................................... 9
IRIX, HP/UX, and So On .............................................................................. 9
FreeBSD’s Strengths ................................................................................................ 10
Portability ................................................................................................. 10
Power ...................................................................................................... 10
Simplified Software Management ................................................................ 10
Optimized Upgrade Process ....................................................................... 11
Advanced Filesystem ................................................................................. 11
Who Should Use FreeBSD? ..................................................................................... 11
Who Should Run Another BSD? ............................................................................... 11
Who Should Run a Proprietary Operating System? ..................................................... 12
How to Read This Book ........................................................................................... 12
What Must You Know? ........................................................................................... 12
For the New System Administrator ............................................................................ 13
Desktop FreeBSD ....................................................................................... 13
How to Think About Unix ........................................................................... 14
Notes on the Second Edition .................................................................................... 16
Contents of This Book ............................................................................................. 16
1
GETTING MORE HELP 19
Why Not Just Email for Help? .................................................................................. 20
The FreeBSD Attitude ................................................................................. 20
Support Options ........................................................................................ 20
xContents in Detail
Man Pages ............................................................................................................ 21
Manual Sections ....................................................................................... 22
Navigating Man Pages .............................................................................. 23
Finding Man Pages ................................................................................... 23
Section Numbers and Man ......................................................................... 24
Man Page Contents ................................................................................... 24
FreeBSD.org .......................................................................................................... 25
Web Documents ....................................................................................... 25
The Mailing List Archives ............................................................................ 26
Other Websites ...................................................................................................... 26
Using FreeBSD Problem-Solving Resources ................................................................. 26
Checking the Handbook/FAQ .................................................................... 27
Checking the Man Pages ........................................................................... 27
Checking the Mailing List Archives .............................................................. 28
Using Your Answer .................................................................................... 28
Emailing for Help ................................................................................................... 29
Writing Your Email .................................................................................... 29
Sending Your Email ................................................................................... 30
Responding to Email .................................................................................. 31
Email Is Forever ........................................................................................ 31
2
INSTALLING FREEBSD 33
FreeBSD Hardware ................................................................................................ 34
Sample Hardware ..................................................................................... 35
Proprietary Hardware ................................................................................ 35
What We Won’t Cover ............................................................................. 36
Hardware Requirements ............................................................................. 36
Preinstall Decisions ................................................................................................. 37
Partitioning ............................................................................................... 37
Multiple Hard Drives .................................................................................. 40
Partition Block Size .................................................................................... 41
Choosing Your Distribution(s) ...................................................................... 42
The FreeBSD FTP Site .............................................................................................. 43
FTP Server Content .................................................................................... 43
The Install Process .................................................................................................. 45
Choosing Boot Media ................................................................................ 45
Choosing Installation Media ....................................................................... 46
Preparing Boot Floppies .......................................................................................... 47
Preparing Boot CDs ................................................................................................ 47
FTP Media Setup .................................................................................................... 48
Actually Installing FreeBSD ...................................................................................... 49
Configuring the Network ............................................................................ 54
Miscellaneous Network Services ................................................................. 56
Time Zone ................................................................................................ 56
Linux Mode .............................................................................................. 56
PS/2 Mouse ............................................................................................. 56
Adding Packages ...................................................................................... 56
Adding Users ............................................................................................ 57
Root Password .......................................................................................... 58
Post-Installation Setup ................................................................................. 58
Restart! ................................................................................................................. 59
Contents in Detail xi
3
START ME UP! THE BOOT PROCESS 61
Power-On and the Loader ........................................................................................ 62
Single-User Mode ................................................................................................... 63
Disks in Single-User Mode .......................................................................... 64
Programs Available in Single-User Mode ...................................................... 64
The Network in Single-User Mode ............................................................... 65
Uses for Single-User Mode ......................................................................... 65
The Loader Prompt ................................................................................................. 66
Default Files ........................................................................................................... 68
Loader Configuration .............................................................................................. 69
Serial Consoles ...................................................................................................... 70
Hardware Serial Consoles .......................................................................... 71
Software Serial Consoles ........................................................................... 71
Serial Console Physical Setup ..................................................................... 73
Serial Console Use .................................................................................... 73
Serial Console Disconnection ...................................................................... 75
Startup Messages ................................................................................................... 76
Multi-User Startup ................................................................................................... 79
/etc/rc.conf and /etc/defaults/rc.conf ........................................................ 79
The rc.d Startup System .............................................................................. 87
Shutdown ................................................................................................. 88
4
READ THIS BEFORE YOU BREAK SOMETHING ELSE!
(BACKUP AND RECOVERY) 89
System Backups ..................................................................................................... 90
Backup Tapes ........................................................................................................ 90
Tape Drive Device Nodes, Rewinding, and Ejecting ...................................... 91
The $TAPE Variable ................................................................................... 91
Tape Status with mt(1) ................................................................................ 92
Other Tape Drive Commands ..................................................................... 93
To Rewind or Not? .................................................................................... 93
Backup Programs ................................................................................................... 94
tar ........................................................................................................................ 94
tar Modes ................................................................................................ 94
Other tar Features ..................................................................................... 96
gzip ........................................................................................................ 97
dump .................................................................................................................... 98
User Control ............................................................................................. 98
dump Levels .............................................................................................. 98
dump, Tape Drives, and Files ...................................................................... 99
dump and Live Filesystems .......................................................................... 99
Timestamps and dump ............................................................................. 100
Running dump ........................................................................................ 100
Throwing Data Overboard with nodump .................................................... 101
Restoring from a dump .......................................................................................... 101
Checking the Contents of an Archive ......................................................... 101
Restoring dump Data ............................................................................... 102
Multiple Backups on One Tape .............................................................................. 105
xii Contents in Detail
Revision Control ................................................................................................... 106
Initializing Revision Control ...................................................................... 107
Editing Files in RCS ................................................................................. 108
Checking Back In .................................................................................... 108
Viewing RCS Logs ................................................................................... 109
Reviewing a File’s Revision History ............................................................ 110
Getting Older Versions ............................................................................ 111
Breaking Locks ........................................................................................ 112
Recording What Happened ................................................................................... 114
The Fixit Disk ....................................................................................................... 114
5
KERNEL GAMES 117
What Is the Kernel? .............................................................................................. 118
sysctl .................................................................................................................. 119
sysctl MIBs .............................................................................................. 120
sysctl Values ........................................................................................... 121
Viewing sysctls ........................................................................................ 121
Changing sysctls ..................................................................................... 122
Kernel Modules .................................................................................................... 124
Viewing Loaded Modules ......................................................................... 124
Loading and Unloading Modules .............................................................. 125
Loading Modules at Boot ......................................................................... 125
Build Your Own Kernel ......................................................................................... 126
Preparations ........................................................................................... 126
Buses and Attachments ............................................................................ 127
Back Up Your Working Kernel .................................................................. 128
Configuration File Format ......................................................................... 128
Configuration Files .................................................................................. 129
Trimming a Kernel ................................................................................................ 131
CPU Types ............................................................................................. 131
Basic Options ......................................................................................... 131
Multiple Processors .................................................................................. 134
Device Drivers ........................................................................................ 134
Pseudodevices ........................................................................................ 135
Removable Hardware .............................................................................. 136
Building a Kernel ................................................................................................. 136
Troubleshooting Kernel Builds ................................................................... 137
Booting an Alternate Kernel ...................................................................... 137
Inclusions, Exclusions, and Expanding the Kernel ..................................................... 138
NOTES .................................................................................................. 138
Inclusions and Exclusions ......................................................................... 139
How Kernel Options Fix Problems ............................................................. 139
Sharing Kernels .................................................................................................... 140
Testing Kernels Remotely ....................................................................................... 141
Kernel Stuff You Should Know ................................................................................ 142
ACPI ...................................................................................................... 142
PAE ....................................................................................................... 142
Symmetric Multiprocessing ....................................................................... 143
Lock Order Reversals ............................................................................... 143
Contents in Detail xiii
6
THE NETWORK 145
Network Layers .................................................................................................... 146
The Physical Layer ................................................................................... 146
Datalink: The Physical Protocol .................................................................. 146
The Network Layer .................................................................................. 147
Heavy Lifting: The Transport Layer ............................................................. 147
Applications ........................................................................................... 148
The Network in Practice ........................................................................................ 148
Getting Bits and Hexes ......................................................................................... 150
Remedial TCP/IP .................................................................................................. 152
IP Addresses and Netmasks ...................................................................... 152
ICMP ..................................................................................................... 155
UDP ....................................................................................................... 155
TCP ....................................................................................................... 156
How Protocols Fit Together ....................................................................... 157
Transport Protocol Ports ............................................................................ 157
Understanding Ethernet ......................................................................................... 158
Protocol and Hardware ............................................................................ 159
Ethernet Speed and Duplex ...................................................................... 160
MAC Addresses ...................................................................................... 160
Configuring Your Ethernet Connection .................................................................... 161
ifconfig(8) .............................................................................................. 161
Adding an IP to an Interface ..................................................................... 162
Testing Your Interface .............................................................................. 163
Set Default Route ..................................................................................... 163
Multiple IP Addresses on One Interface ...................................................... 163
Renaming Interfaces ................................................................................ 164
DHCP .................................................................................................... 165
Reboot! .................................................................................................. 166
Network Activity .................................................................................................. 166
Current Network Activity .......................................................................... 166
What’s Listening on What Port? ................................................................ 167
Port Listeners in Detail .............................................................................. 168
Network Capacity in the Kernel ................................................................ 169
Optimizing Network Performance .......................................................................... 170
Optimizing Network Hardware ................................................................. 170
Memory Usage ....................................................................................... 171
Maximum Incoming Connections ............................................................... 173
Polling ................................................................................................... 174
Changing Window Size .......................................................................... 174
Other Optimizations ................................................................................ 175
Network Adapter Teaming .................................................................................... 175
Aggregation Protocols ............................................................................. 175
Configuring lagg(4) ................................................................................. 176
7
SECURING YOUR SYSTEM 177
Who Is the Enemy? .............................................................................................. 178
Script Kiddies ......................................................................................... 178
Botnets ................................................................................................... 179
xiv Contents in Detail
Disaffected Users .................................................................................... 179
Motivated Skilled Attackers ...................................................................... 179
FreeBSD Security Announcements ........................................................................... 180
User Security ....................................................................................................... 181
Creating User Accounts ........................................................................... 181
Editing Users: passwd(1), chpass(1), and Friends ........................................ 183
Shells and /etc/shells ........................................................................................... 188
root, Groups, and Management ............................................................................. 189
The root Password ................................................................................... 189
Groups of Users ...................................................................................... 190
Using Groups to Avoid Root ..................................................................... 191
Tweaking User Security ......................................................................................... 195
Restricting Login Ability ............................................................................ 195
Restricting System Usage .......................................................................... 197
File Flags ............................................................................................................ 201
Setting and Viewing File Flags .................................................................. 203
Securelevels ......................................................................................................... 204
Securelevel Definitions ............................................................................. 204
Which Securelevel Do You Need? ............................................................ 205
What Won’t Securelevels and File Flags Accomplish? ................................. 206
Living with Securelevels ............................................................................ 206
Network Targets .................................................................................................. 207
Putting It All Together ............................................................................................ 208
8
DISKS AND FILESYSTEMS 209
Disk Drives 101 ................................................................................................... 209
Device Nodes ...................................................................................................... 210
Hard Disks and Partitions ......................................................................... 211
The Filesystem Table: /etc/fstab ............................................................................. 212
What’s Mounted Now? ........................................................................................ 214
Mounting and Unmounting Disks ............................................................................ 214
Mounting Standard Filesystems ................................................................. 214
Mounting at Nonstandard Locations .......................................................... 215
Unmounting a Partition ............................................................................ 215
How Full Is a Partition? ......................................................................................... 215
The Fast File System .............................................................................................. 217
Vnodes .................................................................................................. 218
FFS Mount Types ..................................................................................... 218
FFS Mount Options .................................................................................. 220
Soft Updates and Journaling with FFS ........................................................ 220
Write Caching ........................................................................................ 221
Snapshots .............................................................................................. 222
Dirty Disks .............................................................................................. 222
Forcing Read-Write Mounts on Dirty Disks .................................................. 224
FFS Syncer at Shutdown ........................................................................... 224
Background fsck, fsck -y, Foreground fsck, Oy Vey! ..................................... 225
Using Foreign Filesystems ...................................................................................... 225
Supported Foreign Filesystems .................................................................. 226
Permissions and Foreign Filesystems .......................................................... 228
Contents in Detail xv
Removable-Media Filesystems ................................................................................ 228
Formatting FAT32 Media ......................................................................... 228
Using Removable Media .......................................................................... 230
Ejecting Removable Media ....................................................................... 231
Removable Media and /etc/fstab ............................................................. 231
Other FreeBSD Filesystems .................................................................................... 231
Memory Filesystems ................................................................................. 232
Mounting Disk Images ............................................................................. 235
Filesystems in Files ................................................................................... 235
Miscellaneous Filesystems ......................................................................... 238
Wiring Down Devices ........................................................................................... 238
Adding New Hard Disks ....................................................................................... 240
Creating Slices ....................................................................................... 240
Creating Partitions ................................................................................... 241
Configuring /etc/fstab ............................................................................. 241
Installing Existing Files onto New Disks ...................................................... 241
Stackable Mounts .................................................................................... 242
Network Filesystems ............................................................................................. 243
FreeBSD and CIFS ................................................................................................ 248
Prerequisites ........................................................................................... 248
Kernel Support ........................................................................................ 249
Configuring CIFS .................................................................................... 249
nsmb.conf Keywords ............................................................................... 249
CIFS Name Resolution ............................................................................. 250
Other smbutil(1) Functions ........................................................................ 250
Mounting a Share ................................................................................... 251
Other mount_smbfs Options ..................................................................... 251
Sample nsmb.conf Entries ......................................................................... 252
CIFS File Ownership ................................................................................ 252
Serving CIFS Shares ............................................................................................. 252
devfs .................................................................................................................. 253
devfs at Boot: devfs.conf .......................................................................... 253
Global devfs Rules ................................................................................... 255
Dynamic Device Management with devd(8) ................................................ 256
9
ADVANCED SECURITY FEATURES 261
Unprivileged Users ............................................................................................... 261
The nobody Account ................................................................................ 263
A Sample Unprivileged User ..................................................................... 263
Network Traffic Control ......................................................................................... 263
Default Accept vs. Default Deny ............................................................................. 264
TCP Wrappers ..................................................................................................... 265
Configuring Wrappers ............................................................................. 265
Wrapping Up Wrappers .......................................................................... 271
Packet Filtering .................................................................................................... 272
Enabling PF ............................................................................................ 273
Default Accept and Default Deny in Packet Filtering ..................................... 273
Basic Packet Filtering and Stateful Inspection .............................................. 274
Configuring PF ........................................................................................ 275
Complete PF Rule Sample ......................................................................... 278
Activating PF Rules .................................................................................. 279
xvi Contents in Detail
Public Key Encryption ........................................................................................... 280
Configuring OpenSSL .............................................................................. 281
Certificates ............................................................................................. 282
SSL Trick: Connecting to SSL-Protected Ports ................................................ 285
Jails .................................................................................................................... 286
Jail Host Server Setup .............................................................................. 287
Jail and the Kernel ................................................................................... 289
Client Setup ............................................................................................ 290
Decorating Your Cell: In-Jail Setup ............................................................. 291
Jail and /etc/rc.conf ............................................................................... 293
Jail Startup and Shutdown ........................................................................ 293
Managing Jails ....................................................................................... 294
Jail Shutdown ......................................................................................... 295
What’s Wrong with Jails .......................................................................... 295
Preparing for Intrusions with mtree(1) ...................................................................... 296
Running mtree(1) ..................................................................................... 297
Saving the Spec File ................................................................................ 298
Reacting to an Intrusion ............................................................................ 299
Monitoring System Security ................................................................................... 299
If You’re Hacked .................................................................................................. 300
10
EXPLORING /ETC 301
/etc Across Unix Species ...................................................................................... 302
/etc/adduser.conf ................................................................................................ 302
/etc/amd.map .................................................................................................... 302
/etc/bluetooth, /etc/bluetooth.device.conf, and
/etc/defaults/bluetooth.device.conf ................................................................. 302
/etc/crontab ....................................................................................................... 302
/etc/csh.* .......................................................................................................... 303
/etc/devd.conf .................................................................................................... 303
/etc/devfs.conf, /etc/devfs.rules, and
/etc/defaults/devfs.rules ................................................................................ 303
/etc/dhclient.conf ................................................................................................ 303
/etc/disktab ........................................................................................................ 303
/etc/freebsd-update.conf ...................................................................................... 304
/etc/fstab ........................................................................................................... 304
/etc/ftp.* ........................................................................................................... 304
/etc/group .......................................................................................................... 304
/etc/hosts ........................................................................................................... 304
/etc/hosts.allow .................................................................................................. 304
/etc/hosts.equiv .................................................................................................. 304
/etc/hosts.lpd ...................................................................................................... 305
/etc/inetd.conf .................................................................................................... 305
/etc/localtime ..................................................................................................... 305
/etc/locate.rc ...................................................................................................... 305
/etc/login.* ........................................................................................................ 306
/etc/mail/mailer.conf .......................................................................................... 306
Contents in Detail xvii
/etc/make.conf ................................................................................................... 306
CFLAGS ................................................................................................. 307
COPTFLAGS ........................................................................................... 307
CXXFLAGS ............................................................................................. 307
CPUTYPE=i686 ....................................................................................... 307
INSTALL=install -C ................................................................................... 308
/etc/master.passwd ............................................................................................. 308
/etc/motd ........................................................................................................... 308
/etc/mtree .......................................................................................................... 308
/etc/namedb ...................................................................................................... 309
/etc/netstart ........................................................................................................ 309
/etc/network.subr ................................................................................................ 309
/etc/newsyslog.conf ............................................................................................ 309
/etc/nscd.conf ..................................................................................................... 309
/etc/nsmb.conf .................................................................................................... 309
/etc/nsswitch.conf ............................................................................................... 309
/etc/opie* .......................................................................................................... 309
/etc/pam.d/* ..................................................................................................... 310
/etc/pccard_ether ................................................................................................ 310
/etc/periodic.conf and /etc/defaults/periodic.conf ................................................. 310
daily_output=”root” ................................................................................. 310
daily_show_success=”YES” ...................................................................... 310
daily_show_info=”YES” ........................................................................... 310
daily_show_badconfig=”NO” .................................................................. 311
daily_local=”/etc/daily.local” .................................................................. 311
/etc/pf.conf ........................................................................................................ 311
/etc/pf.os ........................................................................................................... 311
/etc/phones ........................................................................................................ 311
/etc/portsnap.conf ............................................................................................... 311
/etc/ppp ............................................................................................................ 311
/etc/printcap ...................................................................................................... 312
/etc/profile ......................................................................................................... 312
/etc/protocols ..................................................................................................... 312
/etc/rc* ............................................................................................................. 312
/etc/remote ........................................................................................................ 312
/etc/rpc ............................................................................................................. 313
/etc/security/ ...................................................................................................... 313
/etc/services ....................................................................................................... 313
/etc/shells .......................................................................................................... 313
/etc/snmpd.config ............................................................................................... 313
/etc/src.conf ....................................................................................................... 313
/etc/sysctl.conf .................................................................................................... 313
/etc/syslog.conf .................................................................................................. 313
/etc/termcap ....................................................................................................... 314
/etc/ttys ............................................................................................................. 314
11
MAKING YOUR SYSTEM USEFUL 315
Making Software ................................................................................................. 316
Source Code and Software ................................................................................... 316
xviii Contents in Detail
The Ports and Packages System .............................................................................. 317
Ports ...................................................................................................... 318
Finding Software .................................................................................................. 320
Finding by Name .................................................................................... 321
Finding by Keyword ................................................................................ 321
Legal Restrictions ..................................................................................... 322
Using Packages ................................................................................................... 322
CD Packages .......................................................................................... 323
FTP Packages .......................................................................................... 324
Installing Packages .................................................................................. 325
pkg_add(1) Environment Settings .............................................................. 326
What Does a Package Install? .................................................................. 327
Uninstalling Packages .............................................................................. 328
Package Information ................................................................................ 329
Package Problems ................................................................................... 330
Using Ports .......................................................................................................... 331
Installing a Port ....................................................................................... 332
Integrated Port Customizations .................................................................. 334
Port Makefiles ......................................................................................... 336
Uninstalling and Reinstalling ..................................................................... 337
Tracking Port Build Status ......................................................................... 338
Cleaning Up Ports ................................................................................... 338
Building Packages ................................................................................... 339
Changing the Install Path .......................................................................... 339
Setting make Options Permanently ............................................................ 340
Ports and Package Security ................................................................................... 340
12
ADVANCED SOFTWARE MANAGEMENT 343
Using Multiple Processors: SMP ............................................................................. 344
Kernel Assumptions ................................................................................. 344
SMP: The First Try .................................................................................... 345
Today’s SMP .......................................................................................... 346
Processors and SMP ................................................................................ 347
Using SMP ............................................................................................. 348
Schedulers ........................................................................................................... 349
Startup and Shutdown Scripts ................................................................................ 350
rc Script Ordering ................................................................................... 350
A Typical rc Script ................................................................................... 351
Special rc Script Providers ........................................................................ 352
Using Scripts to Manage Running Programs ............................................... 353
Vendor Startup/Shutdown Scripts .............................................................. 353
Debugging Custom rc Scripts .................................................................... 353
Managing Shared Libraries ................................................................................... 354
Shared Library Versions and Files .............................................................. 354
Attaching Shared Libraries to Programs ...................................................... 355
LD_LIBRARY_PATH ................................................................................... 357
What a Program Wants ........................................................................... 358
Threads, Threads, and More Threads ..................................................................... 358
Userland Threading Libraries ................................................................................. 359
Remapping Shared Libraries .................................................................................. 360
Contents in Detail xix
Running Software from the Wrong OS .................................................................... 361
Recompilation ......................................................................................... 362
Emulation ............................................................................................... 363
ABI Reimplementation .............................................................................. 363
Binary Branding ...................................................................................... 364
Supported ABIs ....................................................................................... 364
Foreign Software Libraries ........................................................................ 365
Using Linux Mode ................................................................................................ 365
The Linuxulator Userland .......................................................................... 366
Testing Linux Mode .................................................................................. 366
Identifying and Setting Brands .................................................................. 367
linprocfs ................................................................................................. 367
Debugging Linux Mode with truss(1) .......................................................... 368
Running Software from the Wrong Architecture ........................................................ 369
13
UPGRADING FREEBSD 371
FreeBSD Versions ................................................................................................. 372
Releases ................................................................................................. 372
FreeBSD-current ....................................................................................... 373
FreeBSD-stable ........................................................................................ 374
Snapshots .............................................................................................. 375
FreeBSD and Testing ................................................................................ 376
Which Version Should You Use? ............................................................... 376
Upgrade Methods ................................................................................................ 377
Binary Updates .................................................................................................... 378
/etc/freebsd-update.conf ......................................................................... 378
Running freebsd-update(8) ........................................................................ 379
Scheduling Binary Updates ....................................................................... 380
Upgrading via sysinstall ........................................................................................ 380
Upgrading via Source ........................................................................................... 382
Selecting Your Supfile .............................................................................. 383
Modifying Your Supfile ............................................................................ 384
A Complete Supfile ................................................................................. 386
Blocking Updates: The Refuse File ............................................................. 386
Updating System Source Code .................................................................. 387
Using csup to Get the Whole Source Tree .................................................. 387
Building FreeBSD from Source ............................................................................... 388
Build the World ...................................................................................... 388
Build, Install, and Test a Kernel ................................................................. 389
Optimization with Parallel Builds ............................................................... 390
Prepare to Install the New World .............................................................. 390
Installing the World ................................................................................. 393
mergemaster Revisited ............................................................................. 395
Upgrades and Single-User Mode .............................................................. 395
Shrinking FreeBSD ................................................................................................ 396
Updating with csup and make ............................................................................... 398
Cross-Building FreeBSD ......................................................................................... 399
Building a Local CVSup Server ............................................................................... 399
Controlling Access ................................................................................... 402
xx Contents in Detail
Upgrading the Ports Collection ............................................................................... 403
Configuring portsnap ............................................................................... 403
Using portsnap(8) ................................................................................... 404
Updating Installed Ports ....................................................................................... 404
Initial portmaster Setup ............................................................................ 405
Identifying Unneeded Software ................................................................. 406
Identifying and Upgrading Software .......................................................... 406
Forcing a Rebuild .................................................................................... 407
Rebuilding Upward Dependencies ............................................................. 408
Changing Dependencies .......................................................................... 408
Ignoring Ports ......................................................................................... 408
Other portmaster Features ........................................................................ 409
Reducing the Size of the Ports Tree ............................................................ 409
14
THE INTERNET ROAD MAP: DNS 411
How DNS Works ................................................................................................. 412
Basic DNS Tools .................................................................................................. 413
The host(1) Command .............................................................................. 413
Digging for Detail ................................................................................... 414
Finding Hostnames with dig ..................................................................... 416
More dig Options ................................................................................... 417
in-addr.arpa ........................................................................................... 418
Configuring the Resolver ....................................................................................... 419
Host/IP Information Sources ..................................................................... 419
Setting Local Domain Names .................................................................... 420
The Nameserver List ................................................................................ 421
Local DNS Overrides with /etc/hosts ..................................................................... 422
Building a Nameserver ......................................................................................... 422
Masters and Slaves ................................................................................. 423
BIND Configuration Files .......................................................................... 423
Configuring BIND with named.conf ........................................................................ 424
Options ................................................................................................. 424
Zones in named.conf ............................................................................... 425
Configuring a Slave Domain .................................................................... 426
Configuring a Master Domain .................................................................. 427
Master and Slave File Storage .................................................................. 427
Zone Files ........................................................................................................... 428
A Real Sample Zone ................................................................................ 432
Dots and Termination in Zone Files ............................................................ 433
Reverse DNS Zones ................................................................................. 433
Managing named ................................................................................................ 434
Configuring rndc ..................................................................................... 434
Using rndc ............................................................................................. 435
Checking DNS ..................................................................................................... 436
Nameserver Security ............................................................................................ 436
Controlling Zone Transfers ........................................................................ 436
Securing named(8) .................................................................................. 437
More on BIND ..................................................................................................... 437
Contents in Detail xxi
15
SMALL SYSTEM SERVICES 439
SSH .................................................................................................................... 439
The SSH Server: sshd(8) ........................................................................... 440
Configuring the SSH Daemon ................................................................... 442
Managing SSH User Access ..................................................................... 444
SSH Clients ............................................................................................ 445
Network Time ...................................................................................................... 447
Setting the Time Zone .............................................................................. 447
Network Time Protocol ............................................................................. 448
Name Service Switching and Caching .................................................................... 450
/etc/nsswitch.conf .................................................................................. 450
Name Query Caching with nscd(8) ........................................................... 451
inetd ................................................................................................................... 453
/etc/inetd.conf ....................................................................................... 453
Configuring inetd Servers ......................................................................... 454
Starting inetd(8) ...................................................................................... 455
Changing inetd’s Behavior ....................................................................... 456
DHCP ................................................................................................................. 456
How DHCP Works .................................................................................. 457
Managing dhcpd(8) ................................................................................ 457
Configuring dhcpd(8) .............................................................................. 457
Printing and Print Servers ...................................................................................... 459
/etc/printcap ......................................................................................... 460
TFTP ................................................................................................................... 461
Root Directory ......................................................................................... 461
tftpd and Files ......................................................................................... 462
File Ownership ....................................................................................... 462
tftpd(8) Configuration .............................................................................. 462
Scheduling Tasks .................................................................................................. 463
User Crontabs vs. /etc/crontab ................................................................ 463
cron and Environment .............................................................................. 464
Crontab Format ....................................................................................... 464
16
SPAM, WORMS, AND VIRUSES
(PLUS EMAIL, IF YOU INSIST) 467
Email Overview ................................................................................................... 468
Finding Mail Servers for a Domain ............................................................ 468
Undeliverable Email ................................................................................ 469
The SMTP Protocol ................................................................................... 470
Relay Control .......................................................................................... 472
Stopping Bad Email ................................................................................. 472
Sendmail ............................................................................................................. 473
mailwrapper(8) ....................................................................................... 474
Submission vs. Reception ......................................................................... 474
Sendmail Logging ................................................................................... 476
Configuring Sendmail ........................................................................................... 476
The access File ........................................................................................ 476
The aliases File ....................................................................................... 478
xxii Contents in Detail
The mailertable File ................................................................................. 479
The relay-domains File ............................................................................. 480
Making Changes Take Effect .................................................................... 480
Virtual Domains ................................................................................................... 481
The /etc/mail/local-host-names File ........................................................... 481
User Mapping ........................................................................................ 481
Changing sendmail.cf ........................................................................................... 483
Custom .mc Files ..................................................................................... 484
Rejecting Spam Sources ........................................................................... 485
Greylisting .......................................................................................................... 487
Configuring milter-greylist ......................................................................... 488
Attaching milter-sendmail to Sendmail ........................................................ 490
Sendmail Authentication with SASL ......................................................................... 491
saslauthd(8) ............................................................................................ 492
mailer.conf and Your New Sendmail ......................................................... 492
Building sendmail.cf ................................................................................ 492
Testing SASL ........................................................................................... 493
IMAP and POP3 ................................................................................................... 493
Installing Dovecot .................................................................................... 494
Configuring Dovecot ................................................................................ 494
Creating a Dovecot SSL Certificate ............................................................ 495
Running Dovecot ..................................................................................... 496
Testing POP3S ........................................................................................ 496
Testing IMAPS ........................................................................................ 497
17
WEB AND FTP SERVICES 499
How a Web Server Works .................................................................................... 500
The Apache Web Server ....................................................................................... 500
Apache Configuration Files ...................................................................... 501
Core Apache Configuration ..................................................................... 501
Apache Logs .......................................................................................... 503
Apache Modules .................................................................................................. 505
Directories and Permissions ................................................................................... 507
Controlling Access by IP Address .............................................................. 507
Directory Options .................................................................................... 508
Configuration by Users ............................................................................ 510
Other Directory Settings ........................................................................... 511
Password Protection and Apache .............................................................. 512
Including Other Configuration Files ........................................................................ 515
Virtual Hosting ..................................................................................................... 517
Configuring Virtual Hosts ......................................................................... 517
Tuning Virtual Hosts ................................................................................. 518
HTTPS Websites ................................................................................................... 520
Controlling Apache .............................................................................................. 521
File Transfer ......................................................................................................... 522
FTP Security ............................................................................................ 522
The FTP Client ......................................................................................... 522
Binary and ASCII Transfers ....................................................................... 523
The FTP Server ........................................................................................ 524
FTP User Control ..................................................................................... 524
Contents in Detail xxiii
FTP Server Messages ............................................................................... 525
Setting Up Anonymous FTP Servers ............................................................ 526
Chrooting sftp(1) and scp(1) .................................................................................. 527
18
DISK TRICKS WITH GEOM 529
GEOM Essentials ................................................................................................. 530
Disk Drives 102 ................................................................................................... 530
Slicing Disks ........................................................................................................ 531
Viewing the Slice Table with fdisk(8) .......................................................... 532
Backing Up the Slice Table ....................................................................... 533
Changing the Slice Table ......................................................................... 533
Partitioning Slices .................................................................................... 536
Reading Disklabels .................................................................................. 537
Backing Up and Restoring Disklabels ......................................................... 538
Editing Disklabels .................................................................................... 538
Replicating Drive Slicing and Partitioning ................................................... 539
Missing Disklabels ................................................................................... 540
Building Filesystems .............................................................................................. 540
RAID ................................................................................................................... 541
Hardware vs. Software RAID .................................................................... 541
GEOM RAID and Disk Size ...................................................................... 542
Parity and Stripe Size .............................................................................. 542
RAID Types ............................................................................................. 543
Generic GEOM Commands .................................................................................. 544
Striping Disks ....................................................................................................... 545
Creating a Striped Provider ...................................................................... 546
gstripe Destruction ................................................................................... 546
Daily Status Check .................................................................................. 547
Mirroring Disks .................................................................................................... 547
Creating a Mirror .................................................................................... 547
Repairing Mirrors .................................................................................... 548
Mirrored Boot Disks ................................................................................. 549
Destroying Mirrored Disks ........................................................................ 550
Daily Status Check .................................................................................. 550
RAID-3 ................................................................................................................ 550
Creating a RAID-3 ................................................................................... 551
Repairing a RAID-3 ................................................................................. 551
Destroying a RAID-3 ............................................................................... 553
RAID-10 .............................................................................................................. 553
RAID-10 Setup ........................................................................................ 553
RAID-10 Status ........................................................................................ 554
Destroying a RAID-10 ............................................................................. 554
Journaling Filesystems with gjournal(8) .................................................................... 554
Configuring gjournal(8) ........................................................................... 556
Using a Separate Journal Device ............................................................... 557
De-Journaling Partitions ............................................................................ 557
Filesystem Encryption ............................................................................................ 558
Kernel Configuration ............................................................................... 559
Generating and Using a Cryptographic Key ............................................... 559
Filesystems on Encrypted Devices .............................................................. 560
xxiv Contents in Detail
Deactivating Encrypted Disks .................................................................... 560
Encrypting Swap Space with geli(8) .......................................................... 561
Disk Device Network Exports ................................................................................. 561
geom_gate Security ................................................................................. 562
geom_gate Server Setup .......................................................................... 562
geom_gate Client Setup ........................................................................... 563
Identifying geom_gate Devices ................................................................. 564
Shutting Down geom_gate ....................................................................... 564
Oops! Rescuing geom_gate ...................................................................... 564
Mirroring Disks Across the Network ........................................................................ 565
Backup Server Setup ................................................................................ 565
Primary Server Setup ............................................................................... 566
Mirror Failover and Recovery ................................................................... 567
19
SYSTEM PERFORMANCE AND MONITORING 569
Computer Resources ............................................................................................. 570
Checking the Network .......................................................................................... 571
General Bottleneck Analysis with vmstat(8) .............................................................. 571
Processes ............................................................................................... 572
Memory ................................................................................................. 572
Paging ................................................................................................... 572
Disks ..................................................................................................... 573
Faults ..................................................................................................... 573
CPU ...................................................................................................... 573
Using vmstat ........................................................................................... 573
Continuous vmstat ................................................................................... 574
Disk I/O ............................................................................................................. 574
CPU, Memory, and I/O with top(1) ........................................................................ 575
PID Values .............................................................................................. 576
Load Average ......................................................................................... 576
Uptime ................................................................................................... 576
Process Counts ........................................................................................ 576
Process Types ......................................................................................... 577
Memory ................................................................................................. 577
Swap ..................................................................................................... 578
Process List ............................................................................................. 578
top(1) and I/O ....................................................................................... 579
Following Processes .............................................................................................. 580
Paging and Swapping .......................................................................................... 581
Paging ................................................................................................... 582
Swapping .............................................................................................. 582
Performance Tuning .............................................................................................. 582
Memory Usage ....................................................................................... 583
Swap Space Usage ................................................................................. 583
CPU Usage ............................................................................................ 583
Rescheduling .......................................................................................... 584
Reprioritizing with Niceness ..................................................................... 584
Investigating Software .............................................................................. 586
Status Mail .......................................................................................................... 586
Contents in Detail xxv
Logging with syslogd ............................................................................................ 587
Facilities ................................................................................................. 587
Levels ..................................................................................................... 588
Processing Messages with syslogd(8) ......................................................... 589
syslogd Customization ............................................................................. 592
Log File Management ........................................................................................... 593
Log File Path ........................................................................................... 594
Owner and Group .................................................................................. 594
Permissions ............................................................................................. 594
Count .................................................................................................... 594
Size ....................................................................................................... 595
Time ...................................................................................................... 595
Flags ..................................................................................................... 596
Pidfile .................................................................................................... 597
Signal .................................................................................................... 597
Sample newsyslog.conf Entry .................................................................... 597
FreeBSD and SNMP ............................................................................................. 598
SNMP 101 ............................................................................................. 598
Configuring bsnmpd ................................................................................ 600
20
THE FRINGE OF FREEBSD 603
/etc/ttys ............................................................................................................. 604
/etc/ttys Format ...................................................................................... 604
Insecure Console ..................................................................................... 605
Diskless FreeBSD .................................................................................................. 606
Diskless Clients ....................................................................................... 607
DHCP Server Setup ................................................................................. 607
tftpd and the Boot Loader ......................................................................... 609
The NFS Server and the Diskless Client Userland ......................................... 609
Diskless Farm Configuration .................................................................................. 611
The /conf/base Directory ......................................................................... 611
The /conf/default Directory ................................................................................... 612
Per-Subnet and Per-Client Directories ......................................................... 612
Diskless Packages and Files ................................................................................... 613
Installing Packages .................................................................................. 613
Diskless Configuration Files ...................................................................... 613
NanoBSD: Building Your Own Appliances .............................................................. 615
What Is NanoBSD? ................................................................................. 616
Your Hardware and Your Flash Drive ........................................................ 617
The NanoBSD Toolkit ............................................................................... 618
Expanding FlashDevice.sub ...................................................................... 618
NanoBSD Configuration Options .............................................................. 619
A Sample NanoBSD Configuration ............................................................ 621
Building NanoBSD .................................................................................. 624
Customizing NanoBSD ............................................................................ 627
Using NanoBSD ...................................................................................... 629
Live Media with FreeSBIE ...................................................................................... 630
Installing the FreeSBIE Toolkit .................................................................... 631
Configuring FreeSBIE ............................................................................... 631
FreeSBIE Plug-ins ..................................................................................... 634
xxvi Contents in Detail
Choosing Packages ................................................................................. 635
Building a FreeSBIE Image ....................................................................... 636
Rebuilding FreeSBIE ................................................................................. 636
21
SYSTEM (AND SYSADMIN) PANICS AND CRASHES 637
What Causes Panics? ........................................................................................... 637
Recognizing Panics .............................................................................................. 638
Responding to a Panic .......................................................................................... 639
Preparations ........................................................................................... 640
The Crash Dump in Action ........................................................................ 640
Configuring Crash Dumps ........................................................................ 640
Debugging Kernels .................................................................................. 641
When Panic Strikes: Manual Crash Dumps .............................................................. 642
Using the Dump ................................................................................................... 643
Getting a Backtrace ................................................................................. 643
vmcore and Security ................................................................................ 645
Submitting Problem Reports ................................................................................... 646
Before Filing a PR .................................................................................... 647
Bad PRs ................................................................................................. 648
Good PRs ............................................................................................... 649
A Sample PR .......................................................................................... 652
Submitting the PR .................................................................................... 653
After Submitting the PR ............................................................................. 653
AFTERWORD 655
The Community .................................................................................................... 655
Why Do We Do It? .............................................................................................. 656
What Can You Do? .............................................................................................. 657
If Nothing Else . . . ............................................................................................... 658
Getting Things Done ............................................................................................. 658
APPENDIX
SOME INTERESTING SYSCTL MIBS 661
INDEX 675

FOREWORD
It gives me great pleasure to write the foreword to
Michael Lucas’s Absolute FreeBSD. For five years, Michael’s
Absolute series has provided the definitive guide to BSD
software, not just as a reference, but also as a narrative for real human beings.
This is an important distinction, because while there is no lack of excellent
reference material on FreeBSD, this book provides a nuts-and-bolts tutorial
that readers will find an invaluable companion.
Michael is an active long-term contributor in the FreeBSD community.
Absolute FreeBSD draws on his experience with the many ways in which people
use FreeBSD in the real world—what they want to do, what works, and what
doesn’t. Apart from covering the use of FreeBSD, Michael will tell you about
the thousands of software developers—from hobbyists to professional devel-
opers and university professors—who write FreeBSD and about the evolution
of this community and its software. What I would like to do is invite you to
become a part of that community.
FreeBSD is a powerful network operating system with state-of-the-art
features that make it not only one of the most widely used pieces of software
in the world, but also an easy and practical tool on which to build and
provision services. From the Yahoo! and Verio websites to NetApp storage
xxviii Foreword
products, from Cisco anti-spam appliances and Juniper routers to the root
nameservers—it’s hard to throw a rock on the Internet without hitting
FreeBSD. However, FreeBSD is not the product of any one company, but of a
large open source community: the FreeBSD Project, made up of developers,
users, and countless supporters and advocates. While you can, as many people
do, use FreeBSD simply as a piece of software without ever interacting with
that community, you can significantly enrich your FreeBSD experience by
becoming a part of that community.
Whether you are a first-time user or a kernel hacker, the resources avail-
able via the http://www.freebsd.org website, countless mailing lists, regional
user groups, and conferences can be invaluable. Have a question? Just email
questions@FreeBSD.org, and one or more of the hundreds of volunteers will
undoubtedly answer it. Want to learn more about the exciting new features
coming in future FreeBSD versions? Read the Project’s quarterly status
reports, development mailing lists, or attend one of the many regional BSD
conferences taking place around the world; at the time of writing, the most
recent addition is the first BSDConTR in Istanbul, Turkey.
These resources are a product of the FreeBSD Project and its community,
a large number of collaborating individuals and companies, as well as the
FreeBSD Foundation, a nonprofit organization coordinating funding, legal
resources, and support for development work and community activities.
Michael’s easy-to-use book provides a gateway for newbies to benefit from
this community’s expertise and to become active users of FreeBSD themselves.
FreeBSD is open source software, available for you to use and distribute
at no charge. By helping to support, advocate, or even develop FreeBSD, you
can give back to the FreeBSD Project and help this community grow.
Whether you are a new user of FreeBSD or an experienced one, I am
confident you will find Absolute FreeBSD a book you want to keep close at hand.
Robert N.M. Watson
FreeBSD Core Team Member
President, FreeBSD Foundation
Cambridge, UK
September 2007

ACKNOWLEDGMENTS
I would like to thank all the members of the FreeBSD
community for their hard work, dedication, and
friendship. FreeBSD has saved my hide on numerous
occasions, and I’m delighted to give something back. In that community,
however, there are a few people who I want to specifically thank by name.
Doug Barton, Ceri Davies, Alex Dupre, Max Laier, Alexander Leidinger,
Remko Lodder, Benno Rice, Tom Rhodes, Gleb Smirnoff, and Robert Watson
all provided valuable feedback on this book. Some of them read individual
chapters that they have special expertise in, while others read the whole
manuscript, whether they knew about the topics or not. Wilko Bulte not
only did a review of this book, he volunteered to do so after reviewing the
entire first edition of this book back in 2001. He certainly deserves some
sort of “iron man” award! John Baldwin did an excellent final technical
review, catching an astonishing variety of errors ranging from subtle to
blatant. Any errors in this book were introduced by myself despite these
people’s best efforts.
I’d like to thank David Boyd, David O’Brien, and Wilko Bulte for donating
a variety of hardware that made it possible for me to write this book. I’d
especially like to thank Matt Olander of iXSystems, who sent me a complete
xxx Acknowledgments
amd64 server when I really, really needed one. Speaking of hardware, as I was
finishing this book, I was wondering where I would find a good kernel panic
to write about in the last chapter. FreeBSD obliged me. Thanks to Scott Long
for fixing that panic, so I could actually write Chapter 18.
As always, the folks at No Starch Press have worked their butts off to
bring this to you. You all deserve a long vacation after putting up with me—
tell Bill I said it’s okay. Similarly, the fine staff at the School of Chinese
Martial Arts deserve a vacation from me. Sadly, now that this book is done
I’ll be spending some quality time on the mats, so they don’t get any time
off. Sorry, folks.
And, as always, I’m grateful that my wife did not succumb to the tempta-
tion to bash me over the head with a shovel and bury me and my laptop
behind the garage while I was finishing this book. She’s been more than
patient waiting for me to finish up so I could take out the trash. Last March’s
trash, that is . . .
Michael Lucas
St. Clair Shores, Michigan
September 2007

INTRODUCTION
Welcome to Absolute FreeBSD! This book is
a one-stop shop for system administrators
who want to build, configure, and manage
FreeBSD servers. It will also be useful for those folks
who want to run FreeBSD on their desktops, servers,
diskless system farms, and so on. By the time you finish
this book, you should be able to use FreeBSD to provide network services.
You should also understand how to manage, patch, and maintain your
FreeBSD systems and have a basic understanding of networking, system
security, and software management. We’ll discuss FreeBSD version 7, which
is the version recommended for production use at the time this book is
being released; however, most of this book applies to earlier and later
versions as well.
2Introduction
What Is FreeBSD?
FreeBSD is a freely available Unix-like operating system, used widely by
Internet service providers, in appliances and embedded systems, and
anywhere that reliability on commodity hardware is paramount. One day
last week, FreeBSD miraculously appeared on the Internet, fully formed,
extruded directly from the mutant brain of its heroic creator’s lofty intellect.
Just kidding; the truth is far more impressive. FreeBSD is a result of almost
three decades of continuous development, research, and refinement. The
story of FreeBSD begins in 1979, with BSD.
BSD: FreeBSD’s Granddaddy
Many years ago, AT&T needed a lot of specialized, custom-written computer
software to run its business. It was not allowed to compete in the computer
industry, however, so it could not sell its software. Instead, AT&T licensed
various pieces of software and the source code for that software to universities
at low, low prices. The universities could save money by using this software
instead of commercial equivalents with pricey licenses, and university students
with access to this nifty technology could read the source code to see how
everything worked. In return, AT&T got exposure, some pocket change, and
a generation of computer scientists who had cut their teeth on AT&T tech-
nology. Everyone got something out of the deal. The best-known software
distributed under this licensing plan was Unix.
Compared with modern operating systems, the original Unix had a lot of
problems. Thousands of students had access to its source code, however, and
hundreds of teachers needed interesting projects for their students. If a pro-
gram behaved oddly, or if the operating system itself had a problem, the
people who lived with the system on a day-to-day basis had the tools and the
motivation to fix it. Their efforts quickly improved Unix and created many
features we now take for granted. Students added the ability to control
running processes, also known as job control. The Unix S51K filesystem made
system administrators cry like small children, so they replaced it with the Fast
File System, whose features have spread into every modern filesystem. Many
small, useful programs were written over the years, gradually replacing entire
swaths of Unix.
The Computer Science Research Group (CSRG) at the University of
California, Berkeley, participated in these improvements and also acted as
a central clearinghouse for Unix code improvements. The CSRG collected
changes from other universities, evaluated them, packaged them, and
distributed the compilation for free to anyone with a valid AT&T UNIX
license. The CSRG also contracted with the Defense Advanced Research
Projects Agency (DARPA) to implement various features in Unix, such as
TCP/IP. The resulting collection of software came to be known as the
Berkeley Software Distribution, or BSD.

Introduction 3
BSD users took the software and improved it further, then fed their
enhancements back into BSD. Today, we consider this to be a fairly standard
way for an open source project to run, but in 1979 it was revolutionary. BSD
was also quite successful; if you check the copyright statement on an old BSD
system, you’ll see this:
Copyright 1979, 1980, 1983, 1986, 1988, 1989, 1991, 1992, 1993, 1994
The Regents of the University of California. All rights reserved.
Yep, 15 years of work—a lifetime in software development. How many
other pieces of software are not only still in use, but still in active development,
15 years after work began? In fact, so many enhancements and improvements
went into BSD that the CSRG found that over the years, it had replaced almost
all of the original Unix with code created by the CSRG and its contributors.
You had to look hard to find any original AT&T code.
Eventually, the CSRG’s funding ebbed, and it became clear that the BSD
project would end. After some political wrangling within the University of
California, in 1992 the BSD code was released to the general public under
what became known as the BSD license.
The BSD License
BSD code is available for anyone to use under what is probably the most
liberal license in the history of software development. The license can be
summarized as follows:
Don’t claim you wrote this.
Don’t blame us if it breaks.
Don’t use our name to promote your product.
This means that you can do almost anything you want with BSD code.
(The original BSD license did require that users be notified if a software
product included BSD-licensed code, but that requirement was later
dropped.) There’s not even a requirement that you share your changes
with the original authors! People were free to take BSD and include it in
proprietary products, open source products, or free products—they could
even print it out on punch cards and cover the lawn with it. You want to run
off 10,000 BSD CDs and distribute them to your friends? Enjoy. Instead of
copyright, the BSD license is sometimes referred to as copycenter, as in Take this
down to the copy center and run off a few for yourself. Not surprisingly, companies
such as Sun Microsystems jumped right on it: It was free, it worked, and plenty
of new graduates had experience with the technology. One company, BSDi,
was formed specifically to take advantage of BSD Unix.

4Introduction
The AT&T/CSRG/BSDi Iron Cage Match
At AT&T, UNIX work continued apace even as the CSRG went on its merry
way. AT&T took parts of the BSD Unix distribution and integrated them with
its UNIX, then relicensed the result back to the universities that provided
those improvements. This worked well for AT&T until the company was
broken up and the resulting companies were permitted to compete in the
computer software business. AT&T had one particularly valuable property: a
high-end operating system that had been extensively debugged by thousands of
people. This operating system had many useful features, such as a variety of
small but powerful commands, a modern filesystem, job control, and TCP/IP.
AT&T started a subsidiary, Unix Systems Laboratories (USL), which happily
started selling Unix to enterprises and charging very high fees for it, all the
while maintaining the university relationship that had given it such an
advanced operating system in the first place.
Berkeley’s public release of the BSD code in 1992 was met with great
displeasure from USL. Almost immediately, USL sued the university and the
software companies that had taken advantage of the software, particularly
BSDi. The University of California claimed that the CSRG had compiled BSD
from thousands of third-party contributors unrelated to AT&T, and so it was
the CSRG’s intellectual property to dispose of as it saw fit.
This lawsuit motivated many people to grab a copy of BSD to see what all
the fuss was about, while others started building products on top of it. One of
these products was 386BSD, which would eventually be used as the core of
FreeBSD 1.0.
In 1994, after two years of legal wrangling, the University of California
lawyers proved that the majority of AT&T UNIX was actually taken in its
entirety from BSD, rather than the other way around. To add insult to injury,
AT&T had actually violated the BSD license by stripping the CSRG copyright
from files it had assimilated. (Only a very special company can violate the
world’s most liberal software license!) A half-dozen files were the only sources
of contention, and to resolve these outstanding issues, USL donated some of
them to BSD while retaining some as proprietary information.
Once the dust settled, a new version of BSD Unix was released to the
world as BSD 4.4-Lite. A subsequent update, BSD 4.4-Lite2, is the grandfather
of the current FreeBSD, as well as ancestor to every other BSD variant in use
today.
The Birth of FreeBSD
One early result of BSD was 386BSD, a version of BSD designed to run on the
cheap 386 processor.1 The 386BSD project successfully ported BSD to Intel’s
386 processor, but it stalled. After a period of neglect, a group of 386BSD
users decided to branch out on their own and create FreeBSD so that they
1 At the time, several thousand dollars for a computer was dirt cheap. You young punks have no
idea how good you have it.
Introduction 5
could keep the operating system up to date. (Several other groups started
their own branches off of 386BSD around the same time, of which only
NetBSD remains.)
386BSD and FreeBSD 1 were derived from 1992’s BSD release, the
subject of AT&T’s wrath. As a result of the lawsuit, all users of the original
BSD were requested to base any further work on BSD 4.4-Lite2. BSD 4.4-Lite2
was not a complete operating system—in particular, those few files AT&T
had retained as proprietary were vital to the system’s function. (After all, if
those files hadn’t been vital, AT&T wouldn’t have bothered!) The FreeBSD
development team worked frantically to replace those missing files, and
FreeBSD 2.0 was released shortly afterward. Development has continued
ever since.
Today, FreeBSD is used across the Internet by some of the most vital
and visible Internet-oriented companies. Yahoo! runs almost entirely on
FreeBSD. IBM, Nokia, Juniper, NetApp, and many other hardware com-
panies use FreeBSD in embedded systems where you’d never even know it
unless someone told you. The fact is, if a company needs to pump serious
Internet bandwidth, it’s probably running FreeBSD or one of its BSD relatives.
Like smog, spiders, and corn syrup, FreeBSD is all around you; you simply
don’t see it because FreeBSD just works. The key to FreeBSD’s reliability is
the development team and user community—which are really the same thing.
FreeBSD Development
There’s an old saying that managing programmers is like herding cats. Despite
the fact that the FreeBSD development team is scattered across the world
and speaks dozens of languages, for the most part, the members work well
together as parts of the FreeBSD team. They’re more like a pride of lions
than a collection of house cats. Unlike some other projects, all FreeBSD
development happens in public. Three groups of people are responsible
for FreeBSD’s progress: committers, contributors, and users.
Committers
FreeBSD has about 500 developers, or committers. Committers have read-and-
write access to the FreeBSD master source code repository and can develop,
debug, or enhance any piece of the system. (The term committer comes from
their ability to commit changes to the source code.) Because these commits
can break the operating system in both subtle and obvious ways, committers
carry a heavy responsibility. Committers are responsible for keeping FreeBSD
working or, at worst, not breaking it as they add new features and evaluate
patches from contributors. Most of these developers are volunteers; only a
handful are actually paid to do this painstaking work, and most of those
people are paid only as it relates to other work. For example, Intel employs
a committer to ensure that FreeBSD properly supports its network cards.
FreeBSD has a high profile in the Internet’s heavy-lifting crowd, so Intel
needs its cards to work on FreeBSD.
6Introduction
To plug yourself into the beehive of FreeBSD development, consider
subscribing to the mailing list FreeBSD-hackers@FreeBSD.org, which contains
most of the technical discussion. Some of the technical talk is broken out
into more specific mailing lists—for example, fine details of the networking
implementation are discussed in FreeBSD-net@FreeBSD.org.
Every few years, the committer team elects a small number of its members
to serve as a core team, or Core. Core’s work is simultaneously vital, underrated,
and misunderstood. Core is theoretically responsible for the overall manage-
ment of FreeBSD, but in practice, it manages little other than resolving
personality disputes and procedural conflicts among committers. Core also
approves new committers and delegates responsibility for large parts of
FreeBSD to individuals or groups. For example, it delegates authority over
the ports and packages system to the ports management team. Core does
not set architectural direction for FreeBSD, nor does it dictate processes or
procedures; that’s up to the committers, who must agree en masse. Core
does suggest, cajole, mediate, and inspire, however.
Core also experiences the worst part of management. Some of the key
functions of management in a company are oversight, motivation, and
handling problems between people. Oversight is provided by the millions
of users who will complain loudly when anything breaks or behaves unex-
pectedly, and FreeBSD committers are self-motivated. The ugly part of
management is settling a squabble between two people, and that’s the part
that Core has its hands full of. The status one gets from saying, “I’m in Core”
is an insufficient reward for having to manage an argument between two
talented developers who have gotten on each other’s nerves.
Contributors
In addition to the committer team, FreeBSD has thousands of contributors.
Contributors don’t have to worry about breaking the main operating system
source code repository; they just submit patches for consideration by
committers. Committers evaluate contributor submissions and decide what
to accept and what to reject. A contributor who submits many high-quality
patches is often asked to become a committer himself.
For example, I spent several years contributing to FreeBSD whenever
the urge struck me. Any time I feel that I’ve wasted my life, I can look at the
FreeBSD website and see where my work was accepted by the committers and
distributed to thousands of people. After I submitted the first edition of this
book to the publisher, I spent my spare time submitting patches to the FreeBSD
FAQ. Eventually, some members of the FreeBSD Documentation Project
approached me and asked me to become a committer. As a reward, I got an
email address and the opportunity to humiliate myself before thousands of
people, once again demonstrating that no good deed goes unpunished.
If I had never contributed anything, I’d remain a user. Nothing’s wrong
with that, either.

Introduction 7
Users
Users are the people who run FreeBSD systems. It’s impossible to realistically
estimate the number of FreeBSD users, although organizations such as the
BSDstats Project (http://www.bsdstats.org) are making an effort. After all,
you can download the whole of FreeBSD for free and never register, upgrade,
or email a mailing list. Companies such as Netcraft estimate that between 5
and 15 percent of all computers attached to the Internet are BSD-based. If
you remove all the Windows boxes on corporate desktops, the percentage
rises considerably.
Since FreeBSD is by far the most popular open source BSD, that’s not
an inconsiderable number of machines. And since one FreeBSD server can
handle hundreds of thousands of Internet domains, a disproportionate
number of sites use FreeBSD as their supporting operating system. This
means that there are hundreds of thousands, if not millions, of FreeBSD
system administrators out in the world today.
Other BSDs
FreeBSD might be the most popular BSD, but it’s not the only one.
BSD 4.4-Lite2 spawned several different projects, each with its own focus
and purpose. Those projects in turn had their own offspring, several of
which thrive today.
NetBSD
NetBSD is similar to FreeBSD in many ways, and NetBSD and FreeBSD share
developers and code. NetBSD’s main goal is to provide a secure and reliable
operating system that can be ported to any hardware platform with minimal
effort. As such, NetBSD runs on VAXes, PocketPC devices, and high-end
SPARC and Alpha servers. I run NetBSD on my HP Jornada handheld
computer.2
OpenBSD
OpenBSD branched off from NetBSD in 1996 with the goal of becoming the
most secure BSD. OpenBSD was the first to support hardware-accelerated
cryptography, and its developers are rightfully proud of the fact that their
default installation was largely immune to remote exploits for several years.
The OpenBSD team has contributed several valuable pieces of software to
the world, the most notable being the OpenSSH suite used by almost every
operating system and hardware vendor today.
2 If you’re ever in a position where you need to prove that you are Alpha Geek amongst the pack,
running Unix on your palmtop will almost certainly do it.
8Introduction
Mac OS X
Mac OS X? That’s right. Apple incorporates large chunks of FreeBSD into
its Mac OS X on an ongoing basis. If you’re looking for a stable operating
system with a friendly face and a powerful core, Mac OS X is unquestionably
for you. While FreeBSD makes an excellent desktop for a computer pro-
fessional, I wouldn’t put it in front of Grandma. I would put Mac OS X in
front of Grandma without a second thought, however, and I’d even feel that
I was doing the right thing. But Mac OS X includes many things that aren’t
at all necessary for an Internet server, and it only runs on Apple hardware,
so I don’t recommend it as an inexpensive general-purpose server.
What’s more, code goes both ways. FreeBSD has incorporated code
originally developed for Mac OS X. And while you cannot view the user
interface source code for Mac OS X, you can get the source code to its BSD
core and Mach kernel. Apple has released both under the code name
Darwin.
FreeBSD’s Children
Several projects have taken FreeBSD and built other projects or products
on top of it. The award-winning FreeNAS transforms an x86 system into a
network fileserver with just a simple menu. FreeSBIE is a bootable CD that
lets you run FreeBSD without installing it. The m0n0wall project is also a
bootable CD, but it transforms your system into a firewall with a nice web
management interface. PC-BSD puts a friendly face on FreeBSD, trying to
make FreeBSD usable by Grandma. Other projects like this appear from time
to time; while not all are successful, I’m sure by the time this book comes out,
we’ll have one or two more solid members of this group.
Other Unixes
Several other operating systems derive from or emulate primordial Unix in
one way or another. This list is by no means exhaustive, but I’ll touch on the
high points.
Solaris/OpenSolaris
The best-known Unix is Sun Microsystems’ Solaris and its new offspring,
OpenSolaris. Solaris runs on high-end hardware that supports dozens of
processors and gobs of disk. (Yes, gobs is a technical term, meaning more than
you could possibly ever need, and I know very well that you need more disk than I
think you need.) Solaris, especially early versions of Solaris, had strong BSD
roots. Many enterprise-level applications run on Solaris. Solaris runs mainly
on the SPARC hardware platform manufactured by Sun, which allows Sun to
support interesting features such as hot-swappable memory and mainboards.
OpenSolaris increasingly targets commodity hardware, however.

Introduction 9
AIX
Another Unix contender is IBM’s entry, AIX. AIX’s main claim to fame is its
journaling filesystem, which records all disk transactions as they happen and
allows for fast recovery from a crash. It was also IBM’s standard Unix for
many years, and anything backed by Big Blue shows up all over the place.
AIX is largely based on BSD.
Linux
Linux is a close cousin of Unix, written from the ground up. Linux is similar
to FreeBSD in many ways, though FreeBSD has a much longer heritage and
is more friendly to commercial use than Linux. Linux includes a requirement
that any user who distributes Linux must make his or her changes available
to the end user, while BSD has no such restriction. Of course, a Linux fan
would say, “FreeBSD is more vulnerable to exploitation than Linux.” Linux
developers believe in share-and-share-alike, while BSD developers offer a no-
strings-attached gift to everyone. It all depends on what’s important to you.
Many new Unix users have a perception of conflict between the BSD and
Linux camps. If you dig a little deeper, however, you’ll find that most of the
developers of these operating systems communicate and cooperate in a friendly
and open manner. It’s just a hard fringe of users and developers that generate
friction, much like different soccer teams’ hooligans or fans of different Star
Trek series.
IRIX, HP/UX, and So On
Other Unixes include Silicon Graphics’ IRIX, a solid Unix for graphics
applications, and Hewlett-Packard’s HP/UX, popular in large enterprises.
A quick web search uncovers many smaller contenders, such as Tru64 Unix
and the suicidal SCO Group’s UnixWare. You’ll also find old castoffs such as
Apple’s A/UX and Microsoft’s Xenix. (Yes, Microsoft was a licensed Unix
vendor, back in that age when dinosaurs watched the skies nervously and my
WHY UNIX-LIKE?
One thing to note is that FreeBSD, Linux, and so on are called Unix-like instead of
Unix. The term Unix is a trademark of The Open Group. For an operating system to
receive the right to call itself Unix, the vendor must prove that the OS complies with the
current version of the Single Unix Specification. While FreeBSD generally meets the
standard, continuous testing and re-certification cost money, which the FreeBSD
Project doesn’t have to spare. Certification as Unix also requires that someone sign
a paper stating that not only is he or she responsible for FreeBSD’s conformance to
the Single Unix Specification, but that he or she will fix any deviations from the
standard that are found in the future. FreeBSD’s development model makes this even
more difficult—bugs are found and deviations are fixed, but there’s nobody who
can sign a piece of paper that guarantees 100 percent standards compliance.
10 Introduction
dad hunted mammoth for tribal rituals.) Many high-end applications are
designed to run best on one particular flavor of Unix. All modern Unixes
have learned lessons from these older operating systems, and today’s Unixes
and Unix-like operating systems are remarkably similar.
FreeBSD’s Strengths
After all this, what makes FreeBSD unique?
Portability
The FreeBSD Project’s goal is to provide a freely redistributable, stable, and
secure operating system that runs on the computer hardware that people are
most likely to have access to. Today this means Intel x86-compatible systems
such as the 486, the various Pentiums, AMD, and so on, as well as AMD’s
amd64 architecture (copied by Intel as EM64T). Older x86 systems no
longer work out of the box with newer versions of FreeBSD, but most of
those systems are either long dysfunctional or aren’t about to change
operating systems any time soon.
The ARM platform used in embedded devices is a new addition to
FreeBSD and is well supported on specific embedded boards. FreeBSD also
supports Sun’s SPARC systems and Intel’s Itanium (IA64), as well as the
PowerPC processor recently used by Apple. While these other platforms
are not afterthoughts, they don’t receive the same level of attention that
x86 and amd64 do.
Power
Since FreeBSD runs adequately on 386 hardware, it runs extremely well on
modern computers. It’s rather nice to have an operating system that doesn’t
demand a Pentium III and half a gig of RAM just to run the user interface. As
a result, you can actually dedicate your hardware to accomplishing real work
rather than tasks you don’t care about. If you choose to run a pretty graphical
interface with all sorts of spinning geegaws and fancy whistles, FreeBSD will
support you; it just won’t penalize you if you don’t want that. FreeBSD will
also support you on the latest n-CPU hardware.
Simplified Software Management
FreeBSD also simplifies software management through the Ports Collection.
Traditionally, running software on a Unix-like system required a great deal
of expertise. The Ports Collection simplifies this considerably by automating
and documenting the install, uninstall, and configuration processes for
thousands of software packages.
Introduction 11
Optimized Upgrade Process
Unlike operating systems that require painful and risky upgrade procedures,
FreeBSD’s simple upgrade process builds an operating system optimized for
your hardware and applications. This lets FreeBSD use every feature supported
by your hardware, instead of just the lowest common denominator. If you
change hardware, you can rebuild your operating system to best handle that
particular hardware. Vendors such as Sun and Apple do exactly this, but they
control both the hardware and the software; FreeBSD pulls off the same trick
on commodity hardware.
Advanced Filesystem
A filesystem is how information is stored on the physical disk—it is what maps
the file My Resume to a series of zeroes and ones on a hard drive. FreeBSD
supports very sophisticated filesystems and can support files up to a petabyte
(one thousand thousand gigabytes). Its default filesystem is highly damage
resistant and reads and writes files extremely quickly. The BSD filesystem is
advanced enough that many commercial Unix vendors have used it as a basis
for their own filesystems.
Who Should Use FreeBSD?
While FreeBSD can be used as a powerful desktop or development machine,
its history shows a strong bias towards web, mail, file, and support services.
FreeBSD is most famous for its strengths as an Internet server, and it is an
excellent choice as an underlying platform for any network service. If major
firms such as Yahoo! count on FreeBSD to provide reliable service, it will
work as well for you.
If you’re thinking of running FreeBSD (or any Unix) on your desktop,
you’ll need to understand how your computer works. FreeBSD is not your
best choice if you need point-and-click simplicity. If that’s your goal, get a
Mac so you can use the power of Unix when you need it and not worry about
it the rest of the time. If you want to learn FreeBSD, though, running it on
your desktop is the best way—as we’ll discuss later.
Who Should Run Another BSD?
NetBSD and OpenBSD are FreeBSD’s closest competitors. Unlike competitors
in the commercial world, this competition is mostly friendly. FreeBSD,
NetBSD, and OpenBSD freely share code and developers; some people
even maintain the same subsystems in multiple operating systems.
If you want to use old or oddball hardware, NetBSD is a good choice for
you. For several years I ran NetBSD on an ancient SGI workstation that I used
as a Domain Name System (DNS) and fileserver. It did the job well until the
hardware finally released a cloud of smoke and stopped working.
12 Introduction
OpenBSD has implemented an impressive variety of security features.
Many of the tools are eventually integrated into FreeBSD, but that takes
months or years. If you have real security concerns but don’t need sophis-
ticated multiprocessor support, you might look at OpenBSD.
If you’re just experimenting to see what’s out there, any BSD is good!
Who Should Run a Proprietary Operating System?
Operating systems such as Solaris, Windows, AIX, and their ilk are still quite
popular, despite the open source operating systems gnawing at their market
share. High-end enterprises are pretty tightly shackled to these operating
systems. While this is slowly changing, you’re probably stuck with commercial
operating systems in such environments. But slipping in an occasional
FreeBSD machine to handle basic services such as monitoring and depart-
ment file serving can make your life much easier at much lower cost. Yahoo!
and NetApp have built entire businesses using FreeBSD instead of commercial
operating systems.
Of course, if the software you need only runs on a proprietary operating
system, your choice is pretty clear. Still, always ask a vendor if a FreeBSD
version is available; you might be pleasantly surprised.
How to Read This Book
Many computer books are thick and heavy enough to stun an ox, if you have
the strength to lift them high enough. Plus, they’re either encyclopedic in
scope or so painfully detailed that they’re difficult to actually read. Do you
really need to reference a screenshot when you’re told click OK or accept the
license agreement? And when was the last time you actually sat down to read
the encyclopedia?
Absolute FreeBSD is a little different. It’s designed to be read once, from
front to back. You can skip around if you want to, but each chapter builds on
what comes before it. While this isn’t a small book, it’s smaller than many
popular computer books. After you’ve read it once, it makes a decent
reference.
If you’re a frequent buyer of computer books, please feel free to insert
all that usual crud about “read a chapter at a time for best learning” and so
on. I’m not going to coddle you—if you picked up this book, you either have
two brain cells to rub together or you’re visiting someone who does. (If it’s
the latter, hopefully your host is smart enough to take this book away from
you before you learn enough to become dangerous.)
What Must You Know?
This book is aimed at the new Unix administrator. Two decades ago, the
average Unix administrator had kernel programming experience and was
working on his master’s degree in computer science. Even a decade ago, he
was already a skilled Unix user with real programming skills and most of a
bachelor’s degree in comp sci. Today, Unix-like operating systems are freely

Introduction 13
available, computers are cheaper than food, and even 12-year-old children
can run Unix, read the source code, and learn enough to intimidate older
folks. As such, I don’t expect you to know a huge amount about Unix before
firing it up.
To use this book to its full potential, you need to have familiarity with
some basic tasks, such as how to change directories, list files in a directory,
and log in with a username and password. If you’re not familiar with basic
commands and the Unix shell, I recommend you begin with a book like
UNIX System Administration Handbook by Evi Nemeth and friends (Prentice
Hall PTR, 2006). To make things easier on newer system administrators,
I include the exact commands needed to produce the desired results. If you
learn best by example, you should have everything you need right here.
You’ll also need to know something about computer hardware—not a
huge amount, mind you, but something. For example, it helps to know how
to recognize an IDE, SCSI, or SATA cable. Your need for this knowledge
depends on the hardware you’re using, but if you’re interested enough to
pick up this book and read this far, you probably know enough.
For the New System Administrator
If you’re new to Unix, the best way to learn is to eat your own dog food. No,
I’m not suggesting that you dine with Rover. If you ran a dog food company,
you’d want to make a product that your own dog eats happily. If your dog
turns his nose up at your latest recipe, you have a problem. The point here is
that if you work with a tool or create something, you should actually use it.
The same thing applies to any Unix-like operating system, including FreeBSD.
Desktop FreeBSD
If you’re serious about learning FreeBSD, I suggest wiping out the operating
system on your main computer and running FreeBSD instead. Yes, I know,
now that dog food doesn’t sound so bad. But learning an operating system is
like learning a language; total immersion is the quickest and most powerful
way to learn. That’s what I did, and today I can make a Unix-like system do
anything I want. In fact, this book was composed entirely on a FreeBSD
laptop, using the open source text editor XEmacs and the OpenOffice.org
business suite. I also use FreeBSD to watch movies, rip and listen to MP3s,
balance my bank accounts, process my email, and surf the Web. As I write
this, I have a dozen animated BSD daemons running around on top of my
desktop windows, and I occasionally take a break to zap them with my mouse.
If this doesn’t count as a Stupid Desktop Trick, I don’t know what does.3
Many Unix system administrators these days come from a Windows
background. They’re beavering away in their little world when management
swoops by and says, “You can handle one more system, can’t you? Glad to
3 In the first edition of this book, I neglected to mention exactly how to do a similar Stupid
Desktop Trick, which generated more questioning email than any other topic in the whole
book. That’s a mistake I won’t make again!
14 Introduction
hear it! It’s a Unix box, by the way,” and then vanishes into the managerial
ether. Once the new Unix administrator decides to not slit his wrists, the
boss’s wrists, or start a fresh and exciting career as a whale autopsy technician,
he tentatively pokes at the system. He learns that ls is like dir and that cd is
the same on both platforms. He can learn the commands by rote, reading,
and experience. What he cannot learn, coming from this background, is how
a Unix machine thinks. Unix will not adjust to you; you must adjust to it.
Windows and OS X require similar adjustments, but they hide this behind a
glittering facade. With that in mind, let’s spend a little time learning how to
think about Unix.
How to Think About Unix
These days, most Unix systems come with pretty GUIs out of the box, but
they’re just eye candy. The real work happens on the command line, no
matter how many tools purport to hide it. The command line is actually
one of Unix’s strengths, and it is responsible for its unparalleled flexibility.
Unix’s underlying philosophy is many small tools, each of which does a
single job well. My laptop’s local programs directory (/usr/local/bin) has
662 programs in it. I have installed every one of them, either directly or
indirectly. Most are small, simple programs that only do one task, with
occasional exceptions, such as the office suite. This array of small tools
makes Unix extremely flexible and adaptable. Many commercial software
packages try to do everything; they wind up with all sorts of capabilities but
only mediocre performance in their core functions. Remember, at one time
you needed to be a programmer to use a Unix system, let alone run one.
Programmers don’t mind building their own tools. The Unix concept of
channels encouraged this.
Channels of Communication
People used to GUI environments such as Windows and Mac OS X are
probably unfamiliar with how Unix handles output and input. They’re used
to clicking something and seeing either an OK message, an error, nothing,
or (all too often) a pretty blue screen with nifty high-tech letters explaining
in the language called Geek why the system crashed. Unix does things a little
differently.
Unix programs have three channels of communication: standard input,
standard output, and standard error. Once you understand how each of
these channels works, you’re a good way along to understanding the whole
system.
Standard input is the source of information. When you’re at the console
typing a command, the standard input is the data coming from the keyboard.
If a program is listening to the network, the standard input is the network.
Many programs can rearrange standard input to accept data from the
network, a file, another program, the keyboard, or any other source.
The standard output is where the program’s output is displayed. This is
frequently the console (screen). Network programs usually return their

Introduction 15
output to the network. Programs might send their output to a file, another
program, over the network, or anywhere else available to the computer.
Finally, standard error is where the program sends its error messages.
Frequently, console programs return their errors to the console; others log
errors in a file. If you set up a program incorrectly, it just might discard all
error information.
These three channels can be arbitrarily arranged, a concept that is
perhaps the biggest hurdle for new Unix users and administrators. For
example, if you don’t like the error messages appearing on the terminal,
you can redirect them to a file. If you don’t want to repeatedly type a lot
of information into a command, you can put the information into a file
(so you can reuse it) and dump the file into the command’s standard input.
Or, better still, you can run a command to generate that information and put
it in a file, or just pipe (send) the output of the first command directly to the
second, without even bothering with a file.
Small Programs, Channels, and the Command Line
Taken to its logical extreme, these input/output channels and the variety of
tools seem overwhelming. When I saw a sysadmin type something like the
following during my initial Unix training session, I gave serious consideration
to changing careers.
$ tail -f /var/log/messages | grep -v popper | grep -v named &
Lines of incomprehensible text began spilling across the screen, and
they kept coming. And worse still, my mentor kept typing as gibberish
poured out! If you’re from a point-and-click computing environment, a long
string of commands like this is definitely intimidating. What do all those
funky words mean? And an ampersand? You want me to learn what?
Think of learning to use the command line as learning a language.
When learning a language, we start with simple words. As we increase our
vocabulary, we also learn how to string the words together. We learn that
placing words in a certain order makes sense, and that a different order
makes no sense at all. You didn’t speak that well at three years old—give
yourself some slack and you’ll get there.
Smaller, simpler programs and channels of communication provide
almost unlimited flexibility. Have you ever wished you could use a function
from one program in another program? By using a variety of smaller pro-
grams and arranging the inputs and outputs as you like, you can make
a Unix system behave in any manner that amuses you. Eventually, you’ll
feel positively crippled if you can’t just run a command’s output through
| sort -rnk 6 | less.4
4 This ugly thing takes the output of the last command, sorts it in reverse order by the contents
of the sixth column, and presents it one screen at a time. If you have hundreds of lines of output,
and you want to know which entries have the highest values in the sixth column, this is how you
do it. Or, if you have lots of time, you can dump the output to a spreadsheet and fiddle with
equally obscure commands for a much longer time.
16 Introduction
Everything Is a File
You can’t be around Unix for very long before hearing that everything is a
file. Programs, account information, and system configuration are all stored
in files. Unix has no Windows-style registry; if you back up the files, you have
the whole system.
What’s more, the system identifies system hardware as files! Your CD-ROM
drive is a file, /dev/acd0. Network cards appear as files in /dev/net. Even virtual
devices, such as packet sniffers and partitions on hard drives, are files.
When you have a problem, keep this fact in mind. Everything is a file or
is in a file, somewhere on your system. All you have to do is find it!
Notes on the Second Edition
When I wrote my first technical book, the members of the BSD family had
huge amounts in common. A system administrator familiar with one BSD
could sit down at a different one and have the environment tuned nicely in
an hour or two. Some tools were in a different place, the boot sequences
were slightly different, and some features didn’t quite match, but on the
whole, each was just another derivative of BSD 4.4. That was five years ago,
and in the meantime each BSD has marched down a different path. While
they still have a lot in common, the differences are broad enough that I no
longer feel comfortable saying that much of this book is largely applicable to
all three BSDs. As such, this is Absolute FreeBSD, 2nd Edition, instead of just
Absolute BSD, 2nd Edition.
You’ll find other changes from the first edition, of course. The differences
between FreeBSD 4 and FreeBSD 7 vary from the dramatic to the subtle, and
either can trip you up if you’re not careful. Many tools for making Sendmail
manageable and friendly have been integrated into the system, so I cover
Sendmail instead of Postfix. (I still like Postfix, but this is a FreeBSD book.)
In 2000, it was unthinkable to have a computer without a floppy disk drive;
now, some computers ship without any integrated removable-media drives
whatsoever. This makes diskless work much more important, because for
some hardware, it’s the only way to get an operating system on the machine!
Lastly, FreeBSD has evolved greatly in the last five years, and I’ve learned more
in that time than I would have believed possible. Hopefully, this combination
makes Absolute FreeBSD, 2nd Edition a quantum leap better than its predecessor.
Contents of This Book
Absolute FreeBSD, 2nd Edition contains the following chapters.
Chapter 1: Getting More Help
This chapter discusses the information resources the FreeBSD Project
and its devotees provide for users. No one book can cover everything,
but knowing how to use the many FreeBSD resources on the Internet
helps fill any gaps you find here.
Introduction 17
Chapter 2: Installing FreeBSD
This chapter gives you an overview of installing FreeBSD and offers
advice on an optimal install.
Chapter 3: Start Me Up! The Boot Process
This chapter teaches you about the FreeBSD boot process and how to
make your system start, stop, and reboot in different configurations.
Chapter 4: Read This Before You Break Something Else!
Here we discuss how to back up your data on both a system-wide and a
file-by-file level, and how to make your changes so that they can be easily
undone.
Chapter 5: Kernel Games
This chapter describes configuring the FreeBSD kernel. Unlike some
other operating systems, you are expected to tune FreeBSD’s kernel to
best suit your purposes. This gives you tremendous flexibility and lets you
optimize your hardware’s potential.
Chapter 6: The Network
Here we discuss the network and how it works in FreeBSD.
Chapter 7: Securing Your System
This chapter teaches you how to make your computer resist attackers
and intruders.
Chapter 8: Disks and Filesystems
This chapter covers some of the details of working with hard drives in
FreeBSD, support for other filesystems, and a few network filesystems.
Chapter 9: Advanced Security Features
Here we discuss some of the more interesting security features found in
FreeBSD.
Chapter 10: Exploring /etc
This chapter describes the many configuration files in FreeBSD and how
they operate.
Chapter 11: Making Your System Useful
Here I describe the ports and packages system that FreeBSD uses to
manage add-on software.
Chapter 12: Advanced Software Management
This chapter discusses some of the finer points of running software on
FreeBSD systems.
Chapter 13: Upgrading FreeBSD
This chapter teaches you how to use FreeBSD’s upgrade process. The
upgrade system is among the most remarkable and smooth of any oper-
ating system.
Chapter 14: The Internet Road Map: DNS
This chapter describes DNS and teaches you how to install and trouble-
shoot it.
18 Introduction
Chapter 15: Small System Services
Here we discuss some of the small programs you’ll need to manage in
order to use FreeBSD properly.
Chapter 16: Spam, Worms, and Viruses (Plus Email, If You Insist)
This chapter describes how to set up an email system on FreeBSD to reli-
ably deliver mail and repel spam and viruses.
Chapter 17: Web and FTP Services
This chapter teaches you how to set up and secure these two vital
Internet services.
Chapter 18: Disk Tricks with GEOM
This chapter goes over some of the fancy techniques FreeBSD supports
for mirroring disks, exporting disk devices across the network, and gen-
erally having a good old time protecting and manipulating your data.
Chapter 19: System Performance and Monitoring
This chapter covers some of FreeBSD’s performance-testing and trouble-
shooting tools and shows you how to interpret the results. We also discuss
system logging and FreeBSD’s SNMP implementation.
Chapter 20: The Fringe of FreeBSD
This chapter teaches you some of the more interesting tricks you can do
with FreeBSD, such as running systems without disks and with tiny disks,
as well as some live failover and redundancy setups.
Chapter 21: System (and Sysadmin) Panics and Crashes
This chapter teaches you how to deal with those rare occasions when a
FreeBSD system fails, how to debug problems, and how to create a useful
problem report.
Appendix: Some Interesting sysctl MIBs
This appendix provides basic information about some of the kernel-
tuning options available for your use.
Okay, enough with the introductory stuff. Onward!

1
GETTING MORE HELP
As thick as this book is, it still can’t possibly
cover everything you must know about
FreeBSD. After all, Unix has been kicking
around for close to four decades, BSD is over a
quarter-century old, and FreeBSD is already a teenager.
Even if you memorize this book, it won’t cover every
situation you might encounter—especially when FreeBSD starts acting like a
typical teenager and needs a good smack. The FreeBSD Project supports a
huge variety of information resources, including numerous mailing lists and
the FreeBSD website, not to mention the official manual and Handbook. Its
users maintain even more documentation. The flood of information can be
overwhelming in itself, and it can make you want to just email the world and
beg for help. But before you send a question to a mailing list, confirm that
the information you need isn’t already available.
20 Chapter 1
Why Not Just Email for Help?
The FreeBSD mailing lists are the best-known support resources. Many mail-
ing list participants are very knowledgeable and can answer your questions
very quickly. But remember, when you mail a question to a FreeBSD mailing
list, you are asking tens of thousands of people all over the world to take a
moment to read your email. You’re also asking that one or more of them
take the time to help you instead of watching a favorite movie, enjoying
dinner with their families, or catching up on sleep. Problems arise when
these experts answer the same question 10, 50, or even hundreds of times.
They become grumpy. Some get downright tetchy.
What makes matters worse is that these same people have spent a
great deal of time and effort making the answers to most of these questions
available elsewhere. If you make it clear that you have already searched the
resources and your answer really doesn’t appear therein, you will probably
receive a polite, helpful answer. If you ask a question that has already been
asked several hundred times, however, the expert on that subject just might
snap and go ballistic on you. Do your homework, and chances are you’ll get
an answer more quickly than a fresh call to the mailing list could provide.
The FreeBSD Attitude
“Homework? What do you mean? Am I back in school? What do you want,
burnt offerings on bended knee?” Yes, you are in school. The information
technology business is nothing but lifelong, self-guided learning. Get used
to it or get out. Burnt offerings, on the other hand, are difficult to transmit
via email and are not quite so useful today.
Most commercial operating systems conceal their inner workings. The
only access you have to them is through the options presented by the vendor.
Even if you want to learn how something works, you probably can’t. When
something breaks, you have no choice but to call the vendor and grovel for
help. Worse, the people paid to help you frequently know little more than
you do.
If you’ve never worked with open source software vendors, FreeBSD’s
support mechanism might surprise you. There is no toll-free number to call
and no vendor to escalate within. No, you may not speak to a manager, for a
good reason: You are the manager. Congratulations on your promotion!
Support Options
Having said that, you’re not entirely on your own. The FreeBSD community
includes numerous developers, contributors, and users who care very deeply
about FreeBSD’s quality, and they’re happy to work with you. FreeBSD
provides everything you need: complete access to the source code used to
create the system, the tools needed to turn that source code into programs,
and the same debuggers used by the developers. Nothing is hidden; you can
see the innards, warts and all. You can view FreeBSD’s development history
Getting More Help 21
since the beginning, including every change ever made and the reason for it.
These tools might be beyond your abilities, but that’s not the Project’s prob-
lem. Various community members are even happy to provide guidance as you
develop your own skills so you can use those tools yourself. You’ll have lots of
help fulfilling your responsibilities.
As a grossly overgeneralized rule, people help those like themselves.
If you want to use FreeBSD, you must make the jump from eating what the
vendor gives you to learning how to cook. Every member of the FreeBSD
user community learned how to use it, and they welcome interested new
users with open arms. If you just want to know what to type without really
understanding what’s going on behind the scenes, you’ll be better off
reading the documentation: The general FreeBSD support community
simply isn’t motivated to help those who won’t help themselves or who
can’t follow instructions.
If you want to use FreeBSD but have neither the time nor the inclination
to learn more, invest in a commercial support contract. It might not be able to
put you in touch with FreeBSD’s owner, but at least you’ll have someone
to yell at. You’ll find several commercial support providers listed on the
FreeBSD website.
It’s also important to remember that the FreeBSD Project only main-
tains FreeBSD. If you’re having trouble with some other piece of software, a
FreeBSD mailing list is not the place to ask for help. FreeBSD developers are
generally proficient in a variety of software, but that doesn’t mean that they
want to help you, say, configure KDE.
The first part of your homework, then, is to learn about the resources
available beyond this book. These include the integrated manual, the
FreeBSD website, the mailing list archives, and other websites.
Man Pages
Man pages (short for manual pages) are the primordial way of presenting
Unix documentation. While man pages have a reputation for being obtuse,
difficult, or even incomprehensible, they’re actually quite friendly—for
particular users. When man pages were first created, the average system
administrator was a C programmer and, as a result, the pages were written
by programmers, for programmers. If you can think like a programmer, man
pages are perfect for you. I’ve tried thinking like a programmer, but I only
achieved real success after remaining awake for two days straight. (Lots of
caffeine and a high fever help.)
Over the last several years, the skill level required for system administra-
tion has dropped; no longer must you be a programmer. Similarly, man pages
have become more and more readable. Man pages are not tutorials, however;
they explain the behavior of one particular program, not how to achieve a
desired effect. While they’re neither friendly nor comforting, they should be
your first line of defense. If you send a question to a mailing list without
checking the manual, you’re likely to get a terse man whatever in response.

22 Chapter 1
Manual Sections
The FreeBSD manual is divided into nine sections. Roughly speaking, the
sections are:
Each man page starts with the name of the command it documents
followed by its section number in parenthesis, like this: reboot(8). When you
see something in this format in other documents, it’s telling you to read that
man page in that section of the manual. Almost every topic has a man page.
For example, to see the man page for the editor vi, type this command:
$ man vi
In response, you should see the following:
VI(1) VI(1)
NAME
ex, vi, view - text editors
SYNOPSIS
ex [-eFGRrSsv] [-c cmd] [-t tag] [-w size] [file ...]
vi [-eFGlRrSv] [-c cmd] [-t tag] [-w size] [file ...]
view [-eFGRrSv] [-c cmd] [-t tag] [-w size] [file ...]
LICENSE
The vi program is freely redistributable. You are welcome to copy,
modify and share it with others under the conditions listed in the
LICENSE file. If any company (not individual!) finds vi sufficiently
useful that you would have purchased it, or if any company wishes to
redistribute it, contributions to the authors would be appreciated.
DESCRIPTION
Vi is a screen oriented text editor. Ex is a line-oriented text editor
Ex and vi are different interfaces to the same program, and it is
possible to switch back and forth during an edit session. View is the
:
The page starts with the title of the man page (vi) and the section
number (1), and then it gives the name of the page. This particular page
has three names: ex, vi, and view. Typing man ex or man view would take you
to this same page.
1. General user commands 6. Game instructions
2. System calls and error numbers 7. Miscellaneous information
3. C programming libraries 8. System maintenance commands
4. Devices and device drivers 9. Kernel interfaces
5. File formats

Getting More Help 23
Navigating Man Pages
Once you’re in a man page, pressing the spacebar or the PGDN key takes you
forward one full screen. If you don’t want to go that far, pressing ENTER or the
down arrow scrolls down one line. Typing B or pressing the PGUP key takes
you back one screen. To search within a man page, type / followed by the word
you’re searching for. You’ll jump down to the first appearance of the word,
which will be highlighted. Typing N subsequently takes you to the next
occurrence of the word.
This assumes that you’re using the default BSD pager, more(1). If you’re
using a different pager, use that pager’s syntax. Of course, if you know so
much about Unix that you’ve already set your preferred default pager, you’ve
probably skipped this part of the book entirely.
Finding Man Pages
New users often say that they’d be happy to read the man pages, if they
could find the right one. You can perform basic keyword searches on the
man pages with apropos(1) and whatis(1). apropos(1) searches for any man page
name or description that includes the word you specify. whatis(1) does the
same search, but only matches whole words. For example, if you’re interested
in the vi command, you might try the following:
$ apropos vi
BUS_ADD_CHILD(9) - add a device node to the tree with a given priority
BUS_PRINT_CHILD(9) - print information about a device
BUS_READ_IVAR(9), BUS_WRITE_IVAR(9) - manipulate bus-specific device instance
variables
DEVICE_ATTACH(9) - attach a device
...
This continues for a total of 581 entries, which is probably far more
than you want to look at. Most of these have nothing to do with vi(1),
however; the letters vi just appear in the name or description. Device driver is
a fairly common term in the manual, so that’s not surprising. On the other
hand, whatis(1) gives more useful results in this case.
$ whatis vi
ex(1), vi(1), view(1) - text editors
etags(1), ctags(1) - generate tag file for Emacs, vi
$
There are only two results, and both clearly have relevance to vi(1). On
other searches, apropos(1) gives better results than whatis(1). Experiment with
both and you’ll quickly learn how they fit your style.

24 Chapter 1
Section Numbers and Man
You might find cases where a single command appears in multiple parts of
the manual. For example, every man section has an introductory man page
that explains the contents of the section. To specify a section to search for a
man page, give the number immediately after the man command.
$ man 3 intro
This pulls up the introduction to section 3 of the manual. I recommend
you read the intro pages to each section of the manual, if only to help you
understand the breadth and depth of information available.
Man Page Contents
Man pages are divided into sections. While the author can put just about any
heading he likes into a man page, several are standard. See mdoc(7) for a
partial list of these headings as well as other man page standards:
NAME gives the name(s) of a program or utility. Some programs have
multiple names—for example, the vi(1) text editor is also available as
ex(1) and view(1).
SYNOPSIS lists the possible command-line options and their arguments,
or how a library call is accessed. If I’m already familiar with a program
but just can’t remember the option I’m looking for, I find that this
header is sufficient to remind me of what I need.
DESCRIPTION contains a brief description of the program, library, or
feature. The contents of this section vary widely depending on the topic,
as programs, files, and libraries all have very different documentation
requirements.
OPTIONS gives a program’s command-line options and their effects.
BUGS describes known problems with the code and can frequently save
a lot of headaches. How many times have you wrestled with a computer
problem only to learn that it doesn’t work the way you would expect
under those circumstances? The goal of the BUGS section is to save you
time and describe known errors and other weirdness.1
SEE ALSO is traditionally the last section of a man page. Remember that
Unix is like a language, and the system is an interrelated whole. Like duct
tape, the SEE ALSO links hold everything together.
If you don’t have access to the manual pages at the moment, many
websites offer them. Among them is the main FreeBSD website.
1 It’s called honesty. IT professionals may find this term unfamiliar, but a dictionary can help.
Getting More Help 25
FreeBSD.org
The FreeBSD website (http://www.freebsd.org) contains a variety of informa-
tion about general FreeBSD administration, installation, and management.
The most useful portions are the Handbook, the FAQ, and the mailing list
archives, but you’ll also find a wide number of articles on dozens of topics.
In addition to documents about FreeBSD, the website also contains a great
deal of information about the FreeBSD Project’s internal management and
the status of various parts of the Project.
If you find that the main website works slowly for you, try using a mirror
site. The main site offers a drop-down box with a choice of national mirrors,
or you can just try http://www.<countrycode>.freebsd.org. Almost every country
has a local site that provides a duplicate of the FreeBSD website. I frequently
find that a mirror is more responsive than the main website.
Web Documents
The FreeBSD documentation is divided into articles and books. The difference
between the two is highly arbitrary: As a rule, books are longer than articles
and cover broader topics, while articles are short and focus on a single topic.
The two books that should most interest new users are the Handbook and
the Frequently Asked Questions (FAQ).
The Handbook is the FreeBSD Project’s tutorial-style manual. It is con-
tinuously updated, describes how to perform basic system tasks, and is an
excellent reference when you’re first starting on a project. In fact, I have
deliberately chosen not to include some topics in this book because they
have adequate coverage in the Handbook.
The FAQ is designed to provide quick answers to the questions most
frequently asked on the FreeBSD mailing lists. Some of the answers aren’t
suitable for inclusion in the Handbook, while others just point to the proper
Handbook chapter or article.
Several other books cover a variety of topics, from kernel debugging to
Project organization.
Of the 50 or so articles available, some are kept only for historical reasons
(such as the road map to releasing FreeBSD version 5), while others discuss
the subtleties of specific parts of the system such as serial ports or CVSup.
A few are old enough that they’re retained for only a handful of users who
are still stuck with 20th-century systems.
These documents are very formal, and they require preparation. As such,
they always lag a bit behind the real world. When a new feature is first rolled
out, the appropriate Handbook entry might not appear for weeks or months.
If the web documentation seems out of date, your best resource for up-to-the-
minute answers is the mailing list archive.
26 Chapter 1
The Mailing List Archives
Unless you’re really on the bleeding edge, someone has probably struggled
with your problem before and posted a question about it to the mailing lists.
After all, the archives go back to 1994 and contain close to two million mes-
sages. The only problem is that there are two million pieces of email, any one
of which might contain the answer you seek. (When the first edition of this
book came out, the archives contained only one million messages; they have
nearly doubled in size in the last few years!)
While FreeBSD provides a search facility for its web pages and the
mailing list archive, it pales beside the one offered by Google. Google has
a BSD-specific search site at http://www.google.com/bsd. Search for your error
message on Google, both in the regular web search and the Groups search.
Google Groups also indexes the FreeBSD mailing lists, and you can search
the FreeBSD.org website on Google by including the search term site:freebsd.org
in your query. Additionally, the Rambler search engine has a very good
FreeBSD-specific search engine at http://freebsd.rambler.ru. Rambler runs on
FreeBSD, and it employs at least one FreeBSD committer.
Other Websites
FreeBSD’s users have built a plethora of websites that you might check for
answers, help, education, products, and general hobnobbing. Here are some
of my favorites:
Daemon News (http://bsdnews.com)
This site provides links to news postings on all BSD topics, not just
FreeBSD.
FreeBSD Mall (http://www.freebsdmall.com)
The people who run FreeBSD Mall have been commercial supporters of
FreeBSD since the beginning. They sell FreeBSD on CD and DVD and
offer training and support contracts, as well as FreeBSD paraphernalia
such as clothes and toys. FreeBSD Mall is owned by IX Systems.
O’Reilly Network BSD Developer Center (http://www.onlamp.com/bsd)
This site hosts a variety of BSD articles, as well as content of interest to
BSD users. In my utterly unbiased opinion, the most fascinating thing
on the site is the Big Scary Daemons column on BSD, but everything else
there is also pretty good.
Using FreeBSD Problem-Solving Resources
Okay, let’s pick a common problem and use the FreeBSD resources to solve it.
I’ve seen this question more than once, on several different FreeBSD mailing
lists, so we’ll start with it.

Getting More Help 27
I’ve just installed FreeBSD on my 486 and the network isn’t
working. When I try to ping anything, the console shows
ed0: timeout. What’s wrong?
We’ll use several different methods to find an answer.
Checking the Handbook/FAQ
The Handbook doesn’t have anything relevant to the problem. In the FAQ,
however, this entry appears under Troubleshooting:
I keep seeing messages like "ed1: timeout". What's wrong?
That looks pretty darn close. Read the entry and try the solution presented.
Checking the Man Pages
As we go on, you’ll see that the numbers after device names are simply
instances of a particular device. If you see ed0, it just means device ed, unit
number 0. Every device driver has a man page, so if you type man ed to bring
up the manual entry for this device, you’ll see the following:
ED(1) FreeBSD General Commands Manual ED(1)
NAME
ed, red -- text editor
SYNOPSIS
ed [-] [-sx] [-p string] [file]
red [-] [-sx] [-p string] [file]
DESCRIPTION
The ed utility is a line-oriented text editor. It is used to create,
...
A text editor? What? My text editor is fine! Something obviously isn’t
right. Look closely at this man page; it’s from section 1 of the manual, the
General Commands section. You need to search the manual for other entries
containing ed. As the letters ed appear in an awful lot of manual pages, use
the more specific whatis(1) search.
$ whatis ed
ed(1), red(1) - text editor
ed(4) - NE-2000 and WD-80x3 Ethernet driver
Bingo! The text editor ed(1) is a general-purpose command. We want
the ed in section 4 of the manual. Type man 4 ed to bring up the manual page
for the network device. It’s pretty long, though, about 500 lines. Being lazy,

28 Chapter 1
I’d rather not read the whole thing—I’d rather just search for the part that
has the information I need. Looking at the error message, I guess that timeout
might be a good keyword to look for. Type /timeout and press ENTER.
ed%d: device timeout Indicates that an expected transmitter interrupt
did not occur. Usually caused by an interrupt conflict with another card
on the ISA bus.
Bingo again! Here we have a terse explanation of the problem and a
probable cause (interrupt timeout). We have a good old-fashioned IRQ
conflict, and if you’re actually on a 486, you know more about this problem
than you want to.
Checking the Mailing List Archives
You could use the FreeBSD website search engine to search the mailing list
archives, but I prefer either Google or Rambler. A search for ed0: timeout
site:FreeBSD.org spits out a whole bunch of results. Some of them date from
1994. When I did this right now, the first response answered the question.
When I did this for the first edition, the first result was correct then, as well.
Now, isn’t that faster than composing an email to a mailing list?
Using Your Answer
Any answer you get for our ed0 timeout example assumes that you know what
an IRQ is and how to adjust one on your hardware. This is fairly typical of the
level of expertise required for basic problems. If you get an answer that is
beyond your comprehension, you need to do the research to understand it.
While an experienced developer or system administrator is probably not
going to be interested in explaining IRQs to you, he or she might be willing
to point you to a web page that explains them, if you ask nicely.
ASKING AGAIN . . . AND AGAIN . . .
AND AGAIN . . .
Some of the emails answering this problem date from 1994. Yes, that’s right, over a
dozen years ago! Remember when I mentioned people being sick of answering the
same questions over and over again? Some of these questions have been asked
many times over the years. Be sure you’ve checked all the resources where you
might find assistance for your problem. If you truly can’t find any other help, then
perhaps your problem is unique enough to warrant broadcasting it to the world.

Getting More Help 29
Emailing for Help
When you finally decide to ask for help, do so in a way that allows people to
actually provide the assistance you need. You must include all the information
you have at your disposal, as we will soon discuss. There’s a lot of suggested
information to include, and you can choose to skip some or all of it. If you
slack off and fail to provide all the necessary information, one of the following
things will happen:
Your question will be ignored.
You will receive a barrage of email asking you to gather this information.
On the other hand, if you actually want help solving your problem,
include the following pieces of information in your message:
A complete problem description. A message like How do I make my modem
work? only generates a multitude of questions: What do you want your
modem to do? What kind of modem is it? What are the symptoms? What
happens when you try to use it? How are you trying to use it?
The output of uname -a. This gives the operating system version and
platform.
If you have upgraded your system via csup, give the date and time of your
last update. (This is the date of the newest files in /usr/src.)
Any error output. Be as complete as possible, and include any messages
from the console or from your logs, especially /var/log/messages and any
application-specific logs. Messages about hardware problems should
include a copy of /var/run/dmesg.boot.
It’s much better to start with a message like My modem isn’t dialing my ISP.
The modem is a BastardCorp v.90 model BOFH667. My OS is version 7.2 on a dual-
core Opteron. There are no error messages in /var/log/messages or /var/log/ppp.log.
You’ll skip a whole round of email with a message like this, and you’ll get
better results more quickly.
Writing Your Email
First, be polite. People often say things in email that they wouldn’t dream
of saying to someone’s face. These lists are staffed by volunteers who are
answering your message out of sheer kindness. Before you click that Send
button, ask yourself, Would I be late for my date with the hot twins down the hall
to answer this message?2 The fierce attitude that is occasionally necessary when
working with corporate telephone-based support only makes these knowledge-
able people delete your emails unread. Their world doesn’t have to include
2 Several developers have assured me that they absolutely would accept a date with said hot twins
in lieu of politeness. Large sacks of money also suffice, preferably large, unmarked bills.
30 Chapter 1
surly jerks. Screaming until someone helps you is a valuable skill when deal-
ing with commercial software support, but it will actively hurt your ability to
get FreeBSD support.
Send your email in plaintext, not HTML. Many FreeBSD developers read
their email with a text-only email program such as mutt or elm. These are
very powerful tools for handling large amounts of email, but they do not
display HTML messages without contortions. To see for yourself what this is
like, install /usr/ports/mail/mutt and read some HTML email with it. If you
are using a graphic mail client such as Microsoft Outlook, either send your
email in plaintext or make sure that your messages include both a plaintext
and an HTML version. All mail clients can do this; it’s just a question of
discovering where your GUI hides the buttons. What’s more, be sure to wrap
your text at 72 characters. Sending email in HTML, or without decent line-
wrapping, is an invitation to have your email discarded unread.
Harsh? Not at all, once you understand whom you’re writing to. Most
email clients are poorly suited to handling thousands of messages a day,
scattered across dozens of mailing lists, each containing a score of simul-
taneous conversations. The most popular email clients make reading email
easy, but they do not make it efficient; when you get that much email, effi-
ciency is far more important than ease. As most people on those mailing lists
are in a similar situation, plaintext mail is very much the standard for them.
On a similar note, most attachments are unnecessary. You do not need
to use OpenPGP on messages sent to a public mailing list, and those business-
card attachments just demonstrate that you aren’t a system administrator.
Don’t use a long email signature. The standard for email signatures is four
lines. That’s it; four lines, each no longer than 72 characters. Long ASCII
art signatures are definitely out.
Second, stay on topic. If you are having a problem with X.org, check the
X.org website. If your window manager isn’t working, ask the people respon-
sible for the window manager. Asking the FreeBSD folks to help you with
your Java Application Server configuration is like complaining to hardware
salespeople about your fast-food lunch. They might have an extra ketchup
packet, but it’s not really their problem. On the other hand, if you want
your FreeBSD system to no longer start the mail system at boot time, that’s
a FreeBSD issue.
Sending Your Email
When you’ve composed your nicely detailed and polite question, send it to
FreeBSD-questions@FreeBSD.org. Yes, there are other FreeBSD mailing lists,
some of which are probably dedicated to what you’re having trouble with.
As a new user, however, your question is almost certainly best suited to the
general questions mailing list. I’ve lurked on many of the other mailing lists
for a decade now, and have yet to see a new user ask a question on any of
them that wouldn’t have been better served by FreeBSD-questions. Generally, the
questioner is referred back to FreeBSD-questions anyway.
Getting More Help 31
This goes back to the first point about politeness. Sending a message to
the architectural mailing list asking about what architectures FreeBSD runs
on is only going to annoy the people who are trying to work on architectural
issues. You might get an answer, but you won’t make any friends. Conversely,
the people on FreeBSD-questions are there because they are volunteering to
help people just like you. They want to hear your intelligent, well-researched,
well-documented questions. Quite a few are FreeBSD developers, and some
are even Core members. Others are slightly more experienced users who
have transcended what you’re going through now and are willing to give
you a hand up, as well.
Responding to Email
Your answer might be a brief note with a URL, or even just two words: man
such-and-such. If that’s what you get, that’s where you need to go. Don’t ask
for more details until you’ve actually checked that resource. If you have a
question about the contents of the reference you’re given, or if you’re
confused by the reference, treat it as another problem. Narrow down the
source of your confusion, be specific, and ask about that. Man pages and
tutorials are not perfect, and some parts appear contradictory or mutually
exclusive until you understand them.
Finally, follow through. If someone asks you for more information,
provide it. If you don’t know how to provide it, learn how. If you develop
a bad reputation, nobody will want to help you.
Email Is Forever
Those of us who were on the Internet back in the ’80s remember when we
treated it as a private playground. We could say whatever we wanted, to whom-
ever we wanted. After all, it was purely ephemeral. Nobody was keeping this
stuff; like CB radio, you could be a total jackass and get away with it.
That’s no longer true. In fact, it’s the exact opposite of true. Potential
employers, potential dates, even family members might scan the Internet for
your postings to mailing lists or message boards, trying to learn what sort of
person you are. I have rejected hiring more than one person based on their
postings to a mailing list. I want to work with a system administrator who sends
polite, professional messages to support forums, not childish and incoherent
rants without sufficient detail to offer any sort of guidance. And I’d think a
lot less of my in-laws if I stumbled across a message from one of them on
some message board where they acted like fools. The FreeBSD mailing lists
are widely archived; choose your words well, because they will haunt you for
decades.
Now that you know how to get more help when things go wrong, let’s
install FreeBSD.

2
INSTALLING FREEBSD
Just getting FreeBSD running on your
computer isn’t enough, no matter how
satisfying it might be the first time. It’s impor-
tant that your install be successful. Successful means
that your system must be configured appropriately for
its purpose. A web server, an email server, a desktop
system, or a database server all have different operational requirements, and
meeting those requirements can be greatly eased by planning before you
ever boot the hardware. Proper planning makes installing FreeBSD much
less painful. On the downside, you’ll get much less experience in reinstalling
FreeBSD, because you’ll only have to do it once. If mastering the installation
program is your only goal, you can skip all this boring stuff about “thinking
ahead” and go right to the middle of this chapter.
I’m assuming that you want to run FreeBSD in the real world, doing real
work, in a real environment. This environment might even be your laptop—
while you might argue that your laptop isn’t a real production system, I
challenge you to erase all the data on it without backing it up and tell me
34 Chapter 2
that again. If you’re just using a test machine that you truly don’t care about,
then I still recommend following the best practices so that you develop good
habits.
Consider what hardware you need or have. Then, decide how to best use
that hardware, what parts of FreeBSD you need to install, and how to divide
your hard disk. Only after all of that can you actually boot your computer
and install FreeBSD. Finally, do some brief post-install setup, and your system
is ready to go!
FreeBSD Hardware
FreeBSD supports a lot of different hardware, including both different
architectures and devices for each architecture. One of the project’s goals is
to support the most widely available hardware, and the list of that hardware
has broadened over the last few years to include far more than the “personal
computer.” Today, the supported hardware includes:
amd64 AMD’s 64-bit extensions to the 32-bit i386, copied by Intel as
EM64T, and sometimes called x64. This hardware can run both the
32-bit i386 and 64-bit amd64 versions of FreeBSD. (Linux calls this the
x86-64 platform.)
i386 The good old-fashioned Intel-compatible personal computer.
powerpc The PowerPC processor found in older Apple computers and
many embedded devices.
pc98 Similar to i386, but popular in Japan.
sparc64 Used in high-end servers from Sun Microsystems.
xbox Yes, FreeBSD can run on Microsoft’s Xbox.
FreeBSD supports many network cards, hard drive controllers, and other
add-ons for each architecture. Since many of these architectures use similar
interfaces and hardware, this isn’t as much of a challenge as you might think:
SCSI is SCSI anywhere, and an Intel Ethernet card doesn’t become magically
different just by putting it in a sparc64 machine.
For the most part, FreeBSD doesn’t care about the supporting hardware
so long as it works. Most readers are primarily familiar with the i386 archi-
tecture, so that’s where we’ll spend a fair amount of time. The amd64
platform is quickly becoming popular, however, so we’ll touch on that, as
well as sparc64.
FreeBSD has been ported to a variety of other platforms, such as the ARM
architecture and Intel’s Itanium. These ports are either incomplete or of little
utility to anyone except a developer. While it’s nifty that many ARM boards
run FreeBSD, you can’t go to a computer shop and buy one to play with.
Although FreeBSD runs just fine on ancient hardware, that hardware
must be in acceptable condition. If your old Pentium crashes because it has
bad RAM, using FreeBSD won’t stop the crashes.

Installing FreeBSD 35
Sample Hardware
This book was written using the following sample hardware:
Proprietary Hardware
Some hardware vendors believe that keeping their hardware interfaces
secret prevents competitors from copying their designs and breaking into
their market. This has generally been proven to be a bad idea, especially
as the flood of generic parts has largely trampled these secretive hardware
manufacturers over the last few years. Yet a few vendors, especially video
and sound card makers, still cling to this strategy.
Developing device drivers for a piece of hardware without its interface
specifications is quite difficult. Some hardware can be well-supported without
full documentation and is common enough to make struggling through this
lack of documentation worthwhile. The FreeBSD sound driver team, in parti-
cular, has done an excellent job of reverse-engineering sound cards’ interfaces
and now provides generic sound card infrastructure that works well even for
poorly documented cards. Other hardware, such as the chipset used on the
PCI bus in Sun UltraSPARC III systems, cannot be supported without full
and complete documentation.
If a FreeBSD developer has specifications for a piece of hardware and
interest in that hardware, he’ll probably implement support for it. If not,
that hardware won’t work with FreeBSD. In most cases, unsupported pro-
prietary hardware can be replaced with less expensive and more open
options.
Some hardware vendors provide closed-source binary drivers for
their hardware. For example, Nvidia offers a binary-only driver for their
video hardware. FreeBSD also employs some clever tricks to use Windows
Dual-core amd64 SATA Sager 9750
laptop
Soekris net4801 board
and case
Dual-CPU Opteron rackmount Sun Ultra 1
Pentium 800 i386 system External SCSI array
BUY DRINKS FOR THESE PEOPLE
Much of this hardware was a gift from people who liked the first edition of this book.
Their names all appear in the opening credits. If you find this book useful, I heartily
encourage you to buy any of them a drink, a meal, or a Maserati. I would have had
no crash boxes without them. Without crash boxes to test to destruction, I wouldn’t
have had the ability to learn FreeBSD’s real limits, especially after my boss forcefully
explained to me that paying customers do not appreciate being research subjects.

36 Chapter 2
network drivers, notably those for the wireless Ethernet cards supported by
“Project Evil.”1 For the most part, however, the best support comes from
open-source FreeBSD drivers.
What We Won’t Cover
We won’t cover ISA cards; PCI has been around for a decade now, and I
strenuously doubt that anyone uses ISA cards in a production setting.2 The
FreeBSD Handbook has decent instructions for making your ISA cards work.
PowerPC and pc98 are all older systems, generally in decline, so we won’t
bother discussing them specifically. Like a dinosaur, older server-grade hard-
ware tends to be difficult to kill with anything short of a meteor strike. And
running FreeBSD on an Xbox, while fun, is more of a stunt than an idea
worth implementing in production.
Hardware Requirements
While FreeBSD has minuscule hardware requirements, you’ll get the best
results out of it if you give it enough to work with. The following recommen-
dations are for i386 systems, but other platforms have similar requirements.
Chapter 19 discusses how to measure your system’s performance so that
you can maximize your hardware utilization.
Processor
Your brand of CPU is irrelevant. FreeBSD doesn’t care if you’re running an
Intel, AMD, IBM, or Cyrix/Via CPU. During the boot process, the FreeBSD
kernel probes the CPU and uses whatever chip features it finds. I’ve run
effective servers on 486 machines before—in fact, I’ve filled an Internet T1
with a 486. For you folks who are just learning, I recommend that you get a
Pentium or faster system. Some of the techniques in this book take days on a
486, and I’m no longer that patient. Those same operations take less than an
hour on my dual-core laptop.
1 Yes, this really is called Project Evil. And implementing the Windows kernel interface in the
FreeBSD kernel makes the project worthy of the name.
2 And if you are, you either have been in this business long enough that you probably aren’t even
reading this book, or you are a total nut job. Mind you, the latter is not a disadvantage in this
field.
IS MY HARDWARE SUPPORTED?
The easiest way to tell if your particular hardware is supported is to check the
release notes for the release of FreeBSD you plan to install. The release notes are
available at http://www.freebsd.org.
Installing FreeBSD 37
Memory
Memory (as in RAM) is good. Adding more RAM accelerates a system better
than anything else. I recommend at least 64MB of RAM, but if you have a
system with 256MB or greater you’ll find FreeBSD easier going. If you are
really trying to shrink your system, you can run a carefully crafted kernel in
16MB—but you can’t run the installer in that amount of memory.
Hard Drives
Hard drives can be a big performance bottleneck. While IDE drives are dirt
cheap, they don’t perform as well as SAS, SCSI, or even SATA drives. A SAS
or old-fashioned SCSI system transfers data to and from each drive at the full
controller speed, while IDE and SATA drives split their throughput between
all of the drives on the channel. A SCSI controller can have up to 15 drives
on a channel, while a standard IDE controller can have no more than 2.
SATA controllers tend to put only one drive on a channel, taking the easy
route to good throughput. While you can use splitters to attach more than
one drive to a SATA channel, multiple SATA drives on a single channel have
no greater throughput than a single drive. 15 drives, each running at full
speed, versus 2 drives averaging half speed, make a huge difference in the
amount of data throughput!
If you have IDE or SATA drives, put your hard disks on separate con-
trollers if possible. Many systems now have a hard drive on one IDE controller
and a CD drive on the other. When you add a second hard drive, put it on
the same controller as the CD drive. Most likely, you won’t be using the CD
nearly as often as the hard drive, and this way each drive will have a dedicated
controller.
The base FreeBSD system can fit into 500MB, and stripped-down versions
can fit into 32MB. You’ll be happiest with at least 5GB of disk space on your
test system, although I’m assuming that you have at least 10GB. Some add-on
software requires far more disk space—building the OpenOffice.org suite,
for example, takes 10GB of /usr all on its own! Again, any hard drive new
enough to be workable will probably be at least that large.
Preinstall Decisions
Before installing your server, decide what you’ll use it for. Is this a web server?
Database server? Network logging server? We’ll discuss the requirements for
each in the appropriate section.
Partitioning
Partitions are logical divisions of a hard drive. FreeBSD can handle different
partitions in different ways, and can even allow different filesystems or dif-
ferent operating systems on different partitions. If you’re doing your first
FreeBSD install, and you really don’t know how you want to partition your
disk, you can just use the automated partitioning suggested by the installer.
If you have more complicated needs, I suggest that you write down your
desired partitioning on a piece of paper before you begin.
38 Chapter 2
Partitioning might seem like a pain. If you’re familiar with some other
Unix-like operating systems, such as some distributions of Linux, you might
want to create a single large root partition and put everything on it. If Windows
or Linux let you dump everything on one big disk, why divide your FreeBSD
disk into smaller, less flexible pieces? What are the advantages of partitioning?
On a physical level, different parts of the disk move at different speeds.
By putting frequently accessed data on the fastest parts of the disk, you
optimize system performance. The only way to arrange this is by using
partitions. On a logical level, FreeBSD handles each partition separately.
This means that you can set each partition to have different operating rules.
Partitions that contain user data should not have setuid programs (programs
that run as root), and you might not want them to have programs at all. You
can enforce that easily with partitions.
If the disk is damaged, chances are the damage is limited to a single
partition. You can boot the system from an intact partition and attempt to
recover data from the damaged partition. With a single large partition, any
damage to that partition becomes damage to your entire system, reducing or
eliminating chances of recovery.
Partitions can limit problems caused by poor system administration.
Unattended programs can completely fill a hard drive with logs. Larger hard
drives don’t mean that the problem takes longer to show up; they just mean
that software writes more logs. While Chapter 19 discusses ways to contain logs,
a full hard drive can even prevent you from connecting to the system to fix the
problem! Partitioning confines such problems to a subset of the system.
Finally, many backup programs—i.e., dump(8)—work at the partition
level. On a production system, you’ll want to set different backup strategies
for different types of data. FreeBSD’s standard partitions are / (root), swap
space, /var, /tmp, and /usr.
/ (root)
The root partition holds the core system configuration files, the kernel, and
the most essential Unix utilities. Every other partition lies “under” the root
partition or is subordinate to it. With an intact root partition, you can boot
the system to the bare-bones single-user mode and perform repairs on the
rest of the system. Your system needs fast access to the root partition, so put it
first on the disk. Because root holds only the basic utilities and configuration
files, it doesn’t need to be large; FreeBSD defaults to configuring 512MB for
a root partition, which is more than sufficient.
Swap Space
The next partition on your drive should be the swap space—the disk space
used by virtual memory. When FreeBSD uses up all the physical RAM, it
moves information that has been sitting idle from memory into swap. If
things go well, your system doesn’t need swap space—but if you do need
swap, it must be fast.
So, how much swap space do you need? This is a matter of long debates
between system administrators. The short answer is, “it depends.” Long-
running wisdom says that you should have at least twice as much swap as you
have physical memory. Long-running wisdom has become obsolete, however,
Installing FreeBSD 39
and the capacity of modern systems has invalidated this rule of thumb.
When a process runs out of control and starts allocating memory (say, in an
infinite loop), the kernel will kill the process once the system runs out of
virtual memory. If your system has 6GB RAM and 9GB swap, this process
will need to consume 15GB of memory before the kernel kills it! i386
systems have about 3GB of virtual address space, and they must share that
with the kernel, shared libraries, the stack, and so on. The i386 platform
limits memory usage to 512MB per process, which means that the kernel
will stop a runaway process fairly quickly. 64-bit systems, like amd64, have
vast virtual memory space and a process could conceivably devour gigabytes
of memory. If a system is thrashing gigabytes of memory between disk and
RAM, it will be unresponsive, slow, and generally troubled. Today, you
should have enough swap to do your work. I recommend provisioning as
much swap space as you have RAM, perhaps even a few megabytes more.
The main use for swap on modern systems is for a dump in case of a
system panic and crash. For maximum safety, you want enough swap space
to dump the entire contents of your RAM to swap. This is a worst-case crash
dump. FreeBSD 7.0 and later defaults to using a kernel minidump, however,
which only dumps the kernel memory. A minidump is much smaller than a
full dump—a system with 8GB RAM has an average minidump size of about
250MB. You can probably get away with only providing 1GB of swap, which
leaves plenty of room for even a bloated kernel minidump.
/tmp
The /tmp directory is the system-wide temporary space, open to all system
users. If you do not create a separate /tmp partition, it will be included on
your root partition. This means that your system-wide temporary space will
be subject to the same conditions as the rest of your root drive. This probably
isn’t what you want, especially if you plan to mount your root partition
read-only.
Requirements for a /tmp directory are generally a matter of opinion—
after all, you can always just use a chunk of space in your home directory as
temporary space, and there’s always the /var/tmp directory if you have large
files that you need to work with temporarily. On a modern hard drive, I like
to have at least 512MB in a /tmp directory. Automated software installers
frequently want to extract files in /tmp, and having to work around these
installers when /tmp fills up is possible but tedious.
On systems where you don’t expect /tmp to use much space (for example,
web servers and database servers), you might want to use a memory filesystem
for /tmp. We’ll discuss memory filesystems in Chapter 8. If you intend to use a
memory filesystem, do not create a separate /tmp partition.
/var
The /var partition contains frequently changing logs, mail spools, temporary
run files, upgrade files from tools such as portsnap and FreeBSD-update,
and so on. If your server is a web server, your website logs go to this partition.
You might need to make it 2GB or more. On a small “generic” mail server or
web server I’d use a third of my remaining disk space for /var. If the server
40 Chapter 2
handles only email, databases, or logs, I’d kick this up to 70 percent or more,
or just assign sufficient space to the other partitions and throw everything
left on /var. If you’re really cramped for space, you might assign as little as
30MB to /var.
Make /var larger than physical memory. By default, FreeBSD writes crash
dumps to /var/crash. We’ll discuss crash dumps in Chapter 21, but for now,
take my word for it; if you have enough empty space in /var to write the
contents of your physical memory, that will help should you ever start having
serious system trouble.
/usr
The /usr partition holds the operating system programs, system source code,
compilers and libraries, add-on software, and all the other little details that
make the system actually do anything. Much of this changes only when you
upgrade your system. It also holds users’ home directories, which change
regularly and rapidly. If you have many users, consider creating a separate
/home partition. While you can assign quotas to control disk space, a separate
partition will protect your all-important OS files.
On a modern hard drive, I recommend using at least 6GB for /usr. This
provides enough room to run the operating system, store the main system
source code, and build upgrades to the next version of FreeBSD. On a web
server where users upload website files to their home directories, I suggest
giving this partition the majority of your hard drive.
Other Partitions
Experienced system administrators always have their favorite partitions;
also, some companies have standards on how systems should be partitioned.
Different Unix vendors have attempted to impose their partitioning standards
on the world. You’ll see partitions like /opt and /u1 on different Unix systems.
If you have a preferred partitioning scheme, use it. You can steer FreeBSD
to install add-on software in a different partition if you like. Or, you can have
users’ home directories in /gerbil if it makes you happy. The best advice I
have to offer to readers whom I’ll never meet and whose systems I will never
log on to is this: You are the one who must live with your partitioning, so
think first!
Multiple Hard Drives
If you have more than one hard drive of comparable quality, and you are not
using them for RAID, you can still make excellent use of them: Put your data
on one hard drive and the operating system on another. One of your parti-
tions will contain the information that makes your server special. Database
servers store their data in /var, so put /var on its own hard drive. If it’s a web
server, put /usr on the second hard drive.
Installing FreeBSD 41
If you have a special function for this server, consider making a private
partition just for that function. There’s nothing wrong with creating a /home,
/www, or /data partition on the second hard drive and dedicating that entire
drive to the system’s primary purpose.
In general, segregating your operating system from your data increases
system efficiency. Like all rules of thumb, this is debatable. But no system
administrator will tell you that this is an actively bad idea.
With multiple hard drives, you can improve the efficiency of your swap
space by splitting it amongst the drives. Put the first swap partition on the
second slot of the drive with your root partition, and the other swap parti-
tions on the first slots of the other drives. This splits reads and writes among
multiple disk controllers and thus gives you some redundancy at the controller
level. Remember, however, that a crash dump must fit entirely within a single
swap partition.
For swap splitting to work best, however, the drives must be SAS or SCSI.
If you have IDE or SATA drives, they must be on different IDE controllers for
best results. Remember that each IDE controller splits its total data throughput
among all the hard drives connected to it. If you have two hard drives on the
same IDE controller and you’re accessing both drives simultaneously, each
disk works, on average, only half as fast as it would work alone on the same
channel. The major bottleneck in using swap space is disk speed, and you
won’t gain anything by creating contention on your IDE bus.
Another option is to gain some resiliency by implementing a software-
based RAID. This provides protection against a hard drive failure by sharing
and mirroring the data amongst multiple hard drives. We discuss FreeBSD’s
RAID features in Chapter 18. Your slices on each drive must be of identical
size to use software RAID. This is easiest to accomplish if all your drives are
the same size, but that’s not strictly necessary.
Partition Block Size
This section describes options that can really impair system performance.
If you’re new to FreeBSD, read this section only for your information—don’t
actually try it! This is for experienced Unix administrators who know exactly
what they’re doing, or at least know enough to be leery of the whole topic.
Block size refers to the size of the filesystem building blocks used to store
files. Each block can be divided into fragments. FreeBSD defaults to 16KB
block sizes (16,384 bytes) and 2KB (2,048 bytes) fragments. Files use a com-
bination of fragments and blocks. For example, a 15KB file would be assigned
to one block, while a 17KB file would be assigned to one block and one frag-
ment. We’ll discuss blocks and fragments in Chapter 18.
If you know exactly what you’re doing, and you want to change the
block size, you can do that in the installer. Be warned that FreeBSD behaves
optimally if each block contains eight fragments; you can choose ratios other
than 1:8 but only at a performance cost.

42 Chapter 2
Choosing Your Distribution(s)
A distribution is a particular subset of FreeBSD. You’ll choose one or more
distributions during the installation process. While you can add pieces later,
it’s best and easiest just to make the right choice in the beginning. The
installer offers nine distribution sets:
All This contains absolutely everything that is considered part of
FreeBSD, including the X Window System. (FreeBSD uses the X.org
implentation of X.) If this is a test machine, definitely choose this option.
Developer This includes everything except the games and X.
X-Developer This includes everything except the games.
Kern-Developer This includes the FreeBSD programs and documenta-
tion, but only the kernel source code.
X-Kern-Developer This is the Kern-Developer distribution plus the X
Window System.
User This includes the FreeBSD operating system programs and
documentation only—no source code, no X.
X-User This is the User distribution plus X.
Minimal This contains only the core FreeBSD programs, without
documentation or source code of any sort. This is a good choice if your
disk is really, really small.
Custom Define your own distribution set.
If you’re installing a test machine to learn FreeBSD on, definitely choose
All. An Internet server is probably best served by the User distribution, or
perhaps X-User if you’re already familiar with the X Window System. Power
users might want the Custom distribution.
Games?
Yes, FreeBSD includes very simple games. These are small, text-based games
that were typical on systems of 20 years ago. New users will find the FreeBSD
tips provided by fortune(6) useful, but if you want to play modern games
look in /usr/ports/games and read Chapter 11.
X WINDOW SYSTEM
The X Window System is the standard graphic interface for Unix-like operating
systems. If you expect to sit at the console of your machine on a regular basis and
do day-to-day work, you probably want the X Window System. If you don’t expect
to be using this system to browse the Web or perform other graphics-oriented tasks,
you probably don’t need the X Window System. You can always add the X Window
System later.

Installing FreeBSD 43
The FreeBSD FTP Site
Just as the main source of information about FreeBSD is the FreeBSD
website, the main source of FreeBSD itself is the FreeBSD FTP server. You
can purchase CDs of FreeBSD, and while they’re a decent investment, many
people prefer to just use the Internet to grab what they need. Even if you
have a CD, you’ll interact with the FTP servers eventually.
The primary FreeBSD FTP server is ftp.freebsd.org, but many servers
mirror it to reduce the load on the primary server and provide speedy,
reliable access. You’ll find a comprehensive list of FreeBSD FTP servers
at http://www.freebsd.org, although you can also pick mirrors easily enough
without the list. Every mirror server has a name following this pattern:
ftp<number>.<country>.freebsd.org
The country code is optional; if there’s no country code, it’s usually
assumed to be in the continental United States. For example, we have
ftp14.freebsd.org, ftp2.uk.freebsd.org, ftp5.ru.freebsd.org, and so on.
As a rule, the FTP mirrors with lower numbers are more heavily loaded
than those with higher numbers. Try a site around ftp12.freebsd.org, or some
high-numbered server under your country code, to see if you can get a speedy
connection.
FTP Server Content
Many FreeBSD mirrors also mirror other software, but all FreeBSD content
can be found under /pub/FreeBSD. While the contents of the FTP server vary
over time, let’s take a look at the important files found there:
CERT
ERRATA
ISO-IMAGES-amd64
ISO-IMAGES-i386
ISO-IMAGES-ia64
ISO-IMAGES-pc98
ISO-IMAGES-ppc
ISO-IMAGES-sparc64
README.TXT
distfiles
doc
ports
releases
snapshots
tools
torrents
44 Chapter 2
Lot of stuff, isn’t it? Fortunately, you don’t have to dig through all this to
get everything you need to install, but a few directories merit particular
attention:
CERT This directory contains all FreeBSD security advisories since the
project’s inception. We’ll discuss security advisories in Chapter 7.
ERRATA This directory contains all errata for different releases of
FreeBSD. We’ll discuss errata in Chapter 13.
ISO-IMAGES All of the directories that begin with ISO-IMAGES con-
tain CD disc images for different architectures of FreeBSD. For example,
ISO-IMAGES-i386 contains ISO images for installing FreeBSD on the
i386 architecture. You can burn these images to CD to perform a CD
install. (See your CD recorder documentation for help in doing so.)
README.TXT These are the various subdirectories on the FTP site
and their contents. You might want to consult this file for the changes
since this book was written.
distfiles This directory contains quite a few source code and binary
files for the many third-party applications that run on FreeBSD. This is
definitely the largest directory on the FreeBSD.org FTP server; don’t just
download everything here or your hard drive might burst.
doc This directory contains the latest set of FreeBSD documentation,
subdivided by language. If you’re reading this book in English, you prob-
ably want the en (English) subdirectory. You’ll find all the articles and
books there in a variety of formats, compressed for easy downloading.
ports Within this directory you’ll find all the infrastructure and pack-
ages for the ports system. We’ll discuss ports in Chapter 11.
releases This directory contains the most recent versions of FreeBSD
released along each development track. Older versions can be found
on the server ftp-archive.freebsd.org. We’ll discuss development tracks in
Chapter 13.
snapshots This directory contains recent versions of FreeBSD-current
and FreeBSD-stable. This is where you’ll find the latest testing release of
the bleeding-edge and production versions of FreeBSD.
tools Here you’ll find various Windows programs that can be used to
prepare a multiboot system to run FreeBSD.
torrents BitTorrent users will find this directory useful; it contains tor-
rent seeds for the most recent release(s) of FreeBSD. (If you don’t use
BitTorrent yet, you should check it out.)
Now that you know how to find everything you’ll need, let’s go on to the
install process itself.

Installing FreeBSD 45
The Install Process
One of the more interesting3 parts of a new operating system is figuring out
how to get the OS running on your computer in the first place. On many
modern systems it’s pretty straightforward: throw the CD into the system and
boot from it. However, FreeBSD can be used on systems so old that they don’t
support booting from CD. That’s no problem; you can boot just as well from
floppy disk. FreeBSD can also be used on systems so new that they don’t have
either floppy or CD drives. What then?
Any OS installation process has three parts: booting the installer program,
accessing the installation media, and copying the software onto the hard
drive. Even a Windows installer boots a “mini-Windows” to install Windows
proper. FreeBSD provides options for each of these stages. Once your com-
puter is booted and you have a usable installation media, running through
the program to install the software to disk is straightforward.
Choosing Boot Media
If you have a system that boots from CD, this is probably the easiest way to go.
You can get FreeBSD CDs from a variety of vendors or from the FTP site. Make
sure that your computer’s BIOS is set to boot from CD before the hard disk
and reboot your computer with the FreeBSD disc in the CD drive. If you need
help with configuring your computer’s BIOS, check the manufacturer’s
documentation.
If your computer cannot boot from CD but can boot from floppy disk,
download floppy disk images from the Internet and boot from those. Many
older computers have CD drives that will not work as boot devices, but once
the system is running you can use them for installation media.
Some modern computers have neither a floppy disk nor a CD drive. This
is often the case with small rackmount servers, where space is expensive. With
such a system, you can either install a CD drive or use PXE installation, as
discussed in Chapter 20. (PXE installation requires bootstrapping from an
existing FreeBSD machine, however.)
WHICH VERSION DO I WANT?
FreeBSD has released many different versions, and more are coming. We’ll
discuss FreeBSD versions and release numbers in detail in Chapter 13. In the
meantime, I suggest that you check out http://www.freebsd.org. On its front
page you’ll see a note that says Production Release and gives a version number.
Use that version.
3 The ancient Chinese curse “May you live in interesting times” certainly applies here.

46 Chapter 2
Choosing Installation Media
The two most common sources of installation media are CD and FTP.
CDs are great when you have many machines to install and these machines
have CD drives. They’re fast and easy, and work even if the network is down.
A variety of vendors produce FreeBSD CDs and DVDs. iX Systems, in par-
ticular, has supported FreeBSD for many years, and recently purchased
FreeBSD Mall, the original producer of FreeBSD CDs. The DVD sets have far
more content, including many files that can be downloaded separately from
the Internet, but the CD sets have everything you truly need. From now on
I’m going to only mention CDs, but everything that applies to a CD is also
true of a DVD. If you don’t want to purchase a CD, you can fetch an ISO
image from the FreeBSD FTP server and burn it to CD yourself.
Several dozen FTP servers carry FreeBSD ISO images, installation media,
and related materials. The FreeBSD installer can FTP the software directly
from these servers. To use the FTP installation method, however, you must
have a working Internet connection, and the installation speed will be largely
dependent upon the network between you and your chosen FTP server.
There is also a chance that an intruder has hacked into the FTP server and
uploaded a bad version of FreeBSD for the unsuspecting public, but the
NO REMOVABLE-MEDIA DRIVES?
If your soon-to-be-FreeBSD machine lacks both a CD drive and a floppy, doesn’t
have the power cables or physical space to install a CD drive, cannot boot off a USB
device for whatever reason, and you don’t yet have the knowledge to set up a PXE
installer (this is a lot of “ifs,” but a whole slew of older small rackmount servers fit this
description), don’t despair. You can get a CD drive on your computer for the install.
The safest thing to do is remove your hard drive and install it on a system with a
removable-media drive. Unlike some other operating systems, FreeBSD will let you
install on one machine and run on another.
If that’s not an option, here’s a trick I’ve used more than once. (It might electrocute
the hardware or yourself, and will certainly invalidate your warranty. The author is
not responsible for barbecued hardware or system administrators!)
Find an old computer running any operating system with an IDE CD drive. Put the
old machine next to your FreeBSD box, unplug it, and open the case. Open the case
of your FreeBSD machine. On the old computer, detach the CD drive’s IDE cable at
the controller end. Leave the power attached to the CD drive. Attach the dangling IDE
cable from the old machine to an open port on your FreeBSD system’s IDE controller.
Turn on the old computer; the CD will power up even though it’s not attached to the
old computer’s IDE controller. Now turn on the new computer, and it will pick up the
CD as an attached device.
After the install, put everything back just the way you found it, and nobody will
ever know.

Installing FreeBSD 47
FreeBSD team watches carefully for such events and deals with them swiftly.
The FreeBSD release team also provides cryptographic checksums for every
release in the release announcement, which you can use to verify releases.
Preparing Boot Floppies
You will need several floppy disks (four as of this writing, but possibly more in
the future). Find the release directory for the architecture and version you
want to install. You’ll find a floppies subdirectory there. For example, for an
i386 system and FreeBSD release 7.0, look in ftp://ftp.freebsd.org/pub/freebsd/
releases/i386/7.0-RELEASE/floppies. (You’ll also find this directory in the root
directory of a FreeBSD CD.) You’ll find several files with the .flp extension,
one named boot.flp and several numbered kernX.flp files, such as kern1.flp and
kern2.flp. These files are floppy disk images. Download them all.
You need to put these images onto floppy disks. The catch is, you cannot
use basic file-level copying, such as drag-and-drop in Windows. An image file
must be copied onto the disk in a particular way.
If you’re already running a Unix-like system, the dd(1) command does
everything you need. You’ll need to know your floppy drive’s device name,
which is probably /dev/fd0, /dev/floppy, or /dev/rfd0. If the device name is
/dev/fd0, as it is on BSD systems, you’d enter
# dd if=kern1.flp of=/dev/fd0
to write the kern1.flp image to the floppy disk. Copy each disk image to a
separate floppy disk.
If you’re running Microsoft Windows, you’ll need a special utility to copy
disk images. Microsoft doesn’t provide one, but FreeBSD does, and you’ll
find it in the tools subdirectory of the main site. It’s called fdimage.exe.
This is a free Windows program to copy disk images, and it’s quite easy to
use. It takes only two arguments: the name of the image file and the name of
the drive the disk is in. For example, to copy the image boot.flp to the floppy
in your a: drive, open a DOS prompt and enter the following:
c:> fdimage boot.flp a:
Once the floppy drive finishes churning (which may take a while), repeat
the process for all other disk images you have downloaded.
Preparing Boot CDs
If you’ve purchased an official FreeBSD CD, your install media is ready. If
not, you need to choose an ISO image from the FTP site and burn it. The first
step is to find your image directory. Go to the FTP site and choose the ISO
image for your architecture. In that directory you’ll find a directory for each

48 Chapter 2
current release. For example, ISO images for FreeBSD 7.0 for i386 can be
found at ftp://ftp.freebsd.org/pub/freebsd/ISO-IMAGES-i386/7.0. You’ll find
multiple images there.
The name of an ISO image is composed of the release number, the label
RELEASE, the architecture, and a comment, all separated by hyphens. For
example, these are the names of the ISO images available for 7.0:
7.0-RELEASE-i386-bootonly.iso
7.0-RELEASE-i386-disc1.iso
7.0-RELEASE-i386-disc2.iso
The image labeled disc1 contains the entire FreeBSD distribution, the
X Window System, a few basic packages, and a live filesystem that can be used
to perform repairs when your server goes bad.
The image labeled disc2 contains the most popular pieces of software for
FreeBSD precompiled and ready for use with this release.
The bootonly image boots the FreeBSD installer so that you can do an FTP
install. Many people ask, “If you already have a CD drive, why would you want
to do an FTP install?” The standard FreeBSD ISO image contains a lot of stuff.
If you’re not installing the full distribution, you won’t need a lot of it. Not
everyone has unlimited, unmetered bandwidth on tap.4
Once you’ve chosen your image, burn it to CD. CD burning methods vary
widely among operating systems; even within the Unix-like world, different
operating systems have chosen different ways to burn CDs. On Windows,
many CD burning programs are available, such as Nero and Stomp. Here’s
how you would burn an image to disc on a FreeBSD system with a standard
IDE CD burner:
# burncd -f /dev/acd0 data imagename fixate
Check your operating system’s instructions on burning an image file to
physical media. Be sure to burn this file as an image, not as a regular file.
One clear hint that you’re doing it wrong is if your burning software complains
that the file won’t fit on a single CD. The image file will overflow a single CD
if you’re burning it as a regular file, but not if you burn it as an image.
FTP Media Setup
If you’re installing from CD, the install media is ready—it’s the same disk
you’re booting from. But to do an FTP install, you must choose an FTP server
and understand how to connect your machine to the local network.
Choosing an FTP server is half guesswork. Find the list of FTP mirror
sites and start pinging them. You’re looking for an FTP server with low ping
times—that’s a good sign that it’s fairly accessible from your location. Once
you have a couple of candidates, FTP to them from your desktop machine.
4 And those of us who do have it must learn to refrain from taunting those of you who don’t.
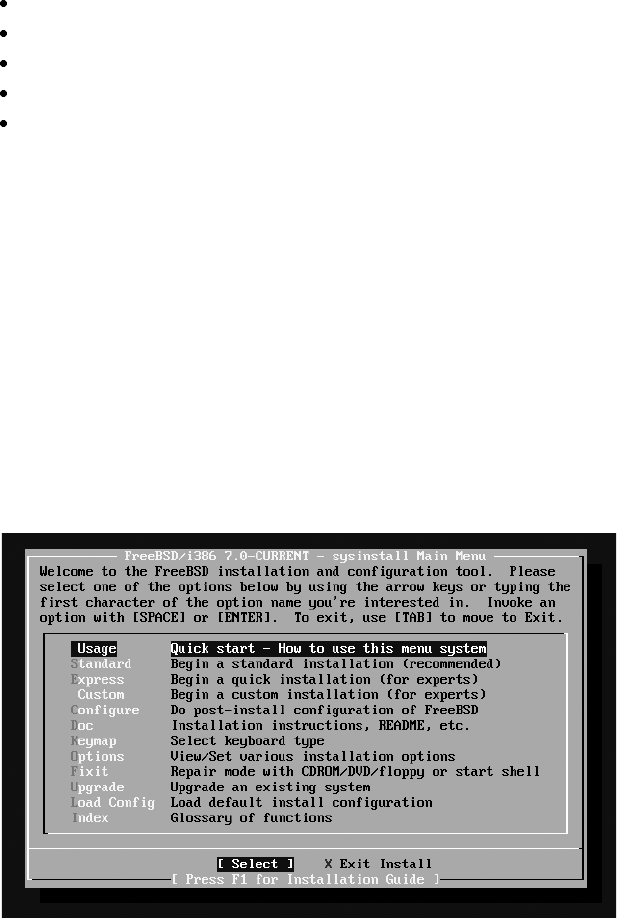
Installing FreeBSD 49
See how responsive they are. Pick one that feels snappy, and make sure that
it has the release you want to install. Take note of the FTP server’s name for
use in the install process.
If your local network uses Dynamic Host Configuration Protocol (DHCP)
to assign IP addresses and other network information, you’re ready to go.
Otherwise, if your network administrators assign IP addresses by hand, get
the following information from them:
IP address for your FreeBSD system
Netmask for your FreeBSD system
IP addresses of nameservers for your network
IP address of your default gateway
Proxy server information (if necessary)
Without this information—and without DHCP—you will be unable to
connect to a network to perform an FTP install.
Actually Installing FreeBSD
Now that you’ve made all the decisions about how you’re going to install
FreeBSD, all that remains is the grunt work of walking through the installer.
Put your boot media in the drive and power up the computer. You’ll see a
series of startup screens and system debugging information, which we cover
in Chapter 3.
The first menu you see will offer you a chance to choose your keyboard
layout. This includes a list of all the keyboard maps supported by FreeBSD.
Note that this does not affect the language of the installer, merely the key-
board layout.
FreeBSD next presents you with the first installation screen (Figure 2-1).
Figure 2-1: The main sysinstall screen
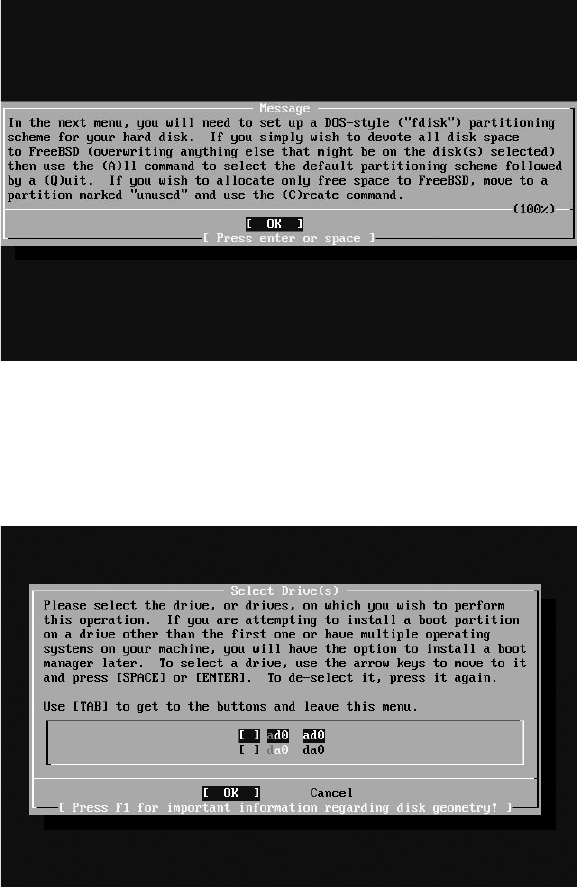
50 Chapter 2
This is sysinstall(8), the notoriously ugly FreeBSD installer. While other
operating systems have pretty graphical installers with mouse-driven menus
and multicolor pie charts, FreeBSD’s looks like an old DOS program. While
replacements have been promised time and time again, as I write this it looks
like sysinstall will be with us for the foreseeable future.
Use the spacebar to select options from sysinstall menus, not the
ENTER key.
Use the arrow keys to go down to the Standard installation, and press
ENTER. You’ll see the fdisk warning with some simple instructions (Figure 2-2).
Figure 2-2: The fdisk instructions
Skim the instructions to be sure they haven’t changed since this was
printed, and then press ENTER.
If you have multiple hard drives, FreeBSD will let you choose which drive
you want to install on. Press the spacebar to select a drive (Figure 2-3).
Figure 2-3: Selecting an installation drive
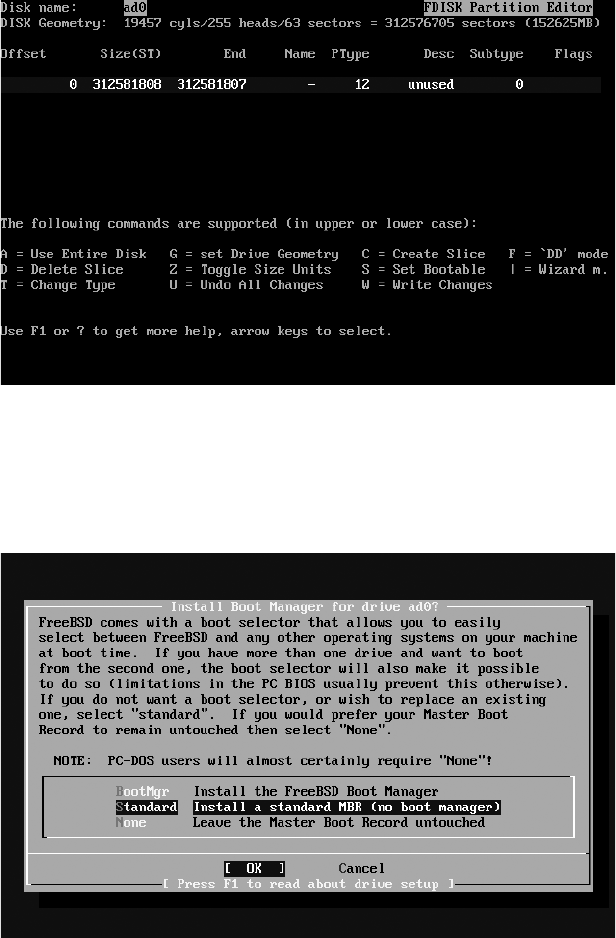
Installing FreeBSD 51
Some hard drives will flash up a scary-looking warning about disk
geometry at this point. It is not a concern on most modern hardware. We will
talk about disk geometry in Chapters 8 and 18; you can look there if you’re
interested. Just press ENTER to continue to the fdisk screen (Figure 2-4).
Figure 2-4: The fdisk menu
Here you determine how much of your hard drive you want to use for
FreeBSD. For a server, you want to use the entire hard drive. Press A to
allocate the whole hard drive to FreeBSD, and then press Q to finish. The
installer will drop you into the MBR selector, shown in Figure 2-5.
Figure 2-5: The MBR installer
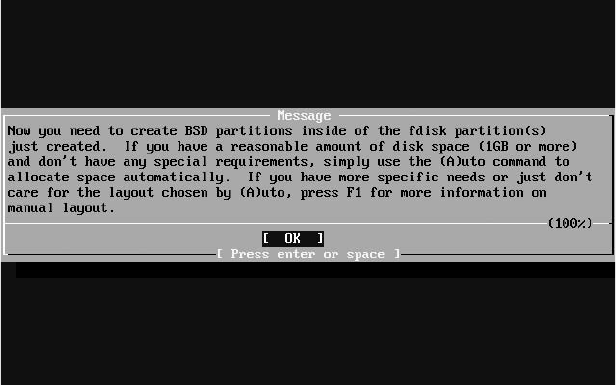
52 Chapter 2
Arrow down to Standard, then TAB to highlight OK. This installs a
standard master boot record (MBR), which removes any existing boot
manager that your computer could use if it booted any other operating
system. (We’re building Internet servers and won’t be sharing the hard
drive with, say, Windows Vista.) Press ENTER to proceed.
If you have multiple hard drives, the installer will return you to the hard
drive selection screen. Choose your next hard drive, or use the TAB key to
take you down to the OK button and proceed to the next step of the install;
sysinstall then displays instructions for using the partitioning tool (Figure 2-6).
Figure 2-6: Partitioning instructions
Read the instructions to be sure they haven’t changed since this was
printed, then press ENTER to continue.
You should now have the partitioning menu. We talked about partition-
ing earlier in this chapter, and you should have already made your decisions
on how to partition your drive. This is where you implement your choices
(Figure 2-7).
To take FreeBSD’s default, generic partition recommendations, press A.
Otherwise, press C to create a partition. You’ll get a box asking for the size of
your partition. Enter the desired partition size, using M for megabytes and G
for gigabytes. The installer will then ask you if this is a filesystem or a swap
space. If you say it’s a partition, it will ask you for the partition mount point
(/, /usr, /var, and so on).
When you have created all your partitions, press Q to exit the partition
editor.
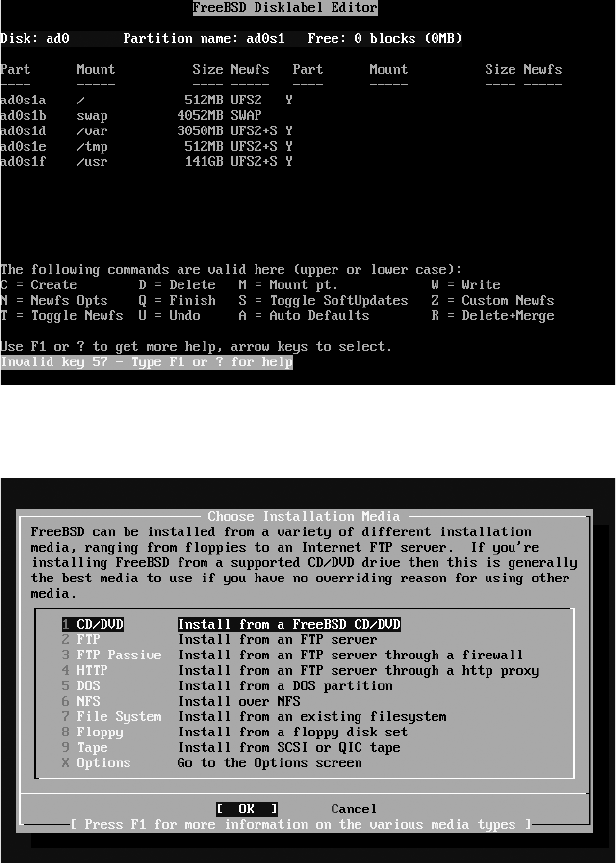
Installing FreeBSD 53
Figure 2-7: The partition editor
Now you’ll be asked for an installation source (Figure 2-8).
Figure 2-8: Installation media choices
Arrow down to highlight your installation media, and press ENTER to
select it. FreeBSD will either spin up your CD to confirm it’s usable, ask you
to select your FTP server, or ask you to configure whatever other installation
media you’ve chosen. I recommend using either FTP or CD.
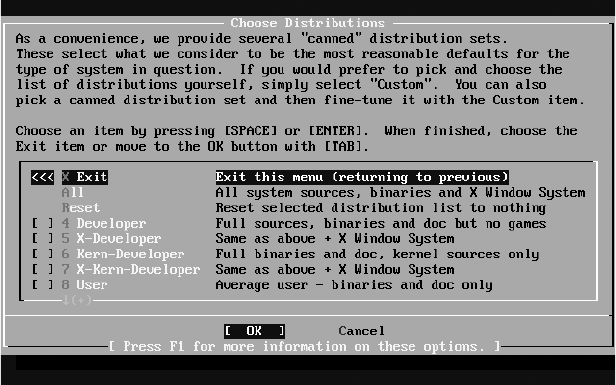
54 Chapter 2
The next menu asks how much of FreeBSD you would like to install
(Figure 2-9). While FreeBSD offers many stripped-down versions for limited
hard drives, these days hard drives are much, much larger than FreeBSD.
On a vaguely modern machine I recommend always installing everything,
especially if you’re just learning about FreeBSD. Arrow down to highlight All
and use ENTER to select it.
Figure 2-9: Choosing a distribution set
sysinstall then asks if you want to install the Ports Collection. You do,
even though you don’t know what it is yet. Select Yes.
You’ll be brought back to the distribution selection menu. Arrow up to
Exit this menu and press ENTER.
sysinstall offers you a last chance to change your mind before installing.
Once you say Yes, install, sysinstall will format your hard drive, your CD drive
will light up, and in a few minutes you’ll have a FreeBSD install.
The installer will then ask several questions to set up basic system services
for you.
Configuring the Network
The installer asks if you want to set up a network device. Say Yes.
You’ll get a whole choice of network interfaces to configure (Figure 2-10).
Yes, FreeBSD can run TCP/IP over FireWire! It can also run TCP/IP over a
parallel port. Neither is terribly common, but it can be done. Look for an
entry that looks like an Ethernet card and choose it. In Figure 2-10, we see
an Intel EtherExpress Pro/100B PCI Fast Ethernet card that looks about right.
Scroll down and press ENTER to configure it.
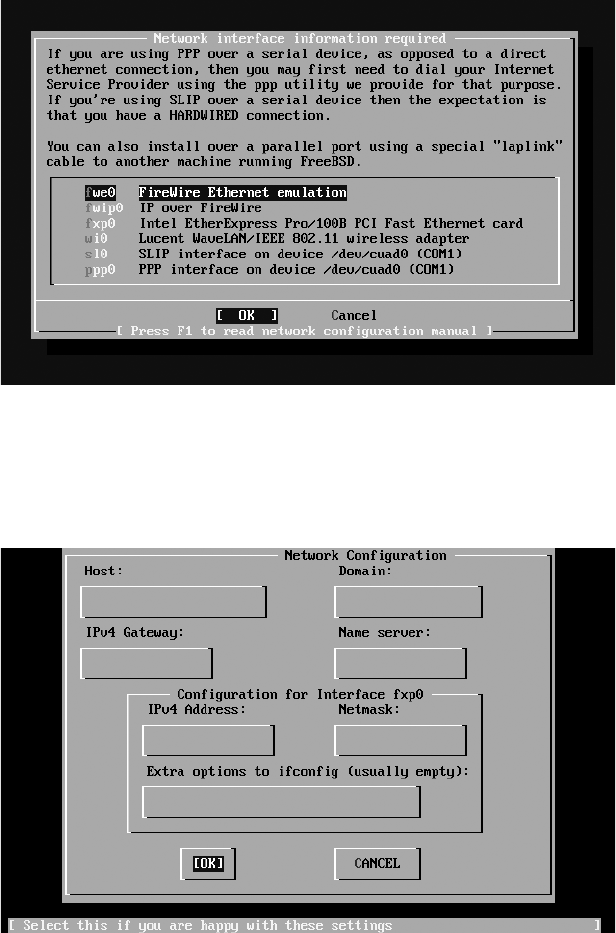
Installing FreeBSD 55
Figure 2-10: The network interfaces menu
You’ll be asked if you want to try IPv6 configuration of this interface. You
probably don’t. You’ll then be asked if you want to try DHCP configuration.
As this is a server, you probably don’t. This will take you to the Network Con-
figuration screen shown in Figure 2-11.
Figure 2-11: Network configuration
Here you fill in your hostname and domain name, as well as the network
information you got from your network administrator.
Even if you use DHCP configuration, you must still set a host and a
domain. Otherwise, your system will boot calling itself Amnesiac. (You can
use a DHCP server to set a hostname, but that’s an advanced topic most
environments aren’t equipped to provide.)
56 Chapter 2
Miscellaneous Network Services
The installer then asks you several questions related to the system function.
Unless you are an experienced system administrator, you don’t want most of
these functions to start. We will enable some of them as we proceed through
the book. Once you understand the systems described, you can enable them
for later installs.
For example, the installer asks if this is a network gateway, or if you want to
configure inetd. Answer No to both. When asked if you want to enable SSH
login, say Yes—that is a secure, safe service required on almost all systems.
Do not enable the anonymous FTP server, the NFS server, the NFS client,
or customize syscons at this time.
Time Zone
The installer prompts you to set your time zone. You’ll be asked if the system
clock is set to UTC: Answer No and walk through the screens presented.
You’ll be asked to choose a continent, a country, and then a time zone.
Linux Mode
Now the installer will ask you if you want to enable Linux mode. I suggest you
answer No at this point. If you need Linux mode, we’ll learn how to activate
it in Chapter 12.
PS/2 Mouse
USB mice work automatically, but PS/2 and older mice need special setup.
The installer will offer to set up a PS/2 mouse for you. If you have a standard
two- or three-button PS/2 mouse plugged in, answer Yes and choose Enable
from the menu. You should see a mouse pointer on your screen, and it
should wiggle when you move it.
sysinstall will ask if your mouse is working. If the mouse pointer wiggles
when you move the mouse, you can answer Yes. In all honesty, I haven’t had
a PS/2 mouse fail on me in the last 10 years. Older types of mice can be
difficult, but are increasingly uncommon.
Adding Packages
The installer asks if you want to install any additional software packages.
If you’re an experienced system administrator, you probably know what
software you want to install. You probably have a favorite shell, and it’s
probably not installed on FreeBSD by default.
FreeBSD divides software packages into categories. Find the category
that you think should include your desired software, and select the category
to bring up a list of all the software on your install media in that category.
Find the software you want, and press the spacebar to select it. For example,
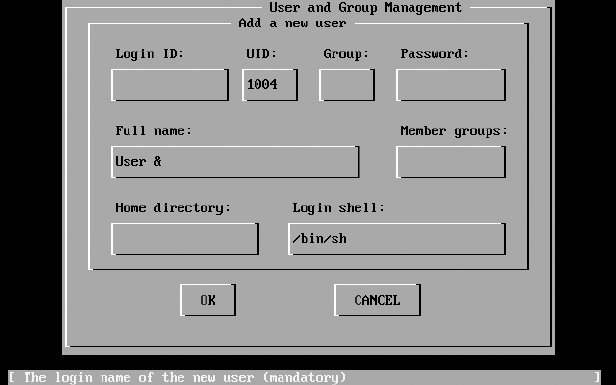
Installing FreeBSD 57
to install the popular Bash shell, scroll down to the Shells category, press
ENTER, scroll down to Bash, and press the spacebar. Then press ENTER to go
back to the Package Selection menu.
When you have chosen all the packages you want to install, return to
the main Package Selection menu. Press TAB to move the cursor from OK to
Install, then press ENTER. Your system will install the selected packages.
Adding Users
Whenever possible, you should do everything while signed on as a regular
user and only use the root account when you must change the system. That
will happen frequently at first, but will grow less common as time passes.
Before you can sign on as a regular user, however, you must create a regular
user account. The installer gives you a chance to create users during the
installation process. Say Yes when asked and you’ll see Figure 2-12.
Figure 2-12: Adding a user
Your first selection in this screen should be the Login ID, or username.
Your company might have a standard for usernames. I prefer the first and
middle initial and full last name (not using the middle initial creates a
surprising number of duplicates).
FreeBSD assigns the UID.
The FreeBSD default is to have the user in a group of the same name as
the username; for example, the user mwlucas is automatically in the group
mwlucas. Experienced system administrators can change this.
Full name is the user’s full name. Other system users can see this name
when they log in, so don’t set it arbitrarily. I’ve seen new system administrators
get in trouble when they give a customer a full name of, say, Pain in the
Tuckus.
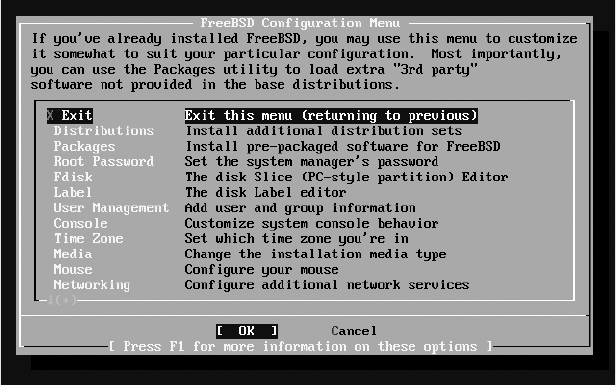
58 Chapter 2
Member groups is just a list of other system groups this account is part of. If
you want this user to be able to use the root password and become root, add
the group wheel in the Member groups space. Only system administrators
need to be in the wheel group.
The Home directory is where the users’ files are kept. The default is
generally fine.
Finally, choose a shell for your new user. Older admins and greybeards-
in-training frequently prefer /bin/sh. The examples in this book are written in
the BSD standard shell /bin/tcsh, which I find a very friendly shell. If you have
a preferred choice, use it.
Select OK when you’re done to create your user.
Root Password
Now the installer tells you to set your root password. If your machine doesn’t
have a root password, anyone can log in without using any password. As root
has absolute control over your hardware and software, this would be bad.
FreeBSD will ask you to enter your root password twice. Remember your root
password, as recovering it is a bit of an annoyance. We talk about the root
password and security in Chapter 7.
Post-Installation Setup
Finally, you’re asked if you want to do any post-installation setup of your
FreeBSD server. The FreeBSD Configuration Menu (Figure 2-13) provides
an easy way to do basic initial setup on your computer.
Figure 2-13: Post-installation configuration
Installing FreeBSD 59
In this menu you’ll be able to enable or disable everything the installer
asked during earlier parts of the install, as well as set all sorts of interesting
network functions. If you have an NTP server on your network, for example,
you can use the menus here to enable it on your FreeBSD machine. We will
see how to enable all of these services later in this book, but if you already
know what you’re doing you can configure them here as well.
Restart!
Once you’ve finished your post-install configuration, go back to the main
sysinstall menu and select Exit. Your computer will then reboot into a fully
installed FreeBSD system, ready to perform all of the examples in this book.
If you want to use sysinstall(8) later to configure your system, you can
run it at any time. By the end of this book, you’ll learn how to do everything
that sysinstall can do quicker and more flexibly at the command line.
Now let’s see what actually happened at that reboot.

3
START ME UP!
THE BOOT PROCESS
While FreeBSD will boot easily and auto-
matically when you turn on the power,
understanding exactly what happens at each
stage will make you a better system administrator.
Intervention during the boot process is rarely necessary,
but one day you’ll be glad you know how to do it. And once you’re comfortable
with adjusting the boot process, you’ll find you can solve problems you’ve
previously accepted and endured.
We’ll start by discussing how the system loader starts, then look at some
interesting changes you can make and the information you can gather from
the boot loader’s command line, including booting alternate kernels and
starting in single-user mode. We’ll cover serial consoles, a standard system
management tool. The FreeBSD multi-user startup process is responsible for
starting all the various services that make your computer useful, and we’ll
give attention to that as well. In addition, we’ll cover the information FreeBSD
records about the boot process and how FreeBSD turns itself off without
corrupting data.

62 Chapter 3
The boot process itself can be divided into three main parts: the loader,
single-user startup, and multi-user startup.
Power-On and the Loader
Every i386 computer has a Basic Input/Output System (BIOS) with just
enough brains to look for an operating system somewhere on a disk. (Other
hardware platforms have console firmware or bootroms that perform the
same function.) If the BIOS finds an operating system on a disk, it hands
control of the computer to that operating system. If the BIOS doesn’t find
an operating system, it complains and gives up. Most BIOSes are rather dumb
and can only recognize operating systems by very simple indicators. The boot
blocks are sections of the disk that are specifically designed to be recognized
as an operating system by the BIOS. On those boot blocks, FreeBSD installs
software that is only smart enough to load the main FreeBSD startup program,
loader(8). The loader presents you with a FreeBSD logo on the right and a
menu of seven options on the left. These are the options:
1. Boot FreeBSD [default]
2. Boot FreeBSD with ACPI disabled
3. Boot FreeBSD in safe mode
4. Boot FreeBSD in single-user mode
5. Boot FreeBSD with verbose logging
6. Escape to loader prompt
7. Reboot
If you wait 10 seconds, the loader will automatically boot FreeBSD by
default. Several other options are only needed for debugging or trouble-
shooting. While you don’t have to memorize all these options, you should be
comfortable with using the basic ones when required.
Boot FreeBSD with ACPI disabled
ACPI is the Advanced Configuration and Power Interface, an Intel/
Toshiba/Microsoft standard for configuring hardware. It replaces the
legacy standards APM (Advanced Power Management1), PnPBIOS, the
MP table, the $PIR table, and a whole bunch of other standards even
RECURSION WARNING!
Some of the topics in this chapter reference material found in later chapters. Those
later chapters, in turn, require that you understand this chapter first. There’s no good
place to begin learning. If you don’t quite understand a part of this chapter, just skim
over it and continue reading; it really will coalesce in your mind as you proceed.
1 The lesson here is: Never name anything advanced. One day, it won’t be.
Start Me Up! The Boot Process 63
more obscure. We discuss ACPI in Chapter 5. ACPI provides many
benefits to modern hardware, but some hardware has troublesome
ACPI implementations. On the other hand, much new SMP hardware
absolutely requires ACPI.
If your newly installed system will not boot normally, try booting it
with ACPI disabled. If your system has worked well for some time, but
suddenly has trouble booting, disabling ACPI probably won’t help.
Boot FreeBSD in safe mode
FreeBSD’s safe mode turns on just about every conservative option in the
operating system. ATA hard disks run without DMA or write caching,
limiting their speed but increasing their reliability by working around
cabling issues and other physical problems. EISA slots are not probed,
and ACPI is disabled. On i386 systems, SMP is disabled. USB keyboards
will no longer work in single-user mode. This option is useful for disaster
recovery and debugging older or otherwise troublesome hardware.
Boot FreeBSD in single-user mode
Single-user mode is a minimal startup mode that is very useful on damaged
systems, even when the damage was self-inflicted. It’s the earliest point
where FreeBSD can provide a command prompt, and is important
enough to have its own section later in this chapter.
Boot FreeBSD with verbose logging
FreeBSD learns a lot about a computer as it boots. Much of this informa-
tion is irrelevant to day-to-day use, but very helpful when debugging.
When you boot in verbose mode, FreeBSD prints all the details it can
about every system setting and attached device. (This information will
be available afterwards in /var/run/dmesg.boot, as discussed later in this
chapter.) You might try verbose mode once on each of your machines,
just to glimpse the complexity within your computers.
Escape to loader prompt
The loader includes a command-line interpreter, where you can issue
commands to tweak your system to boot exactly the way you need. We’ll
cover this in detail in “The Loader Prompt” on page 66.
Reboot
Once more, this time with feeling! Of these options, the most important
are single-user mode and the loader prompt.
Single-User Mode
FreeBSD can perform a minimal boot, called single-user mode, that loads the
kernel and finds devices but doesn’t automatically set up your filesystems,
start the network, enable security, or run any standard Unix services. Single-
user mode is the first point at which the system can possibly give you a
command prompt, however, and you can perform any or all of those non-
automated activities yourself.

64 Chapter 3
When you choose a single-user mode boot, you’ll see the regular system
startup messages flow past. Before any programs start, however, the kernel
offers you a chance to choose a shell. You can enter any shell on the root
partition; I usually just take the default of /bin/sh, but use /bin/tcsh if you
prefer.
Disks in Single-User Mode
In single-user mode, the root partition is mounted read-only and no other
disks are mounted. (We’ll discuss disks and filesystems in Chapter 8, but for
now just follow along.)
Many of the programs that you’ll want to use are on partitions other than
the root, so you’ll want them all mounted read-write and available. To make
sure that your filesystems are in a usable state, run the following commands:
# fsck -p
# mount -a
The fsck(8) program “cleans” the filesystems, confirms that they are
internally consistent and that all the files that a disk thinks it has are actually
present and accounted for. Make the filesystems accessible with mount(8).
The -a flag mounts every filesystem listed in /etc/fstab (see Chapter 8),
but if one of these filesystems is causing your problems, you can mount the
desired filesystems individually by specifying them on the command line
(for example, mount /usr). If you’re an advanced user with NFS filesystems
configured (see Chapter 8), you’ll see error messages for those filesystems at
this point because the network isn’t up yet.
If you have trouble mounting partitions by name, try using the device
name instead. The device name for the root partition is probably either
/dev/ad0s1a (for IDE disks) or /dev/da0s1a (for SCSI disks). You’ll also need to
specify a mount point for this partition. For example, to mount your first IDE
disk partition as root, enter the command:
# mount /dev/ad0s1a /
If you have network filesystems on your server but your network is not yet
up, you can mount all your local partitions by specifying the filesystem type.
Here, we mount all of the local filesystems of type UFS, FreeBSD’s default
filesystem type:
# mount -a -t ufs
Programs Available in Single-User Mode
The commands available for your use depend on which partitions are
mounted. Some basic commands are available in /bin and /sbin, on the root
partition, and are available even if root is mounted read-only. Others live in

Start Me Up! The Boot Process 65
/usr and are inaccessible until you mount that partition. (Take a look at /bin
and /sbin on your system to get an idea of what you’ll have to work with
when things go bad.)
NOTE If you’ve scrambled your shared library system (see Chapter 12), none of these programs
will work. If you’re that unlucky, FreeBSD provides statically-linked versions of many
core utilities in the /rescue directory.
The Network in Single-User Mode
If you want to have network connectivity in single-user mode, use the shell
script /etc/netstart. This script calls the appropriate scripts to start the network,
gives IP addresses to interfaces, and enables packet filtering and routing. If
you want some, but not all, of these services, you’ll need to read that shell
script and execute the appropriate commands manually.
Uses for Single-User Mode
In single-user mode, your access to the system is only limited by your
knowledge of FreeBSD and Unix.
For example, if you’ve forgotten your root password you can reset it
from single-user mode:
# passwd
Changing local password for root
New Password:
Retype New Password:
#
NOTE Note that you weren’t asked for the old root password. In single-user mode, you’re auto-
matically root, and passwd(8) doesn’t ask root for any password.
Or, if you find that there’s a typo in /etc/fstab that confuses the system
and makes it unbootable, you can mount the root partition with the device
name, then edit /etc/fstab to resolve the issue.
Or, if you have a program that panics the system on boot and you need
to stop that program from starting again, you can either edit /etc/rc.conf to
disable the program, or just set the permissions on the startup script so that
it cannot execute.
# chmod 444 /usr/local/etc/rc.d/program.sh
We’ll discuss third-party programs (ports and packages) in Chapter 11.
NOTE There’s a reason all of these examples involve recovering from human errors. Hardware
failures are not common, and FreeBSD failures even less so. If it wasn’t for human
error, our computers would almost never let us down. As you learn more about FreeBSD,
you’ll be more and more capable in single-user mode.

66 Chapter 3
We’ll refer to single-user mode throughout this book, but for now, let’s
look at the loader prompt.
The Loader Prompt
The loader prompt is a small computing environment that allows you to
make basic changes to your computer’s boot environment and the variables
that must be configured early in the boot process. When you escape to a
loader prompt (option 6 in the boot menu), you’ll see the following:
OK
This is the loader prompt. While the word OK might be friendly and
reassuring, it’s one of the few friendly things about the loader environment.
This is not a full-featured operating system; it’s a tool for configuring a system
boot which is not intended for the ignorant nor the faint of heart. Any changes
you make at the loader prompt only affect the current boot. To undo changes,
reboot again. (We’ll see how to make loader changes permanent in the next
section.)
To see all the commands available to the loader, enter a question mark.
OK ?
Available commands:
heap show heap usage
reboot reboot the system
bcachestat get disk block cache stats
...
The first three commands in the loader, listed above, are pretty much
useless to anyone except a developer. Instead, we’ll focus on the commands
useful to a system administrator.
To view the disks that the loader knows about, use lsdev.
OK lsdev
cd devices:
disk devices:
disk0: BIOS drive C:
disk0s1a: FFS
disk0s1b: swap
disk0s1d: FFS
disk0s1e: FFS
disk0s1f: FFS
disk1: BIOS drive D:
disk1s1a: FFS
disk1s1b: swap
pxe devices:
The loader checks for CD drives and doesn’t find any. (The loader
will only find CD drives if you boot from a CD, so don’t be alarmed at this.)
It finds two hard drives, known to the BIOS as drives C and D . It then
Start Me Up! The Boot Process 67
describes the partitions it finds on these hard drives. As we’ll see in Chapter 8,
the root partition generally ends in a. This means that the only root partition
here is shown as disk0s1a . On an unfamiliar system that’s having trouble
booting, you might find this knowledge useful.
The loader has variables set within the kernel and by a configuration file.
View these variables and their settings with the show command.
OK show
LINES=24
acpi_load=YES
autoboot_delay=NO
...
The spacebar advances to the next page. These values include IRQ and
memory addresses for old ISA cards, low-level kernel tunables, and informa-
tion gleaned from the BIOS. We’ll see a partial list of loader variables in
“Loader Configuration” on page 69, and additional values will be brought
up throughout the book in the appropriate sections.
You can change these values for a single boot with the set command. For
example, to change the value console to comconsole, you would enter:
OK set console=comconsole
By the time the loader gives you a command prompt, it has already
loaded the system kernel into memory. The kernel is the heart of FreeBSD
and is detailed in Chapter 5. If you’ve never worked with a kernel before, just
file these tidbits away until you get to that chapter. Use the lsmod command to
view the kernel and kernel modules currently in memory.
OK lsmod
0x400000: /boot/kernel/kernel (elf kernel, 0x6a978c)
modules: elink.1 io.1 splash.1 agp.1 nfsserver.1 nfslock.1 nfs.1 nfs4.1
wlan.1 if_gif.1 if_faith.1 ether.1 sysvshm.1 sysvsem.1 sysvmsg.1 cd9660.1
isa.1 pseudofs.1 procfs.1 msdosfs.1 usb.1 cdce.0 random.1 ppbus.1 pci.1
pccard.1 null.1 mpt_raid.1 mpt.1 mpt_cam.1 mpt_core.1 miibus.1 mem.1 isp.1
sbp.1 fwe.1 firewire.1 exca.1 cardbus.1 ast.1 afd.1 acd.1 ataraid.1 atapci.1
ad.1 ata.1 ahc.1 ahd.1 ahd_pci.1 ahc_pci.1 ahc_isa.1 ahc_eisa.1 scsi_low.1
cam.1
0xaaa000: /boot/kernel/snd_via8233.ko (elf module, 0x6228)
modules: snd_via8233.1
0xab1000: /boot/kernel/sound.ko (elf module, 0x23898)
modules: sound.1
0xad5000: /boot/kernel/atapicam.ko (elf module, 0x4bac)
modules: atapicam.1
While some of this information is of value only to developers, a system
administrator can still learn a lot. Perhaps the most obviously useful informa-
tion is the path to the loaded kernel . This should always be /boot/kernel/kernel
unless you configured the loader to look elsewhere.

68 Chapter 3
You’ll also get a list of the modules included in each loaded kernel file .
The example lists modules from the main kernel itself, ranging from elink to
cam . The loader has also pulled in the files snd_via8233 , sound , and
atapicam , with their respective modules.
To completely erase the loaded kernel and all modules from memory,
use the unload command.
OK unload
You won’t get any confirmation, but a subsequent lsmod will show that the
loader no longer remembers any kernel files.
To load a different kernel, use load.
OK load boot/kernel.good/kernel
boot/kernel.good/kernel text=0x4a6324 data=0x84020+0x9908c
syms=[0x4+0x67220+0x4+0x7e178]
The loader will respond with the name of the file and some low-level
information about it.
While I touch on loading alternate kernels here, before doing this you
really need to understand why you would want to and how to do it safely.
Go read the discussion on “Booting an Alternate Kernel” on page 137.
Once your system boots just the way you need it to, you’ll probably want
to make those settings permanent. FreeBSD lets you do this through the
loader configuration file, /boot/loader.conf. Before you can make changes,
however, you must understand FreeBSD’s default configuration filesystem.
Default Files
FreeBSD separates configuration files into default files and customization
files. The default files contain variable assignments and are not intended to
be edited; instead, they’re designed to be overridden by another file of the
same name. Default configurations are kept in a directory called default.
For example, the boot loader configuration file is /boot/loader.conf, and
the default configuration file is /boot/defaults/loader.conf. If you want to see a
comprehensive list of loader variables, check the default configuration file.
During upgrades, the installer replaces the default configuration files but
does not touch your local configuration files. This separation ensures that
your local changes remain intact while still allowing new values to be added to
the system. FreeBSD adds features with every release, and its developers go to
great lengths to ensure that changes to these files are backward compatible.
This means that you won’t have to go through the upgraded configuration
and manually merge in your changes; at most you’ll have to check out the
new defaults file for nifty configuration opportunities and new system
features.

Start Me Up! The Boot Process 69
The loader configuration file is a good example of these files. The /boot/
defaults/loader.conf file contains dozens of entries much like this:
verbose_loading="NO" # Set to YES for verbose loader output
The variable verbose_loading defaults to NO. To change this setting, do not
edit /boot/defaults/loader.conf—instead, add the line to /boot/loader.conf and
change it there. Your /boot/loader.conf entries override the default setting,
and your local configuration contains only your local changes. A sysadmin
can easily see what changes have been made and how this system differs from
the out-of-the-box configuration.
The default configuration mechanism appears throughout FreeBSD,
especially in the core system configuration.
Loader Configuration
To make loader setting changes permanent, use the configuration file /boot/
loader.conf. Settings in this file are fed directly into the boot loader at system
startup. (Of course, if you enjoy being at your console every time the system
boots, then you don’t have to bother with this!)
If you look at the default loader configuration, you’ll see many options
that resemble variables listed in the loader. For example, here we can set the
name of the console device:
console="vidconsole"
Throughout the FreeBSD documentation, you’ll see references to boot-
time tunables and loader settings. All of these are set in loader.conf. This includes
many sysctl values that are read-only once the system is up and kicking.
(For more on this, see Chapter 5. I present a list of popular kernel sysctls
in Appendix A.) Here, we set the kernel variable kern.maxusers to 32.
kern.maxusers="32"
DON’T COPY THE DEFAULT CONFIG!
One common mistake is to copy the default configuration to the override file and
then make changes there directly. Such copying will cause major problems in certain
parts of the system. You might get away with it in one or two places, but eventually
it will bite you. Copying /etc/defaults/rc.conf to /etc/rc.conf, for example, will
prevent your system from booting. You have been warned.

70 Chapter 3
Some of these variables do not have a specific value set in loader.conf;
instead, they appear as empty quotes. This means that the loader normally
lets the kernel set this value, but if you want to override the kernel you can.
kern.nbuf=""
The kernel has an idea of what the value of kern.nbuf should be, but you
can have the loader dictate a different value if you must.
We’ll discuss system tuning via the boot loader in the appropriate
section—for example, kernel values will be discussed in Chapter 5, where
they will make something resembling sense—but here are some commonly
used loader values that affect the appearance and operation of the loader
itself and basic boot functionality. As FreeBSD matures, the developers intro-
duce new loader values and alter the functionality of old ones, so be sure to
check /boot/defaults/loader.conf on your installation for the current list.
boot_verbose="NO"
This toggles the verbose boot mode that you can reach through the boot
menu. In a standard boot, the kernel prints out a few basic notes about
each device as it identifies system hardware. When you boot in verbose
mode, the kernel tells each device driver to print out any and all infor-
mation it can about each device as well as display assorted kernel-related
setup details. This is useful for debugging and development, but not
generally for day-to-day use.
autoboot_delay="10"
This is the number of seconds between the display of the boot menu and
the automatic boot. I frequently turn this down to 2 or 3 seconds, as I
want my machines to come up as quickly as possible.
beastie_disable="NO"
This controls the appearance of the boot menu (originally, an ASCII art
image of the BSD “Beastie” mascot decorated the boot menu). If set to
YES, the boot menu will not appear.
loader_logo="fbsdbw"
You can choose which logo appears to the right of the boot menu.
The default “FreeBSD” in ASCII art is the fbsdbw option. Other options
include beastiebw (the original logo), beastie (the logo in color), and
none (to have the menu appear without any logo).
Serial Consoles
All this console stuff is nice, but it can be a problem when your FreeBSD
system is in a co-location facility on the other side of the country or on
another continent. A keyboard and monitor are nice, too, but in many data
centers you won’t have room for them. And how do you reset the machine
remotely when it won’t respond to the network? A serial console solves all
these problems and more.
Start Me Up! The Boot Process 71
A serial console simply redirects the computer’s keyboard input and
video to the serial port instead of the keyboard and monitor. Serial consoles
appear on all sorts of network equipment, from Cisco routers and Ethernet
switches to network-based KVM switches. Many physical security systems,
such as keypad-based door locks, also have serial consoles. By hooking up a
standard null modem cable to the serial port and attaching the other end to
another computer’s serial port, you can access the first system’s boot messages
from the second computer. This is especially useful if the machines are at a
remote location. Your system must have a serial port to have a serial console.
An increasing number of systems are arriving “legacy-free,” meaning that they
lack such basic features as serial ports or PS/2 keyboard and mouse ports.
Serial consoles can occur in both hardware and software.
Hardware Serial Consoles
Real Unix hardware (such as Sparc64 systems) has hardware serial console
capability. On these boxes, you can attach a serial cable to the serial console
port and have unfettered access to the hardware configuration, boot messages,
and startup messages. Most x86 hardware does not allow this; you must be
at the keyboard looking at the monitor to control the BIOS, and you must
press the spacebar to interrupt the loader. A few x86 and amd64 mother-
boards do have this functionality, and more and more vendors such as Dell
and HP are offering serial port consoles as a feature on their higher-end
machines—but this is a special feature you must search for. (The HP RILOE
serial console support even lets you control power over the serial console,
which is very nice.)
If your machine doesn’t have a serial console, nothing any operating
system can do will give you access to the PC-style BIOS messages across the
serial port. Boot messages all appear before the operating system starts and
even before the hard drive is accessed. Fortunately, hardware exists to work
around this. The best I’ve seen is the PC Weasel (http://www.realweasel.com).
It’s a video card with a serial port instead of a video port. The PC Weasel lets
you access the BIOS, interrupt the boot to come up in single-user mode, and
in general do whatever you like with the system as if you were at the console.
Hardware serial consoles do not require any operating system support.
Software Serial Consoles
If you don’t need early access to the BIOS messages but only to the boot
loader, FreeBSD’s software serial console will suffice. As FreeBSD boots,
the loader decides where to print console messages and from where to
accept input. While this defaults to the monitor and keyboard, with a few
tweaks you can redirect the console to a serial port. You cannot access the
BIOS, but this serial console gives you the ability to tweak your boot in
almost any way. FreeBSD lets you set the console in two different places.
For production systems, it’s best to set the console in the file /boot/config.
This gives you access to the first stage of the boot process. You have three
choices: Use the standard keyboard/video/mouse as a console, use a serial

72 Chapter 3
port as a console, or use a dual console. The standard console is the default,
so choosing this setup requires no action. To force FreeBSD to use a serial
console, enter -h all by itself in /boot/config.
Dual consoles let you use either the standard or the serial console as
needed. You must pick one console to be the primary console, however.
There are certain low-level tasks, such as booting from an alternate loader or
breaking into the debugger, which you can only perform from the primary
console, but otherwise the consoles are functionally identical. Enter -D in
/boot/config to enable a dual console with the standard console as primary.
Enter -Dh in /boot/config to enable a dual console with the serial console as
primary. I recommend using a dual console.
You can also control consoles from /boot/loader.conf. These entries take
effect slightly later in the boot process, during the final stage of the kernel
bootstrapping process. To use the serial console exclusively, add this entry
to /boot/loader.conf:
console="comconsole"
To switch back to the default video console, remove this line or comment
it out. You can also set the keyboard and video console in /boot/loader.conf
explicitly with this line:
console="vidconsole"
You can specify a dual console configuration by listing both comconsole
and vidconsole, with the preferred console first. Here, we prefer the serial
console:
console="comconsole vidconsole"
If you’re in a server-room situation, you might want to switch back and
forth between a standard console and a serial console. I generally manage
large arrays of FreeBSD systems via the serial console.
KEYBOARD AUTODETECTION
In some FreeBSD documentation found on the Web, you’ll see references to using
keyboard autodetection to choose a console. The idea is that you want to use the
serial console unless you have a keyboard plugged in. This worked just fine in the
days of AT and PS/2 keyboards, but autodetection of USB keyboards is prone to
failure. You’re better off choosing a dual-console configuration rather than relying
on keyboard autodetection.

Start Me Up! The Boot Process 73
Serial Console Physical Setup
No matter what sort of serial console you have, you’ll need to plug into it
correctly to make it work. You’ll need a null modem cable, available at any
computer store or from online vendors. While the gold-plated serial cables
are not worth the money, don’t buy the cheapest model you can find either;
if you have an emergency and need the serial console, you’re probably not in
the mood to deal with line noise!
Plug one end of the null modem cable into the serial console port
on your FreeBSD server—by default the first serial port (COM1 or sio0,
depending on what operating system you’re used to). You can change this
with a kernel recompile, but it’s generally simplest to just use the default
on a server.
Plug the other end of your null modem cable into an open serial port on
another system. I recommend either another FreeBSD (or other Unix) system
or a terminal server, but you can use a Windows box if that’s all you have.
If you have two FreeBSD machines at a remote location, make sure that
they each have two serial ports. Get two null modem cables and plug the first
serial port on each box into the second serial port of the other machine.
That way, you can use each machine as the console client for the other.
If you have three machines, daisy-chain them into a loop. By combining
twos and threes, you can get serial consoles on any number of systems.
I’ve worked data centers with 30 or 40 FreeBSD machines, where installing
monitors was simply not practical, and we used serial consoles to great effect.
Once you have a rack or two of servers, however, investing in a terminal
server is a really good idea. You can find them cheaply on eBay.
Another option is to use two DB9-to-RJ45 converters, one standard
and one crossover. These allow you to run your console connections over
a standard CAT5 cable. If you have a lights-out data center where human
beings are not allowed, you can have your serial consoles come out near
your desk, in your warm room, or anywhere else your standard Ethernet-
style patch panels reach. Most modern data facilities are better equipped
to handle Ethernet than serial cables.
Serial Console Use
Now that you’re all set up, configure your client to access the serial console.
The key to using a serial console is to remember the following settings:
9600 baud
8 bits
no parity
1 stop bit

74 Chapter 3
Enter these values into any terminal emulator on a client computer,
and the serial console will “just work.” You can find terminal emulators for
Microsoft platforms (HyperTerm being the most famous), Macintosh, and
almost any other operating system. A few years ago, I frequently used a Palm
handheld with a serial cable to access serial consoles.
FreeBSD accesses serial lines with tip(1), a program that allows you to
connect to remote systems in a manner similar to telnet. To run tip, do this
as root:
# tip portname
A port name is shorthand for specifying the serial port number and
speed to be used on a serial port. The file /etc/remote contains a list of port
names. Most of the entries in this file are relics of the eon when UUCP was
the major data-transfer protocol and serial lines were the norm instead of the
exception.2 At the end of this file, you’ll see a few entries like:
# Finger friendly shortcuts
sio0|com1:dv=/dev/cuad0:br#9600:pa=none:
sio1|com2:dv=/dev/cuad1:br#9600:pa=none:
sio2|com3:dv=/dev/cuad2:br#9600:pa=none:
sio3|com4:dv=/dev/cuad3:br#9600:pa=none:
sio4|com5:dv=/dev/cuad4:br#9600:pa=none:
sio5|com6:dv=/dev/cuad5:br#9600:pa=none:
sio6|com7:dv=/dev/cuad6:br#9600:pa=none:
sio7|com8:dv=/dev/cuad7:br#9600:pa=none:
The sio entries are the standard Unix-type device names, while the
com names were added for the convenience of people who grew up on x86
hardware. Assume that you have two FreeBSD boxes wired back-to-back, with
each one’s serial port 1 null-modemed into serial port 2. Both machines are
configured to use a serial console. You’ll want to connect to your local serial
port 2 to talk to the other system’s serial console:
# tip sio1
connected
You won’t see anything else, no matter what you type.
If you log into the other system and reboot it, you’ll abruptly see action
in your tip window:
Shutting down daemon processes:.
Stopping cron.
Shutting down local daemons:.
Writing entropy file:.
Terminated
.
Waiting (max 60 seconds) for system process 'vnlru' to stop...done
Waiting (max 60 seconds) for system process 'bufdaemon' to stop...done
2 This might not predate dinosaurs, but it was before spam. Imagine that.

Start Me Up! The Boot Process 75
Waiting (max 60 seconds) for system process 'syncer' to stop...
Syncing disks, vnodes remaining...1 0 0 done
All buffers synced.
Uptime: 1m1s
Shutting down ACPI
Rebooting...
There will be a long pause while the system runs its BIOS routines and
hands control over to the serial console. Eventually you’ll see something
like this:
/boot/kernel/kernel text=0x4a6324 data=0x84020+0x9908c
syms=[0x4+0x67220+0x4+0x7e178]
/boot/kernel/snd_via8233.ko text=0x3a14 data=0x328 syms=[0x4+0xa10+0x4+0xac5]
loading required module 'sound'
/boot/kernel/sound.ko text=0x17974 data=0x37a8+0x10d8
syms=[0x4+0x3290+0x4+0x3d7d]
/boot/kernel/atapicam.ko text=0x2a30 data=0x1d8+0x4 syms=[0x4+0x7b0+0x4+0x7d6]
This indicates that the loader initially found and read the kernel files
before showing the loader menu. Congratulations! You’re using a serial
console. Press the spacebar to interrupt the boot just as if you were at the
keyboard. It doesn’t matter how far away the system is; you can change
your booting kernel, get a verbose boot, bring it up in single-user mode,
or manually fsck the hard drive—whatever. A software serial console might
not show you the BIOS, but chances are that’s set up correctly already. Once
you’ve used a serial console for a while, it won’t matter if the machine is on
the other side of the world or the other side of the room; getting out of your
chair just to access the console will feel like too much work.
If you allow the boot to continue, however, you’ll get to a point where
the boot messages stop and the serial console freezes. This is because it’s a
console; it’s not a logon device. (Being able to log onto a machine via the
serial console is quite useful on occasion; see Chapter 20 for details.)
If a system in a remote location entirely locks up, you can connect to your
serial console and have the “remote hands” at the colocation facility power-
cycle the system. It might not be good for your computer, but it’s also not
good for it to be locked up. With the serial console, you can boot into single-
user mode and fix the problem by digging through the logs and whatever
other troubleshooting you feel capable of. We’ll discuss troubleshooting this
sort of problems in Chapter 21.
Serial Console Disconnection
The tip(1) program uses the tilde (~) as a control character. To disconnect
the serial console, press ENTER and then type the disconnect sequence
“tilde-dot” at any time:
~.
You’ll be gracefully disconnected.

76 Chapter 3
Startup Messages
A booting FreeBSD system displays messages indicating the hardware attached
to the system, the operating system version, and the status of various programs
and services as they start. These messages are important when you first install
your system or when you do troubleshooting. The boot messages always start
off the same way, with a statement listing the copyrights for the FreeBSD
Project and the Regents of the University of California:
Copyright (c) 1992-2007 The FreeBSD Project.
Copyright (c) 1979, 1980, 1983, 1986, 1988, 1989, 1991, 1992, 1993, 1994
The Regents of the University of California. All rights reserved.
FreeBSD 7.0-CURRENT-SNAP010 #0: Tue Dec 13 11:25:44 UTC 2005
root@harlow.cse.buffalo.edu:/usr/obj/usr/src/sys/GENERIC
We also get a notice of the version of FreeBSD that’s booting, along with
the date and time it was compiled. You can also see who compiled this kernel,
what machine it was built on, and even where in the filesystem this kernel was
built. If you build a lot of kernels, this information can be invaluable when
trying to identify exactly what system features are available.
WARNING: WITNESS option enabled, expect reduced performance.
The kernel will print out diagnostic messages throughout the boot
process. The message shown above means that I have debugging and fault-
identifying code enabled in this particular kernel, and my performance will
suffer as a result. In this case I don’t care about the performance impact, for
reasons which will become clear momentarily.
Timecounter "i8254" frequency 1193182 Hz quality 0
This message identifies a particular piece of hardware. The timecounter,
or hardware clock, is a special piece of hardware, and while your computer
needs one, it’s such a low-level device that the end user really can’t do much
with it directly. Now and then, you’ll see messages like this for hardware that
isn’t directly visible to the user but is vital to the system. FreeBSD errs on the
side of printing too much information, rather than obscuring details that
might be critical. For example, it’ll also show all the information it can about
the CPU in the system:
CPU: AMD Athlon(tm) 64 X2 Dual Core Processor 4200+ ( 2200.10-MHz 686-class CPU)
Origin = "AuthenticAMD" Id = 0x20fb1 Stepping = 1
Features=0x178bfbff<FPU,VME,DE,PSE,TSC,MSR,PAE,MCE,CX8,APIC,SEP,MTRR,PGE,MCA,C
MV,PAT,PSE36,CLFLUSH,MMX,FXSR,SSE,SSE2,HTT>
Features2=0x1<SSE3>
AMD Features=0xe2500800<SYSCALL,NX,MMX+,FFXSR,LM,3DNow+,3DNow>
AMD Features2=0x3<LAHF,CMP>
Cores per package: 2
Start Me Up! The Boot Process 77
You probably didn’t know that a simple CPU could have so many details
and features, did you? Here’s why I’m not worried about the performance hit
caused by the WITNESS option shown earlier: This box has a dual-core pro-
cessor , each core is pretty darn fast and supports a whole bunch of
features important to modern CPUs as well as a few AMD-specific features .
I have CPU power to spare3 and a fair amount of memory as well.
real memory = 1072693248 (1023 MB)
avail memory = 1040453632 ( 992 MB)
The real memory is the amount of RAM physically installed in the
computer, while the avail memory is the amount of memory left over after
the kernel is loaded. I have 992 MB of RAM available for real work, which
more than suffices for the load on this system.
FreeBSD/SMP: Multiprocessor System Detected: 2 CPUs
The kernel also prints messages about the hardware it finds and how it’s
going to handle that hardware. For example, in the snippet above, the kernel
announces that it’s found both cores of the CPU and is ready to manage them.
ioapic0 <Version 0.3> irqs 0-23 on motherboard
ioapic1 <Version 0.3> irqs 24-47 on motherboard
Here’s a fairly typical device driver entry. This device is known as ioapic,
and the kernel has found that this hardware is version 0.3 and has extra
information associated with it . What’s more, we’ve found two devices of
that type, numbered 0 and 1 . (All device drivers are numbered starting
with zero.) You can find out more about the device handled by a given driver
by reading the manual page for the driver. Almost all—but not all—device
drivers have manual pages.
npx0: [FAST]
npx0: <math processor> on motherboard
npx0: INT 16 interface
Not all device drivers print all their information on a single line. Here we
have a single device, npx0, that takes up three lines with just a single instance
of the device. The only way to know that this is a single math processor rather
than three separate ones is to check the number of the device. All of these
are for device number zero, so it’s a single device.
acpi0: <PTLTD RSDT> on motherboard
pcib0: <ACPI Host-PCI bridge> port 0xcf8-0xcff on acpi0
pci0: <ACPI PCI bus> on pcib0
3 I would say, “Eat your heart out,” except that by the time this book hits the shelves, this laptop
will be sadly out of date.

78 Chapter 3
One interesting thing about the boot messages is that they display how
your computer’s components are attached to one another. Here, we have
an ACPI system directly on the motherboard and a PCI bridge attached
to acpi0 . We also find a PCI bus attached to the PCI bridge , and as
you read on, you’ll find individual devices attached to that bus. You might
not be equipped to do much with this information now, but you’ll find that
having it available will be valuable when you have to troubleshoot a problem.
This is all good, but too esoteric to be of use at the moment. How about
something usable right now?
firewire0: <IEEE1394(FireWire) bus> on fwohci0
fwe0: <Ethernet over FireWire> on firewire0
This system has FireWire , and FreeBSD can identify and use it! Now
that’s useful, at least if you have FireWire equipment. And FreeBSD can do
Ethernet over FireWire ? That’s kind of cool.4
Even if you don’t have FireWire, chances are you have a network
connection of some sort.
re0: <RealTek 8169SB Single-chip Gigabit Ethernet> port 0x1000-0x10ff mem
0xd2206800-0xd22068ff irq 19 at device 8.0 on pci0
This entry shows that a network card is assigned to the interface re0 ,
and that the card speaks gigabit Ethernet . We also see all sorts of infor-
mation about its memory address, IRQ, and its PCI bus attachment.
Every device on your computer has one or more entries like the above.
Taken as a whole, they describe your computer’s hardware in reasonable
detail. If you boot in verbose mode, you’ll see even more detail—probably
far more than you want.
One key thing that the kernel displays in the boot messages is the device
name for each piece of hardware. This is critical information for managing
your system. Every piece of hardware has a device node name, and to con-
figure it, you’ll need to know that name. For example, earlier we saw an entry
4 FreeBSD’s default Ethernet-over-FireWire driver uses a method only supported by FreeBSD,
mainly because we were here first. To use the Ethernet over FireWire compatible with Mac OS X
and Windows XP, look at fwip(4).
DMESG.BOOT
While the boot information is handy, chances are it will disappear from the screen
by the time you need it. For future reference, the boot messages are stored in the file
/var/run/dmesg.boot. This means that you can inspect your kernel’s hardware
messages even after your system has been up and running for months.
Start Me Up! The Boot Process 79
for an Ethernet card called re0. The card uses the re(4) driver, and the first
instance of this driver has number zero. Your second card of this type would
be re1, then re2, and so on.
Most devices that can be configured or managed have a device node
entry somewhere under /dev. For example, our network card is represented
by the file /dev/net/re0. These files are called device nodes, and are a con-
venient way to address a particular piece of hardware. Most device nodes
cannot be directly accessed as a regular file; you can’t cat(1) a device node
or copy another file to it. However, device nodes are used as arguments to
specialized programs. For example, the hard drive that showed up at boot as
ad4 is the same as the device node /dev/ad4. When you want to mount that
hard drive, you can use the device node name and be sure you’re getting
that exact piece of hardware.
Multi-User Startup
Beyond single-user mode you’ll find multi-user mode. This is the standard
operating mode for a Unix-like OS. If you’re doing real work, your system is
in multi-user mode.
When FreeBSD finishes inspecting the hardware and attaching all the
device drivers appropriately, it runs the shell script /etc/rc. This script mounts
all filesystems, brings up the network interfaces, configures device nodes,
identifies available shared libraries, and does all the other work necessary
to make a system ready for normal work. Most systems have different
startup requirements; while almost every server needs to mount a hard
drive, a web server’s operating requirements are very different from those
of a database server even if it’s running on absolutely identical hardware.
This means that /etc/rc must be extremely flexible. It achieves this flexibility
by delegating everything to other shell scripts responsible for specific aspects
of the system.
The /etc/rc script is controlled by the files /etc/defaults/rc.conf and
/etc/rc.conf.
/etc/rc.conf and /etc/defaults/rc.conf
Much like the loader configuration file, the configuration of /etc/rc is split
between two files: the default setting file /etc/defaults/rc.conf and the local
settings file /etc/rc.conf. Settings in /etc/rc.conf override any values given in
/etc/defaults/rc.conf, exactly as with the loader.
The /etc/defaults/rc.conf file is huge and contains quite a few variables,
frequently called knobs or tunables. We aren’t going to discuss all of them,
not only because knobs are added continually and such a list would be
immediately obsolete, but because quite a few knobs aren’t commonly used
on servers. Almost everything in a standard FreeBSD system has one or more
rc.conf knobs, from your keyboard map to TCP/IP behavior. For a complete,
up-to-date list, read the rc.conf(5) manual page on your system.

80 Chapter 3
In the next few sections, we’ll examine some common entries from
/etc/rc.conf. Each of these appears in /etc/defaults/rc.conf and can be edited
by placing an override in /etc/rc.conf. Each variable appears with its default
setting.
Startup Options
The following rc.conf options control how FreeBSD configures itself and
starts other programs. These far-reaching settings affect how all other system
programs and services run.
If you’re having a problem with the startup scripts themselves, you might
enable debugging on /etc/rc and its subordinate scripts. This can provide
additional information about why a script is or isn’t starting.
rc_debug="NO"
If you don’t need the full debugging output, but would like some
additional information about the /etc/rc process, enable informational
messages with rc_info:
rc_info="NO"
One common problem with systems that have little memory is a shortage
of swap space. We’ll go into the details of swap usage in Chapter 19, but you
can configure a file for use as additional swap immediately at system boot:
swapfile="NO"
Filesystem Options
FreeBSD can use memory as a filesystem, as we will discuss in Chapter 8.
One common use for this feature is to make /tmp really fast by using memory
rather than a hard drive as its back end. Once you’ve read Chapter 8, you
might consider implementing this. rc.conf has variables to let you enable a
memory-backed /tmp and set its size transparently and painlessly. You can
also choose the options FreeBSD will use to complete the filesystem. (The
impatient among you are probably wondering what the flag -S means. It
means disable soft updates. If you have no idea what this means, either, wait
for Chapter 8.) If you want to use a memory filesystem /tmp, set tmpmfs to
YES and set tmpsize to the desired size of your /tmp.
tmpmfs="AUTO"
tmpsize="20m"
tmpmfs_flags="-S"
Another popular FreeBSD filesystem feature is its integrated encrypted
partitions. FreeBSD supports two different filesystem encryption systems out
of the box: GBDE and GELI. Geom Based Disk Encryption (GBDE) was FreeBSD’s

Start Me Up! The Boot Process 81
first encrypted filesystem designed for military-grade use. GELI is a little
more friendly and complies with different standards than GBDE. (You
definitely want to read Chapter 18 before enabling either of these!)
gbde_autoattach_all="NO"
gbde_devices="NO"
gbde_attach_attempts="3"
gbde_lockdir="/etc"
geli_devices=""
geli_tries=""
geli_default_flags=""
geli_autodetach="YES"
geli_swap_flags="-a aes -l 256 -s 4096 -d"
By default, FreeBSD mounts the root partition read/write upon achieving
multi-user mode. If you want to run in read-only mode instead, you can set
the following variable to NO. Many people consider this more secure, but it
might interfere with operation of certain software, and it will certainly
prevent you from editing any files on the root partition!
root_rw_mount="YES"
When a booting FreeBSD attempts to mount its filesystems, it checks
them for internal consistency. If the kernel finds major filesystem problems,
it can try to fix them automatically with fsck -y. While this is necessary in
certain situations, it’s not entirely safe. (Be sure to read Chapter 8 very
carefully before enabling this!)
fsck_y_enable="NO"
The kernel might also find minor filesystem problems which it resolves
on-the-fly using a background fsck while the system is running in multi-user
mode, as discussed in Chapter 8. There are legitimate concerns about the
safety of using this feature in certain circumstances. You can control the use
of background fsck and set how long the system will wait before beginning
the background fsck.
background_fsck="YES"
background_fsck_delay="60"
Miscellaneous Network Daemons
FreeBSD includes many smaller programs (or daemons) that run in the
background to provide specific services. We’ll cover quite a few of these
integrated services throughout the book, but here are a few specific ones
that will be of interest to experienced system administrators. One popular

82 Chapter 3
daemon is syslogd(8). Logs are a Good Thing. Logs are so very, very good
that large parts of Chapter 20 are devoted to the topic of logging with, for,
by, and on FreeBSD.
syslogd_enable="YES"
Once you have decided to run the logging daemon, you can choose
exactly how it will run by setting command-line flags for it. FreeBSD will use
these flags when starting the daemon. For all the programs included in
rc.conf that can take command-line flags, these flags are given in this format.
syslogd_flags="-s"
Another popular daemon is inetd(8), the server for small network services.
(We cover inetd in Chapter 15.)
inetd_enable="NO"
One job commonly run with FreeBSD is Domain Name System, or DNS,
with the industry-standard daemon named(8). DNS is the road map of the
Internet and makes it possible for mere humans to use the network. Because
DNS must be configured in order to be useful, FreeBSD ships with it disabled
by default. We cover DNS in Chapter 14.
named_enable="NO"
Most facilities use the Secure Shell (SSH) daemon for remote logins.
If you want to connect to your system remotely over the network, you’ll
almost certainly need SSH services.
sshd_enable="NO"
While the SSH daemon can be configured via the command line,
you’re generally be better off using the configuration files in /etc/ssh/.
See Chapter 15 for details.
sshd_flags=""
FreeBSD also incorporates extensive time-keeping software and functions
to ensure that the system clock remains synchronized with the rest of the
world. You’ll need to configure this for it to be useful; we will cover that in
Chapter 15.
ntpd_enable="NO"
ntpd_flags="-p /var/run/ntpd.pid -f /var/db/ntpd.drift"

Start Me Up! The Boot Process 83
FreeBSD also includes a small SNMP daemon for use in facilities with
SNMP-based management tools. We’ll cover configuring SNMP in Chapter 19.
bsnmpd_enable="NO"
Network Options
These knobs control how FreeBSD configures its network facilities
during boot.
Every machine on the Internet needs a hostname. The hostname is the
fully qualified domain name of the system, such as www.absolutefreebsd.org.
Many programs will not run properly without this.
hostname=""
FreeBSD includes a few different integrated firewall packages. We’re
going to briefly cover PF, the Packet Filter, in Chapter 9. PF is enabled and
disabled in rc.conf.
pf_enable="NO"
TCP/IP is an old networking protocol and has been extended and
modified several times. Some of these modifications have been lumped
together as TCP extensions, as covered in Chapter 6. Most operating systems
can take advantage of TCP extensions, but many older ones can’t. If you have
trouble communicating with much older hosts, disable TCP extensions.
tcp_extensions="YES"
You might be interested in failed attempts to connect to your system over
the network. This will help detect port scans and network intrusion attempts,
but will also collect a lot of garbage. It’s interesting to set this for a short
period of time just to see what really happens on your network. (Then again,
knowing what’s really going on tends to cause heartburn.) Set this to 1 to log
failed connection attempts.
log_in_vain="0"
Routers use ICMP redirects to inform client machines of the proper
network gateways for particular routes. While this is completely legitimate,
on some networks intruders can use this to capture data. If you don’t need
ICMP redirects on your network, you can set this option for an extremely tiny
measure of added security. If you’re not sure if you’re using them, ask your
network administrator.
icmp_drop_redirect="NO"

84 Chapter 3
If you are the network administrator and you’re not sure if your network
uses ICMP redirects, there’s an easy way to find out—just log all redirects
received by your system to /var/log/messages.5 Note that if your server is under
attack, this can fill your hard drive with redirect logs fairly quickly.
icmp_log_redirect="NO"
To get on the network, you’ll need to assign each interface an IP address.
We’ll discuss this in some detail in Chapter 6. You can get a list of your network
interfaces with the ifconfig(8) command. List each network interface on its
own line, with its network configuration information in quotes. For example,
to give your em0 network card an IP address of 172.18.11.3 and a netmask of
255.255.254.0, you would use:
ifconfig_em0="inet 172.18.11.3 netmask 255.255.254.0"
If your network uses DHCP, use the value dhcp as an IP address.
ifconfig_em0="dhcp"
Similarly, you can assign aliases to a network card. An alias is not the
card’s actual IP address, but the card answers for that IP address, as discussed
in Chapter 6. FreeBSD supports hundreds of aliases on a single card, with
rc.conf entries in the following form:
ifconfig_em0_aliasnumber="address netmask 255.255.255.255"
The alias numbers must be continuous, starting with 0. If there’s a
break in numbering, aliases above the break will not be installed at boot
time. (This is a common problem, and when you see it, check your list of
aliases.) For example, an alias of 192.168.3.4 would be listed as:
ifconfig_em0_alias0="192.168.3.4 netmask 255.255.255.255"
Network Routing Options
FreeBSD’s network stack includes many features for routing Internet traffic.
These start with the very basic, such as configuring an IP for your default
gateway. While an IP address will get you on the network, a default router
will give you access to everything beyond your LAN.
defaultrouter=""
5 And if you’ve never heard of ICMP redirects, run, do not walk, to your nearest book pusher
and get a copy of The TCP/IP Guide by Charles M. Kozierok (No Starch Press, 2005). Once you
have it, read it.

Start Me Up! The Boot Process 85
Network control devices such as firewalls must pass traffic between
different interfaces. While FreeBSD won’t do this by default, it’s simple to
enable. Just tell the system that it’s a gateway and it will connect multiple
networks for you.
gateway_enable="NO"
If your system needs to speak Routing Information Protocol, use the
router_enable knob to start it at boot. I would argue that this knob is
misnamed—many routers use routing protocols other than RIP, but the
knob has had this name for decades now. If you don’t specifically need
the RIP protocol, then leave this knob alone!
router_enable="NO"
Console Options
The console options control how the monitor and keyboard behave. You
can change the language of your keyboard, the monitor’s font size, or just
about anything else you like. For example, the keyboard map defaults to
the standard US keyboard, frequently called QWERTY. You’ll find all sorts
of keymaps in the directory /usr/share/syscons/keymaps. I prefer the Dvorak
keyboard layout, which has an entry there as us.dvorak. By changing the
keymap knob to us.dvorak, my system will use a Dvorak keyboard once it
boots to multi-user mode.
keymap="NO"
FreeBSD turns the monitor dark when the keyboard has been idle for a
time specified in the blanktime knob. If you set this to NO, FreeBSD will not
dim the screen. Mind you, new hardware will dim the monitor after some
time as well, to conserve power. If your screen goes blank even if you’ve set
the blanktime knob to NO, check your BIOS and your monitor manual.
blanktime="300"
FreeBSD can also use a variety of fonts on the console. While the default
font is fine for servers, you might want a different font on your desktop or
laptop. My laptop has one of those 17-inch screens proportioned for watch-
ing movies, and the default fonts look kind of silly at that size. You can choose
a new font from the directory /usr/share/syscons/fonts. Try a few to see how
they look on your systems. The font’s name includes the size, so you can set
the appropriate variable. For example, the font swiss-8x8.fnt is the Swiss font,
8 pixels by 8 pixels. To use it, you would set the font8x8 knob.
font8x16="NO"
font8x14="NO"
font8x8="NO"

86 Chapter 3
You can use a mouse on the console, even without a GUI. By default,
FreeBSD will try to autodetect your mouse type. If you have a PS/2 or USB
mouse, chances are that it will just work when you enable the mouse daemon,
without any special configuration. Some older and more unusual types of
mice require manual configuration, as documented in moused(8).
moused_enable="NO"
moused_type="AUTO"
You can also change the display on your monitor to fit your needs. If you
have an odd-sized monitor, you can change the number of lines of text and
their length to fit, change text colors, change your cursor and cursor behavior,
and do all sorts of other little tweaks. You can get a full list of different options
in man vidcontrol(8).
allscreens_flags=""
Similarly, you can adjust your keyboard behavior almost arbitrarily. Every-
thing from key repeat speed to the effect of function keys can be configured,
as documented in kbdcontrol(8).
allscreens_kbdflags=""
Other Options
This final potpourri of knobs might or might not be useful in any given
environment, but they are needed frequently enough to deserve mention.
For example, not all systems have access to a printer, but those that do will
want to run the printing daemon lpd(8). We brush up against printer
configuration in Chapter 15.
ldp_enable="NO"
The sendmail(8) daemon manages transmission and receipt of email
between systems. While almost all systems need to transmit email, most
FreeBSD machines don’t need to receive email. The sendmail_enable knob
specifically handles incoming mail, while sendmail_outbound_enable allows
the machine to transmit mail. See Chapter 16 for more details.
sendmail_enable="NO"
sendmail_outbound_enable="YES"
One of FreeBSD’s more interesting features is its ability to run software
built for other operating systems. The most common compatibility mode is
for Linux software, but FreeBSD also supports SCO Unix binaries and SVR4
software. We will discuss this feature in Chapter 12. Don’t enable any of these
compatibility modes without reading that chapter first!

Start Me Up! The Boot Process 87
linux_enable="NO"
A vital part of any Unix-like operating system is shared libraries.
You can control where FreeBSD looks for shared libraries. Although the
default setting is usually adequate, if you find yourself regularly setting the
LD_LIBRARY_PATH environment variable for your users, you should consider
adjusting the library path instead. See Chapter 12 for more advice on this.
ldconfig_paths="/usr/lib /usr/X11R6/lib /usr/local/lib"
FreeBSD has a security profile system that allows the administrator to
control basic system features. You can globally disallow mounting hard disks,
accessing particular TCP/IP ports, and even changing files. See Chapter 7
for details on how to use these.
kern_securelevel_enable="NO"
kern_securelevel="-1"
Now that you know a smattering of the configuration knobs FreeBSD
supports out of the box, let’s see how they’re used.
The rc.d Startup System
FreeBSD bridges the gap between single-user mode and multi-user mode
via the shell script /etc/rc. This script reads in the configuration files
/etc/defaults/rc.conf and /etc/rc.conf and runs a collection of other scripts
based on what it finds there. For example, if you have enabled the USB
daemon, /etc/rc runs a script written specifically for starting that daemon.
FreeBSD includes scripts for starting services, mounting disks, configuring
the network, and setting security parameters. You can use these scripts to
stop and restart services exactly as the system does at boot, ensuring system
integrity and making your life generally easier. These scripts live in /etc/rc.d.
WHAT IS rcNG?
Once upon a time, FreeBSD included a handful of monolithic /etc/rc scripts that
configured the entire system. Each specific daemon or service was started by a
few lines buried inside one of these scripts. While this worked well for the majority
of systems, it wasn’t very flexible and couldn’t accommodate all users. NetBSD
developed the current system of small shell scripts for specific services, and FreeBSD
quickly adopted it. The current startup method is the next generation RC scripts,
or rcNG. This system is currently the only one used in any production version
of FreeBSD, and any references you may see to rcNG are leftovers from the
transition era.

88 Chapter 3
Once you have a feature enabled in rc.conf, you can control it via an rc.d
script. For example, suppose you realized you had to run the SSH daemon
on a system that previously hadn’t run it. Set sshd_enable to YES, and go to the
directory /etc/rc.d. There you’ll find a script called sshd.
#./sshd start
Starting sshd.
#
No rc.d script runs unless enabled in rc.conf, however. This ensures that
everything that was running before will still be running after a reboot. You
can also stop a service with the stop command, check its state with the status
command, and reload it with restart. If you really do want to start a program
just once with its rc.d script, and you don’t want it to run after the next reboot,
you can use the forcestart command.
We’ll look at rc.d in more detail in Chapter 12, when we discuss custom-
izing and writing your own rc.d scripts.
Shutdown
FreeBSD makes the rc.d startup system do double duty; not only must it
handle system startup, it must shut all those programs down when it’s time to
power down. Something has to unmount all those hard drives, shut down the
daemons, and clean up after doing all the work. Some programs don’t care
if they’re unceremoniously killed when the system closes up for the night—
after all, after the system goes down any clients connected over SSH will be
knocked off and any web pages that are being requested aren’t going to be
delivered. Database software, however, cares very much about how it’s turned
off, and just killing the process will damage your data. Many other programs
that manage actual data are just as particular, and if you don’t let them clean
up after themselves you will regret it.
When you shut down FreeBSD with either the shutdown(8) or reboot(8)
commands, the system calls the shell script /etc/rc.shutdown. This script calls
each rc.d script in turn with the stop option, reversing the order they were
called during startup, thereby allowing server programs to terminate gracefully
and disks to tidy themselves up before the power dies.
Now that you understand how FreeBSD starts up and shuts down, let’s
look at some basic tools you can use to ensure that your system will continue
to boot even after you’ve been experimenting with it.

4
READ THIS BEFORE YOU BREAK
SOMETHING ELSE!
(BACKUP AND RECOVERY)
The most common cause of system failure
is those pesky humans, but hardware and
operating systems also fail. Hackers learn new
ways to disrupt networks and penetrate applica-
tions, and you’ll inevitably need to upgrade and patch
your system on a regular basis. (Whether or not you
will upgrade and patch is an entirely separate question.) Any time you touch
a system there’s a chance you’ll make a mistake, misconfigure a vital service,
or otherwise totally ruin your system. Just think of how many times you’ve
patched a computer running any OS and found something behaving oddly
afterward! Even small system changes can damage data. You should therefore
always assume that the worst is about to happen. In our case, this means that
if either the hardware or a human being destroys the data on your hard
drive, you must be able to restore that data.
Worse still, if you’re reading this book, you’re probably just learning how
to configure your FreeBSD system and therefore aren’t well prepared for a
disaster. As a new user, you’ll need to test a variety of configurations and

90 Chapter 4
review the history of what you’ve done. There’s little more frustrating than
saying, “But this worked last month, what did I change?” Will you really
recall every change you’ve made over the last weeks, or months, or years?
What about changes made by your co-workers? In fact, if you’re experimenting
hard enough you might even utterly destroy your system, so you’ll need a way
to recover your important data.
This chapter begins with the large-scale approach of backing up the
entire computer. This approach won’t work well if you only want to back up
individual files, so we’ll handle these separately. If a file can change three
times a day, and you take weekly backups, you will lose valuable information
when the file disappears. Finally, should you suffer a partial or near-total
disaster, we’ll consider recovering and rebuilding with single-user mode and
the fixit disk.
System Backups
You only need a system backup if you care about your data. That isn’t as
inane as it sounds. The real question is, “How much would it cost to replace
my data?” A low-end tape backup system can run several hundred dollars.
How much is your time worth, and how long will it take to restore your
system from the install media? If the most important data on your hard disk
is your web browser’s bookmarks file, a backup system probably isn’t worth
the investment. But if your server is your company’s backbone, you’ll want to
take this investment very seriously.
A complete backup and restore operation requires a tape drive and media.
You can also back up to files, across the network, or to removable media
such as CDs or DVDs. Today’s industry standard, however, is tape, so we’ll
focus on that. To use a tape drive you’ll need a backup program, and we’ll
discuss the standard backup programs shipped with FreeBSD.
Backup Tapes
FreeBSD supports SCSI, USB, and IDE tape drives. SCSI drives are faster and
more reliable than IDE drives, although IDE drives are cheaper. USB tape
drives are not always standards-compliant and hence not always compatible
with FreeBSD. Definitely check the release notes or the FreeBSD mailing list
archives to confirm that your tape drive is compatible with FreeBSD.
Once you’ve physically installed your tape drive, you need to confirm
that FreeBSD recognizes it. The simplest way is to check the /var/run/dmesg
.boot file, as discussed in Chapter 3. SCSI and USB tapes show up as sa devices
while IDE tape drives show up as ast. For example, the following three lines
from dmesg.boot describe the SCSI tape device in this machine:
sa0 at ahc0 bus 0 target 9 lun 0
sa0: <SONY SDT-10000 0110> Removable Sequential Access SCSI-2 device
sa0: 40.000MB/s transfers (20.000MHz, offset 8, 16bit)

Read This Before You Break Something Else! (Backup and Recovery) 91
Of all the information we have on this tape drive, the most important is
that your FreeBSD system knows this device as sa0 . We also see that it’s
attached to the SCSI card ahc0 at SCSI ID 9 , what the drive’s model
number is , and it can run at 40MB per second .
Tape Drive Device Nodes, Rewinding, and Ejecting
Before you can use your tape drive for backups you have to know how to
control it. As with many Unix devices with decades worth of history, the way
you access a tape drive controls how it behaves. Tape drives have several
different device nodes, and each one makes the tape drive behave differently.
The most basic tape-control mechanism is the device node used to access it.
For your average SCSI tape drive, you only need worry about three nodes:
/dev/esa0, /dev/nsa0, and /dev/sa0. Similarly, IDE tapes mainly use /dev/east0,
/dev/nast0, and /dev/ast0.
Tapes are sequential access devices, meaning that data is stored on the
tape linearly. A particular section of tape contains certain data, and to access
that data you must roll the tape to expose that section. To rewind or not to
rewind is an important question.
NOTE The behavior of different tape device nodes varies between operating systems. Different
versions of Unix, with different tape management software, handle tapes differently.
Do not make assumptions with your backup tapes!
If you use the node name that matches the device name, the tape drive
will automatically rewind when your command finishes. Our sample SCSI
tape drive has a device name of sa0, so if you run a command using /dev/sa0
as the device node, the tape will rewind when the command finishes.
If you don’t want the tape to automatically rewind when the command
completes, stop it from rewinding by using the node name that starts with n.
Perhaps you need to append a second backup from a different machine onto
the tape, or you want to catalog the tape before rewinding and ejecting. In
our example, use /dev/nsa0 to run your command without rewinding.
To automatically eject a tape when a command finishes, use the node
that begins with e. For example, if you’re running a full system backup, you
probably want the tape to eject when the command finishes so the operator
can put the tape in a case to ship off-site or place in storage. Our example
uses the /dev/esa0 device name to eject the tape when the command finishes.
Some older tape drives might not support automatic ejection; they’ll require
you to push the physical button to work the lever that winches the tape out
of the drive. The easiest way to identify such a drive is to try to eject it via the
device node and see what happens.
The $TAPE Variable
Many programs assume that your tape drive is /dev/sa0, but that isn’t always
correct. Even if you have only one SCSI tape drive, you might want it to eject
automatically (/dev/esa0) or to rewind it upon completion (/dev/nsa0). Or,
you might have an IDE tape drive which goes by an entirely different name.

92 Chapter 4
Many (but not all) backup-related programs use the environment variable
$TAPE to control which device node they use by default. You can always over-
ride $TAPE on the command line, but setting it to your most commonly used
choice can save you some annoyances later.
If you’re using the default FreeBSD shell, set $TAPE with the following
command:
# setenv TAPE /dev/sa0
Tape Status with mt(1)
Now that you know how to find your tape drive, you can perform basic
actions on it—such as rewinding, retensioning, erasing, and so on—with
mt(1). One basic thing mt does is checking a tape drive’s status, as follows:
#mt status
Mode Density Blocksize bpi Compression
Current: 0x25:DDS-3 variable 97000 DCLZ
---------available modes---------
0: 0x25:DDS-3 variable 97000 DCLZ
1: 0x25:DDS-3 variable 97000 DCLZ
2: 0x25:DDS-3 variable 97000 DCLZ
3: 0x25:DDS-3 variable 97000 DCLZ
---------------------------------
Current Driver State: at rest.
---------------------------------
File Number: 0 Record Number: 0 Residual Count 0
You don’t have to worry about most of the information here, but if you
want to go through it line-by-line, the mt(1) man page contains a good
description of all the features. At the very least, if the command returns
anything useful, this means mt(1) can find your tape drive.
One of the first things we see is the drive density . Older drives can
have tapes of different densities for different purposes, but modern tape
drives pack data as tightly as possible. This particular tape drive is a DDS-3
model; while you could choose to use another density, all the choices it offers
are DDS-3. We also see that this tape drive offers hardware compression with
the DCLZ algorithm . Near the bottom, we see what the tape drive is doing
right now .
The status command might give you different sorts of messages. The most
problematic is the one that tells you that your tape drive is not configured:
#mt status
mt: /dev/nsa0: Device not configured
This means that you don’t actually have a tape at the device node that
your $TAPE variable points at. You can experiment with device nodes and
mt(1) by using the -f flag to specify a device node (for example, mt -f
/dev/nsa1 status), although you should get this information from dmesg.boot.

Read This Before You Break Something Else! (Backup and Recovery) 93
If you’re sure that your device node is correct, perhaps you don’t have a tape
inserted into the drive, or the tape drive needs cleaning.
Another response you might get from mt status is mt: /dev/nsa0: Device
busy. You asked for the status of your tape, and it replied, “I can’t talk now,
I’m busy.” Try again later, or check ps -ax to see what commands are using
the tape drive. When you’re working with actual tape, only one program
instance can access it at a time. You cannot list the contents of a tape while
you’re extracting a file from that tape.
Other Tape Drive Commands
You can do more with a tape drive than just check to see if it’s alive. The
mt(1) subcommands I use most frequently are retension, erase, rewind, and
offline.
Tapes tend to stretch, especially after they’re used the first time. (I know
perfectly well that modern tape vendors all claim that they prestretch their
tapes, or that their tapes cannot be stretched, but that claim and two slices of
bread will get you a bologna sandwich.) Retensioning a tape is simply running
the tape completely through, both forwards and back, with the command
mt retension. Retensioning takes all the slack out of the tape and makes
backups more reliable.
Erasing removes all data from a tape. This isn’t a solidly reliable erasure
which you’d need to conceal data from a data recovery firm or the IRS;
mt erase simply rolls through the tape and overwrites everything once. This
can take a very long time. If you want to erase the tape quickly, you can use
mt erase 0 to simply mark the tape as blank.
The mt rewind command rolls a tape back to the beginning, same as
accessing the device through its default device node.
When you offline a tape, you rewind and eject it so that you can put a
new tape in. The command is, oddly enough, mt offline.
To Rewind or Not?
One thing to remember about tape is that it’s a linear storage medium. Each
section of tape holds a particular piece of data. If you back up multiple chunks
of data to tape, avoid rewinding after each backup operation. Imagine that
you wrote a backup of one system to tape, rewound the tape, and backed up
another system. The second backup would overwrite the first, because it used
the same chunk of tape. When you run multiple backups on a single tape, use
the appropriate device node to ensure you don’t rewind the tape between tasks.
TAPE DRIVE TEMPERAMENT
Not all tape drives support all functions. Older tape drives in particular are quite
touchy, even crotchety, requiring very specific settings to work acceptably. If you
have a problem with a particular drive, check the FreeBSD-questions mailing list
archive for messages from others with the same problem. You’ll probably find your
answer there.
94 Chapter 4
Backup Programs
Two popular packages for backing up systems are tar(1) and dump(8). You’ll
certainly encounter other backup tools too, such as pax and cpio. You’ll also
find network-based backup software for FreeBSD, such as Amanda and
Bacula, that can back up an entire network. These tools are well suited for
certain environments, but aren’t as universal as dump and tar. Once you
learn dump and tar, however, you will find it easy to master any other
backup software.
tar(1) was designed for files, and you can restore tar backups on almost
any operating system. dump(8) works on partitions and filesystems, and can
only be restored on the same operating system that the dump was taken on.
If you’re backing up an entire computer, use dump. If you’re backing up
individual files, or might want to restore your backup to a foreign computer,
use tar.
tar
The tar (short for tape archiver) utility can back up anything from a single file
to your whole computer. Unlike dump, tar works on the files and directories
only and has no knowledge of the underlying filesystem, which has its
advantages and disadvantages. tar is a common standard recognized by
almost every operating system vendor; you can find tar for Windows, Linux,
Unix, BSD, Mac OS X, AS/400, VMS, Atari, Commodore 64, QNX, and just
about everything else you might encounter.
tar(1) can back up files to tape or to a file. A backup file containing
tarred files is known as a tarball. Since tar works on files, it’s very easy to
restore just one file from a tarball.
FreeBSD uses a version of tar written from scratch to replace the older
GNU tar, called bsdtar. bsdtar can behave completely consistently with GNU
tar, and can also behave in strict accordance with POSIX tar. If you’re at all
concerned about the differences between GNU tar, POSIX tar, and bsdtar,
read man tar(1) for all the gory details. bsdtar is actually built on libarchive(3),
a library that developers use to add support for backup archives into other
programs. tar(1) can be dumb. If your filesystem is corrupt in any way, tar
will back up what it thinks you asked for. It will then happily restore files that
were damaged during the original backup, overwriting working-but-incorrect
files with not-working-and-still-incorrect versions. These sorts of problems
rarely happen, but tend to be unforgettable when they do.
tar Modes
tar(1) can perform several different actions, controlled by the command-line
flags. These different actions are called modes. You’ll need to read the manual
page for a complete description of all tar modes, but the most commonly
used ones are listed below.

Read This Before You Break Something Else! (Backup and Recovery) 95
Create an Archive
Use create mode (-c) to create a new archive. Unless you specify otherwise, this
flag backs up everything to your tape drive ($TAPE, or /dev/sa0 if you haven’t
set $TAPE). To back up your entire system, you’d tell tar to archive everything
from the root directory down:
# tar -c /
In response, your tape drive should light up and, if your tape is big
enough, eventually present you with a complete system backup. Many
modern hard drives are bigger than tape drives can hold, however, so it
makes sense to only back up the vital portions of your system. For example,
if the only files on your computer that you need are on the partitions
/home and /var, you could specify those directories on the command line:
# tar -c /home /var
List Archive Contents
List mode (-t) lists all the files in an archive. Once you’ve created an archive,
you can use this mode to list the tape’s contents.
# tar -t
.
.snap
dev
tmp
...
This lists all the files in your backup and might take a while to run. Note
that the initial slashes are missing from filenames; for example, /tmp shows
up as tmp. This becomes important during restores.
Extract Files from Backup
In extract mode, tar retrieves files from the archive and copies them to the
disk. (This is also called untarring.) tar extracts files in your current location;
if you want to overwrite the existing /etc directory of your system with files
from your backup, go to the root directory first. On the other hand, to restore
a copy of /etc in my home directory, I would go to my home directory first.
# cd /home/mwlucas
# tar -x etc
Remember when I said that the missing initial slash would be important?
Here’s why. If the backup included that initial slash, tar would always extract
files relative to the root directory. The restored backup of /etc/rc.conf would
always be written to /etc/rc.conf. Without the leading /, you can recover the
file anywhere you want; the restored /etc/rc.conf can be /home/mwlucas/etc/
rc.conf. If I’m restoring files from a machine that’s been decommissioned,
I don’t want them to overwrite files on the current machine; I want them
placed elsewhere so they won’t interfere with my system.

96 Chapter 4
Verify Backups
Once you have a backup, you probably want to confirm that it matches your
system. Diff mode (-d) compares the files on tape to the files on disk. If every-
thing on the tape matches the system, tar -d will run silently. A perfect match
between tape and system is not normal, however. Log files usually grow during
the backup process, so the log files on tape should not match the files on disk.
Similarly, if you have a database server running, the database files might not
match. If you truly want a perfect backup (also called a cold backup), you’ll
need to shut down to single-user mode before taking the backup. You must
decide which errors you can live with and which need correction.
Other tar Features
tar has several other features that can make it more friendly or useful. These
include verbose behavior, different types of compression, permissions restore,
and the most popular option, using a file instead of a tape device.
Use a File Instead of Tape
The -f flag allows you to specify another device or file as the destination for
your archive. In all of the preceding examples I’m either using the default
tape drive /dev/sa0, or I have set $TAPE. If I have neither of these, I’d need to
specify a tape drive with -f:
# tar -c -f /dev/east0 /
Instead of using a tape at all, you can use a tar file, or tarball. Source code
distributed via the Internet is frequently distributed as tarballs. Use the -f
flag to specify a filename. For example, to back up the chapters of this book
as they were written, I ran the following every so often to create the tarball
bookbackup.tar:
#tar -cf bookbackup.tar /home/mwlucas/absolutefreebsd/
This file can easily be backed up on machines elsewhere—so even if my
house burns down, the book would be safe. I could then run phone and power
lines to the neighbor’s house, borrow a laptop, find an open wireless access
point, run tar -xf bookbackup.tar, and work amidst the charred timbers while
waiting for the insurance company. (I couldn’t do much else at the time,
anyway.)
Verbose
The -v flag makes tar verbose. Normally, tar runs silently, except when it
encounters an error. This is good most of the time (who wants to read the
complete list of files on the server every time a backup runs?), but sometimes
you like to have the warm fuzzy feeling of watching a program do its work.
Adding the -v flag makes tar print the name of each file it processes. You can
use the verbose flag to create a complete list of all the files that are being
backed up or restored. In a routine backup or restore, this verbosity makes
errors difficult to see.

Read This Before You Break Something Else! (Backup and Recovery) 97
gzip
The gzip flag (-z) runs the files through the gzip(1) compression program
on their way to or from the archive. Compressed tarballs usually have the
extension .tar.gz or .tgz, and on rare occasion .taz. Compression can greatly
reduce the size of an archive; many backups shrink by 50 percent or more
with compression. While all modern versions of tar support gzip, older
versions don’t, so if you want absolutely everybody to be able to read your
backup, don’t use -z.
Compression
In contrast, all Unix versions of tar can use the -Z flag to compress files with
compress(1). The compress program isn’t as efficient as gzip, but it does
reduce file size. Tarballs compressed with -Z have the extension .tar.Z.
bzip Compression
FreeBSD’s tar supports bzip compression, which shrinks files even more
tightly than gzip, with the -y flag. bzip uses more CPU time than gzip, but
these days CPU time is not nearly as limited as when gzip came out. Not all
versions of tar support bzip compression, either. If you’ll only be reading
your files on a FreeBSD machine, or are comfortable installing bzip on other
platforms, use the -y flag.
Permissions Restore
The -p flag restores the original permissions on extracted files. By default, tar
sets the owner of an extracted file to the username that’s extracting the file.
This is fine for source code, but for system restores you really want to restore
the file’s original permissions. (Try to restore these permissions by hand
some time; you’ll learn quite a bit about why you should have done it right
the first time.)
And More, More, More . . .
Tar has many, many more functions to accommodate decades of changes in
backups, files, filesystems, and disks. For a complete list of functions, read
man tar(1).
COMPRESSION AND FREEBSD TAR
FreeBSD’s libarchive autodetects compression types used in backups. While you
must specify your desired compression when creating an archive, when extracting
an archive you can let tar(1) determine the compression type and let it Do The Right
Thing automatically.

98 Chapter 4
dump
dump(8) is a disk-block backup tool. In some ways, it looks similar to tar(1),
but the significant difference is that dump is aware of the underlying file-
system and takes advantage of the filesystem layout. We’ll talk more about
filesystems in Chapter 8, but for now, all you need to know is that a filesystem
is the scheme by which zeroes and ones are arranged on the physical hard
drive. dump is specifically integrated with FreeBSD’s UFS2 filesystem. New
sysadmins aren’t as likely to be familiar with dump as with tar, but dump is
more efficient and safer than tar. When you have a choice, use dump.1
One drawback of dump is that it works on filesystems, not on files. You
can’t dump /etc unless you want to dump all of the root partition. You can
restore individual files, however.
On the positive side, dump uses separate programs for backup and
recovery (dump(8) and restore(8), respectively). This means that you don’t
have to worry about confusing your flags and accidentally overwriting the file
you’re trying to recover from. dump is considerably faster than tar, too.
User Control
One significant advantage of dump(8) is that users can offer a certain
amount of advice to the program. For example, they can mark a file as
“do not dump,” and it won’t be backed up. Many users have stuff that they
don’t care about, and they will happily agree to not back those things up if
it means that the data they do care about is backed up.
To set the nodump flag on a file, use chflags(1):
#chflags nodump filename
When you set the nodump flag on a directory, everything in or below that
directory is not backed up. For example, I use chflags to avoid backing up my
downloads directory to save time and space during backups, because I can
always download those items again.
dump Levels
One of dump’s more interesting features is its ability to do very specific
incremental backups via dump level, a number from 0 to 9. The default
dump level is 0, which tells dump to copy everything that isn’t marked nodump.
Higher levels of dump mean, “Back up any files that have been changed or
created since a dump of any lower level.” This level pattern means that you
can do full backups, differential backups since a full backup, or incremental
backups—just by changing the dump level.
1 Some sysadmins will disagree and insist that tar(1) is better. This is an argument of epic
proportions in the Unix community, and any recommendation I make will undoubtedly anger
the people devoted to the other tool. I firmly believe that the only way to finally settle this is for
all the people who are fanatic devotees of one tool or the other to meet on the field of honor at
dawn and settle it with their weapon of choice. The rest of us will just get on with our lives.
Read This Before You Break Something Else! (Backup and Recovery) 99
For example, say you start each Monday with a level 0 dump. On Tuesday
you could do a level 1 dump, and only files that changed since Monday will
be backed up. If you perform a level 2 dump on Wednesday, everything that
changed since Tuesday will be backed up. On the following Thursday, you
run another level 1 dump. Any files that were changed since Monday will be
backed up, including files that were backed up on Wednesday.
I recommend using only level 0 dumps because they are far, far easier to
restore from than a series of incremental backups. Level 0 dumps take longer
to run than incremental dumps, however, and take up more tape space, but
in most cases reducing recovery time is more important than the cost of tape.
With proper planning, you can run level 0 dumps overnight.
Specify the desired dump level as a command-line argument; for example,
run a level 2 dump with dump -2.
dump, Tape Drives, and Files
Unfortunately, dump(8) and restore(8) don’t recognize $TAPE and just send
everything to /dev/sa0. You can specify a particular tape drive with -f. Similar
to tar, dump lets you point -f at a file. While dump files are not generally
suitable for distribution in the same way tar files are, it’s a great way to
experiment and become familiar with dump.
Before dump runs a backup, it attempts to calculate how many tapes it
will need for the backup. Unfortunately, dump’s ability to automatically detect
the size of a tape has weakened over time. When dump was new, a 1MB tape
drive was serious business and every vendor had their own standards for tape
formats. Today, tape drives are much more generic and standardized, and
vendors must interoperate more freely. The size of tapes has also dramatically
changed: For example, I’m writing this book using a 40GB tape drive discarded
by a previous employer for the blameless but irremediable crime of being too
small to bother keeping. Between enhanced standardization and dramatically
expanded capacity, dump has a really hard time figuring out how large a
tape is. The best way to deal with this problem is to tell dump to not bother
calculating the size of the tape; instead, just run until the tape hits the end,
and request another tape then. Use the -a flag for this.
dump and Live Filesystems
One problem with backups is that on a working machine, the filesystem tends
to change while the backup is running. This isn’t a problem with filesystems
where the data is fairly static, or where changes in one part don’t affect
changes in another, but it is a serious issue when your data is highly dynamic,
volatile, and/or interrelated. Many databases have this problem. You probably
don’t want to shut down your database server just to get a good backup, and
you might not even be able to dump the database to a file so you can get a cold
backup. Dump takes advantage of UFS2’s snapshot facility to get around this
and ensure that a backup is internally consistent. We’ll cover snapshots in
Chapter 8, but for now, just remember that a snapshot is an image of a disk at
an exact moment in time. Even as the data on the disk changes, the snapshot
remains unchanged and static, so you can back it up easily.

100 Chapter 4
Specify -L to dump a snapshot. If you back up a live UFS2 filesystem
without using this flag, dump will complain and tell you to use -L.
This will not eliminate the “live database” problem, of course; just because
the filesystem is consistent doesn’t mean that the database on the filesystem
will be consistent as well. But you can shut down the database for a moment,
start the dump, and start the database again, letting dump copy the snapshot
taken while the database was shut down. This reduces the downtime window
for backups to only a second or two.
Timestamps and dump
The file /etc/dumpdates records everything you’ve dumped on your system
along with the dates when it was dumped. This is especially important if you
do incremental backups. Use -u to update this record whenever you dump a
filesystem.
Running dump
Putting all this together, we can back up a filesystem. Here I tell dump to
not calculate the number of tapes required, use a snapshot to back up a live
filesystem, and run a level 0 dump of my /usr partition.
# dump -auL /usr
DUMP: Date of this level 0 dump: Sat Apr 5 08:26:03 2008
DUMP: Date of last level 0 dump: the epoch
DUMP: Dumping snapshot of /dev/ad0s1f (/usr) to /dev/sa0
DUMP: mapping (Pass I) [regular files]
DUMP: mapping (Pass II) [directories]
DUMP: estimated 3944900 tape blocks.
DUMP: dumping (Pass III) [directories]
DUMP: dumping (Pass IV) [regular files]
DUMP: 11.54% done, finished in 0:38 at Sat Apr 5 09:09:25 2008
DUMP: 28.12% done, finished in 0:25 at Sat Apr 5 09:01:40 2008
DUMP: 40.69% done, finished in 0:21 at Sat Apr 5 09:02:58 2008
DUMP: 57.26% done, finished in 0:14 at Sat Apr 5 09:01:02 2008
DUMP: 72.60% done, finished in 0:09 at Sat Apr 5 09:00:33 2008
DUMP: 87.49% done, finished in 0:04 at Sat Apr 5 09:00:24 2008
DUMP: 99.99% done, finished soon
DUMP: DUMP: 4095026 tape blocks on 1 volume
DUMP: finished in 2130 seconds, throughput 1922 KBytes/sec
DUMP: level 0 dump on Sat Apr 5 08:26:03 2008
DUMP: Closing /dev/sa0
DUMP: DUMP IS DONE
There’s a whole bunch of important stuff here. First, dump prints the
current date and the date of the last backup . The date shown here, the
epoch, is just a fancy way of saying from the beginning of time. As far as Unix is
concerned, time began in 1970, so this isn’t as far back as you might think.
What this really means is that /etc/dumpdates says that this partition has never
been backed up, which isn’t necessarily the same as never.

Read This Before You Break Something Else! (Backup and Recovery) 101
Before doing any work, dump reminds you which partition you’re backing
up and which tape drive it will use .
dump then performs a preliminary analysis of the target partition,
measuring the targeted files and directory structure so it can estimate how
much tape it will need . Once it has this number, dump tells you about it
and proceeds to actually back up the files . Every few minutes, dump prints
out how far it’s gotten and how much longer it expects to take, so you won’t
think that the machine has gone to sleep on you. Note that the percentages
and estimated time of completion slide around a bit—the lesson here is that
any software timers telling a user how much time remains on a job have never
worked right and probably never will, no matter what operating system you’re
running.
Once the job finishes, dump will tell you how much data it archived
and how fast it worked , then print the date once again . This isn’t the
time the job finished, but rather the date of the backup. Although this job
finished around 9 AM, you’re backing up a snapshot of the filesystem from
8:26 AM.
Finally, dump announces it’s really done . You can eject the tape now.
Throwing Data Overboard with nodump
The system administrator can use the -h flag to decide when to honor the
nodump flag. This flag takes a dump level as an argument.
By default, a level 0 dump archives any files marked nodump. At dump
level 1 or higher, the nodump flag is honored. The -h flag changes this behavior
by specifying the minimum dump level to start obeying the nodump flag. Any
dumps of levels below that given by -h will archive everything, regardless of
the nodump flag.
This gives you an easy way to stretch your backup capacity, if you’re
doing level 0 dumps. When your backups suddenly overflow the tape, start
honoring the nodump flag to shrink your backups. This will buy you a couple
of days, giving you a little breathing room to order new tapes.
Restoring from a dump
Archives are useless unless you can recover from them. dump’s recovery
utility, restore(8), can recover either complete filesystems or individual
files. As with tar and dump, the -f flag lets you choose the device or file
you wish to restore from.
Checking the Contents of an Archive
To list the contents of your dump, use restore’s -t flag:
#restore -t
Dump date: Sat Apr 5 08:26:03 2008
Dumped from: the epoch
Level 0 dump of /usr on test1.blackhelicopters.org:/dev/ad0s1f
Label: none

102 Chapter 4
2 .
3 ./.snap
94208 ./bin
97995 ./bin/bc
...
restore lets us know when this backup was taken , what exactly was
backed up , and what dump level was used. It then starts to print the names
of all files in the backup and their locations in the filesystem. Each file is
listed with its inode number . (We’ll talk about inodes in Chapter 8).
One thing to note is that the files are listed relative to their point in
the original filesystem. We’ve backed up the root directory, listed here as a
single dot . This directory is actually the root of the /usr filesystem, or /usr.
The file ./bin/bc was not actually in /bin/bc on the original system; it belongs
in /usr/bin/bc.
This is important to remember when you’re looking for a particular file
in your backups. restore’s -t flag will let you check a backup for the presence
of a particular file. Suppose I want to recover the file /usr/home/mwlucas/.cshrc.
The first thing to do is check for this file in the archive:
#restore -t /usr/home/mwlucas/.cshrc
...
./usr/home/mwlucas/.cshrc is not on the tape
What do you mean, this file isn’t on tape? Where’s my data? It’s time
to panic! No, hang on a moment. Remember, this archive doesn’t know
anything about /usr; paths are recorded relative to /usr. I must search for
home/mwlucas/.cshrc.
# restore -t home/mwlucas/.cshrc
...
871426 ./home/mwlucas/.cshrc
My .cshrc is in the archive. Whew! Now to get it out.
Restoring dump Data
Once you know that a file is in an archive, you can recover it in two ways: on a
file-by-file basis or as a complete filesystem.
Restoring a File
If you only want a few select pieces, use -x and the filename to extract only
the named file. For example, to recover my .cshrc from tape, I’d run the
following:
#restore -x home/mwlucas/.cshrc
You have not read any tapes yet.
If you are extracting just a few files, start with the last volume
and work towards the first; restore can quickly skip tapes that
have no further files to extract. Otherwise, begin with volume 1.
Specify next volume #: 1
set owner/mode for '.'? [yn] y

Read This Before You Break Something Else! (Backup and Recovery) 103
First, restore asks you for the volume number . This is the number of
the tape you’re using from this backup. If an archive is split among multiple
tapes, dump(8) told you the number of each tape as you shuffled them
through the backup process. (You did label your tapes, right?) If you have
only one tape, it’s volume 1.
Once restore finds the file, it confirms that you want to restore the
original permissions and owner of the file . I want this file to be owned
by me, just as it was originally, so I type y. My current directory now has a
directory home/mwlucas containing my .cshrc.
Restoring a Filesystem
Restoring an entire filesystem is easy—perhaps too easy. It is best to restore a
filesystem on an empty partition, rather than over the existing partition. If
you need extensive restoration, it’s best to erase the partition and start over.
If you need to keep a few select files from the damaged filesystem, back up
those few files individually, erase and reformat the partition, restore the
backup, and copy those select files back.
In the following example, we will completely erase a partition on a
second hard drive and recover from our backup tape. We won’t go into
details on the disk work being done here—you’ll want to read Chapter 8
for that information—but it can be summarized like this:
1. Build a new filesystem with newfs.
2. Attach that filesystem to the system, under /mnt.
3. Go into that directory.
4. Restore the filesystem from the default tape device /dev/sa0.
This is how you accomplish all of that:
# newfs /dev/ad1s1g
# mount /dev/ad1s1g /mnt
# cd /mnt
# restore -r
That’s simple enough that you probably want to destroy a disk just to
restore it, don’t you?
RESTORES AND FURTHER BACKUPS
Any time you perform a full disk restore, run another level 0 dump before taking
another incremental dump. restore(8) rearranges data on the disk. If you take an
incremental dump of your newly restored filesystem and attempt to use it with a pre-
restore level 0 dump, you will get incoherent results, destroy data, and trigger a rain
of toads. Always run a level 0 dump immediately upon restoring a filesystem, so
further incremental backups will work. And have I mentioned how much easier life
is when you always run full backups?

104 Chapter 4
Interactive Restores
One of restore(8)’s more interesting features is interactive mode (-i) with
which you can crack open a dump and access it with a command-line tool,
marking files that you want to restore. Interactive mode is terribly useful
when a user says, “I accidentally erased my resume. It’s somewhere in my
home directory. I’m not sure exactly what it’s called, but the name has the
word resume somewhere in it. Can you get it back?” Obviously the -t flag
won’t help us; we don’t know the filename! Instead, we can wander around
in restore’s interactive mode until we find the file. It won’t be that hard,
and the user will owe us one.2 Run restore with the -i flag, and you’ll get an
interactive dump session with a command prompt that behaves much like a
regular Unix command prompt but only supports those commands necessary
for restore. Depending on your tape drive, it might take a moment or two for
the command prompt to appear.
#restore -i
restore > ls
.:
.snap/ bin/ games/ include/ libdata/ local/ ports/ share/
X11R6/ compat/ home/ lib/ libexec/ obj/ sbin/ src/
restore > cd home/mwlucas
This should look somewhat familiar; it’s the top-level directory of our
dump—in this case, everything under /usr. You can maneuver around the
filesystem with cd and list files with ls, just like in a regular shell. Once you
find the file you want to restore, use the add command to add it to the list of
files to extract. When you’ve found all the files, use the extract command to
start the file recovery.
restore > add ssh.tar
restore > add .cshrc
restore > extract
You have not read any tapes yet.
...
The rest of the process looks just like a noninteractive restore; you’re
asked for a volume number and if you want to have restore to reset the per-
missions properly. When it’s complete, backups of your selected files will
appear in your current directory.
Once you have recovered the files, use the quit command to leave
restore.
2 Collecting that favor encourages the user to not repeat their daft mistake; it’s not just a way to
get your lawn mowed. The secret to being a successful sysadmin is a professional demeanor, a
sense of humor, and a baseball bat.

Read This Before You Break Something Else! (Backup and Recovery) 105
Multiple Backups on One Tape
If your tape drive has sufficient capacity, you’ll probably want to place multiple
backups on a single tape. dump(8) only backs up one partition at a time, after
all, and having separate tapes for different partitions of the same machine is
inefficient. If you’re using tar(1) for backups, you might still have several
different backups on a single tape. The key to multiple backups on a single
machine is mt(1) and controlling rewinds.
Remember, the default device node tells mt, tar, and dump to rewind
after every command. This means that your second backup will overwrite
your first. By changing the device node, you change this behavior. If you run
a backup without rewinding, then run another backup, the second backup
will appear as a second file on the tape. By controlling the tape position, you
can choose where you are writing or restoring.
For example, the following commands dump three filesystems in
succession—root, /var, and /tmp—on the same tape:
# dump -f /dev/nsa0 -auL /
# dump -f /dev/nsa0 -auL /var
# dump -f /dev/nsa0 -auL /tmp
The tape is now at the end of the third file. You can rewind and eject the
tape, label the tape with the files it contains and the date of the backup, and
store it safely.
If you want to see how many backups you have on the tape, just run
mt status and look at the last line.
...
File Number: 3 Record Number: 0 Residual Count 0
Note that the file number has changed to 3. You have three files on
this tape.
To access a file, position the tape drive at the file and use tar or restore to
pull data from the tape. When the tape is rewound, it’s in place to access the
first file. Advance to later files with mt(1)’s fsf command. mt fsf takes one
argument, the number of files to move forward. If you’re at the beginning of
the tape and want to move to the second file, just run this:
# mt -f /dev/nsa0 fsf 1
This moves the tape forward one file. Note that we’ve specified the
-f /dev/nsa0 option, to use the “do not rewind” device node. It would do us
no good to move forward a file and automatically rewind.
Now use the -t option of your archive extraction program to view the
contents of that file. You can easily identify the backup by its contents. As
you list the contents, restore(8) even prints the date and time the backup
was taken and the partition in the backup. If you want to go backwards on
the tape, use mt bsf and the number of files you wish to move.

106 Chapter 4
Tapes require a slightly different mindset than disks, but they’re really
not hard and are still the most commonly used backup media. Now let’s
consider some other methods to protect you, your data, your system, and
what we system administrators laughingly call our minds.
Revision Control
Generally speaking, revision control is the process of tracking changes. In
the Unix world, this means recording changes to source code or configura-
tion files. Revision control allows a developer to see how a piece of code
looked on a specific date, and an administrator to see how the system was
configured before a program stopped working. Even a lowly writer can use
revision control to see how a manuscript has changed over time. If you’re not
using revision control, you’re making your job more difficult than it has to be.
While you’ll encounter many revision control systems, from primordial
Unix’s Source Code Control System (SCCS) to Microsoft’s glitzy Visual
SourceSafe, we’ll discuss Revision Control System, or RCS, included with
almost all Unix systems. Once you master RCS, you can apply its concepts
to almost any other revision control system.
Revision control systems keep a record of all changes that happen to a
file and why the changes were made. First, you mark the file as checked out,
telling the system that you are reserving the right to change the file. You then
edit the file as you need, record the changes in the system, and check in the
file so others can edit it. RCS accomplishes this with three basic commands:
ci(1), co(1), and rcs(1).
Think of revision control as a library—no, not the Web—an old-
fashioned brick-and-mortar library with honest paper books. To use revision
control on a file, you must first tell RCS to keep track of it, like giving it
to the library. To use the file, you check it out, like taking a book home
from the library. Once checked out, nobody else can save or edit that file,
although any legitimate user can access, view, use, copy, or compile that file
while you have it checked out. Once you finish with the file, you check it
back in, thus releasing it for others to check out. This is the heart of any
revision control system. Any file under revision control is said to be in RCS.
BEST PRACTICE IN REVISION CONTROL
I’ve seen a lot of revision control practices in system administration at many facilities
over the years. Perhaps the most common method is saving copies of each file with
the date appended (i.e., rc.conf.20060510). This makeshift revision control is not
only not a good practice; it is actively bad practice. Nothing ensures that it records
every change made, and there’s no tracking system to record why a change was
made. As one of my minions said at one point, “RCS is like medicine that tastes bad;
you need to have it, or you’ll never get better.” Become comfortable with RCS, use it
in a disciplined manner, and in a few months you’ll wonder how you ever accom-
plished anything without it.

Read This Before You Break Something Else! (Backup and Recovery) 107
Every file in RCS has a version number. Every time you return a file to
the system, RCS compares the returned file to the version you checked out.
If there is any change at all, the version number is incremented and the
changes are recorded, along with the date and the reason for the change.
You can track specific versions of a file by the version number.
Initializing Revision Control
Begin the revision control process by checking in a file with ci(1), much like
giving a book to the library. One good file to put under version control is
/etc/rc.conf, so you can track basic system changes. To start the RCS process,
enter ci filename as shown here:
#ci rc.conf
rc.conf,v <-- rc.conf
enter description, terminated with single '.' or end of file:
NOTE: This is NOT the log message!
>> system configuration file
>> .
initial revision: 1.1
done
When you initially check in a file, ci creates or edits a revision control file.
This file has the same name as the original file, with a ,v extension. In this
example, rc.conf becomes rc.conf,v . You’re then prompted for a description
of the file, which will be available to any RCS user later. The description
doesn’t have to be detailed, especially on a standard system file like rc.conf;
the brief system configuration file given here is fine. The description is
much more important with source code files or configuration files for custom,
complex programs. Once you’ve finished the description, enter a single
dot on a line by itself to exit ci. You’ll be told the revision number of
the file , which is always 1.1 when you first check it in.
If you use ls immediately after checking something in, you’ll notice that
the file appears to have vanished. Instead, you’ll see only the revision control
file with the same name but a trailing ,v. This is the RCS file, where the file
and its revision information are stored. If you have lots of files in RCS, the ,v
files can quickly clutter a directory. You can neaten the directory by creating
a directory called RCS, in all caps. The ci program will then put the ,v files in
that directory, keeping the working directory clean.
While it’s fine for some files to disappear when checked in, configuration
files, web pages, and the like shouldn’t just vanish. To avoid this, when check-
ing in a file you can leave a copy in the working directory with ci -u. If a file is
checked in and has vanished, and you want to put a clean copy in the working
directory without editing it, use co(1).
#co rc.conf
rc.conf,v --> rc.conf
revision 1.1
done

108 Chapter 4
As the computer won’t boot properly without rc.conf, it’s important to
have it available. RCS has extracted the file rc.conf from rc.conf,v so that
version 1.1 of this file is available for use. But if you look closely at these
files, you’ll see something that might surprise you.
#ls -l rc.conf*
-r--r--r-- 1 root wheel 321 Apr 10 21:40 rc.conf
-r--r--r-- 1 root wheel 527 Apr 10 21:33 rc.conf,v
The user root owns these files, but the permissions have been set to read-
only (-r--r--r--). Even though I have the root password, I no longer have
permission to edit my own files! This is because the file isn’t checked out
to me. I’ve checked it in—handed it over to the Revision Control System
Librarian. I can view the file, but if I want to edit it, I must ask the RCS system
for it.
Editing Files in RCS
To edit a file, I must check it out and lock it for my use. This prevents anyone
else from editing the file while I’m making my changes. Use co -l to check
out and lock a file:
#co -l rc.conf
rc.conf,v --> rc.conf
revision 1.1 (locked)
done
This looks much like the check-out we did before, but notice the word
locked . This file is checked out and locked by me. I am the only one who
can edit and save this file until I unlock it. Running ls -l at this point will
show that the file’s permissions are now set to read and write, allowing me to
save my work (we’ll discuss permissions in Chapter 7). Anyone else who tries
to check this file out will get a warning that the file is in use, along with the
username of the person who has locked the file.
Checking Back In
When finished with my changes, I check the file in and, since I want other
people to be able to edit the file, use the -u flag to lease an unlocked copy in
the current directory.
WARNING TO VI(1) USERS!
If you or your group owns the file, a w! will force a permission change and allow
you to write to the file without ever checking it out. Everything will look fine, but
the next person who checks out the file will overwrite your changes! Be careful
with using w! at any time, under any circumstances—it’s meant as an emergency
measure, not standard practice. If vi complains that you don’t have permission to
save a file, there’s a good reason. Ignore it at your peril.

Read This Before You Break Something Else! (Backup and Recovery) 109
#ci -u rc.conf
rc.conf,v <-- rc.conf
new revision: 1.2; previous revision: 1.1
enter log message, terminated with single '.' or end of file:
>> clean up unneeded services
>> .
done
When you check something in, ci gives you the new version number of
the file and requests a log message . Enter a brief description of your
changes here. On a multi-user system, you might want to enter why you are
making this change. If you have a trouble ticket system, it’s a good idea to list
your ticket number here; that way, people can reference the ticket and get
the whole story behind the change. As with the description message on the
first check-in, end your comments with a dot on a line by itself .
These log messages allow others to know what changes you’ve made to a
file without digging through all the changes—or, alternatively, to see what
you were trying to do when your change broke something. Your own RCS
logs can also be useful to you, months later, when you stare at something
wondering just what was going on inside your head at the time.
Now that you understand the basics of checking files in and out, let’s
examine some of the more useful functions of RCS. These include viewing
logs, getting old versions of files, breaking locks, finding differences between
file versions, and putting RCS identifiers in files.
Viewing RCS Logs
The quickest way to see the change history of a file is to view the RCS log with
rlog(1). This displays all the log messages entered for a particular file. Here
we check the RCS log for /etc/rc.conf from a different machine:
#rlog rc.conf
RCS file: RCS/rc.conf,v
Working file: rc.conf
head: 1.3
branch:
locks: strict
access list:
symbolic names:
keyword substitution: kv
total revisions: 3; selected revisions: 3
description:
system boot config
----------------------------
revision 1.3
date: 2006/02/17 22:23:45; author: mwlucas; state: Exp; lines: +2 -2
rename new interfaces
----------------------------
revision 1.2
110 Chapter 4
date: 2006/02/16 20:09:46; author: mwlucas; state: Exp; lines: +4 -0
*** empty log message ***
----------------------------
revision 1.1
...
All sorts of useful information appears here. We see that the RCS file is
in a subdirectory called RCS , and that the file is at version 1.3 . The file
description that you entered when first checking in the file appears at the
top of the log entries .
Each revision then has its own entry. Revision 1.3 was checked in
on February 17, 2006 , at 10:23 PM. The file was checked in by the user
mwlucas —apparently I was working late that day. The change wasn’t very
large; I added two lines and removed two lines from this file . Finally, the
log message tells me that I renamed two interfaces . I have absolutely no
memory of doing any of this, which is not terribly surprising if I was working
that late!
Interestingly, I didn’t leave a message for revision 1.2. Apparently I was
feeling sloppy that day. I wonder what I changed?
Reviewing a File’s Revision History
To see what changed between two versions of a file, use rcsdiff(1). This
program takes three arguments: two revision numbers and a filename, as
shown below. I recommend adding the -u flag to make the changes more
readable and show them in context.
#rcsdiff -u -rolderversionnumber -rnewerversionnumber filename
For example, if I ran rcsdiff -u -r1.1 -r1.2 rc.conf, I would see the
following:
RCS file: RCS/rc.conf,v
retrieving revision 1.1
retrieving revision 1.2
diff -u -r1.1 -r1.2
--- rc.conf 2006/02/10 18:09:54 1.1
+++ rc.conf 2006/02/16 20:09:46 1.2
@@ -10,12 +10,16 @@
ifconfig_sk0="name internet inet 172.16.88.3 netmask 255.255.255.0"
ifconfig_sk1="name dmz inet 192.168.3.1 netmask 255.255.255.0"
ifconfig_sk2="name mwlprivate inet 192.168.0.1 netmask 255.255.255.252"
+
+
usbd_enable="YES"
sshd_enable="YES"
ntpd_enable="YES"
-syslogd_flags="-l /var/run/log -l /var/named/var/run/log"
moused_enable="YES"

Read This Before You Break Something Else! (Backup and Recovery) 111
named_enable="YES"
apache21_enable="YES"
+snmpd_enable="YES"
The rcsdiff command just checks out the two revisions of the file you
give it and runs diff(1) on them . rcsdiff recognizes most diff(1) options, so
if you’re comfortable with diff, you can tweak the output as you like. Lines
beginning with a plus sign have been added to the file, and lines that
begin with a minus sign have been removed. Here I added some white
space, removed my custom syslogd_flags (thus reverting to the behavior
shown in /etc/defaults/rc.conf), and enabled snmpd . Well, that’s okay. I wish
I had left a message for myself to make digging through the diff unnecessary,
but at least now I know what I did. This is all useful knowledge, especially on
a production system, and especially on a production system administered by
multiple people.
You can also use rcsdiff between arbitrary revision numbers, allowing you
to view all the changes made between any two revisions. In the preceding
example, we chose to view the differences between two consecutive versions,
but I could have asked for the differences between revisions 1.1 and 1.3, or
even for all the changes made over the previous year.
Getting Older Versions
If the differences between two versions are extensive enough, reading a diff
can be difficult. In some cases, the diff doesn’t provide sufficient context to
understand what’s going on. The simplest thing to do in those cases is just
get the old version of the file and read it. You can use the -r flag to pull an
old version of a file out of RCS. Specify the version number immediately after
-r, without a space:
#co -r1.1 rc.conf
rc.conf,v --> rc.conf
revision 1.1
done
We’ve checked out version 1.1, overwriting the existing rc.conf.
Wait a minute! Overwriting the existing file is probably not correct,
especially for a vital system file. To put the file elsewhere, use the -p flag to
print the file to your screen and redirect that output to a file.
#co -r1.1 -p rc.conf > /tmp/rc.conf.original
rc.conf,v --> standard output
revision 1.1
Here we’ve checked out revision 1.1 of rc.conf , and used the -p flag
to print the file directly to the terminal. The right angle bracket redirects
the output from the screen to a file, in this case /tmp/rc.conf.original.

112 Chapter 4
Breaking Locks
If you don’t check a file back in when you’re done, nobody else will be able
to check out and lock that file. If you’ve gone home for the day, they’ll be
piqued—perhaps even outright miffed. If you’ve gone on vacation, expect
your vacation to be interrupted. Fortunately, it isn’t necessary to wait for your
return to unlock the file; they can break the lock and claim it for themselves.
This is like a librarian showing up at your house with a chainsaw to claim that
overdue book.
As a potential lock breaker, you must exercise caution. If someone is
really editing a file when you break the lock, they’ll go past annoyed straight
to angry. Do your best to find the person before you break a lock! Once
you’ve decided to break the lock, however, run rcs -u on the file. RCS will
ask you to enter a message explaining why you’re breaking the lock, which
it will email to the lock holder.3
When you break the lock, the file will be available for another user to
edit. The changes made by the negligent unlocker will still be in the existing
file, however. Checking out the file again will overwrite that file and eliminate
any changes made. You might wish to copy that file to a temporary location
before you check out and lock the file again, in case those changes are
important.
Multiple Check-ins
It’s not uncommon to change several files simultaneously as part of a single
change. For example, a DNS change might require changes to two or more
zone files (see Chapter 14). These files all need the same log message, and
you won’t want to type it repeatedly. The -m flag lets you specify a log
message on the command line. For example, here I’m checking in the files
blackhelicopters.org.db and absolutefreebsd.com.db with the log message update
for new mail server.
# ci -u -m"update for new mail server" blackhelicopters.org.db
absolutefreebsd.com.db
3 Personally, I take this message as an opportunity to insult the person who left the file locked,
but your site policy might differ.
AUTOMATED LOCK SEARCHES
A web search will show any number of methods for identifying all files that have
been left locked on a system. If people consistently leave files locked on your system,
you might consider running a script via cron to identify these files and the culprits
who left them locked, and automatically mailing the list to the system administration
team on a daily basis.

Read This Before You Break Something Else! (Backup and Recovery) 113
Note the lack of a space between the -m and the quotes around your
check-in message. RCS will check in each file consecutively and use your
message in the log.
RCS and ident Strings
ident strings make it easy for someone viewing a file to see the RCS informa-
tion about that file. For example, if I have a program that began behaving
oddly a week ago, I just want to know what changed at that time. I could run
rlog(1) on all the configuration files to see when things were changed, but
that’s a bit annoying. It’s much nicer to look at the file and have the infor-
mation presented to me. That’s where ident strings come in. You can put ident
strings in files stored in RCS, and when you check the file out, RCS will
automatically update them.
ident strings have the form $string$. For example, the RCS ident string
$Id$ puts information about the last change in the file. I always put #$Id$ in
the first line of critical configuration files, such as /etc/rc.conf. The leading
hash mark tells /etc/rc that this line is a comment and should be skipped; but
once I’ve checked in this file, this line appears as:
#$Id: rc.conf,v 1.3 2006/04/12 17:12:49 mwlucas Exp $
The simple little ident string has expanded quite a bit! We can see at a
glance the file’s version number , the date and time of the last change,
and who last changed this file . It’s an easy way to answer the question,
“Has this file changed lately, and who should I talk to about that change?”
The last bit of the line is the RCS state , an arbitrary string that you can
assign with ci(1) or rcs(1). A few people use this to mark a file as experimental
or production or don’t change for any reason whatsoever. On the other hand, most
people do nothing at all with RCS state, and that’s generally the best idea in
system administration.
While $Id$ is the most commonly used ident string, you have several
others to choose from, including $Header$ and $Log$. $Header$ is very similar to
$Id$, except that it gives the full path for the RCS file instead of just the file-
name. $Log$ adds the RCS log message to the file itself; when you view the file
you will see all the RCS log messages. While the log messages can be over-
whelming on files that change frequently, they can be useful in files that change
less frequently. For example, the /etc/rc.conf files on my servers don’t change
that often after about a month of production use. If I put this ident string in
the file, I will see all the RCS log messages every time I view the file. This
makes changes very obvious. Most other ident strings are just a subset of $Id$,
$Header$, or $Log$. For a full list, see ident(1).
Now that you can back up your system and track the work you do,
you’re able to work more freely, knowing that you can always restore your
past changes.

114 Chapter 4
Recording What Happened
You can now back up your entire system, as well as track changes in a single
file. All that remains is to track what’s happening on the screen in front of
you. script(1) is one of those rarely mentioned but quite useful tools every
sysadmin should know. It logs everything you type and everything that
appears on the screen. You can record errors and log output for later
dissection and analysis. For example, if you’re running a program that
fails in the same spot every time, you can use script to copy your keystrokes
and the program’s response. This is notably useful when upgrading your
system or building software from source code; the last 30 lines or so of the
log file make a nice addition to a help request.
To start script(1), just type script. You’ll get your command prompt
back and can continue working normally. When you want the recording to
stop, just type exit or press CTRL-D. Your activity will appear in a file named
typescript. If you want the file to have a particular name or be in a particular
location just give that name as an argument to script:
# script /home/mwlucas/debug.txt
This is extremely useful to record exactly what you typed, and exactly
what the system responded with, for reporting problems to FreeBSD-questions
@FreeBSD.org.
The Fixit Disk
The best way to learn an operating system is to play with it, and the harder you
play the more you learn. If you play hard enough, you’ll certainly break some-
thing, which is a good thing—having to fix a badly broken system is arguably
the fastest way to learn. If you’ve just rendered your system unbootable, or
plan to learn quickly enough to risk doing that, this section is for you. If your
system is deeply hosed, you’ll learn a lot, quickly.
Single-user mode (discussed in Chapter 3) gives you access to many differ-
ent commands and tools. What if you’ve destroyed those tools, however?
Perhaps you’ve even damaged the statically linked programs in /rescue.
That’s where the fixit disk comes in.
A fixit disk is a “live filesystem” image of a FreeBSD system on CD. It
includes all the programs that come by default with FreeBSD. The installa-
tion CD comes with a fixit disk image. When you boot of the install media,
you can choose to enter fixit mode instead of installing.
Read This Before You Break Something Else! (Backup and Recovery) 115
You must have some familiarity with system administration to use the
fixit system successfully. Essentially, the fixit disk gives you a command
prompt and a variety of Unix utilities. You get to use the boot time error
messages and that ballast you keep between your ears to fix the problem.
It’s you against the computer. Of the half-dozen times I’ve resorted to the
fixit disk, the computer won the first three. The time was well spent, however,
as I’ve developed the ability to restore a damaged system. Definitely finish
reading this book before you even try.
It’s impossible to outline a step-by-step fixit process for generic problem
situations; the exact steps you must follow depend on the exact damage
you’ve inflicted on your poor, innocent computer. If you’re really desperate,
however, fixit mode gives you a shot at recovery without reinstalling. I’ve
had problems where I’ve accidentally destroyed my /etc directory, or fried the
getty(1) program that displays a login prompt. Careful use of fixit mode can
repair these problems in a fraction of the time a reinstall would take.
NOTE It’s important to use a fixit disk that’s roughly equivalent to the FreeBSD version you’re
running. A point or two off won’t make much difference, but you won’t be happy trying
to fix a 6.5 system with an 8-current fixit disk.
Boot off the installation media. When you reach the first menu, you’ll
see a choice offering to enter fixit mode. Select it. You’ll then get a choice of
using a CD or a floppy disk. Use the CD option, as you booted off the disc.
(A fixit floppy only contains a handful of programs; while you can make one,
these days it’s much easier to just use the CD.) While it might not include
your favorite editor or shell, those are in the category of “nice to have” rather
than “absolutely needed.”
At times, all you can hope for is to get the hard drive mounted so that
you can read remaining data from it. The fixit CD contains all the tools you
need to get the system on the network so you can mount a hard drive in read-
only mode and copy any surviving data to another machine. This lets you do
a last backup before blowing away the system and reinstalling. If the fixit disk
doesn’t give you a needed tool to perform a recovery, you might also try a
bootable CD version of FreeBSD, such as FreeSBIE. We’ll touch on FreeSBIE
in Chapter 20.
Now that you can recover from almost any mistake you might make, let’s
dive into the heart of FreeBSD: the kernel.

5
KERNEL GAMES
A common first step in optimizing FreeBSD
is configuring the kernel. If you’re new to
Unix administration, the word kernel might
be intimidating. After all, the kernel is one of
those secret parts of a computer that mere mortals are
not meant to dabble in. In some versions of Unix,
kernel tampering is unthinkable. Microsoft doesn’t advertise that its oper-
ating systems even have kernels, which is like glossing over the fact that
human beings have brains.1 While high-level users can access the kernel
through a variety of methods, this isn’t widely acknowledged or encouraged.
In most parts of the open source Unix-like world, however, meddling with
the kernel is a very viable and even expected way to enhance system per-
formance. It would probably be an excellent way to tune other operating
systems, if you were allowed to do so.
1 Yes, I could make any number of editorial comments here, but they’re all too easy. I do have
some standards, you know.
118 Chapter 5
The FreeBSD kernel can be dynamically tuned, or changed on the fly,
and most aspects of system performance can be adjusted as needed. We’ll
discuss the kernel’s sysctl interface and how you can use it to alter a running
kernel.
At the same time, some parts of the kernel can only be altered while the
system is booting, and some kernel features require extensive reconfiguration.
For example, you might need to add support for new devices or remove
support for devices you don’t use. The best way to do this is to build your
own kernel.
FreeBSD has a modular kernel, meaning that entire chunks of the kernel
can be loaded or unloaded from the operating system, turning entire sub-
systems on or off as desired. This is highly useful in this age of removable
hardware, such as PC cards and USB devices. Loadable kernel modules can
impact performance, system behavior, and hardware support.
Finally, we’ll cover basic debugging of your kernel, including some of the
scary-looking messages it gives out as well as when and how to boot alternate
kernels.
What Is the Kernel?
You’ll hear many different definitions of a kernel. Many are just flat-out con-
fusing, some are technically correct but confusing to the novice, while others
are wrong. The following definition isn’t complete, but it’ll do for most people
most of the time and it’s comprehensible: The kernel is the interface between the
hardware and the software.
The kernel lets the software write data to disk drives and to the network.
When a program wants memory, the kernel handles all the low-level details
of accessing the physical memory chip and allocating resources for the job.
It translates an MP3 file to a stream of zeros and ones that your sound card
understands. When a program requests CPU time, the kernel schedules a
time slot for it. In short, the kernel provides all the software interfaces that
programs need in order to access hardware resources.
While the kernel’s job is easy to define (at least in this simplistic manner),
it’s actually a complicated task. Different programs expect the kernel to pro-
vide different interfaces to the hardware, and different types of hardware
provide interfaces differently. For example, FreeBSD supports a few dozen
families of Ethernet cards, each with its own requirements that the kernel
must handle. If the kernel cannot talk to the network card, the system is
not on the network. Different programs request memory to be arranged in
different ways, and if you have a program that requests memory in a manner
the kernel doesn’t support, you’re out of luck. The way your kernel investigates
some hardware during the boot sequence defines how the hardware behaves,
so you have to control that. Some devices identify themselves in a friendly
manner, while others lock up if you dare to ask them what they’re for.

Kernel Games 119
The kernel and its modules are files in the directory /boot/kernel. Files
elsewhere in the system are not part of the kernel, and such files are collec-
tively called the userland, meaning that they’re intended for users even if they
use kernel facilities.
Since a kernel is just a set of files, you can have alternative kernels on
hand for special situations. On systems where you’ve built your own kernel,
you will find /boot/kernel.old, a directory containing the kernel that was
installed before your current kernel. I like to copy the kernel installed with
the system into /boot/kernel.install. You can also create your own special
kernels. The FreeBSD team makes configuring and installing kernels as
simple as possible. The simplest way to alter a kernel is through the sysctl
interface.
sysctl
The sysctl(8) program allows you to peek at the values used by the kernel and,
in some cases, to set them. Just to make things more confusing, these values
are also sometimes known as sysctls. sysctl is a powerful feature because, in
many cases, it will let you solve performance issues without rebuilding the
kernel or reconfiguring an application. Unfortunately, this power also gives
you the ability to sweep the legs out from under a running program and
make your users really, really unhappy.
The sysctl(8) program handles all sysctl operations. Throughout this book,
I’ll point out how particular sysctls change system behavior, but first, you need
to understand sysctls in general. Start by grabbing all the human-visible sysctls
on your system and saving them to a file so you can study them easily.
# sysctl -A > sysctl.out
The file sysctl.out now contains hundreds of sysctl variables and their
values, most of which will look utterly meaningless. A few of them, however,
you can interpret without knowing much:
kern.hostname: humvee.blackhelicopters.org
This particular sysctl, called kern.hostname, has the value humvee
.blackhelicopters.org. Oddly enough, the system I ran this command on has
a hostname of humvee.blackhelicopters.org, and the sysctl hints that this is the
kernel’s name for the system it’s running on. If only they were all this easy . . .
kern.ipc.msqids: Format: Length:3520
Dump:0xe903e903e903e903c0010100168f7542...
I have no idea what the variable kern.ipc.msqids represents, and I know
even less about what the value means. Still, if I’m having trouble, I can get this
information by asking for help from a software vendor or on a mailing list.

120 Chapter 5
sysctl MIBs
The sysctls are organized in a tree format called a Management Information
Base, or MIB, with several broad categories such as net (network), kern
(kernel), and vm (virtual memory). Table 5-1 lists the roots of the sysctl MIB
tree on a system running the GENERIC kernel.
Each of these categories is divided further. For example, the net category,
covering all networking sysctls, is divided into categories such as IP, ICMP,
TCP, and UDP. The concept of a Management Information Base is used in
several other parts of system administration, as we’ll see in Chapter 20 and
you’ll see throughout your career. The terms sysctl MIB and sysctl are frequently
used interchangeably. Each category is named by stringing together the parent
category and all of its children to create a unique variable name, such as:
...
kern.maxfilesperproc: 11095
kern.maxprocperuid: 5547
kern.ipc.maxsockbuf: 262144
kern.ipc.sockbuf_waste_factor: 8
kern.ipc.somaxconn: 128
...
Here we have five sysctls plucked from the middle of the kern category.
The first two are directly beneath the kern label and have no sensible group-
ing with other values other than the fact that they’re kernel-related. The
remaining three all begin with kern.ipc; they’re part of the IPC (inter-process
communication) section of kernel sysctls. If you keep reading the sysctls you
saved, you’ll see that some sysctl variables are several categories deep.
Table 5-1:
Roots of the sysctl MIB Tree
sysctl Function
kern Core kernel functions and features
vm Virtual memory system
vfs Filesystem
net Networking
debug Debugging
hw Hardware
user Userland interface information
p1003_1b POSIX behavior*
* POSIX is an international standard for Unix-like operating system behavior. Unfortunately, much of
POSIX has changed over the years, and occasionally in ways that make systems compliant with one ver-
sion of POSIX not compliant with another version. If you’re so deeply into POSIX that you know what these
differences are, you can use these sysctls to see exactly how FreeBSD behaves and which version of the
standard it matches.
compat Kernel compatibility with foreign software (see Chapter 12)
security Security-specific kernel features
dev Device driver information

Kernel Games 121
sysctl Values
Each MIB has a value that represents some buffer, setting, or characteristic
used by the kernel. By changing the value, you’ll change how the kernel
operates. For example, some sysctls control how much memory the kernel
allocates for each network connection. On networks with specific problems,
you might get better performance by changing these values.
Each sysctl value is either a string, or an integer, or a binary value, or an
opaque. Strings are free-form texts of arbitrary length; integers are ordinary
whole numbers; binary values are either 0 (off) or 1 (on); and opaques are
pieces of machine code that only specialized programs can interpret. Many
sysctl values are not well documented; there is no single document listing all
available sysctl MIBs and their functions. A MIB’s documentation generally
appears in a man page for the corresponding function, or sometimes only
in the source code. For example, the original documentation for the MIB
kern.securelevel (discussed in Chapter 7) is in init(8). Although sysctl docu-
mentation has expanded in recent years, many MIBs still have no documen-
tation. Appendix A lists some commonly tweaked sysctls and their uses.
Fortunately, some MIBs have obvious meanings. For example, as we
discuss later in this chapter, this is an important MIB if you frequently boot
different kernels:
kern.bootfile: /boot/kernel/kernel
If you’re debugging a problem and have to reboot with several different
kernels in succession, you can easily forget which kernel you’ve booted (not
that this has ever happened to me, really). A reminder can therefore be
helpful.
Viewing sysctls
To view all the MIBs available in a particular subtree of the MIB tree, use the
sysctl command with the name of the part of the tree you want to see. For
example, to see everything under kern, enter this command:
# sysctl kern
kern.ostype: FreeBSD
kern.osrelease: 7.0-CURRENT-SNAP010
kern.osrevision: 199506
...
This list goes on for quite some time. If you’re just becoming familiar
with sysctls, you might use this to see what’s available. To get the exact value
of a specific sysctl, give the full MIB name as an argument:
# sysctl kern.securelevel
kern.securelevel: -1

122 Chapter 5
The MIB kern.securelevel has the integer value -1. We’ll discuss the
meaning of this sysctl and its value in Chapter 7.
An easy way to get some idea of what a sysctl does is to use the -d switch
with the full MIB. This prints a brief description of the sysctl:
# sysctl -d kern.maxfilesperproc
kern.maxfilesperproc: Maximum files allowed open per process
This brief definition tells you that the sysctl controls exactly what you
might think it does. While this example is fairly easy, other MIBs might be
much more difficult to guess.
Changing sysctls
Some sysctls are read-only. For example, take a look at the hardware MIBs:
hw.model: AMD Athlon(tm) 64 X2 Dual Core Processor 4200+
The FreeBSD Project has yet to develop the technology to change AMD
hardware into sparc64 hardware via a software setting, so this sysctl is read-
only. If you were able to change it, all you’d do is crash your system. FreeBSD
protects you by not allowing you to change this value. An attempt to change
it won’t hurt anything, but you’ll get a warning. On the other hand, consider
the following MIB:
vfs.usermount: 0
This MIB determines if users can mount removable media such as
CD-ROM and floppy drives. Changing this MIB requires no extensive tweaks
within the kernel or changes to hardware; it’s only an in-kernel permissions
setting. To change this value, use the sysctl(8) command, the sysctl MIB, an
equal sign, and the desired value:
# sysctl vfs.usermount=1
vfs.usermount: 0 -> 1
sysctl(8) responds by showing the sysctl name, the old value, and the new
value. This sysctl is now changed. A sysctl that can be tuned on the fly like this
is called a run-time tunable sysctl.
Setting sysctls Automatically
Once you have tweaked your kernel’s settings to your whim, you will want
those settings to remain after a reboot. You’ll use the file /etc/sysctl.conf for
this. List each sysctl you want to set and the desired value in this file. For
example, to have the same vfs.usermount sysctl set at boot, add the following
on a separate line in /etc/sysctl.conf:
vfs.usermount=1

Kernel Games 123
Boot-Time Tunable sysctls
Some values are so deeply embedded in the kernel that they can only be
adjusted when initializing the kernel during boot. You’ll find many examples
of these boot-time tunable sysctls (or tunables), frequently related to low-level
hardware settings. As an example, when the kernel first probes an IDE hard
drive, the device driver must choose whether or not to use DMA, PIO, write
caching, or any other hard drive–specific settings. This decision must be made
immediately upon starting the hard drive, and you can’t change your mind
without rebooting the machine. You can set these variables in the system
loader via /boot/loader.conf, as discussed in Chapter 3.
Much like sysctl.conf, setting tunable values in loader.conf will let you really
mess up a machine. The good news is that these values are easily unset.
Dropping Hints on Device Drivers
Many device drivers need to have sysctl flags set early during boot. You’ll learn
about these by reading their man pages, this book, and other documentation.
While these have no entry in the default loader.conf file, you can still add them
to your loader.conf to have them set automatically at boot. For example, to
disable DMA on ATAPI devices (which we’ll discuss in Chapter 8), just put
the desired sysctl setting in loader.conf:
hw.ata.atapi_dma="0"
The kernel will set this flag at boot and the device driver will behave
accordingly.
Additionally, much old hardware requires the kernel to address it at very
specific IRQ and memory values. If you’re old enough to remember plug-
and-pray, “hardware configuration” floppy disks, and special slots for bus
master cards, you know what I’m talking about and probably have one of
these systems polluting your hardware closet even today. (If you’re too young
for that, buy one of us geezers a drink and listen to our horror stories.2)
You can tell FreeBSD to probe for this hardware at any IRQ or memory
address you specify, which is very useful when you have a card with a known
2 Actually, listening is optional.
TOO MANY TUNABLES?
Don’t become confused between sysctl values that can only be set at boot, sysctl
values that can be tuned on the fly, and sysctls that can be set on the fly but have
been configured to automatically adjust at boot. Remember that boot-time tunable
sysctls involve low-level kernel functions, while run-time tunables involve higher-level
functions. Having sysctls adjust themselves at boot is merely an example of saving
your work—it does not change the category that the sysctl belongs to.
124 Chapter 5
configuration but the floppy that can change that configuration biodegraded
years ago. Look in /boot/device.hints where you’ll see lots of entries like this:
hint. ed. 0. disabled="1"
hint.ed.0.port="0x280"
hint.ed.0.irq="10"
hint.ed.0.maddr="0xd8000"
These entries are all hints for the ed device driver . The entry is used
for ed device number zero . The disabled keyword means that FreeBSD
won’t check for this device automatically at boot; if another ed card is found,
it can be assigned device number zero. If you enable this device, FreeBSD will
probe for a card at port 0x280 , IRQ 10 , and memory address 0xd8000 ,
and if a card exists there, it will be assigned the device name ed0. Of course,
if that card isn’t supported by the ed(4) Ethernet driver, you’ll have other
problems!
sysctl(8) gives you the power to do all this with your kernel, but tuning
only takes you so far. Kernel modules will take you another leap forward.
Kernel Modules
Kernel modules are parts of a kernel that can be started (or loaded) when
needed and unloaded when unused. Kernel modules can be loaded when
you plug in a piece of hardware and removed with that hardware. This can
save a bit of system memory and greatly expands your flexibility.
Just as the default kernel is held in the file /boot/kernel/kernel, kernel
modules are the other files under /boot/kernel. Take a look in that directory
and you’ll see hundreds of kernel module files. Each kernel module name
ends in .ko. Generally speaking, the file is named after the functionality
contained in the module. For example, the file /boot/kernel/joy.ko handles the
“joy” joystick driver documented in joy(4). This kernel module makes your
joystick show up as device joy0.
Viewing Loaded Modules
In Chapter 3, we saw how to look at kernel modules loaded before boot, but
that won’t help when the system is up and running. The kldstat(8) command
will show what kernel modules are in use at the moment.
TESTING BOOT-TIME TUNABLES
All of these hints and boot-time tunable sysctls are available in the boot loader and
can be set interactively at the OK prompt, as discussed in Chapter 3. You can test
settings without editing loader.conf, find the value that works for you, and only then
make the change permanent in a file.

Kernel Games 125
# kldstat
Id Refs Address Size Name
1 15 0xc0400000 6a978c kernel
2 1 0xc0aaa000 6228 snd_via8233.ko
3 2 0xc0ab1000 23898 sound.ko
This laptop has three kernel modules loaded. The first is the kernel
proper ; then, we have a sound card driver and the sound subsystem .
(As this computer is a laptop, that’s not surprising.) Each module contains
one or more submodules, which you can view using kldstat -v, but the kernel
itself has a few hundred submodules—so be ready for a lot of output.
Loading and Unloading Modules
Loading and unloading kernel modules is done with kldload(8) and
kldunload(8). For example, my laptop is usually hooked to the network via
a wired Ethernet connection. When I attach to a wireless network, I need to
load the wlan_wep.ko kernel module that handles WEP encryption. I use the
kldload command and the file containing the kernel module for that feature:
# kldload /boot/kernel/wlan_wep.ko
Once I’m done with my wireless connection, I’ll unload the module.3
For this, I don’t need to specify the filename, but just the name of the kernel
module as it is shown in kldstat’s output:
# kldunload wlan_wep.ko
If all possible functions were compiled into the kernel, it would be rather
large. Using modules, you can have a smaller, more efficient kernel and only
load rarely used functionality when it’s required.
kldload(8) and kldunload(8) do not require the full path to the kernel
module, nor do they require the .ko at the end of the file. If you remember
the exact name of the kernel module, you could just use:
# kldload wlan_wep
# kldunload wlan_wep
Personally, my weak brain relies on tab completion in my shell to remind
me of the module’s full and proper name.
Loading Modules at Boot
Use /boot/loader.conf to load modules at boot. The default loader.conf includes
many examples of loading kernel modules, but the syntax is always the same.
Take the name of the kernel module, chop off the trailing .ko, and add the
3 Actually I probably won’t bother, as I’ll be shutting down the laptop. But you get the idea.

126 Chapter 5
string _load="YES". For example, to load the module /boot/kernel/procfs.ko
automatically at boot, add this to loader.conf:
procfs_load="YES"
The hard part, of course, is knowing which module to load. The easy
ones are device drivers; if you install a new network or SCSI card that your
kernel doesn’t support, you can load the driver module instead of recon-
figuring the kernel. In this case, you’ll need to find out which driver supports
your card; the man pages and Google are your friends there. I’ll be giving
specific pointers to kernel modules to solve particular problems throughout
this book.
Wait a minute, though; why would FreeBSD make you load a device
driver to recognize hardware if it recognizes almost everything at boot?
That’s an excellent question! The answer is that you may have built your
own custom kernel and removed support for hardware you’re not using.
You don’t know how to build a kernel? Well, let’s fix that right now.
Build Your Own Kernel
Eventually, you’ll find that you cannot tweak your kernel as much as you
like using only sysctl and modules, and your only solution will be to build a
customized kernel. This sounds much harder than it is; we’re not talking
about writing code here—just editing a text file and running a couple of
commands. If you follow the process, it’s perfectly safe. If you don’t follow the
process, well, it’s like driving on the wrong side of the road. (Downtown.
During rush hour.) But the recovery from a bad kernel isn’t that bad, either.
The kernel shipped in a default install is called GENERIC. GENERIC is
configured to run on a wide variety of hardware, although not necessarily
optimally. GENERIC boots nicely on most hardware from the last decade
or so. Newer hardware, however, often has optimizations that GENERIC
won’t support, as it is aimed at the lowest common denominator. Even so,
it’s perfectly suitable for use in a production environment. When you
customize your kernel, you can include these optimizations, add support
for new hardware, remove support for hardware you don’t need, or enable
nifty new features.
Building a kernel is often considered a rite of passage, and the FreeBSD
support community won’t think twice about asking you to rebuild your
kernel to include or exclude a certain feature. While you shouldn’t think
that rebuilding the kernel will solve every problem, it’s a useful tool to have
in your system administration toolbox.
Preparations
You must have the kernel source code before you can build a kernel. If you
followed my advice back in Chapter 2, you’re all set. If not, you can either go
back into the installer and load the kernel sources, or download the source
Kernel Games 127
code from a FreeBSD FTP mirror, or jump ahead to Chapter 13 and use
csup(8). If you don’t remember if you installed the kernel source code, look
into your /sys directory. If it contains a bunch of files and directories, you
have the kernel sources.
Before building a new kernel, you must know what hardware your system
has. This can be difficult to determine; the brand name on a component
doesn’t necessarily describe the device’s identity or abilities. Many companies
use rebranded generic components—I remember one manufacturer that
released four different network cards under the same model name and
didn’t even put a version number on the first three. The only way to tell
the difference was to keep trying different device drivers until one of them
works. Similarly, many different companies manufactured NE2000-compatible
network cards. The outside of the box had a vendor’s name on it, but the
circuits on the card said NE2000. Fortunately, some vendors use a standard
architecture for their drivers and hardware; you can be fairly sure that an
Intel network card will be recognized by the Intel device driver.
The best place to see what hardware FreeBSD found on your system is
the file /var/run/dmesg.boot, discussed in Chapter 3. Each entry represents
either a hardware or software feature in the kernel. As you work on a new
kernel for a system, keep the dmesg.boot of that system handy.
Buses and Attachments
Every device in the computer is attached to some other device. If you read
your dmesg.boot carefully, you can see these chains of attachments. Here’s an
edited set of boot messages to demonstrate:
acpi0: <PTLTD RSDT> on motherboard
acpi_ec0: <Embedded Controller: GPE 0xb> port 0x62,0x66 on acpi0
cpu0: <ACPI CPU> on acpi0
cpu1: <ACPI CPU> on acpi0
pcib0: <ACPI Host-PCI bridge> port 0xcf8-0xcff on acpi0
pci0: <ACPI PCI bus> on pcib0
Our first device on this system is acpi0 . You probably don’t know what
that is, but you could always use man acpi to learn. (Or, if you must, you could
read the rest of this chapter.) There’s an acpi_ec device on this system,
and it’s attached to acpi0 . The CPUs are also attached to acpi0, as is a
PCI bridge . Finally, we have the first PCI bus, pci0 , attached to the PCI
bridge rather than acpi0. Common PCI devices are connected to a hier-
archy of buses that are, in turn, attached to a PCI bridge to talk to the rest of
the computer. You could read dmesg.boot and draw a tree of all the devices
on the system; while that isn’t necessary, understanding what’s attached where
makes configuring a kernel much more likely to succeed.
If you’re in doubt, use pciconf(8) to see what’s actually on your system.
pciconf -lv will list every PCI device attached to the system, whether or not
the current kernel found a driver for it.

128 Chapter 5
Back Up Your Working Kernel
A bad kernel can render your system unbootable, so you absolutely must
keep a good kernel around at all times. The kernel install process keeps your
previous kernel around for backup purposes, in the directory /boot/kernel.old.
This is nice for being able to fall back, but I recommend that you go further.
If you don’t keep a known good backup, here’s what can happen. If you
build a new kernel, find that you made a minor mistake, and have to rebuild
it again, the system-generated backup kernel is actually the first kernel you
made—the one with that minor mistake. Your working kernel has been
deleted. When you discover that your new custom kernel has the same
problem, or an even more serious error, you’ll deeply regret the loss of
that working kernel.
A common place to keep a known good kernel is /boot/kernel.good. Back
up your working, reliable kernel like this:
# cp -Rp /boot/kernel /boot/kernel.good
Don’t be afraid to keep a variety of kernels on hand. Disk space is
cheaper than time. I know people who keep kernels in directories named by
date, so that they can fall back to earlier versions if necessary. Many people
also keep a current copy of the GENERIC kernel in /boot/kernel.GENERIC for
testing and debugging purposes. The only way to have too many kernels is to
fill up your hard drive.
Configuration File Format
FreeBSD’s kernel is configured via text files. There’s no graphical utility or
menu-driven system for kernel configuration; it’s still much the same as in
4.4 BSD. If you’re not comfortable with text configuration files, building a
kernel is just not for you.
Each kernel configuration entry is on a single line. You’ll see a label to
indicate what sort of entry this is, and then a term for the entry. Many entries
also have comments, set off with a hash mark—much like this entry for the
FreeBSD filesystem FFS:
options FFS # Berkeley Fast Filesystem
Every kernel configuration file is made up of five types of entries: cpu,
ident, makeoptions, options, and devices. The presence or absence of these
entries dictates how the kernel supports the associated feature or hardware:
cpu This label indicates what kind of processor this kernel supports.
The kernel configuration file for the boring old PC hardware includes
several CPU entries to cover processors such as the 486 (I486_CPU),
Pentium (I586_CPU), and Pentium Pro through modern Pentium 4
CPUs (I686_CPU). The kernel configuration for amd64/EM64T hard-
ware includes only one CPU type, as that architecture has only one CPU
Kernel Games 129
family. While a kernel configuration can include multiple CPU types,
they must be of similar architectures; a kernel can run on 486 and
Pentium CPUs, but you can’t have a single kernel that will run on both
Intel-compatible and Sparc processors.
ident Every kernel has a single ident line, giving a name for the kernel.
That’s how the GENERIC kernel gets its name; it’s an arbitrary text
string.
makeoptions This string gives instructions to the kernel-building soft-
ware. The most common option is DEBUG=-g, which tells the compiler to
build a debugging kernel. Debugging kernels help developers trouble-
shoot system problems.
options These are kernel functions that don’t require particular hard-
ware. This includes filesystems, networking protocols, and in-kernel
debuggers.
devices Also known as device drivers, these provide the kernel with
instructions on how to speak to certain devices. If you want your system
to support a piece of hardware, the kernel must include the device driver
for that hardware. Some device entries, called pseudodevices, are not
tied to particular hardware, but instead support whole categories of
hardware—such as Ethernet, random number generators, or memory
disks. You might wonder what differentiates a pseudodevice from an
option. The answer is that pseudodevices appear to the system as devices
in at least some ways, while options have no device-like features. For
example, the loopback pseudodevice is a network interface that only
connects to the local machine. While no hardware exists for it, software
can connect to the loopback interface and send network traffic to other
software on the same machine.
Configuration Files
Fortunately, you don’t normally create a kernel configuration file from scratch;
instead, you copy an existing one and edit it. Start with the GENERIC kernel
for your hardware architecture. It can be found in /sys/<arch>/conf—for
example, the i386 kernel configuration files are in /sys/i386/conf, the amd64
kernel configuration files are in /sys/amd64/conf, and so on. This directory
contains several files, of which the most important are DEFAULTS, GENERIC,
GENERIC.hints, MAC, and NOTES:
DEFAULTS This is a list of options and devices that are enabled by
default for a given architecture. That doesn’t mean that you can compile
and run DEFAULTS, but it is a starting point should you want to build a
truly minimal kernel.
GENERIC This is the configuration for the standard kernel. It contains
all the settings needed to get standard hardware of that architecture up
and running; this is the kernel configuration used by the installer.

130 Chapter 5
GENERIC.hints This is the hints file that is later installed as /boot/device
.hints. This file provides configuration information for older hardware.
MAC This is a kernel configuration file that supports Mandatory Access
Controls—a system for fine-grained access control used in high-security
environments. You only need this configuration file if you’re using MAC.
NOTES This is an all-inclusive kernel configuration for that hardware
platform. Every platform-specific feature is included in NOTES. You can
find platform-independent kernel features in /usr/src/sys/conf/NOTES.
Do not edit any of the files in the configuration directory directly. Instead,
copy GENERIC to a file named after your machine and edit the copy. For
example, my laptop is called humvee.blackhelicopters.org: I would copy the file
GENERIC to a file called HUMVEE and open HUMVEE in my preferred text
editor. Here’s a snippet of a configuration file—the part that covers ATA
devices:
# ATA and ATAPI devices
device ata
device atadisk # ATA disk drives
device ataraid # ATA RAID drives
device atapicd # ATAPI CDROM drives
device atapifd # ATAPI floppy drives
device atapist # ATAPI tape drives
options ATA_STATIC_ID # Static device numbering
Hash marks (#) delimit comments; everything after a hash mark to the
end of line is ignored. They’re there to separate machine-friendly stuff
from human-friendly stuff. For example, the first line of this snippet tells
you that the following entries are all for ATA and ATAPI devices. Other
lines have comments that start in the middle of the line, telling you what
the entries are for.
Compare these entries to a couple of our ATA entries in /var/run/
dmesg.boot:
ata1: <ATA channel 1> on atapci1
acd0: DVDR <PIONEER DVD-RW DVR-K16/1.33> at ata1-master UDMA33
The kernel configuration has an ATA bus, device ata, and the dmesg
shows an ATA channel ata1. The DVD-RW drive is attached to ata1. Without
the device ata in the kernel config, the kernel would not recognize the ATA
bus. Even if the system figured out that a DVD drive is in the system, it wouldn’t
know how to get information to and from it. Your kernel configuration must
include all the intermediary devices for the drivers that rely on them. On the
other hand, if your system doesn’t have ATA RAID drives, floppy drives, or
tape drives, you can remove those device drivers from your kernel.

Kernel Games 131
Trimming a Kernel
Once upon a time, memory was far more expensive than today and was only
available in smaller quantities. When a system has 128MB of RAM, you want
every bit of that to be available for work. It was important to have a kernel as
small as possible. Today, when even a laptop has 2GB RAM, kernel size is
almost irrelevant. Stripping unnecessary drivers out of a kernel to make it
smaller might not be vital—but it isn’t an actively dumb thing to do; it will
teach you how to build a kernel, so that when the need appears you won’t
have to learn something new. So, we’re going to use kernel trimming as a
learning exercise, but don’t consider it vital or even necessary.
Remove an entry from the kernel configuration by commenting it out.
CPU Types
On most architectures, FreeBSD supports only one or two types of CPU. The
i386 platform supports three. Removing unnecessary CPU types from your
kernel configuration will produce a kernel that takes full advantage of the
features offered by your CPU—for example, consider the Pentium versus the
Pentium II with MMX instructions. If those instructions are available on your
CPU, you want to take advantage of them. On the other hand, stripping out
unused CPU types from the kernel will produce a kernel that can only run
on one type of CPU.
You only need to include the CPU you have. If you’re not sure of the
CPU in your hardware, check dmesg.boot. My laptop’s dmesg.boot includes the
following lines:
CPU: AMD Athlon(tm) 64 X2 Dual Core Processor 4200+ (2200.10-MHz 686-class CPU)
Origin = "AuthenticAMD" Id = 0x20fb1 Stepping = 1
Features=0x178bfbff<FPU,VME,DE,PSE,TSC,MSR,PAE,MCE,CX8,APIC,SEP,MTRR,PGE,MCA,C
MOV,PAT,PSE36,CLFLUSH,MMX,FXSR,SSE,SSE2,HTT>
...
As shown in bold, this is a 686-class CPU, which means that I can remove
the I486_CPU cpu statements to make my kernel smaller and faster. As a
result, the kernel will use 686-class CPU-specific optimizations instead of
slower generic code. (Also, as it’s a 64-bit i386-style chip, I could run either
i386 or amd64 versions of FreeBSD, as discussed in Chapter 1. We’re choos-
ing to use i386 examples, however, as that’s probably what most readers have.)
Basic Options
Following the CPU type configuration entries, we have a whole list of options
for basic FreeBSD services such as TCP/IP and filesystems. An average system
won’t require all of these, but having them present provides a great deal of
flexibility. You’ll also encounter options rarely used in your environment as
well as those you can remove from your custom kernel configuration. We

132 Chapter 5
won’t discuss all possible kernel options, but will cover specific examples of
different option types. I’ll specifically mention those that can be trimmed
from an Internet server. Consider the following:
#options SCHED_ULE # ULE scheduler
options SCHED_4BSD # 4BSD scheduler
options PREEMPTION # Enable kernel thread preemption
These options control how FreeBSD performs its internal scheduling.
We’ll discuss scheduling in Chapter 12. Preemption makes FreeBSD more
efficient at multitasking.
options INET # InterNETworking
options INET6 # IPv6 communications protocols
These options support networking. INET is the standard old-fashioned
TCP/IP, while INET6 supports IPv6. Much Unix-like software depends
on TCP/IP, so you certainly require INET. IPv6 has much more limited
deployment, however; while eventually you’ll have to understand it, that
day hasn’t come yet, so you can trim INET6 if you like.
options FFS # Berkeley Fast Filesystem
options SOFTUPDATES # Enable FFS soft updates support
options UFS_ACL # Support for access control lists
options UFS_DIRHASH # Improve performance on big
directories
FFS is the standard FreeBSD filesystem, and the other options are all
related to FFS. Soft updates is a method for ensuring disk integrity even
when your system is shut down incorrectly. UFS access control lists allow
you to grant very detailed permissions on files, and UFS_DIRHASH enables
directory hashing to make directories with thousands of files more efficient.
We discuss FFS and its options in more detail than you care for in Chapter 8.
options MD_ROOT # MD is a potential root device
This option (and all the other _ROOT options) lets the system use some-
thing other than a standard FFS filesystem as a disk device for the root
partition. The installer uses a memory device (MD) as a root partition. If
you’re using a diskless system (Chapter 20), you’ll need an NFS root parti-
tion. If you’re running FreeBSD on a standard computer system, with a hard
drive and a keyboard and whatnot, your kernel doesn’t need any of these
features.
options NFSCLIENT # Network Filesystem Client
options NFSSERVER # Network Filesystem Server

Kernel Games 133
These two options support the Network File System (see Chapter 8).
NFSCLIENT lets you mount partitions served by another machine across the
network, while NFSSERVER allows you to offer partitions for other machines
to mount.
options MSDOSFS # MSDOS filesystem
options CD9660 # ISO 9660 filesystem
options PROCFS # Process filesystem (requires PSEUDOFS)
options PSEUDOFS # Pseudo-filesystem framework
These options support rarely used filesystems such as FAT, CDs, the
process filesystem, and the pseudo-filesystem framework. We discuss these
filesystems in Chapter 8, but all the functionality they require is available via
kernel modules on those rare occasions they’re used.
options COMPAT_43TTY # BSD 4.3 TTY compat [KEEP THIS!]
options COMPAT_FREEBSD4 # Compatible with FreeBSD4
options COMPAT_FREEBSD5 # Compatible with FreeBSD5
options COMPAT_FREEBSD6 # Compatible with FreeBSD6
These compatibility options let your system run software built for older
versions of FreeBSD, or software that makes assumptions about the kernel
that were valid for older versions of FreeBSD but are no longer true. If you’re
installing a system from scratch, you probably won’t need compatibility with
FreeBSD 4, 5, or 6, but a surprising amount of software requires compatibility
with 4.3 BSD. Keep the COMPAT_43TTY option, or your system will break.
options SCSI_DELAY=5000 # Delay (in ms) before probing SCSI
The SCSI_DELAY option specifies the number of milliseconds FreeBSD
waits after finding your SCSI controllers before probing them, giving them a
chance to spin up and identify themselves to the SCSI bus. If you have no
SCSI hardware, you can remove this line. If you have ancient SCSI hardware
that starts up like an arthritic elephant, you might want to increase this to as
much as 15000 (15 seconds).
options SYSVSHM # SYSV-style shared memory
options SYSVMSG # SYSV-style message queues
options SYSVSEM # SYSV-style semaphores
These options enable System-V-style shared memory and interprocess
communication. Many database programs use this feature.
options AHC_REG_PRETTY_PRINT # Print register bitfields in debug
# output. Adds ~128k to driver.
options AHD_REG_PRETTY_PRINT # Print register bitfields in debug
# output. Adds ~215k to driver.

134 Chapter 5
Options like these are only effective if you’re using the hardware they
reference. Otherwise, they’re useless and can be removed.
Multiple Processors
The following two entries enable symmetric multiprocessing (SMP) in i386
kernels:
options SMP # Symmetric MultiProcessor Kernel
device apic # I/O APIC
The SMP option tells the kernel to schedule processes on multiple CPUs,
while the apic handles input/output for SMP kernels. FreeBSD’s i386 SMP
implementation only supports SMP systems that fit the Intel SMP specifica-
tion, which does not include 386 or 486 SMP systems. (Other platforms, such
as sparc64, fully comply with their own standards, so SMP works just fine on
them.) FreeBSD only supports multiple processors on Pentium and newer
processors. In older versions of FreeBSD, SMP kernels performed poorly or
wouldn’t boot at all on single-CPU systems; the overhead of managing data
for multiple processors created additional drag on the system. This is no
longer the case, and FreeBSD now ships with SMP enabled by default.
Device Drivers
After all the options you’ll find device driver entries, which are grouped in
fairly sensible ways.
The first device entries are buses, such as device pci and device eisa.
Keep these, unless you truly don’t have that sort of bus in your system.
A surprising number of “legacy-free” systems have an ISA bus buried some-
where inside them.
Next, we reach what most people consider device drivers proper—entries
for floppy drives, SCSI controllers, RAID controllers, and so on. If your goal
is to reduce the size of your kernel, this is a good place to trim heavily;
remove all device drivers for hardware your computer doesn’t have. You’ll
also find a section of device drivers for such mundane things as keyboards,
video cards, PS/2 ports, and so on. You almost certainly don’t want to delete
these.
The network card device driver section is quite long and looks much like
the SCSI and IDE sections. If you’re not going to replace your network card
any time soon, you can eliminate drivers for any network cards you aren’t
using.
We won’t list all the device drivers here, as there’s very little to be
learned from such a list other than the hardware FreeBSD supported at
the time I wrote this section. Check the release notes for the version of
FreeBSD you’re running to see what hardware it supports.

Kernel Games 135
Pseudodevices
You’ll find a selection of pseudodevices near the bottom of the GENERIC
kernel configuration. As the name suggests, these are created entirely out of
software. Here are some of the more commonly used pseudodevices.
device loop # Network loopback
The loopback device allows the system to communicate with itself via
network sockets and network protocols. We’ll discuss network connections
in some detail in the next chapter. You might be surprised at just how many
programs use the loopback device, so don’t remove it.
device random # Entropy device
This device provides pseudorandom numbers, required for cryptography
operations and such mission-critical applications as games. FreeBSD supports a
variety of randomness sources, and they are all aggregated transparently into
the random devices /dev/random and /dev/urandom.
device ether # Ethernet support
Ethernet has many device-like characteristics, and it’s simplest for
FreeBSD to treat it as a device. Leave this, unless you’re looking for a
learning opportunity.
device sl # Kernel SLIP
device ppp # Kernel PPP
The sl device supports SLIP (Serial Line Internet Protocol), and the
ppp device supports kernel PPP (Point to Point Protocol). Both of these are
old and obsoleted by userland PPP, unless you have specific requirements
for them.
device tun # Packet tunnel.
The tun device is a logical packet tunnel. Software can use a tunnel inter-
face to sneak packets in and out of the kernel. Such software includes userland
PPP, the most popular choice for dial-up connections.
device pty # Pseudo-ttys (telnet etc)
A pty is a pseudoterminal. When you telnet or SSH (see Chapter 15) into
the system, FreeBSD must keep track of your terminal session, send characters
to your screen, and read what you type. The system wants to treat your remote

136 Chapter 5
connection just as it treats the physical monitor and keyboard attached to the
system. The pseudoterminal is a terminal-like pseudodevice assigned to your
connection.
device md # Memory "disks"
Memory disks allow you to store files in memory. This is useful for very fast,
temporary data storage, as we’ll learn in Chapter 8. For most (but not all)
Internet servers, memory disks are a waste of RAM. You can also use memory
disks to mount and access disk images. If you’re not using memory disks, you
can remove them from your kernel.
Removable Hardware
At the end of the GENERIC kernel, you will find support for FireWire and
USB removable hardware. These features are all available in modules, as
befits hardware that might or might not be present.
Building a Kernel
After reading through the previous section, you should be able to design a
minimal kernel configuration. Before trying to add anything, I recommend
trying to build and boot this minimal kernel to learn what your computer
really needs. Now that you have a kernel configuration file that you like,
build it.
You’ll need to specify the name of the file containing your custom
kernel configuration either on the command line, in /etc/make.conf, or in
/etc/src.conf, with the KERNCONF variable.
# cd /usr/src
# make KERNCONF=MYKERNEL kernel
The build process first runs config(8) to find syntactical configuration
errors. If config(8) detects a problem, it will report an error and stop. Some
errors are blatantly obvious—for example, you might have accidentally
deleted support for the Unix File System (UFS), but included support for
booting off of UFS. One requires the other, and config will tell you exactly
what’s wrong. Other messages are strange and obscure; those that may take
the longest to figure out are like this:
HUMVEE: unknown option "NET6"
NET6 is the IPv6 option, isn’t it? No, that’s INET6. The error is perfectly
self-explanatory—once you’re familiar with all the supported kernel options.
Read these errors carefully!
Once config(8) validates your kernel, you just wait. The kernel build
process takes hours on a 486 but less than an hour on a new fast system.
The compiler sends all sorts of cryptic messages scrolling down your

Kernel Games 137
screen. Once the build finishes, the system will move your current kernel
to /boot/kernel.old and install the new kernel in /boot/kernel. Once this
finishes, reboot your server and watch the boot messages.
Copyright (c) 1992-2006 The FreeBSD Project.
Copyright (c) 1979, 1980, 1983, 1986, 1988, 1989, 1991, 1992, 1993, 1994
The Regents of the University of California. All rights reserved.
FreeBSD 7.0-CURRENT #0: Thu May 11 01:16:19 EDT 2006
mwlucas@humvee.blackhelicopters.org:/usr/src/sys/compile/HUMVEE
...
At boot time, FreeBSD shows you exactly what kernel it’s running and
when that kernel was built . Congratulations, you’ve just built a kernel!
Troubleshooting Kernel Builds
If your kernel build fails, the first troubleshooting step is to look at the last
lines of the output. Some of these errors are quite cryptic, but others will be
self-explanatory. The important thing to remember is that errors that say,
“Stop in some directory” aren’t useful; the useful error will be before these.
We talked about how to solve these problems in Chapter 1: Take the error
message and toddle off to the search engine. Compile errors are usually the
result of a configuration error.
Fortunately, FreeBSD insists upon compiling a complete kernel before
installing anything. You haven’t damaged your system by failing to build a
kernel; your aborted compile is still sitting in the compile directory.
Booting an Alternate Kernel
So, what to do if your new kernel doesn’t work, or if it works badly? Perhaps
you forgot a device driver, or accidentally cut out the ppp pseudodevice and
cannot dial out to the Internet. Don’t panic! You did keep your old kernel,
right? Here’s what to do.
Back in Chapter 3, we discussed the mechanics of booting an alternate
kernel. We’ll go through the process of what to type here, but to see some
of the in-depth details of loader management you’ll want to go back to the
earlier section. For now, we’ll focus on the reasons to boot an alternate
kernel and on how to do it correctly.
Start by deciding which kernel you want to boot. Your old kernel should
be in a directory under /boot; in this section, we’ll assume that you want to
boot the kernel in /boot/kernel.good. Reboot and interrupt the boot to get
a loader prompt. Remember that by the time you get the loader prompt,
FreeBSD has already copied the kernel into memory, so the first thing you
have to do is throw the bad kernel overboard:
ok unload

138 Chapter 5
Now load the kernel you want, as well as ACPI (unless you don’t use it)
and any other kernel modules you normally load at boot:
ok load /boot/kernel.good/kernel
ok load /boot/kernel.good/acpi.ko
ok boot
Your system will now boot off the old kernel.
Inclusions, Exclusions, and Expanding the Kernel
Now that you can build a kernel, let’s get a little fancy and see how to use
inclusions, the various no configurations, and the NOTES file.
NOTES
FreeBSD’s kernel includes all sorts of features that aren’t included in
GENERIC. Many of these special features are intended for very specific
systems, or for weird corner cases of a special network. You can find a
complete list of hardware-specific features in the file NOTES under each
platform’s kernel configuration directory—for example, /sys/amd64/conf/
NOTES. Hardware-independent kernel features—those that work on every
platform FreeBSD supports—can be found in /sys/conf/NOTES. If you have
hardware that doesn’t appear to be completely supported in the GENERIC
kernel, take a look at NOTES. Some of these features are obscure, but if
you have the hardware, you’ll appreciate them. Let’s take a look at a typical
entry from NOTES:
# CPU_SOEKRIS enables support www.soekris.com hardware.
#
...
options CPU_SOEKRIS
Soekris is a manufacturer of small systems perfect for homebrew embed-
ding. We’ll talk about those systems in Chapter 21; they aren’t common
enough for this entry to go into GENERIC, but if you have one of these
devices, you can use the CPU_SOEKRIS option to enable the special features of
that CPU.
If the NOTES file lists all the features for every possible device, why
not just use it as the basis for your kernel? First, such a kernel would use
up far more memory than the GENERIC kernel. While even small modern
machines have enough memory to run GENERIC without trouble, if the
kernel becomes ten times larger without the corresponding increase in
functionality, people would get annoyed. Also, many of the options are
mutually exclusive. You’ll find features for Athlon CPUs, Cyrix CPUs, IBM
CPUs, options to work around bugs in particular revisions of particular
cards, and so on.

Kernel Games 139
Inclusions and Exclusions
FreeBSD’s kernel configuration has two interesting abilities that can make
maintaining a kernel easier: the no options and inclusions.
The include feature lets you pull a separate file into the kernel config-
uration. For example, if you have a kernel configuration that can be described
as “GENERIC with a couple extra tidbits,” you could include the GENERIC
kernel configuration with an include statement:
include GENERIC
So, if you want to build a kernel that has all the functionality of GENERIC
but also supports the Soekris CPU, you could create a valid kernel configura-
tion composed entirely of the following:
ident MYKERNEL
include GENERIC
options CPU_SOEKRIS
You might think that this is actually more work than copying GENERIC
to a new file and editing it, and you’d be correct. Why would you bother with
this, then? The biggest reason is that as you upgrade FreeBSD, the GENERIC
configuration can change. The GENERIC in FreeBSD 7.1 is slightly different
from that in 7.0. Your new configuration is valid for both releases, and in
both cases can be legitimately described as “GENERIC plus my options.”
This works well for including items, but isn’t very good for removing
things from the kernel. For example, all of the Soekris CPUs are in small
systems without SCSI or RAID cards. You could expand your configuration
to exclude all of those device drivers with the nodevice keyword. A nodevice
entry removes a previously included device entry. Similarly, the nooption
keyword disables included options.
For an excellent example of this, take a look at the PAE kernel config-
uration. PAE is a configuration used for i386 systems with more than 4GB RAM,
as discussed later in this chapter. Many older devices cannot run on a machine
with this much memory, so they cannot be included in this configuration.
No matter how much you upgrade your FreeBSD system, you know that the
default PAE kernel is “GENERIC, plus the PAE feature, minus all the drivers
that don’t work with PAE.”
How Kernel Options Fix Problems
Some kernel options are only used when a problem appears. For example,
a few years ago a friend of mine had several web servers running on low-end
i386 hardware. When one machine was serving several hundred pages per
second, he started getting errors on the console:
Jun 9 16:23:17 ralph/kernel: pmap_collect: collecting pv entries --
suggest increasing PMAP_SHPGPERPROC

140 Chapter 5
A couple hours after this message began appearing, the system crashed.
Apparently we were supposed to take that suggestion seriously, so I did a
little research on the Internet and read through NOTES, where I found the
following entry:
# Set the number of PV entries per process. Increasing this can
# stop panics related to heavy use of shared memory. However, that can
# (combined with large amounts of physical memory) cause panics at
# boot time due the kernel running out of VM space.
#
# If you're tweaking this, you might also want to increase the sysctls
# "vm.v_free_min", "vm.v_free_reserved", and "vm.v_free_target".
#
# The value below is the one more than the default.
#
options PMAP_SHPGPERPROC=201
This seemed simple enough. First, I backed up the old kernel to /boot/
kernel.pmap-crash. It wasn’t exactly a good kernel, but it did keep the system
running for several hours. We then increased PMAP_SHPGPERPROC to 400
and increased the system’s RAM to 192MB. (This system was serving several
hundred web pages per second on 64MB RAM, with one IDE disk and a
Celeron 433 processor!) After installing our new kernel, the crashes stopped
and the system ran for months at a time. In FreeBSD 7, this particular kernel
option happens to be a run-time tunable sysctl, but many other options in
the kernel can be changed this way.
Without this ability to tweak the kernel, we would have had no choice
but to buy more hardware. Even though this hardware is pretty low-end, it
handled the load with only a software tweak and a minor hardware addition.
FreeBSD has quite a few options like this one for special situations—and it
will tell you what it wants if you pay attention. (Mind you, if you’re merely
desperate to spend money, I happen to run a charity for homeless cash and
can honestly assure you that I will find it a new home where it will be deeply
appreciated.)
Sharing Kernels
If you have several identical servers, you don’t need to build a kernel on
each; you can share your custom-built kernel across them. The kernel and its
modules are just files on disk, after all.
To share a kernel, build and install one kernel and test it every way you
can. Then, tar up /boot/kernel and copy the tarball to each of the other servers.
Back up the original kernel on each server, then extract your tarball to install
the new /boot/kernel. Reboot, and you’re done!

Kernel Games 141
Testing Kernels Remotely
It’s not uncommon to have a FreeBSD system in a remote facility, such as a
co-location. You might not have a serial console, and talking a co-location
technician through the boot loader is not something you would normally
enjoy. The best you can hope for from these co-location facilities is that
you’ll get a pair of “remote hands” that can walk up to the machine and hit
the power button for you. How can you possibly test a new kernel under
those circumstances? The key here is that you want to confirm that a kernel
boots the system properly—and if it doesn’t boot properly, you want the boot
to fall back to a known working kernel. It’s a one-time test boot. That’s where
nextboot(8) comes in handy.
nextboot(8) is a way of saying, “Boot this kernel the next time you boot,
but only once.” nextboot takes at least one argument, -k, which is the directory
under /boot where the test kernel can be found. For example, I’ve built and
installed a new kernel; I want this new kernel to be booted once, and if it
doesn’t work I want the following boot to go back to the previous kernel.
First, I must put my test kernel some place other than /boot/kernel, and have
agood kernel in /boot/kernel.
# mv /boot/kernel /boot/kernel.test
# mkdir /boot/kernel
# cp /boot/kernel.good/* /boot/kernel/
If you plan ahead, you can actually install your custom kernel in this
location in the first place by setting the variable INSTKERNAME when you build
the kernel. Give the name of the kernel when you do your kernel install, and
make(1) will install it appropriately:
# cd /usr/src
# make KERNCONF=TESTKERNEL INSTKERNAME=test kernel
This will install your test kernel as /boot/kernel.test.
Now that I have a known-good kernel as my default kernel, and my test
kernel as /boot/kernel.test, I tell nextboot(8) to try the test kernel with the -k
flag, giving the name of the directory under /boot where this kernel can be
found:
# nextboot -k kernel.test
The next time the system is rebooted, the loader will run /boot/kernel.test
instead of /boot/kernel and also erase the configuration that told it to load this
kernel. When the system reboots once more, it will boot the standard kernel.
The trick here is to make sure that the known good kernel is in the directory
/boot/kernel. If your new kernel works correctly, you can just do:
# mv /boot/kernel /boot/kernel.previous
# mv /boot/kernel.test /boot/kernel
Voilà! Your test kernel is now in production.

142 Chapter 5
Kernel Stuff You Should Know About
A better title for this section would be “Tidbits That You’ll Trip Over Unless
You Know What They Are.” If someone says you have a problem with ACPI,
you should know what that is. When the system spews a scary message about
“lock order reversals,” you should know if freaking out and running away
screaming is warranted. The four key areas here are ACPI, PAE, SMP, and
lock order reversals.
ACPI
The Advanced Configuration and Power management Interface handles
low-level hardware configuration, power configuration, and so on. It’s the
successor to several old protocols such as Plug-and-Play, the PCI BIOS hard-
ware configuration system, and APM (Advanced Power Management). Like
most other Unix-like operating system vendors, FreeBSD uses the reference
implementation of ACPI provided by Intel.
This is just a hardware configuration protocol, what could possibly go
wrong? Well, not all hardware vendors implement ACPI in exact accordance
with the specification—rather, they implement just enough so that their
hardware works with Microsoft operating systems and call it done. This
means that people who use non-Microsoft operating systems need to work
around this. FreeBSD includes various workarounds for these broken ACPI
implementations, but these often take a little bit of time to reach a release.
Also, the first hardware that used ACPI often uncovered issues with ACPI
itself. As with any complicated protocol, the first implementors learned a lot
about how that protocol worked in the real world. If you have hardware built
during this time, you might need to permanently disable ACPI by putting
hint.acpi.0.disabled=1 in /boot/loader.conf. If you think your hardware is
having ACPI problems, you can disable it for a single boot with the boot
menu discussed in Chapter 3.
PAE
For years, i386 computer hardware had a built-in limit where it could handle
only up to 4GB of RAM. At that time, a system with 128MB of RAM was con-
sidered a high-end machine, but by now technology has hit the point where
breaking the limit is not only conceivable but affordable. We’ve seen this sort
of limit before, from the 640KB memory limit on the IBM PC to the 8GB limit
NEXTBOOT WARNINGS
You’ll see in the manual that nextboot(8) writes to the root filesystem before it passes
its boot-time integrity check. This means that if your system shuts down uncleanly before
booting the new kernel, it is possible that nextboot will corrupt your filesystem.
nextboot(8) actually doesn’t allocate any new disk space, however, but merely edits
a file that already exists on the system. The risk of corruption is minuscule.
Kernel Games 143
on hard drives. System architects must pick limits somewhere, and they just
try to aim high enough so they won’t have to worry about those limits for
another ten years or so. Physical Address Extensions (PAE) expands the
memory limit to 64GB, which should satisfy us for another few years at least.
By the time that sort of memory becomes common, most new systems will be
running in 64-bit mode which has much higher limits.
Not all devices are compatible with PAE, so PAE cannot be in the
GENERIC kernel. You’ll find a PAE kernel configuration in /sys/i386/
conf/PAE. Only i386 hardware requires PAE; amd64, sparc64, and other high-
end hardware has different memory limits that have not yet been reached.
PAE cannot be disabled at boot time or run time; it’s either in the kernel
or it isn’t.
Symmetric Multiprocessing
Symmetric Multiprocessing (SMP) is having multiple general-purpose CPUs in a
system. In theory, the operating system divides its workload evenly between
the various CPUs. This is harder than it sounds, for reasons we’ll discuss in
Chapter 12. For SMP to work on your system, your kernel must include
options SMP and device apic.
On occasion, some part of the system will have problems with SMP.
It can be useful to disable SMP temporarily to troubleshoot a problem. If a
problem exists when SMP is enabled, but disappears when SMP is disabled,
that can help identify the problem. Disable SMP at boot by setting the boot-
time tunable kern.smp.disabled to 1. Similarly, you might be asked to disable
the APIC, which disables SMP as a side effect. Disable the APIC with the
kernel hint hint.apic.0.disabled="1".
Lock Order Reversals
A key part of implementing SMP is kernel locking. While you don’t have
to worry about kernel locking as a user, if you’re running certain versions
of FreeBSD (particularly, -current), on occasion your system console will
print out a message about lock order reversals. These messages, produced
by the kernel debugging feature WITNESS (see Chapter 13), mean that
the in-kernel locking isn’t as correct as the developers would hope. For the
most part, these messages are harmless, but they do look scary and do
indicate potential problems.
When you see a lock order reversal, the best thing to do is see if this
particular LOR has been reported previously. A web search for the message
will show if it’s been previously reported. You can also search for the FreeBSD
Lock Order Reversal page (maintained by Bjoern Zeeb as of this writing)
and see if your LOR is listed there. If you can’t find mention of your LOR
anywhere on the Internet, you should let the FreeBSD developers know by
writing to FreeBSD-hackers@FreeBSD.org.
You should now have a decent grip on managing the FreeBSD kernel.
Let’s go on and see some of the things you can do with the network.

6
THE NETWORK
FreeBSD is famous for its network per-
formance. The TCP/IP network protocol
suite was first developed on BSD, and BSD,
in turn, included the first major implementation
of TCP/IP. While competing network protocols were
considered more exciting in the 1980s, the wide avail-
ability, flexibility, and liberal licensing of the BSD
TCP/IP stack made it the de facto standard.
Many system administrators today have a vague familiarity with the basics
of networking, but don’t really understand how it all hangs together. Good
sysadmins understand the network, however. Knowing what an IP address
really is, how a netmask works, and how a port number differs from a protocol
number is a necessary step towards mastering your profession. We’ll cover
some of these issues in this chapter. For a start, you must understand the net-
work layers.
146 Chapter 6
While this chapter gives a decent overview of TCP/IP, it won’t cover many
of the numerous details, gotchas, and caveats. If you need to learn more about
TCP/IP, pick up one of the big thick books on the subject. The TCP/IP Guide
by Charles M. Kozierok (No Starch Press, 2005) is an excellent place to start.
This book specifically covers TCP/IP version 4. Its successor, TCP/IP
version 6, is not widely deployed as of this writing.
Network Layers
Each layer of the network handles a specific task within the network process
and interacts only with the layers above and below it. People learning TCP/IP
often laugh when they hear that all these layers simplify the network process,
but this is really true. The important thing to remember right now is that each
layer communicates only with the layer directly above it and the layer directly
beneath it.
The classic OSI network protocol stack has seven layers, is exhaustively
complete, and covers almost any situation with any network protocol and any
application. The Internet, however, is just one such situation, and this isn’t a
book about networking or networked applications in general. We’re limiting
our discussion to TCP/IP networks such as the Internet and almost all corpo-
rate networks, so we only need to consider four layers of the network stack.
The Physical Layer
At the very bottom we have the physical layer: the network card and the wire,
fiber, or radio waves leaving it. This layer includes the physical switch, hub, or
base station, cables attaching that device to the router, and the fiber that runs
from your office to the telephone company. The telephone company switch
is part of the physical layer, as are transcontinental fiber optic cables. If it can
be tripped over, dropped, or chainsawed, it’s part of the physical layer. From
this point on we’ll refer to the physical layer as the wire, although it can be just
about any sort of medium.
This is the easiest layer to understand—it’s as simple as having intact hard-
ware. If your wire meets the requirements of the physical protocol, you’re in
business. If not, you’re bankrupt. Without a physical layer, the rest of the net-
work can’t work, period, end of story. One of the functions of Internet routers
is to connect one sort of physical layer to another—for example, converting
local Ethernet into T1/E1. The physical layer has no decision-making abilities
and no intelligence; everything that runs over it is dictated by the datalink
layer.
Datalink: The Physical Protocol
The datalink layer is where things get interesting. The datalink layer, or the
physical protocol, transforms information into the actual ones and zeros that
are sent over the physical layer in the appropriate encoding for that physical
protocol. For example, Ethernet uses Media Access Control (MAC) addresses
and the Address Resolution Protocol (ARP); dial-up and wide area networks

The Network 147
use the Point to Point Protocol (PPP). In addition to the popular Ethernet
and PPP datalink layers, FreeBSD supports others, including Asynchronous
Transfer Mode (ATM), High Level Data Link Control (HDLC), and Inter-
network Packet Exchange (IPX), as well as combinations such as the PPP
over Ethernet (PPPoE) used by some home broadband vendors. While
FreeBSD supports all of these datalink protocols, it doesn’t support every
datalink protocol ever used. If you have unusual network requirements,
check the documentation for your version of FreeBSD to see if it’s supported.
Some physical protocols have been implemented over many different
physical layers. Ethernet, for instance, has been transmitted over twinax, coax,
CAT3, CAT5, CAT6, CAT7, optical fiber, radio waves, and carrier pigeon.
With minor changes in the device drivers, the datalink layer can address any
sort of physical layer. This is one of the ways in which layers simplify the net-
work. We’ll discuss Ethernet in detail, as it’s the most common network type
FreeBSD systems use. By understanding Ethernet on FreeBSD, you’ll be able
to manage other protocols on FreeBSD as well—once you understand those
protocols, of course!
The datalink layer exchanges information with the physical layer and the
network layer.
The Network Layer
“The network layer? Isn’t the whole thing a network?”
Yes, but the network layer is more specific. It maps connectivity between
network nodes, answering questions like “Where are other hosts?” and “Can
you reach this particular host?” This logical protocol provides a consistent
interface to programs that run over the network, no matter what sort of phys-
ical layer you’re using. The network layer used on the Internet is Internet
Protocol, or IP. IP provides each host with a unique1 address, known as an
IP address, so that any other host on the network can find it.
The network layer talks to the datalink layer below it and the transport
layer above it.
Heavy Lifting: The Transport Layer
The transport layer deals with real data for real applications and perhaps even
real human beings. The three common transport layer protocols are ICMP,
TCP, and UDP.
Internet Control Message Protocol (ICMP) manages basic connectivity mes-
sages between hosts with IP addresses. If IP provides a road and addresses,
ICMP provides traffic lights and highway exit signs. Most of the time, ICMP
just runs in the background and you never have to think about it.
The other well-known transport protocols are User Datagram Protocol
(UDP) and Transmission Control Protocol (TCP). How common are these?
1 Yes, I know about Network Address Translation, where not all IP addresses are unique. NAT is a
lie, and lying to your network is a good route to trouble—ask anyone who uses NAT on a really
large scale. But even with NAT, if you’re on the Internet you have one or more unique IP
addresses.

148 Chapter 6
Well, the Internet Protocol suite is generally called TCP/IP. These protocols
provide services such as multiplexing via port numbers and transmission of
user data. UDP is a bare-bones transport protocol, offering the minimum
services needed to transfer data over the network. TCP provides more sophis-
ticated features such as congestion control and integrity checking.
In addition to these three, many other protocols run above IP. The file
/etc/protocols contains a fairly comprehensive list of transport protocols that
use IP as an underlying mechanism. You won’t find non-IP protocols here,
such as Digital’s LAT, but it contains many more protocols than you’ll ever
see in the real world. For example, here are the entries for IP and ICMP, the
network-layer protocols commonly used on the Internet:
ip 0IP # Internet protocol, pseudo protocol number
icmp 1 ICMP # Internet control message protocol
Each entry in /etc/protocols has three key fields: an unofficial name , a
protocol number , and any aliases . The protocol number is used within
network requests to identify traffic. You’ll see it if you ever fire up a packet
sniffer or start digging deeper into your network for any reason. As you can
see, IP is protocol 0 and ICMP is protocol 1—if that’s not the groundwork
for everything else, it’s hard to see what could be! TCP is protocol 6, and
UDP is protocol 17. You’ll also see comments giving slightly more detail
about each protocol.
The transport layer speaks to the network layer below and to the
applications above it.
Applications
Applications are definitely a part of the network. Applications open requests
for network connectivity, send data over the network, receive data from the
network, and process that data. Web browsers, email clients, JSP servers, and
so on are all network-aware applications. Applications only have to commu-
nicate with the network protocol and the user. Problems with the user layer
are beyond the scope of this book.2
The Network in Practice
So, you understand how everything hooks together and are ready to move
on, right? Don’t think so. Let’s see how this works in the real world. Some of
this explanation touches on stuff that we’ll cover later in this chapter, but if
you’re reading this book you’re probably conversant enough with networks to
be able to follow it. If you’re having trouble, reread this section after reading
the remainder of this chapter. (Just buy a second copy of this book, cut these
pages out of the second copy, and glue them in at the end of this chapter.)
Suppose a user connected to the Internet via your network wants to
look at Yahoo! The user accesses his web browser and enters the URL.
2 If my current research on reformatting and reinstalling users bears fruit, however, I will be
certain to publish my results.

The Network 149
The browser application knows how to talk to the next layer down in the
network, the transport layer. After kneading the user’s request into an
appropriate form, the browser asks the transport layer for a TCP connection
to a particular IP address on port 80. (Purists might note that we’re skipping
the DNS request part of the process, but it is quite similar to what is being
described and would only confuse our example.)
The transport layer examines the browser’s request. Since the application
has requested a TCP connection, the transport layer allocates the appropriate
system resources for that sort of connection. The request is broken up into
digestible chunks and handed down to the network layer.
The network layer doesn’t care about the actual request. It’s been handed
a lump of data to be carried over the Internet. Much like your postman
delivers letters without caring about the contents, the network layer just
bundles the TCP data with the proper addressing information. The resulting
mass of data is called a packet. The network layer hands these packets down to
the datalink layer.
The datalink layer doesn’t care about the contents of the packet.
It certainly doesn’t care about IP addressing or routing. It’s been given a
lump of zeroes and ones, and it has the job of transmitting those zeros and
ones across the network. All it knows about is how to perform that trans-
mission. The datalink layer may add the appropriate header and/or footer
information to the packet for the physical medium used, creating a frame.
Finally, it hands the frame off to the physical layer for transmission on the
local wire, wave, or other media.
The physical layer has no intelligence at all. The datalink layer hands it
a bunch of zeroes and ones, and it transmits them to another physical device.
It has no idea of what protocol is being spoken or how those digits might be
echoed through a switch, hub, or repeater, but one of the hosts on this net-
work is presumably the router of the network.
When the router receives the zeroes and ones, it hands them up to the
datalink layer. The datalink layer strips its framing information and hands the
resulting packet up to the network layer within the router. The router’s net-
work layer examines the packet and decides what to do with it based on its
routing tables. It then hands the packet down to the appropriate datalink
layer. This might be another Ethernet interface, or perhaps a PPP interface
out of a T1.
EACH INSIDE THE OTHER?
Yes, your original web request has been encapsulated by the TCP protocol. That
request has been encapsulated again at the transport layer by the IP protocol, and
once more by the datalink protocol. All these headers are piled on at the front and
back of your original request. Have you ever seen that picture of a small fish being
swallowed by a slightly larger fish, which is in turn being eaten by a larger fish,
and so on? It’s exactly like that. Or, if you prefer, a frame is like the outermost box
in one of those gifts that arrive wrapped in a series of successively larger gift boxes.
Unwrap one protocol and you’ll find another.
150 Chapter 6
Your wire can go through many physical changes as the data travels. Your
copper T1 line could be aggregated into an optical fiber DS3, which is then
transformed into an OC192 cross-country link. Thanks to the wonders of
layering and abstraction, neither your computer nor your user need to know
anything about any of these.
When the request reaches its destination, the computer at the other end
of the transaction accepts the frame and sends it all the way back up the pro-
tocol stack. The physical wire accepts the zeroes and ones and sends them up
to the datalink layer. The datalink layer strips the Ethernet headers off the
frame and hands the resulting packet up to the transport layer. The transport
layer reassembles the packets into a stream of data, which it then hands to an
application—in this case, a web server. The application processes the request
and returns an answer, which descends the protocol stack and travels across
the network, bouncing up and down through various datalink layers on the
way as necessary. This is an awful lot of work to make the machine go through
just so you can get your “404 Page Not Found” error.
This example shows why layering is so important. Each layer only knows
what it absolutely must about the layers above and below it, making it possible
to swap out the innards of layers if desired. When a new datalink protocol is
created, the other layers don’t have to change; the network protocol just hands
a properly formatted request to the datalink layer and lets that layer do its
thing. When you have a new network card, you only need a driver that inter-
faces with the datalink layer and the physical layer; you don’t have to change
anything higher in the network stack, including your application. Imagine a
device driver that had to be installed in your web browser, and your email
client, and every other application you had on your computer, including the
custom-built ones. You would quickly give up on computing and take up some-
thing sane and sensible, like skydiving with anvils.
Getting Bits and Hexes
As a system administrator you’ll frequently come across terms like 48-bit address
and 18-bit netmask. I’ve seen a surprising number of sysadmins who just
nod and smile when they hear this, all the while thinking, “Yeah, whatever,
just tell me what I need to do in my job.” Unfortunately, math is a real part
of the job, and you must understand bits. While it’s not immediately intuitive,
this understanding is one of the things that separate amateurs from pro-
fessionals. You don’t read a book like this if you want to stay an amateur.
Maybe you’re muttering, “But I already know this!” Then skip it. But
don’t cheat yourself if you don’t know it.
You probably already know that a computer treats all data as zeroes and
ones, and that a single zero or one is a bit. When a protocol specifies a number
of bits, it’s talking about the number as seen by the computer. A 32-bit number
has 32 digits, each being either zero or one. You were probably introduced to
binary math, or base 2, back in elementary school and remembered it just long
enough to pass the test. It’s time to dust off those memories. Binary math is
simply a different way to work with the numbers we see every day.

The Network 151
We use decimal math, or base 10, every day to pay the pizza guy and
balance the checkbook. Digits run from 0 to 9. When you want to go above
the highest digit you have, you add a digit on the left and set your current
digit to zero. This is the whole “carry the one” thing you learned many years
ago, and now probably do without conscious thought. In binary math the
digits run from 0 to 1, and when you want to go above the highest digit you
have, you add a digit on the left and set your current digit to 0. It’s exactly
the same as decimal math with eight fingers missing. As an example, Table 6-1
shows the first few decimal numbers converted to binary.
When you have a 32-bit number, such as an IP address, you have a string
of 32 ones and zeros. Ethernet MAC addresses are 48-bit numbers and have
48 ones and zeros.
Just for fun, Unix also uses hexadecimal numbers in some cases (such as
MAC addresses and netmasks). Hexadecimal numbers are 4 bits long. The
binary number 1111, the full four bits, is equivalent to 15; this means that
the digits in hexadecimal math run from 0 to 15. At this point, a few of you
are looking at the two-digit number 15 that’s supposed to be a single digit
and wondering what I’m smoking and where you can get your own supply.
Hexadecimal math uses the letters A through F as digits for the numbers
10 through 15. When you count up to the last digit and want to add one,
you set the current digit to zero and add a digit to the left of the number.
For example, to count to seventeen in hexadecimal, you say, “1, 2, 3, 4, 5, 6,
7, 8, 9, A, B, C, D, E, F, 10, 11.” Take off a shoe and count along once or
twice until you get the idea.
Hexadecimal numbers are usually marked with a 0x in front. The number
0x12 is the hexadecimal equivalent of decimal 18, while the number 18 is plain
old 18. If a hex number is not marked by a leading 0x, it’s in a place where the
output is always in hexadecimal, such as MAC addresses. The letters A to F are
also a dead giveaway, but not entirely reliable; many hex numbers have no
letters at all, just as many decimal numbers have no odd digits.
Table 6-1:
Decimal and Binary Numbers
Decimal Binary
00
11
210
311
4100
5101
6110
7111
81000

152 Chapter 6
When you’re working with hexadecimal, decimal, and binary numbers,
the simplest thing to do is break out a scientific calculator. Today’s medium-
end or better calculators have functions to convert between the three systems,
as do most software calculators.
Remedial TCP/IP
Now that you know how all this is supposed to work, let’s look at a real
network protocol in depth. The dominant Internet protocol is TCP/IP, or
Transmission Control Protocol over Internet Protocol. TCP is a transport
protocol, while IP is a network protocol, but they’re so tightly intertwined
that they’re generally referred to as a single entity. We’ll start with IP and
proceed to TCP and UDP.
IP Addresses and Netmasks
An IP address is a unique 32-bit number assigned to a particular node on a net-
work. Some IP addresses are more or less permanent, such as those assigned to
vital servers. Others change as required by the network, such as those used by
dial-up clients. Individual machines on a shared network get adjoining IP
addresses.
Rather than expressing that 32-bit number as a single number, an IP
address is broken up into four 8-bit numbers usually shown as decimal num-
bers. While 192.168.1.1 is the same as 11000000.10101000.00000001.00000001
or the single number 11000000101010000000000100000001, the four decimal
numbers are easiest for our weak minds to deal with.
IP addresses are issued in chunks by Internet service providers. Frequently
these chunks are very small—say, 16 or 32 IP addresses. If your system is
co-located on a server farm, you might only get a few IP addresses out of a
block.
A netmask is a label indicating the size of the block of IP addresses assigned
to your local network. The size of your IP block determines your netmask—
or, your netmask determines how many IP addresses you have. If you’ve done
networking for any length of time, you’ve seen the netmask 255.255.255.0
and know that it’s associated with a block of 256 IP addresses. You might
even know that the wrong netmask prevents your system from working.
In today’s world, however, that simple netmask is becoming less and less
common. To understand why, you need to understand something about
the history of IP addressing. Many years ago, IP addresses were issued in
BIT BY BYTES
Computer systems tend to work in bytes, where an 8-bit number is represented by
a single character. The one exception is in the network stack, where everything is in
bits. Thus, we have a 5 megabyte file on a machine with a 10 megabit network
connection. Do not confuse the two!

The Network 153
blocks of three sizes: class A, class B, and class C. This terminology has been
obsolete for over a decade now, but we’ll use it as a starting point.
Class A was very simple: The first of the four numbers in your IP address
were fixed. The issuing agency (the InterNIC, back in the day) might give you
a class A block, for example 10.0.0.0. You could assign any of the last three
numbers in any manner you liked, but all your IP addresses began with 10.
For example, you could delegate 10.1.0.0 through 10.1.1.255 to your data
center, 10.1.2.0 through 10.1.7.255 to your Detroit office, and so on. Only
very large companies such as Ford and Xerox, as well as influential academic
computing institutions such as MIT, received class A blocks. Browsing the
list of original class A owners is quite an education in who had influence in
the 1980s.
In a class B block, the first two of the four numbers in the IP address were
fixed. Your class B block looked something like 172.16.0.0. Every IP address
you used internally began with the first two numbers 172.16, but you could
assign the last two numbers as you wanted. Many mid-sized companies went
after class B blocks.
Similarly, a class C block had the first three numbers fixed. This was
the standard for small companies. The ISP would issue you a block such
as 198.22.63.0 and let you assign the last number as you wanted.
This scheme wasted a lot of IP numbers. Many small companies don’t
need 256 addresses. Many medium-sized firms need more than 256, but fewer
than the 65,000 in a class B block. And almost nobody needs the full 16 million
addresses in a class A block. Before the Internet boomed, these choices were
good enough. Back in the 1980s kids got beat up for messing around with
computers and whatnot, but today’s kids get beat up for not having their
own e-commerce site. This has exerted upward pressure on demand for IP
addresses.
Today’s providers issue IP addresses by prefix length, commonly called a
slash. You’ll see IP blocks such as 192.168.1.128/25. While this looks confusing,
it’s merely a way of using classes with much greater granularity. You know
that each decimal number in an IP address is 8 bits long. By using a class,
you’re saying that a certain number of bits are fixed—you cannot change
them on your network. A class A block has 8 fixed bits, a class B has 16, and
a class C has 24.
This isn’t a class in binary math, so I won’t make you draw it out and do
the conversion, but think of an IP address as a string of binary numbers. On
your network, you can change the bits on the far right, but not the ones on
the far left. The only question is, “Where is the line that separates right from
left?” There’s no reason for that boundary to be on one of those convenient
8-bit lines that separate the decimal versions of the address. A prefix length is
simply the number of fixed bits on your network. A /25 means that you have
25 fixed bits, or one more fixed bit than what used to be called a class C. You
can play with 7 bits. You get a decimal netmask by setting the fixed bits to 1
and your network bits to 0, as in the following example of a /25 netmask:
11111111.11111111.11111111.10000000

154 Chapter 6
11111111 is 255, while 1000000 is 128. Your netmask is 255.255.255.128.
It’s very simple, if you think in binary. You won’t have to work with this every
day, but if you don’t understand the underlying binary concepts, the decimal
conversion looks like total gibberish. With practice, you’ll learn to recognize
certain strings of decimals as legitimate binary conversions.
What does all this mean in practice? First off, blocks of IP addresses are
issued in multiples of 2. If you have 4 bits to play with, you have 16 IP addresses
(2 × 2 × 2 × 2 = 16). If you have 8 bits to play with, you have 256 addresses
(28 = 256). If someone says that you have exactly 19 IP addresses, you’re either
sharing an Ethernet with other people or they’re wrong.
It’s not uncommon to see a host’s IP address with its netmask attached—
e.g., 192.168.3.4/26. This gives you everything you need to get the host on
the local network. (Finding the default gateway is another problem, but it’s
usually the top or bottom address in the block.)
Computing Netmasks in Decimal
You probably don’t want to repeatedly convert between decimal and binary.
Not only is it uncomfortable, it increases your chances of making an error.
Here’s a trick to calculate your netmask while remaining in decimal land.
You need to find how many IP addresses you have on your network. This
will be a multiple of 2 almost certainly smaller than 256. Subtract the number
of IP addresses you have from 256. This is the last number of your netmask.
You’ll still need to recognize legitimate network sizes. If your IP address is
192.168.1.100/26, you’ll need to know that a /26 is 26 fixed bits, or 64 IP
addresses. Look at the last number of your IP address, 100. It certainly isn’t
between 0 and 63, but it is between 64 and 127. The other hosts on your IP
block have IP addresses ranging from 192.168.1.64 to 192.168.1.127, and your
netmask is 255.255.255.192 (256 − 64 = 192).
At this point, I should mention that netmasks frequently appear as hex
numbers. You might feel like giving up the whole thing as a bad job, but to
simplify your life, Table 6-2 shows netmasks, IP information, and related
goodness for /24 and smaller networks.
Table 6-2:
Netmasks and IP Address Conversions
Prefix Binary Mask Decimal Mask Hex Mask Available IPs
/24 00000000 255.255.255.0 0xffffff00 256
/25 10000000 255.255.255.128 0xffffff80 128
/26 11000000 255.255.255.192 0xffffffc0 64
/27 11100000 255.255.255.224 0xffffffe0 32
/28 11110000 255.255.255.240 0xfffffff0 16
/29 11111000 255.255.255.248 0xfffffff8 8
/30 11111100 255.255.255.252 0xfffffffc 4
/31 11111110 255.255.255.254 0xfffffffe 2
/32 11111111 255.255.255.255 0xffffffff 1

The Network 155
Unusable IP Addresses
You now understand how slashes, netmasks, and IP address assignments work
together and how, for example, a /28 has 16 IP addresses. Unfortunately,
you cannot use all the IP addresses in a block. The first IP address in a block
is the network number which is used for internal bookkeeping.
Similarly, the last number in any block of IP addresses is the broadcast
address. According to the IP specifications, every machine on a network is
supposed to respond to a request for this address. This allows you to ping the
broadcast address and quickly determine which IP addresses are in use. For
example, on a typical /24 network, the broadcast address is x.y.z.255. In the
late 1990s, however, this feature was transformed into an attack technique. It’s
now disabled by default on almost every operating system and most network
appliances.3 If you need this feature, set the sysctl net.inet.icmp.bmcastecho to 1.
In any case, you cannot assign the first or the last IP address in a network
to a device without causing network problems. Some systems fail gracefully,
others fail gracelessly. Go ahead, try it sometime—preferably after hours,
unless you want a good story to tell at your next job.
Assigning IP Addresses
You might think that each computer on a network has an IP address, but this
isn’t strictly true. Every network interface has an IP address. Most computers
have only one network interface, so for them the difference is nonexistent.
If you have multiple network cards, however, each card has a separate IP
address. You can also have multiple IP addresses on a single card through
aliasing. On the other hand, with special configuration you can bond multiple
cards into a single network interface, giving the computer one virtual interface
despite the many cards. While these distinctions are small, remember them
when troubleshooting.
ICMP
The Internet Control Message Protocol (ICMP) is the standard for transmitting
routing and availability messages across the network. Tools such as ping(8)
and traceroute(8) use ICMP to gather their results. Proper network perfor-
mance requires ICMP, but an intruder can use some types of ICMP traffic for
reconnaissance. If you must block ICMP for security reasons, be sure to do so
selectively.
UDP
The User Datagram Protocol (UDP) is the most bare-bones data transfer
protocol that runs over IP. It has no error handling, minimal integrity
verification, and no defense whatsoever against data loss. Despite these
drawbacks, UDP can be a good choice for particular sorts of data transfer,
and many vital Internet services rely on it.
3 Except, for some reason, many printers. Put your printers behind a firewall!
156 Chapter 6
When a host transmits data via UDP, the sender has no way of knowing
if the data ever reached its destination. Programs that receive UDP data simply
listen to the network and accept what happens to arrive. When a program
receives data via UDP, it cannot verify the source of that data—while a UDP
packet includes a source address, this address is easily faked. This is why UDP is
called connectionless, or stateless.
With all of these drawbacks, why use UDP at all? Applications that use
UDP most often have their own error-correction handling methods that
don’t mesh well with the defaults provided by protocols such as TCP. For
example, simple client DNS queries must time out within just a few seconds
or the user will call the helpdesk and whine. TCP times connections out only
after two minutes. Since the computer wants to handle its failed DNS requests
much more quickly, simple DNS queries use UDP. In cases where DNS must
transfer larger amounts of data (for example, for zone transfers), it intelli-
gently switches to TCP. Real-time streaming data, such as video conferencing,
also uses UDP. If you miss a few pixels of the picture in a real-time video
conference, retransmitting that data would simply add congestion. You
can’t go back in time to fill in those missing chunks of the picture, after all!
You’ll find similar reasoning behind almost all other network applications
that use UDP.
UDP is also a datagram protocol, meaning that each network trans-
mission is complete and self contained, and received as a single integral unit.
While the application might not consider a single UDP packet a complete
request, the network does. TCP is entirely different.
TCP
The Transmission Control Protocol (TCP) includes such nifty features as error
correction and recovery. The receiver must acknowledge every packet it
gets, otherwise the sender will retransmit any unacknowledged packets.
Applications that use TCP can expect reliable data transmission. This makes
TCP a connected, or stateful, protocol, unlike UDP.
TCP is also a streaming protocol, meaning that a single request can be split
amongst several network packets. While the sender might transmit several
chunks of data one after the other, the recipient could receive them out-of-
order or fragmented. The recipient must keep track of these chunks and
assemble them properly to complete the network transaction.
For two hosts to exchange TCP data, they must set up a channel for that
data to flow across. One host requests a connection, the other host responds
to the request, and then the first host starts transmitting. This setup process
is known as the three-way handshake. The specifics are not important right now,
but you should know that this process happens. Similarly, once transmission
is complete the systems must do a certain amount of work to tear down the
connections.
TCP is commonly used by applications—such as email programs, FTP
clients, and web browsers—for its fairly generic set of timeouts and trans-
mission features.

The Network 157
How Protocols Fit Together
You can compare the network stack to sitting with your family at a holiday
dinner. The datalink layer (ARP, in the case of Ethernet) lets you see every-
one else at the table. IP gives every person at the table a unique chair, except
for the three young nephews using piano bench NAT. ICMP provides basic
routing information, such as, “The quickest way to the peas is to ask Uncle
Chris to hand them to you.” TCP is where you hand someone a dish and the
other person must say “Thanks” before you will let go. Finally, UDP is like
tossing a roll at Aunt Betty; she might catch it, it might bounce off her
forehead, or it could be snatched out of midair by the dog who has watched
for his opportunity since the meal began. (Yes, my family holidays are more
entertaining than most.)
Transport Protocol Ports
Have you ever noticed that computers have too many ports? We’re going to
add TCP and UDP ports into the stew. Transport protocol ports permit one server
to serve many different services over a single transport protocol, multiplexing
connections between machines.
When a network server programs starts, it attaches, or binds, to one or
more logical ports. A logical port is just an arbitrary number ranging from
1 to 65536. For example, Internet mail servers bind to TCP port 25. Each
TCP or UDP packet arriving at a system has a field indicating its desired
destination port. Each incoming request is flagged with a desired destination
port number. If an incoming requests asks for port 25, it is connected to the
mail server listening on that port. This means that other programs can run
on different ports, clients can talk to those different ports, and nobody
except the sysadmin gets confused.
The /etc/services file contains a list of port numbers and the services
that they’re commonly associated with. It’s possible to run almost any
service on any port, but by doing so you’ll confuse other Internet hosts that
try to connect to your system. If someone tries to send you email, their mail
program automatically connects to port 25 on your system. If you run email
on port 77 and you have a web server on port 25, you’ll never get your email
but your web server will start receiving spam. The /etc/services file has a very
simple five-column format.
NEXT-GENERATION TRANSPORT
One interesting feature in FreeBSD 7.0 is support for Stream Control Trans-
mission Protocol (SCTP). This is a next-generation transport protocol designed for
complicated data streams. FreeBSD’s implementation was sponsored by Cisco
Systems, who appear to have viewed a freely usable FreeBSD implementation as
one of the best ways to get this protocol out into the world.

158 Chapter 6
qotd 17/ tcp quote #Quote of the Day
This is the entry for the qotd service , which runs on port 17 in the
TCP protocol . It’s also known as the quote service . Finally we have a
comment that provides more detail; apparently qotd stands for Quote of
the Day. Services are assigned the same port number in both TCP and UDP,
even though they usually only run on one and not the other—for example,
qotd has ports 17/tcp and 17/udp.
Many server programs read /etc/services to learn which port to bind to on
startup, while client programs read /etc/services to learn which port they should
try to connect to. If you run servers on unusual ports, you might have to edit
this file to tell the server where to attach to.
As in all standards, there are often good reasons for breaking the rules.
The SSH daemon, sshd, normally listens on port 22/tcp, but I’ve run it
on ports 23 (telnet), 80 (HTTP), and 443 (HTTPS) for various reasons.
Configuring this depends on the server program you’re using. We’ll see an
example of this in Chapter 15.
Reserved Ports
Ports below 1024 in both TCP and UDP are called reserved ports. These ports
are assigned only to core Internet infrastructure and important services such
as DNS, SSH, HTTP, LDAP, and so on—services that should legitimately only
be offered by a system or network administrator. Only programs with root-
level privileges can bind to low-numbered ports. A user can provide, say, a
game server on a high-numbered port, if the system policy allows—but that’s
a little different from setting up an official-looking web page visible to every-
one stating that the main purpose of the machine is to be a game server!
The port assignment for these core protocols is generally carved in stone.
You can view and change the reserved ports with the sysctls net.inet.ip
.portrange.reservedhigh and net.inet.ip.portrange.reservedlow.
Every so often, someone thinks that they can disable this “bind-only-by-
root” feature and increase their system’s security—after all, if your application
can be run as a regular user instead of root, wouldn’t that increase system
security? Most programs that run on reserved ports actually start as root, bind
to the port, and then drop privileges to a special restricted user that has even
less privilege than a regular user. These programs are designed to start as
root and frequently behave differently when run as a regular user. A few
programs, such as the Apache web server, are written so they can be started
safely by a non-root user, but others are not.
Understanding Ethernet
Ethernet is extremely popular in corporate and home networks, and is the
most common connection media for FreeBSD systems. Ethernet is a shared
network; many different machines can connect to the same Ethernet and
can communicate directly with each other. This gives Ethernet a great
The Network 159
advantage over other network protocols, but Ethernet has physical distance
limitations that make it practical only for offices, co-location facilities, and
other comparatively small networks.
Many different physical media have supported Ethernet over the years.
Once upon a time, most Ethernet cables were thick chunks of coaxial cable.
Today, most are comparatively thin CAT5 cables with eight strands of very
thin wire inside them. You might also encounter Ethernet over optical fiber
or radio. For purposes of our discussion we’ll assume that you’re working
with CAT5 or better cable, today’s most popular choice. No matter what
physical media you use, the theory of Ethernet doesn’t change—remember,
the physical layer is abstracted away.
Protocol and Hardware
Ethernet is a broadcast protocol, which means that every packet you send on
the network can be sent to every workstation on the network. (Note that can
be; some Ethernet hardware limits recipients of these broadcasts.) Either your
network card or its device driver separates the data intended for your com-
puter from the data meant for other computers. One side effect of Ethernet’s
broadcast nature is that you can eavesdrop on other computers’ network
traffic. While this can be very useful when diagnosing problems, it’s also a
security issue. Capturing clear-text passwords is trivial on an old-fashioned
Ethernet. A section of Ethernet where all hosts can communicate directly
with all other hosts without involving a router is called a collision domain, or
segment.
Ethernet segments are connected via hubs or switches. An Ethernet hub
is a central piece of hardware to physically connect many other Ethernet
devices. Hubs simply forward all received Ethernet frames to every other
device attached to the network. Hubs broadcast all Ethernet traffic that
they receive to every attached host and other attached hubs. Each host is
responsible for filtering out the traffic it doesn’t want. This is old-school
Ethernet.
Switches have largely supplanted hubs. A switch is like a hub, but filters
which traffic it sends to each host by identifying the MAC and IP addresses
of attached devices and, for the most part, by only forwarding packets to the
devices they are meant for. Since each Ethernet host has a finite amount of
bandwidth, switching reduces the load on individual systems by decreasing
the amount of traffic each host must sort through.
Switch Failure
Switches fail, despite what Cisco would have you believe. Some failures are
obvious, such as those where the magic black smoke is leaking out of the back
of the box. When a switch loses its magic smoke, it stops working. Others are
more subtle, and make it appear that the switch is still working.
Every switch manufacturer must decide how to handle subtle errors.
Either the switch can shut down until it is attended to, or it can attempt to
alert its manager and continue forwarding packets to the best of its ability. If
you’re a vendor, the choice is obvious—you stumble along as best you can, so

160 Chapter 6
that your customers don’t think that your switches are crap. This means that
your switch can start to act like a hub, and you might not know about it. The
bad news is that if you were relying on the switch to prevent leakage of secure
information, you are fated for disappointment. More than one switch has
failed on me in this way, so don’t be too surprised when it happens to you.
Installing and using a syslog server (see Chapter 19) can mitigate this
risk. While it won’t prevent switch failure, it will make it easier to listen to
your switches when they try to complain.
Ethernet Speed and Duplex
Ethernet originally supported only a couple of megabits per second, but has
expanded to handle tens-of-gigabits speeds. Most people use 10/100 megabits
per second (Mbps) speeds. If a card is labeled 10/100Mbps, it doesn’t mean
it can actually push that much traffic—I’ve seen 100Mbps cards that max
out at less than 10Mbps, and gigabit cards choke on 100Mbps. Card quality
is important when you want to push bandwidth, and the quality of the entire
computer is important when pushing serious bandwidth.
The duplex setting determines if the card can both transmit and receive
data at the same time. A half-duplex connection means that the Ethernet card
is either transmitting or receiving at any given moment; it cannot do both.
A full-duplex connection can both send and receive simultaneously.
MAC Addresses
Every Ethernet card has a unique identifier, a Media Access Control (MAC)
address. This 48-bit number is sometimes called an Ethernet address. When a
system transmits data to another host on the Ethernet, it first broadcasts
an Ethernet request asking, “Which MAC address is responsible for this IP
address?” If a host responds with its MAC address, further data for that IP is
transmitted to that MAC address. This process is known as the Address Resolu-
tion Protocol, or ARP.
Use arp(8) to view your FreeBSD system’s knowledge of the ARP table.
The most common usage is the arp -a command, which shows all of the MAC
addresses and hostnames that your computer knows of.
# arp -a
gw.blackhelicopters.org (192.168.3.1) at 00:00:93:34:4e:78 on fxp0 [ethernet]
sipura.blackhelicopters.org (192.168.3.5) at 00:00:93:c2:0f:8c on fxp0 [ethernet]
This full listing of ARP information is known as the ARP table, or MAC
table. (The terms MAC and ARP are frequently used interchangeably, so don’t
worry about it too much.) Here we see that the host gw.blockhelicopters.org
has an IP address of 192.168.3.1 and a MAC address of 00:00:93:34:4e:78,
and that you can reach these hosts on the local system’s interface fxp0.
If a MAC address shows up as incomplete, the host cannot be contacted
on the local Ethernet. In this case, check your physical layer (the wire), the
remote system, and the configuration of both systems.

The Network 161
Configuring Your Ethernet Connection
Before you try to configure your system to access a network via Ethernet, you
must have basic IP address information. If your network offers Dynamic Host
Configuration Protocol (DHCP) and your machine is a client, you can just
use that and connect to the network as another client. If this machine will be
a server, a static IP address is more sensible. Each server requires:
An IP address
The netmask for that IP address
The IP address of the default gateway
Armed with this information, attach your system to the network with
ifconfig(8) and route(8).
ifconfig(8)
The ifconfig(8) program displays the interfaces on your computer and lets
you configure them. Start by listing the existing interfaces on your system by
running ifconfig(8) without any arguments:
# ifconfig
fxp0: flags=8843< UP,BROADCAST,RUNNING,SIMPLEX,MULTICAST> mtu 1500
options=3<RXCSUM,TXCSUM>
inet 198.22.63.43 netmask 0xfffffff0 broadcast 198.22.63.47
ether 00:02:b3:be:df:f5
media: Ethernet autoselect (10baseT/UTP)
status: active
rl0: flags=8802<BROADCAST,SIMPLEX,MULTICAST> mtu 1500
options=8<VLAN_MTU>
ether 00:20:ed:72:3b:5f
media: Ethernet autoselect (10baseT/UTP)
status: no carrier
lo0: flags=8049<UP,LOOPBACK,RUNNING,MULTICAST> mtu 16384
inet 127.0.0.1 netmask 0xff000000
Our first network interface is fxp0 , or the first network card that uses
the fxp(4) driver. The fxp(4) man page reveals that this is an Intel EtherExpress
PRO card. You’ll then see basic information about this card , including that
it is in the UP state, meaning it is either working or trying to work. It’s assigned
the IP address 198.22.63.43 , the netmask 0xfffffff0 (or 255.255.255.240,
per Table 6-2). You’ll also see the MAC address and the connection speed .
Finally, the status entry shows that this card is active : A cable is plugged in
and we have a link light.
The second card, rl0, has almost none of this information associated with
it. One key fact is the no carrier signal : It’s not plugged in and there is no
link light. This card is not in use.
Finally we have the interface lo0 , the loopback. This interface has the
IP address 127.0.0.1 on every machine. This loopback address is used when the
machine talks to itself. This is a standard software interface, which does not

162 Chapter 6
have any associated physical hardware. Do not attempt to delete the loopback
interface and do not change its IP address—things will break in an amusing
way if you do so. FreeBSD supports other software interfaces such as disc(4),
faith(4), gif(4), and many more.
Adding an IP to an Interface
The install process will configure any network cards you have working at
install time. If you didn’t configure the network for all of your cards during
the setup process, or if you add or remove network cards after finishing the
install, you can assign an IP address to your network card with ifconfig(8).
You need the card’s assigned IP address and netmask.
# ifconfig interface-name IP-address netmask
For example, if your network card is fxp0, your IP address is 192.168.1.250,
and your netmask is 255.255.255.0, you would type:
# ifconfig fxp0 192.168.1.250 255.255.255.0
Specify the netmask in dotted-quad notation as above, or in hex format
(0xffffff00). Perhaps simplest of all is to use slash notation, like this:
# ifconfig fxp0 192.168.1.250/24
If config(8) can also perform any other configuration your network cards
require, such as setting media type and duplex mode. The manual page for
that card’s driver lists supported media and duplex settings. Set the media
type with the media keyword and duplex with the mediaopt keyword. Some
combinations of cards and switches cannot successfully auto-negotiate a
connection, so you’ll need to manually set the speed and duplex on one
side or the other. Some cards will speak either half-duplex or full-duplex at
100Mbps, but only full-duplex at 10Mbps speeds. (The gigabit Ethernet
standard requires auto-negotiation, so hardcoding the duplex on such cards
is not the best practice.) Some cards have multiple media connectors, or
multiple media types on a single connector. You can combine all of this into
a single command, of course.
# ifconfig fxp0 192.168.1.250/24 media 1000baseTX mediaopt full-duplex
To make this persist across reboots, add an entry to /etc/rc.conf
telling the system to configure the card at boot. The entry has the form
ifconfig_interfacename="ifconfig arguments". For example, configuring
the re0 card would require an entry like this:
ifconfig_re0="192.168.1.250 255.255.255.0 media 1000baseTX mediaopt full-duplex"

The Network 163
Once you have a working configuration for your interface, just copy your
ifconfig(8) arguments into a /etc/rc.conf entry.
Testing Your Interface
Now that your interface has an IP address, try to ping the IP address of your
default gateway. If you get a response, as shown in the following example,
you’re on the network. Interrupt the ping with CTRL-C.
# ping 192.168.1.1
PING 192.168.1.1 (192.168.1.1): 56 data bytes
64 bytes from 192.168.1.1: icmp_seq=0 ttl=64 time=1.701 ms
64 bytes from 192.168.1.1: icmp_seq=1 ttl=64 time=1.436 ms
^C
--- 192.168.1.1 ping statistics ---
2 packets transmitted, 2 packets received, 0% packet loss
round-trip min/avg/max/stddev = 1.436/1.569/1.701/0.133 ms
If you don’t get any answers, your network connection isn’t working.
Either you have a bad connection (check your cables and link lights) or you
have misconfigured your card.
Set Default Route
The default route is the address where your system sends all traffic that’s not
on the local network. If you can ping the default route’s IP address, set it via
route(8).
# route add default 192.168.1.1
That’s it! You should now be able to ping any IP address on the Internet.
If you didn’t choose nameservers during the system install, you will have
to use the IP address rather than the hostname. We’ll get DNS working the
hard way in Chapter 14. In the meantime, an excellent source of real IP
addresses are the root nameservers listed in /etc/namedb/named.root.
Once you have a working default router, make it persist across reboots by
adding the proper defaultrouter entry in /etc/rc.conf:
defaultrouter="192.168.1.1"
Multiple IP Addresses on One Interface
A FreeBSD system can respond to multiple IP addresses on one interface.
This is a popular server configuration, especially those running SSL websites.
One server might support hundreds or thousands of domains and needs an
IP address for each. Specify additional IP addresses for an interface with
ifconfig(8) and the alias keyword. The netmask on an alias is always /32,
regardless of the size of the network address block the main address uses.

164 Chapter 6
# ifconfig fxp0 alias 192.168.1.225/32
Once you add an alias to the interface, the additional IP address appears
in ifconfig(8) output. The main IP always appears first, and aliases follow.
# ifconfig fxp0
fxp0: flags=8843<UP,BROADCAST,RUNNING,SIMPLEX,MULTICAST> mtu 1500
options=b<RXCSUM,TXCSUM,VLAN_MTU>
inet6 fe80::202:b3ff:fe63:e41d%fxp0 prefixlen 64 scopeid 0x1
inet 192.168.1.250 netmask 0xffffff00 broadcast 192.168.1.255
inet 192.168.1.225 netmask 0xffffffff broadcast 192.168.1.255
ether 00:02:b3:63:e4:1d
...
Other hosts that ping your aliased IP will get a response from this server.
Once you have the aliases working as you like, make them persist across
reboots by adding another ifconfig statement in /etc/rc.conf:
ifconfig_fxp0_alias0="192.168.1.225/32"
The only real difference between this entry and the standard rc.conf ’s
“here’s my IP address” entry is the alias0 chunk. The alias keyword tells
FreeBSD that this is an aliased IP, and the 0 is a unique number assigned to
this alias. Every alias set in /etc/rc.conf must have a unique number, and this
number must be sequential. If you skip a number, aliases after the gap will
not be installed at boot. This is the most common interface misconfiguration
I’ve seen; FreeBSD needs rebooting so rarely that these errors in /etc/rc.conf
can go unnoticed for months!
Many daemons can be bound to a single address, so you can run multiple
instances of the same program on the same server using multiple addresses.
For example, named(8) (see Chapter 14) can be attached to a single IP
address, but you can run multiple instances of named(8) on a single machine
by using a separate IP address for each.
Renaming Interfaces
FreeBSD names its network interfaces after the device driver used by the
network card. This is a fine old tradition in the Unix world and common
behavior among most industrial operating systems. Some operating systems
ALIASES AND OUTGOING CONNECTIONS
All connections from your FreeBSD system use the system’s real IP address. You
might have 2,000 addresses bound to one network card, but when you ssh from
that machine, the connection comes from the primary IP address. Keep this in
mind when writing firewall rules and other access-control filters. Jails initiate all
connections from the jail IP address, but we won’t cover jails until Chapter 9.

The Network 165
name their network interfaces by the type of interface—for example, Linux
calls its Ethernet interfaces eth0, eth1, and so on. At times, it makes sense to
rename an interface, either to comply with an internal standard or to make
its function more apparent. For example, I have one device with twelve
network interfaces, each plugged into a different network. Each network has
aname such as test, QA, and so on. Renaming these network interfaces to
match the attached networks makes sense.
While FreeBSD is flexible on interface names, some software isn’t—it
assumes that a network interface name is a short word followed by a number.
This isn’t likely to change any time in the near future, so it’s best practice to
use a short interface name ending in a digit. Use ifconfig(8)’s name keyword
to rename an interface. For example, to rename fxp1 to test1, you would run:
# ifconfig fxp1 name test1
Running ifconfig(8) without arguments shows that you have renamed
that interface.
...
test1: flags=8843<UP,BROADCAST,RUNNING,SIMPLEX,MULTICAST> mtu 1500
options=b<RXCSUM,TXCSUM,VLAN_MTU>
...
Make this change permanent with the ifconfig_interface_name option in
/etc/rc.conf.
ifconfig_fxp1_name="test1"
FreeBSD renames interfaces early in the boot process, before setting IP
addresses or other values. This means that any further interface configuration
must reference the new interface name rather than the old. Full config-
uration of a renamed interface with IP addresses and aliases would look
something like this:
ifconfig_fxp1_name="dmz2"
ifconfig_dmz2="192.168.1.2 netmask 255.255.255.0"
ifconfig_dmz2_alias0="192.168.1.3"
DHCP
Very few networks use DHCP for everything, including servers. A DHCP
server will set the server’s IP address, netmask, nameservers, and default
gateway for you. If your network administrator configures servers via DHCP,
you can tell the network card to take its configuration via DHCP with the
following:
ifconfig_fxp0="DHCP"

166 Chapter 6
Reboot!
Now that you have your network interfaces fully configured, be sure to reboot
to test any changes you made to /etc/rc.conf. If FreeBSD finds an error in
/etc/rc.conf, especially in network configuration, you’ll have problems access-
ing the system remotely. It’s much better to learn that you made a typo under
controlled conditions as opposed to the middle of your sleeping hours.
Network Activity
Now that you’re on the network, how can you see what’s going on? There are
several ways to look at the network, and we’ll consider each in turn. Unlike
many commercial operating systems, FreeBSD commands such as netstat(8)
and sockstat(1) give you more information about the network than can
possibly be healthy.
Current Network Activity
netstat(8) is a general-purpose network management program that displays
different information depending on the flags it’s given. One common ques-
tion people have is, “How much traffic is my system pushing right now?”
netstat(8)’s -w option displays how many packets and bytes your system is
processing. The -w flag takes one argument, the number of seconds between
updates. Adding the -d flag tells netstat(8) to include information about
packets that never made it to the system. Here we ask netstat(8) to update
its display every five seconds:
# netstat -w 5 -d
input (Total) output
packets errs bytes packets errs bytes colls drops
34 044068 23 01518 00
33 0 42610 23 0 1518 0 0
...
Nothing appears to happen when you enter this command, but in a few
seconds the display prints a single line of information. The first three columns
describe inbound traffic, while the next three describe outbound traffic. We
see the number of packets received since the last update , the number of
interface errors for inbound traffic since the last update , and the number
of bytes received since the last update . The next three columns show
the number of packets the machine transmitted since the last update , the
number of errors in transmission since the last update , and how many
bytes we sent . We then see the number of network collisions that have
occurred since the last update , and the number of packets that have been
dropped . For example, in this display the system received 34 packets
since netstat -w 5 -d started running.
Five seconds later, netstat(8) prints a second line describing the activity
since the first line was printed.

The Network 167
You can make the output as detailed as you want, and run it as long as
you like. If you’d like to get updates every second, just run netstat -w 1 -d. If
once a minute is good enough for you, netstat -w 60 -d will do the trick. I find
a five-second interval most suitable when I’m actively watching the network,
but you’ll quickly learn what best fits your network and your problems.
Hit CTRL-C to stop the report once you’ve had enough.
What’s Listening on What Port?
Another popular question is, “Which ports are open and what programs
are listening on them?” FreeBSD includes sockstat(1), a friendly tool to
answer this question. It shows both active connections and ports available
for client use.
The sockstat(1) program not only lists ports listening to the network,
but lists any other listening ports (or sockets) on the system. We care most
strongly about open network ports for TCP/IP version 4, so use the -4 flag4
for sockstat(1). Here’s trimmed sockstat(1) output from a very small server:
# sockstat -4
USER COMMAND PID FD PROTO LOCAL ADDRESS FOREIGN ADDRESS
mwlucas sshd 11872 4 tcp4 198.22.63.43:22 24.192.127.92:62937
root sendmail 11433 4 tcp4 *:25 *:*
www httpd 9048 16 tcp4 *:80 *:*
root sshd 573 3 tcp4 *:23 *:*
root sshd 426 3 tcp4 *:22 *:*
bind named 275 20 udp4 198.22.63.8:53 *:*
The first column gives us the username that’s running the program
attached to the port in question. The second column is the name of the
command. We then have the process ID of the program and the file
descriptor number attached to the socket. The next column shows what
transport protocol the socket uses—either tcp4 for TCP on TCP/IP version 4,
or udp4 for UDP on TCP/IP version 4. We then list the local IP address and
port number, and finally the remote IP address and port number for each
existing connection.
Take a look at our very first entry. I’m running the program sshd . A
man page search takes you to sshd(8), the SSH daemon. The main sshd(8)
daemon forked a child process on my behalf to handle my connection, so we
see multiple instances of sshd(8) with different process IDs. I’m connected
to the local IP address 198.22.63.43 , on TCP port 22. The remote end of
this connection is at the IP address 24.192.127.92 , on port 62937. This is an
SSH connection from a remote system to the local computer.
Other available connections include Sendmail , the mail server, running
on port 25. Note that this entry does not have any IP address listed as the
4 -4 is for TCP/IP version 4. Remember, we’re not looking at anything other than the network
right now, and we’re specifically ignoring IPv6.

168 Chapter 6
foreign address. This socket is listening for incoming connections. Our
httpd process is listening for incoming connections on port 80.
The astute among you might notice that this server has two SSH daemons
available for incoming connections, one on port 23 and one on port 22 .
As /etc/services shows, SSH normally runs on port 22 while port 23 is reserved
for telnet. Anyone who telnets to this machine will be connected to an SSH
daemon, which won’t work as they expect. The suspicious among you might
suspect that this SSH server was set up to waltz around firewalls that only
filter traffic based on source and destination ports and not the actual
protocol. (I have no comment on such allegations.)
The last entry is for a nameserver, named , awaiting incoming connec-
tions on port 53. This entry is notable for listening for UDP (and not TCP)
connections and for attaching to the single IP address 198.22.63.8.
Port Listeners in Detail
sockstat(1) provides a nice high-level view of network service availability, but
you can get a little more detailed information about individual connections
with netstat(8). To view open network connections use netstat(8)’s -a flag.
The -n flag tells netstat(8) to not bother translating IP addresses to host-
names; not only can this translation slow down the output, it can cause
ambiguous output. Finally, the -f inet option tells netstat(8) to only worry
about network connections. Here’s matching netstat output from the same
machine we just ran sockstat(1) on:
# netstat -na -f inet
Active Internet connections (including servers)
Proto Recv-Q Send-Q Local Address Foreign Address (state)
tcp4 0 48 198.22.63.43.22 24.192.127.92.62937 ESTABLISHED
tcp4 0 0 *.25 *.* LISTEN
tcp4 0 0 *.23 *.* LISTEN
tcp4 0 0 *.80 *.* LISTEN
tcp4 0 0 *.22 *.* LISTEN
udp4 0 0 198.22.63.43.53 *.*
Here, we get no idea what program is attached to any port. The first
entry in each column is the transport protocol used by the socket—mostly
TCP, but the last line shows UDP.
The Recv-Q and Send-Q columns show the number of bytes waiting to be
handled by this connection. If you see non-zero Recv-Q numbers for some
connection most of the time, you know that the program listening on that
port cannot process incoming data quickly enough to keep up with the net-
work stack. Similarly, if the Send-Q column keeps having non-zero entries,
you know that either the network or the remote system cannot accept data as
quickly as you’re sending it. Occasional queued packets are normal, but if
they don’t go away you might want to investigate why things are slow. You
must watch your own system to learn what’s normal.

The Network 169
The Local Address is, as you might guess, the IP address and network
port number on the local system that the network connection is listening
on. The network port appears at the end of the entry and is separated
from the IP address by a dot. For example, 198.22.63.43.22 is the IP address
198.22.63.43, port 22. If the entry is an asterisk followed by a period and a
port number, that means that the system is listening on that port on all avail-
able IP addresses. The system is ready to accept a connection on that port.
The Foreign Address column shows the remote address and port number of
any connection.
Finally, the (state) column shows the status of the TCP handshake. You
don’t need to know all of the possible TCP connection states, so long as you
learn what’s normal. ESTABLISHED means that a connection exists and that
data is probably flowing. LAST_ACK, FIN_WAIT_1, and FIN_WAIT_2 mean that the
connection is being closed. SYN_RCVD, ACK, and SYN+ACK are all parts of connec-
tion creation. LISTEN indicates that the port is ready for incoming connections.
In the preceding example, one TCP connection is running and four are
ready to accept clients. As UDP is stateless, those connections list no state
information.
By reading this output and combining it with information provided by
sockstat(1), you can learn exactly which programs are behaving well and
which are suffering bottlenecks.
If you’re not interested in listening sockets but only those with active con-
nections, use netstat(8)’s -b option instead of -a. Running netstat -nb -f inet
will display only connections with foreign systems.
Network Capacity in the Kernel
The FreeBSD kernel handles network memory by using mbufs. An mbuf is a
chunk of kernel memory used for networking. You’ll keep tripping across
mentions of mbufs throughout the FreeBSD network stack documentation,
so it’s important to have at least a vague idea of them.
FreeBSD automatically allocates network capacity at boot time based on
the amount of physical RAM in the system. We assume that if you have a
system with 4GB RAM, you want to use more memory for networking than
on a little box with 128MB RAM. View how FreeBSD uses its resources with
netstat -s and netstat -m. Let’s look at the shortest one first.
netstat -m provides a generic view of kernel memory used for networking.
The output can be divided into two general categories: how much is used
and how many requests failed. The output below is trimmed to only include
a few examples of these, but they all follow the same general format:
# netstat -m
...
32/372/404/ 25600 mbuf clusters in use (current/cache/total/max)
...
0/0/0 requests for mbufs denied (mbufs/clusters/mbuf+clusters)
...

170 Chapter 6
Here we see how many mbuf clusters are used . You’d probably guess
that these are related to mbufs, and you’d be right. You don’t have to know
exactly what mbuf clusters are; the important thing is that you know how
many you can allocate and can see that you’re under that limit.
Similarly, we can see how many different requests for mbufs the kernel
has denied . This system hasn’t rejected any requests for mbufs, which means
that we aren’t having performance problems due to memory shortages. If
your system starts rejecting mbuf requests because it’s out of memory, you’re
in trouble. See “Optimizing Network Performance” below.
While netstat -m produces a dozen lines of output, netstat -s runs for
pages and pages. It provides per-protocol performance statistics. Much like
netstat -m, you can break up these statistics into categories of how much was
done and how many problems did you have. Run both of these commands
occasionally on your systems and review the results, so you know what passes
for normal on your servers and can recognize abnormal numbers when you
have problems.
Optimizing Network Performance
Now that you can see what’s going on, how could you improve FreeBSD’s
network performance? There’s a simple rule of thumb when considering
optimizing: don’t. Network performance is generally only limited by your
hardware. On the other hand, many applications cannot process data as
quickly as your network can. If you think that you need to optimize your
performance, you’re probably looking in the wrong spot. Check Chapter 19
for hints on investigating performance bottlenecks.
Generally speaking, network performance should be adjusted only when
you experience network problems. This means that you should have output
from netstat -m or netstat -s indicating that the kernel is having resource
problems. If the kernel starts denying requests for resources or dropping
connection requests, look at the hints in this section. If you have issues, or
you think you should be getting better performance, look at the hardware
first.
Optimizing Network Hardware
Not all network hardware is created equal. While anyone in IT hears this
frequently, FreeBSD’s open nature makes this obvious. For example, here’s
a comment from the source code of the rl network card driver:
The RealTek 8139 PCI NIC redefines the meaning of 'low end.' This is
probably the worst PCI ethernet controller ever made, with the possible
exception of the FEAST chip made by SMC. The 8139 supports bus-master
DMA, but it has a terrible interface that nullifies any performance
gains that bus-master DMA usually offers.
The Network 171
This can be summarized as, “This card sucks and blows at the same time.
Buy another card.” While this is the most vitriolic comment that I’ve seen in
the FreeBSD source code, and this particular hardware is very hard to find
today, the drivers for certain other cards say the same thing in a more polite
manner. Optimizing network performance with low-end hardware is like put-
ting a high-performance racing transmission in your 1982 Chevette. Replacing
your cheap network card will probably fix your problems. Generally speaking,
Intel makes decent network cards; they maintain a FreeBSD driver for their
wired network cards and provide support so that the FreeBSD community
can help maintain the drivers. (Wireless cards are another story.) Similarly,
many companies that build server-grade machines make a point of using
server-grade network cards. Some companies provide a FreeBSD driver, but do
not provide documentation for their hardware. This means that the driver
probably works, but you’re entirely dependent upon the vendor’s future fond-
ness of FreeBSD for your updates. Companies that specialize in inexpensive
consumer network equipment are not your best choice for high-performance
cards—after all, the average home user has no idea how to pick a network
card, so they go by price alone. If in doubt, check the FreeBSD-questions
mailing list archives for recent network card recommendations.
Similarly, switch quality varies wildly. The claim that a switch speaks the
protocol used in 10/100Mb connections doesn’t mean that you can actually
push 100Mbps through it! I have a 10Mb hub that only handles 0.5Mbps, and
a 100Mb switch that bottlenecks at 15Mbps. Think of a switch speed as a
protocol or a language: I could claim that I speak Russian, but twenty years
after my studies ceased, my speech bottlenecks at about three words a minute.
Again, switches designed for home use are not your best choice in a produc-
tion environment.
If getting decent hardware doesn’t solve your problems, read on.
Memory Usage
FreeBSD uses the amount of memory installed in a system to decide how
much memory space to reserve for mbufs. Memory allocated for mbufs
cannot be used for any other purpose, so preallocating gigs of RAM for mbufs
will actually hurt system performance. Don’t adjust the number of mbufs
you create unless netstat -m tells you that you’re short on mbuf space. If you
have a mbuf problem, the real fix is to add memory to your machine. This
will make FreeBSD recompute the number of mbufs created at boot and
solve your problem. Otherwise, you’ll just shift the problem to a different part
of the system or a different application. You might configure gobs of memory
for network connections and find that you’ve smothered your database server.
If you’re sure you want to proceed, though, here’s how you do it.
Two sysctl values control mbuf allocation, kern.maxusers and kern.ipc
.nmbclusters. The first, kern.maxusers, is a boot-time tunable. Your system
automatically determines an appropriate kern.maxusers value from the
system hardware at boot time. Adjusting this value is probably the best way
to scale your system as a whole. In older versions of FreeBSD, kern.maxusers
172 Chapter 6
preallocated memory for networking and refused to release it for other tasks,
so increasing kern.maxusers could badly impact other parts of the system.
Modern FreeBSD does not preallocate network memory, however, so this
is just an upper limit on networking memory. If kern.maxusers is too small,
you’ll get warnings in /var/log/messages (see Chapter 19).
The sysctl kern.ipc.nmbclusters specifically controls the number of mbufs
allocated by the system. Although this is run-time tunable, it’s best to set it
early at boot by defining it in /etc/sysctl.conf (see Chapter 5). This allows you
to shift kernel memory from other tasks specifically to (or from) networking.
If you set this too high, however, you can actually starve the kernel of memory
for other tasks and panic the machine.
# sysctl kern.ipc.nmbclusters
kern.ipc.nmbclusters: 25600
Mbufs are allocated in units called nmbclusters (sometimes called mbuf
clusters). While the size of a mbuf varies, one cluster is about 2KB. You can
use simple math to figure out how much RAM your current nmbcluster
setting requires, and then calculate sensible values for your system and
applications. This example machine has 25,600 nmbclusters, which means
the kernel has reserved about 50MB RAM for networking purposes. This isn’t
much against my test laptop’s gig of RAM, but it’s clearly unsuitable on an
antique Pentium.
To calculate an appropriate number of mbuf clusters, run netstat -m
when the server is really busy. The second line of the output will give you the
number of mbufs in use and the total number available. If your server at its
busiest doesn’t use nearly as many nmbclusters as it has available, you’re
barking up the wrong tree—stop messing with mbufs and replace your hard-
ware already.5 For example:
32/ 372/ 404/ 25600 mbuf clusters in use (current/cache/total/max)
This system is currently using 32 nmbclusters on this machine and has
cached 372 previously used nmbclusters . With this total of 404 clusters in
memory at this time, our capacity of 25,600 clusters is 1.5 percent utilized.
If this is your real system load, actually reducing the number of nmbclusters
might make sense. Chances are, however, that your machine is so slightly
loaded that any optimizations are pointless.
My personal rule of thumb is that a server should have enough mbufs to
handle twice its standard high load. If your server uses 25,000 nmbclusters
during peak hours, it should have at least 50,000 available to handle those
brief irregular peaks.
5 Some readers have already replaced their cruddy hardware before considering software
optimizations. These readers may perceive this comment as unwarranted. I sincerely,
wholeheartedly, and without reservation apologize to all three of you.

The Network 173
Network Capacity Planning
One day your boss will come to you and say, “What sort of server will you
need to handle a hundred thousand simultaneous users?” I can’t help you
estimate your application’s memory requirements (well, okay, I could,
but that’s a different book), but calculating the system’s network memory
requirements is very straightforward. Each TCP connection requires a send
buffer and a receive buffer, while incoming UDP connections require only
a receive buffer. FreeBSD tunes these buffers for each session, but they do
have default values used to get the sessions started. You can get the default
size in bytes from the sysctls net.inet.tcp.sendspace, net.inet.tcp.recvspace, and
net.inet.udp.recvspace.
# sysctl net.inet.tcp.sendspace
net.inet.tcp.sendspace: 32768
# sysctl net.inet.tcp.recvspace
net.inet.tcp.recvspace: 65536
# sysctl net.inet.udp.recvspace
net.inet.udp.recvspace: 41600
Assume you have a web server that must handle a hundred thousand
simultaneous connections. HTTP runs on TCP, so each connection will
require both a send buffer and a receive buffer. Each connection needs
96KB of memory (32,768 bytes + 65,536 bytes = 98,304 bytes, or 96KB).
To handle one hundred thousand simultaneous users we will need 9GB RAM
(100,000 × 96KB = 9GB)! Presumably, you’d like to also run an application
on this machine. Consider load balancing or caching solutions, or be pre-
pared to write one heck of a check for a single machine.
Ask pointed questions any time someone suggests that you will have one
hundred thousand simultaneous users. Unless you work at Yahoo! or one of its
competitors, you’re unlikely to ever see that kind of load. Even if your web app
has 100,000 registered users, they will almost certainly never hit it simul-
taneously. How much money do you want to spend to accommodate that
once-in-a-blue-moon spike?
Maximum Incoming Connections
The FreeBSD kernel provides capacity to handle a certain number of incom-
ing new TCP connections. This doesn’t refer to connections that the server
previously received and is handling, but rather to people who are attempting
ONCE-IN-A-LIFETIME VS. STANDARD LOAD
When the US Government’s “do-not-call” telemarketing blacklist registration site
went live, millions of users immediately tried to sign up. The first day, the site was
fiendishly slow. After a week, the hardware handled the load without trouble. This
was certainly correct capacity planning. Be sure you distinguish planning for once-
in-a-lifetime events from planning for normal load.

174 Chapter 6
to initiate connections simultaneously. For example, the web pages currently
being delivered to client’s don’t count, but the incoming requests that haven’t
even reached the web server do.
The sysctl kern.ipc.somaxconn dictates how many simultaneous connection
attempts the system will try to handle. This defaults to 128, which might not
be enough for a highly loaded web server. If you’re running a high-capacity
server where you expect more than 128 new requests to be arriving simul-
taneously, you probably need to increase this sysctl. If users start complaining
that they can’t connect, this might be your culprit. Of course, very few applica-
tions will accept that many simultaneous new connections; you’ll probably
have to tune your app well before you hit this point.
Polling
Polling takes the time-honored idea of interrupts and IRQs and boots it out
the window, replacing it with regular checks for network activity. In the
classic interrupt-driven model, whenever a packet arrives at the network
card, the card demands attention from the CPU by generating an interrupt.
The CPU stops whatever it’s doing and handles that data. This is grand, and
even desirable, when the card doesn’t process a huge amount of traffic.
Once a system starts handling large amounts of data, however, the card
generates interrupts continuously. Instead of constantly interrupting, the
system is more efficient if the kernel grabs network data from the card at
regular intervals. This regular checking is called polling. Generally speaking,
polling is useful only if you push large amounts of traffic.
Polling is not available as a kernel module as of this writing, since it requires
modifications to device drivers. This also means that not all network cards
support polling, so be sure to check polling(4) for the complete list. Enable
polling by adding DEVICE_POLLING to your kernel configuration. After your
reboot, enable polling on a per-interface basis with ifconfig(8).
# ifconfig re0 polling
Similarly, disable polling with the argument -polling. The ifconfig(8)
command also displays if polling is enabled on an interface.
As you can enable and disable polling on the fly, enable polling when
your system is under heavy load and see if performance improves.
Changing Window Size
FreeBSD uses three buffers for incoming connections: net.inet.tcp.sendspace,
net.inet.tcp.recvspace, and net.inet.udp.recvspace. TCP/IP gurus know these
settings as window size. By changing the size of these buffers, you change
network performance. The default settings were chosen for a very specific
reason, however: They work. Increasing the size of the buffers increases the
amount of kernel memory required for every connection. Unless you increase
your nmbclusters accordingly, you’ll find yourself running out of memory for
network services.
The Network 175
As of FreeBSD 7.0, these buffers automatically adjust themselves with
network load. While you’ll see references to tuning these sysctls in various
places on the Internet, these are leftovers from many years of tweaking
FreeBSD. You really don’t want to adjust these values manually.
Other Optimizations
FreeBSD has about 150 networking-related sysctls. You have all the tools you
need to optimize your system so greatly that it no longer passes any traffic at
all. Be very careful when playing with network optimizations. Many settings
that seem to fix problems actually only fix one set of problems while intro-
ducing another whole spectrum of issues. Some software vendors (i.e., Samba)
recommend particular network sysctl changes. Try them cautiously and watch
for unexpected side effects on other programs before accepting them as your
new default. TCP/IP is a terribly, terribly complicated protocol, and FreeBSD’s
defaults reflect years of experience, testing, and sysadmin suffering.
Network Adapter Teaming
As network servers become more and more vital to business, redundancy
becomes more important. We have redundant hard drives in a server and
redundant bandwidth into a data center, but what about redundant band-
width into a server? FreeBSD can treat two network cards as a single entity,
allowing you to have multiple connections with a single switch. This is com-
monly called network adapter teaming. FreeBSD implements adapter teaming
through lagg(4), the link aggregation interface.
lagg(4) is a kernel module that provides a lagg0 virtual interface. You
assign physical interfaces to the lagg0 interface, making them part of the aggre-
gated link. While you could use lagg(4) with only one physical interface,
aggregating links only makes sense when you have two or more physical
interfaces to assign to the aggregated link. lagg(4) allows you to implement
seamless roaming between wired and wireless networks, failover, and several
different aggregation protocols.
Aggregation Protocols
Not all network switches support all link aggregation protocols. FreeBSD
has basic implementation of some complicated high-end protocols and
also includes very basic failover setups. The three I recommend are Fast
EtherChannel, LACP, and failover. (There are more schemes, which you
can read about in lagg(4).)
Cisco’s Fast EtherChannel (FEC) is a reliable link aggregation protocol,
but only works on high- to medium-end Cisco switches running particular
versions of Cisco’s operating system. If you have an unmanaged switch, Fast
EtherChannel is not a viable choice. Fast EtherChannel is complicated to
configure (on the switch), so I recommend FEC only when it is already your
corporate standard for link aggregation.

176 Chapter 6
The Link Aggregation Control Protocol (LACP) is an industry standard for
link aggregation. The physical interfaces are bonded into a single virtual
interface with approximately the same bandwidth as all of the individual
links combined. LACP provides excellent fault tolerance, and almost all
switches support it. I recommend LACP unless you have a specific requirement
for Fast EtherChannel or a switch that chokes when you use LACP.
If you do have a switch that chokes on LACP, use failover. The failover
method sends traffic through one physical interface at a time. If that interface
goes down, the connection fails over to the next connection in the pool.
While you don’t get aggregated bandwidth, you do get the ability to attach
your server to multiple switches for fault tolerance.
As LACP is usually the best choice, we’ll use it in our examples.
Configuring lagg(4)
The lagg interface is virtual, meaning there is no physical part of the machine
that you could point to and say, “That is interface lagg0.” Before you can
configure the interface, you must create it. FreeBSD lets you create interfaces
with ifconfig interfacename create, but you can also do this in /etc/rc.conf with
the cloned_interfaces statement.
Configuring a lagg(4) interface in rc.conf has three steps: creating the
interface, bringing up the physical interfaces, and aggregating them. Here
we create a single lagg0 interface out of two Intel gigabit Ethernet cards, em0
and em1.
cloned_interfaces="lagg0"
ifconfig_em0="up"
ifconfig_em1="up"
ifconfig_lagg0="laggproto lacp laggport em0 laggport em1 192.168.1.1 netmask
255.255.255.0"
First, you list lagg0 as a cloned interface, so FreeBSD will create this
interface at boot. Then, bring interfaces em0 and em1 up, but don’t con-
figure them. Finally, tell the lagg0 interface what aggregation protocol to
use, what physical interfaces belong to it, and its network information. These
few lines of configuration give you a high-availability Ethernet connection.
This chapter has been a long march through networking, and your head
is probably swimming with more than you ever thought you’d need to know.
Let’s stay a little more local for a while and look at basic system security.

7
SECURING YOUR SYSTEM
Securing your system means ensuring that
your computer’s resources are used only by
authorized people for authorized purposes.
Even if you have no important data on your sys-
tem, you still have valuable CPU time, memory, and
bandwidth. Many folks who thought that their systems
were too unimportant for anyone to bother breaking into found themselves an
unwitting relay for an attack that disabled a major corporation. You don’t want
to wake up one morning to the delightful sound of law enforcement agents
kicking in your door because your insecure computer broke into a bank.
Sure, there are things worse than having some punk kid take over your
servers—say, having the neighborhood loan shark break both your legs.
Discovering that the company web page now says, “Ha ha, you’ve been r00ted!”
is a decent competitor for second place. Even more comprehensible intrusions
cause huge headaches. Most of the actual intrusions I’ve been involved
with (not as attacker, but as a consultant to the victim) have originated
from countries with government censorship, and traffic analysis showed
that the intruders were actually just looking for unrestricted access to news
178 Chapter 7
sites. While I fully sympathize with these people, when I’m depending upon
the stable operation of my servers to run my business, their intrusion is simply
unacceptable.
Over the last few years, taking over remote computers has become
much easier. Point-and-click programs for subverting computers can be
found through search engines. When one bright attacker writes an exploit,
several thousand bored teenagers with nothing better to do can download
it and make life difficult for the rest of us. Even if the data on your system is
worthless, you must secure the system’s resources.
Generally speaking, operating systems are not broken into; the programs
running on operating systems are. Even the most paranoiac, secure-by-default
operating system in the world cannot protect badly written programs from
themselves. Occasionally, one of those programs can interact with the
operating system in such a way as to actually compromise the operating
system. The most well-known of these are buffer overflows, where an intruder’s
program is dumped straight into the CPU’s execution space and the operating
system runs it. FreeBSD has undergone extensive auditing to eliminate buffer
overflows as well as myriad other well-understood security issues, but that’s
no guarantee that they have been eradicated. New functions and programs
appear continuously, and they can interact with older functions and each
other in unexpected ways.
FreeBSD provides many tools to help you secure your system against
attackers, both internal and external. While no one of these tools is sufficient,
all are desirable. Treat everything you learn about system security as a tool
in a kit, not as the answer to all your problems. For example, while simply
raising a system’s securelevel will not make your system secure, it can help
when combined with reasonable permissions, file flags, regular patching,
password control, and all the other things that make up a good security
policy. We’ll cover more advanced security tools in Chapter 9, but without
the basic protections we discuss here, those tools won’t secure your system.
Who Is the Enemy?
We’ll arbitrarily lump potential attackers into four groups: script kiddies,
botnets, disaffected users, and skilled attackers. You’ll find a more detailed
classification in books dedicated to security, but that’s not what you’re here
for. These categories are easily explained, easily understood, and include
99 percent of all the attackers you’re likely to encounter.
Script Kiddies
The most numerous attackers, script kiddies, are not sysadmins. They are not
skilled. They download attack programs that work on a point-and-click basis
and go looking for vulnerable systems. They’re the equivalent of purse
snatchers, preying upon old ladies holding their bags just a little bit too
loosely. Fortunately, script kiddies are easy to defend against: Just keep
your software up to date and follow good computing practices. Like locusts,
they’re easy to squash but there are just so darned many of them!
Securing Your System 179
Botnets
Botnets are composed of machines that have been compromised by worms
or viruses. The virus authors control the botnets and use them for anything
from searching for more vulnerable hosts to sending spam or breaking into
secure sites. Most botnets are composed of Windows machines, but there is
no reason why Unix-like operating systems can’t be assimilated into botnets.
Solaris 10, for example, had a telnet daemon (in.telnetd) vulnerability that
a worm subsequently exploited, causing havoc for Solaris users.
Fortunately, botnet defense is much like script kiddie defense; keeping
your software patched and following good computing practices goes a
long way.
Disaffected Users
The third group, your own users, causes the majority of security problems.
Disaffected and rogue employees cause most security breaches. They’re the
people most likely to know where the security gaps are, to feel that the rules
don’t apply to them, and to have the time to spend breaking your security.
If you tell an employee that company policy forbids him access to a computer
resource, and if the employee feels that he should have access to it, he’s likely
to search for a way around the restriction. Anyone who feels that he is so
fabulously special that the rules don’t apply to him is a security risk. You
might have all your servers patched and a downright misanthropic firewall
installed, but if anyone who knows the password is Current93 can dial the
back room modem, you’re in trouble.
The best way to stop people like these is simply to not be sloppy. Don’t
leave projects insecurely half-finished or half-documented. When someone
leaves the company, disable his account, change all administrative passwords,
inform all employees of that person’s departure, and remind them not to
share confidential knowledge with that person. Have a computer security
policy with real violation penalties and have HR enforce it. And get rid of
the unsecured modem, the undocumented telnet server running on an odd
port, or whatever hurried hack you put into place thinking that nobody would
ever find it.
Motivated Skilled Attackers
The most dangerous group—skilled attackers—are competent system admin-
istrators, security researchers, penetration specialists, and criminals who want
access to your specific resources. Computer penetration is a lucrative criminal
field these days, especially if the victim has resources that can be used for
Distributed Denial of Service (DDoS) attacks or mass spam transmission.
Compromising a web farm and turning it to evil is profitable. If you have
valuable company secrets, you might be targeted by one of these intruders.
If one of these people really wants to break into your network, he’ll probably
get there.

180 Chapter 7
Still, security measures that stop the first three groups of people change
the tactics of the skilled attacker. Instead of breaking into your computers
over the network, he’ll have to show up at your door dressed as a telco
repairman lugging a packet sniffer, or dumpster-dive searching for old
sticky notes with scribbled passwords. This dramatically increases his risk,
possibly making an intrusion more trouble than it’s worth. If you can make
the intruder’s break-in plan resemble a Hollywood script no matter how much
he knows about your network, your security is probably pretty good.
FreeBSD Security Announcements
The best defense against any attackers is to keep your system up to date. This
means you must know when to patch your system, what to patch, and how.
An outdated system is a script kiddie’s best friend.
The FreeBSD Project includes volunteers who specialize in auditing
source code and watching for security issues with both the base operating
system and add-on software. These developers maintain a very low-volume
mailing list, FreeBSD-security-notifications@FreeBSD.org, and subscribing is a
good idea. While you can monitor other mailing lists (such as BugTraq and
CERT) for general announcements, the security notifications list is a single
source for FreeBSD-specific information. To subscribe to the security notifi-
cations mailing list, see the instructions on http://lists.freebsd.org/mailman/
listinfo. The FreeBSD security team releases advisories on that mailing list as
soon as they are available.
Read advisories carefully and quickly act on those that affect you, as
you can be certain that script kiddies are searching for vulnerable machines.
The best thing you can do is address these problems as quickly as possible.
HACKERS, INTRUDERS, AND RELATED SCUM
You’ll frequently hear the word hacker used to describe people who break into
computers. This word has different meanings depending on the speaker. In the
technical world, a hacker is someone who is interested in the inner workings of
technology. Some hackers are interested in everything; others have a narrow area
of specialization. In the FreeBSD community, hacker is a title of respect. The main
FreeBSD technical list is FreeBSD-hackers@FreeBSD.org. In the popular media,
however, a hacker is someone who breaks into computer systems, end of story.
If you’re really interested in the term hacker, check out its entry in the Jargon File,
which is available at http://www.catb.org/jargon/html/H/hacker.html.
To reduce confusion, I recommend completely avoiding the word hacker. In this
book, I call people who break into computers intruders.* Technical wizards can be
called by a variety of names, but they rarely object to “Oh Great and Powerful One.”
* My editor still won’t let me print what I call them in person.

Securing Your System 181
User Security
Remember when I said that your own users are your greatest security risk?
Here’s where you learn to keep the little buggers in line. FreeBSD has a
variety of ways to allow users to do their work without giving them free reign
on the system. We’ll look at the most important tools here, starting with
adding users in the first place.
Creating User Accounts
FreeBSD uses the standard Unix user management programs such as
passwd(1), pw(8), and vipw(8). FreeBSD also includes a friendly interactive
user-adding program, adduser(8). Only root may add users, of course. Just
type adduser on the command line to enter an interactive shell.
The first time you run adduser(8), it prompts you to set appropriate
defaults for all new user settings. Follow through the example session below
so you can determine appropriate defaults for your system.
# adduser
Username: gedonner
Full name: Gregory E Donner
Uid (Leave empty for default):
The username is the name of the account. Users on my systems get
a username of their first initial, middle initial, and last name. You can assign
usernames by whatever scheme you dream up. The full name is the user’s
real name. FreeBSD then lets you choose a numerical user ID (UID) .
FreeBSD starts numbering UIDs at 1,000; while you can change this, all UIDs
below 1,000 are reserved for system use. I recommend just pressing ENTER to
take the next available UID.
Login group [gedonner]:
Login group is gedonner. Invite gedonner into other groups? []: webmasters
Login class [default]:
Shell (sh csh tcsh nologin) [sh]: tcsh
Home directory [/home/gedonner]:
The user’s default group is important—remember, Unix permissions
are set by owner and group. The FreeBSD default of having each user in
their own group is usually the most sensible way for most setups. Any of the
big thick books on system administration offers several grouping schemes—
feel free to use one of those if it matches your needs more closely. In addition
to the primary group, at this time you can add this user to other groups , if
appropriate.
A login class specifies what level of resources the user has access to.
We’ll talk about login classes later in this section.

182 Chapter 7
The shell is the command-line environment. While the system default is
/bin/sh, I use tcsh1 for people new to Unix. If you’re deeply attached to another
shell, feel free to use it instead. Knowledgeable users can change their own
shells.
The home directory is where the user’s files reside on disk. The user
and that user’s primary group own this directory.
Use password-based authentication? [yes]:
Use an empty password? (yes/no) [no]:
Use a random password? (yes/no) [no]: y
Lock out the account after creation? [no]: n
The password options give you a certain degree of flexibility. If all of
your users are comfortable with SSH and public key cryptography, perhaps
you can get away without using passwords. In the meantime, the rest of us are
stuck with passwords .
Use an empty password if you want the user to set his or her own
password via telnet or the console. Whoever connects to that account first
gets to set the password. This makes an empty password a good idea right up
there with the idea of filling a dirigible with hydrogen and then lighting
matches inside it.
A random password , on the other hand, is a good idea for a new
account. The random password generator FreeBSD provides is good enough
for day-to-day use. Random passwords are usually hard to remember, which
encourages the user to change his password as soon as possible.
When an account is locked , nobody can use it to log in. This is
generally counterproductive.
After entering all this information, adduser spits everything back at you
for review and confirmation or rejection. Once you confirm, adduser verifies
the account setup and provides you with the randomly generated password.
It then asks you if you want to set up another user.
Configuring Adduser: /etc/adduser.conf
Creating new users on some Unix systems requires you to manually edit
/etc/passwd, rebuild the password database, edit /etc/group, create a home
directory, set permissions on that home directory, install dotfiles, and so on.
This makes handling your local customizations routine—if you set everything
by hand, you can manage your local account setup easily. adduser(8) hides a
lot of the tedium, but uses a set of sensible defaults. For sites with different
requirements, /etc/adduser.conf lets you meet those requirements while
retaining the high degree of automation.
To create your first initial adduser.conf file, run adduser -C and answer the
questions.
1 For interactive use, that is. Never, never, never program in any C shell. Read Tom Christiansen’s
classic paper “Csh Programming Considered Harmful” for a full explanation. (It’s available at
http://www.faqs.org/faqs/unix-faq/shell/csh-whynot.)

Securing Your System 183
Login group []:
Enter additional groups []: cvsup
Login class [default]:
Shell (sh csh tcsh nologin) [sh]: tcsh
Home directory [/home/]: /nfs/u1/home
Use password-based authentication? [yes]:
Use an empty password? (yes/no) [no]:
Use a random password? (yes/no) [no]: yes
Lock out the account after creation? [no]: no
The login group is the default user group. An empty login group
means that the user account defaults to having its own unique user group
(the FreeBSD default).
You can specify any additional user groups that new accounts belong
to by default, as well as the login class .
Choose a default shell for your users.
Your home directory location might vary from the standalone FreeBSD
standard. In this example, I’ve specified a typical style of NFS-mounted home
directories used when many users have accounts on many machines.
Finally, choose the default password behavior for new users .
These default settings can save you a lot of typing at the command line,
but once you have a basic configuration file you can add more obscure
functions. Table 7-1 shows the adduser.conf entries I find most useful.
Using these values, you can adjust adduser’s default behavior to most
closely match your requirements.
Editing Users: passwd(1), chpass(1), and Friends
Managing users isn’t just about creating and deleting accounts. You’ll need
to change those accounts from time to time. While FreeBSD includes several
tools for editing accounts, the simplest are passwd(1), chpass(1), vipw(8),
and pw(8). These work on the tightly interrelated files /etc/master.passwd,
Table 7-1:
Useful adduser Settings
Setting Effect
defaultLgroup The default group users will be added to (if empty, each user will be in his
own group)
defaultclass The login class assigned by default
passwdtype Either no (account is disabled until password is set by root), none (no
password is set), yes (set password when creating account), or random
(assign a random password)
homeprefix Directory for user home directories (e.g., /home)
defaultshell Shell selected by default (can be any shell in /etc/shells)
udotdir Directory containing user dotfiles, such as .login and .cshrc
msgfile File containing email message sent to each user upon creation

184 Chapter 7
/etc/passwd, /etc/spwd.db, and /etc/pwd.db. We’ll start with the files and then
review the common tools for editing those files.
The files /etc/master.passwd, /etc/passwd, /etc/spwd.db, and /etc/pwd.db
hold user account information. Each file has a slightly different format and
purpose. /etc/master.passwd is the authoritative source of user account infor-
mation and includes user passwords in encrypted form. Normal users do not
have permission to view the contents of /etc/master.passwd. Regular users need
access to basic account information, however; how else can unprivileged sys-
tem programs identify users? The file /etc/passwd lists user accounts with all
privileged information (such as the encrypted password) removed. Anyone
can view the contents of /etc/passwd to get basic account information.
Many programs need account information, and parsing a text file is
notoriously slow. In this day of laptop supercomputers, the word slow isn’t
very meaningful, but this was a very real problem back when disco freely
roamed the earth. For that reason, BSD-derived systems build a database file
out of /etc/master.passwd and /etc/passwd. (Other Unix-like systems have similar
functionality in different files.) The file /etc/spwd.db is taken directly from
/etc/master.passwd and contains sensitive user information, but can only be
read by root. The file /etc/pwd.db can be read by anyone, but contains the
limited subset of information contained in /etc/passwd.
Any time any standard user management program changes the account
information in /etc/master.passwd, FreeBSD runs pwd_mkdb(8) to update the
other three files. For example, the three programs passwd(1), chpass(1), and
vipw(8) all allow you to make changes to the master password file, and all
three programs trigger pwd_mkdb to update the related files.
Changing a Password
Use passwd(1) to change a password. A user can change his own password,
and root can change anyone’s password. To change your own password, just
enter passwd at the command prompt.
# passwd
Changing local password for mwlucas
Old Password:
New Password:
Retype New Password:
When changing your own password, passwd(1) first asks for your current
password. This is to ensure that nobody else can change your password with-
out your knowledge. It’s always good to log out when you walk away from
your terminal, but when you don’t, this simple check in passwd(1) prevents a
lot of practical jokers from really annoying you. Then enter your new pass-
word twice, and it’s done. When you’re the superuser and want to change
another user’s password, just give the username as an argument to passwd.
# passwd mwlucas
Changing local password for mwlucas
New Password:
Retype New Password:

Securing Your System 185
Note that root doesn’t need to know the user’s old password; the root
user can change any user account on the system in any manner desired.
Changing Accounts with chpass(1)
The account has more information associated with it than just the pass-
word. The chpass(1) utility lets users edit everything they can reach in their
account. For example, if I run chpass at the command prompt, I get an
editor with the following text:
#Changing user information for mwlucas.
Shell: /bin/tcsh
Full Name: Michael W Lucas
Office Location:
Office Phone:
Home Phone:
Other information:
I’m allowed to edit six informational fields in my account. The first, my
shell, can be set to any shell listed in /etc/shells (see “Shells and /etc/shells”
on page 188). I can change my full name; perhaps I want my full middle name
listed, or perhaps I wish to be known to other system users as Mr. Scabies—this
is where I set that. I can update my office location and office phone, so my
co-workers can find me easily. This is another feature that was very useful on
the university campuses where BSD grew up and where system users rarely
had an idea of anyone’s physical location. Now that we have extensive online
directories and many more computers, it’s less useful. I generally set my home
phone number to 911 (999 in the UK), and I can put a little bit of personal
information in the Other space. Also note what I cannot change as a regular
user. The sysadmin sets my home directory, and I may not change it even
if the system has a new hard drive with lots of empty space for my MP3
collection. My UID and GID numbers, similarly, are assigned by the system
or the sysadmin.
On the other hand, if root runs chpass mwlucas, its heightened privileges
give it a very different view.
USER MANAGEMENT AND $EDITOR
User management tools such as chpass and vipw (as well as many other system
management tools) bring up a text editor window where you make your changes.
These tools generally check the environment variable $EDITOR to see which text editor
you prefer. $EDITOR lets you default to vi, Emacs, or any other editor installed. I
recommend Vigor (/usr/ports/editors/vigor), a vi(1) clone with an animated-
paperclip help system that might make recent converts from Microsoft Office feel
more comfortable.

186 Chapter 7
#Changing user information for mwlucas.
Login: mwlucas
Password: $1$4d.nOPmc$uuBQy6ZL6hPQNTQef1jty.
Uid [#]: 1001
Gid [# or name]: 1001
Change [month day year]:
Expire [month day year]:
Class:
Home directory: /home/mwlucas
Shell: /bin/tcsh
Full Name: Michael W Lucas
Office Location:
Office Phone:
Home Phone:
Other information:
As root, you can do anything you like to the poor user. Changing his
login to megaloser is only the start of the havoc you can wreak. You even get
access to the user’s hashed password . Don’t alter this, unless you’re
comfortable computing password hashes in your head. Use passwd(1) to
more safely and reliably change the user’s password. You can also change
the user’s home directory, although chpass(1) doesn’t move the user’s files;
you must copy them by hand.
You can also set a date for password changes and account expiration.
Password expiration is useful if you’ve just changed a user’s password and
you want him to change it upon his first login. Account expiration is useful
when someone asks for an account but insists it’s only needed for a limited
time. You can forget to go back and delete that account, but FreeBSD never
forgets. Both of these fields take a date in the form month day year, but you
only need the first three letters of the month. For example, to make a user’s
password expire on June 8, 2008, I would enter Jun 8 2008 in the Change
space. Once the user changes his password the password expiration field is
blanked out again but only the system administrator can extend an account
expiration date.
The Big Hammer: vipw(8)
chpass is fine for editing individual accounts, but what happens when you
must edit many accounts? Suppose your system has hundreds of users and
a brand new hard disk for the home partition; do you really want to run
chpass(1) hundreds of times? That’s where vipw(8) comes in.
vipw lets you directly edit /etc/master.passwd. When you finish your edits,
vipw checks the password file’s syntax to be sure you haven’t ruined anything,
then saves the new password file and runs pwd_mkdb(8). vipw can protect
your password file from many basic mistakes, but if you’re clever, you can still
muck things up. You must understand the format of the password file to use
vipw(8) properly.
Securing Your System 187
If the information in /etc/master.passwd conflicts with information in
other files, programs assume that /etc/master.passwd is correct. For example,
/etc/group doesn’t list the user as a member of the user’s primary group. The
primary group that appears in /etc/master.passwd is correct, even if the user
doesn’t show up as a member in /etc/group.
Each line in /etc/master.passwd is a single account record, containing 10
colon-separated fields. These fields are the following:
Username
This is either an account name created by the sysadmin, or a user created
at install time to provide some system service. FreeBSD includes users for
system administration, such as root, daemon, games, and so on. Each of
these users owns a part of the base system. It also provides accounts for
common services, such as the www user reserved for use by web servers.
Add-on software might add its own system accounts as well.
Encrypted Password
The second field is the encrypted password. System users don’t have a
password, so you can’t log in as one of them. User accounts have a string
of random-looking characters here.
User ID
The third field is the user ID number, or UID. Every user has a
unique UID.
Group ID
Similarly, the fourth field is the group ID number, or GID. This is the user’s
primary group. Usually this is identical to the UID, and the group has
the same name as the username.
User’s Class
The next field is the user’s class as defined in /etc/login.conf (see “Restrict-
ing System Usage” on page 197).
Password Expiration
This is the same as the password expiration date set via chpass(1), but
here you’ll see the time stored as seconds from the epoch. You can use
date -j and the +%s output format to generate epochal seconds from a
real date. To convert midnight, June 1, 2008 to epochal seconds, run
date -j 200806010000 '+%s'.
Account Expiration
To have the account shut itself off on a certain day, set the account
expiration date just as you would for password expiration.
Personal Data
This field is also known as the gecos field for very obscure historical
reasons. This field contains the user’s real name, office number, work
phone number, and home phone number, all separated by commas. Do
not use colons in this field; colons are reserved specifically for separating
fields in /etc/master.passwd itself.

188 Chapter 7
User’s Home Directory
The ninth field is the user’s home directory. While this defaults to
/home/<username>, you can move this anywhere appropriate. You’ll also
need to move the actual home directory and its files when you change
this field. Users with a nonexistent home directory cannot log in by
default, although the requirehome setting in login.conf can change this.
User’s Shell
The final field is the user’s shell. If this field is empty, the system assigns
the user the boring old /bin/sh.
While chpass(1) lets you muck up individual user accounts, vipw(8)
unleashes you on the entire userbase. Be careful with it!
Removing a User
The rmuser(8) program deletes user accounts. You’ll be prompted for the
username you want to delete and asked if you want to remove that user’s
home directory. That’s really all you have to do; destruction is much easier
than creation, after all.
Scripting with pw(8)
The pw(8) command provides a powerful command-line interface to user
accounts. While useradd(8) walks you through setting up an account in a
friendly manner, pw(8) lets you specify everything on a single command line.
I find pw(8) cumbersome for day-to-day use, but if you manage many user
accounts it is invaluable.
One thing I do use pw(8) for is locking accounts. While a locked account
is active, nobody can log in to it. I’ve used this to great effect when a client
was behind on a bill; users call quite quickly when they can’t log in, and yet
their websites continue to come up and their email continues to accumulate.
# pw lock mwlucas
Unlock the account with pw unlock username.
If you need scripts to manage your users, definitely read man pw(8).
Shells and /etc/shells
The shell is the program that provides the user’s command prompt. Different
shells behave differently and offer different shortcuts and features. Many
people are very attached to particular shells and complain bitterly if their
shell is not available on a system. You can install many shells from ports
(see Chapter 11).
The file /etc/shells contains a list of all legitimate user shells. When
you install a shell from a port or a package, it adds an appropriate entry
in /etc/shells. If you compile your own shell from source, without using a
FreeBSD port, you must list the shell by its complete path in /etc/shells.

Securing Your System 189
The FTP daemon won’t allow a user to log in via FTP if his shell is not
listed in /etc/shells. If you use /sbin/nologin as an FTP-only user shell, you must
add it to this file, although a better way to handle such users is with login
classes as discussed later in this chapter.
root, Groups, and Management
Unix security has been considered somewhat coarse because one superuser,
root, can do anything. Other users are lowly peons who endure the shackles
root places upon them. The problem is, root doesn’t have a wide variety of
shackles on hand and can’t individualize them very well. While there is some
truth to this, a decent administrator can combine groups and permissions to
handle almost any problem securely.
The root Password
Certain actions require absolute control of the system, including manipulating
core system files such as the kernel, device drivers, and authentication systems.
Such activities are designed to be performed by root.
To use the root password, you can either log in as root at a console login
prompt or, if you are a member of the group wheel, log in as yourself and
use the switch user command su(1). (We’ll discuss groups later in this section.)
I recommend su; it logs who uses it, and can be used on a remote system.
The command is very simple to use:
# su
Password:
#
Next, check your current user ID with the id(1) command:
# id
uid=0(root) gid=0(wheel) groups=0(wheel), 5(operator)
#
You now own the system—and I do mean own it. Consider every keystroke;
carelessness can return your hard drive to the primordial state of unformatted
empty wasteland. And share the root password sparingly if at all, because
anyone who has the root password can inflict unlimited damage on the
system.
Remember, only the users in the group wheel can use the root password
to become root through su(1). Anyone can use the root password at the
system console, which is why physical protection of your system is vital. If you
give the root password to a regular user who does not have physical access to
the console, they can type su and enter the root password as many times as
they want, and it still won’t work.

190 Chapter 7
This naturally leads to the question, “Who needs root access?” Much of
the configuration discussed in this book requires use of the root password.
Once you have the system running properly, you can greatly decrease or
discontinue use of the root password. For those remaining tasks that absolutely
require root privileges, I recommend sudo (/usr/ports/security/sudo). One of
the simplest ways to reduce the need for root access is through the proper
use of groups.
Groups of Users
Unix-like operating systems classify users into groups, each group consisting
of people who perform similar administrative functions. A sysadmin can
define a group called webmasters, add the accounts of the people editing web
pages to that group, and set the privileges on the web-related files so that
the members of that group can edit those files. He can also create a group
called email, add the email administrators to that group, and set the per-
missions of mail-related files accordingly. Using groups in this manner is a
powerful and oft-neglected tool for system management.
Any user can identify the groups he belongs to with id(1). The preceding
example showed that the user root is in the groups wheel and operator. Root
is a special user, however, and can do anything he pleases. Here’s my account,
which is a little more realistic for an average user:
# id
uid=1001(mwlucas) gid=1001(mwlucas) groups=1001(mwlucas), 0(wheel),
68(dialer), 1006(cvsup)
My UID is 1001, and my username is mwlucas. My GID, primary group ID,
is 1001, and my primary group is named mwlucas as well. This is all pretty
standard for the first user on a system, and even in later users, the only thing
that changes is the numbers assigned to the account and primary group. More
interesting is what other groups I’m assigned to: In addition to my primary
group I’m in the groups wheel, dialer, and cvsup. wheel members may use
the root password to become root, dialer members may use tip(1) without
becoming root, and cvsup members can use the CVS repository on the local
system. Each of these groups has special privileges on my system, and as a
member of those groups I inherit those privileges.
Group information is defined in /etc/group.
/etc/group
The file /etc/group contains all group information except for the user’s pri-
mary group (which is defined with the user account in /etc/master.passwd).
Each line in /etc/group contains four colon-delimited fields: the group name,
the group password, the group ID number, and a list of members. Here’s a
sample entry:
wheel:*:0:root,mwlucas,gedonner

Securing Your System 191
The group name is a human-friendly name for the group. This group is
named wheel. Group names are arbitrary; you could call a group of users
minions if you wished. Choose group names that give you an idea of what
they’re for; while you might remember that your minions may edit the
company web page, will your co-workers understand that?
The second field, the group password, was a great idea that turned out
to be a security nightmare. Modern Unix-like systems don’t do anything
with the group password, but the field remains because old programs expect
to find something in this space. The asterisk is just a placeholder to placate
such software.
The third field gives the group’s unique numeric group ID (GID).
Many programs use the GID rather than name to identify a group. The
wheel group has a GID of 0, and the maximum GID is 65535.
Last is a comma-delimited list of all users in the group. The users root,
mwlucas, and gedonner are members of the group wheel.
Changing Group Memberships
If you want to add a user to a group, add his username to the end of the line
for that group. For example, the wheel group is the list of users that may use
the root password. Here I add rwatson to the wheel group:
wheel:*:0:root,mwlucas,gedonner,rwatson
Mind you, the odds of me convincing rwatson (the president of the
FreeBSD Foundation) to assume sysadmin duties on any of my systems
range from negligible to nonexistent, but it’s worth a try.
Creating Groups
To create a new group, you only need a name for the group and a group ID
number. Technically, you don’t even need a member for the group; some
programs run as members of a group, and FreeBSD uses the group per-
missions to control those programs just as the users are controlled.
Traditionally, GIDs are assigned the next number up the list. GID is an
arbitrary number between 0 and 65535. Generally speaking, GIDs below 1000
are reserved for operating system usage. Programs that need a dedicated
group ID usually use one in this range. User accounts start numbering their
GIDs at 1001 and go up. Some special groups might start numbering at 65535
and go down.
Using Groups to Avoid Root
In addition to being a security concern, the root password distribution
policy can cause dissension in any organization. Many sysadmins refuse to
share the root password with people who are responsible for maintaining
part of the system, but do not offer an alternative and thereby prevent
people from doing their job. Other sysadmins hand out root to dang near
anyone who wants it and then complain when the system becomes unstable.

192 Chapter 7
Both attitudes are untenable in the long run. When I’m a user, I insist that
the sysadmin not give me the root password but instead set up a group that
can do this task. While having root privileges can be convenient, not having
responsibility when the system breaks is more convenient still.
One common situation is where a junior sysadmin is responsible for a
particular portion of the system. I’ve had many DNS administrators work
under me;2 these people don’t ever install software, recompile the kernel,
or perform other sysadmin tasks. They only answer emails, update zone files,
and reload the named daemon. New sysadmins often believe that they need
root access to do this sort of work. By establishing your own groups, consisting
of people who perform similar administrative functions, you avoid distributing
the root password and still allow people to do their work. In this section,
we’ll implement group-level access control over nameserver files. The same
principles apply to any files you choose to protect. Mail and web configura-
tion files are other popular choices for group-based management.
System Accounts
FreeBSD reserves some user account names for integrated programs. For
example, the nameserver runs under the user account bind and the group
bind. Do not log in as the program user for this sort of work! If an intruder
compromises the nameserver, he can only access the system with the
privileges of the user bind.
What’s more, do not allow the group of the system account user to own
the files created for that function. Create a separate user and group to own
program files. That way, our hypothetical nameserver intruder cannot even
edit the files used by the DNS server, further minimizing potential damage.
If the program regularly updates the files (e.g., a database’s backend storage),
you must give the program access rights, but chances are that a human being
doesn’t ever need to edit that file. Similarly, there’s no reason a database
should be able to edit its own configuration file.
Administrative Group Creation
The simplest way to create a group that owns files is to employ adduser(8) to
make a user that owns them, and utilize that user’s primary group as the group
for the files. Because we already have a user called bind, we’ll create an admin-
istrative user dns. The username isn’t important, but you should choose a
name that you’ll remember easily.
Give your administrative user a shell of nologin, which sets a shell of
/sbin/nologin. This prevents anyone from actually logging in as the admin-
istrative user.
If you want, you could specify a particular UID and GID for these sorts of
users. I’ve been known to choose UID and GID numbers that resemble those
used by their related service accounts. For example, the user bind has a UID
and GID of 53. I could give the user dns a UID of 10053 to make it easily
2 Some even survived the experience.

Securing Your System 193
recognizable. At other times, I start numbering my administrative groups at
65535 and work my way down. It doesn’t matter so long as I’m completely
consistent within an organization.
Do not add this administrative user to any other groups. Under no
circumstances add this user to a privileged group such as wheel! Every user
needs a home directory. For an administrative user, a home directory of
/nonexistent works well. This user’s files are elsewhere in the system, after all.
Lastly, let adduser(8) disable the account. While the shell prevents logins, an
extra layer of defense won’t hurt.
Now that you have an administrative user and a group, you can assign
ownership of files to that user. A user and a group own every file. You can see
existing file ownership and permissions with ls -l. (If you’ve forgotten how
Unix permissions work, read ls(1) and chmod(1).) Many sysadmins pay close
attention to file owners, somewhat less attention to worldwide permissions,
and only glance at the group permissions.
# ls -l
total 3166
-rw-r----- 1 mwlucas mwlucas 79552 Nov 11 17:58 rndc.key
-rw-rw-r-- 1 mwlucas mwlucas 3131606 Nov 11 17:58 absolutefreebsd.com.db
Here, I’ve created two files. The first file, rndc.key, can be read and
written by the user mwlucas, it can be read by anyone in the group mwlucas,
but no one else can do anything with it. The file absolutefreebsd.com.db can be
read or written by the user mwlucas or anyone in the group mwlucas, but
others can only read the file. If you’re in the group mwlucas, you can edit the
file absolutefreebsd.com.db without becoming root.
Change a file’s owner and group with chown(1). You must know the
name of the user and group whose ownership you want to change. In this
case, we want to change both files to be owned by the user dns and the
group dns.
# chown dns:dns rndc.key
# chown dns:dns absolutefreebsd.com.db
# ls -l
total 3166
-rw-r----- 1 dns dns 79552 Nov 11 17:58 rndc.key
-rw-rw-r-- 1 dns dns 3131606 Nov 11 17:58 absolutefreebsd.com.db
These files are now owned by the user dns and the group dns. Anyone
who is in the group dns can edit absolutefreebsd.com.db without using the root
password. Finally, this file can be read by the user bind, who runs the name-
server. Add your DNS administrators to the dns group in /etc/group, and
abruptly they can do their jobs.
The DNS administrators might think that they need the root password
for restarting the nameserver program itself. However, this is easily managed
with rndc(8). Other tasks can be managed with cron jobs, or with the add-on
program sudo(8).

194 Chapter 7
Interesting Default Groups
FreeBSD ships with several default groups. Most are used by the system and
aren’t of huge concern to a sysadmin—you should know that they’re there,
but that’s different than working with them on a day-to-day basis. Here, I
present for your amusement and edification the most useful, interesting,
and curious of the default groups (Table 7-2). Adding your own groups
simplifies system administration, but the groups listed here are available
on every FreeBSD system.
Table 7-2:
Interesting FreeBSD Groups
Group Name Purpose
audit Group for users who can access audit(8) information
authpf Group for authenticating the PF packet filter
bin Group to own general system binaries and programs
bind Group for the built-in DNS server (see Chapter 14)
daemon Used by various system services, such as the printing system
_dhcp Group for DHCP client operations
dialer Group which may access serial ports; useful for modems and tip(1)
games Group to own the games
guest Group for system guests (almost never used)
kmem Group used by programs that can access kernel memory, such as fstat(1),
netstat(1), and so on
mail Group for the mail system (see Chapter 16)
mailnull Default group for Sendmail (see Chapter 16)
man Group to own the system man pages
network Group to own network programs such as ppp(8)
news Group to own the Usenet News subsystem (if installed)
nobody Primary group for user nobody who has no privileges
nogroup Group with no privileges
operator Group that can access drives, generally for backup purposes
_pflogd Group for PF logger
proxy Group for FTP proxy in PF packet filter
smmsp Group for the Sendmail Submission User (see Chapter 16)
sshd Owner of the SSH server (see Chapter 15)
staff The system administrators
sys Another system group
tty Group for programs that can write to terminals, such as wall(1)
uucp Group for Unix-to-Unix Copy Protocol programs
wheel Users who may use the root password
www Group for web server programs (not web files)

Securing Your System 195
Tweaking User Security
You can limit user activity, preventing any single user from utilizing too
much memory or processor time. This is not as important today, now that
even small computers have very fast processors and lots of memory, but it is
still very useful in systems with dozens or hundreds of users. You can also
control where users may log in from.
Restricting Login Ability
FreeBSD checks /etc/login.access every time a user tries to log in. If login.access
contains rules that forbid logins from that user, the login attempt fails
immediately. This file has no rules by default, meaning that there are no
login restrictions on anyone with a valid username and password.
/etc/login.access has three colon-delimited fields. The first either grants (+)
or denies (-) the right to log in; the second is a list of users or groups; and the
third is a list of connection sources. You can use an ALL or ALL EXCEPT syntax,
which allow you to make simple but expressive rules. Rules are checked on
a first-fit basis. When login(1) finds a rule where the user and the connection
source match, the connection is immediately accepted or rejected. This makes
rule order vital. The default is to allow logins. For example, to allow only
members of the wheel group to log in from the system console, you might
try this rule:
+:wheel: console
The problem with this rule, however, is that it doesn’t actually deny users
login privileges. Since the default is to accept logins, and since all this rule
does is explicitly grant login privileges to the users in the wheel group, this
won’t stop anyone from logging in. If I’m not in the wheel group, and I try to
log in, this doesn’t deny me access.
You could try two rules like this:
+:wheel: console
-:ALL:console
This would achieve the desired effect, but is longer than you need.
Use ALL EXCEPT instead.
-:ALL EXCEPT wheel: console
This rejects unwanted logins most quickly and runs less risk of adminis-
trator error. As a rule, it’s best to build login.access lists by rejecting logins,
rather than permitting them. FreeBSD immediately rejects non-wheel users
at the console upon hitting this rule.

196 Chapter 7
The last field in login.access, the connection source, can use hostnames,
host addresses, network numbers, domain names, or the special values LOCAL
and ALL. Let’s see how they work.
Hostnames
Hostnames rely upon DNS or the hosts file. If you suspect that your name-
server might suffer problems, you probably don’t want to use this system;
intruders can give a hostname any IP address that they like and fool your
system into accepting the connection, and a nameserver failure could lock
you out completely. Still, it’s possible to use a rule like this:
-:ALL EXCEPT wheel:fileserver.mycompany.com
Users in the wheel group can log in from the fileserver, but nobody
else can.
Host Addresses and Networks
Host addresses work like hostnames, but they’re immune to DNS failures or
spoofing.
-:ALL EXCEPT wheel:192.168.1.5
A network number is a truncated IP address, like this:
-:ALL EXCEPT wheel:192.168.1.
This allows anyone in the wheel group to log in from a machine whose IP
address begins with 192.168.1, and denies everyone else access from those IP
addresses.
LOCAL
The most complicated location is LOCAL, which matches any hostname with-
out a dot in it (generally, only hosts in the local domain). For example, www
.absolutefreebsd.com thinks that any machine in the domain absolutefreebsd.com
matches LOCAL. This works via reverse DNS (see Chapter 14), which is very
vulnerable to spoofing. Although my laptop claims that it has a hostname
of humvee.blackhelicopters.org, its IP address has reverse DNS that claims it
is somewhere in my cable modem provider’s network. A machine in
absolutefreebsd.com thinks that my laptop is not in the same domain and
hence is not local. As such, I cannot use the LOCAL verification method.
Similarly, anyone who owns a block of IP addresses can give their
addresses any desired reverse DNS. The LOCAL restriction is therefore not
terribly useful.

Securing Your System 197
ALL and ALL EXCEPT
ALL matches everything, and ALL EXCEPT matches everything but what you
specify. These are the most useful connection sources, in my opinion. For
example, if you had a highly secure machine only accessible from a couple
of management workstations, you could have a rule like this:
-:ALL EXCEPT wheel:ALL EXCEPT 192.168.89.128 192.168.170.44
Tie It All Together
The point of these rules is to build a login policy that matches your real-
world policies. If you provide generic services, but only allow your system
administrators to log on remotely, a one-line login.access prevents any other
users from logging in:
-:ALL EXCEPT wheel:ALL
This is great, if you can live with a restriction this tight. On the other
hand, I’ve worked at several Internet service providers that used FreeBSD to
provide client services. Lowly customers were not allowed to log onto the
servers unless they had a shell account. System administrators could log in
remotely, as could the DNS and web teams (members of the groups dns and
webmasters). Only sysadmins could log onto the console, however.
-:ALL EXCEPT wheel:console
-:ALL EXCEPT wheel dns webmasters:ALL
Set this up in login.access once, and let group membership control all of
your remote logins forever after.
Restricting System Usage
You can provide more specific controls with login classes. Login classes,
managed through /etc/login.conf, define the resources and information
provided for users. Each user is assigned a class, and each class has limits on
the system resources available. When you change the limits on a class, all
users get the new limits when they next log in. Set a user’s class when
creating the user account, or change it later with chpass(1).
Class Definitions
The default login.conf starts with the default class, the class used by accounts
without any other class. This class gives the user basically unlimited access to
system resources and is suitable for application servers with a limited number
of users. If this meets your needs, don’t adjust the file at all.
198 Chapter 7
Each class definition consists of a series of variable assignments that define
the user’s resource limits, accounting, and environment. Each variable assign-
ment in the class definition begins and ends with a colon. The backslash
character is a continuation character to indicate that the class continues on
the next line, which makes the file more readable. Here’s a sample of the
beginning of one class:
default:\
:passwd_format= md5:\
:copyright=/etc/COPYRIGHT:\
:welcome=/etc/motd:\
...
This class is called default . I’ve shown three of the dozens of variables in
this class. The variable passwd_format , for example, is set to md5 . These
variable assignments and the class name describe the class, and you can change
the user’s experience on the system by assigning the user to another class.
Some of login.conf’s variables don’t have a value, but instead change
account behavior just by being present. For example, the requirehome variable
takes effect just by being included in the class. If this value is present, the
user must have a valid home directory.
:requirehome:\
After editing login.conf, you must update the login database to make the
changes take effect.
# cap_mkdb /etc/login.conf
This rebuilds the database file /etc/login.conf.db that is used for fast lookups,
much like /etc/spwd.db.
The default /etc/login.conf includes several example classes of users.
If you want an idea of what sort of restrictions to put on users for various
situations, check those examples. The following section offers ideas about
what can be set in a login class. For a complete listing of supported settings
in your version of FreeBSD, read man login.conf(5).
Resource Limits
Resource limits allow you to control how much of the system any one user
can monopolize at any one time. If you have several hundred users logged in
to one machine and one of those users decides to compile OpenOffice.org,
that person will consume far more than his fair share of processor time,
memory, and I/O. By limiting the resources one user can monopolize, you
can make the system more responsive for all users.
Table 7-3 defines the resource-limiting login.conf variables.

Securing Your System 199
Note that resource limits are frequently set per process. If you give each
process 20MB of RAM and allow 40 processes per user, you’ve just allowed
each user 800MB of memory. Perhaps your system has a lot of memory, but
does it really have that much?
Current and Maximum Resource Limits
In addition to the limits listed above, you can specify current and maximum
resource limits. Current limits are advisory, and the user can override them at
will. This works well on a cooperative system, where multiple users willingly
share resources but you want to notify those users who exceed the standard
resource allocation. Users cannot exceed maximum limits.
If you do not specify a limit as current or maximum, FreeBSD treats it as
a maximum limit.
To specify a current limit, add -cur to the variable name. To make a
maximum limit, add -max. For example, to set a current and a maximum limit
on the number of processes the user can have, use this input:
...
:maxproc-cur: 30:\
:maxproc-max: 60:\
...
One counterpart to resource limits is resource accounting. These days,
accounting isn’t as important as it was when today’s inexpensive computers
would cost tens of thousands of dollars, so we won’t discuss it in this book.
It’s more important to restrict a single user from consuming your system
than to bill for every CPU cycle someone uses. You should know that the
capability exists, however.
Class Environment
You can also define environment settings in /etc/login.conf. This can work
better than setting them in the default .cshrc or .profile, because login.conf
settings affect all user accounts immediately upon their next login. Some
shells, such as zsh(1), do not read either of these configuration files, so using
a class environment sets the proper environment variables for those users.
Table 7-3:
Some login.conf Variables for Limiting Resource Use
Variable Description
cputime The maximum CPU time any one process may use
filesize The maximum size of any one file
datasize The maximum memory size of data that can be consumed by one process
stacksize The maximum amount of stack memory usable by a process
coredumpsize The maximum size of a core dump
memoryuse The maximum amount of memory a process can lock
maxproc The maximum number of processes the user can have running
openfiles The maximum number of open files per process
sbsize The maximum socket buffer size a user’s application can set

200 Chapter 7
All of the environment fields recognize two special characters. A tilde (~)
represents the user’s home directory, while a cash symbol ($) represents the
username. Here are a few examples from the default class that illustrate this:
:setenv=MAIL= /var/mail/$,BLOCKSIZE=K,FTP_PASSIVE_MODE=YES:\
:path=/sbin /bin /usr/sbin /usr/bin /usr/games /usr/local/sbin /usr/
local/bin /usr/X11R6/bin ~/bin:\
By using the $ character, the environment variable MAIL is set to /var/
mail/<username> . Similarly, the last directory in the PATH variable is the bin
subdirectory in the user’s home directory .
Table 7-4 lists some common login.conf environment settings.
Password and Login Control
Unlike the environment settings, many of which can be set in places other
than the login class, most login and authentication options can only be
controlled from the login class. Here are some common authentication
options:
minpasswordlength
This specifies the minimum length of a password. It only takes effect
the next time the user changes his password; it does not go through
and check that all current passwords are of this length. Here, we set
the minimum password length to 28 characters. (This is a great way to
encourage use of SSH keys.)
\:minpasswordlen=28:\
Table 7-4:
Common login.conf Environment Settings
Variable Description
hushlogin If present, no system information is given out during login.
ignorenologin If present, these users can log in even when /var/run/nologin exists.
ftp-chroot If present, these users are chrooted when using FTP (see Chapter 15).
manpath A list of directories for the $MANPATH environment variable.
nologin If present, the user cannot log in.
path A list of directories for the $PATH environment variable.
priority Priority (nice) for the user’s processes (see Chapter 19).
setenv A comma-separated list of environment variables and their values.
umask Initial umask setting; should always start with 0, see builtin(1).
welcome Path to the login welcome message.
shell The full path of a shell to be executed upon login. This overrides the shell in
/etc/master.passwd. The user’s $SHELL, however, contains the shell from the
password file, resulting in an inconsistent environment. Playing games with
this is an excellent way to annoy your users.
term The default terminal type. Just about anything that tries to set a terminal type
overrides this.
timezone The default value of the $TZ environment variable.

Securing Your System 201
passwd_format
This sets the cryptographic hash used to store passwords in /etc/master
.passwd. The default is md5, for MD5 hashing. Other permissible options
are des (DES), blf (Blowfish), and nthash (Windows NT). DES is most
useful when you want to share passwords between different Unix-like
operating systems. Blowfish might be overkill, but on modern systems
CPU time is cheaper than dirt so it can’t hurt. The nthash algorithm is
most useful when you actively and passionately want someone to break
into your system, but I can’t recommend it for any other purpose.
mixpasswordcase
If present, FreeBSD complains if the user changes his password to an all-
lowercase word.
host.allow
This value lets users in this class use rlogin and rsh. Do not do this.
host.deny
This value is used for rlogin and rsh. Avoid it like fuzzy green meat.
times.allow
You can schedule when users may log in. This requires a comma-delimited
list of days and times. Days are given as the first two letters of the day’s
name (Su, Mo, Tu, We, Th, Fr, and Sa). Time is in standard 24-hour
format. For example, if a user can only log in on Wednesdays, between
8AM and 5 PM, you would use this entry:
:times.allow=We8-17:\
times.deny
The user cannot log in during this time window. Note that this does not
kick off a user if he’s already logged in. The format is the same as for
times.allow. If times.allow and times.deny overlap, times.deny takes
precedence.
File Flags
All Unix-like operating systems have the same filesystem permissions, assigning
read, write, and execute privileges for a file to the file’s owner, its group, and
all others. FreeBSD extends the permissions scheme with file flags which work
with permissions to enhance your system’s security. Some flags are used for
non-security-related functions, but we’ll pay special attention to the security
flags. You can find a complete list of file flags in man chflags(1).
Many of these flags have different effects depending on the system secure-
level, which we will cover in the next section. Understanding securelevels
requires an understanding of file flags, while file flags rely on securelevels.
For the moment, just nod and smile when you encounter a mention of
securelevels; all becomes clear in the next few pages.

202 Chapter 7
Here are the common file flags:
sappnd
The system-level append-only flag can only be set by root. Files with this
flag can be added to, but cannot be removed or otherwise edited. This is
particularly useful for log files. Setting sappnd on a user’s .history file can
be interesting if the account is compromised. Since a common intruder
tactic is to remove .history or symlink it to /dev/null so that the admin
cannot see what happened, sappnd ensures that script kiddies cannot
cover their tracks in this manner. It’s almost funny to review the record
of someone trying to remove a sappnd file; you can almost see the attacker’s
frustration grow as he tries various methods.3 This flag cannot be removed
when the system is running at securelevel 1 or higher.
schg
Only root can set the system-level immutable flag. Files with this flag set
cannot be changed in any way. They cannot be edited, moved, replaced,
or overwritten. Basically, the filesystem itself prevents all attempts to
alter this file. The flag cannot be removed when the system is running
at securelevel 1 or greater.
sunlnk
Only root can set the system-level undeletable flag on a file. The file can
be edited or altered, but it cannot be deleted. This is not as secure as the
previous two flags because if a file can be edited, it can be emptied. It’s still
useful for certain circumstances, however. I’ve used it to solve problems
when a program insisted on deleting its own log files upon a crash. It’s
not generally useful to set on any standard system files, however. This
flag cannot be removed when the system is running at securelevel 1 or
higher.
uappnd
The user-level append-only flag can only be set by the file owner or root.
Like the system-level append-only flag sappnd, a file with this flag set can
be added to but not otherwise edited or removed. This is most useful for
logs from personal programs and the like; it is primarily a means to let
users prevent accidental removal of their own files. The owner or root
can remove this flag.
uchg
The user-level immutable flag can only be set by the owner or root. Like
the schg flag, this immutable flag prevents anyone from changing the
file. Again, root can override this, and it can be disabled by the user at
any securelevel. This flag helps prevent mistakes, but it’s not a way to
secure your system.
3 It’s not funny enough to balance out letting intruders penetrate your system, of course, but it
can provide a brief moment of light in an otherwise ghastly day.

Securing Your System 203
uunlnk
The user-level undeletable flag can only be set by the owner or root.
A file with this flag set cannot be deleted by the owner. Root can over-
ride that, and the user can turn this flag off at any time, making this
mostly useless.
Setting and Viewing File Flags
Set flags with chflags(1). For example, to be sure that your kernel isn’t
replaced you could do this:
# chflags schg /boot/kernel/kernel
This would keep anyone, including you, from changing your kernel.
You can also recursively change the flags on an entire directory tree with
the -R flag. For example, to make your entire /bin directory immutable, run
this command:
# chflags -R schg /bin
And boom! Your basic system binaries cannot be changed.
To see what flags are set on a file, use ls -lo.
# ls -lo log
-rw-r--r-- 1 mwlucas mwlucas sappnd 0 Nov 12 12:37 log
The sappnd entry tells us that the system append-only flag is set on this
log. For comparison, if a file has no flags set, it looks like this:
# ls -lo log
-rw-r--r-- 1 mwlucas mwlucas - 0 Nov 12 12:37 log
The dash in place of the flag name tells us that no flag has been set.
An out-of-the-box FreeBSD install doesn’t have many files marked with
flags, but you can flag anything you want. On one system that I fully expected
to be hacked I went berserk with chflags -R schg in various system directories to
prevent anyone from replacing system binaries with trojaned versions. It might
not stop an attacker from getting in, but it made me feel better to imagine
how frustrated he would be once he gets to a command prompt.
To remove a file flag, use chflags and a no in front of the flag name.
For example, to unset the schg flag on your kernel, enter this command:
# chflags noschg /boot/kernel/kernel
That said, you must be running at securelevel −1 to unset this flag. So,
without further ado, let’s discuss securelevels and what they mean to you.

204 Chapter 7
Securelevels
Securelevels are kernel settings that change basic system behavior to
disallow certain actions. The kernel behaves slightly differently as you raise
the securelevel. For example, at low securelevels file flags can be removed.
A file might be flagged immutable—but you can remove the flag, edit the
file, and reflag it. When you increase the securelevel, the file flag cannot be
removed. Similar changes take place in other parts of the system. Taken as a
whole, the behavior changes that result from increased securelevels either
frustrate or stop an intruder. Enable securelevels at boot with the rc.conf
option kern_securelevel_enable="YES".
Securelevels complicate system maintenance by imposing restrictions on
your behavior. After all, many system administration tasks are also things
intruders might do to cover their tracks. For example, at certain securelevels
you cannot format or mount new hard drives while the system is running.
On the other hand, securelevels hamper intruders even more than they
hamper you.
Securelevel Definitions
Securelevels come in 5 degrees: −1, 0, 1, 2, and 3, with −1 being the lowest
and 3 the highest. Once you enable securelevels with the kern_securelevel_
enable rc.conf option, you can set the securelevel at boot with the kern_
securelevel rc.conf variable. You can raise the securelevel at any time, not just
at boot, but you cannot lower it without rebooting into single-user mode. After
all, if you could lower the securelevel at any time so could your intruder!
Securelevel
−
1
The default provides no additional kernel security whatsoever. If you’re learn-
ing FreeBSD and are frequently changing your configuration, remain at
securelevel −1 and use the built-in file permissions and other Unix safe-
guards for security.
Securelevel 0
The only time securelevel 0 is used is during booting, and it offers no special
features. When the system reaches multi-user mode, however, the securelevel
is automatically raised to 1. Setting kern_securelevel=0 in /etc/rc.conf is effectively
the same as setting kern_securelevel=1. This might be helpful, however, if you
have startup scripts that perform actions prohibited by a higher securelevel.
Securelevel 1
At securelevel 1, the basic secure mode, things become interesting:
System-level file flags may not be turned off.
You cannot load or unload kernel modules (see Chapter 5).
Programs cannot write directly to system memory via either /dev/mem or
/dev/kmem.

Securing Your System 205
Nothing can access /dev/io.
Mounted disks cannot be written to directly. (You can write files to disk,
you just cannot address the raw disk devices.)
The most obvious effect of securelevel 1 for ordinary users is that the
BSD-specific filesystem flags cannot be altered. If a file is marked system-level
immutable, and you want to replace it, too bad.
Securelevel 2
Securelevel 2 has all the behaviors of securelevel 1, with two additions:
Disks cannot be opened for writing, whether mounted or not.
You cannot alter system time by more than one second.
Both of these seem irrelevant to new sysadmins, but they provide
important security protections. Although Unix provides handy tools like text
editors to write files, it is also possible to bypass those tools and even bypass
the actual filesystem to access the underlying ones and zeroes on the hard
drive. If you do this, you can change any file regardless of the file permissions.
The only time this commonly happens is when you install a new hard drive
and must create a filesystem on it. Normally, only the root user can write
directly to the disk in this manner. At securelevel 2, even root cannot do this.
Similarly, another old hacker trick is to change the system time, edit a
file, and change the time back. That way, when the administrator looks for
files that might be causing trouble, the tampered file appears to have been
untouched for months or years, and hence not seem an obvious source of
concern.
Securelevel 3
Securelevel 3 is the network secure mode. In addition to the settings of
securelevels 1 and 2, you cannot adjust packet filter rules. The firewall
on your host is immutable. If you have a system with packet filtering or
bandwidth management enabled, and those rules are well tuned and
unlikely to change, you can use securelevel 3.
Which Securelevel Do You Need?
The securelevel appropriate for your environment depends entirely upon
your situation. For example, if you’ve just put a FreeBSD machine into
production and are still fine-tuning it, leave the securelevel at −1. Once
your system is tuned, however, you can raise the securelevel. Most production
systems run just fine at securelevel 2.
If you use one of FreeBSD’s packet filtering or firewall packages,
securelevel 3 might look tempting. Be very sure of your firewall rules before
you enable this, however! Securelevel 3 makes it impossible to change your
firewall without disrupting your connection. Are you 100 percent certain
that none of your customers will ever call in to say, “Here’s a check, double
my bandwidth”?
206 Chapter 7
What Won’t Securelevels and File Flags Accomplish?
Consider a case where someone compromises a CGI script on your Apache
web server, uses that to bootstrap into a shell, and then uses the shell to
bootstrap himself into root access.
If you’ve set the securelevel accordingly, perhaps this attacker will
become frustrated because he can’t replace your kernel with his specially
compiled one. No problem; he can still replace assorted system programs
with trojaned versions—so that the next time you log in, your new version of
login(1) sends your password to an anonymous web-based mailbox or to an
Internet newsgroup.
So, to protect your key files, you run around doing chflags schg -R /bin/*,
chflags schg -R /usr/lib, and so on. Fine. If you forget one file—say, some-
thing obscure like /etc/rc.bsdextended—your intruder can edit that file to
include chflags -R noschg /. He can then reboot your system late at night
when you might not notice. How often do you sit down and exhaustively
audit your /etc/rc files?
You think that your system is safe, with every file completely protected.
But what about /usr/local/etc/rc.d, the local program startup directory? The
system boot process tries to execute any file with a name ending in .sh in this
directory. Your intruder could therefore do a lot of damage by placing a simple
shell script there. After all, /etc/rc raises the securelevel at the end of the boot
process. What if he were to create a shell script that kills the running /etc/rc
before it could raise the securelevel, then turns around and runs his own
/var/.hidden/rc.rootkit to finish bringing the system up?
Of course, these are only a couple of possibilities. There are others,
limited only by your intruder’s creativity. Just remember that system security
is a thorny problem with no easy solution. Once intruders have a command
prompt, it’s you against them. And if they’re any good, you won’t even notice
the penetration until it’s too late. By following good computing practices and
keeping your system up to date, you can stop them from intruding in the first
place. Do not allow securelevels to make you lazy!
Living with Securelevels
If you’ve been liberal with the schg flag, you will soon find that you can’t
upgrade or patch your system conveniently. The fact is, the same conditions
that make intruders’ lives difficult can make yours a living hell if you don’t
know how to work with them.
If you’ve frozen your /etc/rc.conf with schg, you must lower the securelevel
to change the programs running on your system. Of course, the securelevel
setting is in that file, so in order to edit it, you must take control of the system
before /etc/rc runs. That means you must boot into single-user mode (as dis-
cussed in Chapter 3), mount your filesystems, run chflags noschg on the files in
question, and continue booting. You can even entirely disable securelevels
in /etc/rc.conf and work normally while the system runs. You’ll restore service
more quickly that way, but lose the protections of the file flags.

Securing Your System 207
After you’ve finished maintenance, you can raise (but not lower) the
securelevel by changing the kern.securelevel sysctl to your desired securelevel.
# sysctl kern.securelevel=3
Now that you can control file changes, let’s consider controlling access
to your system from the network.
Network Targets
Intruders normally break into applications that listen to the network, not the
operating system itself. An operating system may or may not help defend a
piece of software against network attacks, but the intrusion itself starts with
the application. One way to reduce the number of attacks that can be carried
out against your server is to identify all of the programs that are listening to
the network and disable any that are not strictly necessary. FreeBSD provides
sockstat(1) as an easy way to identify programs that are listening to the
network.
We cover sockstat in detail in Chapter 6; running sockstat -4 shows all
open IPv4 TCP/IP ports. Every network port you have open is a potential
weakness and a potential target. Shut down unnecessary network services and
secure those you must offer.
It’s a good idea to regularly review which ports are open on your systems,
because you might learn something that surprises you. You might find that
some piece of software you’ve installed has a network component that you
were not aware of, and it’s been quietly listening to the network.
Once you know what’s running, how do you turn off what you don’t
need? The best way to close these ports is to not start the programs that run
them. Network daemons generally start in one of two places: /etc/rc.conf or
a startup script in /usr/local/etc/rc.d. Programs that are integrated with the
main FreeBSD system, such as sendmail(8), sshd(8), and rpcbind(8), have
flags in rc.conf to enable or disable them, as do many add-on programs. A few
add-on programs such as web servers start via scripts in /usr/local/etc/rc.d. See
Chapter 3 for details on enabling and disabling programs at startup.
WORKSTATION VS. SERVER SECURITY
Many companies I’ve seen have tightly secured servers, but pay little attention
to workstation security. A prospective intruder doesn’t care if a system is a server
or a workstation, however. Many servers and firewalls have special rules for the
sysadmin’s workstation. An intruder will happily penetrate a workstation and try
to leverage that into server access. While server security is key, don’t neglect work-
stations—especially your workstation!
208 Chapter 7
Putting It All Together
Once you have only the necessary network ports open, and you know which
programs are using those ports, you know which programs you must be
most concerned about securing. If the FreeBSD security team sends out
an announcement of a problem with a service you don’t run, you can safely
delay implementing a fix until your next maintenance window. If, however,
the security team announces a hole in programs you are using, you know you
have to implement a fix as soon as possible. If they announce a serious security
problem with a piece of network software you’re using, you know you must
act quickly. Simply being able to respond intelligently and quickly to real
risks helps protect you against most intruders. Tools such as file flags and
securelevels minimize the damage successful intruders can do. Finally,
using groups to restrict your own system administrators to particular
sections of the system can protect your computers from both accidental
and deliberate damage.

8
DISKS AND FILESYSTEMS
The importance of managing filesystems
and disks cannot be overemphasized.
(Go ahead, try to emphasize it too much.
I’ll wait.) Your disks contain your data, making
reliability and flexibility paramount to the operating
system. FreeBSD supports a variety of filesystems and
has many different ways to handle them. In this chapter
we’ll consider the most common disk tasks every system
administrator performs.
Disk Drives 101
Most people treat disk drives as fragile magic boxes. If you treat a drive badly,
you can make the drive screech and grind, and with enough abuse, you can
let the magic smoke escape so it will never work again. To really understand

210 Chapter 8
filesystems, you must know a little bit about what’s going on inside the drive.
If you have a dusty old disk drive that you no longer have any respect for, feel
free to crack the case and follow along.
Inside the hard drive case you’ll find a stack of round aluminum or
plastic disks, commonly called platters. When the drive is active, the platters
spin at thousands of revolutions per minute. The RPM count on hard drives
measures platter rotation speed.
A thin layer of magnetic media covers the platters. This magnetic material
is arranged in thousands of circular rings, called tracks, that extend from the
platter’s inner core to its outer edge, much like the growth rings in a tree.
These tracks hold data as strings of zeros and ones. Each track is subdivided
into sectors. Each sector on the outer tracks holds more data than a corre-
sponding sector on an inner track, and reading a constant amount of data
takes less time on an outer track than on an inner track because any point
on the outer track is moving faster.
Heads, mounted over each platter, write and read data as the platters pass
by, much like a phonograph needle. These heads can read and write data
quickly, but they must wait for the disk to move into the proper position under
them. Drive performance basically boils down to how quickly those platters can
move under the drive heads, which is what makes RPM important.
Device Nodes
We touched briefly on device nodes in Chapter 3, but let’s consider them in
more detail. Device nodes are special files that represent hardware on the
system. They’re used as logical interfaces between user programs and either
a device driver or a physical device. By using a command on a device node,
sending information to a device node, or reading data from a device node,
you’re telling the kernel to perform an action upon a physical device. These
actions can be very different for different devices—writing data to a disk
is very different than writing data to a sound card. All device nodes exist
in /dev.
Before you can work with a disk or disk partition, you must know its
device name. FreeBSD disk device nodes come from the names of the device
drivers for that type of hardware. Device driver names, in turn, come from
the chipset used in the device and not from what the device appears to be.
Table 8-1 shows the most common disk device nodes. See the man page
for each if you want the full details.
ATA, SATA, SCSI, AND SAS
I assume that you’re familiar with the basics of the standard disk storage technologies.
If you’re not, please spend a few moments online with any of the excellent tutorials
on these subjects, or even the brief articles available on Wikipedia. I’ll make sug-
gestions here and there about how these technologies can be used, but SCSI IDs
and LUNs are a subject for another book.

Disks and Filesystems 211
Disks attached to most hardware RAID controllers don’t use device
names for each disk. Instead, these RAID controllers present a virtual disk
for each RAID container, using a device node named after the RAID driver.
For example, the amr(4) driver presents its virtual disks as /dev/amrd*. A
few RAID cards use the cam(4) abstraction layer, so their hard drives do
show up as /dev/da* devices.
Hard Disks and Partitions
While we discussed partitioning in Chapter 2, let’s consider partitions from a
disk device perspective. The first possible ATA disk on our first ATA controller
is called /dev/ad0. Subsequent disks are /dev/ad1, /dev/ad2, and so on. Sub-
divisions of each disk start with this name and add something at the end, like
/dev/ad0s1b. While you might expect a disk to be a monolithic whole, you’ll
see lots of subdivisions if you look in /dev for everything that begins with
/dev/ad0.
# ls /dev/ad*
/dev/ad0 /dev/ad0s1a /dev/ad0s1c /dev/ad0s1e
/dev/ad0s1 /dev/ad0s1b /dev/ad0s1d /dev/ad0s1f
So, what are all these subdivisions? Think back to when you allocated
disk space. If you followed the recommendations in this book, you used the
whole disk for FreeBSD. You could have created a second chunk of disk for
a second operating system, or even cut the disk into two FreeBSD sections.
These sections are called partitions in the Microsoft and Linux worlds, and
slices in FreeBSD land. The s1 in the preceding list represents these large parti-
tions, or slices. The drive ad0 has one slice, ad0s1, with further subdivisions
marked by letters.
In FreeBSD, a partition is a further subdivision within a slice. You created
partitions inside the slice during the install. Each partition has a unique device
node name created by adding a letter to the slice device node. For example,
partitions inside the slice /dev/ad0s1 show up as /dev/ad0s1a, /dev/ad0s1b,
/dev/ad0s1c, and so on. Each partition you created—/usr, /var, and so on—is
assigned one of these device nodes.
You can assign partition device names almost arbitrarily, with some
exceptions. Tradition says that the node ending in a (in our example,
/dev/ad0s1a) is the root partition, and the node ending in b (/dev/ad0s1b) is
Table 8-1:
Storage Devices and Types
Device Node Man Page Description
/dev/fd* fdc(4) Floppy disks
/dev/acd* acd(4) IDE CD drives
/dev/ad* ad(4) ATA and SATA hard disks and partitions
/dev/cd* cd(4) SCSI CD drives
/dev/da* da(4) SCSI and SAS hard disks, USB and flash storage, etc.

212 Chapter 8
the swap space. The c label indicates the entire slice, from beginning to
end. You can assign d through h to any partition you like. You can have only
eight partitions in one slice, and up to four slices per drive. For example, the
device node /dev/ad0s1a is disk number 0, slice 1, partition 1, and is probably
the root filesystem. The device node /dev/ad1s2b is on disk number 2, and
is probably swap space.
If you have non-ATA disks, substitute the appropriate device for /dev/ad.
The Filesystem Table: /etc/fstab
So, how does your system map these device names to partitions? With the
filesystem table, /etc/fstab. In that file, each filesystem appears on a separate
line, along with any special options used by mount(8). Here’s a sample entry
from a filesystem table:
/dev/ad4s2a / ufs rw 1 1
The first field in each entry gives the device name.
The second field lists the mount point, or the directory where the
filesystem is attached. Every partition you can write files to is attached to a
mount point such as /usr, /var, and so on. A few special partitions, such as
swap space, have a mount point of none. You can’t write files to swap space—
at least, not if you want to use either the file or the swap space!
Next, we have the type of filesystem on this partition. The standard
FreeBSD partition is of type ufs, or Unix Fast File System. The example
below includes swap (swap space), cd9660 (CD), and nfs (Network File System).
Before you can attach a partition to your directory tree, you must know
what sort of filesystem it has. As you might guess, trying to mount a DOS
floppy as an FFS filesystem will fail.
The fourth field shows the mount options used on this filesystem. The
mount options tell FreeBSD to treat the filesystem in a certain matter. We’ll
discuss mount options in more detail later in this chapter, but here are a few
special ones used only by /etc/fstab:
ro The filesystem is mounted as read-only. Not even root can write to it.
rw The filesystem is mounted read-write.
noauto FreeBSD won’t automatically mount the filesystem, neither at
boot nor when using mount -a. This option is useful for removable media
drives which might not have media in them at boot.
ATA DISK NUMBERING
Just because the first possible ATA disk on the system would be /dev/ad0 doesn’t
mean that you have to have a hard drive /dev/ad0 installed. My laptop’s hard
drive is /dev/ad4 because it’s on a RAID controller, not on the built-in ATA controller.
SCSI and SAS hard drives are smarter about this and generally number the first
disk with /dev/da0 no matter where they’re attached. Removing the kernel option
ATA_STATIC_ID makes ATA disks start numbering at 0, if you desire.

Disks and Filesystems 213
The fifth field tells the dump(8) whether or not this filesystem needs
dumping. If set to 0, dump won’t back up the filesystem at all. Otherwise, the
number gives the minimum dump level needed to trigger a backup of this
filesystem. See Chapter 4 for details.
The last field, Pass#, tells the system when to check the filesystem’s
integrity during the boot process. All of the partitions in the same Pass# are
checked in parallel with fsck(8). Only the root filesystem has a Pass# of 1,
and it is checked first. All other filesystems are set to 2, which means that
FreeBSD mounts them after the root filesystem. Swap and read-only media
don’t require integrity checking, so are set to 0.
With this knowledge, let’s look at a complete /etc/fstab.
# Device Mountpoint FStype Options Dump Pass#
/dev/ad4s1b none swap sw 0 0
/dev/ad4s2a / ufs rw 1 1
/dev/ad4s1a /amd64 ufs rw 2 2
/dev/ad4s1f /amd64/usr ufs rw 2 2
/dev/ad4s1d /amd64/var ufs rw 2 2
/dev/ad4s1e /tmp ufs rw 2 2
/dev/ad4s2e /usr ufs rw 2 2
/dev/ad4s2d /var ufs rw 2 2
/dev/ad4s3d /home ufs rw 2 2
/dev/acd0 /cdrom cd9660 ro,noauto 0 0
data:/mp3 /mp3 nfs rw,noauto,soft 0 0
Our first entry, /dev/ad4s1b , is swap space. It isn’t mounted anywhere;
FreeBSD uses swap as secondary memory.
The second entry is the root partition. Note the device name—while
swap is partition b on slice 1, the root filesystem is partition a on slice 2. The
root directory is on a different slice than the swap space!
The third partition is /dev/ad4s1a . We’d normally expect the root par-
tition to be here, but instead it’s mounted as /amd64. The next two partitions
are also on slice 1, but mounted under /amd64.
Our /tmp filesystem is a partition on slice 1, which contains the /amd64
filesystem.
The next entries, /usr and /var , are normal-looking partitions on
slice 2.
The next partition, /home , is on the same disk, slice 3, partition d.
Where the heck did slice 3 come from?
Our CD drive is mounted on /cdrom and is not automatically mounted
at boot.
The final entry doesn’t start with a device node. This is a Network File
System (NFS) entry, and it tells us to mount the partition mp3 on the machine
data as /mp3 on the local machine when we specifically request it. We’ll talk
about NFS later in this chapter.
This filesystem table comes from a dual-boot machine, running FreeBSD/
i386 and FreeBSD/amd64. That’s why the table doesn’t look quite normal.
I can access the amd64 filesystem and use the amd64 swap space while
running the i386 slice.

214 Chapter 8
What’s Mounted Now?
If not all filesystems are mounted automatically at boot, and if the sysadmin
can request additional mounts, how can you determine what’s mounted
right now on the system? Run mount(8) without any options to see a list of
all mounted filesystems.
# mount
/dev/ad4s2a on / (ufs, local)
devfs on /dev (devfs, local)
/dev/ad4s1e on /tmp (ufs, local, soft-updates)
/dev/ad4s2e on /usr (ufs, local, soft-updates)
/dev/ad4s2d on /var (ufs, local, soft-updates)
/dev/ad4s3d on /usr/home (ufs, local, soft-updates)
Here we see that our filesystems are almost all standard UFS partitions.
The word local means that the partition is on a hard drive attached to this
machine. We also see soft-updates, a feature of the FreeBSD filesystem we’ll
discuss later in this chapter. If you’re using features such as NFS or SMB to
mount partitions, they’ll appear here.
mount(8) is a quick way to get the device names for each of your
partitions, but it also provides other functions.
Mounting and Unmounting Disks
mount(8)’s main purpose is to mount partitions onto your filesystem. If you’ve
never played with mounting before, boot your FreeBSD machine into the
single-user mode (see Chapter 3) and follow along.
In single-user mode FreeBSD has mounted the root partition read-only.
The root partition contains just enough of the system to perform basic setup,
get core services running, and find the rest of the filesystems. Those other
filesystems are not mounted, so their content is inaccessible. Go ahead and
look in /usr on a system in single-user mode; it’s empty. FreeBSD hasn’t lost
the files, it just hasn’t mounted the partition with those files on it yet. To do
anything interesting in single-user mode, you must mount other filesystems.
Mounting Standard Filesystems
To manually mount a filesystem listed in /etc/fstab, such as /var or /usr, give
mount(8) the name of the filesystem you want to mount.
# mount /usr
This mounts the partition exactly as listed in /etc/fstab, with all the options
specified in that file. If you want to mount all the partitions listed in /etc/fstab,
use mount’s -a flag.
# mount -a

Disks and Filesystems 215
Mounting at Nonstandard Locations
Perhaps you need to mount a filesystem at an unusual point. I do this most
commonly when installing a new disk. Use the device name and the desired
mount point. If my /usr partition is /dev/ad0s1e, and I want to mount it on
/mnt, I would run:
# mount /dev/ad0s1e /mnt
Unmounting a Partition
When you want to disconnect a filesystem from the system, use umount(8) to
tell the system to unmount the partition. (Note that the command is umount,
not unmount.)
# umount /usr
You cannot unmount filesystems that are in use by any program. If you
cannot unmount a partition, you’re probably accessing it somehow. Even a
command prompt in the mounted directory prevents you from unmounting
the underlying partition.
How Full Is a Partition?
To get an overview of how much space each partition has left, use df(1). This
provides a list of partitions on your system, the amount of space used by each
one, and where it’s mounted. The annoying thing about df is that it defaults
to providing information in 1KB blocks. This was fine when disks were much
much smaller, but counting out blocks can make you go cross-eyed today.
Fortunately, the -h and -H flags provide human-readable output. The small
-h uses base 2 to create a 1,024-byte megabyte, while the large -H uses base
10 for a 1,000-byte megabyte. Typically, network administrators and disk man-
ufacturers use base 10, while system administrators use base 2.1 Either works
so long as you know which you’ve chosen. I’m a network administrator, so
you get to suffer through my prejudices in these examples, despite what my
tech editor thinks.
# df -H
Filesystem Size Used Avail Capacity Mounted on
/dev/ad4s2a 520M 301M 177M 63% /
devfs 1.0k 1.0k 0B 100% /dev
/dev/ad4s1e 520M 2.4M 476M 0% /tmp
/dev/ad4s2e 11G 4.1G 5.9G 41% /usr
/dev/ad4s2d 1.0G 322M 632M 34% /var
/dev/ad4s3d 49G 43G 2.0G 96% /usr/home
1 This discussion is even less productive than the “Emacs versus vi” argument. And I bet you
thought no such argument could exist!

216 Chapter 8
Here we see the partition name, the size of the partition, the amount of
space used, the amount of space available, the percent of space used, and the
mount point. For example, the home directory on this machine is 96 percent
full, but it still has 2GB of disk free. The root partition is only 63 percent full,
but it has only 177MB free.
FFS holds back 8 percent of the disk space for on-the-fly optimization.
This is used for moving files and reducing fragmentation. You can overfill
your disks and see negative disk space remaining. When this happens, disk
performance drops dramatically. It is best to keep a little free space on your
partitions, so that FFS can continually defragment itself. While you can adjust
the filesystem to reduce the amount of reserved space, this negatively impacts
performance and is basically unwise. See tunefs(8) if you really want to try it.
The obvious question is, “What is taking up all that space?” If your systems
are like mine, disk usage somehow keeps growing for no apparent reason.
You can identify individual large files with ls -l, but recursively doing this
on every directory in the system is impractical.
du(1) displays disk usage in a single directory. Its initial output is intimi-
dating and can scare off inexperienced users. Here, we use du(1) to find out
what’s taking up all the space in my home directory:
# cd $HOME
# du
1 ./bin/RCS
21459 ./bin/wp/shbin10
53202 ./bin/wp
53336 ./bin
5 ./.kde/share/applnk/staroffice_52
6 ./.kde/share/applnk
...
This goes on and on, displaying every subdirectory and giving its size in
blocks. The total of each subdirectory is given—for example, the contents of
$HOME/bin totals 53,336 blocks, or roughly 53MB. I could sit and let du(1)
list every directory and subdirectory, but then I’d have to dig through much
more information than I really want to. And blocks aren’t that convenient a
measurement, especially not when they’re printed left-justified.
Let’s clean this up. First, du(1) supports an -h flag much like df. Also, I
don’t need to see the recursive contents of each subdirectory. We can control
the number of directories we display with du’s -d flag. This flag takes one
$BLOCKSIZE
Many disk tools show sizes in blocks of 512 bytes, or one-half KB. If you set the
environment variable $BLOCKSIZE to k, df(1) and many other programs display
file sizes in blocks of 1KB, which is much more useful. Others like a setting of 1M,
for sizes in megabytes.

Disks and Filesystems 217
argument, the number of directories you want to explicitly list. For example,
-d0 goes one directory deep and gives a simple subtotal of the files in a
directory.
# du -h -d0 $HOME
37G /home/mwlucas
I have 37 gigs of data in my home directory? Let’s look a layer deeper
and identify the biggest subdirectory.
# du -h -d1
38K ./bin
56M ./mibs
...
34G ./mp3
...
Apparently I must look elsewhere for storage space, as the data in my
home directory is too important to delete.
If you’re not too attached to the -h flag, you can use sort(1) to find the
largest directory with a command like du -kxd 1 | sort -n.
The Fast File System
FreeBSD’s filesystem, the Fast File System (FFS), is a direct descendant of
the filesystem shipped with BSD 4.4. One of the original FFS authors still
develops the FreeBSD filesystem and has added many nifty features in recent
years. FFS is sometimes called UFS (for Unix File System), and many system
utilities still call FFS partitions UFS. FreeBSD is not the only operating system
to still use the 4.4 BSD filesystem or a descendant thereof. If a Unix vendor
doesn’t specifically tout its “improved and advanced” filesystem, it is almost
certainly running a derivative of FFS.
FFS is designed to be fast and reliable, and to handle the most common
situations as effectively as possible while still supporting unusual situations
reliably. FreeBSD ships with FFS configured to be as widely useful as possible
on relatively modern hardware, but you can choose to optimize a particular
filesystem for trillions of small files or a half-dozen 30GB files if you must.
You don’t have to know much about FFS’s internals, but you do need to
understand blocks, fragments, and inodes, if nothing else.
Blocks are segments of disk that contain data. FreeBSD defaults to 16KB
blocks. Not all files are even multiples of 16KB, so FFS uses fragments to store
leftovers. The standard is one-eighth of the block size, or 2KB. For example,
a 20KB file would fill one block and two fragments. Inodes are index nodes,
special blocks that contain basic data such as a file’s size, permissions, and
the list of blocks that this file uses. Collectively, the data in an inode is known
as metadata, or data about data. This arrangement isn’t unique to FFS; other
filesystems such as NTFS use data blocks and index nodes as well. The index-
ing system used by each filesystem is largely unique, however.
218 Chapter 8
Each filesystem has a certain number of inodes, proportional to the
filesystem size. A modern disk probably has hundreds of thousands of inodes
on each partition, which is sufficient to support hundreds of thousands of
files. If you have a truly large number of very tiny files, however, you might
need to rebuild your filesystem to support additional inodes. Use df -i to see
how many inodes remain free on your filesystem. If you must rebuild your
filesystem to increase the number of inodes, see Chapter 18.
Vnodes
Inodes and blocks worked wonderfully in Unix’s early days, when hard drives
were permanently attached to machines. As time passed, however, swapping
disks between different machines and even different operating systems became
common. CDs, with their unique read-only filesystem, became popular,
floppy disks slowly converged on the FAT32 filesystem as a standard, and
other Unix-like systems developed their own variant filesystems. Since BSD
needed to speak to all those different systems, another layer of abstraction
was needed.
That abstraction was the virtual node, or vnode. Users never manipulate
vnodes directly, but you’ll see references to them throughout the system
documentation. The vnode is a translator between the kernel and whatever
specific filesystem type you’ve mounted. Every tool that reads and writes to
disks actually does so through vnodes, which map the data to the appropriate
filesystem for the underlying media. When you write a file to an FFS filesystem,
the kernel addresses data to a vnode which, in turn, is mapped to an inode.
When you write a file to a FAT32 filesystem, the kernel addresses data to a
vnode mapped to a point in the FAT32 filesystem. You use inodes only when
dealing with FFS filesystems, but you’ll use vnodes when dealing with any
filesystem.
FFS Mount Types
Unlike Windows filesystems, FreeBSD treats FFS partitions differently
depending on how they’re mounted. The manner in which a partition is
mounted is called the mount type. If you’re mounting a partition manually,
you can specify mount options on the command line, but if you’re using
/etc/fstab to mount it, you must specify any choice in the Options column.
Use -o mounttype to specify a mount type on the command line, or specify
the option in /etc/fstab in the Options column.
Read-Only Mounts
If you want to look at the contents of a disk but not write to it, mount the
partition read-only. In most cases, this is the safest and the most useless way
to mount a disk, because you cannot alter the data on the disk or write any
new data.
Disks and Filesystems 219
Many system administrators mount the root partition, and perhaps even
/usr, as read-only to minimize potential system damage from a loss of power
or software problems. Even if you lose the physical hard drive due to a power
surge or other hardware failure, the data on the platters remains intact.
That’s the advantage of read-only mounts. The disadvantage is that system
maintenance becomes much more difficult because you cannot write to read-
only disks!
Read-only mounts are especially valuable when your computer is
damaged. While FreeBSD won’t let you perform a standard read-write
mount on a damaged or dirty filesystem, it can perform a read-only mount
most of the time. This gives you a chance to recover data from a dying system.
To mount a filesystem read-only, use one of the options rdonly or ro.
Both work identically.
Synchronous Mounts
Synchronous (or sync) mounts are the old-fashioned way of mounting file-
systems. When you write to a synchronously mounted disk, the kernel waits
to see whether the write is actually completed before informing the program.
If the write did not complete successfully, the program can choose to act
accordingly.
Synchronous mounts provide the greatest data integrity in the case of a
crash, but they are also slow. Admittedly, “slow” is relative today, when even a
cheap disk outperforms what was the high end several years ago. Consider
using synchronous mounting when you wish to be truly pedantic on data
integrity, but in almost all cases it’s an overkill.
To mount a partition synchronously, use the option sync.
Asynchronous Mounts
While asynchronous mounts are pretty much supplanted by soft updates,
you’ll still hear about them. For faster data access at higher risk, mount your
partitions asynchronously. When a disk is asynchronously mounted, the kernel
writes data to the disk and tells the writing program that the write succeeded
without waiting for the disk to confirm that the data was actually written.
Asynchronous mounting is fine on disposable machines, but don’t use it with
important data. The performance difference between asynchronous mounts
and noasync with soft updates is very small.
To mount a partition asynchronously, use the option async.
Noasync Mounts
Finally, we have a method that combines sync and async mounts, called
noasync. This is FreeBSD’s default. When using noasync mounts, data that
affects inodes is written to the disk synchronously, while actual data is handled
asynchronously. Combined with soft updates (see later in this chapter), a
noasync mount creates a very robust filesystem.
Noasync mounts are the default, and you don’t need to specify anything.
220 Chapter 8
FFS Mount Options
FreeBSD supports several mount options in addition to the mount types.
These options change the behavior of mounted filesystems.
noatime
Every file in FFS includes an access-time stamp, called the atime, which
records when the file was last accessed. If you have a large number of files
and don’t need this data, you can mount the disk noatime so that FFS does
not update this timestamp. This is most useful for flash media or disks that
suffer from heavy load, such as Usenet news spool drives.
noexec
The noexec mount option prevents any binaries from being executed on this
partition. Mounting /home noexec can help prevent users from running their
own programs, but for it to be effective, be sure to also mount /tmp, /var/tmp,
and anywhere else users can write their own files noexec as well. Also note
that a noexec mount doesn’t prevent a user from running a shell script,
which is just a set of instructions for a program elsewhere in the system.
Another common use for a noexec mount is when you have on your server
binaries for a different operating system or a different hardware architecture
and you don’t want anyone to execute them.
nosuid
The nosuid option prevents setuid programs from running on your system.
Setuid programs allow users to run programs as if they’re another user. For
example, programs such as login(1) must perform actions as root but must
be run by regular users. Setuid programs obviously must be written carefully
so that intruders cannot exploit them to get unauthorized access to your
system. Many system administrators habitually disable all unneeded setuid
programs. You can use nosuid to disable setuid programs on a partition, but
script wrappers like suidperl get around this.
nosymfollow
The nosymfollow option disables symlinks, or aliases to files. Symlinks are
mainly used to create aliases to files that reside on other partitions. To create
an alias to another file on the same partition, use a regular link instead. See
ln(1) for a discussion of links.
Aliases to directories are always symlinks; you cannot use a hard link
for that.
Soft Updates and Journaling with FFS
Soft updates is a technology to organize and arrange disk writes so that file-
system metadata remains consistent at all times, giving nearly the performance
of an async mount with the reliability of a sync mount. While that doesn’t
mean that all data will be safely written to disk—a power failure at the

Disks and Filesystems 221
wrong moment can still lose data—soft updates prevent many problems.
If the system has a failure, soft updates can run its filesystem checks in the
background while the system runs. In my opinion, soft updates are suitable
for partitions of less than 80GB or so.
As of FreeBSD 7.0, FFS also supports journaling. A journaling filesystem
records all changes made to the filesystem on a separate part of the disk, so
that if the system shuts down unexpectedly, data changes can be recovered
from the journal automatically upon restart. This eliminates the need to run
fsck(8). Each journaled filesystem uses about 1GB for the journal, which
means that journaling is wasteful on small filesystems. However, FreeBSD’s
journaling differs from most journaled filesystems in that the journal is main-
tained in a disk layer beneath the filesystem rather than in the filesystem
itself. This journaling is brand new in FreeBSD and is still considered some-
what experimental.
For example, as of this writing, I have a logging host. Most of the par-
titions are less than 10GB, but /var is almost two terabytes. I journal /var,
but use soft updates on the other partitions. Between background fsck and
journaling, system recovery after an unexpected power outage is fast and
painless.
We’ll talk more about journaling and gjournal in Chapter 18.
Write Caching
FFS works best with SCSI and SAS drives due to the robustness of the SCSI
architecture. FFS also works as well as the ATA architecture allows, with one
critical exception: Many modern IDE drives support write caching.
Write caching IDE drives have a small onboard chip. This chip records
data that needs to be written to the drive. This can be tricky for soft updates
and for journaling, because these technologies expect honest hard drives—
when the hard drive reports the data is written to disk, the soft updates mech-
anism expects the data to actually be on that platter. But IDE write caching
reports success as soon as the data is stored in the drive’s cache, not when it
has been written to disk. It might be a second or more until that data is
actually safely stored.
While this doesn’t pose a big risk if it happens occasionally, write caching
occurs continuously on a server. Therefore, if you care about your data,
disable write caching by adding the following to /boot/loader.conf:
hw.ata.wc=0
Disabling write caching slows the IDE drive, but eliminates the risk. I use
write caching on desktop and laptop systems, where data is not being con-
tinuously written to the disk, but on servers it’s a bad idea to leave caching
on. You can either tell your management that the ATA-based server is
throttled and you need more hardware, or you can tell them that you’re
missing data because you overstressed the hardware. Personally, I prefer
the former.
222 Chapter 8
Snapshots
FFS with soft updates can take an image of a disk at a moment in time, or a
snapshot. You’ll find these snapshots in the .snapshot directory in the root of
each partition.
While you don’t perform system administration on snapshots, various
tools take advantage of snapshots. For example, dump(8) backs up a snapshot
of each filesystem rather than the live filesystem so that you have an internally
consistent backup. Background fsck (explained later in this chapter) uses
snapshots to do its work. You can mount a snapshot and get a picture of your
filesystem at a particular instant. While this is interesting, most system admin-
istrators don’t find it terribly useful. Still, you’ll see references to snapshots
throughout working with FreeBSD.
Dirty Disks
No, disks don’t get muddy with use (although dust on a platter will quickly
damage it, and adding water won’t help). A dirty FFS partition is one that’s in
a kind of limbo; the operating system has asked for information to be written
to the disk, but the data is not yet completely written out. Part of the data
block might have been written, the inode might have been edited but the
data not written out, or any combination of the two. If the power goes out
while your disk is dirty, the system reboots with unclean disks.
FreeBSD refuses to mount unclean disks read-write; you can write them
read-only, but that’s not suitable for normal operation. You must clean
your disk.
fsck(8)
FreeBSD includes a filesystem integrity checking tool, fsck(8). When a
rebooting system finds a dirty disk, it automatically checks the filesystem and
tries to clean everything. You have already lost any data not written to disk,
but fsck(8) verifies that every file is attached to the proper inodes and in the
correct directory. If successful, everything is right where you left it—except
for that unwritten data, of course!
Failed Automatic fscks Runs
Occasionally this automated fsck-on-reboot fails to work. When you check
the console, you’ll be looking at a single-user mode prompt and a request to
run fsck(8) manually. At this point, you have a simple choice: run fsck or
not. If you enter fsck at the command prompt, fsck(8) verifies every block
and inode on the disk. It finds any blocks that have become disassociated
from their inodes and guesses how they fit together and how they should be
attached. fsck(8) might not be able to identify which directory these files
belong in, however.
fsck asks if you want to perform these reattachments. If you answer n, it
deletes the damaged files. If you answer y, it adds the lost file to a lost+found
directory in the root of the partition, with a number as a filename. For example,
the lost+found directory on your /usr partition is /usr/lost+found. If there are

Disks and Filesystems 223
only a few files, you can identify them manually; if you have many files and
are looking for particular ones, tools such as file(1) and grep(1) can help
you identify them by content.
Turning Off the fsck Prompt
If your server was in the middle of a very busy operation when it became
dirty, you could end up with many disassociated files. Instead of spending an
hour at the console typing y over and over again to tell fsck to reassemble
these files, type fsck -y at the single-user prompt. This makes fsck(8) believe
that you’re answering yes to every question.
You can set your system to automatically try fsck -y on boot. I don’t
recommend this, however, because if there’s the faintest chance my file-
system will wind up in digital nirvana I want to know about it. I want to type
the offending command myself and feel the trepidation of watching fsck(8)
churn my hard drives. Besides, it’s always unpleasant to discover that your
system is trashed without having the faintest clue of how it got that way. If
you’re braver than I, you can set fsck_y_enable="YES" in rc.conf.
Avoiding fsck -y
What options do you have if you don’t want to use fsck -y? Well, fsdb(8) and
clri(8) allow you to debug the filesystem and redirect files to their proper
locations. You can restore files to their correct directories and names. This is
difficult,2 however, and is recommended only for Secret Ninja Filesystem
Masters.
Background fsck
Background fsck gives FFS some of the benefits of a journaled filesystem
without using all the disk required by journaling. When FreeBSD sees that a
background fsck is in process after a reboot, it mounts the dirty disk read-
write. fsck(8) runs in the background while the server is running, identifying
loose bits of files and tidying them up behind the scenes.
A background fsck actually has two major stages. When FreeBSD finds
dirty disks during the initial boot process, it runs a preliminary fsck(8) assess-
ment of the disks. fsck(8) decides if the damage can be repaired while the
2 In the first edition of this book, I said using fsdb(8) and clri(8) was like climbing Mount Everest
in sandals and shorts. Since writing that, I’ve tried them more than once and discovered that I
was wrong. You don’t get the shorts.
DANGER!
Running fsck -y is not guaranteed safe. At times, when running experimental file-
systems on -current or when doing other daft things, I’ve had the entire contents of a
partition migrate to /usr/lost+found and /var/lost+found thanks to fsck -y. Recovery
becomes difficult at that point. Having said that, in a production system running
FreeBSD-stable with a standard UFS filesystem, I’ve never had a problem.

224 Chapter 8
system is running, or if a full single-user mode fsck run is required. Most
frequently, fsck thinks it can proceed and lets the system boot. After the
system reaches single-user mode the background fsck runs at a low priority,
checking the partitions one by one. The results of the fsck process appear in
/var/log/messages.
You can expect performance of any applications requiring disk activity to
be lousy during a background fsck. fsck(8) occupies a large portion of the
disk’s possible activity. While your system might be slow, it will at least be up.
You must check /var/log/messages for errors after a background fsck.
The preliminary fsck assessment can make an error, and perhaps a full single-
user mode’s fsck on a partition really is required. If you find such a message,
schedule downtime within a few hours to correct the problem. While incon-
venient, having the system down for a scheduled period is better than the
unscheduled downtime caused by a power outage and the resulting single-
user mode’s fsck -y.
Forcing Read-Write Mounts on Dirty Disks
If you really want to force FreeBSD to mount a dirty disk read-write without
using a background fsck, you can. You will not like the results. At all. But, as
it’s described in mount(8), some reader will think it’s a good idea unless they
know why. Use the -w (read-write) and -f (force) flags to mount(8).
Mounting a dirty partition read-write corrupts data. Note the absence of
words like might and could from that sentence. Also note the absence of words
like recoverable. Mounting a dirty filesystem may panic your computer. It might
destroy all remaining data on the partition or even shred the underlying file-
system. Forcing a read-write mount of a dirty filesystem is bad juju. Don’t do it.
FFS Syncer at Shutdown
When you shut down your FreeBSD system the kernel synchronizes all its
data to the hard drive, marks the disks clean, and shuts down. This is done
by a kernel process called the syncer. During a system shutdown, the syncer
reports on its progress in synchronizing the hard drive.
You’ll see odd things from the syncer during shutdown. The syncer doesn’t
actually go down the list of inodes and blocks that need updating on the hard
drive; it walks the list of vnodes that need synchronizing. Thanks to soft updates,
writing one vnode to disk can generate another dirty vnode that needs
updating. You can see the number of buffers being written to disk rapidly
drop from a high value to a low value, and perhaps bounce between zero and
a low number once or twice as the system really synchronizes the hard drive.
THE REAL DETAILS ON FFS
If you really want to know more about FFS, you can download a large diagram of
the kernel internals of FFS at http://phk.freebsd.dk/misc/ufs.pdf. You’ll need a large
engineering or architectural printer, or 18 sheets of regular paper and a lot of
clear tape.

Disks and Filesystems 225
Background fsck, fsck -y, Foreground fsck, Oy Vey!
All these different fsck(8) problems and situations can occur, but when does
FreeBSD use each command? FreeBSD uses the following conditions to decide
when and how to fsck(8) on a filesystem:
If the filesystem is clean, it is mounted without fsck(8).
If a filesystem without soft updates is dirty at boot, FreeBSD runs fsck on
it. If the filesystem damage is severe, FreeBSD stops the fsck and requests
your intervention. You can either run fsck -y or manually check each
reconnection.
If a filesystem with soft updates is dirty at boot, FreeBSD performs a very
basic fsck(8) check. If the damage is mild, FreeBSD uses a background
fsck(8) in multi-user mode. If the damage is severe, FreeBSD interrupts
the boot and requests your intervention with either fsck -y or approval
or rejection of each filesystem problem.
If a journaled filesystem is dirty at boot, FreeBSD recovers the data from
the journal and continues the boot. A journaled filesystem rarely needs
fsck(8).
Using Foreign Filesystems
For our purposes, any partition or disk that isn’t FFS is a foreign filesystem.
FreeBSD includes extensive support for foreign filesystems, with the caveat
that only those functions supported by the filesystem work. Microsoft’s
FAT32 doesn’t support filesystem permissions, for example, and Linux
filesystems don’t support BSD-style file flags.
Each foreign filesystem needs support in the FreeBSD kernel. To make
your life a little easier, mount(8) automatically loads the proper kernel
modules on demand.
To mount any foreign filesystem, you need the same information
needed to mount an FFS filesystem: a device name and a mount point. You’ll
also need the type of filesystem, although you might figure that out by trial
and error. For example, FreeBSD provides a /cdrom mount point for CDs.
The first IDE CD on your system is /dev/acd0. CDs use the ISO 9660 filesystem,
and FreeBSD mounts them with mount -t cd9660(8). Here we mount our CD
on /cdrom:
# mount -t cd9660 /dev/acd0 /cdrom
You can now go to the /cdrom directory and view the contents. Simple
enough, eh?
If you try to mount a disk using the wrong mount command for its
filesystem, you’ll get an error. For example, any floppy disk in my house has
either a FAT32 or an FFS filesystem on it; /dev/fd0 is the proper device node
for floppy disks, and /media is their standard mount point.

226 Chapter 8
# mount /dev/fd0 /media
mount: /dev/fd0 on /media: incorrect super block
This floppy has a FAT32 filesystem. Had I tried mount -t msdosfs first, it
would have worked.
You can unmount any filesystem with umount(8):
# umount /cdrom
umount(8) doesn’t care about the filesystem type. It just disconnects the
disk partition.
Supported Foreign Filesystems
Here are some of the most commonly used foreign filesystems, along with a
brief description of each and the appropriate mount command.
FAT (MS-DOS)
FreeBSD includes extensive support for FAT, the DOS/Windows 9x File
Allocation Table filesystem, commonly used on removable media and
some dual-boot systems. This support covers the FAT12, FAT16, and FAT32
varieties. You can format a floppy disk with an FFS filesystem, however, so
do not blindly assume that all floppy disks are FAT-formatted. As the most
common use for a floppy these days is transferring files between machines,
however, most are FAT32. The mount type is msdosfs (mount -t msdosfs).
If you handle a lot of FAT32 disks, investigate /usr/ports/tools/mtools, a
collection of programs for working with FAT filesystems that offer greater
flexibility than the default FreeBSD tools.
ISO 9660
ISO 9660 is the standard CD filesystem. FreeBSD supports reading CDs and
writing them as well if you have a CD burner. Just about every CD you encoun-
ter is formatted with ISO 9660. The mount command is mount -t cd9660.
cdrtools, in /usr/ports/sysutils/cdrtools, contains many helpful tools for
working with CD images, including tools that build an ISO image from files
on disk.
UDF
UDF, or Universal Data Format, is a replacement for ISO 9660. You’ll find
UDF on some DVDs and on flash/USB devices larger than the 32GB sup-
ported under FAT32. As the capacity of removable media increases, you’ll
see more and more UDF filesystems. The mount command is mount -t udf.
NTFS
The Windows NT/2000/XP filesystem, NTFS, is tightly integrated with
Microsoft’s proprietary kernel. To write to an NTFS partition, you must have
extensive knowledge of how the filesystem works. Since Microsoft does not
Disks and Filesystems 227
make that information available, FreeBSD can safely mount NTFS partitions
read-only but has limited read-write functionality. The mount command is
mount -t ntfs.
I find NTFS mounts most useful when migrating from Windows systems to
FreeBSD systems; just remove the hard drive from the old Windows machine,
mount it in the FreeBSD machine, and copy your data from one to the other.
NTFS support is also useful for dual-boot laptops.
As the NTFS filesystem has a closed specification and contains data
encoded in a proprietary manner, FreeBSD’s NTFS read support is not
guaranteed to work.
ext2fs and ext3fs
The standard Linux filesystems, ext2fs and ext3fs, support many of the same
features as the FreeBSD filesystem and can be safely written to and read from
without any problems. Like the NTFS mounts, mounting Linux filesystems is
most useful for disaster recovery or dual-boot systems. Despite the name,
mount -t ext2fs supports mounting both ext2fs and ext3fs.
Linux filesystem users might find the tools in /usr/ports/sysutils/e2fsprogs
useful. They let you fsck(8) and assess Linux filesystems, among other things.
ReiserFS
ReiserFS is a filesystem with a small percentage of devotees amidst Linux
users. FreeBSD supports read-only ReiserFS partitions. Support for mounting
ReiserFS is implemented directly in mount(8); just run mount -t reiserfs
partition mountpoint.
XFS
FreeBSD supports reading from SGI’s XFS partitions, but writing to XFS
is available on an experimental basis as of this writing. XFS is the oldest
journaling filesystem in existence and has a well-debugged codebase. XFS
is licensed under the GPL, however, which makes it a poor candidate for
inclusion in the FreeBSD base system. If you’re interested in journaling,
please check out gjournal in Chapter 18.
Programs for formatting, mounting, and managing XFS partitions can
be found in /usr/ports/sysutils/xfsprogs.
ZFS
As of 7.0, FreeBSD includes experimental support for ZFS, ported from
OpenSolaris. While the installer doesn’t support ZFS, if you need the
advanced ZFS features you can use them. ZFS’s license is not suitable for
making it the primary FreeBSD filesystem, but its high-end features can be
very useful for certain applications on multiterabyte filesystems and on 64-bit
systems. ZFS on 32-bit systems suffers from memory problems, but ZFS has a
good reputation on 64-bit systems.

228 Chapter 8
Permissions and Foreign Filesystems
The method used to mount a filesystem, and the person who mounts it,
control the permissions of the mounted filesystem. For example, ext3fs and
XFS store permissions in the filesystem and map them to UIDs. Since their
permissions behave much like FFS, and all the permissions information
needed is available within the filesystem and the kernel, FreeBSD respects
the permissions on these filesystem.
NTFS has its own permission system. Since that system bears only a
coincidental resemblance to that used by Unix-like systems, permissions are
discarded when a NTFS partition is mounted on a FreeBSD system, and it’s
treated much like a CD or a floppy disk.
By default, only root can mount filesystems, and root owns all non-Unix
filesystems. If that’s not your preference, you can use the -u and -g flags to
set the user ID and group ID of the owner when you’re mounting a FAT32,
NTFS, or ISO 9660 filesystem. For example, if you’re mounting a FAT32 USB
device for the user cstrzelc and want her to be able to edit the contents, use
this command:
# mount -t msdosfs -u cstrzelc -g cstrzelc /dev/da0 /mnt
The user cstrzelc now owns the files on the device.
You might get sick of mounting media for your users, especially in a
facility with dozens of machines. To let a user mount a filesystem, set the
sysctl vfs.usermount to 1. The user can then mount any filesystem she wants
on any mount point she owns. While cstrzelc couldn’t mount the removable
device on /mnt, she could mount it on /home/cstrzelc/mnt.
Removable Media Filesystems
Removable media has boomed in the last few years. While once we only had
to worry about floppy disks, we now have CDs and USB devices. You must be
able to manage any removable media that might wander in through the door
of your data center. We’ll discuss dealing with filesystems on floppy disks, USB
devices, and CDs.
I recommend not plugging removable media willy-nilly into your
production servers, for security reasons if nothing else. Who knows what’s
actually on that vendor’s USB device? I prefer to mount those devices on my
workstation, examine the contents, and then copy the desired data over to
the FreeBSD machine. Removable media is just too easy for certain appli-
cations, however, and of course the rules change when it’s my personal
USB device.
Formatting FAT32 Media
Both floppy disks and USB media use the FAT32 filesystem. USB media uses
the FAT32 filesystem, but usually comes preformatted. As USB media has a
limited number of reads and writes, do not reformat it capriciously. That

Disks and Filesystems 229
leaves floppies, which frequently need reformatting if used heavily. What
most Windows users think of as “formatting a floppy” is actually a multistage
process that includes formatting the disk, giving it a disk label, and creating
a filesystem. You must perform all of these operations to use a floppy in
FreeBSD.
Low-Level Formatting
First, perform a low-level format with fdformat(1). This program only
requires two arguments: the floppy’s size and the device name.
# fdformat -f 1440 /dev/fd0
Format 1440K floppy '/dev/fd0.1440'? (y/n): y
When you type y, fdformat(1) runs a low-level format to prepare the disk
to receive a filesystem. Low-level formatting is the slowest part of making a
floppy usable. Windows performs this sort of formatting when you request a
complete format.
Creating an FFS Filesystem
After the low-level format, if you want to use FFS on your floppy, label the
disk with disklabel(8). This writes basic identification information to the
floppy, sets partition information, and can even mark a disk as bootable.
Marking a disk as bootable doesn’t actually put any programs on the disk; it
simply puts a marker on the disk so the hardware BIOS identifies this disk as
bootable. If you need an actual FreeBSD boot floppy, just copy the provided
disk image from the installation media. Here, we’ll install a plain disklabel
without any special characteristics:
# disklabel -r -w /dev/fd0 fd1440
The -r option in this example tells disklabel to access the raw disk, because
there is no filesystem on it yet. The -w option says to write to the disk. We’re
writing to /dev/fd0 and installing a standard 1.44MB floppy disk label. You can
find a full list of floppy disk labels in /etc/disktab, as well as labels for many
other types of drives, as discussed in Chapter 10.
Finally, newfs(8) the disk to create a filesystem.
# newfs /dev/fd0
You’ll see a few lines of newfs output and then get a command
prompt back.
NONSTANDARD FLOPPIES
We’ll assume that you have a standard 1.44MB floppy disk, which has been the stand-
ard on x86 hardware for almost two decades. If you have a disk drive of 800KB or
another uncommon size, you’ll have to modify this process somewhat, but the general
steps are the same.

230 Chapter 8
Note that using FFS on a floppy wastes space and does not provide the
protection many people expect it would. While permission information is
stored on the floppy, the system owner can override those privileges easily.
Also, remember that FFS reserves 8 percent of disk space for its own overhead
and bookkeeping. Do you really need a 1.32MB floppy? FFS is nifty, but FAT32
is a better choice for floppy disks.
Creating a FAT32 Filesystem
To swap data between a wide range of hardware, use the FAT32 filesystem on
your floppy. While you still need to low-level format the floppy as discussed
earlier, you don’t need to disklabel it. Just use newfs_msdos(8):
# newfs_msdos /dev/fd0
You’ll get a couple lines of output, and your floppy is done.
Using Removable Media
Handling removable media is just like working with fixed media such as hard
drives. You must know the filesystem on the device, the device node where
the device appears, and assign a mount point.
CDs use the ISO 9660 filesystem, while DVDs use either a UDF or a com-
bination of ISO 9660 and UDF. USB devices and floppy disks are usually
FAT32. Very new USB devices might be UDF. I expect UDF to become more
common, especially as flash devices become larger.
The device node varies with the device type. IDE CDs are /dev/acd0,
while SCSI CDs appear at /dev/cd0. Floppy disks are at /dev/fd0. USB devices
appear as the next available unit of /dev/da. When you insert a USB device,
a message giving the device node and type appears on the console and in
/var/log/messages.
Finally, you need a mount point. By default, FreeBSD includes a /cdrom
mount point for CD and DVD media. You’ll also find a /media mount point
for general removable media mounts. You can create additional mount points
as you like—they’re just directories. For miscellaneous short-term mounts,
FreeBSD offers /mnt.
So, to mount your FAT32 USB device /dev/da0 on /media, run:
# mount -t msdosfs /dev/da0 /media
Occasionally you’ll find a USB device that has an actual slice table on it,
and those devices will insist you mount /dev/da0s1 rather than /dev/da0. This
depends on how the device is formatted, not on anything in FreeBSD.
One annoyance with CD drives is that SCSI CD and ATA CD drives offer
different interfaces to software. Much software is written to only use the SCSI
interface, as SCSI is generally considered more reliable. If you encounter such
a piece of software, check out atapicam(4) kernel module which provides a
SCSI emulation layer to your ATA CD devices.

Disks and Filesystems 231
Ejecting Removable Media
To disconnect removable media from your FreeBSD system, you must
unmount the filesystem. Your CD tray won’t open until you unmount the
CD, and the floppy drive won’t eject your disk. You can probably forcibly
remove a USB dongle, but doing so while the filesystem is mounted panics
the server and might damage data on the device. Use umount(8) just as you
would for any other filesystem:
# umount /cdrom
Removable Media and /etc/fstab
You can update /etc/fstab with entries for removable media to make system
maintenance a little easier. If a removable filesystem has an entry in /etc/fstab,
you can drop both the filesystem and the device name when mounting it.
This means that you don’t have to remember the exact device name or
filesystem to mount the device. You probably already have an /etc/fstab’s
entry for your CD device.
/dev/acd0 /cdrom cd9660 ro,noauto 0 0
While I’m sure you’ve already memorized the meaning of every column
in /etc/fstab, we’ll remind you that entry means “mount /dev/acd0 on /cdrom,
using the ISO 9660 filesystem, read-only, and do not mount it automatically
at boot.” Using this as a template, make similar entries for USB devices and
floppy disks.
/dev/fd0 /mnt msdosfs rw,noauto 0 0
/dev/da0 /medi msdosfs rw, noauto 0 0
FreeBSD doesn’t provide these by default, but I find having them to be
much easier on systems where I use removable media regularly. Confirm that
your next available da device is /dev/da0 , as trying to mount a hard drive
that’s already mounted won’t work.
When listing removable media in /etc/fstab, be sure to include the noauto
flag. Otherwise, whenever you don’t have the removable media in place, your
boot will stop in single-user mode because a filesystem is missing.
Other FreeBSD Filesystems
In addition to FFS and non-FreeBSD filesystems, FreeBSD supports several
special-purpose filesystems. Some of these are interesting but not generally
useful, such as mount_umapfs(8), while others are very useful or even
required in certain circumstances. We’ll talk about memory filesystems, a
popular optimization for certain environments; building filesystems on files;
as well as the procfs and fdescfs filesystems occasionally required by software
packages.

232 Chapter 8
Memory Filesystems
In addition to using disks for partitions, FreeBSD lets you create partitions
from files, from pure RAM, and from a combination of the two. One of the
most popular uses of this is for memory filesystems, or memory disks. Reading and
writing files to and from memory is much faster than accessing files on disk,
which makes a memory-backed filesystem a huge optimization for certain
applications. As with everything else in memory, however, you lose the
contents of your memory disk at system shutdown.
Memory Disk /tmp
The most common place a memory filesystem is used is for /tmp. This is so
common that FreeBSD includes specific rc.conf support for it. Look for the
following rc.conf variables:
tmpmfs="YES"
tmpsize="20m"
tmpmfs_flags="-S"
By setting tmpmfs to YES, you’re telling FreeBSD to automatically create
a memory-based /tmp filesystem at boot. Specify the size of your new /tmp with
the tmpsize variable. We’ll discuss the flags a little later in this section.
If this is all you want to use a memory filesystem for, you’re done.
To create and use special memory devices with mdmfs(8), read on.
Memory Disk Types
Memory disks come in three types: malloc-backed, swap-backed, and vnode-
backed.
Malloc-backed disks are pure memory. Even if your system runs short on
memory, FreeBSD won’t swap out the malloc-backed disk. Using a large
malloc-backed disk is a great way to make your system run out of free memory
and panic. This is most useful for embedded devices with no swap, as we’ll
see in Chapter 20.
Swap-backed disks are mostly memory, but they also access the system swap
partition. If the system runs out of memory, it moves the least recently used
parts of memory to swap as discussed in Chapter 19. Swap-backed disks are
the safest way to use a memory filesystem.
Vnode-backed disks are files on disk. While you can use a file as backing for
your memory disk, this is really only useful for filesystem developers who
want to perform tests or for mounting a disk image.
Your application dictates the type of memory disk you need. If your system
has no swap space and a read-only filesystem, a malloc-backed disk is your
only choice. If you’re running a workstation or a server and want a piece of
fast filesystem for scratch space, you want a swap-backed disk. You only need
a vnode-backed memory disk to mount a disk image.
Once you know what you want to do, use mdmfs(8) to perform the action.

Disks and Filesystems 233
Creating and Mounting Memory Disks
The mdmfs(8) utility is a handy front end for several programs such as
mdconfig(8) and newfs(8). It handles the drudgery of configuring devices
and creating filesystems on those devices, and makes creating memory disks
as easy as possible. You only need to know the size of the disk you want to use,
the type of the memory disk, and the mount point.
Swap-backed memory disks are the default. Just tell mdmfs(8) the size of
the disk and the mount point. Here, we create an 8MB swap-backed memory
disk on /home/mwlucas/test:
# mdmfs -s 8m md /home/mwlucas/test
The -s flag gives the size of the disk. If you run mount(8) without any
arguments, you’ll see that you now have the memory disk device /dev/md0
mounted on that directory.
To create and mount a malloc-backed disk, add the -M flag.
To mount a vnode-backed memory disk, use the -F flag and the path to
the image file.
# mdmfs -F diskimage.file md /mnt
The md entry we’ve been using all along here means, “I don’t care what
device name I get, just give me the next free one.” You can also specify a
particular device name if you like. Here, I used /dev/md9 as the memory disk
device:
# mdmfs -F diskimage.file md9 /mnt
Memory Disk Headaches
Memory disks sound too good to be true for high-performance environments.
They do have constraints that you must understand before you scurry around
and implement them everywhere.
The big issue is that system shutdown erases memory disks. While this
might not seem like a problem, I’ve been surprised more than once by losing
a file on a filesystem I had forgotten was a memory disk.
Also, malloc-backed memory disks never release memory. When you write
a file to a memory disk and then erase the file, the file still takes up memory.
With a swap-backed memory disk FreeBSD eventually writes that file to swap
as memory pressure rises. A memory disk on a long-running system will
eventually exhaust your system’s RAM.
The one way you can free this used memory is to unmount the memory
disk, destroy the disk device, and re-create the memory disk. I find that
performing this task on a monthly basis is more than sufficient, even on a
busy server.
A couple months before release, FreeBSD 7.0 added a tmpfs(5) memory
filesystem that is supposed to release memory back to the system. It’s brand
new to FreeBSD, however, and considered an experimental feature. If you’re
234 Chapter 8
reading this a few releases into the future I’d recommend you check out
tmpfs(5), but if you’re installing 7.0 or 7.1, I’d let someone else discover the
bugs for you.
Memory Disk Shutdown
To remove a memory disk you must unmount the partition and destroy the
disk device. Destroying the disk device frees the memory used by the device,
which is useful when your system is heavily loaded. To find the disk device,
run mount(8) and find your memory disk partition. Somewhere in the
output, you’ll find a line like this:
/dev/md41 on /mnt (ufs, local, soft-updates)
Here, we see memory disk /dev/md41 mounted on /mnt. Let’s unmount it
and destroy it.
# umount /mnt
# mdconfig -d -u 41
Unmounting with umount is done exactly as with other filesystems.
The mdconfig(8) call is a new one, however. Use mdconfig(8) to directly
manage memory devices. The -d flag means destroy, and the -u gives a
device number. The above destroys the device /dev/md41, or the md device
number 41. The memory used by this device is now freed for other uses.
Memory Disks and /etc/fstab
If you list memory disks in /etc/fstab, FreeBSD automatically creates them at
boot time. These entries look more complicated than the other entries, but
aren’t too bad if you understand the mdmfs(8) commands we’ve been using
so far. To refresh your memory, here’s the top of /etc/fstab and a single
standard filesystem:
# Device Mountpoint FStype Options Dump Pass#
/dev/ad4s2a / ufs rw 1 1
We’re allowed to use the word md as a device name to indicate a memory
disk. We can choose the mountpoint just as we would for any other device,
and the filesystem type is mfs. Under Options, list rw (for read-write) and the
command-line options used to create this device. To create our 8MB file-
system mounted at /home/mwlucas/test, use the following /etc/fstab entry:
md /home/mwlucas/test mfs rw,-s 8m 0 0
Looks easy, doesn’t it? The only problem is that the long line messes up
your nice and even /etc/fstab’s appearance. Well, they’re not the only things
that make this file ugly, as we’ll soon see.
Disks and Filesystems 235
Mounting Disk Images
Memory disks can also be used to mount and access disk images. This is most
useful for viewing the contents of CD images without burning them to disk.
Just attach a memory disk to a file with the mdconfig(8) command’s -a flag.
Here, I attach a FreeBSD ISO to a memory device:
# mdconfig -a -t vnode -f /home/mwlucas/7.0-CURRENT-snap.iso
md0
We tell mdconfig(8) to attach a vnode-backed memory device to the
file specified . mdconfig(8) responds by telling us the device it’s attached
to. Now we just mount the device with the proper mount command for the
filesystem:
# mount -t cd9660 /dev/md0 /mnt
One common mistake people make at this point is mounting the image
without specifying the filesystem type. You might get an error, or you might
get a successful mount that contains no data—by default, mount(8) assumes
that the filesystem is FFS!
When you’re done accessing the data, be sure to unmount the image
and destroy the memory disk device just as you would for any other memory
device. While vnode-backed memory disks do not consume system memory,
leaving unused memory devices around will confuse you months later when
you wonder why they appear in /dev. If you’re not sure what memory devices
a system has, use mdconfig -l to view all configured md(5) devices.
# mdconfig -l
md0 md1
I have two memory devices? Add the -u flag and the device number to
see what type of memory device it is. Let’s see what memory device 1
(/dev/md1) is:
# mdconfig -l -u 1
md1 vnode 456M /slice1/usr/home/mwlucas/iso/omsa-51-live.iso
I have an ISO image mounted on this system? Wow. I should probably
reboot some month. Nah, thats too much work, I’ll just unmount the
filesystem.
Filesystems in Files
One trick used for jails (see Chapter 9) and homebrew embedded systems
(see Chapter 20) is building complete filesystem images on a local filesystem.
In the previous section, we saw how we could use memory disks to mount
and access CD disk images. You can use the same techniques to create,

236 Chapter 8
update, and access FFS disk images. The downside of this is that each image
takes up an amount of disk space equal to the size of the disk image. If you
create a 500MB disk image, it takes up a full 500MB of space.
To use a filesystem in a file, you must create a file of the proper size,
attach the file to a memory device, place a filesystem on the device, and
mount the device.
Creating an Empty Filesystem File
The filesystem file doesn’t initially contain any data; rather, it’s just a file
of the correct size for the desired filesystem. You could sit down and type a
whole bunch of zeroes to create the file, but FreeBSD provides a unlimited
source of nothing to save you the trouble. The /dev/zero device is chock full of
emptiness you can use to fill the file.
Use the same dd(1) command you used to copy the installation floppy
images to your filesystem file. Here we copy data from /dev/zero and to the file
filesystem.file:
# dd if=/dev/zero of=filesystem.file bs=1m count=1k
1048576+0 records in
1048576+0 records out
1073741824 bytes transferred in 24.013405 secs ( 44714268 bytes/sec)
We take our data from the input file /dev/zero and dump it to the
output file filesystem.file . Each transfer occurs in blocks of 1K , and we
do this one million times . This takes a few seconds to complete, but as
/dev/zero doesn’t have to generate the next character, the file fills quickly . If
you look in your current directory, you now have a 1GB file called filesystem.file.
One common source of confusion with dd(1) is the block size and
count. Calculating the final size of a file with dd(1) is like moving a pile of
sand; you break the job into loads and move a number of those loads. You
can use several loads with a wheelbarrow, many loads with a bucket, or lots
and lots of loads with a spoon. The size of each load is the block size, and the
number of trips is the count. Perhaps you’re using your bare hands, which
would correspond to a small block size and a high count. Maybe you have a
wheelbarrow, for a medium block size and a moderate count. Perhaps you
have a steam shovel and can do the whole job in one scoop. The larger the
block size, the more load you put on the system with each block. dd(1)
recognizes a variety of abbreviations for increasing block size and count,
as shown in Table 8-2.
Suppose you want a 1GB file. Remember that 1k is actually one kilobyte.
One megabyte is a thousand kilobytes, and one gigabyte is one thousand
megabytes. If you use a block size of 1 byte, and a count of one gig, you’re
asking your system to make 1,073,741,824 trips to the sand pile. Each trip is
very easy, but there’s an awful lot of them! On the other hand, if you select a
block size of one gig and a count of 1, you’re asking the system to pick up the

Disks and Filesystems 237
whole pile at once. It will not be pleased. Neither will you. Generally speaking,
a block size of 1m and a lower count produces reasonably quick results without
overburdening your system. When you use a 1m block, the count equals the
number of megabytes in the file. A count of 1k creates a 1GB filesystem, a
count of 2k creates a 2GB filesystem, a count of 32 creates a 32MB filesystem,
and so on.
Creating the Filesystem on the File
To get a filesystem on the file, you must first associate the file with a device
with a vnode-backed memory disks. We did exactly this in the last section:
# mdconfig -a -t vnode -f filesystem.file
md0
Now, let’s make a filesystem on this device. This is much like creating an
FFS filesystem on a floppy disk with the newfs(8) command. We specify the
-U flag to enable soft updates on this filesystem, as soft updates are useful on
file-backed filesystems.
# newfs -U /dev/md0
/dev/md0: 1024.0MB (2097152 sectors) block size 16384, fragment size 2048
using 6 cylinder groups of 183.77MB, 11761 blks, 23552 inodes.
with soft updates
super-block backups (for fsck -b #) at:
160, 376512, 752864, 1129216, 1505568, 1881920
newfs(8) prints out basic information about the disk such as its size,
block and fragment sizes, and the inode count.
Now that you have a filesystem, mount it:
# mount /dev/md0 /mnt
Congratulations! You now have a 1GB file-backed filesystem. Copy files to
it, dump it to tape, or use it in any way you would use any other filesystem. But
in addition to that, you can move it just like any other file. We’ll make use of
this when we talk about jails in the next chapter, and it’s a vital technique
for building your own embedded systems.
Table 8-2:
dd Abbreviations
Letter Meaning Multiplier
bDisk blocks 512
kKilo 1024
mMega 1048576
gGiga 1073741824
wInteger However many bytes per integer on your platform

238 Chapter 8
File-Backed Filesystems and /etc/fstab
You can mount a file-backed filesystem automatically at boot with the proper
entry in /etc/fstab, much like you can automatically mount any other memory
disk. You simply have to specify the name of the file with -F, and use -P to tell
the system to not create a new filesystem on this file but just to use the one
already there. Here we mount the file-backed filesystem we created on /mnt
automatically at boot time. (I told you we’d see /etc/fstab entries uglier than
the one we created for generic memory disks, didn’t I?)
md /mnt mfs rw,-P,-F/home/mwlucas/filesystem.file 0 0
Miscellaneous Filesystems
FreeBSD supports several lesser-known filesystems. Most of them are useful
only in bizarre circumstances, but bizarre circumstances arise daily in system
administration.
devfs(5) is the device filesystem used for /dev. You cannot store normal
files on a devfs filesystem; it only supports device nodes. The kernel and the
device filesystem daemon devd(8) directly manage the contents of a device
filesystem.
procfs(5) is the process filesystem; it contains lots of information about
processes. It’s considered a security risk and is officially deprecated on modern
FreeBSD releases. You can learn a lot about processes from a mounted process
filesystem, however. A few older applications still require a process filesystem
mounted on /proc; if a server application requires procfs, try to find a similar
application that does the job without requiring it.
If you’re using Linux mode (see Chapter 12), you might need the Linux
process filesystem linprocfs(5). Much Linux software requires a process
filesystem, and FreeBSD suggests installing linprocfs at /compat/linux/proc
when you install Linux mode. I’d recommend only installing linprocfs if a
piece of software complains it’s not there.
fdescfs(5), the file descriptor filesystem, offers a filesystem view of file
descriptors for each process. Some software is written to require fdescfs(5).
It’s less of a security risk than procfs, but still undesirable.
Wiring Down Devices
SCSI disks don’t always power up in the same order, but FreeBSD num-
bers SCSI drives in the order that they appear on the SCSI bus. As such, if
you change the devices on your SCSI bus, you change the order in which
they’re probed. What was disk 0 when you installed FreeBSD could become
disk 1 after you add a new disk drive. This change would cause partitions to
be mounted on the wrong mount points, possibly resulting in data damage.
You can have similar problems with SCSI buses—if you add another SCSI
Disks and Filesystems 239
interface, your buses can be renumbered! What was /dev/da0 when you
installed FreeBSD could become /dev/da1 or even /dev/da17 after you add
a new tape drive. This causes FreeBSD to mount partitions on the wrong
mount points.
To prevent this problem, you can hard-code disk numbering into the
kernel, a process called wiring down the SCSI devices. To wire down the device
you need the SCSI ID, SCSI bus number, and LUN (if used) of each device
on your SCSI chain, available in /var/run/dmesg.boot. For example, on a test
system I have the following dmesg entries for my SCSI adapter:
ahc0: <Adaptec 2940B Ultra2 SCSI adapter> port 0xe000-0xe0ff mem 0xe8042000-
0xe8042fff irq 11 at device 20.0 on pci0
aic7890/91: Ultra2 Wide Channel A, SCSI Id=7, 32/253 SCBs
The first line shows that the main SCSI card is an Adaptec 2940B Ultra2
adapter. The second line gives us more information about the chipset on this
card. This is really only one physical card. The host adapter is using SCSI ID 7,
and no LUN.
A little later in dmesg.boot I have entries for all SCSI disks. While these
entries include things such as disk capacity, model, speed, and features, the
first line for each disk looks much like these:
da0 at ahc0 bus 0 target 8 lun 0
da1 at ahc0 bus 0 target 9 lun 0
da2 at ahc0 bus 0 target 10 lun 0
...
This tells us that the disk da0 is on SCSI card ahc0 , on SCSI bus 0 ,
at SCSI ID 8 , at LUN 0 . Disk da1 is on the same card and bus, at SCSI
ID 9 .
To wire down a drive, tell the kernel exactly what SCSI bus number to
attach to which SCSI card, and then the SCSI ID and LUN of each disk. Do
this with kernel hints in /boot/device.hints:
hint. scbus. 0.at=" ahc0"
hint. da.0.at=" scbus0"
hint.da.0.target=" 8"
hint.da.1.at="scbus0"
hint.da.1.target=" 9"
Here, we’ve told FreeBSD to attach SCSI bus number 0 to card
ahc0 . Disk da0 is attached to SCSI bus 0 at SCSI ID 8 , and disk da1
is attached to the same bus at SCSI ID 9 . On your next reboot the drives
will be numbered as you configured. If you add another SCSI card, or more
SCSI hard drives, FreeBSD configures the new drives and buses with unit num-
bers other than those you’ve reserved for these devices. You can also use lun
hints if you have targets with multiple LUNs.

240 Chapter 8
Adding New Hard Disks
Before you can use a new hard drive, you must slice it, create filesystems,
mount those filesystems, and move data to them. While FreeBSD has
command-line tools that can handle all this for you, the simplest and fastest
way is with sysinstall(8). We’ll assume that you are adding disks to an existing
system, and that your eventual goal is to move a part of your data to this disk.
Creating Slices
Your first task in preparing your new hard disk is to create a slice and
partition it. Follow these steps:
1. Become root and start sysinstall(8). Choose Configure, and then Disk.
2. This menu should look somewhat familiar; you used it when you installed
FreeBSD. (You can see screenshots in Figure 2-4 in Chapter 2.) You’ll see
your existing FreeBSD disks and your new disk. Choose the new disk.
3. If this disk is recycled from another server, you might find that it has a
filesystem on it. It’s usually simplest to remove the existing partitions and
start over. Use the arrow keys to move to any existing partitions, and
press D to delete them.
4. Either create a slice by pressing C, or just use the whole disk by pressing A.
In a server, you almost certainly want to use the entire disk. When you’ve
chosen your slices, make the changes effective immediately by pressing W.
You’ll see a warning like this:
WARNING: This should only be used when modifying an EXISTING installation.
If you are installing FreeBSD for the first time then you should simply
type Q when you're finished here and your changes will be committed in one
batch automatically at the end of these questions. If you're adding a
disk, you should NOT write from this screen, you should do it from the
label editor.
5. Are you absolutely sure you want to do this now?
6. Yes, you’re absolutely sure. Tab over to Yes and hit ENTER.
7. You’ll then be asked if you want to install a boot manager on this disk.
Additional disks don’t need boot managers, so arrow down to Standard
and press the spacebar. The sysinstall program tells you that it has written
out the fdisk information successfully. You now have a FreeBSD slice on
the disk. Hit Q to leave the fdisk part of sysinstall.
BACK UP, BACK UP, BACK UP!
Before doing anything with disks, be sure that you have a complete backup. A single
dumb fat-finger mistake in this process can destroy your system! While you rarely
plan to reformat your root filesystem, if it happens you want to recover really, really
quickly.

Disks and Filesystems 241
Creating Partitions
To create partitions on your disk, follow these steps:
1. Choose the Label option of sysinstall(8), on the same submenu as
FDISK. Select your new disk to reach the disklabel editor. Here you can
create a new partition with the C command, specifying its size in either
megabytes, gigabytes, disk blocks, or disk cylinders. You can also decide
if each new partition will be a filesystem or swap space. When you’re
asked for a mount point, use /mnt for the moment. Sysinstall temporarily
mounts the new partition at that location.
2. When the disk is partitioned as you need, press W to commit the
changes. You’ll get the same warning you saw in the fdisk menu, and
then messages from newfs(8).
Once newfs(8) finishes, exit sysinstall.
Configuring /etc/fstab
Now tell /etc/fstab about your new disks. The configuration differs depending
on whether the new partition is a filesystem or swap space. Every swap space
entry in /etc/fstab looks like this:
devicename none swap sw 0 0
If your new swap partition is /dev/da10s1b, you would add this line to
/etc/fstab:
/dev/da10s1b none swap sw 0 0
Upon your next reboot, FreeBSD will recognize this swap space. You can
also use swapon -a devicename to activate new swap without rebooting.
If you created a data partition, add a new entry as described earlier in
this chapter, much like this:
/dev/da10s1d /usr/obj ufs rw 2 2
Now you can just unmount the new partition from its temporary location,
run mount /usr/obj, and your new disk is ready for files.
Installing Existing Files onto New Disks
Chances are that you intend your new disk to replace or subdivide an
existing partition. You’ll need to mount your new partition on a temporary
mount point, move files to the new disk, then remount the partition at the
desired location.

242 Chapter 8
In our example above, we’ve mounted our new partition on /mnt. Now
you just need to move the files from their current location to the new disk
without changing their permissions. This is fairly simple with tar(1). You can
simply tar up your existing data to a tape or a file and untar it in the new
location, but that’s kind of clumsy. You can concatenate tar commands to
avoid that middle step, however.
# tar cfC - /old/directory . | tar xpfC - /tempmount
If you don’t speak Unix at parties, this looks fairly stunning. Let’s
dismantle it. First, we go to the old directory and tar up everything. Then
pipe the output to a second command, which extracts the backup in the new
directory. When this command finishes, your files are installed on their new
disk. For example, to move /usr/src onto a new partition temporarily mounted
at /mnt, you would do this:
# tar cfC - /usr/src . | tar xpfC - /mnt
Check the temporary mount point to be sure that your files are actually
there. Once you’re confident that the files are properly moved, remove the
files from the old directory and mount the disk in the new location. For
example, after duplicating your files from /usr/src, you would run:
# rm -rf /usr/src/*
# umount /mnt
# mount /usr/src
Stackable Mounts
Suppose you don’t care about your old data; you simply want to split an exist-
ing disk to get more space and you plan to recover your data from backup.
Fair enough. All FreeBSD filesystems are stackable. This is an advanced idea
that’s not terribly useful in day-to-day system administration, but it can bite
you when you try to split one partition into two.
Suppose, for example, that you have data in /usr/src. See how much space
is used on your disk, and then mount a new empty partition on /usr/src. If you
look in the directory afterwards, you’ll see that it’s empty.
Here’s the problem: The new partition is mounted “above” the old disk,
and the old disk still has all that data on it. The old partition has no more
free space than before you moved the data. If you unmount the new partition
MOVING LIVE FILES
You cannot safely move files that are changing as you copy. For example, if you’re
moving your email spool to a new partition, you must shut down your mail server
first. Otherwise, files change as you’re trying to copy them. Tools such as rsync (/usr/
ports/net/rsync) can help reduce outage duration, but an interruption is still necessary.

Disks and Filesystems 243
and check the directory again, you’ll see the data miraculously restored! The
new mount obscured the lower partition.
Although you cannot see the data, data on the old disk still takes up
space. If you’re splitting a disk to gain space, and you just mount a new disk
over part of the old, you won’t free any space on your original disk. The
moral is: Even if you are restoring your data from backup, make sure that
you remove that data from your original disk to recover disk space.
Network Filesystems
A network filesystem allows accessing files on another machine over the
network. The two most commonly used network filesystems are the original
Network File System (NFS) implemented in Unix, and the CIFS (aka SMB)
filesystem popularized by Microsoft Windows. We’ll touch on both of these,
but start with the old Unix standard of NFS.
Sharing directories and partitions between Unix-like systems is perhaps
the simplest Network File System you’ll find. FreeBSD supports the Unix
standard Network File System out of the box. Configuring NFS intimidates
many junior system administrators, but after setting up a file share or two
you’ll find it not so terribly difficult.
Each NFS connection uses a client-server model. One computer is the
server; it offers filesystems to other computers. This is called NFS exporting,
and the filesystems offered are called exports. The clients can mount server
exports in a manner almost identical to that used to mount local filesystems.
One interesting thing about NFS is its statelessness. NFS does not keep
track of the condition of a connection. You can reboot an NFS server and the
client won’t crash. It won’t be able to access files on the server’s export while
the server is down, but once it returns, you’ll pick up right where things left
off. Other network file sharing systems are not always so resilient. Of course,
statelessness also causes problems as well; for example, clients cannot know
when a file they currently have open is modified by another client.
Both NFS servers and clients require kernel options, but the various NFS
commands dynamically load the appropriate kernel modules. FreeBSD’s
GENERIC kernel supports NFS, so this isn’t a concern for anyone who
doesn’t customize their kernel.
NFS is one of those topics that have entire books written about them.
We’re not going to go into the intimate details about NFS, but rather focus
NFS INTEROPERABILITY
Every NFS implementation is slightly different. You’ll find minor NFS variations between
Solaris, Linux, BSD, and other Unix-like systems. NFS should work between them all,
but might require the occasional tweak. If you’re having problems with another
Unix-like operating system, check the FreeBSD-net mailing list archive; the issue has
almost certainly been discussed there.

244 Chapter 8
on getting basic NFS operations working. If you’re deploying complicated
NFS setups, you’ll want to do further research. Even this basic setup lets you
accomplish many complicated tasks.
Enabling the NFS Server
Turn on NFS server support with the following rc.conf options. While not all
of these options are strictly necessary for all environments, turning them all
on provides the broadest range of NFS compatibility and decent out-of-the-
box performance.
nfs_server_enable="YES"
rpcbind_enable="YES"
mountd_enable="YES"
rpc_lockd_enable="YES"
rpc_statd_enable="YES"
First, tell FreeBSD to load the nfsserver.ko kernel module, if it’s not
already in the kernel. rpcbind(8) maps remote procedure calls (RPC) into
local network addresses. Each NFS client asks the server’s rpcbind(8) daemon
where it can find a mountd(8) daemon to connect to. mountd(8) listens
to high-numbered ports for mount requests from clients. Enabling the NFS
server also starts nfsd(8), which handles the actual file request. rpc.lockd(8)
ensures smooth file locking operations over NFS, and rpc.statd(8) monitors
NFS clients so that the NFS server can free up resources when the host
disappears.
While you can start all of these services at the command line, if you’re
just learning NFS it’s best to reboot your system after enabling NFS server.
Afterwards, you’ll see rpc.lockd, rpc.statd, nfsd, mountd, and rpcbind listed
in the output of sockstat(1). If you don’t see all of these daemons listening
to the network, check /var/log/messages for errors.
Configuring NFS Exports
Now tell your server what it can share, or export. We could just export all
directories and filesystems on the entire server, but any competent security
administrator would have a (justified) fit. As with all server configurations,
permit as little access as possible while still letting the server fulfill its role.
For example, in most environments clients have no need to remotely mount
the NFS server’s root filesystem.
Define which clients may mount which filesystems and directories in
/etc/exports. This file takes a separate line for each disk device on the server
and each client or group of clients that access that device. Each line has up to
three parts:
Directories or partitions to be exported (mandatory)
Options on that export
Clients that can connect
Each combination of clients and a disk device can only have one line in
the exports file. This means that if /usr/ports and /usr/home are on the same
partition, and you want to export both of them to a particular client, they

Disks and Filesystems 245
must both appear in the same line. You cannot export /usr/ports and /usr/home
to one client with different permissions. You don’t have to export the entire
disk device, mind you; you can export a single directory within a partition.
This directory cannot contain either symlinks or double or single dots.
Of the three parts of the /etc/exports entry, only the directory is mandatory.
If I wanted to export my home directory to every host on the Internet, I could
use an /etc/exports line consisting entirely of this:
/home/mwlucas
We show no options and no host restrictions. This would be foolish,
of course, but I could do it.3
After editing the exports file, tell mountd to reread it:
# /etc/rc.d/mountd restart
mountd(8) logs any problems in /var/log/messages. The log messages
are generally enigmatic: While mountd(8) informs you that a line is bad, it
generally doesn’t say why. The most common errors I experience involve
symlinks.
Enabling the NFS Client
Configuring the client is much simpler. In /etc/rc.conf, put:
nfsclient="YES"
Then, reboot or run /etc/rc.d/nfsclient start. Either will enable NFS
client functions.
Now we can mount directories or filesystems exported by NFS servers.
Instead of using a device name, use the NFS server’s host name and the
directory you want to mount. For example, to mount the directory /home/
mwlucas from my server sardines onto the directory /mnt, I would run:
# mount sardines:/home/mwlucas /mnt
Afterwards, test your mount with df(1).
# df
Filesystem 1K-blocks Used Avail Capacity Mounted on
/dev/ad4s1a 1012974 387450 544488 42% /
devfs 1 1 0 100% /dev
/dev/ad4s1f 109009798 12959014 87330002 13% /usr
/dev/ad4s1e 1012974 42072 889866 5% /var
sardines:/home/mwlucas 235492762 150537138 66116204 69% /mnt
3 Why is there no safeguard against shooting yourself in the foot like this? Well, Unix feels that
anyone dumb enough to do this doesn’t deserve to be its friend. Various people keep trying to
put Unix in therapy for this type of antisocial behavior, but it just isn’t interested.

246 Chapter 8
The NFS-mounted directory shows up as a normal partition, and I can
read and write files on it as I please. Well, maybe not entirely as I please . . .
NFS and Users
File ownership and permissions are tied to UID numbers. NFS uses UID to
identify the owner. For example, on my laptop the user mwlucas has the UID
of 1001. On the NFS server, mwlucas also has the UID 1001. This makes my life
easy, as I don’t have to worry too much about file ownership; I have the same
privileges on the server as on my laptop. This can be a problem on a large
network, where users have root on their own machines. The best way around
this is to create a central repository of authorized users via Kerberos. On a
small network or on a network with a limited number of NFS users, this usually
isn’t a problem; you can synchronize /etc/master.passwd on your systems or just
assign the same UID to each user on each system.
The root user is handled slightly differently, however. An NFS server
doesn’t trust root on other machines to execute commands as root on the
server. After all, if an intruder breaks into an NFS client you don’t want the
server to automatically go down with it. You can map requests from root to
any other username. For example, you might say that all requests from root
on a client will run as the user nfsroot on the server. With careful use of
groups, you could allow this nfsroot user to have limited file access. Use the
-maproot option to map root to another user. Here, we map UID 0 (root) on
the client to UID 5000 on the server:
/usr/home/mwlucas -maproot=5000
If you really want the root user on the client to have root privileges on
the server, you can use -maproot to map root to UID 0. This might be suitable
on your home network or on a test system.
If you do not use a maproot statement, the NFS maps a remote root account
to nobody:nobody by default.
Don’t forget to restart mountd(8) after editing the exports file.
Exporting Multiple Directories
Many directories under /usr would make sensible exports. Good candidates
include /usr/src, /usr/obj, and /usr/ports/distfiles. List all directories of the
same partition on the same line in /etc/exports, right after the first exported
directory, separated by spaces. My /etc/exports now looks like this:
/usr/home/mwlucas /usr/src /usr/obj /usr/ports/distfiles -maproot=5000
There are no identifiers, separators, or delimiters between the parts of
the line. Yes, it would be easier to read if we could put each shared directory
on its own line, but we can’t; they’re all on the same partition. The FreeBSD
team could rewrite this so that it had more structure, but then FreeBSD’s
/etc/exports would be incompatible with that from any other Unix.

Disks and Filesystems 247
As with many other configuration files, you can use a backslash to break
a single line of configuration into multiple lines. You might find the above
configuration more readable as:
/usr/home/mwlucas \
/usr/src \
/usr/obj \
/usr/ports/distfiles \
-maproot = 5000
Restricting Clients
To allow only particular clients to access an NFS export, list them at the end
of the /etc/exports entry. Here, we restrict our share above to one IP address:
/usr/home/mwlucas /usr/src /usr/obj /usr/ports/distfiles \
-maproot=5000 192.168.1.200
You can also restrict file shares to clients on a particular network by using
the -network and -mask qualifiers:
/usr/home/mwlucas /usr/src /usr/obj /usr/ports/distfiles \
-maproot=5000 -network 192.168.0 -mask 255.255.255.0
This lets any client with an IP address beginning in 192.168.0 access your
NFS server. I use a setup much like this to upgrade clients quickly. I build a
new world and kernel on the NFS server, then let the clients mount those
partitions and install the binaries over NFS.
Combinations of Clients and Exports
Each line in /etc/exports specifies exports from one partition to one host or set
of hosts. Different hosts can have entirely different export statements.
/usr/home/mwlucas /usr/src /usr/obj /usr/ports/distfiles \
-maproot=5000 192.168.1.200
/usr -maproot=0 192.168.1.201
Here, I’ve exported several subdirectories of /usr to the NFS client at
192.168.1.200. The NFS client at 192.168.1.201 gets to mount the whole of
/usr, and may even do so as root.
NFS Performance and Options
FreeBSD uses conservative NFS defaults, so that it can work well with any other
Unix-like operating system. If you’re working in a pure FreeBSD environ-
ment or if your environment only contains higher-end Unix systems, you can
improve NFS performance with mount options.
First of all, NFS defaults to running over UDP. The tcp or -T option tells
the client to request a mount over TCP.
248 Chapter 8
Programs expect the filesystem to not disappear, but when you’re using
NFS it’s possible that the server will vanish from the network. This makes
programs on the client trying to access the NFS filesystem hang forever. By
making your NFS mount interruptible, you will be able to interrupt processes
hung on unavailable NFS mount with CTRL-C. Set interruptibility with intr.
FreeBSD can tell clients if and when a filesystem is no longer accessible.
Programs will fail when trying to access the filesystem, instead of hanging
forever.
Finally, you can set the size of read and write requests. The defaults are
well-suited to networks of the early 1990s, but you can set the read and write
size to more modern values with the -r and -w options. I find that 32768 is a
good value for both. So, putting this all together, I could have my client
mount an NFS file system like this:
# mount -o tcp,intr,soft,-w=32768,-r=32768 server:/usr/home/mwlucas /mnt
The same entry in /etc/fstab looks like this:
server:/usr/home/mwlucas /mnt nfs rw,-w=32768,-r=32768,tcp,soft,intr 0 0
This general NFS configuration gives me good throughput speed on a
local network, limited only by hardware quality.
While NFS is pretty straightforward for simple uses, you can spend many
hours adjusting, tuning, and enhancing it. If you wish to build a complicated
NFS environment, don’t rely entirely on this brief introduction but spend
time with a good book on the subject.
FreeBSD and CIFS
If you’re on a typical office network, the standard network file sharing
protocol is Microsoft’s Common Internet File Sharing, or CIFS. (CIFS was
once known as Server Message Block, or SMB.) This is the “Network
Neighborhood” that Windows users can access. While originally provided
only by Microsoft Windows systems, this protocol has become something of
a standard. Thankfully, today there’s an open source CIFS file sharing server
called Samba. Many commercial products provide services via this protocol.
FreeBSD includes kernel modules to support the filesystem and programs to
find, mount, and use CIFS shares.
Prerequisites
Before you begin working with Microsoft file shares, gather the following
information about your Windows network:
Workgroup or Windows domain name
Valid Windows username and password
IP address of the Windows DNS server

Disks and Filesystems 249
Kernel Support
FreeBSD uses several kernel modules to support CIFS. The smbfs.ko module
supports basic CIFS operations. The libmchain.ko and libiconv.ko modules pro-
vide supporting functions and load automatically when you load smbfs.ko. You
can compile these statically in your kernel as:
options NETSMB
options LIBMCHAIN
options LIBICONV
options SMBFS
Of course, you can load these at boot time with the appropriate entries
in /boot/loader.conf.
Configuring CIFS
CIFS relies on a configuration file, either $HOME/.nsmbrc or /etc/nsmb.conf.
All settings in /etc/nsmb.conf override the settings in user home directories.
The configuration file is divided into sections by labels in square brackets.
For example, settings that apply to every CIFS connection are in the [default]
section. Create your own sections to specify servers, users, and shares, in one
of the following formats:
[servername]
[servername:username]
[servername:username:sharename]
Information that applies to an entire server goes into a section named
after the server. Information that applies to a specific user is kept in a
username section, and information that applies to only a single share is
kept in a section that includes the share name. You can lump the information
for all the shares under a plain [servername] entry if you don’t have more
specific per-user or per-share information.
Configuration entries use the values from the CIFS system—for example,
my Windows username is lucas_m, but my FreeBSD username is mwlucas, so
I use lucas_m in nsmb.conf.
nsmb.conf Keywords
Specify a nsmb.conf configuration with keywords and values under the
appropriate section. For example, servers have IP addresses and users don’t,
so you would only use an IP address assignment in the server section. To use
a keyword, assign a value with an equal sign, as in keyword=value. Here are
the common keywords; for a full list, see nsmb.conf(5).
workgroup=string
The workgroup keyword specifies the name of the Windows domain or work-
group you want to access. This is commonly a default setting used for all
servers.

250 Chapter 8
addr=a.b.c.d
The addr keyword sets the IP address of a CIFS server. This keyword can only
appear under a plain [servername] label.
nbns=a.b.c.d
The nbns keyword sets the IP address of a NetBIOS (WINS) nameserver. You
can put this line in the default section or under a particular server. If you
have Active Directory (which is based on DNS), you can use DNS host names.
Adding a WINS server won’t hurt your configuration, however, and helps in
testing basic CIFS setup.
password=string
The password keyword sets a clear-text password for a user or a share. If you
must store passwords in /etc/nsmb.conf, be absolutely certain that only root
can read the file. Storing a password in $HOME/.nsmbrc is a bad idea on a
multi-user system.
You can scramble your Windows password with smbutil crypt, generating
a string that you can use for this keyword. The scrambled string has double
dollar signs ($$) in front of it. While this helps prevent someone accidentally
discovering the password, a malicious user can unscramble it easily.
CIFS Name Resolution
Let’s build a basic nsmb.conf file. As an absolute minimum, we first need to
find hosts, which means we need a workgroup name. We’ll set the domain
controller as the WINS server. I also have a user set up on the Windows-based
servers to share files, so I’m going to use that as a default in nsmb.conf.
[default]
workgroup=BIGLOSER
nbns=192.168.1.66
username=unix
Armed with this information, we can perform basic SMB name queries.
# smbutil lookup ntserv1
Got response from 192.168.1.66
IP address of ntserv1: 192.168.1.4
If this works, you have basic CIFS functionality.
Other smbutil(1) Functions
Before you can mount a filesystem from a Windows host, you must log into
the host. Only root can perform this operation.
# smbutil login //unix@ntserv1
Password:

Disks and Filesystems 251
So, our configuration is correct. Let’s see what resources this server
offers with smbutil’s view command.
# smbutil view //unix@ntserv1
Password:
Share Type Comment
-------------------------------
IPC$ pipe Remote IPC
ADMIN$ disk Remote Admin
C$ disk Default share
unix disk
4 shares listed from 4 available
You’ll get a list of every shared resource on the CIFS server. Now,
assuming you’re finished, log out of the server.
# smbutil logout //unix@ntserv1
Mounting a Share
Now that you’ve finished investigating, let’s actually mount a share with
mount_smbfs(8). The syntax is as follows:
# mount_smbfs //username@servername/share /mount/point
I have a share on this Windows box called MP3 that I want to access
from my FreeBSD system. To mount this as /home/mwlucas/smbmount, I would
do this:
# mount_smbfs //unix@ntserv1/MP3 /home/mwlucas/smbmount
mount(8) and df(1) show this share attached to your system, and you
can access documents on this server just as you could any other filesystem.
Other mount_smbfs Options
mount_smbfs includes several options to tweak the behavior of mounted
CIFS filesystems. Use the -f option to choose a different file permission
mode and the -d option to choose a different directory permission mode.
For example, to set a mount so that only I could access the contents of the
directory, I would use mount_smbfs -d 700. This would make the FreeBSD
permissions far more stringent than the Windows privileges, but that’s
perfectly all right with me. I can change the owner of the files with the -u
option, and the group with the -g option.
Microsoft filesystems are case-insensitive, but Unix-like operating systems
are case sensitive. CIFS defaults to leaving the case as it finds it, but that may
not be desirable. The -c flag makes mount_smbfs(8) change the case on the
filesystem: -c l changes everything to lowercase and -c u changes everything
to uppercase.

252 Chapter 8
Sample nsmb.conf Entries
Here are samples of nsmb.conf entries for different situations. They all assume
they’re part of a configuration where you’ve already defined a workgroup,
NetBIOS nameserver, and a username with privileges to access the CIFS
shares.
Unique Password on a Standalone System
You would use something like the following if you have a machine named
desktop with a password-protected share. Many Windows 9x systems have this
sort of password-protection feature.
[desktop:shareusername]
password=$$1789324874ea87
Accessing a Second Domain
In this example, we’re accessing a second domain, named development.
This domain has a username and password different from those at our
default domain.
[development]
workgroup=development
username=support
CIFS File Ownership
Ownership of files between Unix-like and Windows systems can be problem-
atic. For one thing, your FreeBSD usernames probably won’t map to Windows
usernames, and Unix has a very different permissions scheme compared to
Windows.
Since you’re using a single Windows username to access the share, you
have whatever access that account has to the Windows resources, but you must
assign the proper FreeBSD permissions for that mounted share. By default,
mount_smbfs(8) assigns the new share the same permissions as the mount
point. In our earlier example, the directory /home/mwlucas/smbmount is owned
by the user mwlucas and has permissions of 755. These permissions say that
mwlucas can edit what’s in this directory, but nobody else can. Even though
FreeBSD says that this user can edit those files, Windows might still not let
that particular user edit the files it’s sharing out.
Serving CIFS Shares
Just as FreeBSD can access CIFS shares, it can also serve them to CIFS clients
with Samba. You can find Samba in /usr/ports/net/samba3. You’ll find the
Samba website at http://www.samba.org, along with many useful tutorials.
Serving CIFS shares from FreeBSD is much more complicated than accessing
them, so we’ll end our discussion here before this book grows even thicker.

Disks and Filesystems 253
devfs
devfs(5) is a dynamic filesystem for managing device nodes. Remember, in a
Unix-like operating system everything is a file. This includes physical hardware.
Every device on the system has a device node under /dev.
Once upon a time, the system administrator was responsible for making
these device node files. Lucky sysadmins managed an operating system that
came with a shell script to handle device node creation and permissions. If the
OS authors had not provided such a shell script, or if the server had unusual
hardware not included in that shell script, the sysadmin had to create the node
with black magic and mknod(8). If any little thing went wrong, the device
would not work. The other option was to ship the operating system with
device nodes for every piece of hardware imaginable. System administrators
could be confident—well, mostly confident—that the desired device nodes
were available, somewhere, buried within the thousands of files under /dev.
Of course, the kernel knows exactly what characteristics each device node
should have. With devfs(5), FreeBSD simply asks the kernel what device nodes
the kernel thinks the system should have and provides exactly those—and no
more. This works well for most people. You and I are not “most people,”
however. We expect odd things from our computers. Perhaps we need to
make device nodes available under different names, or change device node
ownership, or configure our hardware uniquely. FreeBSD breaks the problem
of device node management into three pieces: configuring devices present at
boot, global availability and permissions, and configuring devices that appear
dynamically after boot with devd(8).
devfs at Boot: devfs.conf
The big problem sysadmins have with a dynamic devfs is that any changes
made to it disappear on reboot. When device nodes were permanent files on
disk, the sysadmin could symlink to those nodes or change their permissions
without worrying that his changes would vanish. With an automated, dynamic
device filesystem, this assurance disappears. (Of course, you no longer have
to worry about occult mknod(8) commands either, so you’re better off in the
long run.) The device node changes could include, for example:
Making device nodes available under different names
Changing ownership of device nodes
Concealing device nodes from users
DEVICE MANAGEMENT AND SERVERS
For the most part, device node management on servers works without any adjustment
or intervention. The place I most often need to muck with device nodes is on laptops
and the occasional workstation. FreeBSD’s device node management tools are very
powerful and flexible, and include support for things I wouldn’t expect to use in a
century. We’ll only touch upon the basics. Don’t think that you must master devfs(5)
to get your server running well!
254 Chapter 8
At boot time, devfs(8) creates device nodes in accordance with the rules
in /etc/devfs.conf.
devfs.conf
The /etc/devfs.conf file lets you create links, change ownership, and set per-
missions for devices available at boot. Each rule has the following format:
action realdevice desiredvalue
The valid actions are link (create a link), perm (set permissions), and own
(set owner). The realdevice entry is a preexisting device node, while the last
setting is your desired value. For example, here we create a new name for a
device node:
link acd0 cdrom
We want a symbolic link to the device node /dev/acd0 (an ATAPI CD
drive), and we want this link to be named /dev/cdrom . If we reboot with this
entry in /etc/devfs.conf, our CD device at /dev/acd0 also appears as /dev/cdrom,
as many desktop multimedia programs expect.
To change the permissions of a device node, give the desired permissions
in octal form as the desired value:
perm acd0 666
Here, we set the permissions on /dev/acd0 (our CD device, again) so that
any system user can read or write to the device. Remember, changing the
permissions on the /dev/cdrom link won’t change the permissions on the
device node, just the symlink.
Finally, we can also change the ownership of a device. Changing a device
node’s owner usually indicates that you’re solving a problem the wrong way
and that you may need to stop and think. FreeBSD happily lets you mess up
your system if you insist, however. Here, we let a particular user have absolute
control of the disk device /dev/da20:
own da20 mwlucas:mwlucas
This might not have the desired effect, however, as some programs still
think that you must be root to carry out operations on devices. I’ve seen
more than one piece of software shut itself down if it’s not run by root,
without even trying to access its device nodes. Changing the device node
permissions won’t stop those programs’ complaints when they are run by a
regular user.
Configuration with devfs.conf(5) solves many problems, but not all. If
you want a device node to simply be invisible and inaccessible, you must use
devfs rules.
Disks and Filesystems 255
Global devfs Rules
Every devfs(5) instance behaves according to the rules defined in devfs.rules.
The devfs rules apply to both devices present at boot and devices that appear
and disappear dynamically. Rules allow you to set ownership and permissions
on device nodes and make device nodes visible or invisible. You cannot create
symlinks to device nodes with devfs rules.
Similar to /etc/rc.conf and /etc/defaults/rc.conf, FreeBSD uses /etc/devfs.rules
and /etc/defaults/devfs.rules. Create an /etc/defvs.rules for your custom rules and
leave the entries in the defaults file alone.
devfs Ruleset Format
Each set of devfs rules starts with a name and a ruleset number between
square brackets. For example, here are a few basic devfs rules from the
default configuration:
[devfsrules_hide_all= 1]
add hide
The first set of rules is called devf s_hide_all and is ruleset number 1 .
This ruleset contains only one rule .
Ruleset Content
All devfs rules (in files) begin with the word add, to add a rule to the ruleset.
You then have either a path keyword and a regex of device names, or a type
keyword and a device type. At the end of the rule, you have an action, or a
command to perform. Here’s an example of a devfs rule:
add path da* user mwlucas
This rule assigns all device nodes with a node name beginning with da to
the ownership of mwlucas. On a multi-user system, or a system with SCSI
hard drives, this would be a bad idea. On a laptop, where the only device
nodes beginning with da are USB storage devices, it’s not such a bad idea.
Devices specified by path use standard shell regular expressions. If you
want to match a variety of devices, use an asterisk as a wildcard. For example,
path ad1s1 matches exactly the device /dev/ad1s1, but path ad*s* matches
every device node with a name beginning with ad, a character, the letter s,
and possibly more characters. You could tell exactly what devices are matched
by a wildcard by using it at the command line.
# ls /dev/ad*s*
This lists all slices and partitions on your ATA hard drives, but not the
devices for the entire drive.

256 Chapter 8
The type keyword indicates that you want the rule to apply to all devices
of a given type. Valid keywords are disk (disk devices), mem (memory devices),
tape (tape devices), and tty (terminal devices, including pseudoterminals).
The type keyword is rarely used exactly because it’s so sweeping.
If you include neither a path nor a type, devfs applies the action at the
end of the rule to all device nodes. In almost all cases, this is undesirable.
The ruleset action can be any one of group, user, mode, hide, and unhide.
The group action lets you set the group owner of the device, given as an
additional argument. Similarly, the user action assigns the device owner.
Here, we set the ownership of da disks to the username desktop and the
group usb:
add path da* user desktop
add path da* group usb
The mode action lets you assign permissions to the device in standard
octal form:
add path da* mode 664
The hide keyword lets you make device nodes disappear, and unhide
makes them reappear. Since no program can use a device node if the device
is invisible, this is of limited utility except when the system uses jail(8). We’ll
look at that specific use of hide and unhide in the next chapter.
Once you have a set of devfs rules you like, enable them at boot in
/etc/rc.conf. Here, we activate the devfs ruleset named laptoprules:
devfs_system_rulesets="laptoprules"
Remember, devfs rules apply to the devices in the system at boot and
the devices configured dynamically after startup. To finish up, let’s look at
dynamic devices.
Dynamic Device Management with devd(8)
Hot-swappable hardware is much more common now than it was even ten
years ago. In the last century, laptop network cards were considered cutting-
edge. While you might drop a new CD into the workstation’s cup holder, you
wouldn’t hot-plug a whole CD drive into your desktop. Today, that’s entirely
different. Flash drives are essentially USB-based hard drives that you can
attach and detach at will, and other USB hardware lets you add keyboards,
mice, and even network cards on a whim.
FreeBSD’s devfs dynamically creates new device nodes when this hardware
is plugged in and erases the nodes when the hardware is removed, making
using these dynamic devices much simpler. devd(8) takes this a step further
by letting you run userland programs when hardware appears and disappears.
Disks and Filesystems 257
devd Configuration
devd(8) reads its configuration from /etc/devd.conf and any file under
/usr/local/etc/devd/. I recommend placing your local rules in /usr/local/etc/
devd/devd.conf to simplify upgrades. You could also add different rules files
for different types of devices, if you find your devd(8) configuration
becoming very complicated. You’ll find four types of devd(8) rules: attach,
detach, nomatch, and notify.
attach rules are triggered when matching hardware is attached to the
system. When you plug in a network card, an attach rule configures the card
with an IP address and brings up the network.
detach rules trigger when matching hardware is removed from the system.
detach rules are uncommon, as the kernel automatically marks resources
unavailable when the underlying hardware disappears, but you might find
uses for them.
The nomatch rules triggers when new hardware is installed but not
attached to a device driver. These devices do not have device drivers in the
current kernel.
devd(8) applies notify rules when the kernel sends a matching event notice
to userland. For example, the console message that a network interface has
come up is a notify event. Notifications generally appear on the console or in
/var/log/messages.
devd(8) rules also have priority, with 0 being the lowest. Only the highest
matching rule is processed, while lower-priority matching rules are skipped.
Here’s a sample devd(8) rule:
notify 0 {
match "system" "IFNET";
match "type" "ATTACH";
action "/etc/pccard_ether $subsystem start";
};
This is a notify rule, which means it activates when the kernel sends a
message to userland. As a priority 0 rule, this rule can only be triggered
if no rule of higher-priority matches the criteria we specify. This rule only
triggers if the notification is on the network system IFNET (network), and
only if the notification type is ATTACH —in other words, when a network
interface comes up. Under those circumstances, devd(8) takes action and
runs a command to configure the network interface .
devd(8) supports many options to handle all sorts of different situations.
If you want to automatically mount a particular USB flash disk on a certain
mount point, you can do that by checking the serial number of every USB
device you put in. If you want to configure Intel network cards differently
than 3Com network cards, you can do that too. We’ll do enough with devd(8)
to introduce you to its abilities, mainly through examples, but we won’t delve
deeply into it.
258 Chapter 8
devd(8) Example: Laptops
I use my laptop both at work and at home. At work I use a wired connection,
while at home I use wireless. Both require very particular setups, different DNS
servers, and different configurations all around. I could cheat by renumbering
my home network to match my work network, but experience tells me that my
home network will last much longer than my attachment to any one job.
(Maybe I’m wrong.4) I want the laptop to configure itself for home when I
plug in my wireless card. I want the laptop to configure itself for work when
I plug in the CAT5 cable to the integrated network interface.
If a wired interface is configured to use DHCP, plugging in the cable
tells FreeBSD to start dhclient(8) and configure the network. When I plug
in a wireless card, FreeBSD checks for a configuration and tries to start the
network. Here’s my wireless configuration from /etc/rc.conf (this is all one
line in the configuration, but it is broken to fit in this book):
ifconfig_wi0="inet dhcp ssid WriteFaster wepkey
0xdeadbeefbadc0decafe1234567 weptxkey 1 wepmode on channel 1"
When I insert my wireless card, the kernel attaches the card to the driver
wi0. This is an attach event, and devd(8) searches its configuration for a
corresponding rule. The following entry in /etc/devd.conf matches:
attach 0 {
media-type "802.11";
action "/etc/pccard_ether $device-name start";
};
We inserted a card into the laptop, and FreeBSD attached the wi(4)
driver to it. This is an attach event. This rule has a priority of 0 , so any
other matching rule will run before this default rule. Anything with a media
type of 802.11 (wireless) matches this rule. When an attach event matches
this rule, FreeBSD runs a command to configure the network. I could run
a custom script instead of using the built-in FreeBSD support, but why bother
when the default configuration does everything I need?
Unlike the wireless I use at home, the Ethernet interface I use at work is
always attached to my system. The interface might not be plugged into a
network, but the card itself is always attached. I don’t want to configure this
interface every time the system boots, because if the interface isn’t plugged
in I’ll have a long delay while my laptop’s SSH daemon and other services
time out on DNS queries. At work I have a variety of NFS mounts, as well as
custom client/server settings not available from the DHCP server.
4 It would be nice, some day, to have employment that didn’t end with four corporate security
gorillas dragging me to the door in chains, with my new ex-boss screeching in the background
about federal regulators, crème brûlée, and caffeinated lemurs. I’m certain this is just coincidence,
mind you, as nobody’s ever pressed charges.

Disks and Filesystems 259
This means that I need to run a custom shell script to configure my
network for work, but only when the network cable is plugged in. I want
devd to watch for a notification that the interface has come up and then
run my custom shell script. I’ve written the custom entry below and placed
it in /usr/local/etc/devd/devd.conf:
notify 10 {
match "system" "IFNET";
match "type" "LINK_UP";
media-type "ethernet";
# action "/etc/rc.d/dhclient start $subsystem";
action "/home/mwlucas/bin/jobnetwork.sh";
};
This is a notification rule, which means it triggers when the kernel
sends a matching notification message to the system. It also has a priority of
10 , so it runs before any of FreeBSD’s default rules. This rule triggers on
the network system, when a link comes up (i.e., when we plug in a
network cable), if the link is Ethernet . When all of these conditions are
met, FreeBSD runs a shell script in my home directory.
Note that this rule has a commented-out line . When I said I wrote
this rule, I lied. I actually copied the default entry from /etc/devd.conf and
modified it slightly. FreeBSD already has rules for handling network interfaces
coming up, but I wanted to do something a little different. Instead of coming
up with all these conditions myself, I found a entry that was almost right and
modified it. I suggest you do the same. Just be sure to give your customized
rule a higher priority than the default rule, so FreeBSD uses your rule instead
of its own.
Another devd Example: Flash Drives
Copying an entry is cheating, I hear you cry. Well, let’s try an example where
FreeBSD doesn’t have any infrastructure in place. On my laptop, I want any
USB storage mounted on /media automatically. The first USB storage device
plugged into a laptop shows up in FreeBSD as /dev/da0, but the device name is
umass0. (If you already have other USB or SCSI devices, these numbers will
differ for you.) Generally speaking, all flash media is formatted with the FAT32
fileystem, so you would use mount -t msdosfs to mount it.
When the device is plugged in, FreeBSD attaches it to the kernel, so we
use an attach rule:
attach 10 {
match "device-name" "umass0";
action "/home/mwlucas/bin/mountusb.sh";
};

260 Chapter 8
I assign this rule a priority of 10, so it overrides any new priority 0
functions FreeBSD might install during an upgrade. (If FreeBSD grows the
ability to do this automatically, I’ll probably use that instead, but I don’t want
an upgrade to change my system behavior unless I know about it.) Here, we
match on the device name . When the device appears, a shell script in my
directory runs.
Why not just run the mount(8) command? USB devices need a moment
or two to warm up and stabilize before they can be accessed. Also, some USB
flash drives need to be poked before they really start to work. The shell script
I use here is terribly simpleminded, but it suffices:
#!/bin/sh
sleep 2
/usr/bin/true > /dev/da0
/sbin/mount -t msdosfs /dev/da0s1 /media
While this handles mounting the device for me, devd(8) won’t unmount
the device. FreeBSD expects the sysadmin to unmount filesystems before
removing the underlying devices. It’s no different from unmounting a CD
or floppy disk before ejecting it.
While devd(8) has many more advanced features, these two examples
cover all the features I’ve needed or wanted to use in several years. Please
read the manual page if you seek further enlightenment. Now that you have
a little bit too much understanding of FreeBSD filesystems, let’s look at its
more advanced security features.

9
ADVANCED SECURITY FEATURES
FreeBSD includes a variety of tools for
securing network traffic and users. You can
allow and disallow connections to or from
certain parts of the Internet. You can cage users
in a virtual machine, or jail, where they can access
everything that’s important to them but nothing that’s
important to you. Packet filtering lets you control who can access your system.
In this chapter, we’ll examine these tools and techniques, look at monitoring
your system’s security, and discuss how to react if you suffer an intrusion.
Let’s start with a very basic security topic: unprivileged users.
Unprivileged Users
An unprivileged user is a specific user for a specific task. He has only the rights
necessary to perform that limited task. Many programs run as unprivileged
users or use unprivileged users to perform specific duties.
262 Chapter 9
“Only the rights needed to perform its duties” sounds like every user
account, doesn’t it? That’s true, but the account used by the least privileged
human being still has more rights than many programs need. Anyone with
shell access has a home directory. The normal user may create files in that
home directory, run text editors, or process email. Your average shell user
needs these minimal privileges, but programs do not. By having a program,
particularly a network daemon, run as a very restricted user you control the
amount of damage an intruder can do to either the program or the user.
FreeBSD includes several unprivileged users. Take a look at /etc/passwd
and you’ll see accounts like audit, bind, uucp, and www. These are all
unprivileged accounts for use by specific server daemons. See what they
have in common.
Unprivileged users do not have normal home directories. Many have a
home directory of /nonexistent, while others such as sshd have a special home
directory such as /var/empty. Having a home directory where you may not
write or read files makes the account less flexible, but good enough for a
server daemon. These users do own files on the system, but they usually
cannot write to those files.
Similarly, nobody should ever log into these accounts. If the account
bind is reserved for the DNS system, nobody should actually log into the
system as that user! Such an account must have a user shell that specifically
denies logging in, like /usr/sbin/nologin. How does all this enhance system
security? Let’s look at an example.
The web server is generally run under the unprivileged account www.
Suppose that an intruder discovered a security flaw in the version of the web
server program you’re using and can make the web server execute arbitrary
code. This is among the worst types of security holes, where an intruder can
make the server program do absolutely anything within its power. What is
within this program’s power?
The intruder probably wants a command prompt on the system.
A command prompt on a Unix-like system is the door to so much more
access, after all. The unprivileged user has an assigned shell that specifically
disallows logins. This really annoys intruders and requires them to work
much harder to reach that command prompt.
If he’s really clever, though, the nologin shell won’t stop the intruder.
Let’s assume that through clever trickery he makes the web server execute a
simple shell such as /bin/sh and offer him the prompt. He’s in and can wreak
untold damage . . . or can he?
He has no home directory and does not have permissions to create one.
That means that any files he wants to store must go in a globally accessible
directory such as /tmp or /var/tmp, increasing his visibility. The Apache con-
figuration file is owned by root or by your web server administration group,
and the www user is not part of that group. The intruder might have a path
into the web server, but he can’t reconfigure it. He can’t change the website
files, as the www user doesn’t own them. The www user doesn’t have access
to anything at all on the system, actually. Having broken into the web server
program, he now has to break into FreeBSD or the web application.
Advanced Security Features 263
An unprivileged user doesn’t solve all security problems, mind you. Our
compromised www user can view web application source files. If your appli-
cation is badly written or has database passwords hard-coded into hidden
files, you’re still in a lot of trouble. Still, if you’ve kept your system updated
and patched, he’ll have a very hard time penetrating FreeBSD itself.
The nobody Account
For years, system administrators used the account nobody as a generic
unprivileged user. They’d run web servers, proxy servers, and whatever else
as nobody. This was better than running those programs as root, but not as
good as having separate users for each daemon. If an intruder successfully
penetrated one of these programs, he had access to them all. Our hypothetical
web server intruder would abruptly have access not only to the web server,
but to whatever other programs run as that same user! If you’re using NFS,
remember that NFS defaults to mapping remote root accounts to nobody.
The whole point of using unprivileged users is to minimize the possible
damage from a successful intrusion.
While you might test with the nobody account, don’t deploy production
services with it. Use separate unprivileged accounts liberally.
A Sample Unprivileged User
Here are parameters useful for a generic unprivileged user:
username Assign a username related to the user’s function.
For example, the default user for web servers is www.
home directory /nonexistent
shell /usr/sbin/nologin
UID/GID Choose to use a special range of user and group IDs for
unprivileged users.
full name Assign a name describing the user’s function.
password Use chpass(1) to assign the user a single asterisk as their
encrypted password. This disables the account password.
These settings make your unprivileged user very unprivileged indeed.
You can set all of this easily with adduser(8), giving the account no password,
the correct home directory, and an appropriate shell.
Network Traffic Control
System administrators must have the ability to control traffic to and from
their systems. Unwanted visitors must be stopped while legitimate users get
access. FreeBSD provides a variety of tools that allow you to control outside
access to your systems. We’ll focus on TCP wrappers and packet filtering, two
popular access-control methods.
264 Chapter 9
The TCP wrappers, or simply wrappers, control access to network daemons.
While the program must be written to support TCP wrappers, most modern
software has supported wrappers for many years. Wrappers are fairly simple
to configure and don’t require much networking knowledge.
Packet filtering controls which traffic the system allows to pass through it
and which traffic it rejects. Most firewalls are packet filters with a pretty GUI
on top, but you can use FreeBSD packet filtering and proxy software to build
a solid firewall in and of itself. A rejected connection request never reaches
any userland program; it is blocked in the network stack. Packet filtering can
control access to any program, service, or network port, but does require
more networking knowledge.
If you want to use either wrappers or packet filtering, you must decide
whether you want a default accept or default deny traffic control policy.
Default Accept vs. Default Deny
One of the essential decisions in any security policy is between default accept
and default deny. A default accept security stance means that you allow any
type of connection except what you specifically disallow. A default deny stance
means that you only allow connections from specified parts of the Internet
and/or to specified services, and you refuse all other connections. The default
is used unless you make a specific rule dictating otherwise. Once you have
chosen your default security stance, you create exceptions one way or another
to either provide or block services as necessary. The choice is really between
whether you offer services to the world (default accept) or only to a select
few (default deny).
For example, company policy might dictate that the Intranet web server
must only be accessible from within the company. If so, adopt a default deny
stance and explicitly list who may access the server. Alternatively, if you have
a public website but want to block certain parts of the Internet from accessing
it for whatever reason, adopt a default accept stance. I always recommend
a default deny stance. If you do not make a choice, you’ve chosen default
accept.
Choosing a default does not mean that the default must be implemented
without exceptions. My public web servers have a default deny security stance,
but I specifically allow the world to access the websites. The machine rejects
attempts to connect to other programs unless they come from one of a few
specified IP addresses. This is a perfectly acceptable default deny stance.
Different security tools implement these stances in different ways. For
example, with TCP wrappers, the first matching rule is applied. If your last
rule denies everything, you’ve established a policy that says, “Unless I’ve
specifically created a rule earlier to permit this traffic, block it.” On the other
hand, with the PF packet filter, the last matching rule applies. If your first
rule says, “Block all traffic,” you’ve implemented a policy that says, “Unless I
specifically create a later rule to permit this traffic, block it.”
Both policies annoy the system administrator. If you have a default accept
policy, you’ll spend your time continually plugging holes. If you choose a

Advanced Security Features 265
default deny policy, you’ll spend your time opening access for people. You will
repeatedly apologize for either choice. With default deny, you will say things
like, “I’ve just activated service for you. I apologize for the inconvenience.”
With default accept, you will say things like, “. . . and that is why the intruders
were able to access our internal accounting database and why we lost millions
of dollars.” In the latter case, “I apologize for the inconvenience” really doesn’t
suffice.
TCP Wrappers
Remember from Chapter 6 that network connections are made to various
programs that listen for connection requests. When a program is built with
TCP wrappers support, the program checks the incoming request against
the wrappers configuration. If the wrappers configuration says to reject the
connection, the program immediately drops the request. Despite the name,
TCP wrappers work with both TCP and UDP connections. Wrappers are a
long-running Unix standard that have been incorporated into FreeBSD.
Individual programs might or might not work with wrappers; while just
about everything in the base FreeBSD system does, some third-party software
doesn’t.
TCP wrappers are implemented as a shared library, called libwrap. As
we’ll see in Chapter 12, shared libraries are small chunks of code that can be
shared between programs. Any program that links with libwrap may use the
TCP wrappers functions.
Wrappers most commonly protect inetd(8), the super server that handles
network requests for smaller programs. We’ll discuss inetd in Chapter 15.
While our examples cover inetd(8), you can protect any other program that
supports wrappers in exactly the same way. While wrappers help protect
inetd(8), make sure inetd(8) doesn’t offer any unnecessary services, just as
you do for the main system.
Configuring Wrappers
Wrappers check each incoming connection request against the rules in
/etc/hosts.allow, in order. The first matching rule is applied, and processing
stops immediately. This makes rule order very important. Each rule is on a
separate line and is made up of three parts separated by colons: a daemon
name, a client list, and a list of options. Here’s a sample rule:
ftpd : all : deny
The daemon name is ftpd; the client list is all, meaning all hosts; and the
option is deny, telling wrappers to reject all connections. Nobody can connect
to the FTP server on this host unless an earlier rule explicitly grants access.
In the early examples I refer to only two options: accept and deny. They
allow and reject connections, respectively. We’ll discuss the additional options
later.

266 Chapter 9
Daemon Name
The daemon name is the program’s name as it appears on the command
line. For example, inetd(8) starts the ftpd(8) program when it receives an
incoming FTP request. The Apache web server starts a program called httpd,
so if your version of Apache supports wrappers, give the daemon name as
httpd. (Note that Apache doesn’t run out of inetd, but it can support wrappers
anyway.) One special daemon name, ALL, matches all daemons that support
wrappers.
If your system has multiple IP addresses, you can specify, as part of the
daemon name, different wrapper rules for each IP address that a daemon
listens on:
ftpd@192.168.1.1 : ALL : deny
ftpd@192.168.1.2 : ALL : accept
In this example, we have two daemon names, ftpd@192.168.1.1 and
ftpd@192.168.1.2. Each has a separate TCP wrapper rule.
The Client List
The client list is a list of specific IP addresses, network address blocks,
hostnames, domain names, and keywords, separated by spaces. Hostnames
and IP addresses are simple: Just list them.
ALL : netmanager.absolutefreebsd.com 192.168.1.5 : allow
With this rule at the top of /etc/hosts.allow, wrappers allow my netmanager
machine and any host with an IP address of 192.168.1.5 to connect to any
service on this host. (I could block this access by other means, mind you.)
Specify network numbers in the client list with a slash between the IP
address and the netmask, as discussed in Chapter 6. For example, if script
kiddies attack your server from a bunch of addresses that begin with
216.132.204, you could block them like this:
ALL : 216.136.204.0/255.255.255.0 : deny
You can also use domain names in client lists, by prefacing them with a
dot. This works through reverse DNS, which means that anyone who controls
the DNS server for a block of addresses can work around this restriction.
ALL : .mycompany.com : allow
If you have a long list of clients, you can even list them in a file and put
the full path to the file in the client space in /etc/hosts.allow. I’ve been on
networks with large numbers of widely scattered hosts, such as an ISP or
corporate network environment with network management workstations
scattered across the world. Each workstation shared the same wrapper rules

Advanced Security Features 267
as every other workstation and appeared on half a dozen lines in hosts.allow.
By maintaining a single file with a workstation list, I could centralize all
changes.
In addition to specifically listing client addresses and names, wrappers
provide several special client keywords to add groups of clients to your list.
Table 9-1 shows the keywords and their usage.
Most of the client keywords listed in Table 9-1 require a working DNS
server. If you use these keywords, you must have a very reliable DNS service
and you must remember the vital link between DNS and the rest of your
programs. If your DNS server fails, daemons that use wrappers and those
keywords cannot identify any hosts. This means that everything matches
your UNKNOWN rule, which probably denies the connection. Also, broken DNS
on the client end can deny remote users access to your servers, as your DNS
servers won’t be able to get proper information from the client’s servers.
Finally, if you use DNS-based wrapping extensively, an intruder only needs
to overload your nameserver to create a very effective Denial of Service
attack against your network.
TCP wrappers provide additional keywords, but they’re not as useful or
secure as these. For example, it’s possible to allow connections based on the
username on the remote machine. You don’t want to rely on a client user-
name on a remote machine, however. For example, if I set up wrappers to
only allow someone with a username of mwlucas to connect to my home system,
someone could easily add an account of that name to his FreeBSD system
and get right in. Also, this relies on the same rarely used identd protocol that
was mentioned earlier. You can find a few other obscure keywords of similar
usefulness in hosts_access(5).
Table 9-1:
TCP Wrappers Keywords
Keyword Usage
ALL This matches every possible host.
LOCAL This matches every machine whose hostname does not include a dot. Generally,
this means machines in the local domain. Machines on the other side of the world
who happen to share your domain name are considered “local” under this rule.
UNKNOWN This matches machines with unidentifiable hostnames or usernames. As a general
rule, any host making an IP connection has a known IP address. Tracing
hostnames, however, requires DNS, and tracking usernames requires identd(8).
Be very careful using this option, because transitory DNS issues can make even
local hostnames unresolvable and most hosts don’t run identd(8) by default. You
don’t want a service to become unusable just because your nameserver was
misconfigured—especially if that machine is your nameserver!
KNOWN This matches any host with a determinable hostname and IP address.
PARANOID This matches any host whose name does not match its IP address. You might
receive a connection from a host with an IP address of 192.168.84.3 that claims
to be called mail.absolutefreebsd.com. Wrappers turn around and check the IP
address of mail.absolutefreebsd.com. If wrappers get a different IP address, the
host matches this rule. System administrators who do not have time to maintain
their DNS are the most likely to have unpatched, insecure systems.

268 Chapter 9
The ALL and ALL EXCEPT Keywords
Both daemon names and client lists can use the ALL and ALL EXCEPT keywords.
The ALL keyword matches absolutely everything. For example, the default
hosts.allow starts with a rule that permits all connections, from all locations,
to any daemon:
ALL : ALL : accept
This matches all programs and all clients. You can limit this by giving a
specific name to either the client list or the daemon list.
ALL : 192.168.1.87 : deny
In this example, we reject all connections from the host 192.168.1.87.
Categorically blocking access to all hosts isn’t that great an idea, but
remember that TCP wrappers follow rules in order and quit when they reach
the first matching rule. The ALL keyword lets you set a default stance quite
easily. Consider the following ruleset:
ALL : 192.168.8.3 192.168.8.4 : accept
ftpd : ALL : accept
ALL : ALL : deny
Our workstations 192.168.8.3 and 192.168.8.4 (probably the sysadmin’s
workstations) may access anything they want. Anyone in the world may access
the FTP server. Finally, we drop all other connections. This is a useful default
deny stance.
Use the ALL EXCEPT keyword to compress rules. ALL EXCEPT allows you to list
hosts by exclusion; what isn’t listed matches. Here we write the same rules
with ALL EXCEPT:
ALL : 192.168.8.3 192.168.8.4 : accept
ALL EXCEPT ftpd : ALL : deny
Of course, this rule relies on having a default accept policy that permits
the FTP connection later.
Some people find rules more clear when written with ALL, others prefer
ALL EXCEPT. The important thing to remember is that the first matching rule
ends the check, so be careful slinging ALL around.
If you’re just learning about wrappers, it’s a good idea to allow any con-
nections from the local host; you’re likely to discover a number of programs
that break when they can’t talk to the local machine. Put a rule like this early
in your hosts.allow:
ALL : localhost : allow

Advanced Security Features 269
Options
We’ve already seen two options, allow and deny. allow permits the connection,
deny blocks it. The first rule in the default hosts.allow applies to all daemons
and clients, and it matches and allows all possible connections. This rule can’t
be first in your hosts.allow if you want to wrap your services, but it’s a good
final rule in a default accept security stance. Similarly, an ALL:ALL:deny rule is a
good final rule in a default deny security stance. TCP wrappers support other
options besides the simple allow and deny, however, giving you a great deal of
flexibility.
Logging
Once you have decided to accept or reject the connection attempt, you can
also log the connection. Suppose you want to permit but specifically log all
incoming requests from a competitor. Similarly, you might want to know how
many connections your server rejects because of DNS problems when using
the PARANOID client keyword. Logging is good. More logging is better. Disk
space is cheaper than your time.
The severity option sends a message to the system log, syslogd(8). You
can configure syslogd to direct these messages to an arbitrary file based on
the syslogd facility and level you choose (see Chapter 20).
telnetd : ALL : severity auth.info : allow
This example permits but logs all telnet connections.
Twisting
The twist option allows you to run arbitrary shell commands and scripts
when someone attempts to connect to a wrapped TCP daemon and
returns the output to the remote user. twist only works properly with TCP
connections. (Remember, UDP is connectionless; there is no connection to
return the response over, so you must jump through very sophisticated and
annoying hoops to make twist work with UDP. Also, protocols that transmit
over UDP frequently don’t expect such a response and are not usually
equipped to receive or interpret it. Using twist with UDP is not worth the
trouble.) twist takes a shell command as an argument and acts as a deny-
plus-do-this rule. You must know basic shell scripting to use twist; very compli-
cated uses of twist are possible, but we’ll stick with the simple ones.
LONG RULES
If you’re using a lot of options, wrapper rules can get very long. The hosts.allow file
can use the backslash (\) followed by a return as a line-continuation character, to
help keep rules readable.

270 Chapter 9
twist is useful for a final rule in a default deny stance. Use twist to return
an answer to the person attempting to connect as follows:
ALL : ALL : twist /bin/echo "You cannot use this service."
If you want to deny just a particular service to a particular host, you can
use more specific daemon and client lists with twist:
sendmail : .spammer.com : twist /bin/echo \
"You cannot use this service, spam-boy."
Actually, this is not effective against spam, but it’s a good example. Also,
putting a rude message in twist output might annoy legitimate users who get
caught by it, and it just might motivate the illegitimate user to try harder.
If you’re feeling friendly you can tell people why you’re rejecting their
connection. The following twist rejects all connections from people whose
hostname does not match their IP address and tells them why:
ALL : PARANOID : twist /bin/echo \
"Your DNS is broken. When you fix it, come back and try again."
Using twist holds the network connection open until the shell command
finishes. If your command takes a long time to finish, you could find that
you’re holding open more connections than you like. This can impact system
performance. A script kiddie can use twist to overload your system, creating
a very simple DoS attack. Make twist simple and quick-finishing.
Spawning
Like twist, the spawn option denies the connection and runs a specified
shell command. Unlike twist, spawn does not return the results to the client.
Use spawn when you want your FreeBSD system to take an action upon a con-
nection request, but you don’t want the client to know about it. Spawned com-
mands run in the background. The following example allows the connection
but logs the client’s IP address to a file:
ALL : PARANOID : spawn (/bin/echo %a >> /var/log/misconfigured ) \
: allow
Wait a minute, where did the %a come from? TCP wrappers support
several variables for use in twist and spawn commands, so you can easily
customize your responses. This particular variable, %a, stands for client address.
It expands into the client’s IP address in the shell command before the
command is run. Table 9-2 lists other variables.

Advanced Security Features 271
Use these variables anywhere you would use the information they
represent in a shell script. For example, to log all available client information
to a file whenever anyone connects to a wrapped program, you could use this:
ALL : ALL : spawn (/bin/echo %c >> /var/log/clients) : allow
Spaces and backslashes are illegal characters in shell commands and
might cause problems. While neither appears in hostnames under normal
circumstances, the Internet is almost by definition not normal. TCP wrappers
replace any character that might confuse the command shell with an under-
score (_). Check for underscores in your logs; they might indicate possible
intrusion attempts, or just someone who doesn’t know what they’re doing.
Wrapping Up Wrappers
Let’s take all the examples given so far in this section and build a complete
/etc/hosts.allow to protect a hypothetical network system. We must first
inventory the network resources this system offers, the IP addresses we have
on the network, and the remote systems we wish to allow to connect.
Our IP range is 192.168.0.0/16. Our server provides POP3, ftpd(8), SSH,
and portmap(8).
We have a competitor who we do not want to access our system, with an
IP address range of 10.5.4.0/23. (Specifically blocking a competitor from
using services you provide to the rest of the world is not generally effec-
tive, as they’ll just go to the local coffee shop and use the free wireless.
Still, you might have other reasons for blocking particular addresses.)
Table 9-2:
Variables for twist and spawn Scripts
Variable Description
%a Client address.
%A Server IP address.
%c All available client information.
%d Name of the daemon connected to.
%h Client hostname, or IP address if hostname not available.
%H Server hostname, or IP address if hostname not available.
%n Client hostname, or UNKNOWN if no hostname is found. If the hostname and the
IP address don’t match, this returns PARANOID.
%N Server hostname, but if no hostname is found, this returns either UNKNOWN or
PARANOID.
%p Daemon’s process ID.
%s All available server information.
%u Client’s username.
%% A single % character.

272 Chapter 9
We make the somewhat paranoid decision that hosts with incorrect DNS
information might be attackers, and reject connections from them.
Anyone on the Internet may attempt to access our FTP, SSH, and POP3
servers.
Hosts on our network may use the portmap daemon, but hosts on other
networks cannot.
The local host can communicate with itself.
Everything that’s not permitted is denied.
While these requirements are fairly complicated, they boil down to a very
simple ruleset:
#reject all connections from hosts with invalid DNS and from our competitor
ALL : PARANOID 10.5.4.0/23 : deny
#localhost can talk to itself
ALL : localhost : allow
#our local network may access portmap, but no others
portmap : ALL EXCEPT 192.168.0.0/16 : deny
#allow SSH, pop3, and ftp, deny everything else
sshd, POP3, ftpd : ALL : allow
ALL : ALL : deny
You can find many more commented-out examples in /etc/hosts.allow or
in hosts_allow(5) and hosts_access(5).
Packet Filtering
To control access to networked programs that do not support TCP wrappers,
or whenever your needs exceed what wrappers provide, use one of FreeBSD’s
kernel-level packet filtering tools. If you need a packet filter, it is best to
entirely replace your TCP wrappers implementation with packet filtering.
Using both tools at once on the same machine will simply confuse you.
A packet filter compares every network packet that enters the system to a
list of rules. When a rule matches the packet, the kernel acts based upon that
rule. Rules can tell the system to allow, drop, or alter the packet. You can’t
use the nifty options provided by TCP wrappers, however; instead of spitting
a comparatively friendly rejection message back at the client, the connection
is severed at the network level before the client even reaches the application.
While the idea of packet filtering is straightforward enough, your first
implementation will be a complete nightmare—er, I mean, “valuable learn-
ing experience.” Be prepared to spend hours experimenting and don’t be
discouraged by failures. In my experience, it is ignorance of basic TCP/IP
that causes grief with packet filtering, rather than the packet filter itself.
Trying to filter network traffic without understanding the network is
frustrating and pointless. The only way to really understand TCP/IP is to
do real work with it, however. If Chapter 6 isn’t enough, grab a copy of
The TCP/IP Guide by Charles M. Kozierok (No Starch Press, 2005).

Advanced Security Features 273
FreeBSD suffers from a wealth of packet filters: IPFW, IP Filter, and PF.
IPFW is the primordial FreeBSD packet filtering software. It’s tightly
integrated with FreeBSD; in fact, the generically named files /etc/rc.firewall
and /etc/rc.firewall6 are purely for IPFW. While quite powerful and very
popular with more experienced FreeBSD administrators, it’s a little difficult
for a beginner.
The second packet filter, IP Filter, is not a FreeBSD-specific firewall
program but is supported on several Unix-like operating systems. It is
primarily the work of one individual, Darren Reed, who has by heroic effort
developed the overwhelming majority of the code and ported it to all those
operating systems. IP Filter is not the most popular FreeBSD firewall software,
however.
We’ll focus on the imaginatively named PF, or packet filter. PF originated
in OpenBSD and was designed to be very powerful, flexible, and easy to use.
The average FreeBSD administrator can use PF to achieve any effect possible
with the other two packet filters.
NOTE For in-depth discussion of PF you might check out Peter N.M. Hansteen’s The Book
of PF (No Starch Press, 2007) or my book Absolute OpenBSD (No Starch Press, 2003),
which contains several chapters about PF. You might also look at the PF FAQ online,
but that doesn’t include haiku.
Enabling PF
PF includes the packet filtering kernel module, pf.ko, and the userland
program pfctl(8). Before using PF, you must load the kernel module. The
simplest way is to enable PF in rc.conf:
pf_enable="YES"
PF defaults to the accept all stance, which means that you won’t lock
yourself out of your server merely by enabling the firewall.
Default Accept and Default Deny in Packet Filtering
The security stances (default accept and default deny) are critical in packet
filtering. If you use the default accept stance and want to protect your system
or network, you need numerous rules to block every possible attack. If you
use the default deny stance, you must explicitly open holes for every little
service you offer. In almost all cases, default deny is preferable; while it can
be more difficult to manage, its increased security more than makes up for
that difficulty.
When using a default deny stance, it’s very easy to lock yourself out of
remotely accessing your machine. When you have an SSH connection to a
remote machine and accidentally break the rule that allows SSH access,
you’re in trouble. Everybody does this at least once, so don’t be too embar-
rassed when it happens to you. The point is, it’s best to not learn about
packet filtering on a remote machine; start with a machine that you can
console into, so you can recover easily. I’ve cut my own access many times,

274 Chapter 9
generally because I’m not thinking straight when solving an unrelated packet
filtering problem. The only fix is to kick myself as I climb into the car, drive
to the remote location, and apologize profusely to the people I’ve incon-
venienced as I fix the problem. Fortunately, as I grow older, this happens
less and less.1
Still, in almost all circumstances, a default deny stance is correct. As a
new administrator, the only way you can reasonably learn packet filtering is
if you have convenient access to the system console. If you’re not entirely
confident in your configuration, do not set up a packet filtering system
across the country unless you have either a competent local administrator
or a serial console.
Basic Packet Filtering and Stateful Inspection
Recall from Chapter 6 that a TCP connection can be in a variety of states,
such as opening, open, closing, and so on. For example, every connection
opens when the client sends a SYN packet to the server to request connection
synchronization. If the server is listening on the requested port, it responds
with a SYN-ACK, meaning, “I have received your request, and here is basic
information for our connection.” The client acknowledges receipt of the infor-
mation with an ACK packet, meaning, “I acknowledge receipt of the connec-
tion information.” Each part of this three-way handshake must complete for
a connection to occur. Your packet filtering ruleset must permit all parts of
the handshake, as well as the actual data transmission, to occur. Allowing
your server to receive incoming connection requests is useless if your packet
filter rules do not permit transmitting that SYN-ACK.
In the early 1990s, packet filters checked each packet individually. If a
packet matched a rule, it was allowed to pass. The system did not record what
it had previously passed and had no idea if a packet was part of a legitimate
transaction or not. For example, if a packet arrived marked SYN-ACK with a
destination address inside the packet filter, the packet filter generally decided
that the packet had to be the response to a packet it had previously approved.
Such a packet had to be approved to complete the three-way handshake.
As a result, intruders forged SYN-ACK packets and used them to circumvent
seemingly secure devices. Since the packet filter didn’t know who had
previously sent a SYN packet, it couldn’t reject illegitimate SYN-ACK
packets. Once an intruder gets packets inside a network, he can usually
trigger a response from a random device and start to worm his way in.
Modern packet filters use stateful inspection to counteract this problem.
Stateful inspection means keeping track of every connection and its current
condition. If an incoming SYN-ACK packet appears to be part of an ongoing
connection, but nobody sent a corresponding SYN request, the packet is
rejected. While this complicates the kernel, writing stateful inspection packet
filter rules is easier than writing old-fashioned rules. The packet filter must
1 I’ve learned to make one of my minions drive in and apologize.
Advanced Security Features 275
track many, many possible states, so this is harder to program than it might
seem—especially when you add in problems such as packet fragmentation,
antispoofing, and so on.
If you’ve started to think, “Hey, packet filtering sounds like a firewall,”
you’re right, to a point. The word firewall is applied to a variety of network
protection devices. Some of these devices are very sophisticated; some lose
intelligence contests to cinderblocks. These days, the term firewall is nothing
more than marketing buzzword with very little concrete meeting. The word
firewall is like the word car: Do you mean a rusty 1972 Gremlin with a six-
horsepower engine and an exhaust system that emits enough fumes to breach
the Kyoto Accords, or a shiny 2005 Chevy SSR hardtop convertible with a five-
hundred-horsepower engine, a fancy tricolor paintjob, and the Stereo System
of The Apocalypse? Both have their uses, but one is obviously designed for
performance. While the Gremlins of firewalls might have their place, it’s
preferable to get the best you can afford.
Having said that, FreeBSD can be made as solid a firewall as you desire.
Packet filtering is only the beginning: If you wander through /usr/ports/net
and /usr/ports/security, you’ll find a variety of application proxies that can let
your FreeBSD system go up against Checkpoint or a PIX and come out on
top, for tens of thousands of dollars less.
Configuring PF
Configure PF in /etc/pf.conf. This file contains statements and rules whose
formats vary with the features they configure. Not only is the rule order
extremely important, but also the order in which features are configured.
If you try to do stateful inspection before you reassemble fragmented
packets, for example, connections will not work properly.
The default /etc/pf.conf has the sample rules in the proper order, but if
you’re in the slightest danger of becoming confused, I suggest that you put
large comment markers between the sections, in capital letters if necessary.
(Use hash marks to comment pf.conf.) The features must be entered in this
exact order:
1. Macros
2. Tables
3. Options
4. Packet normalization
5. Bandwidth management
6. Translation
7. Redirection
8. Packet filtering
Yes, PF does more than just filter packets. It’s a general-purpose TCP/IP
manipulation tool. We won’t cover all of its features here; that’s a topic for
another book.

276 Chapter 9
Macros
A macro lets you define variables to make writing and reading rules easier.
For example, here are macros to define your network interface and your IP
address:
interface="fxp0"
serveraddr="192.168.1.2"
Later in your rules, you may describe your network interface as $interface
and your server’s IP address as $serveraddr. This means that if you renumber
your server or change your network card, making one change in your pf.conf
fully updates your rules.
Tables and Options
PF can store long lists of addresses through tables. That’s a more sophisticated
use of PF than we’re going to use, but you should know the capability exists.
Similarly, PF has a variety of options that control network connection
timing, table sizes, and other internal settings. The default settings are
generally adequate for normal (and most abnormal) use.
Packet Normalization
TCP/IP packets can be broken up in transit, and processing these shards of
data increases system load and the amount of work your server must do to
both serve the request and filter the packets. A system must reassemble
these fragments before handing them on to your client software, while
deciding what to do with any other random crud that arrives. PF refers to
this reassembly as scrubbing. For example, to reassemble all fragments
coming in your network interface, drop all fragments too small to possibly
be legitimate, and otherwise sensibly sanitize your incoming data stream, use
the following rule:
scrub in all on $interface
This affects all packets entering the computer.
While scrubbing seems like just a nice thing to have, it’s actually quite
important, since PF filters are based on whole packets. Fragments are much
more difficult to filter and require special handling unless reassembled. Not
scrubbing your traffic causes connectivity problems.
Bandwidth, Translation, and Redirection
We’ll discuss bandwidth management a little later, but for now just recognize
that PF can control how much traffic is allowed to go to a particular port or
IP address.
Two critical parts of a firewall are Network Address Translation (NAT)
and port redirection. PF has many functions to support NAT and port
redirection, which we aren’t going to cover because we aren’t building
firewalls.

Advanced Security Features 277
Traffic Filtering Rules
Now for what we’re really looking for. Traffic filtering rules have this general
format:
pass out on $interface proto { tcp, udp } all keep state
The first word is a keyword labeling what sort of rule this is. Each rule
type has its own keywords. This particular rule is a packet filtering rule.
We then learn which direction matching packets are traveling. This
rule matches packets going out, or leaving the system. PF rules also label the
interface matching packets apply to. The remainder of the rule line varies
with the sort of rule. In this case, packets match only if they are leaving the
system on the interface in the macro $interface and only if they match the
rest of the rule.
Now define the traffic that matches the rule. Define traffic by network
protocol, port, or TCP/IP flags . This simple example matches all TCP and
UDP traffic.
Finally, we tag this rule with keep state . This tells PF to apply stateful
inspection to this rule, allowing further traffic that is part of this connection.
Taken as a whole, this sample rule passes all TCP and UDP traffic leaving
the system. This server can make any desired outbound connections. This is
very typical for an Internet server.
Connections allowed into the system are only slightly more complicated.
Here, we allow outsiders access to our web server:
pass in on $interface proto tcp from any to ($interface) port 80
flags S/SA keep state
You can understand much of this from our earlier example. We’re
passing traffic in on our network interface, so long as it’s TCP . We accept
traffic from any source so long as it’s going to our server interface .
(The parentheses around the interface mean, “whatever IP address is on
this interface,” which is useful for DHCP hosts.) We’re specifically allowing
port 80 traffic .
The only complicated part is the flags keyword . This checks for
specific TCP/IP flags. The letters in front of the following slash indicate the
TCP flags that must be set in the packet, while the letters behind the slash
indicate the flags you’re checking. The S stands for SYN, and the A stands for
ACK. This means, “Out of the SYN and ACK flags, only the SYN flag may be
set.” While this sounds scary, it really just means, “This rule only matches new
incoming connections.”
Adding the keep state to the end of this rule tells PF to keep track of this
connection and allow the rest of the TCP/IP transaction to occur.
This whole rule means, “Allow new incoming connections to TCP
port 80.” Web servers normally run on port 80.

278 Chapter 9
Complete PF Rule Sample
Here’s a sample set of PF rules for protecting a small Internet server. Start
from here and edit this to match your server’s requirements.
interface="em0"
scrub in all
block in on $interface
#allow SSH and POP3 traffic from our network
pass in on $interface proto tcp from 192.168.1.0/24 to $interface port 22
pass in on $interface proto tcp from 192.168.1.0/24 to $interface port 110
#allow SMTP (25), HTTP (80), and HTTPS (443) to the world
pass in on $interface proto tcp from any to $interface port 25
pass in on $interface proto tcp from any to $interface port 80
pass in on $interface proto tcp from any to $interface port 443
#allow the world to query our DNS server
pass in on $interface proto tcp from any to $interface port 53
pass in on $interface proto udp from any to $interface port 53
#allow outgoing traffic
pass out on $interface proto { tcp, udp } all
We start by defining a macro for our interface name, so that if we change
network cards we won’t need to rewrite all our rules. Then we scrub our
incoming traffic. Both of these come straight from the examples earlier.
The first interesting thing we do is set a default deny policy with a block
statement . Everything not explicitly permitted is forbidden.
Our next two rules allow two particular protocols only from certain IP
addresses . We may use POP3 and SSH from 192.168.1.0/24, which is
probably our office or management network.
We offer email, web, and HTTPS services to the world at large, using
rules taken right from our earlier example but changing the port numbers.
We also offer DNS services to the world, but have slightly different rules
for it. DNS runs over both TCP and UDP. This is exactly the sort of thing you
can learn only by reading big thick books on TCP/IP, or by scouring mailing
list archives and pulling out your hair2 trying to make it work. PF purists will
certainly notice that these rules could be compressed and optimized, but for
a small server this style is adequate. Finally, our server may initiate outgoing
TCP and UDP connections on any port .
FLAGS OR NO FLAGS?
In FreeBSD 6.0 and earlier, the flags statement is a requirement. In FreeBSD 7.0, it
is the default. If you’re in any doubt, include the flags statement.
2 I recommend keeping your hair trimmed too short to pull for exactly this reason.

Advanced Security Features 279
This simple policy defines basic rules for communicating with our server.
While it’s not perfect, it can cause an intruder a lot of headaches. Suppose
someone breaks into your web server and starts a command prompt with
root privileges listening on port 10000. Their hard work will be wasted, as
your firewall rules don’t allow incoming connections on that port.
Activating PF Rules
Manage PF with pfctl(8). If your rules have no errors, pfctl(8) runs silently;
it only produces output when you have errors. As a firewall error can cause
you much grief, it’s best to check your rules before activating them. While a
rule check only parses the file, checking for grammatical errors in the rules
themselves, activating rules with grammatical errors either leaves your system
unprotected, or locks you out, or both. Use the -n flag to check a file for
problems, and -f to specify the PF rules file.
# pfctl -nf /etc/pf.conf
If you get errors, fix them and try again. If this runs silently, activate your
new rules by removing the -n flag.
# pfctl -f /etc/pf.conf
Changing PF configuration is very quick. This means you can have
several PF configurations for different times or situations. Perhaps you want
to only allow access to certain services at certain parts of the day; you could
schedule a pfctl run to install appropriate rules for those times. Or maybe
you have separate rules for disaster situations and want to install a special
ruleset when you lose your Internet connection. Using pfctl(8) makes all
these simple.
If you want to see the rules currently running on your filewall, use
pfctl -sr.
# pfctl -sr
No ALTQ support in kernel
ALTQ related functions disabled
scrub in all fragment reassemble
block drop in on em0 all
pass in on wi0 inet proto tcp from 192.168.1.0/24 to 192.168.1.201 port = ssh
flags S/SA keep state
...
PF starts off complaining that something called ALTQ isn’t available .
We’ll get to that in the next section. It then shows the rules you wrote, with
additional defaults explicitly stated . pfctl(8) expands the macros defined
in the configuration. This lets you confirm that those rules remain in play
weeks or months after you loaded them.

280 Chapter 9
Finally, remove all rules from your running configuration with the -Fa
(flush all) flags.
# pfctl -Fa
You’ll see PF systematically erase all rules, NAT configurations, and
anything else in your configuration. Do not manually clear the configuration
before loading a new configuration; just load the new rules file to erase the
old rules.
PF is terribly powerful, very flexible, and can abuse TCP/IP in almost
any way you like (and some ways you won’t like). We’ve barely scratched the
surface. Check out some of the resources listed on page 273 to explore PF in
depth.
Public Key Encryption
Many server daemons rely upon public key encryption to ensure confiden-
tiality, integrity, and authenticity of communications. Many different Internet
services also use public key encryption. You need a basic grasp of public key
encryption to run services like secure websites (https) and secure POP3 mail
(pop3ssl). If you’re already familiar with public key encryption, you can
probably skip this section. If not, prepare for a highly compressed intro-
duction to the topic.
Encryption systems use a key to transform messages between readable
(cleartext) and encoded (ciphertext) versions. Although the words cleartext
and ciphertext include the word text, they aren’t restricted to text; they can also
include graphics files, binaries, and any other data you might want to send.
All cryptosystems have three main purposes: integrity, confidentiality,
and nonrepudiation. Integrity means that the message has not been tampered
with. Confidentiality means that the message can only be read by the intended
audience. And nonrepudiation means that the author cannot later claim that
he or she didn’t write that message.
Older ciphers relied on a single key, and anyone with the key could both
encrypt and decrypt messages. You might have had to do a lot of work to
transform the message, as with the Enigma engine that drove the Allies nuts
during World War II, but the key made it possible. A typical example is any
code that requires a key or password. The one-time message pads popular in
spy novels are the ultimate single-key ciphers, impossible to break unless you
have that exact key.
Unlike single-key ciphers, public key (or asymmetric) encryption systems
use two keys: a private key and a public key. Messages are encrypted with one
key and decrypted with the other, and digital signatures ensure the message
is not tampered with en route. The math to explain this is really quite
horrendous, but it does work—just accept that really, really large numbers
behave really, really oddly. Generally. the key owner keeps the private key
secret but hands the public key out to the world at large, for anyone’s use.
Advanced Security Features 281
The key owner uses the private key while everyone else uses the public
key. The key owner can encrypt messages that anyone can read, while
anyone in the public can send a message that only the key owner can read.
Public key cryptography fills our need for integrity, confidentiality, and
nonrepudiation. If an author wants anyone to be able to read his message,
while ensuring that it isn’t tampered with, he can encrypt the message with
his private key. Anyone with the public key (i.e., the world) can read the
message, but tampering with the message renders it illegible.
Encrypting messages this way also ensures that the author of the
message has the private key. If someone wants to send a message that can
only be read by a particular person, he can encrypt the message with the
desired audience’s public key. Only the person with the matching private
key can read the message.
This works well so long as the private key is kept private. Once the private
key is stolen, lost, or made public, the security is lost. A careless person who
has his private key stolen could even find others signing documents for him.
Be careful with your keys, unless you want to learn that someone used your
private key to order half a million dollars’ worth of high-end graphics work-
stations and have them overnighted to an abandoned-house maildrop in
inner-city Detroit.3
Configuring OpenSSL
FreeBSD includes the OpenSSL toolkit for handling public key cryptography.
While many programs use OpenSSL functionality, the system administrator
doesn’t need OpenSSL directly very often. While OpenSSL works fine out
of the box, I find it worthwhile to set a few defaults to make my life easier
down the road. Configure OpenSSL with the file /etc/ssl/openssl.cnf. Almost
all of the settings in this file are correct as they are, and you should not change
them unless you are a cryptographer. The few things useful to change are the
defaults for generating cryptographic signatures. Each default value is marked
by the string _default. You’d be most interested in the following settings for
common OpenSSL operations, shown with the default settings:
countryName_default = AU
stateOrProvinceName_default = Some-State
0.organizationName_default = Internet Widgits Pty Ltd
The countryName_default is the two-letter code for your nation—in my
case, US. The stateOrProvinceName_default is the name of your local state and
can be of any length. I would set this to Michigan. 0.organizationName_default
is your company name. If I’m buying a signed certificate, I would put the same
thing here that I want to appear on the certificate. If I’m just testing how
programs work with SSL and don’t have a real company name, I might use
the name of the company I work for or something that I make up.
3 This really happened. And before you ask, no, I wasn’t the recipient! A friend gave me my high-
end graphics workstations. Really.

282 Chapter 9
The following values do not show up in openssl.cnf, but if you set them, they
appear as defaults in the OpenSSL command prompts. I find these useful,
even though they change more frequently than the previous defaults—they
remind me of the correct format of these answers, if nothing else.
localityName_default = Detroit
organizationalUnitName_default = Authorial Division
commonName_default = www.absolutefreebsd.com
emailAddress_default = mwlucas@absolutefreebsd.com
The localityName_default is the name of your city. The
organizationalUnitName_default is the part of your company this
certificate is for. One of the most commonly misunderstood values in
OpenSSL, commonName_default is the hostname of the machine this
certificate is for, as it appears in reverse DNS (see Chapter 14). Finally,
emailAddress_default is the email address of the site administrator.
These values all show up in prompts in the OpenSSL command as
default choices and might save you annoyance later.
Certificates
One interesting thing about public key encryption is that the author and the
audience don’t have to be people. They can be programs. Secure Shell (SSH)
and the Secure Sockets Layer (SSL) are two different ways programs can
communicate without fear of intruders listening in. Public key cryptography
is a major component of the digital certificates used by secure websites and
secure mail services. When you open Firefox to buy something online, you
might not realize that the browser is frantically encrypting and decrypting
web pages. This is why your computer might complain about “invalid
certificates”; someone’s public key has either expired or the certificate is
self-signed.
Many companies, such as VeriSign, provide a public key signing service.
These companies are called Certificate Authorities (CAs). Other companies that
need a certificate signed provide proof of their identity, such as corporate
papers and business records, and those public key signing companies sign the
applicant’s certificate with their CA certificate. By signing the certificate, the
Certificate Authority says, “I have inspected this person’s credentials and he,
she, or it has proven their identity to my satisfaction.” They’re not guarantee-
ing anything else, however. A SSL certificate owner can use the certificate to
run a website that sells fraudulent or dangerous products, or use it to encrypt
a ransom note. Signed SSL certificates guarantee certain types of technical
security, not personal integrity or even unilateral technical security. Certifi-
cates do not magically apply security patches for you.
Web browsers and other certificate-using software include certificates for
the major CAs. When the browser receives a certificate signed by a Certificate
Authority, it recognizes the certificate as legitimate. Essentially the web

Advanced Security Features 283
browser says, “I trust the Certificate Authority, and the Certificate Authority
trusts this company, so I will trust the company.” So long as you trust the CA,
everything works.
Most CAs are big companies, but CACert is a grassroots effort to provide
free SSL certificates for everyone who can verify their identity. CACert is
becoming more and more accepted, and while its root certificate is not in
Internet Explorer, I expect to see it in Mozilla Firefox before long.
Using a certificate that is not signed by a Certificate Authority is perfectly
fine for testing. It might also suffice for applications within a company, where
you can install the certificate in the client web browser or tell your users to
trust the certificate. We’ll look at both ways.
Both uses of the certificate require a host key.
SSL Host Key
Both signed and self-signed certificates require a private key for the host.
The host key is just a carefully crafted random number. The following
command creates a 1,024-bit host key and places it in the file host.key:
# openssl genrsa 1024 > host.key
You’ll see a statement that OpenSSL is creating a host key, and dots
crossing the screen as key generation proceeds. In only a few seconds, you’ll
have a file containing a key. The key is a plaintext file that contains the words
BEGIN RSA PRIVATE KEY and a bunch of random characters.
Protect your host key! Make it owned by root and readable only by root.
Once you place your certificate in production, anyone who has that key can
use it to eavesdrop on your private communications.
# chown root host.key
# chmod 400 host.key
Place this host key in a directory with the same permissions that we
placed on the key file itself.
Create a Certificate Request
You need a certificate request for either a signed or self-signed certificate.
We don’t do much with OpenSSL so we won’t dissect this command. Go to
the directory with your host key and enter this verbatim:
# openssl req -new -key host.key -out csr.pem
In response you’ll see instructions and then a series of questions. By
hitting ENTER you’ll take the default answers. If you’ve configured OpenSSL,
the default answers are correct.

284 Chapter 9
Country Name (2 letter code) [US]:
State or Province Name (full name) [Michigan]:
Locality Name (eg, city) [Detroit]:
Organization Name (eg, company) [Absolute FreeBSD]:
Organizational Unit Name (eg, section) [Authorial Division]:
Common Name (eg, YOUR name) [www.absolutefreebsd.com]:
Email Address [mwlucas@absolutefreebsd.com]:
The two-letter code for the country is defined in the ISO 3166 standard,
so a quick web search will find this for you. If you don’t know the state
and city you live in, ask someone who occasionally leaves the server
room. The organization name is probably your company, and you list
the department or division name as well. If you don’t have a company, list
your family name or some other way to uniquely identify yourself, and for a
self-signed certificate you can list anything you want. Different CAs have
different standards for noncorporate entities, so check the CA’s instructions.
The common name is frequently misunderstood. It is not your name,
it is the name of the server as shown in reverse DNS. You must have a server
name here, or the request will be useless.
I suggest using a generic email address rather than an individual’s
email address. In this case I am Absolute FreeBSD, whatever that is. You don’t
want your certificates tied to an individual who might leave the company for
whatever reason.
Please enter the following 'extra' attributes
to be sent with your certificate request
A challenge password []:
An optional company name []:
The challenge password is also known as a passphrase. Again, keep this
secret because anyone with the passphrase can use your certificate. Use of a
certificate passphrase is optional, however. If you use one, you must type it
when your server starts. That means that if your web server crashes, the
website will not work until someone enters the passphrase. While passphrase
use is highly desirable, this might be unacceptable. Hit ENTER to use a blank
passphrase.
You’ve already entered quite a few company names, so a third is
probably unnecessary.
Once you return to a command prompt, you’ll see a file csr.pem in the
current directory. It looks much like your host key, except that the top line
says BEGIN CERTIFICATE REQUEST instead of BEGIN RSA PRIVATE KEY.
Get a Signed Certificate
Submit csr.pem to your Certificate Authority, who will return a file that looks
much like one of the preceding files. Save that to a file called signature.pem
and run the following commands:
# cp csr.pem cert.pem
# cat signature.pem >> cert.pem

Advanced Security Features 285
This copies the host key to a certificate file and then attaches the
signature to the certificate. This is a complete signed certificate. This signed
certificate is good for any SSL service, including web pages, pop3ssl, or any
other SSL-capable daemon.
Sign a Certificate Yourself
A self-signed certificate is technically identical to a signed certificate, but it is
not submitted to a Certificate Authority. Instead, you provide the signature
yourself. Most customers won’t accept a self-signed certificate on a production
service, but it’s perfectly suitable for testing. To sign your own CSR, run the
following:
# openssl x509 -req -days 365 -in csr.pem -signkey host.key -out
selfsigned.crt
Signature ok
subject=/C=US/ST=Michigan/L=Detroit/O=Absolute FreeBSD/OU=Authorial Division/
CN=www.absolutefreebsd.com/emailAddress=mwlucas@absolutefreebsd.com
Getting Private key
#
That’s it! You now have a self-signed certificate good for 365 days in
the file selfsigned.crt . You can use this key exactly like a signed certificate, so
long as you’re willing to ignore the warnings your application displays.
If you sign your own certificates, client software generates warnings that
the “certificate signer is unknown.” This is expected—after all, people outside
my office have no idea who Michael W. Lucas is, or why he’s signing web
certificates. VeriSign and other CAs are trusted. I’m trusted by the people
who know me,4 but not trusted by the world at large. For this reason, don’t
use self-signed certificates anywhere the public will see it because the warnings
will confuse, annoy, or even scare them away. Spend a hundred dollars or so
and have a real CA sign your production certificates.
SSL Trick: Connecting to SSL-Protected Ports
I said we wouldn’t do much with OpenSSL, and that’s correct. There’s one
facility the software offers that’s too useful to pass up, however, and once you
know it you’ll use this one trick at least once a month and be glad you have it.
Throughout this book we test network services by using telnet(1) to
connect to the daemon running on that port and issuing commands. This
works well for plaintext services such as SMTP, POP3, and HTTP. It doesn’t
work for encrypted services such as HTTPS. You need a program to man-
age the encryption for you when you connect to these services. OpenSSL
includes the openssl s_client command, which is intended for exactly this
sort of client debugging. While you’ll see a lot of cryptographic information,
you’ll also get the ability to issue plaintext commands to the daemon and
4 Well, most of them, anyway. Quite a few. A few, at least. Oh, never mind.

286 Chapter 9
view its responses. Use the command openssl s_client -connect with a
hostname and port number, separated by a colon. Here, we connect to
the secure web server at www.absolutefreebsd.com:
# openssl s_client -connect www.absolutefreebsd.com:443
CONNECTED(00000003) depth=1 /O=VeriSign Trust Network/OU=VeriSign, Inc./
OU=VeriSign International Server CA - Class 3/OU=www.verisign.com/CPS
Incorp.by Ref.
...
You’ll see lots of stuff about chains of trust and limitations of liability, as
well as lines and lines of the random-looking digital certificate. After all that,
however, you’ll see a blank line with no command prompt. You’re speaking
directly to the server daemon. As this is a web server, let’s try a HTTP
command:
GET /
The system responds with:
Object Moved
This document may be found <a href="https://www.nostarch.com/">here</
a>read:errno=0
This lets you test encrypted network services just as easily as you can test
unencrypted services.
Some of you are probably wondering why we encrypt the service if it’s so
easy to talk to the encrypted service. The encryption does not protect the
daemon; it protects the data stream between the client and the server. SSL
encryption prevents someone from eavesdropping your network conversation
in transit—it does not protect either the server or the client. SSL cannot save
you if someone breaks into your desktop.
From this point on, I’ll assume that you understand this OpenSSL
command and what happens when we use it.
Jails
One of Unix’s oldest security mechanisms is the idea of a changed root, or
chroot, which confines a user or program to a subsection of the filesystem to
protect other users and the rest of the filesystem. chroot is useful for services
such as named(8), but isn’t so helpful for complicated programs that expect
to have wide access to the system. chrooting your web or email server
requires a great deal of work and often involves adding many programs to
the chroot. If you’re a web hosting company, your clients certainly won’t
like being chrooted!

Advanced Security Features 287
What’s worse, clients who understand the power of Unix-like systems
frequently make requests to complicate things further. They want to install
software or reconfigure the web server to enable the latest nifty Apache
module. In short, they want root access, and under most Unix systems you
can’t hand your root access willy-nilly to clients on a multi-user server.
Unless, of course, you’re on FreeBSD. FreeBSD developers faced this
problem long ago and solved it by dramatically improving the chroot facility.
They solved it so well that you can build a lightweight virtual server on
FreeBSD and isolate that server from the rest of your system. This is called
ajail.
Think of a jail as something like a client-server environment. The main
server is the host system, and each jailed system is a client. Changes made to
the host can be reflected across all systems, but changes to the jail can’t
affect the main system (unless you allow your jails to fill up the disk drive
or some such thing).
To the user, the jail looks like a nearly complete FreeBSD system, missing
only a few device nodes. The user can have root access and install whatever
software he likes without interfering with other clients. All processes running
in the jail are restricted to the jail environment, and the kernel does not give
them access to any information outside their jail. The jail filesystem does not
know about files or filesystems outside the jail. Since no program or process
in the jail knows anything about anything outside the jail, and cannot read or
write anything outside the jail, the user is locked in. Moreover, if the jail is
hacked, the intruder can’t break out of the jail either. This helps secure your
system while meeting the client’s needs.
On modern hardware with inexpensive (but not cheap!) disks and
gigabytes of RAM, a single FreeBSD system can host dozens of jailed web
servers. From a sales perspective, a jailed machine is a good compromise
between a virtual domain on a shared server and a private dedicated server.
Jail Host Server Setup
First, set up your host server to properly support jails. Jails do impose a
number of special requirements on a server, the most annoying of which is
that daemons cannot bind to all available IP addresses.
Each jail is tied to a particular IP address and is defined by that IP address.
You must add an IP alias to your network card for your jail, as discussed in
Chapter 6.
The jail must have exclusive access to that IP address; nothing on the
host system can use it. That IP is the only network address the jail can have.5
If your host server has a daemon that binds to all available IP addresses on
the system, that daemon will prevent a jail from starting. Look at your
server’s sockstat(1) output; any entries where the local address includes an
asterisk indicates a daemon listening on all available IP addresses.
5 As of this writing, the FreeBSD Foundation is supporting work to fully virtualize the IP stack
for use in jails. This will allow a jail to access more than a single IP, as well as enjoy a much
more complete access to the TCP/IP stack, but might or might not be available by the time
you read this.

288 Chapter 9
# sockstat -4
...
root inetd 895 5 tcp4 *:21 *:*
root sshd 822 4 tcp4 *:22 *:*
root syslogd 601 7 udp4 *:514 *:*
...
In this sample, we see that inetd has bound to all IP addresses on port 21 ,
sshd has bound to all addresses on port 22 , and syslogd has bound to all
addresses on port 514 . We must configure all of these services to only
attach to the main server IP.
The easiest way to configure your jail server properly is to decide that
your main server is only a jail host and provides no other services. You need
sendmail, named, and other services? No problem! Set up a services jail that
contains these daemons. Not only is it easier than properly reconfiguring all
those programs, but it also provides an additional layer of security for your
other jails. An intrusion on your host system automatically grants the intruder
access to all of your jails, while an intrusion on a single jail confines the
intruder to that single jail.
You don’t have to configure jailed programs to attach to only a single IP
address. The jailed process only has access to a single IP, so telling a daemon
to attach to all available IP addresses works just as expected.
Here are some common problematic daemons on host servers. In all of
these examples, we’ll assume that the jail host has an IP address of 192.168.1.1.
syslogd
The system logger opens a socket so that it can send log messages, even if it’s
not receiving any logs. Use the -b option to bind syslogd(8) to a particular IP
address with a rc.conf entry:
syslogd_flags="-b 192.168.1.1"
To keep syslogd from opening even that sending socket, use -ss. You
cannot log remotely if you do that, however. We’ll discuss syslogd(8) in detail
in Chapter 19.
inetd
Generally speaking, it’s best to run inetd from within a jail rather than on
the host server. inetd(8) can be restricted to a single address with the -a
flag, much like the following in rc.conf:
inetd_flags="-wW -C 60 -a 192.168.1.1"
Note that inetd usually runs with default flags specified in /etc/defaults/
rc.conf. My release of FreeBSD defaults to running inetd with the flags
-wW -C 60. Instead of just binding inetd to a single address, I added my
flags to the default flags.

Advanced Security Features 289
sshd
The option ListenAddress in /etc/sshd/sshd_config tells sshd(8) which address
to attach to.
ListenAddress 192.168.1.1
Providing SSH on a jail host is actually very sensible; if the only service
your jail host offers is sshd(8), you’ve done well.
NFS
NFS programs such as rpcbind(8) and nfsd(8) bind to all IP addresses on a
system, and changing this behavior is difficult. Don’t run an NFS server on
your jail host. You can use NFS in your jails, however. If you must combine
NFS and jail, don’t use the main host but configure a jail to export your NFS
mounts.
Jail and the Kernel
Now that our network is ready to host a jail, let’s look at the kernel. The jail’s
default settings are adequate for jails, but the sysadmin has the ability to
tweak certain settings. In most cases, changing these settings causes nothing
but grief.
The jail system has its own sysctl tree, security.jail. You can only change
this tree from the host system, not from within a jail, and changes to these
sysctls affect all jails running on the host.
security.jail.set_hostname_allowed
By default, the root user in a jail can set the jail’s local hostname. Since
programs running a jail use the hostname to communicate, changing the
jailed hostname can confuse the host administrator. Change this sysctl
from 1 to 0 to disable changing the hostname.
security.jail.socket_unixiproute_only
A jail defaults to communicating via IP and local Unix sockets. While it isn’t
likely that a jailed user might want to use, say, IPX, it is theoretically possible.
The jail system only supports IP, however, so allowing the use of other proto-
cols might let jailed programs “leak” out of the jail somehow. The jail system
only virtualizes IP, not IPX or other network protocols, so any non-IP protocols
you use are accessible in all jails. This access is probably harmless, but it’s
unwise to assume that you’re smarter than every malicious intruder out
there. The default of 1 restricts the system to IP only; set this to 0 to allow
use of any network protocol other than IP.
security.jail.sysvipc_allowed
System V IPC is a Unix standard for allowing interprocess communication via
shared memory. Basically, related programs can use one chunk of memory to
store information. Many database programs require IPC. The jail system does
290 Chapter 9
not build separate areas of memory for each jail. Enabling IPC allows infor-
mation to leak between jails. Compromising a system through this requires a
moderately skilled attacker. The default value of 0 disallows IPC, setting this
to 1 enables it.
security.jail.enforce_statfs
This controls jailed users’ ability to see information on filesystems. By default
(security.jail.enforce_statfs=2), jailed programs can only see mount points
within the jail and the path to the root directory is trimmed so that the jailed
user doesn’t even see where on the disk his jail is. If you set this to 1, the user
can only see the mount points within the jail but he can see where his jail is on
the host disk. If you set this to 0, the jailed user can see all mounts points
on the system. There’s very rarely a good reason to change this.
security.jail.allow_raw_sockets
Raw sockets allow direct access to the network subsystem. If you do not com-
pletely trust your jailed users or programs, do not allow them access to raw
sockets. Programs such as ping and traceroute use TCP/IP raw sockets, so
some customers like this feature. From a security standpoint, however, there’s
very little reason to allow this and many reasons not to. The default of 0
prevents raw socket access, but set this to 1 to allow it.
security.jail.chflags_allowed
By default, jailed users cannot use filesystem flags and chflags(1) (see
Chapter 7). Remember, many of these flags cannot be cleared without
rebooting the jail into single-user mode. Your customers can get themselves
into trouble with chflags(1), but only you can get them out of trouble.
This is a recipe for customer support headaches. Change this from 0 to 1
to allow chflags.
security.jail.jailed
This read-only value tells you if you’re running sysctl(8) from the host
server (0) or from within a jail (1).
security.jail.list
On the host system, this displays a list of all active jails.
Client Setup
Decide where you want to put your jails. I recommend using a separate parti-
tion, so that if your customers use up all their disk space they don’t affect your
host system. Some admins just keep an eye on their users and raise the cost
for disk hogs. File-backed partitions (see Chapter 8) are an easy way to create
partitions for jails without slicing up your disks beyond recognition. In this
example, we’ll install our first jail in /var/jail/jail1.

Advanced Security Features 291
The basic process for installing a jail is the same as used for upgrading
FreeBSD: Build system binaries from source, then install them. With a jail,
you just install those binaries in a different location. If you’ve upgraded your
system, you’ve already built the programs, but if not go to /usr/src and run:
# make buildworld
Once you have built the system, you just install it. Use the DESTDIR option
to choose a different installation directory. We need to use an extra step to
install our /etc and /var directories, however. (These steps are not needed in
an upgrade, as your host system already has those directory trees.)
# make installworld DESTDIR=/var/jail/jail1
# make distribution DESTDIR=/var/jail/jail1
# mount -t devfs devfs /var/jail/jail1/dev
The last entry installs device nodes in your jail. While not strictly
necessary, many programs expect to have basic devices such as terminals,
random number generators, and so on. You’ll want devfs in your jail at least
in your basic setup stage.
Decorating Your Cell: In-Jail Setup
At this point your jail is ready to boot for the first time. You shouldn’t confuse
boot for the first time with ready for use, however, because you still have a few
tasks to complete from within the jail itself. Use the jail(8) command to start
a jail, like this:
# jail <path to jail> <jail hostname> <jail IP> <command>
For example, our first jail is in the directory /var/jails/jail1. I’m assigning
it a hostname of jail.absolutefreebsd.com and an IP address of 192.168.1.4. I’d
like to jail a command prompt:
# jail /var/jails/jail1 jail.absolutefreebsd.com 192.168.1.4 /bin/sh
The earliest point where a system can give you a command prompt is
single-user mode. While this isn’t exactly a single-user mode jail, no programs
other than /bin/sh are running within the jail.
REDUCING JAIL SPACE
If you search the Internet you’ll find many different ways to reduce the amount of disk
space a jail takes. Union mounts and NFS can considerably reduce your disk space
requirements, but the more you use clever tricks, the less support you’ll get from the
FreeBSD user community.

292 Chapter 9
If you look around you’ll see that you’re in a minimal FreeBSD install.
You’ll find all the user programs you’d expect from a basic FreeBSD system,
but nothing else: You have no user accounts, no root password, no network
daemons, and absolutely nothing optional. Before you use your jail, it’s best
to install all of these.
Create /etc/fstab
Many programs expect to find /etc/fstab and complain if it’s not there. This is
perfectly sensible in a real server, but /etc/fstab is useless on a jailed machine.
It’s best to create an empty file just to shut up complaining programs, however.
# touch /etc/fstab
Configure DNS Resolution
You’ll probably want to configure a DNS server in /etc/resolv.conf. You can
probably copy /etc/resolv.conf from your host system into the jail. Note that
you must do this from the host system, as your jail can’t access the host’s /etc.
sendmail
You don’t have to configure sendmail(8) in the jail, at least not yet, but
you’ll get warnings about an out-of-date aliases database. Run newaliases(8)
to silence those warnings.
/etc/rc.conf
Add the following to the jail’s /etc/rc.conf:
network_interfaces=""
sshd_enable="YES"
You cannot configure your interface from within a jail, but the startup
scripts generally expect that you’ll try. Tell FreeBSD not to bother, as you
cannot configure the interface anyway.
You can only access the jail over the network, so you need SSH.
Root Password and User Account
Your jail does not yet have a root password. Set one with passwd(1). You’ll
also need a user account. Run adduser(8) to add at least one user.
Other Setup
If you like, you can set the time zone with tzsetup(8), install add-on packages,
copy your personal files to your home directory, and so on, but none of that
is necessary at this point. Exit the shell, and your jail shuts down.
Advanced Security Features 293
Jail and /etc/rc.conf
Now that the jail is ready to run, tell the host system about it. The simplest
way to manage a jail is with /etc/rc.conf settings. Here are some example
settings for use with jails:
jail_enable="YES"
jail_list="jail1 jail2 jail3"
These two options control generic jail settings. By setting jail_enable to
YES , you tell the system startup scripts to look for and process additional
jail settings. The jail_list contains a list of all the jails on your system,
separated by spaces. By setting both of these, you can use the FreeBSD
startup system to manage your jails. Each jail also has its own set of rc
variables, which tell the system where each jail lies and how to configure it.
jail_jail1_rootdir="/var/jails/jail1"
jail_jail1_hostname="jail.absolutefreebsd.com"
jail_jail1_ip="192.168.1.4"
jail_jail1_devfs_enable="YES"
jail_jail1_devfs_ruleset="devfsrules_jail"
These entries configure one individual jail. Add similar lines for each
additional jail you build, substituting the name of that jail for jail1 in each
variable. Each jail must have a root directory , a hostname , and an IP
address .
Many programs complain or fail if they cannot find expected device nodes
in /dev. Some device nodes make sense for a jail, such as virtual terminals and
the random number generator. Some do not, such as the disk devices and
network interfaces. You can provide device nodes via devfs , but then apply
rules so that users in the jail can only access the appropriate device nodes.
We talked about devfs in Chapter 8. FreeBSD includes a jail-appropriate set
of rules for jailed devfs as devfsrules_jail in /etc/defaults/devfs.rules.
You can find options for other jail features in /etc/defaults/rc.conf, but
these cover basic jail operations.
Jail Startup and Shutdown
With the above rc.conf settings, you can use /etc/rc.d/jail to manage your jails,
both en masse and on a jail-by-jail basis. To start all of your jails, just run:
# /etc/rc.d/jail start
You can start a single jail by giving its name as an argument:
# /etc/rc.d/jail start jail1

294 Chapter 9
Once you start your jail, use SSH and log in. Now you can add packages,
configure the local system, and in general play with your “new” FreeBSD box.
Play around a little, try to break out of the jail. Try to go to a directory you
know exists on the system, but is outside the jail directory. Even as root, from
within a jail you cannot view or access processes running on the host system.
Even with powerful tools like Perl and cc(1) fully available, letting you build
any tools you like, you cannot disrupt the host system. You could even csup in
the jail and rebuild world, although this is not a good idea. Remember, your
kernel and userland must be in sync; a jailed userland whose versions don’t
match those of the running kernel will not crash the host, but it certainly
won’t behave as expected!
Managing Jails
Jails do complicate process management. If you’re logged in to a jail host
server, you can see all the processes in all your jails. Which processes are
running in your server, and which belong in a jail?
Running ps -ax on the host system shows all processes on the system,
including all the jailed processes. A STAT of J means that the process is
running in a jail. If you have only a few jails, each with a dedicated purpose,
you might successfully guess whose process this is. For example, if you see a
jailed named(8) process, and you have only one jailed nameserver, it’s a
good bet that it’s where that process is running. Most of the time, however,
we’re not that lucky. That’s where two special tools come in, jls(8) and
jexec(8).
jls
The jls(8) program lists all jails running on the system.
# jls
JID IP Address Hostname Path
1 192.168.1.4 jail.absolutefreebsd.com /var/jails/jail1
2 192.168.1.5 jail2.blackhelicopters.org /var/jails/jail2
...
Each jail has a unique Jail ID, or JID . The JID is much like a process
ID; while we know that each jail has one, the exact JID issued to a jail varies.
If you stop a jail and start it again, it will have a different JID. jls(8) also lists
the IP address , hostname , and root directory of the jail.
jexec
jexec(8) allows the jail host administrator to execute commands within any
of the jails running on the system without going to all the trouble of logging
into the jail. This helps give the jail owner a sense of privacy—after all, you
don’t know their root password and don’t even need a logon to their system.
You must know the jail’s JID to use jexec on a jail. To discover which processes

Advanced Security Features 295
run on a jailed system, just run ps -ax from within the jail. For example,
suppose our first jail, jail.absolutefreebsd.com, has a jail ID of 1. To execute
ps -ax within the jail, run:
# jexec 1 ps -ax
You’ll see a list of processes running on the jailed system just as if you
logged in.
jexec(8) lets you run any command on the client jails from the main
host. You can install software, restart daemons, stop runaway processes, or
change user passwords.
Processes and procfs
Remember back in Chapter 8, when I said not to use procfs? A jail host is the
only exception I know to that rule. While procfs has a spotty security history,
your jail server should have no services on it and no untrusted users. The
only use I know of for the process filesystem is identifying a jail from a process
ID. If you see a database program that has somehow started using too much
memory or CPU, and you must identify it in a hurry, check its PID under
/proc to identify its jail.
/proc contains a directory for each running process. To determine which
jail a process is held in, find the directory for its process ID and check therein
for a file named status. The last word in the status file is the hostname of the
jail the process is confined in. If the process is not jailed, the last word is a
hyphen.
Jail Shutdown
When you shut down the host server, the various client jails shut down as
well. Shutting down a jail without shutting down the host is pretty simple.
Stop all the jails or a single jail with the /etc/rc.d/jail stop command. Here,
we stop jail1:
# /etc/rc.d/jail stop jail1
This runs the standard shutdown process within the jail and exits. The
jail disappears from jls(8).
Programs such as shutdown(8) and reboot(8) are useless for shutting
down a jail. Their main tasks are to sync and unmount disks, disconnect the
network, and so on. A virtual machine does not have these responsibilities.
What’s Wrong with Jails
Jails give you huge amounts of flexibility on very little hardware. A small
80GB disk can support a dozen or more jails easily when using textbook
methods, and if you look around for the Secret Ninja Jail Techniques, you
can triple that. Why not run all of your services on jailed servers and only use
the “real” machine as a jail host?

296 Chapter 9
Maintenance, that’s why.
With all those jails, you have a greatly increased maintenance load for
that one machine. If you have two dozen jailed web servers on one machine,
and an Apache security problem appears, you must patch two dozen jailed
web servers. With planning, scripting, and practice this isn’t an
insurmountable problem, but many sysadmins are weak at planning and
practice.6 You can do it, but you must understand the commitment you’re
making when deploying flocks of jails.
On the other hand, many companies have successfully deployed hundreds
of jails and manage them all automatically. Jails solve many problems even as
they create others and give you the luxury of choosing your headaches.
Preparing for Intrusions with mtree(1)
One of the worst things to happen to a sysadmin is something that makes
him think that his system could have been penetrated. If you find mysterious
files in /tmp, or extra commands in /usr/local/sbin, or if things “just don’t feel
right,” you’ll be left wondering if someone has compromised your system.
The worst thing about this feeling is that there’s no way to prove it hasn’t
happened. A skilled attacker can replace system binaries with his own
customized versions, so that his actions are never logged and your attempts
to find him will fail. Having Sherlock Holmes examine your server with a
magnifying glass is useless when the magnifying glass has been provided by
the criminal and includes the special criminal-cloaking feature! People have
even hijacked the system compiler so that freshly built binaries include the
hijacker’s backdoor.7 What makes matters worse is that computers do weird
things all the time. Operating systems are terribly complicated, and appli-
cations are worse. Maybe that weird file in /tmp is something your text editor
barfed up when you hit the keys too fast, or perhaps it’s a leftover from a
sloppy intruder.
The only way to recover a penetrated system is to reinstall it from scratch,
restore the data from backup, and hope that the security hole that led to the
penetration is fixed. That’s a thin hope, and doubt is so easy to acquire that
many system administrators eventually stop caring or lie to themselves rather
than live with the constant worry.
Most intruders change files that already exist on the system. FreeBSD’s
mtree(1) can record the permissions, size, dates, and cryptographic check-
sums of files on your system. If you record these characteristics when your
system is freshly installed, you have a record of what those files look like
intact. When an intruder changes those files, a comparison will point out the
difference. When you have the feeling you’ve been hacked, you can check
that same information on the existing files and see if any have changed.
6 We often script well enough to work around the planning and practice weaknesses.
7 I would say intruder here except that the person in question was Ken Thompson, one of the
creators of Unix and C. He had a miraculous ability to log into any Unix system, anywhere in
the world, including systems developed years after he stopped working on Unix. See http://
www.acm.org/classics/sep95.
Advanced Security Features 297
Running mtree(1)
The following command runs mtree(1) across your root partition and stores
md5 and sha1 cryptographic checksums, placing them in a file for later
analysis:
# mtree -x -ic -K cksum -K md5digest -K sha256digest -p / -X /
home/mwlucas/mtree-exclude > /tmp/mtree.out
While you can use mtree(1) across the entire server, most people use -x
to run it once per partition. You don’t want to record checksums on filesystems
that change frequently, such as the database partition on your database
server. The -ic flag tells mtree to print its results to the screen, with each
subsequent layer in the filesystem indented. This format matches the system
mtree files in /etc/mtree. The -K flag accepts several optional keywords; in
this case we want to generate standard checksums , md5 checksums ,
and sha1 checksums . The -p flag tells mtree which partition to check.
Almost every partition has files or directories that change on a regular basis
and that you therefore don’t want to record checksums for. Use -X to
specify a file containing a list of paths not to match. Finally, redirect the
output of this command to the file /tmp/mtree.out .
The exclusion file can be tricky. Normally, I don’t want to audit the con-
tents of /tmp or /var/tmp. I can use the same file to exclude both directories.
Having an exclusion file with this single line excludes the tmp directory in the
root of the filesystem being checked:
./tmp
Generally speaking, an intruder will want to replace files on the root
or /usr partition. Record checksums for both partitions. If your server is a
web server, the intruder might also target any CGI or PHP applications on
your system.
mtree(1) Output: The Spec File
mtree(1)’s output is known as a specification, or spec. While this specification
was originally intended for use in installing software, we’re using it to verify a
software install. Your spec starts with comments showing the user who ran
the command, the machine the command ran on, the filesystem analyzed,
and the date. The first real entry in the spec sets the defaults for the install
we’re not running, and begins with /set.
/set type=file uid=0 gid=0 mode=0755 nlink=1 flags=none
mtree(1) has picked these settings as defaults based on its analysis of the
files in the partition. The default filesystem object is a file, owned by UID 0
and GID 0, with permissions of 0755, with one hard link and no filesystem
298 Chapter 9
flags. After that, every file and directory on the system has a separate entry.
Here’s the entry for the root directory:
.type=dir nlink=24 size=512 time=1171639839.0
This file is the dot (.) , or the directory we’re in right now. It is a directory ,
and has 24 hard links to it. The size of the directory is 512 bytes , and it
was modified 1,171,639,839.0 seconds into Unix epochal time . The Unix
epoch began January 1, 1970.
In some ways the entry for the directory is rather boring. An intruder
can’t realistically replace the directory itself, after all! Here’s an entry for an
actual file in the root directory.
.cshrc mode=0644 nlink=2 size=801 time=1141972532.0 \
cksum=3359466860 md5digest=67b0d2664a9c2fcccb517e3069ca8125 \
sha256digest=6624a34d5e068cca1f64142e077b8c64869dc2207bf7ff4f292a7f1f3e237b4
We see the filename and the same mode, link, size, and time information,
but we have a few new entries: the checksum , the md5 checksum , and the
sha256 checksum . These cryptographic checksums are computed from the
contents of the file. While it is theoretically possible for an intruder to craft
a file that matches a particular checksum, and while cryptographers are
constantly trying to find practical ways to create files that match arbitrary
md5 and sha256 checksums, it’s extremely unlikely that an intruder can create
a fake file that matches all three different checksums, contains his backdoor,
and still functions well enough that the system owner won’t immediately
notice a problem. By the time this happens, we will have additional checksum
algorithms resistant to those methods and will switch to them.
Saving the Spec File
The spec file contains the information needed to verify the integrity of your
system after a suspected intrusion. Leaving the spec file on the server you
want to verify means that an intruder can edit the file and conceal his
wrongdoing. You must not save the file on the system itself! Now and then
someone will suggest that you checksum the mtree spec file but keep it on
the server. That’s not useful; if someone tampers with the mtree file and the
checksum, how would you know? Or worse—if someone tampered with the
spec file and you caught it, you couldn’t tell what change had been made!
EPOCHAL SECONDS AND REAL DATES
Don’t feel like counting seconds since the epoch began? To convert epochal seconds
into normal dates, run date -r seconds. Cut off the .0 at the end of mtree’s time,
however; date(1) only likes whole seconds.
Advanced Security Features 299
Copy your spec file to a safe location, preferably on an offline media such as
a floppy disk or CD.
Reacting to an Intrusion
When something raises your suspicions and you begin to think that you
might have suffered an intrusion, create a new mtree spec file and compare
it with the one you previously created. mtree(1) can specifically check for
differences between spec files if you specify two files on the command line.
This generates thousands of lines of output, so be sure to redirect it to a file
for easier analysis.
# mtree -f savedspec -f newspec > mtree.differences
Files that have not changed appear on a single line, like this:
sbin/conscontrol file
The file /sbin/conscontrol hasn’t changed between the two files. On the
other hand, here we have two lines for the file /sbin/devd:
sbin/devd file cksum=3950957068 size=328396 md5digest=14d0cc1dbe
a86c69ebd4af1dec2312d0 sha1digest=7acd1bdf46581b1d6a3231ca62b2c47e6e1dcf07
sbin/devd file cksum=4141842183 size=328428 md5digest=5ab5ec4213
03ca770ac2cccd546bcf11 sha1digest=51f5fbc24d47f11115474714040b8cce0eb9b6c9
Compare the old and new checksums for the file /sbin/devd, as well
as the sizes. None of them match. Something changed the devd(8) binary.
Don’t hit the panic button yet, but start asking your fellow system adminis-
trators pointed, hard questions. If you can’t get a good answer as to why this
binary changed, you might look for your backup tapes.
Monitoring System Security
So, you think your server is secure. Maybe it is, for now.
Unfortunately, there’s a class of intruders with nothing better to do than
to keep up on the latest security holes and try them out on systems they think
might be vulnerable. Even if you read FreeBSD-security religiously and apply
every single patch, you still might get hacked one day. While there’s no way
to be absolutely sure you haven’t been hacked, the following hints will help
you find out when something does happen:
Be familiar with your servers. Run ps -axx on them regularly, and learn
what processes normally run on them. If you see a process you don’t
recognize, investigate.
Examine your open network ports with netstat -na and sockstat. What
TCP and UDP ports should your server be listening on? If you don’t
recognize an open port, investigate. Perhaps it’s innocent, but it might
be an intruder’s backdoor.

300 Chapter 9
Unexplained system problems are hints. Many intruders are ham-fisted
klutzes with poor sysadmin skills, who use click-and-drool attacks. They’ll
crash your system and think that they’re tough.
Truly skilled intruders not only clean up after themselves, but also
ensure that the system has no problems that might alert you. Therefore,
systems that are unusually stable are also suspicious.
Unexplained reboots might indicate someone illicitly installing a new
kernel. They might also be a sign of failing hardware or bad configura-
tion, so investigate them anyway.
FreeBSD sends you emails every day giving basic system status informa-
tion. Read them. Save them. If something looks suspicious, investigate.
I particularly recommend two tools to increase your familiarity with your
system. The first, /usr/ports/sysutils/lsof, lists all open files on your system.
Reading lsof(8) output is an education in and of itself; you probably had no
idea that your web server opened so much crud. Seeing strange files open
indicates either that you’re not sufficiently familiar with your system or that
someone’s doing something improper.
The second tool is /usr/ports/security/nessus, an automated vulnerability
scanner. Running Nessus security audits on your own machines is an excellent
way to see your system as an attacker would.
If You’re Hacked
After all this, what do you do if your system is hacked? There is no easy answer.
Huge books are written on the subject. Here are a few general suggestions,
however.
First and foremost: A hacked system cannot be trusted. If someone has
gained root access on your Internet server, he could have replaced any
program on the system. Even if you close the hole he broke in through, he
could have installed a hacked version of login(8) that sends your username
and password to an IRC channel somewhere every time you log in. Do not
trust this system. An upgrade cannot cleanse it, as even sysinstall(8) and the
compiler are suspect.
While tools such as rkhunter (/usr/ports/security/rkhunter) might help you
verify the presence of intruders, nothing can verify that the intruder isn’t
there. Feel free to write FreeBSD-security@FreeBSD.org for advice. Describe what
you’re seeing and why you think you’re hacked. Be prepared for the ugly
answer, though: Completely reinstall your computer from known secure
media (FTP or CD) and restore your data from backup. You did read
Chapter 4, right?
Good security practices reduce your chances of being hacked, just as safe
driving reduces your chances of being in a car wreck. Good luck!

10
EXPLORING /ETC
The /etc directory contains the basic con-
figuration information needed to boot a
Unix-like system. Every time I get saddled
with an unfamiliar system, one of the first things
I do is scope out /etc. The fastest way to go from a
junior sysadmin to a midgrade one is to read /etc
and the associated man pages. Yes, all of it. Yes, this is a lot of reading.
Understanding /etc means that you understand how the system hangs
together. As you progress as a sysadmin, you’re going to pick up this infor-
mation piecemeal anyway, so you might as well take the easier route and
master this part of your toolkit at the beginning.
I discuss many /etc files in a chapter where they’re most important, such
as /etc/services in Chapter 6 and /etc/fstab in Chapter 8. Also, some files are of
only historical interest or are gradually being removed. This chapter covers
important /etc files that don’t quite fit anywhere else.
302 Chapter 10
/etc Across Unix Species
Different Unix-like systems use different /etc files. In many cases, these files
are simply renamed or restructured files from primordial BSD. The first time
I encountered an IBM AIX system, for example, I went looking for a BSD-
style /etc/fstab. It wasn’t there. A little hunting led me to /etc/filesystems, which
is an IBM-specific /etc/fstab. Apparently IBM felt that a file named for an
abbreviation of filesystem table was confusing, so they renamed the file. Knowing
this information existed somewhere in /etc, and knowing which files it
obviously wasn’t in, greatly shortened my search.
Even radically different FreeBSD systems have almost identical /etc
directories. While some add-on programs insert their own files here, you
can expect certain files to be on every FreeBSD system you encounter.
Remember that /etc is the heart of FreeBSD, and that changes to these
files can damage or destroy your system. Before you change any files, review
the information on RCS in Chapter 4. Create an /etc/RCS directory and use
ci(1) and co(1) religiously when experimenting. While having to manually
recover a scrambled filesystem can turn an adequate sysadmin into a pretty
good one, it’s one of the least pleasant ways to get there.
/etc/adduser.conf
This file lets you configure the defaults for new users. See Chapter 7 for
details.
/etc/amd.map
FreeBSD has the ability to automatically mount and unmount NFS
filesystems upon demand through the automounter daemon, amd(8).
See its man page for details.
/etc/bluetooth, /etc/bluetooth.device.conf, and
/etc/defaults/bluetooth.device.conf
FreeBSD supports Bluetooth, a standard for short-range wireless communica-
tion. Unlike 802.11, Bluetooth is designed for short-range but high-level
services such as voice communications. This book is about servers, so we
won’t cover Bluetooth, but you should know that your FreeBSD laptop can
attach to your Bluetooth-equipped cellphone and connect to the Internet
if you desire.
/etc/crontab
The cron(8) daemon lets users schedule tasks. See Chapter 15 for examples
and details.
Exploring /etc 303
/etc/csh.*
The /etc/csh.* files contain system-wide defaults for csh and tcsh. When a user
logs in with either of these shells, the shell executes any commands it finds in
/etc/csh.login. Similarly, when the user logs out, /etc/csh.logout is executed. You
can place general shell configuration information in /etc/csh.cshrc.
/etc/devd.conf
devd(8) manages detachable hardware such as USB, PCCard, and Cardbus
devices. When you insert a wireless card into your laptop, devd(8) notices the
arrival and fires up the appropriate system processes to configure the card as
per /etc/rc.conf. We discuss devd(8) briefly in Chapter 8, but if you think you
need to edit /etc/devd.conf on a server, you’re probably doing something
wrong.
/etc/devfs.conf, /etc/devfs.rules, and
/etc/defaults/devfs.rules
FreeBSD manages device nodes through devfs(5), a virtual filesystem
that dynamically provides device nodes as hardware boots, appears, and
disappears. See Chapter 8 for more information.
/etc/dhclient.conf
Many operating systems give you very basic DHCP client configuration with
no way to fine-tune or customize it; you either use it or you don’t. In most
cases, an empty /etc/dhclient.conf file gives you full DHCP client functionality,
but it won’t work correctly in all situations. Perhaps your network is having
trouble, or you’re at a conference where some script kiddie thinks it’s fun to
set up a second DHCP server and route everyone’s traffic through his machine
so he can capture passwords.
Your server better not be configured via DHCP (unless it’s diskless), so we
won’t go into any depth on this. You should be aware that you can configure
FreeBSD’s DHCP client functionality, however.
/etc/disktab
Once upon a time, hard disks were rare and exotic creatures that came in
only a few varieties. In /etc/disktab you’ll find low-level descriptions of many
different kinds of disks, from the 360KB floppy disk to a Panasonic 60MB
laptop hard drive. (Yes, laptops came with 60MB hard drives, and we were
durned happy to have them.)
304 Chapter 10
Today, this file is mostly used for removable media such as 1.44MB floppy
disks and zip disks. While we provided a description of formatting standard
floppy disks in Chapter 8, this file contains the descriptions needed to format
other removable media. If you want to put a filesystem on your LS 120 disk or
zip drive, you’ll find the necessary label here at the beginning of an entry.
Editing /etc/disktab is only useful if you have multiple identical hard drives
that you want to partition and format in exactly the same way. If you need to
make your own entries, read disktab(5).
/etc/freebsd-update.conf
This file is used by freebsd-update(8) when getting binary updates for your
server. See Chapter 13 for details.
/etc/fstab
See Chapter 8 for a discussion on the filesystem table, /etc/fstab.
/etc/ftp.*
The FTP daemon ftpd(8) uses these files to determine who may access the
system via FTP and what access they have upon a successful connection.
They’re discussed in detail in Chapter 17.
/etc/group
Assigning users to groups is covered in painful detail in Chapter 7.
/etc/hosts
This is a hard-coded list of hostname to IP address mappings, as discussed in
Chapter 14.
/etc/hosts.allow
The /etc/hosts.allow file controls who can access the daemons compiled with
TCP Wrappers support. Learn about it in Chapter 9.
/etc/hosts.equiv
The /etc/hosts.equiv file is used by the r-services (rlogin, rsh, etc.) to let
trusted remote systems log in or run commands on the local system without
providing a password or even logging in. Hosts listed in this file are assumed
to have performed user authentication on a trusted system, so the local
system doesn’t have to bother reauthenticating the user.

Exploring /etc 305
Such blatant trust is very convenient on friendly networks, much as
leaving the doors of your Manhattan townhouse unlocked saves you the
trouble of digging out your door keys every time you get home. There is
no such thing as a friendly network these days. A single disgruntled employee
can largely destroy a corporate network with this service, and a machine
using the r-services is pretty much dog meat for the first script kiddie who
wanders by. In fact, /etc/hosts.equiv and its related services have bitten even
top-notch security experts who thought they could use it safely. I suggest
leaving this file empty and perhaps even making it immutable (Chapter 9).
/etc/hosts.lpd
The /etc/hosts.lpd file is one of the simplest files in /etc. Hosts listed here, each
on its own line, may print to the printer(s) controlled by this machine. While
you can use hostnames, that would allow DNS issues to choke printing, so use
IP addresses instead.
Unlike most other configuration files, /etc/hosts.lpd does not accept
network numbers or netmasks; you must list individual hostnames or IP
addresses.
/etc/inetd.conf
inetd(8) handles incoming network connections for smaller daemons that
don’t run frequently. See the section on inetd in Chapter 15.
/etc/localtime
This file contains local time zone data, as configured by tzsetup(8). It is a
binary file, and you cannot edit it with normal tools. tzsetup(8) actually
copies this file from a subdirectory of /usr/share/zoneinfo. If your time zone
changes, you’ll need to upgrade FreeBSD to get the new time zone files and
then rerun tzsetup(8) to configure time correctly.
/etc/locate.rc
locate(1) finds all files of a given name. For example, to find locate.rc, enter
the following:
# locate locate.rc
/etc/locate.rc
/usr/share/examples/etc/locate.rc
/usr/src/usr.bin/locate/locate/locate.rc
You’ll see that a file called locate.rc can be found in three places: in the
main /etc directory, in the system examples directory, and in the system
source code.

306 Chapter 10
Once a week your FreeBSD system scans its disks, builds a list of every-
thing it finds, and stores that list in a database. The list-building program,
locate.updatedb(8), takes its settings from /etc/locate.rc. The following variables
in this file all change how your locate.updatedb builds your locate database:
TMPDIR contains the temporary directory used by locate.updatedb(8), and
defaults to /tmp. If you’re short on space in /tmp, change this path to a
place where you have more room.
While you can change the location of the database itself with the FCODES
variable, this affects other parts of FreeBSD that expect to find that data-
base in its default location. Be prepared for odd results, especially if
you leave an old locate database in the default location of /var/db/locate
.database.
The SEARCHPATHS variable gives the directory where you want to start
building your database. This defaults to /, the whole disk. To index only
a portion of your disk, set that value here.
PRUNEPATHS lists directories you don’t want to index. This defaults to
excluding temporary directories that traditionally contain only short-
lived files.
The FILESYSTEMS variable lists the types of filesystems you want to index.
By default, locate.updatedb(8) only indexes UFS (FreeBSD) and ext2fs
(Linux) filesystems. Listing NFS (Chapter 8) filesystems is a bad idea; all
of your servers simultaneously indexing the fileserver will bottleneck
either the network or the fileserver.
/etc/login.*
You can control who may log into your system, and what resources those
users may access, by using /etc/login.access and /etc/login.conf. See Chapter 7
for instructions.
/etc/mail/mailer.conf
FreeBSD allows you to choose any mail server program you like via
/etc/mail/mailer.conf, as covered in Chapter 16.
/etc/make.conf
To make, or compile, a program is to build it from source code into machine
language. We’ll discuss building software in detail in Chapter 11. /etc/make.conf
controls how that building process works, letting you set options that directly
affect software builds. Remember, anything you add to make.conf affects all
software built on the system, including system upgrades. This may cause
upgrade failures.1 Many of the options from make.conf are only useful for
developers.
If you’re interested in setting options that affect only system upgrades,
use /etc/src.conf instead.

Exploring /etc 307
Here are some common features set in make.conf. Any values set here
require the same syntax used by make(1). For the most part, following the
examples is best.
CFLAGS
This option specifies optimization settings for building nonkernel programs.
Many other Unix-like operating systems suggest compiling software with
particular compiler flags, or CFLAGS. This practice is actively discouraged on
FreeBSD. System components that require compiler flags already have that
specified in the software configuration, and add-on software has that con-
figuration set for it separately. While people might recommend other settings
for CFLAGS, custom options are not supported by the FreeBSD Project.
In general, FreeBSD code is expected to compile most correctly out of
the box. The only thing that adding compiler options can do is impair
your performance. If you build FreeBSD with nonstandard flags and have
problems, remove those flags and build it again.
COPTFLAGS
The COPTFLAGS optimizations are used only for building the kernel. Again,
settings other than the defaults can build a non-working kernel.
CXXFLAGS
CXXFLAGS tells the compiler what optimizations to use when building C++
code. Be sure to use the += syntax when using CXXFLAGS, so that you add your
instructions to those specified in the software. Everything that I said above
about CFLAGS applies equally well to CXXFLAGS.
CPUTYPE=i686
Certain software can be optimized for different CPU types. By identify-
ing your CPU type in /etc/make.conf you tell the compiler to optimize for
your CPU.
This is most effective if you upgrade your system from source (see
Chapter 13). FreeBSD will not only optimize everything in the base system
for your processor, but any third-party software you build afterwards will
also have the same optimizations.
On a standalone machine, always set CPUTYPE to match your CPU. If you
build FreeBSD on one machine and then NFS export /usr/obj and /usr/src
to other machines so they can upgrade without building, set CPUTYPE to the
lowest common denominator of CPUs on your systems.
1 Having weird crap in make.conf during a system upgrade will make people laugh at you when
you ask for help. But commercial software support techs do that, too, so that’s OK.

308 Chapter 10
As of this writing, FreeBSD recognizes the CPU types shown in Table 10-1.
INSTALL=install -C
When FreeBSD installs a program, it blindly copies the new binary on top
of the old one. By using install -C instead of a naked install, install(1)
compares the new program to the existing one and does not install the new
binary if it is identical to the old one. This prevents pointless timestamp
changes in /usr/include, so make(1) won’t assume software is out of date just
because a header file has been replaced with a newer, but identical, version.
This can also accelerate upgrades and save disk writes. Disk writes are not
usually much of an issue, but it’s an option if you want it.
NOTE We’ll look at the make.conf options useful for the Ports Collection in Chapter 11 and
some unusual options for stripping down FreeBSD in Chapter 20.
/etc/master.passwd
This file contains the core information for all user accounts, as discussed in
Chapter 7.
/etc/motd
The message of the day (motd) file is displayed to users when they log in. You
can place system notices in this file, or other information you want shell
users to see. The welcome option in /etc/login.conf can point different users
to different motd files, so you can have separate messages for each login
class.
/etc/mtree
mtree(1) builds directory hierarchies with permissions set according to a
predefined standard. The /etc/mtree directory stores that standard for the
FreeBSD base system. The FreeBSD upgrade process uses mtree records to
install the system correctly. If you damage file or directory permissions in
Table 10-1:
CPU Types
Architecture Valid Types
i386 architecture, Intel core2, core, nocona, pentium4m, pentium4, prescott,
pentium3m, pentium3, pentium-m, pentium2, pentiumpro,
pentium-mmx, pentium, i486, i386
i386 architecture, VIA c3, c3-2
i386 architecture, AMD opteron, athlon64, athlon-mp, athlon-xp, athlon-4, athlon-tbird,
athlon, k8, k7, k6-2, k6, k5
amd64 architecture, Intel nocona, prescott, core, core2
amd64 architecture, AMD opteron, athlon64
Exploring /etc 309
your base system, you can use mtree(1) to restore them to the defaults. While
you don’t generally need to edit these files, they can be useful if you muck
too much with your system.
/etc/namedb
The /etc/namedb files control the system nameserver. See Chapter 14 for
details on how name service works.
/etc/netstart
This shell script is designed specifically for bringing up the network while in
single-user mode. Having a network in single-user mode is terribly useful for
any number of reasons, from mounting NFS shares to connecting to remote
machines in order to verify configurations. Just run /etc/netstart. This script
has no effect when in full multi-user mode.
/etc/network.subr
This shell script isn’t intended for human use; rather, other network con-
figuration scripts use the subroutines defined herein to support common
functions.
/etc/newsyslog.conf
This file configures the rotation and deletion of log files. See Chapter 19 for
more information.
/etc/nscd.conf
nscd(8) caches the results of name service lookups to optimize system
performance. See Chapter 15 for details.
/etc/nsmb.conf
FreeBSD’s Windows file-share mounting system uses /etc/nsmb.conf to define
access to Windows systems, as described in Chapter 8.
/etc/nsswitch.conf
Name Service Switching is covered in Chapter 14.
/etc/opie*
OPIE, or One-time Passwords In Everything, is a one-time password system
derived from S/Key. While still used in a few places, it’s no longer very
popular. You can read opie(4) if you’re interested. For the most part, OPIE
has been largely replaced by systems like Kerberos.
310 Chapter 10
/etc/pam.d/*
Pluggable Authentication Modules (PAM) allow the system administrator to use
different authentication, authorization, and access control systems. If you’re
using Kerberos or some other centralized authentication system, you’ll need
to work with PAM.
/etc/pccard_ether
This script starts and stops removable network cards, such as Cardbus cards
and USB Ethernet. Its name is just a leftover of history, when the only cards
available were PC Cards. For the most part, devd(8) runs this script as needed,
as discussed in Chapter 8.
/etc/periodic.conf and /etc/defaults/periodic.conf
periodic(8) runs every day to handle basic maintenance and emails the
results to root as status messages. periodic(8) just runs shell scripts stored
in /etc/periodic and /usr/local/etc/periodic. Every one of these scripts is enabled
or disabled in /etc/periodic.conf.
periodic(8) runs programs either daily, weekly, or monthly. Each set of
programs has its own settings—for example, daily programs are configured
separately from monthly programs. These settings are controlled by entries
in /etc/periodic.conf. While we only show examples from the daily scripts, you’ll
find very similar settings for the weekly and monthly scripts as well.
daily_output=”root”
If you want the status email to go to a user other than root, list that user’s name
here. Unless you have a user whose job it is to specifically read periodic email,
it’s best to leave this at the default and forward root’s email to an account
you read. You could also give a full path to a file if you prefer, and even have
newsyslog(8) (see Chapter 19) rotate the periodic log.
daily_show_success=”YES”
With this set to YES, the daily message includes information on all successful
checks.
daily_show_info=”YES”
When set to YES, the daily message includes general information from the
commands it runs.
Exploring /etc 311
daily_show_badconfig=”NO”
When set to YES, the daily message includes information on periodic
commands it tried to run but couldn’t. These messages are generally
harmless and involve subsystems that your system just doesn’t support
or include.
daily_local=”/etc/daily.local”
You can define your own scripts to be run as part of the daily, weekly, and
monthly periodic(8) jobs. These default to /etc/daily.local, /etc/weekly.local,
and /etc/monthly.local, but you can place them anywhere you like.
Each script in the daily, weekly, and monthly subdirectories of /etc/periodic
has a brief description at the top of the file, and most have configuration
options in /etc/defaults/periodic.conf. Skim through these quickly, looking for
things that are of interest to you. The defaults enabled are sensible for most
circumstances, but there’s extra functionality you can enable with a simple
setting in /etc/periodic.conf. For example, if you use GEOM-based disk features,
you’ll find the daily GEOM status messages useful. Since anything I could list
here would be obsolete before I could deliver this manuscript, let alone before
the book reaches you, I won’t go into detail about the various scripts.
/etc/pf.conf
We cover the basics of the PF packet filter in Chapter 9.
/etc/pf.os
PF can identify operating systems by the packets they send, allowing you
to write firewall rules such as “Show FreeBSD users my real home page,
but show Windows users a page suggesting that they get a real operating
system.” See pf.os(5) for more information.
/etc/phones
Modem users can store phone numbers for remote modems in /etc/phones,
aliasing them so that they can just type home instead of the full phone
number. Only tip(1) and cu(1) use this file, however, so it’s not as useful
as you might think.
/etc/portsnap.conf
portsnap provides updates for the ports tree, as discussed in Chapter 11.
/etc/ppp
FreeBSD supports modems with ppp(8). Read the manual page for more
information.
312 Chapter 10
/etc/printcap
This file contains printer configuration information. Printing on Unix-like
systems can be very complicated, especially with the vast variety of printers
you can use. Making your FreeBSD machine send print jobs to a print server
isn’t hard at all, however. We cover the topic in Chapter 15.
/etc/profile
/etc/profile contains the default account configuration information for the
/bin/sh shell, much like /etc/csh.* for csh and tcsh users. Whenever a /bin/sh
user logs in, he inherits what’s in this file. Users can override /etc/profile with
their own .profile. Bash and other sh derivatives also use this file.
While tcsh is the standard FreeBSD shell, sh and derivatives (partic-
ularly bash) are quite popular. Consider keeping settings in /etc/profile and
/etc/csh.login synchronized to ease troubleshooting in the future.
/etc/protocols
In Chapter 6 we discussed network protocols. /etc/protocols lists the various
network protocols you might encounter, as explained in that chapter.
/etc/rc*
Whenever your system boots to the point where it can execute userland
commands, it runs the shell script /etc/rc. This script mounts all filesystems,
brings up the network interfaces, configures devfs(5), finds and catalogs
shared libraries, and performs all the other tasks required to set up a system.
Different systems have radically different startup tasks. A terminal ser-
ver with three 48-port serial cards works completely differently from a web
server. Instead of a single monolithic /etc/rc script that handles every task,
FreeBSD segregates each startup process into a separate shell script that
addresses a specific need.
Additionally, you’ll find a few scripts directly under /etc, such as
/etc/rc.firewall and /etc/rc.initdiskless. These scripts were split out on their
own years before the rcNG startup system came along, and remain in
their historical locations so as to not break legacy software.
We discussed the FreeBSD startup system in Chapter 3.
/etc/remote
This file contains machine-readable configurations for connecting to remote
systems over serial lines. Today, this is only of interest if you use your system
as a serial client—for example, if you want to connect to a serial console.
We discuss serial consoles in Chapter 20.
Exploring /etc 313
/etc/rpc
Remote Procedure Calls (RPC) is a method for executing commands on
a remote computer. Much like TCP/IP, RPC has service and port numbers.
/etc/rpc contains a list of these services and their port numbers. The most
common RPC consumer is NFS, discussed in Chapter 8.
/etc/security/
This directory contains configuration information for the audit(8) security
utility.
/etc/services
This file contains a list of network services and their associated TCP/IP ports.
We discussed /etc/services in detail in Chapter 6.
/etc/shells
This file contains the list of all legitimate user shells, as discussed in Chapter 7.
/etc/snmpd.config
FreeBSD includes a basic SNMP implementation, which we discuss in
Chapter 19.
/etc/src.conf
This file contains machine instructions for building FreeBSD from source. It’s
a parallel of make.conf for the source tree alone. Values set in /etc/make.conf
affect building FreeBSD from source as well, though; the difference is that
/etc/src.conf only affects building FreeBSD but not ports and packages.
/etc/sysctl.conf
This file contains information on which kernel sysctls are set during the boot
process. See Chapter 5.
/etc/syslog.conf
This file controls which data goes into your system logs and where those logs
are stored. See Chapter 19.
314 Chapter 10
/etc/termcap
This file contains the settings and capabilities of different terminal types.
In the age when terminals came in dozens of different types and vendors
released new terminals on an almost daily basis, understanding this file was
vital. Now that the world has largely converged on vt100 as a standard, how-
ever, the default configuration is suitable for almost everyone.
/etc/ttys
This file contains all of the system terminal devices (the windows containing
a command prompt). The name is a relic of the time when terminals were
physical monitors, but today most users use the virtual terminals generated
by telnet or SSH.
We’ll use this file to set up serial logins in Chapter 20.

11
MAKING YOUR SYSTEM USEFUL
Unlike operating systems such as Microsoft
Windows and Red Hat Linux, which tend
to throw absolutely everything you might ever
need into the base install, FreeBSD systems are
minimal—and that’s a good thing. Windows systems
in particular have thousands of objects in the main
system directory and just about every shared library you can imagine. When-
ever you boot the system, Windows loads many of those libraries and objects
into main system memory. I don’t know what each object is for, but I guar-
antee that I will never use many of them—when I use Windows, it’s only
for SSH and Firefox. All these objects do for me is consume RAM. This is, of
course, Microsoft’s approach to operating systems—give ’em everything you’ve
got, and add whipped cream and a cherry on top. Red Hat Linux includes a
similar amount of stuff, but at least it isn’t automatically loaded into the system
at boot and you can choose to remove it easily.
A basic FreeBSD install includes exactly enough to make the system run,
plus a few extra bits that have been traditionally included with Unix systems.
You can choose whether to install additional programs or source code. Even
316 Chapter 11
a complete, running FreeBSD install takes up much less disk space than
either a Windows or a Red Hat Linux install. A Windows install only
supporting SSH and Firefox would be much smaller and simpler—in fact,
it would look a lot more like FreeBSD.
The advantage to this sparseness is that it includes only necessary sys-
tem components. Debugging becomes much simpler, and you know that
no shared library you’ve never even heard of, and would never use, can be
responsible for your problems. The downside is that you must decide what
you do need and install programs to support those functions. FreeBSD
makes software installation as simple as possible.
Making Software
Building software is complicated because source code must be processed
very specifically to create a workable, running program—let alone one that
works well! While programmers could include installation instructions with
each program, full of lines like Now type ar cru .libs/lib20_zlib_plugin.a
istream-zlib.o zlib-plugin.o, this would be downright sadistic. While Unix
admins might seem to approve of sadism, they categorically disapprove of
cruelty when it is directed at themselves; if something can be automated, it
will be.
The main tool for building software is make(1). When run, make looks in
the current directory for a file called Makefile, which is full of instructions
much like that horrid example in the previous paragraph. make(1) reads the
instructions and carries them out, automating the installation process no
matter how complicated it might be. You don’t really have to know the inter-
nals of a Makefile, so we’re not going to dissect one here.
Each Makefile includes one or more targets, or sets of instructions to carry
out. For example, typing make install tells make(1) to check the Makefile
for a procedure called install and, if found, execute it. A target’s name
usually relates to the process to be carried out, so you can safely assume that
make install installs the software. You’ll find targets to install, configure, and
uninstall most software. make(1) handles a huge variety of functions, some of
which far outstrip the creators’ original intents. But that’s part of the fun
of Unix!
Source Code and Software
Source code is the human-readable instructions for building the actual
machine code that makes up a program. You might have already been exposed
to source code in some form. If you’ve never seen it, take a look at a few files
under /usr/src. While you don’t have to read source code, you should be able
to recognize it two out of three times.
Once you have source code for a program, you build (or compile) the pro-
gram on the type of system you want to run it on. (Building software for
a foreign platform via cross-compiling demands that you know much more
about building software, and is not always possible.) If the program was
Making Your System Useful 317
written for an operating system that is sufficiently similar to the platform
you’re building it on, it works. If your platform is too different from the
original, it fails. Once you’ve built the software successfully on your system,
you can copy the resulting program (or binary) to other identical systems,
and it should run.
Some programs are sufficiently well written that they can be compiled on
many different platforms. A few programs specifically include support for
widely divergent platforms; for example, the Apache web server can be com-
piled on both Windows and Unix just by typing make install. This is quite
uncommon, however, and represents heroic effort by the software authors.
Generally speaking, if you can build a program from source, it runs.
A sufficiently experienced sysadmin can use the source code and error
messages to learn why a program won’t build or run. In many cases, the
problem is simple and can be fixed with minimal effort. This is one reason
why access to source code is important.
Back in the age when every sysadmin was a programmer, this debug-
ging absorbed a major portion of the admin’s time. Every Unix-like system was
slightly different, so every sysadmin had to understand his platform, the plat-
form the software was designed for, and the differences between the two
before he could hope to make a piece of code run. The duplication of effort
was truly horrendous.
Over the years, tools such as autoconf were created to help address these
cross-platform issues. Not every program used these tools, and when they
broke, the sysadmin was returned to square one. System administrators had
to edit the source code and Makefiles just to have a chance of making the
programs work. And working is not nearly the same as working well, let alone
working correctly.
The FreeBSD Ports Collection was designed to simplify this process for
FreeBSD users.
The Ports and Packages System
Ports are instructions for compiling software on FreeBSD, and packages are
precompiled ports.
Packages install quickly and easily, while ports take more time but can
be customized for your environment. The whole system is called the Ports
Collection, the ports tree, or simply ports. All these terms refer to the ports them-
selves, the system for building ports, and packages.
The basic idea behind the ports and packages system is that if source code
must be modified to run on FreeBSD, the modifications should be automated.
If you need other software to build this program from source code or to run
the software, those dependencies should be documented and tracked. If
you’re going to automate the changes, you might as well record what the pro-
gram includes so you can easily install and uninstall it. And since you have a
software-building process that produces exactly the same result each time, and
you’ve recorded everything that the process creates, you can copy the binaries
and install them on any similar FreeBSD system.

318 Chapter 11
Ports
A port is a set of instructions on how to apply fixes to, or patch, a set of source
code files. By combining patches with the software’s original installation pro-
cess, the FreeBSD Project maintains a complete record of everything necessary
to install the software. This frees you from struggling to install the program
and lets you concentrate on configuring it.
Ports Tree Installation
If you followed the installation instructions in Chapter 2, you installed the
ports tree in /usr/ports. In that directory you should find several files and a
couple dozen directories. If you don’t have anything in /usr/ports, you appar-
ently can’t follow instructions. That’s okay—I can’t either—but you must
install the ports tree to continue. We’ll discuss portsnap(8) in Chapter 13, but
you can use it now to install the ports tree:
# portsnap fetch
Looking up portsnap.FreeBSD.org mirrors... 3 mirrors found.
Fetching public key from portsnap3.FreeBSD.org... done.
Fetching snapshot tag from portsnap3.FreeBSD.org... done.
Fetching snapshot metadata... done.
Fetching snapshot generated at Thu May 15 20:09:15 EDT 2008:
a2b71859b1a44878d19f879e2d1c801d785761670cc745 5% of 47 MB 29 kBps 26m32s
portsnap searches for a mirror of the portsnap files, cryptographically
verifies the integrity of the files on the portsnap server, downloads the files,
and verifies the integrity of the download itself. After downloading, install
the ports tree:
# portsnap extract
This gives you a current tree with all the latest FreeBSD ports.
Ports Tree Contents
Most of the directories you see here are software categories. Each category con-
tains a further layer of directories, and each of those directories is a piece of
software. FreeBSD has almost 17,000 ports as I write this, so using the directory
tree and categorizing software properly is vital. Of the files and directories in
this category that aren’t software categories, the major ones are described
below.
The CHANGES file lists changes made to the FreeBSD ports infrastructure.
It is primarily of use to the FreeBSD ports developers and people interested
in the internals of the Ports Collection.
COPYRIGHT contains the licensing information for the Ports Collection
as a whole. While each individual piece of software supported by the Ports
Collection has its own copyright and licensing information, the Ports Collec-
tion is licensed under the BSD license.
Making Your System Useful 319
The GIDs file contains a list of all the group IDs used by software in the
Ports Collection. Many pieces of software use an unprivileged user, and
the Ports Collection needs a GID for these users. This file helps prevent
software conflicts, as each port has its own assigned GIDs.
KNOBS contains a list of all tunable settings available in the Ports Collec-
tion. You can set any of these on the command line or in /etc/make.conf
to enable the corresponding feature in software that supports it. We’ll talk
more about tunable settings later in this chapter.
In LEGAL, you’ll see a list of all legal restrictions on software in the Ports
Collection. Some pieces of software have specific limitations on them—such as
no commercial use, no redistribution, no monetary gain, and so on. Individual
ports also list these restrictions, this is just a master list built from all the ports.
MOVED lists all of the ports that have moved from one category to
another. As the FreeBSD ports team creates new categories, they move
ports from one place to another. Automated management tools such as
portmaster(8) need to find moved ports.
The Makefile contains high-level instructions for the whole Ports
Collection.
The Mk subdirectory contains detailed, low-level instructions for the
whole Ports Collection. Many types of programs expect to integrate together,
and these files ensure that different parts of the same tool are built and
installed in a compatible manner. For example, the KDE and GNOME desk-
top suites include dozens or hundreds of smaller programs, and each must
be built correctly to interoperate. If you look in this directory, you’ll see the
files bsd.gnome.mk and bsd.kde.mk dedicated to configuration of these pro-
grams, as well as files for Apache, Emacs, GCC, Perl, and many other software
families. If you really want to learn how the Ports Collection works, read this
directory.
The README file contains a high-level introduction to the Ports
Collection.
The Templates directory contains skeleton files used by other portions of
the Ports Collection.
The Tools directory contains programs, scripts, and other automation,
mostly used by ports developers.
The UIDs file contains unprivileged user IDs used by ports in the system.
Much like the GIDs file, this helps the ports developers avoid conflicts between
unprivileged users required by ported software.
UPDATING contains notes for use when upgrading your software.
Updates that require special intervention appear here in the reverse date
order. We’ll discuss this file in Chapter 13.
The distfiles directory contains the original source code for ported soft-
ware. When a port downloads a chunk of source code, that source code is
kept under /usr/ports/distfiles.
All of the other directories are categories of ports. The following shows
the contents of the arabic ports directory, where software specific to the
Arabic language is kept. Much software elsewhere in the Ports Collection
supports Arabic, but this category is for software focused on Arabic—such as

320 Chapter 11
fonts, translations of certain types of documents, and so on. This category
isn’t useful for most people, but it has the serious advantage of being small
enough to fit in this book. Some ports categories have hundreds of entries.1
Makefile ae_fonts_ttf kacst_fonts khotot php_doc
Makefile.inc arabtex katoob koffice-i18n
ae_fonts_mono aspell kde3-i18n libitl
The Makefile contains instructions for all of the ports in the directory. The
file Makefile.inc contains metainstructions for the ports in this directory. All of
the other directories are individual software packages. We’ll dissect one of
those directories in “Using Ports” on page 331.
Finding Software
Some of these categories have hundreds of ports in them, so how can you ever
hope to find anything? The file /usr/ports/INDEX-7 contains a list of all ports in
alphabetical order. Each port is described on a single line, with fields sepa-
rated by pipe symbols (|). While this is convenient for system tools, it’s not
particularly human-readable. Run make print-index in /usr/ports to get a longer,
much more intelligible index. This index is filled with entries like this:
Port: p5-Compress-Bzip2-2.09
Path: /usr/ports/archivers/p5-Compress-Bzip2
Info: Perl5 interface to bzip2 compression library
Maint: demon@FreeBSD.org
Index: archivers perl5
B-deps: perl-5.8.8
R-deps: perl-5.8.8
E-deps: perl-5.8.8
P-deps: perl-5.8.8
F-deps:
WWW: http://search.cpan.org/dist/Compress-Bzip2/
The index starts with the name of the port and the full path to the port
directory. Info gives a very brief description of the port. The Maint heading
lists the port’s maintainer, a person or team who has assumed responsibility
for this software’s integration into the Ports Collection. The Index space lists
every category where this port can be filed. B-deps lists the build depend-
encies—that is, other software that must be installed to build this port. Some
software must be extracted or decompressed by particular tools, specified in
E-deps. The P-deps field lists any dependencies for patching the software—
rare pieces of software must be patched with a certain tool. The F-deps field
is similar, specifying fetch dependencies—that is, any special software that must
be used to download the software. Finally, the WWW space gives the home page
of the software.
1 17,000 ports. 60-odd categories. Some categories have 11 members. You do the math.

Making Your System Useful 321
Finding by Name
Knowing how to read the index is nice, but how can it help you find a piece
of software? If you know the name of the software, search INDEX for it with
make search. Here, I look for net-snmp:
# cd /usr/ports
# make search name=net-snmp
Port: net-snmp-5.3.1_3
Path: /usr/ports/net-mgmt/net-snmp
Info: An extendable SNMP implementation
Maint: kuriyama@FreeBSD.org
B-deps: autoconf-2.59_2 libtool-1.5.22_4 m4-1.4.8_1 openssl-0.9.8e perl-5.8.8
R-deps: openssl-0.9.8e perl-5.8.8
WWW: http://net-snmp.sourceforge.net/
Port: p5-Net-SNMP-5.2.0
...
Port: p5-Net-SNMP-365-3.65
...
As of this writing, FreeBSD has three ports with net-snmp in their name.
One is the original net-snmp software collection; the two others are Perl
libraries that use SNMP over the network but otherwise have nothing to do
with net-snmp. The fields in the description are taken straight from the
INDEX we saw earlier.
If you don’t need this much detail in your search results, you can use
make quicksearch to find software.
This doesn’t work for all software, however. For example, if you’re look-
ing for the popular Midnight Commander file manager, you might try this
command:
# make search name=midnight
#
Well, that was less than helpful. Let’s try a more general search.
Finding by Keyword
If you don’t know the software’s exact name, try a keyword search. This scans
more fields and returns more hits. If you’re searching for a common word,
however, the key search can provide far too much information.
# make search key=midnight
This returns every port with the string midnight in its description, name,
or dependencies. We’ll quickly learn that Midnight Commander can be found
under /usr/ports/misc/mc.

322 Chapter 11
Other Ways to Browse the Ports Collection
If you prefer using a web browser, build an HTML index. Just go to /usr/ports
and, as root, type make readmes to generate a README.html file with the index
of your ports tree. You can click through various categories and even view
detailed descriptions of every port.
If none of these options work, try the FreeBSD Ports Tree search at http://
www.freebsd.org/cgi/ports.cgi. Also, the FreshPorts search engine at http://www
.freshports.com provides a separate but very nice search function.
Between the web browser and the search engine, you should be able to
find a piece of software to meet your needs.
Legal Restrictions
While most of the software in the Ports Collection is free for any use, some of
it has a more restrictive license. The /usr/ports/LEGAL file lists legal restric-
tions on the contents of the Ports Collection. The most common restriction is
a prohibition on redistribution; the FreeBSD Project does not include such
software on its FTP sites or on a CD image, but provides instructions on how
to build it. For example, for a long time FreeBSD did not have a Java license.
You couldn’t download a compiled, ready-to-go FreeBSD Java package, and
the Project could not redistribute the Java source code. FreeBSD could, how-
ever, distribute instructions on how to build the Sun-provided Java source
code on FreeBSD. A FreeBSD user who wanted Java had to download the
source code from a Sun Microsystems web page, download the patchset
from a FreeBSD site, and build his own version of Java on FreeBSD. Today,
the FreeBSD Foundation supplies a complete, licensed Java package that
can be quickly installed.
Similarly, some pieces of software prohibit commercial use or embed-
ding in commercial products. A few cannot be exported from the United
States, thanks to Department of Commerce rules restricting the export of
cryptography.2 If you’re building FreeBSD systems for redistribution, export,
or commercial use, you need to check this file.
Fortunately, most of the software in the Ports Collection is free for either
commercial or noncommercial use. These restricted packages are the excep-
tion, not the norm.
Using Packages
Packages are precompiled software from the Ports Collection, bundled up
for a particular version of FreeBSD. We’re going to discuss using packages
first, as they’re generally easier and faster than ports. Once you have a grip
on packages, we’ll proceed to ports.
2 Most of this nonexportable software is available from non-US sources and can be downloaded
anywhere in the world. Meanwhile, ex-KGB cryptographers without these regulations will
happily provide strong crypto to anyone at low, low rates.

Making Your System Useful 323
Installing software as a package can save you a great deal of time because
you don’t have to compile it from source. Unless a piece of software has legal
restrictions prohibiting distribution in compiled form, it’s probably available
as a package. Other software, such as Adobe Acrobat, is only available in
precompiled form. Packages are available on CD and via FTP, and have the
same name as the port they come from.
CD Packages
If you have a FreeBSD CD set, you already have a fairly extensive collection
of compiled packages. To use them, mount the CD and read the package file.
If you have downloaded a CD, but not burned it to a physical disk, you can
mount that image and install packages from it instead. (See Chapter 8 for
details on using removable media and mounting disk images.)
Once you have the CD mounted, look at the packages directory. Here’s
that directory from a recent FreeBSD installation CD:
# cd /cdrom/packages/
# ls
All emulators linux textproc x11-servers
INDEX graphics perl5 x11
devel lang print x11-fonts
This looks like a stripped-down /usr/ports directory, and it is. Packages are
just precompiled ports, so they’re stored in the same directory categories as
the ports they’re built from. A single CD doesn’t have nearly enough room
to store all 17,000 FreeBSD packages, however. The installation CDs have
only the very basic packages that almost everyone wants, such as the X Window
System and Perl. The second FreeBSD CD image contains a more complete
selection of packages. For example, here’s the x11 directory from a FreeBSD 6.2
installation CD.
# ls x11
libdrm-2.0.2.tbz xorg-documents-6.9.0.tbz xterm-220.tbz
xorg-6.9.0.tbz xorg-libraries-6.9.0.tbz
xorg-clients-6.9.0_3.tbz xorg-manpages-6.9.0.tbz
In the ports tree, the x11 category contains 342 ports. The installation
CD contains only 7, but they’re the X Window System core components. The
ports tree contains, for example, the tools for configuring a Synaptics touch-
pad in GNOME—important for those who happen to own that touchpad and
use GNOME, but not worth the precious space on the installation CD.
One interesting difference between the ports tree and the package
tree is the directory All . This directory contains all of the packages in the
CD. The entries in each directory are just links to the actual file in the All
directory.

324 Chapter 11
To see what a package does, you can search in /usr/ports just as we
searched for a port by name earlier in this chapter. Note, however, that
the packages directory has an INDEX file containing only the packages on this
disk. While you can’t use the fancy make search name= functions that work in
/usr/ports, you can search the INDEX file directly with grep(1). Here, we
identify the package libdrm:
# cd /cdrom/packages
# grep ^libdrm INDEX
libdrm-2.0.2|/usr/ports/graphics/libdrm|/usr/local| Userspace interface to
kernel Direct Rendering Module services|/usr/ports/graphics/libdrm/pkg-descr|
x11@FreeBSD.org|graphics x11|||http://dri.freedesktop.org||||1
#
For those of you not comfortable with grep(1), we’re searching for
the string libdrm in the file INDEX. The caret character (^) indicates that the
string libdrm must appear at the beginning of a line. The INDEX file contains
all the information provided in make search, just in a less friendly format.
Apipe symbol (
|) delimits the fields, and the fourth field contains a
description of the package.
FTP Packages
Frequently, a package doesn’t exist on CD because the FreeBSD Project has
limited space on the CD sets and can’t possibly fit 17,000+ packages onto them.
Also, software on CD is built for a particular release of FreeBSD. If you install
FreeBSD 7.1 from CD, upgrade your system to 7.3, and want to install packages
for 7.3, the FreeBSD 7.1 CDs won’t help you. If you’re tracking -stable or
-current (see Chapter 13), you’ll have the same problem.
If a package doesn’t exist on CD, you can only get it via FTP. The FreeBSD
Project provides packages for almost all of the 17,000+ items in the Ports
Collection via FTP. Every FreeBSD FTP mirror carries packages for recent
FreeBSD releases, and some carry packages for older (or very old!) releases.
We talked about finding a good mirror for your own use in Chapter 2. Each
official FreeBSD FTP mirror carries packages at the URL:
ftp://mirror.freebsd.org/pub/freebsd/ports/architecture/packages-version/
For example, the i386 packages for FreeBSD 6.2 can be found at
ftp://ftp.freebsd.org/pub/freebsd/ports/i386/packages-6.2-release and all the other
mirror servers in the same directory. If you go look at the FTP site you’ll see
all of the categories in /usr/ports—and many more. While the Ports Collection
places each port in a category, some ports could fit into multiple categories
easily. For example, the Perl SNMP ports we saw earlier could easily be classi-
fied as either network management tools or Perl programs, depending on
your personal bias. The FTP servers have enough room to provide a port
under all of its possible classifications, which makes it easier for users to find
and actually uses less bandwidth. The quicker you find what you’re looking
for and go away, the happier the mirror maintainers are.

Making Your System Useful 325
Just as the CDs, each FTP site has an All directory where the actual
packages are kept. Unlike the CDs, however, on the FTP site you’ll find
thousands and thousands of packages!
Installing Packages
If you have the file on a local disk, install it with pkg_add(1).
# pkg_add xorg-6.9.0.tbz
pkg_add(1) extracts and verifies the compressed package file, and
installs the package as specified in the packing instructions. Under most
circumstances, pkg_add(1) runs silently and just returns you to a command
prompt. On occasion, the package installation routine prints a message
when the package is installed. Pay attention to those messages and do as
they recommend if you want the software to work correctly.
If pkg_add(1) finds that the package has dependencies—other programs
required for this package to work correctly—it tries to install those packages
from the same source. The FreeBSD CD sets are designed to accommodate
this. For example, the xorg package above has several dependencies, but
they’re included on the installation CD. If a required package is missing,
however, pkg_add complains about the missing package by name and fails.
In that case, find the required package on another disk and install it first, or
just install it over FTP.
pkg_add(1) also supports installing automatically over FTP. The -r flag
makes the system go out onto the Internet and fetch the packages auto-
matically from the FreeBSD FTP server.
# pkg_add -r xorg
The advantage of this is that the system automatically finds the proper
FTP server and directory, downloads the proper version of the package and
all of its dependencies, and installs everything. The downside is that if a pack-
age install fails, FreeBSD discards the downloaded package(s)! Use the -K flag
to make FreeBSD keep the downloaded package in the current directory.
You can also download the package individually from the FTP site and
install it at the command line. This won’t handle dependencies for you, but
when you try to install the package, pkg_add(1) will print out all of the miss-
ing dependencies. You can download them or install them remotely. This
method is most useful when you’re stuck behind a firewall and must jump
through hoops to download files.
With large packages, I often use a hybrid approach. For example,
OpenOffice.org is over 100MB and requires several smaller packages as
dependencies. I’ll download OOo from an FTP server, and then try to
install it. pkg_add(1) fails, complaining about required but missing programs.
I then install those smaller packages with pkg_add -r, then try again to install
OOo from the downloaded package.

326 Chapter 11
pkg_add(1) Environment Settings
Shell environment variables can modify how pkg_add(1) behaves. You can
control where the system unpacks packages, where it downloads packages
from, other places the system can check for packages, and so on. It’s best to
set any needed environment variables in your login script, so that you use
them consistently.
Here are the most useful pkg_add(1) environment settings.
PKG_TMPDIR
The PKG_TMPDIR environment variable controls where pkg_add unpacks its
temporary files. A package is a compressed tarball of software files, with some
added installation instructions. To install the package, you must decompress
and untar it. If you’re short on space in the standard directories used by
pkg_add, the untar cannot complete and the install fails. By default,
pkg_add(1) tries to use the directory in the environment variable TMPDIR.
If that variable doesn’t exist, pkg_add(1) tries to use /tmp, /var/tmp, and
/usr/tmp, in that order. Set PKG_TMPDIR to a directory where you have enough
free space:
# setenv PKG_TMPDIR /home/mwlucas/garbage
PACKAGEROOT
By default, pkg_add -r attempts to download every requested package from
ftp://ftp.freebsd.org. This probably isn’t the best choice for you. The primary
FreeBSD mirror is very heavily used and can suffer from congestion. It might
also be further away from your computer. You can frequently get better
performance by choosing a less heavily used mirror. The PACKAGEROOT
environment variable tells pkg_add(1) to use a different FTP server. Set
PACKAGEROOT to a protocol and server name, not a full path. For example,
to use ftp5.us.freebsd.org as your source for packages, set:
# setenv PACKAGEROOT ftp://ftp5.us.freebsd.org
PACKAGESITE
This lists an exact path to check for a package repository. You might use this
if you wish to install only packages from a particular release, or if you have a
local package repository. (We’ll discuss a local package repository later in
this chapter.) Set PACKAGESITE as an absolute URL, as in this example for a
legacy, unsupported FreeBSD release:
# setenv PACKAGESITE ftp://ftp-archive.freebsd.org/pub/FreeBSD-Archive/old-
releases/i386/5.4-RELEASE/packages/All

Making Your System Useful 327
PKGDIR
This directory specifies a location to place copies of packages downloaded
through pkg_add -Kr. This lets you keep downloaded packages organized.
# setenv PKGDIR /usr/ports/packages/All
What Does a Package Install?
Now that your software is installed, how do you find it on your system? There’s
no Start menu, after all! Not to worry. For a complete list of the contents of
every package installed on your system, see /var/db/pkg. This directory con-
tains a subdirectory for every port or package installed on the system, and
those subdirectories contain a list of everything each piece of software con-
tains. For example, now that we’ve installed xorg 6.9, we have a directory
/var/db/pkg/xorg-6.9.0. If you look in that directory, you’ll see the following:
# ls /var/db/pkg/xorg-6.9.0/
+COMMENT +CONTENTS +DESC +MTREE_DIRS
The +COMMENT file contains a brief description of the package, and
+DESC contains a longer description. The file +MTREE_DIRS contains a
mtree(1) description of this package. The interesting file is +CONTENTS,
which lists every file installed by the package, all of the package’s depend-
encies, and any uninstallation instructions. (The package doesn’t need
installation instructions now that it’s installed, but uninstallation instruct-
ions could be important when you want to remove the package.)
# more /var/db/pkg/xorg-6.9.0/+CONTENTS
@comment PKG_FORMAT_REVISION:1.1
@name xorg-6.9.0
@comment ORIGIN:x11/xorg
@cwd /usr/local
@pkgdep expat-2.0.0_1
@comment DEPORIGIN:textproc/expat2
@pkgdep libdrm-2.0.2
@comment DEPORIGIN:graphics/libdrm
...
The first line is the version number of the format the package record is
stored in. When FreeBSD changes package storage formats, the package man-
agement tools can read this to determine how to handle this package. Then
we have the name of the package , followed by the ORIGIN that indicates
which category and directory this package’s originating port can be found.
The cwd label indicates where the files belonging to this package are
installed. All paths to files in this package listing are relative to this directory.
The pkgdep comment indicates a dependency on another piece of software,
in this case expat-2. We also have the directory in the ports tree where this
dependency can be found.
328 Chapter 11
The xorg package is a bit of a cheat, however; it installs no files! FreeBSD’s
xorg package only exists to provide all of the dependencies required by the
X Window System. The only entries you’ll find in the +CONTENTS file are
references to other packages. Let’s look at the +CONTENTS of another
package, one that actually includes files of its own. Here, we look at the
contents of /usr/ports/archivers/zip:
# cd /var/db/pkg/zip-2.32
# more +CONTENTS
...
@cwd /usr/local
man/man1/zip.1.gz
@comment MD5:1c3dc2c955ff2e3d9a6b38b1f6150ca9
@unexec rm -f %D/man/cat1/zip.1 %D/man/cat1/zip.1.gz
bin/zip
@comment MD5:af81366669c5e1cd1fca37ea5fd70d62
bin/zipcloak
...
Once again, we have the working directory , but then we have an
actual file . The combination of directory and file tells us that the zip
package installed a file /usr/local/man/man1/zip.1.gz. This is a manual page,
which is good to know. We also have a comment giving the md5 checksum
of this file, and instructions for removing this file when the package is
deleted. The package isn’t just a man page, however; it also includes an
actual binary file . You know that zip(1) was installed as /usr/local/bin/zip.
Reading this file gives you the name and location of every file installed by
the package.
Much of this information on files and directories is also available through
pkg_info(1), but it’s often easier to just look for yourself.
Uninstalling Packages
Use pkg_delete(1) to uninstall packages:
# pkg_delete xorg-6.9.0
You can specify a package name by the path to the package database
directory—for example, the following works just fine:
# pkg_delete /var/db/pkg/xorg-6.9.0
Uninstalling a package does not uninstall any of its dependencies. As
the xorg package only exists as a collection of dependencies required for the
X Window System, uninstalling it really doesn’t do much of anything. You
must uninstall each dependency separately.
Problems can happen when you uninstall a package required by
other packages. For example, the xorg package requires expat, libdrm,
xorg-libraries, and many other packages. Uninstalling one of these without

Making Your System Useful 329
uninstalling the xorg package would break the xorg package and, almost
certainly, related software. Any software that depends on a piece of
software you’ve uninstalled will probably fail to work properly. You can
use pkg_delete -f to force an uninstall of a package. pkg_delete(1) will
warn you about dependent packages, but will obey.
Package Information
At the time you install your software, you probably know what it does and
what dependencies it installed. A lot of that knowledge, however, will prob-
ably leak out of your brain once you’ve got the software working, and weeks
or months later you won’t remember it at all. Personally, I’m lucky to remem-
ber that I have a piece of software installed at all, let alone what version it was.
FreeBSD includes pkg_info(1), a tool to examine installed packages in a
more friendly manner than by manually searching /var/db/pkg. pkg_info(1)
uses the contents of /var/db/pkg to provide answers, but handles automatically
a lot of boring manual searching and sorting for you. When run without any
options, pkg_info lists each installed package with a brief description:
# pkg_info
915resolution-0.5.2_1,1 Resolution tool for Intel i915 video cards
ORBit-0.5.17_3 High-performance CORBA ORB with support for the C language
ORBit2-2.14.7 High-performance CORBA ORB with support for the C language
OpenSSH-askpass-1.2.2.2001.02.24 Graphical password applet for entering SSH
passphrase
Xaw3d-1.5E_1 A 3-D Athena Widget set that looks like Motif
...
Wow. My laptop has an awful lot of crud on it. This is useful when I decide
to clean up my system and want a brief list so I can decide what to keep and
what to delete.
Other pkg_info(1) Options
pkg_info(1) can provide all sorts of information about installed packages,
from the detailed description to the script used to uninstall the package. All
pkg_info arguments require either a package or filename for analysis, or the
-a flag which means for all packages. For example, to learn which packages on
your system require other packages, use pkg_info -aR:
# pkg_info -aR
Information for 915resolution-0.5.2_1,1:
Information for ORBit-0.5.17_3:
Required by:
gnome-libs-1.4.2_6
gnomecanvas-0.22.0_5
gnome-print-0.37_3
...

330 Chapter 11
So the package 915resolution stands aloof and alone, needing nothing
and not needed by any other package. If I don’t need it, I can delete it. On
the other hand, ORBit is required by many other packages, and I cannot arbi-
trarily delete it.
To find out the space needed by the files within a package, use the -s
option. Note that this only includes the files installed by the package itself;
files created by the package are another matter entirely. Do you count your
MP3 files as part of your MP3 player’s space requirements?
Another common question is, “Which package installed this file?” More
than once I’ve been browsing through /usr/local/bin on a Saturday night3
and come across a file that I don’t recognize, haven’t used, and suspect I
don’t need. Use the -W flag with pkg_info to perform a sort of “reverse lookup”
on files to see which packages they came from.
# pkg_info -W /usr/local/bin/gtail
/usr/local/bin/gtail was installed by package coreutils-6.7
Package Problems
FreeBSD packages seem like a great system, don’t they? Well, almost. The
package system has a few problems, notably the lags in the software porting
process and the software synchronization requirements.
The overwhelming majority of packages contain software produced by
third parties—folks who release their software on a schedule completely inde-
pendent of FreeBSD. When these third parties release an updated version
of their software, the maintainer or the FreeBSD ports team updates the
FreeBSD port. This takes time. A small but popular port might be updated in
hours, while large and less frequently used software might take days or weeks.
A huge program with many dependencies and high visibility, such as GNOME
or KDE, might not be updated for several weeks while all of the testing occurs.
Many users feel that a new release of their favorite tool rates an immediate
update of the FreeBSD package for that software, but that’s logistically imposs-
ible. The FreeBSD folks refuse to rush or release software they know is buggy,
not only from a concern for the quality of their work but because they get
blamed for any problems with the software. If taking extra time reduces user
complaints in the long term, that’s what happens.
Also, many packages rely upon others to function properly. When the
FreeBSD ports team changes a package, that change cascades through all
the dependent packages. That’s why you’ll see packages with names like
sudo-1.6.8.12_1. The software is named sudo, it’s at version 1.6.8.12, and its
FreeBSD port version number is 1. This is the second version of the FreeBSD
port for sudo 1.6.8.12 (the first didn’t get a number). The port changed
slightly in some way, perhaps because a dependency changed, or perhaps
the build method changed. Often these changes are purely internal and
don’t affect the software’s behavior or performance.
3 No, reading /usr/local/bin is not my idea of a fun Saturday night. But my wife gets upset when
I spend the evening putting random household objects in the microwave just to see what happens
to them, so I make do.

Making Your System Useful 331
If you’re running a FreeBSD release and only installing software from the
CD or the version shipped with your release, this interdependency isn’t
much of a concern. After all, the packages built for a release do not change.
On the other hand, you might be running an older version of FreeBSD, but
want a program that was just released. Or perhaps you’re continually upgrad-
ing your system and have older versions of some software.
For example, the package OpenOffice-2.2 requires the package
libiconv-1.9.2_2. If you have libiconv-1.9.1 installed, pkg_add notices that
you do not have the proper dependencies installed. It will probably install
anyway, but the installed software might not run correctly, depending on
changes in the software itself. The smart thing to do is upgrade your libiconv
install before installing the package.
One way around this problem is to always use packages from the same
date or time. If you set the PACKAGESITE environment variable to the packages
directory for a certain FreeBSD release, all of your packages will always match.
In many cases this works just fine, as you probably don’t need the absolutely
latest version of many pieces of software. I think Emacs 19 worked just as well
as Emacs 21, so the differences between Emacs 21.3 and Emacs 21.1 don’t
bother me.
Of course, this means that you won’t get any security updates for packages.
While this might be all right for a laptop, it’s completely unacceptable for a
server. I recommend that in this case you use ports rather than packages.
Instead of checking for installed programs by the name of the package, ports
check for the existence of the program itself. To continue our earlier example,
installing OpenOffice.org from a port means that OOo builds against the
version of libiconv you have installed, if that version supports all the features
OOo needs. This makes the port much more flexible.
Using Ports
Installing software from ports takes longer than using packages, and the Ports
Collection requires a live Internet connection. In exchange, the Ports Collec-
tion can produce more optimal results than packages. Let’s take a look at a
port, and not just any port. Perhaps the biggest single piece of software that
runs on FreeBSD is OpenOffice.org, in /usr/ports/editors/openoffice.org-2. This
software contains a word processor, spreadsheet, presentation tool, and other
assorted pieces that make it a pretty serious contender against Microsoft
Office. The directory contains:
Makefile distinfo files pkg-descr pkg-plist
The Makefile contains the basic instructions for building the port. If you
read this file, you’ll quickly find that it’s only a few hundred lines long. That’s
not a huge amount of instructions for such a complicated piece of software.
Most of that file is dedicated to customizations that are only rarely used.
There’s almost no information about OOo itself in here, and not much

332 Chapter 11
about how to build software on FreeBSD. (Most of the FreeBSD ports system’s
Makefiles are in /usr/ports/Mk; editing those files is difficult, and you really
don’t want to go there until you’re very comfortable with make(1).)
The distinfo file contains checksums for the various files the port down-
loads, so that your system can be sure that the file transferred without error
and that nobody tampered with the file before you got it.
The files directory contains all the add-on files and patches required to
build this port on FreeBSD. This massive office suite, with over a hundred
megabytes of source code, builds on FreeBSD with only 18 patches. Most of
these patches just provide integration into the FreeBSD package system and
aren’t actually required to build OpenOffice.org on FreeBSD.
The file pkg-descr contains a lengthy description of the software.
Finally, the pkg-plist file is a list of all the files installed (the “packing list”).
The port only installs the files listed in the packing list.
Combined, these files comprise the tools and instructions needed to build
the software.
Installing a Port
If you’re familiar with source code, you’ve probably already noticed that a port
contains no actual source code. Sure, there are patches to apply to the source
code, and scripts to run on the source code, but no actual source code! You
might rightly ask, just how building software from source is supposed to work
without source code?
When you activate a port, FreeBSD automatically downloads the appro-
priate source code from an approved Internet site. The port then checks
the downloaded code for integrity errors, extracts the code to a temporary
working directory, patches it, builds it, installs everything, and records the
installation under /var/db/pkg. If the port has dependencies, and those
depedencies are not installed, it interrupts the build of the current port to
build the dependencies from source. To trigger all this, you just go into the
port directory and type:
# make install
You’ll see lots of text scroll down your terminal as the port carries out its
work, and you’ll get your command prompt back when it finishes.
This all-in-one installation process handles any changes in dependencies.
If a port requires another program, the port simply glosses over any minor
changes in that program. If a required program’s API or ABI changes, the
port will handle this for you whereas a package would fail to work correctly.
As you grow more experienced in building from source, however, you’ll
find that this all-in-one approach isn’t appropriate for every occasion. Not
to worry; the Ports Collection provides the ability to take the port-building
process exactly as far as you like, because make install actually runs a whole
series of subcommands. If you specify one of these subcommands, make(1)

Making Your System Useful 333
runs all previous commands as well as the one you specify. For example,
make extract runs make config, make fetch, make checksum, make depends, and
make extract. These subcommands are listed below, in order:
make config
Many ports have optional components. Running make config lets you select
which of those options you wish to support in this port. The options you
select are saved for future builds of the port. These options affect how the
port is built—for example, if you choose to build a program with SNMP
support, you’ll probably be adding a dependency on SNMP software else-
where in the ports tree.
make fetch
Once you have configured the port, the system searches a preconfigured
list of Internet sites for the program source code. The port’s Makefile lists
the authoritative download site for the file. If the source code is not at that
location, the port checks a list of backup sites provided by the Ports Collection.
When the port finds the source code, it downloads it. The original, down-
loaded source code is called a distfile and is stored in /usr/ports/distfiles.
If the port requires a particular program to fetch a distfile, the port will
install that program as part of this step.
make checksum
Next, as a security measure, make checksum confirms that the distfile’s crypto-
graphic checksum matches the one given in the port’s distinfo file. If the
distfile’s master FTP server was broken into by a malicious hacker who
had the source code replaced with a Trojan horse, or if the download was
corrupted, this step detects it and stops the build with a warning about a
checksum mismatch. It doesn’t matter if the source code was corrupted
during download, or if some malicious intruder put his backdoor code into
the distfile before you downloaded it—you don’t want to waste your time
building it, and you certainly don’t want to install it!
FOOT-SHOOTING METHOD #839:
IGNORING THE CHECKSUM
Software authors, especially free software authors, sometimes make minor changes
to their code, but don’t change the software version or the filename of the distfile.
The FreeBSD port rightfully notices this problem and doesn’t work after such a
change. If you’re absolutely certain that the distfile has not been compromised
or corrupted, you can override this check with make NO CHECKSUM=YES install.
I highly recommend that you do not do this without checking with the software
author. Checking with the author ensures that you’re not installing compromised
software, and you’ll also help the software author learn about the importance of
version numbers and release engineering.
334 Chapter 11
make extract
Once FreeBSD has the port distfiles, it must uncompress and extract them.
Most source code is compressed with either gzip(1) or bzip(1), and collated
with tar(1), but some is distributed by other means (Zip files, compress(1),
etc.). This command creates a work subdirectory in the port and extracts the
tarball there. If the port requires a particular program to extract the distfile,
it will install it now.
make patch
This command applies any patches in the port to the extracted source code in
the work subdirectory. If the port requires a special patch program instead
of the base system’s patch(1), the port installs it now.
make depends
The make depends stage checks to see if the necessary dependencies are
installed. For example, a window manager requires X.org. If the depen-
dencies are not installed, this stage recurses through the various dependencies
and installs them.
make configure
Next, FreeBSD checks to see if the software has a configure script. This is not
the same as the make config step performed by the port. If the software came
with its own configure script, the port runs it. Some ports interrupt the build
at this stage to prompt you for information, but most run silently.
make build
This step complies the checked, extracted, patched, and configured software.
make install
Finally, make install installs the software and records it under /var/db/pkg.
Integrated Port Customizations
Many software packages have extensive custom-build features. While enabling
these features isn’t hard for any individual piece of software, there is no
universal method for defining them. With one piece of software you might
have to edit the Makefile; with another, you may have to offer flags to the
configure script. Learning how to make these changes takes time and can be
an annoyance. The FreeBSD Ports Collection offers two ways to consistently
configure these options on your system.
The newer, prettier method is supported by make config. This brings up
a dialog box much like those you saw when you first installed FreeBSD. For
example, the popular Snort intrusion detection software includes support for
logging to different types of databases, integration with dynamic firewall rules,
and so on. If you go to /usr/ports/security/snort and type make config, you’ll see
a menu much like the one shown on Figure 11-1.
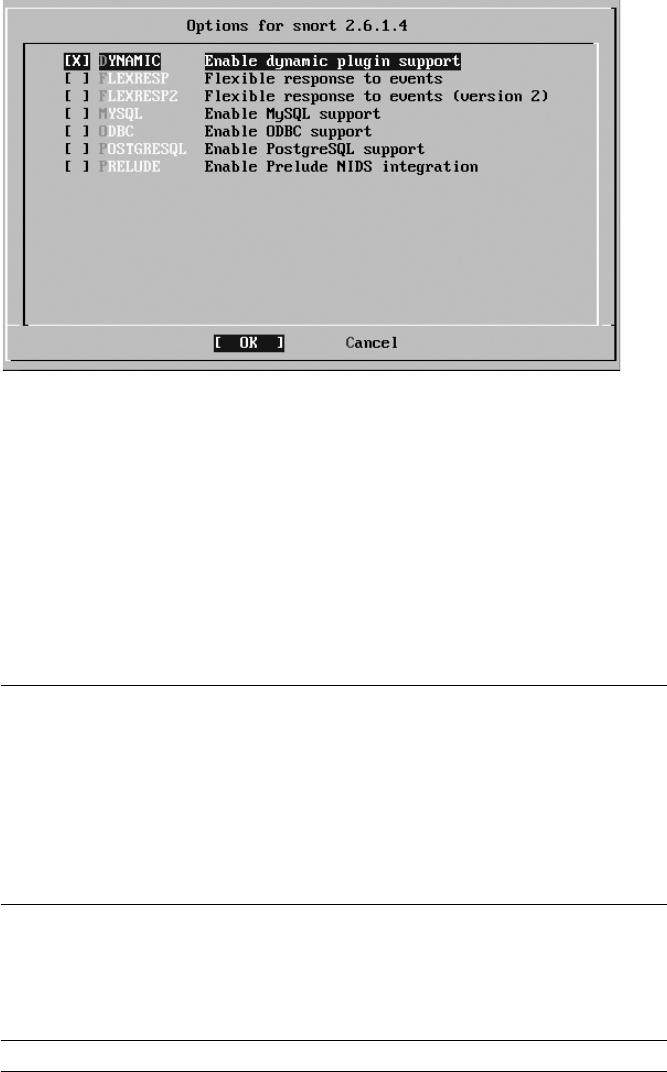
Making Your System Useful 335
Figure 11-1: Port configuration
Use the spacebar to select options you like and the arrows and TAB key
to move around. Hit ENTER over either OK or Cancel to finish. The port
records your desired options in /var/db/ports/<portname>/options, so that when
you upgrade or rebuild the software it can simply reuse the same options.
Snort is a good example of this because it has many popular options. Many
people use different sorts of databases to log Snort events.
This pretty, graphical choice of options is fairly new in FreeBSD, however,
and isn’t used in every port. Many ports still announce additional features
when you first type make install. For example, when you start to build
OpenOffice.org, you’ll get this message:
OPTIONS:
You can compile OOo with debug symbols with WITH_DEBUG=1
If you set WITH_DEBUG=2, you add internal
OOo debug support.
You can compile OOo without Mozilla connectivity with
make -DWITHOUT_MOZILLA
...
OOo actually lists several more options, but you get the idea. If you see
this sort of announcement and you want to use one of the options provided,
press CRTL-C to abort the port build. You can then set these options on the
command line:
# make WITH_DEBUG=1 install

336 Chapter 11
This changes the way the port is built, enabling debugging support and
improving the quality of any bug reports you file with the OOo team. Here’s
one area where ports shine over packages. You cannot do this customization
with a package.
Not all ports announce all options, however. If you’re really curious about
the available options, read the port’s Makefile. Let’s check out a Makefile next.
Port Makefiles
At the top of a Makefile you’ll see a lot of stuff that describes the port:
PORTNAME= apache
PORTVERSION= 2.2.4
PORTREVISION= 2
CATEGORIES= www
MASTER_SITES= ${MASTER_SITE_APACHE_HTTPD} \
${MASTER_SITE_LOCAL:S/%SUBDIR%\//clement\/:aprmysql/}
DISTNAME= httpd-${PORTVERSION}
DISTFILES= ${DISTNAME}.tar.bz2 \
apr_dbd_mysql.rev-57.c:aprmysql
This port is named apache and handles version 2.2.4 of that soft-
ware. It’s the second revision of this port for this version, so it’s going to
show up in /var/db/pkg as apache-2.2.4_2. FreeBSD puts this port under
/usr/ports/www . The MASTER_SITES variable generally lists the Internet sites
where the software can be downloaded. Apache has many mirror sites, how-
ever, and many ports use that list of mirrors. Instead of updating dozens or
hundreds of ports every time Apache adds or removes a mirror site, the Ports
Collection defines an internal variable that contains a list of the mirror
sites, so updates can be made in only one place. DISTNAME contains the basic
name of the software’s distribution file as it is released by the vendor, and
DISTFILES shows the full name of that software. For example, the Apache
source files are all named httpd-<something> , and the actual file for a release
is named httpd-<version>.tar.bz2 .
Further down the Makefile you’ll find variables giving the maintainer’s
email address, a brief description of the port, and so on. Then you’ll find
entries like these:
.if defined(WITH_EXCEPTION_HOOK)
CONFIGURE_ARGS+= --enable-exception-hook
.endif
...
.if defined (WITH_LDAP) || defined (WITH_LDAP_MODULES)
USE_OPENLDAP= YES
CONFIGURE_ARGS+= --with-ldap \
--with-ldap-lib="${LOCALBASE}/lib" \
--with-ldap-include="${LOCALBASE}/include"
.endif
...

Making Your System Useful 337
The .if defined statements are build options for the port. The first line
in this example is a variable you need to set to get this functionality. I don’t
know what the exception hook is, and in all honesty I don’t really care. If
you’re intimate with Apache, however, you might care about this a great
deal. FreeBSD offers you a simple means to add this feature to your build.
Similarly, if you want LDAP support, define WITH_LDAP=YES on the command
line when you build Apache and, when you build the port, it will demand
OpenLDAP as a dependency.
Is this an annoyance? Yes. But the alternative is to muck through the
original software distribution and learn how that particular software’s author
wants these settings configured. True, experienced system administrators
probably know how to do this for their favorite software. But they don’t
know how to do it for all 17,000+ packages in the Ports Collection.
If you use subcommands of make install to build the port (for example,
make patch and then make install), you must include any options you want
with every make command. Otherwise, the port might not build correctly. For
example, if you wanted to build Apache with LDAP support, but wanted to
apply a custom patch before installing, run:
# make patch WITH_LDAP=YES
After applying your patch, run:
# make install WITH_LDAP=YES
Otherwise you would patch the software with the customization option
requiring LDAP, but you wouldn’t actually build it with LDAP support. Your
software would be internally inconsistent.
The hardest part of customizing the way your software builds is deciding
which options you’d like. Unfortunately, there’s no easy answer to this
question, so it’s best to check the software manual or website to help you
decide. More than once I’ve installed a piece of software, read the docu-
mentation, uninstalled the software, and reinstalled it again with the
correct options.
Uninstalling and Reinstalling
One nice thing about installing ports is that an installed port is treated just
like a package. You can uninstall a port with pkg_delete(1) and learn about it
with pkg_info(1). Since the port’s installation is recorded under /var/db/pkg,
you can also go through the contents file and investigate every file the port
includes.
You can also uninstall a port from the port directory. For example,
FreeBSD includes several different versions of the Apache web server. You
might need to evaluate several different versions and have to install and
uninstall each repeatedly. Running make deinstall in the port directory
erases the program from the main system.

338 Chapter 11
After uninstalling a port, the compiled program and source files still
live under the work subdirectory in the port. Running make reinstall will
reinstall the uninstalled program. You can uninstall and reinstall as many
times as you like.
Tracking Port Build Status
How does the Ports Collection keep track of what’s already been done? If you
can run make extract and then make install, how does FreeBSD know what it
has already finished? The Ports Collection uses hidden files to keep note of
what’s been done. You can see these by doing a “long list” of the port’s work
directory:
# cd /usr/ports/games/oneko/work
# ls -la
total 502
...
-rw-r--r-- 1 root wheel 0 Apr 22 14:59 .build_done.oneko._usr_X11R6
-rw-r--r-- 1 root wheel 0 Apr 22 14:59
.configure_done.oneko._usr_X11R6
-rw-r--r-- 1 root wheel 0 Apr 22 14:59 .extract_done.oneko._usr_X11R6
-rw-r--r-- 1 root wheel 0 Apr 22 14:59 .install_done.oneko._usr_X11R6
-rw-r--r-- 1 root wheel 0 Apr 22 14:59 .patch_done.oneko._usr_X11R6
...
The files whose names begin with a dot are hidden files that don’t show up
in a normal directory listing. The Ports Collection uses these files to keep
track of what stage the build process is in. Every port uses these files. See the
file .install_done.oneko._usr_X11R6 ? This means that the install process has
finished.
On more than one occasion, after multiple make install/deinstall cycles,
I’ve had a port refuse to reinstall itself. That’s generally caused by the hidden
file indicating that the install has finished. Remove that file, and the reinstall
can proceed.
Cleaning Up Ports
Ports can take up a lot of room. A software suite such as X.org can take up a
few hundred megabytes, while OpenOffice.org needs almost nine gigabytes
to build! The Ports Collection includes a method to remove preinstallation
files you’re no longer using.
Once you have your programs installed and configured as desired, you
really don’t need the copy of the source code or the intermediate files used to
build the software any longer. You can remove it with make clean. This erases
the work directory of the current port and all dependencies, so be sure you’re
happy with your new program before doing this. You can also clean a port
immediately upon install by running make install clean when you install it.

Making Your System Useful 339
You might also want to remove the original distfiles, stored in
/usr/ports/distfiles. The make distclean command removes the distfiles for
the current port and all dependencies.
To clean the entire ports tree, run make clean -DNOCLEANDEPENDS directly
under /usr/ports. This takes some time, however, and while there are faster
ways to remove every work directory in the ports tree, this one is directly
supported by the FreeBSD Project.
Building Packages
If you’re using ports, you can build your own packages to install on other
FreeBSD machines, which saves a lot of time and ensures that you have
identical software running on every machine. If you have several machines
running OOo, for example, and you want them to all have identical features,
you can build OOo once and then make a package out of it to install on all
the other machines.
The command to create a package is make package. This installs the
program on the local machine and creates a package in the port’s directory.
Simply copy this package to other systems and run pkg_add(1) to install it.
If you create the directory /usr/ports/packages, the Ports Collection will
create a packages tree in that location. Instead of placing the new package
in the port’s directory, the port will place the package in the appropriate
category under /usr/ports/packages.
Changing the Install Path
If you have dozens, or even hundreds, of FreeBSD systems, all with mostly
identical configurations, you might find the default port or package instal-
lation path of /usr/local problematic. In many large server farms, /usr/local is
reserved for programs that are unique to the individual machine, and other
software packages that are used by every system in the server farm are expected
to be installed elsewhere, such as /opt or /usr/pkg. Set this during the port
build with the PREFIX variable:
# make PREFIX=/usr/pkg install clean
The port installs all of its files under this directory. For example, programs
that normally go into /usr/local/bin end up in /usr/pkg/bin.
LOCAL PACKAGE REPOSITORIES
Remember the PACKAGESITE environment variable? Set that to a path on your local
anonymous FTP server (Chapter 17) or an NFS share (Chapter 8) and put your custom
packages there. You can then use pkg_add -r on your other machines, and they will
automatically grab packages from your local repository.

340 Chapter 11
Setting make Options Permanently
If you get sick and tired of typing the same options repeatedly when building
ports, you can list them in /etc/make.conf, as make(1) applies any options in
this file to your ports. If a variable doesn’t mean anything to the software,
having it set won’t hurt.
For example, suppose your standard database program is MySQL. You
want any software that can support MySQL to be built to work with it. Define
the variable WITH_MYSQL in /etc/make.conf:
WITH_MYSQL=YES
Now, any port you install that has optional MySQL support will auto-
matically configure itself appropriately.
Ports and Package Security
It’s hard to keep track of security for ports. Each software vendor has its own
process for handling security problems. An update to a port might mean that
there’s a security problem, or it might mean that there’s a newer version avail-
able. How do you know which ports can be insecure?
FreeBSD provides portaudit(1), a tool for comparing your installed
ports against a database of security vulnerabilities. If a security problem is
discovered in a port, the FreeBSD team updates the portaudit security data-
base to describe the problem. The next time you run portaudit(1), you’ll
be notified of the problem. Start by installing portaudit:
# cd /usr/ports/ports-mgmt/portaudit
# make all install clean
By default, portaudit(1) integrates itself with periodic(1) so that it runs
every day. During this run, it automatically downloads the latest vulnerability
database from http://www.freebsd.org and compares it with the list of ports on
LOCAL DISTFILE REPOSITORIES
If you have several machines that you maintain with ports, it’s best to create a local
distfile repository. You can download the distfiles from the Internet once on one
machine, and then other machines can access those files over the local LAN, making
builds faster and reducing external bandwidth use. Set the environment variable
MASTER_SITE_OVERRIDE to the location of your central distfile repository; now, when
you build a port, the system will check that location first. This could be a local anon-
ymous FTP server, or even a path to an NFS share.

Making Your System Useful 341
your system. The results appear in the daily periodic report mailed to root,
along with a link to a URL describing the problem and suggested fixes.
Here’s a sample message you might see:
Affected package: mozilla-1.7.13_2,2
Type of problem: mozilla -- multiple vulnerabilities.
Reference: <http://www.FreeBSD.org/ports/portaudit/e6296105-449b-11db-ba89-
000c6ec775d9.html>
Additionally, the Ports Collection runs portaudit(1) every time you
try to install a port. If the port has known security problems, it stops you.
If you really and truly want to install insecure software, override this with
make install DISABLE_VULNERABILITIES=YES to install the port.
Running portaudit(1) every night does not make your system secure.
A perfectly secure version of a server program configured incorrectly will be
just as insecure as the world’s best bank vault when you forget to close the
door and hang out a sign that says FREE MONEY. I encourage you to use a
program such as Nessus to check for security problems.
This chapter gets you up and running with FreeBSD software, but the next
chapter kicks software management up a notch.

12
ADVANCED SOFTWARE
MANAGEMENT
While the last chapter covered the simple
cases of installing and running software on
FreeBSD, FreeBSD also makes some difficult
things possible and offers opportunities for sys-
tem administrators to better meet the needs of the
users. Knowing how the system really works helps you
make better decisions. For example, while multiple processors, multicore
processors, and HyperThreading can all increase system performance, they
don’t always help as much as you might think. Knowing how different types
of multiprocessing affect different types of workloads tells you where you
can improve performance and where you cannot. Multiprocessing impacts
threading libraries and schedulers, so we’ll cover them as well.
For your programs to start at boot and stop cleanly at shutdown, you
must be able to create and edit proper startup and shutdown scripts. While
some programs stop nicely when you just kill the operating system under them,
others (for example, databases) demand a gentler shutdown. Starting and
stopping system services cleanly is an excellent habit to develop, so we’ll
learn more about the FreeBSD startup and shutdown scripts.
344 Chapter 12
Under normal circumstances, you’ll never need to know how FreeBSD’s
linking and shared library support works, but we’ll discuss them anyway. Why?
Because normal circumstances are, oddly, quite rare in the computer business.
Finally, FreeBSD can run software designed for other operating systems.
We’ll learn how to do this, focusing on the popular Linux compatibility
package that allows FreeBSD to use unmodified Linux software, as well as
on running software written for other hardware architectures.
Using Multiple Processors: SMP
Computers with multiple CPUs have been around for decades, but now they
are exploding in popularity. FreeBSD has supported the use of multiple CPUs
since version 3, but multiprocessor and multicore hardware is just becoming
common. Modern operating systems use symmetric multiprocessing (SMP), or
multiple identical processors. (Yes, some multiple processor systems don’t
require identical CPUs. You probably have one in your computer right now,
as many video cards have a small processor specifically for graphics tasks.)
SMP systems have many advantages over single processors, and it’s not
just the obvious “more power!” If you think about it at the microscopic level,
in very small timeframes, a CPU can only do one thing at a time. Every pro-
cess on the computer competes for processor time. If the CPU is performing
a database query, it isn’t accepting the packet that the Ethernet card is trying
to deliver. Every fraction of a second the CPU does a context switch and works
on some other request, as directed by the kernel. This happens so often and
so quickly that the computer appears to be doing many things at once—much
as a television picture appears to be moving when it’s really just showing
individual pictures one after the other very quickly.
I have WindowMaker providing a desktop, Firefox displaying ancient
submissions to a mailing list, and OpenOffice.org accepting my typing. Net-
work interrupts are arriving; the screen is displaying text; the MP3 player is
streaming Blue Oyster Cult to my earphones—all apparently seamlessly
multitasking. Actually, this only appears simultaneous to my feeble brain.
In reality, the computer merely switches from one task to another very quickly.
One millisecond, it’s sending another sliver of sound to my headphones,
and the next, it’s updating text on the screen.
With multiple processors, your computer really can perform multiple
operations simultaneously. This is very useful—but system complexity
skyrockets.
Kernel Assumptions
To understand SMP and the problems associated with it, we must delve into
the kernel. All operating systems face the same challenges when supporting
SMP, and the theory here is applicable across a wide variety of platforms.
FreeBSD is somewhat different from many other operating systems, however,
because it has 30 years of Unix heritage to deal with, and its development
model doesn’t allow the work to stop for months at a time. What follows is a
gross simplification. Kernel design is a tricky subject, and it’s almost impossible
for any description to do it justice. Nevertheless, here’s a rough stab at it.
Advanced Software Management 345
FreeBSD divides CPU utilization into time slices. A time slice is the length
of time one CPU spends doing one task. One process can use the CPU either
for a full time slice or until there is no more work for it to do, at which point
the next task may run. The kernel uses a priority-based system to allocate time
slices and to determine which programs may run in which time slices. If a
process is running, but a higher-priority process presents itself, the kernel
allows the first process to be interrupted, or preempted. This is commonly
referred to as preemptive multitasking.
Although the kernel is running, it isn’t a process. Any process has certain
data structures set up by the kernel, and the kernel manipulates those data
structures as it sees fit. You can consider the kernel a special sort of process,
one that behaves very differently from all other processes. It cannot be inter-
rupted by other programs—you cannot type pkill kernel and reboot the
system.
The kernel has special problems, not faced by other parts of the system.
Imagine that you have a program sending data over the network. The kernel
accepts data from the program and places it in a chunk of memory to be
handed to the network card. If the computer can only do one thing at a time,
nothing happens to that piece of memory or that network card until the kernel
gets back to that task. If you have multiple processors, however, the computer
can perform multiple tasks simultaneously. What if two different CPUs, both
working on kernel tasks, direct your network card to perform different actions
at the same time? The network card behaves much as you do when you have
your boss screaming in one ear and your mom in the other; nothing you do
can satisfy them. What if one CPU allocates memory for a network task, while
the other CPU allocates that same memory for a filesystem task? The kernel
becomes confused, and the results will not please you.
Older FreeBSD and Unix kernels declare that the kernel is nonpreemptive
and cannot be interrupted. This simplifies kernel management because every-
thing becomes completely deterministic: When a part of the kernel allocates
memory, it can count on that memory being unchanged when it executes the
next instruction. No other part of the kernel will alter that chunk of memory.
When the computer could only do one thing at a time, this was a safe assump-
tion. Start doing many things at once, however, and this assumption blows
apart.
SMP: The First Try
The first implementation of SMP support in FreeBSD was very simple minded.
Processes were scattered between the CPUs, achieving a rough balance, and
there was a lock on the kernel. Before a CPU would try to run the kernel, it
would check to see if the lock was available. If the lock was free, the CPU held
the lock and ran the kernel. If the lock was not free, the CPU knew that the
kernel was being run elsewhere and went on to handle something else. This
lock was called the Big Giant Lock (BGL), or later just Giant. Under this system,
the kernel could know that data would not change from under it. Essentially,
Giant guaranteed that the kernel would only run on one CPU, just as it
always had.
346 Chapter 12
This strategy worked kind of adequately for two CPUs. You could run a
medium-level database and a web server on a twin-CPU machine and feel
confident that the CPU wouldn’t be your bottleneck. If one CPU was busy
serving web pages, the other would be free to answer database queries. But if
you had an eight-CPU machine, you were in trouble; the system would spend
a lot of time just waiting for Giant to become available!
This simplistic SMP technique is neither efficient nor scalable. The stand-
ard textbooks on SMP rarely mention this method because it’s so clunky. Some
other SMP-handling methods are worse, however. For example, the default
setup of a twin-processor Windows 2000 system dedicates one processor to the
user interface and the other to everything else. This technique also rarely
appears in the textbooks, although it does help your mouse appear more
responsive.
Today’s SMP
A new SMP method was implemented in FreeBSD 5.0 and is being continually
refined even today. FreeBSD has fragmented Giant into many smaller locks,
and now every part of the kernel uses the smallest possible lock to perform its
tasks.
Initially, the locks were implemented on core kernel infrastructure, such
as the scheduler (the part of the kernel that says which tasks may have which
time slices), the network stack, the disk I/O stack, and so on. This immediately
improved performance, because while one CPU was scheduling tasks the other
could be processing network traffic. Then, locks were pushed lower into the
various kernel components. Each part of the network stack developed its own
lock, then each part of the I/O subsystem, and so on—allowing the kernel to
do multiple things simultaneously. These separate kernel subprocesses are
called threads. Each type of locking has its own requirements. You’ll see refer-
ences to many different locks such as mutexes, sx locks, rw locks, spinlocks,
and semaphores. Each has its own benefits and drawbacks, and each must be
carefully applied within the kernel.
Fine-grained locking is a lot harder than it sounds. Lock too finely, and
the kernel spends more time processing locks than pushing data. Lock too
coarsely, and the system wastes time waiting for locks to become available.
Locking sufficient for a 2-processor system stalls and chokes a 32-processor
system. Lock adjustment and tuning has taken years, is still ongoing, and will
continue throughout the life of FreeBSD.
SMP Problems: Deadlocks, Deadly Embraces, and Lock Order Reversals
All of these kernel locks have complicated rules for their use, and they interact
with each other in myriad ways. The rules protect against unexpected lock
interactions. Suppose that kernel thread A needs resources Y and Z, kernel
thread B also needs Y and Z, but B needs Z before it needs Y. If A locks Y
while B locks Z, then A winds up waiting for Z while B waits for Y. Neither
thread can proceed until the missing resource is freed. This deadly embrace
will destabilize the system, probably bringing it down. Proper locking avoids
this problem, among others.
Advanced Software Management 347
You might see a console message warning of a lock order reversal, meaning
that locks have been applied out of order. While this kernel notice is not always
an omen of impending doom, it’s important to pay attention.
The WITNESS kernel option specifically watches for locking order and
lock ordering violations. WITNESS is enabled by default on FreeBSD-current
(see Chapter 13), and if you report a problem with your system, the develop-
ment team might ask you to enable it. WITNESS makes the kernel inspect
every action it takes for locking order violations, which reduces system per-
formance. Running WITNESS, reading the messages, and acting on them is an
excellent way to help improve FreeBSD, however.
Handling Lock Order Reversals
When you get one of these Lock Order Reversal messages, copy the LOR
message in its entirety. In addition to appearing on the console, such
messages are logged to /var/log/messages for your convenience. Once you
have the lock order message, check the Lock Order Reversal status page,
currently at http://sources.zabbadoz.net/freebsd/lor.html. This site contains a list
of all previously reported lock order reversals. Compare the first few lines
of your LOR message to the LOR messages on the site. If your LOR appears
on this page, the associated comment will give you some insight as to how to
proceed. Many of the LORs on this page are known to be harmless, while
some are patched in a later version of FreeBSD.
If your LOR does not appear on the Lock Order Reversal site, check the
FreeBSD mailing list archives for the first couple of lines of your LOR. If you
find your Lock Order Reversal on the mailing lists, read the message and take
the recommended action. There’s no need to post a “me too” message on the
mailing list unless a developer specifically asked for notification of further
LORs of that type.
If you have a new Lock Order Reversal, congratulations! Discovering a new
LOR is not as satisfying as discovering a new insect species—you don’t get to
name your LOR, for one thing—but it does help the FreeBSD Project. File a
problem report for your new Lock Order Reversal, as discussed in Chapter 21.
Provide full details on your system, especially the work being performed at
the time the Lock Order Reversal appeared.
Processors and SMP
You’ll see three different types of multiprocessor systems: multiple processors,
multiple cores, and HyperThreading. You need to understand the differences
among them, as the different processor types have a direct impact on system
and application behavior.
Multiple processors are physically separate chips on the mainboard. They
are what we traditionally think of as processors, with the ability to cooperate
with one another. The processors are all independent, with their own pro-
cessor features (such as cache, registers, and so on), each controlling its own
hardware.
348 Chapter 12
Multicore processors have multiple computing units inside a single
chip. They are growing in popularity, as multicore systems use less power
and generate less heat than comparable multiple-processor systems. The
cores might share onboard features, such as cache and registers. Each core
might be slower than a single standalone processor, but the multiple cores
provide additional parallelism. Multicore CPUs have better performance on
threaded applications or on systems with many processes running, but an
application that runs as a single monolithic process would do better on a
faster single-core CPU. A machine, especially a server, can have multiple
multicore processors.
HyperThreading is a proprietary Intel technology that allows a single-
core processor to split itself into multiple virtual processors. The virtual
processor is not a full-fledged CPU, however; for example, it’s only available
when the first CPU is waiting for something. Under a strict definition of SMP,
this qualifies as symmetric multiprocessing, as all of the CPUs are treated equally.
This virtual processor isn’t as powerful as the real processor, so it’s not really
equal. While someone could write a time slice scheduler that would take
advantage of this, it’s not very useful for the vast majority of workloads.
No Unix-like operating system has a HyperThreading-smart scheduler. Also,
HyperThreading presents a variety of security problems. A task running on
one virtual processor can capture data—such as cryptographic keys—from a
task running on another virtual processor. For this reason, FreeBSD disables
HyperThreading by default. If you want to try HyperThreading on an Intel
CPU, set the sysctl machdep.hyperthreading_allowed to 1 and evaluate your
application performance. If you have a system where users do not actually log
in, then the security issues are probably not important in your case. (If you
provide jailed virtual machines, then you do have users logging in.)
Using SMP
Remember that multiple processors don’t necessarily make the system faster.
One processor can handle a certain number of operations per second. A
second processor just means that the computer can handle twice as many
operations per second, but those operations are not necessarily any faster.
Think of the number of CPUs as the lanes on a road. If you have one
lane, you can move one car at a time past any one spot. If you have four
lanes, you can move four cars past that spot. Although the four-lane road
won’t allow those cars to reach their destination more quickly, there’ll be a
lot more of them arriving at any one time. If you think this doesn’t make a
difference, contemplate what would happen if someone replaced your local
freeway with a one-lane road. CPU bandwidth is important.
While one CPU can only do one thing at a time, one process can only
run on one CPU at a time. Most processes cannot perform work on multiple
processors simultaneously. Threaded programs are an exception, as we’ll see
later in this chapter. Some programs work around this limitation by running
multiple processes simultaneously and letting the operating system scatter
them as needed between processors. Apache did this for many years. Threaded
programs are specifically designed to work with multiple processors and don’t

Advanced Software Management 349
have to take such actions. Many threaded programs simply create a whole
bunch of threads to process data and scatter those threads across CPUs, which
is a simple and effective way to handle parallelism. Other programs do not
handle multiple CPUs at all. If you find that one of your CPUs is 100 percent
busy while the other is mostly idle, you’re running a program that does not
handle multiple CPUs in any way. We will dive into performance issues in
Chapter 19.
SMP and make(1)
The make(1) program, which is used to build software, can start multiple
processes. If your program is cleanly written, you can use multiple processes
to build it. This doesn’t help for small programs, but when you’re building a
large program such as FreeBSD itself (see Chapter 13) or OpenOffice.org,
using multiple processors can really accelerate the work. Use make(1)’s -j flag
to tell the system how many processes to start simultaneously. A good choice
is the number of processors or cores in the system plus one. For example, on
a dual-processor system with two cores on each processor, I would run five
processes to build a program.
# make -j5 all install clean
Not all programs can handle being built with the -j flag. If you have
problems with a build, stop using -j and try again.
Chapter 19 presents various ways to evaluate and measure performance.
Schedulers
The scheduler is the portion of the kernel that decides which tasks and pro-
cesses may run on the CPUs, and in which order. This is a critical system
component that largely determines system performance. A scheduler that
chooses well makes the system perform smoothly; a scheduler that chooses
badly creates slowness despite idle CPUs. The scheduler cannot arbitrarily
assign priorities: Telling the database server that it can have every available
time slot at the expense of disk I/O will not make the database run faster
when it is waiting for a disk write to complete. Schedulers must account for
different types of processors, memory, workloads, and other variables. While
it might seem simple to write a scheduler for a particular type of work, creating
a scheduler that works equally well on a database server, web server, desktop,
and laptop is hard.
FreeBSD has two main schedulers, 4BSD and ULE. The 4BSD scheduler
is the historical scheduler inherited from 4.4 BSD. Over the last few decades
it has been well tested under a vast array of workloads. The scheduler is show-
ing its age, however, and doesn’t work all that well on four-CPU and larger
systems. The 4BSD scheduler is the default in FreeBSD 7.0 and appears in
kernel configuration as the option SCHED_4BSD.
The ULE scheduler was written specifically for multiprocessor systems,
but it also runs perfectly fine on systems with only a single processor. ULE
has demonstrated impressive performance improvements on multiprocessor

350 Chapter 12
systems, but doesn’t have 4BSD’s long history of testing and debugging. While
ULE will probably become the default scheduler at some point in the future,
it isn’t as of this writing. Activate ULE with the SCHED_ULE kernel option.
Generally speaking, the ULE scheduler provides better performance on
SMP systems with complicated applications, such as database servers. The
FreeBSD team uses MySQL and PostgreSQL benchmarks in particular as test
loads, and expects the results to equal or exceed the same test loads on the
same hardware running current versions of Linux.1
Startup and Shutdown Scripts
The startup and shutdown scripts are known as rc scripts after /etc/rc, the script
that manages the multiuser boot and shutdown process. While the main rc
scripts are in /etc/rc.d, scripts in other locations manage add-on software.
Ports and packages install startup scripts, but if you install your own software,
you’ll need to create your own rc script. If you’ve never used shell scripts
before, read carefully. Shell scripting is not hard, and the best way to learn
is by reading examples and making your own variations on those examples.
Additionally, to change an existing package’s startup or shutdown process,
you must understand how the startup scripts function.
During boot and shutdown, FreeBSD checks /usr/local/etc/rc.d for
additional shell scripts to be integrated into the startup/shutdown process.
(You can define additional directories with the local_startup rc.conf variable,
but for now we’ll assume that you have only the default directory.) The startup
process specifically looks for executable shell scripts and assumes that any
script it finds is a startup script. It executes that script with an argument of
start. During shutdown, FreeBSD runs those same commands with an argu-
ment of stop. The scripts are expected to read those arguments and take
appropriate actions.
rc Script Ordering
The most interesting thing about rc scripts is that they are self-ordering.
Instead of encoding the startup order in the filenames, as many other Unix-
like operating systems do, each script identifies what resources it needs before
it can start. The rc system uses that information to sort the scripts into
1 The FreeBSD and Linux kernel teams compete politely in this space, each trying to outdo the
other. The end result is that both operating systems improve. At times, FreeBSD is faster; at other
times Linux is faster. Both systems become better as a result. The FreeBSD performance team
just makes sure that we spend more time in the lead.
WHICH SCHEDULER SHOULD YOU USE?
I recommend trying ULE on all systems. Should you discover that your system behaves
badly with ULE, report the problem and, if necessary, fall back to the 4BSD scheduler.
A kernel can only use one scheduler at a time.

Advanced Software Management 351
order. This is performed by rcorder(8) at boot and at shutdown, but you can
do this by hand at any time to see how it works. Just give rcorder the paths to
your startup scripts as arguments.
# rcorder /etc/rc.d/* /usr/local/etc/rc.d/*
rcorder: Circular dependency on provision `mountcritremote' in file `archdep'.
rcorder: requirement `usbd' in file `/usr/local/etc/rc.d/hald' has no
providers.
dumpon
initrandom
geli
gbde
encswap
...
rcorder(8) has sorted all the scripts in /etc/rc.d and /usr/local/etc/rc.d into
the order used at system boot. First, we see warnings: Some scripts have circu-
lar dependencies. These conflicts are not necessarily bad, because not all
scripts run on every system. In this example, the script mountcritremote wants
to run after the script archdep but the archdep script in turn must run after
mountcritremote. The conflict can’t be too bad, because my system still boots.
This system has no critical remote filesystems, so the mountcritremote script
doesn’t actually do anything, making the error meaningless. Similarly, the hald
script must run after the nonexistent usbd script. FreeBSD 7.0 doesn’t have a
usbd(8) daemon, but older versions of FreeBSD supported by the ports tree
do. The rc system is intelligent enough to skip over these annoyances.
The rc scripts sort themselves into order based upon markers within the
scripts themselves.
A Typical rc Script
The rc system undergoes constant slow evolution. Before writing your own
script, take a look at one of the simpler scripts in /etc/rc.d to confirm that
what I describe is still the standard. While you might see minor changes, the
script should be very similar to this example:
#!/bin/sh
# PROVIDE: rpcbind
# REQUIRE: NETWORKING ntpdate syslogd named
. /etc/rc.subr
name="rpcbind"
rcvar='set_rcvar'
command="/usr/sbin/${name}"
load_rc_config $name
run_rc_command "$1"

352 Chapter 12
The PROVIDE label tells rcorder(8) the official name of this script. If
another rc script needs rpcbind(8) to be running before it runs, it lists this as
a dependency. Similarly, the REQUIRE label lists other scripts that must run
before this script runs. This script must run after the scripts NETWORKING,
ntpdate, syslogd, and named.
To use the self-ordering startup, we must include the rc script infra-
structure from /etc/rc.subr . Your rc script must define the name of the
command as it’s listed in /etc/rc.conf.
The rcvar statement is a leftover from the days when FreeBSD and
NetBSD shared rc scripts, but the rc system expects to find it. You also need
to identify exactly which command you want to run —after all, it’s quite
possible to have multiple commands of the same name on your system, just
in different directories. Next, load the configuration for this command from
/etc/rc.conf . Finally, you can actually run your command .
While this might look intimidating, it’s not really that hard in practice.
Start your customized rc script by copying an existing one. Set the command
name to that of your command and change the path appropriately. Decide
what the script must have run before it: Do you need the network to be
running? Do you need particular daemons to be started already, or do you
need to run your program before certain daemons? If you really don’t know,
have your script run at the very end by using a REQUIRE statement with the
name of the last script run on your system. By looking through other rc scripts
that provide similar functions, you’ll learn how to do almost anything in a
startup script.
With this simple script, you can enable, disable, and configure your
program by adding information to /etc/rc.conf. For example, if your custom
daemon is named tracker, the startup script will look for variables tracker_enable
and tracker_flags in /etc/rc.conf and use them each and every time you run
the startup script.
Special rc Script Providers
The rc system has a few special providers that define major points in the boot
process. Use these to make writing rc scripts easier.
The FILESYSTEMS provider guarantees you that all local filesystems are
mounted as defined in /etc/fstab.
The NETWORKING provider appears after all network functions are
configured. This includes setting IP addresses on network interfaces, PF
configuration, and so on.
The SERVERS provider means that the system has enough basic function-
ality to support basic servers such as named(8) and the NFS support programs.
Remote filesystems are not mounted yet.
The DAEMON provider ensures all local and remote filesystems are
mounted, including NFS and CIFS, and that more advanced network func-
tions such as DNS are operational.
At LOGIN, all network system services are running and FreeBSD is begin-
ning to start up services to support logins via the console, FTP daemons, SSH,
and suchforth.

Advanced Software Management 353
By using one of these providers in a REQUIRE statement in your custom rc
script, you can specify when, generally, you want your custom program to run
without going too far into nitty-gritty details.
Using Scripts to Manage Running Programs
People who have done shell scripting probably realize that the script above
doesn’t actually include any cases for starting, stopping, querying, or restart-
ing the program. rcNG provides all of that for you. You want to restart your
custom daemon? Just run:
# /usr/local/etc/rc.d/customscript restart
and rcNG handles all of the tedious details.
Readers with some Unix experience probably think, “Hey, why bother
using the script when I can just use the command line?” If you’re familiar
with a program, you probably know the exact command line needed to start
and stop it. This is true, but it’s not best practice. On a production server, the
system administrator must start and stop each program exactly the same way
every single time. By using the rcNG infrastructure, you know that the way
the program starts at any random time is exactly how the program starts at
system boot. Similarly, you want the program to stop exactly the same way
every time, including system shutdown. While there’s a certain macho pride
in learning all the command-line arguments to every server daemon on your
system, accepting the necessity of a consistent startup and shutdown and using
the system tools to provide it each and every time is part of the difference
between Unix experience and Unix expertise.
Vendor Startup/Shutdown Scripts
Perhaps you’re installing a complicated piece of software, and the vendor
doesn’t support FreeBSD’s rc system. This isn’t a problem. Most vendor-
supplied scripts expect to get a single argument, such as start or stop.
Remember that at boot time FreeBSD runs each rc script with an argument
of start, and at system shutdown it runs the scripts with an argument of stop.
By adding PROVIDE and REQUIRE statements as comments to this vendor script
and confirming that it accepts those arguments, you can make the script run
at the proper time in the startup and shutdown process. Use of the rc system
features in management scripts is not mandatory.
Debugging Custom rc Scripts
Local scripts, such as those installed by the Ports Collection, are run by
/etc/rc.d/localpkg. If your custom script is causing problems, you might try
running the localpkg script with debugging to see how your script is inter-
acting with the rc system. The best way to do this is to use debugging.
# /bin/sh -x /etc/rc.d/localpkg start
354 Chapter 12
This attempts to start every local daemon on your server again, which
might not be desirable on a production system. Try it on a test system first.
Also, remember that the -x debugging flag is not passed on to the child scripts;
you’re debugging the system startup script /etc/rc.d/localpkg itself, not the
local scripts.
Managing Shared Libraries
A shared library is a chunk of compiled code that provides common func-
tions to other compiled code. Shared libraries are designed to be reused by
as many different programs as possible. For example, many programs must
generate hashes, or cryptographic checksums, on pieces of data. If every pro-
gram had to include its own hashing code, programs would be harder to
write and more unpleasant to maintain. What’s more, programs would have
interoperability problems if they implemented hashes slightly differently,
and program authors would have to learn an awful lot about hashes to use
them. By using a shared library (in this example, libcrypt), the program
can access hash generation functions without any compatibility and main-
tenance problems. This reduces the average program size, both on disk
and in memory, at a cost in complexity.
Shared Library Versions and Files
Shared libraries have a human-friendly name, a version number, and an
associated file. The human-friendly name is usually (but not always) similar
to the associated file. For example, version 2 of the shared library called
libpthread is in the file /lib/libpthread.so.2. On the other hand, version 10 of
the lightweight resolver library lwres is in the file /usr/lib/liblwres.so.10.
Historically, when changes to the library made it incompatible with
earlier versions of the library, the version number was incremented. For
example, libpthread.so.2 became libpthread.so.3. The FreeBSD team does
not bump these versions except at the beginning of a release cycle (see
Chapter 13). Each library also has a symlink for the library name without a
version, pointing to the latest version of the library. For example, you’ll find
that /usr/lib/libwres.so is actually a symlink pointing to /usr/lib/libwres.so.10.
This makes compiling software much easier, as the software only has to look
for the general library file rather than a specific version of that library.
FreeBSD 7 adds symbol versioning, which lets shared libraries support
multiple programming interfaces. With symbol versioning, a shared library
provides every program with the version of the library the program requires.
If you have a program that requires version 2 of a library, version 3 will
support the functions just as well.
Just because FreeBSD supports symbol versioning does not mean that all
the software in the Ports Collection supports it. You must be alert for library
version problems.

Advanced Software Management 355
Attaching Shared Libraries to Programs
So, how does a program get the shared libraries it needs? FreeBSD uses
ldconfig(8) and rtld(1) to provide shared libraries as needed; there are also
a few human-friendly tools for you to adjust and manage shared library
handling.
rtld(1) is perhaps the simplest program to understand. Whenever a
program starts, rtld(8) checks to see what shared libraries the program
needs. rtld(8) searches the library directories to see if those libraries are
available, and then links the libraries with the program so everything works.
You can’t do very much at all with rtld(1), but it provides the vital glue that
holds shared libraries together. Every modern program uses the shared library
ld-elf.so that provides this for ELF binaries. (ELF is the binary format used
on modern FreeBSD systems, as we’ll see later in this chapter.) This func-
tionality is so vital to system function that when you upgrade FreeBSD, the
upgrade process retains the previous version of this shared library just in
case it goes bad.
The Library Directory List: ldconfig(8)
Instead of searching the entire hard drive for anything that looks like a
shared library every time any dynamically linked program is run, the system
maintains a list of shared library directories with ldconfig(8). (Older versions
of FreeBSD built a cache of actual libraries on a system, but modern versions
just keep a list of directories to check for shared libraries.) If a program
cannot find shared libraries that you know are on your system, this means
ldconfig(8) doesn’t know about the directory where those shared libraries
live.2 To see the libraries currently found by ldconfig(8), run ldconfig -r.
# ldconfig -r
/var/run/ld-elf.so.hints:
search directories: /lib:/usr/lib:/usr/lib/compat:/usr/local/lib:/usr/
local/lib/nss
0:-lcrypt.3 => /lib/libcrypt.so.3
1:-lkvm.3 => /lib/libkvm.so.3
2:-lm.4 => /lib/libm.so.4
3:-lmd.3 => /lib/libmd.so.3
...
With the -r flag, ldconfig(8) lists every shared library in the shared
library directories. We first see the list of directories searched, then the
individual libraries in those directories. On my laptop, this list includes
433 shared libraries.
If a program dies at startup with a complaint that it cannot find a
shared library, that library won’t be in this list. Your problem then amounts
to installing the desired library into a shared library directory, or adding the
2 Or, perhaps, the libraries you believe are on your system are not the same as the libraries that
actually are on your system. Never rule out your own failure until you conclusively identify the
problem!

356 Chapter 12
library directory to the list of directories searched. You could just copy every
shared library you need to /usr/lib, but this makes system management very
difficult—much like with a filing cabinet where everything is filed under
Pfor paper. Adding directories to the shared library list is a better idea in the
medium to long term.
Adding Library Directories to the Search List
If you’ve added a new directory of shared libraries, you must add it to the list
ldconfig(8) searches. Check these ldconfig(8) entries in /etc/defaults/rc.conf:
ldconfig_paths="/usr/lib/compat /usr/local/lib /usr/local/lib/compat/pkg"
ldconfig_local_dirs="/usr/local/libdata/ldconfig"
The ldconfig_paths variable lists common locations for libraries. While
out-of-the-box FreeBSD doesn’t have the directory /usr/local/lib, most systems
grow one shortly after install. Similarly, libraries for compatibility with older
versions of FreeBSD go in /usr/lib/compat. /usr/local/lib/compat/pkg is the
location for storing old versions of libraries installed by packages. ldconfig(8)
looks in /lib and /usr/lib by default, but the paths in this variable are common
locations for shared libraries.
Ports and packages use the ldconfig_local_dirs variable to get their
shared libraries into the search list without just dumping everything into
/usr/local/lib. Each package can install a file in one of these directories. The
file is named after the package and contains just a list of directories with the
libraries installed by the package. ldconfig checks these directories for files,
reads the paths in the files, and treats those as additional library paths. For
example, the port nss (/usr/ports/security/nss) installs shared libraries in
/usr/local/lib/nss. The port also installs a file /usr/local/libdata/ldconfig/nss,
containing only a single line with this path in it. The ldconfig startup script
adds the directories in these files to its list of places to check for shared
libraries.
/USR/LOCAL/LIB VS. PER-PORT LIBRARY
DIRECTORIES
Isn’t /usr/local/lib specifically for libraries installed by ports and packages? Why
not just put all your shared libraries into that directory? Most ports do exactly that,
but sometimes having a separate directory makes maintenance simpler. For example,
I have Python 2.4 installed on my laptop, and /usr/local/lib/python24 includes
587 files! Dumping all those into /usr/local/lib would overwhelm my non-Python
libraries and make it harder to find the files installed by ports with only one or two
shared libraries.
To get your directory of shared libraries into the search list, either add it to the
ldconfig_paths in /etc/rc.conf, or create a file listing your directory in /usr/local/
libdata/ldconfig. Either works. Once you add the directory, the libraries in that
directory are immediately available.

Advanced Software Management 357
ldconfig(8) and Weird Libraries
Shared libraries have a couple of edge cases that you should understand, and
many more that you really don’t have to worry about. These include libraries
for different binary types and libraries for other architectures.
FreeBSD supports two different formats of binaries, a.out and ELF.
System administrators don’t need to know the details of these binary types,
but you should know that ELF binaries are the modern standard and became
FreeBSD’s standard in version 3.0, back in 1998. Older versions of FreeBSD
used a.out. Programs compiled as one type cannot use shared libraries of the
other type. While a.out binaries have largely vanished, the cost of supporting
them is so low that this support has never been removed. ldconfig(8) main-
tains separate directory lists for a.out and ELF binaries, as you can see from
the output of /etc/rc.d/ldconfig. You’ll find separate configuration options for
ldconfig(8) with a.out libraries in rc.conf.
Another odd case is when you’re running 32-bit binaries on a 64-bit
FreeBSD install. This is most common when you’re running the amd64
install and want to use a program from an older version of FreeBSD. 64-bit
binaries cannot use 32-bit libraries, so ldconfig(8) keeps a separate directory
list for them. You’ll find options to configure those directories in rc.conf as
well. Don’t mix your 32-bit and 64-bit libraries!
LD_LIBRARY_PATH
While FreeBSD’s built-in shared library configuration system works well if
you’re the system administrator, it won’t work if you’re just a lowly user without
root access.3 Also, if you have your own personal shared libraries, you probably
don’t want them to be globally available. Sysadmins certainly won’t want to
take the risk of production programs linking against random user-owned
libraries! Here’s where LD_LIBRARY_PATH comes in.
Every time rtld(1) runs, it checks the environment variable LD_LIBRARY_PATH.
If this variable has directories in it, it checks these directories for shared
libraries. Any libraries in these directories are included as options for the
program. You can specify any number of directories in LD_LIBRARY_PATH. For
example, if I want to do some testing and use libraries in /home/mwlucas/lib
and /tmp/testlibs for my next run of a program, I would just set the variable
like this:
# setenv LD_LIBRARY_PATH /home/mwlucas/lib:/tmp/testlibs
You can set this automatically at login by entering the proper command
in .cshrc or .login.
3 While most readers of this book will be sysadmins, you can tell your users to buy this book and
read this section. They won’t, but maybe they’ll shut up and leave you alone.

358 Chapter 12
What a Program Wants
Lastly, there’s the question of what libraries a program requires to run
correctly. Get this information with ldd(1). For example, to discover what
libraries Emacs needs, enter this command:
# ldd /usr/local/bin/emacs
/usr/local/bin/emacs:
libXaw3d.so.8 => /usr/local/lib/libXaw3d.so.8 (0x281bb000)
libXmu.so.6 => /usr/local/lib/libXmu.so.6 (0x2820e000)
libXt.so.6 => /usr/local/lib/libXt.so.6 (0x28222000)
libSM.so.6 => /usr/local/lib/libSM.so.6 (0x2826d000)
...
This output tells us the names of the shared libraries Emacs requires and
the locations of the files that contain those libraries. If your program cannot
find a necessary library, ldd(1) tells you so. The program itself announces
the name of the first missing shared library when you try to run it, but ldd(1)
gives you the complete list so that you can use a search engine to find all
missing libraries.
Between ldconfig(8) and ldd(1), you should be fully prepared to manage
shared libraries on your FreeBSD system.
Threads, Threads, and More Threads
One word you’ll hear in various contexts is thread. Some CPUs support
HyperThreading. Some processes have threads. FreeBSD has three different
threading libraries. Some parts of the kernel run as threads. My pants have
many many threads (although some have fewer than my wife thinks necessary
for those pants to be worn in public). What are all these threads, and what
do they mean?
In most contexts, a thread is a lightweight process. Remember, a process is
a task on the system, a running program. Processes have their own process ID
in the system and can be started, stopped, and generally managed by the user.
Threads are pieces of a process, but they are managed by the process and
cannot be directly addressed by the user. A process can only do one thing at
a time, but individual threads can act independently. If you have a multi-
processor system, one process can have threads running on multiple
processors simultaneously.
LD_LIBRARY_PATH AND SECURITY
Using LD_LIBRARY_PATH is not secure. If you point this variable to an overly acces-
sible directory, your program will link against whatever anyone put in there.
LD_LIBRARY_PATH overrides the shared library directory list, so if someone can put
arbitrary files in your library directory, they can take over your program. For this
reason, setuid and setgid programs ignore LD_LIBRARY_PATH.

Advanced Software Management 359
Any threaded program needs to use a threading library that tells the
application how to use threads on that operating system by interacting with
the kernel. Threading libraries implement threading in different ways, so
using particular libraries can impact application performance.
Similarly, a kernel thread is a subprocess within the kernel. FreeBSD has
kernel threads that handle I/O, network, and so on. Each thread has its own
functions, tasks, and locking. The threading within the kernel does not use
any userland libraries.
HyperThreading is a marketing term and is not related to system threads.
While you need to understand what HyperThreading is and how it impacts
your system (as we discussed in the last section), it’s not really part of
threading.
Userland Threading Libraries
FreeBSD supports three different threading libraries: libc_r, libkse, and libthr.
The historical threading library, libc_r, implements threads entirely in
userland. A process’s threads are emulated within a single process. There’s
no scalability, nor any advantage from multiple processors. libc_r is largely
unsupported, performs poorly, and is also the oldest FreeBSD threading
library. FreeBSD keeps libc_r in the source tree, but no longer installs it by
default. Using libc_r is not recommended, but if under some bizarre circum-
stances you must, you can install it from the sources:
# cd /usr/src/lib/libc_r
# make obj all install clean
The default threading library in FreeBSD 6.0 was libkse, an ambitious
attempt to provide M:N threads. M:N threads mean that the system has M
processors and a pool of N userland threads at any one time. This is theo-
retically the most powerful threading model, but it is very complicated and
extremely difficult to implement correctly. Very few operating systems support
M:N threads, and while FreeBSD’s implementation worked, it did not perform
optimally. libkse still ships with FreeBSD, but is no longer the default.
The libthr library is FreeBSD’s new default threading library. libthr uses
a simpler threading model than libkse, but provides much higher perform-
ance, in part due to its simplicity.
You’ll also see references to the threading library libpthread(3). The
pthread part is shorthand for POSIX threads, so this can be any threading
library that complies with the POSIX specification. On FreeBSD, libpthread
is just an alias for the system’s default threading library.
Most of the time, the default library works perfectly. It’s possible that
running a particular program will expose a bug in either the program or in
the threading library. Changing threading libraries can help narrow down the
bug. Also, a program may perform better with a nonstandard thread library.
You can make a particular program use a threading library different from
what the rest of the system uses by remapping shared libraries.

360 Chapter 12
Remapping Shared Libraries
Occasionally, you’ll find a piece of software that you want to run with par-
ticular shared libraries not used by the rest of the system. For example,
FreeBSD’s standard C library is libc. You could have a second copy of libc
with special functions provided just for a particular program, and you can
make only that program use the special libc while using the standard libc
for everything else. FreeBSD allows you to change any shared library any
application gets. This sounds weird, but it is terribly useful in all sorts of
edge cases. rtld(1) can lie to client programs, when /etc/libmap.conf tells it to.
For example, suppose that your database server has better performance
with a particular threading library that’s not your default. ldd(1) might tell
you that the program expects to use the standard shared library libpthread
(aka libthr), but you might decide to try the M:N libkse threading library
instead. You don’t want to change the threading library used by the rest of
the system, only the threading library used by that one program. When the
program says, “I need libpthread,” you want rtld(1) to say, “Here you go,”
and attach it to libkse instead. You can configure this for the whole system,
for individual program names, or for the program at a specific full path.
/etc/libmap.conf has two columns. The first column is the name of the
shared library the program is requesting, the second is the shared library to
be provided instead. All changes take place the next time the program is exe-
cuted; no reboot or daemon restart is required. For example, here we tell the
system, whenever any program requests libpthread, to offer it libkse instead.
These global overrides must appear first in libmap.conf :
libpthread.so.2 libkse.so.2
libpthread.so libkse.so
“May I have libpthread.so.2?” “Certainly, here’s libkse.so.2.”
Globally remapping libraries is a rather bold step that might get you
talked about by other sysadmins, but remapping libraries on a program-by-
program basis is much less ambitious and more likely to solve more problems
than it creates. Simply specify the desired program in brackets before the
remapping statements. If you specify the program by its full path, the remap
will only work if you call the program by its full path. If you give only the name,
the remap will work whenever you run any program of that name. For example,
here we remap csup(8) so that it uses libkse instead of libpthread when called
by its full path:
[/usr/bin/csup]
libpthread.so.2 libkse.so.2
libpthread.so libkse.so
How can you prove this worked? Well, check ldd(1):
# ldd /usr/bin/csup
/usr/bin/csup:
libcrypto.so.5 => /lib/libcrypto.so.5 (0x2808f000)
libz.so.3 => /lib/libz.so.3 (0x281b8000)

Advanced Software Management 361
libpthread.so.2 => /usr/lib/libkse.so.2 (0x281c9000)
libc.so.7 => /lib/libc.so.7 (0x281db000)
You can see that when /usr/bin/csup requests libpthread.so.2 , rtld(1)
attaches it to libkse.so.2 instead. We specified the full path to the csup
binary, however, so we need to call the program by its full path. Try to use
ldd on csup without calling it by its full path:
# cd /usr/bin
# ldd csup
csup:
libcrypto.so.5 => /lib/libcrypto.so.5 (0x2808f000)
libz.so.3 => /lib/libz.so.3 (0x281b8000)
libpthread.so.2 => /lib/libpthread.so.2 (0x281c9000)
libc.so.7 => /lib/libc.so.7 (0x281ef000)
By going to /usr/bin and running ldd directly on csup without having to
specify the full path, rtld doesn’t see the full path to the csup(1) binary.
/etc/libmap.conf says to only use libthr for the full path of /usr/bin/csup, so when
plain naked csup requests libpthread.so.2, it is offered libpthread.so.2.
If you want to have a program use the alternate library no matter if it’s
called by full path or base name, just give the program name in brackets rather
than the full name:
[csup]
libpthread.so.2 libkse.so.2
libpthread.so libkse.so
Similarly, you can choose an alternate library for all of the programs in
a directory by listing the directory name followed by a trailing slash. In this
example, we force all programs in a directory to use an alternate library:
[/home/oracle/bin/]
libpthread.so.2 libkse.so.2
libpthread.so libkse.so
Using libmap.conf lets you arbitrarily remap shared libraries. While it’s
most commonly used for threading libraries (and occasionally for Linux
mode programs), you can inflict whatever libraries you like on your programs.
You can also use LD_LIBRARY_PATH to adjust libraries, of course, but that only
affects users who have that variable set.
Running Software from the Wrong OS
Traditional software is written for a particular OS and only runs on that OS.
Many people built healthy businesses changing software so that it would run
on another system, a process called porting. As an administrator, you have a
few different ways to use software written for a platform other than FreeBSD.
The most effective is to recompile the source code to run natively on FreeBSD.
362 Chapter 12
If this isn’t possible, you can run nonnative software under an emulator such
as Wine, or by reimplementing the application binary interface (ABI) of the
software’s native platform.
Recompilation
Many pieces of software in the Ports Collection are actually ports of software
originally designed for other platforms. (That’s why it’s called the Ports
Collection.) Software written for Linux, Solaris, or other Unix-like operating
systems can frequently be recompiled from source code with little or no
modification and run flawlessly on FreeBSD. By simply taking the source
code and building it on a FreeBSD machine, you can run foreign software
natively on FreeBSD.
Recompiling works best when the platforms are similar. For example,
FreeBSD and Linux provide many similar system functions; both are built on
the standard C functions, both use similar tools, both use the GCC compiler,
and so on. Over the years, the various Unix-like operating systems have
diverged. Each version of Unix has implemented new features, new libraries,
and new functions, and if a piece of software requires those functions it
won’t build on other platforms. The POSIX standard was introduced, in
part, to alleviate this problem. POSIX defines the minimal acceptable Unix
and Unix-like operating systems. Software written using only POSIX-compliant
system calls and libraries should be immediately portable to any other POSIX-
compliant operating system, and most Unix vendors comply with POSIX.
The problem is ensuring that developers comply with POSIX. Many open
source developers care only about having their software run on their pre-
ferred platform. For example, much Linux-specific software out there is not
POSIX-compliant. And POSIX-only code does not take advantage of any
special features offered by the operating system.
For example, FreeBSD has the hyper-efficient data-reading system call
kqueue(2). Other Unix-like operating systems use select(2) and poll(2) instead.
The question application developers ask themselves is whether they should
use kqueue(2), which would make their software blindingly fast on FreeBSD
but useless everywhere else, or if they should use select(2) and poll(2) to
allow their software to work everywhere, albeit more slowly. The developer
can invest more time and support kqueue(2), select(2), and poll(2) equally,
but while this makes users happy it rather sucks from the developer’s point
of view.
FreeBSD takes a middle road. If a piece of software can be recompiled to
run properly on FreeBSD, the ports team generally makes it happen. If the
software needs minor patches, the ports team includes the patches with the
port and sends them to the software developer as well. Most software devel-
opers gladly accept patches that would allow them to support another oper-
ating system. Even though they might not have that OS available to test, or
they might not be familiar with the OS, a decent-looking patch from a
reputable source is usually accepted.
Advanced Software Management 363
Emulation
If software would require extensive redesign to work on FreeBSD, or if the
source code is simply unavailable, we can try emulation. An emulator translates
system and library calls for one operating system into the equivalent calls
provided by the local operating system, so programs running under the
emulator think that they’re running on their native system. Translating all
these calls creates additional system overhead, however, which impacts the
program’s speed and performance.
FreeBSD supports a wide variety of emulators, most of which are in the
Ports Collection under /usr/ports/emulators. In most cases, emulators are useful
for education or entertainment. If you have an old Commodore 64 game
that you’ve had an itch to play again, install /usr/ports/emulators/frodo. (Be
warned: Mounting that C64 floppy on a modern FreeBSD system will teach
you more about disks than man was meant to know.) There’s a Nintendo
GameCube emulator in /usr/ports/emulators/gcube, a PDP-11 emulator in
/usr/ports/emulators/sim, and so on. Emulators, though way cool, are not
really useful for servers, so we won’t cover them in any depth.
ABI Reimplementation
In addition to recompiling and emulating, the final option for running foreign
programs is the one FreeBSD is best known for: ABI (application binary interface)
reimplementation. The ABI is the part of the kernel that provides services to
programs, including everything from managing sound cards to reading files
to printing on the screen to starting other programs. As far as programs are
concerned, the ABI is the operating system. By completely implementing the
ABI of a different operating system on your native operating system and pro-
viding the userland libraries used by that operating system, you can run
nonnative programs as if they were on the native platform.
While ABI reimplementation is frequently referred to as emulation, it
isn’t. When implementing ABIs, FreeBSD is not emulating the system calls
but providing them for the application. No program runs to translate the
system calls to their FreeBSD equivalents, and there’s no effort to translate
userland libraries into FreeBSD ones. By the same token, it would be incorrect
to say, “FreeBSD implements Linux” or “FreeBSD implements Solaris.” When
this technique was created, there was no one word to describe it, and even
today there isn’t really a good description. You can say that FreeBSD imple-
ments the Linux system call interface and includes support for directing a
binary to the appropriate system call interface, but that’s quite a mouthful.
You’ll most often hear it referred to as a mode, as in “Linux mode” or “System
V mode.” By far, the best-supported mode is Linux mode.
The problem with ABI reimplementation is overlap. Many operating
systems include system calls with generic names, such as read, write, and so
on. FreeBSD’s read(2) system call behaves very different from Microsoft’s
read() system call. When a program uses the read call, how can FreeBSD

364 Chapter 12
know which version it wants? You can give your system calls different names,
but then you’re violating POSIX and confusing the program. FreeBSD works
around this by providing multiple ABIs and controlling which ABI a program
uses through branding.
Binary Branding
Operating systems generally have a system function that executes programs.
When the kernel sends a program to this execution engine, it runs the
program.
Decades ago, the BSD (Unix at the time) program execution system call
was changed to include a special check for programs that began with #!/bin/sh,
and to run them with the system shell instead of the execution engine. BSD
took this idea to its logical extreme: Its execution engine includes a list of
different binary types. Each program’s binary type directs it to the correct
ABI. Thus, a FreeBSD system has multiple ABIs, can keep them separate,
and can support programs from a variety of different operating systems.
The nifty thing about this system is that there’s minuscule overhead. As
FreeBSD must decide how to run the program anyway, why not have it decide
what ABI to use? After all, binaries for different operating systems all have
slightly different characteristics, which FreeBSD can use to identify them.
FreeBSD just makes this process transparent to the end user. A binary’s
identification is called its branding. FreeBSD binaries are branded FreeBSD,
while binaries from other operating systems are branded appropriately.
Supported ABIs
As a result of this ABI redirection, FreeBSD can run Linux and SVR4 binaries
as if they were compiled natively. Older versions of FreeBSD could also run
OSF/1 and SCO binaries, but the demand for these platforms has dramatically
decreased.4
SVR4, or System V Release 4, was the last major release of AT&T UNIX.
It appears as early versions of Solaris and SCO Unix. (Some SCO software is
reported to perform more quickly and reliably under FreeBSD’s SVR4 mode
than on actual SCO Unix.) Not much SVR4 software is still in use, but should
you need this capability it’s there.
Linux mode, also known as the Linuxulator, allows FreeBSD to run Linux
software. This ABI has been the most thoroughly tested because Linux’s source
code is available and its ABI is well documented. In fact, Linux mode works
so well that many programs in the Ports Collection rely on it. I use the Linux
versions of Macromedia Flash and Adobe Acrobat without trouble and have
even made commercial software, such as PGP Command Line, run in Linux
mode. We’ll focus on Linux mode, as it’s the most valuable for the average user.
4 OSF/1 is tied to defunct hardware (the awesome Alpha processor), while SCO Unix appears to
have died of shame.

Advanced Software Management 365
Foreign Software Libraries
While ABI reimplementation solves one major issue, programs require more
than just the ABI. Without shared libraries, supporting programs, and the
rest of the userland, most programs will not run properly. No matter which
ABI you use, you must have access to the userland for that platform.
To use SVR4 mode, you need a Sun Solaris 2.5.1 CD. Older versions of
Solaris are not freely available, so the FreeBSD Project can’t just provide
these for you. This isn’t insurmountable, but it makes using SVR4 mode
slightly more difficult and much more expensive. If you have the CD, look
at /usr/ports/emulators/svr4_base.
The Linux userland is freely available. Since the barrier to entry is so low,
we’ll discuss Linux mode in some detail. Once you have a thorough under-
standing of how it works, you can apply this knowledge to any other ABI
compatibility mode you wish to use.
Using Linux Mode
To install the Linuxulator, pick a piece of software that needs Linux mode
and install that instead. The Ports Collection is smart enough to realize that a
piece of software needs Linux mode and chooses the appropriate pieces of
Linux to install. For example, I use Adobe Acrobat Reader (/usr/ports/print/
acroread7) to view PDFs. Installing this port triggers installation of Linux mode.
The port downloads a large number of Linux system files and installs
them under /usr/compat/linux. A Linux program uses this userland rather
than the FreeBSD userland.
The port also loads the Linux mode kernel module. To make FreeBSD
load that module automatically at boot, use this rc.conf entry:
linux_enable="YES"
That’s it! You should now be able to run Linux programs without any
further configuration. All that’s left are the minor annoyances and peccadilloes
of Linux mode. Sadly, there’s a few of those. . . .
WHAT IS LINUX_BASE?
You’ll see many references to something called linux_base. Historically, you installed
a Linux userland from a port called linux_base, and then you installed software on
top of those files. Modern FreeBSD makes this transparent to the user, allowing you
to install the software you need and not worry about the requirements. The various
linux_base ports you’ll see in /usr/ports/emulators are designed for developer use
and compatibility testing, not for you to install!

366 Chapter 12
The Linuxulator Userland
Just as the linux.ko kernel module provides the Linux ABI, the Linuxulator
requires a very minimal Linux userland. Take a look under /usr/compat/linux
and you’ll see something much like the following:
# ls
bin etc lib media mnt opt proc sbin selinux srv
sys usr var
Looks a lot like the contents of FreeBSD’s / directory, doesn’t it? If you
poke around a bit you’ll find that, generally speaking, the contents of /usr/
compat/linux are comparable to your core FreeBSD installation. You’ll find
many of the same programs in both.
One thing Linux devotees immediately notice about any linux_base port
is that its contents are minimal compared to a typical Linux install. That’s
because each Linux-based port installs only what it requires to run. The Ports
Collection expands the Linux userland as necessary when you install a
new port.
Whenever possible, programs in Linux mode try to stay under /usr/
compat/linux, which is somewhat like a weak jail (see Chapter 9). When you
execute a Linux binary that calls other programs, the Linux ABI first checks
for the program under /usr/compat/linux. If the program doesn’t exist there,
Linux mode looks in the main system. For example, suppose you have a Linux
binary that calls ping(8). The ABI first searches under /usr/compat/linux/ for
a ping program; as of this writing, it will find none. The ABI then checks the
main FreeBSD system, finds /sbin/ping, and uses it. The Linuxulator makes
heavy use of this fallback behavior to reduce the size of the Linux mode’s
userland.
Alternatively, suppose a Linux binary wants to call sh(1). The Linux ABI
checks under /usr/compat/linux, finds /usr/compat/linux/bin/sh, and executes
that program instead of the FreeBSD native /bin/sh.
Testing Linux Mode
Now that you have some idea what’s installed in Linux mode, testing Linux
functionality is easy. Run the Linux shell and ask it what operating system it is
running on:
# /usr/compat/linux/bin/sh
sh-3.00$ uname -a
Linux stretchlimo.blackhelicopters.org 2.4.2 FreeBSD 7.0-CURRENT #7: Wed
Apr 23 21:00:47 EDT 2008 i686 i686 i386 GNU/Linux
sh-3.00$
When we ask what type of system this command prompt is running on,
this shell responds that it’s a Linux system running on top of a Linux 2.4.2
kernel called FreeBSD . Pretty cool, eh?

Advanced Software Management 367
Remember, however, that Linux mode is not a complete Linux userland.
You cannot cross-compile software in the default Linuxulator install. You can
only perform very basic tasks.
Identifying and Setting Brands
Branding software binaries is easier than branding cattle, but not nearly as
adventurous. Most modern Unix-like binaries are in ELF format, which
includes space for a comment. That’s where the brand lives. FreeBSD assigns
each program an ABI by the brand on that binary. If a binary has no brand, it
is assumed to be a FreeBSD binary. FreeBSD recognizes three brands: FreeBSD,
Linux, and SVR4.
View and change brands with brandelf(1):
# brandelf /bin/sh
File '/bin/sh' is of brand 'FreeBSD' (9).
No surprise there. This is a FreeBSD binary, so it will be executed under
the FreeBSD ABI. Let’s try a Linux binary:
# brandelf /usr/compat/linux/bin/sh
File '/usr/compat/linux/bin/sh' is of brand 'Linux' (3).
If you have a foreign program that won’t run, check its branding. If it
isn’t branded or is branded incorrectly, you’ve probably discovered your
problem: FreeBSD is trying to run the program under the native FreeBSD ABI.
Change this by setting the brand manually with brandelf -t. For example, to
brand a program Linux, do this:
# brandelf -t Linux /usr/local/bin/program
The next time you try to run the program, FreeBSD will run it under the
Linux ABI and the Linux userland, and the program should work as expected.
linprocfs
Linux uses a process filesystem, or procfs. FreeBSD eliminated procfs some
time ago as a security risk, but if you’re running Linux mode, some Linux
programs will require it. Using Linux software that requires procfs means
accepting that risk. FreeBSD makes a Linux procfs available as linprocfs(5).
To enable linprocfs(5), add the following to /etc/fstab after installing the
Linuxulator:
linproc /compat/linux/proc linprocfs rw 0 0
FreeBSD loads filesystem kernel modules on demand, so just type
mount /compat/linux/proc to activate linprocfs(5) without rebooting.

368 Chapter 12
Debugging Linux Mode with truss(1)
Linux mode isn’t Linux, and nowhere is this more clear than when a program
breaks. Many programs have cryptic error messages, and Linux mode can
obscure them further. The best tool I’ve ever found for debugging Linux
mode is truss(1), the FreeBSD system call tracer. Some people have told me
that using truss(1) for this is like putting the 12-cylinder engine from a Mack
truck into a Volkswagen Beetle, but after much thought and careful consider-
ation I’ve decided that I don’t care. It works. Once you learn about truss(1),
you’ll wonder how you ever lived without it.
truss(1) identifies exactly which system calls a program makes and the
results of each call. Remember, system calls are a program’s interface to the
kernel. When a program tries to talk to the network, or open a file, or even
allocate memory, it makes a system call. This makes truss(1) an excellent way
to see why a program is failing. Programs make a lot of system calls, which
means that truss(1) generates a huge amount of data, making debugging
with truss(1) a good candidate for script(1).
For example, I once had to install a Linux version of PGP Command
Line on a FreeBSD system.5 According to the manual, the -h flag describes
how to use the program. While I have the full manual, this tells me if the
program runs at all in Linux mode:
# pgp -h
/home/mwlucas:unknown (3078: could not create directory, Permission denied)
Here’s the good news: The program runs! The bad news is, it chokes on
something. What directory does it want to create? truss(1) can tell me that.
Start a script(1) session, run the program again, and exit script(1).
Your script file will be hundreds or thousands of lines long; how can you
possibly find the problem? Search for a relevant part of your error message,
or for the string ERR. In this case, I searched for the string directory and
found this near the end of the output:
...
linux_open("/home/mwlucas/.pgp/randseed.rnd",0x8002,00) ERR#2 'No such file or directory'
linux_open("/home/mwlucas/.pgp/randseed.rnd",0x80c1,0600) ERR#2 'No such file or directory'
linux_open("/home/mwlucas/.pgp/randseed.rnd",0x8002,00) ERR#2 'No such file or directory'
...
Aha! The program can’t open a file in /home/mwlucas/.pgp, as the directory
doesn’t exist. Once I create a .pgp directory, not only does the -h test succeed
but my more complicated tests all perform flawlessly.
In addition to truss(1), you could use ktrace(1) and linux_kdump
(/usr/ports/devel/linux_kdump) to parse the output. I suggest you try both tools
and use whichever feels most comfortable to you.
5 See PGP & GPG (No Starch Press, 2006) by yours truly. I could have either gotten PGP to run
in the Linuxulator, or installed a Linux box just for a couple chapters in a book; the choice was
clear.

Advanced Software Management 369
Remember, commercial software vendors do not support their Linux
software in FreeBSD’s Linux mode. If you are in an industrial environment
with service-level agreements and run the risk of paying penalties, think very
carefully before using Linux mode. The main benefit of commercial software
is having someone to blame when it breaks, but FreeBSD’s Linux mode
eliminates that benefit.
Running Software from the Wrong Architecture
64-bit computing is becoming more popular, especially with AMD’s creation
of the 64-bit i386-compatible architecture. Being able to run both 32-bit and
64-bit operating systems is a nearly irresistible selling point for hardware.
Software must be written for 64-bit platforms, however. While the open source
world has dealt with 64-bit computing for years thanks to Sun Solaris, many
programs were written for 32-bit operating systems. When you run FreeBSD’s
amd64 platform, you will eventually find some piece of software that is only
available for i386 hardware. What to do?
Here’s the good news: If your kernel has the COMPAT_IA32 option (already
in GENERIC), FreeBSD/amd64 can run all FreeBSD/i386 software. What
you cannot do is use FreeBSD/amd64 shared libraries for FreeBSD/i386
software. This means that if you want to run a complicated 32-bit program on
a 64-bit computer, you must provide 32-bit versions of the necessary libraries.
This is well supported; if you check rc.conf you’ll find the ldconfig(8)’s options
ldconfig32_paths and ldconfig_local32_dirs. These options are specifically for
telling your amd64 system where to find 32-bit libraries.
Even more surprising, however, is that FreeBSD/amd64 can run Linux’s
32-bit binaries! As 32-bit Linux software is far more common than 64-bit,
FreeBSD’s Linux mode works with 32-bit software. Just include the option
COMPAT_LINUX32 in your kernel. No additional or unusual configuration is
required; Linux mode on amd64 works exactly like Linux mode on i386.
FreeBSD does not currently support running 64-bit Linux software, but just
about everything available specifically for 64-bit Linux is also available for
64-bit FreeBSD.
While there’s always more to learn about software management, you now
know enough to get by. Let’s go on and learn about upgrading FreeBSD.
COMMERCIAL LINUX SOFTWARE AND LINUX MODE
Remember, commercial software vendors do not support their Linux software in
FreeBSD’s Linux mode. If you are in an industrial environment with service-level
agreements and run the risk of paying penalties, think very carefully before using
Linux mode. The main benefit of commercial software is having someone to blame
when it breaks, but FreeBSD’s Linux mode eliminates that benefit.

13
UPGRADING FREEBSD
Upgrading network servers is perhaps the
most annoying task in the system admin-
istrator’s routine. I can manage unexplained
behavior on my desktop after an upgrade, but
when a whole company or hundreds of customers
depend on one system, even thinking of touching
that system makes my bowels churn. Any operating system upgrade can
expand your burgeoning gray hair collection. Even very experienced system
administrators, faced with a choice between upgrading a system in-place and
jabbing red-hot needles into their own eyes, frequently have to sit down and
consider their choices. While a few Unix-like systems have straightforward
upgrade procedures, they require several hours to complete and a certain
amount of luck.
On the other hand, one of FreeBSD’s greatest strengths is its upgrade
procedure. I’ve had machines running through three different major releases
of FreeBSD and innumerable patch levels in between without reinstalling the
system. Very few Windows admins routinely upgrade servers from Windows
2000 to Windows 2003, which is only one major upgrade. (Those people

372 Chapter 13
deserve every penny they make, by the way.) I decommission FreeBSD systems
only when they are so old that the risk of hardware failure keeps me awake
at night. One system started off as a FreeBSD 2.2.5 system, was upgraded to
FreeBSD 3, and finally to FreeBSD 4. When FreeBSD 4.8 came out, the hard
drive began making funny noises, so I elected to install the new version on a
new system. The successor system ran FreeBSD 5 and 6 until it finally died.1
The only time I suffered major inconvenience was when jumping major ver-
sion numbers—that is, from FreeBSD 5 to 6. I spent a couple of hours of my
time making those jumps. Just try that with other operating systems.
FreeBSD Versions
Why is upgrading FreeBSD a relatively simple matter? The key is FreeBSD’s
development method. FreeBSD is a continually evolving operating system.
If you download the current version of FreeBSD in the afternoon, it will be
slightly different from the morning version. Developers from around the
world continually add changes and improvements, which makes the traditional
strict release numbering used by less open software impractical. At any given
moment, you can get several different versions of FreeBSD: releases, errata
branches, -stable, -current, and snapshots.
Releases
If you’re in a production environment, you should probably install a release
version of FreeBSD and then patch your system to the proper errata branch.
A FreeBSD release has a conventional version number, like those you’d
see on any other software: 5.5, 6.3, 7.0, and so on. A release is simply a copy of
the most stable version of FreeBSD at a particular moment in time. Three
or four times a year, the Release Engineering team asks the developers to
focus on resolving outstanding problems rather than making major changes.
The Release Engineering team cuts several release candidates from this code
and offers each for public testing. When the FreeBSD team is satisfied with
the results of their own and the community’s testing, the result is given a
release number. The development team then returns their attention to their
regular projects.2
Errata Branches
An errata branch is a particular FreeBSD release plus any security and
stability patches issued for that release. While the FreeBSD team works
very hard to assure that each and every release is bug free, that goal just
isn’t realistic. It sometimes happens that a security junkie with nothing
better to do discovers a new way to breach deployed servers a week after
FreeBSD’s latest release. The security team provides the errata branches
1 “In the data center, nobody can hear your power supply scream.”
2 Despite what you might think, “annoying the users” is not a regular project for FreeBSD
developers. It’s a fringe benefit.
Upgrading FreeBSD 373
to support users who want their systems to remain as stable as humanly
possible without sacrificing security.
Each release has its own errata branch. For example, FreeBSD 7.0-errata
is different than FreeBSD 7.1-errata, and upgrading between the two is just
as error-prone as upgrading from FreeBSD 7.0 to FreeBSD 7.1. API and ABI
changes are completely, absolutely, entirely forbidden in an errata branch;
applications that work on a release will perform in exactly the same manner
on any version of the errata branch. For maximum stability, stay with the
errata branch of the version you installed.
As of this writing, the FreeBSD Project supports errata branches for two
years after release, but this can change. Watch http://www.freebsd.org/security
or the FreeBSD-announce@FreeBSD.org mailing list for updates on support sched-
uling and end-of-life notices. Of course, with the source code available, it’s
possible for you to continue to support an old release for as long as you use
it. You just can’t expect the FreeBSD team to keep doing all the work for you
forever!
FreeBSD-current
FreeBSD-current, or just -current, is the bleeding-edge, latest version of
FreeBSD which contains code that is making its first public appearance.
While the developers have test servers and post patches for review before
applying, that’s still much less exposure than the wide userbase of FreeBSD-
current. FreeBSD-current is where much initial peer review takes place; at
times, -current undergoes radical changes that give experienced system
administrators migraines.
FreeBSD-current is made available for developers, testers, and interested
parties, but it is not intended for general use. Support for user questions about
-current is very slim because the developers simply don’t have time to help a
user fix his web browser while thousands more critical problems demand atten-
tion. Users are expected to help fix these problems or to patiently endure
them until someone else fixes them.
To make matters worse, -current’s default settings include assorted
debugging code, special warnings, and related developer features. These make
-current run slower than any other version of FreeBSD. You can disable all
this debugging, but if you do so, you won’t be able to file a proper trouble
report when you have a problem. This means that you’re even more out on
your own. Check out the file /usr/src/UPDATING on your -current system for
debugging details.
If you can’t read C and shell code, or don’t feel like debugging your OS,
or don’t like computer functions failing arbitrarily, or just don’t like being
left hanging until your problem annoys someone who can fix it, -current is
not for you. The brave are certainly welcome to try -current, as is anyone
willing to devote a large amount of time to learning and debugging FreeBSD
374 Chapter 13
or anyone who needs a lesson in humility. You are not forbidden to use
-current; you’re just on your own. -current isn’t always the bleeding edge,
but sometimes it might be the why-are-my-fingers-suddenly-little-wiggling-
stumps? edge. You have been warned.
To run -current you must read the FreeBSD-current@FreeBSD.org and
cvs-src@FreeBSD.org mailing lists. These are high-traffic lists with hundreds
of warnings, alerts, and comments a day. If you’re reading this book, you
probably shouldn’t post on these lists; just read and learn. If someone dis-
covers that the newest filesystem patches transform hard drives into zombie
minions of Cthulhu, this is where the information will be made available.
-current Code Freezes
Every 12 to 18 months, FreeBSD-current goes through a month of code freeze,
during which no non-critical changes are permitted and all known critical
problems are being fixed. The goal is to stabilize FreeBSD’s latest and greatest
and to polish off the rough corners. At the end of the code freeze (or shortly
after), -current becomes the .0 release of a new version of FreeBSD. For
example, FreeBSD 6.0 was -current at one point, as was FreeBSD 7.0.
Once the .0 release is out the door, current work branches into two lines:
FreeBSD-current and FreeBSD-stable.
FreeBSD-stable
FreeBSD-stable (or just -stable) is the “bleeding edge for the average user,”
containing some of the most recent peer-reviewed code. FreeBSD-stable is
expected to be calm and reliable, requiring little user attention. Once a piece
of code is thoroughly tested in -current, it might be merged back into -stable.
The -stable version is the one that is mostly safe to upgrade to at almost any
time; you might think of it as FreeBSD-beta.
As -stable ages, the differences between -stable and -current become
greater and greater, to the point where it becomes necessary to branch a
new -stable off of -current. The older -stable is actively maintained for several
months while the new -stable is beaten into shape. Some users upgrade to the
new version of -stable immediately, others are more cautious. After a release
or two of the new -stable, the older -stable is obsoleted and the developers
encourage users to migrate to the new version. After some time, the older
-stable will be receiving only critical bug fixes, and finally it will be abandoned
entirely. You can see how this works in Figure 13-1.
Every so often -stable is polished and tested. Developers stop backport-
ing features from -current and focus on testing. When everyone’s happy with
-stable’s quality, it’s issued a number and released. For example, the fourth
release of FreeBSD 7 is FreeBSD 7.3. FreeBSD 7.3-release is just a point on
the continuum of FreeBSD-stable 7.

Upgrading FreeBSD 375
Figure 13-1: FreeBSD development branches
Users of FreeBSD-stable must read the FreeBSD-stable@FreeBSD.org mailing
list. While this mailing list has a moderate level of traffic and a fair amount of
question-and-answer exchanges that really should be on -questions@, important
messages from developers generally have a subject beginning with HEADS UP.
Look for those messages; they generally mean that a change in the system can
ruin your day if you don’t know about it.
Merging from -current
The phrase merged from -current (MFC) means that a function or subsystem
has been backported from FreeBSD-current into FreeBSD-stable (or, rarely,
into an errata branch). Not all features are MFC’d, however. The point of
FreeBSD-current is that it’s where major changes take place, and many of
those changes require months of testing and debugging. Those large changes
cannot be backported, as they would badly impact the -stable users who expect
a stable codebase. New drivers, bug fixes, and minor enhancements can be
MFC’d—but that’s about it. The FreeBSD Project makes it a point to not MFC
large changes that could break user applications.
Snapshots
Every month or so, the FreeBSD Release Engineering team releases snapshots
of -current and -stable and makes them available on an FTP site. Snapshots are
just points along the development branch; they undergo no special packaging
FreeBSD-current FreeBSD-current
FreeBSD-stable 6 FreeBSD-stable
7
6.0 7.0
6.1
6.2
6.3
6.4
6.5
7.1
7.2
7.3
7...
improvements improvements
THE STABILITY OF -STABLE
The word stable describes the code base, not FreeBSD itself. Running code from a
random point along a stable branch doesn’t guarantee that your system will be
stable, only that the underlying code won’t change radically. The API and ABI are
expected to remain unchanged. While the developers take pains to ensure that
-stable remains, well, stable, mistakes can and do happen. If this risk worries you,
run an errata branch.
376 Chapter 13
or testing. Snapshots do not receive the same attention to quality that releases
do, but are intended as a good starting point for people interested in running
-current or -stable. There is only modest quality control, and many developers
have no idea that a snapshot has come out until it appears on the FTP servers.
You will find bugs. You will find errors. You will experience issues that will
turn your mother’s hair white, assuming you haven’t done that to the poor
woman already.
FreeBSD and Testing
Each version and release of FreeBSD is tested in a variety of ways. Individual
developers check their work on their own hardware and ask each other to
double-check their work. If the work is sufficiently complicated, they might
use a private Perforce source code repository to offer their work to a broader
community before committing it to -current. Coverity has donated analysis
software to the FreeBSD team so that the source code can be automatically
audited, tested, and debugged on an ongoing basis, catching many errors
before they have a chance to affect real-world users. Corporations such as
Yahoo!, Sentex, and iX Systems have donated high-quality test facilities to
the FreeBSD Project, providing a build/test server farm for the security team
and a network performance test cluster for the kernel team. Several highly
regarded FreeBSD developers have made testing a major issue within the
Project.
Ultimately, however, a volunteer project with a few hundred developers
cannot purchase all computer hardware ever made, nor can they run that
hardware under all possible loads. The FreeBSD Project as a whole relies on
donations from hardware vendors who want their equipment to run FreeBSD,
companies who want to use FreeBSD on the equipment they already own, and
on the user base.
The most useful testing comes from users who have real-world equip-
ment and real-world testbeds with real-world workloads. Sadly, most of these
users perform testing when they put a release CD into the computer, run
an install, and fire up the system. At that point, it’s too late to benefit the
release. Any bugs you find might help the next release, but in the meantime
an upgrade to the errata branch for that release might fix your problem.
The solution here is obvious—test FreeBSD on your real-world workloads
before the release is cut. Requests for testing of new -stable releases appear
on FreeBSD-stable@FreeBSD.org. By testing a -stable or -current, you will get even
better value from FreeBSD.
Which Version Should You Use?
-current, -stable, -errata, snapshots—the head spins. Yes, this seems compli-
cated, but it all works to ensure levels of quality. Users can rest assured that
an errata branch is as stable as possible and has been through extensive testing
and peer review. The same user knows that the nifty new features in -stable

Upgrading FreeBSD 377
and -current are available, if he’s willing to assume the risk inherent in each
version. So, which version should you use? Here are my suggestions:
Production
If you’re using FreeBSD in a production setting, track an errata branch
of a -stable release.
Test
If you’re interested in how FreeBSD changes will affect your environ-
ment, track -stable on a test system.
Development
Operating system developers, people with too much spare time and too
little excitement, and blind idiots should run -current. When -current
destroys your MP3 collection, debug the problem and submit a patch to
fix it.
Hobby
If you’re a hobbyist, run any version! Just keep in mind the limitations of
the branch you choose. If you’re just learning Unix, I’d recommend
-release. Once you have your feet under you, upgrade to -stable. If you
have nothing but utter contempt for your data, the masochists on -current
welcome like-minded company.
Upgrade Methods
FreeBSD provides three main ways to upgrade: sysinstall, binary, and source.
FreeBSD supports binary updates through FreeBSD Update. This is very
similar to the binary update services offered for Windows, Firefox, and other
commercial software. You can use FreeBSD Update to upgrade on an errata
branch.
sysinstall is the FreeBSD installer; it can be used to upgrade to whatever
release that installer ships with. For example, the installer for FreeBSD 7.5
can be used to upgrade to FreeBSD 7.5. Use sysinstall when upgrading from
one release or snapshot to another.
Using source code allows you to build the programs that make up
FreeBSD and install them to your hard drive. For example, if you have the
source code for FreeBSD 7.5, you can upgrade to that version. This requires
more effort to set up and use, but gives you much more flexibility. Upgrade
from source when tracking -stable or -current.
PROTECT YOUR DATA!
Chapter 4 is called “Read This Before You Break Something Else!” for good reason.
Upgrades can destroy your data. Back up your system before attempting any sort of
upgrade! I upgrade my laptop every week or so, just for fun (see my earlier comment
about blind idiots and -current). But before I upgrade, I make sure that all my important
data is on a tarball safely cached on another machine. Copy your data to tape, file,
or whatever, but don’t run an upgrade without a fresh backup. You have been warned.
378 Chapter 13
Binary Updates
Many operating systems offer binary updates, where users can download new
binaries for their operating system. FreeBSD provides a similar program with
FreeBSD Update, allowing you to easily upgrade your system along an errata
branch. FreeBSD Update does not let you track -stable or -current, only an
errata branch. For example, if you installed FreeBSD 7.0, FreeBSD Update
will help you upgrade to 7.0-errata but not 7.0-stable or 7.1-release.
FreeBSD Update is designed to be used with standard systems running
the GENERIC kernel. If you have upgraded from source, FreeBSD Update
is not suitable for your system. Similarly, FreeBSD Update only provides
patches to the GENERIC kernel. If you have a custom kernel, you must
build updates to your kernel by hand instead of relying upon the update
service.
Perform binary updates with freebsd-update(8), as configured in
/etc/freebsd-update.conf.
/etc/freebsd-update.conf
freebsd-update(8) is designed to be seamless for the average user, and
updating its configuration is rarely advisable. You might have unusual
circumstances, however, so here are the most useful options you’ll find
in this file:
KeyPrint 800...
KeyPrint lists a cryptographic signature for the update service. If the
FreeBSD Update service suffered a security breach and an intruder
replaced the patches with Trojan horse versions, the FreeBSD Project
would need to repair the breach and issue new cryptographic keys. In
this case, the breach would be announced on the security announce-
ments mailing list (and would also be big news in the IT world). In
other words, there’s no reason to change this in normal use and very
little reason to change it in abnormal use.
ServerName update.freebsd.org
The ServerName tells freebsd-update(8) where to fetch its updates from.
While the FreeBSD Project does provide the tools to build your own
updates, those tools are poorly documented. Configuring your own
update server is for the brave.
Components src world kernel
By default, FreeBSD Update provides the latest patches for the source
code in /usr/src, the userland (world), and the GENERIC kernel. You
might not need all of these components, however. While the kernel
and userland are mandatory, you might not have the source code
installed on your machine. In that case you could eliminate the src
entry and only fetch the userland and kernel updates. You could also
choose to receive only portions of the source code update, as described
in freebsd-update.conf(5).

Upgrading FreeBSD 379
UpdateIfUnmodified /etc/ /var/
FreeBSD Update provides updates to configuration files in /etc. If you have
modified these files, however, you probably don’t want freebsd-update(8)
to overwrite them. Similarly, /var is very fluid, designed for customiza-
tion by the system administrator; you don’t want FreeBSD Update to
muck with your settings. FreeBSD Update only applies patches to files
in the directories listed in UpdateIfUnmodified if they are unchanged
from the default.
MailTo root
If you schedule a run of FreeBSD Update (as described later in this chap-
ter), freebsd-update(8) sends an email of the results to the account listed
in MailTo.
KeepModifiedMetadata yes
Perhaps you’ve modified the permissions or owner of a system file or
command. You probably don’t want freebsd-update(8) to change those
permissions back. With KeepModifiedMetadata set to yes, freebsd-update(8)
leaves your custom permissions and ownership unchanged.
Running freebsd-update(8)
Updating your system with binary updates has two stages: downloading the
updates and applying them.
To download the latest updates to your errata branch, run freebsd-update
fetch.
# freebsd-update fetch
You’ll see the program finding the download sources for the patches,
comparing cryptographic keys for those download sources, and eventually
downloading patches. Finally you’ll see a message similar to this:
The following files will be updated as part of updating to 7.0-RELEASE-p2:
/boot/kernel/kernel
/etc/rc.d/jail
/usr/bin/dig
...
freebsd-update(8) stores these files in /var/db/freebsd-update. To install
the downloaded files, run freebsd-update install:
# freebsd-update install
Installing updates... done.
That’s really everything. Reboot your system, and you’ll see that you’re
running the newest errata branch!
380 Chapter 13
Scheduling Binary Updates
Best practice would say to download and apply updates at a consistent time
on a regular schedule, such as on your monthly maintenance day. FreeBSD
Update includes specific support for this, to avoid flooding the download
servers with requests every hour, on the hour. The freebsd-update cron
command tells the system to download the updates at a random point in
the next hour. Put this command in /etc/crontab to download updates during
that one-hour window. This helps reduce the load on the download servers.
You’ll get an email when the system has updates, so you can schedule a
reboot at your convenience.
Optimizing and Customizing FreeBSD Update
Two common questions about FreeBSD Update concern the custom builds
of FreeBSD and distributing updates locally.
Many people build their own versions of FreeBSD for internal use. Fre-
quently, this is just a version of FreeBSD with various sections cut out, as we’ll
do with NanoBSD in Chapter 20, but some companies use extensive modifica-
tions. If you have deleted files from your FreeBSD install, freebsd-update(8)
will not attempt to patch them.
Similarly, many companies like to have internal update servers for patch
management. The FreeBSD Update system is specifically designed to work
with caching web proxies. While all the files are cryptographically signed and
verified, they are transmitted over vanilla HTTP so that your proxy can cache
them. This reduces bandwidth usage.
If you really want to build your own FreeBSD Update server, the code
for the update server is available in the FreeBSD CVS repository under the
projects directory. If you don’t understand what this means, you really should
not be building your own update server.
Upgrading via sysinstall
The FreeBSD installer, sysinstall(8), can also upgrade a system from one
release of FreeBSD to another or from the errata branch of one release to
another release. The sysinstall upgrade path simply overwrites the old
binaries on disk with the binaries from the next release. For example, if
you’re running 7.1-errata, you can use sysinstall to upgrade to 7.2. Note that
this sort of upgrade is most successful when making comparatively small
jumps. Updating from 7.1 to 7.2 with sysinstall(8) is very likely to be success-
ful, updating from 7.1 to 7.5 might give you headaches, and updating from
7.1 to 9.0 will probably cause problems.
The installation CD includes upgrade instructions in the Install doc-
ument. Before you consider upgrading, read those instructions. Also check
http://www.freebsd.org for any last-minute errata that may affect your upgrade.
Finally, confirm the integrity of your backups.
Upgrading FreeBSD 381
You should also know that very few developers actually use sysinstall for
upgrades. It’s provided only for the end users who really don’t want to build
their own binaries. This means that the sysinstall upgrade method has a few
more rough corners compared to other methods, such as updating from
source code.
The easiest way to upgrade via sysinstall is to boot off the installation CD
for the release you want to upgrade to. Then follow these steps:
1. When you reach the graphic install menu, choose the Upgrade an
Existing System option.
2. sysinstall reminds you to read the upgrade instructions. If you haven’t yet
read them, do so now.
3. You must now choose the distribution components. Here, it’s best to
update exactly the same software you installed originally. For example,
if you installed the Developer distribution set, upgrade the Developer
distribution set. Choosing a different distribution set causes headaches.
For example, if you installed a complete FreeBSD 7.0 system but only
upgrade to a minimal FreeBSD 7.1 install, you’ll have programs from
7.1 but documentation from 7.0.
4. sysinstall asks if you wish to install the Ports Collection. If you are using
portsnap(8) or csup(1) (see the discussions of those tools later in this
chapter) to update your Ports Collection, you do not want to install the
Ports Collection. If you are not updating your Ports Collection separately,
install the new Ports Collection.
5. Back at the Distribution Sets menu, arrow up to Exit and leave the menu.
6. If you selected the system sources as an upgrade target, sysinstall(8) tells
you that it cannot update the sources. That’s fine, proceed anyway.
7. Now you’re asked for a backup directory to store your original /etc in.
Remember, /etc holds your vital system configuration information. The
default /usr/tmp/etc might be fine, but I usually back up /etc somewhere
on the root partition, such as /oldetc.
8. Finally, sysinstall asks for your installation source. Use the CD you
booted from.
9. After offering you one last chance to change your mind, sysinstall
overwrites all the system binaries you chose to install. It replaces your
kernel with a GENERIC kernel of the new version and replaces many
files in /etc.
10. Reboot.
11. After booting again, go through /etc and verify that your vital system files
are in the condition you want. While your password and group files and
/etc/fstab should be intact, you’ll want to check /etc/rc.conf and any other
files you’ve edited.
12. Reboot again. Your base system is now safely upgraded. You must
upgrade any third-party software separately.

382 Chapter 13
Upgrading via Source
Another way to update your system is to build it from source code. FreeBSD
is self-hosting, meaning that it includes all the tools needed to build FreeBSD.
If you want to build the latest version of FreeBSD from source code, your first
step is to get the latest source.
When a developer releases improvements to FreeBSD, the changes are
made available worldwide within about an hour (66 minutes, to be pedantic).
The FreeBSD master source code server tracks the source code, all changes
made to that code, and the author of those changes. Developers can check
in new code, and users can check out the latest versions through Concurrent
Versions System (CVS). CVS is a decent system for source code management,
but an awful tool for source code distribution. CVS requires large amounts of
system resources and bandwidth, and heavy usage eats hard drives. FreeBSD’s
resources are all donated, and it’s only polite to not waste them. Thus, instead
of using CVS, the Project uses a custom-written CVS repository mirroring
protocol. This is much faster, more efficient, easier on the servers, and
generally nicer when supporting millions of users all over the world. The
master CVS source code repository is replicated to the worldwide CVSup
servers, and users download the source code from those mirrors with a tool
called csup.
csup connects to a FreeBSD CVSup mirror, compares the source code
on your machine to the source code on the server, and copies any changes
to your local hard drive. As complex as this might sound, it’s actually fairly
simple to use.
Begin by confirming that your system has the FreeBSD source code
installed under /usr/src. The source code looks like this:
# ls /usr/src
COPYRIGHT UPDATING include sbin
LOCKS bin kerberos5 secure
MAINTAINERS contrib lib share
Makefile crypto libexec sys
Makefile.inc1 etc ports-supfile tools
ObsoleteFiles.inc games release usr.bin
README gnu rescue usr.sbin
CSUP, CVSUP, CVS, AND SUP?
A lot of FreeBSD documentation and websites mention using a tool called CVSup
for source code updates. csup replaced CVSup for average end users, so you can
ignore any references you see to CVSup or cvsup(1) as a program. A lot of related
documentation still mentions CVSup, however; for example, the mirror servers are
called cvsup servers, the sample configurations are in /usr/share/example/cvsup,
and so on. Similarly, CVSup is a combination of CVS and sup (Software Update
Protocol). You’ll see occasional mentions of these tools, but you don’t need to know
them.

Upgrading FreeBSD 383
This is the top directory of the FreeBSD source tree, which contains all
the code needed to build all of FreeBSD. We discussed source code at length
in Chapter 11. Go ahead and look through these directories to get an idea of
what source code looks like.
If you find that this directory is empty, you haven’t installed the source.
But don’t worry, you can install the source code from the installation CD by
doing the following as root:
# mount /dev/acd0c /cdrom
# cd /cdrom/src
# ./install.sh all
If you don’t have an install CD, you can grab the source tarball from a
FreeBSD FTP mirror.
However you install the source, you start with the source code for the
version of FreeBSD you installed. For example, the CDs for FreeBSD 7.0
contain the source code for FreeBSD 7.0. This source code is useful for
managing the system as it is installed, but it isn’t what you want for an
upgrade; if you build and install the source code for FreeBSD 7.0, you’ll
end up reinstalling FreeBSD 7.0. csup compares the source code on your
disk to the source code available on the Internet, and downloads the changes
between the two versions. csup then applies these diffs to the source code
you have on disk, changing it to the source code of the version you want.
This is far more efficient than redownloading the entire 450MB source tree
every time you want to upgrade! Even if you skip a release or two between
upgrades, csup will only have to download a megabyte or two of new source
code to complete the changes.
To update your source tree, tell csup what to update, where to update it
from, and how to perform the updates.
Selecting Your Supfile
csup uses a configuration file, or supfile, to update your source repository. See
/usr/share/examples/cvsup for sample supfiles for updating to different versions.
Once you’ve chosen or written a supfile that meets your needs, you can use
that supfile forever. A recent /usr/share/examples/cvsup contains the following
samples:
cvs-supfile This supfile maintains the entire FreeBSD source repository.
While most users have no need for this, FreeBSD developers need it.
Only use this if you roll your own releases, including floppy disk images,
CD images, and so on. To get the entire CVS repository, you must use
CVSup instead of csup.
doc-supfile This supfile tells csup to update the system’s local documen-
tation (the FAQ, Handbook, and associated articles).
gnats-supfile Use this to make a local copy of the FreeBSD Problem
Report (PR) database. Again, most users won’t want this.

384 Chapter 13
ports-supfile This supfile updates your ports tree to the latest version
(see Chapter 11).
stable-supfile Use this supfile to upgrade your source code to the latest -
stable version.
standard-supfile This brings your source code up to the latest for the
version of FreeBSD you are running. If you’ve installed a snapshot of
FreeBSD 7-stable, it upgrades the source code to the latest FreeBSD
7-stable. If you’re running -current, it upgrades the source code to the
most recent -current. If you’re tracking the FreeBSD 7.1 errata branch,
it will bring your system up to the latest errata release of that version.
(Historically, the standard-supfile only tracked -current.)
www-supfile This supfile downloads the latest version of the FreeBSD
website.
The various components that can be updated with csup are called collec-
tions. For example, there is the source code collection, the documentation
collection (doc-supfile), the Ports Collection (ports-supfile), and so on. Many
collections are also broken up into subcollections. The source tree has
subcollections for components such as userland programs, compilers, the
kernel, and so on. Our main concern when upgrading FreeBSD is the
source collection.
Modifying Your Supfile
Once you’ve chose the supfile you want, you must modify it to fit your environ-
ment. First, copy your chosen sample supfile under /etc and open it in your
preferred editor. Any line beginning with a hash mark (#) is a comment, and
the sample supfiles have more comments than actual configuration entries.
Most supfiles have seven entries, much like this:
*default host=CHANGE_THIS.freebsd.org
*default base=/var/db
*default prefix=/usr
*default release=cvs tag=RELENG_6
*default delete use-rel-suffix
*default compress
src-all
Your first step is to choose a source code mirror, or CVSup server. You’ll
find a complete list of mirrors at the FreeBSD website, but they generally
have a name in the format cvsup<number>.<countrycode>.freebsd.org. For
example you’ll find cvsup15.us.FreeBSD.org (the fifteenth US CVS mirror),
cvsup2.si.freebsd.org (the second Slovenian mirror), and so on. Ping each
server to determine which has the shortest response time from your part of
the Internet, or use /usr/ports/sysutils/fastest_cvsup to automatically determine

Upgrading FreeBSD 385
which CVSup server has the fastest response time. Put your choice in the
default host space marked by CHANGE_THIS.freebsd.org .
The default base tells csup where to store status files, including a list of
uploaded files. This accelerates future updates. The default means that you’ll
find these files in /var/db/sup.
The default prefix is where csup looks for the collection you’ve
chosen. The default path is an src subdirectory under the prefix or, in this
case, /usr/src. Don’t change this unless you want to store the system source
code in a nonstandard location. csup(1) expects to control everything in this
directory and can erase anything that doesn’t seem to belong.
The default release indicates the data repository you’re synchro-
nizing—in this case, the CVS repository. The tag is a branch of the
repository; this is where you select the desired FreeBSD version. Table 13-1
shows common sample tags.
When a developer removes some source files from the main FreeBSD
repository, csup must remove those files from your system to maintain an
identical copy. The delete keyword gives csup permission to do so.
Similarly, the use-rel-suffix option allows csup to share a common base
directory among several versions of the source without confusing them.
Compression saves bandwidth and costs nothing but CPU time. Use it.
Finally, tell csup which collection to update. The src-all flag tells
csup to update the entire source tree. The sample stable-supfile contains a
commented-out list of subcollections, such as usr.bin (the contents of
/usr/bin), contrib (the /usr/src/contrib directory), sys (the kernel), and so on.
You could theoretically update just one part of the source tree, but this is a
spectacularly bad idea. Installing the /usr/bin programs from FreeBSD-current
on your FreeBSD-stable system causes all sorts of unpredictable problems
and is completely unsupported.
You can specify multiple collections in a single supfile. For example,
I need access to the source code collection for FreeBSD 7-stable. As a
documentation committer, I need the latest documentation collection.
Finally, I want the latest ports tree so I can install the most recent software
on my computer. You’ll find sample supfiles for each of these collections
in /usr/share/examples/cvsup, but I don’t want to run csup once for each
collection. I list each of these collections in my supfile.
Table 13-1:
Common FreeBSD Version Tags
Tag Version
RELENG_7 FreeBSD 7-stable
RELENG_6 FreeBSD 6-stable
RELENG_7_0 FreeBSD 7.0-release with errata
.FreeBSD-current
386 Chapter 13
A Complete Supfile
Here’s my complete supfile, including all the changes needed to update my
source code:
*default host=cvsup15.us.freebsd.org
*default base=/var/db
*default prefix=/usr
*default release=cvs tag=RELENG_7
*default delete use-rel-suffix
*default compress
src-all
ports-all tag=.
doc-all tag=.
Note how few changes I’ve made to the sample. I chose a nearby CVSup
server and set my desired version of FreeBSD . The last two lines are the
interesting bit, where I add the ports-all and doc-all collections. Only
the source code collection has releases or branches; if I ask for the RELENG_7
version of the ports tree, the CVSup server would have no idea what I’m
talking about and I wouldn’t get any updates. By adding tag=. to the end of
the collection name, I tell csup to get the latest version of this collection.
Blocking Updates: The Refuse File
While I want the whole source tree and the whole documentation tree, I
only use certain parts of the ports tree. If you look under /usr/ports you’ll see
subdirectories for software in Arabic, French, German, Hebrew, Hungarian,
Japanese, Korean, Polish, Portuguese, Russian, Ukrainian, and Vietnamese.
While I’m glad that this software is available for people who speak those
languages, the chances that I will need any of these programs range from
negligible to nonexistent. To tell csup to not update these directories, make
a file /var/db/sup/refuse that contains the directories you don’t want updated,
much like this:
ports/arabic
ports/french
ports/german
...
ports/vietnamese
The refuse file cannot contain comments.
While you can refuse anything you like, it’s best to not refuse anything
under /usr/src. If you refuse updates to a critical system program, that program
will eventually become incompatible with the rest of the system.

Upgrading FreeBSD 387
Refuse files work by pattern matching, so a refuse file entry saying sys
would block everything that contains the word sys, which happens to include
the entire kernel source code under /usr/src/sys. Make your refuse entries
specific enough to block only what you really want to block.
If you use a refuse file, it’s best to delete the corresponding files from
your hard drive. It’s better to have something fail because the software
doesn’t exist than to have it fail in creative and difficult to diagnose ways
because it exists but hasn’t been updated in three years.
Also, refuse files create risk. Updating only a part of the source tree will
almost certainly cause build failures. The Ports Collection is designed to
work as an integrated whole, and refusing parts of it can be problematic.
While the documentation tree is nicely segmented, you might have trouble
even there. A refuse file might cause more trouble than it’s worth, but only
you can decide that.
Updating System Source Code
Once you’ve created a supfile, run csup by becoming root and running this
command:
# csup supfile
Cannot connect to 2001:468:902:201:209:3dff:fe11:442c: Protocol not supported
Connected to 128.205.32.21
Updating collection src-all/cvs
Edit src/Makefile
Edit src/Makefile.inc1
...
The first thing we see is a scary-looking warning that csup cannot
connect to a really long string of hexadecimal numbers. That long string is
an IPv6 address, which FreeBSD supports but most Internet service providers
do not yet provide. csup then prints out each file it edits, and eventually
prints Finished successfully when complete.
Congratulations! You now have the latest source code.
Using csup to Get the Whole Source Tree
You can run csup without a local source tree installed. csup compares what
you have (nothing) with what you need (everything) and installs what you’re
missing (the whole tree). Mirror maintainers prefer that you install the source
from CD if you have it, however; they’re donating servers and bandwidth for
this service and would like as many people as possible to benefit from it. A
full uncompressed source tree fills about 450MB of disk space, while down-
loading updates to an existing tree only needs a few megabytes. Even with
compression, you’re using a lot of donated bandwidth. The technical term
for this type of activity is rude.

388 Chapter 13
Building FreeBSD from Source
Once you have the latest source code, look at /usr/src/UPDATING. This file
lists, in reverse chronological order, any warnings and special notices about
changes to FreeBSD that are of special interest to people who build from
source. This file tells you if you must take any special actions before rebuilding
your system or if any major system functionality has changed. If you want your
system to work after the upgrade, follow those instructions exactly. Also exam-
ine the new GENERIC or NOTES kernel configuration files for any new
options or interesting kernel changes.
If you hang around the FreeBSD community for a while, you’ll hear
all sorts of stories about special methods people use for building FreeBSD.
You’ll hear anecdotal evidence that one method is better, faster, or stronger
than the standard. While you are certainly free to use any method you like
to update your system, the only method supported by the FreeBSD Project
is that documented at the end of /usr/src/UPDATING. If you follow some
other procedure and have trouble, you will be referred to the documented
procedure. The procedure described in this book has been used since
FreeBSD 6-current and has changed only slightly from 5-current, but I
still recommend double-checking these instructions against those in
/usr/src/UPDATING.
Build the World
First, build the new userland:
# cd /usr/src
# make buildworld
The make buildworld command builds from source the basic tools needed
to build the system compiler, then builds the compiler and associated libraries.
Finally, it uses the new tools, compiler, and libraries to build all the software
included in a core FreeBSD install. (This is much like building a car starting
with the instruction, “Dig iron ore out of the mine.”) The buildworld places
its output under /usr/obj. It can take anywhere from one to several hours,
depending on your hardware. You can continue working normally as the
buildworld runs, if your hardware is robust enough; while the build con-
sumes system resources, it won’t take any of your attention.
CUSTOMIZING YOUR FREEBSD BUILD
Remember back in Chapter 11 when we discussed /etc/make.conf? FreeBSD uses
a separate file to handle customizations for building FreeBSD itself. While settings in
/etc/make.conf affect all software built on the system, anything in /etc/src.conf
affects only building FreeBSD from source.

Upgrading FreeBSD 389
When the buildworld finishes, confirm that it completed without errors. If
the build ends with a bunch of messages like those you see during a failed
kernel compile, do not proceed with the upgrade. If you can’t figure out why
the build failed, go to Chapter 1 and see how you can get help. Never attempt
to install a damaged or incomplete upgrade.
Build, Install, and Test a Kernel
The best way to test your upgrade is to build a new GENERIC kernel. This
separates problems in your custom kernel from general FreeBSD issues. The
impetuous are certainly welcome to upgrade straight to their custom kernel
configuration, but if your kernel fails, you’ll need to try a GENERIC kernel.
Be sure to compare your custom kernel to the new GENERIC configuration,
however, to catch any changes you must make to your custom setup.
By default, the kernel upgrade process builds a GENERIC kernel. If you
want to upgrade straight to a custom kernel, use the variable KERNCONF to tell
make(1) the kernel name. You can set KERNCONF on the command line, in
/etc/make.conf, or in /etc/src.conf.
You can build a new kernel in one of two ways. The make buildkernel
command builds a new kernel, but does not install it. Follow a make buildkernel
with a make installkernel to install the kernel. The make kernel command runs
these two commands right after each other. Use the one that best matches
your schedule. For example, if I’m doing a system upgrade at work during my
Sunday maintenance window, I might run make buildworld and make buildkernel
during the preceding week to save a few hours of my precious weekend. I
don’t want to install that kernel before the maintenance day, however—if the
machine has a problem on Friday and needs a reboot, I want to boot the old
production kernel and not the new, upgraded kernel. On Sunday morning,
when I’m ready to actually upgrade, I run make installkernel. On the other
hand, using make kernel makes sense when upgrading my laptop. So, to
upgrade with my custom kernel I would run:
# make KERNCONF=HUMVEE kernel
Again, do not attempt to install a kernel that did not successfully
compile. If your make buildkernel errors out and dies, fix that problem
before proceeding.
Once you have a new kernel installed, reboot your computer into single-
user mode. The system should restart normally. Userland programs might not
work as you expect, however; many of them depend on certain kernel inter-
faces, which can change during an upgrade. Those are generally mentioned
in /usr/src/UPDATING. If your system runs correctly with the new kernel,
proceed. Otherwise, fully document the issue and boot the old kernel to
restore service while you solve the problem.

390 Chapter 13
Optimization with Parallel Builds
Experienced system administrators have probably used the -j flag of the make
utility to increase build speed. This starts multiple make processes and allows
the system to take advantage of multiple CPUs. If you have a multi-CPU system
or if your CPU has multiple cores, -j can work when building FreeBSD. A
reasonable number of builds to start is one more than the number of CPUs
you have. For example, if you have a quad-core processor, you can reasonably
use five build processes by running make -j5 buildworld && make -j5 kernel.
The FreeBSD Project doesn’t officially support -j for upgrades, even
though many developers use it. If your build fails when using -j, try without
-j before complaining.
Prepare to Install the New World
Beware, grasshopper! This is the point of no return. You can easily back
out a bad kernel—just boot the older, known good one—but once you
install a freshly built world, you cannot revert it out without using your
backups. Confirm that you have a good backup before proceeding, or at
least recognize that the first irrevocable step is happening right now.
If your new kernel works, you can proceed to install your freshly built
userland. First, confirm that your system can install the new binaries. Each
new version of FreeBSD expects that the old system supports all the necessary
users, groups, and privileges that the new version requires. If a program must
be owned by a particular user and that user does not exist on the system, the
upgrade will fail. That’s where mergemaster(8) comes in.
mergemaster compares the existing configuration files under /etc to the
new files in /usr/src/etc, highlights the differences between them, and either
installs them for you, sets them aside for evaluation, or even lets you merge
two different configuration files into one. This is extremely useful during
upgrades. You run mergemaster once before installing the new world, to
ensure that your system can install the new binaries, and once after installing
the new world, to synchronize the rest of /etc with your new world.
Start with mergemaster(8)’s prebuildworld mode, using the -p flag. This
specifically compares /etc/master.passwd and /etc/group and highlights any
accounts or groups that must exist for an installworld to succeed.
# mergemaster -p
*** Unable to find mtree database. Skipping auto-upgrade.
*** Creating the temporary root environment in /var/tmp/temproot
*** /var/tmp/temproot ready for use
*** Creating and populating directory structure in /var/tmp/temproot
These initial messages, all preceded by three asterisks, are merge-
master explaining what it’s doing. The first message announces that
mergemaster can’t find the autoupgrade database .

Upgrading FreeBSD 391
mergemaster can perform many updates automatically, as we’ll see later in
this chapter. mergemaster installs a temporary /etc under /var/tmp/temproot ,
giving it a pristine set of configuration files to compare with the installed
files. After that, we have our first comparison.
*** Displaying differences between ./etc/master.passwd and installed
version:
--- /etc/master.passwd Fri Nov 3 11:52:21 2006
+++ ./etc/master.passwd Mon Jun 6 16:19:56 2005
@@ -1,6 +1,6 @@
-# $FreeBSD: src/etc/master.passwd,v 1.39 2005/06/06 20:19:56 brooks Exp $
+# $FreeBSD: src/etc/master.passwd,v 1.40 2005/06/06 20:19:56 brooks Exp $
#
-root:$1$GtDsdFlU$F5mTAagzalt7dHImUsNSL1:0:0::0:0:Laptop Admin:/root:/bin/csh
+root::0:0::0:0:Charlie &:/root:/bin/csh
One vital piece of information is the file being compared, and merge-
master displays the filename up front. We then see the two different
versions of the file being compared, the installed file first and the
upgraded version of the file second . The astute among you will notice
that the dates don’t seem to make sense; if you’re running an older version
of FreeBSD, why is your password file newer? The dates given are the dates
that the file versions have changed. My password file was last updated on
November 3, 2006, while the version of the file in /usr/src hasn’t changed
since June 6, 2005. A user on my system updated his password recently, that’s
all.3 Notice the minus and plus signs at the beginning of these lines. A minus
sign indicates that a line is from the currently installed file, while a plus sign
shows that a line is from the version in /usr/src.
This is nicely illustrated by the next two lines mergemaster shows. The
first password entry, marked by a minus sign, is for the current root user .
The second line is the password entry for the out-of-the-box upgrade.
Presumably we want to keep the current password for our root account—we
don’t want to “upgrade” it to an empty password!
A little further on, we’ll see a slightly different entry:
_pflogd:*:64:64::0:0:pflogd privsep user:/var/empty:/usr/sbin/nologin
+_dhcp:*:65:65::0:0:dhcp programs:/var/empty:/usr/sbin/nologin
uucp:*:66:66::0:0:UUCP pseudo-user
The line for the user _dhcp is preceded by a plus sign, and there is no
corresponding _dhcp entry with a minus sign. The user _dhcp does not exist
on our current system. If a new user appears in the default FreeBSD config-
uration, it’s because a program or files in the new system expect to be owned
by that user. If you don’t add this user to your system, the install will fail.
3 So, I haven’t updated this system in a long time? No, I deliberately hacked my /etc/master.passwd to
provide an example for this book. Stop looking that deeply at these examples; you’ll just distress
yourself.

392 Chapter 13
A little later, we see a couple of items:
nobody:*:65534:65534::0:0:Unprivileged user:/nonexistent:/usr/sbin/nologin
-mwlucas:$1$zxU7ddkN$9GUEEVJH0r.owyAwU0NFX1:1001:1001::0:0:Michael W Lucas:/
home/mwlucas:/bin/tcsh
The entry with a leading minus sign is my account. Of course it doesn’t
exist in the base FreeBSD distribution. I need my account to survive the
upgrade, of course.
Use 'd' to delete the temporary ./etc/master.passwd
Use 'i' to install the temporary ./etc/master.passwd
Use 'm' to merge the temporary and installed versions
Use 'v' to view the diff results again
Default is to leave the temporary file to deal with by hand
How should I deal with this? [Leave it for later] m
Decisions, decisions. We can delete the temporary (new) master.passwd
file—except, we need the _dhcp user to install our new build of FreeBSD. We
could install the new master.passwd file, but that would wipe out the accounts
that already exist. If you have any doubts, you can view the differences again.
The only way to move forward without breaking the new config or your old
functionality is to merge the two files together. Enter m.
mergemaster splits your command window in half with sdiff(1). The left
side displays the beginning of the currently installed file, while the right side
shows the new version. Only the sections that differ are shown. Pick the side
you want in your new master.passwd file.
# $FreeBSD: src/etc/master.passwd,v 1.39 2005 | # $FreeBSD: src/etc/master.passwd,v 1.40 2005
On the left, we have version 1.39 of the file, and on the right, version 1.40.
mergemaster uses these version numbers (among other tools) to determine
if a file needs updating, so our new version needs the current version number.
Enter r to use the entry on the right, and mergemaster displays the next
difference.
root:$1$GtDsdFlU$F5mTAagzalt7dHImUsNSL1:0:0:: | root::0:0::0:0:Charlie &:/root:/bin/csh
On the left is the beginning of our customized root password entry, and
on the right is the default root password. We want the version from our
current password file, so enter l.
> _dhcp:*:65:65::0:0:dhcp programs:/var/empty:/

Upgrading FreeBSD 393
Here’s a new entry with no corresponding old entry. We need the user
_dhcp to complete the installworld, so enter r.
mwlucas:$1$zxU7ddkN$9GUEEVJH0r.owyAwU0NFX1:10 <
And here’s my account. If I want to log on as myself after the upgrade,
I better enter l.
Once we walk through every difference in the file, mergemaster presents
our next choices:
Use 'i' to install merged file
Use 'r' to re-do the merge
Use 'v' to view the merged file
Default is to leave the temporary file to deal with by hand
*** How should I deal with the merged file? [Leave it for later]
Viewing the merged file is always a good idea, unless you already know
you screwed up and want to do it over. Review your merged file with v, and if
it looks correct to you, install it with i.
*** Merged version of ./etc/master.passwd installed successfully
*** Temp ./etc/group and installed have the same CVS Id, deleting
*** Comparison complete
Do you wish to delete what is left of /var/tmp/temproot? [no] y
When this minimal check finishes, mergemaster displays its closing mes-
sages and offers to clean up after itself. At this point you’re done with the
temporary root partition installed in /var/tmp/temproot, so you might as well
delete it. mergemaster also offers to handle certain housekeeping chores
that result from the changes you made. For example, after creating a new
password file, you must update the password database; mergemaster can
handle that if you let it.
Finally, mergemaster compares the contents of /etc/make.conf with the
example make.conf under /usr/src. Variables that have been changed or
removed are displayed for your attention.
Installing the World
Still in single-user mode, you can install your brand-new FreeBSD with make
installworld. You’ll see numerous messages scroll down the screen, mostly
including the word install.
# cd /usr/src
# make installworld
Some programs and files are no longer in the base system. To see what’s
obsoleted, run make check-old.

394 Chapter 13
# make check-old
>>> Checking for old files
/usr/sbin/pccardc
/usr/share/man/man8/pccardc.8.gz
...
This lists every part of the system that was once installed on your system
but is no longer required. Confirm that you’re no longer using these pro-
grams; if you are, either preserve the existing unsupported program or find
an alternative. A little later in the output, you’ll see the shared libraries that
are now obsolete:
>>> Checking for old libraries
/lib/libcrypto.so.4
/usr/lib/libssl.so.4
/usr/lib/libroken.so.8
/lib/libatm.so.3
/lib/libc.so.6
...
Finally, you’ll see a list of directories that are no longer required. Remov-
ing a directory is fairly rare—I could only find seven examples of removed
directories since make check-old was implemented.
If you’re not specifically using any of the old programs or directories,
delete them with make delete-old. make(1) prompts you with the name of
each file and asks you to confirm that you want to delete the file.
Obsolete Shared Libraries
Obsolete shared libraries require more care. Many third-party programs link
against shared libraries. If you delete the shared library, the program will not
run. This can be really, really annoying if you, say, delete the library required
by your mission-critical application. The only way to restore service is to
recompile the program or replace the shared library. We discuss shared
libraries in Chapter 12. If none of your programs require the library, you
can delete it. Identifying every program that requires a library is a royal pain,
however.
For example, check the list of obsolete shared libraries above. One of the
entries is libc.so.6. Looking in /lib, I see that we now have libc.so.7. Perhaps
I shouldn’t need both libc.so.6 and libc.so.7. However, just about everything
depends on libc—it’s like the main road through town. If I remove libc,
chances are my programs from ports just won’t work at all. The presence of
these obsolete library versions doesn’t hurt anything in the short term; you
can bring your system back on line with the old libraries in addition to the
new ones and reinstall your add-on software in a more leisurely manner.
We’ll see how to update your ports later in this chapter.
If you believe that none of the libraries listed as old are important and
you can delete them anyway, I highly recommend backing each library up
before removing them. By just copying the library to an old-libs directory

Upgrading FreeBSD 395
somewhere, you’ll make recovery much simpler when you find out that
your mission-critical software doesn’t work anymore. You can also store old
libraries in /usr/lib/compat, so that your programs will continue to run but
the old libraries will be safely out of the way. Another option is to use libchk
(/usr/ports/sysutils/libchk) to identify programs linked against old libraries.
mergemaster Revisited
We’re almost there! While we already updated the passwords and group
information in /etc, we must update the rest of the files. mergemaster has
many special functions, all documented in its man page. I’m going to specifi-
cally recommend the two that I find notably useful.
When a file is added to the base FreeBSD install, there’s no need to
compare it to anything. The -i option makes mergemaster automatically
install new files in /etc. I’ll get a list of automatically installed files at the end
of the mergemaster run.
Another set of files that I don’t really care about are files that I have
not edited. For example, FreeBSD has dozens of startup scripts in /etc/rc.d.
If I haven’t edited a startup script, I just want to install the newest version
of the script. The -U flag tells mergemaster to automatically update any
base system file that I have not edited.
# mergemaster -iU
mergemaster walks through every file in /etc, comparing it to that in the
base distribution of FreeBSD. This works exactly the same way as in your pre-
installation mergemaster run, so we’re not going to walk through it here.
Reboot, and your base system is fully upgraded! Now we just have to worry
about upgrading your ports.
Finally, the -P option preserves the files that you replace. You need to set
a save directory in /etc/mergemaster.rc. While I prefer to back up the entire sys-
tem beforehand, using -P to save replaced files locally might be faster than
recovering from backup.
Set your preferred mergemaster options in a .mergemasterrc file in your
home directory or in the file /etc/mergemaster.rc. Some options in the config
file are not available on the command line but are quite handy—for example,
I always edit /etc/motd, so IGNORE_MOTD=yes is very nice.
Upgrades and Single-User Mode
According to the instructions, several parts of the upgrade must be done in
single-user mode. Many users consider this an annoyance, or even a handicap.
FreeBSD programs are just files on disk, aren’t they? Common sense says that
you can just copy them to the disk, reboot, and be done with it.
Here is yet another instance where your common sense is trying to ruin
your month. On rare occasions, the FreeBSD team needs to make some low-
level changes in the system that require running the install in single-user

396 Chapter 13
mode. You can have conflicts where vital programs will not run when installed
in multi-user mode. This is rare, but if it happens with /bin/sh, you’re in a
world of hurt. You have a very straightforward recovery route if that happens:
Remove the hard drive from the server, mount it in another machine, boot
the other machine, and copy your data off the destroyed system before for-
matting and reinstalling. Or, you can boot from the recovery CD and pray
that your skills are sufficient for the task.4
Running in multi-user mode can cause other upgrade problems, such as
subtle races, symbol issues, and innumerable other headaches. You can choose
to upgrade in multi-user mode, but don’t complain if your system has a
problem.
It is perfectly safe to build your new world in multi-user mode. You can
even build and install your new kernel in multi-user mode. Once you start
installing the userland, however, you must be in single-user mode and running
on your upgraded kernel.
Shrinking FreeBSD
What’s the point of having all this source code if you can’t customize your
operating system? FreeBSD not only gives you the source code, it provides
ready-to-turn knobs to easily customize your FreeBSD build.
These options can be set in either /etc/make.conf (see Chapter 10) or
/etc/src.conf. Settings in src.conf only apply to building the FreeBSD source,
while make.conf’s settings apply to all source code building. While the full
list of src.conf options are documented in src.conf(5), Table 13-2 shows
options that I find useful on occasion. We make heavy use of these options
in Chapter 20.
The build system checks to see if any of these variables are defined.
Setting WITHOUT_TOOLCHAIN=NO undefines the variable, but using anything else
will define it. (Yes, setting WITHOUT_SENDMAIL=postfix works.)
If you’re interested in the exact effect that these options have on your
system, I highly recommend Poul-Henning Kamp’s build options survey at
http://phk.freebsd.dk/misc/build_options. You can see what files are removed,
4 This is the voice of experience. Don’t do it. Really.
NFS AND UPGRADES
Have a lot of machines to update? Look at NFS, which we discussed in Chapter 8.
Build world and all your kernels on a central, fast machine, then export /usr/src
and /usr/obj from that system to your other clients. Running make installkernel
and make installworld from those NFS exports saves build time on all your other
machines and guarantees that you have the same binaries on all your FreeBSD boxes.

Upgrading FreeBSD 397
what files change, and which files are no longer installed on the system. I also
recommend trying these on a test system before moving to production, as
wholesale component removal can have unanticipated effects.
In most cases, adding these WITHOUT_ options includes the removed systems
in the make delete-old checks. If you decide that your system does not need
Sendmail, for example, the upgrade not only doesn’t build a new Sendmail
but offers to remove the existing one from the installed system. If you’re not
building a piece of software, you’re better off removing it entirely.
Table 13-2:
System Build Options
Option Effect
WITHOUT_BIND The system doesn’t build any part of BIND, including named, dig,
nslookup, or related libraries.
WITHOUT_CVS The system doesn’t build CVS.
WITHOUT_CXX Do not build the C++ compiler.
WITHOUT_DICT Do not build the dictionary.
WITHOUT_EXAMPLES Do not install the examples.
WITHOUT_GAMES No fun for you on this system!
WITHOUT_GDB Do not build the debugger.
WITHOUT_HTML Don’t build HTML documentation.
WITHOUT_INET6 Drop IPv6 support.
WITHOUT_INFO Do not build or install info(5) documentation.
WITHOUT_IPFILTER Do not build IP Filter.
WITHOUT_IPX Don’t support IPX in any programs.
WITHOUT_KERBEROS Do not build, install, or support Kerberos.
WITHOUT_LIBPTHREAD Do not build libpthread (see Chapter 12).
WITHOUT_LIBTHR Do not build libthr (see Chapter 12).
WITHOUT_LPR Do not build the printing system.
WITHOUT_MAN Do not build or install man pages.
WITHOUT_NIS Do not build or support NIS(8).
WITHOUT_OBJC Do not support Objective C.
WITHOUT_RCMDS Do not build or install rlogin, rcp, rcp, rwho, or other r- programs.
WITHOUT_SENDMAIL Do not build Sendmail.
WITHOUT_SHAREDOCS Do not install the old BSD documentation.
WITHOUT_TCSH Let me guess, you’re one of those /bin/bash wackos?
WITHOUT_TOOLCHAIN Do not install compilers, debuggers, and so on. Useful for embedded
systems. If you want to use this option, you must specify it on the com-
mand line at the make installworld stage. make buildworld fails with
this option.

398 Chapter 13
Updating with csup and make
One popular update method glosses over csup with an additional make(1)
target. I don’t use this myself, but many people prefer it. Instead of using the
csup command and your own supfile, you can use the example supfiles and
make(1). First, define several variables in /etc/src.conf or /etc/make.conf:
SUP_UPDATE=yes
This tells make(1) that it will be performing software updates.
SUP=/usr/bin/csup
The SUP setting is the full path to csup (or CVSup, if you’re still using that).
SUPHOST=cvsup9.us.freebsd.org
List a reasonably close FreeBSD CVSup mirror as the SUPHOST.
SUPFILE=/usr/share/examples/cvsup/stable-supfile
The SUPFILE value tells csup which configuration file to use.
PORTSSUPFILE=/usr/share/examples/cvsup/ports-supfile
PORTSSUPFILE specifies which supfile to use to upgrade ports. Don’t define
this if you don’t want to update your Ports Collection or if you’re using
portsnap(8) as discussed later in this chapter.
DOCSUPFILE=/usr/share/examples/cvsup/doc-supfile
You might guess that this specifies the supfile to use for system documen-
tation. Your guess would be wrong. DOCSUPFILE specifies a supfile to use for
the documentation source code, meaning the raw SGML that makes up the
Handbook, the FAQ, and all the other books and articles. If you don’t have
the documentation-building tools, this is nearly useless.
Once you set all these values, you can start your upgrade with:
# make update && make buildworld && make buildkernel
Is this easier than typing csup /etc/supfile && make buildworld && make
buildkernel? Some people think so. It does save you the effort of writing your
own supfile, but you must understand the contents of that supfile anyway. Use
it if you like.

Upgrading FreeBSD 399
Cross-Building FreeBSD
No, cross-building isn’t putting your server in a dress. FreeBSD runs on several
architectures, such as the classic i386, amd64, sparc64, and so on. You can
build a version of FreeBSD for any of those machines on any machine you
have. For example, I have an antediluvian Sparc workstation (courtesy of
David O’Brien) that dates from the 1990s. It’s perfectly usable, but build-
world on that system would take days. I can build a new FreeBSD for sparc64
on my fast amd64 system, export /usr/obj and /usr/src from my amd64 via NFS
(see Chapter 8), mount those partitions on my Sparc, and install them
normally.
To cross-build FreeBSD for a different architecture, specify the TARGET
variable on the command line.
# make TARGET=sparc64 buildworld && make TARGET=sparc64 buildkernel
The valid targets are listed deep within /usr/src/Makefile.inc1, but
Table 13-3 shows the current usable values.
:
We’ll make use of this feature in Chapter 20.
Building a Local CVSup Server
When you upgrade from source, every server must connect to a FreeBSD
CVSup server and download the latest code. If you have a lot of servers, that’s a
lot of connections and a lot of annoyance. Getting firewall holes for all these
systems can be a pain in a large company; you can probably get the firewall
administrator to open TCP port 5999 for one machine, but not all of them.
Every mirror is maintained by a volunteer who is donating the servers and
the bandwidth, not to mention the support time. Why download the same
bits over and over again?
Also, suppose you log into each of your servers one after the other and
upgrade the system source on that machine. In the few minutes between
starting each upgrade, the code on the mirror site might change slightly. The
mirrors aren’t going to stop their updates just because you’re in the midst of
Table 13-3:
Valid TARGET Values
Value Hardware
amd64 64-bit AMD and Intel hardware
arm ARM platforms (embedded systems)
i386 Classic x86 architectures
ia64 Intel’s Itanium platform
powerpc PowerPC hardware (early 2000s Mac)
sparc64 Classic Sparc 64-bit hardware

400 Chapter 13
upgrading four machines, and if you’re running several production machines,
you’d be best served if all the systems are absolutely identical. Even if they’re
running a version of -stable somewhere between 7.1-release and 7.2-release,
being able to eliminate the different versions of the software as a potential
problem can help troubleshooting immensely. You don’t want to think, “Gee,
server 86 keeps dying; could it be a bug in the slightly different version of
FreeBSD I have on that system?” That’s the door to madness. One way to
address this problem is by running a central CVSup server (also known as a
cvsupd server), which is your own local mirror of the FreeBSD source.
Running a cvsupd server isn’t particularly easy, but it’s less difficult than
running a secure web server. The port /usr/ports/net/cvsup-mirror handles all
the tricky bits of configuring a mirror. The port is actually just a script to con-
figure other programs for you. The script offers default suggestions to
configure a sensible cvsupd server, but that’s all.
One dependency of cvsup-mirror is the full CVSup program; while csup
has replaced CVSup as a client, the cvsupd server program is still part of
CVSup. By default, CVSup tries to install an X-based GUI. Before setting up
your mirror, I strongly recommend installing CVSup without the GUI. You
don’t need a heavy GUI and all the associated X software to run a server.
(If you already have X installed, don’t fret about the X GUI; there’s just no
point in installing the full X suite for this one program.)
# cd /usr/ports/net/cvsup-without-gui
# make all install clean
# cd /usr/ports/net/cvsup-mirror
# make all install clean
After downloading the script, the install process pauses and prompts you
for information. The default answer appears in brackets. Pressing ENTER takes
the default.
Master site for your updates [cvsup-master.freebsd.org]?
cvsup5.us.freebsd.org
How many hours between updates of your files [1]? 1
First, pick the mirror you want to update from . Do not take the default;
instead, enter a reasonably close public mirror. Lowly end users do not rate
access to the global master CVSup server reserved for official public mirrors.
(As an average committer, I don’t rate access to cvsup-master except in truly
extraordinary circumstances, and then by request only.) Then, decide how
often your mirror will update . The mirrors you download from only update
from the master server every hour, so don’t update more often than that.
I usually enter 168, which updates the repository once a week. If I’m doing
server upgrades more than once a week, I’m doing something wrong!
The update process runs from cron (see Chapter 15). In many cases, I
remove the scheduled repository update job and only run the update by hand.
To update a group of machines to the same version of -stable, all I do is update
the cvsupd server once and upgrade all the machines from the server. I fre-
quently upgrade my test machine, put it through several rounds of extensive

Upgrading FreeBSD 401
testing, and upgrade the rest from the same batch of source code, which
guarantees good code and identical systems. There is no requirement for you
to be more up to date than you wish; the source code is yours to do with as
you see fit, after all!
Do you wish to mirror the main source repository [y]? y
Where would you like to put it [/home/ncvs]?
The main source repository contains the FreeBSD source code. Maintain-
ing a local mirror of it is generally the point of this exercise. /home/ncvs is the
default location for a CVS repository; use it unless you have really good reason
not to. Taking the defaults for both of these is a good idea.
Do you wish to mirror the installed World Wide Web data [y]? n
Do you wish to mirror the GNATS bug tracking database [y]? n
Do you wish to mirror the mailing list archive [y]? n
These three questions offer you the opportunity to really utilize that big
hard drive you’ve been saving for a rainy day. The installed World Wide Web data
includes the installed version of the Handbook, the FAQ, and the rest of the
FreeBSD website. The GNATS bug tracking database holds all of the FreeBSD
Problem Reports (PRs) filed since the Project began in the last century. And
the mailing list archive contains a copy of every mailing list ever sent to any
FreeBSD mailing list. I don’t have time to keep up on all the existing FreeBSD
mailing lists, let alone read the archive!
Unique unprivileged user ID for running the client [cvsupin]?
Unique unprivileged group ID for running the client [cvsupin]?
Unique unprivileged user ID for running the server [cvsup]?
Unique unprivileged group ID for running the server [cvsup]?
The mirror server needs two unique user IDs and the associated groups.
Do not use nobody, nonroot, or nogroup—these users share other files on
the system, and using them for your cvsupd mirror would aggravate any
existing security problems. The default users are generally perfectly fine
for this, unless you’ve already issued the cvsup account to Carl van Stromkern
Utley-Peterson or something.
Syslog facility for the server log [daemon]?
We’ll talk about syslog at length in Chapter 19. For now, take the default.
Maximum simultaneous client connections [8]?
You can easily change the maximum number of connections allowed
later, but the default is fine to start with. How many machines will you be
updating simultaneously, anyway?

402 Chapter 13
The port offers to install the users and groups you selected earlier, as
well as configure syslogd. Let it do so.
Would you like me to set up your crontab for hourly updates [y]? y
You might not want to have cvsupd update regularly; if not, choose n here.
To update your mirror, either use cron(8) (see Chapter 15) or run
/usr/local/etc/cvsup/update.sh. You must specify the full path to this command.
The first time you update, it will take a long time to download the whole source
repository, but subsequent updates are brief. To run the CVSup server that
allows clients to connect and update their source code, put cvsupd_enable="YES"
in /etc/rc.conf.
Controlling Access
Just because you want to be a good system administrator and have a private
repository doesn’t mean that you want every Carl van Stromkern Utley-
Peterson in the world to be able to download from your mirror. The cvsupd
server allows you to control which computers have access to the mirror.
The file /usr/local/etc/cvsup/cvsupd.access controls which hosts may connect
to your mirror. Lines beginning with a hash mark (#) denote comments; a
plus sign (+) means that the client may connect, and a minus sign (-) means
that it cannot. An asterisk (*) means that the client must authenticate, as
discussed later in this section.
Each rule in cvsupd.access can refer to either a hostname or an IP address,
but IP addresses are preferred. You can use netmasks with IP addresses as well.
For example, to allow access from the network 192.168.0.0/16 and explicitly
reject clients accessing from elsewhere, use these lines:
+192.168.0.0/16
-0.0.0.0/0
Controlling access by IP addresses is good for a static network. You
might need a more flexible system, however, if you’re connecting from
random IP addresses. That’s where password authentication comes in
handy. Unfortunately, the csup client does not support authentication.
If you require authentication, install /usr/ports/net/cvsup and read cvsupd(8).
Most people, however, find that IP-based access lists meet their needs.
CVS MIRRORS AND DEVELOPMENT
If you want to do FreeBSD development, a CVS mirror is also usable as a local CVS
repository. Add your user account to the cvsup group, and you’ll have privileges to
perform CVS operations on the local repository. If you’re not a developer, don’t
worry about this.

Upgrading FreeBSD 403
Upgrading the Ports Collection
Just like FreeBSD itself, the Ports Collection is continually updated with new
versions of software. Part of upgrading your system includes updating installed
ports. Remember that add-on software can have security problems just as the
main system software can, and the best defense against intrusion is to keep
your software up to date. Upgrading installed software has two steps: first,
updating the Ports Collection to the latest version, and then updating the
installed software to the version supported in the latest Ports Collection.
If you update your system with csup(1), adding the statement ports tag=.
to your supfile seamlessly updates your Ports Collection. If you’re tracking an
errata branch, however, you probably upgrade your system with FreeBSD
Update. Or perhaps you don’t want to update your entire system, just the
Ports Collection. That’s where portsnap(8) comes in handy.
portsnap(8) downloads and installs compressed snapshots and updates
of the Ports Collection, helping system administrators keep their installed
software up to date. Every hour or so, the central FreeBSD portsnap server
gathers together all the changes that have occurred in the Ports Collection
since the last time it checked. These changes are collected into a patch set.
When you run portsnap(8), you get all of the updates that have accumulated
since the last time you updated your ports tree. portsnap(8) applies those
changes to your local Ports Collection, giving you the very latest ports.
Configuring portsnap
The file /etc/portsnap.conf tells portsnap(8) how to handle its updates. While
very few people must reconfigure portsnap(8), here are the options you’ll
most likely want to touch. You might notice that the configuration for
portsnap(8) looks much like the configuration for freebsd-update(8). The
same person wrote both tools, and they use similar underlying technologies
to perform similar tasks. The /etc/portsnap.conf file contains keywords with
values assigned to them.
SERVERNAME=portsnap.freebsd.org
This is the name of your desired portsnap server. The machine portsnap
.freebsd.org is actually a pool of machines. It’s possible that the FreeBSD
Project will establish regional or national portsnap servers to distribute
the load more sensibly, but for now this is the only available portsnap
server.
PORTSNAP VS. CSUP
Use either portsnap(8) or csup(1) to update the Ports Collection, but not both. The
two tools are incompatible. csup is most useful if you are tracking -stable or -current,
while portsnap is best for production systems where you use binary updates. You
can make either portsnap(8) or csup(1) work in either situation, but you must pick
one and stick with it!

404 Chapter 13
KEYPRINT=9b5...
The keyprint is the cryptographic key for the portsnap server. portsnap(8)
cryptographically signs updates to guarantee authenticity and integrity.
Do not change this.
REFUSE arabic korean
The REFUSE variable lets you tell portsnap(8) to not update certain cate-
gories of software. This example prevents updates to the arabic or korean
categories, much as a csup(1) refuse file does. Just as with csup(1), be
careful with what you refuse; the Ports Collection is an integrated whole,
and you can wind up with an inconsistent system if you arbitrarily refuse
large parts of the tree.
Using portsnap(8)
The first time you run portsnap(8), use the fetch extract command:
# portsnap fetch extract
This tells portsnap to download the portsnap server’s latest snapshot of
the Ports Collection and extracts it under /usr/ports. Only use fetch extract
once, to initialize portsnap(8) into a known state.
For subsequent updates, use the fetch update command:
# portsnap fetch update
This downloads all the changes since the last time you ran portsnap(8)
and installs those updates in the Ports Collection.
If you wish to schedule a regular portsnap run via cron(1), it’s best to use
the cron update command instead of fetch update. This helps distribute the
load on the FreeBSD portsnap server. Schedule a 5 AM portsnap run in root’s
crontab with an entry like this:
0 5 * * * /usr/sbin/portsnap cron update
This kicks off the actual update at a random time between 5 AM and 6 AM,
which is much more effective than every portsnap(8) user hitting the download
server simultaneously at 5 AM.
That’s really everything you need to know to use portsnap(8) which is an
excellent way to get the latest FreeBSD applications without using csup(1) or
updating your entire source tree. The only thing you must do now is get your
installed software updated to the version in the Ports Collection.
Updating Installed Ports
If you use csup to update your ports tree, anything you install from now on
will be the latest version. But what about your previously installed applications?
FreeBSD tracks all sorts of dependency information between add-on packages,

Upgrading FreeBSD 405
and often updating one program will impact dozens of others. This is a royal
pain to manage. Wouldn’t it be nice to just say, “Update my Apache install,”
and have FreeBSD manage the dependencies for you? FreeBSD provides two
different tools for handling this issue, portupgrade(8) and portmaster(8).
portupgrade is the original updating tool for FreeBSD ports. Written
in Ruby, portupgrade maintains databases from the information in the
ports tree.
portmaster is a shell script that handles the most common software
maintenance tasks without invoking any extra software or databases, but does
not cover all possible edge cases. We cover portmaster; while it’s not as all-
encompassing as portupgrade, it’s far simpler, so there’s less that can go
wrong with it.
Initial portmaster Setup
Look for portmaster in /usr/ports/ports-mgmt/portmaster. The usual make install
clean shuffle installs it. After your install, run portmaster -L to see what it has
to say about your installed ports. This can take a few minutes to run, so I
suggest capturing the output in a file for leisurely analysis. (You could also use
portmaster -l instead; this runs faster and provides the dependency infor-
mation, but does not note obsolete ports.)
# portmaster -L > portmaster.out
portmaster categorizes ports by their relationships to one another, taking
into account which other software each package requires to work properly.
For example, I’m writing this book in OpenOffice.org. To work correctly,
OOo requires the X Window System, assorted graphics programs, security
libraries, miscellaneous fonts, and a kitchen sink with a garbage disposal of
5.5 horsepower or greater. None of these programs are part of the FreeBSD
base system, and if they’re not installed, OOo will not run. OOo therefore
lists all of these programs as dependencies. In return, all those programs list
OOo as a dependent program. These relationships allow portmaster to build
a relationship tree between the ports, and portmaster uses tree terminology
when referring to ports.
portmaster starts with root ports, which do not have dependencies and
are not depended on by any other program. For example, portmaster
itself requires no software other than itself, and no other program on my
system requires portmaster. A few other programs, such as bash, sudo, and
zip, are commonly installed root ports.
The trunk ports have no dependencies, but are required by other pro-
grams. Many shared libraries for graphics, encryption, and mathematics fall
into this category, as do a variety of scripting and programming languages.
If you use Perl, for example, the base Perl install would almost certainly be a
trunk port.
Further up the tree we have branch ports, which both require other ports
and are required by other ports. Common branch ports include Java, the
X Window System, and web browser rendering engines.

406 Chapter 13
Leaf ports are the tips of the tree; they have dependencies, but no pro-
grams depend on them. Typical leaf ports include text editors, oversized
office suites, web browsers, chat clients, and so on.
When updating ports, it’s entirely possible that a change to a trunk or
branch port will affect leaf ports. If you upgrade a graphics library to a new
version that is incompatible with the old version, don’t be surprised if all the
graphics programs using that library will no longer function.
Identifying Unneeded Software
Many of us have systems where we install software ad-hoc, play with it for a
while, and then forget to remove it when we decide to not use it. When
upgrade time comes, it makes sense to remove these software packages
rather than spend the time to upgrade them. That’s where portmaster’s list
of root and leaf ports is especially valuable.
portmaster(8) starts its printout with the root ports. Go through the list
and identify any programs you no longer want or require. If you’re not sure
where a package came from, run whereis packagename to see where the port
lives. Check the package description in the port to jog your memory and, if
you still don’t recognize the program, or remember it and don’t want it, feel
free to uninstall it. If it turns out to be something vital, you can always reinstall
it later. Do the same with the leaf ports at the end of the list. Why upgrade
what you don’t need?
portmaster’s -e flag uninstalls a port and its dependencies, if those
dependencies are not required by other ports. For example, were I to
uninstall OpenOffice.org, I would have many ports I no longer need.
Running portmaster -e openoffice.org-2.2.0 would remove OOo and all
ports required by nothing else but OOo.
Identifying and Upgrading Software
Upgrade candidates appear in portmaster(8) output like this:
===>>> linux_base-fc-4_8
===>>> New version available: linux_base-fc-4_9
My laptop currently has linux_base version 4_8 installed, and 4_9 is
available. Is it worth going through an upgrade for a minor point release like
that? Maybe, maybe not. You can always check the FreeBSD CVSWeb history
for the port to see what changes took place. If it’s a critical security issue, you
almost certainly want to update, but if not there’s no real rush. It is up to you.
If you want to update, just give portmaster the name of the port you want
to upgrade. You can use the port name, the full path to the package database
for the port, or use a few other methods shown in portmaster(8).
# portmaster linux_base-fc-4_8

Upgrading FreeBSD 407
portmaster first searches for any dependencies that need to be upgraded
as part of this upgrade and kicks off jobs to upgrade those ports. It also starts
fetching distfiles for the upgrade target and the dependencies. portmaster
also front-loads the parts of the port build process that require user inter-
action. It tries to get all of the information it requires from you right up
front, so that you can walk away and be assured that your upgrade won’t be
hung up waiting for you to press ENTER halfway through.
There’s always a risk that the upgrade will fail. As uninstalling the old
version is a necessary prerequisite to installing the upgrade, there’s a window
where a failure might leave you without either the old or the new versions of
the software. portmaster doesn’t just uninstall the port, however; it also creates
a backup package of the old version of the software. This backup is deleted
once the upgrade succeeds, but you can retain it with the -b flag. The backups
are kept in /usr/ports/packages/All. What’s more, if you’re upgrading a whole
chain of packages, portmaster retains the backups of all dependent packages
until the entire upgrade is complete. If I try to upgrade OpenOffice.org with
portmaster and the build fails, I’ll need the older versions of my OpenOffice.org
dependencies to use the older version of the software. portmaster tries hard
to not leave you with an unusable mix of old and new software.
I like to keep backup packages around until I know that the new version
works exactly the way I like, but some of you readers are much smarter than
I am and don’t require such a safety belt.
Forcing a Rebuild
portmaster can’t identify every reason why a port would need an upgrade or
reinstall. For example, my test server has the latest version of sudo(8) on it. If
we check the shared libraries that program requires, we’ll see something
interesting:
# ldd `which sudo`
/usr/local/bin/sudo:
libutil.so.5=> /lib/libutil.so.5 (0x28093000)
libpam.so.3 => /usr/lib/libpam.so.3 (0x2809f000)
libopie.so.4 => /usr/lib/libopie.so.4 (0x280a6000)
libc.so.6=> /lib/libc.so.6 (0x280af000)
libmd.so.3 => /lib/libmd.so.3 (0x28193000)
Remember earlier in this chapter, when libutil.so.5 and libc.so.6
showed up as obsolete? Well, if I had blindly erased them, my sudo would
no longer work. Instead, I’m now hunting for all the programs that require
those libraries. portmaster doesn’t see that sudo requires an upgrade, but
I see that it requires a reinstall. I could go into the port directory and do a make
deinstall && make reinstall, or I could just do:
# portmaster sudo

408 Chapter 13
This forces portmaster to rebuild sudo(8). The process of building sudo
automatically links it against the most recent library, removing one depen-
dency on that obsolete file. If I need to do this with a leaf port, I can use -f to
tell portmaster(8) to rebuild all dependencies whether needed or not.
Rebuilding Upward Dependencies
portmaster automatically updates programs required by a program you want
to update, but it can also be told to upgrade everything that depends on the
program you’re updating. This can quickly cover large numbers of ports if
you’re updating a critical library. Use the -r flag to tell portmaster to check
all the upward as well as downward dependencies.
Changing Dependencies
One important but less frequently needed change is replacing one port with
another. For example, suppose I wanted to replace my Emacs 20 install with
Emacs 21. portmaster can handle that for us easily with the -o argument.
You’ll need to specify the new port and the old installed port, in that order:
# portmaster -o editors/emacs20 editors/emacs21
This isn’t common, mind you, but after surviving several major changes
in software over the years I’m very grateful the capability exists!
Ignoring Ports
Occasionally, you really don’t want to update a port even if you specify
recursion. For example, when I build a new OpenOffice.org, my laptop is tied
up for a day. I really don’t want to update OpenOffice.org as part of another
update; I want to choose exactly when that update happens.
portmaster checks each package database directory for a file called
+IGNOREME. If that file exists, portmaster will not update that package as
part of an update of other dependencies.
# cd /var/db/pkg/openoffice.org-2.0.20060818
# touch +IGNOREME
CAUTION IS FOR THE WEAK! FULL SPEED AHEAD!
If you use the -a flag, portmaster tries to update everything it thinks needs an update.
Use -af, and portmaster will rebuild all of your ports.
Upgrading FreeBSD 409
Even if I update a library that OpenOffice.org depends on and tell
portmaster to update every program that depends on that library, portmaster
will not update OOo itself. OOo might break as a result of that dependency
update, but that’s a risk I take when choosing this path.
Other portmaster Features
I highly recommend reading portmaster(8) to see what functions it includes
that will help solve your problems. You can resume failed builds, see what
portmaster would do if you let it upgrade the system, save packages in your
package repository, and so on. If you have a port upgrade problem,
portmaster(8) probably has your solution.
Reducing the Size of the Ports Tree
The ports tree grows over time. Part of this growth is good, as new ports are
added to the tree. Part of this growth is a necessary evil, such as temporary
retention of older versions of software you’ve just upgraded. The rest of this
growth is an unnecessary evil, as files that were once important but are now
obsolete are never removed from the system. For example, now that I’ve
updated my Linux package to Fedora Core 4, those distfiles for Fedora Core 3
are no longer useful. Finding and removing old files can save gigabytes of disk
space, and that space is not (yet) infinite. While portmaster offers to delete
unused distfiles for you, it’s still worthwhile to perform global checks for
unnecessary distfiles.
portmaster can check for stale distfiles. If you run portmaster
--clean-distfiles, portmaster(8) will identify each unnecessary distfile
and ask if you want to delete it. If you run portmaster --clean-distfiles-all,
portmaster deletes the old distfiles without asking.
Another common problem is not running make clean after installing a
port. Often, I want source code easily at hand while first learning a program,
so I don’t clean my own ports. Eventually I forget about them, and they
lounge around filling up disk space. While writing this section, I found that
I had neglected to clean up after building OpenOffice.org the last time;
no wonder my disk looked bloated! FreeBSD ports are easy enough to clean
en masse; just go to /usr/ports and type make clean NOCLEANDEPENDS=yes. This
recourses through the ports tree and does a make clean for every port,
methodically removing every work directory.
With these tools, you can keep your system as up to date as you like. Now
let’s switch from the basics of FreeBSD administration to some of the things
you can do with FreeBSD.

14
THE INTERNET ROAD MAP: DNS
The Domain Name System (DNS) is one of
those quiet, behind-the-scenes services that
doesn’t get half the attention it deserves.
Although most users have never heard of it, DNS
is what makes the Internet as we know it work. DNS,
also called name service, provides a map between
hostnames and IP addresses. Without DNS, your web browsers and email
programs wouldn’t be able to use the nice and convenient hostnames such
as www.cnn.com; instead, you’d have to type in a numeric IP address for each
server you access. This would greatly reduce the Internet’s popularity. To
most end users, a DNS failure is an Internet failure, end of story.
Any Internet service you implement requires DNS. We’ll discuss how
DNS works, how to check DNS, how to configure your FreeBSD system
to use DNS, and how to build your own DNS service.
412 Chapter 14
How DNS Works
DNS maps IP addresses to hostnames and hostnames to IP addresses.
For example, a user doesn’t care that www.absolutefreebsd.com is actually
198.22.63.8; he just types the URL into his web browser and DNS handles
the translation. As a system administrator, you must be able to install,
inspect, and verify DNS information—and you must understand how your
system performs these operations.
DNS information can be available in any number of places: on the local
system, on a local DNS server, or on a remote nameserver. Unix systems use
aresolver (a program that knows about all these information sources and can
interface with them) to gather DNS answers from all these sources. When a
program wants to know the IP address of a host or the hostname for an IP
address, it asks the resolver, which consults the appropriate information
sources and returns the answer to the program. We’ll look at how to configure
the resolver later in this chapter.
Most commonly, a resolver directs DNS queries to a nameserver—a
computer running a program designed to gather DNS information from
other computers on the Internet. Once a DNS request hits a nameserver, the
nameserver checks its local cache to see if it has looked up that information
recently. If it is in the cache, the nameserver returns the same answer as it
gave the last user. Nameservers receive many identical DNS requests; for
example, the nameserver at one ISP I worked at received several hundred
requests per hour for the IP address of www.cnn.com. Multiply this by all the
Yahoo!, eBay, and MSN requests out there, and you can see why caching
answers locally is so important.
Suppose you’re looking for information that’s a little more obscure,
such as the IP address for www.absolutefreebsd.com, and the local nameserver
doesn’t have that answer handy because nobody’s gone there lately. Your
local nameserver then asks a root server, which is a special server that keeps a
list of all the nameservers responsible for every top-level domain on the
Internet. In a recursive query, the root server tells the nameserver to go ask the
appropriate nameservers, which may in turn refer the query to still other
nameservers. Eventually, your query reaches an authoritative nameserver for
that domain—the one true source of information about that domain—and
your local nameserver gets its actual answer.
Every client on the Internet expects to be able to get information for
every domain from that domain’s authoritative nameservers. Every domain
needs at least two nameservers. If one nameserver fails, the other picks up
the load, but if all the nameservers for a domain fail, the domain vanishes
from the Internet: Web browsers report that the domain does not exist, email
bounces, everyone is at a loss. Even big companies, like Microsoft, have had
this happen. Your manager or customers will notice you, but not in a good
way. Pay attention to your name service!

The Internet Road Map: DNS 413
Basic DNS Tools
FreeBSD includes several tools for inspecting DNS information. Since most
DNS runs over UDP (User Datagram Protocol, see Chapter 6), you cannot
use telnet to manually query a server as we will do with email and web
services later. Your only access to live DNS information is through host(1)
and dig(1).
The host(1) Command
Use host(1) for a quick forward DNS check (finding the IP address of a known
hostname). For example, to check my publisher’s web page, I do the following:
# host www.nostarch.com
www.nostarch.com has address 72.32.92.4
This is perhaps the simplest DNS query you can have: “Here’s a
hostname, what’s its IP address?” Other seemingly simple queries generate
more complicated results.
# host www.cnn.com
www.cnn.com is an alias for cnn.com.
cnn.com has address 64.236.24.20
cnn.com has address 64.236.24.28
...
cnn.com mail is handled by 10 atlmail5.turner.com.
cnn.com mail is handled by 20 nycmail2.turner.com.
...
This illustrates that one hostname can actually refer to an entirely
different hostname—in this case, www.cnn.com is actually an alias for a host
called cnn.com .
The host cnn.com actually has eight independent IP addresses
(trimmed in the example). We also see the mail servers that handle all
the email for cnn.com .
FORWARD AND REVERSE DNS
No, a DNS server does not have a clutch and gearshift. Forward and reverse DNS
are types of DNS maps. Forward DNS maps hostnames to IP addresses; it supports
aliases and other fun features. Reverse DNS maps IP addresses to hostnames; it is
much less flexible than forward DNS. While multiple IPs can be attached to a host-
name, each IP address is expected to resolve to the one true hostname.
For example, an ISP might have several thousand websites hosted on one server.
Forward DNS maps the IP addresses of all those websites to the one server. A reverse
DNS check returns only one answer, the actual hostname of the server hosting all
those web pages.

414 Chapter 14
When you type http://www.nostarch.com into your web browser, you’re
actually directing the web browser to go to the machine called www.nostarch.com
and ask it for its default web page. The browser goes to the single IP address
listed for that machine. When you ask for http://www.cnn.com, the resolver
picks one of the IP addresses listed for that host and gives it to the browser.
Similarly, email servers transfer email to one of the hosts identified as a mail
handler for the domain. While application programs require more than an
IP address to function, the IP is vital. You can’t download a web page if you
can’t find the computer that hosts it!
Digging for Detail
While host(1) is helpful for quick answers, it’s certainly not very detailed.
Also, you don’t know where this information came from—is it from the local
machine’s cache, or did the nameserver ask the master nameserver for that
domain? The standard program for finding detailed DNS information is
dig(1). (Another tool, nslookup(1), was popular for a long time but has
fallen out of favor and has actually lost functionality in recent years.) dig has
a variety of options that allow you to debug a wide range of name service
problems; here, I’ll cover only the most basic options.
In its most basic form, dig is called with nothing but a hostname. For
example, to dig my publisher’s web server I enter:
# dig www.nostarch.com
; <<>> DiG 9.3.2-P1 <<>> www.nostarch.com
;; global options: printcmd
;; Got answer:
;; ->>HEADER<<- opcode: QUERY, status: NOERROR, id: 33643
;; flags: qr rd ra; QUERY: 1, ANSWER: 1, AUTHORITY: 2, ADDITIONAL: 2
;; QUESTION SECTION:
;www.nostarch.com. IN A
;; ANSWER SECTION:
www.nostarch.com. 2550 IN A 72.32.92.4
;; AUTHORITY SECTION:
nostarch.com. 2550 IN NS ns2.laughingsquid.net.
nostarch.com. 2550 IN NS ns1.laughingsquid.net.
;; ADDITIONAL SECTION:
ns1.laughingsquid.net. 171750 IN A 72.3.155.219
ns2.laughingsquid.net. 171750 IN A 72.32.93.189
;; Query time: 58 msec
;; SERVER: 198.22.63.8#53(198.22.63.8)
;; WHEN: Mon Nov 20 18:43:22 2006
;; MSG SIZE rcvd: 135
Yes, this is a lot of information! When using dig(1), however, you’re
probably trying to debug something, and when debugging, you want more
information rather than less. Let’s dissect this.
First, each line that begins with a semicolon is a comment that isn’t
directly relevant to the answer, but might be important. For example, the
first line displays the version of dig you’re using .

The Internet Road Map: DNS 415
The second line shows the options dig is set to use . We didn’t specify
any options, so dig uses its defaults.
Next, we have our first bit of real meat: dig got an answer from
somewhere. The status entry contains an important word, NOERROR,
which tells us that the query was performed without getting an error. If you
don’t get NOERROR, you have a problem. Common errors include NXDOMAIN,
which means that the host or domain you asked about doesn’t exist, or
SERVFAIL, meaning that the nameserver you’re talking to is supposed to know
about that domain but doesn’t actually have any information on it.
Query Section
In the query section , we see dig’s actual query. Our sample includes the
following tidbit:
;www.nostarch.com. IN A
This line begins with a semicolon, telling us it’s a comment. This is our
DNS query in more formal syntax. First, dig confirms that we asked for
www.nostarch.com, but what’s the IN A? DNS can manage many different
naming systems, not just Internet-style IP addresses and hostnames. IN
indicates that this is an Internet query; all domains on the Internet use the
class IN. Last on that line, we have the type of query—here, we’re asking for
an A, or address, record. We have a hostname, and we want its address.
APTR (pointer) would mean that this is a reverse DNS query (in which we
have an IP address and want the associated name). As you work more with
dig, you’ll see other query types as well.
Answer Section
Next, we have the answer section , which is the meat of our reply.
www.nostarch.com. 2550 IN A 72.32.92.4
We asked for www.nostarch.com, so that’s printed first. The next number,
2250, is the TTL, or time-to-live, for this information. Our local nameserver
may cache this answer for another 2,250 seconds, or roughly 42 minutes.
When that time lapses, the local DNS server removes this answer from the
cache. If someone asks for that information again, the local DNS server will
have to go fetch a fresh answer. The IN, again, indicates that this is Internet-
style data, and the A shows that this is an address. Finally, we have the actual
IP address of the host www.nostarch.com, 72.32.92.4.
Authority Section
To get the IP address of www.nostarch.com, we follow the chain of authoritative
nameservers. The authority section lists the nameservers responsible for
the domain—in this case, ns1.laughingsquid.net and ns2.laughingsquid.net. The
information about authoritative nameservers may be cached for 2,550 seconds,
and these are (once again) Internet addresses.

416 Chapter 14
Additional Section
Finally, in the additional section , dig lists the IP addresses of hosts related
to the hosts we queried. dig identified the authoritative nameservers for
nostarch.com, but you’ll need the IP addresses for those servers to make further
DNS queries about the nostarch.com domain. You get the authoritative DNS
server information, but note that the TTL for these answers is much longer
than the TTL for the original answer. These answers are good for another
171,750 seconds, or roughly 48 hours. Once this time passes, your nameserver
will discard these cached results and go ask the root servers once more for the
authoritative DNS servers for nostarch.com.
Do a dig on a couple of domains and become familiar with how the
output looks.
Finding Hostnames with dig
Suppose you have an IP address and want to identify the associated hostname,
much as you might want to find out who owns a phone number. This is a
common problem on the Internet—you might see an IP address hitting your
website every five seconds and wonder who they are and what they’re up to.
To look up a name from an IP address, use reverse lookup with dig’s -x option.
Much of the result is identical to the forward lookup; we’ll only discuss the
notable differences.
# dig -x 72.32.92.4
...
;; QUESTION SECTION:
;4.92.32.72.in-addr.arpa. IN PTR
;; ANSWER SECTION:
4.92.32.72.in-addr.arpa. 3600 IN PTR squid14.laughingsquid.net.
One of the most obvious differences is that our question looks really
funky. What’s this 4.92.32.72.in-addr.arpa stuff? When you’re doing a reverse
lookup, the components of your IP address are reversed and placed under
the domain in-addr.arpa.
We’re also looking for a PTR record, rather than an A record. A PTR
query means that you have an IP address and want to know what hostname
lives there.
Although we know that www.nostarch.com lives at the IP address
72.32.92.4, a reverse lookup reveals that the most correct name for this host
is squid14.laughingsquid.net . This is much like a phone system; while a
whole family can share a single phone, the number is registered to a single
person.
Forward and reverse DNS are generally expected to match, but since
many hosts can share one IP address, an A record does not necessarily need
a matching PTR record. The hostname www.nostarch.com maps to 72.32.92.4,
but 72.32.92.4 maps to squid14.laughingsquid.net. You can, however, expect
to find an A record for squid14.laughingsquid.net pointing to 72.32.92.4. If
the hostname given by a reverse lookup does not have a matching forward

The Internet Road Map: DNS 417
record, DNS is incorrectly configured. Tools that rely upon DNS checks,
such as certain configurations of TCP wrappers, will reject connections
from such systems. You’ll also see this on home broadband connections,
where you might have a person’s domain pointed at an IP with a reverse
DNS name from a cable modem host. Automatic tools exist to check forward
and reverse DNS matches, as we’ll see later in this chapter.
More dig Options
Check dig(1) for a full list of options; below, a few basic ones are covered. The
options I most commonly use are querying a particular server and disabling
recursion.
Querying a Specific Nameserver
By default, dig queries the first nameserver configured in the resolver. If
you’re trying to debug a problem, however, you frequently want to query a
particular nameserver. The @ option lets you choose a particular nameserver.
For example, to ask my local ISP’s DNS server dns1.wideopenwest.com what it
knows about nostarch.com, I enter:
# dig nostarch.com @dns1.wideopenwest.com
The output from this command resembles the sample output
shown earlier, except that you’ll see references to the nameserver at
dns1.wideopenwest.com. If you’re debugging a problem, review answers
from different nameservers carefully; minor differences may show where
your problem lies.
Disabling Recursion
By default, a nameserver provides an answer by recursing through its
resources. Sometimes you don’t want the nameserver to recurse on a query;
instead, you want it to tell you only what it has in cache or where it would go
to look for an answer. It’s frequently helpful to perform the recursion yourself
when trying to solve a problem. Specify +norecurse on the command line to
trigger this behavior. Try this now with a domain that you’re pretty certain
your local nameserver has never looked for. If your nameserver has this
information cached, the result will be much like our previous example. If it
doesn’t, however, you’ll get this:
# dig absolutefreebsd.com +norecurse
...
;; QUESTION SECTION:
;AbsoluteFreeBSD.com. IN A
;; AUTHORITY SECTION:
com. 33195 IN NS A.GTLD-SERVERS.NET.
com. 33195 IN NS B.GTLD-SERVERS.NET.
com. 33195 IN NS C.GTLD-SERVERS.NET.
...
;; ADDITIONAL SECTION:

418 Chapter 14
A.GTLD-SERVERS.NET. 98529 IN A 192.5.6.30
A.GTLD-SERVERS.NET. 129969 IN AAAA 2001:503:a83e::2:30
B.GTLD-SERVERS.NET. 98529 IN A 192.33.14.30
B.GTLD-SERVERS.NET. 129969 IN AAAA 2001:503:231d::2:30
C.GTLD-SERVERS.NET. 98529 IN A 192.26.92.30
...
Note that the reply jumps from the question section right into the
authority section . There is no answer, because this nameserver doesn’t
have an answer. Instead, it refers you to the authoritative nameservers for
.com, the lettered servers under gtld-servers.net. The additional information
section gives the IP addresses for those servers as well. Note that some of
those servers have IPv6 addresses as well as the standard IPv4 addresses.
If your system does not support IPv6, it will not use the IPv6 addresses.
By referring you to the nameservers for the .com domain, this nameserver
is saying, “I don’t know, I suggest you go ask these guys.” You told your
nameserver not to recurse, so it’s not going out to ask.
To query one of these .com nameservers, set a server name and use the
norecurse option again.
# dig www.absolutefreebsd.com @a.gtld-servers.net +norecurse
This refers you to another set of nameservers. Follow the chain down to
see exactly how your nameserver resolves queries.
in-addr.arpa
There’s one major annoyance with PTR records; they’re listed backwards.
You see, DNS checks hostname components from right to left. When you
look for the host www.absolutefreebsd.com, the nameserver first finds the
nameserver for .com. It then checks under .com for absolutefreebsd.com, then
under absolutefreebsd.com for www.absolutefreebsd.com. The biggest units are on
the right. The .com domain was delegated to a master authority, who then
delegated the subdivision absolutefreebsd to me, and I, in turn, delegated the
subdivision www to a particular machine.
In IP addresses, the largest units are on the left. Take an IP address
72.32.92.4, for example. The first number is comparable to the whole .com
domain. The global IP address authority assigned the block 72 to ARIN (the
American Registry for Internet Numbers). ARIN, in turn, delegated 72.32 to a
particular ISP. The ISP turned around and delegated 72.32.92 to a customer,
who assigned 72.32.92.4 to a particular machine. The delegations are very
similar in concept, but run from left to right—opposite to the way the
hostname delegations work.
It’s very easy to confuse a forward IP address with a reversed IP address,
so DNS uses a special domain to indicate that an IP address is reversed.
Reversed IP addresses have the string in-addr.arpa attached at the end.
(The reasons for this date back decades and are rather tedious, so we
won’t go into them.) The bottom line is that our 72.32.92.4 becomes
4.92.32.72.in-addr.arpa.

The Internet Road Map: DNS 419
So, why not just leave the IP address forward and use in-addr.arpa to
indicate that it’s a reverse DNS check? Glad you asked! The preceding address
is a simple one, and digging it searches a very limited space. If you own the
72.32.92.0/241 block, however, you might need to query the entire address
space assigned you by the ISP, or 92.32.72.in-addr.arpa. You might have to
query the whole block of 72.32/16, or 32.72.in-addr.arpa, or perhaps even
72.in-addr.arpa. Each is a check of an increasingly large space, much like
doing dig .com. You will probably never need to dig the whole .com space, but
Internet backbone engineers do, and backbone engineers are the ones who
write programs of this sort. One of the problems with using professional tools
is that they’re geared towards professionals.
Configuring the Resolver
The resolver is responsible for relaying DNS information to client programs.
Configuring your resolver is a vital part of system administration. Even a
DNS server needs a configured resolver, because the computer won’t know
it’s a nameserver unless you tell it. Just about anything you do on a network
requires a working name service client. Configuring a resolver involves answer-
ing a few questions:
Where does the server look for DNS information?
What are the local domain names?
Which nameservers should be queried?
The answers to these questions are configured in /etc/nsswitch.conf and
/etc/resolv.conf.
Host/IP Information Sources
This should be easy; a server gets its host information from a nameserver,
right? I mean, that’s what this whole chapter is about, isn’t it?
The real world isn’t that simple, however. Perhaps you have a small
home network with only three machines, and you consider running a DNS
server to be unacceptable overhead. Or, you might be on a large corporate
network where completing DNS changes takes weeks. FreeBSD (as all Unix-
like operating systems) supports both DNS and a hosts file, /etc/hosts, and you
can decide which to query first.
When FreeBSD needs to know the address of a host (or the reverse),
by default the query goes first to the hosts file and then the configured
1 We talked about /24s back in Chapter 6; go look again if you’re confused.
QUICK AND DIRTY LOOKUPS
host(1) does the reversal for you transparently. dig also does the reversal for you if
you use -x. Don’t let the in-addr.arpa confuse you, however.

420 Chapter 14
nameservers. This means that you can have a local override of nameserver
results, which is very useful for hosts behind a NAT or on a large corporate
network with odd2 network requirements. Under some bizarre circumstances,
you might need to reverse this order to query DNS first and the hosts file
second. In modern versions of FreeBSD, this order is set in /etc/nsswitch.conf.
(Older versions used /etc/host.conf instead, and you’ll still find references to
/etc/host.conf here and there in the documentation.)
Here’s the hostname service lookup configuration from /etc/nsswitch.conf:
hosts: files dns
The resolver queries the information sources in the order listed. If you
have an additional information source, such as cached (see Chapter 15), add
it here. To make the hostname service query the global DNS before the local
hosts file, reverse the order.
The second information source is checked only if the first information
source cannot find a record. If a host has conflicting information in /etc/hosts
and in DNS, the first one to be checked wins.
Setting Local Domain Names
When you’re working on machines on your own network, you don’t want to
have to type the whole hostname all the time. If you have 30 web servers,
typing ssh www19.mycompany.com gets old! You can give the resolver a default
local domain, or a list of domains, on the first line of /etc/resolv.conf.
Specifying the Local Domain
The domain keyword tells the resolver which local domain name to check, by
default, for all hostnames. For example, to specify absolutefreebsd.com as the
local domain, the first line of /etc/resolv.conf should look like this:
domain absolutefreebsd.com
2 Sadly, when it comes to corporate network design, odd is normal.
NAME SERVICE SWITCHING
The file /etc/nsswitch.conf is used not only by the hostname/IP resolver; it is a
configuration file for the general name service switching services. Many different
name services exist in a networked operating system. For example, in Chapter 6
we discussed the network service names and port numbers in /etc/services, as
well as the protocol names and numbers. Looking up a protocol name is a name
service lookup and can be handled internally by the system in a variety of ways.
Determining the UID and GID of a user (see Chapter 7) requires a different sort of
name lookup. /etc/nsswitch.conf determines ordering for all of these queries and
more. We’re only discussing the hostname service lookups here.

The Internet Road Map: DNS 421
Once a local domain is specified, any command that ordinarily requires
a domain name will assume it to be under absolutefreebsd.com. If I type ping
www, the resolver would append the name absolutefreebsd.com to that and give
ping the IP of www.absolutefreebsd.com.
Specifying a List of Domains
Alternately, use the search keyword to specify a list of domains to try. Perhaps
my company uses several domain names, and I want to search them all in
order. List the domains you want the resolver to query, in order, on the first
line of /etc/resolv.conf:
search absolutefreebsd.com blackhelicopters.org stenchmaster.org
In this case, the resolver queries these three domains in order until it
finds a match (or not). For example, if I type ping petulance, the resolver
would check for a host named petulance.absolutefreebsd.com. If it can’t find that,
it checks for petulance.blackhelicopters.org, and then petulance.stenchmaster.org.
If no such host exists in any of the three domains, the command fails.
The Nameserver List
Now that your resolver knows which domains to try, tell it which nameservers
to use. List each nameserver in /etc/resolv.conf on a line of its own, in order of
preference. The resolver queries the listed nameservers in order. Your com-
plete /etc/resolv.conf might look something like this:
domain absolutefreebsd.com
nameserver 127.0.0.1
nameserver 192.168.8.3
nameserver 172.18.33.4
Note that the first IP in this nameserver list is the loopback IP 127.0.0.1.
This entry tells the resolver to ask the local machine for DNS information,
which means that the resolver expects to find a DNS server running on the
local host. While in some rare instances you might not want to use the local
nameserver, in most cases, if you are running a nameserver, the local machine
should ask the local nameserver for answers.
With nameserver entries and either domain or search keywords, your
resolver is fully configured. Next, you need to configure those information
sources that you’ve told the resolver to use.
DEFAULT DOMAIN
If you have neither domain nor search entries in /etc/resolv.conf, the resolver uses
the local machine’s domain name.

422 Chapter 14
Local DNS Overrides with /etc/hosts
The /etc/hosts file matches Internet addresses to hostnames. While the hosts file
is very effective, it only works on a single machine and must be maintained by
hand. Dynamic nameservers have largely superseded /etc/hosts, but the hosts file
may still be useful on small networks or behind a Network Address Translation
(NAT) device. For example, using the hosts file is just fine if you have one or
two servers at home, or if someone else manages your public nameservers.
If you have multiple machines that need to be maintained separately, consider
building a full-fledged nameserver.
Once upon a time, the Internet had a single text hosts file that provided
the hostnames and IP addresses of every node on the Internet. System
administrators submitted their host changes to a central maintainer, who
issued an updated hosts file every few months. This worked fine when the
whole Internet had four hosts on it, and was even acceptable when there
were hundreds of hosts. As soon as the Internet began its exponential growth,
however, this scheme quickly became unmaintainable.
Each line in /etc/hosts represents one host. The first entry on each line is
an IP address, and the second is the fully qualified domain name of the host,
such as mail.absolutefreebsd.com. Following these two entries, you can list an
arbitrary number of aliases for that host.
For example, a small company might have a single server handling
email, serving FTP, web pages, and DNS, as well as performing a variety of
other functions. A desktop on that network might have a hosts file that looks
like this:
192.168.1.2 mail.mycompany.com mail ftp www dns
With this /etc/hosts entry, the desktop could find the server with either
the full domain name or any of the brief aliases listed.
If you find that you need more than two or three host entries, or that
maintaining hosts files is becoming a problem, you need a nameserver. A
nameserver is far more scalable than a hosts file across multiple machines.
While it requires an initial time investment, it’s much less labor to maintain
a nameserver once it is running.
Building a Nameserver
The most popular DNS server software is Berkeley Internet Name Daemon (BIND).
BIND is actually a suite of tools including programs such as host(1), dig(1),
and the DNS server program itself, named(8). BIND is maintained by the
Internet Software Consortium (http://www.isc.org) and is released under a
BSD-style license. While BIND has competitors, such as djbdns (/usr/ports/
net/djbdns), BIND is considered the DNS service reference implementation.
Most of BIND’s competitors were written years ago, when BIND had a poor
security record. BIND has since been rewritten from the ground up. Recent

The Internet Road Map: DNS 423
versions are much more secure than older versions, so there’s little reason to
look at these competitors. No matter which DNS daemon you decide to use,
the concepts used in BIND are generally applicable to any nameserver pro-
gram. One of the most important concepts is the relationship between masters
and slaves.
Masters and Slaves
Every domain needs at least two nameservers. One of these is the master for
the domain. The master holds the authoritative records for that domain.
Make any changes to the domain on the master nameserver. Slaves replicate
their records from the master. Both the master and its slaves are expected to
be authoritative—that is, the world assumes that the answers they provide for
their domain are 100 percent correct.
One DNS server can be a master for some domains and a slave for
others. For example, absolutefreebsd.com has two DNS servers: bewilderbeast
.blackhelicopters.org 3 and tribble.lodden.com. Bewilderbeast.blackhelicopters.org is
the master nameserver for the domain, while tribble.lodden.com is the slave.
Whenever I update the DNS record for this domain, bewilderbeast notifies
tribble that a newer record is available and the slave’s record is updated.
If bewilderbeast is assaulted by badgers and disappears from the Internet,
tribble will continue to offer DNS information for the domain. Tribble is a
master nameserver for lodden.com, however, just as bewilderbeast is a slave
for other domains. Sysadmins share and swap DNS slave services amongst
themselves.
Widely separate your nameservers. If you can swap slave DNS services with
someone on a different Internet backbone in another country, preferably
on another continent, do so. Many social networking websites offer DNS
swap meets. It’s best to swap slave DNS services with someone about your
size—you don’t want to slave several hundred domains in exchange for
slaving your company’s one domain! If nothing else, any number of com-
panies offer geographically diverse slave DNS for modest fees.
BIND Configuration Files
Both masters and slaves use the same configuration files for the name service
daemon, named(8). FreeBSD’s default configuration includes the defaults
needed to make a simple nameserver, but you’ll have to understand the
configuration to provide service for your own domain. The main config-
uration directory is /etc/namedb, and you’ll find several vital files there.
named.root
One file that must be present—but will work out of the box—is named.root,
which lists the root nameservers. When a nameserver receives a query for
a site it doesn’t have in its cache, it sends the query to the root name-
servers. Root nameservers are identified by their IP addresses, and the
3 A bewilderbeast is like a wildebeest, but far more confused.

424 Chapter 14
global Internet community goes to great lengths to ensure that these
addresses change as rarely as possible. This file, therefore, also changes
rarely—as of this writing in late 2007, named.root changed last in 2004.
localhost-forward.db, localhost-reverse.db
These are the correct forward and reverse zone files for the host localhost
on your computer. You don’t know what a zone file is? You will, if you
keep reading.
named.conf
The core of your DNS configuration is the named configuration file,
named.conf. If your named.conf is broken, your nameserver is hosed. This
is where the real meat of DNS configuration takes place.
Configuring BIND with named.conf
At first glance, named.conf looks like C code. Don’t worry if you don’t know C,
however, because the rules are very simple and the examples illustrate every-
thing you must know. Any line beginning with two slashes (//) is a comment.
Similarly, any text enclosed within the old-fashioned C comment marks, /*
and */, is a (possibly multiline) comment. Everything else in named.conf is
either an option or a zone. A zone is a fancy name for a domain—while, strictly
speaking, they aren’t identical, they’re close enough for our purposes. An
option controls how BIND operates.
Options
If you ignore the comments in the default named.conf, the file opens with a
list of options, most of which are obscure and commented out. Use options
by putting them in the options section of the file, which contains the word
options and a pair of curly brackets ({ and }). List options within the
brackets, separated by semicolons. Here’s a very simple options section
from a named.conf file:
options {
directory "/etc/namedb";
pid-file "/var/run/named/pid";
dump-file "/var/dump/named_dump.db";
statistics-file "/var/stats/named.stats";
listen-on { 127.0.0.1; 192.168.0.5; };
};
In this example, most of the options have a value of a directory or a file,
but the listen-on option lists two IP addresses.
The directory option specifies where named looks for stored DNS files.
The default is perfectly fine, especially given that /etc/namedb isn’t really
/etc/namedb. (Don’t freak out yet, keep reading, all will become clear.)
The pid-file is the process ID file, where named stores a text file contain-
ing the process ID of the main named process. Assorted named management
utilities use the contents of this file.

The Internet Road Map: DNS 425
A dump-file contains named’s cache of answers it has already retrieved.
named dumps its cache to disk upon request. A cache file is mostly used for
debugging DNS issues.
If you request named to keep stats and other information about queries,
it will use the statistics-file to store that information.
The listen-on option controls on which IP addresses named accepts
connections. If you have dozens of IP addresses on a single server, you might
want to confine named to only one of those. This is particularly valuable
when you have jails on your system, as it helps prevent misconfigured clients.
BIND supports many, many more options, but these are perhaps the
most popular ones. Consult the BIND documentation at http://www.isc.org
for the complete list of options and their proper uses.
Zones in named.conf
The default named.conf defines three zones, or domains, that every nameserver
manages by default: the root zone, the IPv4 localhost, and the IPv6 localhost. You
shouldn’t need to edit these default zones in any way—in fact, if you’re think-
ing of changing them, you’re almost certainly doing something wrong. We’ll
discuss what these zones are for and what they do.
The Root Zone
named uses the root zone when it has no information on a requested domain
or host. These queries are recursed through a root nameserver. Here’s the
named.conf entry for the root zone:
zone "." {
type hint;
file "named.root";
};
The first entry identifies the domain this query represents. The single
dot in quotes indicates that this is for the entire Internet.
The type indicates what sort of record this is. The root zone is special,
and it is the only zone with the type of hint. All other records are either of
type master or of type slave.
Finally, the file keyword tells named which file contains the informa-
tion for this domain. named looks in the directory specified in the directory
option for a file of this name and assigns its contents to this zone. We’ll look
at those detailed zone files later.
Localhost Zones
Remember from Chapter 6 that every computer uses the loopback IP address
of 127.0.0.1 to identify itself? The nameserver must provide records for this
IP address, or every system call that tries to look up the hostname of the local
host will have to wait and time out before continuing. This would really
annoy users.

426 Chapter 14
Here’s the configuration for the IPv4 localhost zone. You’ll find it in
named.conf just under the root zone:
zone "0.0.127.IN-ADDR.ARPA" {
type master;
file "master/localhost.rev";
};
Looks pretty similar to the options statement and the root zone in the
previous section, doesn’t it?
The zone name appears in quotes after the word zone. Since this
zone is for reverse DNS, we see the domain ends with IN-ADDR.ARPA. If you
reverse the IP address, you’ll see that it’s actually for the 127.0.0 group of IP
addresses.
The type indicates whether this nameserver is a master or a slave for
this domain. Every nameserver is a master for the localhost zone.
Finally, the file keyword tells the nameserver where to get the infor-
mation for this zone. For this domain, the file is actually in a subdirectory of
the named’s configuration directory, /etc/namedb/master/localhost.rev.
The IPv6 version of the localhost entry is very similar. If, like most of the
world, you’re not yet using IPv6, you can comment it out safely.
Configuring a Slave Domain
Perhaps the easiest DNS task is setting up your nameserver to slave a domain.
The entry looks much like the entries for the root zone and the localhost
zone. Before configuring your slave, you must know the name of the
domain and the IP address of the master nameserver. Here’s a sample
slave domain, which closely resembles the root and localhost zones:
zone "absolutefreebsd.com" {
type slave;
file "slave/AbsoluteFreeBSD.com.db";
masters {
198.63.22.8;
};
};
Much of this looks very familiar. We have the domain name , the type
of domain , and the file in which the domain information is kept. It’s a
good idea to keep slave records separate from master records. Not only do the
masters get snooty about sharing quarters with the slaves, but it’s important
to know which records you are truly responsible for and which can be easily
reproduced from the master server. Also, the nameserver must have permis-
sion to write the slave files but not the master files. It’s traditional to name

The Internet Road Map: DNS 427
slave files after the domain, with a .db extension. Despite what the extension
might imply, these files are not binary database files. named(8) creates these
files when it downloads the current zone data from the master server.
We then have a label for the master server for the domain and a list
of the IP addresses for the master server . The slave requests the domain’s
DNS information from the master at regular intervals. The master nameservers
must be listed by their IP addresses, not hostnames; after all, a DNS server must
be able to bootstrap its own records before it can answer anyone else’s queries!
Configuring a Master Domain
The named.conf configuration for a master domain is even simpler than for a
slave zone:
zone "absolutefreebsd.com" {
type master;
file "master/absolutefreebsd.com.db";
};
Once more, there’s the domain name , a label for the type of the
zone, and a filename . Unlike the slave domain, you must create this file;
we’ll look at creating zone files later in this chapter.
Master and Slave File Storage
If you’re managing high-end nameservers, you might be responsible for
thousands of domains and millions of users. If you screw up, you will have
many people very angry at you. Therefore, before you set up hundreds of
zones, think about how you’re going to arrange them.
Always divide a server’s files between those for which your server is a
master and those for which your server is only a slave. The default named
configuration includes those two directories, but many new DNS admins
dump everything into /etc/namedb and regret it later. Files in the master
directory are sacred and must be preserved, and preferably should be under
RCS control as well (see Chapter 4). Files under the slave directory aren’t
exactly garbage, but they don’t require careful protection or backups.
If you expect to serve thousands of domains, you might want to divide
your master zone files still further. In the past, I’ve used a set of 36 directories
under the master directory, one for each letter and number.
Of course, you can create any arrangement of directories to fit your
needs; just remember that you must either live with this arrangement or do
some tedious work to change it. Having a too deep or complicated directory
structure can be just as annoying as a too shallow or simple one.
428 Chapter 14
Zone Files
We have a configuration file that tells named(8) what domains it is responsible
for and where the files with domain information can be found. But we still
need those files—we have no real information yet!
Zone files have a rather obscure syntax because BIND was originally
written by programmers who were more interested in efficiency and correct-
ness than ease of use. Unlike some other programs from that era (such as
Sendmail), zone file configuration is not blatantly user-hostile, even though
some parts of the zone files leave new users scratching their heads until they
wear long furrows in their skulls.
To learn how to work with zone files, follow the provided examples and
you should be all right. Any time you find yourself fingering new grooves in
your head, just remember that you’re digging through the primordial ooze
of the Internet. If DNS was invented today, zone files would probably look
very different.4
Here’s an authoritative reverse DNS zone file for the host localhost at
the IP address 127.0.0.1. Let’s dissect this file. First, anything beginning with
a semicolon is a comment. Our sample begins with comments that I won’t
bother to reproduce. Comment your zone files liberally; later, it’ll help
you figure out what the heck you were doing.
$TTL 3600
@ IN SOA test.blackhelicopters.org.
root.test.blackhelicopters.org. (
20061203 ; Serial
3600 ; Refresh
900 ; Retry
3600000 ; Expire
3600 ) ; Minimum
IN NS test.blackhelicopters.org.
1 IN PTR localhost.blackhelicopters.org.
The $TTL statement is the zone’s default TTL in seconds. It dictates
how long other servers cache information from this zone. You can give your
zone data any TTL you like. 3,600 seconds, or 1 hour, is actually a short time.
A good average is 10,800, or 3 hours. Choosing a TTL is something of a black
art; stick with the default, and you’ll be fine in most normal circumstances.
The next section is the Start of Authority (SOA) record. This is a brief
description of the zone and of how its servers and users should treat it. Every
zone has exactly one SOA record. The SOA does not include information
about what is in the domain, merely information about how long this infor-
mation lasts and who is responsible for the domain.
4 If zone files were created today they’d be in XML, for one thing. And they would require two
different layers of editing and verification to make a simple change and three layers of parsing
and postprocessing to view the output.

The Internet Road Map: DNS 429
The @ symbol that begins the SOA record is a special character that’s
shorthand for “whatever zone named.conf says this file is for.” In this case,
named.conf says that this file holds data for the zone 0.0.127.in-addr.arpa.
When named(8) reads named.conf and loads this file into memory, it makes
this substitution. Using the actual domain name would be less confusing for
new users, but would prevent reusing the same file for multiple domains.
Almost nobody spells out the full domain in a zone file.
The IN represents the type of data. As we’ve seen before when using
dig, IN represents Internet data. SOA means that this is a Start of Authority
record. Both elements appear in every zone file.
Next, we have the name of the machine where the master file came
from. This zone file was created on the machine test.blackhelicopters.org.
Then, we have the email address of the person responsible for
this zone. The make-localhost script assumes that the root account on the
local machine is the email address. The email address lacks the @ sign,
however, because we already used the @ sign as a macro for the domain
name.5 Were we to put the @ in, the email address would become
root0.0.127.IN-ADDR.ARPAtest.blackhelicopters.org, which is not merely
worse to look at but has the added flaw of being wrong. The first dot
in the email address is assumed to be an @ sign.
Today, most nameservers don’t run a mail server. Best current practice
is to use a hostmaster account at your domain name, such as hostmaster@
absolutefreebsd.com. Every domain is expected to have a hostmaster email
address to respond to DNS issues.
Note the parenthesis at the end of the start of the SOA record. Tech-
nically, the SOA record should be on a single line, but that would make it
difficult to read. Instead, you can use the parenthesis to break up the SOA
into several lines. Each of the next five lines is part of the SOA record, with
the closing parenthesis ending the record. Traditionally, the parentheses
include a set of timers and the serial number .
The first number is the serial number, which is the zone file’s version.
Every time you edit the file, increase the serial number. While the serial
number could be any number you choose, it’s most convenient to use the
date. You’ll usually see the date in YYYYMMDD format with two extra digits
at the end. This serial number, 20061203, represents December 3, 2006. Use
the two extra digits to represent the number of times the file has changed in
a day. At times, I’ve left a domain alone for months only to update it twelve
times in a single day.
For example, suppose I create the zone file on May 9, 2008, with a first
serial number of 2008050901. If I change the zone file on June 8 of that year,
the serial number becomes 2008060801. If I then change the file a second
time on that same day, it becomes 2008060802. This system allows up to 100
changes in a day, or roughly one change every 15 minutes. If this isn’t enough
for you, you’re doing something wrong.
5 DNS predates the @ sign as part of email addresses. This overlap is email’s fault, not DNS’s.

430 Chapter 14
Slave servers use the serial number to determine if they must update
their zones from the master. If the zone record on the master server has a
higher serial number than the record on the slave, the slave server knows
that the zone file has been updated and downloads the latest version from
the master.
The next number is the refresh time, in seconds. This dictates how fre-
quently the slave servers contact the master and check for updates. In this
localhost.rev sample, a slave server updates every 3,600 seconds, or 60 minutes.
If the slave cannot check its data against the master, it keeps giving
answers with its current record—after all, one function of a slave DNS server
is to provide service when the master is unreachable. We’ll see exactly how
this works in “Refresh, Retry, and Expire in Practice” on page 431.
The retry value tells the slave how often to try to contact an unreachable
master server. Our sample file has a 900-second (15-minute) retry value. If
the secondary nameserver cannot update at the 1 hour mark, it tries again
every 15 minutes until the master nameserver answers.
The expire value, also in seconds, tells the slave when to discard its cached
records. It’s set to the system administrator’s estimate of when giving out bad
information becomes worse than giving no information at all. In this example,
the expire time is set to 3.6 million seconds, or a little over 41 days.
The last number is the minimum time-to-live. In older versions of BIND,
this was used as the TTL for every timeout you can think of. Today it’s only
used as the TTL for negative answers. For example, if you look up the host
givememymoneyback.absolutefreebsd.com, your nameserver will learn that it doesn’t
exist. The nameserver caches the fact that the host does not exist for the
number of seconds equal to the minimum TTL. Be certain to close the paren-
theses after the minimum TTL, or named will assume that the remainder of
the file is part of the SOA record and will become not only perplexed but
downright belligerent.
Now that you have a complete SOA record, you can list actual information
for the domain. In our example, these two lines contain the zone’s actual
host information:
IN NS test.blackhelicopters.org.
1IN PTR localhost.blackhelicopters.org.
SERIAL GRIEF
If your secondary nameservers haven’t updated their zone files from the master
nameserver, it’s probably a serial number problem. Even if you are utterly, completely
certain that you’ve incremented the serial number, increment it again and try once
more. It’ll probably work.

The Internet Road Map: DNS 431
Each line has four parts: a hostname or number, the data type, the
record type, and the actual data. The first field is either blank or contains a
hostname (such as www) or a number (such as 12). The name of the zone is
automatically attached to this entry, either at the beginning (for reverse
DNS) or end (for forward DNS). Since our example is for reverse DNS, we
add the domain 127.0.0 onto the 1 and get the IP address 127.0.0.1.
If the first field is blank, named(8) appends the zone name anyway to
give us a sensible default. For example, our first line has no first entry, so
named assumes that this line is for 0.0.127.in-addr.arpa, or the network
beginning with 127.0.0, the zone specified in named.conf.
With DNS, the data type is always IN.
The third field, the type of record we have, is actually useful. An NS
record represents a nameserver. In this example, the only nameserver for
this domain is test.blackhelicopters.org. If you’re distributing localhost.rev among
several nameservers, add more NS lines for them. On the other hand, a PTR
entry represents a mapping of an IP address to hostname. This zone is for
the 127.0.0 network, and the .1 host within this network is the hostname
localhost.blackhelicopters.org.
Refresh, Retry, and Expire in Practice
While I’ve mentioned what the refresh, retry, and expire times mean, that’s
not the same as making you understand how they work. Here’s an example.
Suppose you have a domain with a refresh time of 4 hours, a retry time of
1 hour, and an expire time of 48 hours. This means that the slave nameserver
contacts the master every four hours to check for updates. If you update the
records on the master nameserver, they require up to four hours to propagate
to the slave nameservers. So far, so good. Now assume that the master name-
server explodes, scattering its hard drive across three counties. What happens
to the slave server and the clients looking for information on the domain?
The clients are the easy part. As the master nameserver is not reachable,
remote nameservers query the slave servers. The clients get their answers.
The next time the slave server checks for an updated record, it cannot
reach the master. At that point, the slave server changes its check interval.
Instead of using the refresh interval of four hours, it uses the retry time of
one hour. The slave begins checking every hour for updates, and checks
every hour until you restore service at the master nameserver.
If the slave cannot confirm its data for a length of time equal to the
expire time, the slave server considers the data too old to be useful. The slave
discards the domain information and returns an error to any queries about
the domain. The domain disappears from the Internet.
DEFINITIVE DNS DISASTERS
If your master nameserver fails irreparably, you have a length of time equal to
the expire time plus the retry time to reconfigure your slave server as your master
nameserver.

432 Chapter 14
A Real Sample Zone
The localhost zone file is limited; it only represents one machine and has
only one IP address in it. But it’s found on every nameserver and includes all
the data types required in a zone file, making it a useful real-world example.
Now let’s consider a zone file that’s more representative of the domains you’ll
be serving—the zone file for absolutefreebsd.com.
$TTL 1h
@ IN SOA blackhelicopters.org. hostmaster.blackhelicopters.org. (
2006121002 ; Serial
1d ; Refresh
2h ; Retry
1000h ; Expire
2d ) ; Minimum
IN NS bewilderbeast.blackhelicopters.org.
IN NS tribble.lodden.com.
IN MX 20 mail.nobletechnology.net.
IN MX 10 bewilderbeast.blackhelicopters.org.
IN A 198.22.63.8
www IN CNAME absolutefreebsd.com.
This zone resembles the localhost.rev zone we discussed earlier, but it’s
an actual zone file for a real live Internet domain. First, we have the TTL of
one hour . A remote nameserver caches information on this domain for one
hour. The SOA record lists the contact information and a variety of timeouts
for refresh, retry, and expire, as well as the serial number.
The zone file lists two nameservers, bewilderbeast.blackhelicopters.org and
tribble.lodden.com . According to the times in the SOA, tribble.lodden.com
compares its records to those of bewilderbeast.blackhelicopters.org every day. If the
secondary cannot compare records at that time, it tries again every 2 hours. If
tribble.lodden.com cannot compare its records against the master nameserver for
a full 1,000 hours, it stops giving any answer for absolutefreebsd.com. Finally,
remote nameservers will cache “no such host” responses for two days.
Note that older DNS servers only accepted seconds for these time values.
Instead of using 1d to mean “one day,” you had to type 86400 for the number
of seconds in one day. You’ll still see this in old zone files, but there’s no need
to make yourself do the math for new files.
Mail Exchanger
We then have a new record type, MX , for mail exchanger. While a domain
has only one primary mail host, it can have multiple backup mail servers.
Nevertheless, incoming email must ultimately reach the appropriate mail
server. Here’s where you indicate which is the preferred mail server and
which are backups. We’ll discuss this in some detail in Chapter 16.
The one additional entry in the MX records—a number such as 10 or
20—is the preference. Servers with lower preference numbers are more
preferred. In this case, the server bewilderbeast.blackhelicopters.org of preference
10 is the preferred mail server for absolutefreebsd.com. If the primary server
cannot be reached, the backup is mail.nobletechnology.net.

The Internet Road Map: DNS 433
Since some day you might want to add another mail exchanger between
the two preferences, or change to a completely different set of servers, leave
some space between your preference numbers. If you number them 1, 2, 3,
and so on, you won’t have much flexibility later.
Host Records
Finally, we have actual records for each host in the domain. The most common
types of host records are CNAME and A. As we saw in the dig(1) example, a CNAME
is an alias (or, if you want to be pedantic, a reference to a canonical name).
An A record gives the IP address for a hostname. For example, dig(1) will
show that the host absolutefreebsd.com is an alias for www.absolutefreebsd.com.
(Remember, when an entry has no name explicitly stated, it defaults to the
domain the zone file represents!) The host www.absolutefreebsd.com has an
Internet address of 198.22.63.8.
Mail exchangers and nameservers cannot be CNAMEs; they must be actual
hostnames.
Dots and Termination in Zone Files
named(8) assumes that all hostnames in a zone file are part of the zone.
In the zone file for absolutefreebsd.com you don’t need to write out www
.absolutefreebsd.com; named knows that you’re talking about absolutefreebsd.com,
so you can just list www. named(8) appends the zone name to every host in the
zone, unless you say otherwise. This is convenient, except when the host isn’t
part of the domain. For example, neither of the nameservers for absolutefreebsd
.com are in the absolutefreebsd.com domain. I don’t want the master nameserver
showing up as bewilderbeast.blackhelicopters.org.absolutefreebsd.com, do I?
You’ve seen that dots can be substituted for the @ sign in email addresses
in the zone file’s SOA record. Dots are further overloaded, however, into
hostname termination symbols. If you put a dot after a hostname, named(8)
understands that you’ve listed the complete hostname including the domain
name. As you can see in the preceding examples, every complete hostname
after the SOA record has a dot after it. Even the CNAME entry pointing to www
.absolutefreebsd.com has a dot at the end of it. Without the dot, this alias would
point to www.absolutefreebsd.com.absolutefreebsd.com. That’s certainly not what I
want you to type into your browser to find the web page for this book! (Mind
you, having that as an actual hostname is something that DNS geeks find
funny. Remember that before becoming a DNS geek.)
Reverse DNS Zones
Each block of IP addresses you manage needs a reverse DNS file, listing all
the hosts assigned to your various IP addresses. Each A record needs a
corresponding PTR record. This amounts to double-entry bookkeeping,
which is a great thing in accounting but a tedious annoyance in system
administration.

434 Chapter 14
I highly recommend the mkrdns script to automate maintenance of your
reverse DNS. This saves you time and reduces the number of DNS errors.
mkrdns is a Perl script, so simple that it doesn’t even require a port. Search
for mkrdns on your favorite search engine, download the script, and place it
in /usr/local/bin.
You must have an existing zone file for your reverse zones for mkrdns to
update your records. This zone must have a valid SOA record, but doesn’t
need any hosts. mkrdns uses your SOA as a template for the zone file it
creates. Just run the script like this:
# mkrdns /etc/namedb/named.conf
You’ll see that your reverse DNS files are automatically updated. Just
reload your nameserver to make the updates take effect. Oh, we haven’t
talked about reloading nameservers yet? Let’s take care of that right now.
Managing named
On a nameserver, start named(8) automatically at boot time with an rc.conf
option:
named_enable="YES"
This enables the startup script /etc/rc.d/named. You can start and stop
named(8) using this script, as we discussed in Chapter 3. Always use
/etc/rc.d/named stop and /etc/rc.d/named start to turn named on and off.
Once named is running, however, you’ll need to reload named(8) or
have a master nameserver check its zone files for updates. BIND includes the
Remote Name Daemon Control, rndc(8), for these tasks.
Configuring rndc
rndc communicates with named(8) via a secure TCP connection, even from
the local host. This means that you can manage nameservers on remote
systems without logging in. Creating the secure channel requires a shared
cryptographic secret, however. BIND includes rndc-confgen(8), a script to
generate this shared secret and take all the tedious work out of configuring
rndc. Just run rndc-confgen to generate your rndc configuration file:
# rndc-confgen > /etc/namedb/rndc.conf
This file includes both the configuration for rndc(8) itself and a config-
uration to add to named.conf. The named.conf section is commented out with
hash marks and looks something like this:
# Use with the following in named.conf, adjusting the allow list as needed:
# key "rndc-key" {

The Internet Road Map: DNS 435
# algorithm hmac-md5;
# secret "VO5IU1GnxQTlfTxALgciCw==";
# };
#
# controls {
# inet 127.0.0.1 port 953
# allow { 127.0.0.1; } keys { "rndc-key"; };
# };
# End of named.conf
The interesting bit here is the cryptographic secret needed to control
your nameserver. The secrets in rndc.conf and named.conf must match, or rndc
requests will fail. You’ll also see the IP address and TCP port on which named
listens for control connections , and the hosts and keys permitted to man-
age this nameserver . You can allow multiple clients to manage your DNS
server, and you could assign each client a separate cryptographic key; read
rndc(8) and rndc.conf(5) for details.
Copy the commented out lines of rndc.conf into named.conf, remove the
hash marks, and restart named with /etc/rc.d/named restart. You can now
manage your nameserver with rndc.
Using rndc
So, after going to all the trouble to set up rndc, what’s so great about it? For
a complete list of everything rndc can do, read rndc(8). The most common
administrative tasks are: reloading a nameserver, reloading a zone, refresh-
ing a zone, reconfiguring named, and checking named’s status.
Reloading a nameserver with rndc reload makes named(8) reread and
reprocess its configuration, load all master domains from their text files, and
check for updates on all slave domains. This is the most commonly used way
to make a nameserver recognize changes in its zones or configuration.
In between reloading a nameserver and completely restarting the
nameserver, you can have named check for new zones with rndc reconfig.
To reload a zone without reloading the entire nameserver, specify a
domain name after the rndc reload command. You might do this if your
nameserver is heavily loaded and reloading the entire configuration takes
too long or puts too much strain on the network.
Refreshing a zone tells a slave server to immediately check the master
server for updates on that zone. For example, if I want the slave server for
absolutefreebsd.com to check for an update on the master server, I run
rndc refresh absolutefreebsd.com on the slave server.
rndc does not let you restart named. To completely restart named, use
/etc/rc.d/named restart.
With rndc status, you can see various information about your running
nameserver including how many domains you serve, how many clients are
querying the server, and so on.

436 Chapter 14
Checking DNS
DNS configuration errors appear in /var/log/messages whenever you start,
restart, or reload named. Look here for errors. The log messages are generally
fairly explicit and indicate exactly where named thinks the error is located.
Once you’ve created your first zone, ask for a complete list of domains to
check your work. dig’s axfr keyword requests a list of all hosts in the domain:
# dig domainname @primarynameserver axfr
Read the results. Are all the names as you expected? Do you have
hosts with double domain names, such as www.absolutefreebsd.com
.absolutefreebsd.com? If so, you forgot a dot. Are all of your mail servers
and nameservers showing up? If not, fix them.
You can also use dnswalk(1) (/usr/ports/dns/dnswalk) to double-check
your work. This tool catches a wide variety of standard configuration
problems, although it won’t catch conceptual problems. If you have a host
using a CNAME but the canonical name is an alias back to the first name,
creating a loop, dnswalk points it out. If you set your preferred mail exchanger
to mail.whitehouse.gov, it’ll let that pass, however. Use dnswalk like this:
# dnswalk absolutefreebsd.com.
Note the trailing dot.
Nameserver Security
BIND is a popular target for attackers because it provides a lot of infor-
mation about your network. Even if an intruder could not get control of
your machine, he could pillage DNS for interesting hostnames—for example,
“accounting” or “finance.” Additionally, named(8) defaulted to running as
root for many years. If someone broke into named, he owned your machine.
We’ll address both of these problems separately.
Controlling Zone Transfers
The dig example I gave for listing an entire domain is called a zone transfer.
This is the query used by a slave DNS server to update its records of a domain.
A prospective intruder would be very interested in the full hostname list.
Since the purpose of a nameserver is to serve names, we can’t entirely cut out
the bad guy’s access. We can, however, make sure that named only answers
specific queries instead of spilling its guts upon request. With this setup,
named answers requests for particular hostnames but denies requests for
the entire list from arbitrary clients.

The Internet Road Map: DNS 437
To restrict zone transfers to specific hosts, use the named.conf allow-
transfer option:
options {
allow-transfer {
127.0.0.1; 192.168.8.3;
};
};
In this example, the hosts 127.0.0.1 (the local host) and 192.168.8.3
are the only systems permitted to request a zone transfer. Replace those IP
addresses with those of your slave nameservers and your primary debugging
workstation, and you’ve concealed a lot of information about your network.
You might also add the network staff’s desktop machines to this list so that
they can perform zone transfers to debug DNS issues.
If needed, named(8) supports much more restrictive access lists on a zone-
by-zone basis. See the BIND’s documentation in /usr/src/contrib/bind/doc for
more details.
Securing named(8)
How about hackers attacking named(8) itself, trying to get a command
prompt on your system? We could run named in a jail (see Chapter 9) to
ensure that a successful intruder cannot access anything else on your network.
BIND defaults to running in a chroot environment, however. In this case,
the BIND chroot environment is a better choice; it only includes those
system resources necessary for named to run and nothing more. The chroot
is effectively an unprivileged, stripped-down jail. While this is the default
configuration, you need to know how it works.
named(8) runs in a root directory of /var/named. If you look there, you’ll
see subdirectories of dev, etc, and var. Running chrooted, named(8) believes
that /var/named is actually / and that those directories are /dev, /etc, and /var.
The program can only access these limited subdirectories. Note the absence
of, say, /bin or /sbin. An intruder can’t get a shell or access any programs,
because there are no programs to be found!
But, wait a minute. . . . If named(8) is stuck in /var/named, how can it read
the configuration file in /etc/namedb? Take a closer look at /etc/namedb; it’s
actually a symlink to /var/named/etc/namedb. This is because /etc/namedb has
been the named configuration directory for so long and on so many operating
systems that nobody dares remove that link now.
More on BIND
As your network grows, you’ll need more information on BIND. Some of its
advanced features, such as views, will be very useful for an expanding network.
One good source of documentation is /usr/src/contrib/bind9/, especially the doc
subdirectory. The standard book on BIND is DNS and BIND by Paul Albitz
and Cricket Liu (O’Reilly Media, 5th edition, 2006), and I recommend it
highly for advanced DNS information.

15
SMALL SYSTEM SERVICES
Even a server with a very narrowly defined
role, such as a dedicated web server, needs
a variety of small “helper” services to handle
basic administrative issues. In this chapter we’ll
discuss some of those services, such as time synchro-
nization, DHCP services, scheduling tasks, and so on.
We’ll start by securing your remote connections to
your FreeBSD server with SSH.
SSH
One of Unix’s great strengths is its ease of remote administration. Whether
the server is in front of you or in a remote, barricaded laboratory in a sub-
terranean, maximum-security installation surrounded by vicious guard dogs
mentored by a megalomaniacal weasel named Ivan, if you have network
access to the machine you can control it just as if you were sitting in front
of it.

440 Chapter 15
For many years, telnet(1) was the standard way to access a remote server.
telnet is nifty. You can use it to connect to an arbitrary TCP port on a system
and manually talk to that server across the network, as this book recommends
elsewhere. As a remote administration protocol, however, telnet has one
crushing problem: Everything sent over most versions of telnet is unencrypted.
Anyone with a packet sniffer, attached anywhere along your connection, can
steal your username, your password, and any information you view in your
telnet session. When you use telnet, the best password-selection scheme in
the world cannot protect your username and password. Intruders place illicit
packet sniffers anywhere they can; I’ve seen them on small local networks, in
law firms handling sensitive government work, on home PCs, and on Internet
backbones. The only defense against a packet sniffer is to handle your authen-
tication credentials and data in such a way that a packet sniffer cannot capture
them. That’s where SSH, or secure shell, comes in.
SSH behaves much like telnet in that it provides a highly configurable
terminal window on a remote host. But unlike telnet, SSH encrypts everything
you send across the network. SSH ensures not only that your passwords can’t
be sniffed, but also that the commands you enter and their output are
encrypted as well. While telnet does have a few minor advantages over SSH
in that it requires less CPU time and is simpler to configure, SSH’s security
advantages heavily outweigh them. SSH also has many features that telnet
does not have, such as the ability to tunnel arbitrary protocols through the
encrypted session. Like telnet, SSH runs on every modern variant of Unix
and even on Microsoft Windows.
SSH encrypts and authenticates remote connections via public key
cryptography, as we discussed in Chapter 9. The SSH daemon offers the
server’s public key to clients and keeps the private key to itself. The client
and server use the cryptographic key to negotiate a cryptographically secure
channel between them. Since both public and private keys are necessary to
complete this transaction, your data is secure; even if someone captures your
SSH traffic, they can only see encrypted garbage.
To use SSH, you must run an SSH server on your FreeBSD machine
and an SSH client on your workstation.
The SSH Server: sshd(8)
The sshd(8) daemon listens for SSH requests coming in from the network on
TCP port 22. To enable sshd at boot, add the following line to /etc/rc.conf:
sshd_enable="YES"
Once this is set, you can use the /etc/rc.d/sshd script to start and stop SSH.
Stopping the SSH daemon doesn’t terminate SSH sessions that are already in
use; it only prevents the daemon from accepting new connections.
Unlike some of the other protocols we look at, sshd is difficult to test by
hand. One thing you can do is confirm that sshd is running by using telnet to
connect to the SSH TCP port.

Small System Services 441
# telnet localhost 22
Trying ::1...
Trying 127.0.0.1...
Connected to localhost.
Escape character is '^]'.
SSH-2.0-OpenSSH_4.4p1 FreeBSD-20060930
Telnet tries the IPv6 address for localhost, then the IPv4 address ,
and succeeds . The connection attempt succeeds, and we see that the
daemon listening on this port calls itself SSH version 2, implemented in
OpenSSH 4.4p1, on FreeBSD, version 20060930 . (The SSH protocol has
two versions, 1 and 2. Always use version 2.) You can get all this information
from a simple telnet command, but it’s the last free information sshd offers.
Unless you’re capable of encrypting packets by hand, on the fly, this is about
as far as you can go. Press CTRL-] to close the connection and CTRL-C to leave
telnet and return to the command prompt.
SSH Keys and Fingerprints
The first time you start sshd(8), the program realizes that it has no encryption
keys and automatically creates them. If the system is just booting, you will be
offered a chance to pound on the keyboard for a while to help enhance system
randomness. The initializing sshd process will create three pairs of keys.
SSH version 1 uses /etc/ssh/ssh_host_key, /etc/ssh/ssh_host_key.pub,
/etc/ssh/ssh_host_rsa_key, and /etc/ssh/ssh_host_rsa_key.pub. SSH version 1, while
not really secure, is much less appallingly insecure than telnet. SSH version 2
uses the RSA key files as well as the DSA key files /etc/ssh/ssh_host_dsa_key and
/etc/ssh/ssh_host_dsa_key.pub.
The key files ending in .pub contain the public keys for each type of key.
These are the keys that sshd hands to connecting clients. This gives the
connecting user the ability to confirm that the server he is connecting to is
really the server he thinks it is. (In the past, intruders have tricked users into
logging into bogus machines in order to capture their usernames and pass-
words.) Take a look at one of these public key files; it’s pretty long. Even
when a user is offered the chance to confirm that the server is offering the
correct key, it’s so long that even the most paranoid users won’t bother to
verify every single character.
Fortunately, SSH allows you to generate a key fingerprint, which is a
much shorter representation of a key. You cannot encrypt traffic or negotiate
connections with the fingerprint, but the chances of two unrelated keys
having the same fingerprint are negligible. To generate a fingerprint for a
public key, enter the command ssh-keygen -lf keyfile.pub.
# ssh-keygen -lf /etc/ssh/ssh_host_dsa_key.pub
1024 31:28:4b:6e:aa:23:63:2e:9a:6b:44:00:9f:fd:28:21
/etc/ssh/ssh_host_dsa_key.pub

442 Chapter 15
The first number, 1024, shows the number of bits in the key. 1,024 is
standard in 2007, but I expect this to increase to 2,048 in the next few years as
computing power increases. The hexadecimal string starting with 31 and
ending with 21 is the fingerprint of the public key. While it’s long, it’s much
shorter and much more readable than the actual key. Copy this key fingerprint
from the original server to a place where you can access it from your client
machines, either on a web page or on a paper list. Use this key to confirm
your server’s identity the first time you connect.
Configuring the SSH Daemon
While sshd comes with a perfectly usable configuration, you might want to
tweak the settings once you learn all the features sshd(8) offers. The configura-
tion file /etc/ssh/sshd_config lists all the default settings, commented out with a
hash mark (#). If you want to change the value for a setting, uncomment the
entry and change its value.
We won’t discuss all the available sshd options; that would take a rather
large book of its own. Moreover, OpenSSH advances quickly enough to make
that book obsolete before it hits the shelves. Instead, we’ll focus on some of
the more common desirable configuration changes people make.
After changing the SSH daemon’s configuration, restart the daemon
with /etc/rc.d/sshd restart.
VersionAddendum FreeBSD-20061110
The VersionAddendum appears in the server name when you connect to sshd’s
TCP port. Some people recommend changing this to disguise the operating
system version. Identifying a computer’s operating system is simple enough,
however, by using fingerprinting techniques on packets exchanged with the
host, so this isn’t generally worth the time. (On the other hand, changing
the VersionAddendum to DrunkenBadgerSoftware because it amuses you might
be worthwhile.)
Port 22
sshd(8) defaults to listening to TCP port 22. If you want, you can change this to
a nonstandard port. If you want sshd to listen to multiple ports (e.g., port 443
in addition to port 22, to bypass a badly configured firewall), you can include
multiple Port entries on separate lines:
Port 22
Port 443
Protocol 2
Any modern SSH install only supports version 2 of the SSH protocol by
default. SSH version 1 has security problems, and SSH version 2 clients are
now free for all widely deployed systems. sshd(8) still supports version 1,

Small System Services 443
however, and you can enable its support here even though it has poor
security. List your permitted protocol versions in order of preference,
separated by commas.
ListenAddress 0.0.0.0
sshd defaults to listening for incoming requests on all IP addresses on the
machine. If you need to restrict the range of addresses to listen on (for
example, on a jail server), you can specify it here:
ListenAddress 192.168.33.8
If you want sshd to listen on multiple addresses, use multiple ListenAddress
lines.
SyslogFacility AUTH and LogLevel INFO
These two settings control how sshd(8) logs connection information. See
Chapter 19 for more information on logging.
LoginGraceTime 2m
This controls how long a user has to log in after getting connected. If an
incoming user connects but does not successfully log in within this time
window, sshd drops the connection.
PermitRootLogin no
Do not let people log into your server as root. Instead, they should SSH in as
a regular user and become root with su(1). Allowing direct root logins
eliminates any hope you have of identifying who misconfigured your system
and allows intruders to cover their tracks much more easily.
MaxAuthTries 6
This is the number of times a user may attempt to enter a password during a
single connection. After this number of unsuccessful attempts to log in, the
user is disconnected.
AllowTcpForwarding yes
SSH allows users to forward arbitrary TCP/IP ports to a remote system. If
your users have shell access, they can install their own port forwarders, so
there’s little reason to disable this.
X11Forwarding yes
Unix-like operating systems use the X11 (or X) protocol to display graphical
programs. In X, the display is separated from the physical machine. You can
run, say, a web browser on one machine and display the results on another.
As X has had a checkered security history, many admins reflexively disable
X forwarding. Denying X forwarding over SSH doesn’t disable X forwarding
in general, however. Most users, if denied SSH-based X forwarding, just

444 Chapter 15
forward X over unencrypted TCP/IP using either X’s built-in network aware-
ness or a third-party forwarder, which in most circumstances is far worse than
allowing X over SSH. If your sshd server has the X libraries and client pro-
grams installed, a user can forward X one way or another; it’s best to let SSH
handle the forwarding for you. If you don’t have the X software installed,
then X11Forwarding has no effect.
MaxStartups 10
This is the number of connection attempts that can occur at the same time.
If more users than specified by MaxStartups attempt to SSH to the server simul-
taneously, sshd(8) refuses some of the connection attempts until other
users log in, timeout, or fail to log on enough times to be disconnected.
Banner /some/path
The banner is a message that is displayed before authentication occurs. The
most common use for this option is to display legal warnings. The default is
to not use a banner.
Subsystem sftp /usr/libexec/sftp-server
SSH allows you to securely copy files from one system to another with scp(1).
While scp works well, it’s not very user-friendly. The sftp server provides an
FTP-like interface to file transfer, reducing the amount of time you must
spend on user education but still maintaining solid security.
Managing SSH User Access
By default, anyone with a legitimate shell can log into the server. Using the
configuration variables AllowGroups, DenyGroups, AllowUsers, and DenyUsers,
sshd(8) lets you define particular users and groups that may or may not
access your machine.
When you explicitly list users who may SSH into a machine, any user who
is not listed cannot SSH in.
For example, the AllowGroups option lets you restrict SSH access to users
in specified groups defined in /etc/group (see Chapter 7). If this option is set
and a user is not in any of the allowed groups, he cannot log in. Separate
multiple groups with spaces:
AllowGroups wheel webmaster dnsadmin
If you don’t want to give a whole group SSH access, you can list
individual users with AllowUsers. By using AllowUsers, you disallow SSH
access for everyone except the listed users.
The DenyGroups list is the opposite of AllowGroups. Users in the specified
system groups cannot log in. The listed group must be their primary group,
meaning it must be listed in /etc/master.passwd and not just /etc/group. This
limitation makes DenyGroups less useful than it seems at first; you cannot define
a general group called nossh and just add users to it, unless you make it their
primary group as well. Explicitly listing allowed groups is a much more
useful policy.

Small System Services 445
Finally, the DenyUsers variable lists users who may not log in. You
can use this to explicitly forbid certain users who are in a group that is
otherwise allowed.
These four different settings make it possible for a user to be in multiple
groups simultaneously. For example, one user might be in a group listed in
AllowGroups and a group listed in DenyGroups. What then? The SSH daemon
checks these values in the order: DenyUsers, AllowUsers, DenyGroups, and
AllowGroups. The first rule that matches wins. For example, suppose I’m a
member of the wheel group. Here’s a snippet of sshd_config:
DenyUsers: mwlucas
AllowGroups: wheel
I cannot SSH into this machine, because DenyUsers is checked before
AllowGroups.
SSH Clients
Of course, FreeBSD comes with the SSH client, as do most Unix-like operating
systems. If possible, use the included SSH client—it’s part of OpenSSH,
developed by a subset of the OpenBSD team, and is not only the most popular
implementation but also the best. If you’ve been sentenced to run a Microsoft
operating system, I recommend PuTTY, which is free for commercial or
noncommercial purposes and has excellent terminal emulation.
This is a FreeBSD book, so we’ll focus on FreeBSD’s OpenSSH client.
You can configure the client in a variety of ways, but the most common
configuration choices available simply disable the functions offered by the
server. If you’re really interested in tweaking your client’s behavior, read
ssh_config(5).
To connect to another host with SSH, type ssh hostname. In response,
you’ll see something like this:
# ssh sardines.blackhelicopters.org
The authenticity of host 'sardines.blackhelicopters.org (192.168.1.1)' can't
be established.
DSA key fingerprint is a4:df:7c:7e:0e:27:e5:21:b4:f4:0e:2b:c9:10:5f:ea.
Are you sure you want to continue connecting (yes/no)? yes
Your client immediately retrieves the public key from the host you’re
connecting to, and checks its own internal list of SSH keys for a matching key
for that host. If the key offered by the server matches the key the client has in
its list, the client assumes you’re talking to the correct host. If the client does
not have the host key in its list of known hosts, it presents the key fingerprint
for your approval.
The fingerprint presented by the SSH client should be identical to the
fingerprint you generated on your server. If the fingerprint is not identical,
you’re connecting to the wrong host and you need to immediately disconnect.
If it matches, accept the key and continue. Once you accept the fingerprint,
the key is saved under your home directory in .ssh/known_hosts.

446 Chapter 15
If you’re building a new server on your local network for your private
use, perhaps you don’t have to manually compare the key fingerprints. You
should still copy the key fingerprint, however, since you’ll eventually want to
connect from a remote location and will need to verify the key. If many
people will connect to a server, it’s generally okay to put the fingerprint on a
web page. You must decide how much security you need. I strongly encourage
you to error on the side of caution.
Accept the host key, and you’ll be allowed to log into the server. While
using a private key with a passphrase is preferable to using passwords, a pass-
word with SSH is still better than telnet.
Copying Files over SSH
The SSH client is fine for command-line access, but what about moving files
from one system to another? SSH includes two tools for moving files across
the network, scp(1) and sftp(1).
scp(1) is “secure copy” and is ideal for moving individual files. scp takes
two arguments: first, the file’s current location, then the desired location.
The desired location is specified as <username>@<hostname>:<filename>.
Suppose I want to copy the file bookbackup.tgz from my local system to the
remote server bewilderbeast.blackhelicopters.org, giving the remote copy a
different name. I would run:
# scp bookbackup.tgz mwlucas@bewilderbeast.blackhelicopters.org:bookbackup-
january.tgz
If you want to give the new copy the same name, you can leave off the
filename in the second argument:
# scp bookbackup.tgz mwlucas@bewilderbeast.blackhelicopters.org:
scp(1) also lets you copy files from a remote system to your local system:
# scp mwlucas@bewilderbeast.blackhelicopters.org:bookbackup-january.tgz
bookbackup.tgz
If you don’t want to change the filename on the local system, you can use
a single dot as the destination name:
# scp mwlucas@bewilderbeast.blackhelicopters.org:bookbackup.tgz .
Finally, if your username on the remote system is the same as your local
username, you can delete the username and the @ sign. For example, to back
up my work I just use:
# scp bookbackup.tgz bewilderbeast.blackhelicopters.org:
While this looks complicated, it’s quite useful for quickly moving
individual files around the network.

Small System Services 447
If you like interactive systems or if you don’t know the precise name of
the file you want to grab from a remote server, sftp(1) is your friend. sftp(1)
takes a single argument, the username and server name, using scp’s syntax
for a remote server:
# sftp mwlucas@bewilderbeast,blackhelicopters.org
Connecting to bewilderbeast...
Password:
sftp> ls
sftp(1) looks much like a standard command-line FTP client; it supports
the usual FTP commands such as ls (list), cd (change directory), get (down-
load a file), and put (upload a file). One important difference is that sftp(1)
does not require a choice between ASCII and binary transfers; it just transfers
the file as is.
With SSH, scp, and sftp, you can completely eliminate cleartext passwords
from your network.
Network Time
If a database starts entering dates three hours behind, or if emails arrive with
dates from tomorrow, you’ll hear about it pretty quickly. Time is important.1
You have three tools to manage system time: tzsetup(8) controlling the time
zone, the network time correction tool ntpdate(8), and the continuous time-
adjustment program ntpd(8). Start by setting your time zone manually, then
use Network Time Protocol.
Setting the Time Zone
Time zone is easy to manage with tzsetup(8), a menu-driven program that
makes the appropriate changes on your system for each time zone. Global
organizations might use on their systems the default of UTC (Universal Time
Clock), while others use their own local time. Enter tzsetup, follow the
geographic prompts, and choose the appropriate time zone for your location.
OPENSSH SECURES EVERYTHING
Many network programs include support for communicating over SSH. Additionally,
OpenSSH can create arbitrary tunnels between TCP ports on different machines.
Thanks to OpenSSH, you can avoid sending any data unencrypted over your
network.
1 The most important time of all, of course, is the “time to go home.”

448 Chapter 15
Network Time Protocol
Network Time Protocol (NTP), is a method to synchronize time across a network.
You can make your local computer’s clock match the atomic clock at your
government’s research lab or the time on your main server. Computers that
offer time synchronization are called time servers and are roughly lumped
into two groups, Tier 1 and Tier 2.
Tier 1 NTP servers are directly connected to a highly accurate time-
keeping device. If you really need this sort of accuracy, then what you really
need is your own atomic clock. If the time lag caused by the speed of light is
acceptable, a USB radio clock such as that found on an inexpensive GPS is
very nice.
Tier 2 NTP servers feed off the Tier 1 NTP servers, providing time service
as a public service. Their service is accurate to within a fraction of a second
and is sufficient for almost all non–life sustaining applications. Some digging
will even lead you to Tier 3 time servers, which feed off of Tier 2 servers.
The best source of time servers is the list at http://www.pool.ntp.org. This
group has collected public NTP servers into round-robin DNS pools, allowing
easy NTP configuration. These NTP servers are arranged first in a global list,
then by continent, and then by country. For example, if you’re in Canada, a
brief search on that site leads you to 0.ca.pool.ntp.org, 1.ca.pool.ntp.org, and
2.ca.pool.ntp.org. We’ll use these servers in the examples below, but look up
the proper servers for your country and use those instead when setting up
your own time service.
Configuring ntpd(8)
ntpd(8) checks the system clock against a list of time servers. It takes a
reasonable average of the times provided by the time servers, discarding
any servers too far away from the consensus, and gradually adjusts the system
time to match the average. This gives the most accurate system time possible,
without demanding too much from any one server, and helps keep errant
hardware in check. Configure ntp in /etc/ntpd.conf. Here’s a sample:
server 1.ca.pool.ntp.org
server 2.ca.pool.ntp.org
server 3.ca.pool.ntp.org
This system checks three time servers for updates. If you list only one
server, ntpd(8) slaves its clock to that one server and shares any time problems
that server experiences. Using two time servers guarantees that your system
will not know what time it is; remember, NTP takes an average of its time
servers but throws out any values too far out of range of the others. How can
NTP decide if one server is wrong when it only has two values to choose from?
Using three time servers is optimal; if one server runs amok, ntpd recognizes
that the time offered by that server does not make sense against the time
offered by the other two servers. (Think of this as a “tyranny of the majority”;
the one guy whose opinion differs from the rest doesn’t get any voice at all.)

Small System Services 449
Instant Time Correction
ntpd(8) is great at keeping the system clock accurate over time, but it only
adjusts the local clock gradually. If your time is off by hours or days (which is
not unlikely at install time or after a long power outage), you probably want
to set your clock correctly before letting any time-sensitive applications start.
ntpd(8) includes that functionality as well, with ntpd -q.
To perform a single brute-force correction of your clock, use ntpd -q.
This connects to your NTP servers, gets the correct time, sets your system
clock, and exits.
# ntpd -q
ntpd: time set -76.976809s
This system’s time was off by about 77 seconds, but is now synchronized
with the NTP servers.
Do not change the clock arbitrarily on a production system. Time-sensitive
software, such as many database-driven applications, has problems if time
suddenly moves forwards or backwards.
If you have really good hardware with an excellent clock, using ntpd -q
at boot handles all of your time problems. Very few people have that sort of
hardware, however. Most of us have to make do with commodity hardware
with notoriously poor clocks. The best way to ensure you have accurate time
is to run ntpd(8) to gently adjust your clock on an ongoing basis.
ntpd(8) at Boot Time
To have ntpd perform a one-time clock synchronization at boot and then
continually adjust the clock afterwards, set the following in /etc/rc.conf:
ntpd_enable="YES"
ntpd_sync_on_start="YES"
Redistributing Time
While ntpd does not use a large amount of network bandwidth, having every
server on your network query the public NTP servers is a waste of network
resources—both yours and the time server donors’. It can also lead to very
slight (subsecond) variances in time on your own network.
I recommend setting up a single authoritative time server for your net-
work. Have this server synchronize its clock with the global NTP pool. Config-
ure each server on your network to point to this server for its NTP updates.
That way, every clock on your network will be perfectly synchronized. Any
clock errors will occur either everywhere on your network (which tells you
that the time server has an issue) or only on one server (which will indicate a
problem on that particular machine). You will not have to trawl through
NTP logs to try to determine if a particular server in the global time server
pool has somehow messed up your system clock. It is best to enforce this

450 Chapter 15
policy via firewall rules at your network border; allowing only your time
server to communicate with outside NTP servers eliminates one common
source of temporal chaos.
Name Service Switching and Caching
Any Unix-like system performs innumerable checks of many different name
services. We’ve already talked about the Domain Name System that maps
hostnames to IP addresses (see Chapter 14), but there’s also a password entry
lookup service, a TCP/IP port number and name lookup service, an IP
protocol name and number lookup service, and so on. You can configure
how your FreeBSD system makes these queries and what information sources
it uses through nsswitch (name service switching). FreeBSD also has a name
service caching daemon, nscd(8), that stores the results of name service
queries you’ve already made, reducing both network traffic and the time
needed to make these queries.
/etc/nsswitch.conf
The name service switching system, which manages how FreeBSD looks up
network information, is configured in /etc/nsswitch.conf. Each name service
has an entry including the type of the service and the information sources it
uses. We previously saw an example of name service switching in Chapter 14.
Remember this entry for host lookups?
hosts: files dns
This means, “Look for IP addresses in the local files first, and then query
DNS.” The other information sources work similarly. FreeBSD, like most
other Unix-like operating systems, supports name service switching for the
information sources listed in Table 15-1.
Table 15-1:
Lookups Supporting Name Service Switching
Lookup Function
groups Group membership checks (/etc/group)
hosts Hostname and IP checks (DNS)
networks Network entries (/etc/networks)
passwd Password entries (/etc/passwd)
shells Checks for valid shells (/etc/shells)
services TCP and UDP services (/etc/services)
rpc Remote procedure calls (/etc/rpc)
proto TCP/IP network protocols (/etc/protocols)

Small System Services 451
Most of these you don’t want to muck with, unless you like breaking
system functionality. If you have a Kerberos or an NIS domain, for example,
you might want to have your FreeBSD box attach to them for user and group
information—but if you don’t, reconfiguring the password lookups would
just make your system work harder or stop working at all!
For each name service, you must specify one or more sources of informa-
tion. Many of these name services are very simple and default to having a
single authoritative source of information—a file. Others, such as the hosts
name service, are more complicated and have multiple sources. A few are
very complicated simply because of the vast array of information available
and the many possible ways to get that information. As this book does not
cover Kerberos, NIS, or any other enterprise-level user management systems,
we won’t cover changing password, group, and shell information sources.
If you’re in such an environment, read nsswitch.conf(5) for details.
The services we’ll cover have three valid information sources: files, dns,
and cache. Files are the standard text files containing information for the
service. For example, network protocols are traditionally stored in /etc/protocols,
network services in /etc/services, and passwords in /etc/passwd and friends.
Asource of dns means that the information is available on a DNS server,
as is typical for the hosts service. Finally, cache means that the information
must be requested from the local name service caching daemon.
List each desired information source in the order you want them to be
tried. Our hosts entry tells the name service lookup to try the local file first,
and then query the DNS server. If you want your system to try the local cache
first, use instead:
hosts: cache files dns
Now that you can point your name service queries anywhere you want,
let’s look at enabling the caching daemon.
Name Query Caching with nscd(8)
Analyzing my DNS server logs, it quickly became apparent that the two
systems that make the most queries on my network are the proxy server and
the network management server. This makes sense—after all, the proxy calls
up dozens of web pages a second for users, and the management system hits
every vital system on my network every few minutes. While these clients do
not place an unbearable load on the system, there’s no reason for them to
keep performing the same checks on data that rarely changes. For example,
the management workstation looks up the IP address of each router and
switch every sixty seconds. That data is almost static, so those checks are not
only inelegant but actively annoying when I’m reading my DNS query logs.
Similarly, if your server is integrated into a large network, you might have to
authenticate against a Kerberos domain or an LDAP directory, so your system
would make thousands of network-traversing password checks a minute. Even
the /etc/services file can contain thousands of entries, and parsing the file for
each and every lookup takes time.

452 Chapter 15
The caching daemon, nscd(8), handles every information source
managed by nsswitch.conf. Each type of lookup requires a line in the nscd
configuration file, /etc/nscd.conf. By default, nscd(8) caches all six services.
Each entry has a keyword and either a cache name and a value, or just a
value. For example, the default entry for host lookups is:
enable-cache hosts yes
The keyword is enable-cache, the cache name is hosts, and the value is yes.
With this, nscd(8) stores hostname queries. If you edit /etc/nsswitch.conf to
have the hosts name service first try nscd, the results of all name service
queries will be nscd locally. Between nsswitch.conf and nscd(8), my proxy
servers and network management station make only a fraction of the queries
to my DNS server.
nscd(8) and Timing
While nscd has a whole slew of options that might be useful in certain rare
circumstances, the two that I find most generally helpful are timing options.
Control the length of time nscd(8) stores an answer with the options
negative-time-to-live and positive-time-to-live.
positive-time-to-live tells nscd(8) how long to retain cached answers.
For example, suppose you’re using nscd(8) for host name lookups. By setting
the positive-time-to-live, you tell nscd to retain each answer for that number
of seconds before discarding it and looking for a fresh answer. The following
entry tells nscd(8) to retain host information for 600 seconds, or 10 minutes:
positive-time-to-live hosts 600
After 10 minutes, nscd(8) discards the old answer and lets the name
service switcher look further for a fresh answer. When that fresh answer arrives,
nscd(8) stores it for another 10 minutes. The default positive-time-to-live is
3,600 seconds, or 1 hour.
In addition to storing positive responses, nscd(8) also stores negative
responses. If you ask for the host nonexistent.absolutefreebsd.com, you’ll learn that
there is no such host. nscd(8) stores that negative answer as well. You can
control how long that negative answer remains in the cache with negative-
time-to-live, with the same syntax as positive-time-to-live. By default, the
negative-time-to-live for all information is 60 seconds.
Zeroing the Cache
Now and then you can get bad information in your cache. For example, my
network management system checks every vital network device every few
minutes. If I have to change the IP address on a router, I don’t want the
management station to start bleating about the disappearing router; I want it
to go fetch the new answer immediately, without waiting for an hour. A user
can erase his own part of the cache by using nscd’s -i option, while root can
erase the whole cache with -I.

Small System Services 453
For example, I erase my own hosts cache with:
# nscd -i hosts
If I do not erase the cache, my system will update with the new information
according to nscd’s time-to-live settings.
nscd(8) at Boot
Start nscd(8) automatically at boot by setting:
nscd_enable="YES"
in /etc/rc.conf.
inetd
The inetd(8) daemon handles incoming network connections for less
frequently used network services. Most systems don’t have a steady stream of
incoming FTP requests, so why have the FTP daemon running all the time?
Instead, inetd listens to the network for incoming FTP requests. When an
FTP request arrives, inetd(8) starts the FTP server and hands off the request.
Other common programs that rely on inetd are telnet, tftp, and POP3.
inetd also handles functions so small and rarely used that they’re easier to
implement within inetd, rather than route them through a separate program.
This includes discard (which dumps any data received into the black hole
of /dev/null), chargen (which pours out a stream of characters), and other
functions. These days, most of these services are not required and are disabled
by default, but you can enable them if necessary.
/etc/inetd.conf
Take a look at /etc/inetd.conf. Most daemons have separate IPv4 and IPv6
configurations, but if you’re not running IPv6 you can ignore the IPv6 entries.
Let’s look at one entry, the FTP server configuration.
ftp stream tcp nowait root /usr/libexec/ftpd ftpd -l
INETD(8) SECURITY
Some sysadmins think of inetd(8) as a single service with a monolithic security profile.
Others say that inetd(8) has a bad security history. Neither is true. inetd(8) in itself is
secure, but it absorbs a certain amount of blame for the programs it forwards requests
to. Some services provided by inetd (such as telnet and ftp) are inherently insecure,
while others have had a troubled childhood and act out as a result (i.e., qpopper).
Use inetd(8) just as you would any other network server program: Do not run inetd
unless you need it, and then confirm that it offers only trusted and secure programs!

454 Chapter 15
The first field is the service name, which must match a name in
/etc/services. inetd performs a service name lookup to identify which TCP port
it should listen to. If you want to change the TCP/IP port your FTP server
runs on, change the port for FTP in /etc/services. (You could also change the
first field to match the service that runs on the desired port, but I find that
this makes the entry slightly confusing.)
The socket type dictates what sort of connection this is. All TCP
connections are of type stream, while UDP connections are of type dgram.
While you might find other possible values, if you’re considering using them,
either you’re reading the documentation for a piece of software that tells you
what to use, or you’re just wrong.
The protocol is the layer 4 network protocol, either tcp (IPv4 TCP),
udp (IPv4 UDP), tcp6 (IPv6 TCP), or udp6 (IPv6 UDP). If your server accepts
both IPv4 and IPv6 connections, use the entries tcp46 or udp46.
The next field indicates whether inetd should wait for the server
program to close the connection, or just start the program and go away. As a
general rule, TCP daemons use nowait while UDP daemons need wait. (There
are exceptions to this, but they’re rare.) inetd(8) starts a new instance of the
network daemon for each incoming request. If a service uses nowait, you can
control the maximum number of connections inetd accepts per second by
adding a slash and a number directly after nowait, like this: nowait/5. One way
intruders (usually script kiddies) try to knock servers off the Internet is by
opening more requests for a service than the server can handle, and by rate-
limiting incoming connections you can stop this. On the other hand, this
means that your intruder can stop other people from using the service at all.
Choose your poison carefully!
We then have the user that the server daemon runs as. The FTP server
ftpd(8) runs as root, as it must service requests for many system users, but
other servers run as dedicated users.
The sixth field is the full path to the server program inetd runs when
a connection request arrives. Services integrated with inetd(8) appear as
internal.
The last field gives the command to start the external program includ-
ing any desired command-line arguments.
Configuring inetd Servers
While /etc/inetd.conf seems to use a lot of information, adding a program is
actually pretty simple. The easiest way to learn about inetd(8) is to implement
a simple service with it. For example, let’s implement a Quote of the Day
(qotd) service. When you connect to the qotd port, the server sends back a
random quote and disconnects. FreeBSD includes a random quote generator
in its games collection, fortune(1). This random quote generator is all we
need to implement an inetd-based network program. We must specify a port
number, a network protocol, a user, a path, and a command line.

Small System Services 455
port number
The /etc/services file lists qotd on port 17.
network protocol
The qotd service requires that you connect to a network port and get some-
thing back, so it needs to run over TCP. Remember, UDP is connectionless—
a reply is not required. We must specify tcp in our inetd configuration, which
means that we must specify nowait in the fourth field.
user
Best practice says to create an unprivileged user to run the qotd service,
modeled after users such as pop or proxy. For this example, we’ll just use the
general unprivileged user nobody, but if you were implementing this in
production you’d want to create an unprivileged user qotd.
path
Find fortune at /usr/games/fortune.
Running the Command
fortune(6) does not require any command-line arguments, but you can add
them if you like. Believers in Murphy’s Law can use fortune murphy, while
Star Trek fans can get quotes with fortune startrek. (The latter correctly
includes only the One True Star Trek, not any of the wannabe followups.)
Iuse
fortune -o, as anyone who connects to my server deserves what they get.
Sample inetd.conf Configuration
Putting this all together, the entry for qotd in /etc/inetd.conf looks like this:
qotd stream tcp nowait nobody /usr/games/fortune fortune
You might think this example trivial, but providing other services out of
inetd(8) is no more difficult.
Starting inetd(8)
First, enable inetd(8) at boot by adding the following entry to /etc/rc.conf:
inetd_enable=YES
With this set, start inetd by hand with /etc/rc.d/inetd start.
Now that inetd is running, telnet to port 17 and test our new service:
# telnet localhost 17
Trying 127.0.0.1...
Connected to localhost.
Escape character is '^]'.
It is difficult to produce a television documentary that is both
incisive and probing when every twelve minutes one is interrupted by

456 Chapter 15
twelve dancing rabbits singing about toilet paper.
-- Rod Serling
Connection closed by foreign host.
It works! We have the usual TCP/IP connection information and our
random fortune . (As an added bonus, you also know why I don’t write for
television.)
Changing inetd’s Behavior
inetd behaves differently depending on the flags you set for it. The default
flags turn on TCP wrappers, as configured in /etc/hosts.allow (see Chapter 9).
Table 15-2 lists some of the useful flags.
As an extreme example, if you want to use TCP wrappers, allow only two
connections per second from any single host, allow an unlimited number of
service invocations per minute, and only listen on the IP address 192.168.1.2,
you would set the following in /etc/rc.conf:
inetd_flags="-Ww -c 2 -R 0 -a 192.168.1.2"
With inetd(8), almost anything can be a network service.
DHCP
Dynamic Host Configuration Protocol (DHCP) is the standard method for handing
out IP addresses to client computers. While DHCP services are not integrated
with FreeBSD out of the box, they are commonly required to implement
such services as diskless workstations and PXE installs. We’ll cover the basics
of DHCP configuration here, without delving into DHCP’s advanced features,
Table 15-2:
inetd(8) Flags
Flag Description
-l Log every successful connection.
-c Set the maximum number of connections per second that can be made to any service.
By default, there is no limit. Note that “unlimited” is not the same as “infinite”—your
hardware only handles so many connections.
-C Set the number of times one IP address can connect to a single service in one minute.
This connection rate is unlimited by default, but using this can be useful against people
trying to monopolize your bandwidth or resources.
-R Set the maximum number of times any one service can be started in one minute. The
default is 256. If you use -R 0, you allow an unlimited number of connections to any
one service.
-a Set the IP address inetd(8) attaches to. By default, inetd listens on all IP addresses
attached to the system.
-w Use TCP wrappers for programs started by inetd(8), as per hosts.allow (see Chapter 9).
-W Use TCP wrappers for services integrated with inetd(8), as per hosts.allow (see
Chapter 9).

Small System Services 457
to give you just enough information to set up your basic office, diskless
clients, or global network of interconnected offices.
The FreeBSD Ports Collection includes ISC dhcpd, from the same folks
who brought us BIND (see Chapter 14), in /usr/ports/net/isc-dhcp3-server. Install
that port per the instructions in Chapter 11. You’ll be offered a screen of
initial options that highlight many of ISC dhcpd’s features and capabilities,
such as LDAP integration. The default options are suitable for almost any
environment and include many desirable security features. The tools
installed include dhcpd(8), the configuration file /usr/local/etc/dhcpd.conf,
and extensive manual pages.
How DHCP Works
DHCP can be terribly complicated in a complex network, but is rather simple
in an office Ethernet environment. Each DHCP client sends a broadcast across
the local Ethernet asking for someone, anyone, to provide network configura-
tion information. If your DHCP server is on that local Ethernet, it answers
directly. If your DHCP server is on another network segment, the router for
that network segment needs to know which IP address to forward the DHCP
request to. The DHCP server then loans configuration information to the
client and tracks which clients have been assigned which IP addresses.
A configuration issued to a client is called a lease. Like the lease you pay
on a home or auto, DHCP leases expire and must be renewed occasionally.
The client can request certain features—for example, Microsoft clients
ask for the IP address of the WINS server, while diskless systems ask where to
find a kernel. You can manage all these options as necessary.
Each client is uniquely identified by the MAC address of the network
card used to connect to the network. ISC dhcpd tracks MAC and IP addresses,
as well as leases, in the file /var/db/dhcpd/dhcpd.leases. In this file, you can
identify which hosts have which IP addresses. If a host disappears from the
network for a time and returns, dhcpd(8) reissues the same IP to that client
if that IP is still available.
Managing dhcpd(8)
Enable dhcpd(8) in /etc/rc.conf with:
dhcpd_enable="YES"
With this set, you can use the script /usr/local/etc/rc.d/isc-dhcpd to start
and stop the daemon.
Configuring dhcpd(8)
The file /usr/local/etc/dhcpd.conf contains all the configuration for dhcpd.
While ISC dhcpd(8) can fill a book on its own, we’ll focus on the functions
needed for a basic small office as well as those used in the examples later in
this book. The default dhcpd.conf is well commented and includes still more

458 Chapter 15
examples, while the online manual is painfully exhaustive. We’re going to
assume that you’re running a single DHCP server on your network, and that
your server should answer all requests for DHCP services. (It is entirely possible
to cluster ISC dhcpd for fault tolerance, but that’s beyond our scope here.)
Start your dhcpd.conf with a few general rules for client configuration:
option domain-name "absolutefreebsd.com";
option domain-name-servers 192.168.1.11, 192.168.1.12;
default-lease-time 3600;
max-lease-time 14400;
authoritative;
ddns-update-style none;
log-facility local7;
Each DHCP client registers its hostname with the DHCP server, but it
must learn the local domain name. (It’s also possible for the DHCP server to
set the client’s hostname.) Set this with the domain-name option . You can
give your DHCP clients any domain name you like; they do not need to share
the domain name of the server. You can include multiple domains if you
separate them with spaces, but not all operating systems will recognize
additional domain names.
Every TCP/IP client needs a DNS server or two. Specify them with the
option domain-name-servers . Separate multiple DNS servers with commas.
The normal duration of a lease is given (in seconds) by the default-
lease-time option . After the lease time runs out, the client requests a new
DHCP lease from the DHCP server. If the client cannot reach the DHCP
server, it continues to use the old lease for a number of minutes equal to the
maximum life of the lease, specified with max-lease-time .
If this is the only DHCP server for your network, be sure to inform
dhcpd(8) that it is the last word on client configuration with the authoritative
keyword .
DHCP integrates with dynamic DNS, which is a topic we don’t cover
in this book. The most common user of dynamic DNS is Microsoft Active
Directory. If you’re using AD, chances are that you’re using the Microsoft
DHCP Server and not ISC dhcpd. Without AD, you really don’t need
dynamic DNS. Tell the server to not bother updating the global DNS with
ddns-update-style none .
Finally, you can tell dhcpd(8) where to send its log messages . See
Chapter 19 for more information on logging.
Each subnet on your network needs a subnet statement to identify
configuration information for DHCP clients on that subnet. For example,
here’s a network statement for a single small office network:
subnet 192.168.1.0 netmask 255.255.255.0 {
range 192.168.1.50 192.168.1.100;
option routers 192.168.1.1;
option netbios-name-servers 192.168.1.3, 192.168.1.5;
}

Small System Services 459
Each subnet declaration starts by identifying the network number and net-
mask of the subnet. Here, we have a subnet using the IP network number
192.168.1.0 with the netmask 255.255.255.0, or the IP addresses 192.168.1.1
through 192.168.1.255. The information that follows in brackets all pertains
to hosts on that particular subnet.
The range keyword identifies the IP addresses that dhcpd(8) may issue
to clients. In this example, we have 51 IP addresses available for clients. If
52 DHCP clients connect at once, the last host won’t get an address.
Define a default route with the routers option . Note that you cannot
define additional routes with dhcpd(8); instead, your local network router
needs to have the proper routes to reach the destination. If you have multiple
gateways on your local network, your gateway transmits an ICMP redirect to
the DHCP client to give it an updated route. (If you have no idea what this
means, that’s all right. When you need it, you’ll abruptly comprehend what
I’m talking about, and if you never need it, you’ve just wasted the two seconds
it took to read this aside.)
You can take pity on your Microsoft clients and identify the WINS
servers . It is very common for each network segment to have a
WINS server. If you have only one network, or only one set of WINS
servers, you can put the netbios-name-servers option outside of the subnet
declaration.
If you have multiple subnets, create multiple subnet statements.
That’s it! Edit your dhcpd.conf, start dhcpd(8), and watch your logs to see
clients getting addresses.
Printing and Print Servers
Printing on Unix-like operating systems is a topic that makes new sysadmins
cry and seasoned sysadmins ramble on about the good old days when printers
were TTY devices and about the younger generation not knowing how good
they have it.2 The most common printing situations are printers directly
attached to a computer via a parallel or USB port, and printers attached to
anetwork print server.
If you have a printer attached directly to your FreeBSD machine,
I suggest that you install CUPS (/usr/ports/print/cups), the Common Unix
Printing System. This suite of software manages many popular consumer-
grade and commercial printers, from lowly inkjets to big laser printers. I’m
not going into any detail about CUPS, as it varies by printer model. Learn
more about CUPS at http://www.cups.org.
You can also use CUPS to access remote printers, but in many cases that’s
overkill. I recommend CUPS for remote printers when you have multiple
remote printers and you might want to switch between them. On the other
hand, I want all of my servers to use the printer that’s near my desk. A simple
lpd(8) configuration makes this work easily.
Accessing a remote printer that’s managed by another host is very simple,
however. You must run a local printer daemon and tell that printer daemon
2 We’re right; you don’t know how good you have it.

460 Chapter 15
where to find its printer. The remote print server must speak the lpd protocol
on TCP port 515. Test for its presence by telnetting to that port; if you get a
response, the server speaks lpd. Most Unix-like printer servers speak that
protocol, and if you’re in a Microsoft environment, you need to ask your
Windows administrator to install Print Services for Unix.
To enable lpd(8) on your system, add:
lpd_enable="YES"
to /etc/rc.conf so lpd starts at boot. Start and stop lpd(8) by hand with
/etc/rc.d/lpd start and stop.
/etc/printcap
The /etc/printcap file controls printer setup with lpd(8). Printers have dozens
and dozens of options, from the cost per page to manually setting a string to
feed a new sheet of paper.
Every printer your system knows about needs an entry in /etc/printcap,
the printer capability database. This file is, by modern standards, in a rather
obtuse format and will look very unfamiliar to anyone who hasn’t previously
worked with termcap(5). Fortunately, to access a print server you don’t need
to understand printcap(5), you just need to follow the template below.
To connect to a printer on a print server, you must have the print server’s
hostname or IP address and its name for the printer you want to access. Make
an entry in /etc/printcap following the template below. Pay special attention
to the colons and backslashes, they are absolutely vital.
lp|printername:\
:sh=:\
:rm=printservername:\
:sd=/var/spool/output/lpd/printername:\
:lf=/var/log/lpd-errs:\
:rp=printername:
Our first line shows the printer’s names. Each printer can have any
number of names, separated by the pipe symbol (|). The default printer on
any Unix-like system is called lp, so list that as one of the names for your
preferred printer. One other name should be the name used by the print
server for your printer (i.e., “3rdFloorPrinter”). Be warned, Microsoft print
servers frequently share one printer under several different names, and use
different names to handle printing differently. If you find this to be the case
on your network, be sure to choose the PostScript name.
By default, the system will precede each print job with a page giving the
job name, number, host, and other information. Unless you’re in an environ-
ment with a single massive shared printer, this is probably a waste of paper.
The :sh:\ entry suppresses this page.
The rm (remote machine) variable provides the hostname of the print
server. You must be able to ping this server by the name you give here.

Small System Services 461
Each printer requires a unique spool directory , where the local print
daemon can store documents in transit to the print server. This directory
must be owned by user root and group daemon.
Unlike spool directories which must be different, printers can share a
common log file .
Finally, specify the remote printer name . Be sure you end /etc/printcap
with a newline; don’t just terminate the file immediately after the printer
name. Also, note that unlike every other entry in this template, the last line
does not require a trailing backslash.
After editing /etc/printcap, you must restart lpd(8), but once that’s done
you can view your print queue with lpq(1) and watch for any problems in
/var/log/lpd-errs.
TFTP
Let’s end our discussion of small network services with perhaps the smallest
network service still used, the Trivial File Transfer Protocol, or TFTP. TFTP
lets you transfer files from machine to machine without any authentication
whatsoever. It’s also much less flexible than file copy protocols such as SCP
or FTP. TFTP is still used by makers of embedded devices (such as Cisco) to
load system configurations and operating system updates. We only cover it
here because diskless clients use TFTP to download their operating system
kernel and get their initial configuration information. tftpd(8) runs out of
inetd(8) on TCP port 69.
Setting up a tftpd(8) server involves four steps: choosing a root directory
for your server, creating files for the server, choosing an owner for your files,
and running the server process.
Root Directory
tftpd(8) defaults to using the directory /tftpboot. This might be suitable if you
have only a couple files that you rarely access, but the root partition is best
reserved for files that don’t change often. You don’t want a TFTP upload to
crash your system by filling the root partition! I usually put my tftpd(8) root
directory in /var/tftpboot and add a symlink to /tftpboot:
# mkdir /var/tftpboot
# ln -s /var/tftpboot /tftpboot
Now you can create files for access via TFTP.
TFTP SECURITY
TFTP is not suitable for use on the public Internet. Anyone can read or write files on
a TFTP server! Only use TFTP behind a firewall or at least protect it tightly with TCP
wrappers (see Chapter 9).

462 Chapter 15
tftpd and Files
Users can both read and write files via TFTP. If you want tftpd(8) users to be
able to read a file, the file must be world-readable:
# chmod +r /var/tftproot/filename
Similarly, tftpd(8) will not allow anyone to upload a file unless a file of that
name already exists and is world-writable. Remember, programs and regular
files have different permissions. A program must have execute permissions in
addition to read and write permissions, so you must set permissions differently
for programs and files. You can use touch(1) to pre-create files that you’ll
want to upload via TFTP.
# chmod 666 /var/tftproot/filename
# chmod 777 /var/tftproot/programname
Yes, this means that anyone who knows a file’s name can overwrite the
contents of that file. Make vital files read-only.3 This also means you don’t
have to worry about someone uploading a big file and filling your hard drive.
File Ownership
Files in a TFTP server should be owned by a user with the least possible
privilege. If you only run a TFTP server intermittently, you can use the nobody
user. For example, if you only need the TFTP server to perform the occasional
embedded device upgrade, let the nobody user own your files and just turn
tftpd(8) off when it’s not needed. If you run a permanent TFTP server,
however, it’s best to have a dedicated tftp unprivileged user to own the files.
The tftp user does not need to own the tftproot directory and, in fact, should
have an entirely different home directory. He only needs ownership of the
files available to users.
tftpd(8) Configuration
tftpd(8) is configured entirely through command-line arguments, and there
aren’t many of them. For a full list, read tftpd(8), but here are the most
commonly used ones.
If you create a user just to run tftpd(8), specify that user with the -u
argument. If you do not specify a user, tftpd runs as nobody.
I recommend logging all requests to your TFTP daemon. The -l argument
turns on logging. tftpd(8) uses the LOG_FTP facility, which you must enable in
syslog.conf (see Chapter 19).
tftpd supports chrooting (see Chapter 9) with the -s flag. This lets you
confine tftpd(8) to your selected directory. You don’t want users to tftp
3 Unless, of course, you’d like to try installing someone else’s server configuration file as the new
IOS on your Cisco router. Be sure to tell the Cisco support tech to activate the phone recorder
before you describe your problem; he’ll want to share this one with his co-workers.

Small System Services 463
world-readable files such as /boot/kernel/kernel, just on general principle! Always
chroot your tftpd(8) installation.
You can chroot TFTP clients by IP address with the -c argument. In this
case, you must create a directory for every client permitted to connect. For
example, suppose the only host you want to give TFTP access to is your
router, with the IP address of 192.168.1.1. You could create a directory
/var/tftproot/192.168.1.1 and use -c. You must also use -s to define the base
directory of /var/tftproot. This is a good compromise when you must offer
TFTP to only one or two hosts, but you don’t want the world to have access
to your TFTP server.
You can choose to allow a client to write new files to your TFTP server.
This is a bad idea, because it lets remote users fill up your hard disks with
arbitrary files. If you must have this functionality, use the -w flag.
For example, suppose you want to log all requests to tftpd, chroot to
/var/tftpboot, run the server as the user tftpd, and chroot clients by IP address.
The command to run tftpd would look like this:
tftpd -l -u tftpd -c -s /var/tftpboot
Enter this into inetd.conf as described earlier, restart inetd(8), and you’re
in business!
Scheduling Tasks
The FreeBSD job scheduler, cron(8), allows the administrator to have the
system run any command on a regular basis. If you need to back up your
database nightly or reload the nameserver four times a day, cron is your
friend. cron(8) configuration files are called crontabs and are managed with
crontab(1). Every user has a separate crontab stored in /var/cron/tabs, and
the global crontab file is /etc/crontab.
User Crontabs vs. /etc/crontab
The purpose of /etc/crontab is different from that of individual users’ crontabs.
With /etc/crontab, root may specify which user will run a particular command.
For example, in /etc/crontab the sysadmin can say, “Run this job at 10 PM
Tuesdays as root, and run this other job at 7 AM as www.” Other users can
only run jobs as themselves. Of course, root can also edit a user’s crontab.
Also, any system user can view /etc/crontab. If you have a scheduled job
that you don’t want users to know about, place it in a user crontab. For
example, if you have an unprivileged user for your database, use that unpriv-
ileged user’s crontab to run database maintenance jobs.
/etc/crontab is considered a FreeBSD system file. Don’t overwrite it when
you upgrade! One way to simplify upgrading /etc/crontab is to set your custom
entries at the end of the file, marked off with a few lines of hash marks (#).
Finally, while you edit /etc/crontab with a text editor, edit a user crontab
with crontab -e.

464 Chapter 15
cron and Environment
crontabs run in a shell, and programs might require environment variables
to run correctly. You can also specify environment variables on the command
line for each command you run from cron. cron does not inherit any envi-
ronment variables from anywhere; any environment programs need must
be specified. For example, here’s the environment from /etc/crontab on a
FreeBSD 7 system:
SHELL=/bin/sh
PATH=/etc:/bin:/sbin:/usr/bin:/usr/sbin
HOME=/var/log
Yes, this is extremely minimal! Feel free to add environment variables as
needed to user crontabs, but be conservative when changing /etc/crontab.
If you need a custom environment variable, it’s safest to use a user crontab
rather than /etc/crontab, because many of the commands in /etc/crontab are
for core system maintenance.
Crontab Format
Beneath the environment statements, a user crontab is divided into six
columns. The first five columns represent the time the command should
run, as minute, hour, day of the month, month of the year, and day of the
week, in that order. An asterisk (*) in any column means every one, while
anumber means at this exact time. Minutes, hours, and days of the week begin
with 0, and days of the month and months begin with 1. Also, thanks to an
ancient disagreement between AT&T and BSD, Sunday can be represented by
either 7 or 0. After the time, list the command to be run at that time.
/etc/crontab has one extra column: the user under which to run the
command. It goes between the time specification and the command itself.
Check out the many examples in /etc/crontab if you like.
Sample Crontabs
Assume that we’re editing the crontab of an unprivileged user to schedule
maintenance of a program. As /etc/crontab has column headings at the top,
we’ll demonstrate user crontabs here. (To use these examples in /etc/crontab,
just add the user before the command.) Here, we want to run the program
/usr/local/bin/maintenance.sh at 55 minutes after each hour, every single hour:
55 * * * * /usr/local/bin/maintenance.sh
Asterisks tell cron to run this job every hour, on every day of the month,
every month, and on every weekday. The 55 tells cron to only run this job at
minute 55.
To run the same job at 1:55 PM every day, use the following:
55 13 * * * /usr/local/bin/maintenance.sh

Small System Services 465
Here, 13 represents 1:00 PM on the 24-hour clock, and 55 is the number
of minutes past that hour.
One common mistake people make when using cron is specifying a large
unit of time but missing the small one. For example, suppose you want to run
the job every day at 8 AM:
* 8 * * * /usr/local/bin/maintenance.sh
This is wrong. Yes, the job will run at 8:00 AM. It will also run at 8:01,
8:02, 8:03, and so on, until 9 AM. If your job takes more than one minute to
run, you’ll quickly bring your system to its knees. The correct way to specify
8:00 AM, and only 8:00 AM, is this:
0 8 * * * /usr/local/bin/maintenance.sh
To specify ranges of time, such as running the program once an hour,
every hour, between 8 AM and 6 PM, Monday through Friday, use something
like this:
55 8-18 * * 1-5 /usr/local/bin/maintenance.sh
To specify multiple exact times, separate them with commas:
55 8,10,12,14,16 * * * /usr/local/bin/maintenance.sh
More interestingly, you can specify fractions of time, or steps. For example,
to run a program every five minutes, use:
*/5 * * * * /usr/local/bin/maintenance.sh
You can combine ranges with steps. To run the program every five
minutes, but one minute after the previous example, use this:
1-56/5 * * * * /usr/local/bin/maintenance.sh
Control the day a job runs with two fields: the day of the month and the
day of the week. If you specify both, the job will run whenever either condition
is met. For example, tell cron to run a job on the 1st and the 15th of every
month, plus every Monday, as follows:
55 13 * 1,15 1 /usr/local/bin/maintenance.sh
If your job has a nonstandard environment, set the environment on the
command line just as you would in the shell. For example, if your program
requires a LD_LIBRARY_PATH environment variable, you can set it thus:
55 * * * * LD_LIBRARY_PATH=/usr/local/mylibs ;
/usr/local/bin/maintenance.sh

466 Chapter 15
cron also supports special scheduling, such as “annually” or “daily,” with
the @ symbol. Most of these terms are best not used, as they can be ambiguous.
While the machine knows exactly what they mean, humans tend to mis-
understand! One useful crontab entry is for “whenever the system boots,”
which is @reboot. This lets an unprivileged user run jobs when the system
boots. Use the @reboot label instead of the time fields:
@reboot /usr/local/bin/maintenance.sh
cron(8) lets you schedule your work any way you like, eliminating the
human being from many routine maintenance tasks.
Now that you have a decent understanding of the common small services
provided by FreeBSD, let’s go on to heavier services such as email.

16
SPAM, WORMS, AND VIRUSES
(PLUS EMAIL, IF YOU INSIST)
The Internet’s killer application is
email, no matter what you hear from the
marketing office down the hall. Email is so
ubiquitous that it has become the preferred
delivery mechanism for unsolicited advertising, viruses,
worms, and other malicious communication, simply
because everybody on the Internet has it. This chapter discusses how to
handle email flow in the server-to-server case, the client-to-server case, and
the server-to-client case. On today’s Internet, each of these situations uses a
slightly different protocol.
FreeBSD excels as a mail server and handles millions of emails every day.
The FreeBSD Project itself runs some of the busiest email servers in the world
for its mailing lists. FreeBSD on decent hardware can receive and transmit
over 40,000 pieces of email an hour. That’s an average of 11 messages a
second, complete with any rambling text, inflated graphics, and overblown
HTML the messages might include. To get this kind of performance, however,
you must understand how email works.

468 Chapter 16
Email Overview
Most legitimate email originates with a user at a desktop computer. This is
most often a Windows or Mac workstation with Outlook, Eudora, Thunder-
bird, or one of their cousins—although you can send email with almost any
operating system.
The client sends the email to an email server. Almost every company or
ISP has at least one dedicated email system. The server performs some basic
sanity checking on the email to ensure that it complies with Internet standards,
and then searches for a server that claims responsibility for the destination.
When your email server finds a destination server, it transmits the email to
that server. When the recipient checks his email, his mail client software goes
to the mail server and downloads the new messages to his desktop. If the
recipient replies, the whole process is reversed.
Finding Mail Servers for a Domain
Mail servers exchange email with each other, but how do they find each
other? For example, my personal email comes from the domain name
blackhelicopters.org. If I write an email to a user at freebsd.org, how does my
mail server find the mail servers for freebsd.org?
Each domain publishes mail exchanger (MX) records through DNS.
We briefly touched on MX records in Chapter 14. (In the absence of MX
records, email falls back on A records, which are much less flexible.) The DNS
record for a domain that receives email includes one or more MX records,
each with a number indicating preference. Here we find the mail exchangers
for freebsd.org with an MX query:
# dig freebsd.org mx
...
;; QUESTION SECTION:
;freebsd.org. IN MX
;; ANSWER SECTION:
freebsd.org. 381 IN MX 10 mx1.freebsd.org.
freebsd.org has only one MX server, with a preference of 10. Any incoming
email for freebsd.org goes through mx1.freebsd.org. Compare this to a large
business, such as cnn.com:
# dig cnn.com mx
...
;; QUESTION SECTION:
;cnn.com. IN MX

Spam, Worms, and Viruses (Plus Email, If You Insist) 469
;; ANSWER SECTION:
cnn.com. 3600 IN MX 30 lonmail1.turner.com.
cnn.com. 3600 IN MX 40 hkgmail1.turner.com.
cnn.com. 3600 IN MX 10 atlmail3.turner.com.
cnn.com. 3600 IN MX 10 atlmail5.turner.com.
cnn.com. 3600 IN MX 20 nycmail1.turner.com.
cnn.com. 3600 IN MX 20 nycmail2.turner.com.
CNN has six mail exchangers! Two servers have priority 10, the lowest num-
ber, so any machine sending email to cnn.com tries either atlmail3.turner.com
or atlmail5.turner.com first. If the chosen server is down, the sending server
tries the other one. If both priority 10 servers are down, the priority 20 servers,
nycmail1.turner.com and nycmail2.turner.com , are tried next, in random
order. If all of the priority 10 and priority 20 servers are down, the sending
server tries the priority 30 and then the priority 40 server. At least one
of these should be up and accepting email.
Having a single MX record is becoming an increasingly popular antispam
measure. If your domain has a valid DNS, the sender queues the email for
several days. Frequently, a backup mail exchanger doesn’t know what email
recipients are valid at a domain, making it a prime candidate for spam
acceptance. Many spamming tools use backup MXs as routes into the domain.
While I’ve previously said that every domain should have multiple MX hosts,
it’s becoming increasingly difficult to have them without multiplying the
time you spend fighting spam.
Undeliverable Email
When the mail server can find the mail exchangers for a domain but none of
the exchangers are accepting email, the mail server places the message in a
queue. Every fifteen minutes or so, the server attempts to deliver the message
again. Internet standards allow five days to deliver an email message.1 If the
message cannot be delivered in five days, a bounce message is returned to
the sender.
If the mail server cannot find any MX records for a domain, nor any
record for a host with the same name as the domain, the message immediately
bounces back to the sender. The user will then ask you why his perfectly valid
email message bounced, which is when you get to point out that yahoo.com is
not spelled with a Q.
The two errors are very different, and the mail sender will have a very
different experience with them. This is one reason why it is best to have your
secondary nameserver distant from your master nameserver, so that when
your primary nameserver and mail exchanger go away, email will still reach
you when service is restored.
1 Be sure to tell the sales people in your office that email can legitimately take up to five days to
be delivered. They turn this fascinating color.

470 Chapter 16
The SMTP Protocol
Server-to-server email runs over the Simple Mail Transfer Protocol (SMTP),
on TCP port 25. By default, email is not encrypted and has no integrity verifica-
tion system. It’s a very old protocol, from the days before security was such
a great concern. It’s actually pretty easy to send email by hand, without using a
client. Mail transmission by hand is yet another useful trick for debugging
difficult problems or impressing your friends. (Just don’t try to impress girls
with it; it doesn’t work, trust me.)
You can determine if a host can receive email by using telnet to connect
to the SMTP port:
# telnet hostname 25
If you get an answer, a mail server is running on the system. If the
connection is rejected, that server does not accept email. Let’s connect to a
FreeBSD system and see if it accepts email:
# telnet bewilderbeast.blackhelicopters.org 25
Trying 198.22.63.8...
Connected to bewilderbeast.blackhelicopters.org.
Escape character is '^]'.
220 bewilderbeast.blackhelicopters.org ESMTP Sendmail 8.13.8/8.13.8; Thu, 7
Jun 2008 22:06:25 -0400 (EDT)
Not only does this answer prove that a mail server is running on the host,
we can see the exact version of the server software (Sendmail 8.13.8) and the
local date, time, and time zone. The only mysterious part of this response is the
first term, the 220. Every response from an email server includes a response
code and a human-readable response. The sending program only has to read
the leading number; the rest of the response is there for the convenience of
your feeble brain. Several sites on the Internet list and describe all the possible
SMTP response codes.
Now let’s start a conversation with the email server. Open negotiations
with the helo command and the hostname you’re connecting from:
helo pesty.blackhelicopters.org
POSTMASTER@EXAMPLE.COM
All rejected email is also copied to the postmaster account at your domain. The
existence of this email address is mandatory, and all sites that exchange Internet
email must have it. Be sure that you forward email sent to postmaster to your mail
administrator. The standards require that a human being, not an autoresponder,
read those messages. If you have a proprietary email system in addition to your
FreeBSD machine, be sure that it accepts mail to postmaster@!

Spam, Worms, and Viruses (Plus Email, If You Insist) 471
The server answers with something like this:
250 bewilderbeast.blackhelicopters.org Hello d149-67-12-
190.col.wideopenwest.com [67.149.190.12], pleased to meet you
The response includes the response code (250) and the hostname you’re
talking to (bewilderbeast.blackhelicopters.org). The Hello means that the
server is willing to talk to you and it identifies the machine you’re connecting
from. While my laptop is named pesty.blackhelicopters.org, the reverse DNS on
my source IP indicates that I’m actually connected through a Wide Open
West cable modem. Pesty is a legitimate hostname only behind my home
NAT device.
Now tell the mail server who sent the message with the mail from: com-
mand and the author’s email address:
mail from: <mwlucas@AbsoluteFreeBSD.com>
250 2.1.0 mwlucas@AbsoluteFreeBSD.com... Sender ok
If the server is still willing to speak with you, it returns a 250 code and
tells you that you may proceed. If the server is not willing to speak with you,
it rejects your connection now. Now name the recipient with the rcpt to:
command.
rcpt to: <mwlucas@blackhelicopters.org>
250 2.1.5 mwlucas@blackhelicopters.org... Recipient ok
If you’re really testing this, be sure to use another email address and
not mine.
The mail server now knows both the sender and the recipient. This is
the most common place where email transmission is rejected, as discussed in
“Relay Control” on page 472. Now you’re ready to send your email. Issue the
data command:
data
354 Enter mail, end with "." on a line by itself
Type whatever message you like here. Just like the instructions after the
code 354 say, when you’ve finished your message, enter a single dot on a line by
itself. The following example sends an email with the words Test message to
your recipient:
Test message
.
After you type the lone dot, the mail server should return a 250 to indi-
cate acceptance of the message and give you a message ID for the email.
250 2.0.0 l5827nBE004533 Message accepted for delivery

472 Chapter 16
Type quit to exit.
This technique can be used for both good and evil. As an administrator,
you can test your email configuration without mucking with a client that might
obscure test results. It’s also trivial to forge email simply by creating your own
mail from: statement. In some circles, forging email to a friend is a rite of
passage. There are very few legitimate reasons for forging email, however.2
Relay Control
Generally speaking, a mail server accepts either email destined for its local
domains or email being sent from local domains. If the mail server for
absolutefreebsd.com receives an email for a legitimate user at absolutefreebsd.com,
it should accept the message. If the server receives an email from a user
with an absolutefreebsd.com address, and if other access controls are met, the
server should accept the message and pass it on to the recipient. If, however,
someone completely unrelated to absolutefreebsd.com attempts to use that mail
server as a relay for email to a third party, the server should reject it.
People who send junk email (aka spam) search constantly for email
servers that allow anyone to transmit email through them. If your server
allows open relaying, you are a potential source of junk email. If you allow
unrestricted relay through your servers, various antispam groups will blacklist
you. You will lose email connectivity to 30 to 40 percent of the Internet until
you fix your relay access.
So, what are these “other access controls” I mentioned? One of the most
common is restricting the IP addresses that can relay email through your
server. By only allowing hosts on your corporate network to send email
through your servers, you instantly eliminate outsiders’ ability to use your
servers to transmit junk email.
If you provide email service to roaming users, however, the situation
becomes more complicated. You must allow those roaming users to send and
receive email without reconfiguring their laptops, and you must prevent
unauthorized users from illicitly stealing your bandwidth to send junk email.
Stopping Bad Email
Just as you want good email to arrive quickly, you do not want junk email to
reach your users. Junk email includes spam, viruses, worms, and anything
else you throw away unopened. While it’s possible for a legitimate user of
your service to start sending junk email, best practice is to have terms of
service that not only forbid this behavior, but also include high punitive
damages to compensate you for the complaints you will receive and for the
time you’ll spend getting yourself off of blacklists. The two common methods
used against junk email are blacklists and greylisting.
2 I legitimately forge email to teach junior sysadmins that email is untrustworthy. Want to
transform your junior Windows tech into a properly paranoid admin? Forge an email from the
domain controller with the subject “Daily Status Haiku” and a body of “These things are certain:
death, taxes, and data loss. Guess which has occurred.” They will never forget a) that email can
be forged, and b) your face.
Spam, Worms, and Viruses (Plus Email, If You Insist) 473
Junk email blacklists contain lists of hosts that send junk email. As a public
service, blacklist maintainers allow mail administrators to check each incoming
message against the blacklist. When email arrives from a blacklisted IP address,
the server rejects the email. When you use a blacklist, you are trusting the
blacklist administrator to have sensible policies on adding and removing
spammers, as well as to apply those policies uniformly no matter how infuriat-
ing someone behaves towards them. The former is easy, while the latter is
not so simple.
Greylisting is perhaps the most effective antispam technique developed in
the last few years that doesn’t involve actual violence. Spam, worms, and viruses
are not usually sent in strict accordance with the SMTP protocol; mail servers
adhere to the standard more closely. Email is not a real-time communication
medium; mail servers are supposed to try several times to deliver a message
before returning it to the sender. The botnets that send junk email do not
follow that protocol; instead, they try each recipient address only once and
go on to the next recipient. By having your mail server accept messages from
new servers only on the second delivery attempt, you weed out the real mail
servers from the botnets.
FreeBSD’s integrated mail server, sendmail(8), supports both junk email
blacklists and greylisting quite well.
Sendmail
For many years now, Unix-like operating systems have included the traditional
Sendmail Mail Transfer Agent (MTA), or mail server. This program is huge,
obtuse, and downright intimidating to new administrators. Many experienced
system administrators also find it huge, obtuse, and downright intimidating.
Sendmail even breaks one of the cardinal rules of Unix-like systems: Instead
of many small tools that each do a single job well, Sendmail is a huge program
that performs many jobs. When Sendmail was written, the very idea of a
program that could be configured by a file, without having to recompile
the program, was revolutionary. The fact that the Sendmail configuration
looked like the result of placing an excited gerbil on a keyboard really wasn’t
relevant. Take a look in /etc/mail/sendmail.cf for a very basic sendmail(8)
configuration file.
Today, editing sendmail.cf by hand is no longer necessary nor desirable.
Sendmail configuration has become much simpler and more manageable,
and FreeBSD has integrated sendmail(8) into the system in such a way as to
make email setup as simple and painless as possible.
During the years that Sendmail management wasn’t so easy, however,
people who didn’t like Sendmail’s configuration developed competitors that
were simpler, easier to use, and had better security. The most popular are
Postfix (/usr/ports/mail/postfix) and Qmail (http://cr.yp.to/qmail.html). Both
are good tools. The FreeBSD Project uses Postfix to handle its massive email
lists, some of the biggest in the world. FreeBSD lets you seamlessly replace its
integrated Sendmail installation with one of these other packages or with any
other mailer you like.

474 Chapter 16
mailwrapper(8)
For many years, Sendmail was the only mail server available for Unix-like
systems. As such, a lot of add-on software expects to find /usr/sbin/sendmail
and expects it to behave just like Sendmail. What makes matters worse,
Sendmail actually behaves differently when called by different names. The
program mailq(1) is actually the same file as the program sendmail(8), but
since it has a different name, it behaves differently. As so many other pro-
grams must emulate Sendmail exactly, down to this multiname behavior,
it’s not as easy as just erasing your Sendmail binary and replacing it with
something else.
As a result, an administrator on an unfamiliar Unix-like system might
have no idea what /usr/sbin/sendmail really is! If someone previously installed
several different mail servers just to experiment, you’ll have to resort to
detective work and a bit of luck just to identify your so-called Sendmail.
FreeBSD does an end-run around all this by using a separate
mailwrapper(8) program. This mail wrapper directs email requests to the
desired mail server program. You’ll find a file /usr/bin/sendmail, but that
is actually mailwrapper(8) disguising itself as Sendmail. This mail wrapper
redirects Sendmail requests to the preferred mail programs installed elsewhere.
The /etc/mail/mailer.conf file contains a list of program names, along with
the paths to the actual programs to be called. For example, here’s the default
mailer.conf redirecting everything to sendmail(8):
sendmail /usr/libexec/sendmail/sendmail
send-mail /usr/libexec/sendmail/sendmail
mailq /usr/libexec/sendmail/sendmail
newaliases /usr/libexec/sendmail/sendmail
hoststat /usr/libexec/sendmail/sendmail
purgestat /usr/libexec/sendmail/sendmail
Each of these six “programs” in the left column is actually a name that
other programs might use for Sendmail. Alternative mailers such as Postfix
and Qmail actually have separate programs with these names. If you use an
alternative mailer, you must edit mailer.conf to give the proper path to the
mailer programs. When you use the Ports Collection to install an alternative
mailer, the port prints instructions on exactly how to update mailer.conf for
your installation. Follow those instructions for your new MTA to work. If you
install an alternative mailer without using the Ports Collection, you must edit
mailer.conf on your own.
Submission vs. Reception
FreeBSD (as well as all Unix-like systems) uses Sendmail in multiple ways.
Some FreeBSD machines accept email from the Internet and either relay it on
to other machines or deliver it to local users. Other FreeBSD machines do

Spam, Worms, and Viruses (Plus Email, If You Insist) 475
not receive email, but only generate it. Sendmail handles each of these jobs
slightly differently.
The Sendmail submit daemon handles the email sent (or submitted)
from the local machine. In most cases, this email is simply forwarded to a
mail exchanger. For example, all of the servers on my network forward their
daily status email to the actual mail server so I receive them. A server trusts
email originating locally far more than email arriving from the Internet, so
the Sendmail process that handles these messages uses a much less restrictive
configuration and performs far fewer checks. This Sendmail process only
listens to the network on the localhost IP address 127.0.0.1, and therefore
other hosts on the network cannot use it.
The Sendmail inbound daemon accepts email from other hosts on
the network. This Sendmail process requires extensive care and feeding.
This is the Sendmail process that an intruder will try to compromise, and is
the potential conduit of junk email. We will spend the most energy on
configuring the inbound daemon.
The two configurations are mutually exclusive. When you have a full-
fledged Internet mail server on your system, you do not need to have a
weaker instance of Sendmail handling local email much in the same way most
people don’t leave the house to sleep in the tool shed. FreeBSD automatically
disables the submission Sendmail daemon and its queue handlers when
inbound Sendmail is activated.
Enable the submit and inbound mail daemons separately in
/etc/rc.conf. For a full description of all Sendmail configuration options
read rc.sendmail(8), but here are the basic four:
sendmail_enable="NO"
sendmail_submit_enable="YES"
sendmail_outbound_enable="YES"
sendmail_msp_queue_enable="YES"
The plain sendmail_enable turns on the inbound Sendmail daemon.
If you only want to send email from the local host and not receive email,
turn on sendmail_submit_enable. The sendmail_outbound_enable and sendmail
_msp_queue_enable settings handle transmission and retransmission of email
sent from the local host.
The vast majority of Sendmail configuration here applies to the inbound
Sendmail daemon. The submit Sendmail process requires very little config-
uration. When we’re talking about a piece of configuration useful for the
submit Sendmail, we’ll specifically mention that. Otherwise, everything is
for the inbound Sendmail instance. It’s not that these features won’t work
with the submit Sendmail; rather, they just don’t make sense. For example,
why have hostname or IP-based access controls or antispam protection on a
daemon that can only be reached from the local host?

476 Chapter 16
Sendmail Logging
sendmail(8) logs all transactions, errors, and restarts to /var/log/maillog.
Check it out to see your email activity, especially after making any config-
uration changes. When I’m working on the mail system, I prefer to open
the log in a separate terminal window and display new entries as they appear,
using tail -F:
# tail -F /var/log/maillog
Whenever Sendmail sends, receives, or rejects a piece of email, it logs a
message. tail -F shows this log in real time. Hit CTRL-C to stop showing the
log and get your command prompt back.
Configuring Sendmail
The directory /etc/mail contains all the human-friendly Sendmail config-
uration files, plus a couple human-hostile ones. For most common tasks
on a server that accepts incoming email, you only need to worry about
four files: /etc/mail/access, /etc/mail/aliases, /etc/mail/mailertable, and
/etc/mail/relay-domains.
The access file lets you set per-host and per-domain access controls for
your mail server.
The aliases file contains a map of email redirections for the local host.
The mailertable allows you to override MX records for this mail server. The
mailertable is notably useful when you’re using your FreeBSD system to provide
an additional layer of security for a proprietary system with a poor security
record, such as Microsoft Exchange.
The relay-domains file lists domain names and addresses that your server
will relay email for. Most of the systems here will be desktop clients that use
your machine as a mail server, but the list might also include other domains
that you provide backup MX services for.
Each of these files (except relay-domains) has a corresponding database
file ending in .db. Like /etc/passwd.db and /etc/spwd.db, these database files are
built from the text files to let a program access data quickly. When you change
the text file, you must also update the corresponding database file, as we’ll
see when we discuss each file.
The access File
The /etc/mail/access file lets you dictate who may send email through your
system. This is most commonly used for rejecting email from undesirable
correspondents. By default, Sendmail rejects all email not destined for the
local system. This file lets you override other Sendmail rules, in particular
junk email blacklists. The access database is best used for occasional exceptions
to other Sendmail configuration settings, although there are a few tasks that
can only be accomplished in the access database.

Spam, Worms, and Viruses (Plus Email, If You Insist) 477
The file /etc/mail/access has two columns. The left column is either a
domain name, a hostname, an IP address, or a block of IP addresses where a
piece of email originates. The right side is a statement of how email from those
hosts is to be handled; it is one of RELAY, OK, REJECT, or DISCARD. You can also
specify a custom ERROR message for certain hosts or domains. Skilled Sendmail
administrators can also provide custom error codes, but those require that
you know far more about SMTP than we cover in this book.
For example, here we specifically allow all email from the local host,
127.0.0.1. This is always a good rule, just in case someone in one of your
junk email blacklists makes a mistake and lists the local host in the spammer
database. A RELAY rule tells Sendmail to relay email for any matching host.
This tells your Sendmail daemon that it should relay email originating
locally to any destination. Listing the legitimate IP ranges of your network
here also helps in case your company is ever listed in a blacklist that you’re
using. While you’d certainly stop using a blacklist that lists you, this avoids
the headaches that occur between the time your site is blacklisted and the
time you figure it out. Like /etc/login.access, /etc/mail/access does not understand
modern subnets but instead matches the portion of the address range you
list. Here, I want to include the address range 192.168.0.0/23 but must list
two separate blocks of 192.168.0 and 192.168.1 instead:
127.0.0.1 RELAY
192.168.0 RELAY
192.168.1 RELAY
A more restrictive rule is OK, meaning that the Sendmail daemon should
accept but not relay email from the matching hosts. Suppose you have a
partner company that is continually being listed on a junk email blacklist
because they share an ISP with a notorious junk mailer. You can specifically
receive email from them with an OK rule:
theircompany.com OK
Even more restrictive is the REJECT rule, which tells Sendmail to categor-
ically refuse any email from the matching source. Suppose that someone
with the IP address 192.168.8.83 is sending you huge amounts of email in
an attempt to fill up your mail server’s hard drive. You can specifically reject
email from them with a REJECT rule:
192.168.8.83 REJECT
You can reject email with a custom ERROR message by specifying it in the
right hand side of the rule. Normal Sendmail rejections use the message
code 550. Your custom error message will be visible to end users, so exercise
some tact in creating it. Quote your custom message so that Sendmail won’t
eliminate the spaces or scramble it some other way.
suckycompany.com ERROR: 550 "Your momma dresses you funny"

478 Chapter 16
Finally, some hosts treat you so bad that you don’t want to see email from
them, ever. You don’t even want to reject messages from them, you just want
to throw them away unread. Use a DISCARD rule for this:
absolutefreebsd.com DISCARD
The aliases File
The /etc/mail/aliases file contains redirections for email sent to specific
accounts or usernames. Each line starts with an alias name, followed by a
colon and a list of real users on the system to forward the email to. Email
aliases work on systems using either the inbound or the submit Sendmail
configuration.
Forwarding Email from One User to Another
Many people prefer to have email sent to root to be redirected to a real
user’s account. The following example forwards all email sent to root to
another user:
root: mwlucas@AbsoluteFreeBSD.com
Many email addresses actually don’t have accounts associated with them.
For example, the required postmaster address doesn’t usually have an actual
account. You can use an alias to forward this to a real account.
postmaster: root
So, postmaster forwards to root, and root forwards to me. I get all the
email for both root@ and postmaster@ on this machine.
The aliases file already contains a variety of standard addresses for
Internet services, as well as aliases for all of the default FreeBSD service
accounts. They all go to root by default. By defining a real email address
as a destination for your root email, you will automatically get all system
administration email.
Aliased Mailing Lists
You can also list multiple users to create small local mailing lists. This doesn’t
scale for dynamic lists where users subscribe and unsubscribe frequently, but
it’s sufficient for quick and simple lists:
sales: mwlucas, bpollock, sales@nostarch.com
Forwarding Email to Files
Among the aliases file’s more interesting features is the ability to redirect
email to something other than an email account. If you list a filename,

Spam, Worms, and Viruses (Plus Email, If You Insist) 479
Sendmail appends the message to that file. You can maintain a permanent
log of the user mwlucas’s email with something like this:
mwlucas: /var/log/mwlucas-mail, mwlucas
Forwarding Email to Programs
You can also send email to a program for automated handling. Just put a
pipe symbol (|) followed by the full path to the program. For example, if you
have a script that processes incoming email to a certain address, you can use
this line to redirect the email:
orders: |/usr/local/bin/process-orders.pl
Inclusions
Finally, you can include other files in the aliases file. This allows a highly
trusted user to modify an alias on her own. The file must be a list of email
addresses, one per line.
clientlist: include:/usr/home/salesdude/clientlist.txt
The mailertable File
The mailertable file allows you to selectively override MX records. While this
was important when networks used to have connections to non-Internet email
systems such as UUCP, today this allows you to turn FreeBSD into a firewall
or bastion host of some sort. In more than one instance, I’ve had a Microsoft
Exchange system that I couldn’t expose directly to the Internet. By using a
FreeBSD machine as my public MX host and a mailertable on the FreeBSD
machine, I could protect the Exchange system without investing in an
expensive email firewall.
While I don’t have an Exchange system at absolutefreebsd.com, let’s pretend
for a moment that I do. My hosts are named freebsd.absolutefreebsd.com and
exchange.absolutefreebsd.com. My DNS record would read:
absolutefreebsd.com IN MX 10 freebsd.absolutefreebsd.com
The public would then send all email to the FreeBSD machine.
On the FreeBSD machine, I would use a mailertable entry like this:
.absolutefreebsd.com smtp:[exchange.absolutefreebsd.com]
This would make the FreeBSD machine ignore the MX record for the
domain on the left side of the column and instead forward the email for
that domain to the host exchange.absolutefreebsd.com.
480 Chapter 16
The relay-domains File
Sendmail simplifies providing backup MX services for other domains. As with
secondary DNS, one of the best ways to handle backup MX services is to find
an entity of similar size to swap that service with. You certainly don’t want to
invest a lot of time in a backup MX service, especially for an organization
other than your own, and using a similar-sized organization with a similar
level of technical skill helps assure that your partner won’t cause you many
more problems than you already have.
The file /etc/mail/relay-domains lists all of the domains and/or IP
addresses you relay email for. List each domain or address here, one per
line. For example, here’s an entry to provide backup MX services for
absolutefreebsd.com:
absolutefreebsd.com
Hard, isn’t it? Note that you must also list the server in the domain’s DNS
record for backup MX services to work.
Making Changes Take Effect
The access, aliases, and mailertable files all have corresponding database (.db)
files. Much like the password file, these database files are provided for fast
and easy reference to the contents by Sendmail and other programs. When
you edit one of these files, you must update the corresponding database
file. Modern Sendmail manages these databases with make(1). To update
the access and mailertable files, go to the /etc/mail directory and type make maps:
# cd /etc/mail
# make maps
make(1) compares the age of each text file with that of the database files
and will rebuild the database if the text file is newer.
To rebuild the aliases database, either run newaliases(8) or make aliases:
# cd /etc/mail
# make aliases
Why does the aliases database have its own special rebuild command?
The aliases database was the first database in Sendmail, so a special
command was written for it. As these databases proliferated, however,
a more generic method appeared.
Database changes take effect immediately upon rebuilding the database.
Other changes are more intrusive, however, and require restarting the entire
mail system. Changing the mailertable is one of those changes. While you can
restart the email system in a variety of ways, I recommend using the FreeBSD
startup system so that your mail server behaves consistently after reboots:
# /etc/rc.d/sendmail restart

Spam, Worms, and Viruses (Plus Email, If You Insist) 481
This will make all changes take effect, including those in text files.
Purists might note that /etc/rc.d/sendmail is actually a front end for the
shell script /etc/rc.sendmail. The /etc/rc.sendmail file predates the rc.d
startup system and remains in place for historical compatibility.
Virtual Domains
By default, Sendmail rejects all email not destined for the local host. This
works if your local host has the same name as your domain—that is, if the
mail server for absolutefreebsd.com is a machine actually named absolutefreebsd.com.
Frequently, that’s not the case. For example, the mail server for absolutefreebsd
.com is a machine named bewilderbeast.blackhelicopters.org. With email systems, a
virtual domain allows a server to receive email for a different domain. One
FreeBSD machine can handle hundreds or thousands of virtual domains.
Configuring a virtual domain has three steps. First, tell the mail server
that it is responsible for a domain’s email. Then, redirect email for users
in that domain to the appropriate accounts. Finally, publish an MX record
for that domain pointing to your mail server.
The /etc/mail/local-host-names File
The /etc/mail/local-host-names file specifies the hosts and domains that this
machine accepts email for. By adding a host or domain name to this file, you
tell Sendmail that the local machine is the final destination for email bound
for that host or domain. This file contains a list of domains and hosts, one
per line, like this:
blackhelicopters.org
absolutefreebsd.com
absoluteopenbsd.com
pgpandgpg.com
ciscoroutersforthedesperate.com
...
Do not list domains from which you do not accept email! Sendmail
believes it is the final word for any domain listed here, and if the email cannot
be delivered locally, it returns an error message to the sender. You won’t
annoy anyone but your own users by listing remote domain names here.
User Mapping
Now that Sendmail will accept email for the domain, tell the system where to
deliver email for that domain. By default, Sendmail looks for an account with
the same name as in the email address. My machine receives email for both
blackhelicopters.org and absolutefreebsd.com. By default, Sendmail delivers email
for mwlucas@absolutefreebsd.com to the local user mwlucas, and email for
mwlucas@blackhelicopters.org to the local user mwlucas as well. Perhaps these

482 Chapter 16
are two different people; in theory, the user mwlucas@blackhelicopters.org could
be Mark W. Lucas, no relation to yours truly.3 I don’t want his email, and he
couldn’t stomach mine. You cannot forbid overlapping user email names in
different domains. The solution is to provide Sendmail with a map of accounts
in the virtual usertable, /etc/mail/virtusertable. Here are some sample entries:
stenchmaster@blackhelicopters.org chris
postmaster@blackhelicopters.org mwlucas
mwlucas@blackhelicopters.org mwlucas
silence@blackhelicopters.org error:nouser spambait address
@blackhelicopters.org error:nouser no such user
The first entry maps a particular email address on the left-hand side
to a particular user account on the right-hand side. Email to stenchmaster
@blackhelicopters.org is delivered to the local account chris. The next two
entries route particular email addresses in the domain to a user account on
the local system. The fourth entry is slightly more interesting, as it returns
an error to the sender. I want the system to return a “no such user” error to
anyone sending email to the address silence@blackhelicopters.org. I use this
address when I must fill out an online form for someone who I just know
is going to spam me. I’ll activate it for a few minutes to get the silly little
registration email, activate the account, and then block the address again.
Finally, the last entry is a generic rule for the domain as a whole. By specifying
@blackhelicopters.org without a username, I’m telling Sendmail to apply this
rule to all email addresses without a more specific rule. Messages to email
addresses not on this list get an error of “no such user.”
Once upon a time, many system administrators used such a catch-all
email address for their own domains and created email addresses on the fly.
“You want to talk to me? Here’s your personal email address at my domain.”
Now that spammers perform dictionary attacks, however, having such a catch-
all rule directing to a real person’s account is a great way to catch huge
amounts of spam.
3 Of course, in real life they do go to the same person. But you get the idea.
DICTIONARY ATTACKS
A dictionary attack is where the intruder tries every possible username, one after the
other. A spammer would perform a dictionary attack by trying every possible email
address at a domain. By emailing in quick succession aardvark@yourdomain.com,
aardwolf@yourdomain.com, aaron@yourdomain.com, and so on, right down the
dictionary, the spammer hopes that some pieces of junk email will reach real human
beings before he gets shut off. The word list in /usr/share/dict/words includes
235,882 words; if your mail server accepts every one of those words as a valid
email address at your domain and redirects it all to your personal account, you will
have no choice but to erase all your email and hope that nobody sent you anything
important during the attack.

Spam, Worms, and Viruses (Plus Email, If You Insist) 483
Make similar entries for your other virtual domains. If you want
mwlucas@absolutefreebsd.com and mwlucas@blackhelicopters.org to go to
different accounts, just create separate maps in the virtusertable :
mwlucas@absolutefreebsd.com michael
mwlucas@blackhelicopters.org mwlucas
I suggest listing your virtual domains in alphabetical order, to reduce
confusion when you have thousands of domains on one machine.
Like other large Sendmail configuration files, sendmail(8) accesses the
virtusertable through a database file that you must keep up to date. Changes
to the virtusertable do not take effect until you update the database by going
into /etc/mail and running make maps, just as you would update other Sendmail
databases.
Now just publish an MX record for the domain pointing to your mail
server, and your email virtual domain is ready for action.
Changing sendmail.cf
Remember that horrible configuration file, /etc/mail/sendmail.cf ? Yes, you do
need to change it. Do not edit sendmail.cf directly, however. Sendmail actually
includes tools to build this configuration file out of other configuration files.
Yes, this is strange by today’s standards, but when Sendmail was created it was
cutting edge. (I am assured that this is what young, hip people call, “Kickin’
It Old Skool.”)
FreeBSD includes two .cf files, sendmail.cf and submit.cf. The sendmail.cf
file configures Sendmail to transmit email to other systems and to the inbound
Sendmail process, if running. Sendmail uses the submit.cf file only if in the
submit configuration, and then only for processing the local unsent email
queue. The submit.cf file is actually much simpler, if you have the inclination
and stamina to read it. These files are built automatically by applying the
rules in two separate files, freebsd.mc and freebsd.submit.mc.
The .mc files are configuration files for the m4 macro language processor.
The m4(1) command reads the instructions from those files and the defini-
tions stored in /usr/share/sendmail/cf to actually build the .cf files. You define
Sendmail’s desired behavior in the .mc files, and use m4 to build appropriate
Sendmail configuration files from them. For example, let’s look at freebsd.mc.
While the file begins with hash marks as comments, once the actual
configuration starts, the hash mark is no longer used; instead, the string dnl
serves to comment out anything you want m4(1) to ignore. Some of the lines
in that file might be fairly obvious:
...
FEATURE(access_db, `hash -o -T<TMPF> /etc/mail/access ')
...
FEATURE(mailertable, `hash -o /etc/mail/mailertable')
FEATURE(virtusertable, `hash -o /etc/mail/virtusertable')
...

484 Chapter 16
Hey, we just talked about the access file, the mailertable, and the virtusertable!
These statements tell m4(1) to include these features, using the databases
(hashes) made from the specified filenames. This might not be so scary
after all.
Take a careful look at those statements, however. We define a feature and
then specify a configuration for that feature in quotes. The first quote mark is
actually a backtick , however, while the second is a straight, up-and-down
single quote mark . These quotes must appear exactly like this, with exactly
these characters, or m4(1) will not properly parse the file.
You’ll also see some configuration options commented out with the
characters dnl:
dnl Dialup users should uncomment and define this appropriately
dnl define(`SMART_HOST', `your.isp.mail.server')
If you want to use a smart host, you would remove the leading dnl from
the second line and fill in the hostname of your mail server. We’ll learn
about smart hosts later in this chapter.
By changing entries in the .mc file and rebuilding the configuration file,
you control how Sendmail operates. We’ll use this functionality to customize
your system. I’ll provide two simple examples here, and then we’ll build on
this in later sections.
Custom .mc Files
The Sendmail Makefile looks for default .mc files named after the full
hostname of the system. For example, my laptop pesty.blackhelicopters.org has
two .mc files: /etc/mail/pesty.blackhelicopters.org.mc and /etc/mail/pesty
.blackhelicopters.org.submit.mc. If those files do not already exist, make(1)
copies sendmail.mc and submit.mc to create them.
I have never encountered a situation where it made sense to edit the
submit.mc file; while it’s possible that such situations exist, I would suggest
that if you’re thinking of editing it, you’re solving the wrong problem.
Almost always, you need to edit the <hostname>.mc file.
Start by copying freebsd.mc to <hostname>.mc, and then make all your
changes to that file. Let’s start by configuring a smart host.
Smart Hosts
A smart host is a local mail server that knows how to send email outside the
local network. I don’t want my laptop to contact remote mail servers directly;
I want it to hand the email to my dedicated mail server, which does all the
hard work of looking up MX records, identifying servers, and transmitting
and retransmitting until the remote server condescends to accept my email.
My laptop needs to be free for more important work, like playing MP3s and
writing this drivel.

Spam, Worms, and Viruses (Plus Email, If You Insist) 485
You can configure a smart host in your <hostname>.mc file. Remember
the sample of a smart host in the last section? Just edit that to provide the
name of your smart host and rebuild sendmail.cf. The smart host for my
network is the overworked bewilderbeast.blackhelicopters.org, so I edit
/etc/mail/pesty.blackhelicopters.org.mc as follows:
dnl Dialup users should uncomment and define this appropriately
define(`SMART_HOST', `bewilderbeast.blackhelicopters.org')
I’ve deleted the dnl from the beginning of the second line. This uncom-
ments the SMART_HOST setting and lets m4(1) notice this line. I’ve carefully left
the special quote marks intact, in their original places, surrounding the host-
name of my local mail exchanger. Now I rebuild the sendmail.cf with make all
and install it with make install:
# cd /etc/mail
# make all
/usr/bin/m4 -D_CF_DIR_=/usr/share/sendmail/cf/ /usr/share/sendmail/cf/m4/cf.m4
pesty.blackhelicopters.org.mc > pesty.blackhelicopters.org.cf
# make install
install -m 444 pesty.blackhelicopters.org.cf /etc/mail/sendmail.cf
install -m 444 pesty.blackhelicopters.org.submit.cf /etc/mail/submit.cf
You can watch make(1) using the <hostname>.mc file to build a <hostname>.cf
file and then installing it as sendmail.cf. Once I restart sendmail(8), my changes
take effect. My laptop will send all email to bewilderbeast.blackhelicopters.org for
delivery to remote sites.
If you use a different file for your <hostname>.mc file, set the /etc/make.conf
variable SENDMAIL_MC to the full path of your preferred .mc file.
Rejecting Spam Sources
Perhaps the simplest way to reduce incoming junk email is to use a blacklist. A
blacklist is a list of IP addresses known to send junk email. A variety of different
people maintain blacklists, with differing criteria, granularity, and severity.
Think about your requirements before choosing a blacklist. You can find a
list of antispam blacklists using any search engine.
Before using a blacklist, consider the size of the organization maintaining
it. “Fred’s Anti-Spam Blacklist” might be maintained by a single person,
whose energy for maintaining that list ebbs and surges. A small blacklisting
organization might have very strong prejudices for or against different types
of email activity, and you must carefully evaluate the organization’s standards
before implementing their blacklist. Also, investigate how the organization
adds and removes entries in its blacklist. Do they take submissions from the
public? If so, how do they verify those submissions? How do people get off
486 Chapter 16
the blacklist? Will the organization blacklist large chunks of IP space because
of the behavior of one or two small networks within that block? If so, using
that blacklist would prevent you from receiving email from those IP blocks.
That might not be a problem for you personally, but you need to consider all
these factors before choosing a blacklist for other people’s email.
As of this writing, my preferred antispam blacklist is Spamhaus (http://www
.spamhaus.org). Created in 1999, Spamhaus provides free service to low-traffic
mail servers and inexpensive service to high-volume sites. Their ZEN blacklist
includes IP addresses known to be controlled by junk emailers, addresses
assigned to end users (dial-up, DSL, cable, and so on) who should never send
email directly, and addresses in botnets. Any of these could be a source of
spam, viruses, and worse, and by rejecting all email from these addresses you
can cut your junk email load considerably. If you provide smart host services
to clients using SASL for relay access (as discussed in the next section), ZEN
might block those users from sending email. Use SBL instead of ZEN. We
will use the Spamhaus ZEN service as our example blacklist in this section,
but you can use any blacklists you prefer.
The default sendmail.mc includes a sample blacklist entry:
dnl Unc
The default blacklist at http://www.mail-abuse.org is a for-pay service for
all users, even the low-volume ones, but it provides a template for blacklist
configuration. Check your blacklist for the necessary host information and
then add a rule similar to the following, all on a single line:
FEATURE( `dnsbl', `zen.spamhaus.org', `"550 Mail from "
$`'&{client_addr} " refused - see http://www.spamhaus.org/zen/"')
We tell Sendmail to use the DNS-based blacklist feature and check for
entries at the domain zen.spamhaus.org . We also provide a custom rejection
message , including the IP address of the client and a pointer to more
information.
Rebuild your sendmail.cf, restart Sendmail for the blacklist to take effect,
and watch your email log for incoming messages. Messages blocked by the
blacklist appear in /var/log/maillog like this:
Jun 16 12:10:13 bewilderbeast sm-mta[40174]: ruleset=check_relay, arg1=82-
46-225-100.cable.ubr04.dund.blueyonder.co.uk, arg2=127.0.0.4, relay=82-46-
225-100.cable.ubr04.dund.blueyonder.co.uk [82.46.225.100], reject=550 5.7.1
Mail from 82.46.225.100 refused - see http://www.spamhaus.org/zen/
That’s one piece of junk email you don’t have to waste any more time
on. While blacklists are far from perfect, they can cut your junk email load
considerably. Another powerful tool is greylisting, as we’ll see next.

Spam, Worms, and Viruses (Plus Email, If You Insist) 487
Greylisting
Blacklists provide unilateral protection against known spam sources. Whitelists
document known good email sources. The key word in both of these state-
ments is “known.” Stopping unknown threats is much harder than stopping
the known ones. Greylisting provides a decent middle ground that lets you
reject known bad email and accept known good email, while helping you sort
everyone else into one of these categories.
Most junk email sources try to deliver as much email as possible to as many
recipients as possible. To do this, they use a stripped-down version of the
SMTP protocol. In particular, most botnets don’t try multiple times to deliver
email. Real mail servers will try for up to five days to deliver a legitimate
message, while botnets try once and give up when they’re told to try again
later. Greylisting takes advantage of this difference between real email
servers and spam botnets to accept the former and reject the latter.
The first time a greylisting mail server receives a connection from
a previously unknown mail server, it returns an error code that means,
“Temporary failure, please try again later.” The greylisting server records the
IP address, sender, and recipient of the attempted email. If the remote mail
server attempts to deliver the same email again after a configurable timeout
period, the local mail server accepts the message. The greylisting server adds
the sender, recipient, and IP address to a list of good email transactions and
accepts all email matching that description for a certain number of days
without challenge. The average spam source tries once, or possibly twice
within a brief time, and gives up.
It’s very true that spammers adapt, and some botnets have taken to
retransmitting email after a few hours. The good news is, that time gives
blacklist maintainers a chance to identify the new spam source and add the
source IP to their blacklist. Greylisting gives you a chance to take advantage
of their work.
One of the big objections to greylisting is that it slows legitimate email.
That’s true, up to a point. The email administrator can add known good IP
addresses and domains to a whitelist, a list of email sources that are never
greylisted. That way, email from your big clients and important business
partners will always pass through immediately.
You can find many different greylisting implementations for many
different MTAs. In my opinion, the most powerful and useful is Bob Beck’s
spamd(8) from OpenBSD. This greylist system uses the PF packet filter and
can do many things4 to reduce junk email overhead, but is comparatively
complicated to configure. If you are using PF on your mail server, you should
investigate spamd(8). Here, we use milter-greylist (/usr/port/mail/milter-greylist),
which is simpler but provides nearly as good (but much less amusing) results
as spamd.
4 My favorite PF/spamd trick is packet shaping on incoming spam, so that incoming spammers
are suddenly reduced to having the equivalent of a 900-baud modem. One PF/spamd machine
can keep botnet hosts busy for days while using almost none of your system resources. Best of all,
while the spambot is trying to transmit email to you, it isn’t sending thousands of other junk
emails. This is one of the very few computer features that still makes me smile years after I’ve
learned of it.

488 Chapter 16
Configuring milter-greylist
After installing milter-greylist, look at the configuration file /usr/local/etc/
mail/greylist.conf. This is a standard Unix-style configuration file containing
variable assignments, with hash marks indicating comments. Use the config-
uration file to specify timeouts, peer email exchangers, whitelist addresses
and recipients, and many other features. We’ll discuss only the features
necessary for average systems here. Be sure to read greylist.conf(5) for the
full details of greylisting. milter-greylist is quite mature, and it probably
supports your odd situation.
Base Program Settings
At the top of greylist.conf, you’ll find a set of basic program settings. You
should not need to change these.
pidfile "/var/run/milter-greylist.pid"
socket "/var/milter-greylist/milter-greylist.sock"
dumpfile "/var/milter-greylist/greylist.db"
user "mailnull"
The pidfile records the process ID of the running milter-sendmail(8)
daemon. The socket is a Unix socket where a running Sendmail daemon can
communicate with the milter-greylist daemon. The dumpfile is the database
of identified good email. When milter-greylist identifies a new good email
source, it is added to this database. Finally, the user specifies the unprivileged
user to run the milter-greylist daemon.
MX Peers
When a network has multiple mail exchangers, legitimate email can try one
server after another in order to get through. This is the behavior of legitimate
mail exchangers, so greylisting must support it. The peer option lets you
define other mail exchangers running milter-greylist that should synchronize
greylist databases with one another. For example, if my main mail server has
three backup MX servers at 192.168.1.1, 172.16.18.3, and 10.19.84.3, I would
list them all as peers:
peer 192.168.1.1
peer 172.16.18.3
peer 10.19.84.3
Once I make corresponding entries for the other mail exchangers, they
automatically exchange greylist data amongst themselves.
Lists of Addresses
You can define lists of IP addresses separately, using the keyword list, a
name, and the keyword addr. Enclose the addresses in the list within curly

Spam, Worms, and Viruses (Plus Email, If You Insist) 489
brackets and separate them by spaces. For example, you might create a list
called my network that defines the IP addresses in your organization:
list "my network" addr {198.22.63.0/24 192.168.0.0/16}
Like many other files with potentially long lines, a backslash (\) indicates
that the entry continues on the next line. Here’s the start of a list of major
mail servers that break with greylisting:
list "broken mta" addr { \
12.5.136.141/32 \ # Southwest Airlines (unique sender)
12.5.136.142/32 \ # Southwest Airlines
12.5.136.143/32 \ # Southwest Airlines
...
Each is commented after the backslash for easy identification, and the
list can run as long as needed and still be legible.
Lists of Domains
Lists of domains are similar to lists of addresses. Each domain needs to be the
actual domain name of the mail server making the incoming connection, not
the domain name of the end user’s email address. For example, I want to
give my publisher’s email special handling, so I create a list that includes his
domains. Email from my publisher might come from a nostarch.com server or
from one of the publisher’s ISP’s machines in the laughingsquid.net domain.
Use the domain keyword to specify a list of domains:
list "good domains" domain { nostarch.com laughingsquid.net}
Lists of Users
You can create lists of your users that need special greylisting rules with the
rcpt option:
list "spam lovers" rcpt { sales@absolutefreebsd.com cstrzelc@stenchmaster.com }
Access Controls
milter-greylist applies rules to incoming connections as defined by access
control lists (ACLs). Access lists allow you to apply greylisting as broadly or as
finely as you like. milter-greylist checks incoming messages against the access
control lists in order and applies the first matching rule to the email. Use the
special acl default for your last rule to define the mail server’s behavior for all
email that doesn’t match an earlier rule, much like default accept and default
deny in packet filtering. For example, the following ACLs allow email from
your local network, the known broken mail servers, and my publisher. Some

490 Chapter 16
of my users who do not want greylisting are specifically whitelisted, but all
other email is greylisted:
acl whitelist list "my network"
acl whitelist list "good domains"
acl whitelist list "broken mta"
acl whitelist list "spam lovers"
acl greylist default
The first entry automatically allows all email from the IP addresses defined
in the list my network. The second allows all email from the domains listed in
the list good domains. The third permits all email from the IP addresses defined
in the list broken mta. The fourth entry specifies users who do not experience
greylisting—that is, they get all email immediately. The last one greylists all
other email as a default, requiring all senders to prove that they’re proper
mail servers before accepting their offered email.
Greylist Timing
By default, milter-greylist has a thirty minute retry requirement. While some
spambots try to retransmit junk email within a few minutes, very few of them
will wait 30 minutes. Spambot behavior will change as computers become
more powerful, and I would not be shocked to see later generations retransmit
after longer and longer windows. You will need to adjust the duration of the
temporary failure. Use the delay keyword in the greylist ACL to set this. You
can use the abbreviations d, h, and m for days, hours, and minutes. Here I set
the challenge duration to two hours, an absurdly long time as of 2007 but,
sadly, probably quite sensible for a year or two from now:
acl greylist default delay 2h
Once a mail sender has passed the greylist challenge, milter-greylist
caches the sender’s authenticity for three days before challenging the sender
again. Incoming email from this sender is not delayed during this time. You
might want to change this timeout as well, depending on your environment.
Use the autowhite keyword to set this. Here, we tell milter-greylist to allow
successful senders to send email without further challenge for 30 days:
acl greylist default autowhite 30d
As a rule, the timing of greylist challenges depends highly upon your
environment. You might find that a five-minute delay suffices to meet
your antispam needs without unduly delaying email, while other people
might need several hours of delay to cut their junk email acceptably.
Attaching milter-sendmail to Sendmail
milter-greylist runs outside of Sendmail. How can you tell Sendmail to talk
to milter-greylist? The key is Sendmail’s milter interface, allowing outside
programs to attach to Sendmail and provide additional functionality.

Spam, Worms, and Viruses (Plus Email, If You Insist) 491
When you install milter-greylist from ports, you’ll see instructions on
how to attach Sendmail to milter-greylist. As a rule, you add lines to the end
of <hostname>.mc and rebuild sendmail.cf. For example, as of this writing the
milter-greylist port told me to add the following to my mail server’s .mc file:
dnl j,{if_addr},{cert_subject},i,{auth_authen} are already enabled by default
define(`confMILTER_MACROS_HELO', confMILTER_MACROS_HELO``, {verify}'')
define(`confMILTER_MACROS_ENVRCPT', confMILTER_MACROS_ENVRCPT``, {greylist}'')
INPUT_MAIL_FILTER(`greylist', `S=local:/var/milter-greylist/milter-
greylist.sock, F=T, T=R:30s')
The define entries assign values to macros within Sendmail, while the
INPUT_MAIL_FILTER statement tells Sendmail to run incoming email through a
filter available at the specified Unix domain socket.
I added these lines to sendmail.mc and ran make all restart. Sendmail
abruptly started talking to my running milter-greylist process, and 15 minutes
later my steady stream of junk email became a trickle of pure, clean, legitimate
email.5
Sendmail Authentication with SASL
Your most problematic users are those who want to use your email facilities
from anywhere in the world. The mail server will accept email from any-
where, so long as it’s destined for a user at the machine. When your company
president flies to the big customer meeting in Antarctica, however, he will
expect the mail server to accept messages from his client despite all your
fancy relay controls intended to exclude spammers. You can provide this
with the Simple Authentication and Security Layer (SASL). SASL requires users
to authenticate to the mail server before the server will relay email for that
client. This means that legitimate users can use the mail exchanger from
anywhere in the world, while users who cannot authenticate can only use
it from known good IP addresses.
Supporting SASL in Sendmail requires rebuilding Sendmail from source.
To avoid mucking with the Sendmail install in the base system, FreeBSD
includes a port of Sendmail in /usr/ports/mail/sendmail. There, you can build
Sendmail with custom options and use it instead of the base system Sendmail.
Using a port means that you can rebuild Sendmail to your specifications
more easily, without having to apply patches to the base system Sendmail
(and having your next upgrade overwrite them). If you look at the port’s
Makefile you’ll see that Sendmail supports many options, from database
backends to LDAP integration. Go into the port directory and type:
# make SENDMAIL_WITH_SASL2=YES all install clean
This will build SASL version 2 and a SASL-aware Sendmail and install
them under /usr/local, like any other port.
5 Receiving only non-spam email doesn’t mean I actually answer any of that email, mind you.
I seem to have reached that point in life where my main goal is to stop receiving information.

492 Chapter 16
saslauthd(8)
The saslauthd(8) daemon processes authentication requests from other
software. In this case, we want Sendmail to request users to authenticate
against the FreeBSD password database. Authenticated users can relay email,
unauthenticated users cannot. You must enable saslauthd(8) in /etc/rc.conf to
handle Sendmail’s authentication requests:
saslauthd_enable="YES"
Either reboot your system or run /usr/local/etc/rc.d/saslauthd start to
activate saslauthd(8).
mailer.conf and Your New Sendmail
At this point, you have a new Sendmail installed as an add-on package.
Activate it in mailer.conf just as you would Postfix or Qmail. Since the port
installs the Sendmail binary as /usr/local/sbin/sendmail, your new mailer.conf
will look like this:
sendmail /usr/local/sbin/sendmail
send-mail /usr/local/sbin/sendmail
mailq /usr/local/sbin/sendmail
newaliases /usr/local/sbin/sendmail
hoststat /usr/local/sbin/sendmail
purgestat /usr/local/sbin/sendmail
Building sendmail.cf
While your custom Sendmail binary supports SASL, you must still configure
sendmail(8) to accept SASL authentication. We also want to use SSL for our
authentication information, to avoid transmitting usernames and passwords
in clear text. Add the following entries to /etc/mail/<hostname>.mc :
TRUST_AUTH_MECH(`GSSAPI DIGEST-MD5 CRAM-MD5 LOGIN')dnl
define(`confAUTH_MECHANISMS', `GSSAPI DIGEST-MD5 CRAM-MD5 LOGIN')dnl
define(`CERT_DIR', `/usr/local/etc/certs')dnl
define(`confCACERT_PATH', `CERT_DIR')dnl
define(`confCACERT', `CERT_DIR/hostname.pem')dnl
define(`confSERVER_CERT', `CERT_DIR/hostname.pem')dnl
define(`confSERVER_KEY', `CERT_DIR/hostname-key.pem')dnl
define(`confCLIENT_CERT', `CERT_DIR/hostname.pem')dnl
define(`confCLIENT_KEY', `CERT_DIR/hostname-key.pem')dnl
define(`confAUTH_OPTIONS', `A p y')dnl
DAEMON_OPTIONS(`Port=smtp, Name=MTA')dnl
DAEMON_OPTIONS(`Port=smtps, Name=TLSMTA, M=s')dnl
With this configuration you tell Sendmail that users must log in to
authorize email relaying.

Spam, Worms, and Viruses (Plus Email, If You Insist) 493
We also provide a SSL certificate location , which you might wish to
change to fit with the rest of your system. For example, if you use Dovecot as
we suggest in the next section, you might find configuration simpler if you
put your certificates in /etc/ssl/certs. You can use one SSL certificate for
multiple services on the same host, after all.
Once you have these entries, run make all install in /etc/mail to build
and install the new sendmail.cf.
Testing SASL
Restart Sendmail with /etc/rc.d/sendmail restart, and your Sendmail install
should be ready to perform SASL-authenticated email relaying. The simplest
way to verify this is by configuring an email client to use SASL and trying to
send email to a host not on your network. I keep a Yahoo! email account just
for this sort of testing; if I can deliver email to Yahoo! I can probably deliver
it almost anywhere else.
Most consumer email clients show SASL as a checkbox saying something
like, “My outgoing email server requires authentication.” Have it use the
same credentials as used for downloading email. Your client should now be
able to send email without trouble, while clients who do not authenticate will
be rejected.
Oh, wait; you don’t have credentials to get mail, do you? Now that we’re
done with Sendmail’s ability to send and receive email, let’s get email from
the server to the client.
IMAP and POP3
While you can log directly into your FreeBSD system and read your email, your
customers and end users probably want to use pretty graphical email clients
such as Thunderbird or Eudora. FreeBSD supports these clients through a
variety of ports and packages. The two standard protocols for transferring
email to clients are IMAP and POP3.
The Internet Message Access Protocol, or IMAP, allows desktop clients to
synchronize their email with a centralized server. Multiple client machines
can synchronize their mailboxes with an IMAP server, so if you have both a
laptop and a desktop system, they can both get all of the email sent to your
account. IMAP is popular in corporate environments, where you allow clients
to retain email on the server. I do not recommend using IMAP in an ISP
environment, however. ISP customers with IMAP begin to expect that you
will keep all their email forever and are vastly disappointed, even hurt, when
a hardware failure demonstrates the flaws in this thinking. Make your cus-
tomers responsible for their own email storage. Still, IMAP is very nice for an
office environment, and we’ll cover IMAP over SSL later in this chapter.
The Post Office Protocol (POP, now in version 3) is a simpler protocol that
lets users download email to a desktop. POP3 is popular with Internet service
providers and many small businesses precisely because of its simplicity. Most

494 Chapter 16
IMAP servers can provide POP3 services as well as IMAP, so a single daemon
meets all of our needs. We’ll cover POP3 over SSL, which provides protection
of usernames and passwords as well as concealing message contents.
Simple IMAP servers, such as imap-wu, only let you synchronize your
clients with the standard Unix mail spool in /var/mail. Others, such as Cyrus
IMAP, support tens of thousands of users. The Dovecot IMAP server hits a nice
medium ground, being full-featured enough to support most environments
but simple enough to not require dedicated staff. Additionally, Dovecot’s
author has put up one thousand euros of his own money as a reward for the
first person to “demonstrate a remotely exploitable security hole in Dovecot.”
Many people have spent a good amount of time trying to claim that reward,
and nobody’s managed yet.
Installing Dovecot
You’ll find Dovecot in /usr/ports/mail/dovecot. Dovecot can interoperate with
LDAP servers, different types of databases, and different authentication
systems; it also supports many other configuration options. For our basic mail
server, however, we only need a standard Dovecot install serving the users on
our FreeBSD system. Go to the port directory and run make all install clean.
Dovecot installs a whole bunch of documentation in /usr/local/share/doc
/dovecot and example configuration files in /usr/local/etc. Like Apache, Dovecot
has plenty of configuration settings that are best left alone unless you specif-
ically need the feature. We’re going to focus on providing both POP3 and
IMAP services over SSL. While you can also provide email services without SSL
or other cryptographic protections, this is a very bad idea on today’s Internet.
Configuring Dovecot
Copy the sample Dovecot configuration file /usr/local/etc/dovecot-example.conf
to /usr/local/etc/dovecot.conf, then open it in a text editor. Believe it or not,
there are very few changes you must make to have Dovecot working securely
on FreeBSD.
By default, Dovecot offers unencrypted IMAP and POP3 services. That’s
a common standard on the Internet today, but all modern email clients
support transferring authentication credentials and messages over a secure
SSL connection. The protocols entry defines the protocols Dovecot offers.
Change both the IMAP and POP3 entries to the SSL version by adding s to
the end of their names:
protocols = imaps pop3s
Now define where Dovecot keeps its SSL certificates using the
ssl_cert_file and ssl_key_file variables. Dovecot includes a script to
create a proper self-signed certificate, or you can use a commercial
certificate as discussed in Chapter 9.

Spam, Worms, and Viruses (Plus Email, If You Insist) 495
ssl_cert_file = /etc/ssl/certs/dovecot.pem
ssl_key_file = /etc/ssl/private/dovecot.pem
If you change the default paths provided, you must edit the self-signed
certificate generation script to reflect the correct paths. A FreeBSD purist
would certainly tell you to edit the script and put the certificates in /usr/local
/etc/ssl, but then every time you upgrade Dovecot you’d need to modify the
script again. The location of the SSL files isn’t too important so long as you
document how your system is configured.
Creating a Dovecot SSL Certificate
While you could create a self-signed certificate as described in Chapter 9,
Dovecot includes a shell script to create this certificate for you and arrange it
exactly as Dovecot wishes. The directory /usr/local/share/dovecot contains the
shell script and a configuration file. Open the configuration file, dovecot-openssl
.cnf, in a text editor. The settings should look very familiar from Chapter 9,
but since that was almost half a book ago, we’ll look at them quickly.
The top of the file contains settings such as the certificate type and
strength. Leave all of this alone. You can set the values further down to
reflect your environment, however.
The C variable is your two-letter country code. I’m in the United States,
so I would put C=US.
ST is your state or province, and L is your locality or city. I’m from Detroit,
Michigan, so I would put:
ST=Michigan
L=Detroit
O is the organization. If you have a company, list it here. If not, list your
own name.
OU is the organizational unit, or the section of your organization respon-
sible for this system. I generally just put Email Team here.
The common name is the reverse DNS name of the server where clients
connect to get their email, which is almost certainly the same as the hostname
of your mail server. For example, the common name of my mail server is
bewilderbeast.blackhelicopters.org.
emailAddress is the address of the person responsible for this server. This
might be a group or role account, such as helpdesk@mycompany.com.
This is all the configuration necessary for Dovecot to generate its own
self-signed certificate. Now just run the mkcert.sh script:
# /usr/local/share/dovecot/mkcert.sh
Poof! Your self-signed certificate is ready.

496 Chapter 16
Running Dovecot
Enable Dovecot in /etc/rc.conf with dovecot_enable="YES", then run /usr/local
/etc/rc.d/dovecot start. /var/log/maillog will show Dovecot starting and tell
you that it’s initializing SSL.
You now should have a running Dovecot server! Configure your client to
communicate with the server and try it out. Be certain to tell the client that
an SSL connection is required! Any errors will appear in /var/log/maillog.
The hard part now is separating a server error from a client error. All
email clients have their own problems, glitches, and features. Separating a
client error from a server problem, especially when unfamiliar software is
involved, can be quite annoying. A vital skill in email client troubleshooting
is the ability to test email accounts without using the client at all.
Testing POP3S
We configured POP3 to use SSL, which means we cannot just telnet to the
POP3 port (110) and speak directly to the server. In Chapter 9, however,
we saw how to use openssl(1) to connect to remote ports with a telnet-like
interface. We can use that to access the mail server’s SSL POP3 interface.
POP3S runs on port 995. Here, we talk to the POP3S interface on my email
system:
# openssl s_client -connect bewilderbeast.blackhelicopters.org:995
CONNECTED(00000003)
...
+OK Dovecot ready.
Now that you’re connected and Dovecot is ready for you, identify yourself
with the user command.
user mwlucas
+OK
Now use the pass command to give your password. It will be displayed on
the screen in clear text. Be certain nobody’s looking over your shoulder while
you do this!
pass n0tmyr3alpassw0rd!
+OK Logged in.
I’m connected! What kind of email do I have?
list
+OK 2 messages:
1 1391
2 4258

Spam, Worms, and Viruses (Plus Email, If You Insist) 497
Message 1 is 1,391 bytes, while message 2 is 4,258 bytes. To view a message,
use retr and the message number.
If you can run these commands, you can be certain that basic POP3S
functions correctly. Getting a random email client to work with POP3S is
beyond the scope of this book as well as, probably, of most users.
Testing IMAPS
You can test IMAPS much the same as you tested POP3S, and for similar
reasons. Testing IMAPS by hand removes any client problems from trouble-
shooting. IMAPS is a much more complicated protocol than POP3, and
some of the commands you’ll have to run are uglier. (In fact, my tech editor
says that I am a braver man than he is for even attempting to run IMAP by
hand. Bah!) IMAPS runs on port 993, but the openssl(1) command is
otherwise identical to that used for testing POP3S:
# openssl s_client -connect bewilderbeast.blackhelicopters.org:993
CONNECTED(00000003)
...
* OK Dovecot ready.
Note that IMAPS uses an asterisk (*) instead of the plus sign (+) used by
POP3S. Every IMAP command begins with a number. For example, use 01
LOGIN followed by your username and password to identify and authenticate
to the server:
01 LOGIN mwlucas n0tmyr3alpassw0rd!
01 OK Logged in.
We’re connected to our IMAP server. Now use the 02 LIST command to
see what directories IMAP knows about in our account:
02 LIST "" *
* LIST (\NoInferiors \UnMarked) "/" "Junk E-mail"
* LIST (\NoInferiors \UnMarked) "/" "mwlucas"
* LIST (\NoInferiors \UnMarked) "/" "INBOX"
02 OK List completed.
So far, so good. Let’s see what’s in the INBOX with 03 SELECT:
03 SELECT INBOX
* FLAGS (\Answered \Flagged \Deleted \Seen \Draft)
* OK [PERMANENTFLAGS (\Answered \Flagged \Deleted \Seen \Draft \*)] Flags
permitted.
* 2 EXISTS
* 0 RECENT
* OK [UIDVALIDITY 1185130816] UIDs valid
* OK [UIDNEXT 3] Predicted next UID

498 Chapter 16
My default mail folder has 2 messages . We see that the next message is
number 3, so the messages are numbers 1 and 2. Let’s see if we can get the
first message out by entering the following command:
06 UID fetch 1:1 (UID RFC822.SIZE FLAGS BODY.PEEK[])
You should see the first email message in the user’s default email folder
spilled out to the screen. (If you’ve already been running IMAP for a while,
your email server will probably have a message higher than 1.) Finally, use
07 LOGOUT to disconnect from IMAP.
If you can do all of this, you have basic IMAP over SSL functionality.
Check your client configuration.
While you can go much, much further with Sendmail and Dovecot, you
can now provide basic email services to both corporate users and customers.
Let’s learn about providing web services on FreeBSD.

17
WEB AND FTP SERVICES
The Internet started back in the 1970s, but
didn’t become a household name until the
advent of the Web in the 1990s. The Netscape
Corporation took the Mosaic web browser and
transformed it into a commercial product, sparking an
information and communication revolution that’s still
rolling on. Although many dot-com companies crashed and burned, the age
of global person-to-person communication began with the Netscape web
browser. Technologies such as peer-to-peer file sharing have expanded the
Internet even further, but what still comes to most people’s minds when
someone says “Internet” is the Web.
FreeBSD’s web server performance is legendary. For many years some
Microsoft subsidiaries used FreeBSD in preference to their own Windows
platforms, and Microsoft even released a shared source “.NET for FreeBSD”
toolkit. Yahoo! runs FreeBSD, as do a variety of other high-demand web
server farms. Netcraft surveys of the most reliable web hosting services in
the world consistently show that about a third of them run FreeBSD.
You can build your own highly reliable web and FTP services on FreeBSD.

500 Chapter 17
How a Web Server Works
A basic web server is fairly straightforward: A web browser opens a TCP
connection to the server and requests a page; the web server spits out the
page and closes the connection. That’s the easy part. Things become
considerably more complicated when you use server modules, dynamic
pages, and so on.
The Web uses HyperText Transfer Protocol (HTTP), which is a very simple
protocol similar to POP3. Over the last few years, functions have been added
to HTTP to make it more complicated, but basic HTTP operations are simple
enough to be performed by hand. Try it yourself—telnet to port 80 on a
server and type GET /:
# telnet www.blackhelicopters.org 80
Trying 198.22.63.8...
Connected to www.blackhelicopters.org.
Escape character is '^]'.
GET http://www.blackhelicopters.org/
<HTML>
<body bgcolor="black">
<center><font color="white">Nothing to see here.<br>This is not the
site you're looking for.</br>
</html>
Connection closed by foreign host.
If you’ve ever looked at any HTML, the output should look familiar. If
not, try the View Source option in your web browser next time you view a web
page. You’ll see that this is the actual HTML that generates the pretty picture
in your browser. If you can’t get this much from your web server, it probably
isn’t working.
The Apache Web Server
If you look under /usr/ports/www, you’ll see several different web servers.
You’ll find dhttpd, thttpd, bozohttpd, XS-HTTPD, and more, each with its
own special features. For example, tclhttpd is a web server implemented
entirely in Tcl. If you need a special-purpose web server, chances are it’s
available. We’ll concentrate on the most popular web server, Apache.
FreeBSD includes ports of several versions of Apache, but most of these
are legacy versions. If you have an application that specifically requires
Apache version 1.3 with particular modules, FreeBSD will support you. For
most new installs, however, you want the latest version. As of this writing,
that’s Apache 2.2. While Apache supports many different features, such as
LDAP and SQL backends, for the moment we’re just going to concentrate
on basic Apache configuration. Apache 2.2 installs fine either from the
port (/usr/ports/www/apache22) or from the package.
Web and FTP Services 501
Apache Configuration Files
You’ll find Apache 2.2’s configuration files in /usr/local/etc/apache22. While
Apache configuration has changed a lot over the years, the current config-
uration layout strikes a good compromise between complexity and modularity.
The key files are httpd.conf, mime.types, and magic.
mime.types
The mime.types file contains a list of all standard file types and their identifying
characteristics. When a web server is transmitting a file to a client, it must
identify the type of file so the client can handle it appropriately. You don’t
want your web browser to interpret a video stream as HTML! The mappings
in mime.types provide Apache with the necessary information to correctly
specify these types. The Apache’s mime.types file is largely comprehensive.
Even if a program’s documentation tells you to add some information to
mime.types, confirm that that information isn’t already there before making
any changes. You should almost never edit this file.
magic
The mime.types file cannot deal with every file type in the world. Apache’s
built-in mime_magic module uses the information in the magic file to try to
identify the otherwise unknown file types. Throughout my many years of
system administration, whenever I thought that I needed to change anything
in the magic file, I was wrong.
httpd.conf
The httpd.conf file is where the interesting things happen. The file is well
commented and is several hundred lines long, so I won’t exhaustively analyze
it. If you really want to know everything about Apache, you can find several
big books on the topic. We’ll cover those particular settings that you must
configure, as well as some popular options. Whatever you do, don’t change
anything you don’t understand.
The subdirectories Includes, extra, and envvars.d all add particular functions
to Apache, separating the core server functionality from frequently changed
add-ons. For example, each of the functions in the extra directory can be
enabled by uncommenting a single line in httpd.conf. We’ll see how this works
and how you can use this design to enforce your security policy.
Core Apache Configuration
While Apache supports many different features in its complicated config-
uration, getting a basic web server up and running is quite simple. First, set
apache_22_enable="YES" in /etc/rc.conf. After that, setting up your first website is
just a matter of making a few minor changes to httpd.conf.

502 Chapter 17
Server Root Path
The ServerRoot setting specifies the directory containing all the website files
and server programs. When you reference another file in httpd.conf, Apache
prepends the ServerRoot to it unless you begin the filename with a slash (/).
ServerRoot "/usr/local"
With the default ServerRoot, a configuration entry of libexec/apache22 indi-
cates the real directory of /usr/local/libexec/apache22. An entry of /var/log/httpd
.log remains unchanged, however. I don’t recommend changing this, simply
because so much of the default Apache configuration relies on ServerRoot
being /usr/local.
Listen
The Listen option controls which TCP ports or IP addresses Apache binds to.
The default is port 80 (the standard port for HTTP) on every IP address on
the local machine:
Listen 80
You can also specify individual IP addresses by listing them on a line:
Listen 192.168.8.44
By combining these, you can listen on a single IP address on an
unusual port:
Listen 192.168.8.44:8080
Use multiple Listen statements to make Apache available on any number
of ports or IP addresses on your system.
User and Group
These options specify an unprivileged user under which Apache will run.
FreeBSD ships with the user and group www specifically for web server use.
While occasionally you’ll hear someone suggest running Apache as root,
don’t do it no matter what; if an intruder breaks into an insecure application
on your web server, he’ll get root access as a side benefit!
User www
Group www
Administrator’s Email Address
The web server needs to know the email address of the system administrator.
Apache automatically inserts this information into various output and error
pages.

Web and FTP Services 503
ServerAdmin webmaster@blackhelicopters.org
Address harvesters can get this address pretty easily, so be sure to have
basic antispam protections on this address.
Server Name
This is the name of your website. It must be a real hostname with a DNS entry,
or Apache won’t start. For testing purposes, however, you can use an entry in
/etc/hosts instead of an actual DNS entry. You can also list an IP address.
ServerName www.absolutefreebsd.com
Document Root Path
The document root directory is where you place the HTML files that make
up the actual website. Apache’s default site contains a simple message
indicating the web server works, which is nice but won’t draw many visitors.
If you place your own HTML documents here, the Ports Collection will notice
the change and complain when you try to upgrade. It’s best to choose your
own directory for your own documents. I prefer to place my websites in
/var/www, as I try to keep the contents of /usr as static and unchanging as
possible.
DocumentRoot "/var/www/mywebsitename"
Apache Logs
Apache has fairly sophisticated logging facilities and allows you to choose
your desired level of detail in your logs. You can also design your own log
formats, but I highly recommend using one of the default log formats. Many
third-party tools can process and analyze Apache logs, but if you redesign
your logs, these tools will fail.
Basic Logs
The easiest log is the error log. If you have multiple websites running on a
single server, I recommend renaming the default error log to include the
site name:
ErrorLog /var/log/httpd-mysite-error.log
The log that interests most web administrators is the list of requests for
files. To log site access, define a log format and then declare where to place
the logs in that format. Apache 2.2 includes three log formats:
The common log format includes the IP address of the client, the time of
the request, and the file requested.

504 Chapter 17
The combined log format includes everything from the common log for-
mat, as well as the site that referred the client to this site and the user
agent used by the client.
The combinedio log format includes everything from the combined log
format, as well as the actual number of bytes transferred over the
network. This data size information includes the headers and other
metainformation transferred with the actual documents.
Once you choose or define a log format, implement it with a CustomLog
statement:
CustomLog /var/log/httpd-mysite-access.log combinedio
You can have several CustomLog statements for each site and use each log for
a different purpose. For example, you may be using an Apache module that
provides special functionality that you want to log, but you don’t want to break
the web log analysis software used by your clients. Use multiple CustomLog
statements to write multiple logs for the same site.
Rotating Logs
A good rule of thumb is that each 10,000 requests generate about 1MB of log
files. This might not seem like much on a small site, but even a small website
can get that many requests over months. My (extraordinarily lame) personal
website gets approximately 60,000 hits a year.1 A busy site can generate this
many hits in minutes. If you don’t rotate your logs, finding information in
them becomes nearly impossible.
Apache doesn’t handle logging as gracefully as most other server pro-
grams, mainly because Apache is designed to handle thousands and thousands
of simultaneous users. If you simply use newsyslog(8) to rotate your logs as you
do for other programs, Apache will corrupt its own logs. Apache supports log-
ging to programs, however. I recommend handling your logs via rotatelogs(8),
included with Apache. Use a piped call to rotatelogs(8) instead of a filename
in your log statements. Here’s an example:
ErrorLog "|/usr/local/sbin/rotatelogs /var/log/httpd-mysite-error-log 86400"
Instead of a filename, we have a call to rotatelogs(8) and then a base
filename. The trailing number is the number of seconds between log file
rotations, 86,400 seconds being equal to one day.
Similarly, use rotatelogs(8) for the access log by specifying the log type at
the end of the entry. You can also make use of the ServerRoot path to avoid
typing the entire path to rotatelogs(8).
CustomLog "|sbin/rotatelogs /var/log/httpd-mysite-access-log 86400" combined
1 This is not a plea for more web traffic to my home page. Really. Should you feel the urge to visit
my website, I suggest you get some fresh air and exercise instead.

Web and FTP Services 505
The following examples use ErrorLog only because those entries are
slightly shorter and therefore easier for your lazy author to type. They all
apply equally well to access logs.
You can rotate logs based on their size, which will be completely irrelevant
to time but might make your life easier. Here, we split the error log every
5 megabytes:
ErrorLog "|sbin/rotatelogs /var/log/httpd-mysite-error-log 5M"
By default, rotatelogs names each log file by the time the log starts, in
seconds since the epoch. While you can translate epochal time to human-
friendly time easily enough with date(1), you can also make rotatelogs use a
human-friendly date for the filename. Here, the error log’s filename includes
the time the file was created:
ErrorLog "|sbin/rotatelogs /var/log/httpd-mysite-error-log.%Y-%m-%d-%H_%M_%S 86400"
If you have a special logging situation that rotatelogs(8) cannot
solve, investigate cronolog (/usr/ports/sysutils/cronolog) or httplog
(/usr/ports/sysutils/httplog) instead. I’ve never been in such a situation,
however.
Apache Modules
Apache is a modular program, much like the FreeBSD kernel. Apache can
handle such diverse things as Microsoft Front Page extensions, scripting
languages (including PHP), and embedded Perl. Apache 2.2’s core functions
are contained in modules. You could choose to disable some of these, but
doing so would change the standard web server behavior and cause you grief.
You can find Apache modules to compress pages before transmission, vastly
decreasing bandwidth. FreeBSD has many modules in the Ports Collection
under /usr/ports/www. Module port names begin with mod_, such as mod_gzip.
APACHE MODULES VS. KERNEL MODULES
While kernel modules are not Apache modules, FreeBSD includes a kernel module
just to optimize web servers. If a client sends a long HTTP request, that request might
take a long time (in computer terms) to completely arrive. The HTTP accept filter buffers
incoming HTTP traffic in the kernel until a complete request arrives. With this buffering,
the web server doesn’t waste time waiting for a request to arrive; it receives the
whole request at once and can act on it. Enable the HTTP accept filter by setting
apache22_http_accept_enable="YES" in /etc/rc.conf.

506 Chapter 17
Load and unload Apache modules via the configuration file. The entries
look like this:
LoadModule authn_file_module libexec/apache22/mod_authn_file.so
LoadModule authn_dbm_module libexec/apache22/mod_authn_dbm.so
LoadModule authn_anon_module libexec/apache22/mod_authn_anon.so
...
Each entry consists of a LoadModule statement, the name of the module, and
the file where that module can be found. The filenames respect ServerRoot,
so these files are are actually in /usr/local/libexec/apache22.
Here are some of the popular Apache modules available in the Ports Col-
lection. Other people’s definition of popular will probably differ from mine,
but that’s their prerogative.2 Most of these can be found in /usr/ports/www.
mod_bandwidth Allows controlling the amount of bandwidth used by
a site. Very useful for virtual servers where clients have a certain amount
of bandwidth per month.
mod_dtcl Embeds a Tcl interpreter in Apache, for faster Tcl-based
applications.
mod_fastcgi Accelerates CGI scripts.
mod_gzip Accelerates websites and decreases bandwidth usage by
compressing content. Highly recommended.
mod_mp3 Turns Apache into a streaming MP3 server.
mod_perl2 Embeds a Perl interpreter in Apache, for faster Perl
applications.
mod_python Embeds a Python interpreter in Apache, for faster Python
applications.
mod_ruby Embeds a Ruby interpreter in Apache, for faster Ruby
applications.
mod_webapp-apache2 Connects Apache to Tomcat for Java applica-
tion servers.
php5 Provides the popular PHP web scripting language. (This module
is in /usr/ports/lang/php5.) When you install PHP, it gives you the choice
to pull in MySQL, another popular tool.
You’ll find many other Apache modules scattered throughout the Ports
Collection. When you have an Apache problem, I suggest searching the Web;
chances are the software you need is already there.
Many of these ports configure themselves in httpd.conf upon installation.
If you’re using revision control on httpd.conf (as you should!), this means that
you’ll need to check out httpd.conf before you install the port. If a port doesn’t
configure itself upon installation, read the module documentation; chances
are there’s a good reason why. You might have to make some decisions
about how you want the software to behave before configuring Apache.
2 Yes, I do allow people to disagree with me. Even though they’re wrong.

Web and FTP Services 507
Directories and Permissions
Apache has many interesting features, but it’s not a good idea to enable
everything everywhere—a bit of sloppy programming can result in you broad-
casting extra information from your website or even allowing an intruder to
break in. Apache permissions are set on a directory-by-directory basis. The
configuration looks a little like XML: You have a Directory label in angle
brackets, a list of permissions and settings, and then a closing Directory with a
backslash. Any options or settings between the opening and closing Directory
statements affect that directory:
<Directory /path/to/files>
...options and settings...
</Directory>
By default, Apache uses very restrictive permissions and settings. For
example, you’ll see the following entry right at the top of the directory listings
in httpd.conf:
<Directory />
AllowOverride None
Order deny,allow
Deny from all
</Directory>
Apache has features to allow users to override the default server config-
uration and change server options, password protection, MIME types, and so
on. The AllowOverride None line means that users cannot use these features
unless we explicitly permit them. The Order and Deny statements mean that no
directory on the system may be accessed from the Web. This is a default deny
security stance. Unless you specify otherwise, every directory on your system
has these permissions.
Now that you’ve disallowed everything, you can explicitly enable the
features you want. Here are some settings you might find of interest.
Controlling Access by IP Address
The Allow and Deny options list the IP addresses and hostnames that Apache
permits to access content in a directory. Apache compares client IP addresses
against the Allow and Deny lists in the order given in the Order statement, and
then permits or rejects access requests based on the results. When Order is
deny,allow, Apache permits access unless prohibited by a Deny statement. When
Order is allow,deny, Apache denies access unless explicitly permitted by an Allow
statement. The last matching rule applies.
Order allow,deny
Allow from all

508 Chapter 17
This example, the default for the DocumentRoot directory, specifically sets
a default deny policy and then allows all hosts to access the site with the Allow
statement. As with TCP wrappers, you can use the special all host to indicate
every host. You can block some sites by adding a Deny statement to this default:
Order allow,deny
Deny from 192.168.0.0/16
Allow from all
Here, you’ve blocked certain IP addresses from reaching your site. You
could also use hostnames, if you’re willing to rely on reverse DNS for your
web server security:
Order allow,deny
Deny from *.absolutefreebsd.com
Allow from all
In this case, all I must do to access your site is walk over to a machine that
has reverse DNS not in the absolutefreebsd.com domain. Changing my reverse
DNS is easier than changing my IP address.
Inversely, you can easily restrict access to your internal website to your
company’s IP addresses only by doing something like this:
Order deny,allow
Allow from 192.168.0.0/16
Deny from all
You’ll see similar examples throughout the Apache configuration files.
Directory Options
Options are general server features enabled and disabled on a directory-by-
directory basis. They allow a web server to do all sorts of nifty things, such as
execute CGI scripts, password protect directories, and change language
handling. These options give web developers a lot of power but can also
generate a lot of support calls. Enabling only the necessary options reduces
the amount of time you spend troubleshooting problems later.
Inside a directory entry, specify options with the Options keyword. For
example, to enable the ExecCGI and MultiViews options in the directory
/var/www/mysite/cgi-bin, use the following configuration:
<Directory /var/www/mysite/cgi-bin>
Options ExecCGI, MultiViews
</Directory>
Now let’s see what options Apache supports.
None
The None option disables all options. The sample httpd.conf ships with
Options set to None. If you’re building your httpd.conf on top of the default
configuration, you must explicitly enable any options you want to use.
Web and FTP Services 509
All
The All option is Apache’s built-in default. If you don’t specify any
options, almost any Apache option works on the website. If the user
uploads a password-protection script to control directory access, it will
work. If a user uploads a CGI script that exploits a system flaw to start a
root shell on a high-numbered port, granting everyone in the world a
backdoor onto your system, that will work too. The All option allows
every Apache option except MultiViews (as shown on the next page).
ExecCGI
Apache can run any CGI scripts in this directory.
FollowSymLinks
You can use symlinks—symbolic links, or file aliases, as discussed in ln(1)—to
point to other files or directories on the server. A user could symlink to
just about any file on the server, and that file will be visible if the file per-
missions allow.
SymLinksIfOwnerMatch
The server follows symlinks if the owner of the symlink is the owner of
the file that the symlink points to. In English, this means that a user can
employ symlinks only to point to her own documents.
Includes
Server-side includes (shell commands inside HTML files, also known as SSI)
and CGI scripts work in this directory. SSI can be a serious security risk
unless securely programmed. After all, you’re allowing anyone who can
see your website to run the command you use in your HTML page. Con-
niving visitors can make a command do things the web designer never
intended. Search the Web for discussions on the security of SSI, and you’ll
find enough to keep you busy for a long, long time. If you don’t know
how to use SSI safely, don’t enable this!
IncludesNOEXEC
This allows server-side includes, but disables the #exec feature and the
include function of server-side includes. Without the #exec feature, SSI
commands must be written within carefully restricted parameters. Basi-
cally, this permits simple server-side includes and CGI scripts but elimi-
nates many common security holes. Just because the most common
security holes are eliminated doesn’t mean that this is safe; you’re just
making the intruder’s work a little harder.
Indexes
If a directory doesn’t contain an index document (index.html), the Indexes
option lets the server return a prettily formatted list of the directory
contents. You might consider this a security problem, depending on
the contents of your directory. For example, if someone browses the
directory of my personal web page I don’t really care, but if they browse
a directory containing my private code, I care a great deal. (In my case
it’s because my private code is embarrassing, but other people have code
that’s actually worth money.)

510 Chapter 17
MultiViews
This option permits the server to handle HTML documents written in
multiple languages. For example, a web developer can write a single page
that contains text in English, Chinese, and Spanish. MultiViews allows the
server to negotiate the desired language with the client’s web browser.
Configuration by Users
One of the interesting things about Apache is that users may upload their own
configuration files, and the server will read and use them. The AllowOverride
keyword lets the Apache administrator dictate what configuration settings
users may or may not adjust in a given directory. This allows web developers
to handle much routine configuration themselves, as well as to install
insecure CGI scripts in random locations.
Users place configuration overrides in a file called .htaccess in the affected
directory. If you’re running a corporate web server and your web developer
basically gets what he wants, there’s no reason not to allow whatever override
he desires. If you’re running an ISP web server and you don’t allow a certain
group of clients to use CGI scripts, don’t enable the ExecCGI option and dis-
able the override that permits CGI use.
AllowOverride appears on a single line within a Directory statement,
followed by the allowed overrides. Here is a reasonable set of defaults for
most websites:
AllowOverride FileInfo AuthConfig Limit Indexes
These are some valid AllowOverride statements that you might allow users
to adjust via a .htaccess file.
AuthConfig
AuthConfig allows the user to password protect directories. This is a safe
option; it is generally expected on server farms where any idiot with a
credit card can get an account.
FileInfo
FileInfo permits users to insert their own MIME information for files in
a directory. While it’s generally better to add MIME information to the
server’s mime.types file, some users think they need this.
Indexes
The Indexes override lets the user control how directory indexing is han-
dled, including setting a new default document, controlling how icons
appear in server-generated indexes, and so on.
Limit
Users who can override Limit configuration can use the Allow, Deny, and
Order keywords to build their own hostname and IP address controls on
their directories. This option is also quite safe.

Web and FTP Services 511
None
The None override means that the user may not override any server config-
uration. This is a good default, but it is a little too restrictive for most
environments.
Options
Finally, you could allow your users to set their own directory options as
discussed in the previous section. This is useful if you trust your web
developers or if you don’t care that someone might upload an insecure
program and get your server compromised.
Other Directory Settings
While Apache lets you tweak all kinds of settings in each directory, we’re only
going to cover the most essential settings here. You can find many, many more
settings in the Apache documentation.
Index Documents
The DirectoryIndex statement defines the names of default documents in
directories. When a client requests a directory rather than a filename,
Apache checks for files with these names, in order. Change this if you’re
using a tool such as PHP (whose filenames end in .php) or those Windows
web page editors that use .htm or, worse, insist on naming the index page
default.htm.
DirectoryIndex index.php index.htm index.html
Aliases
Use the Alias statement to provide shortcuts to directories on your website,
much like a symlink. You can use an Alias statement to join disparate direc-
tories into a single coherent site without using FollowSymlinks like a maniac.
This is especially useful with third-party programs and web applications.
Alias /icons/ "/usr/local/www/icons"
This example means that if someone calls up http://www.absolutefreebsd
.com/icons, they would actually be viewing the directory /usr/local/www/icons,
even though the DocumentRoot of my site is nowhere near that directory.
You probably still need a Directory statement to grant permissions to the
aliased directory.
Custom Error Pages
In addition to serving web pages, web servers can also display errors to the
client. While Apache includes standard error pages, you can create your own
custom error pages and direct clients to them. Specify the ErrorDocument
keyword, the error number, and the name of the file to be served:
ErrorDocument 404 /missing.html

512 Chapter 17
404 is the code for the classic “Page not found” error. When a user
requests a page that doesn’t exist, he gets the file missing.html instead.
Password Protection and Apache
Restricting a website to users with a username and password is a common
requirement. Apache can authenticate via all sorts of username and password
schemes, from integration with LDAP and Kerberos domains to databases to
plaintext files. We’re going to examine two standard methods of authentica-
tion: Apache password files and Radius authentication.
Password Files
Password files are very common in environments where you have only a few
users accessing a password-protected directory. They’re also popular in
virtual host environments, where users want to control access to their own
sites. Do not put the password file in a directory in the website itself, or users
could download it and try to crack the passwords. Put the password file in a
directory completely outside any website. If you have user accounts on your
system, and a user manages the website, you can put the password file in the
user’s home directory.
Create an empty password file with touch(1), then use htpasswd(1) to
add usernames and change user passwords. The syntax is very simple:
# htpasswd passwordfile username
For example, to add a user named mwlucas to the password file
webpasswords, I would run htpasswd webpasswords mwlucas. To change that
user’s password, I would use the exact same command. The password con-
tains a single line for each user, listing the username and a password hash:
mwlucas:iJf2e7KIgS5i6
To remove a user from the database, just remove the corresponding entry
from the password file. You can also use htpasswd(1)’s -D flag, but I find that
removing users with vi(1) is easier than trying to remember this.
Now tell Apache to apply password protection to the directory. While
you can configure password protection directly in httpd.conf, it’s most common
to configure authentication in a .htaccess file. That way, changes to your
authentication system don’t necessitate reloading the entire web server. End
users commonly want to reconfigure their own authentication systems, and
using password files is an easy way to accomplish this. Define AllowOverride
AuthConfig for the password-protected directory (or the entire site), then
create a .htaccess file in the protected directory that looks something like this:
AuthName "Employees Only"
AuthType basic
AuthUserFile /home/mwlucas/sitepasswords
require valid-user

Web and FTP Services 513
AuthName is the text that appears in the password prompt box. You can
place any text you like between the quotes, and it will be shown by the web
browser.
AuthType tells Apache how to configure authentication with the client.
For standard usernames and passwords, use an AuthType of basic.
The AuthUserFile directive tells Apache where the user database is kept and
what kind of database it is. In this case, we’re pointing Apache to a htpasswd(1)
user file.
The require valid-user statement tells Apache that it should prompt for
a username and password, and only grant access to users who have valid
credentials.
Radius User Authentication
Radius is a decent way to authenticate against third-party directory services,
such as Active Directory and LDAP. You can find a whole variety of Radius
servers, from freely available OpenRADIUS to the Internet Authentication
Service bundled with Windows servers. The nice thing about Radius integra-
tion is that you don’t need to muck about with LDAP or Kerberos, because
enterprise directory management teams can be reluctant to allow nonstandard
systems to talk to the directory. In most cases, you can just build a Radius server
and let it authenticate against your enterprise directory without involving
anyone else. While an Internet search shows several Radius authenticators
for Apache, I prefer mod_auth_xradius (/usr/ports/www/mod_auth_xradius).
It works well with modern Apache and is fairly easy to configure.
First, configure your Radius server. If you’re in an enterprise or service
provider setting, chances are you already have a Radius server. Many different
vendors provide Radius servers, each with its own pluses and minuses. FreeBSD
includes several in the Ports Collection. The good news is that Apache doesn’t
need any fancy Radius features; any Radius server suffices. If you are in a
Microsoft Active Directory environment, check out Internet Authentication
Services. It’s very small, and chances are you can get your AD administrator
to install it for you. Your fellow employees will be happy that your web app
provides a logon integrated with their desktop accounts, when so many don’t.
Now tell Apache to load the module. Go to the end of the LoadModule list
and add it:
LoadModule auth_xradius_module libexec/apache22/mod_auth_xradius.so
Then, configure the Radius cache. Apache uses the cache to store the list
of users who have successfully authenticated. Without a cache, Apache makes
a Radius request for every object on every web page. This might be dozens of
requests for a single click of the mouse, which is obviously undesirable.
AuthXRadiusCacheTimeout 300
AuthXRadiusCache dbm "/tmp/auth_xradius_cache"

514 Chapter 17
The AuthXRadiusCacheTimeout tells Apache how long to cache objects, in
seconds. The AuthXRadiusCache line tells Apache where to store the cache. In
this case, I’m using a dbm (hash database) file in /tmp. If you have untrusted
users logging into your web server on the command line, place your cache in
a directory that users cannot access, but on a dedicated server /tmp is ade-
quately secure.
Now, tell your protected directory to require Radius authentication. You
could do this in a .htaccess file just as you do for usernames and passwords, but I
recommend placing the configuration directly into httpd.conf. Sites using
Radius authentication are generally managed by a system administrator, not
by users. Place your configuration directly into a Directory statement. For
example, I run Nagios on FreeBSD. Here’s a configuration for password-
protecting the nagios directory with Radius:
<Directory /usr/local/www/nagios>
AllowOverride None
...
AuthName "Nagios"
AuthBasicProvider "xradius"
AuthType basic
AuthXRadiusAddServer "radius.absolutefreebsd.com" "RadiusSecret"
AuthXRadiusTimeout 2
AuthXRadiusRetries 2
require valid-user
</Directory>
While this looks confusing at first glance, it’s not that bad if you go
through it slowly. The AllowOverride statement specifically disallows config-
uration of the directory via a .htaccess file. As we’re configuring the directory
within the web server itself, that’s perfectly fine.
The AuthName entry gives the text displayed in the user-visible password
prompt.
AuthBasicProvider tells Apache where to get its source of authentication
information. While the password file has been built into Apache for many
years, so Apache knows about it by default, when you use add-on authentica-
tion systems you must tell Apache.
The AuthType of basic indicates that you’re using HTTP basic
authentication.
To tell Apache where to find your Radius server and the shared secret,
use the AuthXRadiusAddServer value. Put both the server name and the shared
secret in quotes.
A Radius server should respond in less than a second. To tell Apache how
many seconds to wait for an answer before trying again, use AuthXRadiusTimeout.
To tell Apache how many times to retry, use AuthXRadiusRetries.
Finally, tell Apache that the user must provide a valid username and
password to get access.

Web and FTP Services 515
While this example is specific to Radius, in particular the XRadius module,
you can apply the same principles to any other authentication module. Read
the module documentation and configure Apache as required. While it won’t
look exactly like the Radius setup, chances are it will be very similar.
Groups and .htaccess
One useful feature of usernames and passwords is the ability to restrict access
by group. Perhaps you have a large website, where authenticated users get
access to the majority of the site content but only a few of those authenticated
users should have access to the administrative area. You can use groups to
accomplish this. Apache group files look much like /etc/group: a group name,
followed by a colon, followed by a comma-delimited list of users:
administrators: mwlucas, gedonner
Then, tell Apache about the group file and add a require-group statement
to the .htaccess file or directly to httpd.conf:
authgroupfile /usr/local/etc/apache22/users/webgroup
require-group administrators
This way, your administrators have a single password for both the semi-
public and administrative areas of your site, but only the administrators can
access the administrative area. You can use this function to divide your website
in any way by creating more groups.
Including Other Configuration Files
One feature that makes Apache configuration easier to manage is the ability
to include other configuration files. Older httpd.conf files were over a thousand
lines long and included large amounts of text irrelevant to most users. These
features are now segmented off into separate configuration files. Near the end
of httpd.conf you’ll see entries like this:
...
# Fancy directory listings
#Include etc/apache22/extra/httpd-autoindex.conf
# Language settings
#Include etc/apache22/extra/httpd-languages.conf
# User home directories
#Include etc/apache22/extra/httpd-userdir.conf
...
By uncommenting the configuration entry, you enable the functionality
in the included file. For example, to enable fancy directory listings you would
uncomment the line pointing to that configuration file . Of course, you must
review the file to confirm that the functionality is configured as you wish.
516 Chapter 17
The default Apache configuration file has two directories set aside for
included configurations: extra and Includes. The Includes directory is for your
use. Any file in the Includes directory with a name ending in .conf is sucked
into the global Apache configuration. We’ll use this feature when we create
virtual hosts later in this chapter. The files in extra come with Apache and
cover special Apache functions that are not required in every setting, but are
sufficiently popular to be integrated with Apache itself. These functions are:
MPM The multiprocessing module tells Apache how to handle worker
processes. All the settings in this file are defaults.
Multi-Language Error Messages Apache defaults to providing error
messages in English. If you need to support multiple languages, enable
this module. The browser and the server will negotiate a language for
the error messages.
Fancy Directory Listings The default Apache autoindex function looks
rather drab. The fancy directory module tells Apache to generate pret-
tier directory indexes.
Language Settings You can give Apache a different native language and
tell it about different character sets.
User Home Directories Traditionally, a user’s home directory on a web
server was available as a web page via http://<servername>/~<username>.
This module enables this functionality. You can see this in play at my
home page, http://www.blackhelicopters.org/~mwlucas.
Status Apache can generate a web page that tells you about Apache’s
status, configuration, and other real-time information.
Virtual hosts You can run multiple websites on a single web server
through virtual hosts. We’ll cover virtual hosts later in this chapter.
Manual Apache ships with the manual for the version you installed.
Enabling this makes the manual available on the website for easy
reference.
WebDAV DAV lets you create a shared file area where users can upload
and download documents. You must consider the security of your site and
read the WebDAV documentation before enabling this.
Defaults Apache includes many default settings set in the code itself.
If you must override these settings, load this default configuration and
make your changes here.
SSL SSL is important enough that we dedicate a section later in this
chapter specifically to HTTPS sites.
Each of these functions has a configuration file in extra. Take a look
there for more details.

Web and FTP Services 517
Virtual Hosting
Virtual hosting occurs when one web server handles multiple websites. The
server is configured to handle web requests for each of the hosted domains.
Many companies need a very small website, with just a few pages of infor-
mation and perhaps a CGI script or two. This is an excellent application
for virtual hosting. I’ve run thousands of virtual domains on one FreeBSD
system without putting the system load up over 0.2. When each site pays
$19.95 a month to handle a couple dozen hits a day, you’re quickly looking
at real money on inexpensive hardware.
One common stumbling block to understanding virtual hosts is the belief
that the www in a URL is a magic incantation that points to a website. This is
incorrect. When you type a URL such as http://www.freebsd.org, you’re telling
your browser to go to a machine named www.freebsd.org and check its website.
The www started off as system administrators’ shorthand for “the server with
our world wide website on it” and has spread into popular usage. If you pay
attention, you’ll see websites on machines with many different names. With
virtual hosts, many hostnames point to one machine. The server needs to
differentiate between the requests for different domains and then answer
each request with the appropriate file. To enable virtual hosts, uncomment
the Include line for virtual hosts in httpd.conf and restart Apache.
Configuring Virtual Hosts
As one Apache server can handle thousands of virtual hosts, I suggest placing
the configuration for each server in its own file in the Includes directory. If you
end the filename in .conf, Apache will automatically include the configuration
on the next reload. Further, I recommend naming the file after the domain
it serves. You’ll end up with files like www.customer1.com.conf, www.customer2
.com.conf, and so on. Compared to sorting through a single monolithic config-
uration file, this makes site troubleshooting much easier.
Apache supports two different styles of virtual hosts: name-based and IP-
based. Name-based virtual hosts assume that the client asks for the name of the
website. All browsers since Netscape 3 and IE 4 support this behavior. Name-
based virtual hosts are almost always the proper choice. An IP-based virtual host
is attached to a single individual IP address; this is only necessary when a virtual
host needs a SSL certificate. You can use both on a single server.
Here’s a name-based virtual server configuration for absolutefreebsd.com.
It’s installed as /usr/local/etc/apache22/Includes/absolutefreebsd.com.conf.
<VirtualHost *:80>
ServerAdmin webmaster@absolutefreebsd.com
DocumentRoot /var/www/absolutefreebsd.com
ServerName absolutefreebsd.com
ServerAlias www.absolutefreebsd.com
ErrorLog /var/log/http/absolutefreebsd.com-error_log
CustomLog /var/log/http/absolutefreebsd.com-access_log combined
</VirtualHost>

518 Chapter 17
The first thing to note is the <VirtualHost> and </VirtualHost> tags.
Everything between these tags defines a single virtual host. The *:80 entry
tells Apache that a request for this website can come to port 80 on any IP
address on this host.
Just like our main server, a virtual host needs a ServerAdmin and
DocumentRoot , where Apache will find the documents that make up the
website. The web server also needs ErrorLog and CustomLog directives.
(You can have all of your virtual websites log to a single file, but then you’ll
have to sort them out later.)
Perhaps the most interesting thing here is the ServerName and ServerAlias
directives. The server name is absolutefreebsd.com. The ServerAlias directive
gives this site a second name, www.absolutefreebsd.com. Apache serves up the
same site for either name. If someone doesn’t type the www part of the site
name, you still want them to reach the page.
The IP-based virtual host is almost identical to the name-based host, with
the exception of the content of the <VirtualHost> tags. Instead of using *:80 to
indicate that you’re listening for requests for this host on all addresses on the
machine, you use a single IP address:
<VirtualHost 192.168.1.5:80>
ServerAdmin webmaster@AbsoluteFreeBSD.com
...
This virtual host attaches to the IP address 192.168.1.5. This is only useful
for a site using HTTPS, which must have its own unique IP address. See
“HTTPS Websites” on page 520.
This virtual host entry should contain everything needed for this website.
For example, the Nagios server for which I configured Radius authentication
earlier in this chapter is actually a virtual host. The Radius configuration
should go into the virtual host configuration file rather than httpd.conf itself.
Tuning Virtual Hosts
Once you have your minimal virtual host working, you can add some more
touches. Here we’ll discuss various options that work with both IP-based and
name-based virtual hosts.
THE DEFAULT HOST
If you’re using virtual hosts, the first host you set up will be the default website. Make
sure that the DocumentRoot and error logs are the same as you set for the default site
in httpd.conf. I also recommend removing the sample name-based virtual host from
the virtual host configuration in extra/httpd-vhosts.conf.

Web and FTP Services 519
Port Numbers
You can serve different sites on different TCP/IP ports. You’ve probably seen
this before—a hostname in a URL may end in a colon followed by a number.
If Apache is listening on ports 80 and 8080, for example, you could have a
different virtual host on each port, as long as you add the port number after
the IP address in the VirtualHost directive.
Here’s an example configuration that creates two different sites on two
different ports. If I was to use these in production, I’d fill them out with
logging statements and administrator information, but this example is inten-
tionally simple:
<VirtualHost *:80>
DocumentRoot /var/www/www.absolutefreebsd.com
ServerName www.absolutefreebsd.com
</VirtualHost>
<VirtualHost *:8080>
DocumentRoot /var/www/data.absolutefreebsd.com
ServerName data.absolutefreebsd.com
</VirtualHost>
Of course, you could point both of these sites to the same directory to
serve the same content, or you could have them both listening on port 80. It
doesn’t really matter, so long as it solves your problem.
Options and AllowOverride
By default, virtual hosts inherit the Options and AllowOverride settings of the
Apache root directory. The default permissions are very restrictive, allowing
no access from anywhere. You can use the Options and AllowOverride statements
with a virtual host. Any option that is valid in httpd.conf is valid on a virtual host.
This lets you set server configuration on a site-by-site basis; for example, you
could allow server-side includes on one virtual host but not on others. The
following virtual host has Options settings that override the server’s defaults
and special privileges for the DocumentRoot directory:
<VirtualHost *:80>
DocumentRoot /var/www/absolutefreebsd.com
ServerName absolutefreebsd.com
Options IncludesNOEXEC
</VirtualHost>
<Directory /var/www/absolutefreebsd.com>
AllowOverride AuthConfig
</Directory>
This makes your virtual host almost as flexible as a dedicated server—
until your customers want their own custom Apache modules installed, of
course. That’s when you sell them a jailed server and let them install their
own modules.

520 Chapter 17
HTTPS Websites
Many online shopping malls and password-protected areas use what they
call secure websites. What they mean by this is that they use SSL to encrypt traffic
between the server and the client. While these sites aren’t as secure as the
name implies, SSL provides a vital layer of protection. SSL functionality is
integrated with Apache via the extra/httpd-ssl.conf file. Uncomment the entry
for this file in httpd.conf to enable SSL.
All SSL web servers need a secure certificate. We discussed generating a
certificate request and creating a self-signed certificate in Chapter 9. For your
private use, a self-signed certificate is sufficient, but anything that faces the
public really needs a certificate from an accredited CA. If you attempt to use
a self-signed certificate on a customer-facing application, the client’s web
browser will spew scary looking warnings about your lack of security.
The completed certificate has two parts: a certificate file (hostname.crt)
and a host key (hostname.key). Place these files in a directory outside of the
web content, so that nobody can download them from the web server itself.
Be sure to make these files readable only by the web server unprivileged
user and not by regular users:
# chmod 600 hostname.crt
# chmod 600 hostname.key
# chown www:www hostname.crt
# chown www:www hostname.key
Now that you have the certificate on the system, tell Apache about it.
In the past, SSL configuration used to bring tears to the eyes of experienced
system administrators; today, it only requires four lines within your virtual
host configuration:
<VirtualHost 192.168.1.5:443>
ServerName secure.absolutefreebsd.com
SSLEngine on
SSLCertificateFile etc/apache22/ssl.crt/hostname.crt
SSLCertificateKeyFile etc/apache22/ssl.key/hostname.key
...
First, note that the we’re using an IP-based virtual host that’s listening on
port 443. Standard HTTPS sites run on TCP port 443.
The ServerName is extremely important for HTTPS websites. The ServerName
should exactly match the reverse DNS of this IP address and the name on the
SSL certificate. If the three names do not exactly match, the user might see
security warnings. ServerAlias is not useful for HTTPS websites.
We then turn the SSL engine on for the site and list the full path to the
certificate and the host key. Use the full hostname for the files containing
the certificate and key.

Web and FTP Services 521
Controlling Apache
Apache is a complicated program that you can manage in several different
ways. While apachectl(8) works quite well, I recommend using FreeBSD’s
integrated Apache startup script. This script runs apachectl(8) with any
special settings needed for your environment and ensures that the next time
your system boots, your Apache server works as it did before shutting down.
Apache is a little different from most other programs, however, so you have
several different arguments you can use other than the plain old start and
stop. The common options are start, stop, restart, graceful, gracefulstop,
and configtest.
/usr/local/etc/rc.d/apache22 start activates Apache with all modules as
configured. There is no longer any special command for starting SSL web
servers. If the server configuration is invalid, it prints out the problem with
the config and does not start the service.
/usr/local/etc/rc.d/apache22 stop shuts off Apache immediately, termi-
nating all open connections without completing the requests.
/usr/local/etc/rc.d/apache22 restart checks the server configuration. If it
finds a configuration problem, the script prints out the problem and does
nothing. If the configuration is valid, it stops and immediately starts Apache.
/usr/local/etc/rc.d/apache22 graceful performs a graceful restart. Open
connections are allowed to complete before being shut down. While this might
seem unnecessary, it’s quite important when you serve large files or have a
group of web servers behind a load balancer. Like restart, this command
checks the configuration before shutting down the service and takes no action
if there is a configuration problem.
/usr/local/etc/rc.d/apache22 gracefulstop shuts Apache down without
abruptly terminating open connections. Open connections are permitted to
remain open and complete their requests before the process shuts down.
/usr/local/etc/rc.d/apache22 configtest checks the Apache configuration
and prints out any problems it sees. This is the function used by the restart and
graceful commands to validate the configuration before shutting down the
current process.
Now that you can manage Apache, let’s see how you can get files to and
from the server itself.
SECURE WEB SERVERS AND SSL
I recommend avoiding the term “secure website” when you mean SSL. Encrypting
the network traffic between the client and the server only defends against one
particular type of network attack. Intruders can still penetrate either the server or the
client. A secure web server requires regular maintenance, good web design, and an
educated system administrator who is left alone long enough to do his job. While
that last one looks like a significant barrier, it pales compared to one of the
requirements for a secure web client: an educated user!

522 Chapter 17
File Transfer
A web server isn’t any good without web content. While I design my websites
on FreeBSD, my websites are hideous.3 Web design professionals usually
design their sites on a workstation and upload them to the server. The
standard methods for file transfer are FTP and sftp/scp.
FTP, the File Transfer Protocol, is the classic method of moving files from
one computer to another over the Internet. Most of your users will prefer to
use FTP. Like many other protocols, FTP has not aged well. FTP has problems
in many modern environments. Over the years, fixes for these issues have
been bolted onto the specification, creating a Frankensteinian horror of a
protocol that lurches after network administrators when they turn away even
for a moment. While FreeBSD makes handling FTP as easy as possible, you’ll
still need to do some work to keep it chugging along.
FTP Security
FTP transmits passwords and usernames in clear text, which means anyone
with a packet sniffer can capture this information. Nobody except the network
administrator should have a packet sniffer on your local network, but if your
users are on remote networks or behind cable modems, their passwords are
vulnerable.
As the system administrator, however, you should never, never, never
transmit your password over the network in clear text! Instead, use scp(1)
and sftp(1) to move files between machines.
The FTP Client
FTP is a fairly complex protocol which, unlike POP3 or SMTP, cannot be
easily tested via telnet(1). You must use an FTP client. To connect to a host,
just type ftp and the hostname:
# ftp sardines
Connected to sardines.blackhelicopters.org.
220 sardines.blackhelicopters.org FTP server (Version 6.00LS) ready.
Name (sardines:mwlucas):
The client sends your local username as a default, but you can enter a
different username if necessary. You’ll then be asked for your password:
331 Password required for mwlucas.
Password:
230 User mwlucas logged in.
Remote system type is UNIX.
Using binary mode to transfer files.
ftp>
3 Mind you, my websites are not hideous because I design them on FreeBSD. They are hideous
because my personal strengths of cynicism, sarcasm, and bitterness are completely inapplicable
to making web pages look nice.

Web and FTP Services 523
If everything goes as planned, you’re now logged into the remote server
with a shell almost like a command shell. You cannot execute commands, but
you can move around and view files using standard Unix commands such as
ls and cd.
To download a file with FTP, use the get command and the filename:
ftp> get .cshrc
local: .cshrc remote: .cshrc
229 Entering Extended Passive Mode (|||50451|)
150 Opening BINARY mode data connection for '.cshrc' (614 bytes).
100% |*************************************| 614 272.17 KB/s 00:00 ETA
226 Transfer complete.
614 bytes received in 00:00 (193.48 KB/s)
ftp>
As you watch, your FTP client opens a connection to transfer the file.
A line of asterisks crawls across the screen as the file moves, and an ETA line
updates with the length of time remaining in the download. When the file
transfer finishes, you’ll see a notification, the size of the file you transferred,
and an FTP prompt.
Similarly, use the put command to copy files from your local system to
the FTP server. The output looks almost the same as that for get, so I won’t
repeat it here.
Use the mget and mput commands to move multiple files at once. For
example, if you want to download all the files that end in .html, enter mget
*.html. Annoyingly, the server will prompt you to confirm every single file.
You can toggle the verification on and off with the prompt command.
Finally, you can view text files over FTP. The less command displays the
contents of a remote file, one page at a time, exactly like less(1). While it’s
rude to view a file and then download it, using less to view README and index
documents is fine.
Binary and ASCII Transfers
The difference between binary and ASCII transfers is a big source of user
confusion, caused by the different handling of the return and newline
characters. DOS and Unix systems have long disagreed on how to mark the
end of a line, as you might have noticed when moving files between the two
systems. An Internet search will uncover many documents describing the
issue in painful detail and many more articles denouncing one side or the
other for being Just Plain Wrong. All you need to know is how to live with the
problem and get on with your life.
While you can transfer both binary and text files in binary mode, you
cannot transfer binary files in ASCII mode. Unix-like systems default to using
binary transfers, while Windows-based systems default to using ASCII. You
can tell an FTP server to use binary transfers with the bin command and
ASCII with the a command. Binary works for everything, so use binary mode
for all FTP transfers and you’ll never have this problem.
524 Chapter 17
The FTP Server
Now that you know how to use the FreeBSD FTP client, let’s look at how to
provide FTP services. Your first task is to decide if you’re going to run your
FTP daemon, ftpd(8), from inetd(8) or in standalone mode.
FreeBSD defaults to running the FTP daemon from inetd(8). Most
systems don’t get that many FTP requests, and inetd can easily handle the
few requests that do arrive. If you won’t be supporting more than a couple
hundred of simultaneous FTP sessions, inetd(8) works well. Just uncomment
the FTP line in /etc/inetd.conf (see Chapter 15) and restart inetd. Any changes
to the ftpd(8) command line can be made in inetd.conf.
However, if your FTP server handles hundreds or thousands of simulta-
neous connections, running FTP from inetd just adds to the system overhead.
You’ll want to set up FTP in standalone mode, where it is permanently
listening to the network and handling requests itself. Confirm that ftpd(8) is
not running out of inetd and then set ftpd_enable="YES" in /etc/rc.conf. You
can either start ftpd(8) with /etc/rc.d/ftpd or reboot.
You can adjust ftpd(8) in many different ways through command-line
flags. Add these flags to the ftpd(8) line in /etc/inetd.conf or to ftpd_flags in
/etc/rc.conf. Now, let’s look at the features that FreeBSD’s ftpd(8) offers.
Logging ftpd(8) Usage
ftpd(8) has two levels of logging. If you specify -l once (this is the default in
/etc/inetd.conf), ftpd(8) will log all successful and unsuccessful login attempts.
If you specify it twice, ftpd(8) logs all FTP activities: downloads, uploads,
directory creation and destruction, and so on.
Read-Only Mode
You might want to prevent FTP users from uploading files, replacing files, or
changing the server’s filesystem in any way. This is good for a server that only
provides downloads, such as a mirror site. Use the -r flag to set this behavior.
Write-Only Mode
Perhaps you want a server where users can only upload files, not download
them. In this case, use the -o flag.
Timeout
By default, if a user leaves an FTP session idle for 15 minutes (900 seconds),
it is disconnected. You can set a new idle timeout with the -t flag, specifying
the number of seconds of permitted idle time.
FTP User Control
Two common concerns with running an FTP server are that it can allow users
to download arbitrary system files and that FTP passwords can be sniffed. You
don’t want your server compromised because some dingbat user used his

Web and FTP Services 525
password at the local cybercafe, his login was stolen, and the intruder down-
loaded key system files! The best way to control users is by choosing who may
log in and which directories those legitimate users may access.
Chrooting Users
You can lock FTP users into their own home directories with chroot(8). To
the user, their home directory will look like the top of the filesystem. They
won’t be able to leave their home directory or access arbitrary system files.
This is much like a small jail. Chrooting is useful for web servers that have
multiple clients on one machine—that is, web servers with many virtual hosts.
After all, customers only need to see their own directories, not anyone else’s.
To chroot a user, add her username to the file /etc/ftpchroot. Put each
user on a new line. Every time a user logs in via FTP, the user’s account is
checked against /etc/ftpchroot. If the username appears there, the user is
locked into her home directory. A chrooted user has complete control of her
home directory (unless you set the permissions otherwise) and can create as
many subdirectories and store as many files as the disk space allows; the user
just can’t leave her home directory and explore the system.
You can also list groups in /etc/ftpchroot, chrooting all users who are in
that group. Preface group names with an @ sign (for example, @customers).
Suppose we have a system with two web designers, Gordon and Chris.
These admins should only upload files into their home directories. Similarly,
we have a group of users who maintain their own websites. These clients are
all in the group webclients. To chroot all of these users, set up /etc/ftpchroot
like this:
gordon
chris
@webclients
All of these users are now restricted to their home directories.
Disallowing Users’ FTP Access
The file /etc/ftpusers is deceptively named. Instead of a list of users permitted to
use FTP, it contains a list of users who are not allowed to use FTP. FreeBSD’s
default /etc/ftpusers contains a variety of system accounts, such as root and
nobody. No system administrator should log in as root!
You can list groups in this file by prefacing them with the @ symbol.
I habitually ban members of the wheel group from using FTP. People who
have access to the root password should never transmit their own password in
clear text. Anyone whom I would trust with root access knows how to use
SSH, scp(1), and sftp(1)!
FTP Server Messages
The FTP server provides two different connection messages: /etc/ftpwelcome
and /etc/ftpmotd.

526 Chapter 17
When a client first makes an FTP connection, ftpd(8) displays the contents
of /etc/ftpwelcome. You can put here the terms of use, legal warnings, capacity
statements, obscenities and threats, or whatever else you like. Users see this
message before they even get a login prompt. This is an excellent place to
put an “Unauthorized use not permitted” message. While not as much fun as
an “Unauthorized users will be prosecuted to the full extent of an unfriendly
Rottwieler and my 12-gauge shotgun” message, the former is actually admis-
sible in court if an intruder hijacks your server.
Once the user has logged in, ftpd(8) displays the contents of /etc/ftpmotd.
This is a good place to remind your users of the system terms of service.
Setting Up Anonymous FTP Servers
Anonymous FTP sites are a popular way to provide files and documents to the
Internet at large. Anonymous FTP sites are frequently broken into, however.
While FreeBSD’s ftpd(8) is quite robust and secure, you should still take
basic precautions and configure your server properly to avoid problems.
Here are a few recommendations:
Do not share anonymous and non-anonymous FTP services on a single
server.
Set ftpd to run read-only by starting it with the -r flag.
Use ftpd’s -S flag to log all anonymous FTP activity to the file /var/log/ftpd.
This file must exist before ftpd(8) starts using it, so run touch /var/log/ftpd
first.
Create a nonprivileged user ftp for ftpd(8). This user’s home directory
will be the root of the anonymous FTP directory, and all files you want
the world to see must be placed in this directory.
Create the directory /home/ftp/pub for the traditional pub folder in an
FTP server and change the permissions on the ftp user’s home directory
to prevent that user from changing the home directory. This will force
all uploaded files (if permitted) to go into pub.
Anonymous FTP Pitfalls
Allowing just anyone to upload to your server might seem friendly. You
might have bandwidth and disk to spare, and you might desire to provide a
public service. In an ideal world (such as the Internet of the ’80s and early
’90s), this would be lovely.
If you allow anyone to store data on your system, however, people can
use your FTP server to store illegal software, child porn, or terrorist data. To
make it harder for you to find, they can create hidden directories or disguise
the data. Even if you go looking through all the crud people upload, you’ll
probably ignore files that look innocuous. It’s not your fault that the file
labeled CookieRecipies.txt is actually a MPEG of the Gerbil Liberation Front
training for its secret mission to cram the President of the United States into
a giant wheel and make him run for his life. But you’ll have a hard time
explaining that to Homeland Security.
Web and FTP Services 527
Chrooting sftp(1) and scp(1)
Finally, a quick word on sftp(1) and scp(1). These are file transfer services
that run over SSH (see Chapter 15), providing authentication, integrity, and
nonrepudiation for data transfers. sftp is a secure replacement for FTP, while
scp replaces rcp(1). Users who transfer files to a server can use these protocols
instead of FTP.
One problem that system administrators face is that of chrooting users
of these services. While it’s nice that you can provide a secure encrypted
connection for users to transfer their data, you still don’t want them to
download random files from all over your server! For these users, I rec-
ommend scponly (/usr/ports/shells/scponly). A user whose shell is set to
/usr/local/bin/scponly will only have sftp and scp access to your server.
Now that you can serve websites and FTP data, let’s spend some time
with FreeBSD’s disk layer. Say hello to GEOM!

18
DISK TRICKS WITH GEOM
FreeBSD has an incredibly flexible disk
management system called GEOM. GEOM
is an infrastructure system that allows kernel
developers to easily program modules, called
GEOM classes, for different types of disk functionality.
FreeBSD uses GEOM to support disk encryption,
journaling, several different types of software RAID, and exporting disk
devices across the network. The GEOM tools provide flexibility, redundancy,
and ease of implementation for both developers and system administrators.
We’ll take you through FreeBSD’s disk partitioning tools and then cover
several of the popular GEOM classes.
Throughout this chapter, we’ll experiment with disk devices. Any time
you touch a disk’s layout or format, you risk the data on that disk. While it’s
entirely possible to manipulate unused disk space without affecting data on
the rest of the disk, learning how to do that is still risky. Back up your data.
Better still, find an unused disk and learn on it! (On the other hand, learning
on the disk that contains your most precious data will nicely focus your mind.)
530 Chapter 18
We specifically discuss the disk formats used with i386 and amd64
systems. Other platforms have slightly different disk management systems.
Sparc uses a disklabel at the front of the disk, but no slice table. The ia64
platform uses slices based on GPT, while partitioning an ARM disk is by far
the easiest part of making FreeBSD run on that hardware.
GEOM Essentials
GEOM is a generic framework that allows almost arbitrary layering of storage
devices. Different GEOM modules transform storage media in various ways.
Additionally, these modules are stackable; the output of one can be used as
the input for another. You want your hard drives mirrored? Sure. How about
mirroring across the network? No problem. What if you want the drive
encrypted, as it’s mirrored, across the network, in stripes? Wake me up when
you want something difficult, buddy. Mind you, FreeBSD doesn’t promise
massive performance through too many GEOM layers, but it can be done.
GEOM separates storage devices into consumers and providers. A consumer
lies beneath the module, while a provider offers services to the next layer up.
For example, suppose you’re using a GEOM class to mirror the hard drives
/dev/da0 and /dev/da1 into one virtual disk, /dev/mirror/mirror0. The disk
devices are consumed by the mirrored disk, while the combined device node
/dev/mirror/mirror0 is a provider that offers services to the next layer.
FreeBSD sees all providers identically. A physical hard disk is just another
provider. Maybe you’re putting a filesystem right on the provider, or perhaps
/dev/mirror/mirror0 is a consumer of the GEOM disk encryption module.
In any case, to use any of FreeBSD’s advanced disk features, you must know
a little more about hard disk management.
Disk Drives 102
Historically, data on disk could be mapped to a location on the hard drive.
This location could be expressed in terms of cylinders, tracks, and sectors.
Remember, each hard disk is made of a stack of disk platters. Each disk
platter has a series of circular rings, or tracks, arranged much like the growth
rings in a tree. These tracks hold data as a string of zeroes and ones. A head
moves over a particular track at a certain distance from the center of the disk
and reads this data as the platter spins beneath it. When you request data
from a particular track, the head shifts its position and lets that track rotate
past beneath it, catching the data much as a parent might snatch a child off
a spinning merry-go-round.
If you stack the tracks on top of one another from all the platters, you
have a cylinder. The innermost track of each platter forms cylinder 0. The
next-innermost is cylinder 1. The 1,603rd track of each platter is cylinder
1,602. Many operating systems expect to find that disk slices encompass
complete cylinders and get quite irate if they don’t.

Disk Tricks with GEOM 531
Each track is broken up into segments called sectors, or blocks, which can
each hold a certain amount of data (512 bytes for many years now). Each
sector within a track has a unique number, starting with 1.
So, sectors combine into tracks, which are stacked into cylinders, which
combine to describe the disk’s geometry. This all seems straightforward enough,
and would be if you could rely on it.
Over the years, both hard drive manufacturers and operating systems
have set and broken limits. This applies to all aspects of machine design—
some of you probably remember when 640KB was the maximum RAM that
could be put in a PC. A few of you even remember when 640KB was an
unimaginably vast amount of RAM and you had no idea what to do with it.1
Hard drive manufacturers avoided these limits by tricking the system BIOS
and/or the operating system. If you’re a hard drive manufacturer making a
hard drive with 126 sectors per track, and the most popular operating system
can only accept 63 sectors per track, you have a problem. The easy solution is
to teach your hard drive to lie. If you claim you have half as many sectors per
track but twice as many platters, the numbers still add up, and all operating
systems can still identify unique blocks. A lie makes the problem go away.
You’ll encounter several different types of these translations if you read
about disk management history. A leading FreeBSD developer summed
this all up nicely with, “It’s all just lame x86 BIOS crap, though.”
By the time hard drive information reaches the user, it has quite possibly
been through one or more such translations. If you have hardware RAID,
either on a local RAID card or from a SAN, geometry information is obviously
bogus. Today, the important thing to understand is how this fits together in a
logical sense, not necessarily in a physical sense. Accept the lies your hard drive
tells you, even when they’re obvious.
Many operating systems try to optimize performance based on cylinder
information. Geometry translations make these optimization schemes not
work as intended.
Slicing Disks
Remember from Chapter 8 that FreeBSD divides disks in two distinct ways:
slices and partitions. A slice is a BIOS partition, the only sort of partition
recognized by older Microsoft Windows systems. A FreeBSD partition is a
subdivision of a slice. FreeBSD lets you configure slices and partitions sep-
arately. A single disk (on i386 and amd64) can have up to four slices, and
each slice can have up to eight partitions. FreeBSD filesystems are on
partitions inside slices.
Before the first slice, you’ll find the Master Boot Record (MBR) at cylinder 0,
head 0, sector 1. The MBR contains the slice table as well as the system’s
initial bootstrapping code. The MBR is strictly limited to 512 bytes, which
seemed like a lot of space at the time it was defined. A booting computer
1 And yes, I know, I know, some of you weren’t even born then! Please review the footnote on
page 4.

532 Chapter 18
reads the MBR of the boot drive to identify disk slices, finds the slice with the
operating system on it, and activates the bootstrap code on that slice. You can
use any portion of the disk after the MBR for FreeBSD.
Viewing the Slice Table with fdisk(8)
To read and edit the slice table in the MBR, use fdisk(8). fdisk always needs
one argument, the name of the disk you want to examine. Here I run fdisk
on one of my test hard drives:
# fdisk /dev/da2
******* Working on device /dev/da2 *******
parameters extracted from in-core disklabel are:
cylinders=1116 heads=255 sectors/track=63 (16065 blks/cyl)
Figures below won't work with BIOS for partitions not in cyl 1
parameters to be used for BIOS calculations are:
cylinders=1116 heads=255 sectors/track=63 (16065 blks/cyl)
Media sector size is 512
Warning: BIOS sector numbering starts with sector 1
Information from DOS bootblock is:
The data for partition 1 is:
sysid 165 (0xa5),(FreeBSD/NetBSD/386BSD)
start 63, size 17928477 (8754 Meg), flag 80 (active)
beg: cyl 0/ head 1/ sector 1;
end: cyl 1023/ head 254/ sector 63
The data for partition 2 is:
<UNUSED>
The data for partition 3 is:
<UNUSED>
The data for partition 4 is:
<UNUSED>
This particular SCSI disk claims to have 1,116 cylinders, 255 heads, and
63 sectors per track . Remember, a head is a mechanical device that sits
above the platter. 255 heads would be an awful lot to cram within a single hard
drive! While I prefer that systems that lie to me pay me the courtesy of making
the lies believable, we have no choice but to accept the hard drive’s answers
and treat them as fact. No matter how many heads, cylinders, and sectors
this hard drive really has, I’m confident it has 17,928,540 sectors (1,116 ×
255 × 63 = 17,928,540).
Back when hard drives first implemented translations, you might gather
conflicting drive geometry information from different sources. fdisk(8)
provides all the information it can gather about the drive in the hope
that the system administrator can sort out enough truth to use the drive.
This is rarely necessary on modern drives; these days, the information in
these first two sections should always be identical.
While all hard drives should have a sector size of 512 bytes , fdisk(8) is
kind enough to verify this.

Disk Tricks with GEOM 533
We then see the information for each of the four possible slices on the
disk. Our first partition is labeled as a FreeBSD partition. Each operating
system has a unique slice identifier, and the 165 marks this as a FreeBSD slice.
We also see which of the millions of sectors are assigned to this slice.
Slice 1 begins at sector 63—remember, the MBR takes up the first head on
the first cylinder, or sectors 1 through 62. Slice 1 fills 17,928,477 sectors, so it
ends at sector number 17,928,539 (17,928,477 + 62 = 17,928,539). The disk
has 17,928,540 sectors, but don’t forget the MBR. This disk is full.
One annoying thing is that the MBR only has enough bits in its slice
table to indicate up to 1,024 cylinders per disk. (This limitation created the
504MB limit on hard drives.) This disk has far more cylinders than that!
That means you cannot use the cylinder counts in each individual partition
to measure the disk. The only meaningful number is the number of sectors.
Finally, slices 2, 3, and 4 are unused .
Backing Up the Slice Table
Before changing the slice table on a disk, back up the old slice table. This lets
you restore the disk to its previous configuration, should you make an
error. To back up the slice table, use fdisk(8)’s -p flag:
# fdisk -p /dev/da0 > da0.slice.backup
To restore a disk’s slice table from the backup, use the -f flag and the
name of the backup file:
# fdisk -f da0.slice.backup /dev/da0
If you haven’t touched the hard drive since reslicing it, you might even
get your data back. Most of the time, however, restoring the slice table won’t
restore the data in those slices, merely the disk configuration. You must restore
the data from backup.
Changing the Slice Table
fdisk(8) not only lets you view the table, you can edit it both interactively and
via scripts as well. The simplest way to initialize a new FreeBSD disk is to tell
fdisk(8) to mark it with a single large slice dedicated to FreeBSD. It’s common
enough that fdisk’s -I flag is dedicated to doing exactly that. The -B flag tells
FreeBSD to completely reinitialize the MBR, which is always a good idea when
starting over. Here, we reinitialize the SCSI disk /dev/da17 to have a single
FreeBSD partition:
# fdisk -BI /dev/da17
You could also write your custom slice table in the same format that
fdisk(8) uses to back up the slice table, and write that slice table to the disk
just like restoring a backup. This is generally inadvisable for most users.

534 Chapter 18
If you use a backup file, fdisk(8) assumes that you know what you’re doing—
even when you clearly don’t. fdisk(8) includes an interactive mode that
automatically detects a large number of subtle error conditions and offers
alternatives that won’t mess up your hard drive. I suggest always using inter-
active mode to edit slice tables. The -u flag enters fdisk(8)’s interactive mode.
Remember, we covered using sysinstall in Chapter 8 to reslice, repartition,
and reformat hard drives. Use fdisk(8) if sysinstall won’t work for some reason
or if you want more detailed control over the process.
Let’s use fdisk(8) to split our sample hard drive into two roughly equal
slices. We know that this hard drive has 17,928,477 sectors. This means we
want each slice to be about 8,964,238 sectors.
# fdisk -u /dev/da17
******* Working on device /dev/da17 *******
fdisk prints the drive geometry information, then asks if you want to
change the disk geometry. Changing the geometry is almost always a bad
idea unless you have a thorough, almost intimate understanding of your
particular disk, so leave it alone:
Do you want to change our idea of what BIOS thinks ? [n] n
You’ll then get a printout of the first slice’s configuration and will be
asked if you want to change it:
The data for partition 1 is:
sysid 165 (0xa5),(FreeBSD/NetBSD/386BSD)
start 63, size 17928477 (8754 Meg), flag 80 (active)
beg: cyl 0/ head 1/ sector 1;
end: cyl 1023/ head 254/ sector 63
Do you want to change it? [n] y
DISKS AND MATH
When working with fdisk(8) and disklabel(8), do as much math as possible
beforehand on a piece of scratch paper. If you have to do more math partway
through the process, do that on scratch paper as well. Disk management uses large
numbers, and you should spend your valuable brain power on ensuring you entered
them correctly rather than on manipulating them. While simple addition, subtraction,
and division might seem easy, most disk configuration errors are caused by errors in
third grade math. By writing out all the numbers beforehand, you will save yourself
the embarrassment of learning that you can’t do third-grade math.

Disk Tricks with GEOM 535
Today, slice 1 uses up all of the sectors on the disk. We want to reduce
the number of sectors in slice 1 and assign the remainder to slice 2. Slice 1
begins in sector 63 and uses about 8,964,238 sectors. We just have to tell
fdisk(8) that. Hit ENTER to take the defaults:
Supply a decimal value for "sysid (165=FreeBSD)" [165]
Supply a decimal value for "start" [63]
Supply a decimal value for "size" [17928477] 8964301
fdisk: WARNING: partition does not end on a cylinder boundary
fdisk: WARNING: this may confuse the BIOS or some operating systems
Correct this automatically? [n] y
fdisk: WARNING: adjusting size of partition to 8964207
Explicitly specify beg/end address ? [n]
sysid 165 (0xa5),(FreeBSD/NetBSD/386BSD)
start 63, size 8964207 (4377 Meg), flag 80 (active)
beg: cyl 0/ head 1/ sector 1;
end: cyl 557/ head 254/ sector 63
Are we happy with this entry? [n] y
We let the slice begin right where FreeBSD thinks it should, but change
the number of sectors in the slice . fdisk(8) does a bit of calculation and
points out that this slice doesn’t end evenly on a cylinder . The odds that
your calculated slice size would end on a cylinder boundary are close to
negligible. Slices ending mid-cylinder can be a problem, especially if you have
a multiboot machine. Always let fdisk(8) correct this problem. fdisk(8) shows
the size in sectors of your new slice and displays the new slice entry
before asking you to confirm the change and proceeding to the next slice:
The data for partition 2 is:
<UNUSED>
Do you want to change it? [n] y
Supply a decimal value for "sysid (165=FreeBSD)" [0] 165
Supply a decimal value for "start" [0] 8964270
Supply a decimal value for "size" [0] 8964207
This slice has never been used before, so it has no defaults. We
must enter the slice type, as well as the starting sector. Slice 1 used
8,964,207 sectors, and the MBR used 62, so we’ve used up 8,964,269 sectors
(8,964,207 + 62 = 8,964,269). Our slice can start at sector 8,964,270. The
disk has 17,928,477 sectors in total, leaving us 8,964,207 sectors for this slice
(17,928,477 – 8,964,269 = 8,964,207). Let’s see what fdisk(8) thinks of these
numbers:
fdisk: WARNING: partition does not start on a head boundary
fdisk: WARNING: partition does not end on a cylinder boundary
fdisk: WARNING: this may confuse the BIOS or some operating systems
Correct this automatically? [n] y
fdisk(8) doesn’t think much of these numbers at all, but it knows what
to do. Let fdisk(8) make its corrections.

536 Chapter 18
fdisk: WARNING: adjusting start offset of partition to 8964333
Explicitly specify beg/end address ? [n]
sysid 165 (0xa5),(FreeBSD/NetBSD/386BSD)
start 8964333, size 8964207 (4377 Meg), flag 0
beg: cyl 558/ head 1/ sector 1;
end: cyl 91/ head 254/ sector 63
Are we happy with this entry? [n] y
Again, don’t explicitly specify the beginning or end address. fdisk(8) has
already done the hard work for you, so let it stand.
You’ll then be prompted to change the other two slices, if you desire. You
have no space left on the disk, so you really can’t use those slices right now:
Partition 1 is marked active
Do you want to change the active partition? [n]
Remember, the active partition is the slice with the root filesystem on it.
The boot loader hands control of the booting system to the slice you indicate.
If this is not a boot drive, the active partition is irrelevant.
We haven't changed the partition table yet. This is your last chance.
...
Information from DOS bootblock is:
1: sysid 165 (0xa5),(FreeBSD/NetBSD/386BSD)
start 63, size 8964207 (4377 Meg), flag 80 (active)
beg: cyl 0/ head 1/ sector 1;
end: cyl 557/ head 254/ sector 63
2: sysid 165 (0xa5),(FreeBSD/NetBSD/386BSD)
start 8964333, size 8964207 (4377 Meg), flag 0
beg: cyl 558/ head 1/ sector 1;
end: cyl 91/ head 254/ sector 63
3: <UNUSED>
4: <UNUSED>
Should we write new partition table? [n] y
This really is your last chance to salvage any data on that disk. Review the
slice table and, if the numbers look sensible, enter Y to write your new slice
table to the hard drive.
That’s everything you need to do to get a slice table on a disk. Now let’s
make some partitions in those slices.
Partitioning Slices
The i386-style slice table is not sufficient to meet FreeBSD’s partitioning
needs. A slice table only supports four disk divisions, while FreeBSD needs a
root partition, swap space, /usr, /var, and /tmp. The system administrator might
need his own collection of partitions as well. A disklabel is a special data block
at the beginning of a slice that indicates partitions’ positions within a slice.
Different platforms have different disklabel formats and requirements—i386
and amd64 use bsdlabels, sparc64 uses sunlabels, and so on. On all platforms,

Disk Tricks with GEOM 537
disklabel(8) provides native disklabel management. If you’re working on an
unfamiliar hardware architecture, be absolutely certain to read disklabel(8)
before trying to edit the disk!
Reading Disklabels
To view a slice’s disklabel, run disklabel(8) with the device name of a slice as
an argument. For example, slice 1 on disk ad0 is /dev/ad0s1:
# disklabel /dev/ad0s1
# /dev/ad0s1:
8 partitions:
# size offset fstype [ fsize bsize bps/cpg]
a: 1048576 0 4.2BSD 2048 16384 8
b: 2097152 1048576 swap
c: 39179889 0 unused 0 0 # "raw" part, don't edit
d: 10485760 3145728 4.2BSD 2048 16384 28552
e: 2097152 13631488 4.2BSD 2048 16384 28552
f: 23451249 15728640 4.2BSD 2048 16384 28552
The disklabel shows that the disk supports up to eight partitions ,
although only six are configured. Partitions are named by letters a through h.
While the disk supports “up to eight” partitions, that doesn’t mean that
you’ll actually get eight usable partitions from your new disk. Partition a
is traditionally the root partition. While you could use this for normal data,
I prefer not to risk confusing myself. The b partition is traditionally swap
space. While FreeBSD only swaps on partitions labeled as swap in /etc/fstab,
you can bet having a b partition used for data would confuse me when I’m
troubleshooting at 3 AM. Finally, the c partition is the label for the whole
slice. While FreeBSD no longer needs the c partition, that doesn’t mean that
all of the add-on tools I might use would understand a c partition with data
on it! It’s been around so long that I would not dream of using it for data.
This means that you can have up to six data partitions on your root disk (d to
h, plus possibly a).
Each partition has a size in sectors and an offset from the beginning
of the slice. The offset is how far into the slice the partition begins, in sectors.
Remember, sector counts start at 0. Partition c covers the entire disk, with a
size of 39,179,889 sectors and an offset of 0. In this example, partition a has
a size of 1,048,576 and an offset of 0. The root partition is the first on the slice.
Partition b begins 1,048,576 sectors into the slice, or right after the end of
slice a, and has a size of 2,097,152. If partition a takes up 1,048,576 sectors,
and partition b takes up 2,097,152 sectors, then the next partition must begin
at sector 3,145,728 (1,048,576 + 2,097,152 = 3,145,728). Check out the offset
for partition d. This is all just basic addition.
Each partition needs a filesystem type . The only types of filesystems
normally used within a FreeBSD disklabel are 4.2BSD (any FreeBSD filesystem
such as UFS or UFS2), swap (for swap space), or unused (for the c partition or
empty space). FreeBSD supports other filesystem types, but it’s very rare to

538 Chapter 18
plop a FAT or a CD filesystem in the middle of your FreeBSD hard disk, and
odds are you’ll never see a disk with a Sixth Edition Unix partition in the
middle of it.
The next two columns give the size of fragments and blocks for UFS
and UFS2 filesystems. FreeBSD defaults to using 16KB blocks and 2KB frag-
ments. We talked about UFS2 design back in Chapter 8. The defaults are a
good average on most modern systems. If you have a special-purpose filesystem
that will only hold files of an unusual size, you might want to change the
block size. For example, if your application uses millions of files that are only
6KB each, it makes sense to change the block size to 8KB. The minimum size
is 4KB. If your application will use only a few files, but they’re monstrously
huge, you might want to use 32KB or even 64KB blocks. One word of warning,
however: FreeBSD expects the fragment size to be exactly one-eighth of the
block size. Using another ratio for block:fragment size reduces performance.
The final column gives the number of cylinders in a cylinder group in
this filesystem. Always, always let FreeBSD calculate this. Given the number of
lies—er, sorry, I mean “translations”—that hard drives and operating systems
perform on hard disk geometry, and the fact that you can’t do anything useful
by changing cylinder group information, leave it alone.
Now that you understand disklabels, let’s make our own.
Backing Up and Restoring Disklabels
Before doing anything, back up the current disklabel to a file:
# disklabel /dev/da0s1 > da0s1.label.backup
With this file, you can restore the disklabel to its previous state with
disklabel’s -R flag:
# disklabel -R /dev/da0s1 da0s1.label.backup
Abracadabra! Your old disklabel has been restored!
Editing Disklabels
To create or rearrange partitions on a slice, change the disklabel. Changing
the disklabel destroys the partitions on the disk. This means that any data on
that disk is lost. (It really isn’t “destroyed until you write new data on the
drive”; it’s just lost.) I recommend editing the disklabels only on new disks
without any data, or on disks with excellent backups. You cannot edit the
disklabel on slices with mounted partitions.
For example, here’s the disklabel on one of my test disks:
# disklabel /dev/da0s1
# /dev/da0s1:
8 partitions:
# size offset fstype [fsize bsize bps/cpg]
c: 17767827 0 unused 0 0 # "raw" part, don't edit
d: 17767827 0 4.2BSD 2048 16384 28552

Disk Tricks with GEOM 539
Decide how you want to partition this disk. According to fdisk(8), this
slice has 8,675MB of free space. I want 1GB of swap space, two 2GB partitions,
and a fourth partition with all the remaining space (3.5GB, more or less). All
of these partitions use the standard block size and fragment size. Now, edit
the disklabel using the -e flag, and you’ll get a copy of the disklabel in a text
editor. To create the four desired partitions, I edit the label to look like this:
# /dev/da0s1:
8 partitions:
# size offset fstype [fsize bsize bps/cpg]
b: 1G * swap
c: 17767827 0 unused 0 0 # "raw" part, don't edit
d: 2G * 4.2BSD 2048 16384 28552
e: 2G * 4.2BSD
f: * * 4.2BSD
Where are all the sector and offset counts? disklabel(8) recognizes the
abbreviations K (kilobytes), M (megabytes), and G (gigabytes), and can do the
multiplication necessary to get a proper number of sectors in a partition of
that size. We just have to specify the size of each partition in the desired units.
Note the size of partition f, however. Here, the asterisk (*) tells disklabel to use
all of the remaining space. You can also use percentages in a disklabel to say,
for example, “Give this partition 50 percent of the remaining free space.”
disklabel(8) can also calculate the proper offset for each partition. The
asterisk (*) tells disklabel(8) to calculate the offset for you.2
Finally, note the fragment and block sizes. The fragment and block sizes of
partition d are explicitly stated, but only because the original label had a parti-
tion d that listed these values and I didn’t bother to erase them. disklabel(8)
assumes the default unless you specifically tell it otherwise.
Save your work and exit the text editor, then look at your new disklabel:
# size offset fstype [fsize bsize bps/cpg]
b: 2097152 16 swap
c: 17767827 0 unused 0 0 # "raw" part, don't edit
d: 4194304 2097168 4.2BSD 2048 16384 28552
e: 4194304 6291472 4.2BSD 0 0 0
f: 7282051 10485776 4.2BSD 0 0 0
You can see that the sectors and offsets have been calculated, but what
about the block and fragment sizes on partitions e and f? When you create
filesystems on these partitions, newfs(8) will fill these in with the default values.
Replicating Drive Slicing and Partitioning
So, you can both back up and restore slice tables and disklabels from files.
Shouldn’t you be able to use these to duplicate slicing and partitioning on
identical disks? Why yes, you can! First, confirm that your disks are truly
2 Remember, BSD grew features because the program authors needed them. Apparently the
authors of disklabel(8) knew that they couldn’t do third grade math either, so don’t feel bad.

540 Chapter 18
identical. Not all 80 gig disks have the same number of sectors. If your disks
are slightly different, you can replicate the smallest disk on all of the other
disks.
First, edit your first disk’s slice and partition tables exactly the way you
want all of your disks to be subdivided. Back up that disk’s disklabels and slice
table to files, then “restore” those configurations to the other disks. For
example, here the disk /dev/da0 has a single slice. We copy the slice table of
that disk and the disklabel of that slice, and restore them to the drive /dev/da2:
# fdisk -p /dev/da0 > da0.slice.table
# disklabel /dev/da0s1 > da0s1.disklabel
# fdisk -f da0.slice.table /dev/da2
# disklabel -R /dev/da2s1 da0s1.disklabel
Use fdisk(8) and disklabel(8) to verify the new configuration of the disk
/dev/da2. You can use this to mass-produce identically partitioned disks when
you want to, say, use GEOM classes to build a storage array.
Missing Disklabels
Occasionally you might come across a slice with no disklabel at all. I find
this most commonly on test disks, when I have been repartitioning and
reslicing the disk to test some goofball idea. If a slice has no disklabel,
create one with -w:
# disklabel -w /dev/da0
You new disklabel now has a single a partition covering the entire slice.
Editing this to fit your needs is much easier than writing a disklabel from
scratch.
Building Filesystems
Now that you have slices and partitions, you’re almost ready to use the disk. All
that remains is creating a filesystem. Use newfs(8) to create a UFS filesystem on
a newly allocated partition. Use the -U flag to enable soft updates. We’ll talk
about some other newfs(8) options as we proceed through this chapter, but
for the moment we just want to create standard UFS2 filesystems:
# newfs -U /dev/da2s1d
/dev/da2s1d: 2048.0MB (4194304 sectors) block size 16384, fragment size 2048
using 12 cylinder groups of 183.77MB, 11761 blks, 23552 inodes.
with soft updates
super-block backups (for fsck -b #) at:
160, 376512, 752864, 1129216, 1505568, 1881920, 2258272, 2634624, 3010976,
3387328, 3763680, 4140032
Disk Tricks with GEOM 541
newfs(8) starts by printing out basic information about the new filesystem,
such as its size, the number of sectors and blocks, and the size of blocks and
fragments. You’ll then see the number of inodes. newfs(8) prints out the
location of each superblock as it proceeds, just so you know it’s doing some-
thing. (This used to be much more important when computers were much
slower than they are today; newfs(8) could take minutes to run on a large
filesystem, and it was nice to see that it was working and didn’t just lock up.)
You can specify the block and fragment sizes with the -b and -f flags,
respectively. If you do not specify the block and fragment sizes on the
command line, newfs(8) checks the disklabel for this information. If you do
not specify these, newfs(8) uses the defaults. I prefer to specify these in the
disklabel, simply because that gives me a better opportunity to double-check
my work. In any case, newfs(8) updates the disklabel with the block and
fragment sizes for later reference.
Now that you can slice, partition, and format disks at will, let’s look at
some more advanced topics in disk management. One such topic is RAID.
RAID
One of the big requirements in any serious data storage system is RAID, or a
Redundant Array of Independent Disks. The I in the definition once meant
Inexpensive, but that’s relative. A one-petabyte RAID array costs far less than a
single one-petabyte disk, but it is still rather expensive. A RAID system splits
data between the drives to improve performance or reliability. RAID can
work in either hardware or software.
Hardware vs. Software RAID
FreeBSD supports both hardware and software RAID. Hardware RAID is man-
aged by the SCSI controller, and host adapters that provide RAID are called
RAID controllers. When you run RAID in hardware, the controller handles all
the computations of how to arrange data on the hard drives. Most hardware
RAID systems are very stable, and a hardware controller is usually the most
efficient way to handle RAID.
One problem with hardware RAID is that different controllers store data
on the disks in different formats. If your RAID controller goes bad, you cannot
replace it with a RAID controller of a different brand; it probably won’t
recognize the data on your disks. If you store critical data on a hardware RAID
array, you must have either a support agreement that provides you with an
identical controller in case of failure, a spare controller of the same make
and model, or excellent backups.
Software RAID is managed by the operating system, and the OS figures
out how to arrange the data on the disks. Compared to hardware RAID, this
method slightly increases system load but uses less expensive equipment. You
also don’t run the risk of losing your data when you cannot find a replacement
RAID controller of the exact same type.
542 Chapter 18
Using hardware RAID is typically much simpler than software because all
you have to do is follow the manual. RAID controllers usually have a simple
menu-driven BIOS that lets you set virtual disk sizes, restore damaged disks,
and configure your virtual disks. Software RAID, on the other hand, demands
that the system administrator actually knows what he’s doing. If you want to
know about hardware RAID, read your RAID controller’s manual—we’re
discussing software RAID. Many of the types of RAID supported by FreeBSD
also appear in hardware.
Many RAID manufacturers provide software tools to manage their
controllers from the operating system. You can manage and configure
amr(4) arrays with megarc (/usr/ports/sysutils/megarc), mfi(4) arrays with
MegaCli (/usr/ports/sysutils/linux-megacli), and aac(4) arrays with aaccli
(/usr/ports/sysutils/aaccli). 3Ware provides management software for twe(4)
and twa(4) controllers, and Areca provides a management program for
arcmsr(4) controllers.
GEOM RAID and Disk Size
For any RAID system, all of your hard drives must be the same size—or, at
least, you must use the same amount of space on each hard drive. If you have
a set of 10 500GB drives in a RAID array, but one of the drives fails and you
must replace it with a 700GB drive, you can only use 500GB of that drive. You
cannot use the remaining 200GB on that oversized drive without hampering
the performance of the entire array.
We’re going to assume that the disks or slices you use for software RAID
are all the same size. If you have several drives, check fdisk(8) for each to
confirm they are all the same size. If some of the drives are of slightly different
size, even by just a couple hundred sectors, GEOM uses the smallest drive size
as a limit.
Technically, you don’t have to have a slice table on data storage volumes.
You can run a mirror or a stripe on top of the raw disk—it’s all the same to
GEOM. Our examples do not use slice tables on the disks.
Parity and Stripe Size
Many RAID types use parity for error detection. Parity is just a very, very simple
checksum to ensure that data is copied correctly. A RAID system uses parity
for error detection, so that it can determine the proper state of a section of
disk. This gives the disk array the ability to provide redundancy. RAID systems
that use parity generally need to dedicate some disk space to parity, but most
of these systems configure a parity area transparently.
Similarly, RAID levels that distribute data amongst multiple drives can
use different stripe sizes. The stripe size is the size of the chunk of file written
on a single drive. For example, if you have a 512KB file and a stripe size of
128KB, this file is written in four stripes scattered amongst your disks. You’ll
see papers and references claiming that such-and-such stripe size is better for
this or that reason. These arguments might even be true—for particular
Disk Tricks with GEOM 543
workloads. If you really want to experiment with stripe sizes, do so with your
own real operations on your own hardware. You might get a performance
boost, but chances are it won’t be very much. In our examples, we’ll default
to using 128KB stripes unless specified otherwise. 128KB is a nice middle-of-
the-road value that works well for most workloads.
RAID Types
RAID comes in several varieties. Most hardware supports RAID-0, RAID-1,
and RAID-5. There are other types, however. FreeBSD notably supports
RAID-3, which is useful for certain applications. You’ll also see RAID 0+1
and RAID 10, with occasional appearances from RAID 50 and RAID 6.
RAID-0, or striping, is not really redundant and technically isn’t RAID at
all. It requires at least two disks, and data is shared between the disks in a way
that increases throughput and disk size. You can use RAID-0 to combine
several 500GB hard drives into a multiterabyte virtual disk, but a hard drive
failure on any one drive destroys all of the data on all drives. You must restore
from backup to access any data on that drive. RAID-0 is useful if you need a
single really big filesystem, but it provides no reliability benefits and is actually
more vulnerable than a single disk. The size of the RAID-0 array is the size of
all the hard drives combined.
RAID-1, or mirroring, is where the content of one disk is duplicated on
another. This is a great way to achieve low-cost reliability. I use mirroring
on all of my servers. Mirroring can give even a cheap desktop-chassis server
some measure of data protection. The size of the RAID-1 array is the size of
the smallest hard drive in the array.
In RAID-3, or striping with a dedicated parity disk, a spare hard drive is used
to maintain parity and integrity data for the data striped across the remaining
hard drives. This means that a failure in any one hard drive won’t cause loss
of data. You must have an odd number of disks—at least three—to use RAID-3.
For certain applications, the dedicated parity drive provides higher through-
put. RAID-3 can only satisfy one I/O request at a time, however. If you’re
loading large files one at a time, you might consider RAID-3. The size of the
RAID-3 array is the size of all but one of your hard drives combined.
RAID-5, or striping with parity shared across all drives, is the current industry
standard for redundancy. Much like RAID-3, it uses parity to provide data
redundancy; loss of a single drive doesn’t destroy any data. Unlike RAID-3, the
parity space is divided amongst all of the drives. Throughput is unexceptional,
but a RAID-5 array can serve multiple I/O requests simultaneously. The size of
your RAID-5 array is the combined size of all but one of your hard drives.
Unfortunately, FreeBSD 7 does not have a stable software implementation
of RAID-5. You’ll find references to gvinum(8), a GEOM-based port of the
Vinum volume manager that supports RAID-5, but this software is not yet
fully reliable. Other implementations are in development, but not available
at this time.

544 Chapter 18
RAID 0+1 is a mirror of striped disks. You require disks in multiples of 2,
with a minimum of 4. Set up an array of disks in RAID 0, so that you have a
single large disk area. Then, mirror the entire array onto an identical set
of hard drives. The size of the RAID 0+1 array is the total size of half of your
hard drives, much like RAID-1. RAID 0+1 is not as fault-tolerant as RAID 10,
so it is rarely used. We will not discuss it.
RAID-10 is a stripe of mirrored disks. You need disks in multiples of 2, with a
minimum of 4, and (for full redundancy) two separate disk controllers. Disks
are paired into mirrors, and data is then striped across the mirrors. As the
system does not have to calculate parity, this is the fastest-performing high-
availability disk system you can find. The size of the array is the total of half
of your hard drives.
GEOM can provide all of these RAID types, and more, in software.
Generic GEOM Commands
Most GEOM-related commands (such as gstripe(8), graid3(8), and friends)
support a set of common subcommands to assess and control various GEOM
operations. While you can use these commands through geom(8), I find it
less confusing to use the command for a specific module such as gstripe(8).
For example, the status subcommand shows the condition of a particular
GEOM subsystem. I can ask GEOM about the status of all of my RAID-3
devices by running geom raid3 status. I find it easier to use graid3(8) and
type graid3 status. We’ll use the latter form throughout the examples in this
chapter. Almost every GEOM module has the four commands load, unload,
list, and status.
The load command activates the kernel module for that class. For
example, gstripe load loads the geom_stripe.ko module into the kernel.
Similarly, the unload command removes that module from the kernel.
The status command prints the condition of the devices of that type. For
example, here we see the condition of the GEOM-mirrored disk set on my
mail server:3
# gmirror status
Name Status Components
mirror/gm0 COMPLETE ad1
ad2
The format of this output varies between GEOM modules, as appropriate
for the device.
Finally, the list command lists all the module’s consumers, or the devices
underlying the module. The list command is frequently a synonym for “other
interesting stuff about this module that doesn’t quite fit in the other three
3 “What, after all this griping about using SCSI disks in servers you’re using IDE?” Yes, but it’s my
personal mail server. I get more email than I want, so having my hard disks catch on fire really
wouldn’t upset me. I doubt your boss would say the same thing.

Disk Tricks with GEOM 545
commands,” such as debugging output. For example, here’s a snippet of
the list output from a graid3 device:
# graid3 list
Geom name: MyRaid3
State: COMPLETE
Components: 3
Flags: ROUND-ROBIN
GenID: 0
...
Providers:
1. Name: raid3/MyRaid3
Mediasize: 18210036736 (17G)
Sectorsize: 1024
Mode: r1w1e1
Consumers:
1. Name: da0
...
This particular server has a graid3 device called MyRaid3 . We see some
generic information applicable to most GEOM-based devices: The device is
complete (meaning that all the disks in the device are present, working, and
up to date) and has three consumers. We then get into graid3-specific debug-
ging information .
Under the Providers heading , we see the list of devices provided by this
GEOM class. This server offers a RAID-3 device under/dev/raid3/MyRaid3 .
We can see the size of the device, block size, and other useful disk information.
We also have the Consumers section , which lists all of the underlying
disks in the GEOM device. Here you’ll find information not only about
the disks themselves, but also about the interaction of those disks with the
GEOM module.
These commands constitute the interface of the various GEOM modules
providing software-based disk virtualization.
Striping Disks
FreeBSD uses gstripe(8) to configure and manage disk striping. This lets you
create a single virtual disk out of two or more smaller disks. Striping has the
advantage of sharing transactions between the hard drives, theoretically
multiplying throughput by the number of drives in the array. (Reality rarely
mimics theory, of course!)
For this example, I’m using three hard drives, /dev/da0, /dev/da1, and
/dev/da2. Each has a single slice, with only one partition (d) on that slice. While
you can use a manual method to configure the striped drive each time you
need it, I assume that you want the striped drive to be automatically available
at boot.
First, load the geom_stripe kernel module with gstripe load. You can also
specify geom_stripe_load="YES" in /boot/loader.conf to load striping at boot.

546 Chapter 18
Creating a Striped Provider
Now tell the drives that they’re in a striped provider. Below, we create a stripe
named MyStripe. This stripe includes the three drives. Use the -s flag to give
the stripe size of 131,072 bytes, or 128KB. The -v flag tells gstripe(8) to be
more verbose:
# gstripe label -v -s 131072 MyStripe /dev/da0 /dev/da1 /dev/da2
Metadata value stored on /dev/da0.
Metadata value stored on /dev/da1.
warning: /dev/da2: only 9105018368 bytes from 9186602496 bytes used.
Metadata value stored on /dev/da2.
Done.
Here we see that gstripe(8) stores information about the striped provider
on the disks. The man page tells us that stripe information is stored in the
last sector of the disk. We can also see that the disk /dev/da2 is slightly larger
than the others, but gstripe(8) is smart enough to not use the excess space
on that disk.
Now that you’ve created your striped provider, look in /dev/stripe:
# ls /dev/stripe/
MyStripe
We have the disk device /dev/stripe/MyStripe. This virtual disk doesn’t
require a disklabel or a slice table, although you can use them if you like.
Mind you, aggregating several disks into a single large partition only to divide
them up again might seem odd. You just need a filesystem and a mount point
for the new drive. Don’t forget newfs(8)’s -U for soft updates.
# newfs -U /dev/stripe/MyStripe
/dev/stripe/MyStripe: 26042.8MB (53335720 sectors) block size 16384, fragment size 2048
using 142 cylinder groups of 183.77MB, 11761 blks, 23552 inodes.
with soft updates
super-block backups (for fsck -b #) at:
160, 376512, 752864, 1129216, 1505568, 1881920, 2258272, 2634624, 3010976, 3387328,
...
Take a close look at the output of newfs(8) above. Somehow, newfs(8)
found cylinder groups in this virtual disk. fdisk(8) reports finding cylinders,
heads, and sectors. This should really drive home that cylinder, head, and
sector information doesn’t mean much; sectors are the only thing that matters.
Now you can mount and use your striped disk, listing devices under
/dev/stripe in /etc/fstab just as you would any other disk device.
gstripe Destruction
If you want to stop striping (say, because you want to upgrade to something
with redundancy), be sure to tell your disks that they’re no longer part of a
stripe. Unmount the striped device and run gstripe clear /dev/da0 /dev/da1
/dev/da2 to erase the stripe configuration from the disks. You can then
unload the kernel module.

Disk Tricks with GEOM 547
Daily Status Check
If you’d like FreeBSD to perform a status check on your gstripe(8) devices
every day and include the results in your daily periodic(8) message, just add
daily_status_gstripe_enable="YES" to /etc/periodic.conf.
Mirroring Disks
FreeBSD configures and manages mirrored disks with gmirror(8). While
mirrors are traditionally pairs of disks, you can have a mirror with any number
of disks. Mirrored disks are one of the simplest forms of fault tolerance; if a
single drive fails, the data remains on the mirror. When choosing drives to
mirror, it’s best to make them physically separate: on different controllers,
different cables, even different servers if possible. For this example, I’m using
two SCSI hard drives, /dev/da0 and /dev/da1.
Mirroring a disk writes metadata at the very end of each partition, over-
writing any data already there. I recommend only mirroring drives and
partitions that are newly created, as any data on these partitions tends to be
written at the front end of the partition. Older partitions frequently have
files scattered throughout the entire space.
Load the geom_mirror kernel module, or run gmirror load. To load
mirroring support at boot, add geom_mirror_load="YES" to /boot/loader.conf.
Creating a Mirror
gmirror(8) works much like gstripe(8): Identify the disks that you want to
mirror and use gmirror(8) to label the disks as participants. Unlike gstripe(8),
however, you usually create a mirror of a disk that already has data on it.
In this example, I’m already using disk /dev/da7 for /usr/ports. (Technically,
I’m using /dev/da7s1d as the partition, but that’s the only partition on the
disk.) You can only configure mirroring on unmounted disks, so I have to
unmount this partition before attempting the mirror. Labeling the disk as
part of a mirror is very fast, however.
# umount /usr/ports/
# gmirror label -v MyMirror /dev/da7
Metadata value stored on /dev/da7.
Done.
# mount /dev/da7s1d /usr/ports/
mount: /dev/da7s1d : No such file or directory
Ack! What happened to our partition? Don’t panic. Your disk is now part
of a mirrored device called MyMirror in /dev/mirror :
# ls /dev/mirror/
MyMirror MyMirrors1 MyMirrors1c MyMirrors1d
# mount /dev/mirror/MyMirrors1d /usr/ports/
A check of /usr/ports shows that your data is once again available.

548 Chapter 18
View the status of disks in your mirror with gmirror’s status command:
# gmirror status
Name Status Components
mirror/MyMirror COMPLETE da7
All of the disks in your mirror are completely up to date. As there’s only
one disk, that’s what you would expect! Add disks to the mirror set with the
insert command. You must provide two arguments, the name of the mirror
and the drive you want to use:
# gmirror insert MyMirror /dev/da2
Once you have added the disk, check the mirror’s status:
# gmirror status
Name Status Components
mirror/MyMirror DEGRADED da7
da2 (11%)
The mirror set is not fully up to date yet—it takes a few minutes to copy
data from the “good” disk to the new mirroring disk. Depending on the disk
size and the speed of your disk system, this might take from a few minutes to
several hours. You can always check mirror status to see how your update is
progressing.
Repairing Mirrors
The main purpose of a mirror is redundancy; when one hard drive dies, you
want to be able to recover data and/or maintain operations. Your hardware
dictates your ability to continue operations and/or recover. If you have a
system with hot-swappable SCSI or SATA drives, you can repair mirrors on
the fly, but if you’re using an ATA system you’ll probably have to shut down
to replace the bad hard drive.
First, remove the broken drive from the mirror set with gstripe(8)’s
forget command. Despite the scary-sounding name, this instructs gmirror(8)
to remove all drives that are not currently available from the mirror config-
uration. The forget command does not erase the whole mirror! Then just
use the same insert command you used to add a drive to the configuration
in the first place:
# gmirror forget MyMirror
# gmirror insert MyMirror /dev/da8

Disk Tricks with GEOM 549
Mirrored Boot Disks
Mirroring your boot disk isn’t as hard as you might think. While it’s even
possible to mirror your drives during installation using the emergency shell,
we’ll take a slightly easier route and do it after installation.
First, make sure that your /boot/loader.conf loads the geom_mirror kernel
module. Without this, FreeBSD won’t be able to find the boot disk; it’ll be on
a disk device that the kernel cannot recognize. I suggest rebooting once just
to be absolutely certain that geom_mirror loads at boot.
Your next problem is helping FreeBSD find the boot drive. In a default
FreeBSD install, your root partition is on a disk device such as /dev/ad0s1a.
When you have your root drive on a mirrored disk, however, your root parti-
tion will be on a device like /dev/mirror/MyBootDrives1a. Your other partitions
and slices will be on similar devices. You must have the correct devices in
/etc/fstab for FreeBSD to boot correctly. People suggest all sorts of tricks to
change /etc/fstab in single-user mode, without even vi(1) available. You can
use sed(1) or ed(1), or you can mount /usr to get vi(1). But why not make
the change in multi-user mode, saved in a separate file?
Copy /etc/fstab to /etc/fstab-mirror. Edit that file to give the new device
names for your partitions. For example, suppose you intend to create a drive
RootMirror0 for your boot drive. Here’s a small /etc/fstab:
/dev/ad0s1a / ufs rw 1 1
/dev/ad0s1e /usr ufs rw 2 2
/dev/ad0s1d /var ufs rw 2 2
Once you have your mirror created, FreeBSD will expect an /etc/fstab like
this instead:
/dev/mirror/RootMirror0s1a / ufs rw 1 1
/dev/mirror/RootMirror0s1e /usr ufs rw 2 2
/dev/mirror/RootMirror0s1d /var ufs rw 2 2
As you know what the necessary /etc/fstab looks like, create it ahead of
time while you have your friendly text editor handy. Triple-check your work,
however; it’s much easier to make certain your filesystem table is correct than
muck around with the boot loader or the fixit CD!
Now reboot into single-user mode. In single-user mode, FreeBSD mounts
only the root partition in read-only mode. While you can’t normally configure
any GEOM module on a mounted disk, setting the sysctl kern.geom.debugflags
to 16 lets you do exactly that. This won’t help you if you want to get your root
partition on almost any other sort of RAID, but in the case of mirrored disks
it works nicely. In single-user mode, put your new /etc/fstab in place, enable
GEOM debugging, and then create your root mirror:
# cp /etc/fstab /etc/fstab-nomirror
# cp /etc/fstab-mirror /etc/fstab
# sysctl kern.geom.debugflags=16
# gmirror label -v RootMirror0 /dev/ad0

550 Chapter 18
After you reboot, FreeBSD should find your root partition on the new
mirrored GEOM disk. Your mirror has only one disk in it, mind you, which
makes it a pretty wimpy mirror. Once you’re in multi-user mode again,
however, just run the appropriate insert command to add the backup disk:
# gmirror insert RootMirror0 /dev/ad6
Congratulations! You have boot disk redundancy.4 If you lose your main
hard drive, you’ll need to tell the BIOS to boot the other hard drive—but
that’s fairly minor compared to losing all your data.
Destroying Mirrored Disks
If you no longer want to mirror your disks, use the gmirror stop command on
the mirror name. You can then run gmirror clear to erase gmirror’s metadata
from the disks previously involved in the mirror:
# gmirror stop MyMirror
# gmirror clear /dev/da7 /dev/da2
This frees these disks for use in other GEOM modules.
Daily Status Check
FreeBSD can include a status check of your mirrored disks in its daily
periodic(8) run. Just add the line daily_status_gmirror_enable="YES" to
/etc/periodic.conf.
RAID-3
While RAID-3 doesn’t have a great deal of mindshare in the IT community, it
is very fast in applications such as CAD systems, which tend to work with
single large files. To use RAID-3, you need at least 3 disks, or an odd number
4 One question people ask is, “Why call this drive RootMirror0 and not just RootMirror?” When
you stick the slice name on the end of the device name, it comes out as RootMirrors1, and that
confuses me more than RootMirror0s1. Name the devices anything you like, so long as you don’t
confuse yourself or your co-workers.
MULTI-WAY MIRRORS
While mirrors are traditionally two disks, using three-way mirrors can dramatically
decrease the time necessary for database backups without affecting redundancy. Put
your database data on a three-way mirror. When you want to run a cold backup,
shut down the database, remove a hard drive from the mirror, and start the database
again. Back up the hard drive removed from the mirror at your leisure; when the
backup is done, throw the third drive back into the mirror and let it recover normally.

Disk Tricks with GEOM 551
of disks above 3, such as 5, 7, 9, 11, and so on. Manage RAID-3 arrays with
graid3(8). As with the other RAID schemes, it’s best to make these disks as
physically separate as possible.
First, load the RAID-3 kernel module with graid3 load. You can also use
kldload(8) or put geom_raid3_load="YES" into /boot/loader.conf.
Creating a RAID-3
You should start to recognize a trend here: Identify the disks you want to
include in the RAID-3 and use graid3(8) to label these disks as participants.
Unlike gmirror(8), creating a RAID-3 destroys any data on these disks. In this
example, I’ll use /dev/da0, /dev/da1, and /dev/da2 to create a RAID-3 device
called MyRaid3. The last disk device you specify will be your parity device.
# graid3 label -v -r MyRaid3 /dev/da0 /dev/da1 /dev/da2
Metadata value stored on /dev/da0.
Metadata value stored on /dev/da1.
warning: /dev/da2: only 9105018368 bytes from 9186602496 bytes used.
Metadata value stored on /dev/da2.
Done.
This looks much like creating a mirror or stripe, with the exception of
the -r flag. Using -r with labeling makes graid3(8) use the parity disk when
reading, which accelerates random I/O requests but slows down sequential
I/O. As most disk activity is random, I’ve chosen to use it.
The disk devices are in /dev/raid3. Create a filesystem with newfs -U /dev
/raid3/MyRaid3, mount it as you like, and start loading it with data!
Repairing a RAID-3
RAID-3 offers a certain level of redundancy and fault tolerance. For example,
if one of our drives fails, you will see it in the status report:
# graid3 status
Name Status Components
raid3/MyRaid3 DEGRADED da2
da0
That doesn’t look good. What happened to /dev/da1? We’ll figure that
out later,5 but for now the important thing is to restore service. I have several
warm spares in the SCSI array, so let’s put one in place to restore our
redundancy.
5 An investigation would show that someone ripped the drive out of the array to generate a
failure so he’d have something to write about. Fortunately, my boss doesn’t read my books.

552 Chapter 18
First, let’s remove any reference to the old drive from our RAID-3. List
the devices and get the number of each drive:
# graid3 list
...
1. Name: da2
Mediasize: 9186603008 (8.6G)
...
Number: 2
Type: PARITY
2. Name: da0
Mediasize: 9105018880 (8.5G)
...
Number: 0
Type: DATA
...
We’re looking for the type and number of each disk that’s left in the
RAID-3. Disk /dev/da2 is disk number 2 in the array; it is the parity disk.
Disk /dev/da0 is disk number 0 and contains data . So, we’ve lost one of
the data disks, but it’s backed up courtesy of the parity disk. Had we lost the
parity disk, our RAID-3 would be working roughly as a striped disk until we
replaced the parity disk.
We have disks 0 and 2 of our three disks, so the disk that failed was
number 1. Start by removing drive number 1 from the RAID-3 device,
making room for a replacement device. (Remember, a RAID-3 device can
only have an odd number of members, so you can’t just add another drive.)
Then add in a new drive number 1, device /dev/da3:
# graid3 remove -n 1 MyRaid3
# graid3 insert -n 1 MyRaid3 da3
graid3: warning: da3: only 9105018368 bytes from 9186602496 bytes used.
Well, that seemed painless, although we wasted a little bit of disk space
because our new disk was larger than the old one. But did it work? Check the
status.
# graid3 status
Name Status Components
raid3/MyRaid3 DEGRADED da2
da0
da3 (1%)
It certainly seemed to work. Wait a little to see if the array rebuilds
successfully.

Disk Tricks with GEOM 553
Destroying a RAID-3
If you no longer want to use the RAID-3 device, unmount the partition and
use the graid3 stop command on the mirror. You can then erase graid3’s
metadata from the disks involved:
# graid3 stop MyRaid3
# graid3 clear /dev/da3 /dev/da2 /dev/da0
You can then use these disks elsewhere—say, in a RAID-10.
RAID-10
The stripe of mirrored disks, or RAID-10, is perhaps the fastest way to get
large amounts of high-performance storage. Disks are grouped into mirrors,
and then data is striped across the pairs. There is no parity disk; instead,
mirroring provides redundancy, and striping provides performance. While it
uses a whole lot of disks, RAID-10 is the only real choice for high-throughput
performance.
Technically, RAID-10 is a nested RAID. It’s a RAID 0 running on top of
RAID 1. Start by creating your mirrors (RAID 1) and then stripe (RAID 0)
the data across those mirrors. GEOM lets you build layers like this easily.
RAID-10 is normally used in high-performance, high-availability environ-
ments. It’s too expensive to use for customer web pages when a regular
mirror would suffice, but, oddly, the finance department seems willing to
spend that kind of money when their own data is at risk. It is very important
for the mirrored disks, if at all possible, to be on different controllers and in
different SCSI shelves in different racks.
RAID-10 Setup
Write down your disk arrangement before you begin, so you don’t get
confused. We’ll use four hard drives: /dev/da0, /dev/da2, /dev/da3, and
/dev/da4.6 Drives da0 and da2 are paired as mirror1, da3 and da4 make up
our mirror2. If possible, da0 and da3 should not be on the same SCSI con-
troller as da2 and da4.
Configure your mirrors with the gmirror(8) command:
# gmirror label -v mirror0 /dev/da0 /dev/da2
# gmirror label -v mirror1 /dev/da3 /dev/da4
Check gmirror status to verify that all the mirrors were created as specified
and that each mirror is complete.
6 Not only did I unceremoniously rip /dev/da1 out of the SCSI cage, but I’m far, far too lazy to
get out of my chair to plug it in back in.

554 Chapter 18
Now create a gstripe(8) volume that includes both mirror devices. We’ll
use the standard stripe size and call the device raid10:
# gstripe label -v -s 131072 raid10 /dev/mirror/mirror0 /dev/mirror/mirror1
Metadata value stored on /dev/mirror/mirror0.
warning: /dev/mirror/mirror1: only 9105017856 bytes from 9186601984 bytes
used.
Metadata value stored on /dev/mirror/mirror1.
Done.
You’re done.
No, really. That’s everything. There’s a raid10 device in /dev/stripe. Run
newfs -U /dev/stripe/raid10 to put a filesystem on the device, mount it, and
you’re ready to go!
RAID-10 Status
To verify the condition of a RAID-10 array, you must check the status of both
the mirrors and the stripe device:
# gmirror status
Name Status Components
mirror/mirror0 COMPLETE da0
da2
mirror/mirror1 COMPLETE da3
da4
# gstripe status
Name Status Components
stripe/raid10 UP mirror/mirror0
mirror/mirror1
The important things you learn here is that the mirrors are working. If
one of the mirrors is degraded, replace the drive and rebuild the mirror. The
stripe device needs no maintenance; as with a regular gstripe(8) partition,
entirely losing one of the mirrors would destroy data. Remember to separate
your mirrored disks as widely as possible.
Destroying a RAID-10
To stop using the RAID-10, you must destroy the stripe and then destroy the
mirrored disks just as you would for any other RAID-0 and RAID-1 array.
Journaling Filesystems with gjournal(8)
Traditional wisdom says that the best way to ensure filesystem integrity is by
using a journaling filesystem. A journaling filesystem writes all disk changes to
a small file, or journal, before writing them to the actual filesystem. This means
that changes are safely and quickly cached on disk, so that in case of a power
outage there is less chance of data loss. The system then goes back and reads

Disk Tricks with GEOM 555
the journal, writing the changes to the filesystem proper in a leisurely fashion.
On boot, the system checks the journal file for any changes that were not yet
written to disk and makes those changes, ensuring up-to-date data.
For years, FreeBSD relied on soft updates to provide many journaling-like
features without implementing a full journaling filesystem. As disks grew
larger and larger, however, they increasingly challenged soft updates. UFS
and UFS2 are well known as stable and reliable filesystems. Implementing
journaling requires digging around in the guts of UFS2—which, even if done
by a programmer with a rare combination of sunny optimism and rampaging
paranoia, would still risk FreeBSD’s hard-earned reputation.
This remained a tough nut to crack until the introduction of GEOM’s
stackable filesystem modules. If adding journaling to UFS2 is a difficult
problem, why not create a disk layer beneath UFS2 to do the journaling for
us? That’s where gjournal(8) fits in. gjournal(8) only needs minor hooks in
the filesystem layer to teach the filesystem where to write its changes, and
then gjournal actually writes the changes to the disk. This eliminates fsck(8)
at boot after a crashed system.
gjournal(8) is a new feature in FreeBSD 7 and is actually a rather radical
approach to filesystem journaling. While many people use gjournal(8) with
great success, it should still be considered an experimental feature as of this
time. I use it on a multiterabyte filesystem with millions of Netflow files.
Compared to the mature UFS, however, gjournal(8) is an untested child.
While bugs get fixed when found, you might be the lucky one to find a new
bug that puts data at risk. Consider yourself warned.
The journal file uses one gigabyte of disk by default. This makes it
unsuitable for small filesystems. I usually use soft updates on filesystems of
20GB or smaller, and configure journaling on anything larger. Journaling
and soft updates are mutually exclusive; you may use both on the same
server, but not on the same filesystem.
Implementing gjournal(8) on a filesystem destroys any data on that file-
system. (In rare circumstances this can be avoided, but this is a safe assumption
most of the time.) If you want to convert an existing filesystem to use gjournal,
be sure to back it up first and be prepared to restore it from backup. Given the
size of modern disks, I find it fairly simple to back up the 400MB or so of an
OTHER NESTED RAID TYPES
You’ve probably already thought, “Hey, I could make a RAID-13 by putting a RAID-3
on top of mirrored disks!” Yes, GEOM supports that. You can invent your own RAID
levels. You could build a RAID-33 out of three RAID-3 devices, a RAID-130 by striping
across two RAID-3 on top of mirrored disks, a RAID-303, and so on, and so on.
These setups are just wasteful of disks without any real gain, and many of them
actually pose more risk to your data than simpler RAID-10 setups. Nested RAID
involves a variety of subtle error conditions, and people have probably already
tested whatever bright idea you have. Be sure to read the literature on any type
of nested RAID before risking production data on it!

556 Chapter 18
out-of-the-box FreeBSD /usr partition to another partition on the disk,
configure journaling on /usr in single-user mode, and restore /usr. Other
partitions start with much less data and are hence easier to convert. Once
gjournal(8) loses its experimental status, I expect support for it will be
integrated into the installer.
Configuring gjournal(8)
gjournal(8) requires a journal file. This can be a standalone disk device, or it
can actually be included in the partition containing the journaled filesystem.
If both the journal and the filesystem are on the same disk device, there’s no
performance reason to separate the two. If you can place your journal on a
separate disk device, however, you might see better performance. (Again,
two old-fashioned ATA drives on the same controller don’t count!) For our
initial examples, we’re going to assume that you have the journal file on the
same disk partition as the filesystem to be journaled.
Load the kernel module with gjournal load or manually load the
geom_journal.ko kernel module. You can also load the module at boot time
in /boot/loader.conf.
Now label the partition as a gjournal(8) user. Here we convert
/dev/da0s1d, the single partition on this disk, to use journaling:
# gjournal label /dev/da0s1d
gjournal: File system exists on /dev/da0s1d and this operation would destroy it.
Use -f if you really want to do it.
All right, convert isn’t the word I want. We eradicate the existing filesystem
and plop a journal file at the end of the partition.
# gjournal label -f /dev/da0s1d
gjournal prepares a journaling device for this partition. Instead of creating
a separate directory in /dev for journal devices, it appends .journal to the end
of the partition’s device name. All further filesystem operations are done on
the journaling device.
Jounalling and newfs(8)
Now create a filesystem on the journal device. Instead of the -U that enables
soft updates, use -J to enable journaling.
# newfs -J /dev/da0s1d.journal
/dev/da0s1d.journal: 7651.7MB (15670656 sectors) block size 16384, fragment size 2048
...

Disk Tricks with GEOM 557
One thing to note here is the size of the journaling device. This is an
8.5GB disk, but the journaling device is 7,651MB. Where’s my remaining
gigabyte? The journal file ate it. This is normal and expected.
Mounting Journaled Filesystems
Most UFS2 partitions are mounted noasync, but any journaled filesystems
must be mounted async. As we discussed in Chapter 8, async mounts just
dump data right to the disk and don’t wait to confirm that the data is safely
written to the disk. Journaling handles verification and integrity checking.
Specify async as a mount option in /etc/fstab:
/dev/da0s1d.journal /usr ufs rw,async 2 2
Using a Separate Journal Device
The main advantage of using a separate journal device is that you might—
might—be able to preserve the existing filesystem. gjournal(8) stores its
metadata in the last sector of the partition. If that sector is used by the
filesystem, then the filesystem cannot be converted and must be newfs’ed.
Use the journal device as the second argument when you label the device.
Here we label /dev/da0s1d as a journaling filesystem using /dev/da1s1e as
the journaling device. If you are using the last sector of the to-be-journaled
filesystem, gjournal(8) will warn you.
# gjournal label /dev/da0s1d da1s1e
Instead of using newfs(8) to build a journaled filesystem on /dev/da0s1d,
use tunefs(8) to enable journaling and disable soft updates on an existing
filesystem:
# tunefs -J enable -n disable /dev/ad0s1d
Now mount the new journaled filesystem async using the .journal
device node.
De-Journaling Partitions
Just as with the RAID-based GEOM modules, use gjournal stop to shut down
the journal and gjournal clear on the device node to remove gjournal
metadata from the partition:
# gjournal stop da0s1d.journal
# gjournal clear /dev/da0s1d
Then unload the kernel module to completely shut down journaling
on your system.

558 Chapter 18
Filesystem Encryption
FreeBSD supports two different disk encryption methods, GBDE and GELI.
Both tools work very differently, support different cryptographic algorithms,
and are designed for different threat models. People talk about encrypting
disks all the time, but you rarely hear discussions of what disk encryption is
supposed to protect the disk from.
GBDE, or Geom-Based Disk Encryption, has specific features for high-security
environments where protecting the user is just as important as concealing
the data. In addition to a cryptographic key provided by the user, GBDE uses
keys stored in particular sectors on the hard drive. If either key is unavailable,
the partition cannot be decrypted. Why is this important? If a secure data
center (say, in an embassy) comes under attack, the operator might have a
moment or two to destroy the keys on the hard drive and render the data
unrecoverable. If the bad guys have a gun to my head and tell me to “Enter
the passphrase or else,” I want the disk system to say The passphrase is
correct, but the keys have been destroyed. I don’t want a generic error saying
Cannot decrypt disk. In the first situation, I still have value as a blubbering
hostage; in the latter, either I’m dead or the attackers get unpleasantly
creative.7
GELI is much more flexible, but won’t protect me from bodily harm the
way GBDE might. If someone might steal my laptop for the confidential
documents on it, or if an untrusted system user might snoop my swap space
to steal secrets, GELI suffices. GELI doesn’t try to protect my person, just my
data. As I won’t take any job that poses a higher than average risk of exposure
to firearms (keeping in mind that I live in Detroit), that’s perfectly fine with
me. GELI also uses FreeBSD’s cryptographic device driver, which means that
if your server has a hardware cryptographic accelerator, GELI takes advantage
of it transparently.
I should mention that in most cases, filesystem encryption is not only
pretentious but actively increases the risk of data loss. More data is lost to
encryption misconfiguration or lost keys than to theft. When I hear someone
say, “I’ve encrypted my whole hard drive!” I have a nearly psychic vision of
the future where that same person is saying, “I’ve lost access to everything on
my hard drive!” More often than not I’m correct. Consider carefully if you
really, truly need disk encryption.
In this example, we’ll use GELI to encrypt a disk partition on /dev/da0,
storing the cryptographic keys on the USB storage device mounted on /media.
You might find it more sensible to use a filesystem in a file (see Chapter 8) as
an encrypted partition. Very few people actually need to encrypt their entire
hard drive, and in certain circumstances, doing so might raise suspicions. I
have enough trouble explaining to airport security why my computer “looks
so weird.” In their minds, a boot prompt that says Insert cryptographic key
and enter cryptographic passphrase is only one step away from This man is a
7 Just for the record: If you have a sharp stick and the proper attitude, you can have my
passphrases.

Disk Tricks with GEOM 559
dangerous lunatic who requires a very thorough body cavity search. If you
really do need to encrypt certain documents, chances are they only total a
few megabytes. That’s a perfect application for a filesystem in a file.
Kernel Configuration
GELI requires the kernel module geom_eli.ko, which in turn requires crypto.ko.
You can load these at boot in /boot/loader.conf or add the appropriate devices
to your kernel configuration:
options GEOM_ELI
device crypto
Generating and Using a Cryptographic Key
GELI lets you use a key file and/or a passphrase as cryptographic keys for an
encrypted device. We’ll use both. To generate your cryptographic key file,
use dd(1) to grab a suitable amount of data from /dev/random and write it to
a file. Remember, /media is where our USB device is mounted. If you really
want to protect your data, create your key directly on the USB device and
don’t leave it on your filesystem where a hypothetical intruder could recover
it. (Even deleting the file still leaves remnants that a skilled attacker could
conceivably use.)
# dd if=/dev/random of=/media/da0.key bs=64 count=1
1+0 records in
1+0 records out
64 bytes transferred in 0.000149 secs (429497 bytes/sec)
The 64 bytes of data constitute a 512-bit key. You can increase the size of
the key if you like, at the cost of extra processor overhead when accessing the
encrypted filesystem. Don’t forget that your passphrase also increases key
complexity.
To assign a passphrase to the key, use geli init. The -s flag tells geli(8)
the desired sector size on the encrypted filesystem; 4,096, or 4KB, is usually a
decent sector size for this application. The -K indicates the key file. You must
also specify the device to be encrypted.
# geli init -s 4096 -K /media/da0.key /dev/da0
Enter new passphrase:
Reenter new passphrase:
A passphrase is much like a password except that it can contain spaces
and be of any length. If you really want to protect your data, I recommend
using a passphrase that is several words long, contains non-alphanumeric
characters, and is not a phrase in your native language.

560 Chapter 18
Now that you have a key, attach it to the device to be encrypted.
# geli attach -k /media/da0.key /dev/da0
Enter passphrase:
geli(8) now knows that /dev/da0 is an encrypted disk and that the file
/media/da0.key contains the key file. Once you enter the passphrase, you can
access the decrypted contents of the encrypted disk at the new device node
/dev/da0.eli. Of course, you need a filesystem to put any data on that disk.
Filesystems on Encrypted Devices
Before you build a filesystem on your encrypted device, purge the disk of any
lingering data. newfs(8) doesn’t actually overwrite most of the bits in a new
partition; it simply adds superblocks that indicate the location of inodes. If
you’ve used this disk before, an intruder would be able to see chunks of old
files on the disk. Worse, he’d see chunks of encrypted data placed there by
GELI. Before you put a filesystem on the disk, it’s best to cover the disk with a
deceptive film of randomness to make it much more difficult for an intruder
to identify which blocks contain data and which do not. Use dd(1) again:
# dd if=/dev/random of=/dev/da0.eli bs=1m
8684+0 records in
8683+1 records out
9105014784 bytes transferred in 1575.226434 secs (5780131 bytes/sec)
As you can see, this elderly system needed over 25 minutes to cover the
whole 8.5GB disk with high-quality randomness. The amount of time necessary
varies with system speed and the amount of randomness available. A crypto-
graphic accelerator increases the amount of available randomness nicely.
Now that your disk is full of garbage, put a filesystem on it and attach it
to your system. Do not use soft updates on your encrypted disk. Encrypting a
disk device decreases system performance anyway.
# newfs /dev/da0.eli
# mount /dev/da0.eli /mnt
Your encrypted disk device is now available on /mnt. Store your confidential
files there.
Deactivating Encrypted Disks
When you have finished with your encrypted partition, shut down GELI and
return the partition to its inaccessible, encrypted state. First unmount the
partition, then use geli detach to disconnect the encrypted disk from the key.
While other GEOM modules usually place metadata in the last sector of
a partition, GELI does no such thing. You don’t have to clear any metadata
from a GELI partition before using it elsewhere. You must remember which

Disk Tricks with GEOM 561
partitions are encrypted and which are just empty, especially if you have many
free disks in your system. A completely encrypted disk doesn’t even have a
disklabel on it, so it’s easy to confuse an encrypted disk with a blank one!
Encrypting Swap Space with geli(8)
If you allow untrusted users to log onto your system, you might find it sensible
to encrypt your swap space. I find this useful on servers where multiple users
log in to use a particular application. Instead of generating a key that requires
protection, FreeBSD randomly generates a passphrase-free key on every boot
and encrypts the swap space with it. This scrambles the data in the swap
partition sufficiently so that no intruder can capture sensitive information
from swap space. While both GBDE and GELI support swap encryption in
this manner, we’re going to stick with GELI.
In addition to loading the geom_eli kernel module at boot, you have to
make a minor change to /etc/fstab. By adding the .eli extension to your swap
device name, you tell FreeBSD to automatically use a GELI-encrypted swap
partition. So, for example, the swap space on my machine would change from:
/dev/ad0s1b none swap sw 0 0
to:
/dev/ad0s1b .eli none swap sw 0 0
This minor change is all you need to encrypt your swap. Personally, I
find it most useful to simply add more memory to a secure server so it does
not have to swap to disk, but that might not be an option for you.
Disk Device Network Exports
You need a CD burner in machine A, but it’s installed in machine B? Or
maybe it’s a hard drive partition you need to access, or even a filesystem on
disk? Not a problem! Just export the device across the network through
geom_gate and mount it on the other machine.
Why bother to export the device, when you could just log into the other
machine? Perhaps you want to use a piece of software that expects to access
a device rather than a file. Maybe you want to take an image of an unmounted
partition, and the machine with that partition doesn’t have enough space to
hold that image. Perhaps you’d like to use gmirror(8) across the network, so
if one machine dies you have an up-to-date copy of the disk. Or maybe just
because it’s kind of nifty and will make other system administrators look at
you cross-eyed. geom_gate is a client-server application; the system with
the device to be exported is the server and the system that mounts the remote
device is the client. Both client and server require the geom_gate.ko kernel
module loaded.

562 Chapter 18
geom_gate Security
The geom_gate client-server connection is not encrypted, so anyone who
could intercept the traffic can see the transactions. Mind you, they’ll probably
have a great deal of difficulty recognizing the contents of that traffic! If you’re
using geom_gate across an untrusted network, a VPN or at least an SSH tunnel
is advisable. geom_gate traffic uses TCP port 3080 by default. (If you want to
have some real fun, you can stack geom_gate on top of GELI!)
The server has access control in the form of an exports file, much like
NFS. The server only exports the devices specified in the exports file, and only
to the identified clients.
geom_gate Server Setup
You can only export CDs, disk images, and partitions with geom_gate. You
cannot export tape drives, devices such as /dev/random or /dev/io, or terminal
devices. If you can’t mount(8) it, you cannot export it. A device cannot be
mounted while exported, however; it must be mountable but unmounted.
To export a device, list it in the geom_gate exports file, /etc/gg.exports.
Each entry in the exports file has this format:
host permissions device
The host can be either an IP address (e.g., 192.168.1.2), a network (e.g.,
192.168.1.0/24), or a hostname (such as pesty.blackhelicopters.org).
Assign each exported device read-write (RW), read-only (RO), or write-
only (WO) privileges.
Finally, list the exact device node you want to export. For example, here
we permit read-only access to the server’s CD drive from every host on my
private network and then assign read-write access to the disk device /dev/da0
from my laptop’s IP address:
192.168.1.0/24 RO /dev/acd0
192.168.1.202 RW /dev/da0
Now start ggated(8). As of this writing, ggated(8) is not integrated into
the rc.d startup system. Fortunately, you’ve all read Chapter 12 so you know
exactly how to write a rc.d script that integrates perfectly with FreeBSD.
ggated(8) should work without any arguments:
# ggated
geom_gate is now listening for client requests on TCP port 3080.

Disk Tricks with GEOM 563
geom_gate Client Setup
Now that we have something exporting devices, let’s fire up a client. The
client doesn’t need a configuration file, just the ggatec(8) command. Use
this syntax to create a local device node for a device node exported from
a remote server:
# ggatec create -o permissions servername devicename
For example, suppose we want read-only access to the server’s CD drive.
The server is named sardines.blackhelicopters.org, and the CD is /dev/acd0. This
device is listed in /etc/gg.exports on the server.
# ggatec create -o ro sardines /dev/acd0
ggate0
ggatec(8) replies with the local device node (/dev/ggate0) that corresponds
to the remote device node (/dev/acd0). If this is really an exported CD device,
I should be able to see the CD in that drive.
# mount -t cd9660 /dev/ggate0 /cdrom/
A simple ls /cdrom shows that the server’s CD is now mounted on the
client. Pretty cool, huh?
The next question is, how far can you take this? Let’s export an actual
hard drive and see what sort of abuses we can inflict upon it.
# ggatec create -o ro sardines /dev/da0
ggate1
The obvious thing to try is to use this as a regular hard drive. Can
we fdisk(8), disklabel(8), and newfs(8) it? The short answer is, no, we can’t.
fdisk(8) can’t write the first sector of the drive. We can’t use disklabel(8)
because disklabels belong on slices, not on whole disks, and we didn’t export
/dev/da0s1, only /dev/da0. If we export /dev/da0s1, we won’t get the various
partitions beneath it, only the whole slice. You must be very specific about what
you export, and even then you cannot perform low-level operations on it.
Once you have partitions and a filesystem on the server disk, however, you can
mount those filesystems as you desire and access data on them transparently.
# ggatec create -o ro sardines /dev/da0s1a
ggate3
# mount /dev/ggate3 /mnt
The remote disk /dev/da0s1a is now mounted locally at /mnt.

564 Chapter 18
Identifying geom_gate Devices
After you’ve been using geom_gate for a while, it’s easy to forget exactly
which devices you have mounted from which machines. The device name
/dev/ggate isn’t a too helpful mnemonic for the actual device. ggatec(8) has
a list command that gives details on locally mounted geom_gate devices.
Use the -v flag to get detailed information on the remote devices:
# ggatec list -v
NAME: ggate0
info: sardines:3080 /dev/acd0
access: read-only
timeout: 0
queue_count: 0
...
While ggatec(1) lists a great deal of information about each device, the
important bits for most of us are the remote device server, the remote device
name, and the type of access we have to that device.
Shutting Down geom_gate
When you’re finished with the exported devices, remove them from the
client. Unmount the device on the client locally and then use ggatec(8)’s
destroy function. For example, if we have /dev/ggate0 mounted as /cdrom:
# umount /cdrom
# ggatec destroy -u 0
The -u flag supplies the number of the ggate device we are eliminating.
We use -u 0 because we are shutting down device ggate0.
On the server side, just stop ggated(8) with pkill(1):
# pkill ggated
Poof! Your network devices are no longer exported.
Oops! Rescuing geom_gate
Suppose you weren’t quite done with geom_gate when you killed it. For
example, I unmounted /cdrom before destroying /dev/ggate0, but I still had
/dev/ggate3 mounted at /mnt. I cannot access that partition now, I cannot
unmount it, and if I try to copy data to it, the command hangs. What to
do? ggatec(8) has a rescue command for exactly this sort of situation. Restart
ggated(8) on the server and then start a new ggatec(8) process on the client.

Disk Tricks with GEOM 565
The syntax for rescue is much like that for create, except that you can specify
a ggate device node number. Here we reactivate /dev/ggate3 for our /mnt
mount point:
# ggatedc rescue -o rw -u 3 sardines /dev/da0s1a
There. Now, nobody needs to know that you goofed!
Mirroring Disks Across the Network
Two servers can share a single disk image. When data is written to one disk, it is
transparently copied to the other. You can use this to achieve a certain degree
of high availability with commodity hardware. Use ggated(8) to provide disk
exporting and gmirror(8) to handle the replication.
Remember that network speed is much lower than disk speed, and that
mirroring disks across the network is a bad choice for I/O-intensive applica-
tions. For example, as you read this, I expect 3Gbps SATA-II disks to be
common. That’s three gigabits a second, or three times the speed of a gigabit
network! When combined with the fact that not all gigabit network hardware
actually runs at gigabit speeds, if you’re actually using those 3Gbps of disk
I/O, a networked backup will sadly disappoint you. For low-I/O applications,
however, a network-mirrored disk of vital data might be useful.
In the example below, we mirror a 100MB file-backed filesystem across
the network. This is large enough to be useful for, say, a small database, but
small enough to run on my modest network.
Backup Server Setup
Create a 100MB file on one server and then copy it to the other server. This
way, you start with the same data file on both sides, hopefully reducing the
initial synchronization time. The simplest way to create a file of a given size
is with truncate(1):8
# truncate -s100m /var/db/dbmirrorbackup.img
truncate(1)’s -s flag dictates the size of the file to create. You can use k
for KB, m for MB, or G for GB. (You can also use t for TB, but we don’t quite
have disks of that size. Yet.)
Now, configure /etc/gg.exports to allow our primary server to access this disk
image. The primary server (in this example, at 192.168.1.2) needs read/write
privileges on this device:
192.168.1.2 RW /var/db/dbmirrorbackup.img
Now start ggated(8). Your backup server is ready.
8 If truncate(1) is the easiest way to make a file, why did I make you use dd(1) back in Chapter 8?
Because you need to know dd(1). It was for your own good.

566 Chapter 18
Primary Server Setup
The primary server is slightly more complicated—but not by much. First,
attach a ggate device to the remote file:
# ggatec create backupserver /var/db/dbmirror.img
ggate0
Our remote filesystem file is available locally as /dev/ggate0. Now, load
gmirror(8) and label the ggate device as a mirror. Here, our mirror device is
called remotemirror0:
# gmirror load
# gmirror label remotemirror0 /dev/ggate0
We now have a mirror device. We need a local filesystem file, created just
like the backup filesystem:
# truncate -s100m /var/db/dbmirrorprimary.img
Attach the local file to a memory device, so it gets a device node, and then
insert that device node into the mirror:
# mdconfig -a -t vnode -f /var/db/dbmirrorprimary.img
md0
# gmirror insert remotemirror0 /dev/md0
You’ll see that the mirror quickly becomes up to date. There’s no data in
it, after all!
# gmirror status
Name Status Components
mirror/remotemirror0 DEGRADED ggate0
md0 (33%)
When the mirror is up to date, which should not take more than a
couple of minutes for a filesystem of this size, use newfs(8) and mount it:
# newfs -U /dev/mirror/remotemirror0
# mount /dev/mirror/remotemirror0 /database
You now have a distributed mirror mounted on /database.
Depending on your system load and the throughput on this network-
mirrored disk, you might find it useful to mount the disk noatime to minimize
disk writes.

Disk Tricks with GEOM 567
Mirror Failover and Recovery
The purpose of a mirrored disk is to allow you to recover data after a
disk failure, and the purpose of mirroring a disk across the network is
to allow you to recover after a server failure. You can use heartbeat
(/usr/ports/sysutils/heartbeat) in combination with mirrored disks to create a
low-cost, high-availability solution, automatically making one system take
over when the other fails. With heartbeat, one system watches another and
can take over operations when the master system disappears.
Your client machine would be the primary server and would handle system
activity most of the time. In the event of a system failure, however, the backup
machine takes on the role of the master machine. The backup machine can
activate its copy of the mirror with mdconfig(8) and mount(8):
# mdconfig -a -t vnode -f dbmirrorbackup.img
md0
# fsck -B /dev/md0
# mount /dev/md0 /database
You can then activate your database server program and start using the
data on the mirrored partition.
When the master system recovers, it reattaches the backup file as a ggate
device, relabels the mirror, inserts the local partition into the mirror, and lets
the mirror rebuild from the backup. Once the mirror is completely rebuilt,
heartbeat can switch services back to the master machine. Scripting and
automating failover are not terribly difficult but highly implementation-
and environment-dependent, so we’ll have to leave that for you.
High availability like this works best if you use a transactional database,
such as PostgreSQL as opposed to MySQL. It’s also best if you can keep the
amount of “live” data on your mirrored partition to a minimum, relying on
periodically archiving data to the other server’s remote disk. High availability
requires careful application design and should not be taken lightly.
This concludes our tour of the most popular GEOM modules. While
you’ll find several other modules of interest in FreeBSD, with the background
you’ve gained from this chapter deploying any of them will be fairly straight-
forward and pain free. Let’s move on into a topic near every system admin-
istrator’s heart: performance.

19
SYSTEM PERFORMANCE AND
MONITORING
Even if “It’s slow!” is not the most dreaded
phrase a system administrator will ever hear,
it’s pretty far up on that list. The user doesn’t
know why the system is slow and probably can’t
even quantify or qualify the problem any further than
that. It just feels slow. Usually there’s no test case, no set
of reproducible steps, and nothing particularly wrong. A slowness complaint
can cause hours of work as you dig through the system trying to find problems
that might or might not even exist. One phrase is more dreadful still, especially
after you’ve invested those hours of work: “It’s still slow.”
An inexperienced system administrator accelerates slow systems by buying
faster hardware. This exchanges “speed problems” for costly parts and even
more expensive time. Upgrades just let you conceal problems without actually
using the hardware you already own, and sometimes they don’t even solve
the problem at all.
570 Chapter 19
FreeBSD includes many tools designed to help you examine system
performance and provide the information necessary to learn what’s actually
slowing things down. Once you understand where a problem is, identifying
the solution to the problem becomes much simpler. You might actually need
faster hardware, but sometimes shifting system load or reconfiguring software
might solve the problem at much less expense. In either case, the first step is
understanding the problem.
Computer Resources
Performance problems are usually caused by running more tasks than the
computer can handle. That seems obvious, but think about it a moment.
What does that really mean?
A computer has four basic resources: input/output, network bandwidth,
memory, and CPU. If any one of them is filled to capacity, the others cannot
be used to their maximum. For example, your CPU might very well be waiting
for a disk to deliver data or for a network packet to arrive. If you upgrade
your CPU to make your system faster, you will be disappointed. Buying a
whole new server might fix the problem, but only by expanding the existing
bottleneck. The new system probably has more memory, faster disks, a better
network card, and faster processors than the old one. You have deferred the
problem until the performance reaches some new limit. However, by identify-
ing where your system falls short and addressing that particular need, you
can stretch your existing hardware much further. After all, why purchase a
whole new system when a few gigabytes of relatively inexpensive memory
would fix the problem? (Of course, if your goal is to retire this “slow” system
to make it your new desktop, that’s another matter.)
Input/output is a common bottleneck. A PCI bus has a maximum
throughput, and while you might not be pushing your disk or your network
to their limits, you might be saturating the PCI bus by heavily using them
both simultaneously.
One common cause of system slowdowns is running multiple large
programs simultaneously. For example, I once thoughtlessly scheduled a
massive database log rotation that moved and compressed gigabytes of data
at the same time as the daily periodic(8) run. Since the job required shutting
down the main database and caused application downtime, speed was
crucial. Both the database job and the periodic(8) run slowed unbearably.
Rescheduling one of them made both jobs go more quickly.
We’re going to look at several FreeBSD tools for examining system per-
formance. Armed with that information, we’ll consider how to fix performance
issues. Each potential bottleneck can be evaluated with the proper tools.
FreeBSD changes continually, so later systems might have new tuning options
and performance features. Read tuning(7) on your system for current per-
formance tips.

System Performance and Monitoring 571
Checking the Network
If your system’s slowness stems from network problems, you need more band-
width or you must make better use of the bandwidth you have. This can be
summarized as, “You can’t fit ten pounds of bandwidth in a five-pound circuit.”
If your T1 is full, making everything else slow, stop filling it!
To check for bandwidth problems, begin by monitoring how much
bandwidth your system is using. Consult netstat -m and netstat -s, and look
for errors or places where you’re out of memory or buffers. Use a packet
sniffer or Netflow to catch your big traffic generators, and use MRTG or
Cricket to track utilization on a long-term basis.
Other system conditions are much more complicated. Start by checking
where the problem lies with vmstat(8).
General Bottleneck Analysis with vmstat(8)
FreeBSD includes several programs for examining system performance.
Among these are vmstat(8), iostat(8), and systat(1). We’ll discuss vmstat
because I find it most helpful; iostat(8) is similar to vmstat(8), and systat(1)
provides the same information in an ASCII graphical format.
vmstat(8) shows the current virtual memory statistics. While its output
takes getting used to, vmstat(8) is very good at showing large amounts of data
in a small space. Type vmstat at the command prompt and follow along.
# vmstat
procs memory page disks faults cpu
r b w avm fre flt re pi po fr sr ad0 in sy cs us sy id
3 0 0 580416 1388912 234 11 7 0 209 0 0 171 5796 3816 3 10 87
vmstat divides its display into six sections: process (procs), memory, paging
(page), disks, faults, and cpu. We’ll look at all of them quickly and then discuss
in detail those parts that are the most important for investigating performance
issues.
WHAT IS NORMAL?
One word you’ll keep tripping over in this chapter is abnormal. As the system
administrator, you’re supposed to know what is normal for your system. It’s somewhat
like art; you might not be able to define normal, but you need to recognize abnormal
when you see it. Use these tools regularly when the system is behaving itself, so you
can have a good idea of which results are out of whack during system slowdowns.
Pay attention to your hardware!
572 Chapter 19
Processes
vmstat(8) has three columns under the procs heading.
Memory
FreeBSD breaks memory up into chunks called pages. These pages, allocated
to processes, are all of uniform size. The size of a page is hardware- and
OS-dependent. The system treats each page as a whole—if FreeBSD must
shift memory into swap, for example, it does that on a page-by-page basis.
The memory section has two columns.
Paging
The page section shows how hard the virtual memory system is working. The
inner workings of the virtual memory system are an arcane science that I won’t
describe in detail here.
rThe number of processes that are blocked waiting for CPU time.
These processes are ready to run but cannot get access to the CPU.
If this number is high, your CPU is the bottleneck.
bThe number of processes that are blocked waiting for system input
or output—generally, waiting for disk access. These processes will
run as soon as they get their data. If this number is high, your disk
is the bottleneck.
wThe number of processes that are runnable but are entirely
swapped out. If you regularly have processes swapped out, your
memory is inadequate for the work you are doing on the system.
avm The average number of pages of virtual memory that are in use.
If this value is abnormally high or increasing, your system is
actively consuming swap space.
fre The number of memory pages available for use. If this value is
abnormally low, you have a memory shortage.
flt The number of page faults, where information needed was not
in real memory and had to be fetched from swap space or disk.
re The number of pages that have been reclaimed or reused from
cache.
pi Short for pages in; this is the number of pages being moved from
real memory to swap.
po Short for pages out; this is the number of pages being moved
from swap to real memory.
fr How many pages are freed per second.
sr How many pages are scanned per second.
System Performance and Monitoring 573
Moving memory into swap is not bad, but consistently recovering paged-
out memory indicates a memory shortage. Having high fr and flt values can
indicate lots of short-lived processes—for example, a CGI script that starts
many other processes or a cron job scheduled too frequently.
Disks
The disks section shows each of your disks by device name. The number shown
is the number of disk operations per second, a valuable clue to determining
how well your disks are handling their load. You should divide your disk
operations between different disks whenever possible and arrange them on
different buses when you can. If one disk is obviously busier than the others,
and the system has operations waiting for disk access, consider moving some
frequently accessed files from one disk to another. One common cause of
high disk load is a coredumping program that can restart itself. For example,
a faulty CGI script that dumps core every time someone clicks on a link will
greatly increase your disk load.
If you have a lot of disks, you might notice that they don’t all appear on
the vmstat display. vmstat(8) is designed for 80-column display and therefore
cannot list every disk on a large system. If, however, you have a wider display
and don’t mind exceeding the 80-column limit, use the -n flag to set the
number of drives you want to display.
Faults
Faults are not bad; they’re just received system traps and interrupts. An
abnormally large number of faults is bad, of course—but before you tackle this
problem, you need to know what’s normal for your system.
CPU
Finally, the cpu section shows how much time the system spent doing user
tasks (us), system tasks (sy), and how much time it spent idle (id). top(1)
presents this same information in a friendlier format, but only for the
current time, whereas vmstat lets you view system utilization over time.
Using vmstat
So, how do you use all this information? Start by checking the first three
columns to see what the system is waiting for. If you’re waiting for CPU access
in The number of system interrupts (IRQ requests) received in the
last five seconds.
sy The number of system calls in the last five seconds.
cs The number of context switches in the last second, or a per-
second average since the last update. (For example, if you have
vmstat update its display every five seconds, this column displays
the average number of context switches per second over the last
five seconds.)

574 Chapter 19
(the r column), then you’re short on CPU horsepower. If you’re waiting for
disk access (the b column), then your disks are the bottleneck. If you’re
swapping (the w column), you’re short on memory. Use the other columns
to explore these three types of shortages in more detail.
Continuous vmstat
You’re probably more interested in what’s happening over time, rather than
in a brief snapshot of system performance. Use vmstat’s -w flag and a number
to run it as an ongoing display updating every so many seconds. FreeBSD
recalculates its virtual memory paging counters every five seconds, but other
counters are updated continuously:
# vmstat -w 5
procs memory page disks faults cpu
r b w avm fre flt re pi po fr sr ad0 ad4 in sy cs us sy id
1 1 0 184180 12876 8 0 0 0 30 11 0 0 1143 122 517 0 1 99
0 1 0 184180 8360 1 0 0 0 260 0 373 0 1513 419 2287 0 5 95
0 1 0 184180 7984 0 0 0 0 224 0 387 1 1528 428 2318 0 5 95
0 1 0 184180 14892 0 0 0 0 62 346 188 1 1328 221 1322 0 3 96
...
Every five seconds, an updated line appears at the end. You can sit there
and watch how your system’s performance changes when scheduled jobs kick
off or when you start particular programs. Hit CTRL-C when you’re done. In
this example, processes are sometimes waiting for CPU time (as shown by
the occasional 1 in the r column), but we have something waiting for disk
access all the time.
An occasional wait for a system resource doesn’t mean you must upgrade
your hardware; if performance is acceptable, don’t worry about it. Otherwise,
however, you must look further. In this case, I’m looking at vmstat(8) because
someone reported a performance problem. vmstat(8) shows that something
is waiting for disk all of the time. Let’s see just how busy our disks are.
Disk I/O
We looked at disk management in Chapter 8, and again in Chapter 18. When
it comes to performance, disk speed is a common bottleneck. If programs
repeatedly wait for disk activity to complete before proceeding, they run
more slowly. This is commonly called blocking on disk, meaning that the disk
is preventing program activity. The only real solution for this is to use faster
disks, install more disks, or reschedule the load.
While FreeBSD provides several tools to check disk activity, my favorite is
gstat(8), so we’ll use that. Just enter gstat without arguments for a display that
updates every second or so:
L(q) ops/s r/s kBps ms/r w/s kBps ms/w %busy Name
0 0 0 0 0.0 0 0 0.0 0.0| ad0s1b.eli

System Performance and Monitoring 575
1 213 211 1066 4.6 2 4 9.2 97.9| ad0
0 0 0 0 0.0 0 0 0.0 0.0| acd0
1 213 211 1066 4.7 2 4 9.2 98.0| ad0s1
0 0 0 0 0.0 0 0 0.0 0.0| ad0s1a
0 0 0 0 0.0 0 0 0.0 0.0| ad0s1b
0 0 0 0 0.0 0 0 0.0 0.0| ad0s1c
0 0 0 0 0.0 0 0 0.0 0.0| ad0s1d
0 2 0 0 0.0 2 4 9.2 0.9| ad0s1e
1 211 211 1066 4.7 0 0 0.0 98.2| ad0s1f
We see a line for each disk device, slice, and partition, and various infor-
mation for each. gstat(8) shows all sorts of good stuff, such as the number of
reads per second (r/s), writes per second (w/s), the kilobytes per second of
reading and writing, as well as the number of milliseconds each read or write
takes. The first thing to look for is the %busy column, second from the right.
The swap space partition , our first entry, is idle. Disk ad0 is running
at 97 percent of capacity, however. No wonder our system feels slow! Slightly
further down, we see that the big disk activity on disk ad0 is actually concen-
trated on slice ad0s1 . Most of the slices are idle, and there’s just a smidge
of activity on ad0s1e. Partition ad0s1f , however, is very busy, at 98.2 percent
utilization and hundreds of reads per second. Checking /etc/fstab or mount(8)
shows that ad0s1f is /usr on this server. Something is reading lots and lots of
data from this disk . . . but what? To find out, we need other tools.
CPU, Memory, and I/O with top(1)
The top(1) tool provides a good overview of system status, displaying infor-
mation about CPU, memory, and disk usage. Just type top to get a full-screen
display of system performance data. The display updates every two seconds,
so you have a fairly accurate, close to real-time system view.
last pid: 977; load averages: 1.14, 0.80, 0.18 up 0+00:18:03 18:30:34
41 processes: 2 running, 39 sleeping
CPU states: 0.0% user, 0.0% nice, 2.1% system, 0.0% interrupt, 97.9% idle
Mem: 106M Active, 139M Inact, 130M Wired, 8164K Cache, 68M Buf, 1607M Free
Swap: 4096M Total, 4096M Free
PID USERNAME THR PRI NICE SIZE RES STATE C TIME WCPU COMMAND
840 mwlucas 1 96 0 278M 24740K select 1 0:33 1.76% Xorg
873 mwlucas 1 96 0 113M 81916K CPU0 0 0:51 0.59% acroread
903 mwlucas 6 20 0 169M 103M kserel 0 0:31 0.00% soffice.bin
853 mwlucas 1 96 0 7924K 6608K select 1 0:04 0.00% wmaker
762 root 1 96 0 3208K 964K select 1 0:02 0.00% moused
859 mwlucas 1 4 0 18496K 10544K select 0 0:00 0.00% yank
...
Very tightly packed, isn’t it? top(1) crams as much data as possible into
a standard 80 × 25 terminal window or X terminal. Let’s take this apart and
learn how to read it.

576 Chapter 19
PID Values
Every process on a Unix machine has a unique process ID, or PID. Whenever
a new process starts, the kernel assigns it a PID one greater than the previous
process. The last PID value is the last process ID assigned by the system. In
the previous example, our last PID is 977 . The next process created will be
978, then 979, and so on. Watch this number to see how fast the system
changes. If the system is running through PIDs more quickly than usual, it
might indicate a process forking beyond control1 or something crashing and
restarting.
Load Average
The load average is a somewhat vague number that offers a rough impression
of the amount of CPU load on the system. The load average is the average
number of threads waiting for CPU time. (Other operating systems have
different load average calculation methods.) An acceptable load average
depends on your system. If the numbers are abnormally high, you need to
investigate. Many Pentiums feel bogged down at a load average of 3, while
some modern systems are still snappy with a load average of 10.
top(1) lists three load averages. The first (1.14 in our example) is the load
average over the last minute, the second (0.80) is for the last five minutes, and
the last (0.18) is for the last 15 minutes. If your 15-minute load average is high,
but the 1-minute average is low, you had a major activity spike that has since
subsided. On the other hand, if the 15-minute value is low but the 1-minute
average is high, something happened within the last 60 seconds and might
still be going on now. If all of the load averages are high, the condition has
persisted for at least 15 minutes.
Uptime
The last entry on the first line is the uptime , or how long the system has
been running. This system has been running for 18 minutes, and the current
time is 18:30:34. I’ll leave it up to you to calculate when I booted this system.
Process Counts
On the second line, you’ll find information about the processes currently
running on the system . Running processes are actually doing work—
they’re answering user requests, processing mail, or doing whatever your
system does. Sleeping processes are waiting for input from one source or
another; they are just fine. You should expect a fairly large number of
sleeping processes at any time. Processes in other states are usually waiting
for a resource to become available or are hung in some way. Large numbers
of non-sleeping, non-running processes hint at trouble. The ps(1) command
shows the state of all processes.
1 Some users actually try to consume system resources by starting too many programs. This is
called forkbombing. These users are like script kiddies, but not as educated and without the sense
of self-preservation.

System Performance and Monitoring 577
Process Types
The CPU states line indicates what percentage of available CPU time the
system spends handling different types of processes. It shows five different
process types: user, nice, system, interrupt, and idle.
The user processes are average everyday programs—perhaps daemons
run by root, or commands run by regular users, or whatever. If it shows up in
ps -ax, it’s a user process.
The nice processes are user processes whose priority has been deliberately
manipulated. We’ll look at this in detail in “Reprioritizing with Niceness” on
page 584.
The system value gives the total percentage of CPU time spent by FreeBSD
running kernel processes and the userland processes in the kernel. These
include things such as virtual memory handling, networking, writing to disk,
debugging with INVARIANTS and WITNESS, and so on.
The interrupt value shows how much time the system spends handling
interrupt requests (IRQs).
Last, the idle entry shows how much time the system spends doing
nothing. If your CPU regularly has a very low idle time, you might want to
think about rescheduling jobs or getting a faster processor.
Memory
The Mem line represents the usage of physical RAM. FreeBSD breaks memory
usage into several different categories.
Active memory is the total amount of memory in use by user processes.
When a program ends, the memory it had used is placed into inactive memory
and the data pulled from the disk is put into cache memory. If the system has
to run this program again, it can retrieve the software from memory instead
of disk.
Similarly, the Buf entry shows the size of the memory buffer. This buffer
contains most of the data recently read from the disk. The memory in Buf is
actually a subset of the active, inactive, and cache entries, not an entirely
separate category.
Free memory is totally unused. It might be memory that has never been
accessed, or it might be memory released by a process. This system has
1,607MB of free RAM. If you have a server that’s been up for months, and it
still has free memory, you might consider putting some of that RAM in a
machine that’s hurting for memory. This top(1) snapshot comes from my
laptop, which needs every bit of RAM it can get just on general principles.
TOP AND SMP
On an SMP system, top(1) displays the average use among all the processors. You
might have one processor completely tied up compiling something, but if the other
processor is idle, top(1) shows the CPU usage of only 50 percent.

578 Chapter 19
FreeBSD will shuffle memory between the inactive, cache, and free catego-
ries as needed to maintain a pool of available memory. Memory in the cache
is most easily transferred to the free pool. When cache memory gets low and
FreeBSD needs still more free memory, it picks pages from the inactive pool,
verifies that it can use them as free memory, and moves them to the free
pool. FreeBSD tries to keep the total number of free and cache pages above
the sysctl vm.v_free_target. (Remember, the page size is given by the sysctl
hw.pagesize which is 4,096 on i386 and amd64 systems.)
This means that having free memory does not mean that your system has
enough memory. If vmstat(8) shows that you are swapping at all, you are out
of memory. You might have a program that releases memory on a regular
basis. Also, FreeBSD will move some pages from cache to free in an effort to
maintain a certain level of free memory.
FreeBSD uses wired memory for in-kernel data structures, as well as for
system calls that must have a particular piece of memory immediately available.
Wired memory is never swapped or paged.
Swap
The Swap line gives the total swap available on the system and how much is
in use. Swapping is using the disk drive as additional memory. We’ll look at
swap in more detail later in the chapter.
Process List
Finally, top(1) lists the processes on the system and their basic characteristics.
The table format is designed to present as much information as possible in
as little space as possible. Every process has its own line.
PID First, we have the process ID number, or PID. Every running pro-
cess has its own unique PID. When you use kill(1), specify the process by
its PID. (If you don’t know the PID of a process, you can use pkill(1) to
kill the process by its name.)
Username Next is the username of the user running the process. If
multiple processes consume large amounts of CPU or memory, and they
are all owned by the same user, you know who to talk to.
Priority and niceness The PRI (priority) and NICE columns are inter-
related and indicate how much precedence the system gives each process.
We’ll talk about priority and niceness a little later in this chapter.
Size Size gives the amount of memory that the system has set aside for
this process.
Resident memory The RES column shows how much of a program is
actually in memory at the moment. A program might reserve a huge
amount of memory, but only use a small fraction of that reservation at
any time. For example, as I type this, my OpenOffice.org program has
allocated 169MB but is only using 103MB. (As an interesting side note,
X.org’s memory usage includes the memory on your video card, which is
separate from your main system memory.)

System Performance and Monitoring 579
State The STATE column shows what a process is doing at the moment.
A process can be in a variety of states—waiting for input, sleeping until
something wakes it, actively running, and so on. You can see the name of
the system call a process is waiting on, such as select, pause, or ttyin. On
an SMP system, when a process runs you’ll see the CPU it’s running on.
In our example output, acroread is running on CPU0.
Time The TIME column shows the total amount of CPU time the process
has consumed.
WCPU The weighted CPU usage shows the percentage of CPU time
that the process uses, adjusted for the process’s priority and niceness.
Command Finally, we have the name of the program that’s running.
Looking at top(1)’s output gives you an idea of where the system is
spending its time.
top(1) and I/O
In addition to the standard CPU display, top(1) has an I/O mode that displays
which processes are using the disk most actively. While top(1) is running, hit M
to enter the I/O mode. The upper portion of the display still shows memory,
swap, and CPU status, but the lower portion changes considerably.
PID USERNAME VCSW IVCSW READ WRITE FAULT TOTAL PERCENT COMMAND
3064 root 89 0 89 0 0 89 100.00% tcsh
767 root 0 0 0 0 0 0 0.00% nfsd
1082 mwlucas 2 1 0 0 0 0 0.00% sshd
1092 root 0 0 0 0 0 0 0.00% tcsh
904 root 0 0 0 0 0 0 0.00% sendmail
...
The PID is the process ID, of course, and the USERNAME column shows who
is running the process.
VCSW stands for voluntary context switches; this is the number of times this
process has surrendered the system to other processes. IVCSW means involuntary
context switches and shows how often the kernel has told the process, “You’re
done now, it’s time to let someone else run for a while.”
Similarly, READ and WRITE show how many times the system has read from
disk and written to disk. The FAULT column shows how often this process has
had to pull memory pages from swap, which makes for another sort of disk
read. These last three columns are aggregated in the TOTAL column.
The PERCENT column shows what percent of disk activity this process is
using. Unlike gstat(8), top(1) displays each process’s utilization as a percent-
age of the actual disk activity, rather than the possible disk activity. If you have
only one process accessing the disk, top(1) displays that process as using 100
percent of disk activity, even if it’s only sending a trickle of data. gstat(8) tells
you how busy the disk is, but top(1) tells you what’s generating that disk
activity and where to place the blame. Here we see that process ID 3064 is
generating all of our disk activity. It’s a tcsh(1) process, also known as “some
user’s shell.” Let’s track down the miscreant.

580 Chapter 19
Following Processes
On any Unix-like system, every userland process has a parent-child relationship
with other processes. When FreeBSD boots, it creates a single process by
starting init(8) and assigning it PID 1. This process starts other processes,
such as the /etc/rc startup script and the getty(8) program that handles your
login request. These processes are children of process ID 1. When you log in,
getty(8) starts a new shell for you, making your shell a child of the getty
process. Commands you run are either children of your shell process or part
of your shell. You can view these parent-child relationships with ps(1) using
the -ajx flags (among others).
# ps -ajx
USER PID PPID PGID SID JOBC STAT TT TIME COMMAND
root 0 0 0 0 0 WLs ?? 0:00.01 [swapper]
root 1 0 1 1 0 ILs ?? 0:00.01 /sbin/init --
root 2 0 0 0 0 DL ?? 0:00.79 [g_event]
...
haldaemon 826 1 826 826 0 Ss ?? 0:02.80 /usr/local/sbin/hald
root 827 826 826 826 0 I ?? 0:00.06 hald-runner
...
At the far left we have the username of the process owner, then the PID
and parent PID (PPID) of the process. This is the most useful thing we see here,
but we’ll briefly cover the other fields.
The PGID is the process group ID number, which is normally inherited
from its parent process. A program can start a new process group, and that
new process group will have a PGID equal to the process ID. Process groups
are used for signal processing and job control. A session ID, or SID, is a group-
ing of PGIDs, usually started by a single user or daemon. Processes may not
migrate from one SID to another. JOBC gives the job control count, indicating
if the process is running under job control (i.e., in the background).
STAT shows the process state—exactly what the process is doing at the
moment you run ps(1). Process state is very useful as it tells you if a process is
idle, what it’s waiting for, and so on. I highly recommend reading the section
on process state from ps(1).
TT lists the process’s controlling terminal. This column shows only the end
of the terminal name, such as v0 for ttyv0 or p0 for ttyp0. The example shows
only processes without a controlling terminal, indicated by ??, but we’ll see
another example with terminals shortly.
MORE TOP FEATURES
top can alter its display in many ways. You can view processes for a particular user,
include or exclude kernel threads, exclude idle processes, and so on. Read the man
page for details.

System Performance and Monitoring 581
The TIME column shows how much processor time the process has used,
both in userland and in the kernel.
Finally, we see the COMMAND name, as it was called by the parent process.
Processes in square brackets are actually kernel threads, not real processes.
So, how can this help us track a questionable process? In our top(1) I/O
example, we saw that process 3064 was generating almost all of our disk activ-
ity. Run ps -ajx and look for this process:
...
root 3035 3034 3035 2969 1 S+ p0 0:00.03 _su -m (tcsh)
chris 2981 2980 2981 2981 0 Is p1 0:00.03 -tcsh (tcsh)
root 2989 2981 2989 2981 1 I p1 0:00.01 su -m
root 2990 2989 2990 2981 1 D p1 0:00.05 _su -m (tcsh)
root 3064 2990 3064 2981 1 DV+ p1 0:00.15 _su -m (tcsh)
mwlucas 2996 2995 2996 2996 0 Is p2 0:00.02 -tcsh (tcsh)
...
Our process of interest is owned by root and is a tcsh(1) instance, just
as top’s I/O mode said. It’s actually running under su(1), however, which
means that there’s a real person behind this performance problem. Process
3064 is a child of process 2990 , which is a child of process 2989 , both of
which are owned by root. Process 2989 is a child of 2981 , however, which is
a shell run by a real user. You might also note that these processes are all
parts of session 2981, showing that they’re probably all run in the same login
session. The TT column shows p1, which means that the user is logged in on
/dev/ttyp1, the second virtual terminal on this machine.
It’s normal for a system to experience brief periods of total utilization. If
nobody else is using the system and nobody’s complaining about performance,
why not let this user run his job? If this process is causing problems for other
users, however, we can either deprioritize it, use our root privileges to kill the
job, or show up at the user’s cubicle with a baseball bat.
Paging and Swapping
Using swap space isn’t bad in and of itself, as FreeBSD uses swap as virtual
memory. Swap space is much slower than chip memory, but it does work, and
many programs don’t need to have everything in RAM in order to run. A
typical program spends 80 percent of its time running 20 percent of its code.
Much of the rest of its code covers startup and shutdown, error handling,
and so on. You can safely let those bits go to swap space with minimal perfor-
mance impact.
Swap caches data that it has handled. Once a process uses swap, that
swap remains in use until the process either exits or calls the memory back
from swap.
Swap usage occurs through paging and swapping. Paging is all right;
swapping is not so good, but it’s better than crashing.

582 Chapter 19
Paging
Paging occurs when FreeBSD moves a portion of a running program into
swap space. Paging can actually improve performance on a heavily loaded
system because unused bits can be stored on disk until they’re needed—if
ever. FreeBSD can then use the real memory for actual running code. Does it
really matter if your system puts your database startup code to swap once the
database is up and running?
Swapping
If the computer doesn’t have enough physical memory to store a process that
isn’t being run at that particular microsecond, the system can move the entire
process to swap. When the scheduler starts that process again, FreeBSD fetches
the entire process from swap and runs it, probably consigning some other
process to swap.
The problem with swapping is that disk usage goes through the roof and
performance drops dramatically. Since requests take longer to handle, there
are more requests on the system at any one time. Logging in to check the
problem only makes the situation worse, because your login is just one more
process. Some systems can handle certain amounts of swapping, while on
others the situation can quickly degenerate into a death spiral.
When your CPU is overloaded, the system is slow. When your disks are a
bottleneck, the system is slow. Memory shortages can actually crash your com-
puter. If you’re swapping, you must buy more memory or resign yourself to
appalling performance.
vmstat(8) specifically shows the number of processes swapped out at any
one time.
Performance Tuning
FreeBSD caches recently accessed data in memory because a surprising
amount of information is read from the disk time and time again. If this
information is cached in physical memory, it can be accessed very quickly. If
the system needs more memory, it dumps the oldest cached chunks in favor
of new data.
For example, the top(1) output we’re discussing is from my laptop. On
it, I had started Firefox so I could check my comics.2 The disk had to work for
a moment or two to read in the program. I then shut the browser off so I could
focus on my work, but FreeBSD leaves Firefox in the system buffer cache.
If I start Firefox again, FreeBSD will just pull it from memory instead of trou-
bling the disk, which dramatically reduces its startup time. Had I started
another large process, FreeBSD would have dumped the web browser from
the cache to read in the new program.
2 Sluggy Freelance (http://www.sluggy.com), Help Desk (http://www.ubersoft.net), and User Friendly
(http://www.userfriendly.org), if anyone cares. Fear the bunny.

System Performance and Monitoring 583
If your system is operating well, you will have at least a few megabytes
of free memory. The sysctls vm.v_free_target and hw.pagesize tell you how
much free memory FreeBSD thinks it needs on your system. If you consist-
ently have more memory than these two sysctls multiplied, your system is not
being used to its full potential. For example, on my laptop I have:
# sysctl vm.v_free_target
vm.v_free_target: 13745
# sysctl hw.pagesize
hw.pagesize: 4096
My system wants to have at least 13,745 × 4,096 = 56,299,520 bytes, or
about 54MB, of free memory. I could lose a gigabyte of RAM from my laptop
without flinching, if it wasn’t for the fact that I suffer deep-seated emotional
trauma about insufficient RAM.
Memory Usage
If you have a lot of memory in cache or buffer, you don’t have a memory
shortage. You might make good use of more memory, but it isn’t strictly
necessary. If you have low free memory, but a lot of active and wired memory,
your system is devouring RAM. Adding memory would let you take advantage
of the buffer cache.
When you’re out of free space and have little or no memory in cache or
buffer, investigate your memory use further. You might well have a memory
shortage. Once you start to use swap, this memory shortage is no longer
hypothetical.
Swap Space Usage
Swap space helps briefly cover RAM shortages. For example, if you’re untar-
ring a huge file you might easily consume all of your physical memory and
start using virtual memory. It’s not worth buying more RAM for such occa-
sional tasks when swap suffices.
In short, swap space is like wine. A glass or two now and then won’t
hurt you and might even be a good choice. Hitting the bottle constantly is
a problem, however.
CPU Usage
A processor can only do so many things a second. If you run more tasks than
your CPU can handle, requests will start to back up, you’ll develop a processor
backlog, and the system will slow down. That’s CPU usage in a nutshell.
If performance is unacceptable and top(1) shows your CPU hovering
around 100 percent all the time, CPU utilization is probably your problem.
While new hardware is certainly an option, you do have other choices. For
example, investigate the processes running on your system to see if they’re
all necessary. Did some junior sysadmin install a SETI@Home client

584 Chapter 19
(/usr/ports/astro/setiathome) to hunt for aliens with your spare CPU cycles?
Is anything running that was important at one time, but not any longer?
Find and shut down those unnecessary processes, and make sure that they
won’t start the next time the system boots.
Once that’s done, evaluate your system performance again. If you still
have problems, try rescheduling or reprioritizing.
Rescheduling
Rescheduling is easier than reprioritizing; it is a relatively simple way to
balance system processes so that they don’t monopolize system resources.
As discussed in Chapter 15, you and your users can schedule programs to
run at specific times with cron(1). If you have users who are running massive
jobs at particular times, you might consider using cron(1) to run them in
off hours. Frequently, jobs such as the monthly billing database search can
run between 6 PM and 6 AM and nobody will care—finance just wants the
data on hand at 8 AM on the first day of the month, so they can close out
last month’s accounting. Similarly, you can schedule your make buildworld
&& make buildkernel at 1 AM.
Reprioritizing with Niceness
If rescheduling won’t work, you’re left with reprioritizing, which can be a little
trickier. When reprioritizing, you tell FreeBSD to change the importance of a
given process. For example, you can have a program run during busy hours,
but only when nothing else wants to run. You’ve just told that program to be
nice and step aside for other programs.
The nicer a process is, the less CPU time it demands. The default
niceness is 0, but niceness runs from 20 (very nice) to -20 (not nice at all).
This might seem backwards; you could argue that a higher number should
mean a higher priority. That would lead to a language problem, however;
calling this factor “selfishness” or “crankiness” instead of “niceness” didn’t
seem like a good idea at the time.3
top(1) displays a PRI column for process priority. FreeBSD calculates a
process’s priority from a variety of factors, including niceness, and runs high-
priority processes first whenever possible. Niceness affects priority, but you
cannot directly edit priority.
If you know that your system is running at or near capacity, you can
choose to run a command with nice(1) to assign the process a niceness.
Specify niceness with nice -n and the nice value in front of the command.
For example, to start a very selfish make buildworld at nice 15, you would run:
# nice -n 15 make buildworld
3 Besides, “selfish” and “cranky” are already taken by the system administrators themselves.

System Performance and Monitoring 585
Only root can assign a negative niceness to a program, as in nice -n -5. For
example, if you have a critical kernel patch that must be applied urgently and
you want the compile to finish as quickly as possible, use a negative niceness:
# cd /usr/src
# nice -n -20 make kernel
Usually, you don’t have the luxury of telling a command to be nice when
you start it, but instead have to change its niceness when you learn that it’s
absorbing all of your system capacity. renice(8) reprioritizes running processes
by their process IDs or owners. To change the niceness of a process, run renice
with the new niceness and the PID as arguments.
For example, one of my systems is a logging host that also runs several
instances of softflowd(8), flow-capture, Nagios, and other critical network
awareness systems. I also have other assorted pieces of software running on
this system, such as a CVSup server for my internal hosts. If I find that intermit-
tent load on the CVSup server is interfering with my Nagios-based network
monitoring or my syslogd(8) server, I must take action. Renicing the cvsupd(8)
server will make the clients run more slowly, but that’s better than slowing
down monitoring. Use pgrep(1) to find cvsupd(8)’s PID:
# pgrep cvsupd
993
# renice 10 993
993: old priority 0, new priority 10
Boom! FreeBSD now schedules the cvsupd process less often than other
processes. This greatly annoys the users of that service, but since I’m the main
user and I’m already annoyed that’s all right.
To renice every process owned by a user, use the -u flag. For example, to
make my processes more important than anyone else’s, I could do this:
# renice -5 -u mwlucas
1001: old priority 0, new priority -5
NICE VS. TCSH
The tcsh(1) shell has a nice command built in. That built-in nice uses the renice(8)
syntax, which is different from nice(1). I’m sure there’s a reason for that other than
annoying tcsh users, but that rationale escapes me at the moment. If you specifically
want to use nice(1), use the full path /usr/bin/nice.

586 Chapter 19
The 1001 is my user ID on this system. Again, presumably I have a very
good reason for doing this, beyond my need for personal power.4 Similarly,
if that user who gobbled up all my disk I/O insists on being difficult, I could
make his processes very, very nice, which would probably solve other users’
complaints.
Investigating Software
We’ve spent a lot of time discussing tuning FreeBSD to solve performance
problems. That’s only logical, as this is a FreeBSD book. Don’t forget about
your software, however! You can frequently solve performance problems by
tweaking the software that’s causing the problems. For example, I have a set
of Perl CGI scripts that thrash disks and choke CPUs. A Google search showed
that these scripts behave much better running under mod_perl2. I changed
the web server configuration, and the problem went away. This is far, far
easier than changing the operating system configuration.
Now that you can look at system problems, let’s learn how to hear what
the system is trying to tell you.
Status Mail
If you look in /etc/crontab, you’ll see that FreeBSD runs maintenance jobs
every day, week, and month through periodic(8). These jobs perform basic
system checks and notify the administrators of changes, items requiring atten-
tion, and potential security issues. The output of each scheduled job is mailed
daily to the root account on the local system. The simplest way to find out
what your system is doing is to read this mail; many very busy system adminis-
trators just like you have collaborated to make these messages useful. While
you might get a lot of these messages, with a little experience you’ll learn
how to skim the reports looking for critical or unusual changes only.
The configuration of the daily, weekly, and monthly reports is controlled
in periodic.conf, as discussed in Chapter 10.
4 Being selfish doesn’t count as a good reason to renice -20 your processes. Or so I’ve been told.
THE BOTTLENECK SHUFFLE
Every system has bottlenecks. If you eliminate one bottleneck, performance will
increase until another bottleneck is hit. The system’s performance is bound by the
slowest component in the computer. For example, a web server is frequently
network-bound because the slowest part of the system is the Internet connection.
If you upgrade your 1.5Mb/s T1 to a 2.4Gb/s OC-48, the system will hand out its
sites as fast as its other components allow. The hypothetical “eliminating bottlenecks”
that management often demands is really a case of “eliminating bottlenecks that
interfere with your usual workload.”
System Performance and Monitoring 587
You probably don’t want to log in as root on all of your servers every day
just to read email, so forward root’s mail from every server to a centralized
mailbox. Make this change in /etc/aliases, as discussed in Chapter 16.
The only place where I recommend disabling these jobs is on embed-
ded systems, which should be managed and monitored through some other
means, such as your network monitoring system. On such a system, disable the
periodic(8) checks in /etc/crontab.
While these daily reports are useful, they don’t tell the whole story. Logs
give a much more complete picture.
Logging with syslogd
The FreeBSD logging system is terribly useful. Any Unix-like operating system
allows you to log almost anything at almost any level of detail. While you’ll
find default system logging hooks for the most common system resources,
you can choose a logging configuration that meets your needs. Almost all
programs integrate with the logging daemon, syslogd(8).
The syslog protocol works through messages. Programs send individual
messages, which the syslog daemon syslogd(8) catches and processes.
syslogd(8) handles each message according to its facility and priority level,
both of which client programs assign to messages. You must understand both
facilities and levels to manage system logs.
Facilities
A facility is a tag indicating the source of a log entry. This is an arbitrary label,
just a text string used to sort one program from another. In most cases, each
program that needs a unique log uses a unique facility. Many programs or
protocols have facilities dedicated to them—for example, FTP is such a
common protocol than syslogd(8) has a special facility just for it. syslogd also
supports a variety of generic facilities that you can assign to any program.
Here are the standard facilities and the types of information they’re
used for.
auth Public information about user authorization, such as when people
logged in or used su(1).
authpriv Private information about user authorization, accessible only
to root.
console Messages normally printed to the system console.
cron Messages from the system process scheduler.
daemon A catch-all for all system daemons without other explicit handlers.
ftp Messages from FTP and TFTP servers.
kern Messages from the kernel.
lpr Messages from the printing system.
mail Mail system messages.

588 Chapter 19
mark This facility puts an entry into the log every 20 minutes. This is
useful when combined with another log.
news Messages from the Usenet News daemons.
ntp Network Time Protocol messages.
security Messages from security programs such as pfctl(8).
syslog Messages from the log system about the log system itself. Don’t
log when you log, however, as that just makes you dizzy.
user The catch-all message facility. If a userland program doesn’t specify
a logging facility, it uses this.
uucp Messages from the Unix-to-Unix Copy Protocol. This is a piece of
pre-Internet Unix history that you’ll probably never encounter.
local0 through local7 These are provided for the system administrator.
Many programs have an option to set a logging facility; choose one of
these if at all possible. For example, you might tell your customer service
system to log to local0.
While most programs have sensible defaults, it’s your job as the system
administrator to manage which programs log to which facility.
Levels
A log message’s level represents its relative importance. While programs send
all of their logging data to syslogd, most systems only record the important
stuff that syslogd receives and discard the rest. Of course, one person’s trivia
is another’s vital data, and that’s where levels come in.
The syslog protocol offers eight levels. Use these levels to tell syslogd
what to record and what to discard. The levels are, in order from most to
least important:
emerg System panic. Messages flash on every terminal. The computer is
basically hosed. You don’t even have to reboot—the system is doing it
for you.5
alert This is bad, but not an emergency. The system can continue to
function, but this error should be attended to immediately.
crit Critical errors include things such as bad blocks on a hard drive or
serious software issues. You can continue to run as is, if you’re brave.
err These are errors that require attention at some point, but they won’t
destroy the system.
warning These are miscellaneous warnings that probably won’t stop the
program that issued them from working just as it always has.
notice This includes general information that probably doesn’t require
action on your part, such as daemon startup and shutdown.
5 You might think this is funny now, but just wait until it happens to you.

System Performance and Monitoring 589
info This includes program information, such as individual transactions
in a mail server.
debug This level is usually only of use to programmers and occasionally
to sysadmins who are trying to figure out why a program behaves as it
does. Debugging logs can contain whatever information the programmer
considered necessary to debug the code, which might include information
that violates user privacy.
none This means, “Don’t log anything from this facility.” It’s most com-
monly used to exclude information from wildcard entries, as we’ll see
shortly.
By combining level with priority, you can categorize messages quite
narrowly and treat each one according to your needs.
Processing Messages with syslogd(8)
The syslogd(8) daemon catches messages from the network and compares
them to entries in /etc/syslog.conf. That file has two columns; the first describes
the log message, either by facility and level, or by program name. The second
tells syslogd(8) what to do when a log message matches the description. For
example, look at this entry from the default syslog.conf:
mail.info /var/log/maillog
This tells syslogd(8) that when it receives a message from the mail
facility with a level of info or higher, the message should be appended to
/var/log/maillog.
Wildcards
You can also use wildcards as an information source. For example, this line
logs every message from the mail facility:
mail.* /var/log/maillog
To log everything from everywhere, uncomment the all.log entry and
create the file /var/log/all.log :
*.* /var/log/all.log
This works, but I find it too informative to be of any real use. You’ll find
yourself using complex grep(1) statements daisy-chained together to find
even the simplest information. Also, this would include all sorts of private
data.

590 Chapter 19
Excluding Information
Use the none level to exclude information from a log. For example, here we
exclude authpriv information from our all-inclusive log. The semicolon allows
you to combine entries on a single line:
*.*; authpriv.none /var/log/most.log
Comparison
You can also use the comparison operators < (less than), = (equals), and >
(greater than) in syslog.conf rules. While syslogd defaults to recording all
messages at the specified level or above, you might want to include only a
range of levels. For example, you could log everything of info level and
above to the main log file while logging the rest to the debug file:
mail.info /var/log/maillog
mail.=debug /var/log/maillog.debug
The mail.info entry matches all log messages sent to the mail facility at
info level and above. The second line only matches the messages that have
a level of precisely debug. You can’t use a simple mail.debug, because the debug-
ging log will then duplicate the content of the previous log. This way, you
don’t have to sort through debugging information for basic mail logs, and
you don’t have to sort through mail transmission information to get your
debugging output.
Local Facilities
Many programs offer to log via syslog. Most of these can be set to a facility of
your choice. The various local facilities are reserved for these programs. For
example, by default dhcpd(8) (see Chapter 15) logs to the facility local7. Here,
we catch these messages and send them to their own file:
local7.* /var/log/dhcpd
If you run out of local facilities, you can use other facilities that the system
is not using. For example, I’ve once used the uucp facility on a busy log server
on a network that had no uucp services.
Logging by Program Name
If you’re out of facilities, you can use the program’s name as a matching term.
An entry for a name requires two lines: the first line contains the program
name with a leading exclamation mark and the second line sets up logging.
For example, FreeBSD uses this to log ppp(8) information:
!ppp
*.* /var/log/ppp.log

System Performance and Monitoring 591
The first line specifies the program name and the second one uses
wildcards to tell syslogd(8) to append absolutely everything to a file.
The !programname syntax affects all lines after it, so you must put it last
in syslogd.conf.
Logging to User Sessions
When you log to a user, any messages that arrive appear on that user’s screen.
To log to a user session, list usernames separated by commas as the destina-
tion. To write a message to all users’ terminals, use an asterisk (*). For
example, the default syslog.conf includes this line:
*.emerg *
This says that any message of emergency level will appear on all users’
terminals. Since these messages usually say “Goodbye” in one way or another,
that’s appropriate.
Sending Log Messages to Programs
To direct log messages to a program, use a pipe symbol (|):
mail.* |/usr/local/bin/mailstats.pl
Logging to a Logging Host
My networks habitually have a single logging host that handles not only the
FreeBSD boxes but also Cisco routers and switches, other Unix boxes, and
any syslog-speaking appliances. This greatly reduces system maintenance and
saves disk space. Each log message includes the hostname, so you can easily
sort them out later.
Use the at symbol (@) to send messages to another host. For example, the
following line dumps everything your local syslog receives to the logging host
on my network:
*.* @loghost.blackhelicopters.org
The syslog.conf on the destination host determines the final destination
for those messages.
On the logging host, you can separate logs by the host where the log
message originated. Use the plus (+) symbol and the hostname to indicate
that the rules that follow apply to this host:
+dhcpserver
local7.* /var/log/dhcpd
+ns1
local7.* /var/log/named
If you’re using this configuration, I recommend placing your generic
rules at the top of syslog.conf and per-host rules near the bottom.

592 Chapter 19
Logging Overlap
syslog doesn’t log on a first-match or last-match basis; instead, it logs according
to every matching rule. This means you can easily have one log message in
several different logs. Consider the following snippet of log configuration.
(The first line is taken from the default FreeBSD syslog.conf but is trimmed to
fit legibly on paper.)
*.notice;authpriv.none /var/log/messages
local7.* /var/log/dhcp
Every message of level notice or more is logged to /var/log/messages.
We have our DHCP server logging to /var/log/dhcp. This means that any
DHCP messages of notice level or above will be logged to both /var/log/
messages and /var/log/dhcpd. I don’t like this; I want my DHCP messages
only in /var/log/dhcpd. I can deliberately exclude DHCP messages from
/var/log/messages by using the none facility:
*.notice;authpriv.none;local7.none /var/log/messages
My /var/log/messages syslog configuration frequently grows quite long as I
exclude every local facility from it, but that’s all right.
syslogd Customization
FreeBSD runs syslogd by default, and out of the box it can be used as a logging
host. You can customize how it works through the use of command-line flags.
You can specify flags either on the command line or in rc.conf as syslogd_flags.
Allowed Log Senders
You can specify exactly which hosts syslogd(8) accepts log messages from.
This can be useful so you don’t wind up accepting logs from random people
on the Internet. While sending you lots of logs could be used to fill your hard
drive as a preparation for an attack, it’s more likely to be the result of a
misconfiguration. Your log server should be protected by a firewall in any case.
Use the -a flag to specify either the IP addresses or the network of hosts that
can send you log messages, as these two (mutually exclusive) examples show:
syslogd_flags="-a 192.168.1.9"
syslogd_flags="-a 192.168.1.0/24"
SPACES AND TABS
Traditional Unix-like operating systems require tabs between the columns in
syslog.conf, but FreeBSD permits you to use spaces. Be sure to use only tabs if
you share the same syslog.conf between different operating systems.

System Performance and Monitoring 593
While syslogd(8) would also accept DNS hostsnames and domain names
for this restriction, DNS is really an unsuitable access control device.
You can entirely disable accepting messages from remote hosts by
specifying the -s flag, FreeBSD’s default. If you use -ss instead, syslogd(8)
also disables sending log messages to remote hosts. Using -ss removes
syslogd(8) from the list of network-aware processes that show up in sockstat(1)
and netstat(1). While this half-open UDP socket is harmless, some people
feel better if syslogd(8) doesn’t appear attached to the network at all.
Attach to a Single Address
syslogd(8) defaults to attaching to UDP port 514 on every IP address the
system has. Your jail server needs syslogd, but a jail machine can only run
daemons that bind to a single address. Use the -b flag to force syslogd(8) to
attach to a single IP:
syslogd_flags="-b 192.168.1.1"
Additional Log Sockets
syslogd(8) can accept log messages via Unix domain sockets as well as over
the network. The standard location for this is /var/run/log. No chrooted
processes on your system can access this location, however. If you want those
chrooted processes to run, you must either configure them to log over the
network or provide an additional logging socket for them. Use the -l flag for
this and specify the full path to the additional logging socket:
syslogd_flags="-l /var/named/var/run/log"
The named(8) and ntpd(8) programs come with FreeBSD and are
commonly chrooted. The /etc/rc.d/syslogd is smart enough to add the
appropriate syslogd sockets if you chroot these programs through rc.conf.
Verbose Logging
Logging with verbose mode (-v) prints the numeric facility and level of each
message written in the local log. Using doubly verbose logging prints the name
of the facility and level instead of the number:
syslogd_flags="-vv"
These are the flags I use most commonly. Read syslogd(8) for the
complete list of options.
Log File Management
Log files grow, and you must decide how large they can grow before you trim
them. The standard way to do this is through log rotation. When logs are
rotated, the oldest log is deleted, the current log file is closed up and given a
new name, and a new log file is created for new data. FreeBSD includes a

594 Chapter 19
basic log file processor, newsyslog(8), which also compresses files, restarts
daemons, and in general handles all the routine tasks of log file shuffling.
cron(1) runs newsyslog(8) once per hour.
When newsyslog(8) runs, it reads /etc/newsyslog.conf and examines each
log file listed therein. If the conditions for rotating the log are met, the log is
rotated and other actions are taken as appropriate. /etc/newsyslog.conf uses
one line per log file; each line has seven fields, like this:
/var/log/ppp.log root:network 640 3 100 * JC
Let’s examine each field in turn.
Log File Path
The first entry on each line (/var/log/ppp.log in the example) is the full path
to the log file to be processed.
Owner and Group
The second field (root:network in our example) lists the rotated file’s owner
and group, separated by a colon. This field is optional and is not present in
many of the standard entries.
newsyslog(8) can change the owner and group of old log files. By default,
log files are owned by the root user and the wheel group. While it’s not
common to change the owner, you might need this ability on multi-user
machines.
You can also choose to change only the owner, or only the group. In
these cases, you use a colon with a name on only one side of it. For example,
:www changes the group to www, while mwlucas: gives me ownership of the file.
Permissions
The third field (640 in our example) gives the permissions mode in standard
Unix three-digit notation.
Count
This field specifies the oldest rotated log file that newsyslog(8) should keep.
newsyslog(8) numbers archived logs from newest to oldest, starting with the
newest as log 0. For example, with the default count of 5 for /var/log/messages,
you’ll find the following message logs:
messages
messages.0.bz
messages.1.bz
messages.2.bz
messages.3.bz
messages.4.bz
messages.5.bz
System Performance and Monitoring 595
Those of you who can count will recognize that this makes six archives,
not five, plus the current log file, for a week of logs. As a rule, it’s better to
have too many logs than too few; however, if you’re tight on disk space,
deleting an extra log or two might buy you time.
Size
The fifth field (100 in our example) is the file size in kilobytes. When
newsyslog(8) runs, it compares the size listed here with the size of the file. If
the file is larger than the size given here, newsyslog(8) rotates the file. If you
don’t want the file size to affect when the file is rotated, put an asterisk here.
Time
So far this seems easy, right? The sixth field, rotation time, changes that. The
time field has four different legitimate types of value: an asterisk, a number,
and two different date formats.
If you rotate based on log size rather than age, put an asterisk here.
If you put a plain naked number in this field, newsyslog(8) rotates the
log after that many hours have passed. For example, if you want the log to
rotate every 24 hours but don’t care about the exact time when that happens,
put 24 here.
The date formats are a little more complicated.
ISO 8601 Time Format
Any entry beginning with an @ symbol is in the restricted ISO 8601 time
format. This is a standard used by newsyslog(8) on most Unix-like systems;
it was the time format used in MIT’s primordial newsyslog(8). Restricted
ISO 8601 is a bit obtuse, but every Unix-like operating system supports it.
A full date in the restricted ISO 8601 format is 14 digits with a T in the
middle. The first four digits are the year, the next two the month, the next
two the day of the month. The T is inserted in the middle as a sort of decimal
point, separating whole days from fractions of a day. The next two digits are
hours, the next two minutes, the last two seconds. For example, the date of
March 2, 2008, 9:15 and 8 seconds PM is expressed in restricted ISO 8601 as
20080302T211508.
While complete dates in restricted ISO 8601 are fairly straightforward,
confusion arises when you don’t list the entire date. You can choose to specify
only fields near the T, leaving fields further away as blank. Blank fields are
wildcards. For example, 1T matches the first day of every month. 4T00 matches
midnight of the fourth day of every month. T23 matches the twenty-third
hour, or 11 PM, of every day. With a newsyslog.conf time of @T23, the log rotates
every day at 11 PM.
As with cron(1), you must specify time units in detail. For example,
@7T, the seventh day of the month, rotates the log once an hour, every hour,
on the seventh day of the month. After all, it matches all day long! A time of

596 Chapter 19
@7T01 would rotate the log at 1 AM on the seventh day of the month, which is
probably more desirable. You don’t need more detail than an hour, however,
as newsyslog(8) only runs once an hour.
FreeBSD-Specific Time
The restricted ISO 8601 time system doesn’t allow you to easily designate
weekly jobs, and it’s impossible to specify the last day of the month. That’s why
FreeBSD includes a time format that lets you easily perform these common
tasks. Any entry with a leading cash sign ($) is written in the FreeBSD-specific
month week day format.
This format uses three identifiers: M (day of month), W (day of week), and
H (hour of day). Each identifier is followed by a number indicating a particular
time. Hours range from 0 to 23, while days run from 0 (Sunday) to 6 (Saturday).
Days of the month start at 1 and go up, with L representing the last day of the
month. For example, to rotate a log on the fifth of each month at noon I
could use $M5H12. To start the month-end log accounting at 10 PM on the last
day of the month, use $MLH22.
Flags
The flags field dictates any special actions to be taken when the log is rotated.
This most commonly tells newsyslog(8) how to compress the log file, but you
can also signal processes when their log is rotated out from under them.
Log File Format and Compression
Logs can be either text or binary files.
Binary files can only be written to in a very specific manner. newsyslog(8)
starts each new log with a “logfile turned over” message, but adding this text
to a binary file would damage it. The B flag tells newsyslog(8) that this is a
binary file and that it doesn’t need this header.
Other log files are written in plain old ASCII text, and newsyslog(8) can
and should add a timestamped message to the top of the file indicating when
the log was rotated. Additionally, compressing old log files can save consider-
able space. The J flag tells newsyslog(8) to compress archives with bzip(1),
while the Z flag specifies gzip compression.
Special Log File Handling
newsyslog(8) can perform a few special tasks when it creates and rotates
log files. Here are the most common; you can read about the others in
newsyslog.conf(5).
ROTATING ON SIZE AND TIME
You can rotate logs at a given time, when they reach a certain size, or both. If you
specify both size and time, the log rotates whenever either condition is met.

System Performance and Monitoring 597
If you don’t want to back up certain logs, use the D flag to set the NODUMP
flag on newly created log files.
Perhaps you have many similar log files that you want to treat identically.
The G flag tells newsyslog that the log file name at the beginning of the line is
actually a shell glob, and that all log files that match the expression are to be
rotated in this manner. To learn about regular expressions, read regexp(3).
Bring aspirin.
You might want newsyslog to create a file if it doesn’t exist. Use the C flag
for this. The syslogd program will not log to a nonexistent file.
The N flag explicitly tells newsyslog to not send a signal when rotating
this log.
Finally, use a hyphen (-) as a placeholder when you don’t need any of
these flags. However, you will need one of the newsyslog.conf flags further
down the line, such as when specifying the path to a pidfile.
Pidfile
The next field is a pidfile path (not shown in our example, but look at
/etc/newsyslog.conf for a couple of samples). A pidfile records a program’s
process ID so that other programs can easily view it. If you list the full path to
a pidfile, newsyslog(8) sends a kill -HUP to that program when it rotates the
log. This signals the process to close its logfiles and restart itself. Not all
processes have pidfiles, and not all programs need this sort of special care
when rotating their logs.
Signal
Most programs perform logfile rotation on a SIGHUP, but some programs need a
specific signal when their logs are rotated. You can list the exact signal neces-
sary in the last field, after the pidfile.
Sample newsyslog.conf Entry
Let’s slap all this together into a worst-case, you-have-got-to-be-kidding
example. A database log file needs rotation at 11 PM on the last day of the
month. The database documentation says that you must send the server an
interrupt signal (SIGINT, or signal number 2) on rotation. You want the
archived logs to be owned by the user dbadmin and only viewable by that
user. You need six months of logs. What’s more, the logs are binary files.
Your newsyslog.conf line would look like this:
/var/log/database dbadmin: 600 6 * $MLH23 B /var/run/db.pid 2
This is a deliberately ugly example; in most cases you just slap in the
filename and the rotation condition and you’re done.
598 Chapter 19
FreeBSD and SNMP
Emailed reports are nice but general, and logs are difficult to analyze for
long-term trends. The industry standard for network, server, and service
management is Simple Network Management Protocol, or SNMP. Many different
vendors support SNMP as a protocol for gathering information from many
different devices across the network. FreeBSD includes an SNMP agent,
bsnmpd(8), that not only provides standard SNMP functions but also gives
visibility to FreeBSD-specific features.
bsnmpd (short for Begemot SNMPD) is a minimalist SNMP agent specifically
designed to be extensible. All actual functionality is provided via external
modules. FreeBSD includes the bsnmpd modules for standard network
SNMP functions and modules for specific FreeBSD features, such as PF and
netgraph(4). bsnmpd does not try to be all things to all people, but rather
offers a foundation where everyone can build an SNMP implementation that
does only what they need, no more and no less.
SNMP 101
SNMP works on a classic client-server model. The SNMP client, or agent,
sends a request across the network to an SNMP server. The SNMP server,
bsnmpd, gathers information from the local system and returns it to the
client.
An SNMP agent can also send a request to make changes to the SNMP
server. If the system is properly (or improperly, depending on your point of
view) configured, you can issue commands via SNMP. This “write” config-
uration is most commonly used in routers, switches, and other embedded
network devices. Most Unix-like operating systems have a command-line
management system and don’t usually accept instruction via SNMP. Writing
system configuration or issuing commands via SNMP requires careful setup
and raises all sorts of security issues; it’s an excellent topic for an entire book.
No system administrator I know is comfortable managing their system via
SNMP. With all of this in mind, we’re going to focus specifically on read-
only SNMP.
In addition to having an SNMP server answer requests from an SNMP
client, the client can transmit SNMP traps to a trap receiver elsewhere on the
network. An SNMP agent generates these traps in response to particular
events on the server. SNMP traps are much like syslogd(8) messages, except
that they follow the very specific format required by SNMP. FreeBSD does
not include an SNMP trap receiver at this time; if you need one, check out
snmptrapd(8) from net-snmp (/usr/ports/net-mgmt/net-snmp).
SNMP MIBs
SNMP manages information via a Management Information Base, or MIB, a tree-
like structure containing hierarchical information in ASN.1 format. We’ve
seen an example of a MIB tree before: the sysctl(8) interface discussed in
Chapter 5.

System Performance and Monitoring 599
Each SNMP server has a list of information it can extract from the local
computer. The server arranges these bits of information into a hierarchical
tree. Each SNMP MIB tree has very general main categories: network, physical,
programs, and so on, with more specific subdivisions in each. Think of the
tree as a well-organized filing cabinet, where individual drawers hold specific
information and files within drawers hold particular facts. Similarly, the upper-
most MIB contains a list of MIBs beneath it.
MIBs can be referred to by name or by number. For example, here’s a
MIB pulled off a sample system:
interfaces.ifTable.ifEntry.ifDescr.1 = STRING: "fxp0"
The first term in this MIB, interfaces, shows us that we’re looking at this
machine’s network interfaces. If this machine had no interfaces, this first
category would not even exist. The ifTable is the interface table, or a list of all
the interfaces on the system. ifEntry shows one particular interface, and ifDescr
means that we’re looking at a description of this interface. This MIB can be
summarized as, “Interface number 1 on this machine is called fxp0.”
MIBs can be expressed as numbers, and most SNMP tools do their work
natively in numerical MIBs. Most people prefer words, but your poor brain
must be capable of working with either. A MIB browser can translate between
the numerical and word forms of an SNMP MIB for you, or you could install
/usr/ports/net-mgmt/net-snmp and use snmptranslate(1), but for now just trust
me. The preceding example can be translated to:
.1.3.6.1.2.1.2.2.1.2.1
Expressed in words, this MIB has 5 terms separated by dots. Expressed
in numbers, the MIB has 11 parts. That doesn’t look quite right if they’re
supposed to be the same thing. What gives?
The numerical MIB is longer because it includes the default .1.3.6.1.2.1,
which means .iso.org.dod.internet.mgmt.mib-2. This is the standard subset of
MIBs used on the Internet. The vast majority of SNMP MIBs (but not all)
have this leading string in front of them, so nobody bothers writing it down
any more.
If you’re in one of those difficult moods, you can even mix words and
numbers:
.1.org.6.1.mgmt.1.interfaces.ifTable.1.2.1
At this point, international treaties permit your co-workers to drive you
from the building with pitchforks and flaming torches. Pick one method of
expressing MIBs and stick to it.
MIB Definitions and MIB Browsers
MIBs are defined according to a very strict syntax and are documented in MIB
files. Every SNMP agent has its own MIB files; bsnmpd’s are in /usr/share/snmp.
These files are very formal plaintext. While you can read and interpret them
600 Chapter 19
with nothing more than your brain, I highly recommend copying them to a
workstation and installing a MIB browser so that you can comprehend them
more easily.
MIB browsers interpret MIB files and present them in their full tree-like
glory, complete with definitions of each part of the tree and descriptions of
each individual MIB. Generally speaking, a MIB browser lets you enter a
particular MIB and displays both the numerical and word definitions of that
MIB, along with querying an SNMP agent for the status of that MIB.
If you have a FreeBSD (or lesser Unix-like) workstation, use mbrowse
(/usr/ports/net-mgmt/mbrowse) for MIB browsing. Windows systems have many
options, but Getif (http://www.wtcs.org) is a decent no-cost choice. If you
don’t want to use a graphical interface for SNMP work, check out net-snmp
(/usr/ports/net-mgmt/net-snmp) for a full assortment of command-line SNMP
client tools.
SNMP Security
Many security experts state that SNMP really stands for “Security: Not My
Problem!” This is rather unkind but very true. SNMP needs to be used only
behind firewalls on trusted networks. If you must use SNMP on the naked
Internet, use packet filtering to keep the public from querying your SNMP
service. SNMP agents run on UDP port 161.
SNMP provides basic security through communities. If you go looking
around you’ll find all sorts of explanations why a community is not the same
thing as a password, but a community is a password. Most SNMP agents have
two communities by default: public (read-only access) and private (read-write
access). Yes, there’s a default that provides read-write access. Your first task
whenever you provision an SNMP agent on any host, on any OS, is to disable
those default community names and replace them with ones that haven’t
been widely documented for decades.
SNMP comes in different versions. Version 1 was the first attempt, and
version 2c is the modern standard. You’ll see references to SNMP version 3,
which uses advanced encryption to protect data on the wire. Very few vendors
actually implement SNMPv3, however. FreeBSD’s bsnmpd(8) uses SNMPv2c.
This means that anyone with a packet sniffer can capture your SNMP commu-
nity name, so be absolutely certain you’re only using SNMP on a private
network. Making SNMP queries over an untrusted network is a great way to
have strangers poking at your system management.
Configuring bsnmpd
Before you can use SNMP to monitor your system, you must configure the
SNMP daemon. Configure bsnmpd(8) in /etc/snmpd.config. In addition to
including the default communities of public and private, the default config-
uration does not enable any of the FreeBSD-specific features that make
bsnmpd(8) desirable.

System Performance and Monitoring 601
bsnmpd Variables
bsnmpd uses variables to assign values to configuration statements. Most
high-visibility variables are set at the top of the configuration file, as you’ll
see here:
location := "Room 200"
contact := "sysmeister@example.com"
system := 1 # FreeBSD
traphost := localhost
trapport := 162
These top variables define values for MIBs that should be set on every
SNMP agent. The location describes the physical location of the machine.
Every system needs a legitimate email contact. bsnmpd(8) runs on operating
systems other than FreeBSD, so you have the option of setting a particular
operating system here. Lastly, if you have a trap host, you can set the server
name and port here.
Further down the file, you can set the SNMP community names:
# Change this!
read := "public"
# Uncomment begemotSnmpdCommunityString.0.2 below that sets the community
# string to enable write access.
write := "geheim"
trap := "mytrap"
The read string defines the read-only community of this SNMP agent.
The default configuration file advises you to change it. Take that advice. The
write string is the read-write community name, which is disabled by default
further down in the configuration file. You can also set the community name
for SNMP traps sent by this agent.
With only this configuration, bsnmpd(8) will start, run, and provide basic
SNMP data for your network management system. Just set bsnmpd_enable="YES"
in /etc/rc.conf to start bsnmpd at boot. You won’t get any special FreeBSD
functionality, however. Let’s go on and see how to manage this.
Detailed bsnmpd Configuration
bsnmpd(8) uses the variables you set at the top of the configuration file to
assign values to different MIBs later in the configuration. For example, at the
top of the file you set the variable read to public. Later in the configuration
file, you’ll find this statement:
begemotSnmpdCommunityString.0.1 = $(read)
This sets the MIB begemotSnmpdCommunityString.0.1 equal to the value of
the read variable.

602 Chapter 19
Why not just set these values directly? bsnmpd(8) is specifically designed
to be extensible and configurable. Setting a few variables at the top of the file
is much easier than directly editing the rules further down the file.
Let’s go back to this begemotSnmpdCommunityString MIB set here. Why are
we setting this? Search for the string in your MIB browser, and you’ll see that
this is the MIB that defines an SNMP community name. You probably could
have guessed that from the assignment of the read variable, but it’s nice to
confirm that.
Similarly, you’ll find an entry like this:
begemotSnmpdPortStatus.0.0.0.0.161 = 1
Checking the MIB browser shows that this dictates the IP address and the
UDP port that bsnmpd(8) binds to (in this case, all available addresses, on
port 161). All MIB configuration is done in this manner.
Loading bsnmpd Modules
Most of bsnmpd’s interesting features are configured through modules.
Enable modules in the configuration file by giving the begemotSnmpdModulePath
MIB a class that the module handles and the full path to the shared library
that implements support for that feature. For example, in the default config-
uration you’ll see a commented-out entry for the PF bsnmpd(8) module:
begemotSnmpdModulePath."pf" = "/usr/lib/snmp_pf.so"
This enables support for PF MIBs. Your network management software
will be able to see directly into PF when you enable this, letting you track
everything from dropped packets to the size of the state table.
As of this writing, FreeBSD’s bsnmpd(8) ships with the following
FreeBSD-specific modules. All of these modules are disabled by default,
but you can enable them by just uncommenting their configuration file
entries.
Netgraph Provides visibility into all Netgraph-based network features,
documented in snmp_netgraph(3).
PF Provides visibility into the PF packet filter.
Hostres Implements the Host Resources SNMP MIB, snmp_hostres(3).
bridge Provides visibility into bridging functions, documented in
snmp_bridge(3).
Restart bsnmpd(8) after enabling any of these in the configuration file.
If the program won’t start, check /var/log/messages for errors.
With bsnmpd(8), syslogd(8), status emails, and a wide variety of
performance analysis tools, you can make your FreeBSD system the best-
monitored device on the network. Now that you can see everything your
system offers, grab a flashlight as we explore a few of FreeBSD’s darker
corners.

20
THE FRINGE OF FREEBSD
If you hang around the FreeBSD com-
munity for any length of time, you’ll hear
mention of all sorts of things that can be
done if you know how. People build embedded
FreeBSD devices and ship them to customers all over
the world, who don’t even know that they have a
Unix-like server inside the little box running their air conditioner or radio
relay station. People run FreeBSD on machines without hard drives, support-
ing hundreds or thousands of diskless workstations from a single server.
You’ll find bootable CDs and USB devices that contain complete FreeBSD
systems, including all the installed software you could ever want. These
things aren’t difficult to do, once you know the tricks.
In this chapter, we’re headed into the fringes of FreeBSD—the really
cool things that are done by FreeBSD users, but aren’t necessarily supported
by the mainstream FreeBSD Project. While you can find support and assistance
through the usual channels, you must be prepared to debug and troubleshoot
everything in this chapter even more than usual.

604 Chapter 20
/etc/ttys
The file /etc/ttys controls how and where users may log into your FreeBSD
system. While you can set per-user restrictions on account logins elsewhere,
the /etc/ttys file controls which devices are available for logins and how they
can be used. While most people use only the console and SSH connections
that FreeBSD ships with, you can configure other devices to allow logins.
Remember, tty is short for teletype. Once upon a time, the main output
interface for a Unix-like system was a teletype. Anything you can log in on is
considered a tty. FreeBSD supports many different types of terminal devices,
from old-fashioned serial terminals to the usual keyboard/video/mouse
console to SSH and telnet sessions. FreeBSD systems offer four standard
login devices, or terminals: the console, virtual terminals, dial-up terminals,
and pseudoterminals.
The console is the only device available in single-user mode. On most
FreeBSD systems, this is either a video console that includes the monitor and
keyboard, or a serial console accessed from another system. Once the system
hits multi-user mode, the console is usually attached to a virtual terminal
instead. The console device is /dev/console.
A virtual terminal is attached to the physical monitor and keyboard.
If you’re not using X, you can have multiple terminals on your one physical
terminal. Switch between them with ALT and the function keys. For example,
the next time you’re at a console, hit ALT-F2. You’ll see a fresh login screen,
with ttyv1 after the host name. This is the second virtual terminal. Hitting
ALT-F1 takes you back to the main virtual terminal. By default, FreeBSD has
eight virtual terminals and reserves a ninth for X Windows. You can use
the eight virtual text terminals even when you’re in X, and some X desktops
provide multiple X virtual terminals. The virtual terminals are the /dev/ttyv
devices.
A dial-up terminal is connected via serial line. You can attach modems
directly to your serial ports and let users dial into your server. This is not so
common these days, but the same functionality supports logging in over a
serial console. Dial-up terminals are the /dev/ttyd devices.
Finally, a pseudoterminal is implemented entirely in software. When you
SSH into your server, you don’t need any actual hardware, but the software
still needs a device node for your login session. Pseudoterminals are the
/dev/ttyp devices.
Configure access to terminal devices in /etc/ttys. Most terminal devices
don’t require configuration—after all, if you can get a pseudoterminal it’s
because you’ve been authenticated and authorized to connect through
SSH, telnet, or some other network protocol. The useful things you can do
here are setting the console to require a password and enabling logins over
a serial console.
/etc/ttys Format
A typical entry in /etc/ttys looks like this:
ttyv0 "/usr/libexec/getty Pc" cons25 on secure

The Fringe of FreeBSD 605
The first entry is the console device. In this case, ttyv0 is the first virtual
terminal on the system.
The second field is the program that is spawned to process login requests
on this terminal. FreeBSD uses getty(8) for this on everything except pseudo-
terminals. Pseudoterminals process their login requests through whatever
daemon the user logs in through.
The third entry is the terminal type. You’ve probably heard of the vt100
terminal, or even the Sun terminal. On FreeBSD, the monitor uses a type of
cons25, which is a 25-character by 80-character screen. Pseudoterminals use
the terminal type of network; their features are determined by the server
daemon and the client software.
The fourth entry determines if the terminal is available for logins or not.
This is either on for accepting logins or off for not allowing them. Pseudo-
terminals are activated upon demand.
This example also includes the keyword secure, which tells getty(8) that
root may log in to this console.
Offering terminals is a low-level system task handled directly by init(8).
Changes to /etc/ttys do not take effect until you restart init(8). init is always
PID 1.
# kill -1 1
Insecure Console
When you boot FreeBSD in single-user mode, you get a root command
prompt. This is fine for your laptop and works nicely for servers in your
corporate datacenter, but what about machines in untrusted facilities? If
you have a server in a co-location center, for example, you probably don’t
want just anyone to be able to get root-level access to a machine. You can
tell FreeBSD that the physical console is insecure and make it require the
root password to enter single-user mode. The system will then boot from
power-on to multi-user mode without requiring a password, but will require
the password when you explicitly boot in single-user mode.
Requiring a password in single-user mode does not completely protect
your data, but it does raise the bar considerably. A lone tech working late,
when nobody’s looking, could boot your system into single-user mode and
add an account for himself in only fifteen minutes or so. Dismantling your
machine, removing the hard drives, mounting them into another machine,
making changes, and bringing your server back online requires much more
time, is far more intrusive, and is much more likely to be noticed by co-location
management.
Find the console entry in /etc/ttys:
console none unknown off secure

606 Chapter 20
You’ll see that the console terminal isn’t as full-featured as other terminals;
it doesn’t run getty(8) and uses the generic unknown terminal type. The console
is intended for use only in single-user mode or when attached to another
terminal, however, so that’s fine.
To make the console require a root login when booted into single-user
mode, change the secure to insecure.
Serial Logins
We talked about serial consoles back in Chapter 3. In addition to providing
console access, FreeBSD lets you log in through a serial port. In many Unix-
like systems in the 1970s and 1980s, this was the only way to get a login prompt.
While it’s fallen into disfavor today thanks to the ubiquitous network, a serial
login is very useful on a system where you already have a serial console or
where the system does not support a video console. Systems without the
standard video monitor and keyboard are called headless systems.
To enable logging in on a serial line, find the /etc/ttys entry for your serial
port. The default configuration lists four dial-up terminals, ttyd0 through
ttyd3. These correspond to serial ports sio0 through sio3, or COM1 through
COM4. Let’s assume you have a serial console attached to the first serial port.
ttyd0 "/usr/libexec/getty std.9600" dialup off secure
This is pretty easy to configure. The port is off . Change it to on.
Serial logins are slower than network logins. They’re limited by the speed
of the serial port. This can be a problem when you have a serial console
and a serial login. The console prints debugging messages to your serial login
session, which takes up bandwidth on the serial port. If you have a lot of log
messages arriving quickly, they can prevent you from using the serial console.
Even so, a serial login is invaluable for headless servers and embedded devices,
as we’ll see later in this chapter.
Diskless FreeBSD
While FreeBSD isn’t difficult to manage, dozens or hundreds of nearly iden-
tical systems can become quite a burden. One way to reduce your maintenance
overhead is to use diskless systems. Diskless systems are not forbidden to have
hard drives; rather, they load their kernel and operating system from an NFS
server elsewhere on the network.
Why use a diskless system for your server farm? Multiple systems can boot
off of a single NFS server, centralizing all patch and package management.
This is excellent for collections of terminals, computation clusters, and other
environments where you have large numbers of identical systems. Rolling
out an operating system update becomes a simple matter of replacing files
on the NFS server. Similarly, when you discover that an update has problems,
reverting it is as simple as restoring files on the NFS server. In either case, the
only thing you have to do at the client side is reboot. As the clients have

The Fringe of FreeBSD 607
read-only access to the server, untrusted users cannot make any changes to
their local systems that couldn’t be undone by rebooting. If you have only a
couple of systems, running diskless might be too much work for you, but any
more than that and diskless is a clear winner.
Before you can run diskless systems, you must have an NFS server, a DHCP
server, a TFTP server, and hardware that supports diskless booting. Let’s go
through each and see how to set it up.
Diskless Clients
Machines that run diskless must have enough smarts to find their boot loader
and operating system over the network. There are two standard ways of doing
this: BOOTP and PXE. BOOTP, the Internet Bootstrap Protocol, is an older
standard that fell out of favor long ago. PXE, Intel’s Preboot Execution Envi-
ronment, has been supported on almost every new machine for years now, so
we’ll concentrate on that.
Boot your diskless client machine and go into the BIOS setup. Somewhere
in the BIOS you will find an option to set the boot device order. If the machine
supports PXE, one of those options will be the network. Enable that option
and have the machine try it first.
Your diskless client is ready. Now let’s get the server ready.
DHCP Server Setup
While most people think of DHCP as a way to assign IP addresses to clients,
it can provide much more than that. You can configure your DHCP server to
provide the locations of a TFTP server, an NFS server, and other network
resources. Diskless systems make extensive use of DHCP, and you’ll find that
we use DHCP options you never tried before. Configuring the ISC DHCP
server to handle diskless systems is pretty straightforward, once you have the
MAC address of your diskless workstation.
MAC Address
To assign configuration information to a DHCP client, you need the MAC
address of that client’s network card. Some BIOS implementations provide
the MAC addresses of integrated network cards, and some server-grade hard-
ware has labels with the MAC address printed on them. Those options, how-
ever, are too easy, so we’ll try the hard way.
TEST, TEST, TEST!
Your first diskless setup will be much like your first firewall setup: error-prone, trouble-
some, and infuriating. I strongly suggest that you test each step of the preparation so
that you can find and fix problems more easily. Test instructions are provided for
each required service.

608 Chapter 20
When a machine tries to boot off the network, it makes a DHCP request
for its configuration information. While you don’t have a diskless config-
uration yet, any DHCP server logs the MAC address of clients. For example,
when I boot my diskless client, my DHCP log shows:
Jul 27 10:15:49 sardines dhcpd: DHCPDISCOVER from 00:00:24:c1:cb:a4 via fxp0
Jul 27 10:15:49 sardines dhcpd: DHCPOFFER on 192.168.1.78 to 00:00:24:c1:cb:a4 via fxp0
This client has a MAC address of 00:00:24:c1:cb:a4 and has been offered
IP address 192.168.1.78. Given this information, we can create a DHCP config-
uration to assign this host a static IP address and provide its boot information.
DHCP Configuration: Specific Diskless Hosts
We configured basic DHCP services in Chapter 15. Here’s a sample dhcpd(8)
configuration for a diskless client. This does not go inside a subnet statement,
but is a top-level statement on its own.
group diskless {
next-server 192.168.1.1;
filename "pxeboot";
option root-path "192.168.1.1:/var/diskless/1/";
host diskless1.blackhelicopters.org {
hardware ethernet 00:00:24:c1:cb:a4 ;
fixed-address 192.168.1.99 ;
}
}
We define a group called diskless . The group will allow us to assign
certain parameters to the group and then just add hosts to the group. Every
host in the group gets those same parameters.
The next-server setting tells the DHCP clients the IP address of a
TFTP server, and the filename option tells clients the name of the boot
loader file to request from that TFTP server. Remember from Chapter 3
that the boot loader is the software that finds and loads the kernel. Finally,
option root-path tells the boot loader where to find the root directory for
this machine. All of these options and settings are given to all clients in the
diskless group.
We then assign our diskless client to the diskless group using the host state-
ment and the hostname of this system . Our first client is called diskless1.
This client is identified by its MAC address and is assigned a static IP .
It also receives the standard configuration for this group.
Create additional host entries just like this for every diskless host on your
network.
Restart dhcpd(8) to make this configuration take effect. Now reboot
your diskless client. The DHCP log should show that you have offered this
client its static address. However, the DHCP client cannot boot any further
without a boot loader, which means you need a TFTP server.

The Fringe of FreeBSD 609
DHCP Configuration: Diskless Farms
Perhaps you have a large number of identical diskless hosts, such as thin clients
in a terminal room. It’s perfectly sensible to not want to make a static DHCP
entry for each thin client. Let these hosts get their boot information from the
DHCP server, but without specifying a host address. They’ll just take an
address out of the DHCP pool.
You can also specifically identify hosts that are requesting DHCP infor-
mation from PXE and assign those hosts to a specific group of addresses.
A host booting with PXE identifies itself to the DHCP server as a client of
type PXEclient. You can write specific rules to match clients of that type and
configure them appropriately. Look in the DHCP manual for information
on how to match on vendor-class-identifier and dhcp-client-identifier.
tftpd and the Boot Loader
We covered configuring a TFTP server in Chapter 15. The TFTP server must
provide the pxeboot file for your diskless clients. FreeBSD installs pxeboot in the
/boot directory.
# cp /boot/pxeboot /tftpboot
# chmod +r /tftpboot/pxeboot
Try to download pxeboot via TFTP from your workstation. If that works,
reboot your diskless client and watch it try to boot. The console should show
a message like this:
Building the boot loader arguments
Relocating the loader and the BTX
Starting the BTX loader
You’ve seen this message before, when a regular FreeBSD boots off its
hard drive. Your diskless client will stop here, because it can’t mount the
userland that doesn’t yet exist. That’s a job for your NFS server.
The NFS Server and the Diskless Client Userland
Many tutorials on diskless operation suggest using the server’s userland and
root partition for diskless clients. That might be easy to do, but it’s not even
vaguely secure. Your diskless server probably has programs on it that you
don’t want the clients to have access to, and it certainly has sensitive security
information that you don’t want to hand out to a whole bunch of workstations.
Providing a separate userland is a much wiser option.

610 Chapter 20
While you can provide a separate userland in many ways, I find that
the simplest is to slightly modify the jail(8) construction process from
Chapter 9. First, make a directory for our diskless clients, and then install
a userland and kernel in that directory. Here we install our new userland
in /var/diskless/1:
# mkdir -p /var/diskless/1
# cd /usr/src
# make installworld DESTDIR=/var/diskless/1
# make installkernel DESTDIR=/var/diskless/1
# make distribution DESTDIR=/var/diskless/1
This installs a vanilla FreeBSD userland in /var/diskless/1.
Now tell your NFS server about this directory. I intend to install several
diskless systems on this network, so I offer this directory via NFS to my entire
subnet. The clients do not need write access to the NFS root, so I export it
read-only. The following /etc/exports line does this:
/var/diskless/1 -ro -maproot=0 -alldirs -network 192.168.1.0 -mask 255.255.255.0
Restart mountd(8) via /etc/rc.d/mountd to make this share available and
try to mount it from a workstation. Confirm that the directory contains a
basic userland visible from the client and that you cannot write to the file-
system. After that, reboot your diskless client and see what happens. It should
find the kernel and boot into an unconfigured multi-user mode. Depending
on the server, client, and network speed, this might take a while to complete.
My main laptop netboots nearly as quickly as it boots from the hard drive,
while my 266 MHz Soekris net4801 takes several minutes to boot.
At this point, you could configure your userland to specifically match
your single diskless client. You could make changes in /etc, such as creating
/etc/fstab that reflects your needs, and copy password files into place. That
would suffice for one client, but FreeBSD has infrastructure designed
specifically to support dozens or hundreds of clients off the same filesystem.
Let’s look into how this is done.
IMPROVING DISKLESS NFS SECURITY
Once your diskless farm is running, you could go back and assign a different user for
the NFS root account. Running find /var/diskless/1 -user 0 -exec chown nfsroot
changes the owner of all files owned by root to be owned by the user nfsroot. You can
then edit the exports file to map root to the nfsroot user. When you’re first learning,
however, don’t try to get fancy.

The Fringe of FreeBSD 611
Diskless Farm Configuration
One of the benefits of diskless systems is that multiple machines can share
the same filesystem. However, even on machines that are mostly identical,
you’ll probably find that you must make certain configuration files slightly
different. FreeBSD includes a mechanism for offering personalized config-
uration files on top of a uniform userland by remounting directories on mem-
ory filesystem (MFS) partitions and copying custom files to these partitions.
FreeBSD’s default diskless setup lets you set up diskless workstations
across multiple networks and subnets—an invaluable feature when you have
a large network. If you only have a few diskless systems, however, you might
find it slightly cumbersome at first. Over time, however, you’ll find that you
make more and more use of it. Diskless systems are a convenient solution to
many problems.
On boot, FreeBSD checks to see if it’s running diskless by looking at the
vfs.nfs.diskless_valid sysctl. If the sysctl equals 0, you’re running off a hard
drive; otherwise you’re running diskless. On diskless systems, FreeBSD runs
the /etc/rc.initdiskless script.
Diskless configuration is kept in the /conf directory on the NFS client,
which is the conf directory under the NFS root. While we refer to this directory
as /conf, in our example this directory could be found on the server in
/var/diskless/1/conf.
You must create a few subdirectories: at least /conf/base and /conf/default,
as well as, possibly, separate directories for subnets and/or individual IP
addresses. The contents of these directories are used to build memory file-
systems on top of the mounted root partition, so you can make changes for
individual hosts.
The easiest way to explain this is by example. We’ll make a common
change and configure /etc as a memory filesystem on our diskless hosts.
The /conf/base Directory
The /conf/base directory contains basic information about the partitions we’re
going to remount. Anything in this directory affects all of our diskless clients.
Every directory that gets remounted on a memory filesystem needs a further
subdirectory under /conf/base. As we want to remount our /etc filesystem, we
create /conf/base/etc.
Activating Diskless Remounting
In our /conf/base/etc directory, we must tell FreeBSD to remount /etc on our
clients. Create a file named diskless_remount containing the name of the
directory to remount. This sounds complicated, but it just means that the
file /conf/base/etc/diskless_remount contains the single word:
/etc
This tells FreeBSD to build an MFS /etc and mount it appropriately on
our diskless client.

612 Chapter 20
Populating and Trimming Remounted Filesystems
By default, rc.initdiskless copies the server directory to populate the memory
filesystem. That is, our MFS /etc is a copy of what’s in /etc on the read-only
NFS filesystem. Some files are not necessary on your MFS filesystem, however.
For example, diskless systems shouldn’t keep logs locally so they don’t need
newsyslog or /etc/newsyslog.conf. You don’t back up diskless clients, so /etc/
dumpdates is also unnecessary. Browsing /etc will reveal quite a few files that
you don’t need on your MFS /etc. Keeping your diskless /etc small saves
memory, which can be very useful on small systems. If you remove too much,
however, your system will not boot, and the list of necessary files is not intuitive.
For example, if your remove /etc/mtree, the machine will hang in single-user
mode because it cannot repopulate the MFS /var partition.
Put the full paths to your unwanted files and directories in the file
/conf/base/etc.remove. For example, the following entries remove the /etc/gss
and /etc/bluetooth directories as well as the file /etc/rc.firewall:
/etc/gss
/etc/bluetooth
/etc/rc.firewall
Not so hard, is it? Now let’s put some things back into our configuration.
The /conf/default Directory
The default directory contains files issued to all diskless clients. Many files are
the same on all clients, such as /etc/fstab. You put those files in an etc directory
under /conf/default. For example, to distribute /etc/fstab to all of your clients,
you would store it as /conf/default/etc/fstab.
Anything you put in the default directory overrides the same files provided
by remounting the base system.
Per-Subnet and Per-Client Directories
Very few files are unique to certain diskless hosts. You might have a diskless
DNS server that needs a particular named.conf file, or a diskless NTP server
that needs a unique ntp.conf. If nothing else, every diskless host should have
unique SSH keys.
The diskless system provides the ability to override the base configuration
on a per-subnet and a per-IP basis. The per-subnet override requires a direc-
tory named after the broadcast address of the subnet. For example, our
diskless box has an IP of 192.168.1.99 and a netmask of 255.255.255.0.
The broadcast address on its network is 192.168.1.255. Any files that
need copying to every diskless client on this network should be placed in
/conf/192.168.1.255/etc.
Similarly, you can specify overrides on a per-IP basis by using a directory
with the same name as the IP address. To place a custom rc.conf on our test
diskless system and only that system, save it as /conf/192.168.1.99/etc/rc.conf.

The Fringe of FreeBSD 613
Anything in the per-IP directories overrides the same files in the per-
subnet directory. Similarly, anything in the per-subnet directory overrides
the same files in the default directory, which override the files in the base
directory.
Diskless Packages and Files
Naked systems without software aren’t very useful. Inevitably, you’ll want to
install packages on your diskless systems. You also must install configuration
files on diskless clients.
Installing Packages
The key to installing software on the diskless clients is to install it in the
directory the diskless clients will use as their filesystem. You can install
packages in nonstandard directories with pkg_add(8)’s chroot function.
You must copy the software to the diskless client directory before starting.
# cp /usr/ports/packages/All/jdk-1.5.0.11p5,1.tbz /var/diskless/1
# pkg_add -C /var/diskless/1 /jdk-1.5.0.11p5,1.tbz
Remember, chroot changes the root directory of a process. Before
pkg_add(8) does anything, it changes its root to /var/diskless/1. As far
as pkg_add(8) is concerned, the package is now in the root directory.
You can also use ports on your diskless clients, but it’s slightly more
complicated. If you need a customized port, I recommend building it into
a package and then installing with pkg_add -C to cleanly chroot it.
Diskless Configuration Files
You must decide if you want identical configuration files distributed amongst
all of your diskless clients or on a client-by-client basis. Are your configuration
files unique to each diskless client, or do you manage them separately?
Here’s how you can configure the most common configuration files for
diskless operation.
DISTRIBUTING RC.CONF TO DISKLESS HOSTS
While most FreeBSD administrators use /etc/rc.conf as the sole configuration point
for the system, remember that you can also use /etc/rc.conf.local. This is especially
useful for diskless systems. If you want to have a diskless farm where all of the
machines run identical services, you can distribute a single rc.conf to all the hosts.
Place anything that is truly local to an individual machine in /etc/rc.conf.local and
distribute it only to that diskless client. This is the easiest way to keep a large number
of systems synchronized.

614 Chapter 20
/etc/rc.conf
Every host needs a basic rc.conf. While the hostname and IP address are already
set by DHCP, you must tell the system to create a writable /var and /tmp
filesystem if nothing else.
/etc/fstab
Every FreeBSD machine needs a filesystem table. Even diskless machines
have filesystems, after all! Here’s the /etc/fstab from our sample diskless
machine:
192.168.1.1:/var/diskless/1 / nfs ro 0 0
md /tmp mfs -s=30m,rw 0 0
md /var mfs -s=30m,rw 0 0
md /etc mfs -s=2m,rw 0 0
If you provide other partitions (such as home directories), you’ll want
to list them here as well. You might also choose to use local hard disks to
provide swap and scratch space. If you use local disk on a public or semi-
public machine, however, I recommend using newfs(8) on those partitions
at each boot so that any data left behind by previous users does not pose a
security risk to the next user.
SSH Keys
If your diskless hosts provide SSH services, they need unique SSH keys. Now
and then you will hear of someone who uses the same SSH keys across his
entire diskless farm. While the traffic is encrypted and hence cannot be read
in transit, shared keys make it impossible to tell one remote machine from
another.
Left to its own devices, FreeBSD automatically creates new SSH keys for
a host at boot. As these keys are written to a memory filesystem, they are lost
at every shutdown. Remember that the SSH client software caches the key for
each remote host it connects to and refuses to connect if the key changes. If
the SSH keys on your diskless hosts keep changing, you will quickly become
annoyed. The simplest thing to do is go into each client’s configuration
directory on the server and create the keys there:
# cd /var/diskless/1/conf/192.168.1.99/etc
# mkdirs ssh
# cd ssh
# touch ssh_host_key
# ssh-keygen -t dsa -f ssh_host_dsa_key -N ''
# ssh-keygen -t rsa -f ssh_host_rsa_key -N ''
If you have many diskless clients, write a script for this.
As the permanent filesystem is mounted read-only, root can actually do
very little damage to a diskless workstation. Considering this, you might
decide that you want to SSH to your diskless workstations as root instead of
creating passwords for each of your administrators. Copy /etc/ssh/shhd_config
to your /conf/default/etc/ssh directory and set PermitRootLogin to yes to enable

The Fringe of FreeBSD 615
this. (While doing this on a server with a read-write filesystem is a terrible
security risk, the fact that a diskless system is ephemeral changes the rules.)
Password Files
Presumably you’ll want a password file on your diskless system. FreeBSD does
not have a good method for creating password files independent of the main
system. It’s best to create the password files on a test machine or in a jail, then
copy the four key password files (master.passwd, passwd, pwd.db, and spwd.db)
from /etc into the appropriate conf directory. (You can use pwd_mkdb(8)’s -d
option to create and install the database files, but you still have to perform
some drudgery to create a suitable password file in the first place.) You could
also run chroot(8) to lock yourself into your diskless root directory on the
server and run adduser(8) there.
syslogd.conf
Remember, you have no hard drive. If you want your diskless system to use
syslog, you must provide a logging host.
You’ll certainly find other files you need, but this should get you started
in diskless networking.
NanoBSD: Building Your Own Appliances
News flash: Computers are expensive.
Many people dedicate a computer to a single purpose, such as a
firewall/NAT device. It’s quite true that a high-end 486 running FreeBSD
is perfectly capable of handling network connectivity in a small office, but
computers have costs beyond the base hardware. These systems are bulky,
use a lot of power for the job they do, and frequently, their ancient hard
drives are staggering on the verge of death. If you’re in a business environ-
ment, your manager does not want to hear, “You know that old desktop
that was so slow you wouldn’t let the receptionist endure it any longer?
I put it back into service as the web server.” FreeBSD lets you cluster fairly
easily, but there’s a reason industry publications never mention a RAIC
(Redundant Array of Inexpensive Crap).1 Of course, you can always use your
DISKLESS INSTALLATION
One common headache these days is that small servers don’t always come with CD
drives. While the machine doesn’t need a CD during operation, its absence compli-
cates installation. Diskless booting makes that problem go away. NFS can export
a FreeBSD installation CD image and have the installation target boot with the
CD image as its root directory. You’ll boot directly into sysinstall!
1 That’s because the industry would rather sell you a Redundant Array of Expensive Crap, but
that’s another story.

616 Chapter 20
hard-earned IT budget to purchase a new machine with full warranty, but we
all have other things we’d rather buy than a computer that will sit 99 percent
idle. All this adds up to “expensive.” It’s enough to make even the most rabid
open source advocate consider purchasing an inexpensive firewall appliance,
exchanging flexibility and certainty for low-power, cheap-to-replace silence.
You can get the best of both worlds by building your own appliance on
low-power, inexpensive hardware. FreeBSD is used heavily in the embedded
market. Companies such as NetApp and Juniper build high-performance
devices on top of FreeBSD. Tools for building FreeBSD images for embed-
ded devices are integrated with the core FreeBSD source tree. You’ll come
across many methods of doing this, but the most widely used method is
NanoBSD (/usr/src/tools/tools/nanobsd).
Many companies manufacture small, inexpensive, low-end computers,
but my favorite is Soekris (http://www.soekris.com). Soekris boxes are roughly
the size of a paperback book. They have no fan, no video card, very low
power requirements, and are designed specifically to work with open source
operating systems. The CPU, memory, serial and USB ports, and network
interfaces are soldered directly onto the motherboard. You can buy them as a
plain motherboard or with a case. You can use a hard drive or mini-PCI card
with them, or use a flash card as a drive. Best of all, they’re only a couple
hundred dollars—cheap enough to slide through most accounting depart-
ments without you having to fill out a mass of paperwork. You don’t get a
warranty with them, but for the price of one small rackmount server you
can buy ten Soekris boxes. If one dies, throw it away and plug the next one
in. Mind you, these systems are so simple that I’ve never had one die in
production.2
We’ll use one of these systems with a flash card instead of a hard drive.
All the examples in this section were implemented on a Soekris net4801,
with a 266 MHz processor, 128MB RAM, and an AC/DC power supply. For
average use, I recommend either a 128MB or 256MB flash card. Anything
more than 256MB is a waste, unless you have really really big programs on
your embedded system. As I write this, however, even 128MB cards are getting
difficult to find; you will probably have to use the smallest flash drive you can
find. Other vendors offer similar hardware, but you’ll have to modify these
instructions slightly. (We’re on the fringe of FreeBSD, remember?)
For my example here, I’m building the smallest possible DNS server,
with only those programs that are strictly necessary for supporting DNS.
What Is NanoBSD?
NanoBSD is a shell script that builds a stripped-down version of FreeBSD
suitable for simple devices. A simple device means that the system is built to
perform a very particular task or tasks. A NanoBSD system can make an
excellent nameserver, or an excellent firewall, or an excellent router. It
makes a lousy desktop, however, as desktop systems are expected to support
2 The one in my test lab that I spilled the Slurpee on doesn’t count. The sparks were really nifty,
though.

The Fringe of FreeBSD 617
many complicated functions and add functions over time. Similarly, most
multipurpose servers are poor NanoBSD candidates. If you want to convert
your NanoBSD firewall into a NanoBSD DNS server, you’ll need to build a
new NanoBSD image and reinstall from scratch. That’s not very difficult,
but you would never expect to do that on a server.
NanoBSD can be complicated, and you’ll probably need several attempts
to make your first working NanoBSD disk. What’s worse, the configuration
process isn’t easy to break apart for step-by-step explanation. You will probably
want to read this section twice.
Building a NanoBSD image has two main steps: building the operating
system and disk image, and then customizing that disk image for your
environment. We’re going to learn about NanoBSD the same way, by first
focusing on getting a NanoBSD image that boots on your hardware, and
then looking at customizing that image.
Your Hardware and Your Flash Drive
NanoBSD builds a version of FreeBSD tuned to your specifications and then
installs it to a disk image suitable for copying directly to a flash drive. Before
you can build the disk image, you must know your hardware’s idea of your
flash card’s geometry. Flash drives don’t have cylinders or heads, but they tell
the computer that they do. Worse, different computers might see the geom-
etry differently. While tools such as diskinfo(8) might work, they might provide
incorrect answers depending on the exact hardware. The only way to author-
itatively identify your flash card’s geometry is by mounting it in the target
system, powering it on, and checking what the flash card reports.
A Soekris uses the serial port as a default console. Unlike many other
embedded systems, however, a Soekris uses a default port speed of 19,200bps
instead of 9,600bps. Attach a null modem cable to the Soekris serial port,
plug the other end into your computer’s serial port, and open up a tip(1)
session at 19,200bps.
# tip -19200 sio0
Now power up your Soekris. After the POST messages, you’ll see a screen
much like this:
comBIOS ver. 1.28 20050529 Copyright (C) 2000-2005 Soekris Engineering.
net4801
0128 Mbyte Memory CPU Geode 266 Mhz
Pri Sla KODAK ATA_FLASH LBA 984-4-32 63 Mbyte
Slot Vend Dev ClassRev Cmd Stat CL LT HT Base1 Base2 Int
-------------------------------------------------------------------
0:00:0 1078 0001 06000000 0107 0280 00 00 00 00000000 00000000
...

618 Chapter 20
This informative screen tells you interesting things about the hardware,
but what we’re most concerned with is the disk information. This flash drive
shows up as the primary slave device . Also, the machine sees this 63MB flash
card as having 984 cylinders, 4 heads, and 32 sectors . We can prepare a
NanoBSD image to fit this geometry. Shut down your Soekris box and remove
the flash drive. The next time you power it on, the flash drive will boot it into
FreeBSD.
The NanoBSD Toolkit
You’ll find NanoBSD in /usr/src/tools/tools/nanobsd. The base toolkit includes
a directory called Files, the shell script nanobsd.sh, and the file FlashDevice.sub.
The Files directory contains files that will be copied to your NanoBSD
image. NanoBSD comes with a few scripts to make managing NanoBSD
systems a little easier, and you can add your own later.
The file FlashDevice.sub contains geometry descriptions of various flash
storage devices. This file is woefully incomplete due to the innumerable flash
drive vendors, but very easy to expand.
The real brains of NanoBSD are in the shell script nanobsd.sh. This is
actually a driver for the build-from-source process discussed in Chapter 13.
In addition to these files, you’ll need a NanoBSD configuration file and
possibly a packages directory.
Expanding FlashDevice.sub
Chances are, your flash card is not already listed in FlashDevice.sub. Adding it
is very straightforward and only takes a few moments. All you do is copy an
existing entry and modify it to match your card. You must know the disk brand
and size, as well as the disk geometry as seen by the target device. You can get
the brand and size off the flash card label. The Soekris displays the geometry
in its BIOS screen, as do most hardware vendors. An entry for a new card
will look like this:
samsung)
#Source: mwlucas@freebsd.org
case $a2 in
128|128mb)
NANO_MEDIASIZE=`expr 130154496 / 512`
NANO_HEADS=8
NANO_SECTS=32
NANOBSD AND DISKLESS SYSTEMS
If you have a diskless infrastructure available, netboot your NanoBSD system diskless
one time. This will give you the dmesg.boot for the system, which will help you make
a good kernel configuration. It will also tell you what device name your system uses
for the flash drive, saving you a round of customization later on.

The Fringe of FreeBSD 619
;;
*)
echo "Unknown Samsung Corp Flash Capacity"
exit 2
;;
esac
;;
First, we list the card manufacturer , in alphabetical order within the file.
We know one size of flash drive, the one in our hand. This is a 128MB
device. We want the script to accept either 128 or 128mb as an argument, so we
specify both of them.
NANO_MEDIASIZE equals the number of cylinders, times the number of
heads, times the number of sectors per track, times by 512. Calculate this
number and make the substitution in the expr(1) statement. (Yes, NanoBSD
immediately divides this value by 512 again.)
The NANO_HEADS and NANO_SECTS statements are taken directly from the
heads and sectors seen by the target device.
We also have a default statement , so that if you try to use a Samsung
256MB flash card without configuring it, NanoBSD will abort early on instead
of building a bogus image.
Add an entry like this to FlashDevice.sub, and you can proceed to config-
uring your NanoBSD build.
NanoBSD Configuration Options
Customize a NanoBSD build with a configuration file. FreeBSD doesn’t
include a NanoBSD configuration file by default, for a good reason: Every
NanoBSD install is slightly different. You can find many sample files on the
Internet, and I’ll include my own sample file here. As FreeBSD changes,
however, you must tweak your configuration. A NanoBSD configuration that
works with FreeBSD 7.0 won’t be quite right for FreeBSD 7.5 and will quite
probably fail on FreeBSD 8.0. You can have multiple configuration files for
different types of NanoBSD builds.
Here are some of the useful configuration settings and how they can
be used.
NANO_NAME=full
This is the name you assign to this particular build of NanoBSD. NanoBSD
uses this to assign the names to work directories and to the disk image file.
NANO_SRC=/usr/src
This is the location of the source tree NanoBSD uses to build its disk
images. If you want to use a different location, change this variable. You
can build NanoBSD on any version of FreeBSD reasonably close to the
version you’re running on.
NANO_TOOLS=tools/tools/nanobsd
The NanoBSD scripts and files are considered to be part of the FreeBSD
source code. This means that when you run csup, the files that came with
620 Chapter 20
NanoBSD can be updated. If you make changes to any of the NanoBSD
files, csup(1) will undo those changes and return the files to their default
state. If you change the NanoBSD core components, you’ll want to copy
the NanoBSD directory somewhere else under the source tree (such as
/usr/src/tools/tools/local-nanobsd). Tracking the changes between your cus-
tom NanoBSD tools and the system base NanoBSD tools is your problem.
NANO_PACKAGE_DIR=${NANO_SRC}/${NANO_TOOLS}/Pkg
NanoBSD looks in this directory for any packages to install on the com-
pleted disk image. By default, this is /usr/src/tools/tools/nanobsd/Pkg.
NANO_PMAKE="make -j 3"
This defines the -j flag NanoBSD gives to make(1) during the buildworld
and buildkernel processes. If you have trouble building NanoBSD during
either buildworld or buildkernel, try setting this to make -j 1.
CONF_BUILD=' '
NanoBSD uses any options defined here at the make buildworld stage. You
can find a complete list of options that work on your version of FreeBSD
in src.conf(5).
CONF_INSTALL=' '
NanoBSD uses any options defined here at the make installworld stage.
Again, see src.conf(5) for the supported options.
CONF_WORLD=' '
NanoBSD uses anything in this variable as flags during the whole build
process.
NANO_KERNEL=GENERIC
You’ll almost certainly want a custom kernel for your NanoBSD
image. Specify it here. This should be the name of a file under
/usr/src/sys/i386/conf.
NANO_CUSTOMIZE=""
By default, NanoBSD does not apply any customization scripts to the disk
image building process. We’ll talk about customizing disk images later
in this chapter. Specify any customization scripts that you want to use in
this variable.
NANO_NEWFS="-b 4096 -f 512 -i 8192 -O1 -U"
NanoBSD builds disk image filesystems with newfs(8). Specify any options
you want here. Remember that NanoBSD runs its disk mounted read-only,
so you should not need any custom options here.
NANO_DRIVE=ad0
You must identify how your device sees its flash drive. The easiest way to do
this is to boot the target device and see what it thinks the hard drive is.
NANO_MEDIASIZE=1000000
This gives the size of your flash drive in 512-byte sectors.

The Fringe of FreeBSD 621
NANO_IMAGES=2
NanoBSD lets you put multiple operating system images on a single flash
drive. This can make upgrades very easy, but uses twice as much space. As
flash drives are now more than large enough to hold almost any FreeBSD
image you can build, there’s rarely any reason to change this.
NANO_CODESIZE=0
You can define how much of your flash drive you want to allocate for
your NanoBSD operating system slices. If you set this to 0, the disk image
building script makes the operating system slices as large as possible.
NANO_CONFSIZE=2048
NanoBSD also creates a slice for configuration data, as we’ll see later.
This specifies the size of this slice, in 512-byte sectors. 2,048 sectors equals
1 megabyte.
NANO_DATASIZE=0
NanoBSD can optionally create a fourth slice for data storage. It is con-
ceivable, though not common, to build a NanoBSD device that stores
data on a long-term basis. If set to 0, nanobsd.sh doesn’t create a data parti-
tion. If set to a negative number, NanoBSD makes the data slice as large as
possible.
NANO_RAM_ETCSIZE=10240
This is the size of the memory disk used for /etc, in 512-byte sectors.
10240 is 5MB.
NANO_RAM_TMPVARSIZE=10240
This is the size of the memory disk shared between /var and /tmp. 5MB
is large enough so long as you don’t try to write to your logs.
NANO_SECTS=63 and NANO_HEADS=16
These define the geometry of the flash drive you’re using. Do not set
these in your configuration file! Configure your flash card correctly in
FlashDevice.sub instead.
FlashDevicesamsung128
This tells NanoBSD to take the disk device geometry from the
FlashDevice.sub file, instead of using the NANO_SECTS and NANO_HEADS values.
This sample entry means to use a 128MB flash device made by Samsung.
A Sample NanoBSD Configuration
All this looks impressive, but how do we use it? Let’s create a configuration
file and walk through it. Remember, I’m building a DNS server on a Soekris
device. Any variable I don’t set gets the default value.
#configuration for building a Soekris DNS server
NANO_NAME=SoekrisDNS
NANO_IMAGES=2
NANO_KERNEL=SOEKRIS
NANO_DRIVE=ad1

622 Chapter 20
NANO_PMAKE="make -j 3"
FlashDevice samsung 128
customize_cmd cust_comconsole
customize_cmd cust_allow_ssh_root
customize_cmd cust_install_files
CONF_INSTALL='
WITHOUT_TOOLCHAIN=YES
'
CONF_WORLD='
COMCONSOLE_SPEED=19200
NO_MODULES=YES
WITHOUT_ACPI=YES
WITHOUT_ASSERT_DEBUG=YES
WITHOUT_ATM=YES
WITHOUT_AUDIT=YES
WITHOUT_AUTHPF=YES
#WITHOUT_BIND=YES
WITHOUT_BLUETOOTH=YES
WITHOUT_CALENDAR=YES
WITHOUT_CPP=YES
WITHOUT_CVS=YES
WITHOUT_CXX=YES
WITHOUT_DICT=YES
WITHOUT_DYNAMICROOT=YES
WITHOUT_EXAMPLES=YES
WITHOUT_FORTH=YES
WITHOUT_FORTRAN=YES
WITHOUT_GAMES=YES
WITHOUT_GCOV=YES
WITHOUT_GDB=YES
WITHOUT_GPIB=YES
WITHOUT_GROFF=YES
WITHOUT_HTML=YES
WITHOUT_I4B=YES
WITHOUT_INET6=YES
WITHOUT_INFO=YES
WITHOUT_IPFILTER=YES
WITHOUT_IPX=YES
WITHOUT_KERBEROS=YES
WITHOUT_LIBPTHREAD=YES
WITHOUT_LIBTHR=YES
WITHOUT_LPR=YES
WITHOUT_MAILWRAPPER=YES
WITHOUT_MAN=YES
WITHOUT_NCP=YES
WITHOUT_NETCAT=YES
WITHOUT_NIS=YES
WITHOUT_NLS=YES
WITHOUT_NLS_CATALOGS=YES
WITHOUT_NS_CACHING=YES
WITHOUT_OBJC=YES
WITHOUT_PAM_SUPPORT=YES
WITHOUT_PF=YES
WITHOUT_PROFILE=YES
WITHOUT_RCMDS=YES

The Fringe of FreeBSD 623
WITHOUT_RCS=YES
WITHOUT_RESCUE=YES
WITHOUT_SENDMAIL=YES
WITHOUT_SHAREDOCS=YES
WITHOUT_SPP=YES
WITHOUT_SYSCONS=YES
WITHOUT_USB=YES
#WITHOUT_WPA_SUPPLICANT_EAPOL=YES
WITHOUT_ZFS=YES
'
I start by giving this disk image a unique name with the NANO_NAME
variable . I have a custom kernel configuration for this device. Where
did I get this kernel configuration? I booted the Soekris diskless to capture
/var/run/dmesg.boot off of a GENERIC kernel, and then I searched the Inter-
net for other net4801 kernels to identify the potentially useful options other
people used. The only annoying thing about booting this device diskless is
that you must disable ACPI in the boot loader.
Thanks to the diskless boot, I know that the net4801 sees the flash slot
as drive /dev/ad1 . If I don’t set this in my configuration file, on my first
NanoBSD I would get complaints that the kernel could not find the root
partition on /dev/ad0.
I then list the various customize_ scripts I want to use on this image. We’ll
talk about customizations later in this chapter. All of these scripts are in the
default NanoBSD toolkit, and I recommend using them for your first image.
We then have special options for make(1) to use during the install
process. We’ll look at the options a little later, but for now you just need to
know that WITHOUT_TOOLCHAIN tells make(1) to not install the compiler, libraries,
or other tools needed to build software. We won’t be building ports on an
embedded system!
Take careful note of how the CONF_INSTALL variable is set. We have a
single tick mark (') after the equal sign, our variable on a line of its own, and
then a single tick mark (') afterwards. This helps keep multiple options sep-
arate and makes the file readable. We do something similar for CONF_WORLD,
in the next section. NanoBSD expects that each variable will be listed on its
own line, as it builds a private make.conf out of them.
Each of the options in CONF_WORLD tells NanoBSD to not build a particular
section of FreeBSD. Most are self-explanatory; for example, WITHOUT_ACPI says
to not build ACPI. NO_MODULES means to not build kernel modules. I am delib-
erately not building systems that I don’t want to put on my finished disk image,
such as Sendmail, games, and packet filters.
These options are all buried within FreeBSD’s build structure. Some
of them have been around for years; others are new. Some of them will
disappear—there’s no guarantee than any of them will work a few releases
down the road. Your src.conf man page has the current list of build variables
for the installed version of FreeBSD. I include the whole list just so you can
see how aggressive you can be in cutting. Yes, FreeBSD is so much smaller
than many Linux versions; but this doesn’t mean it can’t be made smaller
still! Some of the build options listed in src.conf(5) should not be used for
624 Chapter 20
NanoBSD, however. For example, WITHOUT_SETUID_LOGIN has bad effects on
your login. WITHOUT_SYMVER removes symbol versioning, which makes it
impossible to use binaries compiled on other FreeBSD machines on your
NanoBSD image. Be certain you understand what a build option really
does before enabling it.
Also, note that you might have to disable some of these build options for
particular NanoBSD images. I’m building a DNS server, so I need BIND.
I commented out the WITHOUT_BIND entry in my configuration file for this
particular build.
In the CONF_INSTALL option, I list the only option that is used not with
builds but with installations of FreeBSD 7.0. The WITHOUT_TOOLCHAIN tells make
installworld to not install the compiler, headers, or related tools on the disk
image. We need to build a new compiler to build the new FreeBSD, but we
don’t need it installed on our final image. The installation process won’t try to
install anything that we stripped out of the build, but running make buildworld
requires an up-to-date compiler.
This is a complete NanoBSD configuration file. Now, let’s use it to build
our custom disk image.
Building NanoBSD
Run nanobsd.sh as a shell script, specifying the configuration file with -c:
# /bin/sh nanobsd.sh -c mynanoconfig.txt
A NanoBSD build prints fairly generic log messages as it proceeds:
## Clean and create object directory (/usr/obj/nanobsd.SoekrisDNS/)
## Construct build make.conf (/usr/obj/nanobsd.SoekrisDNS//make.conf)
## run buildworld
### log: /usr/obj/nanobsd.SoekrisDNS//_.bw
## build kernel (SOEKRIS)
...
## build diskimage
### log: /usr/obj/nanobsd.SoekrisDNS//_.di
# NanoBSD image completed
If you get the NanoBSD image completed message, the build succeeded. If
not, the build failed at the last stage you see in the log. It’s not uncommon to
perform multiple rounds of troubleshooting to get a configuration file that
works properly, especially when aggressively using WITHOUT_ options to reduce
FreeBSD’s size.
NanoBSD Build Directory
NanoBSD uses a build directory under /usr/obj named after NANO_NAME. Our
configuration file specifies that we’re building a NanoBSD called SoekrisDNS,
so our build directory is /usr/obj/nanobsd.SoekrisDNS. Go to that directory and
look at the files. You’ll find several oddly named files, some large directories,
and disk images.

The Fringe of FreeBSD 625
NanoBSD uses files beginning with _. as markers, logs, and temporary
directories. Despite the terseness of the messages you saw during the build
process, NanoBSD doesn’t actually discard the output of the commands it
runs to build your disk image; it just redirects it to other files.
Use the log files to help solve build and configuration problems.
NanoBSD Build Troubleshooting
NanoBSD’s error messages when a build fails aren’t terribly helpful. For
example, here’s a complete output of a failed NanoBSD build:
# /bin/sh nanobsd.sh -c soekris-dns.conf
## Clean and create object directory (/usr/obj/nanobsd.SoekrisDNS/)
## Construct build make.conf (/usr/obj/nanobsd.SoekrisDNS//make.conf)
## run buildworld
### log: /usr/obj/nanobsd.SoekrisDNS//_.bw
You can see that the build process failed, but not why.
To get the actual error, look at the log file specified in the message. In
this case, the log is the file /usr/obj/nanobsd.SoekrisDNS/_.bw . The end of
that log file shows the last output from the failed build process. You’ll see the
usual sort of error for that part of the upgrade process.
One thing to remember is that NanoBSD uses make -j3 by default. This
can obscure error messages in the log, as the error that caused the crash might
be several lines before the apparent end of the build.
Why would a NanoBSD install fail when a regular upgrade from source
works fine from the same source code? The leading cause of build failures is
a choice of incompatible build options for the source tree. My NanoBSD
configuration file includes many different WITHOUT_ options. You might notice
Table 20-1:
NanoBSD Build Files
File Purpose
_.bk make buildkernel log
_.bw make buildworld log
_.cust.<X> Installing customization X
_.di fdisk disk image
_.dl Disklabel disk image
_.env The environment used while building NanoBSD
_.etc make distribution log
_.fdisk fdisk(8) configuration
_.ik make installkernel log
_.iw make installworld log
_.w Newly built world
disk.image Disk image of a single slice
disk.full Disk image of complete device
626 Chapter 20
that some of them are commented out. At the time I built this disk image,
those options broke the build. While my embedded DNS server doesn’t really
need the software provided by the options I commented out, not including
these options broke my NanoBSD build. (WITHOUT_BIND, of course, is com-
mented out because I actually want BIND on this image.)
Another problem you can have when you’re building a NanoBSD image
is when the build completes, but the disk image construction dies with:
/usr/obj/nanobsd.SoekrisDNS/_.mnt: write failed, filesystem is full
Your files take up more space than is available on the drive. By default,
the /conf slice takes up 1 megabyte. NanoBSD splits the remaining space in
half. If you have a 128MB flash card, each of the two NanoBSD images should
get 63.5MB of disk space. If your FreeBSD build, including any additional files
and the installed packages, is larger than that, image construction will fail.
Don’t forget that flash card vendors measure disk space the same way disk
drive manufacturers do, in base 10 rather than base 2. Your 128MB flash card
is actually a bit smaller than that. You need to put only one NanoBSD image
on the disk, reduce the amount of stuff you include, or get a larger flash card.
The Completed Build
So, your build finished! Take a look at the disk image and see what’s in it:
# mdconfig -af _.disk.full
md0
If you run fdisk(8) against the disk image, you’ll see that it has three slices
in use, two large ones and a very small third one. The two large slices are our
NanoBSD images. Mount one and look around in it.
# mount /dev/md0s1a /mnt
Some poking around reveals that your NanoBSD system is complete but
doesn’t really do anything. It’s an unconfigured FreeBSD install. Nevertheless,
I recommend copying it to a flash disk and test-booting it on your target
hardware to make sure it runs. Install NanoBSD on the flash disk /dev/da0
by running:
# dd if=disk.full of=/dev/da0
Now remove the flash drive, install it in your Soekris or other device, fire
up your serial console, and turn on the power.
Serial Console Speeds
If you boot a vanilla FreeBSD install on a Soekris box, you’ll have problems.
Soekris hardware uses a default serial console speed of 19,200bps, while
FreeBSD uses a more common 9,600bps. This means that if you connect

The Fringe of FreeBSD 627
your terminal at 19,200, you’ll see all of the Soekris boot messages, but when
FreeBSD starts, you’ll see garbage. If you connect your terminal at 9,600,
you’ll see the FreeBSD messages but nothing but garbage from the Soekris.
Changing the FreeBSD console speed will be one of the first custom-
izations we perform on our FreeBSD system. For an initial test of your
FreeBSD image, however, boot your Soekris and console in at 9,600bps.
Customizing NanoBSD
Now that you have a vanilla FreeBSD install that boots on your hardware, let’s
customize it to meet our needs. Theoretically, you can customize NanoBSD in
two ways: by editing the finished disk image or by changing the build to
create the desired disk image. The first method is easy, but undesirable. If
you’re actually using NanoBSD in a production environment, one day you’ll
have to build a new disk image. Perhaps you must apply a security patch, or
you’ll find an application where a second NanoBSD box would be ideal. By
modifying the build, you greatly ease producing a correct and usable updated
image. You have three tools to modify the build: customization scripts, copying
files, and adding packages.
Customization Scripts
Customization scripts are shell script functions inside nanobsd.sh or within
your configuration file. Use a customization script to change a file that’s
likely to change as FreeBSD grows. For example, FreeBSD updates the
included version of SSH every few releases. You don’t want to write a custom
sshd(8) configuration file and load it unilaterally, as that would quite pos-
sibly be incompatible with newer versions of OpenSSH. The sensible thing
to do is use a configuration script to make changes to the sshd_config included
with the system, no matter what version it might be. NanoBSD includes a
customization script just for that.
cust_allow_ssh_root () (
sed -i "" -e '/PermitRootLogin/s/.*/PermitRootLogin yes/' \
${NANO_WORLDDIR}/etc/ssh/sshd_config
)
This simple sed(1)3 script changes one line in /etc/ssh/sshd_config to
allow the root user to SSH into the NanoBSD system. This script would break
if the PermitRootLogin option was renamed or removed, but that will happen
rarely if ever. You can include anything you like in a customization script,
even spawning a complicated Perl script that takes NANO_NAME as an argument
and writes a custom rc.conf for your image.
3 sed(1) and awk(1) expertise is another thing that separates the Real Sysadmins from the
young punks. Reading shell scripts is an excellent way to pick up enough about these tools to
fool people into thinking you’re an expert.
628 Chapter 20
NanoBSD includes four customization scripts:
cust_comconsole
Enables serial console and serial login.
cust_allow_ssh_root
Allows root to SSH into the system.
cust_install_files
Copies files under the Files directory into completed image.
cust_pkg
Installs packages from the Pkg directory into completed image.
As you’ve probably gathered, customization scripts drive the other two
methods of tweaking your image.
Adding Packages
Create a Pkg directory in the NanoBSD directory. The customization script
cust_pkg installs any packages you place in this directory on your image.
That’s really it.
If you’re short on space, however, you don’t need to install the entire
package. Find the binary for the program you want to run, use ldd(1) to
identify the necessary libraries, and just copy those files to your image.
Adding Files
The cust_install_files customization script copies files from the tree under the
Files directory into your completed image. By default, the Files directory
contains a single subdirectory called root. The contents of this directory are
copied into /root on the image.
If you regularly build NanoBSD images, I recommend changing the
cust_install_files script. NanoBSD includes several files in the Files directory,
and those are considered system files. When you update your source tree,
csup(1) wipes out any changes you made to any files under the Files directory.
Copy cust_install_files into your configuration file, give it a name like
cust_install_dns_files, and point it to a directory other than Files.
I’m building a DNS server, so I need a custom named.conf and rndc.conf.
These files go in /var/named/etc/namedb, so I must create the directory
/usr/src/tools/tools/nanobsd/Files/var/named/etc/namedb (ick!) and put my
custom files in there.
Similarly, I need an rc.conf. I’ll create Files/etc/rc.conf for my configuration.
I need SSH keys, which I create exactly as I would for a diskless workstation.
Similarly, I want a syslog.conf that writes to my networked log server.
One last annoyance when working with Soekris hardware is the serial
console speed. We set the serial console speed in our configuration file with
the COMCONSOLE_SPEED variable, telling FreeBSD to use a default console speed
of 19,200. If you didn’t do that, the simplest way to accommodate the dif-
ference in port speed is to set FreeBSD to use the higher console speed.

The Fringe of FreeBSD 629
You can do this with the proper entries in /boot/loader.conf. Just create the
following entries in Files/boot/loader.conf:
comconsole_speed="19200"
console="comconsole,vidconsole"
This gives your NanoBSD install a serial console with a default speed of
19,200bps. It won’t take effect until the boot loader starts, however. You’re
really better off building your whole NanoBSD world with a console speed of
19,200 through a CONF_WORLD variable.
Perfecting Customizations
One of the headaches in building a NanoBSD image is getting the right set
of customizations for your purpose. You’ll add every file and every setting
you think you need in your image, copy the completed image to a flash drive,
and boot it on your device only to realize you forgot something and must add
a file to the image.
While building a NanoBSD image takes a while, the longest part of the
process is building the world and kernel. You can add a file to the custom-
ization image and rerun the image-building process without building a whole
new world and kernel by adding the -b flag to nanobsd.sh:
# /bin/sh nanobsd.sh -b -c myconfig.txt
This skips the buildworld and buildkernel stages, and assembles a fresh
disk image with your updated files.
Using NanoBSD
So you have a NanoBSD image that boots and includes all the software you
need. You’ve copied it to a flash drive and are running it without trouble.
What happens when you must make a minor change or install an upgrade?
Not to worry. NanoBSD has special provisions for both these cases.
Minor Updates
NanoBSD uses the cfg slice to handle minor changes. Any files on /cfg are
copied to the running NanoBSD’s /etc partition during boot. This means
that you can make changes to, say, /etc/rc.conf without building a whole
new image. For a good example of how this is used, take a look at the
change_password script in Files/root. This script runs passwd(1) to let you
change root’s password, mounts /cfg read-write, copies the vital password
files to /cfg, and unmounts /cfg. The next time the system boots, NanoBSD
copies those vital password files to /etc.
Whenever you make changes to your running NanoBSD system, I
recommend making corresponding changes to your NanoBSD build system.
This way, when you have to roll a new disk image, your changes will be all
captured and up to date.
630 Chapter 20
Updating Disk Images
So, you’ve built a NanoBSD image and are running it on a Soekris box
nailed to the top of a windmill so you can use custom SNMP scripts to
manage power output. One day you have to do an upgrade. Do you break
out a ladder and a crowbar so you can climb to the top of the windmill and
install a new flash card? No, most FreeBSD developers are far too sedentary
to tolerate any such thing.4
Remember, a NanoBSD system has two disk images. Only one of them
runs at any moment. The included upgrade scripts allow you to upgrade the
disk image that is not in use at the moment. You then reboot onto the new
image. If the new image doesn’t work, you can boot the original image,
restoring service while you work out what went wrong.
Upgrade a NanoBSD installation remotely over SSH with the scripts
updatep1 and updatep2. If your system is running slice 1, use the script updatep2.
If you’re on slice 2, run updatep1. In addition to providing a command prompt,
SSH lets you transfer files or even run commands on remote systems. Here, we
are logged into our NanoBSD system and want to update slice 2 with a disk
image on the server 192.168.1.5:
# ssh 192.168.1.5 cat _.disk.image | sh /root/updatep2
We connect to the remote system and feed it the output of cat(1) —in
this case, the image of a single partition. On the remote system, we run the
updatep2 script, which runs some basic sanity checking to confirm we aren’t
trying anything too daft and then copies the disk image to the unused slice.
It also sets the new boot default to the freshly upgraded slice. If the upgrade
doesn’t work correctly—that is, if the system boots but the application doesn’t
run correctly—use the serial console to boot on the other slice, or use
boot0cfg(8) on the running system to tell NanoBSD to boot the other
slice next time.
Once you start to experiment with NanoBSD, you can find any number
of uses for it. In addition to custom-built appliances, I use NanoBSD to
provide a userland for jails and diskless workstations. If you want more full-
featured bootable FreeBSD media, though, take a look at FreeSBIE.
Live Media with FreeSBIE
Compared to NanoBSD, FreeSBIE takes a different approach to creating
purpose-built FreeBSD installs and has a different target. While NanoBSD is
trying to satisfy users of small media, FreeSBIE targets live read-only media
such as CDs, DVDs, and big flash devices. Having much more disk space gives
FreeSBIE a certain amount of flexibility lacking in NanoBSD. While I prefer
using NanoBSD for appliance functions, many people use FreeSBIE to build
bootable CDs that turn any old workstation into an appliance-style server.
4 Put a good drink at the top of that windmill, however, and you’ll get three out of four
developers up the ladder before you can blink. It’s all a question of alinging your needs with
their priorities.

The Fringe of FreeBSD 631
Using a live CD is as simple as booting off of the CD. The operating
system on the CD should identify your hardware, configure the installed
software, and in general boot into a fresh and usable operating system. If
you want detailed information about using a running FreeSBIE install,
check out the FreeSBIE website at http://www.freesbie.org. We’re going to
focus on building your own customized FreeSBIE disk.
FreeSBIE builds a fresh world and kernel from the source code in /usr/src,
but then takes its packages from the system you’re building on. This means
that your build system must have a fairly coherent and clean set of packages.
If you’ve abused your system and your package records are inaccurate, you
can’t use them to build a FreeSBIE live CD.
While we refer to a FreeSBIE live CD throughout this section, all of this
applies to building DVDs and flash devices as well.
Installing the FreeSBIE Toolkit
You can get the very latest FreeSBIE tools from the FreeSBIE CVS repository
available through http://www.freesbie.org, or, if you have an up-to-date Ports
Collection, you can install it from /usr/ports/sysutils/freesbie. Everything in the
FreeSBIE toolkit installs under /usr/local/share/freesbie.
The FreeSBIE toolkit includes very few instructions. Most of the docu-
mentation is available only on the FreeSBIE website, http://www.freesbie.org.
Configuring FreeSBIE
Under /usr/local/share/freesbie/conf you’ll find the default FreeSBIE config-
uration file freesbie.defaults.conf. Do not edit this file directly; instead, create a
freesbie.conf file in the same directory. Anything in freesbie.conf overrides the
same setting in freesbie.defaults.conf.
As of FreeSBIE 2.0, here are some commonly changed configuration
options. The example configuration below shows as you would configure it
in your customized freesbie.conf file, not as it appears in freesbie.defaults.conf.
(The default configuration file has special syntax to allow your custom
configuration to override those values.)
FREESBIE AND FREEBSD
FreeSBIE is not an integrated part of FreeBSD. While the FreeSBIE developers work
very hard to support newer versions of FreeBSD, their work still lags slightly behind
mainstream FreeBSD development. This chapter was written using FreeSBIE 2, which
is designed for FreeBSD 6. I expect FreeBSD 7 support shortly after FreeBSD 7 is
released. When you start working with FreeSBIE, be prepared to do your own
investigation and troubleshooting.

632 Chapter 20
For your first FreeSBIE build, I recommend changing as little as possible.
While many options might be tempting to change, sticking as close to the
defaults as possible gives the best initial results. Overly ambitious initial
customization causes build failures. As with so many other things, I recom-
mend you learn about FreeSBIE’s hidden catches one at a time.
BASEDIR="/usr/local/freesbie-fs"
This is the directory where FreeSBIE installs its freshly built world,
packages, and custom files.
CLONEDIR="/usr/local/freesbie-clone"
FreeSBIE uses this directory as a temporary staging area when building
images.
SRCDIR="/usr/src"
This is the source tree that FreeSBIE uses to build its world and kernel.
ISOPATH="/usr/obj/FreeSBIE.iso"
FreeSBIE puts the completed ISO at this location.
IMGPATH="/usr/obj/FreeSBIE.img"
This is the full path to a completed UFS FreeSBIE image for flash media.
MAKEJ_WORLD="-j3"
This determines the -j argument for make(1) to use when building world.
Set this to -j1 if you have a build failure and want to determine if it’s an
actual problem or just a parallelization issue.
MAKEJ_KERNEL="-j1"
This sets the parallelization of make(1) when building the kernel.
MAKEOPT="-DNO_CLEAN"
If you want to use any make(1) options for the world and kernel builds,
specify them here.
KERNELCONF="/usr/src/sys/i386/conf/CUSTOMFREESBIE"
This is the full path to the FreeSBIE kernel configuration file. I find that
the kernel configuration provided with FreeSBIE only works well with the
same version of FreeBSD that the FreeSBIE developers are using. As of
FreeBSD 7.0, a FreeSBIE build takes advantage of the following non-
GENERIC options:
options GEOM_UZIP
options GEOM_LABEL
options VESA
options SC_PIXEL_MODE
I additionally remove all SCSI and RAID controllers, as I really
don’t need access to those disks. If I don’t want to touch the hard drive
I’ll also remove the atadisk device so that my disk image cannot find
any IDE disks. If you want firewall features, add the PF kernel options.
The Fringe of FreeBSD 633
MAKE_CONF="/etc/make.conf"
This defines the custom make.conf you want to use for your FreeSBIE
build. Note that as the packages are copied from the installed system,
any special make.conf settings will not apply to the packages. You might
as well use src.conf instead.
SRC_CONF="/etc/src.conf"
You can customize the source build with src.conf, just as you can with the
primary FreeBSD build. Specify the full path to your FreeSBIE-specific
src.conf here.
FILE_LIST="/home/mwlucas/freesbie-files.txt"
You can specify exactly which files you want to install on your FreeSBIE
disc. If you specify a file list, FreeSBIE installs only the files on that list
into the image. (Effectively, this means that only files on this list are
copied from the FreeSBIE base dir to the FreeSBIE clone dir.) This means
you must make a 100 percent complete list of all the files on the live CD.
This is most useful for NanoBSD-like small systems, in my opinion.
PRUNE_LIST="/home/mwlucas/freesbie-prune.txt"
This file contains a list of files and directories that are included in the
build, but must be removed before building the live CD image. Any files
listed in the prune list file are removed from the cloned directory before
the image is built from that directory. This can be very useful to reduce the
size of a live CD.
PKGFILE="/home/mwlucas/freesbie-packages"
This file contains a list of packages, one package per line, without version
information. FreeSBIE installs all of the packages on this list onto your live
image. If you do not set this, FreeSBIE’s make packageselect command
creates a package list in the file /usr/local/share/freesbie/conf/packages.
EXTRA="customroot rootmfs etcmfs sound xautostart"
FreeSBIE provides a variety of plug-ins to enable different functions on
the live CD. We’ll cover the standard plug-ins later.
MINIMAL=YES
If you define MINIMAL, FreeSBIE builds the smallest FreeBSD it can. This
creates a result similar to NanoBSD. A MINIMAL build only works reliably
with whatever version of FreeBSD the FreeSBIE developers are using.
NO_BUILDWORLD=YES
By defining this, you tell FreeSBIE to not build a new userland. You must
have a freshly compiled userland available in /usr/obj.
NO_BUILDKERNEL=YES
This tells FreeSBIE to not build a new kernel and use the previously com-
piled kernel in /usr/obj instead.
634 Chapter 20
MAKEOBJDIRPREFIX="/usr/freesbie/obj"
While you can set this to provide a separate FreeSBIE build area, doing
so is not recommended. Many shell scripts assume that the recently built
userland and kernel are under /usr/obj.
NO_COMPRESSEDFS=YES
This tells FreeSBIE to use an uncompressed filesystem on the ISO image.
FreeSBIE Plug-ins
FreeSBIE provides plug-ins to more thoroughly customize disk images. While
a default FreeSBIE build is perfectly serviceable, plug-ins let you turn on and
off different features on your live CD. Plug-ins install extra configuration
scripts or enable different automated functions on your bootable image. All
of the plug-in scripts are in /usr/local/share/freesbie/extra. The README file
describes all of the default plug-ins.
List all of the plug-ins you want to use in the EXTRA value in freesbie.conf.
Here are some of the plug-ins I find most interesting or useful.
adduser
The adduser plug-in adds the user freesbie to the live CD. You can spec-
ify a username of your own choosing with the FREESBIE_ADDUSER variable in
freesbie.conf.
autologin
When you enable the autologin plug-in, the user freesbie is automatically
logged in at boot.
comconsole
Enabling the comconsole plug-in in the build adds the serial console as
a second console. Setting the configuration option SERIAL_ONLY=YES in
freesbie.conf builds an image that only uses the serial console. You could
also do this by adding a custom loader.conf into the image through the
customroot plug-in.
customroot
The customroot plug-in lets you add arbitrary files to your live CD. Any
files in the directory /usr/local/share/freesbie/extra/customroot are copied to
your new image. Use subdirectories as necessary to put the files in the
proper place. For example, if you want a custom /etc/rc.conf, put it in
/usr/local/share/freesbie/extra/customroot/etc/rc.conf. By adding a custom
/usr/local/share/freesbie/extra/customroot/var/named/etc/namedb/named.conf,
you can have an easily replaceable secondary nameserver that boots off
of read-only media. Any files added by this plug-in override any other file
source in FreeSBIE.
customscripts
The FreeSBIE build process runs any scripts found in /usr/local/freesbie/
extra/customscripts immediately before creating the ISO image. You can
add users or edit files automatically with this plug-in.
The Fringe of FreeBSD 635
etcmfs
This tells the system to use a memory filesystem for /etc.
l10n.sh
This plug-in lets the live CD user choose an international character
set. This is useful for non-English speakers.
mountdisks
With this plug-in enabled, FreeSBIE mounts any UFS, FAT, or NTFS
slices found on the system the live CD runs on.
pf
This plug-in creates and activates a simple “block all incoming, allow all
outgoing” PF ruleset upon boot.
rootmfs
This plug-in makes the live CD use a memory filesystem for root. While
the user can make changes to the root directory, they disappear upon a
reboot.
sound
Upon boot, the live CD autodetects the sound card and installs the cor-
rect sound driver.
swapfind
If the system running the live CD has any swap partitions, FreeSBIE finds
and uses them. This requires writing to the disk, of course, which might
be undesirable.
varmfs
The live CD uses a memory filesystem for /var. This makes local logging
possible, but the logs won’t survive a reboot.
xautostart
The live CD starts X at boot.
xconfig
The live CD automatically configures X at boot. This is desirable when
using xautostart.
xconfigure-probe
FreeSBIE uses an alternate method to automatically configure X at boot.
(As X offers multiple methods to configure a display, this dichotomy
isn’t anything the FreeSBIE team can solve.)
Choosing Packages
You can create a text file containing all the packages you want to install on
your live CD, or you can use make packageselect in /usr/local/share/freesbie. This
command creates a menu of all the packages installed on your build system
and lets you select which ones you want to install on your live CD. When you
select a package, all dependencies are pulled in automatically.

636 Chapter 20
Building a FreeSBIE Image
To build a FreeSBIE CD from your configuration, just do:
# cd /usr/local/share/freesbie
# make iso
FreeSBIE builds a complete FreeBSD, trims and expands it as desired,
installs packages, runs the customization scripts, and compresses the whole
thing into a customized live CD image.
If you want to create a flash image instead of an ISO, use make flash.
FreeSBIE asks which flash device you want to use, initializes it, builds
a FreeSBIE userland, and installs it on the specified flash device.
Rebuilding FreeSBIE
FreeSBIE uses dotfiles much like ports to indicate when it’s finished with a
step. By default, these files are in /usr/obj/usr/local/share/freesbie.
If you want to rebuild FreeSBIE without rebuilding world, delete the files
for the stages that you’ve completed already.
This is the last stop in our exploration of FreeBSD’s darker corners. Now
let’s see what to do when things go really, really, really wrong.

21
SYSTEM (AND SYSADMIN)
PANICS AND CRASHES
One of the nicest things about FreeBSD is
its stability; the only Blue Screen of Death
you can find is a screensaver. In fact, I ran
FreeBSD for almost a year before seeing a
machine crash for reasons other than bad hardware.
FreeBSD can crash, or panic, but it allows you to recover
from a panic fairly easily—so don’t, er, panic. You can even connect to the
remote console during a panic and force a reboot. FreeBSD provides the
tools you need to discover exactly what happened as well as extensive debug-
ging information about the panic. Even if you don’t know what to do with
this information, you can submit a problem report and discuss the matter
with the FreeBSD development team.
What Causes Panics?
When does a system panic? Panicking is a choice made by the kernel when
it faces an unresolvable conflict. If the system achieves a condition that it
doesn’t know how to handle, or if it fails its own internal consistency checks,

638 Chapter 21
it panics. Production versions of FreeBSD are increasingly difficult to panic,
but it can still happen. The easiest way to panic a system is to do something
daft, like pull out a non–hot swappable hard drive while it’s in use. Panics are
not uncommon when running -current; they’re not frequent, mind you, but
they’re not rarities.
FreeBSD is very complex, and neither its royal blood lineage nor the
open source development process can protect it from all bugs. Fortunately,
that heritage and the development process do give you the tools you need
to provide the information for other people to debug your problem. You
might begin with a cryptic error code, but you’ll quickly learn that your
string of garbage characters means something to someone.
I recommend that every system be prepared to capture a crash dump
before it is allowed to enter production. FreeBSD captures crash dumps by
default, but if you reconfigure your server or have special disk partitioning
you’ll want to confirm that crash dumps will still work. This precaution will
be wasted on most of your servers, but the preparation really takes very little
time. When one of your several servers panics, you’ll be glad that you have all
of the crash information on hand.
Recognizing Panics
When a system panics, it stops running all programs and stops listening to the
network. On a released version of FreeBSD, or when tracking -stable, a system
that panics automatically reboots. Not all unexplained reboots are panics—if
you have a bad power supply or bad memory, for example, the hardware
failure can cause a reboot without any sort of log or console message. You
might have messages in your error log if you panic, depending on the type
of panic. If you have your system configured to display panics rather that
reboot, you’ll see a console message much like this:
panic: _mtx_lock_sleep: recursed on non-recursive mutex ahc_lock @ /usr/src/
sys/dev/aic7xxx/aic7xxx_osm.h:203
cpuid = 0
KDB: enter: panic
[thread pid 12 tid 100002 ]
Stopped at kdb_enter+0x32: leave
db>
The only part of this message that seems even vaguely sensible to me is
the first line. I know that a mutex is a kind of kernel lock (see Chapter 12),
and my SCSI card uses the ahc driver. This makes sense, actually; I triggered
this panic on a -current machine by running fdisk(8) on a SCSI hard drive.1
1 Also known as, “I guess I’m not writing Chapter 18 today, as it is FreeBSD’s will that I write
Chapter 21.” And here I was, wondering how I was going to get a good panic for this chapter.
System (and Sysadmin) Panics and Crashes 639
The db> at the bottom is a debugger command prompt. Hit ENTER a couple
of times and you’ll see that you can enter commands. They aren’t useful Unix
commands, but they will help you get more information out of the system.
Responding to a Panic
If you get a panic, the first thing to do is get a copy of the panic message. Since
FreeBSD is no longer running, the standard methods for copying data from
your machine won’t work—you cannot SSH in, and script(1) is no longer
viable. The console might even be completely locked up and unresponsive
instead of being in the debugger. In any event, you must have that error
message.
FreeBSD didn’t always automatically reboot after a panic; originally it just
sat there displaying the panic message. The first time I saw a panic, I scrambled
for paper and pen. Eventually I found an old envelope and a broken stub of
pencil that made marks if you held it at just the right angle, and crawled
between the server rack and the rough brick wall. I balanced the six-inch
black-and-white monitor in one hand, and with my other hand I held the
envelope against the wall. Apparently I grow a third hand under duress,
because I got the panic message onto the envelope somehow. Finally, scraped
and cramped, I slithered back out of the rack and victoriously typed the
whole mess into an email. Surely the FreeBSD Project’s Panic Emergency
Response Team would be able to look at this garbage and tell me exactly
what had happened.
I quickly learned that FreeBSD has no elite group standing by to take my
problem report. Instead, I got a lonesome email: “Can you send a backtrace?”
When I asked how, I was directed to a man page. (See Chapter 1.) Fortunately,
the panic was easily reproducible—the only thing that had to happen to
recreate the issue was for a customer to log in to the system. I spent the rest
of the day struggling to master serial logins and core dumps.
The problem with the panic message on my envelope was that it only
gave a tiny scrap of the story. It was so vague, in fact, that it was like describing
a stolen car as “red, with a scratch on the fender.” If you don’t give the car’s
make, model, VIN, and license plate number, you cannot expect the police
to make much headway. Similarly, without much more information from your
crashing kernel, the FreeBSD developers cannot catch the criminal code.
There’s a really simple way around this problem, however: Configure all
of your machines to handle a panic before the panic happens. Set them up
when you install the server. I now configure all my machines for proper panic
processing prior to permitting them in production. That way, you’ll be ready
for disaster and you’ll know exactly what to do if a machine ever panics. This
might seem like a novel idea, and it certainly isn’t emphasized in the FreeBSD
documentation, but it makes sense. If none of your systems ever panics, you
don’t have anything to complain about. If you get a panic, you’re ready and
you’ll be able to present the FreeBSD folks with complete debugging infor-
mation without any trouble.
640 Chapter 21
Preparations
While you can manage a panic in several ways, I prefer to dump the memory
to disk for leisurely processing. You need a swap partition slightly larger than
your kernel’s memory usage. While it’s possible that you might need to dump
the entire contents of your physical RAM, it seems FreeBSD 7.0 kernel dumps
are less than half a gigabyte in most cases. If you are using something that
requires a great deal of kernel memory, such as the experimental ZFS support,
your kernel dumps will be much larger. If you do not have a sufficiently large
swap partition, you must either reinstall or add another hard drive with an
adequate swap partition. (Remember I brought this up back in Chapter 2?
Don’t you wish you’d listened to me then?) While having a /var partition
sufficiently large to hold the kernel dump is helpful, it isn’t mandatory.
The Crash Dump in Action
The kernel crash-capturing process works somewhat like this: If a properly
configured system crashes, it saves a copy of the kernel memory. The copy is
called a dump. The system cannot save the dump straight to a file. The crashed
kernel doesn’t know anything about filesystems, for one thing, and the file-
system might be corrupt or a write could corrupt it. The kernel understands
partitions, however, so it can write the dump to a partition. The best partition
available is the swap partition, which is memory scratch space. FreeBSD defaults
to dumping on the first swap partition on the system, placing the dump as
close to the end of the partition as possible. After the dump, the computer
reboots.
FreeBSD enables swap during the reboot and then checks its filesystems for
cleanliness. The partitions will almost certainly be dirty after a panic. Perhaps
they’re journaled or use background fsck(8), but the system cannot guarantee
that. FreeBSD must enable swap before running fsck(8), because fsck(8) might
need swap space. Hopefully, you have enough memory for fsck(8) to not
require swapping, and if swapping is necessary, hopefully you have enough
swap space to avoid overwriting the dump file lurking at the end of the swap
partition.
Once FreeBSD has a filesystem where it can save a core dump, it checks the
swap partition for a dump. If it finds a core dump, FreeBSD runs savecore(8)
to copy the dump out of swap and into a proper filesystem file, clears the dump
from swap space, and continues rebooting. You now have a kernel core file
usable for debugging.
Configuring Crash Dumps
FreeBSD defaults to saving core dumps on the first available swap partition
and, on every reboot, checks that partition for a dump. You can change this
behavior as necessary to fit your system.

System (and Sysadmin) Panics and Crashes 641
The obvious change you might need is to place your dump in a different
swap partition, especially if you had to add a hard drive to get enough swap to
hold your dump. Set the dump device with the dumpdev variable in /etc/rc.conf:
dumpdev="/dev/ad4s1b"
Remember, /etc/fstab lists all the swap partitions.
savecore(8) automatically places kernel dumps in /var/crash. If your /var
partition is not large enough to contain the dump, however, set a different
directory with the dumpdir variable in rc.conf:
dumpdir="/usr/crash"
While savecore also supports a few other options, such as compression,
they aren’t usually necessary on modern systems.
With a debugging kernel and a dump device, you’re as ready for a panic
as you can be.
Debugging Kernels
The FreeBSD kernel build process makes large amounts of debugging infor-
mation available in the kernel. You’ll find the primary debugging informa-
tion in the symbols files, which provide a map between the machine code and
the source code. This map also includes a complete list of source code line
numbers so that developers can learn exactly where a problem occurred.
Without this information, the developer is stuck trying to map a kernel core
to the source code by hand, which is somewhat like solving a million-piece
jigsaw puzzle without a picture or even a guarantee that you have all the
pieces. This would be an ugly job regardless, but it becomes even uglier when
you consider that the developer doing the work is an unpaid volunteer.
Symbols are important.
Including the debugger in the kernel eases the debugging process if you
have console access or if you have a serial console on a remote machine. While
you can use entirely off-line debugging, at times having the debugger handy
during a crash simplifies troubleshooting.
SERIAL CONSOLES AND PANICS
While a serial console is not strictly necessary for panic debugging, it can be
invaluable when dealing with a stuck machine. The ability to capture everything with
script(1), if nothing else, makes a serial console worthwhile. On a remote machine,
a serial console is a necessity. If you really want to be prepared for a panic, make
sure all of your machines have serial consoles or at least dual consoles. If possible,
log the output of your serial consoles; this way, you’ll get the panic message even if
the system is not configured for crash dumps.

642 Chapter 21
To retain debugging information and include the kernel debugger, ensure
your kernel configuration includes these lines:
makeoptions DEBUG=-g
options KDB
options KDB_TRACE
options DDB
When you add the DDB option to your kernel, FreeBSD will no longer automati-
cally reboot after a panic. Do you want your system to reboot itself after a
panic, or do you want it to wait for you to intervene? If the system is at a
remote location, you’ll almost certainly want to trigger a dump and reboot
automatically after a panic, but if you’re at the console, you might want it
to wait for you to tell it to reboot.
To reboot automatically, use the kernel option KDB_UNATTENDED:
options KDB_UNATTENDED
This option tells FreeBSD to reboot after a panic even if DDB is in the
kernel. When the system panics, you’ll see a message telling you to hit the
spacebar to enter the debugger; if you don’t do it, the system will reboot in
15 seconds.
When Panic Strikes: Manual Crash Dumps
Suppose you have a debugging kernel installed, your swap partition can con-
tain your dump, and your machine is not configured to reboot automatically
after a panic. One day, one of your machines disappears from the network.
You look at the console only to find a cryptic message followed by a db> prompt.
Or, perhaps you hit ENTER on the serial console only to see the db> prompt
appear. FreeBSD is waiting for you to tell it to reboot after a panic.
While you have the machine in the debugger, take a moment to capture
some of the debugging output. If the panic message is there, copy it. If not,
tell the debugger to reprint it:
db> panic
panic: from debugger
cpuid = 0
Uptime: 2m38s
panic: _mtx_lock_sleep: recursed on non-recursive mutex ahc_lock @ /usr/src/
sys/cam/cam_periph.h:182
...
The debugger repeats the panic message for your convenience.
You could also ask the debugger for more information about the panic:
db> trace
Tracing pid 12 tid 100002 td 0xc2117c00
kdb_enter(c0a908ed,0,3e9,c0b9fe2c,0,...) at kdb_enter+0x32

System (and Sysadmin) Panics and Crashes 643
panic(c0a8f7ce,c0a54565,c0a4ba56,b6,c228ca30,...) at panic+0x124
_mtx_lock_sleep(c228ca30,c2117c00,0,c0a4ba56,b6,...) at _mtx_lock_sleep+0x47
_mtx_lock_flags(c228ca30,0,c0a4ba56,b6,780,...) at _mtx_lock_flags+0xef
...
This might go on for several pages. If you have a serial console, be certain
to capture it all.
Before you reboot the machine, dump the kernel.
db> continue
Physical memory: 243 MB
Dumping 62 MB: 47 31 15
Dump complete
= 0xf
FreeBSD counts down how much memory remains to be dumped and
reboots the system when finished.
If you don’t want to dump, you can just reboot the machine:
db> reset
Your server will reboot and return to service.
If you have set KDB_UNATTENDED, the machine will reboot without any of
this, just as if you had entered continue.
Using the Dump
If you’re a kernel developer, this is where you stop listening to me and rely
upon your own debugging experience. If you’re a system administrator, how-
ever, you probably don’t know enough about C and kernel internals to have
any real hope of debugging a complicated kernel issue. Therefore, we’ll
focus on extracting enough information to give a developer a good shot at
identifying the problem.
After a dumped panic, you’ll find the files vmcore.0 and info.0 in /var/crash.
(Each subsequent crash gets a consecutively higher number.) The info.0 file
contains basic information about the dump, such as the partition the dump
came from, the date, and if the dump succeeded. The vmcore.0 file is the
memory image of the kernel at the time of the crash. You have a complete
record of what the kernel was thinking at the time it panicked.
If your system crashes frequently, crash dumps can grow to fill your /var
partition. If you have multiple instances of a certain type of crash, you only
need one dump of that type. Crash dumps from older versions of FreeBSD
are probably useless and can be deleted.
Getting a Backtrace
Go to the directory containing the kernel that panicked. This might be your
currently running kernel, or perhaps a test kernel. The kernel directory has
two files for every module, one named after the kernel module and the other

644 Chapter 21
with the word .symbols appended. The .symbols files are the debugging images.
Once you’re in the kernel directory, run kgdb(1) giving it the kernel.symbols
filename and the full path to the vmcore for your crash:
# cd /boot/kernel.panicked/
# kgdb kernel.symbols /var/crash/vmcore.0
kgdb(1) prints a synopsis of gdb(1)’s copyright and license (kgdb(1) is
actually a modified gdb(1) specifically tweaked for debugging kernels). Then
you’ll see a copy of the original panic message and finally get a kgdb prompt.
Here, at long last, you can get the requested backtrace.
(kgdb) backtrace
#0 doadump () at pcpu.h:195
#1 0xc048c629 in db_fncall (dummy1=-875263368, dummy2=0, dummy3=524358,
dummy4=0xcbd489e4 "ÐèHÀ") at /usr/src/sys/ddb/db_command.c:486
#2 0xc048cb95 in db_command_loop () at /usr/src/sys/ddb/db_command.c:401
#3 0xc048e305 in db_trap (type=3, code=0) at /usr/src/sys/ddb/db_main.c:222
#4 0xc0772426 in kdb_trap (type=3, code=0, tf=0xcbd48b88)
at /usr/src/sys/kern/subr_kdb.c:502
#5 0xc09faa2b in trap (frame=0xcbd48b88) at /usr/src/sys/i386/i386/trap.c:620
#6 0xc09e053b in calltrap () at /usr/src/sys/i386/i386/exception.s:139
#7 0xc07725a2 in kdb_enter (msg=0xc0a908ed "panic") at cpufunc.h:60
#8 0xc074b954 in panic (
fmt=0xc0a8f7ce "_mtx_lock_sleep: recursed on non-recursive mutex %s @
%s:%d\n") at /usr/src/sys/kern/kern_shutdown.c:547
#9 0xc07400b7 in _mtx_lock_sleep (m=0xc228ca30, tid=3255925760, opts=0,
file=0xc0a51887 "/usr/src/sys/dev/aic7xxx/aic7xxx_osm.h", line=203)
at /usr/src/sys/kern/kern_mutex.c:311
#10 0xc07402df in _mtx_lock_flags (m=0xc228ca30, opts=0,
file=0xc0a51887 "/usr/src/sys/dev/aic7xxx/aic7xxx_osm.h", line=203)
at /usr/src/sys/kern/kern_mutex.c:187
...
This is a complete list of everything the kernel did, in reverse order. Line 0
shows that the debugger called the doadump function, which performs the crash
dump to disk. Immediately below that we see assorted debugging calls. Line 8
includes our panic message and the word panic itself; this is where our server
started turning belly-up.
A panicking kernel will call a function called panic and sometimes trap.
You’ll see variants on these two words, such as db_trap, kdb_trap, calltrap, and
so on, but we’re only interested in the plain unadorned trap or panic call.
Search through your kgdb(1) output for either of these functions. In our
previous example, line 8 includes a call to panic. Lines 3, 4, and 5 contain
functions that the panic helper calls when attempting to figure out exactly
what happened and what to do about it.
Line 9 shows what happened immediately before the system decided to
panic in line 8. Line 9 reads:
#9 0xc07400b7 in _mtx_lock_sleep (m=0xc228ca30, tid=3255925760, opts=0,
file=0xc0a51887 "/usr/src/sys/dev/aic7xxx/aic7xxx_osm.h", line=203)
at /usr/src/sys/kern/kern_mutex.c:311

System (and Sysadmin) Panics and Crashes 645
The hex numbers don’t mean much to me, but this sure looks a lot like
our panic message. FreeBSD got confused while executing code from line 203
of /usr/src/sys/dev/aic7xxx/aic7xxx_osm.h. This gives the developer a pretty
good idea of where to start looking for the problem. We can look a little
closer, however. Enter the up command and the line you’re interested in:
(kgdb) up 9
#9 0xc07400b7 in _mtx_lock_sleep (m=0xc228ca30, tid=3255925760, opts=0,
file=0xc0a51887 "/usr/src/sys/dev/aic7xxx/aic7xxx_osm.h", line=203)
at /usr/src/sys/kern/kern_mutex.c:311
311 KASSERT((m->lock_object.lo_flags & LO_RECURSABLE) != 0,
Here we see the actual line of code that was compiled into the panicking
code. At this point, I must surrender you to a kernel developer’s tender mer-
cies. Including this in a problem report will save a round of email, however,
and it’s quite possible that a developer will just say “Oops!” and send you a fix
with no further troubleshooting. Use the quit command to leave kgdb(1):
(kgdb) quit
If you build another kernel, be certain to save the panicked kernel for
further debugging. You can only debug a kernel dump with the kernel that
panicked.
The above is a pretty good start on a problem report. You can see exactly
where the system broke and what line of code it broke on. Interested devel-
opers would quite probably write you back and tell you other things to type at
the kgdb prompt, but you are well on your way to getting the problem solved
and helping the FreeBSD folks squash a bug.
vmcore and Security
The vmcore file contains everything in your kernel memory at the time of the
panic, which might include sensitive security information. Someone could con-
ceivably use this information to break into your system. A FreeBSD developer
might request a copy of the vmcore file and the bad kernel for many legitimate
reasons; it makes debugging easier and can save countless rounds of email.
Still, carefully consider the potential consequences of someone having this
information. If you don’t recognize the person who asks or if you don’t trust
him, don’t send the file!
If the panic is reproducible, however, you can cold-boot the system to
single-user mode and trigger the panic immediately. If the system never starts
any programs containing confidential information and nobody types any
passwords into the system, the dump cannot contain that information. Repro-
ducing a panic in single-user mode generates a security-information-free,
sanitized dump. Boot into single-user mode and then run:
# mount -ar
# /etc/rc.d/dumpon start
# command_that_panics_the_system

646 Chapter 21
The first command mounts the filesystems as read-only, so that you won’t
have to fsck(8) yet again after a panic. The second command tells FreeBSD
where to put a dump. Finally, run the command that triggers the panic. Trig-
gering the panic might require more than one command, but this should get
a clean dump for you in most cases. If your panic requires that you load
confidential information into memory, that information will be present in
the dump.
Submitting Problem Reports
You might argue that I should have included this in Chapter 1 on “Getting
More Help.” Problem Report (PR) sounds impressive, doesn’t it? A problem
report is not where you say that you have a problem, however, it’s where you
prove that FreeBSD has a problem. Yes, I said prove. It’s not that FreeBSD is
innocent until proven guilty, but for you to submit a proper problem report,
you must substantiate your claim. Problem reports filed without evidence
will be closed with a terse response such as “not a bug” or “useless PR.” The
proper forum to cry for help is a search engine, or perhaps even FreeBSD-
questions@FreeBSD.org.
You can also file a PR to submit an improvement to the FreeBSD Project.
The key word here is improvement, not wish. This sort of PR needs actual
code attached along with a history of its testing and any other necessary
information.
Finally, problem reports are collaborative. By filing a PR, you are indi-
cating a willingness to work with the FreeBSD developers to resolve your
issue. This might mean applying a patch, or trying a different command, or
running debugging commands and sending the output to the developers.
Filing a PR and expecting an answer like, “Fixed, go do this” is unrealistic.
If you are not willing to work with the development team, don’t open a PR.
Of course, including the proper information in a PR helps resolve the issue
much more quickly. If you can include everything the developer needs to
know in your initial report, you’ll get a much more prompt answer.
WHAT IS NOT A PROBLEM REPORT?
Any variation on “I don’t know what I’m doing” doesn’t belong in a problem report.
This includes “FreeBSD doesn’t work the way I think it should” or “Something bad
happens when I do something dumb.” If you break your arm, the hospital has to take
you no matter what sort of foolish thing you did, but the FreeBSD team is much more
choosy. Similarly, any variation on “The software included in FreeBSD isn’t at the
version I would like” is not a problem report. FreeBSD doesn’t update to the latest and
greatest compiler the second it becomes available, for example, and might never
update to that particular compiler. There’s always a reason for these decisions, and
opening a PR to whine about them will get you nothing but a comment like “Install it
from ports” and an immediately closed PR.

System (and Sysadmin) Panics and Crashes 647
Repeat after me: “Free software. Donated support time.” Remember
this when your RAID card device driver makes your hard drives spin to a
conga beat.
Finally, it’s best if you’re running a recent version of FreeBSD when filing
a PR. Someone will look at a problem report based on a version of FreeBSD a
release or two back, but nobody’s going to look at a PR for FreeBSD 2.2-stable.
Before Filing a PR
Ideally, you won’t ever have to file a problem report. Not only is a proper
problem report a lot of work for you, it’s a lot of work for the developers. The
FreeBSD Project has a mailing list dedicated to assessing the PR database and
guiding problem reports to the likely owners. While sending an email to a
FreeBSD mailing list announces your woes to thousands of people, opening
a PR announces your woes to thousands of people and demands that they
handle virtual paperwork for you. Before filing a PR, be absolutely certain
that both you and the FreeBSD Project need it.
First, treat your issue as a general problem and look through the usual
FreeBSD resources. Review the FAQ and the Handbook. Search mailing list
archives and the Internet for other people who have had this problem. Check
the problem report system for an already open PR on this. Then ask on
FreeBSD-questions@FreeBSD.org if anyone else has seen this behavior. Is this
expected, or should you open a PR? The questions people ask about your
problem will be invaluable in troubleshooting your problem and in creating
your problem report.
Before starting your PR, gather every bit of information that might possibly
be helpful. This includes:
Verbose boot output
System version
Custom kernel configuration (if any)
Debugging output from the problem
Can you reproduce this problem? For a developer to actually investigate
the problem, you need a reproducible test case. If your server starts singing
show tunes at 3 AM, that is a problem. If it only happened once and you can’t
reproduce it, you’re best served by keeping your mouth shut so people don’t
think you’re a loony. If it happens whenever you run a particular combination
of commands on certain hardware, however, the matter can be verified and
investigated, so that either the problem is resolved or someone offers your
server a recording contract.
FreeBSD tracks problem reports with GNATS, a long-standing bug
tracking system. While newer and flashier systems exist, none of them meets
the FreeBSD Project’s requirements. Before you submit a problem report,
take a look at the existing PR database to see what’s included in existing
problem reports. You can search the PR database at http://www.freebsd.org/
support.html. Does your problem resemble any problems in the PR database?
Are there any comments on those PRs? How about any debugging output?
648 Chapter 21
Can you reference another PR in yours, saying that it might be related? Or,
does another PR exactly match your issue, and can you use any information
in there?
Assuming you get this far, you might actually need to file a problem
report. Let’s see what not to put in it.
Bad PRs
The easiest way to understand a good PR is by reading some bad ones and
identifying what qualifies them as such. While bad PRs are easy to find, I
picked one and rewrote it so as to not embarrass anyone (with my luck, the
original author is reading this right now!). I came across this problem report
a few days ago:
When I boot the FreeBSD 6.2-REL ISO image, I can’t get past the
“Welcome to FreeBSD!” options screen. The boot menu is stuck,
and each time the screen refreshes it stays at 10. It doesn’t matter
what I press, the system never boots. If I press a whole bunch of
buttons, I eventually get a kernel panic. The same ISO image
launches in VMWare, the countdown appears, and I can install it
to a partition on the disk. I’ve also tried enabling/disabling USB
keyboard legacy support in BIOS without success.
The PR includes the model number of the motherboard, keyboard, and
mouse. The instructions on repeating the problem suggest booting the ISO
image with a similar configuration of hardware.
First off, the reader obviously has a problem with FreeBSD. It might even
be that FreeBSD has a problem. I have no doubt that the system fails at boot
exactly as advertised. But there’s no evidence and no diagnostic information.
The reproduction process is not very useful; if every 6.2 installation CD caused
this behavior on common hardware such as this, the development team would
never have signed off on the release.
Including the hardware make and model is not as useful as you might
think. Vendors occasionally change chipsets in a piece of hardware without
changing the model number. The verbose boot information identifies the
actual hardware in the machine in a way that the model number never can.
If I experienced this behavior, I would first try burning a second CD.
Perhaps the first write of the disk was bad. If the behavior persisted, I would
download a FreeBSD 6.1 ISO. If the 6.1 ISO also failed, I would ask on the
-questions@ mailing list for “further advice before I file a PR.” If I could install
FreeBSD 6.1, but not 6.2, I would include the kernel and verbose boot infor-
mation from the 6.1 install in my problem report. I would also include a link
to the mailing list archive of any discussion on my problem.
As you might guess, nobody has followed up on this problem report. Your
goal is to file a problem report that is so complete and compelling that the
developers will want to work on it. Show that you are easy for a volunteer to
work with.
The FreeBSD FAQ includes a joke by Dag-Erling Smørgrav: “How many
-current users does it take to change a light bulb?” The answer is one thousand,
one hundred, and sixty nine, and includes “three to submit PRs about it, one

System (and Sysadmin) Panics and Crashes 649
of which is misfiled under doc and consists only of ‘it’s dark.’” If your PR
amounts to “it’s dark,” it’s a bad problem report.
Good PRs
You can enter PRs using the web interface, but I find that rather clunky. If you
like graphic interfaces, you might try gtk-send-pr (/usr/ports/sysutils/gtk-send-pr).
I always use send-pr(1) for problem reports. I find that send-pr(1) lets me
consider my problem report carefully, even coming back to it a day later after
I’ve had a chance to think about it. Begin by printing a blank PR form with -P
and placing it in a file:
# send-pr -P > problemreport.txt
Now open the problem report in a text editor. Here’s a sample of the template:
To: FreeBSD-gnats-submit@freebsd.org
From: Michael W Lucas <mwlucas>
Reply-To: Michael W Lucas <mwlucas>
Cc:
X-send-pr-version: 3.113
X-GNATS-Notify:
>Submitter-Id: current-users
>Originator: Michael W Lucas
>Organization: <organization of PR author (multiple lines)>
>Confidential: no <FreeBSD PRs are public data>
>Synopsis: <synopsis of the problem (one line)>
>Severity: <[ non-critical | serious | critical ] (one line)>
>Priority: <[ low | medium | high ] (one line)>
>Category: <choose from the list of categories above (one line)>
>Class: <[ sw-bug | doc-bug | change-request | update | maintainer-
update ] (one line)>
>Release: FreeBSD 7.0-CURRENT i386
>Environment:
System: FreeBSD pesty.blackhelicopters.org 7.0-CURRENT FreeBSD 7.0-CURRENT #0:
Wed May 21 13:29:50 EDT 2008 mwlucas@pesty.blackhelicopters.org:/usr/obj/usr/
src/sys/GENERIC i386
<machine, os, target, libraries (multiple lines)>
>Description:
<precise description of the problem (multiple lines)>
>How-To-Repeat:
<code/input/activities to reproduce the problem (multiple lines)>
>Fix:
<how to correct or work around the problem, if known (multiple lines)>
Both the web interface and the text form have the same fields; the
difficulty lies in filling out the form correctly. The blank template also includes
several lines beginning with SEND-PR, which send-pr(1) deletes from the form
upon submission. Similarly, any text in angle brackets (< and >) is a comment,
and send-pr(1) deletes it. The template lists legitimate choices inside the
angle brackets. Let’s go over it, one chunk at a time.
650 Chapter 21
The discussion below applies mostly for system panics, the most frustrating
type of problem report. FreeBSD also uses the PR database for submission
of new ports and new features, however. Fill out these sorts of submissions
appropriately for the submission, as per the documentation at the FreeBSD
website.
To:
This field is the email address of the FreeBSD PR database. Leave that
alone.
From, Reply-To:
Make sure these lines contain valid email addresses. GNATS will reply to
your email address with your PR number, and interested developers will
try to contact you here.
cc:
You might want to copy someone else on your PR. My boss feels better
when he is copied on support requests for issues that he thinks are criti-
cal, for example.
X-send-pr-version, X-GNATS-Notify, Submitter-Id:
Leave these fields unchanged.
Originator:
This is your name, generally pulled from the system environment. While
some folks use handles on the Internet, I recommend using your real
name. It’s difficult to treat a serious problem with the attention it deserves
if it comes from “Mr. Ticklebottoms.”
Organization:
This field is not used, so you can put here whatever you like.
Confidential:
FreeBSD’s GNATS is a public database, and you should never enter con-
fidential information in a problem report. Changing this will result in
send-pr refusing to submit the PR. If you believe that you have discov-
ered a bug with security implications, contact security-officer@FreeBSD.org.
Don’t contact the security officer just because you want to list your root
password in the PR, however.
Synopsis:
This is the most critical single line field in the problem report. Give a brief,
one-line description of the problem. Developers use this field to decide if
they are interested in a PR. A synopsis like, “FreeBSD sucks and blows
at the same time!” will get closed or ignored, while a subject like, “Panic
under heavy I/O load, backtrace attached” has a good chance of attract-
ing skilled attention. If you have a patch to fix the problem, put the word
PATCH at the beginning of the synopsis and someone will look at that very
quickly. (They might not accept the patch, mind you, but they’ll look
at it.)
System (and Sysadmin) Panics and Crashes 651
Severity:
This field can be either non-critical, serious, or critical. Pick a reason-
able one. Critical issues affect every user of FreeBSD. Serious problems
affect users of a particular device driver or in a common environment.
Everything else is non-critical. If you get a reputation listing trivial reports
as critical, you’ll find yourself being ignored fairly quickly. The FreeBSD
Project works on the honor system, and reputation counts for more
than you might think.
Priority:
You can enter either low, medium, or high. The priority field has been so
badly abused that it is now meaningless and ignored. I recommend either
low or medium.
Category:
You must enter one of the options listed in the comments area at the top
of the PR form. The categories include things such as ports, www, docs,
bin, kern, and misc. Pick a category where your problem fits in. I normally
use kern for kernel problems, bin for userland problems, ports for issues
with the Ports Collection, or doc for doc problems.
Class:
This is a type of problem. If you can crash a program or the system, it’s
a sw-bug.
Release:
send-pr(1) automatically puts your system type here. If you’re filling out
a PR on a system other than the one you’re reporting on, put the FreeBSD
release you’re reporting on here.
Environment:
Put the output of uname -a here. You can add additional information to
this field to describe other relevant parts of your machine. For example,
if the machine is a heavily loaded web server, mention that. If you have
a snippet of a configuration file that reproduces the panic, put it here.
The Environment section should be very brief. You might wish to obscure
the hostname for security reasons.
Description:
The Description field is a free-form, plaintext section for you to go into
detail about the issue. Don’t rant or rave; just describe what happens.
Include all your error messages. If it’s possible to get a crash dump, do
so and include the debugger output. Also, include your kernel configu-
ration and the boot messages from a verbose boot.
How-To-Repeat:
Give brief instructions on how to replicate this error. For some PRs, this
can be very short: “Read FreeBSD-questions for a week and see how often
this is asked” is a perfectly legitimate How-To-Repeat for doc changes. More
technical problems require detailed information.

652 Chapter 21
Fix:
The most important part of the PR goes under Fix. If you have a patch
that fixes the problem, put it here. If you have a way to work around the
problem, put it here. Anything you’ve discovered about how to solve
the problem goes here. Sometimes, the most unusual fix or condition
provides the vital clue for the solution. If you have no idea of how to
solve or work around this issue, leave Fix blank. Putting random thoughts
or speculation into the Fix field does not improve the quality of the PR.
A Sample PR
Given the above, let’s fill out a sample problem report about the crash I
debugged in the first half of this chapter. It’s a real crash that I encountered
while attempting to write Chapter 18, so I actually did need a solution. Imme-
diately after updating my system to FreeBSD-current as of July 4, 2007, I started
getting crashes when accessing my external SCSI array. I had planned to use
this cage to demonstrate GEOM modules, and I needed it working right away.
The panic message seems to indicate a problem with the ahc0 driver. I fill
out my name and email address in the spaces at the top and then go to the
more interesting parts of the form:
>Submitter-Id: current-users
>Originator: Michael W Lucas
>Organization: none
>Confidential: no
>Synopsis: panic: _mtx_lock_sleep: in aic7xxx_osm.h (with backtrace)
>Severity: serious
>Priority: medium
>Category: kern
>Class: sw-bug
>Release: FreeBSD 7.0-CURRENT i386
The Submitter-Id remains unchanged. I am the originator, and anyone
who mentions the word organization in reference to me gets laughed at. This
PR is not confidential.
The Synopsis is difficult. I put in the first part of the panic string and the
location of the panic, and mention that I have a backtrace. That’s about all
that will fit on a single line.
As this error affects a single device, but causes a panic, it’s serious. I assign
it medium priority, just because I can’t bring myself to call it low and yet the
developers won’t think it’s critical.
This is a kernel panic, so its category is kern. I can crash the kernel, so it is
in the class of sw-bug.
The Environment gives me a little more flexibility. I start with the output of
uname -a and then talk about what makes my environment special:
This is a standard i386 system with an external SCSI array attached.
Verbose dmesg is attached.

System (and Sysadmin) Panics and Crashes 653
The Description is my opportunity to tell the FreeBSD team what the
problem is:
This system performs fine on an April 22 2007 kernel. I updated to -current on
July 4, 2007, and immediately started seeing these panics. Upon further
testing, I found that I could read data just fine from the SCSI drives, but
that attempting to write to the drives resulted in this panic. The panic
message and backtrace are attached.
How-To-Repeat is where I give step-by-step instructions on how to trigger
this bug:
/dev/da7 is my test drive. I can run:
# fdisk /dev/da7
and read the slice table as often as I wish without trouble. A simple write
operation such as
# fdisk -BI /dev/da7
panics the system. This does not happen every time, but if I run this command
a few times in a row, it regularly and reliably panics. My record is five
successful "fdisk -BI /dev/da7" runs, one after the other in quick succession,
before the sixth panics the system.
This succinctly describes my problem, without screaming that I have a
deadline and really need to get Chapter 18 written before my legion of
devoted fans2 arrive at my door with pitchforks and torches demanding their
book. I have clear instructions on how to reproduce the problem. I also must
include the verbose boot messages and the kernel backtrace in this section.
Submitting the PR
Your system must have a working outbound email system to send a PR. If you
cannot send email from a machine, do not use send-pr(1) on it. Save your
problem report and related files on a machine that can send email and use
send-pr(1) there. Use send-pr(1)’s -f flag to specify a completed PR template:
# send-pr -f prreport.txt
Your PR is now submitted. Nothing to it, once you have all the information!
After Submitting the PR
A few hours after submitting the problem report, I received an email stating
that I was now the proud submitter of PR kern/114489. No matter how you
submit the PR, you’ll receive a confirmation email with a PR number within
several hours. Any response you make to that email will automatically attach
to that PR, so long as you don’t change the subject. You can submit patches
and responses from any computer with a working email system.
2 Three fans might not qualify as a legion, and Amanda is more of a sarcastic fan than a devoted
one, but I take what I can get.
654 Chapter 21
Similarly, GNATS includes any response a developer makes to your PR in
its history of the problem report. Now that your PR is in the FreeBSD data-
base, it’ll be tracked forever. That is not a guarantee that anyone will act
on your issue or that your problem will be solved; it’ll simply be recorded,
publicly, forever.
If it seems that your PR has been forgotten for several weeks, drop a
friendly note to the appropriate mailing list with your PR number and a brief
explanation of the issue and why it’s important. Since FreeBSD is a volunteer
effort, it’s quite possible that something happened to the person who would
normally handle that sort of PR. While many FreeBSD developers are pro-
fessional programmers, for many of them this is still a hobby that must take
a backseat to sick kids or the big work deadline. If nothing else, you can con-
tact one of the commercial support firms listed on the FreeBSD website.
Within a couple of days, I had responses from developers offering patches
to fix the problem. The first round of patches exposed bugs elsewhere, but
patches to resolve those followed quickly. As you can see by the presence of
Chapter 18, I was able to get a solution to my problem.
A surprising number of difficult PRs are closed quickly when they include
the proper information. Just remember that the FreeBSD folks do this out of
love for their work, not because they must. They want to produce quality code,
which is stronger motivation than a paycheck. If you can help them pro-
duce a quality product, they will happily work with you.
As of late 2007, I’ve submitted several dozen problem reports. Most have
been solved and/or committed, and then closed. The odd ones out were
mostly trivial goofs on documentation that lives under /usr/src/contrib, an area
where the FreeBSD Project specifically disavows responsibility for minor
fixes. If a doofus like me can get over 90 percent of his problem reports
successfully closed, anyone can. Be warned, however; if you submit enough
correct patches, you’ll find that the committers you work with will start to
talk about you behind your back. Eventually they will grow tired of acting as
the secretary for your high-quality work and will offer you commit access. If
you refuse, they will offer more insistently. Don’t worry, becoming a committer
is not that painful. The rumors that the FreeBSD Project initiation ritual
involves a group of Danes with axes behind a bikeshed are completely
untrue. Mostly.
Keep filing good problem reports anyway; that’s the only way FreeBSD
improves!

AFTERWORD
If you’ve made it this far, you now know
how to manage and use FreeBSD as a
platform for just about any server task. You
might have to learn how new programs work, but
you know enough about the operating system to make
FreeBSD support just about anything. Congratulations!
FreeBSD is a wonderful, flexible platform, capable of assuming just about
any role in your network. To wrap things up, I’d like to talk briefly about
some other aspects of FreeBSD.
We’ve talked about the obvious parts of FreeBSD throughout this book:
the programs, the kernel, the features, and so on. One thing we haven’t
talked about much is the community that creates all of this.
The Community
The FreeBSD community includes computer scientists, experienced program-
mers, users, system administrators, documentation writers, and just about
anyone who is interested in the system. They come from all walks of life, from

656 Afterword
all over the world, and have education levels ranging from high school to
post-doctoral. I personally have had dealings with FreeBSD users from every
continent and most large islands on the planet.1 Nationality simply isn’t
important, nor is race, color, or creed.
Some are computer scientists. Some work at ISPs or manufacturing firms.
Some are physicians, and some work as clerks in video rental shops. At one
point I worked closely with a brilliant developer who turned out to be too
young to drive. Oddly enough, time zone is important, but only because it
impacts the ability of developers to communicate with one another. Since
most of the community’s interaction is online, the only things that represent
you are your words and your work. These are the people who improve FreeBSD
and drive it forward, making it more than a collection of ones and zeroes and
more than just a way to serve websites.
One of the interesting things about the FreeBSD community is that it has
developed methods for coping with changes in its leadership. Many open
source projects have a single leader or a small static leadership team. When
those people decide to move on, their project is probably over. Someone else
might branch or fork that project, but the original community usually frag-
ments. The people who created the FreeBSD Project have mostly moved on
to other things, but the community has grown other leaders. After three gen-
erations of leadership, FreeBSD as a project has demonstrated a resilience to
leadership changes that is almost unique in the open source world. Today’s
FreeBSD leaders take a very active interest in their own replacements, mentor-
ing and coaching those junior members of the community who seem most
likely to become the leaders of the 2010s. What’s more, we always welcome
those who came before us, both in the CVS repository and at the bar.
Why Do We Do It?
Each person works on FreeBSD for his own reasons. A tiny portion of people
are paid to improve the code, either by corporations dependent on FreeBSD
or government agencies such as DARPA. Many developers work on FreeBSD
as a hobby, so they can program things more correctly than they are allowed
to at their day job. How many of you have had work projects completed less
successfully than you would like because of a deadline? FreeBSD’s deadlines
are announced months or years in advance, and developers set their own
work habits and their own levels of contribution.
Many of us are not software developers, but work on some other part of
FreeBSD instead. Some write documentation, some design the websites, some
just hang out on mailing lists and answer user questions. People spend hours
and hours working on FreeBSD-related matters. Why? I can assure you that
the royalties on this book will not come close to compensating me for the
1 Yes, this includes a man who took his FreeBSD laptop on a cruise to Antarctica. With his wife.
On their 20th anniversary. He did not mention whether his wife threw the laptop overboard or
not. If she did, I imagine he just bought a better one when they got back.
Afterword 657
evenings I could have spent with my family. I’m writing this Afterword on a
porch on a cliff in Ontario, Canada, overlooking Lake Erie. Everybody else
has gone out to walk the trails and chase butterflies, hopefully not over that
same cliff. Why would I choose to do this instead?
We do it for the satisfaction of creating something useful to the rest of
mankind and to return some of what we’ve been given.
You’re free to simply take what FreeBSD offers and do whatever you
wish with it. After a while of doing this, I found that I wanted to return
something to the community. This is how the community grows, and a
growing community means that FreeBSD will prosper.
If you want some of that satisfaction yourself, there’s a place for you too.
What Can You Do?
If you’re interested in supporting the FreeBSD Project, for whatever reason,
there’s a space for you in every part of the Project. Ever since I started using
FreeBSD back in 1996, every so often someone posts on a mailing list, “I’d
like to help, but I can’t code.” (In fact, I think I’ve sent that message myself!)
The standard response to these messages is silence. If you’ve already decided
that you can’t help, you’re right; you can’t. Once you decide that you can
help, however, you can.
Nobody denies that some high-visibility programmers are the celebrities
of FreeBSD. Many of these people have impressive skills, and most of us could
never dream of being the next Robert Watson or Jordan Hubbard. However,
even if you can’t program your way out of a paper bag, you can still help. Turn
it around and ask a different question.
Don’t ask what FreeBSD needs. You can’t provide that, unless you have a
large bank balance begging for a charitable cause to belong to. (If you have
piles of cash, however, the FreeBSD Foundation would be happy to help you
out.) Don’t say, “Wouldn’t it be cool if FreeBSD did such-and-such” if you
can’t create that yourself. What do you do? Any large organization needs
many different people, and whatever skills you have today are useful to the
FreeBSD Project.
I know people who run FreeBSD-related websites and provide valuable
resources such as http://bsdforums.com and http://www.freshports.org. These
people are respected contributors.
I know FreeBSD users who are web designers and documentation writers.
They contribute content to the website. Do enough of that, and you’ll be a
committer.
I know FreeBSD users who contribute to user mailing lists, answering
questions. Do enough of that and you’ll want to update the FAQ. Submit
enough FAQ updates, and you’ll become a committer.
658 Afterword
I write copiously, and passably well. I wrote some updates for the FAQ,
and now this book. The FAQ updates made me a committer, although I
would say that this book is the greater contribution. The mere sight of code
I’ve written makes small children cry and old ladies make the sign to ward off
the evil eye, but the FreeBSD folks welcome me and treat me as a partner
simply because I do the work.
What is it that you do? What do you enjoy doing? Leverage that skill. It
will be appreciated.
If Nothing Else . . .
If you truly have no useful skills, and you have no other ideas, reread this book.
Read the documentation on the FreeBSD website. Subscribe to FreeBSD-
questions@FreeBSD.org and help other users. Many people started this way.
I encourage you to direct people to existing information resources when-
ever possible. When someone asks a question in the FAQ, guide them there.
If the question has been asked before, suggest that they search the mailing
list archives. Teaching people to help themselves is the most effective use of
your time-—not just in FreeBSD, but out in the world as well. As the old saying
goes, teach a man to fish and you can sell him fishhooks. After answering
questions for a while, you’ll see the shape of the Project’s needs. One of
those needs will almost certainly match your skills.
Getting Things Done
Here’s the big secret of success in FreeBSD: Everything that it contains is there
because somebody saw a need that he could fill and did something about it.
NetBSD and FreeBSD started when a bunch of 386BSD patchkit users got sick
of waiting for the next patchkit release. I didn’t ask for permission to write
this book before starting. The fine folks over on bugbusters@FreeBSD.org don’t
wade through the PR database for fun; they do it because they think it’s
important enough to spend their time on. (Actually, if you’re a programmer,
going through the PR database and looking for problems you can solve is
one of the best contributions you can make.)
Once you have an idea, search the mailing list for discussions about it.
Many projects are suggested but never implemented. If someone’s previously
brought up your idea, read the archived discussion. If the idea met with general
approval, you can assume that you’ll get the same reaction. If nobody’s working
on the project any more, get to work! The FreeBSD team will be perfectly
happy if the first time they hear from you is an email message saying, “Hi, my
patches for implementing such-and-such feature in the installer are available
at this URL.”
Afterword 659
Whatever you do, don’t post a question to the mailing list that says, “Why
doesn’t someone else do the work for X?” Most of these suggestions fall into
three categories: obvious (“Hey, wouldn’t it be cool if FreeBSD ran on main-
frames?”), foolish (“Why isn’t there a kernel option BRINGMEACOLDBEER?”), or
both (“Why not support my Sinclair ZX80?”). In any of these cases, the person
asking is both unqualified to perform the work himself and claims to be help-
less to support others who could do the work. All these suggestions do is annoy
people and waste bandwidth.
In short: Shut up and work. Do what you can do, and do it well, and people
will appreciate it. Programmers can help by picking an idea off the FreeBSD
Project Ideas List or jumping into the bugbusters@FreeBSD.org mailing list and
wading through the PR slurry. Nonprogrammers can help by picking a hole
and filling it in. You might become a leader in the Project, or you might be
known as “That dude who hangs out on -questions@ and helps people with
ACPI.” All are absolutely vital. Your help makes FreeBSD prosper and grow.
Stick around long enough, and you just might find yourself one of FreeBSD’s
new leaders.
I look forward to seeing you on the mailing lists.

SOME INTERESTING
SYSCTL MIBS
This appendix is a dictionary of some useful
sysctl MIBs, as well as some sysctl MIBs that
are no longer useful but have long been dis-
cussed in FreeBSD forums. Chapter 5 discusses
tools for manipulating sysctl MIBs. When a MIB is dis-
cussed in detail elsewhere in the book, a reference is
made to the appropriate chapter. Your system certainly
has many more sysctls than these, but described here
are those that I’ve tripped over repeatedly.
Remember, thoughtless use of sysctls can easily damage or destroy a
working system. For example, if you set a limit on resource usage below the
value needed at that moment, you can crash a process or a system. Be sure
you understand the implications of what you’re doing before setting a sysctl.
If you don’t understand it, that’s what test systems are for.
For each sysctl, I list a sample value from my test system so you can see
what the value should look like.
662 Appendix
Each sysctl description indicates when the sysctl can be changed. Some
sysctls can be changed at any time, others can be changed only at boot. A few
are read-only.
For each sysctl, I also mention if it is a variable, toggle, or tunable. Variables
have a wide variety of ranges. Toggles have only two legitimate values, 1 (the
described service is on) and 0 (the service is off). Tunables are set in the boot
loader. (Strictly speaking, a boot tunable is different from a sysctl, but you set
the sysctl by setting the tunable.)
kern.osrelease: 7.0-RELEASE
Read-only. This displays the running version of FreeBSD, such as
7.2-release, 8.0-current, and so on.
kern.maxvnodes: 100000
Run-time variable. The maximum number of vnodes (virtual filesystem
nodes) the system can have open simultaneously.
kern.maxproc: 6164
Boot-time tunable. The maximum number of processes the system can
run at any one time.
kern.maxfiles: 12328
Run-time variable and boot-time tunable. The maximum number of files
that the system can have open for reading or writing at any one time.
kern.argmax: 262144
Read-only. The maximum number of characters you can use in a single
command line. You might run up against this in some unusual circum-
stances. If you do, please see xargs(1).
kern.securelevel: -1
Run-time variable. The current kernel security level. See Chapter 9.
kern.hostname: bewilderbeast.blackhelicopters.org
Run-time tunable. The hostname, as set in /etc/rc.conf.
kern.posix1version: 200112
Read-only. This gives the version of POSIX the kernel complies with. If
you need to change this, please feel free to contribute code to support
other POSIX versions.
kern.ngroups: 16
Read-only. The maximum number of groups any one user may belong to.
kern.boottime: { sec = 1187744126, usec = 946476 } Tue Aug 21 20:55:26 2007
Read-only. This gives the time the system booted, in both epochal time
and as a human-friendly date.
kern.domainname:
Run-time variable. This offers the YP/NIS domain name, not the TCP/IP
domain name. If you are not using YP/NIS, it will be blank.
Some Interesting sysctl MIBs 663
kern.osreldate: 700052
Read-only. This is the FreeBSD version, not an actual date. Various ports
configure themselves with this sysctl value.
kern.bootfile: /boot/kernel/kernel
Read-only. This is the kernel file that the system booted. While you could
technically change this, don’t. Reboot on a new kernel instead. The only
time this changes on a running system is when you tell FreeBSD to install
a new kernel and move the old kernel to /boot/kernel.old, but that’s a very
special case.
kern.maxfilesperproc: 11095
Run-time variable. This is the maximum number of files a single process
can open.
kern.maxprocperuid: 5547
Run-time variable. The maximum number of processes one user ID can
run simultaneously.
kern.ipc.somaxconn: 128
Run-time variable. The maximum number of new connections the system
will accept at any one time. If you’re running a heavily loaded server, you
might need to increase this to 256 or even 512.
kern.ipc.maxpipekva: 16777216
Boot-time tunable. This is the maximum amount of kernel memory that
can be used by pipes.
kern.ipc.pipekva: 212992
Read-only. This is the current amount of memory used by pipes.
kern.ipc.shmmax: 33554432
Run-time variable. This is the maximum size of a System V shared mem-
ory segment. You might have to tune this for programs that use large
amounts of shared memory, notably databases.
kern.ipc.shmseg: 128
Boot-time tunable. This is the maximum number of System V shared
memory segments any one process can open.
kern.ipc.shmall: 8192
Run-time variable. This is the maximum number of pages available for
System V shared memory.
kern.ipc.shm_use_phys: 0
Run-time toggle, boot-time tunable. Enabling this tells FreeBSD it can
never swap out shared memory segments. This can improve performance
if you are using large amounts of System V shared memory, but by mak-
ing shared memory unpageable you can hurt the performance of every
other program on your system.
664 Appendix
kern.ipc.numopensockets: 70
Read-only. This is the number of open sockets of all sorts, including
network and local domain sockets.
kern.ipc.maxsockets: 12328
Run-time variable, boot-time tunable. This is the total number of sockets
available on the system. This includes Unix domain sockets as well as
network sockets.
kern.logsigexit: 1
Run-time toggle. A program that exits abnormally usually sends a signal.
When this toggle is set, the name of the program and the exiting signal
are logged to /var/log/messages.
kern.init_path: /sbin/init:/sbin/oinit:/sbin/init.bak:/rescue/init:/stand/
sysinstall
Read-only. init(8) is the program that actually starts running the userland.
This sysctl lists the paths where the kernel looks for init(8). If you’ve
damaged your system (say, during an upgrade gone bad), this provides
a series of backup paths the system checks for a copy of init(8). This sysctl
is also available in the boot loader as init_path.
kern.init_shutdown_timeout: 120
Run-time variable. This is the number of seconds that userland processes
have to shut themselves off during the shutdown process. After this many
seconds, the kernel shuts itself off no matter what might be running.
kern.randompid: 0
Run-time variable. If set to 0, each newly assigned process ID is one greater
than the previous. If set to a larger number, the next PID is random. As
the value of this sysctl increases, the randomness of the next PID increases.
kern.openfiles: 246
Read-only. This is the number of files currently open on the system.
kern.module_path: /boot/kernel;/boot/modules
Run-time variable. This lists the directories where kldload(8) checks for
kernel modules.
kern.maxusers: 384
Boot-time tunable. For many years, kern.maxusers was a general-purpose
hint the system administrator could set to tell BSD and FreeBSD how much
memory to allocate for certain types of system tasks. Modern FreeBSD
systems auto-tune kern.maxusers. Any documentation that suggests chang-
ing kern.maxusers is almost certainly obsolete.
kern.sync_on_panic: 0
Run-time toggle. When FreeBSD panics (see Chapter 21), it unmounts
all disks without synchronizing them first. This results in dirty disks, as
discussed in Chapter 8. If you set this sysctl, FreeBSD will attempt to sync
the disks before shutting down. This is extremely dangerous, as you have
no way to know the condition of a panicked system. You might actually
Some Interesting sysctl MIBs 665
damage data or the underlying filesystem by attempting to sync your disks
after a panic, resulting in a sysadmin panic as well as a system panic.
kern.coredump: 1
Run-time toggle. By default, when a program crashes, FreeBSD writes
a core dump. Setting this to 0 disables core dumps. It is most useful on
embedded and diskless systems.
kern.nodump_coredump: 0
Run-time toggle. Enabling this tells FreeBSD to set the nodump flag on
core files. See Chapter 4.
kern.timecounter.choice: TSC(-100) i8254(0) dummy(-1000000)
Read-only. This lists the hardware clocks available on your system. Most
modern hardware has four common options, in order from best to worst:
ACPI, i8254, TSC, and dummy. The numbers give relative accuracy of the
various clocks.
kern.timecounter.hardware: i8254
Run-time variable. You can change this to use a different hardware
clock. Your choices are provided in the kern.timecounter.choice sysctl.
By default, FreeBSD uses the best available clock.
kern.timecounter.smp_tsc: 0
Boot-time tunable. If this equals 0, do not use the TSC hardware clock on
this hardware. TSC does not work correctly on most SMP systems.
kern.sched.name: 4BSD
Read-only. This is the name of the scheduler in the running kernel.
kern.sched.quantum: 100000
Run-time variable. This gives the maximum number of microseconds a
process can run if other processes are waiting for CPU time when using
the 4BSD scheduler. If you’re considering changing this, you are almost
certainly doing something wrong. The ULE scheduler does not offer this
sysctl.
kern.sched.preemption: 1
Read-only. This shows if preemption is enabled in the kernel. Preemp-
tion allows a more urgent kernel thread to interrupt a less urgent kernel
thread.
kern.log_console_output: 1
Run-time toggle, boot-time tunable. By default, FreeBSD sends console
messages to syslogd. (Console messages do not include responses to
commands typed on the console, just messages that the system logs to
the console whether someone is logged in or not.) Changing this to 0
disables this feature.
kern.smp.disabled: 0
Boot-time toggle. Disable SMP in /boot/loader.conf by setting kern.smp
.disabled to 1.
666 Appendix
kern.smp.cpus: 2
Read-only. This is the number of CPUs running on the system.
kern.filedelay: 30
Run-time variable. This dictates how often FreeBSD synchronizes file
data between the vnode buffer cache and the disk. More frequent syn-
chronization causes increased disk load, while decreasing the synch-
ronization frequency increases risk. Only system administrators who
thoroughly understand the buffer cache should even consider touch-
ing this.
kern.dirdelay: 29
Run-time variable. This controls how often the system synchronizes
directory data between the buffer cache and the disk. It should be set
to slightly less than the kern.filedelay sysctl. Again, only highly experi-
enced system administrators should consider changing this.
kern.metadelay: 28
Run-time variable. This controls how often FreeBSD synchronizes filesys-
tem metadata between the buffer cache and the disk. It should be set to
slightly less than the kern.dirdelay sysctl. Again, for highly experienced
system administrators only! Mucking with synchronization is a great way
to get a deep education in data loss.
vm.v_free_min: 3258
Run-time variable. The minimum number of pages of cache and free
memory that must be available before a process waiting on memory will
be awakened and told to run.
vm.v_free_target: 13745
Run-time variable. The minimum number of pages of combined free
and cache memory that the virtual memory manager tries to maintain
or exceed.
vm.v_free_reserved: 713
Run-time variable. If the number of pages of free memory falls below this
value, the virtual memory manager will start swapping out processes.
vm.v_inactive_target: 20617
Run-time variable. FreeBSD tries to keep at least this much memory
inactive, by making active pages inactive.
vm.v_cache_min: 13745
vm.v_cache_max: 27490
Run-time variable. The minimum and maximum desired size of the
virtual memory cache queue.
vm.swap_enabled: 1
Run-time toggle. This controls the use of swap space. If set to 0, your
system will not swap. This is most useful for diskless systems.
Some Interesting sysctl MIBs 667
vm.swap_idle_enabled: 0
Run-time toggle.
vm.swap_idle_threshold1: 2
Run-time variable.
vm.swap_idle_threshold2: 10
Run-time variable. Setting the swap_idle_enabled sysctl tells the virtual
memory manager to pull idle processes into swap more quickly than
other processes. The threshold sysctls tell the system how many seconds
to wait before considering different sorts of processes idle. The defaults
are fine for most people; just enabling vm.swap_idle_enabled should do the
trick. This can help some systems stay afloat when they’re desperately
short on memory and are swapping out entire processes.
vm.exec_map_entries: 16
Boot-time toggle. This is the maximum number of processes that can be
started simultaneously.
vfs.nfs.diskless_valid: 0
Read-only. If 0, this system is not running diskless. If non-zero, the system
is running diskless.
vfs.nfs.diskless_rootpath:
Read-only. This gives the path to the root filesystem of a diskless machine.
vfs.nfs.diskless_rootaddr:
Read-only. This gives the IP address of the root filesystem of a diskless
machine.
vfs.vmiodirenable: 1
Run-time toggle. Allows UFS to use the virtual memory system to cache
directory lookups, increasing disk performance.
vfs.usermount: 0
Run-time toggle. If enabled, users may mount filesystems on mount
points that they own. This allows unprivileged users to mount floppy
disks and CDs. See Chapter 8.
vfs.ffs.doasyncfree: 1
Run-time variable. This tells the UFS filesystem to asynchronously update
inodes and indirect blocks after reorganizing disk space. See the sysctl
vfs.ffs.doreallocblks.
vfs.ffs.doreallocblks: 1
Run-time variable. By default, FreeBSD reorganizes its disks so that files
are contiguous at all times. In effect, UFS continuously defragments
itself. Set this to 0 to disable this behavior.
net.inet.ip.portrange.lowfirst: 1023
net.inet.ip.portrange.lowlast: 600
Run-time variables. Some programs or protocols require connections to
be made from low-numbered ports, indicating that they are started by
668 Appendix
privileged processes. Remember, an outgoing TCP/IP connection uses a
port on the local system. Also remember that ports from 0 through 1023
can only be opened by root. This means that if a connection comes from
a low-numbered port, it’s theoretically running as root. (This involves
trusting that the machine initiating the connection has not been broken
in to.) FreeBSD uses ports between those given by net.inet.ip.portrange
.lowfirst (default of 1023) and net.inet.ip.portrange.lowlast (default of
600). I only know of one instance where changing this makes sense. The
IPMI firmware on some Intel NICs always intercepts UDP packets bound
for ports 623 and 664. If you don’t have one of those cards, leave this
alone.
net.inet.ip.portrange.first: 49152
net.inet.ip.portrange.last: 65535
Run-time variable. When FreeBSD allocates a random port for an out-
going connection from unprivileged processes, it uses ports between those
given by net.inet.ip.portrange.first (default of 49152) and net.inet.ip
.portrange.last (default of 65535).
net.inet.ip.portrange.hifirst: 49152
net.inet.ip.portrange.hilast: 65535
Run-time variable. Some programs specifically request a high-numbered
port for an outgoing connection. By default, this range of ports overlaps
with the ports specified by net.inet.ip.portrange.first to net.inet.ip
.portrange.last, but you can separate these ranges by using the hifirst
and hilast sysctls.
net.inet.ip.portrange.reservedhigh: 1023
net.inet.ip.portrange.reservedlow: 0
Run-time variable. This specifies the range of ports that can only be
opened by root.
net.inet.ip.portrange.randomized: 1
Run-time variable. By default, FreeBSD will allocate random ports within
the ranges allocated for that type of connections.
net.inet.ip.portrange.randomcps: 10
Run-time variable. This is the maximum number of random port allo-
cations within a single second. If more than this many ports are needed,
FreeBSD switches to sequential port allocation to avoid consuming all
system randomness.
net.inet.ip.portrange.randomtime: 45
Run-time variable. This is the number of seconds FreeBSD will use
sequential TCP/UDP port allocations before reverting to random port
allocation.
net.inet.ip.forwarding: 0
Run-time toggle. You might want FreeBSD to act as a router, gateway, or
firewall. With this set, the system forwards packets between interfaces.
Some Interesting sysctl MIBs 669
net.inet.ip.redirect: 1
Run-time toggle. With this set, a FreeBSD system acting as a router or
gateway will send ICMP redirect packets to other systems on the network.
It has no effect if the system is not routing.
net.inet.ip.ttl: 64
Run-time variable. This is the maximum number of hops any non-ICMP
protocol may take across the network.
net.inet.ip.sourceroute: 0
Run-time toggle. This enables forwarding of source-routed packets.
Source routing is generally considered a bad idea on the public Internet.
net.inet.ip.accept_sourceroute: 0
Run-time toggle. This enables acceptance of source-routed packets. If
you don’t know what source routing is, just accept my word that this is a
really bad idea in almost all cases.
net.inet.ip.fastforwarding: 0
Run-time toggle. This sysctl greatly accelerates packet throughput on
routers and gateways. It does so by eliminating most of the sanity and
integrity checks performed on packets and by completely eliminating
any packet-filtering rules.
net.inet.ip.check_interface: 0
Run-time toggle. This provides basic antispoofing protection for your
server. It’s only useful on a router, gateway, or firewall. Most of the time,
this is better done at the firewall level.
net.inet.icmp.icmplim: 200
Run-time variable. This is the maximum number of ICMP requests the
system will answer per second. Systems that have a huge amount of ICMP
requests (mostly those running security and network tools such as Nessus,
nmap, and Nagios) will need to increase this. Set this to 0 to disable
ICMP throttling altogether.
net.inet.icmp.drop_redirect: 0
Run-time toggle. This tells FreeBSD to ignore ICMP redirect packets.
Most of the time redirects improve performance, but I have had edge
cases where ignoring redirects was the proper course of action.
net.inet.icmp.log_redirect: 0
Run-time toggle. If set, FreeBSD will log all ICMP redirects to the con-
sole. (You didn’t really need that console for anything useful, did you?)
net.inet.icmp.bmcastecho: 0
Run-time toggle. This enables responses to requests to the broadcast
address of a network. While this facilitated troubleshooting and was
originally required for standards compliance, responding to broadcast
pings was such a security problem that it’s now disabled by default on
all modern operating systems.
670 Appendix
net.inet.tcp.rfc1323: 1
net.inet.tcp.rfc3042: 1
net.inet.tcp.rfc3390: 1
Run-time toggles. These enable various TCP methods described in the
corresponding RFCs and should be perfectly safe. Some very, very old
systems might have slow or problematic throughput when communicat-
ing with your FreeBSD system with these enabled.
net.inet.tcp.sendspace: 32768
net.inet.tcp.recvspace: 65536
Run-time variable. These give the default initial buffer size for a new
TCP/IP connection. While FreeBSD allocates these buffers dynamically
as the throughput to the remote host requires, these values provide a
good starting point. While you will find advice about changing these
values in much old documentation, today they should be left alone.
net.inet.tcp.log_in_vain: 0
Run-time toggle. This enables logging any attempt to connect to a TCP
port when no program is listening on that port. On the public Internet,
this can generate a huge amount of output. I suggest enabling this on a
test system just so you can see what sort of crap flies around the Internet
these days, and then turning it off so that you can use your console again.
net.inet.tcp.blackhole: 0
Run-time toggle. By default, TCP/IP returns an error code when you
attempt to connect to a closed port. This shows up as a “Connection
reset by peer” error. If you set this to 1, attempts to connect to closed
TCP ports are dropped without sending an error. This slows down port
scans and can add some semblance of security to your system. It is not a
replacement for packet filtering, however!
net.inet.tcp.delayed_ack: 1
Run-time toggle. This tells FreeBSD to attempt to include TCP ACK
information on a data packet instead of sending additional packets to
signal the end of a connection.
net.inet.tcp.recvbuf_auto: 1
Run-time toggle. This enables automatic resizing of receive buffers.
net.inet.tcp.recvbuf_inc: 16384
Run-time variable. This is the size of the increment by which receive
buffers are changed by automatic sizing.
net.inet.tcp.recvbuf_max: 262144
Run-time variable. This is the maximum size of any one receive buffer on
the system.
net.inet.tcp.slowstart_flightsize: 1
Run-time variable. This specifies the number of packets FreeBSD will
send during the slow-start portion of a TCP transaction across a wide
area network.
Some Interesting sysctl MIBs 671
net.inet.tcp.local_slowstart_flightsize: 4
Run-time variable. This specifies the number of packets FreeBSD will
send during the slow-start portion of a TCP transaction across the local
network.
net.inet.tcp.newreno: 1
Run-time toggles. This toggles RFC2582 connection recovery, also known
as the TCP NewReno Algorithm.
net.inet.tcp.tso: 1
Run-time toggle. Some network hardware can handle breaking network
requests into packets with proper sizes for the medium. For example, with
certain network cards, FreeBSD can just hand a lump of data to the card
and ask it to break that lump up into packets. This allows for more opti-
mized communication with the network card and less work for the CPU.
This tells FreeBSD to use the hardware to perform segmentation when
supported.
net.inet.tcp.sendbuf_auto: 1
Run-time toggle. This enables automatic sizing of TCP connection send
buffers.
net.inet.tcp.sendbuf_inc: 8192
Run-time variable. This gives the amount to increase or decrease the TCP
send buffer each time a change is needed.
net.inet.tcp.sendbuf_max: 262144
Run-time variable. This is the maximum size of a single TCP send buffer.
net.inet.tcp.sack.enable: 1
Run-time toggle. FreeBSD uses selective ACK by default, but occasionally
very old hosts have trouble with this feature.
net.inet.tcp.do_tcpdrain: 1
Run-time toggle. This tells FreeBSD to flush packets from the reassembly
queue when it is low on mbufs. Now that FreeBSD automatically allocates
mbufs from kernel memory, this is much less useful than it once was.
net.inet.tcp.always_keepalive: 1
Run-time toggle. By default, FreeBSD checks all TCP connections to see
if they’re still alive. Normally, if a connection between two hosts drops,
these keepalives tell the systems to close down the connection. If you dis-
able this behavior, FreeBSD will not check if the connection between the
hosts is up or down; rather, it will assume that the connection is up until
it cannot pass data.
net.inet.udp.log_in_vain: 0
Run-time toggle. This logs attempts to connect to any UDP port where
no program is listening.
672 Appendix
net.inet.udp.blackhole: 0
Run-time toggle. Like TCP, UDP sends an error message when someone
attempts to connect to a port that doesn’t have anything listening on it.
If you set this to 1, attempts to connect to closed UDP ports are dropped
without sending an error. This slows down port scans.
net.link.log_link_state_change: 1
Run-time toggle. If enabled, FreeBSD will log every time a network
interface goes up or down.
debug.debugger_on_panic: 1
Run-time toggle. If set, FreeBSD will enter the debugger on a panic.
debug.trace_on_panic: 0
Run-time toggle. If set, FreeBSD automatically prints a stack trace when
it enters the debugger after panicking.
debug.witness.watch: 1
Run-time variable, boot-time tunable. With WITNESS compiled into the
kernel, FreeBSD performs additional sanity checking of all kernel locks.
Setting this to 0 disables these checks. Once you turn WITNESS off, you
cannot turn it back on without rebooting. Note that you will not get the
benefits of WITNESS when you disable it; specifically, if your system
panics due to locking while under heavy load, you won’t get the lock
message that would have told a FreeBSD developer where to find the
problem.
debug.witness.skipspin: 1
Boot-time toggle. This tells WITNESS to not perform any checks on spin
locks. Checking spin locks with WITNESS makes almost any machine
unbearably slow. Skipping spin locks, but using WITNESS in all other
cases, makes WITNESS only slow instead of unbearably slow. This is the
same as the kernel option WITNESS_SKIPSPIN.
debug.minidump: 1
Run-time toggle, boot-time tunable. By default, FreeBSD only dumps
kernel memory on a panic. Set this to 0 to dump the entire contents of
physical memory on panic.
hw.ata.ata_dma: 1
Boot-time toggle. This enables DMA in IDE devices. Set this to 0 if your
hardware uses PIO instead of DMA. If your hardware is old enough to
require PIO, you probably know about it.
hw.ata.atapi_dma: 1
Boot-time toggle. This enables DMA in ATAPI devices. Set this to 0 if your
hardware uses PIO instead of DMA or if your hardware has a buggy DMA
implementation. Again, if your hardware is old enough to require PIO,
you probably know about it.
Some Interesting sysctl MIBs 673
hw.ata.wc: 1
Boot-time toggle. This enables IDE write caching, as supported by
some hard drives. Write caching uses a small buffer on the hard drive
to cache writes en route to the disk, improving performance at a cost in
reliability. Set this to 0 to disable write caching and enhance data safety.
See Chapter 8.
hw.syscons.kbd_reboot: 1
Run-time toggle. With this enabled, the old-fashioned CTRL-ALT-DELETE
sequence reboots the system. Set this to 0 to disable this behavior.
compat.linux.osrelease: 2.4.2
Run-time variable. This defines the version of Linux supported by Linux
mode. Some Linux programs behave differently when this is changed.
While you can change it on the fly, if any Linux programs are in use, the
system will panic. It’s best to let the Linux mode software do this for you.
security.jail.set_hostname_allowed: 1
Run-time variable. This dictates whether jail administrators can change
the hostname of their jail. See Chapter 9.
security.jail.socket_unixiproute_only: 1
Run-time variable. This controls whether jail owners can use protocols
other than TCP/IP. See Chapter 9.
security.jail.sysvipc_allowed: 0
Run-time variable. This determines whether jail owners can use System V
IPC calls. See Chapter 9.
security.jail.enforce_statfs: 2
Run-time variable. When set to 0, jailed users can see all mount points
and partitions on the system, both inside and outside the jail. When set
to 1, only mount points below the jail’s root are visible. When set to 2,
only the jail’s root mount point is visible.
security.jail.allow_raw_sockets: 0
Run-time variable. When set, root in a jail can create raw sockets. See
Chapter 9.
security.jail.chflags_allowed: 0
Run-time toggle. The jail administrator can use chflags(1). See Chapter 9.
security.jail.list:
Read-only. This lists all the active jails on the system. FreeBSD changes this
as you start and stop jails, but you cannot change this sysctl with sysctl(8)
to activate new jails. See Chapter 9.
security.jail.jailed: 0
Read-only. If set to 1, the program that queried the sysctl is running
inside a jail. See Chapter 9.
674 Appendix
security.bsd.see_other_uids: 1
Run-time toggle. By default, users can see processes belonging to
other users through ps(1) and related tools. Setting this to 0 disables
this visibility.
security.bsd.see_other_gids: 1
Run-time toggle. By default, users can see processes belonging to other
groups through ps(1) and related tools. Setting this to 0 disables this
visibility.
security.bsd.unprivileged_read_msgbuf: 1
Run-time toggle. By default, unprivileged users can read the system mes-
sage buffer through dmesg(8). This includes users inside jails. Setting
this to 0 disables that visibility, which is usually desirable in a jail server.
security.bsd.hardlink_check_uid: 0
Run-time toggle. By default, users can create hard links—see ln(1)—to
any file. If you set this to 1, users cannot create hard links to files owned
by other users.
security.bsd.hardlink_check_gid: 0
Run-time toggle. By default, users can create hard links to files owned by
any group. If you set this to 1, users can only create hard links to files that
are owned by a group they belong to.
security.bsd.overworked_admin: 3.1415925
Read-only. If you’ve actually read this whole appendix, you’ve obviously
been working too hard. Put this book down. Go outside. Get some fresh
air for an hour or two. You’ll feel better. If you thought this was a real
sysctl MIB, however, stay outside and offline for at least two days.

INDEX
Symbols and Numbers
* (asterisks), in crontabs, 464
@reboot, 466
$ (dollar sign), for user name in environ-
ment fields, 200
$BLOCKSIZE environment variable, 216
$EDITOR environment variable, 185
$Header$ string, 113
$HOME/.nsmbrc file, 249
$Id$ string, 113
$Log$ string, 113
$TAPE variable, 91–92
. (dot) in names, for hidden files, 338
# (hash marks), for comments, 130
+IGNOREME file, 408
? (question mark), to display commands
for loader, 66
/ (root) partition, 38
// (slashes), for comments, 424
~ (tilde)
in environment fields for user home
directory, 200
for tip program, 75
3Ware, 542
4BSD scheduler, 349
32-bit computing, 369
64-bit computing, 369
110n.sh plug-in, for FreeSBIE, 635
386BSD, 4
A
a command (FTP), 523
A host record, 433
aaccli, 542
ABI (application binary interface)
reimplementation, 363
supported, 364
access control lists, for milter-greylist,
489–490
access-time stamp, 220
account expiration field, in
/etc/master.passwd file, 187
ACPI (Advanced Configuration and
Power Interface), 142
disabled when booting, 62–63
Active Directory, 513
active memory, 577
addr keyword, in /etc/nsmb.conf file, 250
Address Resolution Protocol (ARP),
146, 160
table, 160
adduser command, 181
adduser plug-in, for FreeSBIE, 634
administrative group, creating, 192–193
Adobe Acrobat Reader, 365
Advanced Configuration and Power
Interface (ACPI), 142
disabled when booting, 62–63
aggregation protocols, 175–176
AHC_REG_PRETTY_PRINT option, for kernel, 133
AHD_REG_PRETTY_PRINT option, for kernel, 133
AIX, 9
alert level for syslog protocol, 588
Alias statement, for Apache, 511
aliases
assigning to network card, 84
and outgoing connections, 164
ALL EXCEPT option, in login.access, 197
ALL option
for Apache, 509
in login.access, 197
in TCP wrappers, 267, 268
AllowGroups variable, for SSH, 444–445
AllowOverrride keyword
for Apache, 510
for virtual host, 519
AllowTcpForwarding, for SSH, 443
AllowUsers variable, for SSH, 444–445
allscreens_flags variable, 86
Alpha servers, 7
amd64 platform, 34
676 INDEX
anonymous FTP server, 526
antispam blacklists, 473, 485–486
a.out format, 357
Apache web server, 500–506
configuration files, 501
controlling, 521
core configuration, 501–503
directories and permissions, 507–515
HTTPS websites, 520
including other configuration files,
515–516
logs, 503–505
modules, 505–506
password protection and, 512–515
virtual hosting, 517–519
apachectl program, 521
application binary interface (ABI)
reimplementation, 363
supported, 364
applications, 148
apropos, for man page searches, 23
architectures, FreeBSD build for
difference in, 399
archives
checking contents, 101–102
listing file in, 95
restoring files from, 102–103
restoring filesystem, 103
Areca, 542
ARM platform, 10
ARP (Address Resolution Protocol),
146, 160
table, 160
arp -a command, 160
ASCII file transfer, 523
asterisks (*), in crontabs, 464
asynchronous mounts in FFS, 219
Asynchronous Transfer Mode (ATM), 147
AT&T, and BSD, 2, 4
AT&T UNIX, 364
ATA disk drives, numbering, 212
atapicam kernel module, 230
atime, 220
ATM (Asynchronous Transfer Mode), 147
atomic clock, 448
attach rules, for devd, 257
audit group, 194
auth facility, 587
AuthConfig override, in .htaccess file, 510
authentication
PAM (Pluggable Authentication
Modules), 310
Radius user authentication, 513–515
with SASL, 491–493
authoritative nameserver, 412
chain of, 415
authpf group, 194
authpriv facility, 587
AuthXRadiusCache option, for Apache, 514
AuthXRadiusCacheTimeout option, for Apache,
514
autoboot_delay variable, 70
autologin plug-in, for FreeSBIE, 634
automatic reboots, after system panic,
638, 642
avail memory, listing in startup
messages, 77
B
background fsck, 81, 223–224
backtrace, 643–645
backup server, setup for mirroring, 565
backups
of disklabels, 538
before drive install, 240
extracting files from, 95
of kernel, 128
multiple on one tape, 105–106
of old version of software, 407
programs
dump, 98–101
tar, 94–97
restoring, from dump, 101–104
rewinding tapes, 91
slice table, 533
specifying tape drive for, 96
of system, 90
tapes for, 90–93
bandwidth, 571
PF control of, 276
Banner setting, for SSH, 444
base 2, 150
base 10, 151
BASEDIR option, for FreeSBIE, 632
Bash shell, installing, 57
Basic Input/Output System (BIOS), 62
setting to boot from CD, 45
beastie_disable variable, 70
Beck, Bob, 487
Begemot SNMPD (bsnmpd), 598,
600–602
Berkeley Internet Name Daemon (BIND)
chroot environment for, 437
configuration files, 423–424
masters and slaves, 423
security, 436–437
Berkeley Software Distribution (BSD), 2–3
license, 3
INDEX 677
best practices, in revision control, 106
Big Giant Lock (BGL), 345
bin command (FTP), 523
/bin directory, commands in, 64–65
bin group, 194
/bin/sh shell, 58, 64
/bin/tcsh shell, 58, 64
binaries, formats, 357
binary
branding, 364
identifying and setting, 367
file transfer, 523
math, 150–151
updates, 378–380
values, as sysctl value, 121
BIND (Berkeley Internet Name Daemon).
See Berkeley Internet Name Daemon
(BIND)
bind group, 194
binding network server to ports, 157
BIOS (Basic Input/Output System), 62
setting to boot from CD, 45
bits, 150
blacklists, 473, 485–486
blank screen, for idle system, 85
blanktime variable, 85
bleeding-edge version of
FreeBSD-current, 373–374
block size, 41, 236–237
blocking on disk, 574
blocks in FFS, 217
$BLOCKSIZE environment variable, 216
Bluetooth, 302
boot blocks, 62
boot CDs, preparing, 47–48
boot disks, mirroring, 549–550
boot floppies, preparing, 47
boot loader
for diskless client, on network, 607
and tftpd server, 609
boot media, 45–46
boot process
with alternate kernel, 137–138
default files, 68–69
loader, 62–63
configuration, 69–70
loader prompt, 67–68
loading kernel modules, 125–126
multi-user startup, 79–88
serial consoles, 70–75
single-user mode, 63–66
startup messages, 76–79
bootable CDs, FreeSBIE to build, 630
bootable disk, marking, 229
/boot/defaults/loader.conf file, 68–69
boot.flp file, 47
/boot/kernel directory, 119, 124
/boot/kernel/kernel directory, 67
/boot/kernel.good directory, 128
/boot/kernel.old directory, 128
/boot/loader.conf file, 68, 69–70
controlling consoles from, 72
to disable write caching, 221
to load geom_mirror kernel module, 549
for setting NanoBSD serial console
speed, 629
BOOTP (Internet Bootstrap
Protocol), 607
boot-time tunable sysctls, 123
testing, 124
boot-time tunables, 69
boot_verbose variable, 70
botnets, 179
bottleneck, 586
analysis with vmstat, 571–574
disk speed as, 574
input/output as, 570
locating, 570
bounce message, 469
branch ports, 405
brandelf command, 367
branding software binaries, identifying
and setting, 367
bridge module for bsnmpd, 602
broadcast address, 155
broadcast protocol, Ethernet as, 159
BSD (Berkeley Software Distribution), 2–3
license, 3
BSD 4.4-Lite, 4
BSDstats Project, 7
bsdtar, 94
bsnmpd (Begemot SNMPD), 598
configuring, 600–602
loading modules, 602
buffer overflows, 178
buffers, for incoming connections,
174–175
bug tracking system (GNATS), 647
build status, tracking, 338
building FreeBSD, 388–396
GENERIC kernel, 389
installing userland, 393–395
make buildworld command, 388–389
optimizing with parallel builds, 390
preparing for userland install, 390–393
building nameserver, 422–424
burnCD command, 48
bytes, 152
bzip compression, 97
678 INDEX
C
CA (Certificate Authorities), 282
cache memory, 577, 578
caching
and name service switching, 450–453
zeroing, 452–453
cash symbol ($), for user name in environ-
ment fields, 200
CAT5 cable, 159
console connections over, 73
Category field, in problem report, 651
CD images, viewing contents, 235
CD packages, 322–323
CD9660 option, for kernel, 133
cdrtools, 226
CDs
booting from, 45, 46
as fixit disk, 115
installing FreeBSD from, 46–47
ISO 9660 filesystem for, 230
preparing boot, 47–48
purchasing with FreeBSD, 43
central processing unit (CPU)
FreeBSD support for, 131
information display, in startup messages,
76–77
load on system, 576
multiple, 143, 344–349
requirements, 36
and SMP, 347–348
usage and performance, 583–584
vmstat information on, 573
certification as Unix, 9
CERT directory, 44
Certificate Authorities (CA), 282
certificates, 282–285
creating request, 283–284
obtaining signed, 284–285
self-signed, 285
for SSL web servers, 520
CFLAGS option, in /etc/make.conf, 307
challenge password, for certificate, 284
CHANGES file, for ports infrastructure, 318
check-ins, multiple, 112–113
checksum, 333
chflags command, 203
chmod command, 65
chown command, 193
chpass() command, for changing accounts,
185–186
chroot command, 286, 525, 613
for tftpd server, 463
chroot environment, for BIND, 437
ci command, 107
CIFS (Common Internet File Sharing).
See Common Internet File Sharing
(CIFS)
ciphertext, 280
Cisco, Fast EtherChannel (FEC), 175
Class A network, 153
Class B network, 153
Class C network, 153
class environment, for users, 199
Class field, in problem report, 651
cleaning ports, 338–339
cleartext, 280
clients
FTP, 522–523
for geom_gate, 563
for NFS, restricting, 247
for SSH, 445–447
cloned interfaces statement, 176
CLONEDIR option, for FreeSBIE, 632
CNAME host records, 433
co command, 107
for old versions of file, 111
coaxial cable, 159
code freeze, 374
cold backup, 96
collections, for csup, 384
collision domain, 159
combined log format, for Apache, 504
combinedio log format, for Apache, 504
comconsole plug-in, for FreeSBIE, 634
COMCONSOLE_SPEED variable, 628
command line, 14, 15
command prompt
as intruder’s goal, 262
root, in single-user mode, 605
shell for, 188–189
in single-user mode, 63
SNMP tools, 600
commands
displaying for loader, 66
man pages for documenting, 21–24
comments
hash marks (#) for, 130
to remove entry from kernel
configuration, 131
slashes (//) for, 424
commercial operating system, 12
committers, 5–6, 654
becoming, 657, 658
Common Internet File Sharing (CIFS),
243, 248–252
configuring, 249
file ownership, 252
kernel support for, 249
mounting share, 251
INDEX 679
name resolution, 250
prerequisites, 248
serving shares, 252
common log format, for Apache, 503
Common Unix Printing System
(CUPS), 459
communication channels, 14–15
communities in SNMP, 600
comparison operators, in syslog.conf
rules, 590
COMPAT_IA32 option, for kernel, 369
compatibility options, for kernel, 133
compat.linux.osrelease sysctl, 673
compiling programs, 316–317
compressed tarballs, 97
compression
of files, 97
of log file, 596
computer resources, performance
and, 570
Computer Science Research Group
(CSRG), 2
copyright, 4
Concurrent Versions System (CVS), 382
/conf/base directory, 611–612
/conf/default directory, 612–613
Confidential field, in problem report, 650
confidentiality, from cryptosystems, 280
config program, in kernel build
process, 136
CONF_INSTALL variable, for NanoBSD, 623
confirmation email, of problem report
submission, 653–654
CONF_WORLD variable, for NanoBSD, 623
connected protocol, 156
connectionless protocol, 156
console facility, 587
consoles, 604
hardware serial, 71
insecure, 605–606
options in /etc/rc.conf file, 85–86
serial, 70
serial port on Soekris as default, 617
software serial, 71–72
consumer in GEOM, 530
context switches
by CPU, 344
voluntary or involuntary, 579
contributors, 6
COPTFLAGS option, in /etc/make.conf, 307
copy of panic message, obtaining, 639
copycenter, 3
copying
default configuration, risk from, 69
files
NanoBSD disk image to flash drive,
617–618
over SSH, 446
copyright, for FreeBSD Project, in startup
messages, 76
COPYRIGHT file, for Ports Collection, 318
Core, 6
coredumpsize variable, in login.conf file, 199
corrupt filesystem, tar and, 94
corrupted data, from mounting dirty
partition as read-write, 224
CPU (central processing unit). See central
processing unit (CPU)
cpu criteria, in kernel configuration file,
128–129
cputime variable, in login.conf file, 199
CPUTYPE option, in /etc/make.conf, 307–308
crash. See panics
crash boxes, 35
crash dump, 640
configuring, 640–641
manual, 642–643
system preparation to capture, 638
using, 643–646
create mode for tar, 95
crit level for syslog protocol, 588
cron facility, 587
cron (job scheduler), 463–466
and environment, 464
for scheduling regular portsnap, 404
crontabs, 463
in boot process, 466
format, 464–466
cross-building, FreeBSD, 399
cryptographic key, generating and using
in GELI, 559–560
CSRG (Computer Science Reserach
Group), 2
copyright, 4
csup tool, 382, 387
to get source tree, 387
CUPS (Common Unix Printing
System), 459
current resource limits, for user
account, 199
cust_allow_ssh_root script, 628
cust_comconsole script, 628
cust_install_files script, 628
Custom distribution, 42
customized kernel, 126–130
CustomLog statements, for Apache, 504
customroot plug-in, for FreeSBIE, 634
customscripts plug-in, for FreeSBIE,
634–635
680 INDEX
cust_pkg script, 628
CVS (Concurrent Versions System), 382
CVSup server
building local, 399–402
controlling access, 402
CVSup tool, 382
CXXFLAGS option, in /etc/make.conf, 307
cylinders in disk drives, 530
Cyrus IMAP, 494
D
daemon facility, 587
daemon group, 194
Daemon News, 26
DAEMON provider, for rc scripts, 352
daemons, unprivileged user
accounts for, 262
daily status check, of mirrored disks, 550
daily_local variable for periodic, 311
daily_output variable for periodic, 310
daily_show_badconfig variable for
periodic, 311
daily_show_info variable for periodic, 311
daily_show_success variable for
periodic, 310
daily_status_gstripe_enable, 547
DARPA (Defense Advanced Research
Projects Agency), 2
Darwin, 8
data command, 471
data corruption, from mounting dirty
partition as read-write, 224
data, separating from operating system, 41
databases
for Sendmail files, 480
shutdown, 88
three-way mirror for, 550
datalink layer, in OSI, 146–147, 149, 150
datasize variable, in login.conf file, 199
date, converting epochal seconds to, 298
db> prompt, 642
DB9-to-RJ45 converters, 73
dd command, 47, 236–237
deactivating encrypted disks, 560–561
deadly embrace, 346
debug level for syslog protocol, 589
debug.debugger_on_panic sysctl, 672
debugging
enabling, 80
kernels, 641–642
Linux mode, 368–369
preparing system to provide informa-
tion after panic, 639–640
rc scripts, 353–354
debug.minidump sysctl, 672
debug.witness.skipspin sysctl, 672
debug.witness.watch sysctl, 672
decimal math, 151
default accept, vs. default deny, 264–265
in packet filtering, 273–274
default BSD pager (more), 23
default class, 197
default configuration, copying,
risk from, 69
default files, 68–69
default groups
in FreeBSD, 194
for user account, 181, 183
default host, 518
default route, 163
defaultclass setting, in adduser.conf file, 183
defaultLgroup setting, in adduser.conf file, 183
DEFAULTS file, for kernel
configuration, 129
defaultshell setting, in adduser.conf file, 183
Defense Advanced Research Projects
Agency (DARPA), 2
deleting
shared libraries, 394
user accounts, 188
DenyGroups variable, for SSH, 444–445
DenyUsers variable, for SSH, 444–445
dependencies
changing, 408
portmaster to check, 408
for software packages, 325
uninstalling package and, 328
Description field, in problem report,
651, 653
detach rules, for devd, 257
/dev/console device, 604
devd command, 256–260
configuration, 257
Developer distribution, 42
devfs filesystem, 238, 253–260
global rules, 255–256
Device busy message, 93
device drivers
development, 35
entry in startup messages, 77
kernel options, 134
man pages for, 27
sysctl flags for, 123–124
device filesystem, 238
device names, 27
of floppy drives, 47
for root partition, 64
device nodes, 79, 210–212
devfs filesystem for managing, 253–260
INDEX 681
for dynamic devices, 256
and removable media, 230
for tape drive, 91
Device not configured message, 92
devices criteria, in kernel configuration
file, 129
/dev/ttyd device, 604
/dev/ttyp device, 604
/dev/ttyv device, 604
/dev/zero device, 236
df command, 215–217, 245
DHCP (Dynamic Host Configuration
Protocol), 49, 161, 165, 456–459
configuration, 55
server setup for diskless system, 607–609
_dhcp group, 194
dialer group, 194
dial-up terminal, 604
dictionary attacks, 482
diff mode, 96
dig command, 414–418
axfr keyword, 436
disabling recursion, 417–418
finding hostnames with, 416–417
on specific nameserver, 417
digital certificates, 282
directories
for Apache, 507–515
options, 508–510
Apache server return of formatted
list, 509
displaying disk usage, 216
exporting multiple, 246–247
directory services, authentication against
third-party, 513
DirectoryIndex statement, for Apache, 511
dirty disks in FFS, 222–224
forcing read-write mounts on, 224
disk device, network exports, 561–565
disk drives, 209–210. See also filesystems
basics, 530–531
deactivating encrypted, 560–561
device nodes for, 211
hard disks and partitions, 211–212
mirroring, 547–550
mounting and unmounting, 214–215
striping, 545–547
vmstat information on, 573
disk images
mounting, 235
for NanoBSD
copying to flash drive, 617–618
updating, 630
disk management system. See GEOM
disklabel, 536–537
backup and restore, 538
editing, 538–539
missing, 540
reading, 537–538
disklabel command, 229–230
disklabel editor, 241
diskless clients, TFTP for downloading
operating system, 461
diskless farm, configuring, 611–612
diskless FreeBSD, 606–610
activating remounting, 611
clients, 607
DHCP setup for, 607–609
distributing /etc/rc.conf to hosts, 613
installing, 615
installing packages on, 613–615
NFS server and client userland, 609–610
diskless workstations, NanoBSD for user-
land, 630
disks, in single-user mode, 64
distfiles directory, 44
for Ports Collection, 319
distfiles, portmaster offer to delete, 408
distribution of FreeBSD, choosing, 42, 54
djbdns, 422
dmsg.boot, to determine CPU type, 131
DNS (Domain Name System). See Domain
Name System (DNS)
dnswalk command, 436
doadump function, 644
doc directory, 44
documentation
from FreeBSD.org, 25–26
Frequently Asked Questions (FAQ),
25, 648, 659
Handbook, 25, 27
mailing list archives, 26, 28
man pages, 21–24, 27–28
DocumentRoot setting, for Apache, 503
dollar sign ($), for username in environ-
ment fields, 200
domain lists, milter-greylist, 489
Domain Name System (DNS), 82, 411
basic tools, 413–419
dig command, 414–418
host command, 413–414
in-addr.arpa, 418–419
nslookup, 414
checking, 436
configuring resolver, 419–421
how it works, 412
for jail, 292
master and slave file storage, 427
682 INDEX
Domain Name System (DNS), continued
reverse DNS zones, 433–434
Soekris for server, 628
swap meets, 423
zone files, 428–434
domains
finding mail servers for, 468–469
setting local names, 420–421
virtual, 481–483
dot (.) in names, for hidden files, 338
dotted-quad notation, for configuring
interface, 162
Dovecot IMAP server
configuring, 494–495
installing, 494
running, 496
SSL certificate creation, 495
downloading. See also FTP sites
FreeBSD updates, 379
DSA key files, 441
du command, 216
dual console, 72
dump, 640. See also crash dump
swap space for, 39
dump program, 94, 98–101, 643–646
levels in, 98–99
restoring files from, 101–104
running, 100–101
snapshot for, 222
duplex setting for Ethernet, 160
DVDs. See also CDs
filesystems for, 230
installing FreeBSD from, 46–47
Dvorak keyboard layout, 85
dynamic devices, devd command for
managing, 256
Dynamic Host Configuration Protocol
(DHCP), 49, 161, 165, 456–459
server setup for diskless system, 607–609
dynamic nameservers, 422
E
$EDITOR environment variable, 185
ejecting
removable media, 231
tapes, 91
ELF binaries, 357
email
greylisting, 473, 487–491
for help, 29–31
IMAP and POP3, 493–498
mailwrapper program, 474
managing, 86
overview, 468–473
permanence of, 31
responding to, 31
sending, 30–31
Sendmail Mail Transfer Agent (MTA),
473–476
attaching milter-greylist to, 490–491
authentication with SASL, 491–493
configuration options, 476–481
database files, 480
submission vs. reception, 474–475
SMTP protocol, 470–472
spam
mail server access for, 472
rejecting sources, 485–486
text wrap in, 30
undeliverable, 469
virtual domains, 481–483
whitelist, 487
email address of administrator, for
Apache, 502–503
emerg level for syslog protocol, 588
employees, as security risk, 179
empty quotes, in loader.conf file, 70
emulator, 362, 363
encapsulation, 149
encrypted disks, deactivating, 560–561
encryption
of filesystems, 558–561
of partitions, 80
password field, in /etc/master.passwd
file, 187
public key, 280–286
certificates, 282–285
connecting to SSL-protected ports,
285–286
OpenSSL configuration, 281–282
encryption keys, for SSH, 441–442
Environment field, in problem report,
651, 652
environment variables
for commands run from cron, 464
specifying for crontab, 465
epochal seconds, converting to normal
dates, 298
erasing
hosts cache, 452–453
tape, 93
err level for syslog protocol, 588
errata branch, 372–373
ERRATA directory, 44
error log, for Apache, 503–504
error messages, for NanoBSD build
failure, 625–626
ErrorDocument keyword, for Apache, 511
errors, in DNS configuration, 436
INDEX 683
/etc/adduser.conf file, 182–183
/etc/amd.map, 302
/etc/bluetooth, 302
/etc/bluetooth.device.conf, 302
/etc/crontab
for maintenance jobs, 586
vs. user crontabs, 463
/etc/csh.* files, 303
/etc/defaults/bluetooth.device.conf, 302
/etc/defaults/devfs.rules file, 255, 303
/etc/defaults/periodic.conf, 310–311
/etc/defaults/rc.conf file, 79–87, 356
/etc/devd.conf file, 303
for flash drives, 259–260
for laptop wireless networks, 258–259
/etc/devfs.conf file, 253–254, 303
/etc/devfs.rules file, 255, 303
/etc/dhclient.conf file, 303
/etc directory, 301
in different Unix-like systems, 302
/etc/disktab file, 303
/etc/dumpdates file, 100
/etc/exports file, 244–245
/etc/freebsd-update.conf, 378–379
/etc/fstab file, 64, 212–213
configuring for new disks, 241
for diskless systems, 614
to enable linprocfs, 367
file-backed filesystems and, 238
for jails, 292
memory disks and, 234
for mirrored boot drives, 549
removable media and, 231
/etc/ftpchroot file, 525
groups list in, 525
/etc/ftpmotd file, 526
/etc/ftpusers file, 525
/etc/ftpwelcome message, 526
/etc/gg.exports file, 562
/etc/group file, 190–191
/etc/hosts file, 419–420
local DNS overrides with, 422
/etc/hosts.allow file, 265, 304
/etc/hosts.equiv file, 304
/etc/hosts.lpd file, 305
/etc/inetd.conf, 305, 453–454, 524
/etc/libmap.conf file, 360
/etc/localtime file, 305
/etc/locate.rc, 305
/etc/login.* file, 306
/etc/login.access file, 195
/etc/login.conf file, 197
environment settings in, 199–200
/etc/login.conf.db file, 198
/etc/mail/access file, 476–478
/etc/mail/aliases file, 476, 478–479
/etc/mail/local-host-names file, 481
/etc/mail/mailer.conf file, 306, 474
/etc/mail/mailertable file, 476, 479
/etc/mail/relay-domains file, 476, 480
/etc/mail/sendmail.cf file, 473
changing, 483–486
/etc/make.conf, 306–308, 396
/etc/master.password file, 184
vipw to edit, 186
etcmfs plug-in, for FreeSBIE, 635
/etc/motd file, 308
/etc/mtree directory, 308
/etc/namedb directory, 427
/etc/netstart script, 65, 309
/etc/network.subr script, 309
/etc/newsyslog.conf file, 309, 594–597
/etc/nscd.conf, 309
/etc/nsmb.conf file, 249
sample entries, 252
/etc/nsswitch.conf file, 420, 450–451
/etc/opie*, 309
/etc/pam.d/*, 310
/etc/passwd file, 184
/etc/pccard_ether script, 310
/etc/periodic.conf, 310–311
daily_status_gmirror_enable, 550
daily_status_gstripe_enable, 547
/etc/pf.conf file, 275–277
/etc/pf.os, 311
/etc/phones, 311
/etc/portsnap.conf file, 403–404
/etc/ppp, 311
/etc/printcap file, 312, 460–461
/etc/profile file, 312
/etc/protocols file, 148, 312
/etc/pwd.db file, 184
/etc/rc script, 79, 87–88, 312
/etc/rc.conf file, 79–87
and clock synchronization, 449
console options, 85–86
defaultrouter entry, 163
for diskless system, 614
distributing to diskless hosts, 613
dumdev variable, 641
editing to disable program, 65
to enable inetd at boot, 455–456
to enable mail daemons, 475
to enable sshd at boot, 440
enabling devfs rules, 256
enabling dhcpd in, 457
filesystem options, 80–81
ifconfig statement, 164
ifconfig_interface_name option, 165
for jails, 292, 293
684 INDEX
/etc/rc.conf file, continued
network daemons, 81–83, 207
network options, 83–84
network routing options, 84–85
nfsclient option, 245
other options, 86–87
securelevels and, 206
to start lpd at boot, 460
startup options, 80
to turn on NFS server support, 244
/etc/rc.d directory, 87–88
/etc/rc.d/jail file, 293
/etc/rc.initdiskless script, 611
/etc/rc.shutdown script, 88
/etc/remote file, 74, 312
/etc/resolv.conf
default local server in, 420
nameserver list in, 421
/etc/rpc, 313
/etc/security/ directory, 313
/etc/services file, 157, 167, 313
/etc/shells file, 188–189, 313
/etc/snmpd.config file, 313, 600
/etc/spwd.db file, 184
/etc/src.conf file, 313, 396
/etc/ssh/sshd_config file, 442
/etc/ssl/openssl.cnf file, 281
/etc/sysctl.conf file, 122
kern.ipc.nmbclusters sysctl value, 172
/etc/syslog.conf file, 313, 589
/etc/termcap file, 314
/etc/ttys file, 314, 604–606
ether device, 135
Ethernet, 147, 158–160
configuring connection, 161–166
as device, 135
speed and duplex, 160
Ethernet address, 160
Eudora, FreeBSD support for, 493
ExecCGI option, for Apache, 509
exit command, for script command, 114
expire value, for slave nameserver,
430, 431
exporting
disk device across network, 561–565
multiple directories, 246–247
NFS, 243
configuring, 244–245
ext2fs Linux filesystem, 227
ext3fs Linux filesystem, 227
extra directory, for Apache, 516
EXTRA option, for FreeSBIE, 633
extract command, 104
extracting files, from backup, 95
F
failed attempts to connect to system, 83
failover, 176
FAQ (Frequently Asked Questions), 25,
648, 659
Fast EtherChannel (FEC), 175
Fast File System (FFS), 2, 217–225
creating filesystem, 229–230
diagram of kernel internals, 224
dirty disks, 222–224
kernel options, 132
mount options, 220
mount types, 218–219
snapshots, 222
soft updates and journaling with,
220–221
syncer at shutdown, 224
write caching, 221
FAT filesystem, 226
for removable media, 228–230
fault tolerance, mirrored disks for, 547
faults, vmstat information on, 573
fdescfs filesystem, 238
fdformat command, 229
fdimage.exe utility, 47
fdisk
to backup slice table, 533
instructions, in FreeBSD install, 50
interactive mode, 534
for NanoBSD disk image, 626
for splitting hard drive into slices,
534–536
viewing slice table with, 532–533
FEC (Fast EtherChannel), 175
fetch dependencies, 320
fetch extract command, 404
fetch update command, 404
FFS. See Fast File System (FFS)
file descriptor filesystem, 238
file flags, 201–203
limitations, 206
removing, 203
setting and viewing, 203
file ownership
in TFTP server, 462
viewing with ls, 193
file size, and log rotation, 595
file transfer, 522–526
binary and ASCII, 523
FTP client, 522–523
FTP server, 524
anonymous, 526
messages, 525–526
FTP user control, 524–525
scp program, 527
INDEX 685
security, 522
sftp program, 527
file-backed filesystems, 238
FileInfo override, in .htaccess file, 510
FILE_LIST option, for FreeSBIE, 633
files, 16
adding to NanoBSD, 628–629
changing owner and group, 193
forwarding email to, 478–479
filesize variable, in login.conf file, 199
filesystem integrity checking tool (fsck).
See fsck
filesystem table, 212–213. See also
/etc/fstab file
filesystems, 11
attempt for automatic fix, 81
building, 540–541
corruption from nextboot, 142
creating FFS, 229–230
displaying currently mounted, 214
dump program and, 98, 99–100
encryption, 558–561
in files, 235–238
creating empty filesystem file, 236–237
foreign, 225–228
journaling with gjournal, 554–557
making accessible, 64
mounting, 214
network, 243–248
options in /etc/rc.conf file, 80–81
populating and trimming
remounted, 612
removable media, 228–231
restoring, 103
special purpose, 231–238
memory filesystems, 232–234
FILESYSTEMS provider, for rc scripts, 352
finding
mail servers for domain, 468–469
man pages, 23
software, 320–322
by keyword, 321–322
by name, 321
fine-grained locking, 346
fingerprint for public key, 441–442
from client, 445
firewall, 275
displaying rules currently
running on, 279
for TFTP, 461
FireWire, kernel support for, 136
Fix field, in problem report, 652
fixit disk, 114–115
flags, for inetd, 456
flash drives
copy NanoBSD disk image to, 617–618
devd example with, 259–260
managing, 256
Soekris with, 616
FlashDevice.sub, expanding, 618–619
floppy disk
booting from, 45
formatting, 228–230
preparing boot, 47
using FFS on, 229–230
.flp file extension, 47
FollowSymLinks option, for Apache, 509
fonts, on console, 85
forcing read-write mounts, on dirty disks
in FFS, 224
foreign
filesystems, 225–228
software libraries, 365
forget command (gstripe), 548
Forward DNS, 413
forwarding email, 478
4BSD scheduler, 349
FQDN (fully qualified domain name), 83
fragments in FFS, 217
frame, 149
free memory, 577
FreeBSD. See also building FreeBSD;
installing FreeBSD
attitude, 20–21
birth of, 4–5
CD set, compiled packages, 323
Configuration Menu, 58–59
CVSWeb history, 406
desktop, 13–14
development, 5–7
Documentation Project, 6
FAQ, 25, 648, 659
forcing use of serial console, 72
FTP site, 43–45
information resources, 19
management of, 6
manual, sections, 22
master source code repository,
read-and-write access to, 5
minimal install, 315–316
partition requirements, 536
potential users, 11
Ports Collection, 317
projects built on, 8
security announcements, 180
shrinking, 396–397
-specific time, 596
strengths, 10–11
website, contributing to, 657
what it is, 2–5
686 INDEX
FreeBSD community, 655–656
leadership, 656
reasons for involvement, 656–657
FreeBSD Mall, 26, 46
FreeBSD Project
email servers, 467
submitting improvements, 646
supporting, 657
FreeBSD-current, 373–374
FreeBSD.org, 25–26
FreeBSD-questions, 30–31
FreeBSD-stable, 374–375
freebsd-update command, 379
FreeSBIE, 8
building image, 636
choosing packages, 635
configuring, 631–634
installing toolkit, 631
live media with, 630–636
plug-ins, 634–635
rebuilding, 636
freesbie.defaults.conf file, 631
Frequently Asked Questions (FAQ), 25
fsck program, 64, 222–224
background, 223–224
FreeBSD use of variations, 225
turning off prompt, 223
fsck_y_enable variable, 81
FTP client, sftp program as, 447
ftp facility, 587
FTP packages, 324–325
FTP sites
for FreeBSD, 43–45
FreeBSD ISO images on, 46
media setup for install from, 48–49
ftp-chroot variable, in login.conf, 200
ftpd daemon, 524
full-duplex setting for Ethernet, 160, 162
fully qualified domain name (FQDN), 83
G
games, decision to install, 42
games group, 194
gateway_enable variable, 85
GBDE (Geom Based Disk Encryption),
80–81, 558
GELI, 80–81, 558
to encrypt partitions, 558–560
to encrypt swap space, 561
GENERIC file
for kernel configuration, 129
and NFS, 243
GENERIC kernel, 126
building, 389
GENERIC.hints file, for kernel
configuration, 130
GEOM, 529
commands, 544–545
essentials, 529–530
RAID and disk size, 542
Geom Based Disk Encryption (GBDE),
80–81, 558
GEOM classes, 529
geom_eli.ko kernel module, 559
geom_gate application, 561
client setup, 563
identifying devices, 564
security for, 562
server setup, 562
shutdown, 564
geom_mirror kernel module, 547
/boot/loader.conf file to load, 549
geom_stripe kernel module, loading, 545
gerbil
filesystem, 40
on keyboard, 473
Liberation Front, 526
get command, for downloading files
with FTP, 523
Getif, 600
ggatec command, 563
list command, 564
rescue command, 564–565
ggated command, 562
GID (group ID). See group ID (GID)
GIDs file, for Ports Collection, 319
gjournal command, 554–557
configuring, 556–557
stop command, 557
gmirror command, 547–550
clear command, 550
stop command, 550
GNATS (bug tracking system), 647
including database on CVSup server, 401
GNU tar, 94
Google, BSD-specific search, 26
graceful restart, of Apache, 521
graid3 load command, 551
graphical interface, X Window
System as, 42
grep command, 324
greylisting, 473, 487–491
group ID (GID), 191
for administrative users, 192–193
in /etc/master.passwd file, 187
Group option, for Apache, 502
INDEX 687
groups of users, 190–191
to avoid root user, 191–194
changing for file, 193
changing memberships, 191
creating, 191
default, 181, 194
listing in /etc/ftpchroot, 525
gstat program, to check disk activity,
574–575
gstripe clear command, 546
gstripe command, 545–547
destruction, 546
gtk-send-pr, 649
guest group, 194
gzip compression, 97
H
hacked system, 300
hackers, 180
half-duplex setting for Ethernet, 160, 162
Handbook, 25, 27
hard drives
adding, 240–243
creating partitions, 241
creating slices, 240
fdisk for splitting into slices, 534–536
installing existing files on new, 241–242
multiple, 40–41
requirements, 37
selecting for FreeBSD install, 50–51
hard-coding disk numbering, 238–239
hardware
checking on support for, 36
device name display, 78–79
optimizing network performance with,
170–171
and protocols, 159–160
requirements, 10, 34–37
hardware clock, identifier in startup
messages, 76
hardware serial consoles, 71
hash marks (#), for comments, 130
HDLC (High Level Data Link
Control), 147
$Header$ string, 113
headless systems, 606
heads in disk drives, 210, 530, 532
heartbeat, 567
helo command, 470–471
help. See also documentation
emailing for, 29–31
mailing list, for FreeBSD, 20–21
problem-solving resources, 26–28
from websites, 26
Hewlett-Packard, HP/UX, 9
hexadecimal numbers, 151, 162
hidden files, . (dot) in names for, 338
High Level Data Link Control
(HDLC), 147
hm.pagesize sysctl, 583
home directories
changing for user account, 186
locking FTP users into, 525
for unprivileged users, 262
for users, 40, 58, 182
/home partition, 40
$HOME/.nsmbrc file, 249
homeprefix setting, in adduser.conf file, 183
host addresses, and login access, 196
host command, 413–414
host key, for certificate, 283
host.allow option, 201
host.deny option, 201
hostname, 83
finding with dig, 416–417
and login access, 196
Hostres module for bsnmpd, 602
hosts cache, erasing, 452–453
How-To-Repeat field, in problem report,
651, 653
HP RILOE serial console, 71
HP/UX (Hewlett-Packard), 9
.htaccess file, 510
configuring authentication in, 512
groups and, 515
to require Radius authentication, 514
require-group statement, 515
HTML, avoiding for email, 30
HTML index, for browsing Ports
Collection, 322
htpasswd command, 512
HTTP (HyperText Transfer Protocol), 500
httpd.conf file, 501
configuring Radius
authentication in, 514
including other configuration files,
515–516
permissions and settings in, 507
HTTPS websites, 520
hub for Ethernet, 159
hushlogin variable, in login.conf, 200
hw.ata.ata_dma sysctl, 672
hw.ata.atapi_dma sysctl, 672
hw.ata.wc sysctl, 673
hw.syscons.kbd_reboot sysctl, 673
HyperTerm, 74
HyperText Transfer Protocol (HTTP), 500
HyperThreading, 348, 358
688 INDEX
I
i386 platform, 34
memory usage, 39
IBM, 5, 9
ICMP (Internet Control Message
Protocol), 147, 155
redirects, 83
icmp_drop_redirect variable, 83
icmp_log_redirect variable, 84
$Id$ string, 113
IDE drives, 37
tape, 90
device nodes, 91
write caching, 221
ident criteria, in kernel configuration
file, 129
ident strings, Revision Control
System and, 113
identd protocol, 267
ifconfig command, 84, 161–162
alias keyword, 163–164
for assigning IP address to network card,
162–163
name keyword, 165
ifconfig statement, in /etc/rc.conf file, 164
ifconfig_em0 variable, 84
+IGNOREME file, 408
ignorenologin variable, in login.conf, 200
image files, copying onto disk, 47
IMAP (Internet Message Access
Protocol), 493
testing with SSL, 497–498
imap-wu, 494
IMGPATH option, for FreeSBIE, 632
inactive memory, 577
in-addr.arpa, 418–419
inbound traffic, on network, 166
Includes directory
for Apache, 516
virtual hosting configuration in, 517
Includes option, for Apache, 509
IncludesNOEXEC option, for Apache, 509
incoming connections, buffers for,
174–175
incremental backups, in dump, 98–99
index, for port directory, 320
Indexes option, for Apache, 509
Indexes override, in .htaccess file, 510
INET option, for kernel, 132
INET6 option, for kernel, 132
inetd daemon, 82, 453–456
changing behavior, 456
configuring servers, 454–455
/etc/inetd.conf, 453–454
on jail host server, 288
option to configure, 56
starting, 455–456
inetd_enable variable, 82
info level for syslog protocol, 589
info.0 file, 643
inodes, 217
input, 14
input/output
as bottleneck, 570
top tool and, 579
insecure console, 605–606
INSTALL option, in /etc/make.conf, 308
install path, changing, 339
installation media, 46–47
installed
packages, listing with description, 329
ports, updating, 404–409
installed World Wide Web data, including
on CVSup server, 401
installing
Dovecot IMAP server, 494
ports, 332–334, 337–338
software packages, 325
userland, 393–395
installing FreeBSD, 49
adding software packages, 56–57
adding users, 57–58
boot floppies preparation, 47
on diskless system, 615
hardware
proprietary, 35–36
requirements, 34–37
sample hardware, 35
planning, 33
post-installation setup, 58–59
preinstall decisions, 37–42
distribution choices, 42
games, 42
multiple hard drives, 40–41
partition block size, 41
partitioning, 37–40
process, 45–47, 49–59
INSTKERNAME variable, for kernel, 141
integers, as sysctl values, 121
integrity of cryptosystems, 280
Intel network cards, 171
interactive restores, 104
Internet Authentication Service, 513
Internet Bootstrap Protocol
(BOOTP), 607
Internet Control Message Protocol
(ICMP), 147, 155
redirects, 83
INDEX 689
Internet Message Access Protocol
(IMAP), 493
testing with SSL, 497–498
Internet Protocol (IP), 147
Internet Software Consortium, 422
Internetwork Packet Exchange (IPX), 147
interruptible NFS mount, 248
interrupts, vmstat information on, 573
intrusion
preparation with mtree, 296–299
reacting to, 299
involuntary context switches, 579
iostat, 571
IP (Internet Protocol), 147
IP addresses, 152–155
adding to interface, 162–163
Apache binding to, 502
assigning, 155
for interface, 84
controlling Apache access by, 507–508
determining for hostnames, 413
finding hostnames for, 416–417
information for FTP install, 49
for jails, 287
multiple on interface, 163–164
unusable, 155
IP Filter, 273
IP-based virtual hosts, 517–518
IPFW, 273
IPv6 addresses, 418
configuration, 55
IPX (Internetwork Packet Exchange), 147
IRIX (Silicon Graphics), 9
ISA cards, 36
ISO 8601 time format, for logs, 595–596
ISO 9660 filesystem, for CDs, 230
ISO image, name of, 48
ISO-IMAGES directory, 44
ISOPATH option, for FreeSBIE, 632
iX Systems, 46
J
jail command, 291
jail ID (JID), 294
jails, 286–296
client setup, 290–291
for diskless clients, 610
and /etc/rc.conf, 293
host server setup, 287–289
inetd daemon, 288
NFS programs, 289
sshd, 289
syslogd daemon, 288
in-jail setup, 291–292
and kernel, 289–290
limitations, 295–296
managing, 294–295
NanoBSD for userland, 630
reducing disk space, 291
for running named, 437
shutdown, 293–294, 295–296
startup, 293–294
Java license, 322
jexec program, 294–295
JID (jail ID), 294
jls program, 294
job control, 2
job scheduler (cron), 463–466
and environment, 464
for scheduling regular portsnap, 404
journaling
in FFS, 220–221
with gjournal, 554–557
Juniper, 5, 616
junk email. See also spam
blacklists to reduce, 485–486
preventing, 472–473
K
KDB_UNATTENDED option, 642
Kerberos, 246
kern facility, 587
kern.argmax sysctl, 662
kern.bootfile sysctl, 663
kern.boottime sysctl, 662
KERNCONF variable, 136, 389
kern.coredump sysctl, 665
Kern-Developer distribution, 42
kern.dirdelay sysctl, 666
kern.domainname sysctl, 662
kernel, 117–143
actions in reverse order in backtrace,
644–645
assumptions, 344–345
backups, 128
booting alternate, 137–138
building, 126–130, 136–138
buses and attachments, 127
configuration files, 128–130
preparations, 126–127
troubleshooting, 137
debugging, 641–642
defined, 118–119
determining currently booted, 121
and jails, 289–290
network capacity in, 169–170
no options and inclusions, 139
nodevice keyword, 139
NOTES file for hardware-specific
features list, 138
690 INDEX
kernel, continued
options for problem solving, 139–140
sharing, 140
sysctl program, 119–124
testing remotely, 141–142
trimming, 131–136
basic options, 131–134
CPU types, 131
device drivers, 134
multiple processors, 134
pseudodevices, 135–136
removable hardware, 136
viewing, 67
WITNESS option, 347
kernel minidump, 39
kernel modules, 124–126
vs. Apache modules, 506
loading and unloading, 125
loading at boot, 125–126
kernel thread, 359
KERNELCONF option, for FreeSBIE, 632
kern.filedelay sysctl, 666
kern.hostname sysctl, 662
kern.init_path sysctl, 664
kern.init_shutdown_timeout sysctl, 664
kern.ipc.maxpipekva sysctl, 663
kern.ipc.maxsockets sysctl, 664
kern.ipc.nmbclusters sysctl value, 171–172
kern.ipc.numopensockets sysctl, 664
kern.ipc.pipekva sysctl, 663
kern.ipc.shmall sysctl, 663
kern.ipc.shmmax sysctl, 663
kern.ipc.shmseg sysctl, 663
kern.ipc.shm_use_phys sysctl, 663
kern.ipc.somaxconn sysctl, 174, 663
kern.log_console_output sysctl, 665
kern.logsigexit sysctl, 664
kern.maxfiles sysctl, 662
kern.maxfilesperproc sysctl, 663
kern.maxproc sysctl, 662
kern.maxprocperuid sysctl, 663
kern.maxusers sysctl, 171–172, 664
kern.maxvnodes sysctl, 662
kern.metadelay sysctl, 666
kern.module_path sysctl, 664
kern.ngroups sysctl, 662
kern.nodump_coredump sysctl, 665
kern.openfiles sysctl, 664
kern.osreldate sysctl, 663
kern.osrelease sysctl, 662
kern.posix1version sysctl, 662
kern.randompid sysctl, 664
kern.sched.name sysctl, 665
kern.sched.preemption sysctl, 665
kern.sched.quantum sysctl, 665
kern.securelevel sysctl, 662
kern_securelevel variable, 87
kern_securelevel_enable variable, 87
kern.smp.cpus sysctl, 666
kern.smp.disabled sysctl, 665
kern.sync_on_panic sysctl, 664
kern.timecounter.choice sysctl, 665
kern.timecounter.hardware sysctl, 665
kern.timecounter.smp_tsc sysctl, 665
kernX.flp files, 47
key fingerprint, for SSH, 441
keyboard
autodetection, 72
choosing layout during install, 49
redirecting input to serial port, 71
keyboard map, 85
keywords, in TCP wrappers, 267
kgdb program, 644
kldstat command, 124–125
kldunload command, 125
kmem group, 194
knobs, 79
KNOBS file, for Ports Collection, 319
KNOWN keyword, in TCP wrappers, 267
kqueue program, 362
L
LACP (Link Aggregation Control
Protocol), 176
lagg module, 175
configuring interface, 176
laptop computers, devd example with,
258–259
layers in protocol stack, 146–148
LDAP (Lightweight Directory Access
Protocol), 513
ldconfig program, 355–356
entries in /etc/defaults/rc.conf, 356
ldconfig32_paths option, 369
ldconfig_local32_dirs option, 369
ldconfig_paths variable, 87
ldd command, 358, 360–361
LD_LIBRARY_PATH environment variable,
87, 357
and security, 358
ldp_enable variable, 86
leaf ports, 406
lease in DHCP, 457
LEGAL file, for Ports Collection, 319
less command (FTP), 523
levels in dump, 98–99
libarchive, 94
autodetection of compression type, 97
INDEX 691
libc_r library, 359
libiconv.ko module, 249
libkse threading library, 359
libmchain.ko module, 249
libpthread threading library, 359
libraries
foreign, 365
program requirements for, 358
shared, 87, 354–358
versions, 354
threading, 359–360
library directories
adding to search list, 356
list, 355–356
libthr library, 359
license, for BSD, 3
Lightweight Directory Access Protocol
(LDAP), 513
Limit override, in .htaccess file, 510
Link Aggregation Control Protocol
(LACP), 176
linprocfs filesystem, 238
Linux, 9
filesystems, 225
network interface names in, 165
recompiling software for, 362
Linux mode, 364, 365–369
and commercial software, 369
debugging, 368–369
option to enable, 56
testing, 366–367
Linux process filesystem, 238
linux_base, 365
Linuxulator, 364
userland, 366
list command (GEOM), 544–545
LIST command, for IMAP, 497
list mode for tar, 95
Listen setting, for Apache, 502
ListenAddress, for SSH, 443
live files, moving, 242
live media, with FreeSBIE, 630–636
load average, 576
load command (GEOM), 544
loader, 62–63
configuration, 69–70
prompt, 67–68
escape, 63
when booting alternate kernel, 137
loader.conf file, 123
loader_logo variable, 70
loading kernel modules, 125
LoadModule statement, for Apache, 505–506
local distfile respository, 340
LOCAL keyword
in login.access, 196
in TCP wrappers, 267
local package repositories, 339
local programs directory, 14
localhost zones, in named.conf file,
425–426
localhost-forward.db file, 424
localhost-reverse.db file, 424
localn facility, 588
lock order
message, 347
reversals, 143, 347
locked files
breaking locks, 112–113
in revision control, 108
locking, fine-grained, 346
locking accounts, pw command for, 188
locks, automated searches, 112
$Log$ string, 113
logging host, 591
logical packet tunnel, 135
logical port, 157
login
controlling, 604–606
disallowing for unprivileged user, 262
restricting, 195–197
through serial port, 606
login classes, 181, 197
LOGIN command, for IMAP, 497
login group, for user account, 183
LoginGraceTime, for SSH, 443
log_in_vain variable, 83
LogLevel INFO, for SSH, 443
logs
for Apache, 503–505
rotating, 504–505
file format and compression, 596
file management, 593–597
filling drive with, 38
for ftpd, 524
for NanoBSD build failure, 625–626
overlap, 592
by program name, 590–591
of screen display, 114
from Sendmail, 476
with syslogd, 587–593
verbose, 63, 593
booting with, 63
viewing in revision control, 109–110
lookups, supporting name service
switching, 450
692 INDEX
loopback
device, 135
interface, 161
IP address, 421
lost+Found directory, 222
low-level formatting, of FAT32 media, 229
lpd protocol, 460
lpr facility, 587
ls command, for viewing file ownership
and permissions, 193
lsdev command, 66
lsmod command, 67
M
MAC (Media Access Control) addresses,
146, 160
for DHCP client, 607–608
MAC file, for kernel configuration, 130
Mac OS X, FreeBSD in, 8
MAC table, 160
machdep.hyperthreading_allowed sysctl
value, 348
macros, in /etc/pf.conf file, 276
magnetic media, 210
mail exchanger (MX) record,
432–433, 468
mail facility, 587
mail from: command, 471
mail group, 194
mail servers for domain
finding, 468–469
relay control in, 472
mailer.conf, 492
mailing list
alias for, 478
archives, 26, 28
including on CVSup server, 401
for FreeBSD development, 6
for FreeBSD help, 20–21
retention of postings to, 31
mailnull group, 194
mailq program, 474
mailwrapper program, 474
make build command, 334
make buildkernel command, 389
make buildworld command, 388–389
make check-old command, 393–394
make checksum command, 333
make clean command, 408
make config command, 333
make configure command, 334
make delete-old command, 394
make depends command, 334
make distclean command, 339
make extract command, 334
make fetch command, 333
make install command, 334, 337
make installkernel command, 389
make installworld command, 393–395
make kernel command, 389
make package command, 339
make packageselect command, 635
make patch command, 334
make print-index command, 320
make search command, 321
make tool, 316
for NanoBSD, 623
PREFIX variable for, 339
setting options permanently, 340
and SMP, 349
for upgrading FreeBSD, 398
MAKE_CONF option, for FreeSBIE, 633
Makefile, 316, 319, 320, 336–337
for OpenOffice.org, 331–332
for Sendmail, 484–485
MAKEJ_KERNEL option, for FreeSBIE, 632
MAKEJ_WORLD option, for FreeSBIE, 632
MAKEOBJDIRPREFIX option, for FreeSBIE, 634
MAKEOPT option, for FreeSBIE, 632
makeoptions criteria, in kernel configura-
tion file, 129
malloc-backed disks, 232
creating, 233
man command, 22, 24
man group, 194
man pages, 21–24, 27–28
Management Information Base (MIB), for
sysctls, 120
manpath variable, in login.conf, 200
maproot statement, 246
mark facility, 588
master boot record (MBR), 531
installing, 52
master domain, configuring, 427
master zone files, organizing, 427
MaxAuthTries, for SSH, 443
maximum resource limits, for user
account, 199
maxproc variable, in login.conf file, 199
MaxStartups, for SSH, 444
MBR (master boot record), 531
installing, 52
mbuf clusters, 170, 172
mbufs, 169
memory allocated for, 171
md device, 136
mdconfig command, 234, 235
INDEX 693
mdmfs command, 232–233
Media Access Control (MAC) addresses,
146, 160
for DHCP client, 607–608
media keyword, for ifconfig, 162
mediaopt keyword, for ifconfig, 162
MegaCli, 542
megarc, 542
member groups, 58
memory
buffer, size of, 577
disks, 136
filesystems, 232–234
constraints, 233–234
shutdown, 234
and network performance optimization,
171–173
program use of, 578
requirements, 37
top for information on, 577–578
usage, 583
vmstat information on, 572
memoryuse variable, in login.conf file, 199
merged from -current (MFC), 375
mergemaster program, 390–393, 395
metadata, 217
MFC (merged from -current), 375
mget command (FTP), 523
MIB (Management Information Base), for
sysctls, 120. See also Simple Network
Management Protocol (SNMP)
Microsoft
FAT32 filesystem, 225
.NET for FreeBSD, 499
Print Services for Unix, 460
Windows, 315
utility for copying disk images, 47
Xenix, 9
migrating from Windows to FreeBSD, 227
milter-greylist, 487
access control lists for, 489–490
attaching to Sendmail, 490–491
configuring, 488–490
retry requirement, 490
mime_magic file, for Apache, 501
mime.types file, for Apache, 501
Minimal distribution, 42
MINIMAL option, for FreeSBIE, 633
minimum time-to-live, for slave
nameserver, 430
minpasswordlength option, 200
mirror of striped disks (RAID 0+1), 544
mirror sites for FreeBSD
FTP site, 43
website, 25
mirroring
disks across network, 565–567
backup server, 565
primary server, 566
(RAID-1), 543, 547–550
boot disks, 549–550
daily status check of, 550
failover and recovery, 567
repairing, 548
mixpasswordcase option, 201
mknod command, 253
mod_bandwidth Apache module, 506
mod_dtcl Apache module, 506
modem, storing phone numbers for
remote, 311
mod_fastcgi Apache module, 506
mod_gzip Apache module, 506
mod_mp3 Apache module, 506
mod_perl2 Apache module, 506
mod_python Apache module, 506
mod_ruby Apache module, 506
modular kernel, 118
mod_webapp-apache2 Apache
module, 506
monitor, displaying, 86
monitoring system security, 299–300
more (default BSD pager), 23
Mosaic web browser, 499
mount command, 64, 214
for foreign filesystems, 225
mount options
in FFS, 220
for journaled filesystems, 557
mount point, for removable media, 230
mountd command, 245
mountdisks plug-in, for FreeSBIE, 635
mounts, stackable, 242–243
mount_smbfs command, 251, 252
mouse, 86
moused_enable variable, 86
moused_type variable, 86
MOVED file, for Ports Collection, 319
moving files to new drives, 242
mput command (FTP), 523
msdosfs mount type, 226
MSDOSFS option, for kernel, 133
msgfile setting, in adduser.conf file, 183
mt command
fsf command, 105
for multiple backups on one tape,
105–106
for tape drive status, 92
mt erase command, 93
mt offline command, 93
mt retension command, 93
694 INDEX
mt rewind command, 93
mtree program, 296–299
multicore processors, 348
multiple
hard drives, 40–41
processors, 344–349
multitasking, 344
multi-user mode, upgrade problems
from, 396
multi-user startup, 79–88
MultiViews option, for Apache, 510
mutt, 30
/mvar/log/messages, for problem solving, 29
MX (mail exchanger) record,
432–433, 468
N
name service, 411. See also Domain Name
System (DNS)
switching, 420
and caching, 450–453
name-based virtual hosts, 517–518
named daemon, 82
managing, 434–435
security for, 437
named.conf file, 424–427
zones in, 425–426
named.root file, 423–424
names
for groups, 191
of ISO images, 48
for network interfaces, changing,
164–165
nameserver, 412
building, 422–424
disabling recursion, 417–418
dynamic, 422
security, 436–437
update of secondary, zone file serial
number and, 430
NanoBSD
building, 624–627
building appliances, 615–630
configuration options, 619–621
sample entries, 621–624
copying disk image to flash drive,
617–618
customizing, 627–629
defined, 616–617
disk image construction failure, 626
and diskless systems, 618
minor updates, 629
toolkit, 618
using, 629–630
nanobsd.sh script, 624
NAT (Network Address Translation), 147n
PF and, 276
navigating man pages, 23
nbns keyword, in /etc/nsmb.conf file, 250
negative niceness, 585
negative time-to-live option, 452
nested RAID, 553, 555
NetApp, 5, 616
NetBSD, 7, 11–12, 87
Netcraft, 7
Netgraph module for bsnmpd, 602
net.inet.icmp.bmcastecho sysctl, 669
net.inet.icmp.drop_redirect sysctl, 669
net.inet.icmp.icmplim sysctl, 669
net.inet.icmp.log_redirect sysctl, 669
net.inet.ip.accept_sourceroute sysctl, 669
net.inet.ip.check_interface sysctl, 669
net.inet.ip.fastforwarding sysctl, 669
net.inet.ip.forwarding sysctl, 668
net.inet.ip.portrange.first sysctl, 668
net.inet.ip.portrange.hifirst sysctl, 668
net.inet.ip.portrange.hilast sysctl, 668
net.inet.ip.portrange.last sysctl, 668
net.inet.ip.portrange.lowfirst sysctl, 667
net.inet.ip.portrange.lowlast sysctl, 667
net.inet.ip.portrange.randomcps sysctl, 668
net.inet.ip.portrange.randomized sysctl, 668
net.inet.ip.portrange.randomtime sysctl, 668
net.inet.ip.portrange.reservedhigh sysctl, 668
net.inet.ip.portrange.reservedlow sysctl, 668
net.inet.ip.redirect sysctl, 669
net.inet.ip.sourceroute sysctl, 669
net.inet.ip.ttl sysctl, 669
net.inet.tcp.always_keepalive sysctl, 671
net.inet.tcp.blackhole sysctl, 670
net.inet.tcp.delayed_ack sysctl, 670
net.inet.tcp.do_tcpdrain sysctl, 671
net.inet.tcp.local_slowstart_flightsize
sysctl, 671
net.inet.tcp.log_in_vain sysctl, 670
net.inet.tcp.newreno sysctl, 671
net.inet.tcp.recvbuf_auto sysctl, 670
net.inet.tcp.recvbuf_inc sysctl, 670
net.inet.tcp.recvbuf_max sysctl, 670
net.inet.tcp.recvspace sysctl, 173, 174, 670
net.inet.tcp.rfc1323 sysctl, 670
net.inet.tcp.rfc3042 sysctl, 670
net.inet.tcp.rfc3390 sysctl, 670
net.inet.tcp.sack.enable sysctl, 671
net.inet.tcp.sendbuf_auto sysctl, 671
net.inet.tcp.sendbuf_inc sysctl, 671
net.inet.tcp.sendbuf_max sysctl, 671
net.inet.tcp.sendspace sysctl, 173, 174, 670
net.inet.tcp.slowstart_flightsize sysctl, 670
INDEX 695
net.inet.tcp.tso sysctl, 671
net.inet.udp.blackhole sysctl, 672
net.inet.udp.log_in_vain sysctl, 671
net.inet.udp.recvspace sysctl value, 173, 174
net.link.log_link_state_change sysctl, 672
netmasks, 152–155, 162
computing in decimal, 154
Netscape Corporation, 499
net-snmp, 600
netstat program, 166, 168–169
for viewing kernel memory used for
networking, 169
network
adapter teaming, 175–176
capacity in kernel, 169–170
capacity planning, 173
cards
assigning IP address to, 162–163
device drivers in kernel, 134
changing window size, 174–175
collisions, 166
current activity, 166–167
daemons, in /etc/rc.conf file, 81–83
device, configuring, 54–56
exports, of disk device, 561–565
filesystems, 243–248
gateway, 56
group, 194
identifying programs listening to, 207
layers, 146–148
maximum incoming connections,
173–174
mirroring disks across, 565–567
backup server, 565
primary server, 566
once-in-a-lifetime vs. standard load, 173
optimizing performance, 170–175
of hardware, 170–171
memory usage, 171–173
options in /etc/rc.conf file, 83–85
performance of, 571
polling, 174
in practice, 148–150
secure mode, 205
server, binding to ports, 157
services, FreeBSD as platform, 11
in single-user mode, 65
starting daemons, 207
time, 447–450
synchronization, 449–450
traffic control, 263–264
Network Address Translation (NAT), 147n
PF and, 276
Network Configuration screen, 55
Network File System (NFS), 243
clients, restricting, 247
enabling client, 245–246
enabling server, 244
exporting, 243
configuring, 244–245
multiple directories, 246–247
kernel options, 133
performance and options, 247–248
server
and diskless client userland, 609–610
for diskless system, 607
and users, 246
network interfaces
adding IP to, 162–163
displaying list, 161–162
multiple IP addresses on, 163–164
renaming, 164–165
testing, 163
testing configuration, 166
Network Neighborhood (Windows), 248
Network Time Protocol (NTP), 448–450
NETWORKING provider, for rc
scripts, 352
newfs command, 103, 229
and encrypted devices, 560
for filesystem creation on file, 237
journaling and, 556–557
for soft updates, 546
for UFS filesystem, 540–541
newfs_msdos command, 229
news facility, 588
news group, 194
newsyslog program, 594
and Apache logs, 504
newsyslog.conf, sample entry, 597
next generation RC scripts (rcNG), 87
nextboot command, 141, 142
NFS (Network File System). See Network
File System (NFS)
NFSCLIENT option, for kernel, 132
nfsd program, 289
NFSSERVER option, for kernel, 132
nice command, in tcsh shell, 585
nice processes, 577
niceness, for reprioritizing, 584–586
Nintendo GameCube emulator, 363
nmbclusers, 172
“no such user” error, returning message
to email sender, 482
noasync mounts, 219
noatime mount option, 220
noauto filesystem mount option, 212
nobody account, 263
nobody group, 194
696 INDEX
NO_BUILDKERNEL option, for FreeSBIE, 633
NO_BUILDWORLD option, for FreeSBIE, 633
NO_COMPRESSDFS option, for FreeSBIE, 634
nodump, 98, 101
NOERROR, in dig response, 415
noexec mount option, 220
nogroup group, 194
Nokia, 5
nologin shell, 192
nologin variable, in login.conf, 200
nomatch rules, for devd, 257
none level for syslog protocol, 589, 590
None option, for Apache, 508
None override, in .htaccess file, 511
nonrepudiation, from cryptosystems, 280
normal performance, defining, 571
nosuid mount option, 220
nosymfollow mount option, 220
NOTES file, 130, 138
notice level for syslog protocol, 588
notify rules, for devd, 257
NS record, 431
nscd program, 450
name query caching with, 451–453
and timing, 452
nslookup, 414
NTFS, 226–227
permissions, 228
NTP (Network Time Protocol), 448–450
ntp facility, 588
ntpd program, 447
configuring, 448
time correction, instant, 449
null modem cable
for serial console, 73
for Soekris, 617
Nvidia, 35
O
OK (loader prompt), 66
One-time Passwords In Everything
(OPIE), 310
opaques, as sysctl values, 121
open source software, support
mechanism, 20–21
OpenBSD, 7, 11–12
openfiles variable, in login.conf file, 199
OpenOffice.org suite, 13, 325, 331
dependencies, 405
OpenRADIUS, 513
OpenSolaris, 8, 227
OpenSSH, 442, 445, 447
OpenSSL, configuration, 281–282
openssl command, 496, 497
openssl s-client command, 285
operating system
BIOS location of, 62
determining version and platform, 29
for diskless client
download with TFTP, 461
on network, 607
running software from other, 86–87,
361–365
separating data from, 41
operator group, 194
OPIE (One-time Passwords In
Everything), 310
optimizing performance
with parallel builds, 390
partitioning and, 38
Options, for virtual host, 519
options criteria, in kernel configuration
file, 129
O’Reilly Network BSD Developer
Center, 26
OSI network protocol stack, 146
outbound traffic, on network, 166
outgoing connections, and aliases, 164
output, 14
overlap, in ABI implementation, 363
ownership
of device, changing, 254
of file, changing, 193
of log file, 594
of non-Unix filesystem, 228
P
PACKAGEROOT environment variable, for
pkg_add, 326
packages. See software packages
PACKAGESITE environment variable, 331, 339
for pkg_add, 326
packet filtering, 264, 272–280
activating rules, 279–280
configuring, 275–277
default accept and default deny,
273–274
rule sample, 278–279
with SNMP, 600
and stateful inspection, 274–275
packet normalization, in /etc/pf.conf
file, 276
packet sniffer, and telnet, 440
packets, 149
PAE (Physical Address Extensions), 139,
142–143
“Page not Found” error, 512
pages of memory, 572
INDEX 697
paging, 581–582
vmstat information on, 572–573
PAM (Pluggable Authentication
Modules), 310
panic function, 644–645
panics
causes, 637–638
configuring computer to process, 639
manual crash dumps, 642–643
recognizing, 638–639
responding to, 639–642
and serial consoles, 641
triggering in single-user mode, 645–646
parallel builds, optimization with, 390
PARANOID keyword, in TCP wrappers,
267, 269
parent-child relationship, of processes, 580
parity, 542–543
partitions, 211–212, 531. See also root
partition
block size for, 41
creating, 241
during install process, 52–53
slices, 536–537
de-journaling, 557
encrypted, 80
/etc/fstab file entry for, 241
GELI to encrypt, 558–560
for jails, 290–291
mounting onto filesystem, 214–215
replication of, 539–540
restoring filesystem on empty, 103
space remaining, 215–217
for swap space, 537
tar for backups, 95
unmounting, 215
pass command, 496
passphrase, 284, 559, 560
passwd command, 65, 184–185
passwd_format option, 201
passwdtype setting, in adduser.conf file, 183
password expiration field, in
/etc/master.passwd file, 187
password keyword, in /etc/nsmb.conf file, 250
passwords
for Apache, 512–515
files on diskless system, 615
for FTP, 522
for groups, 191
for single-user mode, 605
for user accounts, 182
changing, 184–185
expiration dates, 186
file for, 184
patch of source code files, 318
patching system, 180
path, to loaded kernel, 67
path variable, in login.conf, 200
PC Weasel, 71
pc98, 34, 36
pciconf command, 127
per-client directory, for diskless hosts,
612–613
performance
computer resources and, 570
disk input/output, 574–575
following processes, 580–581
of network, 571
optimization, partitioning and, 38
problem solving, 570
of software, 586
status mail, 586–587
swap and paging, 581–582
system status information, 575–579
tuning, 582–586
CPU usage, 583–584
memory usage, 583
swap space, 583
periodic command, 586
Perl, 323
PermiRootLogin, for SSH, 443
permissions
for Apache, 507–515
of device node, 254
and foreign filesystems, 228
for log file, 594
NFS and, 246
restoring for extracted files, 97
Revision Control System and, 108
viewing with ls, 193
personal data field, in /etc/master.passwd
file, 187
per-subnet directory, for diskless hosts,
612–613
PF (packet filter), 273
activating rules, 279–280
configuring, 275–277
enabling, 273
rule sample, 278–279
PF module for bsnmpd, 602
pf plug-in, for FreeSBIE, 635
pfctl program, 279–280
pf_enable variable, 83
_pflogd group, 194
PGID (process group ID), 580
pgrep command, 585
phpt Apache module, 506
Physical Address Extensions (PAE), 139,
142–143
698 INDEX
physical layer, in OSI, 146, 149
PID (process ID), 576, 578
pidfile, 597
pinging IP addresses, 163
pkg_add program, 325, 613
environment settings in, 326–327
pkg_delete program, 328–329, 337
PKGDIR environment variable, for
pkg_add, 327
PKGFILE option, for FreeSBIE, 633
pkg_info tool, 329
PKG-TMPDIR environment variable, for
pkg_add, 326
pkill command, 578
plaintext, for email, 30
platters, 210, 530
Pluggable Authentication Modules
(PAM), 310
plug-ins, for FreeSBIE, 634–635
PocketPC devices, 7
Point to Point Protocol (PPP), 135, 147
politeness, in asking for help, 29–30
polling, in network, 174
POP (Post Office Protocol), 493
testing with SSL, 496–497
portability of FreeBSD, 10
portaudit tool, 340
porting, 361
portmaster script
checking all dependencies, 408
initial setup, 405–406
ports, 317–320
build options for, 337
cleaning up, 338–339
directory, 44
ignoring, 408–409
installing, 332–334
integrated customizations, 334–336
names, 74–75
redirecting, PF and, 276
security, 340–341
tracking build status, 338
for transport protocols, 157–158
closing, 207
connecting to SSL-protected, 285–286
information on, 167–168
netstat for information on, 168–169
reserved, 158
reviewing open, 207
for SSH, 442
for virtual host, 519
tree
contents, 318–320
installing, 318
reducing size of, 409
uninstalling and reinstalling, 337–338
updating installed, 404–409
Ports Collection, 10
for Apache modules, 506
browsing, 322
installing, 54
software from, 331–340
legal restrictions, 322
upgrading, 403–404
software to version in, 404
portsnap program, 318, 403–404
portupgrade tool, 405
POSIX, 120
standards, 362
threads, 359
Post Office Protocol (POP), 493
testing with SSL, 496–497
Postfix, 16, 473
postmaster account, 470
forwarding email for, 478
power for FreeBSD, 10
powerpc, 34, 36
PPP (Point to Point Protocol), 135, 147
PPP over Ethernet (PPPoE), 147
Preboot Execution Environment
(PXE), 607
installation, 45
preemption options, 132
preemptive multitasking, 345
PREFIX variable, for make, 339
primary server, setup for mirroring, 566
print servers, 459–461
printers, 86
/etc/printcap file for settings, 460–461
printing, 459–461
priorities, niceness and, 584–586
Priority field, in problem report, 651
priority variable, in login.conf, 200
private key, 280
problem report (PR)
actions before filing, 647–648
after submission, 653–654
bad versions, 648–649
good versions, 649–652
response to, 639
sample, 652–653
submitting, 646–654
problem-solving resources, 26–28
process filesystem, 238
process ID (PID), 576, 578
process group ID (PGID), 580
process state, 580
processes, 358
counts, 576
displaying all on system, 294
INDEX 699
following, 580–581
parent-child relationship of, 580
priorities, 584–586
top list of, 578–579
vmstat statistics on, 572
processor. See central processing
unit (CPU)
procfs filesystem, 238
and jails, 295
for Linux, 367
PROCFS option, for kernel, 133
production system, changing clock on, 449
programs
attaching shared libraries to, 355–357
compiling, 316–317
/etc/rc.conf to disable, 65
forwarding email to, 479
identifying those listening to
network, 207
identifying those requiring libraries, 394
library requirements, 358
logging by name, 590–591
scripts to manage running, 353
sending log messages to, 591
Project Evil, 36
prompt command (FTP), 523
proprietary hardware, 35
proprietary operating system, 12
protocols
fitting together, 157
and hardware, 159–160
in network layers, 146–148
provider in GEOM, 530
proxy group, 194
PRUNE_LIST option, for FreeSBIE, 633
PS/2 mouse, setup, 56
ps command, 294, 576
pseudodevices, 129
kernel options, 135–136
PSEUDOFS option, for kernel, 133
pseudorandom number generation, random
device for, 135
pseudoterminal, 135, 604, 605
pty device, 135
.pub file extension, 441
public key encryption, 280–286
certificates, 282–285
connecting to SSL-protected ports,
285–286
OpenSSL configuration, 281–282
for SSH, 441
put command (FTP), 523
PuTTY, 445
pw command, scripting with, 188
PXE (Preboot Execution
Environment), 607
installation, 45
pxeboot file, for diskless clients, 609
Q
Qmail, 473
qotd (Quote of the Day), 158
implementing, 454–455
question mark (?), to display commands
for loader, 66
quit command, for restore, 104
quotas, for disk space, 40
R
rackmount servers, booting, 45
Radius user authentication, 513–515
RAID (Redundant Array of Independent
Disks), 541–544
controllers, 541
hardware vs. software, 541–542
nested, 553, 555
parity and stripe size, 542–543
types, 543–544
RAID-0 (striping), 543
configuring, 545–547
RAID-1 (mirroring), 543, 547–550
boot disks, 549–550
daily status check of, 550
repairing, 548
RAID-3 (striping with dedicated parity
disk), 543, 550–553
destroying, 553
RAID-5 (striping with parity shared across
all drives), 543
RAID-10 (stripe of mirrored disks), 544,
553–554
RAM (random access memory),
requirements, 37
Rambler search engine, 26
random device, for pseudorandom number
generation, 135
random password generator, 182
rc scripts
debugging, 353–354
example, 351–352
self-ordering, 350
special providers, 352–353
rc_debug variable, 80
rc_info variable, 80
rcNG (next generation RC scripts), 87
rcorder program, 351
rcs command, breaking locks with, 112
700 INDEX
rcsdiff command, 110–111
README file, for Ports Collection, 319
README.TXT directories, 44
read-only
mode, 81
for FTP server, 524
mounts, in FFS, 218–219
read-write mounts in FFS, forcing on
dirty disks, 224
real memory, listing in startup
messages, 77
real-time streaming data, UDP for, 156
@reboot, 466
reboot command, 88
automatic, after system panic, 638, 642
rebuild of software, forcing, 407–408
recpt to: command, 471
recursive query, 412
Red Hat Linux, 315
redirections for email, 478
redundancy
in network servers, 175
restoring to RAID-3, 551–552
Redundant Array of Independent Disks
(RAID). See RAID (Redundant Array
of Independent Disks)
Reed, Darren, 273
refresh time, for slave nameserver,
430, 431
refreshing zone, 435
refuse file, 386–387
regular expressions, 597
regular user account, creating, 57
reinstalling ports, 337–338
ReiserFS, 227
rejecting logins, 195
relay control, in mail server, 472
Release Engineering team, 372
Release field, in problem report, 651
release versions of FreeBSD, 372–373
releases directory, 44
reloading nameserver, 435
Remote Name Daemon Control (rndc),
434–435
command, 193, 434–435
remote printers, 459
Remote Procedure Calls (RPC), 313
remote reset of computer, serial console
for, 70–75
removable hardware
ejecting media, 231
kernel support for, 136
removable media
/etc/fstab file and, 231
filesystems, 228–231
replication, of slices and partitions,
539–540
require-group statement, in .htaccess file, 515
requirehome variable, in login.conf file, 198
rescheduling, for CPU performance, 584
/rescue directory, 65
research, before sending problem
report, 647
reserved ports, 158
resolver, 412
configuring, 419–421
nameserver list for, 421
resource limits, 198–199
response to hacking, 300
restore program for dump, 98, 101–104
and further backups, 103
interactive, 104
restoring
disklabels, 538
slice table, 533
retensioning tape, 93
retry requirement, for milter-greylist, 490
retry value, for slave nameserver, 430, 431
reverse DNS, 413
zones, 433–434
reversed IP addresses, 418
revision control, 106–113
breaking locks, 112–113
checking back in, 108–109
editing files, 108
initializing, 107–108
reviewing files revision history, 110–111
viewing logs, 109–110
revision history, reviewing, 110–111
rewinding backup tapes, 91, 93
RIP (Routing Information Protocol), 85
rkhunter, 300
rlog command, 109
rmuser program, 188
rndc (Remote Name Daemon Control),
434–435
command, 193, 434–435
rndc-confgen script, 434
ro filesystem mount option, 212
roaming users, email service to, 472
root
directory, for tftpd server, 461
partition, 38, 214, 537
device names for, 64
in /etc/fstab, 213
running mtree across, 297–298
in single-user mode, 64
password, 189–190
for jails, 292
resetting, 65
INDEX 701
posts, in portmaster, 405
server, 412
user
for changing accounts, 186
minimizing use of, 57
NFS server and, 246
ownership of non-Unix filesystem, 228
status mail to, 586
using groups to avoid, 191–194
zone, in named.conf file, 425
rootmfs plug-in, for FreeSBIE, 635
root_rw_mount variable, 81
rotatelogs program, 504–505
rotating logs, 593
file size as basis, 595
flags for actions, 596
time as basis for, 595–596
route command, 163
router_enable knob, 85
Routing Information Protocol (RIP), 85
RPC (Remote Procedure Calls), 313
rpcbind program, 289
RSA key files, 441
rtld program, 355–356
running processes, 576
run-time tunable sysctl, 122
rw filesystem mount option, 212
S
safe mode, booting in, 63
Samba, 248
SAS drives, 37
SASL (Simple Authentication and Security
Layer), 491
testing, 493
saslauthd daemon, 492
SATA drives, 37
savecore program, 640, 641
/sbin directory, commands in, 64–65
sbsize variable, in login.conf file, 199
schedulers, 349–350
scheduling
adjusting for CPU performance, 584
binary updates, 380
tasks, 463–466
schg file flag, 202
scp program, 446, 527
screen, blank, for idle system, 85
script command, 114
script kiddies, 178
and twist for system overload, 270
scripts
for customizing NanoBSD, 627–628
to manage running programs, 353
shutdown, 350–354
from vendor, 353
SCSI drives, 37
numbering, 238–239
tape, 90
device nodes, 91
wiring down, 238–239
SCSI_DELAY option, for kernel, 133
SCTP (Stream Control Transmission
Protocol), 157
sdiff command, 392
search keyword, in /etc/resolv.conf, 421
sections, specifying for man search, 24
sectors in disk drives, 210, 531
Secure Shell (SSH), 82, 282. See also SSH
(Secure Shell) daemon
Secure Sockets Layer (SSL). See SSL
(Secure Sockets Layer)
secure websites, 520, 521
securelevels, 204–207
definitions, 204–205
and file flags, 201
limitations, 206
security
default accept vs. default deny, 264–265
for diskless NFS, 610
Ethernet and, 159
file flags, 201–203
limitations, 206
for file transfer, 522
FreeBSD announcements, 180
for geom_gate, 562
groups of users, 190–191
to avoid root user, 191–194
default, 194
HyperThreading and, 348
for inetd, 453
intrusion preparation with mtree,
296–299
jails, 286–296
and /etc/rc.conf, 293
client setup, 290–291
host server setup, 287–289
in-jail setup, 291–292
and kernel, 289–290
limitations, 295–296
managing, 294–295
shutdown, 293–294, 295–296
startup, 293–294
and LD_LIBRARY_PATH environment
variable, 358
for nameserver, 436–437
network targets, 206
network traffic control, 263–264
702 INDEX
security, continued
packet filtering, 272–280
activating rules, 279–280
configuring, 275–277
default accept and default deny,
273–274
rule sample, 278–279
and stateful inspection, 274–275
for ports and packages, 340–341
potential attackers, 178–180
public key encryption, 280–286
certificates, 282–285
connecting to SSL-protected ports,
285–286
OpenSSL configuration, 281–282
response to hacking, 300
restricting login ability, 195–197
restricting system usage, 197–201
risks, 177–178
root password, 189–190
securelevels, 204–207
definitions, 204–205
limitations, 206
shells, 188–189
for SNMP, 600
system monitoring, 299–300
TCP wrappers, 265–272
configuring, 265–271
example, 271–272
unprivileged users, 261–263
user accounts, 181–188
creating, 181–183
deleting, 188
editing, 183–188
and vmcore file, 645–646
workstation vs. server, 207
security facility, 588
security.bsd.hardlink_check_gid sysctl, 674
security.bsd.overworked_admin sysctl, 674
security.bsd.see_other_gids sysctl, 674
security.bsd.see_other_uids sysctl, 674
security.bsd.unprivileged_read_msgbuf
sysctl, 674
security.jail.allow_raw_sockets sysctl, 673
security.jail.allow_raw_sockets sysctl
value, 290
security.jail.chflags_allowed sysctl, 673
security.jail.chflags_allowed sysctl
value, 290
security.jail.enforce_statfs sysctl, 673
security.jail.enforce_statfs sysctl value, 290
security.jail.jailed sysctl, 673
security.jail.jailed sysctl value, 290
security.jail.list sysctl, 673
security.jail.list sysctl value, 290
security.jail.set_hostname_allowed sysctl, 673
security.jail.set_hostname_allowed sysctl
value, 289
security.jail.socket_unixiproute_only
sysctl, 673
security.jail.socket_unixiproute_only sysctl
value, 289
security.jail.sysvipc_allowed sysctl, 673
security.jail.sysvipc_allowed sysctl value,
289–290
SELECT command, for IMAP, 497
selecting options from sysinstall menus,
spacebar for, 50
Sendmail Mail Transfer Agent, 86,
473–476
attaching milter-greylist to, 490–491
authentication with SASL, 491–493
configuration options, 475, 476–481
Makefile for, 484–485
submission vs. reception, 474–475
sendmail.cf file, 483
building, 492–493
sendmail_enable variable, 86
sendmail_outbound_enable variable, 86
send-pr, 649
serial consoles, 70–75
disconnection, 75
hardware, 71
and panics, 641
physical setup, 73
software, 71–72
speeds for Soekris, 626–627, 628
use, 73–75
Serial Line Internet Protocol (SLIP), 135
serial number, of zone file, 429–430
serial port
logging in through, 606
on Soekris, as default console, 617
server farm, diskless system for, 606
Server Message Block (SMB), 248
ServerName, for Apache, 503
ServerRoot setting, for Apache, 502
servers
device node management on, 253
security, vs. workstation, 207
SERVERS provider, for rc scripts, 352
server-side includes, 509
set command, to change variables, 67
setenv command, 92
setenv variable, in login.conf, 200
setuid programs, preventing running, 220
Severity field, in problem report, 651
sftp program, 447, 527
shared libraries, 87, 354–358
attaching to programs, 355–357
INDEX 703
remapping, 360–361
versions, 354
shell variable, in login.conf, 200
shells, 188–189
changing for user account, 185
kernel option to choose, 64
for user account, 182
for users, 58
show command, 67
shrinking FreeBSD, 396–397
shutdown, 88
of Apache, 521
jails, 293–294, 295–296
and memory disk erasure, 233
scripts, 350–354
from vendor, 353
syncer at, 224
signatures, in email, 30
Silicon Graphics, IRIX, 9
Simple Authentication and Security Layer
(SASL), 491
testing, 493
simple device, 616
Simple Mail Transfer Protocol (SMTP),
470–472
Simple Network Management Protocol
(SNMP), 598–601
client (agent), 598
Management Information Base (MIB),
598–600
definitions and browsers, 599–600
security for, 600
Single Unix Specification, 9
single-user mode
for boot process, 63–66
disks in, 64
network in, 65
programs available, 64–65
fixit disk for, 114–115
root command prompt in, 605
triggering panic in, 645–646
upgrades and, 395–396
64-bit computing, 369
skilled attackers, 179–180
sl device, 135
slash notation for IP addresses, 153
for configuring interface, 162
slashes (//), for comments, 424
slave domain, configuring, 426–427
sleeping processes, 576
slice table
backups, 533
changing, 533–536
viewing with fdisk, 532–533
slices, 211, 531
creating, 240
fdisk for splitting hard drive into,
534–536
partitioning, 536–537
replication of, 539–540
SLIP (Serial Line Internet Protocol), 135
smart hosts, for email, 484–485
SMB (Server Message Block), 248
smbfs.ko module, 249
smbutil crypt command, 250
smbutil login command, 250
smmsp group, 194
SMP (symmetric multiprocessing). See
symmetric multiprocessing (SMP)
SMTP (Simple Mail Transfer Protocol),
470–472
snappnd file flag, 202
snapshots
in FFS, 222
of FreeBSD, 375–376
snapshots directory, 44
SNMP (Simple Network Management
Protocol). See Simple Network
Management Protocol (SNMP)
Snort, 334, 335
SOA (Start of Authority) record, 428–429
sockstat program, 167–168, 207
Soekris, 138, 616
serial console speeds, 626–627, 628
serial port as default console, 617
soft updates, 219, 220–221
vs. journaling, 555
kernel options, 132
software
finding, 320–322
by keyword, 321–322
by name, 321
forcing rebuild, 407–408
identifying and upgrading, 406–407
identifying unneeded, 406
make for, 316
management, 10
performance tuning, 586
recompilation, 362
running from other operating system,
86–87, 361–365
and source code, 316–317
software packages, 317–320, 322–331. See
also libraries
adding, 56–57
to NanoBSD, 628
building, 339
on CDs, 322–323
from FTP, 324–325
704 INDEX
software packages, continued
information, 329–330
installing, 325
on diskless systems, 613–615
listing installed with description, 329
problems, 330–331
result of installing, 327–328
security, 340–341
uninstalling, 328–329
software serial consoles, 71–72
Solaris, 8
recompiling software for, 362
sound plug-in, for FreeSBIE, 635
source code, 377
building FreeBSD, 388–396
GENERIC kernel, 389
installing userland, 393–395
make buildworld command, 388–389
optimizing with parallel builds, 390
preparing for userland install,
390–393
and software, 316–317
updating, 387
for upgrading FreeBSD, 382–387
spacebar, for selecting options from
sysinstall menus, 50
spam. See also junk email
mail server access for, 472
rejecting sources, 485–486
spambots, retransmission times, 490
spamd program, 487
Spamhaus, 486
spamming tools, and backup MXs, 469
SPARC servers, 7
sparc64, 34
spawn option, for TCP wrappers, 270–271
specification for mtree, 297–298
saving, 298–299
spool directory, for printer, 461
SRC_CONF option, for FreeSBIE, 633
SRCDIR option, for FreeSBIE, 632
SSH (Secure Shell) daemon, 82, 167–168,
439–447
clients, 445–447
copying files, 446–447
server (sshd), 289, 440–442
configuring, 442–444
stopping, 440
user management, 444–445
SSH keys, for diskless system, 614
SSH login, option to configure, 56
sshd group, 194
sshd script, 88
ssh-keygen command, 441–442
SSL (Secure Sockets Layer), 282
connecting to protected ports, 285–286
host key, 283
for web traffic, 520
ssl_cert_file variable, for Dovecot,
494–495
ssl_key_file variable, 494–495
stackable mounts, 242–243
stacksize variable, in login.conf file, 199
staff group, 194
standard error, 14–15
standard input, 14
standard output, 14
Start of Authority (SOA) record, 428–429
startup. See also boot process
options in /etc/rc.conf file, 80
messages, 76–79
/var/run/dmesg.boot for storing, 78
scripts, 350–354
from vendor, 353
state of process, 579
stateful inspection, and packet filtering,
274–275
stateful protocol, 156
stateless protocol, 156
status command (GEOM), 544
stop command, for service, 88
storage devices, device nodes for, 211
Stream Control Transmission Protocol
(SCTP), 157
streaming protocol, 156
strings, as sysctl value, 121
stripe of mirrored disks (RAID-10), 544,
553–554
striped provider, creating, 546
striping
(RAID-0), 543
configuring, 545–547
with dedicated parity disk (RAID-3),
543, 550–553
with parity shared across all drives
(RAID-5), 543
su command (switch user), 189
subdirectories, displaying size in
blocks, 216
submit.cf file, 483
subnet statement, for DHCP clients,
458–459
Subsystem sftp setting, for SSH, 444
Sun Microsystems, 3, 8
sunlnk file flag, 202
superuser, password changes by, 184–185
supfiles, 383–384
examples, 386
INDEX 705
modifying, 384–385
for upgrading FreeBSD, 398
SVR4 (System V Release 4), 364
swap space, 212
analysis, 581–582
encrypting with GELI, 561
in /etc/fstab, 213
/etc/fstab file entry for, 241
/etc/rc.conf file setting for, 80
and panic preparation, 640
partition for, 38–39, 537
and performance, 583
splitting among multiple drives, 41
swap-backed disks, 232
creating, 233
swapfind plug-in, for FreeSBIE, 635
switch user command (su), 189
switches for Ethernet, 159
failure, 159–160
quality of, 171
symbol versioning, 354
symbols files, 641, 644
symlinks, 509
disabling, 220
for library, 354
SymLinksIfOwnerMatch option, for
Apache, 509
symmetric multiprocessing (SMP), 143,
344–349
current implementation, 346–347
first implementation, 345–346
kernel options, 134
processors and, 347–348
using, 348–349
SYN-ACK packets, forged, 274
syncer at shutdown in FFS, 224
synchronization of time, 448
synchronous mounts in FFS, 219
Synopsis field, in problem report, 650, 652
sys group, 194
/sys/conf/NOTES file, 138
sysctl command, 121–122
sysctl values, 69, 121, 661–674
changing, 122–124
for device drivers, 123–124
setting automatically, 122
viewing, 121–122
sysinstall
for adding hard disks, 240–243
for upgrades, 377
screen, 49–50
for reconfiguring system, 59
syslog facility, 588
syslogd daemon, 82, 587–593
customization, 592–593
facilities for log entry, 587–588
on jail host server, 288
levels for log message, 588–589
processing messages with, 589–592
syslogd.conf, for diskless system, 615
syslogd_enable variable, 82
syslogd_flags variable, 82
SyslogFacility AUTH, for SSH, 443
systat, 571
system
accounts, 192
backups, 90
binaries, preventing replacement with
trojan versions, 203
console, physical protection of, 189
keeping up to date, 180
memory, Windows loading of, 315
monitoring, 299–300
tar to backup, 95
traps, vmstat information on, 573
System-V-style shared memory, options to
enable, 133
T
tables, in /etc/pf.conf file, 276
tail command, 476
tape drives
and dump, 99
moving backwards on, 105
$TAPE variable, 91–92
tapes for backups, 90–93
erasing, 93
multiple backups on one tape, 105–106
retensioning, 93
rewinding, 91, 93
tar (tape archiver) program, 94–97
modes, 94–96
for moving files to new drives, 242
tarball, 94
creating, 96
.tar.gz file extension, 97
.tar.Z file extension, 97
.taz file extension, 97
tclhttpd, 500
TCP (Transmission Control Protocol). See
Transmission Control Protocol (TCP)
TCP wrappers, 265–272, 456
and access to network daemons, 264
configuring, 265–271
ALL keyword, 268
client list, 266–267
daemon name, 266
706 INDEX
TCP wrappers; configuring, continued
logging, 269
options, 269
spawn option, 270–271
twist option, 269–270
example, 271–272
tcp_extensions variable, 83
TCP/IP, 2, 145
configuring, 54–55
kernel options, 132
network layers, 146–148
variables for, 83
tcsh shell, nice command, 585
telnet, 285–286, 440
to connect to SMTP port, 470
to connect to SSH TCP port, 440–441
/temp directory, for memory filesystem, 232
Templates directory, for Ports
Collection, 319
term variable, in login.conf, 200
terminals, 604
emulators, 74
servers, 73
testing
boot-time tunable sysctls, 124
for FreeBSD, 376
IMAPS, 497–498
kernel remotely, 141–142
Linux mode, 366–367
network interface configuration, 166
POP3S, 496–497
SASL (Simple Authentication and
Security Layer), 493
text editors
for problem report, 649
for user management, 185
XEmacs, 13
text wrap, in email, 30
TFTP (Trivial File Transfer Protocol),
461–463
tftpd server, 461
and boot loader, 609
configuring, 462–463
file ownership, 462
and read-write files, 462
.tgz file extension, 97
third-party directory services, authentica-
tion against, 513
32-bit computing, 369
threaded programs, and multiple
processors, 348–349
threading libraries, 359–360
threads, 346, 358–359
waiting for CPU time, 576
three-way handshake, 156
three-way mirror, for database, 550
Thunderbird, FreeBSD support for, 493
Tier 1 NTP servers, 448
Tier 2 NTP servers, 448
tilde (~)
in environment fields for user home
directory, 200
for tip program, 75
time
for log rotation, 595–596
network, 447–450
specifying for crontab, 465
time servers, 448
time slice, 345
time zone setting, 56, 447
timecounter, identifier in startup
messages, 76
timeout, for FTP session, 524
time-to-live (TTL)
in dig answer, 415
for zones, 428
times.allow option, 201
times.deny option, 201
timestamps, and dump, 100
timezone variable, in login.conf, 200
tip program, 74–75, 617
disconnecting serial console, 75
/tmp directory, 39
tmpfs memory filesystem, 233–234
tmpmfs variable, 80
tmpmfs_flags variable, 80
tmpsize variable, 80
toggles, 662
tools directory, 44, 319
top tool, 575
and I/O, 579
torrents directory, 44
touch command, 462, 512
tracking changes, revision control for,
106–113
tracks in disk drives, 210, 530
Transmission Control Protocol (TCP),
147, 156–157
handshake, 156
status of, 169
port, Apache binding to, 502
transport layer, in OSI, 147–148, 149, 150
trap function, 644–645
trimming kernel, 131–136
basic options, 131–134
CPU types, 131
device drivers, 134
multiple processors, 134
pseudodevices, 135–136
removable hardware, 136
INDEX 707
Trivial File Transfer Protocol (TFTP),
461–463
trojan versions of binaries, preventing
replacement with, 203
troubleshooting
kernel builds, 137
NanoBSD build, 625–626
result of refuse files, 387
truncate command, 565
trunk ports, 405
truss program, 368–369
TTL (time-to-live). See time-to-live (TTL)
tty group, 194
tun device, 135
tunables, 662
low-level kernel vs. run-time, 123
turnables, 79
tutorials, 25
twist option for TCP wrappers, 269–270
variables, 271
tzsetup program, 447
U
uappnd file flag, 202
uchg file flag, 202
UDF (Universal Data Format), 226
udotdir setting, in adduser.conf file, 183
UDP (User Datagram Protocol), 147,
155–156
wrappers and, 265
ufs (Unix Fast File System), 212
UFS (Unix File System), 217
access control lists, kernel options, 132
UFS2, snapshot facility, 99
UFS_DIRHASH option, for kernel, 132
UID (user ID). See user ID (UID)
UIDs file, for Ports Collection, 319
ULE scheduler, 349–350
umask variable, in login.conf, 200
umount command, 215, 231
for foreign filesystems, 226
uname command, -a option, 29
undeliverable email, 469
uninstalling
ports, 337–338
software packages, 327, 328–329
Universal Data Format (UDF), 226
Universal Time Clock (UTC), 447
University of California, 4
Unix, 2
Unix Fast File System (ufs), 212
Unix Systems Laboratories (USL), 4
Unix-like systems, vs. Unix, 9
UNKNOWN keyword, in TCP wrappers, 267
unload command, 68
in GEOM, 544
unloading kernel modules, 125
unmounting
disks, for configuring mirroring, 547
and ejecting removable media, 231
partitions, 215
unprivileged users, 261–263
untarring, 95
Update server, building, 380
updating
blocking, 386–387
installed ports, 404–409
UPDATING file, for Ports Collection, 319
upgrading
Ports Collection, 403–404
software, 406–407
upgrading FreeBSD, 371–409
binary updates, 378–380
cross-building, 399
methods, 377
procedure for, 11
and single-user mode, 395–396
via source, 382–387
supfiles and make for, 398
via sysinstall, 380–381
versions, 372–377
decision on use, 376–377
FreeBSD-current, 373–374
FreeBSD-stable, 374–375
releases, 372–373
snapshots, 375–376
testing, 376
uptime, statistics on, 576
USB hardware
FAT filesystem for, 228–230
filesystems for, 230
kernel support for, 136
tape drives, 90
user accounts, 181–188. See also root, user
changing shell, 185
creating, 181–183
deleting, 188
editing, 183–188
for jail, 292
user command, 496
user crontabs, vs. /etc/crontab, 463
User Datagram Protocol (UDP), 147,
155–156
wrappers and, 265
User distribution, 42
user facility, 588
user ID (UID), 181
for administrative users, 192–193
in /etc/master.passwd file, 187
708 INDEX
user mapping, 481–483
User option, for Apache, 502
user processes, 577
user sessions, logging to, 591
userland
for diskless clients, NFS server and,
609–610
installing, 390, 393–395
usernames, 57
in /etc/master.passwd file, 187
for FTP, 522
users, 7
adding, 57–58
Apache configuration by, 510–511
home directories, 40
unprivileged, 261–263
user’s class field, in /etc/master.passwd
file, 187
user’s home directory field, in
/etc/master.passwd file, 188
user’s shell field, in /etc/master.passwd
file, 188
USL (Unix Systems Laboratories), 4
/usr partition, 40
/usr/bin/sendmail file, 474
/usr/compat/linux, 366
/usr/local/bin directory, 14
/usr/local directory, 339
/usr/local/etc/dhcpd.conf file, 457–459
/usr/local/etc/dovecot.conf file, 494
/usr/local/etc/mail/greylist.conf file, 488
/usr/local/etc/rc.d script, 207, 350
/usr/local/lib directory, 356
/usr/local/share/dovecot directory, 495
/usr/local/share/freesbie directory, 631
/usr/local/share/freesbie/conf, 631
/usr/ports directory, 318
/usr/ports/emulators directory, 363
/usr/ports/games directory, 42
/usr/ports/INDEX-7 file, 320
/usr/ports/LEGAL file, 322
/usr/ports/mail/dovecot directory, 494
/usr/ports/mail/mutt, 30
/usr/ports/mail/sendmail, 491
/usr/ports/net/cvsup-mirror port, 400
/usr/ports/security/nessus utility, 300
/usr/ports/sysutils/lsof utility, 300
/usr/ports/www directory, 500
/usr/share/syscons/fonts directory, 85
/usr/share/syscons/keymaps directory, 85
/usr/src/tools/tools/nanobsd directory, 618
/usr/src/UPDATING file, 388
UTC (Universal Time Clock), 447
uucp facility, 588
uucp group, 194
uunlnk file flag, 203
V
,v file extension, 107
/var partition, 39–40
/var/crash directory, 643
/var/db/pkg directory, 327
/var/db/sup/refuse file, 386
variables, 662
for loader, 67
in loader.conf file, 70
set command to change, 67
in sysctl.out file, 119
/var/log/maillog file, 476
for Dovecot errors, 496
/var/log/messages, 84, 347
for DNS configuration errors, 436
varmfs plug-in, for FreeSBIE, 635
/var/run/dmesg.boot file, 63, 78
for problem solving, 29
and tape drive recognition by system, 90
/var/tmp directory, 39
VAXes, 7
verbose logging, 593
booting with, 63
verbose mode for tar, 96
verbose_loading variable, 69
VeriSign, 282
version numbers, in revision control, 107
version of FreeBSD, in startup
messages, 76
VersionAddendum, 442
vfs.ffs.doasyncfree sysctl, 667
vfs.ffs.doreallocblks sysctl, 667
vfs.nfs.diskless_rootaddr sysctl, 667
vfs.nfs.diskless_rootpath sysctl, 667
vfs.nfs.diskless_valid sysctl, 611, 667
vfs.usermount sysctl, 667
vfs.usermount sysctl variable, 228
vfs.vmiodirenable sysctl, 667
vi, Revision Control System and, 108
video card, with serial port, 71
video, redirecting to serial port, 71
view command (smbutil), 251
Vigor, 185
vipw utility, 186–188
virtual domains, 481–483
virtual hosting
in Apache web server, 517–519
SSL configuration, 520
virtual memory
disk space for, 38–39
statistics, 571
INDEX 709
virtual nodes (vnodes), 218
writing to disk at shutdown, 224
virtual terminal, 604
viruses, 179
vmcore file, 643
and security, 645–646
vm.exec_map_entries sysctl, 667
vmstat program, 571–574
continuous, 574
using, 573–574
vm.swap_enabled sysctl, 666
vm.swap_idle_enabled sysctl, 667
vm.swap_idle_threshold1 sysctl, 667
vm.swap_idle_threshold2 sysctl, 667
vm.v_cache_max sysctl, 666
vm.v_cache_min sysctl, 666
vm.v_free_min sysctl, 666
vm.v_free_reserved sysctl, 666
vm.v_free_target sysctl, 583, 666
vm.v_inactive_target sysctl, 666
vnode-backed disks, 232
creating, 233
vnodes (virtual nodes), 218
writing to disk as shutdown, 224
voluntary context switches, 579
W
warning level for syslog protocol, 588
warnings, from self-signed certificates, 285
web server. See also Apache web server
estimating needs, 173
functioning of, 500
websites, HTTPS, 520
welcome variable, in login.conf, 200
whatis, for man page searches, 23
wheel group, 189, 190, 194
whereis command, 406
whitelist, 487
wildcards, for logging, 589
window size, for network incoming
connections, 174–175
Windows (Microsoft)
background, and Unix
administration, 13
NT/200/XP filesystem, 226–227
WINS server, 459
wired memory, 578
wiring down SCSI devices, 238–239
WITHOUT_ options, for customizing
FreeBSD, 397
WITNESS kernel option, 347
wlan_wep.ko module, 125
workgroup keyword, in /etc/nsmb.conf
file, 249
workstation, security, vs. server, 207
worms, 179
wrappers. See TCP wrappers
wrapping text, in email, 30
write caching in FFS, 221
write-only mode, for FTP server, 524
www group, 194
X
X Window System, 42, 323
dependencies required, 328
X11Forwarding, for SSH, 443–444
xautostart plug-in, for FreeSBIE, 635
xbox, 34
xconfig plug-in, for FreeSBIE, 635
xconfigure-probe plug-in, for
FreeSBIE, 635
X-Developer distribution, 42
XEmacs, 13
Xenix (Microsoft), 9
XFS partitions, 227
X-Kern-Developer distribution, 42
xorg package, 328
X-User distribution, 42
Y
Yahoo!, 5, 499
Z
ZEN blacklist, 486
ZFS, 227
zone files, 428–434
dots and termination in, 433
example, 432
reloading, 435
secondary nameservers update, serial
number and, 430
zone transfers, controlling, 436–437
zones in named.conf, 424

5IFSFTNPSFUPLFFQJOH
'SFF#4%GSFF
UIBONFFUTUIFFZF
5IF'SFF#4%'PVOEBUJPO10#PY#PVMEFS$064"
1IPOF'BY8FCXXXGSFFCTEGPVOEBUJPOPSH
4HEYWORKHARDBEHINDTHESCENESANDYOUHARDLY
EVERSEETHEM4HEYRE4HE&REE"3$&OUNDATION
ANDTHEYQUIETLYFUNDANDMANAGEPROJECTSSPONSOR
&REE"3$EVENTS$EVELOPER3UMMITSANDPROVIDE
TRAVELGRANTSTO&REE"3$DEVELOPERS4HE&REE"3$
&OUNDATIONREPRESENTSTHE0ROJECTINEXECUTING
CONTRACTSLICENSEAGREEMENTSCOPYRIGHTSTRADE
MARKSANDOTHERLEGALARRANGEMENTSTHATREQUIRE
ARECOGNIZEDLEGALENTITY4HE&OUNDATIONSFUNDING
ANDMANAGEMENTEXPERTISEISESSENTIALTOKEEP
&REE"3$FREE!NDKEEPINGITFREEISGETTINGMORE
COSTLYEVERYYEAR
4HATSWHYTHEYNEEDYOURHELP4HEWORKOF4HE
&REE"3$&OUNDATIONISENTIRELYSUPPORTEDBYYOUR
GENEROUSDONATIONS
0LEASEHELPUSTODAY(ELPKEEP&REE"3$FREE
4OMAKEADONATION
VISITOURWEBSITEAT
WWWFREEBSDFOUNDATIONORG

UPDATES
Visit http://www.nostarch.com/abs_bsd2.htm for updates, errata, and other
information.
COLOPHON
Absolute FreeBSD, 2nd Edition was laid out in Adobe FrameMaker. The font families
used are New Baskerville for body text, Futura for headings and tables, and
Dogma for titles.
The book was printed and bound at Malloy Incorporated in Ann Arbor,
Michigan. The paper is Glatfelter Thor 50# Smooth, which is made from
15 percent postconsumer content. The book uses a RepKover binding, which
allows it to lay flat when open.

www.nostarch.com
TH E F I N EST IN G E E K E N T E RTA IN M ENT ™
SHELVE IN:
OPERATING SYSTEMS/UNIX
$59.95 ($65.95 CDN)
F R E E B S D :
N O T J U S T F O R
A L P H A G E E K S
A N Y M O R E !
F R E E B S D :
N O T J U S T F O R
A L P H A G E E K S
A N Y M O R E !
“ I LAY F L A T.”
This book uses RepKover —a durable binding that won’t snap shut.
Printed on recycled paper
FreeBSD—the powerful, flexible, and free Unix-like
operating system—is the preferred server for many
enterprises. But it can be even trickier to use than either
Unix or Linux, and harder still to master.
Absolute FreeBSD, 2nd Edition is your complete guide
to FreeBSD, written by FreeBSD committer Michael
W. Lucas. Lucas considers this completely revised and
rewritten second edition of his landmark work to be his
best work ever; a true product of his love for FreeBSD
and the support of the FreeBSD community. Absolute
FreeBSD, 2nd Edition covers installation, networking,
security, network services, system performance, kernel
tweaking, filesystems, SMP, upgrading, crash debugging,
and much more, including coverage of how to:
• Use advanced security features like packet filtering,
virtual machines, and host-based intrusion detection
• Build custom live FreeBSD CDs and bootable flash
• Manage network services and filesystems
• Use DNS and set up email, IMAP, web, and FTP
services for both servers and clients
• Monitor your system with performance-testing and
troubleshooting tools
• Run diskless systems
• Manage schedulers, remap shared libraries, and
optimize your system for your hardware and your
workload
• Build custom network appliances with embedded
FreeBSD
• Implement redundant disks, without special hardware
• Integrate FreeBSD-specific SNMP into your network
management system
Whether you’re just getting started with FreeBSD or
you’ve been using it for years, you’ll find this book to
be the definitive guide to FreeBSD that you’ve been
waiting for.
A B O U T T H E A U T H O R
Michael W. Lucas is a network engineer and system
administrator responsible for a network that stretches
across the Western Hemisphere. He is the author of the
critically acclaimed Absolute OpenBSD, Cisco Routers
for the Desperate, and PGP & GPG, all from No Starch
Press. Despite being from Detroit, Michigan, he knows
almost nothing about automobiles. He has been using
Unix systems for over 20 years and FreeBSD since 1995.
Fortunately for the rest of us, his writing keeps him too
busy to implement his plans for world domination.
With a foreword by
R O B E R T W A T S O N ,
President of
the FreeBSD Foundation
A B S O L U T E
F R E E B S D
2ND EDITION
A B S O L U T E
F R E E B S D®
2ND EDITION
T H E C O M P L E T E G U I D E T O F R E E B S D
M I C H A E L W . L U C A S
L U C A S
A B S O L U T E
F R E E B S D
2 N D E D I T I O N
A B S O L U T E
F R E E B S D
2 N D E D I T I O N
