PMSS User Manual SPFU La (3)
PMSS%20User%20Manual_SPFU_La%20(3)
User Manual: Pdf
Open the PDF directly: View PDF ![]() .
.
Page Count: 211 [warning: Documents this large are best viewed by clicking the View PDF Link!]

1
Procurement Management Support System – PMSS
User Guide - SPFU
Compulink Systems Ltd.
Plot no. 38, Rajiv Gandhi IT Park,
MIDC, Hinjewadi, Pune- 411057
Phone 91- 20- 66528000 • Fax 91- 20- 66528080
User manual for PMSS v1.0

Procurement Management Support System – PMSS v1.0 User Guide
2
Index
Introduction ............................................................................................................. 3
Configuration Module .............................................................................................. 9
User Maintenance .............................................................................................. 11
Procurement Plan .................................................................................................. 13
Procurement Plan Creation .................................................................................... 13
Procurement Plan Approval .................................................................................... 19
Institution’s Plan Approval .................................................................................... 22
Plan Revision ........................................................................................................ 25
Procurement Process ............................................................................................ 28
Initiation ......................................................................................................... 28
In Progress ....................................................................................................... 29
Completed ....................................................................................................... 30
Cancelled ........................................................................................................ 30
Shopping Goods .................................................................................................... 32
Shopping Works .................................................................................................... 53
Direct Contracting ................................................................................................. 72
NCB Goods ............................................................................................................ 76
NCB Works .......................................................................................................... 105
ICB ...................................................................................................................... 130
LIB ...................................................................................................................... 131
Quality and Cost Based Selection (QCBS) ............................................................ 133
Fixed Budget Selection (FBS) .............................................................................. 177
Least Cost Selection (LCS) .................................................................................. 178
Consultant Qualification Selection (CQS) ............................................................ 180
Single Source Selection (SSS) ............................................................................. 181
Individual Consultants – Competitive Method ..................................................... 187
Individual Consultants – SSS .............................................................................. 199
Prior Reviews ...................................................................................................... 204
Request/ Queries ................................................................................................ 206
PMSS-MIS ........................................................................................................... 210

Procurement Management Support System – PMSS v1.0 User Guide
3
Introduction
NPIU was established by Ministry of Human Resource Development, Government of India, in August
1990 for coordination, facilitation, monitoring and to provide guidance to the States/ Institutions in all
aspects of the projects.
Technical Education Quality Improvement Programme (TEQIP) was envisaged in 2003 as a long-term
programme to be implemented in 3 phases for transformation of the technical education system with
World Bank assistance. TEQIP-II is planned as a sequel to TEQIP-I to continue the development activities
initiated by TEQIP-I. Under TEQIP-II, estimate of around 200 institutions from all over the country will be
selected to achieve the following objectives:
Strengthening Institutions to produce high quality engineers for better employability
Scaling up PG education and demand driven Research & Development and Innovation
Establishing Centers of Excellence for focused applicable research
Training of faculty for effective Teaching
Enhancing Institutional and System Management effectiveness
To achieve the objectives of the programme, the institutions will be funded for various activities covered
under the programme by the World Bank through the Government of India. Substantial portion of these
funds will be used to procure various good, services, and works (civil works) by the participating
institutions. All procurement under the TEQIP-II programme will be carried out in accordance with the
World Bank guidelines, failing which, could result in penalties.
The PMSS will be used to support and monitor the procurement activities of the institutions, which are
selected for the project. PMSS will help the procurement activities by reducing time, standardizing the
processes, ensuring transparency, support decision making and compliance with agreed norms. Apart
from the institutions, PMSS will also be used by the SPFUs (State Project Facilitation Unit) and NPIU
(National Project Implementation Unit) for procurement as well as monitoring activities.
Procurement Management Support System – PMSS v1.0 User Guide
4
Client Software Requirement
Procurement management support system (PMSS) is a web based application. Client side software
requirements of PMSS are;
o Web browser, Internet explorer 5 and above.
o Adobe reader
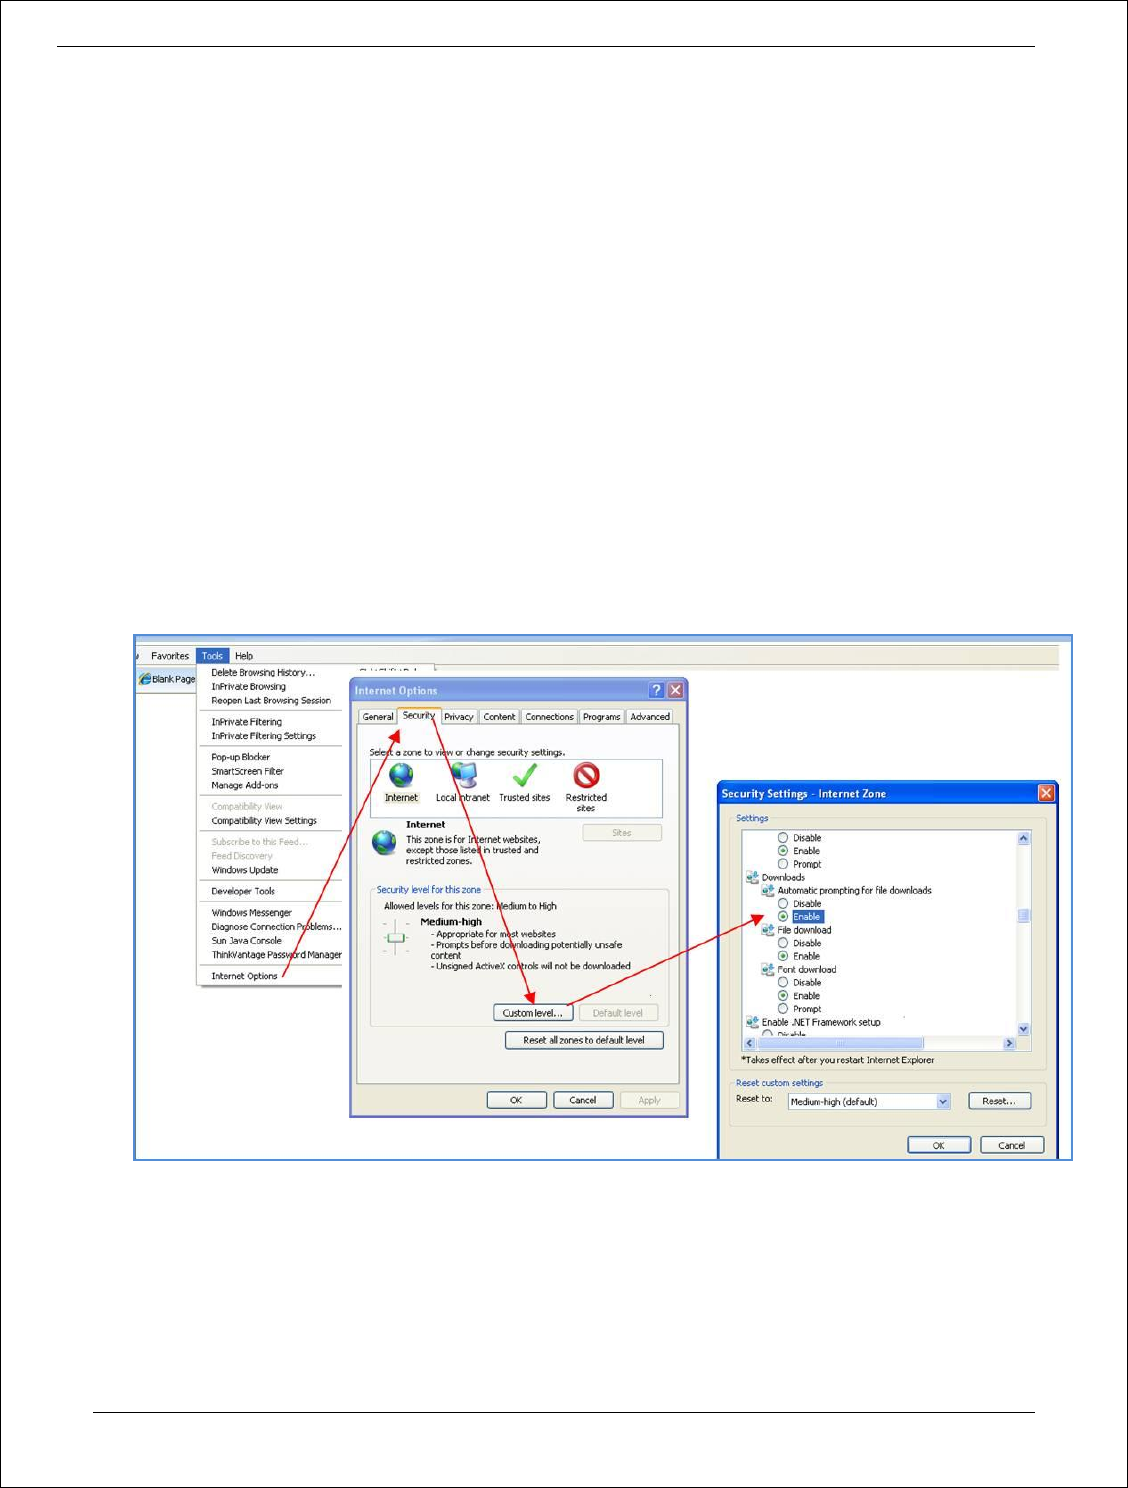
Browser settings
1. Open internet explorer (IE).
2. Select option Tools->Internet Options-> Security-> Custom Level-> Automatic Prompting for file
downloads
3. Select ‘Enable’
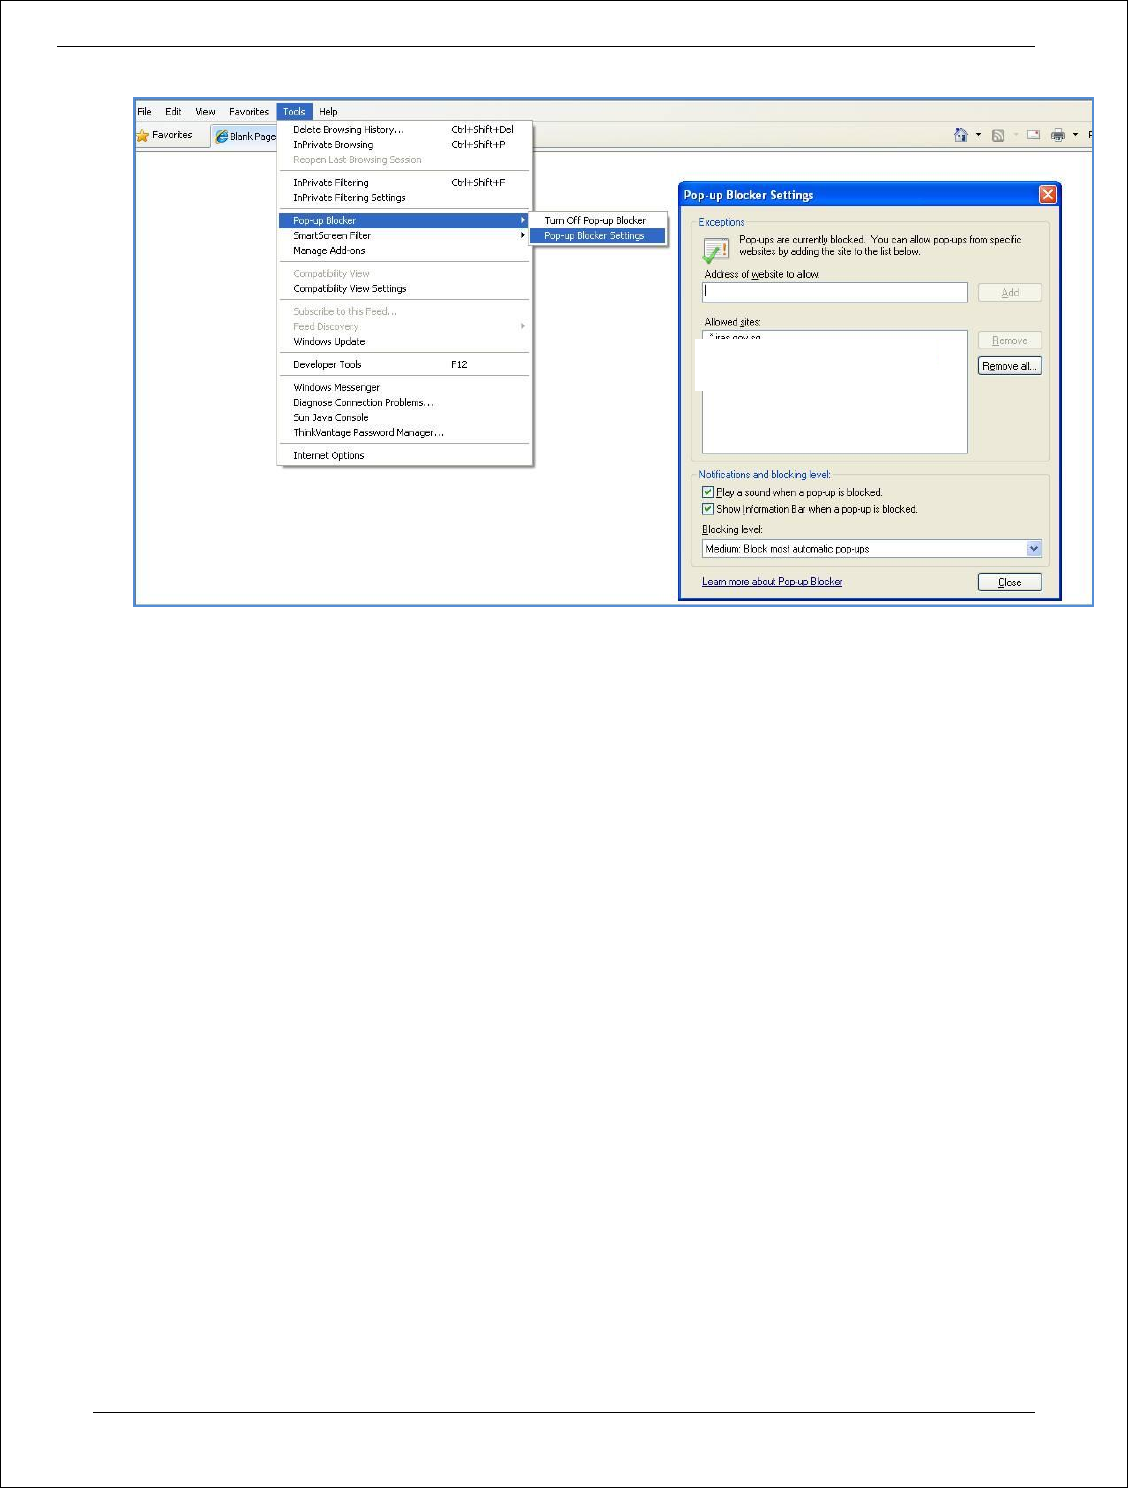
4. Select option Tools-> Pop-up Blocker-> Pop-up Blocker Setting.
5. In the ‘Address of Website to allow’ field type the PMSS website url
6. Click ‘Add’.
Procurement Management Support System – PMSS v1.0 User Guide
5

Procurement Management Support System – PMSS v1.0 User Guide
6
CONFIGURATION AND SETUP
Institution Configuration
Chapter
1
Procurement Management Support System – PMSS v1.0 User Guide
7
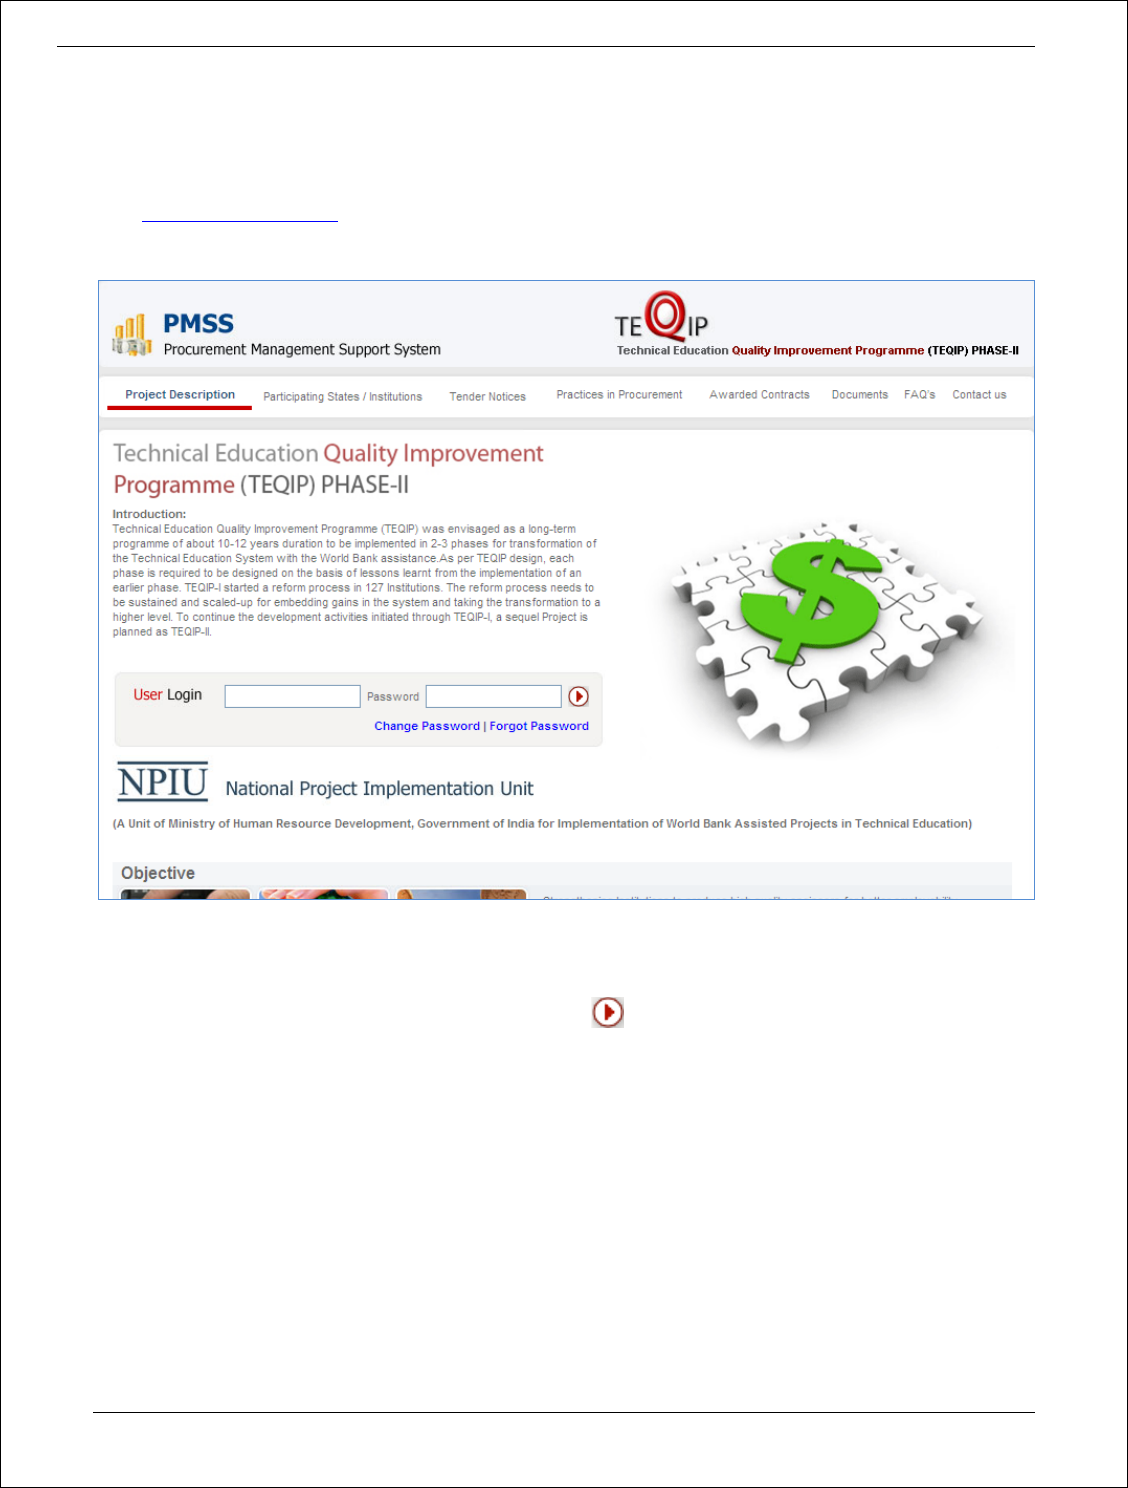
Home Page
Browse the following URL to access the PMSS system;
URL: www.teqip-pmss.com
This will display the Home Page;
Login
Fill the Login ID and Password on the home page and click to enter into the system.
Change Password
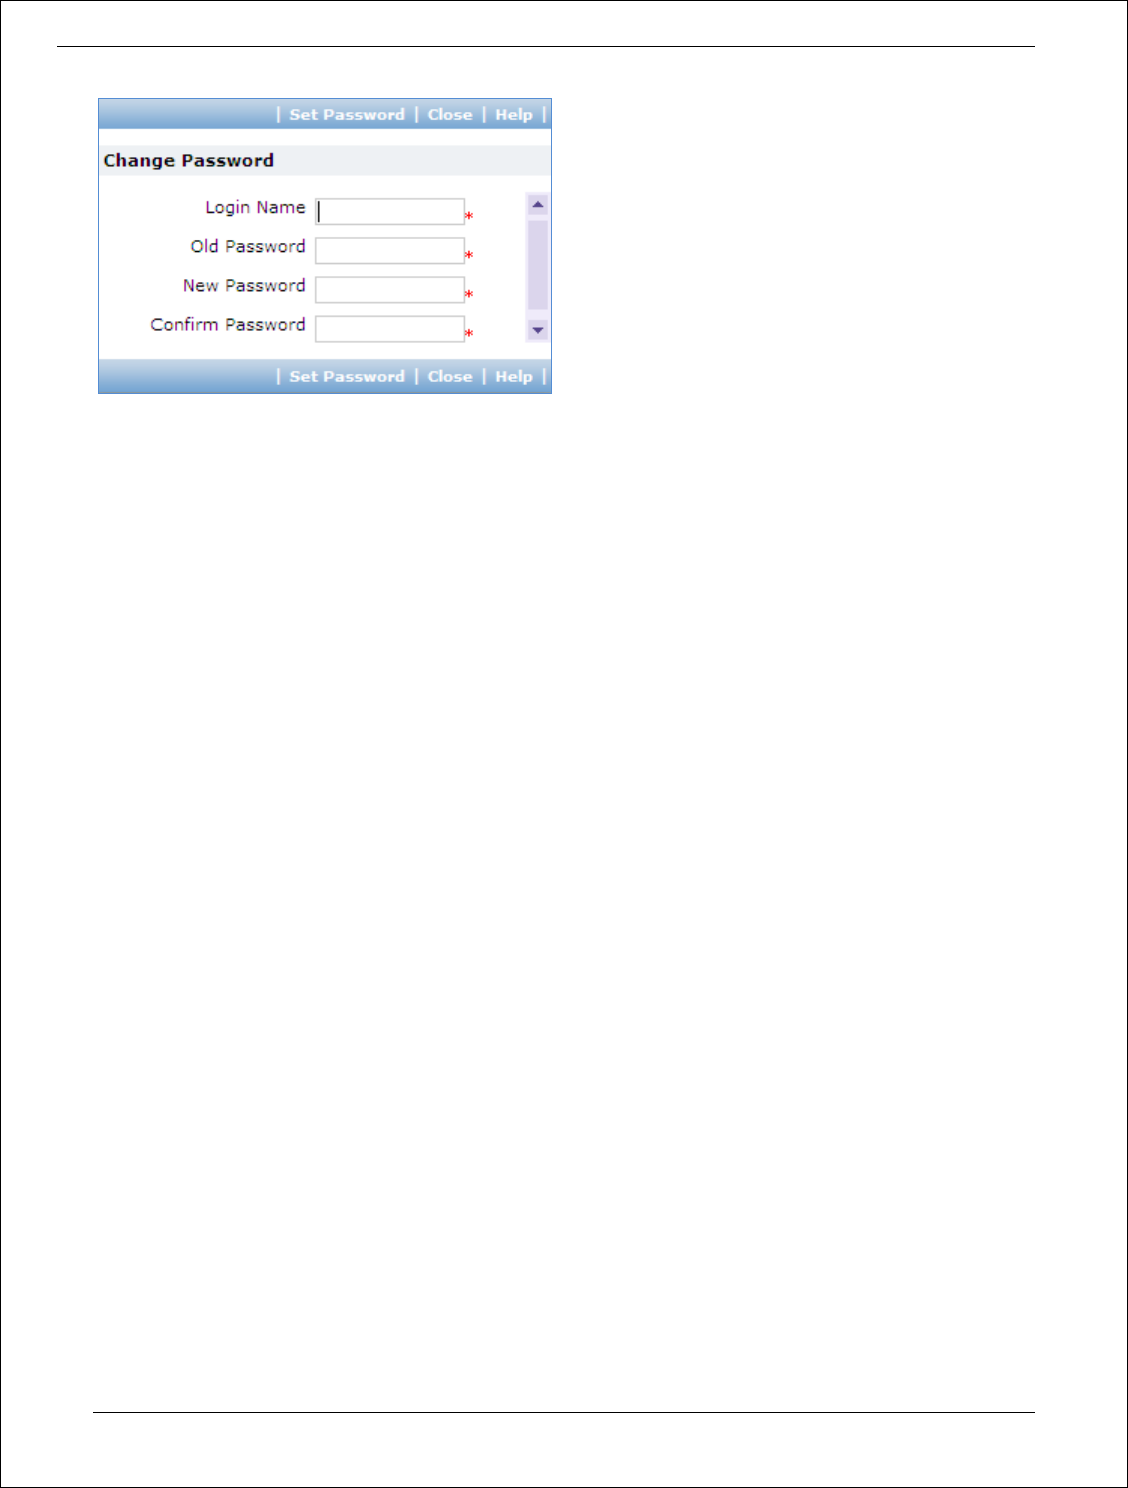
To change the password, click on ‘Change Password’ link on the home page. A pop up will be seen;
Procurement Management Support System – PMSS v1.0 User Guide
8
Fill the Login Name, Old Password, New Password, Confirm Password. The system will indicate the success or
failure of changing the password.
Forgot Password
Enter Login ID and click on the ‘Forgot Password’ link.
An email popup will be shown. Enter the required details in the email and click send.
Procurement Management Support System – PMSS v1.0 User Guide
9
Configuration Module
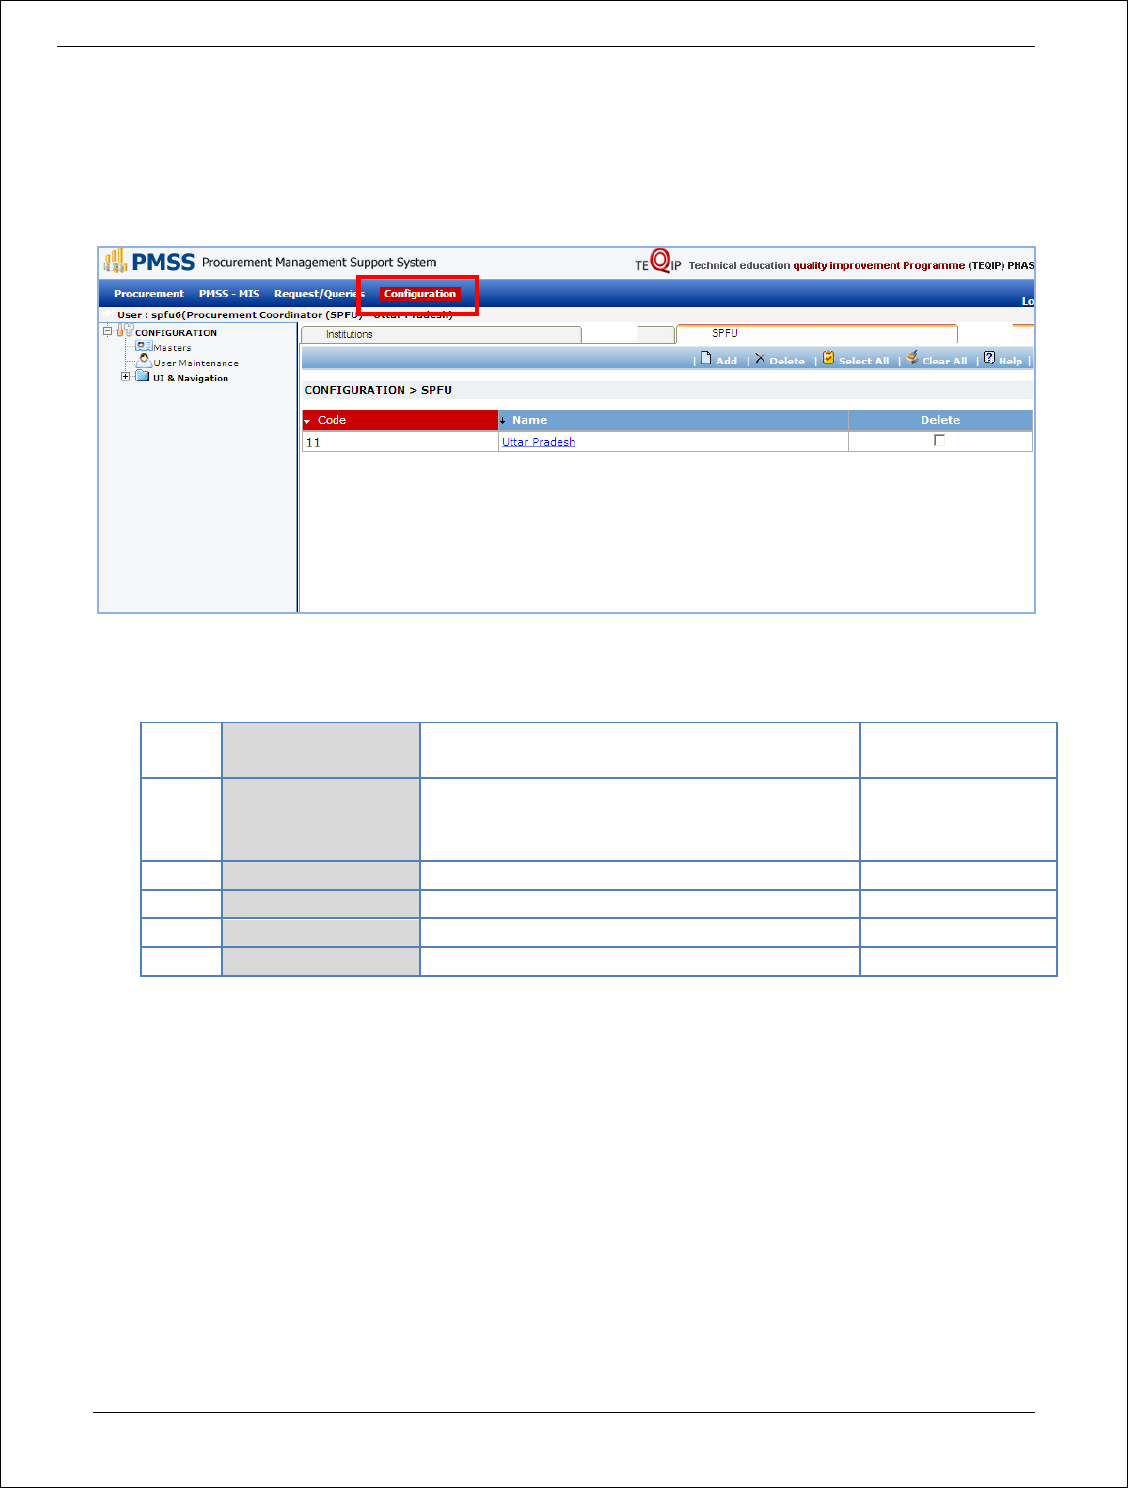
To access the Configuration Module, click on ‘Configuration’
1. Click on the SPFU name
2. Fill the fields on the page. Details of the fields are mentioned below;
Sr.
No.
Field Name
Field Description
Sample Data
1
Address
SPFU’s Address
B289, Shamim
Towers, Kloar
Street
2
Website URL
SPFU’s Website URL
www.cslnit.com
3
Phone Number
SPFU’s Telephone Number
020 26453280
4
Fax Number
SPFU’s Fax Number
020 26453288
5
Email ID
SPFU’s email
csl@cslnit.com
3. Two subtabs can be seen in the lower section
Purchase Committee
Institution Logo
Purchase Committee
Purchase Committee for the Institution can be created here.
To define the purchase committee;
o Click on ‘Add’ link
o Enter the Committee Member name
o Enter his Designation

Procurement Management Support System – PMSS v1.0 User Guide
10
o Enter his/ her Role In Purchase Committee
o Select the department to which this member belongs to (dropdown will list the
departments created in the above Department sub tab)
o Click ‘Save’
To add another Committee member repeat the above steps
Note: Adding at least three purchase committee members is mandatory
Institution Logo
Institution’s logo can be uploaded here.
o Click on ‘Add’ link
o In the pop up browse and select the logo file
o Click ‘Upload’
Procurement Management Support System – PMSS v1.0 User Guide
11
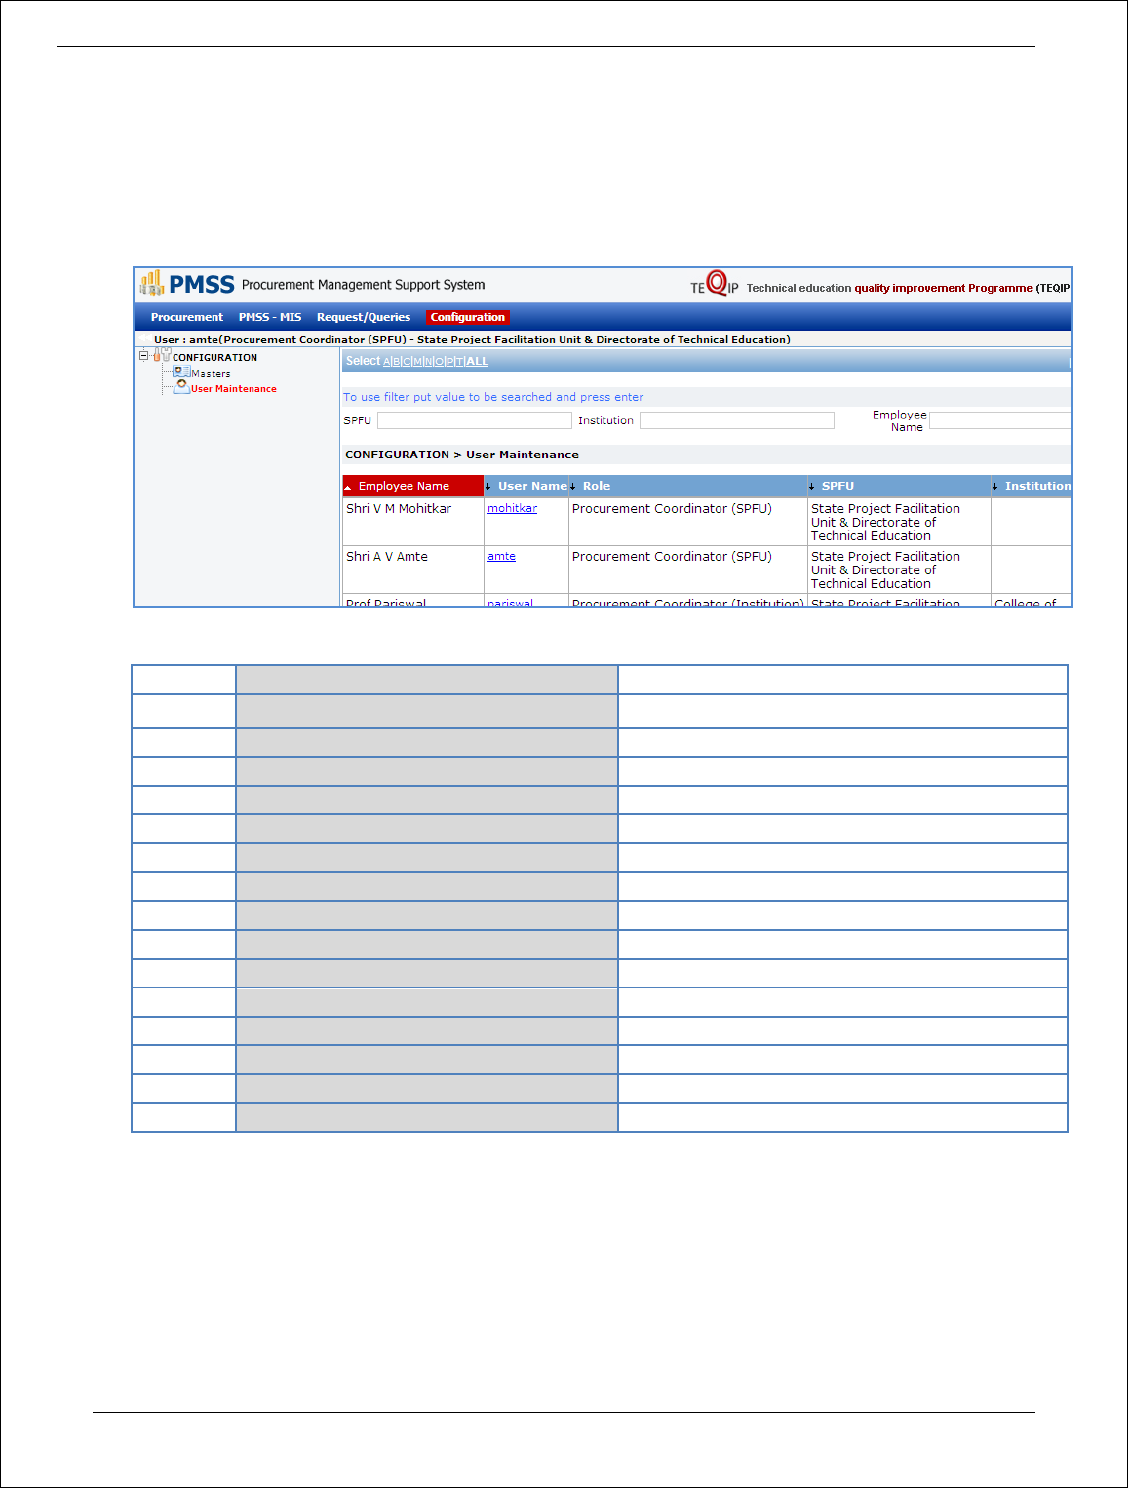
User Maintenance
Under this node SPFU user details can be seen. Select option Configuration-> User Maintenance
1. Click on the name of the user
2. Following details can be seen
Sr. No.
Field Name
Sample Data
1
Sanjay Matkar
Mohammed Ali Shaikh
2
First Name
Mohammed
3
Middle Name
Ali
4
Last Name
Shaikh
5
User Name
shaikh.mohammed
6
Birth Date
02/03/1978
7
Gender
Male
8
Email
shaikh.mohammed@cslnit.com
9
Phone
020-26789023
10
Address
B289, Shamim Towers, Kloar Street
11
City
Mumbai
12
Pin Code
400058
13
Role
Procurement Coordinator(Institution)
14
State
Maharashtra
15
Institution
CSL NIT

Procurement Management Support System – PMSS v1.0 User Guide
12
PROCUREMENT PLANNING
Procurement Plan Creation and Approval
Chapter
2
Procurement Management Support System – PMSS v1.0 User Guide
13
Procurement Plan
Purpose
The purpose of the procurement plan is to plan and define all the procurements for the stipulated plan
period. Procurement plan is the heart of the PMSS; procurements can be initiated in PMSS only when
the procurement plan has been approved.
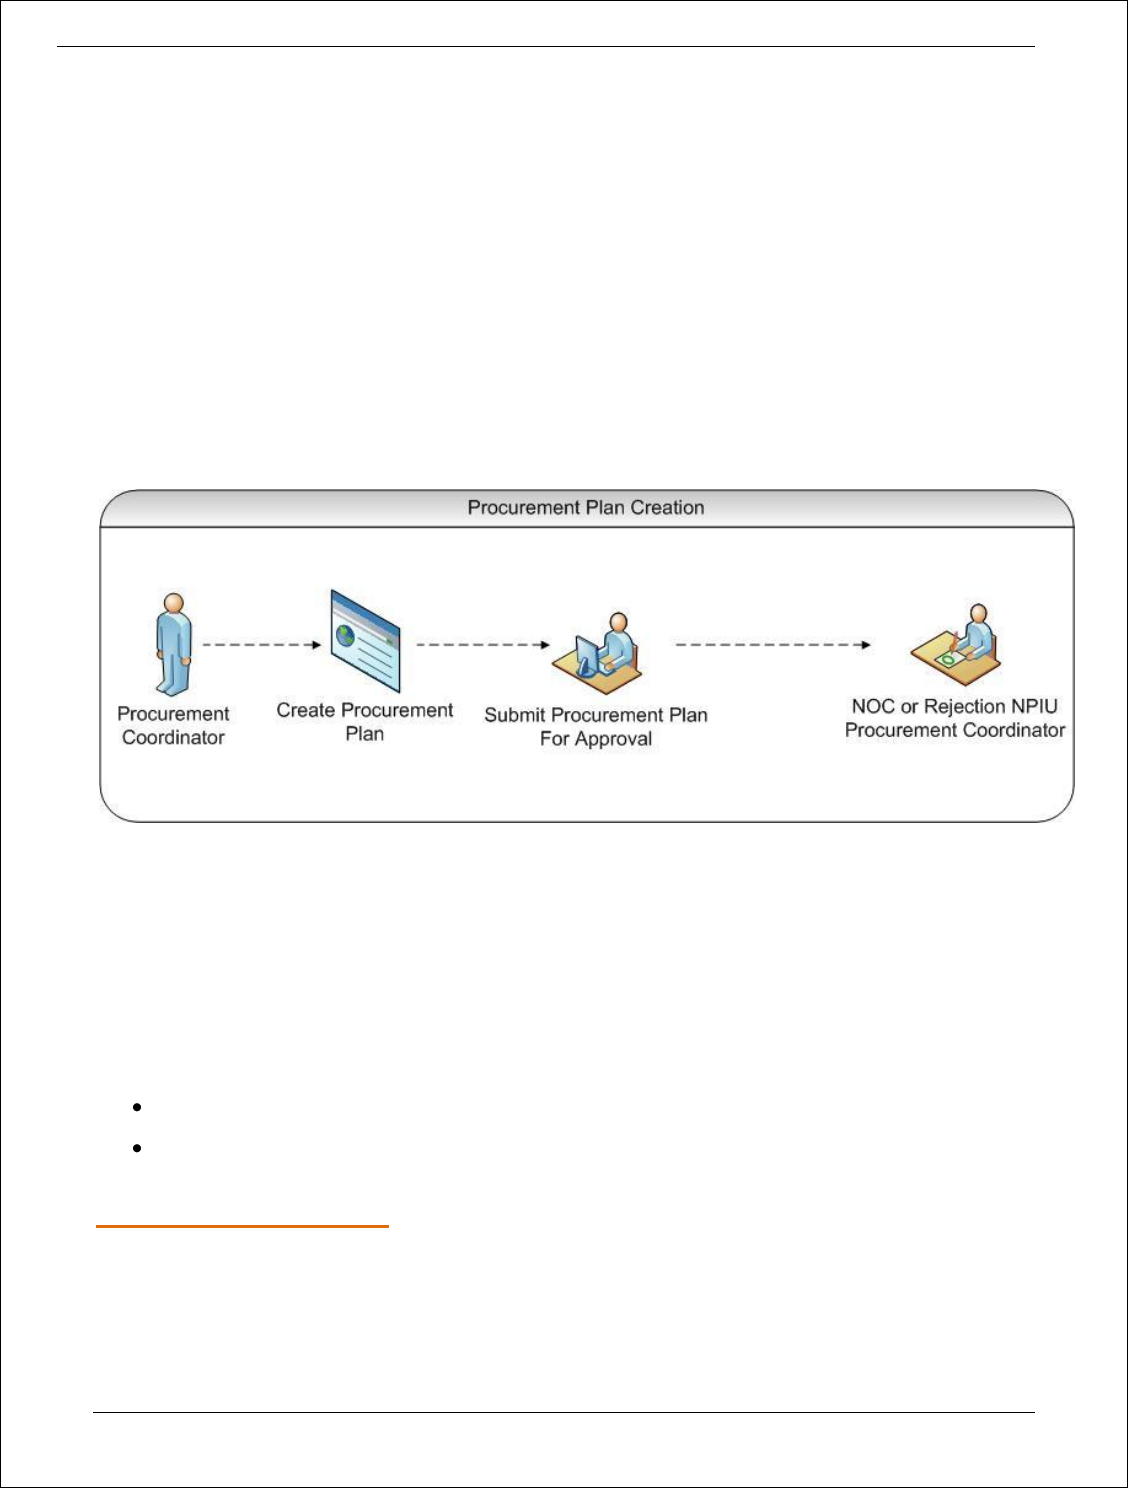
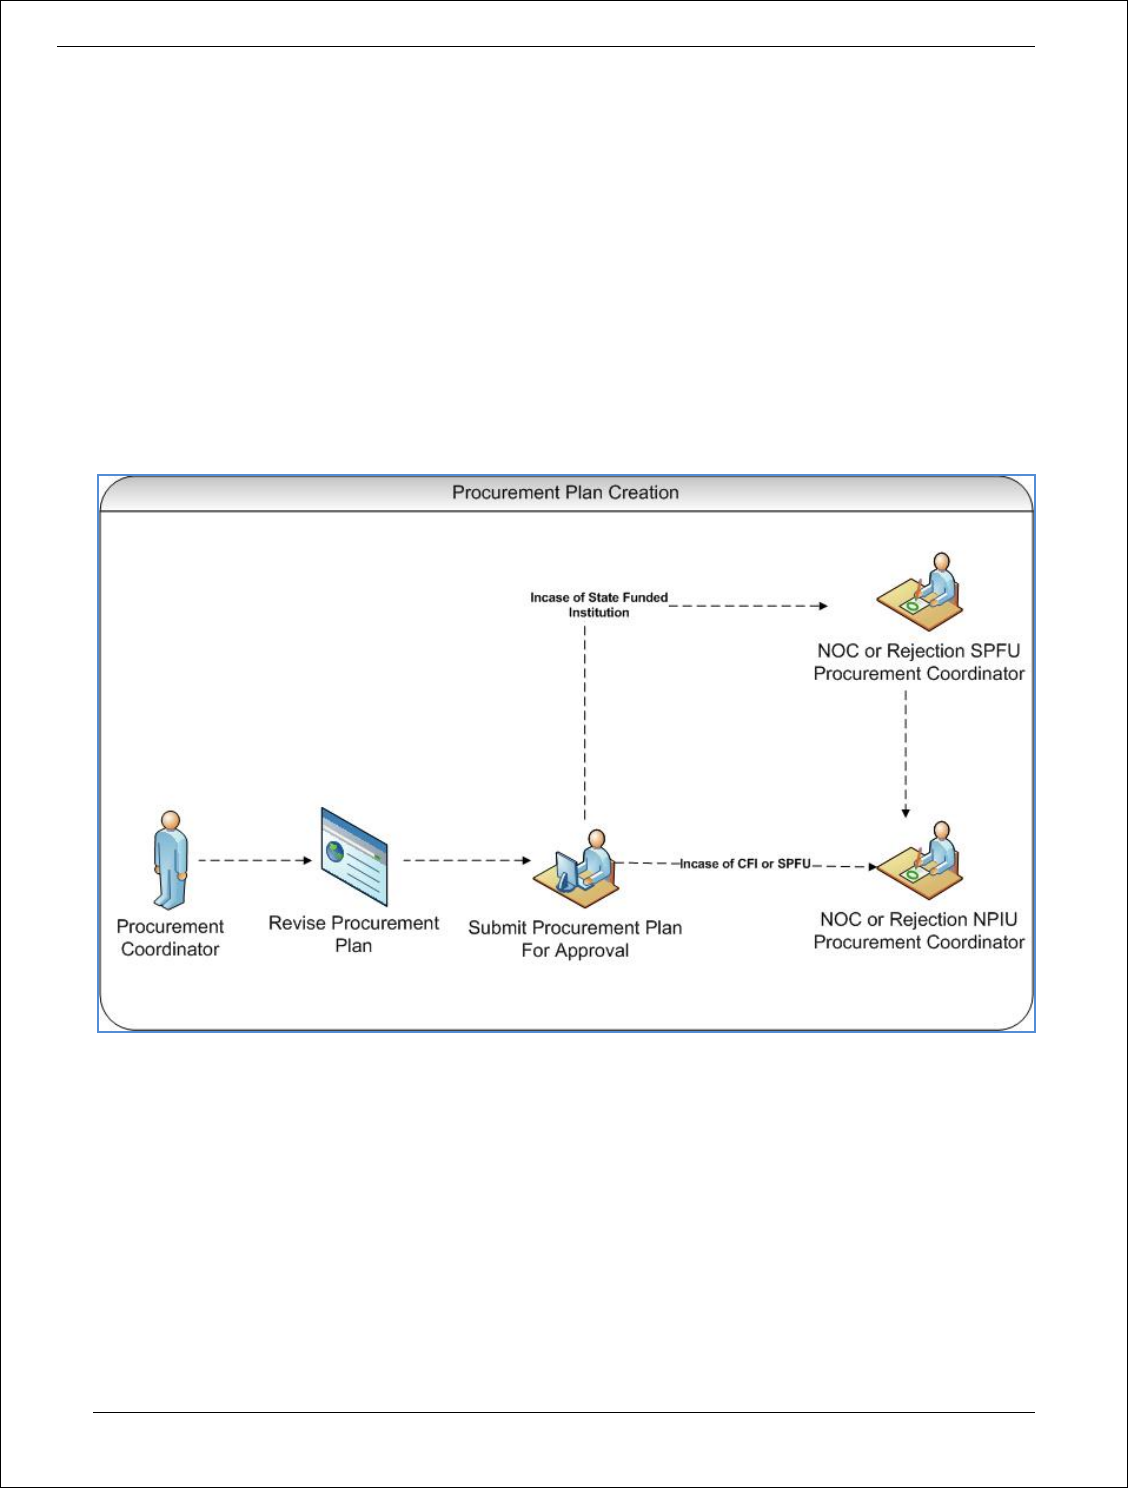
Process flow
Role(s)
o Procurement Coordinator (SPFU) – creates and submits the plan for approval
o Procurement Coordinator – NPIU’s procurement coordinator who approves the procurement
plans
Process Details
Planning process can be segregated in two parts
Procurement Plan Creation
Procurement Plan Approval
Procurement Plan Creation
Purpose
To create all the packages and services those are to be procured in the stipulated plan period.
Role(s)
Procurement Management Support System – PMSS v1.0 User Guide
14
Procurement Coordinator (SPFU)
Process Details
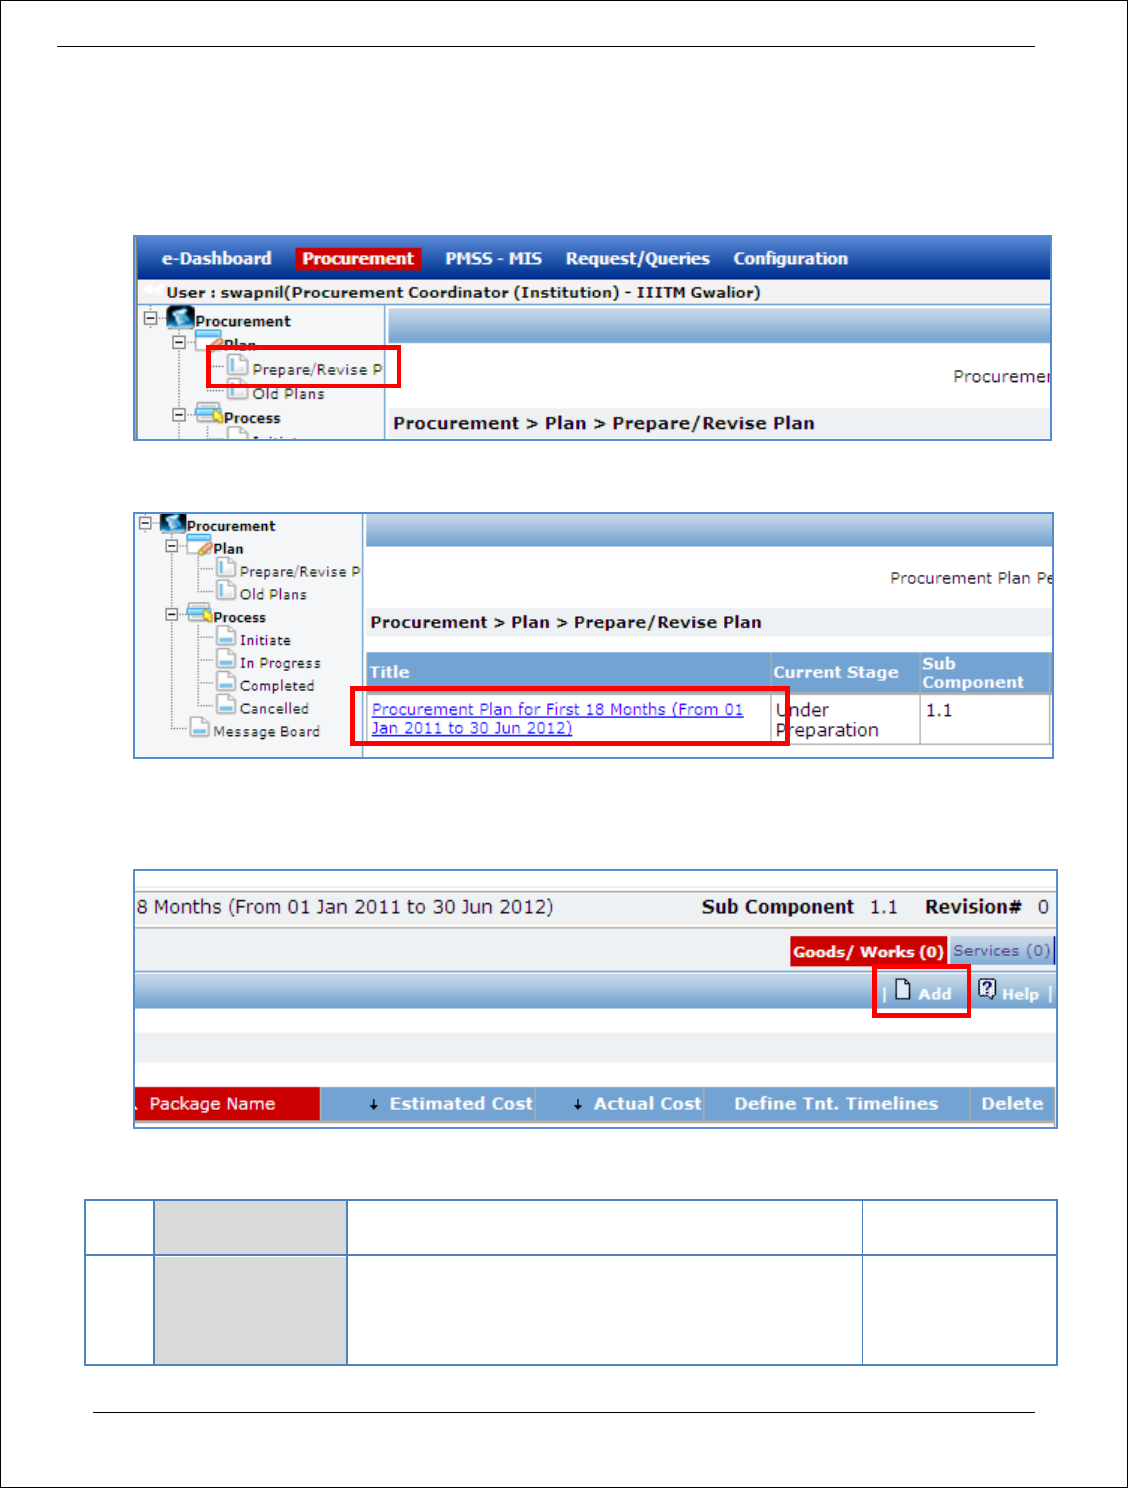
To create procurement plan, select option Procurement-> Plan-> Prepare/ Revise Plan
1. Click on the Procurement Plan Title, which is in the right section
2. To plan procurements of goods/ civil works; select the ‘Goods/ Civil Works’ tab and click on ‘Add’,
which is within the tab.
3. A popup will appear. Fill the fields on the page. Details of the fields are mentioned below;
Sr.
No.
Field Name
Field Description
Sample Data
1
Package Name
Enter Name of Package.
A package is group of items to be purchased together.
Items belonging to the same expenditure category
(Goods, Works or Services) should be grouped
Stationary Items

Procurement Management Support System – PMSS v1.0 User Guide
15
together.
Proprietary items should be added as separate
packages.
The system will refer to the package by this name. This
name will appear in bidding documents, purchase
order/contracts and any other document related to
procurement of this package.
2
Justification
Enter more information about the Package.
The description will be displayed and can be changed
at the time of actual procurement of the item.
This field is not mandatory.
This includes pens,
pencils and
computer printing
papers.
3
Category
Select Expenditure Category of the package – Goods or
Civil Works.
This is one of the important fields related to the
package. Please note that you cannot modify the
category after you save.
After you select the category, ‘Item Details’ section will
appear.
Goods
4
Sub Category
Select Expenditure Sub-Category.
This dropdown will be populated after you select the
category.
This is one of the important fields related to the
package.
Equipments
5
Sub Component
Select the sub component for this package
1.2
6
Activity
Mention the activity to which this package is related
Management
Capacity
Enhancement
7
Is Proprietary
This checkbox will be editable only for Category
“Goods” and Sub-Category “Equipments”.
Check the checkbox if the package is a proprietary
item.
This is one of the important fields related to the
package.
8
Through DGS & D
Check the checkbox if the package is going to be
procured through DGS & D.
9
EstimatedFinancial
Sanction Date
Enter date in DD/MM/YYYY format or select date using
calendar.
You cannot enter past Date.
Please enter date on which you should get financial
sanction for procurement of this package.
System will automatically calculate estimated timelines
for procurement of this package based on this date.
This is one of the important fields related to the
package.
12/02/2011
Procurement Management Support System – PMSS v1.0 User Guide
16
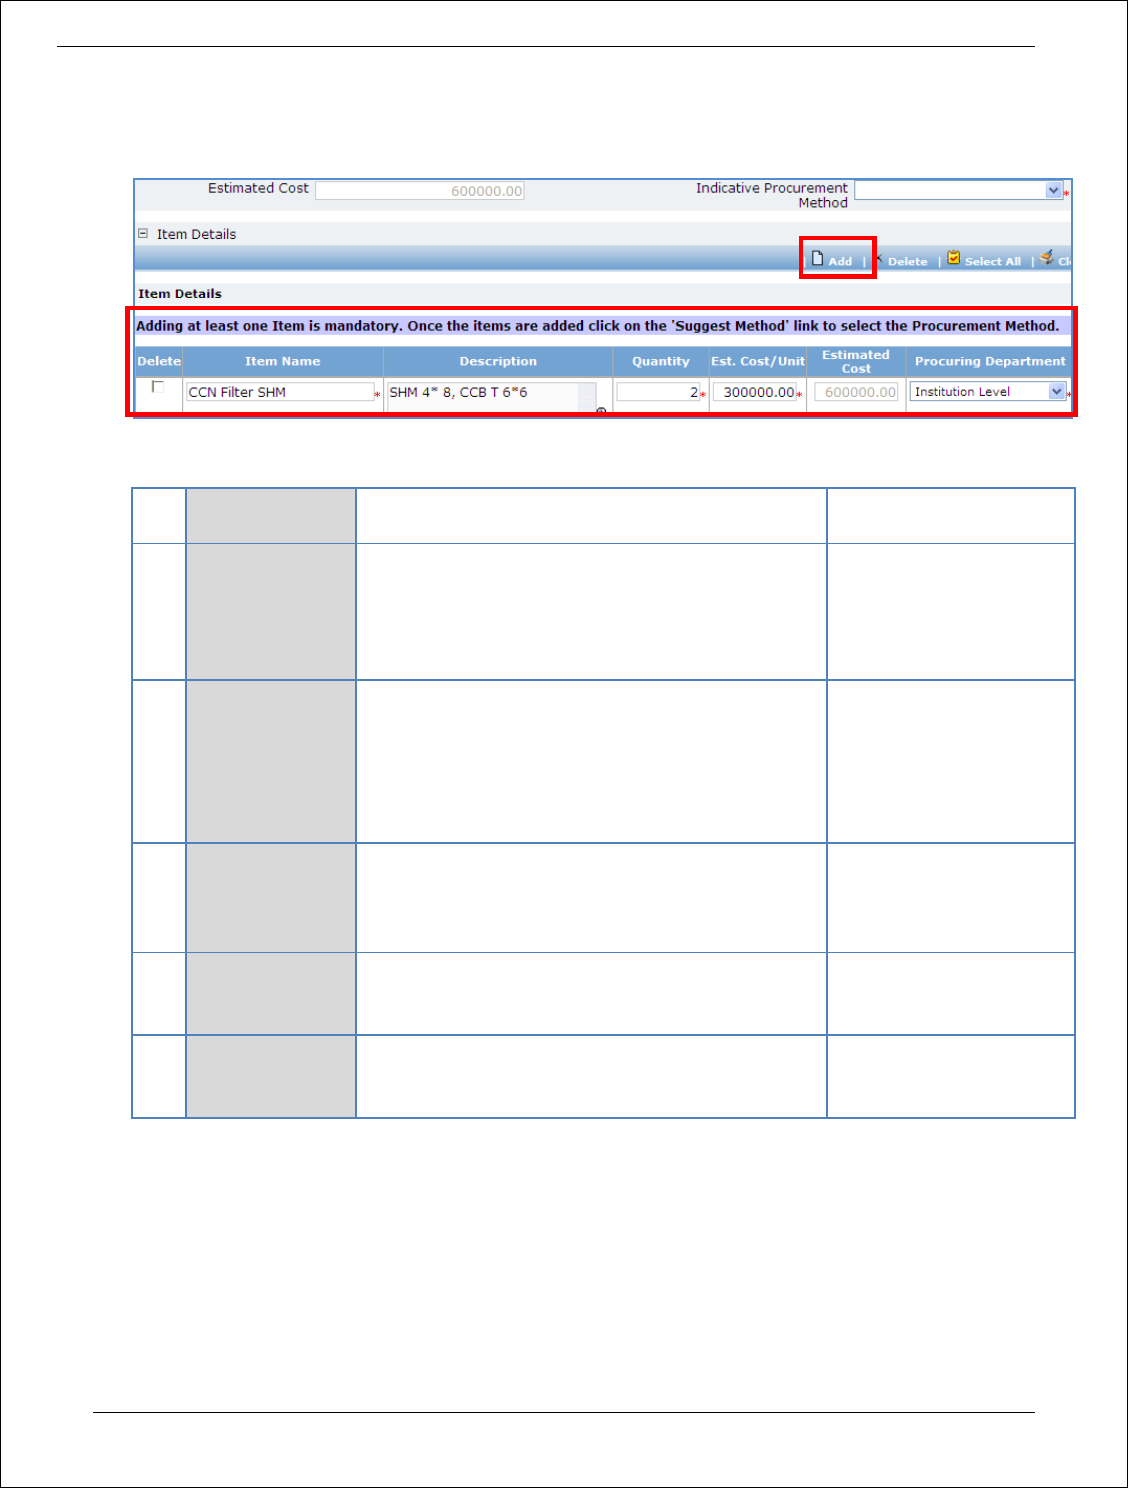
4. Adding at least one Item is mandatory. To add an Item click on the ‘Add’, which is in the ‘Item
Details’ section. A row will appear where the item details can be added.
5. Fill the fields on the page. Details of the fields are mentioned below;
Sr.
No.
Field Name
Field Description
Sample Data
1
Item Name
Enter Name of an individual Item
This name will appear in bidding documents,
purchase order/contracts and any other
document wherever list of individual items is
displayed.
Pencils
2
Justification
Enter more information about the item.
The description will be displayed in bidding
documents, purchase order/contracts and any
other document wherever list of individual items
appears.
This field is not mandatory.
HB Pencils
3
Quantity
Enter Quantity of the item to be procured.
This is one of the important fields related to the
item.
100
4
Est. Cost Per
Unit
Enter Estimated Cost Per Unit (.e. Rate) for the
item
200
5
Estimated Cost
This is a read-only field.
This will get auto-calculated by the system as
Quantity * Est. Cost Per Unit.
6. To add another item, repeat steps 4 and 5.
7. After adding the items, click on the ‘Suggest Methods’ link, which is in front of the
‘Indicative Procurement Method’ dropdown. This will populate the ‘Indicative Procurement
Method’ dropdown. The method(s) will be populated based on the ‘Total Estimated Cost’
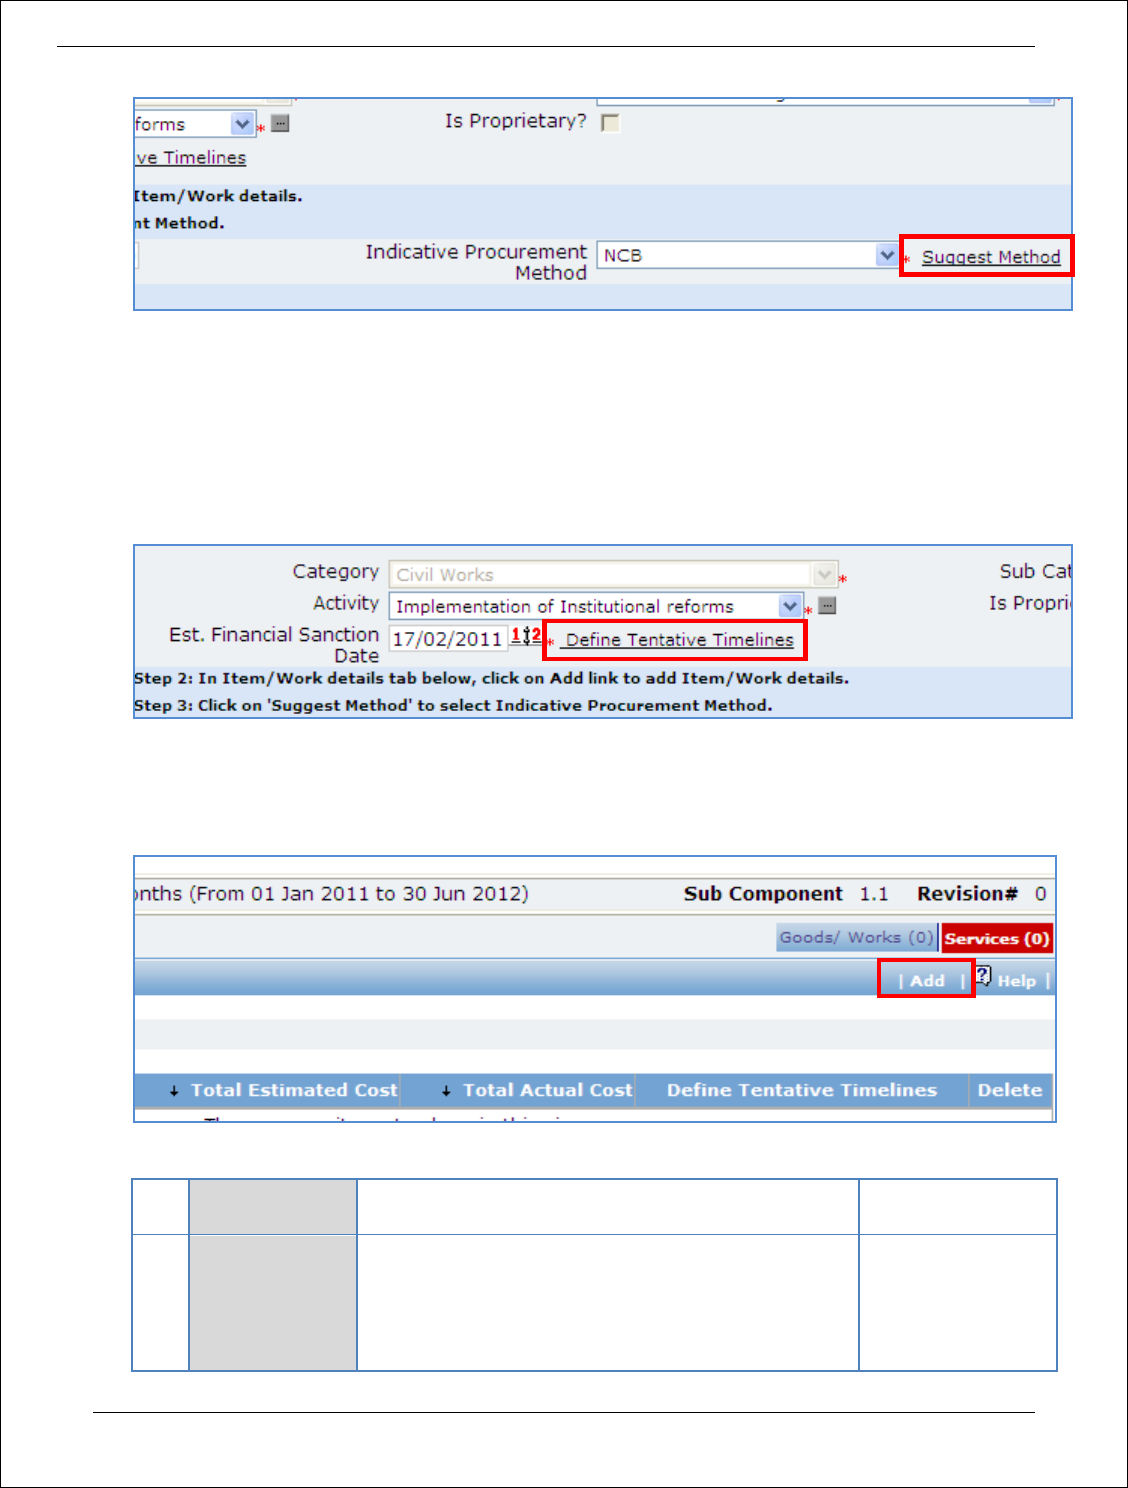
Procurement Management Support System – PMSS v1.0 User Guide
17
8. Select the appropriate method in the ‘Indicative Procurement Method’ dropdown.
9. Click ‘Save’
10. Once saved, ‘Define Tentative Timelines’ link will appear in front of Est. Financial Sanction date field.
The purpose of this link is to input the estimated dates of Bid Invitation, Bid Opening, etc for that
package.
11. Click on ‘Define Tentative Timelines’ link. A pop showing auto calculated dates will be seen. Edit
these dates, if required.
12. To plan procurements of services; select the ‘Services’ tab and click on ‘Add’, which is within the tab
13. A popup will appear. Fill the fields on the page. Details of the fields are mentioned below;
Sr.
No.
Field Name
Field Description
Sample Data
1
Service Name
Enter Name of Service to be procured.
The system will refer to the package by this name.
This name will appear in bidding documents,
contracts and any other document related to
procurement of this package.
Inventory System

Procurement Management Support System – PMSS v1.0 User Guide
18
2
Description
Enter more information about the Service to be
procured.
The description will be displayed and can be changed
at the time of actual procurement.
This field is not mandatory.
Service will include
development of
inventory
application.
3
Category
This lists only one entry “Services”. Select the item
from the list.
This is one of the important fields related to the
package.
Services
4
Sub-Category
Select Expenditure Sub-Category.
This dropdown will be populated after you select the
category.
This is one of the important fields related to the
package.
Professional
Services
5
Sub Component
Select the sub component for this package
1.2
5
Activity
Mention the activity to which this package is related
Management
Capacity
Enhancement
6
Service Provider
This dropdown lists two items – Firms and Individual
For Services which will be procured from Individual
Consultant, select “Individual” from the dropdown.
For Services which will be procured from Firms,
select “Firm” from the dropdown.
Firms
7
Total Estimated
Cost
Enter Total Estimated Cost of the service
100000
8
Indicative
Procurement
Method
After you enter Total Estimated Cost, System will
calculate Indicative Procurement Methods applicable
for the estimated cost and populate this dropdown.
Select appropriate Procurement method from the
list.
SSS
9
Estimated
Financial
Sanction Date
Enter date in DD/MM/YYYY format or select date
using calendar.
You cannot enter past Date.
Please enter date on which you are expected to get
internal financial sanction for procurement of this
package.
System will automatically calculate estimated
timelines for procurement of this package based on
this date. This is one of the important fields related
to the package.
12/02/2011
14. Click ‘Save’
15. To add another service repeat steps from 18 to 21.

Procurement Management Support System – PMSS v1.0 User Guide
19
16. ‘Define Tentative Timelines’ link can be seen on the list page.
17. Click on ‘Define Tentative Timelines’ link. A pop showing auto calculated dates will be seen. Edit
these dates, if required.
18. After adding all the packages and services to be procured click on ‘Submit Procurement Plan’, which
is on the upper bar in the right section.
19. Plan can be viewed as per the format given in the PIP. Click on PP View/ PP View Report, which is on
the upper bar in the right section and also available on the list page of the plan.
Procurement Plan Approval
Purpose
To send the procurement plan for review and approval.
Role(s)
o Procurement Coordinator (SPFU)
o Procurement Coordinator – NPIU’s procurement coordinator, approves the procurement plans
of SPFUs and institutions
Prerequisite
o Plan should be created completely.
o Plan should be within the allocated budget.
Process Details
Once the procurement plan is created it has to be sent for approval. SPFU plan will be sent to NPIU for
approval.
1. Click on ‘Submit Procurement Plan’, which is on the upper bar in the right section.

Procurement Management Support System – PMSS v1.0 User Guide
20
2. An email pop up will be seen, click on ‘Send’. This will send an email to the approving authority.
3. When the approving authority approves the plan email will be received by the SPFU users.
4. Once the plan is approved by the approving authorities the status of the plan will change to
‘Approved’, which can be seen in the Colum after the plan title in the right section.
5. To view the approving details click on the ‘Plan Status’ link this will show the approval stages and
comments.
6. If the plan is rejected then status of the plan will be ‘Under Clarification’. SPFU users will receive an
email notification accordingly.
7. If rejected, click on the plan title. Then click on the ‘Rejection Comments’ link, which is in the upper
bar in the right section and view the rejection comments.
8. Modify the plan as required and send the plan for approval again.

Procurement Management Support System – PMSS v1.0 User Guide
21
PLAN APPROVAL
Procurement Plan Approval
Chapter
3
Procurement Management Support System – PMSS v1.0 User Guide
22
Institution’s Plan Approval
Purpose
To review and approval institutions procurement plans.
Role(s)
o Procurement Coordinator (Institution) – Sends plan for approval
o Procurement Coordinator (SPFU) – Reviews and approves the plan
o Procurement Coordinator – NPIU’s procurement coordinator, reviews and approves the plan
Prerequisite
o Institution should belong to the SPFU
o Plan should be submitted by the institution
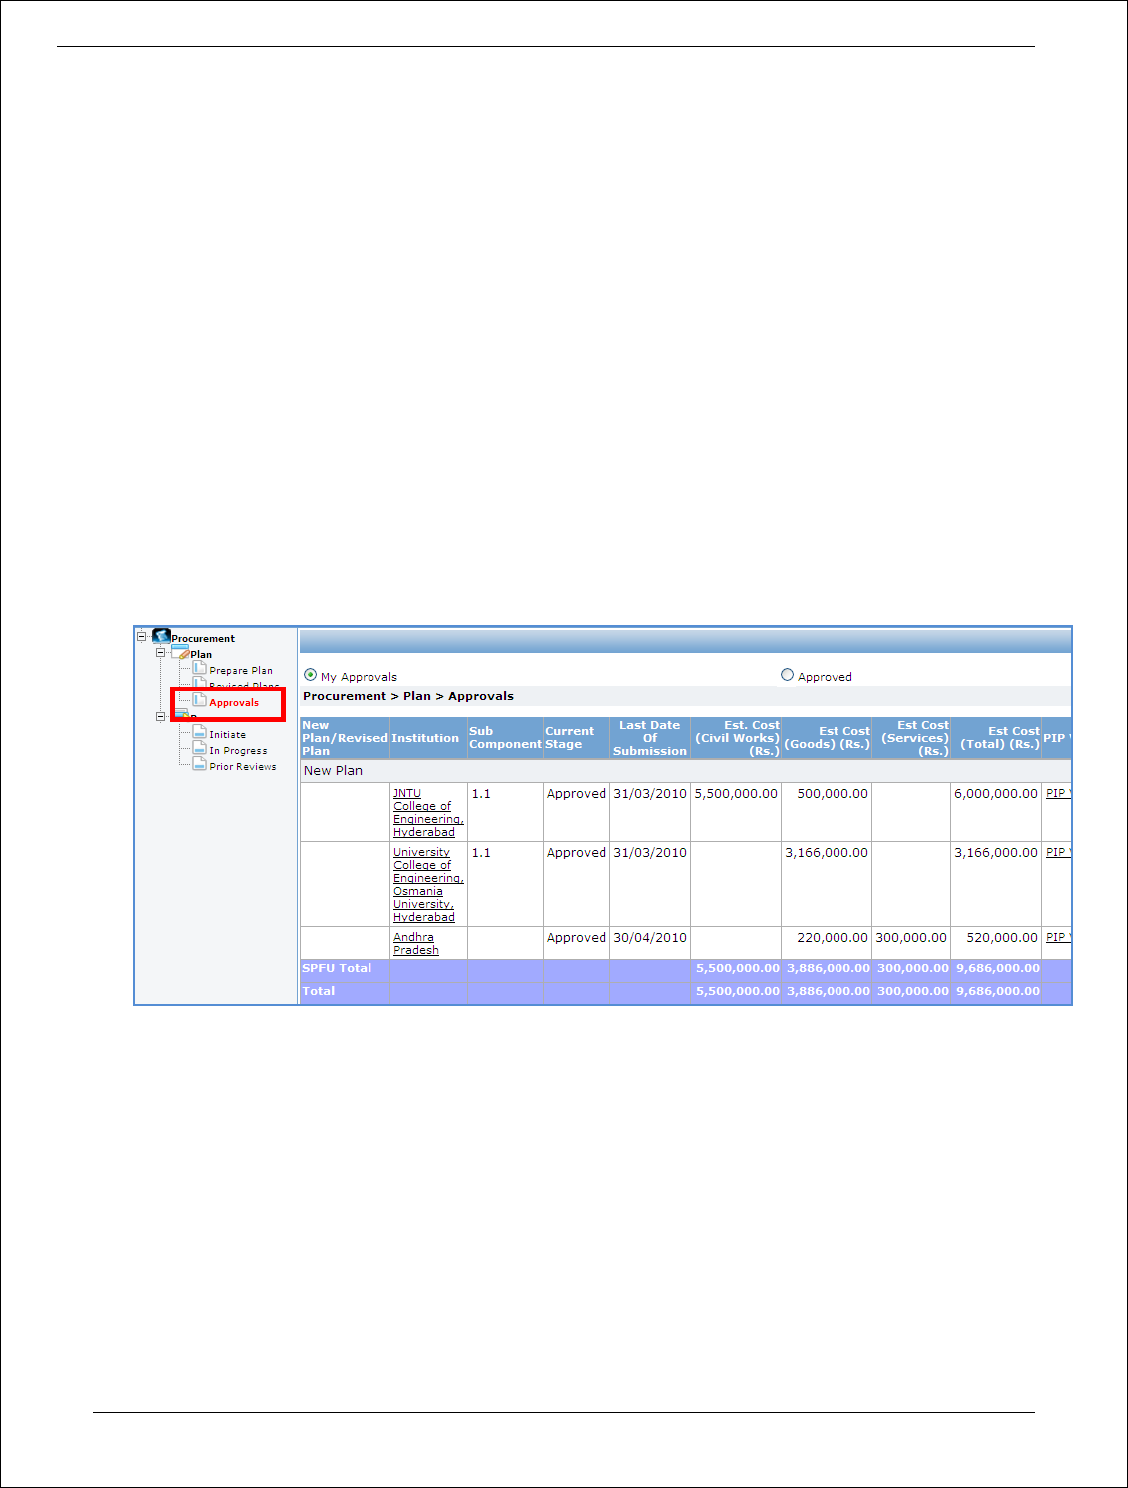
Process Details
1. Select option Procurement-> Plan-> Approvals
2. List of all the institutions along with its own plan can be seen by the SPFU
3. Click on the institution to see its detail procurement plan.
4. To approve the plan click on the ‘Send to NPIU’ link. To reject the plan click on ‘Send back to
Institution’ link.

Procurement Management Support System – PMSS v1.0 User Guide
23
5. Once the plan is approved it will go to NPIU for approval

Procurement Management Support System – PMSS v1.0 User Guide
24
PLAN REVISION
Procurement Plan Revision
Chapter
4
Procurement Management Support System – PMSS v1.0 User Guide
25
Plan Revision
Purpose
The purpose of the procurement plan revision is to make changes to existing packages/ services or to
add new packages/ services. Revised packages/ services can be initiated only when the revised
procurement plan has been approved.
Process flow
Role(s)
o Procurement Coordinator (SPFU)
o Procurement Coordinator – NPIU’s procurement coordinator, approves revisions
Prerequisite
o Procurement Plan should be approved at least once.
Procurement Management Support System – PMSS v1.0 User Guide
26
o Procurement budget should be available.
Process Details
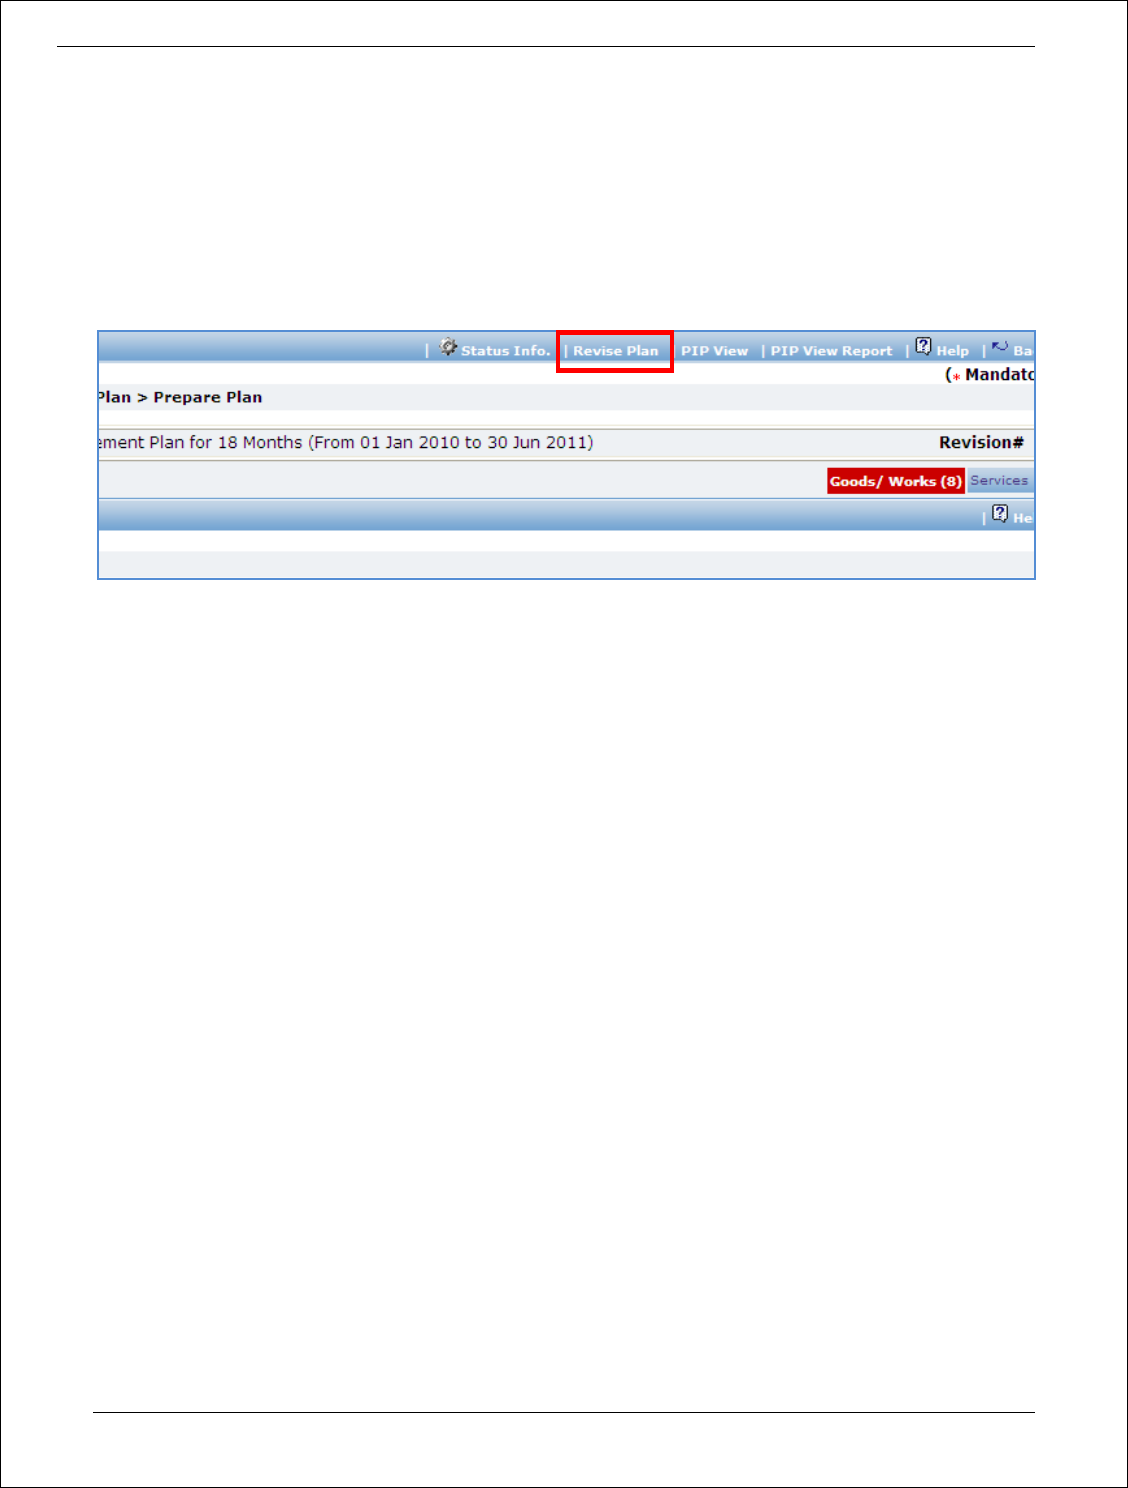
To revise the procurement plan select option Procurement-> Plan-> Prepare/ Revise Plan. Click on the
procurement plan title then click ‘Revise Plan’ link, which is on the upper bar of the right section.
1. Click on the package/ service that have to be revised.
2. Make the necessary changes to package/ service
3. Click ‘Save’
4. To make changes to another package/ service repeat steps 1 to 3.
5. New packages/ services can also be added by following steps of adding packages/ services, as
described in procurement plan creation section.
6. All the package / service, which have been revised, will be shown in a different colour.
7. To send the plan for revision approval click on ‘Submit Plan for Revision Approval’ link, which is on
the upper bar in the right pane.
Note: When a procurement plan is revised and sent for approval, procurements can still be
initiated for those package/ service which are not revised. However, the package/ service
which have been revised cannot be initiated until the procurement plan is approved.

Procurement Management Support System – PMSS v1.0 User Guide
27
PROCUREMENTS
Procurements Process
Chapter
5
Procurement Management Support System – PMSS v1.0 User Guide
28
Procurement Process
Purpose
To perform the procurement of the approved packages/ services.
Role(s)
o Procurement Coordinator (SPFU) – Performs procurement process for SFPU procurements.
Performs Prior reviews of insititution procurements, when applicable.
o Procurement Coordinator – NPIU’s procurement coordinator, Performs Prior review, when
applicable.
Prerequisite
o Procurement plan should be approved
Process Details
Process node is divided into;
Initiation
In Progress
Completed
Cancelled
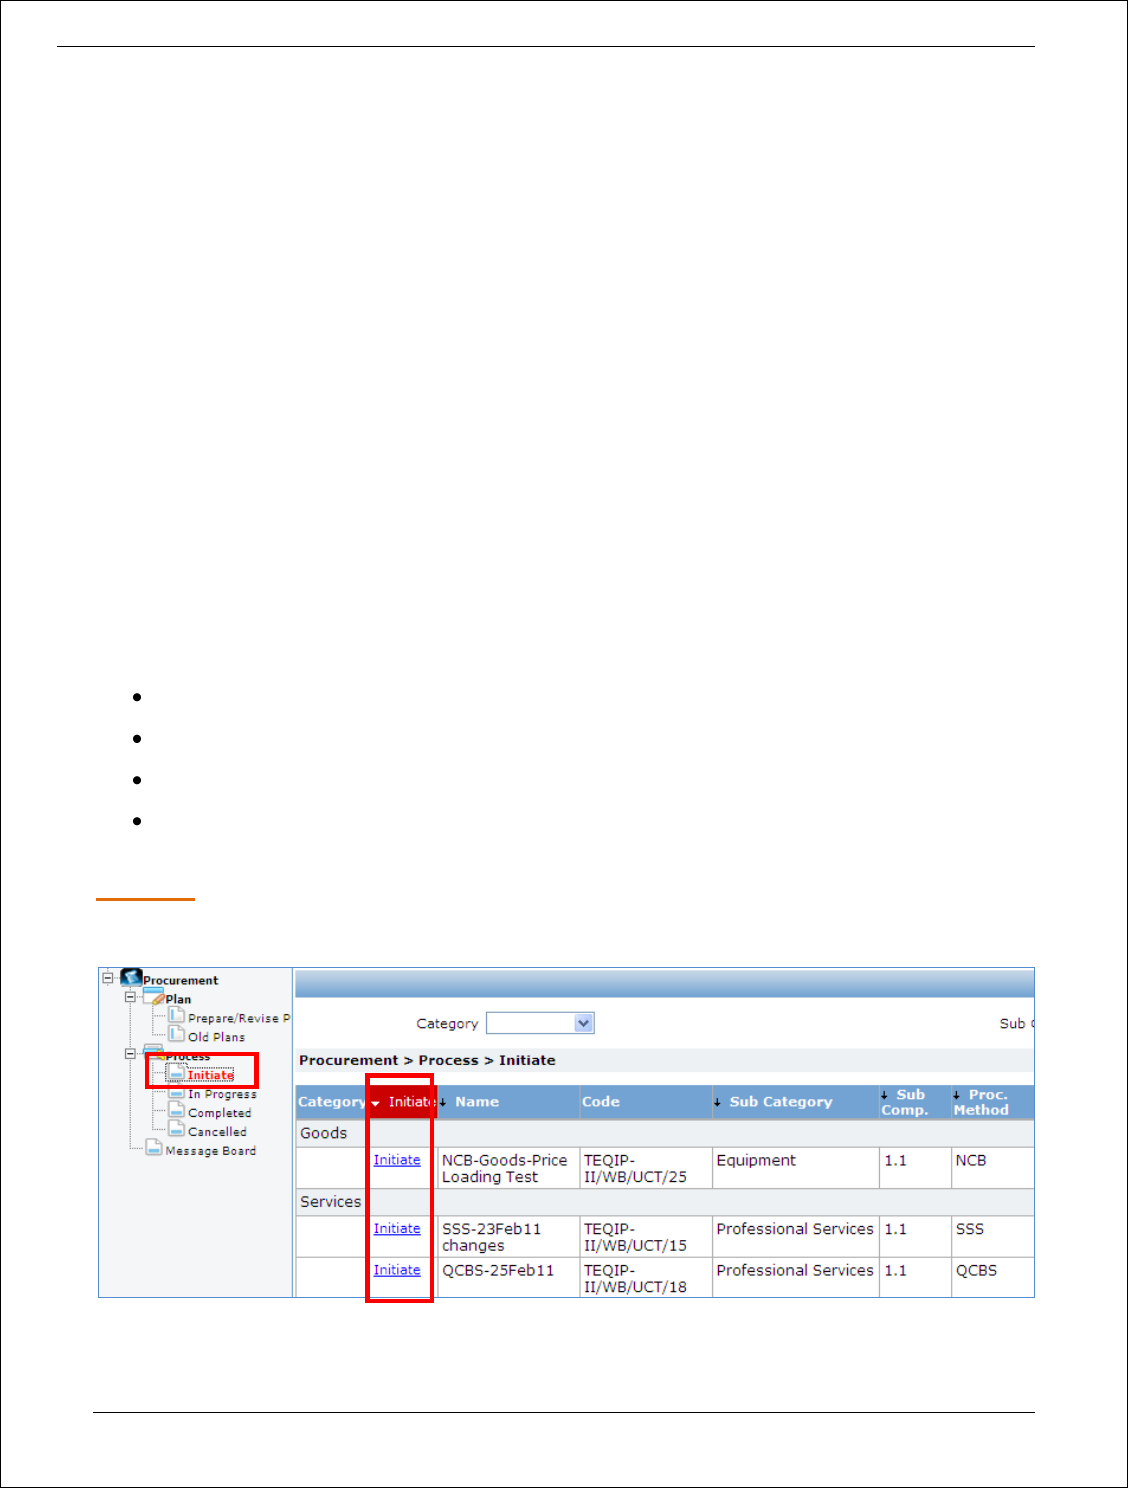
Initiation
Approved packages/ services are listed under Procurement-> Process-> Initiate
1. Click on ‘Initiate’ link, which is in the right section. This will initiate the procurement.
2. Fill the fields on the page
Procurement Management Support System – PMSS v1.0 User Guide
29
Sr.
No.
Field Name
Field Description
Sample Data
1
Actual Financial
Sanction Date
Enter the date in DD/MM/YYYY format. This date is
the date on which procurement was sanctioned
internally.
12/03/2011
3. Click ‘Save’
4. ‘Revise Timelines’ link will appear in front of the ‘Actual Financial Sanction’ date field, click on the
link will show a pop up. Dates in this popup will be auto populated based on the Procurement
Method and Initiation date. Edit the dates, if required.
5. Click on ‘Click here to Proceed’ link this will display the Guidelines for the select method.
6. Click on ‘Click to start Procurement Process’ this will initiate the procurement and the package/
service will move to in progress.
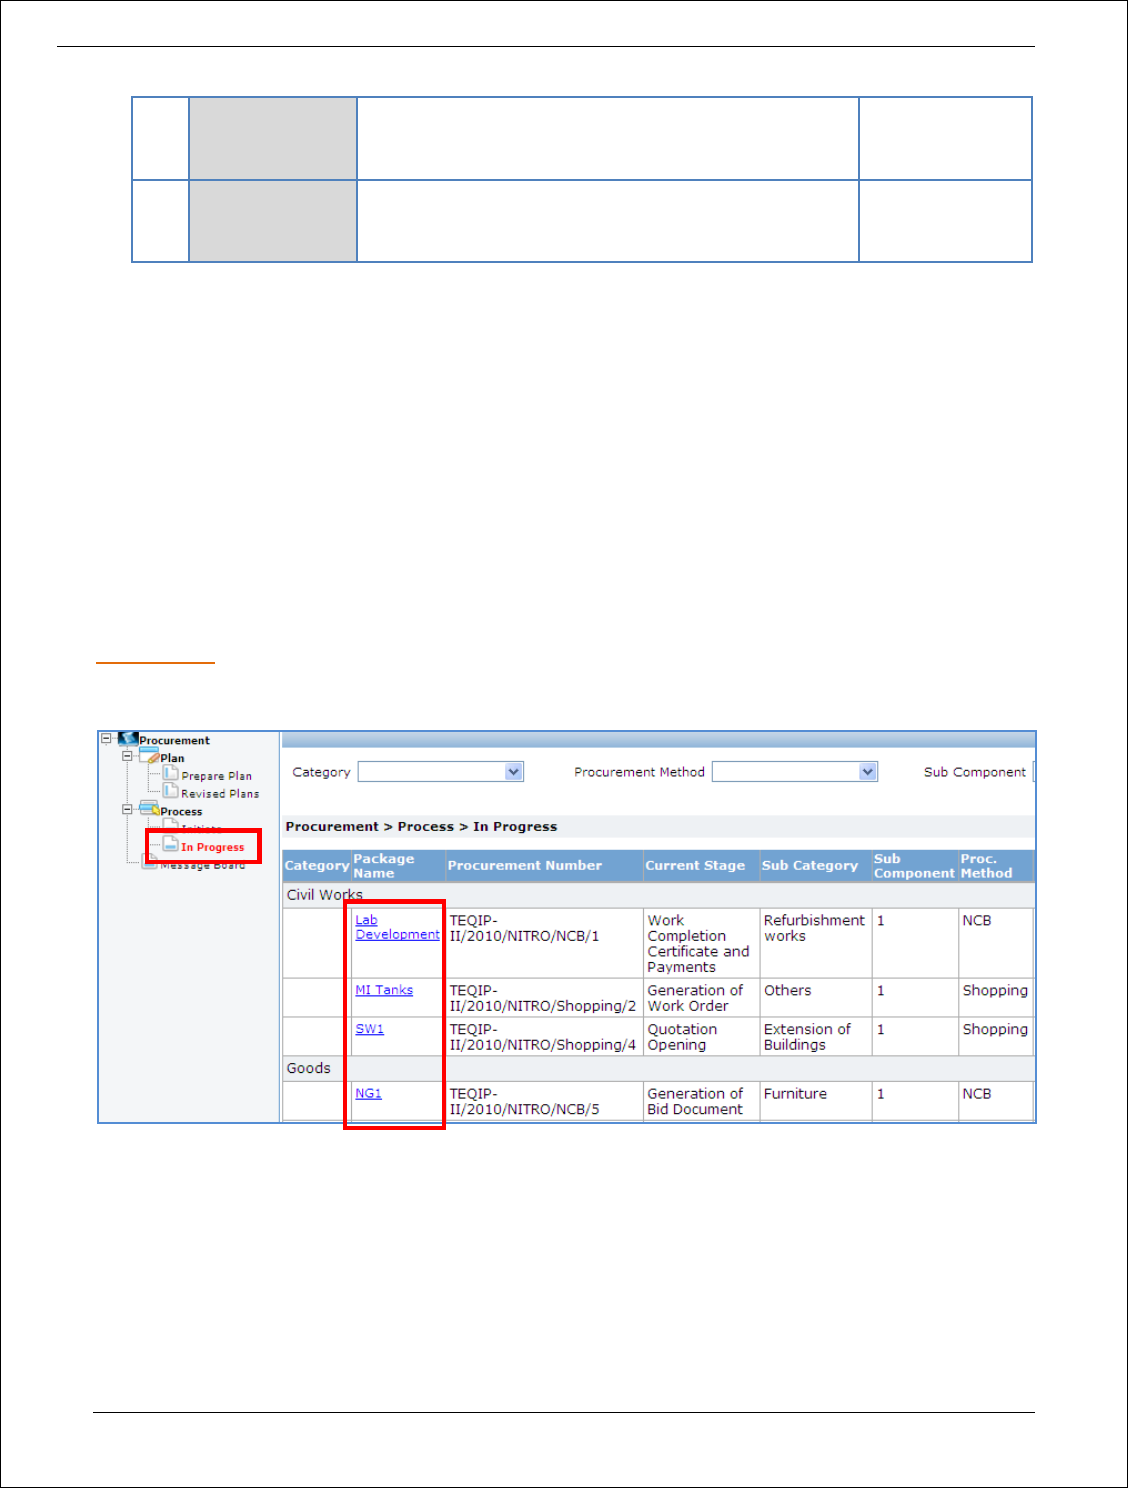
In Progress
Initiated procurements are listed under the option Procurement-> Process-> In Progress
1. Click on the Package/ Service Name, which is in the right section. This will open the procurement in
its current stage.
2. Perform the action required for this stage and Click on ‘Move to Next Stage’. Now, Perform the
action required for this stage and click on ‘Move to Next Stage’ and so on. (Details on performing
each stage are described in detail in Chapters 6 to 11).

Procurement Management Support System – PMSS v1.0 User Guide
30
3. Thus procurement processes for the package/ service can be completed by performing all the
required stages (steps).
Note: All the stages (steps) for each procurement method are described in Chapters 6 to 11.
Completed
Completed procurements are listed under the option Procurement-> Process-> Completed
1. Click on the Package/ Service Name, which is in the right section.
2. To view details of the package/ service, click on the respective stage, steps or subtabs.
3. To view documents attached to the package/ service see the documents subtab.
Cancelled
Cancelled procurements are listed under the option Procurement-> Process-> Cancelled
1. Click on the Package/ Service Name, which is in the right section.
2. To view details of the package/ service, click on the respective stage, steps or subtabs.
3. To view documents attached to the package/ service see the documents subtab.

Procurement Management Support System – PMSS v1.0 User Guide
31
SHOPPING METHOD
Procurement Using Shopping/ Direct Contracting Method
Chapter
6

Procurement Management Support System – PMSS v1.0 User Guide
32
Shopping Goods
Purpose
To perform procurement of goods using shopping method.
Process flow
Role(s)
o Procurement Coordinator (SPFU)
Prerequisite
o Package to be procured should fall under category goods.
o Value of the package should be <=USD 20,000
Process Details
First stage of Shopping is ‘Invitation Letter’.
Invitation Letter
In this stage suppliers are added. Invitation letters are generated & sent out to these suppliers.
Procurement Management Support System – PMSS v1.0 User Guide
33
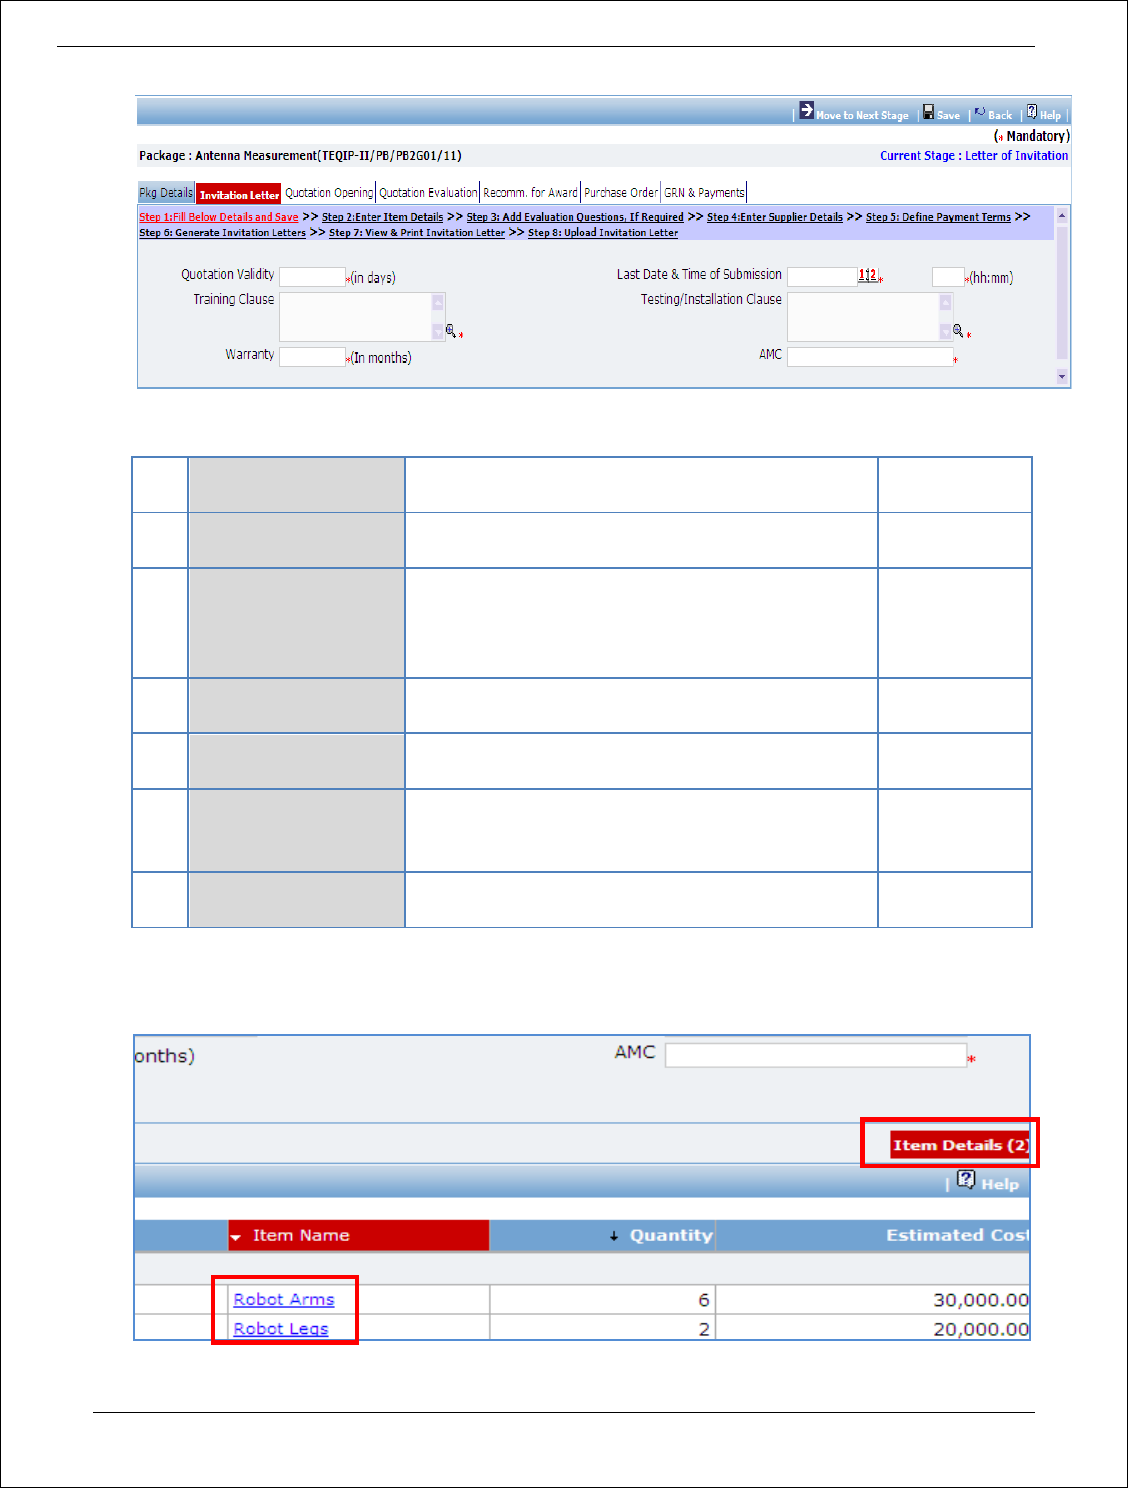
1. Fill the fields on the page. Details of the fields are mentioned below;
Sr.
No.
Field Name
Field Description
Sample Data
1
Quotation Validity
Enter the number of days for which Quotation is
required to be Validity.
15
2
Last Date & Time of
Submission
Enter the date and time by which quotation
should be submitted. Date format is
DD/MM/YYYY and time format is HH:MM, 24 hrs
format.
12/03/2011
16:00
3
Training Clause
Enter the training requirement, if any. Else enter
NA.
4
Testing/Installation
Clause
Enter the testing/installation requirement, if any.
Else enter NA.
5
Warranty
Enter the warranty period in months. It should not
be less than 6 months. In-case of no warranty
enter NA.
6
AMC
Mention whether AMC is applicable Yes/ No or
enter the AMC amount.
2. Click ‘Save’
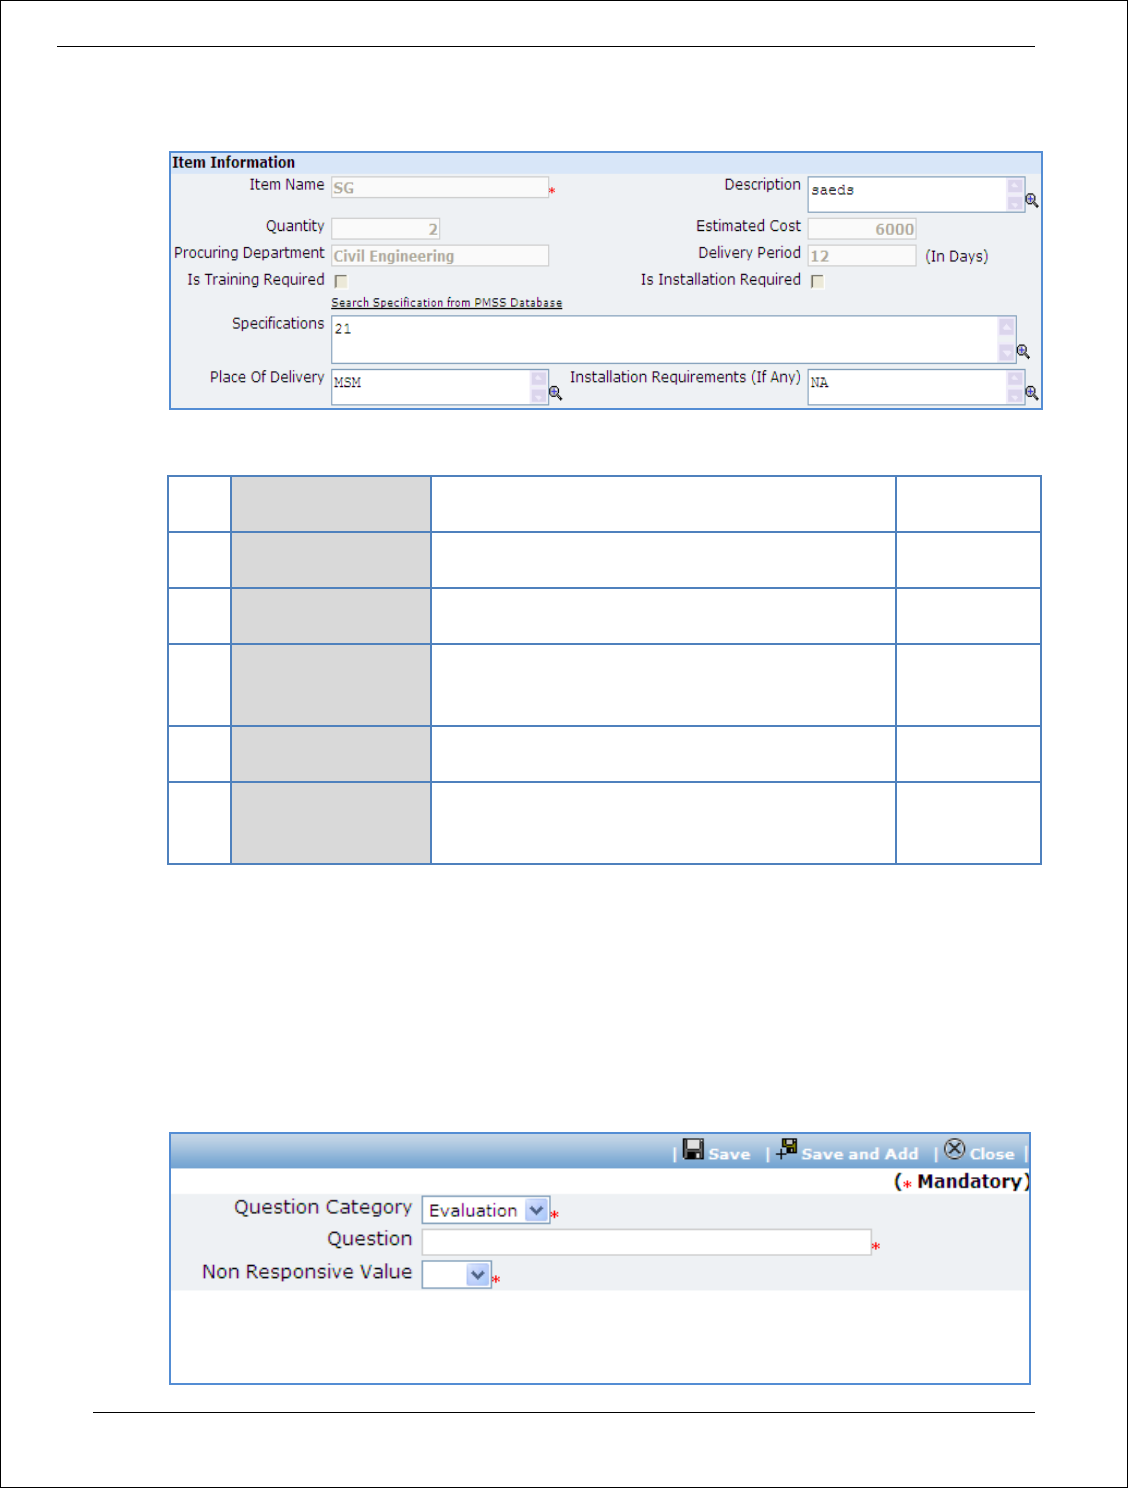
3. Click on ‘Step 2: Enter Item Details’ link. ‘Items’ subtab is shown in the lower section.
Procurement Management Support System – PMSS v1.0 User Guide
34
a. Click ‘Item Name’, a pop up will be seen.
b. Fill the fields on the page. Details of the fields are mentioned below;
Sr.
No.
Field Name
Field Description
Sample Data
1
Is Training Required
Check this option if training is required for the
selected item
2
Is Installation
Required
Check this option if installation is required for the
selected item
3
Specifications
Enter the item specification. Click on ‘Search
Specification from PMSS Database’ link to get
specifications from other items.
4
Place Of Delivery
Mention the place of delivery where the selected
item is required to be delivered
5
Installation
Requirements (If
Any)
Mention the installation requirement details for
the selected item, if any
c. Click ‘Save’
d. If there is more than one item, repeat steps from a. to c.
4. Click on ‘Step 3: Add Evaluation Questions, If Required’ link (this is an optional step, to be
performed only if additional evaluation question are required). ‘Questions’ subtab is shown in the
lower section.
a. Click ‘Add’, which is within the subtab. A pop up will be seen
Procurement Management Support System – PMSS v1.0 User Guide
35
b. Fill the fields on the page. Details of the fields are mentioned below;
Sr.
No.
Field Name
Field Description
Sample Data
1
Question
Enter the description of the question
to be asked during quotation
evaluation. Form the question such
that response (answer) is Yes/ No/ NA.
Does the supplier have a
local service center?
2
Non Responsive
Value
Select the value (Yes/ No/ NA) based
on which the supplier will become
non- responsive.
E.g. if the question is
‘Does the Contractor have
a local service center?’
then the non- responsive
value could be ‘No’.
c. Click ‘Save’.
d. To add another Question repeat steps from a. to c.
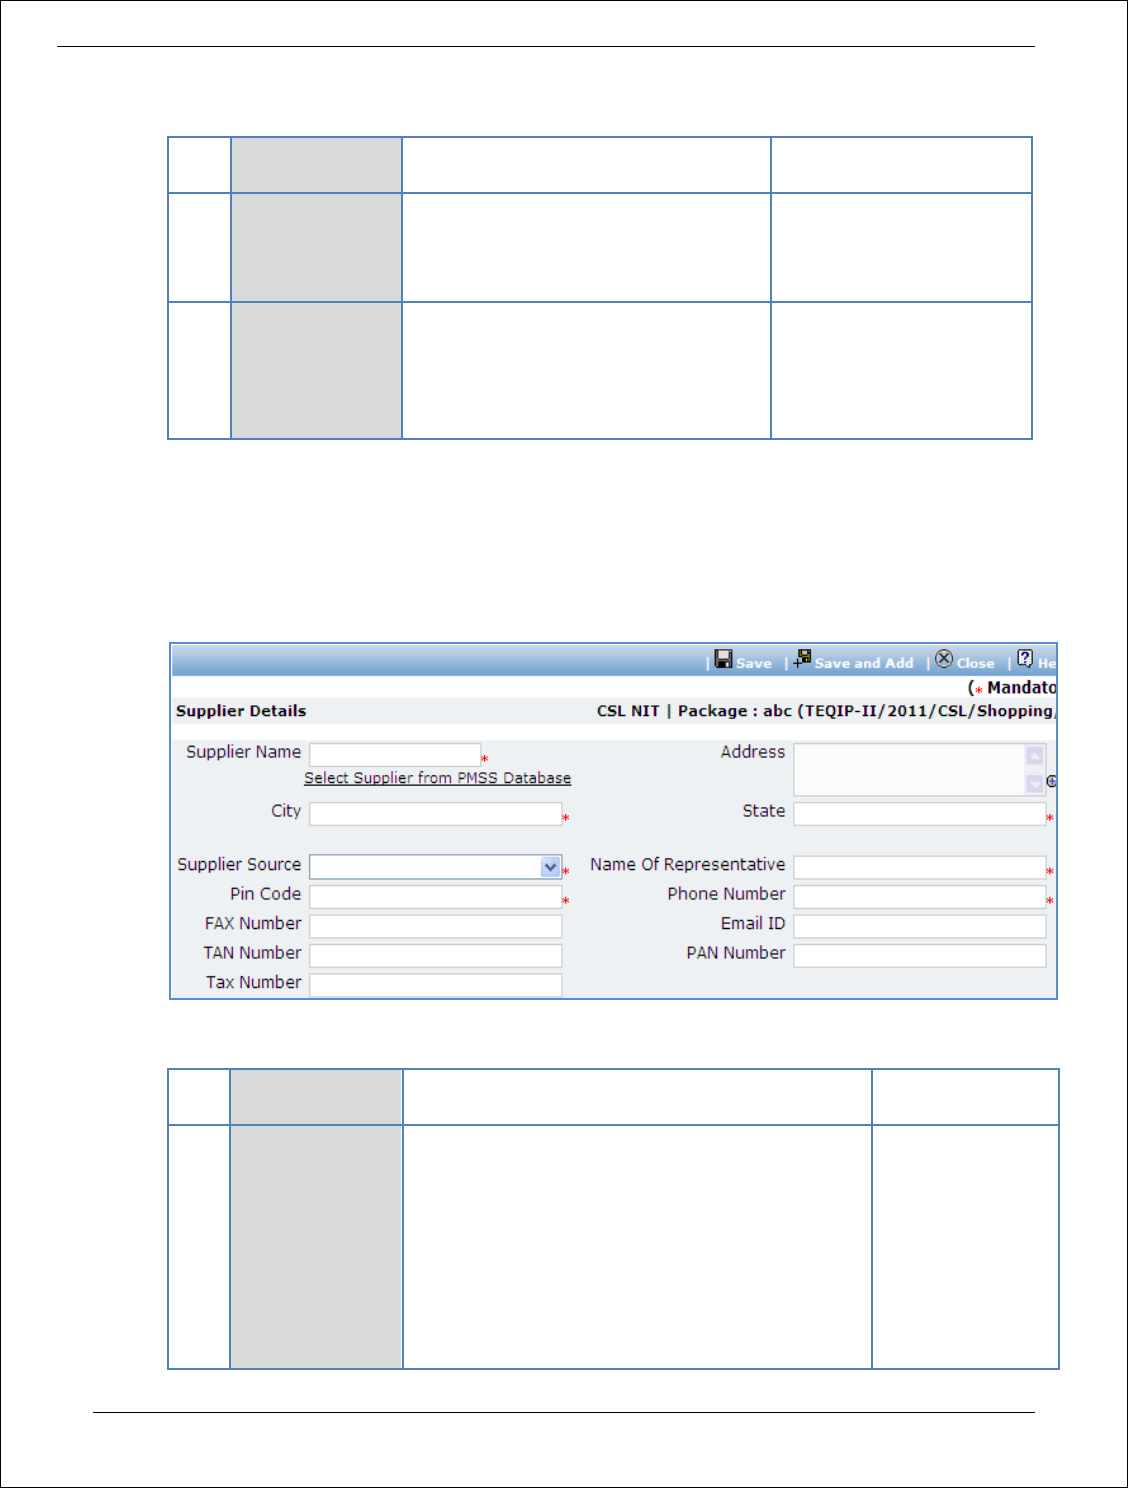
5. Click on ‘Step 4: Enter Supplier Details’ link. Supplier Details subtab is shown in the lower section.
a. Click ‘Add’, which is within the subtab. A pop up will be seen
b. Fill the fields on the page. Details of the fields are mentioned below;
Sr.
No.
Field Name
Field Description
Sample Data
1
Supplier Name
Enter the supplier name.
Supplier can also be searched using ‘Select
Supplier from PMSS Database’ link. Click on this
link will display the existing list of suppliers, if
any. Once the list is displayed click on the
supplier’s name this will auto populated the
selected supplier’s data. To search additional
suppliers within the state or city use the filters
provided on the page
FTTI Pvt Ltd
Procurement Management Support System – PMSS v1.0 User Guide
36
2
Address
Enter the address of the Supplier
STI Towers,
Unit# 141/38,
Campus 29. RMZ
Millenia Business
Park.
881, Dr. MGR
Road
3
City
Enter the city of the Supplier
Pune
4
State
Enter the state of the Supplier
Maharashtra
5
Supplier Source
Select the source of supplier i.e. the source from
which the supplier was found
Website
6
Specify Source
Only if ‘Supplier Source’ is ‘Others’ then type the
source
Pamphlets
7
Email ID
Enter the Email ID of the Supplier
ftti@efttil.com
8
Pin Code
Enter the Pin Code of the Supplier
411232
9
Name Of
Representative
Enter the Representative of the Supplier
Mr. Mohan
Solanki
10
Phone Number
Enter the Phone Number of the Supplier.
To enter more than one number use comma (,) as
a separator.
26422689
11
PAN Number
Enter the PAN Number of the Supplier
ANS44874
12
TAN Number
Enter the TAN Number of the Supplier
13
Tax Number
Enter the TAX Number of the Supplier
c. Click ‘Save’
d. To add another Supplier repeat steps from a. to c.
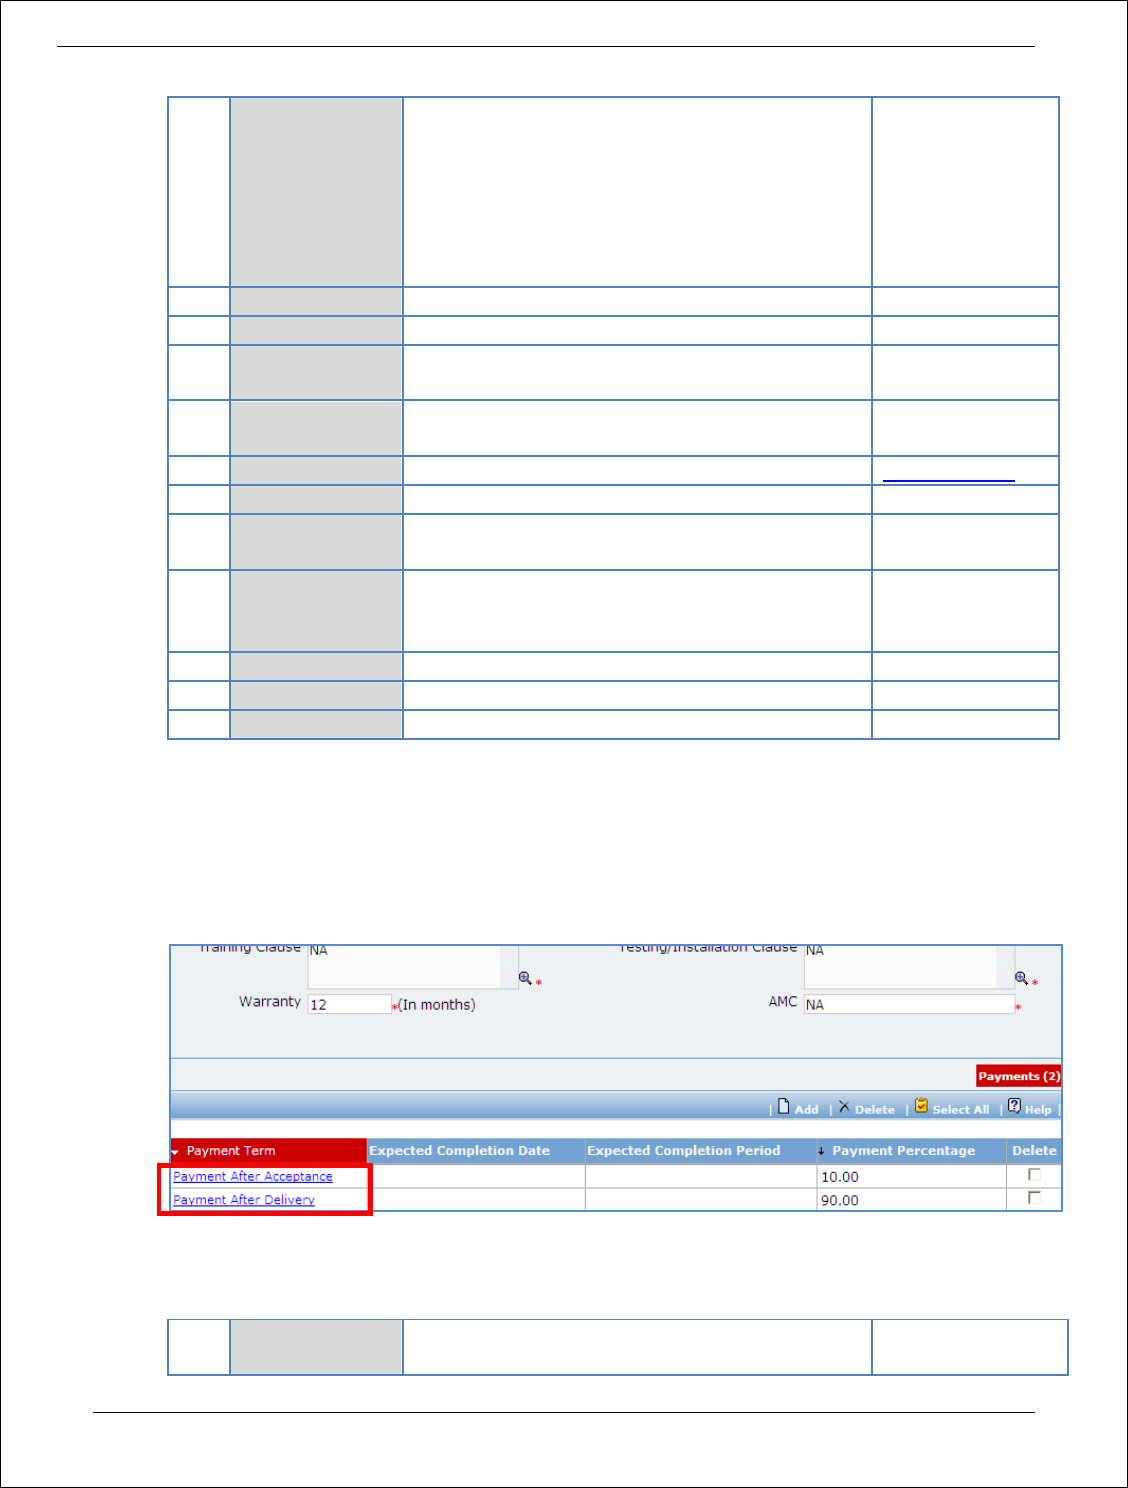
6. Click on ‘Step 5: Define Payment Terms’ link. ‘Payments’ subtab is shown in the lower section.
a. By default two Payment Terms are shown
b. Click on the Payment Term a pop up will be seen
c. Fill the fields on the page. Details of the fields are mentioned below;
Sr.
No.
Field Name
Field Description
Sample Data
Procurement Management Support System – PMSS v1.0 User Guide
37
1
Expected
Delivery Period
Mention the period in which this delivery is
expected once the contract is signed.
30
2
Payment
Percentage
By default percentage will be show, edit the
percentage if required
10
d. Click ‘Save’
e. Update the second payment term by repeating steps b. to d.
7. You can also add new payment terms, if required. Total of payment percentage of the payment
terms should be 100.
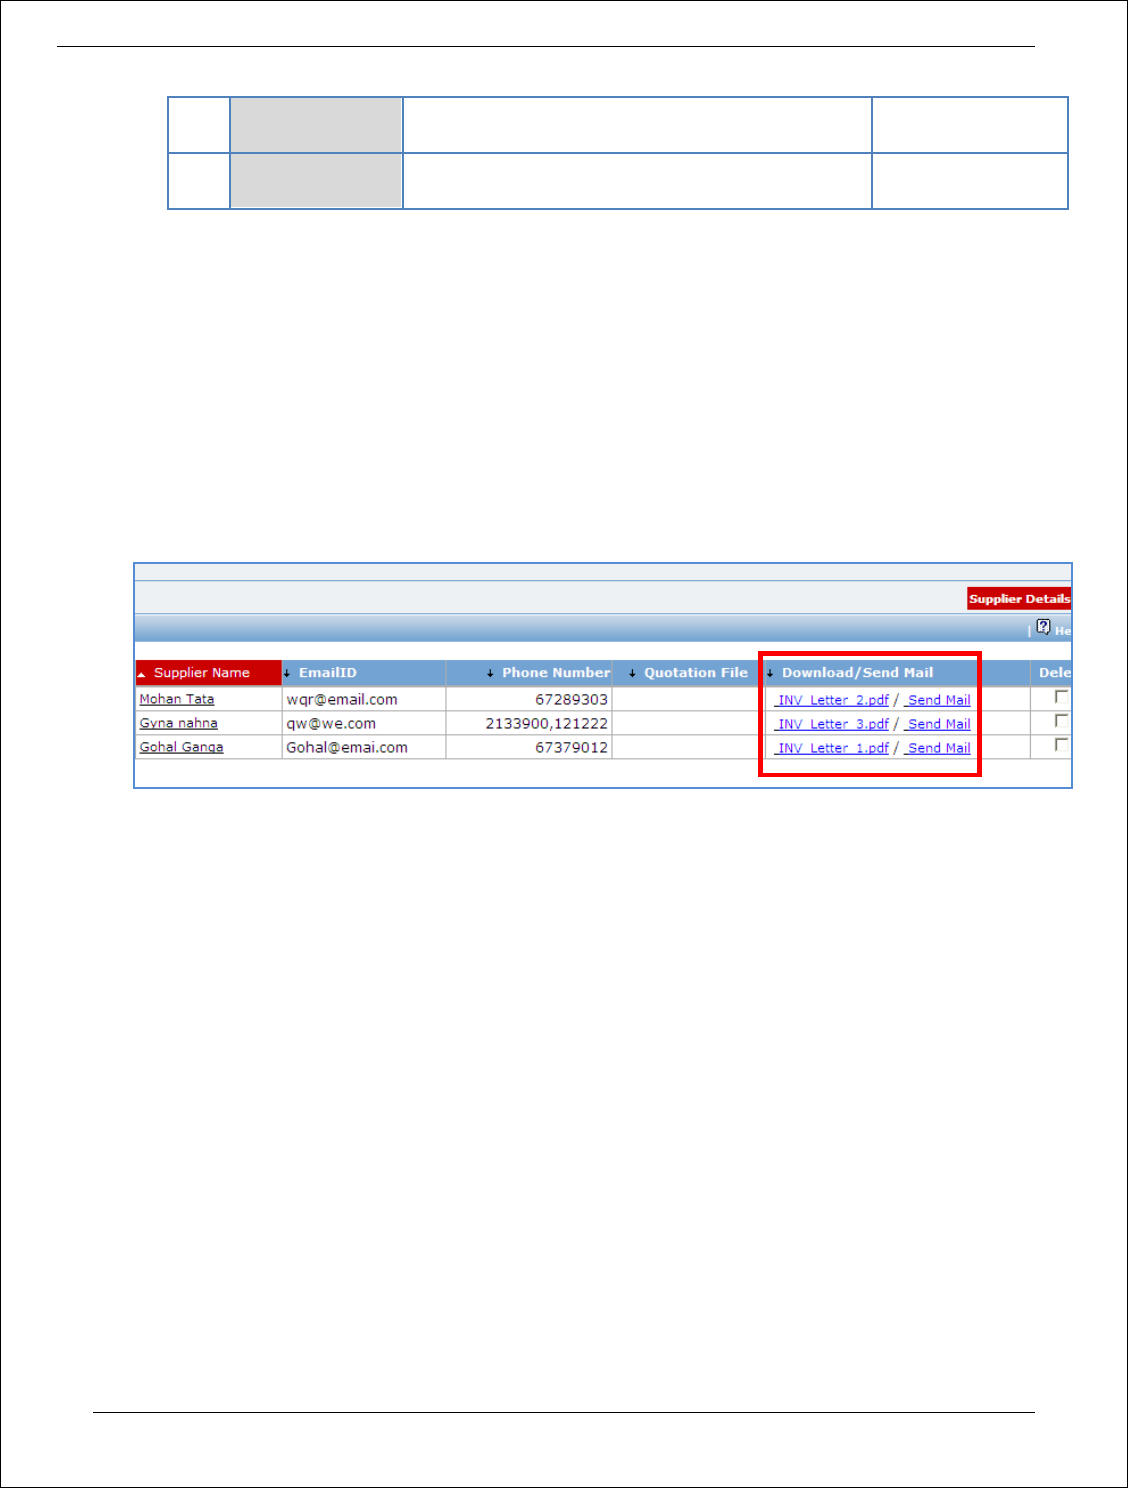
8. After filling mandatory data, click on ‘Step 6: Generate Invitation Letters’ link. This will generate the
invitation letters for the added suppliers.
9. Click on ‘Step 7: View & Print Invitation Letter’. ‘Supplier Details’ subtab is shown in the lower
section
a. Click on the Invitation letter to view/ print the invitation letter.
b. Click on Send Mail to send the invitation letter via email
c. Repeat above steps for all suppliers.
10. All the invitations letters generated are editable and necessary changes can be made to the
invitation letters before sending the letters to the suppliers. [It is not possible to email the updated
invitation letters through the “Send Mail” link]
11. Click on ‘Step 8 : Upload Invitation Letter” . The Documents sub tab is shown in the lower section.
Click on the “Add “ link to add the updated invitation letter. Any one Invitation letter
generated/updated for this package is to updated for reference.
12. On completion of ‘Invitation Letter’ stage click on ‘Move to Next Stage’. This will move the
procurement to ‘Quotation Opening’ stage.
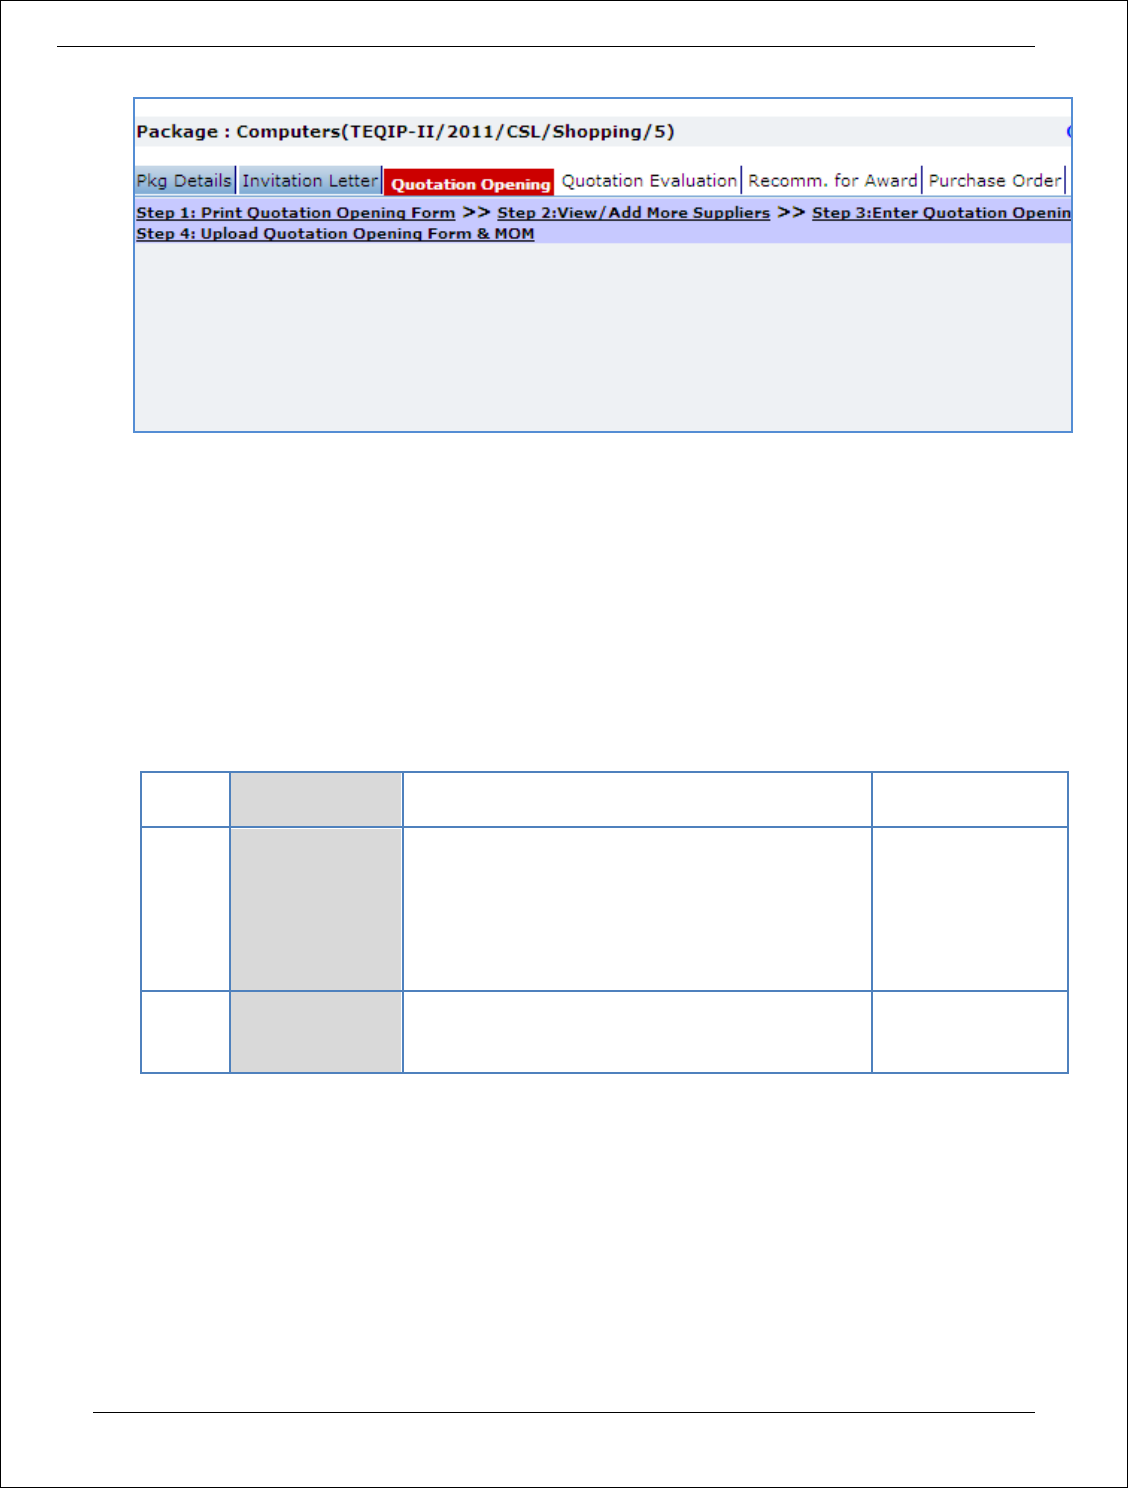
Quotation Opening
In this stage the quotation opening is performed and responsive quotations are identified.
Procurement Management Support System – PMSS v1.0 User Guide
38
13. On the ‘Quotation Opening’ tab click on ‘Step 1: Print Quotation Opening Form’. This will open a
quotation opening form. This form can be used during Quotation Opening. Print of this form can be
taken and Quotation opening details can be recorded on this form. The supplier names (which were
added during Invitation letter stage) are seen on this form against which quotation opening details
can be mentioned. Three extra columns are provided to accommodate names of any new suppliers
who have submitted their quotations directly.
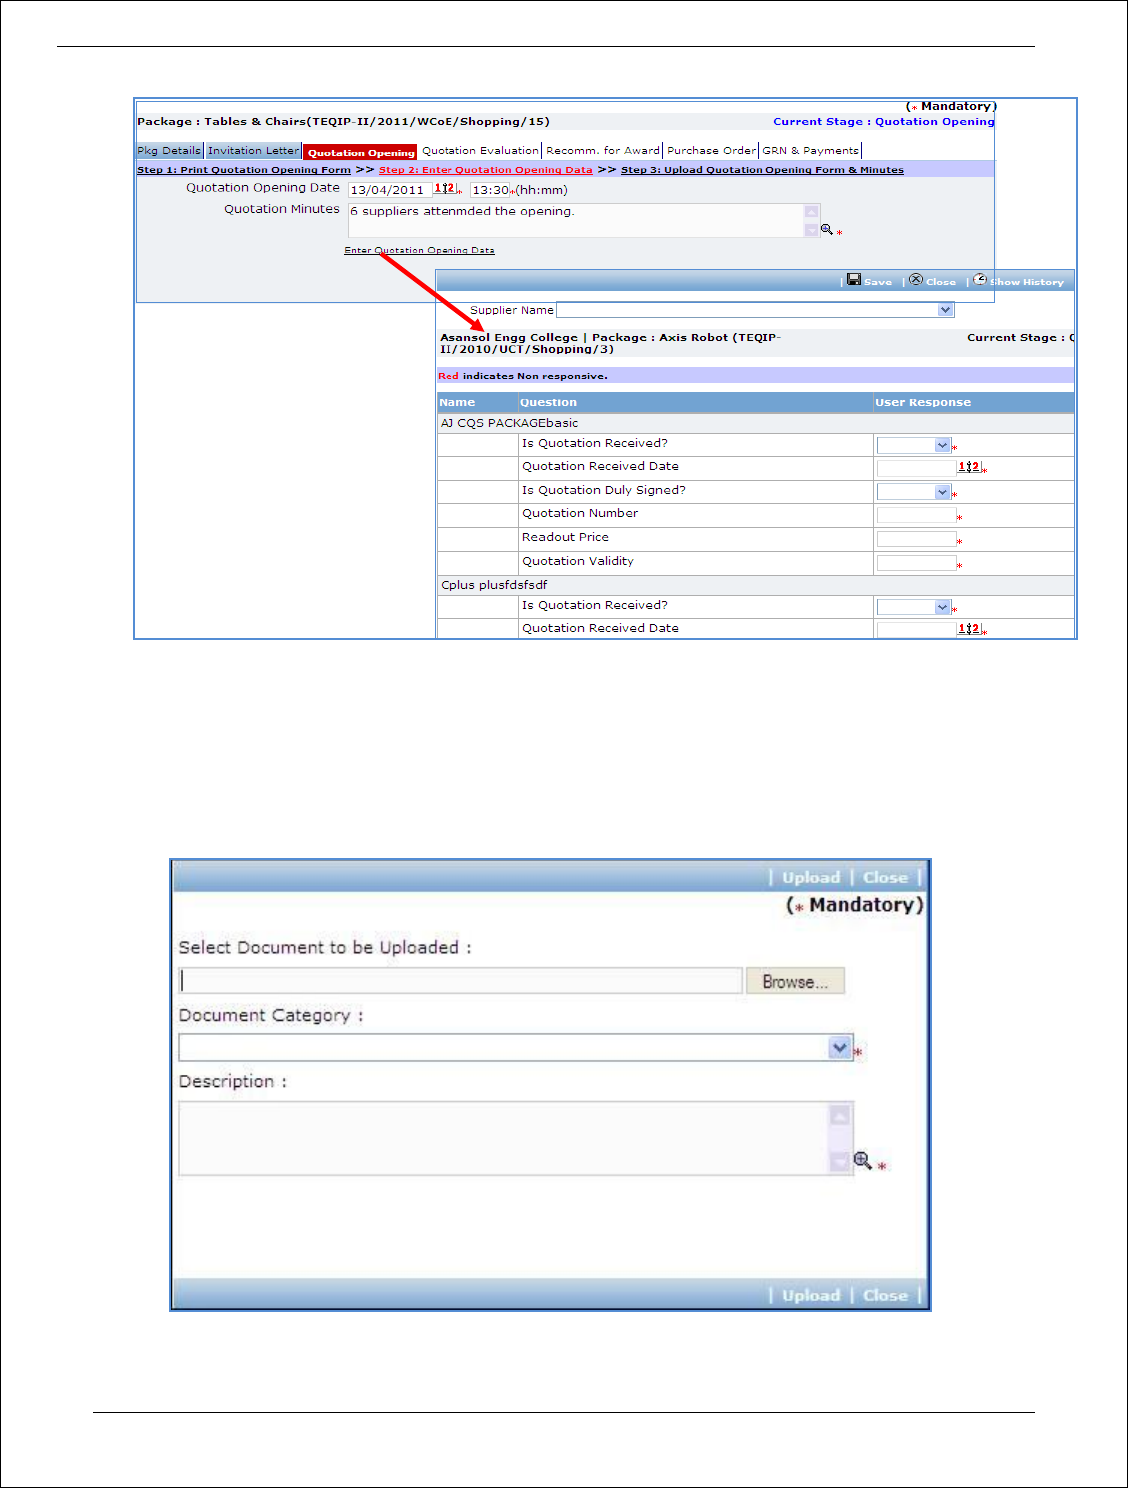
14. Click on ‘Step 2: Enter Quotation Opening Data’ and Fill the fields on the page. Details of the fields
are mentioned below;
Sr. No.
Field Name
Field Description
Sample Data
1
Quotation
Opening Date
Enter the actual date and time when quotation
was opened. Date format is DD/MM/YYYY and
time format is HH:MM, 24 hrs format. It is
recommended that opening should be done at
the start of the week so that there is ample time
to enter opening data in PMSS.
12/03/2011 16:00
2
Quotation MoM
Enter the Minutes of Meeting.
Larger MoM’s can be uploaded using the
documents subtab
15. Click ‘Save’
16. Click on the ‘Enter Quotation Opening Data’ link. A pop up will be seen
Procurement Management Support System – PMSS v1.0 User Guide
39
a. Enter the Responsiveness Criteria.
b. Click ‘Save’.
17. Click on ‘Step 3: Upload Quotation Opening Form’ link. ‘Documents’ subtab will be shown in the
lower section.
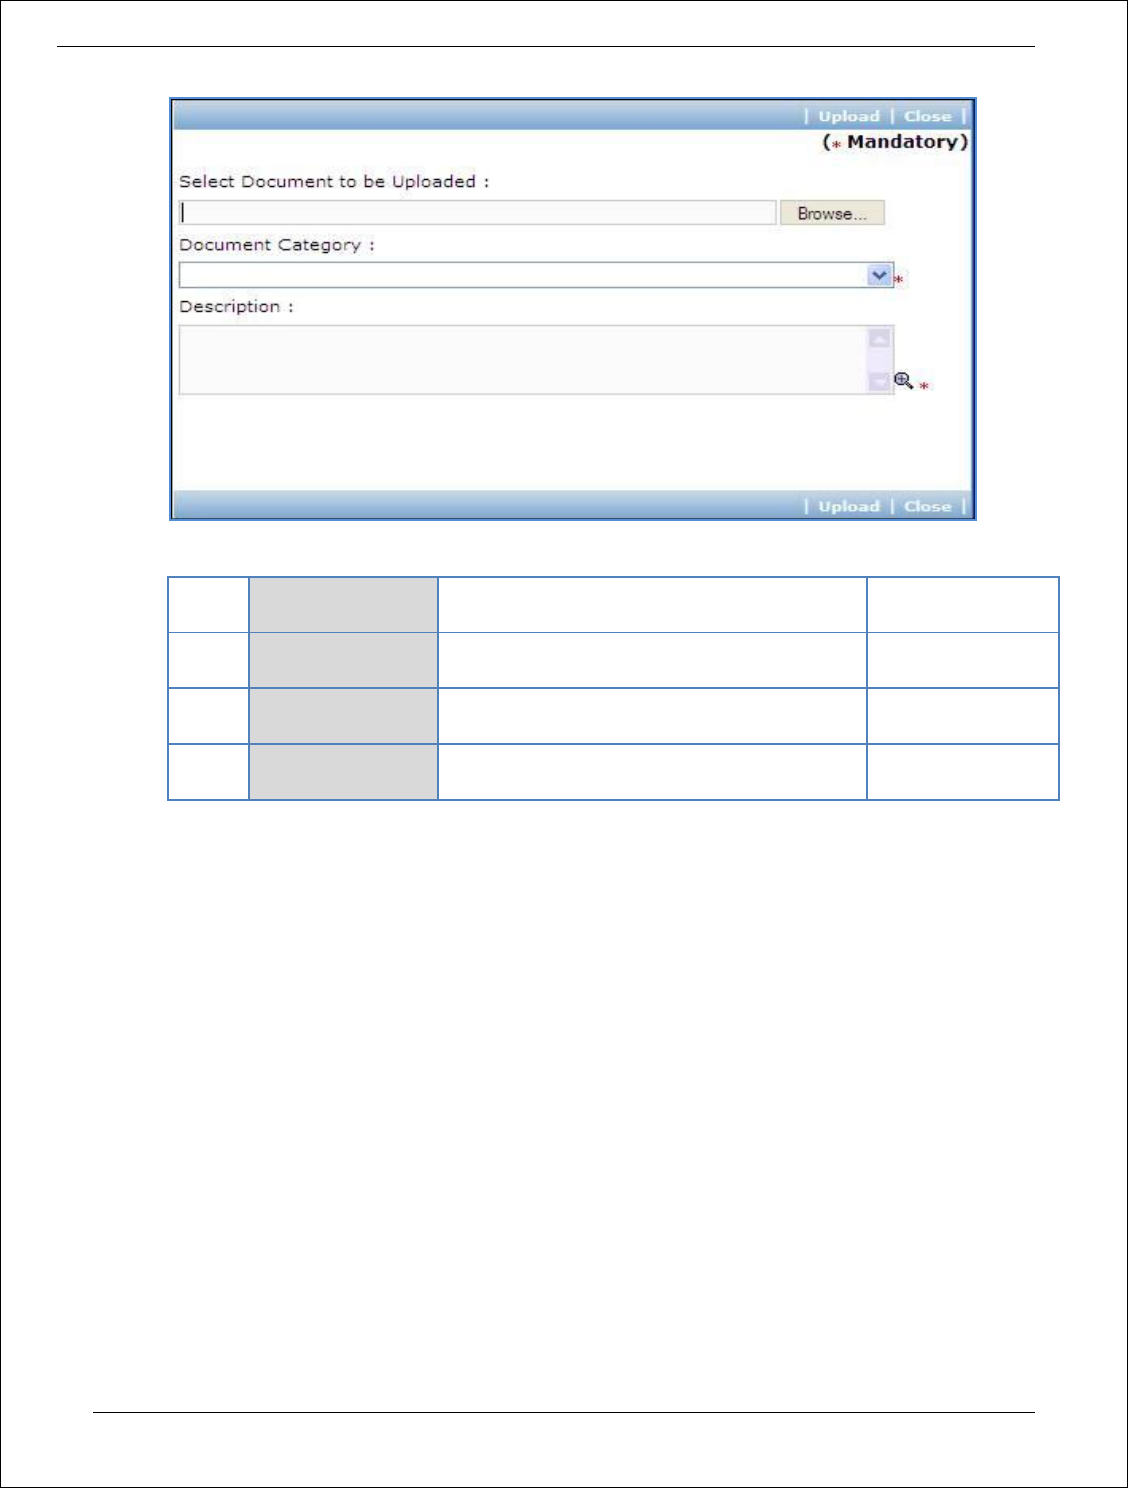
a. Click ‘Add’, which is within the subtab. A pop up will be seen
b. Fill the fields on the page. Details of the fields are mentioned below;
Procurement Management Support System – PMSS v1.0 User Guide
40
Sr.
No.
Field Name
Field Description
Sample Data
1
Document to be
uploaded
Browse the document that you want to
upload.
2
Document
Category
Select the appropriate document category.
Quotation
Opening Form
3
Description
Enter more information about the uploaded
document.
Signed Quotation
Opening Form
c. Click ‘Upload’ to upload the document in the system.
d. Uploaded document will appear on the list shown in ‘Documents’ section.
e. User can select and delete the document that has been uploaded in current stage of the
procurement. To delete a document, select ‘Delete’ checkbox against the document and click
‘Delete’ link.
18. On completion of ‘Quotation Opening’ stage click on ‘Move to Next Stage’. This will move the
procurement to ‘Quotation Evaluation’ stage.
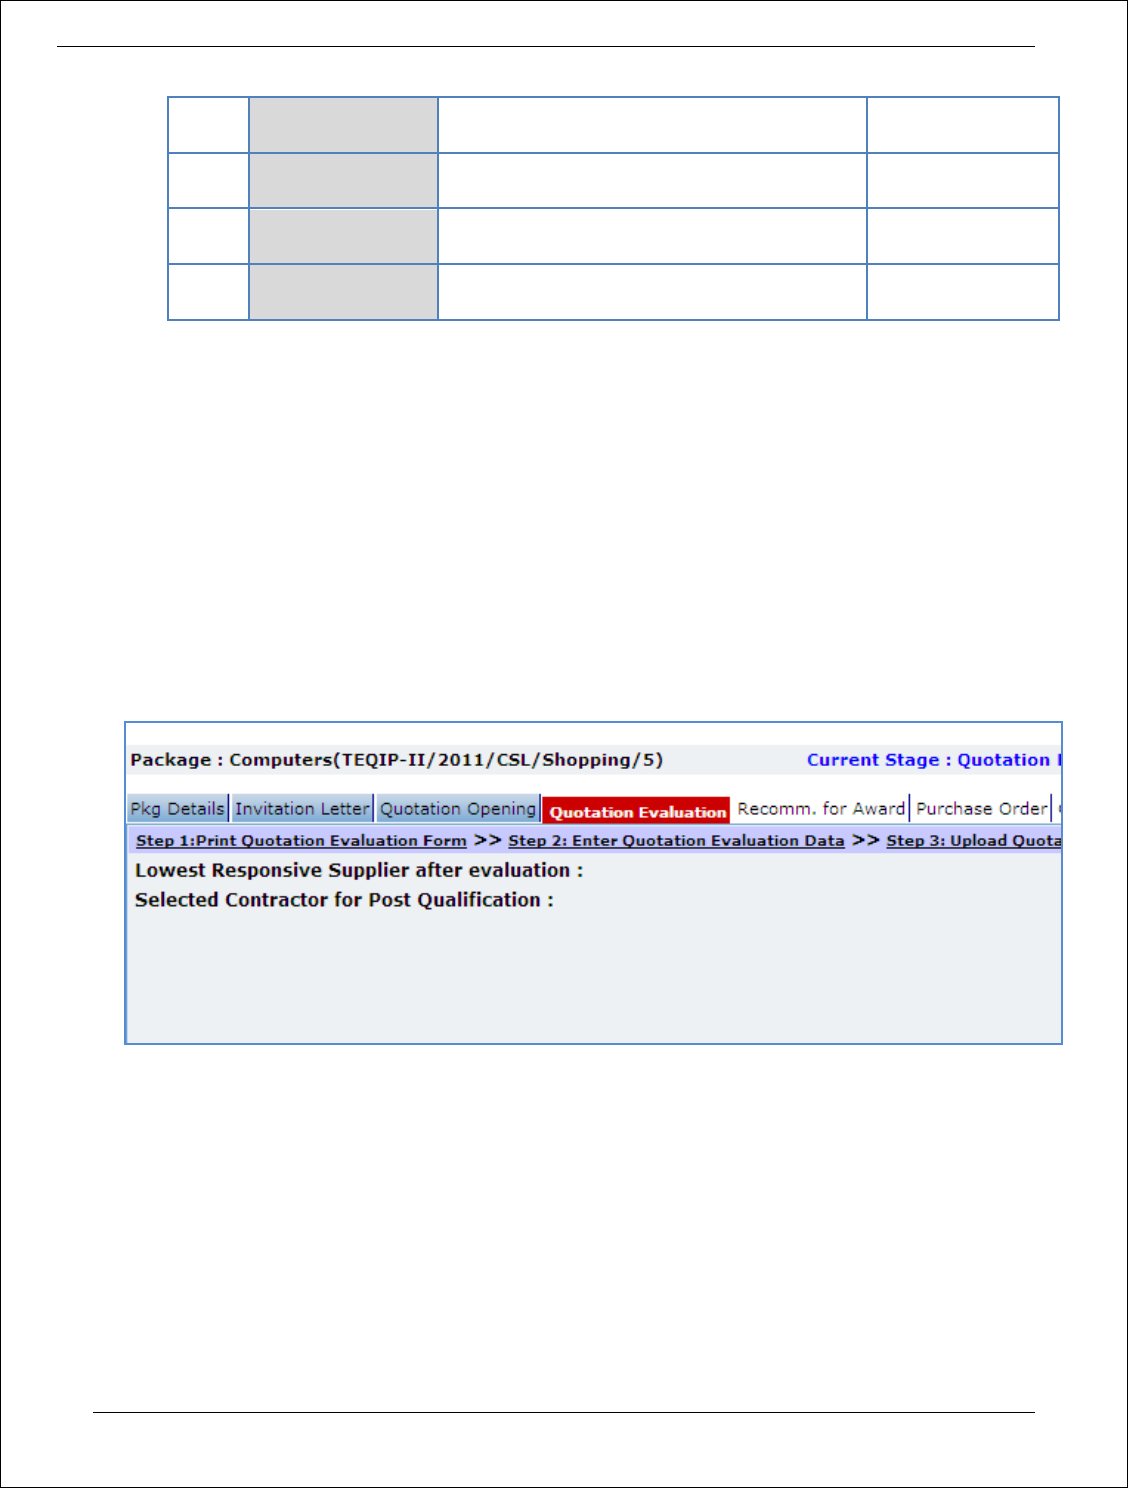
Quotation Evaluation
In this stage evaluation is performed and lowest evaluated supplier is identified.
19. On the ‘Quotation Evaluation’ tab click on ‘Step 1: Print Quotation Evaluation Form’. This will open a
quotation evaluation form. This form can be used during Quotation Evaluation. Print of this form can
be taken and Quotation Evaluation details can be recorded on this form.
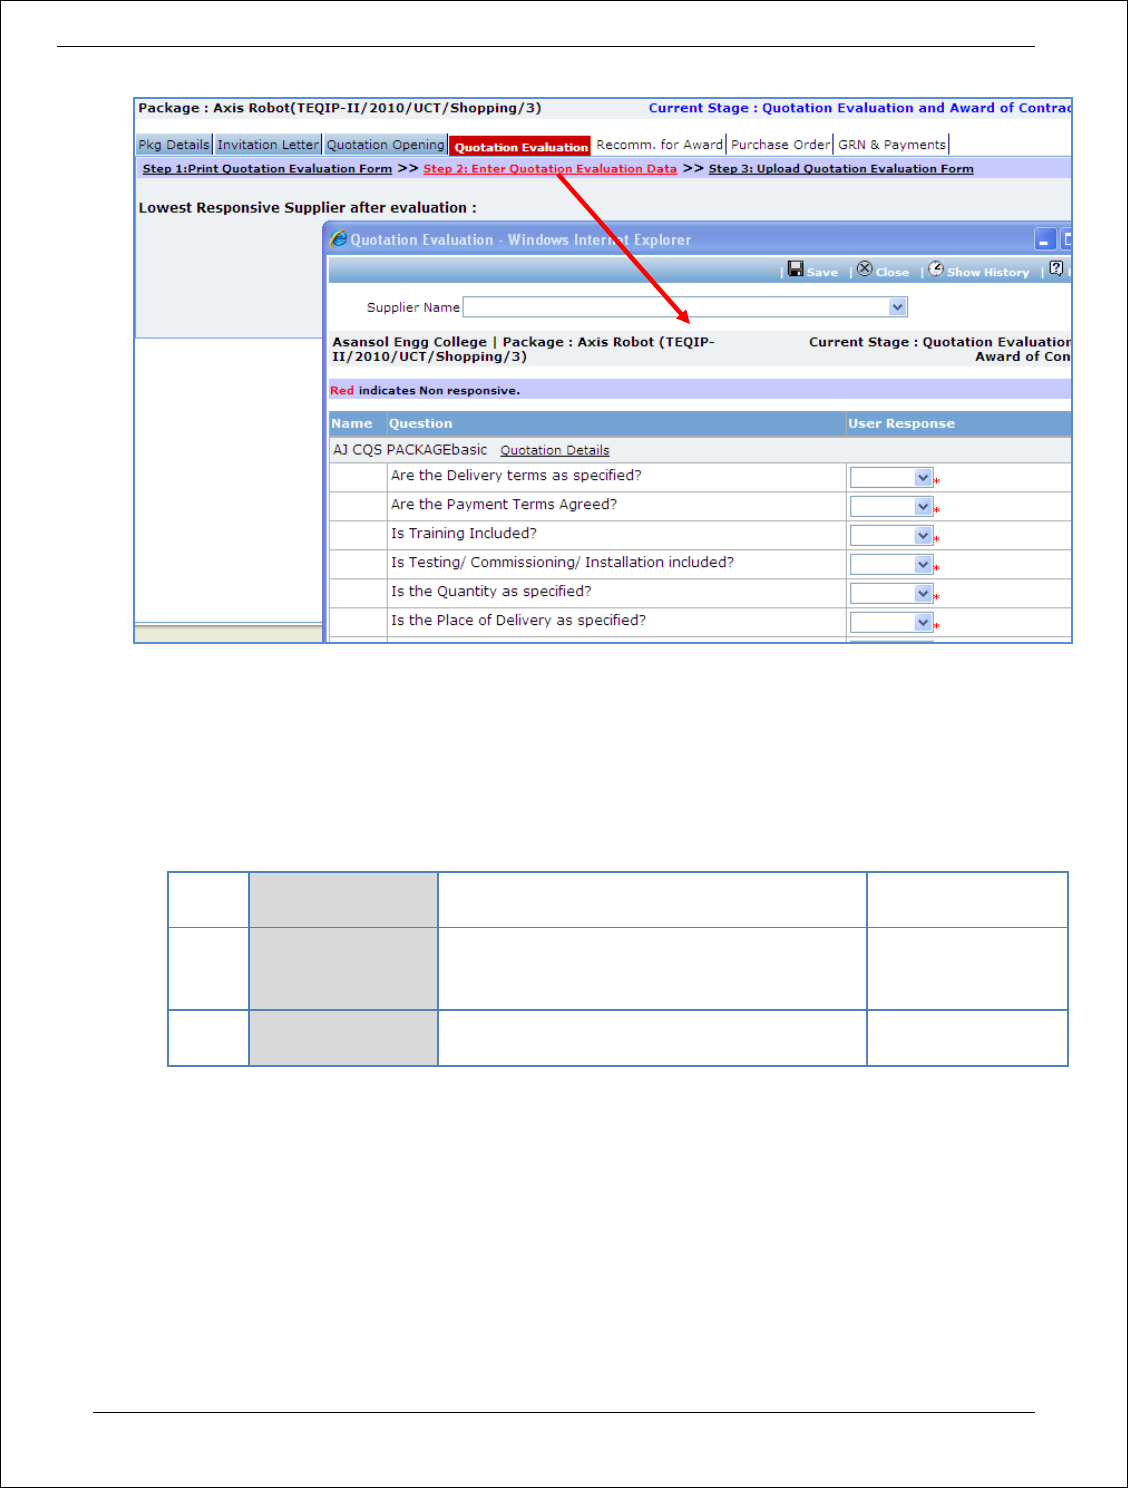
20. Click on the ‘Step 2: Enter Quotation Evaluation Data’ link. A pop up will be seen
Procurement Management Support System – PMSS v1.0 User Guide
41
a. Enter the comparative data for all the supplier.
b. Click ‘Save’.
c. Click on ‘Quotation Details’ link, which is in front of each responsive supplier. A popup will be
seen.
d. Fill the fields on the page. Details of the fields are mentioned below;
Sr.
No.
Field Name
Field Description
Sample Data
1
Basic Cost per
unit
Basic cost for each item can be entered in
this field. Enter the basic cost per item as
given by the supplier
2000
2
Comments
Enter comments, if any
Quotation Opening
Form
e. Click on ‘Save’
f. Quotation details of all responsive Suppliers can be entered by repeating steps from c. to e.
21. System will show the lowest evaluated responsive supplier (L1) on the main page.
22. Click on ‘Step 3: Upload Quotation Evaluation Form’ link. ‘Documents’ subtab will be shown in the
lower section.
a. Click ‘Add’, which is within the subtab. A pop up will be seen
Procurement Management Support System – PMSS v1.0 User Guide
42
b. Fill the fields on the page. Details of the fields are mentioned below;
Sr.
No.
Field Name
Field Description
Sample Data
1
Document to be
uploaded
Browse the document that you want to
upload.
2
Document
Category
Select the appropriate document category.
Quotation
Evaluation Form
3
Description
Enter more information about the uploaded
document.
Signed Quotation
Evaluation Form
c. Click ‘Upload’ to upload the document in the system.
d. Uploaded document will appear on the list shown in ‘Documents’ section.
e. User can select and delete the document that has been uploaded in current stage of the
procurement. To delete a document, select ‘Delete’ checkbox against the document and click
‘Delete’ link.
23. Click on ‘Step 4: View/Edit Supplier Details’ link to update supplier details which are unavailable at
this time of invitation letter generation. The list of all participation suppliers is shown on the lower
half of the screen. Click on the supplier name to update the necessary details.
24. On completion of ‘Quotation Evaluation’ stage click on ‘Move to Next Stage’. This will move the
procurement to ‘Recommendation for Award’ stage.
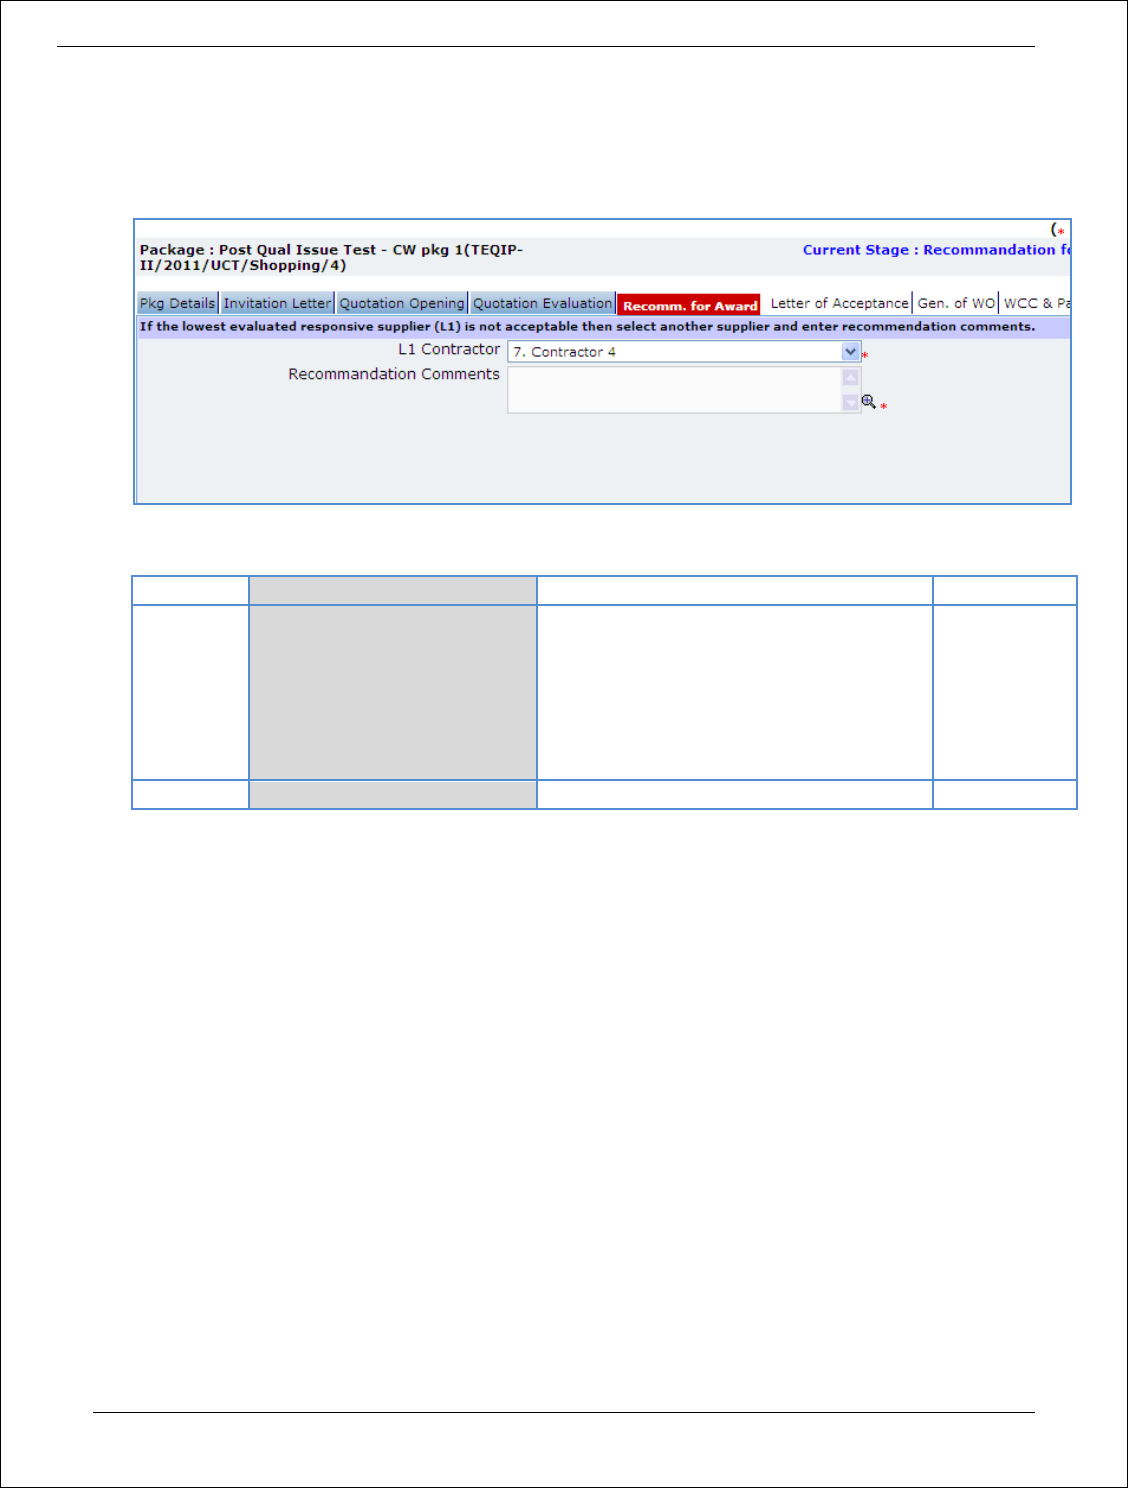
Recommendation for Award
In this stage appropriate responsive supplier can be recommend. If the lowest evaluated responsive
supplier (L1) is not acceptable by the committee then another supplier can be selected in this stage

Procurement Management Support System – PMSS v1.0 User Guide
43
25. Fill the fields on the page. Details of the fields are mentioned below;
Sr. No.
Field Name
Field Description
Sample Data
1
L1 Supplier
If the lowest evaluated responsive
supplier (L1) is not acceptable by the
committee then another supplier can be
selected
2
Recommendation Comments
Enter the comments
Note: If the Contract price (i.e. Evaluated Price) is more than 25% of the estimated price then the
package will be sent for prior review. Once the user clicks on ‘Move to Next Stage’ system
will ask for a confirmation before sending the package for prior review.
26. On completion of ‘Recommendation for Award’ stage Click on ‘Move to Next Stage’. This will move
the procurement to ‘Purchase Order’ stage.
Purchase Order
In this stage PO is generated and Payment terms are updated with expected completion and
payment dates
Procurement Management Support System – PMSS v1.0 User Guide
44
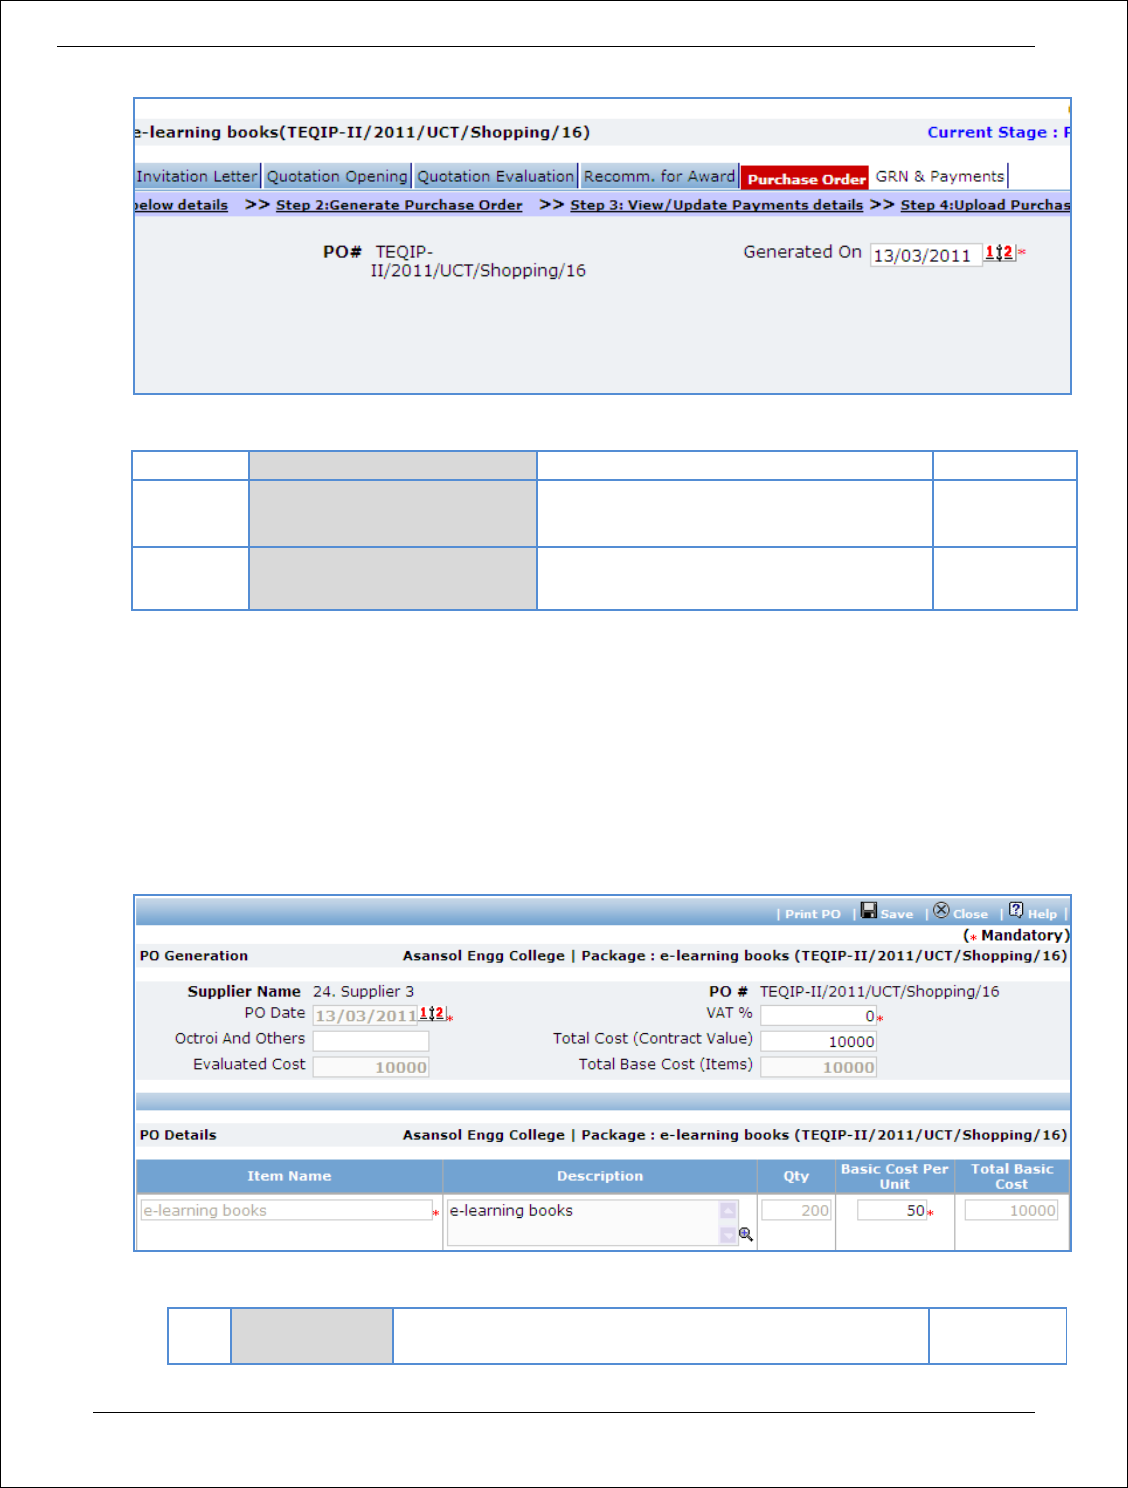
27. Fill the fields on the page. Details of the fields are mentioned below;
Sr. No.
Field Name
Field Description
Sample Data
1
Generated On
System will show the current date (i.e.
today’s date) by default. Click on ‘Save’
Today’s date
2
PO#
PO number will be generated
automatically
Note: If Generated date is greater than the bid validity (i.e. difference between Bid opening date
and Generated date is more than the bid validity given by the selected supplier) system will
ask to provide a new bid validity. Enter the total new bid validity. E.g. if original validity was
90 days and supplier has extended it by 30 days then enter 120 days.
28. Click on ‘Step 2: Generate Purchase Order’. A Pop up will be seen
a. Fill the fields on the page. Details of the fields are mentioned below;
Sr.
No.
Field Name
Field Description
Sample Data
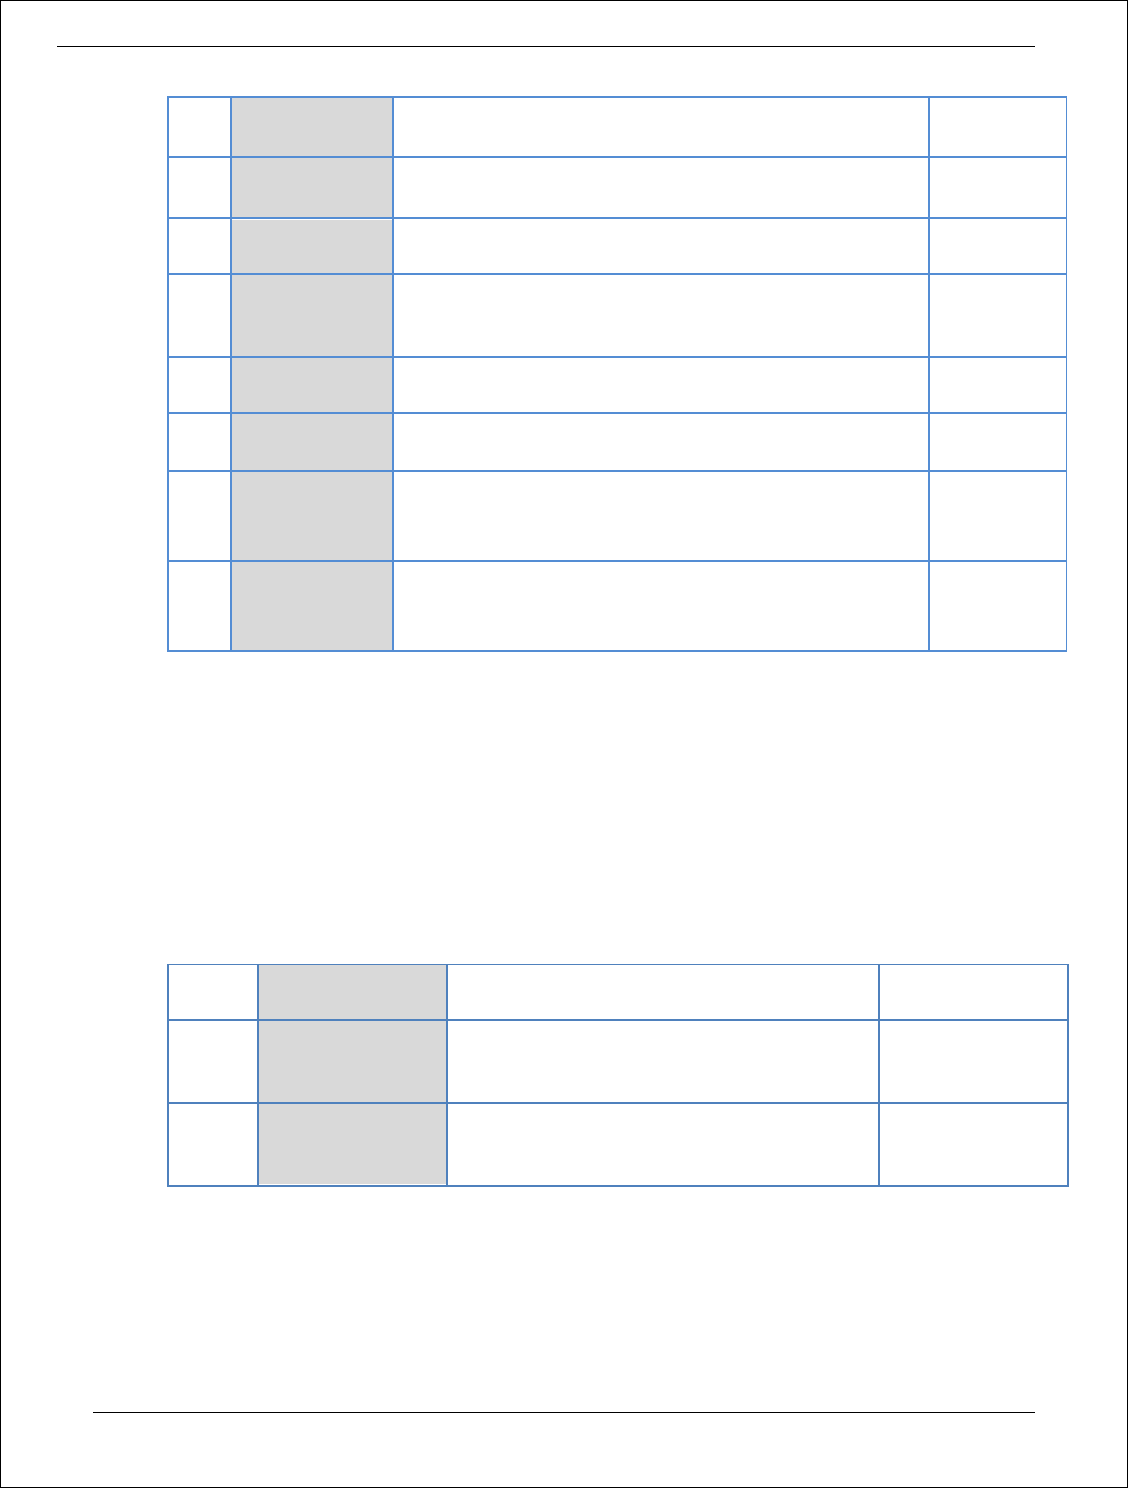
Procurement Management Support System – PMSS v1.0 User Guide
45
1
PO date
Will be auto populated as the PO generation date. The
field is editable.
12/12/2011
2
VAT %
Enter the Value Added Tax percentage for this PO. If
there is no VAT enter 0.
12
3
Octroi and
Others
Enter the Octroi and Others charges amount
1200
4
Total Cost
(Contract
Value)
Will be auto calculated as (Total Base Cost + VAT)
System
calculated
5
Evaluated Cost
Will be auto populated from the Evaluated Price
System
calculated
6
Total Base Cost
(Item)
Will be auto calculated as (Qty*Basic Cost Per Unit)
System
calculated
7
Basic Cost Per
Unit
This can be seen in the lower row, i.e. in the items
section. Edit the basic cost per unit as required.
8
Quantity
Quantity is editable
b. Click ‘Save’
c. Click ‘Print PO’. System will give an option to Open/ Save the PO. Save the PO on your computer
with a proper name. Update the sections highlighted in yellow and save the document.
29. Click on ‘Step 2: View/Update Payments details’ link. ‘Payments’ subtab will be seen in the lower
section.
a. Click on the payment term name a pop up will be seen
b. Fill the fields on the page. Details of the fields are mentioned below;
Sr. No.
Field Name
Field Description
Sample Data
1
Expected Delivery
Date
This is auto calculated as Purchase Order
Date + Expected Delivery Period. Edit the
date if required. Date format is DD/MM/YYYY
10/04/2011
2
Expected Payment
Date
Enter the expected date when payment will
be made against this completion. Date
format is DD/MM/YYYY
12/04/2011
c. Click ‘Save’.
d. Update the other payment terms by repeating steps a. to c.
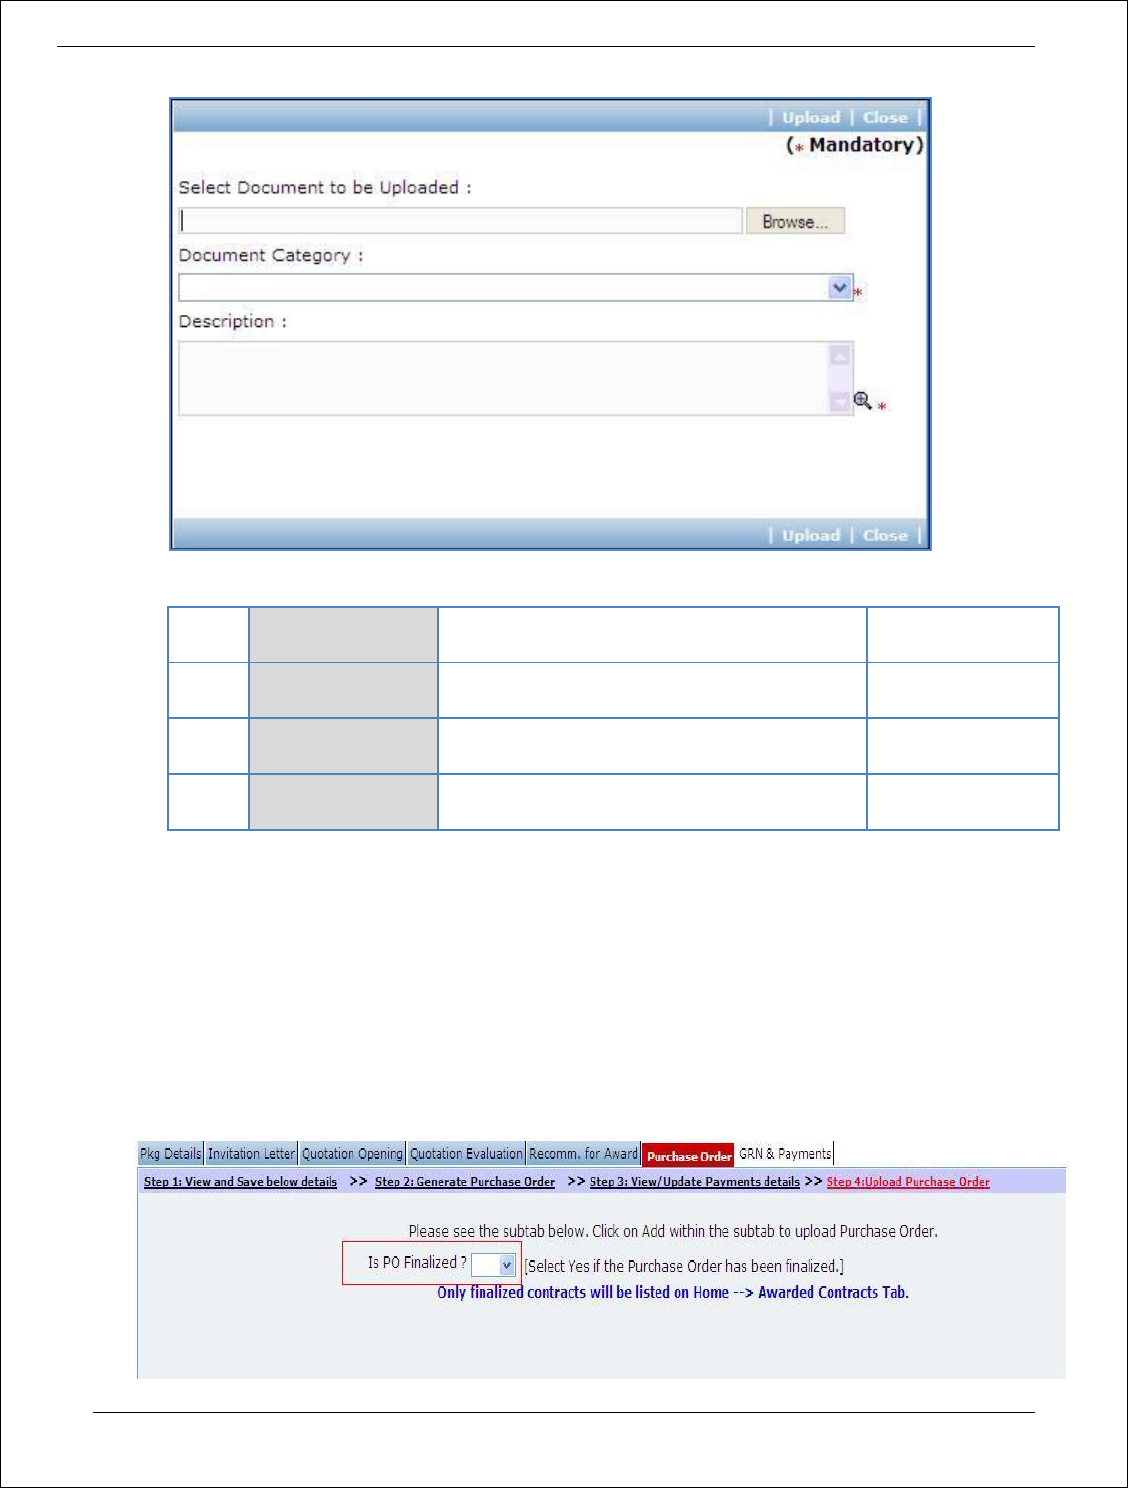
30. Click on ‘Step 3: Upload Purchase Order’. ‘Documents’ subtab will be shown in the lower section.
a. Click ‘Add’, which is within the subtab. A pop up will be seen
Procurement Management Support System – PMSS v1.0 User Guide
46
b. Fill the fields on the page. Details of the fields are mentioned below;
Sr.
No.
Field Name
Field Description
Sample Data
1
Document to be
uploaded
Browse the document that you want to
upload.
2
Document
Category
Select the appropriate document category.
Quotation
Evaluation Form
3
Description
Enter more information about the uploaded
document.
Signed Quotation
Evaluation Form
c. Click ‘Upload’ to upload the document in the system.
d. Uploaded document will appear on the list shown in ‘Documents’ section.
e. User can select and delete the document that has been uploaded in current stage of the
procurement. To delete a document, select ‘Delete’ checkbox against the document and click
‘Delete’ link.
31. If the PO has been finalized then select YES in the “PO Finalized drop down. All finalized contracts
will be listed in the “Awarded Contracts” section on the Home page.
Procurement Management Support System – PMSS v1.0 User Guide
47
32. On completion of ‘Purchase Order’ stage Click on ‘Move to Next Stage’. This will move the
procurement to ‘GRN & Payments’ stage.
GRN & Payments
In this stage Goods received details are captured and Payment tracking is performed.
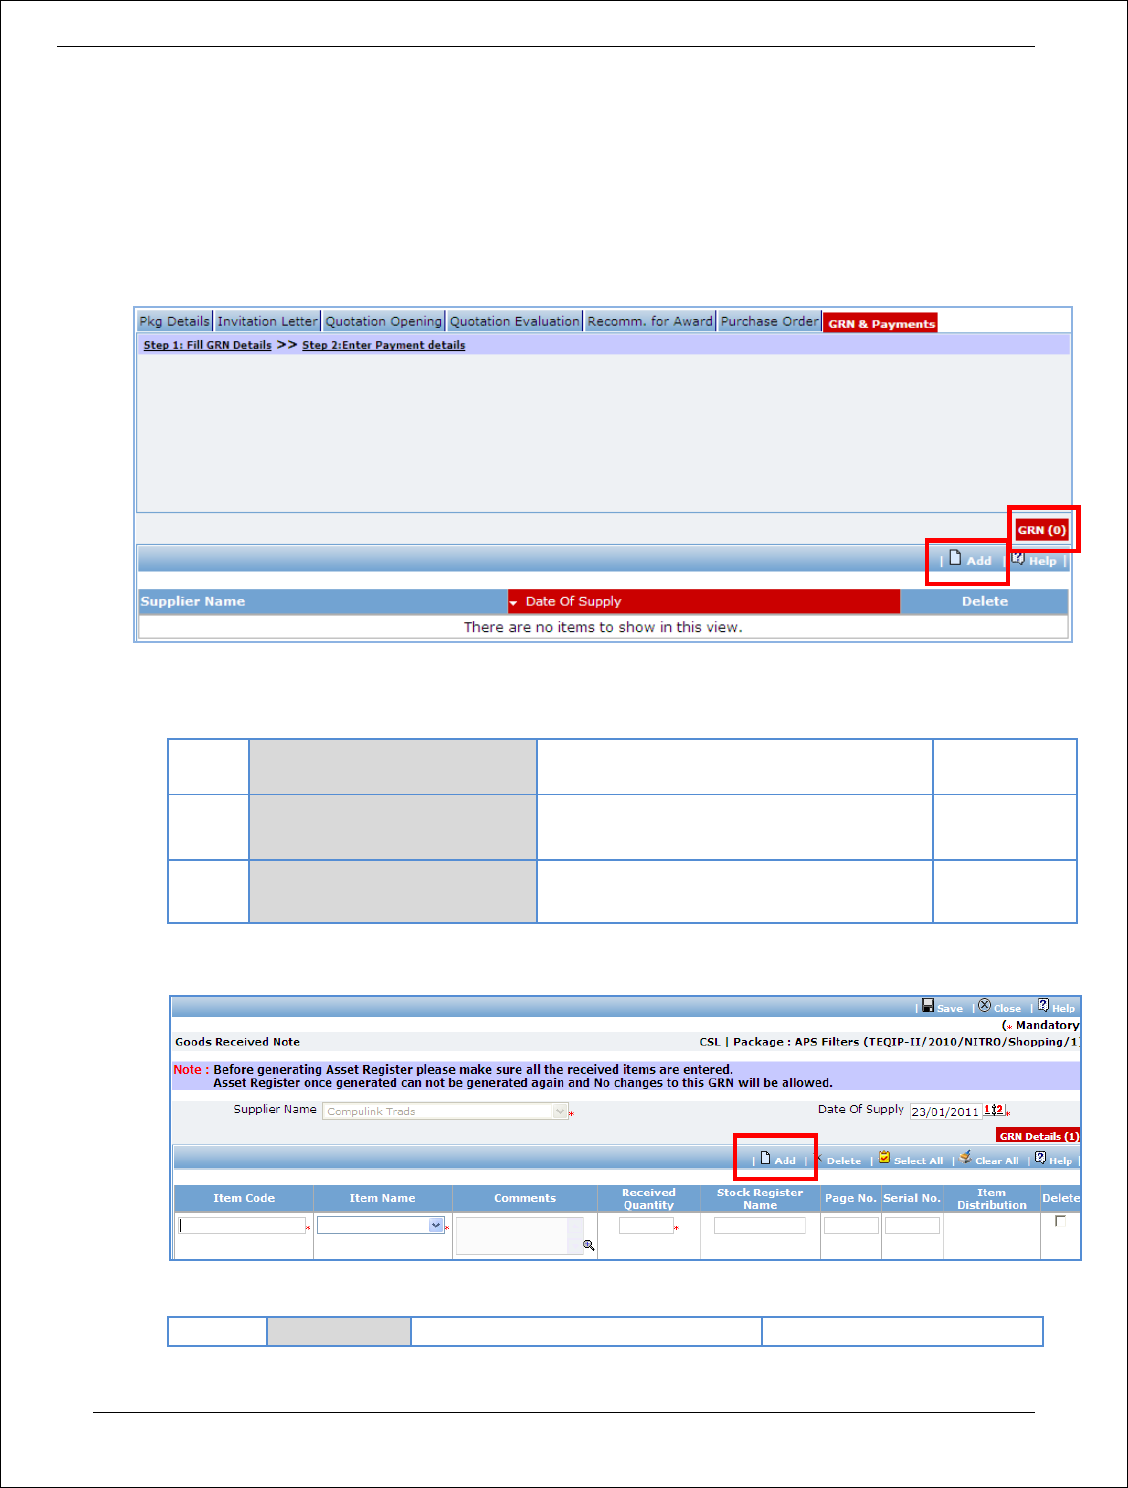
33. Click on ‘Setp1: Fill GRN Details’. ‘GRN’ subtab will be shown in the lower section;
a. Click on ‘Add’, a pop up will be seen
b. Fill the fields on the page. Details of the fields are mentioned below;
Sr.
No.
Field Name
Field Description
Sample Data
1
Supplier Name
This field is auto populated with the
selected supplier’s name
System
populated
2
Date of Supply
Enter the date when Goods are supplied.
Date format is DD/MM/YYYY
12/8/2011
c. Click ‘Add’ link which is in the Items section.
d. Fill the fields on the page. Details of the fields are mentioned below;
Sr. No.
Field Name
Field Description
Sample Data
Procurement Management Support System – PMSS v1.0 User Guide
48
1
Item Code
Enter a short (abbreviated) name for
the item that is supplied
LMPrinter – can be a short
name for item ‘LaserJet
Monolithic Printer’
2
Item Name
Select the item that is supplied
LaserJet Monolithic Printer
3
Comments
Enter the comments, if required
Received ok
4
Received
Quantity
Enter the quantity of item received
2
5
Stock
Resistor
Name
Enter the name of the resistor
where the entry of this item is made
for manual records
TEQIP – II stock resistor
6
Page No.
Enter the page number of the stock
resistor on which this entry is made
32
7
Serial No.
Enter the serial number of this item
ABC Institution/ TEQIP – II/
LMP - 43
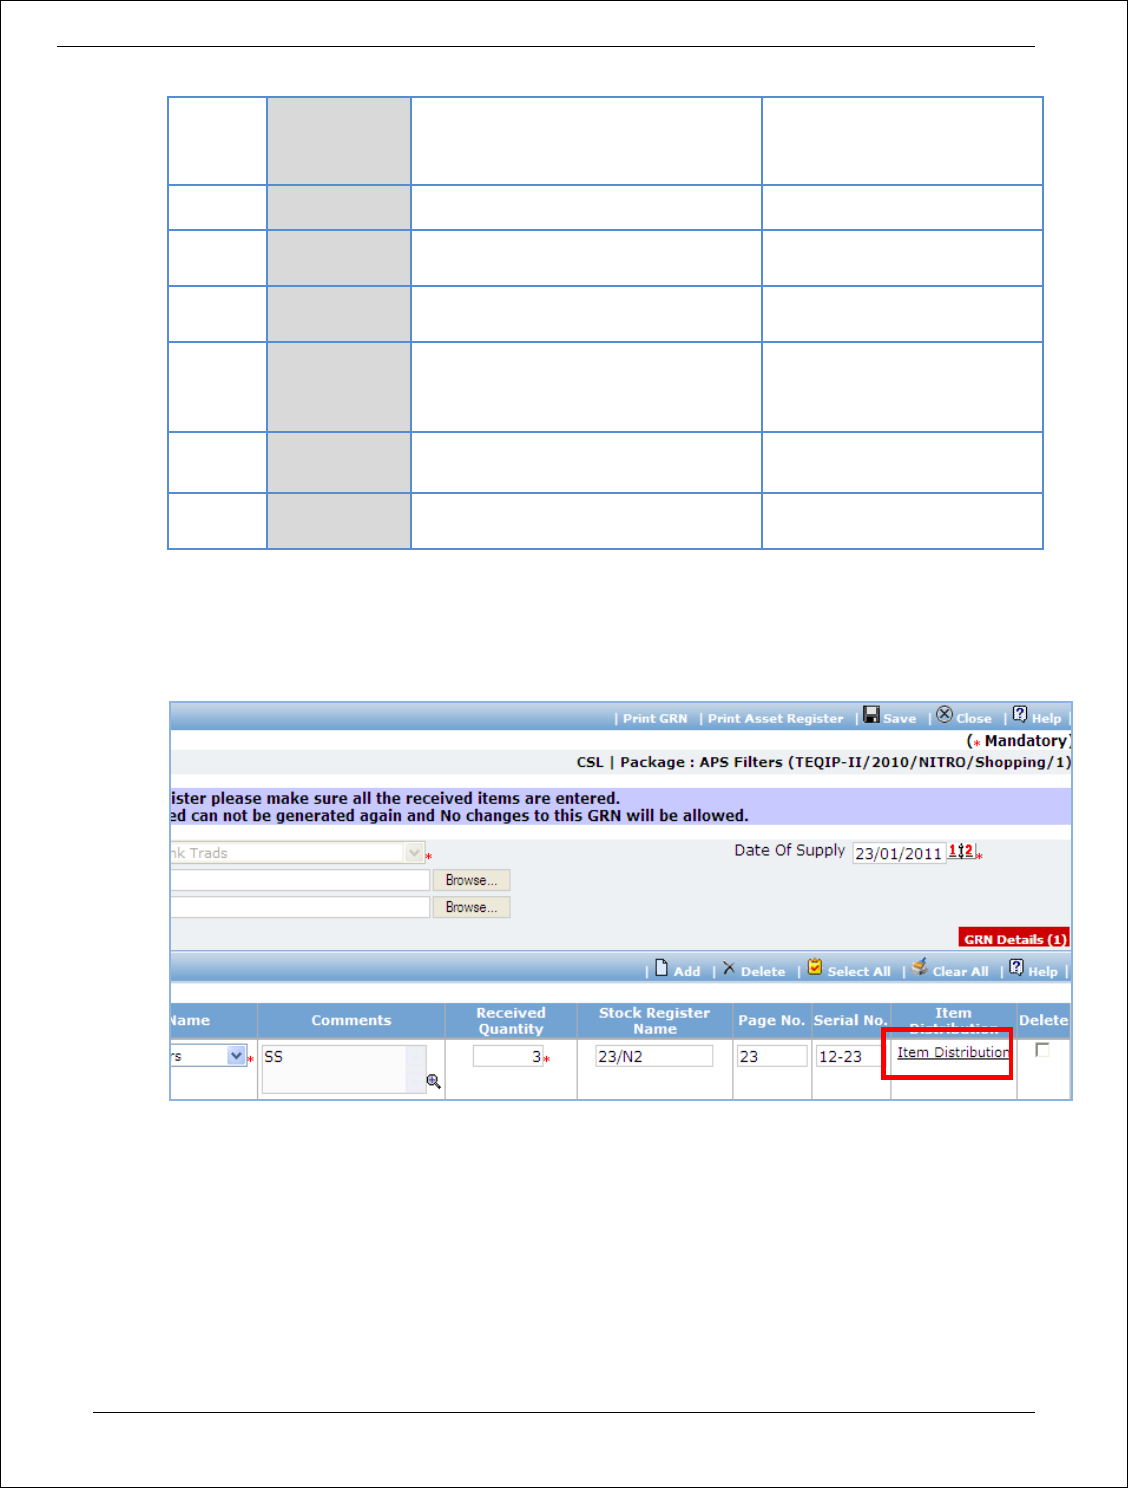
e. To add another Item repeat steps c. & d.
f. Click ‘Save’, which is on the upper bar of the main (GRN) section.
g. Once saved, ‘Item Distribution’ link will appear against each item.
h. Click on ‘Item Distribution’ link a pop up will be seen. Enter the Actual Quantity supplied to each
department.
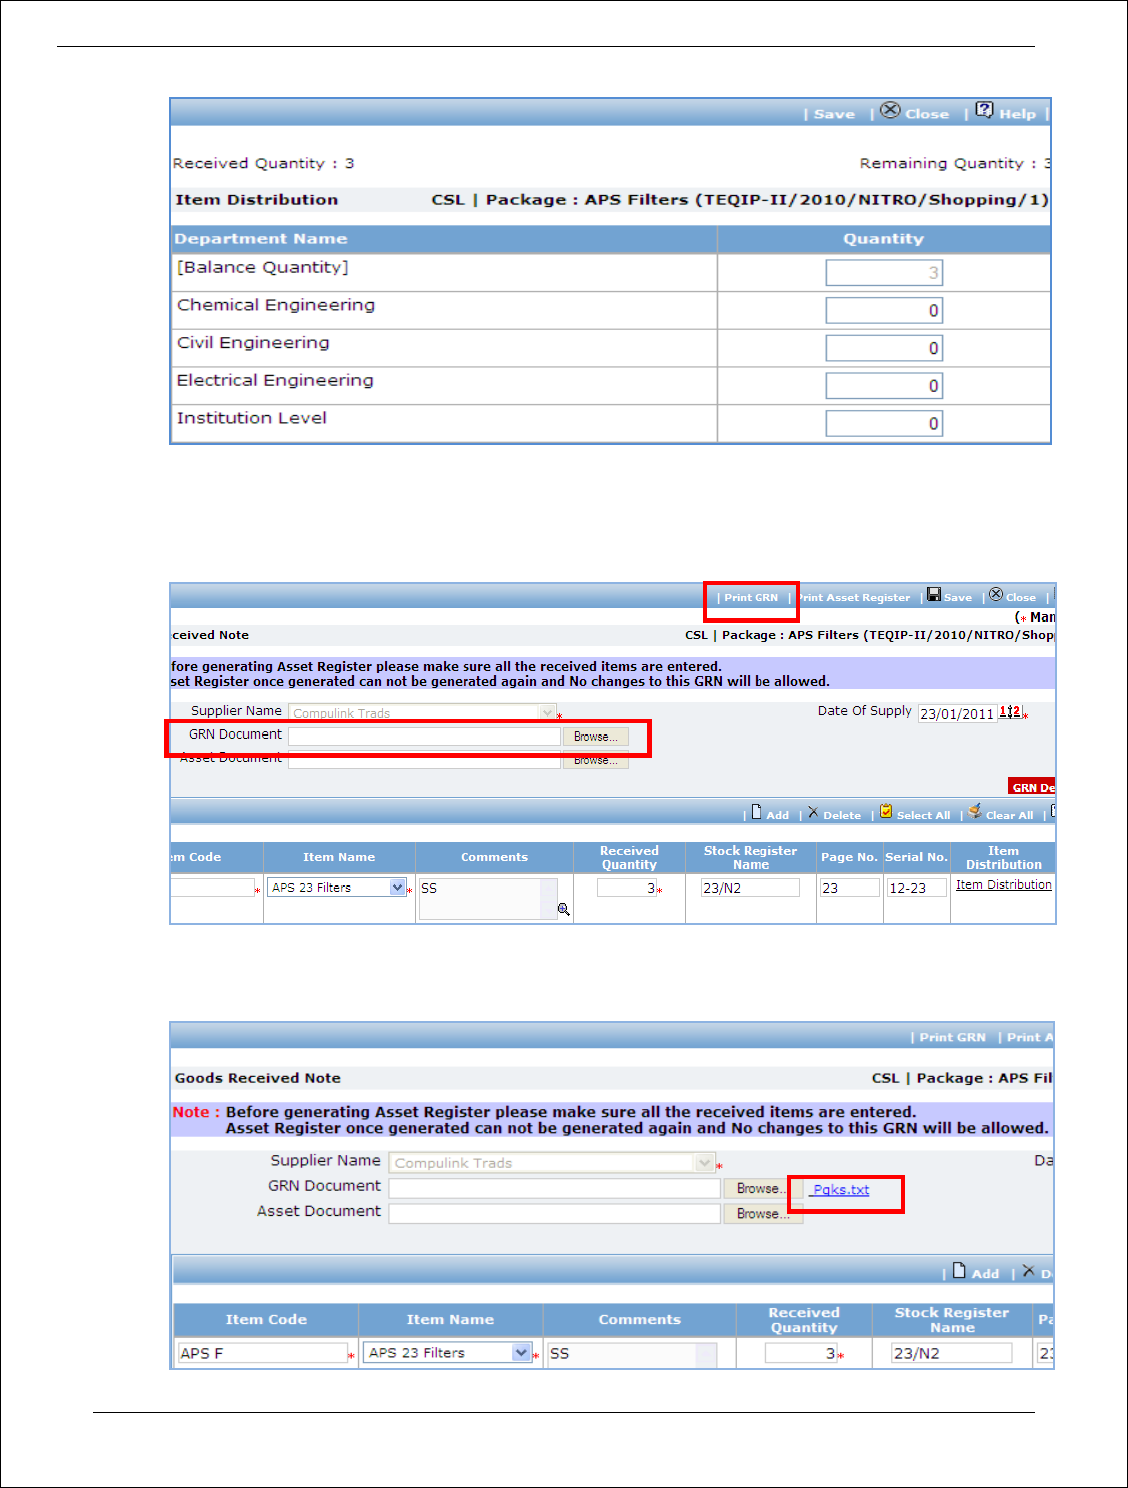
Procurement Management Support System – PMSS v1.0 User Guide
49
i. Click ‘Save’.
j. Click on ‘Print GRN’, which is on the upper bar of the main (GRN) section. GRN Report will be
generated.
k. The GRN Report can be uploaded using the Browse function, which is in front of the ‘GRN
Document’ field. Once uploaded, link will appear besides the browse function.

Procurement Management Support System – PMSS v1.0 User Guide
50
l. Report can be downloaded, if required by clicking on the link.
m. Click on ‘Print Asset Register’, which is on the upper bar of the main (GRN) section. Asset
Register will be generated.
Note: Asset Register can be generated only once. System will give a warning message to confirm
that all the items have been added etc. Once Asset Register is generated no changes can be
made to that GRN record
n. Fill the fields in the Asset Register. Details of the fields are mentioned below;
Sr.
No.
Field Name
Field Description
Sample Data
1
Unique
Number
Auto populated by the system based on the quantity
of items received
2
Model
Number
Enter the model number of the item
HP LazerJet 3005
3
Serial
Number
Enter the serial number of the item
o. Once the Asset Register is filled it can be uploaded using the Browse function, which is in front
of the ‘Asset Document’ field. Once uploaded, link will appear besides the browse function.

Procurement Management Support System – PMSS v1.0 User Guide
51
p. Asset Register can be downloaded by clicking on the link.
34. To add another record for GRN repeat steps from a. to p.
35. Click on ‘Setp2: Enter Payment details’. ‘Payments’ subtab will be shown in the lower section;
a. Click on the Payment Term a pop up will be seen
b. Fill the fields on the page. Details of the fields are mentioned below;
Sr.
No.
Field Name
Field Description
Sample
Data
1
Goods Received?
Check this box if goods are received against
this payment
2
Goods received note
generated?
Check this box if GRN is generated for the
received goods
3
Actual Completion
Date
Enter the actual date of delivery. Date
format is DD/ MM/ YYYY
12/07/2011
Procurement Management Support System – PMSS v1.0 User Guide
52
Actual Payment
Amount
Enter the actual amount paid
12000
4
Actual Payment Date
Enter the date when payment is made. Date
format is DD/MM/YYYY
13/08/2011
5
Cheque/Draft Number
Enter the Cheque/ Draft number by which
payment is made
40023467
6
Comments
Enter the comments, if any
c. Click ‘Save’
d. To enter details of another payment repeat steps a. to c.
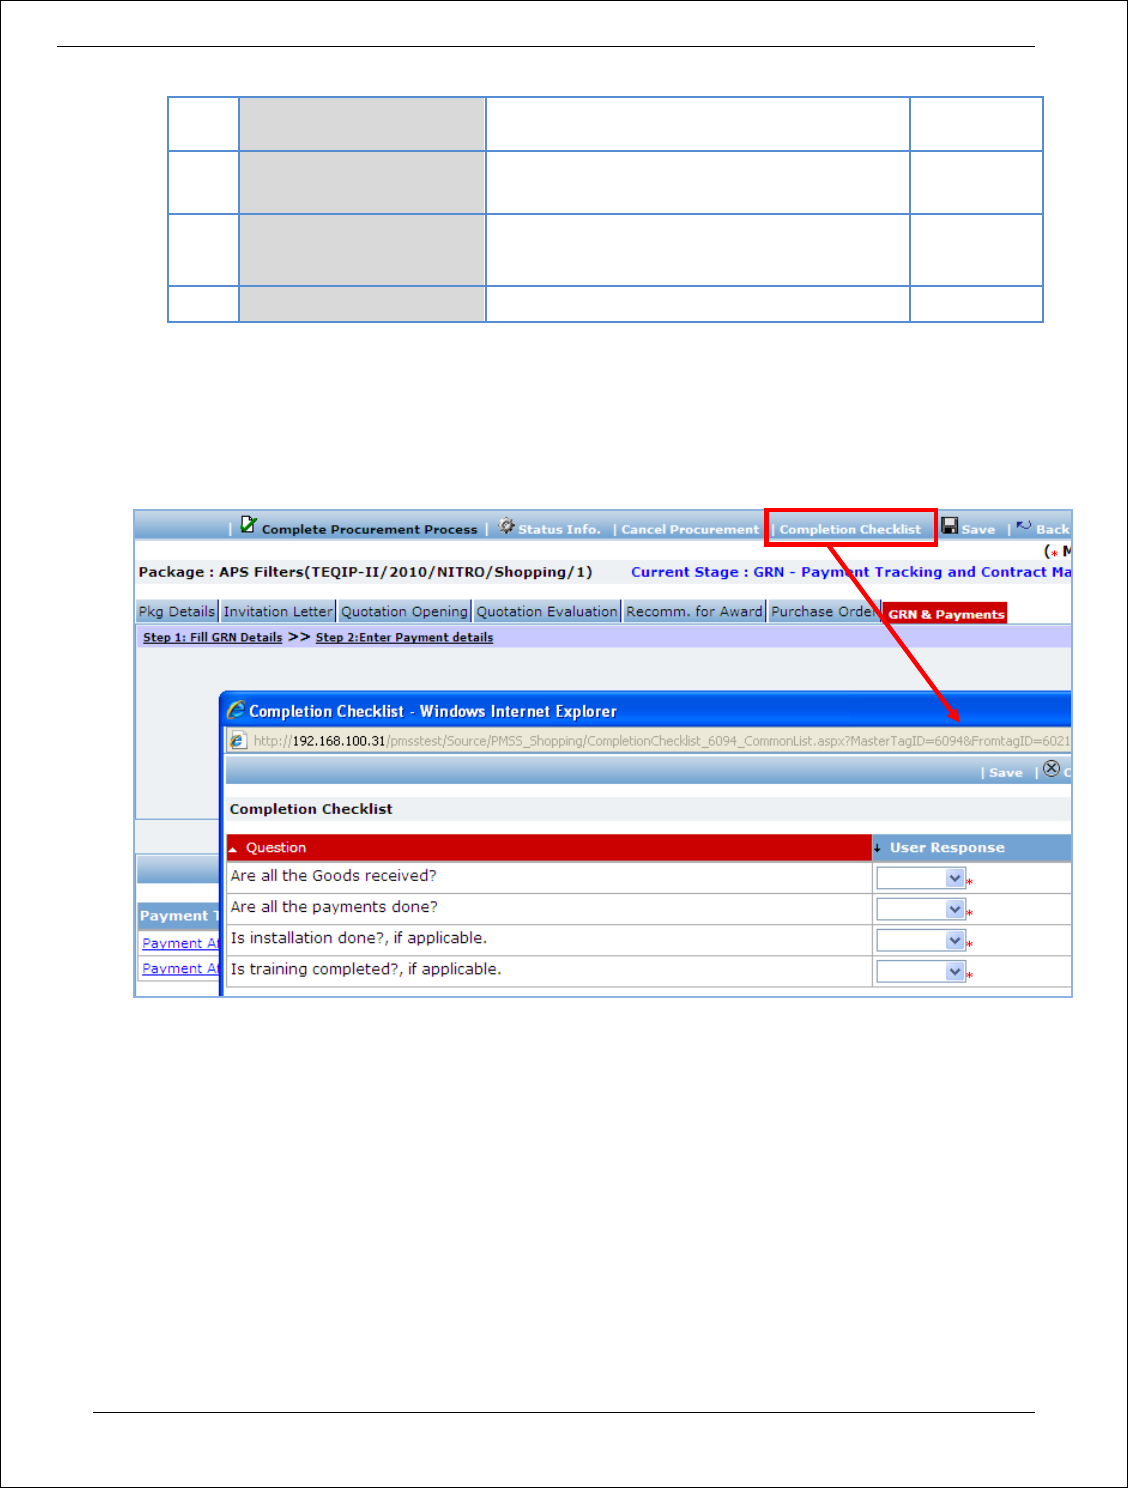
36. Once all the details for all the payments are recorded, Procurement can be marked as complete.
Click on ‘Completion Checklist’, checklist will be seen
a. Fill in the completion checklist
b. Click ‘Save’
37. Click on ‘Complete Procurement Process’ this will complete the procurement for that Package.
Procurement Management Support System – PMSS v1.0 User Guide
53
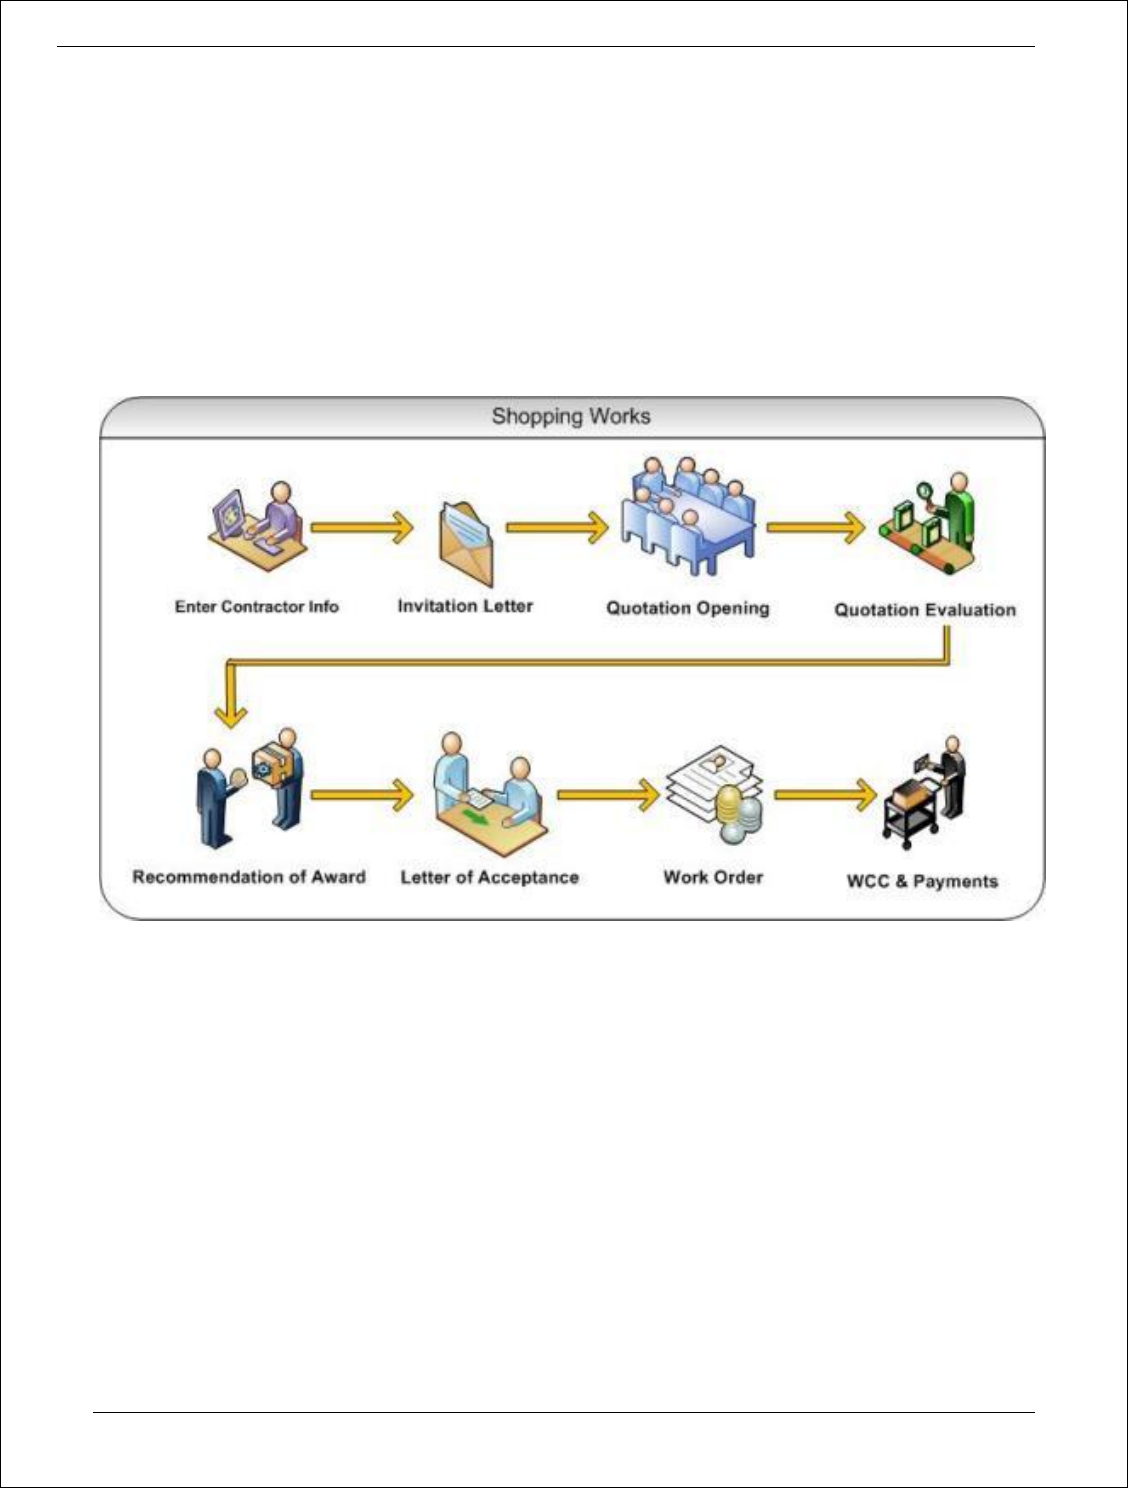
Shopping Works
Purpose
To perform procurement of civil works using shopping method.
Process flow
Role(s)
o Procurement Coordinator (SPFU)
Prerequisite
o Package to be procured should fall under category civil works.
o Value of the package should be < USD 30, 000
Process Details
First stage of Shopping is ‘Invitation Letter’.
Invitation Letter
In this stage contractors are added. Invitation letters are generated & sent out to these contractors.
Procurement Management Support System – PMSS v1.0 User Guide
54
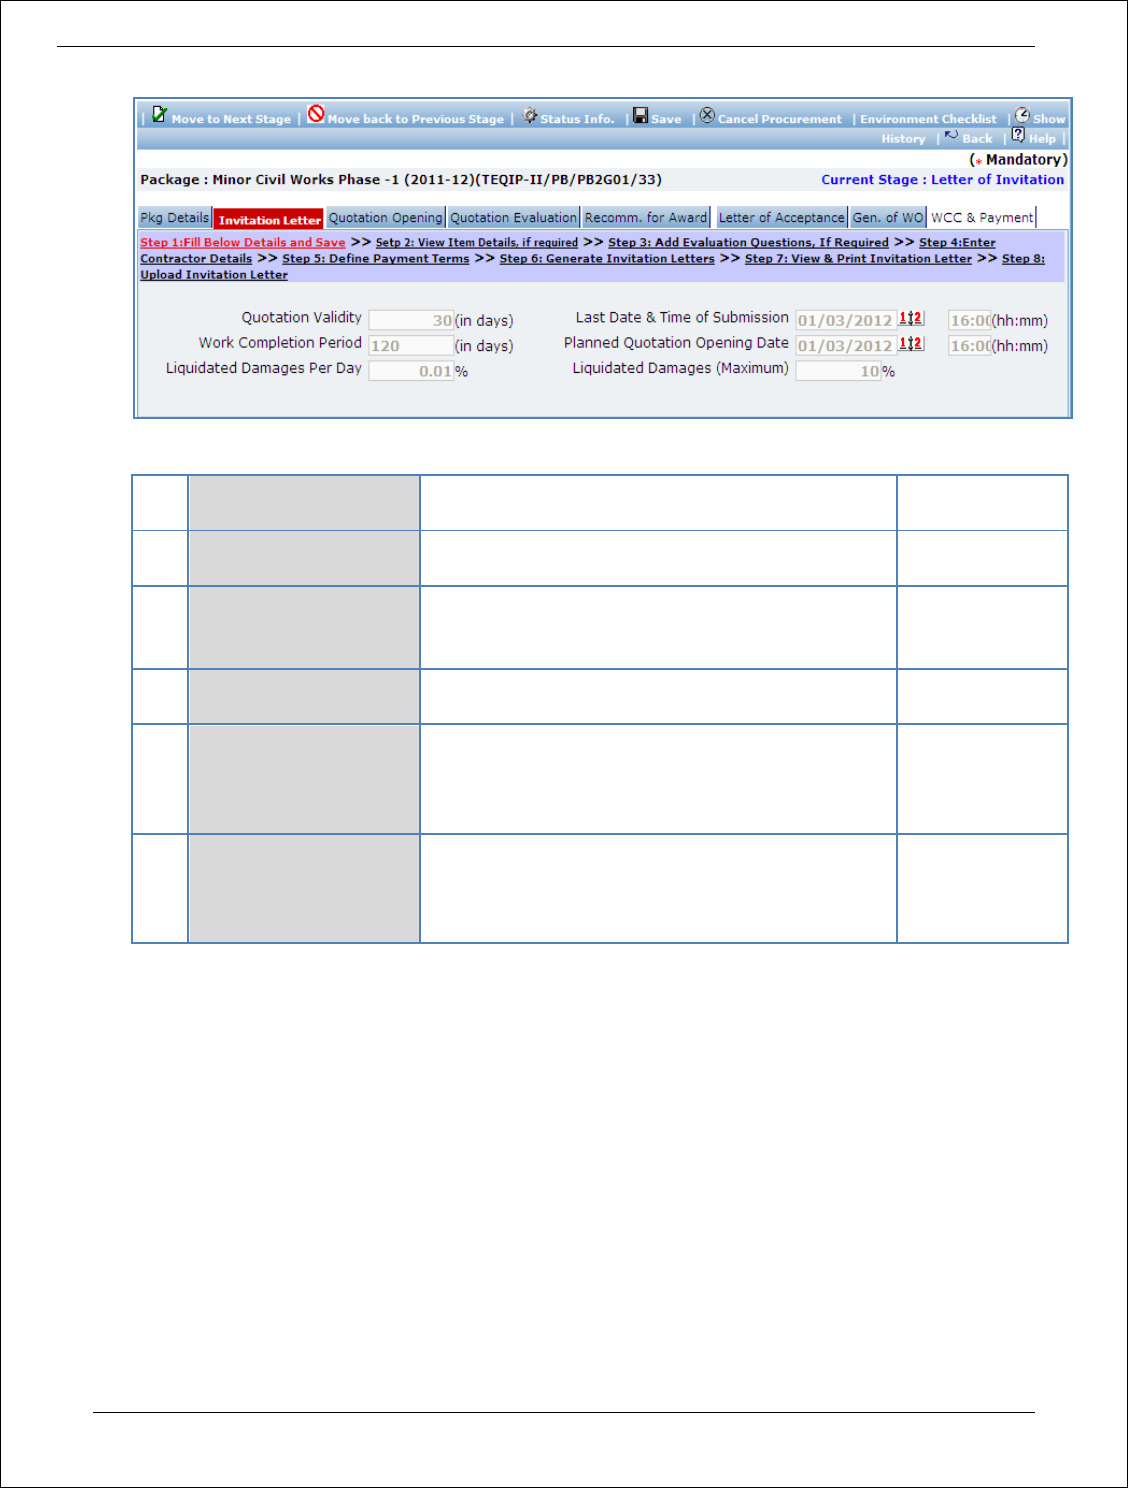
1. Fill the fields on the page. Details of the fields are mentioned below;
Sr.
No.
Field Name
Field Description
Sample Data
1
Quotation Validity
Enter the number of days for which Quotation is
required to be Validity.
15
2
Last Date & Time of
Submission
Enter the date and time by which quotation
should be submitted. Date format is DD/MM/YYYY
and time format is HH:MM, 24 hrs format.
12/03/2011
16:00
3
Work Completion
Period
Enter the total period in days by which work is
expected to be completed
120
4
Liquidated Damages
Per Day
Will be auto populated as 0.05%. Edit this field, if
required. Value in this field will be used to
calculated the Liquidated damages per day incase
of any completion delays.
5
Liquidated Damages
(Maximum)
Will be auto populated as 2%. Edit this field, if
required. Value in this field will be used to
calculated the maximum amount of liquidated
damages applicable
2. Click ‘Save’
3. Click on ‘Step 2: View Item Details, if required’ link (This is an optional step, used to only view the
item details). ‘Items’ subtab is shown in the lower section;
a. Click ‘Item Name’, a pop up will be seen
b. View the item details, if required
c. If there is more than one item then, repeat steps a. and b.
4. Click on ‘Step 3: Add Evaluation Questions, If Required’ link (This is an optional step, to be
performed only if additional evaluation question are required). ‘Questions’ subtab is shown in the
lower section.
a. Click ‘Add’, which is within the subtab. A pop up will be seen
Procurement Management Support System – PMSS v1.0 User Guide
55
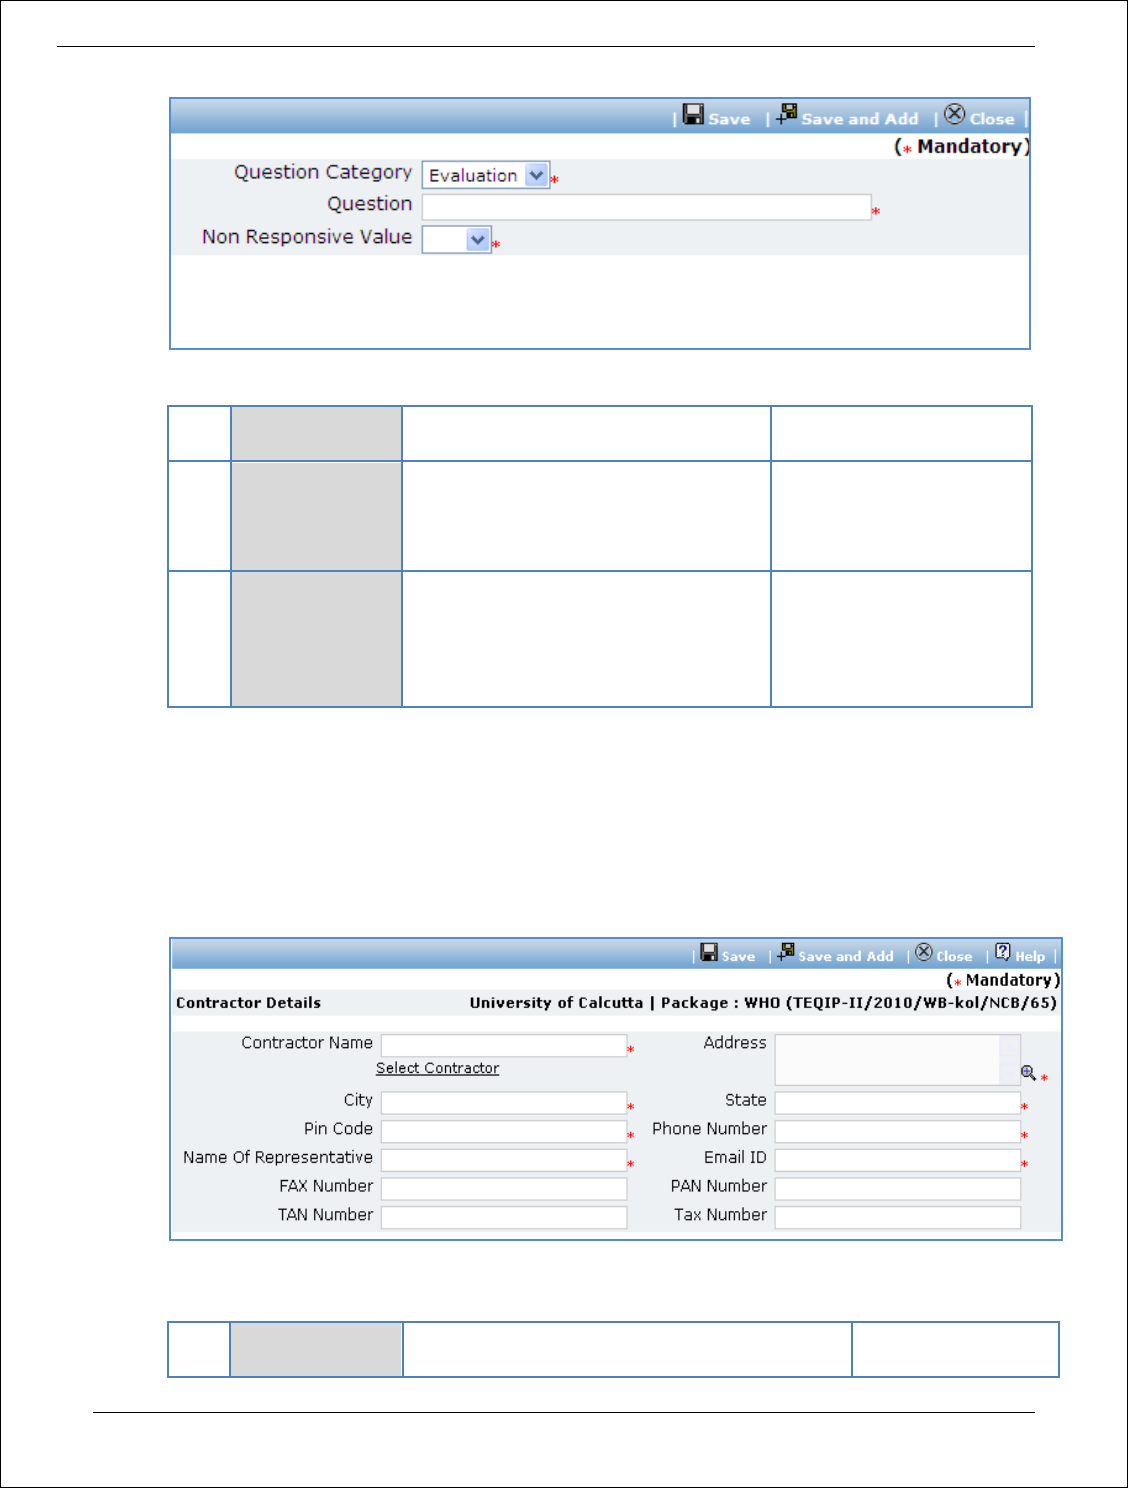
b. Fill the fields on the page. Details of the fields are mentioned below;
Sr.
No.
Field Name
Field Description
Sample Data
1
Question
Enter the description of the question
to be asked during quotation
evaluation. Form the question such
that response (answer) is Yes/ No/ NA.
Does the supplier have a
local service center?
2
Non Responsive
Value
Select the value (Yes/ No/ NA) based
on which the supplier will become
non- responsive.
E.g. if the question is
‘Does the Contractor have
a local service center?’
then the non- responsive
value could be ‘No’.
c. Click ‘Save’.
d. To add another Question repeat steps from a. to c.
5. Click on ‘Step 4: Enter Contractor Details’ link. ‘Contractor Details’ subtab is shown in the lower
section.
a. Click ‘Add’, which is within the subtab. A pop up will be seen
b. Fill the fields on the page. Details of the fields are mentioned below;
Sr.
No.
Field Name
Field Description
Sample Data
Procurement Management Support System – PMSS v1.0 User Guide
56
1
Contractor
Name
Enter the contractor name.
Contractor can also be searched using ‘Select
Contractor from PMSS Database’ link. Click on
this link will display the existing list of
contractors, if any. Once the list is displayed
click on the contractor’s name this will auto
populated the selected contractor’s data. To
search additional contractors within the state
or city use the filters provided on the page
FTTI Construction
2
Address
Enter the address of the Supplier
STI Towers,
Unit# 141/38,
Campus 29. RMZ
Millenia Business
Park.
881, Dr. MGR Road
3
City
Enter the city of the Supplier
Pune
4
State
Enter the state of the Supplier
Maharashtra
7
Email ID
Enter the Email ID of the Supplier
ftti@efttil.com
8
Pin Code
Enter the Pin Code of the Supplier
411232
9
Name Of
Representative
Enter the Representative of the Supplier
Mr. Mohan Solanki
10
Phone Number
Enter the Phone Number of the Supplier.
To enter more than one number use comma (,)
as a separator.
26422689
11
PAN Number
Enter the PAN Number of the Supplier
ANS44874
12
TAN Number
Enter the TAN Number of the Supplier
13
Tax Number
Enter the TAX Number of the Supplier
c. Click ‘Save’
d. To add another Contractor repeat steps from a. to c.
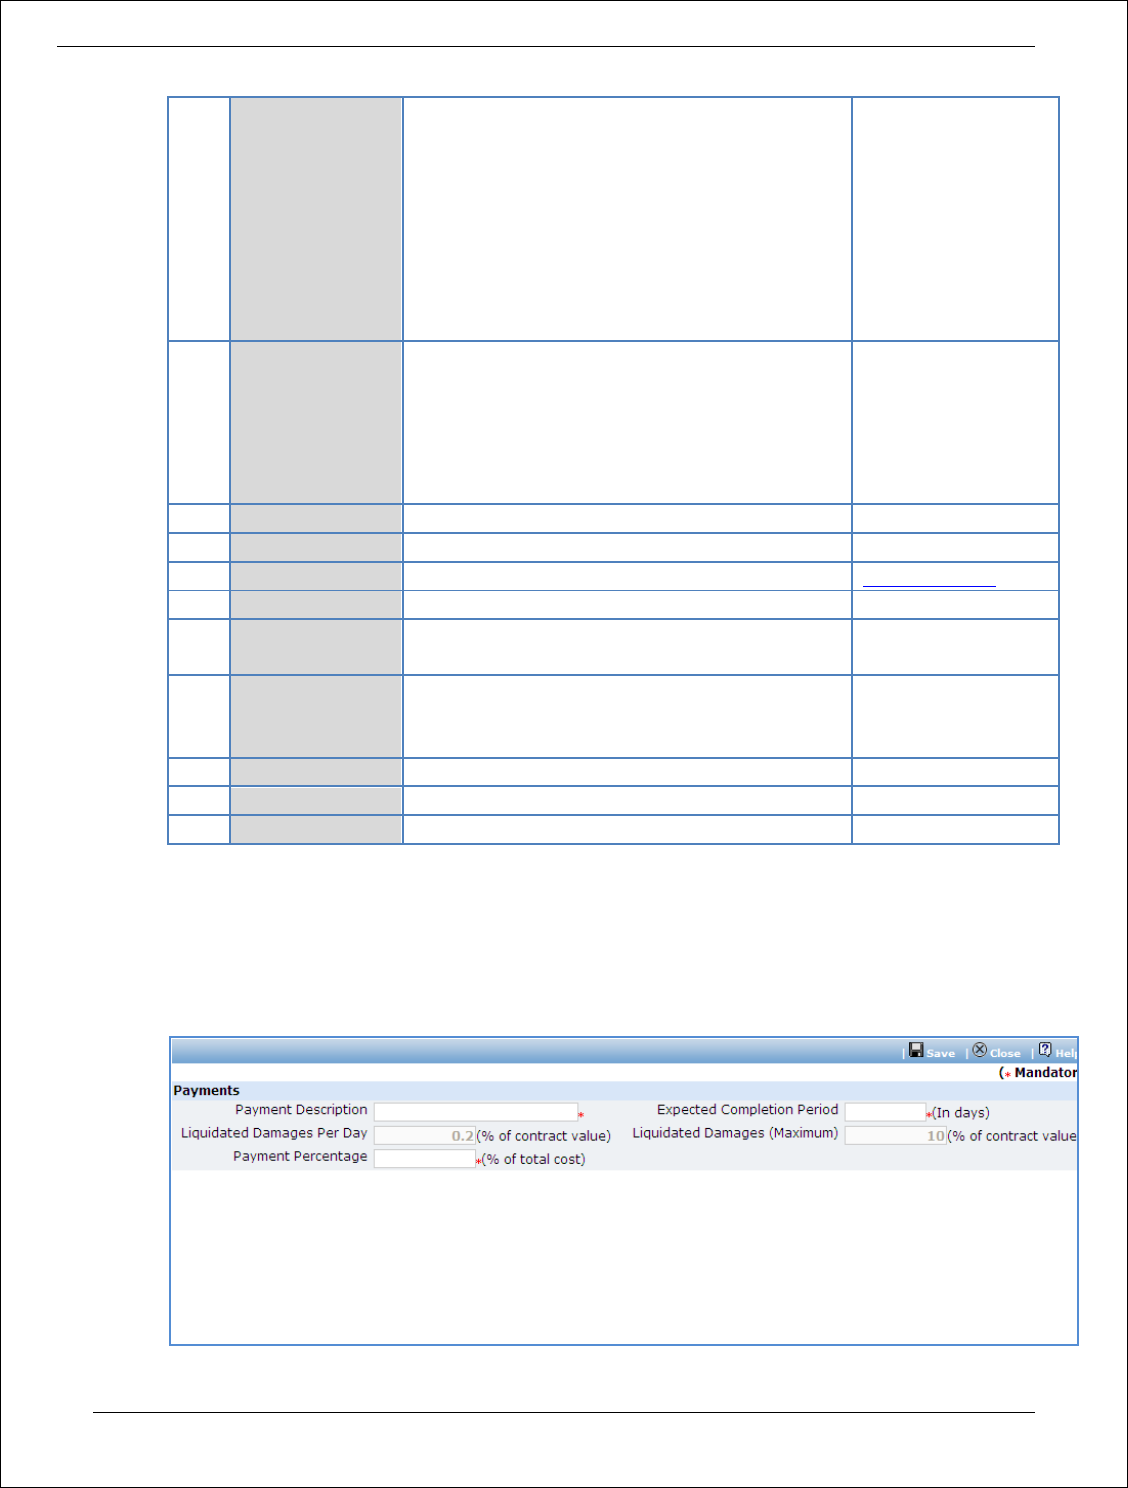
6. Click on ‘Step 5: Add/View Payment Terms’ link. ‘Payments’ subtab is shown in the lower section.
a. Click ‘Add’, which is within the subtab. A pop up will be seen
Procurement Management Support System – PMSS v1.0 User Guide
57
b. Fill the fields on the page. Details of the fields are mentioned below;
Sr.
No.
Field Name
Field Description
Sample Data
1
Payment Terms
Enter the payment title
1. On reaching
plinth level
(first level)
2. On Completion
2
Completion
Period
Enter the period in days in which completion is
expected once the contract is signed.
60
3
Payment
Percentage
By default percentage will be show, edit the
percentage if required
10
c. Click ‘Save’.
d. To add another payment term repeat steps from a. to c.
7. After filling mandatory data, click on ‘Step 6: Generate Invitation letter’ link. This will generate the
invitation letters for the added contractors.
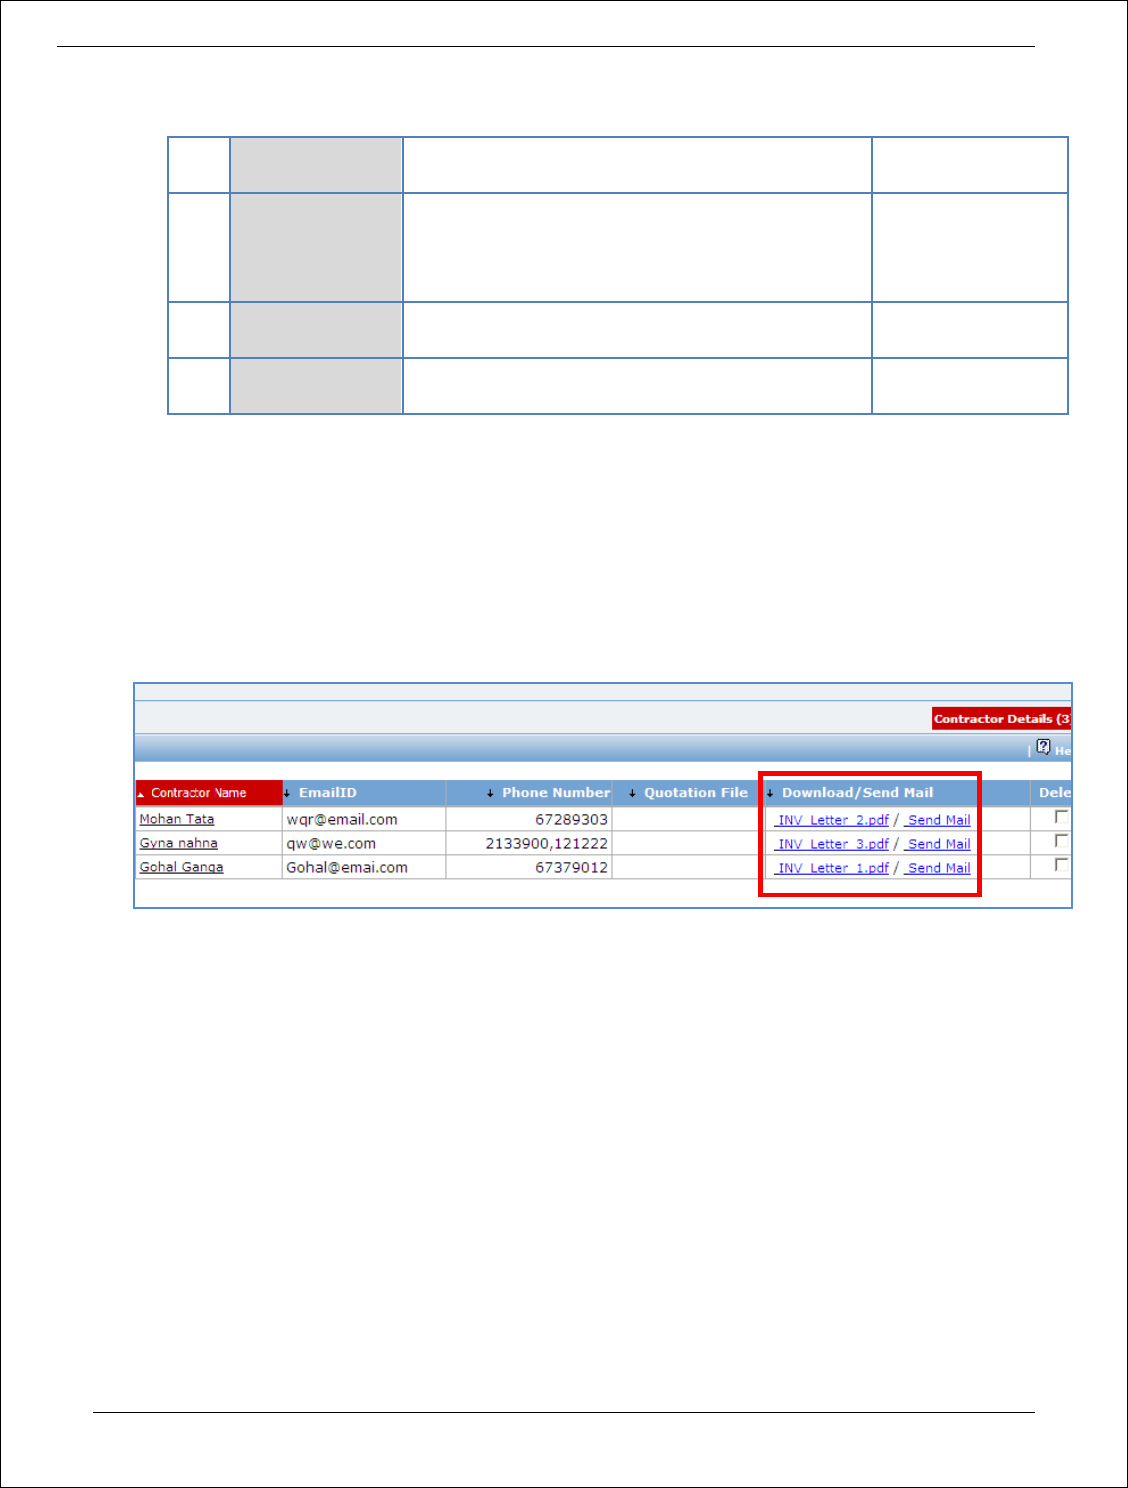
8. Click on ‘Step 7: View & Print Invitation Letter’. ‘Contractors Details’ subtab is shown in the lower
section
d. Click on the Invitation letter to view/ print the invitation letter.
e. Click on Send Mail to send the invitation letter via email
f. Repeat above steps for all contractors.
9. All the invitations letters generated are editable and necessary changes can be made to the
invitation letters before sending the letters to the suppliers. [It is not possible to email the updated
invitation letters through the “Send Mail” link]
10. Click on ‘Step 8 : Upload Invitation Letter” . The Documents sub tab is shown in the lower section.
Click on the “Add “ link to add the updated invitation letter. Any one Invitation letter
generated/updated for this package is to updated for reference.
11. On completion of ‘Invitation Letter’ stage click on ‘Move to Next Stage’. This will move the
procurement to ‘Quotation Opening’ stage.
Procurement Management Support System – PMSS v1.0 User Guide
58
Quotation Opening
In this stage the quotation opening is performed and responsive quotations are identified.
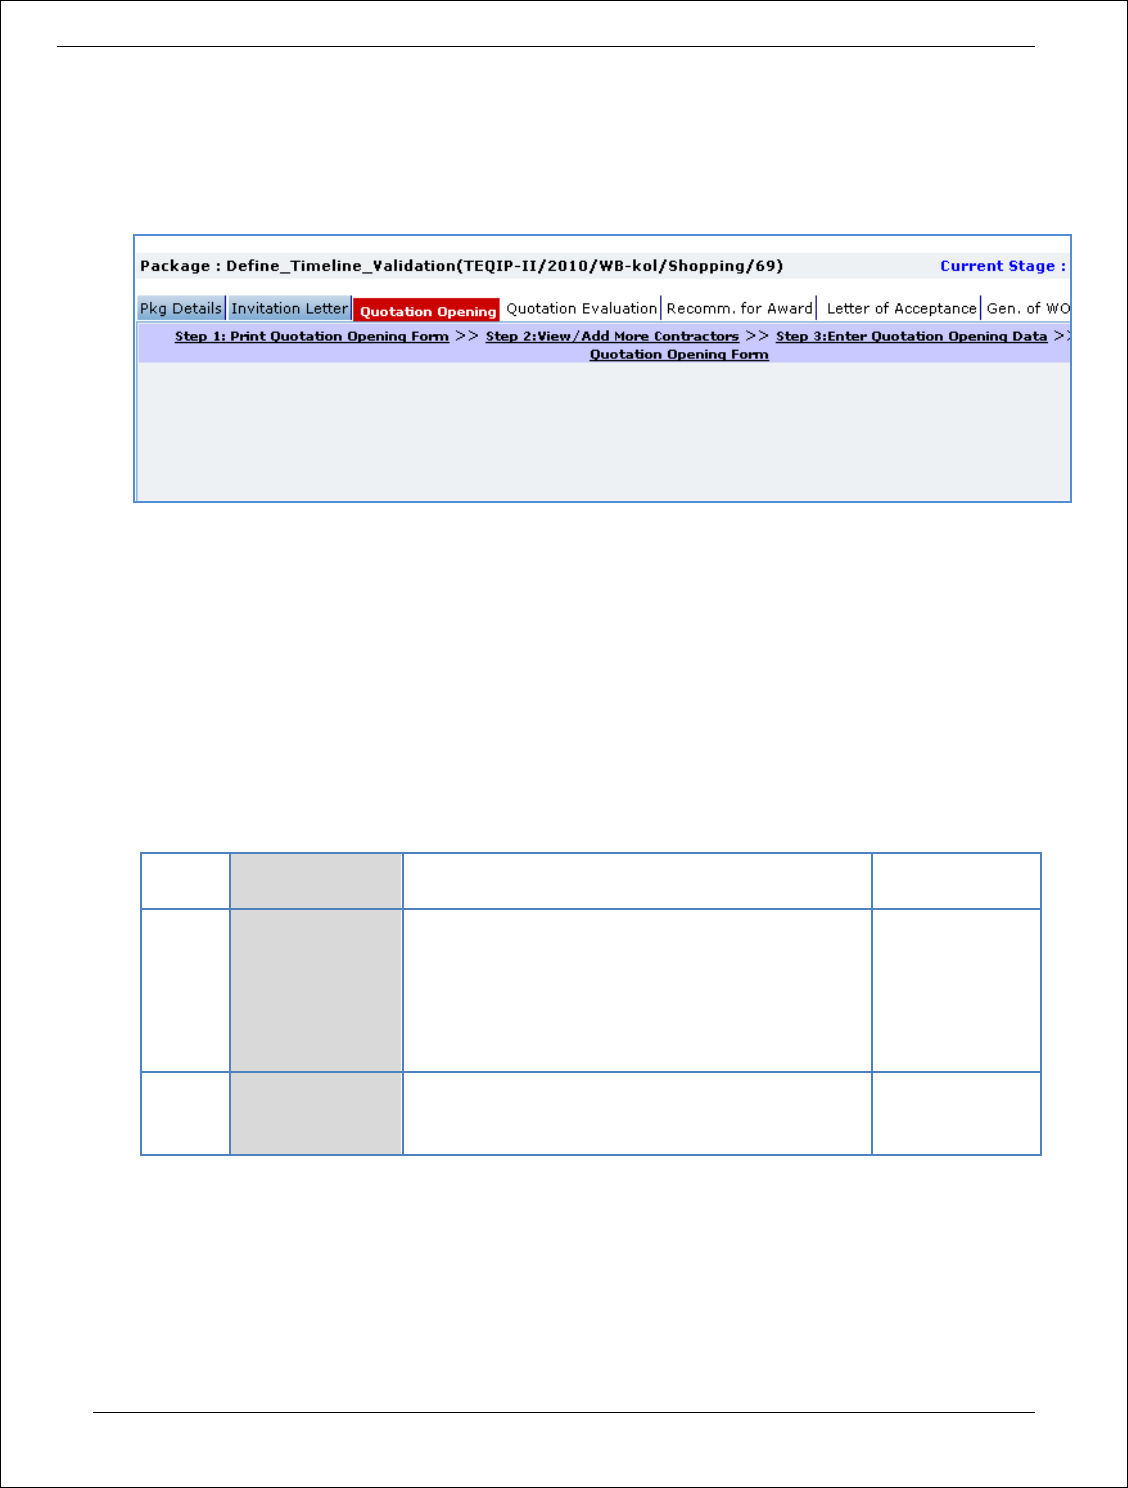
12. On the ‘Quotation Opening’ tab click on ‘Step 1: Print Quotation Opening Form’. This will open a
quotation opening form. This form can be used during Quotation Opening. Print of this form can be
taken and Quotation opening details can be recorded on this form. The Contractor names (which
were added during Invitation letter stage) are seen on this form against which quotation opening
details can be mentioned. Three extra columns are provided to accommodate names of any new
contractors who have submitted their quotations directly.
13. Click on ‘Step 2: Enter Quotation Opening Data’ and Fill the fields on the page. Details of the fields
are mentioned below;
Sr. No.
Field Name
Field Description
Sample Data
1
Quotation
Opening Date
Enter the actual date and time when quotation
was opened. Date format is DD/MM/YYYY and
time format is HH:MM, 24 hrs format. It is
recommended that opening should be done at
the start of the week so that there is ample time
to enter opening data in PMSS.
12/03/2011
16:00
2
Quotation MoM
Enter the Minutes of Meeting.
Larger MoM’s can be uploaded using the
documents subtab
14. Click ‘Save’
15. Click on the ‘Enter Quotation Opening Data’ link. A pop up will be seen

Procurement Management Support System – PMSS v1.0 User Guide
59
a. Enter the Responsiveness Criteria.
b. Click ‘Save’.
16. Click on ‘Step 3: Upload Quotation Opening Form’ link. ‘Documents’ subtab will be shown in the
lower section.
a. Click ‘Add’, which is within the subtab. A pop up will be seen
b. Fill the fields on the page. Details of the fields are mentioned below;
Procurement Management Support System – PMSS v1.0 User Guide
60
Sr.
No.
Field Name
Field Description
Sample Data
1
Document to be
uploaded
Browse the document that you want to
upload.
2
Document
Category
Select the appropriate document category.
Quotation
Opening Form
3
Description
Enter more information about the uploaded
document.
Signed Quotation
Opening Form
c. Click ‘Upload’ to upload the document in the system.
d. Uploaded document will appear on the list shown in ‘Documents’ section.
e. User can select and delete the document that has been uploaded in current stage of the
procurement. To delete a document, select ‘Delete’ checkbox against the document and click
‘Delete’ link.
17. On completion of ‘Quotation Opening’ stage click on ‘Move to Next Stage’. This will move the
procurement to ‘Quotation Evaluation’ stage.
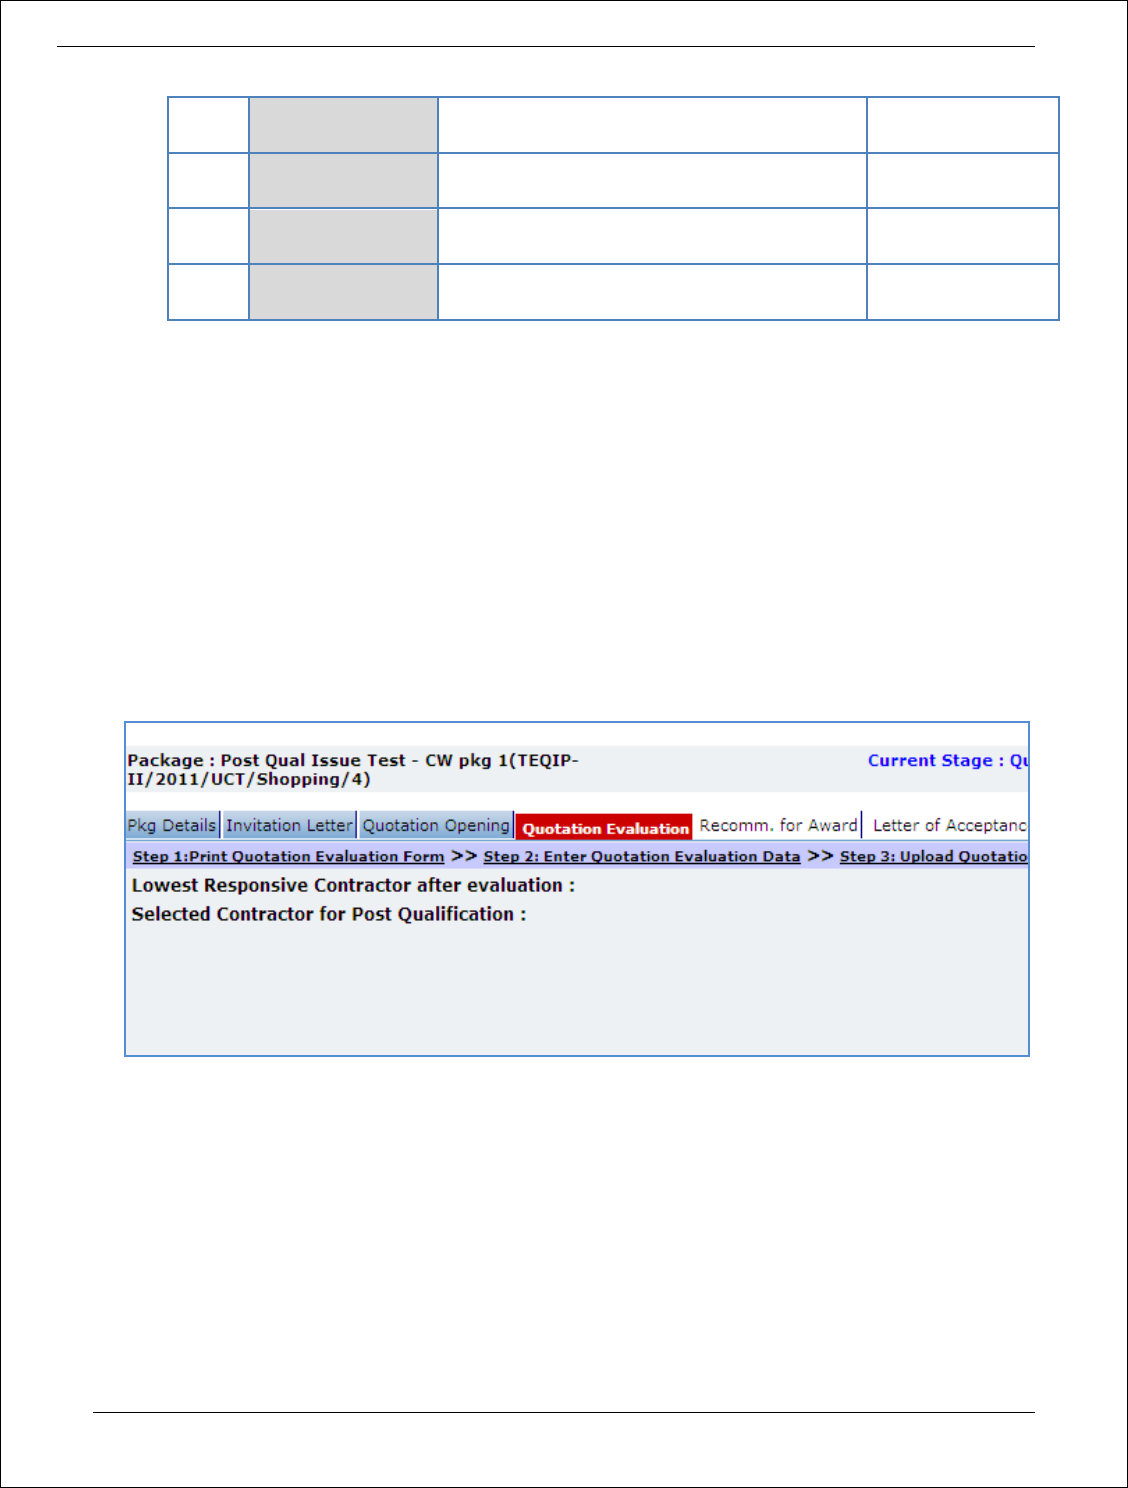
Quotation Evaluation
In this stage evaluation is performed and lowest evaluated contractor is identified.
18. On the ‘Quotation Evaluation’ tab click on ‘Step 1: Print Quotation Evaluation Form’. This will open a
quotation evaluation form. This form can be used during Quotation Evaluation. Print of this form can
be taken and Quotation Evaluation details can be recorded on this form.
19. Click on the ‘Step 2: Enter Quotation Evaluation Data’ link. A pop up will be seen
a. Enter the comparative data for all the contractors.
b. Click ‘Save’.
Procurement Management Support System – PMSS v1.0 User Guide
61
c. Click on ‘Quotation Details’ link, which is in front of each responsive supplier. A popup will be
seen.
d. Fill the fields on the page. Details of the fields are mentioned below;
Sr.
No.
Field Name
Field Description
Sample Data
1
Basic Cost per
unit
Basic cost for each item can be entered in
this field. Enter the basic cost per item as
given by the supplier
2000
2
Comments
Enter comments, if any
e. Click on ‘Save’
f. Quotation details of all responsive Contractors can be entered by repeating steps from c. to e.
20. System will show the lowest evaluated responsive contractor (L1) on the main page.
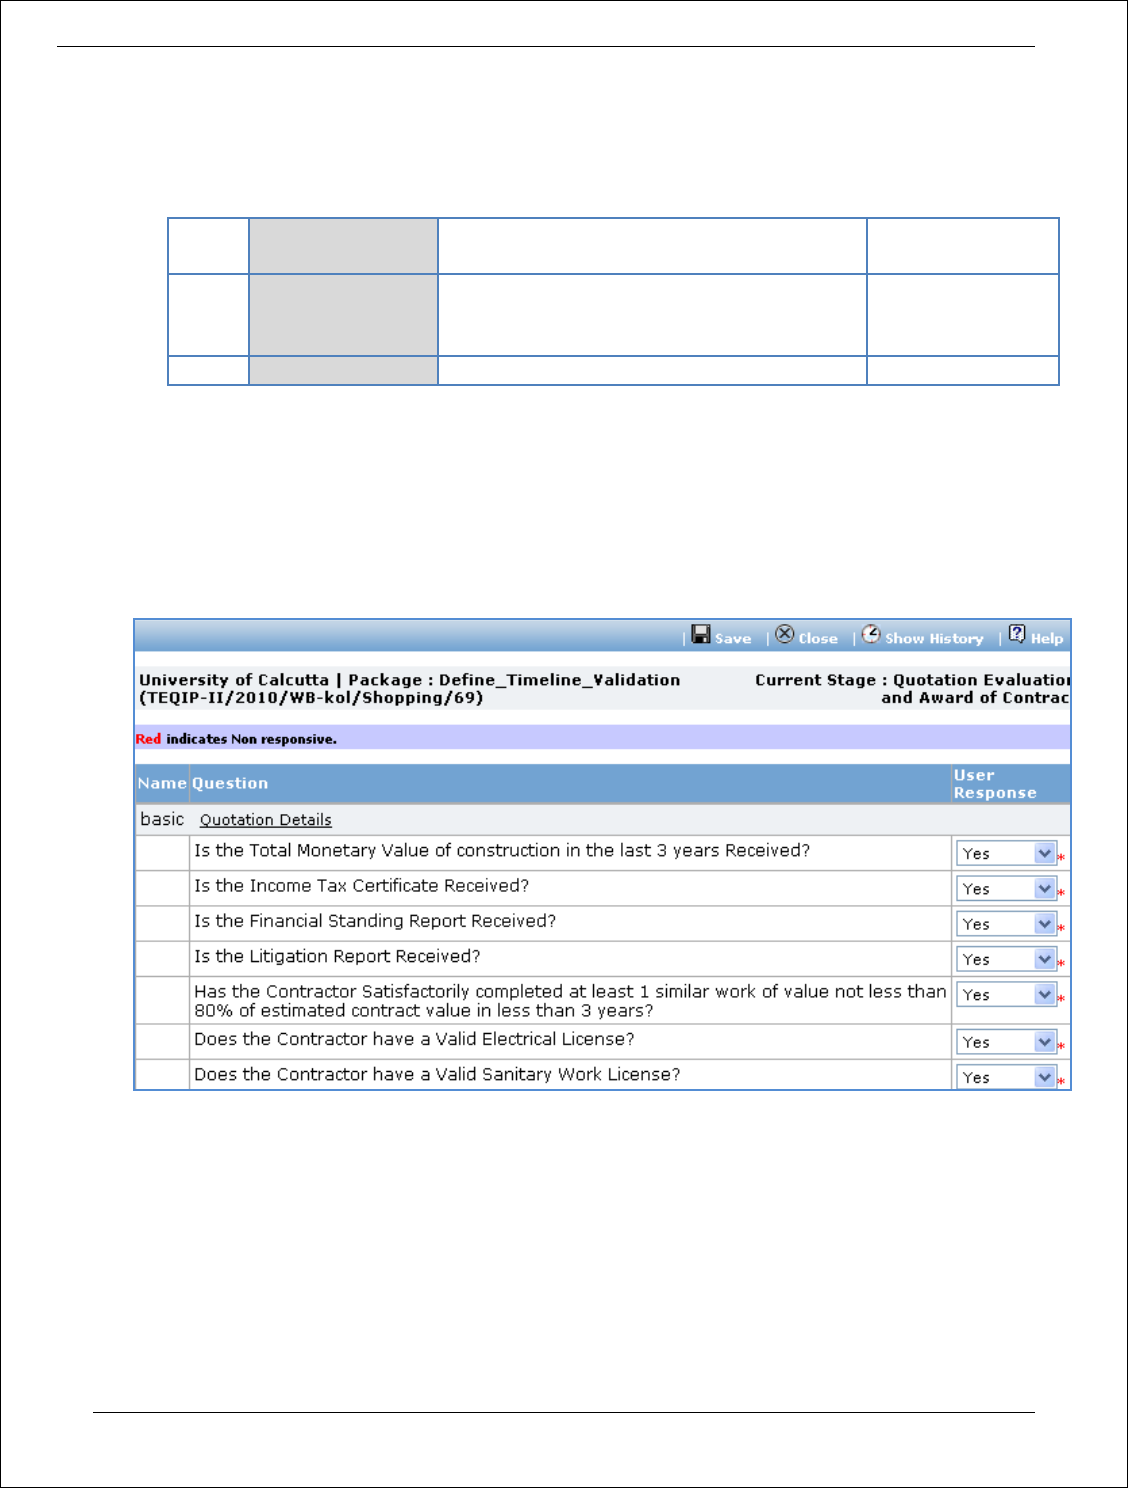
21. Click on ‘Perform Post Qualification’ link, which is in front of the contractor name. A pop up will be
seen
a. Enter the post qualification details
b. If the Contractor becomes non-responsive in this step then automatically next lowest evaluated
contractor will be seen.
c. Repeat the Post Qualification process for this Contractor.
22. Click on ‘Step 3: Upload Quotation Evaluation Form’ link. ‘Documents’ subtab will be shown in the
lower section.
a. Click ‘Add’, which is within the subtab. A pop up will be seen

Procurement Management Support System – PMSS v1.0 User Guide
62
b. Fill the fields on the page. Details of the fields are mentioned below;
Sr.
No.
Field Name
Field Description
Sample Data
1
Document to be
uploaded
Browse the document that you want to
upload.
2
Document
Category
Select the appropriate document category.
Quotation
Evaluation Form
3
Description
Enter more information about the uploaded
document.
Signed Quotation
Evaluation Form
c. Click ‘Upload’ to upload the document in the system.
d. Uploaded document will appear on the list shown in ‘Documents’ section.
e. User can select and delete the document that has been uploaded in current stage of the
procurement. To delete a document, select ‘Delete’ checkbox against the document and click
‘Delete’ link.
23. Click on ‘Step 4: View/Edit Contractor Details’ link to update supplier details which are unavailable at
this time of invitation letter generation. The list of all contractors is shown on the lower half of the
screen. Click on the contractor name to update the necessary details.
24. On completion of ‘Quotation Evaluation’ stage click on ‘Move to Next Stage’. This will move the
procurement to ‘Recommendation for Award’ stage.
Recommendation for Award
Procurement Management Support System – PMSS v1.0 User Guide
63
In this stage appropriate responsive supplier can be recommend. If the lowest evaluated responsive
contractor (L1) is not acceptable by the committee then another supplier can be selected in this
stage
25. Fill the fields on the page. Details of the fields are mentioned below;
Sr. No.
Field Name
Field Description
Sample Data
1
L1 Contractor
If the lowest evaluated responsive
contractor (L1) is not acceptable by the
committee then another contractor can
be selected
2
Recommendation Comments
Enter the comments
Note: If the Contract price (i.e. Evaluated Price) is more than 25% of the estimated price then the
package will be sent for prior review. Once the user clicks on ‘Move to Next Stage’ system
will ask for a confirmation before sending the package for prior review.
26. On completion of ‘Quotation Opening’ stage click on ‘Move to Next Stage’. This will move the
procurement to ‘Letter of Acceptance’ stage.
Letter of Acceptance
In this stage Letter of Acceptance is generated and acceptance is taken from the contractor

Procurement Management Support System – PMSS v1.0 User Guide
64
27. Fill the fields on the page. Details of the fields are mentioned below;
Sr. No.
Field Name
Field Description
Sample Data
1
LOA Generated Date
System will show the current date (i.e.
today’s date) by default. Click on ‘Save’.
Today’s Date
2
Performance Security
Amount
Will be auto calculated by the system
3
Maintenance Period Expiry
Date
Enter the maintenance period date. Date
format is DD/MM/YYYY
29/8/2011
Note: If Generated date is greater than the bid validity (i.e. difference between Bid opening date
and Generated date is more than the bid validity given by the selected supplier) system will
ask to provide a new bid validity. Enter the total new bid validity. E.g. if original validity was
90 days and contractor has extended it by 30 days then enter 120 days.
28. Click on ‘Step 2: Generate Acceptance Letter’ link. System will give an option to Open/ Save the LOA.
Save the LOA on your computer with a proper name. Update the sections highlighted in yellow and
save the document.
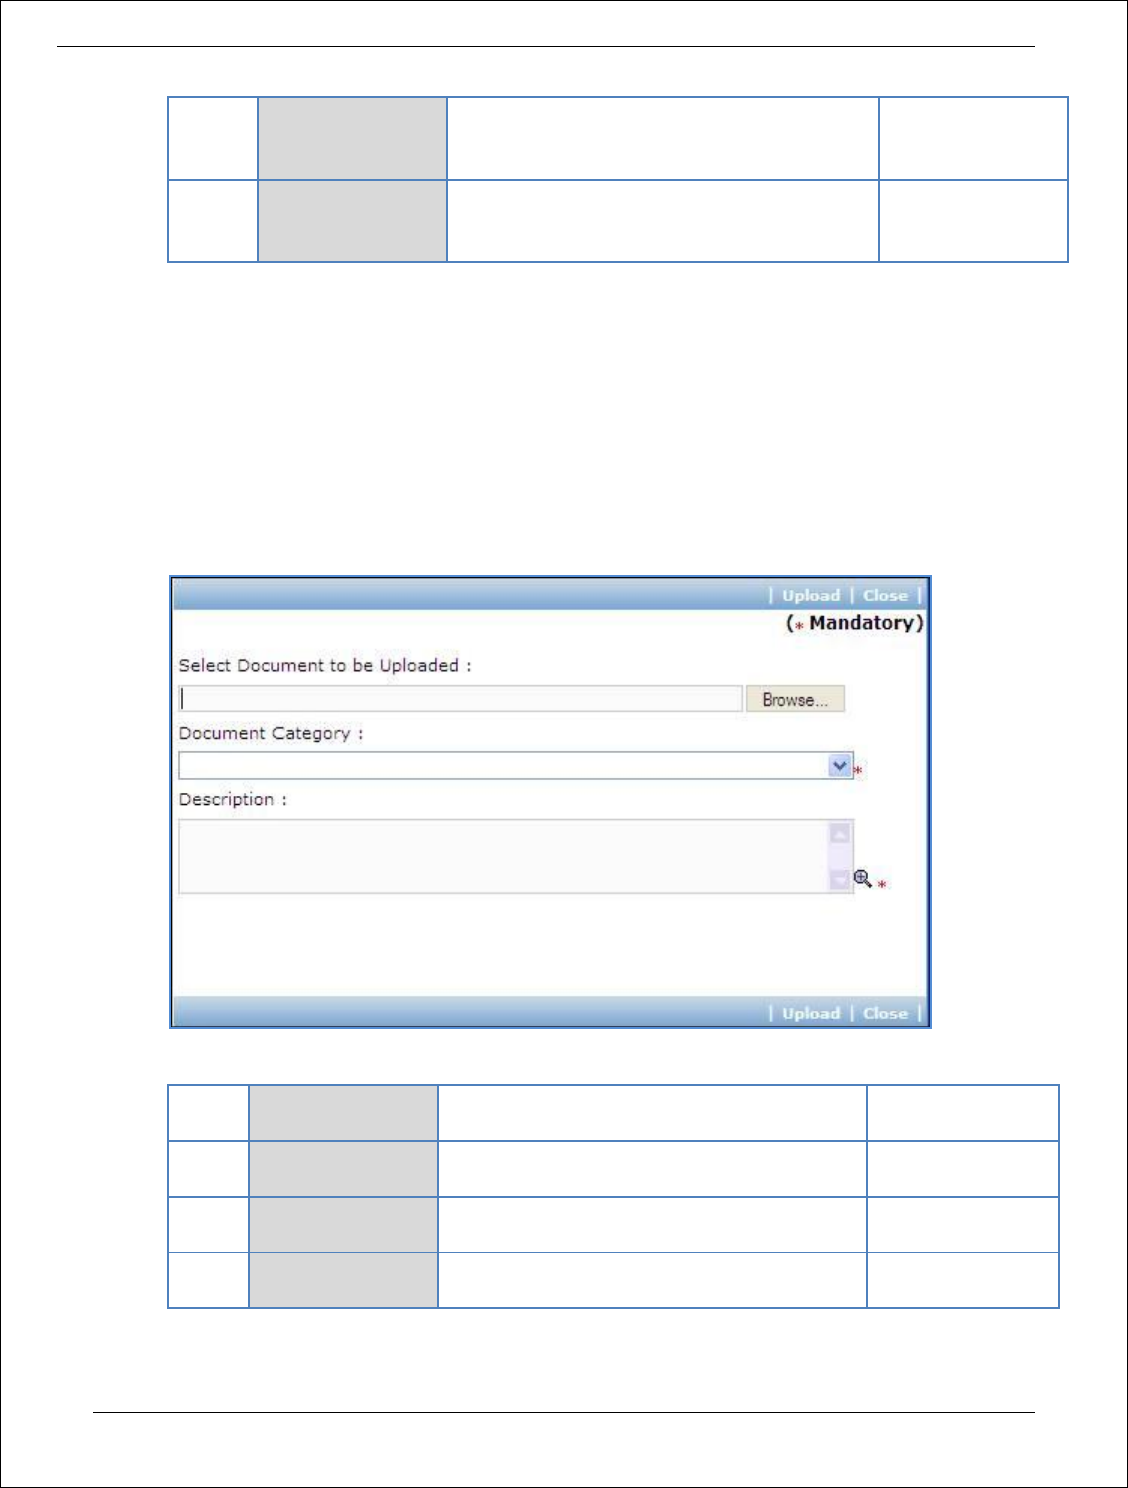
29. Click on ‘Step 3: Upload Letter Of acceptance’ link. ‘Documents’ subtab will be shown in the lower
section.
a. Click ‘Add’, which is within the subtab. A pop up will be seen

Procurement Management Support System – PMSS v1.0 User Guide
65
b. Fill the fields on the page. Details of the fields are mentioned below;
Sr.
No.
Field Name
Field Description
Sample Data
1
Document to be
uploaded
Browse the document that you want to
upload.
2
Document
Category
Select the appropriate document category.
LOA
3
Description
Enter more information about the uploaded
document.
Signed LOA
uploaded
c. Click ‘Upload’ to upload the document in the system.
d. Uploaded document will appear on the list shown in ‘Documents’ section.
e. User can select and delete the document that has been uploaded in current stage of the
procurement. To delete a document, select ‘Delete’ checkbox against the document and click
‘Delete’ link.
30. On completion of ‘Letter of Acceptance’ stage Click on ‘Move to Next Stage’. This will move the
procurement to ‘Gen of WO’ stage.
Gen of WO
In this stage Work Order is generated and Payment terms are updated with expected completion
and payment dates

Procurement Management Support System – PMSS v1.0 User Guide
66
31. Fill the fields on the page. Details of the fields are mentioned below;
Sr. No.
Field Name
Field Description
Sample Data
1
Performance Security rcvd
Date
Enter the date when Performance
Security was received from the
contractor. Date format is DD/MM/YYYY
12/05/2011
2
Performance Security Expiry
Date
Enter the date when Performance
Security will expiry. This date should be
more than Work Completion Date +
Maintenance Period Expiry Date + 28
days
29/06/2013
3
Contract Start Date
Enter the date when contract is expected
to start. Date format is DD/MM/YYYY
01/06/2011
4
Work Start Date
Enter the date when work is expected to
start. Date format is DD/MM/YYYY
01/06/2011
5
Work Completion Date
Enter the date when work is expected to
complete. Date format is DD/MM/YYYY
23/05/2012
6
Basic Value
Will be auto populated from the
Evaluated Price
System
calculated
7
Sum of all Applicable Taxes
Enter the total amount of all the taxes
2300
8
Contract Value
Will be auto populated as Basic Value +
Sum of all Applicable Taxes
System
calculated
9
WO Generated Date
Will be auto populated as Current Date.
The field is editable. Enter the date on
which Work Order has been generated.
Date format is DD/MM/YYYY
30/05/2011
32. Click on ‘Step 2: View/Update Payments details’ link. ‘Payments’ subtab will be seen in the lower
section.
a. Click on payment term a pop up will be seen
b. Fill the fields on the page. Details of the fields are mentioned below;
Sr. No.
Field Name
Field Description
Sample Data
Procurement Management Support System – PMSS v1.0 User Guide
67
1
Expected
Completion Date
This is auto calculated as Contract Start Date
+ Expected Completion Period. Edit the date
if required.
30
2
Expected Payment
Date
Enter the expected date when payment will
be made against this completion. Date
format is DD/MM/YYYY
12/06/2011
c. Click ‘Save’.
d. Update the other payment terms by repeating steps a. to c.
33. Click on ‘Generate Work Order‘link. System will give an option to Open/ Save the WO. Save the LOA
on your computer with a proper name. Update the sections highlighted in yellow and save the
document.
34. Click on ‘Step 4: Upload Work Order’ link. ‘Documents’ subtab will be shown in the lower section.
a. Click ‘Add’, which is within the subtab. A pop up will be seen
b. Fill the fields on the page. Details of the fields are mentioned below;
Sr.
No.
Field Name
Field Description
Sample Data
1
Document to be
uploaded
Browse the document that you want to
upload.
2
Document
Category
Select the appropriate document category.
Work Order
3
Description
Enter more information about the uploaded
document.
Signed WO
uploaded
c. Click ‘Upload’ to upload the document in the system.
Procurement Management Support System – PMSS v1.0 User Guide
68
d. Uploaded document will appear on the list shown in ‘Documents’ section.
e. User can select and delete the document that has been uploaded in current stage of the
procurement. To delete a document, select ‘Delete’ checkbox against the document and click
‘Delete’ link.
35. If the WO has been finalized then select YES in the “WO Finalized drop down. All finalized contracts
will be listed in the “Awarded Contracts” section on the Home page.
36. On completion of ‘Work Order’ stage Click on ‘Move to Next Stage’. This will move the procurement
to ‘WCC & Payments’ stage.
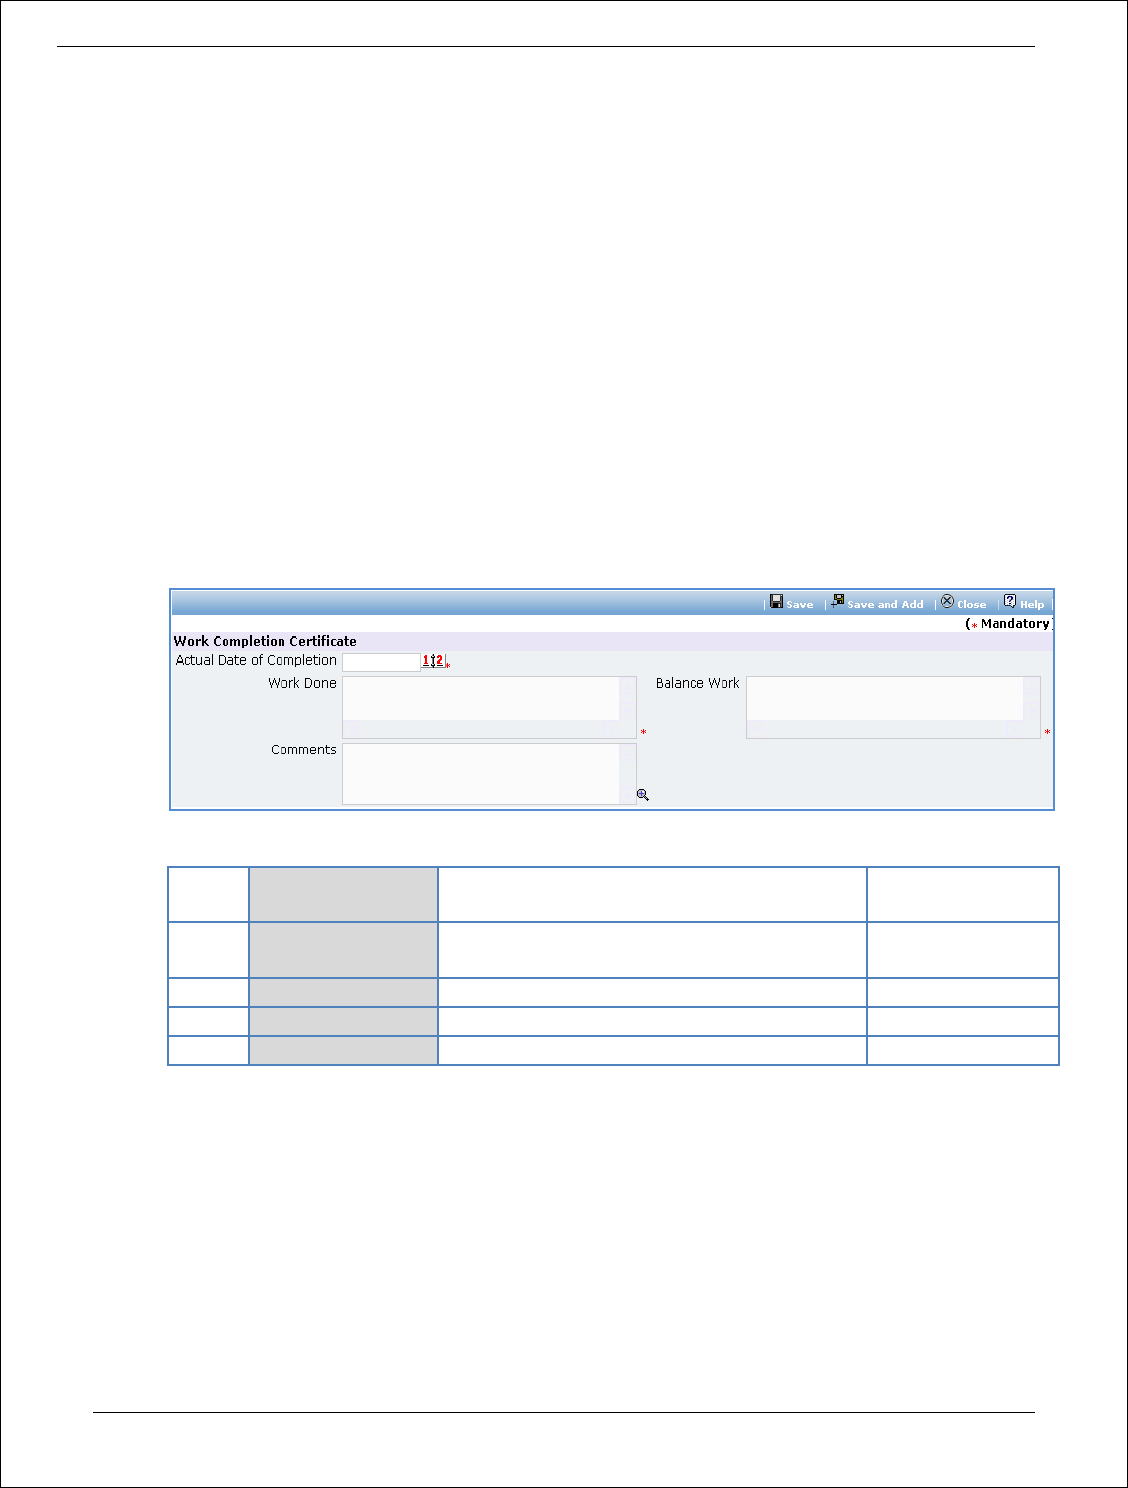
WCC & Payments
In this stage Work completion details are captured and Payment tracking is performed.
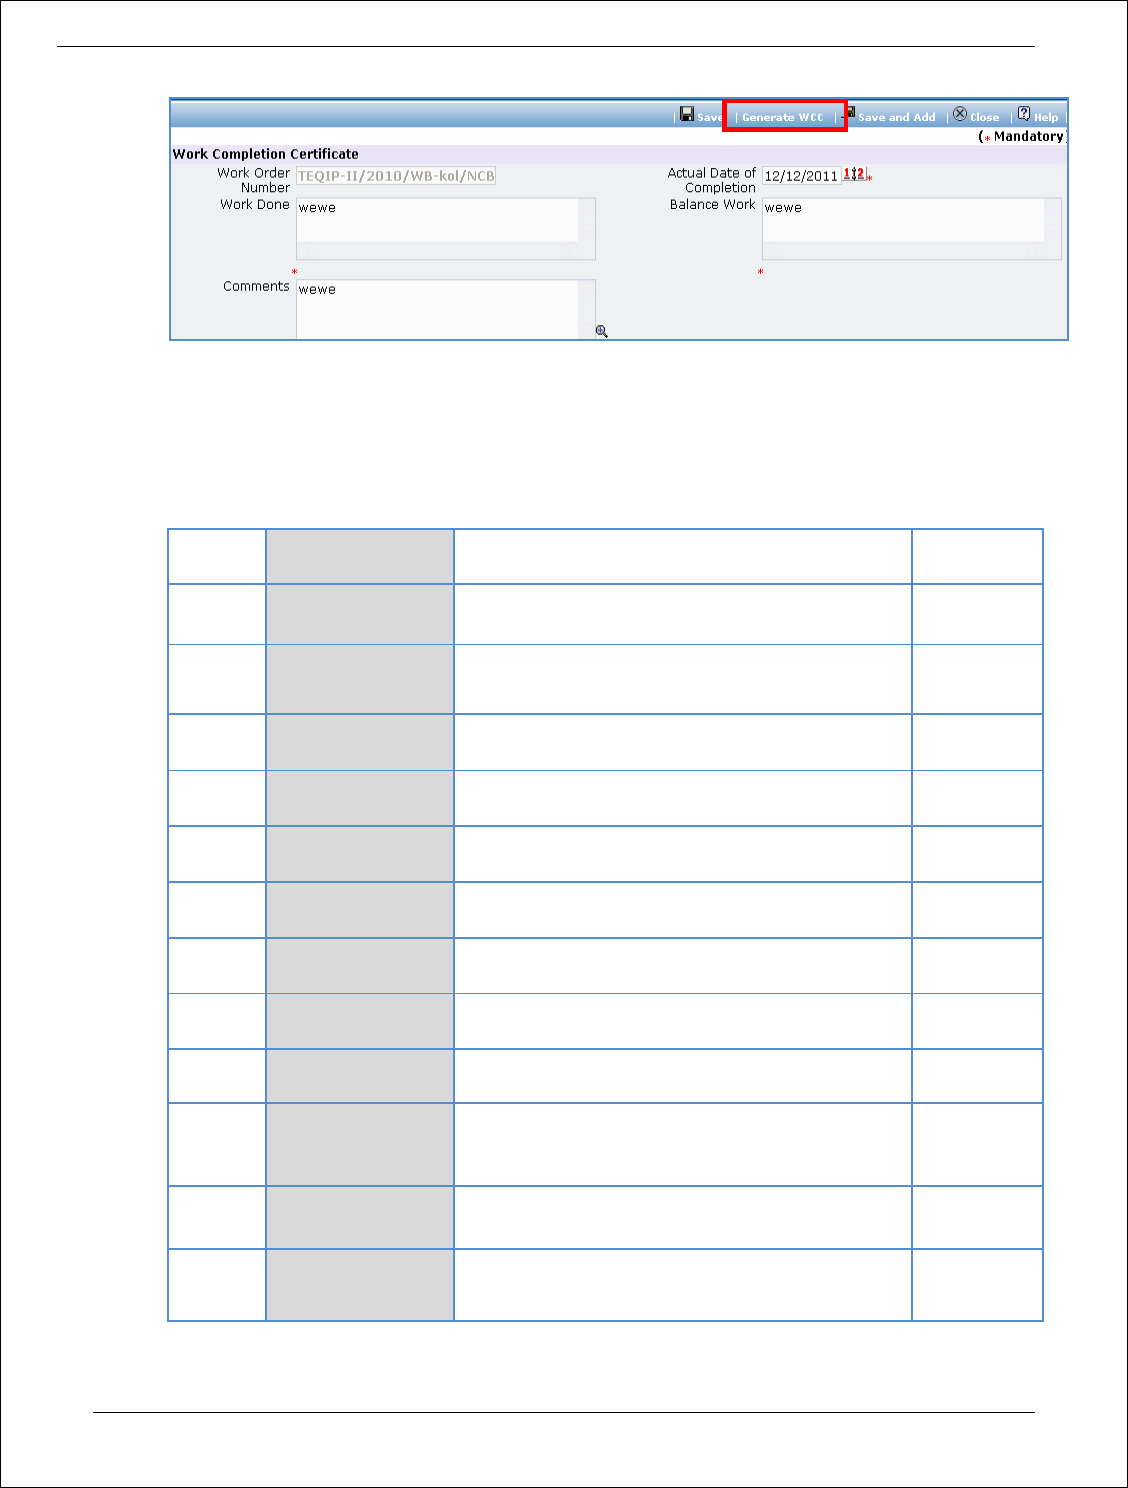
37. Click On ‘Step 1: Add/View Work Completion’ link. ‘Work Completion’ subtab will be seen
a. Click on ‘Add’, a pop up will be seen
b. Fill the fields on the page. Details of the fields are mentioned below;
Sr.
No.
Field Name
Field Description
Sample Data
1
Actual Date of
Completion
Enter the completion date. Date format is
DD/MM/YYYY
22/18/2011
2
Work Done
Mention the work completion details
3
Balance Work
Mention the details of the remaining work
4
Comments
Enter comments, if any
c. Click ‘Save’
d. Click on ‘ Generate WCC’ , which is on the upper bar of the main (WCC) section. WCC Report will
be generated.
Procurement Management Support System – PMSS v1.0 User Guide
69
e. To add another record for WCC repeat steps from a. to d.
38. Click on ‘Step 2: Enter/View Payment Details’. ‘Payments’ subtab will be seen in the lower section
a. Click on the Payment Term a popup will be seen
b. Fill the fields on the page. Details of the fields are mentioned below;
Sr. No.
Field Name
Field Description
Sample
Data
1
WCC Generated?
Check this box if Work completion certificate is
generated
2
Work Completed?
Check this box if work is completed
3
Actual Completion
Date
Enter the actual date of completion. Date
format is DD/ MM/ YYYY
12/10/2011
4
Liquidated
Damages Waived?
Check this box if Liquidated Damages are going
to be waived
5
Liquidated
Damages
Will be auto populated if ‘Actual Completion
date’ is more than ‘Expected completion date’
6
Actual Completion
Period
Enter the actual completion period in days
7
Comments
Comment on Actual completion period, if
required
8
Actual Payment
Date
Enter the date when payment is made. Date
format is DD/MM/YYYY
13/08/2011
9
Comments
Comment on Actual Payment Date, if required
8
Actual Payment
Amount
Enter the actual amount paid. Ideally, this
amount + the Retention Money amount should
match the Expected Payment amount
12000
10
Comments
Comment on Actual Payment Amount, if
required
11
Retention Money
Will be auto calculated as 5% of Expected
payment amount
2300

Procurement Management Support System – PMSS v1.0 User Guide
70
12
Cheque/Draft
Number
Enter the Cheque/ Draft number by which
payment is made
40023467
c. Click ‘Save’
d. To enter details of another payment repeat steps a. to c.
39. In cases where Amendment is made click on ‘Fill Amendment details, if required’ link.
40. Fill the fields on the page. Details of the fields are mentioned below;
Sr. No.
Field Name
Field Description
Sample
Data
1
Is Amendment required?
Select yes to perform amendment.
Other fields (described below) will be
shown once ‘Yes’ option is selected.
Yes
2
Maintenance Period Expiry Date
System will show the Maintenance
Period Expiry Date. Edit the date, if
required.
4
Work Completion Date
System will show the completion date.
Edit the date as per new completion
date.
3
Performance Security Amount
System will show the performance
security amount. Edit the amount, if
required
5
Performance Security Expiry
Date
System will show the performance
security expiry Date. Edit the date as
per new expiry date
a. Click ‘Save’
b. ‘Payments’ subtab is shown in the lower section. Click on the payment term name and update
the details as per new terms.
Note: Only those payment terms are editable which do not have any actual completion date
c. Select ‘Yes’ in the ‘Amendment Complete?’ field.
d. Click ‘Save’. This will complete the amendment process. After completing the amendment user
can continue to track WCC and Payments.
41. Once all the details for all the payments are recorded this Procurement can be marked as complete.
Click on ‘Completion Checklist’, checklist will be seen
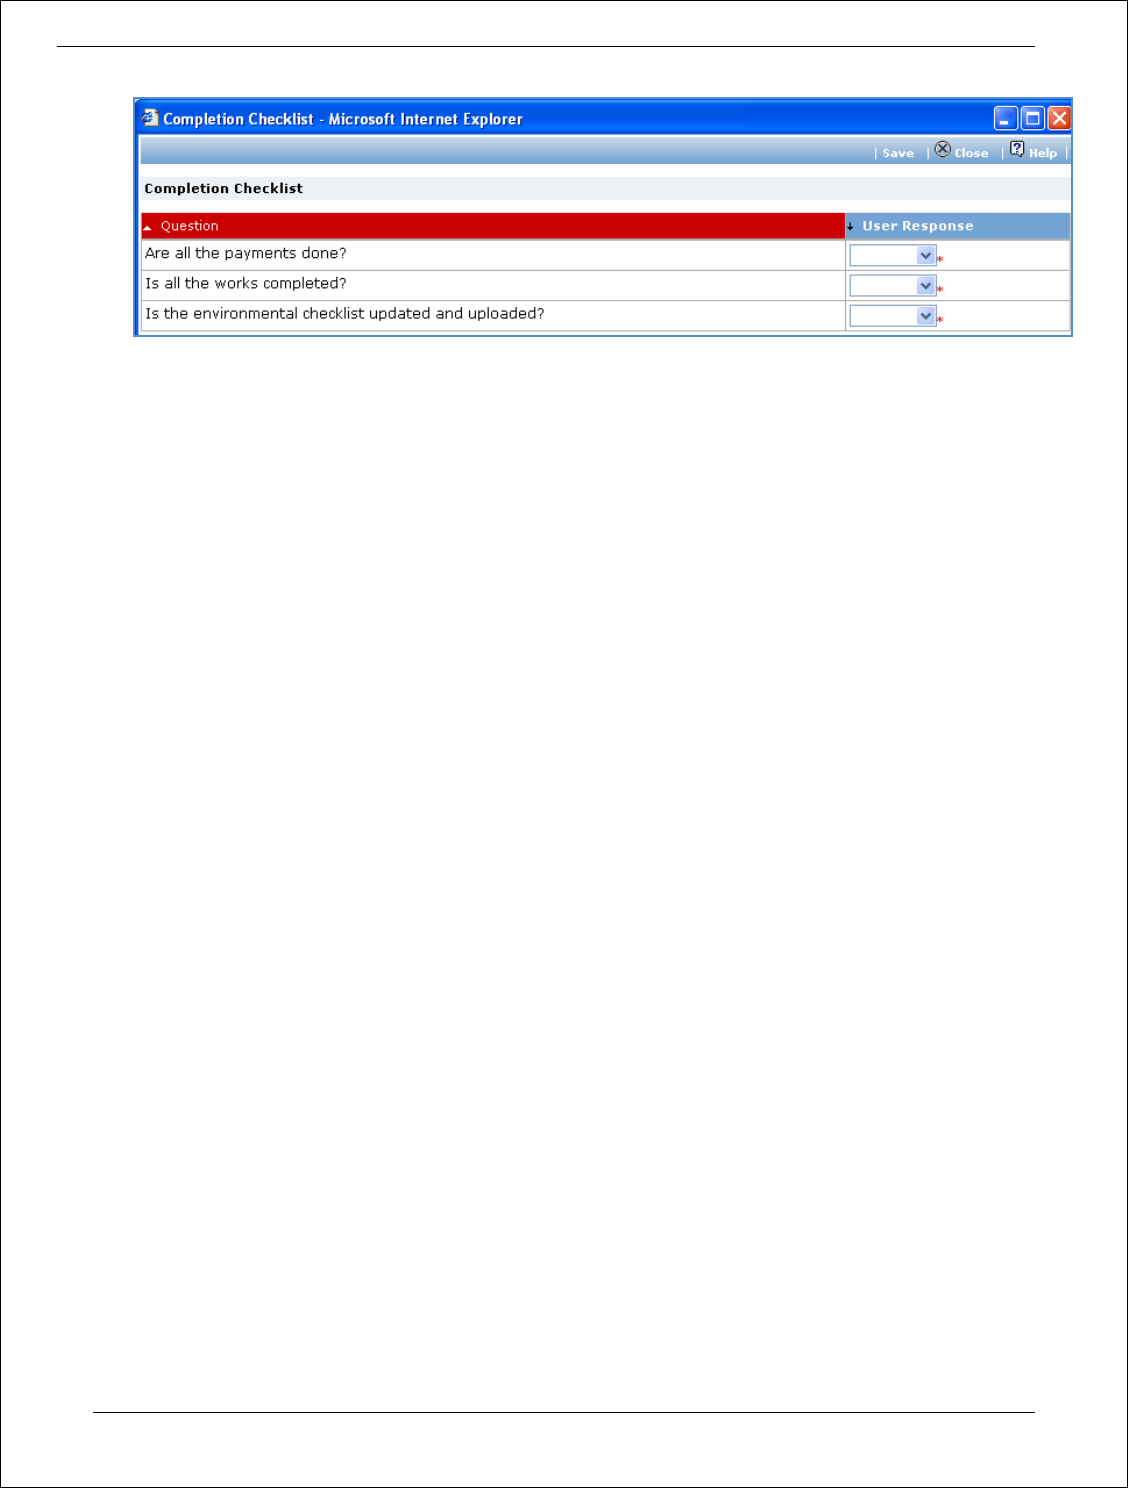
Procurement Management Support System – PMSS v1.0 User Guide
71
c. Fill in the completion checklist
d. Click ‘Save’
42. Click on ‘Complete Procurement Process’ this will complete the procurement for that Package.
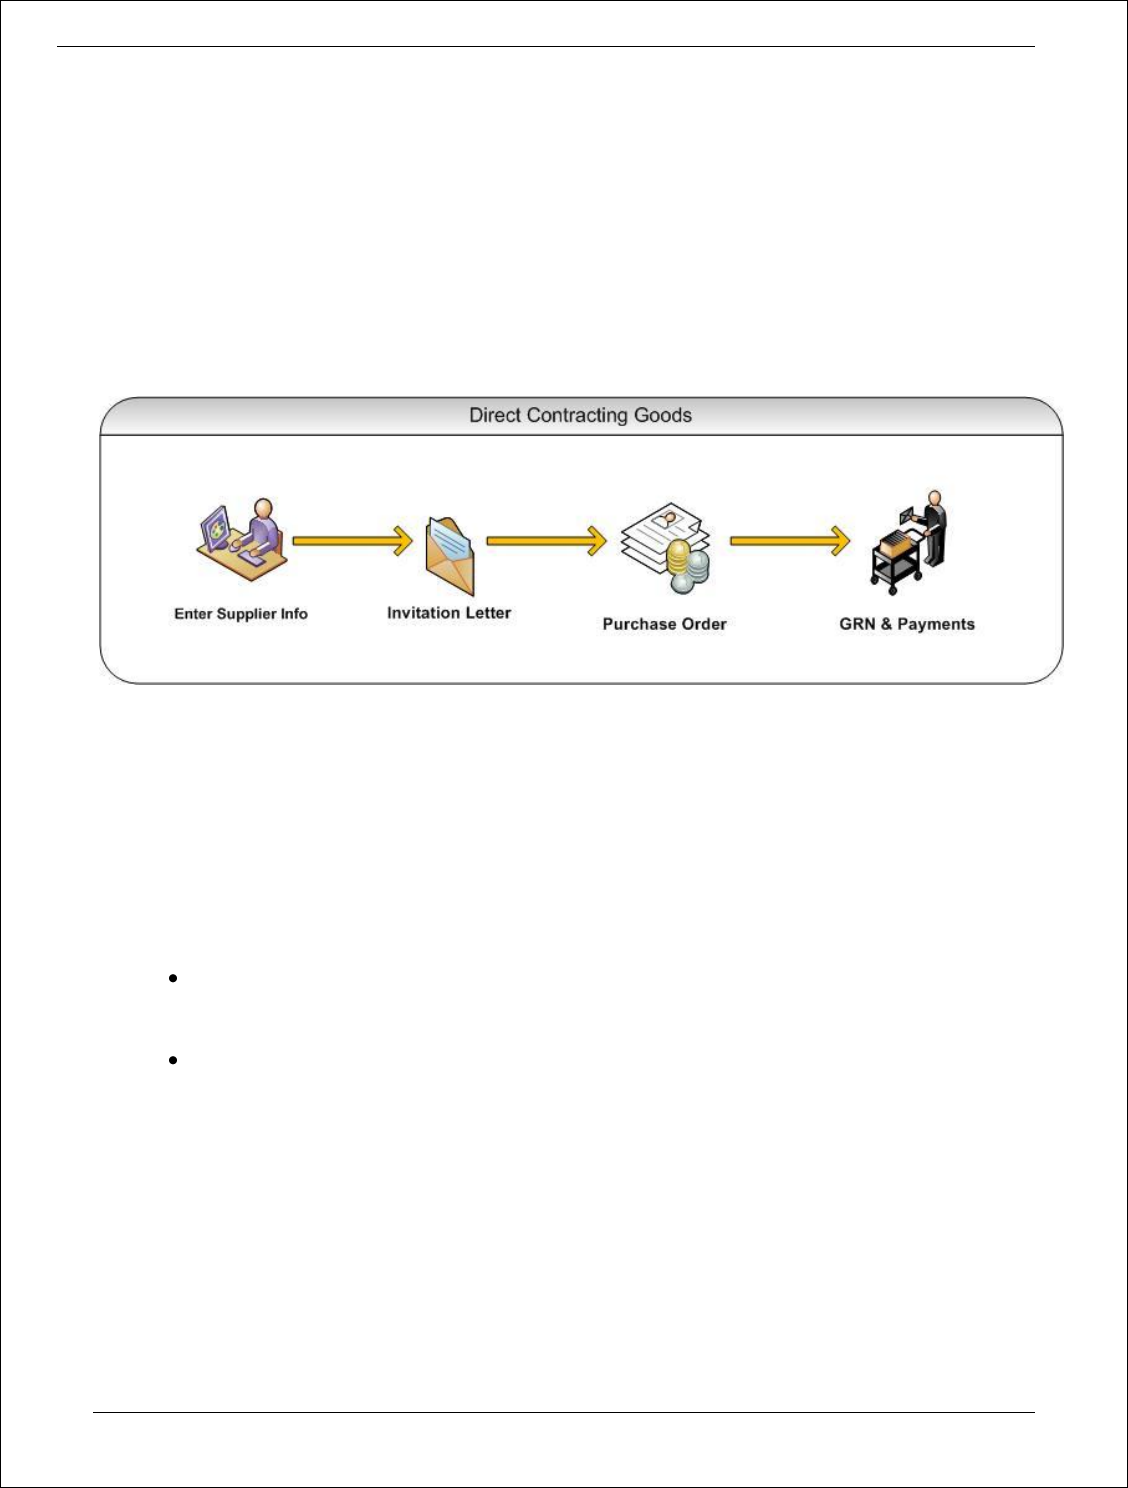
Procurement Management Support System – PMSS v1.0 User Guide
72
Direct Contracting
Purpose
To perform procurement of goods using Direct Contracting method.
Process flow
Role(s)
o Procurement Coordinator (institution)
Prerequisite
o Package to be procured should fall under category goods/ civil works.
Process Details
Direct Contracting is similar to Shopping except;
Quotations are invited from only one supplier/ contractor. Thus the condition on minimum
three suppliers/ contractors does not exist for Direct Contracting.
Quotation Opening and Quotation Evaluation steps are not present for Direct Contracting.
First stage of Direct contracting is ‘Invitation Letter’.
Invitation Letter
43. Steps 1 through 7 for direct contracting are the same as Shopping with the invitation letter being
generated the single supplier.
44. After uploading the invitation letter in step 7 , click on Step 8 to enter the price received from the
supplier in response to the invitation letter and click on the save button on top of the screen..
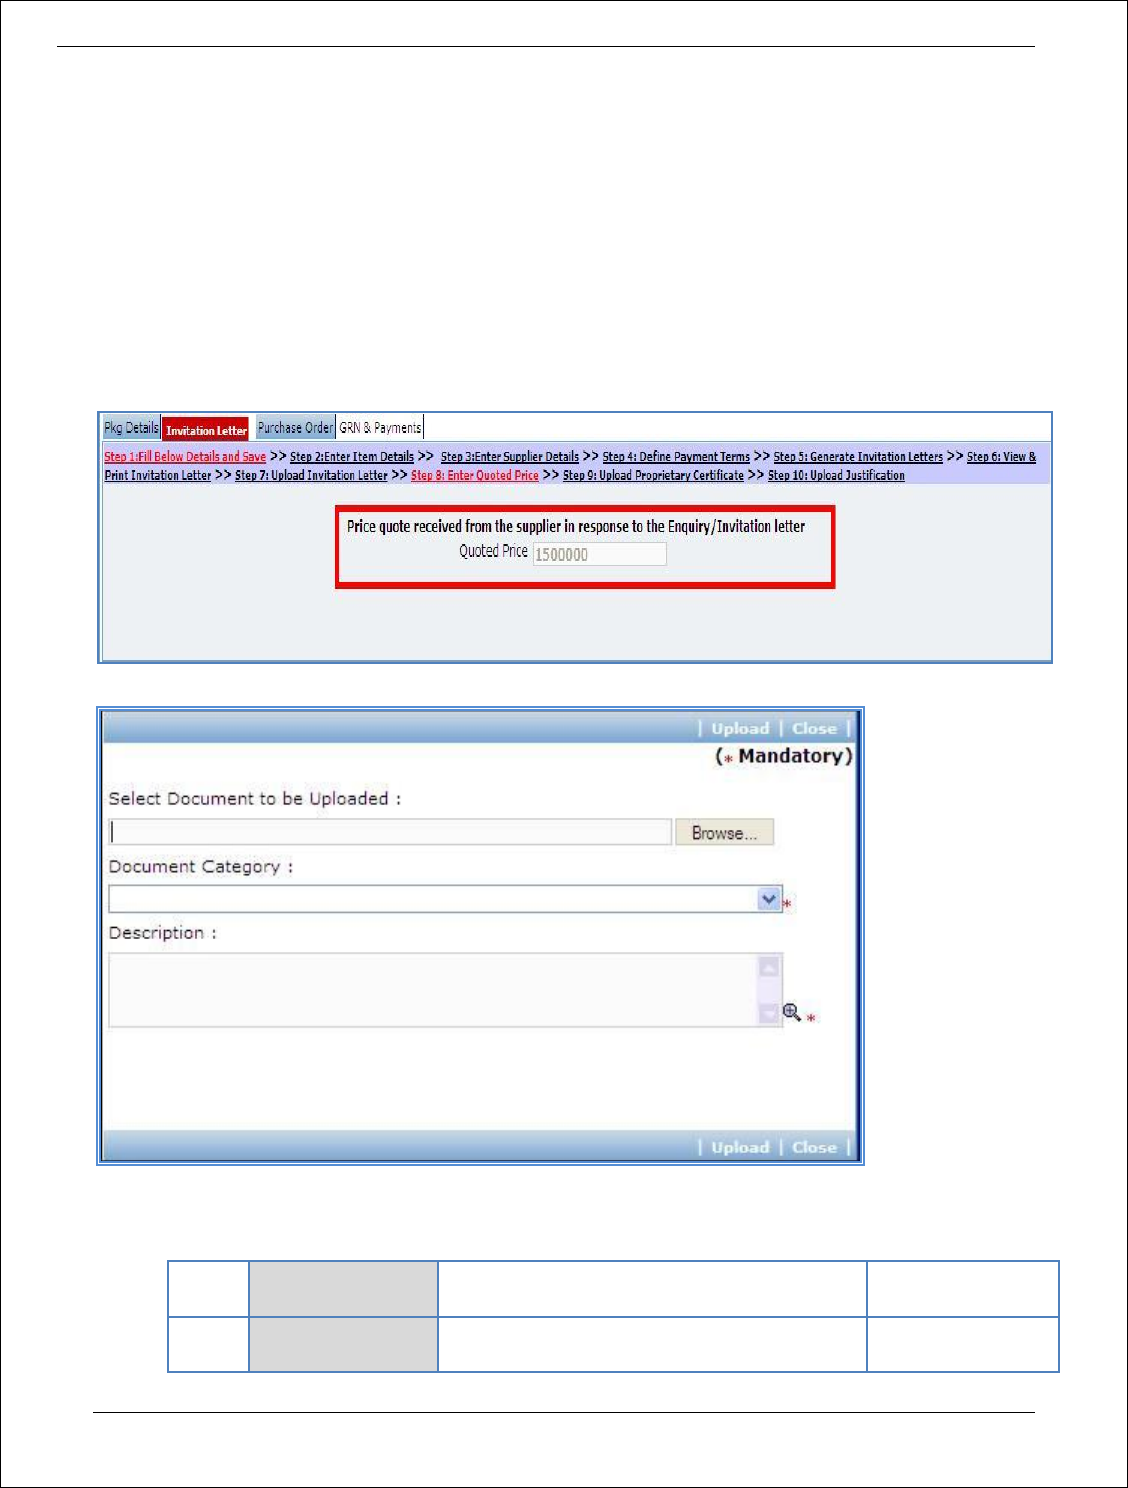
Procurement Management Support System – PMSS v1.0 User Guide
73
45. After uploading the invitation letter in step 7, click on Step 8: Enter Quoted Price to enter the price
received from the supplier in response to the invitation letter and click on the save button on top of
the screen.
46. Click on Step 9 : Upload Proprietary certificate to upload the proprietary certificate. [This step is
applicable only for procurement of proprietary items]. The ‘Documents’ subtab will be shown in the
lower section.
a. Click ‘Add’, which is within the subtab. A pop up will be seen
b. Fill the fields on the page. Details of the fields are mentioned below;
Sr.
No.
Field Name
Field Description
Sample Data
1
Document to be
uploaded
Browse the document that you want to
upload.

Procurement Management Support System – PMSS v1.0 User Guide
74
2
Document
Category
Select the appropriate document category.
Proprietary
Certificate
3
Description
Enter more information about the uploaded
document.
c. Click ‘Upload’ to upload the document in the system.
d. Uploaded document will appear on the list shown in ‘Documents’ section.
e. User can select and delete the document that has been uploaded in current stage of the
procurement. To delete a document, select ‘Delete’ checkbox against the document and click
‘Delete’ link.
47. Click on Step 10 : Upload Justification to upload the justification document. Follow steps a to e to
upload the document.
48. If price quoted by the supplier exceeds 20,000$, the package will be sent to NPIU for prior review
49. Next step is “Purchase Order” in case of Goods and "Gen of WO” in case of Works. All the further
steps are similar to Shopping method.
DGS & D
Process Details
DGS & D is similar to Direct Contracting except;
Rate Contract No., RC Item No. and Model No. have to be mentioned for the item(s).
Instead of invitation letter a letter of enquiry is generated.

Procurement Management Support System – PMSS v1.0 User Guide
75
COMPETITIVE BIDDING METHOD
Procurement Using NCB/ ICB/ LIB Method
Chapter
7
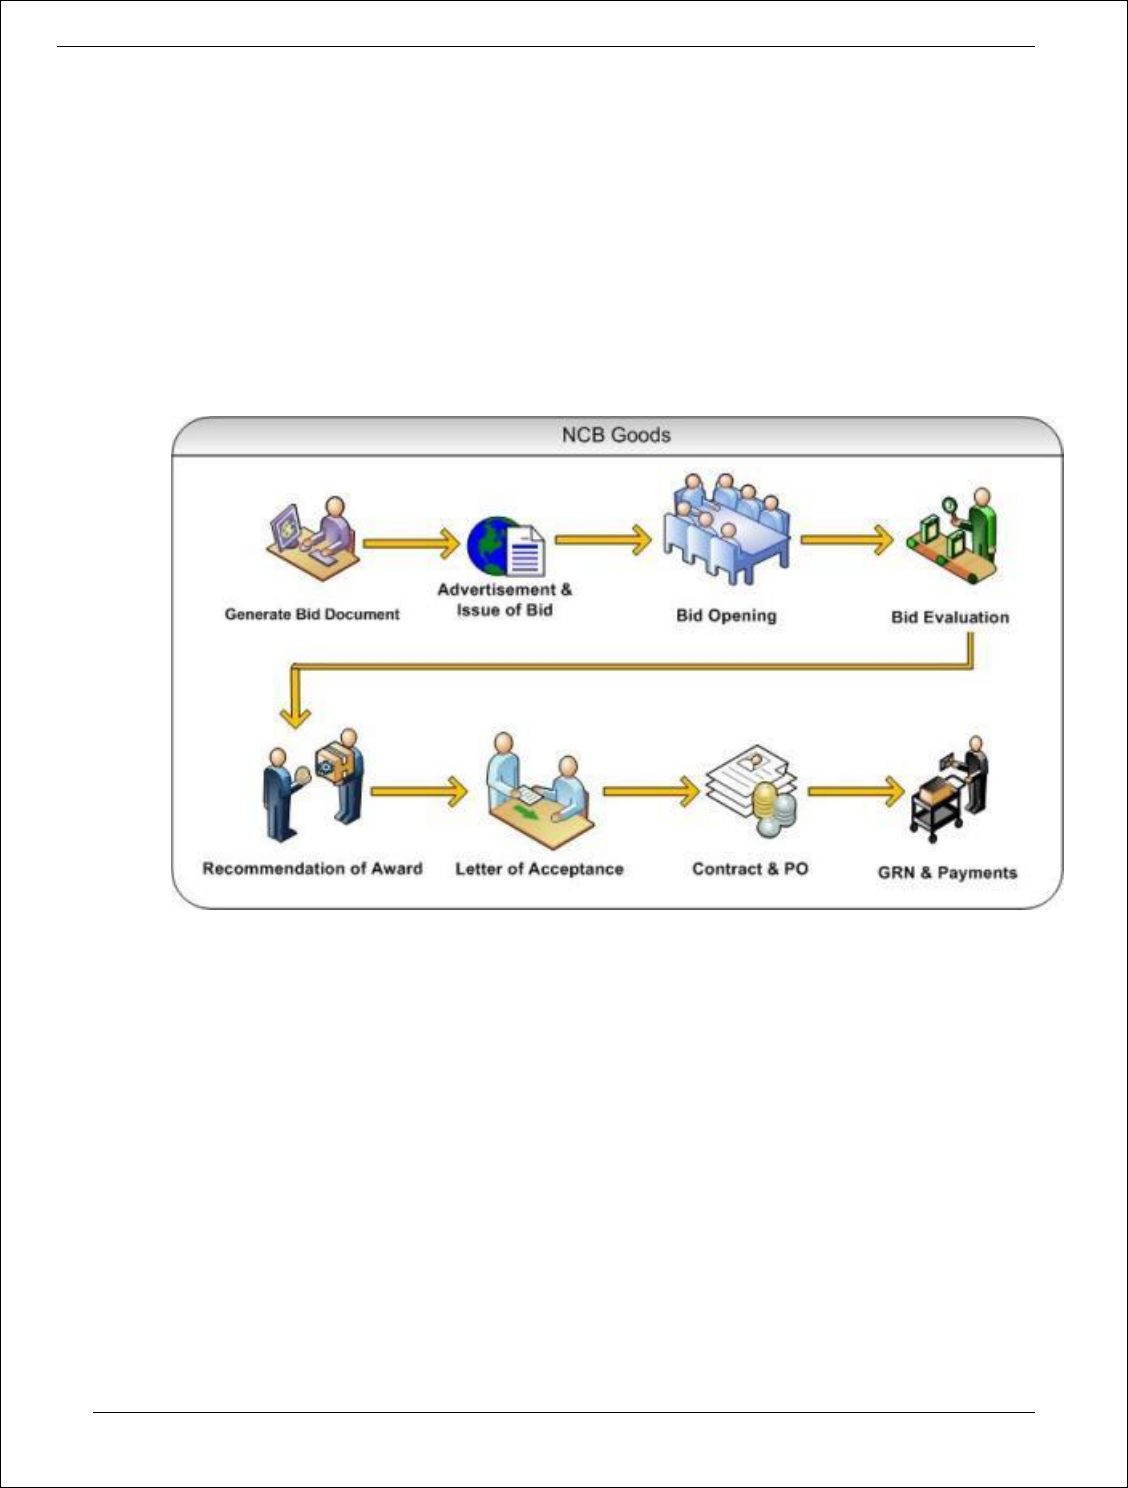
Procurement Management Support System – PMSS v1.0 User Guide
76
NCB Goods
Purpose
To perform procurement of goods using NCB method.
Process flow
Role(s)
o Procurement Coordinator (institution)
o Procurement Coordinator (SPFU) – Performs Prior review, when applicable. All NCB’s regardless
of value are to be prior reviewed at SPFU
o Procurement Coordinator – NPIU’s procurement coordinator, Performs Prior review, when
applicable.
Prerequisite
o Package to be procured should fall under category goods.
o Value of the package should be > USD 20,000 and Less than USD 300,000.
o For value range US$ 100,000 up to US$ 200,000, prior review is done by SPFU
o For value range US$ 200,000 up to US$ 300,000, prior review is done by NPIU also.
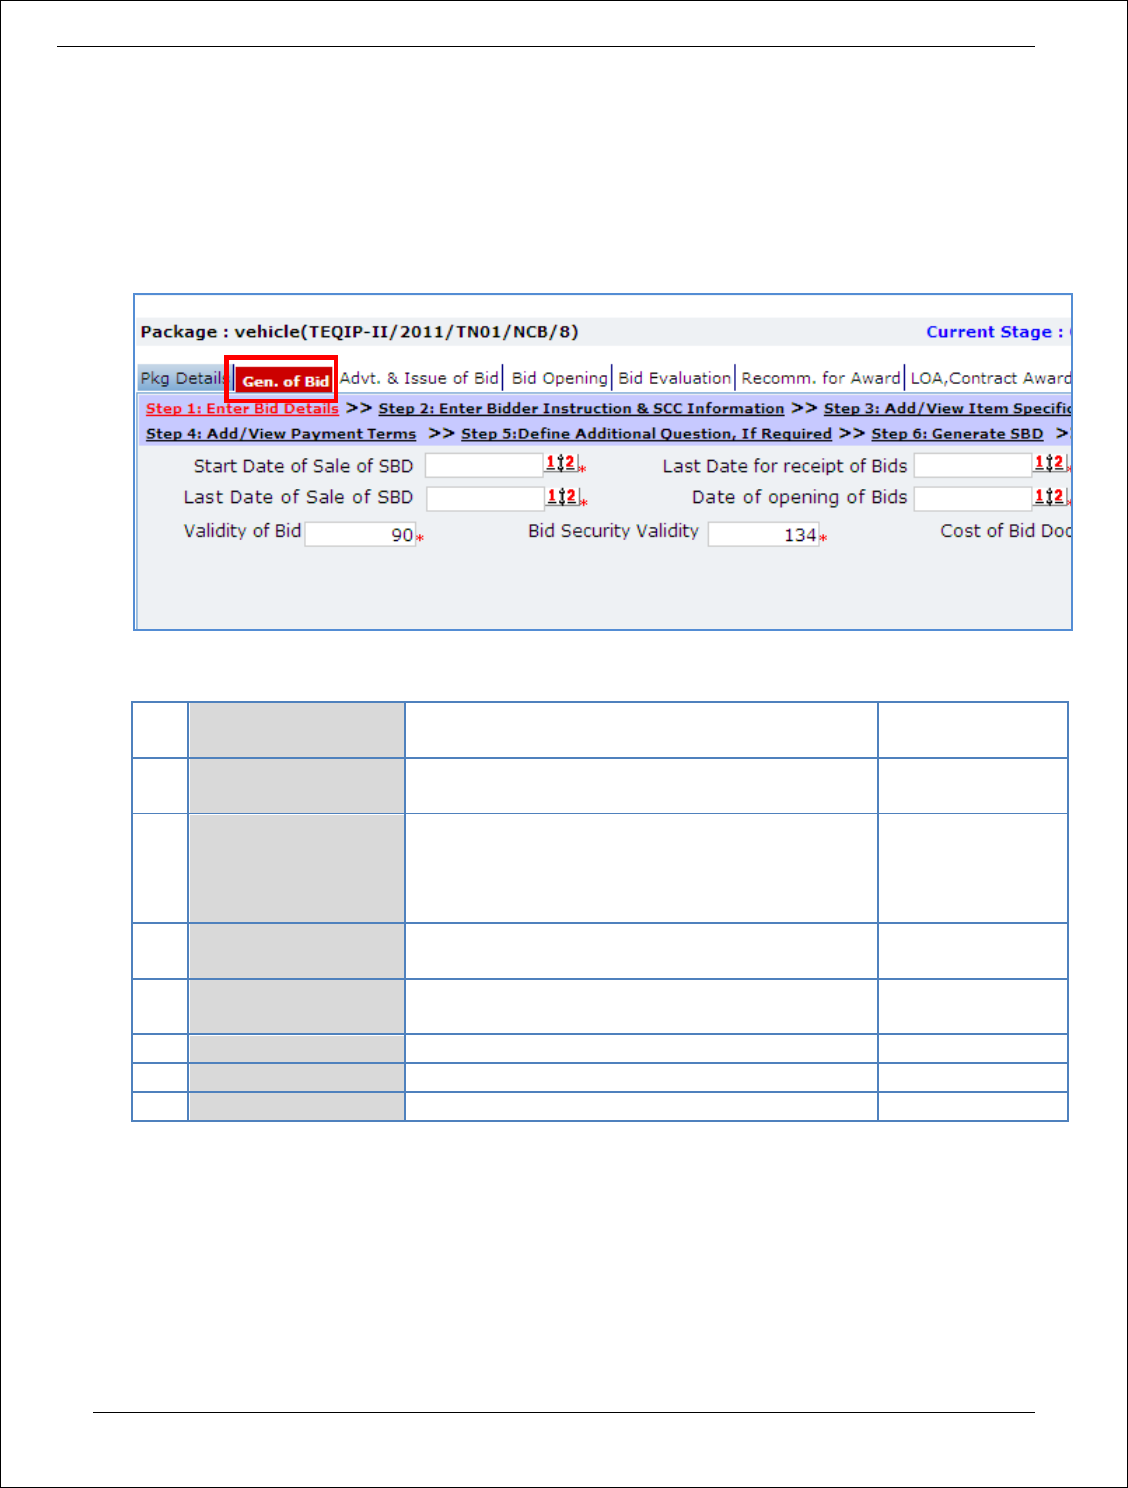
Procurement Management Support System – PMSS v1.0 User Guide
77
Process Details
First stage of NCB is ‘Gen. of Bid’.
Gen of Bid
In this stage Standard Bidding Document is generated
1. Fill the fields on the page. Details of the fields are mentioned below;
Sr.
No.
Field Name
Field Description
Sample Data
1
Start Date of Sale of
SBD
Enter the date on which SBD sale will start. Date
format is DD/MM/YYYY
15
2
Last Date for receipt
of Bids
Will be auto populated as 30 days from start of
sale date. Edit the date, if required. Date format is
DD/MM/YYYY and time format is HH:MM, 24 hrs
format.
12/03/2011 16:00
3
Last Date of Sale of
SBD
Will be auto populated and will match the Last
Date for receipt of Bids
4
Date of opening of
Bids
Will be auto populated and will match the Last
Date for receipt of Bids
5
Validity of Bid
Will be auto populated as 90 days
6
Bid Security Validity
Will be auto populated as 134 days
7
Cost of Bid Document
Enter the price of Bid document
2. Click ‘Save’
3. Click on ‘Step 2: Enter Bidder Instruction & SCC Information’ a pop up will be seen
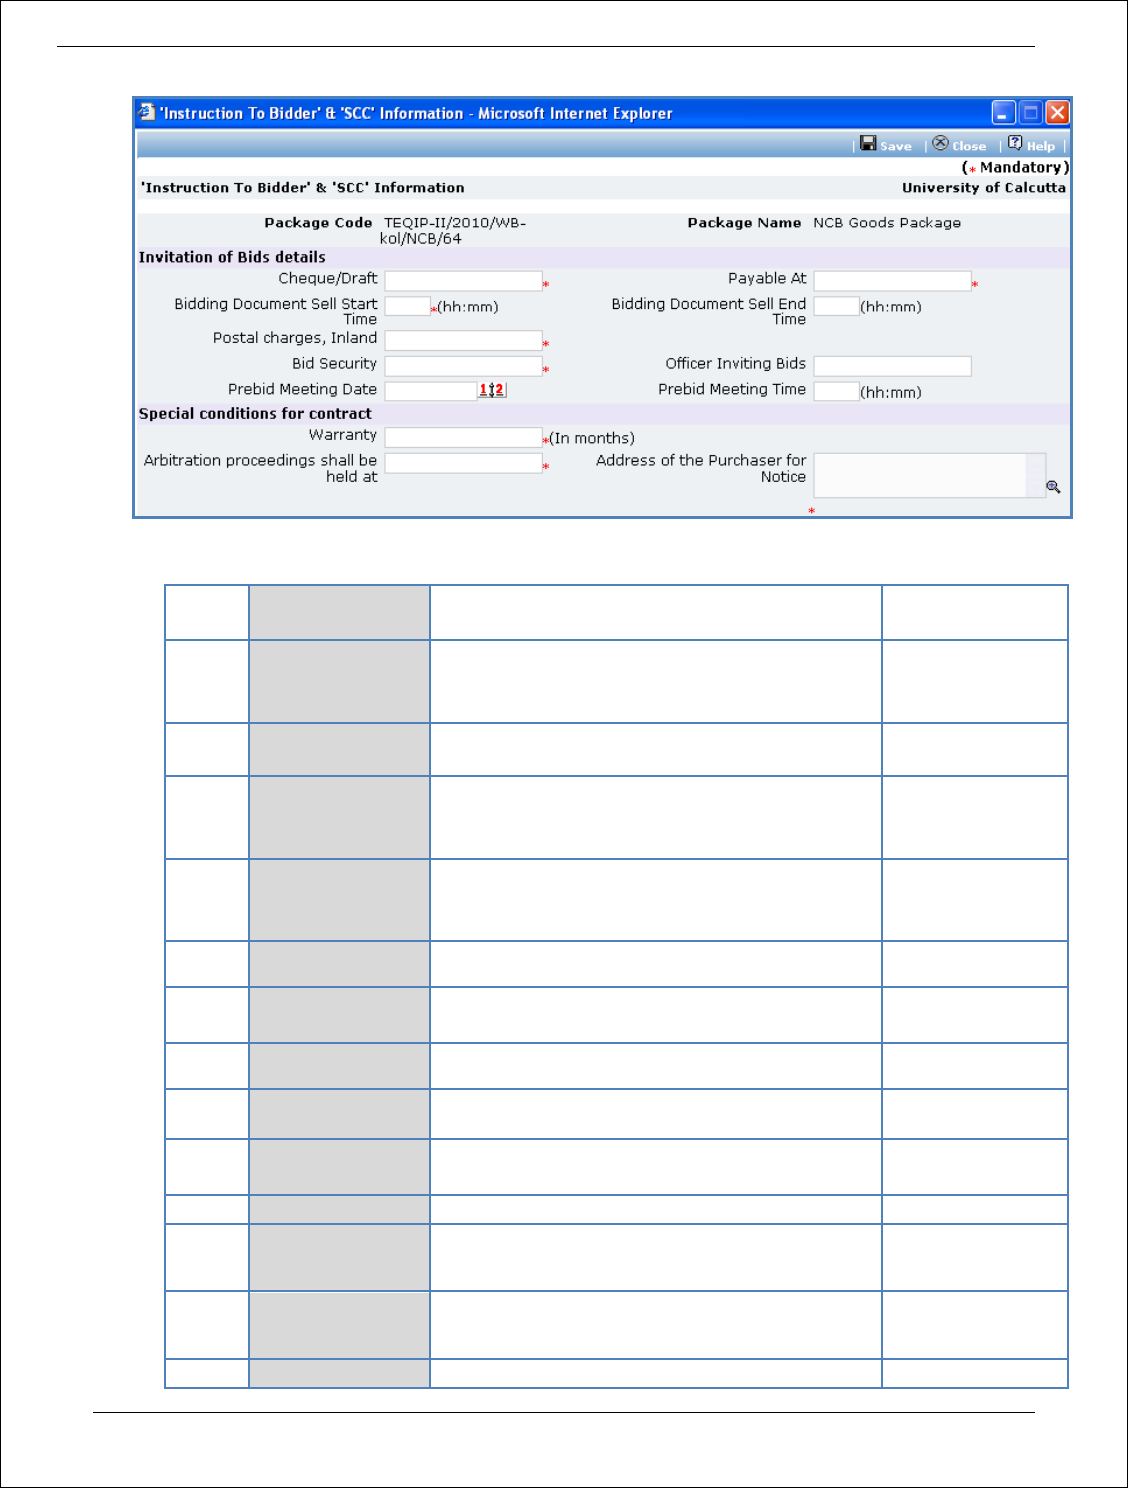
Procurement Management Support System – PMSS v1.0 User Guide
78
a. Fill the fields on the page. Details of the fields are mentioned below;
Sr. No.
Field Name
Field Description
Sample Data
1
Cheque/Draft in
favour of
Mention the name that has to be put on the
cheque/ draft for purchase of complete bidding
document
CSL NIT
2
Payable At
Mention where draft should be payable
Delhi
3
Bidding
Document Sell
Start Time
Mention office hrs, start time when bid doc can
be obtained. Time format is HH:MM, 24 hrs
format
9:00
4
Bidding
Document Sell
End Time
Mention office hrs, end time till when bid doc
can be obtained. Time format is HH:MM, 24 hrs
format
18:00
5
Postal charges,
Inland
Mention postal charges in Rs
230
6
Bid Security
Mention bid security amount in Rs. It should be
within 2% to 5% of estimated cost of package
36000
7
Officer Inviting
Bids
Mention the name of the officer
Mr. Mohan Lal
8
Prebid Meeting
Date
If Prebid meeting is planned then enter the
date. Date format is DD/MM/YYYY
12/08/2011
9
Prebid Meeting
Time
Enter Prebid meeting time. Time format is
HH:MM, 24 hrs format
12:00
10
Warranty
Enter the warranty period in months
12
11
Arbitration
proceedings shall
be held at
Mention the place
12
Address of the
Purchaser for
Notice
Mention the address
13
Liquidated
Will be auto populated as 0.01%. Edit this field,
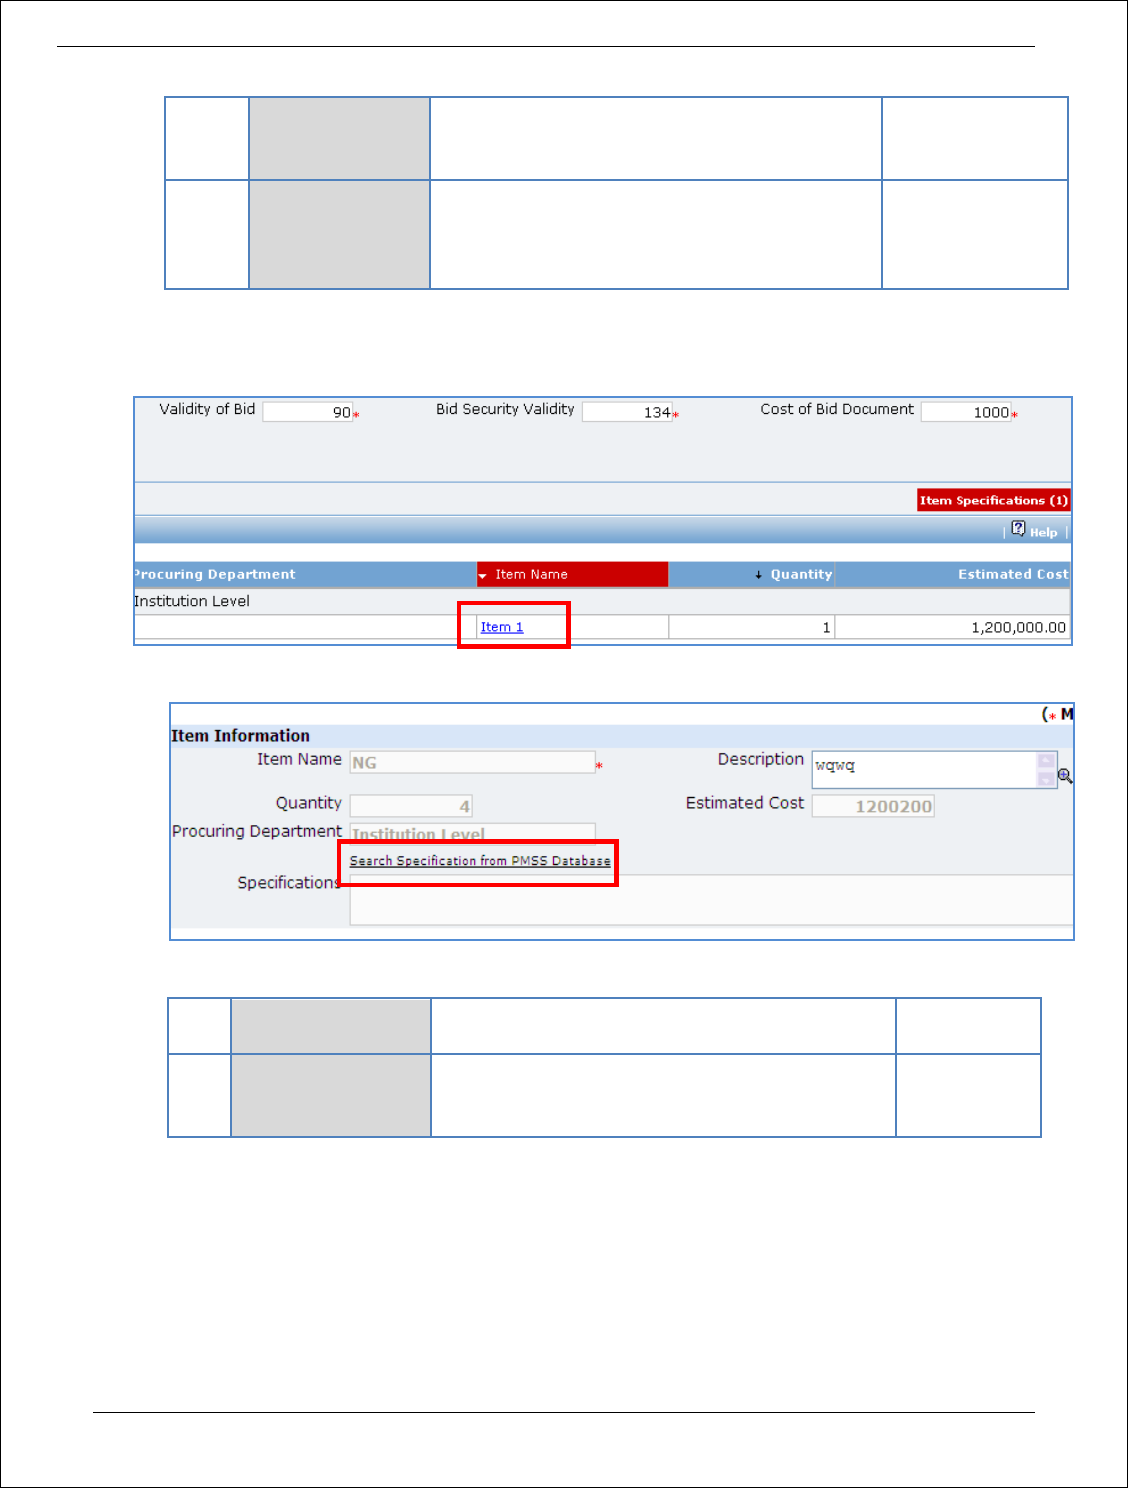
Procurement Management Support System – PMSS v1.0 User Guide
79
Damages (Per
Day)
if required. Value in this field will be used to
calculated the Liquidated damages per day
incase of any completion delays.
14
Liquidated
Damages
(Maximum)
Will be auto populated as 10%. Edit this field, if
required. Value in this field will be used to
calculated the maximum amount of liquidated
damages applicable
b. Click ‘Save’
4. Click on ‘Step 3: Enter Item Details’ link. ‘Item Specifications’ subtab will be seen in the lower section
a. Click ‘Item Name’, a popup will be seen
b. Fill the fields on the page. Details of the fields are mentioned below;
Sr.
No.
Field Name
Field Description
Sample Data
1
Specifications
Enter the item specification. Click on ‘Search
Specification from PMSS Database’ link to get
specifications from other items.
c. Click ‘Save’
d. If there is more than one item then, repeat steps from a. to c.
5. Click on ‘Step 4: Add/View Payment Terms’ link. ‘Payment Terms’ subtab will be seen in the lower
section.
a. By default three Payment Terms are shown

Procurement Management Support System – PMSS v1.0 User Guide
80
b. Click on the payment term name a pop up will be seen
c. Fill the fields on the page. Details of the fields are mentioned below;
Sr.
No.
Field Name
Field Description
Sample Data
1
Expected
Delivery Period
Mention the period in which this delivery is
expected once the contract is signed.
30
2
Payment
Percentage
By default percentage will be show, edit the
percentage if required
10
d. Click ‘Save’.
e. To add another payment term repeat steps from a. to c.
6. Click on ‘Step 5: Define Question, If Required’ link. (This is an optional step, to be performed only if
additional evaluation/ post qualification questions are required). ‘Questions’ subtab is shown in
the lower section.
a. Click ‘Add’, which is within the subtab. A pop up will be seen
b. Fill the fields on the page. Details of the fields are mentioned below;
Sr.
No.
Field Name
Field Description
Sample Data
1
Question
Enter the description of the question
to be asked during quotation
evaluation/ post qualification. Form
the question such that response
(answer) is Yes/ No/ NA.
Does the supplier have a
local service center?

Procurement Management Support System – PMSS v1.0 User Guide
81
2
Non Responsive
Value
Select the value (Yes/ No/ NA) based
on which the supplier will become
non- responsive.
E.g. if the question is
‘Does the Contractor have
a local service center?’
then the non- responsive
value could be ‘No’.
c. Click ‘Save’.
d. To add another Question repeat steps from a. to c.
7. After filling mandatory data, click on ‘Step 6: Generate SBD’ link. System will give an option to Open/
Save the SBD. Save the SBD on your computer with a proper name. Update the sections highlighted
in yellow and save the document.
8. Click on ‘Step 7: Upload SBD Document’ link. ‘Documents’ subtab will be seen in the lower section
a. Click ‘Add’, which is within the subtab. A pop up will be seen
b. Fill the fields on the page. Details of the fields are mentioned below;
Sr.
No.
Field Name
Field Description
Sample Data
1
Document to be
uploaded
Browse the document that you want to
upload.
2
Document
Category
Select the appropriate document category.
Standard Bidding
Document
3
Description
Enter more information about the uploaded
document.
SBD
c. Click ‘Upload’ to upload the document in the system.
d. Uploaded document will appear on the list shown in ‘Documents’ section.
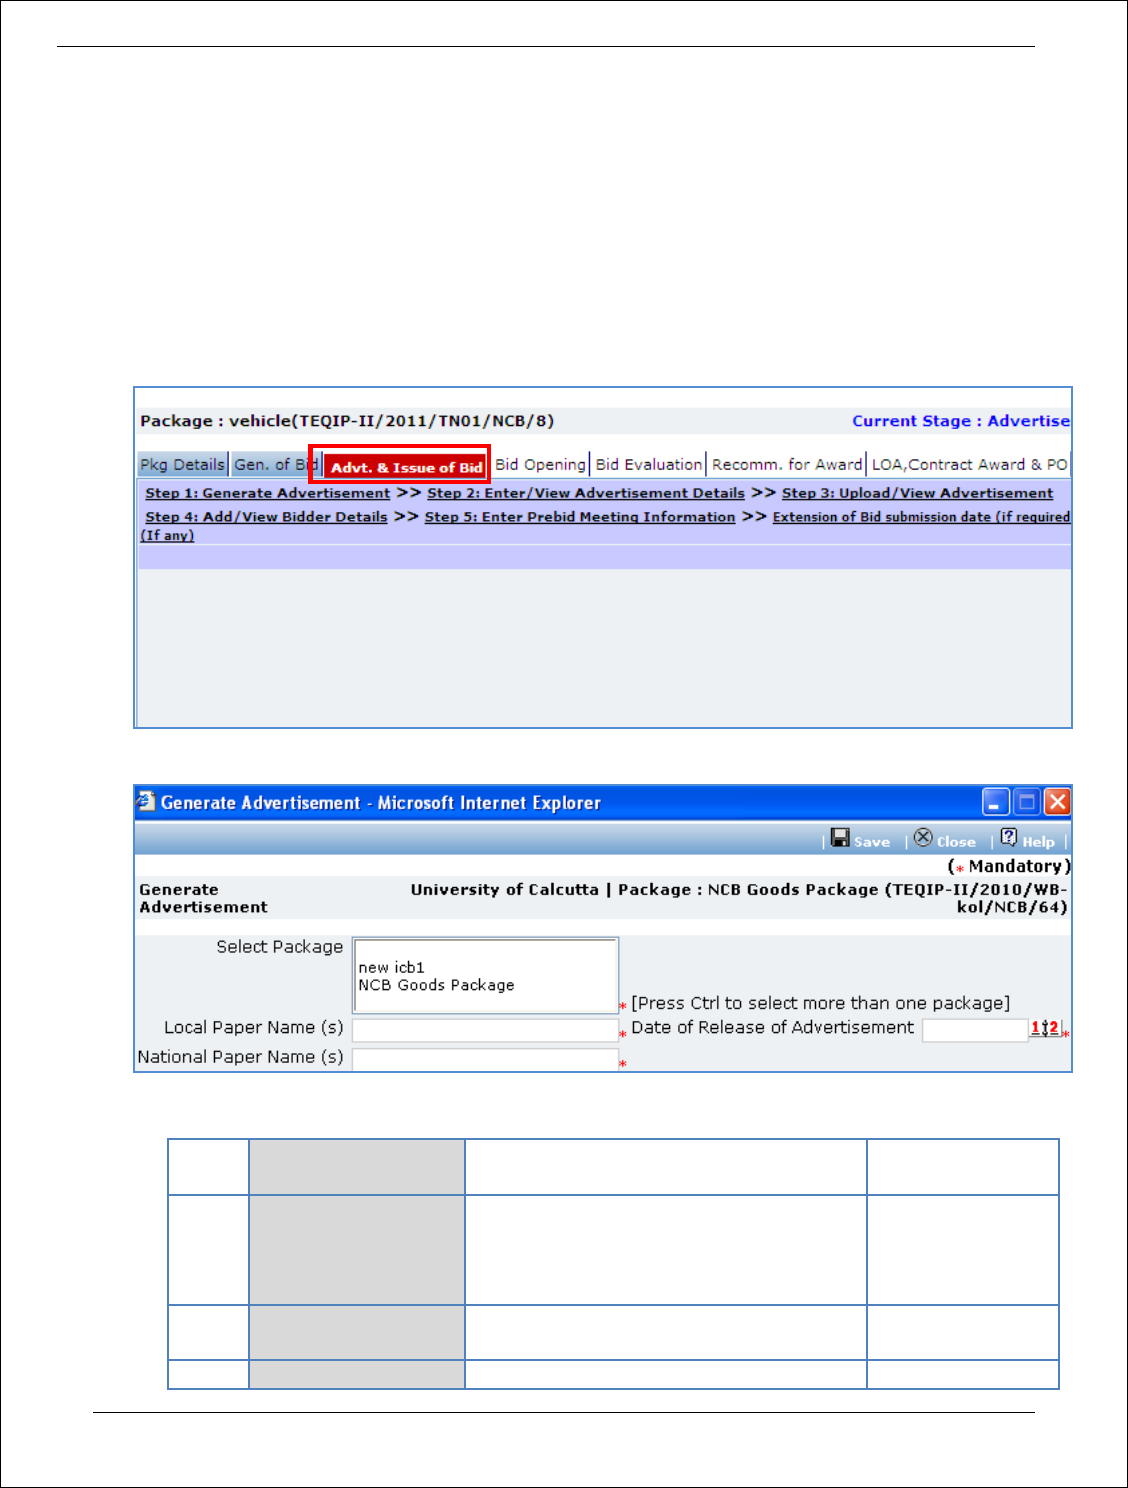
Procurement Management Support System – PMSS v1.0 User Guide
82
e. User can select and delete the document that has been uploaded in current stage of the
procurement. To delete a document, select ‘Delete’ checkbox against the document and click
‘Delete’ link.
9. On completion of ‘Gen of SBD’ stage click on ‘Move to Next Stage’. This will move the procurement
to ‘Advertisement & Issue of Bids’ stage.
Advertisement & Issue of Bids
In this stage tender is floated and info of supplier purchasing bid is captured, if available
10. Click on ‘Step 1: Generate Advertisement’. A pop up will be seen
a. Fill the fields on the page. Details of the fields are mentioned below;
Sr.
No.
Field Name
Field Description
Sample Data
1
Select Package
All the packages which are in Advt. Stage
will be displayed. Press control button on
the keyboard to select more than one
package.
2
Local Paper Name(s)
Enter the name of the local paper in
which this advertisement will be printed
Lokamat
3
National Paper
Enter the name of the national paper in
Times of India
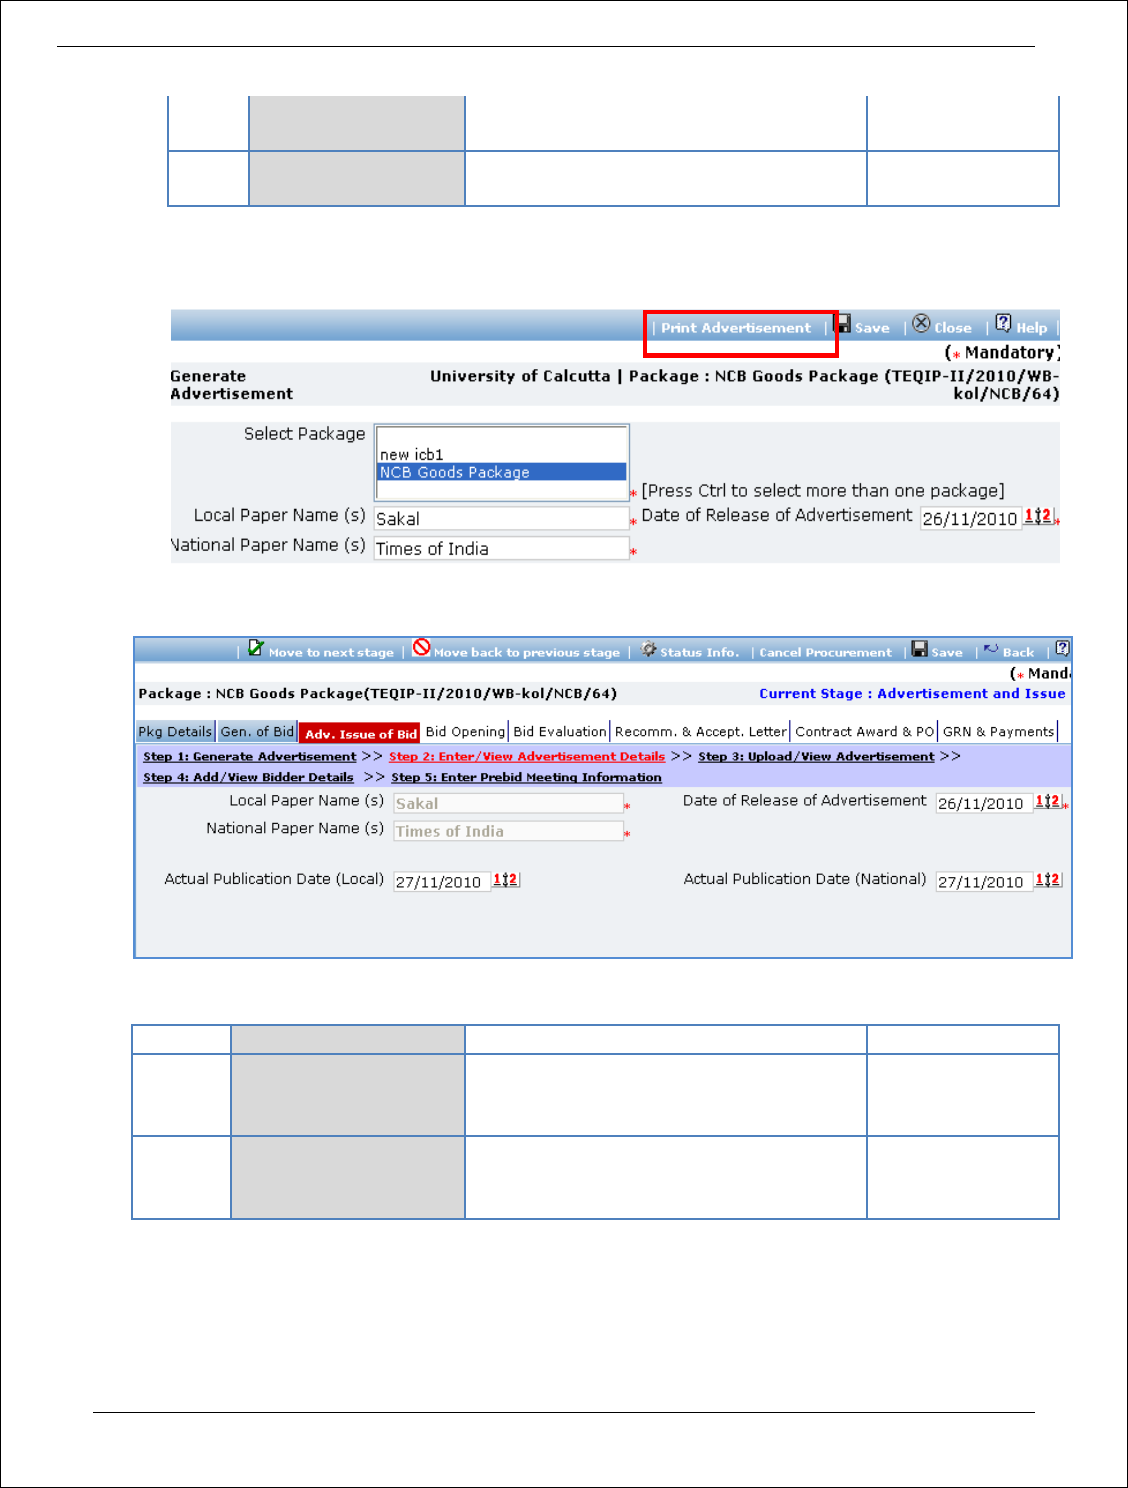
Procurement Management Support System – PMSS v1.0 User Guide
83
Name(s)
which this advertisement will be printed
4
Date of Release of
Advertisement
Enter the date in format DD/MM/YYYY
12/09/2011
b. Click ‘Save’
c. ‘Print Advertisement’ link will be seen, click on this link to generate the advertisement.
11. Click on ‘Step 2: Enter/View Advertisement Details’.
12. Fill the fields on the page. Details of the fields are mentioned below;
Sr. No.
Field Name
Field Description
Sample Data
1
Actual Publication Date
(Local)
Enter the date when Advertisement was
actually published in the Local paper. Date
format is DD/MM/YYYY
16/09/2011
2
Actual Publication Date
(National)
Enter the date when Advertisement was
actually published in the N paper. Date
format is DD/MM/YYYY
16/09/2011
13. Click ‘Save’
14. Click on ‘Step 3: Upload/View Advertisement’ link. ‘Documents’ subtab will be seen in the lower
section

Procurement Management Support System – PMSS v1.0 User Guide
84
a. Click ‘Add’, which is within the subtab. A pop up will be seen
b. Fill the fields on the page. Details of the fields are mentioned below;
Sr.
No.
Field Name
Field Description
Sample Data
1
Document to be
uploaded
Browse the document that you want to
upload.
2
Document
Category
Select the appropriate document category.
Copy of
Advertisement
3
Description
Enter more information about the uploaded
document.
c. Click ‘Upload’ to upload the document in the system.
d. Uploaded document will appear on the list shown in ‘Documents’ section.
e. User can select and delete the document that has been uploaded in current stage of the
procurement. To delete a document, select ‘Delete’ checkbox against the document and click
‘Delete’ link.
15. Click on ‘Step 4: Add/View Bidder Details’ link. ‘Bidder Details’ subtab will be seen in the lower
section
a. Click ‘Add’, which is with the subtab a pop up will be seen
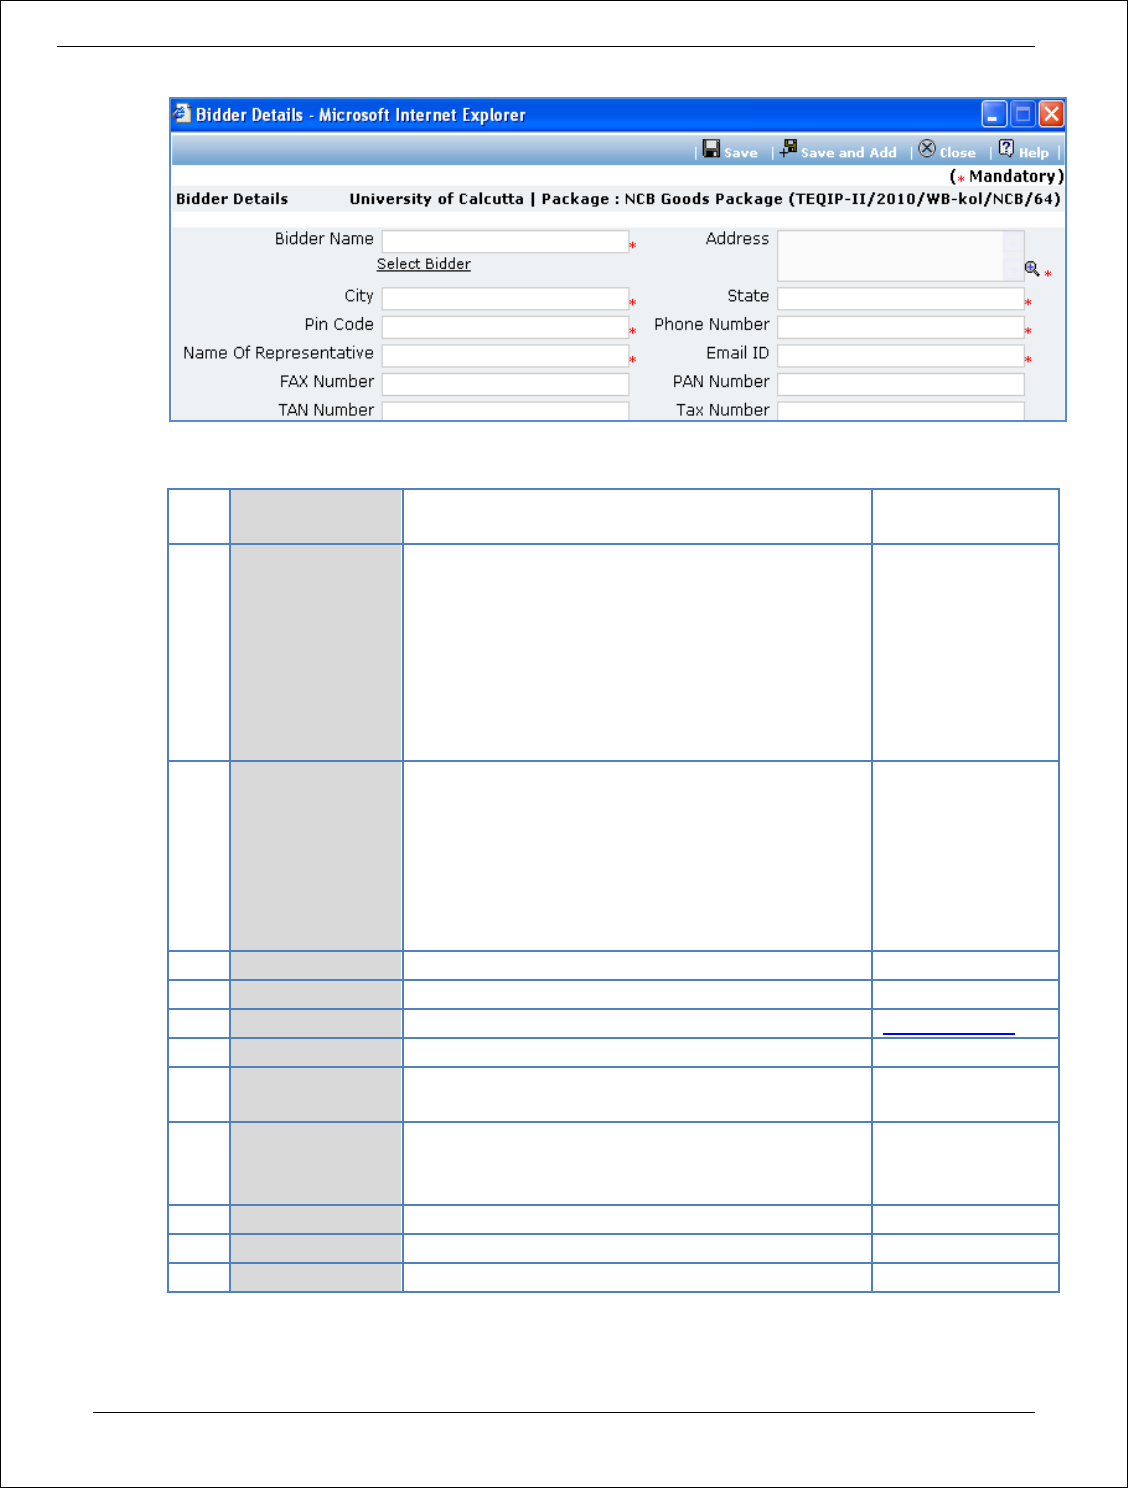
Procurement Management Support System – PMSS v1.0 User Guide
85
b. Fill the fields on the page. Details of the fields are mentioned below;
Sr.
No.
Field Name
Field Description
Sample Data
1
Bidder Name
Enter the Bidder name.
Bidder can also be searched using ‘Select Bidder
from PMSS Database’ link. Click on this link will
display the existing list of Bidders, if any. Once
the list is displayed click on the Bidder’s name this
will auto populated the selected Bidder’s data. To
search additional Bidders within the state or city
use the filters provided on the page
FTTI Pvt Ltd
2
Address
Enter the address of the Bidder
STI Towers,
Unit# 141/38,
Campus 29. RMZ
Millenia Business
Park.
881, Dr. MGR
Road
3
City
Enter the city of the Bidder
Pune
4
State
Enter the state of the Bidder
Maharashtra
5
Email ID
Enter the Email ID of the Bidder
ftti@efttil.com
6
Pin Code
Enter the Pin Code of the Bidder
411232
7
Name Of
Representative
Enter the Representative of the Bidder
Mr. Mohan
Solanki
8
Phone Number
Enter the Phone Number of the Bidder.
To enter more than one number use comma (,) as
a separator.
26422689
9
PAN Number
Enter the PAN Number of the Bidder
ANS44874
10
TAN Number
Enter the TAN Number of the Bidder
11
Tax Number
Enter the TAX Number of the Bidder
c. Click ‘Save’
d. To add another Supplier repeat steps from a. to c.
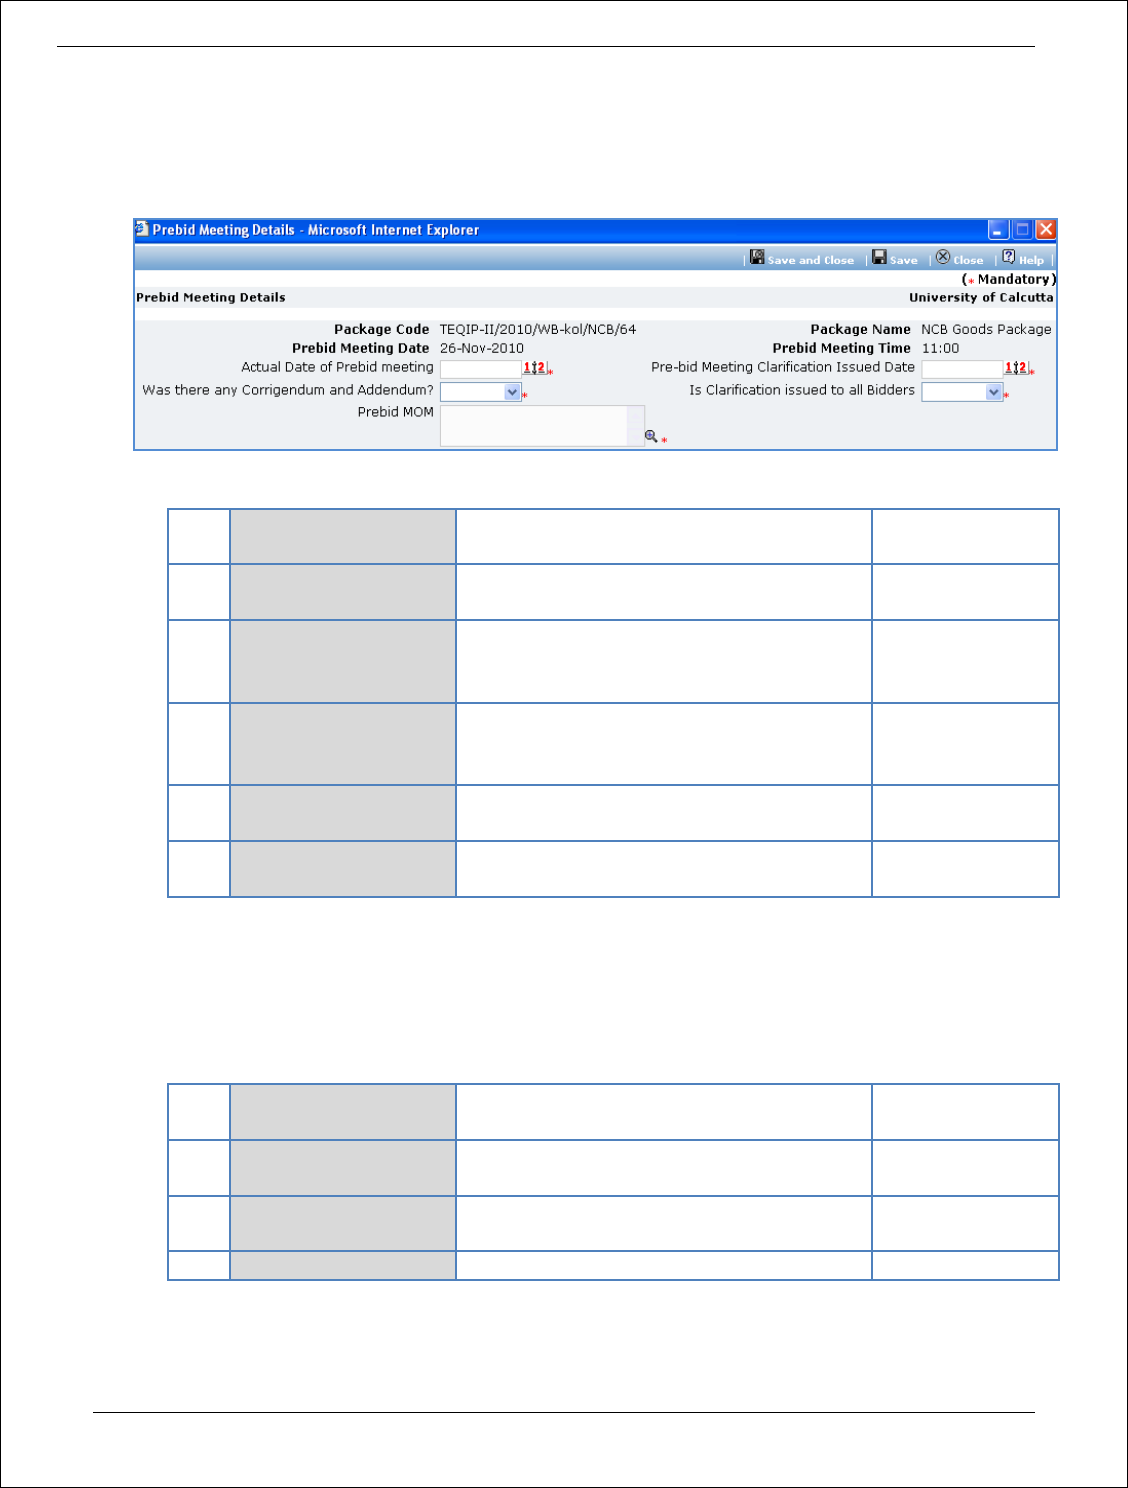
Procurement Management Support System – PMSS v1.0 User Guide
86
16. Click on ‘Step :5 Enter Prebid Meeting Information’ link (This link will be shown only if Prebid Date
and Prebid Time fields are added in ‘Instruction to Bidder & SCC Information Popup’). A popup will
be seen
a. Fill the fields on the page. Details of the fields are mentioned below;
Sr.
No.
Field Name
Field Description
Sample Data
1
Actual Date of Prebid
meeting
Enter the date when prebid was actually
conducted. Date format is DD/MM/YYYY
22/09/2011
2
Pre-bid Meeting
Clarification Issued
Date
Enter the date when clarification was
issued. Date format is DD/MM/YYYY
23/09/2011
3
Was there any
Corrigendum and
Addendum?
Select Yes/ No
Yes
4
Is Clarification issued
to all Bidders
Select Yes/ No
Yes
5
Prebid MOM
Enter the MoM. Larger MoM can also be
uploaded in the documents tab
b. Click ‘Save
17. Incase of extension to bid submission date, Click on ‘Extension of Bid submission date (if required)’
link. A popup will be seen.
a. Fill the fields on the page. Details of the fields are mentioned below;
Sr.
No.
Field Name
Field Description
Sample Data
1
Current Submission
Date
System will show the current date
2
Extended Date
Enter the new date. Date format is
DD/MM/YYYY
22/09/2011
3
Reason for Extension
Enter the reason
b. Click ‘Save’
18. Incase of Corrigendum, Click on ‘Upload Corrigendum (If any)’ link and upload the documents
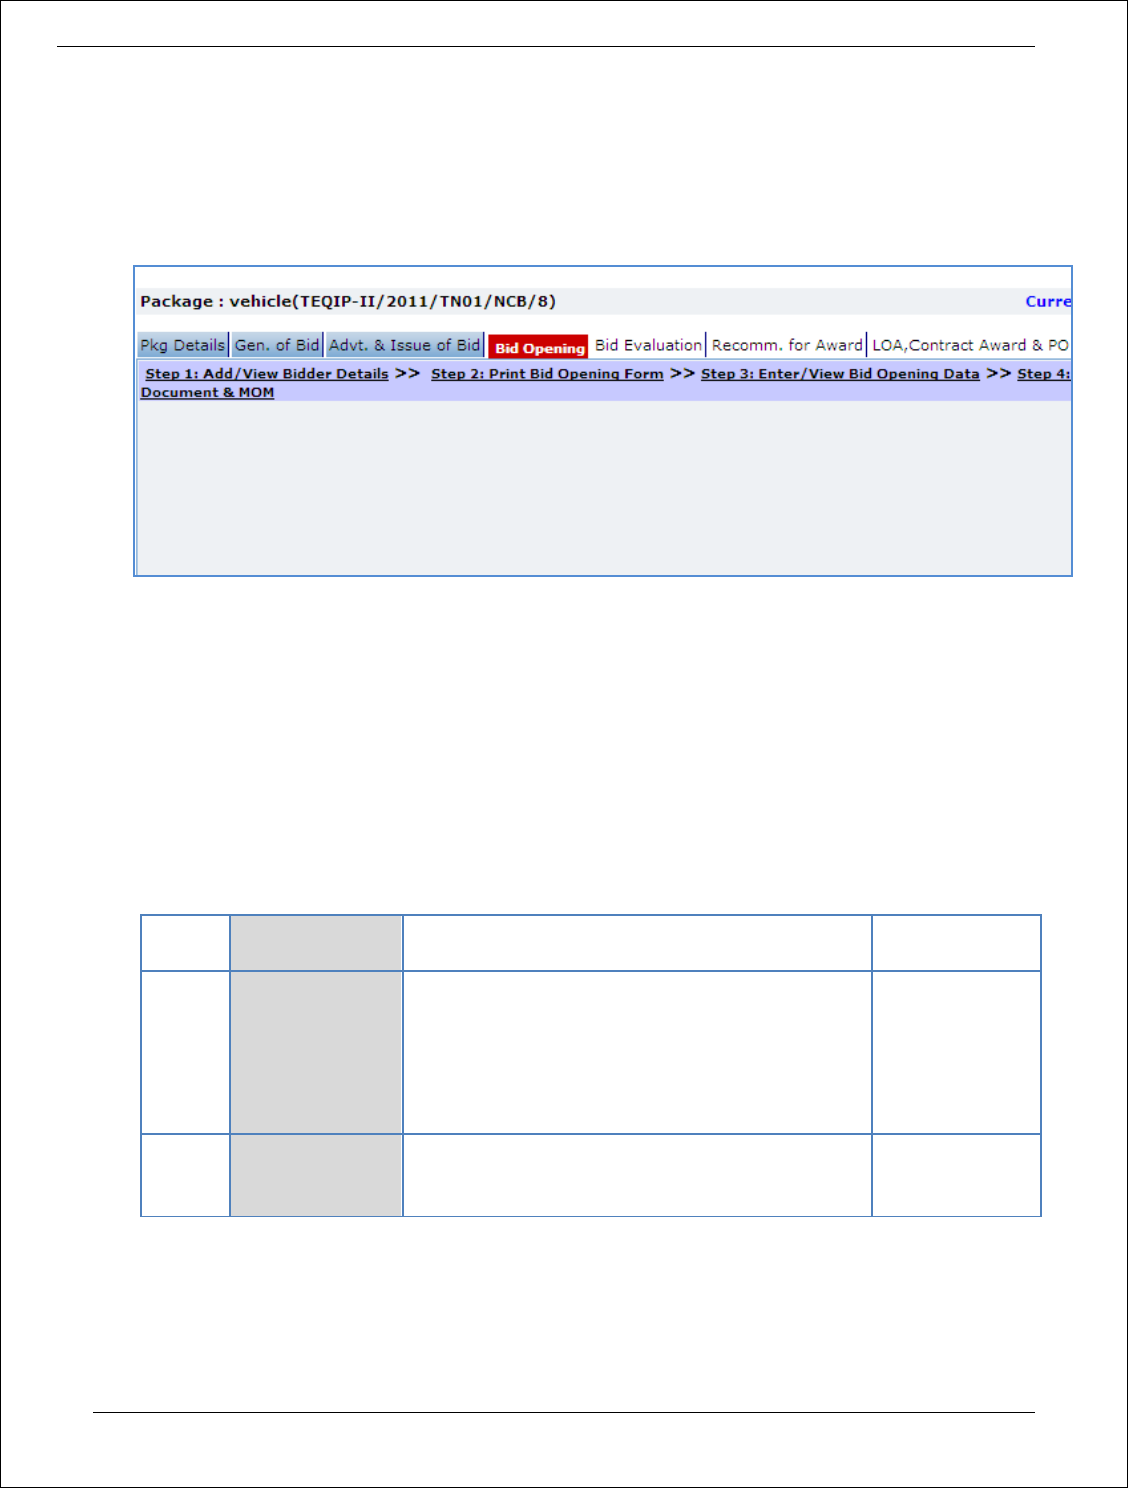
Procurement Management Support System – PMSS v1.0 User Guide
87
19. On completion of ‘Advertisement & Issue of Bids’ stage Click on ‘Move to Next Stage’. This will move
the procurement to ‘Bid Opening’ stage.
Bid Opening
In this stage Bid opening is performed and responsive bids are identified.
20. On the ‘Bid Opening’ tab click on ‘Step 1: Add/View Bidder Details’ link. Repeat point 15, if required.
21. Click on ‘Step 2: Print Bid Opening Form’. This will open a Bid opening form. This form can be used
during Bid Opening. Print of this form can be taken and Bid opening details can be recorded on this
form. The bidder names (which were added) are seen on this form against which Bid opening details
can be mentioned. Three extra columns are provided to accommodate names of any new bidders
who have submitted their Bids directly.
22. Click on ‘Step 3: Enter/ View Bid Opening Data’ and Fill the fields on the page. Details of the fields
are mentioned below;
Sr. No.
Field Name
Field Description
Sample Data
1
Bid Opening
Date
Enter the actual date and time when Bid was
opened. Date format is DD/MM/YYYY and time
format is HH:MM, 24 hrs format. It is
recommended that opening should be done at
the start of the week so that there is ample time
to enter opening data in PMSS.
12/03/2011
16:00
2
Bid MoM
Enter the Minutes of Meeting.
Larger MoM’s can be uploaded using the
documents subtab
23. Click ‘Save’
24. Click on the ‘Enter Bid Opening Data’ link. A pop up will be seen
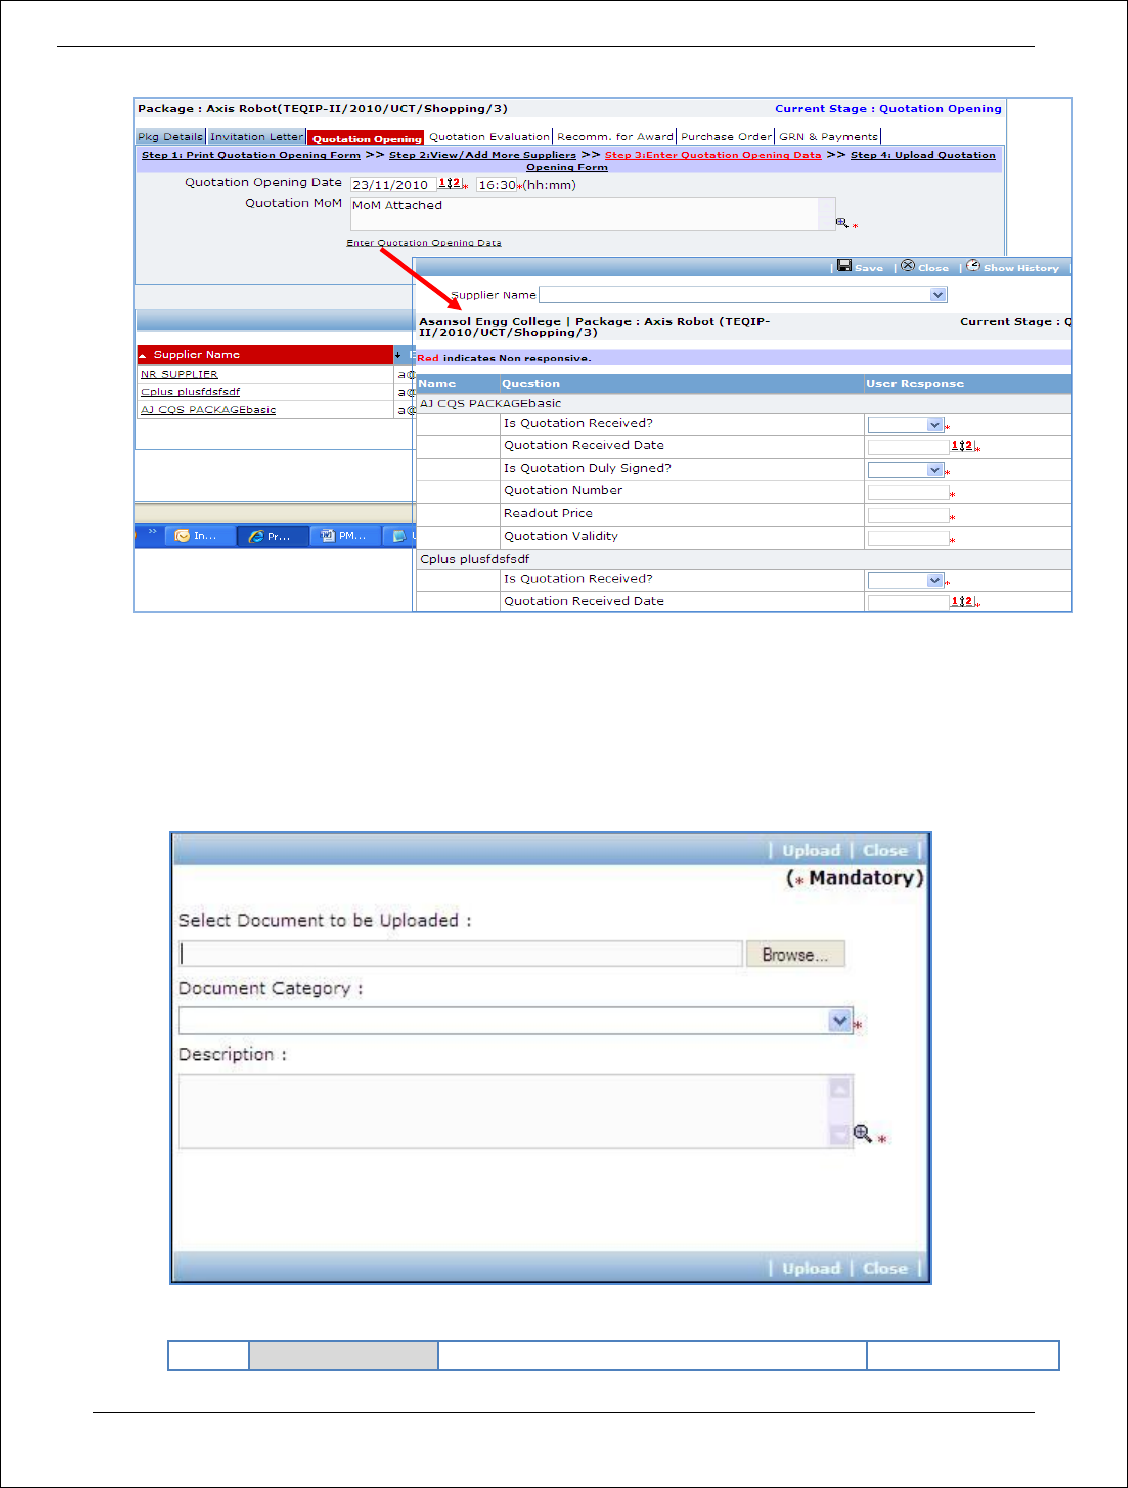
Procurement Management Support System – PMSS v1.0 User Guide
88
c. Enter the Responsiveness Criteria.
d. Click ‘Save’.
25. Click on ‘Step 4: Upload Bid Opening Document & MOM’ link. ‘Documents’ subtab will be shown in
the lower section.
a. Click ‘Add’, which is within the subtab. A pop up will be seen
b. Fill the fields on the page. Details of the fields are mentioned below;
Sr.
Field Name
Field Description
Sample Data
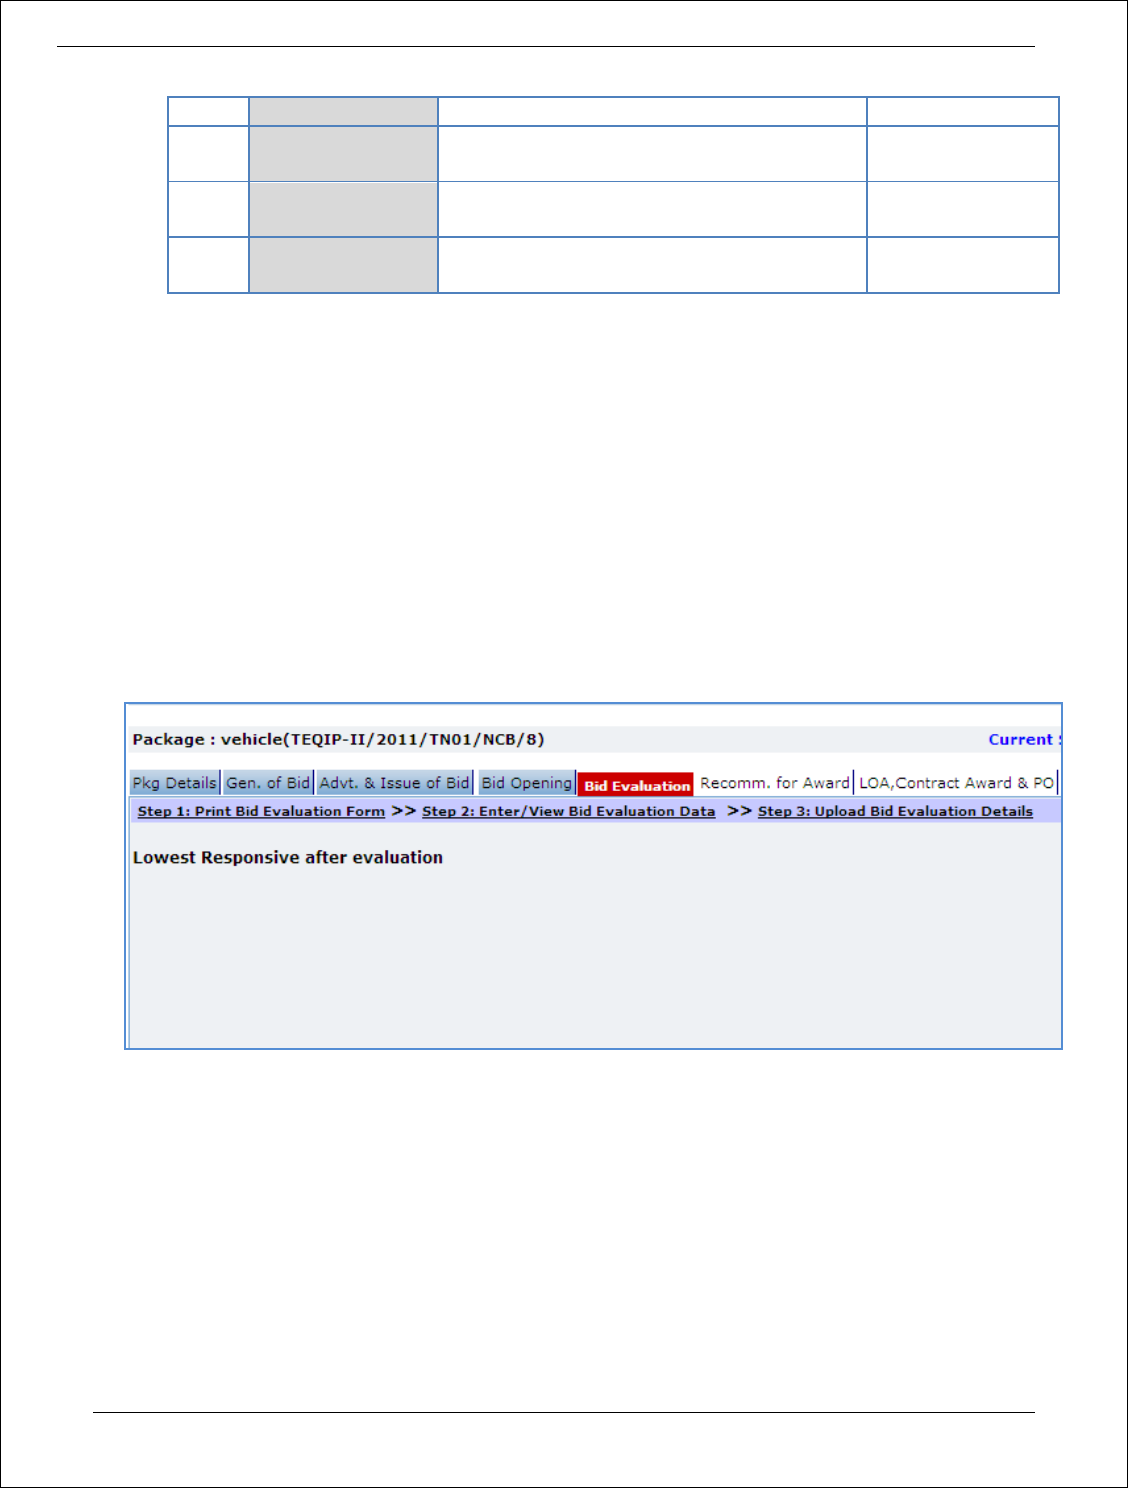
Procurement Management Support System – PMSS v1.0 User Guide
89
No.
1
Document to be
uploaded
Browse the document that you want to
upload.
2
Document
Category
Select the appropriate document category.
Bid Opening Form
3
Description
Enter more information about the uploaded
document.
Signed Bid
Opening Form
c. Click ‘Upload’ to upload the document in the system.
d. Uploaded document will appear on the list shown in ‘Documents’ section.
e. User can select and delete the document that has been uploaded in current stage of the
procurement. To delete a document, select ‘Delete’ checkbox against the document and click
‘Delete’ link.
26. On completion of ‘Bid Opening’ stage click on ‘Move to Next Stage’. This will move the
procurement to ‘Bid Evaluation’ stage.
Bid Evaluation
In this stage evaluation is performed and lowest evaluated bidder is identified.
27. On the ‘Bid Evaluation’ tab click on ‘Step 1: Print Quotation Evaluation Form’. This will open a bid
evaluation form. This form can be used during Bid Evaluation. Print of this form can be taken and Bid
Evaluation details can be recorded on this form.
28. Click on the ‘Step 2: Enter/ View Bid Evaluation Data’ link. A pop up will be seen
a. Enter the comparative data for all the bidders.
b. Click ‘Save’.
c. Click on ‘Quotation Details’ link, which is in front of each responsive supplier. A popup will be
seen.
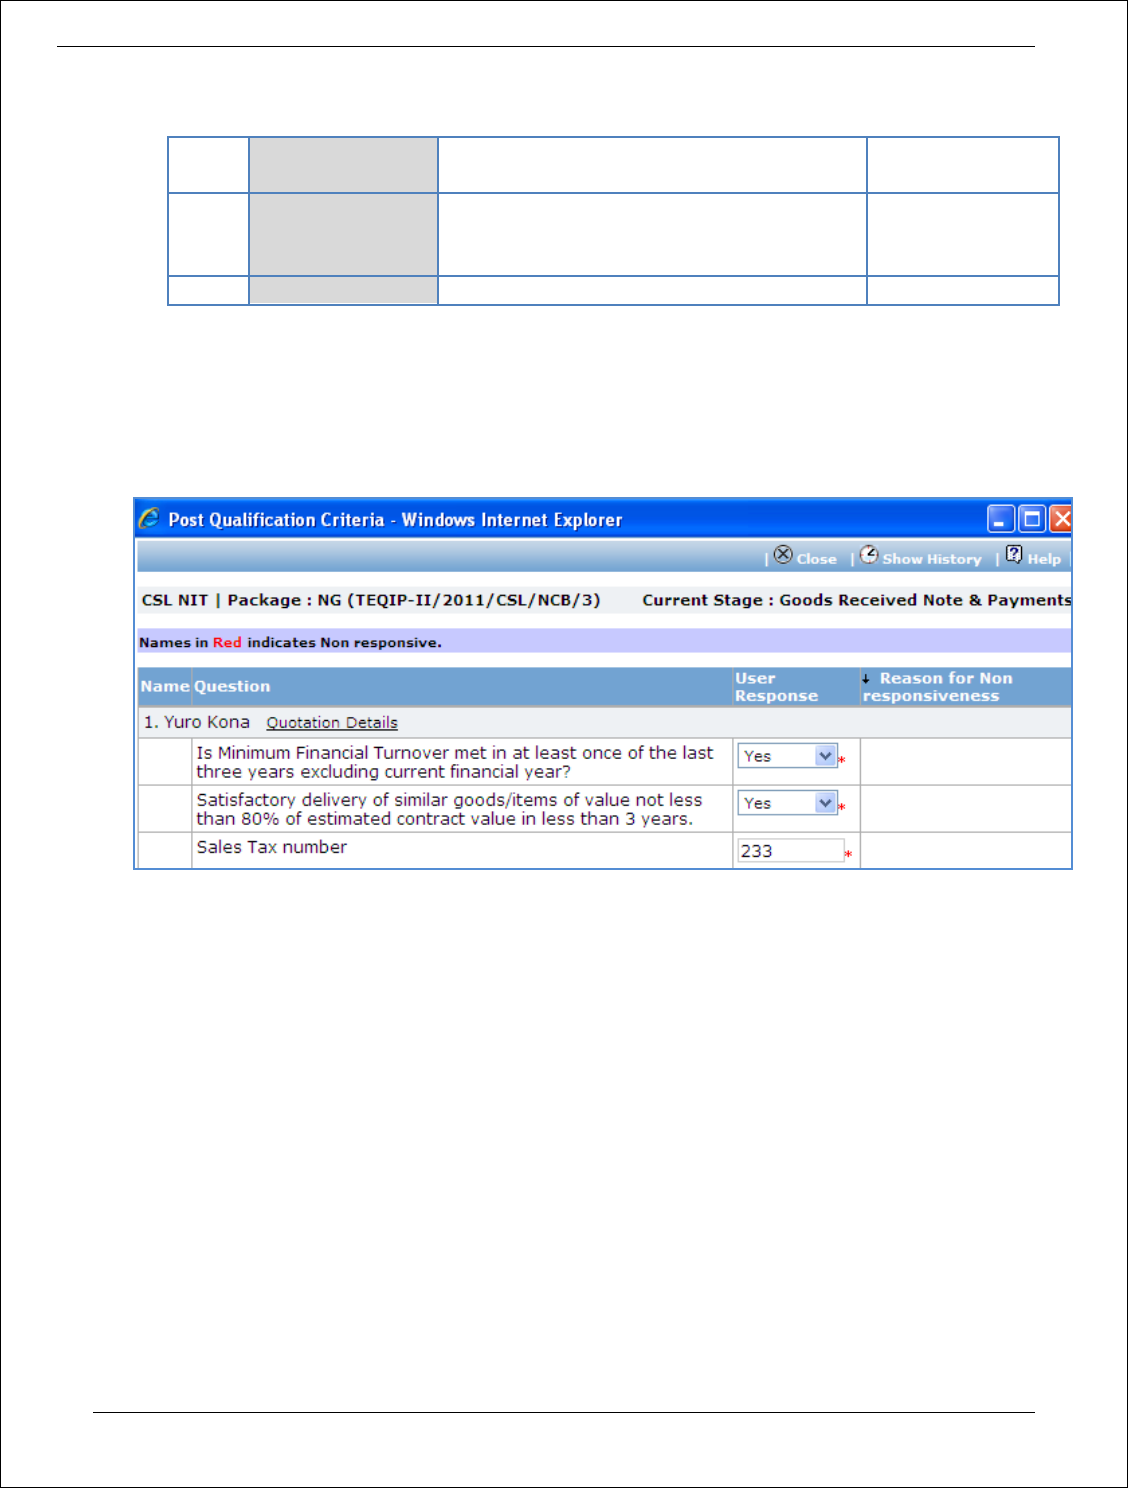
Procurement Management Support System – PMSS v1.0 User Guide
90
d. Fill the fields on the page. Details of the fields are mentioned below;
Sr.
No.
Field Name
Field Description
Sample Data
1
Basic Cost per unit
Basic cost for each item can be entered in
this field. Enter the basic cost per item as
given by the supplier
2000
2
Comments
Enter comments, if any
e. Click on ‘Save’
f. Quotation details of all responsive Bidders can be entered by repeating steps from c. to e.
29. System will show the lowest evaluated responsive bidder (L1) on the main page.
30. Click on ‘Perform Post Qualification’ link, which is in front of the bidder name. A pop up will be seen
a. Enter the post qualification details
b. If the bidder becomes non-responsive in this step then automatically next lowest evaluated
bidder will be seen.
c. Repeat the Post Qualification process for this Bidder.
31. Click on ‘Step 3: Upload Bid Evaluation Details’ link. ‘Documents’ subtab will be shown in the lower
section.
a. Click ‘Add’, which is within the subtab. A pop up will be seen
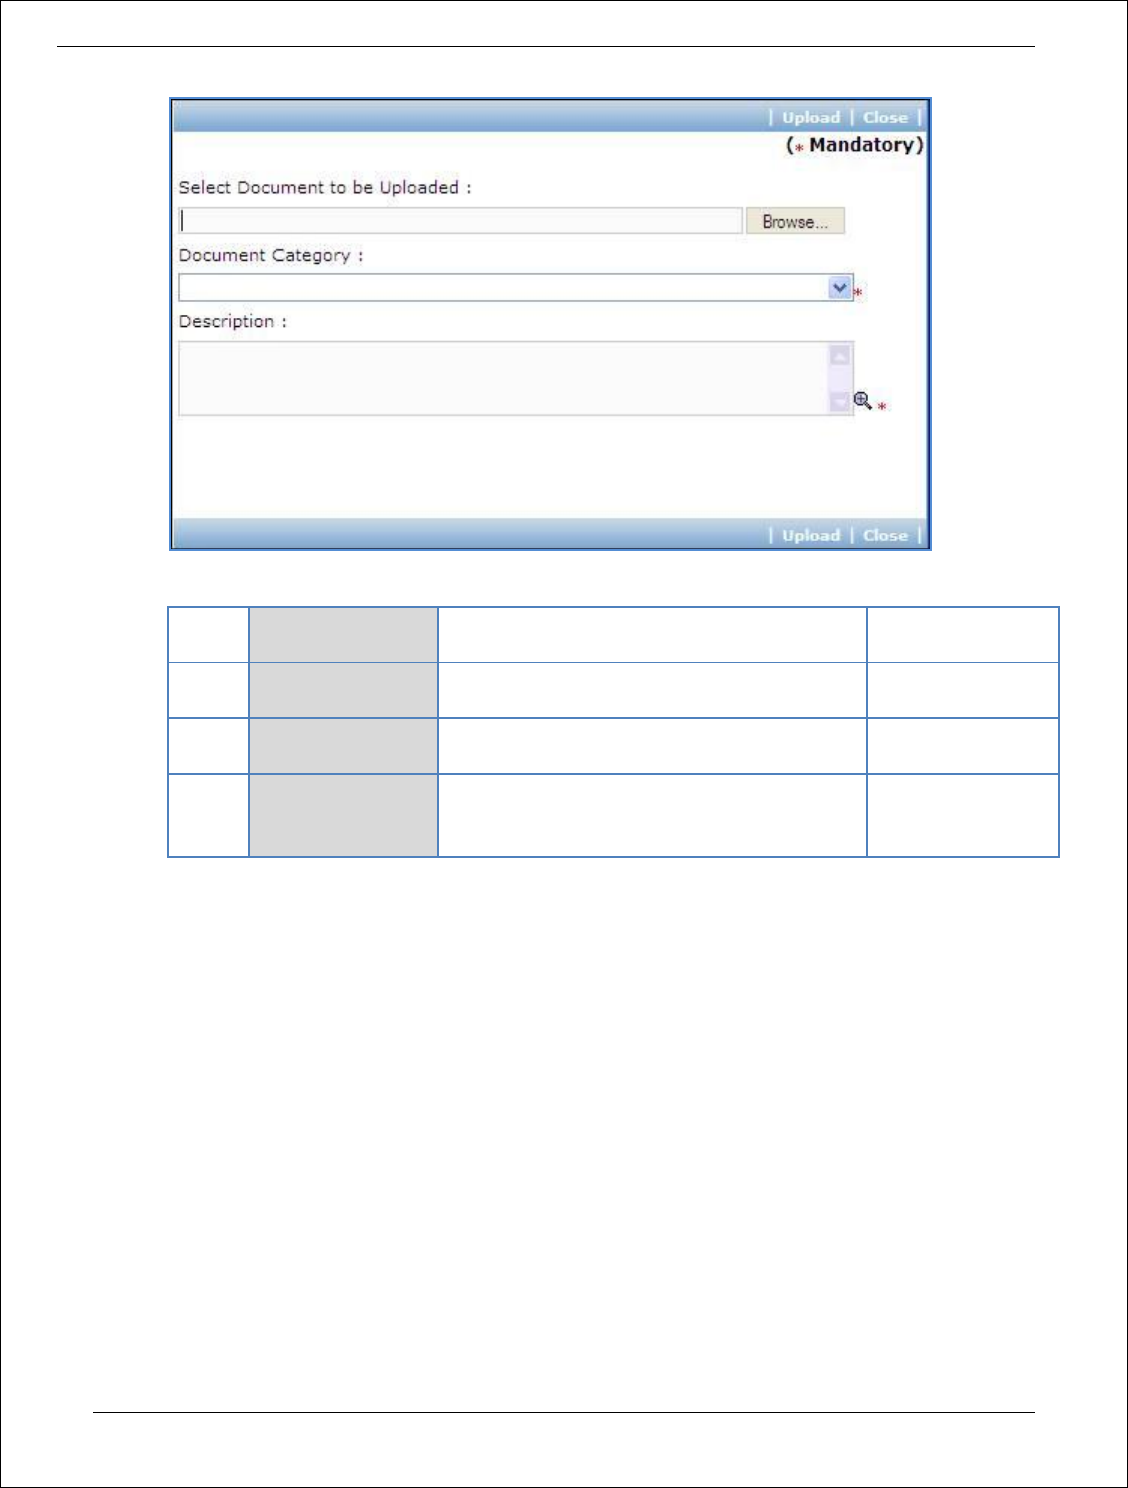
Procurement Management Support System – PMSS v1.0 User Guide
91
b. Fill the fields on the page. Details of the fields are mentioned below;
Sr.
No.
Field Name
Field Description
Sample Data
1
Document to be
uploaded
Browse the document that you want to
upload.
2
Document
Category
Select the appropriate document category.
Bid Evaluation
Form
3
Description
Enter more information about the uploaded
document.
Signed Bid
Evaluation Form
uploaded
c. Click ‘Upload’ to upload the document in the system.
d. Uploaded document will appear on the list shown in ‘Documents’ section.
e. User can select and delete the document that has been uploaded in current stage of the
procurement. To delete a document, select ‘Delete’ checkbox against the document and click
‘Delete’ link.
32. Click on ‘Step 4: View/Edit Bidder Details’ link to update bidder details which are unavailable at
initial stage. The list of all bidders is shown on the lower half of the screen. Click on the bidder name
to update the necessary details.
33. On completion of ‘Bid Evaluation’ stage click on ‘Move to Next Stage’. This will move the
procurement to ‘Recommendation for Award’ stage.
Recommendation for Award
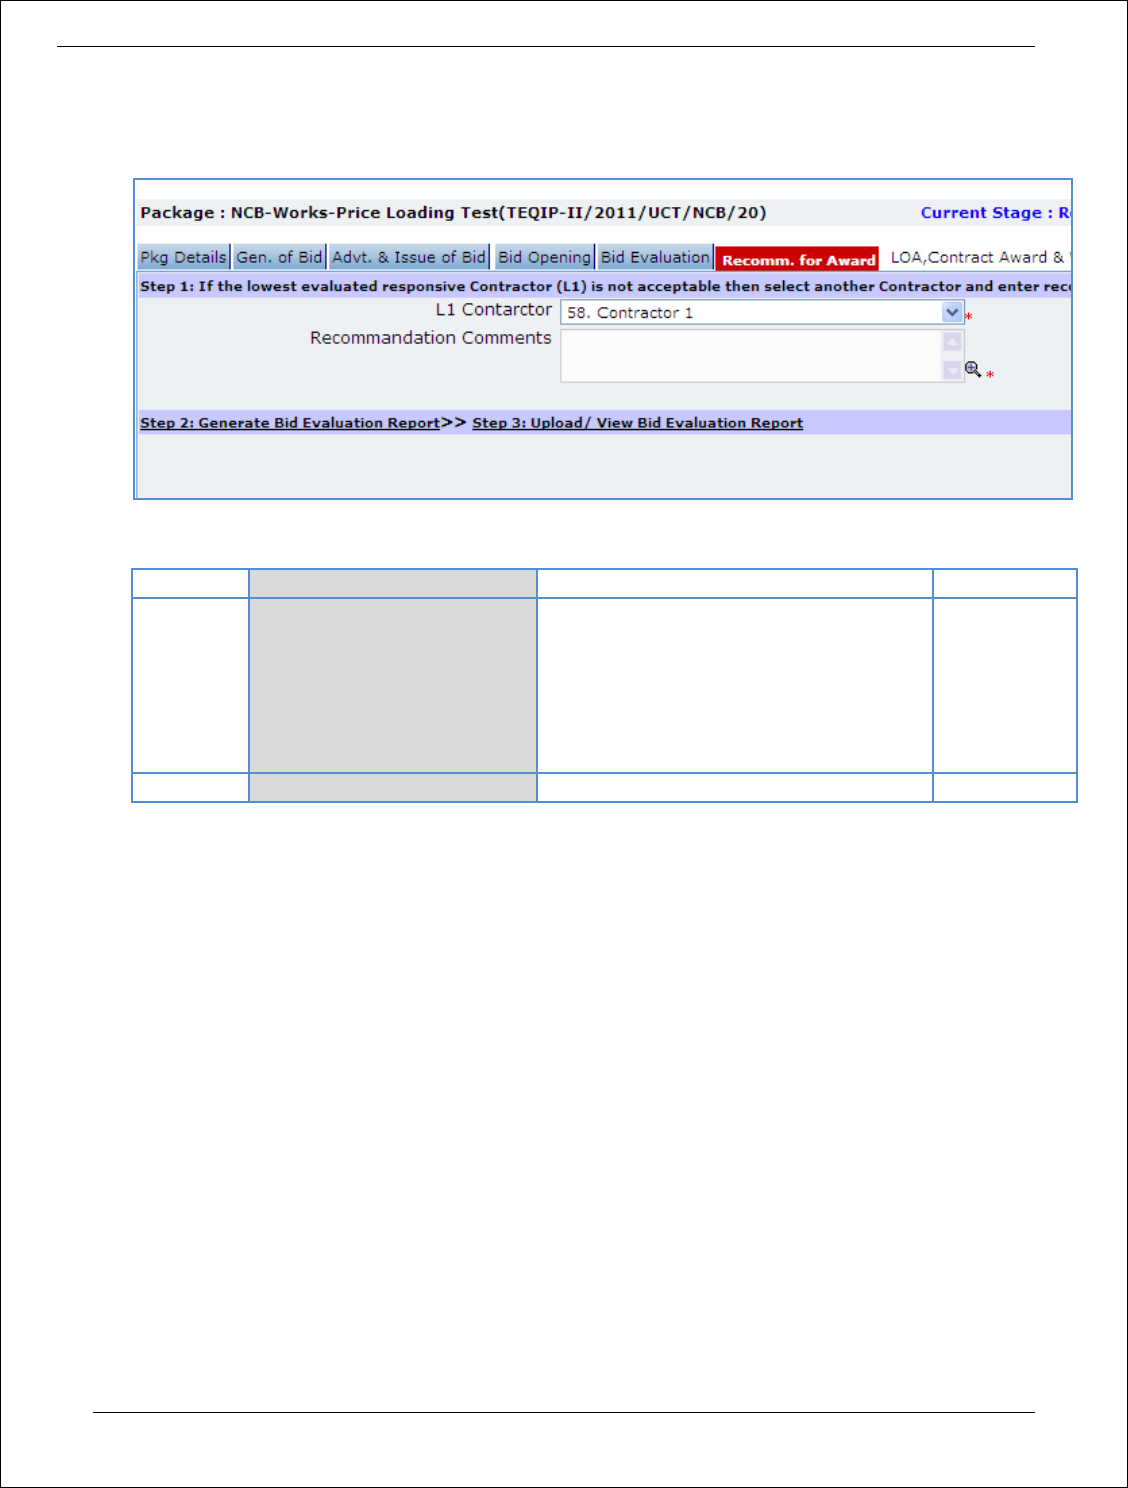
Procurement Management Support System – PMSS v1.0 User Guide
92
In this stage appropriate responsive bidder can be recommend. If the lowest evaluated responsive
bidder (L1) is not acceptable by the committee then another bidder can be selected in this stage
34. Fill the fields on the page. Details of the fields are mentioned below;
Sr. No.
Field Name
Field Description
Sample Data
1
L1 Bidder
If the lowest evaluated responsive bidder
(L1) is not acceptable by the committee
then another contractor can be selected
2
Recommendation Comments
Enter the comments
35. Click on ‘Step 2: Generate Bid evaluation Report’ link. System will give an option to Open/ Save the
Bid evaluation Report. Save the report on your computer with a proper name. Update the sections
highlighted in yellow and save the document.
36. Click on ‘Step 3: Upload Bid Evaluation Report’ link. ‘Documents’ subtab will be shown in the lower
section.
a. Click ‘Add’, which is within the subtab. A pop up will be seen
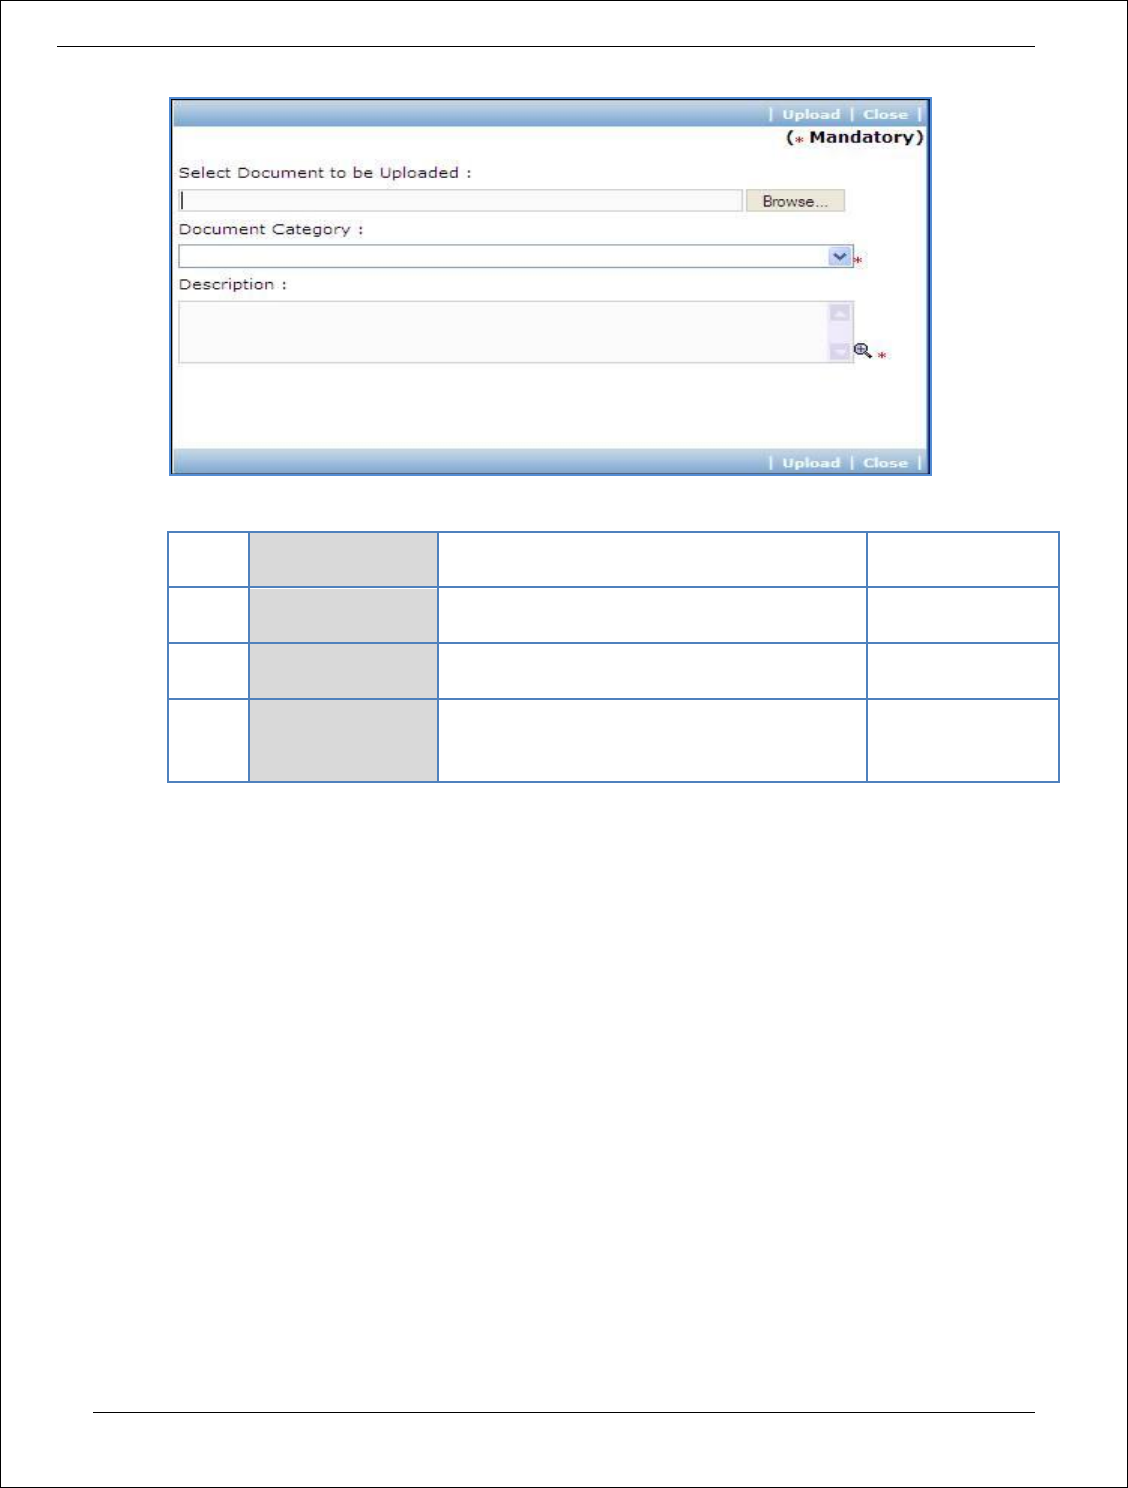
Procurement Management Support System – PMSS v1.0 User Guide
93
b. Fill the fields on the page. Details of the fields are mentioned below;
Sr.
No.
Field Name
Field Description
Sample Data
1
Document to be
uploaded
Browse the document that you want to
upload.
2
Document
Category
Select the appropriate document category.
Bid Evaluation
Report
3
Description
Enter more information about the uploaded
document.
Signed Bid
Evaluation report
uploaded
c. Click ‘Upload’ to upload the document in the system.
d. Uploaded document will appear on the list shown in ‘Documents’ section.
e. User can select and delete the document that has been uploaded in current stage of the
procurement. To delete a document, select ‘Delete’ checkbox against the document and click
‘Delete’ link.
Note: If the Contract price (i.e. Evaluated Price) is more than 25% of the estimated price then the
package will be sent for prior review. Once the user clicks on ‘Move to Next Stage’ system
will ask for a confirmation before sending the package for prior review.
37. On completion of ‘Recommendation for Award’ stage Click on ‘Move to Next Stage’. This will move
the procurement to ‘LOA, Contract Award and PO’ stage.
LOA, Contract Award and PO
In this stage LOA, Contract Award and PO are generated and Payment terms are updated.
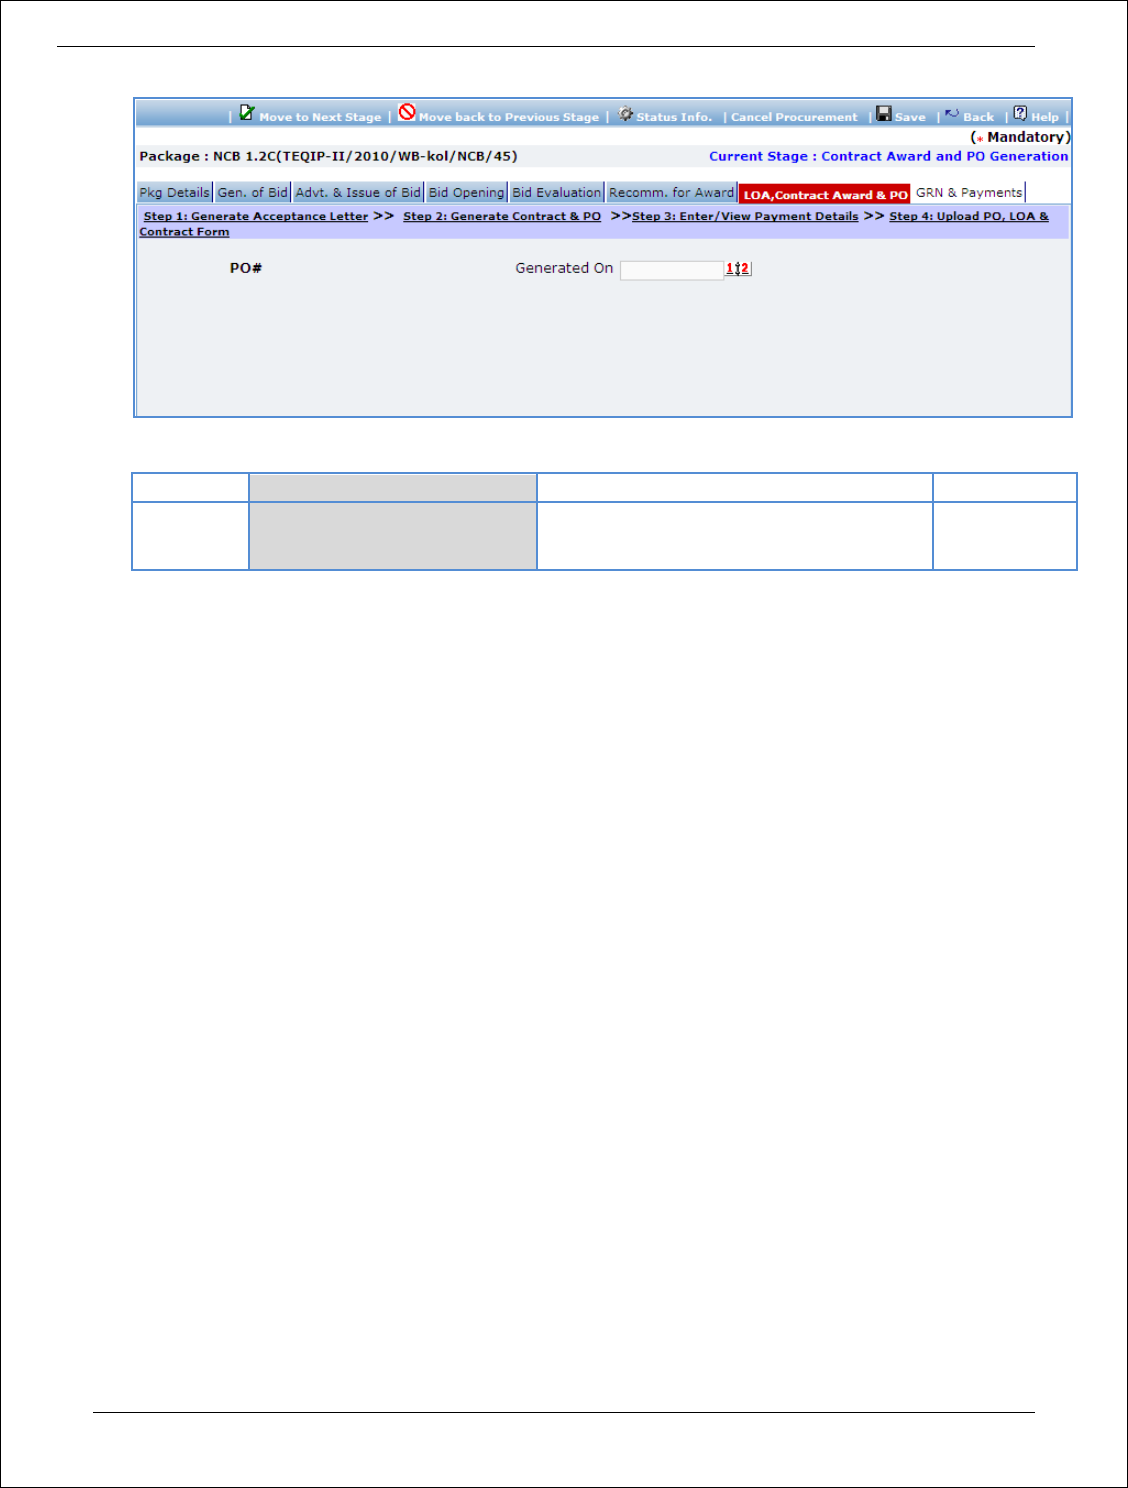
Procurement Management Support System – PMSS v1.0 User Guide
94
38. Fill the fields on the page. Details of the fields are mentioned below;
Sr. No.
Field Name
Field Description
Sample Data
1
LOA Generated Date
System will show the current date (i.e.
today’s date) by default. Click on ‘Save’
Today’s Date
39. Click ‘Save’
Note: If Generated date is greater than the bid validity (i.e. difference between Bid opening date
and Generated date is more than the bid validity given by the selected supplier) system will
ask to provide a new bid validity. Enter the total new bid validity. E.g. if original validity was
90 days and contractor has extended it by 30 days then enter 120 days.
40. Click on ‘Step 2: Generate Letter of Acceptance’ link. System will give an option to Open/ Save the
LOA. Save the LOA on your computer with a proper name. Update the sections highlighted in yellow
and save the document.
41. Click on ‘Step 3: Generate Contract & PO’ link. A Pop up will be seen
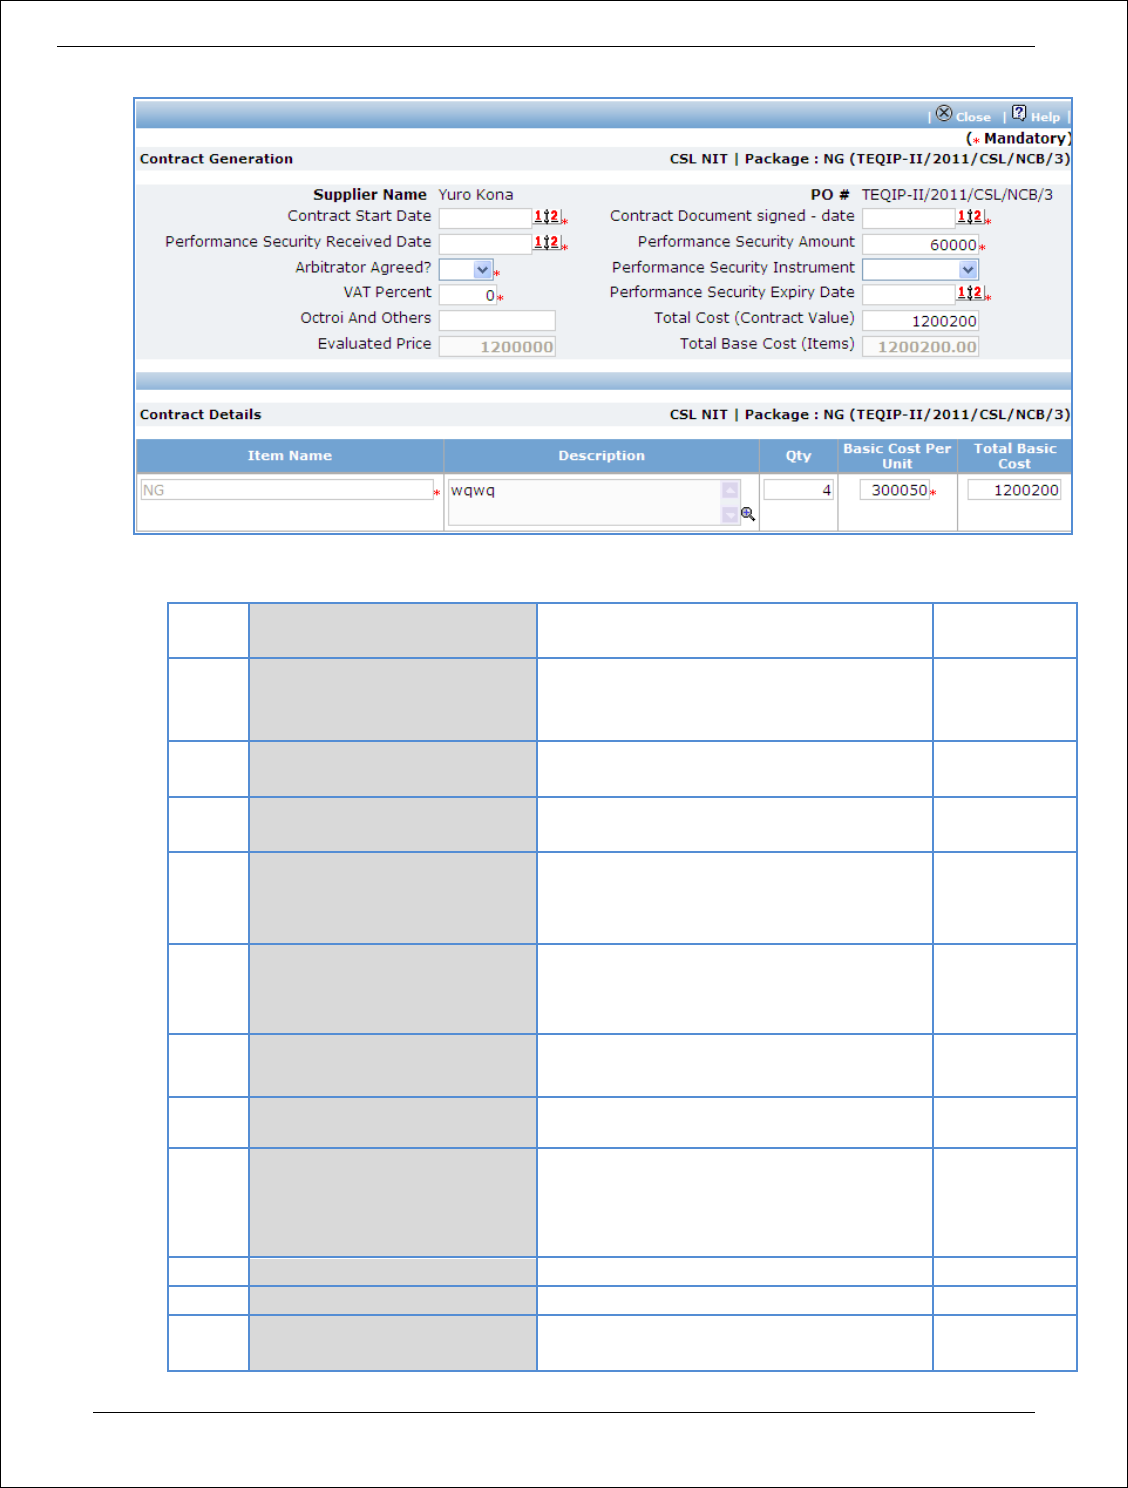
Procurement Management Support System – PMSS v1.0 User Guide
95
a. Fill the fields on the page. Details of the fields are mentioned below;
Sr.
No.
Field Name
Field Description
Sample Data
1
Performance Security
Received Date
Enter the date when Performance
Security was received from the bidder.
Date format is DD/MM/YYYY
12/05/2011
2
Contract Document signed -
date
Enter the contract signed date. Date
format is DD/MM/YYYY
20/05/2011
3
Contract Start Date
Enter the date when contract is expected
to start. Date format is DD/MM/YYYY
01/06/2011
4
Expected Delivery Date
Enter the date when delivery is expected
to complete. Date format is
DD/MM/YYYY
23/08/2011
5
Performance Security
Amount
Will be auto calculated as 5% of the
estimated cost. Edit the amount, if
required.
36000
6
Arbitrator Agreed?
Select Yes/ No. Whether arbitrator is
agreed or otherwise.
Yes
7
Performance Security
Instrument
Select the Performance Security
Instrument
DD
8
Performance Security Expiry
Date
Enter the date when Performance
Security will expiry. This date should be
more than Expected Delivery Date +
Warranty + 28 days
29/06/2013
9
VAT Percent
Enter the Value added tax percentage
12
10
Octroi And Others
Enter amount in Rs
1600
11
Evaluated Price
Will be auto populated
System
calculated

Procurement Management Support System – PMSS v1.0 User Guide
96
12
Total Base Cost (Item)
Will be auto calculated as (Qty*Basic Cost
Per Unit)
System
calculated
13
Qty
This field can be seen in the lower row,
i.e. in the items section. Edit the Quantity
if required. For NCB goods Quantity can
be increase/ decrease by 15% of the
planned quantity.
12
14
Basic Cost Per Unit
This can be seen in the lower row, i.e. in
the items section. Edit the basic cost per
unit as required.
15
Total Cost (Contract Value)
Will be auto populated as (Total Base
Cost (Item) + VAT)
System
calculated
b. Click ‘Save’
c. Click ‘Print PO’. System will give an option to Open/ Save the PO. Save the PO on your computer
with a proper name. Update the sections highlighted in yellow and save the document.
d. Click ‘Print Contract’. System will give an option to Open/ Save the Contract. Save the
Contract on your computer with a proper name. Update the sections highlighted in yellow and
save the document.
42. Click on ‘Step 4: View/Update Payments details’ link. ‘Payments’ subtab will be seen in the lower
section.
a. Click on the payment term name
b. Fill the fields on the page. Details of the fields are mentioned below;
Sr. No.
Field Name
Field Description
Sample Data
1
Expected
Completion Date
This is auto calculated as Contract Start Date
+ Expected Completion Period. Edit the date
if required.
30
2
Expected Payment
Date
Enter the expected date when payment will
be made against this completion. Date
format is DD/MM/YYYY
12/08/2011
c. Click ‘Save’.
d. Update the other payment terms by repeating steps a.to c.
43. Click on ‘Step 5: Upload PO, LOA & Contract Form’ link. ‘Documents’ subtab will be shown in the
lower section.
a. Click ‘Add’, which is within the subtab. A pop up will be seen

Procurement Management Support System – PMSS v1.0 User Guide
97
b. Fill the fields on the page. Details of the fields are mentioned below;
Sr.
No.
Field Name
Field Description
Sample Data
1
Document to be
uploaded
Browse the document that you want to
upload.
2
Document
Category
Select the appropriate document category.
Letter of
Acceptance
3
Description
Enter more information about the uploaded
document.
Signed LOA
uploaded
c. Click ‘Upload’ to upload the document in the system.
d. Uploaded document will appear on the list shown in ‘Documents’ section.
e. User can select and delete the document that has been uploaded in current stage of the
procurement. To delete a document, select ‘Delete’ checkbox against the document and click
‘Delete’ link.
f. To upload PO repeat Steps a. to c. (Select document category as ‘Purchase Order’)
g. To upload Contract repeat Steps a. to c. (Select document category as ‘Contract Form’)
44. On completion of ‘LOA, Contract Award and PO’ stage Click on ‘Move to Next Stage’. This will move
the procurement to ‘GRN & Payments’ stage.
GRN & Payments
In this stage Goods received details are captured and Payment tracking is performed.
45. Click on ‘Setp1: Fill GRN Details’. ‘GRN’ subtab will be shown in the lower section;
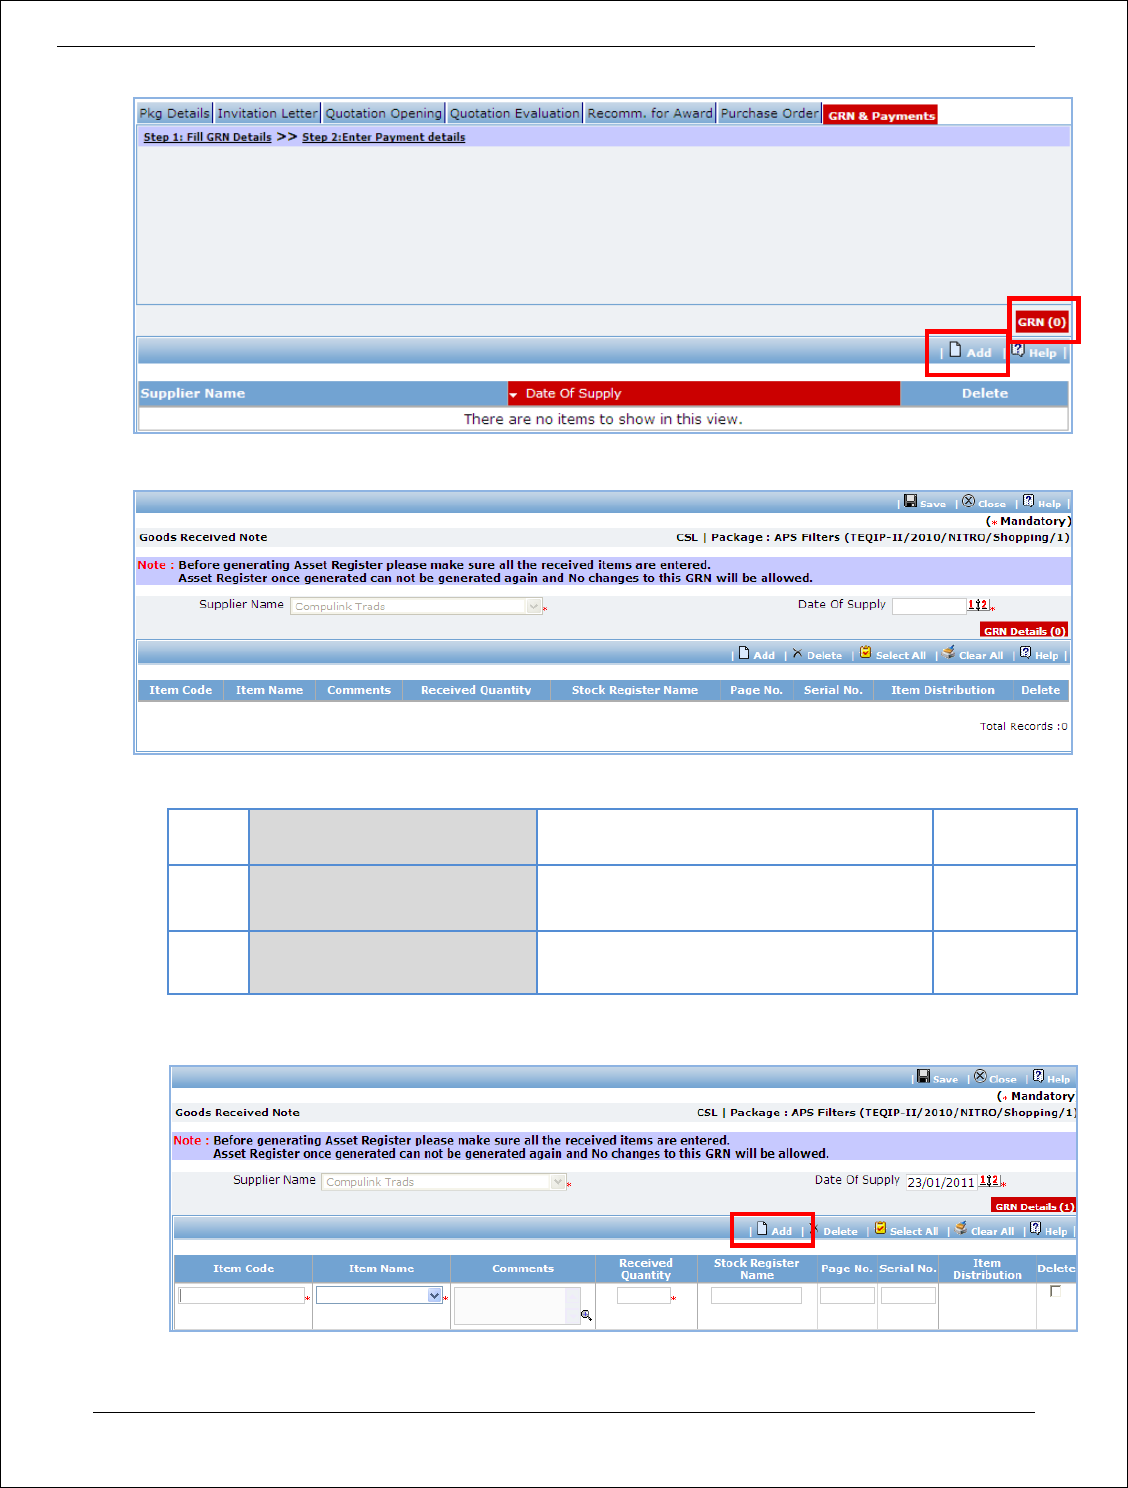
Procurement Management Support System – PMSS v1.0 User Guide
98
a. Click on ‘Add’, a pop up will be seen;
b. Fill the fields on the page. Details of the fields are mentioned below;
Sr.
No.
Field Name
Field Description
Sample Data
1
Supplier Name
This field is auto populated with the
selected supplier’s name
System
populated
2
Date of Supply
Enter the date when Goods are supplied.
Date format is DD/MM/YYYY
12/8/2011
c. Click ‘Add’ link which is in the Items section.
d. Fill the fields on the page. Details of the fields are mentioned below;

Procurement Management Support System – PMSS v1.0 User Guide
99
Sr. No.
Field Name
Field Description
Sample Data
1
Item Code
Enter a short (abbreviated) name for
the item that is supplied
LMPrinter – can be a short name
for item ‘LaserJet Monolithic
Printer’
2
Item Name
Select the item that is supplied
LaserJet Monolithic Printer
3
Comments
Enter the comments, if required
Received ok
4
Received
Quantity
Enter the quantity of item received
2
5
Stock
Resistor
Name
Enter the name of the resistor
where the entry of this item is made
for manual records
TEQIP – II stock resistor
6
Page No.
Enter the page number of the stock
resistor on which this entry is made
32
7
Serial No.
Enter the serial number of this item
ABC Institution/ TEQIP – II/ LMP
- 43
e. To add another Item repeat steps c. & d.
f. Click ‘Save’, which is on the upper bar of the main (GRN) section.
g. Once saved, ‘Item Distribution’ link will appear against each item.
h. Click on ‘Item Distribution’ link a pop up will be seen. Enter the Actual Quantity supplied to each
department.

Procurement Management Support System – PMSS v1.0 User Guide
100
i. Click ‘Save’.
j. Click on ‘Print GRN’, which is on the upper bar of the main (GRN) section. GRN Report will be
generated.
k. The GRN Report can be uploaded using the Browse function, which is in front of the ‘GRN
Document’ field. Once uploaded, link will appear besides the browse function.
l. Report can be downloaded, if required by clicking on the link.
m. Click on ‘Print Asset Register’, which is on the upper bar of the main (GRN) section. Asset
Register will be generated.
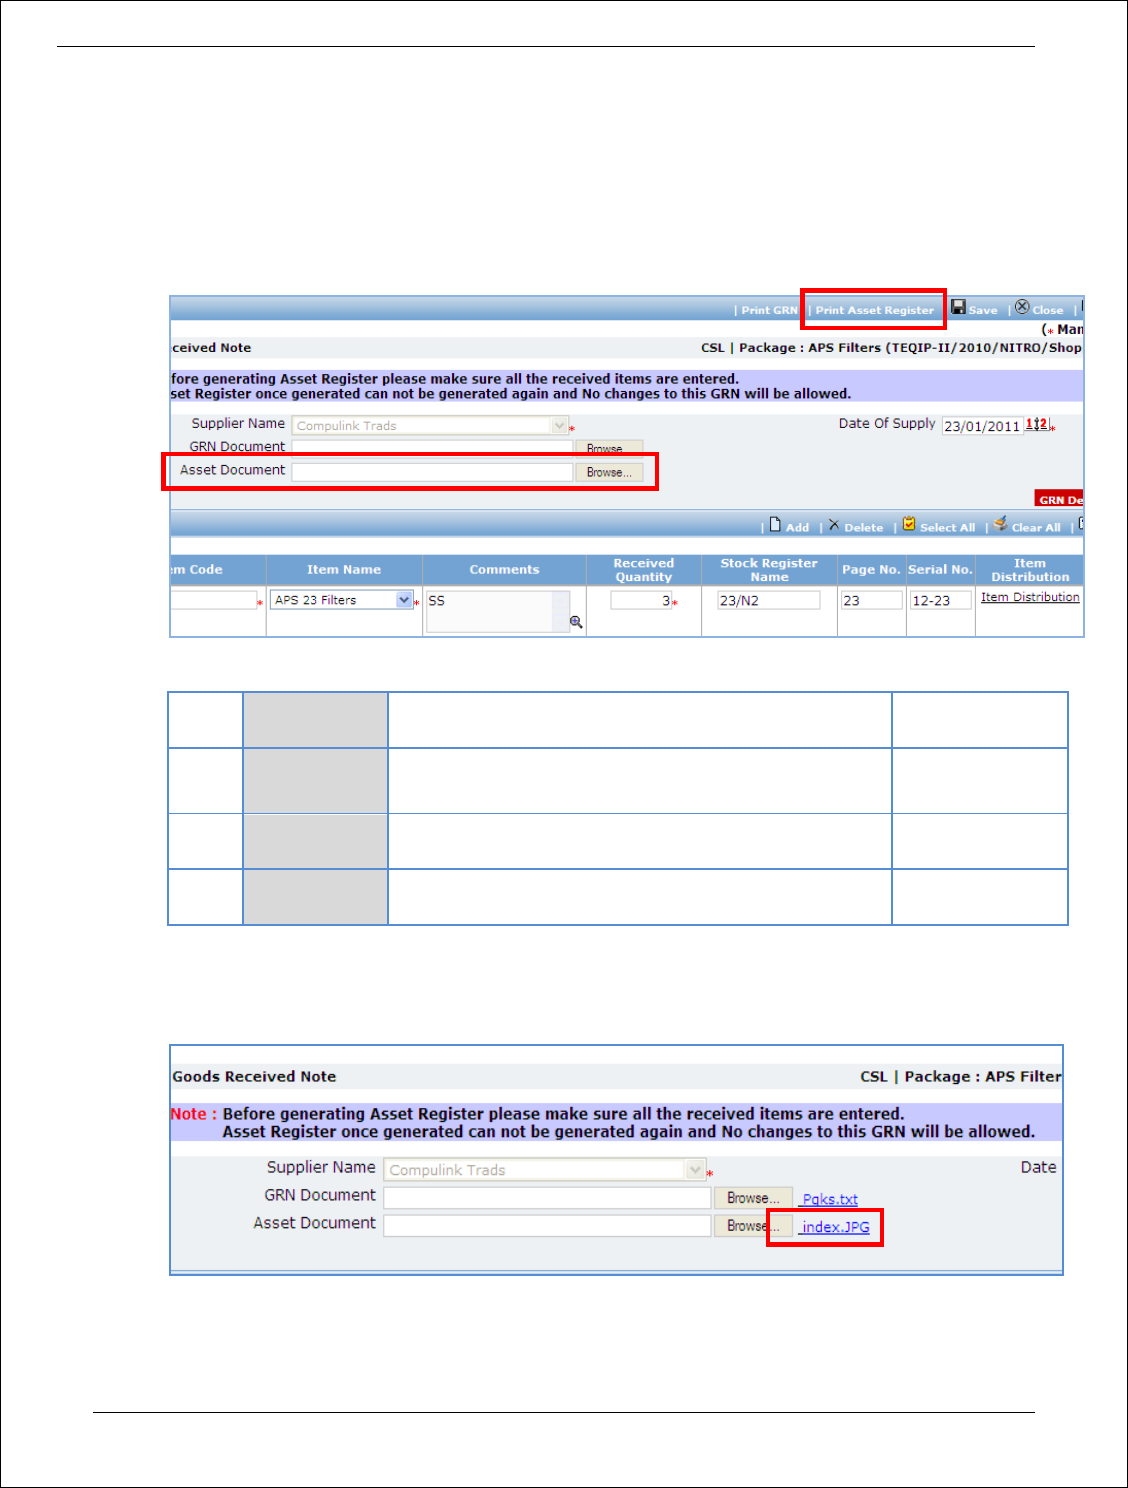
Procurement Management Support System – PMSS v1.0 User Guide
101
Note: Asset Register can be generated only once. System will give a warning message to confirm
that all the items have been added etc. Once Asset Register is generated no changes can be
made to that GRN record.
n. Fill the fields in the Asset Register. Details of the fields are mentioned below;
Sr.
No.
Field Name
Field Description
Sample Data
1
Unique
Number
Auto populated by the system based on the quantity
of items received
2
Model
Number
Enter the model number of the item
HP LazerJet 3005
3
Serial
Number
Enter the serial number of the item
o. Once the Asset Register is filled it can be uploaded using the Browse function, which is in front
of the ‘Asset Document’ field. Once uploaded, link will appear besides the browse function.
p. Asset Register can be downloaded by clicking on the link.
46. To add another record for GRN repeat steps from a. to p.
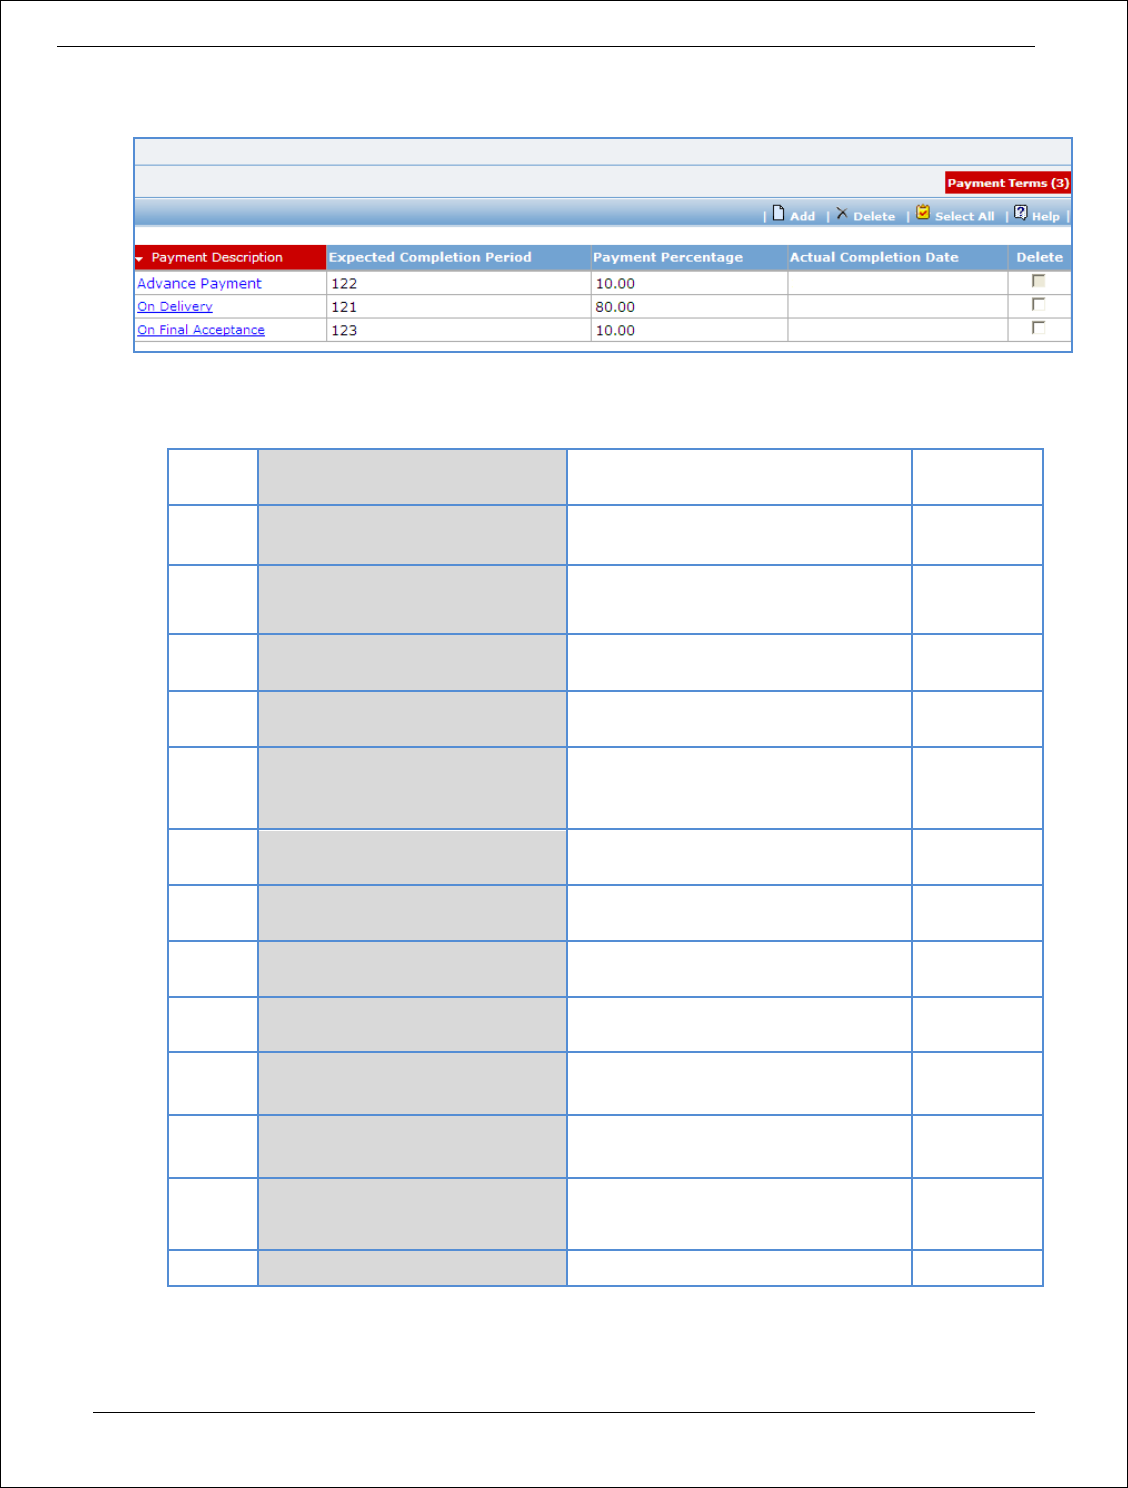
Procurement Management Support System – PMSS v1.0 User Guide
102
47. Click on ‘Setp2: Enter Payment details’. ‘Payments’ subtab will be shown in the lower section;
a. Click on the Payment Term a pop up will be seen
b. Fill the fields on the page. Details of the fields are mentioned below;
Sr. No.
Field Name
Field Description
Sample
Data
1
Goods Received?
Check this box if goods are received
against this payment
2
Goods received note
generated?
Check this box if GRN is generated
for the received goods
3
Actual Completion Date
Enter the actual date of delivery.
Date format is DD/ MM/ YYYY
12/07/2011
4
Liquidated Damages
Waived?
Check this box if Liquidated
Damages are going to be waived
5
Liquidated Damages
Amount
Will be auto populated if ‘Actual
Completion date’ is more than
‘Expected completion date’
6
Actual Completion Period
Enter the actual completion period
in days
7
Comments
Comment on Actual completion
period, if required
8
Actual Payment Date
Enter the date when payment is
made. Date format is DD/MM/YYYY
13/08/2011
9
Comments
Comment on Actual Payment Date,
if required
8
Actual Payment Amount
Enter the actual amount paid
12000
10
Comments
Comment on Actual Payment
Amount, if required
5
Cheque/Draft Number
Enter the Cheque/ Draft number by
which payment is made
40023467
6
TDS
Enter the TDS amount
a. Click ‘Save’
b. To enter details of another payment repeat steps a. to c.

Procurement Management Support System – PMSS v1.0 User Guide
103
48. In cases where Amendment is made click on ‘Fill Amendment details, if required’ link.
49. Fill the fields on the page. Details of the fields are mentioned below;
Sr. No.
Field Name
Field Description
Sample
Data
1
Is Amendment required?
Select yes to perform amendment.
Other fields (described below) will be
shown once ‘Yes’ option is selected.
Yes
2
Warranty
System will show the warranty period.
Edit the warrant, if required.
3
Performance Security Amount
System will show the performance
security amount. Edit the amount, if
required
4
Expected Delivery Date
System will show the delivery date.
Edit the date as per new delivery date.
5
Performance Security Expiry Date
System will show the performance
security expiry Date. Edit the date as
per new expiry date
50. Click ‘Save’
51. ‘Payments’ subtab is shown in the lower section. Click on the payment term name and update the
details as per new terms.
Note: Only those payment terms are editable which do not have any actual completion date
52. Select ‘Yes’ in the ‘Amendment Complete?’ field.
53. Click ‘Save’. This will complete the amendment process. After completing the amendment user can
continue to track GRN and Payments.
54. Once all the details for all the payments are recorded, Procurement can be marked as complete.
Click on ‘Completion Checklist’, checklist will be seen
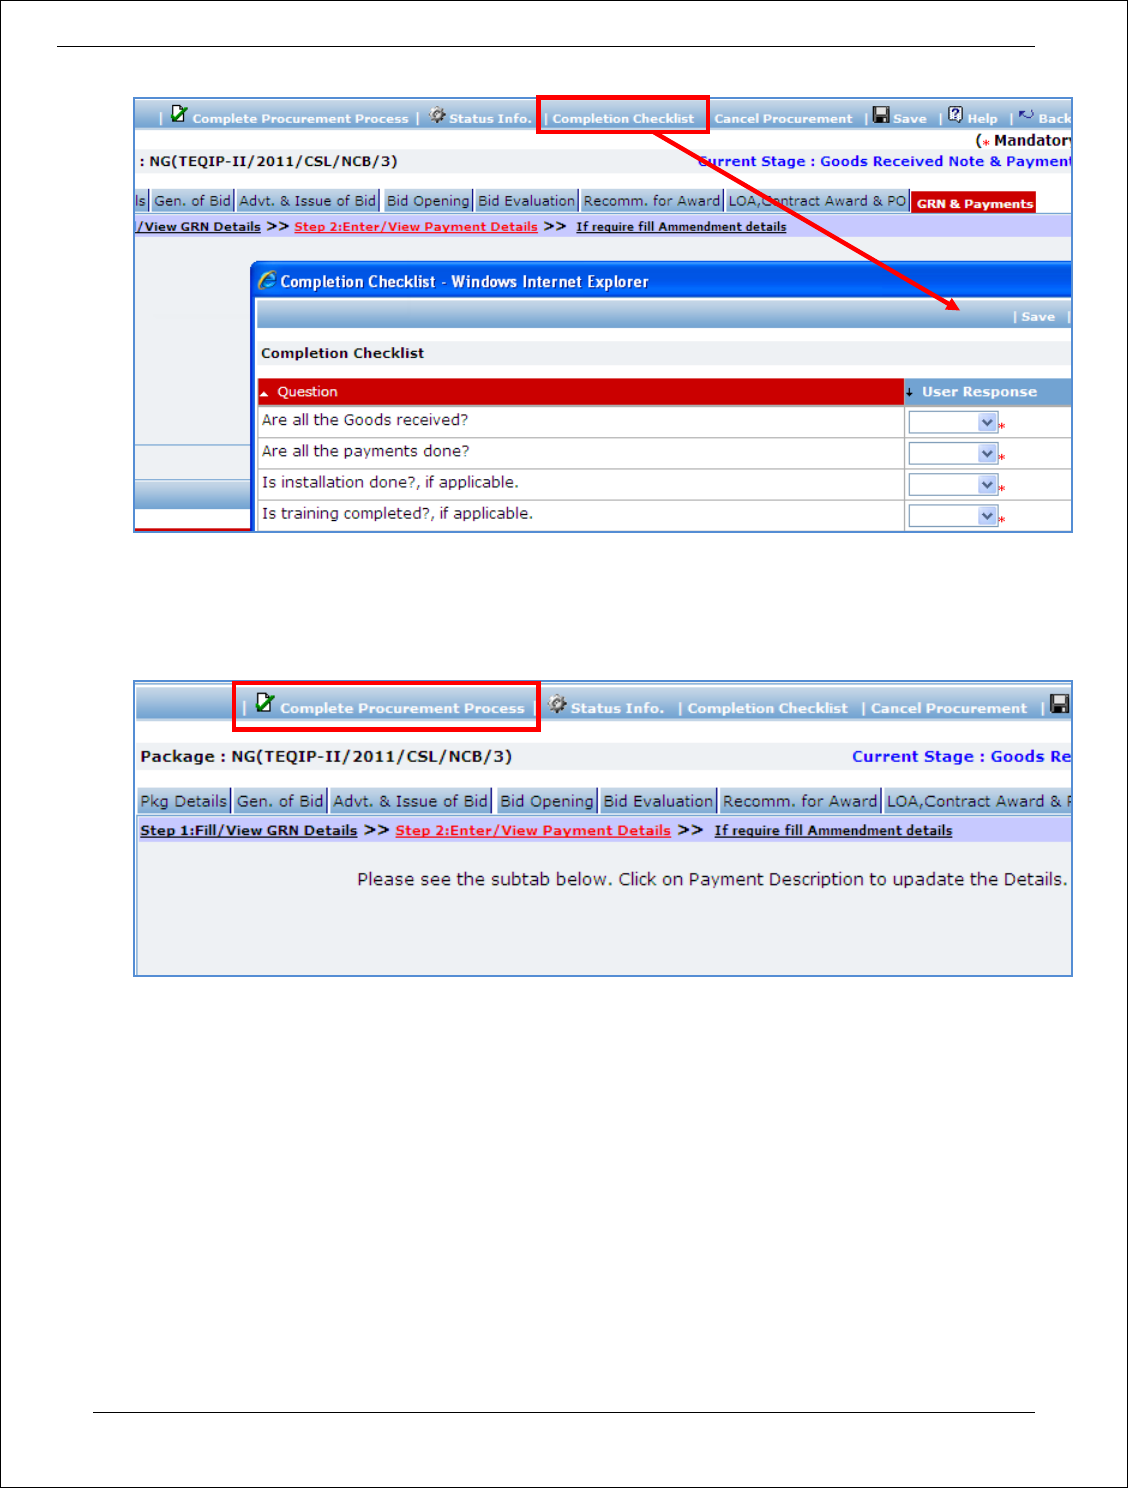
Procurement Management Support System – PMSS v1.0 User Guide
104
a. Fill in the completion checklist
b. Click ‘Save’
38. Click on ‘Complete Procurement Process’ this will complete the procurement for that Package.
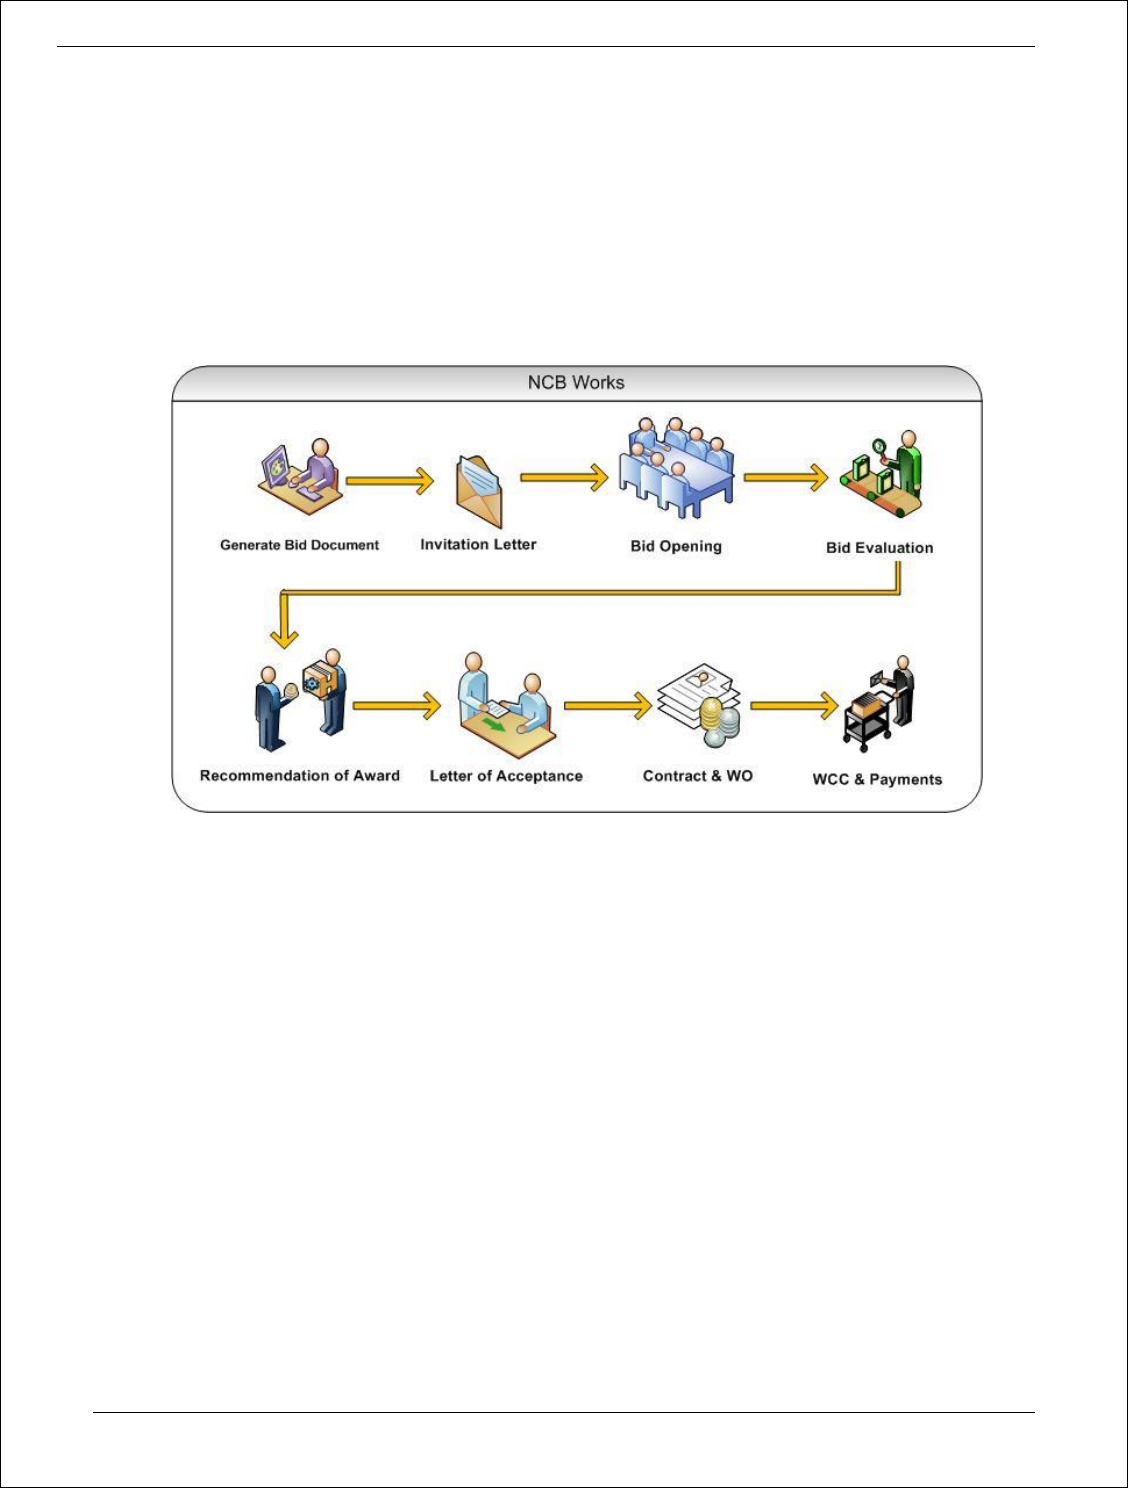
Procurement Management Support System – PMSS v1.0 User Guide
105
NCB Works
Purpose
To perform procurement of civil works using NCB method.
Process flow
Role(s)
o Procurement Coordinator (SPFU)
o Procurement Coordinator – NPIU’s procurement coordinator, Performs Prior review, when
applicable.
Prerequisite
o Package to be procured should fall under category Civil Works.
o Value of the package should be > USD 30,000.
o For value range US$ 100,000 up to US$ 200,000, prior review is done by SPFU
o For value range US$ 200,000 up to US$ 300,000, prior review is done by NPIU also.
Process Details
First stage of NCB is ‘Gen. of Bid’.
Gen of Bid
In this stage Standard Bidding Document is generated
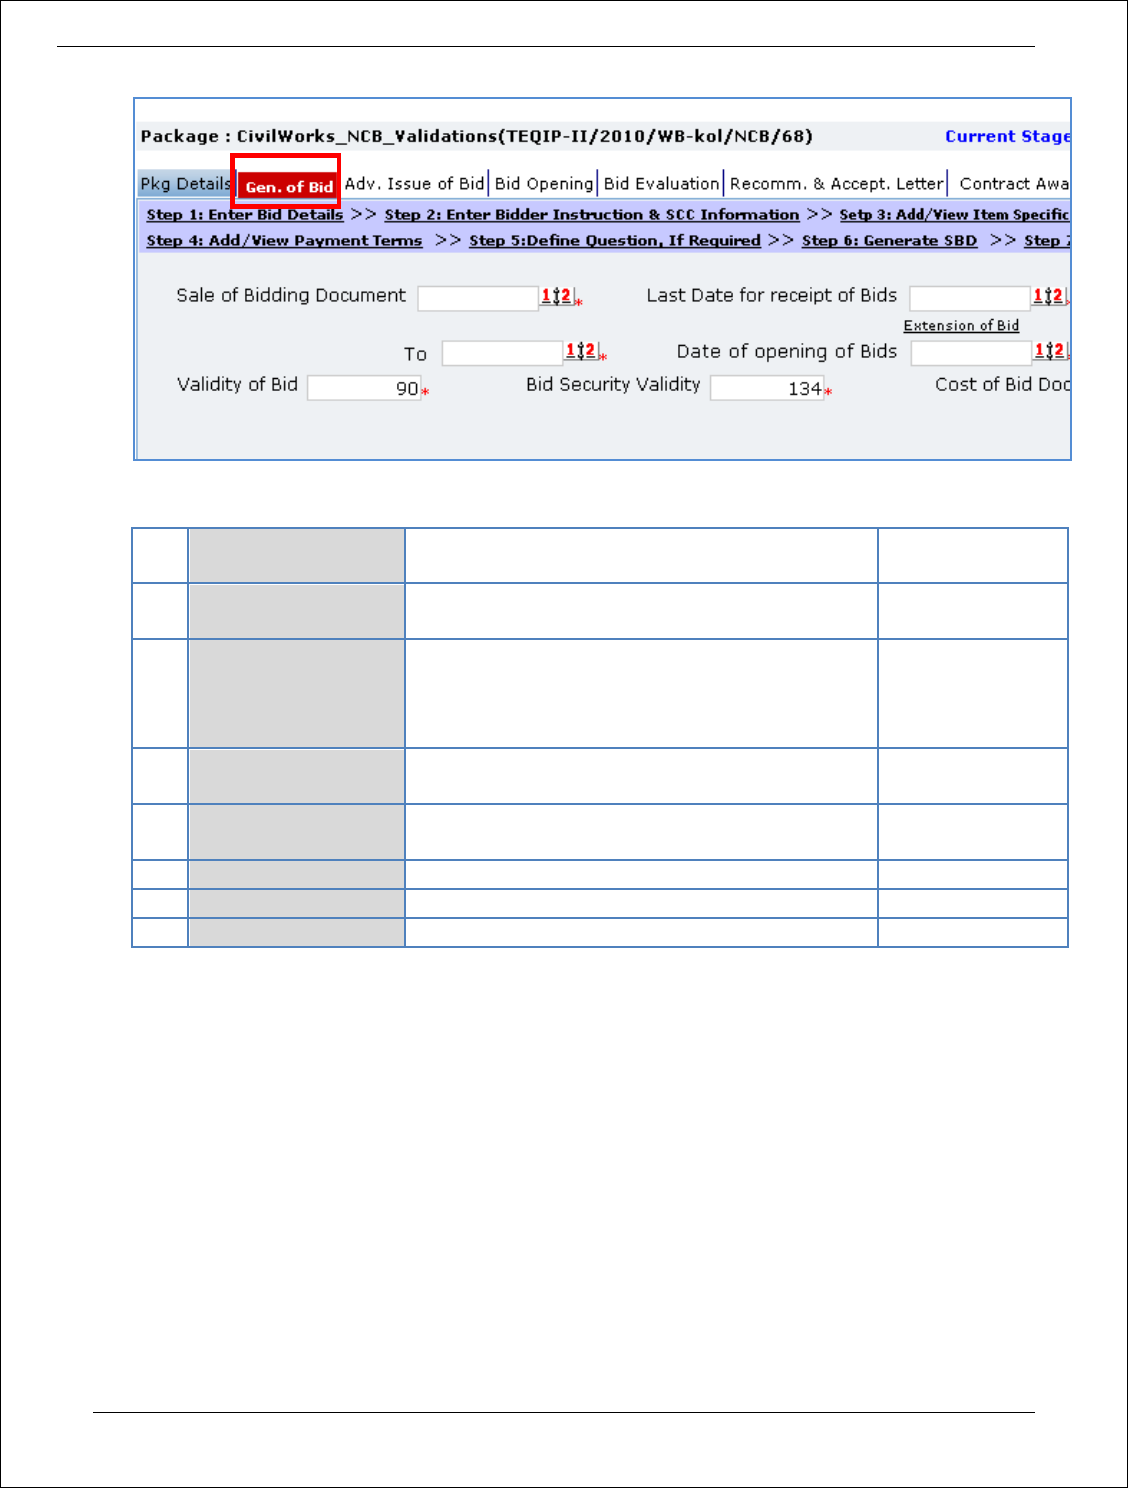
Procurement Management Support System – PMSS v1.0 User Guide
106
1. Fill the fields on the page. Details of the fields are mentioned below;
Sr.
No.
Field Name
Field Description
Sample Data
1
Start Date of Sale of
SBD
Enter the date on which SBD sale will start. Date
format is DD/MM/YYYY
15
2
Last Date for receipt
of Bids
Will be auto populated as 30 days from start of
sale date. Edit the date, if required. Date format is
DD/MM/YYYY and time format is HH:MM, 24 hrs
format.
12/03/2011 16:00
3
Last Date of Sale of
SBD
Will be auto populated and will match the Last
Date for receipt of Bids
4
Date of opening of
Bids
Will be auto populated and will match the Last
Date for receipt of Bids
5
Validity of Bid
Will be auto populated as 90 days
6
Bid Security Validity
Will be auto populated as 134 days
7
Cost of Bid Document
Enter the price of Bid document
2. Click ‘Save’
3. Click on ‘Step 2: Enter Bidder Instruction & SCC Information’ a pop up will be seen.
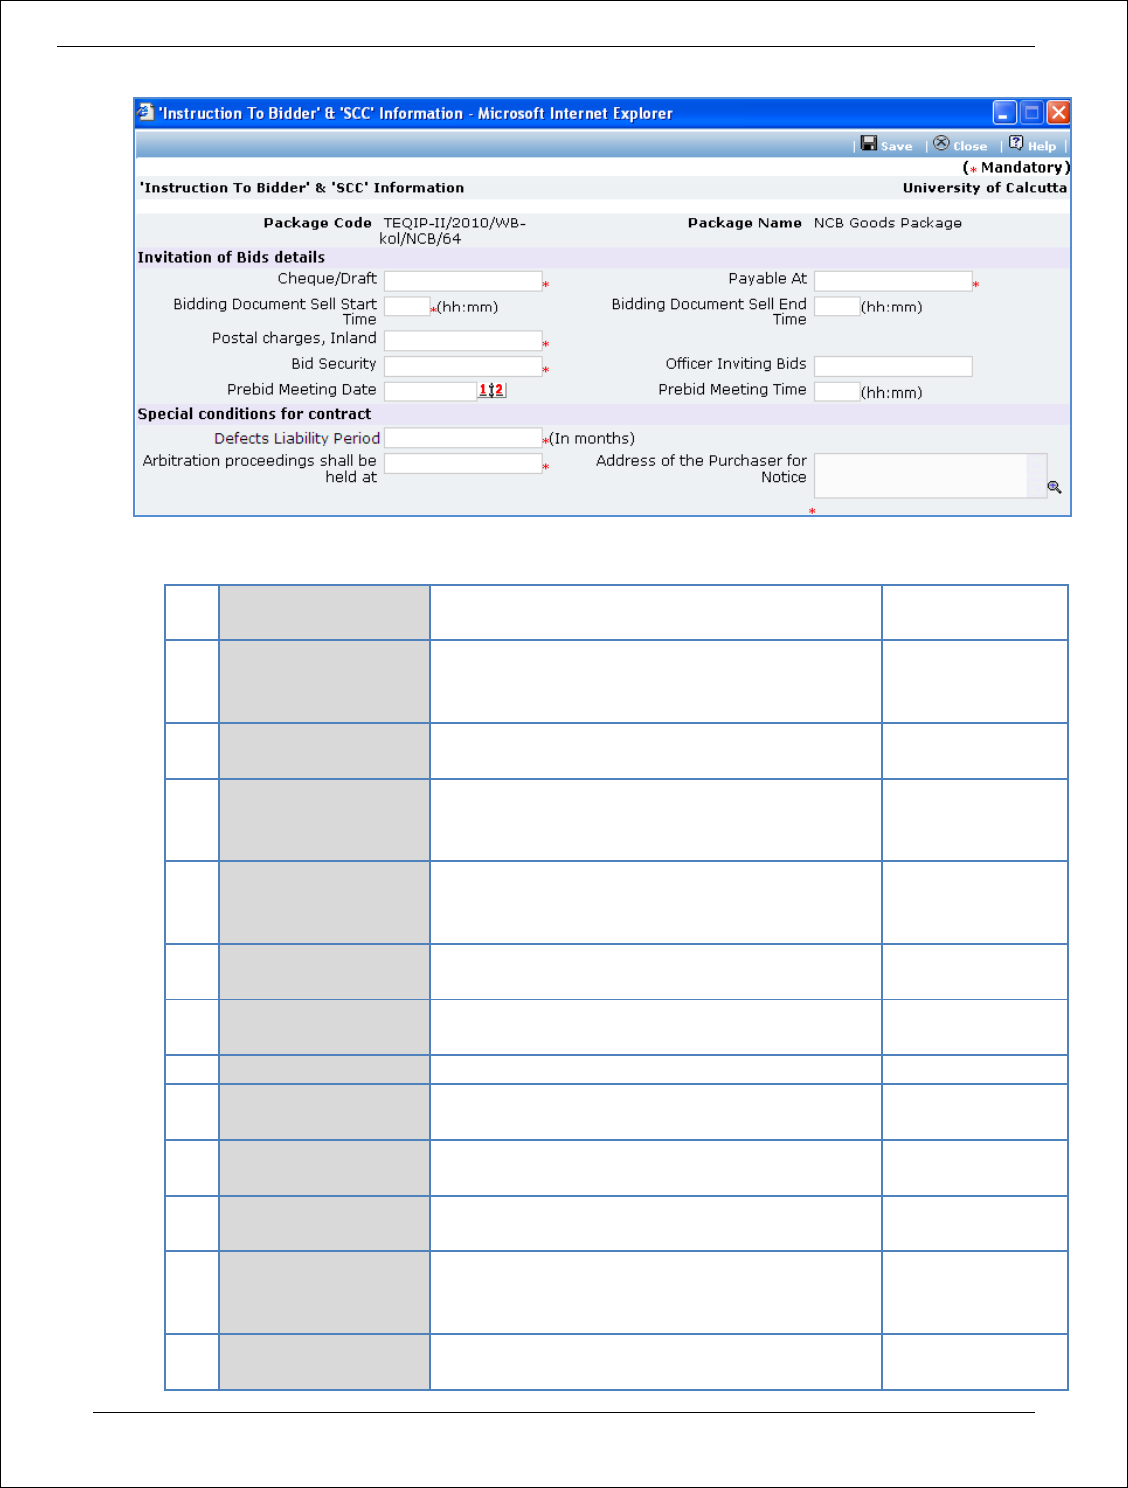
Procurement Management Support System – PMSS v1.0 User Guide
107
a. Fill the fields on the page. Details of the fields are mentioned below;
Sr.
No.
Field Name
Field Description
Sample Data
1
Cheque/Draft in
favour of
Mention the name that has to be put on the
cheque/ draft for purchase of complete bidding
document
CSL NIT
2
Payable At
Mention where draft should be payable
Delhi
3
Bidding Document
Sell Start Time
Mention office hrs, start time when bid doc can
be obtained. Time format is HH:MM, 24 hrs
format
9:00
4
Bidding Document
Sell End Time
Mention office hrs, end time till when bid doc
can be obtained. Time format is HH:MM, 24 hrs
format
18:00
5
Postal charges,
Inland
Mention postal charges in Rs
230
6
Bid Security
Mention bid security amount in Rs. It should be
within 2% to 5% of estimated cost of package
36000
7
Officer Inviting Bids
Mention the name of the officer
Mr. Mohan Lal
8
Prebid Meeting Date
If Prebid meeting is planned then enter the
date. Date format is DD/MM/YYYY
12/08/2011
9
Prebid Meeting Time
Enter Prebid meeting time. Time format is
HH:MM, 24 hrs format
12:00
10
Defects Liability
Period
Enter the Defects Liability Period in days
120
11
Arbitration
proceedings shall be
held at
Mention the place
12
Address of the
Purchaser for Notice
Mention the address
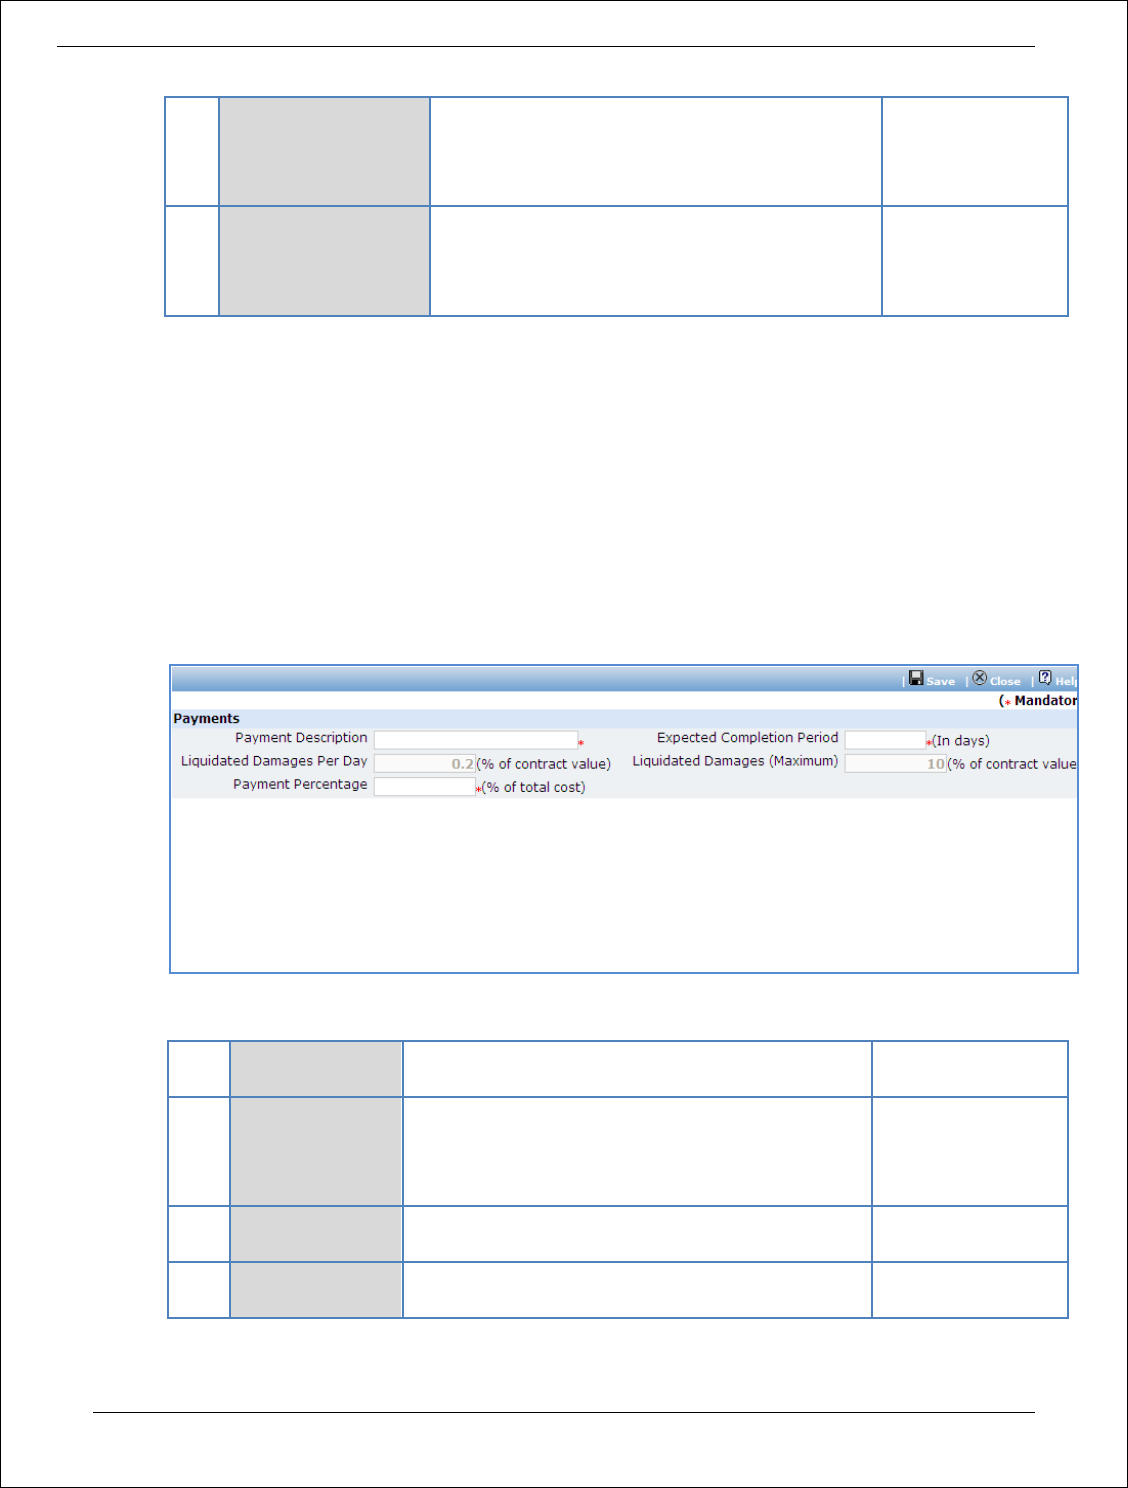
Procurement Management Support System – PMSS v1.0 User Guide
108
13
Liquidated Damages
(Per Day)
Will be auto populated as 0.01%. Edit this field,
if required. Value in this field will be used to
calculated the Liquidated damages per day
incase of any completion delays.
14
Liquidated Damages
(Maximum)
Will be auto populated as 10%. Edit this field, if
required. Value in this field will be used to
calculated the maximum amount of liquidated
damages applicable
b. Click ‘Save’
4. Click on ‘Step 3: View Item Details, if required’ link (This is an optional step, used to only view the
item details). ‘Items’ subtab is shown in the lower section
a. Click ‘Item Name’, a pop up will be seen
b. View the item details
c. If there is more than one item then, repeat steps a. and b.
5. Click on ‘Step 4: Add/View Payment Terms’ link. ‘Payments’ subtab is shown in the lower section.
a. Click ‘Add’, which is within the subtab. A pop up will be seen
b. Fill the fields on the page. Details of the fields are mentioned below;
Sr.
No.
Field Name
Field Description
Sample Data
1
Payment Terms
Enter the payment title
3. On reaching
plinth level
(first level)
4. On Completion
2
Completion
Period
Enter the period in days in which completion is
expected once the contract is signed.
60
3
Payment
Percentage
By default percentage will be show, edit the
percentage if required
10
c. Click ‘Save’.
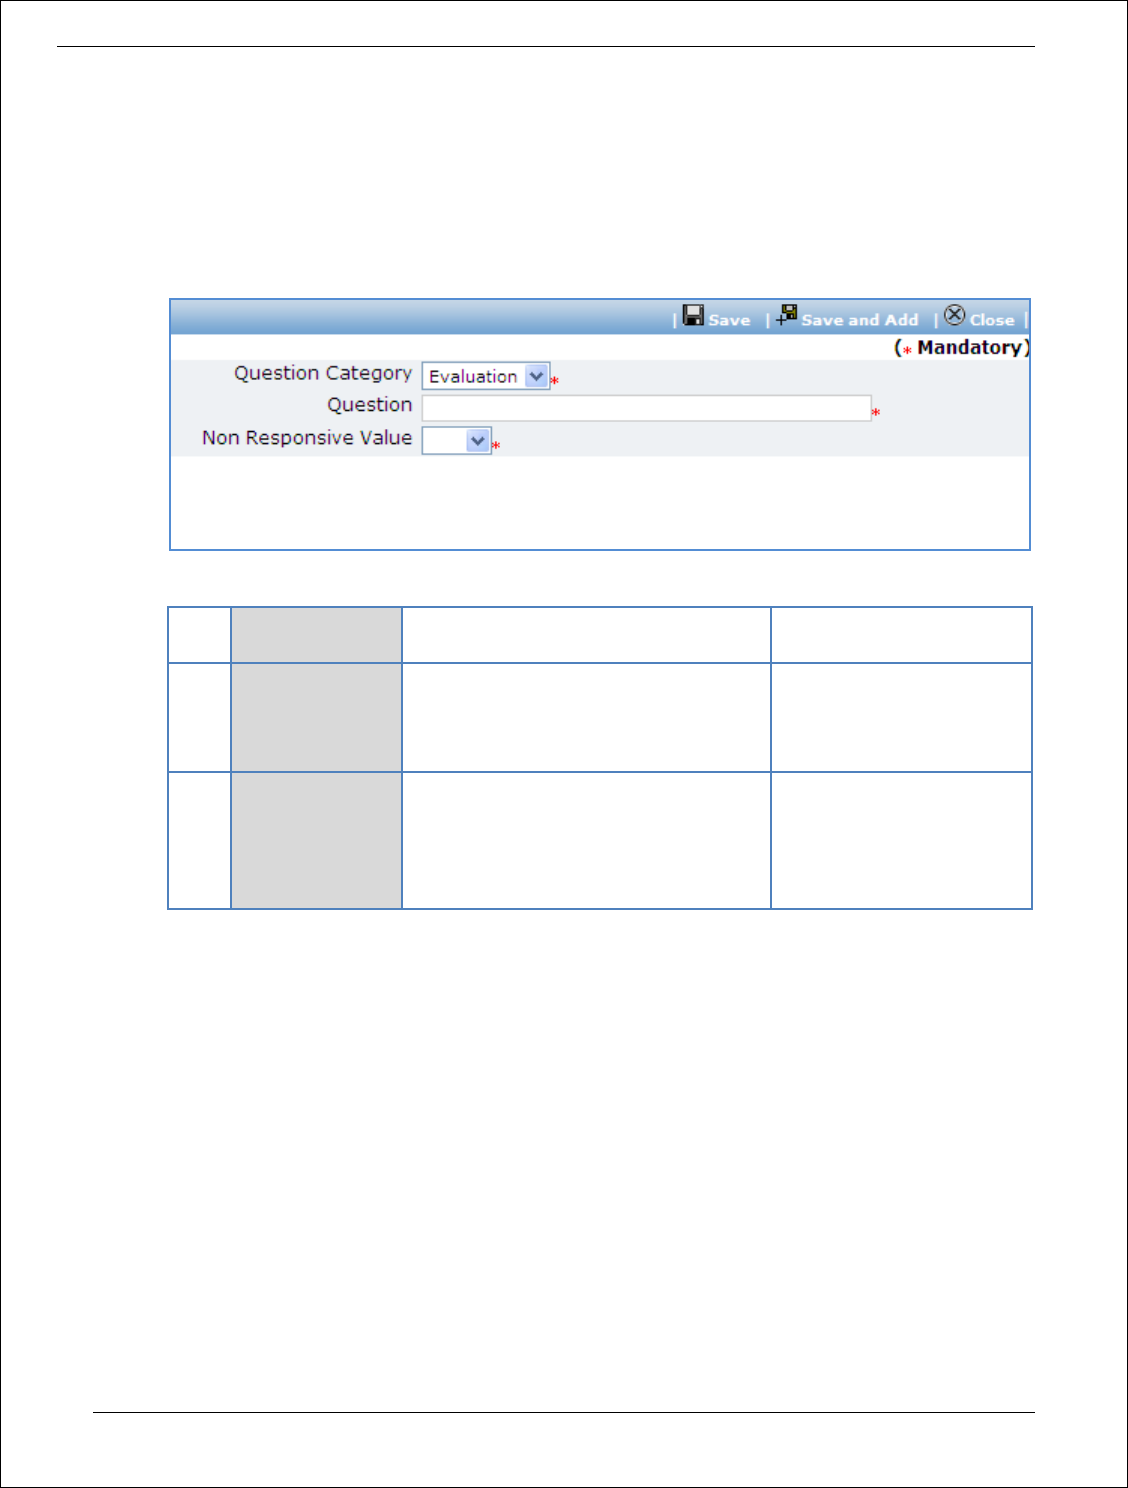
Procurement Management Support System – PMSS v1.0 User Guide
109
d. To add another payment term repeat steps from a. to c.
6. Click on ‘Step 5: Define Additional Question, If Required’ link (This is an optional step, to be
performed only if additional evaluation/ post qualification question are required). ‘Questions’
subtab is shown in the lower section.
a. Click ‘Add’, which is within the subtab. A pop up will be seen
b. Fill the fields on the page. Details of the fields are mentioned below;
Sr.
No.
Field Name
Field Description
Sample Data
1
Question
Enter the description of the question
to be asked during quotation
evaluation. Form the question such
that response (answer) is Yes/ No/ NA.
Does the supplier have a
local service center?
2
Non Responsive
Value
Select the value (Yes/ No/ NA) based
on which the supplier will become
non- responsive.
E.g. if the question is
‘Does the Contractor have
a local service center?’
then the non- responsive
value could be ‘No’.
c. Click ‘Save’.
d. To add another Question repeat steps from a. to c.
7. After filling mandatory data, Click on ‘Step 6: Generate SBD’ link. System will give an option to
Open/ Save the SBD. Save the SBD on your computer with a proper name. Update the sections
highlighted in yellow and save the document.
8. Click on ‘Step 7: Upload SBD Document’ link. ‘Documents’ subtab will be seen in the lower section
a. Click ‘Add’, which is within the subtab. A pop up will be seen

Procurement Management Support System – PMSS v1.0 User Guide
110
b. Fill the fields on the page. Details of the fields are mentioned below;
Sr.
No.
Field Name
Field Description
Sample Data
1
Document to be
uploaded
Browse the document that you want to
upload.
2
Document
Category
Select the appropriate document category.
Standard Bidding
Document
3
Description
Enter more information about the uploaded
document.
SBD
c. Click ‘Upload’ to upload the document in the system.
d. Uploaded document will appear on the list shown in ‘Documents’ section.
e. User can select and delete the document that has been uploaded in current stage of the
procurement. To delete a document, select ‘Delete’ checkbox against the document and click
‘Delete’ link.
9. On completion of ‘Gen of SBD’ stage click on ‘Move to Next Stage’. This will move the procurement
to ‘Advertisement & Issue of Bids’ stage.
Advertisement & Issue of Bids
In this stage tender is floated and info of contractor purchasing SBD is captured, if available
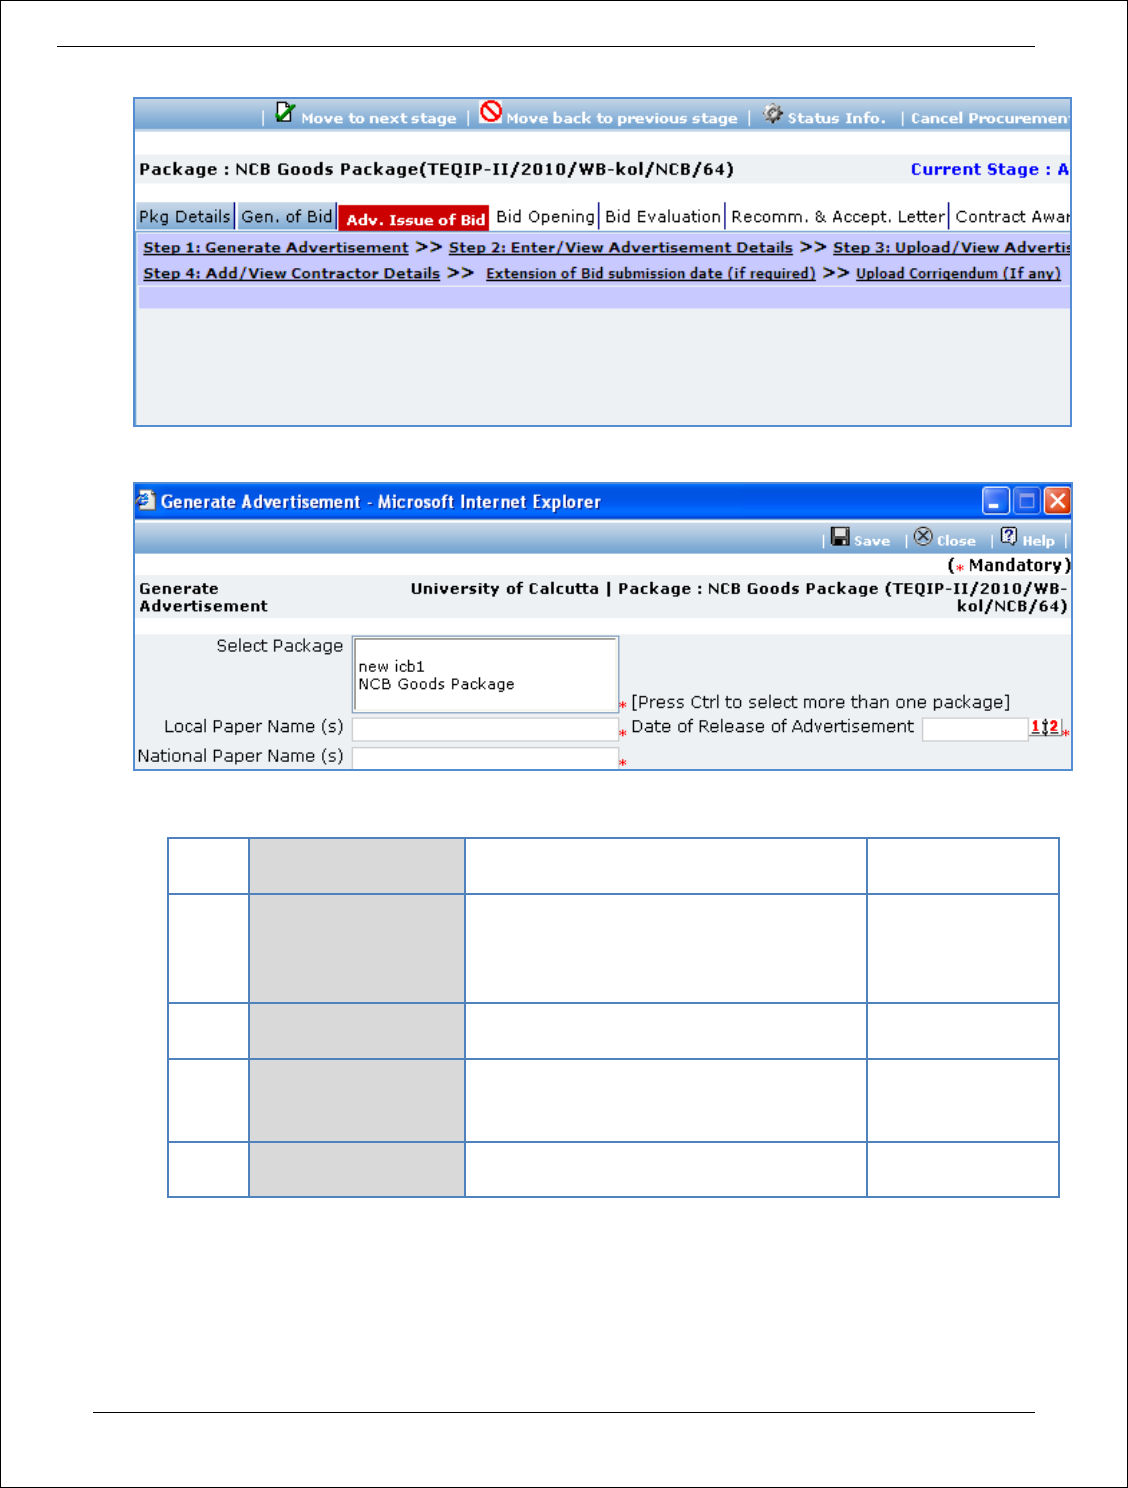
Procurement Management Support System – PMSS v1.0 User Guide
111
10. Click on ‘Step 1: Generate Advertisement’. A pop up will be seen
a. Fill the fields on the page. Details of the fields are mentioned below;
Sr.
No.
Field Name
Field Description
Sample Data
1
Select Package
All the packages which are in Advt. Stage
will be displayed. Press control button on
the keyboard to select more than one
package.
2
Local Paper Name(s)
Enter the name of the local paper in
which this advertisement will be printed
Lokamat
3
National Paper
Name(s)
Enter the name of the national paper in
which this advertisement will be printed
Times of India
4
Date of Release of
Advertisement
Enter the date in format DD/MM/YYYY
12/09/2011
b. Click ‘Save’
c. ‘Print Advertisement’ link will be seen, click on this link to generate the advertisement.

Procurement Management Support System – PMSS v1.0 User Guide
112
11. Click on ‘Step 2: Enter/View Advertisement Details’.
12. Fill the fields on the page. Details of the fields are mentioned below;
Sr. No.
Field Name
Field Description
Sample Data
1
Actual Publication Date
(Local)
Enter the date when Advertisement was
actually published in the Local paper. Date
format is DD/MM/YYYY
16/09/2011
2
Actual Publication Date
(National)
Enter the date when Advertisement was
actually published in the N paper. Date
format is DD/MM/YYYY
16/09/2011
13. Click ‘Save’
14. Click on ‘Step 3: Upload/View Advertisement’ link. ‘Documents’ subtab will be seen in the
lower section
a. Click ‘Add’, which is within the subtab. A pop up will be seen

Procurement Management Support System – PMSS v1.0 User Guide
113
b. Fill the fields on the page. Details of the fields are mentioned below;
Sr.
No.
Field Name
Field Description
Sample Data
1
Document to be
uploaded
Browse the document that you want to
upload.
2
Document
Category
Select the appropriate document category.
Copy of
Advertisement
3
Description
Enter more information about the uploaded
document.
c. Click ‘Upload’ to upload the document in the system.
d. Uploaded document will appear on the list shown in ‘Documents’ section.
e. User can select and delete the document that has been uploaded in current stage of the
procurement. To delete a document, select ‘Delete’ checkbox against the document and click
‘Delete’ link.
15. Click on ‘Step 4: Add/View Contractor Details’ link. ‘Contractor Details’ subtab will be seen in the
lower section
a. Click ‘Add’, which is with the subtab a pop up will be seen
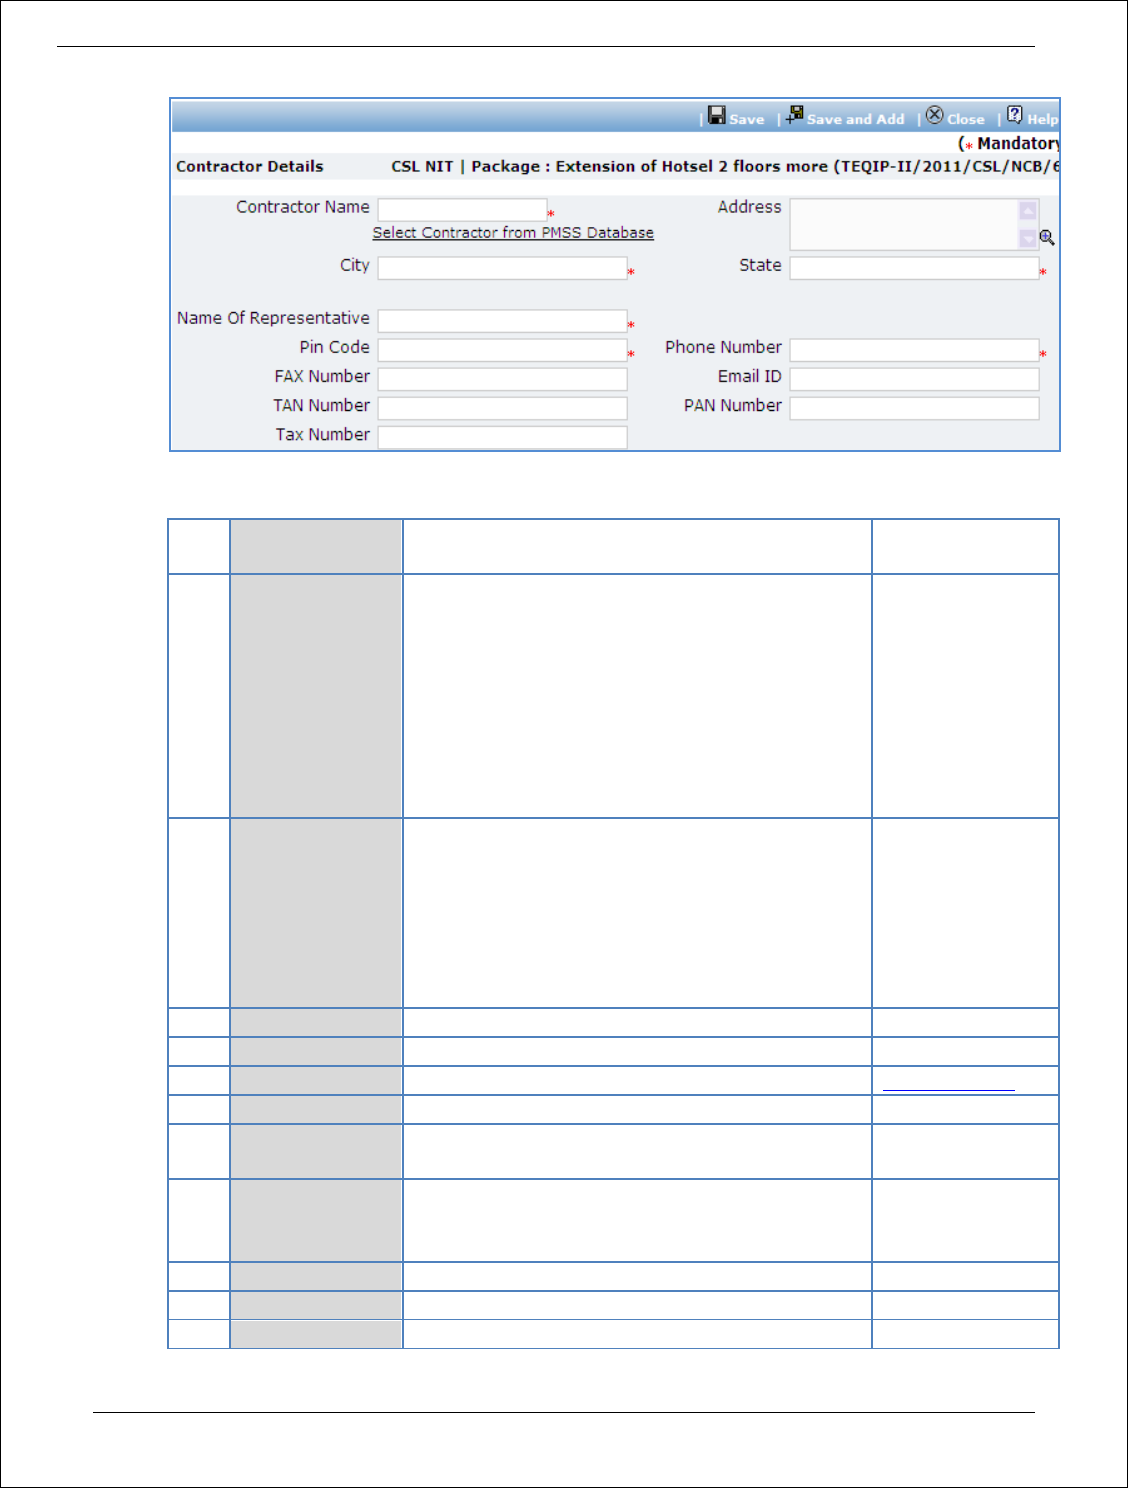
Procurement Management Support System – PMSS v1.0 User Guide
114
b. Fill the fields on the page. Details of the fields are mentioned below;
Sr.
No.
Field Name
Field Description
Sample Data
1
Contractor
Name
Enter the Contractor name.
Contractor can also be searched using ‘Select
Contractor from PMSS Database’ link. Click on
this link will display the existing list of
Contractors, if any. Once the list is displayed click
on the Contractor’s name this will auto populated
the selected Contractor’s data. To search
additional Contractors within the state or city use
the filters provided on the page
FTTI Pvt Ltd
2
Address
Enter the address of the Contractor
STI Towers,
Unit# 141/38,
Campus 29. RMZ
Millenia Business
Park.
881, Dr. MGR
Road
3
City
Enter the city of the Contractor
Pune
4
State
Enter the state of the Contractor
Maharashtra
5
Email ID
Enter the Email ID of the Contractor
ftti@efttil.com
6
Pin Code
Enter the Pin Code of the Contractor
411232
7
Name Of
Representative
Enter the Representative of the Contractor
Mr. Mohan
Solanki
8
Phone Number
Enter the Phone Number of the Contractor.
To enter more than one number use comma (,) as
a separator.
26422689
9
PAN Number
Enter the PAN Number of the Contractor
ANS44874
10
TAN Number
Enter the TAN Number of the Contractor
11
Tax Number
Enter the TAX Number of the Contractor
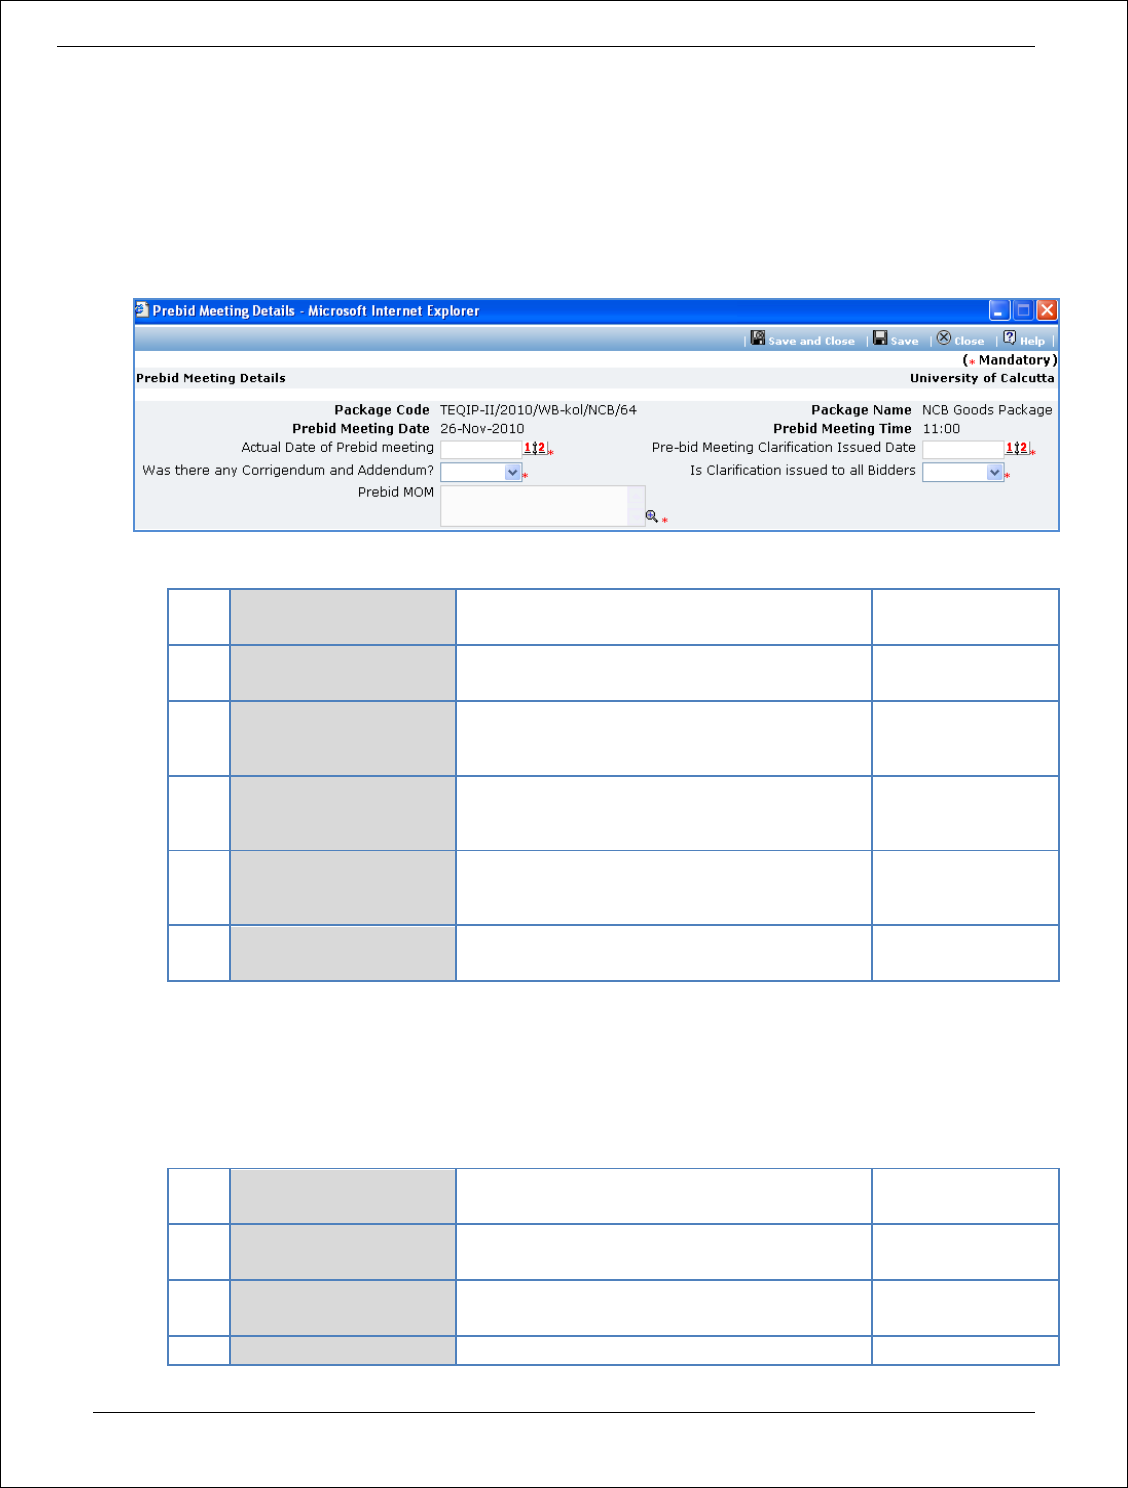
Procurement Management Support System – PMSS v1.0 User Guide
115
c. Click ‘Save’
d. To add another Supplier repeat steps from a. to c.
16. Click on ‘Step :5 Enter Prebid Meeting Information’ link (This link will be shown only if Prebid Date
and Prebid Time fields are added in ‘Instruction to Bidder & SCC Information Popup’). A popup will
be seen
a. Fill the fields on the page. Details of the fields are mentioned below;
Sr.
No.
Field Name
Field Description
Sample Data
1
Actual Date of
Prebid meeting
Enter the date when prebid was actually
conducted. Date format is DD/MM/YYYY
22/09/2011
2
Pre-bid Meeting
Clarification Issued
Date
Enter the date when clarification was
issued. Date format is DD/MM/YYYY
23/09/2011
3
Was there any
Corrigendum and
Addendum?
Select Yes/ No
Yes
4
Is Clarification
issued to all
Contractors
Select Yes/ No
Yes
5
Prebid MOM
Enter the MoM. Larger MoM can also be
uploaded in the documents tab
b. Click ‘Save
17. Incase of extension to bid submission date, Click on ‘Extension of Bid submission date (if required)’
link. A popup will be seen.
c. Fill the fields on the page. Details of the fields are mentioned below;
Sr.
No.
Field Name
Field Description
Sample Data
1
Current Submission
Date
System will show the current date
2
Extended Date
Enter the new date. Date format is
DD/MM/YYYY
22/09/2011
3
Reason for Extension
Enter the reason
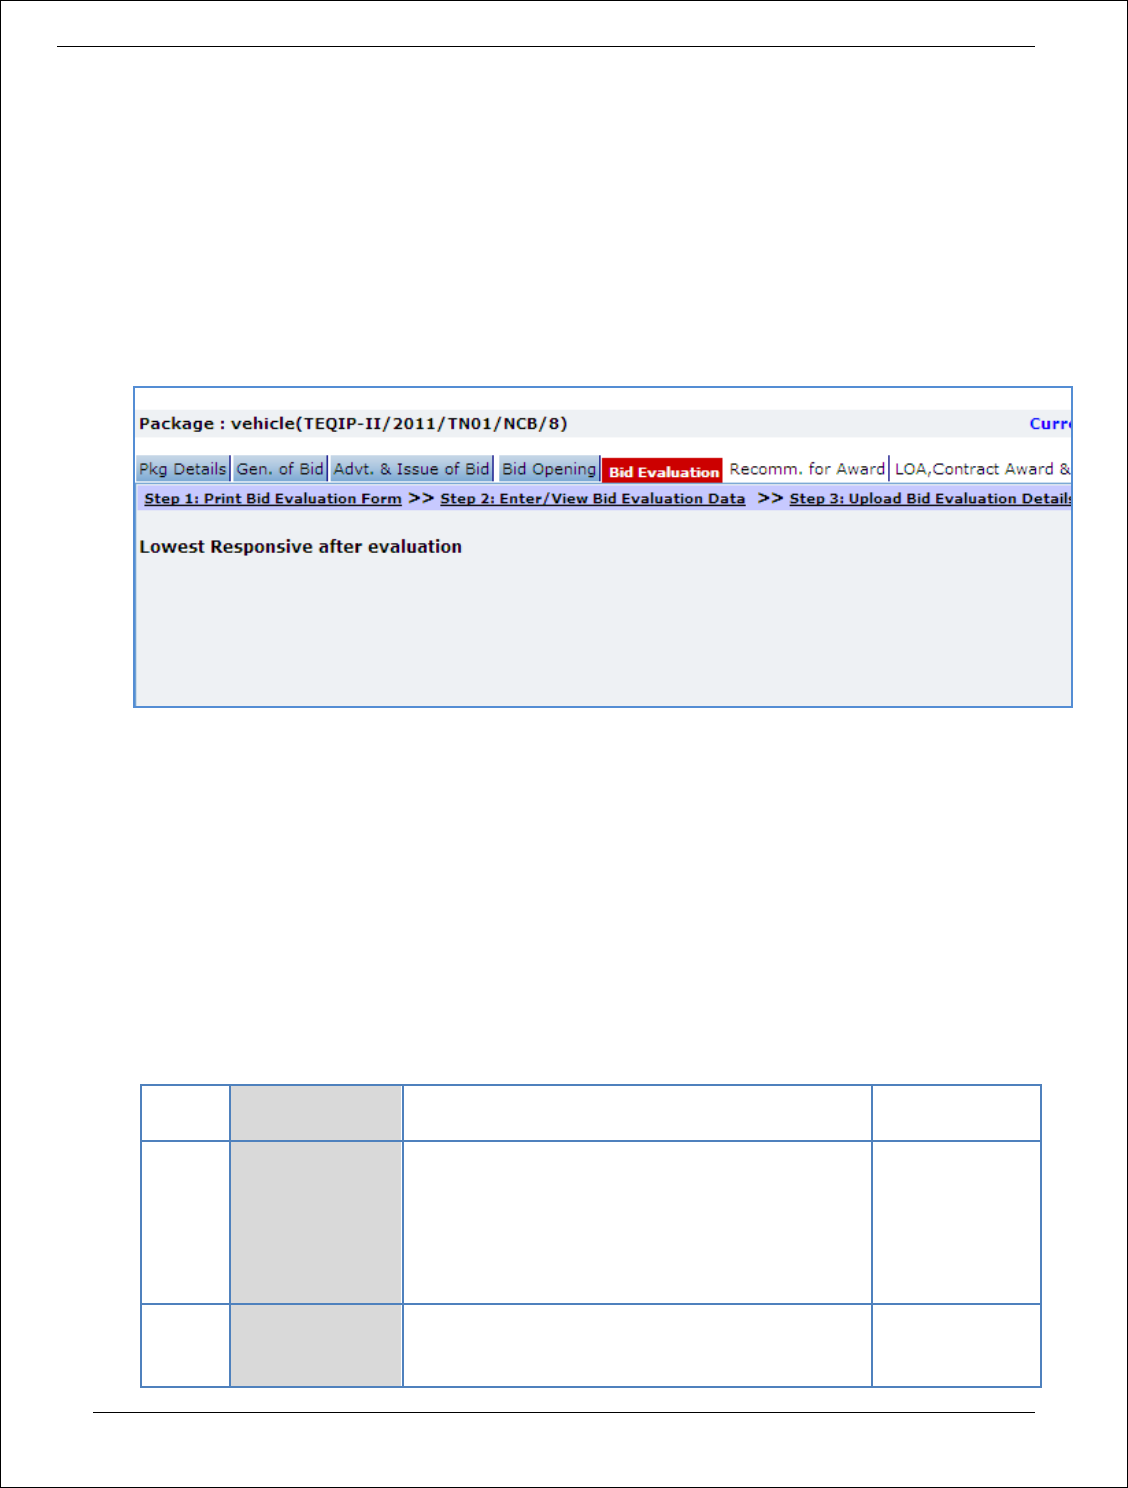
Procurement Management Support System – PMSS v1.0 User Guide
116
d. Click ‘Save’
18. Incase of Corrigendum, Click on ‘Upload Corrigendum (If any)’ link and upload the documents
19. On completion of ‘Advertisement & Issue of Bids’ stage Click on ‘Move to Next Stage’. This will move
the procurement to ‘Bid Opening’ stage.
Bid Opening
In this stage Bid opening is performed and responsive bids are identified.
20. On the ‘Bid Opening’ tab click on ‘Step 1: Add/View Contractor Details’ link. Repeat point 15, if
required.
21. Click on ‘Step 2: Print Bid Opening Form’. This will open a Bid opening form. This form can be used
during Bid Opening. Print of this form can be taken and Bid opening details can be recorded on this
form. The Contractor names (which were added) are seen on this form against which Bid opening
details can be mentioned. Three extra columns are provided to accommodate names of any new
Contractors who have submitted their Bids directly.
22. Click on ‘Step 3: Enter/ View Bid Opening Data’ and Fill the fields on the page. Details of the fields
are mentioned below;
Sr. No.
Field Name
Field Description
Sample Data
1
Bid Opening
Date
Enter the actual date and time when Bid was
opened. Date format is DD/MM/YYYY and time
format is HH:MM, 24 hrs format. It is
recommended that opening should be done at
the start of the week so that there is ample time
to enter opening data in PMSS.
12/03/2011
16:00
2
Bid MoM
Enter the Minutes of Meeting.
Larger MoM’s can be uploaded using the
documents subtab
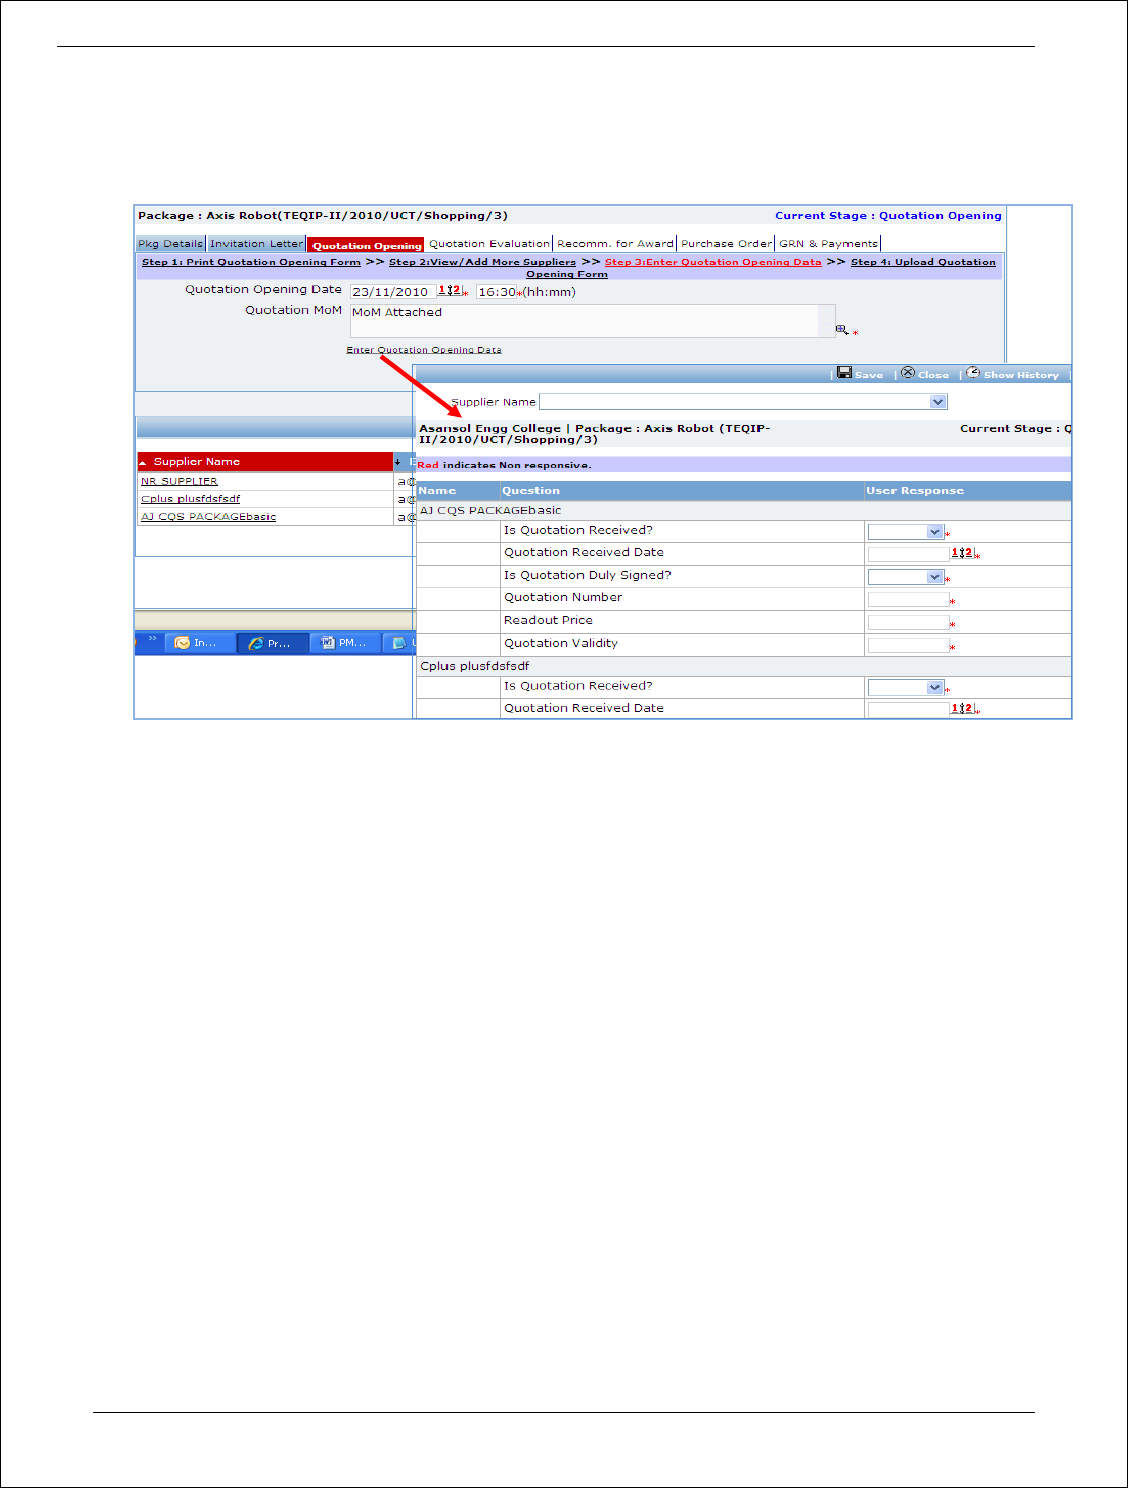
Procurement Management Support System – PMSS v1.0 User Guide
117
23. Click ‘Save’
24. Click on the ‘Enter Bid Opening Data’ link. A pop up will be seen
a. Enter the Responsiveness Criteria.
b. Click ‘Save’.
25. Click on ‘Step 4: Upload Bid Opening Document & MOM’ link. ‘Documents’ subtab will be shown in
the lower section.
a. Click ‘Add’, which is within the subtab. A pop up will be seen
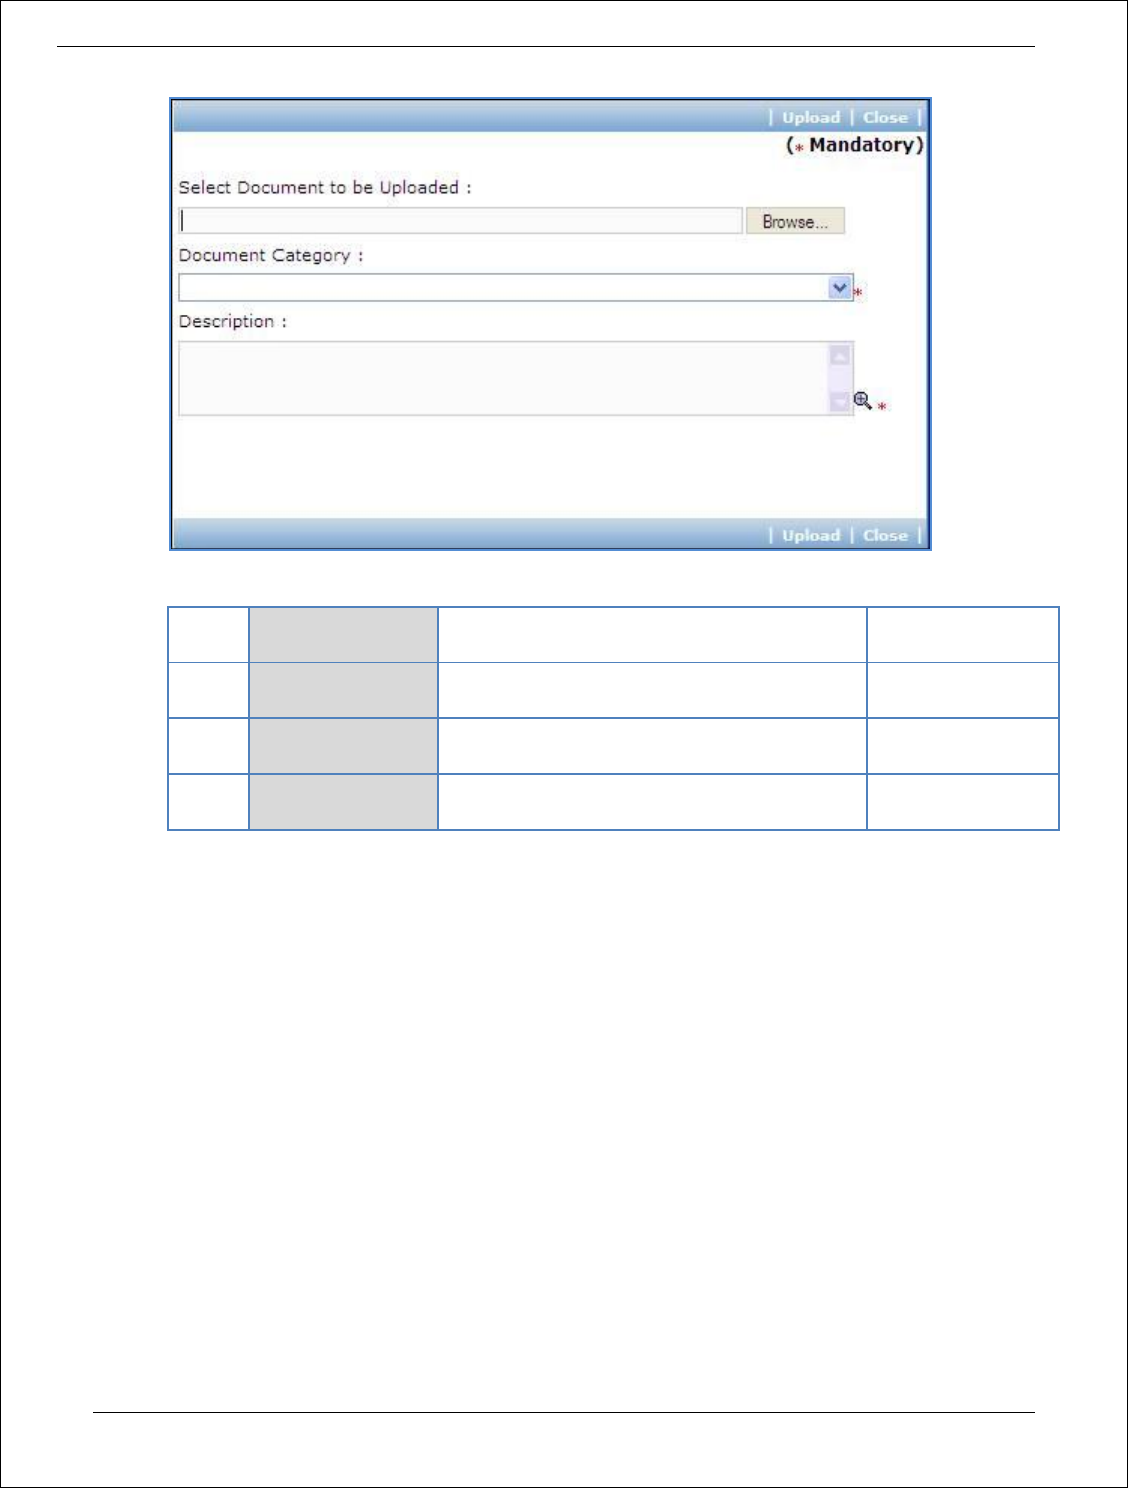
Procurement Management Support System – PMSS v1.0 User Guide
118
b. Fill the fields on the page. Details of the fields are mentioned below;
Sr.
No.
Field Name
Field Description
Sample Data
1
Document to be
uploaded
Browse the document that you want to
upload.
2
Document
Category
Select the appropriate document category.
Bid Opening Form
3
Description
Enter more information about the uploaded
document.
Signed Bid
Opening Form
c. Click ‘Upload’ to upload the document in the system.
d. Uploaded document will appear on the list shown in ‘Documents’ section.
e. User can select and delete the document that has been uploaded in current stage of the
procurement. To delete a document, select ‘Delete’ checkbox against the document and click
‘Delete’ link.
26. On completion of ‘Bid Opening’ stage click on ‘Move to Next Stage’. This will move the
procurement to ‘Bid Evaluation’ stage.
Bid Evaluation
In this stage evaluation is performed and lowest evaluated Contractor is identified.

Procurement Management Support System – PMSS v1.0 User Guide
119
27. On the ‘Bid Evaluation’ tab click on ‘Step 1: Print Quotation Evaluation Form’. This will open a bid
evaluation form. This form can be used during Bid Evaluation. Print of this form can be taken and Bid
Evaluation details can be recorded on this form.
28. Click on the ‘Step 2: Enter/ View Bid Evaluation Data’ link. A pop up will be seen
a. Enter the comparative data for all the Contractors.
b. Click ‘Save’.
c. Click on ‘Quotation Details’ link, which is in front of each responsive supplier. A popup will be
seen.
d. Fill the fields on the page. Details of the fields are mentioned below;
Sr.
No.
Field Name
Field Description
Sample Data
1
Basic Cost per unit
Basic cost for each item can be entered in
this field. Enter the basic cost per item as
given by the supplier
2000
2
Comments
Enter comments, if any
e. Click on ‘Save’
f. Quotation details of all responsive Contractors can be entered by repeating steps from c. to e.
29. System will show the lowest evaluated responsive Contractor (L1) on the main page.
30. Click on ‘Perform Post Qualification’ link, which is in front of the Contractor name. A pop up will be
seen
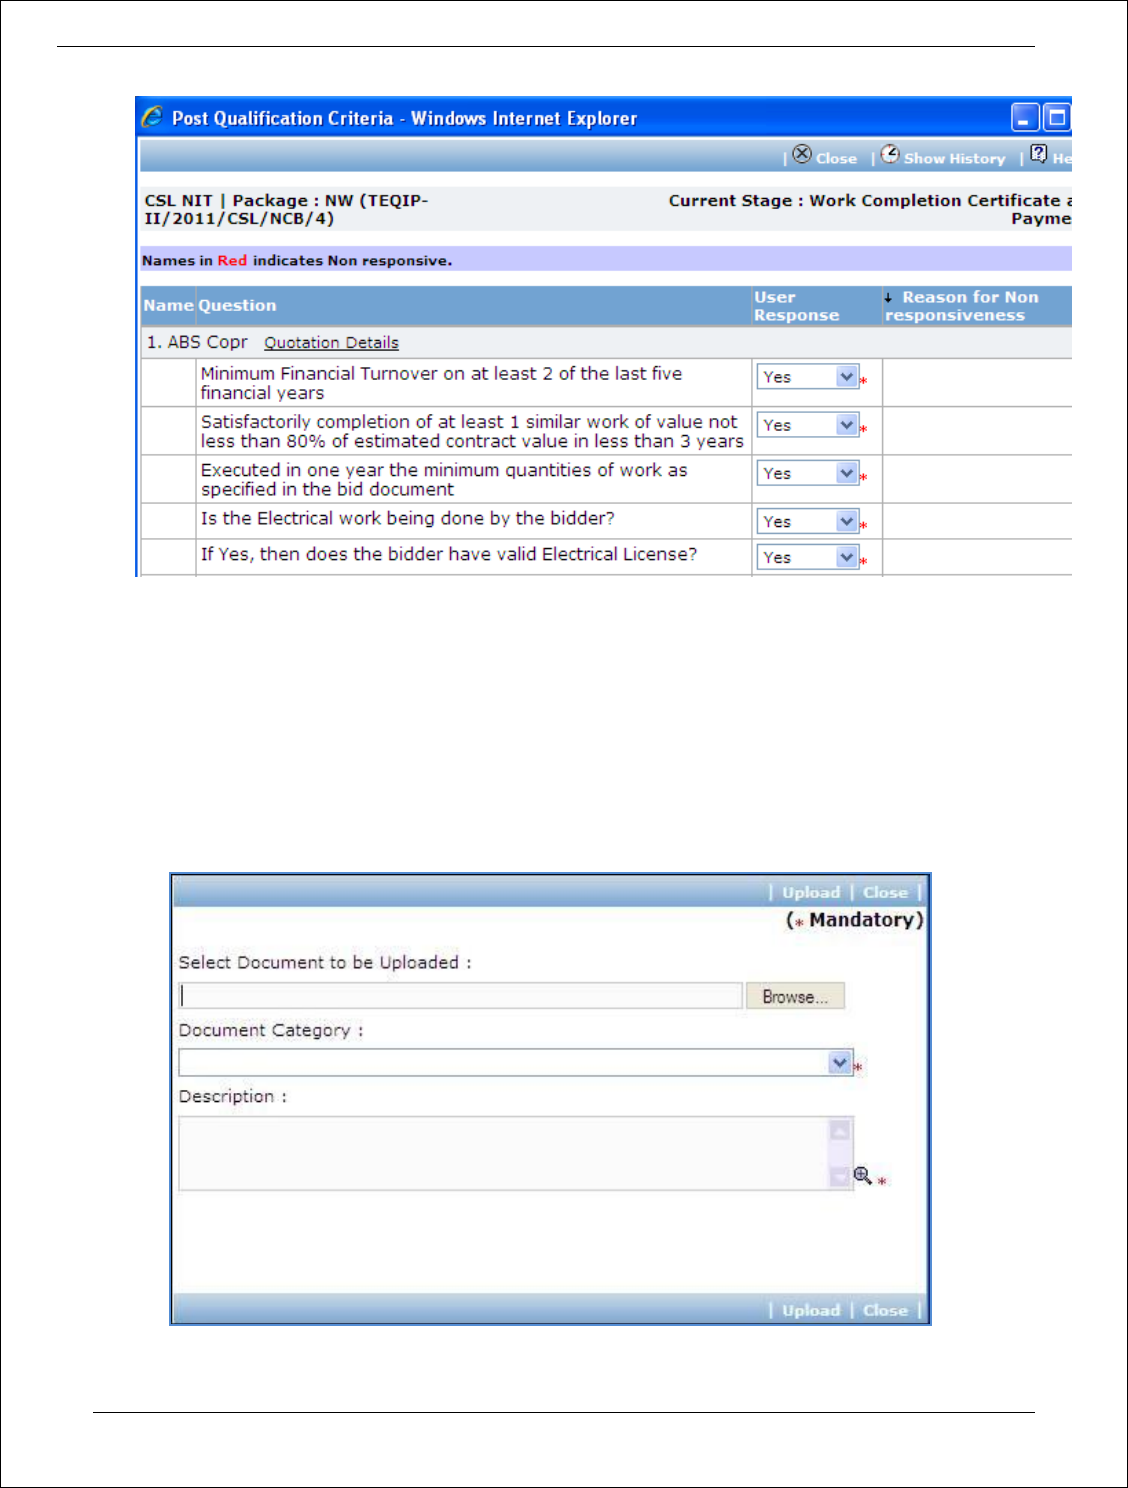
Procurement Management Support System – PMSS v1.0 User Guide
120
a. Enter the post qualification details
b. If the Contractor becomes non-responsive in this step then automatically next lowest evaluated
Contractor will be seen.
c. Repeat the Post Qualification process for this Contractor.
31. Click on ‘Step 3: Upload Bid Evaluation Details’ link. ‘Documents’ subtab will be shown in the lower
section.
a. Click ‘Add’, which is within the subtab. A pop up will be seen
b. Fill the fields on the page. Details of the fields are mentioned below;

Procurement Management Support System – PMSS v1.0 User Guide
121
Sr.
No.
Field Name
Field Description
Sample Data
1
Document to be
uploaded
Browse the document that you want to
upload.
2
Document
Category
Select the appropriate document category.
Bid Evaluation
Form
3
Description
Enter more information about the uploaded
document.
Signed Bid
Evaluation Form
uploaded
c. Click ‘Upload’ to upload the document in the system.
d. Uploaded document will appear on the list shown in ‘Documents’ section.
e. User can select and delete the document that has been uploaded in current stage of the
procurement. To delete a document, select ‘Delete’ checkbox against the document and click
‘Delete’ link.
32. Click on ‘Step 4: View/Edit Bidder Details’ link to update bidder details which are unavailable at
initial stage. The list of all bidders is shown on the lower half of the screen. Click on the bidder name
to update the necessary details.
33. On completion of ‘Bid Evaluation’ stage click on ‘Move to Next Stage’. This will move the
procurement to ‘Recommendation for Award’ stage.
Recommendation for Award
In this stage appropriate responsive Contractor can be recommend. If the lowest evaluated
responsive Contractor (L1) is not acceptable by the committee then another Contractor can be
selected in this stage
34. Fill the fields on the page. Details of the fields are mentioned below;
Sr. No.
Field Name
Field Description
Sample Data
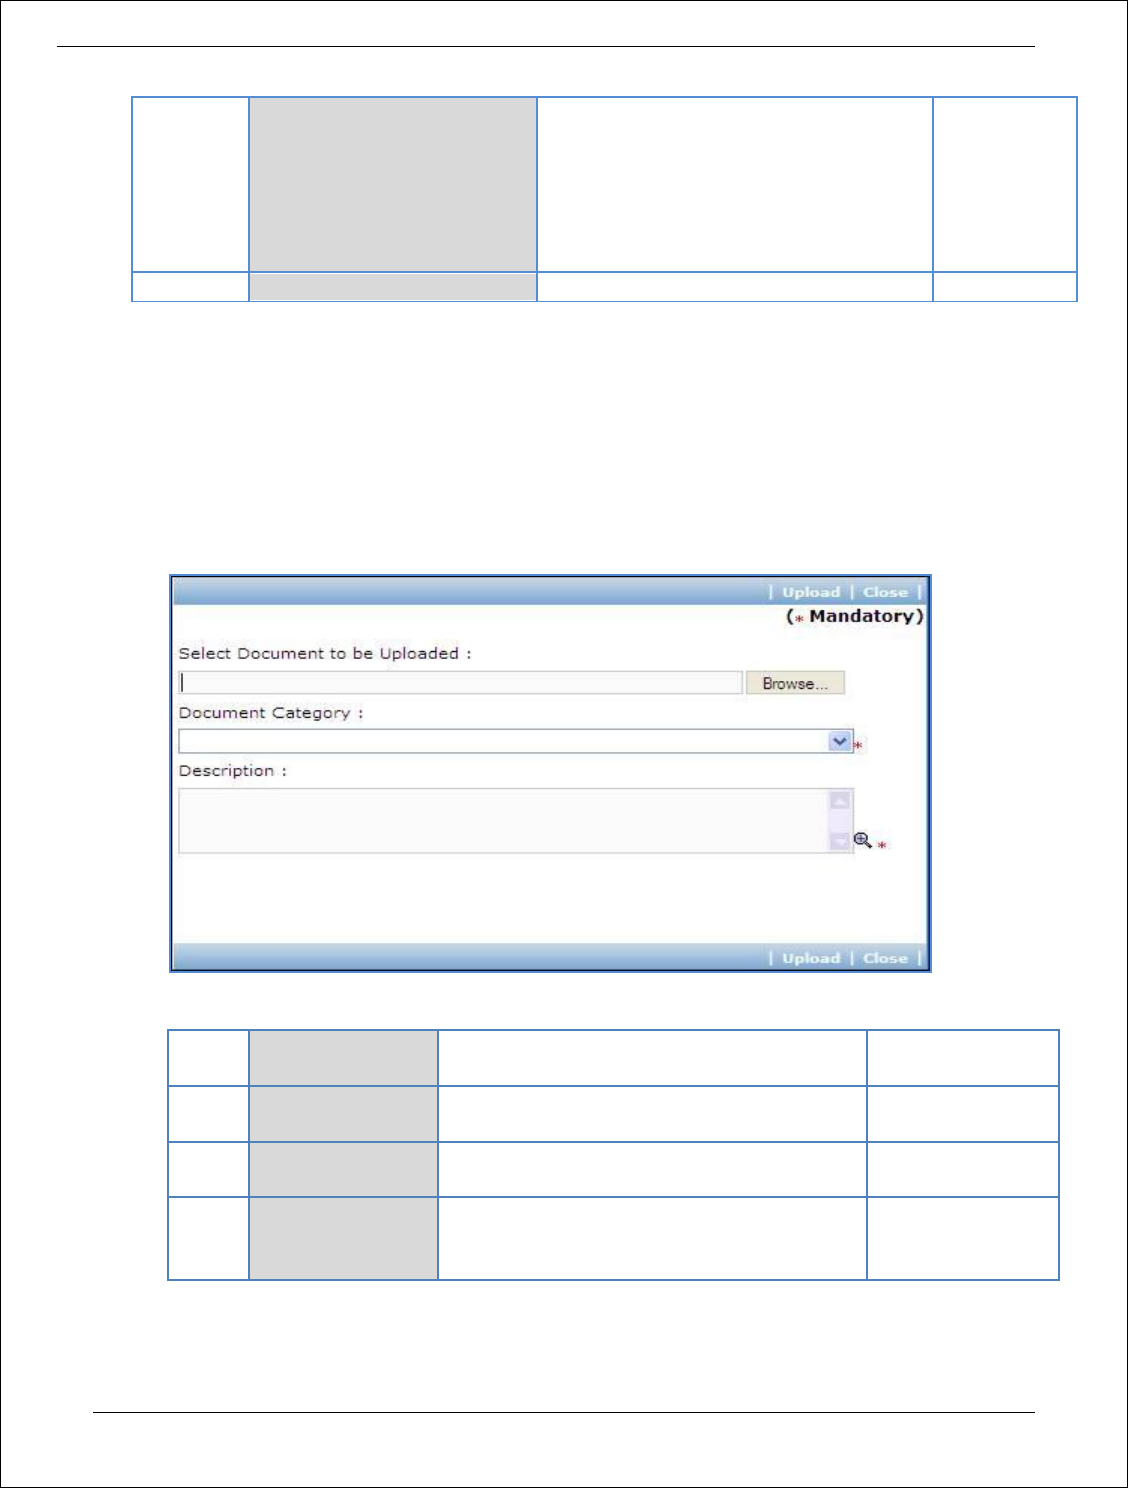
Procurement Management Support System – PMSS v1.0 User Guide
122
1
L1 Contractor
If the lowest evaluated responsive
Contractor (L1) is not acceptable by the
committee then another contractor can
be selected
2
Recommendation Comments
Enter the comments
35. Click on ‘Step 2: Generate Bid evaluation Report’ link. System will give an option to Open/ Save the
Bid evaluation Report. Save the report on your computer with a proper name. Update the sections
highlighted in yellow and save the document.
36. Click on ‘Step 3: Upload Bid Evaluation Report’ link. ‘Documents’ subtab will be shown in the lower
section.
a. Click ‘Add’, which is within the subtab. A pop up will be seen
b. Fill the fields on the page. Details of the fields are mentioned below;
Sr.
No.
Field Name
Field Description
Sample Data
1
Document to be
uploaded
Browse the document that you want to
upload.
2
Document
Category
Select the appropriate document category.
Bid Evaluation
Report
3
Description
Enter more information about the uploaded
document.
Signed Bid
Evaluation report
uploaded
c. Click ‘Upload’ to upload the document in the system.
d. Uploaded document will appear on the list shown in ‘Documents’ section.

Procurement Management Support System – PMSS v1.0 User Guide
123
e. User can select and delete the document that has been uploaded in current stage of the
procurement. To delete a document, select ‘Delete’ checkbox against the document and click
‘Delete’ link.
Note: If the Contract price (i.e. Evaluated Price) is more than 25% of the estimated price then the
package will be sent for prior review. Once the user clicks on ‘Move to Next Stage’ system
will ask for a confirmation before sending the package for prior review.
37. On completion of ‘Recommendation for Award’ stage Click on ‘Move to Next Stage’. This will move
the procurement to ‘LOA, Contract Award & WO’ stage.
LOA, Contract Award & WO
In this stage LOA, Contract Award and WO are generated and Payment terms are updated.
38. Fill the fields on the page. Details of the fields are mentioned below;
Sr. No.
Field Name
Field Description
Sample Data
1
Performance Security
Amount
Will be auto calculated as 5% of contract
value
2
LOA Generated Date
System will show the current date (i.e.
today’s date) by default. Click on ‘Save’
Today’s Date
39. Click ‘Save’
Note: If Generated date is greater than the bid validity (i.e. difference between Bid opening date
and Generated date is more than the bid validity given by the selected supplier) system will
ask to provide a new bid validity. Enter the total new bid validity. E.g. if original validity was
90 days and contractor has extended it by 30 days then enter 120 days.
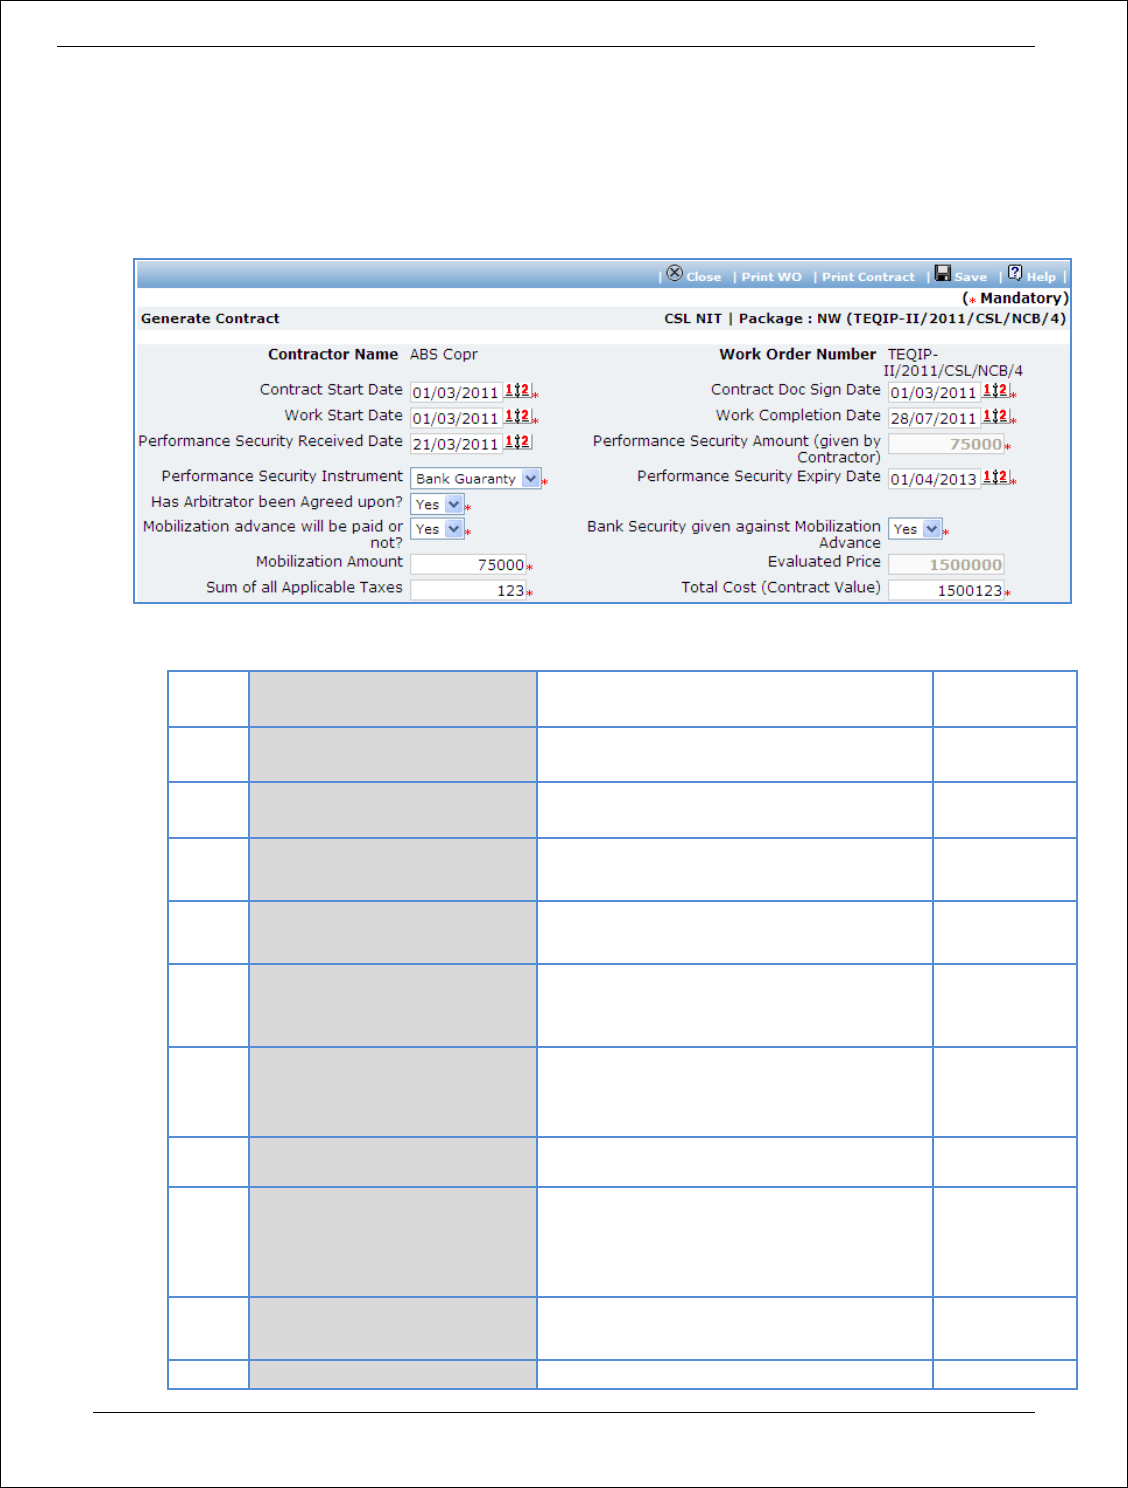
Procurement Management Support System – PMSS v1.0 User Guide
124
40. Click on ‘Step 2: Generate Letter of Acceptance’ link. System will give an option to Open/ Save the
LOA. Save the LOA on your computer with a proper name. Update the sections highlighted in yellow
and save the document.
41. Click on ‘Step 3: Generate Contract & WO’. A Pop up will be seen
a. Fill the fields on the page. Details of the fields are mentioned below;
Sr.
No.
Field Name
Field Description
Sample Data
1
Contract Start Date
Enter the date when contract is expected
to start. Date format is DD/MM/YYYY
01/06/2011
2
Contract Document signed -
date
Enter the contract signed date. Date
format is DD/MM/YYYY
20/05/2011
3
Work Start Date
Enter the date when work is expected to
start. Date format is DD/MM/YYYY
01/06/2011
4
Work Completion Date
Enter the date when work is expected to
complete. Date format is DD/MM/YYYY
23/05/2012
5
Performance Security
Received Date
Enter the date when Performance
Security was received from the bidder.
Date format is DD/MM/YYYY
12/05/2011
6
Performance Security
Amount
Will be auto calculated as 5% of the
estimated cost. Edit the amount, if
required.
36000
7
Performance Security
Instrument
Select the Performance Security
Instrument
DD
8
Performance Security Expiry
Date
Enter the date when Performance
Security will expiry. This date should be
more than Expected Delivery Date +
Warranty + 28 days
29/06/2013
9
Has Arbitrator been Agreed
upon?
Select Yes/ No. Whether arbitrator is
agreed or otherwise.
Yes
1
Mobilization advance will be
Select Yes/ No. Whether Mobilization
Yes
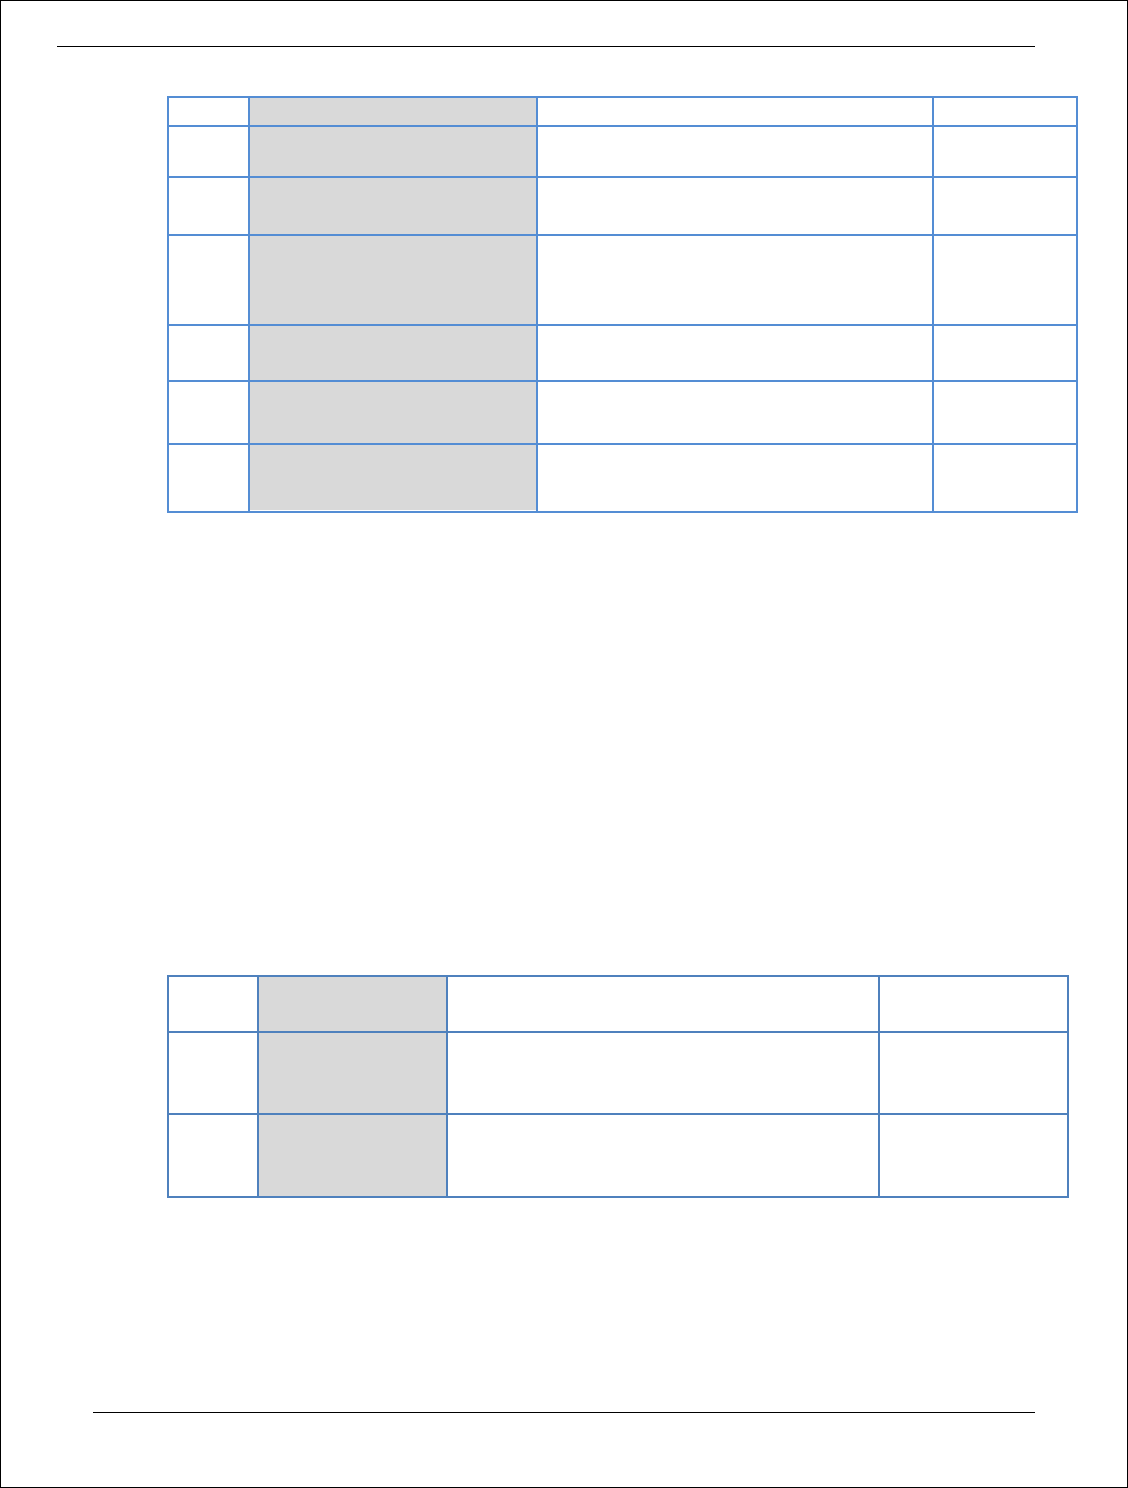
Procurement Management Support System – PMSS v1.0 User Guide
125
paid or not?
advance will be paid or otherwise.
10
Bank Security given against
Mobilization Advance?
Select Yes/ No. Whether Bank Security
given against Mobilization Advance
Yes
12
Total Base Cost (Item)
Will be auto calculated as (Qty*Basic Cost
Per Unit)
System
calculated
13
Mobilization Amount
Enter the mobilization amount. Enter 0 if
no mobilization amount is taken
12000
14
Evaluated Price
Will be auto populated
System
calculated
15
Sum of all Applicable Taxes
Enter the total amount of all the taxes
2300
16
Total Cost (Contract Value)
Will be auto populated as (Total Base
Cost (Item) + Sum of all Applicable Taxes)
System
calculated
b. Click ‘Save’
c. Click ‘Print WO’. System will give an option to Open/ Save the WO. Save the WO on your
computer with a proper name. Update the sections highlighted in yellow and save the
document.
d. Click ‘Print Contract’. System will give an option to Open/ Save the Contract. Save the
Contract on your computer with a proper name. Update the sections highlighted in yellow and
save the document.
42. Click on ‘Step 2: View/Update Payments details’ link. ‘Payments’ subtab will be seen in the lower
section.
a. Click on the payment term name a pop up will be seen
b. Fill the fields on the page. Details of the fields are mentioned below;
Sr. No.
Field Name
Field Description
Sample Data
1
Expected
Completion Date
This is auto calculated as Contract Start Date
+ Expected Completion Period. Edit the date
if required.
30
2
Expected Payment
Date
Enter the expected date when payment will
be made against this completion. Date
format is DD/MM/YYYY
12/08/2011
c. Click ‘Save’.
d. Update the other payment terms by repeating steps a.to c.
43. Click on ‘Step 5: Upload WO , LOA & Contract Form’ link. ‘Documents’ subtab will be shown in the
lower section.
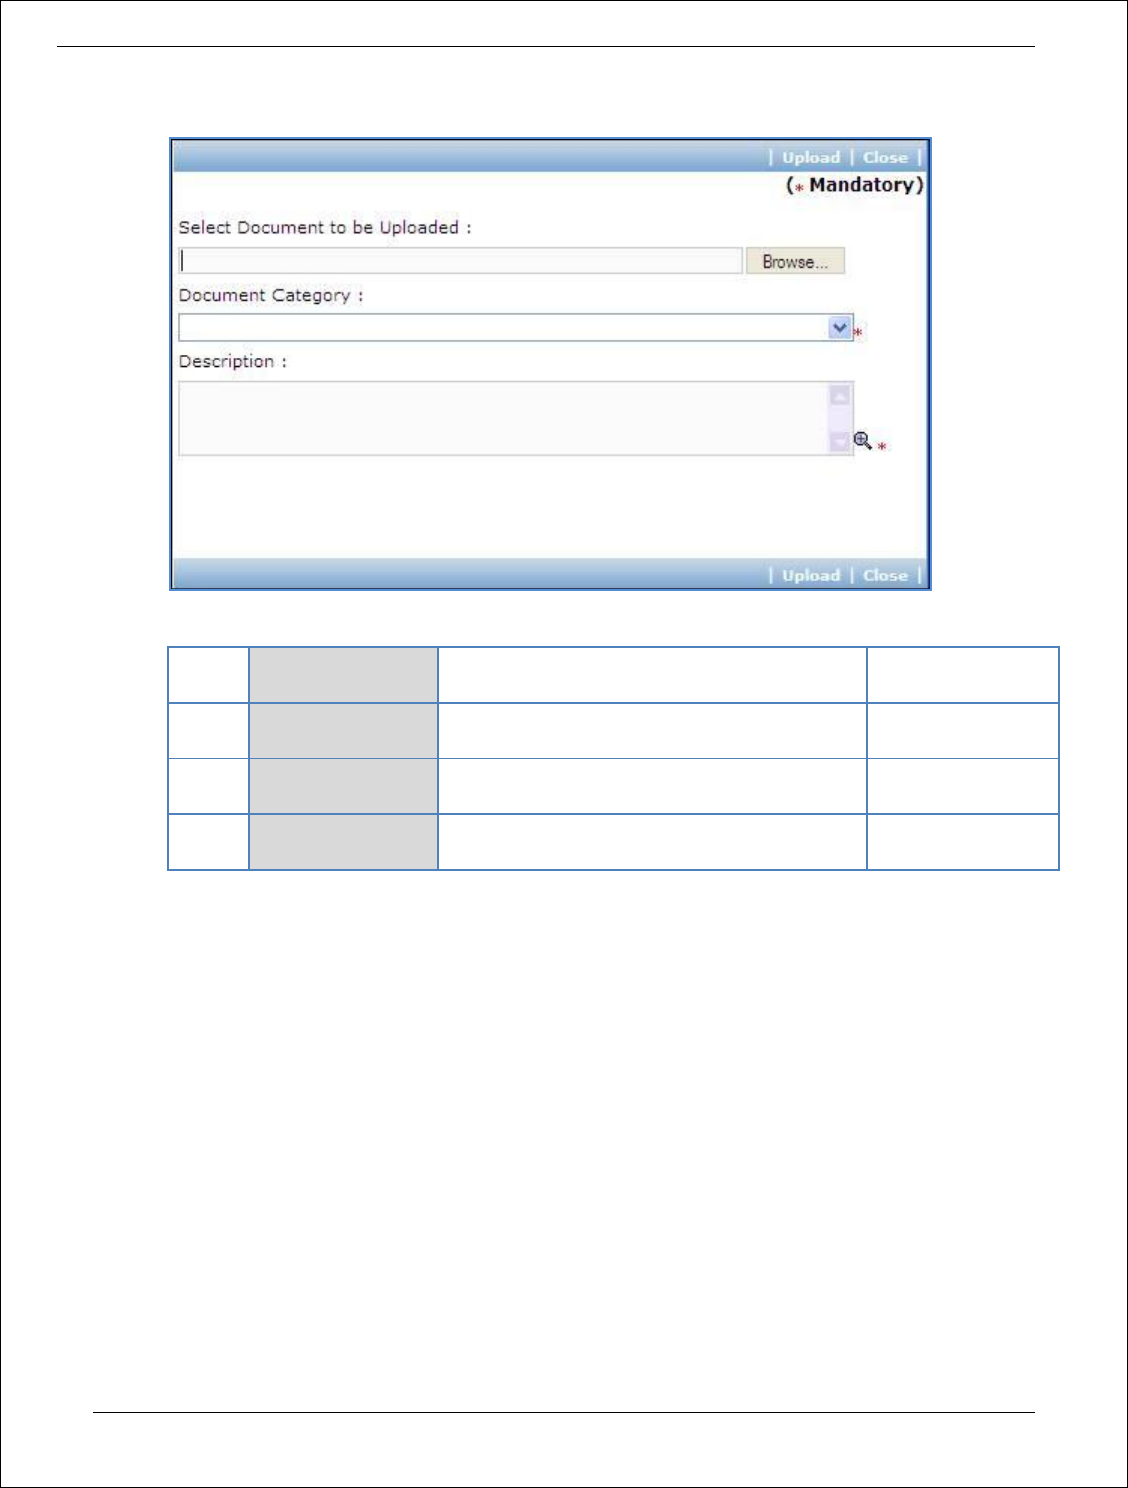
Procurement Management Support System – PMSS v1.0 User Guide
126
a. Click ‘Add’, which is within the subtab. A pop up will be seen
b. Fill the fields on the page. Details of the fields are mentioned below;
Sr.
No.
Field Name
Field Description
Sample Data
1
Document to be
uploaded
Browse the document that you want to
upload.
2
Document
Category
Select the appropriate document category.
Letter of
Acceptance
3
Description
Enter more information about the uploaded
document.
Signed LOA
uploaded
c. Click ‘Upload’ to upload the document in the system.
d. Uploaded document will appear on the list shown in ‘Documents’ section.
e. User can select and delete the document that has been uploaded in current stage of the
procurement. To delete a document, select ‘Delete’ checkbox against the document and click
‘Delete’ link.
f. To upload WO repeat Steps a. to c. (Select document category as ‘Work Order’)
g. To upload Contract repeat Steps a. to c. (Select document category as ‘Contract Form’)
44. On completion of ‘Work Order’ stage Click on ‘Move to Next Stage’. This will move the procurement
to ‘WCC & Payments’ stage.
WCC & Payments
In this stage Work completion details are captured and Payment tracking is performed.
45. Click On ‘Step 1: Add/View Work Completion’ link. ‘Work Completion’ subtab will be seen
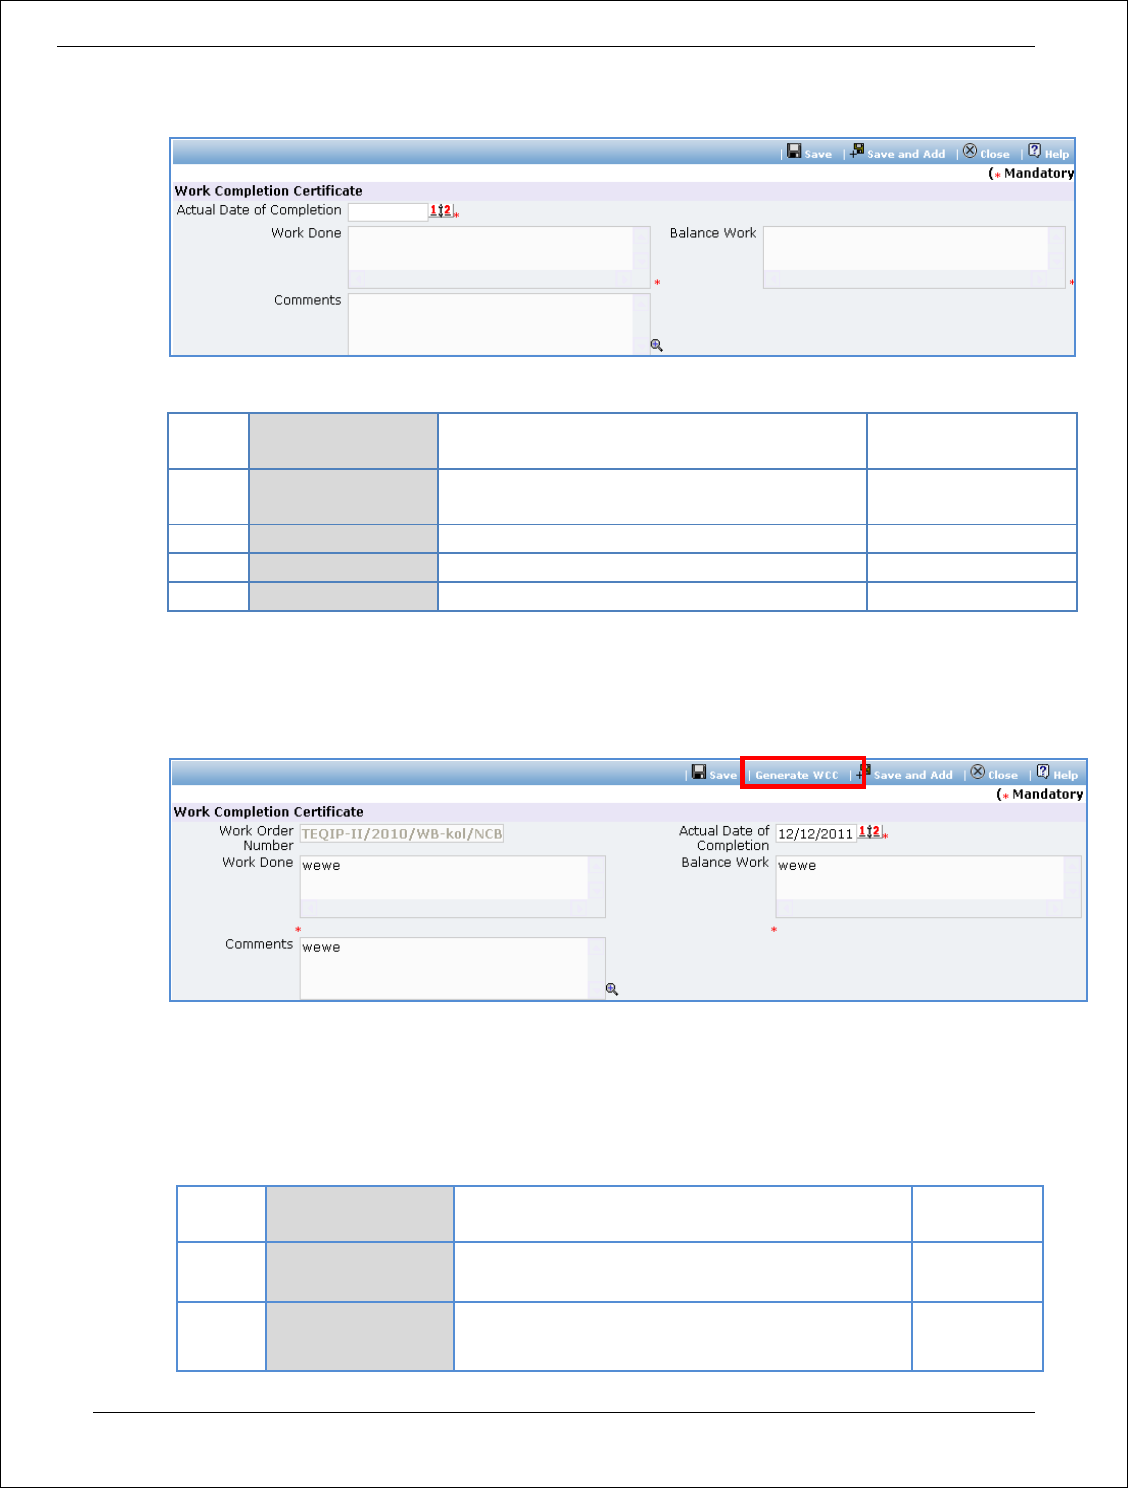
Procurement Management Support System – PMSS v1.0 User Guide
127
a. Click on ‘Add’, a pop up will be seen
b. Fill the fields on the page. Details of the fields are mentioned below;
Sr.
No.
Field Name
Field Description
Sample Data
1
Actual Date of
Completion
Enter the completion date. Date format is
DD/MM/YYYY
22/18/2011
2
Work Done
Mention the work completion details
3
Balance Work
Mention the details of the remaining work
4
Comments
Enter comments, if any
c. Click ‘Save’
d. Click on ‘ Generate WCC’ , which is on the upper bar of the main (WCC) section. WCC Report will
be generated.
e. To add another record for WCC repeat steps from a. to d.
46. Click on ‘Step 2: Enter/View Payment Details’. ‘Payments’ subtab will be seen in the lower section
a. Click on the Payment Term a popup will be seen
b. Fill the fields on the page. Details of the fields are mentioned below;
Sr. No.
Field Name
Field Description
Sample
Data
1
WCC Generated?
Check this box if Work completion certificate is
generated
2
Work Completed?
Check this box if work is completed
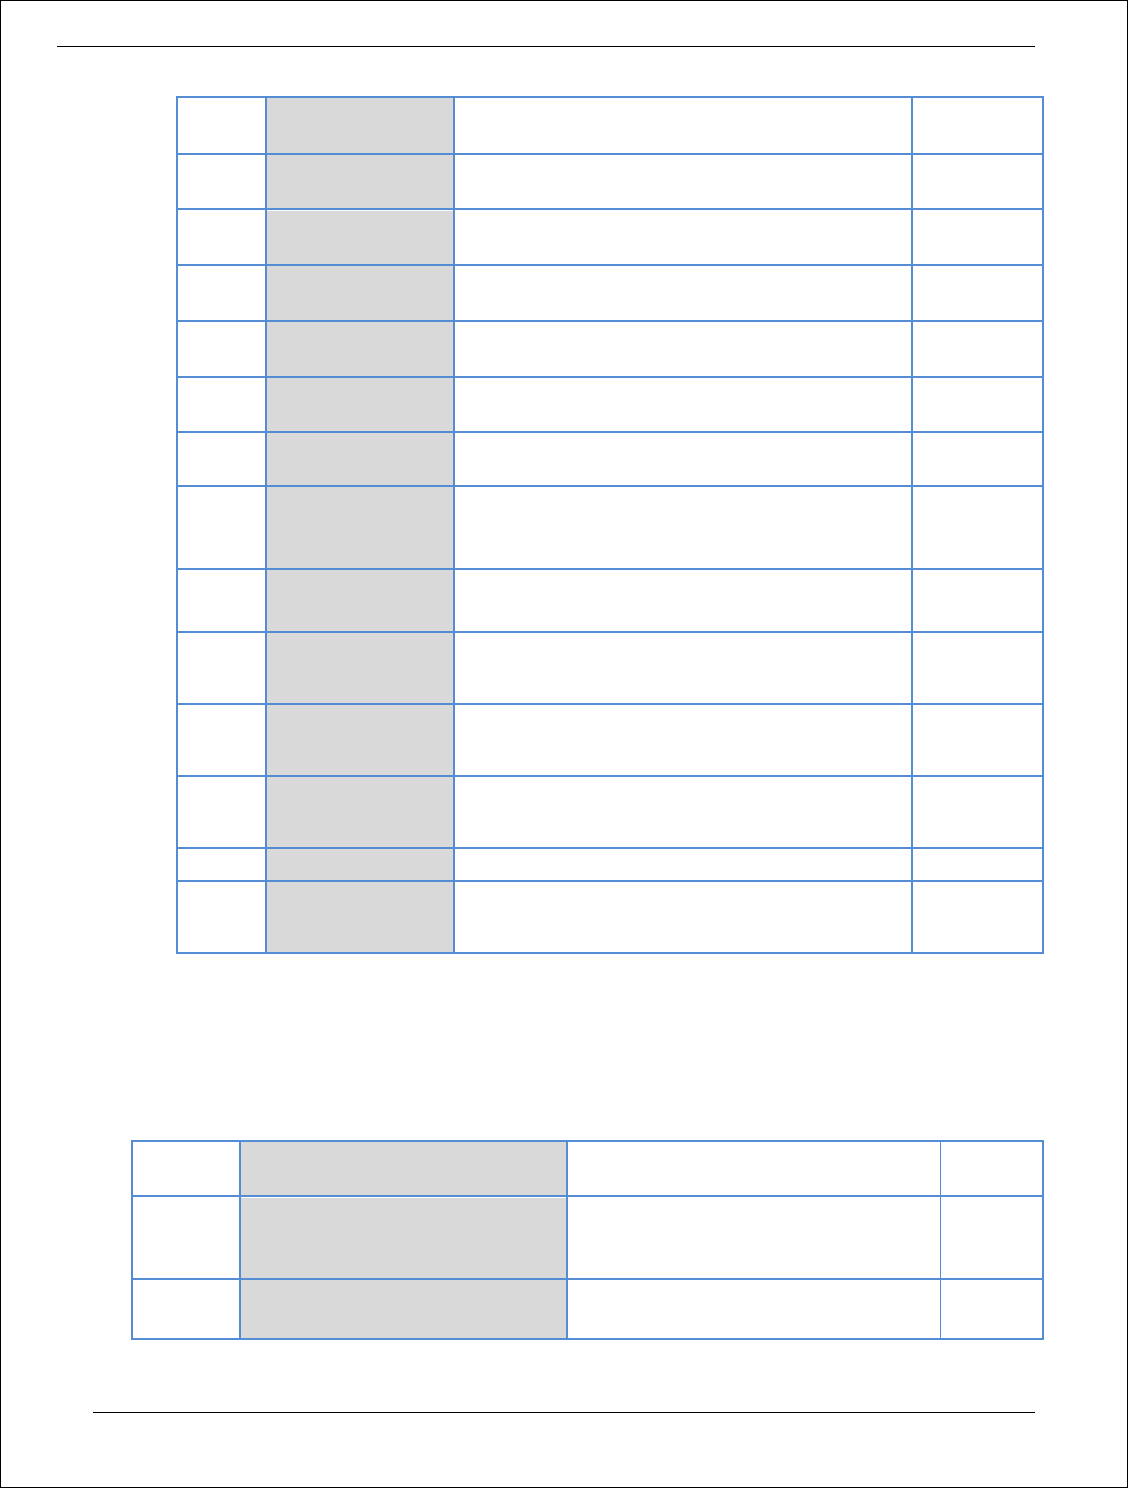
Procurement Management Support System – PMSS v1.0 User Guide
128
3
Actual Completion
Date
Enter the actual date of completion. Date
format is DD/ MM/ YYYY
12/10/2011
4
Liquidated
Damages Waived?
Check this box if Liquidated Damages are going
to be waived
5
Liquidated
Damages
Will be auto populated if ‘Actual Completion
date’ is more than ‘Expected completion date’
6
Actual Completion
Period
Enter the actual completion period in days
7
Comments
Comment on Actual completion period, if
required
8
Actual Payment
Date
Enter the date when payment is made. Date
format is DD/MM/YYYY
13/08/2011
9
Comments
Comment on Actual Payment Date, if required
10
Actual Payment
Amount
Enter the actual amount paid. Ideally, this
amount + the Retention Money amount should
match the Expected Payment amount
12000
11
Comments
Comment on Actual Payment Amount, if
required
12
Retention Money
Will be auto calculated as 5% of Expected
payment amount
2300
13
Deduction For
Mobilization
Enter the deduction for mobilization amount if
any
2000
14
Cheque/Draft
Number
Enter the Cheque/ Draft number by which
payment is made
40023467
15
TDS
Enter the TDS amount
16
Quality Check
Carried Out
Select Yes if Quality check is carried Out
Yes
c. Click ‘Save’
d. To enter details of another payment repeat steps a. to c.
47. In cases where Amendment is made click on ‘Fill Amendment details, if required’ link.
48. Fill the fields on the page. Details of the fields are mentioned below;
Sr. No.
Field Name
Field Description
Sample
Data
1
Is Amendment required?
Select yes to perform amendment.
Other fields (described below) will be
shown once ‘Yes’ option is selected.
Yes
2
Defects Liability Period
System will show the Defects Liability
period. Edit the period, if required.
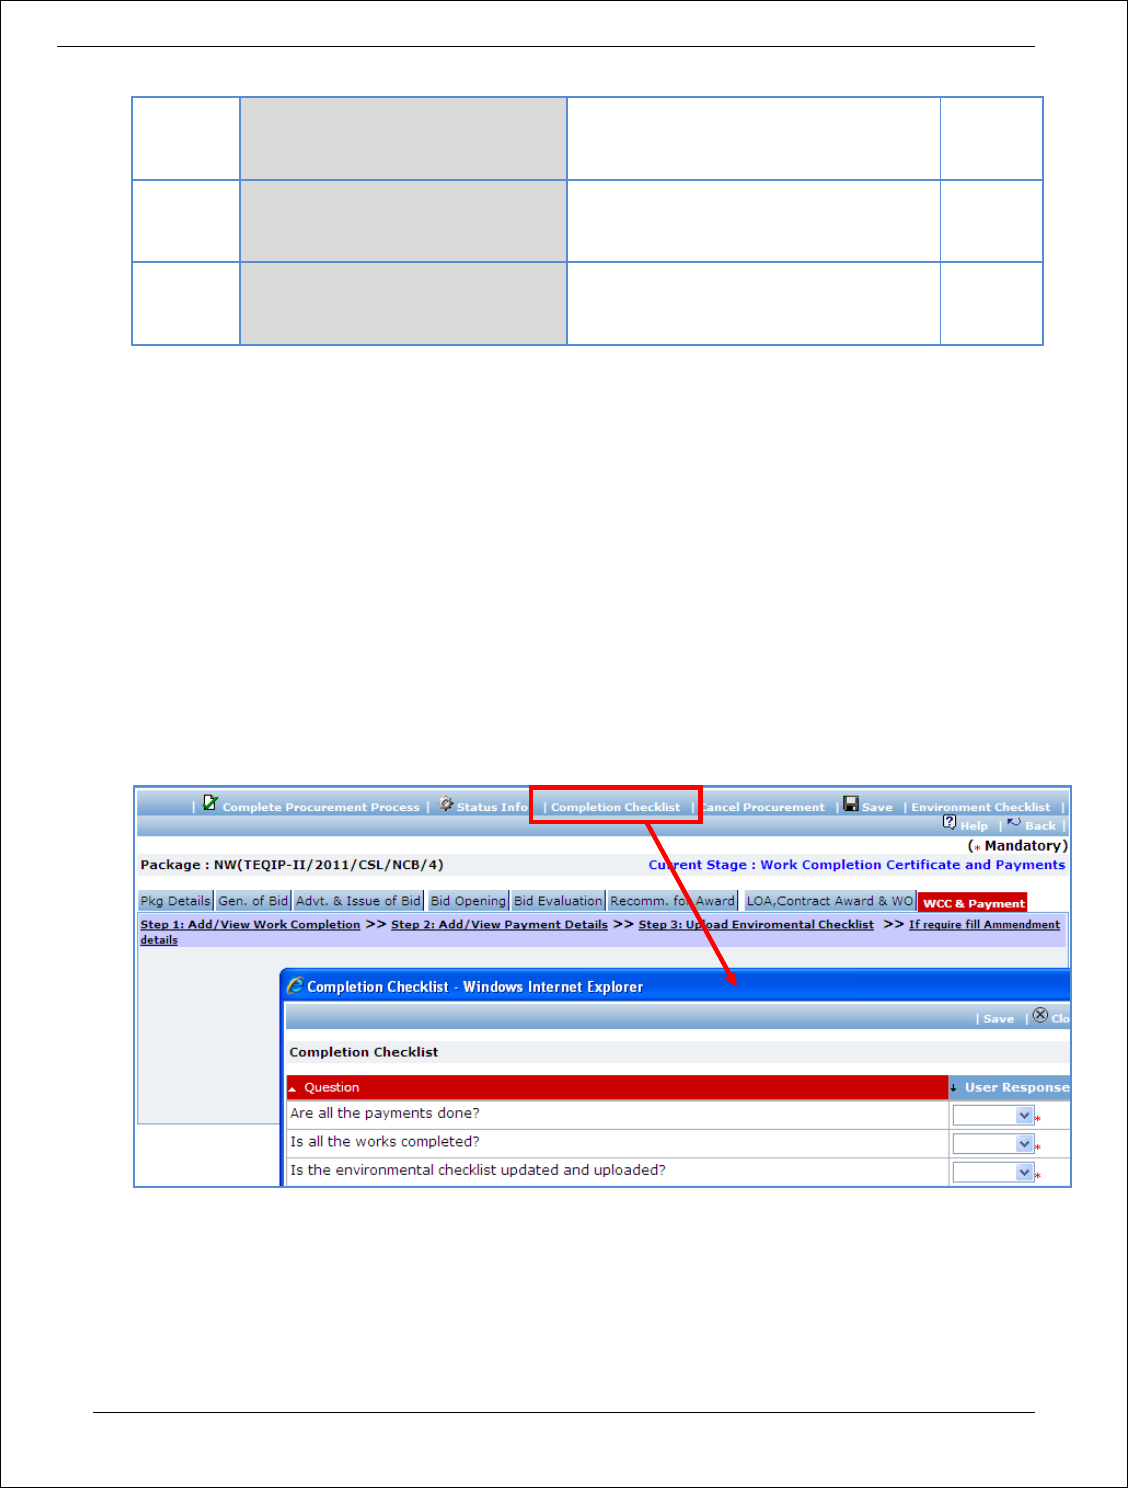
Procurement Management Support System – PMSS v1.0 User Guide
129
4
Work Completion Date
System will show the completion date.
Edit the date as per new completion
date.
3
Performance Security Amount
System will show the performance
security amount. Edit the amount, if
required
5
Performance Security Expiry Date
System will show the performance
security expiry Date. Edit the date as
per new expiry date
49. Click ‘Save’
50. ‘Payments’ subtab is shown in the lower section. Click on the payment term name and update the
details as per new terms.
Note: Only those payment terms are editable which do not have any actual completion date
51. Select ‘Yes’ in the ‘Amendment Complete?’ field.
52. Click ‘Save’. This will complete the amendment process. After completing the amendment user can
continue to track WCC and Payments.
53. Once all the details for all the payments are recorded this Procurement can be marked as complete.
Click on ‘Completion Checklist’, checklist will be seen
a. Fill in the completion checklist
b. Click ‘Save’
50. Click on ‘Complete Procurement Process’ this will complete the procurement for that Package.
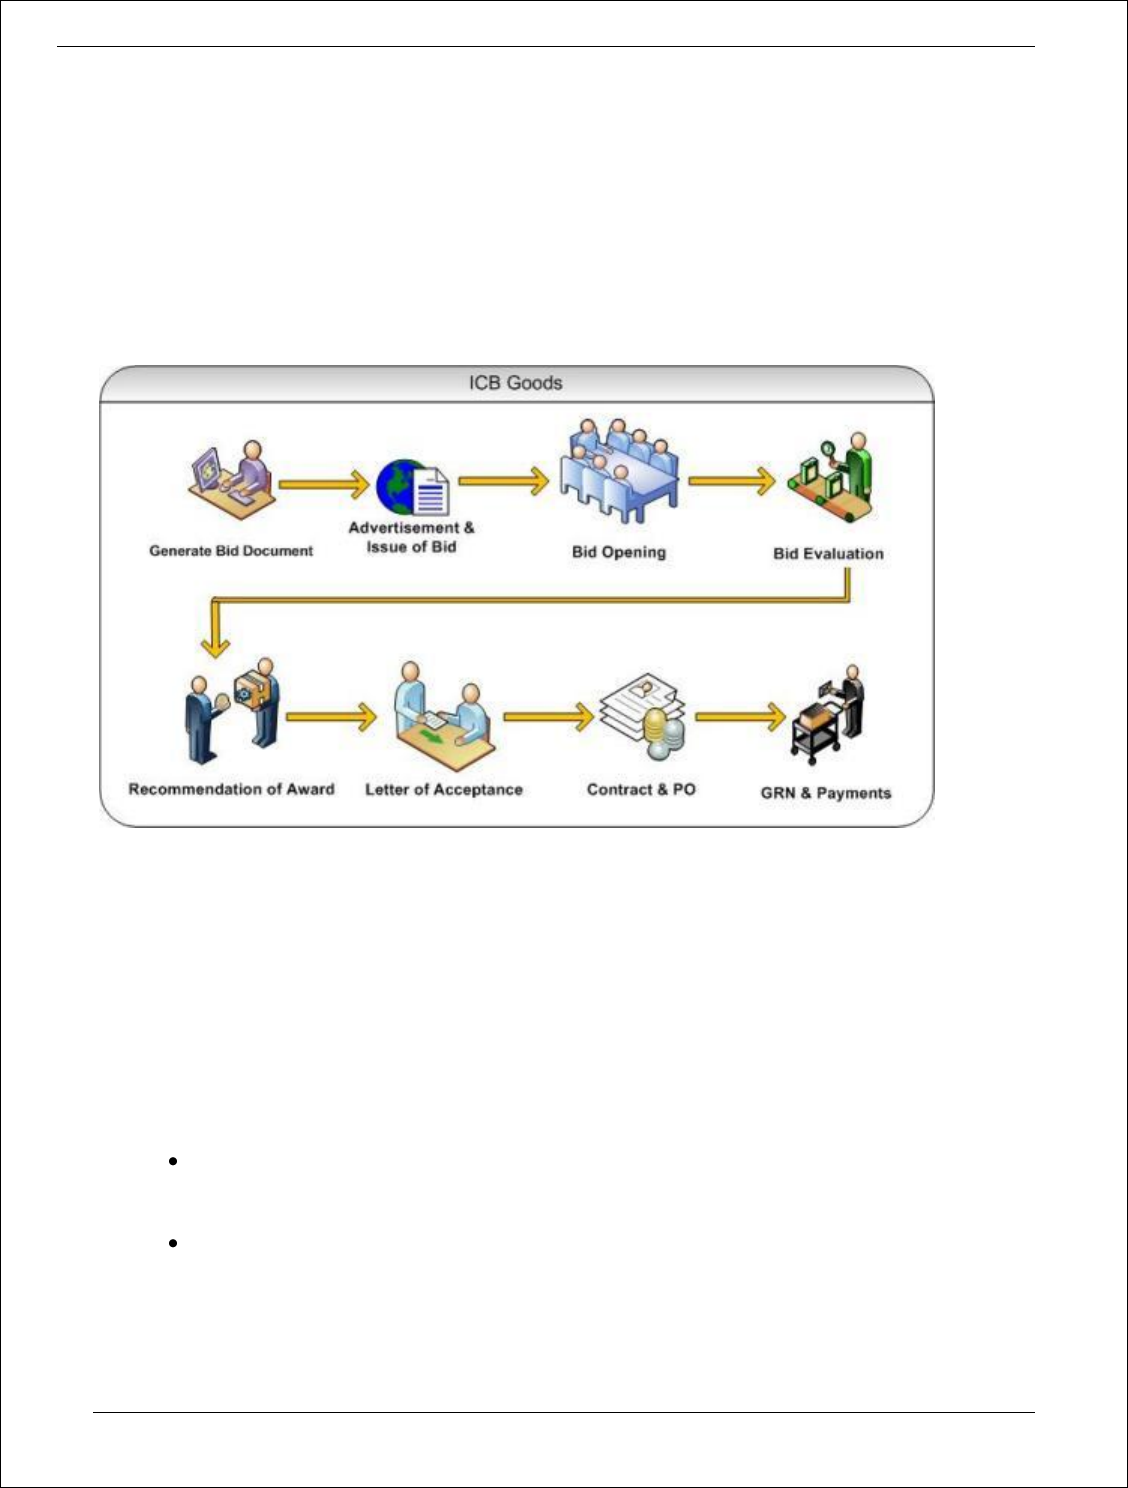
Procurement Management Support System – PMSS v1.0 User Guide
130
ICB
Purpose
To perform procurement of goods using ICB method.
Process flow
Role(s)
o Procurement Coordinator (institution)
Prerequisite
o Package to be procured should fall under category goods.
o Value of the package should be >USD 300,000
Process Details
Steps for ICB are same as NCB except;
At the advertisement stage ‘International site details’ and ‘UNDB’ published data can be
inputted.
At every stage World Bank prior review is required thus after every stage package will go for
World Bank review.
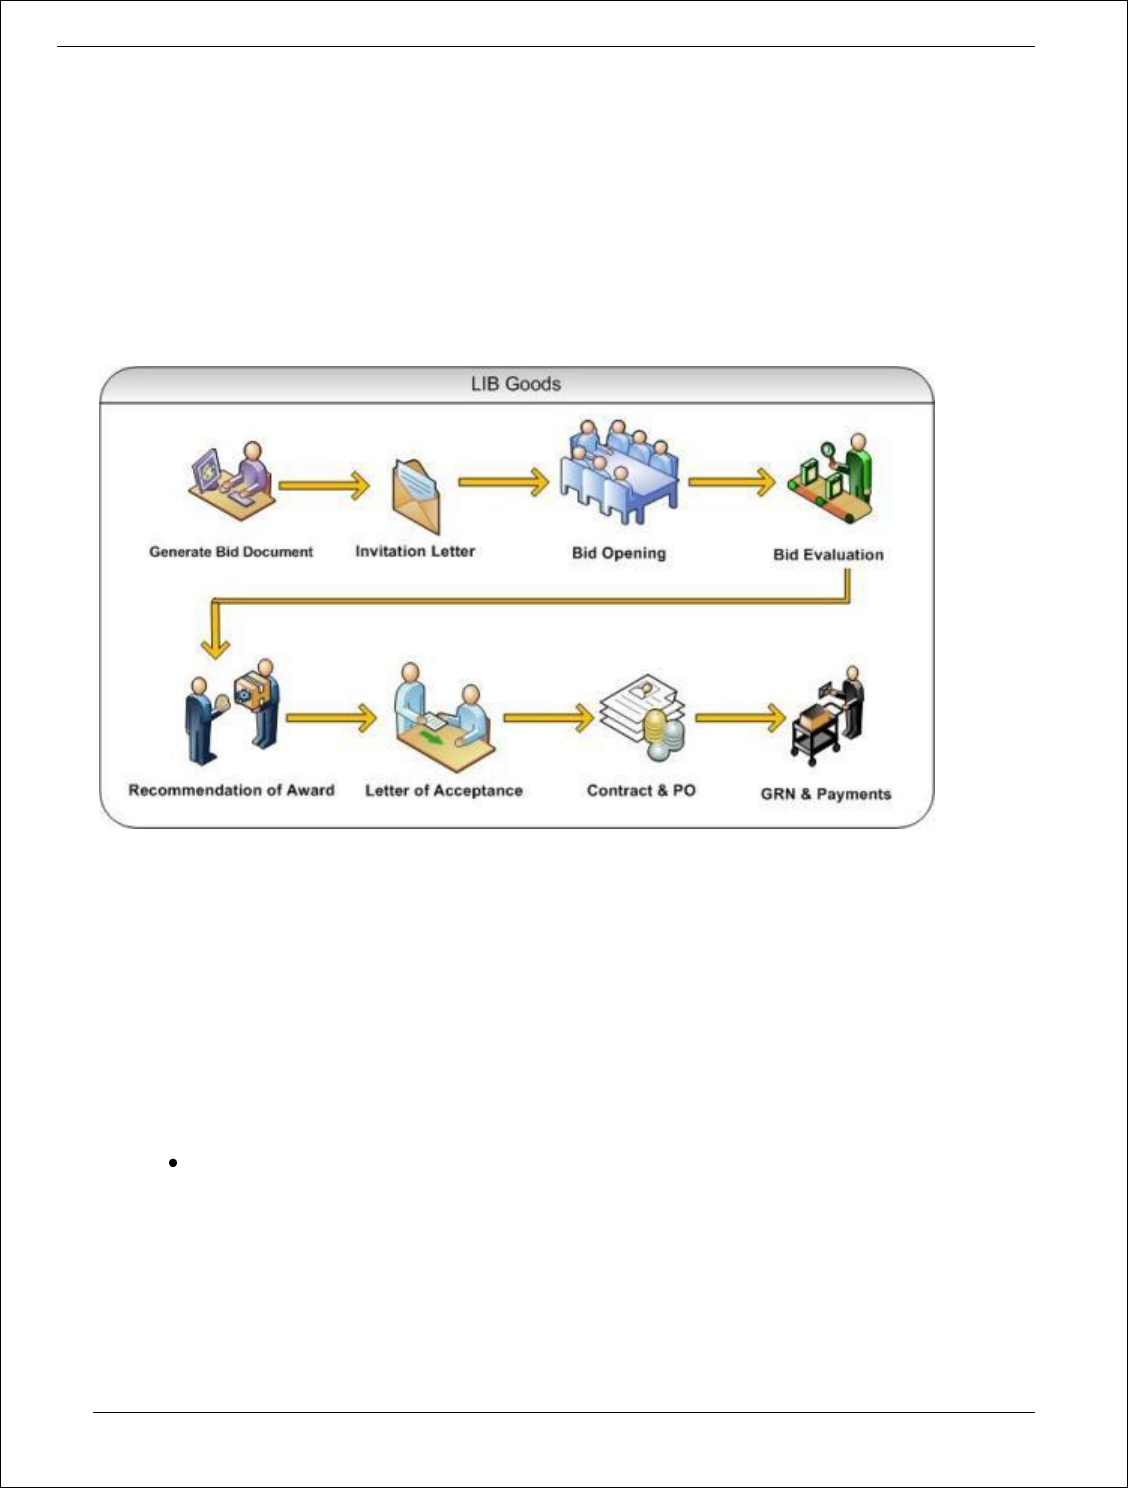
Procurement Management Support System – PMSS v1.0 User Guide
131
LIB
Purpose
To perform procurement of goods using ICB method.
Process flow
Role(s)
o Procurement Coordinator (institution)
Prerequisite
o Package to be procured should fall under category goods.
o Value of the package should be >USD 300,000
Process Details
Steps for LIB are same as ICB except;
Advertisement is not done in LIB, it is done by direct invitation.

Procurement Management Support System – PMSS v1.0 User Guide
132
SERVICES METHOD
User Guide – Procurement Using QCBS/FBS/LCS/CQS/SSS/Individual Consultant –
Competitive/Individual Consultant - SSS
Chapter
8

Procurement Management Support System – PMSS v1.0 User Guide
133
Quality and Cost Based Selection (QCBS)
Purpose
QCBS is most generally used method for selecting service providers. QCBS method can be used for
selecting providers for Research contracts, professional services, training, workshops and fellowships.
Process flow
Role(s)
o Procurement Coordinator (SPFU) – initiates and carries out the process of selection of providers.
o Procurement Coordinator – reviews the procurement if submitted to him for prior review.
Prerequisite
o Financial Sanction should be obtained for procurement of the service.
o TOR (Terms of References) should be prepared and reviewed by reviewing authorities at SPFU
and NPIU.
o TOR should be reviewed and approved by World Bank Officials.

Procurement Management Support System – PMSS v1.0 User Guide
134
o Technical Review Committee should be formed for this procurement. This committee will
review and evaluate technical proposals received by the consultants based on the evaluation
criteria given in the RFP document.
Prior Review Scenarios
o If estimated cost is <10,000 US$ and shortlisted consultants at EOI Shortlisting stage are not
equal to 6, then the procurement will be sent to respective NPIU procurement coordinator for
prior review.
o If estimated cost is 2,00,000 US$ and above, then the procurement will be submitted to NPIU
procurement Coordinator to obtain World Bank NOC.
Process Details
The following section explains procurement of services using QCBS method step-by-step.
The first stage is “Generation of TOR”
Generation of TOR
In this stage activities related to TOR approval are performed. Technical Evaluation Committee will be
defined in this stage. This committee will be involved in evaluation of technical proposals submitted by
the consultants.
‘TOR’ tab will be selected by default.
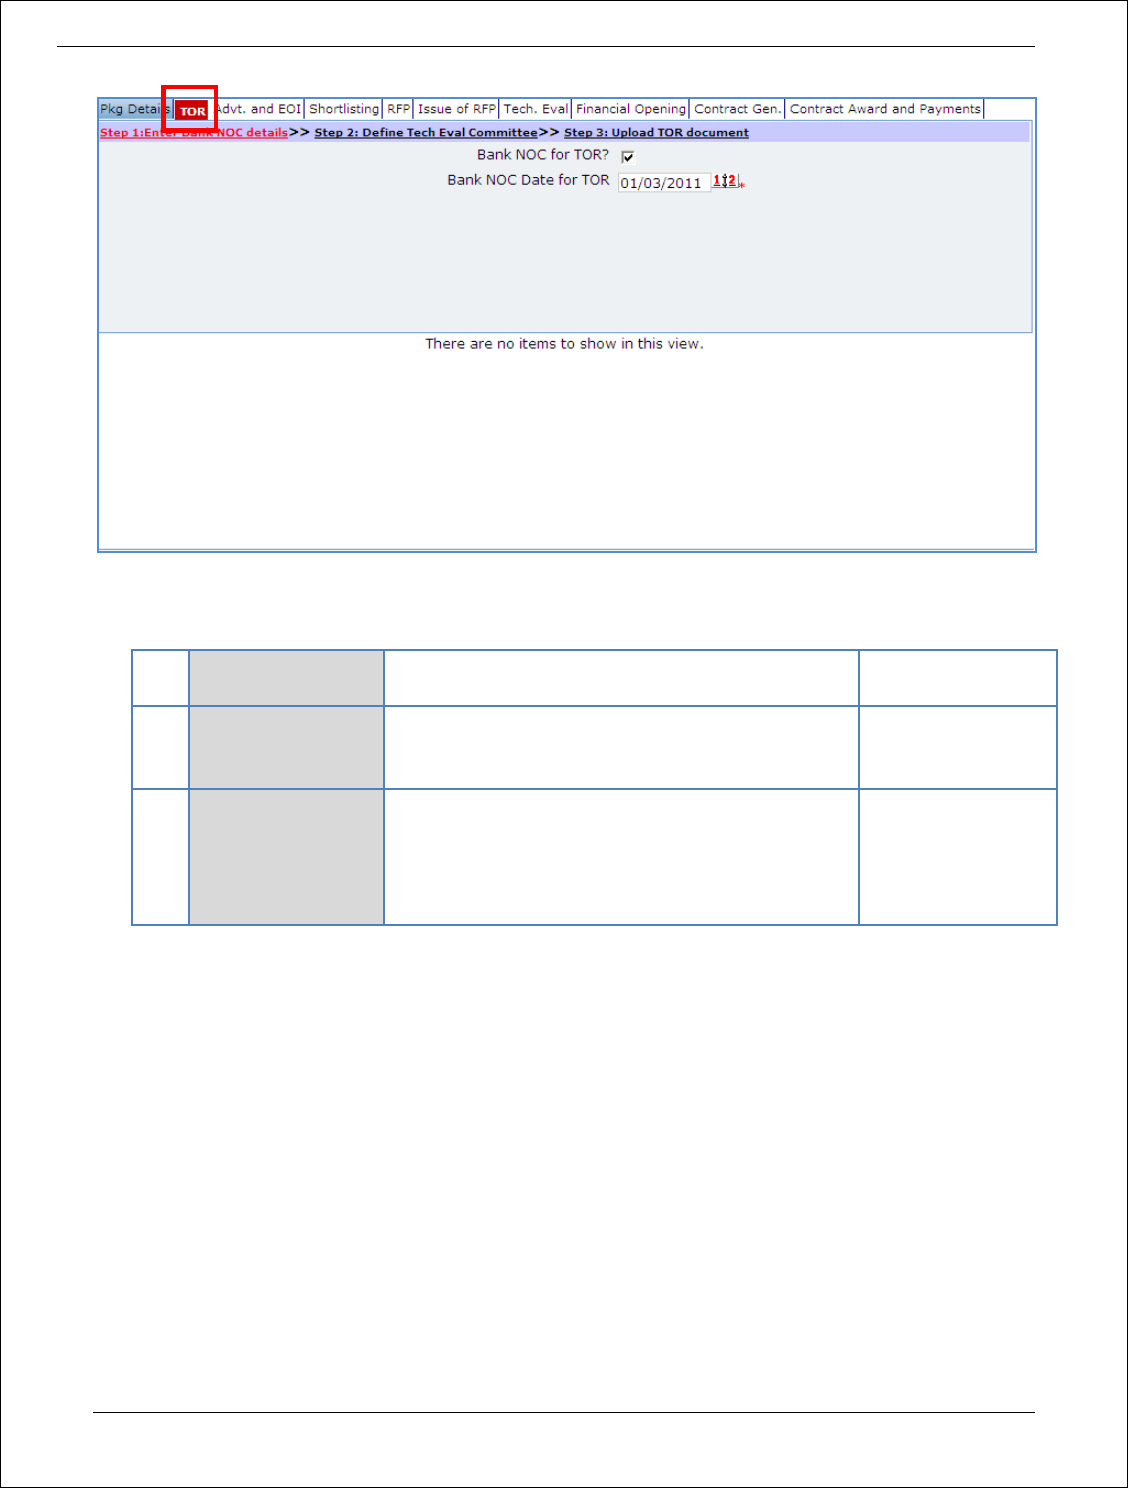
Procurement Management Support System – PMSS v1.0 User Guide
135
1. Fill following details on the page related to World Bank NOC for TOR.
Sr.
No.
Field Name
Field Description
Sample Data
1
Bank NOC for TOR
Enter the checkbox if World Bank NOC has been
obtained for the TOR
This field is not mandatory.
2
Bank NOC Date for
TOR
Enter date in DD/MM/YYYY format or select date
using calendar.
You cannot enter past Date.
Please enter date on which World Bank has given
its NOC for the TOR.
2. Click ‘Save’.
3. Click “Step 2: Define Tech Evaluation Committee” link. ‘Technical Evaluation Committee’ subtab is
shown in the lower section.
4. Define Technical Evaluation Committee members.
a. To add a Technical Evaluation Committee member, click on the ‘Add’ link, which is within the
subtab. A popup will be seen
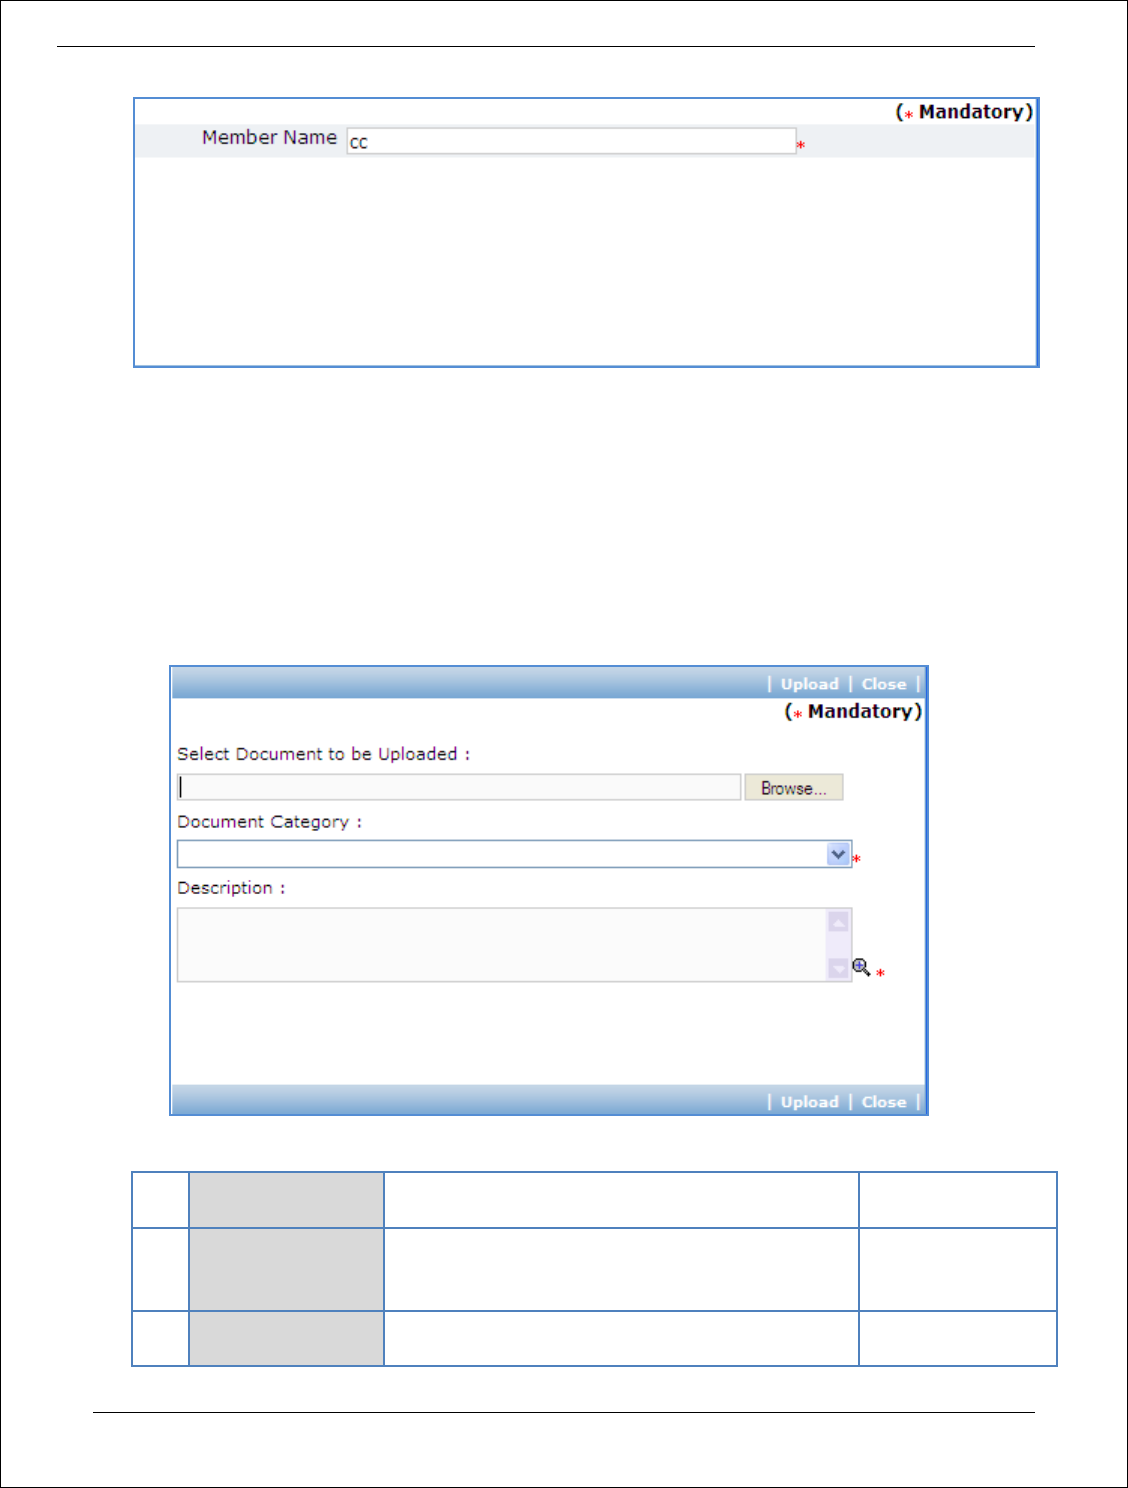
Procurement Management Support System – PMSS v1.0 User Guide
136
b. It has only one field – Member Name. Fill the name of member in the field.
c. Click ‘Save’
d. To add another member, repeat steps a to c.
5. Click “Step 3: Upload TOR Document” link. ‘Documents’ subtab is shown in the lower section. It
contains all documents uploaded in the system at various stages of the procurement.
6. Upload finalized and approved TOR Document.
a. Click ‘Add’ link, which is within the subtab. A popup will be seen
b. Fill the fields on the page. Details of the fields are mentioned below;
Sr.
No.
Field Name
Field Description
Sample Data
1
Document to be
uploaded
Browse the document that you want to upload.
2
Document
Category
Select the appropriate document category.
TOR
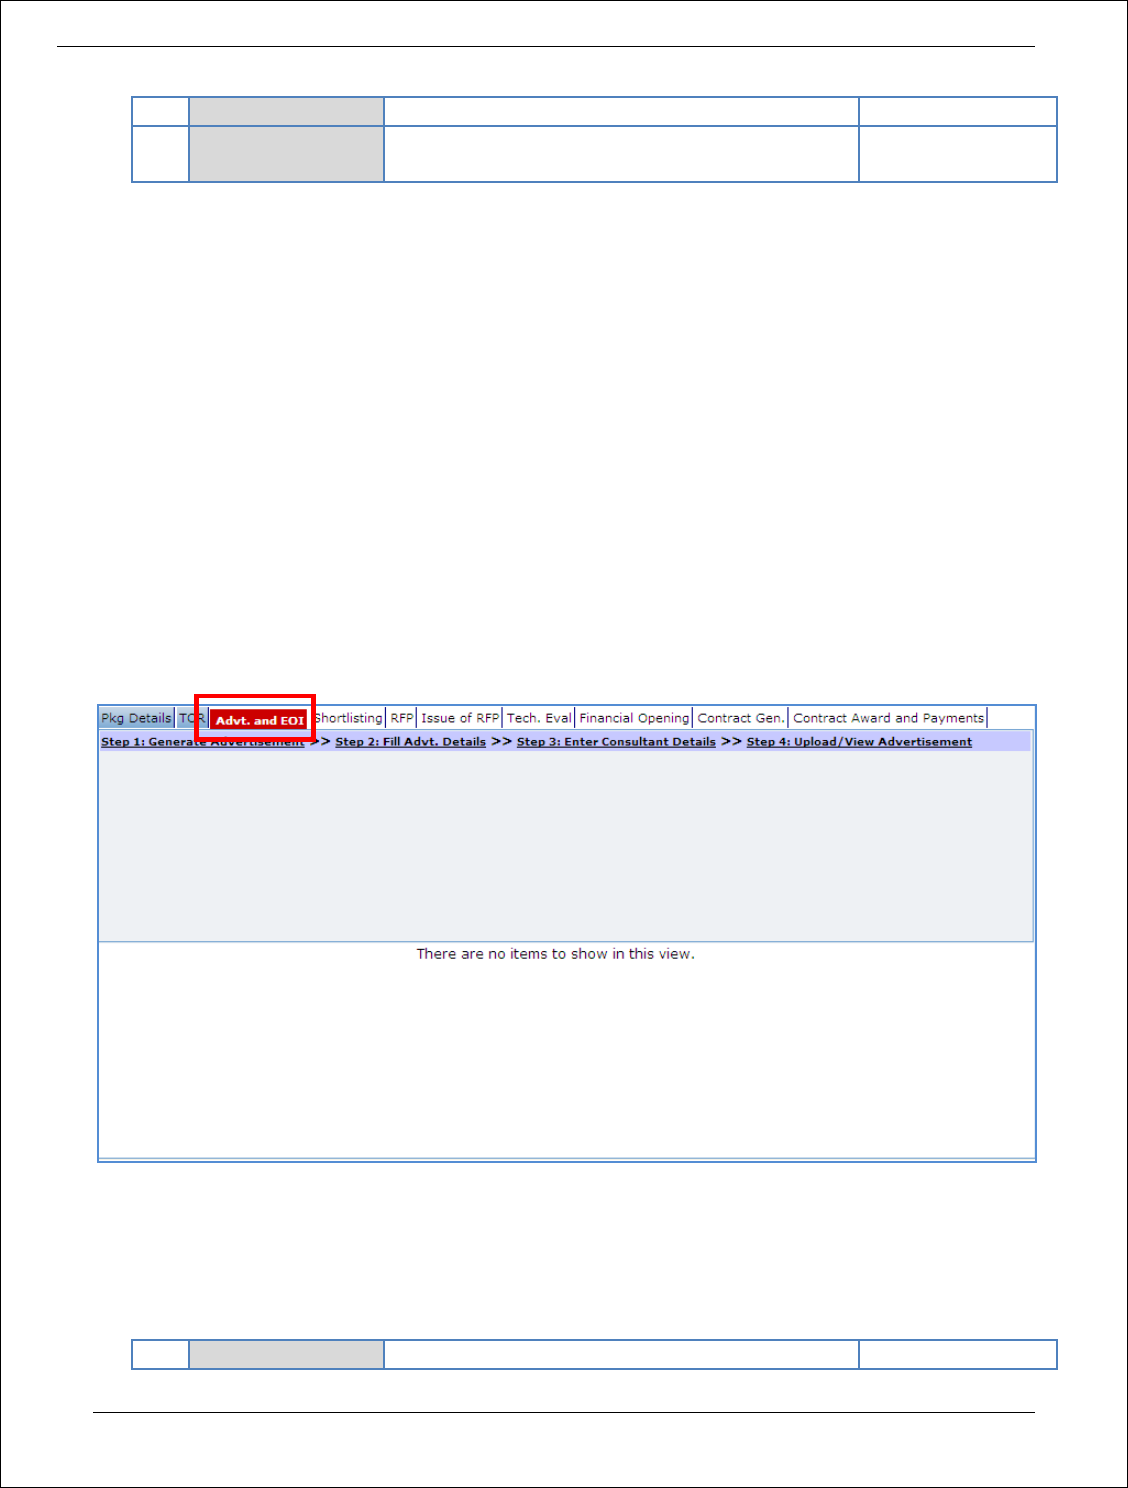
Procurement Management Support System – PMSS v1.0 User Guide
137
3
Description
Enter more information about the uploaded
document.
This is approved
TOR.
c. Click ‘Upload’ to upload the document in the system.
7. After the document is uploaded, it will appear on the list shown in ‘Documents’ section.
8. You can select and delete any document that has been uploaded in current stage of the
procurement. For e.g. if you are in ‘TOR Generation’ stage, you can delete documents that you have
uploaded in this stage. To delete a document, select ‘Delete’ checkbox against the document and
click ‘Delete’ link.
9. On completion of ‘Generation of TOR’ stage click on ‘Move to Next Stage’. This will move the
procurement to ‘Adv & Issue of EOI’ stage.
Adv & Issue of EOI
In this stage Advertisement related activities are performed.
‘Advt. and EOI’ tab is selected by default.
10. Click ‘Step 1: Generate Advertisement’. The advertisement will be generated. Save the locally and
make necessary changes.
11. Click “Step 2: Fill Advt. Details” link. Fill the fields on the page. Details of the fields are mentioned
below;
Sr.
Field Name
Field Description
Sample Data

Procurement Management Support System – PMSS v1.0 User Guide
138
No.
1
Local Paper Name
Enter name of the local newspaper in which the
advertisement for procurement of the service will
be published.
Sakal
2
National Paper
Name
Enter name of the national newspaper in which
the advertisement for procurement of the service
will be published.
Times of India
3
Date of Release of
Advertisement
Please enter date on which the advertisement will
be released to the Publishing Agency/Department.
Enter date in DD/MM/YYYY format or select date
using calendar.
This date cannot be earlier to date on which the
procurement was initiated.
4
Last Date of EOI
Submission
This date is the last date for submission of EOI.
System will auto-calculate as 21 days from date of
Release of Advertisement.
If required, you can modify this date by entering
date in DD/MM/YYYY format or selecting date
using calendar.
15/03/2011
5
Actual Date of
Publication (Local)
Enter date in DD/MM/YYYY format or select date
using calendar.
Please enter date on which the advertisement was
published in local news paper.
6
Actual Date of
Publication
(National)
Enter date in DD/MM/YYYY format or select date
using calendar.
Please enter date on which the advertisement was
published in national news paper.
12. Click ‘Save’.
13. Click “Step 3: Enter Consultant Details” link. ‘Consultant Details’ subtab is shown in the lower
section.
a. Click ‘Add’, which is within the subtab. A pop up will be seen

Procurement Management Support System – PMSS v1.0 User Guide
139
b. Fill the fields on the page. Details of the fields are mentioned below;
Sr.
No.
Field Name
Field Description
Sample Data
1
Consultant Name
Enter Name of the consultant.
Consultant can also be searched using ‘Select
Consultant from PMSS Database’ link. Click on this
link will display the existing list of consultants, if
any. Once the list is displayed, click on the
consultant’s name. This will auto populated the
selected consultant’s data. In order to search
additional consultants within the state or city use
the filters provided on the page.
ABC Consultants
2
Address
Enter the address of the Consultant
STI Towers,
Unit# 141/38,
Campus 29. RMZ
Millenia Business
Park.
881, Dr. MGR Road
3
City
Enter the city of the Consultant
Pune
4
State
Enter the state of the Consultant
Maharashtra
5
Email ID
Enter the Email ID of the Consultant
ftti@efttil.com
6
Pin Code
Enter the Pin Code of the Consultant
411232
7
Name Of
Representative
Enter the Representative of the Consultant
Mr. Mohan Solanki
8
Phone Number
Enter the Phone Number of the Consultant.
To enter more than one number use comma (,) as
a separator.
26422689
9
PAN Number
Enter the PAN Number of the Consultant
ANS44874
10
TAN Number
Enter the TAN Number of the Consultant
11
Tax Number
Enter the TAX Number of the Consultant
c. Click ‘Save’.
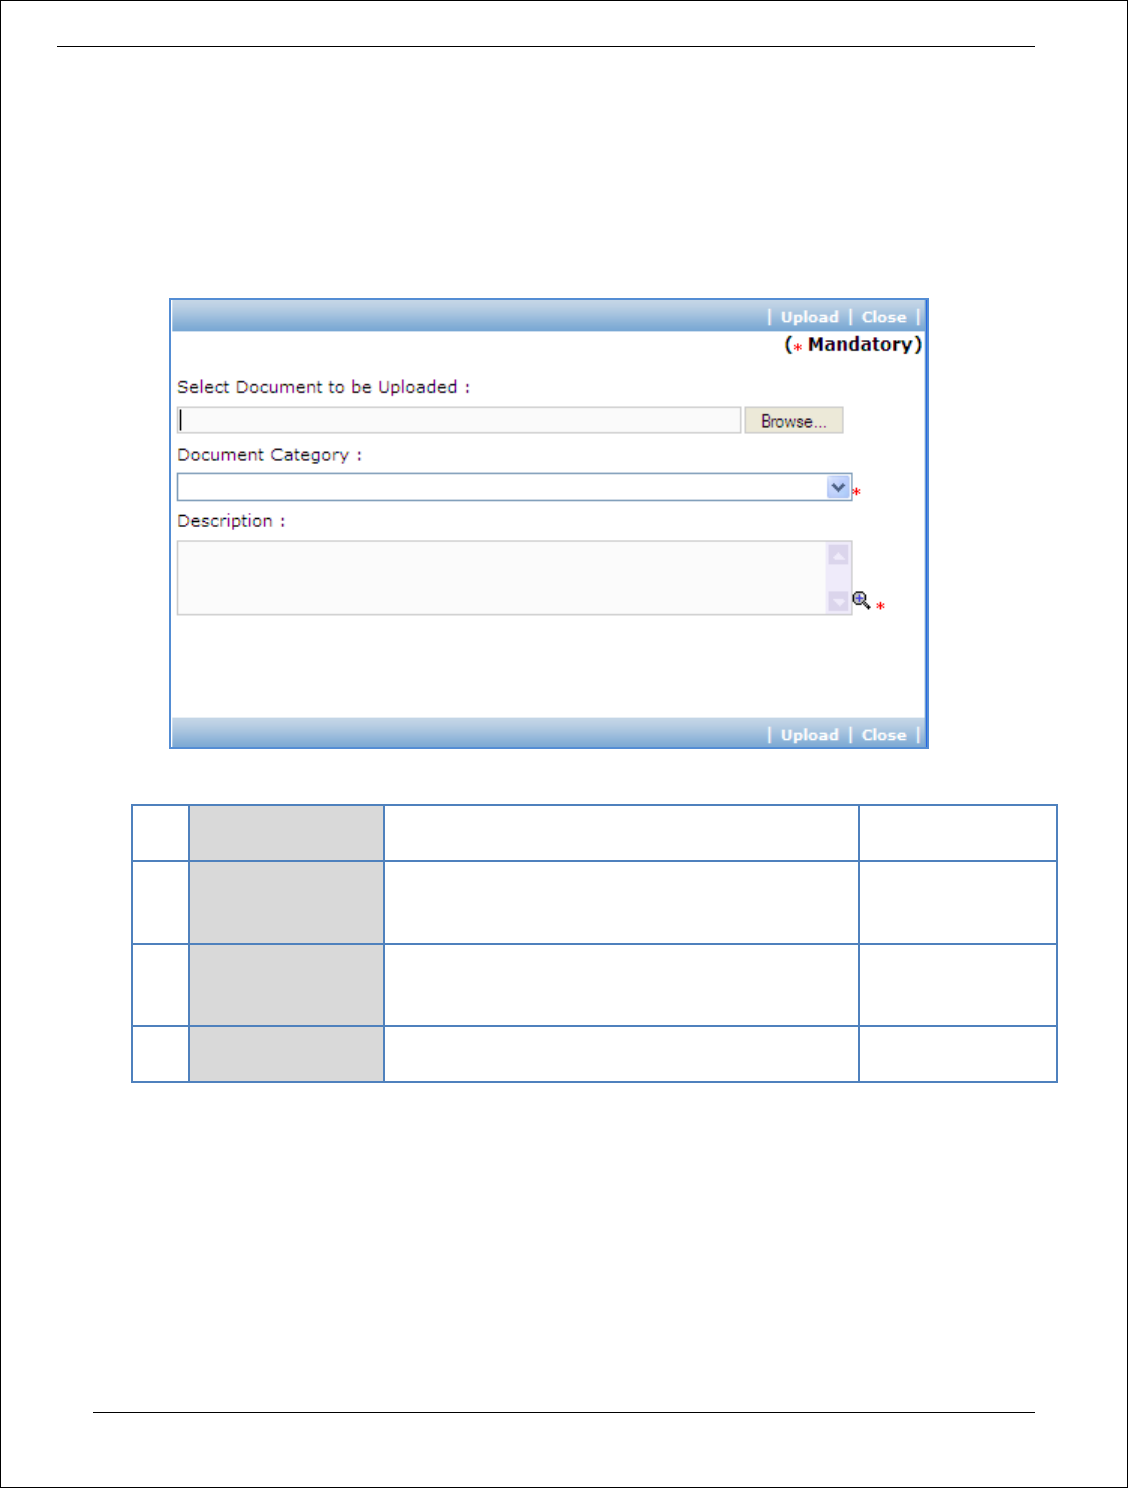
Procurement Management Support System – PMSS v1.0 User Guide
140
d. To add another consultant, repeat steps a to c.
14. Click “Step 4: Upload/View Advertisement” link. ‘Documents’ subtab is shown in the lower section.
It contains all documents uploaded in the system at various stages of the procurement.
15. Upload the Advertisement Document.
a. Click ‘Add’ link, which is within the subtab. A popup will be seen
b. Fill the fields on the page. Details of the fields are mentioned below;
Sr.
No.
Field Name
Field Description
Sample Data
1
Document to be
uploaded
Browse the document that you want to upload.
2
Document
Category
Select the appropriate document category.
TOR
3
Description
Enter more information about the uploaded
document.
This is approved
TOR.
c. Click ‘Upload’ to upload the document in the system.
d. Uploaded document will appear on the list shown in ‘Documents’ section.
e. User can select and delete the document that has been uploaded in current stage of the
procurement. To delete a document, select ‘Delete’ checkbox against the document and click
‘Delete’ link.
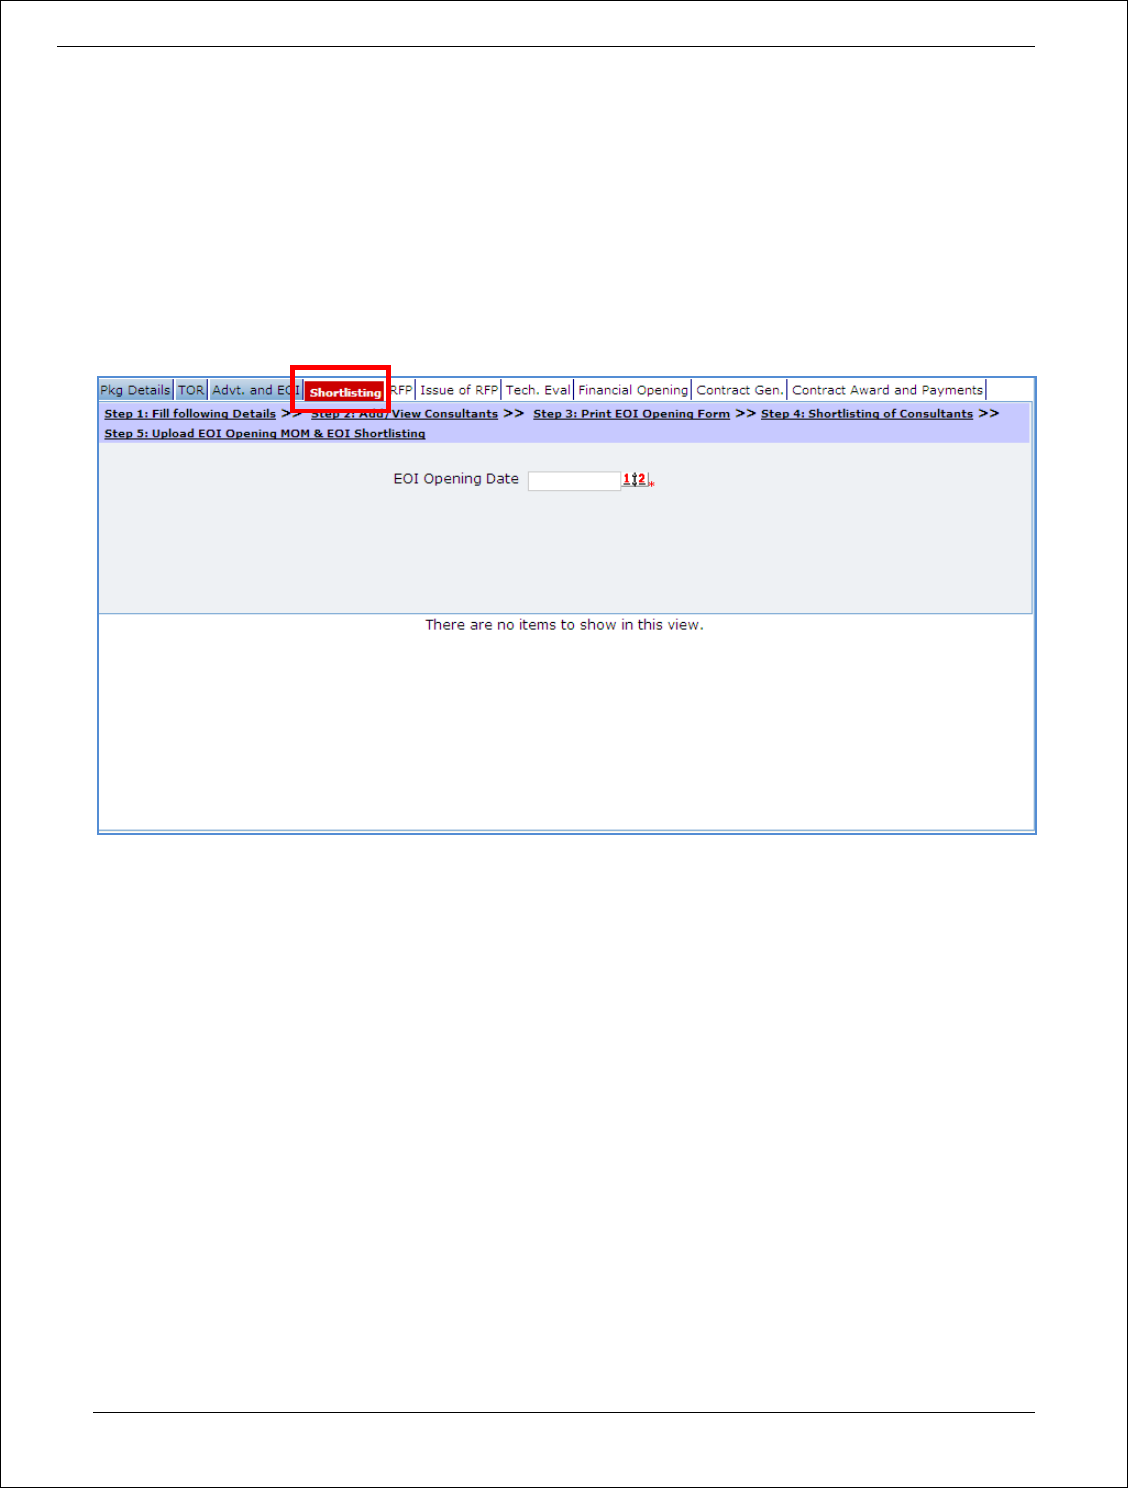
Procurement Management Support System – PMSS v1.0 User Guide
141
16. On completion of ‘Adv & EOI Opening’ stage click on ‘Move to Next Stage’. This will move the
procurement to ‘EOI Opening & Shortlisting of Consultants’ stage.
EOI Opening & Shortlisting of Consultants
In this stage the EOI opening is performed and responsive consultants are identified.
‘Shortlisting’ tab is selected by default.
17. On “Step 1: Fill following Details”, fill actual EOI Opening Date in DD/MM/YYYY format or select date
using calendar. This date cannot be earlier to date on which the procurement was initiated.
18. Click “Step 2: Add/View Consultants” link. ‘Consultant Details’ subtab is shown in the lower section.
a. The subtab displays list of consultants added at ‘TOR Generation’ stage. If there are any new
consultants who have submitted their EOI Proposals, follow these steps to add new consultant;
b. Click ‘Add’, which is within the subtab. A pop up will be seen
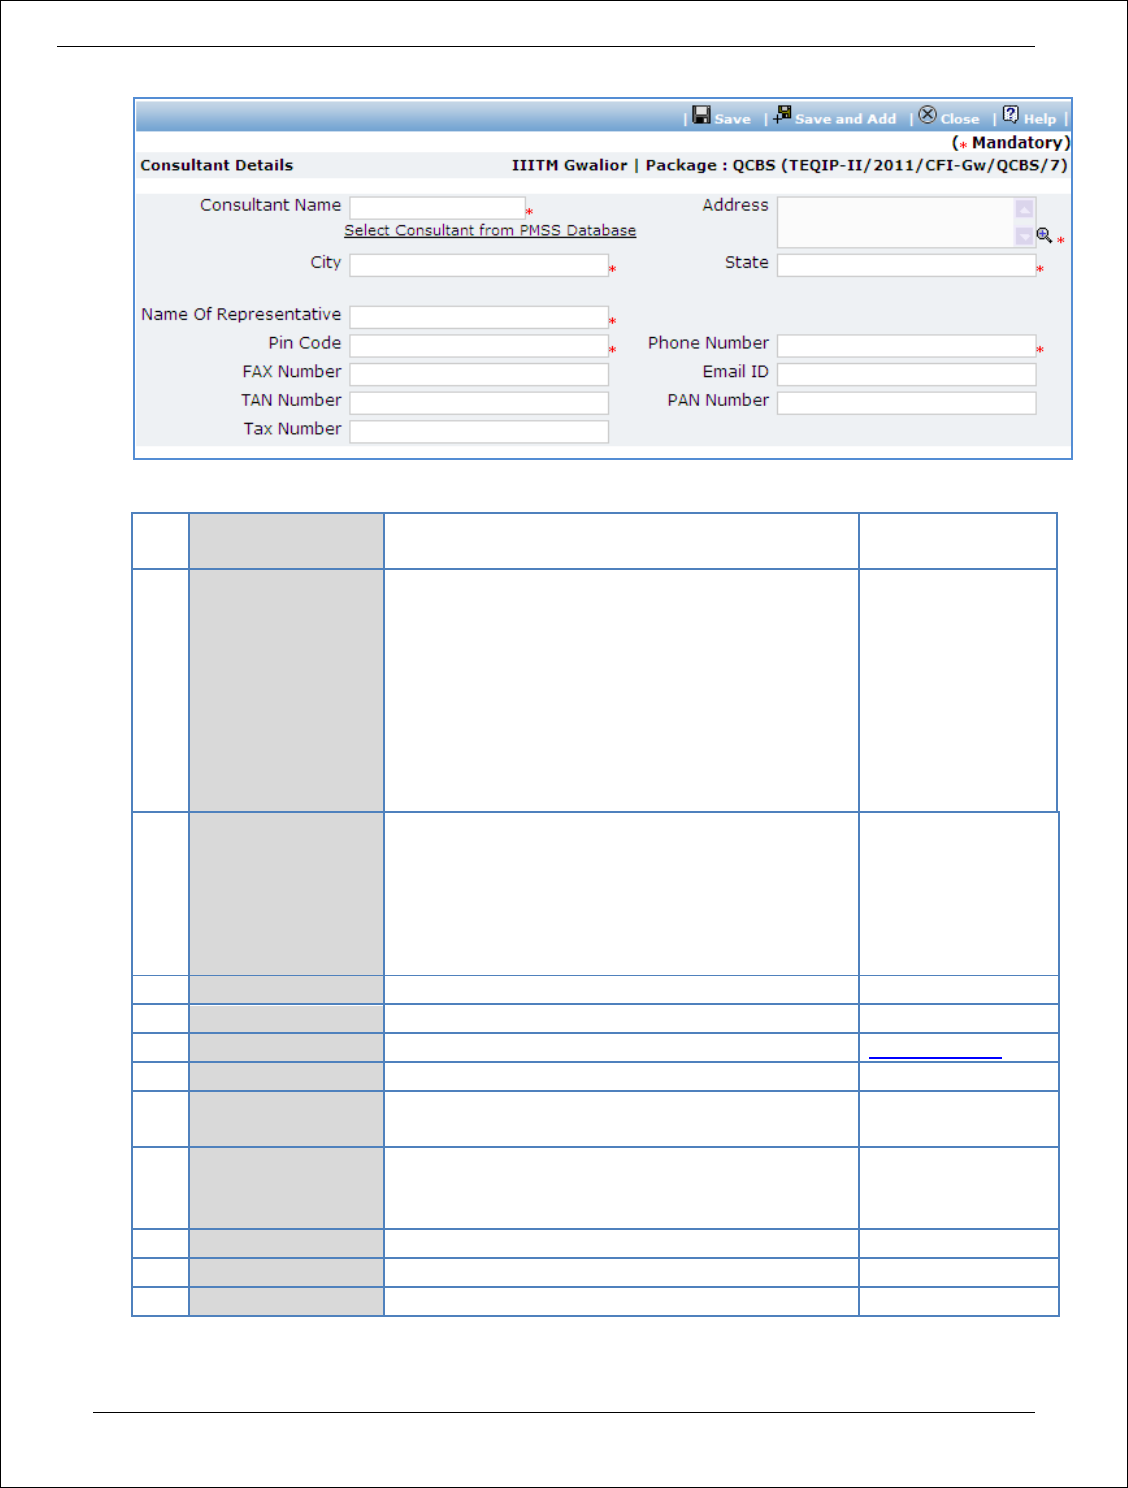
Procurement Management Support System – PMSS v1.0 User Guide
142
c. Fill the fields on the page. Details of the fields are mentioned below;
Sr.
No.
Field Name
Field Description
Sample Data
1
Consultant Name
Enter Name of the consultant.
Consultant can also be searched using ‘Select
Consultant from PMSS Database’ link. Click on this
link will display the existing list of consultants, if
any. Once the list is displayed, click on the
consultant’s name. This will auto populated the
selected consultant’s data. In order to search
additional consultants within the state or city use
the filters provided on the page.
ABC Consultants
2
Address
Enter the address of the Consultant
STI Towers,
Unit# 141/38,
Campus 29. RMZ
Millenia Business
Park.
881, Dr. MGR Road
3
City
Enter the city of the Consultant
Pune
4
State
Enter the state of the Consultant
Maharashtra
5
Email ID
Enter the Email ID of the Consultant
ftti@efttil.com
6
Pin Code
Enter the Pin Code of the Consultant
411232
7
Name Of
Representative
Enter the Representative of the Consultant
Mr. Mohan Solanki
8
Phone Number
Enter the Phone Number of the Consultant.
To enter more than one number use comma (,) as
a separator.
26422689
9
PAN Number
Enter the PAN Number of the Consultant
ANS44874
10
TAN Number
Enter the TAN Number of the Consultant
11
Tax Number
Enter the TAX Number of the Consultant
d. Click ‘Save’.
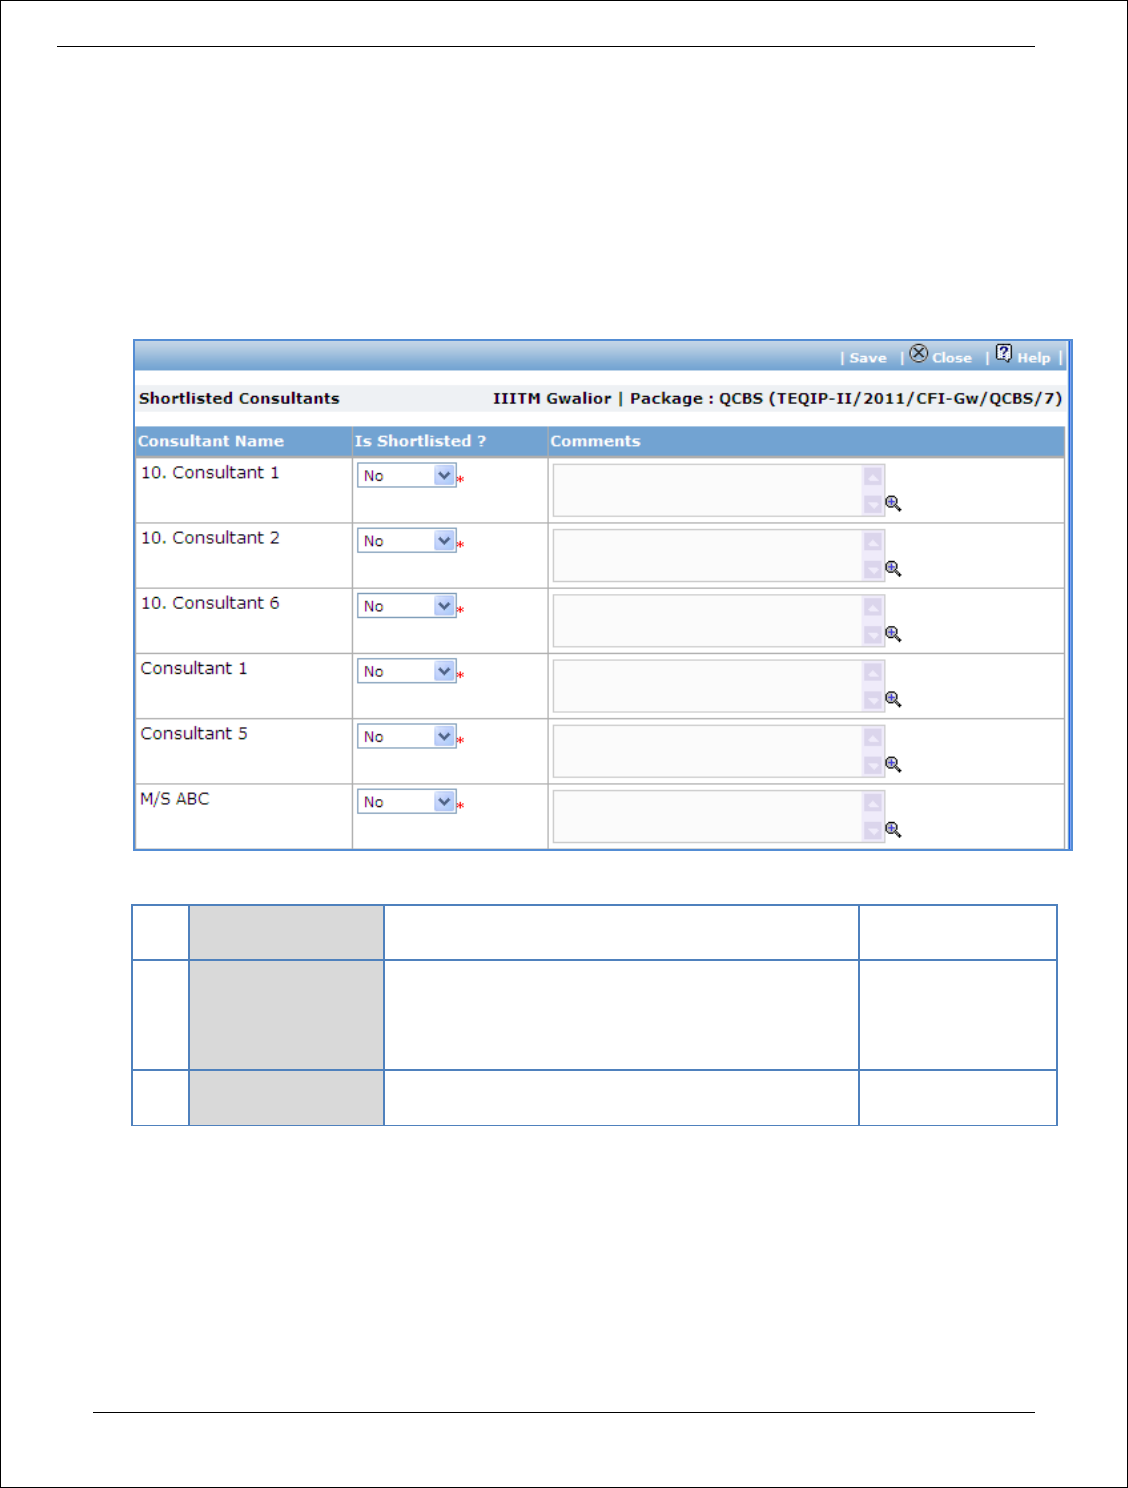
Procurement Management Support System – PMSS v1.0 User Guide
143
e. To add another consultant, repeat steps a to c.
19. Click “Step 3: Print EOI Opening Form” link. This will open EOI opening form. This form can be used
during EOI Opening. Print of this form can be taken and EOI opening details can be recorded on this
form. The consultant names are seen on this form against which EOI opening details can be
mentioned. Shortlisting of consultants can be done using the data filled on this form.
20. Click “Step 4: Shortlisting of Consultants” link. A popup will be seen
a. Fill fields mentioned below for each consultant;
Sr.
No.
Field Name
Field Description
Sample Data
1
Is Shortlisted
Select Yes or No.
Select Yes if the consultant has been shortlisted
Select No if the consultant has not been
shortlisted
No
2
Comments
Enter reasons for short listing or rejection of the
consultant.
Not adequate
project experience
b. Click ‘Save’. At the time of saving, if shortlisted consultants are not 6, the system will ask for
confirmation to continue the process.
c. Click ‘Close’ to close the popup window.
21. If shortlisted consultants are not exactly 6, the system will show a message as shown below;
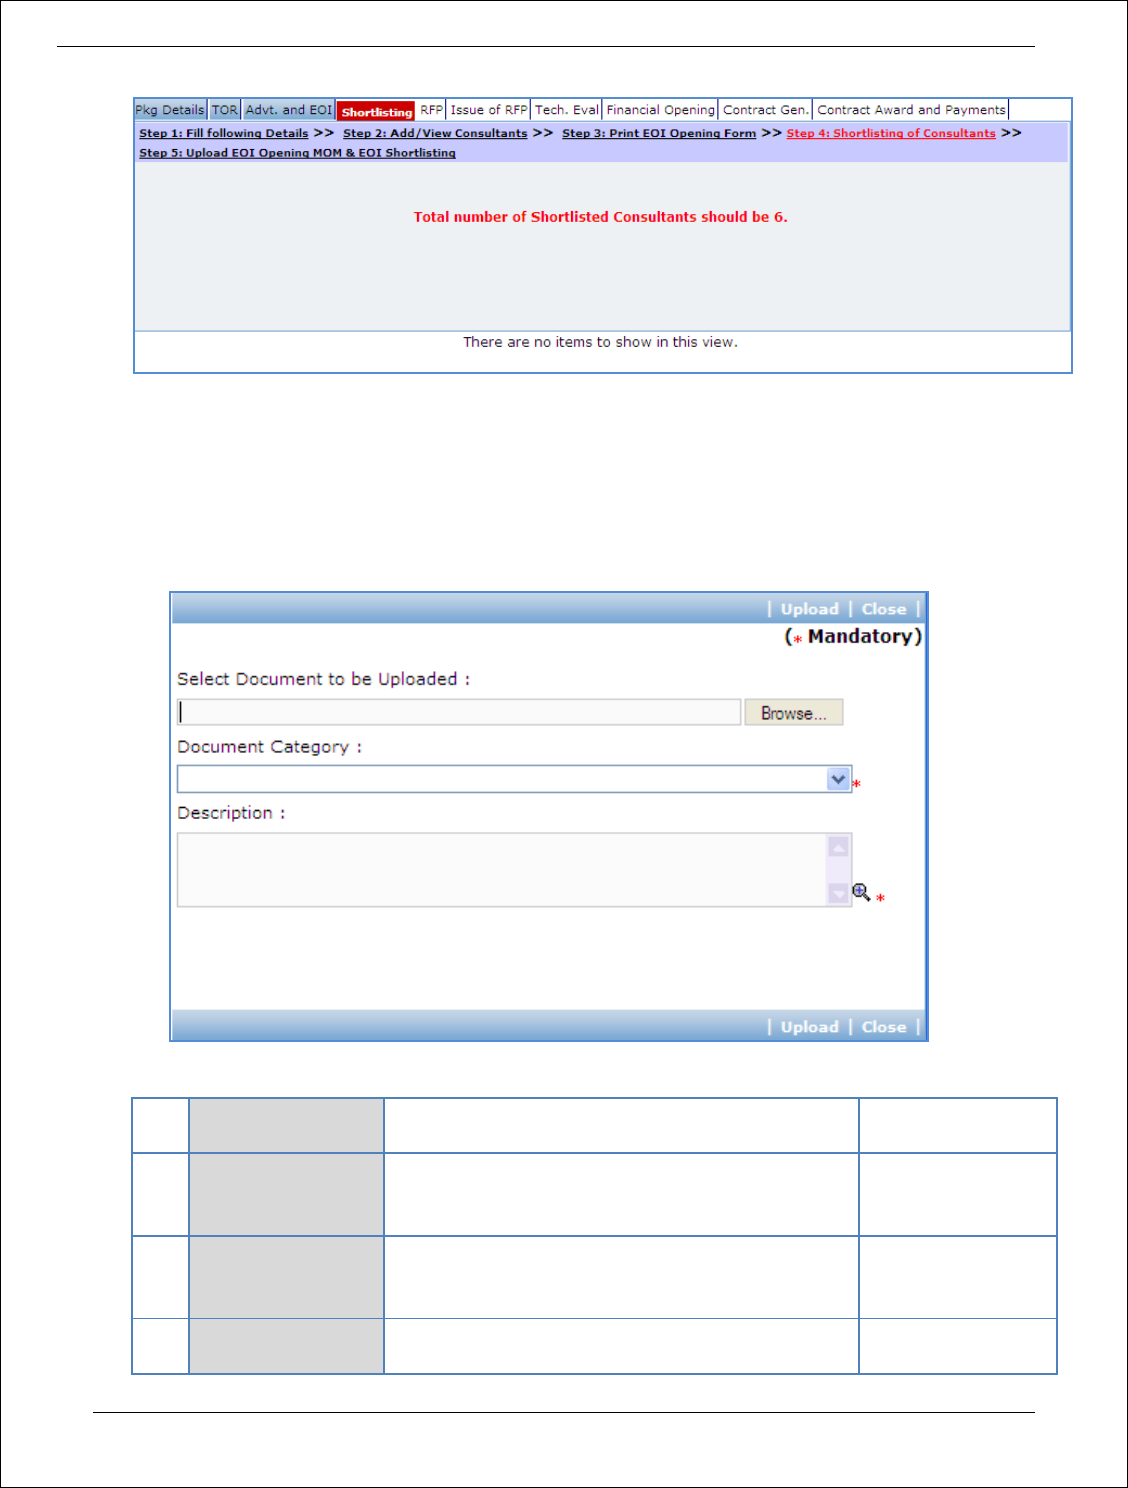
Procurement Management Support System – PMSS v1.0 User Guide
144
22. Click “Step 5: Upload EOI Opening MOM and EOI Shortlisting” link. ‘Documents’ subtab is shown in
the lower section. It contains all documents uploaded in the system at various stages of the
procurement.
23. To upload the EOI Opening MOM Document;
a. Click ‘Add’ link, which is within the subtab. A popup will be seen
b. Fill the fields on the page. Details of the fields are mentioned below;
Sr.
No.
Field Name
Field Description
Sample Data
1
Document to be
uploaded
Browse the document that you want to upload.
2
Document
Category
Select the appropriate document category.
TOR
3
Description
Enter more information about the uploaded
document.
This is approved
TOR.
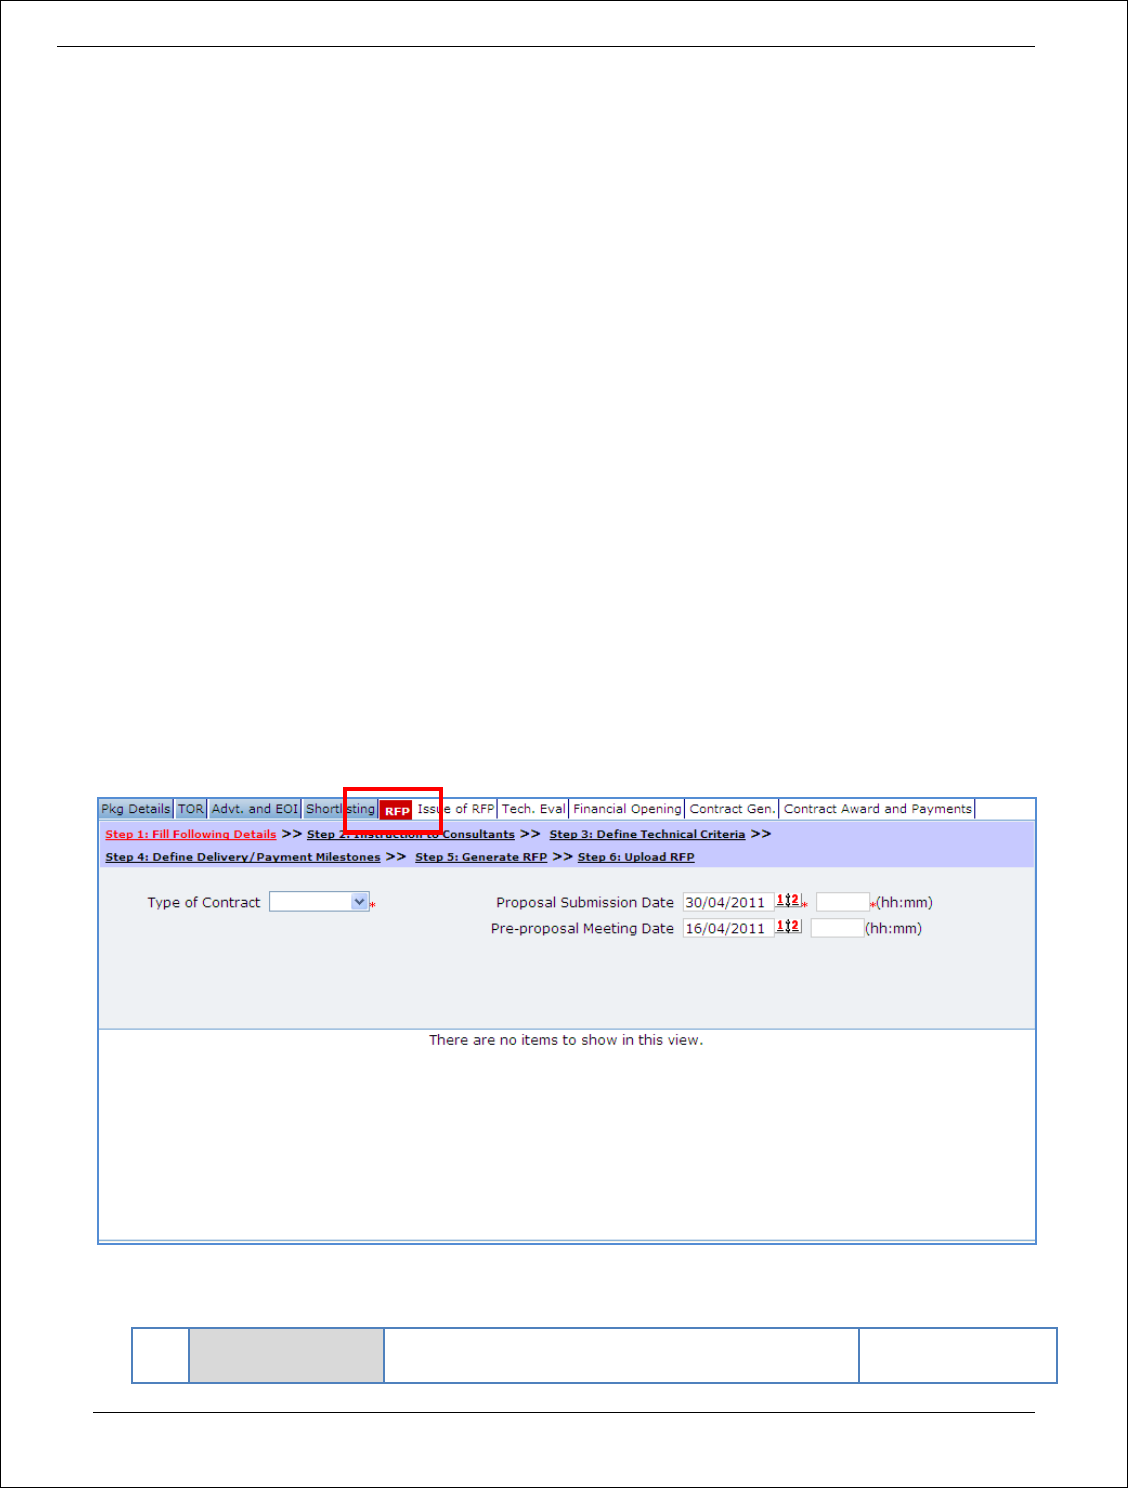
Procurement Management Support System – PMSS v1.0 User Guide
145
c. Click ‘Upload’ to upload the document in the system.
d. Repeat the step 1-c to upload EOI Shortlisting document.
e. Uploaded documents will appear on the list shown in ‘Documents’ section.
f. User can select and delete the document that has been uploaded in current stage of the
procurement. To delete a document, select ‘Delete’ checkbox against the document and click
‘Delete’ link.
24. On completion of ‘EOI Opening & Shortlisting of Consultants’ stage click on ‘Move to Next Stage’.
25. If Prior review is applicable to the procurement, it will be sent for prior review. Please refer section
‘Prior Review Scenarios’ for details.
26. After necessary approvals are obtained, the procurement will move to the next stage ‘RFP
Preparation’.
RFP Preparation
In this stage the required information for RFP is accepted and RFP document is generated.
‘RFP’ tab is selected by default.
27. Fill the fields on the page. Details of the fields are mentioned below;
Sr.
No.
Field Name
Field Description
Sample Data

Procurement Management Support System – PMSS v1.0 User Guide
146
1
Type of Contract
Select appropriate Contract Type from the list–
Lump sum or Timebased.
According to Procurement Manual, Lump-sum
contracts are used for assignments in which the
content and the duration of the work are clearly
defined.
Time Based Contracts are used for assignments in
which it is difficult to define the scope and the
duration of the work to be performed.
This is one of the important fields.
Lump sum
2
Proposal
Submission Date
This date is the last date for submission of
Proposal.
System will auto-calculate and display this date as
45 days from date of Release of Advertisement.
If required, you can modify this date by entering
date in DD/MM/YYYY format or selecting date
using calendar. If you modify this date, please
verify Pre-proposal Meeting Date.
This date should be atleast 45 days from date of
Release of Advertisement.
30/04/2011
3
Proposal
Submission Time
Enter Time in HH:MM format
11:00
4
Pre-proposal
Meeting Date
This date is the last date for submission of
Proposal.
System will auto-calculate and display this date as
14 days prior to Proposal Submission Date.
If required, you can modify this date by entering
date in DD/MM/YYYY format or selecting date
using calendar.
16/04/2011
5
Pre-proposal
Meeting Time
Enter Time in HH:MM format
12:00
28. Click “Step 2: Instruction to Consultants” link. A popup will be seen;
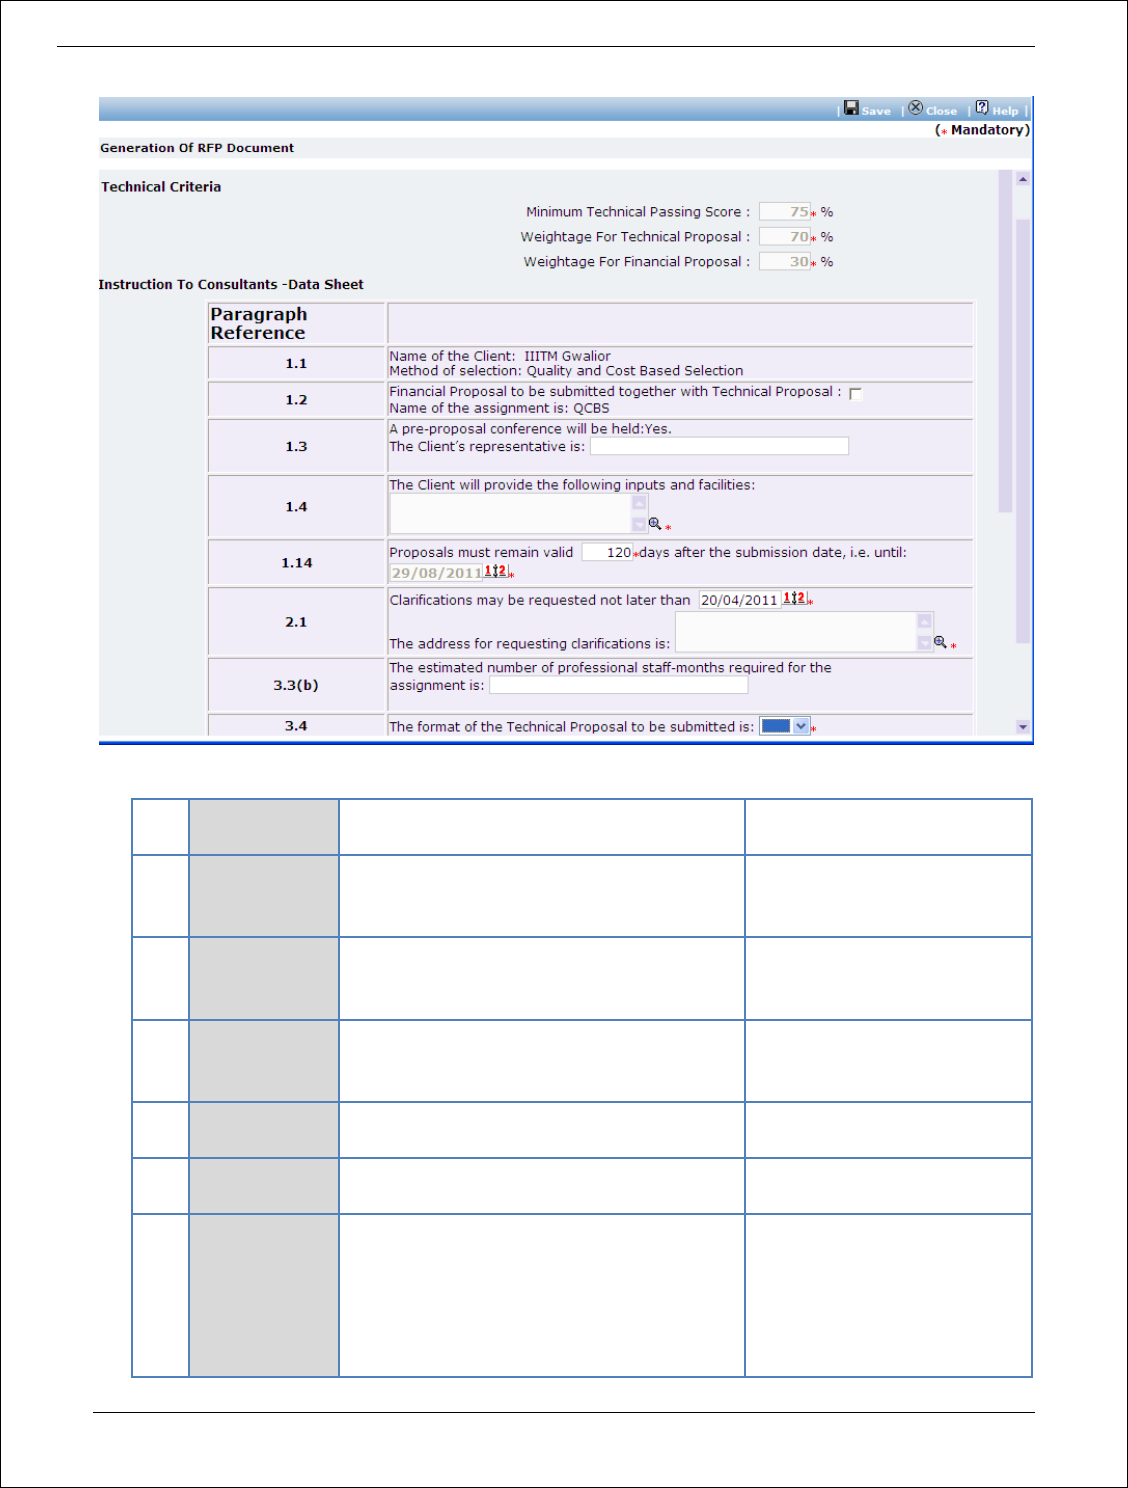
Procurement Management Support System – PMSS v1.0 User Guide
147
a. Fill the fields on the page. Details of the fields are mentioned below;
Sr.
No.
Field Name
Field Description
Sample Data
1
Min Score for
Technical
Proposal
This is minimum qualifying score for
Technical Proposals.
This will be auto-populated by the system.
75
2
Weightage for
technical
proposal
This is weightage for technical proposal.
This will be auto-populated by the system.
75
3
Weightage for
financial
proposal
This is weightage for financial proposal.
This will be auto-populated by the system.
25
4
1.2
Select the checkbox if Financial Proposal is
required along with technical proposal
5
1.3
Enter name of the representative from the
client
Prof A U Digraskar, CPA, NPIU
6
1.4
Enter inputs and facilities to be provided
by the client
(i) An orientation about the
agreed procurement
procedures for the
project;
(ii) Procurement Manual
developed for the

Procurement Management Support System – PMSS v1.0 User Guide
148
project;
7
1.14
Enter Proposal Validity Period in days.
Based on this value Proposal Validity Date
will be auto-calculated by the system.
120
8
2.1
This date is the last date for seeking
clarifications on the RFP
This date will be auto-calculated by the
system as 10 days prior to Proposal
Submission Date.
If required, you can modify this date by
entering date in DD/MM/YYYY format or
selecting date using calendar.
This date should not be less than last date
of EOI submission.
20/04/2011
8
2.1
Enter of address for requesting
clarifications
National Project
Implementation Unit
EdCIL House, 4th Floor, 18- A,
Sector 16- A,
Gautum Budh Nagar,
Noida (U.P) – 201301
9
3.3(b)
Enter estimated number of staff months
for this assignment
40
10
3.4
Select the format of technical Proposal
required to be submitted by the
consultants – FTP or STP
This depends on nature of the assignment
FTP
11
3.4(g)
Enter here training related needs, if any.
Select the checkbox is the training is
needed and enter information about
training requirement in the given text
area.
The consultant will
undertake one day Training
and Orientation, estimated
to be 40 Training Days (One
Day training is estimated for
each batch, comprising 20-25
end users.)
12
3.7
This information is related to local taxation
is applicable. Select ‘Yes’ from the list if
the location taxation is to be applied to
the amounts paid to the consultant under
the contract.
Yes
13
4.3
Enter no. of copies of proposal to be
submitted
2
14
4.5
Enter address where proposal should be
submitted.
National Project
Implementation Unit
EdCIL House, 4th Floor, 18- A,
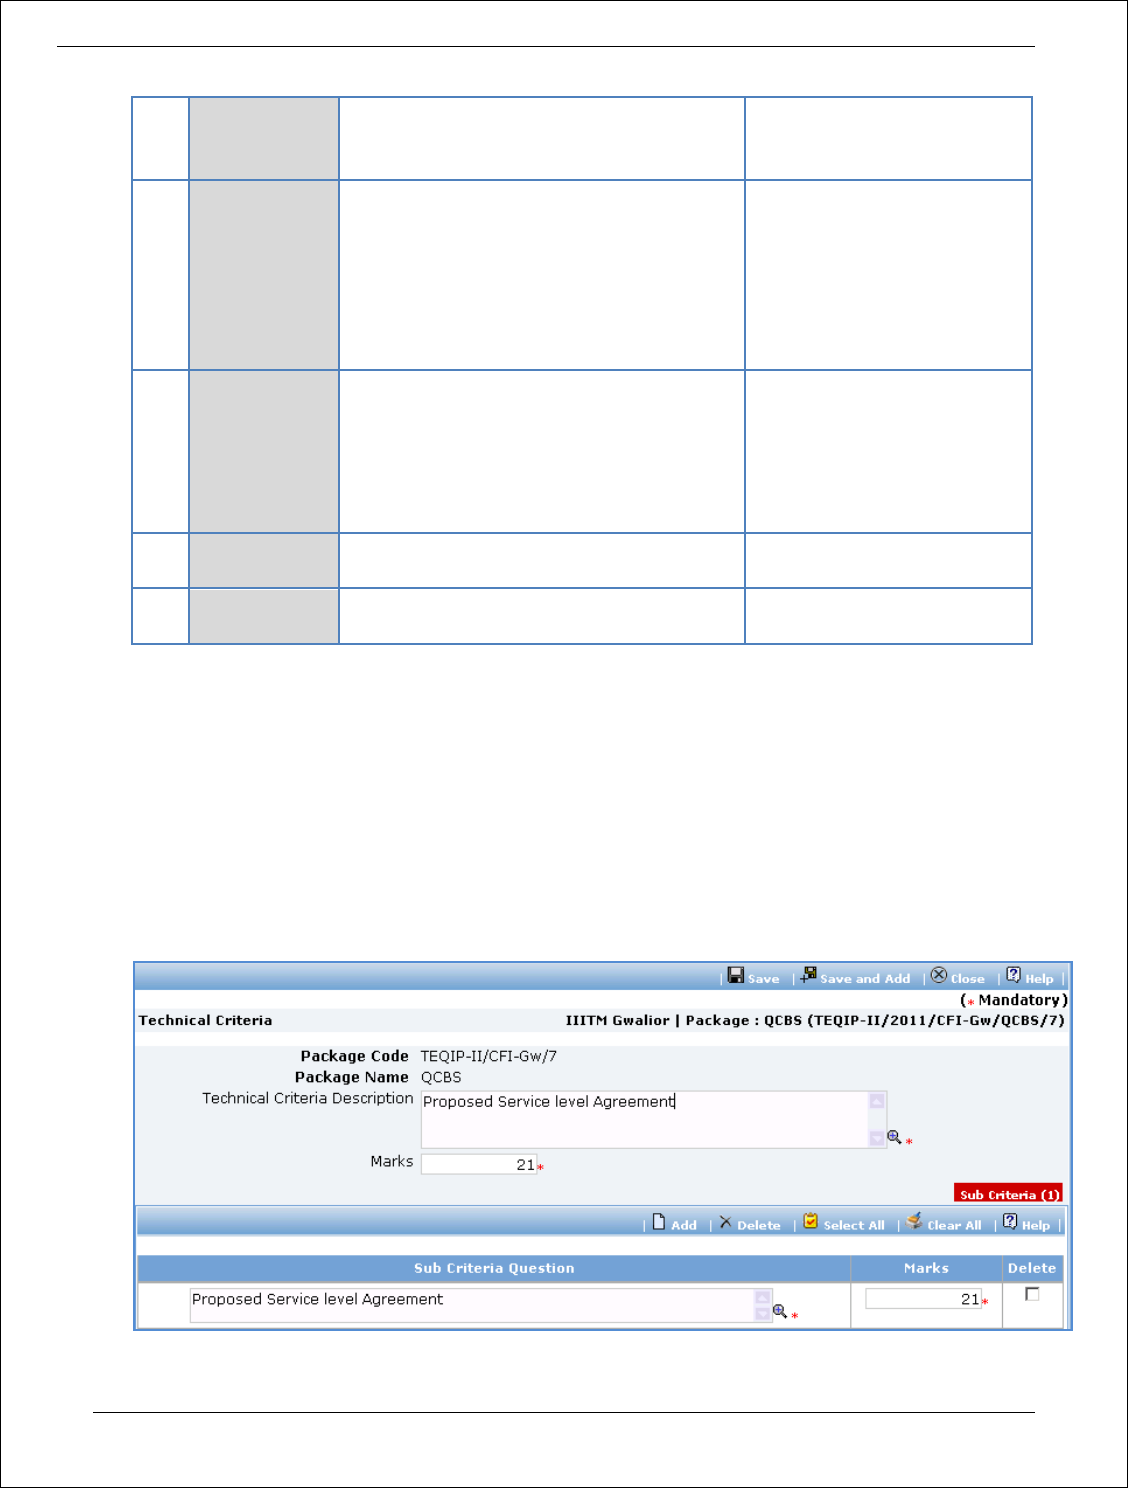
Procurement Management Support System – PMSS v1.0 User Guide
149
Sector 16- A,
Gautum Budh Nagar,
Noida (U.P) – 201301
15
6.1
Enter expected contract negotiation date.
If required, you can modify this date by
entering date in DD/MM/YYYY format or
selecting date using calendar.
This date should not be less than last date
of submission of Proposal.
01/06/2011
16
6.1
Enter address of location at which contract
negotiation meeting will be conducted
National Project
Implementation Unit
EdCIL House, 4th Floor, 18- A,
Sector 16- A,
Gautum Budh Nagar,
Noida (U.P) – 201301
17
7.2
Enter expected date on which the contract
will be commenced
15/06/2011
18
7.2
Enter location at which consulting services
will be commenced
NPIU, Noida
b. Click ‘Save’.
29. Click “Step 3: Define Technical Criteria” link. ‘Technical Criteria’ subtab is shown in the lower
section.
30. Initially, list of some default technical criterias will be displayed. These are some basic criterias
added by NPIU Administrator as part of configuration settings of the system.
31. You can add new criteria, modify or delete existing criterias.
a. To add new criteria, Click ‘Add’ which is within the subtab. A pop up will be seen
b. Fill the fields on the page. Details of the fields are mentioned below;

Procurement Management Support System – PMSS v1.0 User Guide
150
Sr.
No.
Field Name
Field Description
Sample Data
1
Technical Criteria
Description
Enter name of technical criteria. This name will
appear in bidding documents and evaluation
forms.
Experience of the
organisation/
consultant relevant
to the assignment
2
Marks
Total marks for this technical criteria
9
c. Click ‘Save’
d. To add sub-criteria , click on the ‘Add’, which is in the ‘Sub Criteria’ section. A row will appear
where the sub-criteria can be added.
e. Fill the fields on the page. Details of the fields are mentioned below;
Sr.
No.
Field Name
Field Description
Sample Data
1
Sub Criteria
Question
Enter Sub Criteria description
Specific experience in
software development
related to procurement
management (indicate
max. 2 projects in last 3
years)
2
Marks
Enter marks for the sub-criteria
5
f. To add another sub-criteria, repeat steps a to c. Click ‘Save’.
32. To add another criteria, repeat steps a to f.
33. Please ensure that total of marks for all technical criteria defined for the procurement is exactly 100.
34. Click “Step 4: Define Milestones” link. ‘Milestones’ subtab is shown in the lower section.
a. To add a milestone, Click ‘Add’ which is within the subtab. A pop up will be seen

Procurement Management Support System – PMSS v1.0 User Guide
151
b. Fill the fields on the page. Details of the fields are mentioned below;
Sr.
No.
Field Name
Field Description
Sample Data
1
Milestone Name
Enter name of the milestone
BRD Signoff
2
Milestone
Description
Enter description for the milestone
After BRD signoff
3
Payment Amount
(%)
Enter percentage of amount to be paid for this
milestone
Total of Payment Amount % for all milestones
should be exactly 100.
10
4
Expected Delivery
Period
Enter period in days in which this milestone
should be accomplished.
In later stages of the procurement, expected
delivery date will be calculated using this value.
30
c. Click ‘Save’ or ‘Save and Add’. ‘Save and Add’ link should be used if you want to
save the data and add another milestone. Alternatively, you can click ‘Save’ and to
repeat steps a to c.
35. Please ensure total of ‘Payment Amount %’ for all milestones is exactly 100.
36. Click ‘Step 5: Generate RFP’. The RFP document will be generated. Save the file locally and make
necessary changes to the sections highlighted in yellow. Before generating the document, system
validates the required information and prompts for missing information.
37. After completing changes to the locally saved RFP document, click “Step 6: Upload RFP” link.
‘Documents’ subtab is shown in the lower section. It contains all documents uploaded in the system
at various stages of the procurement.
38. Upload the RFP Document.
a. Click ‘Add’ link, which is within the subtab. A popup will be seen
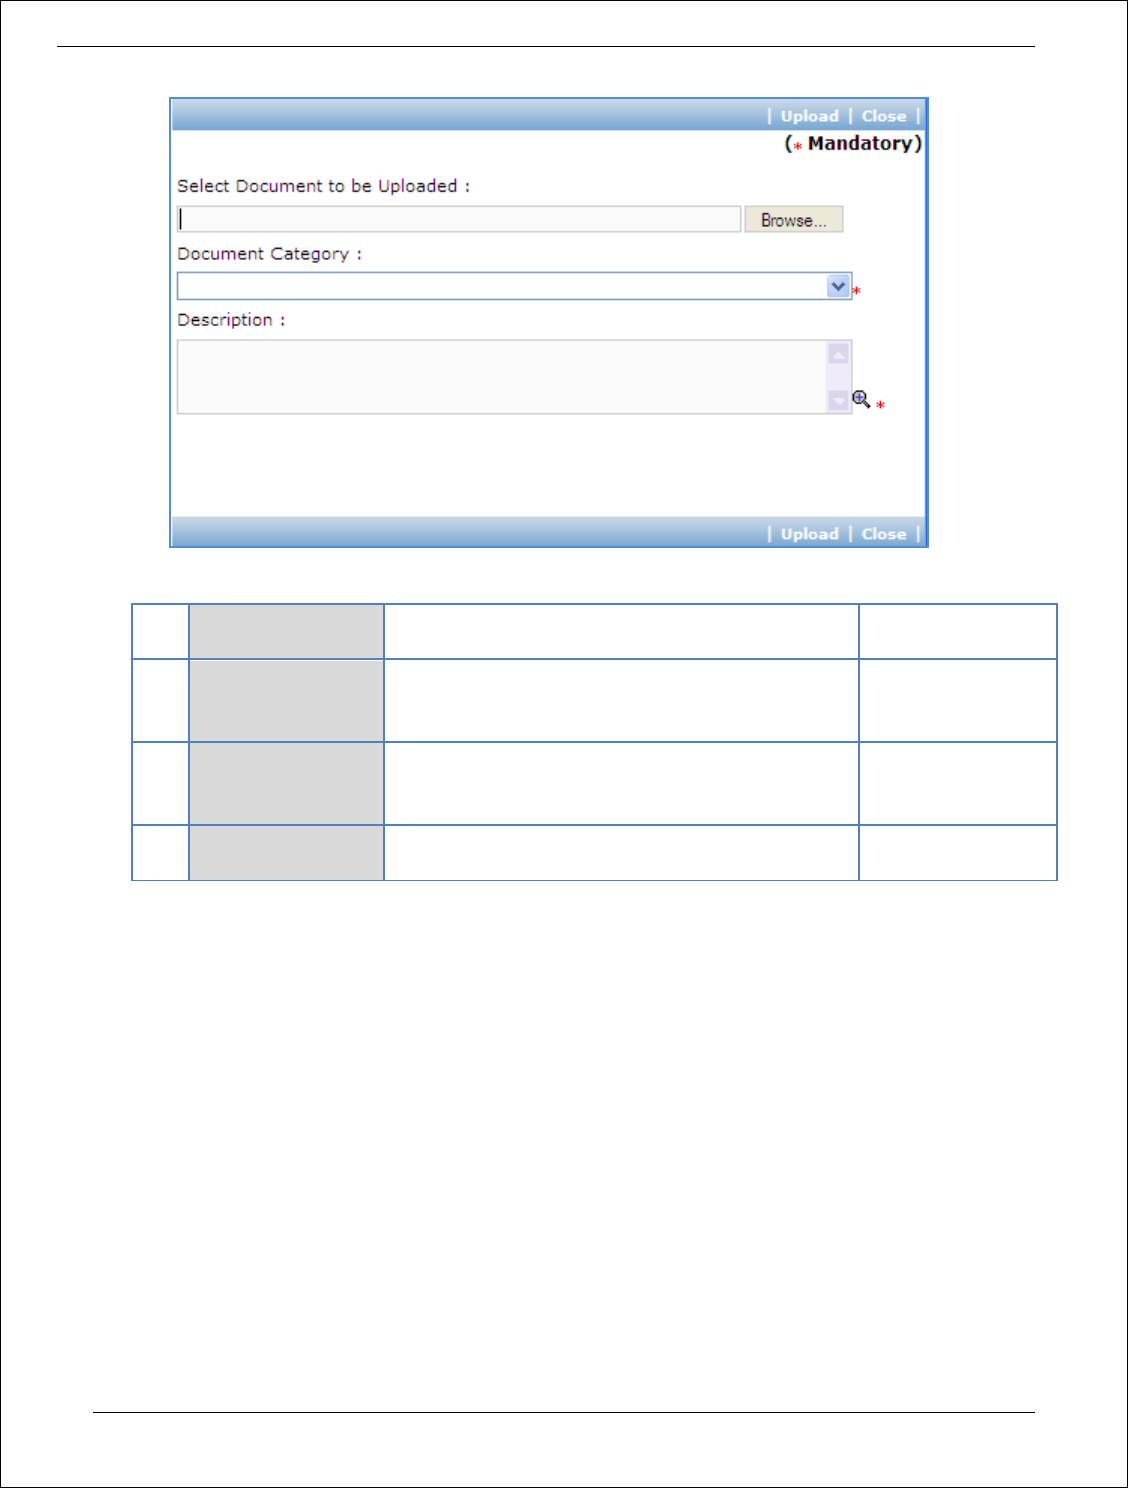
Procurement Management Support System – PMSS v1.0 User Guide
152
b. Fill the fields on the page. Details of the fields are mentioned below;
Sr.
No.
Field Name
Field Description
Sample Data
1
Document to be
uploaded
Browse the document that you want to upload.
2
Document
Category
Select the appropriate document category.
TOR
3
Description
Enter more information about the uploaded
document.
This is approved
TOR.
c. Click ‘Upload’ to upload the document in the system.
d. Uploaded document will appear on the list shown in ‘Documents’ section.
e. User can select and delete the document that has been uploaded in current stage of the
procurement. To delete a document, select ‘Delete’ checkbox against the document and click
‘Delete’ link.
39. On completion of ‘RFP Generation’ stage click on ‘Move to Next Stage’.
40. If Prior review is applicable to the procurement, it will be sent for prior review. Please refer section
‘Prior Review Scenarios’ for details.
41. After necessary approvals are obtained, the procurement will move to the next stage ‘Issue of RFP’.
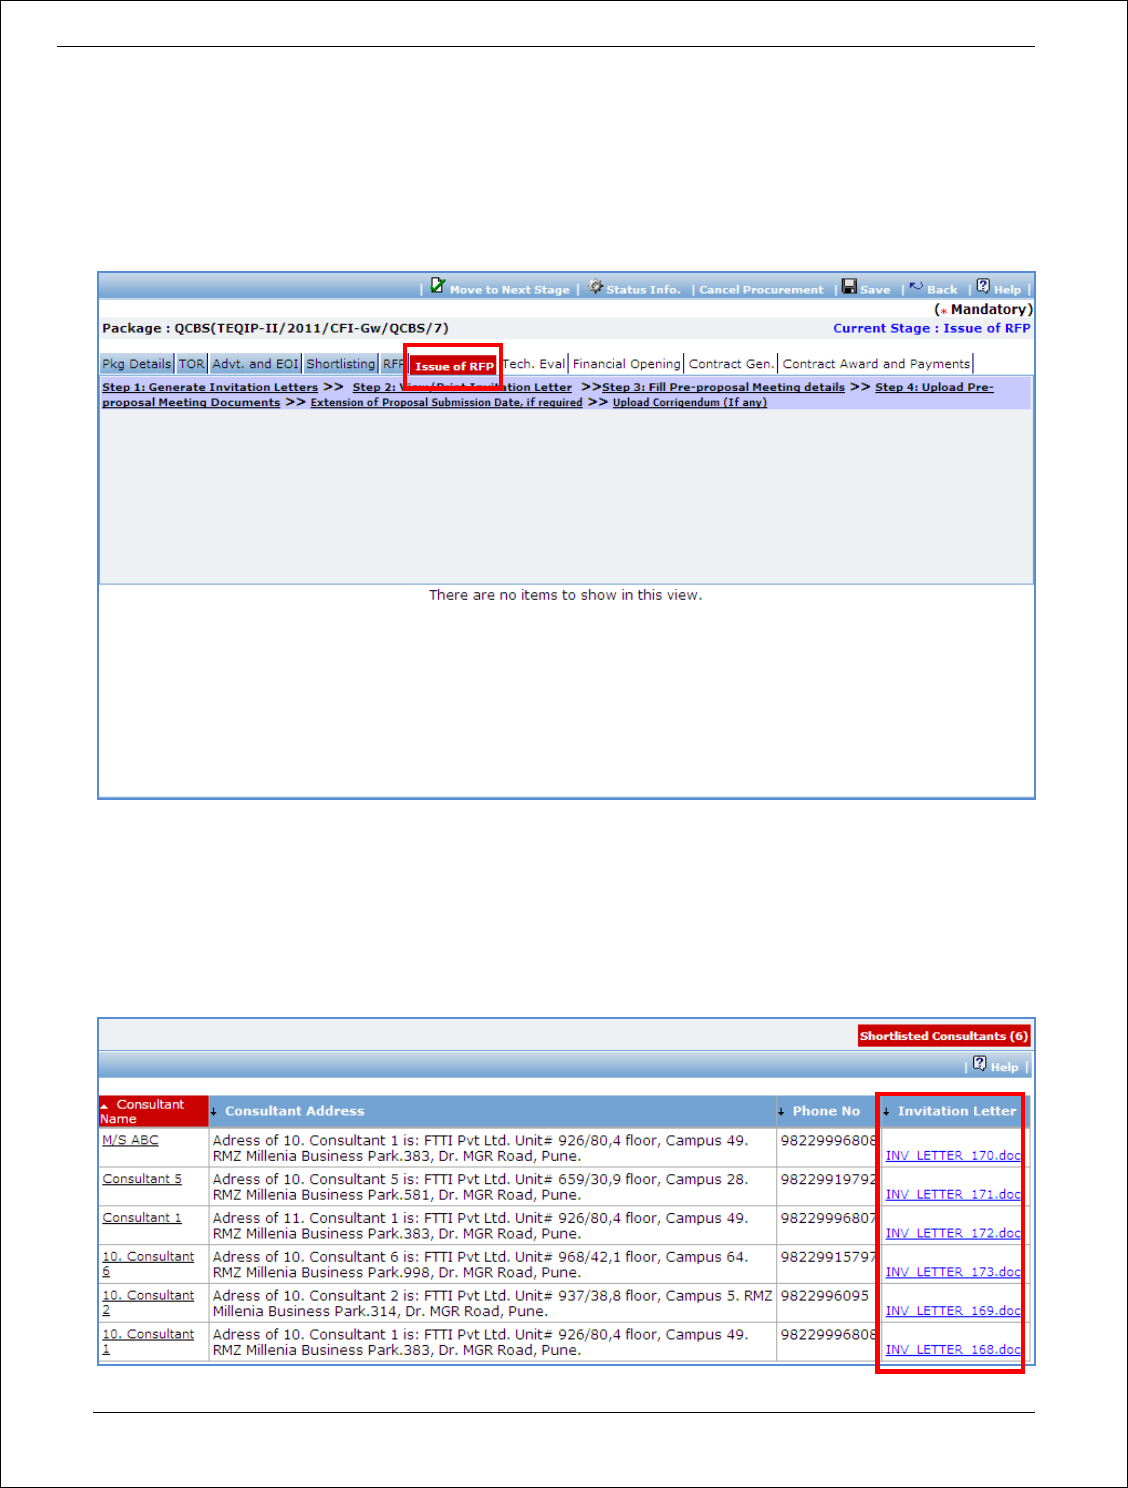
Procurement Management Support System – PMSS v1.0 User Guide
153
Issue of RFP
In this stage invitation letters are generated for shortlisted consultants and RFP document is issued to
them. Pre-proposal meeting details are also recorded in this stage.
‘Issue of RFP’ tab is selected by default.
42. Click ‘Step 1: Generate Invitation Letters’ link. Request will be sent for generating Invitation letters
for shortlisted consultants. The letters are generated by a separate service. Please revisit this page
after some time to view or print the letters.
43. Click ‘Step 2: View/Print Invitation Letters’ link. ‘Shortlisted Consultants’ subtab is shown in the
lower section. This subtab lists consultants which are been shortlisted.

Procurement Management Support System – PMSS v1.0 User Guide
154
44. Click on link in ‘Invitation Letter’ column to view the invitation letter for the consultant. Save the file
locally and make necessary changes to the sections highlighted in yellow.
45. Issue of RFP to the consultants is an offline process. Please follow the steps below to create RFP
document to be issued to a consultant ;
a. Open the invitation letter for the consultant and copy the contents.
b. Open the RFP document and locate section ‘Section 1. Letter of Invitation’ in the document.
c. Replace the copied invitation letter in place of ‘<Note: Replace the Invitation Letter here.>’
d. Save the RFP document with a new suitable name.
e. Repeat steps a to d for all shortlisted consultants.
46. After completing these steps, you can proceed to sending the RFP documents to the consultants
along with other essential documents.
47. Click “Step 3: Fill Pre-proposal Meeting Details” link.
48. Fill the fields on the page. Details of the fields are mentioned below;
Sr.
No.
Field Name
Field Description
Sample Data
1
Actual Pre
proposal Date
Enter date on which Pre-proposal meeting was
conducted
Enter date in DD/MM/YYYY format or select
date using calendar.
21/03/2011
2
Pre-proposal MOM
Enter Minutes of Pre-proposal Meeting.
Alternatively you can provide summary about
the meeting in this text box and upload a
separate Pre-proposal MOM document as part
of ‘Step 4 – Upload Pre-proposal Meeting
Documents’.
Please see details in
‘Pre-Proposal Meeting
Document’
3
Clarification Issued
to all Consultants
Select Yes or No or Not required.
Select Not required if there are no clarifications
that can be issued.
Select No if clarifications have not yet been
issued to the consultants.
Select Yes if clarifications are issued to all the
consultants.
Yes
4
Date of
Clarification Issued
Enter date on which clarifications are issued to
the consultants.
Enter date in DD/MM/YYYY format or select
date using calendar.
This date should not be less than Pre-proposal
Meeting date.
22/03/2011
5
Clarification Details
Enter details of clarification issued to the
consultants.
Revised copy of
Procurement Manual
has been circulated.
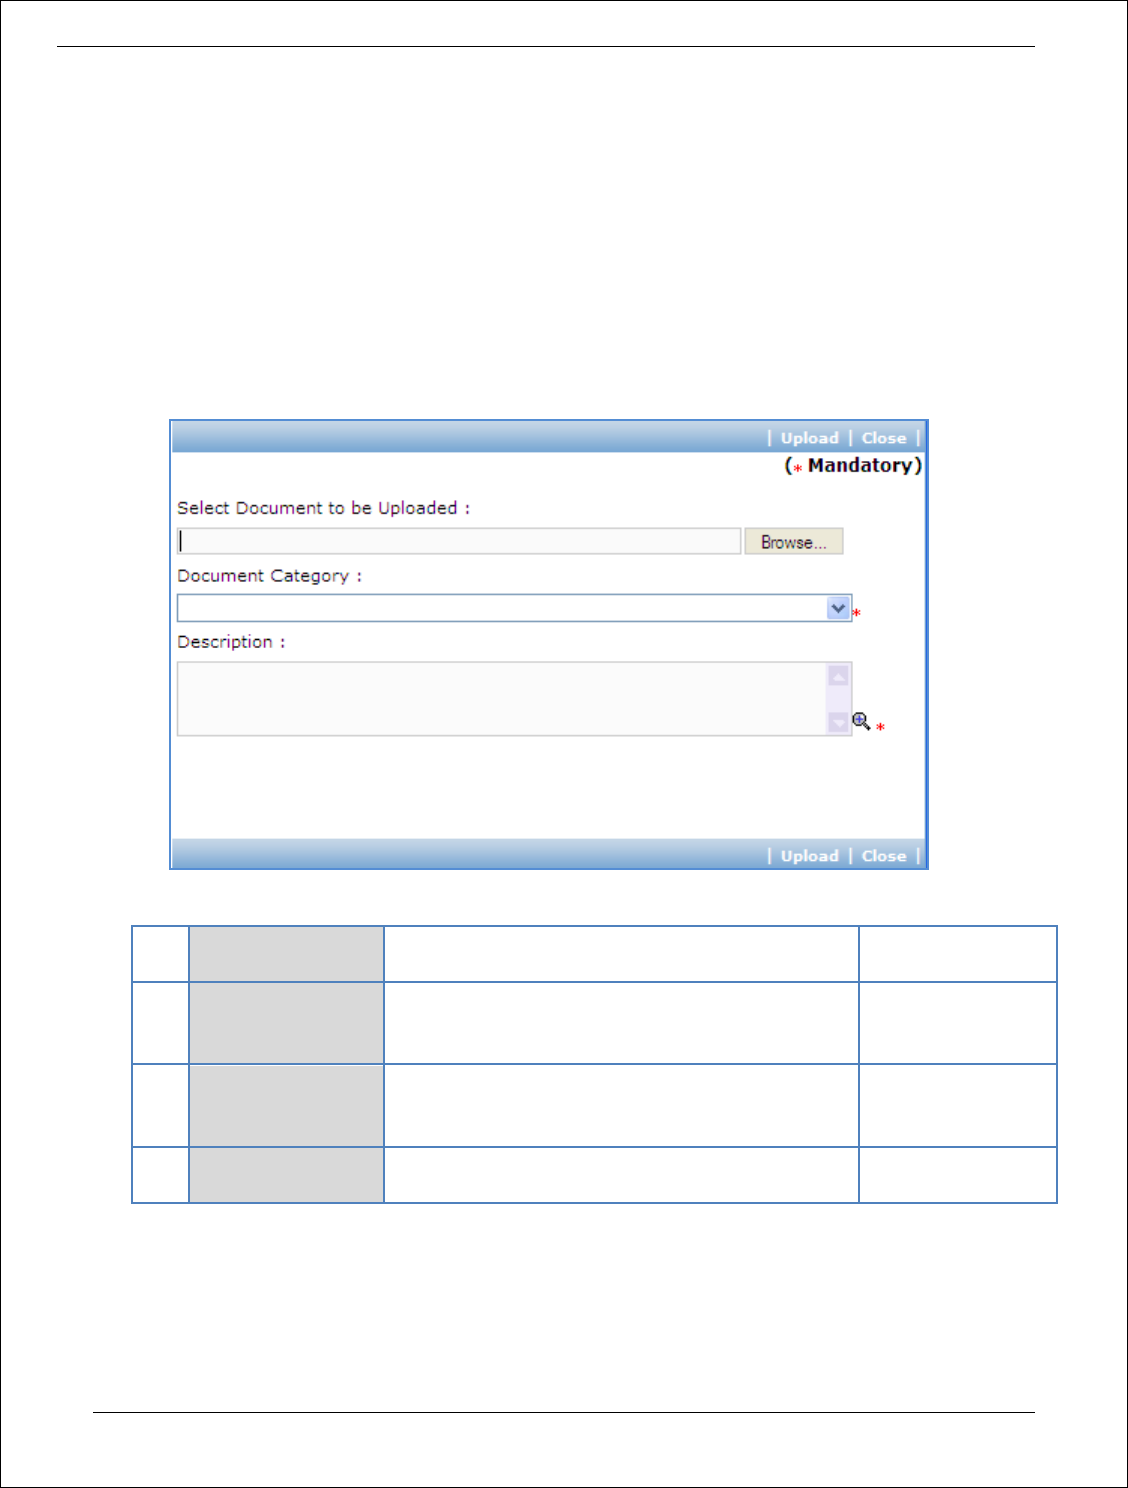
Procurement Management Support System – PMSS v1.0 User Guide
155
49. Click ‘Save’.
50. Click “Step 4: Upload Pre-proposal Meeting Documents” link. ‘Documents’ subtab is shown in the
lower section. It contains all documents uploaded in the system at various stages of the
procurement.
51. Upload Pre-proposal Meeting related documents. The documents can include Pre-proposal Meeting
Minutes, presentations exhibited during the meeting, clarifications etc.
a. Click ‘Add’ link, which is within the subtab. A popup will be seen
b. Fill the fields on the page. Details of the fields are mentioned below;
Sr.
No.
Field Name
Field Description
Sample Data
1
Document to be
uploaded
Browse the document that you want to upload.
2
Document
Category
Select the appropriate document category.
TOR
3
Description
Enter more information about the uploaded
document.
This is approved
TOR.
c. Click ‘Upload’ to upload the document in the system.
d. Uploaded document will appear on the list shown in ‘Documents’ section.
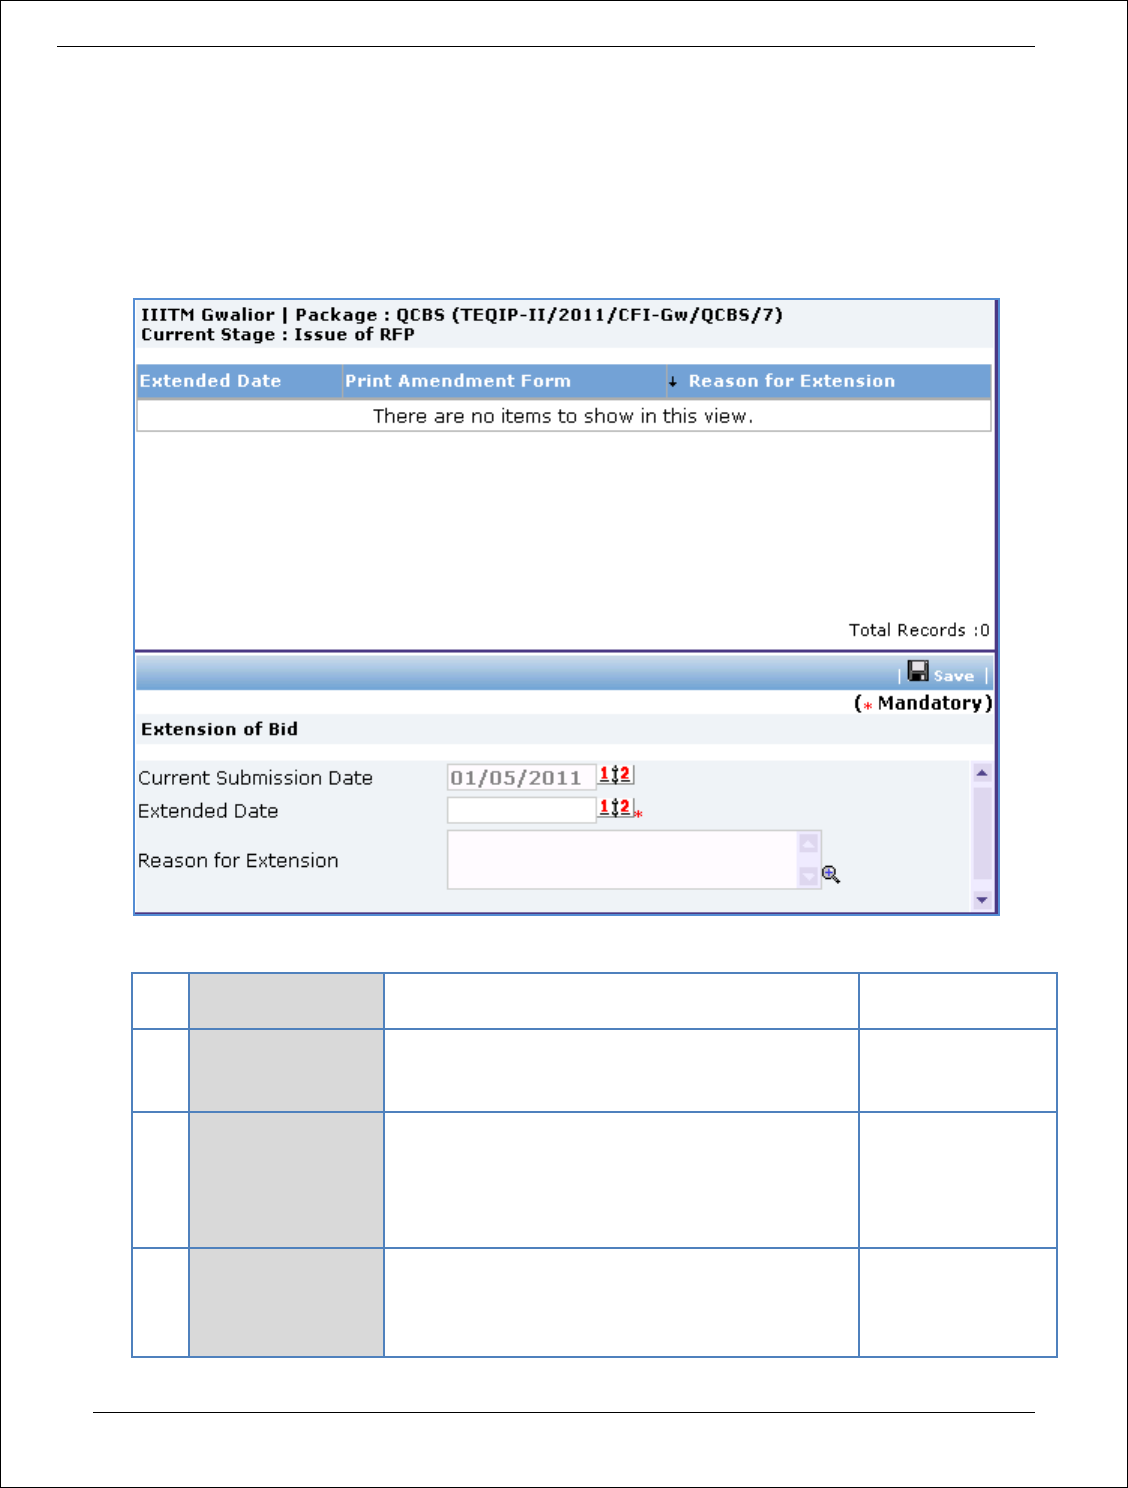
Procurement Management Support System – PMSS v1.0 User Guide
156
e. User can select and delete the document that has been uploaded in current stage of the
procurement. To delete a document, select ‘Delete’ checkbox against the document and click
‘Delete’ link.
52. If Extension of Proposal Submission Date is required, click link ‘Extension of Proposal Submission
Date, if required’. A popup will be seen;
a. Fill the fields on the page. Details of the fields are mentioned below;
Sr.
No.
Field Name
Field Description
Sample Data
1
Current
Submission Date
This will be displayed by the system and cannot be
edited.
01/05/2011
2
Extended Date
Enter new Proposal Submission Date.
Enter date in DD/MM/YYYY format or select date
using calendar.
This date should not be less than current
Submission Date.
10/05/2011
3
Reason for
Extension
Specify reason for extending the date.
Scope of
Procurement Plan
module has been
revised.
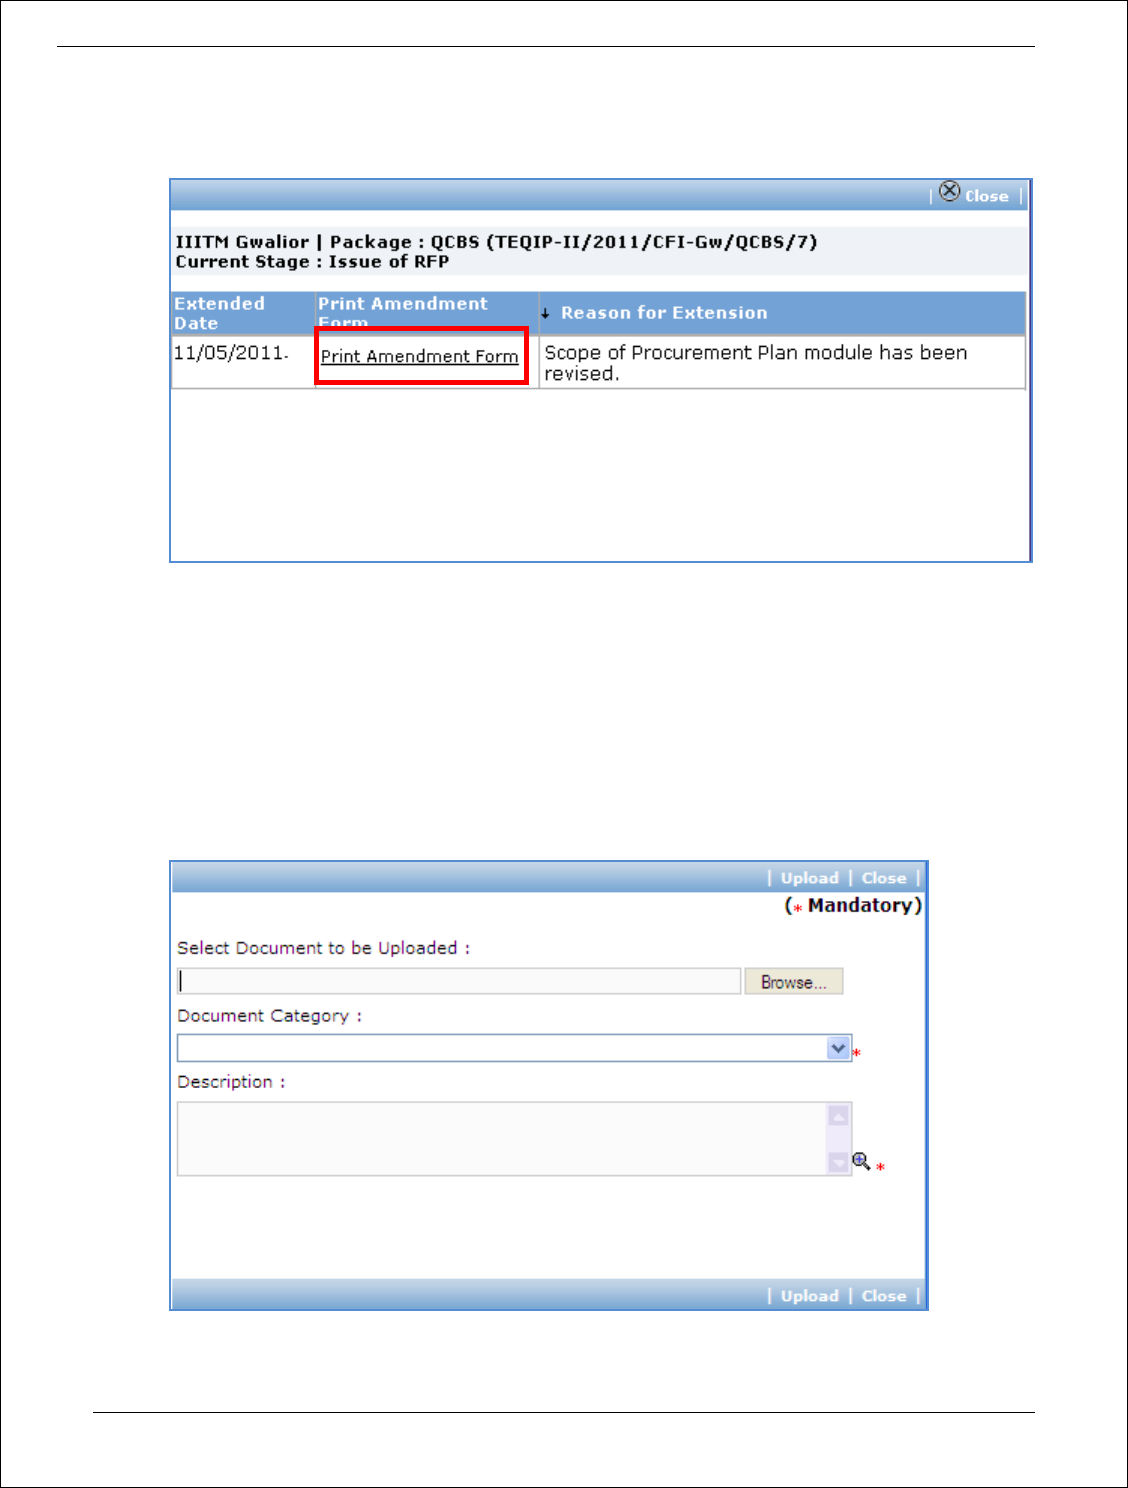
Procurement Management Support System – PMSS v1.0 User Guide
157
b. Click ‘Save’
c. A record for the extended date will be added to the list on the top of the page.
d. Click ‘Print Amendment Form’ link to generate the amendment letter. Save the file locally. The
letter should be sent to all shortlisted consultants.
53. If there is any corrigendum/addendum issued to the consultants, Click “Step 4: Upload
Corrigendum” link. ‘Documents’ subtab is shown in the lower section. It contains all documents
uploaded in the system at various stages of the procurement.
54. Upload the corrigendum/addendum document.
a. Click ‘Add’ link, which is within the subtab. A popup will be seen
b. Fill the fields on the page. Details of the fields are mentioned below;

Procurement Management Support System – PMSS v1.0 User Guide
158
Sr.
No.
Field Name
Field Description
Sample Data
1
Document to be
uploaded
Browse the document that you want to upload.
2
Document
Category
Select the appropriate document category.
TOR
3
Description
Enter more information about the uploaded
document.
This is approved
TOR.
c. Click ‘Upload’ to upload the document in the system.
d. Uploaded document will appear on the list shown in ‘Documents’ section.
e. User can select and delete the document that has been uploaded in current stage of the
procurement. To delete a document, select ‘Delete’ checkbox against the document and click
‘Delete’ link.
55. On completion of ‘Issue of RFP’ stage click on ‘Move to Next Stage’. This will move the procurement
to ‘Technical Evaluation’ stage.
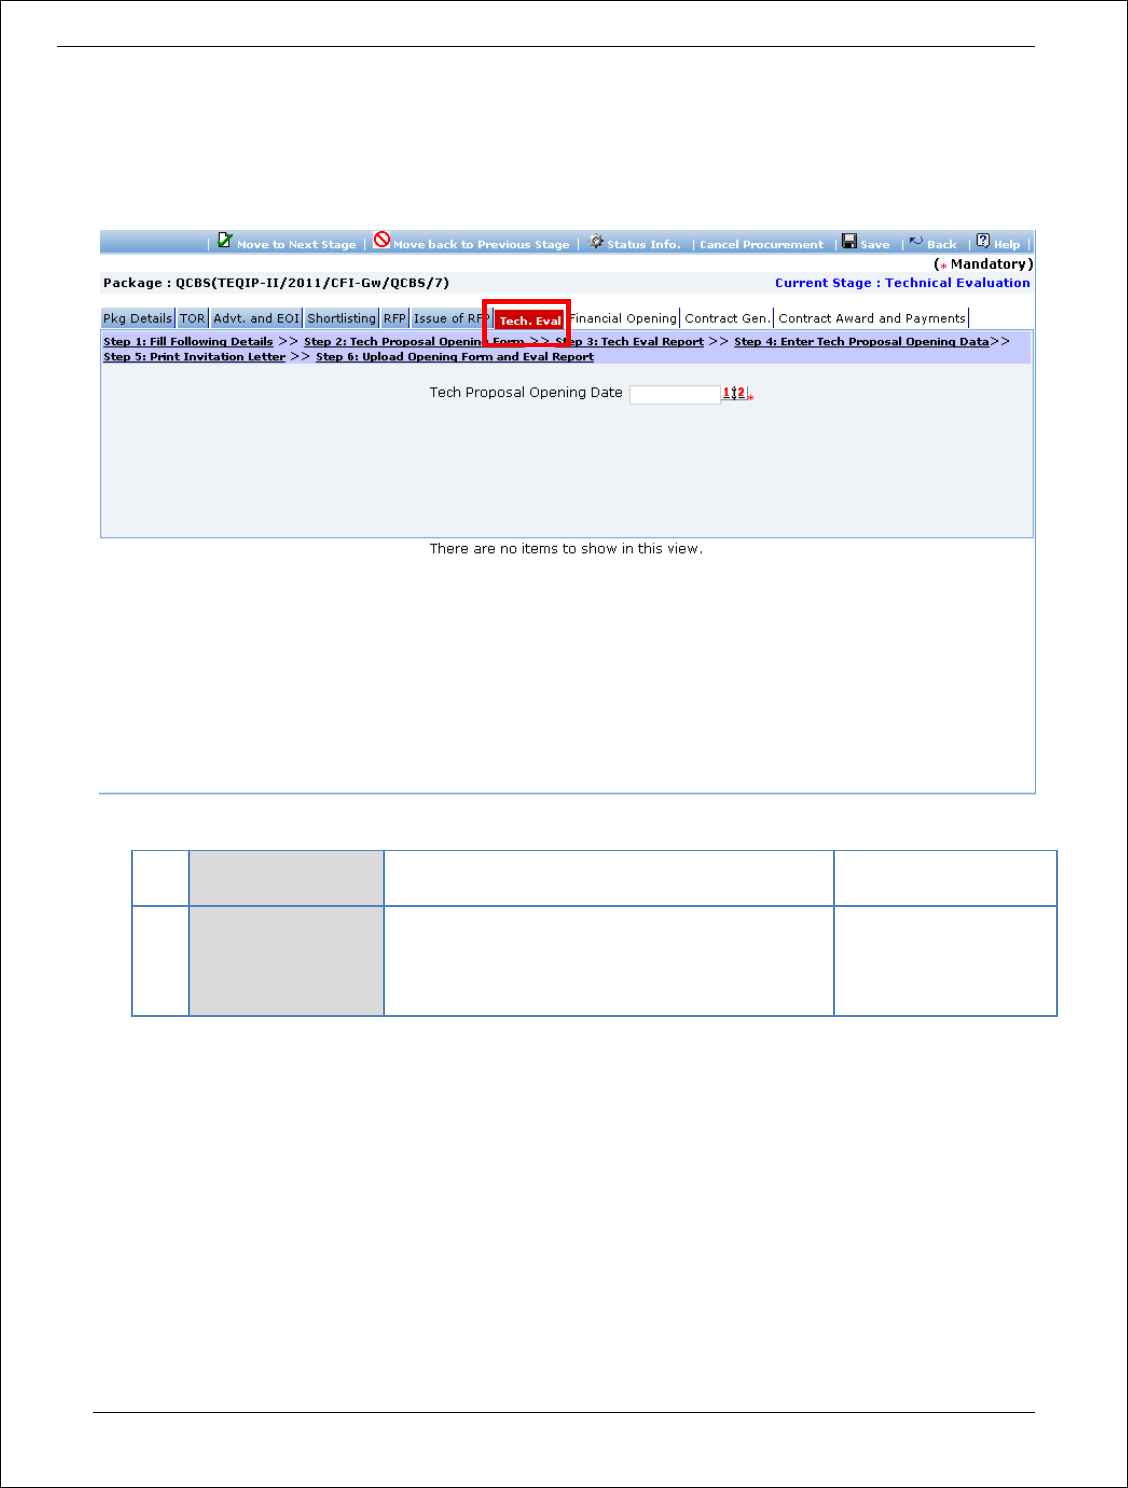
Procurement Management Support System – PMSS v1.0 User Guide
159
Technical Evaluation
In this stage Technical Proposal are evaluated and technical scores are calculated for the Proposals.
‘Technical Evaluation’ tab is selected by default.
56. As step 1, fill the fields on the page. Details of the fields are mentioned below;
Sr.
No.
Field Name
Field Description
Sample Data
1
Technical Proposal
Opening Date
Enter date on which technical proposals are
opened and evaluated.
Enter date in DD/MM/YYYY format or select
date using calendar.
13/05/2011
57. Click ‘Save’.
58. Click “Step 2: Tech Proposal Opening Form” link. This will open Technical Proposal opening form.
This form can be used during Technical Opening Meeting. Print of this form can be taken and
Technical Proposal opening details can be recorded on this form. The consultant names are seen on
this form against which Technical opening details can be mentioned.
59. Click “Step 3: Tech Eval Report” link. This will open Technical Evaluation Report in form of an excel
sheet. Save the document locally. This document can be used during Technical Proposal Evaluation.
Technical scores on different criterias can be recorded in this excel sheet.
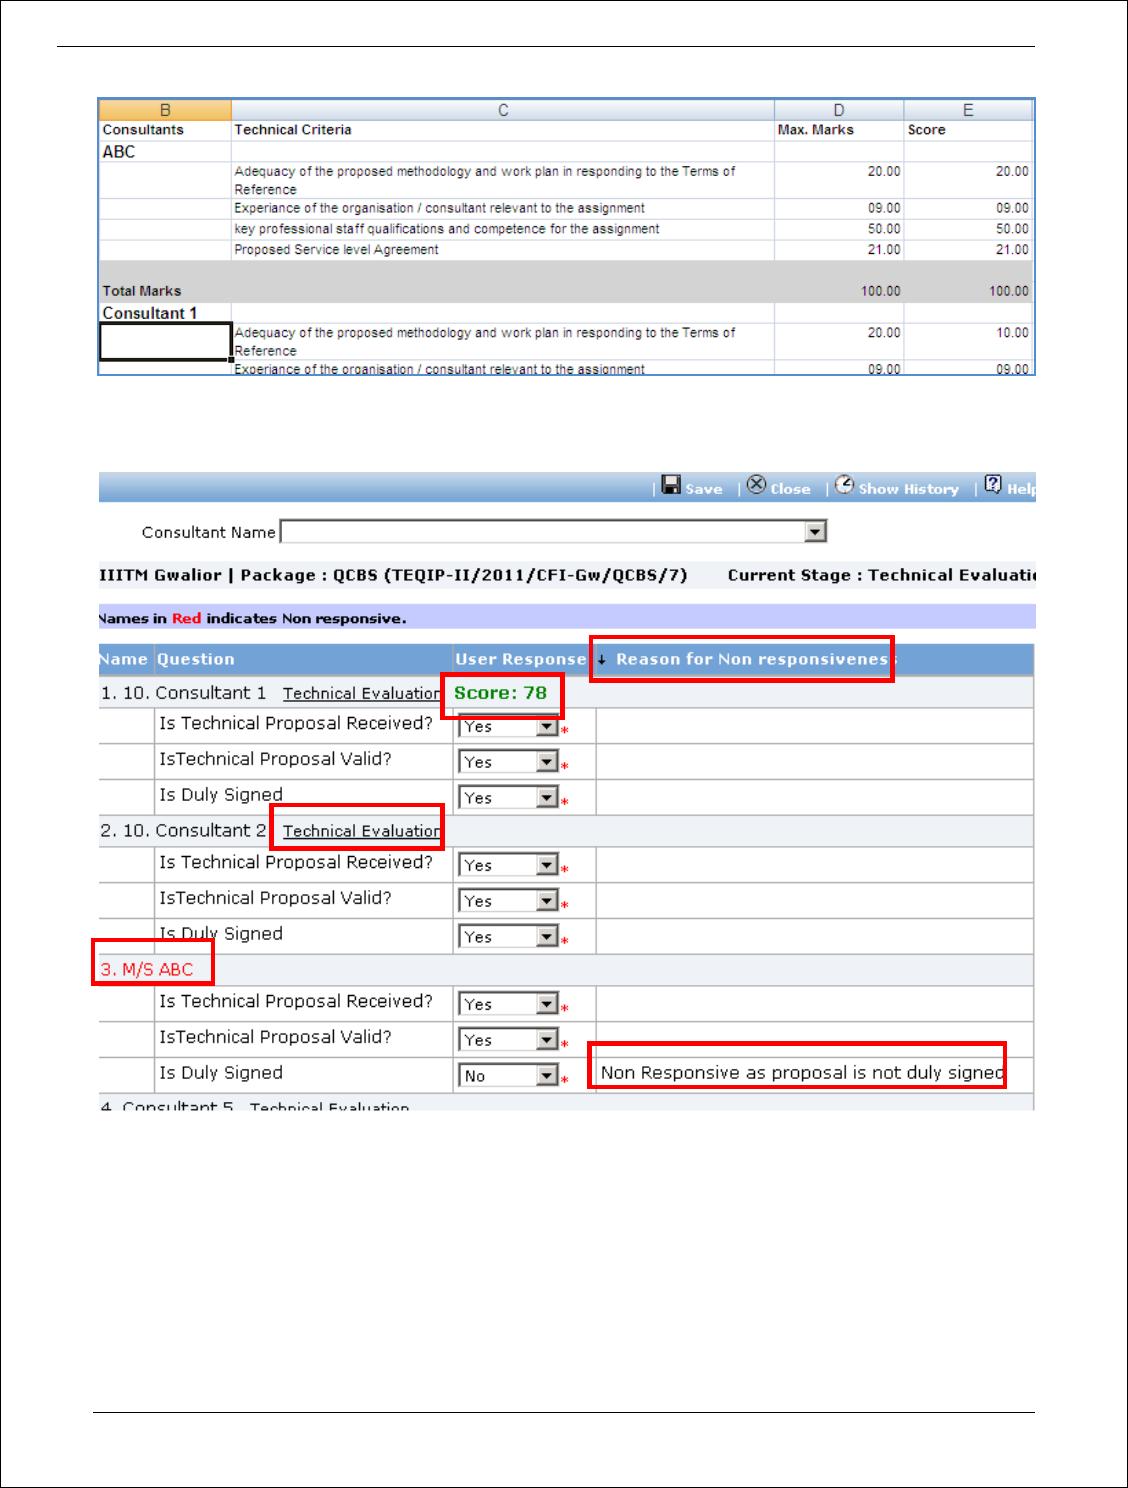
Procurement Management Support System – PMSS v1.0 User Guide
160
60. Click “Step 4: Enter Tech Proposal Opening Data” link. A popup will be seen;
61. Fill Technical Proposal Opening data on this page which was recorded as part of ‘Step 2: Tech
Proposal Opening Form’.
62. Click ‘Save’
63. System will identify non-responsive consultants based on entered data. Reason for non-
responsiveness will be shown in ‘Reason for Non-responsiveness’ column. Non-responsive
Consultants are marked in Red.
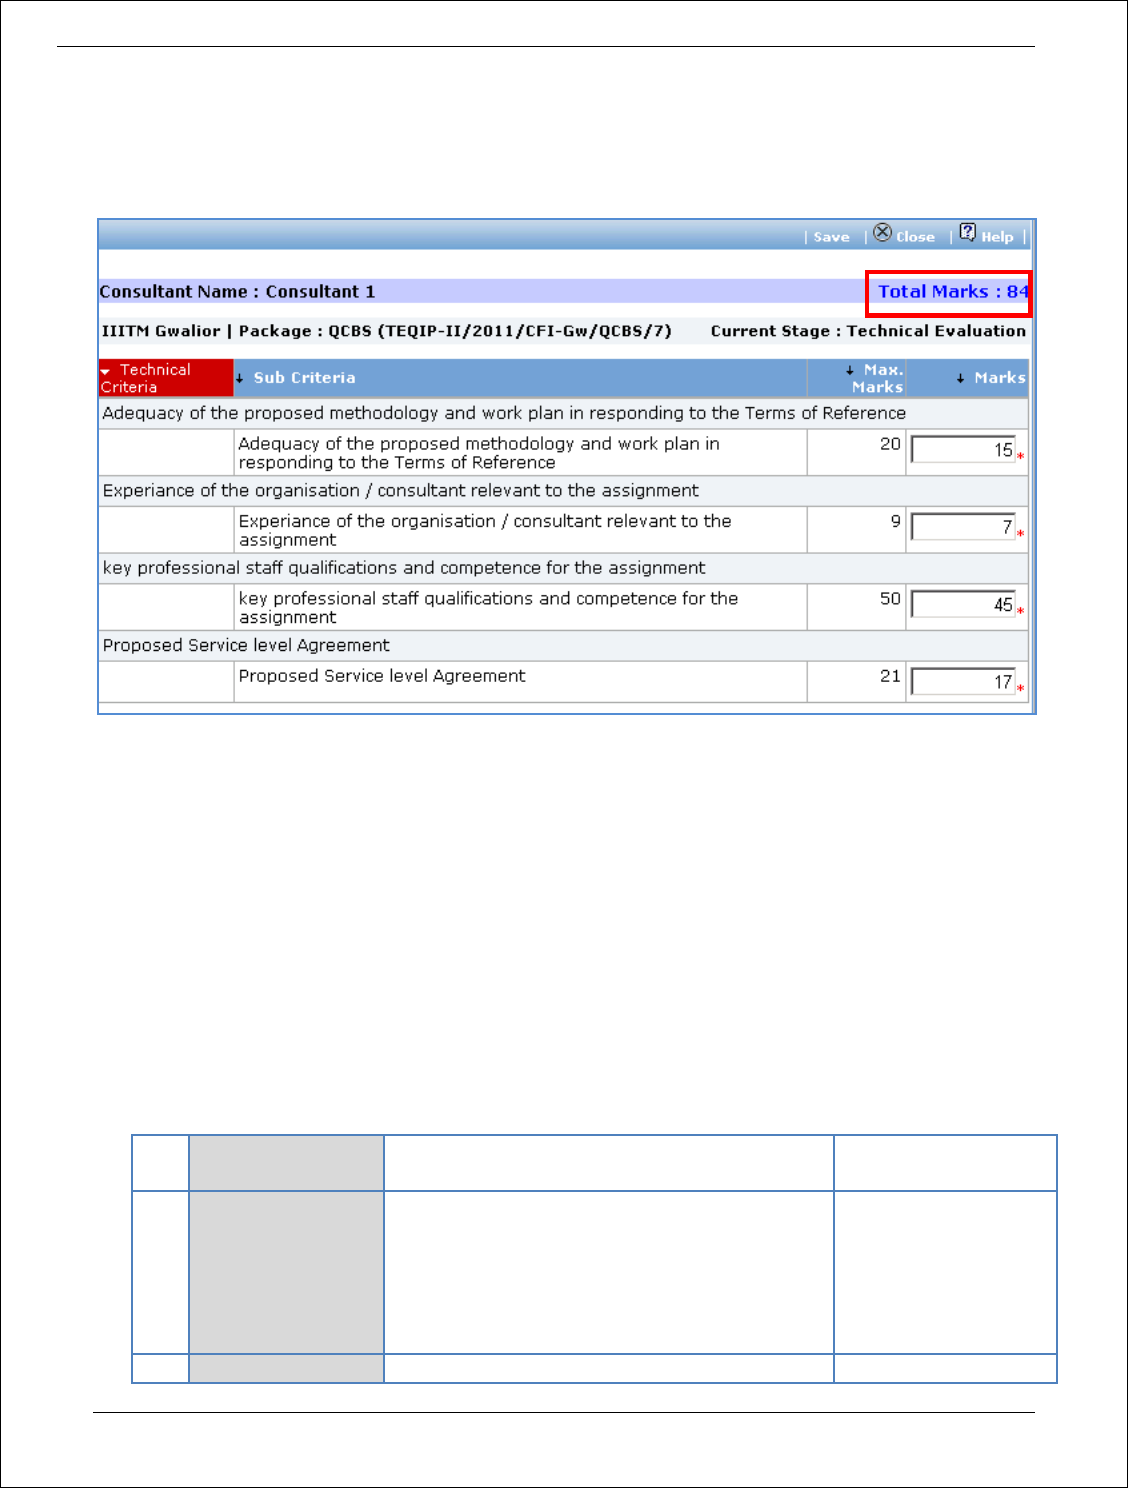
Procurement Management Support System – PMSS v1.0 User Guide
161
64. ‘Technical Evaluation’ link will be shown against Responsive Consultant names.
65. Fill Technical Score for all responsive consultants
a. Click ‘Technical Evaluation’ link against a consultant. A popup will be seen;
b. Fill score for each technical criteria/sub-criteria.
c. Click ‘Save’.
d. System will calculate and display total marks obtained by the consultant.
e. Click ‘Close’.
66. Score obtained by the consultant will be shown against the consultant name. System evaluates and
ranks the consultants based on their scores.
67. After recording technical evaluation details for all responsive consultants, Click ‘Close’ link to close
the popup.
68. Click ‘Step 5: Print Invitation Letter’ link. Fill the fields on the page. Details of the fields are
mentioned below;
Sr.
No.
Field Name
Field Description
Sample Data
1
Planned Financial
Proposal Opening
Date
Enter date on which financial proposals will be
opened.
Enter date in DD/MM/YYYY format or select
date using calendar.
This date should not be less than Technical
Proposal Opening Date.
13/05/2011
2
Planned Financial
Enter time at which financial proposals will be
11:00
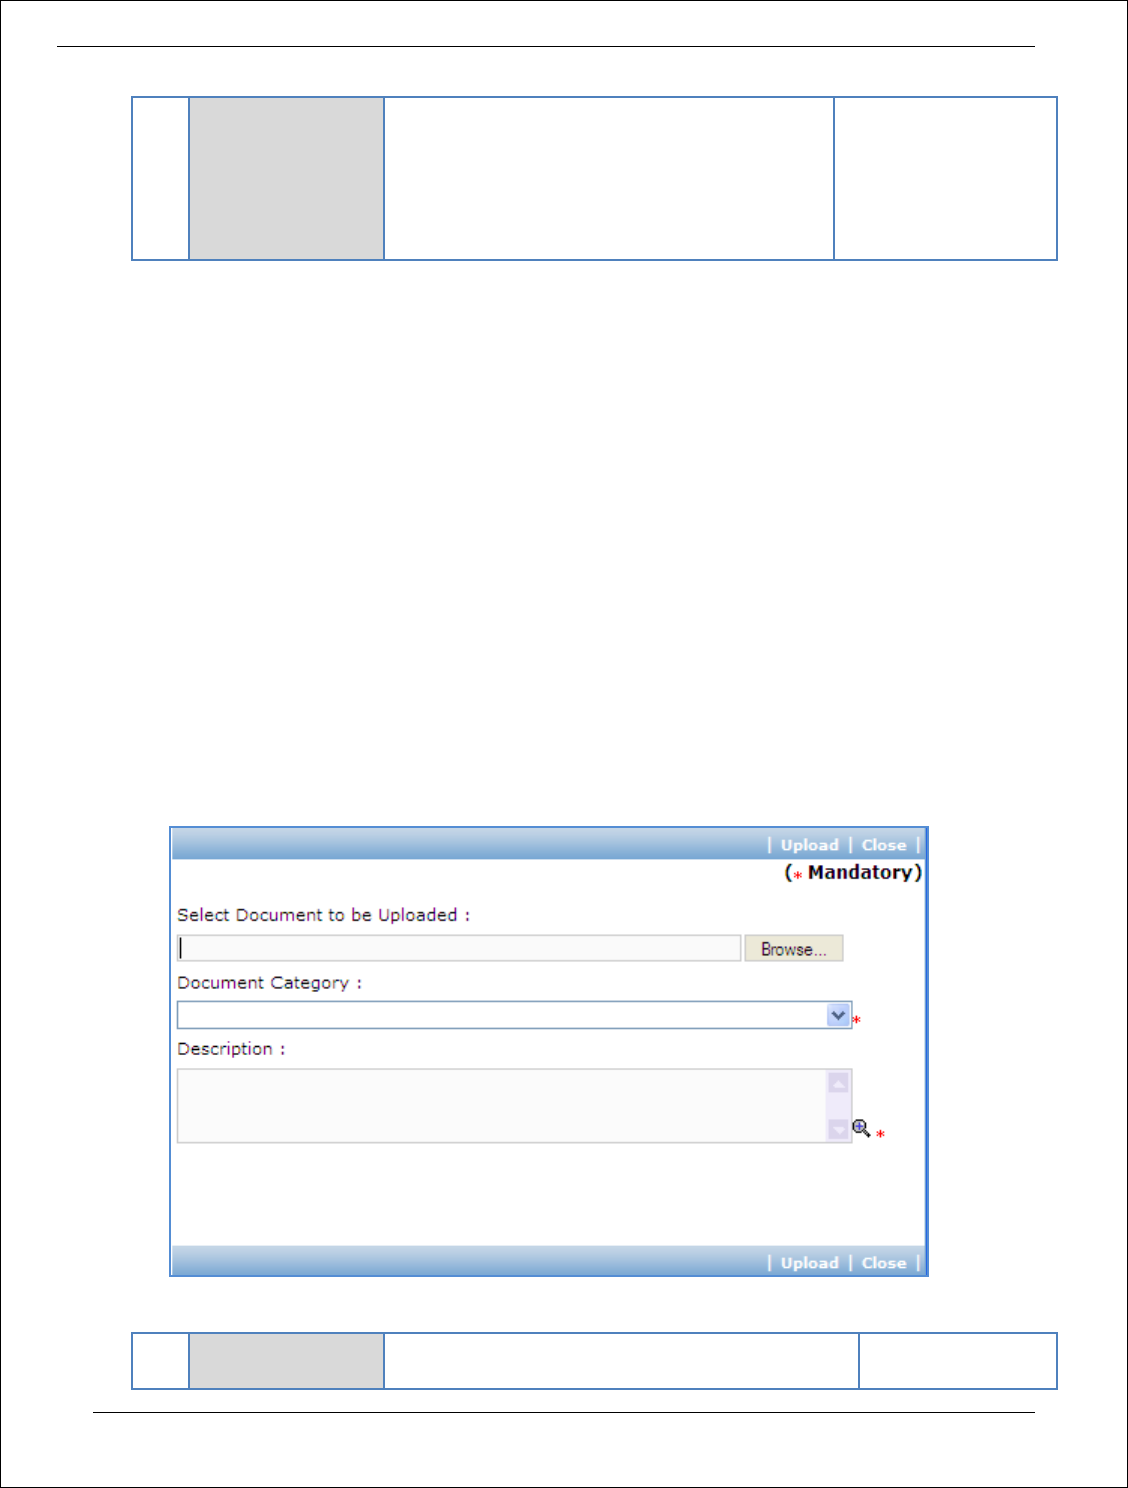
Procurement Management Support System – PMSS v1.0 User Guide
162
Proposal Opening
Time
opened.
Enter the time in HH:MM format.
Planned Financial Opening Date and Time will
appear in invitation letters for financial
proposal opening meeting sent to technically
responsive consultants.
69. Click ‘Save’
70. ‘Consultant Score’ subtab is shown in the lower section. This subtab lists technical responsive
consultants and their scores. Technical Responsive consultants are the consultants for whom
technical evaluation scores are entered in the system.
71. On ‘Consultant Score’ list, link ‘Invitation Letter for Financial Proposal Opening’ will be shown for
consultants who have obtained minimum qualifying technical score specified in RFP document.
72. Click ‘Invitation Letter for Financial Proposal Opening’ link against each consultant to generate the
invitation letter for the financial proposal opening meeting to the consultant. Save the letter locally
and send to the consultant.
73. Click “Step 5: Upload Opening Form and Eval Report” link. ‘Documents’ subtab is shown in the lower
section. It contains all documents uploaded in the system at various stages of the procurement.
74. Upload copy of duly signed Technical Proposal Opening Form.
a. Click ‘Add’ link, which is within the subtab. A popup will be seen
b. Fill the fields on the page. Details of the fields are mentioned below;
Sr.
No.
Field Name
Field Description
Sample Data

Procurement Management Support System – PMSS v1.0 User Guide
163
1
Document to be
uploaded
Browse the document that you want to upload.
2
Document
Category
Select the appropriate document category.
TOR
3
Description
Enter more information about the uploaded
document.
This is approved
TOR.
c. Click ‘Upload’ to upload the document in the system.
d. Uploaded document will appear on the list shown in ‘Documents’ section.
e. User can select and delete the document that has been uploaded in current stage of the
procurement. To delete a document, select ‘Delete’ checkbox against the document and click
‘Delete’ link.
75. Upload Technical Proposal Evaluation Report following above steps.
76. On completion of ‘Technical Evaluation’ stage click on ‘Move to Next Stage’.
77. If Prior review is applicable to the procurement, it will be sent for prior review. Please refer section
‘Prior Review Scenarios’ for details.
78. After necessary approvals are obtained, the procurement will move to the next stage ‘Combined
Evaluation’.
Combined Evaluation
In this stage combined evaluation of the technical and financial proposals submitted by the
consultants will be performed.
‘Financial Opening’ tab is selected by default.
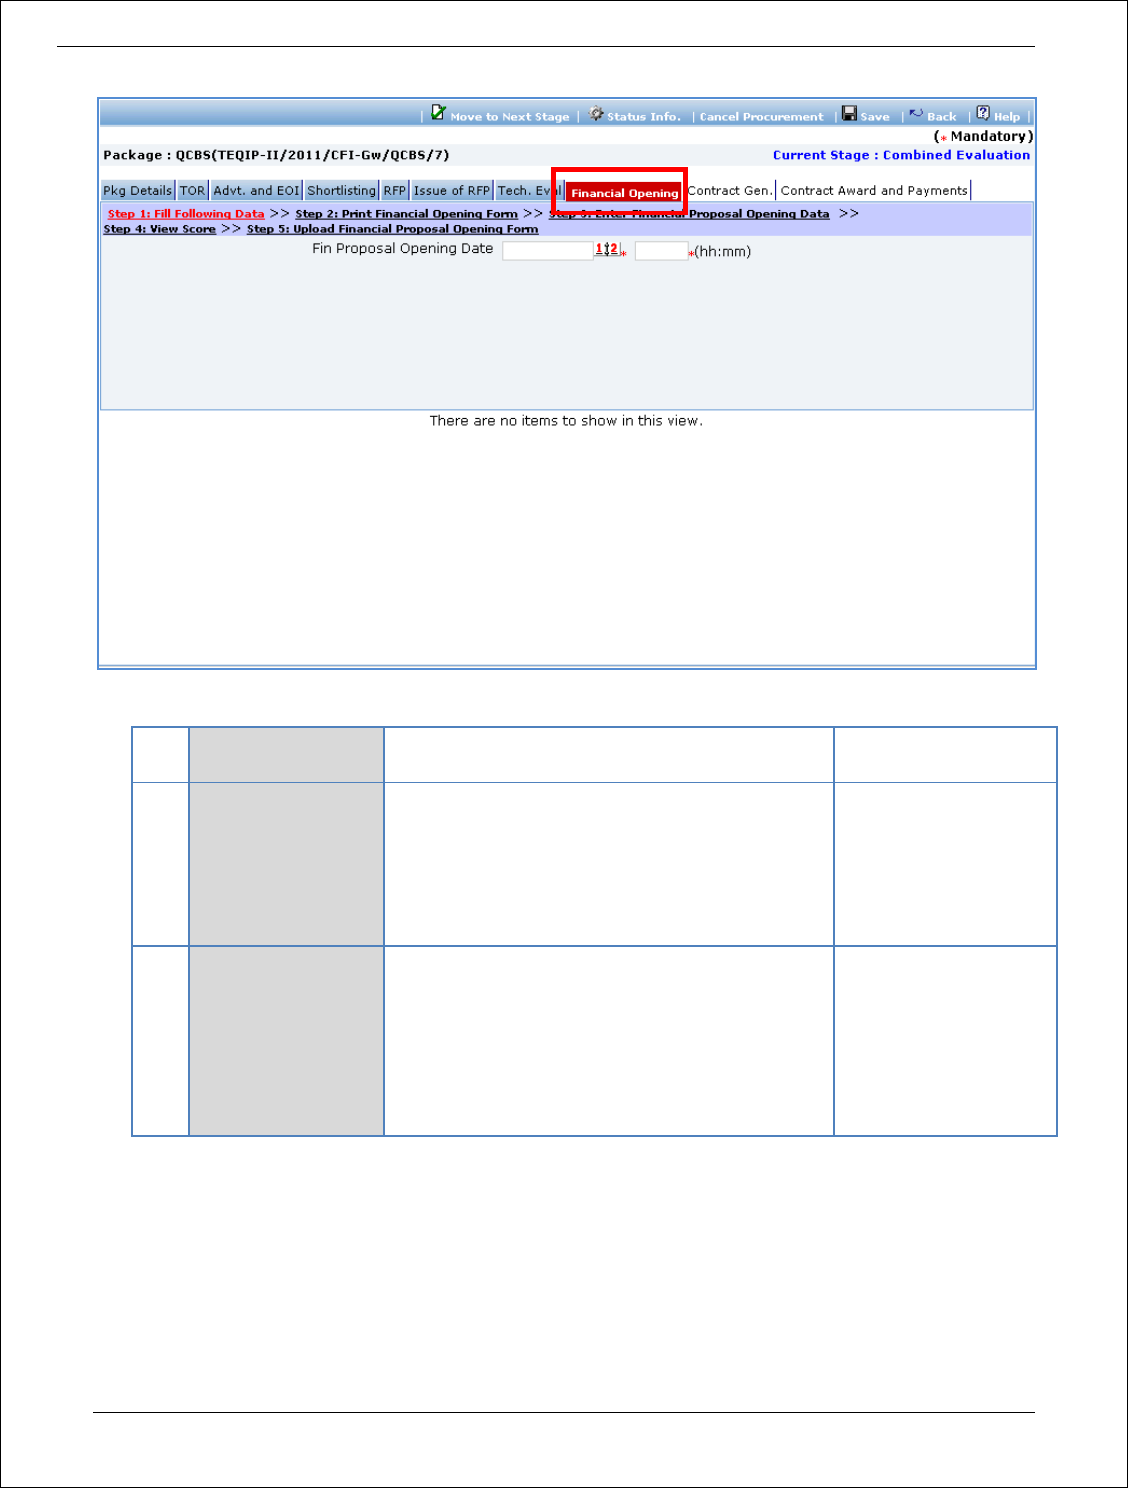
Procurement Management Support System – PMSS v1.0 User Guide
164
79. As step 1, fill the fields on the page. Details of the fields are mentioned below;
Sr.
No.
Field Name
Field Description
Sample Data
1
Financial Proposal
Opening Date
Enter date on which financial proposals are
opened.
Enter date in DD/MM/YYYY format or select
date using calendar.
This date should not be less than Technical
Proposal Opening Date.
16/05/2011
2
Financial Proposal
Opening Time
Enter time at which financial proposals are
opened.
Enter the time in HH:MM format.
Planned Financial Opening Date and Time will
appear in invitation letters for financial
proposal opening meeting sent to technically
responsive consultants.
11:00
80. Click ‘Save’.
81. Click “Step 2: Print Financial Opening Form” link. This will open Financial Proposal Opening Form.
This form can be used during Financial Opening Meeting. Print of this form can be taken and
Financial Proposal opening details can be recorded on this form. The consultant names are seen on
this form against which financial opening details can be mentioned.
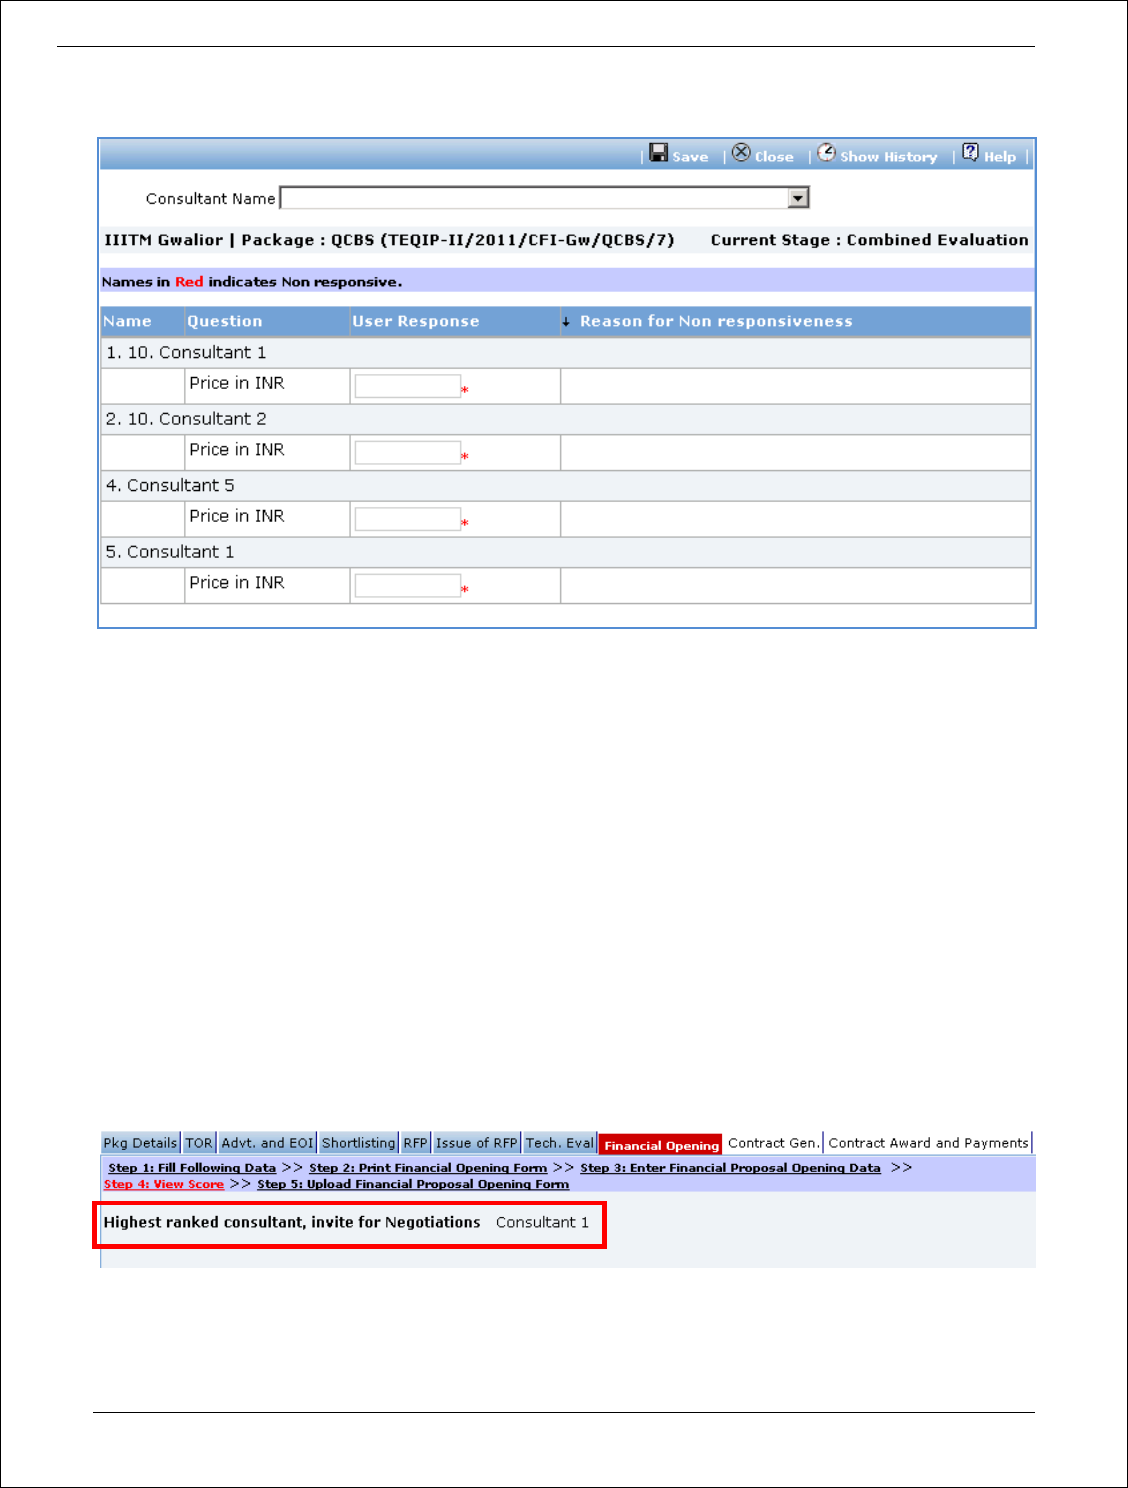
Procurement Management Support System – PMSS v1.0 User Guide
165
82. Click “Step 3: Enter Financial Proposal Opening Data” link. A popup will be seen;
83. Fill Price in INR for all technically responsive consultants.
84. Click ‘Save’.
85. System will calculate total score and rank for all consultants
a. System will calculate financial scores based on lowest price in INR.
b. Lowest Priced proposal will be given financial score as 100. Financial scores for other consultants
will be calculated using formula
Sf = 100 x Fm / F (Sf is the financial score, Fm is the lowest price and F the price of the
proposal)
c. Total Score will be calculated as technical score + financial score.
d. Consultants will be ranked. Consultants with highest total score will be ranked as 1.
86. System will automatically select and display consultant with highest total score for inviting for
negotiations.
87. Click “Step 4: View Score” link. ‘Consultant Score’ subtab is shown in the lower section.
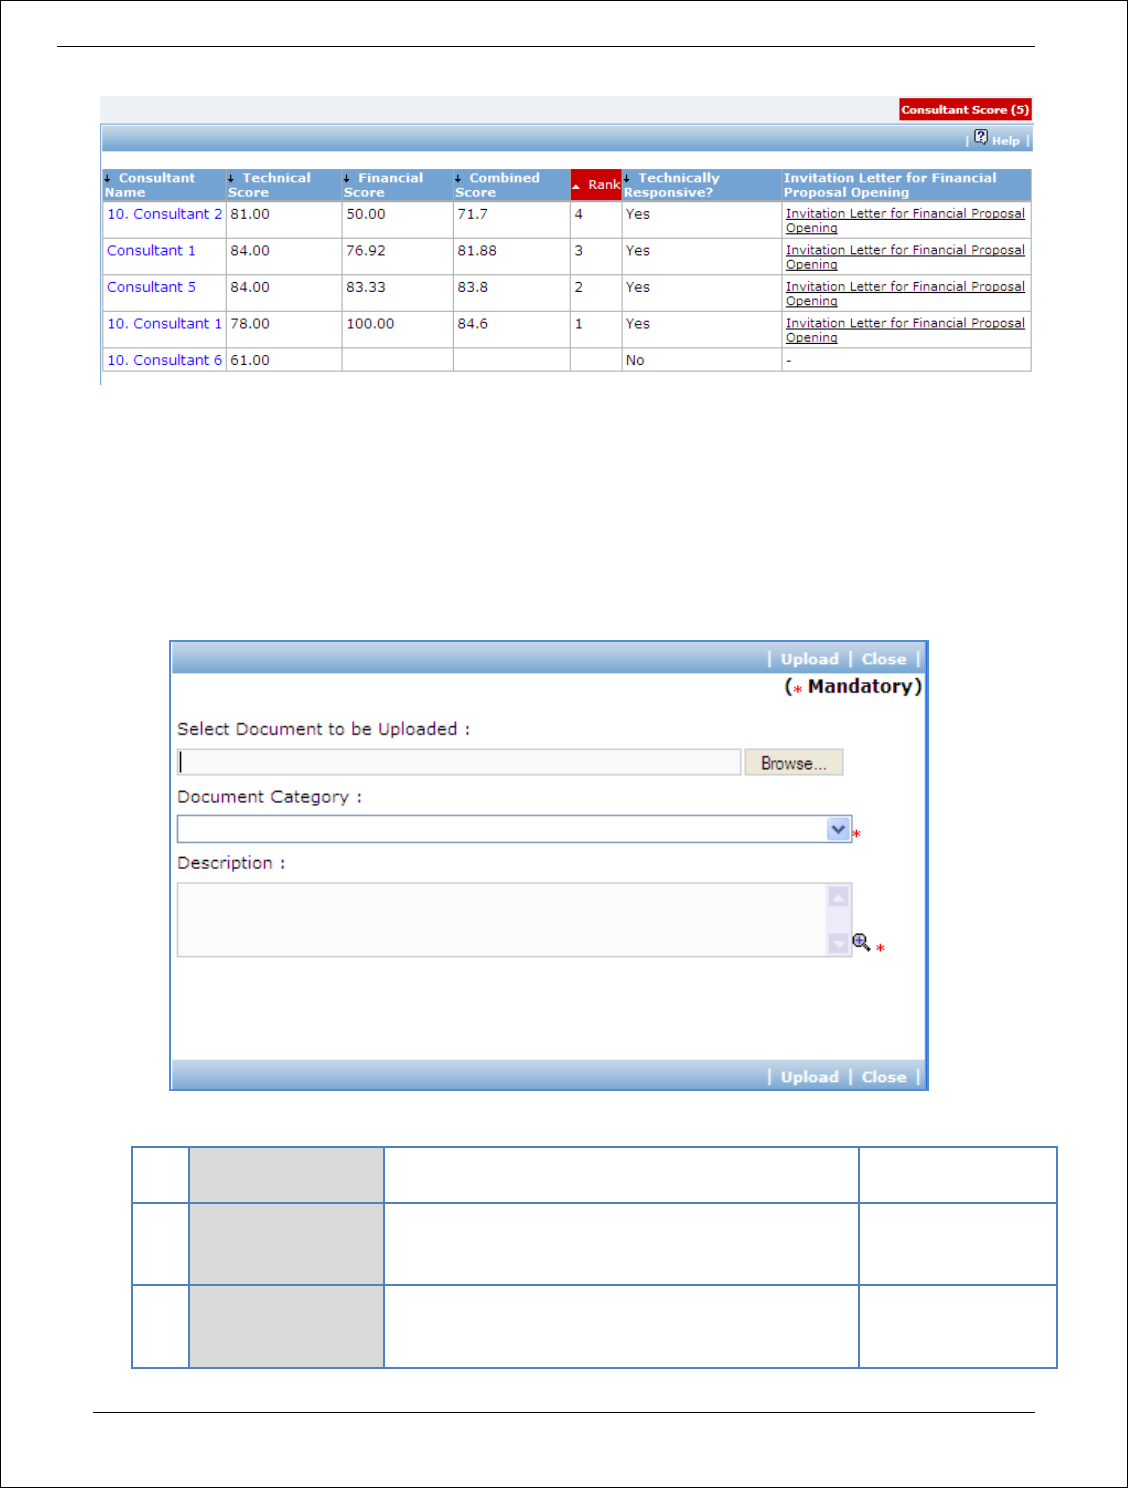
Procurement Management Support System – PMSS v1.0 User Guide
166
88. This subtab displays list of consultants, their technical and combined scores and overall rank.
89. Click “Step 5: Upload Financial Proposal Opening Form” link. ‘Documents’ subtab is shown in the
lower section. It contains all documents uploaded in the system at various stages of the
procurement.
90. Upload copy of duly signed Financial Proposal Opening Form.
a. Click ‘Add’ link, which is within the subtab. A popup will be seen
b. Fill the fields on the page. Details of the fields are mentioned below;
Sr.
No.
Field Name
Field Description
Sample Data
1
Document to be
uploaded
Browse the document that you want to upload.
2
Document
Category
Select the appropriate document category.
TOR
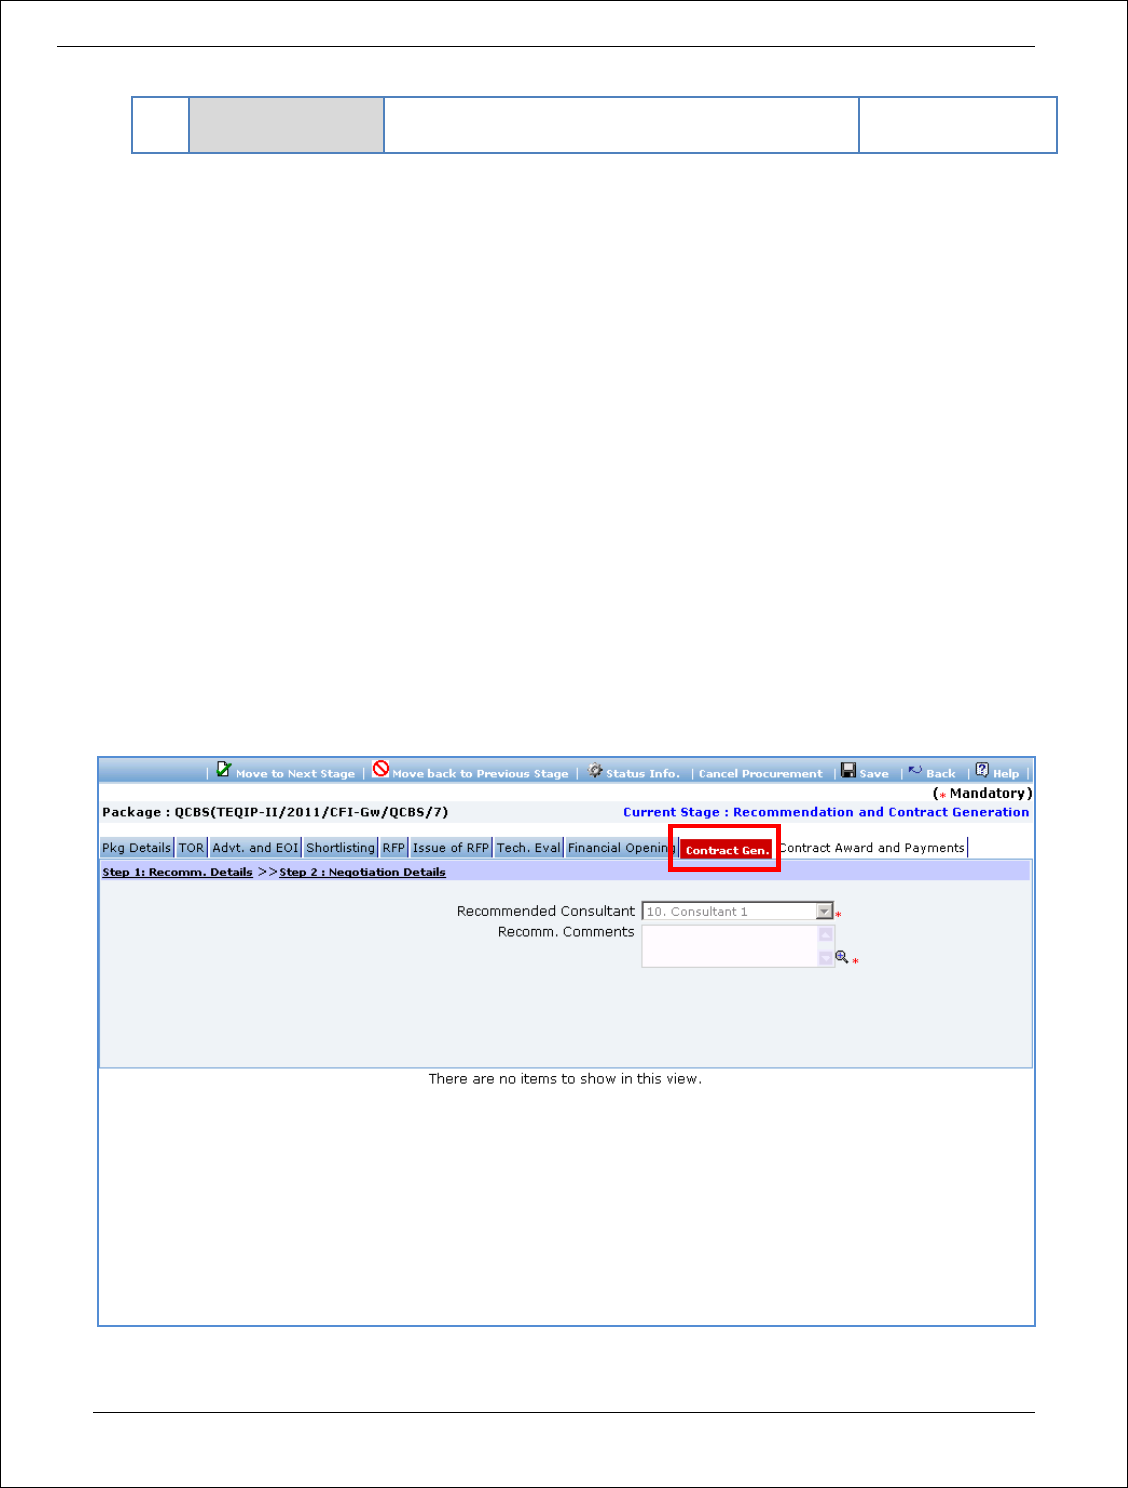
Procurement Management Support System – PMSS v1.0 User Guide
167
3
Description
Enter more information about the uploaded
document.
This is approved
TOR.
c. Click ‘Upload’ to upload the document in the system.
d. Uploaded document will appear on the list shown in ‘Documents’ section.
e. User can select and delete the document that has been uploaded in current stage of the
procurement. To delete a document, select ‘Delete’ checkbox against the document and click
‘Delete’ link.
91. On completion of ‘Combined Evaluation’ stage click on ‘Move to Next Stage’. This will move the
procurement to ‘Recommendation and Contract Generation’ stage.
Recommendation and Contract Generation
In this stage recommendation of award meeting details and negotiation meeting details are recorded
in the system. If negotiations are successful, contract will be generated.
‘Contract Gen.’ tab is selected by default.

Procurement Management Support System – PMSS v1.0 User Guide
168
92. As step 1 ‘Recomm. Details’ fill the fields on the page. Details of the fields are mentioned below;
Sr.
No.
Field Name
Field Description
Sample Data
1
Recommended
Consultant
System will display name of the selected
consultant. Highest scored consultants will be
displayed initially. In subsequent stage if
negotiations fail with the selected consultant,
next highest scoring consultant will be
displayed in this field.
Compulink Systems
Ltd.
2
Recomm.
Comments
Enter reason or comments recommending the
consultant.
Consultant has vast
experience in the
developing
procurement
softwares.
93. Click ‘Step 2: Negotiation Details’ link in order to enter details about negotiation meeting with the
selected consultant. Fill the fields on the page. Details of the fields are mentioned below;
Sr.
No.
Field Name
Field Description
Sample Data
1
Date of
Negotiation
Enter date on which negotiation meeting has
been conducted
Enter date in DD/MM/YYYY format or select
date using calendar.
This date should not be less than Financial
Proposal Opening Date.
20/05/2011
2
Negotiation
Comments
Enter details about negotiation meeting
3
Is Negotiation
Successful
Select Yes or No.
If negotiations have been successful with the
consultant, select ‘Yes’.
If negotiations have failed, select ‘No’.
Failed negotiation will be sent for approval to
World Bank.
Yes
94. Click ‘Save’.
95. Click ‘Negotiation History’ link to view history of negotiations for the procurement. A popup is seen;
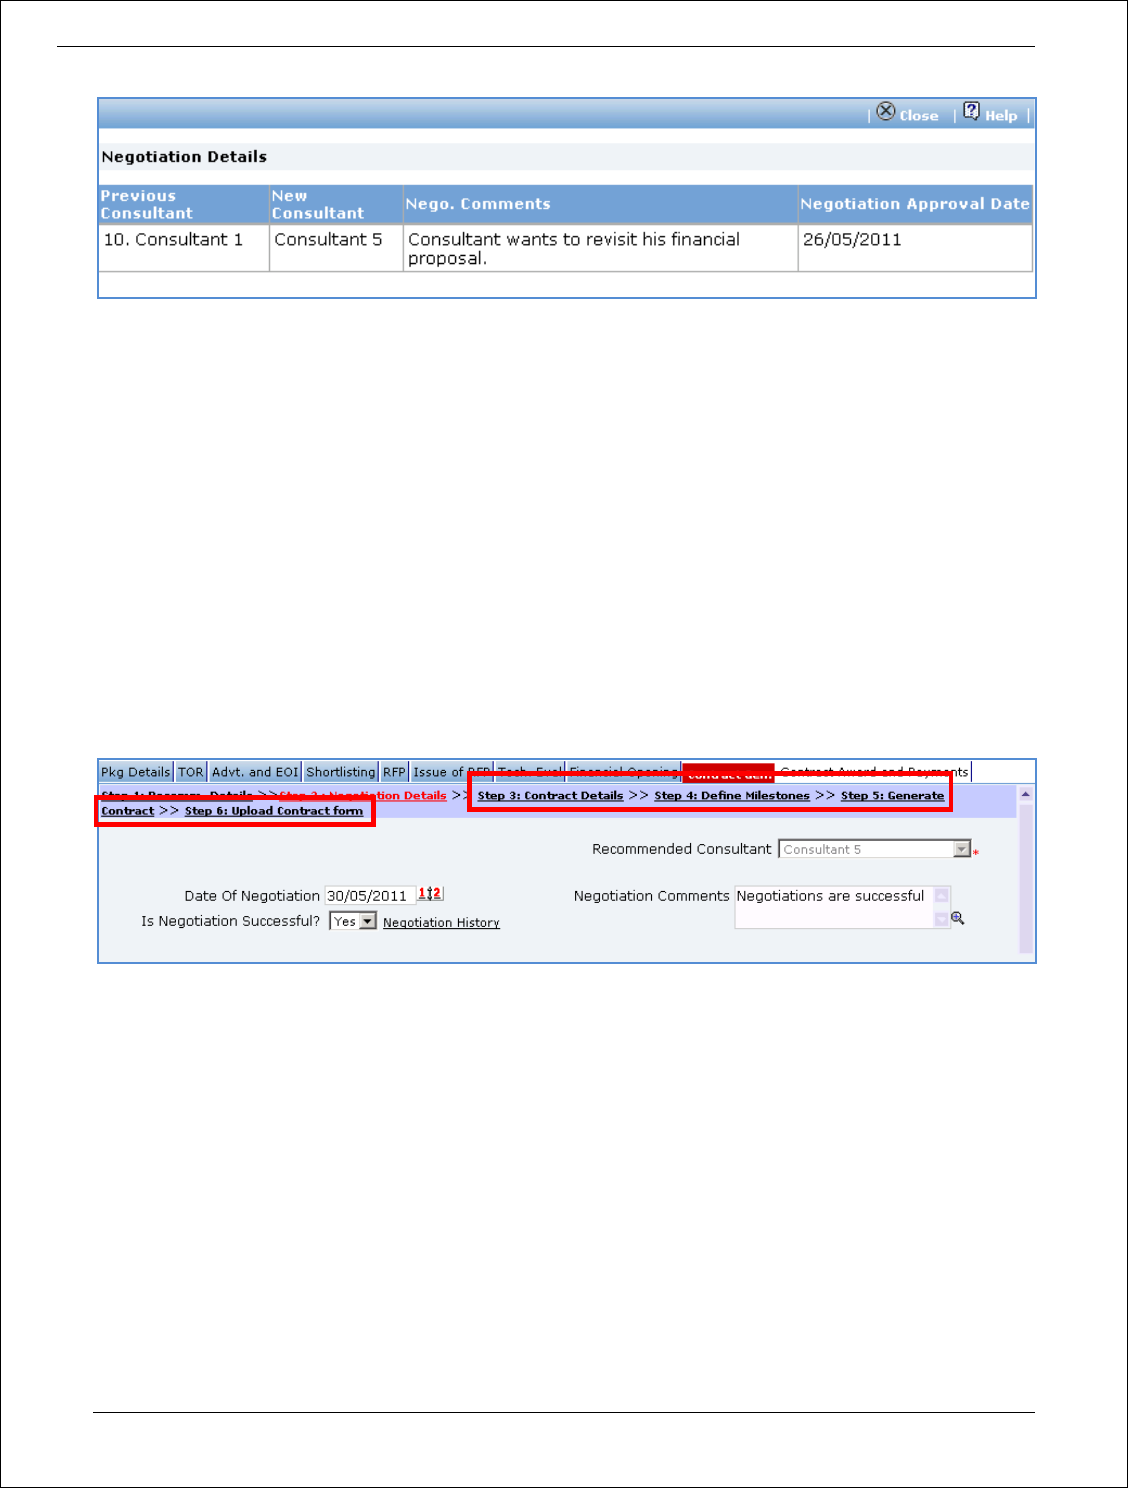
Procurement Management Support System – PMSS v1.0 User Guide
169
96. Click ‘Save’.
97. History of negotiations will be displayed on the popup in descending order. Recent negotiation will
be first in the list.
98. If negotiations have failed, the procurement will be sent for review ;
a. Click ‘Move to Next Stage’ link.
i) The procurement will be sent to NPIU to obtain NOC from World Bank.
b. After necessary approvals are obtained, negotiations with consultant with next highest score
can be performed. Repeat steps 93 to 98 for recording negotiations with the newly selected
consultant.
c. Repeat this process until negotiations are successful with the selected consultant.
99. On successful negotiations, next set of links will be displayed.
100. Click ‘Step 3: Contract Details’ link. A popup is shown;

Procurement Management Support System – PMSS v1.0 User Guide
170
101. Fill the fields on the page. Details of the fields are mentioned below;
Sr.
No.
Field Name
Field Description
Sample Data
Contract Details
1
Member in Charge
Enter name of the member at the consultant
who will be in charge of this project
Mr. Yash Mehra
2
Authorized
Representative of
Client
Enter name of authorized representative of the
client
Mr. Nikhil Pandit
3
Contract Start Date
Enter date on which Contract will be started
Enter date in DD/MM/YYYY format or select
date using calendar.
This date should not be less than Date of
Negotiations
05/06/2011
4
Date of
commencement of
services
Enter date on which Contract will be started
Enter date in DD/MM/YYYY format or select
date using calendar.
This date should not be less than Contract Start
Date
10/06/2011
5
Arbitrator
Proceedings to be
held at
Enter location at which arbitration will be held
New Delhi
6
Delivery Period (In
months)
Enter period in months within which the service
under this contract will be completed
20
7
Interest on
delayed payments
(%)
Enter percentage interest that will be charged
to the SPFU in case of delayed payments.
2
8
Basic Value
This field will be read-only and auto-populated
as value proposed by the consultant in his
financial proposal and entered in the system at
the time of Financial Proposal Opening stage.
1200

Procurement Management Support System – PMSS v1.0 User Guide
171
9
Applicable Tax
Enter tax applicable in Indian Rupees.
200
10
Contract Value
This field will be read-only and auto-calculated
as Basic Value + Applicable Tax.
1400
Award Generation Checklist
11
Is Advance
Payment Required
Select Yes or No.
No
12
Bank Guarantee
Submitted
Select Yes or No
No
13
Payment
Milestones
Defined
Select Yes or No
Yes
14
Arbitrator Agreed
Select Yes or No
Yes
102. Click ‘Save’.
103. Contract Value will be displayed on the page. System will auto-calculate payment amount for all
milestones of the procurement based on the Payment Amount % for the milestone.
104. Click “Step 4: Define Milestones” link. ‘Milestones’ subtab is shown in the lower section. The list of
milestones defined for the procurement will be displayed. You can modify or delete existing
milestones or add new milestones. Refer to stage “RFP Generation” for detailed steps.
105. Please ensure total of ‘Payment Amount %’ for all milestones is exactly 100.
106. Click ‘Step 5: Generate Contract’. The contract document will be generated. Save the file locally and
make necessary changes to the sections highlighted in yellow. Before generating the document,
system validates the required information and prompts for missing information.
107. After completing changes to the locally saved draft contract document, click “Step 6: Upload
Contract Form” link. ‘Documents’ subtab is shown in the lower section. It contains all documents
uploaded in the system at various stages of the procurement.
108. Upload the draft contract document.
a. Click ‘Add’ link, which is within the subtab. A popup will be seen

Procurement Management Support System – PMSS v1.0 User Guide
172
b. Fill the fields on the page. Details of the fields are mentioned below;
Sr.
No.
Field Name
Field Description
Sample Data
1
Document to be
uploaded
Browse the document that you want to upload.
2
Document
Category
Select the appropriate document category.
TOR
3
Description
Enter more information about the uploaded
document.
This is approved
TOR.
c. Click ‘Upload’ to upload the document in the system.
d. Uploaded document will appear on the list shown in ‘Documents’ section.
e. User can select and delete the document that has been uploaded in current stage of the
procurement. To delete a document, select ‘Delete’ checkbox against the document and click
‘Delete’ link.
109. You can also upload Minutes of negotiation meeting by following above steps.
110. On completion of ‘Recommendation and Contract Generation’ stage click on ‘Move to Next Stage’.
111. If Prior review is applicable to the procurement, it will be sent for prior review. Please refer section
‘Prior Review Scenarios’ for details.
112. After necessary approvals are obtained, the procurement will move to the next stage ‘Award of
Contract and Payments’.

Procurement Management Support System – PMSS v1.0 User Guide
173
Award of Contract and Payments
This is last stage of QCBS process. In this stage Contract sign date is entered and delivery dates are
calculated. Actual Payment information is entered into the system against each payment milestone.
‘Contract Award and Payments’ tab is selected by default.
113. As step 1 ‘Enter Contract Sign Date’ fill the fields on the page. Details of the fields are mentioned
below;
Sr.
No.
Field Name
Field Description
Sample Data
1
Contract Sign Date
Enter date on which Contract has been signed
by both parties.
Enter date in DD/MM/YYYY format or select
date using calendar.
This date should not be less than Contract
Generation Date
10/06/2011
114. Click ‘Save’.
115. Click ‘Step 2: Print Prior Review Checklist’. Prior Review Checklist will be generated in MS Word
format. Save the file locally. This checklist should be sent to the World Bank for review and obtaining
WBR number.
116. Click “Step 3: Upload Signed Copy of Contract” link. ‘Documents’ subtab is shown in the lower
section. It contains all documents uploaded in the system at various stages of the procurement.
117. Upload the contract document signed by both parties.
a. Click ‘Add’ link, which is within the subtab. A popup will be seen

Procurement Management Support System – PMSS v1.0 User Guide
174
b. Fill the fields on the page. Details of the fields are mentioned below;
Sr.
No.
Field Name
Field Description
Sample Data
1
Document to be
uploaded
Browse the document that you want to upload.
2
Document
Category
Select the appropriate document category.
TOR
3
Description
Enter more information about the uploaded
document.
This is approved
TOR.
c. Click ‘Upload’ to upload the document in the system.
d. Uploaded document will appear on the list shown in ‘Documents’ section.
e. User can select and delete the document that has been uploaded in current stage of the
procurement. To delete a document, select ‘Delete’ checkbox against the document and click
‘Delete’ link.
118. Click “Step 4: Track Milestones” link. ‘Milestones’ subtab is shown in the lower section.
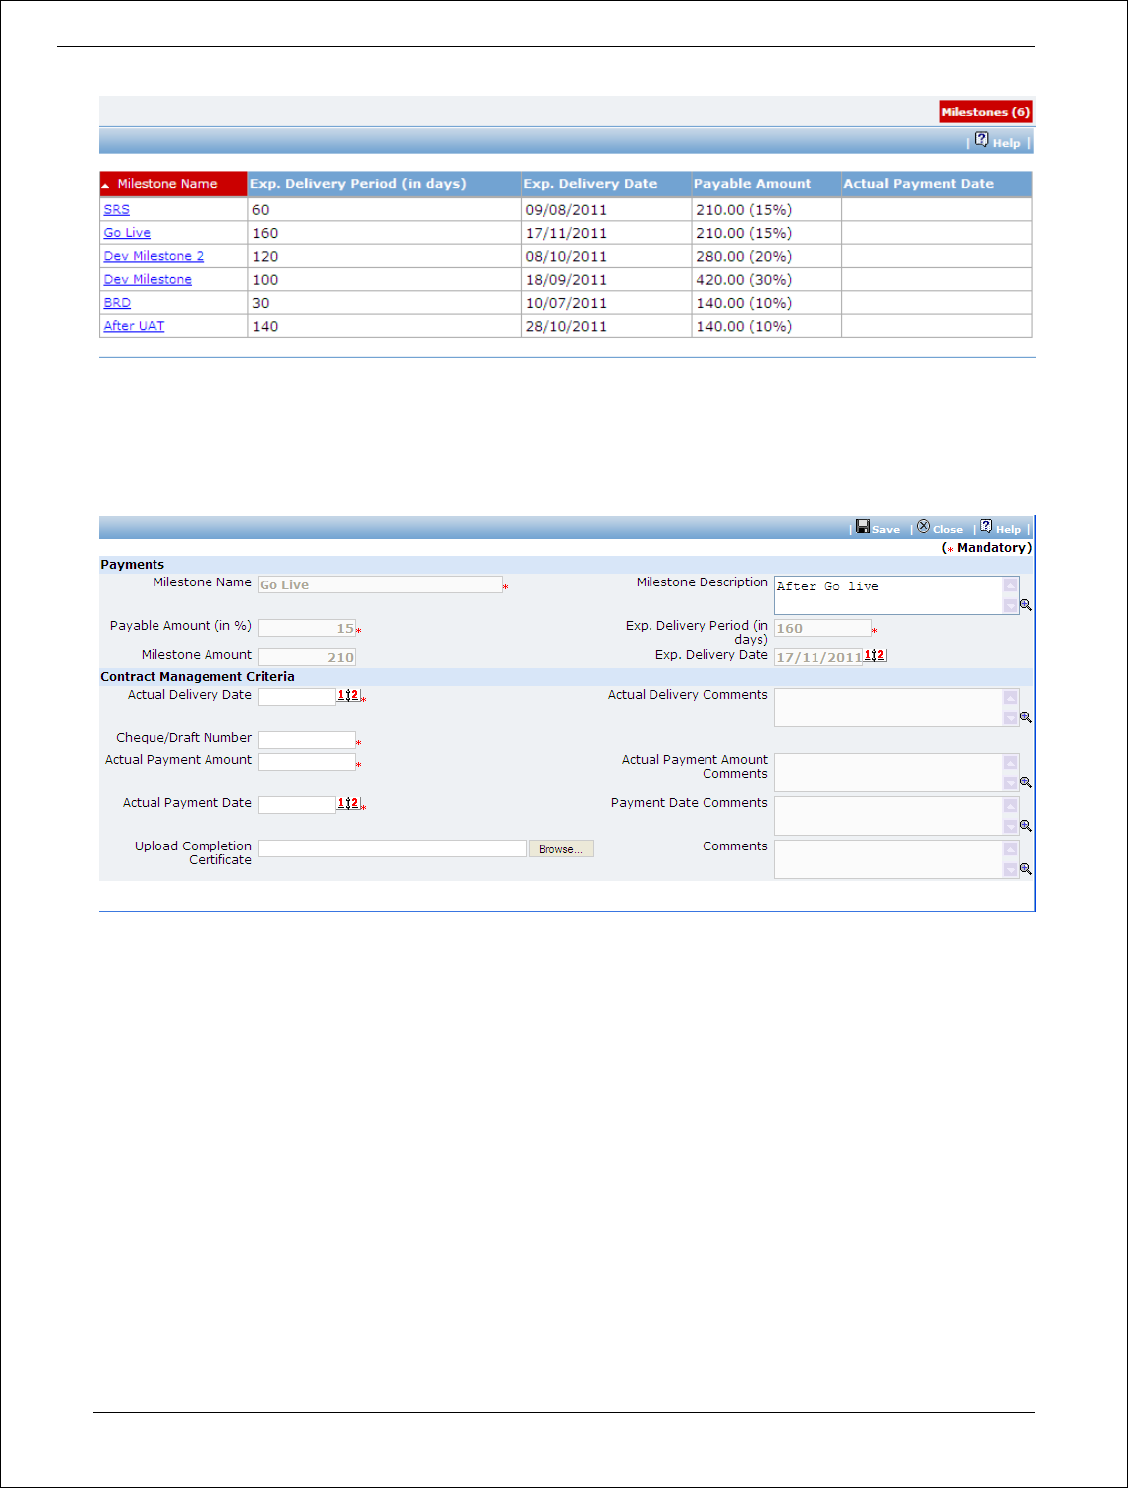
Procurement Management Support System – PMSS v1.0 User Guide
175
119. List of milestones is displayed in the subtab. System auto-calculates and displayed
‘Expected Delivery Date’ for all milestones based on Contract Sign Date.
120. Click link in ‘Milestone Name’ column to enter payment information for the milestone. A
pop up will be seen
a. Expected Delivery Date and Milestone Amount will be auto-calculated by the system on
Contract Sign Date and Contract Amount respectively.
b. Fill the fields on the page. Details of the fields are mentioned below;

Procurement Management Support System – PMSS v1.0 User Guide
176
c. Fill the fields on the page. Details of the fields are mentioned below;
Sr.
No.
Field Name
Field Description
Sample Data
1
Actual Delivery
Date
Enter date on which service/work against the
milestone was completed and delivered.
Enter date in DD/MM/YYYY format or select date
using calendar.
This date should not be less than contract sign
date.
10/07/2011
2
Actual Delivery
Comments
Enter comments related to actual delivery date, if
Expected Delivery Date is not matching with
Actual Delivery Date.
3
Cheque/Draft
Number
Enter Instrument number by which the payment
was made i.e. Cheque or Draft Number
411004
4
Actual Payment
Amount
Enter Actual amount paid to the consultant
120
5
Actual Payment
Comments
Enter comments if Actual Amount paid doesn’t
match with the milestone amount
6
Actual Payment
date
Enter date on which actual payment was made.
Enter date in DD/MM/YYYY format or select date
using calendar.
20/07/2011
7
Payment Date
Comments
Enter comments if any related to actual payment
date
8
Upload Completion
Certificate
Browse and select completion certification
document for the milestone specifying that the
milestone has been completed.
9
Comments
Enter any general comment, if any related to this
milestone.
d. Click ‘Save’.
121. Repeat above steps to enter tracking information for all milestones of the procurement.
122. After payments against all milestones have been completed, click on ‘Completion
Checklist’.
123. A popup will be seen. Enter responses to the process completion checklist.
124. Click link ‘Complete Procurement Process’ to mark the procurement as Complete.
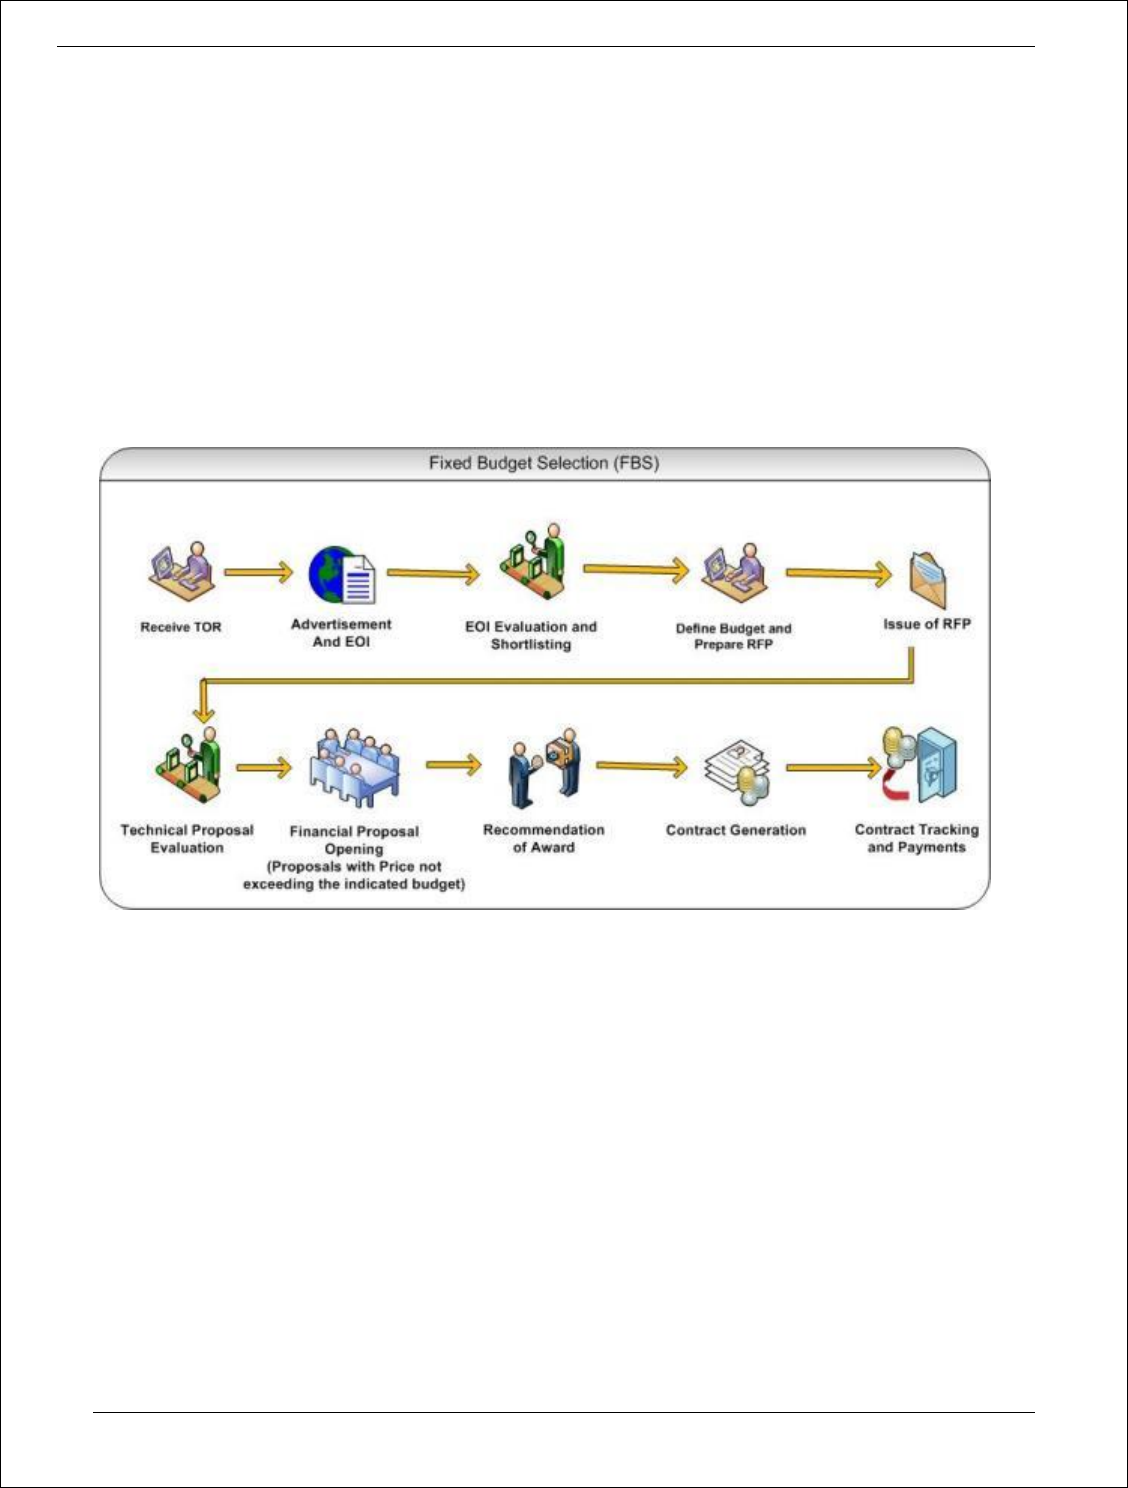
Procurement Management Support System – PMSS v1.0 User Guide
177
Fixed Budget Selection (FBS)
Purpose
FBS method can be used for selecting providers for Research contracts, professional services, training,
workshops and fellowships. This method is used when estimated budget for the procurement has been
fixed. Consultants who has quoted price within the indicated budget are evaluated.
Process flow
Role(s)
o Procurement Coordinator (SPFU) – initiates and carries out the process of selection of providers.
o Procurement Coordinator – reviews the procurement if submitted to him for prior review.
Prerequisite
o Indicative Budget should be finalized.
o Other Prerequisites are similar to QCBS method. Please refer to section “Prerequisites’ under
“Quality and Cost Based Selection”.
Prior Review Scenarios
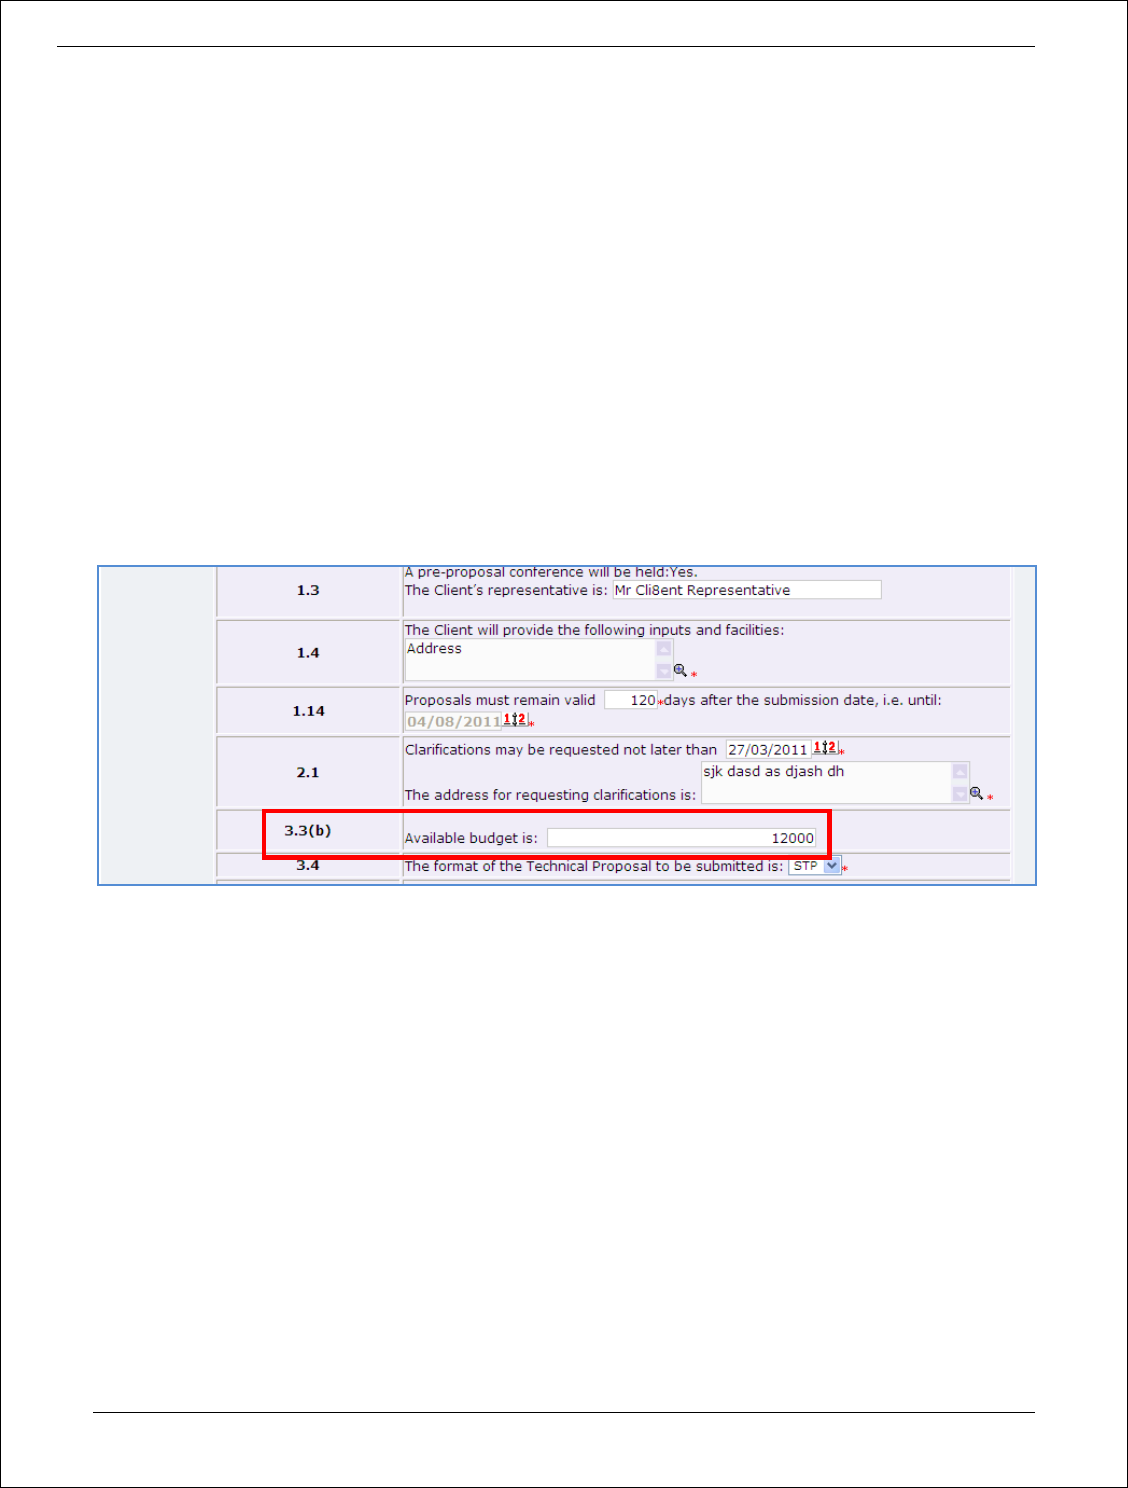
Procurement Management Support System – PMSS v1.0 User Guide
178
Prior Review Scenarios are similar to QCBS method. Please refer to section “Prior Review Scenarios’
under “Quality and Cost Based Selection”.
Process Details
1. Procurement using FBS method will follow same stages as QCBS method with few variations as
mentioned below;
RFP Preparation
2. On “Step 2: Instruction to Consultants’ step page, available budget for the procurement should be
specified in paragraph ‘3.3(b)’. In QCBS method, this paragraph has details about estimated
duration of the contract in person months.
Combined Evaluation
3. Financial proposal Evaluation will be carried only for proposals which have quoted price within
indicated budget. After “Step 3 Enter Financial Proposal Opening Data”, Proposals exceeding the
indicated budget shall be marked as technically non-responsive.
1. A Consultant who has obtained the highest technical score shall be selected and displayed as
recommended consultant.
Least Cost Selection (LCS)
Purpose
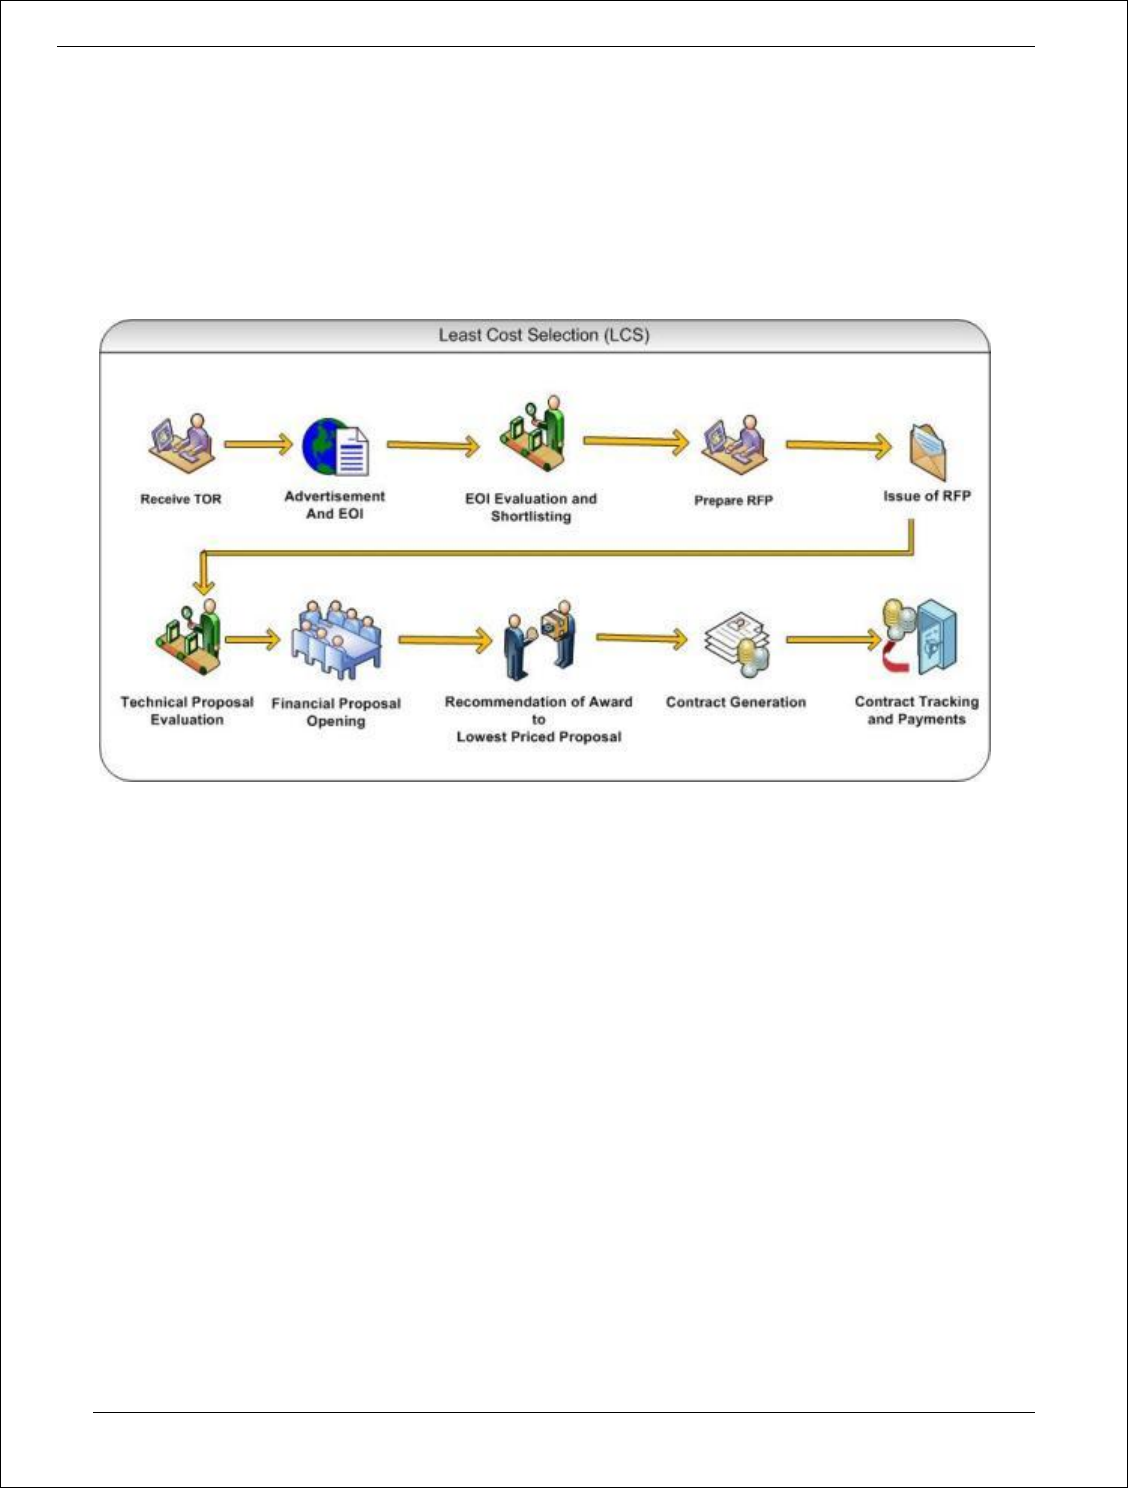
Procurement Management Support System – PMSS v1.0 User Guide
179
FBS method can be used for selecting Consultants for assignments of a standard routine nature like
audits, engineering design of non-complex works etc. Consultant Firm which is technically responsive
and has quoted lowest price of all consultants is selected.
Process flow
Role(s)
o Procurement Coordinator (SPFU) – initiates and carries out the process of selection of providers.
o Procurement Coordinator (NPIU) – reviews the procurement if submitted to him for prior
review.
Prerequisite
o Prerequisites are similar to QCBS method. Please refer to section “Prerequisites’ under “Quality
and Cost Based Selection”.
Prior Review Scenarios
Prior Review Scenarios are similar to QCBS method. Please refer to section “Prior Review Scenarios’
under “Quality and Cost Based Selection”.
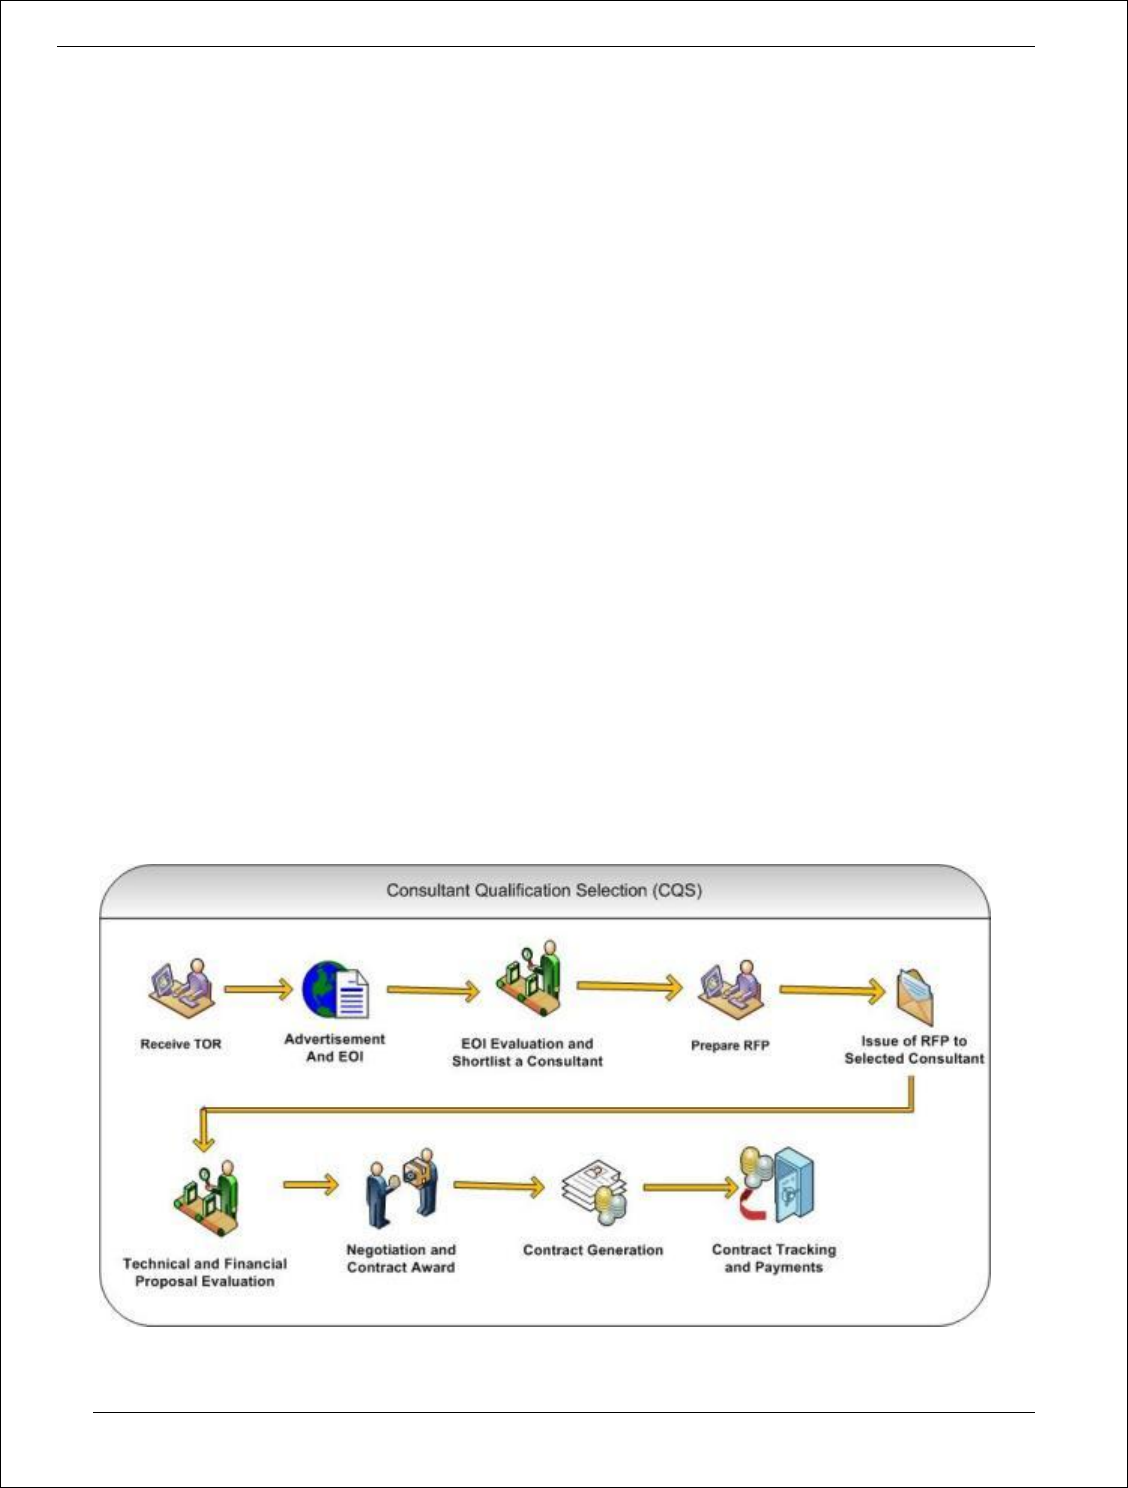
Procurement Management Support System – PMSS v1.0 User Guide
180
Process Details
1. Procurement using LCS method will follow same stages as QCBS method with few variations as
mentioned below;
Combined Evaluation
2. System doesn’t perform combined evaluation. A Consultant who has scored “minimum” qualifying
technical score (% specified in RFP document) and has lowest quoted price shall be selected and
displayed as recommended consultant.
Consultant Qualification Selection (CQS)
Purpose
CQS method can be used for selecting Consultants for assignments of a standard routine nature like
audits, engineering design of non-complex works etc. Consultant Firm which is technically responsive
and has quoted lowest price of all consultants is selected.
Process flow

Procurement Management Support System – PMSS v1.0 User Guide
181
Role(s)
o Procurement Coordinator (SPFU) – initiates and carries out the process of selection of providers.
o Procurement Coordinator (NPIU) – reviews the procurement if submitted to him for prior
review.
Prerequisite
o Prerequisites are similar to QCBS method. Please refer to section “Prerequisites’ under “Quality
and Cost Based Selection”.
Prior Review Scenarios
o If estimated cost is between 10,000 US$ and 2,00,000 US$, then the procurement will be sent to
NPIU procurement coordinator for prior review.
o If estimated cost is 2,00,000 US$ and above, then the procurement will be submitted to NPIU
procurement Coordinator to obtain World Bank NOC.
Process Details
1. Procurement using CQS method will follow same stages as QCBS method with few variations as
mentioned below;
EOI Opening & Shortlisting of Consultants
2. On “Step 4: Shortlisting of Consultants’, only one consultant will shortlisted and will be issued RFP.
3. Technical and Financial Evaluation will be done for only one consultant.
Single Source Selection (SSS)
Purpose
SSS method can be used for selecting consulting firms only if it presents a clear advantage over
competition due to various reasons like continuation of same work, Rapid selection is necessary, small
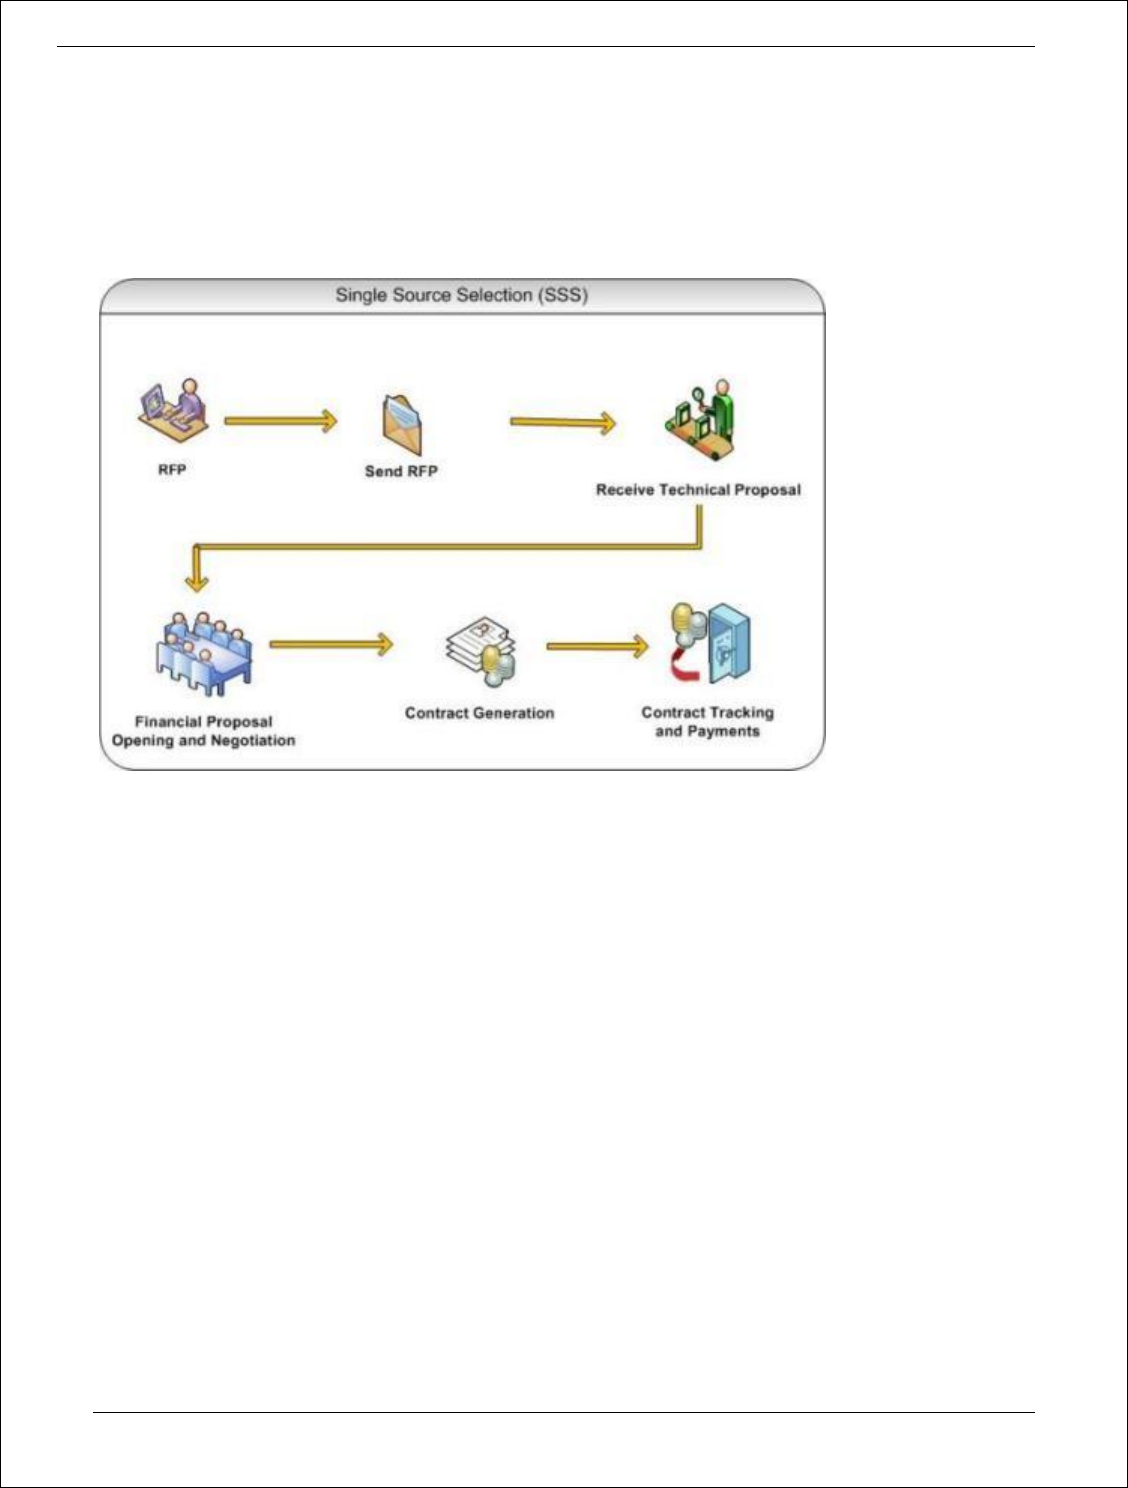
Procurement Management Support System – PMSS v1.0 User Guide
182
assignment, or the consultant has experience of exceptional significance of the assignment. As this is not
competitive method of selection, technical or financial evaluation will not be carried out.
Process flow
Role(s)
o Procurement Coordinator (SPFU) – initiates and carries out the process of selection of providers.
o Procurement Coordinator (NPIU) – reviews the procurement if submitted to him for prior
review.
Prerequisite
o Justification for selection of the consultant should be documented and duly signed.
o Other Prerequisites are similar to QCBS method. Please refer to section “Prerequisites’ under
“Quality and Cost Based Selection”.
Prior Review Scenarios
o The procurement will be submitted to NPIU procurement Coordinator to obtain World Bank
NOC.
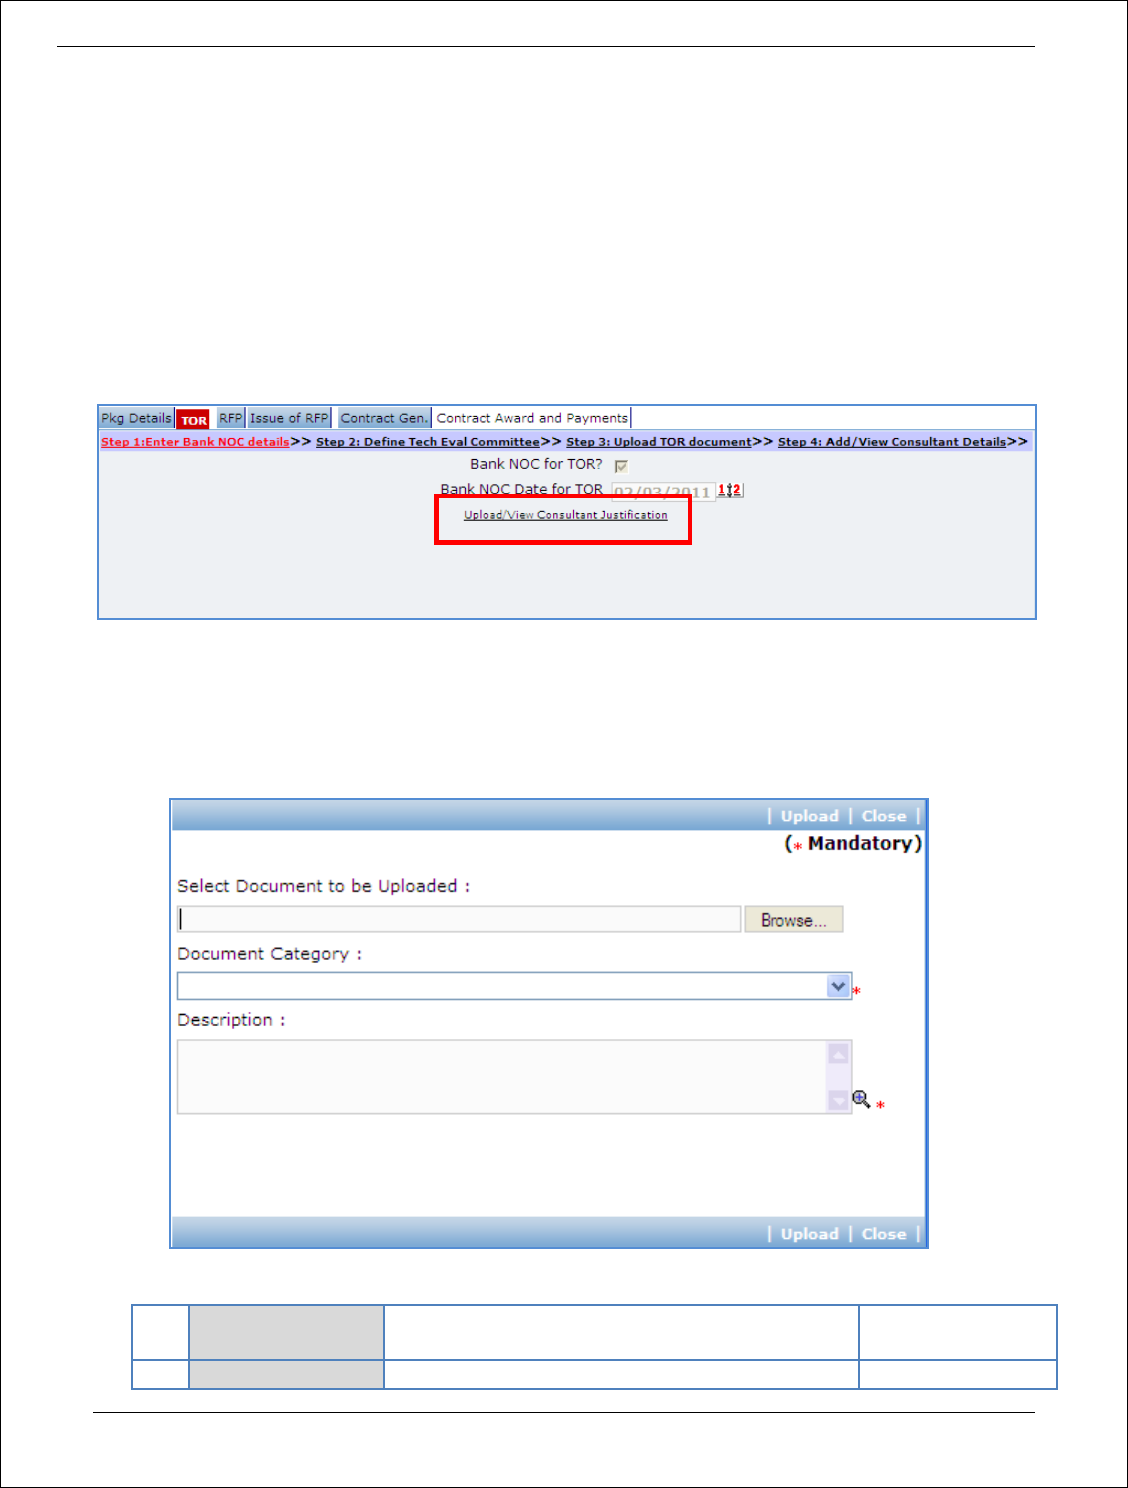
Procurement Management Support System – PMSS v1.0 User Guide
183
Process Details
1. Procurement using SSS method will go through following stages;
Generation of TOR
The steps on this stage are similar to QCBS except few variations;
2. On “Step 1: Enter Bank NOC Details’, ‘Upload/View Consultant Justification’ link will be shown.
3. Click the link. ‘Documents’ subtab is shown in the lower section. It contains all documents uploaded
in the system at various stages of the procurement.
4. Upload the justification document justifying selection of the consultant.
a. Click ‘Add’ link, which is within the subtab. A popup will be seen
b. Fill the fields on the page. Details of the fields are mentioned below;
Sr.
No.
Field Name
Field Description
Sample Data
1
Document to be
Browse the document that you want to upload.
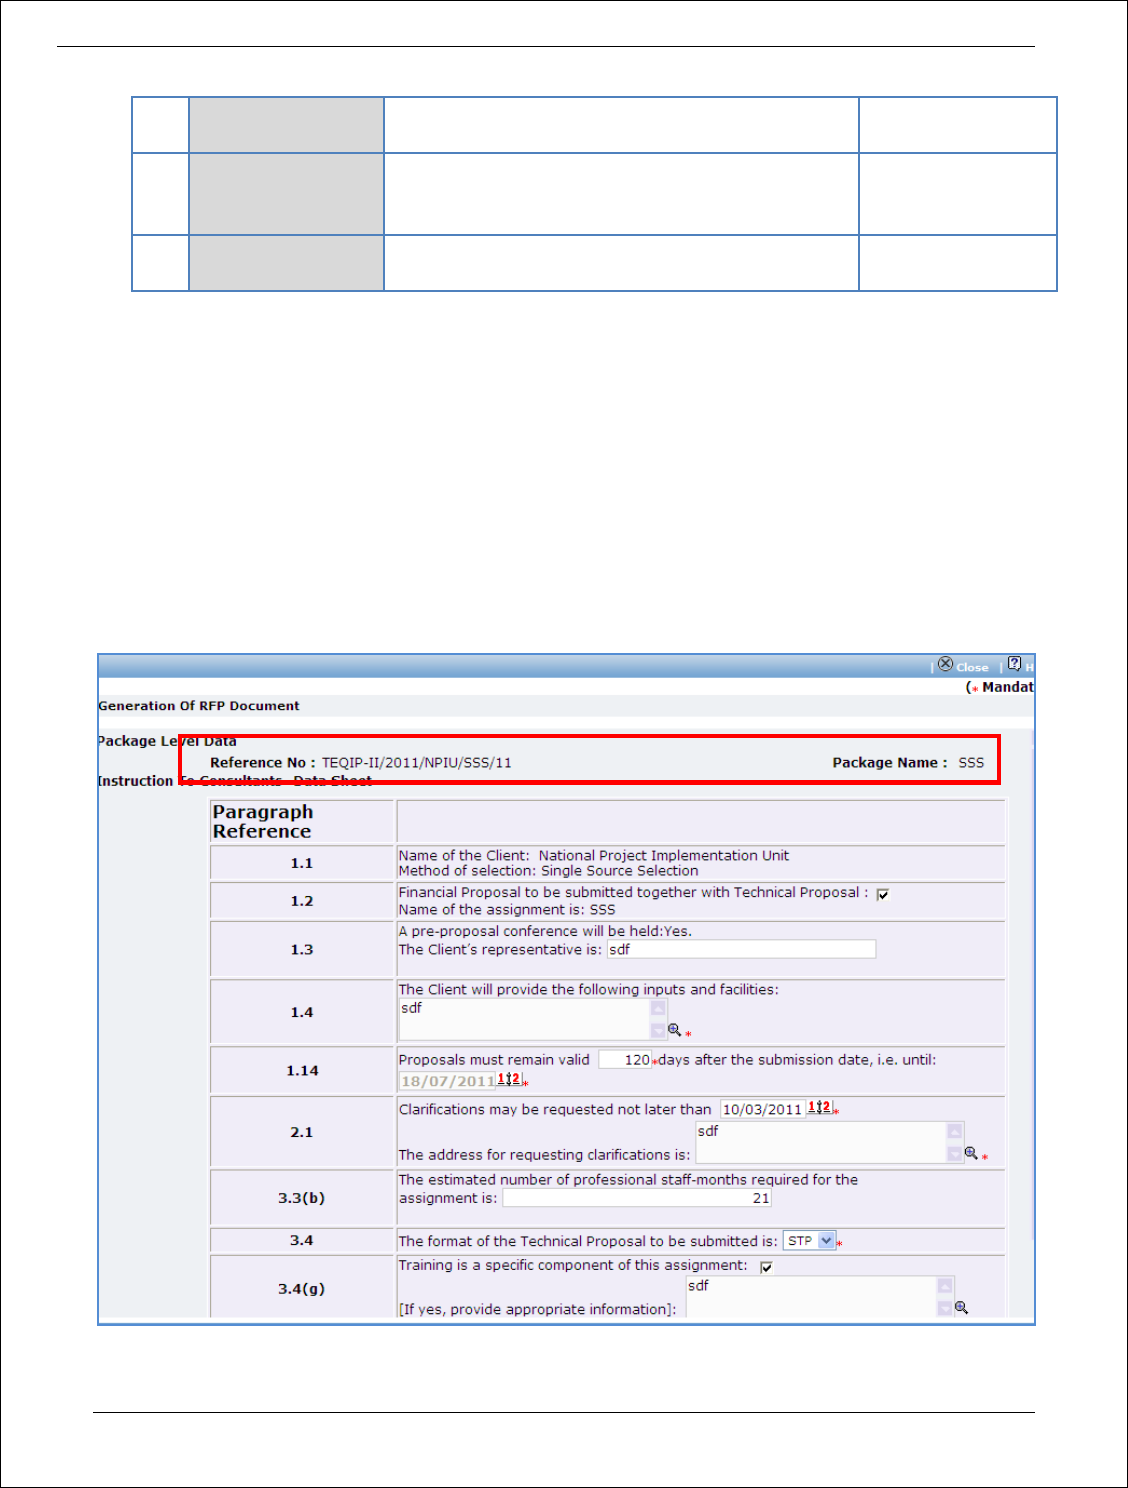
Procurement Management Support System – PMSS v1.0 User Guide
184
uploaded
2
Document
Category
Select the appropriate document category.
TOR
3
Description
Enter more information about the uploaded
document.
This is approved
TOR.
c. Click ‘Upload’ to upload the document in the system.
d. Uploaded document will appear on the list shown in ‘Documents’ section.
e. User can select and delete the document that has been uploaded in current stage of the
procurement. To delete a document, select ‘Delete’ checkbox against the document and click
‘Delete’ link.
RFP Preparation

Procurement Management Support System – PMSS v1.0 User Guide
185
The steps on this stage are similar to QCBS except few variations;
5. On “Step 2: Instruction to Consultants” popup page, few fields are not displayed
o Min. Score for Technical Proposal
o Weightage for technical proposal
o Weightage for financial proposal
Issue of RFP
6. The steps on this stage are similar to QCBS except that RFP will be issued to only one consultant in
case of SSS.
Recommendation and Contract Generation
In this stage recommendation of award meeting details and negotiation meeting details are recorded
in the system. If negotiations are successful, contract will be generated.
‘Contract Gen.’ tab is selected by default.
7. On ‘Step 1: Financial Proposal Details’, fill the fields on the page. Details of the fields are mentioned
below;
Sr.
Field Name
Field Description
Sample Data

Procurement Management Support System – PMSS v1.0 User Guide
186
No.
1
Proposal Amount
Enter amount quoted by the consultant in the
financial proposal.
This value will be considered as basic value at
the time of contract generation.
12000
8. Click ‘Save’.
9. All other steps on this stage are similar to QCBS procurement method.
Award of Contract and Payments
10. The steps on this stage are similar to QCBS procurement method.
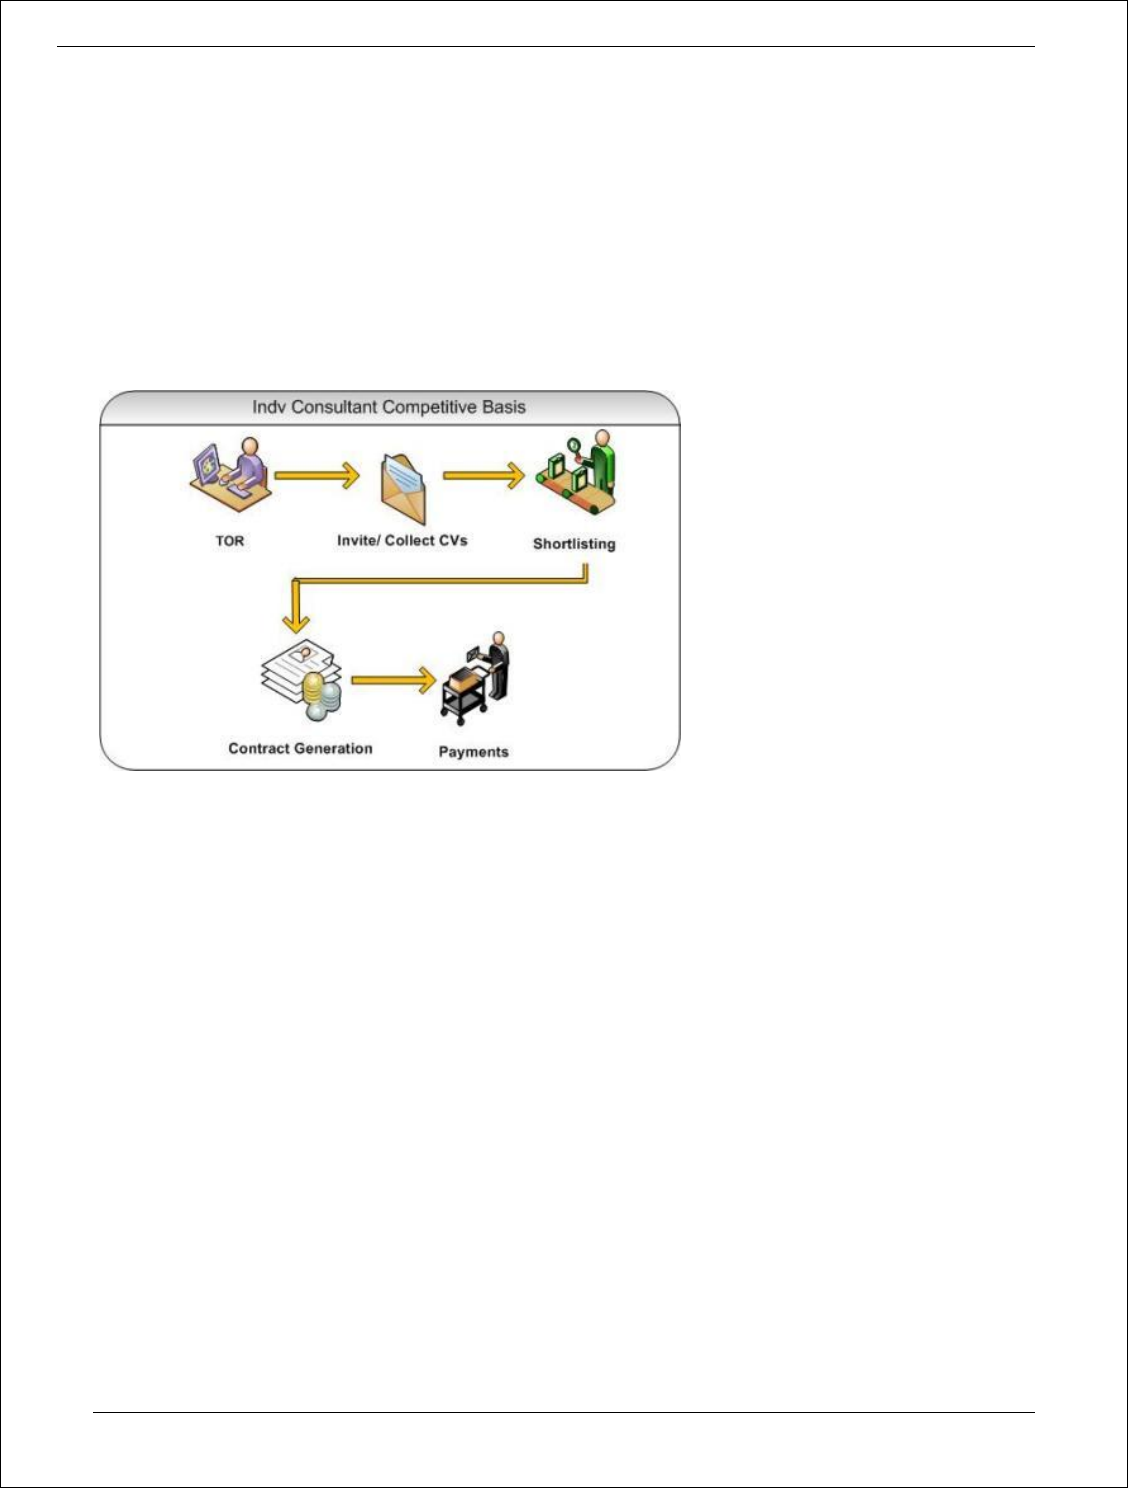
Procurement Management Support System – PMSS v1.0 User Guide
187
Individual Consultants – Competitive Method
Purpose
This method is used for obtain services from individual consultant using competitive bidding.
Process flow
Role(s)
o Procurement Coordinator (SPFU) – initiates and carries out the process of selection of providers.
Prerequisite
o Financial Sanction should be obtained for procurement of the service.
o TOR (Terms of References) should be prepared and reviewed by reviewing authorities.
o Technical Review Committee should be formed for this procurement. This committee will
review and evaluate technical proposals received by the firms based on the evaluation criteria
given in the RFP document.
Process Details
The first stage is “TOR”
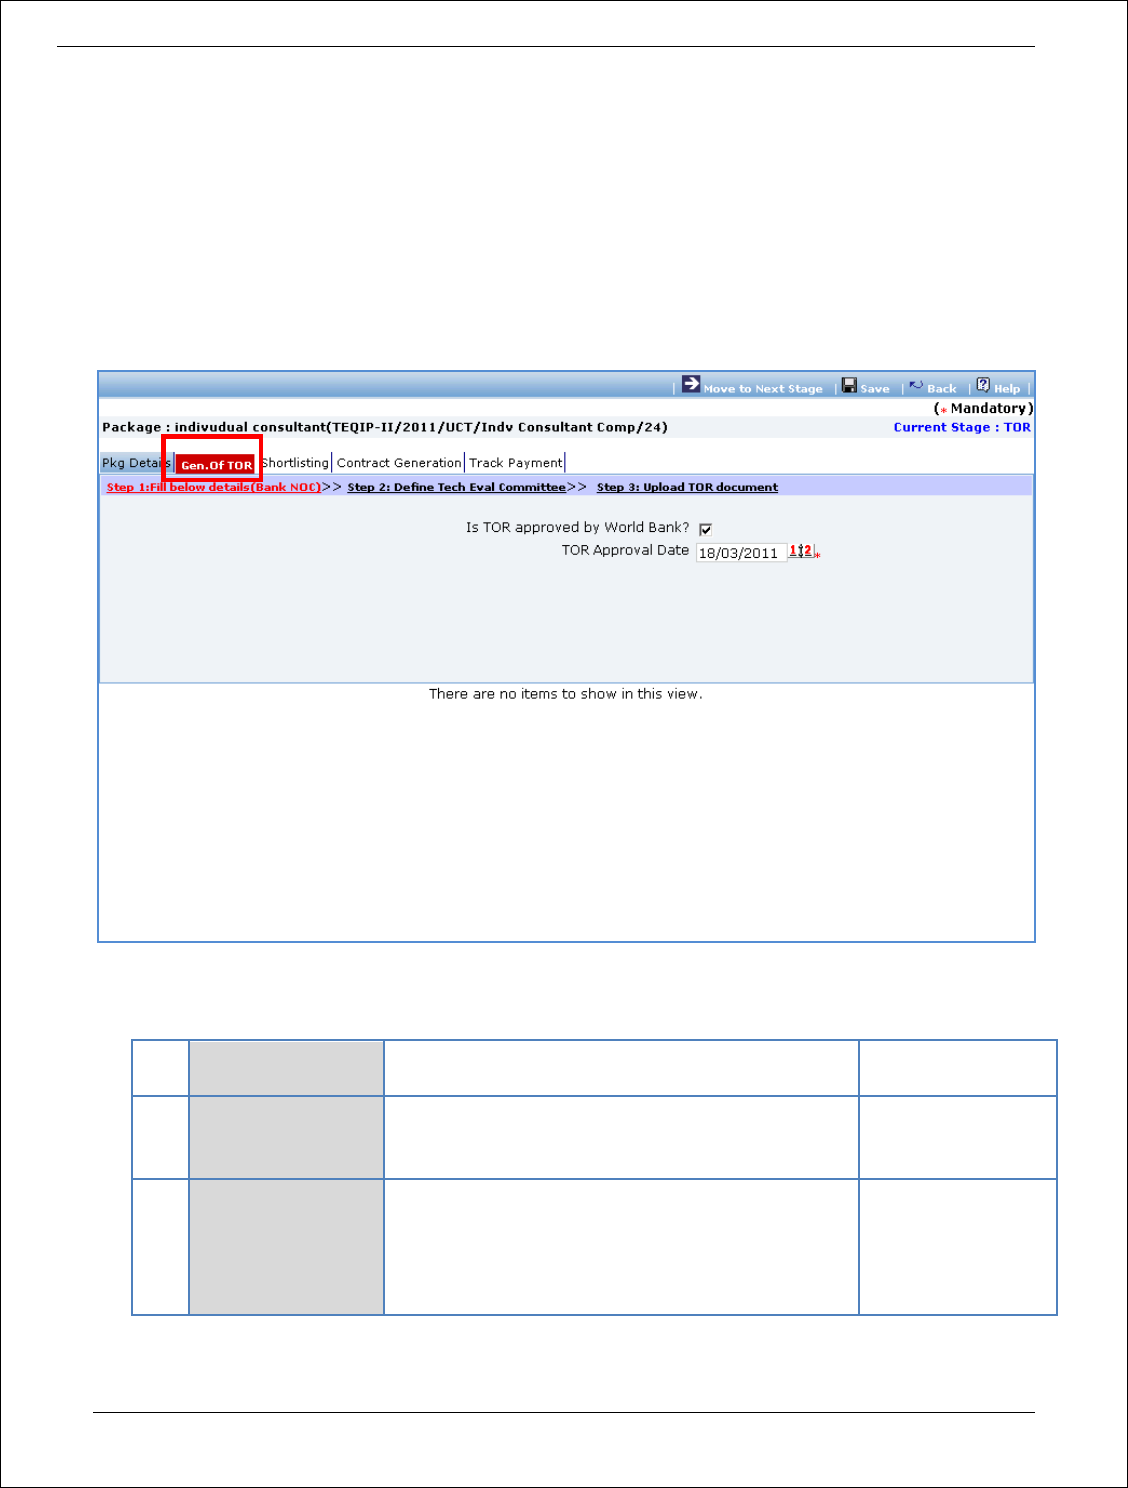
Procurement Management Support System – PMSS v1.0 User Guide
188
TOR
In this stage activities related to TOR approval are performed. Technical Evaluation Committee will be
defined in this stage. This committee will be involved in evaluation of technical proposals submitted by
the consultants.
‘Generation of TOR’ tab will be selected by default.
1. Fill following details on the page related to World Bank NOC for TOR.
Sr.
No.
Field Name
Field Description
Sample Data
1
Bank NOC for TOR
Enter the checkbox if World Bank NOC has been
obtained for the TOR
This field is not mandatory.
2
Bank NOC Date for
TOR
Enter date in DD/MM/YYYY format or select date
using calendar.
You cannot enter past Date.
Please enter date on which World Bank has given
its NOC for the TOR.
2. Click ‘Save’.
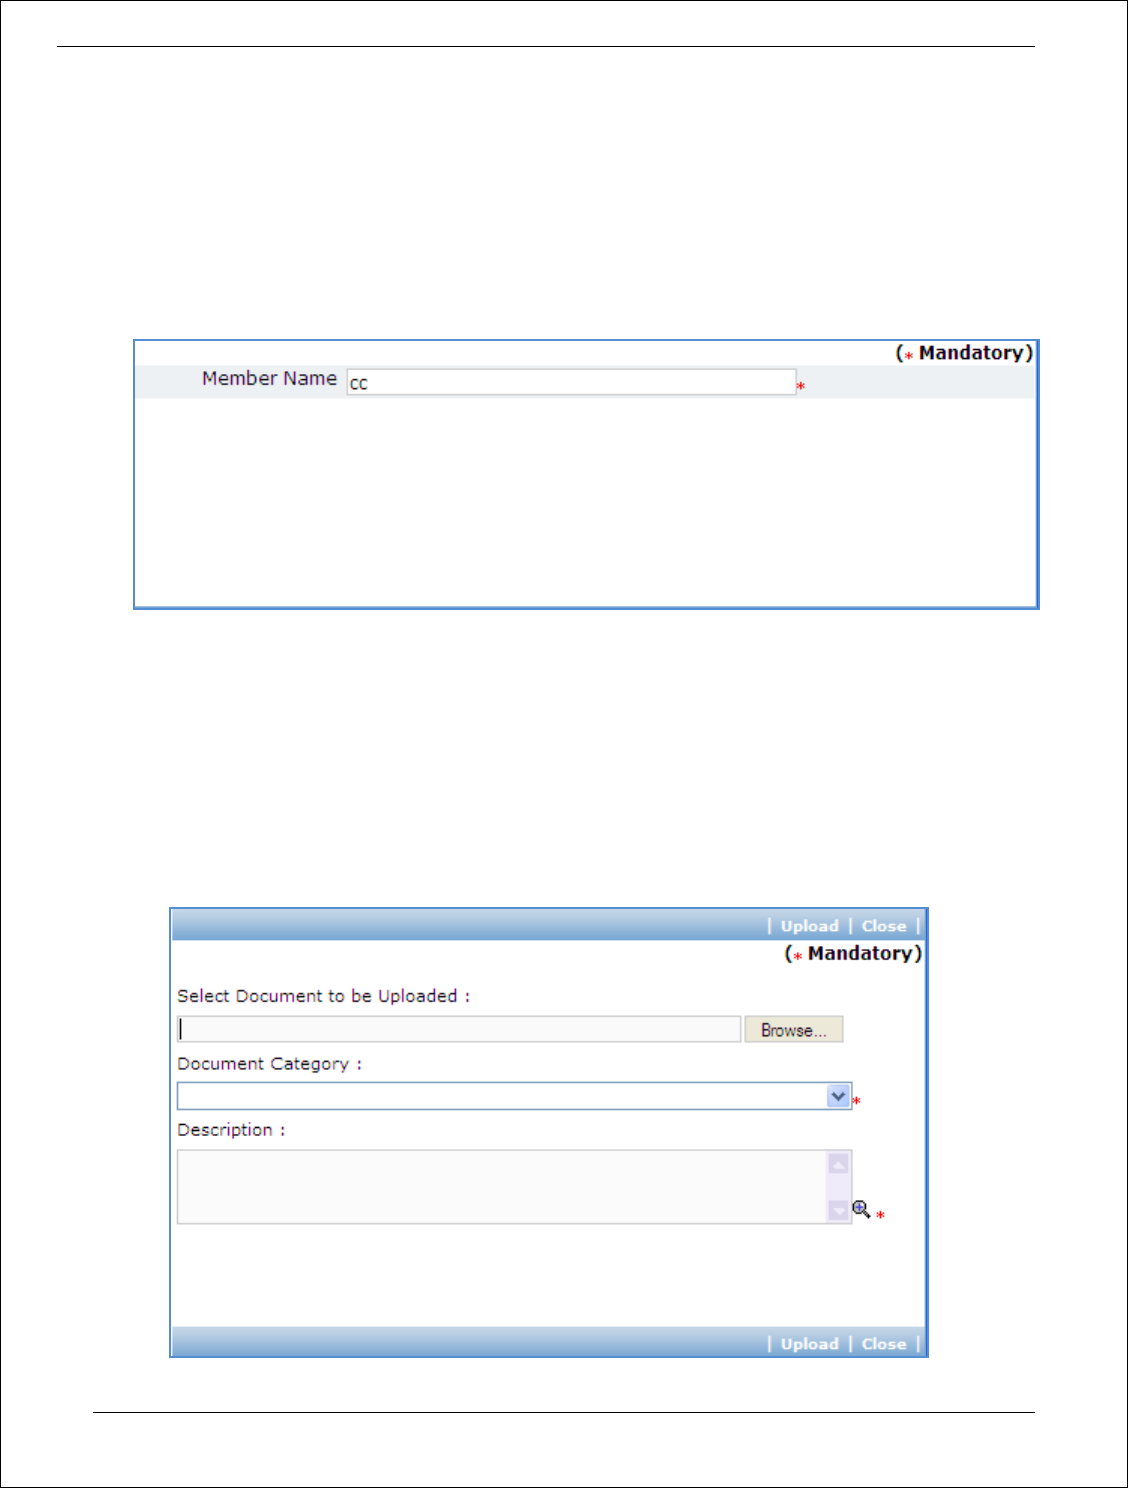
Procurement Management Support System – PMSS v1.0 User Guide
189
3. Click “Step 2: Define Tech Evaluation Committee” link. ‘Technical Evaluation Committee’ subtab is
shown in the lower section.
4. Define Technical Evaluation Committee. Defining Technical Evaluation Committee members is
mandatory.
a. To add a Technical Evaluation Committee member, click on the ‘Add’ link, which is within the
subtab. A popup will be seen
b. It has only one field – Member Name. Fill the name of member in the field.
c. Click ‘Save’
d. To add another member, repeat steps a to c.
5. Click “Step 3: Upload TOR Document” link. ‘Documents’ subtab is shown in the lower section. It
contains all documents uploaded in the system at various stages of the procurement.
6. Upload finalized and approved TOR Document.
a. Click ‘Add’ link, which is within the subtab. A popup will be seen

Procurement Management Support System – PMSS v1.0 User Guide
190
b. Fill the fields on the page. Details of the fields are mentioned below;
Sr.
No.
Field Name
Field Description
Sample Data
1
Document to be
uploaded
Browse the document that you want to upload.
2
Document
Category
Select the appropriate document category.
TOR
3
Description
Enter more information about the uploaded
document.
This is approved
TOR.
c. Click ‘Upload’ to upload the document in the system.
7. After the document is uploaded, it will appear on the list shown in ‘Documents’ section.
8. You can select and delete any document that has been uploaded in current stage of the procurement.
For e.g. if you are in ‘TOR Generation’ stage, you can delete documents that you have uploaded in
this stage. To delete a document, select ‘Delete’ checkbox against the document and click ‘Delete’
link.
9. On completion of ‘Generation of TOR’ stage click on ‘Move to Next Stage’. This will move the
procurement to ‘Shortlisting’ stage.
Shortlisting
In this stage short-listing of firms will be performed.
‘Shortlisting’ tab is selected by default.
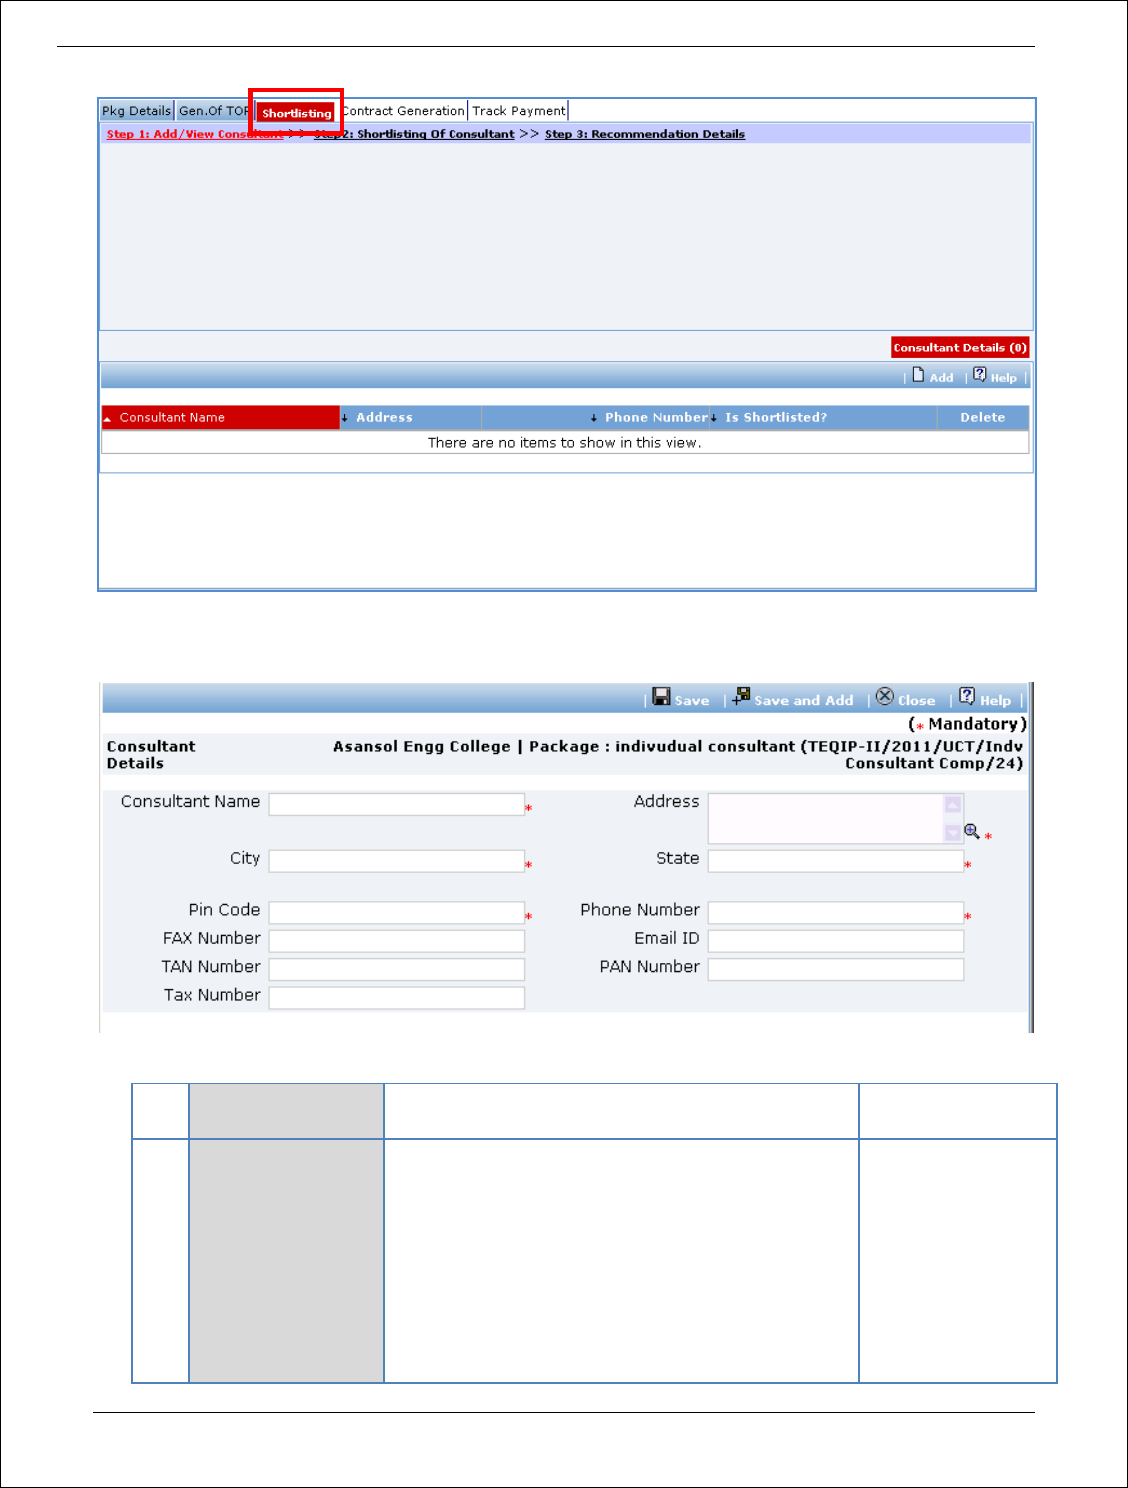
Procurement Management Support System – PMSS v1.0 User Guide
191
10. Click “Step 1: Add/View Consultants” link. ‘Consultant Details’ subtab is shown in the lower section.
a. Click ‘Add’, which is within the subtab. A pop up will be seen
b. Fill the fields on the page. Details of the fields are mentioned below;
Sr.
No.
Field Name
Field Description
Sample Data
1
Consultant Name
Enter Name of the consultant.
Consultant can also be searched using ‘Select
Consultant from PMSS Database’ link. Click on this
link will display the existing list of consultants, if
any. Once the list is displayed, click on the
consultant’s name. This will auto populated the
selected consultant’s data. In order to search
additional consultants within the state or city use
the filters provided on the page.
ABC Consultants
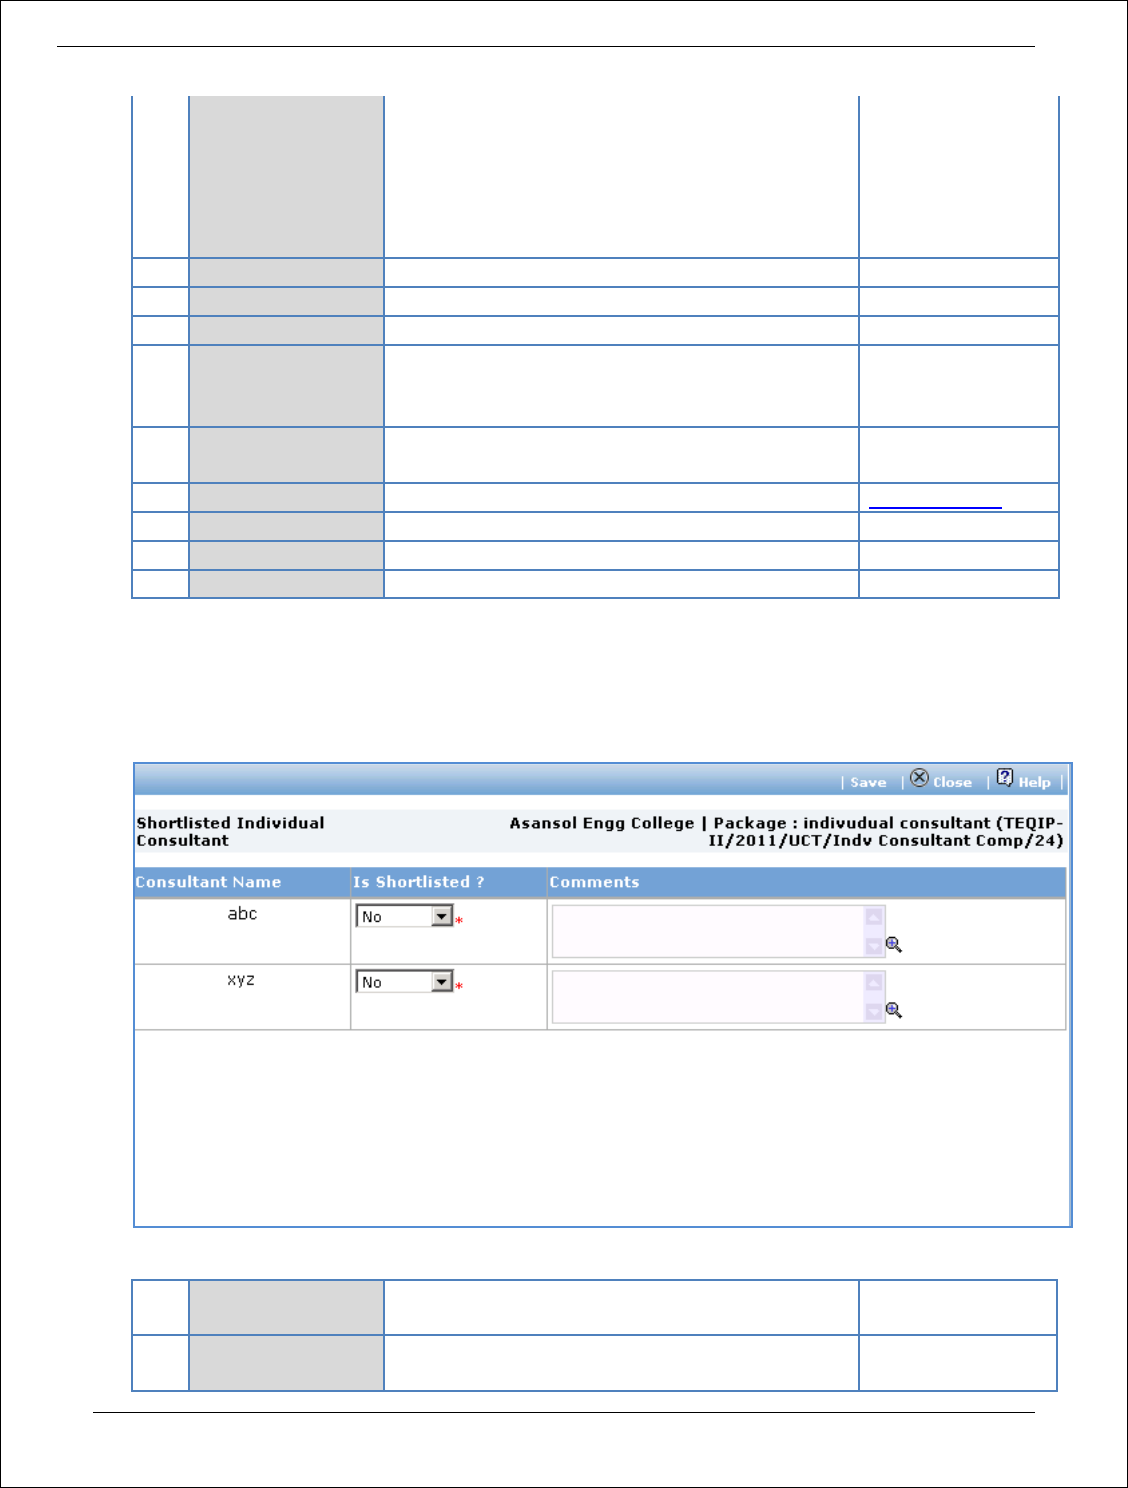
Procurement Management Support System – PMSS v1.0 User Guide
192
2
Address
Enter the address of the Consultant
STI Towers,
Unit# 141/38,
Campus 29. RMZ
Millenia Business
Park.
881, Dr. MGR Road
3
City
Enter the city of the Consultant
Pune
4
State
Enter the state of the Consultant
Maharashtra
5
Pin Code
Enter the Pin Code of the Consultant
411232
6
Phone Number
Enter the Phone Number of the Consultant.
To enter more than one number use comma (,) as
a separator.
26422689
7
Fax Number
Enter the Fax Number of the Consultant.
26422680
8
Email ID
Enter the Email ID of the Consultant
ftti@efttil.com
9
PAN Number
Enter the PAN Number of the Consultant
ANS44874
10
TAN Number
Enter the TAN Number of the Consultant
11
Tax Number
Enter the TAX Number of the Consultant
c. Click ‘Save’.
d. To add another consultant, repeat steps a to c.
11. Click “Step 2: Shortlisting of Consultants” link. A popup will be seen
a. Fill fields mentioned below for each consultant;
Sr.
No.
Field Name
Field Description
Sample Data
1
Is Shortlisted
Select Yes or No.
Select Yes if the consultant has been shortlisted
No
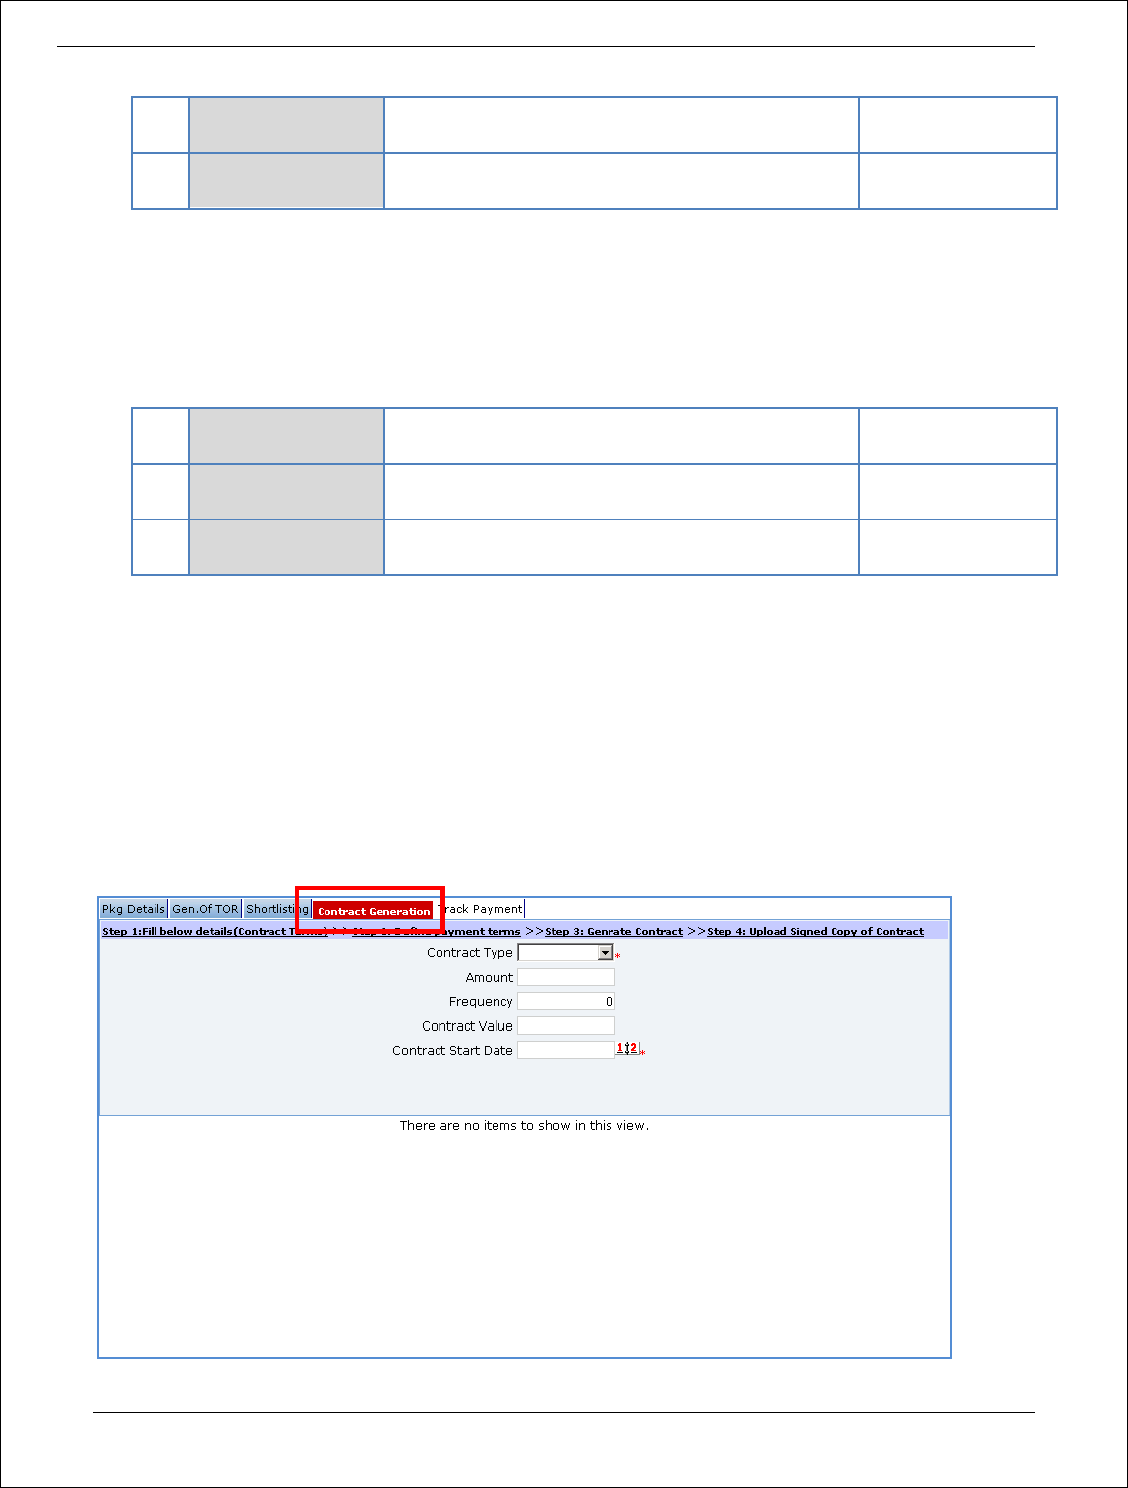
Procurement Management Support System – PMSS v1.0 User Guide
193
Select No if the consultant has not been
shortlisted
2
Comments
Enter reasons for short listing or rejection of the
consultant.
Not adequate
project experience
b. Click ‘Save’.
c. Click ‘Close’ to close the popup window.
12. Click “Step 3: Recommendation Details” link. Fill the fields on the page. Details of the fields
are mentioned below;
Sr.
No.
Field Name
Field Description
Sample Data
1
L1 Consultant
Select lowest price consultant i.e. L1 consultant
who should be awarded this contract
ABC Ltd.
2
Recommendation
Comments
Enter comments recommending the selected
consultant
Vast experience in
the domain
13. Click ‘Save’
14. On completion of ‘Shortlisting’ stage click on ‘Move to Next Stage’. This will move the procurement
to ‘Contract Generation’ stage.
Contract Generation
In this stage the contract terms will be defined and contract will be generated.
‘Contract’ tab is selected by default.

Procurement Management Support System – PMSS v1.0 User Guide
194
15. On “Step 1: Fill below details (Contract Details), fill the fields on the page. Details of the fields
are mentioned below;
Sr.
No.
Field Name
Field Description
Sample Data
1
Contract Type
Select type of contract - Lumpsum or Time based
Lumpsum
For Lumpsum Type
2
Amount
Enter value quoted by the shortlisted consultant
12000
3
Frequency
Enter no. of intervals at which payment will be
made to the consultant
4
4
Contract Value
System will auto-populate ‘Amount’ field value in
this field
12000
5
Contract Start Date
Enter date on which contract will be started
Enter date in DD/MM/YYYY format or select date
using calendar.
01/04/2011
For Time based Type
6
Billing Cycle
Select billing cycle for the contract – Daily or
Monthly.
Daily
7
Fees
Enter Fees per day or month depending on billing
cycle.
If Billing Cycle is ‘Daily’, fees per day should be
entered.
If Billing Cycle is ‘Monthly’, fees per month should
be entered.
100
8
Total Contract
Period
Enter period of the contract in days or month
depending on billing cycle.
If Billing Cycle is ‘Daily’, Contract Period should be
entered in days.
If Billing Cycle is ‘Monthly’, Contract Period should
be entered in months.
20
9
Contract Value
System will auto-populate ‘Amount’ field value in
this field
2000
10
Contract Start Date
Enter date on which contract will be started
Enter date in DD/MM/YYYY format or select date
using calendar.
01/04/2011
16. Click ‘Save’
17. Click “Step 2: Define Payment Terms” link. ‘Milestones’ subtab is shown in the lower section.
a. To add a milestone/payment term, Click ‘Add’ which is within the subtab. A pop up
will be seen
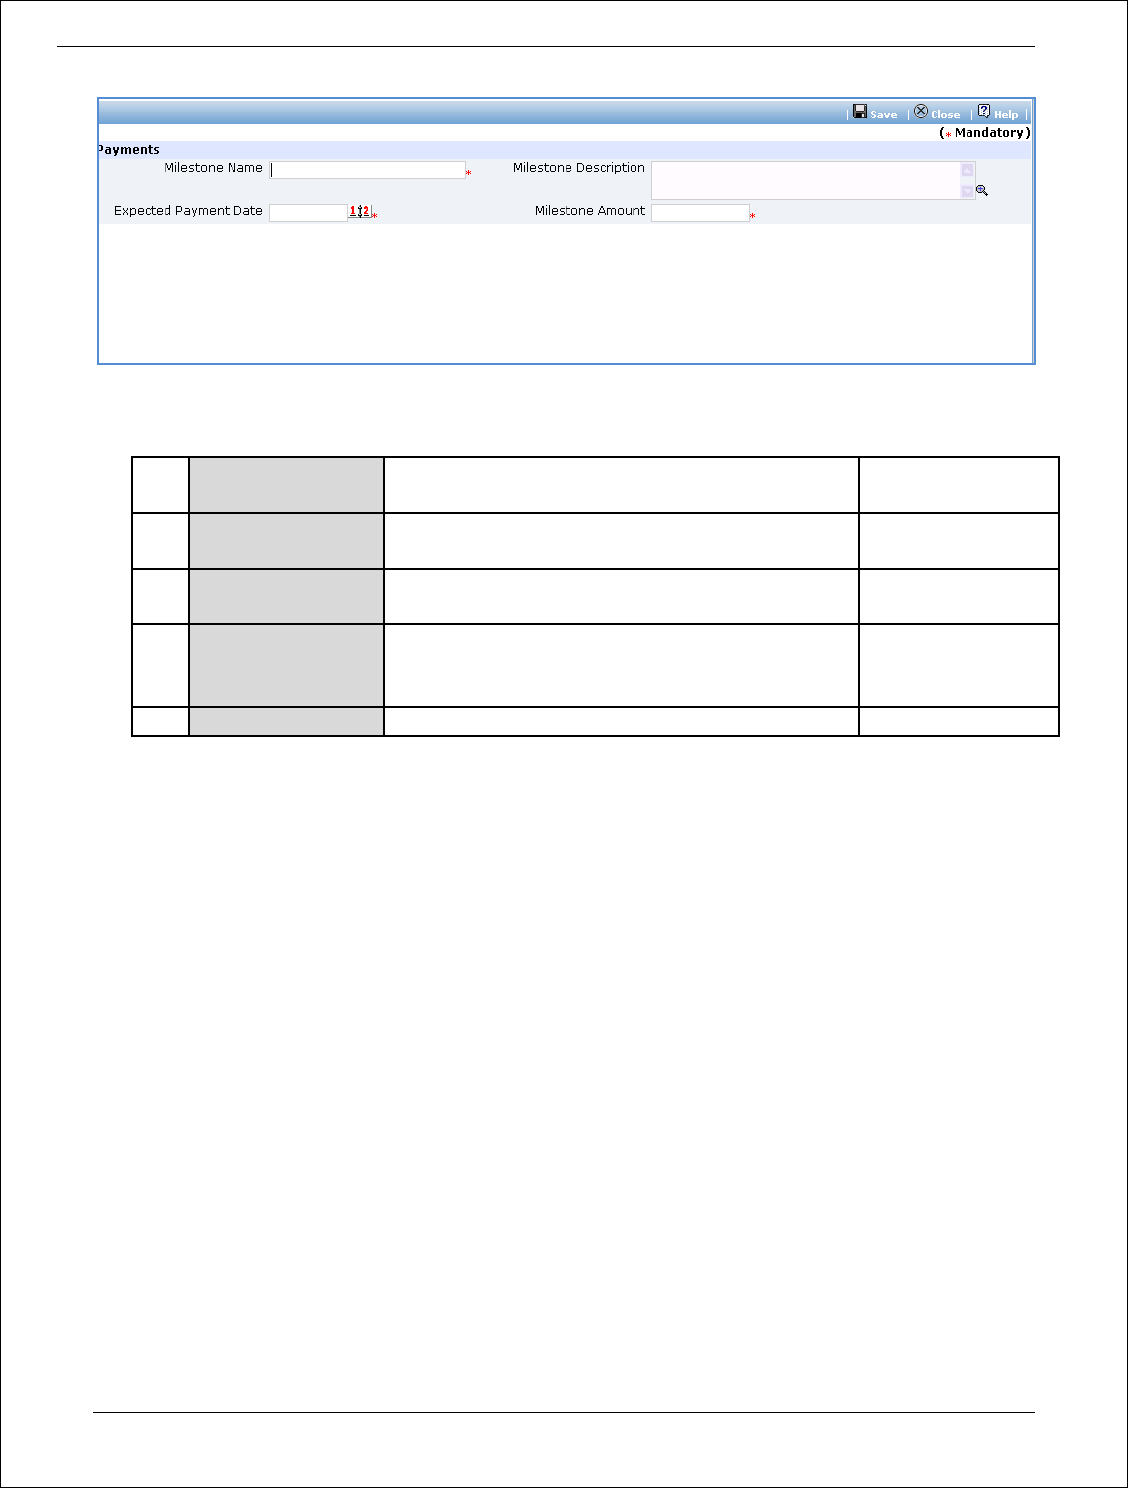
Procurement Management Support System – PMSS v1.0 User Guide
195
b. Fill the fields on the page. Details of the fields are mentioned below;
Sr.
No.
Field Name
Field Description
Sample Data
1
Milestone Name
Enter name of the milestone
BRD Signoff
2
Milestone
Description
Enter description for the milestone
After BRD signoff
3
Expected Payment
Date
Enter expected payment date for this milestone
Enter date in DD/MM/YYYY format or select date
using calendar.
30/04/2011
4
Milestone Amount
Enter milestone amount
1200
c. Click ‘Save’
d. To add new payment terms, repeat steps a to c.
18. Please ensure total of ‘Payment Amount %’ for all milestones is exactly 100.
19. Click ‘Step 3: Generate Contract’. The contract document will be generated. Save the file locally and
make necessary changes to the sections highlighted in yellow. Before generating the document,
system validates the required information and prompts for missing information.
20. After completing changes to the locally saved draft contract document, click “Step 4: Upload Signed
Copy of Contract” link. ‘Documents’ subtab is shown in the lower section. It contains all documents
uploaded in the system at various stages of the procurement.
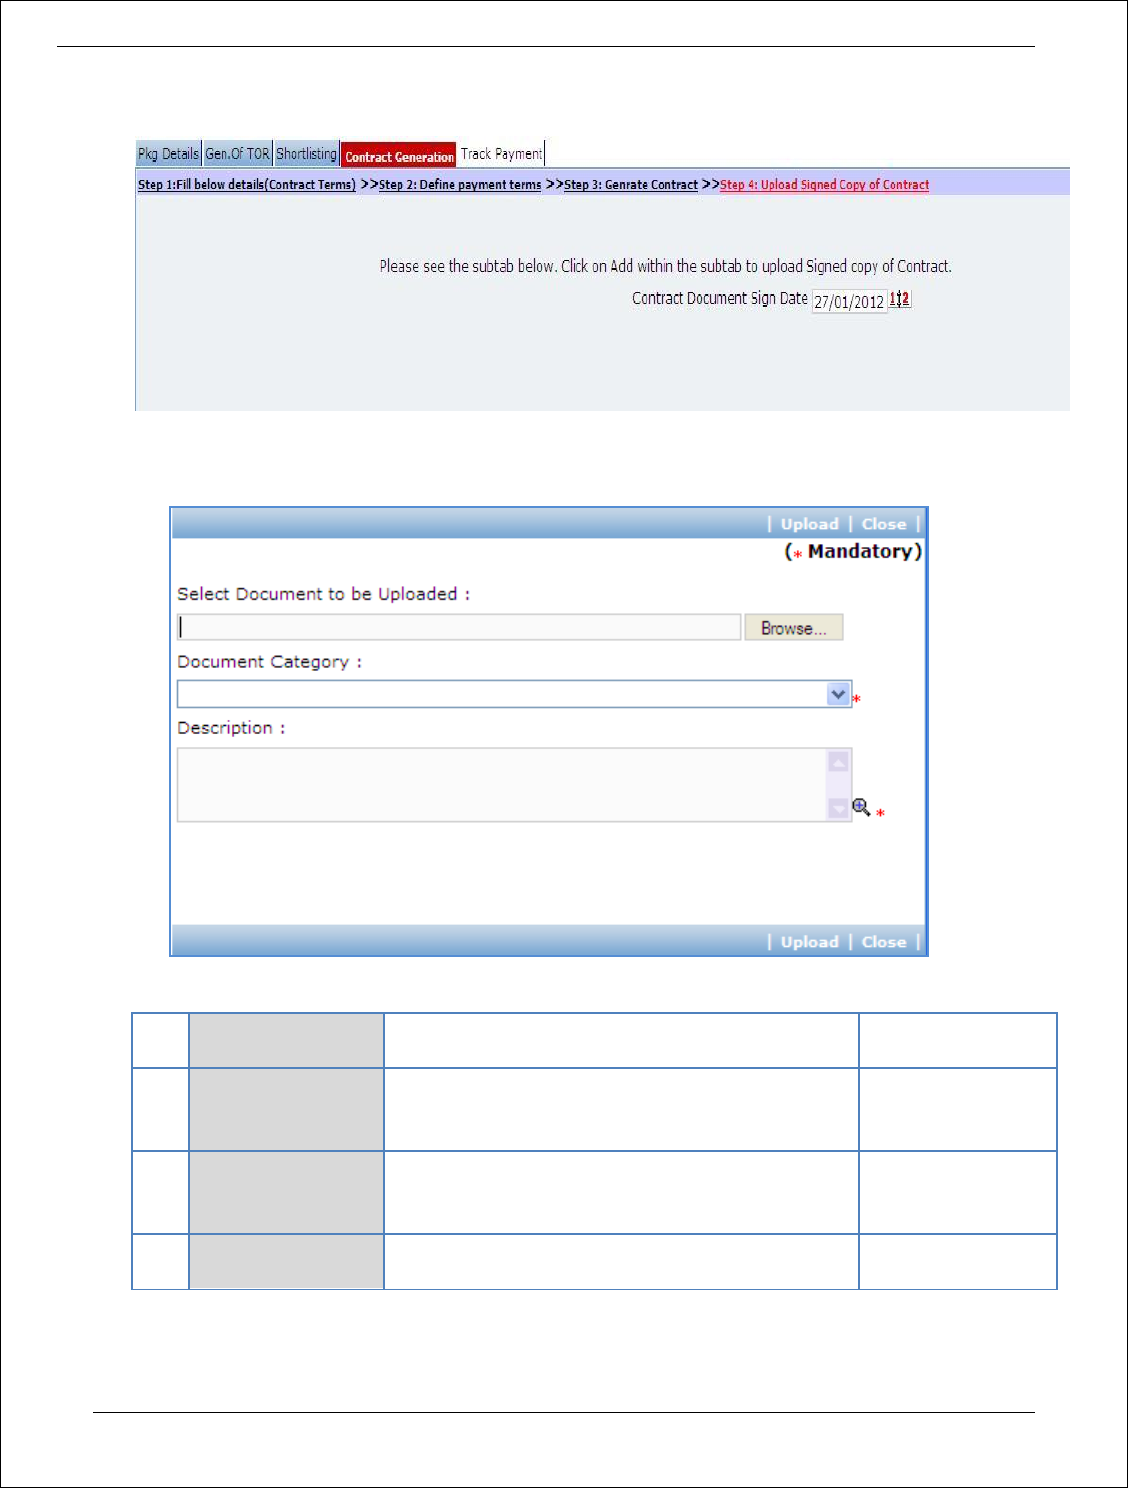
Procurement Management Support System – PMSS v1.0 User Guide
196
21. Upload the signed contract document.
a. Enter the date on which the contract is signed.
b. Click ‘Add’ link, which is within the subtab. A popup will be seen
c. Fill the fields on the page. Details of the fields are mentioned below;
Sr.
No.
Field Name
Field Description
Sample Data
1
Document to be
uploaded
Browse the document that you want to upload.
2
Document
Category
Select the appropriate document category.
TOR
3
Description
Enter more information about the uploaded
document.
This is approved
TOR.
d. Click ‘Upload’ to upload the document in the system.

Procurement Management Support System – PMSS v1.0 User Guide
197
e. Uploaded document will appear on the list shown in ‘Documents’ section.
f. User can select and delete the document that has been uploaded in current stage of the
procurement. To delete a document, select ‘Delete’ checkbox against the document and click
‘Delete’ link.
22. On completion of ‘Contract Generation’ stage click on ‘Move to Next Stage’. This will move the
procurement to ‘Track Payment’ stage.
Track Payment
This is last stage of the process. In this stage information about actual Payment will be entered into
the system.
‘Track Payment’ tab is selected by default.
23. Click “Step 1: Track Payment” link. ‘Milestones’ subtab is shown in the lower section. List of
milestones is displayed in the subtab.
24. Click link in ‘Milestone Name’ column to enter payment information for the milestone. A
pop up will be seen
a. Fill the fields on the page. Details of the fields are mentioned below;
Sr.
No.
Field Name
Field Description
Sample Data
1
Cheque/Draft
Number
Enter Instrument number by which the payment
was made i.e. Cheque or Draft Number
411004
2
Actual Payment
date
Enter date on which actual payment was made.
Enter date in DD/MM/YYYY format or select date
using calendar.
20/07/2011
3
Payment Date
Comments
Enter comments if any related to actual payment
date
4
Actual Payment
Amount
Enter Actual amount paid to the consultant
120

Procurement Management Support System – PMSS v1.0 User Guide
198
5
Actual Payment
Comments
Enter comments if Actual Amount paid doesn’t
match with the milestone amount
b. Click ‘Save’.
25. Repeat above steps to enter tracking information for all milestones of the procurement.
26. After payments against all milestones have been completed, click on ‘Complete
Procurement Process’ to mark the procurement as Complete.
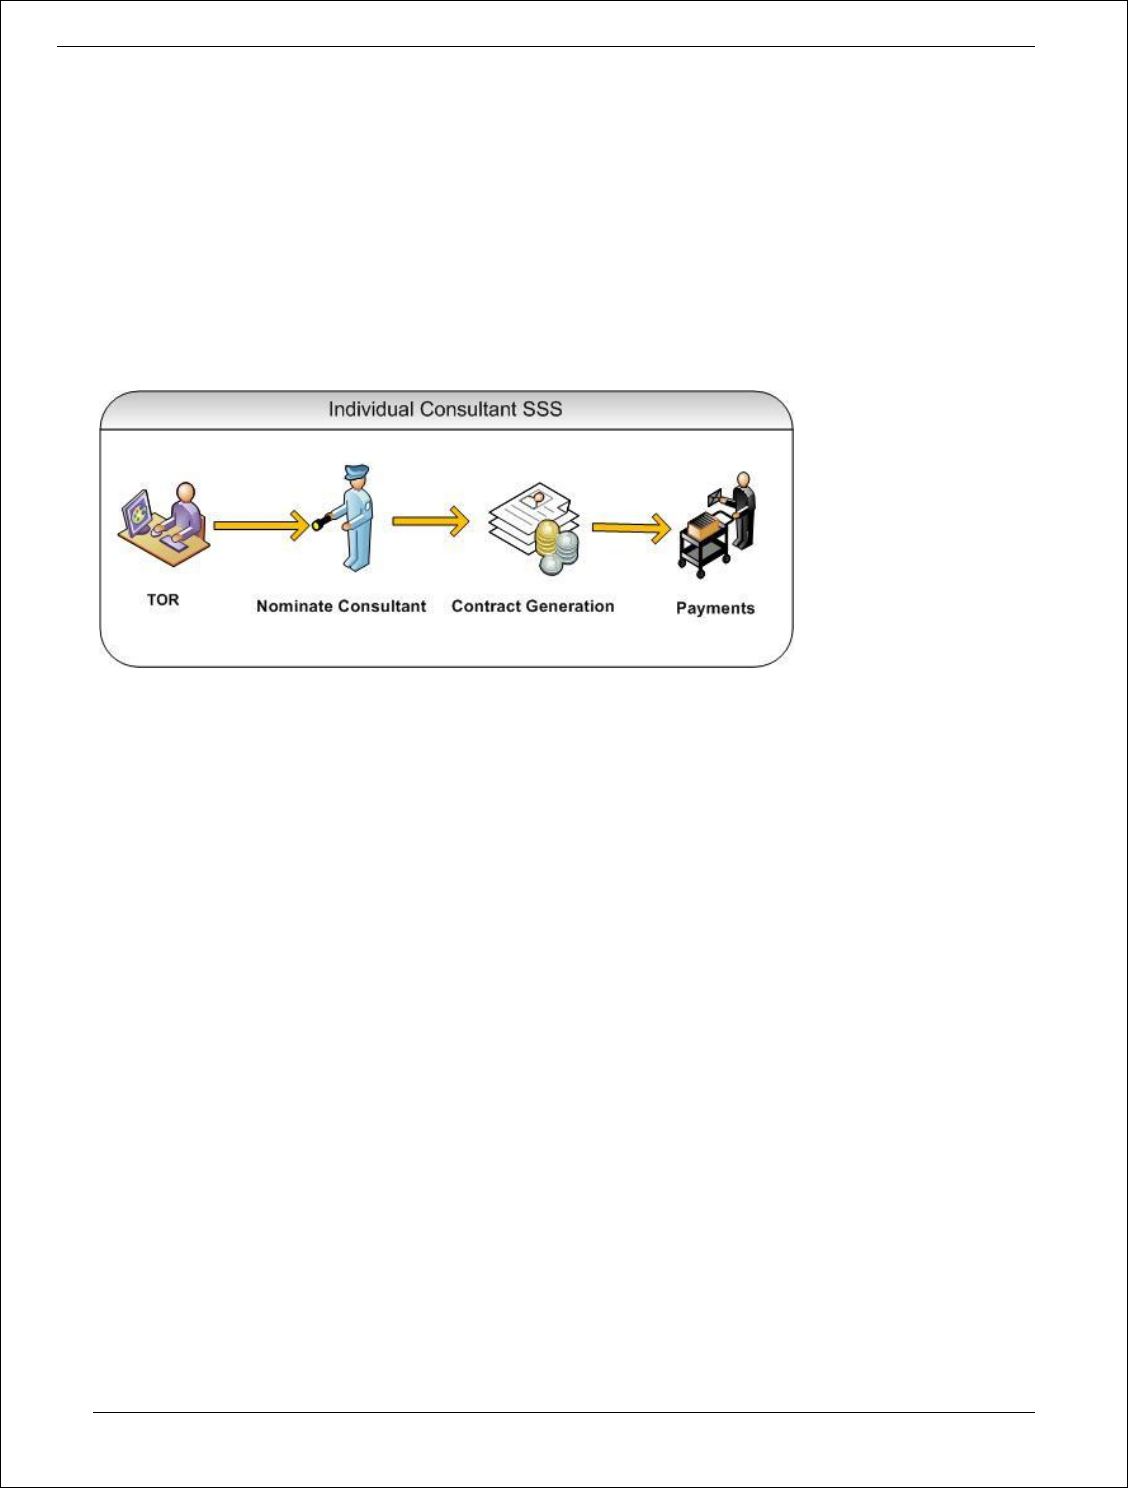
Procurement Management Support System – PMSS v1.0 User Guide
199
Individual Consultants – SSS
Purpose
This method is used for obtain services from individual consultant using Single Source Selection.
Process flow
Role(s)
o Procurement Coordinator (SPFU) – initiates and carries out the process of selection of providers.
Prerequisite
o Justification for the consultant should be prepared and duly signed.
o Other Prerequisites are similar to Individual Consultant – Competitive method.
Process Details
TOR
1. The steps on this stage are similar to Individual Consultant – Competitive method.
Shortlisting
In SSS method, there will be no short-listing process. Instead, justification for selection of consultant will
be uploaded in the system.
‘Shortlisting’ tab is selected by default.
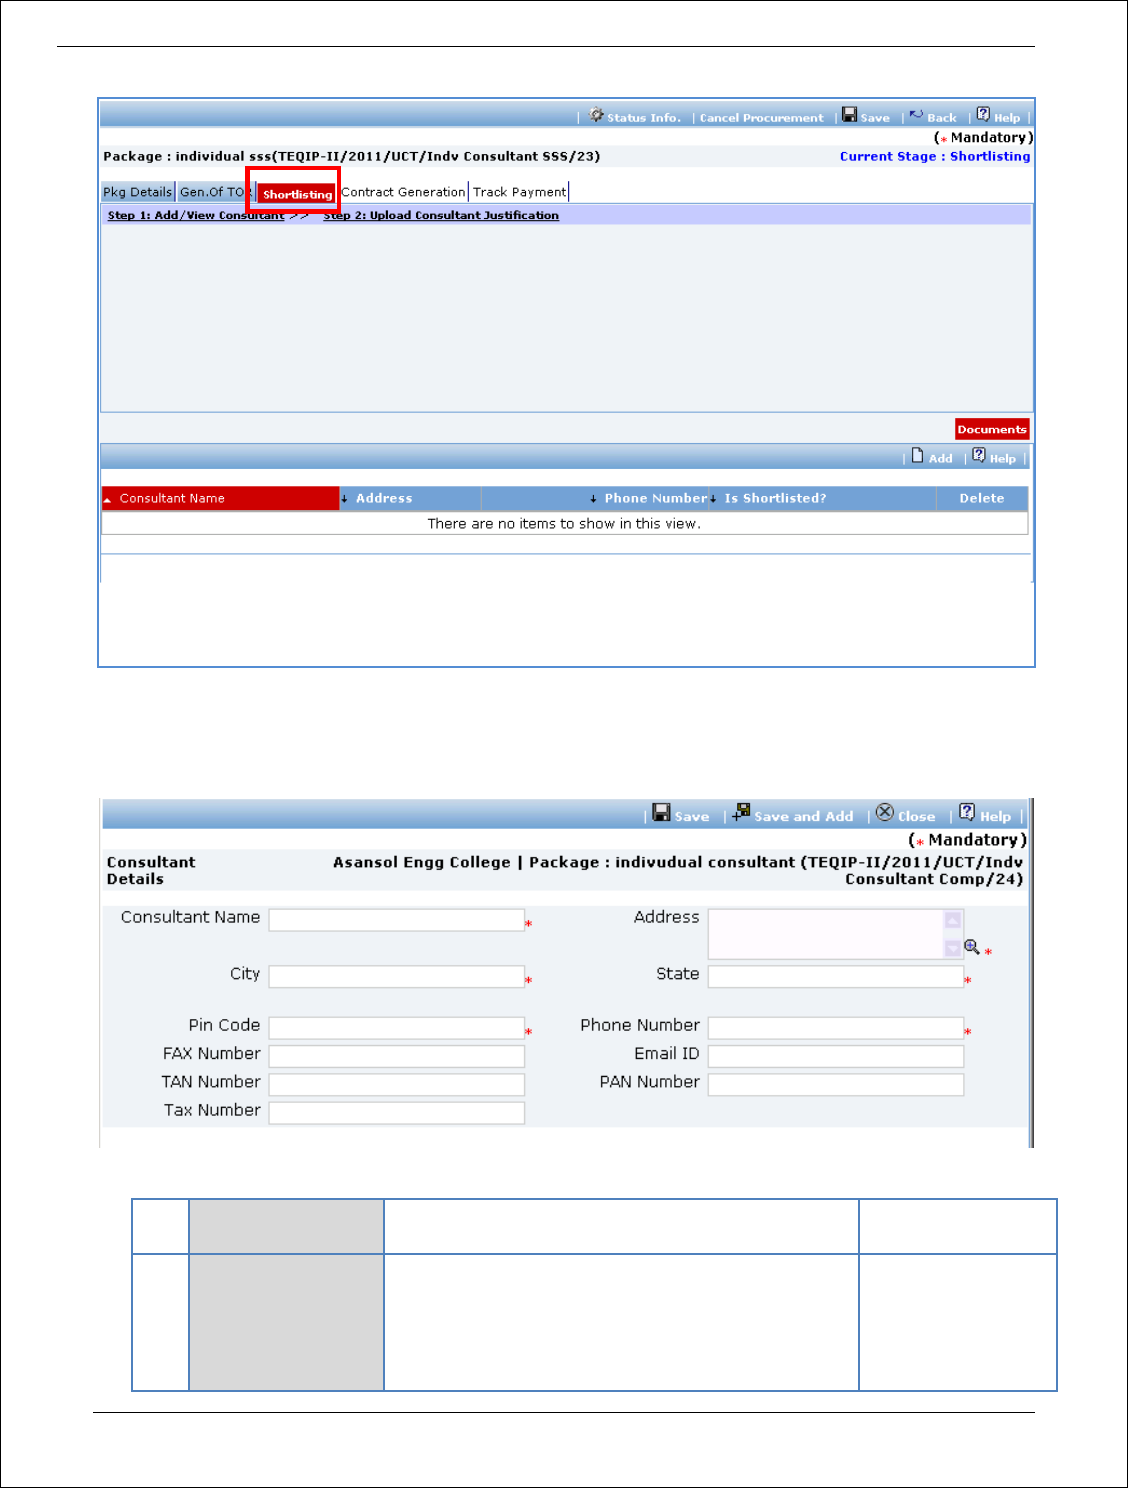
Procurement Management Support System – PMSS v1.0 User Guide
200
2. Click “Step 1: Add/View Consultants” link. Only one consultant can be uploaded. ‘Consultant
Details’ subtab is shown in the lower section.
a. Click ‘Add’, which is within the subtab. A pop up will be seen
b. Fill the fields on the page. Details of the fields are mentioned below;
Sr.
No.
Field Name
Field Description
Sample Data
1
Consultant Name
Enter Name of the consultant.
Consultant can also be searched using ‘Select
Consultant from PMSS Database’ link. Click on this
link will display the existing list of consultants, if
any. Once the list is displayed, click on the
ABC Consultants
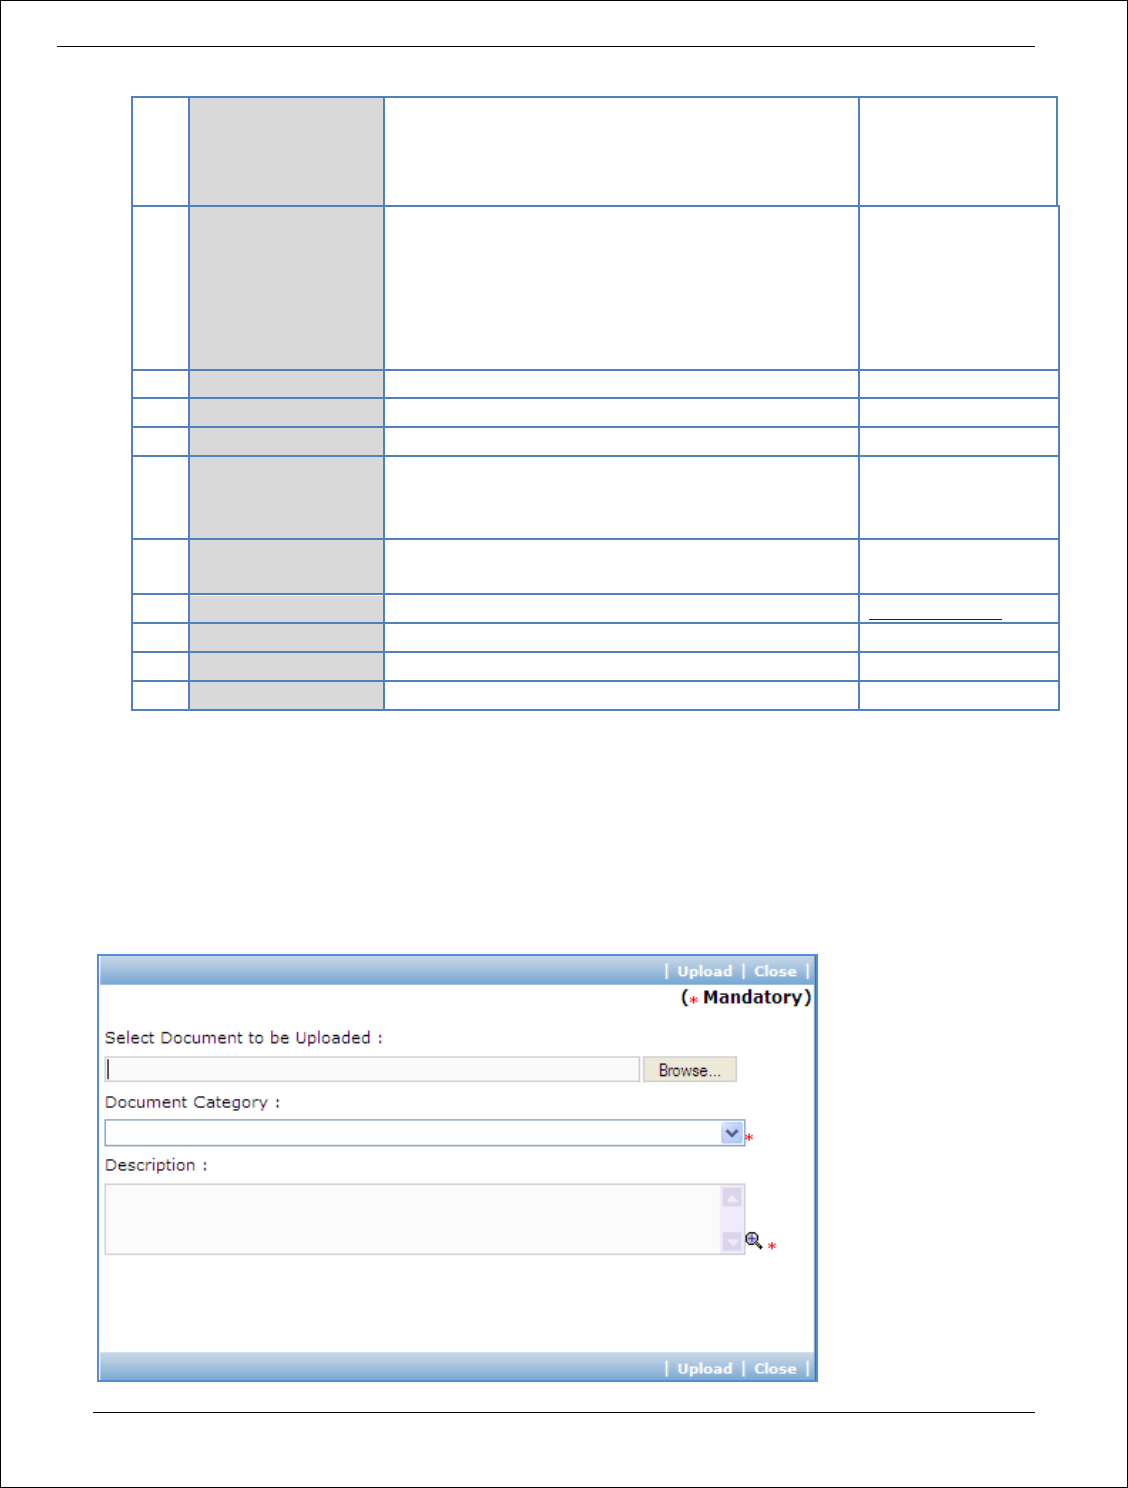
Procurement Management Support System – PMSS v1.0 User Guide
201
consultant’s name. This will auto populated the
selected consultant’s data. In order to search
additional consultants within the state or city use
the filters provided on the page.
2
Address
Enter the address of the Consultant
STI Towers,
Unit# 141/38,
Campus 29. RMZ
Millenia Business
Park.
881, Dr. MGR Road
3
City
Enter the city of the Consultant
Pune
4
State
Enter the state of the Consultant
Maharashtra
5
Pin Code
Enter the Pin Code of the Consultant
411232
6
Phone Number
Enter the Phone Number of the Consultant.
To enter more than one number use comma (,) as
a separator.
26422689
7
Fax Number
Enter the Fax Number of the Consultant.
26422680
8
Email ID
Enter the Email ID of the Consultant
ftti@efttil.com
9
PAN Number
Enter the PAN Number of the Consultant
ANS44874
10
TAN Number
Enter the TAN Number of the Consultant
11
Tax Number
Enter the TAX Number of the Consultant
c. Click ‘Save’.
3. Click “Step 4: Upload Consultant Justification” link. ‘Documents’ subtab is shown in the lower
section. It contains all documents uploaded in the system at various stages of the procurement.
4. Upload justification document explaining selection of the consultant for the contract.
a. Click ‘Add’ link, which is within the subtab. A popup will be seen

Procurement Management Support System – PMSS v1.0 User Guide
202
b. Fill the fields on the page. Details of the fields are mentioned below;
Sr.
No.
Field Name
Field Description
Sample Data
1
Document to be
uploaded
Browse the document that you want to upload.
2
Document
Category
Select the appropriate document category.
TOR
3
Description
Enter more information about the uploaded
document.
This is approved
TOR.
c. Click ‘Upload’ to upload the document in the system.
d. Uploaded document will appear on the list shown in ‘Documents’ section.
e. User can select and delete the document that has been uploaded in current stage of the
procurement. To delete a document, select ‘Delete’ checkbox against the document and click
‘Delete’ link.
5. On completion of ‘Shortlisting’ stage click on ‘Move to Next Stage’. This will move the procurement
to ‘Contract Generation’ stage.
Contract Generation
6. The steps on this stage are similar to Individual Consultant – Competitive method.
Track Payment
7. The steps on this stage are similar to Individual Consultant – Competitive method.

Procurement Management Support System – PMSS v1.0 User Guide
203
PRIOR REVIEWS OF PROCUREMENTS
User Guide – Prior Reviews
Chapter
9
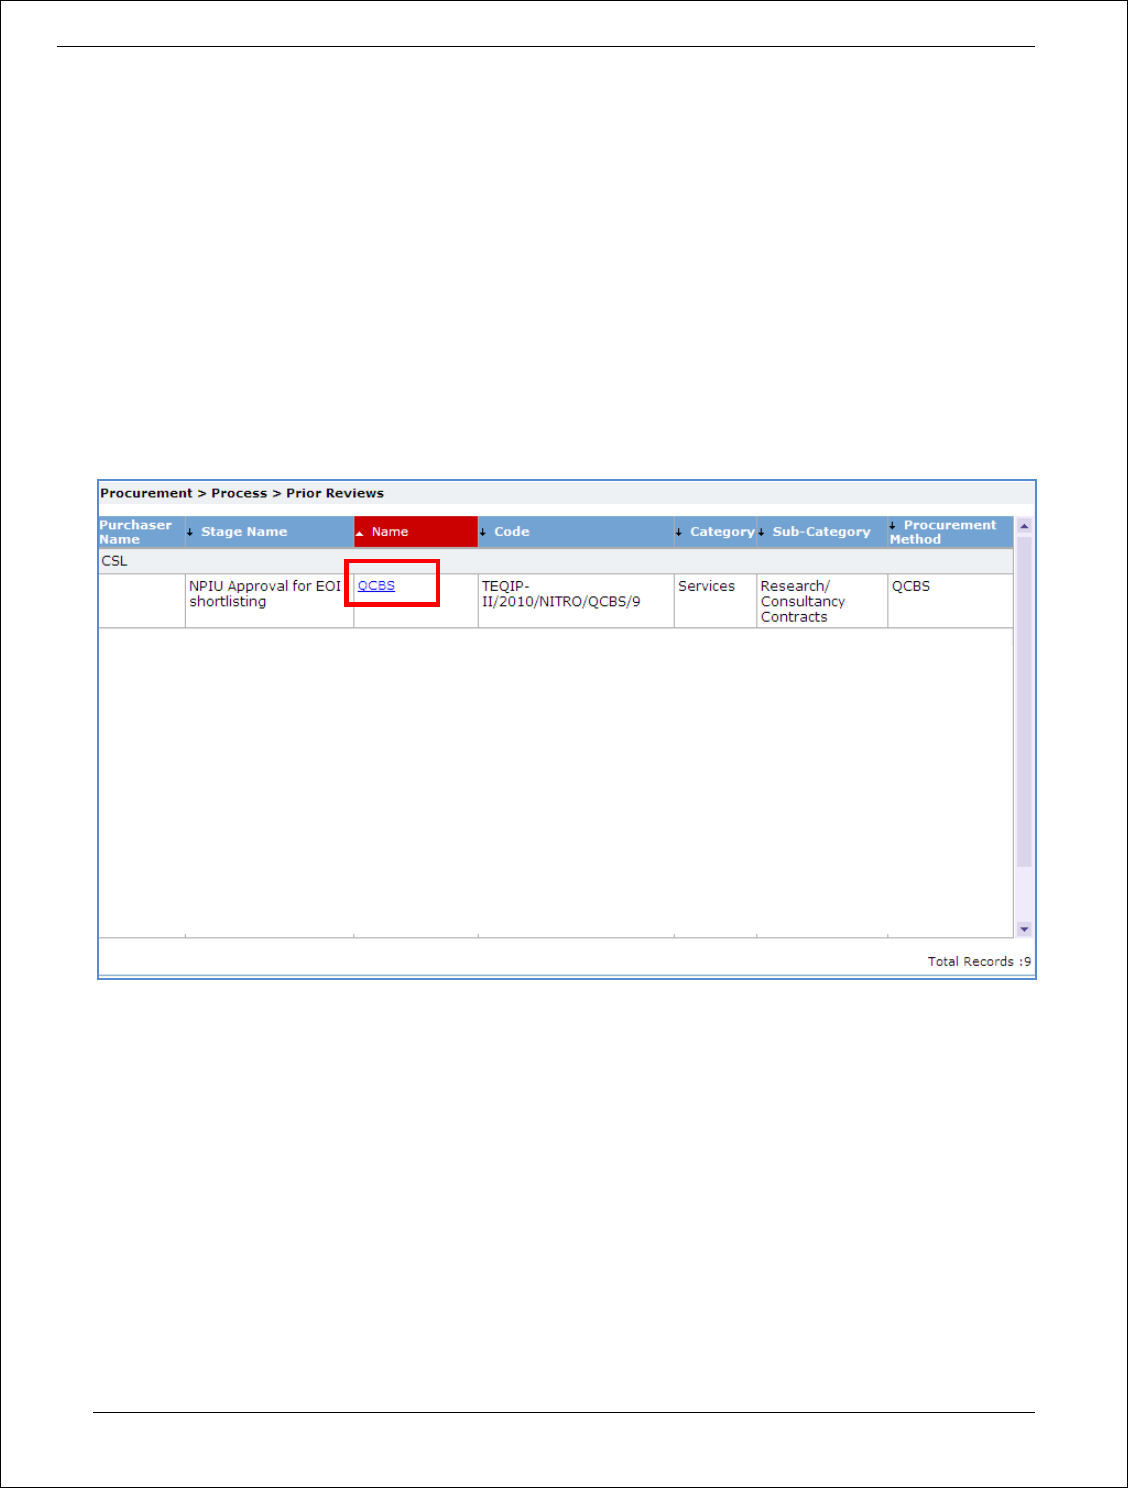
Procurement Management Support System – PMSS v1.0 User Guide
204
Prior Reviews
Purpose
In this module, procurements sent for prior review can be reviewed.
Role(s)
o Procurement Coordinator (SPFU) – submits a request.
Process Details
1. All procurements submitted for prior review will be listed. The list will be grouped on Institution
name.
2. Click on link at package name to view the details of the procurement.
3. Review the details on the page.
4. After you have completed the review,
a. Click ‘No Objection’ to give NOC to continue the process.
b. Click ‘Revise & Resubmit’ link if you wish to suggest changes. Suggestions can be
entered in the text area on Comments dialog box.

Procurement Management Support System – PMSS v1.0 User Guide
205
REQUEST/ QUERIES
User Guide – Request/ queries
Chapter
10
0
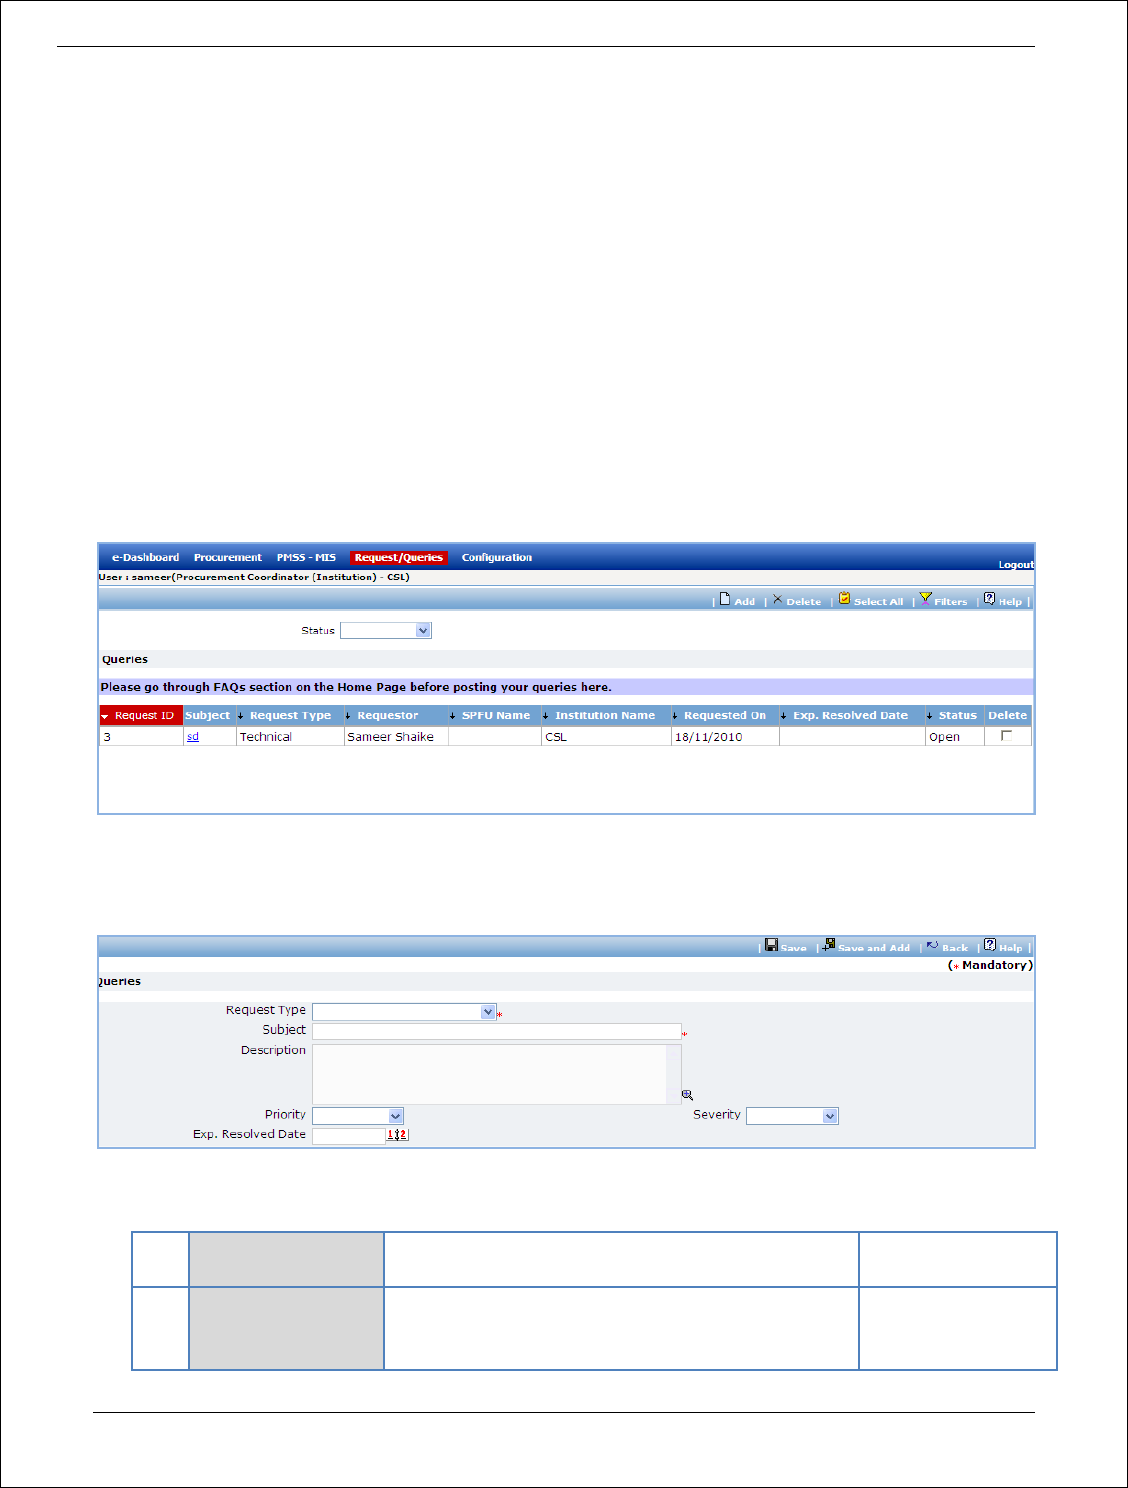
Procurement Management Support System – PMSS v1.0 User Guide
206
Request/ Queries
Purpose
This module is an interface used for answering the queries/ requests raised by the users.
Role(s)
o Procurement Coordinator (SPFU) – submits a request.
o Procurement Coordinator (NPIU) – reviews the request and resolves the request/query.
Process Details
1. Click ‘Add’ link to add new request. A popup will be seen;
a. Fill the fields on the page. Details of the fields are mentioned below;
Sr.
No.
Field Name
Field Description
Sample Data
1
Request Type
Select Request Type – Process Related or
Technical
Select ‘Process Related’ if the query is related to
Technical
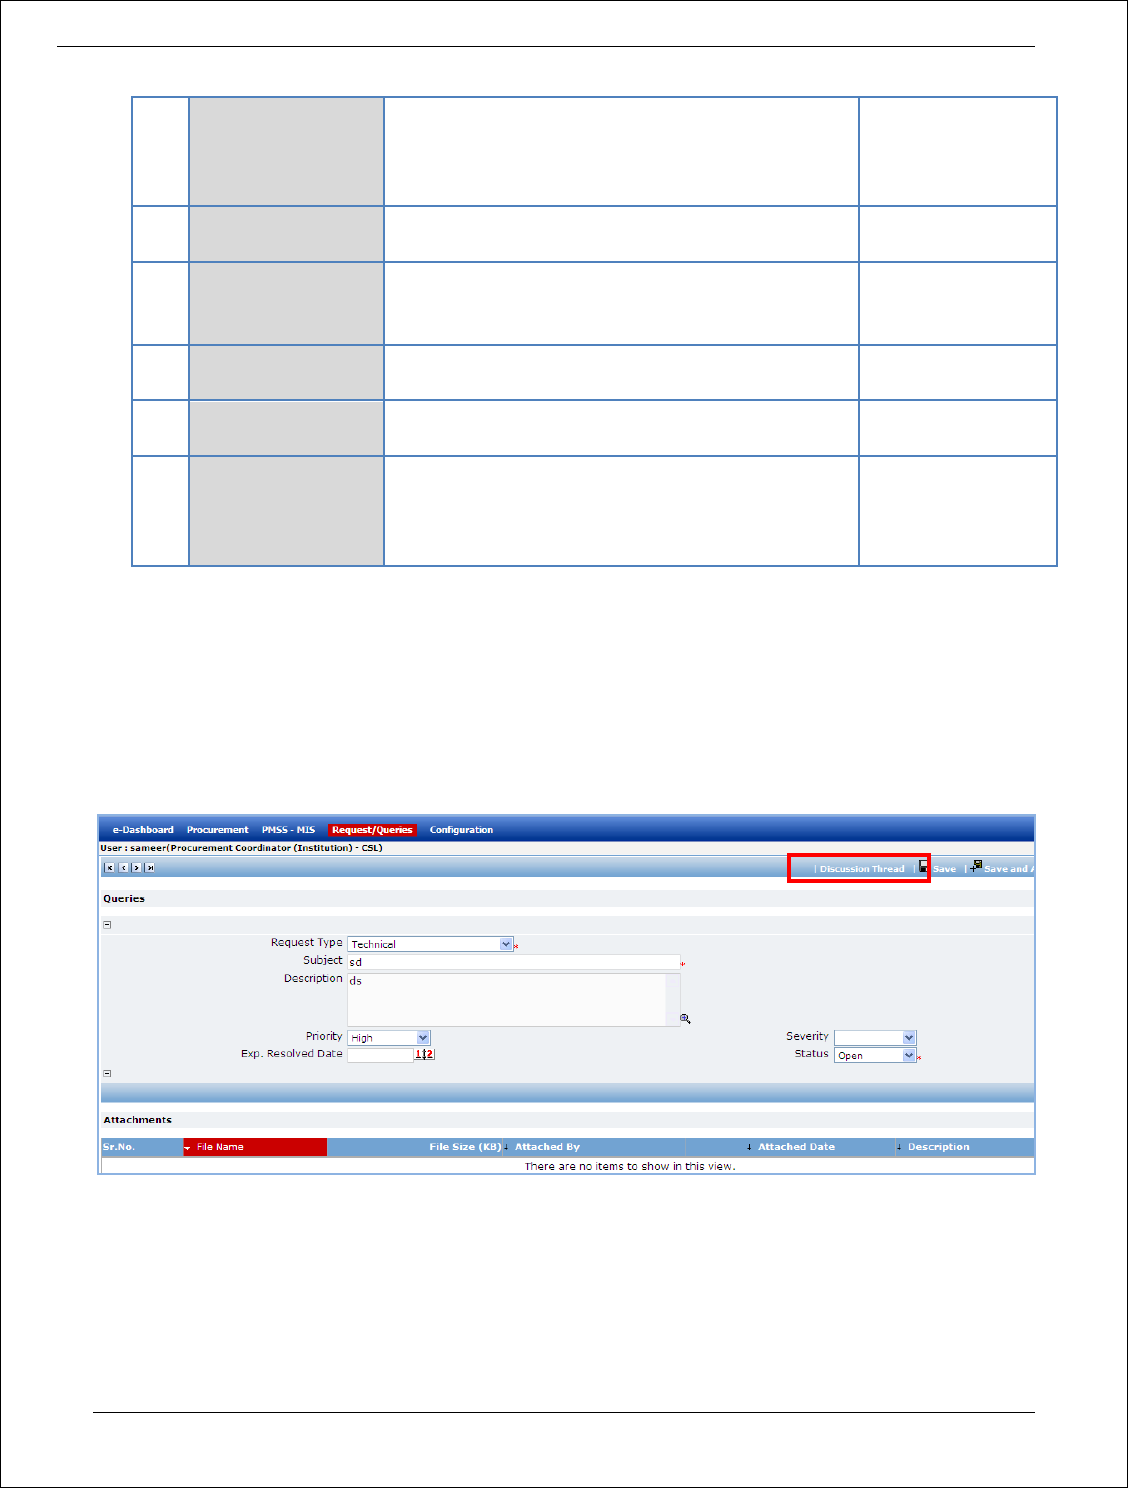
Procurement Management Support System – PMSS v1.0 User Guide
207
World Bank procurement process guidelines or
procurement manual.
Select ‘Technical’ if the query is related to the
PMSS Application.
2
Subject
Enter some brief description about the query as
subject.
Unable to add new
consultant
3
Description
Enter detailed description of the query. In case of
technical query, you should provide steps to the
problem or functionality.
4
Priority
Select severity – High, Medium or Low depending
on your priority or urgency to get the solution.
High
5
Severity
Select – Critical, Major or Minor depending on
criticality of the functionality
Critical
6
Exp. Resolution
Date
Enter date by which the query should be resolved.
Enter date in DD/MM/YYYY format or select date
using calendar.
23/03/2011
b. Click ‘Save’
2. User will be able to add attachment using the ‘Add Attachment’ link, if required.
3. Email will be sent to all the users of NPIU and SPFU.
4. All the users of NPIU will be able to see the request in the Request/ Queries module.
5. User can click on the request to see the details of the request.
6. User can provide his/ her comments (resolution) using the discussion thread or change
the status.
7. Click ‘Save’ if you change the status.
8. Email will be sent to the requestor.

Procurement Management Support System – PMSS v1.0 User Guide
208
9. The requestor can click on the request and see the comments (resolution) in discussion
thread.
10. If the user is satisfied with the resolution, he/ she can mark the status as ‘Closed’ else
the user can change the status to ‘Re-open’ and mention the comments (reason for re-
opening) in the discussion thread.
11. All the discussion threads will be recorded with the timestamp.

Procurement Management Support System – PMSS v1.0 User Guide
209
PMSS-MIS
User Guide – MIS
Chapter
11
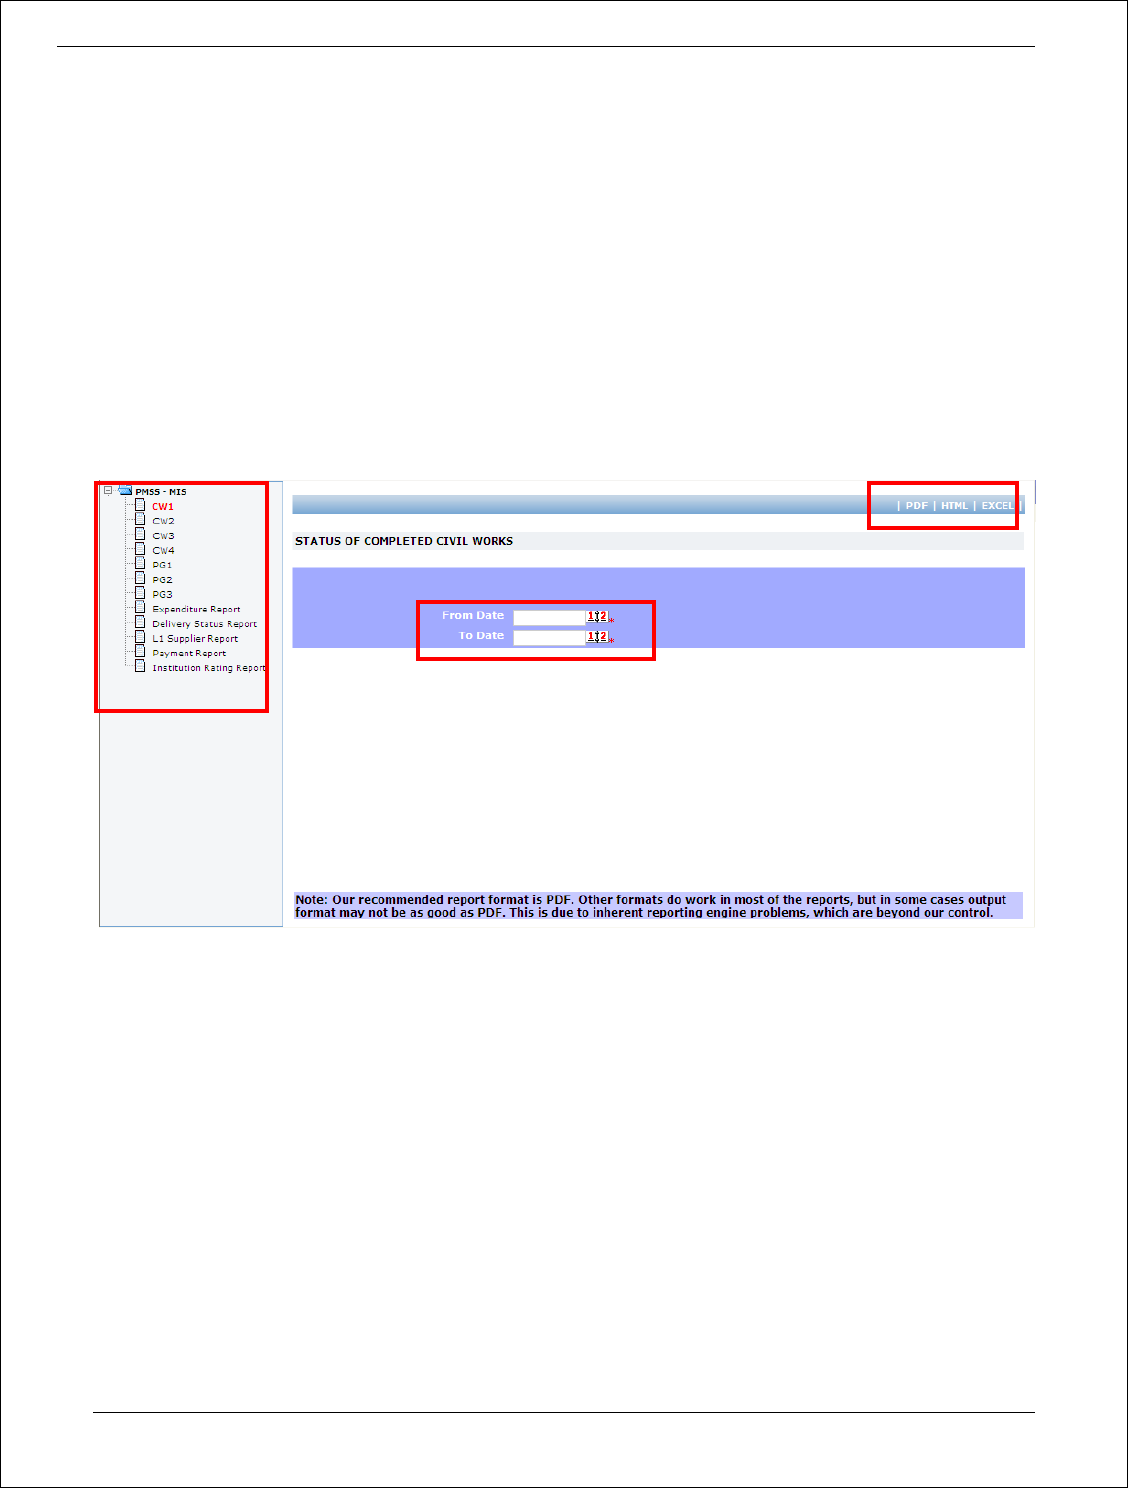
Procurement Management Support System – PMSS v1.0 User Guide
210
PMSS-MIS
Purpose
This module will be used to print reports.
Role(s)
o Procurement Coordinator
Process Details
1. Click on a link for the report that you want generate seen in left side navigation bar.
2. Specify the period for which the report should be generated. For e.g. for generating a report for
March, 2010, enter ‘01/03/2010’ as ‘From Date’ and ‘31/03/2010’ as ‘To Date’.
3. Click on the format in which the report should be generated. Report can be generated in any of the
three formats PFD, HTML and Excel.

Procurement Management Support System – PMSS v1.0 User Guide
211
Procurement Management Support System – PMSS
Thank You
