QSG_Doro_2424_en_A3(A7)_v20(2041,2051,2061)_20171221 2424 Quick Start Guide QSG En
User Manual: Pdf 2424 - Quick Start Guide User Guide for Doro Mobile Phone, Free Instruction Manual
Open the PDF directly: View PDF ![]() .
.
Page Count: 2
www.doro.com
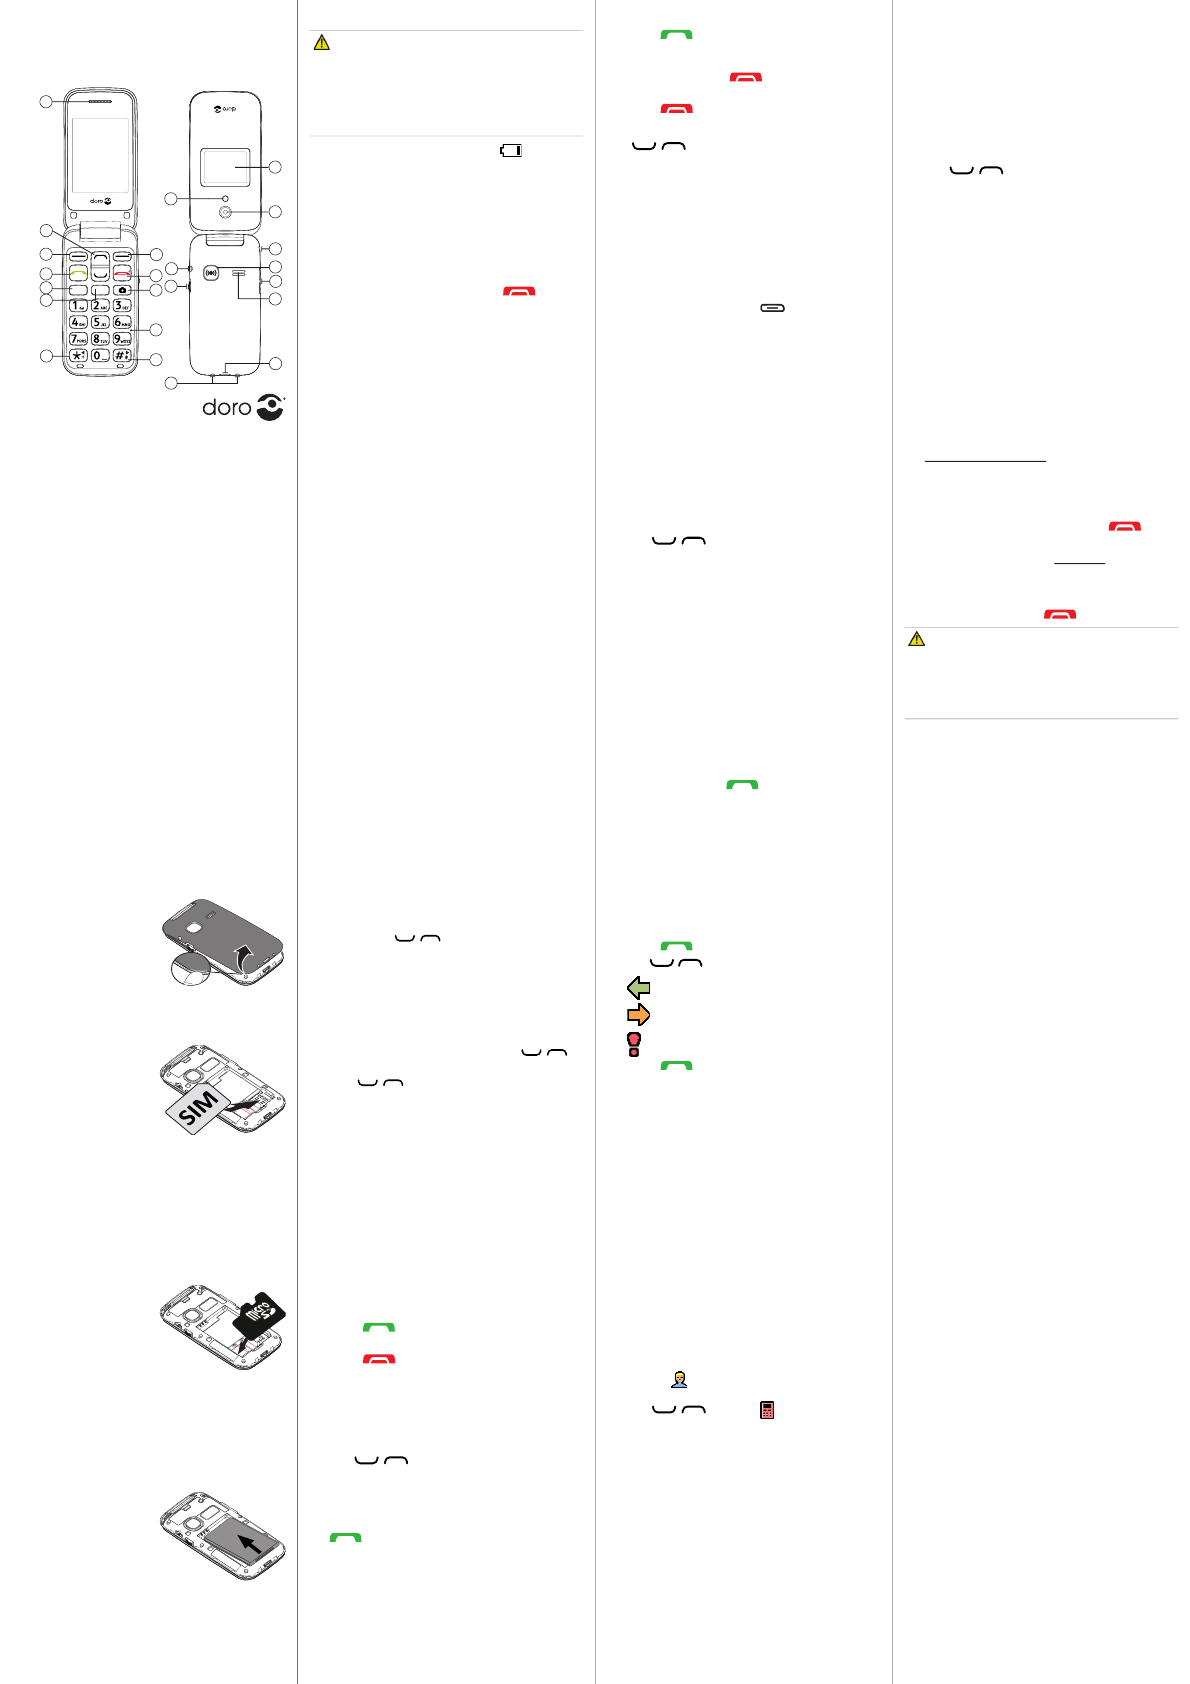
Insert SD card (optional)
GB
Locate the SD card holder
and gently slide the card
in the holder.
Note! The circuit
boards (metal part) on
the cards must not be
scratched or bent. Try
not to touch the circuits with your ngers.
Use only compable memory cards with
this device. Compable card type: microSD,
microSDHC. Incompable cards may damage
the card itself, the device and corrupt any
data stored on the card.
Insert the baery by
sliding it into the baery
compartment with the
circuits facing up to the
le. Replace the baery
cover.
3. CALLS
Make a call
1. Enter the phone number. Delete with Clear.
2. Press to dial. Press Abort to cancel
the call.
3. Press to end the call.
Note! For internaonal calls, always use +
before the country code for best operaon.
Press * twice for the internaonal prex +.
Call from the phonebook
1. Press Name to open the phonebook.
2. Use / to scroll through the
phonebook, or quick search by pressing the
key corresponding to the rst leer of the
name.
3. Press â Call, alternavely, press
to dial the selected entry, or press
Back to return to standby.
4. PHONEBOOK
The Phonebook can store 300 entries with 1
phone numbers in each entry.
Add a contact
1. Press Menu â Phonebook â
-New contact- â OK.
2. Enter a Name for the contact, see “Enter
text”. Delete with Clear.
3. Use / to select Number and
enter the phone number.
4. When done, press Save.
Doro 2424
Quick Start Guide
1. Speaker
2. Scroll buons
3. Le selecon buon
4. Call key
5. Speed dial A
6. Speed dial B
7. Internaonal prex/
symbols/*/8
8. Right selecon
buon
9. End call /
Power on/
10. Camera key
11. Microphone
12. Silent /
Input method/#/9
13. Torch/Camera ash
14. Headset socket
15. Torch key
16. Charging cradle
connectors
17. External display
18. Camera lens
19. Lanyard hold
20. Assistance buon
21. Volume
22. Loudspeaker
23. Charging socket
1. GET STARTED
Be careful not to damage
your ngernails when
you remove the baery
cover. Do not bend or
twist the baery cover
excessively as it may be
damaged.
Insert SIM card (required)
Remove the baery if it
is already installed. Slide
the card under the metal
part, with the gold-col-
oured circuit board facing
down. The cut-o corner
of the card helps you to
place the card, correct placement is indicated
in the compartment.
Note! This device accepts micro SIM or 3FF
SIM card. Use of incompable SIM cards
may damage the card or the device, and may
corrupt data stored on the card.
Charge the phone
CAUTION
Only use baeries, charger and accessories
that have been approved for use with
this parcular model. Connecng other
accessories may be dangerous and may
invalidate the phone’s type approval and
guarantee.
When the baery is running low, is
displayed and a warning signal is heard.
• Connect the mains adapter to the wall
socket and to the charging socket y.
Tip: Don’t forget to remove the protecve
plasc lm from the display.
2. GET TO KNOW YOUR PHONE
Turn the phone on and off
1. Press and hold the red buon on the
phone to turn it on/o. Conrm with Yes to
power o.
2. If the SIM card is valid but protected with a
PIN code (Personal Idencaon Number),
PIN is displayed. Enter the PIN code and
press OK. Delete with Clear.
Note! If PIN and PUK codes were not provided
with your SIM card, please contact your
service provider.
shows the number of PIN aempts
le. When no more aempts remain, PIN
blocked is displayed. The SIM card must now
be unlocked with the PUK code (Personal
Unblocking Key).
1. Enter the PUK code and conrm with OK.
2. Enter a new PIN code and conrm with OK.
3. Re-enter the new PIN code and conrm
with OK.
Start-up wizard
When starng the telephone for the rst me,
you can use the start-up wizard to set some
basic sengs.
Tip: You can run the start-up wizard later if
you want.
In this document the arrow (â) indicates next
acon in the step-by-step instrucons.
To conrm an acon in the phone, press OK.
To select an item, scroll vercally or highlight
the item using / and then press OK.
To scroll horisontally, use * (8 ) or # ( 9).
Enter text
• Press a numerical key repeatedly unl the
desired character is shown. Wait a few
seconds before entering the next character.
• Press * for a list of special characters.
Select the desired character with /
and press OK to enter it.
• Use / to move the cursor within the
text.
• Press # to cycle upper case, lower case and
numerals.
Change language, time and date
The default language is determined by the SIM
card.
Receive a call
1. Press to answer, or press Silent to
switch o the ring signal and then Reject
(busy signal).
Alternately, press to reject the call
directly.
2. Press to end the call.
Volume control
Use / to adjust the sound volume
during a call. The volume level is indicated on
the display.
Silent
Silent is a xed prole with keypad tone,
message tone and ring tone disabled, while
vibraon, tasks and alarm are unchanged.
• Press and hold # to acvate and to
deacvate silent.
Call options
During a call the so keys ( ) give access to
addional funcons.
Speed dial
Use 2–9 to speed dial an entry from standby.
• Press and hold the corresponding buon to
dial.
Add speed dial numbers
1. Press Menu â Phonebook â.
2. Use / to scroll through the
phonebook, or quick search by pressing the
key corresponding to the rst leer of the
name.
3. â â â
Speed dial â Set number.
4. Select 2 â Edit and select an entry from
the phonebook.
5. Press OK to conrm.
6. Repeat to add speed dial entries for buons
2–9.
SOS calls
As long as the phone is switched on, it is always
possible to place an SOS call by entering the
main local emergency number for your present
locaon followed by .
Received, missed, and dialled calls are saved in
a combined call log. 20 calls of each type can
be stored in the log. For mulple calls related
to the same number, only the most recent call
is saved.
1. Press .
2. Use / to scroll through the call log.
= Received call
= Dialled call
= Missed call
3. Press to dial, or .
In the event of a trauma, it is crical to have
this informaon as early as possible to increase
the chances of survival. Add ICE contact to
improve your own safety. First responders
can access addional informaon such as
medicaon and next of kin from your phone in
case of an emergency. All elds are oponal,
but the more informaon provided the beer.
Press Menu â Phonebook â ICE.
1. Use / to scroll the list of entries.
2. Press Edit to add or edit informaon in each
entry. Delete with Clear.
3. Press Save when done.
5. ASSISTANCE BUTTON
The assistance buon allows easy access to
contact your predened help numbers should
you need help. Make sure that the assistance
funcon is acvated before use and make all
necessary conguraons.Test the applicaon
thoroughly.
Make an assistance call
1. When help is needed, press and hold the
assistance buon for 3 seconds, or press it
twice within 1 second.
The assistance call begins aer a delay of
5 seconds. In this me you can prevent a
possible false alarm by pressing .
2. An assistance text message (SMS) is sent to
all recipients. The rst recipient in the list
is dialled. If the call is not answered within
25 seconds, the next number is dialled.
Dialling is repeated 3 mes or unl the call
is answered, or unl is pressed.
CAUTION
When an assistance call is acvated the phone
is pre-set to handsfree mode. Do not hold
the device near your ear when the handsfree
mode is in use, because the volume may be
extremely loud.
Settings
• Press Menu â â Assistance.
6. MESSAGES
Create and send text messages
1. Press Menu â Messages â Write
message.
2. Write your message.
3. Then press â To.
4. Select a recipient with Add from Phonebook.
Alternavely, select Enter number to add
recipient manually and press OK.
5. You can modify the recipients by selecng
one and press â Edit/Delete/
Delete all.
6. When done, press â Send.
Create and send picture messages
Both you and the recipient must have sub-
scripons that support picture message. The
sengs for picture message are supplied by
your service provider and can be sent to you
automacally via text message.Press Menu â
Messages â MMS.
1. Write your message.
2. Press â Add picture:
• to select a le.
Note! To keep best picture quality, send only
one picture per message.
You can also Add sound, Add video, and
Preview MMS using the menu.
3. Press â Add subject and enter
your subject, then press Done.
4. Press â To and select select a
recipient with Add from Phonebook.
Alternavely, select Enter recipient to add
recipient manually and press OK.
5. When done, press â Send.
Settings
• Press Menu â Messages â Messages â
SMS / MMS.
English
Note! All illustraons are for illustrave
purposes only and may not accurately depict
the actual device. This guide is for reference
only. The actual device and the items supplied,
including but not limited to the colour, size,
and screen layout, may vary depending on
the soware and accessories available in your
region or oered by your service provider.
Supplied accessories provide the best
performance with your phone. Your local Doro
dealer provides addional accessories.
A B
1
8
9
10
6
11
12
20
22
23
16
3
4
5
7
2
15
14
19
21
13
17
18
Doro 2424
DFC-0160 (2041,2051,2061)
QSG
English
QSG_Doro_2424_en_A3(A7)_v20(2041,2051,2061)
7.
1. Press shortcut buon
or press Menu â Camera.
2. Press to take the photo.
3. Press to reach more sengs.
4. Press Back to return to standby.
Camera settings
• Press Menu â Camera ââ.
8. BLUETOOTH®
You can connect wirelesses to other Bluetooth®
compable devices such as headsets or other
phones.
Important!
When you are not using Bluetooth® connecv-
ity, turn o or . Do not pair
with an unknown device.
®
1. Press Menu â â â
Bluetooth.
2. Press â On to acvate.
Search device
1. Press Menu â â â
Bluetooth â .
2. Press Search new.
3. Select a device from the list and press Bond
to connect. If Bluetooth® is not enabled,
press Yes to acvate.
4. Press OK to conrm.
9. SOUND & DISPLAY
Tone setup
1. Press Menu â â Sound â
Tone setup â Ringtone.
2. Use / to select one of the available
melodies, the melody will be played.
3. Press OK to conrm or Back to discard
changes.
LCD backlight
Customise the display sengs.
1. Press Menu â â Phone setup â
LCD backlight:
• Set Brightness 1-5 using * (down) and
# (up), 3 is the default value.
• Set Time 5-60 seconds using * (down)
and # (up).
2. Press OK to conrm.
11. TROUBLESHOOTING
Phone cannot be switched on
Connect the power adapter
and charge the baery.
Check the installaon of the
baery.
Check the baery and charger.
-
tures < 0°C or > 40°C
Improve the charging
environment.
to phone or power socket
Check the charger
connecons.
PIN code not accepted
Wrong PIN code entered too
Enter the PUK code to change
the PIN code, or contact the
service provider.
SIM card error
SIM card damaged
Check the condion of the
SIM card. If it is damaged,
contact the service provider.
Check the installaon of the
SIM card. Remove the card
and reinstall it.
Wipe the contact surfaces
of the SIM card with a clean
cloth.
Failure to connect to network
SIM card invalid Contact the service provider.
No coverage of GSM service Contact the service provider.
Failure to add a contact
Delete contacts to free up
memory.
subscribed from network Contact the service provider.
12. SAFETY INSTRUCTIONS
WARNING
The unit and the accessories can contain small parts. Keep all of
the equipment out of the reach of small children.
The mains adapter is the disconnect device between the product
and mains power. The mains socket outlet must be close to the
equipment and easily accessible.
Network services and costs
Your device is approved for use on the GSM 900/1800 MHz
networks. To use the device, you need a subscripon with a
service provider.
Using network services may result in trac costs. Some
product features require support from the network, and you
may need to subscribe to them.
Operating environment
Follow the rules and laws that apply wherever you are, and
always turn o the unit whenever its use is prohibited or can
cause interference or hazards. Only use the unit in its normal
user posion.
Parts of the unit are magnec. The unit can aract metal
objects. Do not keep credit cards or other magnec media near
the unit. There is a risk that informaon stored on them can be
erased.
Medical units
The use of equipment that transmits radio signals, for example,
mobile phones, can interfere with insuciently protected
medical equipment. Consult a doctor or the manufacturer
of the equipment to determine if it has adequate protecon
against external radio signals, or if you have any quesons. If
noces have been put up at health care facilies instrucng
you to turn o the unit while you are there, you should comply.
Hospitals and other health care facilies somemes use
equipment that can be sensive to external radio signals.
Implanted medical devices
To avoid potenal interference, manufacturers of implanted
medical devices recommend a minimum separaon of 15 cm
between a wireless device and the medical device. Persons
who have such devices should:
• Always keep the wireless device more than 15 cm from the
medical device.
• Not carry the wireless device in a breast pocket.
• Hold the wireless device to the ear opposite the medical device.
If you have any reason to suspect that interference is taking
place, turn the phone o immediately. If you have any
quesons about using your wireless device with an implanted
medical device, consult your health care provider.
Areas with explosion risk
Always turn o the unit when you are in an area where there
is a risk of explosion. Follow all signs and instrucons. There is
a risk of explosion in places that include areas where you are
normally requested to turn o your car engine. In these areas,
sparks can cause explosion or re which can lead to personal
injury or even death.
Turn o the unit at lling staons, and any other place that has
fuel pumps and auto repair facilies.
Follow the restricons that apply to the use of radio equipment
near places where fuel is stored and sold, chemical factories
and places where blasng is in progress. Areas with risk for
explosion are oen – but not always – clearly marked. This
also applies to below decks on ships; the transport or storage
of chemicals; vehicles that use liquid fuel (such as propane or
butane); areas where the air contains chemicals or parcles,
such as grain, dust or metal powder.
This product contains a Li-ion baery. There is a risk of re and
burns if the baery pack is handled improperly.
WARNING
Danger of explosion if baery is incorrectly replaced. To reduce
risk of re or burns, do not disassemble, crush, puncture, short
external contacts, expose to temperature above 60° C (140° F),
or dispose of in re or water. Recycle or dispose of used baeries
according to the local regulaons or reference guide supplied
with your product.
WARNING
Excessive exposure to loud sounds can cause
hearing damage.
Exposure to loud sounds while driving may distract
your aenon and cause an accident.
Listen to a headset at a moderate level, and do not hold the
device near your ear when the loudspeaker is in use.
Important!
Mobile phones use radio signals, the mobile phone network, the
terrestrial network and user-programmed funcons. This means
that connecon cannot be guaranteed in all circumstances.
Therefore, never rely only on a mobile phone for very important
calls such as medical emergencies.
Vehicles
Radio signals can aect electronic systems in motor vehicles
(for example, electronic fuel injecon, ABS brakes, automac
cruise control, air bag systems) that have been incorrectly
installed or are inadequately protected. Contact the manufac-
turer or its representave for more informaon about your
vehicle or any addional equipment.
Do not keep or transport ammable liquids, gases or explosives
together with the unit or its accessories.
For vehicles equipped with air bags: Remember that air bags ll
with air with considerable force. Do not place objects, including
xed or portable radio equipment in the area above the airbag
or the area where it might expand. Serious injuries may be
caused if the mobile phone equipment is incorrectly installed
and the airbag lls with air.
It is prohibited to use the unit in ight. Turn o the unit before
you board a plane. Using wireless telecom units inside a plane
can pose risks to air safety and interfere with telecommunica-
ons. It may also be illegal.
13. CARE AND MAINTENANCE
Your unit is a technically advanced product and should be
treated with the greatest care. Negligence may void the
warranty.
• Protect the unit from moisture. Rain/snowfall, moisture and
all types of liquid can contain substances that corrode the
electronic circuits. If the unit gets wet, you should remove the
baery and allow the unit to dry completely before you replace
it.
• Do not use or keep the unit in dusty, dirty environments. The
unit’s moving parts and electronic components can be damaged.
• Do not keep the unit in warm places. High temperatures can
reduce the lifespan for electronic equipment, damage baeries
and distort or melt certain plascs.
• Do not keep the unit in cold places. When the unit warms up
to normal temperature, condensaon can form on the inside
which can damage the electronic circuits.
• Do not try to open the unit in any other way than that which is
indicated here.
• Do not drop the unit. Do not knock or shake it either. If it is
treated roughly the circuits and precision mechanics can be
broken.
• Do not use strong chemicals to clean the unit.
The advice above applies to the unit, baery, mains adapter
and other accessories. If the phone is not working as it should,
please contact the place of purchase for service. Don’t forget
the receipt or a copy of the invoice.
14. WARRANTY
This product is guaranteed for a period of 24 months from
the date of purchase. In the unlikely event of a fault occurring
during this period, please contact the place of purchase. Proof
of purchase is required for any service or support needed
during the guarantee period.
This guarantee will not apply to a fault caused by an accident
or a similar incident or damage, liquid ingress, negligence,
abnormal usage, non-maintenance or any other circumstances
on the user’s part. Furthermore, this guarantee will not apply
to any fault caused by a thunderstorm or any other voltage
uctuaons. As a maer of precauon, we recommend discon-
necng the charger during a thunderstorm.
Baeries are consumables and are not included in any
guarantee. This guarantee does not apply if baeries other
than DORO original baeries are used.
Please note that this is a voluntary manufacturer’s warranty
and provides rights in addion to, and does not aect statutory
rights of end-users.
15. COPYRIGHT AND OTHER NOTICES
© 2017 Doro AB. All rights reserved.
Bluetooth® is a registered trademark of Bluetooth SIG, inc.
eZiType™ is a trademark of Zi Corporaon.
vCard is a trademark of the Internet Mail Consorum.
microSD is a trademark of SD Card Associaon.
The contents of this document are provided “as is”. Except as
required by applicable law, no warranes of any kind, either
express or implied, including, but not limited to, the implied
warranes of merchantability and tness for a parcular
purpose, are made in relaon to the accuracy, reliability or
contents of this document. Doro reserves the right to revise
this document or withdraw it at any me without prior noce.
Other product and company names menoned herein may be
the trademarks of their respecve owners.
Any rights not expressly granted herein are reserved. All other
trademarks are property of their respecve owners.To the
maximum extent permied by applicable law, under no circum-
stances shall Doro or any of its licensors be responsible for any
loss of data or income or any special, incidental, consequenal
or indirect damages howsoever caused.
Doro does not provide a warranty for or take any responsi-
bility for the funconality, content, or end-user support of
third-party apps provided with your device. By using an app,
you acknowledge that the app is provided as is. Doro does
not make any representaons, provide a warranty, or take
any responsibility for the funconality, content, or end-user
support of third-party apps provided with your device.
The unauthorised copying of copyrighted materials is contrary
to the provisions of the Copyright Laws of the United States
and other countries. This device is intended solely for copying
non-copyrighted materials, materials in which you own the
copyright, or materials which you are authorised or legally
permied to copy. If you are uncertain about your right to copy
any material, please contact your legal advisor.
16. TECHNICAL DATA
Specifications
Network bands (MHz)
power/dBm]: 2G GSM
900 [33], 1800 [30]
Bluetooth (MHz) [maximum
dBm]:
3.0 (2402 - 2480) [10]
Dimensions: 103 mm x 52 mm x 19 mm
Weight: 92 g (including baery)
3,7 V/800 mAh Li-ion baery
temperature:
Min: 0°C (32°F)
Max: 40°C (104°F)
Charging ambient
temperature:
Min: 0°C (32°F)
Max: 40°C (104°F)
Storage temperature: Min: -20°C (-4°F)
Max: 60°C (140°F)
Specific Absorption Rate (SAR)
This device meets applicable internaonal safety require-
ments for exposure to radio waves. Your mobile device is a
radio transmier and receiver. It is designed not to exceed the
limits for exposure to radio waves (radio frequency electromag-
nec elds) recommended by internaonal guidelines from
the independent scienc organizaon ICNIRP (Internaonal
Commission of Non-Ionizing Radiaon Protecon).
The radio wave exposure guidelines use a unit of measurement
known as the Specic Absorpon Rate, or SAR. The SAR limit
for mobile devices is 2 W/kg averaged over 10 grams of ssue
and include a substanal safety margin designed to assure the
safety of all persons, regardless of age and health.
Tests for SAR are conducted using standard operang posions
with the device transming at its highest cered power level
in all tested frequency bands. The highest SAR values under the
ICNIRP guidelines for this device model are:
Head SAR: 0.873 W/kg
Body SAR: 0.637 W/kg
During normal use, the SAR values for this device are usually
well below the values stated above. This is because, for
purposes of system eciency and to minimize interference
on the network, the output power of your mobile device is
automacally decreased when full power is not needed for the
call. The lower the power output of the device, the lower its
SAR value.
This device meets RF exposure guidelines when used against
the head or when posioned at least 0.5 cm away from the
body. When a carry case, belt clip or other form of device
holder is used for body-worn operaon, it should not contain
metal and should provide at least the above stated separaon
distance from the body.
The World Health Organizaon (WHO) has stated that current
scienc informaon does not indicate the need for any special
precauons when using mobile devices. If you are interested
in reducing your exposure, they recommend you reduce your
usage or use a hands-free accessory to keep the device away
from your head and body.
Correct disposal of this product
(Waste Electrical & Electronic Equipment)
(Applicable in countries with separate collecon
systems)
This marking on the product, accessories or manual
indicates that the product and its electronic accessories
(e.g. charger, headset, USB cable) should not be disposed
of with other household waste. To prevent possible harm to
the environment or human health from uncontrolled waste
disposal, please separate these items from other types of waste
and recycle them responsibly to promote the sustainable reuse
of material resources.
Household users should contact either the retailer where they
purchased this product, or their local government oce, for
details of where and how they can take these items for envi-
ronmentally safe recycling. Business users should contact their
supplier and check the terms and condions of the purchase
contract. This product and its electronic accessories should
not be mixed with other commercial wastes for disposal. This
product is RoHS compliant.
10. ADDITIONAL FUNCTIONS
Alarm
1. Press Menu â Organiser â Alarm â On.
2. Enter the alarm me using the keypad and
press OK to conrm.
• Single, for a single occurrence
• Repeated, for a repeated alarm. Scroll
through the list of days and press On or
to enable or to disable for each day.
3. When done, press OK.
4. When the alarm goes o a signal will sound.
Press Stop to turn o the alarm or press
Snooze to repeat the alarm aer 9 minutes.
Note! The alarm works even when the phone
is switched o. Do not power on if wireless
phone use is prohibited or when it may cause
interference or danger.
Torch
Slide up to turn on the torch. Slide down
to turn o.
Reset settings
1. Press Menu â .
2. Select to reset the phone
sengs. All the changes that you have
made to the phone sengs will be reset to
default sengs.
3. Enter the phone code and press OK to reset.
Tip: The default phone code is 1234.
Reset all
1. Press Menu â Organiser â File manager â
Highlight phone â â Details â.
2. Select Reset all to delete phone sengs
and content such as contacts, number lists
and messages (SIM memory is not aected).
3. Enter the phone code and press OK to reset.
Tip: The default phone code is 1234.
www.doro.com
Correct disposal of batteries in this product
(Applicable in countries with separate collecon
systems)
The marking on the baery, manual or packaging
indicates that the baery in this product should not be
disposed of with other household waste. Where marked,
the chemical symbols Hg, Cd or Pb indicate that the baery
contains mercury, cadmium or lead above the reference levels
in EC Direcve 2006/66. If baeries are not properly disposed
of, these substances can cause harm to human health or the
environment. To protect natural resources and to promote
material reuse, please separate baeries from other types of
waste and recycle them through your local, free baery return
system.
Hereby, Doro declares that the radio equipment type
DFC-0160 (Doro 2424) is in compliance with Direcves:
2014/53/EU and 2011/65/EU. The full text of the EU
declaraon of conformity is available at the following internet
address: www.doro.com/dofc
