Taper Fill Surgical Technique Rev C
2015-04-28
: Pdf Taperfill Surgical Technique Rev C TaperFill_Surgical_Technique_Rev_C_ 4 2015 pdf
Open the PDF directly: View PDF ![]() .
.
Page Count: 12
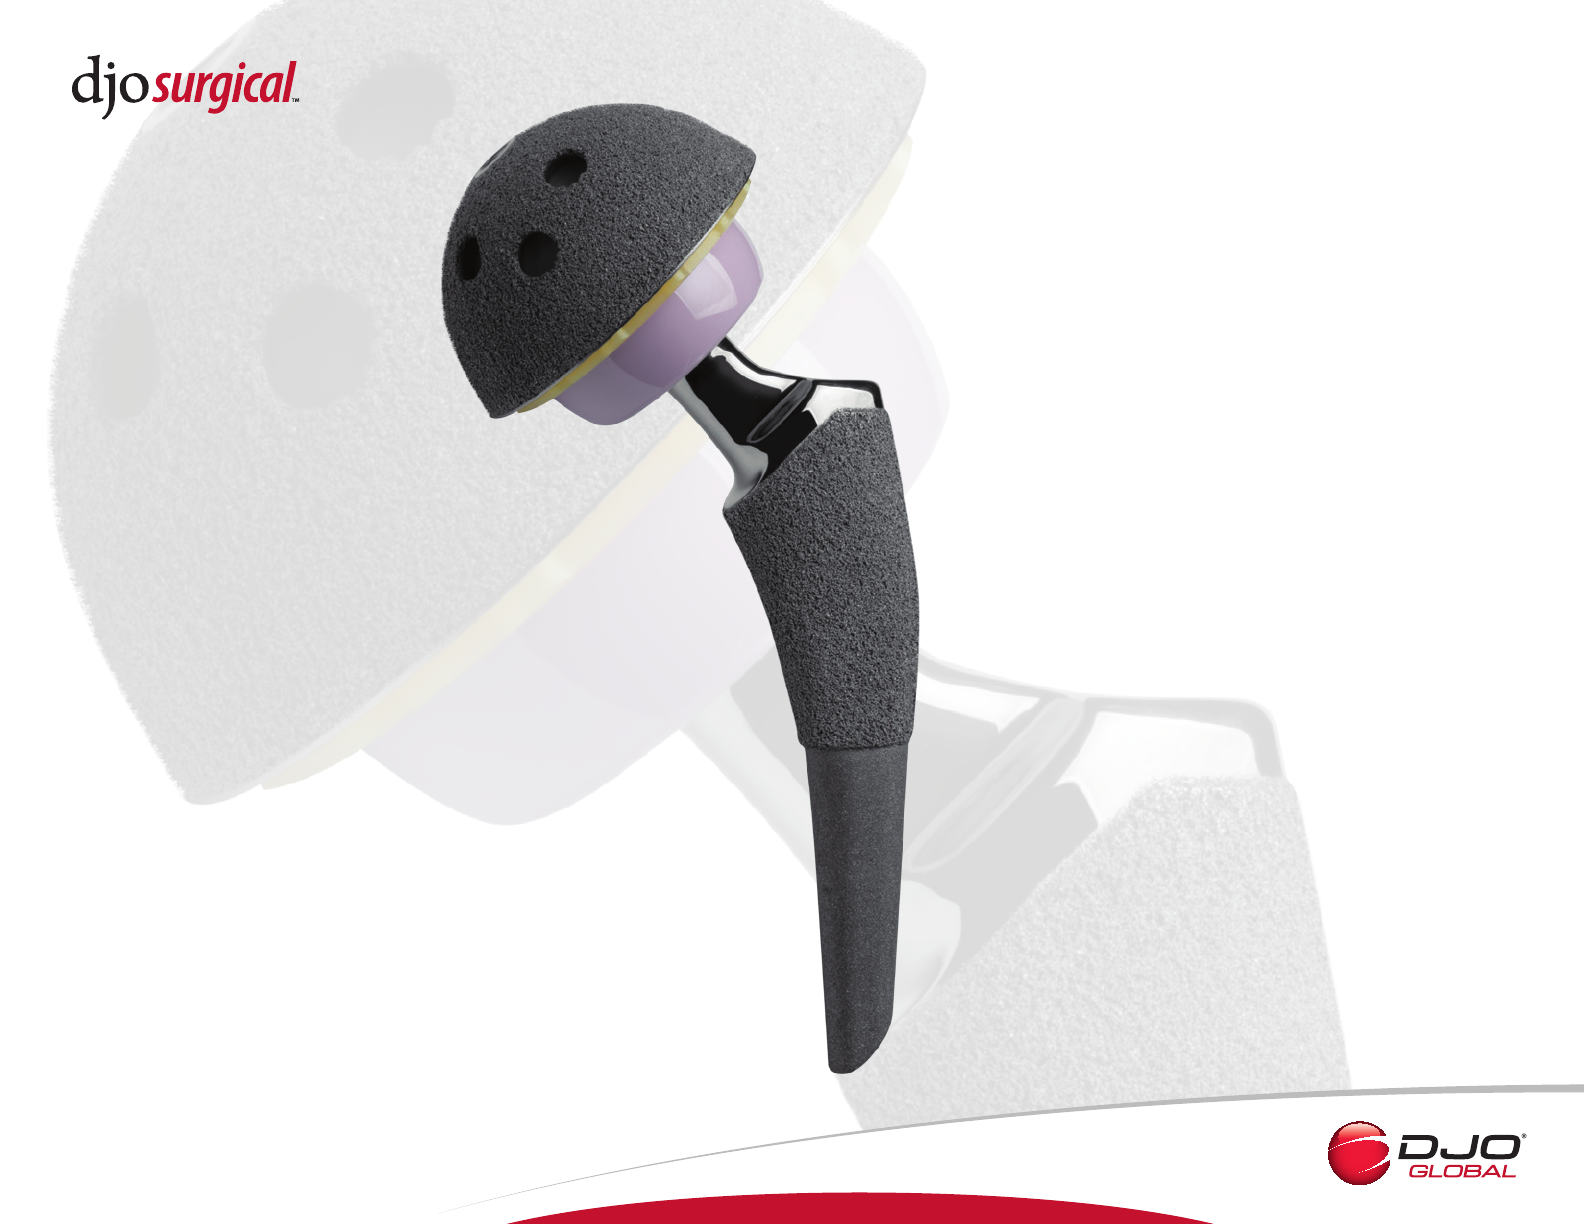
TaperFill™
Surgical Technique

2 TaperFill™ Hip System Surgical Technique
DJO Surgical
9800 Metric Boulevard
Austin, TX
(800) 456-8696
www.djosurgical.com
This brochure is presented to demonstrate a surgical
technique. DJO Surgical, as the manufacturer of
this device, does not practice medicine and cannot
recommend this or any other surgical technique
for use on a specific patient. The choice of the
appropriate surgical technique is the responsibility
of the surgeon performing the operation.
Table of Contents
Indications and Contraindications 3
TaperFill™ Hip Size Charts 4-5
Preoperative Planning 6
General Architecture and Bone Quality 6
Planning for Equalization of Leg Lengths 6
Planning for Proper Oset 6
Prosthesis Size 6
Surgical Approach 7
Femoral Neck Resection 7
Use of the Box Osteotome 7
Canal Finder 8
Tapered Reamer 8
Broaching 9
Trial Reduction 10
Final Implantation 11
Reduction 11
Closure 11
Aftercare 11
3 TaperFill™ Hip System Surgical Technique
Surgical Technique
Taperfill™ Hip System
System Description
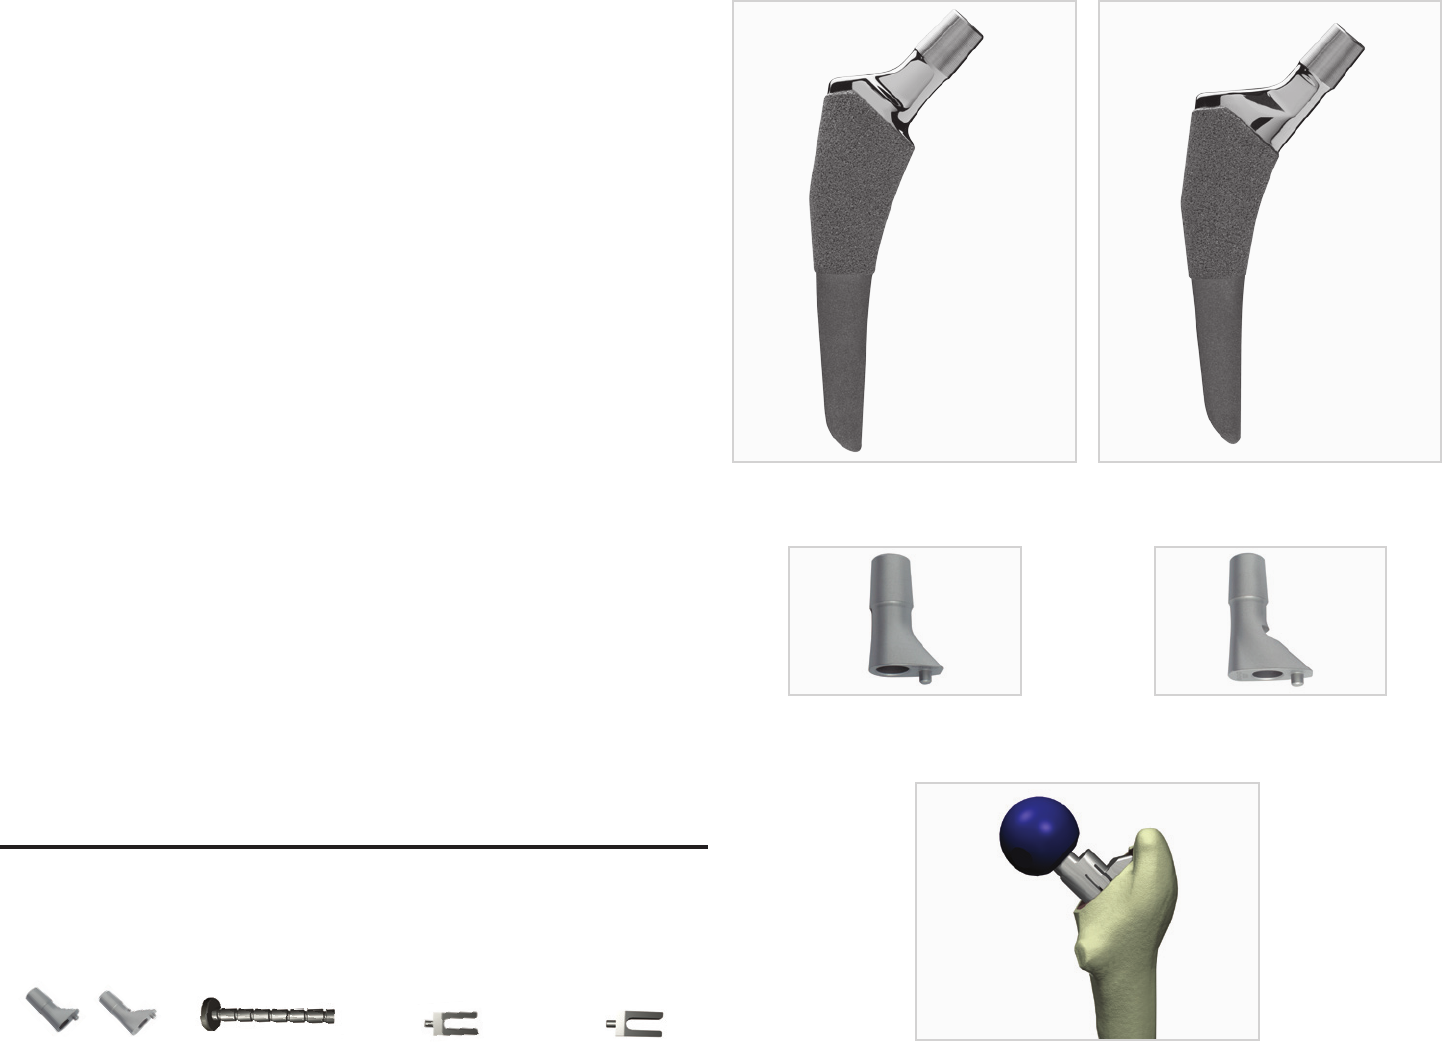
The TaperFill Hip System consists of the following:
• Increased sizing options with fourteen standard sizes:
5, 6, 7, 8, 9, 10, 11, 12, 13, 14, 15, 16, 17, and 19.
• Standard and Lateralized oset versions in each size
(Lateral oset only for size 19.)
• Delta Ceramic heads are available.
• Reduced neck geometry.
• A twelve-degree proximal taper in the porous coating section.
• Taper of the distal medial border of the prosthesis
• Single reamer.
• Broach handle attachment allowing for version control during
broaching and simple removal of the broach.
• Threaded stem inserts that allows for complete control of
version during implantation.
Indications
Joint replacement is indicated for patients suering from disability
due to:
• Noninflammatory degenerative joint disease including
osteoarthritis and avascular necrosis of the natural femoral
head
• Rheumatoid arthritis
• Correction of functional deformity
• Femoral fracture
This device may also be indicated in the salvage of previously failed
surgical attempts.
The constrained acetabular component is indicated for primary
or revision patients at high risk of hip dislocation due to a history
of prior dislocation, bone loss, soft tissue laxity, neuromuscular
disease, or intra-operative instability and for who all other options to
constrained acetabular components have been considered.
This stem is to be press-fit. This stem is intended for cementless use.
Contraindications
Joint replacement is contraindicated where there is:
• Infection or sepsis;
• insucient bone quality which may aect the stability of the
implant;
• muscular, neurological or vascular deficiencies, which
compromise the aected extremity;
• Osteomyelitis;
• Rapid joint destruction or bone absorption apparent on
roentgenogram;
• Pathological conditions of the acetabulum, which would
prevent achieving proper range of motion, appropriate
head stability, and/or a well-seated and supported smooth
articulation of the head within the acetabulum;
• Alcoholism or other addictions;
• Materials sensitivity;
• Loss of ligamentous structures;
• High levels of physical activity (e.g. competitive sports, heavy
physical labor);
• Materials sensitivity;
• Pregnancy
• Uncooperative patient or a patient with neuralgic disorders
and incapable of following instructions
• Distant foci of infections

4 TaperFill™ Hip System Surgical Technique
TaperFill™ Hip Stem Sizing Charts
The TaperFill Hip stem is press-fit titanium, P2® coated tri-tapered design. Each stem size is available in standard and lateralized oset
versions (size 19 is only available in the lateral oset option).
Standard
Lateralized
PART SIZE A B C D E F G H I
NECK LENGTH STEM LENGTH NECK OFFSET DISTANCE TO AA DISTANCE TO BB AA M/L AA A/P BB M/L BB A/P
. .
.
. .
.
.
. .
.
. .
.
. .
.
. .
.
.
PART SIZE A B C D E F G H I
NECK LENGTH STEM LENGTH NECK OFFSET DISTANCE TO AA DISTANCE TO BB AA M/L AA A/P BB M/L BB A/P
.
.
.
.
.
.

5 TaperFill™ Hip System Surgical Technique
C
B
A
E
A
A
B
D
B
F
G
H
I
SECTION A-A
SECTION B-B
C
A
EAA
D
B B
B
6 TaperFill™ Hip System Surgical Technique
Preoperative Planning
Proper preoperative planning is done both with and without the use
of templates. Proper radiographs should generally include a single
A/P of the pelvis and an A/P and lateral radiograph of the hip to
include the proximal one-third of the femur. A radiograph with the
hip in 15 degrees of internal rotation is preferred. If proper positioning
of the hip is not possible, this must be taken into consideration when
templating for prosthesis size, leg length, and oset. Whenever
possible, x-ray magnification calibration should be used and
radiographs representing 20% magnification should be a goal.
The information obtained during the templating process is crucial
to successful hip arthroplasty. Following the steps outlined below
will greatly facilitate the ease of implantation and proper prosthesis
choice and placement. It is important to note that templating is only
a guide for prosthesis sizing and positioning.
General Architecture and Bone Quality
When assessing initial radiographs for general architecture and bone
quality of the hip, pay special attention to:
• Areas of bone loss, especially in the superior weight-bearing
dome of the acetabulum.
• Proximal femoral geometry, specifically the relationship
between the size of the metaphyseal flare and the diameter of
the femoral canal.
• Cortical thickness both proximally and distally.
• Degree of osteoporosis
Planning for Equalization of Leg Lengths
• Clinically measure the leg lengths and note any discrepancies.
• Radiographically measure any leg length discrepancy on the
A/P pelvis view using the relationship between a set point
on the lesser trochanter and a line drawn along the inferior
borders of both pubic rami.
• Note the correlation with the clinical and radiographic
measurements.
• Using the x-ray template for the neck-cutting guide, measure
where a standard neck cut would be made.
• Either the level of the neck cut can be adjusted or the
templated implant size may be changed to adjust the
discrepancy in leg length.
Planning for Proper Oset
The availability of two osets allows not only for restoration of
proper osets in each individual patient, but also allows increased
stability of the hip in each stem size without increasing leg length.
• Draw a vertical line through the center of the femoral canal
exiting proximally.
• Locate the center of the femoral head and draw a horizontal
line perpendicular to the vertical line from the center of the
femoral head.
• Measure the distance of the horizontal line. This is the oset.
• Compare the oset to the oset table (page 4, column C).
Once the size is templated, compare that determination to the
recommended oset to estimate final prosthesis selection.
Prosthesis Size
• Using the template, align the centerline of the femoral stem to
the center of the femoral shaft.
• Use varying sizes to template. The proper size should be in
contact with the endosteal surface laterally and medially in the
porous coating section of the prosthesis.
• Once a provisional size has been determined, overlay the
standard and lateralized version of the same stem size and
assess the relationship between the center of the femoral head
on the template and the true anatomic femoral head.
• Choose the prosthesis that overlays most accurately in size and
oset.
• As a check, once you determine your size by templating,
compare the oset of that size with the oset, as previously
measured in step three.
7 TaperFill™ Hip System Surgical Technique
Surgical Technique
Surgical Approach
Surgical approach is determined by surgeon preference. The TaperFill
Hip stem and instrumentation have been designed to accommodate
all surgical approaches with ease. General principles of proper
arthroplasty surgical approach should be followed. These include:
• Proper patient positioning.
• An incision of adequate length.
• Consistent use and placement of retractors for optimal
visualization.
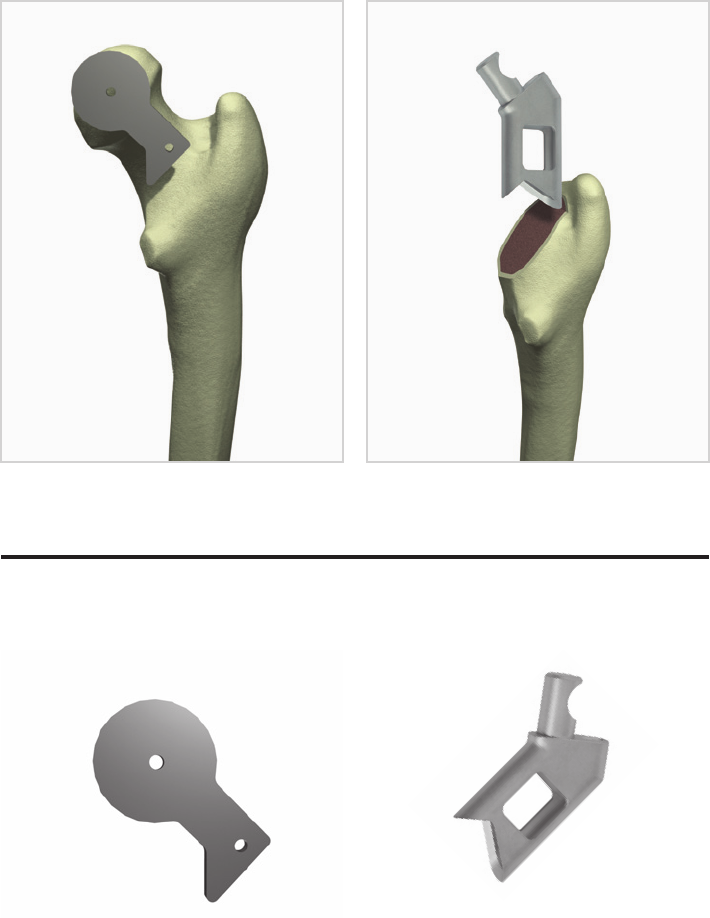
Femoral Neck Resection
The femoral neck cut can be made using the neck cutting guide by
placing a pin in the center of the femoral head and sliding the guide
over the pin (Figure 1). The distal part of the guide is centered over
the femoral neck. Alternatively, you can place the femoral broach
against the outer surface of the femur at the level determined by
preoperative templating. You can then mark the osteotomy with
an electrocautery. Prior to cutting, always check the level of the
resection visually and in relation to the lesser trochanter for proper
positioning. As a general rule, the femoral neck cut should be
approximately 15mm above the lesser trochanter. After the femoral
neck cut is made, the acetabular prosthesis is implanted.
Use of the Box Osteotome
Lateralization of the prosthesis is critical to proper positioning.
Visualize the center of the femoral canal along the outer border and
mark a vertical centerline using an electrocautery along the outer
surface of the proximal femur extending proximally. Note where
this line exits at your femoral neck cut. A rongeur is useful to initially
remove laterally retained femoral neck. Centering the box osteotome
over the vertical centerline, remove a few millimeters of proximal
bone (Figure 2). Care must be taken to ensure proper version by
placing the leg in a neutral rotation position and noting the version
of the femoral neck. This allows a check for proper anteversion of the
stem. Normal version is approximately 10-15 degrees of anteversion.
If the noted neck version is within this range with the leg in a neutral
position, simply follow the version angle of the neck with the box
osteotome and subsequent broaches. Adjust this accordingly.
Figure 1
Guide [803-03-012] Box Osteotome [803-00-040]
Figure 2
Instrumentation
8 TaperFill™ Hip System Surgical Technique
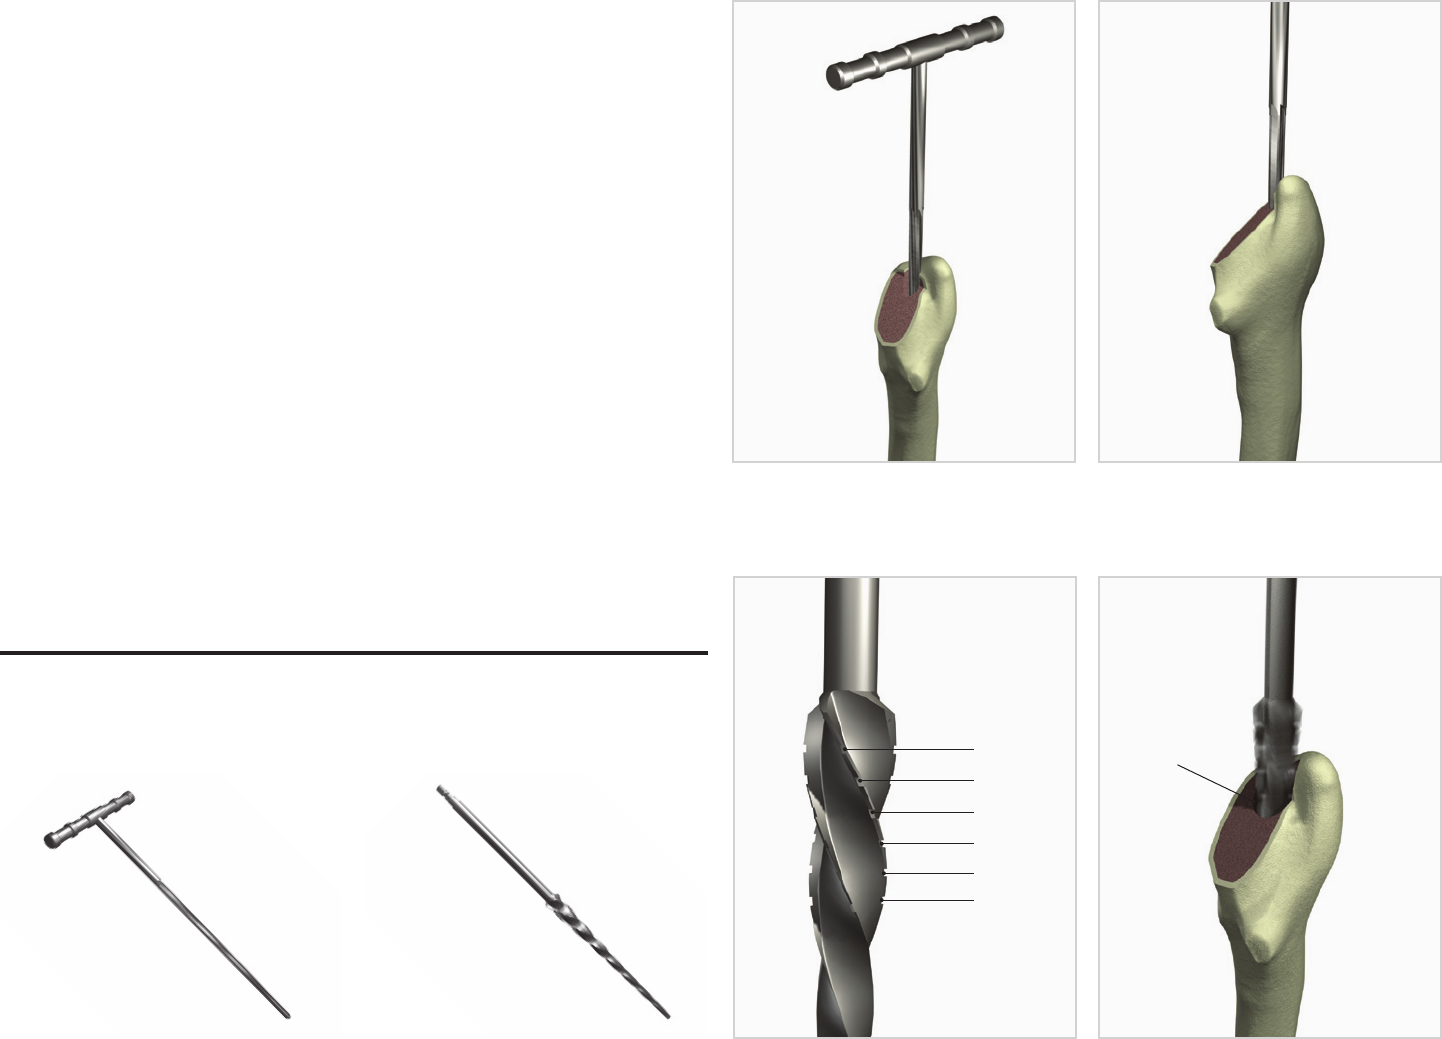
Canal Finder
A thin, sharp canal finder is then used and placed down the
centerline (Figure 3). This should encounter minimal resistance.
Pay special attention to both medial/lateral and anterior/posterior
placement of the canal finder.
Tapered Reamer
The tapered reamer should be attached to power, although hand
reaming is possible. Placing the reamer down the center of the
canal, ream straight down the canal to the distance determined
by preoperative templating. The reamer has proximal markings
corresponding to the prosthesis sizes. These marking should be
brought down to the level of the osteotomy (Figure 4).
Figure 3 (a).
Figure 4 (a).
Starter Reamer [803-00-035] Tapered Reamer [803-03-001]
Figure 3 (b).
Figure 4 (b).
Instrumentation
17
15
13
11
9
7
Depth mark for
corresponding
implant size
Insertion Depth
9 TaperFill™ Hip System Surgical Technique
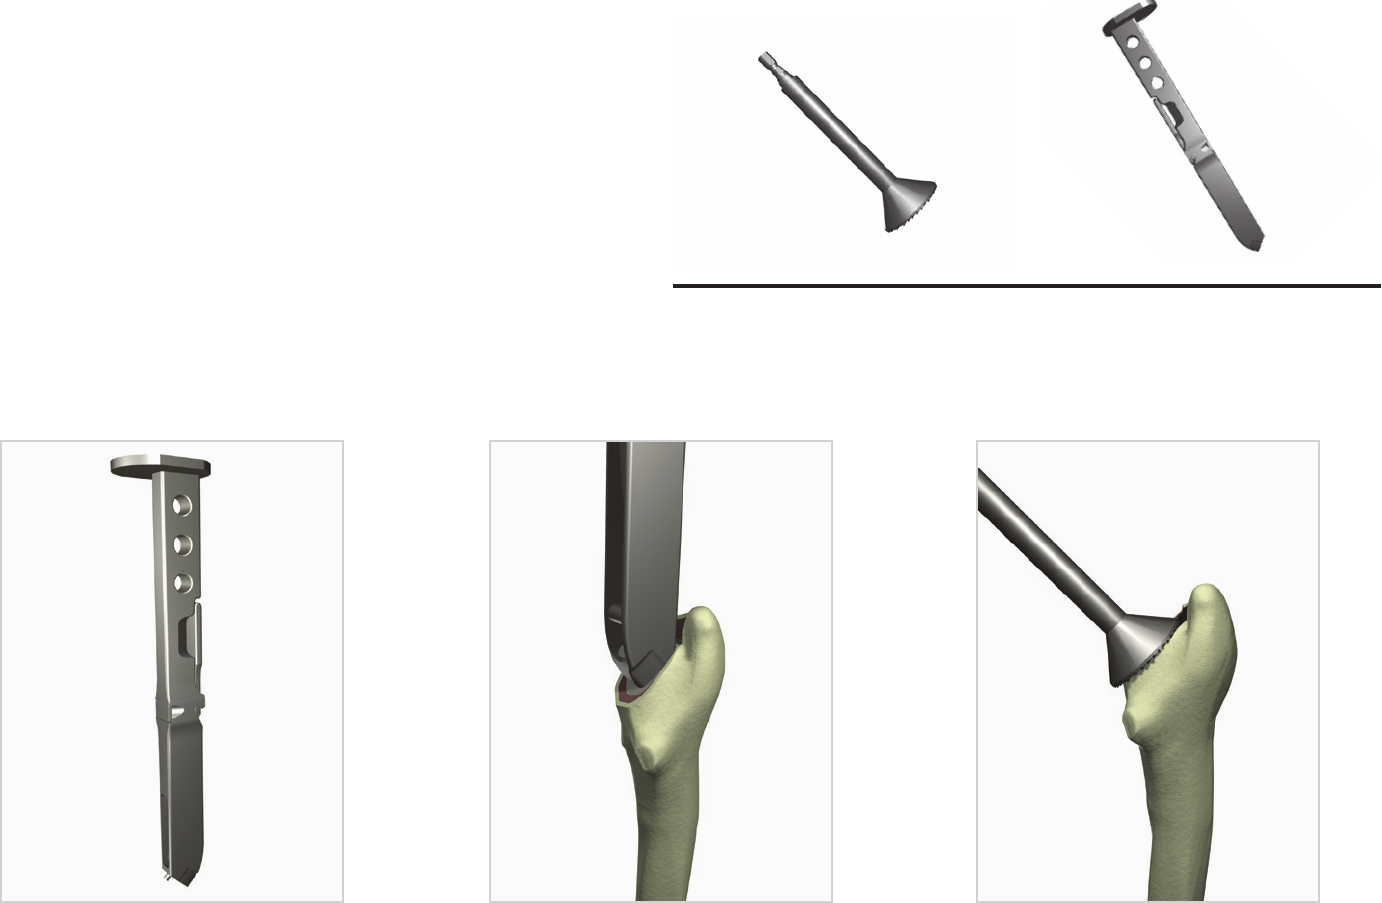
Figure 6Figure 5
Small Calcar Reamer
[803-00-032]
Large Calcar Reamer
[803-00-033]
Broach Handle
[803-03-059]
Figure 7
InstrumentationBroaching
The TaperFill System’s broach handle (Figure 5) is designed for
quick attachment and release of the broaches. Insertion of the
broach into the femoral cavity is accomplished by using a mallet
against the proximal strike plate. Striking the underside of the strike
plate facilitates removal of the broach. Broaching is begun with
the smallest available broach. As a general guideline, follow the
version previously determined by the box osteotome and pay special
attention to varus/valgus and anterior/posterior positioning. Pay
special attention to proper lateralization of each successive broach.
While the prosthesis is designed for implantation straight down the
canal, the surgeon can make modifications of the positioning as
needed. Successive broaching is done until the prosthesis reaches
a stable position and the level of the broach teeth approximates
the neck resection (Figure 6). Calcar reaming may be performed;
however, since this is a collarless prosthesis, it is not necessary
(Figure 7). Excessive force is not necessary to seat the broach to a
stable position.
10 TaperFill™ Hip System Surgical Technique
Trial Reduction
Once the broach reaches a position of stability, you are ready for
trial reductions. The TaperFill Hip stem has two options, a standard
and lateral oset (Figure 8). Neck trials are available in standard
and lateralized versions (Figure 9). Either may be used on the same
broach trial. Depending on your preoperative templating, place the
appropriate head and neck trial on the broach (Figure 10). When
performing trial reductions there are four important things to check:
1. Visually inspect the reduction of the head in the cup. Make
sure the reduction is concentric and the appropriate amount of
coverage of the femoral head is obtained.
2. Critical for the prevention of dislocation, assess appropriate
tissue tension general, 1-2mm of pistoning is appropriate when
pulling straight on the leg. Pulling the leg in a neutral position
is important to get a true assessment of tissue tension.
3. Move the leg in a variety of positions to assess stability. The
hip should be stable through a full functional range of motion.
Pay special attention to particular maneuvers that lead to
instability. Additionally assess the presence of anterior or
posterior acetabular osteophytes that may cause the hip to
sublux out of the cup.
4. Measure leg lengths at this time. If you are performing the
surgery with the patient in a supine position, assessing proper
leg lengths is straight forward. Patients in a lateral decubitus
position present more diculty. In those situations, your
preoperative templating of the relationship of the center of
the femoral head to the tip of the greater trochanter is that
much more important. Depending upon your preoperative
templating, you can assess your leg length status and adjust
accordingly.
Figure 8
Figure 10
Figure 9
Standard
Standard
Lateral
Lateral
Head Distractor
Small
[803-03-037]
Head Distractor
Handle
[803-03-036]
Neck Trials
[803-21-026/027]
Head Distractor
Large
[803-03-038]
Instrumentation
11 TaperFill™ Hip System Surgical Technique
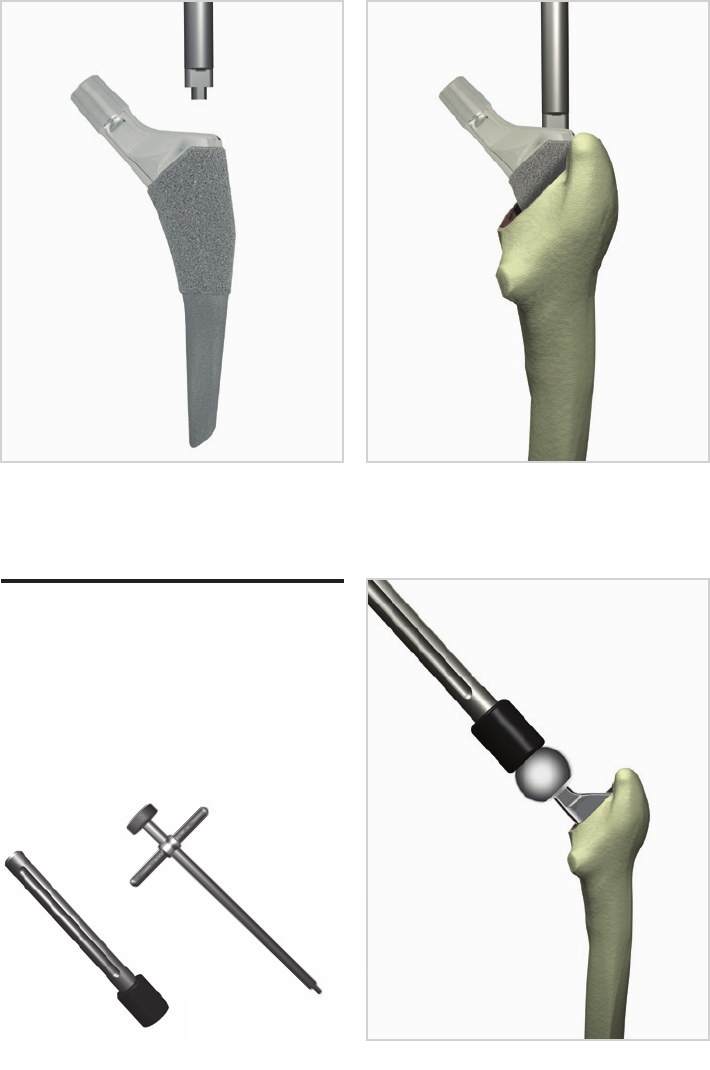
Final Implantation
Once the final construct is determined, final implantation of the
prosthesis is performed. The TaperFill Hip stem is placed by hand
into the prepared femur, and the stem inserter is then used to seat
the implant. Seat the stem down the canal in the broached space
(Figure 12). It is generally proud by one to three centimeters. Impact
the prosthesis down to a stable position with a mallet. Visually
confirm the prosthesis is stable on further impaction. An audible
“tone change” occurs frequently when a stable position is reached.
Take care not to impact the final prosthesis with too much force.
Reduction
Go through the same four steps outlined previously with trial
head components. The proper final head is then placed and firmly
impacted (Figure 13). The acetabulum is inspected for any bone or
soft tissue and the hip is reduced.
Closure
Standard hip closure is then performed. Inspect the joint and the
entire wound for bone and soft tissue and thoroughly irrigate.
Attention to detail during the closure, with care to properly
reapproximate key structures will improve joint stability and wound
healing.
Aftercare
Postoperative instructions have some variability based on surgeon
preference and patient factors. In general, patients are allowed full
weight bearing with the TaperFill Hip stem, but are protected with a
walker or Lofstrand crutches for six weeks mainly to protect the soft
tissues. Physical therapy instructions are clear. The physical therapist
is to only work on gait training and arthroplasty precautions.
Patients are restricted from any passive range-of-motion or resistive
exercises since these can stretch soft tissue repairs and capsular
structures. Only active range-of-motion exercises through a limited
range are recommended. The patients are walking on postoperative
day one and discharged when specific parameters, set by the joint
arthroplasty team, are met.
Figure 12 (a). Figure 12 (b).
Figure 13
Stem Inserter
[803-03-027]
Head Impactor
[803-03-018]
Instrumentation

©2013 Encore Medical, L.P. 0020328-Rev C 06/14
CAUTION: Federal Law (USA)
restricts this device to sale by
or on the order of a physician.
See package insert
for a complete listing of
indications, contraindications,
warnings, and precautions.
DJO Surgical I A DJO Global Company
T 800.456.8696 D 512.832.9500 F 512.834.6300
9800 Metric Blvd. I Austin, TX 78758 I U.S.A.
djosurgical.com
