VistA Scheduling Enhancements GUI User Guide VSE 1 5
User Manual: Pdf
Open the PDF directly: View PDF ![]() .
.
Page Count: 212 [warning: Documents this large are best viewed by clicking the View PDF Link!]
- 1 Introduction
- 2 System Summary
- 3 Getting Started
- 4 Ribbon Bar
- 5 Request Management
- 5.1 Request Management Procedures
- 5.1.1 Viewing a Patient’s Existing Requests
- 5.1.2 Adding Appointment Request
- 5.1.3 Viewing/Editing Appointment Request
- 5.1.4 Disposition or Removing an Appointment Request
- 5.1.5 Transfer to EWL Request for a Patient
- 5.1.6 Disposition or Removing a Patient from the EWL
- 5.1.7 Adding Patient-Centered Scheduling Request
- 5.1.8 Viewing/Editing Patient-Centered Scheduling Request
- 5.1.9 Disposition or Remove Patient-Centered Scheduling Request
- 5.2 Contacting a Patient
- 5.1 Request Management Procedures
- 6 Appointment Management
- 6.1 Adding Appointments
- 6.2 Disposition Appointments
- 6.2.1 Edit Appointment Information
- 6.2.2 View Appointment Information
- 6.2.3 Cancelling an Appointment
- 6.2.4 Mark as No Show Appointment
- 6.2.5 Undo No-Show Appointment
- 6.2.6 Checking In a Patient
- 6.2.7 Undo a Patient Check In
- 6.2.8 Check Out a Patient
- 6.2.9 Undo a Patient Check Out
- 6.2.10 Rescheduling an Appointment
- 6.3 Multiple Appointment Requests and Appointments
- 6.4 Overbooking Appointments
- 6.5 Variable Length (VL) APPT
- 6.6 Compensation and Pension (C&P) APPTs
- 6.6.1 Add a C&P APPT Request
- 6.6.2 Add a C&P APPT for Pending 2507 Request NOT Previously Linked to Appointment
- 6.6.3 Add a C&P APPT for Pending 2507 Request Already Linked to APPT NOT Due to Cancellation
- 6.6.4 Add a C&P APPT for Pending 2507 Request due to Clinic Cancellation
- 6.6.5 Add C&P APPT for Pending 2507 Request due to Veteran Cancellation/No Show
- 6.6.6 Disposition APPT Linked to Pending 2507 Request
- 6.7 VA Online Scheduling (formerly VAR)
- 7 Clinics
- 7.1 Tasks Tab
- 7.1.1 Viewing Clinic Schedule Availability
- 7.1.2 Viewing Clinic’s Availability Cancellation
- 7.1.3 Viewing the Clinic’s Length of APPT and Max OB
- 7.1.4 Viewing the Clinic’s VL Indicator
- 7.1.5 Viewing the Clinic’s Special Instructions
- 7.1.6 Viewing Clinic’s Available Slots
- 7.1.7 The Time Slot Viewer
- 7.1.8 Viewing Provider Availability
- 7.1.9 Viewing Clinic Group Availability
- 7.2 System Tab
- 7.1 Tasks Tab
- 8 Reports
- 9 Trash Queue Cleanup
- 10 VistA Scheduling 508 Compliance
- 11 Troubleshooting
- 12 Acronyms and Abbreviations
- 13 Keyboard Shortcuts Quick List

VistA Scheduling Enhancements (VSE)
VS GUI
User Guide
April 2018
Department of Veterans Affairs
Office of Information and Technology (OI&T)
Version 1.12.1

VistA Scheduling Enhancements ii January 2018
VS GUI User Guide
Revision History
Date Revision Description Author
05/01/2018 1.12.1 Updated with edits prior to release
of 1.5 E. Vanderwall
S. Cox
S. Pierce
01/24/18 1.12 Updated for Release 1.5 F. Johnson
01/05/18 1.11.3 Updated for Release 1.4 S. Cox
E. Vanderwall
11/07/17 1.10.2 Updated patch description and
contacts in Sections 1 and 2 E. Vanderwall
11/06/17 1.9 Reviewed and incorporated Health
Product Support comments E. Vanderwall
8/31/2017 1.8 Updated per the requirements
associated with release 1.3.2 M. Habic
M. Massiah-King
06/23/2017 1.7 Addressed Business User
comments and updated for Build
1.3 Release 1; provided technical
edits for format and consistency
M. Habic
01/27/2017 1.6 Addressed VA comments; added
Section 5.1.8 Viewing/Editing
Patient-Centered Scheduling
Request; added alternate text to all
figures and tables; added sections
for acronyms and hot keys
M. Woehrle
C. Kron
E. Phelps
01/18/2017 1.5 Performed internal peer review;
removed Welcome to VA
references; updated Section 2;
added VSE Additional
Enhancements description
M. Woehrle
L. Masucci
E. Phelps
01/08/2017 1.4 Incorporated user acceptance
testing updates: pages 7, 9, 11, 15,
22, 23, 25, 27, 35-37, 46-48, 50, 52,
55, 57-58,60,63,69,71,
74,76,79,81,84,86,89-91,93,96-
109,117-118,120-121, 123, 125,
127-130,132-147,166,181-195;
provided technical edits for format
and consistency
C. Kron
E. Stuck
C. Zavala
E. Phelps
12/21/2016 1.3 Updated table of contents and
footers for pages 161-211; provided
technical edits – fixed figure
captions, added table list, added
queries for author
C. Kron
E. Phelps

VistA Scheduling Enhancements iii April 2018
VS GUI User Guide
12/7/2016 1.2 Updates to Clinic Grid (pages
31,37-38,72,91) C. Kron
11/21/2016 1.1 Updates from CIT/ST: pages 6-
13,16-21,23-24,27-95,97,99-
104,123-124,127,129-131,133,135-
137,139-145,157-161,168-171,173-
174,176,184
C. Kron
05/02/2016 1.0 Initial baseline D. Reed

VistA Scheduling Enhancements iv April 2018
VS GUI User Guide
Table of Contents
1 Introduction ........................................................................................ 1
1.1 Purpose ............................................................................................................ 1
1.2 Overview ........................................................................................................... 1
1.3 Project References .......................................................................................... 1
1.3.1 Information ............................................................................................... 1
1.3.2 Coordination ............................................................................................ 2
1.3.3 Help Desk ................................................................................................. 2
1.3.4 Organization of the User Guide .............................................................. 3
2 System Summary ............................................................................... 4
2.1 User Access Levels ......................................................................................... 5
3 Getting Started ................................................................................... 7
3.1 Logging On ....................................................................................................... 7
3.2 Two Factor Authentication Using PIV Cards ................................................. 7
3.3 New Return to Clinic Orders (RTC Orders) .................................................... 9
3.4 Logging Off ...................................................................................................... 9
3.5 VS GUI Tabs ..................................................................................................... 9
3.5.1 Tasks Tab ................................................................................................. 9
3.5.2 System Tab Action Areas ...................................................................... 10
3.5.3 Reports Tab Action Areas ..................................................................... 11
3.6 Searching ....................................................................................................... 11
3.6.1 Search for Patient .................................................................................. 11
3.7 Filtering ........................................................................................................... 12
3.7.1 Filtering Lists ......................................................................................... 13
3.7.2 Paging Through Records ...................................................................... 14
3.7.3 Filtering by Facility or Clinic ................................................................. 15
3.7.4 Filtering by Time Period ........................................................................ 15
3.8 Sorting ............................................................................................................ 15
3.8.1 Sorting by Column ................................................................................. 16
3.8.2 Sorting Pending Appointments by Column ......................................... 16
3.8.3 Print Pending Appointment List for a Patient ..................................... 17
3.9 Printing and Exporting a Request Management Grid ................................. 18
3.9.1 Printing a Request Management Grid .................................................. 18
3.9.2 Exporting a Grid ..................................................................................... 19
3.10 Viewing ........................................................................................................... 19
3.10.1 View Only Mode ..................................................................................... 19
3.10.2 Viewing Requests by Request Type..................................................... 20
3.10.3 Viewing Requests by Patient ................................................................ 21

VistA Scheduling Enhancements v April 2018
VS GUI User Guide
3.10.4 Schedule View ........................................................................................ 21
4 Ribbon Bar ....................................................................................... 22
4.1 Patients Demographics ................................................................................. 22
4.1.1 Finding a Patient .................................................................................... 22
4.1.2 Viewing Patient Demographics in the Ribbon Bar .............................. 23
4.1.3 Patient Eligibility Information ............................................................... 25
4.1.4 Updating Patient Demographics .......................................................... 26
4.1.5 Editing Permanent Address .................................................................. 27
4.1.6 Adding a Temporary Address ............................................................... 28
4.1.7 Bad Address ........................................................................................... 29
4.2 Actions ............................................................................................................ 32
4.2.1 New Request .......................................................................................... 32
4.3 Pending Appointment Window ..................................................................... 32
4.4 Special Needs/Preferences ........................................................................... 35
4.4.1 Adding/Removing Special Needs/Preferences from Requests ......... 35
4.5 Patient Flags .................................................................................................. 36
4.6 Tools ............................................................................................................... 37
4.6.1 Print......................................................................................................... 37
4.6.2 Export ..................................................................................................... 37
4.6.3 Refresh ................................................................................................... 38
4.6.4 Query ...................................................................................................... 38
4.7 Settings – User Preferences ......................................................................... 41
5 Request Management ...................................................................... 43
5.1 Request Management Procedures ............................................................... 43
5.1.1 Viewing a Patient’s Existing Requests ................................................ 43
5.1.2 Adding Appointment Request .............................................................. 47
5.1.3 Viewing/Editing Appointment Request ................................................ 50
5.1.4 Disposition or Removing an Appointment Request ........................... 52
5.1.5 Transfer to EWL Request for a Patient ................................................ 53
5.1.6 Disposition or Removing a Patient from the EWL .............................. 55
5.1.7 Adding Patient-Centered Scheduling Request ................................... 55
5.1.8 Viewing/Editing Patient-Centered Scheduling Request ..................... 57
5.1.9 Disposition or Remove Patient-Centered Scheduling Request ......... 62
5.2 Contacting a Patient ...................................................................................... 64
5.2.1 New Contact Attempt ............................................................................. 64
6 Appointment Management .............................................................. 69
6.1 Adding Appointments ................................................................................... 69
6.1.1 Add Appointment for Appointment Request ....................................... 69

VistA Scheduling Enhancements vi April 2018
VS GUI User Guide
6.1.2 Add Appointment for EWL Request ..................................................... 73
6.1.3 Add Appointment for Patient-Centered Scheduling Request ............ 79
6.1.4 Add Appointment for Consult Request ................................................ 85
6.1.5 Add Appointment from Return to Clinic request (RTC) ...................... 89
6.2 Disposition Appointments ............................................................................ 90
6.2.1 Edit Appointment Information .............................................................. 90
6.2.2 View Appointment Information ............................................................. 92
6.2.3 Cancelling an Appointment .................................................................. 94
6.2.3.1 Cancel directly from pending appointment box ................................... 97
6.2.4 Mark as No Show Appointment ............................................................ 98
6.2.5 Undo No-Show Appointment .............................................................. 101
6.2.6 Checking In a Patient ........................................................................... 103
6.2.7 Undo a Patient Check In ...................................................................... 105
6.2.8 Check Out a Patient ............................................................................. 107
6.2.9 Undo a Patient Check Out ................................................................... 110
6.2.10 Rescheduling an Appointment ........................................................... 111
6.3 Multiple Appointment Requests and Appointments ................................. 112
6.3.1 Multiple Appointment Request ........................................................... 112
6.3.1.1 Note Regarding Parent and Child Appointment Requests ................ 113
6.3.2 Adding Multiple Appointments from Find Appointment Dialog....... 114
6.4 Overbooking Appointments ........................................................................ 119
6.4.1 Overbooking Appointments with SDMOB Security Key ................... 119
6.4.2 Overbooking Appointments with SDOB Security Key ...................... 123
6.5 Variable Length (VL) APPT ......................................................................... 128
6.5.1 Identifying a VL Clinic: ........................................................................ 128
6.5.2 Add a VL APPT ..................................................................................... 130
6.6 Compensation and Pension (C&P) APPTs ................................................ 132
6.6.1 Add a C&P APPT Request ................................................................... 132
6.6.2 Add a C&P APPT for Pending 2507 Request NOT Previously Linked
to Appointment .................................................................................................. 133
6.6.3 Add a C&P APPT for Pending 2507 Request Already Linked to APPT
NOT Due to Cancellation .................................................................................. 134
6.6.4 Add a C&P APPT for Pending 2507 Request due to Clinic
Cancellation ....................................................................................................... 136
6.6.5 Add C&P APPT for Pending 2507 Request due to Veteran
Cancellation/No Show ....................................................................................... 139
6.6.6 Disposition APPT Linked to Pending 2507 Request ......................... 142
6.7 VA Online Scheduling (formerly VAR) ....................................................... 143
7 Clinics ............................................................................................. 144

VistA Scheduling Enhancements vii April 2018
VS GUI User Guide
7.1 Tasks Tab ..................................................................................................... 144
7.1.1 Viewing Clinic Schedule Availability .................................................. 144
7.1.2 Viewing Clinic’s Availability Cancellation ......................................... 147
7.1.3 Viewing the Clinic’s Length of APPT and Max OB ............................ 148
7.1.4 Viewing the Clinic’s VL Indicator ....................................................... 148
7.1.5 Viewing the Clinic’s Special Instructions .......................................... 148
7.1.6 Viewing Clinic’s Available Slots ......................................................... 149
7.1.7 The Time Slot Viewer ........................................................................... 150
7.1.8 Viewing Provider Availability .............................................................. 154
7.1.9 Viewing Clinic Group Availability ....................................................... 156
7.2 System Tab ................................................................................................... 157
7.2.1 Viewing Clinic Availability Information .............................................. 157
7.2.2 Adding and Removing Privileged Users ............................................ 159
7.2.2.1 Add A Privileged User ....................................................................... 159
7.2.2.2 Remove Privileged User ................................................................... 160
7.2.3 Creating Clinic Groups ........................................................................ 161
7.2.4 Removing a Resource from a Clinic Group ....................................... 163
8 Reports ........................................................................................... 164
8.1 The Audit Activity Report ............................................................................ 164
8.1.1 Generating an Audit Activity Report for an Individual Scheduler ... 164
8.1.2 Generating an Audit Activity Report for All Schedulers ................... 165
8.1.3 Working with Audit Activity Report Data ........................................... 166
8.1.3.1 Sorting by Column Header ................................................................ 166
8.1.3.2 Filtering by Column Data ................................................................... 167
8.1.4 Export an Audit Activity Report for Individual or All Schedulers .... 168
8.2 Clinics Report .............................................................................................. 169
8.2.1 Clinic Activity Report – Individual Clinic ........................................... 169
8.2.2 Working with the Clinic Activity Report ............................................. 169
8.2.2.1 Sorting by Column Headers .............................................................. 169
8.2.2.2 Filtering Data by Column ................................................................... 171
8.2.3 Exporting a Clinic Report .................................................................... 172
9 Trash Queue Cleanup .................................................................... 174
9.1 Compile List of Re-Opened REQUEST Records that Can Be Closed ...... 174
9.2 Commit Records to Be Closed from Compiled List .................................. 176
9.2.1.1 Systems Manager ............................................................................. 178
9.3 View Unresolved APPT Requests Reopened by the SDCANCEL Option 180
10 VistA Scheduling 508 Compliance ........................................ 181
10.1 The Tasks Tab .............................................................................................. 181

VistA Scheduling Enhancements viii April 2018
VS GUI User Guide
10.1.1 The Ribbon Bar .................................................................................... 181
10.1.2 Request Type Dialog ........................................................................... 182
10.1.3 Appointment Request .......................................................................... 182
10.2 Systems Tab ................................................................................................. 186
10.2.1 Systems Tab Ribbon Bar .................................................................... 186
10.2.2 Scheduling Management ..................................................................... 186
10.2.2.1 Clinics and Users Tab ...................................................................... 186
10.2.2.2 Clinic Groups Tab ............................................................................. 188
10.2.3 Availability Selection ........................................................................... 189
10.3 The Reports Tab........................................................................................... 189
10.3.1 Reports Tab Ribbon Bar ...................................................................... 189
10.3.2 Audit Activity ........................................................................................ 190
10.3.3 Clinic Activity ....................................................................................... 191
11 Troubleshooting...................................................................... 191
11.1 Changing User ID and Password................................................................ 191
11.2 Special Instructions for Error Correction .................................................. 192
12 Acronyms and Abbreviations ................................................ 193
13 Keyboard Shortcuts Quick List .............................................. 195
List of Figures
Figure 1: User Login ................................................................................................................. 7
Figure 2: Main Screen with Test Environment Displayed........................................................ 7
Figure 3: Linking PIV to VistA Account .................................................................................. 8
Figure 4: User Logoff ............................................................................................................... 9
Figure 5: VS GUI Tabs ............................................................................................................. 9
Figure 6: Tasks Tab Display ................................................................................................... 10
Figure 7: System Tab .............................................................................................................. 11
Figure 8: Reports Tab ............................................................................................................. 11
Figure 9: Patient Search .......................................................................................................... 12
Figure 10: Filtering Lists ........................................................................................................ 13
Figure 11: Paging Through Records ....................................................................................... 14
Figure 12: Filtering by Facility/Clinic .................................................................................... 15
Figure 13: Filtering by Time Period ....................................................................................... 15
Figure 14: Sorting by Column ................................................................................................ 16
Figure 15: Sorting Pending Appointments list by Column ..................................................... 16
Figure 16: Print Pending ......................................................................................................... 17
Figure 17: Select Desired Printer ............................................................................................ 17
Figure 18: Selecting the Print Option ..................................................................................... 18

VistA Scheduling Enhancements ix April 2018
VS GUI User Guide
Figure 19: Selecting a Printer ................................................................................................. 18
Figure 20: Exporting a Grid .................................................................................................... 19
Figure 21: Request Type Column ........................................................................................... 20
Figure 22: Select Patient ......................................................................................................... 21
Figure 23: Patient Pending Requests and Booked Appointments .......................................... 21
Figure 24: Changing View of a Specific Schedule ................................................................. 22
Figure 25: Search Patient ........................................................................................................ 23
Figure 26: Patient Demographics in the Ribbon Bar .............................................................. 24
Figure 27: Patient Inquiry Detail ............................................................................................ 25
Figure 28: Patient's Eligibility Information ............................................................................ 26
Figure 29: Patient Information Dialog .................................................................................... 27
Figure 30: Patient is Being Edited Warning Pop-up ............................................................... 27
Figure 31: Patient Info Dialog–Permanent Address ............................................................... 28
Figure 32: Patient Info Dialog – Temporary Address ............................................................ 29
Figure 33: Select Patient ......................................................................................................... 30
Figure 34: Request Type ......................................................................................................... 30
Figure 35: Appointment Request Dialog—Bad Address Selection ........................................ 30
Figure 36: Actions Pane .......................................................................................................... 32
Figure 37: Request Type – APPT ........................................................................................... 32
Figure 38: Pending Appointment Window – Past Appointment Date .................................... 33
Figure 39: Pending Appointment Window – Current less than Three Days in Future ........... 33
Figure 40: Pending Appointment Window – Future Appointment Dates .............................. 34
Figure 41: Patient Info Dialog – Special Needs/Preferences Section ..................................... 35
Figure 42: Ribbon Bar – Special Needs/Preferences .............................................................. 35
Figure 43: Patient Record Flags Dialog .................................................................................. 36
Figure 44: Patient Record Flags .............................................................................................. 37
Figure 45: Refresh Button in Tools Pane ................................................................................ 38
Figure 46: Request Query ....................................................................................................... 39
Figure 47: Query Rule Validation........................................................................................... 39
Figure 48: Request Query Rule Confirmation ........................................................................ 39
Figure 49: Settings – User Preferences ................................................................................... 42
Figure 50: Settings – Save as Default View ........................................................................... 43
Figure 51: Request Grid and Pending Appointments ............................................................. 44
Figure 52: Request Grid Displaying Expand Entry Block...................................................... 45
Figure 53: Appointment Demographics.................................................................................. 46
Figure 54: Appointment Event Log ........................................................................................ 46
Figure 55: Appointment Wait Time ........................................................................................ 46
Figure 56: Patient Information ................................................................................................ 47

VistA Scheduling Enhancements x April 2018
VS GUI User Guide
Figure 57: Encounter Information .......................................................................................... 47
Figure 58: Request Type - APPT ............................................................................................ 48
Figure 59: Actions Pane—New Req. Selection ...................................................................... 48
Figure 60: Appointment Request Dialog – Request Information Section .............................. 49
Figure 61: Special Needs/Preferences Section from Patient Info Dialog ............................... 49
Figure 62: Appointment Request Dialog ................................................................................ 50
Figure 63: View Request (Read Only).................................................................................... 51
Figure 64: Edit Request (Request Information Only) ............................................................. 52
Figure 65: APPT/Veteran Disposition Options ...................................................................... 53
Figure 66: EWL Request Dialog............................................................................................. 54
Figure 67: Request Type–PATIENT-CENTERED SCHEDULING ..................................... 56
Figure 68: Patient-Centered Scheduling APPT Request Dialog............................................. 57
Figure 69: Patient-Centered Scheduling Disposition Dialog .................................................. 58
Figure 70: Patient-Centered Scheduling Appointment View Request Dialog........................ 59
Figure 71: Patient-Centered Scheduling Disposition Dialog .................................................. 60
Figure 72: Patient-Centered Scheduling Appointment Edit Request Dialog.......................... 61
Figure 73: Patient-Centered Scheduling Disposition Options ................................................ 62
Figure 74: PtCSch Comment Dialog Box ............................................................................... 63
Figure 75: Warning Pop-Up If Business Rules Were Not Met .............................................. 63
Figure 76: Request Type/Dispositions/Contact Message Reference ...................................... 64
Figure 77: Contact Attempts ................................................................................................... 65
Figure 78: Patient Contact Dialog........................................................................................... 65
Figure 79: New Contact Attempt Submitted and Displayed .................................................. 66
Figure 80: Displaying Name of Person Entering Contacts ..................................................... 66
Figure 81: Appointment Canceled .......................................................................................... 67
Figure 82: New Contact Attempt After Cancellation ............................................................. 68
Figure 83: Select APPT Request – Clinic Schedule Grid Display ......................................... 69
Figure 84: Select Time Slot .................................................................................................... 70
Figure 85: Right-click Options – Add Appointment .............................................................. 70
Figure 86: New Appointment Dialog ..................................................................................... 71
Figure 87: Print Letter? Dialog ............................................................................................... 71
Figure 88: Closing Request Dialog ......................................................................................... 72
Figure 89: Clinic Schedule Grid – Past Appointment Display ............................................... 72
Figure 90: Clinic Schedule Grid – Current Appointment Display ......................................... 73
Figure 91: Clinic Schedule Grid – Future Appointment Display ........................................... 73
Figure 92: Request Type ......................................................................................................... 74
Figure 93: Select EWL Request .............................................................................................. 75
Figure 94: Select Time Slot .................................................................................................... 75

VistA Scheduling Enhancements xi April 2018
VS GUI User Guide
Figure 95: Right-click Options – Add Appointment .............................................................. 76
Figure 96: New Appointment Dialog ..................................................................................... 76
Figure 97: Print Letter? Dialog ............................................................................................... 76
Figure 98: Print to VistA Device Printer to place address in correct position ........................ 77
Figure 99: Closing Request Dialog ......................................................................................... 77
Figure 100: EWL Appointment Past Date Display ................................................................. 78
Figure 101: EWL Appointment Current Date ........................................................................ 78
Figure 102: EWL Appointment Future Date Display ............................................................. 79
Figure 103: Request Type ....................................................................................................... 79
Figure 104: Select Patient-Centered Scheduling Request ...................................................... 80
Figure 105: Select Time Slot .................................................................................................. 80
Figure 106: Right-click Options – Add Appointment ............................................................ 80
Figure 107: New Appointment Dialog ................................................................................... 81
Figure 108: Print Letter? Dialog ............................................................................................. 82
Figure 109: Closing Request Dialog ....................................................................................... 82
Figure 110: Clinic Schedule Display – Past Date Appointment ............................................. 83
Figure 111: Clinic Schedule Display – Current Date Appointment ....................................... 83
Figure 112: Clinic Schedule Display – Future Date Appointment ......................................... 84
Figure 113: Select Consult Request ........................................................................................ 85
Figure 114: Clinic Schedules .................................................................................................. 86
Figure 115: Select Time Slot .................................................................................................. 86
Figure 116: Right-click Options – Add Appointment ............................................................ 86
Figure 117: New Appointment Dialog ................................................................................... 87
Figure 118: Print Letter? Dialog ............................................................................................. 87
Figure 119: Clinic Schedule Display – Consult Past Appointment Date ............................... 88
Figure 120: Clinic Schedule Display – Consult with Current Date ........................................ 88
Figure 121: Clinic Schedule Display – Consult Future Appointment Date............................ 89
Figure 122: Appointment Right-click Options – Edit Appointment ...................................... 91
Figure 123: Edit Appointment Dialog .................................................................................... 92
Figure 124: Hover Box Displaying Appointment Details ...................................................... 93
Figure 125: Appointment Right-click Options – View Appointment .................................... 93
Figure 126: View Appointment Dialog .................................................................................. 94
Figure 127: Appointment Right-click Options – Cancel Appointment .................................. 95
Figure 128: Cancel Appointment Dialog ................................................................................ 96
Figure 129: Pending Appointment Window – Appointment Status Cancelled by Clinic ...... 96
Figure 130: Pending Appointment Window – Appointment Status Cancelled by Patient ..... 97
Figure 131: APPT Request – Time Slot Count Increase ........................................................ 97
Figure 132: Select Cancel Appointment ................................................................................. 98

VistA Scheduling Enhancements xii April 2018
VS GUI User Guide
Figure 133: Cancelled by Clinic ............................................................................................. 98
Figure 134: Appointment Right-click Options – Mark as No Show ...................................... 99
Figure 135: Mark as No Show Dialog .................................................................................. 100
Figure 136: Clinic Schedule Display – No-Show Red ......................................................... 100
Figure 137: Pending Appointment Window – Appointment Status No-Show ..................... 100
Figure 138: No-Show Warning Message .............................................................................. 101
Figure 139: Appointment Right-click Options – Undo No-show ......................................... 102
Figure 140: Appointment Clinic Schedule Display – Undo No-show as Purple .................. 102
Figure 141: Undo No-show – Appointment Status No Action Taken .................................. 103
Figure 142: Appointment Right-click Options – Check In Patient....................................... 104
Figure 143: Appointment Check In Dialog .......................................................................... 104
Figure 144: Clinic Schedule Display – Check In Yellow ..................................................... 105
Figure 145: Pending Appointment Window – Status ACT REQ/CHECKED IN ................ 105
Figure 146: Appointment Right-click Options – Undo Check In Patient ............................. 106
Figure 147: Clinic Schedule Display – Undo Check In Patient Purple ................................ 106
Figure 148: Pending Appointment Window – Appointment Status No Action Taken ........ 107
Figure 149: Appointment Right-click Option – Check Out Patient ..................................... 108
Figure 150: Appointment Check Out Dialog ........................................................................ 109
Figure 151: Clinic Schedule Display – Check Out Patient Orange ...................................... 109
Figure 152: Pending Appointment Window – Status ACT REQ/CHECKED OUT ............ 109
Figure 153: Appointment Right-click Options – Undo Check Out Patient .......................... 110
Figure 154: Clinic Schedule Display – Undo Check Out Patient Yellow ............................ 110
Figure 155: Pending Appointment Window – Status ACT REQ/CHECKED IN ................ 111
Figure 156: MRTC Interval/Appt. # Dialog ......................................................................... 113
Figure 157: MRTC Requests displayed in Request Management Grid ................................ 114
Figure 158: Find Appointment Dialog .................................................................................. 116
Figure 159: Find Appointment Dialog and MRTC Booking Status Dialog ......................... 117
Figure 160: Future Clinic Inactivation Date ......................................................................... 118
Figure 161: Request Type ..................................................................................................... 119
Figure 162: Clinic Schedule Display – APPT Request Future CID/Preferred Date............. 120
Figure 163: Max Overbook Limit ......................................................................................... 120
Figure 164: Appointment Right-click Options – Add Appointment .................................... 121
Figure 165: View Appointment Dialog – Appointments ...................................................... 122
Figure 166: Print Letter? Dialog ........................................................................................... 122
Figure 167: Closing Request Dialog ..................................................................................... 123
Figure 168: Clinic Schedule Display – Overbook Appointment .......................................... 123
Figure 169: Request Type ..................................................................................................... 124
Figure 170: Clinic Schedule Display – APPT Request Future CID/Preferred Date............. 125

VistA Scheduling Enhancements xiii April 2018
VS GUI User Guide
Figure 171: Overbook After Hours Time Slot ...................................................................... 125
Figure 172: Appointment Right-click Options – Add Appointment .................................... 126
Figure 173: Overbook Confirmation Dialog......................................................................... 126
Figure 174: New Appointment Dialog ................................................................................. 127
Figure 175: Print Letter? Dialog ........................................................................................... 127
Figure 176: Closing Request Dialog ..................................................................................... 127
Figure 177: Clinic Schedule Display – Overbook Appointment After Hours ...................... 128
Figure 178: Clinic Schedules – Clinic Search ...................................................................... 129
Figure 179: Clinic Schedule Grid ......................................................................................... 129
Figure 180: VL Indicator ...................................................................................................... 129
Figure 181: Consecutive Time Slots ..................................................................................... 130
Figure 182: New Appointment Dialog ................................................................................. 131
Figure 183: Clinic Schedule Display – Appointment Length Extended............................... 132
Figure 184: TRACKING Record Updated ........................................................................... 133
Figure 185: C&P Appointment for Patient with No Pending 2507 Request ........................ 134
Figure 186: C&P Requests Dialog ........................................................................................ 135
Figure 187: C&P Request Due to Cancellation Dialog ........................................................ 135
Figure 188: AMIE C&P EXAM TRACKING Record Updated .......................................... 135
Figure 189: C&P Requests Dialog ........................................................................................ 137
Figure 190: C&P Request Due to Cancellation Dialog ........................................................ 137
Figure 191: C&P Request APPT Links Dialog .................................................................... 138
Figure 192: C&P APPT Links Due to Veteran Cancellation or No Show ........................... 138
Figure 193: C&P APPT Links Due to Cancellation Dialog ................................................. 138
Figure 194: C&P APPT Links Adjustment Dialog .............................................................. 139
Figure 195: C&P Requests Dialog ........................................................................................ 140
Figure 196: C&P Request Due to Cancellation Dialog ........................................................ 140
Figure 197: C&P Request APPT Links Dialog .................................................................... 141
Figure 198: C&P Canceled APPT Links Dialog Warning ................................................... 141
Figure 199: C&P APPT Links Due to Veteran Cancellation or No Show ........................... 141
Figure 200: AMIE C&P EXAM TRACKING Record Updated .......................................... 142
Figure 201: C&P Cancel APPT Associated 2507 Request Updated .................................... 143
Figure 202: C&P Cancel APPT NOT Linked to Pending 2507 Request ............................. 143
Figure 203: Clinic Schedules Search .................................................................................... 145
Figure 204: Clinic Schedules Display – Available and Unavailable .................................... 145
Figure 205: Clinic Schedules Display – Hours of Operation ............................................... 146
Figure 206: Clinic Schedules Display – Holiday Bookable ................................................. 146
Figure 207: Clinic Schedules Display – Holiday Unbookable ............................................. 147
Figure 208: Clinic Schedule Display – No Availability Defined ......................................... 147

VistA Scheduling Enhancements xiv April 2018
VS GUI User Guide
Figure 209: Clinic Schedule Display – Whole and Partial Day Cancel Availability ........... 147
Figure 210: APPT Length and Max OB Allowed ................................................................ 148
Figure 211: VL Indicator ...................................................................................................... 148
Figure 212: Special Instructions Indicator ............................................................................ 149
Figure 213: Time Slot Count ................................................................................................ 149
Figure 214: Overbook Time Slot Count ............................................................................... 150
Figure 215: Minimized Time Slot Viewer ............................................................................ 151
Figure 216: Expanded Time Slot Viewer ............................................................................. 151
Figure 217: Time Slot Viewer Displays Slot Details............................................................ 151
Figure 218: Time Slot Viewer Right-click–Edit, View, Cancel ........................................... 152
Figure 219: Time Slot Viewer – Check In Patient ................................................................ 153
Figure 220: Time Slot Viewer – Check Out Patient ............................................................. 153
Figure 221: Time Slot Viewer – Mark as No Show ............................................................. 154
Figure 222: Provider Schedules ............................................................................................ 154
Figure 223: Provider Schedules Selection List ..................................................................... 155
Figure 224: Provider Schedule Display ................................................................................ 155
Figure 225: Provider Schedules Booked APPTs .................................................................. 155
Figure 226: Clinic Groups .................................................................................................... 156
Figure 227: Clinic Groups Search Result List ...................................................................... 156
Figure 228: Clinic Groups Schedule Display ....................................................................... 157
Figure 229: Clinic Availability Search ................................................................................. 158
Figure 230: Clinic Availability ............................................................................................. 159
Figure 231: Clinics and Users ............................................................................................... 159
Figure 232: Add Privileged User .......................................................................................... 160
Figure 233: Remove Privileged User .................................................................................... 161
Figure 234: Create New Clinic Group .................................................................................. 161
Figure 235: Find Resource .................................................................................................... 162
Figure 236: Add Resource to Clinic Group .......................................................................... 163
Figure 237: Remove Resource from Clinic Group ............................................................... 163
Figure 238: Reports Tab Selections ...................................................................................... 164
Figure 239: Audit Activity Report – Individual Scheduler .................................................. 164
Figure 240: Audit Activity Report – All Schedulers ............................................................ 166
Figure 241: Audit Activity Sort – Ascending ....................................................................... 167
Figure 242: Audit Activity Sort – Descending ..................................................................... 167
Figure 243: Audit Activity Report – Filtered ....................................................................... 168
Figure 244: Audit Activity Report – Multiple Filters ........................................................... 168
Figure 245: Clinic Activity Report Sort – Ascending Order ................................................ 171
Figure 246: Clinic Activity Report Sort – Descending Order .............................................. 171

VistA Scheduling Enhancements xv April 2018
VS GUI User Guide
Figure 247: Clinic Activity Report – Filtered ....................................................................... 172
Figure 248: Clinic Activity Report – Multiple Filters .......................................................... 172
Figure 249: Clinic Activity ................................................................................................... 173
Figure 250: Save As .............................................................................................................. 173
List of Tables
Table 1: Clinic Schedule Availability ................................................................................... 144
Table 2: Keyboard Shortcuts for Ribbon Bar Components .................................................. 182
Table 3: Keyboard Shortcuts for Request Type .................................................................... 182
Table 4: Keyboard shortcuts for the Appointment Request .................................................. 183
Table 5: Keyboard Shortcuts for the Systems Tab Ribbon Bar ............................................ 186
Table 6: Keyboard Shortcuts for Scheduling Management .................................................. 188
Table 7: Keyboard Shortcuts for the Clinic Groups Tab ...................................................... 188
Table 8: Keyboard Shortcuts for the Availability Selection ................................................. 189
Table 9: Keyboard Shortcuts for the Reports Tab Ribbon Bar ............................................. 190
Table 10: Keyboard Shortcuts for Audit Activity................................................................. 190
Table 11 Keyboard Shortcuts for Clinic Activity ................................................................. 191
Table 12: Warning Messages ................................................................................................ 192

VistA Scheduling Enhancements 1 April 2018
VS GUI User Guide
1 Introduction
Department of Veterans Affairs (VA) Veterans Health Information Systems and Technology
Architecture (VistA) Scheduling (VS) Graphical User Interface (GUI) module is the
Windows GUI version of the Patient Information Management System (PIMS) Scheduling
module. It provides appointment management functions included in PIMS Scheduling, but
with the added convenience and usability of a GUI.
1.1 Purpose
The Veterans Health Administration (VHA) Office of Veterans Access to Care (OVAC)
requested an enterprise enhancement for the VS package. The enhancement reduces
operating costs for VHA and improves operational efficiencies, resulting in patient-centered
access to care, coordinated care, increased customer satisfaction, and the reduction of
excessive cycle/wait time for scheduling patients.
1.2 Overview
VS GUI is a software module that allows schedulers to make appointments quickly by
viewing multiple appointment request types and multiple clinics in one screen. A scheduler
can easily view patient requests for service, find the next available open appointment, view
the provider’s availability in multiple clinics, and track a patient’s appointment process.
Refer to Section 2 for a more detailed description of VS GUI functionality.
1.3 Project References
1.3.1 Information
The VS GUI points of contact (POCs) include:
• OVAC VSE Project Manager – Ms. Erin Vanderwall,
Erin.Vanderwall@va.gov
• OVAC Program Office – VHAVSEProgramOffice@va.gov
• OIT VSE Project Manager – Mr. Shannon Ayers, Shannon.Ayers@va.gov
Note: The VSE project SharePoint site can be accessed via the following link:
http://vaww.oed.portal.va.gov/pm/iehr/vista_evolution/enhancements/SitePages/Home.aspx
VSE Pulse pages:
• Scheduler: https://www.vapulse.net/community/vista-scheduling-
enhancements-vse
• Super User: https://www.vapulse.net/groups/vse-super-users
• National Return to Clinic Order Implementation:
https://www.vapulse.net/groups/return-to-clinic-rtc
• Frequently Asked Questions/Known Issues document:
https://www.vapulse.net/docs/DOC-107042

VistA Scheduling Enhancements 2 April 2018
VS GUI User Guide
1.3.2 Coordination
Coordination between the project and its specific support functions (e.g., installation
coordination, security, etc.) for VS GUI is the same as those for VistA.
1.3.3 Help Desk
Refer to Section 11 for additional information.

VistA Scheduling Enhancements 3 April 2018
VS GUI User Guide
1.3.4 Organization of the User Guide
This user guide is comprised of 11 sections, as follows:
• Introduction: Addresses general project information
• System Summary: Contains system configuration, data flows, and user
access level information
• Getting Started: Contains procedures for logging on and off of the system,
instructions on how to print and export schedules, and information on VS GUI
tab displays, basic functions for searching, sorting, filtering, and viewing
• Ribbon Bar: Contains procedures for using the Schedule Manager Ribbon
Bar and details on features, such as patient demographics, new request
actions, pending appointments, print, export, refresh, query tool, user
preferences, and patient preferences
• Request Management: Outlines features and procedures for using the
Request Management Grid (where patient’s pending requests are displayed 25
at a time) and the Pending Appointments window (where booked
appointments are displayed in the in the Ribbon Bar of the Tasks tab)
• Appointment Management: Provides details describing how to manage an
appointment – after selecting a patient, the option appears to schedule a new
appointment (APPT) or Patient-Centered Scheduling (PtCSch); a list of recent
and upcoming appointments is displayed in the Ribbon Bar
• Clinics: Provides an overview of clinic and administrator views and actions
• Reports: Provides an overview of viewing and printing reports, and
procedures for generating audit and clinic reports; a list of warnings is also
included
• Trash Queue Cleanup: Defines this task and provides instructions for use
• VistA Scheduling 508 Compliance: Outlines processes for executing VistA
Scheduling application functionality from the keyboard
• Troubleshooting: Provides contact information for the Help Desk regarding
any problems with the VS GUI module

VistA Scheduling Enhancements 4 April 2018
VS GUI User Guide
2 System Summary
The VSE project delivers a series of enhancements to legacy VistA Scheduling Version 5.3
via the VS GUI application.
The previously nationally released version 1.4 includes VS GUI 2.0.0.14 and VistA M patch
SD*5.3*672. Install compliance date was Feb 8, 2018. This update included the following:
• Provides the capability for VSE users to authenticate via Personal Identity
Verification (PIV)
• Clinic Group will display for second patient without searching for a different
clinic group first. (Users should put curser in the clinic group field and click Enter
to refresh.) Ticket I10959194FY17
• Electronic Wait List (EWL) can now be consistently dispositioned from the
Resource Management (RM) Grid. Ticket I11259063FY17
• Scheduling grid no longer allows overbooks in the evenings after a FULL DAY
availability cancellation. The visual display does not extend the cancellation hash
marks to midnight, but it will not allow the user to book, and presents an
appropriate error message to user. Ticket I12362398FY17
• Drag and drop rescheduling within the current calendar view (including clinic
groups and provider search calendar views) is now available for most existing
appointments. Consult linked appointments and appointments in the past cannot
drag and drop as they have other linkages that still require manual cancellation.
Ticket I12487403FY17
• Slot tallies no longer move as the calendar view is scrolled down. Ticket
I12529073FY17
• Schedulers cannot add new request or appointments in VS GUI after a patient is
listed as deceased in VistA. Ticket I12602010FY17
• Cancel by Clinic no longer allows PID to be changed by switching between
Cancel by Clinic and Cancel by Patient. Ticket I12748395FY17
• VS GUI Audit Report now reports accurate counts of actions within VS GUI for
both individual and all schedulers. Tickets I12871937FY17
• Checking out appointment “Follow-up Needed” now works better than it did in
former versions, however we continue to keep it tied to the SD SUPERVISOR
key until we can completely separate the administrative check out function in VS
GUI from any ties to the encounter files. We do not recommend use of check out
at this time. Ticket I13233499FY17
• Appointments scheduled in VS GUI with a past date will now show in CPRS
cover sheet and visit location lists. Ticket I13212697FY17
• SDRR CLINIC LETTER REPORT will now run properly (was hanging on bad
data in previous versions). Ticket R14380532FY17
The next nationally released version 1.5 includes VS GUI 2.0.0.15 and VistA M patches
SD*5.3*679 and GMRC*3.0*98. Install period is projected for May 31 2018 at time of
publishing. This update includes the following:
• Pending Appointment Box Improvements:

VistA Scheduling Enhancements 5 April 2018
VS GUI User Guide
o Columns in the Pending Appointment list are now sortable
o Filters can now be placed on each column in the Pending Appointments
list
o The date range for the Pending Appointments list has changed from (-365
days to +365 days) to (-365 days to + 1000 days)
o Right-clicks on the Pending Appointments list in the ribbon in VS GUI, a
new menu option, Print Pending, is now available. This option will print a
list of all of the current patient’s appointments that occur from the install
date of SD*5.3*679 into the future. If the list is filtered or date range
extended, the Print Pending results should reflect those filters.
• Patient Selection, when a patient is selected, the system no longer immediately
jumps to the New Request pop up box to prompt the user for a request type. The
user can click the New Request (New Request) button in the ribbon in order to
start a new request, as they could previously. This forces the scheduler to view
existing requests before making a new one.
• The View Mode selector in the Arrangement pane of the ribbon has been
removed, as it was unused.
• The print buttons in the letter printing window previous read Print (Local) and
Print (Server). Now they read Print (Windows Printer) and Print (VistA Print
Device), respectively.
• In the Select Patient pane located in the ribbon, additional fields have been added
to the patient information displayed. These include Primary Care Provider (PCP),
Mental Health Provider (MHP), and phone number. This addresses Ticket
R16775634FY18.
• The New Appointment dialog will now have the Comments field filled with the
comments from the original appointment request, whether it is an Appointment
(Appt.) Request, National Return to Clinic (RTC), Patient Centered Scheduling
(PtCSch) Electronic Wait List (EWL), or Consult request.
• The New Appointment dialog will now check to make sure that the slot being
booked into has not been made unavailable since the user started working on the
appointment (such as a clinic that was temporarily opened on a holiday being re-
closed). This addresses Ticket I15980703FY17.
• View only users and users without privileges in restricted clinics can now access
both the View Appointment and Expand Entry options when right-clicking on an
appointment. Neither of these options allows changing of any data. This addresses
Ticket R16581333FY17.
• The system will now allow a user to cancel an appointment for a deceased patient.
This addresses Ticket I12603678FY17.
2.1 User Access Levels
The VS GUI module uses three access levels:
Provider and Non-Scheduler (View Only) can view patient appointments, clinics, and
provider’s availability in VS GUI via:

VistA Scheduling Enhancements 6 April 2018
VS GUI User Guide
• View patient appointments, clinics, and provider’s availability
• Find Available Appointments slots in a clinic or group of clinics
• Appointment Schedule displayed by clinic, provider or clinic group
• Request Management Query Tool to produce a list of patients waiting for an
appointment
• Expand Entry on existing appointments to view details of when the
appointment was created, encounter information (if available), and other
appointment audit fields
• VistA Account Requirements: VistA option CLINICAL SCHEDULING
PROCEDURE CALLS [SDECRPC] and VistA key SDECZVIEW. Please
note, SDECZVIEW blocks all other SDEC keys the user may hold
Scheduler can make appointments quickly by viewing multiple clinics in one screen. The
user can easily find open appointments, view the provider’s availability in multiple clinics,
and track a patient’s appointment process in VS GUI via:
• Find Appointments to specify the dates to view only available appointments
in a clinic or list of clinics
• Resource Schedules to display clinic schedules
• Appointment Schedule to display appointment schedules for a clinic and be
able to view a provider’s schedule for the day, week, or month
• Request Management Queue to display a list of patients waiting for an
appointment or a consolidated list of a particular patient’s unfulfilled
appointment needs
• Ribbon Bar for a view that shows individual patient information after a
patient is selected (demographics, pending appointments, etc.), as well as
system functions like print, export, query tool and user preferences.
• VistA Account Requirements: VistA option CLINICAL SCHEDULING
PROCEDURE CALLS [SDECRPC] and VistA key SDECZMENU. Please
note, SDECZVIEW blocks all other SDEC keys the user may hold.
Administrator can perform all VS GUI Scheduler functions with the Task tab, with the
addition of two additional tabs:
• System Tab to add/delete privileged users from a prohibited clinic and setup
clinic groups.
• Reports Tab to view and export reports for clinic profile and user action audit
reports
• VistA Account Requirements: VistA option CLINICAL SCHEDULING
PROCEDURE CALLS [SDECRPC] and VistA keys SDECZMENU and
SDECZMGR. Please note, SDECZVIEW blocks all other SDEC keys the
user may hold.
VistA Scheduling Enhancements 7 April 2018
VS GUI User Guide
3 Getting Started
This section provides a general walkthrough of the system from initiation through exit. The
logical arrangement of the information shall enable the user to understand the sequence and
flow of the system.
3.1 Logging On
VistA User Access and Verify codes are required to log on to the VS GUI. The user must
have VistA options and keys according to their role (listed above).
VA Identification Cards (PIV)-enabled log in is introduced in this version. It is now the
primary method of log in, but the user must have an active VistA account to access VS GUI,
regardless of the method used to log in.
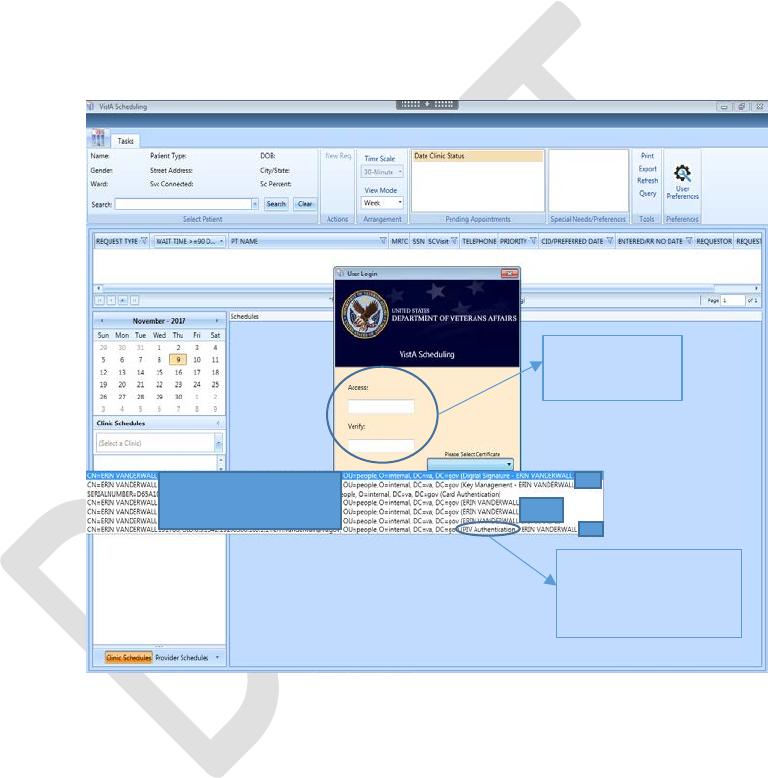
Figure 1: User Login
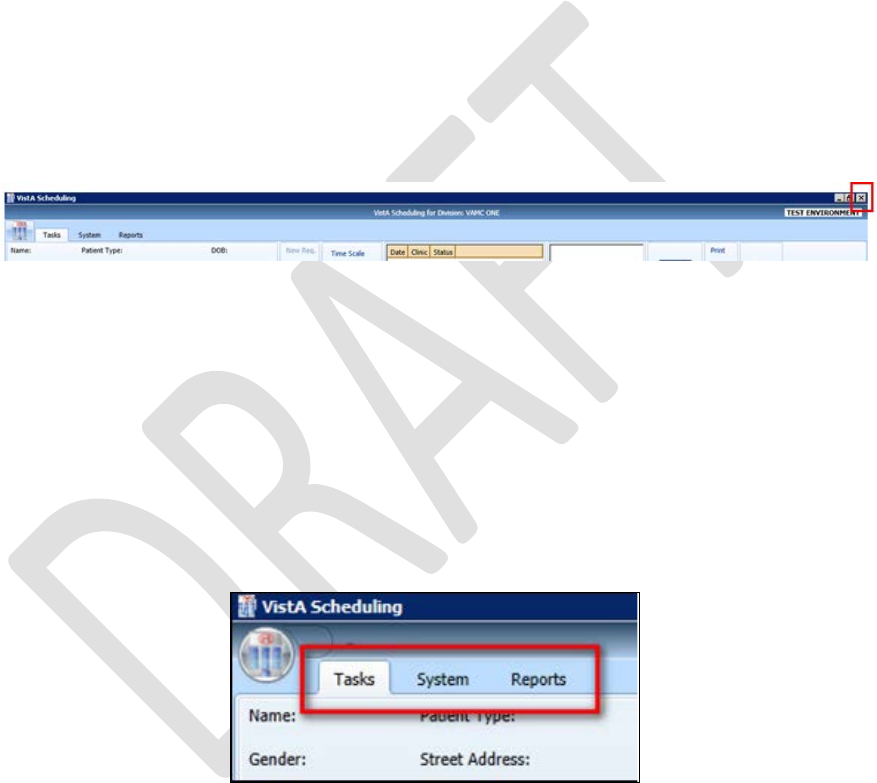
Note: The main screen of the application informs users whether they are logged into
the test or production environment. The environment to which the user is logged in
will be displayed in the top right corner of the main screen page.
Figure 2: Main Screen with Test Environment Displayed
3.2 Two Factor Authentication Using PIV Cards
You will be prompted to access VS GUI using your PIV card and Personal Identification
Number (PIN). In order to do this, you must have taken the one-time action of linking
your PIV card to your Vista account. If you have already linked your account when
CPRS began PIV log in, you will not need to do it again for VS GUI. However, if you
VistA Access
Verify Codes
are available
PIV log in is
preferred.
Highlight the
certificate that

VistA Scheduling Enhancements 8 April 2018
VS GUI User Guide
move to a different station/VistA instance, you may need to re-link to add your new
VistA account to your PIV card.
If you have not already linked your account, you can do so by following this link
http://go.va.gov/qugx. If you experience any issues or are unable to complete the
linking/binding process, please contact the Enterprise Service Desk at (855) 673-4357,
Option 3, or by email to ESDOtherSupport@va.gov.
Note: After selecting IAM Provisioning Service Link VistA to User you can tell if you’re
already linked or there is no link by looking at the Vista Instances.
Figure 3: Linking PIV to VistA Account
If you are not able to log in with your PIV for any reason, you will be able to bypass the
PIV logon on the log in pop up by inserting your Access code/Verify Code on the log in
pop up box, but it is expected that a security mandate will require you to use two factor
authentications in the future, so it is highly recommended that you link your account to
avoid access problems in the future.
If you have used your PIV card in another capacity (logged into your computer, for
instance) in the last few minutes, VS GUI may recognize that PIV activity, and
automatically take you into the application without re-entering your PIV PIN.
Note: If the PIV authentication service itself is having problems authenticating, the user
may get an error, even if they select the correct certificate. These are usually widespread
outages affecting several applications. If the PIV service is going to be down for an
extended time, the national PIV will remove PIV completely, and the user will see a
message to use VistA login credentials. Either way, VistA credentials are the
contingency and can be used whether or not PIV authentication is working.
VistA Scheduling Enhancements 9 April 2018
VS GUI User Guide
3.3 New Return to Clinic Orders (RTC Orders)
A nationally developed Return To Clinic (RTC) order dialog is included in CPRS version
31A. This order will allow VistA to transfer the national RTC orders to VS GUI as RTC
requests. This will make it easier to transfer a providers RTC order information seamlessly
into an appointment with minimal human error in data transfer. All facilities have received
upgrades to both CPRS and VS GUI to allow this to happen, however implementation and
use of the national RTC order may not be immediate, and in some sites, will take significant
planning and coordination. Once clinical staff begin using the national RTC orders in CPRS,
the resulting requests should be processed in VS GUI.
3.4 Logging Off
To log off when you are finished scheduling appointments, click the close button (X) in the
upper right corner of the VS GUI.
Figure 4: User Logoff
3.5 VS GUI Tabs
The VS GUI provides the following tabs:
• Tasks: Allows the scheduler to search for patient requests, view clinic
resources, and make appointments.
• System: Allows an administrator (with the SDECZMGR security key) to
add/delete privileged users from a prohibited clinic and set up clinic groups.
• Reports: Allows for various reports to be generated by users holding the
SDECZMGR security key.
Figure 5: VS GUI Tabs
3.5.1 Tasks Tab
The Tasks tab Ribbon Bar includes the following sections:
• Select Patient: Search for and view information about a selected patient
• Actions: Allows the sscheduler to initiate new APPT or Patient-Centered
Scheduling requests
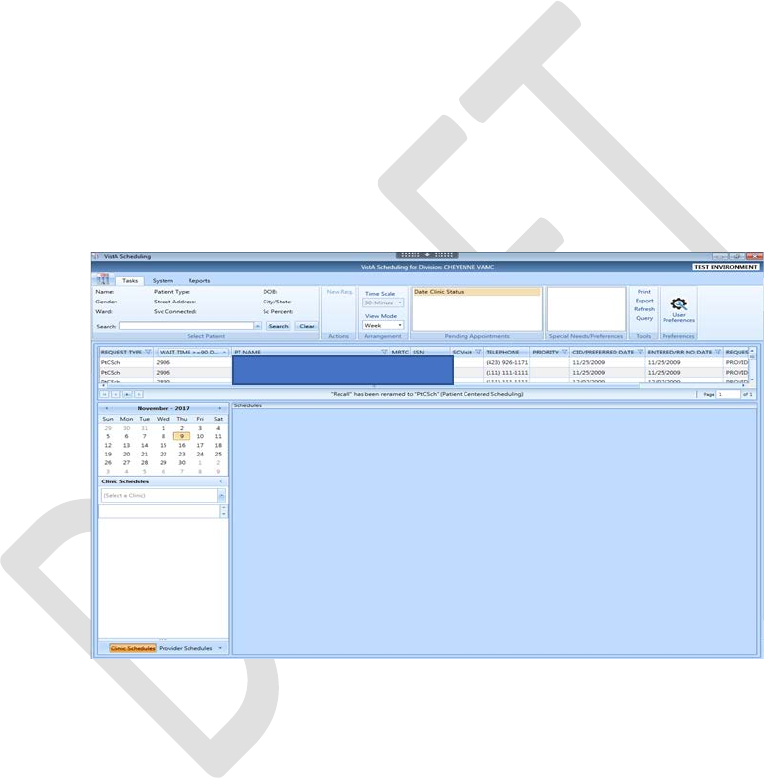
VistA Scheduling Enhancements 10 April 2018
VS GUI User Guide
• Arrangement: Time Scale (slot length) displayed. Note: in this version,
View Mode does not change the view of the calendar. Use the Day, Week,
Month and Timeline buttons above the calendar itself to change the display.
• Pending Appointments: Date, clinic, and status of any pending
appointments, past appointments (365 days back), and future appointments
(1000 days forward) for the selected patient
• Special Needs/Preferences: Identified special needs and/or preferences for
the selected patient missing the Patient Record Flags (PRFs)
• Tools: Options include print, export, refresh, and queries.
• Settings: Access to User Preferences.
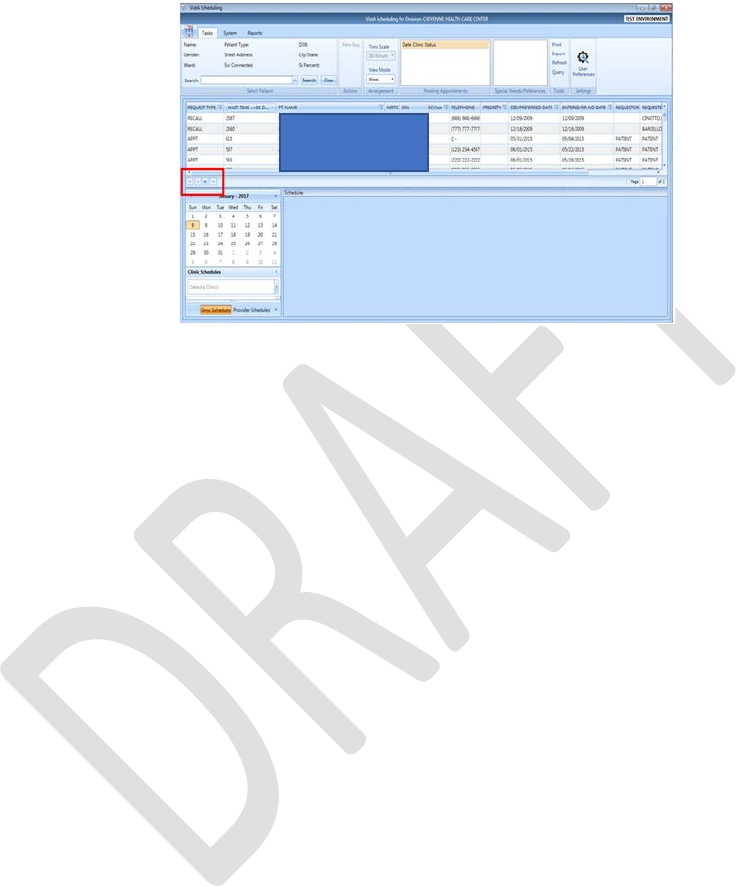
The Tasks tab Resource area includes the following sections:
• Calendar to choose a desired appointment date and to search for and access
Clinic Schedules, Provider Schedules, and Clinic Groups
• Schedules: View single or multiple clinic schedules in one screen
Figure 6: Tasks Tab Display
3.5.2 System Tab Action Areas
The System tab includes the following sections:
• Resource Management: Scheduling Management allows for management
of privileged users within Prohibited and Clinic Groups as well as the creation
and management of clinic groups.
• Resource Schedules Availability allows for search of clinic, provider or
clinic group by name.
• Selected Clinic provides a quick view of the selected clinic’s Primary
Provider, Overbook Limit, Inactive Date, and Reactive Date.
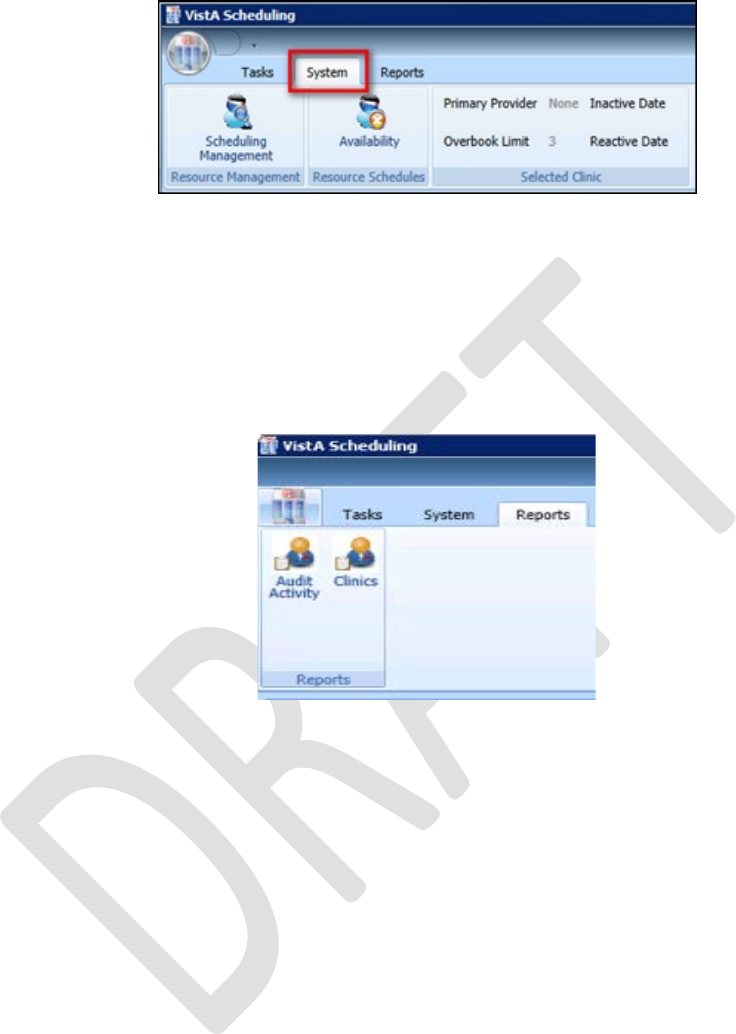
VistA Scheduling Enhancements 11 April 2018
VS GUI User Guide
Figure 7: System Tab
3.5.3 Reports Tab Action Areas
The Reports tab allows for viewing and exporting of Audit Activity and Clinics setup
information. Please note: Audit Activity Report is now working. See details in 8.1
Figure 8: Reports Tab
3.6 Searching
The search feature enables a scheduler to:
• View and search clinic profiles to view appointments resources by clinic,
provider, or by clinic groups
• View and search patient requests by request type
• Sort the request queue by any column in ascending or descending order and
filter.
• Sort results and save the search into various outputs, such as Microsoft Excel
or Adobe PDF and print to a network printer.
3.6.1 Search for Patient
1. Log into VS GUI.
2. From the Tasks tab, in the Search text box, type the search criteria for the
patient. Click Search, and then select the requested patient’s name. Click
Search/Choose patient from the resulting list.
VistA Scheduling Enhancements 12 April 2018
VS GUI User Guide
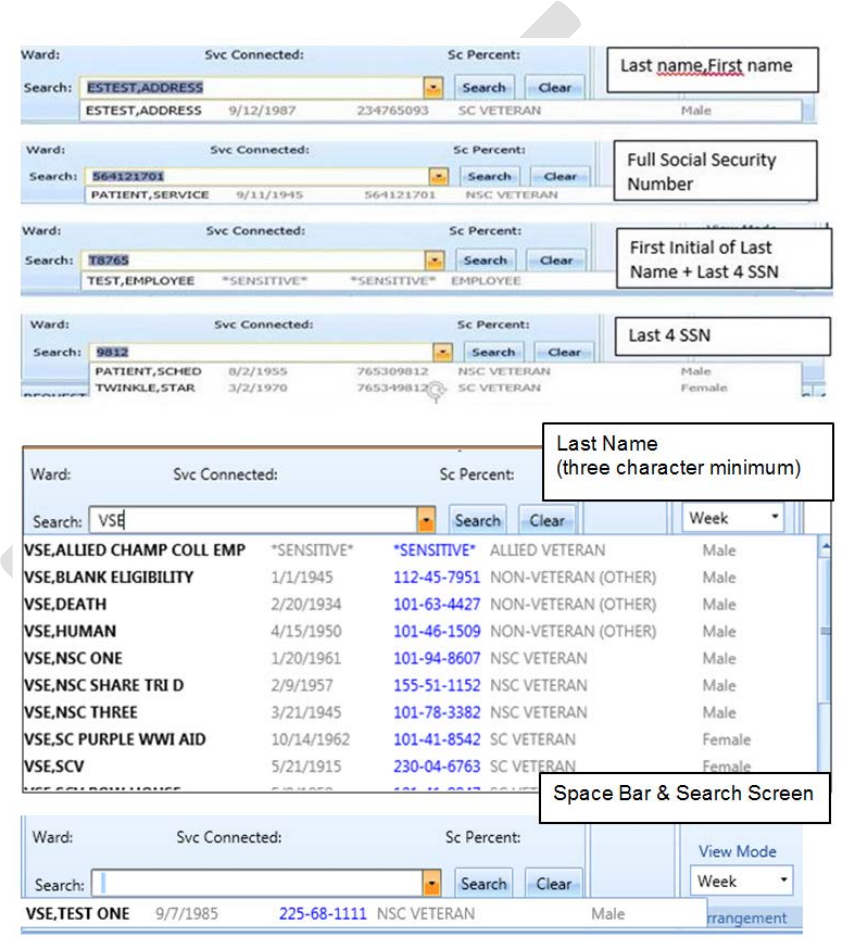
3. In the Search field, the following options are available for searching for a
patient:
o Last name,First name (no space between comma and first name)
o Full SSN
o First initial of the last name + last four of the SSN (ex. T0170)
o Last four of SSN (0170)
o Last name only (three-character minimum)
o Spacebar + Search will bring the last patient used in VistA, CPRS and VS
GUI into the search drop down.
Figure 9: Patient Search
3.7 Filtering
VistA Scheduling Enhancements 13 April 2018
VS GUI User Guide
Filtering can be accomplished in several areas of the VS GUI. Items that can be filtered are:
• Lists
• Time Period
• Facility
The following sections describe basic filtering.
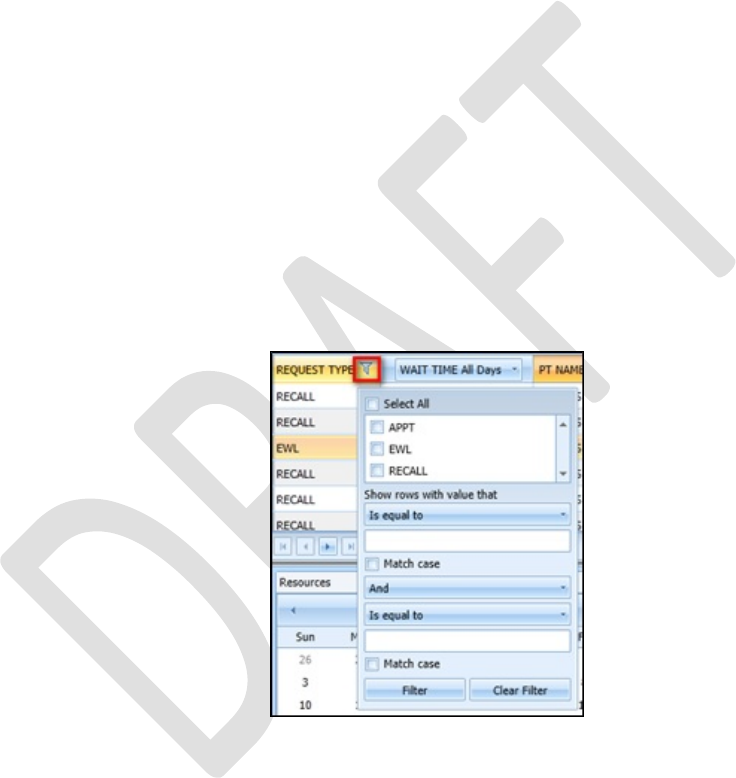
3.7.1 Filtering Lists
You can filter any column on the request grid to narrow the type of information that you
want to view.
1. In the request grid or pending appointments box, click any column that shows a
filter icon.
2. Select a filter option.
3. Please note: Return to Clinic (RTC) are a sub-type of APPT Requests, and will
be included if you check APPT.
NOTE: Filters often carry forward to other patients or activities. They do not automatically clear
as the user moves from patient to patient, since many times the filter function is being used to
work a list of open items and those filters should stay in place.
Figure 10: Filtering Lists
VistA Scheduling Enhancements 14 April 2018
VS GUI User Guide
3.7.2 Paging Through Records
Filtered results are retrieved from the database and displayed in 25 row increments.
To view additional records, use the arrow key located below the list to page through the
records.
Figure 11: Paging Through Records
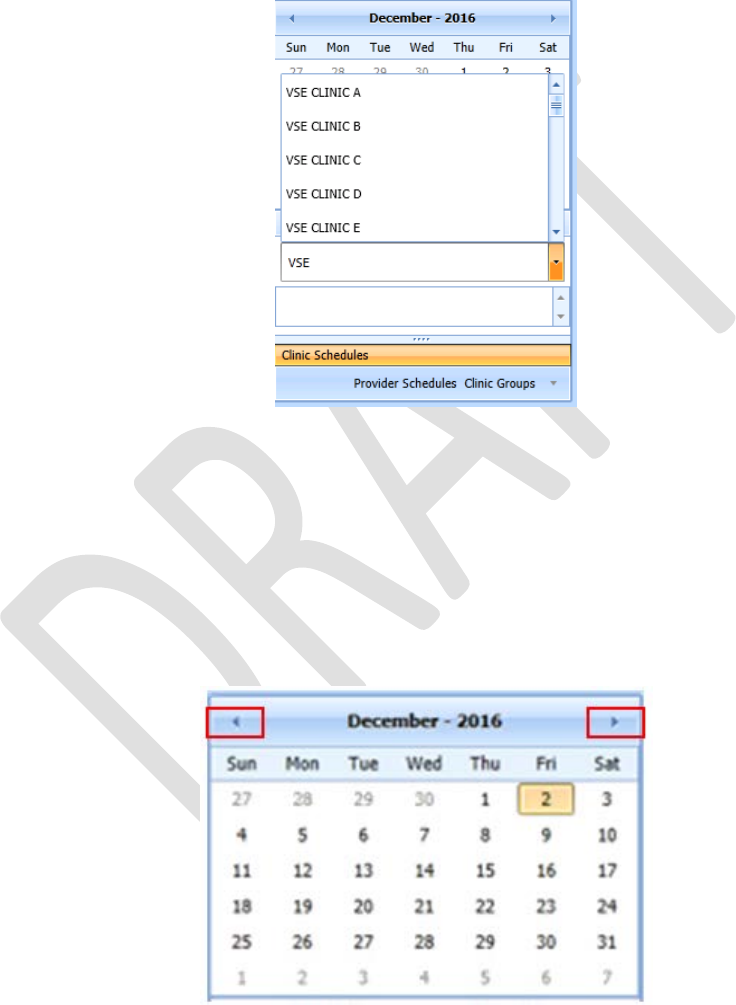
VistA Scheduling Enhancements 15 April 2018
VS GUI User Guide
3.7.3 Filtering by Facility or Clinic
1. To filter by facility or clinic, in the Clinic Schedules pane, type in the name of
the desired clinic (six-character minimum when searching by clinic name;
four-character minimum when searching by clinic abbreviation),
2. Click the name of the clinic from the list to view the desired clinic.
Figure 12: Filtering by Facility/Clinic
3.7.4 Filtering by Time Period
1. To filter by time period, in the Resources pane, search for and select a desired
clinic.
2. From the calendar, select a month and day for viewing appointments.
Click the back and forward buttons to go to the previous or the next month.
Figure 13: Filtering by Time Period
3.8 Sorting

VistA Scheduling Enhancements 16 April 2018
VS GUI User Guide
You can sort the consolidated list of requests in the request grid in different ways to isolate
the information that you need to see.
3.8.1 Sorting by Column
You can sort the consolidated list of requests in ascending or descending order. The default
sort is by Priority Group, Service Connected priority, Preferred Appointment date, and Date
entered (Request date).
To sort by column:
1. Log on to VS GUI.
2. Click any of the column headers to change the sort order.
Figure 14: Sorting by Column
3. Click on the column header again to return to the default sort order.
3.8.2 Sorting Pending Appointments by Column
You can sort the pending appointments of a patient by Date, Clinic and Status. Date sort is
the default and the non-cancelled appointment closest to today’s date is displayed.
To sort by column:
1. Log on to VS GUI.
2. Click the Date, Clinic or Status column header to change the sort order.
Figure 15: Sorting Pending Appointments list by Column
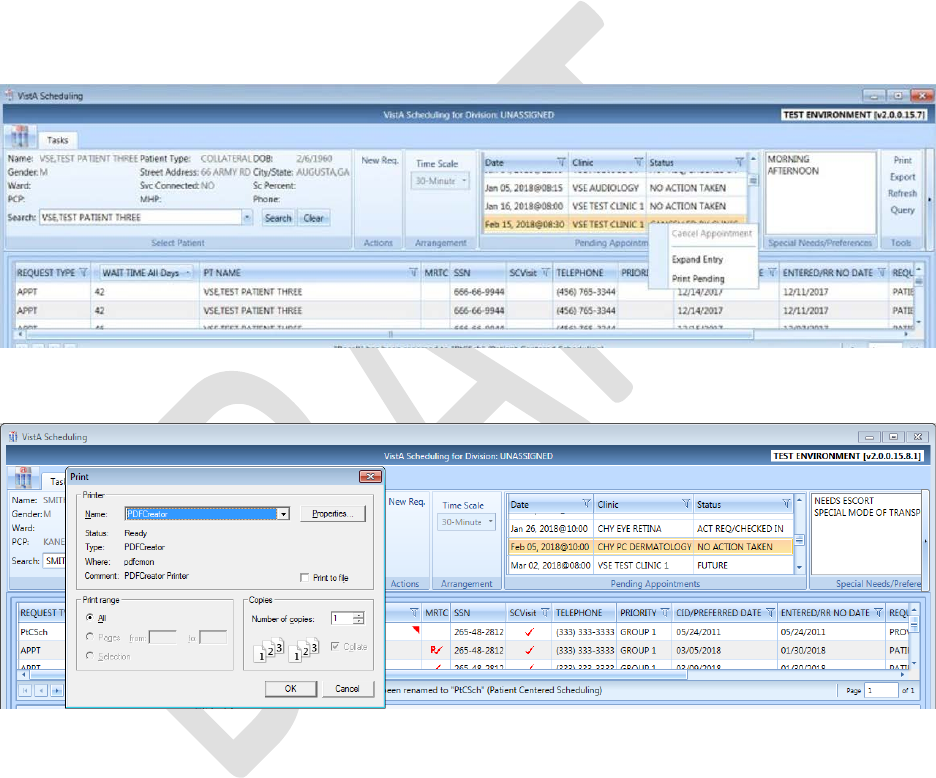
VistA Scheduling Enhancements 17 April 2018
VS GUI User Guide
3.8.3 Print Pending Appointment List for a Patient
The VS GUI allows for print of the Pending Appointment List. Use the following procedure
to print.
1. Log on to VS GUI.
2. In the “Search” field, search for the name of the patient you wish to print
pending appointments for.
3. Right click in the Pending Appointments section. Select Print Pending from
the menu. Select desired printer, and then click Print.
Figure 16: Print Pending
Figure 17: Select Desired Printer

VistA Scheduling Enhancements 18 April 2018
VS GUI User Guide
3.9 Printing and Exporting a Request Management Grid
3.9.1 Printing a Request Management Grid
The VS GUI also allows for printing of a Request Management Grid. Use the following
procedure to print a request grid.
Note: Only requests downloaded on the Request Management Grid will print.
1. On the Ribbon Bar, in the Tools section, select the Print option.
Figure 18: Selecting the Print Option
2. Select the desired printer, and then click Print.
Figure 19: Selecting a Printer
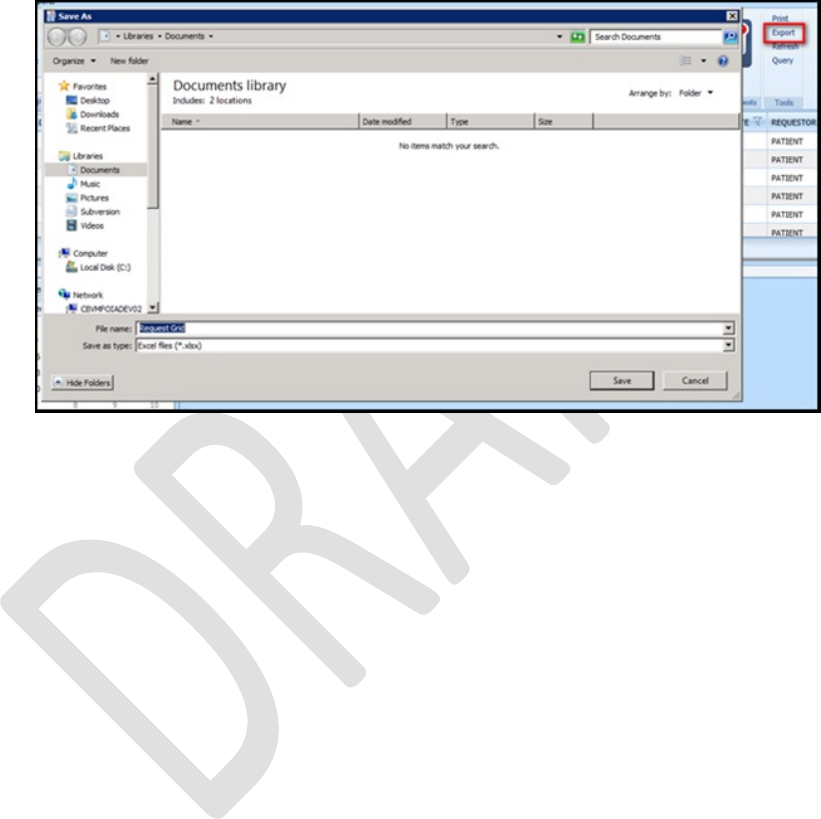
VistA Scheduling Enhancements 19 April 2018
VS GUI User Guide
3.9.2 Exporting a Grid
The VS GUI also allows for exporting of a Request Management Grid in Microsoft Excel
format.
To export a schedule:
1. On the Ribbon Bar, in the Tools section, select the Export option.
Figure 20: Exporting a Grid
2. In the Save As dialog box, type a file name, select a file type, browse to the
location where you want to save the information, and then click Save.
3. Open the file and review the contents. All data displayed in the Request
Management Grid is saved.
Note: Only data that was loaded on screen at the time of export will be exported to
the file. Users may need to load more screens to see all the data.
3.10 Viewing
3.10.1 View Only Mode
A View Only mode is available for non-scheduling personnel. To provide this mode to a
user, you will need the option SDECRPC, and the SDECVIEW security key must be
assigned to the user. This mode allows users to view data in VS GUI but no changes or edits
will be allowed. This key overrides other VS GUI keys and assigns the user to View Only of
the Task Tab.
Information available for viewing includes:
• All Pending Requests
• Previously scheduled appointments
• Clinic with appointments scheduled
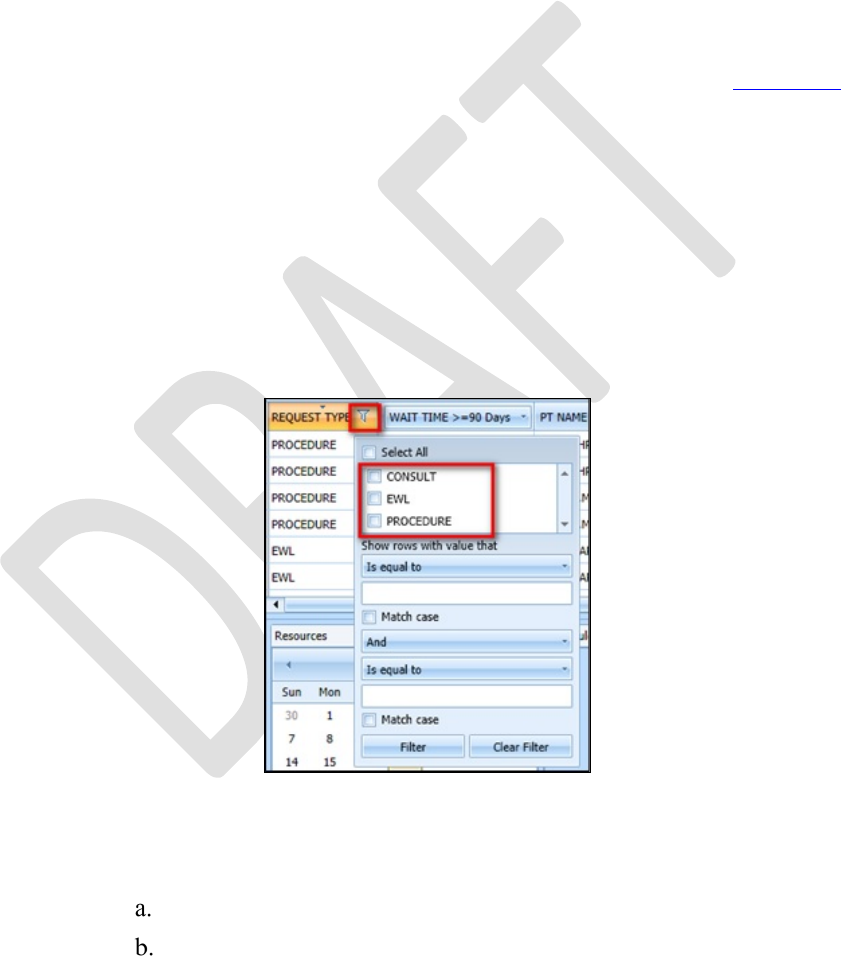
VistA Scheduling Enhancements 20 April 2018
VS GUI User Guide
• Provider with appointments scheduled
• Clinic Group with appointments scheduled
• Patient demographics and special needs/preferences
• Expanded Entry to display appointment audit details such as create date/time
• Query Tool to display a custom list of open requests
3.10.2 Viewing Requests by Request Type
A Scheduler can view requests for Veteran Appointments (APPT) requests—Consults,
Procedure, Veteran, Patient-Centered Scheduling reminders, or EWL reminders. The default
view is for requests that are 90 days or older. Users can change the view for a particular
session or change the default view by changing their user preferences (refer to Section 4.9).
Requests display 25 records at a time. Additional requests can be viewed by going to the next
page.
To view requests by request type:
1. Log on to VS GUI.
2. View the request grid. Consult, APPT, EWL, Procedure, and Patient-Centered
Scheduling requests that have a wait time of 90 days or more will appear in the
grid. The preferred date for the patient request type is shown in the Clinically
Indicated Date (CID)/Preferred Date column.
Figure 21: Request Type Column
3. Click the Request Type column to filter specific requests. Only request types
that are in the current request grid display in the filter tool.
Select EWL to view the Electronic Wait List requests.
Select APPT to view appointment requests (and RTC requests if the
category does not appear on its own.)
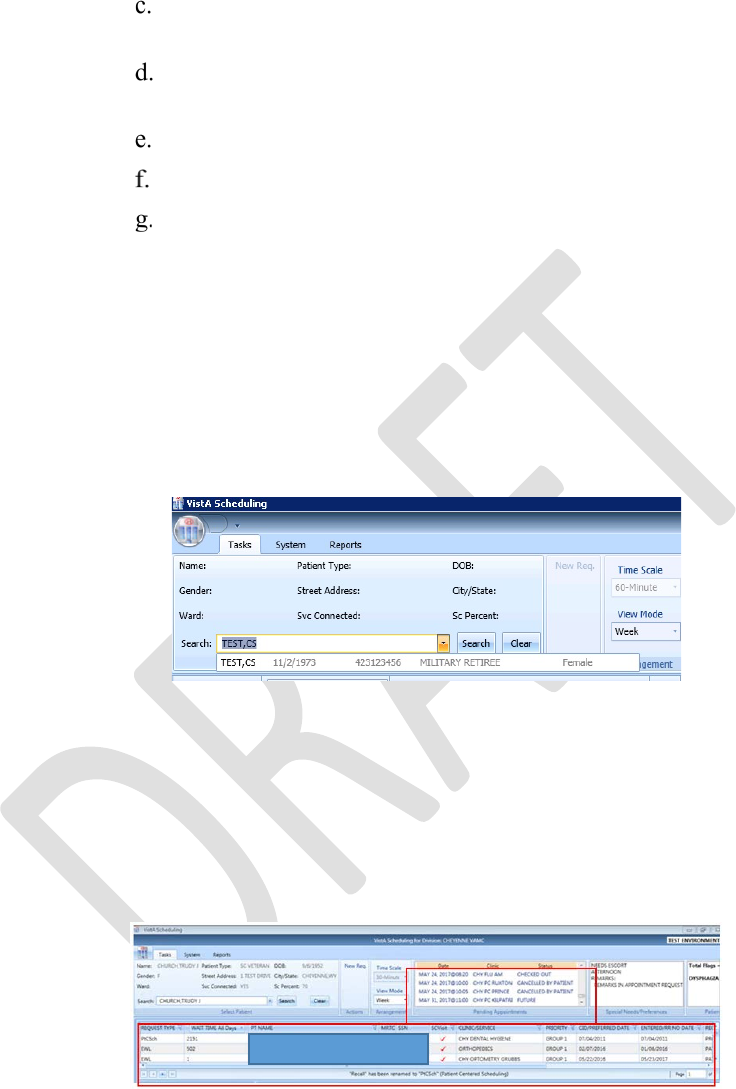
VistA Scheduling Enhancements 21 April 2018
VS GUI User Guide
Select RTC to view Return to Clinic requests (may be included in APPT
for some views including the query tool)
Select Patient-Centered Scheduling to view Patient-Centered
Scheduling requests.
Select Procedure to view procedure requests.
Select Consult to view consultation requests.
Or you can use any combination of the above.
3.10.3 Viewing Requests by Patient
To view requests by patient:
1. Log on to VS GUI.
2. From the Tasks tab, in the Search text box, type the patient’s last name or the
patient’s first initial of the last name and last four of the SSN (e.g. S1234),
Click Search, and then select the requested patient’s name.
Figure 22: Select Patient
3. In the Request Type dialog box select either APPT or PATIENT-
CENTERED SCHEDULING, and then click OK or click Cancel to see the
existing open requests.
The patient’s pending requests are displayed in the Request Management Grid, 25 records at
a time. Booked appointments are displayed in the Pending Appointments window on the
Ribbon Bar of the Tasks tab.
Figure 23: Patient Pending Requests and Booked Appointments
3.10.4 Schedule View
The buttons across the top of the calendar are the only working method to change the view
the schedule.
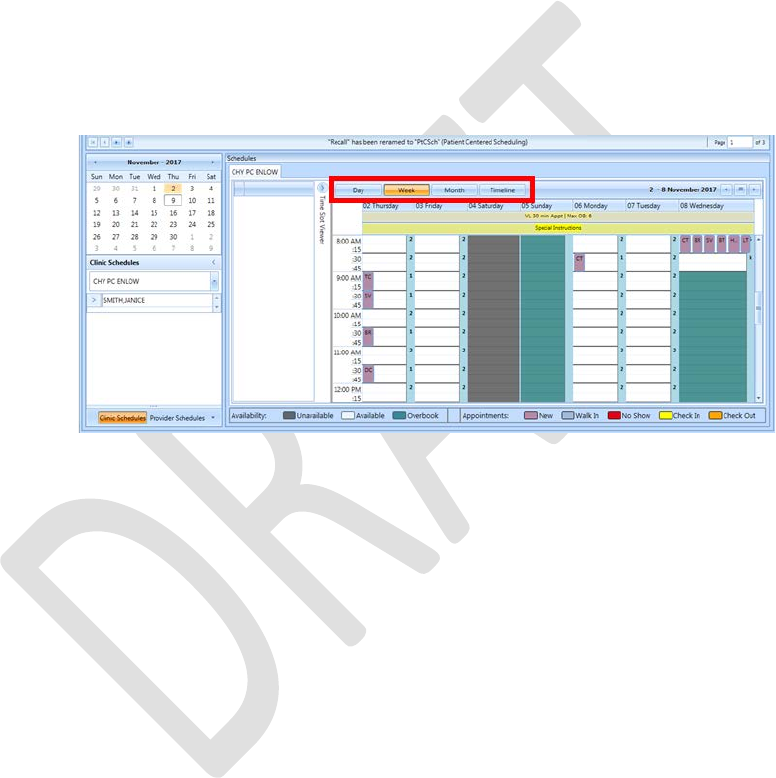
VistA Scheduling Enhancements 22 April 2018
VS GUI User Guide
The default schedule view displays the clinic schedule by week. but the view can be changed
to day or month view for ease of scheduling. To change the schedule view:
1. Log on to VS GUI.
2. Search and select a Clinic to open.
3. To change a view for a specific schedule, at the top of the Schedules section,
click the tab of your choice. The available views from the schedule include:
o Day
o Week
o Month
o Timeline
See the week view display below.
Figure 24: Changing View of a Specific Schedule
4 Ribbon Bar
The following section outlines the features available in the Ribbon Bar of Schedule Manager.
4.1 Patients Demographics
4.1.1 Finding a Patient
1. Log on to VS GUI.
2. From the Tasks tab, in the Search text box, type the patient’s last name or the
patient’s first initial of the last name and last four of the SSN (e.g. S1234).
Click Search, and then select the requested patient’s name.
3. Select the requested patient’s name from the list.
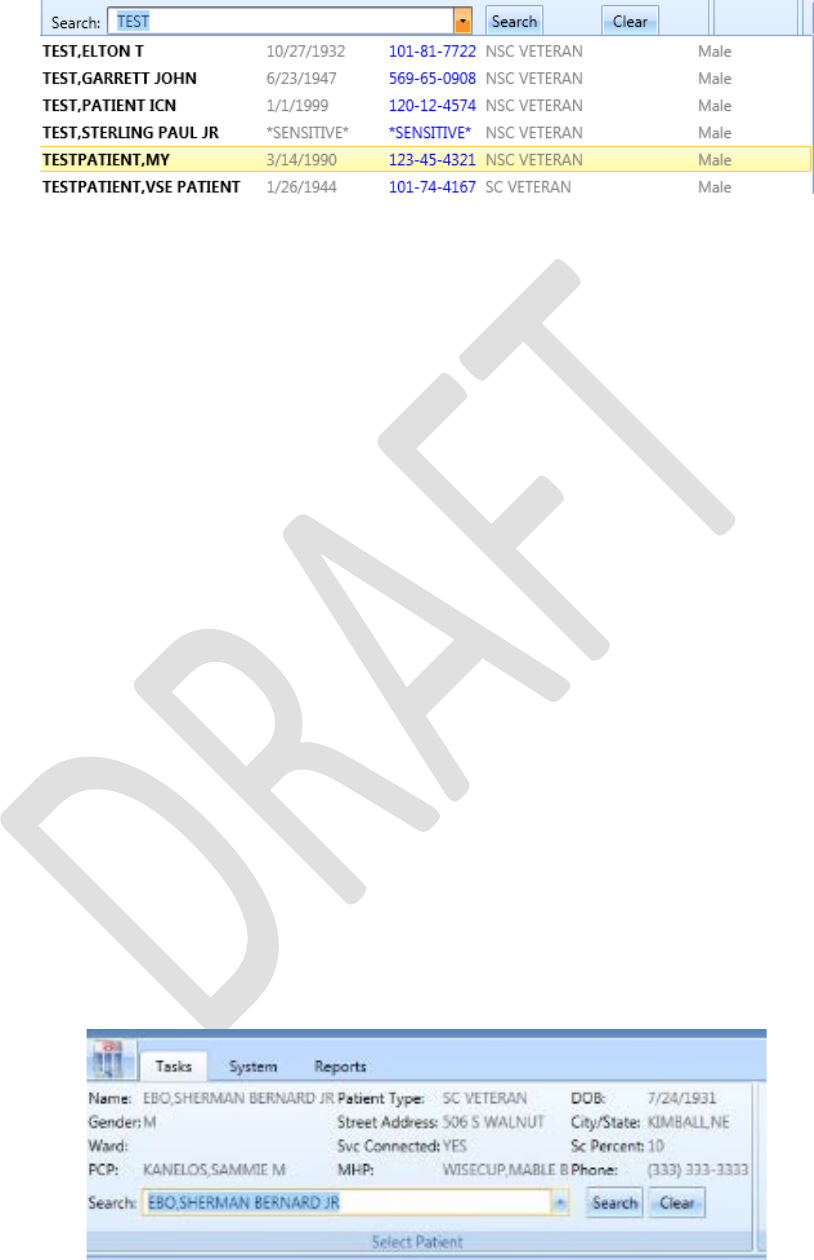
VistA Scheduling Enhancements 23 April 2018
VS GUI User Guide
Figure 25: Search Patient
4.1.2 Viewing Patient Demographics in the Ribbon Bar
You can view basic patient demographic information in the Ribbon Bar; it provides a limited
amount of patient information, but you can choose to display more patient details. To view
patient demographics in the Ribbon Bar:
1. Log on to VS GUI.
2. From the Tasks tab, in the Search text box, type the patient’s last name or the
patient’s first initial of the last name and last four of the SSN (e.g. S1234).
Click Search, and then select the requested patient’s name.
View the patient demographics in the Ribbon Bar. The following patient demographics are
available:
• Name: Last name, First name
• Patient Type: VA patient type
• DOB: Date of birth in mm/dd/yyyy format
• Gender: Male (M) or female (F)
• Street Address: Patient’s street address
• City/State: Patient’s address city and state
• Ward: For inpatients, current ward location display
• Svc Connected: Is the patient service connected (YES or NO)
• SC Percent: Percent of service connected disability
• PCP: The patients Primary Care Provider
• MHP: The patients Mental Health Provider
• Phone: List the primary phone number of the patient

VistA Scheduling Enhancements 24 April 2018
VS GUI User Guide
Figure 26: Patient Demographics in the Ribbon Bar
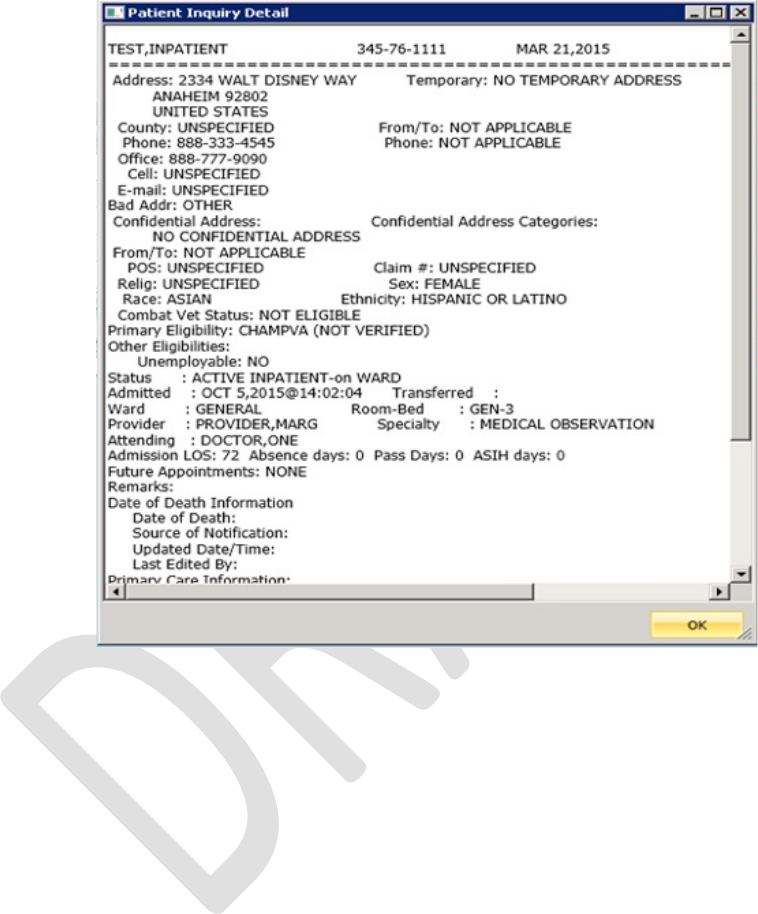
VistA Scheduling Enhancements 25 April 2018
VS GUI User Guide
3. Click anywhere in the Select Patient section of the screen to view the Patient
Inquiry Detail screen. This allows for viewing of additional patient
information, including the patients Primary Care team and provider, if
applicable.
Figure 27: Patient Inquiry Detail
4.1.3 Patient Eligibility Information
When adding a new Patient-Centered Scheduling or APPT request, the Patient’s Eligibility
Information window displays along with the New Appointment dialog box. The user can
move the Patient’s Eligibility Information window around the screen, for convenience.
Changes to eligibility may take 5 to 20 minutes to show in VS GUI as there are task jobs
running to verify the change before it is fully posted to the patient’s file. Please refresh if
you know the patient had a recent change in eligibility.
The window includes:
• SC Percent
• Current Disabilities
• Primary and Secondary Eligibility Codes
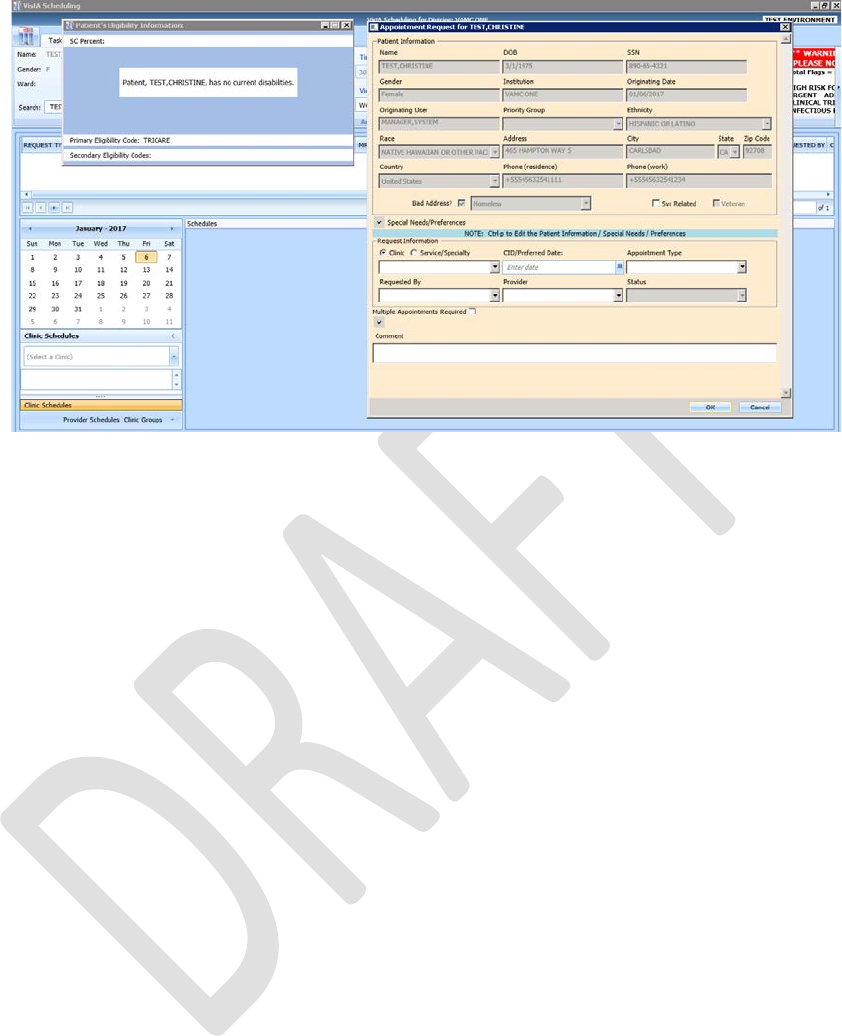
VistA Scheduling Enhancements 26 April 2018
VS GUI User Guide
Figure 28: Patient's Eligibility Information
When the New Appointment dialog box is closed, the Patient Eligibility Information
window closes automatically.
4.1.4 Updating Patient Demographics
Patient demographic information, such as ethnicity, race, address, state, ZIP code, country, or
phone numbers that were not defined during registration, can be updated at any time during
the process. Perform the following procedure to update patient demographic data.
1. Log on to VS GUI as a Scheduler.
2. From the Tasks tab, in the Search text box, type the patient’s last name or the
patient’s first initial of the last name and last four of the SSN (e.g. S1234).
Click Search, and then select the requested patient’s name. Click Search.
3. Press CTRL+P to open the Patient Info screen. Alternatively, right click in the
patient demographics box or the patient preferences box.
Patient demographic information can now be displayed and edited at any point in the process.
Undefined patient demographic information displays in lists and text fields, on the Patient
Information window.
Note: Information that appears dimmed cannot be edited.
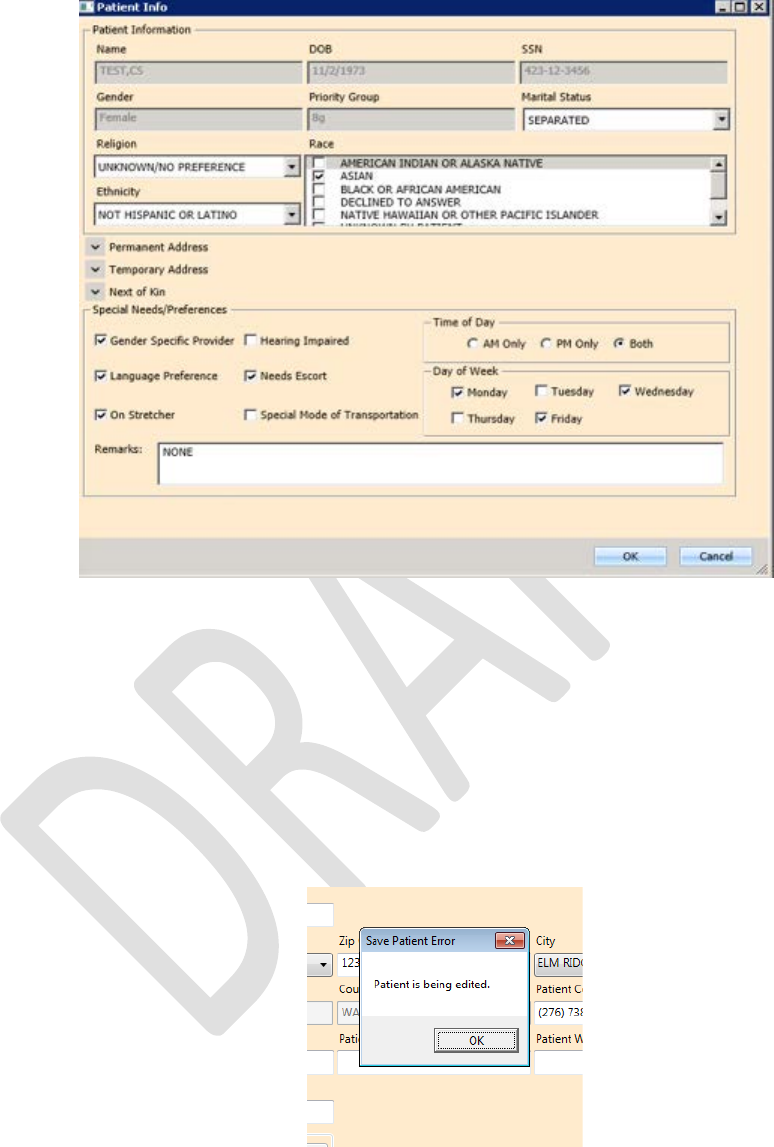
VistA Scheduling Enhancements 27 April 2018
VS GUI User Guide
Figure 29: Patient Information Dialog
4. Click OK to update patient demographics. At this point, the updated
information displays in the Ribbon Bar.
5. Click Cancel to go back to the all patients view.
Note: If the patient is being edited in VistA Register a Patient or Load/Edit Patient
Data and the user attempts to save edits made to the Patient Info data, a “Patient is
being edited” warning message will appear and the user must click OK and Cancel to
get out of the Patient Info screen until the VistA Register a Patient or Load/Edit
Patient Data option is exited.
Figure 30: Patient is Being Edited Warning Pop-up
4.1.5 Editing Permanent Address
The Permanent address for a patient can be edited.
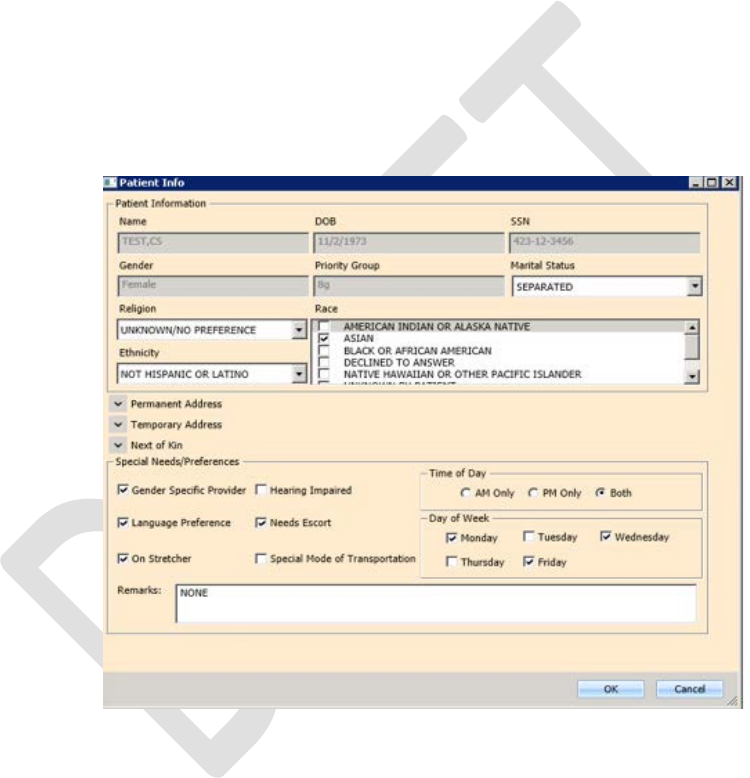
VistA Scheduling Enhancements 28 April 2018
VS GUI User Guide
1. Point to the Patient Info screen, which is available at any point via the RM
Grid.
2. Press CTRL + P to view the patient’s information.
A user can update the patient’s address Line 1 and 2, Zip Code, and Phone Numbers.
• Zip Code – five or nine digits (when entered, the system provides choices for
Cities that match that zip code and based on that, automatically completes the
State and County fields).
• For Phone numbers, VS GUI automatically formats the Patient Work Phone to
(xxx) xxx-xxxx if 10 digits are entered. If more than 10 digits are entered, it
auto formats to x-xxx-xxx-xxxx x….
Only characters (,), +, -, and X (Except Cell and Pager) are allowed in the
Phone Numbers.
3. Click OK when complete to save the information.
Figure 31: Patient Info Dialog–Permanent Address
Note: Areas highlighted in gray cannot be edited.
4.1.6 Adding a Temporary Address
A temporary address can be entered for a patient.
1. Point to the Patient Info screen.
2. Press CTRL + P, which is available at any point in the RM Grid.
Note: The Address Active Box should be checked with a Start Date and End Date
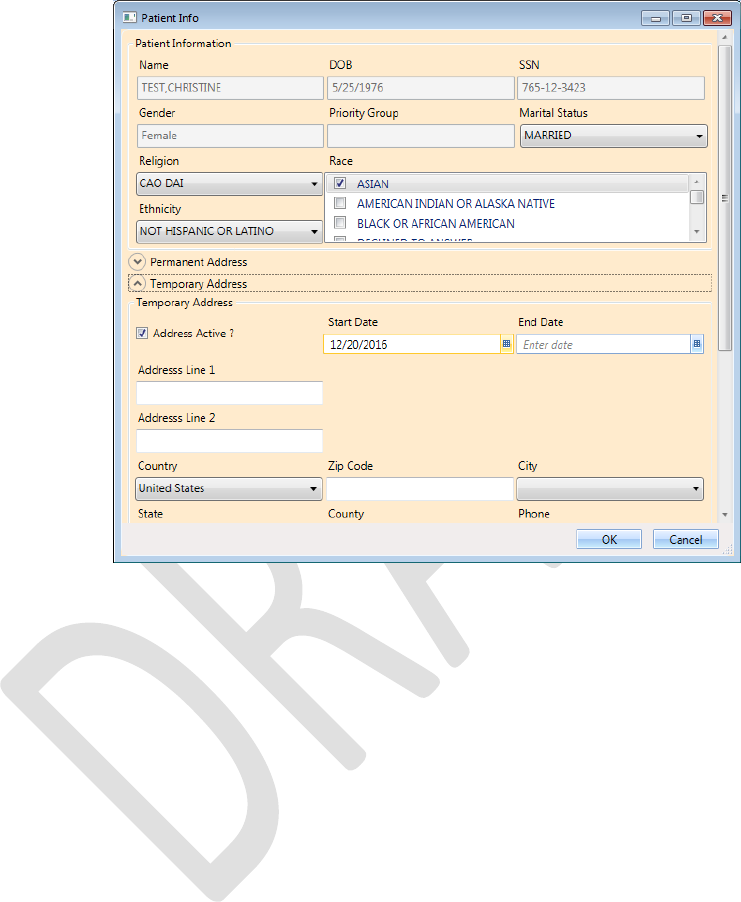
VistA Scheduling Enhancements 29 April 2018
VS GUI User Guide
A user can update the patient’s address Lines 1 – 2 and Zip Code. Zip Code can be five or
nine digits (when entered, the system provides choices for Cities that match that zip code and
based on that, automatically completes the State and County fields).
3. Click OK when complete to save the information.
Figure 32: Patient Info Dialog – Temporary Address
Note: Areas highlighted in gray cannot be edited.
4.1.7 Bad Address
A patient’s address may be incorrect (e.g., mail has been returned as undeliverable, or if the
patient is homeless). If you learn that a patient’s address is incorrect, you must indicate that
information on the patient’s record so notices are no longer sent. The incorrect address can be
indicated while updating the patient’s address information in the Patient Info dialog.
1. Log on to VS GUI as a Scheduler.
2. From the Tasks tab, in the Search text box, type the patient’s last name or the
patient’s first initial of the last name and last four of the SSN (e.g. S1234).
Click Search, and then select the requested patient’s name.
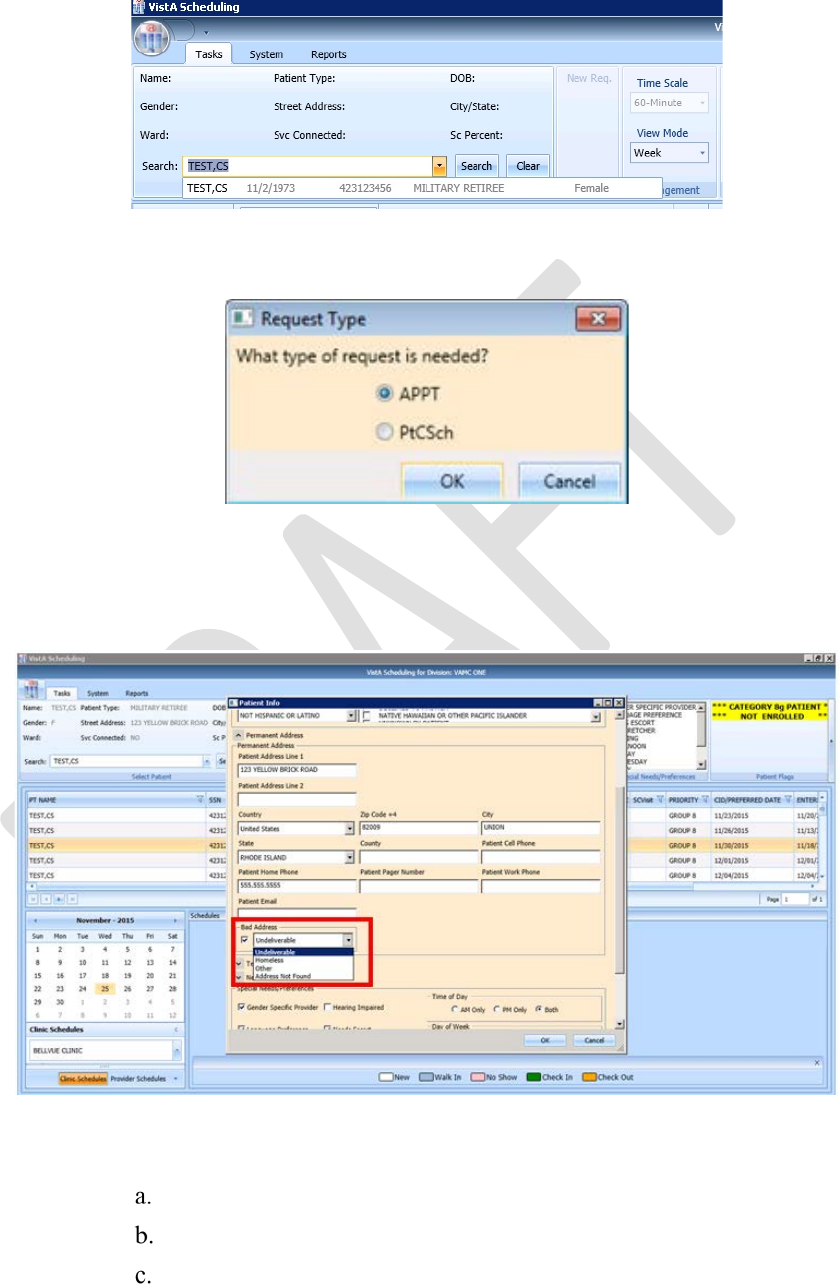
VistA Scheduling Enhancements 30 April 2018
VS GUI User Guide
Figure 33: Select Patient
3. In the Request Type dialog box, click Cancel.
Figure 34: Request Type
4. Press CTRL + P to open the Patient Information dialog screen. Confirm that
the patient’s address information is incorrect or missing, and then click to
check the Bad Address check box.
Figure 35: Appointment Request Dialog—Bad Address Selection
5. Choose the reason for the bad address:
Undeliverable
Homeless
Other

VistA Scheduling Enhancements 31 April 2018
VS GUI User Guide
Address Not Found
6. Click OK.
Note: If a scheduler later obtains a correct address and updates the patient’s record,
the scheduler must ensure that the bad address flag is REMOVED manually. If the
bad address remains, mail will not resume being sent to the patient.
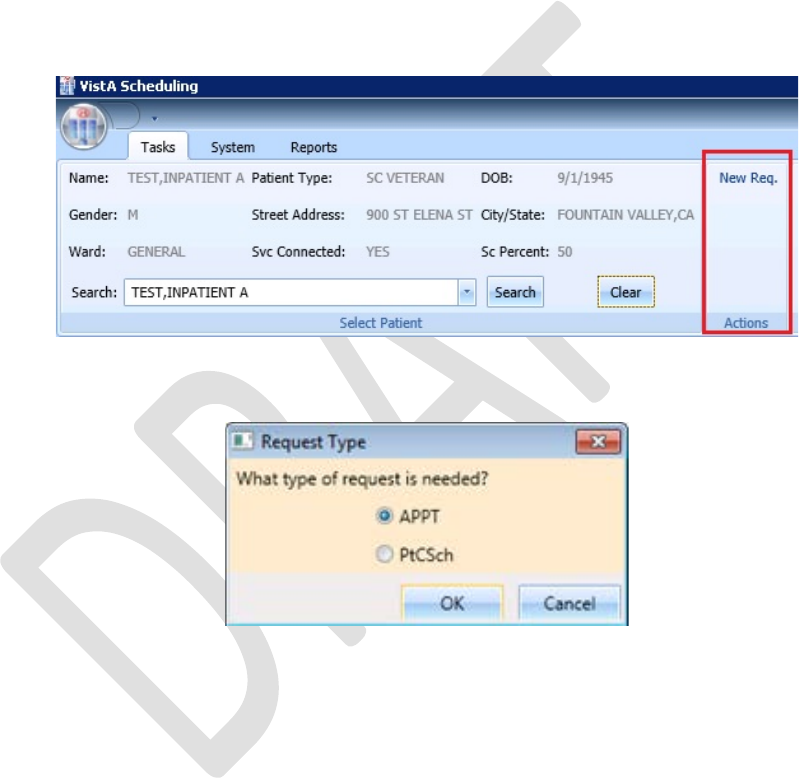
VistA Scheduling Enhancements 32 April 2018
VS GUI User Guide
4.2 Actions
4.2.1 New Request
After searching for and accessing a specified patient’s demographics and associated pending
appointments, the Actions pane allows you to create a new request for the patient. For
example, creating a Patient-Centered Scheduling request as a follow-up to an appointment
request or creating a new appointment request after looking at only patient information.
To start a new request for an already selected patient:
1. Patient demographics and pending appointments appear in the Ribbon Bar. In
the Actions pane, select New Request.
Figure 36: Actions Pane
The Request Type dialog box opens.
Figure 37: Request Type – APPT
2. Click the Request Type, and then click OK.
4.3 Pending Appointment Window
The Pending Appointment Window displays a patient’s existing appointments. The
appointment view defaults to the current date. The Scheduler can utilize the scroll bar to the
right to scroll up to view appointments 365 days in the past. Or, the Scheduler can utilize the
scroll bar to scroll down to view appointments 1000 days in the future.
Selecting an appointment from the Pending Appointment window in the Ribbon Bar opens
the Clinic Schedule Grid. When you select a past appointment, the clinic schedule defaults to
the appointment’s date.
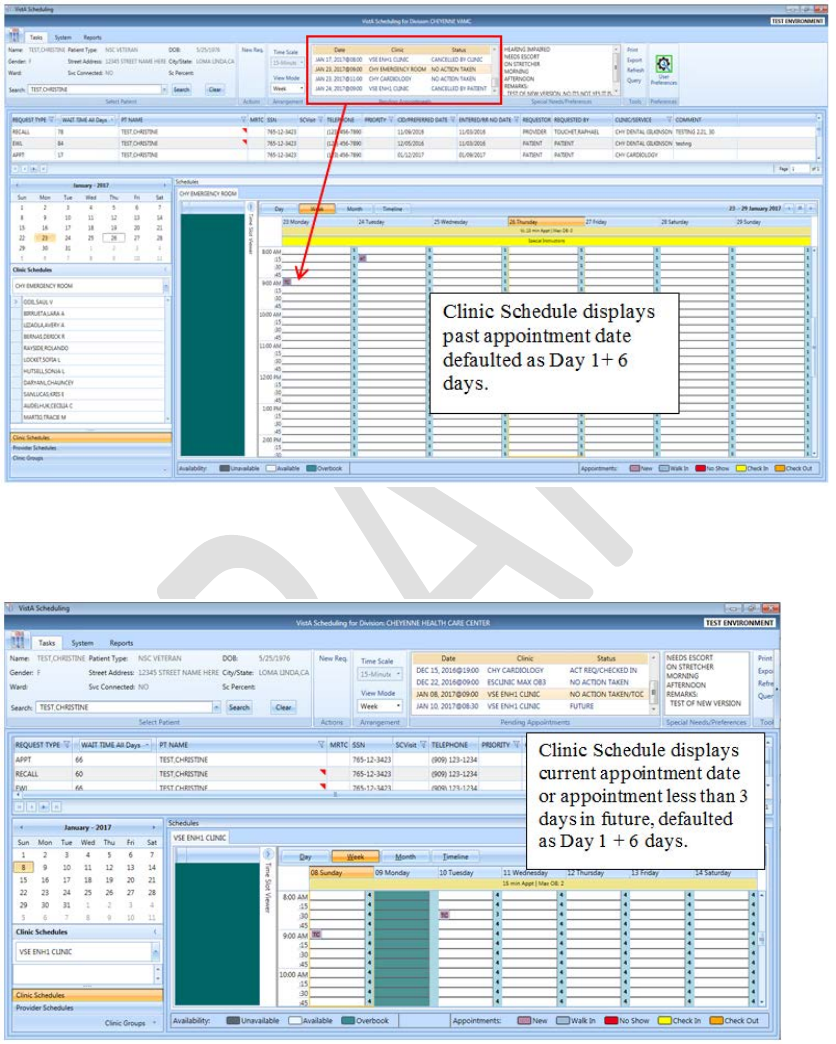
VistA Scheduling Enhancements 33 April 2018
VS GUI User Guide
Right click on an existing appointment in either the Pending Appointments box or in the
calendar to select Expanded Entry. This will show the audit history of that appointment’s
creation, check in, etc.
Figure 38: Pending Appointment Window – Past Appointment Date
The clinic schedule defaults to the current date (today’s date) when you select an
appointment dated “today” or less than three days in the future.
Figure 39: Pending Appointment Window – Current less than Three Days in
Future
The clinic schedule defaults to -/+ three days of the appointment date for future dates.
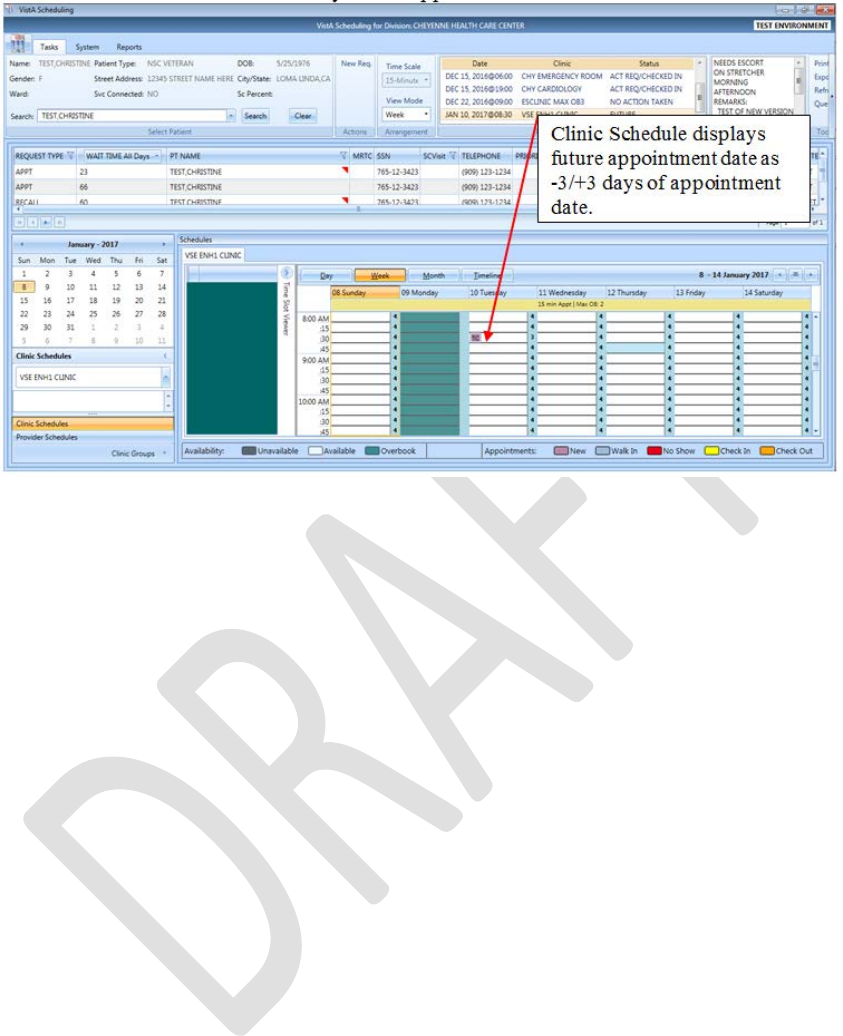
VistA Scheduling Enhancements 34 April 2018
VS GUI User Guide
Figure 40: Pending Appointment Window – Future Appointment Dates
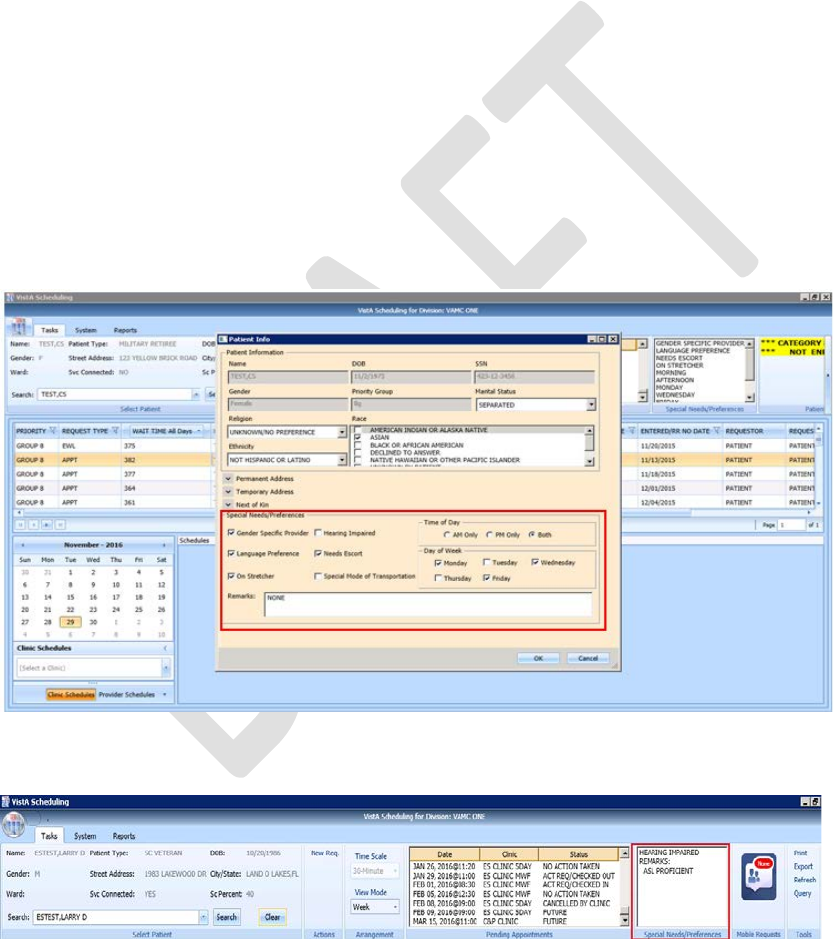
VistA Scheduling Enhancements 35 April 2018
VS GUI User Guide
4.4 Special Needs/Preferences
4.4.1 Adding/Removing Special Needs/Preferences from Requests
Patients visiting the VA may require additional assistance when they arrive for their visit.
Some of these special needs/preferences may include issues with hearing, how they are
arriving at the VA, Day of the Week or Time of the Day, etc.
To add Special Needs/Preferences to an appointment request:
1. Log on to VS GUI
2. From the Tasks tab, in the Search text box, type the patient’s last name or the
patient’s first initial of the last name and last four of the SSN (e.g. S1234).
Click Search, and then select the requested patient’s name. Click Search.
3. Press CTRL + P to open the Patient Info dialog box.
4. Select the patient’s special needs from the Special Needs/Preferences section
of the Patient Info dialog box.
5. Add additional information regarding patient’s Special Needs/Preferences
selections in the Remarks field.
Figure 41: Patient Info Dialog – Special Needs/Preferences Section
6. Click OK. The Special Needs/Preferences entered display in the Ribbon Bar.
Figure 42: Ribbon Bar – Special Needs/Preferences
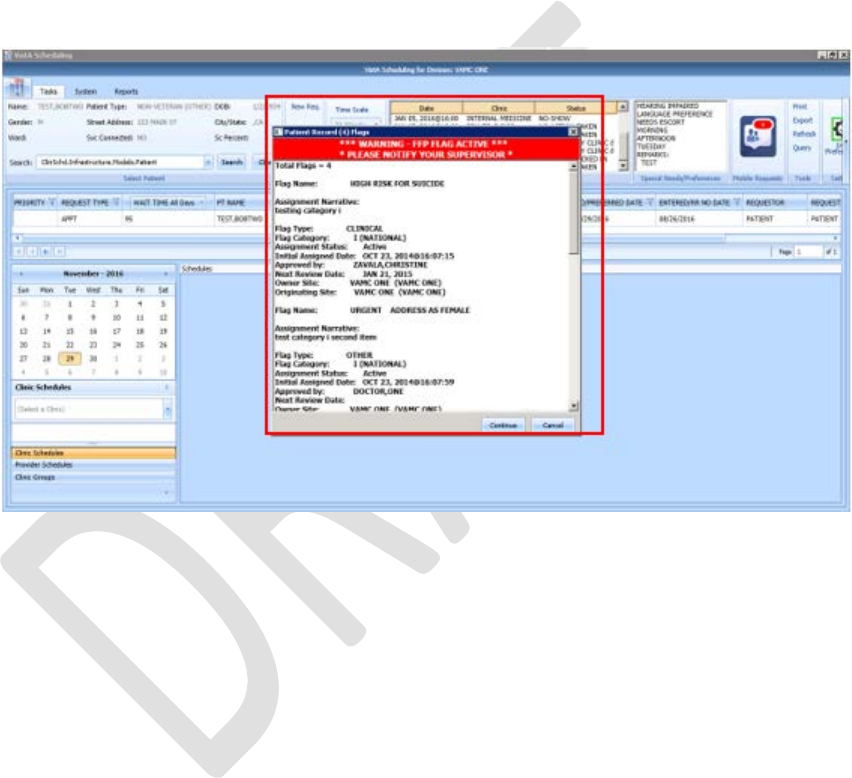
VistA Scheduling Enhancements 36 April 2018
VS GUI User Guide
4.5 Patient Flags
PRFs are used to alert VHA medical staff and employees of patients whose behavior and
characteristics may pose a threat either to their safety, the safety of other patients, or
compromise the delivery of quality health care. PRF assignments are displayed during the
patient look-up process. Each PRF includes a narrative that describes the reason for the flag
and may include some suggested actions for users to take when they encounter the patient.
When a patient’s record is flagged, a message window opens with an appropriate action
recommended.
Figure 43: Patient Record Flags Dialog
1. Select an appropriate action.
2. To continue processing the appointment, click Continue; otherwise, click
Cancel.
Once processing has continued, the PRF continues to show on the Ribbon Bar. If the
user clicks on PRF in the flag box in the ribbon bar, the pop up box containing flag
details will return.
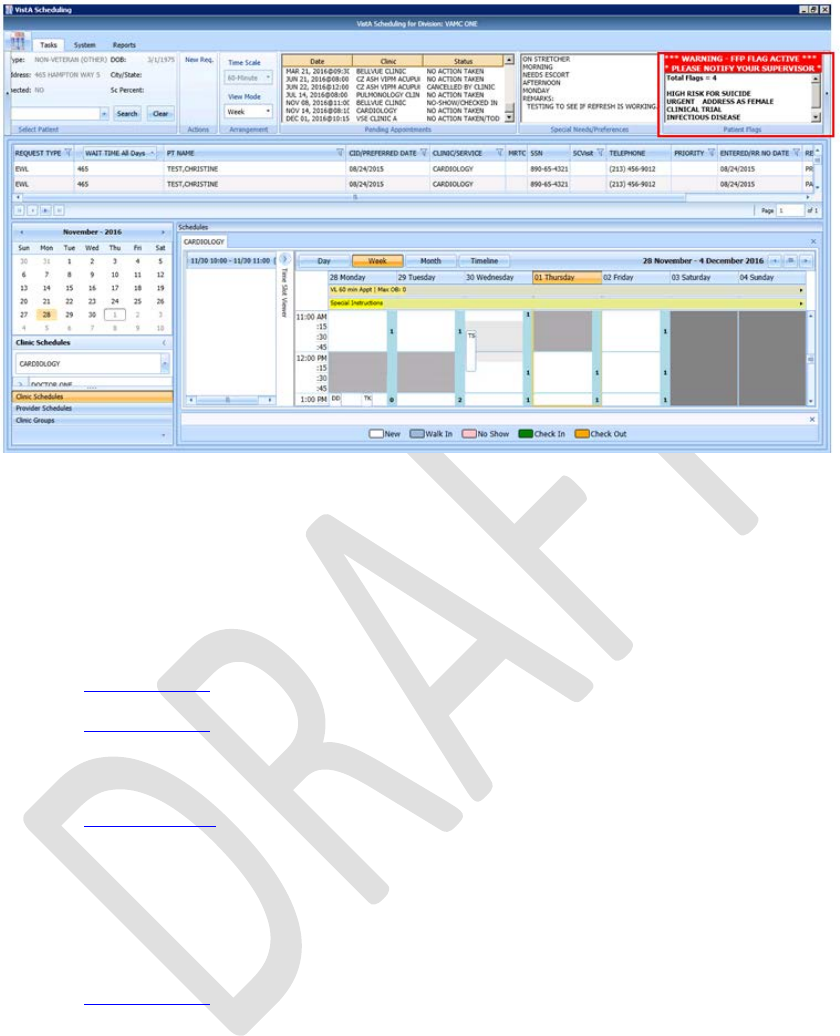
VistA Scheduling Enhancements 37 April 2018
VS GUI User Guide
Figure 44: Patient Record Flags
4.6 Tools
4.6.1 Print
Note: The print buttons in the letter printing window previous read Print (Local) and Print
(Server). Now they read Print (Windows Printer) and Print (VistA Print Device), respectively.
Refer to Section 3.8.3 for details on printing the pending appointments list for a patient.
Refer to Section 3.9.1 for details on using the Print functionality in the Tools Pane via a
network printer. If you are printing a patient letter using this method, the address will print
too high on the page to fit into a windowed envelope.
Refer to Section 6.1.1 for details on printing using an active VistA print device. This
method is vastly preferred as it places the address into the correct spot for windowed
envelopes and allows schedulers to print to their office printer, centralized printers or other
bulk mail devices that are used in VistA for processing outgoing mail.
4.6.2 Export
Refer to Section 3.9.2 for details on exporting the request grid.
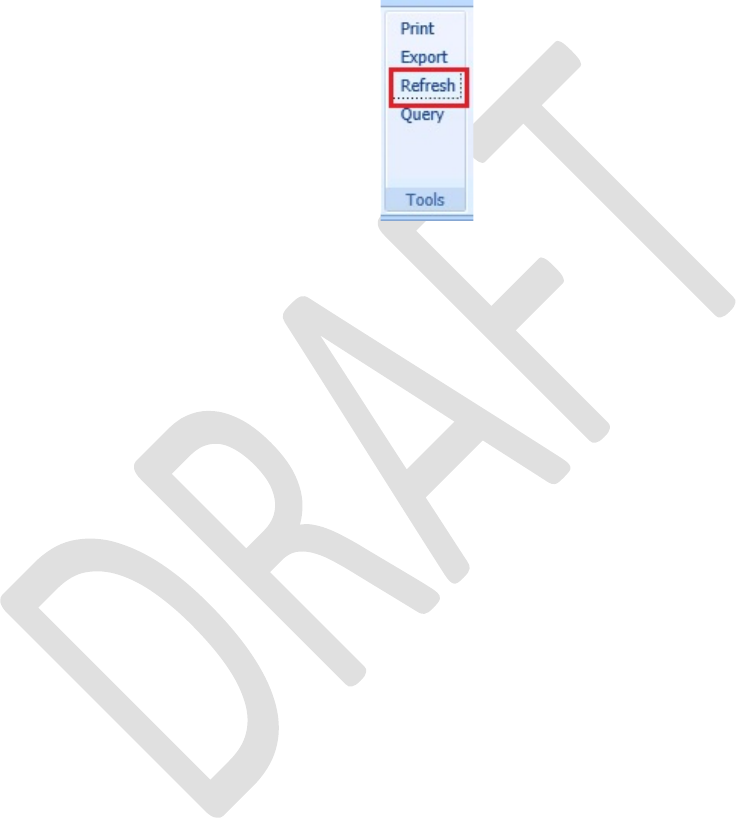
VistA Scheduling Enhancements 38 April 2018
VS GUI User Guide
4.6.3 Refresh
After checking a patient’s pending appointments or checking availability for a clinic, you
may want to reset the GUI back to the default view from when you first logon to the GUI,
clearing all text entered in any fields.
1. To refresh the GUI, go to the Tools pane.
2. Click Refresh. The GUI resets to its default logon view.
Figure 45: Refresh Button in Tools Pane
4.6.4 Query
In order to sift through patient data and only view data of a specific type, the Query tool can
be utilized to show only data matching specific criteria. Once the query has been performed,
only records matching the query criteria appear in the request grid.
• Patients are in Group A and can be used independently or in conjunction with other
search criteria.
• Request Type + Clinic/Services are in Group B. This group can be used
independently or in conjunction with other search criteria.
• Priority, Wait Time, SC Visit, Service Connected, Origination Date, CID/Preferred
Date and Urgency are in Group C. This group must be combined with other search
criteria from either Group A, Group B, or Group A and B to satisfy the Query Tool
business rules.
To perform a query:
1. Log on to VS GUI.
2. Select Query from the Tools pane. The Request Query window displays.
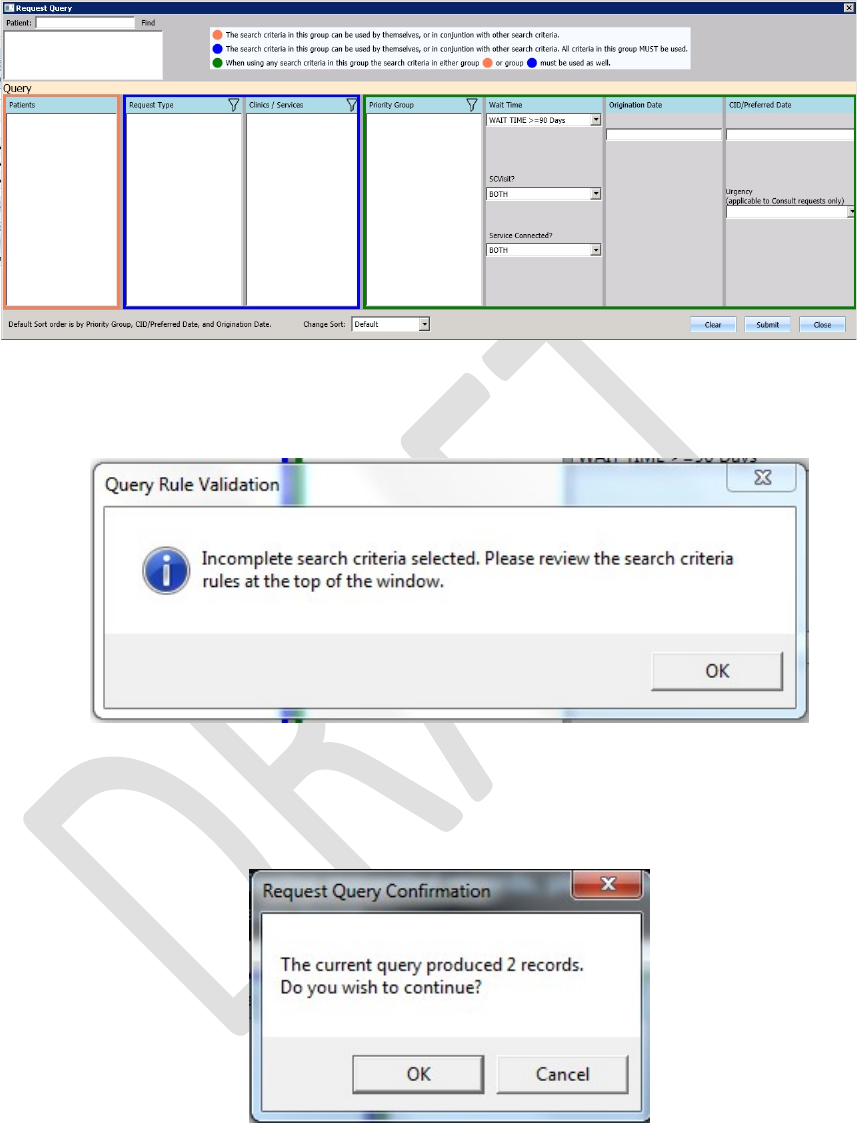
VistA Scheduling Enhancements 39 April 2018
VS GUI User Guide
Figure 46: Request Query
3. Click Submit. If the search criteria rules are not satisfied, a Query Rule
Validation dialog box displays.
Figure 47: Query Rule Validation
Once all search criteria has been selected and the results have been returned, a Request
Query Confirmation dialog box displays the number of records found that satisfied the
search criteria.
Figure 48: Request Query Rule Confirmation
4. Click OK to display the Query results in the Request Management Grid.
5. Click Cancel to remove search criteria and start a new search.

VistA Scheduling Enhancements 40 April 2018
VS GUI User Guide
Note: RTC requests are a subtype of Appointment Requests. In version 2.0.0.14,
chose Appointment to see both APPT and RTC requests. In addition, the query tool
will only return the first 200 entries found in the search. The user will be asked if
they want to continue and view the first 200, or go back to limit the search. Once the
list displays, page forward until the user reaches the end of the list to sort/filter on the
entire list. The query tool will retain the search criteria of the last search in a user’s
session to aid the user while they work a list of open requests.

VistA Scheduling Enhancements 41 April 2018
VS GUI User Guide
4.7 Settings – User Preferences
Users may now set their own column preferences within a session or as their default view.
From the far right of the Ribbon Bar, select the User Preferences setting icon.
The current column order is:
Request Type;
Wait Time; (Wait time calculated from Create date to today)
Patient (PT) Name;
Multiple Return To Clinic (MRTC);
SSN;
SC Visit;
Telephone;
Priority;
CID/PreferredDate;
Entered/RR No Date;
Requestor;
Requested By;
Clinic/Service; and
Comment
Note: Users can drag and drop columns to reorder them. Save as default and accept to save
the order from session to session. Reordered columns do NOT have any effect on log in
times, and are highly encouraged as Clinic/Service and CID/Preferred Date are far to the
right in the default order.
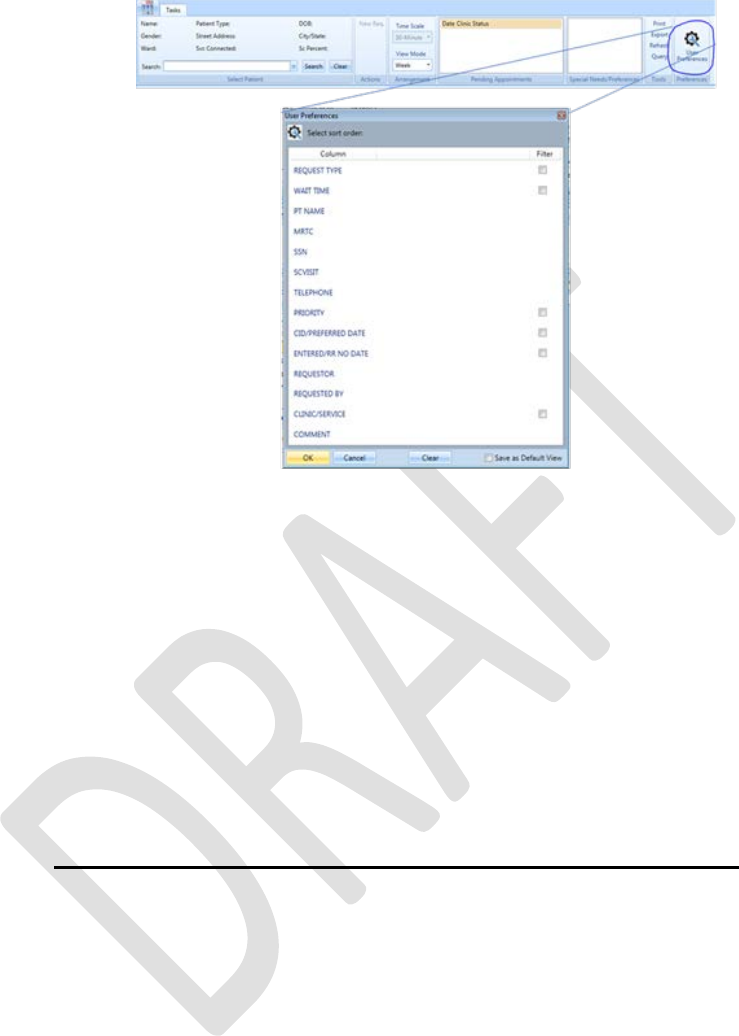
VistA Scheduling Enhancements 42 April 2018
VS GUI User Guide
Figure 49: Settings – User Preferences
Filters on the following fields are also available:
• Request Time
• Wait Time
• CID/Preferred Date
• Clinic/Service
• SC Visit
• Priority
• Entered/RR (Recall Reminder) No Date
NOTE: Adding filters to user preferences is highly discouraged at this time. If the user
restricts their log in with filters, and the system cannot find any open requests, the log in will
take an excessive amount of time. If a user experiences long log in times, clear all
preferences.
To save your user preferences:
1. Select the sort order or filters to display.
To save the selections as your default view, select “Save as Default View” on the
bottom right. If you do not select “Save as Default View,” your selections will only
be applicable to your current session.
2. Click OK to save.
Note: If you filter the requests to view only Consult requests you will not see the
PtCSch requests unless you unfilter the preferences.
The User Preferences Settings icon is highlighted in green indicates the user
preferences are stored.
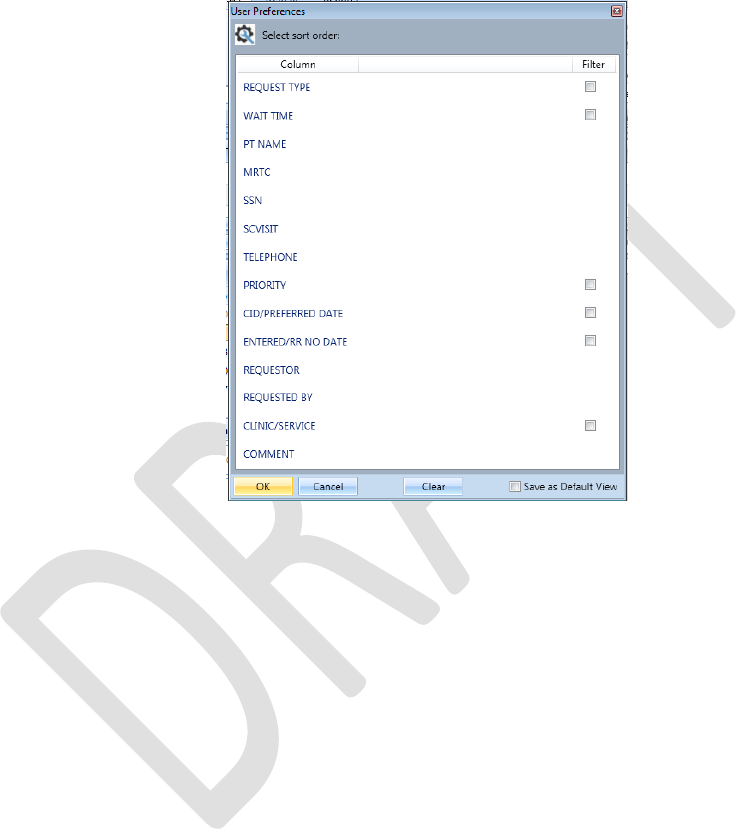
VistA Scheduling Enhancements 43 April 2018
VS GUI User Guide
To remove any existing user preferences for the user’s default view:
1. Click the User Preferences icon.
2. In the User Preferences window, click Clear, Save as Default View, then click
OK to save.
The User Preferences Settings icon will now display without the green highlight when
no user preferences have been stored.
Figure 50: Settings – Save as Default View
5 Request Management
5.1 Request Management Procedures
5.1.1 Viewing a Patient’s Existing Requests
1. Log on to VS GUI.
2. From the Tasks tab, in the Search text box, type the patient’s last name or the
patient’s first initial of the last name and last four of the SSN (e.g. S1234).
Click Search, and then select the requested patient’s name.
3. Click Search.
4. Select the requested patient’s name from the list.
In the Request Management grid, view the existing requests for the selected patient.
Note: The patient’s booked appointments display in the Pending Appointment Window in
the Ribbon Bar. The default is the current date. Schedulers can scroll up or down to view
appointments dated -365 days to +1000 days of the current date.
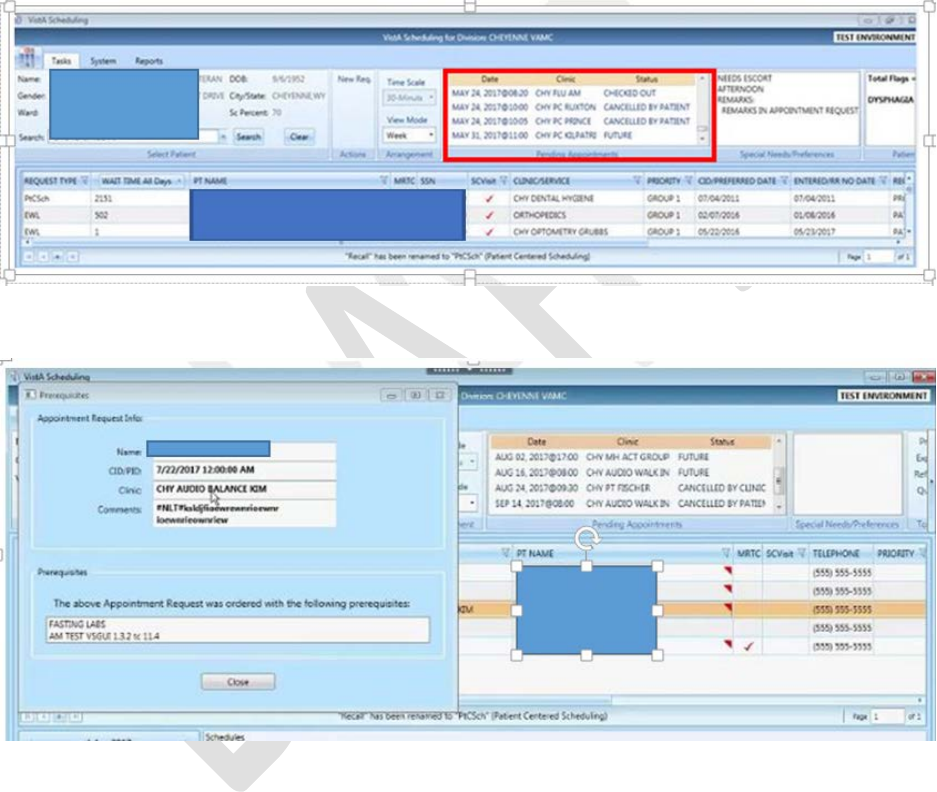
VistA Scheduling Enhancements 44 April 2018
VS GUI User Guide
5. Click a Request Type entry and the Prerequisites screen opens. Prerequisites
are for RTCs only and the Prerequisite box will open if there is a
Prerequisite note. #NLT# will display in the comments if the provider
selected “NO LATER THAN” for a priority request.
o The Prerequisite screen will remain open while the user is on the Request
Management Grid.
o If switching to a Request Type with no Prerequisites, then the Prerequisite
screen will go away.
Figure 51: Request Grid and Pending Appointments
Figure 54: Prerequisite Screen
6. Right-click on an appointment in the Pending Appointments block and the
EXPAND ENTRY block opens.
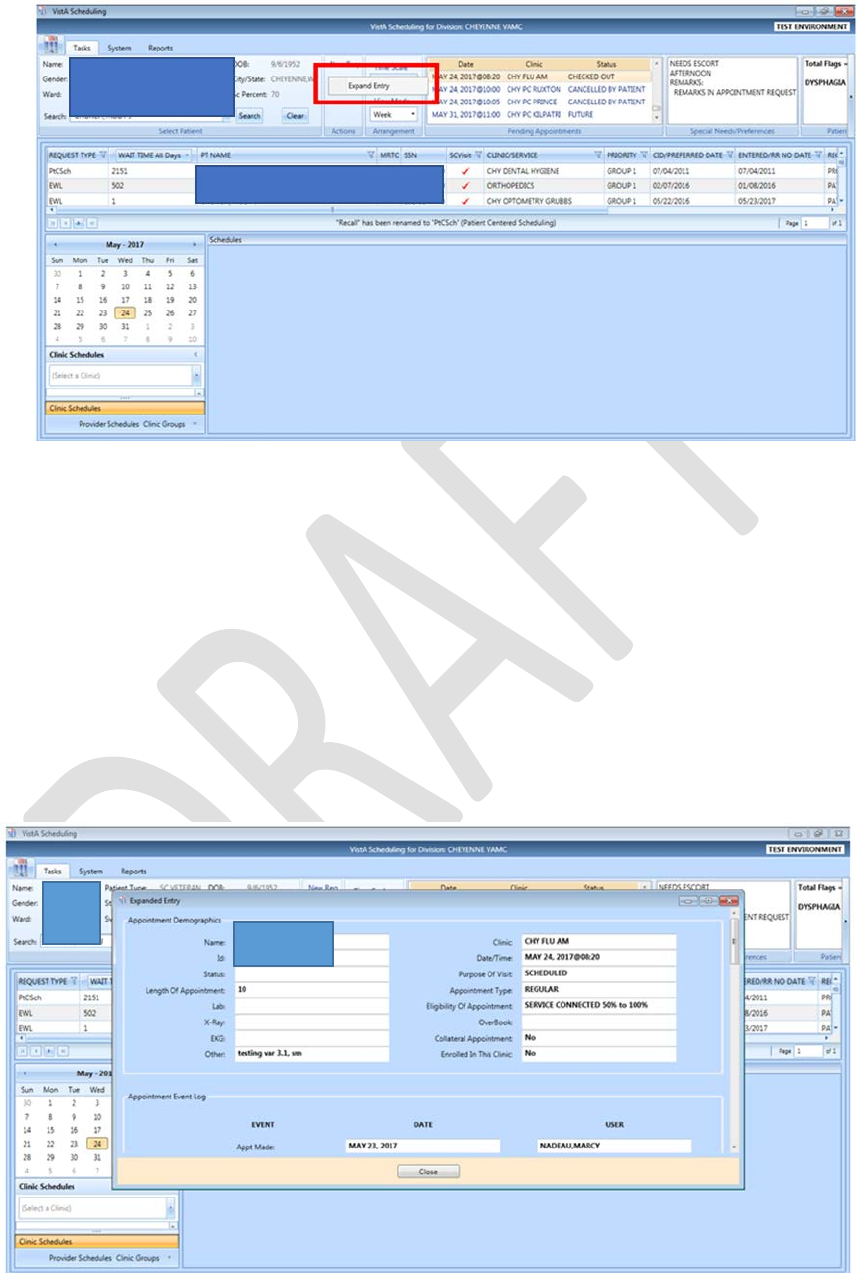
VistA Scheduling Enhancements 45 April 2018
VS GUI User Guide
Figure 52: Request Grid Displaying Expand Entry Block
7. Click the Expand Entry block to see the expanded appointment information.
o Appointment Demographics
o Appointment Event Log
o Appointment Wait Time
o Patient Information
o Encounter Information (this information will only display if the encounter
information has been entered for this patient)
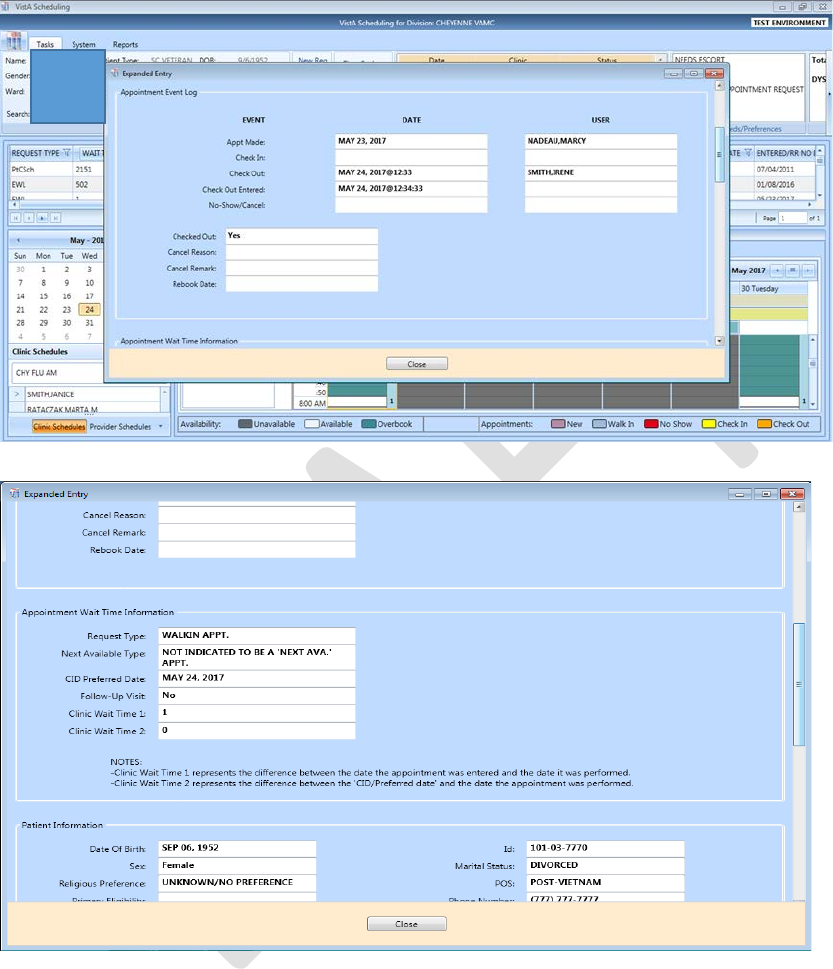
VistA Scheduling Enhancements 46 April 2018
VS GUI User Guide
Figure 53: Appointment Demographics
Figure 54: Appointment Event Log
Figure 55: Appointment Wait Time
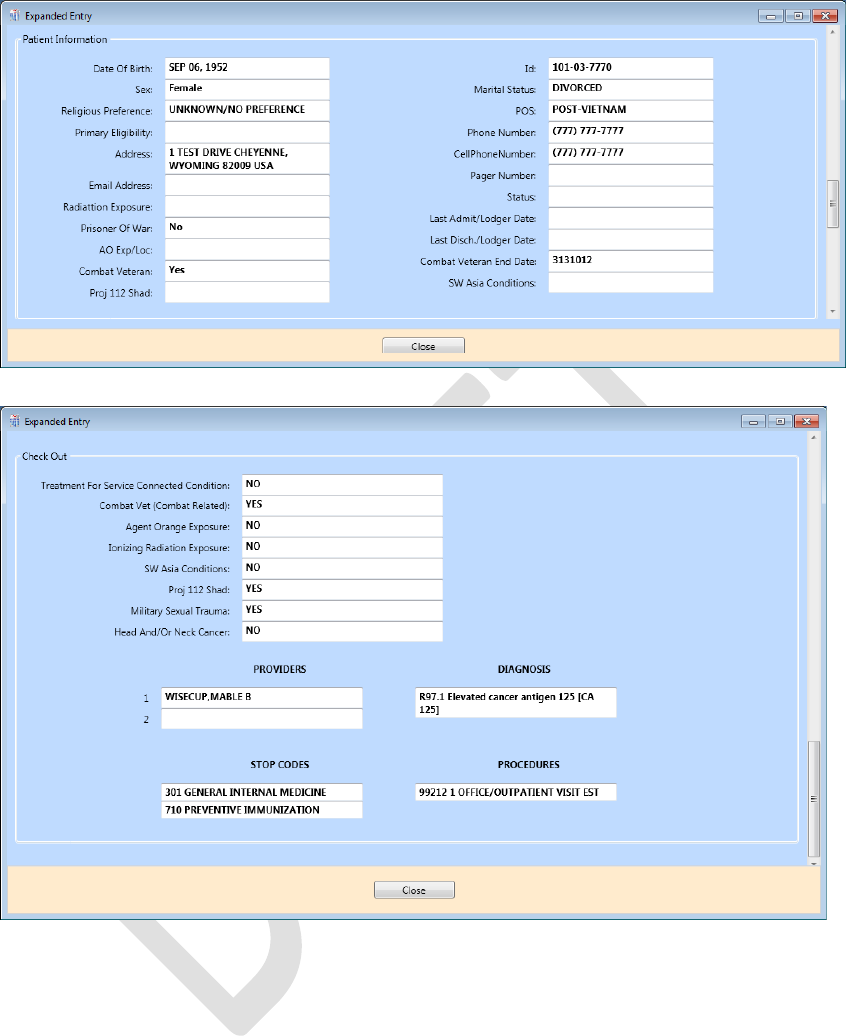
VistA Scheduling Enhancements 47 April 2018
VS GUI User Guide
Figure 56: Patient Information
Figure 57: Encounter Information
Note: This information will only display if the encounter information has been entered
for this patient.
5.1.2 Adding Appointment Request
1. To submit an appointment request, from the Tasks tab search for the patient
using the Search field.
2. Select APPT in the Request Type dialog box.
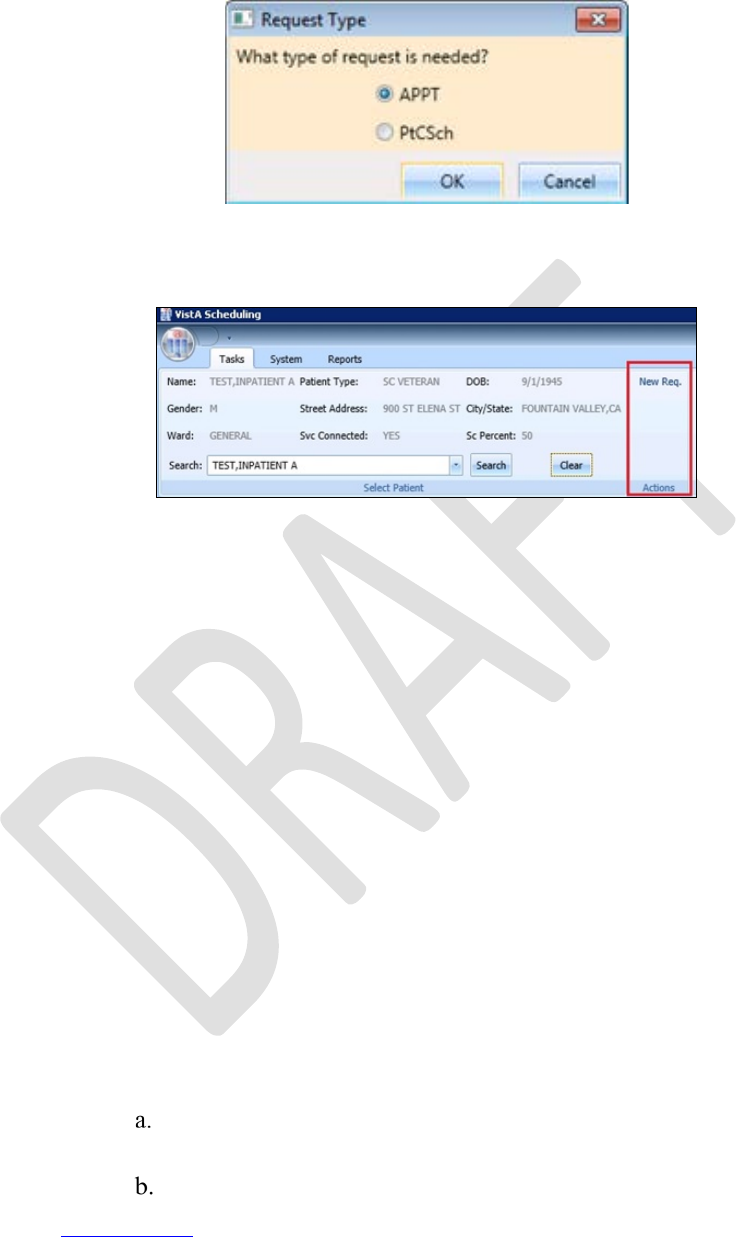
VistA Scheduling Enhancements 48 April 2018
VS GUI User Guide
Figure 58: Request Type - APPT
Note: If the patient has already been selected, the Request Type dialog box can be
accessed via New Req. in the Actions Pane of the Ribbon Bar.
Figure 59: Actions Pane—New Req. Selection
3. In the Appointment Request dialog box, confirm Patient Information details.
4. In the Appointment Request dialog box, complete the Request Information
section.
5. Click the Clinic or Service/Specialty button. For Clinic, enter clinic name
(minimum of six characters) or Clinic abbreviation. For Service/Specialty enter
service or specialty (minimum of six characters required).
6. Enter CID/Preferred Date for the preferred appointment/Patient-Centered
Scheduling date. Enter date directly or select date from Calendar control
option. CID/Preferred Date can be past, current, or future.
7. Select Appointment Type if not defaulted by patient eligibility and clinic
selection then choose from the list.
8. In Requested By, select either Provider or Patient.
If Provider is selected, then enter the provider name (three-character minimum for
the list to populate) and select from the list.
Note: If the Patient was selected from Requested By, then the Provider field appears
dimmed and cannot be edited.
o Status is automatically populated.
Established – The patient has been seen at that clinic in the past 24
months.
New – The patient has not been seen at that clinic in the past 24 months.
Refer to Section 6.3.2 for additional instructions regarding Multiple Appointments Required
check box options.
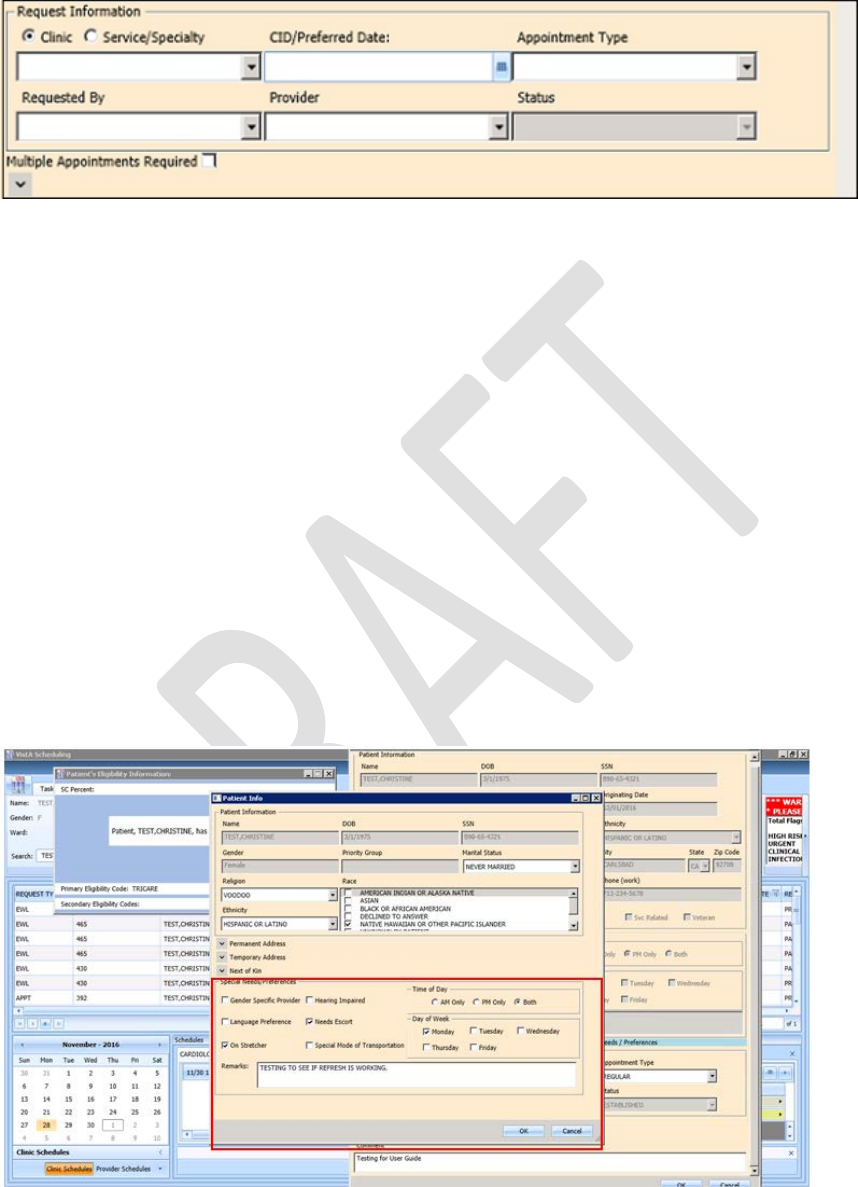
VistA Scheduling Enhancements 49 April 2018
VS GUI User Guide
Figure 60: Appointment Request Dialog – Request Information Section
If needed, users can view existing special needs and preferences in the middle section
drop down box. If changes are needed, the user can call the edit special needs and
preferences box by CTRL + P, complete the Special Needs/ Preference section. The
Remarks field is available to add clarifying information regarding selections made.
Selected Special Needs/Preferences and Remarks display in the Ribbon Bar.
Note: Text can be added in the Remarks field up to 80 characters to add information
regarding the Appointment Request. Text displays in the Request Management Grid
under the Comment column.
9. Click OK.
Updated demographics display in ribbon bar. The APPT Request appears on the
Request Management grid. The Clinic Schedule Grid opens for the clinic specified in
the request.
Note: APPT Requests with Comments are flagged with a red arrow in the Request
Management Grid.
Figure 61: Special Needs/Preferences Section from Patient Info Dialog

VistA Scheduling Enhancements 50 April 2018
VS GUI User Guide
Figure 62: Appointment Request Dialog
5.1.3 Viewing/Editing Appointment Request
If a request (APPT, EWL, Veteran) needs to be reviewed or modified before being booked,
you can View/Edit the request in the Request Grid:
1. Log on to VS GUI as a Scheduler.
2. From the Tasks tab, in the Search text box, type the patient’s last name or the
patient’s first initial of the last name and the last four of the SSN (e.g. S1234).
Click Search, and then select the requested patient’s name. Click Search.
3. Select the requested patient’s name from the list.
Note: When the Spacebar + Search is used, the Ribbon Bar and Request
Management Grid adjust to that selected patient.
4. In the Request Management grid, right-click the applicable APPT request.
5. Select APPT/VETERAN Disposition option.
The following options appear for selection:
o View Request
o Edit Request
o Transfer to EWL – refer to Section 5.1.5 for instructions
o Death
o Removed/Non-VA Care
o Removed/Scheduled-Assigned
o Removed/VA Contract Care
o Removed/No longer Necessary
o Entered in Error
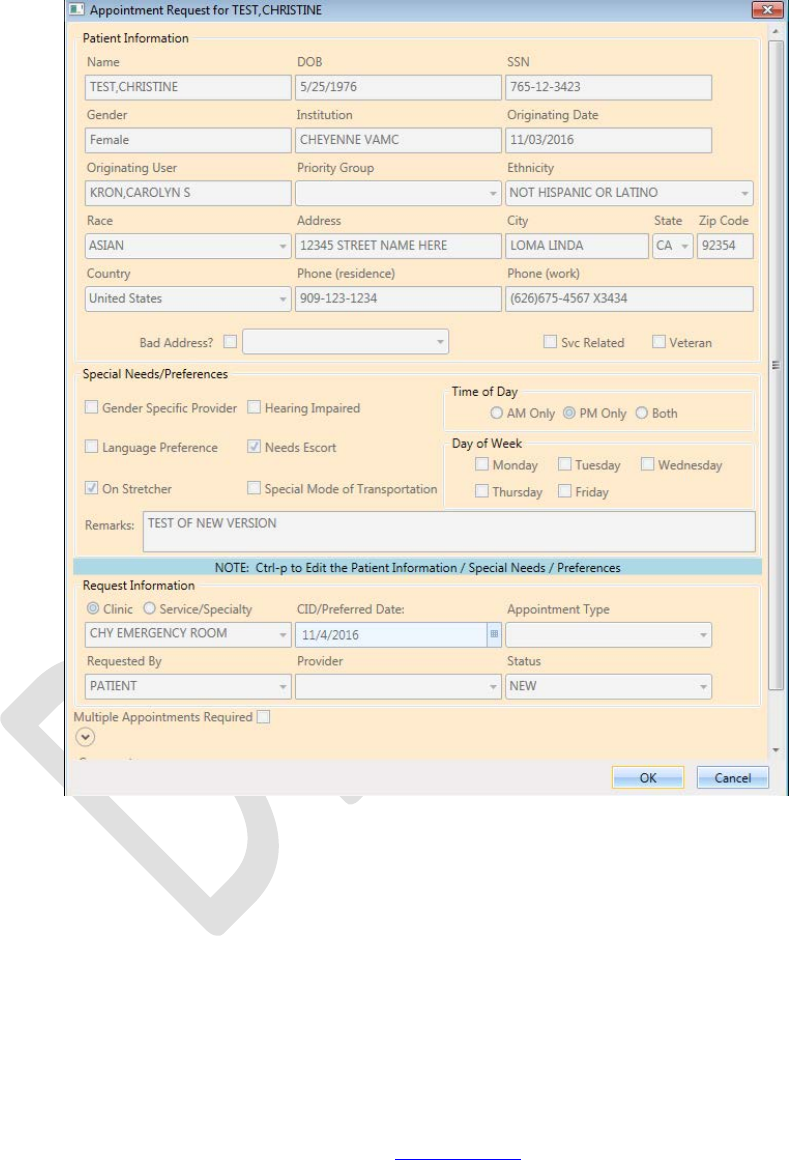
VistA Scheduling Enhancements 51 April 2018
VS GUI User Guide
6. Select View Request. The Appointment Request dialog box opens with
everything dimmed as the dialog box is Read-Only.
Figure 63: View Request (Read Only)
7. Click OK.
You return to the Request Management Grid.
8. Right-click the applicable APPT request.
9. Select the APPT/VETERAN Disposition option.
The following options appear for selection:
o View Request
o Edit Request
o Transfer to EWL. Refer to Section 5.1.5 for instructions
o Death
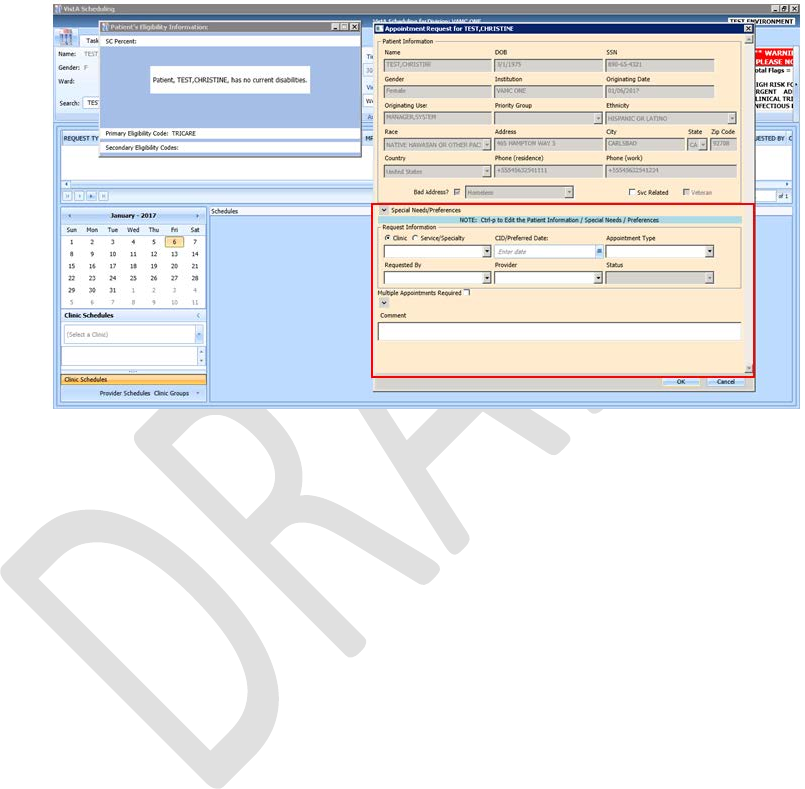
VistA Scheduling Enhancements 52 April 2018
VS GUI User Guide
o Removed/Non-VA Care
o Removed/Scheduled-Assigned
o Removed/VA Contract Care
o Removed/No longer Necessary
o Entered in Error
10. Select Edit Request.
The Appointment Request and Patient’s Eligibility Information dialog display.
Figure 64: Edit Request (Request Information Only)
The editable fields are Clinic/Service Specialty; Appointment Type; Requested By;
Provider, and Comments. The CID/Preferred Date CANNOT be edited.
11. Click OK.
The request returns to the Request Management Grid with the updated information
listed.
Note: If you change the request for a Clinic to a Service/Specialty request, the
Appointment Type field can then be edited. Also, changes to the APPT Request are
tracked by the system in the SDEC APPT REQUEST file.
5.1.4 Disposition or Removing an Appointment Request
If an APPT request is no longer needed, the Scheduler can remove it from the Request Grid
following the steps below.
1. Log on to VS GUI as a Scheduler.
2. From the Tasks tab, in the Search text box, type the patient’s last name or the
patient’s first initial of the last name and last four of the SSN (e.g. S1234).
Click Search, and then select the requested patient’s name.
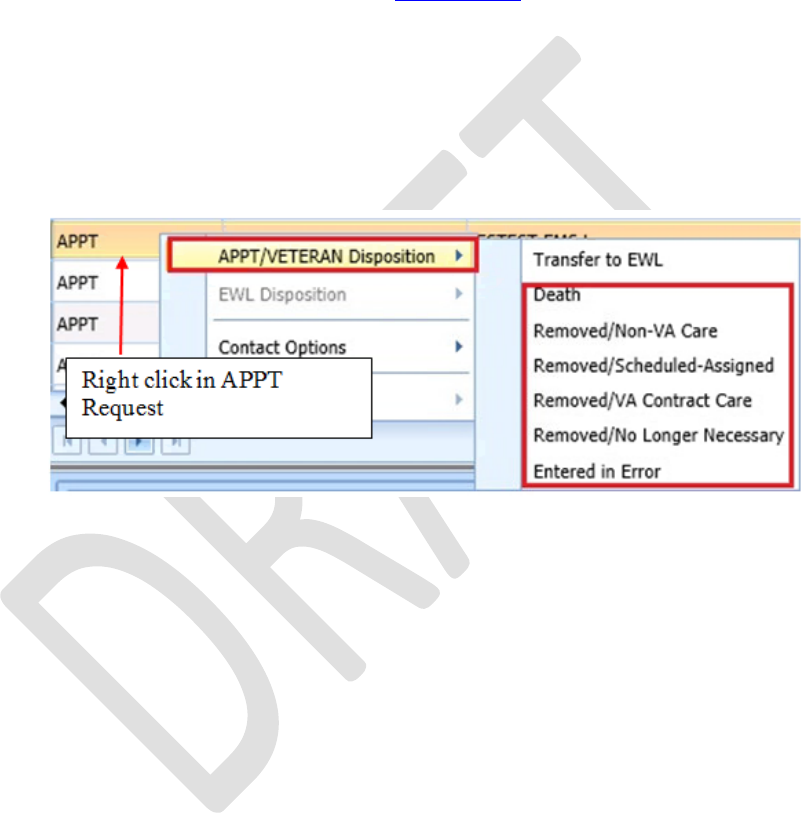
VistA Scheduling Enhancements 53 April 2018
VS GUI User Guide
3. Click Search.
4. Select the requested patient’s name from the list.
5. In the Request Management grid, right-click the applicable APPT request.
6. Select APPT/VETERAN Disposition option.
The following options appear for selection:
o Transfer to EWL. Refer to Section 5.1.5 for instructions
o Death
o Removed/Non-VA Care
o Removed/Scheduled-Assigned
o Removed/VA Contract Care
o Removed/No longer Necessary
o Entered in Error
Figure 65: APPT/Veteran Disposition Options
7. Select the applicable APPT Disposition option. APPT Request is removed
from Request Management Grid.
5.1.5 Transfer to EWL Request for a Patient
If an appointment cannot be scheduled because of limitations, the patient is put on an EWL
for future scheduling. Use the following procedures to transfer an APPT Request to an EWL
Request.
1. Log on to VS GUI as a Scheduler.
2. From the Tasks tab, in the Search text box, type the patient’s last name or the
patient’s first initial of the last name and last four of the SSN (e.g. S1234).
Click Search, and then select the requested patient’s name.
3. In the Request Type dialog box, click Cancel.
4. In the Request Management grid, view the open APPT Requests for the
patient.
5. Select the APPT request that needs transferred to EWL.
6. Right-click the APPT request and select APPT/VETERAN Disposition.
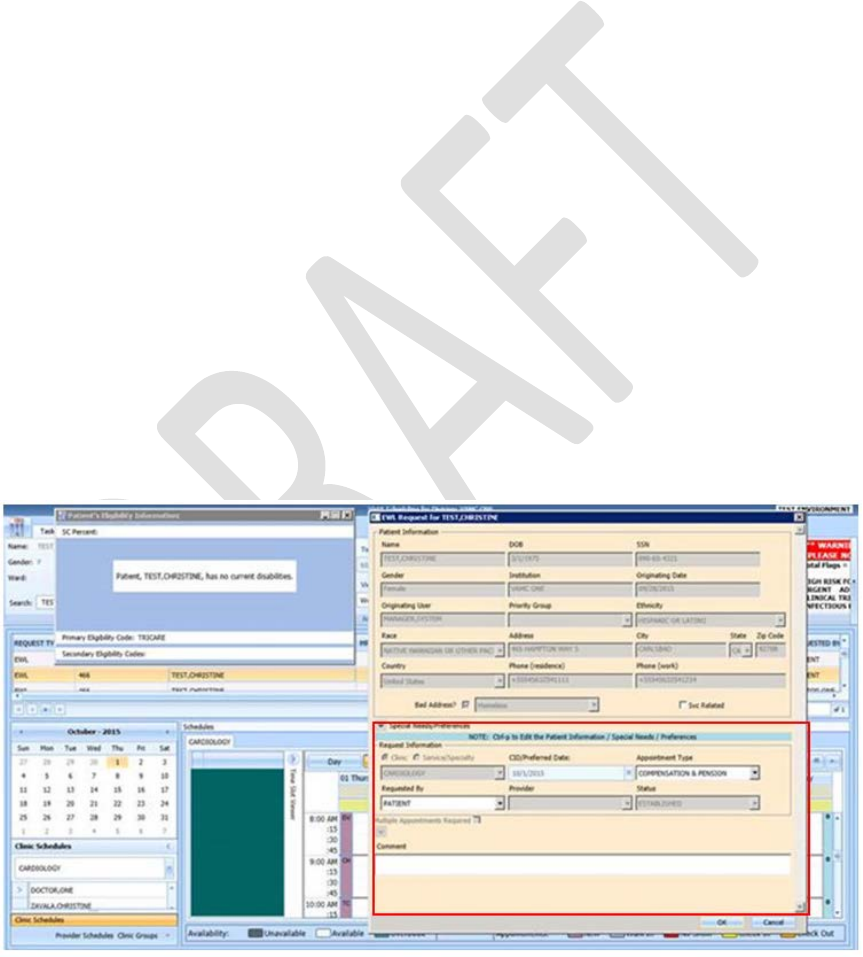
VistA Scheduling Enhancements 54 April 2018
VS GUI User Guide
7. In the APPT/VETERAN Disposition options, select TRANSFER TO EWL.
The EWL Request dialog box displays.
Note: The Transfer to EWL option is not available for MRTC appointments
nor is it available for users who do not have the SDWL MENU Security Key.
Confirm Clinic is the default in the dialog box. If not, search for and select the
appropriate Wait List Clinic by name. Searching by clinic abbreviation is not
supported in the EWL Request dialog.
Note: Clinic or Service (stop code) does not default if it is not activated as Wait List
Clinics in SD Wait List Parameter (File #409.32).
CID/Preferred date and Status are not editable.
Appointment Type is the default from APPT Request Clinic. If a patient is a Veteran
and the Service Related box is checked, the Appointment type defaults to Service
Connected. Also, if the Service Connected disability is greater than or equal to 50%,
the Appointment type defaults to Service Connected. This puts the EWL request in a
higher priority than other EWL requests.
Requested By and Provider are populated from the original APPT request but are
editable.
Enter Comments as appropriate.
8. Click OK.
The request grid shows requests of the selected patient. The newly added request is
selected. The calendar defaults to the desired date and shows the clinic schedules.
Figure 66: EWL Request Dialog

VistA Scheduling Enhancements 55 April 2018
VS GUI User Guide
5.1.6 Disposition or Removing a Patient from the EWL
If a patient is on the EWL for an appointment or a consult, and information is received that
the patient no longer needs the appointment, the EWL request can be removed and will no
longer appear in the Request Management Grid.
To disposition or remove the EWL Request:
1. Log on to VS GUI as a Scheduler.
2. From the Tasks tab, in the Search text box, type the patient’s last name or the
patient’s first initial of the last name and last four of the SSN (e.g. S1234).
Click Search, and then select the requested patient’s name. The patient must
have an existing EWL request.
3. In the request grid, right-click the desired EWL request and select the EWL
Disposition.
The following EWL Disposition options are available for selection:
o Death
o Removed/Non-VA Care
o Removed/Scheduled-Assigned
o Removed/VA Contract Care
o Removed/No longer Necessary
o Entered in Error
o Transferred
The EWL Request is removed from the Request Management Grid and the next APPT
Request is moved up and highlighted.
5.1.7 Adding Patient-Centered Scheduling Request
To add a new Patient-Centered Scheduling request for a patient:
1. Log on to VS GUI as a Scheduler.
2. From the Tasks tab, in the Search text box, type the patient’s last name or
patient’s first initial of the last name and last four of the SSN (e.g. S1234).
Click Search, and then select the requested patient’s name.
3. Click the New Req button in the Actions pane.
4. In the Request Type dialog box, select PATIENT-CENTERED
SCHEDULING (PtSch) and click OK.

VistA Scheduling Enhancements 56 April 2018
VS GUI User Guide
Figure 67: Request Type–PATIENT-CENTERED SCHEDULING
5. Enter a Patient-Centered Scheduling Date. Enter the date the provider
requested.
6. Enter a Patient-Centered Scheduling Date (per patient). Enter the date the
patient prefers.
7. Enter a Patient-Centered Scheduling Appt Type.
o Follow up
o Consultation
o Routine
o Evaluation
Check the box for Fasting if the patient needs to fast for the appointment.
8. Enter the Length of the Appointment.
9. Select Clinic (the Clinic can be searched by Clinic Name with 6-character
minimum or by the Clinic’s abbreviation with a 4-character minimum).
Note: The Clinic does not appear for selection if the Patient-Centered Scheduling
Reminders Letter is not defined for the clinic.
10. Select Patient-Centered Scheduling Provider (3-character minimum).
11. Enter a Comment.
12. Press Ctrl + P to view the Special Needs/Preferences window for the Patient
Info dialog box and add or edit preferences as appropriate.
13. Click OK.
The request grid shows requests of the selected patient. The newly added request is
selected. The calendar defaults to the desired date and the selected clinic and defaults,
and shows the clinic schedules.
View the Special Needs/Preferences window in the ribbon bar to confirm it is
updated.
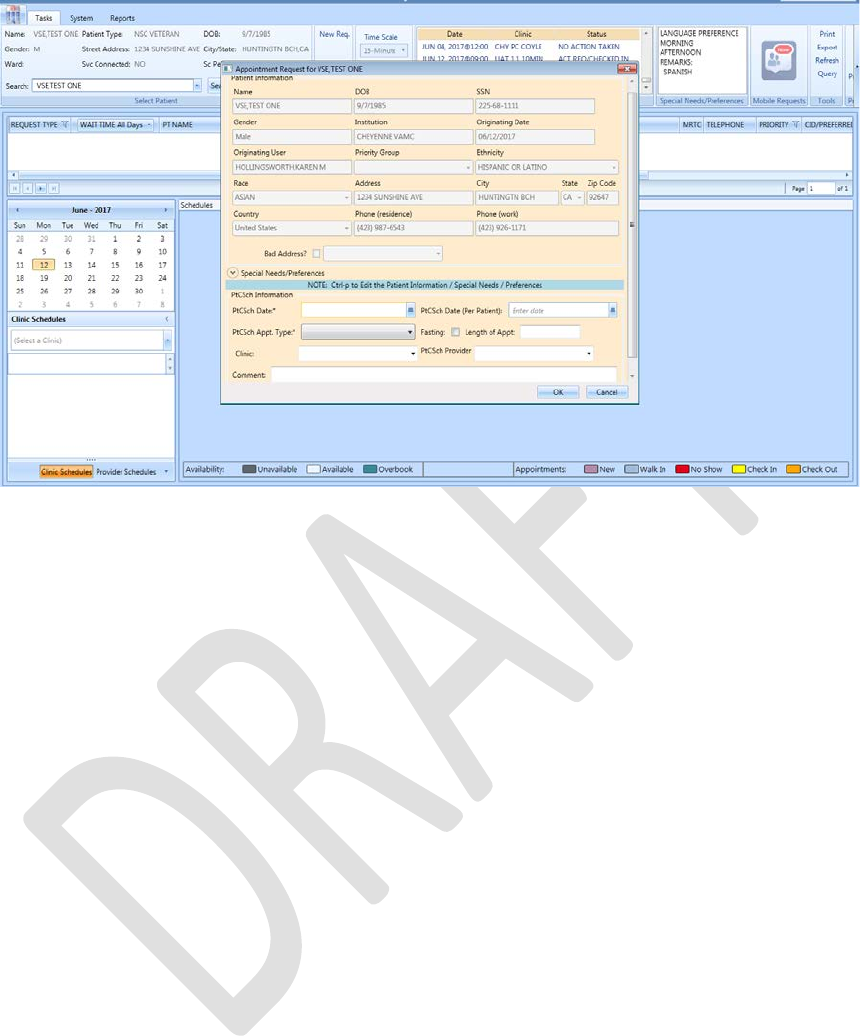
VistA Scheduling Enhancements 57 April 2018
VS GUI User Guide
Figure 68: Patient-Centered Scheduling APPT Request Dialog
5.1.8 Viewing/Editing Patient-Centered Scheduling Request
If a Patient-Centered Scheduling request needs to be reviewed or modified before being
booked, you can View/Edit the request in the Request Grid using the following steps:
1. Log on to VS GUI as a Scheduler.
2. From the Tasks tab, in the Search text box, type the patient’s last name or the
patient’s first initial of the last name and last four of the SSN (e.g. S1234).
Click Search, and then select the requested patient’s name.
Note: When Spacebar + Search are used, the Ribbon Bar and Request Management
grid adjust to that selected patient.
3. In the Request Management grid, right-click the applicable Patient-Centered
Scheduling request.
4. Select the Patient-Centered Scheduling Disposition option.
The following options appear for selection:
o View Request
o Edit Request
o Failure to respond
o Moved
o Deceased
o Doesn’t want VA services
o Received care at another VA
o Other
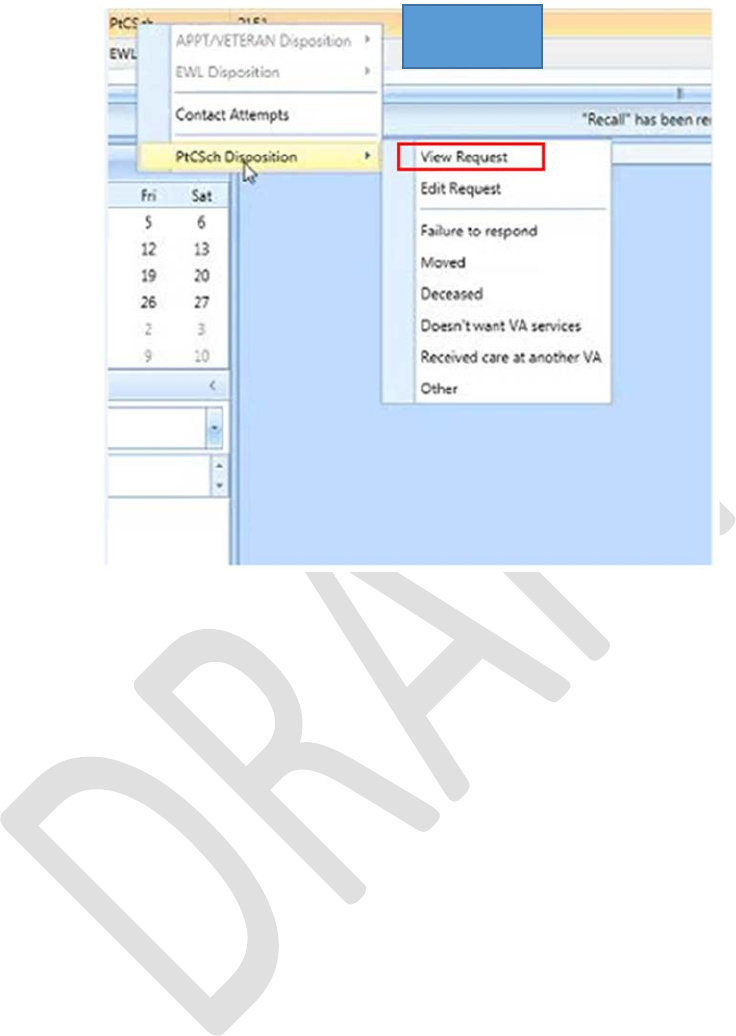
VistA Scheduling Enhancements 58 April 2018
VS GUI User Guide
Figure 69: Patient-Centered Scheduling Disposition Dialog
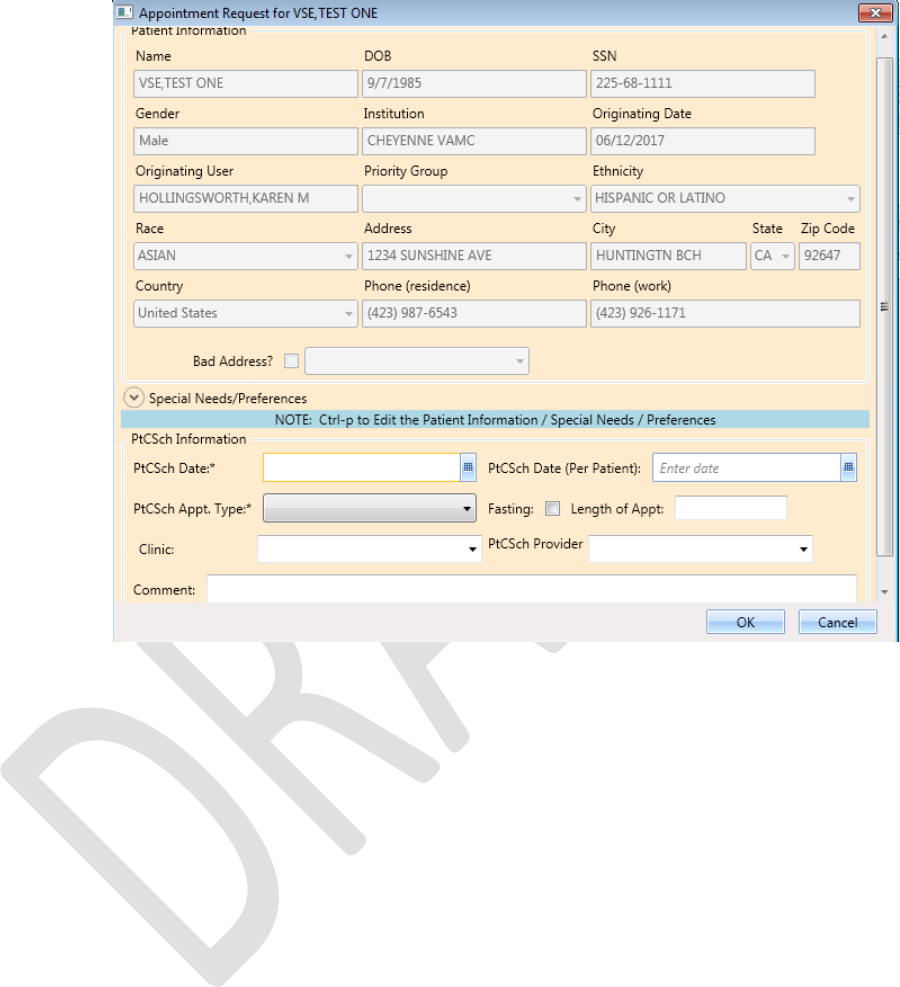
VistA Scheduling Enhancements 59 April 2018
VS GUI User Guide
5. Select View Request. The Patient-Centered Scheduling Request dialog box
appears with the contents dimmed as the dialog box is Read-Only.
Figure 70: Patient-Centered Scheduling Appointment View Request Dialog
6. Click OK. You return to the Request Management Grid.
7. Right-click the applicable Patient-Centered Scheduling request.
8. Select Patient-Centered Scheduling Disposition.
The following options appear for selection:
o View Request
o Edit Request
o Failure to respond
o Moved
o Deceased
o Doesn’t want VA services
o Received care at another VA
o Other
9. Select Edit Request. The Patient-Centered Scheduling Request dialog
displays.
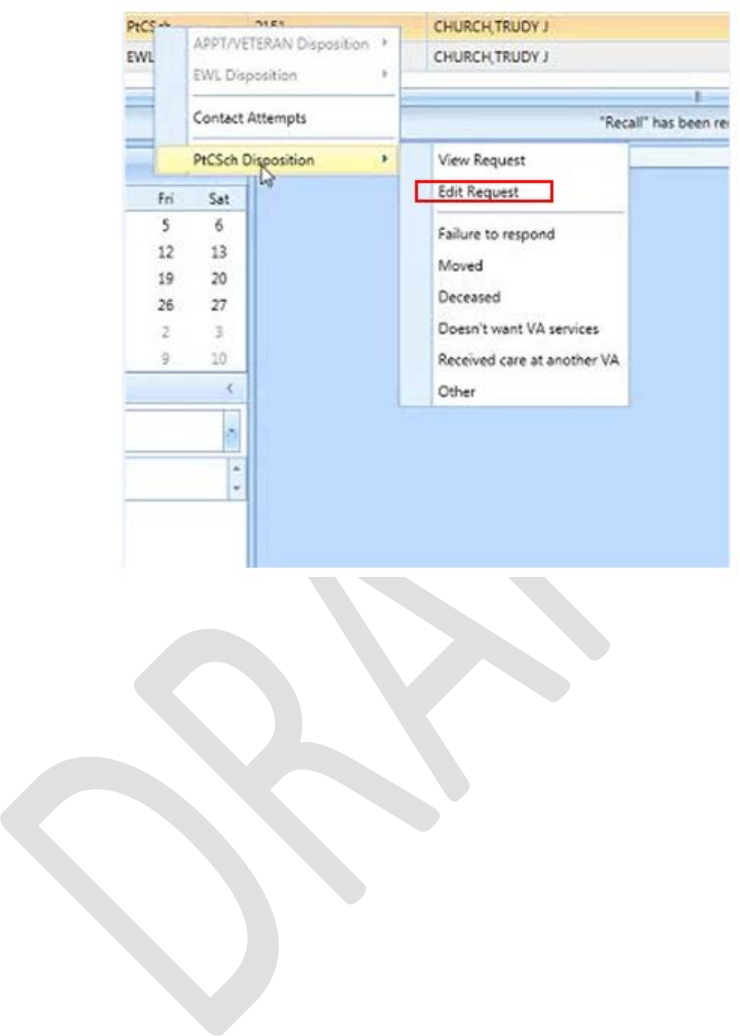
VistA Scheduling Enhancements 60 April 2018
VS GUI User Guide
Figure 71: Patient-Centered Scheduling Disposition Dialog
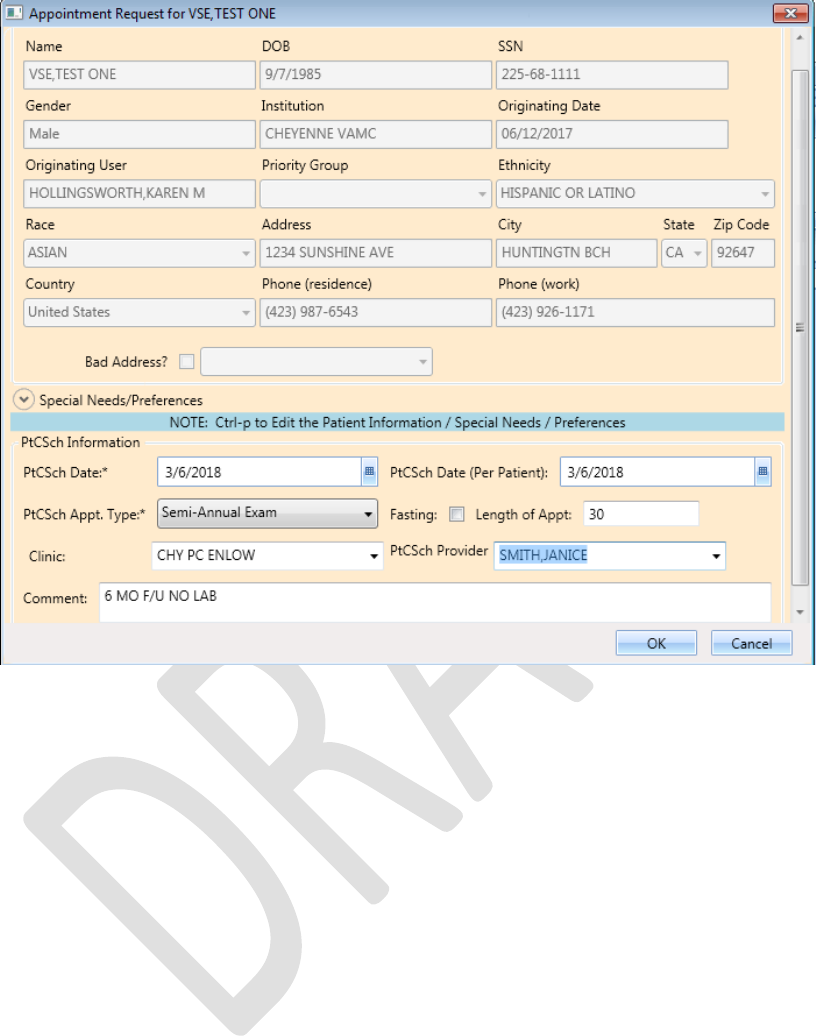
VistA Scheduling Enhancements 61 April 2018
VS GUI User Guide
Figure 72: Patient-Centered Scheduling Appointment Edit Request Dialog
Note: The editable fields are PtCSch Appt. Type, Fasting, Length of Appt., Clinic,
PtCSch Provider, and Comment. Note the PtCSch Date and PtCSch Date (Per Patient)
are not editable.
10. Click OK. The request returns to the Request Grid with the altered
information listed.
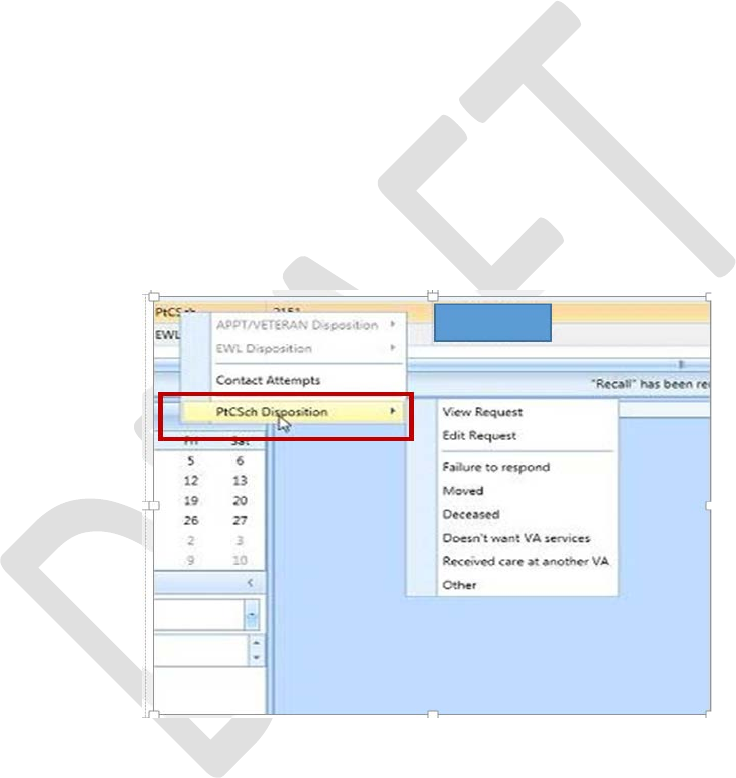
VistA Scheduling Enhancements 62 April 2018
VS GUI User Guide
5.1.9 Disposition or Remove Patient-Centered Scheduling Request
To cancel or delete a Patient-Centered Scheduling request:
1. Log on to VS GUI as a Scheduler.
2. From the Tasks tab, in the Search text box, type the patient’s last name or the
patient’s first initial of the last name and last four of the SSN (e.g. S1234).
Click Search, and then select the requested patient’s name.
3. In the RM Grid, right-click the Patient-Centered Scheduling request and
select PtCSch Disposition. The following dispositions are available for
selection:
o Failure to respond
o Moved
o Deceased
o Doesn’t want VA services
o Received care at another VA
o Other
Figure 73: Patient-Centered Scheduling Disposition Options
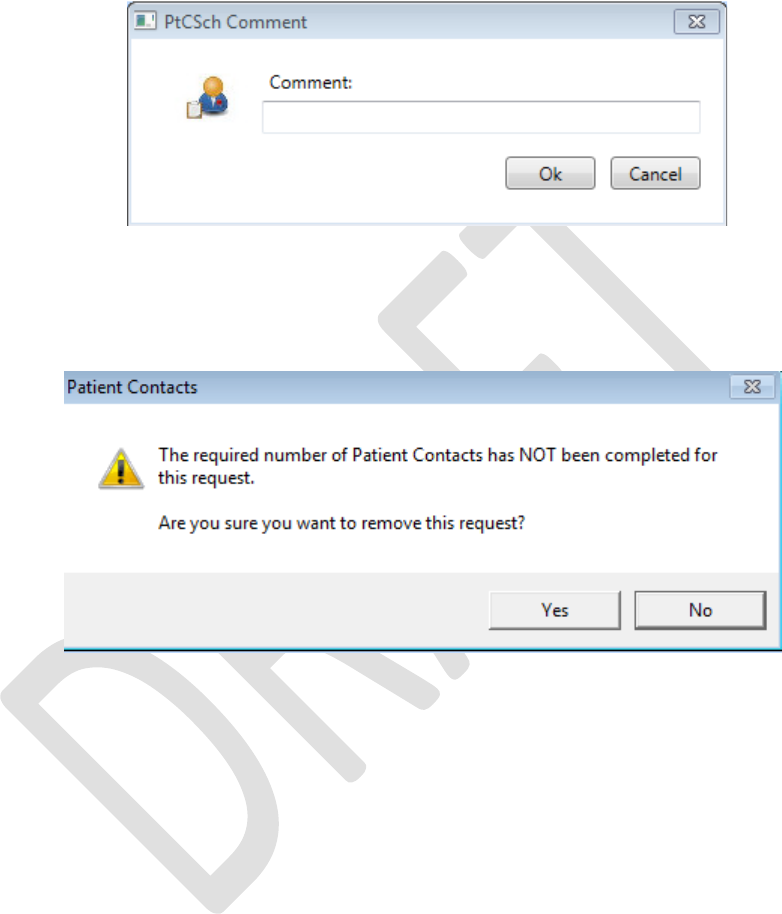
VistA Scheduling Enhancements 63 April 2018
VS GUI User Guide
4. From the PtCSch Comment dialog box, enter comments as necessary. Only
the current comment entered is displayed although there is an Audit Log of
Uses that created previous comments.
Figure 74: PtCSch Comment Dialog Box
5. Click OK. The patient is removed from the request grid.
Certain dispositions will present a Patient Contacts message pop-up if the business
rules were not met. To disposition the request, click Yes to acknowledge the warning.
Figure 75: Warning Pop-Up If Business Rules Were Not Met
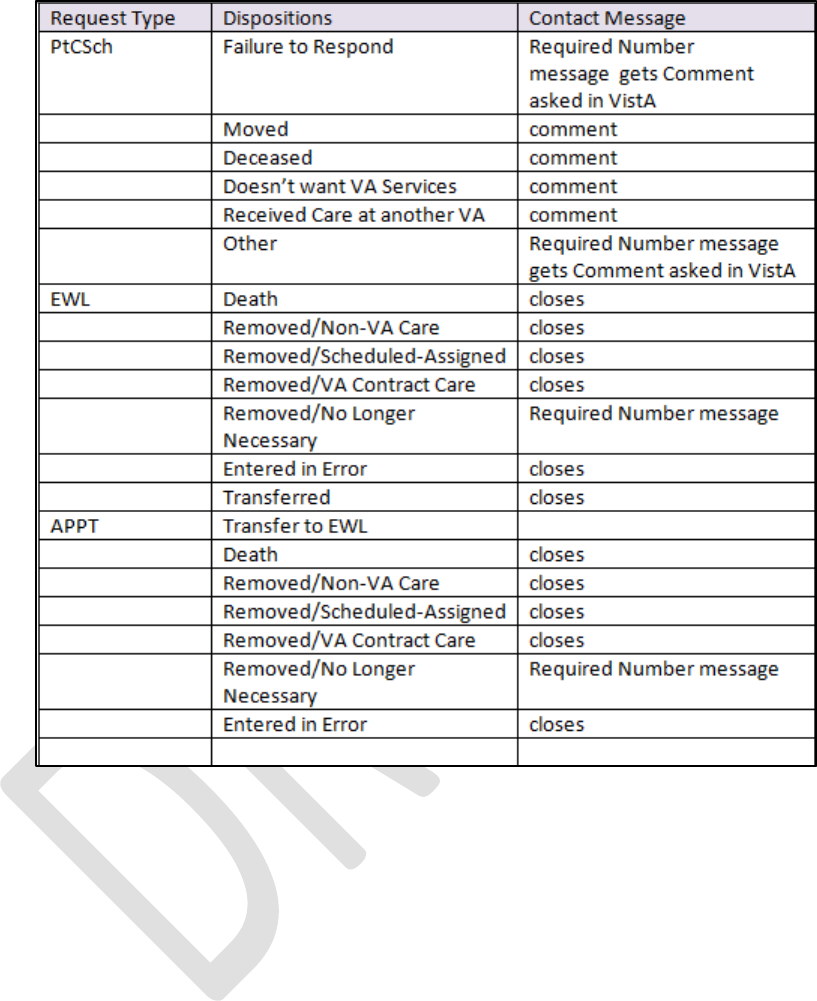
VistA Scheduling Enhancements 64 April 2018
VS GUI User Guide
Note here the Request Type, Dispositions, and Contact Message information.
Figure 76: Request Type/Dispositions/Contact Message Reference
5.2 Contacting a Patient
A patient may need to be contacted by phone or letter to schedule an appointment. Contact
efforts can be added to the patient record for APPT and EWL requests. They are viewable in
the GUI and are stored in the SDEC APPT REQUEST file.
5.2.1 New Contact Attempt
To document New Contact Attempt information:
1. Log on to VS GUI as a Scheduler.
2. From the Tasks tab, in the Search text box, type the patient’s last name (or the
patient’s first initial of the last name) and last four of the SSN (e.g. S1234).
3. Click Search.
4. Select the requested patient’s name from the list.
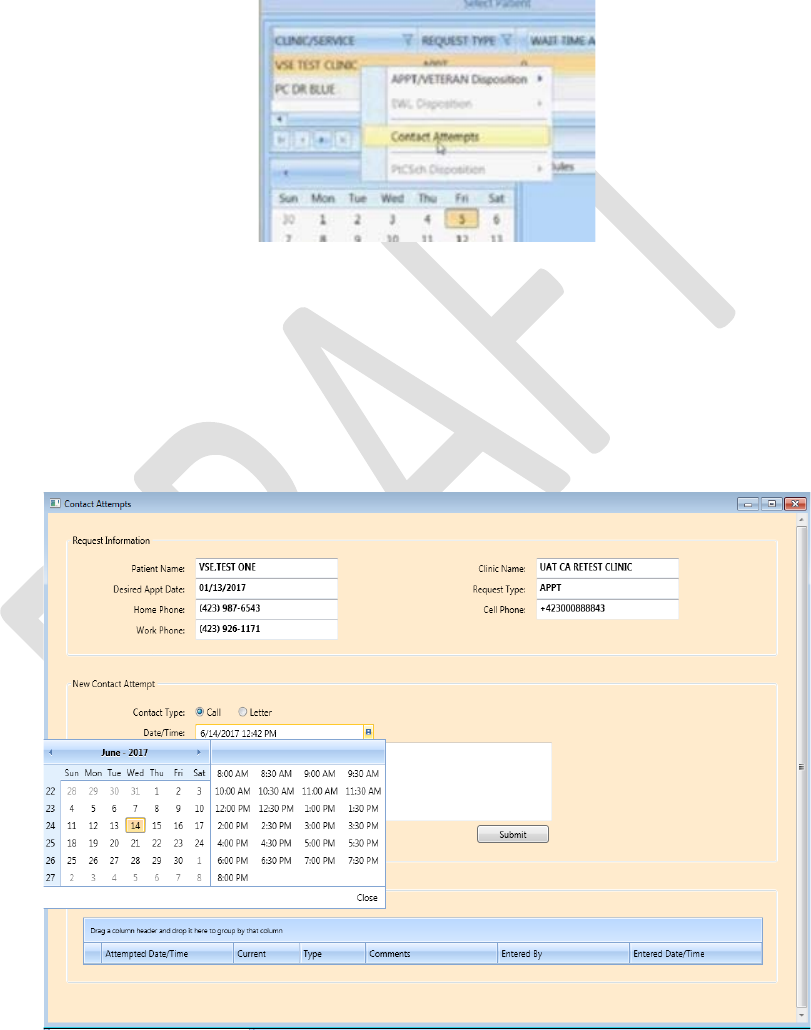
VistA Scheduling Enhancements 65 April 2018
VS GUI User Guide
5. In the request grid, right-click APPT, PtCSch, or EWL request type, and then
select Contact Attempts. The following Contact Types are available for
selection:
o Call
o Letter
6. Select Call or Letter
Figure 77: Contact Attempts
The New Contact Attempt dialog box displays showing, Patient Name, Clinic Name,
Desired Appt. Date, Request Type, and Patient phone numbers. Select Call or Letter
and accept the default contact date/time (which is the time the New Contact Attempt
dialog was opened) or change as appropriate. You can change the Date/Time to a past
Date/Time to document when the contact attempt was created. Backdating an attempt
will still reflect the entry date and time in the far-right column.
Figure 78: Patient Contact Dialog
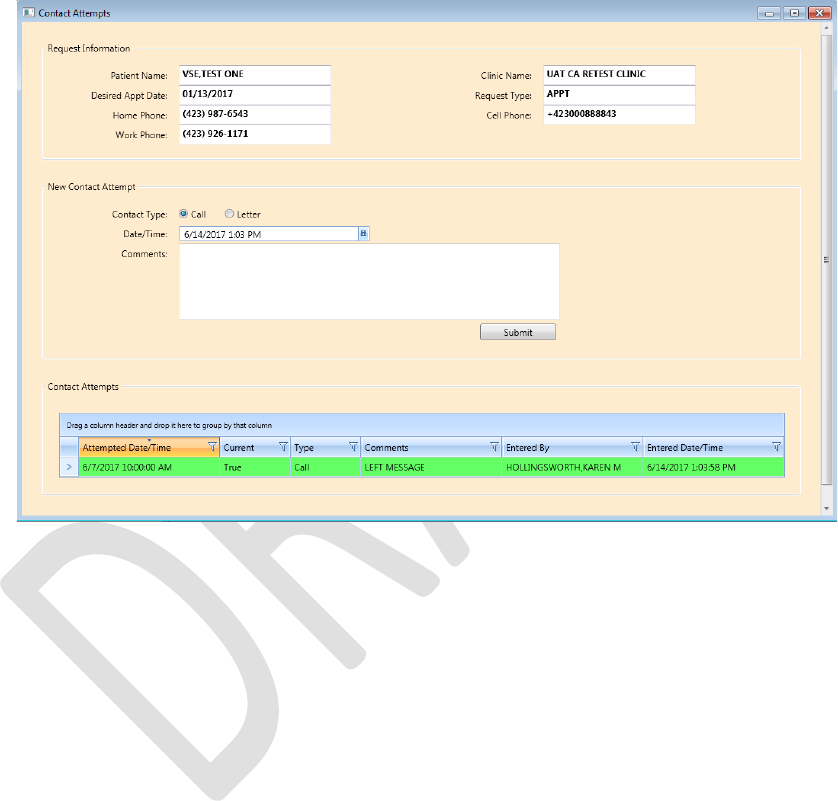
VistA Scheduling Enhancements 66 April 2018
VS GUI User Guide
7. Enter the phone number that was contacted, if desired, and provide any
appropriate information in the Comments section.
8. Click Submit to enter the Call Attempt details, which will be displayed at the
bottom of the New Contact Attempt screen and highlighted in Green.
The above procedures can be repeated as many times as needed to attempt to contact the
patient. There is no limit to the number of attempts that can be created.
Figure 79: New Contact Attempt Submitted and Displayed
Note: The name of the person entering the contacts, the date the contact was entered,
and the attempt date/time are shown.
• For Non-Mental Health appointment contacts, a call and a letter (letter must
be at least 14 days old) are required prior to system dispositioning without an
appointment.
• Mental Health appointment contacts require 3 calls on different calendar days
(ex. Monday, Tuesday, Wednesday). At least one letter is required (letter
must be at least 14 days old) and can be on same day as a call attempt.
• Attempting to disposition prior to the above rules being met will result in a
warning message of the business rules not being met (See Figure 77). Click
Yes to acknowledge the warning and disposition the request or Click No to
return to Request Management Grid.
Figure 80: Displaying Name of Person Entering Contacts
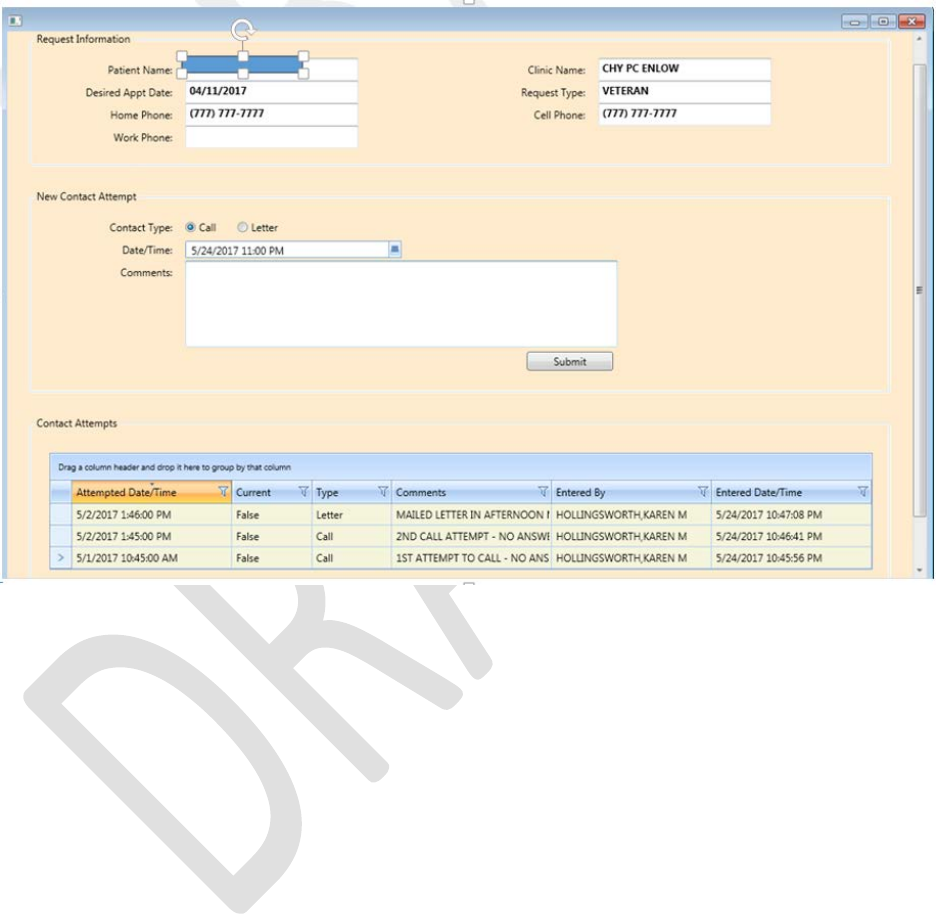
VistA Scheduling Enhancements 67 April 2018
VS GUI User Guide
After making an appointment the request is dispositioned and removed from Request
Management. If the appointment is cancelled, the request returns to the grid and the current
field in Contact Attempts changes to false and is a tan color.
Figure 81: Appointment Canceled
After making a New Contact Attempt after the cancellation, the new attempt will be
green and the Current field will be “True”.

VistA Scheduling Enhancements 68 April 2018
VS GUI User Guide
Figure 82: New Contact Attempt After Cancellation
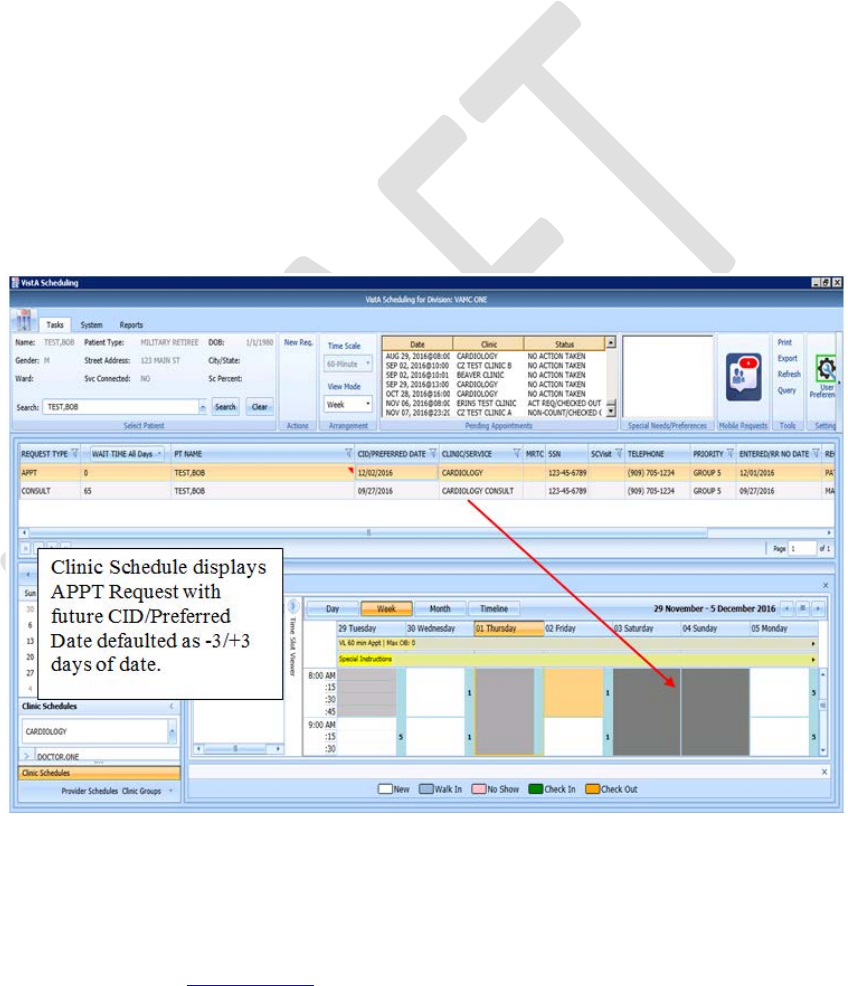
VistA Scheduling Enhancements 69 April 2018
VS GUI User Guide
6 Appointment Management
6.1 Adding Appointments
6.1.1 Add Appointment for Appointment Request
1. Log into VS GUI as a Scheduler.
2. From the Tasks tab, type the patient’s last name and first name in the Search
text box. Click Search, and then select the requested patient’s name from the
list.
3. In the Request Management Grid, select APPT request. The Clinic Schedule
Grid displays the clinic schedule based upon CID/Preferred date of request. For
past dates, the clinic schedule opens defaulted to current date. For current date
(or CID/Preferred date less than three days in future), the clinic schedule
displays defaulted to current date. For future dates, the clinic schedule displays
-/+ three days of CID/Preferred date.
Note: For newly created APPT requests, the system automatically highlights the
APPT request and the Clinic Schedule displays.
Figure 83: Select APPT Request – Clinic Schedule Grid Display
4. In the Clinic Schedule Grid, select the available time slot. Uneven start times
are available. Time Slot details display in the Time Slot Viewer.
Note: Refer to Section 7.1.7 for detailed information on Time Slot Viewer
functionality.
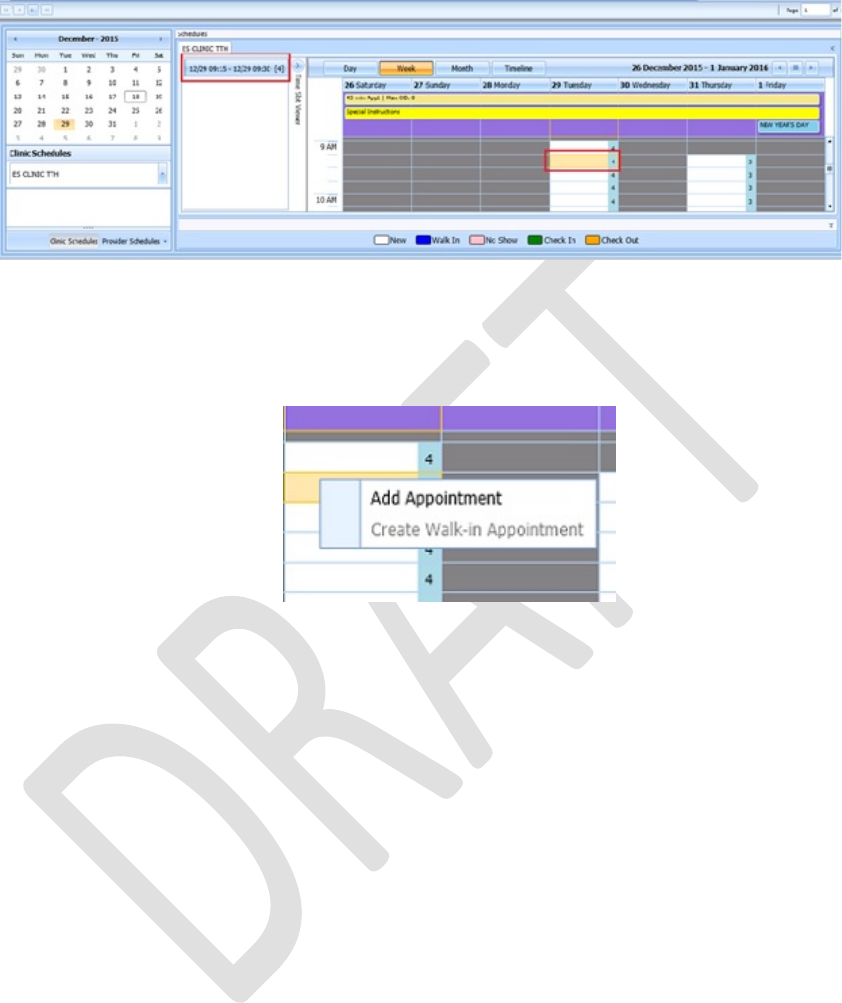
VistA Scheduling Enhancements 70 April 2018
VS GUI User Guide
Figure 84: Select Time Slot
5. Right-click in the time slot. Add Appointment option displays. The Create
Walk In Appointment option is only available for selection on the current date.
It is not available for past or future CID/Preferred dates.
Figure 85: Right-click Options – Add Appointment
6. Select Add Appointment.
The New Appointment dialog displays as well as the Patient Eligibility dialog box.
• Appointments Tab:
o The Patient Information Section displays Name, DOB, SSN, Svc
Connected, SC Percent, Global Assessment of Function (score) (GAF) (read
only), and the Svc Related check box.
o The Appointment information section displays Benefit/Eligibility (provides
drop down for patients with multiple eligibility), Start Time, Appt Type,
Duration, Clinic and Notes (Appointment Start Time; Duration on for
appointments to VL Clinics; and Notes are editable fields). Information can
be added pertinent to appointment.
o The comments from the original request will populate the Notes field in the
New Appointment dialog. This text is editable before the new appointment
is created.
o The Appointment Conflicts section displays any appointments already
scheduled that potentially conflict with the appointment being added.
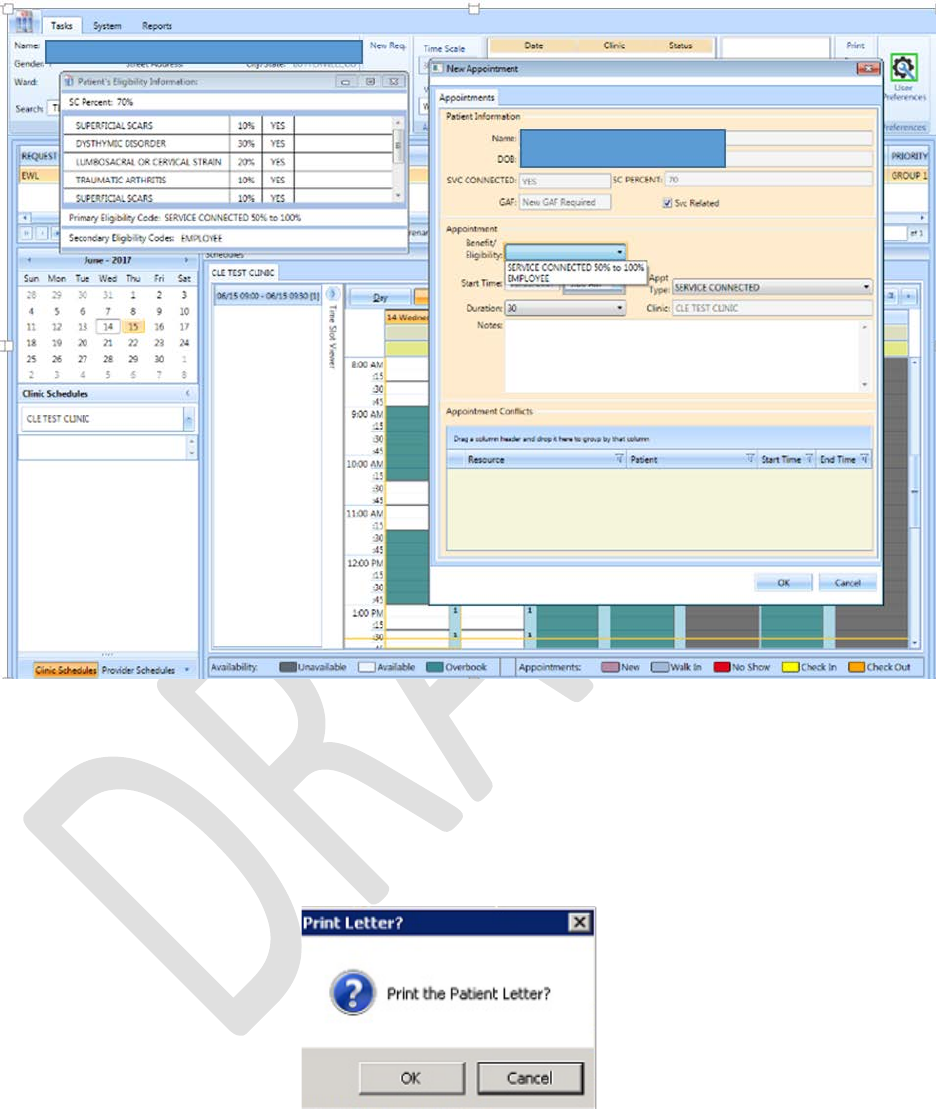
VistA Scheduling Enhancements 71 April 2018
VS GUI User Guide
Figure 86: New Appointment Dialog
7. Add any applicable notes to the appointment. Click OK.
The Print Letter? Dialog box displays.
8. Click OK to print the Letter to the patient.
Click Cancel if you do not want to print the letter.
Figure 87: Print Letter? Dialog
9. To close the Request dialog box, click OK.
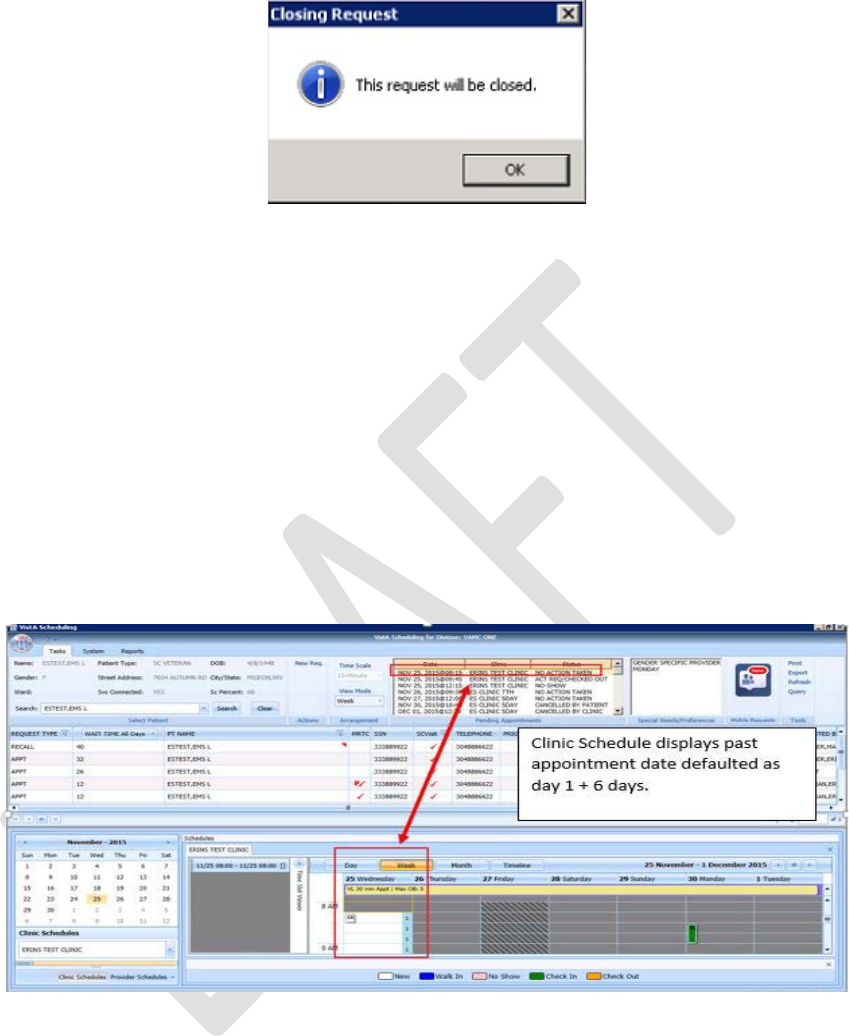
VistA Scheduling Enhancements 72 April 2018
VS GUI User Guide
Figure 88: Closing Request Dialog
The APPT Request is removed from the Patient Request Management Grid. The Next
request for patient is moved up and highlighted.
The Clinic Schedule closes and the next appointment clinic schedule opens.
The New appointment displays in the Pending Appointment Window on the Ribbon
Bar.
10. Select appointment from the Pending Appointment window to view the
appointment in the Clinic Schedule Grid. The clinic schedule opens. For past
dates, the clinic schedule opens defaulted to the appointment date. For the
current date (or appointment date less than three days in future), the clinic
schedule displays defaulted to current date. For future dates, the clinic schedule
displays -/+ three days of appointment date.
Figure 89: Clinic Schedule Grid – Past Appointment Display
For current date (or appointment date less than three days in future), the clinic
schedule displays defaulted to current date. See below.
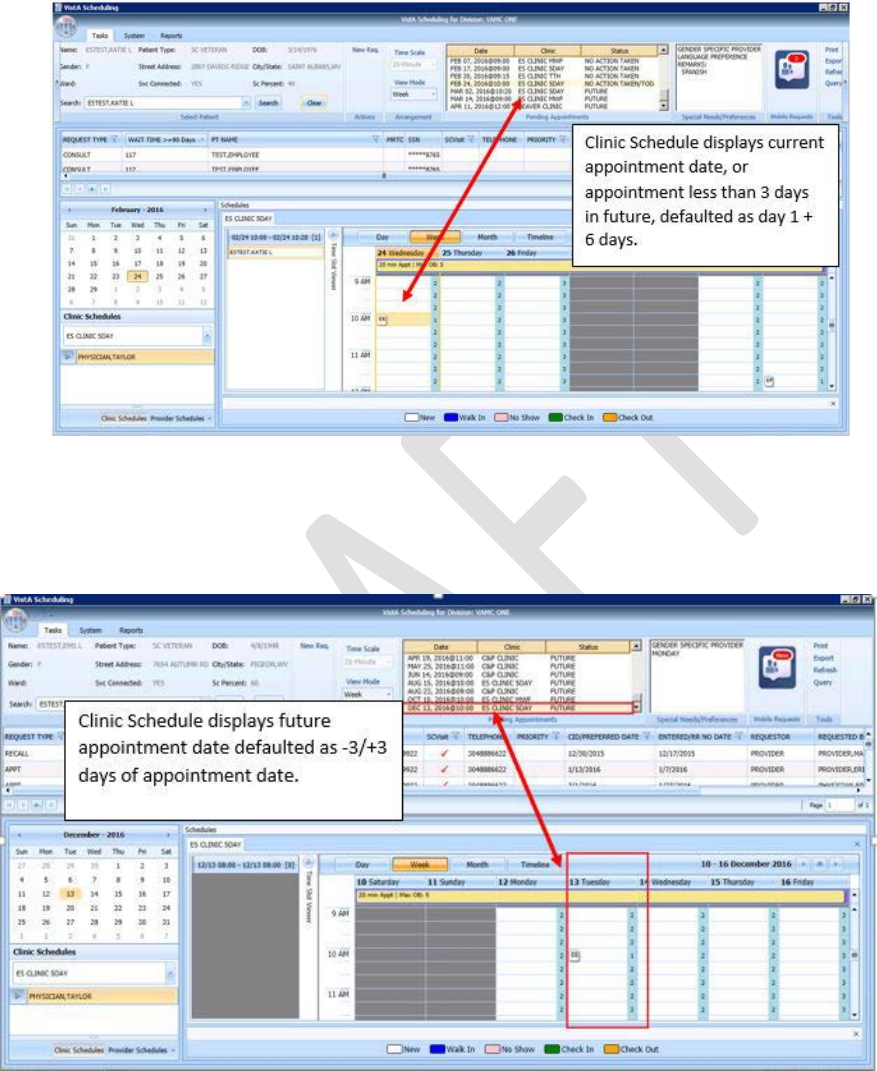
VistA Scheduling Enhancements 73 April 2018
VS GUI User Guide
Figure 90: Clinic Schedule Grid – Current Appointment Display
For future dates, the clinic schedule displays -/+ three days of the appointment date. See
below.
Figure 91: Clinic Schedule Grid – Future Appointment Display
6.1.2 Add Appointment for EWL Request
1. Log into VS GUI as a Scheduler.
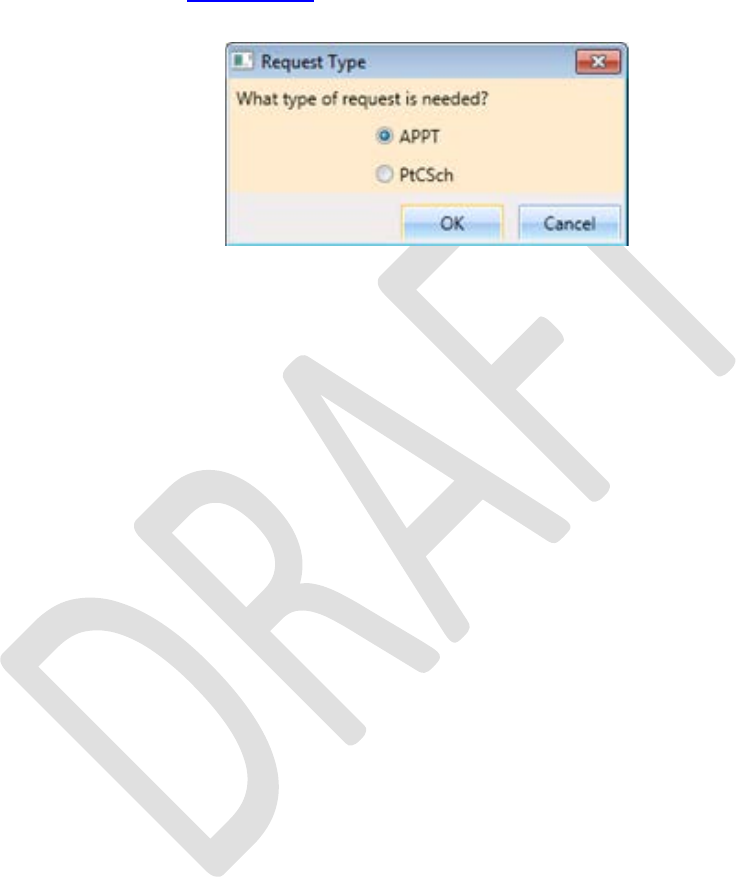
VistA Scheduling Enhancements 74 April 2018
VS GUI User Guide
2. From the Tasks tab, type the patient’s last name and first name in the Search
text box. Click Search, and then select the requested patient’s name from the
list.
3. Click the New Req button in the Actions pane.
Note: Refer to Section 5.1.5 for steps on transferring the APPT request to the new
EWL Request.
Figure 92: Request Type
4. In the Request Management Grid select the EWL request.
The Clinic Schedule Grid displays the clinic schedule based upon the CID/Preferred
date of the request. For past dates, the clinic schedule opens defaulted to
CID/Preferred date. For the current date (or the CID/Preferred date less than three
days in future), the clinic schedule displays defaulted to the current date. For future
dates, the clinic schedule displays -/+ three days of the CID/Preferred date.
Note: For the newly created Patient-Centered Scheduling request the system
automatically highlights the APPT request and the Clinic Schedule displays. If the
EWL is for a service/specialty, no grid is displayed and the clinic must be searched
and selected.
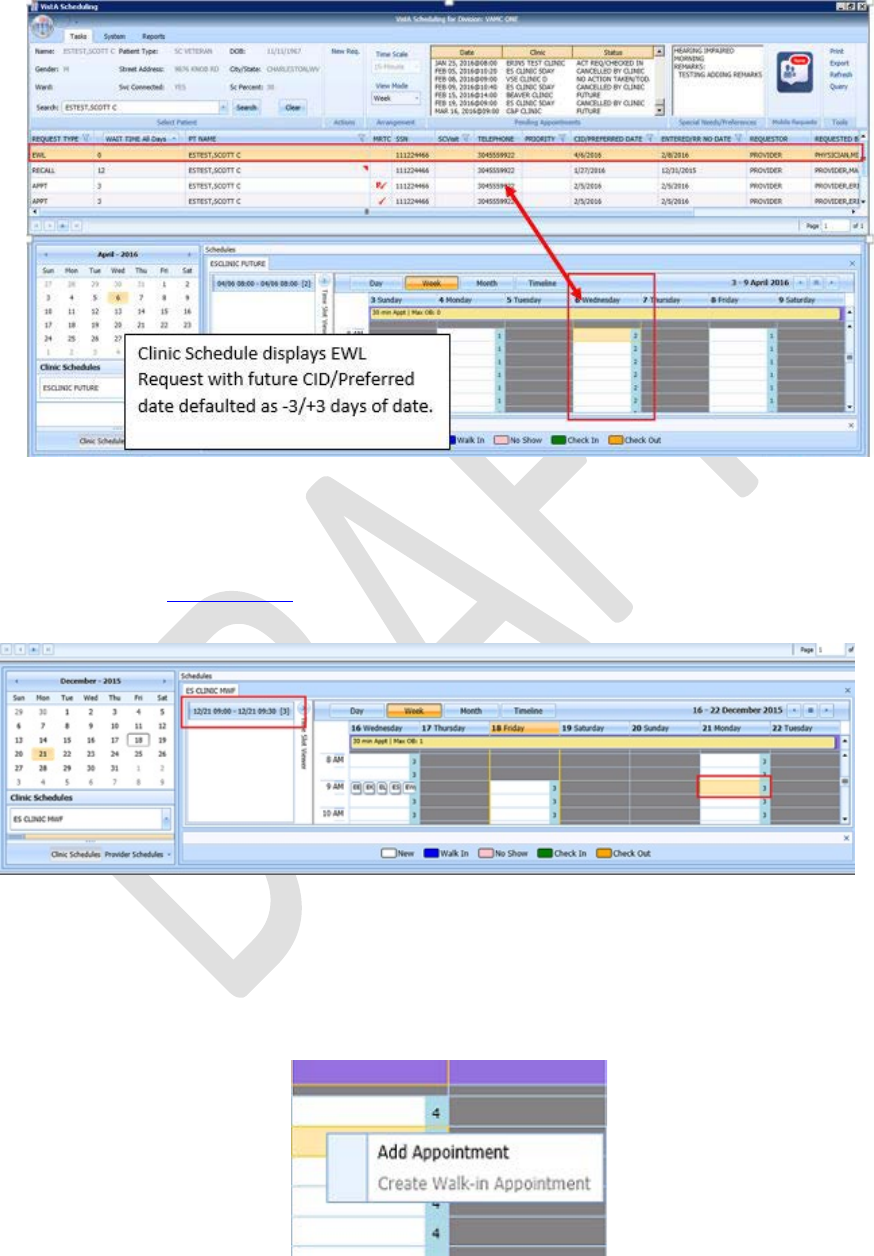
VistA Scheduling Enhancements 75 April 2018
VS GUI User Guide
Figure 93: Select EWL Request
5. In the Clinic Schedule Grid, select the available time slot. Time Slot details
display in the Time Slot Viewer.
Note: See Section 7.1.7 for detailed information on the Time Slot Viewer
functionality.
Figure 94: Select Time Slot
6. Right-click in the time slot. The Add Appointment option displays.
Note: The Create Walk In Appointment option is only available for selection on the
current date. It is not available for past or future CID/Preferred dates.
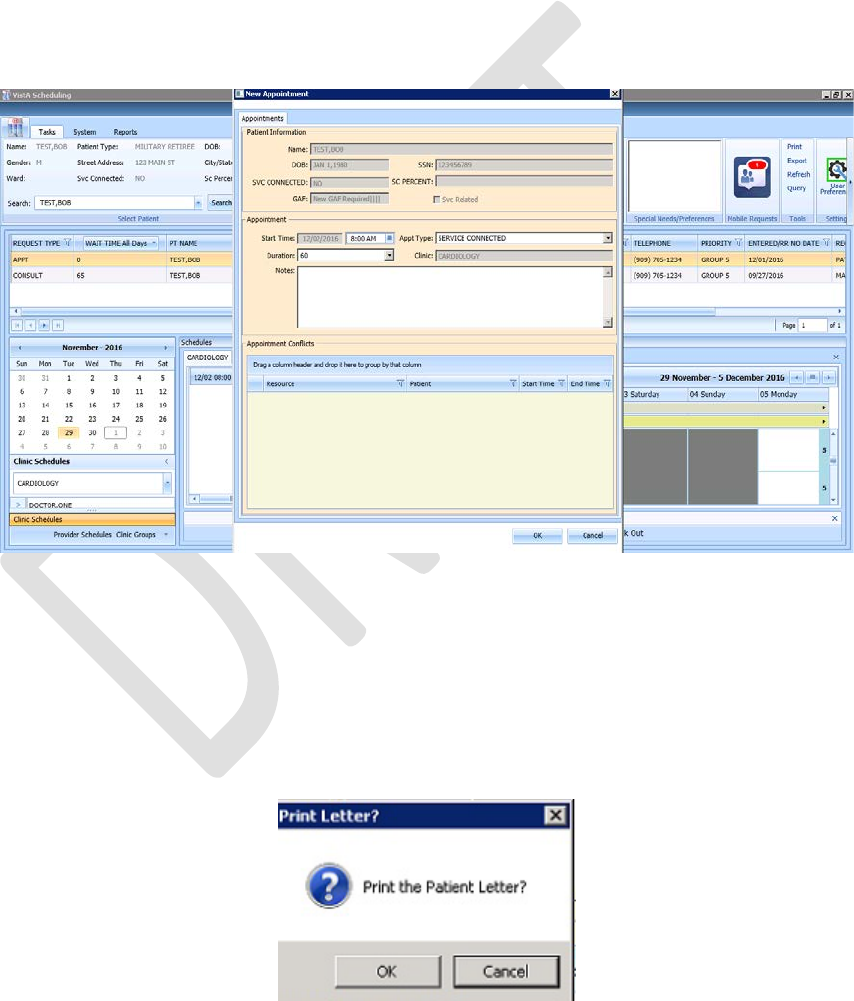
VistA Scheduling Enhancements 76 April 2018
VS GUI User Guide
Figure 95: Right-click Options – Add Appointment
7. Select Add Appointment.
The New Appointment dialog box contains the following sections:
• Appointments Tab:
o The Patient Information section displays Name, DOB, SSN, Svc
Connected, SC Percent, GAF (read only), and Svc Related check box.
o The Appointment information section displays Start Time, Appt Type,
Duration, Clinic and Notes (Appointment Start Time; Duration on for
appointments to VL Clinics; and Notes are editable fields).
o The Appointment Conflicts section displays any appointments already
scheduled that conflict with appointment being added.
Figure 96: New Appointment Dialog
8. Add any applicable Notes to the appointment. The comments from the original
request will populate the Notes field in the New Appointment dialog. Click
OK.
The Print Letter? Dialog box displays.
9. Click OK to print the Letter to the patient. Click Cancel if you do not want to
print the letter.
Figure 97: Print Letter? Dialog

VistA Scheduling Enhancements 77 April 2018
VS GUI User Guide
10. If you do want to print the letter, click OK, and the print dialog box will pop
up. If there is no letter in the box, contact your local clinic set up team to place
that type of letter into the clinic’s set up. If there is a letter, decide whether to
print to a network printer via Print (Windows Printer) or a VistA print device
via the search box and Print (VistA Print Device). It is highly recommended
to use the VistA method, as that will place the address in the correct position
for a windowed envelope.
Figure 98: Print to VistA Device Printer to place address in correct position
11. To close the Request dialog box, click OK.
Figure 99: Closing Request Dialog
• The EWL Request is removed from the Patient Request Management Grid. The
EWL request is dispositioned as scheduled.
• The Next request for the patient is moved up and highlighted.
• The Clinic Schedule closes and the clinic for the next request displays.
• The New appointment displays in the Pending Appointment Window on the
Ribbon Bar.
12. Select appointment from the Pending Appointment window to view the
appointment in the Clinic Schedule Grid. The clinic schedule opens. For past
dates, the clinic schedule opens defaulted to appointment date.
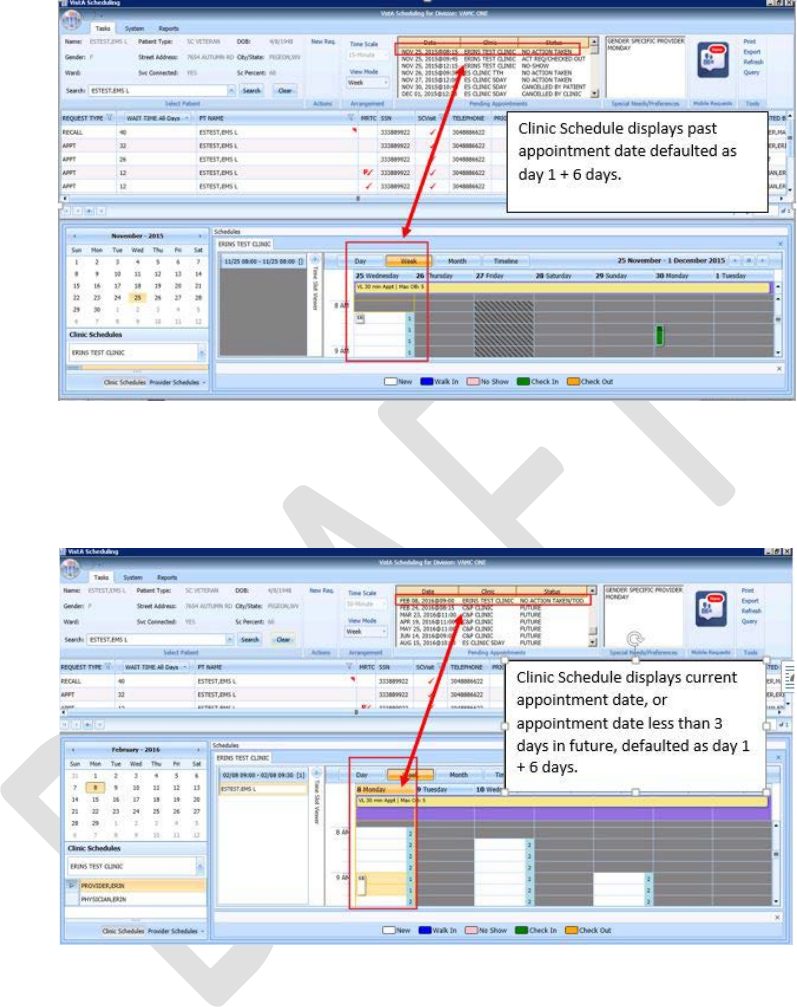
VistA Scheduling Enhancements 78 April 2018
VS GUI User Guide
Figure 100: EWL Appointment Past Date Display
For the current date (or the appointment date less than three days in the future), the
clinic schedule displays the default, the current date. See below.
Figure 101: EWL Appointment Current Date
For future dates, the clinic schedule displays -/+ three days of the appointment date.
See below.
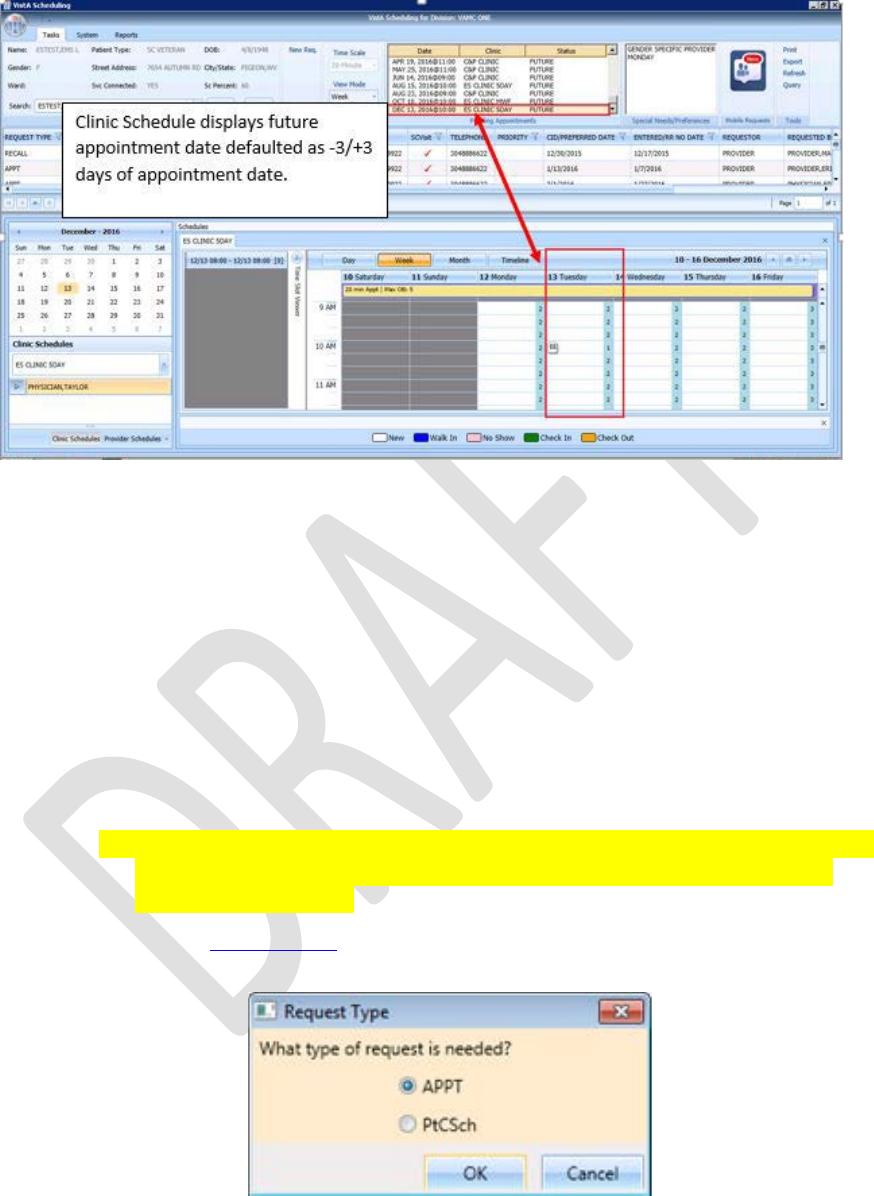
VistA Scheduling Enhancements 79 April 2018
VS GUI User Guide
Figure 102: EWL Appointment Future Date Display
6.1.3 Add Appointment for Patient-Centered Scheduling Request
1. Log into VS GUI as a Scheduler.
2. From the Tasks tab, in the Search text box, type the patient’s last name or the
patient’s first initial of the last name and last four of the SSN (e.g. S1234).
Click Search, and then select the requested patient’s name.
3. Click the New Req button in the Actions pane.
4. In the Request Type dialog box, select Patient-Centered Scheduling (PtSch)
and then click OK to create a new request or click Cancel for the existing
request.
5. When a New Patient is searched, please select CANCEL when the Request
Type box pops up. This will allow searching for existing requests before
creating anything new.
Note: Refer to Section 5.1.7 for steps on adding a new Patient-Centered Scheduling
Request.
Figure 103: Request Type
6. In the Request Management Grid select Patient-Centered Scheduling request.
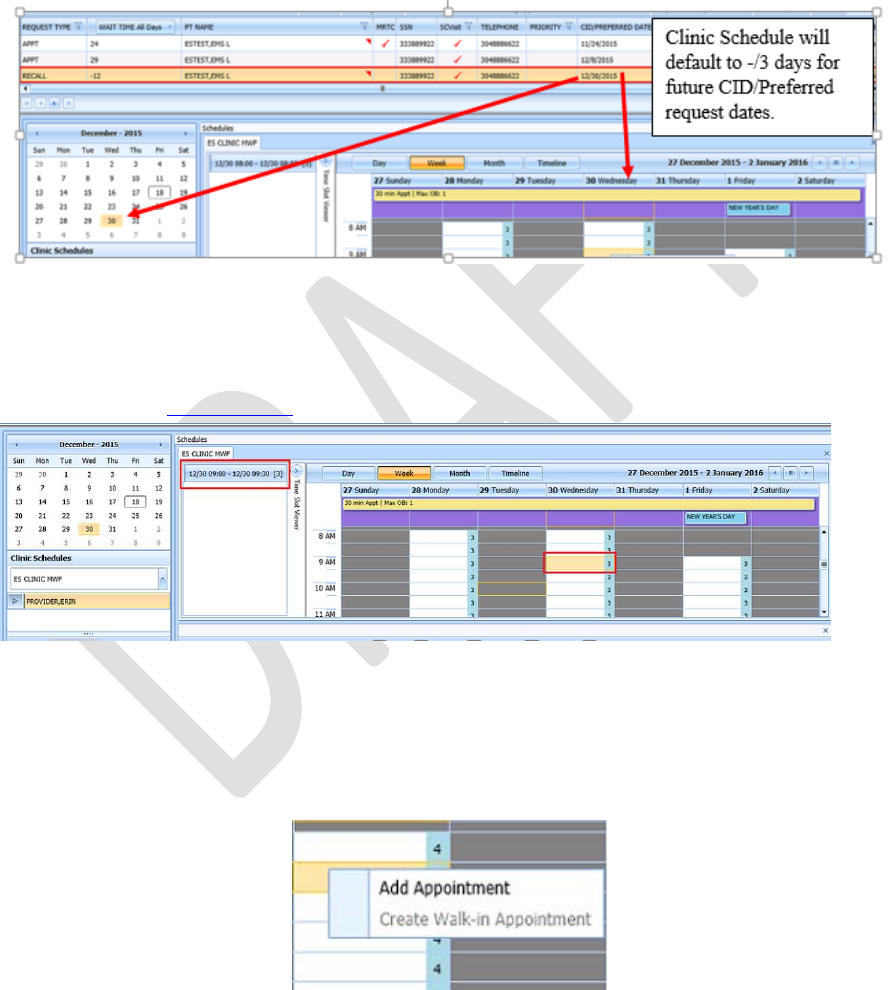
VistA Scheduling Enhancements 80 April 2018
VS GUI User Guide
The Clinic Schedule Grid displays the clinic schedule based upon the CID/Preferred
date of request. For past dates, the clinic schedule opens defaulted to the
CID/Preferred date. For current date (or the CID/Preferred date less than 3 days in
future), the clinic schedule displays defaulted to current date. For future dates, the
clinic schedule displays -/+3 days of the CID/Preferred date.
Note: For a newly created Patient-Centered Scheduling request the system
automatically highlights the PATIENT-CENTERED SCHEDULING request in the
Request Management Grid and Clinic Schedule.
Figure 104: Select Patient-Centered Scheduling Request
7. In the Clinic Schedule Grid, select the available time slot.
Time Slot details display in the Time Slot Viewer.
Note: See Section 7.1.7 for detailed information on Time Slot Viewer functionality.
Figure 105: Select Time Slot
8. Right-click in the time slot.
Add Appointment option displays.
Note: The Create Walk In Appointment option is only available for selection on the
current date. It is not available for past or future CID/Preferred dates.
Figure 106: Right-click Options – Add Appointment
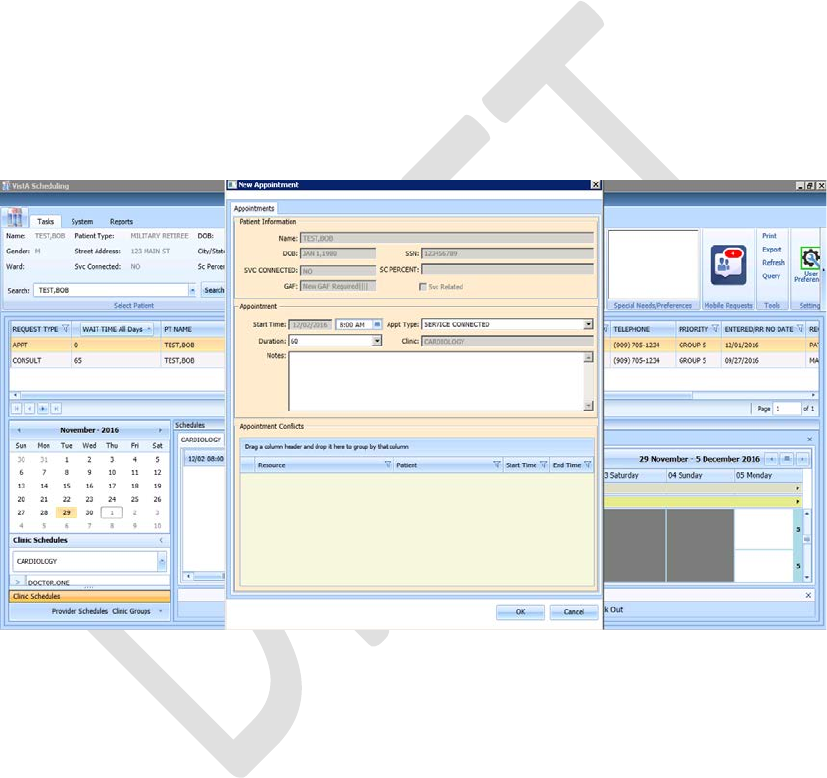
VistA Scheduling Enhancements 81 April 2018
VS GUI User Guide
9. Select Add Appointment.
The New Appointment dialog box contains the following sections:
• Appointments Tab:
o The Patient Information Section displays Name, DOB, SSN, SVC
Connected, SC Percent, GAF (read only), and Svc Related check box.
o The Appointment information section displays Start Time, Appt Type,
Duration, Clinic and Notes (Appointment Start Time; Duration on for
appointments to VL Clinics; and Notes are editable fields).
o The comments from the original request will populate the Notes field in
the New Appointment dialog.
o The Appointment Conflicts section displays any appointments already
scheduled that conflict with the appointment being added.
Figure 107: New Appointment Dialog
10. Add any applicable Notes to the appointment. The comments from the original
request will populate the Notes field in the New Appointment dialog. Click
OK.
The Print Letter? Dialog box displays.
11. Click OK to print the Letter to patient.
Click Cancel if you do not want to print the letter.
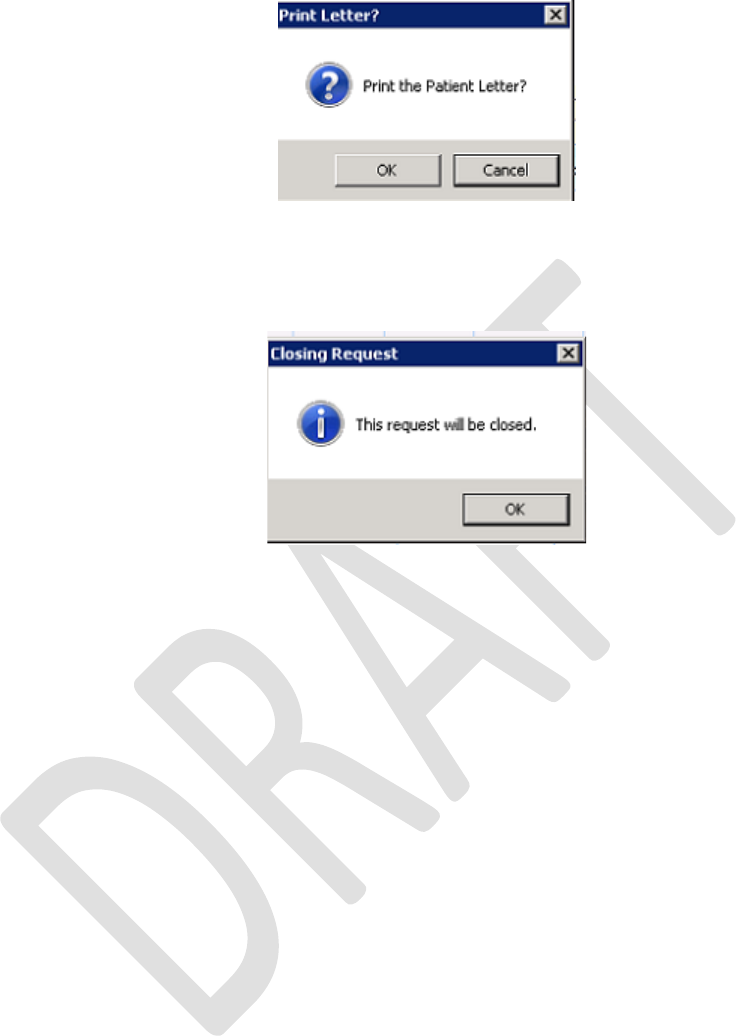
VistA Scheduling Enhancements 82 April 2018
VS GUI User Guide
Figure 108: Print Letter? Dialog
The Closing Request dialog box displays.
12. Click OK.
Figure 109: Closing Request Dialog
Note: The Patient-Centered Scheduling request is not immediately removed from the
request grid. The request is removed when the task “CLEAN UP CLINIC PATIENT-
CENTERED SCHEDULING ENTRIES” has been run and when the appointment is
made within the CLEAN UP DAY SETTING in ENTER/EDIT CLINIC PATIENT-
CENTERED SCHEDULING SITE PARAMS menu option.
The Clinic Schedule closes and the clinic for the next request displays.
The New appointment displays in Pending Appointment Window on the Ribbon Bar.
13. Select an appointment from the Pending Appointment window to view it in the
Clinic Schedule Grid. The clinic schedule opens. For past dates, the clinic
schedule displays defaulted to appointment date.
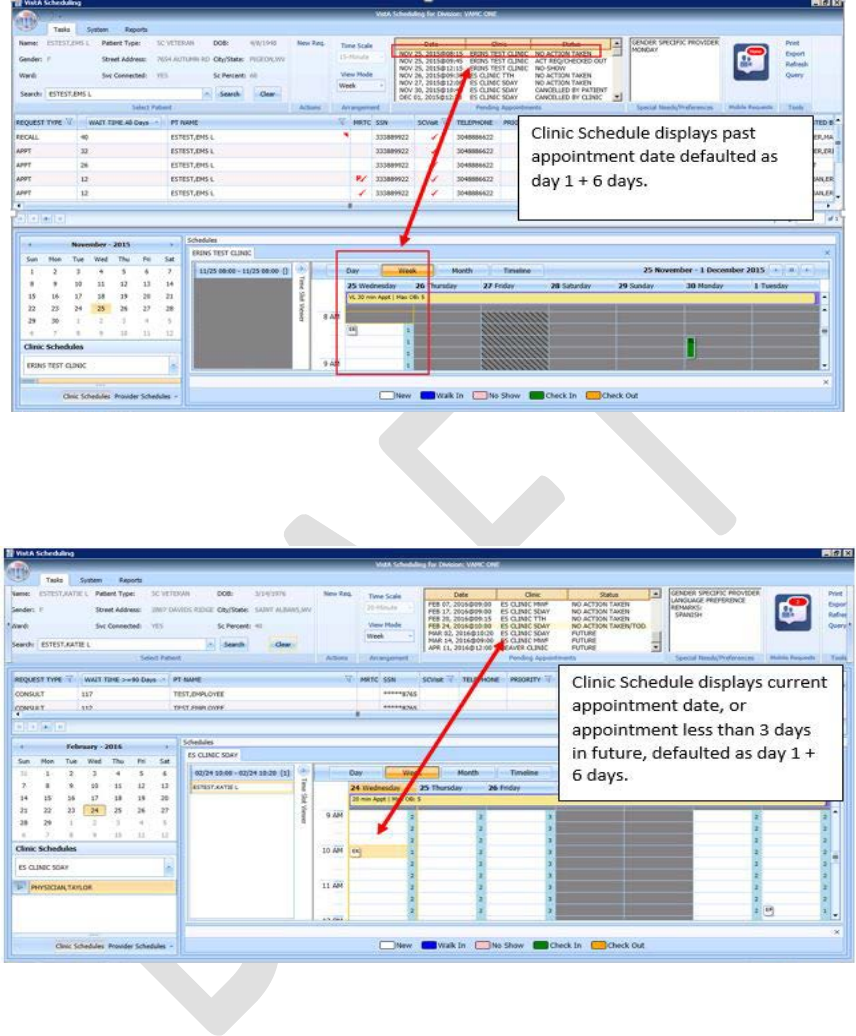
VistA Scheduling Enhancements 83 April 2018
VS GUI User Guide
Figure 110: Clinic Schedule Display – Past Date Appointment
For the current date (or if the appointment date is less than three days in the future),
the clinic schedule displays the appointment date as Day 1 + six days to current date.
Figure 111: Clinic Schedule Display – Current Date Appointment
For future dates, the clinic schedule displays -/+ three days of the appointment date.
See below.
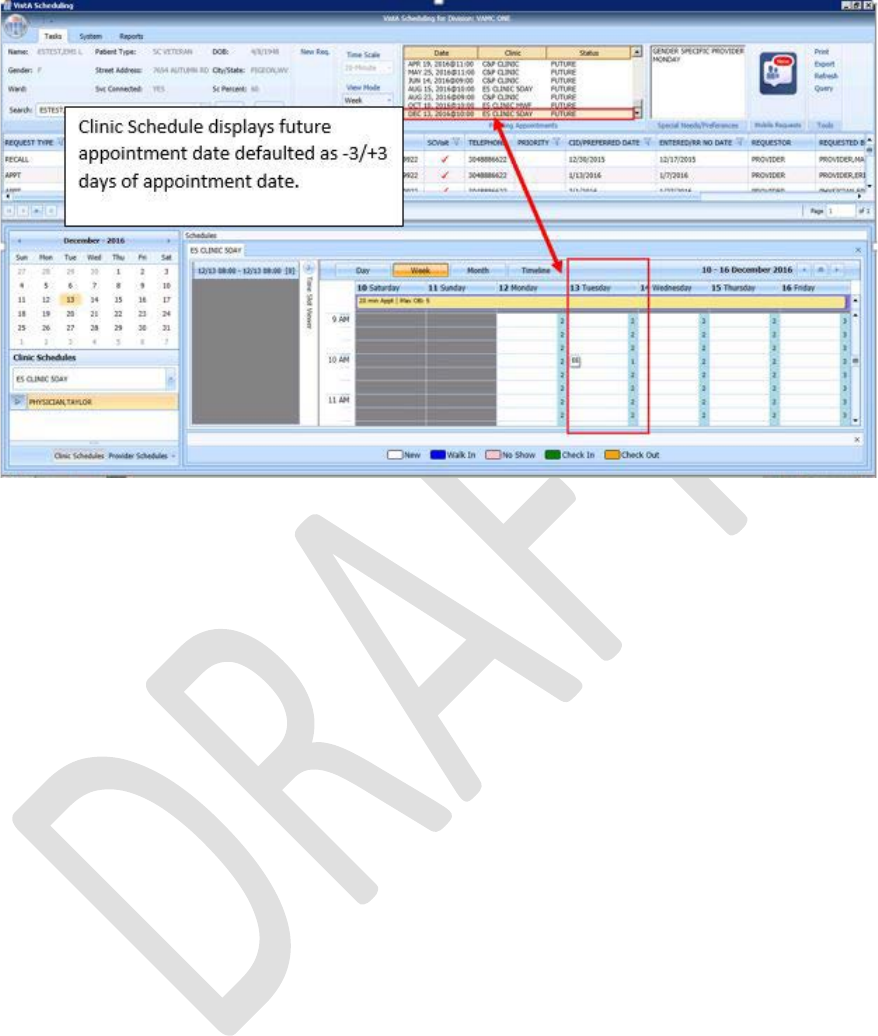
VistA Scheduling Enhancements 84 April 2018
VS GUI User Guide
Figure 112: Clinic Schedule Display – Future Date Appointment
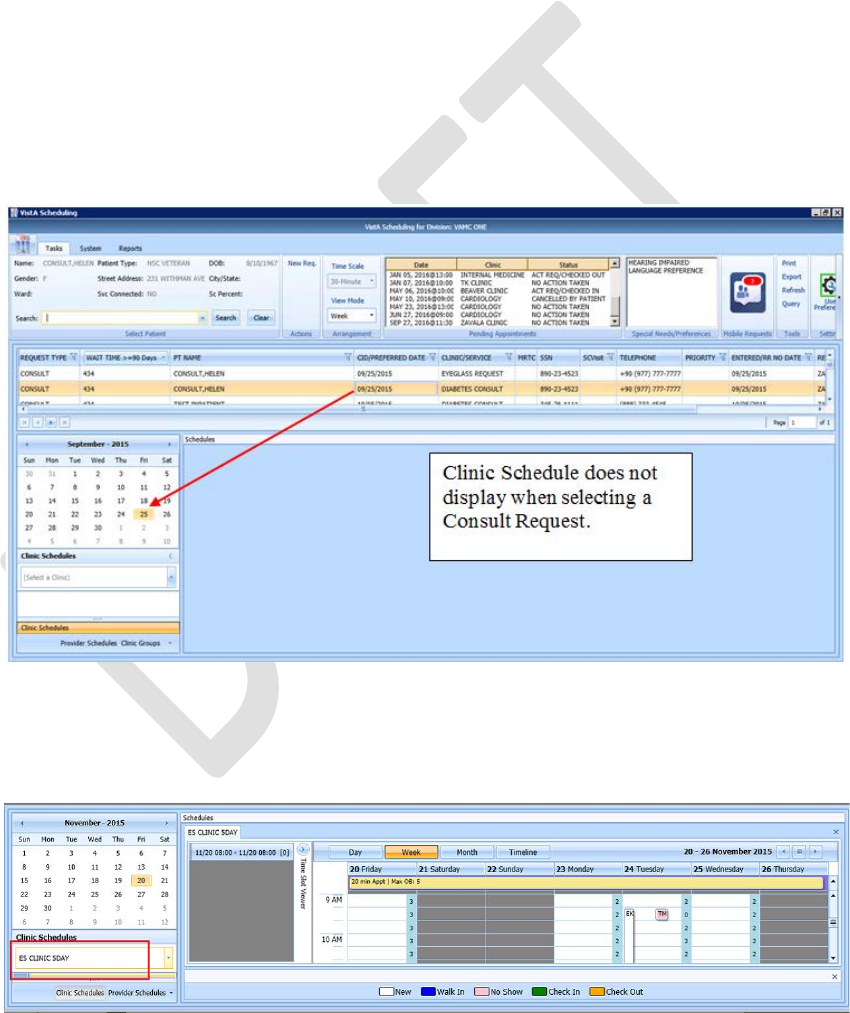
VistA Scheduling Enhancements 85 April 2018
VS GUI User Guide
6.1.4 Add Appointment for Consult Request
1. Log into VS GUI as a Scheduler.
2. From the Tasks tab, in the Search text box, type the patient’s last name or the
patient’s first initial of the last name and last four of the SSN (e.g. S1234).
Click Search, and then select the requested patient’s name.
Note: Consult requests are added from CPRS.
3. In the Request Management Grid select Consult Request.
Note: The Clinic Schedule does NOT display when selecting Consult request, as a
consult is directed to an entire service, not a specific clinic. The scheduler should read
the consult body in CPRS to determine which specific clinic or clinic group should be
used, and then search for that clinic or group in the clinic schedules search box.
Consult scheduling can benefit greatly from clinic groups when the specialty has more
than one consult clinic that can be grouped and viewed side by side.
Figure 113: Select Consult Request
From the Clinic Schedules, enter the clinic name (six-character minimum).
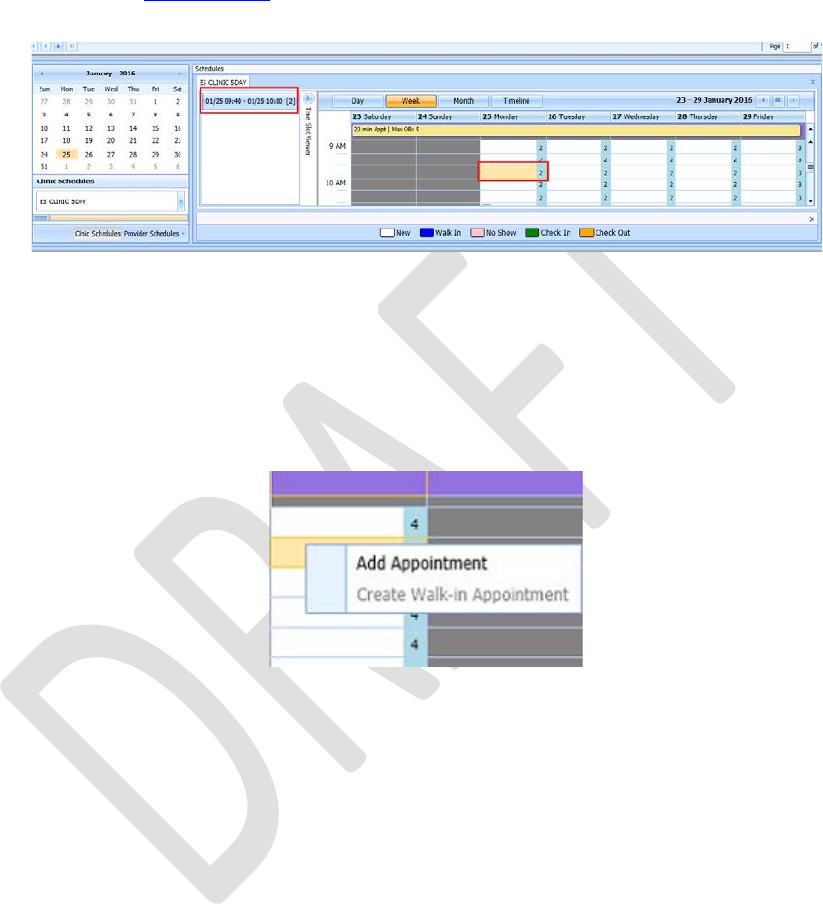
VistA Scheduling Enhancements 86 April 2018
VS GUI User Guide
Figure 114: Clinic Schedules
4. In Clinic Schedule, click the available time slot. Time Slot details display in
the Time Slot Viewer.
Note: See Section 7.1.7 for detailed information on Time Slot Viewer functionality.
Figure 115: Select Time Slot
5. Right-click in the time slot.
Add Appointment option displays.
Note: The Create Walk-In Appointment option is only available for selection on
current date. It is not available for past or future CID/Preferred dates.
Figure 116: Right-click Options – Add Appointment
6. Select Add Appointment.
The New Appointment dialog box displays as well as the Patient Eligibility dialog box.
• Appointments Tab:
o The Patient Information Section displays Name, DOB, SSN, SVC
Connected, SC Percent, GAF (read only), and Svc Related check box.
o The Appointment information section displays Start Time, Appt Type,
Duration, Clinic and Notes (Appointment Start Time; Duration on for
appointments to VL Clinics; and Notes are editable fields).
o The Appointment Conflicts section displays any appointments already
scheduled that conflict with appointment being added.
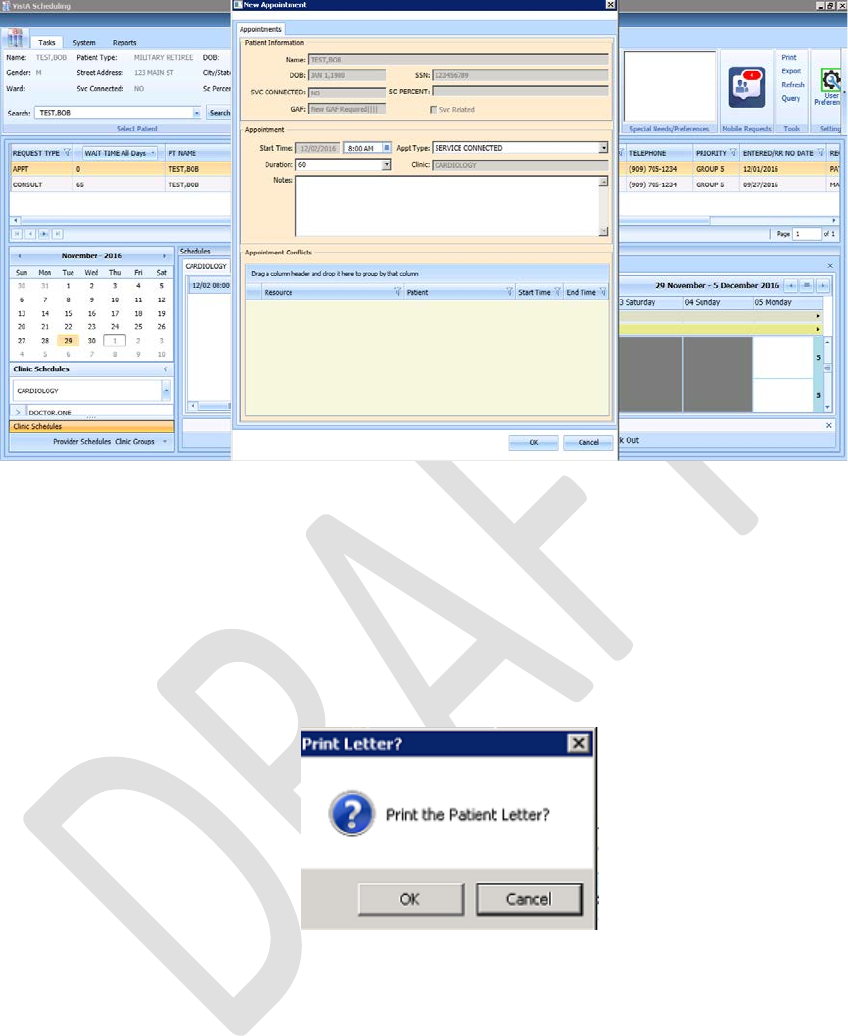
VistA Scheduling Enhancements 87 April 2018
VS GUI User Guide
Figure 117: New Appointment Dialog
7. Add any applicable Notes to the appointment. The comments from the original
request will populate the Notes field in the New Appointment dialog. Click
OK.
The Print Letter? dialog box displays.
8. Click OK to print the Letter to the patient.
Click Cancel if you do not want to print the letter.
Figure 118: Print Letter? Dialog
• The Consult Request is removed from the Patient Request Management Grid.
• The next request for the patient is moved up and highlighted.
• The Clinic Schedule closes and the clinic for the next request displays, if
applicable.
• The New appointment displays in the Pending Appointment Window on the
Ribbon Bar.
9. Select the appointment from the Pending Appointment window to view it in
the Clinic Schedule Grid.
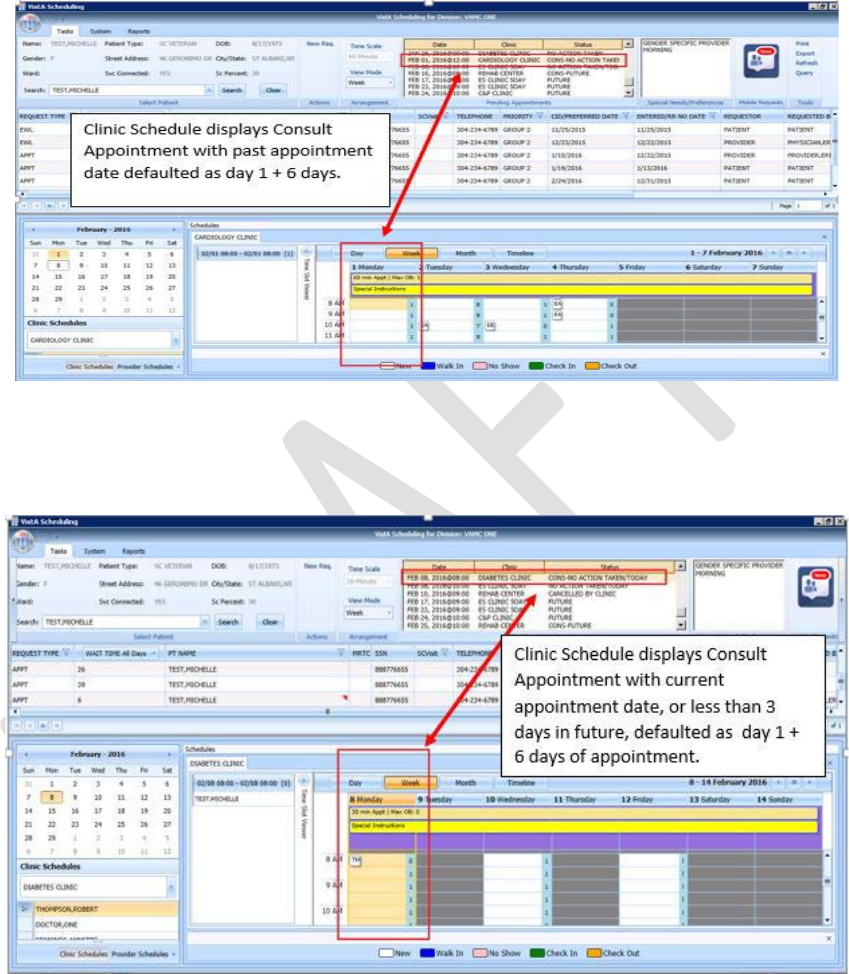
VistA Scheduling Enhancements 88 April 2018
VS GUI User Guide
The clinic schedule opens. For past dates, the clinic schedule opens to the default
appointment date.
Figure 119: Clinic Schedule Display – Consult Past Appointment Date
For the current date (or appointment date less than three days in future), the clinic
schedule displays the current date as the default. See below.
Figure 120: Clinic Schedule Display – Consult with Current Date
For future dates, the clinic schedule displays -/+ three days of the appointment date.
See below.
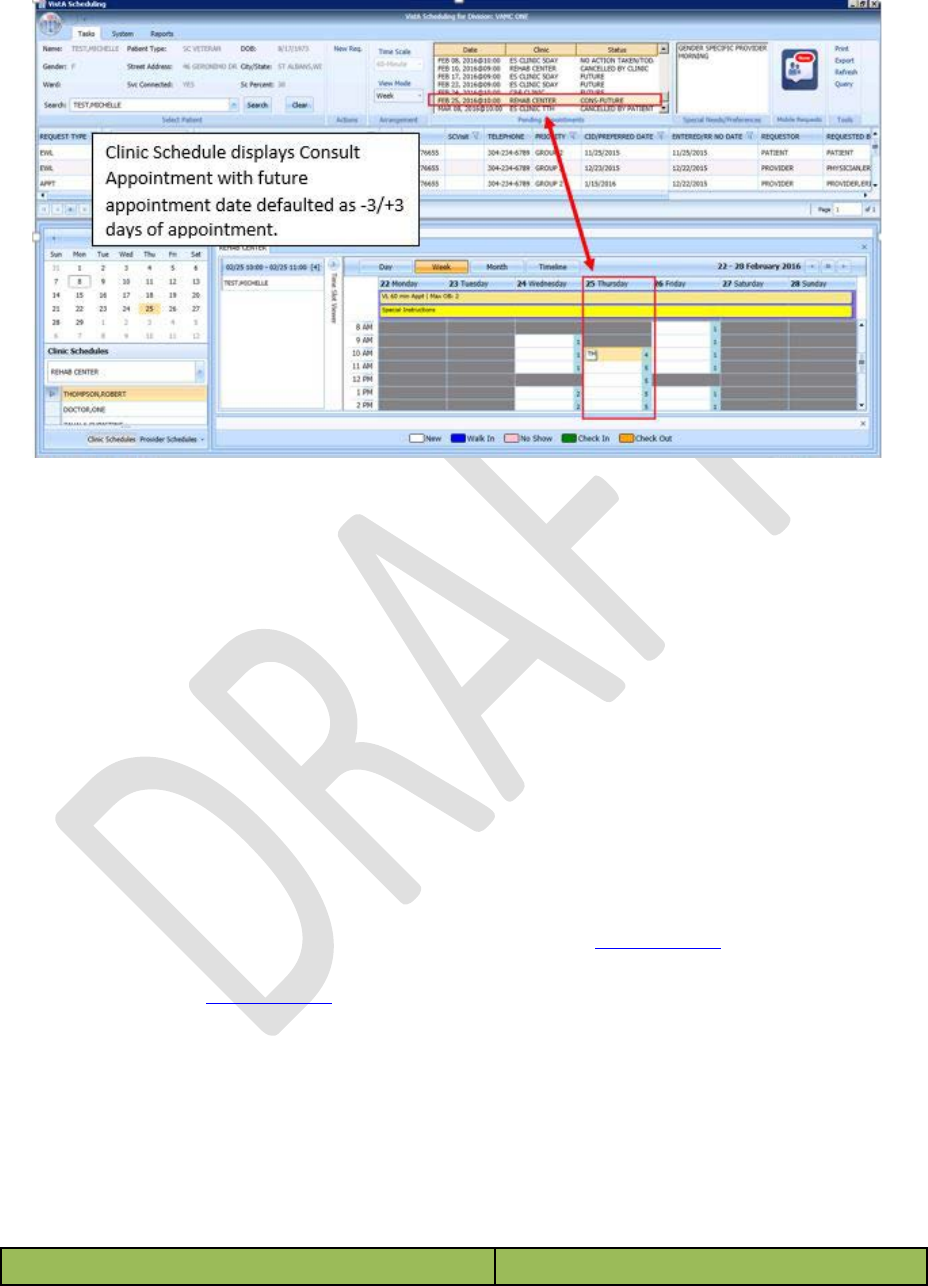
VistA Scheduling Enhancements 89 April 2018
VS GUI User Guide
Figure 121: Clinic Schedule Display – Consult Future Appointment Date
6.1.5 Add Appointment from Return to Clinic request (RTC)
1. Log into VS GUI as a Scheduler.
2. From the Tasks tab, in the Search text box, type the patient’s last name or the
patient’s first initial of the last name and last four of the SSN (e.g. S1234).
Click Search, and then select the requested patient’s name.
Note: RTC requests are added from CPRS when the clinical staff use the National
Return to Clinic Order and sign it.
3. In the Request Management Grid select the RTC Request and schedule the
appointment. Scheduling the appointment while the RTC request is selected
(orange) will automatically complete the corresponding order in CPRS.
Note: If the RTC is for a single follow up appointment, it will follow the same steps as
a Patient Centered Scheduling Request (PtCSch) in Section 6.1.3. If the RTC is for a
series of follow up appointments, it will follow the same steps as in the MRTC
requests in Section 6.3.1. Contact attempts can be added as appropriate.
4. If a RTC request has prerequisites from the RTC Order in CPRS, it will pop up
an extra box with that information. If the prerequisite pop up box is accidently
closed, it can be reopened, by clicking on the RTC order in the RM grid again.
5. If a RTC request must be dispositioned without making an appointment, right
click on the RTC and select from the disposition drop down. The
corresponding National Return to Clinic Order will respond accordingly.
APPT Request Dispositions RTC Order Disposition

VistA Scheduling Enhancements 90 April 2018
VS GUI User Guide
'D' FOR DEATH Discontinued – alert to Provider
'NC' FOR REMOVED/NON-VA CARE Discontinued – alert to Provider
'SA' FOR REMOVED/SCHEDULED-ASSIGNED Completed
'CC' FOR REMOVED/VA CONTRACT CARE Discontinued – alert to Provider
'NN' FOR REMOVED/NO LONGER NECESSARY Discontinued – alert to Provider
'ER' FOR ENTERED IN ERROR Discontinued – alert to Provider
6.2 Disposition Appointments
6.2.1 Edit Appointment Information
Editing appointment information can be done within the VS GUI.
To edit appointment information:
1. Log on to VS GUI as a Scheduler.
2. From the Tasks tab, type the patient’s last name and first name in the Search
text box. Click Search, and then select the requested patient’s name from the
list.
3. Point to the appointment to be edited in the Pending Appointments Window on
the Ribbon Bar.
The clinic schedule displays. For past appointment dates, the clinic schedule opens the
default appointment date. For the current date (or appointment date less than three
days in future), the clinic schedule displays the current date as the default. For future
dates, the clinic schedule displays -/+ three days of the appointment date.
4. In the Clinic Schedule Grid, point to the appointment, right-click on the
appointment, and then select Edit Appointment.
The Edit Appointment dialog box displays.
Note: See Section 7.1.7 for detailed information on Time Slot Viewer functionality.
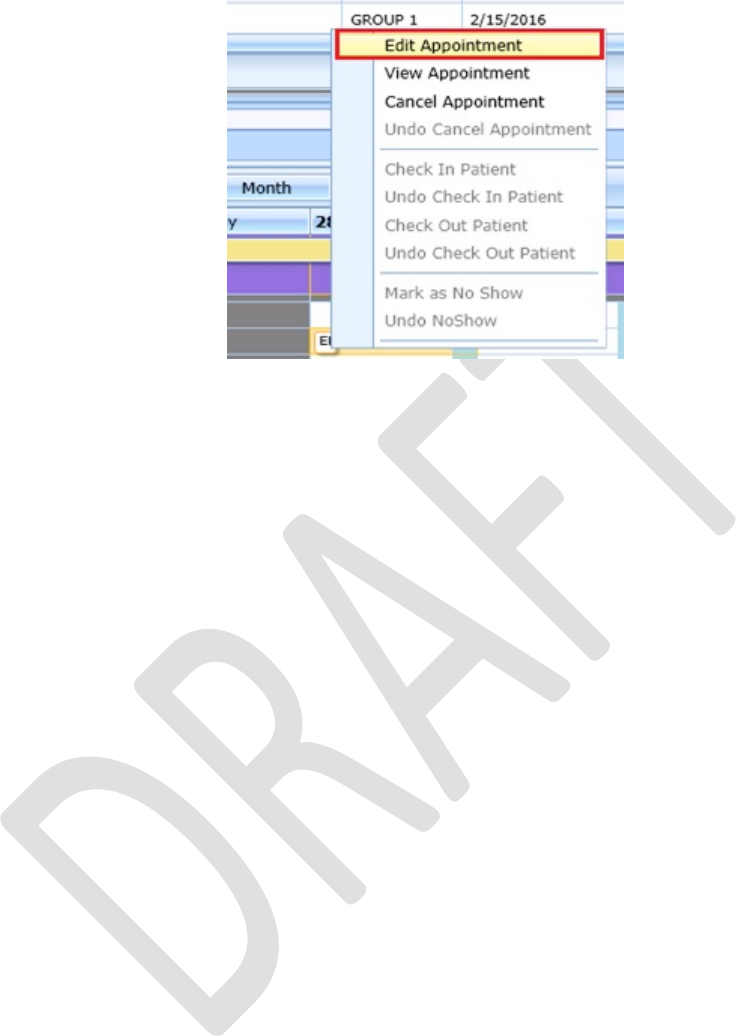
VistA Scheduling Enhancements 91 April 2018
VS GUI User Guide
Figure 122: Appointment Right-click Options – Edit Appointment
The only field that is editable is Notes.
5. Make any necessary edits to the appointment information, and then click OK.

VistA Scheduling Enhancements 92 April 2018
VS GUI User Guide
Figure 123: Edit Appointment Dialog
6.2.2 View Appointment Information
Viewing appointment information can be done in the Clinic Schedule Grid in the VS GUI.
To view appointment information:
1. Log on to VS GUI.
2. From the Tasks tab, in the Search text box, type the patient’s last name or the
patient’s first initial of the last name and last four of the SSN (e.g. S1234).
Click Search, and then select the requested patient’s name.
3. Point to the appointment to be viewed in the Pending Appointments Window
on the Ribbon Bar.
The clinic schedule displays. For past appointment dates, the clinic schedule defaults
to the appointment date as Day 1 + six days. For the current date (or appointment date
less than three days in future), the clinic schedule displays the default, the current date
The linked image cannot be displayed. The file may have been moved, renamed, or deleted. Verify that the link points to the correct file and location.
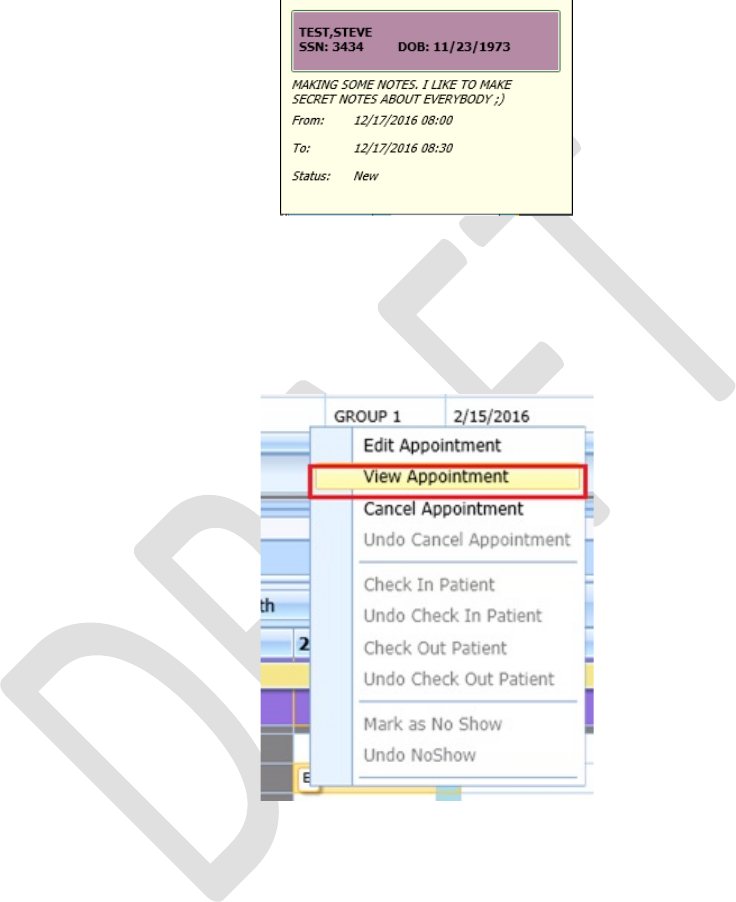
VistA Scheduling Enhancements 93 April 2018
VS GUI User Guide
as Day 1 + six days. For future dates, the clinic schedule displays -/+ three days of the
appointment date.
4. In the Clinic Schedule Grid, point to the appointment, move the pointer over
the appointment, and the appointment details display.
Figure 124: Hover Box Displaying Appointment Details
5. Right-click the appointment.
6. Select View Appointment.
Figure 125: Appointment Right-click Options – View Appointment
The View Appointment dialog box displays. It is in read-only mode. No fields are
editable.
7. Click OK to close the View Appointment dialog box.
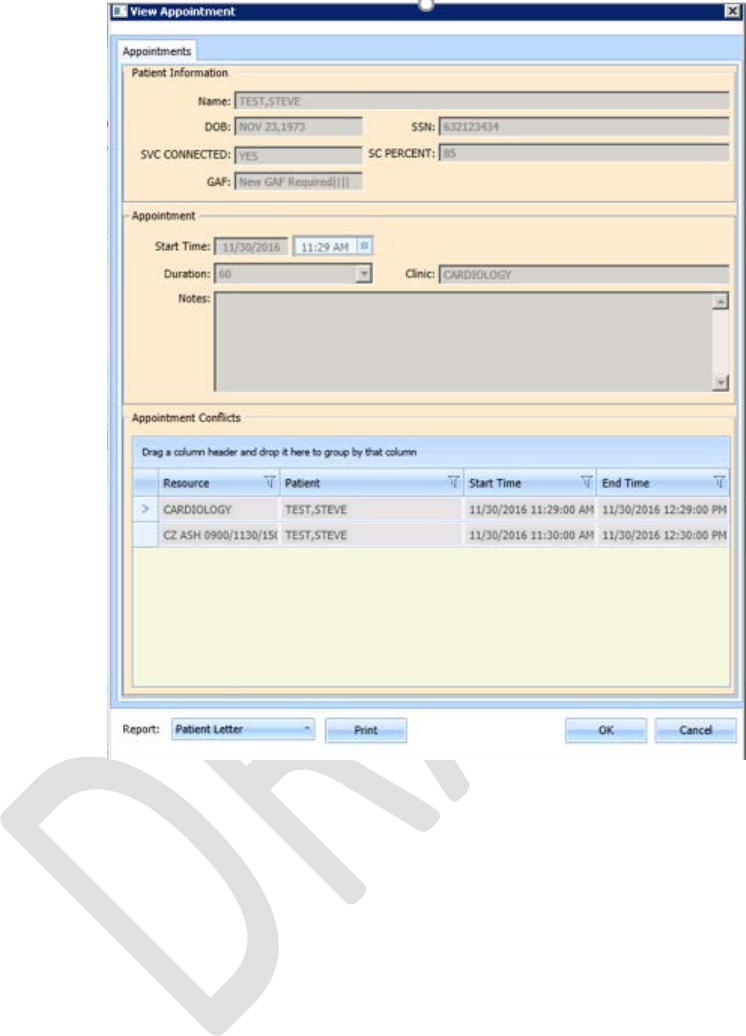
VistA Scheduling Enhancements 94 April 2018
VS GUI User Guide
Figure 126: View Appointment Dialog
6.2.3 Cancelling an Appointment
You can cancel an appointment without rebooking it.
1. Log on to VS GUI as a Scheduler.
2. From the Tasks tab, in the Search text box, type the patient’s last name or the
patient’s first initial of the last name and last four of the SSN (e.g. S1234).
Click Search, and then select the requested patient’s name.
3. Select a scheduled appointment from the Pending Appointment Window on the
Ribbon Bar.
The clinic schedule displays. For past appointment dates, the clinic schedule opens the
default, the appointment date. For the current date (or appointment date less than three
days in future), the clinic schedule displays the default, the current date. For future
dates, the clinic schedule displays -/+ three days of the appointment date.
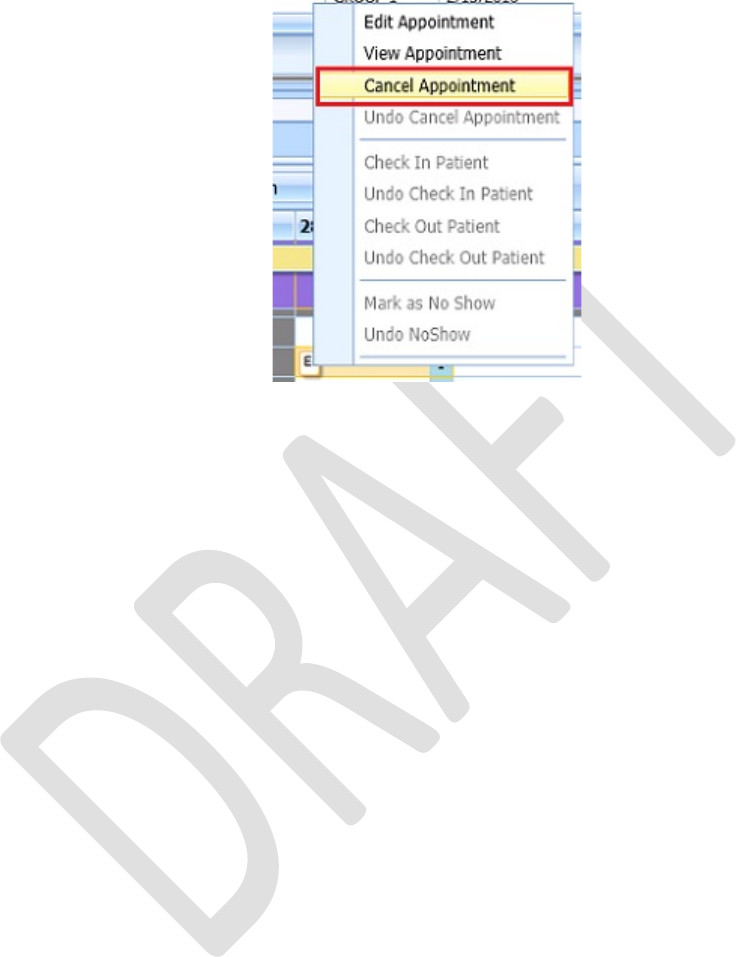
VistA Scheduling Enhancements 95 April 2018
VS GUI User Guide
4. Select an appointment from the Clinic Schedule Grid.
5. Right-click and select Cancel.
Figure 127: Appointment Right-click Options – Cancel Appointment
6. In the Cancel Appointment dialog box, select a cancellation option:
• Cancelled by Clinic: The original CID/Preferred appointment date defaults to
the patient desired date. The date cannot be edited.
• Cancelled by Patient: The patient CID/Preferred date is available and defaults to
original CID/Preferred date request. You can edit the date to change it.
7. Select the Reason for Cancellation from the list.
Edit the CID/Preferred dates if applicable.
Add Remarks as needed.
8. Click OK.
The appointment is canceled and not rebooked. If the appointment is linked to a
consult, the consult status changes to Active.
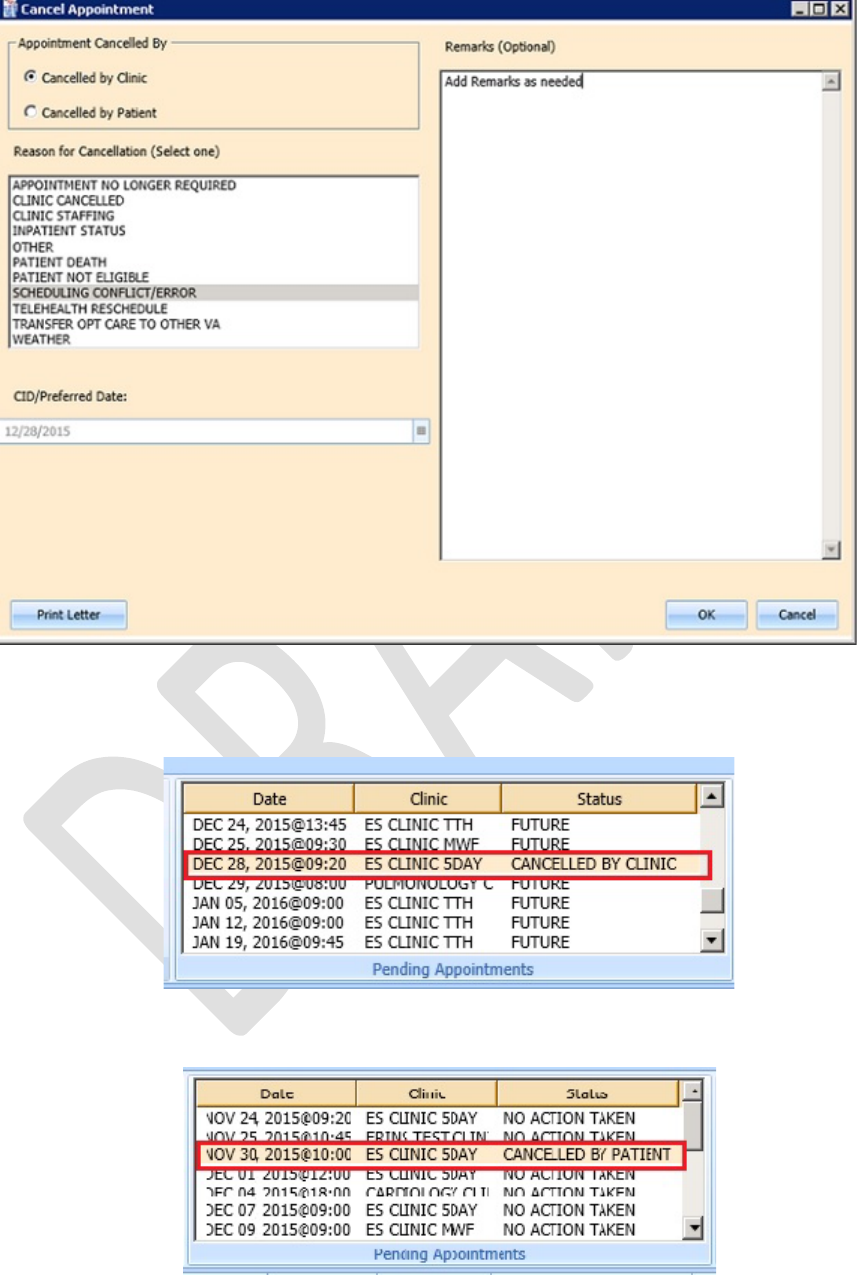
VistA Scheduling Enhancements 96 April 2018
VS GUI User Guide
Figure 128: Cancel Appointment Dialog
The Appointment displays in Pending Appointments with a status of Cancelled by
Clinic or Cancelled by Patient (whichever is applicable).
Figure 129: Pending Appointment Window – Appointment Status Cancelled by
Clinic
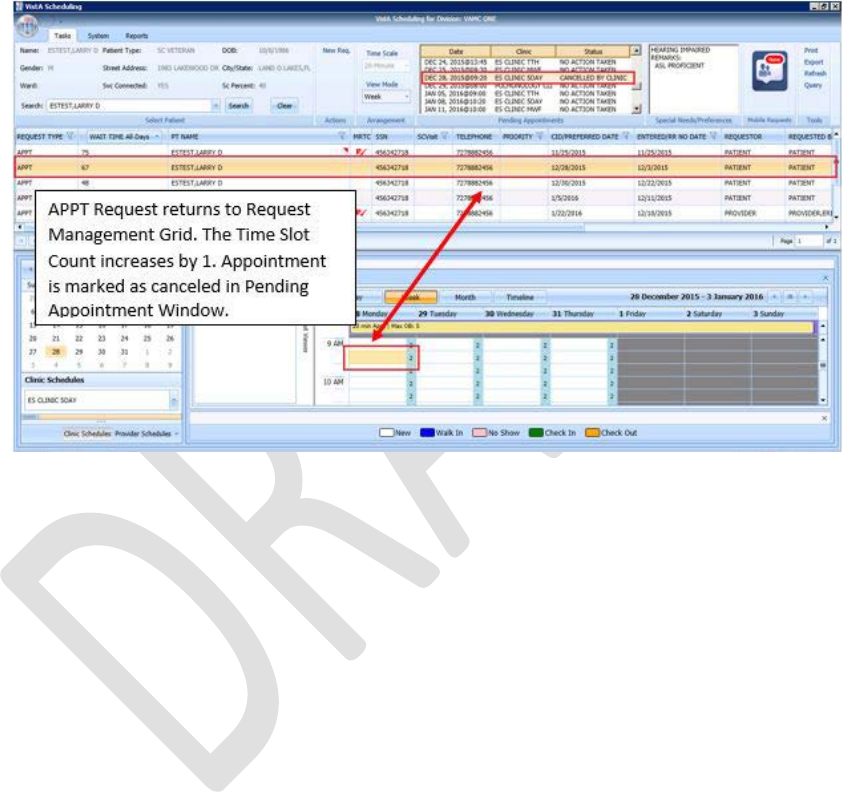
VistA Scheduling Enhancements 97 April 2018
VS GUI User Guide
Figure 130: Pending Appointment Window – Appointment Status Cancelled by
Patient
• The Clinic Schedule closes.
• The patient’s appointment request reappears on the APPT Request grid for
future rescheduling.
9. Select the APPT Request and the Clinic Schedule displays again.
Note: The Time Slot count increases when an appointment is canceled.
Figure 131: APPT Request – Time Slot Count Increase
6.2.3.1 Cancel directly from pending appointment box
1. Log on to VS GUI as a Scheduler.
2. From the Tasks tab, in the Search text box, type the patient’s last name or the
patient’s first initial of the last name and last four of the SSN. Click Search, and
then select the requested patient’s name. Right click on a scheduled appointment
from the Pending Appointment window in Ribbon bar.
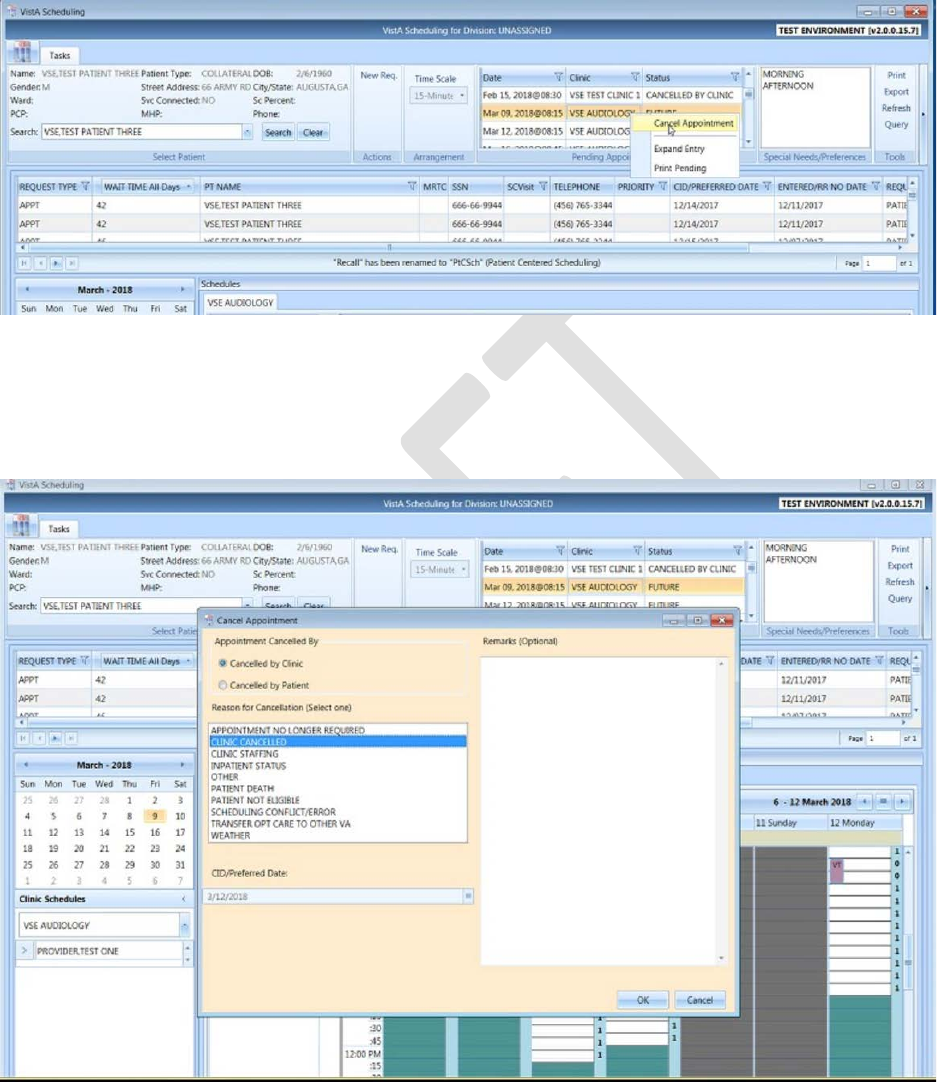
VistA Scheduling Enhancements 98 April 2018
VS GUI User Guide
Figure 132: Select Cancel Appointment
3. In the Cancel Appointment dialog box, select cancellation the appropriate
cancellation option Cancelled by Clinic or Cancelled by Patient. Select a
Reason for cancellation from the list. Click OK.
Figure 133: Cancelled by Clinic
4.
6.2.4 Mark as No Show Appointment
To record a no show appointment.
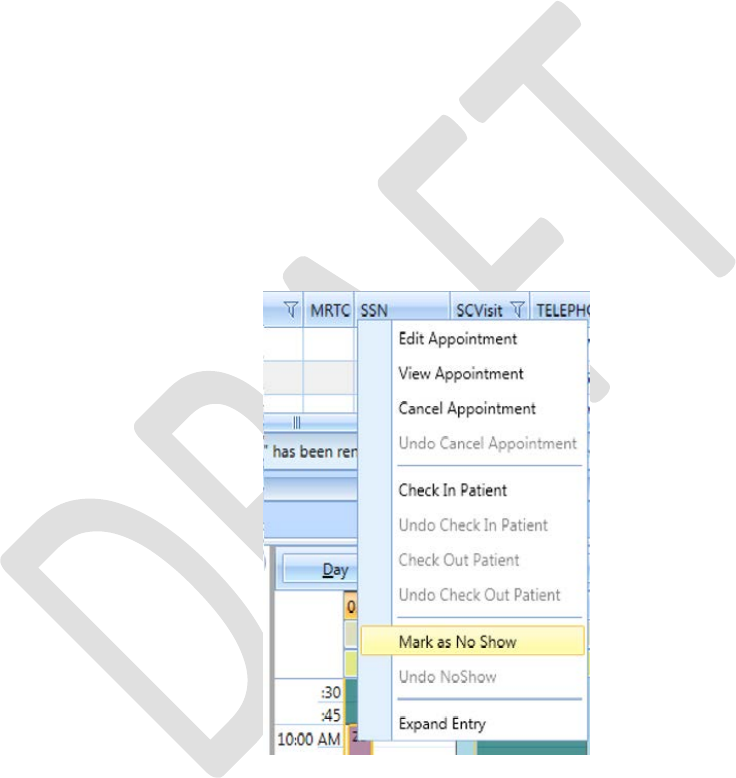
VistA Scheduling Enhancements 99 April 2018
VS GUI User Guide
1. Log on to VS GUI as a Scheduler.
2. From the Tasks tab, type the patient’s last name and first name in the Search
text box. Click Search, and then select the requested patient’s name from the
list.
3. From the Pending Appointment Window select appointment to mark as no
show.
The clinic schedule displays.
For past appointment dates, the Clinic Schedule displays the default, the appointment
date. For the current date (or appointment date less than 3 days in future), the clinic
schedule displays the current default date.
4. Select the appointment from the Clinic Schedule Grid.
5. Right-click the Appointment.
6. Select Mark as No Show. The appointment MUST be a past date/time from
the current date/time.
Note: “Mark as No Show” is not available for future appointments.
Figure 134: Appointment Right-click Options – Mark as No Show
The Mark as No Show dialog box displays.
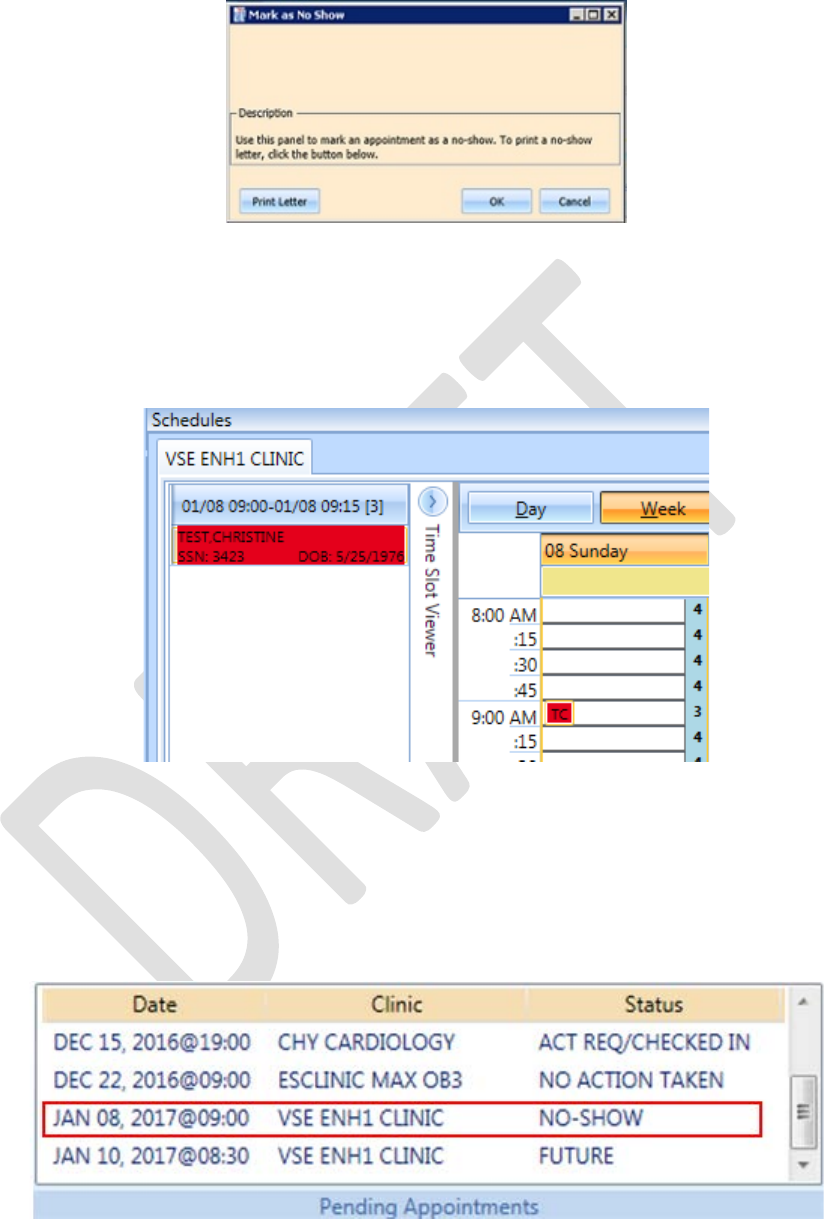
VistA Scheduling Enhancements 100 April 2018
VS GUI User Guide
Figure 135: Mark as No Show Dialog
7. Click OK.
The Appointment displays in red in the Clinic Schedule Grid and the Time Slot
Viewer.
Figure 136: Clinic Schedule Display – No-Show Red
The Status in the Pending Appointment Window on the Ribbon Bar changes to No-
Show.
The Request returns to the Request Management Grid for the patient.
Figure 137: Pending Appointment Window – Appointment Status No-Show
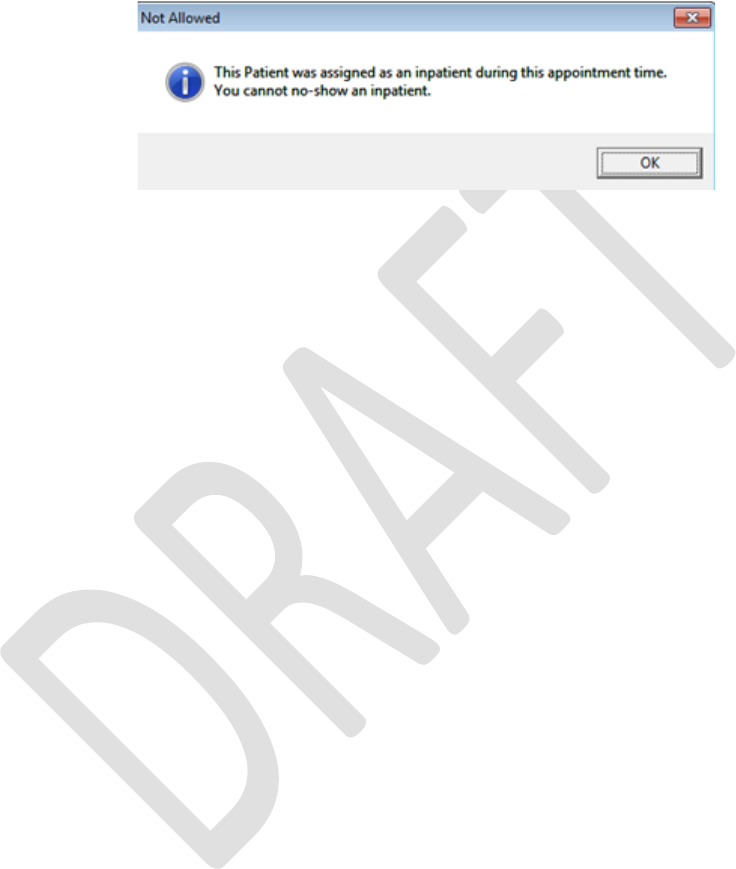
VistA Scheduling Enhancements 101 April 2018
VS GUI User Guide
Inpatient appointments CANNOT be dispositioned as a No-Show.
A Not Allowed warning message will display if the user attempts to flag an Inpatient
as a No Show.
8. Click OK to close the message and the appointment should not show as a No-
Show.
Figure 138: No-Show Warning Message
6.2.5 Undo No-Show Appointment
If a patient was previously recorded as a no-show but arrives in time for the current
appointment, the previously recorded no show can be undone.
To undo a no-show appointment:
1. Log on to VS GUI as a Scheduler.
2. From the Tasks tab, in the Search text box, type the patient’s last name or the
patient’s first initial of the last name and last four of the SSN (e.g. S1234).
Click Search, and then select the requested patient’s name. Click Search.
3. In the Pending Appointments Window on the Ribbon Bar, point to the No
Show appointment to be undone.
The clinic schedule displays.
For past appointment dates, the clinic schedule displays the default appointment
date.
For the current date (or appointment date less than 3 days in future), the clinic
schedule displays the current default date.
4. Right-click Appointment.
5. Select Undo No-show.
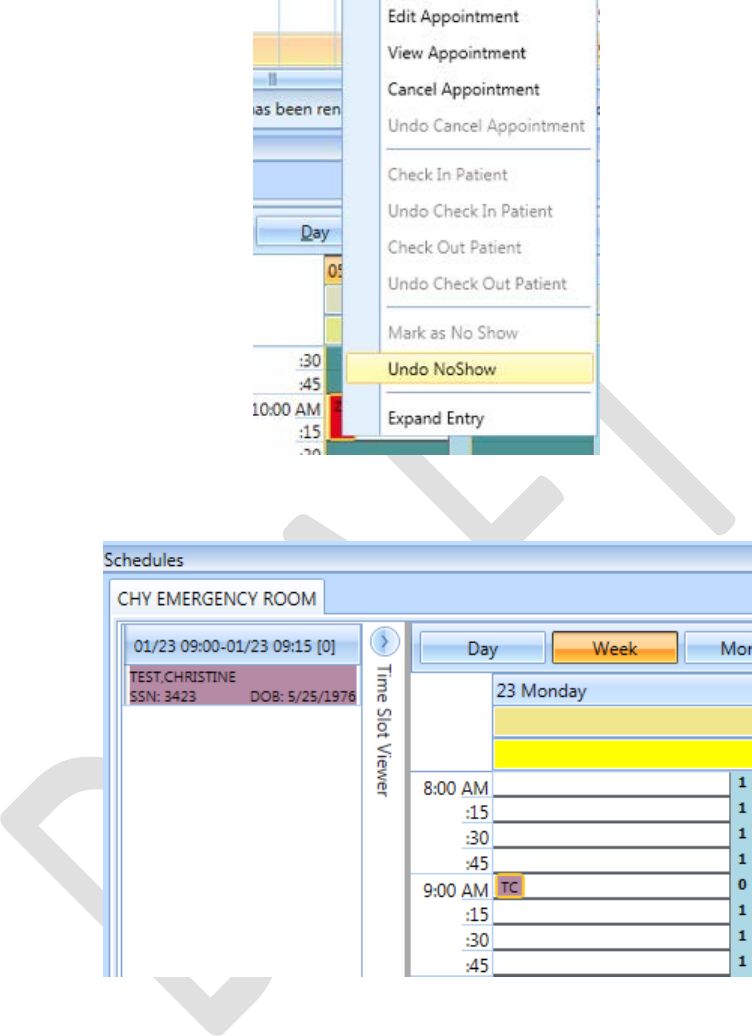
VistA Scheduling Enhancements 102 April 2018
VS GUI User Guide
Figure 139: Appointment Right-click Options – Undo No-show
In the Clinic Schedule Grid, the appointment changes from red to purple.
Figure 140: Appointment Clinic Schedule Display – Undo No-show as Purple
The appointment status in the Pending Appointments Window changes to No Action
Taken.

VistA Scheduling Enhancements 103 April 2018
VS GUI User Guide
Figure 141: Undo No-show – Appointment Status No Action Taken
The Request closes and is relinked to the appointment.
6.2.6 Checking In a Patient
If a clinic location uses VPS Vetlink and/or patient kiosks to check in patients, continue to
use VPS Vetlink and kiosks to check in patients. VS GUI is an overlay to VistA, and like a
VistA check in, a check in VS GUI will not reflect in Vetlink for patient tracking.
To check in a patient for an appointment:
1. Log on to VS GUI as a Scheduler.
2. From the Tasks tab, in the Search text box, type the patient’s last name or the
patient’s first initial of the last name and last four of the SSN (e.g. S1234).
Click Search, and then select the requested patient’s name.
3. In the Pending Appointments Window on the Ribbon Bar, point to the
appointment to be checked in.
The clinic schedule displays. For past appointment dates, the clinic schedule Clinic
Schedule opens defaulted to appointment date. For the current date (or appointment
date less than three days in future), the clinic schedule displays the current default
date.
4. Right-click Appointment.
5. Select Check In Patient.
Note: Check In is not available for appointments with future dates.
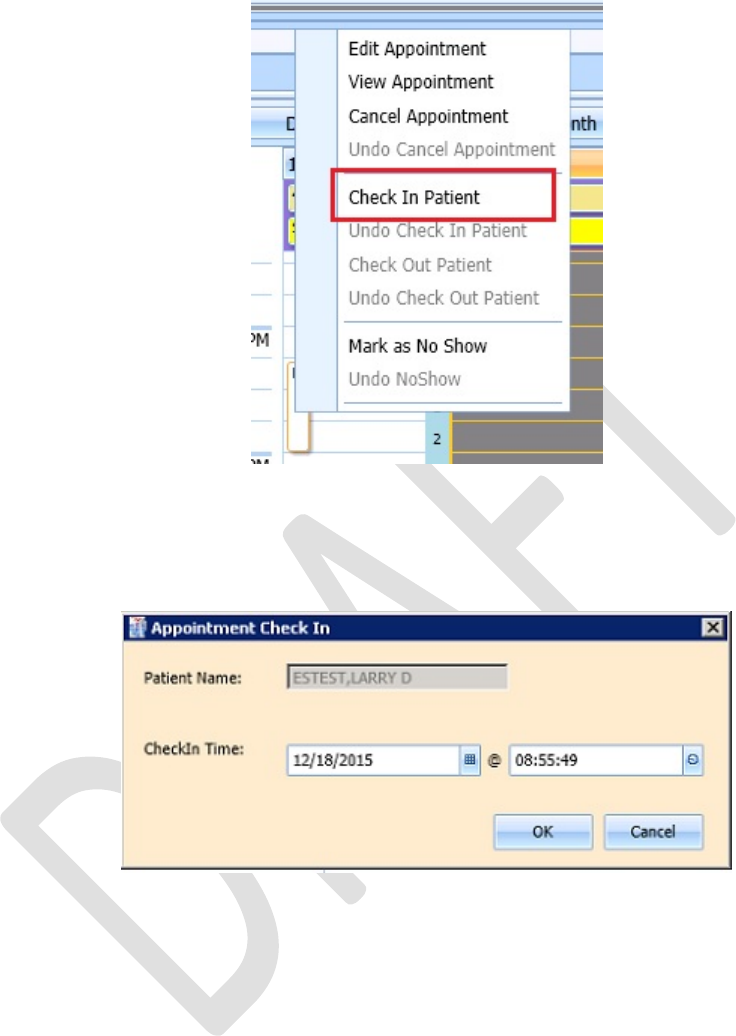
VistA Scheduling Enhancements 104 April 2018
VS GUI User Guide
Figure 142: Appointment Right-click Options – Check In Patient
The Appointment Check In dialog box opens. You can change the check in date and
time as needed.
Figure 143: Appointment Check In Dialog
6. Click OK.
The appointment color changes to yellow, which indicates the patient has checked in
for the appointment.
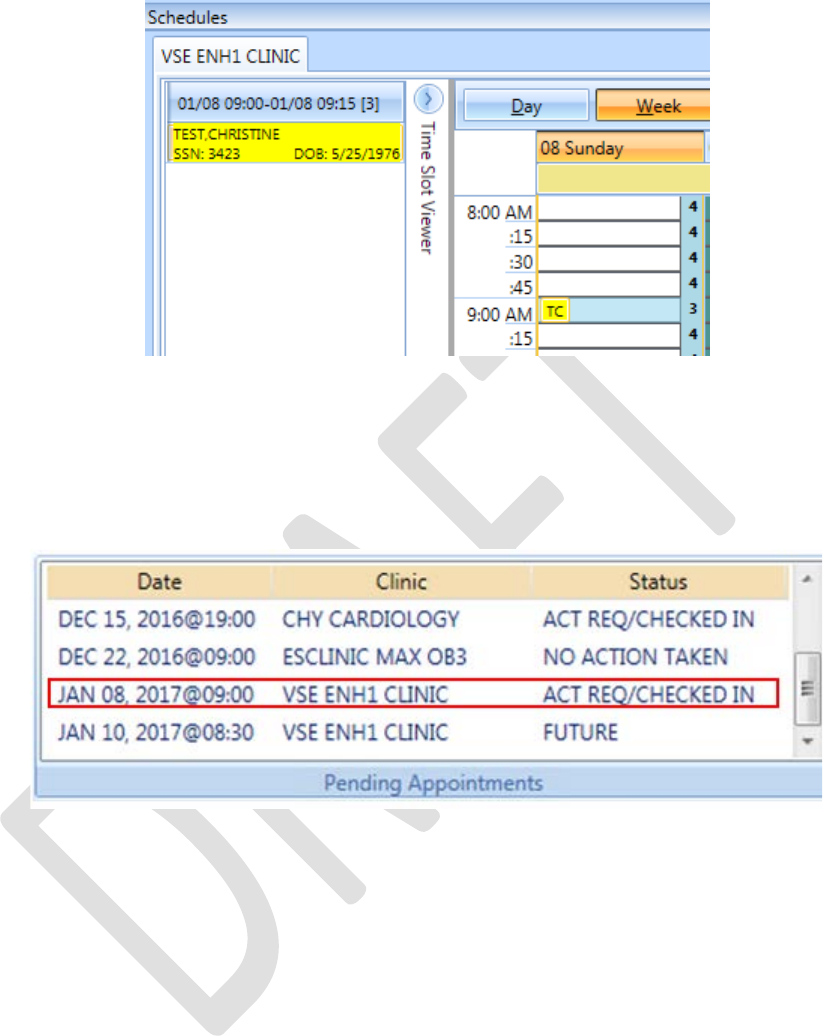
VistA Scheduling Enhancements 105 April 2018
VS GUI User Guide
Figure 144: Clinic Schedule Display – Check In Yellow
In the Pending Appointment Window on the Ribbon Bar, the appointment status
changes to ACT REQ/CHECKED IN.
Figure 145: Pending Appointment Window – Status ACT REQ/CHECKED IN
6.2.7 Undo a Patient Check In
If a patient is checked in by mistake, the check in can be undone.
To undo a patient check in:
1. Log on to VS GUI as a Scheduler.
2. On the Clinic Schedule Grid, select the patient check in that needs to be
undone.
3. Right-click and then select Undo Check In Patient.
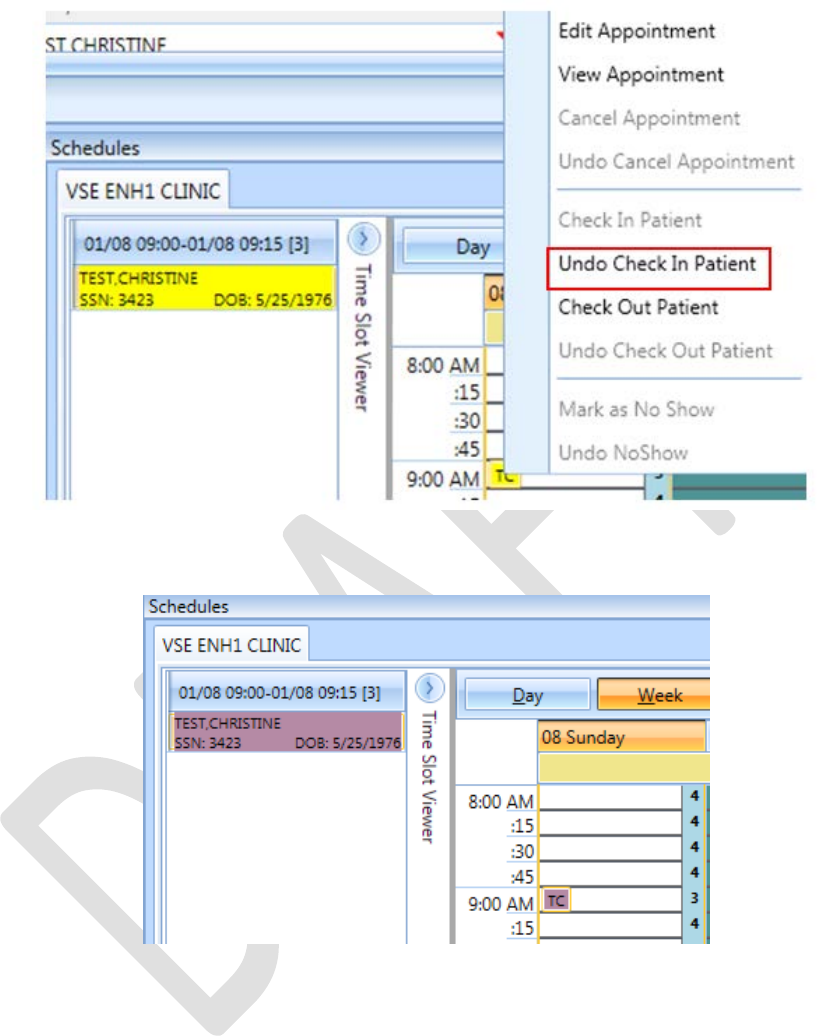
VistA Scheduling Enhancements 106 April 2018
VS GUI User Guide
Figure 146: Appointment Right-click Options – Undo Check In Patient
The Appointment changes color from yellow to purple.
Figure 147: Clinic Schedule Display – Undo Check In Patient Purple
On the Pending Appointment Window, appointment status changes to No Action
Taken.
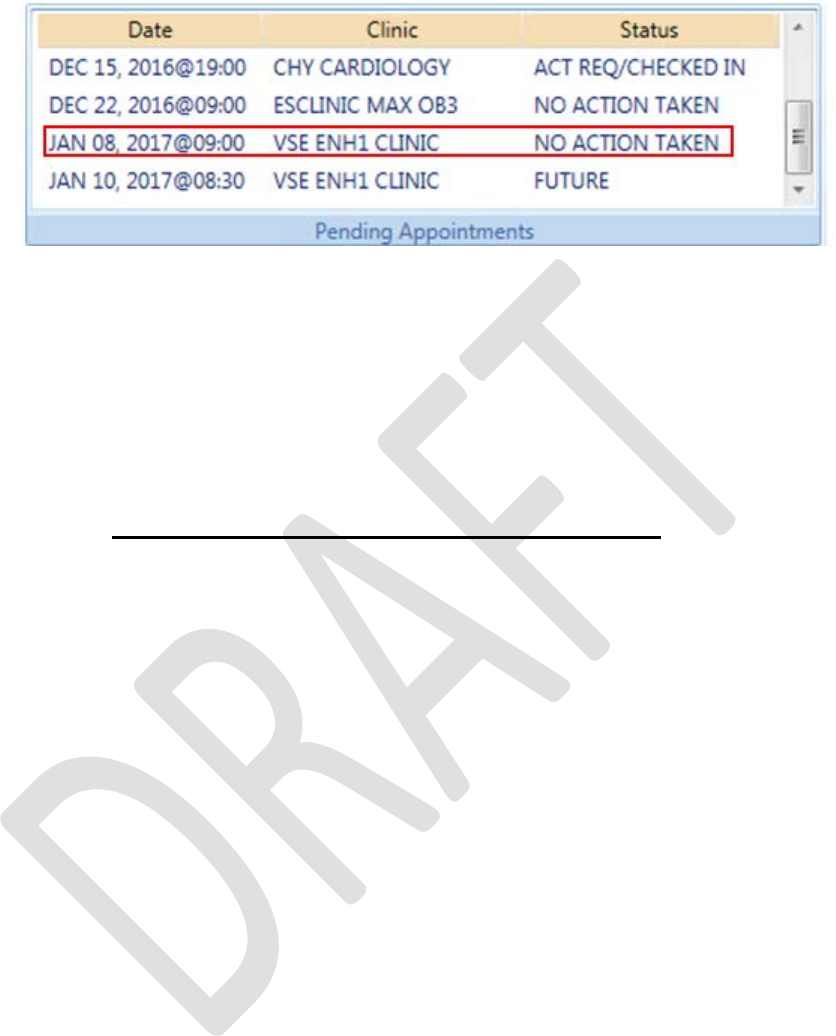
VistA Scheduling Enhancements 107 April 2018
VS GUI User Guide
Figure 148: Pending Appointment Window – Appointment Status No Action
Taken
6.2.8 Check Out a Patient
To check out a patient:
1. Requires the SD SUPERVISOR key in VistA. Please note: The check out
follow-up function is now working in version 2.0.0.14, but is still tied to the
encounter. Until we can make the VS GUI’s Check Out purely administrative,
we highly discourage the use of Check Out in VS GUI.
2. Log on to VS GUI as a Scheduler.
3. From the Tasks tab, in the Search text box, type the patient’s last name or the
patient’s first initial of the last name and last four of the SSN (e.g. S1234).
Click Search, and then select the requested patient’s name.
4. In the Pending Appointments Window on the Ribbon Bar, point to the
appointment to be checked out.
The Clinic Schedule displays.
• For a past appointment date, the Clinic Schedule opens on the default
appointment date.
• For the current date (or appointment date less than three days in future),
the schedule displays the current default date.
• For future dates, the schedule displays -/+ three days of the appointment
date.
5. Right-click and select Check Out Patient.
Note: Check Out is not available to select if Check In has not been performed.
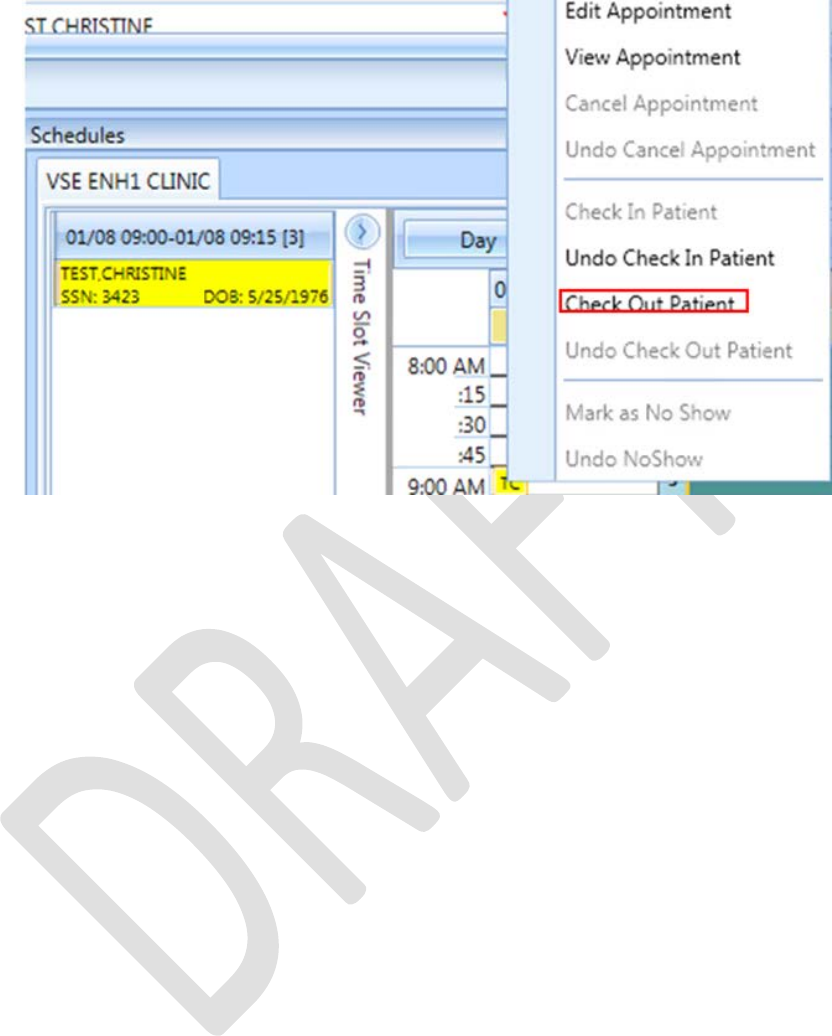
VistA Scheduling Enhancements 108 April 2018
VS GUI User Guide
Figure 149: Appointment Right-click Option – Check Out Patient
6. Update the Appointment Check Out dialog box.
7. Confirm the date and time. Edit as needed.
Note: Check Out must be at least one minute after Check In.
8. Click OK.
The appointment status is changed to ACT REQ/Checked Out in the Pending
Appointment Window and the color changes to orange in Clinic Schedule.
Note: When the Scheduler clicks OK, if Follow-up Needed was checked, then the
new APPT Request dialog box opens. This APPT Request dialog box needs to
be completed before Patient Check Out is complete.
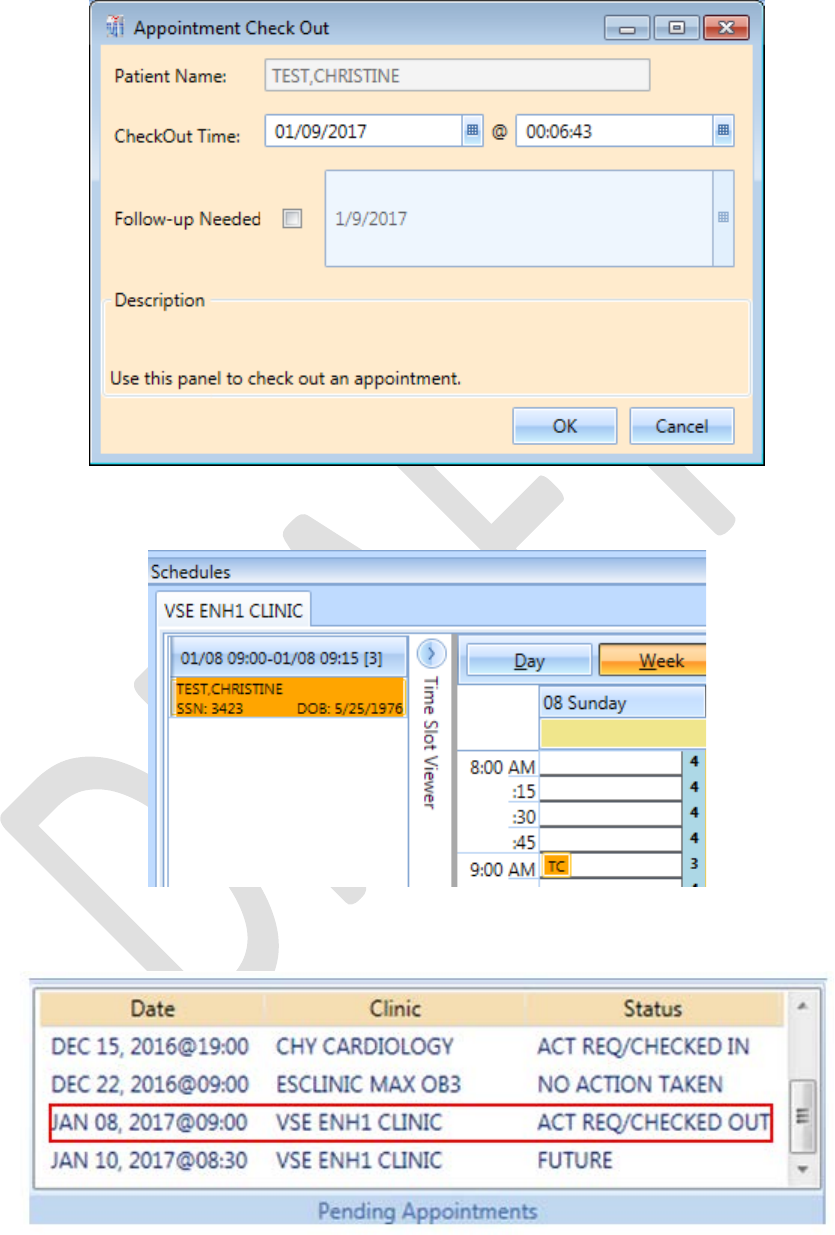
VistA Scheduling Enhancements 109 April 2018
VS GUI User Guide
Figure 150: Appointment Check Out Dialog
Figure 151: Clinic Schedule Display – Check Out Patient Orange
Figure 152: Pending Appointment Window – Status ACT REQ/CHECKED OUT
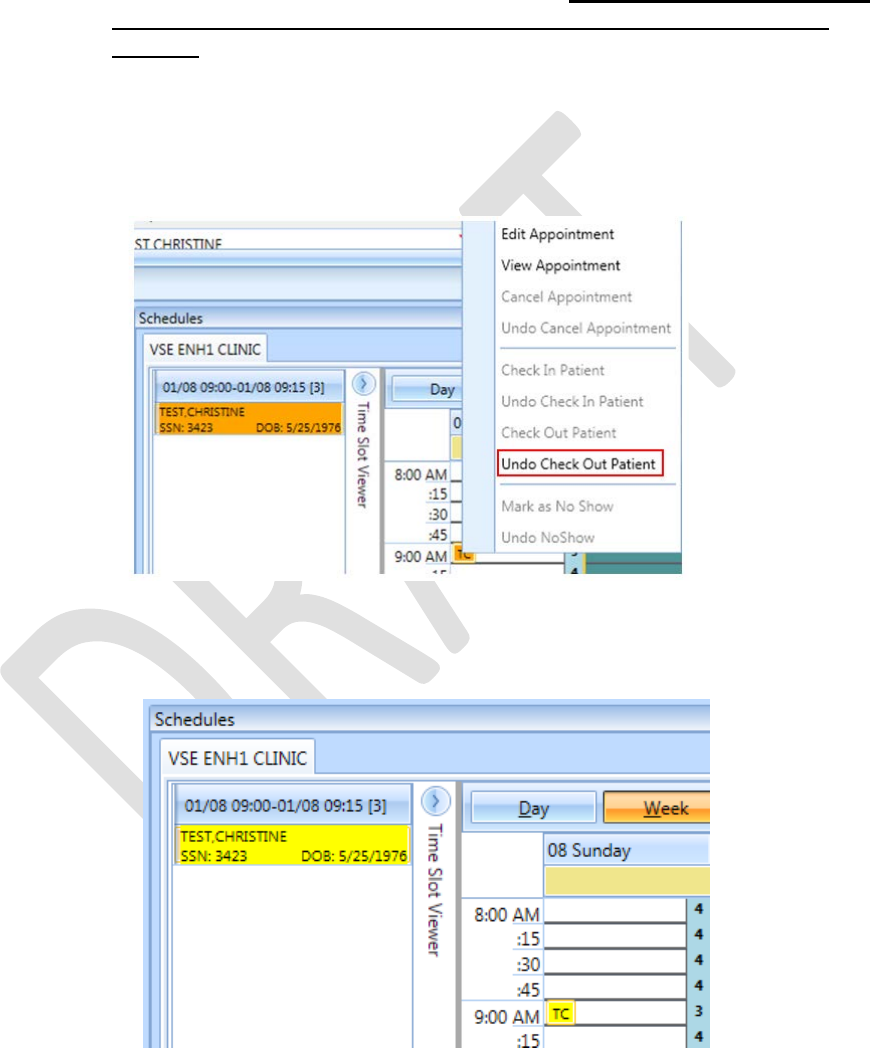
VistA Scheduling Enhancements 110 April 2018
VS GUI User Guide
6.2.9 Undo a Patient Check Out
If a patient is checked out by mistake, the checkout can be undone.
To check out a patient:
1. Requires the SD SUPERVISOR key in VistA. Please note: The Undo Check
Out function is not working as designed and should not be used in this
version. It will remove any encounter information associated with this visit.
2. Log on to VS GUI as a Scheduler.
3. On the Clinic Schedule Grid, select the patient check in that needs to be
undone.
4. Right-click and select Undo Check Out Patient.
Figure 153: Appointment Right-click Options – Undo Check Out Patient
The Appointment changes color from orange to yellow.
Figure 154: Clinic Schedule Display – Undo Check Out Patient Yellow
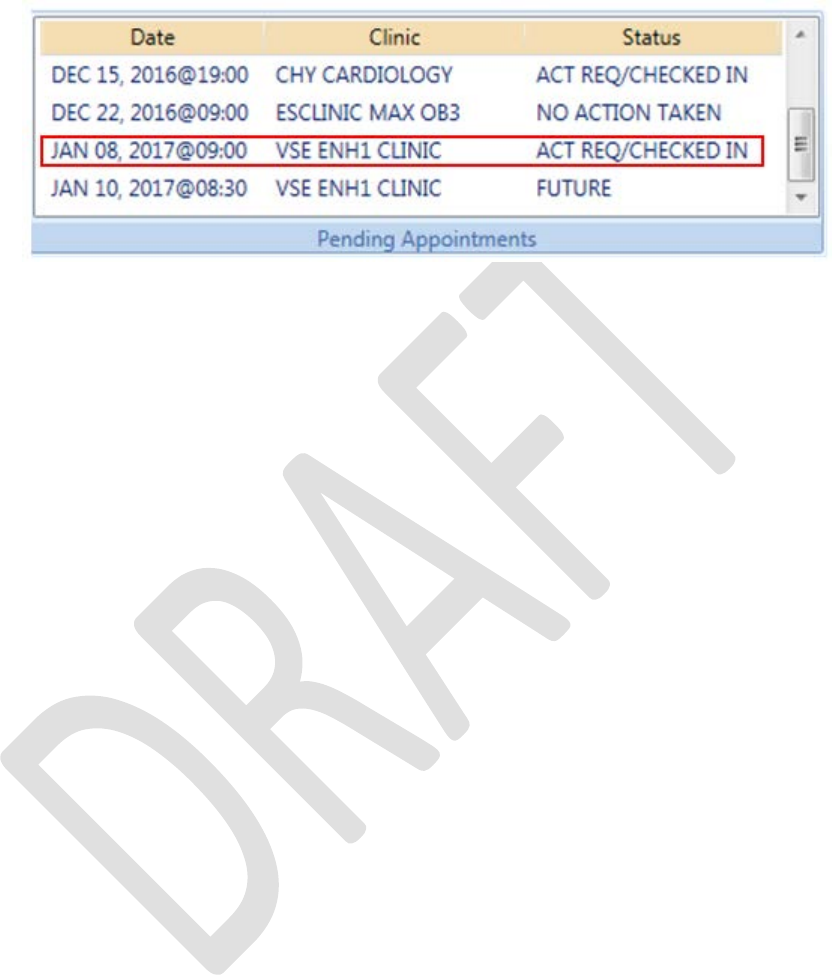
VistA Scheduling Enhancements 111 April 2018
VS GUI User Guide
From the Pending Appointment Window, the appointment status changes to ACT
REQ/CHECKED IN.
Figure 155: Pending Appointment Window – Status ACT REQ/CHECKED IN
Note: Undoing the checkout will also delete all the unnecessary information that has
been entered up to this point.
6.2.10 Rescheduling an Appointment
You can cancel an appointment and reschedule it for another time.
1. Log on to VS GUI as a Scheduler.
2. From the Tasks tab, in the Search text box, type the patient’s last name or the
patient’s first initial of the last name and last four of the SSN (e.g. S1234).
Click Search, and then select the requested patient’s name.
3. In the Pending Appointments Window on the Ribbon Bar, point to and select
the appointment to be rescheduled.
The Clinic Schedule displays.
For a past appointment date, the Clinic Schedule opens to the default appointment
date.
For the current date (or appointment date less than three days in the future), the
schedule displays the current default date.
For future dates, the schedule displays -/+ three days of an appointment date.
4. On the Clinic Schedule Grid, select the scheduled appointment, and cancel per
section 6.2.3 Cancelling An Appointment.
5. Add the new appointment per section 6.1 Adding Appointments.
The box opens.
6. Click OK to move the appointment or click cancel if you do not want to move
the appointment.

VistA Scheduling Enhancements 112 April 2018
VS GUI User Guide
6.3 Multiple Appointment Requests and Appointments
Multiple Appointment Requests allow the scheduler to create requests and book a series of
appointments at one time for a patient.
6.3.1 Multiple Appointment Request
1. Log into VS GUI as a Scheduler.
2. From the Tasks tab, in the Search text box, type the patient’s last name or the
patient’s first initial of the last name and last four of the SSN (e.g. S1234).
Click Search, and then select the requested patient’s name. Click Search.
3. In the Request Type dialog box, select APPT to create a new request.
The Patient’s Eligibility Information dialog box opens.
4. In the Appointment Request dialog box confirm Patient Information details
and complete the Request Information section.
• Select the Clinic or Service/Specialty button. For Clinic, enter the name of
the clinic (minimum of six characters required). For Service/Specialty, enter
the service or specialty (minimum of six characters required).
• Enter the CID/Preferred Date for the preferred appointment date. The
scheduler can enter the date directly or select the date from the Calendar
control option.
• Select the Appointment Type (if not defaulted by patient eligibility and clinic
selection) then choose from the list.
• In Request By, select either Provider or Patient.
• For you select Provider, enter the provider’s name (three character
minimum) and select from list. If you select Patient , then the Provider field is
dimmed and you cannot be edit that field.
• The Status is automatically populated.
Established – This indicates that the patient has been seen at that clinic in
the past 24 months
New – This indicates that the patient has not been seen at that clinic in
the past 24 months
The Multiple Appointments Required check box is enabled.
5. Click the box to enter a check mark.
• The Number of Appointments Required list is visible. Up to 60
appointments can be requested at one time.
• The Interval Between Appointments (In days) list is visible. Up to 30 days
between appointments can be requested at one time.
Note: The combination of Number of Appointments Required and Interval
Between Appointments cannot exceed 24 months. If the selected combination
exceeds 24 months to complete, when the scheduler selects OK to complete the
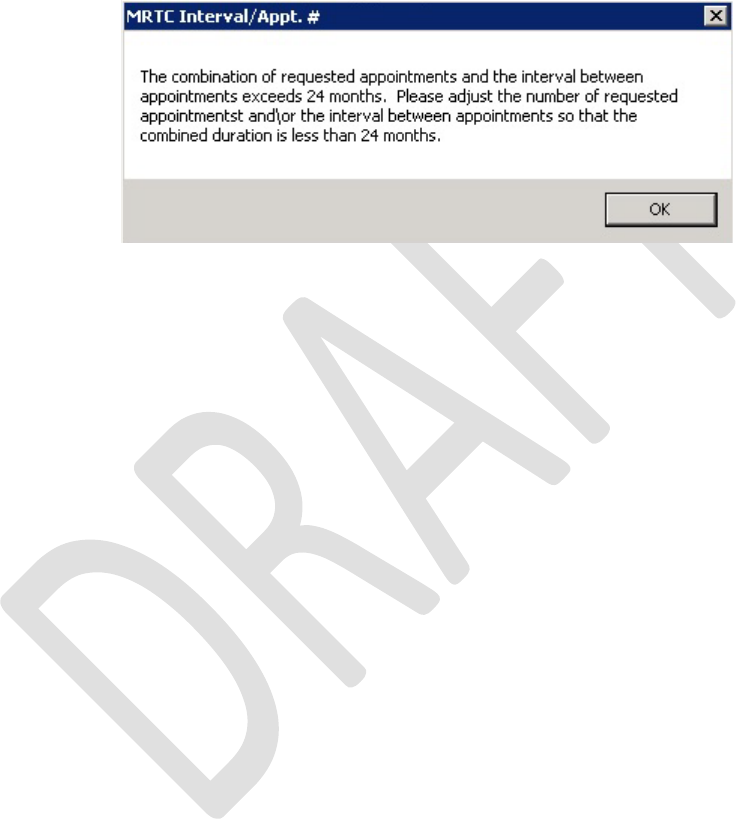
VistA Scheduling Enhancements 113 April 2018
VS GUI User Guide
Appointment Request, the MRTC Interval/Appt.# Dialog displays the message:
“The combination of requested appointments and the interval between
appointments exceeds 24 months. Adjust the number of requested appointments
and/or the interval between appointments so that the combined duration is less
than 24 months.” The adjustment must be made before the Multiple Appointment
Request can be completed.
Figure 156: MRTC Interval/Appt. # Dialog
• Text can be added in the Comment field up to 80 characters to add
information regarding the Appointment Request. For MRTC Requests, the
text displays in the Request Management Grid under the Comment column
after the {Day, Interval} information.
• Only the current comment entered is displayed although there is an Audit Log
of Uses that created previous comments.
6. Click OK.
The Find Appointment dialog box opens to allow the scheduler to book Multiple
Appointments at one time. See Section 0 for booking appointments from the Find
Appointment Dialog.
6.3.1.1 Note Regarding Parent and Child Appointment Requests
When booking Multiple Appointment Requests, the scheduler can click Close in the Find
Appointment dialog. If this is done prior to the first appointment in the series being booked
the Parent MRTC Request is placed in the Request Grid with a “P” and a check mark in
MRTC Column. The {Day, Interval} requested in the Appointment Request displays in the
Comment column. Any text entered into the Comment field of the Appointment Request
dialog displays in the Comment column after the {Day, Interval} information. The MRTC
APPT Requests with Comments are flagged with a red arrow in the Request Management
Grid.
If the scheduler books the first appointment in the series and then clicks CLOSE in the Find
Appointment Dialog box, the Parent Request displays in the Request Grid. Additionally, the
remaining unbooked appointments display as individual Child MRTC Requests in the
Request Grid with a check mark, not a “P” in the MRTC Column. The appointment
placement in the series as well as the number of total appointments requested display in the
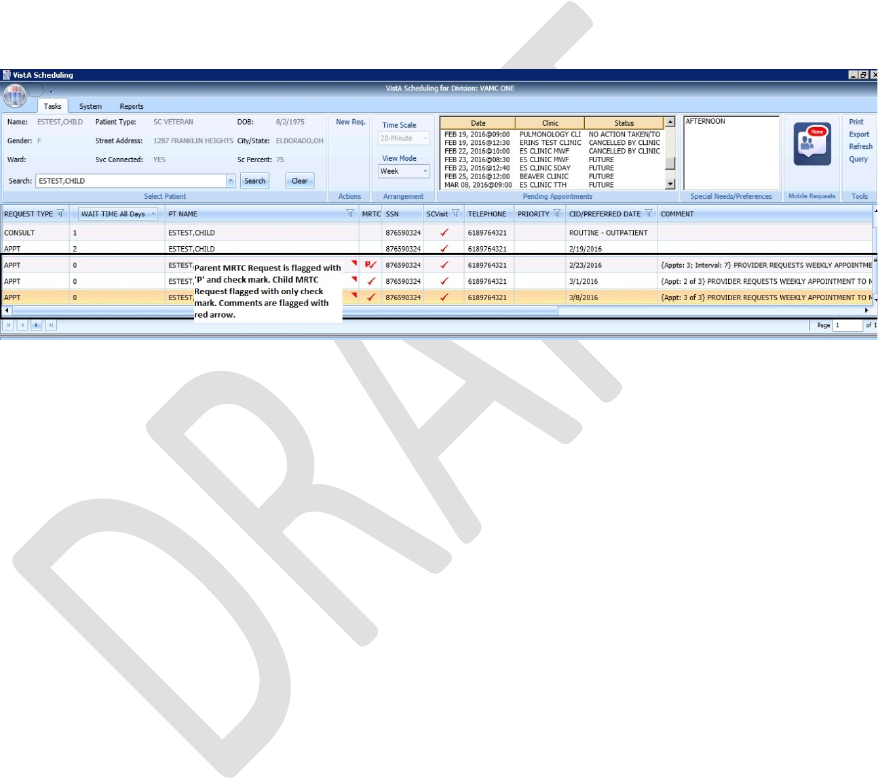
VistA Scheduling Enhancements 114 April 2018
VS GUI User Guide
Comments column. Any comments entered in the original MRTC Appointment Request
dialog box display in each individual Child Request after the {Day, Interval} information.
Selecting the Parent MRTC Request launches the Find Appointment dialog box and the
scheduler can continue booking all remaining appointments for the series from Find
Appointment. However, selecting a Child MRTC Request opens the Clinic Schedule and the
scheduler can only book the individual appointment following the same steps as adding an
appointment for an APPT Request (refer to Section 6.1.1). The Parent MRTC Request is not
removed from the Request Grid until all appointments in the series have been booked. A
Child MRTC Request is removed from the Request Grid at the time the appointment is
booked.
Figure 157: MRTC Requests displayed in Request Management Grid
6.3.2 Adding Multiple Appointments from Find Appointment Dialog
When the scheduler clicks OK in the Appointment Request Dialog with Multiple
Appointments Required checked, the Find Appointment dialog box displays to allow the
scheduler to book Multiple Appointments at one time.
In the Find Appointment dialog box, the following information is displayed:
• Calendar in upper left corner. The CID/Preferred date entered in
Appointment Request is highlighted.
• The Clinic is the default on the list from the Appointment Request in the
Resources Section in the upper middle pane of the Find Appointment dialog
box. This field is editable and Clinics can be switched between appointments
as needed.
• Patient’s Time of Day and Day of Week preferences are the default in the
upper right pane of the Find Appointment dialog box. These can be
edited/adjusted as needed.
• The CID/Preferred date entered in Appointment Request is displayed under
the Time of Day and Day of Week preferences in the Find Appointment
dialog box with the label Original CID:. This data is not editable.
• Search is available if the availability needs to be recalculated due to date or
clinic changes.

VistA Scheduling Enhancements 115 April 2018
VS GUI User Guide
• The Multiple Appointments Required information is the default from the
Appointment Request in the middle of the Find Appointment dialog box. This
information is not editable.
• CID displays a list of unbooked appointment dates. These dates are calculated
based upon the original CID/Preferred Date + the Number of Appointments +
the Interval Between Appointments.
• For clinics with special instructions defined, Special Instructions displays in
the Search Results section of the Find Appointment dialog box. When clicked,
a Special Instructions dialog box displays with the defined information
available to review.
• The clinic’s appointment length, variable length, and Max Overbook
settings display in the label in the Search Results section.
In the Search Results section, availability results display -/+ three Days of the CID
date for future dates. For current CID dates availability display Day 1 + six days in
Search Results field.
Note: Time of Day and Day of Week preferences limit availability results.
• Book Column allows the scheduler to select the time slot for booking an
appointment.
• Start Time Column displays the start time of time slot.
• End Time Column displays the end time of time slot.
• Resource Column displays the name of the Clinic currently selected.
• Slots Column displays available time slot count. Slots available for
overbooking display based upon the Scheduler’s security key allowances.
Note: Time Slots do not display if no availability is defined for that time
period for the clinic or overbooking has been reached beyond the scheduler’s
security key allowances.
• Number of Available Slots: The count displays at the bottom of the Find
Appointment dialog box notifying the scheduler how many slots are available
for the selected CID date.
• Next and Book buttons are disabled until first Time Slot(s) is selected for
booking.
1. Select a time slot in the Booking Column. If the clinic is Variable Length,
schedulers can select multiple appointment slots in the view to lengthen the
appointment time. The additional slots must all be adjacent to each other (stop
time of first = start time of second).
Note: If Clinic DISPLAY INCREMENTS PER HOUR is defined for a count less than
the defined LENGTH OF APP'T, then multiple Time Slots may need to be selected to
satisfy the Appointment Booking Requirements and enable the Book Button.
2. Click Book.
Note: If the selected time slot has reached its defined slot count and the scheduler has
the appropriate security keys to overbook, then a dialog box displays a message
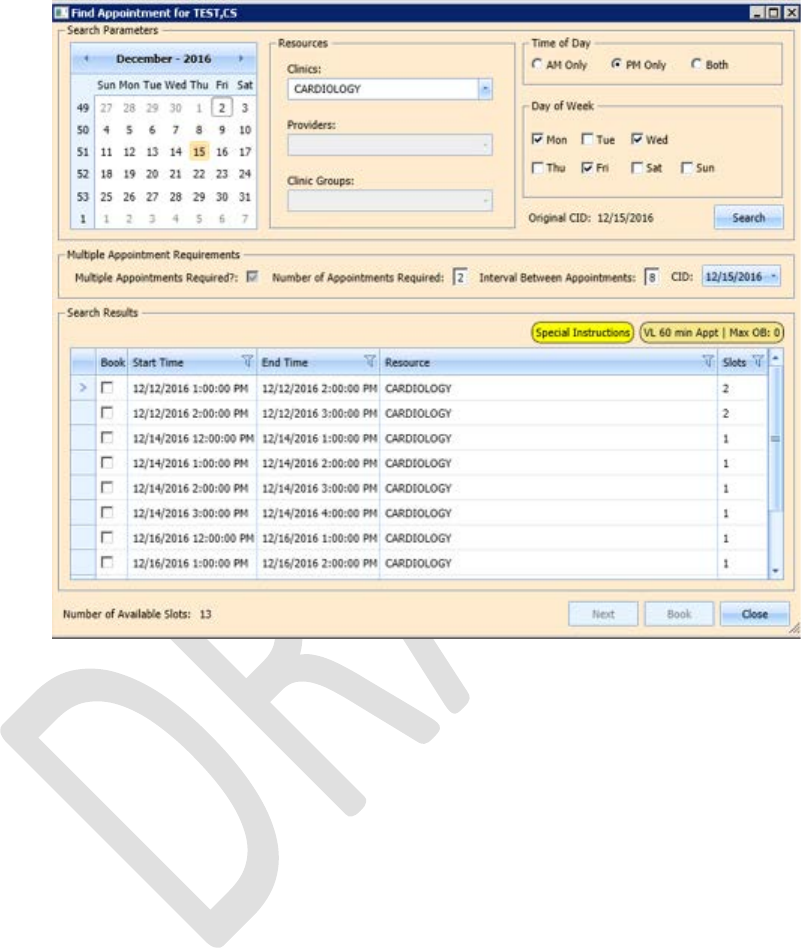
VistA Scheduling Enhancements 116 April 2018
VS GUI User Guide
alerting the scheduler that continuing with scheduling the appointment will result in
overbooking the selected time slot. The Scheduler can click OK to confirm
overbooking and continue to the New Appointment dialog box.
Figure 158: Find Appointment Dialog
The New Appointment dialog box opens. The New Appointment dialog box has one
tab:
• Appointments Tab:
o Patient Information Section displays Name, DOB, SSN, SVC Connected,
SC Percent, GAF (read only), and Svc Related check box.
o Appointment information section displays Start Time, Appt Type, Duration,
Clinic and Notes (Appointment Start Time; Duration on for appointments to
VL Clinics; and Notes are editable fields).
o Appointment Conflicts section displays any appointments already
scheduled that conflict with the appointment being added.
3. Confirm information in the New Appointment dialog box and add any
applicable text to the Notes section. Click OK.
The Print Letter? Dialog box displays.
4. Click OK to Print the Patient Letter.
5. Click Cancel to close dialog box and not print the Patient Letter.
The Closing Request dialog box displays “This request will be closed.”
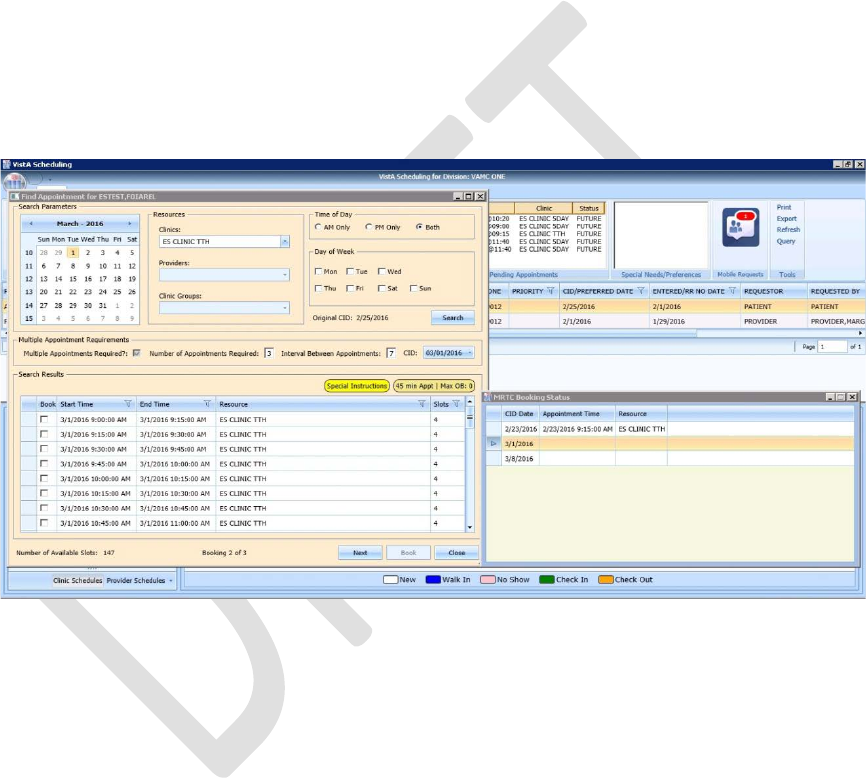
VistA Scheduling Enhancements 117 April 2018
VS GUI User Guide
6. Click OK.
The First MRTC Appointment is booked. The CID date in the Find Appointment
dialog box changes to the next appointment date in the series. The MRTC Booking
Status dialog box displays appointments as they are booked. An arrow points to date in
MRTC Series that is being booked and automatically updates as appointments are
completed.
The following information displays in the MRTC Booking Status dialog box:
• CID Date—Calculated by first booked appointment date and Interval
Requested.
• Appointment Date—the date selected when booking appointments.
• Resource—the Clinic name where the appointment was booked.
Figure 159: Find Appointment Dialog and MRTC Booking Status Dialog
To book a second MRTC appointment:
1. Select a time slot for the second MRTC appointment in the series.
2. Click Book.
The New Appointment dialog box displays.
3. Confirm information in the New Appointment dialog box. Add any applicable
text to the Notes section, and then click OK.
The Print Letter? Dialog box displays.
4. Click OK to Print the Patient letter.
Click Cancel to close dialog and not print the Patient Letter.
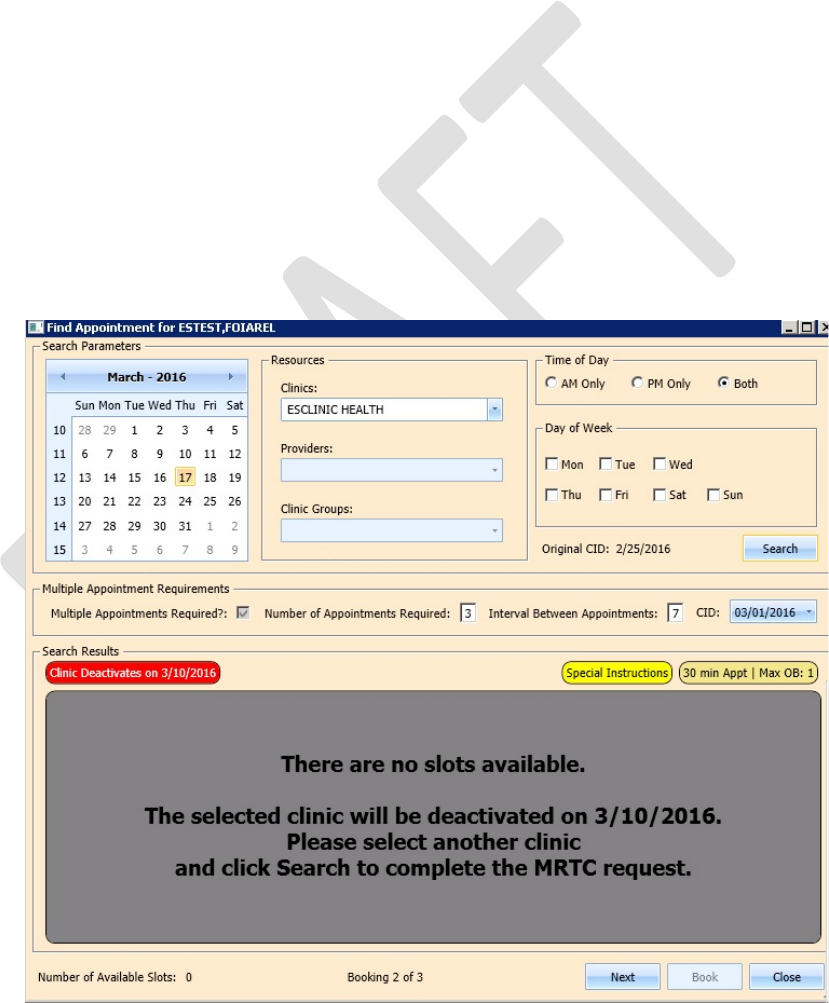
VistA Scheduling Enhancements 118 April 2018
VS GUI User Guide
The Closing Request dialog box displays a message “This request will be
closed.”
5. Click OK.
The Second MRTC Appointment is booked. The CID date in the Find Appointment
dialog box changes to the next appointment date in the series. The Appointment date is
added in the MRTC Booking Status dialog box for the second appointment and the
arrow moves to the next appointment (if applicable).
Once all MRTC Appointments have been booked for the series, the Closing Request
dialog displays, “The Parent MRTC Request will be closed.”
If a clinic has a future inactive date and the CID date falls + three days after the
Inactivate Date, a gray label displays in the Search Results section of the Find
Appointment dialog box, “There are no slots available. The selected Clinic will be
deactivated on {Inactivation Date}. Select another clinic, and then click Search to
complete the MRTC request.”
To complete adding appointments for the series, the scheduler needs to change to an
appropriate clinic in the Resources section with availability and continue adding
appointments for the remainder of the series requests.
Figure 160: Future Clinic Inactivation Date
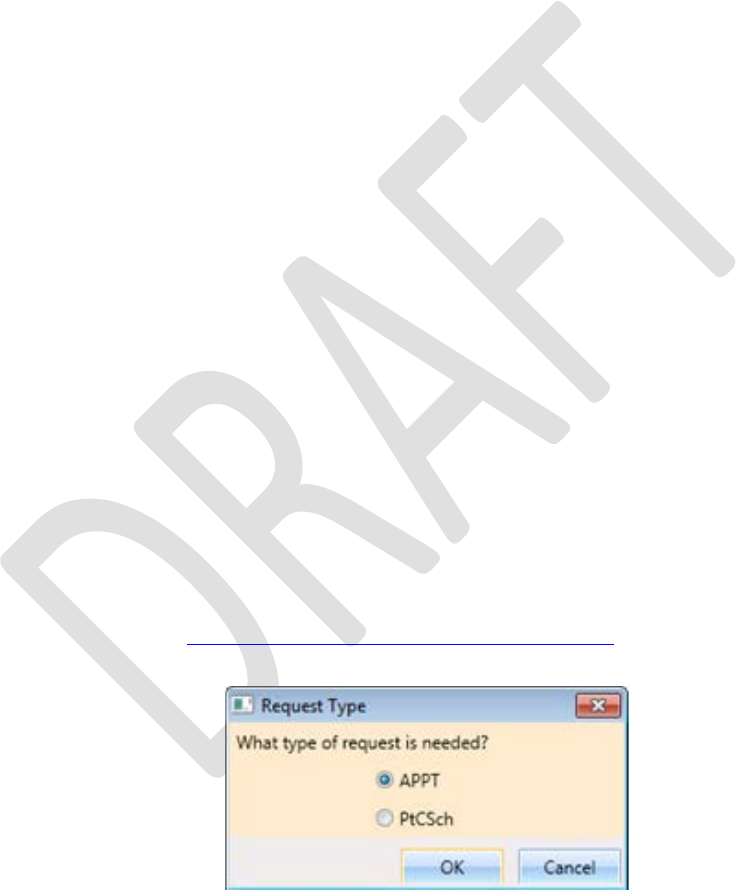
VistA Scheduling Enhancements 119 April 2018
VS GUI User Guide
6.4 Overbooking Appointments
Schedulers can overbook appointments based upon the following rules:
• The scheduler must have the Scheduling Overbook (SDOB) security key to
overbook up to the clinic’s Maximum (Max) Overbook (OB) definition.
Schedulers must have the Scheduling Master Overbook security key
(SDMOB) security key to schedule beyond the clinic’s Max OB definition.
Schedulers with both overbook security keys can overbook on any day that
has availability defined regardless of the clinic’s Max OB definition.
Schedulers cannot overbook if they are not assigned an overbooking security
key.
• The Clinic must have availability defined for the day in question. If there is no
availability defined, then schedulers will not be able to overbook
appointments on that day regardless of the security key assigned to them.
• Appointments cannot be overbooked prior to the start of the day’s clinic
availability.
6.4.1 Overbooking Appointments with SDMOB Security Key
Schedulers assigned the SDMOB security key can overbook anytime outside of the clinic’s
availability from the clinic’s start time to 11:59 p.m. even if the Max Overbook Limit defined
for a clinic has been reached.
To overbook an appointment with the SDMOB security key:
1. Log into VS GUI as a Scheduler.
2. From the Tasks tab, in the Search text box, type the patient’s last name or the
patient’s first initial of the last name and last four of the SSN (e.g. S1234).
Click Search, and select the requested patient’s name. Click Search.
3. In the Request Type dialog box, select APPT, and then click OK to create a
new request or click Cancel for the existing request.
Note: Refer to Section 5.1.2 Adding Appointment Request for steps on adding a new
APPT Request.
Figure 161: Request Type
4. In the Request Management Grid select the APPT request.
The Clinic Schedule Grid displays the clinic’s schedule based upon the CID/Preferred
date of request. For past dates, the clinic schedule opens to the default CID/Preferred

VistA Scheduling Enhancements 120 April 2018
VS GUI User Guide
date as Day 1 + six days. For the current date (or the CID/Preferred date less than
three days in the future), the clinic schedule displays the current default date as Day 1
+ six Days. For future dates, the clinic schedule displays -/+ three days of
CID/Preferred date.
Figure 162: Clinic Schedule Display – APPT Request Future CID/Preferred Date
Note: For a newly created APPT request, the system automatically highlights the
APPT request and the Clinic Schedule displays.
In the Clinic Schedule Grid, select the time slot in gray that is within the clinic’s
hours, from the clinic’s start time to 11:59, or a date/time slot that has existing
overbookings.
Note: The Clinic Max Overbook limit displays in the Clinic Day Event notes.
Figure 163: Max Overbook Limit
5. Right-click in the time slot.
The Add Appointment option displays.

VistA Scheduling Enhancements 121 April 2018
VS GUI User Guide
Note: The Create Walk In Appointment option is only available for selection on the
current date. It is not available for past or future CID/Preferred dates.
Note: Right-click options do not display if the selected time slot is for a day that has
no availability defined or is prior to the clinic’s start time.
Figure 164: Appointment Right-click Options – Add Appointment
6. Select Add Appointment.
The Overbook message displays.
7. Click OK.
The View Appointment dialog box displays as well as the Patient Eligibility dialog
box.
• The Appointments Tab:
o Patient Information Section displays Name, DOB, SSN, SVC Connected,
SC Percent, GAF (read only), and Svc Related check box.
o Appointment information section displays Start Time, Appt Type, Duration,
Clinic and Notes (Appointment Start Time; Duration on for appointments to
VL Clinics; and Notes are editable fields).
o Appointment Conflicts section displays any appointments already
scheduled that conflict with an appointment being added.

VistA Scheduling Enhancements 122 April 2018
VS GUI User Guide
Figure 165: View Appointment Dialog – Appointments
8. Add any applicable Notes to the appointment. Click OK.
The Print Letter? Dialog displays.
9. Click OK to print the Letter to the patient.
Click Cancel to not print letter.
Figure 166: Print Letter? Dialog
The Closing Request dialog box opens.
10. Click OK.
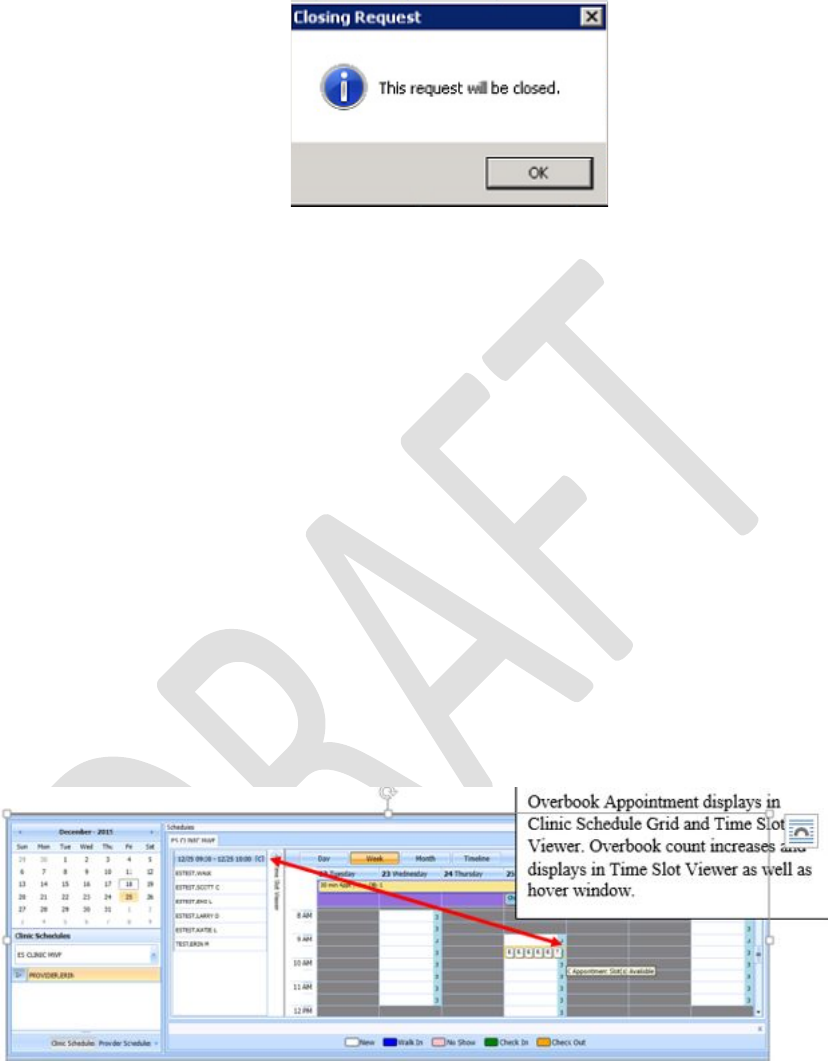
VistA Scheduling Enhancements 123 April 2018
VS GUI User Guide
Figure 167: Closing Request Dialog
• The APPT Request is removed from the Patient Request Management Grid.
• The Next request for the patient is moved up and highlighted.
• The Clinic Schedule closes.
• The New appointment displays in the Pending Appointment Window on the
Ribbon Bar.
11. Select an appointment from the Pending Appointment window to view it in the
Clinic Schedule Grid.
• The clinic schedule opens.
• For past dates, the clinic schedule opens to the default appointment date.
• For the current date (or appointment date less than three days in future), the
clinic schedule defaults to the current date.
• For future dates, the clinic schedule displays -/+ three days of the appointment
date.
• The Overbook count increases in the Clinic Schedule time slot and in the Time
Slot Viewer. If the appointment count has filled the time slot, hover over the
window to show the slot count.
Figure 168: Clinic Schedule Display – Overbook Appointment
6.4.2 Overbooking Appointments with SDOB Security Key
Schedulers who are assigned the SDOB security key can overbook outside of the clinic’s
availability from the clinic start time to 11:59 p.m. Schedulers cannot overbook past the Max
Overbook Limit defined for a clinic.
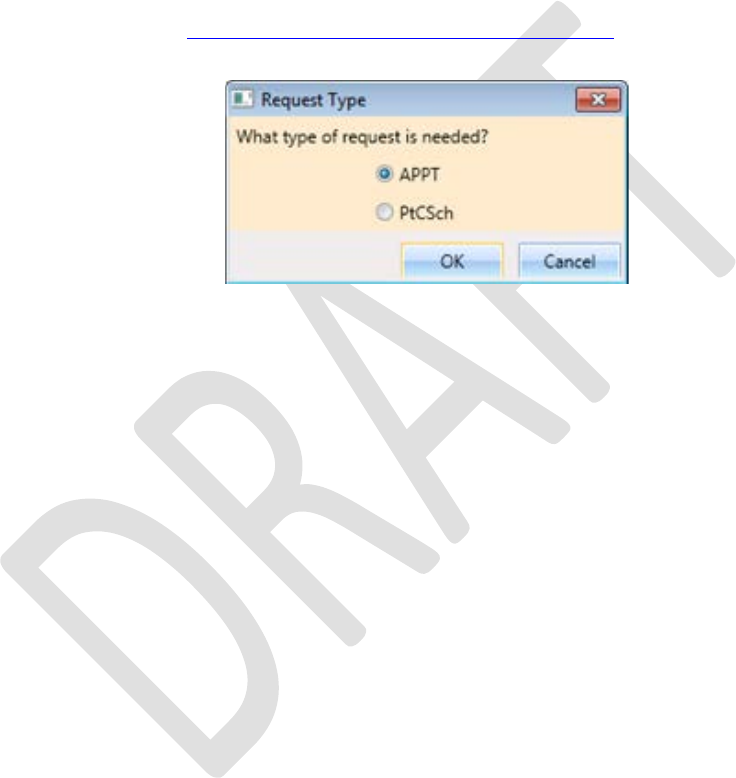
VistA Scheduling Enhancements 124 April 2018
VS GUI User Guide
To overbook an appointment with the SDOB security key:
1. Log into VS GUI as a scheduler.
2. From the Tasks tab, in the Search text box, type the patient’s last name or the
patient’s first initial of the last name and last four of the SSN (e.g. S1234).
Click Search, and then select the requested patient’s name. Click Search.
3. If creating a new request, click the New Req button in the Actions pane of the
ribbon bar. In the Request Type dialog box, select APPT and then click OK
to create a new request.
Note: Refer to Section 5.1.2 Adding Appointment Request for steps on adding new
APPT Request.
Figure 169: Request Type
4. Select APPT request in the Request Management Grid.
The Clinic Schedule Grid displays the clinic’s schedule based upon the CID/Preferred
date of request. For a past date, the clinic’s schedule opens to the default
CID/Preferred date as Day 1 + six days. For a current date (or CID/Preferred date less
than three days in future), the clinic’s schedule displays the current default date as Day
1 + six days. For future dates, the clinic schedule displays -/+ three days of
CID/Preferred date.
Note: For a newly created APPT request the system automatically highlights the
APPT request and the Clinic Schedule displays.
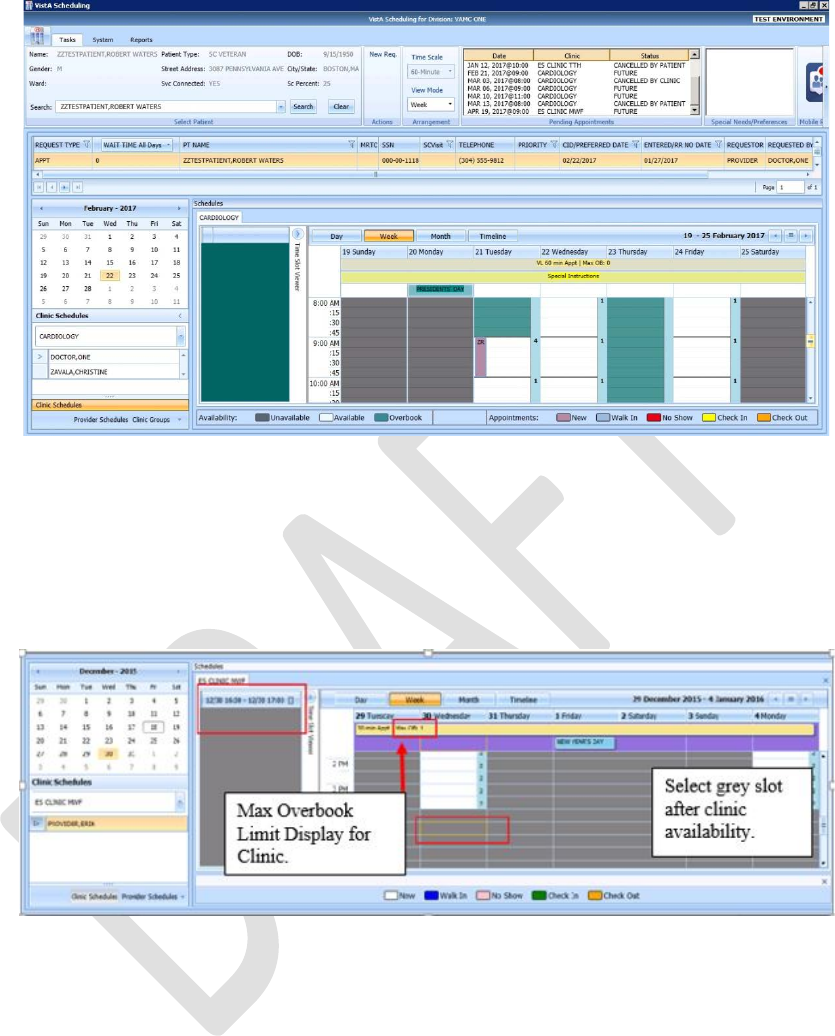
VistA Scheduling Enhancements 125 April 2018
VS GUI User Guide
Figure 170: Clinic Schedule Display – APPT Request Future CID/Preferred Date
5. In the Clinic Schedule Grid, select the time slot colored in teal that is within
the clinic’s hours, close of clinic hours to 11:59 p.m., or a date that does not
already have existing overbooks.
Note: The Clinic Max Overbook limit displays in the Clinic Day Event notes.
Figure 171: Overbook After Hours Time Slot
6. Right-click the time slot.
The Add Appointment option displays. The Create Walk In Appointment option is
only available for selection on the current date. It is not available for past or future
CID/Preferred dates.
Note: Right-click options do not display if the selected time slot is for a day that has
no availability defined, is prior to the clinic’s start time, or the Max Overbook limit
has been met for the day.
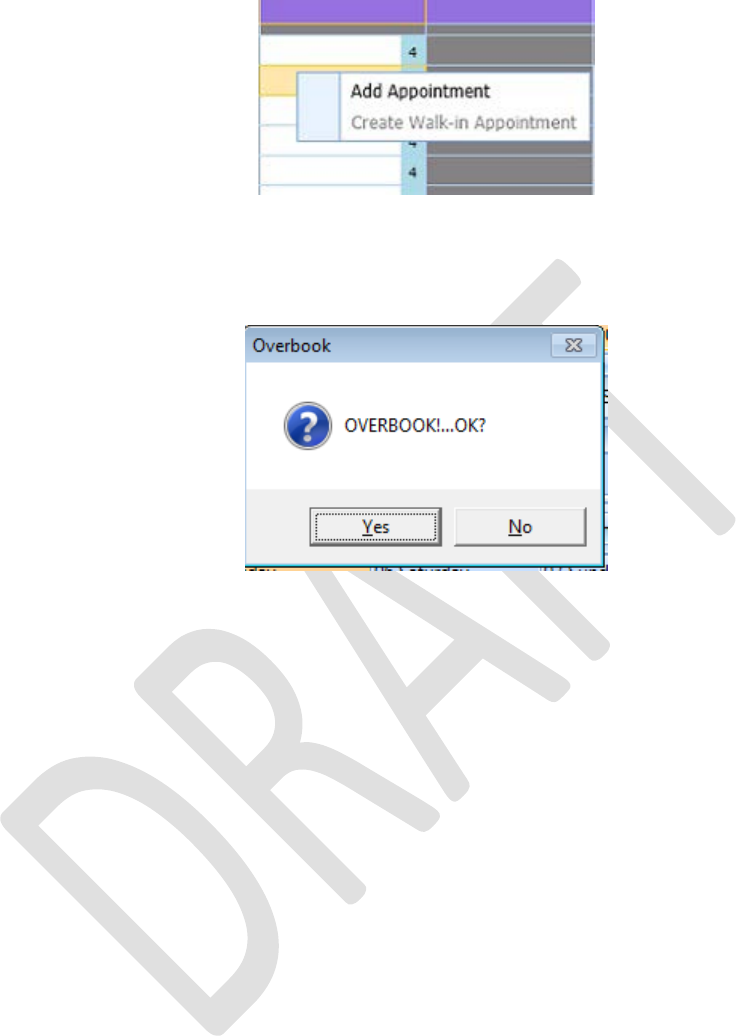
VistA Scheduling Enhancements 126 April 2018
VS GUI User Guide
Figure 172: Appointment Right-click Options – Add Appointment
7. Select Add Appointment.
The Overbook message displays.
Figure 173: Overbook Confirmation Dialog
8. Click OK.
The New Appointment dialog box displays, as well as the Patient Eligibility dialog box.
• Appointments Tab:
o Patient Information Section displays Name, DOB, SSN, SVC Connected,
SC Percent, GAF (read only), and Svc Related check box.
o Appointment information section displays Start Time, Appt Type, Duration,
Clinic and Notes (Appointment Start Time; Duration on for appointments to
VL Clinics; and Notes are editable fields).
o Appointment Conflicts section displays any appointments already
scheduled that conflict with the appointment being added.
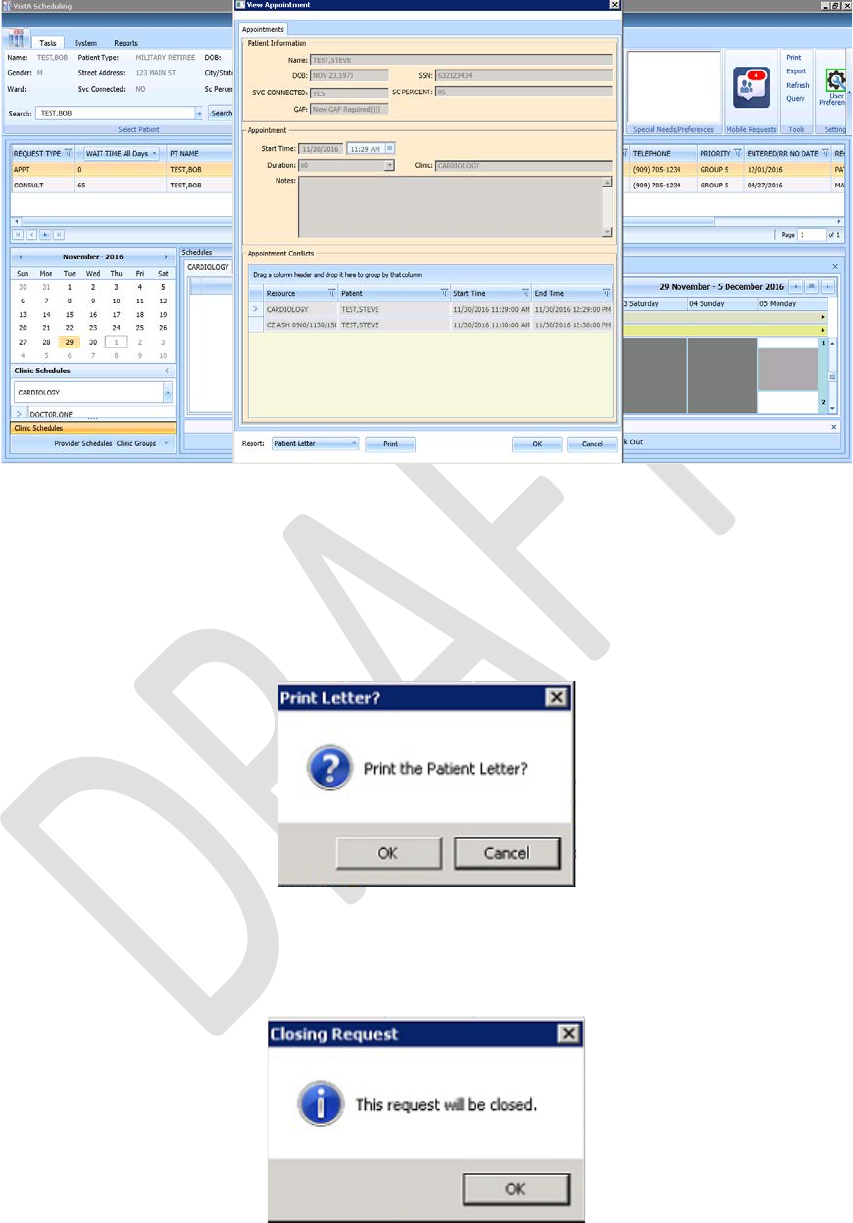
VistA Scheduling Enhancements 127 April 2018
VS GUI User Guide
Figure 174: New Appointment Dialog
9. Add any applicable Notes to the appointment. Click OK.
The Print Letter? Dialog box displays.
10. Click OK to print the Patient Letter.
11. Click Cancel to exit the dialog box and not print the Patient Letter.
Figure 175: Print Letter? Dialog
The Closing Request dialog box opens.
12. Click OK.
Figure 176: Closing Request Dialog
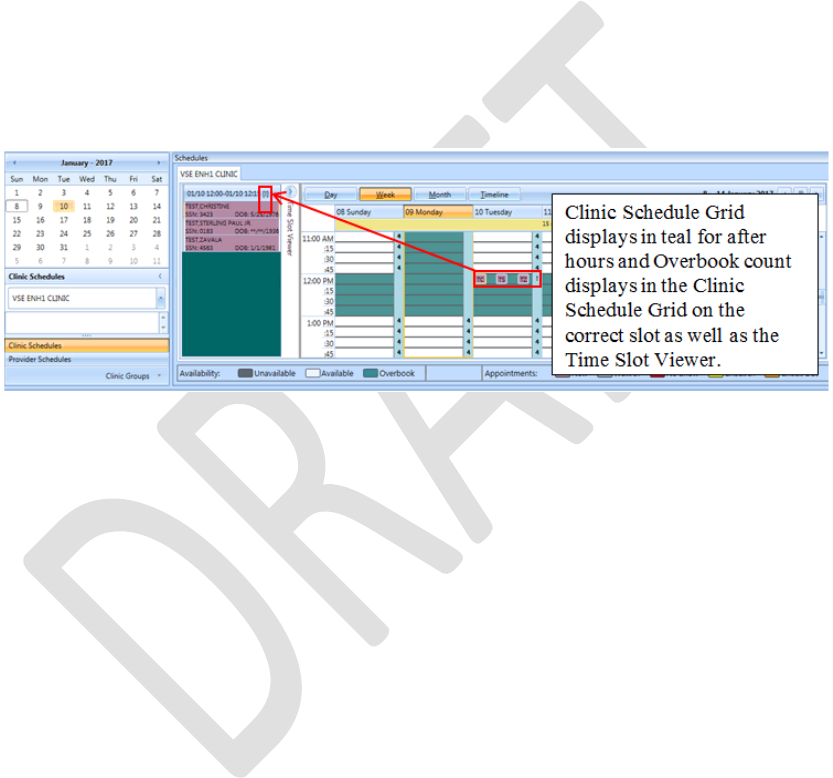
VistA Scheduling Enhancements 128 April 2018
VS GUI User Guide
The APPT Request is removed from the Patient Request Management Grid. The Next
request for the patient is moved up and highlighted.
The Clinic Schedule closes.
The New appointment displays in the Pending Appointment window in Ribbon Bar.
13. Select an appointment from the Pending Appointment window to view it in the
Clinic Schedule Grid.
The clinic schedule opens. For past dates, the clinic schedule opens to the default
appointment date. For the current date (or appointment date less than three days in
future), the clinic schedule displays the current default date. For future dates, the clinic
schedule displays -/+ three days of appointment date.
The Overbook count increases in the clinic schedule time slot and in the Time Slot
Viewer. If the appointment count has filled the time slot, hover over the window to
display the slot count.
Figure 177: Clinic Schedule Display – Overbook Appointment After Hours
6.5 Variable Length (VL) APPT
Scheduling appointments can typically be done in fixed length intervals based upon the
clinic’s definitions. However, a clinic can be setup as a Variable Length (VL) clinic, which
allows a user to schedule an appointment for an extended amount of time as needed rather
than scheduling multiple appointments.
6.5.1 Identifying a VL Clinic:
To identify if a clinic is set up for VL scheduling:
1. Log on to VS GUI.
2. From the Clinic Schedules, type the clinic’s name (six-character minimum) or
the clinic’s abbreviation (four-character minimum).
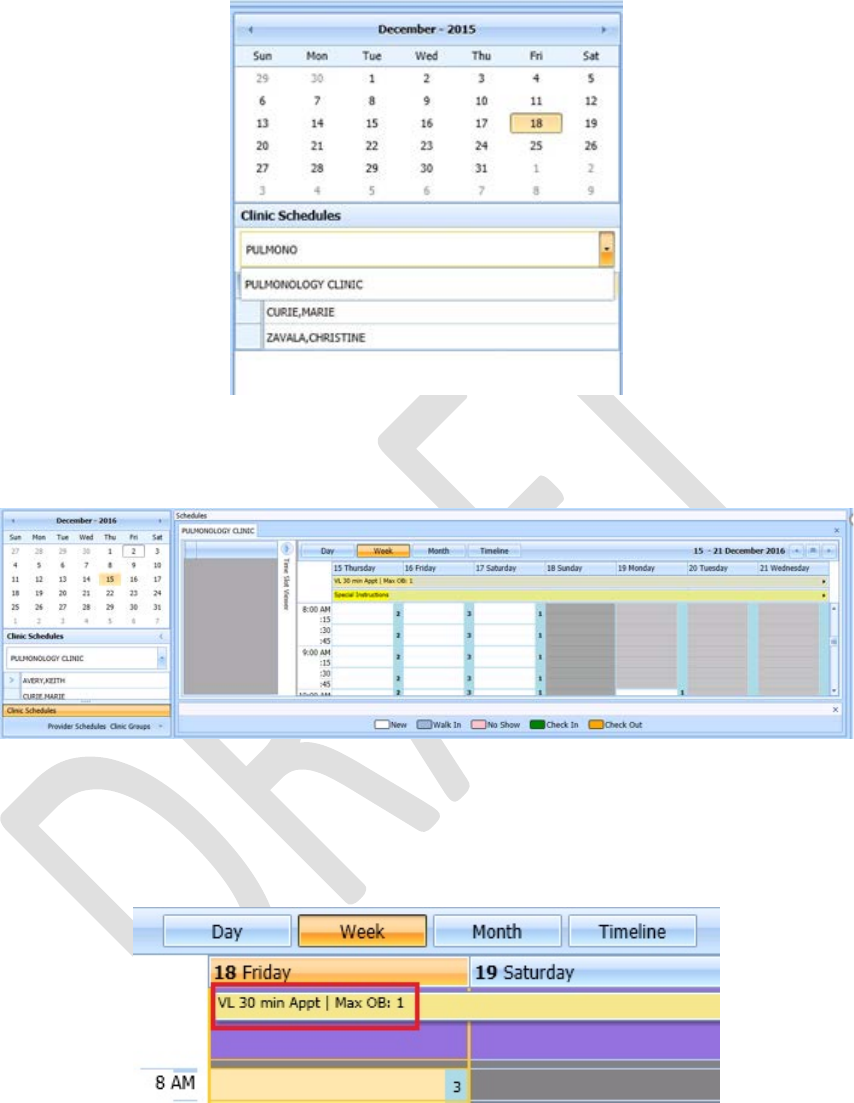
VistA Scheduling Enhancements 129 April 2018
VS GUI User Guide
Figure 178: Clinic Schedules – Clinic Search
The selected clinic’s schedule displays the default, the current date as Day 1 + six
days.
Figure 179: Clinic Schedule Grid
To confirm whether VL appointments can be booked at a clinic, view the All Day
Event Bar in the Clinic Schedule Grid. The clinic’s defined appointment length and
max overbooking limit are displayed. If the clinic is designated as a variable length
clinic, the letters “VL” display before the appointment length.
Figure 180: VL Indicator
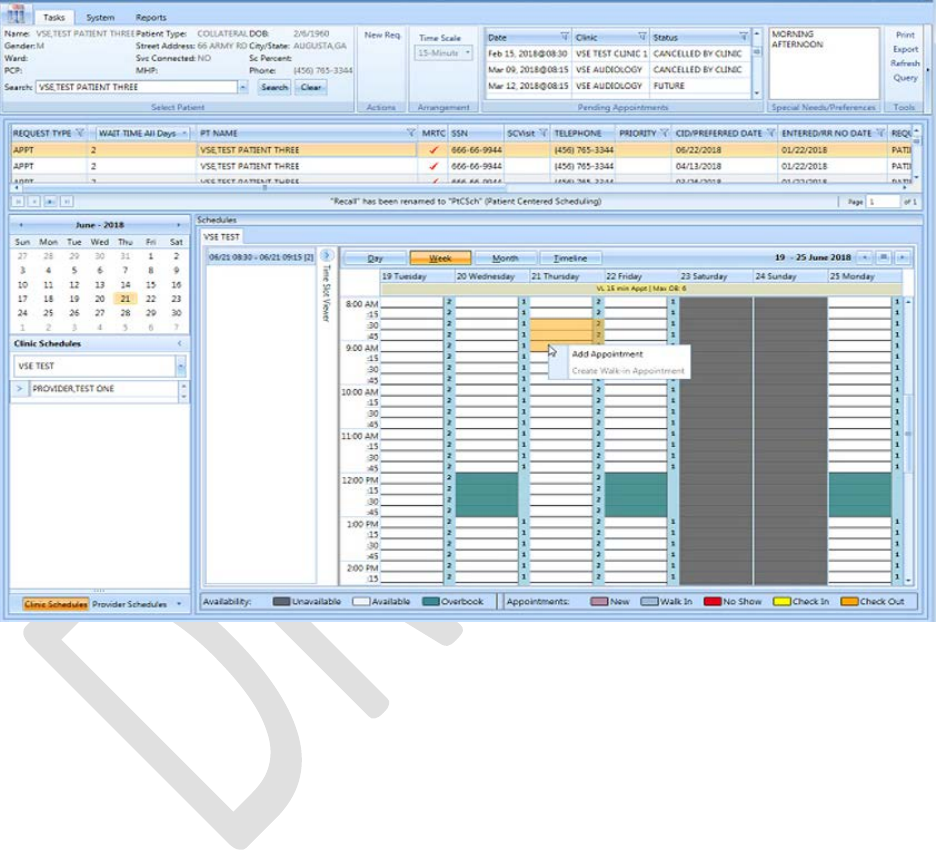
VistA Scheduling Enhancements 130 April 2018
VS GUI User Guide
6.5.2 Add a VL APPT
To add a VL APPT:
1. In the clinic schedule, select the time slot that the APPT shall begin.
2. Highlight consecutive time slots and select Add Appointment
Figure 181: Consecutive Time Slots
3. Right-click and select Add Appointment.
The New Appointment dialog box displays.

VistA Scheduling Enhancements 131 April 2018
VS GUI User Guide
Figure 182: New Appointment Dialog
4. The New Appointment dialog box appears. Confirm that the appointment
duration reflects the correct amount of time.
5. Click OK.
The Print Letter? Dialog box opens.
6. Print the letter if appropriate. Click cancel, if you do not want to print the
letter.
The Closing Request dialog box displays a message “This request will be closed”.
7. Click OK.
The New APPT displays in the Pending Appointment window.
8. Select the APPT from the Pending Appointment window.
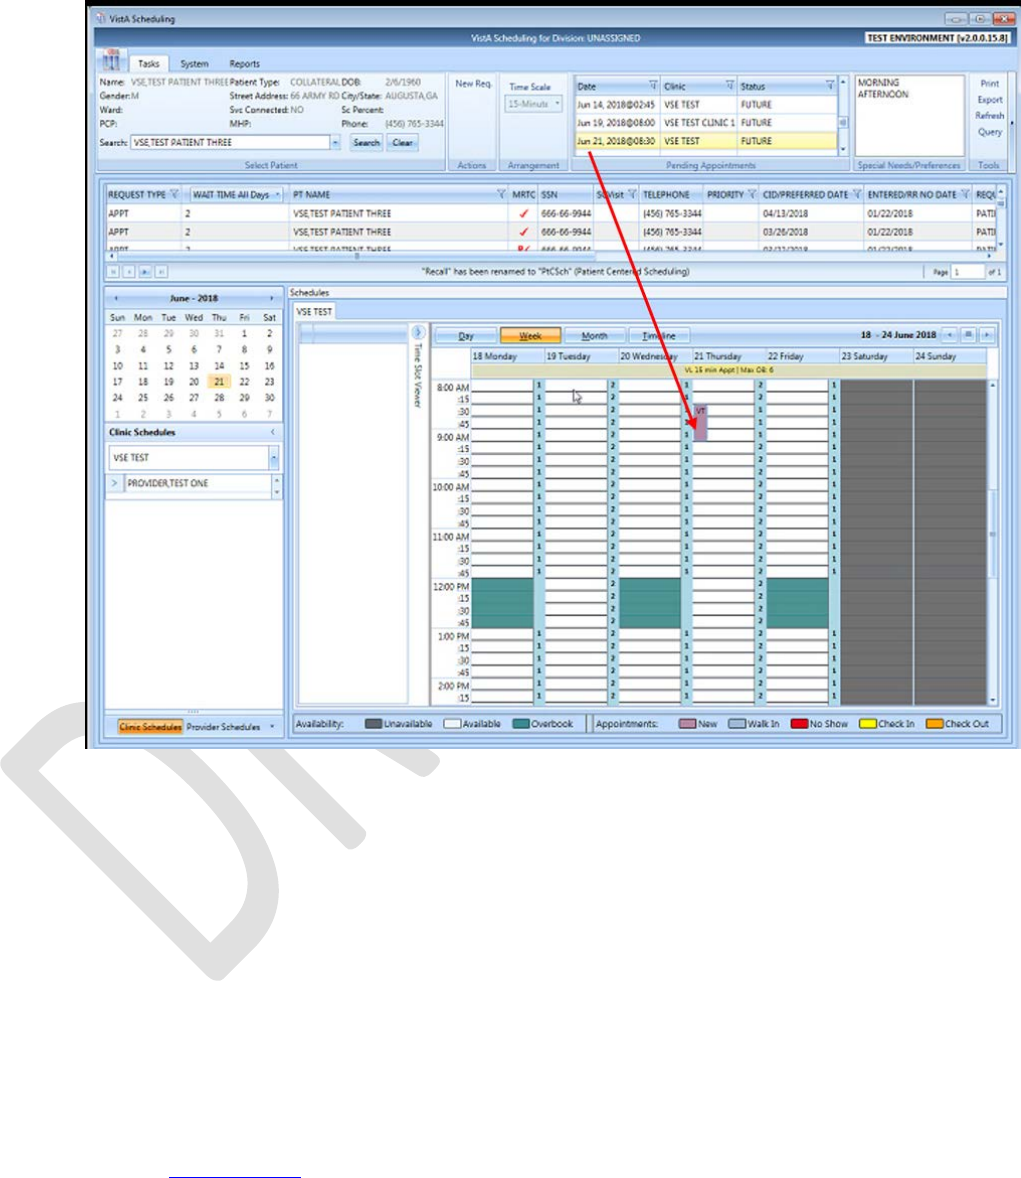
VistA Scheduling Enhancements 132 April 2018
VS GUI User Guide
The Clinic Schedule displays the booked APPT spanning three time slots, which
indicates a VL APPT.
Figure 183: Clinic Schedule Display – Appointment Length Extended
6.6 Compensation and Pension (C&P) APPTs
6.6.1 Add a C&P APPT Request
1. Log into VS GUI.
2. From the Tasks tab, type the patient’s last name and the first name in the
Search text box. Click Search, and then select the requested patient’s name
from the list.
3. Click the New Req button in the Actions pane.
4. Select the APPT Request Type.
5. Complete the APPT Request dialog box.
Refer to Section 5.1.2 for instructions on completing APPT Request dialog.
6. Select the appropriate Clinic for the C&P appointment.
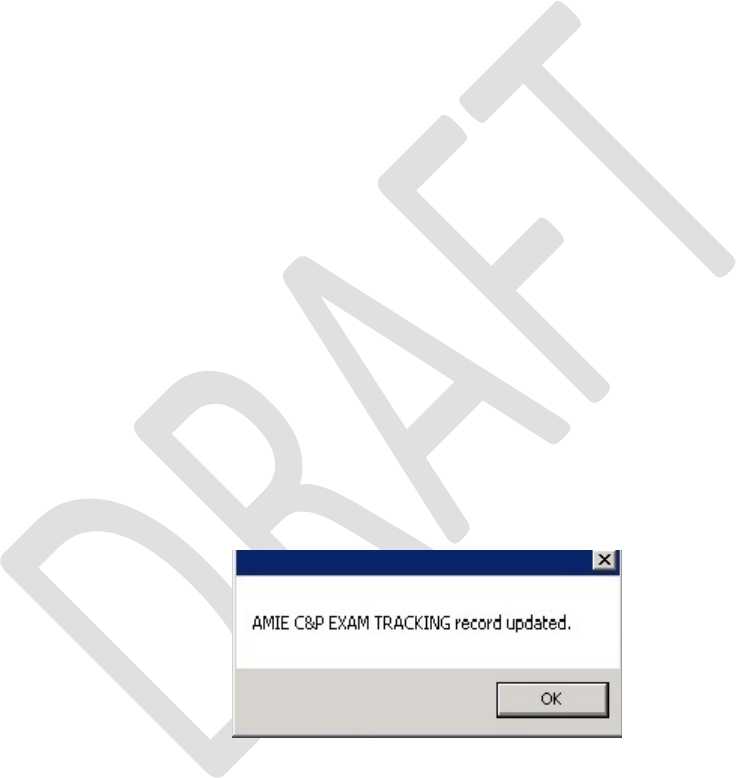
VistA Scheduling Enhancements 133 April 2018
VS GUI User Guide
7. Enter the CID/Preferred Date.
8. In Appointment Type list, select C&P.
9. Click OK.
The APPT Request displays on the patient’s Request Management Grid.
6.6.2 Add a C&P APPT for Pending 2507 Request NOT Previously
Linked to Appointment
1. Log into VS GUI.
2. From the Tasks tab, in the Search text box, type the patient’s last name or the
patient’s first initial of last name and last four of the SSN (e.g. S1234). Click
Search, and then select the requested patient’s name.
3. In the Request Management Grid, select pending C&P APPT Request.
4. In the Clinic Schedule Grid, click the open time slot.
5. Right-click, and then select Add Appointment
Note: The Create Walk-In Option is available if the current day is selected in the
Clinic Schedule.
The New Appointment dialog box displays.
Confirm the Appointment Type is listed as C&P. If not, select the Appointment
Type from the list.
Add any applicable APPT information to the Notes section.
6. Click OK.
The Dialog box displays:
Figure 184: TRACKING Record Updated
Note: If the patient did NOT have a pending 2507 Request on file a dialog box
opens:

VistA Scheduling Enhancements 134 April 2018
VS GUI User Guide
Figure 185: C&P Appointment for Patient with No Pending 2507 Request
7. Click OK.
The Print Letter? Dialog box displays.
8. Click OK to print the Patient Letter.
Click Cancel to exit the dialog box and not print the patient letter.
The Closing Request Dialog box displays a message - “This request will be
closed.”
9. Click OK.
The New C&P APPT displays in the Pending Appointment window and the
Automated Medical Information Exchange (AMIE) Tracking Link is updated.
6.6.3 Add a C&P APPT for Pending 2507 Request Already Linked to
APPT NOT Due to Cancellation
1. Log into VS GUI.
2. From the Tasks tab, type the patient’s last name and the first name in the
Search text box. Click Search, and then select the patient’s name with the
pending C&P APPT Request from the list.
3. In the Request Management Grid, select pending C&P APPT Request.
4. In the Clinic Schedule Grid click an open time slot.
5. Right-click on open time slot, and then select Add Appointment.
Note: The Create Walk-In Option is available if the current day is selected in the
Clinic Schedule.
The New Appointment dialog box opens.
6. Confirm the Appointment Type is listed as C&P. If not, select it from the list.
7. Click OK.
The C&P requests dialog box displays the following information:
• Name: Veteran’s name
• Request Date: Date 2507 Request created

VistA Scheduling Enhancements 135 April 2018
VS GUI User Guide
Figure 186: C&P Requests Dialog
8. Select the appropriate 2507 Request from the list.
9. Click OK.
The C&P Request dialog box displays an option to select Yes or No:
Figure 187: C&P Request Due to Cancellation Dialog
10. Click No.
A message update dialog box displays:
Figure 188: AMIE C&P EXAM TRACKING Record Updated
11. Click OK.

VistA Scheduling Enhancements 136 April 2018
VS GUI User Guide
The Print Letter? Dialog box opens.
12. Click OK to print the Patient Letter.
Click Cancel to exit the dialog box and not print the Patient Letter.
The Closing Request dialog box displays the message: “This request will be
closed.”
The New C&P Appointment displays in the Pending Appointment window, and
shows the AMIE Tracking Link is updated.
6.6.4 Add a C&P APPT for Pending 2507 Request due to Clinic
Cancellation
1. Log into VS GUI.
2. From the Tasks tab, in the Search text box, type the patient’s last name or the
patient’s first initial of the last name and last four of the SSN (e.g. S1234).
Click Search, and then select the requested patient’s name. Click Search.
3. In the Request Management Grid, select pending C&P APPT Request.
4. In the Clinic Schedule Grid, click the open time slot.
5. Right-click the time slot, and then select Add Appointment.
Note: The Create Walk-In Option is available if the current day is selected in the
Clinic Schedule.
The New Appointment dialog box opens.
Confirm the Appointment Type is listed as C&P. If not, select the Appointment Type
from the list.
6. Click OK.
The C&P Requests dialog box displays the following information:
• Name: Veteran’s name
• Request Date: Date 2507 Request created
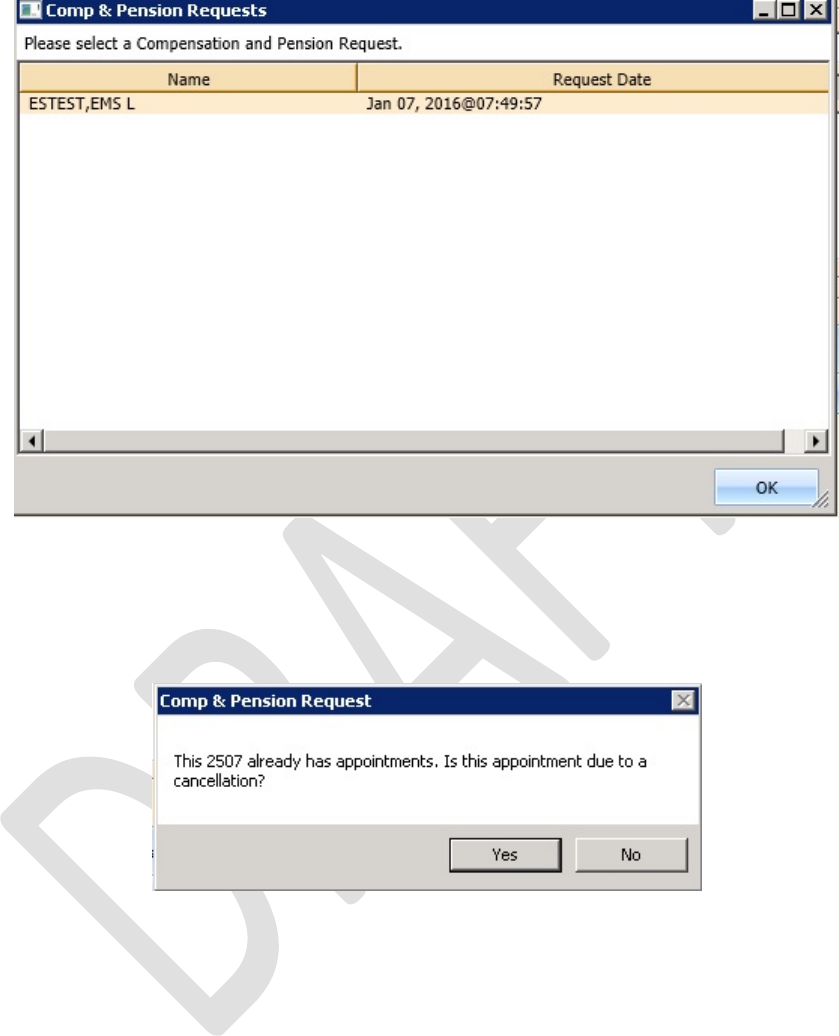
VistA Scheduling Enhancements 137 April 2018
VS GUI User Guide
Figure 189: C&P Requests Dialog
7. Select the appropriate 2507 Request from the list.
8. Click OK.
The C&P Request displays the option to select Yes or No:
Figure 190: C&P Request Due to Cancellation Dialog
9. Click Yes.
The C&P APPT Links dialog box displays the following information:
• Initial Appointment Date
• Clock Stop Appointment Date
• Current Appointment Date
• Clinic Name
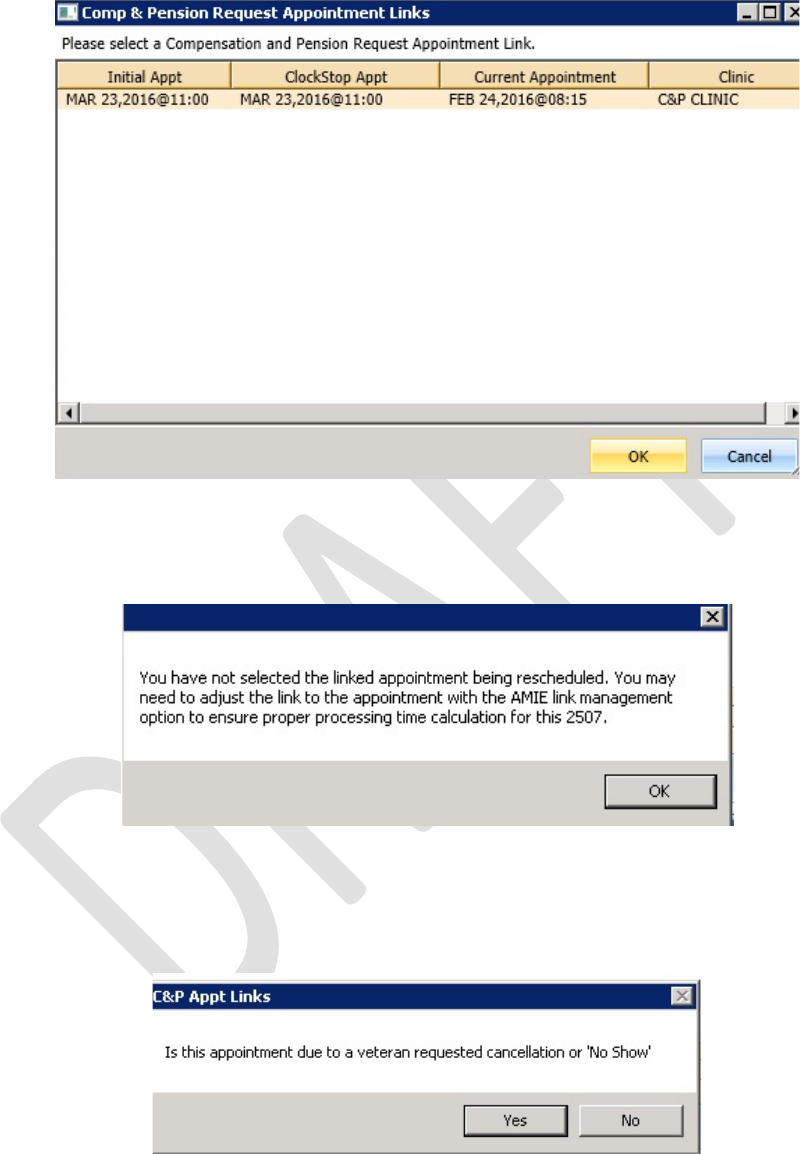
VistA Scheduling Enhancements 138 April 2018
VS GUI User Guide
Figure 191: C&P Request APPT Links Dialog
10. Click OK.
Note: If the scheduler clicks Cancel, the following dialog box opens:
Figure 192: C&P APPT Links Due to Veteran Cancellation or No Show
The C&P APPT Links dialog box displays a message with the option to select Yes or
No:
Figure 193: C&P APPT Links Due to Cancellation Dialog
11. Click No.

VistA Scheduling Enhancements 139 April 2018
VS GUI User Guide
A Dialog box displays a message about the C&P appointment.
Figure 194: C&P APPT Links Adjustment Dialog
12. Click OK.
The Print Letter? Dialog opens.
13. Click OK to print the Patient Letter.
Click Cancel to exit the dialog box and not print the Patient Letter.
The Closing Request dialog box displays a message: “This request will be closed.”
The New C&P APPT displays in the Pending Appointment window and shows the
AMIE Tracking Link is updated.
Note: The previous appointment linked to the 2507 Request must be manually
dispositioned.
6.6.5 Add C&P APPT for Pending 2507 Request due to Veteran
Cancellation/No Show
1. Log into VS GUI.
2. From the Tasks tab, in the Search text box, type the patient’s last name or the
patient’s first initial of the last name and last four of the SSN (e.g. S1234).
Click Search, and then select the requested patient’s name. Click Search.
3. In the Request Management Grid, select pending C&P APPT Request.
4. In the Clinic Schedule Grid, click an open time slot.
5. Right-click the time slot, and then select Add Appointment.
Note: The Create Walk-In Option is available if the current day is selected in the
Clinic Schedule.
The New Appointment dialog box opens.
6. Confirm the Appointment Type is listed as C&P. If not, select the Appointment
Type from the list, and then click OK.
The C&P Requests dialog box displays the following information:
• Name: Veteran name
• Request Date: Date 2507 Request created
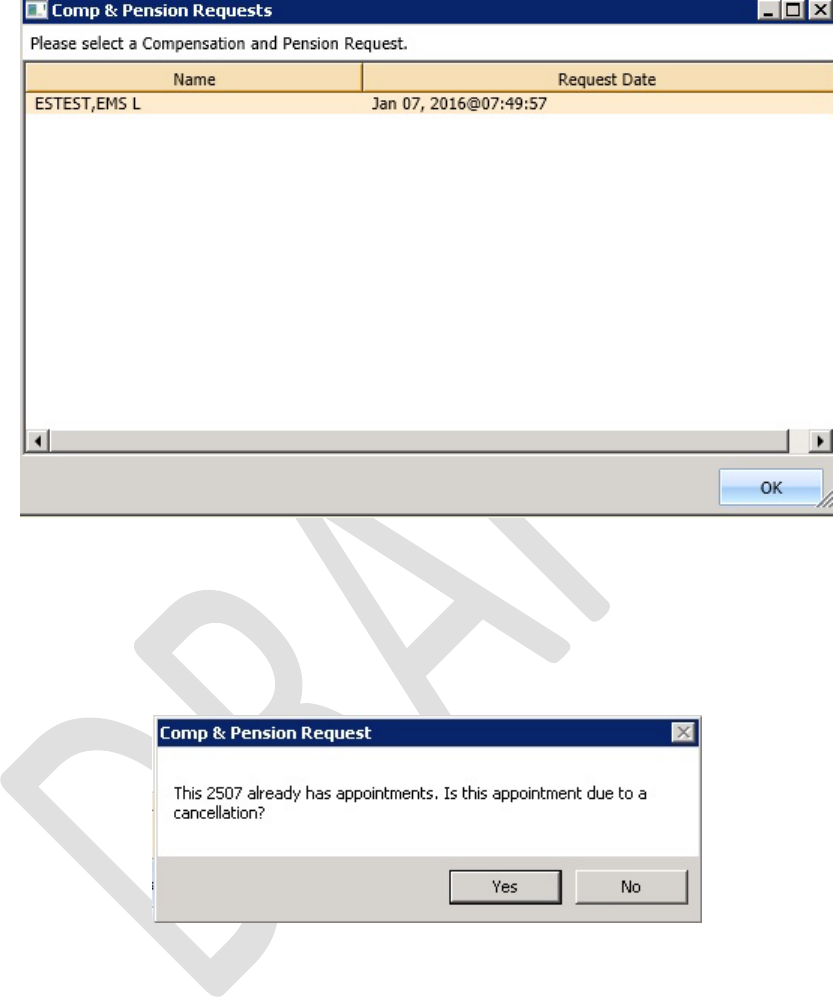
VistA Scheduling Enhancements 140 April 2018
VS GUI User Guide
Figure 195: C&P Requests Dialog
7. Select the appropriate 2507 Request from the list.
8. Click OK.
The C&P Request dialog box displays information about the appointment and the
option to select Yes or No:
Figure 196: C&P Request Due to Cancellation Dialog
9. Click Yes.
The Comp & Pension Appointment Links dialog box displays the following information:
• Initial Appointment Date
• Clock Stop Appointment Date
• Current Appointment Date
• Clinic Name
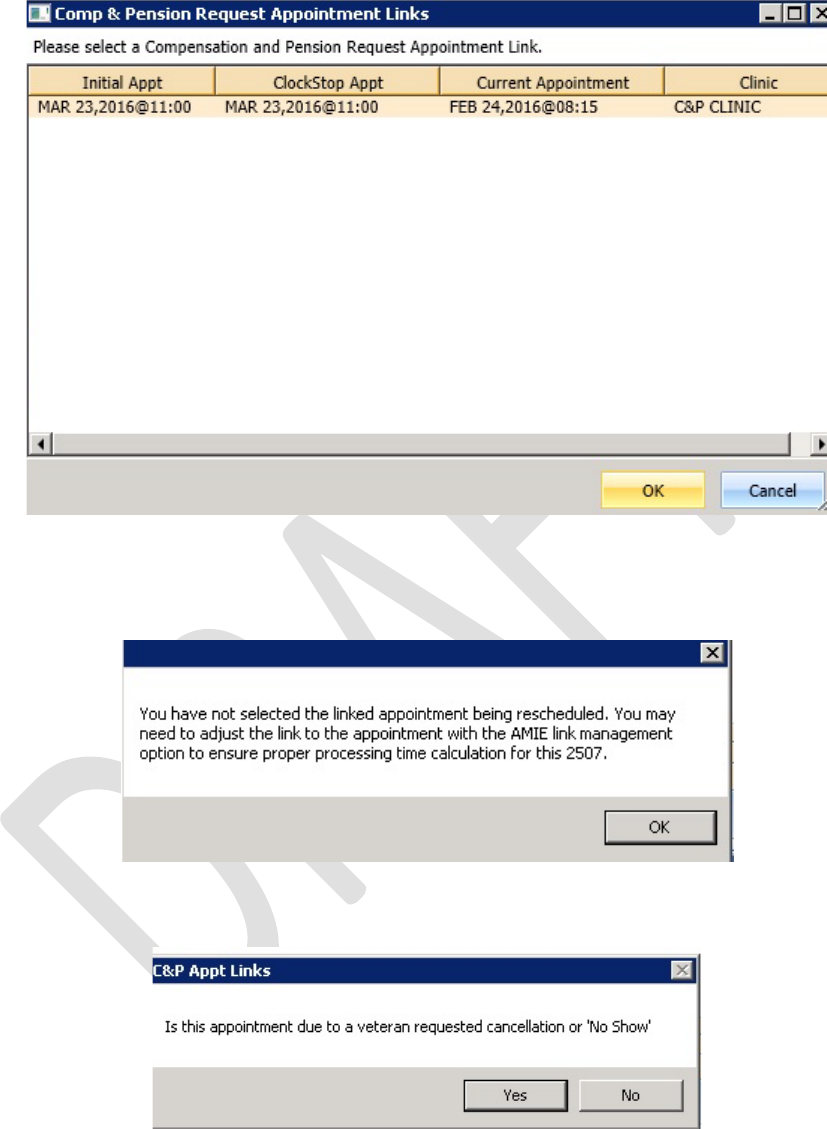
VistA Scheduling Enhancements 141 April 2018
VS GUI User Guide
Figure 197: C&P Request APPT Links Dialog
10. Click OK.
Note: If the scheduler clicks Cancel instead of OK, the following message displays:
Figure 198: C&P Canceled APPT Links Dialog Warning
The C&P Appt Links dialog box displays the option to select Yes or No:
Figure 199: C&P APPT Links Due to Veteran Cancellation or No Show
11. Click Yes.
A message update dialog box displays:

VistA Scheduling Enhancements 142 April 2018
VS GUI User Guide
Figure 200: AMIE C&P EXAM TRACKING Record Updated
12. Click OK.
The Print Letter? Dialog box displays.
13. Click OK to print the Patient Letter.
Click Cancel to exit the dialog box and not print the Patient Letter.
The Closing Request dialog box displays a message: “This request will be closed.”
The New C&P APPT displays in the Pending Appointment window and Shows the
AMIE Tracking Link is updated.
Note: The previous appointment linked to the 2507 Request must be manually
dispositioned.
6.6.6 Disposition APPT Linked to Pending 2507 Request
1. Log into VS GUI.
2. From the Tasks tab, in the Search text box, type the patient’s last name or the
patient’s first initial of the last name and last four of the SSN (e.g. S1234).
Click Search, and then select the requested patient’s name. Click Search.
3. In the Pending Appointment window, select the pending C&P APPT linked to
the pending 2507 Request.
4. In the Clinic Schedule Grid, click the appointment.
5. Right-click the appointment and the following options are available to select:
• Edit Appointment
• View Appointment
• Cancel Appointment
6. Select Cancel Appointment.
The Cancel Appointment dialog box displays. See Section 0 for detailed instructions
on completing the Cancel Appointment dialog.
7. Select Appointment Cancelled By.
8. Select Reason for Cancellation.
Edit CID/Preferred Date if applicable.
9. Enter Remarks.
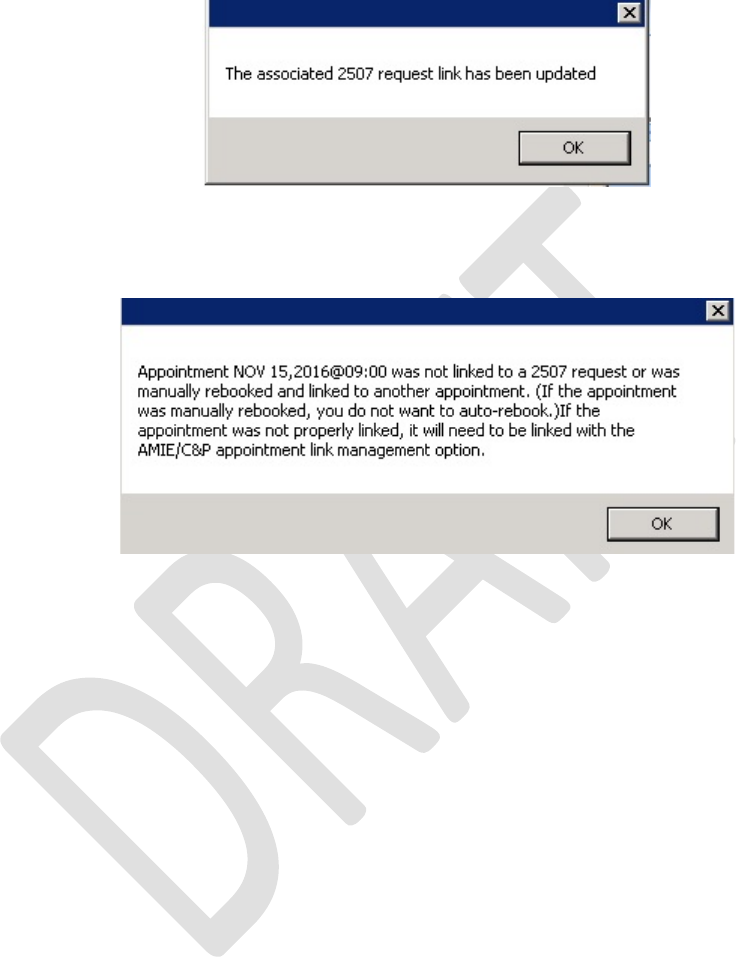
VistA Scheduling Enhancements 143 April 2018
VS GUI User Guide
10. Click OK.
A Dialog box displays an update message:
Figure 201: C&P Cancel APPT Associated 2507 Request Updated
Note: If the C&P APPT was NOT linked to the 2507 request, the following message
displays in dialog box:
Figure 202: C&P Cancel APPT NOT Linked to Pending 2507 Request
11. Click OK.
The APPT status is updated in the Pending Appointment window. The APPT is
removed from the Clinic Schedule and the AMIE Link is updated.
6.7 VA Online Scheduling (formerly VAR)
Note: Note: VA Online Scheduling requests will NOT be processed in VS GUI at this
time due to a number of enhancements that will be added at a later date. The
SDECZREQUEST key is held in reserve until that time. If a user has the key on their
VistA account now, it will give them an error each time they log in as the service
cannot connect to the mobile request service.
VA Online Scheduling requests will eventually interface with VS GUI requests,
including:
• Schedule an appointment requested in VA Online Scheduling through the VS
GUI interface, fulfilling that request..
• View appointment requests within the GUI.
• Communicate or message the Veteran from within the GUI up to a limit of
four times.
• Close out requests from within the GUI.

VistA Scheduling Enhancements 144 April 2018
VS GUI User Guide
7 Clinics
7.1 Tasks Tab
7.1.1 Viewing Clinic Schedule Availability
The VS GUI displays a consistent color visual indicator for a clinic’s workable hours
including bookable holidays, non-workable hours including non-bookable holiday, clinic
cancellation, and no availability as follows:
Table 1: Clinic Schedule Availability
Appointment Availability Type Color
Available Slots/Hours of Operation White
Unavailable/ Non-workable hours during day
with availability defined (i.e. clinic lunch
breaks).
Teal
Cancelled Availability for Clinic—Partial
and All Day Cancellation. Teal + hash mark (\\)
Holiday but bookable White
Holiday but NOT bookable Gray
No availability defined for day (i.e. Saturday
or Sunday). Gray
No availability defined for the clinic Gray
To search for a clinic and view the clinic schedule:
1. From the Tasks tab, on the Clinic Schedules, enter a partial name of a clinic
(six character minimum).
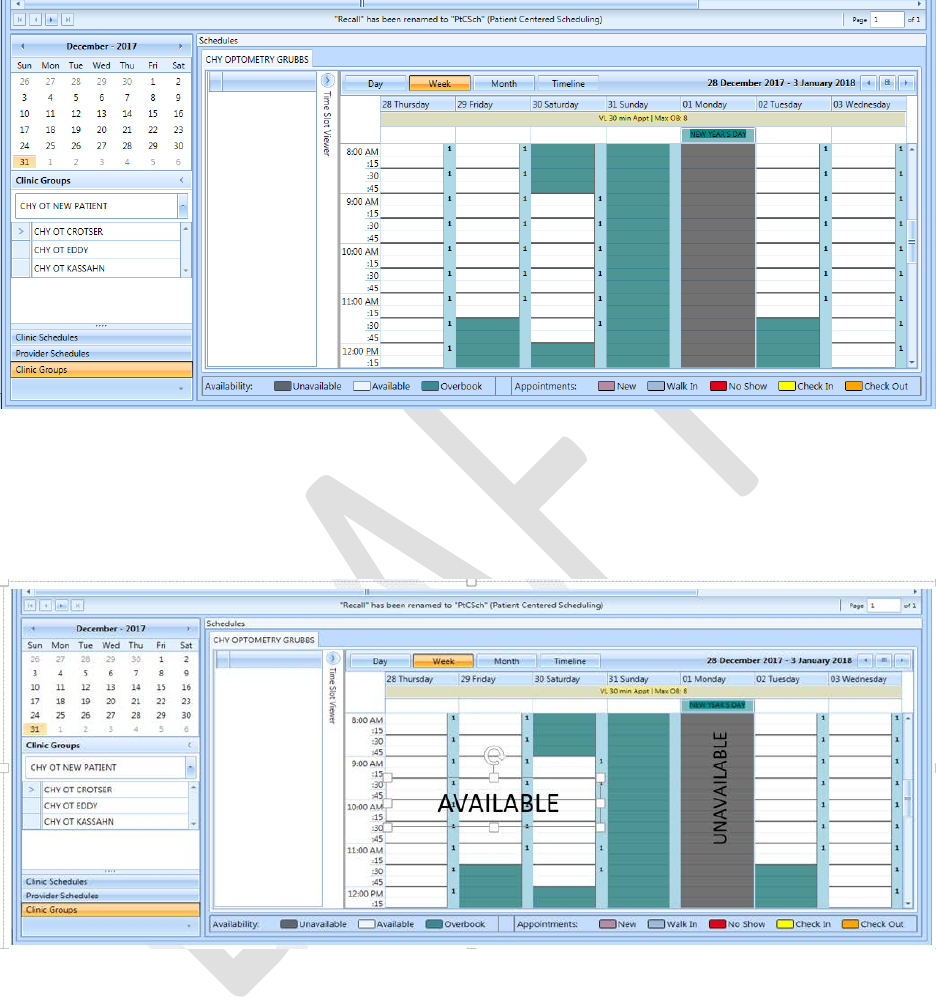
VistA Scheduling Enhancements 145 April 2018
VS GUI User Guide
Figure 203: Clinic Schedules Search
2. Select the desired clinic from the returned list.
The selected clinic schedule displays.
Figure 204: Clinic Schedules Display – Available and Unavailable
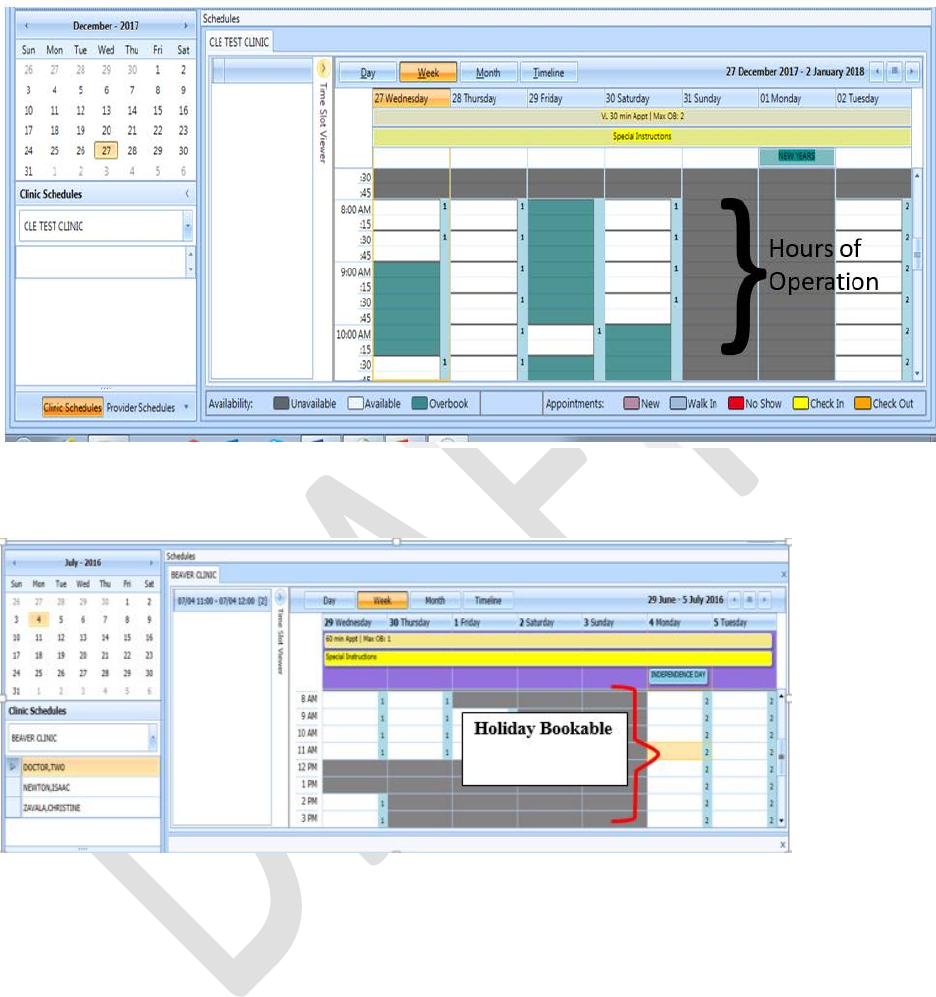
VistA Scheduling Enhancements 146 April 2018
VS GUI User Guide
Figure 205: Clinic Schedules Display – Hours of Operation
Figure 206: Clinic Schedules Display – Holiday Bookable
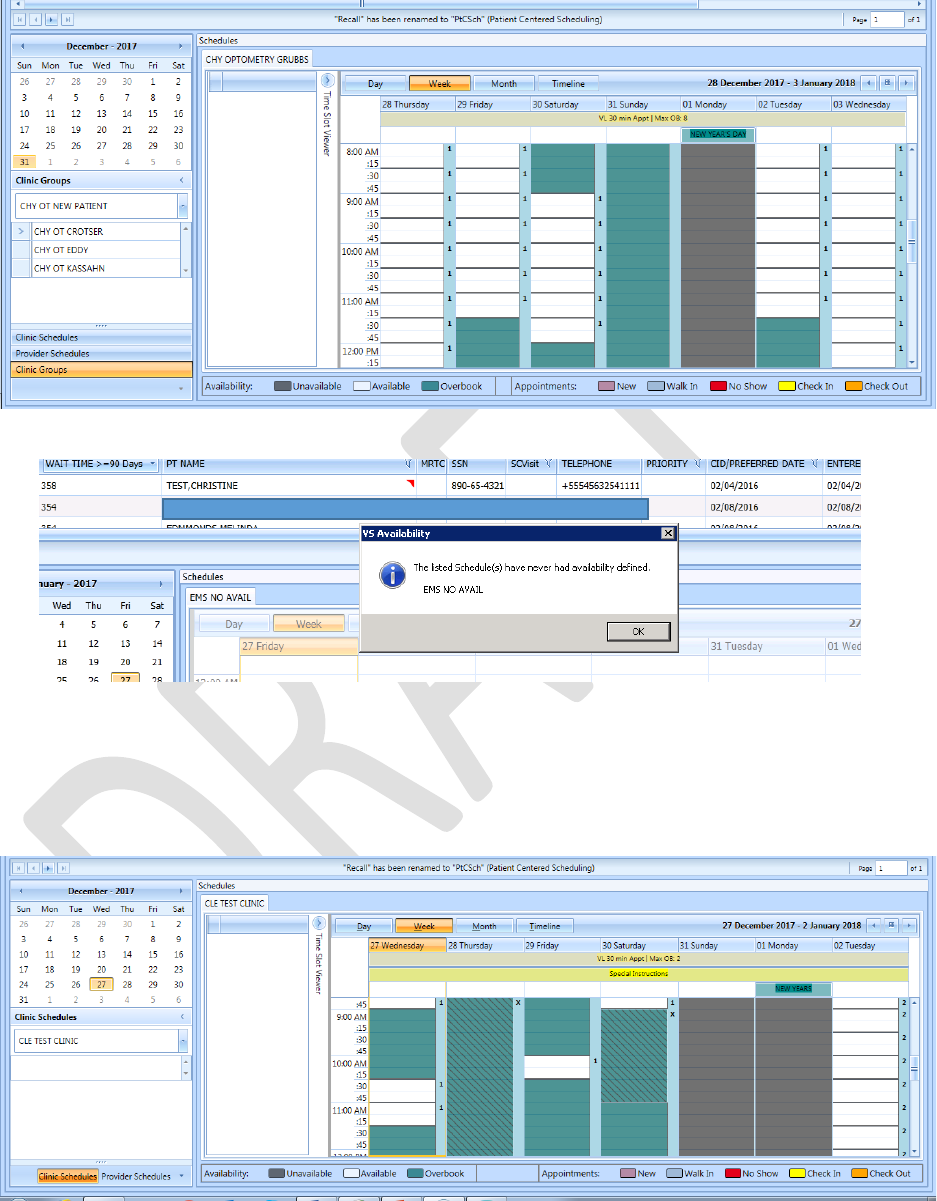
VistA Scheduling Enhancements 147 April 2018
VS GUI User Guide
Figure 207: Clinic Schedules Display – Holiday Unbookable
Figure 208: Clinic Schedule Display – No Availability Defined
7.1.2 Viewing Clinic’s Availability Cancellation
The Clinic Schedule displays full or partial day cancellation in gray + \\ over the cancelled
time slots.
Figure 209: Clinic Schedule Display – Whole and Partial Day Cancel
Availability
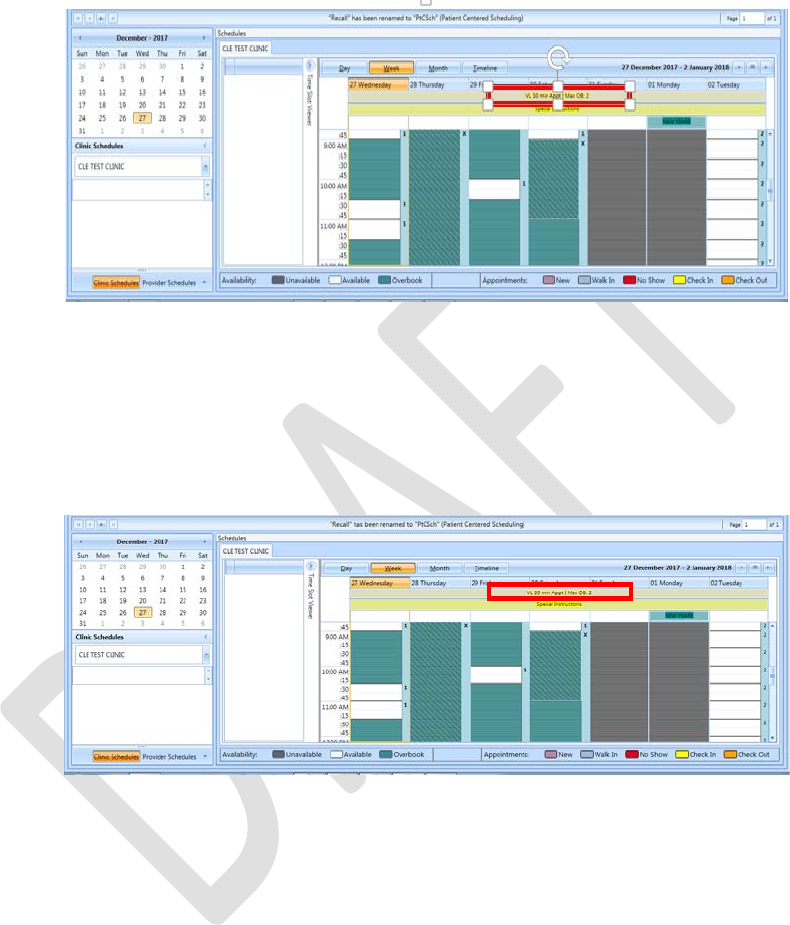
VistA Scheduling Enhancements 148 April 2018
VS GUI User Guide
7.1.3 Viewing the Clinic’s Length of APPT and Max OB
A label in the All Day Event Bar displays the Length of APP and Max OB values defined for
the selected clinic.
Figure 210: APPT Length and Max OB Allowed
7.1.4 Viewing the Clinic’s VL Indicator
For clinics defined as Variable Length, a flag “VL” displays before the Length of
Appointment information in the All Day Event Bar in the Clinic Schedule Grid.
Note: Refer to Section 6.5.2 on How to Add VL APPT.
Figure 211: VL Indicator
7.1.5 Viewing the Clinic’s Special Instructions
To display a clinic’s special instructions:
1. From the Tasks tab, on the Clinic Schedules, enter a partial name of a clinic
(six characters minimum).
2. Select the desired clinic from the returned list.
The selected clinic schedule displays and the Special Instruction Indicator
displays in the All Day Event Bar in the Clinic Schedule.
3. Click the Special Instructions indicator to display the Special Instructions.
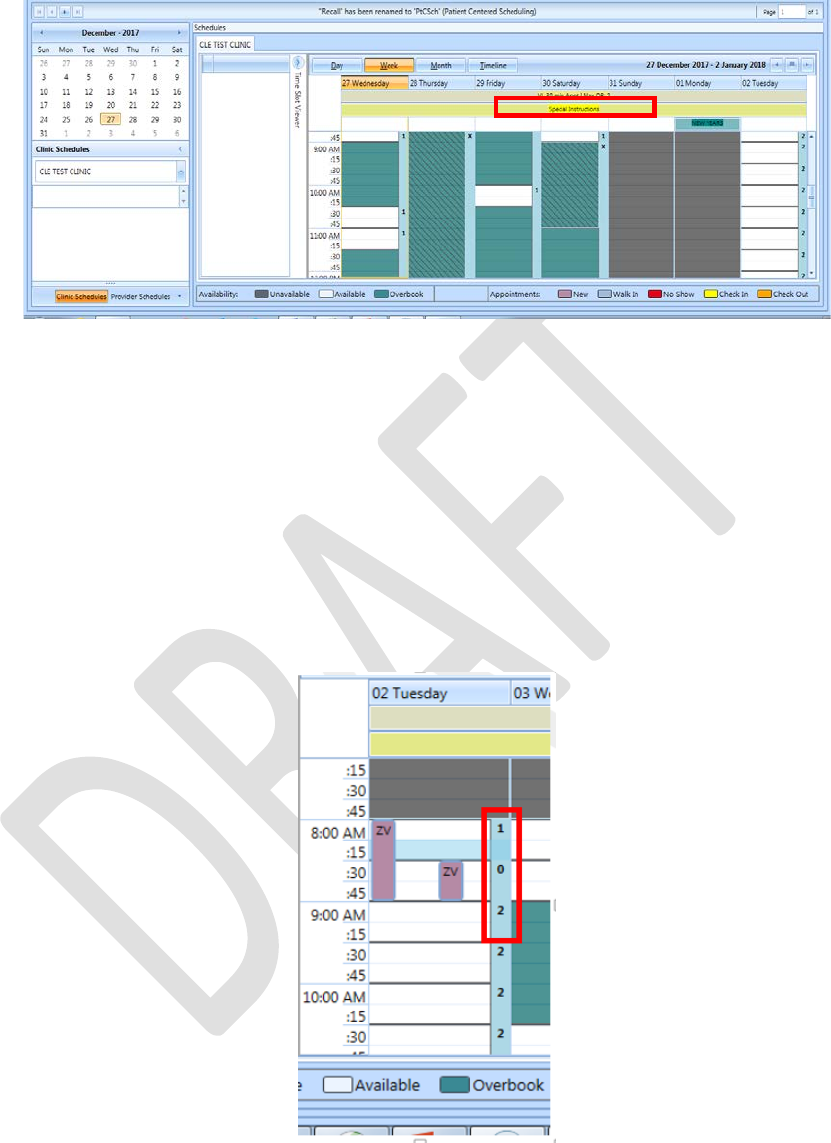
VistA Scheduling Enhancements 149 April 2018
VS GUI User Guide
Figure 212: Special Instructions Indicator
7.1.6 Viewing Clinic’s Available Slots
The Time Slot Count for availability displays as follows:
• 0-9 and j-z –denote available slots where j=10,k=11…z=26.
• Upper Case Letters A-W denote overbooks, with A being the first slot to be
overbooked and B being the second for that same time, etc.
• Special characters *,$,!,@,# denote overbooks or appointments that fall
outside of a clinic’s regular hours.
Figure 213: Time Slot Count
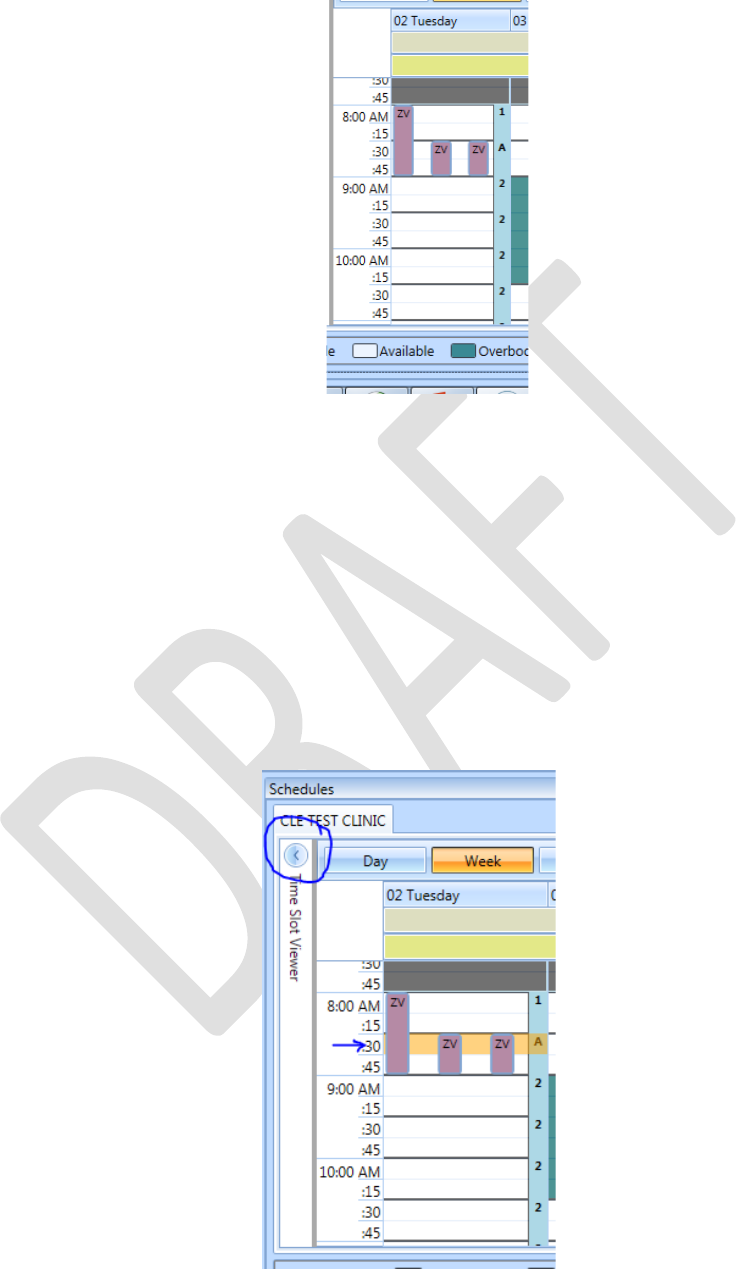
VistA Scheduling Enhancements 150 April 2018
VS GUI User Guide
Figure 214: Overbook Time Slot Count
7.1.7 The Time Slot Viewer
The Time Slot Viewer displays to the left of the Clinic Schedule Grid. It displays APPT
information per selected time slot. For APPTs booked in the time slot, the full patient’s name
displays in a list in the order they were added to the time slot.
1. From the Tasks Tab, on the Clinic Schedules, enter a partial name of a clinic
(six-character minimum).
2. Select the desired clinic from the returned list.
The selected clinic schedule displays.
Note: Time Slot Viewer can be expanded or minimized in Clinic Schedule Grid.

VistA Scheduling Enhancements 151 April 2018
VS GUI User Guide
Figure 215: Minimized Time Slot Viewer
Figure 216: Expanded Time Slot Viewer
When you select a time slot from the Clinic Schedule it populates the Time Slot Viewer with
the following information:
• Date/Time of the Time Slot.
• Available slot count left for the time slot.
• A list of patient names in the order they were booked, for any APPTs
scheduled in the time slot.
Figure 217: Time Slot Viewer Displays Slot Details
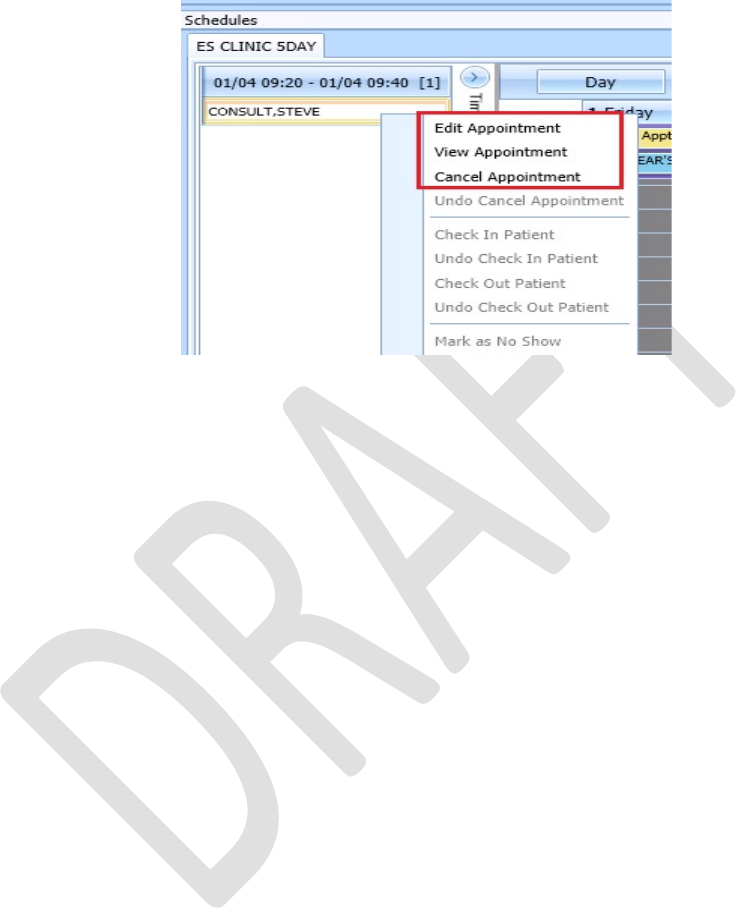
VistA Scheduling Enhancements 152 April 2018
VS GUI User Guide
For booked APPTs, right-click to extend action options that are available from Time
Slot Viewer, the same as in the Clinic Schedule Grid.
Figure 218: Time Slot Viewer Right-click–Edit, View, Cancel
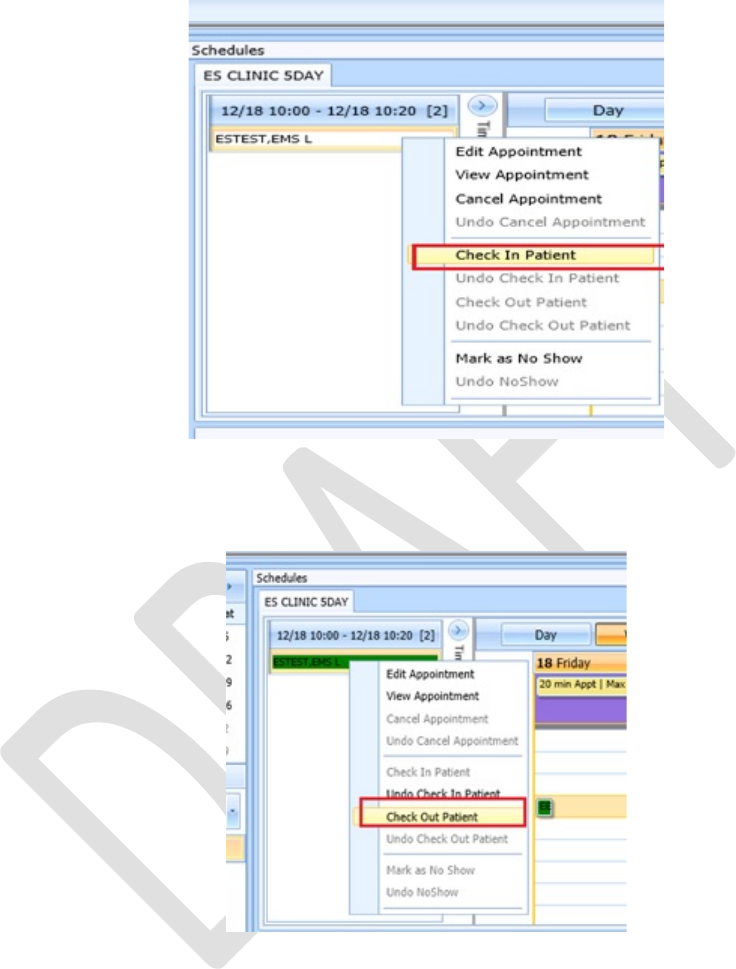
VistA Scheduling Enhancements 153 April 2018
VS GUI User Guide
The Check In Patient command from the Time Slot Viewer is the same as from the Clinic
Schedule Grid.
Figure 219: Time Slot Viewer – Check In Patient
The Check Out Patient command from the Time Slot Viewer is the same as from the Clinic
Schedule Grid.
Figure 220: Time Slot Viewer – Check Out Patient
The Mark as No Show command from the Time Slot Viewer is the same as from the Clinic
Schedule Grid.
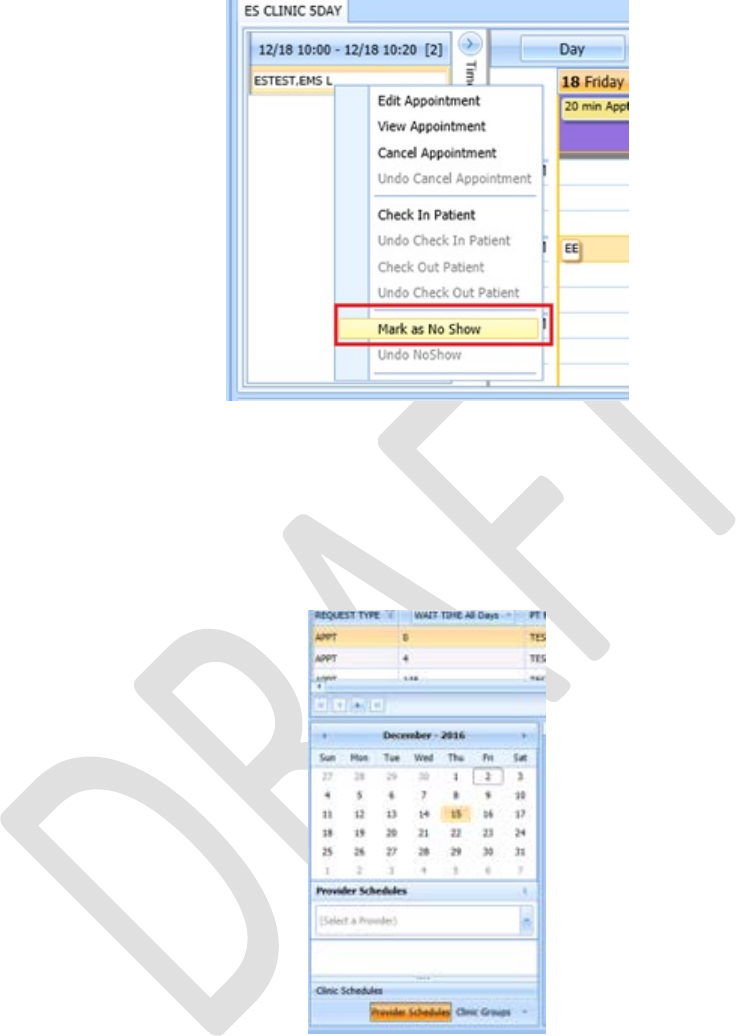
VistA Scheduling Enhancements 154 April 2018
VS GUI User Guide
Figure 221: Time Slot Viewer – Mark as No Show
7.1.8 Viewing Provider Availability
To search for a provider and view the provider’s schedule.
1. From the Tasks tab, under the Request grid calendar, select Provider
Schedules.
Figure 222: Provider Schedules
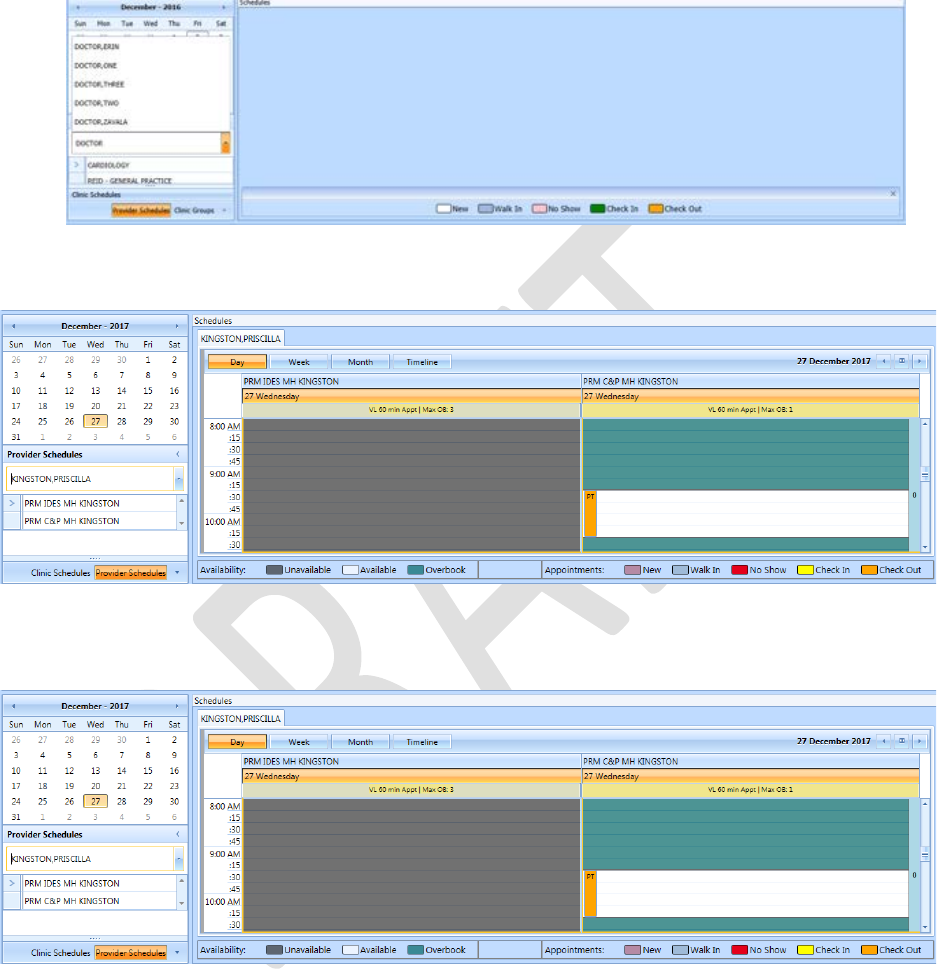
VistA Scheduling Enhancements 155 April 2018
VS GUI User Guide
2. Enter a partial name of a provider (three characters minimum). Select the
desired provider from the returned list.
Figure 223: Provider Schedules Selection List
The selected provider schedule displays.
Figure 224: Provider Schedule Display
The provider’s availability displays across all clinics. If the provider has only one
clinic, that clinic’s schedule and availability appear.
Figure 225: Provider Schedules Booked APPTs
Available APPT slots display as white space, which a scheduler can select to add an
APPT.
The APPTs display with the name of the patient in a specific Clinic Schedule time
slot.
Time slots in the Clinic Schedule that appear dimmed indicate they are not available
therefore, schedulers are unable to add APPTs for those specific slots.
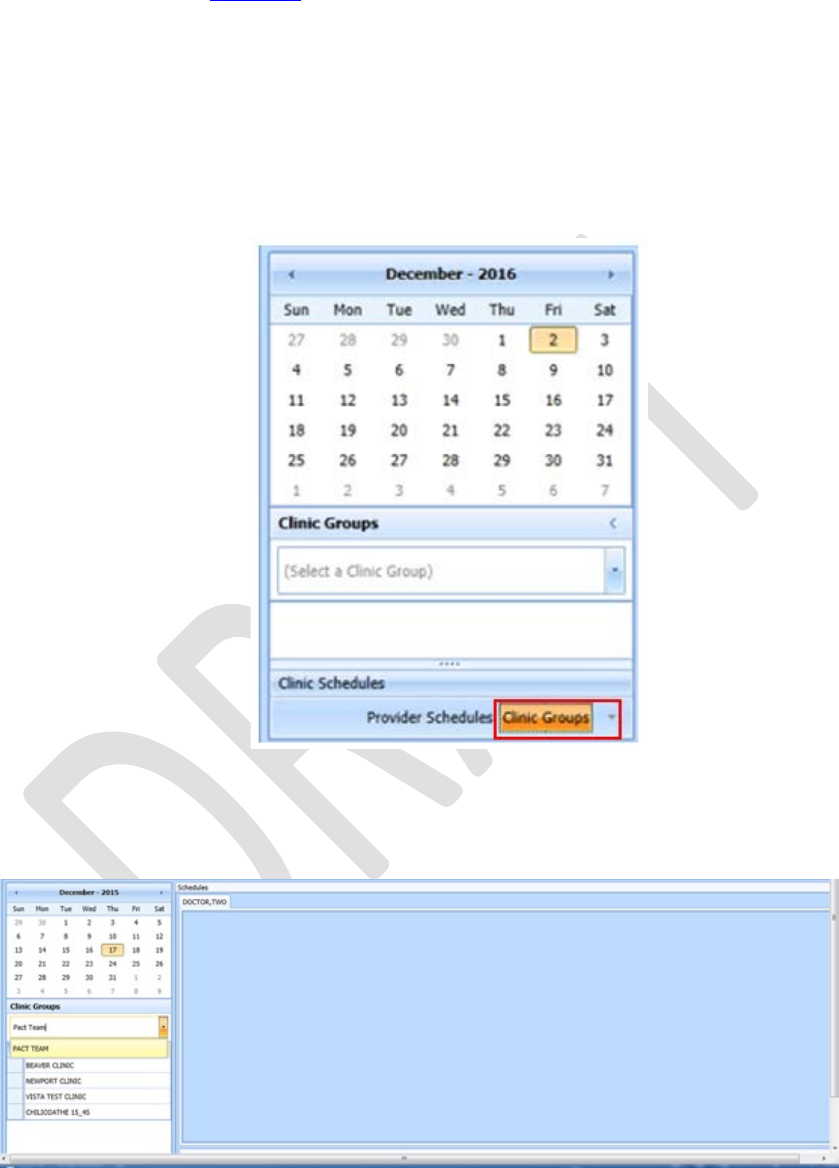
VistA Scheduling Enhancements 156 April 2018
VS GUI User Guide
Note: Refer to Section 6 for APPT Management instructions on how to Add, Check-
In, Checkout, and Cancel APPTs.
7.1.9 Viewing Clinic Group Availability
To search for a clinic group and view the clinic group’s schedule:
1. On the Tasks tab, point to the calendar of the Request grid, and then select
Clinic Groups.
Figure 226: Clinic Groups
2. Enter a partial name of a clinic group (six-character minimum).
3. Select the desired Clinic Group from the returned list.
Figure 227: Clinic Groups Search Result List

VistA Scheduling Enhancements 157 April 2018
VS GUI User Guide
The selected clinic group schedule(s) displays, starting with today’s date in the Day
view.
Figure 228: Clinic Groups Schedule Display
Note: Refer to Section 6 for the APPTs Management instructions on how to Add,
Check-In, Checkout, and Cancel APPTs.
7.2 System Tab
The System tab requires the SDECZMGR security key to access the tab.
7.2.1 Viewing Clinic Availability Information
Clinic availability cannot be modified from the VS GUI.
To quickly search for clinic availability:
1. From the System tab, click Availability in the Resource Schedules section.
2. In the Availability Selection dialog box, type the desired clinic’s name.
3. Select the desired clinic and click OK.
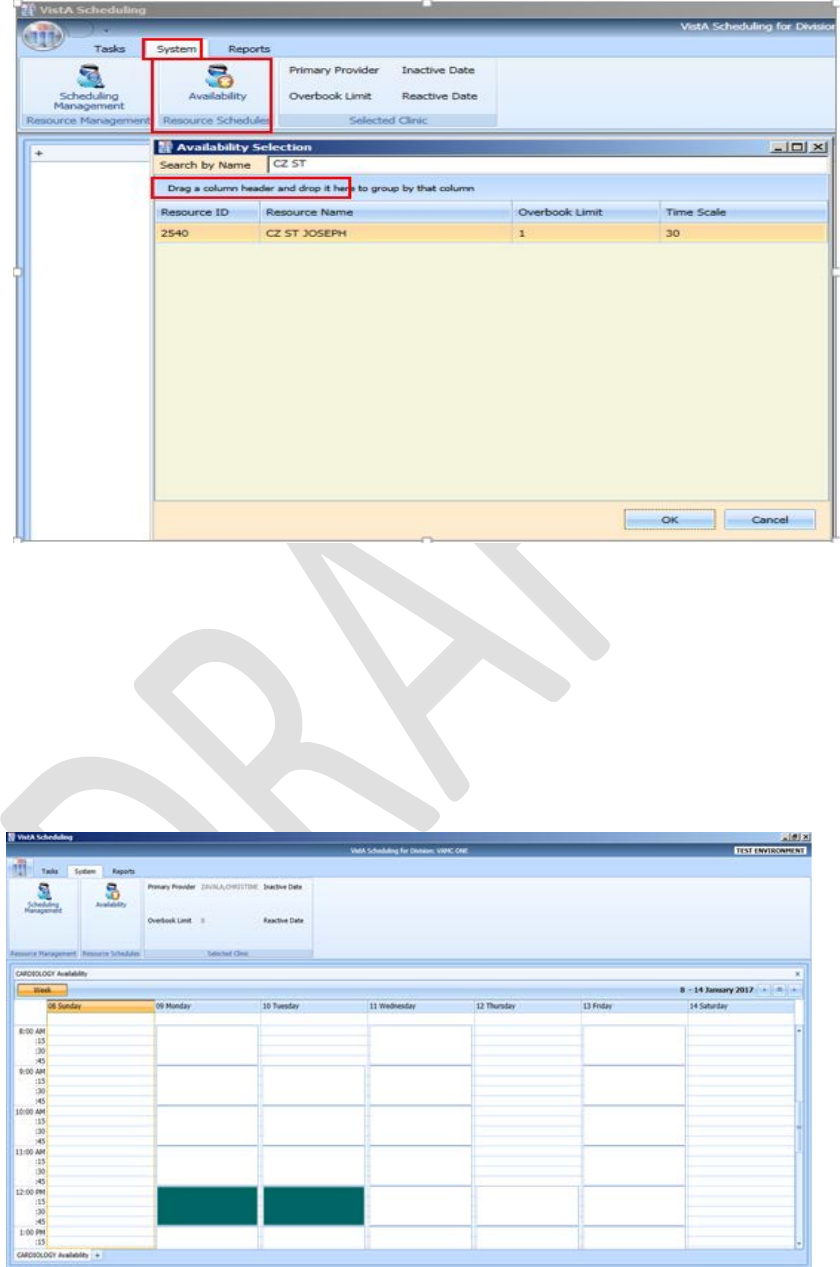
VistA Scheduling Enhancements 158 April 2018
VS GUI User Guide
Figure 229: Clinic Availability Search
• The Schedule displays for the selected clinic. Primary Provider, Overbook
Limit, Inactive Date, and Reactive Date, as applicable, also display in the
Selected Clinic section.
• The Schedule also displays the number of APPTs per slot and the number of
slots total per APPT length (in minutes and total number of bookable
minutes).
• The Schedule uses the same visual coloration as the Clinic Schedule for
workable hours, non-workable hours, and no availability.

VistA Scheduling Enhancements 159 April 2018
VS GUI User Guide
Figure 230: Clinic Availability
7.2.2 Adding and Removing Privileged Users
7.2.2.1 Add A Privileged User
To add a privileged user to a prohibited clinic:
1. On the System tab, click Scheduling Management.
2. In the Prohibited Clinic search box, type a partial or full name of the clinic
(minimum six characters).
3. Click Find.
A list of prohibited clinics displays.
4. Select the appropriate prohibited clinic.
A list of privileged users for the selected clinic displays.
Figure 231: Clinics and Users
5. Select a user from the Users pane on the left side of the open window, and then
click Add User.
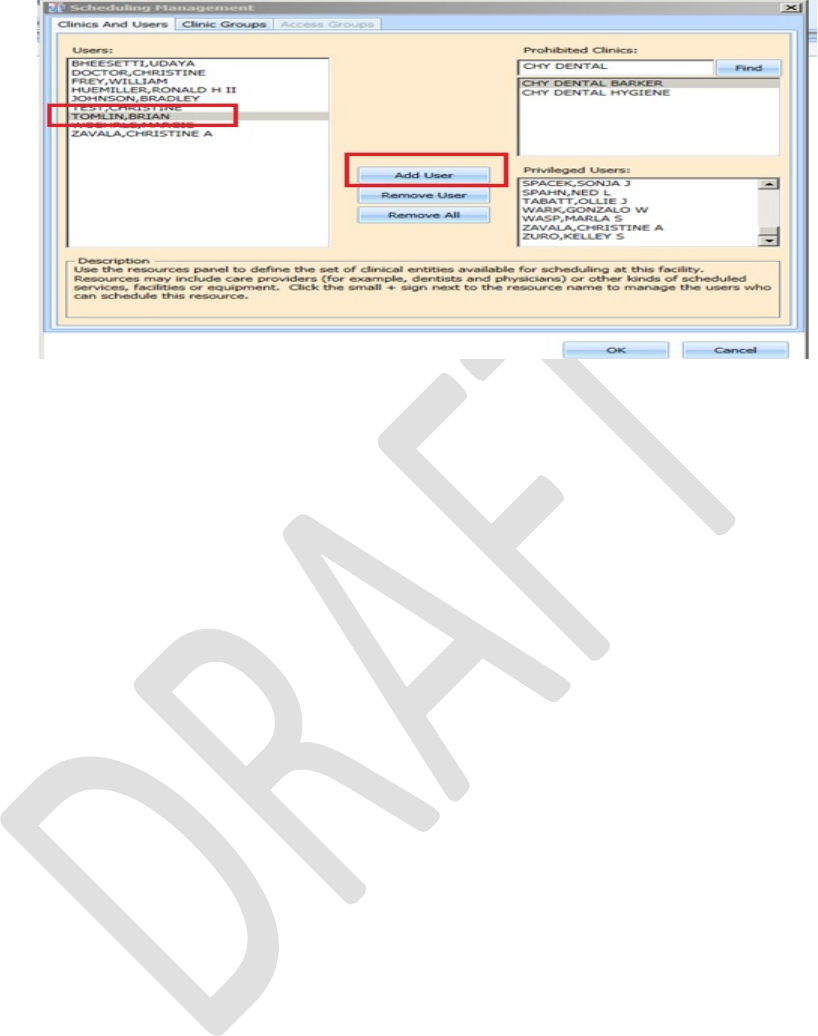
VistA Scheduling Enhancements 160 April 2018
VS GUI User Guide
Figure 232: Add Privileged User
6. Click OK to add the user to the list of Privileged Users.
7. Please note: Only users with the VistA key SDECZMENU will show in the
user list.
7.2.2.2 Remove Privileged User
To remove a privileged user from a prohibited clinic:
1. On the System tab, click Scheduling Management.
2. In the Prohibited Clinic search box, type a partial or full name of the clinic
(minimum six characters).
3. Click Find.
A list of prohibited clinics displays.
4. Select the appropriate prohibited clinic.
A list of privileged users for the selected clinic displays.
5. Select a user from the Privileged User list for the selected prohibited clinic,
and then click Remove User.
If all privileged users need to be removed, click Remove All.
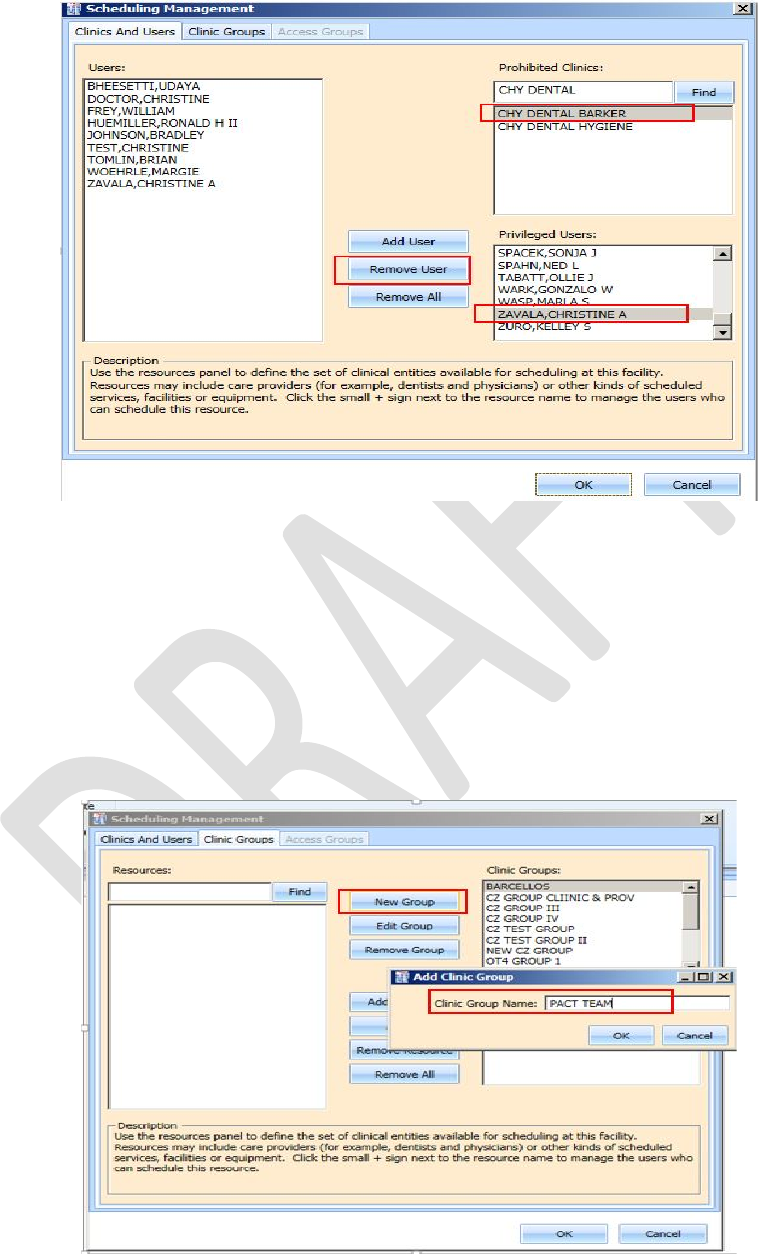
VistA Scheduling Enhancements 161 April 2018
VS GUI User Guide
Figure 233: Remove Privileged User
7.2.3 Creating Clinic Groups
To create a Clinic Group:
1. On the System tab, click Scheduling Management.
2. Select the Clinic Groups tab.
3. Click New Group.
4. Enter a name in the Clinic Group Name text box.
Figure 234: Create New Clinic Group
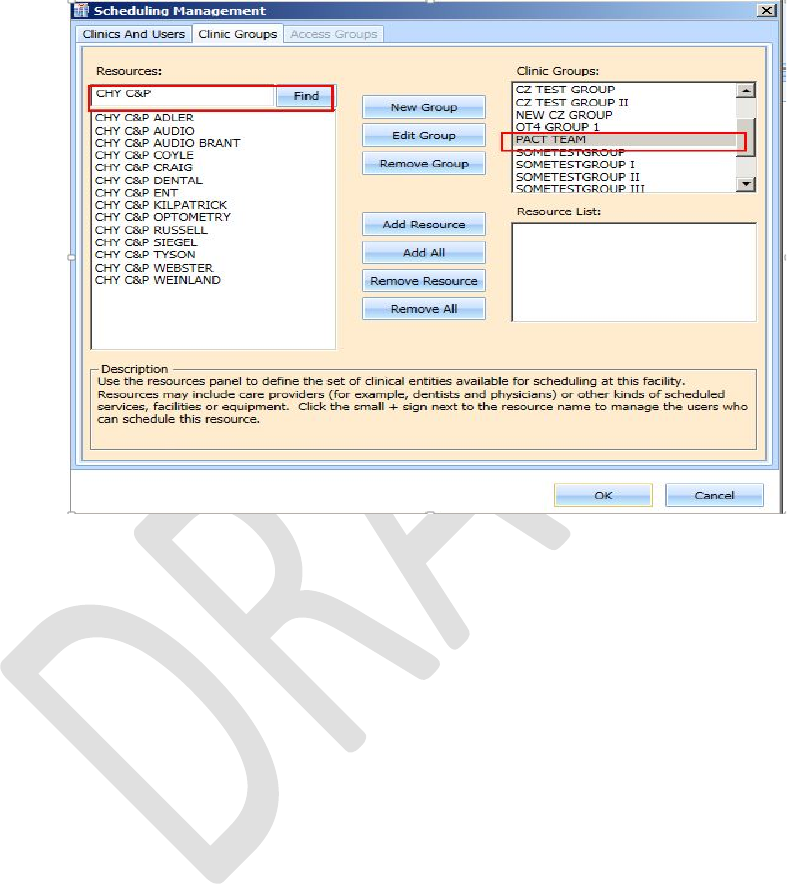
VistA Scheduling Enhancements 162 April 2018
VS GUI User Guide
5. Click OK.
6. Select the newly added Clinic Group.
7. Enter a partial name search for a Resource, and then click Find.
A resource can be a clinic or a provider that is active with an active person class.
Figure 235: Find Resource
8. Select the appropriate resource to add to the Clinic Group, and then click Add
Resource.
If all of the resources listed from the search need to be added, click Add All.
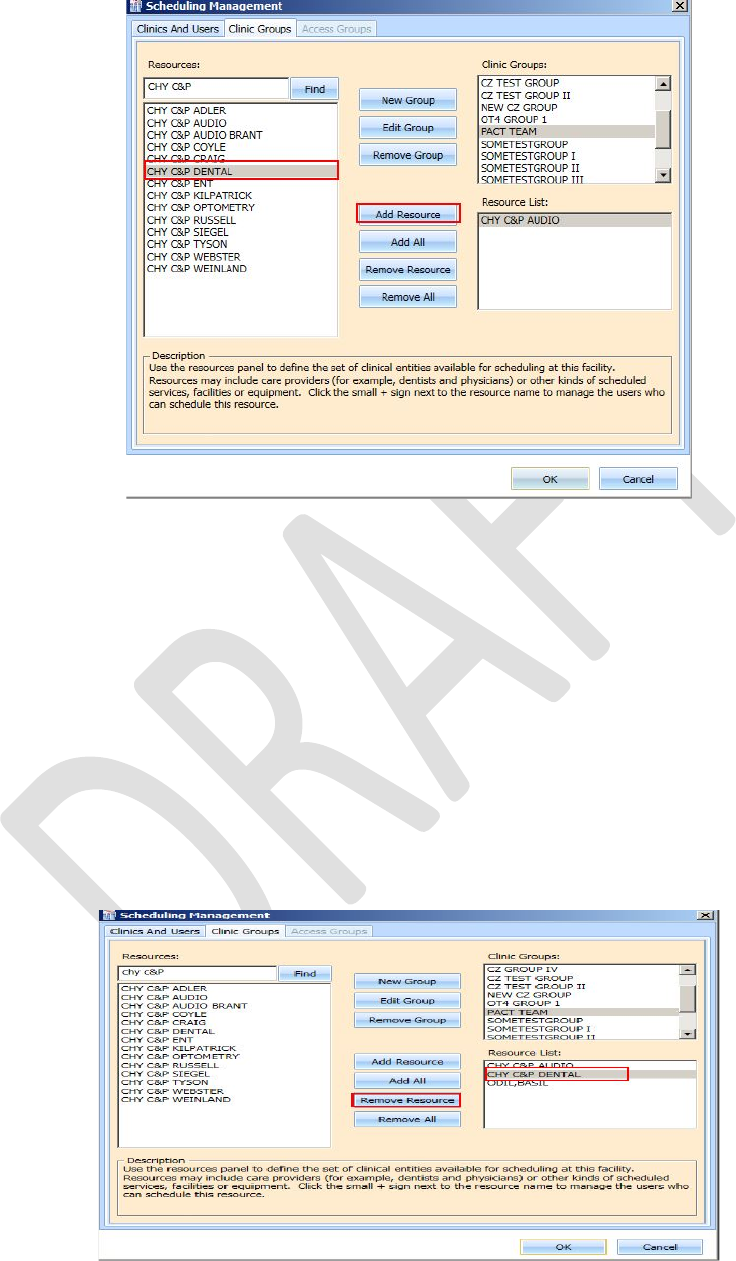
VistA Scheduling Enhancements 163 April 2018
VS GUI User Guide
Figure 236: Add Resource to Clinic Group
9. Click OK to add the clinic group to the list.
7.2.4 Removing a Resource from a Clinic Group
To remove a resource from a Clinic Group:
1. On the System tab, click Scheduling Management.
2. Select the Clinic Groups tab.
3. Select a clinic group to be edited from the Clinic Groups list.
Resources defined for the Clinic Group are displayed in the Resource List box.
4. Select a resource to remove, and then click Remove Resource.
If all resources need to be removed, click Remove All.
Figure 237: Remove Resource from Clinic Group
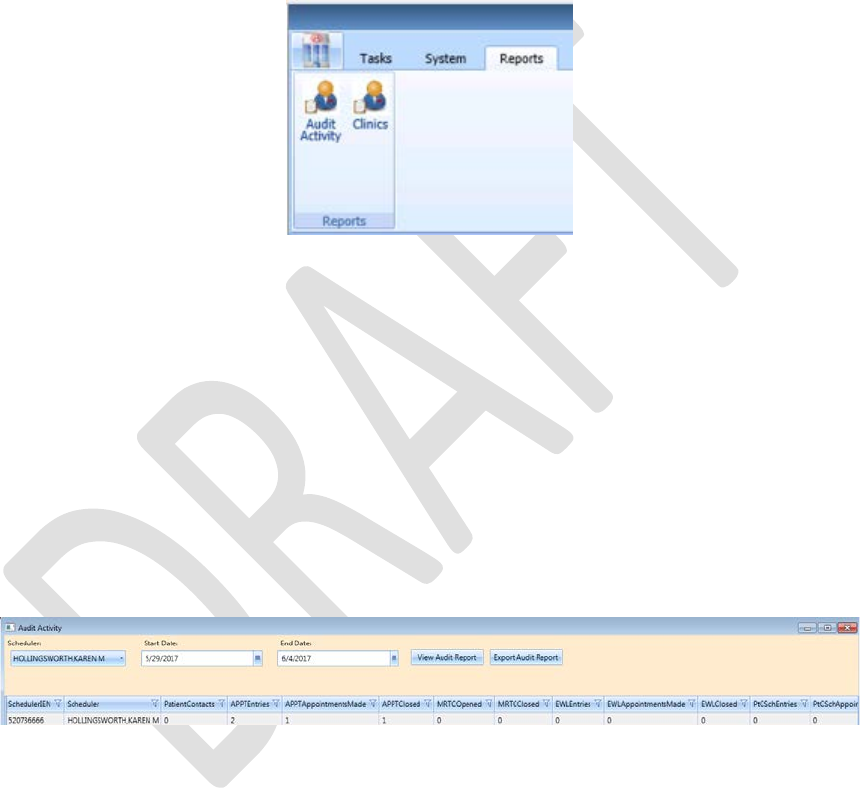
VistA Scheduling Enhancements 164 April 2018
VS GUI User Guide
8 Reports
The Reports tab allows you to view and print various reports. The Reports tab requires the
SDECZMGR manager security key to access the tab. The following selections and reports
are available:
• Audit Activity
• Clinics
Figure 238: Reports Tab Selections
8.1 The Audit Activity Report
8.1.1 Generating an Audit Activity Report for an Individual Scheduler
To view Audit Activity for an individual scheduler:
1. From the Reports tab, select Audit Activity.
The Audit Activity dialog displays.
2. Select the individual scheduler’s name from the list.
3. Select Start Date and End Date. You can type the date or select it from the
calendar.
Figure 239: Audit Activity Report – Individual Scheduler
The following columns display data for the selected scheduler, based upon the time frame
specified:
• SchedulerIEN (New Person File)
• SchedulerName
• PatientContacts
• APPTEntries
• APPTAppointmentsMade
• APPTClosed

VistA Scheduling Enhancements 165 April 2018
VS GUI User Guide
• EWLEntries
• EWLAppointmentsMade
• EWLClosed
• Patient-Centered SchedulingAppointmentsMade
• ConsultAppointmentsMade
• AppointmentsCancelled
• TotalActions
4. Click Close to exit the Audit Activity report dialog box.
8.1.2 Generating an Audit Activity Report for All Schedulers
1. From the Reports tab select Audit Activity.
The Audit Activity dialog displays.
2. From the Scheduler list select All.
3. Enter the Start Date and the End Date for the audit report.
4. Click View Audit Report.
The following columns display data for All Schedulers based upon the time frame
specified:
• SchedulerIEN (Internal Entry Number – New Person File)
• SchedulerName
• PatientContacts
• APPTEntries
• APPTAppointmentsMade
• APPTClosed
• EWLEntries
• EWLAppointmentsMade
• EWLClosed
• Patient-Centered SchedulingAppointmentsMade
• ConsultAppointmentsMade
• AppointmentsCancelled
• TotalActions
Note: APPT columns include actions on RTC requests.
5. Click Close to exit the Audit Activity report dialog box.
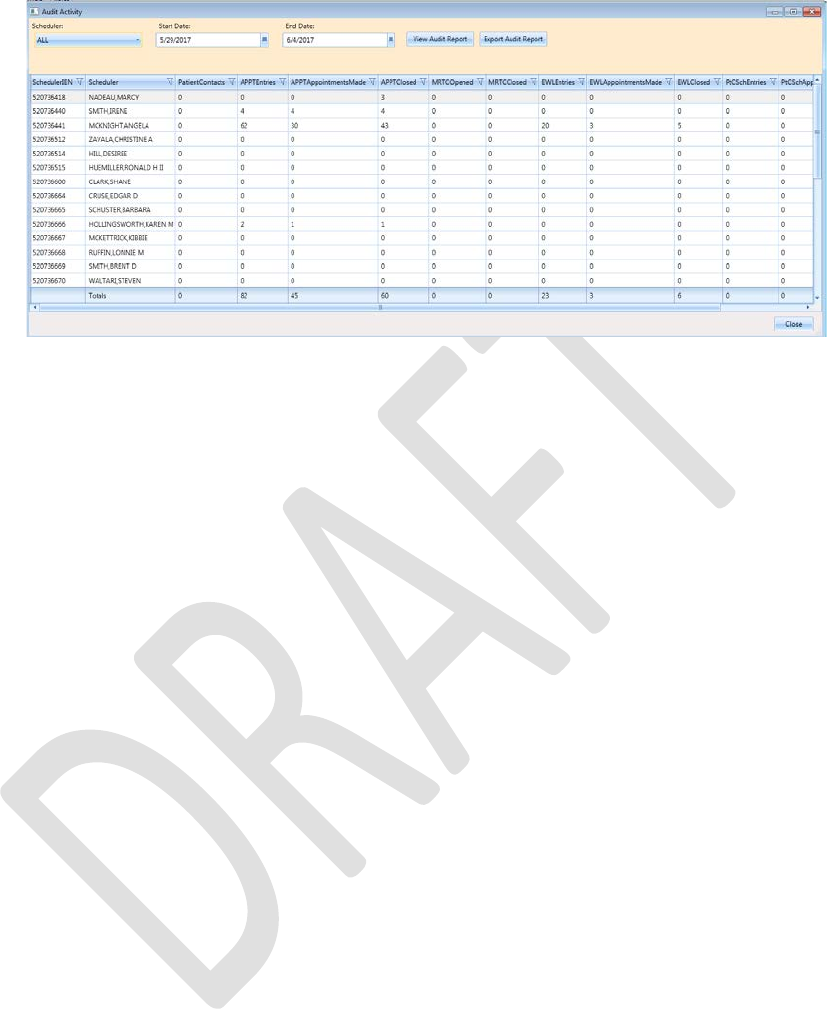
VistA Scheduling Enhancements 166 April 2018
VS GUI User Guide
Figure 240: Audit Activity Report – All Schedulers
8.1.3 Working with Audit Activity Report Data
8.1.3.1 Sorting by Column Header
1. Log into VS GUI.
2. Select the Reports tab.
3. Select Audit Activity from the Reports section.
The Audit Activity dialog box displays for all schedulers defined in the New
Person file (#200).
The following data displays on the screen for the selected scheduler:
• SchedulerIEN (New Person File)
• SchedulerName
• PatientContacts
• APPTEntries
• APPTAppointmentsMade
• APPTClosed
• EWLEntries
• EWLAppointmentsMade
• EWLClosed
• Patient-Centered SchedulingAppointmentsMade
• ConsultAppointmentsMade
• AppointmentsCancelled
• TotalActions
4. Select the applicable column header to change the sort order for the report by
data specified in a different column.
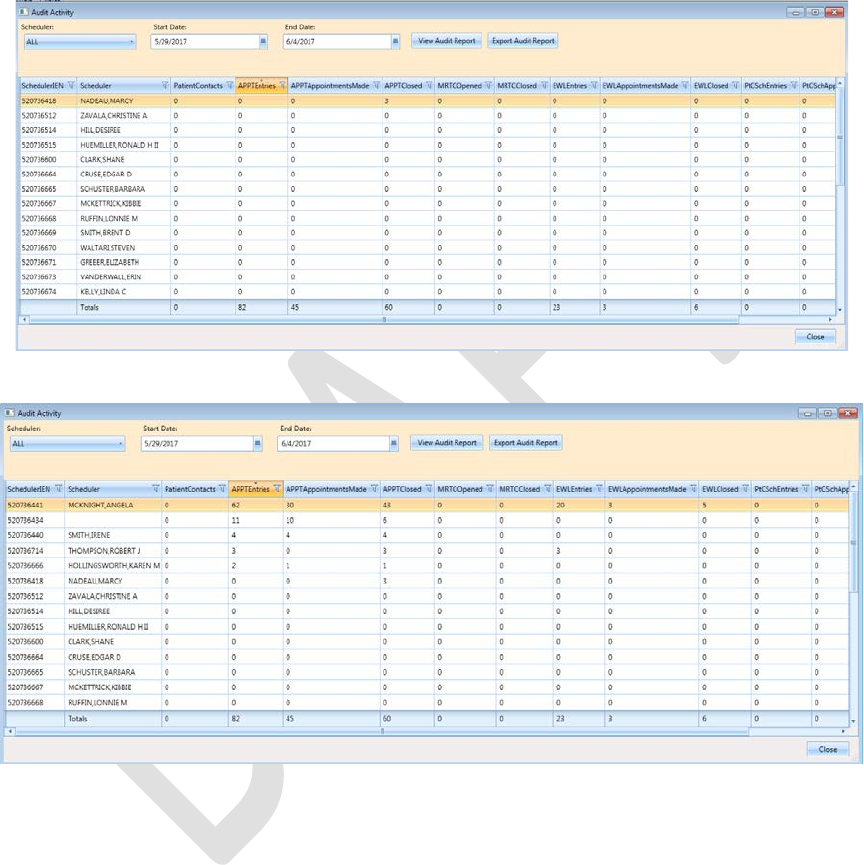
VistA Scheduling Enhancements 167 April 2018
VS GUI User Guide
• To sort data in the specified column in ascending order, click the column
header.
• To sort data in the specified column in descending order, click the column
header a second time.
5. Click Close to exit the Audit Activity Report dialog box.
Figure 241: Audit Activity Sort – Ascending
Figure 242: Audit Activity Sort – Descending
8.1.3.2 Filtering by Column Data
1. Select a filter option from each column header to filter data in the Audit
Activity report.
Note: All schedulers who have greater than or equal to 10 APPT Appointments Made
in the selected date range.
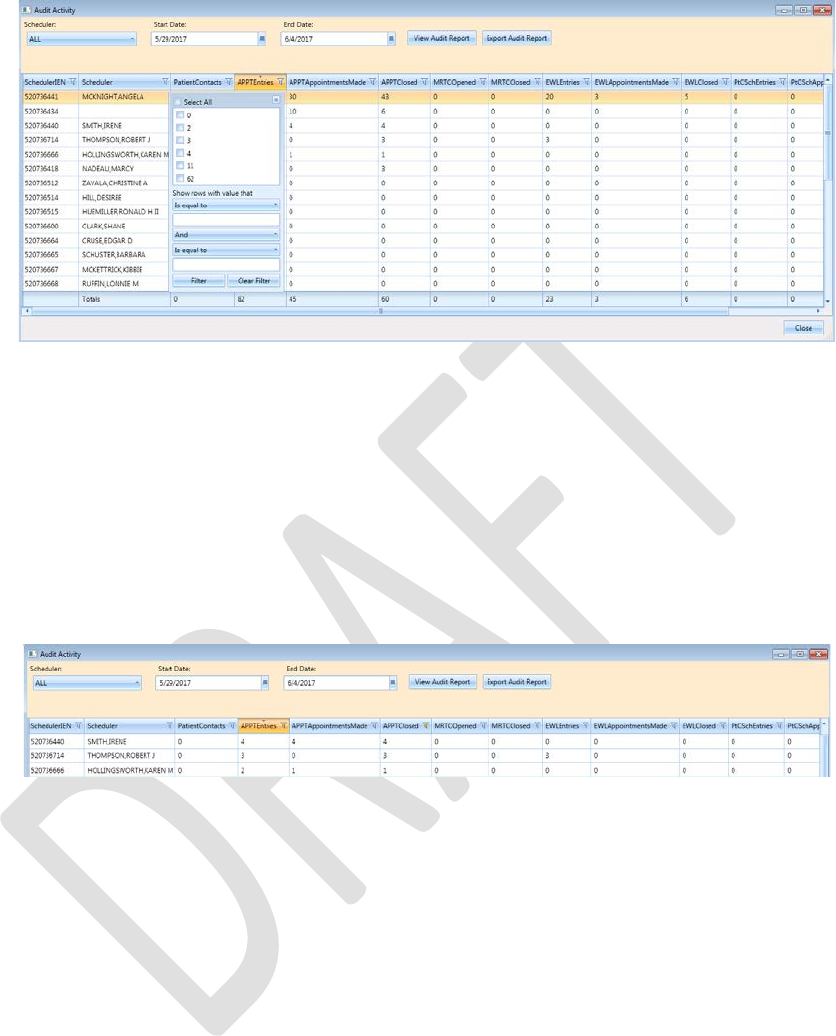
VistA Scheduling Enhancements 168 April 2018
VS GUI User Guide
Figure 243: Audit Activity Report – Filtered
Multiple filters can be selected to refine results (i.e., All schedulers who have greater
than or equal to 10 APPT Entries but less than or equal to 30 APPT Closed for the
selected date range).
Selected filters are highlighted in column headers.
To remove filters, select the filter option in a column header, and then click Clear
Filter.
2. Click Close to exit the Audit Activity report dialog box.
Figure 244: Audit Activity Report – Multiple Filters
8.1.4 Export an Audit Activity Report for Individual or All Schedulers
The data displayed on the screen can be exported to an Excel spreadsheet.
1. To export the audit report, click Export Audit Report.
The Save As dialog box opens.
2. Select the location to save the report file.
The default File name is “Audit Report”. You can edit if necessary.
Confirm the “Save As Type” is Excel.
3. Click Save.
The Report is generated. It contains data displayed on the screen in the Audit
Activity dialog box and it is saved to the location specified in the Save As dialog
box.
4. Click Close to exit the Audit Activity report dialog box.

VistA Scheduling Enhancements 169 April 2018
VS GUI User Guide
8.2 Clinics Report
The Clinic Report is accessed from the Reports tab by selecting Clinics from the Reports
section. The report displays clinic activity for all clinics, defined in the Hospital Location file
as the default.
8.2.1 Clinic Activity Report – Individual Clinic
The Clinic Report can be limited to individual clinics.
1. Log into VS GUI.
2. Select Reports tab.
3. From the Reports section, click Clinics.
4. In the Clinic Activity dialog box, enter the clinic’s name (six-character
minimum) that is defined in the Hospital Location file.
5. Click Search.
The following data displays on the screen for the selected clinic:
• Clinic name
• Division
• Stop Code
• Service
• CreateDT
• InactiveDT
• ReactiveDT
• AppType
• DefaultProv
• AdditionalProv
• ApptLength
• Variable
• MaxDays
6. Click the Clear button to remove the search criteria and return to the Clinic
Activity report for all clinics.
7. Click Exit to close the Clinic Activity Report dialog box.
8.2.2 Working with the Clinic Activity Report
8.2.2.1 Sorting by Column Headers
1. Log into VS GUI.
2. Select the Reports tab.

VistA Scheduling Enhancements 170 April 2018
VS GUI User Guide
3. Select Clinics from the Reports section.
The Clinic Activity dialog box displays for all clinics defined in the Hospital
Location file (File #44).
The following data displays on the screen for the selected clinic:
• Clinic name
• Division
• Stop Code
• Service
• CreateDT
• InactiveDT
• ReactiveDT
• AppType
• DefaultProv
• AdditionalProv
• ApptLength
• Variable
• MaxDays
Note: The sort defaults in alphabetical order by the Clinic’s name.
4. To change the sort order for the report by data specified in a different column,
select the applicable column header.
5. Click once on the column header to sorts the data in ascending order.
6. Click a second time on the column header to sort the data in descending order.
7. Click Exit to close the Clinic Activity Report dialog box.
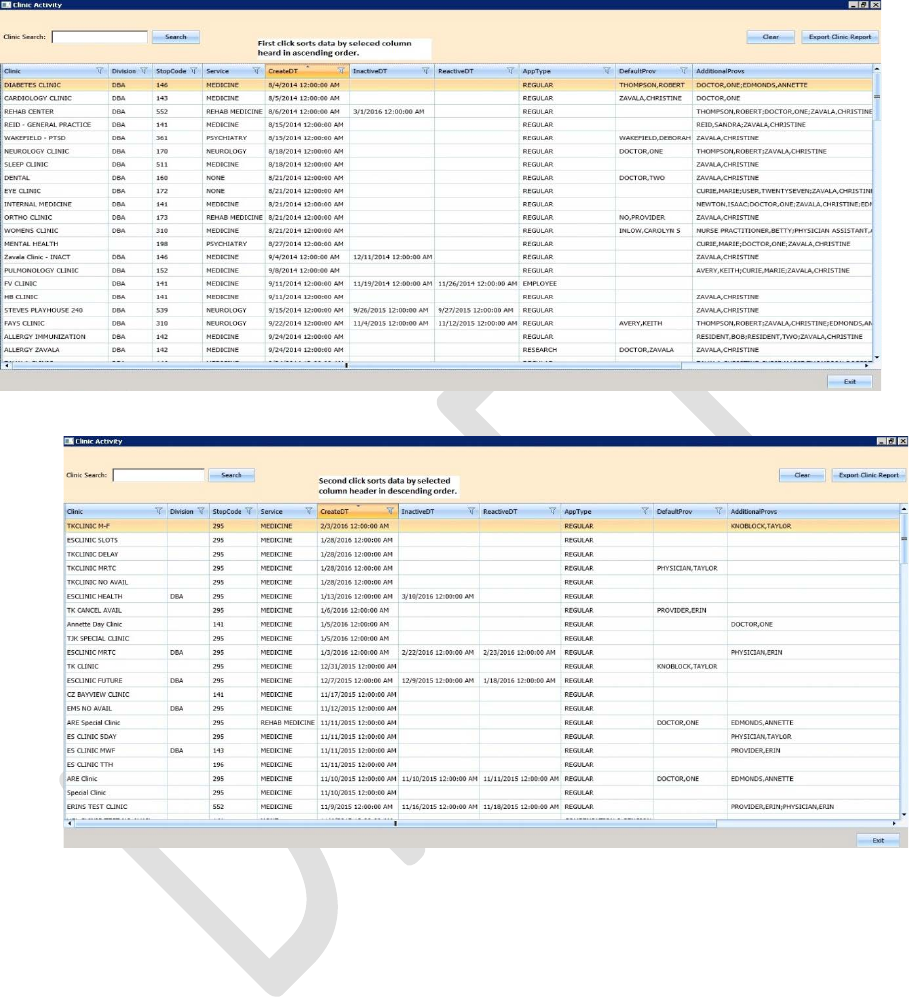
VistA Scheduling Enhancements 171 April 2018
VS GUI User Guide
Figure 245: Clinic Activity Report Sort – Ascending Order
Figure 246: Clinic Activity Report Sort – Descending Order
8.2.2.2 Filtering Data by Column
Data in the Clinic’s Activity report can be filtered as follows:
1. Select the filter option in each column header (e.g., Clinic Activity data can be
filtered by all Clinics with a defined Service of Rehab Medicine).
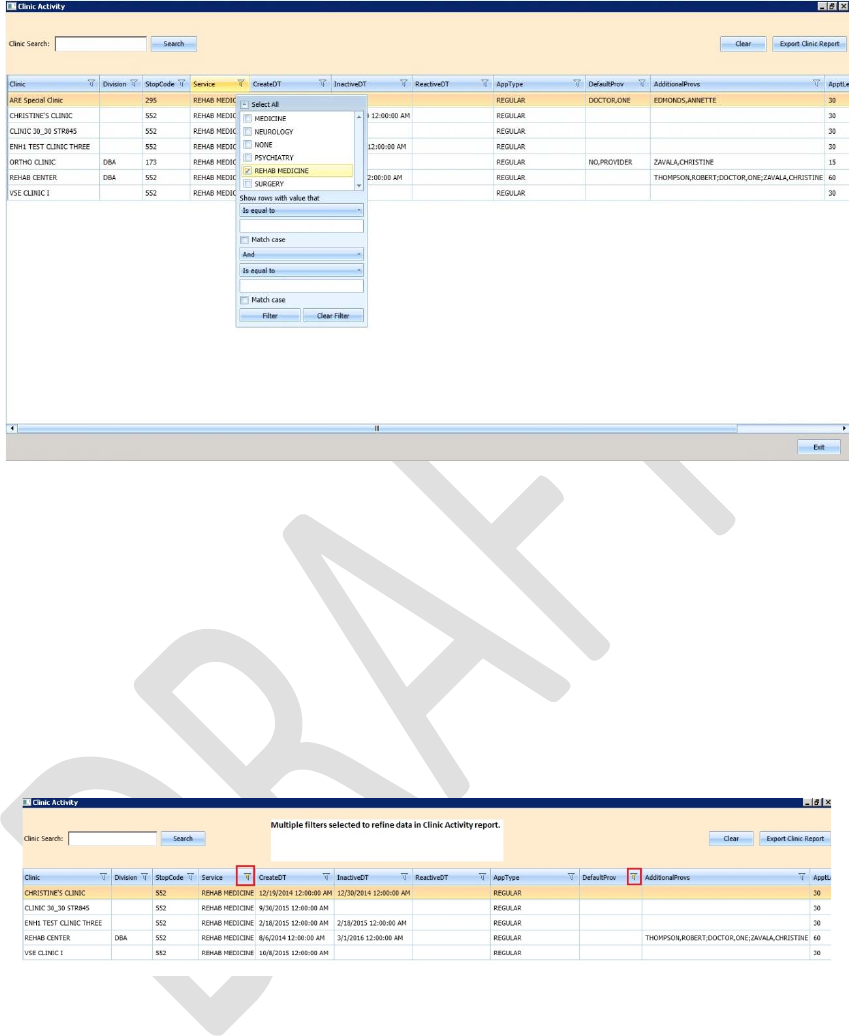
VistA Scheduling Enhancements 172 April 2018
VS GUI User Guide
Figure 247: Clinic Activity Report – Filtered
Multiple filters can be selected to refine results (e.g., Clinic Activity data can be filtered by
all Clinics with a defined Service of Rehab Medicine that also have no DefaultProv defined).
Selected filters are highlighted in column headers.
To remove filters:
1. Select a filter option in the column header, and then click Clear Filter.
2. Click Exit to close the Clinic Activity report dialog box.
Figure 248: Clinic Activity Report – Multiple Filters
8.2.3 Exporting a Clinic Report
To export a Clinic Report:
1. From the Reports tab, in the Reports section, select Clinics.
The Clinic Activity dialog box opens, displaying the report.
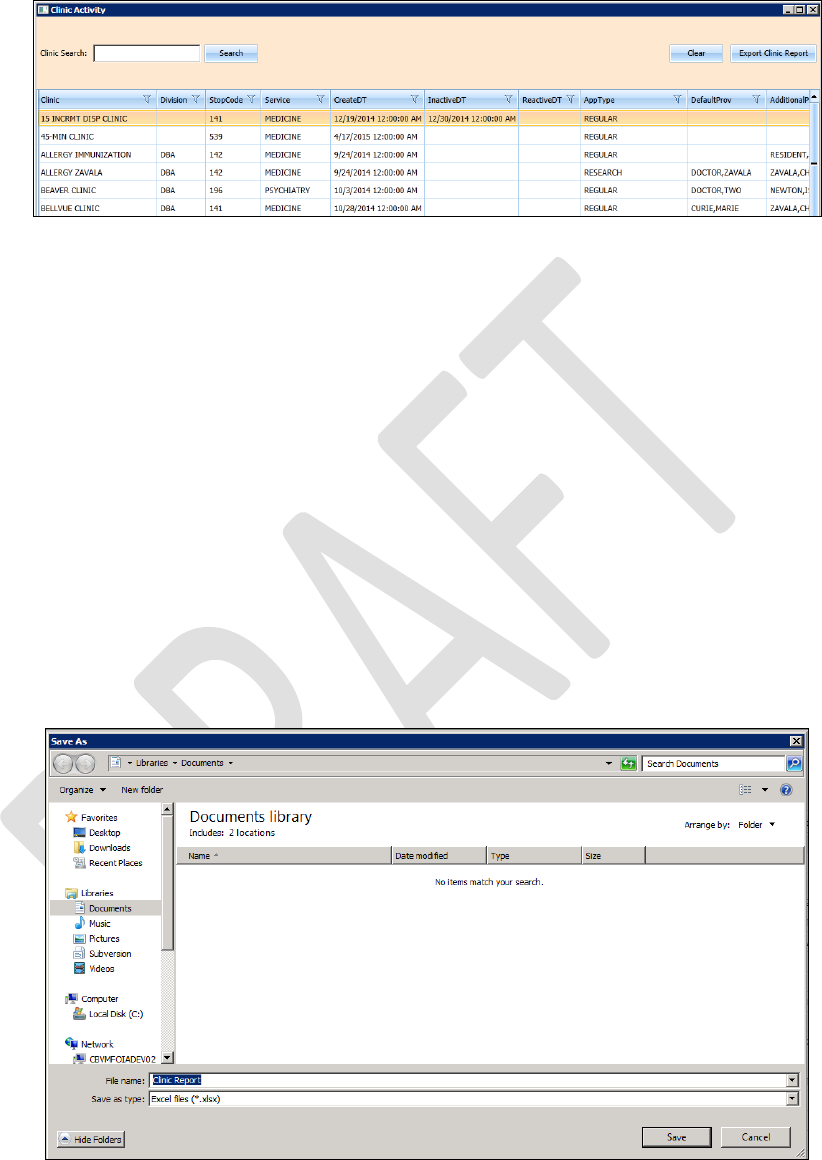
VistA Scheduling Enhancements 173 April 2018
VS GUI User Guide
Figure 249: Clinic Activity
If applicable, search for a specific clinic in the Clinic Search field. Click Search.
If no specific clinic is used, ensure the full list is downloaded by scrolling down
on the right several times until the last clinic on the list is the same when scroll to
the bottom.
2. Click Export Clinic Report.
A Save As dialog box opens.
3. Select the location to save the report.
Confirm the file name. The default is “Clinic Report”.
Confirm the Save as Type is Excel.
4. Click Save.
Data displayed on the screen is exported to the file and saved to the specified
location with the defined name.
5. Click Exit to close the Clinic Activity report dialog box.
Figure 250: Save As

VistA Scheduling Enhancements 174 April 2018
VS GUI User Guide
9 Trash Queue Cleanup
WARNING: ONLY USE THIS OPTION IF DIRECTED BY HEALTH PRODUCT
SUPPORT ADMIN TEAM. PLACE A TICKET IF YOUR SITE THINKS THIS MAY
BE NEEDED.
During initial set-up of VS GUI, administrators who need to identify and purge unresolved
requests, a task can be run to identify open appointment requests or duplicate appointment
requests, close them, and produce a report for administrators. This excludes VAR requests
which are called Veteran or Mobile requests, all stored in the SDEC APPT REQUEST file.
9.1 Compile List of Re-Opened REQUEST Records that Can
Be Closed
During initial set-up of VS GUI, the following dialog allows the user to find open
appointment requests or duplicate appointment requests to produce a report for
administrators to review/review verify.
The SDEC Initial Cleanup Utility will allow the Closing of Re-Opened SDEC APPT
REQUEST records, which have resulted from a cancellation in VistA of a corresponding
SDEC APPOINTMENT.
1. Log on to the VistA Legacy System.
2. Select VS GUI Initial Cleanup Utility [SDEC INITIAL CLEANUP UTILITY]
3. Select Compile List of Re-Opened REQUEST records that can be closed
To Compile a List of Re-Opened REQUEST records that can be closed:
1. Enter a list of Clinics (one by one) to EXCLUDE from Compilation.
2. Enter the Clinic to Exclude.
3. Press Enter to not exclude any Clinic.
A dialog box displays “You did not choose any Clinics to Exclude”.
Are you sure you want to run Cleanup for all clinics? Yes or No?
4. Click Yes to continue.
5. Click No to abort.
6. Select one of the following to print the results:
• VistA Print Device
• Spooler
• VistA Email
• Screen with capture
7. Review the list to ensure these are all extraneous open requests that should be
auto-closed.

VistA Scheduling Enhancements 175 April 2018
VS GUI User Guide
To Compile for all Clinics excluding the following:
•
Select Option: SDEC INITIAL CLEANUP UTILITY VS GUI Initial Cleanup Utility
The following Utility will allow the Closing of Re-Opened SDEC APPT REQUEST
records which have resulted from a Cancellation in VistA of a corresponding
SDEC APPOINTMENT.
3 Select one of the following Compile List of Re-Opened REQUEST
records that can be Closed
2 Commit Records to Be Closed from Compiled List
What Would You like to Do?: 1 Compile List of Re-Opened REQUEST records that can be
Closed
Please enter in, one by one, a list of Clinics to EXCLUDE from Compilation.
Enter CLINIC to EXCLUDE: <Hit Enter to not exclude any Clinics>
You did not choose any Clinics to Exclude.
Are you sure you want to run cleanup for ALL clinics? (Y OR N):? NO// YES
Compiling for all Clinics excluding the following:
DEVICE: HOME// HOME (CRT)
(You may enter a device that prints to a file, a printer, email message, or you may
print on the screen.)
*** Open SDEC APPT REQUESTs List run Jan 09, 2017@02:48:47 ***
LAST 4 APPT REQ IEN
CLINIC PATIENT SSN APPT IEN CID DA==
VSE ENH1 CLINIC FAULCON,GONZALO J 2916 1747 ; 1985 12/27/2016
VSE ENH1 CLINIC TEST,STERLING PAUL JR 0183 1752 ; 1988 12/27/2016

VistA Scheduling Enhancements 176 April 2018
VS GUI User Guide
9.2 Commit Records to Be Closed from Compiled List
During initial set up of VS GUI, to commit Records to Be Closed from the Compiled List
created via SDEC INITIAL CLEANUP UTILITY:
1. Log on to the VistA Legacy System.
2. Select VS GUI Initial Cleanup Utility [SDEC INITIAL CLEANUP UTILITY]
3. Select Commit Records to Be Closed from Compiled List
A dialog box displays “What Would You like to Do?”
To Commit Records to Be Closed from the Compiled List:
1. Open SDEC APPT REQUEST Compilation Lists to choose from:
The batch list displays records.
2. Enter the Batch # previously reviewed above. There may be several batches in
the list from past compile jobs.
A message displays “Committing Open records for Batch # to Closed…. Done”
After the task is completed, the Current Status changes to “Closed” and the
Disposition fields in the SDEC APPT REQUEST file are set accordingly.
To verify the record has been closed:
1. Go to VA FileMan
2. Inquire to view the SDEC APPT REQUEST File (#409.85)
View the following fields:
• CURRENT STATUS
• DATE DISPOSITIONED
• DISPOSITIONED BY
• DISPOSITION
• DISPOSITION CLOSED BY CLEANUP
Select Option: SDEC INITIAL CLEANUP UTILITY VS GUI Initial Cleanup Utility
The following Utility will allow the Closing of Re-Opened SDEC APPT REQUEST
records which have resulted from a Cancellation in VistA of a corresponding
SDEC APPOINTMENT.
4 Select one of the following Compile List of Re-Opened REQUEST
records that can be Closed
2 Commit Records to Be Closed from Compiled List
What Would You like to Do?: 2 Commit Records to Be Closed from Compiled List

VistA Scheduling Enhancements 177 April 2018
VS GUI User Guide
Open SDEC APPT REQUEST Compilation Lists to Choose From:
Batch # Run User Start Date Finish Da==
1 STUCK,ERIN Dec 14, 2016@07:41:56 Dec 14, 2016@07:41:56
2 KRON,CAROLYN S Dec 16, 2016@23:54:52 Dec 16, 2016@23:54:53
3 KRON,CAROLYN S Dec 22, 2016@11:47:18 Dec 22, 2016@11:47:19
4 KRON,CAROLYN S Jan 09, 2017@02:34:05 Jan 09, 2017@02:34:05
5 KRON,CAROLYN S Jan 09, 2017@02:48:47 Jan 09, 2017@02:48:47
Enter Batch #:5
Committing Open records for Batch # 5 to Closed...Done
Once the task completes, the CURRENT STATUS is changed to “CLOSED” and the
DISPOSITION fields in the SDEC APPT REQUEST file are set accordingly.
To verify the record has been closed, go to VA FileMan and Inquire to view the SDEC APPT
REQUEST File (#409.85). View the following fields:
• CURRENT STATUS
• DATE DISPOSITIONED
• DISPOSITIONED BY
• DISPOSITION
• DISPOSITION CLOSED BY CLEANUP

VistA Scheduling Enhancements 178 April 2018
VS GUI User Guide
9.2.1.1 Systems Manager
3. Navigate to Fileman Record INQUIRY [RTZ INQ-FM-INQUIRY], either
through the programmer prompts or through the site’s local fileman prompts.
4. Select Inquire to File Entries [DIINQUIRE]
5. Inquire to File Entries
Output from What File: SDEC APPT REQUEST//
6. Select SDEC APPT REQUEST PATIENT:
7. Press Return
To see more
To exit
OR
Choose a number from the list
Select Systems Manager Menu Option: fm VA FileMan
VA FileMan Version 22.0
Enter or Edit File Entries
Print File Entries
Search File Entries
Modify File Attributes
Inquire to File Entries
Utility Functions ...
Data Dictionary Utilities ...
Transfer Entries
Other Options ...
Select VA FileMan Option: inquire to File Entries
OUTPUT FROM WHAT FILE: SDEC APPT REQUEST//
Select SDEC APPT REQUEST PATIENT: TEST,STERLING PAUL JR
5 TEST,STERLING PAUL JR
2 TEST,STERLING PAUL JR
3 TEST,STERLING PAUL JR
4 TEST,STERLING PAUL JR
3 TEST,STERLING PAUL JR
Press <RETURN> to see more‘,‘‘^‘ to exit this list, OR
CHOOSE 1-5:
Press <RETURN> to see more‘,‘‘^‘ to exit this list, OR
CHOOSE 10-15:

VistA Scheduling Enhancements 179 April 2018
VS GUI User Guide
16 TEST,STERLING PAUL JR
17 TEST,STERLING PAUL JR
18 TEST,STERLING PAUL JR
19 TEST,STERLING PAUL JR
20 TEST,STERLING PAUL JR
Press <RETURN> to see more‘,‘‘^‘ to exit this list, OR
CHOOSE 1-20: 16 TEST,STERLING PAUL JR
ANOTHER ONE:
STANDARD CAPTIONED OUTPUT? Yes// (Yes)
Include COMPUTED fields: (N/Y/R/B): NO// b BOTH Computed Fields and Record Num
ber (IEN)
DISPLAY AUDIT TRAIL? No// y YES
NUMBER: 1752 PATIENT: TEST,STERLING PAUL JR
CREATE DATE: DEC 23, 2016 INSTITUTION: CHEYENNE VAMC
REQUEST TYPE: APPOINTMENT
REQ APPOINTMENT TYPE: REGULAR
Created on Dec 23, 2016@14:37:43 by User #520736464 (SDECRPC Option)
PATIENT STATUS: NEW
Created on Dec 23, 2016@14:37:43 by User #520736464 (SDECRPC Option)
REQ SPECIFIC CLINIC: VSE ENH1 CLINIC
Created on Dec 23, 2016@14:37:43 by User #520736464 (SDECRPC Option)
ORIGINATING USER: KRON,CAROLYN S PRIORITY: FUTURE
REQUESTED BY: PATIENT
Created on Dec 23, 2016@14:37:43 by User #520736464 (SDECRPC Option)
CID/PREFERRED DATE OF APPT: DEC 27, 2016
Created on Dec 23, 2016@14:37:43 by User #520736464 (SDECRPC Option)
CURRENT STATUS: CLOSED
Changed from ‘OPEN‘ on Jan 09, 2017@02:49:09 by User #520736464
(SDEC INITIAL CLEANUP UTILITY Option)
Changed from ‘CLOSED‘ on Dec 23, 2016@14:47:01 by User #520736464
(SDCANCEL Option)
Changed from ‘OPEN‘ on Dec 23, 2016@14:38:10 by User #520736464
(SDECRPC Option)
Enter RETURN to continue ‘r‘‘^‘ to exit:
Created on Dec 23, 2016@14:37:43 by User #520736464 (SDECRPC Option)
COMMENTS: TEST
Created on Dec 23, 2016@14:37:43 by User #520736464 (SDECRPC Option)
ENROLLMENT PRIORITY: GROUP 8 MULTIPLE APPOINTMENT RTC: NO
DATE/TIME ENTERED: DEC 23, 2016@13:37
DATE EDITED: DEC 23, 2016@14:37 EDITED BY: KRON,CAROLYN S
REQ SPECIFIC CLINIC: VSE ENH1 CLINIC
DATE DISPOSITIONED: JAN 09, 2017 DISPOSITIONED BY: KRON,CAROLYN S
DISPOSITION: ENTERED IN ERROR DISPOSITION CLOSED BY CLEANUP: YES
SERVICE CONNECTED PERCENTAGE: 0 SERVICE CONNECTED PRIORITY: NO

VistA Scheduling Enhancements 180 April 2018
VS GUI User Guide
9.3 View Unresolved APPT Requests Reopened by the
SDCANCEL Option
A user who has access to the VS GUI Requests Reopened by Cancel Availability [SDEC
REQ REOPENED BY SDCANCEL] can view unresolved appointment requests. This is
helpful after clinic availability has been canceled on a day with a lot of patients scheduled. If
the user runs this report, it is a guide to which patients still have an open request sitting in VS
GUI ready to be rescheduled.
To view unresolved appointment requests:
1. Go to the Outputs option under the Scheduling Manager’s Menu.
2. Select VS GUI Requests Reopened by Cancel Availability [SDEC REQ
REOPENED BY SDCANCEL].
3. Select CLINIC:
Follow the steps shown below.
Select Scheduling Manager‘s Menu Option: outputs
AQK Encounter Activity Report
AQK2 ACRP Stop Code Report
CAAR Clinic Appointment Availability Report
Appointment List
Appointment Management Report
Cancelled Clinic Report
Clinic Assignment Listing
Clinic List (Day of Week)
Clinic Next Available Appt. Monitoring Report
Clinic Profile
Display Clinic Availability Report
Enrollments > X Days
File Room List
Future Appointments for Inpatients
Inpatient Appointment List
Management Report for Ambulatory Procedures
No-Show Report
Patient Profile MAS
PCMM Main Menu ...
Print Scheduling Letters
Provider/Diagnosis Report
Radiology Pull List
Routing Slips
Visit Rpt by Transmitted OPT Encounter
VS GUI Requests Reopened by Cancel Availability
Workload Report

VistA Scheduling Enhancements 181 April 2018
VS GUI User Guide
Select Outputs Option: a
2 VSE ENH1 CLINIC ONE ZAVALA,CHRISTINE A
3 VSE ENH1 CLINIC TWO
CHOOSE 1-3: 1 VSE ENH1 CLINIC
Select CLINIC:
DEVICE: HOME// HOME (CRT)
VS GUI Requests Re-Opened by Cancel Availability (SDCANCEL) Option
for clinics: VSE ENH1 CLINIC
PATIENT SSN TELEPHONE CID/PREF DATE
TEST,CHRISTINE 000-12-1234 (555)123-1234 JAN 12,2017
10 VistA Scheduling 508 Compliance
The following section outlines the process for executing the VistA Scheduling Application
functionality using the keyboard. Many keyboard shortcuts have been added for ease of use.
A consolidated list of all keyboard shortcuts is provided in Section 13.
10.1 The Tasks Tab
Ctrl + T is the keyboard shortcut to navigate to the Tasks Tab.
10.1.1 The Ribbon Bar
1. Log on to VS GUI as a scheduler.
The Search field is highlighted and the cursor is blinking.
2. Press the Tab key to advance through the Ribbon Bar.
3. Beginning at the Patient Search field, move from left to right.
If the controls in each section listed below are enabled, when you press the tab key each one
will be highlighted accordingly:
• Patient Search Field
• Search Button
• Clear Button
• Actions
• Arrangement
• Pending Appointments
• Special Needs/Preferences
• Mobile Requests
• Tools
• Print

VistA Scheduling Enhancements 182 April 2018
VS GUI User Guide
o Export
o Refresh
o Query
After leaving the Tools section, you will be redirected to the Patient Search field.
Table 2: Keyboard Shortcuts for Ribbon Bar Components
Ribbon Bar Component Keyboard Shortcut
Patient Search Field ALT + S
Action ALT + A
Arrangement ALT + G
Pending Appointment Window ALT + P
Special Needs/Preferences ALT + N
Mobile Requests ALT + M
Tools ALT + T
10.1.2 Request Type Dialog
Using the Tab key:
1. From the Actions Pane, with the New Req. highlighted, press Enter.
The Request Type dialog box displays.
Focus is OK.
2. Press the Tab key to move to CLEAR.
3. Press the Tab key to move to APPT Request Type.
4. Press the Tab key to move to PATIENT-CENTERED SCHEDULING Request
Type.
5. To select a Request Type, press the tab key to highlight, and then press the
Space Bar key to select.
6. Press the Tab key to move to OK, and then press Enter.
Note: The arrow keys can also be used to navigate to the Request Type dialog
box.
Table 3: Keyboard Shortcuts for Request Type
Component Keyboard Shortcut
OK ALT + O
Clear ALT + C
10.1.3 Appointment Request

VistA Scheduling Enhancements 183 April 2018
VS GUI User Guide
Using the Tab key:
The Appointment Request Dialog opens with OK highlighted.
Use the Tab key to move to CLEAR and the Svc Related check box.
1. Press the Space Bar to select.
Use the Tab key to move to Clinic (default) and Service/Specialty.
2. Press the Space Bar to select.
3. Press the Tab key to move to the Clinic field, and then enter the Clinic Name
(four-character minimum).
4. Press the Tab key to move to the CID/Preferred Date field, and once
highlighted press Enter to display Calendar control.
5. Use the up arrow and the down arrow to navigate the dates in the calendar, and
then press Enter to select the date.
6. Press the Tab key to move to Appointment Type, and then use the arrow keys
to select Appointment Type.
7. Press the Tab key to move to the Requested By field, and then use the arrow
keys to select Requested By.
8. Press the Tab key to move to the Provider field (if applicable), and then enter
the Provider name (three-character minimum).
9. Press the Tab key to move to the Multiple Appointments Required check
box, and then press the Space Bar to select.
10. Press the Tab key to move to the Number of Appointments Required field,
and then use the arrow keys to select the number of appointments required.
11. Press the Tab key to move to the Interval Between Appointments field, and
then use the arrow keys to select the number of days between appointments.
12. Press the Tab key to move to the Comments field, and then enter your text.
13. Press the Tab key to move to OK, and then press Enter to select and create the
APPT Request and exit the dialog box.
Table 4: Keyboard shortcuts for the Appointment Request
Component Keyboard shortcut
OK ALT + O
Clear ALT + C
Query
The Query Dialog box opens with the Patient field highlighted.

VistA Scheduling Enhancements 184 April 2018
VS GUI User Guide
1. Enter the patient’s Last Name, First Name or the last initial and last four of
the SSN.
2. Press the Tab key to move to Find, and then press Enter.
Use the Down Arrow to highlight names in the Patient list.
3. Press the Enter key to select patients from the list to include in the query.
4. Press the Tab key to move to the Patients column.
Use the Down Arrow to highlight the names listed.
5. To remove names from the selection press Enter.
Use the Tab key to move to the Request Type Filter.
6. Press Enter to open the Request Types dialog box.
Use the arrow keys to navigate to the Request Type selection grid.
7. Press the Space Bar to select the highlighted Request Type.
Use the Tab key to move to OK to confirm the selection.
Use the Tab key to Cancel the selection and exit the dialog box.
The Clinic/Service Filter
Use the Tab key to move to the Clinic/Service Filter.
1. Press Enter to open the Clinics dialog box.
2. Enter the Clinic/Service name in the blank field (four-character minimum).
Use the Tab key to move to Find and the Select All check box.
3. Press the Space Bar to Select All.
Use the Tab key to move to Clinics or Services.
Clinics is the default.
4. Press the Space Bar to select the Services button.
Use the arrow keys to navigate up and down the Clinics/Service Grid.
Use the Space Bar to select/deselect from the list.
5. Press the Tab key to move to OK, and then press Enter to confirm the
selections for the query.
OR use the Tab key to Cancel
6. Press Enter to quit the selection and exit the dialog box.
The Priority Group Filter
1. Press the Tab key to move to the Priority Group Filter and then press Enter
to display the Priority Group dialog box.

VistA Scheduling Enhancements 185 April 2018
VS GUI User Guide
Use the Tab key to move to the Select All check box.
2. Press the Space Bar to select (if applicable).
3. Press the Tab key to move to the Priority Group grid.
Use the up or down arrow to navigate up and down the list.
Use the Space Bar to select/deselect the Priority Group options.
4. Press the Tab key to move to OK, and then press Enter to confirm the
selections for the query.
OR use the Tab key to Cancel
5. Press Enter to quit the selection and exit the dialog box.
Wait Time
1. Press the Tab key to move to the following:
• Wait Time list.
• SC Visit? List
• Connected? list
Use the arrow keys to navigate the options for the query selections.
2. Press the Tab key to move to the Origination Date field/CID/Preferred Date
field.
3. Enter the date for the query selection as applicable.
4. Press the Tab key to move to the Urgency field (Applicable to Consult
Requests only)/Change Sort field.
Use the arrow keys to navigate to the list for query selection.
5. Press the Tab key to move to the Clear button, and then press Enter.
The Clear Filter dialog box displays.
6. Press the Tab key to move to OK, and then press Enter to clear the Request
Query dialog box of all filter selections and start the query selection process
again.
7. Press the Tab key to move to Cancel and then press Enter to Cancel Clear
Filter selection and exit the dialog box.
Note: Selecting Cancel will keep the current Request Query filter selections for
the query.
8. Press the Tab key to move to the Submit button, and then press Enter.
The Request Query Confirmation dialog box opens.
9. Press the Tab key to move to OK, and then press Enter.
The query results display in the Request Management Grid.

VistA Scheduling Enhancements 186 April 2018
VS GUI User Guide
To Cancel the action:
1. Press the Tab key to Cancel.
2. Press the Enter key to abort the query results and return to the Request Query
dialog box.
3. Press the Tab key to move to Close, and then press Enter to close the Request
Query dialog box.
10.2 Systems Tab
To access the Systems Tab, press CTRL+Y.
10.2.1 Systems Tab Ribbon Bar
1. Press the Tab key to move to Scheduling Management.
2. Press Enter to display the Scheduling Management dialog box.
3. Press the Tab key to move to Availability, and then press Enter to open the
Availability Selection dialog box.
Table 5: Keyboard Shortcuts for the Systems Tab Ribbon Bar
Ribbon Bar Component Keyboard Shortcut
Systems Tab CTRL + Y
Scheduling Management ALT + M
Availability ALT + H
Selected Clinic ALT + L
10.2.2 Scheduling Management
10.2.2.1 Clinics and Users Tab
The Scheduling Management Dialog box opens on the Clinics and Users tab with the OK
button highlighted. Focus is on OK button.
1. Press the Tab key to move to the Users Selection List.
Use the Down Arrow to highlight the First Name in the Users List.
2. Press Enter to select the User Name, and then press the Tab key to move to
the Prohibited Clinic field.
3. Enter the Clinic Name.
4. Press the Tab key to move to the Find button, and then press Enter.
The Prohibited Clinic List is displayed.

VistA Scheduling Enhancements 187 April 2018
VS GUI User Guide
Use the arrow keys to navigate up and down the list.
5. Press the Tab key to move to the Privileged Users List for users who are
assigned to the selected clinic.
Use the Tab key to move to the Add User button, the Remove User button or the
Remove All button.

VistA Scheduling Enhancements 188 April 2018
VS GUI User Guide
Table 6: Keyboard Shortcuts for Scheduling Management
Component Keyboard Shortcut
Add User ALT + A
Remove User ALT + R
Remove All ALT + E
Find ALT + F
OK ALT + O
Cancel ALT + C
10.2.2.2 Clinic Groups Tab
When the user accesses the Clinic Group tab, the OK button is highlighted.
1. Press the Tab key to move to Resources.
2. Enter the Clinic Schedule Resource criteria
— User name, Clinic Name, Clinic Group
3. Press the Tab key to move to the Find button, and then press Enter.
Use the down arrow to highlight the first name in the Resource List.
4. Press the Tab key to move to the following:
• New Group
• Edit Group
• Remove Group
• Clinic Groups List
• Add Resource
• Add All
• Remove Resource
• Remove All
Table 7: Keyboard Shortcuts for the Clinic Groups Tab
Component Keyboard Shortcut
New Group ALT + N
Edit Group ALT + E
Remove Group ALT + R
Add Resource ALT + S
Add All ALT + L
Remove Resource ALT + D
Remove All ALT + X

VistA Scheduling Enhancements 189 April 2018
VS GUI User Guide
Component Keyboard Shortcut
OK ALT + O
Cancel ALT + C
10.2.3 Availability Selection
The Availability Selection Dialog box opens with the OK button highlighted.
1. Press the Tab key to move to the Cancel button.
2. Press the Tab key to move to the Search by Name field.
3. Enter the Clinic Name (four-character minimum).
4. Press the Tab key to move to the Resource List Grid.
Use the arrow keys to navigate up and down the Resource List.
5. Press Enter to select the highlighted Resource.
The Select Clinic Availability displays.
Table 8: Keyboard Shortcuts for the Availability Selection
Component Keyboard Shortcut
Search Field ALT + S
First Row of Results Grid ALT + G
OK ALT + O
Cancel ALT + C
10.3 The Reports Tab
To access the Reports Tab press CTRL+R.
10.3.1 Reports Tab Ribbon Bar
1. Press the Tab key to move to Audit Activity.
2. Press the Tab key to move to Clinics.
3. Press the Tab key to move to Management Reports.

VistA Scheduling Enhancements 190 April 2018
VS GUI User Guide
Table 9: Keyboard Shortcuts for the Reports Tab Ribbon Bar
Ribbon Bar Component Keyboard Shortcut
Reports Tab Ctrl + R
Reports Alt + R
10.3.2 Audit Activity
The Audit Activity dialog box opens with the Close button highlighted.
1. Press the Tab key to move to the Scheduler list.
The default is All.
Use the Down Arrow to select a user’s name (listed in alphabetical order).
2. Enter the user’s name (last name, first name) to go directly to the specific user.
3. Press the Tab key to move to the Start Date field, and then press Enter to
select the Calendar.
Use the arrow keys to select the date.
4. Press the Tab key to move to the End Date field, and then press Enter to
select the Calendar.
Use the arrow keys to select the date.
5. Press the Tab key to move to the View Audit Report, and then press Enter to
display the Audit Report in Grid.
6. Press the Tab key to move to the Export Audit Report, and then press Enter to
open the Save As dialog box.
Note: Only data displayed on the screen will appear in the exported Audit
Report.
You can use the Tab key to navigate the Audit Report Grid.
Table 10: Keyboard Shortcuts for Audit Activity
Component Keyboard Shortcut
Scheduler drop down ALT + S
Audit Report ALT + V
Export Report ALT + E
Close ALT + C

VistA Scheduling Enhancements 191 April 2018
VS GUI User Guide
10.3.3 Clinic Activity
The Clinic Activity dialog box opens with the Exit button highlighted.
1. Press the Tab key to move to the Clinic Search field, and then enter the Clinic
Name (six-character minimum).
2. Press the Tab key to move to the Search button, and then press Enter.
3. Press the Tab key to move to the Clinic Results Grid.
Use the Tab key to navigate through the Clinic Results Grid including the Column
Headers and Filters.
Table 11 Keyboard Shortcuts for Clinic Activity
Component Keyboard Shortcut
Search Button ALT + S
Clear ALT + C
Export ALT + E
Exit ALT + X
11 Troubleshooting
Contact the Enterprise Service Desk (ESD), formally the National Service Desk (NSD), and
open a ticket for any VS GUI related issues. At the time of publishing, the phone number is
855-673-HELP (4357).
VSE Pulse page resources and training aids:
• Frequently Asked Questions/Known Issues document:
https://www.vapulse.net/docs/DOC-107042
• Scheduler: https://www.vapulse.net/community/vista-scheduling-
enhancements-vse
• Super User: https://www.vapulse.net/groups/vse-super-users
• National Return to Clinic Order Implementation:
https://www.vapulse.net/groups/return-to-clinic-rtc
11.1 Changing User ID and Password
Contact your supervisor or System Administrator for User ID or Password changes.

VistA Scheduling Enhancements 192 April 2018
VS GUI User Guide
11.2 Special Instructions for Error Correction
Some potential warning messages are listed here.
Table 12: Warning Messages
Reason for
Message Message
Action
Result
Sensitive
Information
Warning
Warning displays to the
user:
***WARNING***
***RESTRICTED
RECORD***
Click
OK User is able to
log into the
Security Log
Audit Trail
Warning for similar
names and SSN Similar Names dialog
displays
System lit patients with
similar name and same last
four digits of SS#
Click
OK User is able to
continue
Accessing
deceased patient’s
record
This patient died on <Date
of Death>
Do you wish to continue?
Click
OK User is able to
perform action
such as
Disposition,
Cancel
Appointments
Accessing own
record at selection Security regulations prohibit
computer access to your
own medical record.
Click
OK User is unable to
perform any
activity/actions

VistA Scheduling Enhancements 193 April 2018
VS GUI User Guide
12 Acronyms and Abbreviations
Term Description
Access Block A color-coded representation of the amount of time allotted for a
specific Access Type (or appointment).
Access Groups Categories of Access Types. Assigning Access Types to Access
Groups makes it easier to schedule and search for certain types of
appointments.
Access Types The variety of different appointment types available in the Legacy
VistA Scheduling package. Each type of appointment, such as
routine physical, dental, walk-in, or other specific appointment type is
an Access Type.
AMIE Automated Medical Information Exchange
API Application Program Interface
APPT Appointment: A scheduled or unscheduled meeting between patient
and healthcare professional.; an appointment can include several
encounters with providers or clinics for tests, procedures, etc.
CID Clinically Indicated Date
Clinic A medical center location where patients receive care by a doctor or
authorized provider.
CPRS Computerized Patient Record System
Enh Enhancement
EWL Electronic Wait List
GUI Graphical User Interface
MUMPS Massachusetts General Hospital Utility Multi-Programming System
MRTC Multiple Return To Clinic
NSR New Service Request
OI&T Office of Information and Technology
OOS Occasion of Service
OT3 Optional Task #3
OT4 Optional Task #4

VistA Scheduling Enhancements 194 April 2018
VS GUI User Guide
Term Description
OVAC Office For Veterans Access to Care
PACT Patient-Aligned Care Teams
PII Personally Identifiable Information
PIMS Patient Information Management System
POC Point of Contact
PRF Patient Record Flag
Provider A doctor or other authorized provider in the medical center who
provides patient care.
PT Patient
PWS Performance Work Statement
RM Grid Request Management Grid
RTC Return to Clinic
SDMOB Scheduling Master Overbook
SDOB Scheduling Overbook
Slot Number of appointments per defined appointment length that have
been previously set up in VistA Scheduling. For example, if “Slots =
4” and the clinic (resource) appointment length is 30 minutes, then
there are four available appointments for every 30 minutes.
SSN Social Security Number
T4 Transformation Twenty-One Total Technology
TAC Technology Acquisition Center
TCP/IP Transmission Control Protocol/Internet Protocol
VA Department of Veterans Affairs
VAR Veteran Appointment Request
VCL Veterans Crisis Line
VHA Veterans Health Administration

VistA Scheduling Enhancements 195 April 2018
VS GUI User Guide
Term Description
VistA Veterans Health Information Systems and Technology Architecture
VL Variable Length
VS VistA Scheduling
VSE VistA Scheduling Enhancements
13 Keyboard Shortcuts Quick List
Patient demographic information can be displayed and edited at any point in the process by
entering CTRL + P to open the Patient Info screen.
Ribbon Bar Components
Ribbon Bar Component Keyboard Shortcut
Patient Search Field ALT + S
Action ALT + A
Arrangement ALT + G
Pending Appointment Window ALT + P
Special Needs/Preferences ALT + N
Mobile Requests ALT + M
Tools ALT + T
Request Type
Component Keyboard Shortcut
OK ALT + O
Clear ALT + C
Appointment Request
Component Keyboard Shortcut
OK ALT + O
Clear ALT + C

VistA Scheduling Enhancements 196 April 2018
VS GUI User Guide
Systems Tab Ribbon Bar
Ribbon Bar Component Keyboard Shortcut
Systems Tab CTRL + Y
Scheduling Management ALT + M
Availability ALT + H
Selected Clinic ALT + L
Scheduling Management
Component Keyboard Shortcut
Add User ALT + A
Remove User ALT + R
Remove All ALT + E
Find ALT + F
OK ALT + O
Cancel ALT + C
Clinic Groups Tab
Component Keyboard Shortcut
New Group ALT + N
Edit Group ALT + E
Remove Group ALT + R
Add Resource ALT + S
Add All ALT + L
Remove Resource ALT + D
Remove All ALT + X
OK ALT + O
Cancel ALT + C
Availability Selection
Component Keyboard Shortcut
Search Field ALT + S
First Row of Results Grid ALT + G
OK ALT + O
Cancel ALT + C

VistA Scheduling Enhancements 197 April 2018
VS GUI User Guide
Reports Tab Ribbon Bar
Ribbon Bar Component Keyboard Shortcut
Reports Tab CTRL + R
Reports ALT + R
Audit Activity
Component Keyboard Shortcut
Scheduler list ALT + S
Audit Report ALT + V
Export Report ALT + E
Close ALT + C
Clinic Activity
Component Keyboard Shortcut
Search Button ALT + S
Clear ALT + C
Export ALT + E
Exit ALT + X
