Client Programming Guide
client_programming_guide
User Manual: Pdf
Open the PDF directly: View PDF ![]() .
.
Page Count: 156 [warning: Documents this large are best viewed by clicking the View PDF Link!]
- Client Programming Guide
- Table of Contents
- Chapter 1. Overview
- Chapter 2. User Input
- Chapter 3. Cameras
- Chapter 4. Terrain
- Chapter 5. Cloud shadows
- Chapter 6. Chunks
- Chapter 7. Entities
- Chapter 8. User Data Objects
- Chapter 9. Scripting
- Chapter 10. Models
- Chapter 11. Animation System
- Chapter 12. Server Communications
- Chapter 13. Particles
- Chapter 14. Detail Objects
- Chapter 15. Water
- Chapter 16. BigWorld Umbra integration
- Chapter 17. Graphical User Interface (GUI)
- Chapter 18. Sounds
- Chapter 19. 3D Engine (Moo)
- 19.1. Features
- 19.2. Supported video cards
- 19.3. Hardware requirements for special effects
- 19.4. Visual
- 19.5. EffectMaterial
- 19.6. Visual channels
- 19.7. Textures
- 19.8. Vertex declaration
- 19.9. Graphics settings
- 19.10. High-resolution screenshots
- Chapter 20. Full-screen Filters
- Chapter 21. Debugging
- 21.1. Build configuration — conditional feature inclusion
- 21.2. Watchers
- 21.3. Memory tracking
- 21.4. Scripts
- 21.5. Script interactive debugging
- 21.6. Client Access Tool (CAT)
- 21.7. Timing
- Chapter 22. Releasing The Game
- Chapter 23. Simplified Server Usage

Client Programming Guide
BigWorld Technology 1.9.1. Released 2008.
Software designed and built in Australia by BigWorld.
Level 3, 431 Glebe Point Road
Glebe NSW 2037, Australia
www.bigworldtech.com
Copyright © 1999-2008 BigWorld Pty Ltd. All rights reserved.
This document is proprietary commercial in confidence and access is restricted to authorised users. This document is
protected by copyright laws of Australia, other countries and international treaties. Unauthorised use, reproduction or
distribution of this document, or any portion of this document, may result in the imposition of civil and criminal penalties as
provided by law.

ii
Table of Contents
1. Overview ...................................................................................................................................... 7
1.1. Client in context ................................................................................................................. 7
1.2. Outline ............................................................................................................................... 8
1.3. Configuration files .............................................................................................................. 8
1.3.1. File resources.xml ................................................................................................ 8
1.3.2. File <engine_config>.xml .................................................................................... 9
1.3.3. File <scripts_config>.xml ................................................................................ 10
1.3.4. File <preferences>.xml ...................................................................................... 10
2. User Input ................................................................................................................................... 12
3. Cameras ....................................................................................................................................... 13
3.1. The Cursor Camera ........................................................................................................... 13
3.2. The Free Camera ............................................................................................................... 13
3.3. The FlexiCam .................................................................................................................... 14
4. Terrain ......................................................................................................................................... 15
4.1. Advanced Terrain .............................................................................................................. 15
4.1.1. Overview ................................................................................................................ 15
4.1.2. Key Features ........................................................................................................... 15
4.1.3. Texturing ................................................................................................................ 15
4.1.4. Lighting .................................................................................................................. 15
4.1.5. Shadows ................................................................................................................. 15
4.1.6. LOD ....................................................................................................................... 15
4.1.7. Memory footprint ................................................................................................... 16
4.1.8. terrain2 resources ................................................................................................ 17
4.1.9. terrain section in space.settings .................................................................... 21
4.2. Classic Terrain .................................................................................................................. 23
4.2.1. Key features ........................................................................................................... 23
4.2.2. Overview ................................................................................................................ 23
4.2.3. Chunking ............................................................................................................... 23
4.2.4. Disk footprint ......................................................................................................... 23
4.2.5. Memory footprint ................................................................................................... 24
4.2.6. Texture spacing ....................................................................................................... 24
4.3. Terrain specular lighting ................................................................................................... 24
5. Cloud shadows ............................................................................................................................ 26
5.1. Requirements .................................................................................................................... 26
5.2. Implementation ................................................................................................................. 26
5.3. Effect File Implementation ................................................................................................ 26
5.4. Tweaking .......................................................................................................................... 27
6. Chunks ........................................................................................................................................ 28
6.1. Definitions ........................................................................................................................ 28
6.2. Implementation files ......................................................................................................... 28
6.3. Details and notes .............................................................................................................. 29
6.3.1. Includes .................................................................................................................. 29
6.3.2. Models ................................................................................................................... 29
6.3.3. Entities ................................................................................................................... 29
6.3.4. Boundaries and portals ........................................................................................... 29
6.3.5. Transforms .............................................................................................................. 30
6.3.6. Other items ............................................................................................................ 30
6.4. Loading and ejecting ......................................................................................................... 30
6.5. Focus grid ......................................................................................................................... 30
6.5.1. Hull tree ................................................................................................................. 30
6.5.2. Quad tree ............................................................................................................... 31
6.6. Collisions .......................................................................................................................... 31
6.7. Sway items ....................................................................................................................... 31
7. Entities ........................................................................................................................................ 33

iii
7.1. Entities are Python script objects ....................................................................................... 33
7.2. Exposing the client ............................................................................................................ 33
7.3. Script entry points ............................................................................................................ 34
7.3.1. prerequisites() ......................................................................................................... 34
7.4. Entity Manager ................................................................................................................. 34
8. User Data Objects ........................................................................................................................ 35
8.1. .1. User Data Objects are Python script objects ................................................................... 35
8.2. .2. Accessing from the Client ............................................................................................. 35
9. Scripting ...................................................................................................................................... 37
9.1. Functional components ...................................................................................................... 37
9.1.1. Entity skeleton ........................................................................................................ 37
9.1.2. Python script object ................................................................................................ 37
9.1.3. Model management ................................................................................................ 38
9.1.4. Filters ..................................................................................................................... 38
9.1.5. Action Queue ......................................................................................................... 38
9.1.6. Action Matcher ....................................................................................................... 43
9.1.7. Trackers .................................................................................................................. 45
9.1.8. Timers and Traps .................................................................................................... 46
9.2. Personality script ............................................................................................................... 46
9.2.1. init ....................................................................................................................... 47
9.2.2. fini ....................................................................................................................... 48
9.2.3. handleKeyEvent ................................................................................................... 49
9.2.4. handleMouseEvent ............................................................................................... 49
9.2.5. onChangeEnvironments ....................................................................................... 50
9.2.6. onGeometryMapped ............................................................................................... 50
9.2.7. onRecreateDevice ............................................................................................... 50
9.2.8. onTimeOfDayLocalChange ................................................................................... 51
9.2.9. start ..................................................................................................................... 51
10. Models ....................................................................................................................................... 52
10.1. Performance .................................................................................................................... 52
10.2. Hard Points ..................................................................................................................... 52
10.2.1. Naming scheme .................................................................................................... 53
10.2.2. How it works ........................................................................................................ 53
10.2.3. Syntax ................................................................................................................... 53
10.2.4. Data ...................................................................................................................... 54
10.3. SuperModel ..................................................................................................................... 55
10.3.1. Design .................................................................................................................. 55
10.3.2. SuperModel classes ............................................................................................... 56
11. Animation System ..................................................................................................................... 57
11.1. Basic keyframed animations ............................................................................................ 57
11.2. Animation layering and blending .................................................................................... 57
11.3. Animation data files ........................................................................................................ 58
11.4. Animation data streaming ................................................................................................ 59
11.5. Actions ............................................................................................................................ 59
12. Server Communications ............................................................................................................. 60
12.1. Login ............................................................................................................................... 60
12.2. Online ............................................................................................................................. 60
12.3. Firewalls .......................................................................................................................... 61
13. Particles ..................................................................................................................................... 62
13.1. Particle Systems ............................................................................................................... 62
13.2. Particle Actions ............................................................................................................... 63
13.2.1. Source actions ....................................................................................................... 63
13.2.2. Movement actions ................................................................................................. 64
13.2.3. Sink actions .......................................................................................................... 64
13.2.4. Alteration actions .................................................................................................. 64
13.3. Particle types ................................................................................................................... 64

iv Copyright 1999-2008 BigWorld Pty. Ltd. All rights reserved. Proprietary commercial in confidence.
13.4. Attaching particle systems to bones ................................................................................. 65
14. Detail Objects ............................................................................................................................ 67
14.1. Flora ................................................................................................................................ 67
14.1.1. Placement ............................................................................................................. 67
14.1.2. Implementation ..................................................................................................... 67
14.1.3. Frame coherency ................................................................................................... 68
14.1.4. Animation ............................................................................................................. 68
14.1.5. Lighting ................................................................................................................ 68
14.1.6. File format ............................................................................................................ 68
15. Water ......................................................................................................................................... 69
15.1. Code overview ................................................................................................................. 69
15.2. Scene generation ............................................................................................................. 70
15.3. Render settings ................................................................................................................ 70
15.3.1. Setting the quality ................................................................................................ 70
15.4. Simulation ....................................................................................................................... 71
15.5. Rain ................................................................................................................................ 71
15.6. Water depth ..................................................................................................................... 71
15.7. Watchers .......................................................................................................................... 71
16. BigWorld Umbra integration ...................................................................................................... 73
16.1. Building BigWorld with Umbra enabled .......................................................................... 73
16.2. Integration details ........................................................................................................... 73
16.2.1. Modes of operation ............................................................................................... 73
16.2.2. Chunk items ......................................................................................................... 73
16.2.3. Umbra proxies ...................................................................................................... 74
17. Graphical User Interface (GUI) .................................................................................................. 75
17.1. C++ GUI support ............................................................................................................. 75
17.1.1. SimpleGUIComponent .......................................................................................... 75
17.1.2. GUIShader ............................................................................................................ 75
17.1.3. SimpleGUI ............................................................................................................ 76
17.2. Python GUI support ........................................................................................................ 76
17.3. XML ................................................................................................................................ 77
17.4. XML and Python ............................................................................................................. 78
17.4.1. onLoad(self,section) ..................................................................................... 78
17.4.2. onBound(self) ................................................................................................... 78
17.4.3. onSave(self,section) ..................................................................................... 78
17.5. Input events .................................................................................................................... 78
17.5.1. Keyboard Events ................................................................................................... 79
17.5.2. Axis Events ........................................................................................................... 80
17.5.3. Mouse Events ........................................................................................................ 80
17.5.4. Drag-and-drop events ............................................................................................ 83
17.5.5. Component PyGUI ................................................................................................ 86
17.6. Mouse cursor ................................................................................................................... 86
17.7. Fonts ............................................................................................................................... 87
17.7.1. Creating new fonts ................................................................................................ 87
18. Sounds ....................................................................................................................................... 89
18.1. Usage overview ............................................................................................................... 89
18.2. Updating the FMOD libraries .......................................................................................... 89
19. 3D Engine (Moo) ....................................................................................................................... 91
19.1. Features ........................................................................................................................... 91
19.1.1. D3DXEffects vertex and pixel shader support ........................................................ 91
19.1.2. Cubic environment maps ...................................................................................... 92
19.1.3. Render targets ....................................................................................................... 92
19.1.4. Lighting ................................................................................................................ 92
19.1.5. Normal mapping/bump mapping .......................................................................... 93
19.1.6. Terrain .................................................................................................................. 93
19.1.7. Animation ............................................................................................................. 93

v
19.1.8. Vertex morphing ................................................................................................... 94
19.2. Supported video cards ..................................................................................................... 94
19.3. Hardware requirements for special effects ....................................................................... 94
19.4. Visual .............................................................................................................................. 95
19.5. EffectMaterial .................................................................................................................. 95
19.5.1. Format .................................................................................................................. 95
19.5.2. Automatic variables/Globals .................................................................................. 95
19.5.3. Artist-editable/tweakable variables ........................................................................ 98
19.5.4. Multiple-layered effects per material ................................................................... 100
19.5.5. Recording material states ..................................................................................... 100
19.5.6. Using BigWorld .fx files with 3ds Max ............................................................... 100
19.6. Visual channels .............................................................................................................. 101
19.6.1. Sorted channel .................................................................................................... 101
19.6.2. Internal sorted channel ........................................................................................ 101
19.6.3. Shimmer channel ................................................................................................ 101
19.6.4. Sorted shimmer channel ...................................................................................... 101
19.6.5. Distortion channel ............................................................................................... 102
19.7. Textures ......................................................................................................................... 102
19.7.1. Texture detail levels/compression ......................................................................... 102
19.7.2. Animated textures ............................................................................................... 103
19.7.3. Applying a code-generated texture to a character .................................................. 104
19.8. Vertex declaration .......................................................................................................... 108
19.8.1. File format .......................................................................................................... 108
19.9. Graphics settings ........................................................................................................... 110
19.9.1. Customising options ............................................................................................ 112
19.9.2. Using settings ...................................................................................................... 116
19.10. High-resolution screenshots .......................................................................................... 117
19.10.1. The backBufferWidthOverride watcher .............................................................. 118
19.10.2. How to take a high resolution screenshot ........................................................... 118
19.10.3. Troubleshooting ................................................................................................. 118
19.10.4. Hardware recommendations ............................................................................... 119
20. Full-screen Filters ..................................................................................................................... 120
20.1. Bloom ............................................................................................................................ 120
20.1.1. How the bloom filter works ................................................................................ 120
20.1.2. How to use bloom ............................................................................................... 120
20.1.3. Tweaking bloom .................................................................................................. 121
20.1.4. Blurring the scene ............................................................................................... 122
20.1.5. Making the bloom permanent ............................................................................. 122
20.2. Heat shimmer ................................................................................................................ 122
20.2.1. How to use heat shimmer .................................................................................... 122
20.2.2. Tweaking heat shimmer ...................................................................................... 123
21. Debugging ............................................................................................................................... 124
21.1. Build configuration — conditional feature inclusion ....................................................... 124
21.2. Watchers ........................................................................................................................ 124
21.2.1. Watcher types ...................................................................................................... 124
21.2.2. Using watchers .................................................................................................... 125
21.2.3. Watcher Console .................................................................................................. 125
21.2.4. Remote watcher access ......................................................................................... 125
21.3. Memory tracking ........................................................................................................... 126
21.3.1. ResourceCounters overview ................................................................................. 126
21.3.2. Memory allocation taxonomy ............................................................................... 126
21.3.3. Case studies ........................................................................................................ 127
21.3.4. Displaying the memory tracking console ............................................................. 135
21.4. Scripts ........................................................................................................................... 136
21.4.1. Python Console ................................................................................................... 136
21.4.2. Remote Python Console ....................................................................................... 137

vi Copyright 1999-2008 BigWorld Pty. Ltd. All rights reserved. Proprietary commercial in confidence.
21.4.3. Script reloading ................................................................................................... 137
21.4.4. Common errors .................................................................................................... 138
21.5. Script interactive debugging .......................................................................................... 138
21.6. Client Access Tool (CAT) ............................................................................................... 139
21.6.1. Connecting to the client ....................................................................................... 139
21.6.2. CAT Scripts ......................................................................................................... 140
21.6.3. Creating scripts for CAT ...................................................................................... 141
21.7. Timing ........................................................................................................................... 147
22. Releasing The Game ................................................................................................................ 149
22.1. Compile the game executable ......................................................................................... 149
22.2. Prepare the assets .......................................................................................................... 149
22.2.1. Run bin_convert.py ........................................................................................ 149
22.2.2. Run res_packer ................................................................................................ 150
22.2.3. Processing done in bin_convert and res_packer ............................................. 152
22.2.4. Files and folders that do not need to be shipped to the end user ............................ 153
22.2.5. Font Licensing issues with bin_convert and res_packer ................................. 153
22.3. Zip assets and specify paths ........................................................................................... 153
23. Simplified Server Usage ........................................................................................................... 155
23.1. Setting up the windows share ........................................................................................ 155
23.2. Mounting the Windows share on Linux .......................................................................... 155
23.3. Caveats .......................................................................................................................... 156
7
Chapter 1. Overview
This document is a technical design overview for the Client Engine for 3d engine Technology. It is part of a
larger set of documentation describing the whole system. It only includes references to the BigWorld Server
in order to provide context. Readers interested only in the workings of the BigWorld Client may ignore the
server information.
The intended audience is technical-typically MMOG developers and designers.
For API-level information, please refer to the online documentation.
Note
For details on BigWorld terminology, see the document Glossary of Terms.
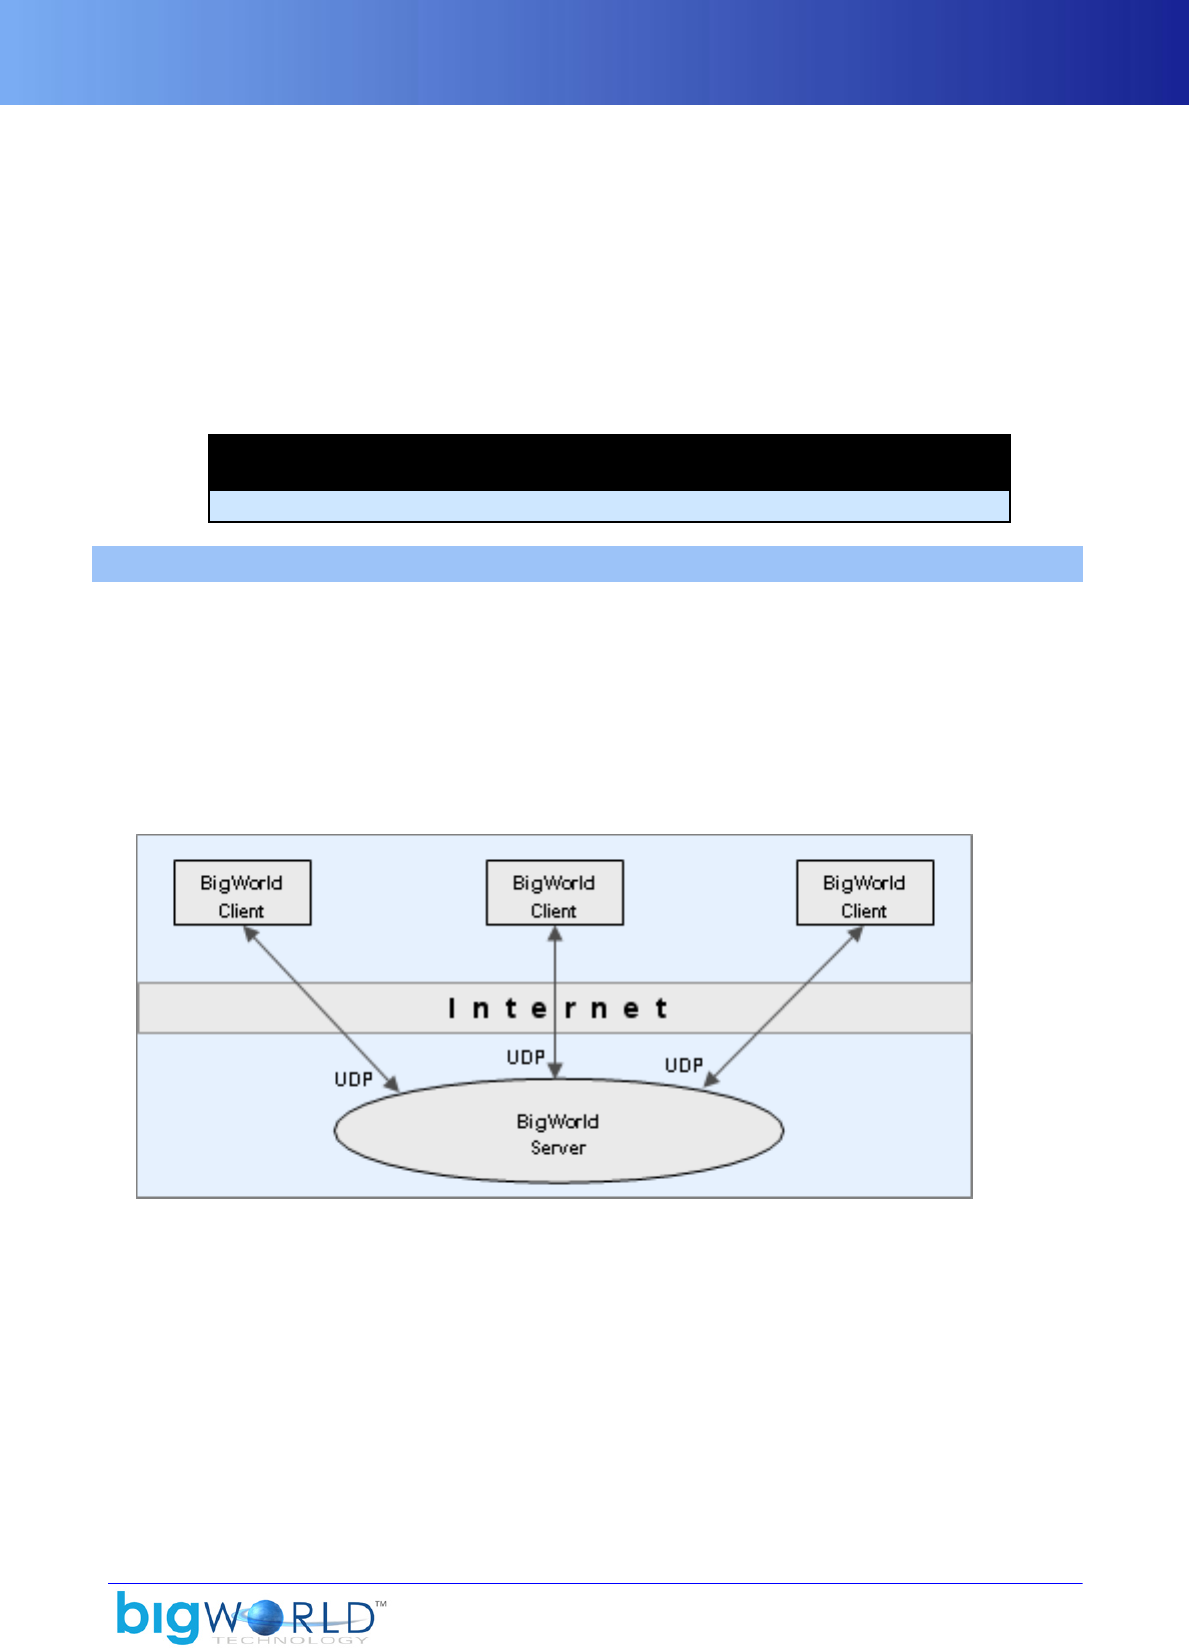
1.1. Client in context
The BigWorld Client provides the end-user experience of the BigWorld client/server architecture. In a
BigWorld client/server implementation, the client connects to the server using UDP/IP over the Internet.
The BigWorld Client presents the user with a realistic and immersive 3D environment. The contents of that
environment are a combination of static data stored with the client, and dynamic data sent from the server.
The user interacts with the world through an avatar (character) that he or she controls. The movement and
actions of that avatar are relayed to the server. The avatars controlled by other connected users are part of
the dynamic data sent from the server.
Client perspective of BigWorld system. Note that the BigWorld server is not just one machine, although the client can treat it as such.
Developers may choose to integrate the client with their own server technology, but if they do, they will have
to address problems already tackled by the BigWorld architecture, like:
▪Uniform collision scene (used on client and server).
▪Uniform client/server scripting (used on client and server).
▪Tools that produce server and client content.
▪Optimised low bandwidth communication protocol.

Outline
8Copyright 1999-2008 BigWorld Pty. Ltd. All rights reserved. Proprietary commercial in confidence.
1.2. Outline
The client initialises itself, connects to the server, and then runs in its main thread a standard game loop (each
iteration of which is known as a frame):
▪Receive input
▪Update world
▪Draw world
Each step of the frame is described below:
▪Input
Input is received from attached input devices using DirectInput. In a BigWorld client/server
implementation, input is also received over the network from the server using WinSock 2.
▪Update
The world is updated to account for the time that has passed since the last update.
▪Draw
The world is drawn with the 3D engine Moo, which uses Direct3D (version 9c). For details, see 3D Engine
(Moo) on page 91 .
A number of other objects also fall into the world's 'update then draw' system. These include a dozen
related to the weather and atmospheric effects (rain, stars, fog, clouds, etc.), various script assistance systems
(targeting, combat), pools of water, footprints, and shadows.
There are other threads for background scene loading and other asynchronous tasks.
1.3. Configuration files
Configuration files are defined relatively to one of the entries in the resources folders list (or <res>). For
details on how BigWorld compiles this list, see the document Content Tools Reference Guide's chapter
Starting the tools.
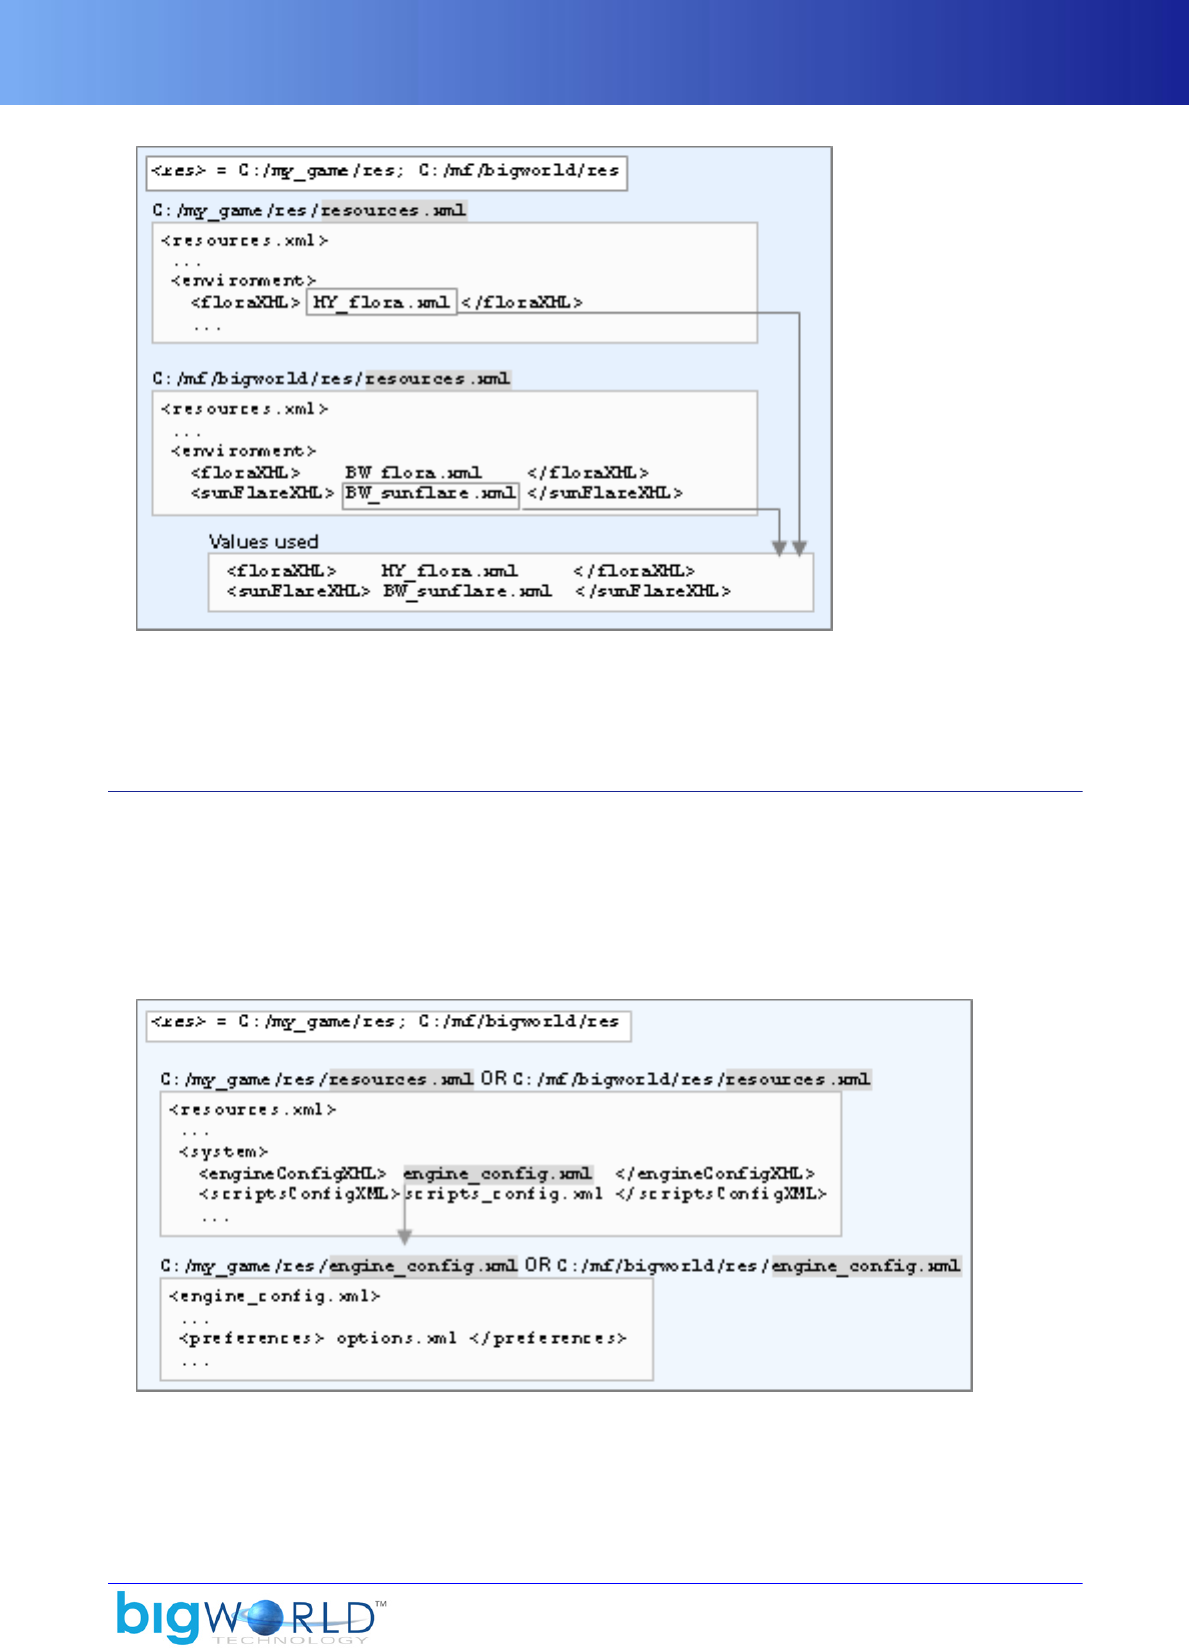
1.3.1. File resources.xml
This file defines game-specific resources that are needed by the client engine to run.
The entries in resources.xml are read from the various entries in the resources folders list (or <res>), in the
order in which they are listed. Only missing entries will have their values read in subsequent folders.
A default file exists under folder bigworld/res, and any of its resources may be overridden by creating your
own file <res>/resources.xml.
The example below illustrates this mechanism:
File <engine_config>.xml
9
Precedence of your game's resources.xml file over BigWorld's ones
For a complete list of the resources and values used by BigWorld, refer to the resources.xml file provided
with the distribution.
1.3.2. File <engine_config>.xml
The XML file <engine_config>.xml lists several engine configuration options.
The actual name and location of this file is defined by the resources.xml's engineConfigXML tag — its
location is always defined relative to one of the entries in the resources folders list (or <res>), which will
be searched in the order in which they are listed.
An example follows below:
Locating engineConfigXML's file
Under the main section of the XML file, a personality tag must be included, naming the personality script
to use.
File <scripts_config>.xml
10 Copyright 1999-2008 BigWorld Pty. Ltd. All rights reserved. Proprietary commercial in confidence.
Several other tags are used by BigWorld to customize the way the client runs. For a complete list of the
supported tags and a description of their functions, refer to the engine_config.xml file provided with
the distribution. Additional information can also be found in the Client Python API documentation.
The data contained in this file is passed to the personality script as the second argument to the init method
(for details, see “init” on page 47 ), in the form of a DataSection object.
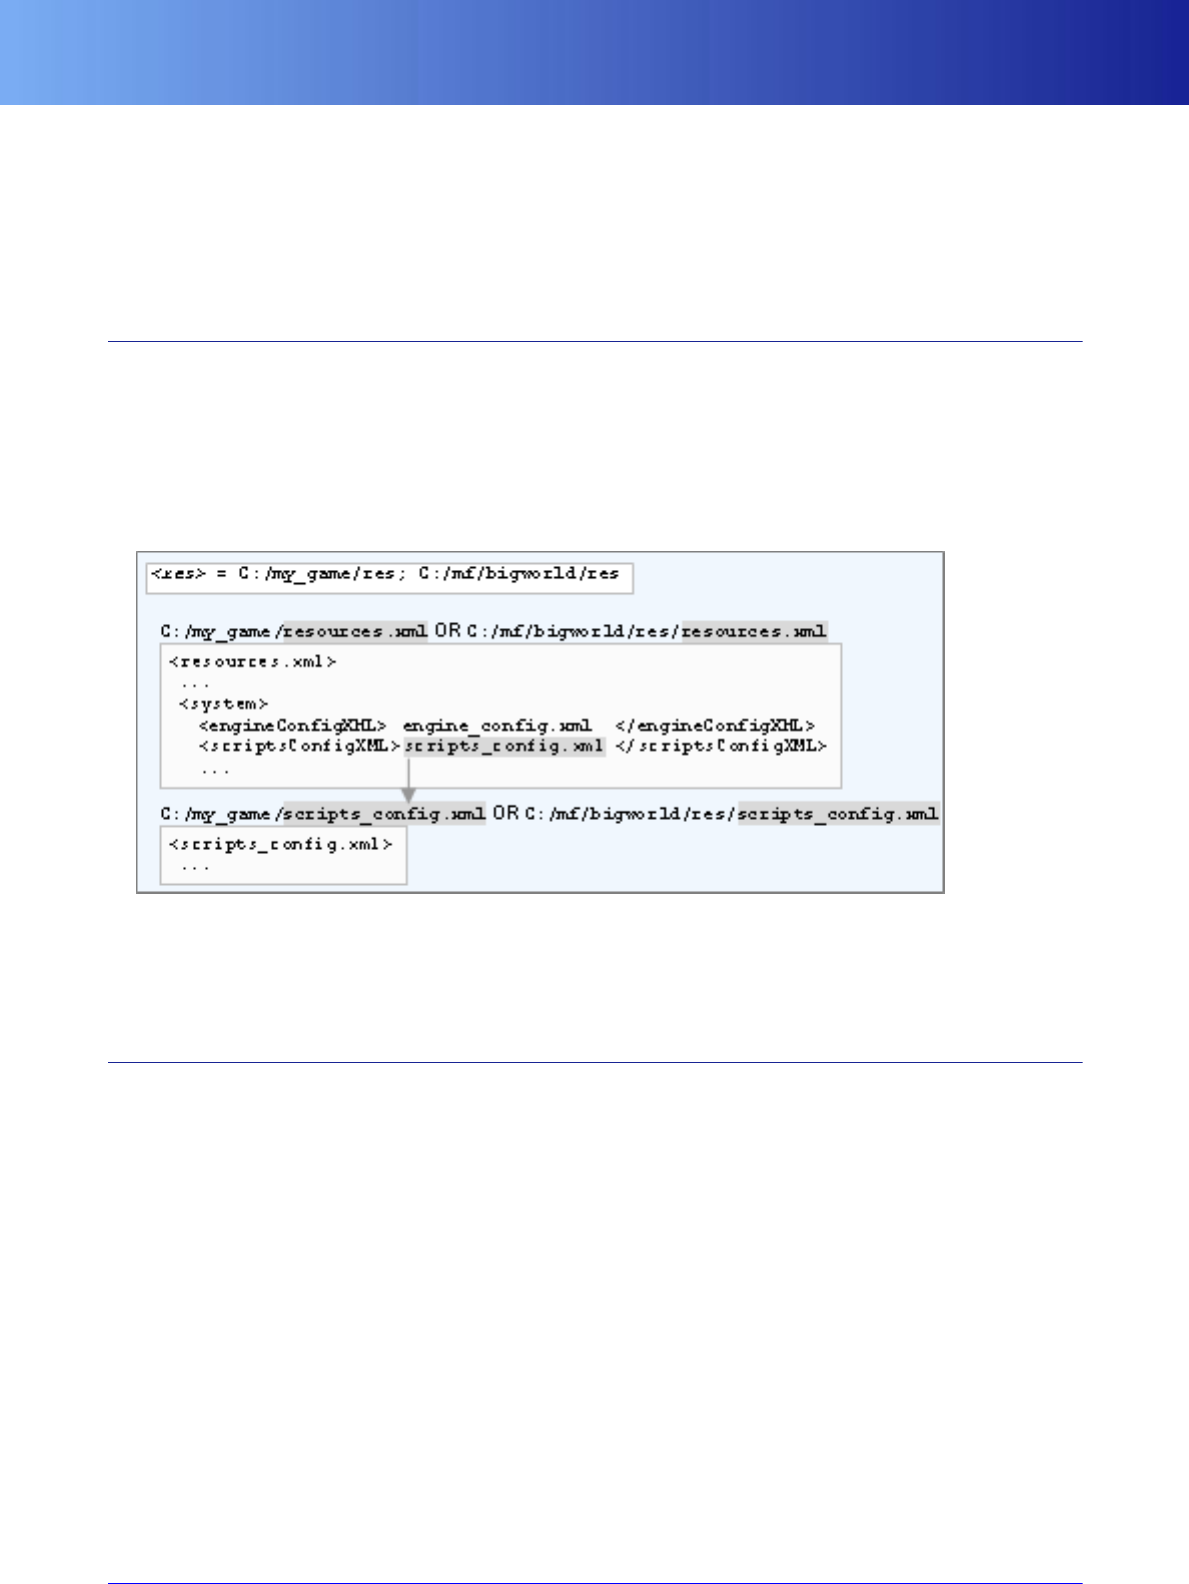
1.3.3. File <scripts_config>.xml
The XML file <scripts_config>.xml can be used to configure the game scripts. It has no fixed grammar,
and its form can be freely defined by the script programmer.
The actual name and location of this file is defined by the resources.xml's scriptsConfigXML tag —
its location is always defined relative to one of the entries in the resources folders list (or <res>), which will
be searched in the order in which they are listed.
Locating scriptsConfigXML's file
The data contained in this file is passed to the personality script as the first argument to the init method
(for details, see “init” on page 47 ), in the form of a DataSection object.
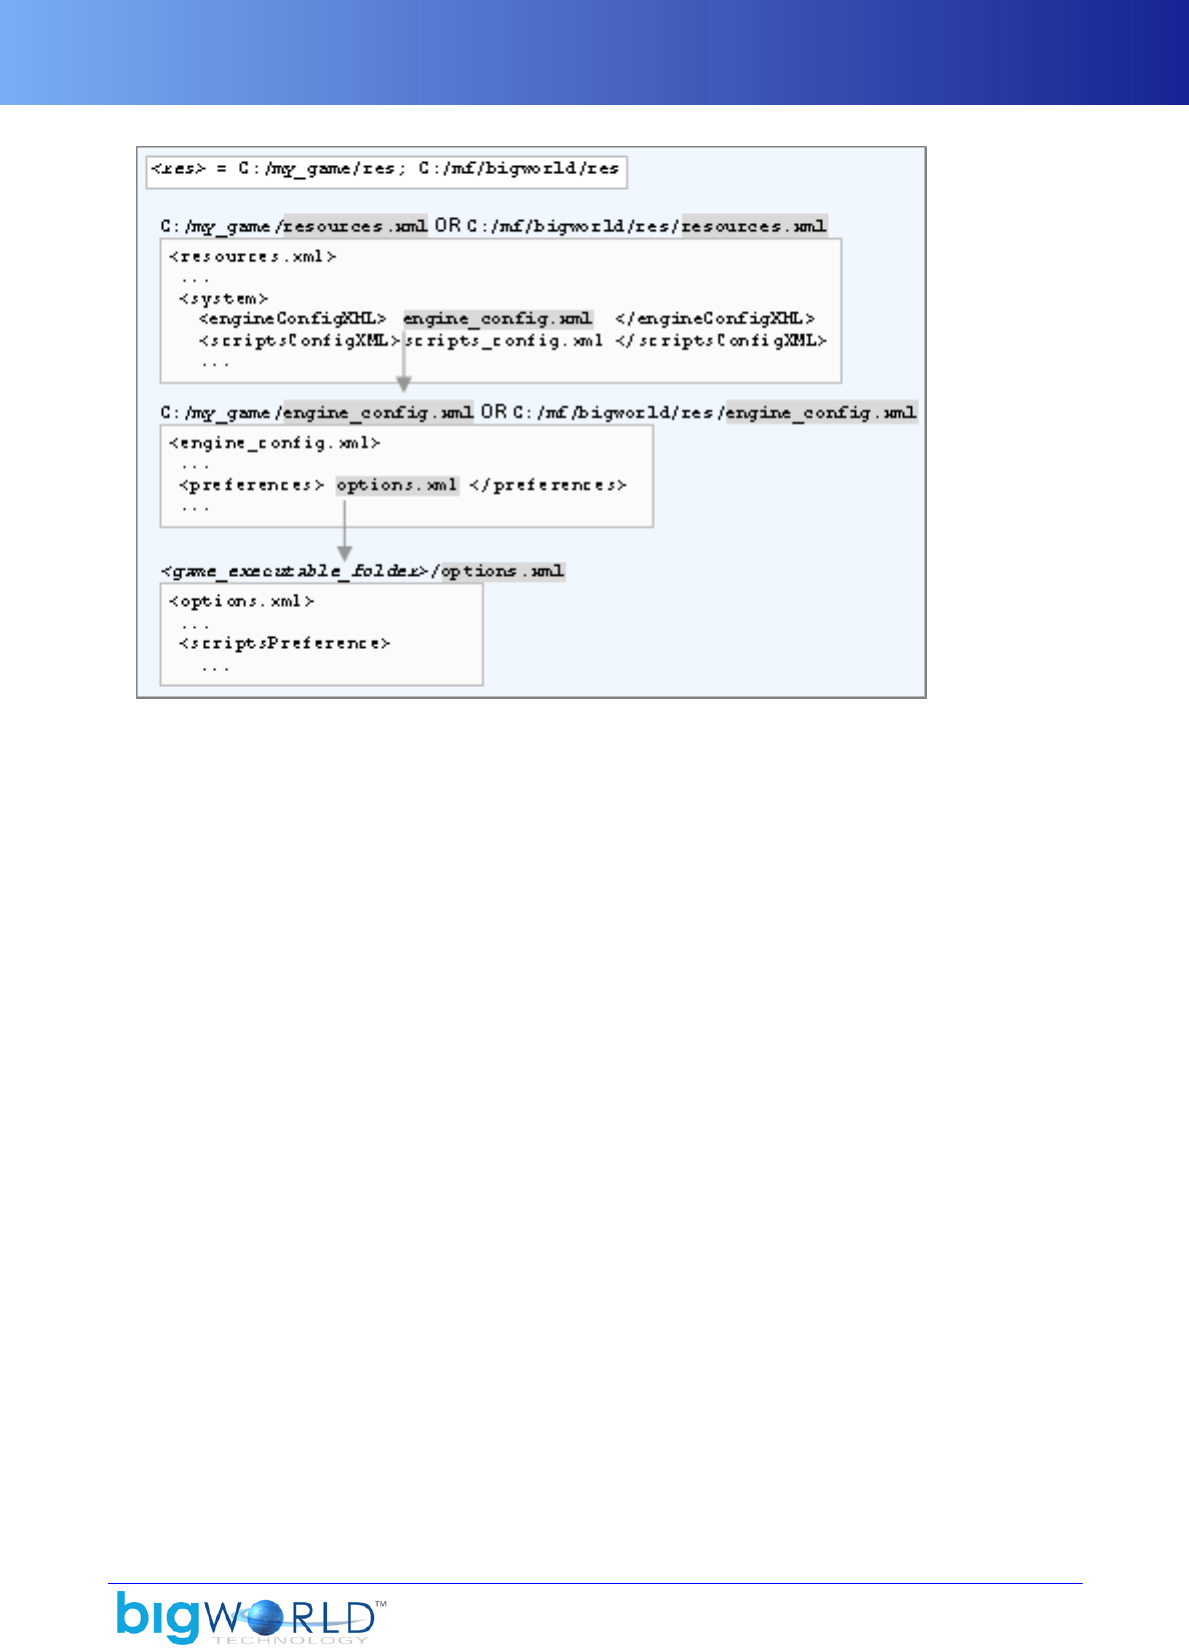
1.3.4. File <preferences>.xml
The XML file <preferences>.xml is used to save user preferences for video and graphics settings, with
a pre-defined grammar.
The file also embeds a data section (called scriptsPreference) that can be used by scripts to persist game
preferences — there is no fixed grammar for this section.
The actual name and location of this file is defined in file specified by resources.xml's engineConfigXML
tag, in the preferences tag — its location is always defined in relation to the game's executable folder.
File <preferences>.xml
11
Locating engineConfigXML's preferences' file
The data contained in the scriptsPreference of this file is passed to the personality script as the third
argument to the init method (for details, see “init” on page 47 ), in the form of a DataSection object.
The current user preferences can be saved back into the file (including changes to the DataSection that
represents the script preferences) by calling BigWorld.savePreferences. For details, see the Client
Python API documentation .

12
Chapter 2. User Input
The BigWorld client uses DirectInput 8. It reads keyUp and keyDown events from the keyboard, and button
and mouse movement events from the mouse. It also reads button and axis movement events from joysticks.
The DirectInput devices are used in exclusive foreground mode. When the client is in the foreground, it
has exclusive access (excepting Alt+Tab and Ctrl+Alt+Delete) to the hardware. During development
you can choose to run in non-exclusive mode, this makes it easier to debug, and to use other applications
while running the client. To change this setting, alter the <inputDevices> <exclusive> setting in your
engine_config.xml file.
When the client switches back in after having been switched out, it reads the whole state from the devices
and generates any appropriate key/button events.
In order to simplify event handling, the user input module always emulates a joystick, even if one is not
attached or if the attached joystick is not selected. It does this by using keys (set by other parts of the
application) to influence the joystick direction. This means that the application only needs to be concerned
about the exported joystick class to determine movement, instead of having different modes depending on
attached hardware and user choices.
Currently, the user can select the hardware joystick for movement with the J key, and switch back to the
keyboard with the K key. The eventual client will allow the user to set up the game controls in whatever
manner he desires (as is standard practice in games).
The output from the user input module is processed by a number of other modules, which take it in turn to
examine events, then either consume or ignore them. If an event is not consumed by any module then it is
discarded. The order of modules that get a turn at the events is as follows:
▪Debug — Special keys, consoles, etc...
▪Personality — Global keys.
▪Camera — To move it around.
▪Application — Hard-coded keys such as QUIT.
▪Player script — The rest, which is the major part of the processing.
Note that the GUI system does not automatically receive input, instead it is up to the script write to choose
when. This could be either in the personality script, or in the player script. The most obvious place is in
the personality script callbacks, for example in the personality script's handleKeyEvent, you should call
GUI.handleKeyEvent() and check the return value.
The BigWorld client performs event matching to ensure consistent module behaviour. If a keyDown (or
buttonDown) event is consumed by a module, that module's identifier is recorded as the sink of the event's
key number. When the corresponding keyUp event arrives, it is delivered directly to that module. For
example, if a chat console is brought up (and inserted into the list) while the player is running, and the user
subsequently releases the run key, then the player script will still get the keyUp event for that key, and be
able to stop the run action.
For more details on how to capture and process input events, see “Input events” on page 78 .

13
Chapter 3. Cameras
The placement of the camera update within the general update process is a delicate matter, because the
camera depends on some components having been updated before it, whilst other components depend on
the camera being updated before them.
Conceptually, there are four types of camera: fixed camera, FlexiCam, cursor camera, and free camera. The
first three are client-controlled views, ranging from minimum user interaction to maximum user interaction.
The last camera is completely user-controlled, but is not part of actual game play.
There are however just three camera classes: FlexiCam, CursorCamera, and FreeCamera. The fixed camera
is implemented with a FlexiCam object. They all derive from a common BaseCamera class.
There is only ever one active camera at a time. The personality script usually handles camera management,
since the camera is a global, but any script can also manipulate the camera, and the player script often does
(although usually indirectly, through the personality script)
The base class and all the derived classes are fully accessible to Python. Any camera can be created and set
to whatever position a script desires, including to the position of another camera. This is particularly useful
when switching camera types to remove any unwanted 'jump-cuts'.
3.1. The Cursor Camera
The cursor camera is a camera that follows the character in the game world. It always positions itself on a
sphere centred on the character's head. It works primarily with the direction cursor so as to face the camera
in the direction of the character's head. You may use any MatrixProvider in place of the direction cursor, and
you may use any MatrixProvider in place of the player's head.
The direction cursor is an input handler that translates device input from the user into the manipulation of an
imaginary cursor that travels on an invisible sphere. This cursor is described by its pitch and yaw. It produces
a pointing vector extending from the head position of the player's avatar in world space, in the direction of
the cursor's pitch and yaw. The direction cursor is a useful tool to allow a targeting method across different
devices. Rather than have each device affect the camera and character mesh, each device talks to the direction
cursor, affecting its look-at vector in the world. The cursor camera, target tracker, and action matcher then
read the direction cursor for information on what needs to be done.
The cursor camera takes the position of the direction cursor on the sphere, extends the line back towards the
character's head, and follows that line until it intersects with the sphere on the other side. This intersection
point is the cursor camera's position. The direction of the camera is always that of the direction cursor.
The cursor camera is an instance of the abstract concept InputCursor. There can be only one active
InputCursor at any time, and BigWorld automatically forwards keyboard, joystick, and mouse events to it.
Upon startup, the cursor camera is the active InputCursor by default. You can change the active InputCursor
at any time, using the method BigWorld.setCursor (for example to change the InputCursor to be a mouse
pointer instead).
3.2. The Free Camera
The Free Camera is a free roaming camera that is neither tied to a fixed point in space nor following the
player's avatar. It is controlled by the mouse (for direction) and keyboard (for movement), and allows the
user to fly about the world. The free camera has inertia in order to provide smooth, gradual transitions in
movement. It is not a gameplay camera, but is useful for debugging, development, and demonstration of
the game.

The FlexiCam
14 Copyright 1999-2008 BigWorld Pty. Ltd. All rights reserved. Proprietary commercial in confidence.
3.3. The FlexiCam
The FlexiCam is a flexible camera that follows the character in the game world. It always positions itself at
a specified point, relative to the character orientation, and always looks at a specified orientation, relative
to the character's feet direction.
It is called FlexiCam because it has a certain amount of elasticity to its movement, allowing the sensation of
speed to be visualised. This makes it especially useful for chasing vehicles.

15
Chapter 4. Terrain
The terrain system employed by the BigWorld client integrates neatly with the chunking system. It allows a
wide variety of terrains to be created in an artistic manner and managed efficiently. In BigWorld 1.9 a new
more advanced terrain system was introduced that improves the quality of terrains that can be created.
4.1. Advanced Terrain
4.1.1. Overview
The advanced terrain engine uses a height map split up into blocks of 100m*100m. Each block consists of
height information, texture information, normals, hole and LOD information.
4.1.2. Key Features
▪Configurable height map resolution
▪Unlimited number of texture levels with configurable blend resolution and projection angles
▪Configurable normal map resolution
▪Configurable hole map resolution
▪Per pixel lighting
▪LOD System
▪Geo mip-mapping with geo-morphing
▪Normal map LOD
▪Texture LOD
▪Height map LOD
4.1.3. Texturing
Texturing is done by blending multiple textures layers together, each texture layer has its own projection
angle and blend values for blending with other texture layers. The resolution of the blend values is
configurable per space and the layers themselves are stored per chunk. The textures are assumed to be rgba
with the alpha channel used for the specular value.
4.1.4. Lighting
The lighting of the advanced terrain is performed per pixel. A normal map is stored per block, which is used
in the lighting calculations, this is combined with the blended texture to output the final colour. The terrain
allows up to 8 diffuse and 6 specular lights per block. For details of how the specular lighting is calculated
see “Terrain specular lighting” on page 24
4.1.5. Shadows
The terrain uses a horizon shadow map for shadowing, this map stores two angles (east-west) between which
there is an unobstructed view of the sky from the terrain. In the terrain shader, these angles are checked
against the sun angle and the sun light is only applied if the sun angle falls between the horizon angles.
4.1.6. LOD
The purpose of the LOD system is to reduce the amount of cpu and gpu time spent rendering terrain and
to reduce the memory footprint of the terrain. The terrain LOD system achieves this by reducing geometric

Memory footprint
16 Copyright 1999-2008 BigWorld Pty. Ltd. All rights reserved. Proprietary commercial in confidence.
and texture detail in the distance and loading/unloading high resolution resources as they are needed. The
LODing is broken up by resource so that texture and geometric detail can be streamed separately. The LOD
distances are configurable in the space.settings file, please see “terrain section in space.settings” on
page 21 for more information.
4.1.6.1. Geometry
Geometry LOD is achieved by using geo-mipmaps and geo-morphing. Geo-mipmaps are generated from
the high resolution normal map for the terrain block. Depending on the x/z distance from the camera a lower
resolution version of the terrain block is displayed. To avoid popping when changing between the different
resolutions of the height map, geo-morphing is used, this allows the engine to smoothly interpolate between
two height map levels. Degenerate triangles are inserted between blocks of differing sizes to avoid sparkles.
4.1.6.2. Collision Geometry
Collision geometry is streamed in using two distinct resolutions. The low resolution collisions are always
available, whereas the higher resolution collisions are streamed in depending on their x-z distance from the
camera.
4.1.6.3. Texture
Texture LOD is performed by substituting the multi-layer blending with a single top-down image of the
terrain block. The LOD image is smoothly blended in based on the x-z distance from the camera. The top-
down image is generated in the World Editor.
4.1.6.4. Normal maps
Normal map LOD is performed by using low-resolution and high resolution maps. The low resolution
normal map is always available and the high resolution map is streamed in and blended based on the x-z
distance from the camera. The normal maps are generated in the World Editor. The size of the LOD normal
map is a 16th of the resolution of the normal map or 32x32 whichever value is larger.
4.1.7. Memory footprint
Since the advanced terrain allows for a number of configuration options the memory footprint of the terrain
depends on the options selected.
In the Fantasydemo example provided with the BigWorld engine, the terrain overhead is as follows, this
information was captured using the resource counters in the Fantasydemo client, the graphics settings were
set to high and the far plane was set to 1500 metres:
(this includes the textures used by the texture layers, which may also be used by other assets)
Component Size
Collision data 42,453,517
Vertex buffers 6,169,008
Index buffers 536,352
Texture layers 57,541,905
Shadow maps 26,361,856
LOD textures 35,148,605
Hole maps 4,096
Normal maps 6,572,032
Total 174,787,371
Terrain memory usage

terrain2 resources
17
4.1.8. terrain2 resources
A terrain2 section is contained in a chunk's .cdata file. It contains all the resources for the terrain in a
chunk. The different types of terrain data are described in BNF format in the following chapter.
4.1.8.1. heights sections
The heights sections stores the height map for the terrain block. Multiple heights sections are stored in
the block, one for each LOD level, each heights section stores data at half the resolution of the previous
one. The heights sections are named as " heights? " where ? is replaced by a number. The highest res
height map is stored in a section named heights the second highest in a section called heights1 all the way
down to a map that stores 2x2 heights. This way if the height map resolution is 128x128, 7 height maps are
stored in the file (heights, heights1, ... heights6)
<heightMap> ::= <header><heightData>
<header> ::=
<magic><width><height><compression><version><minHeight><maxHeight><padding>
▪<magic>
uint32 0x00706d68 (string "hmp\0")
▪<width>
uint32 containing the width of the data
▪<height>
uint32 containing the height of the data
▪<compression>
(unused) uint32 containing the compression type
▪<version>
uint32 containing the version of the data, currently 4
▪<minHeight>
float containing the minimum height of this block
▪<maxHeight>
float containing the maximum height of this block
▪<padding>
4 bytes of padding to make the header 16-byte aligned
▪<heightData>
PNG compressed block of int32 storing the height in millimetres, dimensions = width * height from the
header
4.1.8.2. layer sections
The layer sections store the texture layers for the terrain block. Multiple layer sections are stored in the
terrain block. Each section describes one texture layer. The layer sections are named " layer ? " where ?

terrain2 resources
18 Copyright 1999-2008 BigWorld Pty. Ltd. All rights reserved. Proprietary commercial in confidence.
is replaced by a number greater than 1. I.e if the block has 3 layers, three layer sections will be stored ("layer
1", "layer 2", "layer 3")
<textureLayer> ::= <header><textureName><blendData>
<header> ::=
<magic><width><height><bpp><uProjection><vProjection><version><padding>
<textureName> ::= <length><string>
▪<magic>
uint32 0x00646c62 (string bld/0")
▪<width>
uint32 containing the width of the data
▪<height>
uint32 containing the height of the data
▪<bpp>
(unused) uint32 containing the size of the entries in the layer data
▪<uProjection>
Vector4 containing the projection of the u coordinate of the texture layer
▪<vProjection>
Vector4 containing the projection of the v coordinate of the texture layer
▪<version>
uint32 containing the version of the data, currently 2
▪<padding>
12 bytes of padding to make the header 16-byte aligned
▪<length>
the length of the texturename string
▪<string>
the name of the texture used by this layer
▪<blendData>
png compressed block of uint8 defining the strength of this texture layer at each x/z position
4.1.8.3. normals & lodNormals sections
The normals section stores the high resolution normal map for the terrain block. The lodNormals section
stores the LOD normals for the height block, the LOD normals are generally 1/16th of the size of the normals.
<normals> ::= <header><data>
<header> ::= <magic><version><padding>

terrain2 resources
19
▪<magic>
uint32 0x006d726e (string "nrm/0")
▪<version>
uint32 containing the version of the data, currently 1
▪<padding>
8 bytes of padding to make the header 16-byte aligned
▪<data>
png compressed block storing 2 signed bytes per entry for the x and z components of the normal the y
component is calculate in the shader
4.1.8.4. holes section
The holes section stores the holemap for the terrain block, this section is only stored when a terrain block
has holes in it.
<holes> ::= <header><data>
<header> ::= <magic><width><height><version>
▪<magic>
uint32 0x006c6f68 (string "hol/0")
▪<width>
uint32 containing the width of the data
▪<height>
uint32 containing the height of the data
▪<version>
uint32 containing the version of the data, currently 1
▪<data>
The hole data stored in a bit field of width * height, each row in the data is rounded up to 1 byte. If a bit
is set to 1 it denotes a hole in the map.
4.1.8.5. horizonShadows section
The horizonShadows section stores the horizon shadows for the terrain block.
<shadows> ::= <header><data>
<header> ::= <magic><width><height><bpp><version><padding>
▪<magic>
uint32 0x00646873 (string "shd/0")
▪<width>

terrain2 resources
20 Copyright 1999-2008 BigWorld Pty. Ltd. All rights reserved. Proprietary commercial in confidence.
uint32 containing the width of the data
▪<height>
uint32 containing the height of the data
▪<bpp>
(unused)uint32 containing the bits per entry in the data
▪<version>
uint32 containing the version of the data, currently 1
▪<padding>
12 bytes of padding to make the header 16-byte aligned
▪<data>
The shadow data, (uint16,uint16) * width * height, the horizon shadow data stores two angles between
which there is no occlusion from any terrain or objects.
4.1.8.6. lodTexture.dds section
The lodTexture.dds section stores the LOD texture for the terrain block. The LOD texture is a low
resolution snapshot of all the texture layers blended together. The texture is stored in the DXT5 format. For
more information about the dds texture format please refer to the DirectX documentation.
4.1.8.7. dominantTextures section
The dominantTextures section stores the dominant texture map. The dominant texture map stores the
texture with the highest blend for each x/z location in the terrain block.
<dominant> ::=<header><texNames><data>
<header> ::=
<magic><version><numTextures><texNameSize><width><height><padding>
▪<magic>
uint32 0x0074616d (string "mat/0")
▪<version>
uint32 containing the version of the data, currently 1
▪<numTextures>
uint32 containing the number of textures referenced by the dominant texture map
▪<texNameSize>
uint32 containing the size of the texture entries
▪<width>
uint32 containing the width of the data
▪<height>

terrain section in space.settings
21
uint32 containing the height of the data
▪<padding>
8 bytes of padding to make the header 16-byte aligned
▪<texNames>
numTextures entries of texNameSize size containing the names of the dominant textures referred to in
this map. Texture names shorter than texNameSize are padded with 0
▪<data>
stored as a compressed bin section. byte array of width * height, each entry is an index into the texture
names which indexes the dominant texture at the x/z location of the entry
4.1.9. terrain section in space.settings
The terrain section in the space.settings file contains the configuration options for the terrain. The values
in the lodInfo and server sections can be modified, but the root level values should only be modified
by the World Editor.
<version> 200 (int) </version>
<heightMapSize> uint </heightMapSize>
<normalMapSize> uint </normalMapSize>
<holeMapSize> uint </holeMapSize>
<shadowMapSize> uint </shadowMapSize>
<blendMapSize> uint </blendMapSize>
<lodInfo>
<startBias> float </startBias>
<endBias> float </endBias>
<lodTextureStart> float </lodTextureStart>
<lodTextureDistance> float </lodTextureDistance>
<blendPreloadDistance> float </blendPreloadDistance>
<lodNormalStart> float </lodNormalStart>
<lodNormalDistance> float </lodNormalDistance>
<normalPreloadDistance> float </normalPreloadDistance>
<defaultHeightMapLod> uint </defaultHeightMapLod>
<detailHeightMapDistance> float </detailHeightMapDistance>
<lodDistances>
+<distance?> float </distance?>
</lodDistances>
<server>
<heightMapLod> uint </heightMapLod>
</server>
</lodInfo>
▪<version>
The version of the terrain, this value is 200 for advanced terrain
▪<heightMapSize>
The size of the height map per terrain block, this value is a power of 2 between 4 and 256
▪<normalMapSize>
The size of the normal map per terrain block, this value is a power of 2 between 32 and 256
▪<holeMapSize>

terrain section in space.settings
22 Copyright 1999-2008 BigWorld Pty. Ltd. All rights reserved. Proprietary commercial in confidence.
The size of the hole map per terrain block, this can be any value up to 256
▪<shadowMapSize>
The size of the shadow map per terrain block, this value is a power of 2 between 32 and 256
▪<blendMapSize>
The size of the blend maps per terrain block, this value is a power of 2 between 32 and 256
▪<lodInfo>
This section contains the configurations for the terrain LOD system
▪<startBias>
This value is the bias value for the start of geo-morphing, this value defines where a LOD level starts fading
out to the next one. This value is a factor of the difference between two lodDistances.
▪<endBias>
This value is the bias value for the end of geo-morphing, this value defines where a LOD level has fully
faded out to the next one. This value is a factor of the difference between two lodDistances.
▪<lodTextureStart>
This is the start distance for blending in the LOD texture, up until this distance, the blended layers are
used for rendering the terrain.
▪<lodTextureDistance>
This is the distance the lodtexture is blended in over, this value relative to lodTextureStart.
▪<blendPreloadDistance>
This is the distance at which the blends are preloaded, this value is relative to lodTextureDistance and
lodTextureStart
▪<lodNormalStart>
This is the start distance for blending in the LOD normals
▪<lodNormalDistance>
This is the distance the full normal map is blended in over, this value relative to lodNormalStart.
▪<normalPreloadDistance>
This is the distance at which the full normal maps are preloaded. This value is relative to lodNormalStart
and lodNormalDistance
▪<defaultHeightMapLod>
This is the default LOD level of height map to load, 0 = the full height map, 1 = half resolution, 2 = quarter
resolution etc.
▪<detailHeightMapDistance>
This is the distance at which the full height map is loaded
▪<lodDistances>

Classic Terrain
23
This section contains the geometry LOD distances.
▪<distance>
The distance sections define the distances at which each geometry LOD level is blended out. distance0
is for the first LOD level, distance1 for the second LOD level etc. The distance
between LOD levels must be at least half the diagonal distance of a terrain
block (~71), this is because we only support a difference of 1 LOD level between
neighbouring blocks.
▪<server>
This section contains the information used by the server
▪<heightMapLod>
This defines which LOD level to load on the server, this value is used to speed up loading on the server.
4.2. Classic Terrain
4.2.1. Key features
▪Works with the chunking system.
▪Individual grid squares addressable from disk and memory.
▪Based on a 4x4 metre grid (tiles), which matches portal dimensions.
▪Low memory footprint.
▪Low disk footprint.
▪Fast rendering.
▪Automatic blending.
▪Easy tool integration.
▪Layered terrain with tiled textures for easy strip creation.
▪Uses texture projection to apply texture coordinates to save vertex memory.
4.2.2. Overview
The terrain is a huge height map defined by a regular grid of height poles, every 4x4 metres. Terrain is
organised into terrain blocks of 100x100 metres. Each of these blocks can have up to four textures, which are
blended on a per-vertex (i.e., per-pole) basis. The terrain also is self-shadowing, and allows holes to be cut
out of it, for things like cave openings. The terrain also contains detail information, so that the detail objects
can be matched to the terrain type.
4.2.3. Chunking
The terrain integrates properly with the chunking: each terrain block is 100x100 metres, which is the size of
the outside chunks. The terrain blocks are stored in separate files, so that they can be opened as needed.
4.2.4. Disk footprint
Each terrain block covers one chunk, each with dimension of 100x100 metres. It contains 28x28 height, blend,
shadow, and detail values (there are two extra rows and one column to allow for boundary interpolation).
Each terrain block also stores 25x25 hole values, one for each 4x4m tile.

Memory footprint
24 Copyright 1999-2008 BigWorld Pty. Ltd. All rights reserved. Proprietary commercial in confidence.
The table below display the terrain cost per chunk.
ComponentSize calculation Size
Headers 256 (header) + 128 x 4
(texture names) 768
Height 28 x 28 x sizeof( float ) 3,136
Blend 28 x 28 x sizeof( dword ) 3,136
Shadow 28 x 28 x sizeof( word ) 1,568
Detail 28 x 28 x sizeof( byte ) 784
Hole 25 x 25 x sizeof( bool ) 625
Total 10,017
Terrain cost per chunk
For example, for a 15x15 km world the total disk size of the terrain would be: 10,017 x 150 x 150 ~ 215MB.
4.2.5. Memory footprint
With a field of view of 500m, and each terrain block covering 100x100 metres, a typical scene would require
roughly 160 terrain blocks in memory at any one time.
The memory usage of this much terrain is about 2MB, plus data management overheads.
4.2.6. Texture spacing
The TerrainTextureSpacing tag included in the environment section of file <res>/resources.xml
(for details on the precedence of entries in the various copies of file resources.xml, see “File
resources.xml” on page 8 ) determines the size (in metres) to which texture map will be stretched/shrunk
when applied to the terrain.
This value determines both the length and height of the texture tile.
4.3. Terrain specular lighting
The equation for the specular lighting is:
SpeClr = TerSpeAmt * ( (SpeDfsAmt * TerDfsClr) + SunClr) * SpeRfl
The list below describes each variable:
▪SpeClr (Specular colour)
Final colour reflected.
▪TerSpeAmt (Specular amount)
Value is given by the weighted blend of the alpha channel of the 4 terrain textures.
▪SpeDfsAmt (Specular diffuse amount)
Initial value is stored in the variable specularDiffuseAmount in the effect file bigworld/res/
shaders/terrain/terrain.fx.
Its value can be tweaked during runtime via the watcher render/terrain/specularDiffuseAmount.
Once the desired result is achieved, the new value can be stored in the effect file.

Terrain specular lighting
25
▪TerDfsClr (Terrain diffuse colour)
Value is given by the weighted blend of the RGB channels of the 4 terrain textures.
▪SunClr (Sunlight colour)
Colour impinged by sunlight.
▪SpeFlr (Specular reflection)
Specular reflection value at the given pixel, adjusted by the Specular power coefficient
As a result of the formula, a small amount of the Terrain diffuse colour (TerDfsClr) is added to the
Sunlight colour (SunClr) to give the Specular colour (SpeClr).
The initial value of the power of specular lighting is stored in the variable specularPower in the effect
file bigworld/res/shaders/terrain/terrain.fx. Its value can be tweaked during runtime via the
watcher render/terrain/specularPower. Once the desired result is achieved, the new value can be
stored in the effect file.
Note that the Specular power can only be adjusted for shader hardware version 2.0 and later. Earlier versions
of shader hardware are limited to a Specular power value of 4 (which is the default for shader hardware
version 2.0 and later).
Note
The final amount of specular lighting applied to the terrain is affected by the variable
specMultiplier in file bigworld/res/shaders/terrain/terrain.fx.
Set it to anything other than 1 to rescale the specular lighting, or 0 to completely disable
it.
Note
Terrain specular lighting can be turned off via TERRAIN_SPECULAR graphics settings.
For details, see “Graphics settings” on page 110 .

26
Chapter 5. Cloud shadows
All objects in the BigWorld client engine that are drawn outside are affected by cloud shadows. This effect is
applied per-pixel, and is performed using a light map-stored as a texture feed in the engine that is projected
onto the world.
This light map is exposed to the effects system via macros defined in the file bigworld/res/shaders/
std_effects/stdinclude.fxh.
By default, the texture feed is named skyLightMap, and therefore is accessible to Python via the command:
BigWorld.getTextureFeed( "skyLightMap" )
Information for the sky light map is found in the sky XML file, which is defined in the file <res>/spaces/
<space>/space.settings (for details on this file's grammar, see the document File Grammar Guide's
section space.settings) for the given space. The parameters are the same as in any BigWorld light map.
5.1. Requirements
Cloud shadowing requires one extra texture layer per material. While the fixed-function pipeline supports
this for most materials, cloud shadowing on bump-mapped and specular objects requires more than four sets
of texture coordinates, meaning that for bump-mapped objects it will only work on Pixel Shader 2 and above.
5.2. Implementation
The sky light map is calculated by the code in C++ file src/lib/romp/sky_light_map.cpp, and is
updated by the sky module during draw.
It is exposed to the effect engine via automatic effect constants. The light map is updated only when a new
cloud is created, or the current set of clouds has moved more than 25% downwind.
Between updates, the projection texture coordinates are slid by the wind speed so that the cloud shadows
appear to move with the clouds. All effect files incorporate the cloud shadowing effect, including the terrain
and flora.
5.3. Effect File Implementation
There are two effect constants exposed to effect files to aid with sky light mapping:
▪SkyLightMapTransform
Sets the "World to SkyLightMap" texture projection.Use this constant to convert x,z world vertex positions
to u,v texture coordinates.
▪SkyLightMap
Exposes the sky light map texture to effect files.
There are several macros in file bigworld/res/shaders/std_effects/stdinclude.fxh that assist
with integrating cloud shadowing into your effect files.
These macros are described in the list below:
▪BW_SKY_LIGHT_MAP_OBJECT_SPACE, BW_SKY_LIGHT_MAP_WORLD_SPACE
These macros declare the variables and constants required for the texture projection, including:

Tweaking
27
▪World space camera position.
▪Sky light map transform.
▪The sky light map itself.
When using an effect file that performs lighting in object space (for example, if you are also using the
macro DIFFUSE_LIGHTING_OBJECT_SPACE), use the variation BW_SKY_LIGHT_MAP_OBJECT_SPACE,
and that will have the world matrix declared.
▪BW_SKY_LIGHT_MAP_SAMPLER
This macro declares a sampler object that is used when implementing cloud shadows in a pixel shader.
▪BW_SKY_MAP_COORDS_OBJECT_SPACE, BW_SKY_MAP_COORDS_WORLD_SPACE
These macros perform the texture projection on the given vertex position, and set the texture coordinates
into the given register.
Be sure to pass the positions in the appropriate reference frame, depending on which set of macros you
are using.
▪BW_TEXTURESTAGE_CLOUDMAP
This macro defines a texture stage that multiplies the previous stage's result by the appropriate cloud
shadowing value.
It should be used after any diffuse lighting calculation, and before any reflection or specular lighting.
▪SAMPLE_SKY_MAP
This macro samples the sky light map in a pixel shader, and returns a 1D-float value representing the
amount by which you should multiply your diffuse lighting value.
5.4. Tweaking
After the light map is calculated based on the current clouds, it is clamped to a maximum value. This means
that the cloud map can never get too dark, or have too great an effect on the world.
For example, even if the sun is completely obscured by clouds during the day, there will still be enough
ambient lighting and illumination from the cloud layer itself such that sunlight still takes effect.
The BigWorld watcher Client Settings/Clouds/max sky light map darkness' sets the maximum
value that the sky light map can have. A value of 1 means that the sky light map is able to completely obscure
the sun (full shadowing). The default value of 0.65 represents the BigWorld artists' best guess at the optimal
value for cloud shadowing. A value of 0 would mean there is never any effect of cloud shadows on the world.
This value is also read from the file sky.xml in the light map settings. It is represented by the maxDarkness
tag. For details on the sky light map settings file, see “Sky light map” on page 93 .

28
Chapter 6. Chunks
The scene graph drawn by the BigWorld client is built from small convex chunks of space. This has many
benefits including easy streaming, reduced loading times, concurrent world editing, and facilitation of server
scene updates and physics checking.
The concepts and implementation of the chunking system are described in the following sections.
6.1. Definitions
The following terms are related to the BigWorld chunking system:
A space is a continuous three-dimensional Cartesian medium. Each space is divided piecewise into chunks,
which occupy the entire space but do not overlap. Every point in the space is in exactly one chunk. A space
is split into columns of 100x100 metres in the horizontal dimensions, and total vertical range. Examples of
separate spaces include planets, parallel spaces, space stations, and 'detached' apartment/dungeon levels.
A chunk is a convex three-dimensional volume. It contains a description of the scene objects that reside inside
it. Scene objects include models, lights, entities, terrain blocks, etc, known as chunk items. It also defines the
set of planes that form its boundary.
Note
The outside chunk of a column is exempt from this — it needs only define the four planes
to adjacent column. The boundary planes of other chunks overlapping that grid square
are used to build a complete picture of the division of space inside it.
Some planes have portals defined on them, indicating that a neighbouring chunk is visible through them.
A portal is a polygon plus a reference to the chunk that is visible through that polygon. It includes a flag to
indicate whether it permits objects to pass through it. Some portals may be named so that scripts can address
them, and change their permissivity.
6.2. Implementation files
The following files are used by the chunking system:
▪One space.settings file for each space in the universe (XML format)
For details on this file's grammar, see the document File Grammar Guide's section space.settings.
▪<res>/spaces/<space>/space.settings
▪Environment settings
▪Bounding rectangle of grid squares
▪Multiple .chunk files for each space (XML format)
For details on this file's grammar, see the document File Grammar Guide's section <chunk>o.chunk,
<chunk>i.chunk.
▪<res>/spaces/<space>/XXXXZZZZo.chunk (o = outside)
▪<res>/spaces/<space>/CCCCCCCCi.chunk (i = inside)
▪List of scene objects
▪Texture sets used

Details and notes
29
▪Boundary planes and portals (including references to visible chunks)
▪Collision scene
▪Multiple .cdata files for each space (binary format)
▪<res>/spaces/<space>/XXXXZZZZ.cdata
▪Terrain data such as:
▪Height map data
▪Overlay data
▪Textures used
— or —
▪Multiple instances of lighting data for each object in the chunk:
▪Static lighting data
▪A colour value for each vertex in the model
6.3. Details and notes
6.3.1. Includes
Includes are transparent after being loaded (to client, server, and scripts). Label clashes are handled by
appending '_n' to labels, where N is the number of objects with that label already.
Includes are expanded inline where they are encountered, and do not need to have a bounding box for the
purposes of the client or server.
The WorldEditor does not generate includes.
6.3.2. Models
Material overrides and animation declarations remain the domain of model files. For more details, see Models
on page 52 .
6.3.3. Entities
Only entities that are implicitly instantiated need to have their ID field filled in. If it is zero or is missing,
then the entity is assigned a unique ID from either the client's pool (if it is a client-instantiated entity) or the
creating cell's pool (if it is a server-instantiated entity).
If an entity needs a label, it must include the label as a property in its formal type definition.
6.3.4. Boundaries and portals
The special chunk identifier heaven may be used if only the sky (gradient, clouds, sun, moon, stars, etc...) is
to be drawn there. Similarly with earth, if the terrain ought to be drawn. Therefore, outside chunks will have
six sides, with the heaven chunk on the top and the earth chunk on the bottom.
The absence of a chunk reference in a portal means it is unconnected and that nothing will be drawn there.
If a chunk is included inside another, then its boundary planes are ignored — only things like its includes,
models, lights, and sounds are used.

Transforms
30 Copyright 1999-2008 BigWorld Pty. Ltd. All rights reserved. Proprietary commercial in confidence.
An internal portal means that the specified boundary is not an actual boundary, but instead that the space
occupied by the chunk it connects to (and all chunks that that chunk connects to) should be logically
subtracted from the space owned by this chunk, as defined by its non-internal boundaries. This was originally
intended only for 'outside' chunks to connect to 'inside' chunks, but it may be readily adapted for 'interior
portals', the complement to 'boundary portals'.
In a portal definition, the vAxis for the 2D polygon points is found by the cross product of the normal with
uAxis.
In boundary definitions, the normals should point inward.
6.3.5. Transforms
Everything in the chunk except the bounding box is interpreted in the local space of the chunk (as specified
in the top-level transform section).
6.3.6. Other items
The following items can also exist in chunks:
▪Spot Light
▪Ambient Light
▪Directional Light
▪Water (body of water)
▪Flare (lens flare)
▪Particle System
6.4. Loading and ejecting
At every frame, the Chunk Manager performs a simple graph traversal of all the chunks it has loaded, looking
for new chunks to load. It follows the portals between chunks, keeping track of how far it has 'travelled' in
its scan. Its scan is limited to the maximum visible distance, i.e., a little further than the far plane distance.
The closest unloaded chunk it finds on this traversal is the chunk that is loaded next. Loading is done in a
separate thread, so it does not interfere with the running of the game. Similarly, any chunks that are beyond
the reach of the scan are candidates for ejecting (unloading).
6.5. Focus grid
The focus grid is a set of columns surrounding the camera position. Each column is 100x100metres and is
aligned to the terrain squares and outside chunks. The focus grid is sized to just exceed the far plane.
For a far plane of 500m, for example, the focus grid goes 700m in each direction, making for 14 x 14 = 196
columns total.
The set of columns in the focus grid is dependent on the camera position. As the camera moves, the focus grid
disposes columns that are no longer under the grid and 'focuses' on ones that have just come close enough.
Each column contains a hull tree and a quad tree.
6.5.1. Hull tree
A hull tree is a kind of binary-space partitioning tree for convex hulls. It can handle hulls that overlap. It can
do point tests and proper line traversals.

Quad tree
31
The hull tree is formed from the boundaries of all the chunks that overlap the column. From this tree, the
chunk that any given point lies in can be quickly determined. (e.g., the location of the camera)
6.5.2. Quad tree
The quad tree is made up of the bounding boxes (or, potentially, any other bounding convex hull) of all the
obstacles that overlap the column. This tree is used for collision scene tests. Chunk items are responsible for
adding and implementing obstacles. Currently only model and terrain chunk items add any obstacles.
If a chunk or obstacle is in more than one column, it is added to the trees of both columns.
6.6. Collisions
Using its focus grid of obstacle quad trees, the chunk space class can sweep any 3D shape through its space,
and report all the triangle collisions to a callback object. The currently supported 3D shapes are points and
triangles, but any other could be added with very little difficulty.
The bottommost level of collision checking is handled by a generic obstacle interface, so any conceivable
obstacle could be added to this collision scene, as long as it can quickly determine when another shape
collides with it (in its own local coordinates).
For more details, see file bigworld/src/client/physics.cpp.
6.7. Sway items
A sway item is a chunk item that is swayed by the passage of other chunk items. Whenever a dynamic chunk
item moves, any sway items in that chunk get the sway method called on them, specifying source and destiny
of movement.
Currently the only user of this is ChunkWater. It uses movements that pass through its surface to make
ripples in the water. This is why the ripples work for any kind of dynamic item — from dynamic obstacles/
moving platforms to player models to small bullets.
▪In mf/src/lib/chunk/chunk_water.cpp:
/**
* Constructor
*/
ChunkWater::ChunkWater() :
ChunkItem( 5 ), 1
pWater_( NULL )
{
}
...
/**
* Apply a disturbance to this body of water
*/
void ChunkWater::sway( const Vector3 & src, const Vector3 & dst )
{
if (pWater_ != NULL)
{
pWater_->addMovement( src, dst );
}
}
1Calls ChunkItem constructor with wantFlags =5:
▪1 — wantsDraw

Sway items
32 Copyright 1999-2008 BigWorld Pty. Ltd. All rights reserved. Proprietary commercial in confidence.
▪4 — wantsSway
▪In mf/src/lib/chunk/chunk_item.hpp:
...
class ChunkItem : public SpecialChunkItem
{
public:
ChunkItem( int wantFlags = 0 ) : SpecialChunkItem( wantFlags ) { }
};
...
typedef ClientChunkItem SpecialChunkItem;
...
class ClientChunkItem : public ChunkItemBase
{
public:
ClientChunkItem( int wantFlags = 0 ) : ChunkItemBase( wantFlags ) { }
};
...
ChunkItemBase( int wantFlags = 0 );
bool wantsDraw() const { return !!(wantFlags_ & 1); }
bool wantsTick() const { return !!(wantFlags_ & 2); }
bool wantsSway() const { return !!(wantFlags_ & 4); }
bool wantsNest() const { return !!(wantFlags_ & 8); }

33
Chapter 7. Entities
Entities are a key BigWorld concept, and involve a large system in their own right. They are the link between
the client and the server. They are the feature most particular to BigWorld Technology, in comparison to other
3D game systems.
This section deals only with the management aspects of entities on the client.
For details on the environment in which entity scripts are placed, and the system that supports them, see
Scripting on page 37 . For details on the definition of an entity, which is shared between the server and
the client, see the document Server Programming Guide's section Physical Entity Structure for Scripting →
The definition file.
For more details, see the file bigworld/src/client/chunk_entity.hpp.
7.1. Entities are Python script objects
Each entity on the client is a Python script object (PyObject).
Depending on the entity type, it can exist in different parts of BigWorld, as listed below:
▪Client only
For example, a security camera prop, or an information icon. Client-only entities are created by setting
WorldEditor's Properties' panel Client-Only attribute to true. (for details on this panel, see the document
Content Tools Reference Guide 's section WorldEditor → Panel summary → Properties panel). Client-only
entities should not have cell or base scripts.
▪Client and server
The entity will exist in both parts at the same position. For example, the player Avatar, NPCs, a vending
machine.
▪Server only
The entity will be instantiated on the server only. For example, a NPC spawn point or teleportation
destination point.
7.2. Exposing the client
In order to do anything useful, there is a wealth of functions that the scripts can call on the client C++ code.
These functions determine what a script can actually accomplish — anywhere from the very high level:
setEntityTemplate(MONSTER_34)
To the very low level:
def tick(self):
self.frame+=1
self.setAnimations([("IDLE-1",self.frame,1.0)])
In general, BigWorld allows access to as low a level as practical, allowing the scripts the maximum control
and flexibility. However, it is recommended that if something has to be done at every frame, it should not
be done in script.

Script entry points
34 Copyright 1999-2008 BigWorld Pty. Ltd. All rights reserved. Proprietary commercial in confidence.
7.3. Script entry points
Script entry points are the opposite of exposing the client — these are the Python functions that client C++
code can call on script objects. Most of them correspond to messages from the server that are automatically
routed to the relevant script environments, or to messages sent between scripts locally on the client.
However, some come from the client itself. This may be as a result of menu selections, or key presses, or
various other callbacks depending on the use of the various C++ services provided by the client.
7.3.1. prerequisites()
This is a callback that allows entity scripts to return a list of resources that must be loaded before the entity
may enter the world. These resources are loaded by the loading thread, so as to not interrupt the rendering
pipeline.
It is recommended practice for an entity to expose its required resources as pre-requisites, and load them in
the method enterWorld. Unlike pre-loading, pre-requisites do not leak a reference, so when the entity leaves
the world, it should free its resources.
The Entity Manager calls Entity::checkPrerequisites before allowing an entity to enter the world. This method
checks whether the pre-requisites for this entity entering the world are satisfied. If they are not, then it starts
the process of satisfying them (if not yet started).
Note that when the method prerequisites is called on the entity, its script has already been initialised and
its properties have been set up. The entity thus may specialise its pre-requisites list based on the specific
instance of that entity.
For example:
def prerequisites( self ):
return [ DoorResources[ self.modelType ].modelName
7.4. Entity Manager
The Entity Manager stores two lists of entities:
▪Active List — Contains the entities that are currently in the world, as relayed by the server or indicated
by the chunk files.
▪Cached List — Contains the entities that have recently been in the world, but are now just outside the
client's 500m radius area of interest (AoI).
Entities are cached so that if they come back into the client's AoI shortly after they have left it, the server does
not have to resend all the data associated with that entity; only the fields that have changed.
Since messages may be received from the server out of order, the Entity Manager is not sensitive to their
order. For example, if an entity enters the player's AoI then quickly leaves it, the BigWorld client behaves
correctly even if it receives the entity's 'leave AoI' message before its 'enter AoI' message.
The Entity Manager can always determine the relative time that it should have received a message from the
sequence number of the packet, since packets are sent at regular intervals.

35
Chapter 8. User Data Objects
User data objects are a way of embedding user defined data in Chunk files. Each user data object type is
implemented as a collection of Python scripts, and an XML-based definition file that ties the scripts together.
These scripts are located in the resource tree under the folder scripts.
User data objects differ from entities in that they are immutable (i.e. their properties don't change), and that
they are not propagated to other cells or clients. This makes them a lot lighter than entities.
A key feature of user data objects is their linkability. Entities are able to link to user data objects, and user
data objects are able to link to other user data objects. This is achieved by including a UDO_REF property in
the definition file for the user data object or entity that wishes to link to another user data object.
For more information about linking, please refer to Server Programming Guide's section User Data Object
Linking.
For details on the definition of a user data object, which is shared between the server and the client, see the
document Server Programming Guide's section Physical User Data Object Structure for Scripting → The user
data object definition file.
8.1. .1. User Data Objects are Python script objects
Each user data object is a Python script object (PyObject). Depending on the user data object type, it can
exist in different parts of BigWorld, as listed below:
▪Client only
Client only user data objects are created by using the CLIENT domain in the Domain tag inside its
definition file. Client-only user data objects should not have cell or base scripts
For an example of a client-only user data object, please refer to the CameraNode user data
object, implemented in the <res>/scripts/client/CameraNode.py and the <res>/scripts/
user_data_object_defs/CameraNode.def files.
▪Server only
Server only user data objects are instantiated on the server only, and will be instantiated in the cell if its
Domain tag is CELL, or in the base if the Domain tag is set to BASE.
For an example of a server user data object, please refer to the PatrolNode user data
object, implemented in the <res>/scripts/cell/PatrolNode.py and the <res>/scripts/
user_data_object_defs/PatrolNode.def files.
8.2. .2. Accessing from the Client
The client can access all client-only user data objects using the command:
>>> BigWorld.userDataObjects
<WeakValueDictionary at 3075900908>
This will return a Python dictionary, using the user data object’s unique identifier as the key, and its
PyObject representation as its value. The attributes and script methods of the user data object can be
accessed using the standard dot syntax:
>>> patrolNode.patrolLinks

.2. Accessing from the Client
36 Copyright 1999-2008 BigWorld Pty. Ltd. All rights reserved. Proprietary commercial in confidence.
[UserDataObject at 2358353012, UserDataObject at 2358383771]

37
Chapter 9. Scripting
The facilities provided to scripts are of extreme importance, as they determine the generality and extensibility
of the client. To a script programmer this environment is the client; just as to an ordinary user, the windowing
system is the computer.
The scripting environment offers a great temptation to try to write the whole of a program in it. This can
quickly make for slow and incomprehensible programs (especially if the same programming discipline is not
applied to the scripting language as is to C++). Therefore, we recommend that a functionality should only be
written in script when it does not need to be called at every frame. Furthermore, where it is global, it should
be implemented in the personality script. So, for example, a global chat console would be implemented in
the personality script, whilst a targeting system, which needs to check the collision scene at every frame, is
best implemented in C++.
Importantly, the extensive integration of Python throughout BigWorld Technology allows for both rapid
development of game code, and enormous flexibility.
9.1. Functional components
This section describes the contents and services of the (general) C++ entity, from the point of view of a script
that uses these facilities. The functional components of an entity, described in the following sections are:
▪Entity Skeleton
▪Python Script Object
▪Model Management
▪Filters
▪Action Queue
▪Action Matcher
▪Trackers (IK)
▪Timers and Traps
9.1.1. Entity skeleton
The Entity class (entity.cpp) is the C++ container that brings together whatever components are in use for a
particular entity. It is derived from Python object and intercepts certain accesses, and passes those it does not
understand on to the user script. This allows scripts to call C++ functions on themselves (and other entities)
transparently, using the 'self' reference. The same technique of integration has been used in the cell and base
components of the server.
This class handles any housekeeping or glue required by the component classes — it is the public face of an
entity as far as other C++ modules are concerned.
The data members of this class include id, type, and position.
9.1.2. Python script object
This is the instance of the user-supplied script class. The type of the entity selects the class. It stores type-
specific data defined in the XML description of the entity type, as well as any other internally used data that
the script wishes to store.
When field data is sent from the server, this class has its fields automatically updated (and it is notified of the
change). When messages are received from the server (or another script on the client), the message handlers
are called automatically. The entity class performs this automation — it appears to be automatic from the
script's point of view.

Model management
38 Copyright 1999-2008 BigWorld Pty. Ltd. All rights reserved. Proprietary commercial in confidence.
9.1.3. Model management
A model is BigWorld's term for a mesh, plus the animations and actions used on it.
The model management component allows an entity to manage the models that are drawn and animated at
its position. Models can be attached to each other at well-defined attachment points (hard points), or they
can exist independently. A model is not automatically added to the scene when it is loaded — it must be
explicitly put in it.
An entity may use any number of independent (disconnected) models, but most will use zero or one. Those
that use more require special filters to behave sensibly. For details, see “Filters” on page 38 .
The best way to understand models is t`o be acquainted to their Python interface, which is described in the
Client Python API documentation's entry Main → Client → BigWorld → Classes → PyModel. For more
details, see Models on page 52 .
9.1.4. Filters
Filters take time-stamped position updates and interpolate them to produce the position for an entity at an
arbitrary time.
BigWorld provides only the Filter base class. The game developer would derive game-specific filters from
this. Each entity can then select one type of filter for itself from the variations available. It can dynamically
change its filter if it so desires.
Whenever a movement update comes from the server, it is handed over to the selected filter, along with the
time that the (existing) game time reconstruction logic calculated for that event.
The filter can also be provided with gaps in time and transform, i.e., 'at game-time x there was a forward
movement of y metres and a rotation of z radians lasting t seconds'. The filter (if it is smart enough) can then
incorporate this into its interpolation.
The filter can also execute script callbacks at a given time in the stream.
Filters are fully accessible from Python.
9.1.5. Action Queue
The action queue is the structure within the BigWorld Technology framework that controls the queue of
actions in effect on a model (actions are wrapped by ActionQueuer objects that are contained by the action
queue).
The ActionQueue deals with the combining of layers and also applying the appropriate blend in and blend
out times.
The ActionQueue also deals with any scripted callback functions that are linked to the playing of an action,
like for example calling sound-playing callbacks at particular frames in an action.
An action is described in XML as illustrated the example .model file below (model files are located in any
of the various sub-folders under the resource tree <res> , such as for example, <res>/environments,
<res>/flora, <res>/sets/vehicles, etc...):
<action>
<name> ACTION_NAME </name>
?<animation> ANIMATION_NAME </animation>
?<blendInTime> float </blendInTime>
?<blendOutTime> float </blendOutTime>
?<filler> [true|false] </filler>
?<track> int </track>
?<isMovement> [true|false] </isMovement>

Action Queue
39
?<isCoordinated> [true|false] </isCoordinated>
?<isImpacting> [true|false] </isImpacting>
?<match>
?<trigger>
?<minEntitySpeed> float </minEntitySpeed>
?<maxEntitySpeed> float </maxEntitySpeed>
?<minEntityAux1> float </minEntityAux1>
?<maxEntityAux1> float </maxEntityAux1>
?<minModelYaw> float </minModelYaw>
?<maxModelYaw> float </maxModelYaw>Coor
?<capsOn> capabilities </capsOn>
?<capsOff> capabilities </capsOff>
</trigger>
?<cancel>
?<minEntitySpeed> float </minEntitySpeed>
?<maxEntitySpeed> float </maxEntitySpeed>
?<minEntityAux1> float </minEntityAux1>
?<maxEntityAux1> float </maxEntityAux1>
?<minModelYaw> float </minModelYaw>
?<maxModelYaw> float </maxModelYaw>Coor
?<capsOn> capabilities </capsOn>
?<capsOff> capabilities </capsOff>
</cancel>
?<scalePlaybackSpeed> [true|false] </scalePlaybackSpeed>
?<feetFollowDirection> [true|false] </feetFollowDirection>
?<oneShot> [true|false] </oneShot>En
?<promoteMotion> [true|false] </promoteMotion>
</match>
</action>
Example .model file describing action
The list below describes some of the tags in the XML file:
▪name
Name of that action as used by a script.
These are available as named 'constants' off the model object returned by the Model Manager.
▪animation
The base animation whence the frame data is sourced.
▪blendInTime
Time in seconds the action takes to completely blend in.
▪blendOutTime
Time in seconds the action takes to completely blend out.
▪filler
Specifies if the action is just padding and can be interrupted if anything else comes on the queue.
▪track
Track number in which the action should be played.
If the action has a track, then the animation is blended on top of whatever other animations exist — i.e.,
it bypasses the queue.

Action Queue
40 Copyright 1999-2008 BigWorld Pty. Ltd. All rights reserved. Proprietary commercial in confidence.
▪isMovement
Specifies that the action uses a simple movement animation which can be easily translated to the entity on
the server. Thus as the model moves in the client the server-side entity's position will be updated accurately.
Examples of animations used with isMovement are walk, run, side-step, etc. This setting cannot be used
with isCoordinated and isImpacting.
▪isCoordinated
Specifies that the action's animation starts from an offset position. Used for actions that require
coordination with a non-player character (NPC), which needs to be positioned relative to the player's
character for the purpose of matching contact points (e.g. shaking hands). This setting cannot be used with
isMovement and isImpacting.
▪isImpacting
Specifies that the action uses a complex movement animation which cannot be easily translated to the entity
on the server. The entity's position on the server will only be updated to a new position when the animation
finishes playing. Examples of animations used with isImapcting are jumping, combat and knockdowns,
interacting with entities, etc. This setting requires promoteMotion and cannot be used with isMovement
and isCoordinated.
▪match
If this section is present, it means the Action Matcher can automatically select the action (see below).
▪trigger (section match)
This section defines criteria used to determine when to start an action.
▪minEntitySpeed (section trigger)
Determines the minimum velocity of the entity for the action to start.
▪maxEntitySpeed (section trigger)
Determines the maximum velocity of the entity for the action to start.
▪minEntityAux1 (section trigger)
Determines the minimum pitch of the entity for the action to start.
▪maxEntityAux1 (section trigger)
Determines the maximum pitch of the entity for the action to start.
▪minModelYaw (section trigger)
Determines the minimum yaw of the model for the action to start.
▪maxEntityYaw (section trigger)
Determines the maximum yaw of the model for the action to start.
▪capsOn (section trigger)
Determines which special case character states need to be on for the action to start.
▪capsOff (section trigger)
Determines which special case character states need to be off for the action to start.

Action Queue
41
▪cancel (section match)
This section defines the criteria used to determine when to stop an action.
▪minEntitySpeed (section cancel)
Determines the minimum velocity of the entity for the action to stop.
▪maxEntitySpeed (section cancel)
Determines the maximum velocity of the entity for the action to stop.
▪minEntityAux1 (section cancel)
Determines the minimum pitch of the entity for the action to stop.
▪maxEntityAux1 (section cancel)
Determines the maximum pitch of the entity for the action to stop.
▪minModelYaw (section cancel)
Determines the minimum yaw of the model for the action to stop.
▪maxEntityYaw (section cancel)
Determines the maximum yaw of the model for the action to stop.
▪capsOn (section cancel)
Determines which special case character states need to be on for the action to stop.
▪capsOff (section cancel)
Determines which special case character states need to be off for the action to stop.
▪scalePlaybackSpeed (section match)
Specifies that the animation playback speed should be scaled as a function of the entity's speed. This setting
requires isMovement.
▪feetFollowDirection (section match)
Specifies that the model should turn to track the Entity. In practice this means while this action is matched,
the model rotates on the spot instead of playing a turning action.
▪oneShot (section match)
Specifies that the action will only be selected for playing once in a row by the action matcher. Note the
distinction between this and filler, where filler is not related to the action matcher.
▪promoteMotion (section match)
Specifies that the motion of the root node within the animation should affect the model's position. Use
in conjunction with isImpacting to update the entity's position on the server. This setting cannot be used
with filler.
The Python interface to a model's action queue allows actions to be played directly on that model, or a set
of actions to be queued and played in sequence. Callback functions can be defined and played when actions
are finished.

Action Queue
42 Copyright 1999-2008 BigWorld Pty. Ltd. All rights reserved. Proprietary commercial in confidence.
In Python, a model can be easily created and an action played on it, as illustrated in the example below:
class Jogger( BigWorld.Entity ):
....
def __init__( self ):
self.model = BigWorld.Model( "jogger.model" )
def warmUp( self ):
self.model.action( "StretchLegs" )()
...
Model creation in Python
9.1.5.1. Debugging animations
If a model is not being animated as it is supposed to, it is useful to display the Action Queue graph in the
Python console.
This is can be done by calling BigWorld.debugAQ() method, which can receive two kinds of arguments:
▪PyModel
Displays the graph for the specified model, with the blend weight of each action. Each action is represented
in a different, arbitrarily chosen, colour.
▪None
Switches off the graph display.
Python console displaying Action Queue's debugging graph

Action Matcher
43
The graph in the picture above displays the execution on the TurnLeft animation (in green) and the Idle one
(in red). We can determine the animations that were being played in each labelled point in the graph:
▪A — 100% of the Idle animation is being played.
▪Between A and B — Idle animation is being blended in with TurnLeft animation.
▪B — 50% of the Idle animation is being played, and 50% of the TurnLeft animation is being played.
▪C — 100% of the TurnLeft animation is being played.
For more details, see the Client Python API documentation.
Note
ModelEditor offers the same functionality for the model. For details, see the document
Content Tools Reference Guide's section ModelEditor → Panel Summary → Actions
Panel.
9.1.6. Action Matcher
Given a model, an action queue, and a set of actions, all behaviour of a game object/character can be specified
by event-driven calls on the Action Queuer. This ends up with a heavy overhead, as many changes in object
state need to directly call the object and solve which animation should be played.
The solution to this problem is to internalise most of the behaviour of a character in a system called the Action
Matcher, which automatically updates an object's motion based on the object's state. It is a simple pattern
matcher, picking an animation based on model's attributes such as speed, direction, etc.
State parameters such as speed, rotation, or power are exposed to the Action Matcher, which then selects
the action that best maps to these parameters. This frees the game from having to handle many aspects of
animation, allowing it to only have to update state parameters, such as position.
When there are no (unblended) actions in the Action Queue for a model (within the player's AoI), the Action
Matcher takes over and plays an 'idle' action. It triggers these 'idle' animations to give the game world more
life, since real living things are not still. It can also be used to automate menial animation tasks.
This class looks at all the actions that have a match section (see XML example in section “Action Queue” on
page 38 , whose constraints are satisfied for the Action Matcher object controlling the model.
Scriptable constraints are tested against the capabilities bit fields capsOn and capsOff. The Action Matcher
for a model has a set of capability bits, which value is controlled by script. An action will only be matched if
all the capsOn bits are on and all the capsOff bits are off in the Action Matcher's set.
It then looks at the change in pose (position and orientation — as set by the filter) and selects the first action
that matches this change for the time over which the change occurred. The trigger constraints are used to
test most actions. The cancel constraints are used if the action that matched last frame is encountered. This
feature is intended primarily to reduce action hysteresis.
The update function of an action-matched object takes the previous updated position of the object, chooses
the best matched action from its matched action list, then plays the animation back at the correct speed to
smoothly link action with speed. As a game character starts moving faster, the Action Matcher may choose a
faster running cycle to play back and increase its playback speed to precisely match speed so no foot sliding
is seen.
This method allows an AI system to define behaviour with respect to a few variables such as orientation,
speed, and aiming direction, and the Action Matcher will convert these updated parameters into a smoothly
moving character.

Action Matcher
44 Copyright 1999-2008 BigWorld Pty. Ltd. All rights reserved. Proprietary commercial in confidence.
In a client/server architecture where position and orientation are updated over a network, the Action Matcher
(combined with a filter) can automatically compensate for position jumps caused by network lag by having
characters realistically run faster to the latest updated position.
When an action is loaded, its data is augmented with the effect on pose that performing the action would
have on the root node. This information is used for the matching described above.
Now that an action has been selected, it is passed to the Action Queue. If the action supplied is the same
as the previous action, it continues to be played in the normal fashion (i.e., frame += fps*deltaTime).
Otherwise, it is blended in over a few frames while the other is blended out.
9.1.6.1. Using the Action Matcher
Each action designed to be matched must define a <match> section. These are added via ModelEditor using
the Actions window. The matching parameters are divided in two:
▪Trigger parameters — Define when an action can be started, and
▪Cancel section — Defines when an action should be stopped.
The minEntitySpeed and minEntitySpeed tags in each section define the velocities in which actions can and
cannot be triggered or cancelled.
The auxiliary parameters can be used to define a pitch range that is used to match action. The minModelYaw
and maxModelYaw tags define a yaw range. The main matching parameters define speed and orientation
ranges that the action applies to, and also a user-defined set of matching flags that are used with special case
character states. These flags can be used to set whether a game character is not using the basic action set,
such as being injured or being angry.
The BigWorld engine uses the matchCaps parameter to store the bitwise flag set of an action. At any given
time, the model itself will have an on/off flag set representing the state of these states, and this is tested
against each action's matchCaps per frame.
A set of user-defined action states should be defined (created as a text file or as comment section in model
file). A simple example is given in the list below:
▪Capability flag: 1 — State: Angry
▪Capability flag: 2 — State: Happy
▪Capability flag: 3 — State: Sad
A set of angry animation can now be accessed using the action matcher by just adding the angry flag to the
current matchCaps.
In Python code, a simple example of a character that should now move and behave in an angry manner is
shown below:
class AngryMan( BigWorld.Entity ):
....
def enterWorld( self ):
self.am = BigWorld.ActionMatcher( self )
def enterAngryMode( self ):
self.am.matchCaps = self.am.matchCaps + [1]
...
Python implementation of character in angry mode

Trackers
45
By using the Action Matcher this way, a character's natural motion can be fleshed out without having to
explicitly call any function to play animations. Specific event-based actions should still be called directly via
the Action Queue structure, but the background behaviour of the character can be completely defined using
the ModelEditor tool and setting matching flags appropriately in the code base.
9.1.7. Trackers
A tracker applies inverse kinematics to nodes in the entity's model so that they appear to point to a position
defined by a given 'target' entity. An entity may have any number of trackers.
To add a tracker to an entity, use a script call like this:
tracker = BigWorld.Tracker()
tracker.dirProvider = DiffDirProvider(
self.focalMatrix, target.focalMatrix )
tracker.nodeInfo = BigWorld.TrackerNodeInfo(
model,
primaryNode,
secondaryNodeList,
pointingNodeName,
minPitch, maxPitch,
minYaw, maxYaw,
angularVelocity )
self.model.tracker = tracker
Adding tracker in Python
The parameters for the BigWorld.TrackerNodeInfo method are described below:
▪model
PyModel that owns the nodes that the tracker will affect.
▪primaryNode
Primary node reference.
Node references are built up from the entity's independent model (the first one if there are multiple)
following a path of attachment points and ending in a node name. This allows trackers to transparently
work through attached models (i.e., they are treated as if they are welded onto the model's skeleton).
This is more important for Supermodels (for more details, see “SuperModel” on page 55 ), where
characters are built out of multiple model parts.
▪secondaryNodeList
List of secondary nodes, containing tuples of the form (node, weight).
These have the same transform performed on them as on the primary node, in proportion with the weight
amount. Actually, all the weights (including the primary node, with a weight of 1.0) are summed, and each
node gets their weight proportion of this total applied to them.
▪pointingNodeName
Name of the node providing the frame of reference used for tracker manipulations.
If the node specified is not present, then the model's scene root is used.
▪minPitch, maxPitch, minYaw, maxYaw

Timers and Traps
46 Copyright 1999-2008 BigWorld Pty. Ltd. All rights reserved. Proprietary commercial in confidence.
Limits on the turn that the tracker is permitted to apply, in degrees.
▪angularVelocity
Speed at which a tracker will turn the PyModelNode instances that it influences, in degrees per second.
9.1.8. Timers and Traps
These are generic helper services provided to entity scripts.
A script can set timers to have itself called-back at a certain time, as illustrated in the example below:
BigWorld.callback( afterTime, fn )
Traps use a slightly different interface:
trapRef = self.addTrap( radius, function )
A trap goes off if any entity wanders within the given radius of the entity it is created on, and can be cancelled
with the self.delTrap method.
There are two other types of trap, optimised for their specific need, as discussed in the following sections.
9.1.8.1. Pot
A Pot is a 'player-only-trap', and is triggered only by the player entity. Due to this, it is a lot cheaper to use
than a general trap.
A Pot is added given a matrix provider, a radius, and a script callback for triggering.
potHandle = BigWorld.addPot( trapMatrix, radius, callback )
9.1.8.2. Mat
A Mat is a 'matrix trap', and is triggered when an area is triggered by another. This makes sense only because
matrix providers are dynamic. The areas are defined as:
▪Source-matrix translation and a bounding area given by the scale of the x-, y- and z-axes in that matrix.
▪Destination-matrix translation of destination matrix (treated as a point).
A Mat is defined in Python as listed below:
matHandle = BigWorld.addMat( sourceMatrix, callback, destMatrix )
9.2. Personality script
The personality script is a Python script used to handle several callbacks from the BigWorld engine for
initialisation, cleanup, input handling, and environment changes. It can also implement client functionality
that does not belong to any particular entity in the game, such as the game start screen.
Its name is defined in the file specified by the resources.xml's engineConfigXML tag, in the
personality tag — for more details, see “File <engine_config>.xml” on page 9 .

init
47
The personality script generally declares a class to contain all data to be shared by functions in the script, and
declares a global variable using the constructor of that class. For example, a personality script may include
the following code:
class sharedData:
def __init__( self ):
self.settings = ""
# initialise the shared data object for this personality script
sd = sharedData()
# This callback is called by BigWorld when initialising
def init( configSect ):
# save the configSect object for later use
sd.configSect = configSect
Example of personality script
The sections below describe the available personality callbacks.
9.2.1. init
The callback has the following syntax:
init(scriptsConfig, engineConfig, preferences, loadingScreenGUI = None)
The script is called once, when the engine initialises, and receives the arguments below:
▪scriptsConfig
PyDataSection object containing data from XML file defined in resources.xml's
scriptsConfigXML tag (for details, see “File <scripts_config>.xml” on page 10 ).
▪engineConfig
PyDataSection object containing data from XML file defined in resources.xml's engineConfigXML
tag (for details, see “File <scripts_config>.xml” on page 10 ).
▪preferences
PyDataSection object containing data from the scriptsPreference section of the file specified in
the preferences tag of the file specified in resources.xml's engineConfigXML tag (for details, see
“File <preferences>.xml” on page 10 ).
▪loadingScreenGUI
Optional argument representing the loading screen GUI, if one was defined in resources.xml (for
details, see “File <preferences>.xml” on page 10 ).
The available read functions are listed below:
▪readBool
▪readFloat
▪readFloats
▪readInt

fini
48 Copyright 1999-2008 BigWorld Pty. Ltd. All rights reserved. Proprietary commercial in confidence.
▪readInts
▪readMatrix34
▪readString
▪readStrings
▪readVector2
▪readVector2s
▪readVector3
▪readVector3s
▪readVector4
▪readVector4s
▪readWideString
▪readWideStrings
To read data from PyDataSection, call the read function that relates to the data type, passing in the section
name as the first argument, and the default value as the second argument. The plural read functions (ending
in 's') read the contents of all matching subsections of the specified section, and return the results as tuple of
values. You can refer to sub-sections by using the forward slash.
For example:
username = userPreferences.readString("login/username", "guest")
You can also reference to subsections of a PyDataSection by calling the section name prefixed with an
underscore.
For example:
username = userPreferences._login._username.asString
9.2.2. fini
The callback has the following syntax:
fini()
This is script is called when the client engine shuts down. It is used to do any cleanup required before the
client exits. This is a good place to perform a logout procedure on the player to logout gracefully.
For example:
# note: you must set up a logOff method as a base method in the
# def file of the class that the player is using.
def fini():
try:
BigWorld.player().base.logOff()

handleKeyEvent
49
except:
pass
Example of fini() implementation
9.2.3. handleKeyEvent
The callback has the following syntax:
handleKeyEvent( down, key, mods )
This script is called whenever a key is pressed or released.
▪The first argument is a Boolean indicating whether the key is currently in a down state.
▪The second argument is the key code.
▪The third argument is a bitmask defining the modifier keys that were applied to the key event (Shift,
Alt, Ctrl) — for a list of key codes and modifier bitmasks, see fantasydemo/res/scripts/client/
keys.py.
Generally, several systems can process keyboard input, so the arguments are passed to a handleKeyEvent
method on each system in turn, until one returns a Boolean value of TRUE, indicating that it has processed
the key event.
For example:
def handleKeyEvent( down, key, mods ):
global rds
# give the chat console a go first
if rds.chat.editing:
if rds.chat.handleKeyEvent( down, key, mods ):
return 1
# try the gui
if GUI.handleKeyEvent( down, key, mods ):
return 1
# now do our custom keys
if not down: return 0 # we are not interested in key releases
if key == KEY_RETURN and mods == 0:
rds.chat.edit( 1 ) # bring up the chat console
return 1
# return 0 because the key event has not been handled
return 0
Example of handleKeyEvent() implementation
Note that the engine also calls the handleKeyEvent method on the entity that the player is controlling. All
keys related to player control are handled there.
9.2.4. handleMouseEvent
The callback has the following syntax:
handleMouseEvent( dx, dy, dz )

onChangeEnvironments
50 Copyright 1999-2008 BigWorld Pty. Ltd. All rights reserved. Proprietary commercial in confidence.
This script is called whenever the mouse moves. It operates similarly to handleKeyEvent.
For example:
def handleMouseEvent( dx, dy, dz ):
# try the gui
if GUI.handleMouseEvent( dx, dy, dz ):
return 1
# return 0 because the mouse event has not been handled
return 0
Example of handleMouseEvent() implementation
9.2.5. onChangeEnvironments
The callback has the following syntax:
onChangeEnvironments( inside )
This script is a callback acknowledging the environment type the player is currently in.
Currently there are only inside and outside environment types. The argument is a Boolean value indicating
whether the player is inside or not. This may be useful for modifying the behaviour of the camera in third
person mode.
For example:
def onChangeEnvironments( inside ):
global sd
sd.inside = inside
sd.updatePivotDist()
9.2.6. onGeometryMapped
The callback has the following syntax:
onGeometryMapped(spaceID, spacePath)
This callback method tells the player entity about changes to the geometry in a space. It is called when
geometry is mapped into any of the currently existing spaces on the client. The space ID and the name of
the space geometry are passed as parameters.
The first parameter is the ID of the space the geometry is being mapped in to. The second parameter is the
name describing the space's geometry.
9.2.7. onRecreateDevice
The callback has the following syntax:
onRecreateDevice ()

onTimeOfDayLocalChange
51
This script is a callback alerting the scripts that the Direct3D device has been recreated. This often occurs
when the screen resolution is changed.
This callback was introduced primarily so that scripts can re-layout their GUI component scripts, but it is
also useful for recreating any static PyModelRenderer textures (since these do not automatically update,
unless they are dynamic).
For example:
def onRecreateDevice():
(width,height) = GUI.screenResolution()
myGuiController.doLayout( width, height )
myRenderers.recreateTextures()
9.2.8. onTimeOfDayLocalChange
The callback has the following syntax:
onTimeOfDayLocalChange( gameTime, secondsPerGameHour )
This script is a callback to allow scripts to be notified of changes in the game time.
It is passed two floats as arguments: the first one is the game time in seconds, and the second is the number
of real-time seconds per game hour.
9.2.9. start
The callback has the following syntax:
start()
This script is called after the engine has initialised, and used to start the game. It may be used to bring up
a start menu, or login screen.

52
Chapter 10. Models
For the purposes of the BigWorld client, a model is a self-contained unit of geometry that can draw itself into
a 3D scene at the location of a world-space transform matrix. Moreover, all models may have animations
that alter their appearance over time — some models explicitly support animations of their nodes (which are
skinned), whereas the others are animated by displaying alternate geometries.
Moo, the BigWorld 3D engine, currently exports three kinds of objects that may be used as models:
▪Meshes with skeletons.
▪Meshes without skeletons.
▪Billboards (a special form of simple geometry).
However, the model concept in the BigWorld client encapsulates anything that fits into the definition above,
and the implementation is easily extended to incorporate new kinds of objects.
Moo names its meshes visuals (visuals actually include a good deal more than a simple polygon mesh. They
can have groups of meshes, bones, envelopes, materials, and a hierarchical skeleton too) and .visual files
can be readily created from a 3ds Max model using a BigWorld exporter. Node-based animations can also
be created with the exporter. A .model file can then be created with the tool ModelEditor, so that the visual
and its animations are tied together. Model files that are billboards or static meshes (and their animations)
can also be created with ModelEditor.
A model file can also specify a simpler parent file to be used when drawn in the distance. Chains of parent
model files thus formed are known as level-of-detail (LOD) chains.
10.1. Performance
In order to improve rendering performance, a model can be flagged in ModelEditor to be batch rendered,
which results in the creation of the batched tag in the generated model file (for details, see the document
Content Tools Reference Guide's section ModelEditor → Panel summary → Object Properties panel).
The batch rendering works by caching per-instance data (essentially lighting conditions and transforms) at
traverse time, and once the scene has been traversed, rendering all instances at the same time, only updating
the data necessary for each render. This saves the engine from setting vertices, indices, and textures multiple
times for batched models. It does use a bit more memory, but gives a considerable performance boost.
It is advisable to use the batch flag on models with many instances of it in the scene. In FantasyDemo, the
batch flag is used on trees, guards, striffs, chickens, and the guard's guns. Please note that the flag does not
affect models that use tints.
10.2. Hard Points
Hard points, or attachment points, can be conceived as logical patches of Velcro that allow us to stick a gun
in a hand, sling a backpack over a shoulder, or place a security camera on a turret. The artists must embed
hard points in their .visual files using dummy nodes.
Hard points use well-defined names, preceded by 'HP_' prefix, so that entities can scan for hard point nodes.
The significant information is:
▪Name.
▪Position.
▪Orientation.
This information allows the developer to attach any object to any other, within the constraints of game logic.

Naming scheme
53
Examples of hard points include:
▪HP_LeftHand
▪HP_RightHand
▪HP_Shoulder
▪HP_Belt1
10.2.1. Naming scheme
In order to avoid the need for an intermediate step, there needs to be an explicit pairing between character
hard points and item hard points. Every item needs a hard point for every specific way that it can be held.
As an example, listed below are the hard points for a human character and a gun.
▪In human.model:
▪HP_Left_Hand
▪HP_Right_Hand
▪HP_Belt_1
▪HP_Belt_2
▪HP_Belt_3
▪HP_Belt_4
▪HP_Shoulder
▪HP_Blade_Lower
▪HP_Blade_Upper
▪In gun.model:
▪HP_Left_Hand
▪HP_Right_Hand
▪HP_Belt_2
▪HP_Shoulder
10.2.2. How it works
The (client-side) Entity class provides a list of hard points, but only if asked by the specializing class. For
example, when a model is loaded, it will find all nodes prefixed with (for instance) 'HP_'. These are then
stored in a hardPoint list that is owned by the model.
When an item is equipped, the entity/game arbiter will be asked to match up the item with the correct hard
point. For example, if the 'next weapon' button is pressed, the next weapon in the inventory can be attached
to the right hand hard point.
10.2.3. Syntax
The syntax for using hard points from Python is elegant and powerful. To attach model gun to model avatar
on hard point hand, use the following syntax:

Data
54 Copyright 1999-2008 BigWorld Pty. Ltd. All rights reserved. Proprietary commercial in confidence.
avatar.hand = gun
A model is checked when it is attached to ensure that it is not attached elsewhere. To retrieve the model
attached to avatar's hand, simply use:
model = avatar.hand
If no model is attached, then None is returned.
The model is attached by reference, not by copy, so anything that can be done to the original model reference
can be done to the reference retrieved from a hard point.
For example, gun.Shoot() and avatar.hand.Shoot() have the same effect.
10.2.4. Data
A model definition is an XML file specifying:
▪A base model definition reference (optional).
▪The visual defining the mesh.
▪The animations the mesh can use.
▪The actions that the model can perform (for more details, see “Action Queue” on page 38 ).
The ModelEditor tool is used to create a .model file that links an object's geometry to its animations and
defines the sets of animations/actions that are possible to play on this object.
As with all resource files in the BigWorld framework, .model files are in XML format. They are hierarchical
and inherit data from their parent(s), in this way basic animations that apply to a large set of characters can
be isolated from more character-specific animations without having to be duplicated.
The example below defines a very simple model:
<jogger.model>
<nodefullVisual> jogger </nodefullVisual>
<parent> biped </parent>
<animation>
<name> jog </name>
<frameRate> 30.0 </frameRate>
<nodes> jogAnim </nodes>
<alpha>
<Torso> 0.0 </Torso>
<Pelvis> 1.0 </Pelvis>
</alpha>
</animation>
<action>
<name> BIPED_JOG </name>
<animation> jog </animation>
<blendInTime> 0.300000 </blendInTime>
<blendOutTime> 0.300000 </blendOutTime>
<filler> false </filler>
<blended> false </blended>
<isMovement> true </isMovement>

SuperModel
55
<isCoordinated> false </isCoordinated>
<isImpacting> true </isImpacting>
<match>
<trigger>
<minEntitySpeed> 1.0 </minEntitySpeed>
<maxEntitySpeed> 3.0 </maxEntitySpeed>
<capsOn> 16 </capsOn>
</trigger>
</match>
</action>
<jogger.model>
Example of .model file
This file describes a character (jogger) which has a geometry defined by the visual file jogger and has a
standard set of biped actions via the <parent> tag, which may include walk, run, and jump animations,
but also specifies a jog animation.
The animation section includes:
▪Name of the animation.
▪Frame rate at which the animation should normally be played at.
▪Tag <nodes>, which refers to the name of the animation file that contains the raw keyframe data.
The <action> section describes the action name that is used to play this action from the Python code.
10.3. SuperModel
A SuperModel is a collection of models that need to function as one. The SuperModel class is a utility class
that forms a flexible basis for modules that want to use models. It is used for the static models specified in
chunks, and the dynamic models that entities can manipulate.
The SuperModel provides an efficient representation (both in memory and in CPU) of a conceptual model.
The supermodel is made up of selectable parts, and these parts have an inheritance tree for specifying
animations, actions, material overrides, and most importantly, lower level of detail (LOD) parts that may be
substituted at appropriate distances.
The supermodel brings all these parts and their adornments together into one conceptual model that
automatically takes care of the complexity that arises from the multi-part and LODing features.
An example of the most basic SuperModel is a single mesh, which has been exported from 3ds Max using
the BigWorld exporter; into the format understood by the 3D engine Moo.
SuperModels do not live in the scene graph or in chunks, and provide no interfaces to the scripting system.
These matters are left up to higher-level classes, which are encouraged to use SuperModel for all their model
needs.
10.3.1. Design
There are model files, with the .model extension, but there are no explicit SuperModel files.
There is the SuperModel class, which holds together and controls the animation and rendering of a number
of models. A SuperModel is created based on information in chunk and model files (these are instance-like
classes — there is nothing analogous to PyModelInfo.).
Using LOD ratios, the SuperModel class can manage the transition between, say, an avatar being rendered
at a high LOD using three separate models, to it being rendered at a low LOD using just one.

SuperModel classes
56 Copyright 1999-2008 BigWorld Pty. Ltd. All rights reserved. Proprietary commercial in confidence.
Animations are accumulated on the same inheritance hierarchy, and the animation most appropriate to the
current LOD level is used. All the animations for all the LOD levels are interpreted and selected from a flat
namespace. Attempting to play an animation that does not exist (or does not exist at the current LOD level)
selects an infinite length animation of the model's initial pose. Care must be taken to ensure that multi-model
SuperModels do not waste time animating unnecessarily (e.g., when all the small parts have an animation
overriding the whole part's animation, it would be a waste of time to apply the whole part's animation).
The mesh files themselves specify how a part is connected to others for multi-part supermodels.
10.3.2. SuperModel classes
The SuperModel class implements the basic functionality of the BigWorld model definition, using the objects
provided by Moo. It combines a number of the .model files created by ModelEditor (but usually just one)
into one conceptual model, managing any animations and level-of-detail chains. The SuperModel class is
detailed in “SuperModel” on page 55 .
Two classes currently use SuperModels in the BigWorld client, for two different needs:
▪ChunkModel
▪PyModel
Both are described in the following subsections.
10.3.2.1. ChunkModel
A ChunkModel is a model that inhabits the static scene base (e.g., rocks, trees). Together with the terrain, it
populates the client world and forms the majority of interesting scenery.
All ChunkModels are added to the collision scene for their chunk, unless flagged otherwise. They may
optionally play one animation, at a specified speed multiplier — otherwise they are static.
They depend heavily upon the services of their SuperModel, supplying only the interface required to live in
a chunk, and the simple instructions to play back their single animation.
10.3.2.2. PyModel
This class implements the model as it appears to the scripting environment.
It allows scripts to perform the following operations:
▪Fetch bound actions sourced from the model's definition.
▪Reference hard points (for details, see “Hard Points” on page 52 ).
▪Specify position, rotation, and scaling.
▪Add motors to move itself around in the scene (such as an Action Matcher).
▪Add trackers for inverse kinematics.
▪Add particle systems tied to any node.
▪Control the generation of footsteps and dust particles.
▪Control visibility and shadows.
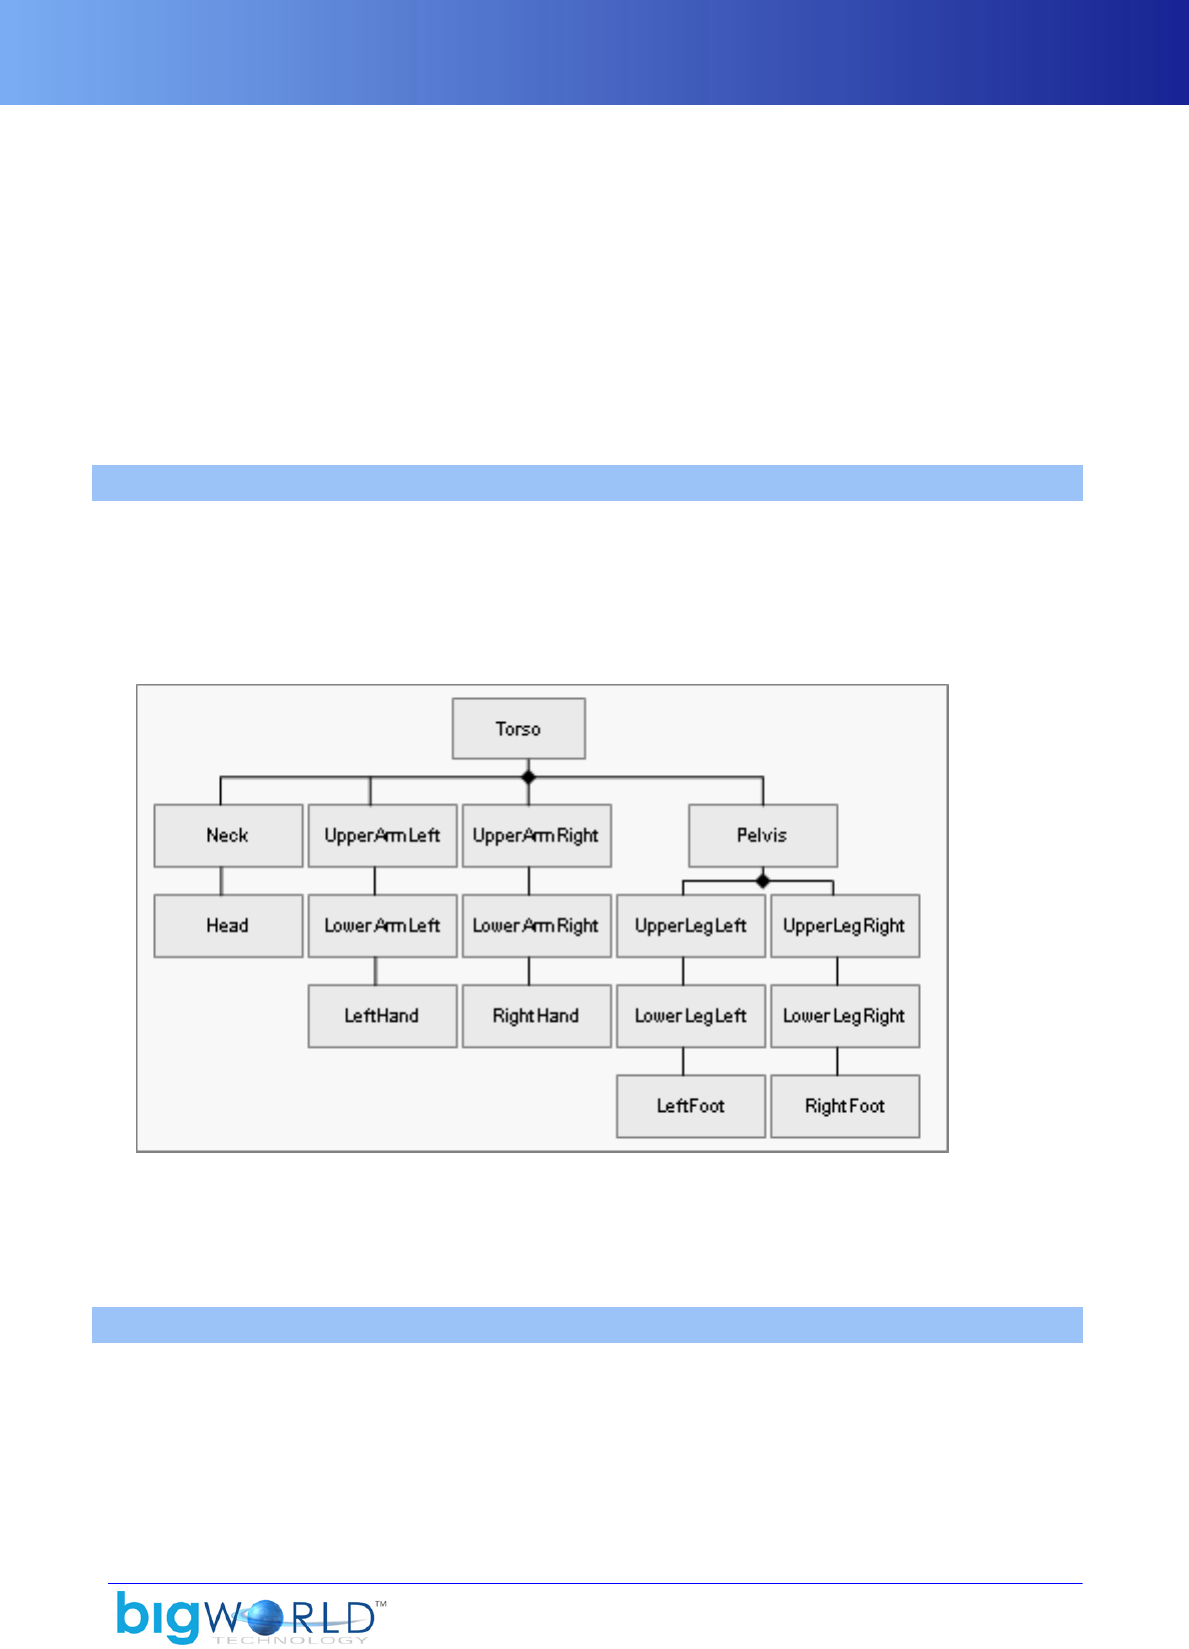
57
Chapter 11. Animation System
The animation system in the BigWorld engine combines many sophisticated techniques that are accessed
via an easy-to-use interface. This system allows game developers to quickly create lifelike characters and
environments. The problem this system solves is taking the raw content that is created by artists and
integrating it into a believable dynamic game world.
Artists working on design tools such as 3ds Max or Maya can create models and animations, then use the
BigWorld Exporter plug-in to export them into data files of a format understandable by the graphics engine.
The ModelEditor tool can be used to view these models and play back animations. It is then used to create a
list of actions from these animations that are the Python-accessible interfaces within the game engine.
11.1. Basic keyframed animations
The motions of an object over time can be stored as an array of keyframes that describe the position, rotation,
and scale of an object (or part of one) at different points in time. These keyframes are then used as reference
values and intermediate positions and rotations are calculated by interpolating between keyframe data.
More realistic intricate objects are described as nodal trees representing a bone hierarchy. An example is a
simple biped character that would have a typical hierarchy shown below:
Typical biped hierarchy
Each node represents the spatial state of a part of an object. These can map to rendered geometry either
directly for rigid objects such as a hydraulic machine or as bone transforms that are used to update a skinned
mesh (each geometry vertex having a set of weights that define how each bone influences its movement).
11.2. Animation layering and blending
A simple animation such as a man waving may consists of keyframe arrays from a subset of the whole bone
tree, e.g., only for Torso, UpperArmRight and LowerArmRight.
A different animation of the man walking may include only the Torso and Pelvis sub-tree. These two
animations can be seen as different layers of the total movement. Within the BigWorld framework, this
layering is achieved via setting nodal alpha values with the ModelEditor tool, as illustrated below:

Animation data files
58 Copyright 1999-2008 BigWorld Pty. Ltd. All rights reserved. Proprietary commercial in confidence.
ModelEditor 'Blending' fields
Within the engine, different layers can be seen to be played on different animation tracks, which control the
stopping and starting of animations for particular parts of the body (the usual separation into upper and
lower body allows motion and action to be dealt with smoothly yet independently within a game).
It is possible to play an arbitrary number of animations at once and have the resulting motion be a blended
interpolation of all the animations. This is essentially the same procedure as keyframed interpolation, as we
are interpolating position, rotation, and scale data. When the different animation layers need to be combined
into a single motion, the nodes that overlap in the different tracks need to be blended together.
Transitions between animations could be achieved by creating all possible animation transitions and allowing
all animations to complete their cycle before starting a new animation.
A much more adaptable and robust method is to blend out ending animations and blend in starting
animations over a period of time. As long as the animation list is large enough to account for possible jarring
transitions. For example, instead of having only stand and run animations, include also walk and jog ones,
then this system combined with good animations creates smooth lifelike behaviour in game characters.
11.3. Animation data files
The BigWorld exporter outputs the following data files (all file types exported to the resource tree <res>):
▪.visual files
Define an object's bone structure and material data.
▪.primitive files
Define the vertex data such as offset and weighting values for a skinned object, and contain BSP data where
appropriate.
▪.animation files
Define the keyframe data of an animation.

Animation data streaming
59
11.4. Animation data streaming
Animation data is stored as a series of blocks that are asynchronously streamed into memory on demand.
The sum of all these blocks is referred to as the streamed block cache, which size is constrained to prevent
excessive memory usage. To specify the size of the cache, set the animation/streamChacheSizeKB tag
in <engine_config>.xml (for details, see “File <engine_config>.xml” on page 9 )
The watchers Memory/StreamedBlocks_CacheSize and Memory/StreamedBlocks_CacheMaxSize
display the current size and the limit of the cache in bytes, respectively.
11.5. Actions
An action is a wrapper object that links an animation to in-game behaviour and events. Action objects differ
from animation ones in the information they hold, as described below:
▪Animation object
▪Raw keyframe data.
▪Information on frame rate.
▪Functionality on how to play itself on a model.
▪Action object
▪Blending time information.
▪Information on whether action is loop.
▪Information on whether an animation is movement.
▪Animation-matching data specifying particular object state values for when a particular action should
be played.
The raw data describing an action is defined in a .model file in XML format (located in any of the various
sub-folders under the resource tree <res>, such as for example, <res>/environments, <res>/flora,
<res>/sets/vehicles, etc...).. This data is produced from the ModelEditor tool.
For details, see “Action Matcher” on page 43 .

60
Chapter 12. Server Communications
The communication with the server uses a low-level UDP-based protocol named Mercury. Mercury is
described in detail in the document Server Overview's section Inter-process communication (Mercury).
Server communication is accessible from both C++ and Python scripts.
Note
This section is only applicable for a full client/server BigWorld implementation.
12.1. Login
To log in, the client sends a UDP packet using Mercury to the login server, on a well-known port. The packet
contains all the account and character information required to authenticate the client and select a character.
If login is successful, the login server adds an entity for the character to the BigWorld server system, and
refers the client to a proxy server, which handles all in-game communication. Both sides then begin sending
data to each other. For more details on the login process, see the document Server Overview's section Design
Introduction → Use cases → Logging in.
12.2. Online
A Mercury channel is created between the proxy and the client. Only selected data that is classified as reliable
is resent in the event of a dropped packet. Due to the average packet rate, and the expected network latency,
a packet is classified as dropped if a packet with a higher sequence number is received before it is.
Since the client is operating in high-latency conditions, the server does not wait for dropped packets to be
resent before delivering other pending information to the client. The client must therefore cope with receiving
out-of-order messages of all kinds.
Messages are sent to the server through a ServerConnection class. The position of the player is sent to
the server 10 times a second. Messages are received from the server by this class during the input loop, and
dispatched to their handlers in the Entity Manager.
▪The types of messages that the server can send to the client are as follows:
▪enterEntity
Informs the client that the entity with the given ID has entered its AoI.
▪leaveEntity
Informs the client that the entity with the given ID has left its AoI.
▪createEntity
In response to a query from the client, provides the type and other immediate data of the entity.
▪avatarUpdate
Updates the position of an entity that has a volatile position.
These messages are sent unreliably (i.e., they are not resent if the packet is lost).
▪entityMessage
Sends a script message to, or updates a property of the client representation of an entity.

Firewalls
61
▪The types of messages that the client can send to the server are as follows:
▪avatarUpdate
Informs the position of the client's player entity to the server.
▪requestEntityUpdate
Requests information about the entity with the given ID that has just entered the client's AoI.
This works by effectively setting the entity's last update time (to the requesting client) to the time
contained in this message.
Properties that have been changed since that time are resent.
▪entityMessage
Sends a script message to the server side of an entity (either on the base or on the cell).
12.3. Firewalls
The bane of mass-market online gaming is the firewall, especially the corporate ones. Our protocols have
been designed to work smoothly through all but the most paranoid of firewalls.
From the firewall's point of view, it should appear that the client has initiated both the login and the proxy
packet streams — since the login reply packet contains the address of the proxy server to send to, the client
can immediately begin sending data, which makes it appear to the server it has initiated this stream too, i.e.,
it 'punched a hole in the firewall'.
The BigWorld server correctly handles the case where it sends data to the client (which may be lost if the
client is behind a firewall) before the client has sent any data to it — the lost data is resent.
All that the firewall needs to support for these protocols to work is the storing of a UDP reply mapping entry
when it forwards an outgoing packet, so that a when a reply packet arrives with exactly reversed addresses
(the source and destination IP and port are swapped from the request packet), it is forwarded back to the
requesting client. This is the same requirement as that of the ubiquitous Internet Domain Name Service
(DNS), which practically all firewalls support.
The BigWorld server does not require the client to make requests from any particular port, so it is not confused
if a firewall masquerades the port as well as the IP.

62
Chapter 13. Particles
A particle is a textured rectangle or a small mesh that can be drawn quickly and simply, usually with an
additive blend mode. They are mostly used to create interesting graphical effects.
Particles are managed within particle system objects, which keep track of a number of particles with similar
properties, and an identical function pipeline to describe the transition of its particles' properties.
13.1. Particle Systems
The particle system is implemented in C++ and is accessible from both the scripting environment and C++.
The Python module for particle systems is named Pixie.
Each particle system is presently responsible for a set of particles of the same texture. While a particle system
can change its particle texture colour dynamically, effects that require different simultaneous textures require
separate particle systems.
A particle system is a conglomerate of the following:
▪Particles. This is a container that has specific allocation requirements determined by the renderer type.
Currently there are contiguous particles, which have optimal insert/erase characteristics; and FixedIndex
particles, these behave like a circular buffer and ensure that particle indices remain constant over their
lifetime. FixedIndexParticles are a requirement for trail rendering and mesh particle rendering.
▪Particle Actions, which are responsible for the movement of particles (these actions do all the work of
moving, creating and destroying each particle).
▪Particle Renderer, which is in charge of drawing the particles.
The Particle System itself provides a common access point for all three objects.
The Particle Renderer is for the most part hidden within the particle system. Likewise, the particles
themselves are inaccessible to the outside. Most game code associated with the Particle System involves the
creation of special Particle Actions.
Particle Actions work only during the update phase of the client. They are called in turn during the tick
method for a particle system, and the combined actions of each produce the overall particle effect of the
system.
For each particle system class, there is a corresponding python wrapper class. For example,
MetaParticleSystem is wrapped by PyMetaParticleSystem. These python wrappers hold no state,
they only hold a smart pointer reference to the underlying C++ object. The reason for this separation between
the C++ object and their python equivalent is to allow the full construction of particle systems in the
background thread (Python objects may only be constructed in the main thread.)
There is one more particle system class, which is the ChunkParticles class. This is entirely C++ and
implements a ChunkItem for particle systems, it allows particle systems to be placed in the world via the
WorldEditor tool. Note that such particle systems should be automatically time triggered, as there is no way
to access them at run-time in python and turn them on or off.
At present, the procedure for using a particle system involves the following steps:
▪Particle System is created using Particle Editor.
▪Particle Editor is used to create the different types of Particle Actions that control the particles.
▪Any texture and material effects are set.
▪Particle System is added to a model, in order to be displayed and updated.

Particle Actions
63
Particle Systems can easily be created in the BigWorld ParticleEditor and saved as XML files — typically
under folder the resource tree <res>. In the client, they can either be placed directly into the scene using the
World Editor, or invoked from Python as such:
import Pixie
ps = Pixie.create( "my_particle_system.xml" )
BigWorld.player().model.node( "biped head" ).attach( ps )
Note that particle systems can take a reasonably long time to construct - for a moderately complex system
it might take 5ms to parse the xml file, create all the subsystems and hook them all up together. For this
reason, it is highly recommended that the script-writer load Particle Systems asynchronously, using either
the Pixie.createBG method, the BigWorld.loadResourceListBG method, or using Entity prerequisites. For
example:
Example 1:
import Pixie
ps = Pixie.createBG( "my_particle_system.xml", self.onLoadPS )
def onLoadPS( self, ps ):
BigWorld.player().model.node( "biped head" ).attach( ps )
Example 2:
import BigWorld
BigWorld.loadResourceListBG( ("particles/one.xml", "particles/two.xml"),
self.onLoadResources )
def onLoadResources( self, resources ):
self.model.root.attach( resources["particles/one.xml"] )
self.model.root.attach( resources["particles/two.xml"] )
13.2. Particle Actions
There are four main categories of Particle Actions:
▪Source
Creates particles
▪Movement
Changes the velocity or position of the particles based on a set of rules. One movement action is special as
it applies the effect of velocity onto the position of each particle.
▪Sink
Removes particles from the list of active particles according to a set of rules.
▪Alteration
Changes the appearance of the particles.
13.2.1. Source actions
Source actions can create particles over regular periods of time, on demand, or even be sensitive to the
movement of the model to which it is attached. The size, colour, velocity, position, and even age of the

Movement actions
64 Copyright 1999-2008 BigWorld Pty. Ltd. All rights reserved. Proprietary commercial in confidence.
particles can be specified upon creation. The key behind vector descriptions of particles is the Vector
Generation subsystem.
Each source action requires three vector generators. A vector generator is a class of objects that randomly
create vectors within a given space; the space is usually defined by the type of generator and the parameters
given to it. For example, a sphere generator may accept a point in 3D space and a radius value, while a line
generator may accept two points in 3D space.
The three generators are used to find the initial position, velocity, and colour of the particle when created.
When calculating position and velocity, the local space of the model is taken into account, but only for the
creation of the particle. What this means is that a cube described by two points, (-0.5, -0.5, -0.5) to (0.5, 0.5,
0.5) is roughly the bounding box of the particle in position.
13.2.2. Movement actions
Movement actions act on every particle in the system. There is a variety of movements that can be applied
to a particle. Examples would be force, stream, barrier, and jitter.
Basic movement of particles due to velocity is calculated automatically within the particle system, taking
wind also into account.
Particles can also undergo full scene collision — e.g., spent bullets tumbling down steps.
13.2.3. Sink actions
Sink actions remove particles from the system, whether it is due to age or for moving beyond a specified
boundary. Examples of sink actions are sink, barrier, and splat.
It is important to note that without sink actions, particles once created will never leave the system, eventually
forcing it to hit its particle limit.
13.2.4. Alteration actions
Alteration actions affect the appearance of the particles. They can modify the shading, alpha level, and size
of the particle over time. They are typically used in smoke effects, gentle fading in and out, and glowing
effects. Particle textures can be animated if the texture specified is an animated texture.
13.3. Particle types
The particle system renderer is separate from the main particle system calculations, and allows not just
texture-based particles, but also sprite-based and mesh-based particles. Multiple particle systems can share
the same renderer.
The mesh particle renderer can use any visual, but for optimum performance, meshes specific for use in
particle systems should be exported from 3ds Max or Maya in groups of 15, having the Mesh Particles option
button selected in its respective exporter dialog. For more details, see the document Content Tools Reference
Guide's chapter 3ds Max and Maya Exporters .

Attaching particle systems to bones
65
3ds Max Visual Exporter dialog and Maya Visual Exporter dialog
13.4. Attaching particle systems to bones
Note
For details on any class mentioned in this section, see the Client Python API
documentation's entry Class List.
To have a particle system follow a bone and orient to an external target, you should attach it to a node, and
then point that node using a tracker.
The tracker class provided by the BigWorld module (BigWorld.Tracker) can be set up using a variety of
DirectionProviders to point a node in the appropriate direction:
▪EntityDirProvider
Points a node in the direction that an entity is facing.
▪DiffDirProvider
Points a node towards the position given by a MatrixProvider (e.g., to point at the head node of another
entity, or to point in a constant world direction).
▪ScanDirProvider
Makes a node swing back and forth around its Y-axis (e.g., to simulate a security camera).
Depending on your particular game, you might not be able to use a tracker to point a node on the source
model. For example, the node may be part of a character's skeleton and have some mesh rigged to it, so you
may not want to actually point to this bone (only the particle system attached to it). If this is the case, then you
will need to create a new node on which to mount your particle system — ask your artists to build dummy
nodes into their models on which to mount FX.

Attaching particle systems to bones
66 Copyright 1999-2008 BigWorld Pty. Ltd. All rights reserved. Proprietary commercial in confidence.
To have a particle system exist at a position that is not provided by a bone, you should attach it to a separate
model, and display the separate model using Entity.addModel. Using Entity.addModel instead of
Entity.model.node(xxx).attach means that the model exists at location independent from the entity
— in fact, it means that nobody will be setting the position/direction of the model, and it is entirely up to
the script.
Once you have an independent model, you can set its position and orientation to any MatrixProvider, by
using the Servo Motor. As explained in the Client Python API documentation, the Servo class is a Motor
that sets the transform of a model to the given MatrixProvider — as the MatrixProvider is updated,
the model moves. The signal attribute is the MatrixProvider that sets the model's transform.
This way, you can use the Servo Motor to move the model to a position provided by any dynamic matrix.
If the independent model has a node to point to, then you can set its orientation by using a Tracker, as
explained above. This allows you to detach the position of a particle system from a bone, but still set the
orientation of the particle system to the orientation of the bone, or towards an external target.
Finally, if you want a particle system to exist at a fixed point/orientation, then use the ParticleSystem's
explicitPosition and explicitDirection attributes. These set the position/orientation of a particle
system once, and cannot be set to dynamic matrices. Note that if you use either attribute, you will need to
use both (setting either attribute tells the particle system that it is using an 'explicit transform' derived from
both attributes).
Note
Be careful when attaching particle systems to bones! To attach a particle system to
a bone, a PyModelNode must be retrieved. If there are no existing PyModelNodes
referencing the bone you want to use, then its transform is undefined until the next
draw call. Since python scripts are updated *before* the draw call, there is no way of
knowing where a node is at the time of first retrieval. Therefore in this case, you should
only attach a particle system to a PyModelNode when you know it has been updated.
Your possible options are :
▪Retrieve and keep a reference to the bone when you create your model. This will
ensure at a later date when a particle system is attached to that bone, that the bone's
position is well-known.
▪Retrieve a reference to the bone you require, and callback yourself the next frame to
attach the particle system to it. For example :
BigWorld.callback( 0.0, partial( self.model.node("HP particles").attach, self.particles
) )

67
Chapter 14. Detail Objects
A detail object is a small mesh drawn in large numbers onto the terrain around the camera position. They
are separated from ordinary models for efficiency. The selection and placement of these objects is largely
automatic — it is based on the texture used by the underlying terrain.
Examples of detail objects are: grasses, ferns, bulrushes, pebbles, and rocks. The user does not interact with
detail objects (for example, no collision detection is performed).
14.1. Flora
BigWorld by default has about 60,000 triangles of flora active at any time, of which about 15,000 will be
drawn at any one time. You may change the size of the vertex buffer used by changing the value of the
vb_size tag in your flora configuration file (which is specified by the environment/floraXML tag in
your configuration file <res>/resources.xml — for details, see “File resources.xml” on page 8 .).
14.1.1. Placement
Because of the multitude of objects involved, it is impractical to place detail objects by hand. Instead,
BigWorld has Ecotypes.
Ecotypes define objects that are automatically placed within the world, guided by terrain texture. They are
defined in XML, and have the following properties:
▪One or more units (Moo visuals).
▪One or more textures, which are used to match the terrain to an ecotype.
▪Sound tag, for character footsteps.
For example, a grass ecotype could contain two separate meshes: one for low-height grass, and another for
mid-height grass.
The set of ecotypes currently active is managed by the Flora class, which also manages the individual active
detail objects, allocating and de-allocating them as required.
Each terrain block can have four textures, and each of these textures can have one associated ecotype. This
allows for four different ecotypes per terrain block. Hence, within the detail sphere (50-metre radius from
the camera) up to 16 different ecotypes may be visible.
Detail objects are not placed precisely within the terrain blocks — this would create square regions of detail
objects. Detail objects 'jitter' their position before querying the terrain for its detail mapping. This effectively
antialiases the quantized detail map.
Flora is calculated and stored in terrain files by the World Editor. For more details, see the document Content
Creation Manual (accessible in WorldEditor, ModelEditor, and ParticleEditor via the Help → Content
Creation menu item, or by pressing F1).
14.1.1.1. Visual consistency
The detail objects are mapped directly from terrain textures. Visually this is correct, since in real life the
colour on the terrain is actually made from the colour of millions of detail objects (blades of grass, etc...).
Thus, a green 'grassy' terrain texture can be made to map perfectly to a grass ecotype.
In BigWorld, whenever a texture is used, its accompanying detail objects are displayed.
14.1.2. Implementation
Drawing detail objects is an extremely performance-critical area, as all routines are run thousands of times
per frame.

Frame coherency
68 Copyright 1999-2008 BigWorld Pty. Ltd. All rights reserved. Proprietary commercial in confidence.
Vertex buffers are the perfect solution. The detail objects are kept transformed in a large vertex buffer. Thus,
1,000 pieces of grass at 6 vertices each means a world-space vertex buffer of 6,000 vertices. This allows all
grass to be drawn using one call to the video card, using one transform matrix. 3D accelerators are extremely
fast performing this kind of batched rendering.
As the player moves around the world, he sees the detail objects in the immediate vicinity (50m). In reality,
this means that the active set of detail objects must change according to the camera position. Detail objects
that are just coming into view are faded in, using alpha blending.
The flora configuration XML file <flora>.xml (for details on this file's grammar, see the document File
Grammar Guide's section <flora>.xml) can define the size of the vertex buffer either statically or as a set of
options selectable by the user via the FLORA_DENSITY graphics setting. For details, see “FLORA_DENSITY”
on page 114 .
14.1.3. Frame coherency
In a multi-thousand object system, frame coherency must be utilised aggressively. The obvious choice for
frame coherency is the vertex transforms. Each detail object is kept transformed in a vertex buffer in world
space, until its terrain tile (or 'flora block') leaves the detail radius, at which point another terrain tile will
have moved into the detail radius. Then the new tile's detail objects will be transformed and placed in the
freed up vertex buffer memory.
On average, detail objects have shown around 97% coherency between frames, making for a huge saving
in transformation cost.
14.1.4. Animation
In order to create an immersive, living, breathing world, most things must animate.
Animating detail objects add greatly to the illusion of the world. The BigWorld client uses 3D Perlin noise
based on (wx, wz, time) to create believable procedural animation to the detail objects. Perlin noise was
chosen because it is a cheap way to create space-time coherent noise. The implementation performs the
animation efficiently in the vertex shader.
14.1.5. Lighting
When using simplified meshes (which is crucial in a multi-thousand object ornamentation system), lighting
becomes challenging. Consider a criss-cross grass object rising vertically out of the terrain. If lit using
standard procedures, the criss-cross objects would flare up in the evening sun.
In the BigWorld client, lighting for detail objects is performed using the light map calculated from the actual
terrain. Thus, it picks up terrain shadows as well. This is a mostly correct solution, because the mesh-based
terrain itself is really a simplified version of the millions of detail objects in existence.
14.1.6. File format
The XML flora file defines among other things, the light map to be used, plus the ecotypes and noise
generation functions. For details on this file's grammar, see the document File Grammar Guide's section
<flora>.xml.

69
Chapter 15. Water
Bodies of water can be placed in the world via WorldEditor, using the provided helper file bigworld/res/
helpers/misc/water.xml — for details, see the document Content Creation Manual's lesson Add Water
to the World.
As all water objects are VLO's, every instance will create two new files in the chunk folder (named with a
unique ID for each instance):
▪.vlo file
Contains the XML chunk item section for the water object.
▪.odata file
Contains binary information related to the VLO (in this case, the water's per-vertex transparency/edging
data).
15.1. Code overview
The water implementation is contained in the mf/src/lib/romp library, more specifically in the following
files:
▪chunk_water.cpp, chunk_water.hpp
Water's link to the BigWorld chunking system.
See also: mf/src/lib/chunk/chunk_vlo.cpp, and mf/src/ lib/chunk/chunk_vlo.hpp.
▪editor_chunk_water.cpp, editor_chunk_water.hpp
Editor-related features, like saving, moving, and editing.
See also: mf/src/lib/chunk/editor_chunk_vlo.cpp and mf/src/lib/chunk/
editor_chunk_vlo.hpp.
▪water.cpp, water.hpp, water.ipp
The main files. Contains the surface drawing/setup.
▪water_scene_renderer.cpp, water_scene_renderer.hpp
Implementation of the water scene (reflection/refraction) generation.
▪water_simulation.cpp, water_simulation.hpp
Implementation of the simulation of water surface.
The water features also uses the shaders below (located in res/shaders/water):
▪water.fx
Main surface shader for the water.
▪simulation.fx
Shader for simulation of GPU water interaction.
Each ChunkWater in the world creates its own Water object. A ChunkWater is created by the first reference
ChunkVLO encountered. The water is a very large object (VLO), which means that it can span/belong to more

Scene generation
70 Copyright 1999-2008 BigWorld Pty. Ltd. All rights reserved. Proprietary commercial in confidence.
than one chunk. This is implemented by placing a VLO reference object (ChunkVLO) into every chunk that
the water overlaps. Each reference is treated like the actual large object, passing and retrieving data from/to it.
Each water object adds itself to the draw list at each frame, with Waters::addToDrawList. The engine
then draws the list of water surfaces with a call to Waters::drawWaters.
15.2. Scene generation
A reflection scene are rendered based on the current water quality level (for details, see “Setting the quality”
on page 70 ). The reflection scene is a render target that is updated in the main game loop, during the
call to TextureRenderer::updateDynamics.
Multiple water surfaces can share a reflection render target (WaterScene class) if they are both in the same
position on the y-axis. The water scene generation assumes a flat plane for the water to reflect/clip around
the defined y-axis position.
The refraction scene uses the Distortion channel texture which contains a copy of the main render target.
15.3. Render settings
The terrain will always be drawn, but everything else is linked to the current quality setting defined by the
following variables:
▪WaterSceneRenderer:: s_drawDynamics_
Determines if dynamic objects are drawn into the water scene.
▪WaterSceneRenderer:: s_drawPlayer_
Determines if the player model is drawn into the water scene.
▪WaterSceneRenderer:: s_drawTrees_
Determines if trees are drawn into the water scene.
▪WaterSceneRenderer:: s_maxReflectionDistance_
Maximum distance that a dynamic object can be away from the water. Default value is 25.
▪WaterSceneRenderer:: s_maxReflections_
Maximum number of dynamic objects to draw. Default value is 10.
▪WaterSceneRenderer:: s_useClipPlane_
Toggles the use of the hardware clipping planes
15.3.1. Setting the quality
The Water::init method is used to initialise the graphics settings options menu link and the FX files, and is
only called once. It will make available the following menu items:
▪Water Quality → High — Invoked method: Waters::setQualityOption
All world items are drawn in the water scenes. Highest detail shader is also used.
▪Water Quality → Mid — Invoked method: Waters::setQualityOption
Except for dynamic objects, all world items are drawn in the water scenes.
▪Water Quality → Low — Invoked method: Waters::setQualityOption

Simulation
71
Player, trees and sky are drawn in the Reflection. Reflection texture size is reduced.
▪Water Quality → Lowest — Invoked method: Waters::setQualityOption
Dynamic objects, player drawing, terrain and trees are disabled. Only the sky will be drawn into the
reflection.
▪Water Simulation Quality → High — Invoked method: Waters::setSimulationOption
Perturbations can propagate between cellsA.
▪Water Simulation Quality → Low — Invoked method: Waters::setSimulationOption
Simulation is restricted to the individual cellsA.
▪Water Simulation Quality → Off — Invoked method: Waters::setSimulationOption
Simulation is disabled
A — Cells are sub-divisions of the water surface (for details, see “Simulation” on page 71 ).
15.4. Simulation
The water surface is divided up into cells with size defined by the water surface (defaulting to be 100.0 units).
Each cell defines an area of water simulation that can be active.
There is a common pool of simulation textures (of size MAX_SIM_TEXTURE_BLOCKS) maintained by the
SimulationManager class.
A cell is activated when a movement enters its defined area, and is deactivated after a period of inactivity
(defined by SimulationManager::maxIdleTime_, with a default value of 5.0 seconds).
When the high detail simulation options are selected, water movements will propagate to (and activate)
neighbouring cells.
The maximum number of active movements is defined by MAX_SIM_MOVEMENTS. Water movements are
passed into the simulation manager through the Sway system — for details, see the Client C++ API
documentation's entry Class List → ChunkWater, Public Member Fuction sway.
15.5. Rain
Water is automatically affected by rain — there is another simulation texture block reserved in the
SimulationManager, and that is used for the rain.
15.6. Water depth
The water depth is determined by the lowest terrain point underneath the water. The bounding box generated
from this value could also be used to define a water volume for gameplay purposes. This can be found by
searching for the bbDeep_ references in mf/src/lib/romp/water.cpp.
This depth information is also used to colour the water's refraction based on the actual per-pixel depth of the
water surface. This uses an MRT (multiple render target) depth texture generated in the main scene render.
A foaming edge effect is also added using this information.
15.7. Watchers
To configure the behaviour of the water system, the watchers below are used (all watchers are prefixed by
Client Settings/Water/):

Watchers
72 Copyright 1999-2008 BigWorld Pty. Ltd. All rights reserved. Proprietary commercial in confidence.
▪character impact
Strength at which a movement will hit the water surface simulation.
▪draw
Defines whether water surfaces are drawn.
▪Draw Dynamics
Linked to WaterSceneRenderer::s_drawDynamics_.A
▪Draw Player
Linked to WaterSceneRenderer::s_drawPlayer_.A
▪Draw Trees
Linked to WaterSceneRenderer::s_drawTrees_.A
▪Max Reflection Distance
Linked to WaterSceneRenderer::s_maxReflectionDistance_.A
▪Max Reflections
Linked to WaterSceneRenderer::s_maxReflections_.A
▪Scene/Use Clip Plane
Linked to WaterSceneRenderer::s_useClipPlane_.A
▪water speed square
Speed in which a wave will travel in the water simulation.
▪wireframe
Toggles wireframe mode for water surface.
A — For details, see “Render settings” on page 70 .

73
Chapter 16. BigWorld Umbra integration
Umbra is a third party visibility library produced by Umbra Software Ltd (www.umbra.fi), and is not
provided as part of the BigWorld license — it needs to be licensed separately.
Umbra uses the graphics hardware to determine what parts of the scene are visible. Any opaque object that
writes to the depth buffer can be used as an occluder and any chunk item with a bounding box can potentially
be occluded.
16.1. Building BigWorld with Umbra enabled
To enable Umbra in BigWorld, the preprocessor definition UMBRA_ENABLE needs to be set to 1 in
umbra_config.hpp in the chunk library (src/lib/chunk/umbra_config.hpp).
You will also need to add the Umbra include and library paths to your projects.
To link against the Umbra debug library, this needs to be set up in chunk_umbra.cpp file in the chunk
library (src/lib/chunk/chunk_umbra.cpp).
16.2. Integration details
16.2.1. Modes of operation
16.2.1.1. Hardware mode
The BigWorld engine will choose to use hardware mode when hardware occlusion queries are supported.
In hardware mode, Umbra uses the z-buffer for occluding objects, this means that any opaque object that is
rendered in the scene can occlude objects that are further away.
In hardware mode only 2 umbra cells are created, one for inside objects and one for outside objects, both
cells exist in world space and are connected by umbra portals.
16.2.1.2. Software mode
BigWorld will chose to use Umbra in software mode when hardware occlusion queries are not supported.
In software mode only objects specified as occluders can occlude other objects. By default only terrain
occludes geometry, additional static models can be set manually as occluders in ModelEditor (for details, see
the document Content Tools Reference Guide's section ModelEditor → Panel summary → Object Properties
panel). All chunk items with a physical size can be occluded by Umbra. Please refer to the Umbra reference
documentation for descriptions of Umbra-related objects.
In software mode chunks correspond fairly well to Umbra cells. Each indoor chunk has a corresponding
Umbra cell, which is connected to other Umbra cells by Umbra portals. All outdoor chunks share one
common Umbra cell, which is owned by the chunk space. All cells exist in world space.
16.2.2. Chunk items
When using Umbra to render the scene, every ChunkItem needs to have a corresponding Umbra object —
the chunk item itself is set as the Umbra object's user data, so that when a Umbra object is deemed visible,
its chunk item can be retrieved and rendered.
When implementing a specialised chunk item, you will need to add a Umbra object for it. The chunk item
contains a UmbraObjectProxy and a UmbraModelProxy, which can store the Umbra object and Umbra model
for the specialised chunk item. The object-to-cell matrix is the world transform of the object.

Umbra proxies
74 Copyright 1999-2008 BigWorld Pty. Ltd. All rights reserved. Proprietary commercial in confidence.
16.2.3. Umbra proxies
To ease handling of Umbra objects, BigWorld provides proxy objects for Umbra objects (class
UmbraObjectProxy) and Umbra models (class UmbraModelProxy). These objects are a thin wrapper
around the corresponding Umbra objects, allowing BigWorld to use standard smart pointers to reference
them.
The proxies are also stored in a managed list, to ensure that all Umbra objects are destructed before Umbra
is shut down. For details on these classes, see the C++ API documentation.

75
Chapter 17. Graphical User Interface (GUI)
The BigWorld GUI can be broken into standalone (menu and options interfaces) and in-game overlays.
The in-game overlays require 3D integration, and thus have a separate design. The unique features of the
in-game interface are support for:
▪Linking to in-game objects (specifically models' bounding boxes),
▪Alpha blending, or superimposing over the scene,
▪Special effects like scaling, rotation, colour change, fading in/out, and motion blur.
The most important feature of the in-game interface is the ability to fade away when not in use. This allows
the game designer to create a more immersive game world experience. Whilst a GUI is required to relate
important information to the player, it should only do so when that information is required. At other times,
the player should not be distracted by overlays, but immersed fully in the 3D world.
Some examples of in-game interfaces would be:
▪Targeting
▪Current item display
▪Player health and damage
▪Chat window
17.1. C++ GUI support
There are two C++ base classes for GUI support:
▪SimpleGUIComponent
▪GUIShader
There is also one management class:
▪SimpleGUI
17.1.1. SimpleGUIComponent
The SimpleGUIComponent class is simply a textured rectangle. The derived class TextGUIComponent draws
text, and the also derived class FrameGUIComponent draws a resizable frame using three bitmaps (corner,
edge, background).
SimpleGUIComponent has many properties, mostly accessed from Python and XML files. For more details,
see “Python GUI support” on page 76 .
Components are hierarchical only in that parents draw their children; children do not inherit their parents'
transform. WindowGUIComponent is an exception to this rule — children are automatically clipped and
translated by their parent. Note that this is a feature of WindowGUIComponent, not the GUI system in
general.
17.1.2. GUIShader
The GUIShader class alters the way that components are drawn, in an analogous form to vertex shaders (in
fact, 99% of GUI shaders operate only on temporary variables instead of vertices, hardware TnL support).

SimpleGUI
76 Copyright 1999-2008 BigWorld Pty. Ltd. All rights reserved. Proprietary commercial in confidence.
▪ClipGUIShader clips GUIComponents to a proportion of its original length, which is useful for making
health bars.
▪ColourGUIShader colours a component.
▪AlphaGUIShader fades a component.
▪MatrixGUIShader transforms a component.
Shaders are applied to all children — so use a MatrixGUIShader to implement windowing, and an
AlphaGUIShader to fade in/out a whole tree of components.
17.1.3. SimpleGUI
This is the GUI root, and it is ticked and drawn at every frame.
Use SimpleGUI::addSimpleComponent() and SimpleGUI::removeSimpleComponent() to build your tree of
GUI components. Note that you would normally never call these methods from C++, as they are mostly called
by scripts.
17.2. Python GUI support
You probably will create GUIs using Python and XML most of the time. There is no BigWorld GUI editor,
thus all GUI is currently created using the Python console in game.
The code below shows an example:
import GUI
#create a simple GUI component
s=GUI.Simple( "maps/guis/stats_bar.dds" )
#width/height initially in pixels. can use widthRelative/heightRelative
#to designate the component uses clip coordinates ( -1 .. +1 ) instead.
s.width = 64
s.height = 16
#colour attribute is ( r,g,b,a )
s.colour = ( 255, 128, 0, 255 )
#the materialFX is simply the blend mode. can be "BLEND","SOLID","ADD"...
s.materialFX = "BLEND"
#the position is always in clip coordinates ( -1 .. +1 )
s.position = ( 0, 0.85, 0.5 )
#the anchors determine what the position means with respect to the width
#and height. in this example, the position of (0,0.85,0.5) and anchors
#"TOP,CENTER" means that the top centre of the component will rest at
#the given position.
#The component will hang down from y=0.85, and will be centred on x=0.0
s.verticalAnchor = "TOP"
s.horizontalAnchor = "CENTER"
#create a clipper for the health amount. clip shaders are used to
#implement stats bars. the constructor parameter "RIGHT" means the
#shader will clip the component from the right hand side.
c=GUI.ClipShader( "RIGHT" )
#all shaders animate their values. the speed indicates how long the

XML
77
#internal parameter will change from the old value to the new. This speed
#indicates the health bar will always take 1/2 a second to change.
c.speed = 0.5
#the value is what the game normally changes if player's health changes.
c.value = 1.0
#this line adds the shader. Note that you can call your shader any name
#you like. Internally, the simple GUI component sees you are trying to
#add a GuiShader to it, under the name of clipper.
#Internally it will call SimpleGUIComponent::addShader()
s.clipper = c
#create a colourer for the health amount
c=GUI.ColourShader()
#the start,middle and end simply represent colours to blend to when the
# value parameter is 1.0, 0.5 and 0.0 respectively.
c.start=(255,0,0,192)
c.middle=(255,255,0,192)
c.end=(0,255,0,192)
c.speed=0.5
c.value=1.0
s.colourer=c
#and make the health bar be drawn
GUI.addRoot( s )
Example of GUI creation
You can then customize the new health bar simply by setting the appropriate values in the shaders:
# player's health went down to 80%
s.clipper.value = s.colourer.value = 0.8
Finally, you can associate a script with the GUI component, in order to handle input and I/O events, and to
build high-level functionality onto it. Associate a script object with the component using the script attribute:
s.script = PyGUI.Button( s )
For more details about GUI scripts, see “XML and Python” on page 78 , and “Input events” on page
78 . For more details on attributes, see the Client Python API documentation's entry Main Page → Client
→ GUI → Classes → SimpleGUIComponent.
17.3. XML
GUI can also be represented as XML files. They can be saved in the folder <res>/guis once constructed,
for example, using the method described above.
The advantage of the Python interface is that once you have created the GUI, simply call:
s.save( "guis/health_bar.gui" )
An XML file will be created encapsulating the GUI component, its shaders, and all of its children. Once you
have done this, write:

XML and Python
78 Copyright 1999-2008 BigWorld Pty. Ltd. All rights reserved. Proprietary commercial in confidence.
GUI.delRoot( s )
s = None
s = GUI.load( "guis/health_bar.gui" )
GUI.addRoot( s )
After that, you will have exactly the same component, with all its shaders and children set up.
Advanced users will find creating XML by hand the quickest way to create your GUI. Alternatively, a GUI
editor can be entirely created in Python.
17.4. XML and Python
When you have a GUI component with a script saved in XML, your Python script must implement the
following methods (at the very least to stub them out):
▪def onLoad( self, section )
▪def onBound( self )
▪def onSave( self, section )
17.4.1. onLoad(self,section)
The onLoad method is called just after the C++ load method has been called, the standard member variables
have been setup, and the associated script has already been constructed.
The data section that the GUI component is being loaded from is passed into the method. This allows the
definition of custom attributes, especially for loading custom data into the script object.
Note that the method is called before any children components or shaders have been loaded.
17.4.2. onBound(self)
The onBound method is called after the load is complete.
The main difference between this method and onLoad is that by the time onBound is called, the whole GUI
component tree has been created. Thus in the onBound method you can write custom script handling to
manipulate child components. For example, you could invoke your own custom Layout Manager in this
method.
17.4.3. onSave(self,section)
The onSave method is called just after the C++ save method has saved all standard GUI component members,
but before the shaders and children are saved.
17.5. Input events
SimpleGUI offers support for keyboard, joystick, and mouse input. To capture events, a component needs
to have its property focus set to true, and an associated Python script attached.
When loading a component from a GUI file, the attribute of a SimpleGUIComponent is automatically
set if the XML declares a script field. The value of the field is used to instantiate the script object (it must
be a callable receiving one parameter — the SimpleGUIComponent being created — , and returning a
Python object). The Python object returned will be the one assigned as the script object for the newly created
component.
The script attribute can also be set manually for an existing component, like in the example below:

Keyboard Events
79
# instantiate a new PyGUI Button class, and make it the component's
# script attribute. note most scripts are passed the GUI component
# in their constructor so they can perform operations on them.
s.script = PyGUI.Button( s )
There are separate focus properties for each category of input events, as described below:
▪focus
Associated with: Keyboard events, joystick (axis) events, and mouse button events.
▪crossFocus
Associated with: Mouse enter events, and mouse leave events.
▪moveFocus
Associated with: Mouse move events.
▪dragFocus
Associated with: Drag events.
▪dropFocus
Associated with: Drop events.
To make a component start receiving input events, you must set the appropriate property to True, and to
have it no longer receiving events set it to False, as illustrated below:
# start receiving key/axis events
c.focus = True
# stop receiving mouse enter/leave events
c.crossFocus = False
When a component has a script and it has focus enabled, the script will start capturing input events.
The script must define the appropriate methods to handle the events. The example below illustrated a script
defining the methods to handle keyboard and joystick (axis) events:
class Button:
def handleKeyEvent( self, isDown, key, mods ):
# do whatever, and return 1 if
# this key event was consumed
def handleAxisEvent( self, axis, value, dTime ):
# do whatever, and return 1
# if this axis event was consumed
The following sub-sections describe the events supported by SimpleGUI. For more details, see the Client
Python API documentation's entry Main Page → Client → GUI → Classes → SimpleGUIComponent.
17.5.1. Keyboard Events
Keyboard events are related to input from keyboard, mouse, and joystick buttons. They are reported to script
objects through the handleKeyEvent method:

Axis Events
80 Copyright 1999-2008 BigWorld Pty. Ltd. All rights reserved. Proprietary commercial in confidence.
def handleKeyEvent( self, isDown, key, mods )
The parameters are described below:
▪isDown
New key state. True for down, False for up.
▪key
Code of the key, mouse, or joystick button being pressed or released.
▪mods
Key modifiers flags.
A return value of True means that the event has been consumed, thus effectively preventing it from being
propagated to other components or game scripts. A return value of False allows further propagation.
To receive key events, a component must have the property focus set to True.
Note that mouse button events reported through the method handleKeyEvent differ from those reported
through handleMouseButtonEvent in that the mouse cursor does not have to be inside the area defined by
a component for that component to capture the event. The only requirements for the capture are to have the
property focus set to True, and not having another component consuming the event earlier in the focus list.
17.5.2. Axis Events
Axis events are related to joystick axis input. They are reported to script objects through the
handleAxisEvent method:
def handleAxisEvent( self, axis, value, dTime )
The parameters are described below:
▪axis
Axis that the event refers to.
▪value
New coordinate value.
▪dTime
Time since the axis was last processed.
A return value of True means that the event has been consumed, effectively preventing it to be propagated
to other components or game scripts. A return value of False allows further propagation.
To receive axis events, a component must have the property focus set to True.
17.5.3. Mouse Events
Mouse events can be grouped into three categories:
▪Button events

Mouse Events
81
▪Cross events
▪Move events.
Mouse events are propagated from the top-most component under the mouse cursor down to the bottom
component until it is handled by a component (by returning True in one of its event handling methods).
The following sub-sections describe how to handle input from each category of mouse event.
Note that mouse events are only generated when the object MouseCursor is active. For more details, see
“Mouse cursor” on page 86 .
17.5.3.1. Button events
Button events are related to mouse buttons input. They are reported to the script objects through the methods
handleMouseButtonEvent and handleMouseClickEvent methods.
17.5.3.1.1. handleMouseButtonEvent
This method is called by SimpleGUI when one of the mouse buttons have been pressed or released over the
component:
def handleMouseButtonEvent( self, comp, key, isDown, mods, pos )
The parameters are described below:
▪comp
Component over which the button was pressed or released.
▪key
Code of the key (button) being pressed or released.
▪isDown
New button state. True for down, False for up.
▪mods
Key modifiers flags.
▪pos
Position of the mouse on the instant of the mouse button press or release.
Value is a 2-tuple of floats in clip-space, ranging from -1.0 (leftmost in x-axis, top in y-axis) to 1.0 (rightmost
in x-axis, bottom in y-axis).
A return value of True means that the event has been consumed, effectively preventing it to be propagated
to other components or game scripts. A return value of False allows further propagation.
To receive mouse button events, a component must have the property focus set to True.
17.5.3.1.2. handleMouseClickEvent
This method is called by SimpleGUI when the left mouse button was pressed and released over the
component.

Mouse Events
82 Copyright 1999-2008 BigWorld Pty. Ltd. All rights reserved. Proprietary commercial in confidence.
def handleMouseClickEvent( self, comp, pos )
The parameters are described below:
▪comp
Component over which the button was pressed.
▪pos
Position of the mouse on the instant of the mouse button click.
Value is a 2-tuple of floats in clip-space, ranging from -1.0 (leftmost in x-axis, top in y-axis) to 1.0 (rightmost
in x-axis, bottom in y-axis).
A return value of True means that the event has been consumed, effectively preventing it to be propagated
to other components or game scripts. A return value of False allows further propagation.
To receive mouse left button events, a component must have the property focus set to True.
17.5.3.2. Cross events
Cross events are related to the mouse pointer entering or leaving the region defined by the component
in the screen. They are reported to the script objects through the methods handleMouseEnterEvent and
handleMouseLeaveEvent.
The signature for handleMouseEnterEvent is described below:
def handleMouseEnterEvent( self, comp, pos )
The signature for handleMouseLeaveEvent is described below:
def handleMouseLeaveEvent( self, comp, pos )
The parameters for both methods are described below:
▪comp
Component that the mouse entered or left.
▪pos
First position of the mouse when entering or leaving the component.
Value is a 2-tuple of floats in clip-space, ranging from -1.0 (leftmost in x-axis, top in y-axis) to 1.0 (rightmost
in x-axis, bottom in y-axis).
A return value of True means that the event has been consumed, effectively preventing it to be propagated
to other components or game scripts. A return value of False allows further propagation.
To receive mouse enter and leave events, a component must have the properties focus and crossFocus set
to True.
17.5.3.3. Move events
Move events are related to the mouse pointer hovering over the region defined by the component in the
screen. They are reported to the script objects through the handleMouseEvent method:

Drag-and-drop events
83
def handleMouseEvent( self, comp, pos )
The parameters are described below:
▪comp
Component over which the mouse cursor hovered.
▪pos
Position of the mouse on the instant of the event.
Value is a 2-tuple of floats in clip-space, ranging from -1.0 (leftmost in x-axis, top in y-axis) to 1.0 (rightmost
in x-axis, bottom in y-axis).
A return value of True means that the event has been consumed, effectively preventing it to be propagated
to other components or game scripts. A return value of False allows further propagation.
To receive mouse move events, a component must have the property focus and moveFocus set to True.
17.5.4. Drag-and-drop events
ISimpleGUI offers support for drag-and-drop functionality. Drag-and-drop events can be grouped into two
categories:
▪Drag events
▪Drop events
The following sub-sections describe how to handle input from each category of drag-and-drop event.
Note that drag-and-drop events are only generated when the MouseCursor is active. For more details, see
“Mouse cursor” on page 86 .
17.5.4.1. Drag events
Drag events are related to a component being dragged by the user. They are always generated
on the component being dragged and reported through the methods handleDragStartEvent and
handleDragStopEvent.
17.5.4.1.1. handleDragStartEvent
This method is called when the user is trying to drag the component:
def handleDragStartEvent( self, comp, pos )
The parameters are described below:
▪comp
Component that the user is trying to drag.
▪pos
Position of the mouse on the instant of the event.
Value is a 2-tuple of floats in clip-space, ranging from -1.0 (leftmost in x-axis, top in y-axis) to 1.0 (rightmost
in x-axis, bottom in y-axis).

Drag-and-drop events
84 Copyright 1999-2008 BigWorld Pty. Ltd. All rights reserved. Proprietary commercial in confidence.
A return value of True signals to the GUI manager that this component is willing to be dragged, and
consumes the event. A return value of False prevents the component from being dragged, and allows further
propagation of the event.
To receive this event, a component must have the property dragFocus set to True.
17.5.4.1.2. handleDragStopEvent
This method is called when the user released the mouse left button, and therefore wants to drop the
component:
def handleDragStopEvent( self, comp, pos )
The parameters are described below:
▪comp
Component being dragged.
▪pos
Position of the mouse on the instant of the event.
Value is a 2-tuple of floats in clip-space, ranging from -1.0 (leftmost in x-axis, top in y-axis) to 1.0 (rightmost
in x-axis, bottom in y-axis).
The return value from this method is always ignored, and the originating mouse button event is allowed to
propagate further.
To receive this event, a component must have the property dragFocus set to True.
17.5.4.2. Drop events
Drop events are related to a component being dropped over another one. They are always generated
on the recipient component and reported through the handleDragEnterEvent, handleDragEnterEvent and
handleDropEvent methods.
17.5.4.2.1. handleDragEnterEvent
This method is called when the user just dragged another component over this one, but has not dropped it yet:
def handleDragEnterEvent( self, comp, pos, dropped )
The parameters are described below:
▪comp
Component about to receive the drop.
▪pos
Position of the mouse on the instant of the event.
Value is a 2-tuple of floats in clip-space, ranging from -1.0 (leftmost in x-axis, top in y-axis) to 1.0 (rightmost
in x-axis, bottom in y-axis).
▪dragged

Drag-and-drop events
85
Component being dragged.
The return value from this method is used to determine if the recipient component is willing to accept the
drop. This event is always considered consumed when first triggered, and the originating mouse move event
is propagated no further.
To receive this event, a component must have the property dropFocus set to True. Arguments
17.5.4.2.2. handleDragLeaveEvent
This method is called when the dragged component is no longer over this one:
def handleDragLeaveEvent( self, comp, pos )
The parameters are described below:
▪comp
Component that was about to receive the drop.
▪pos
Position of the mouse on the instant of the event.
Value is a 2-tuple of floats in clip-space, ranging from -1.0 (leftmost in x-axis, top in y-axis) to 1.0 (rightmost
in x-axis, bottom in y-axis).
A return value of True means that the event has been consumed, effectively preventing the originating
mouse event to be propagated to other components or game scripts. A return value of False allows further
propagation.
To receive this event, a component must have the property dropFocus set to True.
17.5.4.2.3. handleDropEvent
This method is called when the user has dropped a component over this one:
def handleDropEvent( self, comp, pos, dropped )
The parameters are described below:
▪comp
Component receiving the drop.
▪pos
Position of the mouse on the instant of the event.
Value is a 2-tuple of floats in clip-space, ranging from -1.0 (leftmost in x-axis, top in y-axis) to 1.0 (rightmost
in x-axis, bottom in y-axis).
▪dropped
Component receiving the drop.
The return value from this method is always ignored, and the originating mouse button event is allowed to
propagate further.

Component PyGUI
86 Copyright 1999-2008 BigWorld Pty. Ltd. All rights reserved. Proprietary commercial in confidence.
To receive this event, a component must have the property dropFocus set to True.
17.5.5. Component PyGUI
You might find it useful to build your own Python module with custom GUI components. To do that, the
best starting point is the module PyGUI.
PyGUI is the informal Python module for basic GUI elements, created for the Citizen Zero project, and
defined in fantasydemo/res/scripts/client/Helpers/PyGUI.py.
Starting from the basic functionality offered by SimpleGUI native components, you can code your own GUI
toolkit in Python. Below are some examples of widgets you can create:
▪Page control
▪Drop-down List
▪Edit field
▪Multi-line text field
▪Check box
17.6. Mouse cursor
It is possible to control the behaviour and appearance of the mouse cursor from the game scripts. Mouse
cursor-related functions and properties can be accessed though the MouseCursor object.
The MouseCursor object is a singleton, and can be obtained using the method GUI.mcursor.
The properties published by it are described below:
▪position — Read/write
Mouse cursor position
▪shape — Read/write
Mouse cursor shape
▪visible — Read/write
Mouse cursor visibility status
▪active — Read-only
Mouse activity status
The MouseCursor is an instance of the abstract concept InputCursor. There can only be one active
InputCursor at any given time.
To activate the MouseCursor, use the method BigWorld.setCursor. To deactivate it, activate another input
cursor, or pass None to BigWorld.setCursor.
Mouse and drag-and-drop events are only propagated to GUI components while the MouseCursor is active.
The code below illustrates how to use the MouseCursor:
# access and modify the mouse cursor

Fonts
87
import GUI
import BigWorld
mc = GUI.mcursor()
mc.shape = "arrow"
mc.visible = True
if not mc.active:
lastPosition = mc.position
mc.position = ( 0.0, 0.0 )
BigWorld.setCursor( mc )
# mc.active is now True
Example of how to use MouseCursor object
17.7. Fonts
Fonts are created on demand, when necessary, via the method FontManager::get. It checks in the font
folder (specified by the system section's fontRoot tag in <res>/resources.xml — for details, see “File
resources.xml” on page 8 ) for a .font file with the given name.
A .font file has two sections:
▪Creation section
Describes the font itself
▪Generated section
Contains font metrics information, once the font has been created.
If the font file is found by FontManager and does not contain a Generated section, then it will create the
font, save the new texture and the updated font file, and return the new Font pointer.
17.7.1. Creating new fonts
In order to create a new font, create a .font file in the font folder, containing a creation tag.
17.7.1.1. Example font file
In this example, a font file named large_bold.font is created, and the used by the GUI.
The font file contains the following:
<creation>
<sourceFont> Courier </sourceFont>
<sourceFontSize> -20 </sourceFontSize>
<startChar> 32 </startChar>
<endChar> 255 </endChar>
<effectsMargin> 1.0 </effectsMargin>
<textureMargin> 1.0 </textureMargin>
<dropShadow> true </dropShadow>
<bold> true </bold>
</creation>
Example font file large_bold.font
Once the file is created, run the BigWorld client, then create a TextGUIComponent in the Python console
and select the new font, as illustrated below:

Fonts
88 Copyright 1999-2008 BigWorld Pty. Ltd. All rights reserved. Proprietary commercial in confidence.
t = GUI.Text( "Test font creation" )
t.font = "large_bold.font"
GUI.addRoot(t)
FontManager creates the new font when the attribute t.font is set.
Note that in the example above, the font was created with a drop shadow. When a TextGUIComponent
is created, the attribute materialFX is set by default to BLEND. This causes the drop shadow to be
correctly displayed, allowing white text to be visible even if the game background becomes white. If you set
materialFX to 'ADD', then the drop shadow will no longer appear.

89
Chapter 18. Sounds
BigWorld provides sound support via the third-party FMOD sound library (www.fmod.org). A license to
use FMOD is not included with BigWorld, and if you want to release a title using FMOD, a separate licensing
agreement with Firelight Technologies needs to be entered into.
Whilst FMOD is enabled in the BigWorld FantasyDemo, it is disabled in the shipped BigWorld source by
default. To enable FMOD, edit src/lib/fmodsound/fmod_config.hpp and enable the #define.
It should be noted that the BigWorld sound API is very much in an alpha state at the moment, and will
expand and/or change in the future. Likely features for a future BigWorld release include:
▪Turn-key support for reloading soundbanks in-game (i.e., loading sound designer changes in-game
without needing to restart the client).
▪Sound support in the content tools.
▪API support for the FMOD::EventCategory class (which provides pseudo group-channel functionality).
▪API support for stereo/5.1 panning, reverb, and other audio parameters/effects.
This documentation provides only an overview of the BigWorld sound API, which is essentially a thin
interface to the FMOD Designer API. For documentation related to general FMOD design principles and
sound issues, please see the FMOD documentation itself.
18.1. Usage overview
To implement sounds in your game, an FMOD soundbank needs to be built with the FMOD Designer tool
(available from the FMOD website).
A very small example project is included in fantasydemo/audio/fd_sound.fdp. Instructions on how to use
the FMOD Designer are beyond the scope of this document — for that purpose, we recommend the PDF
user manual shipped with the tool.
Once you have a compiled soundbank, you need to edit the soundMgr section of <engine_config>.xml to
refer to your file — for details on this file, see “File <engine_config>.xml” on page 9 .
Simple 2D and 3D sound playback can now be triggered via script:
▪2D sound support is provided by BigWorld.playSound and BigWorld.getSound.
▪3D sound support is provided by PyModel.playSound and PyModel.getSound.
The aforementioned API calls return a PySound instance, which can be used to stop, re-trigger, or adjust
parameters on the sound. For details on the sound API calls, see the Python API documentation.
18.2. Updating the FMOD libraries
BigWorld includes in src/lib/fmod all FMOD libraries needed to build the client with sound support. These
libraries are up-to-date at the time of the release of a particular BigWorld version.
To use a more recent version of the FMOD libraries (which is recommended for elaborate sound work), follow
the steps below:
1. Delete the src/lib/fmod folder (otherwise, .vcproj files will try to use that folder first).
2. Configure the global Visual C++ folders to point to the FMOD folder (probably C:\Program
Files\FMOD SoundSystem\...).

Updating the FMOD libraries
90 Copyright 1999-2008 BigWorld Pty. Ltd. All rights reserved. Proprietary commercial in confidence.
3. Copy the fmodex.dll and fmod_event.dll files from your FMOD folder to your game's executable
folder.

91
Chapter 19. 3D Engine (Moo)
Moo is a 3D engine using DirectX 9 that provides resource-, object- and device- based services up to, but not
including the scene database.
Resource-based services include the generation and management of vertex buffers, index buffers, vertex
shaders, pixel shaders, and effects. Textures are compressed and stored automatically. All resources that are
not managed by Direct3D are managed by Moo, allowing for large amounts of data moving in and out of use.
Object-based services include a full animation system, skinned bipeds, compound skeletal geometrics,
and specialised terrain rendering. Moo exposes the concept of a visual, an important mid-level geometric
construct that sits beneath the scene database and greatly simplifies the scene database code.
Device-based services include level-of-detail control over rendering states, encapsulated in materials and
shaders. The 3D window is encapsulated as a RenderContext, and provides frames-of-reference in which to
render geometrics and store lighting states.
Finally, Moo provides the essential alpha-blended sorted triangle pipeline — a service that unfortunately is
still not provided by Direct3D or directly in (most) hardware.
It is important to note that where possible, Moo uses underlying Direct3DX structures such as D3DXMatrix,
D3DXVector, and D3DXQuaternion. The DirectX team continually improves the implementation of these
mathematical classes, and their functionality often takes advantage of processor specific instructions, such
as MMX, SIMD and 3DNow!. It is prudent to leverage the efforts of these engineers.
19.1. Features
Some of the advanced features of Moo are listed below:
▪D3DXEffects vertex and pixel shader support
▪Cubic environment maps
▪Render targets
▪Lighting
▪Normal mapping/bump mapping
▪Terrain
▪Animation
▪Vertex morphing
The following sections describe these features.
19.1.1. D3DXEffects vertex and pixel shader support
Effect files are used extensively in Moo. Most of the rendering pipeline is based around the class
EffectMaterial, which implements a way of managing the global values used by the effects, and also the per-
instance data for the effects, such as textures, self-illumination values, and specular reflection constants.
The effect files also make it easier to manage pixel and vertex shaders, as they are created together in one file.
Using the D3DXEffect format removes much of the complexities of adding new shader effects to the engine
and allows rapid prototyping of new visual effects.

Cubic environment maps
92 Copyright 1999-2008 BigWorld Pty. Ltd. All rights reserved. Proprietary commercial in confidence.
19.1.2. Cubic environment maps
Cubic environment maps can be used for some reflections and for normalisation cube maps (used for normal
mapping).
19.1.3. Render targets
Render targets are used to create billboard textures. They can also be used in conjunction with the GUI
components to display 3D objects in the 2D GUI (for example, for item selection previews).
19.1.4. Lighting
The lighting component of Moo supports three different kinds of lights:
▪Directional lights.
▪Point lights.
▪Spot lights.
Any object can be lit by two directional lights, four point lights and two spot lights. These lights are picked
according to an attenuation metric, so that generally the closest lights will be chosen. It is also important to
note that the fewer lights used, the faster the execution of the lighting vertex shader will be.
19.1.4.1. Light maps
The class bigworld/src/lib/romp/light_map.cpp is generalised to support both the flora and sky
light maps. Light maps are configurable in XML files.
19.1.4.1.1. Flora light map
The flora light map details are specified in flora.xml (for details on this file's grammar, see the document
File Grammar Guide's section <flora>.xml) and its location is specified in the file resources.xml (for
details on this file, see “File resources.xml” on page 8 ).
The material tag for flora light map should be system/materials/light_map.mfm (for details on this
file's grammar, see the document File Grammar Guide's section <material>.mfm).
The default width/height for the flora light map is 64x64. This is small, but still enough resolution for the
projection onto the flora, because its visible area is 100x100 metres.
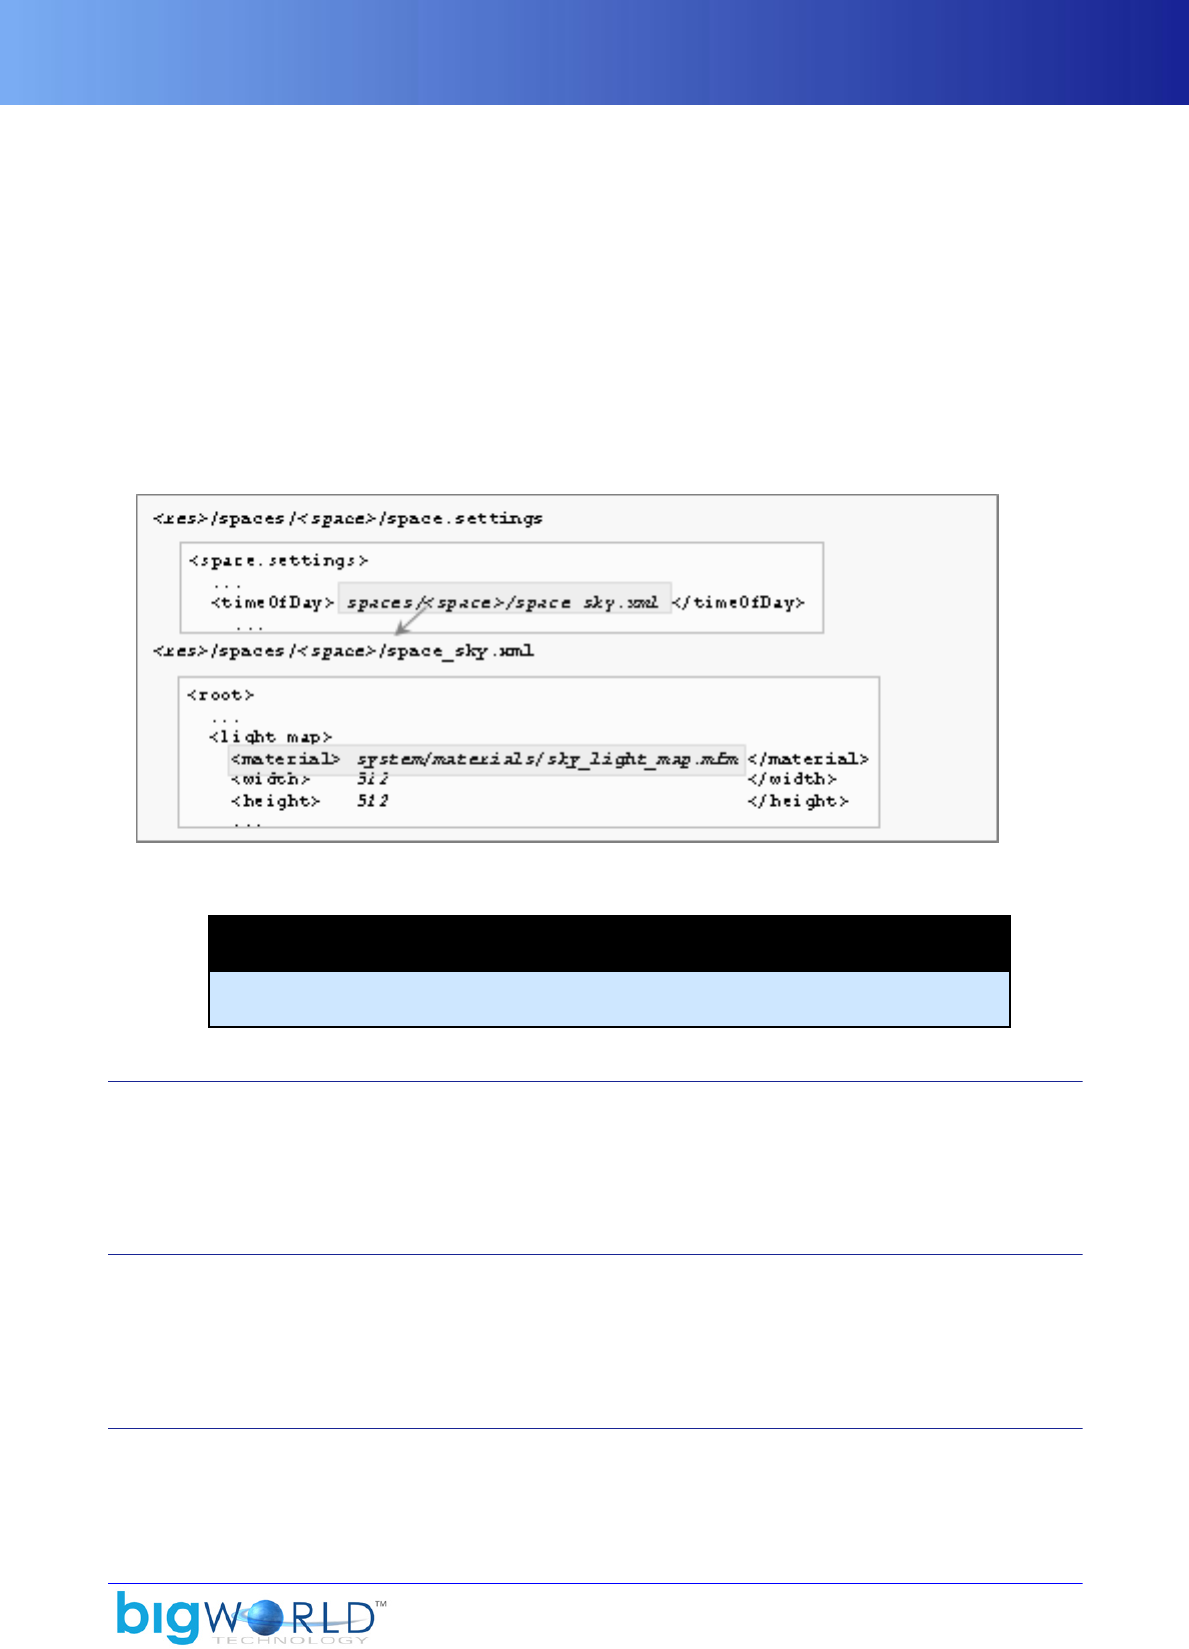
Normal mapping/bump mapping
93
Definition of flora light map
19.1.4.1.2. Sky light map
The sky light map details are specified in the space's sky.xml file, and its location is specified in the space's
space.settings file (for details on this file's grammar, see the document File Grammar Guide's section
space.settings.).
The material tag for sky light map should be system/materials/sky_light_map.mfm (for details on
this file's grammar, see the document File Grammar Guide's section <material>.mfm).
The default width/height for the sky light map is 512x512. This is quite large because the light map is projected
across the whole visible world (usually around 1x1 km).
Definition of sky light map
Note
The sky light map's shimmer effect can be disabled by the via the SKY_LIGHT_MAP
graphic setting (for details, see “Customising options” on page 112 ).
19.1.5. Normal mapping/bump mapping
Normal mapping is used to add surface detail to objects by using per-texel normals baked into a texture. Moo
currently supports normal maps for specular and diffuse lighting on dynamically lit objects, and specular
lighting on statically lit objects. The current version of the Exporter supports tangent space normal mapping
only.
19.1.6. Terrain
Moo takes advantage of the multi-texture, vertex, and pixel shading capabilities of the supported graphics
cards. Since it uses a blended 4-layered texturing system for the terrain, Moo utilises the hardware's four
texture stages optimally so that that most of the terrain can be rendered in just one pass. The terrain also
supports self-shadowing from a directional light source.
19.1.7. Animation
Moo supports node-based and vertex-based (morph) animation. Moo can also blend animations together to
provide smooth transitions between them.

Vertex morphing
94 Copyright 1999-2008 BigWorld Pty. Ltd. All rights reserved. Proprietary commercial in confidence.
19.1.8. Vertex morphing
Moo's vertex morphing is suitable for small changes in surfaces, such as facial animation. Morph targets are
exported from the content creation package, and controlled through the normal animation system.
Please note that as morph targets are applied in software, extensive use will affect rendering performance.
19.2. Supported video cards
The currently supported graphics cards are as follows:
▪NVIDIA
GeForce4 series, GeForce FX series, GeForce 6x00 series, GeForce 7x00 series cards and above.
▪ATI
Radeon 9000 series, and Radeon x000 series of cards.
Any graphics chip that supports at least Hardware Transform and Lighting and two texture stages should
work, some with a limited subset of features enabled. These include (but are not limited to):
▪NVIDIA
GeForce3 series and GeForce GO 4 series cards.
▪ATI
Radeon 7000 series, Radeon 8000 series, Mobility 8000 and Mobility 9000 series.
19.3. Hardware requirements for special effects
The table below lists the special effects available in Moo, and their hardware requirements:
Special effect Vertex
shader
version
Pixel
shader
version
Texture
stages
required
Bloom 1.1 1.1 4
Cloud shadows 1.1 - 3
Flora 1.1 - 1
Heat Shimmer 1.1 - 1
Normal mapping 1.1 1.1 4
PyModel Shimmer 1.1 - 1
PyModel stipple 1.1 1.1 4
Shadows 2.0 2.0 1
Simulated sub-surface
scattering 3.0 3.0 4
Sky Gradient dome 1.1 - 3
Terrain shadows 1.1 1.1 4
Terrain Specular 1.1 1.1 4
Hardware requirements for special effects

Visual
95
19.4. Visual
The Visual class implements the basic renderable objects drawn by the 3D engine. A visual contains a node
hierarchy, vertices, indices, and materials used for rendering objects, and it also contains a BSP tree used for
collision detection.
The node hierarchy gives the renderable object a frame of reference when rendering objects. Visual uses the
EffectMaterial, Primitives, and Vertices classes to render its geometry.
19.5. EffectMaterial
The material system in the BigWorld 3D engine uses D3DXEffects files extensively.
The material system is implemented through the class EffectMaterial, which contains one or more
D3DX effects, their overridden values, and information about the collision properties and surface type of
the material.
The idea behind the material system is to give as much control as possible to the artists, to allow them to
experiment with new rendering techniques without involving programmers.
19.5.1. Format
The format of the EffectMaterial on disk is very simple, having only a handful of sections, and with
most of the work done through the .fx file.
19.5.2. Automatic variables/Globals
Automatic variables are used for any variable that is controlled by the engine, such as transforms, lights,
camera positions, etc... Automatic variables are exposed to Effect files using variable semantics.
In an Effect file, the automatic variables are defined like below:
<type> <variableName> : <semantic>;
where:
▪<type>
The variable type (float, bool, texture, etc.).
▪<variableName>
Name used for the variable in the effect file.
▪<semantic>
Name exposed to the engine.
The automatic variables are connected to the effect through the class EffectConstantValue. New automatic
variables can be added by overriding the EffectConstantValue interface, implementing the operation (),
and adding an instance of the new class using EffectConstantValue::set or using a handle returned from
EffectConstantValue::get.
The automatic variables set up by Moo::EffectVisualContext are listed below:
▪Ambient (float4)

EffectMaterial
96 Copyright 1999-2008 BigWorld Pty. Ltd. All rights reserved. Proprietary commercial in confidence.
Current ambient colour.
▪BloomMap (texture)
The texture holding the bloomed version of the scene. Used by the GoboComponent to apply blurs to
special GUI components.
▪CameraPos (float3)
Current camera position in world space.
▪CameraPosObjectSpace (float3)
Current camera position in object space.
▪DirectionalLightCount (int)
Number of directional lights.
▪DirectionalLights (DirectionalLights[2])
Current diffuse directional lights in world space.
▪DirectionalLightsObjectSpace (DirectionalLights[2])
Current diffuse directional lights in object space.
▪FloraAnimationGrid (float4[64])
8x8 array of Perlin noise values used to animate the flora vertex buffer.
▪FloraTexture (texture)
The composite Flora texture map used by the FloraRenderer.
▪FogColour (float4)
Fog colour.
▪FogEnd (float)
End of linear fog.
▪FogGradientTexture (texture)
The fog texture used by the terrain renderer.
▪FogStart (float)
Start of linear fog.
▪FogTextureTransform (matrix)
Projects the fog texture onto the terrain.
▪GUIColour (float4)
Colour for use by the GUI.
▪MipFilter (int)

EffectMaterial
97
Configurable MIPFILTER.
▪MinMagFilter (int)
Configurable MIN/ MAGFILTER.
▪MaxAnisotropy (int)
Configurable MAXANISOTROPY.
▪NormalisationMap (texture)
Normalisation cubemap.
▪PenumbraSize (float)
Used by the terrain renderer for self-shadowing.
▪PointLightCount (int)
Number of point lights.
▪PointLights (PointLights[4])
Current diffuse point lights in world space.
▪PointLightsObjectSpace (PointLights[4])
Current diffuse point lights in object space.
▪SpecularDirectionalLightCount (int)
Number of specular directional lights.
▪SpecularDirectionalLights (DirectionalLights[2])
Current specular directional lights in world space.
▪SpecularDirectionalLightsObjectSpace (DirectionalLights[2])
Current specular directional lights in object space.
▪SpecularPointLightCount (int)
Number of specular point lights.
▪SpecularPointLights (PointLights[2])
Current specular point lights in world space.
▪SpecularPointLightsObjectSpace (PointLights[2])
Current specular point lights in object space.
▪SpotLightCount (int)
Number of spot lights.
▪SpotLights (SpotLights[2])

Artist-editable/tweakable variables
98 Copyright 1999-2008 BigWorld Pty. Ltd. All rights reserved. Proprietary commercial in confidence.
Current diffuse spot lights in world space.
▪SpotLightsObjectSpace (SpotLights[2])
Current diffuse spot lights in object space.
▪StaticLighting (bool)
Whether static lighting is applied or not.
▪StippleMap (texture)
Map to be used for the stipple effect.
▪SunAngle (float)
Used by the terrain renderer for self-shadowing.
▪TerrainTextureTransform (float4[2])
Projects textures onto the terrain.
▪Time (float)
Time in seconds since the game started.
▪View (float4x4)
Current view matrix.
▪ViewProjection (float4x4)
Current view*projection matrix.
▪WindAnimation (float4)
Two Vector2's. in (x,y) is a value that can be used for wind-affected texture scrolling. It keeps the
incremental value of a single uv coordinate blown around by the wind. in (x,z) is the current wind average
speed.
▪World (float4x4)
Current world matrix.
▪WorldPalette (float4[17*3])
Matrix palette, made up of the current renderset matrices stored as transposed 4x3 matrices.
▪WorldView (float4x4)
Current world*view matrix.
▪WorldViewProjection (float4x4)
Current world*view*projection matrix.
19.5.3. Artist-editable/tweakable variables
Artist-editable variables are variables that are designed to be overridden on a per-material basis. These
variables can be edited in WorldEditor and ModelEditor, allowing you to change the look of a model in real
time, while visualising it.

Artist-editable/tweakable variables
99
The artist-editable variables can be exposed to the engine by setting the attribute artistEditable or
worldBuilderEditable to true.
Setting artistEditable to true exposes the variable to ModelEditor's Materials Settings panel (for
details, see the document Content Tools Reference Guide's section ModelEditor → Panel Summary →
Materials Settings panel), while setting worldBuilderEditable to true exposes it to both ModelEditor
and, if the objects/materialOverrideMode tag is set to 1 in bigworld/tools/worldeditor/
options.xml (for details on this file's grammar, see the document File Grammar Guide's section
options.xml → WorldEditor) file, to WorldEditor's Properties panel (for details, see the document Content
Tools Reference Guide's section WorldEditor → Panel summary → Properties panel).
The notation for these variables in a FX file is described below:
<type> <variableName>
<
bool [artistEditable|worldBuilderEditable] = true;
... 1
> = <defaultValue>;
1Other attribute definitions.
where:
▪<type> — Type of the object.
▪<variableName> — Variable name in the effect file.
▪<defaultValue> — Default value of the variable.
Currently, the supported types of artist-editable variables are:
▪bool
▪float
▪float4
▪float4x4
▪int
▪texture
The conditions to have the variable exposed in either tool are described below:
▪If artistEditable is set to true in the FX file
Exposed in ModelEditor?: Yes
Exposed in WorldEditor?: No
▪If worldBuilderEditable is set to true in the FX file
▪If materialOverrideMode is set to 1 in bigworld/tools/ worldeditor/options.xml
Exposed in ModelEditor?: No
Exposed in WorldEditor?: No

Multiple-layered effects per material
100 Copyright 1999-2008 BigWorld Pty. Ltd. All rights reserved. Proprietary commercial in confidence.
▪If materialOverrideMode is set to 0 in bigworld/tools/ worldeditor/options.xml
Exposed in ModelEditor?: No
Exposed in WorldEditor?: Yes
19.5.4. Multiple-layered effects per material
The Moo::EffectMaterial class supports having multiple-layered D3DXEffects per material.
This is useful for materials that need to use a standard set of vertex shaders, but only have slight changes
to the pixel shader component of the effect. These materials would generally only be created by the asset
converter, as ModelEditor does not support adding more than one effect per material.
19.5.5. Recording material states
Material states can be recorded by class Moo::EffectMaterial by calling the method recordPass()
between a begin() and end() pair on the material.
This method returns a Moo::StateRecorder that is used to store the current render states for delayed
rendering.
This object only stays valid until the end of the current render loop, and will not be usable after this point.
19.5.6. Using BigWorld .fx files with 3ds Max
BigWorld .fx files and 3ds Max .fx files unfortunately are not 100% compatible. It is however possible to
create a .fx file that can be used in both applications.
To expose editable parameters, BigWorld shaders use the annotation below:
bool artistEditable = true;
whereas 3ds Max requires the annotation string below:
UIName="name"
The sample effect file bigworld/res/shaders/std_effects/normalmap.fx exposes its parameters
properly to BigWorld and 3ds Max. The exporter also exports the values entered in the 3ds Max shader
material panel.
The file normalmap.fx also uses a separate technique, called max_preview, plus additional vertex and
pixel shaders.
This is due to two reasons:
▪There is no uniform way to apply the lighting in both the BigWorld engine and 3ds Max.
▪3ds Max uses a right-handed coordinate system, while BigWorld uses a left-handed one.
In itself this is not a big problem, but it means that additional shader work is required if you want to preview
your shaders in 3ds Max.
If you have not applied Service Pack 1for 3ds Max 7, an issue exists in that its Material Panel is very poor
at dealing with #include directives in the effect files. What happens is that if you save a material with the

Visual channels
101
effect normalmap applied, then not always it will be properly loaded up again in 3ds Max, which can cause
additional confusion for the artists. This problem has been fixed in Service Pack 1, so it is important to apply
it if you want to use .fx files in 3ds Max.
It is important to be mindful of these issues before you decide to make your .fx files compatible with 3ds
Max.
19.6. Visual channels
The visual channels implement the delayed rendering pipeline in Moo.
There are presently five standard channels implemented:
▪Sorted channel
▪Internal sorted channel
▪Shimmer channel
▪Sorted shimmer channel
▪Distortion channel
An application can create as many channels as it wants by overriding the Moo::VisualChannel interface
and implementing VisualChannel::addItem.
The following sub-sections describe these channels.
19.6.1. Sorted channel
The sorted channel is used for objects that need to be rendered in a back-to-front order.
When a primitive group from a visual is added to this channel, its triangles are not sorted internally.
This channel is mostly useful for additive objects, i.e., objects with a destination blend of one.
19.6.2. Internal sorted channel
The internal sorted channel is used for objects that need to be rendered in a back-to-front order, and also
have its triangles rendered in a back-to-front order.
Objects that are added to this channel will also be sorted against objects in the sorted channel.
This channel is useful for alpha-blended objects, and any transparent object that does not have a destination
blend of one.
19.6.3. Shimmer channel
The shimmer channel is used for objects that need a heat shimmer.
Any object that is added to this channel should only write to the alpha channel of the frame buffer.
19.6.4. Sorted shimmer channel
The sorted shimmer channel is used for objects that need a heat shimmer, and also need to draw colour
information.

Distortion channel
102 Copyright 1999-2008 BigWorld Pty. Ltd. All rights reserved. Proprietary commercial in confidence.
Any object added to this channel should write to both the alpha channel (for shimmer amount) and colour
channel of the frame buffer.
19.6.5. Distortion channel
The distortion channel is used for objects that want direct access to the final scene as a texture. This can be
used to achieve effects like refraction (for example, the water).
19.7. Textures
19.7.1. Texture detail levels/compression
Textures are loaded and compressed automatically based on their filenames, which control the size, format
conversions, and compression levels.
For details on this file's grammar, see the document File Grammar Guide's section .texformat, .
The system is implemented through the class Moo::TextureDetailLevel. The Texture Manager stores
a list of texture detail levels and uses them to resize and compress textures based on their filenames. The
legacy .texformat system is still supported.
The properties for the TextureDetailLevel are divided into two sets:
▪Filename matching criterion.
▪Conversion rule.
The filename matching criterion set of properties defines the criteria used to check if the current
TextureDetailLevel applies to the texture being checked. They are described below:
▪contains_
Matched strings for a string contained in the texture filename.
▪postFixes_
Matched strings for the postfixes of the texture filename.
▪preFixes_
Matched strings for the prefixes of the texture filename.
Only one string from each list of strings has to match the texture name for the TextureDetailLevel to
consider it a match. If there are no strings in one of the lists, that will be considered a match as well.
The conversion rule set of properties defines how matching textures will be converted. They are described
below:
▪compressedFormat_
Format to which convert the texture (when texture compression is enabled).AB
▪format_
The format to convert the texture to.
▪lodMode_
Defines how texture responds to the texture quality settings.

Animated textures
103
Texture quality is set via TEXTURE_QUALITY graphics setting.AB
▪maxDim_
The maximum width/height dimension of the texture.
▪minDim_
The minimum width/height dimension of the texture.
▪noResize_
Determines that the texture will not be scaled to be a power of two, and will not have mipmapping,
compression or a .dds version.
▪reduceDim_
The number of times to halve the dimensions of the texture when compression is disabled.A
A — Texture compression can be toggled via TEXTURE_COMPRESSION graphics setting.B
B — For details, see “Graphics settings” on page 110 .
The texture detail level can be read from a datasection, as displayed in the example below:
<prefix> objects/ </prefix>
<postfix> tga </postfix>
<postfix> bmp </postfix>
<contains> norms </contains>
<contains> normals </contains>
<maxDim> 512 </maxDim>
<minDim> 128 </minDim>
<reduceDim> 1 </reduceDim>
<format> A8R8G8B8 </format>
Example texture detail level format
The example above results in any texture loaded from a sub-tree of folder objects/ with the extension .tga
or .bmp and that contains the string norms or normals to have its dimensions reduced by half once, as long
as the smallest dimension does not fall below 128. If the format is different, it will be changed to a 32-bit
colour with alpha.
The default detail levels are:
▪Any file with a filename ending in norms.tga or norms.bmp will be converted to an A8R8G8B8 texture
(so as to not compress BigWorld's normal maps).
▪Any other .tga file is converted to the DXT3 format.
▪Any other .bmp file is converted to the DXT1 format.
By default textures are only scaled down if their dimensions are bigger than 2048.
19.7.2. Animated textures
Moo supports simple animated textures by texture swapping.

Applying a code-generated texture to a character
104 Copyright 1999-2008 BigWorld Pty. Ltd. All rights reserved. Proprietary commercial in confidence.
When Texture Manager loads a texture, it will look for a file with the same name as the one being loaded,
but with a .texanim extension. If such file is found, then it will be loaded as an animated texture.
The .texanim file is a simple XML file that references a number of textures, contains an animation string
and a frames-per-second value.
The format of a .texanim file is described below:
<frames> string </frames>
<fps> .f </fps>
+<texture> TEXTURE_RESOURCE </texture>
File .texanim format
An example of a .texanim file is displayed below:
<frames> abcdefgh </frames>
<fps> 10.0 </fps>
<texture> maps/fx/fx_dirt01.tga </texture>
<texture> maps/fx/fx_dirt02.tga </texture>
<texture> maps/fx/fx_dirt03.tga </texture>
<texture> maps/fx/fx_dirt04.tga </texture>
<texture> maps/fx/fx_dirt05.tga </texture>
<texture> maps/fx/fx_dirt06.tga </texture>
<texture> maps/fx/fx_dirt07.tga </texture>
<texture> maps/fx/fx_dirt08.tga </texture>
Example file .texanim format
In this case, the animating texture will play the fx_dirt textures back in order at a rate of ten frames per
second.
You can change the order in which the frames are played back by changing the frames tag . The a in the
tag's value refers to the first texture stored in the XML file, b refers to the second texture stored, and so on.
19.7.3. Applying a code-generated texture to a character
To apply a code-generated texture to a model, follow the steps below:
1. Create an automatic .fx variable (e.g., customTexture).
2. Update the character's shaders so that they render using the new .fx variable, instead of the diffuseMap
property.
3. You will need a single TextureSetter, which is a Moo::EffectConstantValue. This provides the
"current custom texture" to .fx files.
4. Write a PyFashion that sets up the "current custom texture" when drawing an instance of a PyModel.
5. Create a Moo::BaseTexture that wraps the custom texture creation process.
19.7.3.1. Loading textures from disk
When loading texture from disk, it is recommended to have the loading thread running in the background,
so that it does not interrupt the rendering thread.

Applying a code-generated texture to a character
105
The example below illustrates a texture loader using the BackgroundTask and BGTaskManager classes.
Note that the code provides two features — threaded texture loading, and providing the texture to the .fx
file system.
#include "pch.hpp"
#include "cstdmf/bgtask_manager.hpp"
#include "cstdmf/concurrency.hpp"
DECLARE_DEBUG_COMPONENT2( "romp", 0 );
// -------------------------------------------------------------------------
// Section: Texture Setter
// -----------------------------------------------------------------------
/**
* This class sets textures on the device. It is also multi-threaded.
* When it is told to use a new texture, it uses the background loading
thread
* to do so. While it is doing this, the textureName refers to the new
* texture, but isLoading() will return true. And in this state, it will be
* sneakily using the pre-existing texture until the new one is ready.
*/
class ThreadedTextureSetter : public Moo::EffectConstantValue
{
public:
ThreadedTextureSetter():
pTexture_( NULL ),
bgLoader_( NULL ),
textureName_( "" )
{
}
/**
* This method is called by the effect system when a material needs
* to draw using a texture with the given automatic semantic.
*/
bool operator()(ID3DXEffect* pEffect, D3DXHANDLE constantHandle)
{
SimpleMutexHolder holder( mutex_ );
if (pTexture_ && pTexture_->pTexture())
pEffect->SetTexture(constantHandle, pTexture_->pTexture());
else
pEffect->SetTexture(constantHandle, NULL);
return true;
}
/**
* This method sets our texture. If the texture is different then
* the existing one, we schedule the new one for loading, and set
* the textureName and the isLoading() flag. In an unspecified amount
* of time, the new texture will be loaded and used.
*/
void texture( const std::string& texName )
{
if (textureName_ == texName)
return;
if (this->isLoading())
return;
textureName_ = texName;

Applying a code-generated texture to a character
106 Copyright 1999-2008 BigWorld Pty. Ltd. All rights reserved. Proprietary commercial in confidence.
bgLoader_ = new BackgroundTask(
&ThreadedTextureSetter::loadTexture, this,
&ThreadedTextureSetter::onLoadComplete, this );
#ifndef EDITOR_ENABLED
BgTaskManager::instance()->addTask( *bgLoader_ );
#else
ThreadedTextureSetter::loadTexture( this );
ThreadedTextureSetter::onLoadComplete( this );
#endif
}
/**
* This class-static method is called by the background loading thread
* and allows us to load the texture resource in a blocking manner.
*/
static void loadTexture( void* s )
{
ThreadedTextureSetter* setter = static_cast<ThreadedTextureSetter*>(s);
Moo::BaseTexturePtr pTex =
Moo::TextureManager::instance()->get( setter->textureName() );
setter->pTexture(pTex);
}
/**
* This class-static method is called when the background loading thread
* has finished.
*/
static void onLoadComplete( void* s )
{
ThreadedTextureSetter* setter = static_cast<ThreadedTextureSetter*>(s);
setter->onBgLoadComplete();
}
/**
* This method returns the name of the texture we are currently
* drawing with. If isLoading() is true, then the textureName
* refers to the texture we would like to draw with (however we
* will be actually drawing with the previous texture ptr).
*/
const std::string& textureName() const
{
return textureName_;
}
/**
* This method returns true if we are currently waiting for the
* background loading thread to load our texture.
*/
bool isLoading()
{
SimpleMutexHolder holder( mutex_ );
return (bgLoader_ != NULL);
}
private:
//only called by the background loading thread
void pTexture( Moo::BaseTexturePtr pTex )
{
SimpleMutexHolder holder( mutex_ );
pTexture_ = pTex;
}

Applying a code-generated texture to a character
107
//only called by the background loading thread
void onBgLoadComplete()
{
SimpleMutexHolder holder( mutex_ );
delete bgLoader_;
bgLoader_ = NULL;
}
Moo::BaseTexturePtr pTexture_;
std::string textureName_; //store a copy for use while loading.
BackgroundTask* bgLoader_;
SimpleMutex mutex_;
};
Example of texture loader
19.7.3.2. Manipulate individual pixels within a texture
To manipulate pixel within a code-generated texture, there are at least two available options:
1. Create the texture in the managed pool
This way there will be a system memory copy and a video memory copy. You can then lock the texture
and manipulate it as needed — DirectX will update the changes to video memory.
The only drawback to this option is that on some hardware configurations, the system memory texture
may be stored swizzled, meaning that the lock operation would have to unswizzle it before you can make
changes — a potentially costly lock operation.
Note that to use the texture, you will need to have mipmaps available, so when performing the lock you
will have to either:
▪Update each surface of the texture individually.
— or —
▪Use stretch rect to supply the mipmap chain from the top surface.
2. Create the texture in video memory as a render target
You will have to use shaders to write your changes to the texture.
The drawback to this method is that if the device is reset, then your changes will be lost. If that happens,
you will have to handle the CreateUnmanagedObjects callback (from the DeviceCallback interface) and
recreate the custom texture.
Unfortunately, you cannot just copy the data to system memory, because a CTRL+ALT+DEL will lose the
device without giving you a chance to save the video memory data first.
Note again that to use the texture, you will need to have mipmaps available. So perhaps in this instance
you can create a separate mipmap texture in video memory, and use stretch rect to supply the mipmap
chain from the source render target. The source render target might be a 'scratch pad' used in building
all the custom character textures.
19.7.3.3. Using a shader to build a custom texture
The closest example on how to achieve this is provided by the flora light map, which uses a variation
of the terrain shaders to render the lighting information to a render target. For details, see src/lib/romp/
flora_light_map.cpp.

Vertex declaration
108 Copyright 1999-2008 BigWorld Pty. Ltd. All rights reserved. Proprietary commercial in confidence.
Note that to use shaders you will need a video memory/render target surface as described in the section
above.
19.7.3.4. Dealing with the texture cache
The custom texture is needed to implement the Moo::BaseTexture interface, so that it can add itself to the
Texture Manager. However, depending on the following step (applying custom textures to models), you may
not even need to use the TextureManager, as it simply provides a 'retrieve texture by name' access to textures.
If you are creating several custom textures for characters, then you may have an internal (hidden) naming
scheme, which would result in a minimal benefit for using the texture cache. It may be good enough simply
to use smart pointers to handle caching.
19.7.3.5. Assigning custom textures to a model
Assuming that you have one model that you want display many times, each with a unique custom texture,
then you will have to implement a class deriving from the PyFashion class.
Such classes are created from Python, assigned to a PyModel instance, and given an opportunity to alter
how a shared model renders (i.e., to set the custom texture on the model). The PyFashion class will become
the main interface to your scripts, so in Python you can construct the PyFashion instance with the names
of the texture you want to combine, and then assign it to a player's model by simply setting the fashion as
any named attribute on its PyModel (PyModel::pySetAttribute automatically detects when a fashion
is set on itself, and incorporates it into its rendering chain).
To actually set the custom texture on the model, we recommend creating a class deriving from
Moo::EffectConstantValue, and that provides the custom texture to .fx files by name. In the .fx files,
use the automatic variable semantic (e.g., Texture diffuseMap :customCharacterTexture), instead
of the existing artistEditable property.
For an example code on creating a texture setter, see “Loading textures from disk” on page 104 .
19.8. Vertex declaration
Vertex declarations are used by Direct3D to map vertex stream data to vertex shaders.
Moo uses the VertexDeclaration class to ease the handling of vertex declarations used by Direct3D.
Vertex declarations are stored on disk in XML format and loaded as needed. The vertex declarations stored
on disk can be retrieved by calling method VertexDeclaration::get().
By default, the vertex declarations are stored under folder bigworld/res/shaders/ formats.
19.8.1. File format
The format of the vertex declaration file is described below:
<root>
+<USAGE> (usage index, optional defaults to 0)
?<stream> (strm #, opt, dflt is strm used by the prev elmnt) </stream>
?<offset> (ofst into strm, opt, dflt is nxt ofst aft prev elmnt) </offset>
?<type> (data type, opt, defaults to FLOAT3) </type>
</USAGE>
</root>

Vertex declaration
109
Vertex declaration file format
The USAGE tag maps to the enumerated type D3DDECLUSAGE, and its possible values are listed below:
▪POSITION
▪BLENDWEIGHT
▪BLENDINDICES
▪NORMAL
▪PSIZE
▪TEXCOORD
▪TANGENT
▪BINORMAL
▪TESSFACTOR
▪POSITIONT
▪COLOR
▪FOG
▪DEPTH
▪SAMPLE
The data types entered in the type tag map to enumerated type D3DDECLTYPE, and its possible values are
listed below:
▪D3DCOLOR
▪DEC3N
▪FLOAT1
▪FLOAT16_2
▪FLOAT16_4
▪FLOAT2
▪FLOAT3
▪FLOAT4
▪SHORT2
▪SHORT2N
▪SHORT4
▪SHORT4N
▪UBYTE4

Graphics settings
110 Copyright 1999-2008 BigWorld Pty. Ltd. All rights reserved. Proprietary commercial in confidence.
▪UBYTE4N
▪UDEC3
▪USHORT2N
▪USHORT4N
As an example, the xyznuv_d vertex format is defined like this:
<xyznuv_d.xml>
<POSITION/>
<NORMAL/>
<TEXCOORD>
<type> FLOAT2 </type>
</TEXCOORD>
<COLOR>
<stream> 1 </stream>
<offset> 0 </offset>
<type> D3DCOLOR </type>
</COLOR>
</xyznuv_d.xml>
Vertex declaration file xyznuv_d.xml
19.9. Graphics settings
To allow the game client to run as smoothly as possible in the widest range of systems, BigWorld's 3D engine
exposes several parameters. These can be tweaked by the player to achieve the optimal balance between
visual quality and game responsiveness for his particular hardware configuration.
These parameters are known as graphics settings, and are listed below:
▪BLOOM_FILTER
Available options: ON, OFF
Toggles the bloom effect.
▪FAR_PLANEA
Available options: FAR, MEDIUM, NEAR “Customising options” on page 112
Modifies the viewing distance. The viewing distance is defined per space and this graphics option modifies
the viewing distance by a factor. The factors and options are configurable in the file bigworld/res/
system/data/graphics_settings.xml
▪FLORA_DENSITYA
Available options: HIGH, MEDIUM, LOW, OFF “Customising options” on page 112
Sets the density of the flora detail objects by a factor. The factors and options are configurable in the file
bigworld/res/system/data/graphics_settings.xml.
▪FOOT_PRINTS
Available options: ON, OFF

Graphics settings
111
Toggles footprints on and off.
▪HEAT_SHIMMER
Available options: ON, OFF
Toggles the heat shimmer effect on and off.
▪OBJECT_LODA
Available options: HIGH, MEDIUM, LOW “Customising options” on page 112
Modifies the relative distance from the camera for LOD transitions by a factor.
▪SHADER_VERSION_CAP
Available options: SHADER_MODEL_3, SHADER_MODEL_2, SHADER_MODEL_1, SHADER_MODEL_0
Sets the maximum shader model version available to the engine.
SHADER_MODEL_0 is disabled if client is running with a graphics card supports Shader Model 1
only. SHADER_MODEL_0 need vertex shader 2.0 capability, no matter it is software or hardware vertex
processing. SM1 graphics card such as nVidia TI4400 enables hardware vertex processing but only support
vertex shader 1.1, so SHADER_MODEL_0 option can’t be applied.
▪SHADOWS_COUNTA
Available options: From 1 to maxCount (defined in shadows.xml — for details on this file's grammar,
see the document File Grammar Guide's section shadows.xml)
Sets the number of simultaneously visible dynamic shadows.
▪SHADOWS_QUALITY
Available options: HIGH, MEDIUM,LOW, OFF
Sets shadow quality. HIGH uses a 12-tap filter for shadows, MEDIUM uses a 4-tap filter for shadows, LOW
uses a 1-tap filter for shadows and OFF turns shadows off
▪SKY_LIGHT_MAPB
Available options: ON, OFF
Toggles the cloud shadows on and off.
▪TERRAIN_SPECULARB
Available options: ON, OFF
Toggles terrain specular lighting on and off.
▪TERRAIN_LOD
Available options: FAR, MEDIUM,NEAR
Modifies the terrain geo-morphing distances by a factor. The factors and options are configurable in the
file bigworld/res/system/data/terrain2.xml
▪TERRAIN_MESH_RESOLUTION

Customising options
112 Copyright 1999-2008 BigWorld Pty. Ltd. All rights reserved. Proprietary commercial in confidence.
Available options: HIGH, MEDIUM,LOW
Selects the terrain resolution to use. HIGH uses the highest available resolution, MEDIUM uses half the
available resolution, LOW uses a quarter of the available resolution
▪TEXTURE_COMPRESSIONAC
Available options: ON, OFF “Customising options” on page 112
Toggles texture compression on and off
▪TEXTURE_FILTERING
Available options: ANISOTROPIC_16X, ANISOTROPIC_8X, ANISOTROPIC_4X, ANISOTROPIC_2X,
TRILINEAR, BILINEAR, LINEAR, POINT
Selects texture filtering. Shaders can be modified to take advantage of this setting by using the
automatic variables MinMagFilter, MipFilter, and MaxAnisotropy to set the MINFILTER ,
MAGFILTER, MIPFILTER and MAXANISOTROPY sampler states. For details, see bigworld/res/
shaders/speedtree/speedtree.fx.
▪TEXTURE_QUALITYAC “Customising options” on page 112
Available options: HIGH, MEDIUM, LOW
Sets texture quality level.
▪SPEEDTREE_QUALITY
Available options: VERYHIGH, HIGH, MEDIUM, LOW, LOWEST
Sets the quality of the speedtree rendering. VERYHIGH Enables per-pixel lighting (normal mapped) on all
tree parts, HIGH Enables per-pixel lighting (normal mapped) on only the tree branches, MEDIUM Trees use
simple lighting, LOW Trees use simple animation and lighting, using the fixed function pipeline.
▪WATER_QUALITY
Available options: HIGH, MEDIUM, LOW, LOWEST
Sets the quality of water reflection rendering. HIGH Enables drawing of all object types, MEDIUM Disables
drawing of dynamic objects, LOW Disables drawing of dynamic objects and halves the resolution of the
render target. LOWEST only renders specular reflections.
▪WATER_SIMULATION
Available options: HIGH, LOW, OFF
Sets the quality of the water simulation. HIGH Enables inter-cell water simulation, MEDIUM enables water
simulation on a cell by cell basis, OFF turns water simulation off.
A — Adjustable via configuration files. For details, see “Customising options” on page 112 .
B — Requires restart of the client. For details, see “Settings that require restarting the client” on page 117 .
C — Delayed setting. For details, see “Delayed settings” on page 117 .
19.9.1. Customising options
Although most of these settings have their options determined in the engine, some settings can have their
options customized via configuration files.

Customising options
113
These settings and their customisation are discussed in the following topics.
19.9.1.1. TEXTURE_QUALITY and TEXTURE_COMPRESSION
Both TEXTURE_QUALITY and TEXURE_COMPRESSION settings are customized by the way of the texture
format (.texformat) and detail levels (texture_detail_level.xml) files (for details on this file's
grammar, see the document File Grammar Guide's section .texformat).
Lowering the texture quality and using compressed formats helps improving engine performance, by
reducing the amount of texture memory required to store them. This means that less data needs to be sent
to the graphics card at each frame, ultimately improving frame rate.
TEXURE_QUALITY adjusts the resolution of a texture by preventing its topmost mipmap levels from being
loaded. This means that, at the highest level of quality, the texture will be at the same resolution as the original
texture map. At medium level, it will be at half its original size, and at a quarter of it at the lowest level of
quality.
How many mipmap levels are skipped in each quality level for each texture can be controlled by the lodMode
tag in the texture's detailLevel section.
The table below lists the values lodMode can assume, next to the number of mipmaps skipped for each of
the texture quality setting levels:
lodMode# of skipped mipmaps
Value DescriptionHigh
quality Medium
quality Low
quality
1 Normal 0 1 2
2 Low
bias 0 1 1
3 High
bias 0 0 1
Number of skipped mipmaps per quality setting level/ LOD level
TEXURE_COMPRESSION affects the format in which texture maps are stored in memory. When texture
compression is disabled, all textures are stored using the format defined by the format tag in the
texture's detailLevel section. When texture compression is enabled, the format defined by the
formatCompressed is used. If formatCompressed is not defined for a texture, then format is used,
whatever the compression setting is.
Note that there is no restriction to what texture format is used for format or formatCompressed, but for
the texture compression setting to yield any significant performance results, formatCompressed should
define a texture format that uses less texture memory than its non-compressed format counterpart.
For details on how to setup a texture's level of detail, see “Texture detail levels/compression” on page 102 .
For details on the configuration file's grammar, see the document File Grammar Guide's section .texformat
.
19.9.1.2. SHADOWS_COUNT
SHADOWS_COUNT defines the maximum number of simultaneous dynamic shadows casters in a scene.
Shadows are rendered using shadow buffers, thus consuming texture memory. Filling the buffers up at every
frame requires rendering the scene again for each shadow caster. Reducing the number of simultaneous
dynamic shadow casters reduces the memory requirements and the amount of processing used to update
the buffers at every frame.

Customising options
114 Copyright 1999-2008 BigWorld Pty. Ltd. All rights reserved. Proprietary commercial in confidence.
Value ranges from 1 to value specified in maxCount shadows.xml file, in power of two steps (for details
on this file's grammar, see the document File Grammar Guide 's section .texformat ).
19.9.1.3. FLORA_DENSITY
FLORA_DENSITY defines the size of the vertex buffer used to render the flora detail objects.
Since the flora drawing distance to the camera is fixed, defining the size of the vertex buffer also determines
the flora density. Because it uses alpha blending, drawing the flora can negatively influence the frame
rendering time, especially on hardware with limited fill rate performance. Reducing the amount of flora
rendered at any one time may help improving the frame rate.
Flora density options are defined in <graphics_settings>.xml (for details on this file's grammar, see
the document File Grammar Guide's section <graphics_settings>.xml) as a multiplier of the vertex
buffer, which actual size is defined per space in <flora>.xml (for details on this file's grammar, see the
document File Grammar Guide's section <flora>.xml).
<graphics_settings.xml>
<flora>
<option>
<label> HIGH </label>
<value> 1.0 </value>
</option>
<option>
<label> LOW </label>
<value> 0.5 </value>
</option>
<option>
<label> OFF </label>
<value> 0 </value>
</option>
</flora>
</graphics_settings.xml>
Example <graphics_settings>.xml — Configuring flora density
19.9.1.4. FAR_PLANE
FAR_PLANE defines the maximum viewing distance when rendering the 3D world.
Decreasing the viewing distance reduces the amount of geometry sent to the rendering pipeline, resulting
in higher frame rates.
Because the far plane distance can be defined on a per-space basis (in space.settings file — for details
on this file's grammar, see the document File Grammar Guide's section space.settings), FAR_PLANE is
actually multiplied by the space's specific far plane value before it is applied to the camera.
Specified in <graphics_settings>.xml (for details on this file's grammar, see the document File
Grammar Guide's section <graphics_settings>.xml), the far plane can be configured as in the example
below:
<graphics_settings.xml>
<farPlane>

Customising options
115
<option>
<value> 1.0 </value>
<label> FAR </label>
</option>
<option>
<value> 0.75 </value>
<label> MEDIUM </label>
</option>
<option>
<value> 0.5 </value>
<label> NEAR </label>
</option>
</farPlane>
</graphics_settings.xml>
Example <graphics_settings>.xml — Configuring far plane
19.9.1.5. OBJECT_LOD
OBJECT_LOD defines the relative distance to the camera before LOD transitions occur.
For standard BigWorld models, LOD distances are defined using the ModelEditor. ParticleEditor is used
to set the LOD distance for particle systems (the maximum distance to which the system is still visible).
LOD levels and transition distances for SpeedTrees are defined inside SpeedTreeCAD (although they can
be overridden by the SpeedTree's XML configuration file, which is specified in resources.xml file's
speedTreeXML tag. For details on this file, see “File resources.xml” on page 8 ).
The OBJECT_LOD setting specify multipliers that will modify those distances during runtime, allowing the
user to trade some visual quality for better performance.
The LOD multipliers are defined in <graphics_settings>.xml (for details on this file's grammar, see
the document File Grammar Guide's section <graphics_settings>.xml):
<graphics_settings.xml>
<objectLOD>
<option>
<value> 1.0 </value>
<label> HIGHT </label>
</option>
<option>
<value> 0.66 </value>
<label> MEDIUM </label>
</option>
<option>
<value> 0.33 </value>
<label> LOW </label>
</option>
</objectLOD>
</graphics_settings.xml>

Using settings
116 Copyright 1999-2008 BigWorld Pty. Ltd. All rights reserved. Proprietary commercial in confidence.
Example <graphics_settings>.xml — Configuring object LOD
19.9.2. Using settings
Upon startup, the client automatically tries to load the graphics settings from disk. All graphics settings are
stored in the graphicsPreferences section of the file specified in preferences tag of the file specified in
resources.xml's engineConfigXML tag (for details, see “File <preferences>.xml” on page 10 ). The
first time the application is run, and when the graphics card or its driver has changed, the graphics settings
will try to auto-detect the most appropriate settings for the device.
Saving, on the other hand, is not performed automatically; it must be controlled from the scripts, using the
BigWorld.savePreferences method — it will save both the graphics settings and the video and script
preferences.
The game scripts can use the functions BigWorld.graphicsSettings and
BigWorld.setGraphicsSettings to query and change the current state of the settings (usually trough
a graphical user interface).
19.9.2.1. Auto-detecting settings
Auto-detecting of settings is supported through an xml configuration file specified by the tag
graphicsSettingsPresets in resources.xml. This file defines matching criteria to attempt to match
a group of settings to a specific device (graphics card). There are three different ways of matching a group
of settings to a device. All matching is done agains the D3DADAPTER_IDENTIFIER9 structure. The auto-
detection itself is performed in the method Moo::GraphicsSetting::init
▪GUID
Matches a specific device type and driver version to a settings group, this is useful when there are known
issues with a certain driver/device pair and you can adjust your graphics settings accordingly
▪VendorID/DeviceID pair
Matches a specific device type to the settings this is useful when you know the vendor and device id's
for a specific device
▪Device description string
Matches the strings to the device description, all the strings need to match for the setting to be selected
<graphicsPreferences> HIGH <=== Name of the preset, if no name is present, the
preset will not appear in the list of settings,
but it will still be used when auto-detecting
settings for the graphics card
<entry> <=== a graphics setting to change
<label> CLASSIC_TERRAIN_QUALITY </label> <=== the name of the graphics
setting
<activeOption> 0 </activeOption> <===the selected option
</entry>
<GUIDMatch> 01234567.89abcdef.01234567.89abcdef </GUIDMatch>
<=== Combined GUID of device and driver version, this is the value from
DeviceIdentifier in the
D3DADAPTER_IDENTIFIER9 structure saved out using the BigWorld
UniqueID class.
If this value matches, the setting will be used.
<VendorDeviceIDMatch>
<VendorID> 4318 </VendorID> <=== the VendorId from D3DADAPTER_IDENTIFIER9

High-resolution screenshots
117
<DeviceID> 1554 </DeviceID> <=== the DeviceId from D3DADAPTER_IDENTIFIER9
</VendorDeviceIDMatch> <=== If these two values match the current device,
the setting will be selected
unless there is a GUIDMatch with the current
device
<DeviceDescriptionMatch>
<string> nvidia </string> <=== Any number of strings that will be matched
agains the
<string> 6800 </string> <=== Description orioerty from
D3DADAPTER_IDENTIFIER9
</DeviceDescriptionMatch> <=== If these values match the current device,
the setting will be selected
unless there is a GUIDMatch or
VendorDeviceIDMatch with the
current device
<defaultSetting> true </defaultSetting> <=== this value is true for the
value to be used as the default setting,
the default setting is used
when no other settings match.
</graphicsPreferences>
Example <graphics_settings_presets>.xml — Setting up device matches
19.9.2.2. GraphicsPresets class
A simple python graphics presets class is also supplied. This class helps with grouping several graphics
settings together so that you can have pre-defined settings for multiple graphics options for a specific level
of hardware or performance. The GraphicsPresets class can be found in the folder bigworld/res/
scripts/GraphicsPresets.py.
19.9.2.3. Delayed settings
Most settings take effect immediately after calling BigWorld.setGraphicsSettings, but some are just
flagged as delayed. That means that after being set they are added to a list of pending settings, and that they
will only come into effect when that list gets committed.
This was designed to give the interface programmer a chance to warn the user that processing the new
settings may take a while to complete before the client application blocks for a few seconds (currently, there
is no support for displaying a progress bar while the settings are being processed).
The following functions allow the scripts to manage the pending settings list:
▪BigWorld.hasPendingGraphicsSettings
▪BigWorld.commitPendingGraphicsSettings
▪BigWorld.rollBackPendingGraphicsSettings
19.9.2.4. Settings that require restarting the client
Some settings are not applied until the client application is restarted. The function
BigWorld.graphicsSettingsNeedRestart returns true whenever the client requires a restart for a
recently changed setting to take effect.
19.10. High-resolution screenshots
To take an in-game screenshot, press the PrtScn button, or execute the Python command
BigWorld.screenShot(extension, name). An image file with the same dimensions as the back buffer

The backBufferWidthOverride watcher
118 Copyright 1999-2008 BigWorld Pty. Ltd. All rights reserved. Proprietary commercial in confidence.
will be placed in the current working folder. Normally the back buffer is the same size as the window or the
screen resolution when in full-screen mode. It is possible to configure the output file type and default name
through editing the engine_config.xml (for details on this file, see “File <engine_config>.xml” on
page 9 ). file. There is a <screenShot> tag that contains both an <extension> tag (can be one of "bmp",
"jpg", "tga", "png" or "dds") and a <name> tag (the screen shot root name).
The name of the generated file will be <name>_<sequence>.<extension>, where <sequence> is
a four-digit non-negative integer, padded with leading zeros (e.g., shot_0012.bmp). The screen capture
mechanism will not overwrite pre-existing files.
When running in windowed mode, it is possible to have a back buffer that is larger than the window itself,
thus increasing the size of the screenshot.
19.10.1. The backBufferWidthOverride watcher
The size of the back buffer can be changed (via Debug (Watchers) Console) by the backBufferWidthOverride
watcher.
The values specified to the watcher, and their effect on the back buffer are described below:
▪Watcher's value: 0 (default)
Resulting dimensions of the back buffer: Same as those of the window (when in windowed mode) or
screen (when in full-screen mode).
▪Watcher's value: Between 1 and the maximum surface width (4096 high-end cards)
Resulting dimensions of the back buffer: Width of the back buffer will be as specified. Height of the back
buffer will be the specified width divided by the aspect ratio of the window.
▪Watcher's value: Greater than supported by hardware
Resulting dimensions of the back buffer: Maximum value supported by the hardware (typically 2048 or
4096). Specified value will be ignored.
19.10.2. How to take a high resolution screenshot
To take a high-resolution screenshot
1. Open engine_config.xml (for details on this file, see “File <engine_config>.xml” on page 9 ) and
check the settings in <supershot> tag. If you have a video card with a large amount of memory you may
be able to change hRes to 4096.
2. Load the space/level and navigate to the place of which you want the screenshot.
3. Press ctrl+PrtScn to enable high resolution screenshot settings.
4. Press PrtScn to take a screenshot.
5. Press ctrl+PrtScn to restore regular render settings.
19.10.3. Troubleshooting
The list below describes some errors that you might come across when taking high-resolution screenshots
and how to solve them:
▪Back buffer's size did not change to the value that I specified.
When setting backBufferWidthOverride, client checks if specified size is larger than the hardware can
support. If that is the case, then hardware will ignore the specified size and use its maximum (typically
2048 or 4096).

Hardware recommendations
119
— or —
When very large numbers are specified in the Debug (Watchers) Console, parsing may wrap the value. If
this is the case of the value specified for backBufferWidthOverride, then it will be set to 0.
▪There is a glow covering the screen.
Sometimes, limited video memory resources will stop the renderer from allocating some of the buffers
that it uses, or from drawing special effects like bloom and heat shimmer.
This is particularly common when changing to a lower resolution after using a very large one, and can
result in erroneous bloom.
To solve this, you can either:
▪Set buffer to a smaller width (an application restart may also be necessary).
▪Turn off heat shimmer through the Debug (Watchers) Console:
▪Press Caps Lock+F7 to open the Debug (Watchers) Console.
▪Use Page Up, Page Down, and Enter to navigate to the Client Settings/ fx/Heat item.
▪Use Page Up and Page Down to enable item, then press Enter to edit it.
▪A line at the bottom of the screen will be opened to edit the watcher's value — change its value to
false , then press Enter.
▪Press Esc to exit the Debug (Watchers) Console.
▪Changing back buffer's size had no effect when working in full-screen mode.
When in full-screen mode, the back buffer must always have the same dimensions as the screen resolution
— this is a hardware/API limitation.
Hence, backBufferWidthOverride will always be disabled (value equals 0) when running in full-
screen mode.
19.10.4. Hardware recommendations
To produce high-resolution screenshots, a very capable video card is necessary — the two key requirements
are:
▪Maximum texture resolution
▪Available video memory
DirectX 9 requires 2048 resolution as a minimum, but 4096 is available on nVidia GeForce3+ (7800+
recommended) and ATI 1X800+ series cards. It is recommended that you have a minimum of 256MB video
memory when taking screenshots at resolutions in the order of 4096x3072.

120
Chapter 20. Full-screen Filters
The BigWorld 3D engine has two full-screen filters used for specialised rendering effects. Bloom is used to
improve the lighting, and heat shimmer is used for simulating heat, and other special effects.
Both are described in the following sections.
20.1. Bloom
Blooming is a way to simulate the high dynamic range of lighting, by producing an automatic glow around
very bright objects.
Extra brightness can be alluded to on the computer screen by having the light from an object bleed around
the edges of objects in front, a technique similar to lens flare. With lens flares, you have to specify the position
of the lens flare manually, and it can only represent a point light source. However, you can have secondary
flaring, as well as choosing a custom texture for each flare.
When blooming is turned on, it occurs automatically wherever there are very bright objects in the scene.
Because it works at the pixel level, you can have arbitrarily shaped blooms, and there is no performance
penalty for having many objects that bloom (instead, there is a constant cost to perform the full-screen bloom
effect).
Additionally, blooming works well with dynamic objects, for example capturing moving glints from specular
highlights, or by using animated textures.
There are many papers on the Internet describing this, and more advanced implementations. To find them
search for the terms 'Frame Buffer Post-Processing', or 'High Dynamic Range Rendering'.
Note
The bloom filter can be disabled by the via the BLOOM_FILTER graphic setting (for
details, see “Customising options” on page 112 ).
20.1.1. How the bloom filter works
After the scene is drawn, a copy is made to an off-screen texture. During this process, the colours are put
through a power function in a pixel shader, so that only the very bright areas remain, and the darker ones
become black.
This texture is then down-sampled onto a small texture (one quarter the size of the back buffer). This texture
is then blurred a number of times using a Gaussian blur function in a pixel shader. It is this blurring that
allows the colour to bleed around the edges of objects.
Once the blurring is complete, the texture containing the blurred, bright portions of the screen is added back
over the original back buffer.
20.1.2. How to use bloom
Since blooming occurs automatically as a full-screen effect within the engine, all you have to do to observe
its effect is to make sure there are bright pixels in the scene and that blooming is turned on.
To get bright pixels in the scene sometimes it is not enough to just make sure that textures include bright
areas; even bright textures appear dark if the lighting is insufficient.
There are other ways to make sure bright areas are rendered in the scene, as described below:

Tweaking bloom
121
▪Use the self-illumination property of materials to simulate an emissive material. Self-illuminated materials
are not darkened by the scene lighting, and therefore can achieve a brightness that allows blooming to
occur.
▪Add an additive texture layer (a glow map) to an existing material. This is similar to using self-illuminated
materials, except in that the emissiveness is controlled at the texel level. This method is even more flexible,
because you can use rolling UVs, or even an animated texture.
▪Blooming occurs naturally with specular bump mapping, because specular highlights are often very bright,
and reflected lighting is additive.
20.1.3. Tweaking bloom
There are a number of watchers in 'Client Settings/fx/Bloom' that you can tweak to change the look of the
bloom filter.
The list below describes these watchers:
▪bloom and blur
Specifies if brightness capture is to be done.
If set to FALSE, then the brightness capture is turned off, meaning the blooming code just blurs the original
scene.
When turned off, the blurred scene is not drawn back over the back buffer, so the scene is unaffected, but
access to the blurred texture is possible (for details, see “Blurring the scene” on page 122 ).
▪enable
Toggles the bloom filter. Possible values: 0 and 1.
The bloom filter is turned off is value is set to 0.
▪colour attenuation
Affects the brightness of the resultant bloom effect.
This value is very sensitive, and values between 0.95 and 1.05 produce reasonable results for the 4x4 filter.
This value is also affected by num passes and filterMode.
▪filterMode
Selects a 4x4 Gaussian filter (1), or a 24x24 Gaussian filter (3).
The 24x24 mode produces a slightly better result, but involves more rendering passes and is therefore
slower than the 4x4 mode.
Note that if you use the 24x24 filter you will need to dramatically reduce the colour attenuation value to
around 0.2.
▪num passes
Selects the number of blur passes to be performed.
Increasing the number of passes produces a smoother result, but will use more GPU time.
▪smooth
Selects the blending mode used during the blurring stage. Possible values: 0 or 1.

Blurring the scene
122 Copyright 1999-2008 BigWorld Pty. Ltd. All rights reserved. Proprietary commercial in confidence.
Subtle variation on the blurring effect.
20.1.4. Blurring the scene
As a side effect of the bloom code, it is possible to turn bloom off, but leave the blur code running. The blurred
scene is not drawn back over the back buffer; the results are left in an off-screen render target.
This render target is set as a texture feed called bloom2, which can be retrieved in the following ways:
▪From C++, call TextureFeeds::instance().get("bloom2").
▪From Python, call BigWorld.getTextureFeed("bloom2").
The blurred version of the screen can be assigned to GUI components, and you can achieve a variety of effects
with this.
An alternative way to set the blurring mode on is to call BigWorld.selectBloomPreset(1) from Python.
This selects a set of predefined values for blurring that gives reasonable results.
20.1.5. Making the bloom permanent
Once the desired look has been achieved, you will probably leave it turned on all the time, without variations.
The simplest way to make permanent your selected values is to modify the C++ function
app.cpp::selectBloomPreset(), changing the default values or adding more presets for your game.
You may find it useful, for example, to turn the blur mode on when entering in full-screen menu mode,
leaving the game running behind the menus as a blurry backdrop.
20.2. Heat shimmer
Heat shimmer was originally intended as a full-screen depth-based effect for desert scenes. However, it has
ended up as a special effect more suited to simulating the diffraction from a moving water surface or bubbles,
and localised heat-haze effects.
Areas of the scene are designated as 'shimmering' by drawing a brightness value into the alpha channel of the
back buffer. This alpha channel is then used to blend a wobbly copy of the back buffer over the top of itself.
The shimmer effect itself is created in a vertex shader by simply modifying the UV coordinates of a fairly
dense mesh by sending a couple of sine and cosine waves through it. The vertex shader outputs two sets of
UV coordinates: the original unperturbed coordinates, and the displaced ones. A pixel shader then simply
uses the alpha channel of the back buffer to select between UV coordinate 1 and UV coordinate 2.
Note
The heat shimmer can be disabled by the via the HEAT_SHIMMER graphics setting.
For details, see “Customising options” on page 112 .
20.2.1. How to use heat shimmer
Shimmer occurs wherever the alpha is set on the back buffer. In order to output alpha, you must turn the
shimmer flag of a material on, and make the material output alpha (i.e., it should not be disabled, as the final
stage of the material must output alpha).
If the shimmer flag is not set, then alpha writes are disabled, and therefore the shimmer effect will not be
applied, even if the material outputs alpha.
The amount of alpha determines how much that part of the screen is shimmering, via a simple blend between
the shimmered and non-shimmered back buffer.

Tweaking heat shimmer
123
An example of a shimmer effect is the heat haze above a flame. There are two ways to achieve this effect,
as described below:
▪Create an invisible cylinder mesh above the flame, by setting the material channel to shimmer and
outputting alpha.
It is recommended to have soft edges on the cylinder (achieved by projecting a falloff map onto the cylinder
using front camera-normal projection on the second texture stage of the material). Make sure that the falloff
map is projecting alpha, and not colour, since only the alpha affects the amount of shimmer.
▪Use a particle system. In your flame particle system, add a second sub-system that outputs particles that
are fairly large and rise much higher than the flame itself.
The texture must have an alpha component, and the materialFX of that particle system should be set
to FX_SHIMMER.
20.2.2. Tweaking heat shimmer
The inputs to the vertex shader are quite involved, so there are three preset shimmer styles (set with the
Python function BigWorld.setShimmerStyle), which are described below:
▪0
A fairly subtle effect, that introduces a 1-pixel offset. This means that while a slight shimmer is visible,
the border of the shimmer region is still noticeable. This can be used for invisibility or cloaking effects on
characters.
▪1
A very obvious effect, that shimmers greatly. This can be used for shockwave effects.
▪2
A subtle effect that has no pixel offset. This is useful in the general cases, for simulating the changing
diffraction on the surface of water (the shimmer looks similar to the wave like undulation of water),
simulating the effect of bubbles in a glass tank of water, or heat haze above bonfires and weapon discharges.

124
Chapter 21. Debugging
This section describes some of the debugging features of the BigWorld client.
Debugging is an important part of any development process, and the client has many features that facilitate
finding bugs early, in-game debugging, remote debugging, and the immediate application of changes
without restarting.
21.1. Build configuration — conditional feature inclusion
BigWorld provides a number of features that aid in runtime debugging, such as the debug menu and the
telnet Python service.
To remove these features from a final release build of the client, a number of compile guards exist. These are
collectively controlled by the following define located in src/lib/ cstdmf/config.hpp.
#define CONSUMER_CLIENT_BUILD 0
If CONSUMER_CLIENT_BUILD is 0, then the development features will be compiled.
Individual features are encapsulated in their own individual compile guards, which can collectively be
switched using the above define. Individual features may also be enabled, by setting the corresponding force
enable define to a non-zero value.
This is illustrated in the example below:
#define CONSUMER_CLIENT_BUILD 0
#define FORCE_ENABLE_DEBUG_KEY_HANDLER 0
#define ENABLE_DEBUG_KEY_HANDLER (!CONSUMER_CLIENT_BUILD \
|| FORCE_ENABLE_DEBUG_KEY_HANDLER)
21.2. Watchers
A watcher is an object that wraps a variable or function result in a program, and turns it into a string.
Watchers can be read-write or read-only, and can be viewed in various ways. Their hierarchy is usually
organised by functionality. There are also watchers that can dynamically match changing data, such as the
contents of a sequence or map.
21.2.1. Watcher types
The simplest watcher type is the DirectoryWatcher, which allows the creation of a directory of other watchers
(including DirectoryWatchers). This is one way in which the hierarchy can be built up. For example, a float
value for the amount of rain drawn by the rain system in the BigWorld client is specified at 'Client Settings/
Rain/ amount'. This uses three DirectoryWatchers: the root directory, the Client Settings directory, and the
Rain directory.
There are also templatised watchers for any data type that can be streamed onto a std::stream object. These
come in two flavours, as DataWatchers of variables, and as MemberWatchers of the result (or sole argument)
of member functions of a class.
The DataWatchers and MemberWatchers can also take a 'base object' argument, which the data they point
to is considered a member of. This is very useful when combined with more complicated types of watchers,
such as the SequenceWatcher.

Using watchers
125
The SequenceWatcher and MapWatcher appear to be the same as a DirectoryWatcher, but they watch any
class that supports the STL sequence or mapping methods. They have just one client watcher, but they
present as many children as there are elements of their wrapped container. The child watcher is called with
its 'base object' set to the element of the container. To handle pointers in these containers, there is also the
BaseDereferenceWatcher, which presents no extra hierarchy level, but rather dereferences its base object and
calls a sole child watcher with that value. The children can be named either by a static list, or by making a
request for a certain value in the child watcher (such as name).
21.2.2. Using watchers
From the types above, it can be seen that a watcher hierarchy can be set up to both expose simple settings
and to track complex structures.
The simplest way to make a watcher is to use the MF_WATCH macro. This macro takes the path name for the
watcher, and a variable or member function to get/set its value. It expands to code that adds the appropriate
watcher.
To change the parsing or display of a value (as a string), it is not necessary to write a new watcher. Instead,
you can use member functions that get and set the value as a string. This is how the 'Client Settings/Time
of day' value works — there are simple accessors for timeOfDayAsString, which format the time of day
as 'hours:minutes' and parse it back from the same format. Setting a watcher can also be used to trigger a
command — for example, the server is also notified whenever the time of day is set (for debugging purposes
only).
To track complex structures, the appropriate watcher must be created directly, and inserted into the watcher
hierarchy. Classes that participate in such an arrangement often implement a getWatcher() static method
that returns a watcher object that works when the 'base object' is set to an instance of their class. The same
watcher can be shared by all instances of the class, and is usually of type DirectoryWatcher of DataWatchers
and MemberWatchers.
This is done on the client with the map of entities maintained by the Entity Manager. The entities are named
by their ID.
Most of the C++ state of the client is also available through explicitly added watchers, as they were needed
for some stage of the debugging already.
21.2.3. Watcher Console
The watcher console provides access to the watcher system from within the game. It can be brought up at
any time, and overlays the game screen with a listing of the current watcher directory.
Directory-like entries can be followed down, and the value of any writable watcher can be set by selecting
it, pressing Enter, then typing in a new value.
There are also keys for adjusting numerical values by 1, 10, 100, or 1000.
21.2.4. Remote watcher access
The watcher system is exported from the client using a very simple UDP-based watcher message protocol.
The server uses this protocol extensively for its own debugging needs.
This is not related to Mercury, although it can be (and currently is) linked to its input loop. When the client
starts up, it broadcasts a watcher nub notification packet, advertising the port its watcher nub is listening for
requests on (it sends a similar message when it shuts down cleanly).
To access the watcher values, a number of tools may be used, but by far the most useful is a UNIX daemon
called 'watcher'. This daemon listens for any broadcast watcher packets and adds or removes them from an
internal list.

Memory tracking
126 Copyright 1999-2008 BigWorld Pty. Ltd. All rights reserved. Proprietary commercial in confidence.
The other side of the daemon presents an HTTP interface to all the watcher nubs it knows. It inserts the name
of the watcher nub (contained in the registration message, e.g., 'client of John', 'cell14', etc...) as the top level of
a watcher super-hierarchy. It presents the individual watcher trees as branches of this top directory. The path
in the request URL is translated into the watcher value request path. This interface can get and set values.
So by connecting to this daemon with any web browser, all the running clients on the local network can be
seen, and then investigated or manipulated, right down to changing the value of a Python variable in an
entity. Python variables can be set to arbitrary Python, which is executed on the client to find its value. The
client can also send its watcher nub notification to another external address if so desired, so even remote
clients can be accessed in this way.
21.3. Memory tracking
The memory tracking system can be used to determine the amount of memory allocated to a class or module.
The ResourceCounters class is the primary class used to perform the tracking.
21.3.1. ResourceCounters overview
This is a simple class that tracks the memory usage of a component based on a description string (the
component allocating/deallocating the memory) and a memory pool enumeration (the memory pool to be
used, i.e., system memory, managed video memory, or default video memory).
The two main worker methods of this class are add and subtract, which respectively track memory allocations
and deallocations using the description-pool.
The ResourceCounters class maintains a map of the components it is tracking. Rather than calling the
methods of ResourceCounters directly, two macros are exposed. These macros are defined away to nothing
when memory tracking is disabled:
#define RESOURCE_COUNTER_ADD(DESCRIPTION_POOL, AMOUNT) /
ResourceCounters::instance().add(DESCRIPTION_POOL, (size_t)(AMOUNT));
#define RESOURCE_COUNTER_SUB(DESCRIPTION_POOL, AMOUNT) /
ResourceCounters::instance().subtract(DESCRIPTION_POOL, (size_t)(AMOUNT));
ResourceCounters also exposes toString-style methods that are used by the realtime resource-monitoring
console to display the current memory usage statistics.
21.3.2. Memory allocation taxonomy
With respect to the memory tracking system, there are two basic types of memory allocation:
▪DirectX memory allocation
All DirectX resources are COM objects. COM objects use reference counting to manage their sharing
among multiple objects. The Moo library provides the wrapper class ComObjectWrap for dealing with
these objects.
Inside BigWorld, there are two reference types used to refer to DirectX objects: plain points (e.g.,
DX::Texture*) and ComObjectWrap pointers. For DirectX objects, the memory tracking is performed purely
through the ComObjectWrap class. Therefore, any DirectX resource that needs its memory tracked must
be refactored to use ComObjectWrap references if it does not do so already. For details on how the DirectX
textures were instrumented, see “DirectX textures” on page 127 .
▪Standard memory allocation
All other objects in BigWorld use standard stack or heap memory. Unlike the memory tracking for DirectX
resources, there is no unified way of instrumenting a particular class or set of classes. For details on

Case studies
127
the main issues encountered when instrumenting arbitrary classes, see “Binary blocks” on page 129 ,
“Terrain height maps” on page 130 , and “Terrain texture layers” on page 133 .
21.3.3. Case studies
This section documents the instrumenting of four classes/types that make up the BigWorld system:
▪DirectX textures
▪Binary blocks
▪Terrain height maps
▪Terrain texture layers.
Each of these classes/types presents its own set of challenges. These examples highlight the main issues that
come up during instrumentation.
21.3.3.1. DirectX textures
Even with the memory-tracking functionality added to the ComObjectWrap class, COM objects are not
memory-tracked by default, because the accounting for memory must occur after the resource has been
created. Since there is no way of knowing when this happens automatically, memory tracking cannot be
activated automatically for all COM objects.
In order to activate the memory tracking for a particular DirectX resource, the programmer must make a
call to ComObjectWrap::addAlloc(<string description>) after creating the DirectX resource to
activate the memory tracking for this resource. Note that ComObjectWrap objects automatically handle
the deallocation of memory from the memory tracking system on destruction of the last resource reference.
Therefore there is no need for the programmer to explicitly make the deallocation.
Below are excerpts of the lock_map.*pp files that support DirectX texture instrumenting.
▪src/tools/worldeditor/project/lock_map.hpp
Class LockMap
{
public:
...
ComObjectWrap<DX::Texture> lockTexture() { return lockTexture_; }
...
private:
...
ComObjectWrap<DX::Texture> lockTexture_;
...
};
▪src/tools/worldeditor/project/lock_map.cpp
LockMap::LockMap() :
gridWidth_(0),
gridHeight_(0),
colourLocked_(Colour::getUint32(COLOUR_LOCKED)),
colourLockedEdge_(Colour::getUint32(COLOUR_LOCKED_EDGE)),
colourLockedByOther_(Colour::getUint32(COLOUR_LOCKED_BY_OTHER)),
colourUnlocked_(Colour::getUint32(COLOUR_UNLOCKED))
{
}
...

Case studies
128 Copyright 1999-2008 BigWorld Pty. Ltd. All rights reserved. Proprietary commercial in confidence.
void LockMap::setTexture(uint8 textureStage)
{
Moo::rc().setTexture(textureStage, lockTexture_.pComObject());
}
...
void LockMap::updateLockData( uint32 width, uint32 height, uint8* lockData)
{
bool recreate = !lockTexture_.pComObject(); 1
...
}
void LockMap::releaseLockTexture()
{
lockTexture_ = NULL; 2
}
...
void LockMap::createLockTexture()
{
...
HRESULT hr = Moo::rc().device()->CreateTexture(
gridWidth_, gridHeight_, 1, 0, D3DFMT_A8R8G8B8,
D3DPOOL_MANAGED, &lockTexture_, 0 );
lockTexture_.addAlloc("texture/lock terrain");
...
}
1Several functions require a reference to a DirectX texture resource, such as setTexture. A call to
ComObjectWrap:: pComObject() returns such a pointer.
2When releasing resources, the release call is handled automatically. It must not be called explicitly on
release — ComObjectWrap should simply be set to NULL.
It is important that when ComObjectWrap objects are being used to access a DirectX resource that
they be used everywhere to access that resource. ComObjectWrap objects automatically increment and
decrement the internal reference count of the COM objects they reference when passing COM objects between
themselves. Passing a COM object reference from a ComObjectWrap object to a regular pointer circumvents
the automated memory deallocation and reference decrementing functionality.
The only situation when a DirectX resource should be exposed as a plain pointer is when passing the object
to DirectX functions directly (see the above example in src/tools/bigbang/project/lock_map.cpp's
function setTexture, when Moo::rc().setTexture is called).
In src/tools/worldeditor/project/lock_map.cpp's function createLockTexture, directly after
the call to Moo::rc().device()->CreateTexture, a call to lockTexture_.addAlloc("texture/
lock terrain") is made. This call accounts for the allocation of memory during the
Moo::rc().device()->CreateTexture call for the lockTexture_ object. The" texture/lock terrain"
memory resource pool will be incremented by the amount of memory used by lockTexture_. But how to
is the amount of memory used by lockTexture_ determined?
ComObjectWrap is a templated class. A different class implementation is created at compile time for each
COM object that makes use of this class. In the case of DX::Texture, a ComObjectWrap<Dx::Texture>
class is created. During the call ComObjectWrap::addAlloc(<string description>), calls
to the functions ComObjectWrap::pool and ComObjectWrap::size are made. Each COM
object can implement its own version of these methods using template specialisation. The
ComObjectWrap<Dx::Texture> versions are:
template<> uint ComObjectWrap<DX::Texture>::pool() const
{

Case studies
129
// Get a surface to determine pool
D3DSURFACE_DESC surfaceDesc;
pComObject_->GetLevelDesc(0, &surfaceDesc);
return (uint)surfaceDesc.Pool;
}
template<> uint ComObjectWrap<DX::Texture>::size() const
{
// Determine the mip-map texture size scaling factor
double mipmapScaler = 0.0;
for (DWORD i = 0; i < pComObject_->GetLevelCount(); i++)
mipmapScaler += 1 / pow(4.0, (double)i);
// Get a surface to determine the width, height, and format
D3DSURFACE_DESC surfaceDesc;
pComObject_->GetLevelDesc(0, &surfaceDesc);
// Get the surface size
uint32 surfaceSize = DX::surfaceSize(surfaceDesc);
// Track memory usage
return (uint)(surfaceSize * mipmapScaler);
}
Excerpt — src/lib/moo/com_object_wrap.ipp
The ComObjectWrap<DX::Texture>::pool function determines what memory pool the texture
resides in by examining the surface description of the surface at mipmap level 0. The
ComObjectWrap<DX::Texture>::size function determines the size of the memory allocation by
computing the mipmap scaling factor due to the mipmap levels, determining the memory footprint of the
zero level mipmap level for the given texture format, and then multiplying the two.
Every DirectX resource that is to be memory-tracked will need to implement its own versions of these
functions.
21.3.3.2. Binary blocks
Memory tracking for BinaryBlock involves calls to the RESOURCE_COUNTER_ADD and
RESOURCE_COUNTER_SUB macros in the constructor and destructor respectively. In the constructor, if the
BinaryBlock is the owner of the data, the memory tracking call is:
RESOURCE_COUNTER_ADD( ResourceCounters::DescriptionPool( "binary block",
(uint)ResourceCounters::SYSTEM),
(uint)(len_ + sizeof(*this)))
Otherwise, if another BinaryBlock owns the data, the call is:
RESOURCE_COUNTER_ADD( ResourceCounters::DescriptionPool( "binary block",
(uint)ResourceCounters::SYSTEM),
(uint)sizeof(*this))
Note that in the first version, the size of the binary data allocation is accounted for, as well as the size of the
BinaryBlock object, while in the second version only the size of the BinaryBlock object is accounted for.
Similarly in the destructor, if the BinaryBlock owns the data, the memory tracking call is:
RESOURCE_COUNTER_SUB( ResourceCounters::DescriptionPool( "binary block",

Case studies
130 Copyright 1999-2008 BigWorld Pty. Ltd. All rights reserved. Proprietary commercial in confidence.
(uint)ResourceCounters::SYSTEM),
(uint)(len_ + sizeof(*this)))
Otherwise, the call is:
RESOURCE_COUNTER_SUB( ResourceCounters::DescriptionPool( "binary block",
(uint)ResourceCounters::SYSTEM),
(uint)sizeof(*this))
As it stands, the memory usage for all BinaryBlock objects is placed in a single resource pool called "binary
block". This is still a very high level of granularity — it is likely that BinaryBlock objects are used by many
different objects to varying degrees. It would be useful to known their distribution throughout the system.
For details on how this is done, see “Terrain texture layers” on page 133 .
21.3.3.3. Terrain height maps
Like most classes, TerrainHeightMap2 has primitive types, pointers, and objects as member variables.
TerrainHeightMap2::TerrainHeightMap2(CommonTerrainBlock2 &terrainBlock2):
...
{
...
RESOURCE_COUNTER_ADD( ResourceCounters::DescriptionPool( "height map",
(uint)ResourceCounters::SYSTEM),
(uint)(sizeof(*this)))
}
TerrainHeightMap2::~TerrainHeightMap2()
{
RESOURCE_COUNTER_SUB( ResourceCounters::DescriptionPool( "height map",
(uint)ResourceCounters::SYSTEM),
(uint)(sizeof(*this)))
}
Excerpt — src/lib/moo/terrain_height_map2.cpp
The calls to RESOURCE_COUNTER_ADD and RESOURCE_COUNTER_SUB account for the static memory used
by the member variables, but do not account for the dynamically allocated memory used by our member
pointers, the member pointers of our member objects, member pointers of member objects of our member
objects, and so on.
Therefore, it is necessary to examine both the member pointers and the member objects to account for their
dynamic memory usage, if any. With respect to the TerrainHeightMap2 class, there are three members of
interest:
▪CommonTerrainBlock2* terrainBlock2_
▪TerrainQuadTreeCell quadTree_
▪Image<float> heights_
21.3.3.3.1. CommonTerrainBlock2* terrainBlock2_
On construction of a TerrainHeightMap2 object, a reference to the parent CommonTerrainBlock2
objects is passed in. As such, the TerrainHeightMap2 is not responsible for the memory usage of this class
(in fact, the opposite is true — if memory tracking is added to CommonTerrainBlock2, then it is likely
that the memory allocated by TerrainHeightMap2 should be allocated into the CommonTerrainBlock2
resource counter). Simply accounting for the terrainBlock2_ pointer in the constructor's call to
RESOURCE_COUNTER_ADD is sufficient.

Case studies
131
21.3.3.3.2. TerrainQuadTreeCell quadTree_
The TerrainQuadTreeCell class must be inspected to check whether it or any of its members result in
any dynamic memory allocations. The inspection is recursive until all members and their allocations are
accounted for. For the TerrainQuadTreeCell class we have the following expansion:
TerrainQuadTreeCell
std::string allocator_; // Need to account for this
std::vector<TerrainQuadTreeCell> children_; // Need to account for this
BoundingBox boundingBox_; // Need to expand
static BoundingBox s_insideOut_; // For simplicity we do not
// account for static members
Outcode oc_; // Is of primitve type uint32
Outcode combinedOc_; // Is of primitve type uint32
Vector3 min_; // Only contains primitives
Vector3 max_; // Only contains primitives
For TerrainQuadTreeCell, the dynamic memory used by member variables
TerrainQuadTreeCell::allocator_ and TerrainQuadTreeCell::children_ must be accounted
for.
▪TerrainQuadTreeCell::allocator_
allocator_ is a std::string that records the resource pool being used. Since we want
TerrainHeightMap2's TerrainQuadTreeCell instances to use TerrainHeightMap2's resource
pool, we need a way to configure TerrainQuadTreeCells resource pool. This is done by passing the
resource pool string to the TerrainQuadTreeCell constructor.
TerrainQuadTreeCell::TerrainQuadTreeCell(const std::string& allocator);
Excerpt — src/lib/moo/terrain_quad_tree_cell.cpp
allocator_ is then set to the resource pool passed as parameter, so that the correct resource pool will
be used. It is a simple matter to account for allocator_'s additional memory usage in the constructor's
memory-tracking call to RESOURCE_COUNTER_ADD:
TerrainQuadTreeCell::TerrainQuadTreeCell(const std::string& allocator);
{
...
RESOURCE_COUNTER_ADD( ResourceCounters::DescriptionPool( allocator_,
(uint)ResourceCounters::SYSTEM),
(uint)( sizeof(*this) +
allocator_.capacity() ))
...
}
A similar call is made in the destructor.
▪TerrainQuadTreeCell::children_
children_ is a std::vector containing zero or four TerrainQuadTreeCell objects. Vectors
use dynamic memory allocation, but since the objects are of type TerrainQuadTreeCell, that
means we are already accounting for the memory of each allocation. The only catch with
having a vector of TerrainQuadTreeCell objects is that the call to children_.resize(4) in

Case studies
132 Copyright 1999-2008 BigWorld Pty. Ltd. All rights reserved. Proprietary commercial in confidence.
TerrainQuadTreeCell::init would create four TerrainQuadTreeCell objects using the default
constructor. These objects must use the same resource pool as their parent TerrainQuadTreeCell object.
This is achieved by passing a prototype instance to the resize method with the appropriate resource pool:
void TerrainQuadTreeCell::init(...)
{
...
TerrainQuadTreeCell childPrototype(allocator_);
children_.resize(4, childPrototype);
...
Excerpt — src/lib/moo/terrain_quad_tree_cell.cpp
At this point all memory has been accounted for in class TerrainHeightMap2.
21.3.3.3.3. Image<float> heights_
The Image<float> class must be inspected to see if it or any of its members result in any dynamic memory
allocations. Like the inspection performed on TerrainQuadTreeCell, the inspection is recursive until all
members and there allocations are accounted for. The member variables of the Image<PixelType> class
are:
Image<PixelType>
std::string allocator_; // Need to account for this
PixelType* pixels_; // Need to account for this
PixelType** lines_; // Need to account for this
uint32 width_; // Primitive
uint32 height_; // Primitive
bool owns_; // Primitive
size_t stride_; // Primitive
For Image<float>, the dynamic memory used by the member variables Image<float>::allocator_,
Image<float>::pixels_, and Image<float>::lines_ must be accounted for.
▪Image<float>::allocator_
Just like TerrainQuadTreeCell::allocator_ (for details, see “TerrainQuadTreeCell quadTree_” on
page 131 ), Image<float>::allocator_ stores the resource pool for this object. Its memory is
accounted for in the constructor's memory tracking call to RESOURCE_COUNTER_ADD:
RESOURCE_COUNTER_ADD( ResourceCounters::DescriptionPool( allocator_,
(uint)ResourceCounters::SYSTEM),
(uint)( sizeof(*this) + allocator_.capacity() ))
A similar call is made in the destructor.
▪Image<float>::pixels_
The dynamic memory allocations assigned to Image<float>::pixels_ can be determined simply
by searching through the Image class. Every direct or indirect memory allocation and deallocation
must be accounted for. The following is an example of an indirect dynamic memory allocation to the
Image<float>::pixels_ member variable.
template<typename PixelType>

Case studies
133
bool Image<PixelType>::createBuffer(uint32 w, uint32 h, PixelType* & buffer,
bool& owns, size_t& stride, bool& flipped)
{
...
// Track memory usage
RESOURCE_COUNTER_ADD(
ResourceCounters::DescriptionPool( allocator_,
(uint)ResourceCounters::SYSTEM),
(uint)(sizeof(PixelType) * w * h))
buffer = new PixelType[w*h];
...
}
template<typename PixelType>
void Image<PixelType>::init( uint32 w, uint32 h, PixelType *pixels,
bool owns, size_t stride, bool flipped)
{
...
pixels_ = pixels;
width_ = w;
height_ = h;
owns_ = owns;
stride_ = (stride == 0) ? w*sizeof(PixelType) : stride;
createLines(width_, height_, pixels_, stride_, flipped);
}
template<typename PixelType>
inline void Image<PixelType>::resize(uint32 w, uint32 h)
{
...
PixelType *newBuf = NULL; // Creates a PixelType pointer
bool owns, flipped;
size_t stride;
// newBuf points to newly created pixel buffer
createBuffer(w, h, newBuf, owns, stride, flipped);
// pixels_ now points to newly created pixel buffer
init(w, h, newBuf, owns, stride, flipped);
}
▪Image<float>::lines_
Use the same technique described above for Image<float>::lines_.
21.3.3.4. Terrain texture layers
The final instrumenting case study is for class TerrainTextureLayer2. The techniques described in the
earlier case studies can be used to account for all but three of TerrainTextureLayer2's member variables:
CommonTerrainBlock2* terrainBlock_; // Same as CommonTerrainBlock2*
terrainBlk2
std::string textureName_; // Need to account for this
TerrainTextureLayer2::ImageType blends_; // Same as Image<float> heights_
uint32 width_; // Primitive
uint32 height_; // Primitive
Vector4 uProjection_; // Primitive
Vector4 vProjection_; // Primitive
size_t lockCount_; // Primitive
BaseTexturePtr pTexture_; // Need to account for this
State state_; // Primitive

Case studies
134 Copyright 1999-2008 BigWorld Pty. Ltd. All rights reserved. Proprietary commercial in confidence.
BinaryPtr compressedBlend_; // Need to account for this
TerrainTextureLayer2's member variables
▪std::string::textureName_
textureName_ can be accounted for in a similar manner to TerrainQuadTreeCell::allocator_ (for details,
see “TerrainQuadTreeCell quadTree_” on page 131 ) and Image<float>::allocator_ (for details,
see “Image<float> heights_” on page 132 ), except that the allocation occurs in several places in
terrain_texture_layer2.cpp. Each can be handled similarly by subtracting from the resource pool
before an assignment and adding to the resource pool after an assignment, as illustrated below:
RESOURCE_COUNTER_SUB( ResourceCounters::DescriptionPool( "texture layer",
(uint)ResourceCounters::SYSTEM),
(uint)textureName_.capacity())
textureName_ = filename;
RESOURCE_COUNTER_ADD( ResourceCounters::DescriptionPool( "texture layer",
(uint)ResourceCounters::SYSTEM),
(uint)textureName_.capacity())
Excerpt — src/lib/moo/terrain_texture_layer2.cpp
▪BaseTexturePtr::pTexture_
BaseTexturePtr is a smart pointer to the abstract class BaseTexture. The first case study above
already accounted for all texture usage in the system, therefore we need a way to override the call to
ComObjectWrap::addAlloc(std::string description) so that for this particular texture the
"terrain texture layer/texture" memory resource pool is used.
First, a search is performed to find where pTexture_ is being assigned:
pTexture_ = TextureManager::instance()->get( textureName_ );
The desired memory pool needs to be added to this parameter list to override the default pool used
for TextureManager's created textures. The call now looks like this with all the default values for the
parameters filled in:
pTexture_ = TextureManager::instance()->get(
textureName_, true, true, true, "terrain texture layer/texture" );
The last parameter must have a default value assigned so that the interface for the method is not
broken. The allocator pool must be passed through to the construction of the AnimatingTexture
and ManagedTexture classes. This requires the addition of the allocator pool description string to the
constructors of these classes (and any other classes that inherit from BaseTexture that need more
accurate memory tracking). The constructor of the BaseTexture class is also changed to accept this
allocator string in its constructor and store it in a member variable. This member variable can then be
used by all classes that inherit from BaseTexture to account for the memory allocated in the call to
CreateTexture.
▪BinaryPtr::compressedBlend_
As mentioned above, the BinaryBlock class accounts for all its memory usage. Therefore, if we wish
to account for the compressedBlend_ dynamic allocation in the TerrainTextureLayer2 memory

Displaying the memory tracking console
135
pool we must override the memory tracking in BinaryBlock. This can be achieved similarly to how
the resource pool was overridden when creating a texture. The desired pool must be passed through to
the BinaryBlock constructor. This required adding the default valued allocator string to the end of the
following methods:
inline BinaryPtr Moo::compressImage( Image<PIXELTYPE> const &image,
std::string allocator)
{
...
return compressPNG(pngData, allocator);
}
...
src/lib/moo/png.hpp
BinaryPtr Moo::compressPNG( PNGImageData const &data,
std::string allocator)
{
...
BinaryPtr result = concatenate(outputBuffers, allocator);
...
}
...
BinaryPtr concatenate ( std::vector<BinaryPtr> const &buffers,
std::string const &allocator)
{
...
BinaryPtr result = new BinaryBlock(data, totalSize, allocator() );
...
}
src/lib/moo/png.cpp
BinaryBlock::BinaryBlock( const void * data, int len,
const char *allocator, BinaryPtr pOwner )
{
...
RESOURCE_COUNTER_ADD( ResourceCounters::DescriptionPool(allocator_,
(uint)ResourceCounters::SYSTEM),
(uint)sizeof(*this))
}
src/lib/resmgr/binary_block.cpp
21.3.4. Displaying the memory tracking console
The memory tracking console can be displayed in the client, WorldEditor, ModelEditor and ParticleEditor.
To display the console in the client, press Ctrl+CapsLock+F5, and to display it in the tools, press
Shift+Ctrl+F5.
The user can cycle through the realtime memory usage information by pressing Space. There are three levels
of granularity:
▪All memory — one pool.
▪System memory, video memory, and miscellaneous memory — three pools.

Scripts
136 Copyright 1999-2008 BigWorld Pty. Ltd. All rights reserved. Proprietary commercial in confidence.
▪System memory, managed memory, default memory, and miscellaneous memory — four pools
Note that video memory is a combination of managed and default memories. Also, miscellaneous memory is
a catchall for any memory that does not fall into the system, managed, or default pools (e.g., DirectX Scratch
memory).
21.4. Scripts
The implementation of a game using the BigWorld client can potentially involve many scripts. These scripts
will interact and have real-time requirements and dependencies, since they are part of a network game —
in some cases, the game cannot be simply stopped and stepped through without affecting the behaviour of
the client being debugged.
Scripting must therefore be approached in the same way as any other coding, and not as a poor alternative
to C++ coding. Scripts must be designed properly, and consideration must be given to the appropriate use
of class hierarchies and other language concepts.
21.4.1. Python Console
The Python console can be brought up at any time during the game.
This is a console that looks and acts exactly like a Python interpreter, so arbitrary Python can be entered into
it. All C++ modules can be accessed, so the environment is the same as that in which the scripts are executed.
Python errors and exceptions that are not caught by the script itself (before they reach the C++ call-in point)
are output to the console, and therefore are errors from commands entered into the Python console itself.
The console is the first place to access when an error occurs in a game.
The Python console supports multi-line commands the same way that the standard Python interpreter does,
and it also supports macros like a UNIX shell. Macro invocations begin with a dollar sign ($), and their
expansions are contained in a dictionary in the personality file ( see the fantasydemo personality script for
an example). It implements the BWPersonality.expandMacros() callback function.
The list below describes the line editing shortcuts supported by the Python console:
▪Backspace
Deletes the character to the left on insertion point. Same as Ctrl+H.
▪Delete
Deletes the character to the right of insertion point. Same as Ctrl+D.
▪End
Moves insertion point to the end of line. Same as Ctrl+E.
▪Home
Moves insertion point to the beginning of line. Same as Ctrl+A.
▪Ctrl+Backspace
Cuts to clipboard all text between insertion point and beginning of word. Same as Ctrl+W.
▪Ctrl+Delete
Cuts to clipboard all text between insertion point and end of word. Same as Ctrl+R.
▪Ctrl+Insert
Pastes the content of clipboard after insertion point. Same as Ctrl+Y.

Remote Python Console
137
▪Ctrl+Left arrow
Moves insertion point to the beginning of word.
▪Ctrl+Right arrow
Moves insertion point to the end of word.
▪Ctrl+A
Moves insertion point to the beginning of line. Same as Home.
▪Ctrl+D
Deletes the character to the right of insertion point. Same as Delete.
▪Ctrl+E
Moves insertion point to the end of line. Same as End.
▪Ctrl+H
Deletes the character to the left of insertion point. Same as Backspace.
▪Ctrl+K
Cuts to clipboard all text between insertion point and end of line.
▪Ctrl+R
Cuts to clipboard all text between insertion point and end of word. Same as Ctrl+Delete.
▪Ctrl+U
Cuts to clipboard all text between insertion point and beginning of line.
▪Ctrl+W
Cuts to clipboard all text between insertion point and beginning of word. Same as Ctrl+Backspace.
▪Ctrl+Y
Pastes the content of clipboard after insertion point. Same as Ctrl+Insert.
The console also offers the functionality of auto code completion. By pressing Tab, it automatically completes
the current word by trying to match it against the attributes defined for the referenced context. If a unique
match is found, then it is added after the insertion point. If more than one match exists, then pressing Tab
cycles through all of them.
21.4.2. Remote Python Console
The services provided by the Python console are also available remotely over the network.
The client accepts connections using the telnet protocol on TCP port 50001. A number of telnet options are
supported, such as the emulation of line editing.
21.4.3. Script reloading
All scripts can be reloaded by pressing Caps Lock+F11.
Existing entity class instances are updated so that they are instances of the new classes, without losing their
dictionary. Entity script classes can provide a reload method to refetch stored function references that have

Common errors
138 Copyright 1999-2008 BigWorld Pty. Ltd. All rights reserved. Proprietary commercial in confidence.
changed after reloading. For example, the reload function in the player script recalculates its key bindings,
which would otherwise continue to reference functions in the old version of the class.
When the server sends an update to a script, only that script is reloaded and only its instances are updated.
21.4.4. Common errors
Some common scripting errors are listed below:
▪Could not find class <entity>
There is a Python error in the file <res>/scripts/client/<entity>.py. Check the file python.log
in the current working folder.
▪App::init: BigWorldClientScript::init() failed
There is a mismatch between Python script and <res>/scripts/entity_defs/<entity>.def.
▪EntityType::init: EntityDescriptionMap::parse failed
An undefined data type was used in file <res>/scripts/entity_defs/<entity>.def file, or in
<res>/scripts/entity_defs/alias.xml.
For details on entity definition and Python script files, see the document Server Programming Guide's
sections Physical Entity Structure for Scripting → The definition file and Physical Entity Structure for
Scripting → The script files, respectively.
21.5. Script interactive debugging
You can run BigWorld Client as a Python extension module, instead of as an executable. This will allow you
to use third party interactive debuggers (such as Wing IDE and Komodo), or Python's built-in debug module
(pdb) to debug your game's scripts.
To run the client as Python extension module, follow these steps below:
1. Create the Python extension module by build the client using the PyModule_Hybrid configuration.
This configuration requires the environment variable PYTHONHOME to be set to the top-level folder of a
standard Python installation (e.g., C:\Python25).
Because the client will link against the stock standard dynamic Python libraries, you must disable the
dependency of your startup project (e.g., fantasydemo) to the pythoncore project. To do so, follow the
steps below:
▪On the Solution Explorer pane, right-click your startup project.
▪In the context menu, select the Project Dependencies menu item
▪In the Project Dependencies dialog box, check pythoncore on the Depends On list.
▪Click OK.
Note
Instead of a winMAIN entry point, when build as an extension module, the client will
require a Python module initialisation entry point.
For a sample implementation, see <mfroot>/fantasydemo/src/client/
winmain.cpp, or just copy the code inside the BWCLIENT_AS_PYTHON_MODULE
#if/#endif block into your winmain.cpp file).

Client Access Tool (CAT)
139
2. Run the client using the following start-up script:
# add client script directories
# to Python's script search path
import sys
sys.path[1:1] = [
r'd:\mf\fantasydemo\res\scripts\client',
r'd:\mf\fantasydemo\res\scripts\common']
# run the client. Replace fantasydemo with
# the name of your extension module (.pyd)
import fantasydemo
fantasydemo.run(' '.join(sys.argv))
Using the script above, you can start the client from the command prompt (for example, with the command
python.exe fantasydemo.py.) or from Visual Studio. Now, from anywhere in the scripts or from the
Python console, you can invoke the standard Python debugger:
import pdb
pdb.set_trace()
For more information on how to use the pdb module, please refer to the Python Manuals.
You can also use the start-up script to run the client using a third party interactive Python debugger/IDE. This
should allow you to set breakpoints and inspect variables. For more information on how to use an interactive
debugger, please refer to your package manuals.
Note
The client will be disconnected from the server if the execution of the main thread is
interrupted by more than a few seconds, as it usually happens when Python scripts are
debugged interactively.
Note
When running the client as an extension module, it is possible to quit the Python
interpreter before exiting the client (by, for example, invoking exit() from pdb prompt).
Because the client will still try to execute Python commands during its shutdown
process, this will cause the client to crash.
21.6. Client Access Tool (CAT)
CAT provides a graphical interface to change watcher values and run Python console commands on a remote
or local client. It does so via the Remote Python Console service provided by the client. For more details, see
“Remote Python Console” on page 137 .
21.6.1. Connecting to the client
In order to connect to the client, you have to provide the computer name and/or the IP address where it is
running.

CAT Scripts
140 Copyright 1999-2008 BigWorld Pty. Ltd. All rights reserved. Proprietary commercial in confidence.
Client Chooser dialog
If you provide both the computer name and the IP address, CAT first tries to connect using the computer
name, and if that fails, then it uses the IP address. Specify localhost as the computer name or 127.0.0.1 in the
IP address to connect to the local client.
CAT automatically reconnects to the last client when it is started.
21.6.2. CAT Scripts
CAT searches for scripts in folder <res>/../tools/cat/scripts, where <res> is one of the entries in
the resources folders list (for details on how BigWorld compiles this list, see the document Content Tools
Reference Guide's chapter Starting the Tools).
For example, if one of the entries in <res> is C:/mf/fantasydemo/res, then CAT will look for scripts
under the folder C:/mf/fantasydemo/tools/cat/scripts. It will then present a tree view of the
scripts, as illustrated in the picture below:

Creating scripts for CAT
141
Tree view of scripts
CAT scripts are specialised Python scripts. In the image above, the CAT script <res>/../tools/cat/
scripts/Render/Performance.py is selected. It defines the GUI controls to the right of the tree. When
you select a different CAT script from the tree, different controls will be presented to the right of the tree.
CAT scripts allow the viewing and manipulation of client watcher values as well as the execution of
commands in the client's Python console. See the examples provided in folder fantasydemo/tools/cat/
scripts for information on how to create your own scripts.
The list below describes the toolbar buttons and its functions:
▪Reconnect
Reconnects to the client, e.g., after you restart the client.
▪Disconnect
Disconnects from the client.
▪Auto update
Refreshes the data on the current tab once every 2 seconds.
▪Update
Refreshes the data on the current tab e.g., if watcher values are changed from the within client.
21.6.3. Creating scripts for CAT
CAT looks for scripts in folder <res>/../tools/cat/scripts, thus enabling two separate sets of CAT
scripts to exist:
▪BigWorld system scripts
▪Scripts defined by you that are specific for your game.
CAT scans this directory hierarchically, and generates a folder tree akin to Windows Explorer's one, using
the folder names as branches and script files as leaves.
The picture below illustrates how a folder structure will be displayed in CAT:
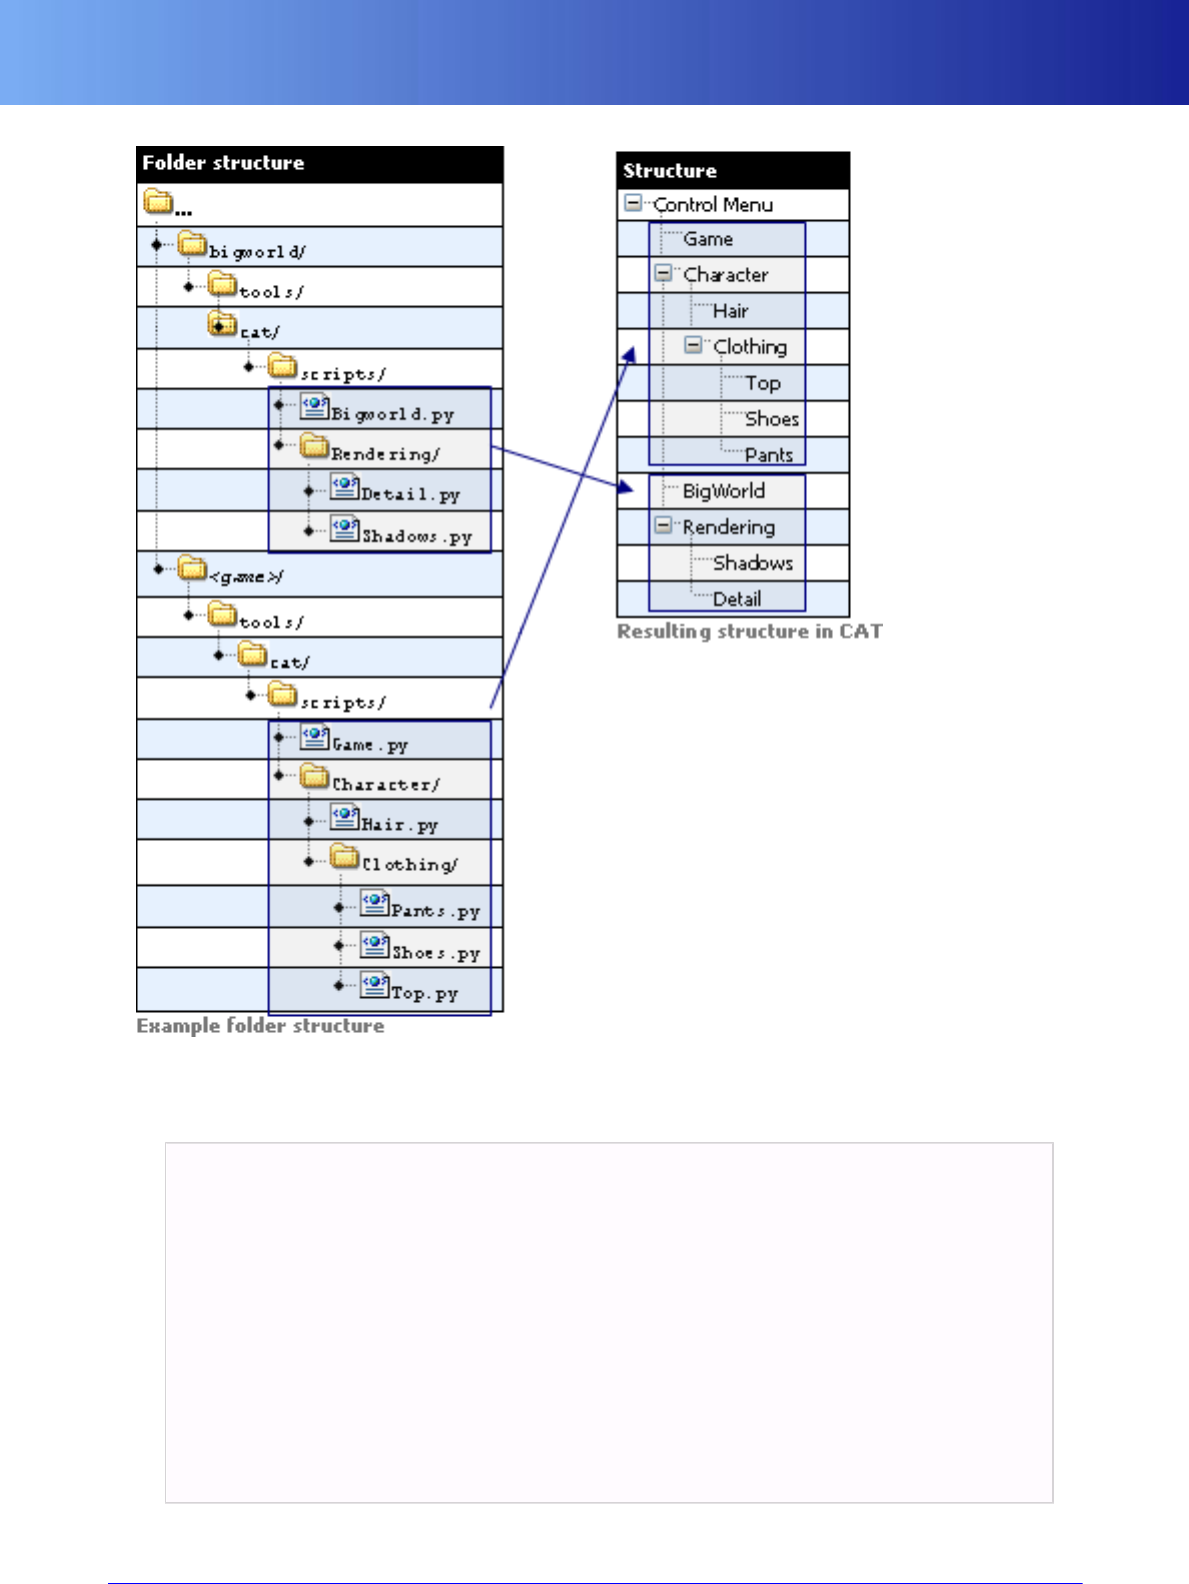
Creating scripts for CAT
142 Copyright 1999-2008 BigWorld Pty. Ltd. All rights reserved. Proprietary commercial in confidence.
Example folder structure vs. Resulting structure in CAT
The basic structure of the CAT script files is illustrated below:
from controls import *
envSetup = \
"""
…
"""
args = \
(
...
)
commands = \
(
...
)

Creating scripts for CAT
143
Skeleton of CAT script files
CAT script files are divided in three blocks, which are described below:
▪envSetup
Block where variables local to this CAT script are created and initialised.
▪args
Represent various controls for variables, which can be edited. They can either represent variables local to
the CAT page, or watchers that mirror values on the client.
▪commands
Executable commands that appear on the CAT page as buttons.
The following sections discuss the blocks args and commands.
21.6.3.1. Block args
There are several widget elements available in the args block of the CAT pages.
In order to add multiple elements, they should be placed in a list with comma delimiters. Any underscores
in names are ignored and replaced by spaces.
21.6.3.1.1. Basic Elements
The basic elements of args control the layout of CAT pages.
▪Divider()
This element causes CAT to display a horizontal divider between elements, allowing pages to be visually
divided.
▪FixedText( "<text>" )
This element displays any static text segments such as headings. Multiple lines of text can be specified by
using the newline character "\n".
21.6.3.1.2. Variables
It is possible to set up variables that are local to a specific CAT page.
These can also have an associated Python variable tied to them, to allow for updates from the client
application.
Below is a list of commands to create variables in CAT:
▪StaticText ( "<name>" [, default = "<value>"] [, updateCommand = "<python_update
_source>" ] )
This widget creates a non-editable field with the specified name and default value (if default is present).
If updateCommand is specified, then <python_update_source> will be used as the Python value from
the client that will be displayed.
For example:
StaticText( "Position",
updateCommand = """

Creating scripts for CAT
144 Copyright 1999-2008 BigWorld Pty. Ltd. All rights reserved. Proprietary commercial in confidence.
location = $B.findChunkFromPoint( $p.position ).split( '@' )
print "(%.1f,%.1f,%.1f) @ %s @ %s" %
( $p.position.x, $p.position.y, $p.position.z,
location[0], location[1] )
""" )
Creation of field
▪CheckBox( "<name>" [, updateCommand = "<python_update_source>" [, setCommand
= "<python_set_source>" ] ] )
This widget creates a check box called with the specified name.
If updateCommand is specified, then until the check box is edited, it will use <python_update_source> as
the Python code to get the value that will be displayed.
If setCommand is specified, then when the field is edited, <python_set_source> will be executed.
For example:
CheckBox( "Use Dash",
updateCommand = "$p.isDashing",
setCommand = "$p.switchToDash(Use_Dash)" )
Creation of check box
▪Int ( "<name>" [, default = <value> ] [, updateCommand =
"<python_update_source>" [, setCommand = "<python_set_source>" [, minMax =
(<min>,<max>) ] ] ] )
This widget creates an integer field with the specified name and default value (if default is present).
If setCommand is specified, then when the field is edited, <python_set_source> will be executed.
If updateCommand is specified, then <python_update_source> will be used as the Python value from the
client that will be displayed.
If minMax is specified, then the field will have the specified (inclusive) value range.
For example:
Int( "Health",
default = 100,
updateCommand = "$p.healthPercent",
setCommand = "$p.healthPercent = Health; $p.set_healthPercent()",
minMax = ( 0, 100 ) )
Creation of integer field
▪Float ( ( "<name>" [, default = <value> ] [, updateCommand =
"<python_update_source>" [, setCommand = "<python_set_source>" [, minMax =
(<min>,<max>) ] ] ] )
This widget creates a float field with the specified name and default value (if default is present).
If updateCommand is specified, then <python_update_source> will be used as the Python value from the
client that will be displayed.

Creating scripts for CAT
145
If setCommand is specified, then when the field is edited, <python_set_source> will be executed.
If minMax is specified, then the field will have the specified (inclusive) value range.
For example:
Float( "Speed Multiplier",
default = 1.0,
updateCommand = "$p.speedMultiplier",
setCommand = "$p.speedMultiplier = Speed_Multiplier",
minMax = ( 1.0, 10.0 ) )
Creation of float field
▪FloatSlider ( ( "<name>" [, updateCommand = "<python_update_source>" [,
setCommand = "<python_set_source>" [, minMax = (<min>,<max>) ] ] ] )
This widget creates a float slider with the specified name and default value (if default is present).
If updateCommand is specified, then <python_update_source> will be used as the Python value from the
client that will be displayed.
If setCommand is specified, then when the field is edited, <python_set_source> will be executed.
If minMax is specified, then the field will have the specified (inclusive) value range.
For example:
FloatSlider( "Camera_Distance",
updateCommand = "BigWorld.camera().pivotMaxDist",
setCommand = "BigWorld.camera().pivotMaxDist=Camera_Distance",
minMax = (0.01, 200.0) )
Creation of float slider
▪List ( "<name>", ("<option1>", "<option2>", ...), [, default = "<option9>" [,
updateCommand = "<python_update_source>" ] ] )
This widget creates a drop-down menu with the specified name, containing the entries specified in the list
passed as the second argument.
If default is specified, then the value entered must be present in the list passed as the second argument.
In a similar fashion to the Int and Float widgets, the drop-down menu can be given an associated Python
variable.
▪Enum ( "<name>", ( ("<option_1>",<value1>), ("<option_2>",<value2>), ...), [,
updateCommand = "<python_update_source>" [, setCommand = "<python_set_source>"
] ] )
This widget creates a drop-down menu with the specified name, containing the entries specified in the list
of 2-tuple passed as the second argument.
Each entry will be associated with the value specified on the second element of its tuple.
If updateCommand is specified, then <python_update_source> will be used as the Python value from the
client that will be displayed.

Creating scripts for CAT
146 Copyright 1999-2008 BigWorld Pty. Ltd. All rights reserved. Proprietary commercial in confidence.
If setCommand is specified, then when the field is edited, <python_set_source> will be executed.
For example:
Enum( "Mode",
( ("Walk",0), ("Run",1), ("Dash",2) ),
updateCommand = "2*$p.isDashing + $p.isRunning",
setCommand = """
if Mode==0: $p.switchToRun(1); $p.switchToDash(0)
if Mode==1: $p.switchToRun(0); $p.switchToDash(0)
if Mode==2: $p.switchToRun(1); $p.switchToDash(1)
""" )
Creation of drop-down menu with associated numeric values
▪Bool ( "<name>", [, updateCommand = "<python_update_source>" [, setCommand =
"<python_set_source>" ] ] )
This widget creates a drop-down menu with the specified name, with just one entry having two possible
values: true or false.
If updateCommand is specified, then <python_update_source> will be used as the Python value from the
client that will be displayed.
If setCommand is specified, then when the field is edited, <python_set_source> will be executed.
For example:
Bool( "Walking", updateCommand = "1-$p. isRunning ", setCommand = "$p.
switchToRun (Walking)" )
Creation of drop-down menu with true/false entry
21.6.3.1.3. Watchers
Watchers allow you to view the value of specific variables in a live system.
These values can be accessed from the Debug (Watchers) Console in the FantasyDemo (accessed by pressing
Caps Lock+F7). However, CAT gives you a much simpler way to manipulate them.
Whenever adding a CAT control, it is essential to ensure that there is a matching MF_WATCHER that
corresponds to the value in question. The best way to check that is by looking for the value in the watcher
console within the game.
The value is retrieved from and saved to the value that matches the value path MF_WATCHER.
Below is a list of commands that allow you to manipulate watchers:
▪WatcherCheckBox( "<name>", "<value_path>" )
Shows a check box with the specified name.
▪WatcherFloat( "<name>", "<value_path>" [, minMax = (<min>,<max>)] )
Shows a float field with the specified name. If minMax is specified, then the field will have the specified
(inclusive) value range.

Timing
147
▪WatcherFloatEnum ( "<name>", "<value_path>", ( ( "<option1>", <value1> ), (
"<option2>", <value2> ) ) )
Shows a dropdown menu with the specified name, containing the entries specified in the list of 2-tuple
passed as the third argument.
Each entry will be associated with the value specified on the second element of its tuple.
▪WatcherFloatSlider( "<name>", "<value_path>", minMax = (<min>,<max>) )
Shows a float slider with the specified name, and with the specified (inclusive) value range.
▪WatcherInt( "<name>", "<value_path>" [, minMax = (<min>,<max>)] )
Shows an integer field with the specified name. If minMax is specified, then the field will have the specified
(inclusive) value range.
▪WatcherIntSlider( "<name>", "<value_path>", minMax = (<min>,<max>) )
Shows a slider with the specified name, and with the specified (inclusive) value range.
▪WatcherText( "<name>", "<value_path>" )
Creates a field with the specified name.
21.6.3.2. Block commands
These are commands that appear as buttons in CAT, shown below the elements specified in the block args.
They execute a given Python script. Each command to be added takes the following format:
( "<description>", "<script>" ),
where <description> is the button's caption, and <script> is the Python script to be executed.
For example:
from controls import *
...
commands = \
(
( "Hide_GUI", "BigWorld.hideGui()" ),
( "Show_ GUI ", "BigWorld.showGui()" )
)Example implementation of block commands
Example implementation of block commands
21.7. Timing
The BigWorld libraries provide a number of timing tools for analysing game performance. One of the most
important of these is the DogWatch timer class.
When a DogWatch is created, it is registered in a global list. Whenever that timer is started, it is automatically
entered into a timing statistics hierarchy, based on what other timers are running when it is started. The same
timer can have multiple instances in the hierarchy if it is run more than once in different contexts.

Timing
148 Copyright 1999-2008 BigWorld Pty. Ltd. All rights reserved. Proprietary commercial in confidence.
The root timer is called Frame, and is always running for the entire frame time at every frame. All other timer
instances are children of this timer's instance. Care is taken at the frame boundary to ensure that no time
goes unaccounted for. Timers can even be running across the frame boundary. If this is the case, then they
are momentarily stopped, and then restarted in the next frame's time slice.
A view of the DogWatch timer hierarchy is displayed in a debug console, which shows the average of
the DogWatch times over the last second. The user can navigate and drill down in the hierarchy, which is
displayed using indentation on a single console page. Any of the timer instances can also be graphed, and
there can be as many graphs displayed simultaneously as desired. By default, the client keeps 120 frames
of DogWatch timer history.

149
Chapter 22. Releasing The Game
This chapter lists the steps necessary to prepare the game for its release.
The following sections detail each of these steps.
22.1. Compile the game executable
To compile the final release of your game's executable, make sure of the following:
1. In the VisualStudio's Configuration Manager dialog box (accessed by the Build�Configuration Manager
menu item):
▪The Active Solution Configuration drop-down list must be set to Release.
▪In the Project Contexts table, the Configuration row for all projects must be set to Release.
2. In the VisualStudio's <project> Property Pages dialog box (accessed by the Project�Properties menu
item while the desired project is selected):
▪The Configuration drop-down list box must be set to Release.
▪The Configuration Properties → C/C++ → Preprocessor entry, Preprocessor Definitions field must
contain NDEBUG, _RELEASE, CODE_INLINE and _WINDOWS, WIN32.
3. In lib/cstdmf/config.hpp:
▪The CONSUMER_CLIENT_BUILD pre-processor flag must be set to 1.
This ensures that debug keys, watchers, and other features not meant to be released will not be compiled
into the final game executable.
22.2. Prepare the assets
To prepare the assets for release, use the bin_convert.py tool, found under bigworld/ tools/misc/res_packer
folder.
22.2.1. Run bin_convert.py
bin_convert is a command-line tool implemented in Python that prepares assets in batch. Its usage is
described below:
bin_convert [--res|-r search_paths] [source_path [dest_path [base_path]]]
The options for invoking bin_convert.py are described below:
▪search_paths
Search paths of the original source assets, as specified in <res> (the resources folders list) — for details
on how BigWorld compiles this list, see the document Content Tools Reference Guide's chapter Starting
the Tools.
This value overrides the local paths.xml, if there is one.
▪source_path

Run res_packer
150 Copyright 1999-2008 BigWorld Pty. Ltd. All rights reserved. Proprietary commercial in confidence.
Path of the original source assets.
▪dest_path
Path of the final game, i.e., the destination of processed assets.
This tool can be customised in different ways, so it can skip certain files, skip entire folder, have special
handlers for asset types (overriding res_packer).
For more information on customising bin_convert.py, please refer to its source code.
If the desired processing cannot be achieved in Python, then you can modify the source of res_packer
using any of the included packer classes as example.
The list below shows some example of usage of bin_convert.py:
▪python bin_convert.py /mf/fantasydemo/res /mf/fantasydemo/packed
Converts all FantasyDemo assets in res to packed folder.
▪python bin_convert.py --res /mf/fantasydemo/res;/mf/bigworld/res /mf/
fantasydemo/res /mf/fantasydemo/packed
Converts all FantasyDemo assets in res to packed folder, specifying the search paths in the command line.
▪python bin_convert.py /mf/fantasydemo/res/characters /mf/fantasydemo/packed/
characters /mf/fantasydemo/packed
Converts all FantasyDemo assets in the res/characters folder to the packed/characters folder.
Note that base_path (in this case c:/mf/ fantasydemo/packed) must be specified to ensure that
res_packer works properly.
22.2.2. Run res_packer
res_packer is a command-line tool that is capable of processing assets depending on their type, pre-
processing assets to make them load faster and stripping information that is not needed when running the
game. Usually, it is called from bin_convert and is not used directly by the developer. Its usage is as
follows:
Batch list mode:
res_packer [--res|-r search_paths] -list|-l asset_list_file -in|-i src_path
-out|-o dest_path [-err|-e error_log_file]
Compatible mode:
res_packer [--res|-r search_paths] source_file [dest_file [base_path] ]
The options for invoking res_packer are described below:
Batch list mode:
▪search_paths

Run res_packer
151
Search paths of the original source assets, as specified in <res> (the resources folders list) — for details
on how BigWorld compiles this list, see the document Content Tools Reference Guide's chapter Starting
the Tools.
This value overrides local paths.xml, if there is one.
Note
For some asset types, search paths have to be specified, either in the command line,
in the game's paths.xml, or in the BW_RES_PATH environment variable.
These paths should be the source search paths used by the game, so that
res_packer can find other source files that might be needed in the processing.
For instance, to process a model file, other assets such as the visual, textures, and
animations must be also read.
▪asset_list_file
A text file that contains a list of all the assets to process. This expected the dissolved paths with one per line.
▪src_path
The root path of the input files.
▪dest_path
The root path of the output files.
▪error_log_file
An optional error output log. Any files that fail to process will be added to this log.
Compatible mode:
▪source_file
Source file (with path) to process.
▪dest_file
Destination file (with path) of the processed assets.
In some cases, source_file might not be copied at all (.bmp files are not copied), or the processed file
could be of a different type than the original source file (.bmp files are converted to .dds files).
If this argument is missing, then source_file will not be processed, and a message will be sent to the
standard output (useful for examining XML files, for instance).
▪base_path
Base path of the final game — usually corresponds to dest_file's path.
This argument is used when packing file types that require special processing, such as images, models,
and chunk files.
If this argument is missing, then the dest_file's path is used.
To modify res_packer's default behaviour for an asset type, or to add new asset types for processing,
modify the source code using any of the included packer classes as example.

Processing done in bin_convert and res_packer
152 Copyright 1999-2008 BigWorld Pty. Ltd. All rights reserved. Proprietary commercial in confidence.
Note
When processing Python files, res_packer does not compile the .py files into
.pyc when called directly without bin_convert. Compiling of .py files is done
directly inside bin_convert. Furthermore, if old .pyc files exist in the source folder,
res_packer copies them to the destination folder without recompiling when run
directly without bin_convert.
22.2.3. Processing done in bin_convert and res_packer
The default processing done by these tools is as follows:
▪bin_convert
▪Skips the scripts/editor, scripts/cell and scripts/base folders.
▪Skips the animations, .bwthumbs and CVS folders.
▪Skips the thumbnail files (i.e., files with .thumbnail.* extension).
▪For .py files
Generates .pyc compiled Python files and skips the source .py, using a custom handler.
▪res_packer:
▪For .bmp, .tga, .jpg, .png, .texformat and .dds files:
Generates DDS for source image files that do not have one, and copies DDS files that do not have a
corresponding source image file. The .texformat files are skipped after processing.
▪For .model and .anca files:
Loads models to generate .anca files. The .animation files are skipped after processing, and the .model
files are packed.
▪For .cdata files:
Strips thumbnail.dds and navgen sections.
▪For .chunk files:
Strips entities that are not client-only, then packs the file.
▪For .fx, .fxh and .fxo files:
By default it ignores .fx and .fxh files, and only copies .fxo files, but it can also be configured (by
recompiling) to copy the source .fx and .fxh files, and skip the .fxo ones, so the shaders are compiled
when the user launches the application or changes the settings.
▪For .font files:
Generates font DDS textures and packs the .font file.
▪For all other file types:
Text XML files — i.e., files beginning with the < (left angle bracket) character, regardless of extension —
will be packed, while others will just be copied.

Files and folders that do not need to be shipped to the
end user
153
22.2.4. Files and folders that do not need to be shipped to the end user
Both bin_convert and res_packer try their best to slim down the game's assets that will be shipped to the
end user, but because each game has different architecture and requirements, some final tuning might be
needed for your game. Following is a list of files and folders to help identify what should not be shipped
to the end user:
▪Files *.bmp, *.tga, *.jpg, *.png, *.texformat: The final dds files are generated and packed by
res_packer, so the source images are not needed.
▪Files *.thumbnail.*: These files are not packed, as these are generated and used in the tools' Asset
Browser only.
▪Files *.animation: Packed .anca files are generated from the source .animation files by
res_packer.
▪Files *.py: Compiled .pyc files are generated by bin_convert, so Python source is not needed.
▪Folders to skip: animations, .bwthumbs, scripts/editor, scripts/cell, scripts/base,
bigworld/res/server, bigworld/res/helpers.
22.2.5. Font Licensing issues with bin_convert and res_packer
By default, res_packer will pack the font DDS files into your game’s destination folder, and font authors
usually require buying a license in order to allow their font(s) to be used. Please make sure you own license(s)
to the font(s) you use in your game.
22.3. Zip assets and specify paths
To pack assets to zip files, simply create one or more zip files containing the game's assets. To create a set of
Zip files that can be used by the BigWorld client application:
1. Zip files bigger than 2GB are not supported. More than one Zip file might be required.
The maximum Zip file size supported is 2GB.
2. Before creating the Zip files, the assets should be prepared via bin_convert.py.
This tool is located under bigworld/tools/misc/res_packer folder.
3. Zip file access is done through zlib, and the supported Zip compression methods are DEFLATE and
STORE.
Zip files created with WinRAR, WinZip and 7-Zip have been successfully tested.
4. Create Zip files for the base BigWorld resources.
Navigate to the folder containing BigWorld's packed assets, and create the Zip files for its files and sub-
folders.
5. Create Zip files for the actual game assets.
Navigate to the game assets folder, and create the Zip files for its files and sub-folders.
6. Specify Zip files as paths in the paths.xml file, in order of precedence.
The paths.xml file's Path tag can be set either to a path, or to a Zip file. Usually, game asset folders/zip files
are listed before BigWorld resources folders/zip files.

Zip assets and specify paths
154 Copyright 1999-2008 BigWorld Pty. Ltd. All rights reserved. Proprietary commercial in confidence.
Additionally, you might want to add a non-zip folder used, to cache data generated at runtime, such as
compiled shader .fxo files (the default behaviour of res_packer is to skip the .fxo files, so shaders are
compiled on the user's machine at runtime).
Assuming the following:
▪Common BigWorld resources compressed to bwres001.zip.
▪Final game assets compressed to res001.zip and res002.zip.
▪Game is installed in C:\MyBigWorldGame, and contains a cache sub-folder named mycache, for
caching compiled shaders.
Your paths.xml file should look similar to this:
<root>
<Paths>
<Path> /MyBigWorldGame/res001.zip </Path>
<Path> /MyBigWorldGame/res002.zip </Path>
<Path> /MyBigWorldGame/bwres001.zip </Path>
<Path> /MyBigWorldGame/mycache </Path>
</Paths>
</root>
You can also combine Zip file paths with normal file system paths as well, so that you can have additional
assets in unzipped folder.
If your unzipped folder is called myunzipped, then paths.xml will look like this:
<root>
<Paths>
<Path> /MyBigWorldGame/res001.zip </Path>
<Path> /MyBigWorldGame/res002.zip </Path>
<Path> /MyBigWorldGame/bwres001.zip </Path>
<Path> /MyBigWorldGame/myunzipped </Path>
<Path> /MyBigWorldGame/mycache </Path>
</Paths>
</root>

155
Chapter 23. Simplified Server Usage
For anyone not familiar with both Windows and Linux, running a BigWorld server on a Linux box to test
game scripts and/or assets can be intimidating and error prone. Additionally, since designers and artists
typically do most of their work on Windows, the process of synchronising files between the Windows and
Linux machines can be tedious.
The solution presented here aims to simplify this task by having all assets and game scripts reside on the
Windows machine, with a Linux box (which can be shared among multiple users) hosting and running the
BigWorld server binaries.
Basically, the solution proposes the following:
1. User exports the root BigWorld directory (i.e., the directory containing bigworld, fantasydemo, and
src folders) as a Windows share.
2. Linux box mounts the relevant <res> directories inside the bigworld folder on the Linux filesystem.
This makes game development easy for a Windows-based developer/artist, since all editable files reside on
the machine they are working on.
Note
The solution intentionally keeps the server binaries on the Linux box.
Running server executables pulled from SAMBA-mounted filesystems causes
unexpected problems, and is not recommended.
Running server binaries from NFS-mounted filesystems, however, works correctly.
23.1. Setting up the windows share
To share the mf directory on the Windows machine, follow the steps below:
1. Select the mf directory and right-click it.
2. In the context menu, select the Sharing and Security... menu item.
3. On the mf Properties dialog box, select the Share This Folder option button.
4. In the Share Name field, type the name to share the folder by (in our example, mf-win).
5. Click the Permissions button.
6. In the Permission For mf dialog box's Group or User Names list box, select the Everyone item.
7. In the Permissions For Everyone list box's Full Control entry, select the Allow check box.
23.2. Mounting the Windows share on Linux
To assist the process of mounting the Windows share, BigWorld provides the script bigworld/tools/
server/install/setup_win_dev.py.
Please note, however, that it was designed for developers working at BigWorld, and hence it uses default
values appropriate for BigWorld as well. Before artists and game programmers use it, a sysadmin or
programmer should edit this file to change the defaults to values appropriate for your development
environment.
This script works on the following assumptions:

Caveats
156 Copyright 1999-2008 BigWorld Pty. Ltd. All rights reserved. Proprietary commercial in confidence.
▪You are using CVS ‐ if you wish to use this script in a Subversion-based environment, then a search-and-
replace should be done.
▪The server binaries are stored in the CVS repository.
▪Your username on the Windows box is the same as your username on the Linux box.
▪You are using Fedora Core 5 or later (this script has not been tested on Debian).
The script displays a list of prerequisites upon startup, which are reproduced here for convenience:
▪You have been entered in the sudoers file (for details, issue the man sudoers command) on the Linux box.
▪You know the appropriate $CVSROOT for your environment.
▪You know where your home directory will be on the Linux box.
▪You have shared the root BigWorld directory on your Windows box.
Once these requirements have been met and/or the necessary modifications have been made for your
environment, running setup_win_dev.py will perform the following actions:
▪Create your home directory on the Linux machine if it does not already exist.
▪Mount your Windows share using Samba and patch /etc/fstab (so it can be easily mounted in the
future).
▪Detect the <res> folder in your Windows share and ask you which ones should be symlinked into the
Linux BigWorld folder.
▪Request the order in which the <res> folder should appear in your $BW_RES_PATH.
▪Set up your ~/.bwmachined.conf file.
▪Fetch the server binaries from CVS.
Once the actions above have been performed, you can use WebConsole from your Windows box to:
▪Start and stop a server.
▪View server output.
▪Connect to the Python Console of a running server process.
▪Perform other administrative functions.
23.3. Caveats
At present, setup_win_dev.py does not insert your Windows password into the /etc/fstab entry. This
is because the file is world-readable by default, which would expose the passwords.
The downside to this approach is that the Linux box will not be able to automatically remount any Windows
shares at boot time ‐ the shares have to be manually mounted via the shell, and each user's password must
be entered. If the Linux box is rebooted often, then this can be time consuming.
If you consider your internal security robust enough to have your Windows passwords in /etc/fstab,
then you can add the passwords in the options section of the relevant mounts in /etc/fstab.
