Alcatel GO FLIP User Guide (Virgin Mobile) Virgin Ug En
virgin_alcatel_go_flip_ug_en_021317_ GO FLIP™ User Manual for Virgin Mobile – Alcatel
User Manual: Pdf Go Flip (Virgin Mobile) - User Guide User Guide for Alcatel Mobile Phone, Free Instruction Manual - 5
Open the PDF directly: View PDF ![]() .
.
Page Count: 123 [warning: Documents this large are best viewed by clicking the View PDF Link!]
- Title
- Contents
- Getting Started
- Making Connections
- Apps and Entertainment
- Settings
- Getting Help
- Index

Available applications and services are subject to change at any time.
USER GUIDE
A downloadable, printable guide to your Alcatel GO FLIP and
its features.

i
TABLE OF CONTENTS
GETTING STARTED 1
Introduction 2
AbouttheUserGuide 2
Set Up Your Phone 3
PartsandFunctions 3
BatteryUse 4
InserttheBattery 4
RemovetheBattery 5
ChargetheBattery 6
SIMCard 8
SDCard 9
InsertanSDCard 10
RemoveanSDCard 10
TurnYourPhoneOnandOff 12
ActivationandService 13
CompletetheSetupScreens 13
Basic Operations 15
Basics 15
HomeScreenandApplications(Apps)List 15
PhoneSettingsMenu 15
CaptureScreenshots 16
Applications 16
LaunchApplications 16
AppsList 17
PhoneNumber 18
AirplaneMode 18
EnterText 19
LockandUnlockYourScreen 20
UpdateYourPhone 20
UpdateYourPhoneSoftware 20
UpdateYourProfile 21
UpdateYourPRL 22
Your Phone's Home Screen 23

ii
HomeScreenBasics 23
StatusBar 23
ChangetheHomeScreenWallpaper 24
MAKING CONNECTIONS 26
Phone Calls and Voicemail 27
PlaceandAnswerCalls 27
CallUsingthePhoneDialer 27
CallEmergencyNumbers 29
AnswerPhoneCalls 29
In-CallScreenLayoutandOperations 30
PlaceaCallfromContacts 31
CallfromCallLog 32
Voicemail 33
VoicemailSetup 33
OptionalCallingServices 34
CallWaiting 34
ConferenceCalling 34
CallForwarding 35
CallSettings 36
Contacts 38
AddaContact 38
ViewContacts 40
ContactsScreenLayout 41
EditaContact 42
DeleteaContact 42
ShareaContact 43
ImportContacts 44
BackUpContacts 45
Messaging 46
TextandMultimediaMessaging 46
SendaTextMessage 46
SendaMultimediaMessage(MMS) 47
SaveandResumeaDraftMessage 48
NewMessagesNotification 48
ManageMessageConversations 48
TextandMMSOptions 49

iii
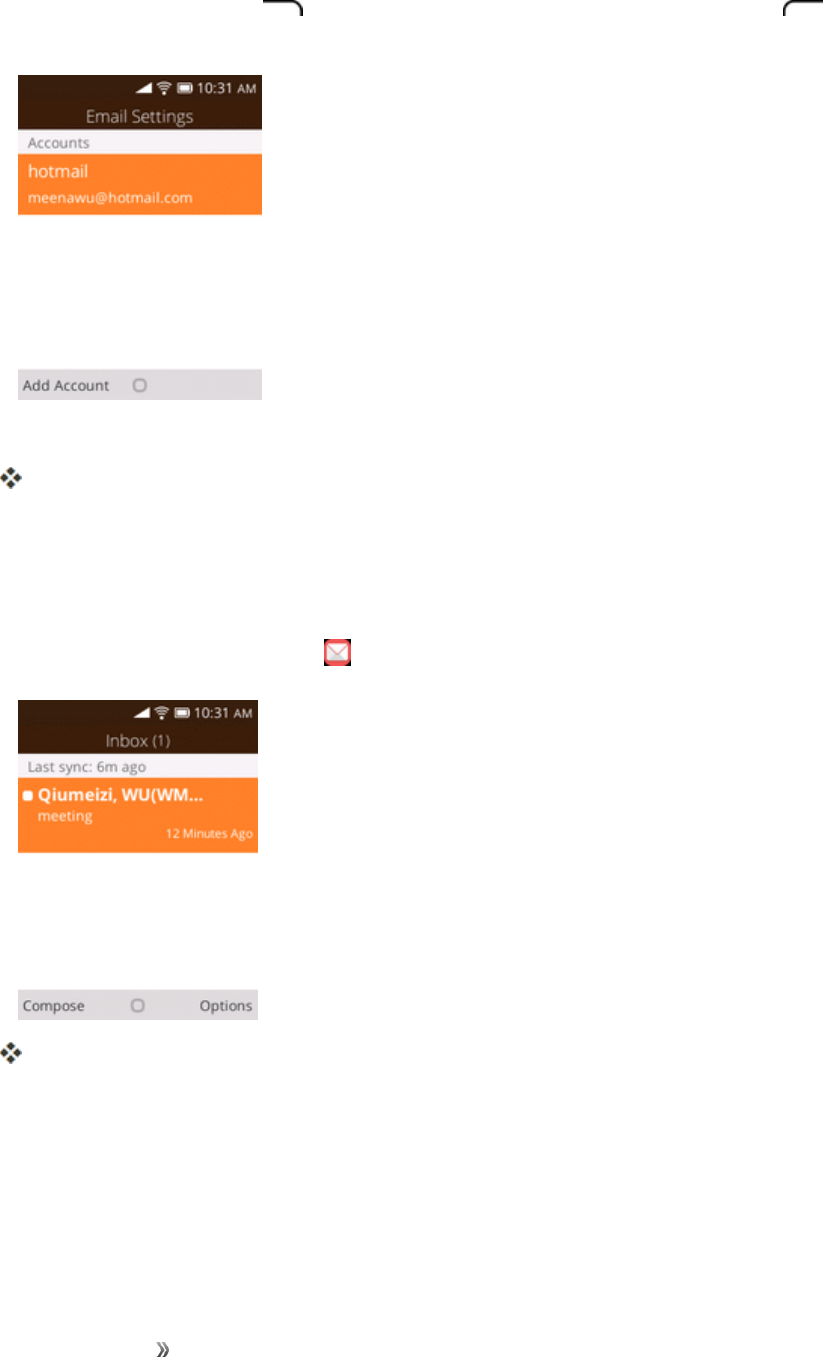
E-mail 50
SetUpanE-mailAccount 50
AddAnotherE-mailAccount 50
CreateandSendE-mail 51
OpenE-mailMessages 52
DeleteanE-mailAccount 54
ManageYourEmailInbox 54
Internet 56
DataConnectionStatusandIndicators 56
Browser 56
UsetheBrowser 56
BrowserOptions 57
Connectivity 59
Wi-Fi 59
TurnWi-FiOnandConnecttoaWirelessNetwork 59
Wi-FiSettings 60
DisconnectWi-Fi 61
Bluetooth 61
BluetoothInformation 62
EnabletheBluetoothFeature 62
PairBluetoothDevices 63
ConnecttoaPairedBluetoothDevice 64
SendInformationUsingBluetooth 65
ReceiveInformationviaBluetooth 66
APPS AND ENTERTAINMENT 67
Camera and Video 68
CameraOverview 68
TakePicturesandRecordVideos 69
TakeaPicture 69
RecordVideos 70
ViewPicturesandVideosUsingGallery 71
EditPictures 72
SharePicturesandVideos 74
SendPicturesorVideosbyEmail,MessagesorBluetooth 74
CameraSettings 76
SwitchBetweenCameraandVideoMode 76

iv
SetCameraFunctions 76
Productivity 78
Calendar 78
AddanEventtotheCalendar 78
ViewCalendarEvents 79
SyncCalendars 80
Calculator 81
Clock 81
SetAlarms 82
AdditionalClockFeatures 83
Entertainment and Activities 85
PlayMusic 85
MusicScreenLayout 86
SETTINGS 87
Connections Settings 88
BasicSettings 88
Wi-FiSettingsMenu 89
BluetoothSettings 91
CellularandData 92
Personalization Settings 94
SoundSettings 94
DisplaySettings 95
SearchSettings 95
NoticesSettings 96
DateandTimeSettings 97
LanguageSettings 98
InputMethodsSettings 99
Privacy and Security Settings 101
ScreenLockSettings 101
AppPermissionSettings 101
DoNotTrackSettings 102
BrowsingPrivacySettings 103
Storage Settings 104
USBStorageSettings 104
MediaStorageSettings 104
Device Settings 106

v
DeviceInformationSettings 106
DownloadsSettings 107
BatterySettings 108
AccessibilitySettings 108
SystemUpdatesSettings 109
GETTING HELP 111
For Assistance 112
Troubleshooting 112
Specifications 112
VirginAccountInformationandHelp 113
ManageYourAccount 113
Re-Virgin 114
CopyrightInformation 114
INDEX 115

Getting Started 1
GETTING STARTED
Thetopicsinthissectionwillintroduceyoutoyourphone,helpyougetsetupwithservice,provide
anoverviewofthephonescreen,andgetyoustartedwithbasicphoneoperations.

Getting Started Introduction 2
INTRODUCTION
Thefollowingtopicsdescribethebasicsofusingthisguideandyournewphone.
ABOUT THE USER GUIDE
ThankyouforpurchasingyournewAlcatelGOFLIP.Thefollowingtopicsexplainhowbesttouse
thisguidetogetthemostoutofyourphone.
Before Using Your Phone
ReadtheGetStartedguideandImportantInformationbookletthatwerepackagedwithyourphone
thoroughlyforproperusage.
Accessibleservicesmaybelimitedbysubscriptioncontractconditions.
Descriptions in the User Guide
Notethatmostdescriptionsinthisguidearebasedonyourphone'ssetupatthetimeofpurchase.
Unlessotherwisenoted,instructionsbeginfromthephone'shomescreen,whichisdisplayedby
pressingtheEnd/power key .Someoperationdescriptionsmaybesimplified.
Screenshots and Key Labels
Screenshotsandotherillustrationsinthisuserguidemayappeardifferentlyonyourphone.Key
labelsintheuserguidearesimplifiedfordescriptionpurposesanddifferfromyourphone'sdisplay.
Other Notations
Intheuserguide,thephonemaybereferredtoeitheras"phone,""device,"or"handset."A
microSD™ormicroSDHC™cardisreferredtoasan"SDcard"ora"memorycard."
Getting Started Set Up Your Phone 3
SET UP YOUR PHONE
Thefollowingtopicsgiveyoualltheinformationyouneedtosetupyourphoneandwirelessservicethe
firsttime.
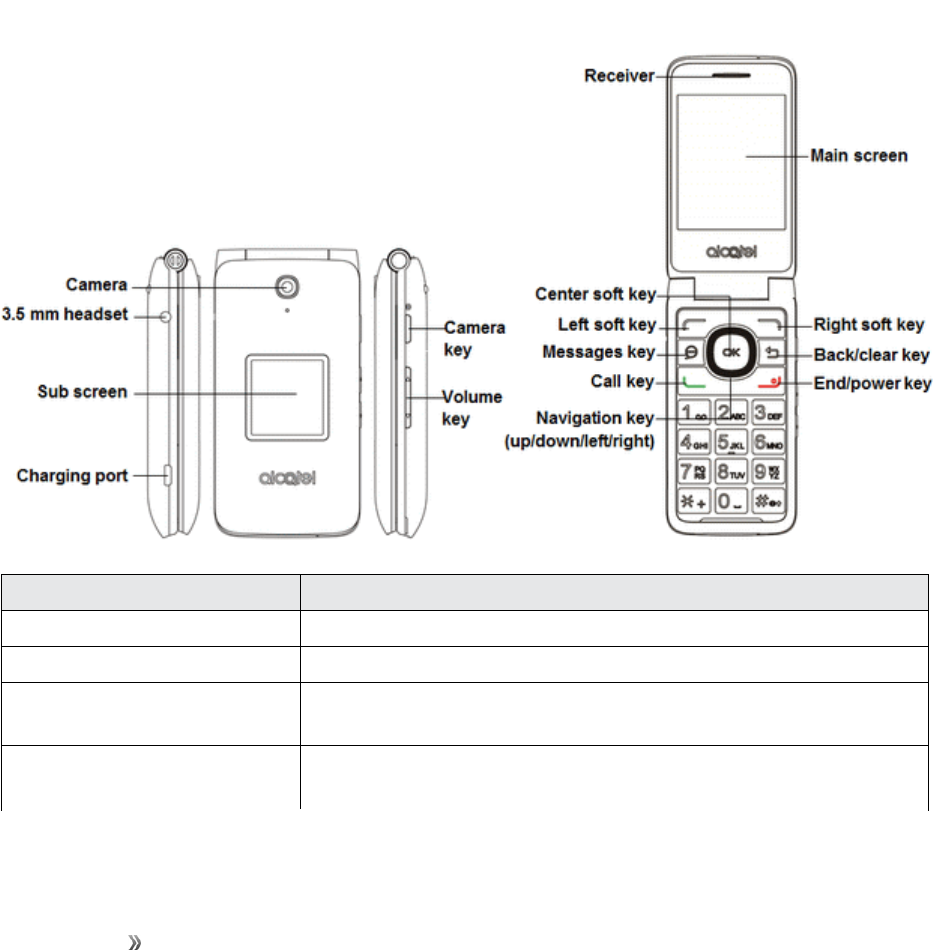
PARTS AND FUNCTIONS
Thesetopicsillustrateyourphone’sprimarypartsandkeyfunctions.
Note:Yourphone'sscreensandappslayoutsaresubjecttochange.Thisuserguideusessample
imagesonly.
Phone Layout
Thefollowingillustrationoutlinesyourphone’sprimaryexternalfeaturesandkeys.
Part Description
Camera Takespicturesandrecordsvideos.
Receiver Letsyouhearthecallerandautomatedprompts.
Main screen Displaysalltheinformationneededtooperateyourphone,such
asthecallstatus,theContactslist,andthedateandtime.
Sub screen Displaythedate,timeandthenotificationofincomingcallsor
messages.

Getting Started Set Up Your Phone 4
Part Description
Center soft keySelectsorconfirmsanoption(pressthemiddleofthekey).
Navigation keyNavigateUp,Down,Left,orRightthroughmenus.
Messages keyLaunchesthemessagesscreenfromanyscreen.
Call key Launchescalllogfromidlescreen.
Back/clear keyReturnsyoutothepreviousscreen,orcloseadialogbox,options
menu.
End/power key Returnsyoutotheapplistorturnthephoneonoroff.
Charging port Allowsyoutoconnectthephonecharger.
Volume keys Allowsyoutoadjusttheringtoneormediavolumeoradjustthe
voicevolumeduringacall.
3.5 mm headset jack Allowsyoutoplugineitherastereoheadsetoranoptional
headsetforconvenient,hands-freeconversations.
CAUTION!Insertinganaccessoryintotheincorrectjackmaydamagethephone.
BATTERY USE
Thefollowingtopicsexplainhowtoinsertandremoveyourphone’sbattery.
Battery Cautions
Storage:Avoidstoringorleavingbatterywithnochargeremaining.Savedinformationand
settingsmaybecomelostorchanged,orbatterymaybecomeunusable.Chargeonceeverysix
monthsbeforestoringorleavingunusedforalongperiod.
Bulges:Dependingonuse,bulgesmayappearnearendofbatterylife.Thisdoesnotaffect
safety.
Replacing Battery:Thebatteryisaconsumableitem.Itneedstobereplacedifoperatingtime
shortensnoticeably.Purchaseanewbattery.
Cleaning:Cleansoiledterminalsbetweenbatteryandphonewithaclean,drycottonswab.
Soiledterminalscanresultinapoorconnectionandpreventcharging,etc.
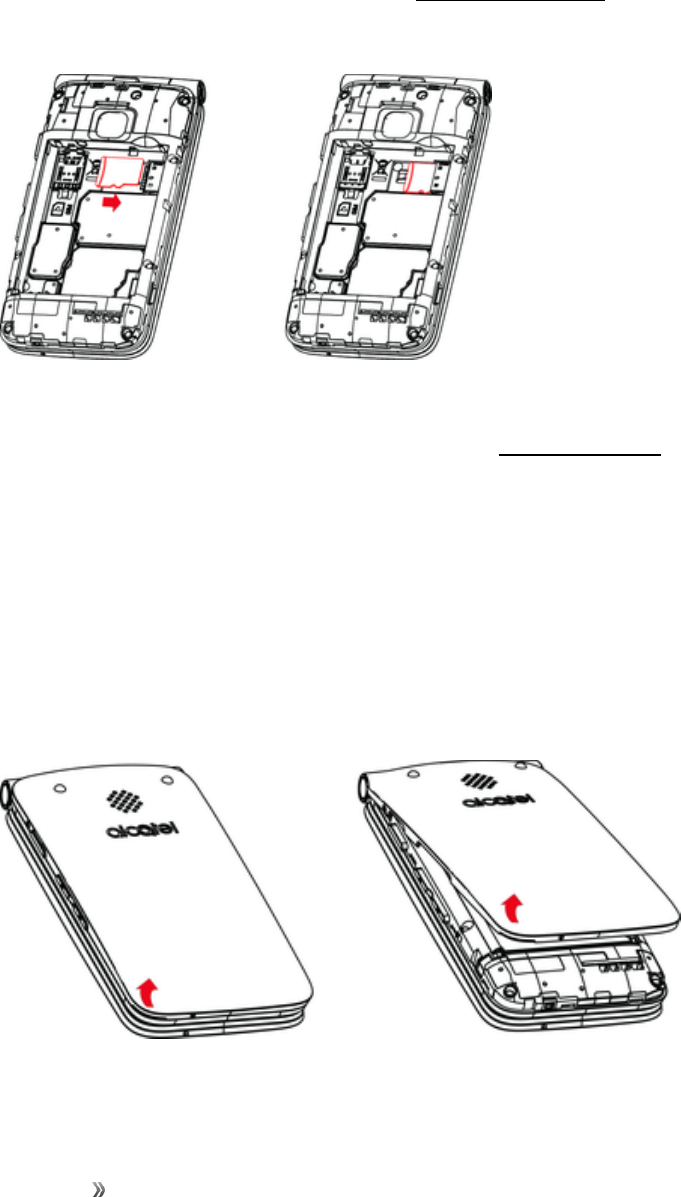
Insert the Battery
Followtheseinstructionstoinsertyourphone’sbatterysafelyandproperly.
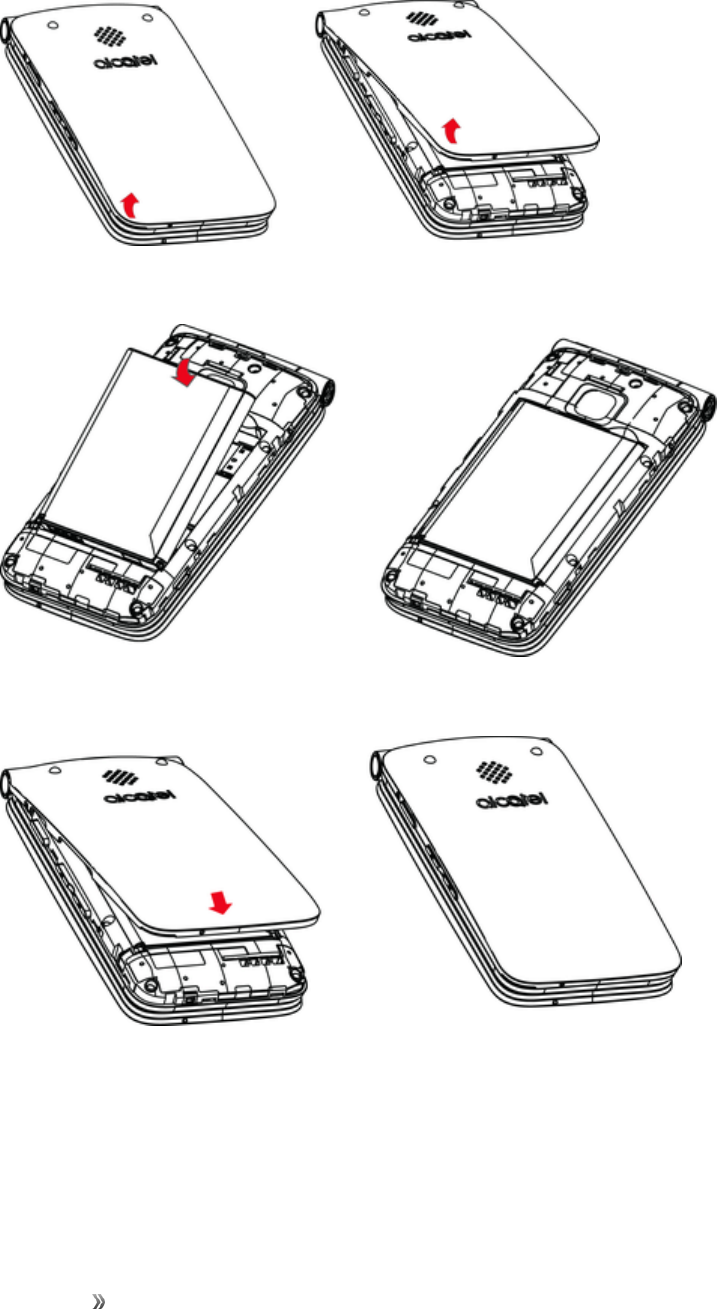
Getting Started Set Up Your Phone 5
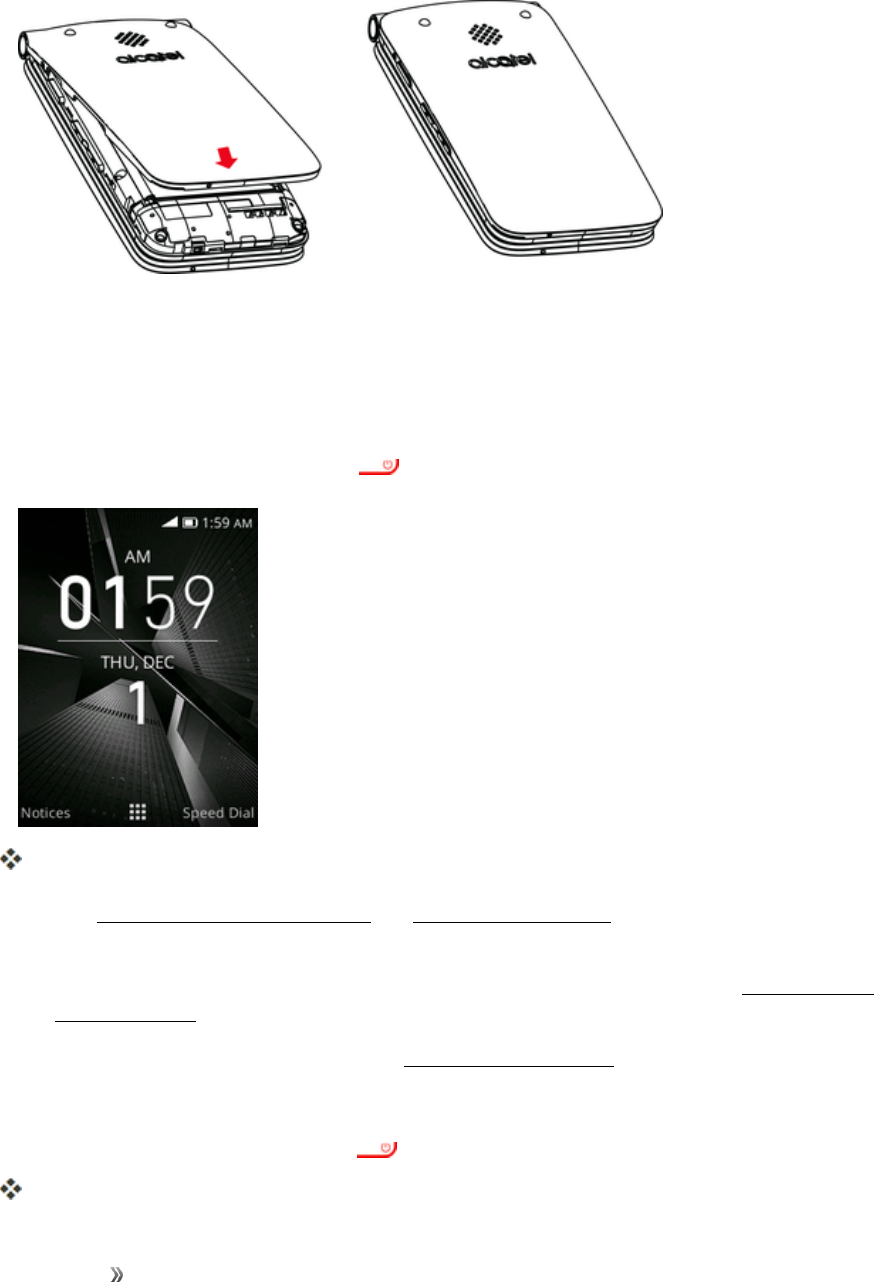
1. Removethebatterycoverbygentlyliftinginthedirectionshownbelow.
2. Insertthebatterybygentlyliftingupwardasshownbelow.
3. Attachthebatterycover.
lMakesureallthetabsaresecureandtherearenogapsaroundthecover.
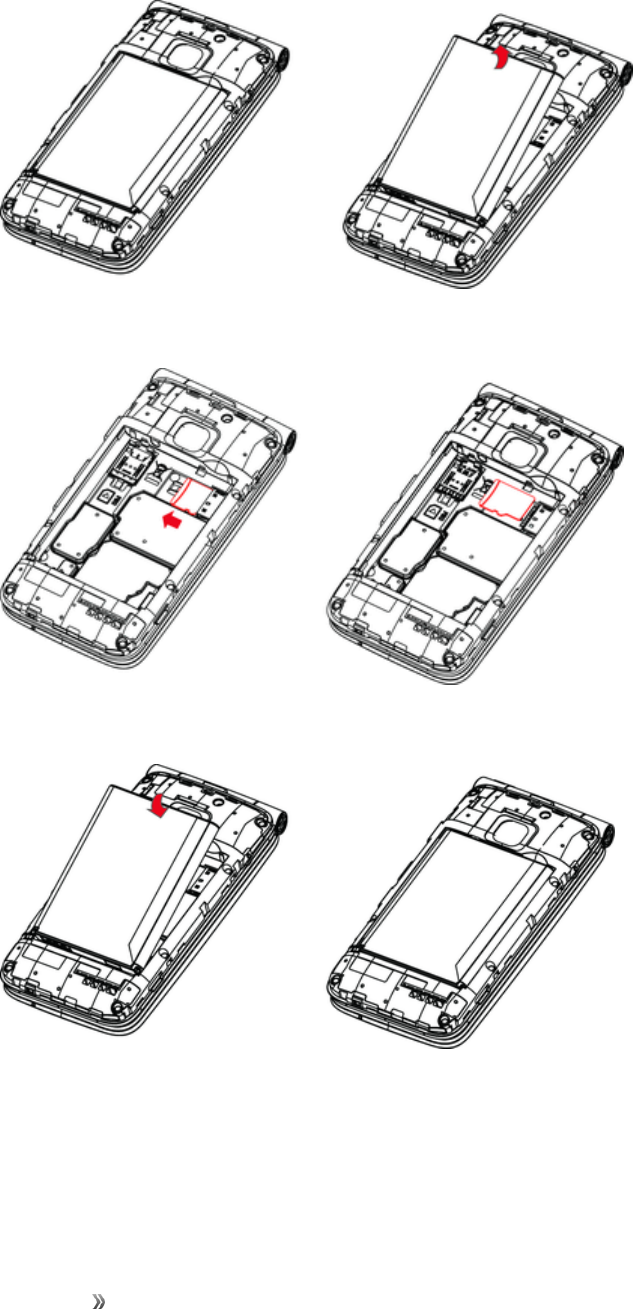
Remove the Battery
Followtheseinstructionstoremoveyourphone’sbattery.Alwayspowerthephoneoffbefore
removingthebattery.
Getting Started Set Up Your Phone 6
1. Removethebatterycoverbygentlyliftinginthedirectionshownbelow.
2. Removethebatterybygentlyliftingupwardasshown.
Charge the Battery
Followtheseinstructionstochargeyourphone’sbatteryusingeithertheincludedACadapterorvia
aUSBconnectiononyourcomputer.

Getting Started Set Up Your Phone 7
Charge Using the AC Adapter
1. Plugthechargerintothechargingportofyourphone.
2. PlugtheACadapterintoanelectricaloutlet.
3. Aftercharging,unplugtheACadapterfromtheoutletandremovethechargerfromthephone.
Charge Using a PC Connection
BeforeusingaPCconnectiontochargeyourphone,ensurethatthecomputeristurnedon.
Dependingonthetypeofconnection,yourphone’sbatterymaynotcharge.

Getting Started Set Up Your Phone 8
1. InsertthesmallendoftheUSBcordintothechargingportofyourphone.
2. InsertthelargeendoftheUSBcordintoanexternalUSBportonyourcomputer.
3. Aftercharging,removetheUSBcablefromboththephoneandthecomputer.
SIM CARD
TheSIMcardisanICcardcontainingphonenumberandothercustomerinformation.Yourphone’s
SIMcardispreinstalledandshouldonlybeaccessedifdirectedbyacustomerservicerepresentative.
Handling a SIM Card
KeepthefollowinginmindwhenhandlingaSIMcard.
nYouareresponsibleforanydamagecausedbyinsertingtheSIMcardinanother-brandICcard
reader,etc.Virginisnotresponsibleinsuchacase.
nAlwayskeeptheICchipclean.
nWipecleanwithadry,softcloth.
nAvoidapplyinglabels.MaydamageSIMcard.
nSeeinstructionsincludedwithSIMcardforhandling.
nTheSIMcardisthepropertyofVirgin.
nTheSIMcardisreplaceable(atcost)incaseofloss/damage.
nReturntheSIMcardtoVirginwhencancelingsubscription.
nReturnedSIMcardsarerecycledforenvironmentalpurposes.
nNotethatSIMcardspecificationsandperformancemaychangewithoutnotice.
nItisrecommendedthatyoukeepaseparatecopyofinformationthatisstoredonSIMcard.
Virginisnotresponsiblefordamagesfromstoredinformationthatislost.
Getting Started Set Up Your Phone 9
nAlwaysfollowemergencyprocedurestosuspendserviceifyourSIMcardorphone(SIMcard
inserted)islostorstolen.Fordetails,contactCustomerService.
nAlwayspoweroffthephonebeforeinserting/removingtheSIMcard.
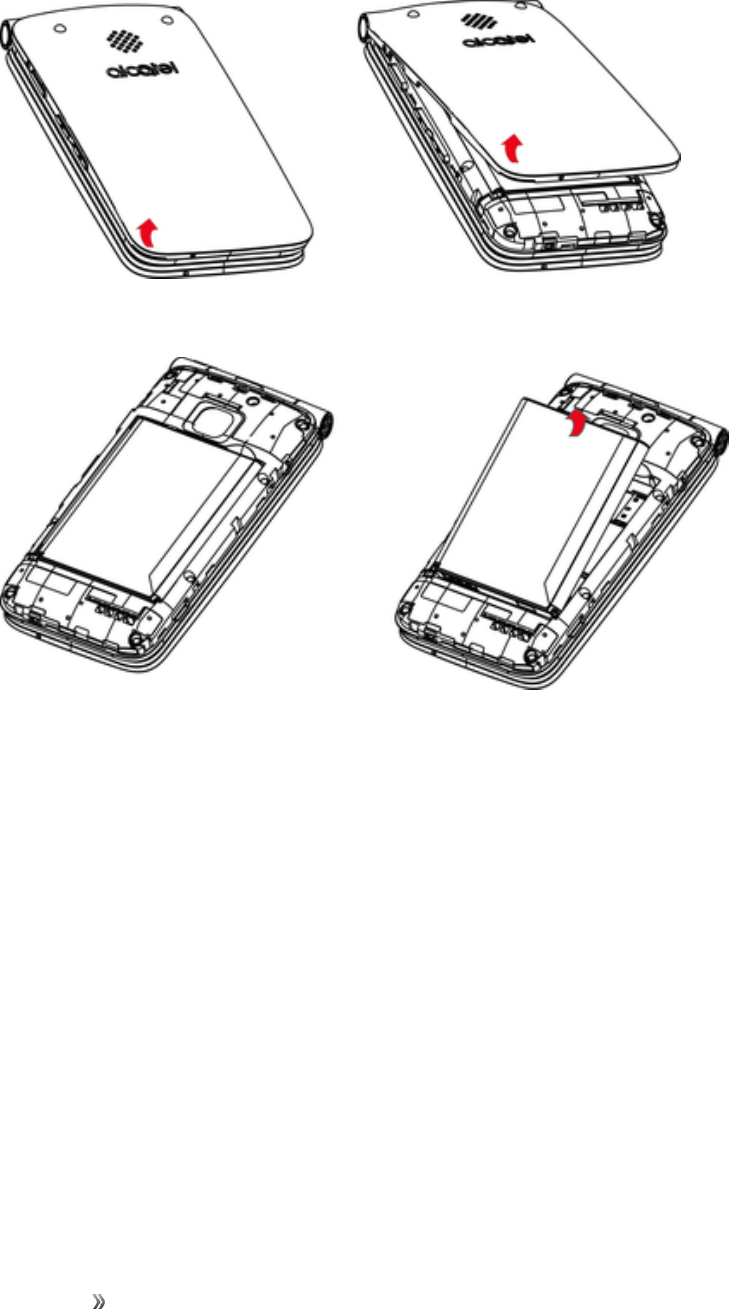
Insert SIM Card
FollowtheseinstructionstoinsertaSIMcard.Remembertopoweroffyourphonebeforeinsertinga
SIMcard.
Note:Yourphone’sSIMcardispreinstalled.Theseinstructionsareforreferenceonly.
1. Removethebatterycoverandbattery.(SeeRemovetheBattery.)
2. GentlyinserttheSIMcardwiththegoldICchipfacingdownward.
3. Insertthebatteryandreplacethebatterycover.(SeeInserttheBattery.)
lAlignthecontactsofthebatterywiththecontactsinthephone.
lMakesureallthetabsaresecureandtherearenogapsaroundthecover.
SD CARD
YourphonesupportstheuseofanoptionalSDcard(notincluded)toexpanditsstoragecapacity.It
supportscardsupto32GB.Somecardsmaynotoperateproperlywithyourphone.
SD Card Cautions
Data:InformationstoredonanSDcardcanbecomelostorchangedaccidentlyorasaresultof
damage.Itisrecommendedthatyoukeepaseparatecopyofimportantdata.Virginisnot
responsiblefordamagesfromdatathatislostorchanged.
Reading/Writing Data:Neverpowerofforremovethebatterywhilereadingorwritingdata.
Battery Level:Alowbatterychargemaypreventreading/writingtoanSDcard.
Handling SD Card:Use/storeSDcardsawayfromthereachofinfants,otherwiseitmay
causechokingifswallowed.
Getting Started Set Up Your Phone 10
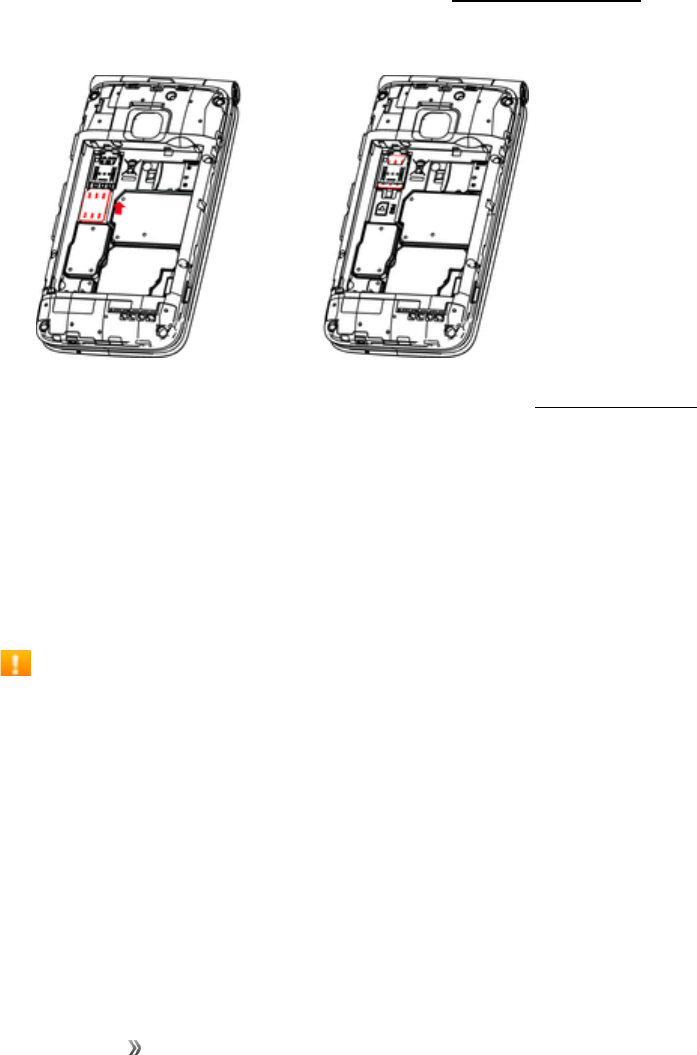
Insert an SD Card
FollowthesestepstoinsertanoptionalSDcard(notincluded).
Important:MakesuretopoweryourphoneoffbeforeinsertingorremovinganSDcard.
1. Removethebatterycoverandbattery.(SeeRemovetheBattery.)
2. GentlyinserttheSDcardwithterminalsfacingdownallthewaywithoutbendingthecard.
Important:InsertonlySDcards.
3. Insertthebatteryandreplacethebatterycover.(SeeInserttheBattery.)
lAlignthecontactsofthebatterywiththecontactsinthephone.
lMakesureallthetabsaresecureandtherearenogapsaroundthecover.
Remove an SD Card
FollowtheseinstructionstoremoveanSDcard.
Important:AlwayspoweroffbeforeinsertingorremovinganSDcard.
1. Removethebatterycoverbygentlyliftinginthedirectionshownbelow.
Getting Started Set Up Your Phone 11
2. Removethebattery.
3. PushdownontheplasticspringandremoveSDcard.
4. Insertthebattery.Alignthecontactsofthebatterywiththecontactsinthephone.
Getting Started Set Up Your Phone 12
5. Attachthebatterycover.Makesureallthetablearesecureandtherearenogapsaroundthe
cover.
TURN YOUR PHONE ON AND OFF
Theinstructionsbelowexplainhowtoturnyourphoneonandoff.
Turn Your Phone On
nPressandholdtheEnd/power key .
Yourphonewillpoweron.Dependingonthesettings,youmayseethelockscreen.
lSeeLockandUnlockYourScreenandScreenLockSettingsforinformationaboutusingthe
screenlock.
lThefirsttimeyouturnthephoneon,youwillseethestartupscreens.SeeCompletethe
SetupScreensfordetails.
lIfyourphoneisnotyetactivated,seeActivationandServiceformoreinformation.
Turn Your Phone Off
nPressandholdtheEnd/power key .
Yourphonewillpoweroff.

Getting Started Set Up Your Phone 13
Note:Yourscreenremainsblankwhileyourphoneisoff(unlessthebatteryischarging).
ACTIVATION AND SERVICE
Beforeusingyourphone,youmustsetupyourservicewithVirgin.Youwillneedyourphone’sserial
numbers(MEIDandICCID).Thesenumberscanbefoundonthephone'spackaging.
FormoreinformationaboutyourVirginaccount,seeVirginAccountInformationandHelp.
Create Your Account and Pick Your Plan
SetupyourVirginaccount.
1. Fromyourcomputer,visitVirginmobileusa.comandclickActivate.
2. ChooseanactivationoptionandclickNext.
3. Whenprompted,entertheserialnumber(MEID)printedonthestickerlocatedonthebackofyour
phoneinthebatterycompartment.Thisnumbercanalsobefoundonthebottompanelofthe
phone’spackage.
4. Followtheremaininginstructionstochooseyourplanandselectapaymentmethod.
5. Followtheactivationinstructionsbelowandyou’llbeabletostartusingyourphone.
Activate Your Phone
AftersettingupyouraccountonVirginmobileusa.com,simplyturnyourdeviceon.Yourdeviceis
designedtoactivateautomatically.IfyouareswappingfromanotherVirgindevicetoanewone,be
suretoturnofftheolddevicebeforeswappingtheserialnumber(MEID).OncetheMEIDswapis
complete,turnonthenewdeviceandtheprogramminginformationwillbepushedtoyourdevice
automatically.
COMPLETE THE SETUP SCREENS
Thesetupscreenshelpyousetupcertainfeaturesandpreferencesonyourphone.Onceyourphone
hasbeenturnedon,youwillseeaWelcomemessage.Youcanthencompletethesetupprocess.
Note:Youmaybeabletocompletethesetupscreensbeforeyourphonehasbeenactivatedonyour
account.

Getting Started Set Up Your Phone 14
1. FromtheWelcomescreen,selectalanguageandpresstheRight soft key togetstarted.
lToskipanysection,presstheRight soft key toskip.
2. Followtheonscreeninstructionstocompleteeachsection.Foreachtopic,youwillhavethe
optiontoskipitandcontinuetothenextscreen.
lSelect a network–Ifprompted,followthepromptstosignintoanavailableWi-Finetwork.
ForsecuredWi-Finetworks,youwillneedtoenterapassword.SeeWi-Fiformoredetails.
lSetup KaiOS Account–UsetheNavigationkeytoselectCreate Accounttosetupa
newKaiOSAccountorLogin Accountandcompletethestepstosignintoyourcurrent
KaiOSAccount.PresstheRight soft key toskip.Thefollowingoptionsmayapply
dependingonyourselection:
oCreate Account–FollowtheinstructionstosignupforanewKaiOSAccount.
oLogin Account–EnteryourKaiOSAccountaddressandpasswordandsignintoyour
currentKaiOSAccount.
lAbout KaiOS–ReadanyapplicableTermsandConditionsofKaiOSsystemforusingyour
phone,presstheRight soft key toagreetothetermsofserviceandprivacypolicy.
3. Yoursetupisnowcomplete.
Yourphoneisnowsetupforuse.Ifyouskippedanypartofthesetup,youcanaccess
additionaloptionsthroughtheAppsscreenorthroughSettings.

Getting Started Basic Operations 15
BASIC OPERATIONS
Thefollowingtopicsoutlinebasicfeaturesandoperationsofyourphone.
BASICS
Thefollowingtopicsofferanoverviewofyourphone’sbasicoperations.
Home Screen and Applications (Apps) List
Mostofyourphone’soperationsoriginatefromthehomescreenortheappslist.
1. PresstheEnd/powerkey untildisplaythehomescreen.
2. FromanyappscreenpresstheEnd/powerkey todisplaytheapplist.
Forinformationaboutusingthehomescreen,seeHomeScreenBasics.
Phone Settings Menu
Youcancustomizeyourphone’ssettingsandoptionsthroughtheSettingsmenu.

Getting Started Basic Operations 16
nFromtheappslistscreen,selectSettings .
Formoreinformation,seeBasicSettings.
Capture Screenshots
Youcanuseyourphone’sEnd/powerandhomekeystocapturescreenshots.
nPressandholdtheCamerakeyandVolume down keyatthesametimetocapturea
screenshotofthecurrentscreen.
ThecurrentscreenshotwillbecapturedandstoredintheScreenshotsalbuminthephone’s
Galleryapplication.Fromtheappslistscreen,selectGallery .
APPLICATIONS
Thefollowingtopicsdescribehowtoaccesstheapplications(apps)listandlaunchappsonyour
phone.
Launch Applications
Allinstalledappscanbeaccessedandlaunchedfromtheappslist.
Getting Started Basic Operations 17
1. Fromhome,presstheCenter softkey .
Theappslistopens.
2. UsetheNavigationkeytoselectanapplicationandthenpress tolaunchthecorresponding
application.
Theapplicationopens.
Apps List
Theappslistexpandstoincludeallappsinstalledonyourphone.Thefollowingtableoutlinesthe
primaryappsthathavebeenpreinstalledonyourphone.
App Function/Service
Calculator Performbasicmathematicalcalculations.
Calendar Createandmanageevents,meetings,andappointments,organize
yourtimeandremindsyouofimportantevents.
Phone Placeandreceivecalls,usevoicemail,setupandmanagecontacts,
andmore.
/ Camera/Video
Takeandsharepicturesandvideos.
Clock Setalarms,useastopwatch,setatimer.
Contacts Manageyourcontactsfromavarietyofsources.
FM Radio Letsyoulistentotheradios.
Browser AbrowseryoucanusetosurfontheInternet.
Getting Started Basic Operations 18
App Function/Service
Gallery
Manageyourphotosandvideos.
E-Mail Send,receive,andmanageyourEmailmessages.
Messages Sendandreceiveinstanttextmessages.
Music
Letsyoubrowseandplaymusic.
Settings ProvideanoverviewofitemsyoucanchangethroughSettings.
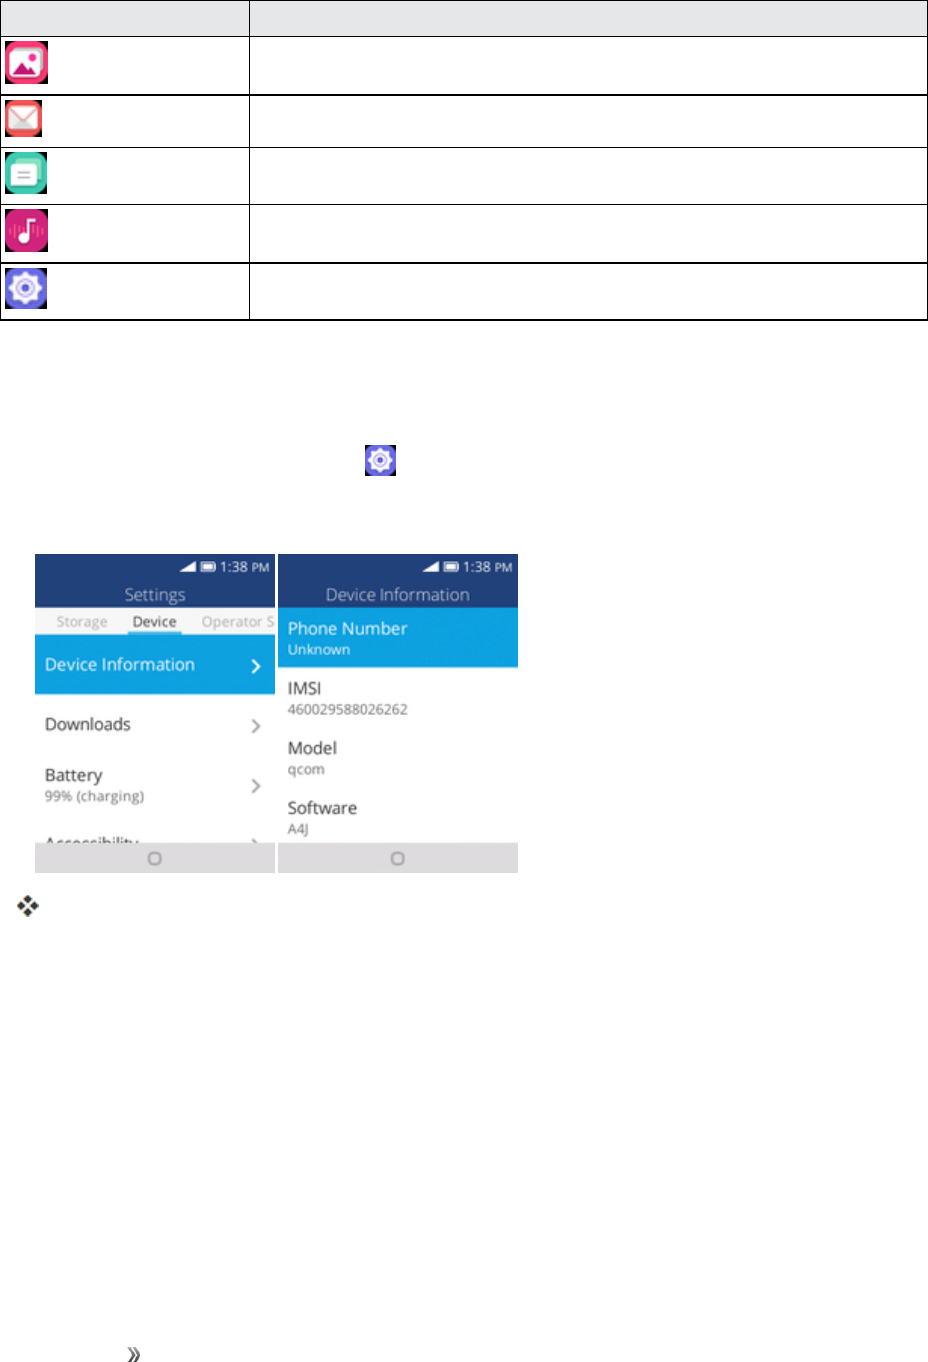
PHONE NUMBER
Followtheinstructionsbelowtodisplayyourphone’swirelessphonenumber.
1. Fromtheappslist,selectSettings >Device > Device Information.
2. SelectPhone Number.
YouwillseethenumberlistedunderPhone number.
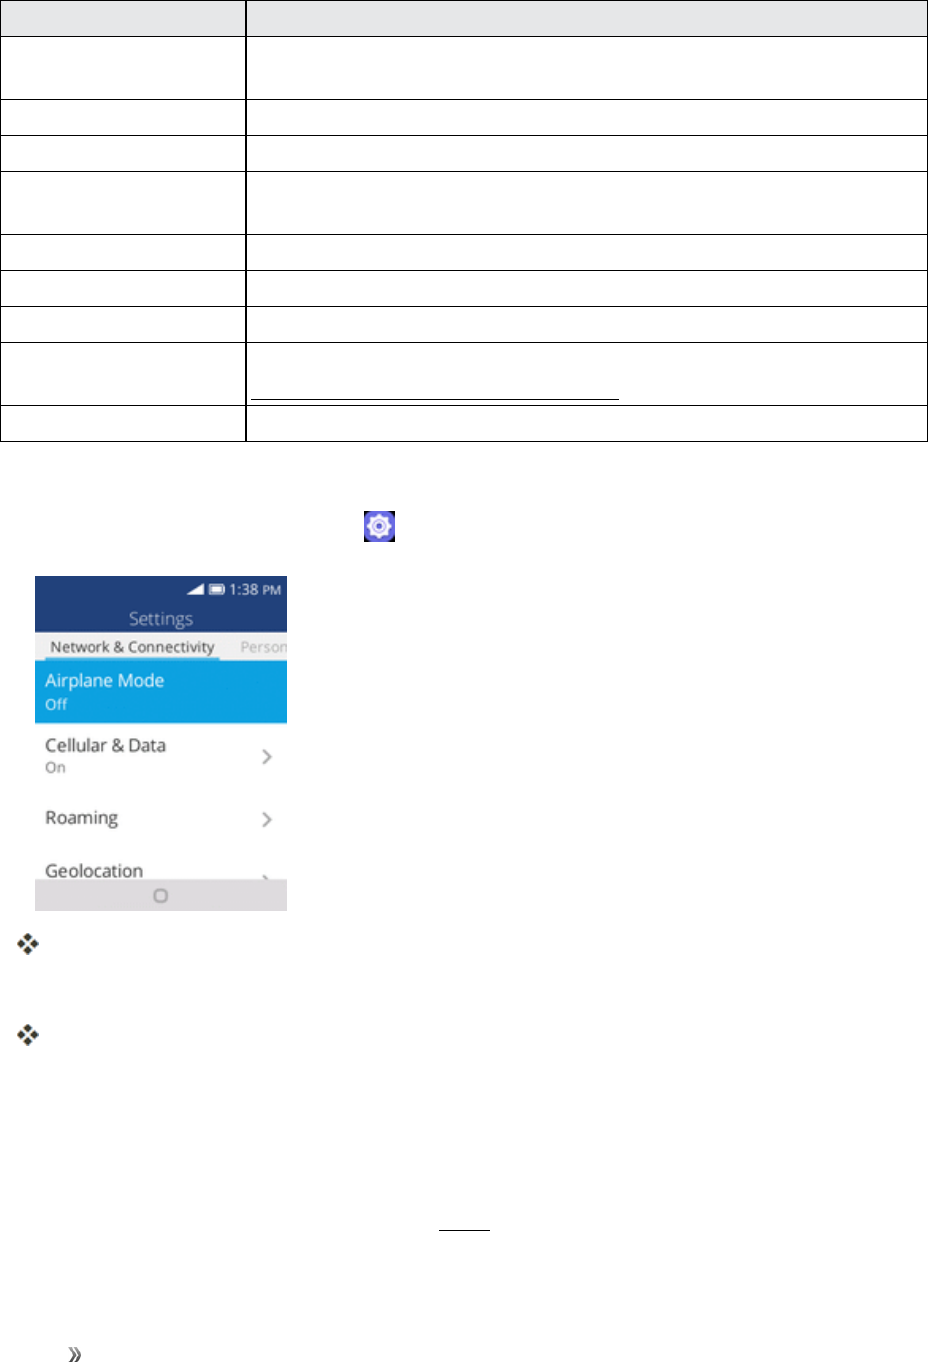
AIRPLANE MODE
Airplanemodeturnsoffallfunctionsthatemitorreceivesignals,whileleavingyourphoneonsoyou
canuseappsthatdon’trequireasignalordata.
Toturnonairplanemode:
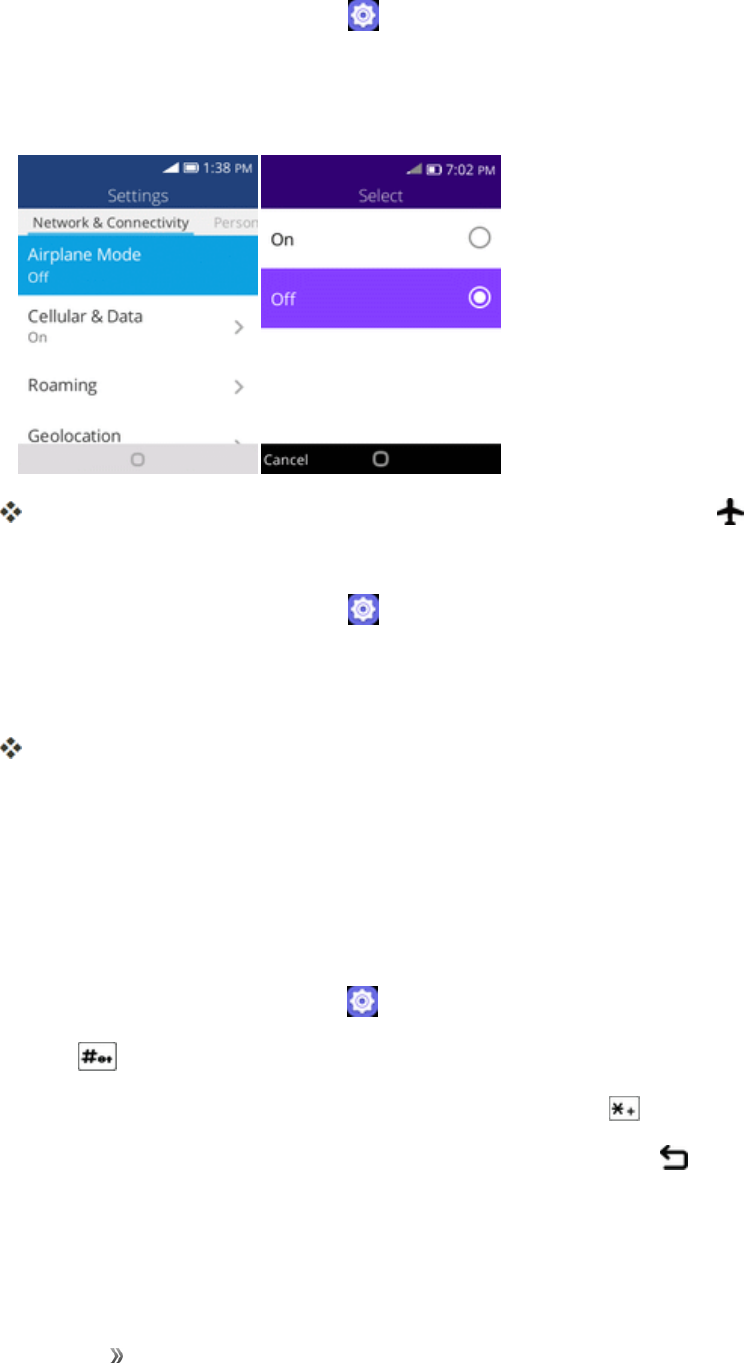
Getting Started Basic Operations 19
1. Fromtheappslist,selectSettings >Network & Connectivity.
2. SelectAirplane Mode.
3. SelectOn toenableairplanemode.
Yourphoneisnowinairplanemode.Youwillseetheairplanemodeicon inthestatusbar.
Toturnoffairplanemode:
1. Fromtheappslist,selectSettings >Network & Connectivity.
2. SelectAirplane mode.
3. SelectOff todisableairplanemode.
Yourphone’swirelessconnectionfeaturesarenowrestored.
ENTER TEXT
Youcanentertextusingyourphone'sNuanceT9keyboard.
Text Input
Yourphoneoffersyouachoiceofusingnormalorpredictivetextinput.Toselectyourdesiredinput:
1. Fromtheappslist,selectSettings >Personalization>Input methods.
2. Press toswitchamong"Abc/abc/ABC"mode.
3. Toinsertapunctuationmarkorspecialcharacter,pleasepress .
4. IfyouwanttodeletetypedlettersorsymbolspresstheBack/clearkey todeletethemoneby
one.

Getting Started Basic Operations 20
LOCK AND UNLOCK YOUR SCREEN
Yourphoneallowsyoutoquicklyturnthescreenon/offwhenyouunfold/foldthephone,oryoucan
setupscreenlocktopreventothersfromusingyourphonewithoutyourpermission.
Turn the Screen Off When Not in Use
nToquicklyturnthescreenoff,simplyfold(close)thephone..
Tosavebatterypower,thephoneautomaticallyturnsoffthescreenafteracertainperiodoftimewhen
youleaveitidle.Youwillstillbeabletoreceivemessagesandcallswhilethephone’sscreenisoff.
Note:Forinformationonhowtoadjustthetimebeforethescreenturnsoff,seeDisplaySettings.
Turn the Screen Lock On or Off
1. Fromtheappslist,selectSettings >Privacy & Security>Screen Lock.
2. SelectOntoenablescreenlock
3. Youwillbepromptedtoenterthepasscode.SeeScreenLockSettings.
UPDATE YOUR PHONE
Fromtimetotime,updatesmaybecomeavailableforyourphone.Youcanapplyupdatesthrough
theSettings >Device > System Updatesmenu.
Software Update Cautions
During update:Thephonecannotbeuseduntilthesoftwareupdateiscomplete.Itmaytake
timetoupdateyourphone’ssoftware.
Signal during update:Updateyourphonewheresignalreceptionisgood,anddonotchange
locationduringtheupdateprocess.Makesurethebatteryisadequatelychargedbefore
beginninganupdate.Aweaksignalorlowbatteryduringanupdatemaycausetheupdateto
fail.Anupdatefailuremaydisablethephone.
Other functions during update:Otherphonefunctionscannotbeusedduringasoftware
update.
Update Your Phone Software
Youcanupdateyourphone'ssoftwareusingtheSystemUpdatesoption.
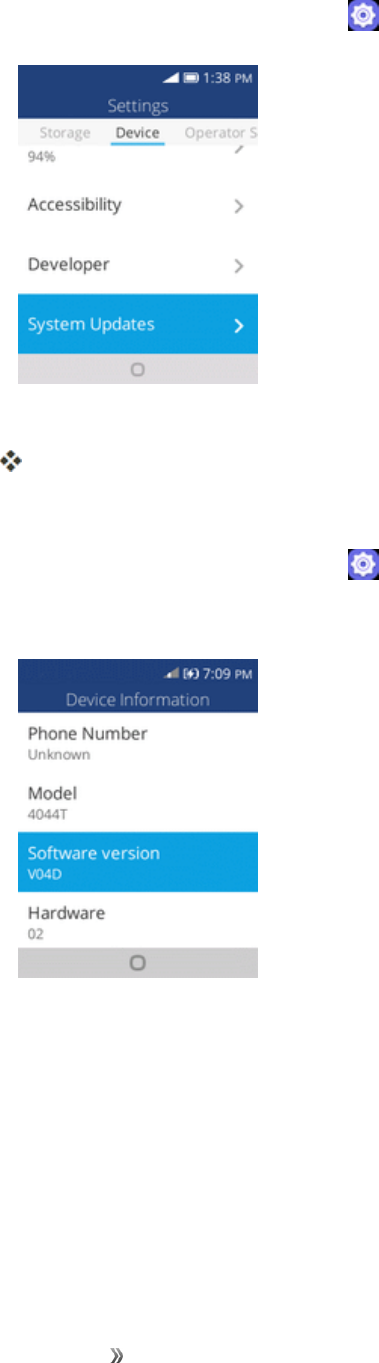
Getting Started Basic Operations 21
1. Fromtheappslist,selectSettings >Device > System Updates.
2. SelectSystem Updates.
Youmayberequiredtopoweryourphoneoffandbackontocompletethesoftwareupgrade.
Confirm Your Current Phone Software
1. Fromtheappslist,selectSettings >Device > Device Information.
2. LocatetheSoftwareversionread-onlyfield.
Update Your Profile
Thisoptionallowsyoutoautomaticallyupdateyouronlineuserprofileinformation.Ifyouchooseto
changeyourusernameandselectanewoneonline,youmustthenupdatetheusernameonyour
phone.
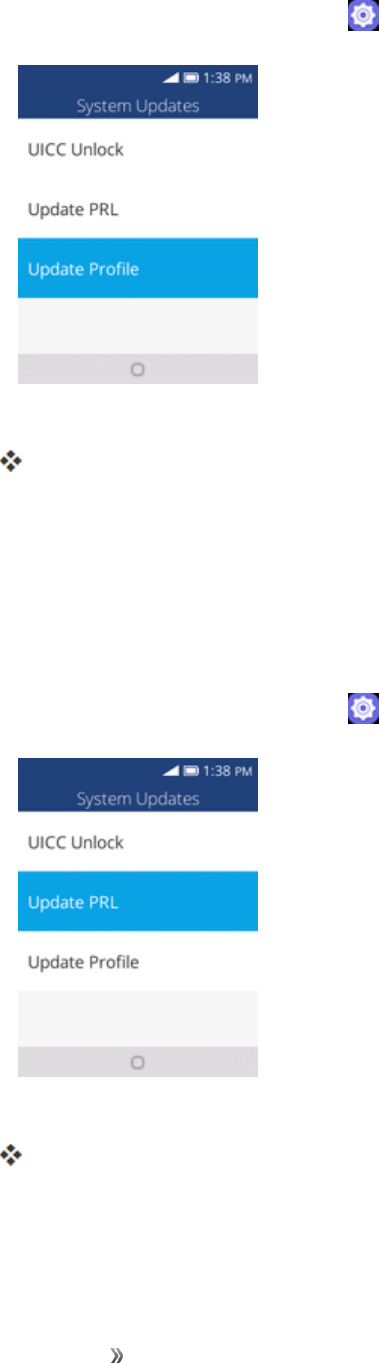
Getting Started Basic Operations 22
1. Fromtheappslist,selectSettings >Device > System Updates > Update Profile.
2. Followtheonscreeninstructions.
Thephonewilldownloadandinstalltheprofileupdateandyouwillseeaconfirmationwhen
complete.
Note:Ifyourdataservicesoraccountsyncingeverseemstogooutunexpectedly,usethisfeature
toreconnectwiththenetwork.
Update Your PRL
ThisoptionallowsyoutodownloadandupdatethePRL(preferredroaminglist)automatically.
1. Fromtheappslist,selectSettings >Device > System Updates > Update PRL.
2. Followtheonscreeninstructions.
ThephonewilldownloadandinstallthePRLupdateandyouwillseeaconfirmationwhen
complete.
Getting Started Your Phone's Home Screen 23
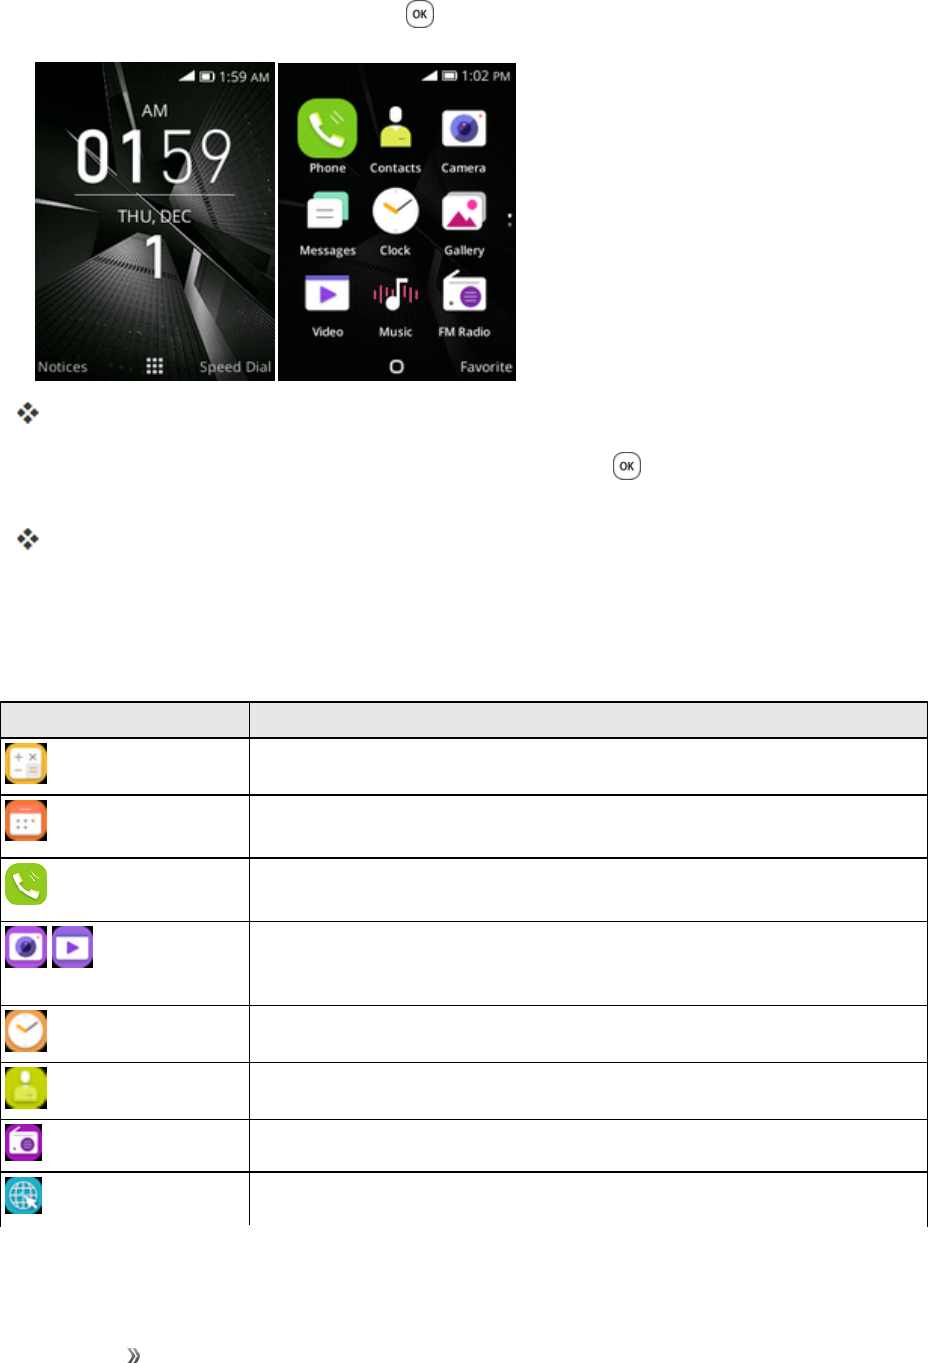
YOUR PHONE'S HOME SCREEN
Thefollowingtopicsdescribehowtouseyourphone’shomescreenandunderstandthestatusbar.
HOME SCREEN BASICS
Thehomescreenisthestartingpointforyourphone’sapplications,functions,andmenus.
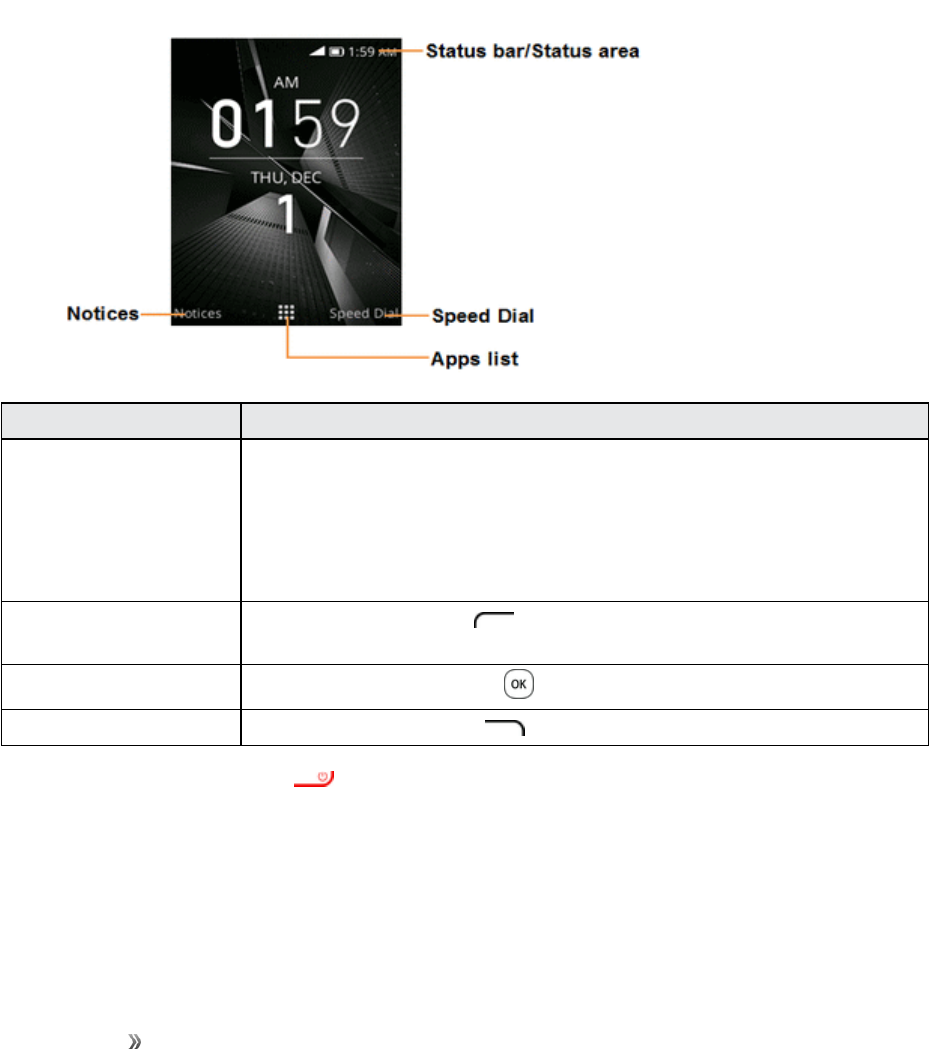
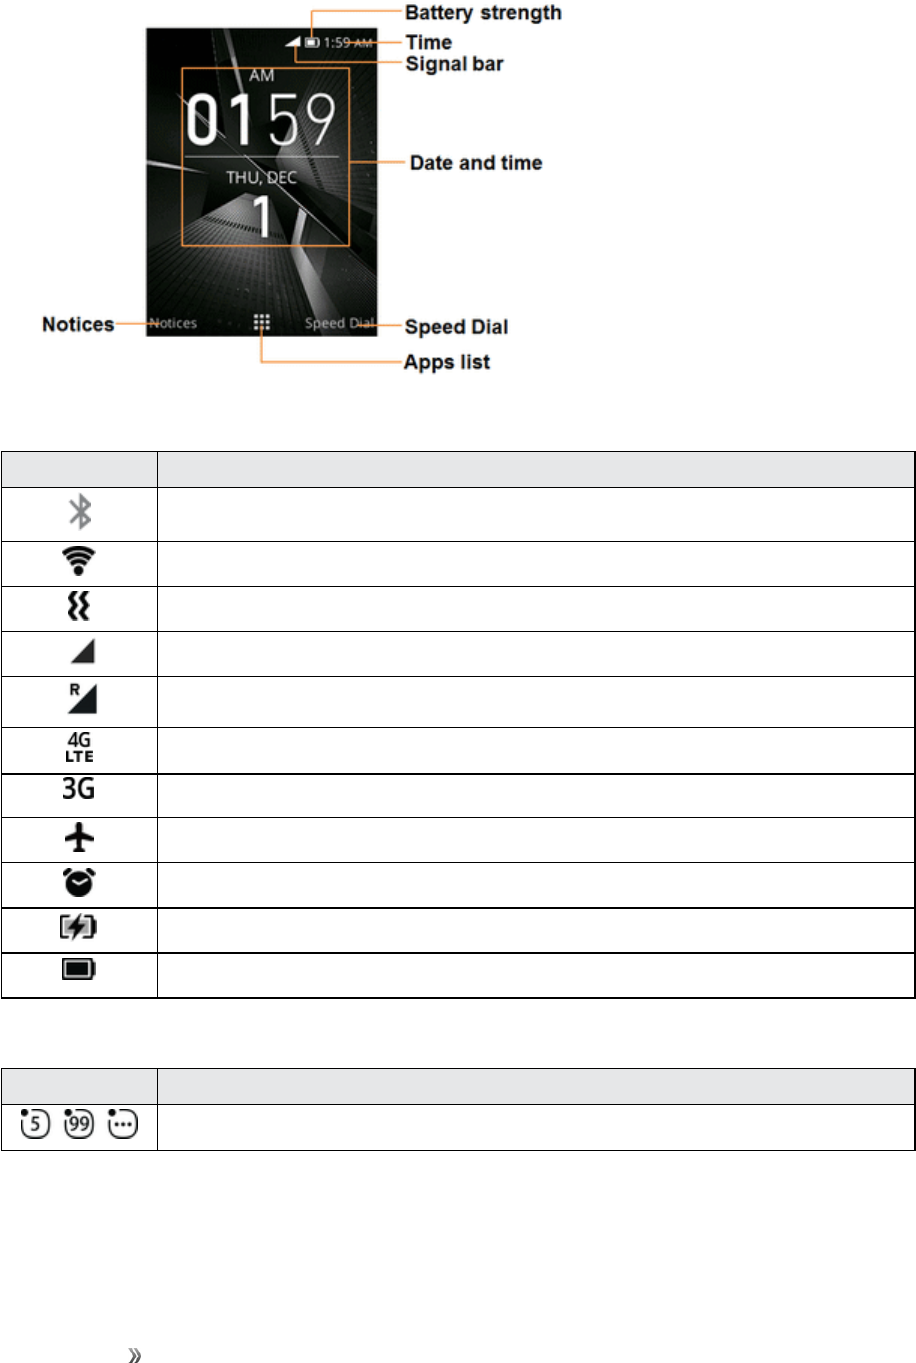
Home Screen Layout
Belowisyourhomescreen’slayout.
Item Description
Status bar/Status
area
Thestatusbardisplaysiconstonotifyyouofyourphone’sstatus(onthe
rightside)andnotifications(ontheleftside).
Thestatusareaofthestatusbar(ontheright)displaysphoneand
servicestatusinformationsuchassignalstrength,batterystatus,Wi-Fi
anddataconnectivity,ringerstatus,andtime.
Notices PresstheLeft soft key toviewnumericalnotifications(missedcall,
newmail,newmessage,etc.
Apps list PresstheCenter soft key toentertheappslist.
Speed Dial PresstheRight soft key toenterspeeddial.
Tip:PresstheEnd/power key toreturntothemainhomescreen.
STATUS BAR
Thestatusbaratthetopofthehomescreenprovidesphoneandservicestatusinformationonthe
rightsideandnotificationalertsontheleft.
Getting Started Your Phone's Home Screen 24
Main Status Icons
Icon Status
Bluetooth®active
Wi-Fi®active
Vibrate
Network(fullsignal)
Network(roaming)
4GLTEdataservice
3Gdataservice
Airplanemode
Alarmset
Battery(charging)
Battery(fullcharge)
Notification Icons
Icon Notification
Generalnumericalnotifications(missedcall,newmail,newmessage,etc.)
CHANGE THE HOME SCREEN WALLPAPER
Selectandassignyourphone’sbackgroundwallpaper.

Getting Started Your Phone's Home Screen 25
1. Fromtheappslist,selectSettings >Personalization>Display>Wallpaper.
2. SelectWallpaperandthenusetheNavigationkeytoselectfromGallery,Wallpaper,or
Camera.
3. SelectawallpaperandthenpresstheRight soft key tosetthewallpaper.
Thewallpaperisset.

Making Connections 26
MAKING CONNECTIONS
Thetopicsinthissectionwillcoveryourphone’sabilitytohelpyoumakeconnections,fromphone
callsandmaintainingcontacts,totextmessages,email,Internet,andinternationalservices.

Making Connections Phone Calls and Voicemail 27
PHONE CALLS AND VOICEMAIL
Thefollowingtopicsoutlinetheuseofyourdevice’sphoneapptoplaceandreceivecalls,use
voicemail,andmore.
PLACE AND ANSWER CALLS
Thefollowingtopicsdescribehowtodirectlydialcalls,howtoanswerincomingcalls,andhowto
usethein-callscreenoptions.
Adjust In-Call Volume
nAdjusting Call Volume:PresstheVolumekeyupordownduringthecall.
Troubleshooting
Problem:Difficultyduringcall.
Answer 1:Itmaynotbepossibletomakeacallproperlyinanoisylocation.
Answer 2:WhencallingusingSpeaker,checkthecallvolume.Raisingthecallvolumemaymake
callingdifficult.
Problem:Soundpopsmomentarilyduringacall.
Answer:Areyouchanginglocationwhilecalling?Soundpopswhensignalisweakandthephone
switchestoadifferentarea.
Emergency Call Cautions
EmergencycallsarerestrictedinAirplanemode.
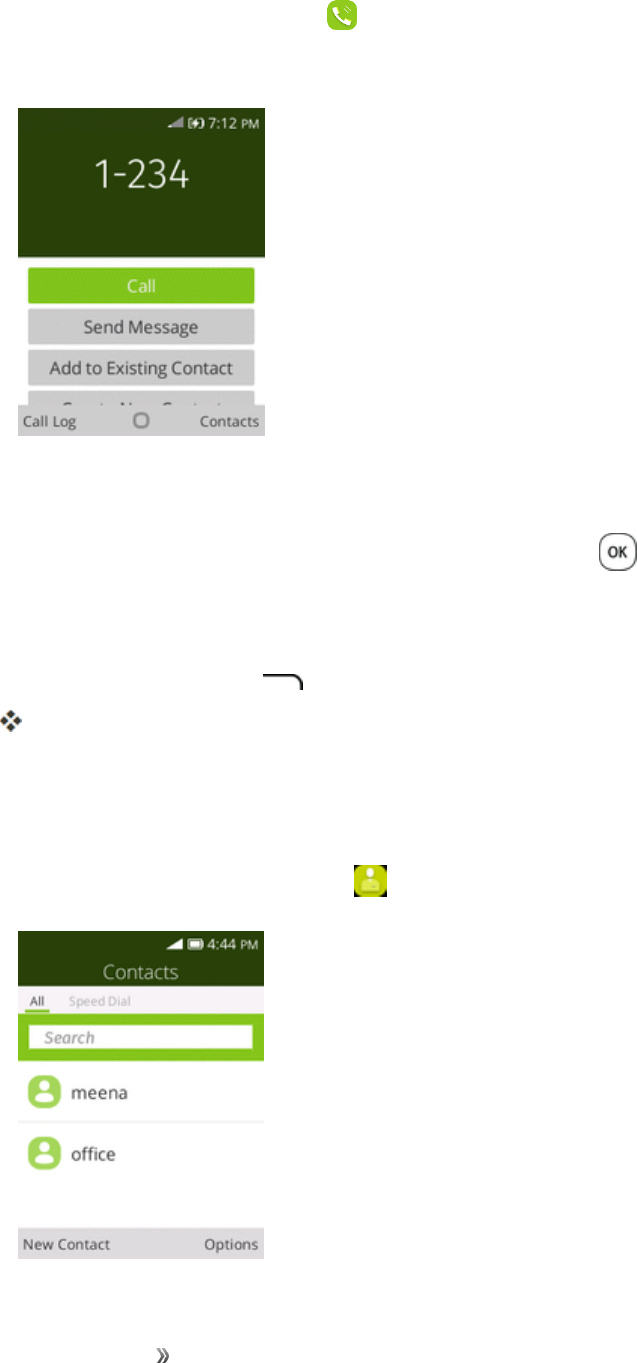
Call Using the Phone Dialer
Themost“traditional”waytoplaceacallisbyusingthephone’sdialerscreen.
1. Fromtheappslist,selectPhone todisplaythephonescreen.
Thephoneappopens.
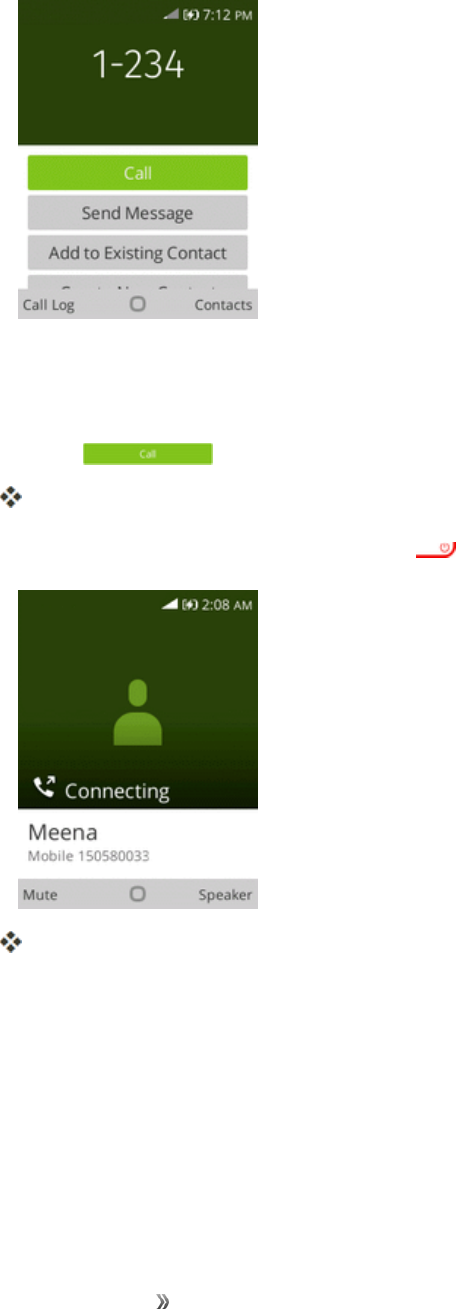
Making Connections Phone Calls and Voicemail 28
2. Pressthenumberkeysonthekeypadtoenterthephonenumber.
lAsyouenterdigits,SmartDialsearchesforcontactsthatmatch.Ifyouseethenumberyou
wanttodial,usetheNavigationkeytoselectthenumberandplacethecallimmediately
withoutenteringtherestofthenumber.
3. Select tocallthenumber.
Thephonedialsthenumber.Thecallbeginswhentheotherpartyanswers.
4. Toendthecall,presstheEnd/power key .
Thecallends.
Troubleshooting
Problem:Calldoesnotconnect.
Answer 1:Wasthenumberdialedusingtheareacode?Ifnot,trydialingusingthefull10-digit
numberincludingtheareacode.
Answer 2:Areyouinanareawithpoorwirelesscoverage?Trycallingagainfromanotherarea.

Making Connections Phone Calls and Voicemail 29
Call Emergency Numbers
Youcanplacecallsto9-1-1evenifthephone’sscreenislockedoryouraccountisrestricted.
Tocallthe9-1-1emergencynumberwhenthephone’sscreenislockedwithascreenlock:
1. Fromthelockscreen,presstheLeft soft key toenterEmergency Call.
2. PresstheCenter softkey toplacethecall.
Aslongasyouareinanareacoveredbywirelessservice,theemergencycallisplaced.
Tocallthe9-1-1emergencynumbernormallyorwhenyouraccountisrestricted:
1. Unlockthescreen.Formoreinformation,seeLockandUnlockYourScreen.
2. Fromtheappslist,selectPhone todisplaythephonescreen.
3. Press9 1 1 .
Aslongasyouareinanareacoveredbywirelessservice,theemergencycallisplaced.
Enhanced 9-1-1 (E 9-1-1) Information
ThisphonefeaturesanembeddedGlobalPositioningSystem(GPS)chipnecessaryforutilizingE
9-1-1emergencylocationserviceswhereavailable.
Whenyouplaceanemergency9-1-1call,theGPSfeatureofyourphoneseeksinformationto
calculateyourapproximatelocation.Dependingonseveralvariables,includingavailabilityand
accesstosatellitesignals,itmaytakeupto30secondsormoretodetermineandreportyour
approximatelocation.
Important:Alwaysreportyourlocationtothe9-1-1operatorwhenplacinganemergencycall.
Somedesignatedemergencycalltakers,knownasPublicSafetyAnsweringPoints(PSAPs),may
notbeequippedtoreceiveGPSlocationinformationfromyourphone.
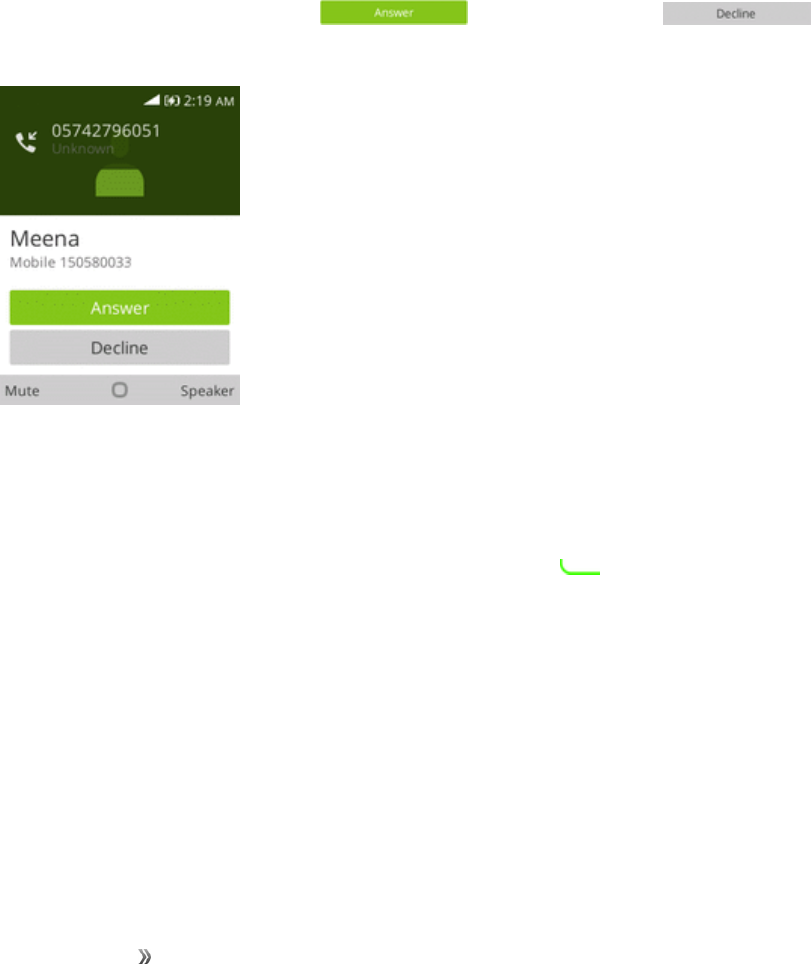
Answer Phone Calls
Thefollowinginformationletsyouknowhowtoanswerincomingcalls,mutetheringeronincoming
calls,rejectincomingcalls,andmore.
Whenyoureceiveaphonecallfromacontact,thesubscreenappearsanddisplaysthecaller
name.WhenyoureceiveaphonecallfromsomeonewhoisnotstoredinContacts,thephone
numberappearontheIncomingcallscreen.
Note:Ifyourphoneisturnedoff,allcallsautomaticallygotovoicemail.

Making Connections Phone Calls and Voicemail 30
Answer an Incoming Call
1. Whenacallarrives,presstheRight soft key ortheCall key toanswerit.
Thecallbegins.
2. Toendthecall,presstheEnd/power key .
Thecallends.
Mute the Ringing Sound
Tomutetheringerwithoutrejectingthecall,youcanpresstheVolumekeydown.
Reject an Incoming Call
nWhenacallarrives,presstheRight soft key ortheEnd/power key torejectit.
Theringtoneorvibrationwillstopandthecallwillbesentdirectlytovoicemail.
In-Call Screen Layout and Operations
Whileyou’reonacall,youwillseeanumberofonscreenoptions.

Making Connections Phone Calls and Voicemail 31
nSpeaker:Routethephone’saudiothroughthespeaker(On)orthroughtheearpiece(Off).
lPresstheRight soft key toactivateSpeakertoroutethephone’saudiothroughthe
speaker.(YoucanadjustthespeakervolumeusingtheVolumekey.)
lPresstheRight soft key againtodeactivateSpeakertousethephone’searpiece.
Warning:Becauseofhighervolumelevels,donotplacethephonenearyourearduring
speakerphoneuse.
nMute:Mutethemicrophoneduringanactivecall.
lPresstheLeft soft key tomutethemicrophone.
lPresstheLeft soft key againtounmutethemicrophone.
Note:IfMuteisactivated,thespeakermodeisdeactivated.
nAdd Call: :PresstheCenter softkey toinitiateaconferencecall(3-way
call).
nEnd call:PresstheEnd/power key toendthecurrentcall.
Place a Call from Contacts
YoucanplacephonecallsdirectlyfromentriesinyourContactslist.
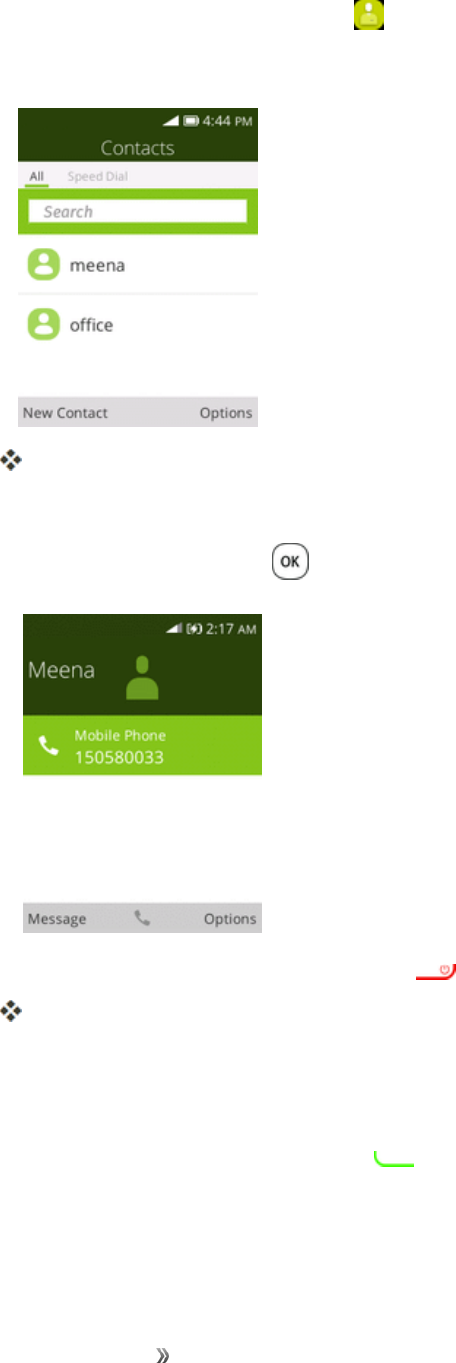
Making Connections Phone Calls and Voicemail 32
1. Fromtheappslist,selectContacts todisplaythecontactsapp.
2. SelectContactstodisplaytheContactslist.
Thecontactslistappears.
3. UsetheNavigationkeytoselectacontact.
4. PresstheCenter softkey tocallthenumber.
5. Toendthecall,presstheEnd/power key .
Thecallends.
Call from Call Log
Thecallloglistletsyouquicklyplacecallstorecentincoming,outgoing,ormissednumbers.
1. Fromtheappslist,presstheCall key todisplaythecallloglist.

Making Connections Phone Calls and Voicemail 33
Thecallloglistappears.
2. SelectanentryandpresstheRight soft key todisplaytheOptionsdetails.
3. SelectanentryandpresstheCenter softkey ortheCall key toplaceacall.
Thephonedialsthenumber.Thecallbeginswhentheotherpartyanswers.
4. Toendthecall,presstheEnd/power key .
Thecallends.
VOICEMAIL
Thefollowingtopicsdescribehowtosetupanduseyourphone'svoicemailfeatures.
Voicemail Setup
Followtheinstructionsbelowtosetupvoicemailonyourphone.Youshouldsetupyourvoicemail
andpersonalgreetingassoonasyourphoneisactivated.Alwaysuseapasscodetoprotectagainst
unauthorizedaccess.Yourphoneautomaticallytransfersallunansweredcallstoyourvoicemail,
evenifyourphoneisinuseorturnedoff.
1. Fromtheappslist,selectPhone .
2. Touchandhold todialyourvoicemailnumber.
3. Followthesystempromptsto:
lCreateyourpasscode.
lRecordyournameannouncement.
lRecordyourgreeting.
Making Connections Phone Calls and Voicemail 34
Important:Voicemail Passcode–Itisstronglyrecommendedthatyoucreateapasscodewhen
settingupyourvoicemailtoprotectagainstunauthorizedaccess.Withoutapasscode,anyonewho
hasaccesstoyourphoneisabletoaccessyourvoicemailmessages.
OPTIONAL CALLING SERVICES
Thefollowingtopicsoutlineadditionalvoice-relatedservicesavailablewithyourphone,including
callservicesandmore.
Call Waiting
Whenyou’reonacall,yourphone’sscreeninformsyouthatanothercalliscominginanddisplays
thecaller’sphonenumber(ifitisavailable).
Torespondtoanincomingcallwhileyou’reonacall:
nUsetheNavigation keytoselect toanswerthecallor to
ignoretheincomingcall.(Thisputsthefirstcalleronholdandanswersthesecondcall.)
Conference Calling
Withconferencecalling,alsoknownas3-waycalling,youcantalktotwopeopleatthesametime.
Whenusingthisfeature,thenormalairtimerateswillbechargedforeachofthetwocalls.
1. OnthePhonescreen,enteranumberandpresstheCall key (orplaceacallfromLogor
Contacts).

Making Connections Phone Calls and Voicemail 35
2. Onceyouhaveestablishedtheconnection,dialthesecondnumber.
Thisputsthefirstcalleronholdanddialsthesecondnumber.
3. Whenyou’reconnectedtothesecondparty,pressMerge Call.Yourconferencecallisnowin
session.
Note:Ifoneofthepeopleyoucalledhangsupduringyourcall,youandtheremainingcallerstay
connected.Ifyouinitiatedthecallandarethefirsttohangup,allcallersaredisconnected.
Call Forwarding
CallForwardingletsyouforwardallyourincomingcallstoanotherphonenumber–evenwhenyour
phoneisturnedoff.YoucancontinuetomakecallsfromyourphonewhenyouhaveactivatedCall
Forwarding.
Note:Youarechargedahigherrateforcallsyouhaveforwarded.
ToactivateCallForwarding:
1. Fromtheappslist,selectSettings >Network & Connectivity>Call Settings> Call
Forwarding.
Thecallforwardingmenuappears.
Making Connections Phone Calls and Voicemail 36
2. Configureyouroptions.
Yourcallsettingsoptionsareset.
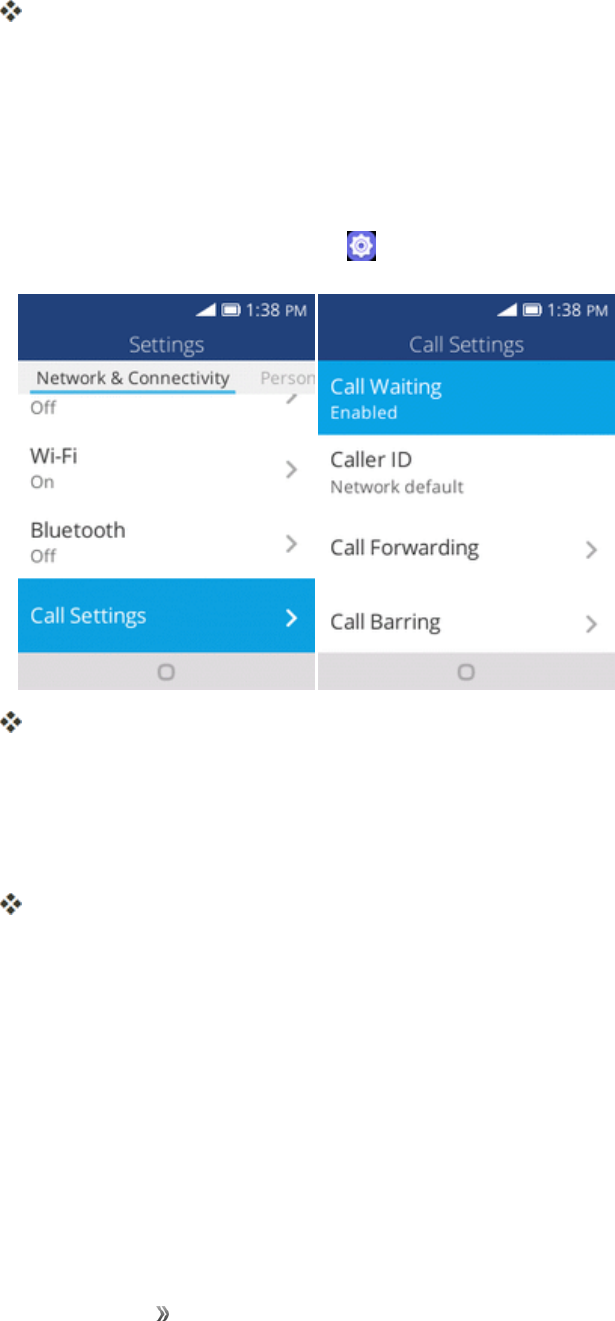
CALL SETTINGS
Yourphone’sCallSettingsmenuletsyouconfigureyourvoicemailoptionsandanumberofother
settingsforthephoneapplication.
Use the Call Settings Menu
1. Fromtheappslist,selectSettings >Network & Connectivity>Call Settings.
Thecallsettingsmenuappears.
2. Configureyouroptions.
lSelectamenuitemtodisplayitsoptions.
lSelectyouroptionsandfollowthepromptstosetthem.
Yourcallsettingsoptionsareset.
TTY Mode
ATTY(teletypewriter,alsoknownasaTDDorTextTelephone)isatelecommunicationsdevice
thatallowspeoplewhoaredeaf,hardofhearing,orwhohavespeechorlanguagedisabilities,to
communicatebytelephone.
YourphoneiscompatiblewithselectTTYdevices.PleasecheckwiththemanufacturerofyourTTY
devicetoensurethatitsupportsdigitalwirelesstransmission.YourphoneandTTYdevicewill
connectusingaspecialcablethatplugsintoyourphone’sheadsetjack.Ifthiscablewasnotprovided
withyourTTYdevice,contactyourTTYdevicemanufacturertopurchasetheconnectorcable.
ToturnTTYModeonoroff:
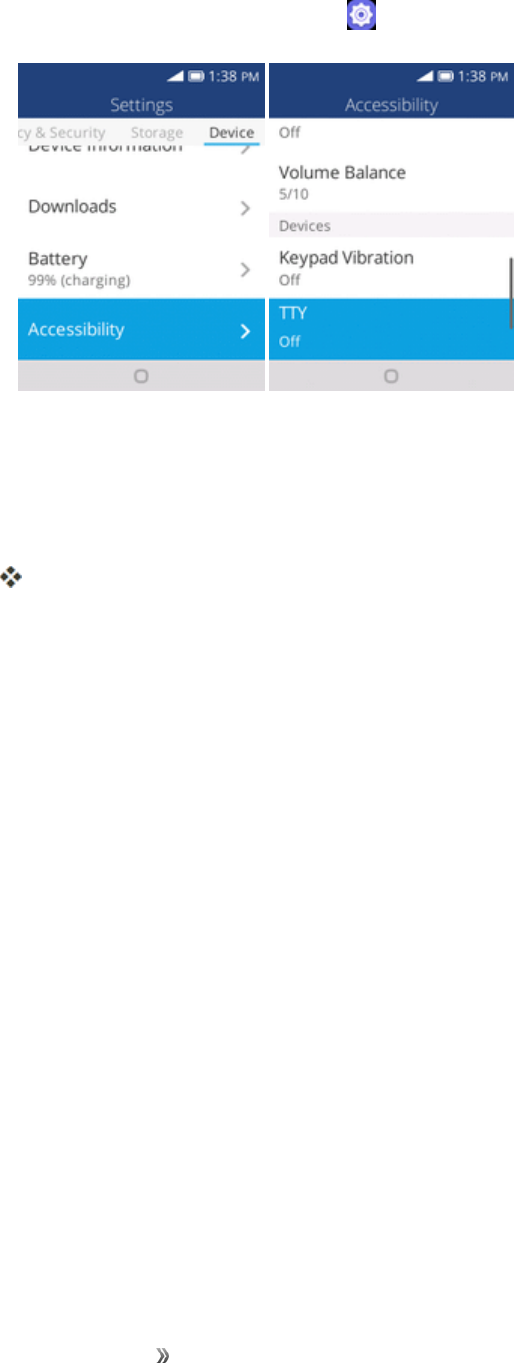
Making Connections Phone Calls and Voicemail 37
1. Fromtheappslist,selectSettings >Device>Accessibility >TTY.
2. SelectFull,HCO,orVCOtoturnTTYmodeon.
–or–
SelectOfftoturnTTYmodeoff.
Yourphone’sTTYmodeisset.
Note:Whenenabled,TTYmodemayimpairtheaudioqualityofnon-TTYdevicesconnectedtothe
headsetjack.
Warning:9-1-1 Emergency Calling
ItisrecommendedthatTTYusersmakeemergencycallsbyothermeans,including
TelecommunicationsRelayServices(TRS),analogcellular,andlandlinecommunications.Wireless
TTYcallsto9-1-1maybecorruptedwhenreceivedbypublicsafetyansweringpoints(PSAPs),
renderingsomecommunicationsunintelligible.TheproblemencounteredappearsrelatedtoTTY
equipmentorsoftwareusedbyPSAPs.ThismatterhasbeenbroughttotheattentionoftheFCC,
andthewirelessindustryandthePSAPcommunityarecurrentlyworkingtoresolvethis.

Making Connections Contacts 38
CONTACTS
TheContactsapplicationletsyoustoreandmanagecontactsfromavarietyofsources,including
contactsyouenterandsavedirectlyinyourphone.
Contacts Cautions
InformationsavedinContactsmaybelostorchangedifthebatteryisremovedforalongperiod
orleftuncharged.Accidentormalfunctionmayalsocauselossorchangetoinformation.Itis
recommendedthatyoukeepaseparatecopyofcontactsandotherimportantinformation.
Virginisnotresponsibleforanydamagesfromlostorchangedcontacts.
ADD A CONTACT
Youcanaddcontactsfromyourphone’sPhoneapplication.Enterdetailssuchasname,phone
numbers,emailaddresses,mailingaddresses,andmore.
1. Fromtheappslist,selectContacts .
YouwillseetheContactslist.

Making Connections Contacts 39
2. PresstheLeft soft key toaddacontact.
TheNewContactscreenappears.
3. Usethekeyboardtoenterasmuchinformationasyouwant.
lFirstName
lLastName
lMobilePhone
lPersonalEmail
lCompany
l[AddPicture]:SelecttheAddPictureicontoassignapicturetothecontact.
l[AddPhone]:Selecttoaddmorephonenumberstothecontact.
l[AddEmail]:SelecttoaddmoreEmailaddresstothecontact.
l[AddAddress]:Selecttoaddmoreaddresstothecontact.
l[AddDate]:SelecttoaddBirthdayoranniversarytothecontact.
l[AddRingtone]:Selecttoaddringtonetothecontact.
l[AddComment]:Selecttoaddcommenttothecontact.
4. Whenyouhavefinishedaddinginformation,presstheRight soft key andselectSave.
Thecontactisadded.
Save a Phone Number
YoucansaveaphonenumbertoContactsdirectlyfromthephonekeypad.
Making Connections Contacts 40
1. Fromtheappslist,selectPhone .
2. EnteraphonenumberandselectCreate NewContact.
3. Toaddthenumbertoanexistingcontact,selectAdd to Existing Contact.Toaddanew
contact,selectCreate new contact.
lForanexistingcontact,choosethecontactnameandpress toselectanumbertypefor
thenewnumber.
lForanewcontact,enterthenameandanyadditionalinformation.
4. PresstheRight soft key andchooseSave.
Thecontactisadded.
VIEW CONTACTS
Viewacontact’sdetailsbydisplayingacontactentry.
1. Fromtheappslist,selectContacts .
Making Connections Contacts 41
YouwillseetheContactslist.
2. Selectacontacttoviewitsdetails.
Thecontact’sdetailedlistingappears.
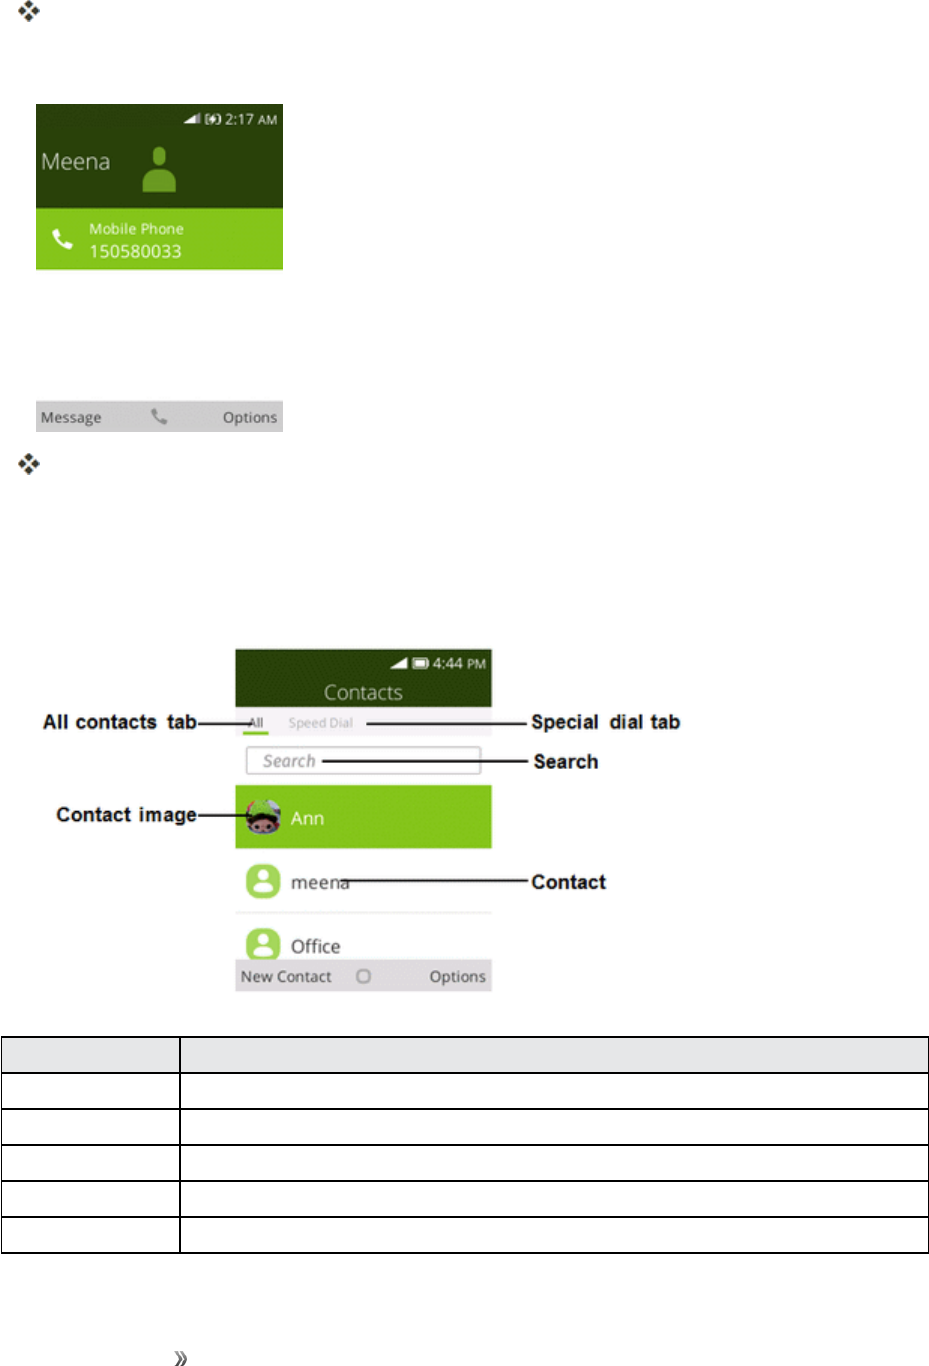
CONTACTS SCREEN LAYOUT
Thefollowingillustrationshow’syourContactsapplayoutanddescribesthevariousfeatures.
Item Description
All contacts tab Showallcontacts.
Speed Dial tab Showspeeddialcontacts.
Contact Selecttoshowcontact’sdetails.
Contact image Showthumbnailofcontactentry.
Search Searchcontacts.

Making Connections Contacts 42
EDIT A CONTACT
Onceyou’veaddedacontact,youcanaddoreditanyoftheinformationintheentry,assignacaller
IDpicture,customizewithauniqueringtone,andmore.
1. Fromtheappslist,selectContacts .
YouwillseetheContactslist.
2. Selectacontacttoviewitsdetails.
Thecontact’sdetailedlistingappears.
3. PresstheRight soft key andthenselectEdit.
4. Addoredittheinformation,andthenpresstheRight soft key andselectSave.
Yourchangesaresavedtothecontactentry.
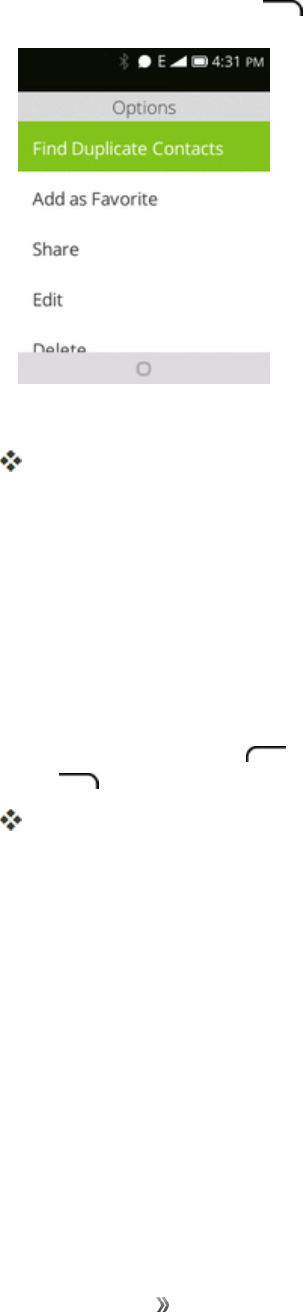
DELETE A CONTACT
Youcandeleteacontactfromthecontactsdetailspage.
1. Fromtheappslist,selectContacts .
YouwillseetheContactslist.
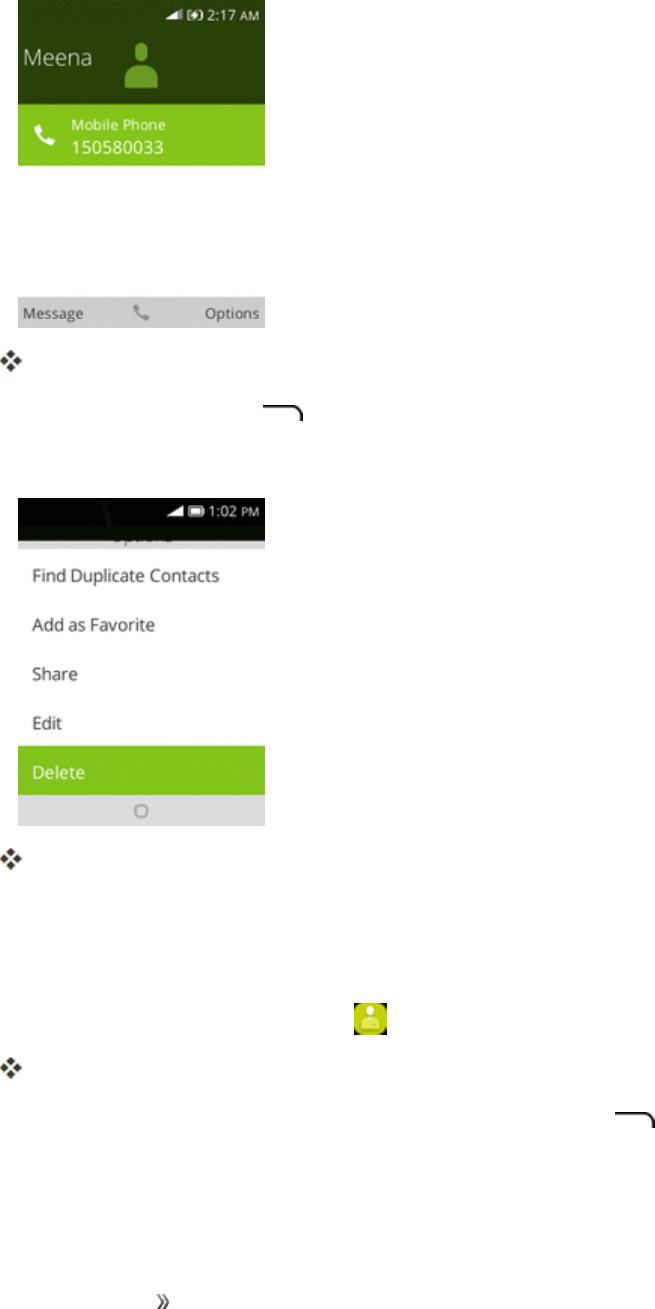
Making Connections Contacts 43
2. Selectacontacttoviewitsdetails.
Thecontact’sdetailedlistingappears.
3. PresstheRight soft key andthenselectDelete.
4. SelectDelete.
Thecontactisdeleted.
SHARE A CONTACT
YoucanquicklysharecontactsusingBluetooth,Gmail,ortextmessaging.
1. Fromtheappslist,selectContacts .
YouwillseetheContactslist.
2. Selectacontacttodisplayit,andthenpresstheRight soft key andselectShare.
3. IntheShare Withmenu,selectamethod:
Making Connections Contacts 44
lE-MailtosendtheinformationasanEmailattachment.Addressthemessage,adda
subjectandamessage,andthenselectSend.SeeCreateandSendEmailfordetails.
lMessagestosendtheinformationinatextmessage.Selectacontactorenterawireless
phonenumber,enteranyadditionalinformation,andthenselectSend.Formore
informationontextmessaging,seeSendaMultimediaMessage(MMS).
lBluetoothtosendtheinformationviaBluetooth.SeeBluetoothforinformationonpairing
andsendingviaBluetooth.
4. Completetherequiredstepsaspromptedfortheselectedmethod.
Theselectedcontactwillbeshared.
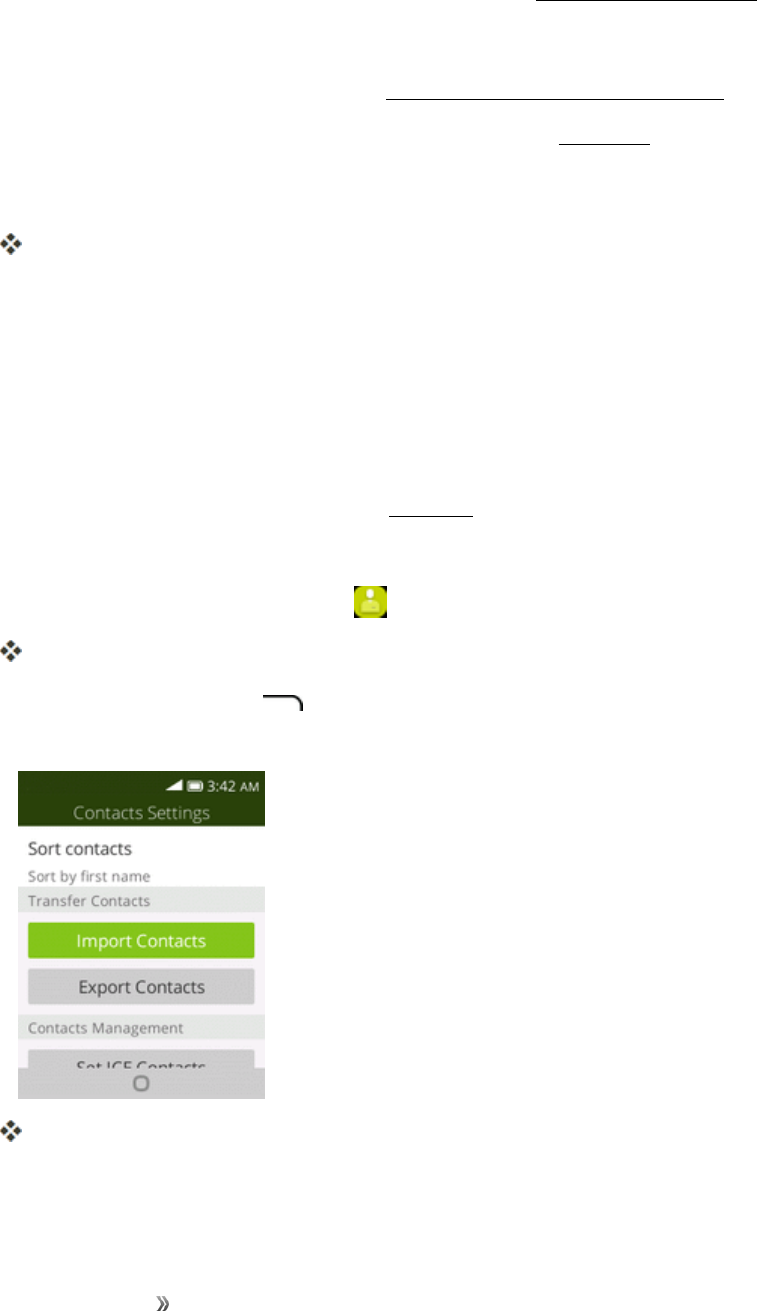
IMPORT CONTACTS
YourphoneoffersacoupleofoptionsforimportingcontactsfrominstalledSDmemorycardsor
externaldevicesviaUSB.
Before Importing Contacts from an SD Card
YouwillneedtohaveinstalledanSDcardwithpreviouslybackedupcontactsinformationintoyour
phonebeforeyoucanimportcontacts.SeeSDCardforSDcardinformation.
Import Contacts from an SD Card or USB Storage
1. Fromtheappslist,selectContacts .
YouwillseetheContactslist.
2. PresstheRight soft key andthenselectSettings>Import Contacts/Export
Contacts.
YouwillseetheImportContacts/ExportContactsmenu.
3. SelectImport ContactsorExport Contacts.
4. Followtheonscreeninstructionstocompletetheimport.

Making Connections Contacts 45
Thecontactsareimportedandstoredintheselectedaccount.
BACK UP CONTACTS
IfyouaresavingcontactstoanaccountthatdoesnotautomaticallybackthemupviatheCloud,you
canmanuallybackthemuptoanoptionalinstalledSDcardforre-importifneeded.
Before Backing Up Contacts to an SD Card
YouwillneedtohaveinstalledanSDcardwithpreviouslybackedupcontactsinformationintoyour
phonebeforeyoucanbackupyourcontacts.SeeSDCardforSDcardinformation.
Back Up Contacts to Your SD Card
1. Fromtheappslist,selectContacts .
YouwillseetheContactslist.
2. PresstheRight soft key >andselectSettings>Import Contacts/Export Contacts.
YouwillseetheImportContacts/ExportContactsmenu.
3. SelectExport Contacts.
4. SelectMemorycardtoconfirmtheexport.
5. Followtheonscreeninstructionsandselectcontactstocompletetheexport.
ThecontactsareexportedandsavedtotheinstalledSDcard.

Making Connections Messaging 46
MESSAGING
Withwirelessserviceandyourphone’smessagingcapabilities,youhavetheopportunitytoshare
informationthroughmanydifferentchannelsandaccounts,includingpersonalandcorporateemail,
andtextandmultimediamessaging.
TEXT AND MULTIMEDIA MESSAGING
Withtextmessaging(SMS),youcansendandreceiveinstanttextmessagesbetweenyour
wirelessphoneandanothermessaging-readyphone.
Multimediamessages,orMMS,cancontaintextandpictures,music,audioorvideofiles,contact
cards.
Seeyourserviceplanforapplicablechargesformessaging.
Send a Text Message
Quicklycomposeandsendtextmessagesonyourphone.
1. Fromtheappslist,selectMessages .
–or–
Select fromanyscreenexceptduringcall.
2. OntheMessagesscreen,presstheLeft soft key tocomposemessages.
TheComposescreenopens.
3. Fillinoneormorerecipients.Youcan:
lEnterphonenumbersdirectlyintheTofield.Asyouenterinformation,anymatchingphone
numbersfromyourcontactslistaredisplayed.Selectamatchtoenterthatnumberoraddress
directly.
lPresstheRight soft key toaddthecontactstowhomyouwanttosendthemessage.

Making Connections Messaging 47
lSelectthe“Message”boxandthenstartcomposingyourmessage.
Note:Onceyougooverthe160-characterlimit,anewmessageiscreatedbutautomaticallyjoined
intoonewhenreceived.
4. Whendone,presstheLeft soft key tosendthetextmessage.
Send a Multimedia Message (MMS)
Whenyouneedtoaddalittlemoretoatextmessage,youcansendamultimediamessage(MMS)
withtextandpictures,music,audioorvideofiles,contactcards.
1. Fromtheappslist,selectMessages .
–or–
Select fromanyscreen.
2. OntheMessagesscreen,presstheLeft soft key tocomposemessages.
3. Fillinoneormorerecipients.Youcan:
lEnterphonenumbersdirectlyintheTofield.Asyouenterinformation,anymatchingphone
numbersfromyourcontactslistaredisplayed.Selectamatchtoenterthatnumberoraddress
directly.
lPresstheRight soft key toaddthecontactstowhomyouwanttosendthemessage.
lSelectthe“Message”boxandthenstartcomposingyourmessage.
Note:Toaddasubjectline,presstheRight soft key >and selectAdd Subject.
4. Selectthe“Message”box,andthenstartcomposingyourmessage.
5. PresstheRight soft key andselectAdd Attachment.
6. IntheAttachwindow,selectfromthefollowingfileattachments:

Making Connections Messaging 48
lVideo.Selectavideoandattachit.
lMusic.Selectatrackfromyourphoneormemorycard.
lGallery.SelectaphotofromGallery.
lContacts.Selectacontactfromyourphone.
lCamera.SelectCameratotakeaphotooravideo.
7. PresstheLeft soft key totosendtheMMSmessage.
Save and Resume a Draft Message
Whilecomposingatextormultimediamessage,presstheRight soft key continuouslyand
press tosaveyourmessageasadraft.
Toresumecomposingthemessage:
1. Fromtheappslist,selectMessages .
2. OntheMessagesscreen,selectthemessagetoresumeeditingit.
3. Whenyoufinisheditingthemessage,presstheLeft soft key .
New Messages Notification
Dependingonyournotificationsettings,thephonewillplayaringtone,vibratewhenyoureceivea
newtextormultimediamessage.
Anoticeiconalsoappearsinthenotificationsareaofthestatusbartonotifyyouofanewtextor
multimediamessage.Whenyouunfoldthephone,apop-upwilldisplaytonotifyyouthenew
message.PresstheRight soft key toreplythemessagedirectlyorpresstheLeft soft key
toenterhomescreen.
Manage Message Conversations
Textandmultimediamessagesthataresenttoandreceivedfromacontact(oranumber)are
groupedintoconversationsormessagethreadsintheMessagesscreen.TextorMMSconversations
letyouseeexchangedmessages(similartoachatprogram)withacontactonthescreen.
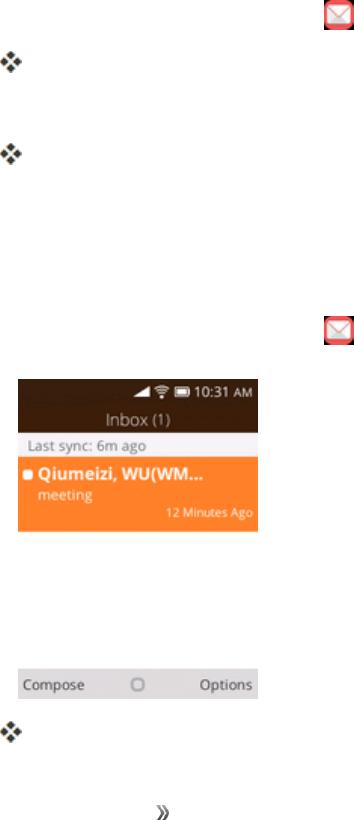
Read a Text Message
OntheMessagesscreen,pressthetextmessageorconversationtoopenandreadit.
ToreturntotheMessagingscreenfromaconversation,presstheBack/clear key .
Note:Toviewthedetailsofaparticularmessage,intheconversation,presstheRight soft key
toopentheoptionsmenu,andthenchooseView message report.
Note:IfamessagecontainsalinktoaWebpage,pressthemessageandthenpressthelinkto
openitintheWebbrowser.

Making Connections Messaging 49
Note:Ifamessagecontainsaphonenumber,pressthemessageandthenpressthephone
numbertodialthenumberoraddittoyourcontacts.
View a Multimedia Message (MMS)
1. Fromtheappslist,select Messages .
2. OntheMessagesscreen,selectamultimediamessageorconversationtoopenit.
3. Selecttheattachmenttoopenit.
Note:Ifyouareconcernedaboutthesizeofyourdatadownloads,checkthemultimediamessage
sizebeforeyoudownloadit.
Reply to a Message
1. Fromtheappslist,select Messages .
2. OntheMessagesscreen,selectaconversationtoopenit.
3. SelecttheMessageboxatthebottomofthescreen,enteryourreplymessage,andthenpress
theLeft soft key tosend.
Note:Toreplytoatextmessagewithamultimediamessage,openthetextmessage,pressthe
Right soft key andthenselectAdd SubjectorAdd Attachment.Thetextmessageis
automaticallyconvertedintoamultimediamessage.
Delete Conversations
1. Fromtheappslist,select Messages .
2. OntheMessagesscreen,presstheRight soft key toselectDelete Threadtodeletethe
conversation.
3. Todeletemorethanoneconversation,selectSelect ThreadandthenpresstheRight soft
key todeletethesemessages.
Tip:Youcanalsodeleteaconversationwhileyou'reviewingit.Whileviewingaconversation,press
theRight soft key andthenselectDeletetoconfirm.
Text and MMS Options
ThemessagessettingsmenuletsyoucontroloptionsforyourtextandMMSmessagesincluding
messagelimits,sizesettings,andnotifications.
1. Fromtheappslist,select Messages .
2. OntheMessagesscreen,presstheRight soft key andselectSettings.Youcansetthe
following:
Making Connections Messaging 50
lAuto Retrieve Messages:Selectthisoptiontoautomaticallyretrieveallyourmultimedia
messagescompletely.Whenselected,themultimediamessageheaderplusthemessage
bodyandattachmentswillautomaticallydownloadtoyourphone.Ifyouturnoff,onlythe
multimediamessageheaderwillberetrievedandshowninyourMessagingscreen.
lWAP Push:PresstoenterWAPpushoptions.
lEmergency alerts:PresstoenterEmergencyalertsoptions.
E-MAIL
UsetheE-Mailapplicationtosendandreceiveemailfromyourwebmailorotheraccounts,using
POP3orIMAP,oraccessyourExchangeActiveSyncaccountforyourcorporateemailneeds.
Set Up an E-mail Account
Yourphonesupportsseveraltypesofemailaccountsandallowsyoutohavemultipleemail
accountssetupatonetime.
Beforesettingupanemailaccount,makesureyouhavetheusername(userID),password,server
name,etc.,soyoucangetsetupsuccessfully.
1. Fromtheappslist,selectE-Mail .
Apopupwindowforaddinganaccountappearsifnoemailaccounthasbeenpreviouslysetup.
2. Followtheonscreeninstructionstosetupyouremailaccount.
Theemailaccountissetupandyouwillbeginreceivingemail.
Add Another E-mail Account
Ifyouhavemultipleemailaccountsyouwishtoviewonyourphone,youcanaddseveraltypesof
personalemailaccounts,suchasPOP3andIMAPaccountsonyourphone.
1. Fromtheappslist,selectE-Mail .
Theemailinboxopens.
Making Connections Messaging 51
2. PresstheRight soft key andselectSettings.ThenpresstheLeft soft key toadd
account.
3. Followtheonscreeninstructionstocompletetheaccountsetup.
Theemailaccountisaddedandyouwillbeginreceivingemailfortheaccount.
Create and Send E-mail
Composeandsendemailusinganyaccountyouhavesetuponyourphone.Increaseyour
productivitybyattachingfilessuchaspictures,videos,ordocumentstoyouremailmessages.
1. Fromtheappslist,selectE-Mail .
Theemailinboxopens.

Making Connections Messaging 52
2. Fromtheinbox,presstheLeft soft key tocompose.
Theemailcompositionwindowopens.
3. Enterthemessagerecipient(s),subject,andmessage,andthenpresstheLeft soft key to
send.
Theemailmessageissent.
Email Composition Options
nAdd Cc/Bcc:Inthemailsubjectorcompositionbox,presstheRight soft key toadd
recipients.
nAdd Attachment:Inthemailcompositionbox,presstheRight soft key >Add
Attachment.Locateandthenchoosethepictureorvideoyouwanttoattach.
nSave to Local Draft (Send Later):Whilecomposingyourmessage,presstheEnd/power
key andapop-upwindowwilldisplaywhethertosaveasadraft.
Note:Toviewyourdraftemailmessages,intheinbox,presstheRight soft key >View
Folders > Local Drafts.
Note:Toviewyoursentmessages,intheinbox,presstheRight soft key >Outbox.
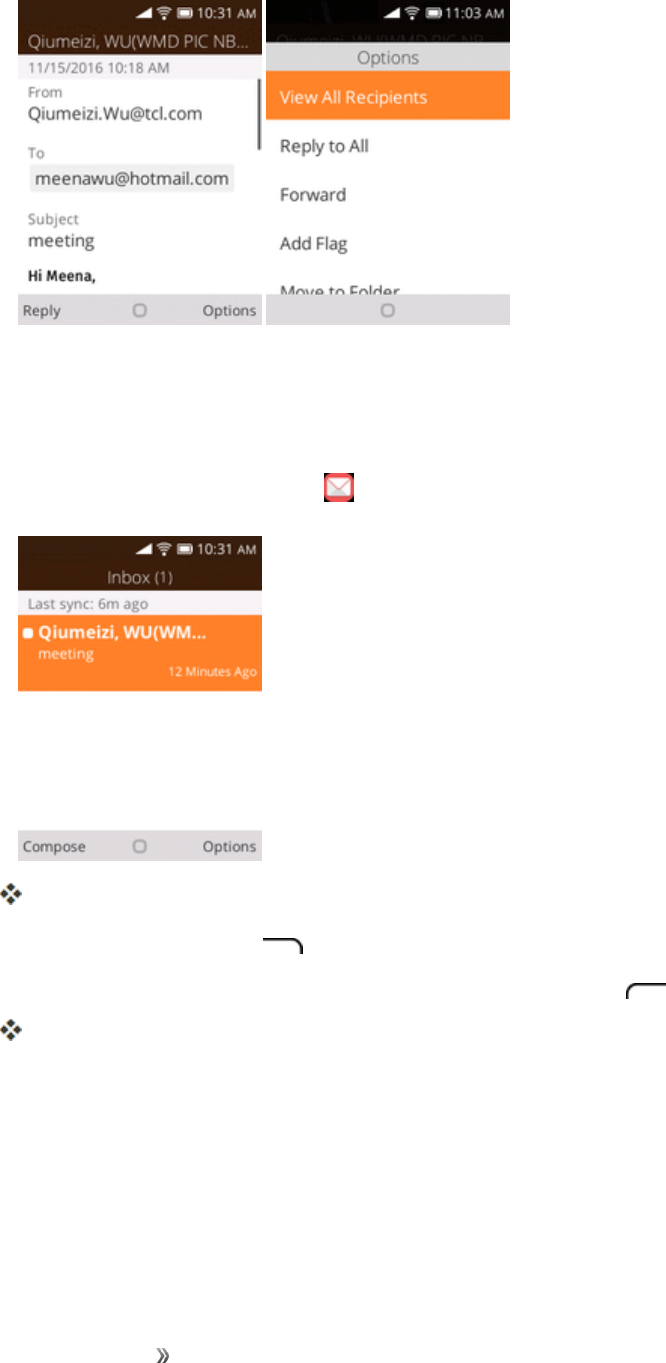
Open E-mail Messages
Youcanalsoopenandreademailmessagesdirectlyfromtheemailinbox.Readingandreplyingto
emailonyourphoneisassimpleasonyourcomputer.

Making Connections Messaging 53
1. Fromtheappslist,selectE-Mail .
Theemailinboxopens.
2. Pressthemessageyouwanttoview.
Theemailmessageopens.
3. PresstheLeft soft key toreplyemaildirectlyorpresstheRight soft key toopen
emailoptionstoreplytothemessage.
Making Connections Messaging 54
Delete an E-mail Account
Youcandeleteanemailaccountfromyourphoneifyounolongerwishtoreceivemessagesforthe
accountonyourphone.
1. Fromtheappslist,selectE-Mail .
Theemailinboxopens.
2. PresstheRight soft key >Settings.
3. Selecttheaccount(s)todelete,andthenpresstheLeft soft key toconfirm.
Theaccountisdeletedfromyourphone
Manage Your Email Inbox
Youremailinboxprovidesmanagementoptionsforviewing,sorting,anddeletingyouremail
messages.

Making Connections Messaging 55
View Your Email Inbox
1. Fromtheappslist,selectE-Mail .
Theemailinboxopens.
2. PresstheRight soft key >View Folders> Inboxtoseeallyouremailinboxesatonce.
Refresh an Email Account
Whateveryourautomaticsynchronizationsettingsare,youcanalsosynchronizeyoursentand
receivedemailmessagesmanuallyatanytime.
nWhileviewingtheaccountyouwanttosynchronize,presstheRight soft key >
Synchronize.
Delete an Email Message
nChoosethemessageyouwanttodelete,presstheRight soft key >Delete.
Delete Multiple Email Messages
1. Ontheemailaccountinbox,presstheRight soft key >Edit>Select Multiple.
2. Selectthemessagesyouwanttodelete.
3. PresstheRight soft key >Delete,andthenpresstheRight soft key toconfirm.

Making Connections Internet 56
INTERNET
ThefollowingtopicsdescribehowtoconnecttoandusetheInternetonyourphone.
Data Connection Status and Indicators
Yourphonedisplaysthecurrentstatusofyourdataconnectionthroughindicatorsatthetopofthe
screen.Thefollowingsymbolsareused:
Icon Status
Network (full signal):Thefullnessofthetriangleiconindicatesthestrengthofthe
signal.Afullericonmeansabettersignal.
4G LTE data service:Yourphoneisconnectedtoa4GLTEnetwork.
3G data service:Yourphoneisconnectedtoa3Gdatanetwork.
Wi-Fi connection:YourphoneisconnectedtoaWi-Finetworkfordata.
BROWSER
Yourphone’sWebbrowsergivesyoufullaccesstobothmobileandtraditionalwebsitesonthego,
using2G,3G,4G,orWi-Fidataconnections.
SSL/TLS
SSL(SecureSocketsLayer)andTLS(TransportLayerSecurity)areprotocolsforencrypting
sent/receiveddata.WhileinascreenconnectedbySSL/TLS,dataisencryptedtosafely
send/receiveprivateinformation,creditcardnumbers,corporatesecrets,etc.,andprovide
protectionagainstonlinethreats(eavesdropping,falsification,impersonation,etc.).
SSL/TLS Cautions
Whenopeningasecuredpage,usersmustdecideastheirresponsibilitywhetherornottoopen
thepagewithuseofSSL/TLS.VirginandtheapplicableCertificationAuthoritiesmakeno
guaranteeswhatsoevertousersregardingsecurityofSSL/TLS.
Use the Browser
YourphonesupportstheWebbrowserforsurfingontheInternet.

Making Connections Internet 57
1. Fromtheappslist,selectBrowser .
Browseropens.
2. PresstheLeft soft key toentersearchwordsoraWebaddress(URL).
ThesearchresultsappearoraWebpageopens.
3. UsetheNavigationkeytolocatetheplaceyouwanttovisit,andthenpress toconfirm.
Browser Options
CustomizeyourexperiencewiththeInternetthroughthebrowseroptionsmenu.

Making Connections Internet 58
1. Fromtheappslist,selectBrowser .
Thebrowseropens.
2. PresstheRight soft key toopenbrowseroptions.
Yourbrowseroptionsaredisplayed.
Making Connections Connectivity 59
CONNECTIVITY
Thefollowingtopicsaddressyourphone’sconnectivityoptions,includingWi-FiandBluetooth.
WI-FI
Wi-FiprovideswirelessInternetaccessoverdistancesofupto300feet.Touseyourphone’sWi-Fi,
youneedaccesstoawirelessaccesspointor“hotspot.”
TheavailabilityandrangeoftheWi-Fisignaldependsonanumberoffactors,including
infrastructureandotherobjectsthroughwhichthesignalpasses.
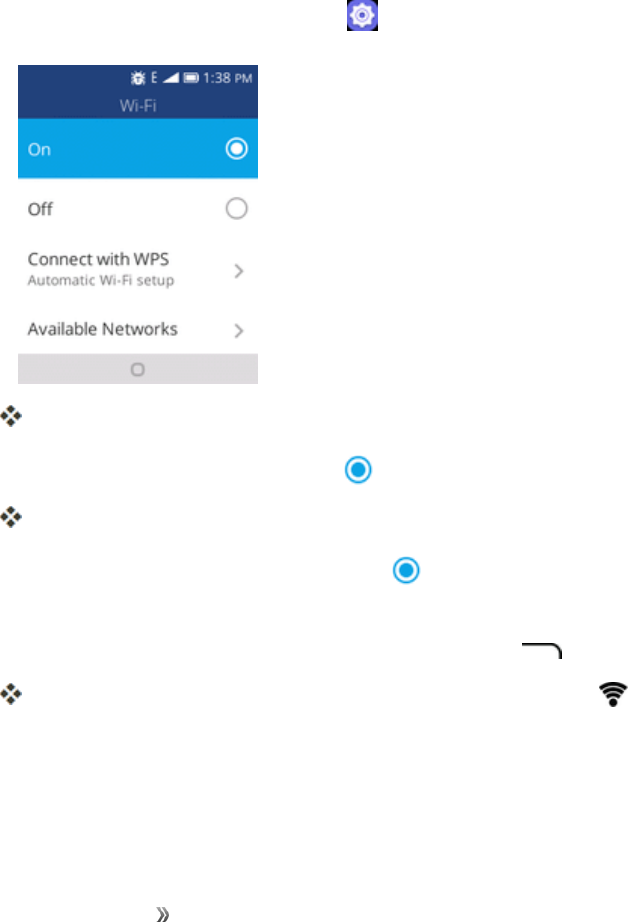
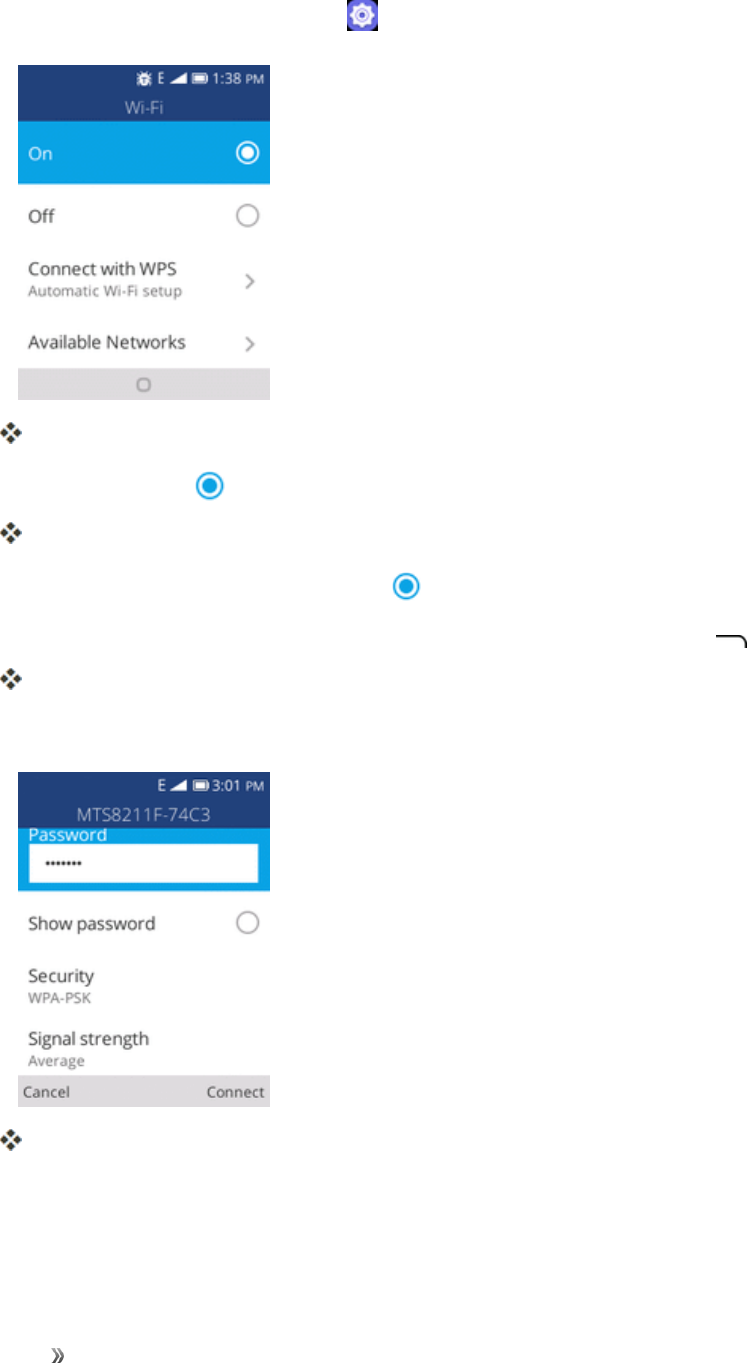
Turn Wi-Fi On and Connect to a Wireless Network
Usethewirelessandnetworkssettingmenutoenableyourphone’sWi-Fiandconnecttoan
availableWi-Finetwork.
1. Fromtheappslist,selectSettings > Network & Connectivity > Wi-Fi.
TheWi-Fisettingsmenuappears.
2. SelecttheOnicontoturnWi-Fion .
Wi-Fiisenabled.Youwillseethenamesandsecuritysettingsofin-rangeWi-Finetworks.
lTodisableWi-Fi,selecttheOfficon .
3. ChooseAvailable Networks,selectaWi-Finetworktoconnect,enterthepassword(ifit’snot
anopennetwork),andthenpresstheRight soft key toconnect.
YourphoneisconnectedtotheWi-Finetwork.Youwillsee( )inthestatusbar.
lThepassword,forahouseholdwirelessLANrouter,issometimesfoundonastickeronthe
router(WEP,WPA,KEY,etc.).Contacttheroutermanufacturerforinformation.For
passwordforapublicwirelessLAN,checkwithuser'sserviceprovider.
lEnteringapasswordisnotrequiredifanaccesspointisnotsecurityprotected.

Making Connections Connectivity 60
Note:Thenexttimeyourphoneconnectstoapreviouslyaccessedsecuredwirelessnetwork,you
willnotbepromptedtoenterthepasswordagain,unlessyouresetyourphonetoitsfactorydefault
settingsoryouinstructthephonetoforgetthenetwork.
Note:Wi-Finetworksareself-discoverable,whichmeansnoadditionalstepsarerequiredforyour
phonetoconnecttoaWi-Finetwork.Itmaybenecessarytoprovideausernameandpasswordfor
certainclosedwirelessnetworks.
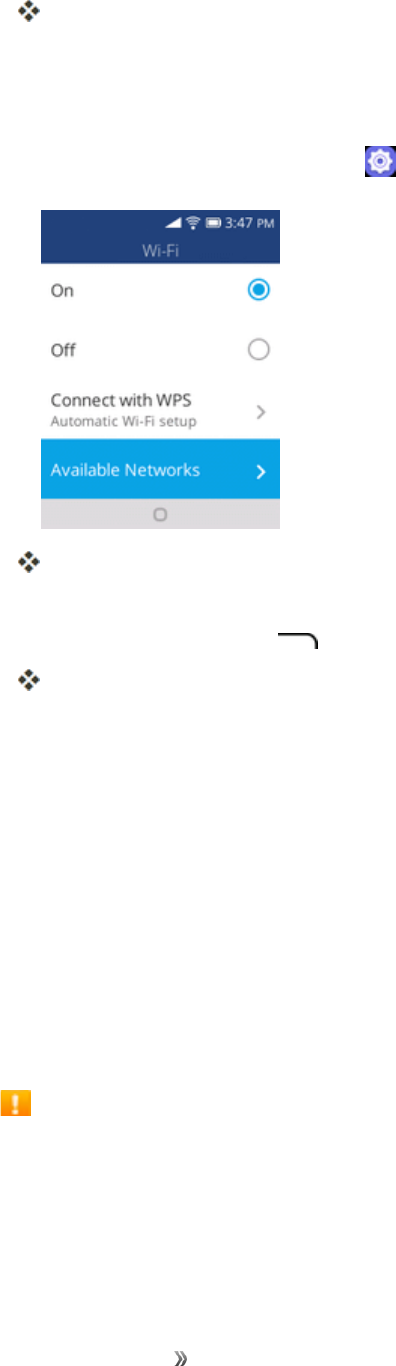
Wi-Fi Settings
UsetheWi-FisettingsmenutomanuallysetyourWi-Ficonnectionoptions.
1. Fromtheappslist,selectSettings > Network & Connectivity > Wi-Fi.
TheWi-Fisettingsmenuappears.
2. SelecttheOnicontoturnWi-Fion .
Wi-Fiisenabled.Youwillseethenamesandsecuritysettingsofin-rangeWi-Finetworks.
lTodisableWi-Fi,selecttheOfficon .
3. SelectAdvanced Settings.
Making Connections Connectivity 61
TheadvancedWi-Fisettingsmenuappears.
Disconnect Wi-Fi
YoumaywishtodisconnectfromaconnectedWi-FinetworkwithoutturningWi-Fioff.
1. Fromtheappslist,selectSettings > Network & Connectivity > Wi-Fi.
TheWi-Fisettingsmenuappears.
2. SelectAvailable Networksandchoosethenameoftheconnectedaccesspointandthen
presstheRight soft key toforget.
Wi-Fiisdisconnected.
Note:Afterdisconnectingfromanaccesspoint,youmayneedtore-enterthepasswordtoreconnect.
BLUETOOTH
Bluetooth®isashort-rangecommunicationstechnologythatallowsyoutoconnectwirelesslytoa
numberofBluetoothdevices,suchasheadsetsandhands-freecarkits,andBluetooth-enabled
handhelds,computers,printers,andwirelessphones.TheBluetoothcommunicationrangeis
usuallyapproximately30feet.
Bluetooth Hints
Problem:Can’tuseBluetooth?
Answer:Isyourphoneinairplanemode?Bluetoothisunavailableinairplanemode.
Bluetooth Function Cautions
Informationmaynotappearcorrectlyonconnecteddevicesdependingonthetransferreddata.
Making Connections Connectivity 62
Bluetooth Information
BluetoothisatechnologythatenableswirelessconnectionwithPCs,Bluetoothdeviceswithhands-
freefeatures,etc.
Function Description
Audio output Listentomusic,etc.,wirelessly.
Hands-free calls Callhands-free,usingBluetooth-capablehands-freedevicesand
headsets.
Data exchange ExchangedatawithBluetoothdevices.
Enable the Bluetooth Feature
Usethesettingsmenutoenableordisableyourphone’sBluetoothcapabilities.
nWirelessconnectiontoallBluetoothfunctionsisnotguaranteedforthephone.
nThephonemaynotconnectproperlydependingontheotherdevice.
nNoisemaybeexperiencedwithwirelesscallsandhands-freecallsdependingontheconditions.
ToenableBluetooth:
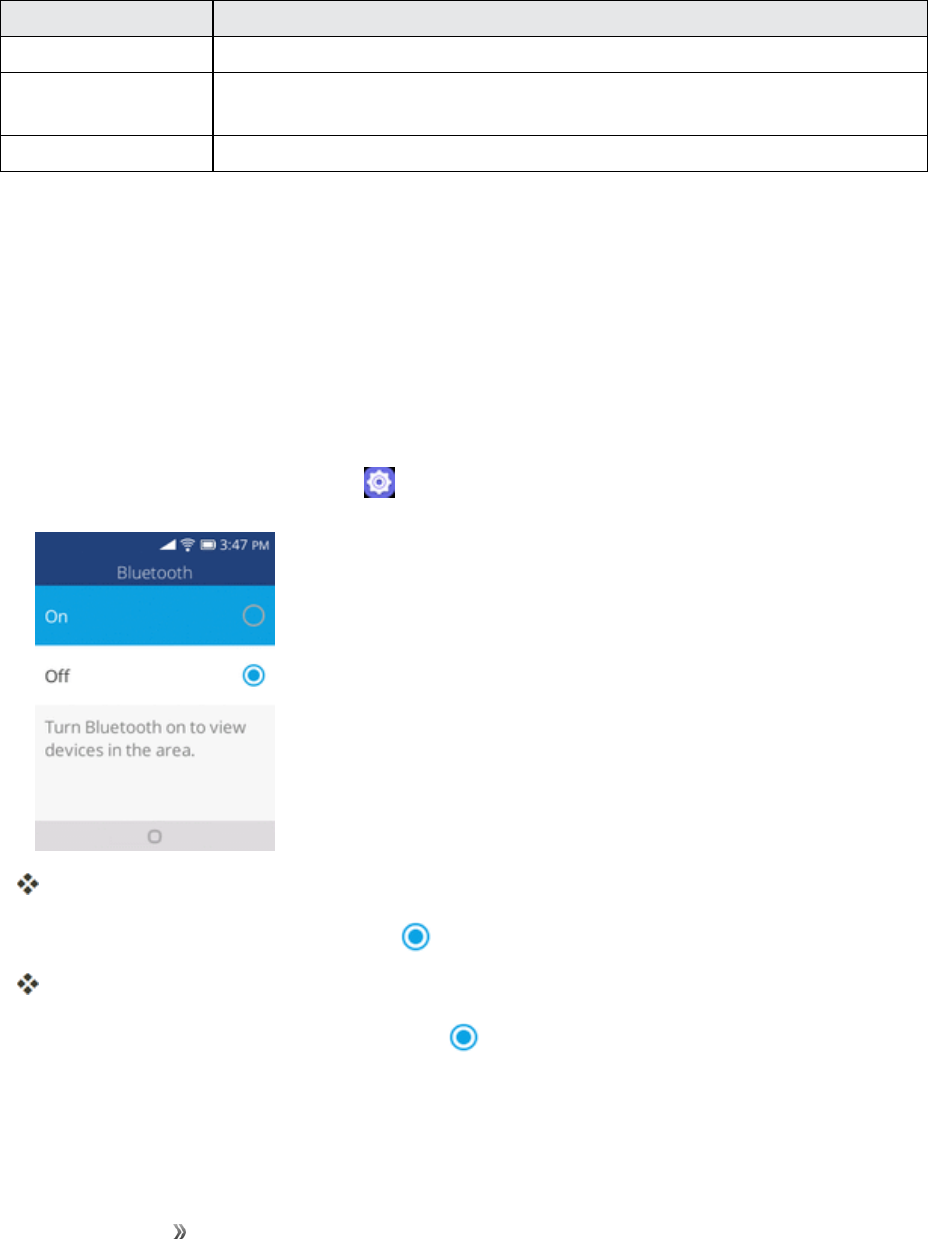
1. Fromtheappslist,selectSettings > Network & Connectivity > Bluetooth.
TheBluetoothsettingsopen.
2. SelecttheOnicontoturnBluetoothon .
Bluetoothisenabled.
lTodisableBluetooth,selecttheOfficon .
Note:TurnoffBluetoothwhennotinusetoconservebatterypower,orinplaceswhereusinga
wirelessphoneisprohibited,suchasaboardanaircraftandinhospitals.
Making Connections Connectivity 63
Pair Bluetooth Devices
SearchforandpairnearbyBluetoothdevices.RegisteredBluetooth®devicescanbeconnected
simply.
nEnabletheBluetoothfunctionontheBluetoothdevicesbeingpairedbeforehand.
TopairBluetoothdevices:
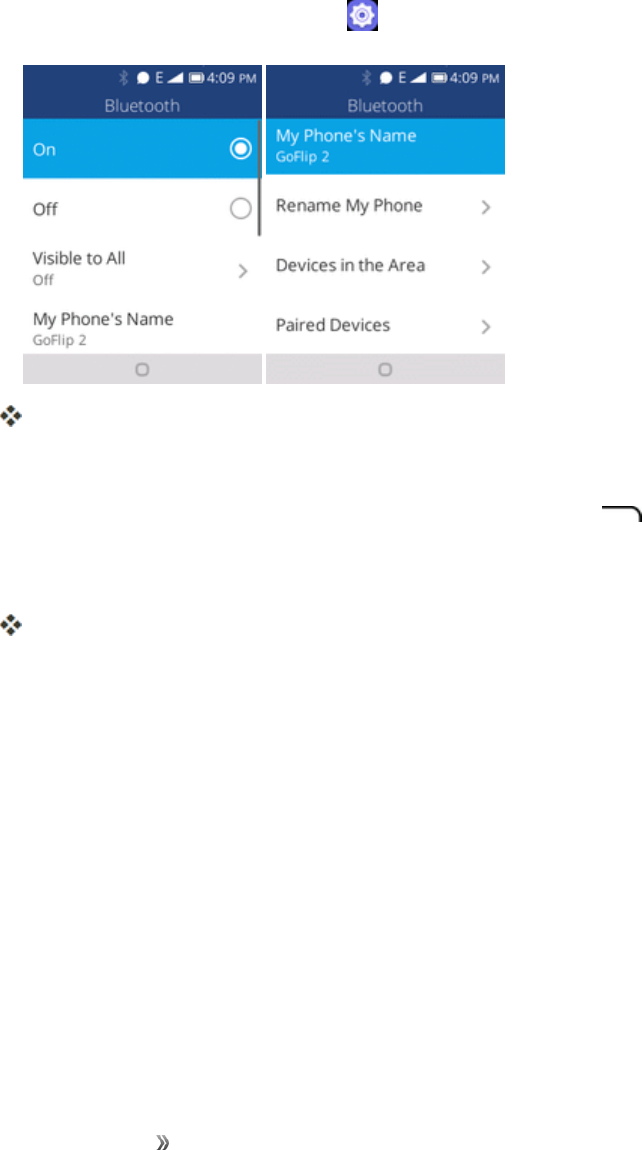
1. Fromtheappslist,selectSettings > Network & Connectivity > Bluetooth.
TheBluetoothsettingsopen.
lNearbydevicesappearinthe“DevicesintheArea”list.
lIfatargetdeviceisnotdetected,presstheRight soft key torescan.
2. Selectadevicefromthe“DevicesintheArea”list,andfollowtheonscreeninstructionstopairwith
thedevice.
TheBluetoothdeviceispairedtoyourphone.
lMethodstoacceptaBluetoothconnectiondifferdependingonthedevicesused.
Making Connections Connectivity 64
Unpairing from a Paired Device
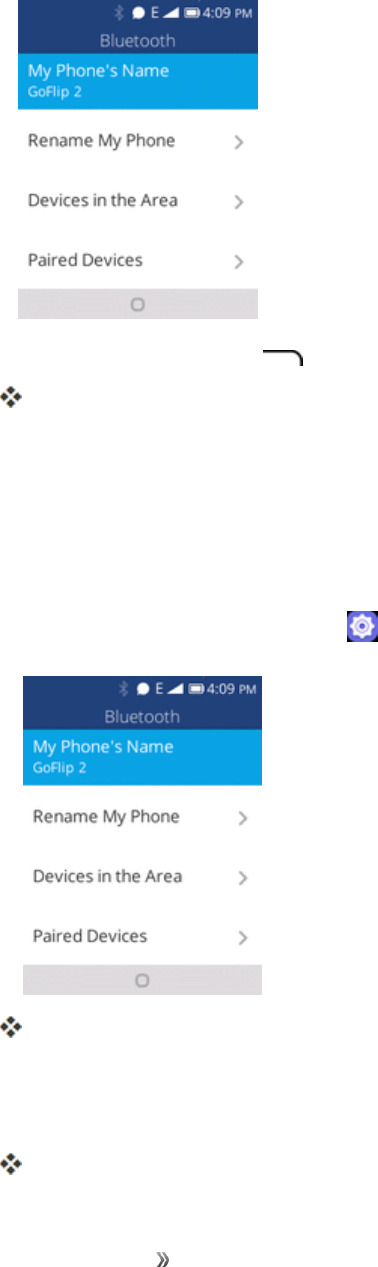
1. FromtheBluetoothsettingsmenu,selectPaired Devicestounpair.
2. PresstheRight soft key toforget.
Thedeviceisunpairedfromyourphone.Tomakeanotherconnectionwiththedevice,youwill
needtopairagain.
Connect to a Paired Bluetooth Device
YoucanlistentomusicoveraBluetoothstereoheadset,orhavehands-freeconversationsusinga
compatibleBluetoothheadsetorcarkit.It’sthesameproceduretosetupstereoaudioandhands-free
devices.
1. Fromtheappslist,selectSettings > Network & Connectivity > Bluetooth.
TheBluetoothsettingsopen.
lPairedBluetoothdevicesappearinthe“PairedDevices”list.
2. Selectadevicefromthe“PairedDevices”list.
Yourphoneconnectstothepaireddevice.
Making Connections Connectivity 65
Thepairingandconnectionstatusisdisplayedbelowthedevice’snameintheBluetoothdevices
section.Whenthedeviceisconnectedtoyourphone,theBluetoothpairedicon isdisplayedin
thestatusbar.Dependingonthetypeofdeviceyouhaveconnected,youcanthenstartusingthe
headsetorcarkittolistentomusicormakeandreceivephonecalls.
Note:DuetodifferentspecificationsandfeaturesofotherBluetooth-compatibledevices,display
andoperationsmaybedifferent,andfunctionssuchastransferorexchangemaynotbepossible
withallBluetooth-compatibledevices.
Send Information Using Bluetooth
YoucanuseBluetoothtotransferinformationbetweenyourphoneandanotherBluetooth-enabled
devicesuchasaphoneornotebookcomputer.
Types of Data You Can Send via Bluetooth
Youcansendthefollowingtypesofinformation,dependingonthedeviceyouaresendingto:
nImagesandvideos
nContacts
nAudiofiles
Intheinstructionsbelow,Contactsdataisbeingusedasanexample.
Sending Contacts Data via Bluetooth
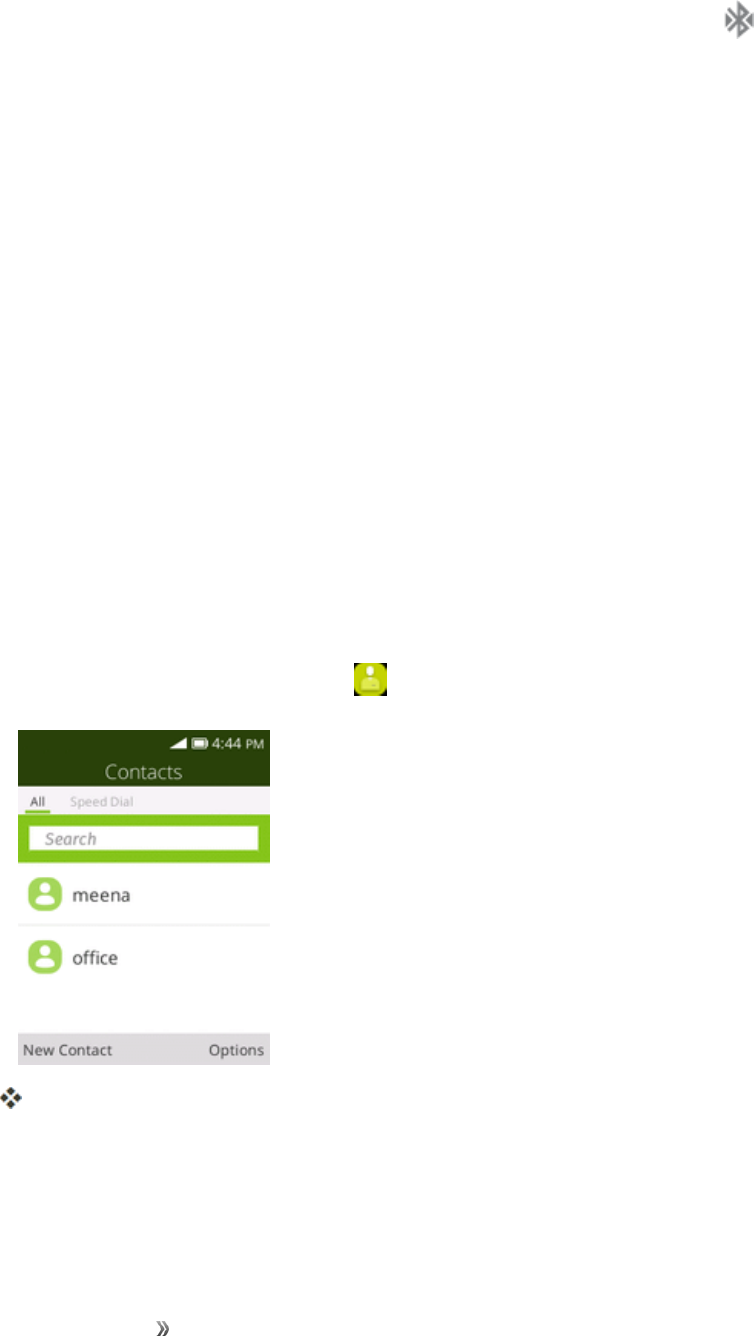
1. Fromtheappslist,selectContacts .
YouwillseetheContactslist.
Making Connections Connectivity 66
2. Selectacontacttosend.
3. PresstheRight soft key >Share > Bluetooth.
4. Selectapaireddevicetoreceivethedata.
Thecontactinformationissent.
lIfyouseeamessagetoconfirm,followtheonscreeninstructions.
Receive Information via Bluetooth
YourphoneiscapableofreceivingawidevarietyoffiletypeswithBluetooth,includingpictures,
musictracks,anddocumentssuchasPDFs.
1. WhenanotherdeviceattemptstosendafiletoyourphoneviaBluetooth,youwillseearequestto
acceptthefile.
2. PresstheLeft soft key onhomescreentoreviewthisnotice,andpresstheRight soft
key toacceptthefile.
Thefileissenttoyourphone.
lWhenyourphonereceivesafile,youwillseeanotification.
lWhenyouopenareceivedfile,whathappensnextdependsonthefiletype:
oMediafilesanddocumentsareusuallyopeneddirectlyinacompatibleapplication.For
example,ifyouopenamusictrack,itstartsplayingintheMusicapplication.
oForavCardcontactfile,iftherearemultiplevCardfilesonyourstoragecard,youcan
choosetoimportone,several,orallofthosecontactstoyourcontactslist.

Apps and Entertainment 67
APPS AND ENTERTAINMENT
Thetopicsinthissectionwillexplorethefeaturesthatmakeyourphonesomuchmorethana
phone,fromthecameraandproductivityappstomusic,entertainment,andmore.
Apps and Entertainment Camera and Video 68
CAMERA AND VIDEO
Youcanusethecameraorvideocameratotakeandsharepicturesandvideos.Yourphonecomes
witha2megapixelcamerathatletsyoucapturesharppicturesandvideos.
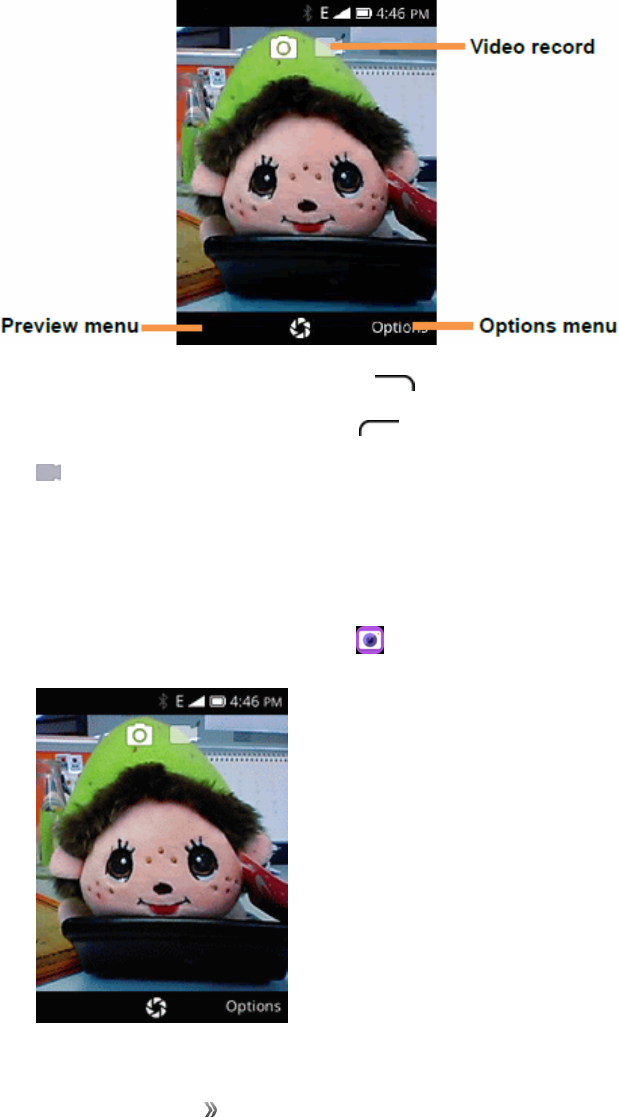
CAMERA OVERVIEW
Thecamera'sviewfinderscreenletsyouviewyoursubjectandaccesscameracontrolsandoptions.
nOptions:PresstheRight soft key toopensettingsoptions.
nPreview:PresstheLeft soft key toviewpictureyoutook.
nVideo record:Selecttostart/pausevideorecord.
Learn More About Your Phone's Camera
Foranoverviewofyourphone'scameraanditsfeatures,youcanaccessmoreinformationthrough
thephone'ssettingsmenu.
nFromtheappslist,selectCamera .

Apps and Entertainment Camera and Video 69
Thecameraviewfinderappears.
TAKE PICTURES AND RECORD VIDEOS
Thefollowingtopicsteachyouhowtotakepicturesandrecordvideoswithyourphone’scamera.
Capturing Pictures/Videos
nFile Format for Pictures:FileformatforpicturesisJPEG.
nFile Format for Videos:Fileformatforvideosis3GPP.
Camera Cautions
If Lens Becomes Dirty:Fingerprints/smudgesonlenspreventcapturingofclearstill
images/videos.Wipelenswithasoftclothbeforehand.
Avoid Exposure to Direct Sunlight:Becarefulnottoexposelenstodirectsunlightforlong
periods.Maydiscolorcolorfilterandaffectcolorofimages.
Take a Picture
Youcantakehigh-resolutionpicturesusingyourphone’scamera.
Note:IfyouhaveanSDcardinstalled,picturesandvideosarestoredtotheSDcard.Ifnocardis
installed,picturesandvideosaresavedtoyourphone’smemory.
1. Fromtheappslist,selectCamera .
Thecameraviewfinderappears.
2. Press totakethepicture.
TheshutterclicksandthepictureiscapturedandsavedtoyourphoneorSDcard.

Apps and Entertainment Camera and Video 70
Record Videos
Youcanrecordhigh-qualityvideoswithyourphone’svideocamera.
Note:IfyouhaveanSDcardinstalled,picturesandvideosarestoredtotheSDcard.Ifnocardis
installed,picturesandvideosaresavedtoyourphone’smemory.
1. Fromtheappslist,selectCamera .
Thecameraviewfinderappears.
2. AimthecameraatyoursubjectandthenpressNavigation RightkeytoswitchtoVideo ,
andpress tostartrecording.
Videorecordingbegins.
3. Press againtostoprecording.
ThecamerastopsrecordingandthevideoiscapturedandsavedtoyourphoneorSDcard.
Apps and Entertainment Camera and Video 71
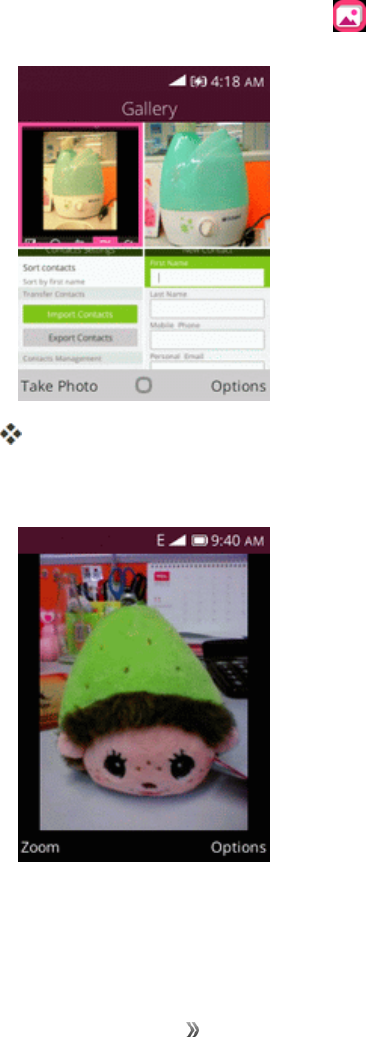
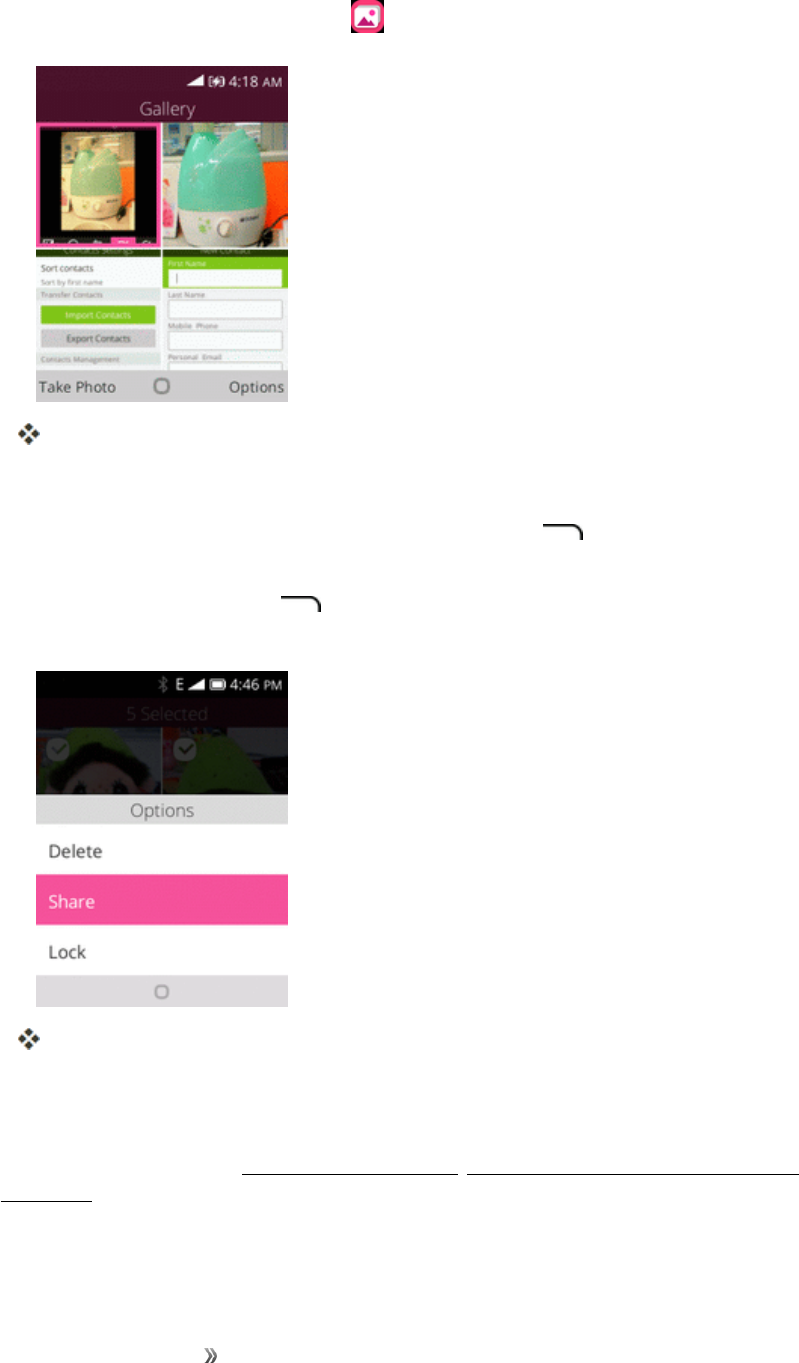
VIEW PICTURES AND VIDEOS USING GALLERY
UsingtheGalleryapplication,youcanviewpicturesthatyou’vetakenwithyourphone’scamera,
downloaded,orcopiedontoyourstoragecardorphonememory.
Forpicturesthatareonyourstoragecardorphonememory,youcandobasiceditingsuchas
rotatingandcropping.Youcanalsoeasilyassignapictureasyourcontactpictureorwallpaperand
sharepictureswithyourfriends.
View Pictures and Videos
Youcanaccessandviewallyourstoredpicturesfromyourphone’sGallery.
1. Fromtheappslist,selectGallery .
Thelistofpicturesopens.
2. Selectanimagetoviewthepicture.
Apps and Entertainment Camera and Video 72
Thepictureopens.
lPresstheLeft soft key tozoominorzoomout.
lPresstheRight soft key toopenoptionsmenuandchoosewhattodowiththepicture.
Pictures and Videos: Review Screen
Aftercapturingapictureorvideo,fromthecamerascreen,presstheLeft soft key toseethe
iteminthereviewscreen.Fromthere,youcanaccessoptionssuchasview,share,setaswallpaper
ordeletethepicture.
EDIT PICTURES
Whetheryou’rebrowsingpicturesinfilmstriporgridviewintheGalleryapplication,youcanchoose
apicturetoopenaselectionmenuandchoosetodeletethepicture,rotateorcropit,andmore.
Rotate a Picture
1. Fromtheappslist,selectGallery .
Thelistofpicturesopens.

Apps and Entertainment Camera and Video 73
2. Selectthepictureyouwanttorotate.
3. PresstheRight soft key andthenselectRotate.
Thepictureisrotated.
Edit a Picture
1. Fromtheappslist,selectGallery .
Thelistofpicturesopens.

Apps and Entertainment Camera and Video 74
2. Selectthepictureyouwanttoedit.
3. PresstheRight soft key andthenselectEdit.
Aneditscreenappearsonthepicture.
lExposure
lRotate
lCrop
lFilters
lAuto-correction
4. PresstheRight soft key tosavethechangestothepicture.
Themodifiedpictureissavedinthealbumasacopy.Theoriginalpictureremainsunedited.
SHARE PICTURES AND VIDEOS
TheGalleryapplicationletsyousendpicturesusingemail,Bluetoothormultimediamessages.
Send Pictures or Videos by Email, Messages or Bluetooth
Youcansendseveralpictures,videos,orbothinanemailmessage.Theyareaddedasfile
attachmentsinyouremail.
Apps and Entertainment Camera and Video 75
1. Fromtheappslist,selectGallery .
Thelistofpicturesopens.
2. Selectthepicturesyouwanttoshare.
lToselectmultipleitems,presstheRight soft key >Select Multipletoturnonmultiple
select.Selectalltheitemsyouwanttoinclude.
3. PresstheRight soft key >ShareandthenontheShareviamenu,selectE-mailor
Bluetooth.
Followonscreenpromptstocompleteandsendthemessage.
Note:IfyouselectedE-mailandyouhavemultipleemailaccounts,thedefaultemailaccountwillbe
used.
Formoreinformation,seeCreateandSendEmail,SendaMultimediaMessage(MMS),and
Bluetooth.

Apps and Entertainment Camera and Video 76
CAMERA SETTINGS
Youcanadjustyourcamera’ssettingsbypressingtheRight soft key onthecamerascreen.
Switch Between Camera and Video Mode
Youcanswitchbetweencameraandvideomodefreely.
1. Fromtheappslist,selectCamera .
Thecameraviewfinderappears.
2. PressNavigation RightkeytoswitchtoVideo.
Thevideoscreenopens.
Set Camera Functions
Youcanconfigureyourcamera’ssettingstofitanysituationandevent.

Apps and Entertainment Camera and Video 77
1. Fromtheappslist,selectCamera .
Thecameraviewfinderappears.
2. PresstheRight soft key toopenoptionsmenu.
Thecamerasettingsmenuopens.
3. Selectyourdesiredsettings.
Thesettingsareapplied.
lSettableitemsdifferdependingonthecameratypeinuse.
Apps and Entertainment Productivity 78
PRODUCTIVITY
Useyourphonetostayaheadofthegamewithcalendar,alarm,calculatorandmoreproductivity
apps.
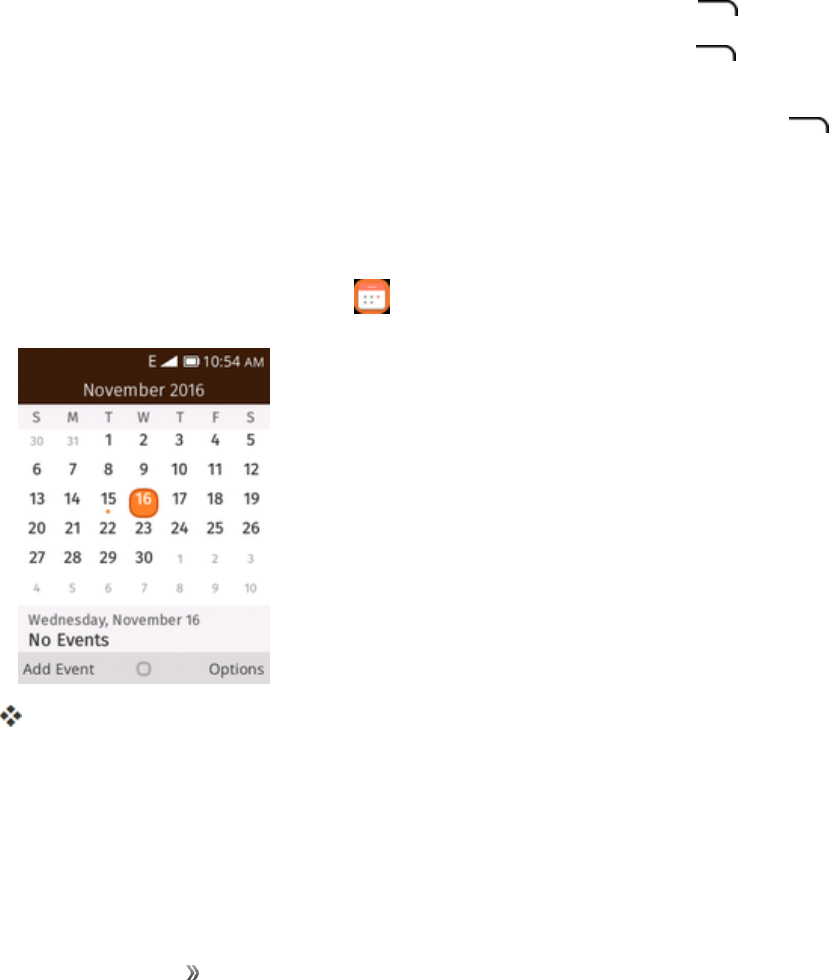
CALENDAR
UseCalendartocreateandmanageevents,meetings,andappointments.YourCalendarhelps
organizeyourtimeandremindsyouofimportantevents.Dependingonyoursynchronization
settings,yourphone’sCalendarstaysinsyncwithyourCalendarontheWeb,Exchange
ActiveSynccalendar,andOutlookcalendar.
Calendar Operations
nView Today’s Calendar:FromtheCalendar,presstheRight soft key >Today.
nChange Calendar View:FromtheCalendar,presstheRight soft key andchoose
Weekly VieworDay Viewtochangethecurrentview.
nView Particular Day/Month/Year:FromtheCalendar,presstheRight soft key >Go
andpressNavigationkeytochooseparticularday,monthoryear.
Add an Event to the Calendar
AddeventstoyourcalendardirectlyfromtheCalendarapplication.
1. Fromtheappslist,selectCalendar .
TheCalendarappopens.
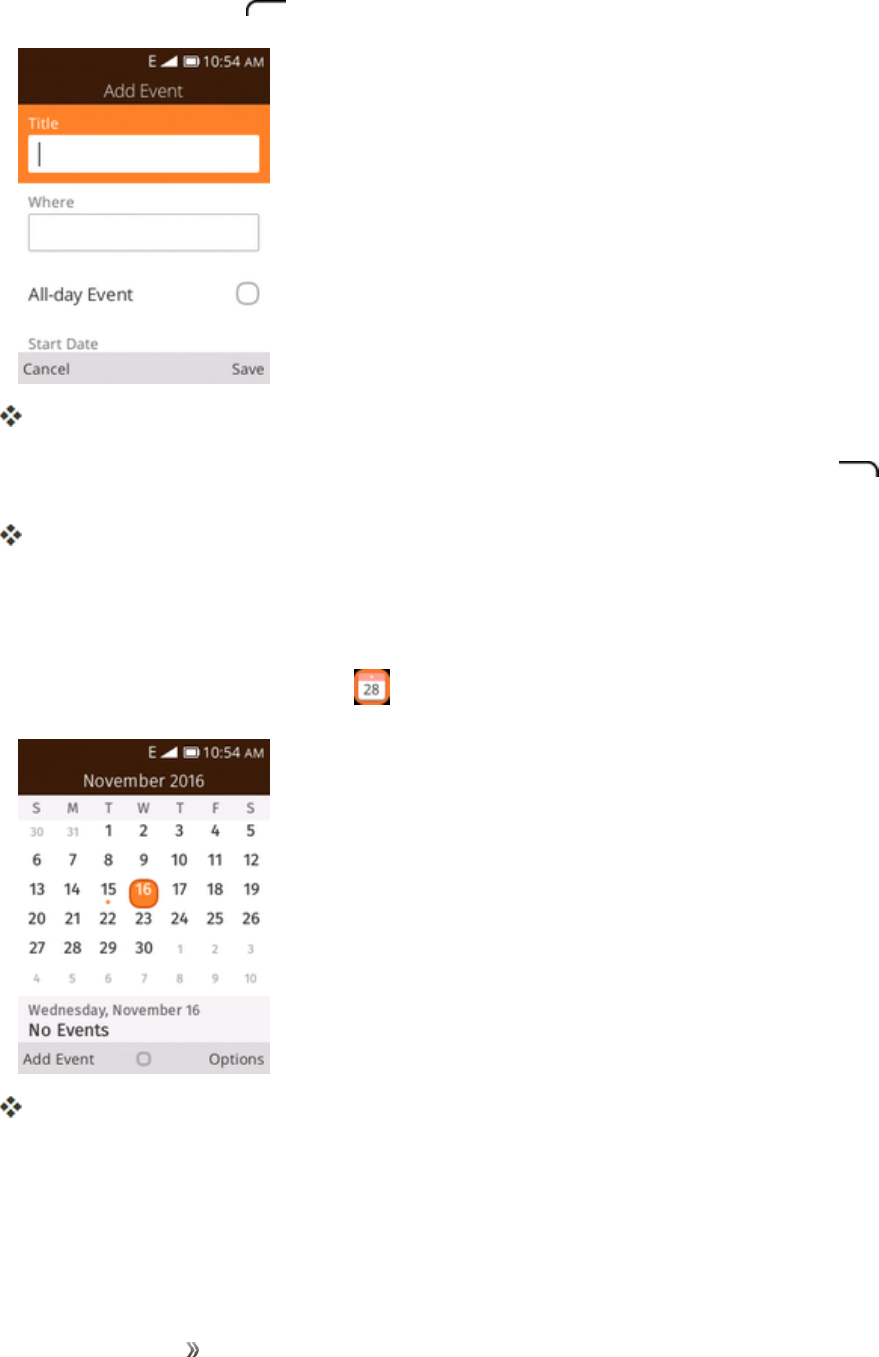
Apps and Entertainment Productivity 79
2. PresstheLeft soft key toaddnewevent.
Theaddeventwindowopens.
3. Enteraneventtitle,startdate/time,enddate/time,etc.,andthenpresstheRight soft key to
save.
Theeventisaddedtoyourcalendar.
View Calendar Events
YoucandisplaytheCalendarindaily,weeklyormonthlyview.
1. Fromtheappslist,selectCalendar .
TheCalendarappopens.
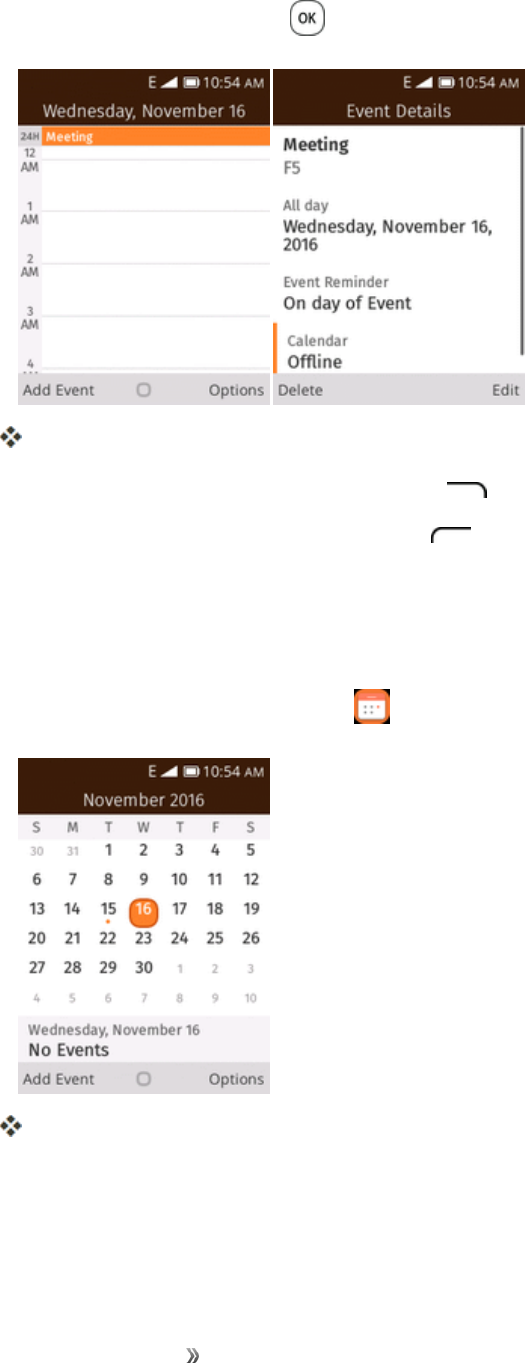
Apps and Entertainment Productivity 80
2. Selectadateandthenpress todisplayevents.
Theeventdetailsappear.
lIneventdetails,presstheRight soft key toedittheevent.
lIneventdetails,presstheLeft soft key todeletetheevent.
Sync Calendars
Youcanselectwhichcalendarsyou’dliketosynconyourphone,alongwithwhattypesof
informationyouwanttosync.
1. Fromtheappslist,selectCalendar .
TheCalendarappopens.

Apps and Entertainment Productivity 81
2. PresstheRight soft key >Sync calendar.
Thesyncsettingshavebeenupdated.
CALCULATOR
Yourphone’sconvenientbuilt-incalculatorletsyouperformbasicmathematicalequations.
1. Fromtheappslist,selectCalculator .
Thecalculatorapplaunches.
2. Presskeysforcalculations.
Calculationresultsappear.
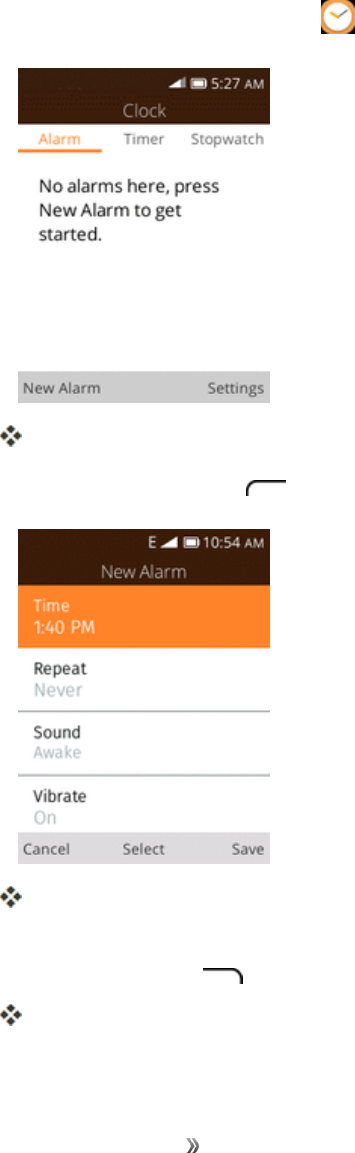
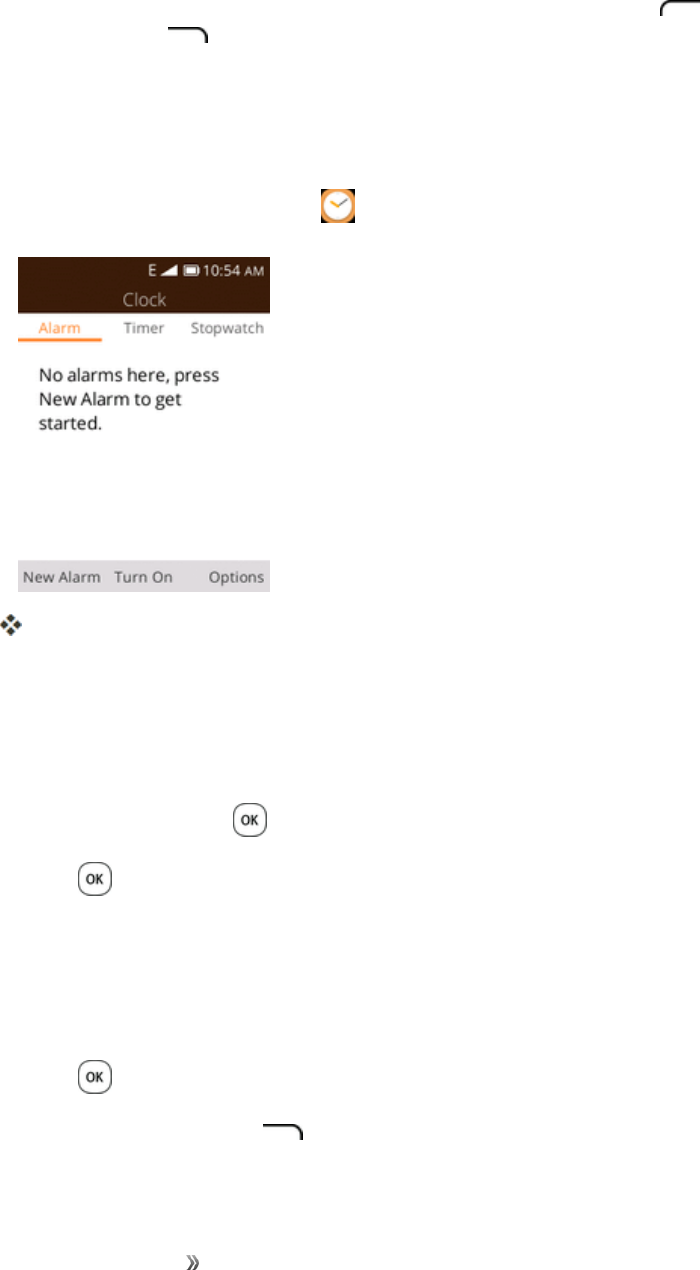
CLOCK
Yourphonehasaclockappthatletsyousetalarms,useastopwatch,andsetatimer.
Apps and Entertainment Productivity 82
Check the Time
Youcancheckthephoneanytimeonyourphone.Thecurrenttimedisplaysinthecenterofthehome
screen.
Set Alarms
Setmultiplealarmsusingyourphone’sClockapp.
1. Fromtheappslist,selectClock .
TheClockappears.
2. PresstheLeft soft key tocreatenewalarm.
Thealarmaddingscreenappears.
3. Setthealarmoptions,includingtime,repeatpattern,alarmtone,andvolume,andthenpress
theRight soft key toconfirm.
Thealarmisset.
Apps and Entertainment Productivity 83
Phone at Alarm Time
nAtthesetalarmtime,thephonesoundsthealarmand/orvibrates.
nStoppinganalarm:Whenthealarmsounds,presstheLeft soft key tosnoozeitorthe
Right soft key tostop.
Additional Clock Features
Yourphone’sclockappprovidesadditionalusefulfeaturesincludingstopwatchandtimerfunctions.
Thesefeaturesareavailablefromtheclockappdisplay.
nFromtheappslist,selectClock .
TheClockappears.
Timer
Thestopwatchletsyoutimeeventsdowntothehundredthofasecond.
1. Fromtheclockapp,pressNavigationkeytoenterTimerscreen.
2. Setthetimeandpress tobegintiming
3. Press tostoptiming.
Stopwatch
Thetimerprovidesacountdowntimerforupto99hours,59minutes,and59seconds.
1. Fromtheclockapp,pressNavigationkeytoenterStopwatch screen.
2. Press tobegintiming.
3. PresstheRight soft key torecordlap.

Apps and Entertainment Productivity 84
4. Press tostoporresumetiming.
lAdditionaloptionsincludeLaptokeeptrackoflaps,Restarttocontinuetiming,andResetto
resetthestopwatchtozero.
Apps and Entertainment Entertainment and Activities 85
ENTERTAINMENT AND ACTIVITIES
Thefollowingtopicsprovideanoverviewofyourphone’smusic.
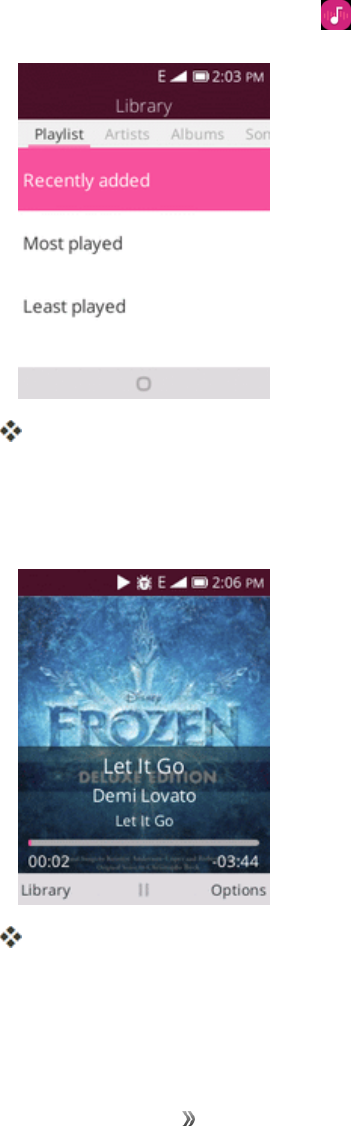
Play Music
UsetheMusicapptolistentoallyourmusiconyourphone.Compatiblemusicfileformatsinclude:
mp3,wma,wav,mod,etc.
1. Fromtheappslist,selectMusic .
TheMusicappopens.
2. UsetheNavigationkeytoselectalibrarycategorysuchasArtistorAlbums.
3. Chooseanitemfromthecategorywindowandthenselectasong.
Thesongbeginsplaying.
Apps and Entertainment Entertainment and Activities 86
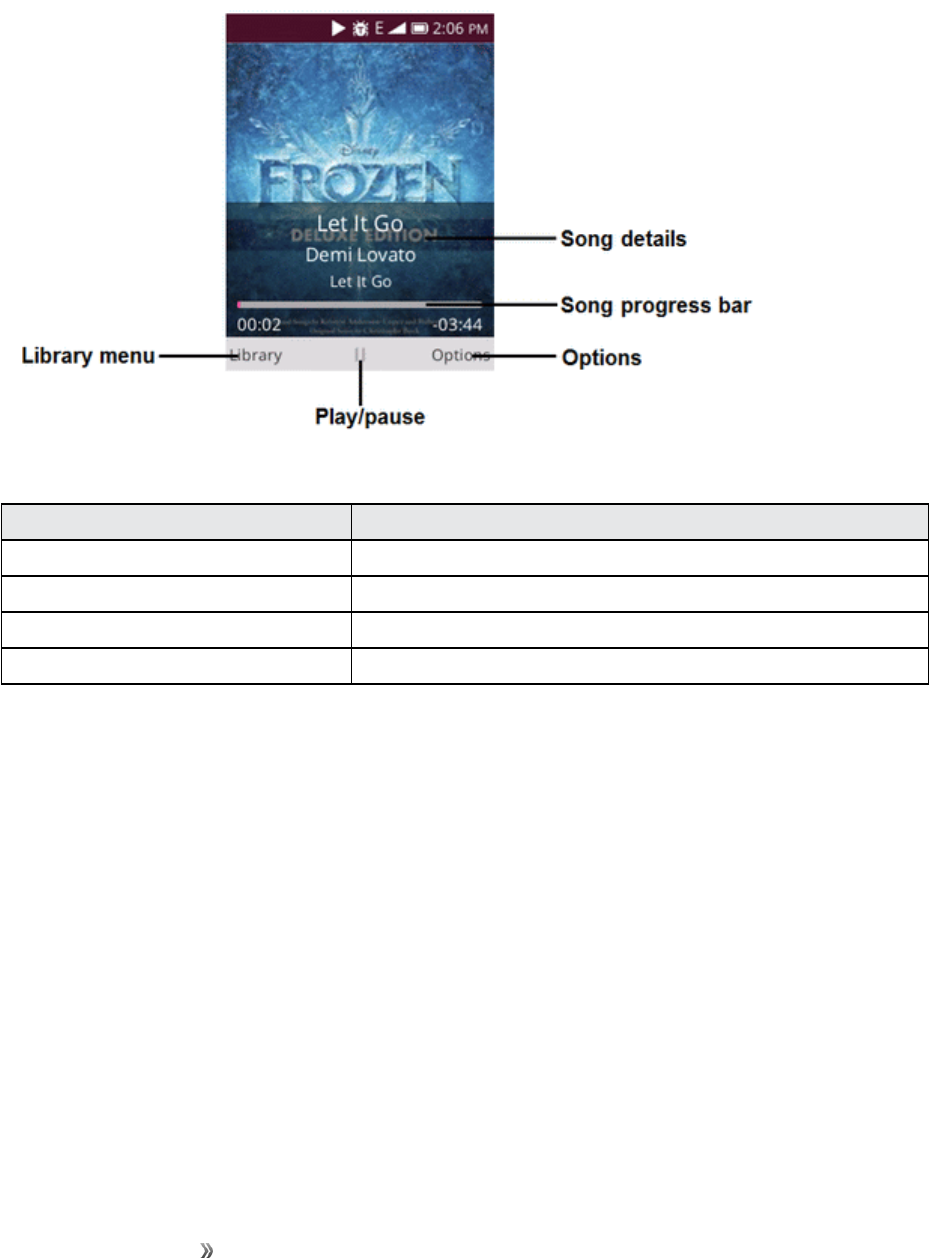
Music Screen Layout
ThefollowingpictureoutlinesthemainfeaturesoftheMusicappplayerscreen.
Options Menu:
Feature Description
Shuffle All Selecttoshuffleallsongs.
RepeatAll Selecttorepeatallsongs
Share SelecttoshareasongviaE-Mail,MessagesorBluetooth.
Set as ringtone Selecttosetasringtoneofthephone.


Settings Connections Settings 88
CONNECTIONS SETTINGS
Thefollowingtopicsintroduceyourphone’sbasicsettingsmenusandcoveryourphone’s
Connectionssettingsoptions.
BASIC SETTINGS
Fromtheappscreen,selectSettings toaccessyourphone’ssettingsmenu.
Thetablebelowoutlinesthetop-levelsettingscategories.
Category Description
Airplane Mode Enableandsetairplanemodeoptions.
Cellular & Data Setyourphone’scellularnetworksettings.
Geolocation Selectyourphone’slocationaccessoptions.
Wi-Fi EnableandsetWi-Fioptions.
Bluetooth EnableBluetoothconnections.
Call Settings SetcallerID,callforwardingoptions,etc.
Messaging Settings Setmessagingringer,messagingvibrate,etc.
Internet Sharing EnableWi-Fihotspotoptions.
Emergency Alert SetEmergencyalertoptions.
Sound Setringtone,operationtones,etc.
Display Setwallpaper,brightness,etc.
Search Setsearchengineandenablesearchsuggestions.
Notices Enablenoticesonlockscreenoptions.
Date & Time Setdateandtimeofthephone.
Language Setyourphone’slanguage.
Input Methods Selectandconfigurespeechinputsettings.
Answer Mode Selectdeviceanswermode.
Screen Lock Setyourphone’slockscreenoptions.
SIM Security SetyourSIMCardsecurity.
App Permissions Checkandmanagetheappsinyourphone.
Do Not Track SetDoNotTrackmodeoptions.
Browsing Privacy Setbrowsingprivacyoptions.
USB Storage EnableUSBstorage.
End user storage Checkapplicationstoragestatus.
Settings Connections Settings 89
Category Description
Device Information Accessimportantphoneinformationandviewlegalandsafety
information.
Downloads Checkdownloadsonyourphone.
Battery Monitoryourphone’sbatteryusage.
Accessibility Setaccessibilityoptionssuchasinvertcolors,hearingaidcompatibility,
etc.
Developer Setdeveloperoptions.
System Updates Checkandupdateyourphonewiththelatestversion.
KaiOS Account SetyourKaiOSaccount.
Anti-Theft Setyourdeviceanti-theftinformation.Formoreinformation,visit
https://services.kaiostech.com/antitheft
Operator Services Checkyouroperatorservices.
Access Settings
1. Fromtheappslist,selectSettings .
Thesettingsmenuopens.
2. Selectcategoriesandthenselectyoursettingsoptions.
Settingsaremadeandapplied.
WI-FI SETTINGS MENU
TheWi-FisettingsmenuletsyouturnWi-Fionoroff,setupandconnecttoavailableWi-Fi
networks,andconfigureadvancedWi-Fioptions.
FormoreinformationaboutWi-Fisettings,seeWi-Fi.
Settings Connections Settings 90
1. Fromtheappslist,selectSettings > Network & Connectivity > Wi-Fi.
TheWi-Fisettingsmenuappears.
2. SelecttheOnicon toturnWi-Fion.
Wi-Fiisenabled.Youwillseethenamesandsecuritysettingsofin-rangeWi-Finetworks.
lTodisableWi-Fi,selecttheOfficon .
3. SelectaWi-Finetwork,enterthepassword,andpresstheRight soft key toconnect.
YourphoneisconnectedtotheselectedWi-Finetwork.
4. ConfigureyourWi-Fisettings.
YourWi-Fisettingschangesaresaved.
lThepassword,forahouseholdwirelessLANrouter,issometimesfoundonastickeronthe
router(WEP,WPA,KEY,etc.).Contacttheroutermanufacturerforinformation.For
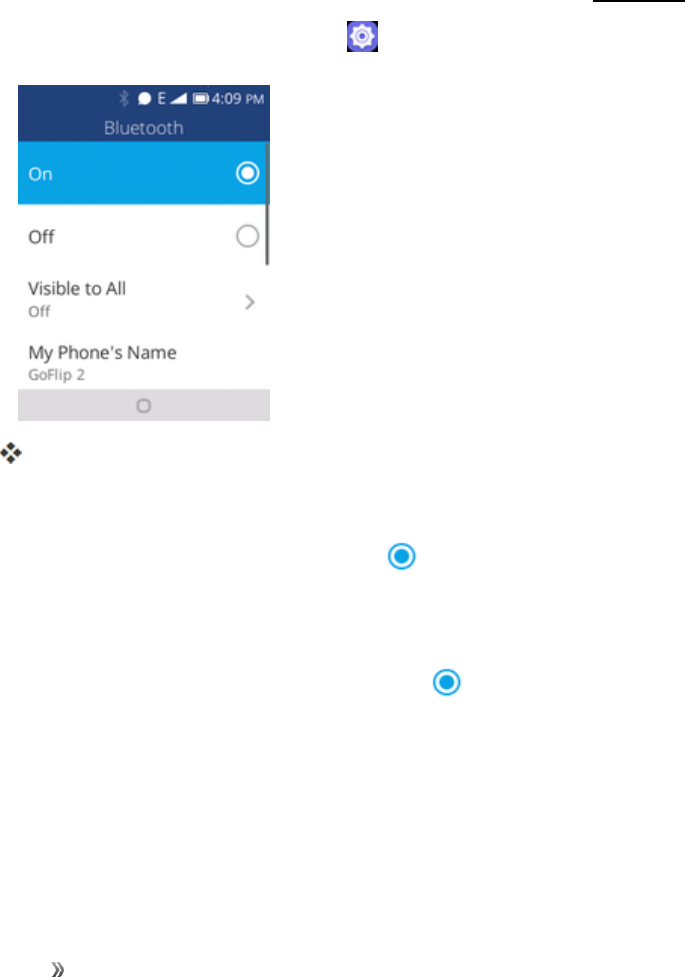
Settings Connections Settings 91
passwordforapublicwirelessLAN,checkwithuser'sserviceprovider.
lEnteringapasswordisnotrequiredifanaccesspointisnotsecurityprotected.
Advanced Wi-Fi Settings
TheadvancedWi-Fisettingsmenuletsyousetupandmanagewirelessaccesspoints.
nManager Networks:FromWi-Fisettings,selectAdvanced Settings>Manage Networks.
nImportcertificates:FromWi-Fisettings,selectAdvanced Settings>ManageCertificates.
BLUETOOTH SETTINGS
Yourphone’sBluetooth®capabilitiesletyouusewirelessheadsets,sendandreceivepicturesand
files,andmore.Fordetailsonyourphone’sBluetoothusage,seeBluetooth.
nFromtheappslist,selectSettings > Network & Connectivity >Bluetooth.
TheBluetoothsettingsopen.
Bluetooth Settings Operations
nEnable Bluetooth:SelecttheOnicon toturnBluetoothon.
lWhenenabled,confirmationappearsforyourphonetobediscoverablebyotherdevices.
Followtheonscreeninstructions.
lTodisableBluetooth,selecttheOfficon .
nVisible to All:SelectthetheOnorOff icontoenablethisfunction.
lWhenenabled,yourphonecanbediscoveredbyotherdevices.
lThissettingisavailablewhenBluetoothisenabled.
nMy Phone’s Name:Checkyourphone’scurrentname.
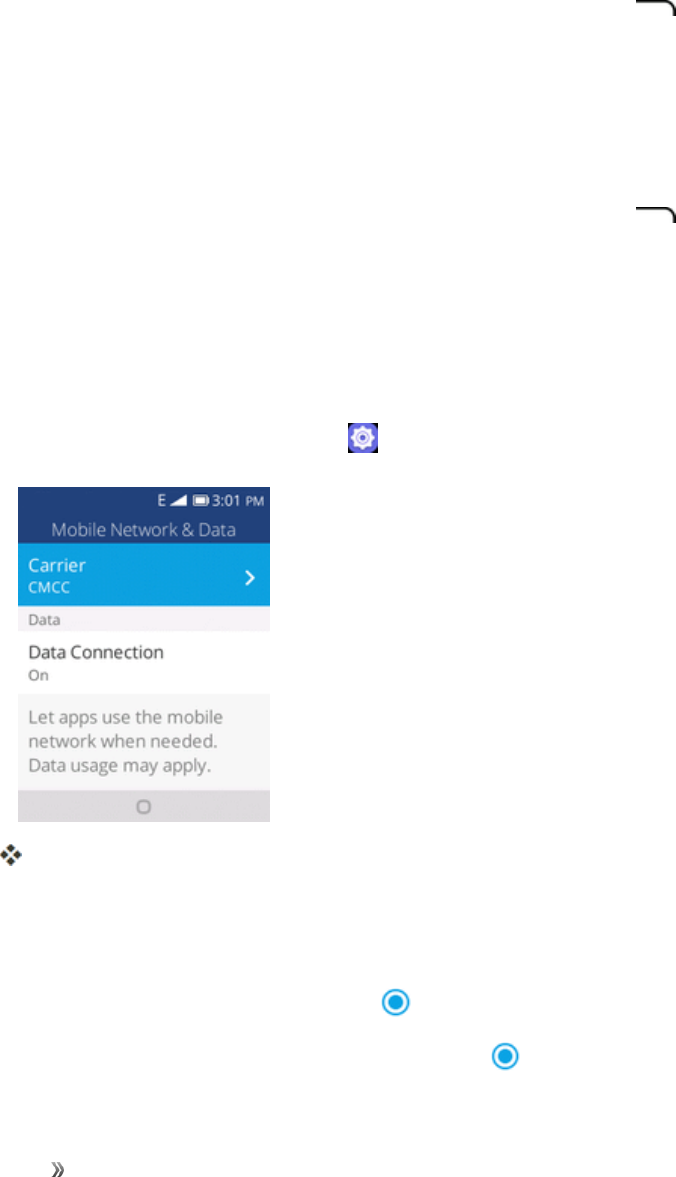
Settings Connections Settings 92
nRename My Phone:Youcansetthephone’snameasitappearstootherdevice.
lEmojicannotbeusedinadevicename.
lThissettingisavailablewhenBluetoothisenabled.
nNearby Devices:Checkavailabledevicesforconnecting.
lIfthetargetdevicedoesnotappear,presstheRight soft key tosearchagain.
lThissettingisavailablewhenBluetoothisenabled.
nPaired Devices:Makesuretheotherdevicesaresettobediscovered.FromBluetooth
settings,selectthedevicenamein“DevicesintheArea”andfollowtheonscreeninstructions.
lDependingonthedevice,youmayberequiredtoenteroracceptapasskey.
lIfthetargetdevicedoesnotappear,presstheRight soft key tosearchagain.
lThissettingisavailablewhenBluetoothisenabled.
CELLULAR AND DATA
Themobilenetwork&datemenuletsyouviewyourSIMcard’scarrier,enabledataconnection,
enableVoLTE,andmore.
nFromtheappslist,selectSettings > Network & Connectivity >Cellular & Data.
TheCellular&Datawindowopens.
Cellular & Data Operations
nCarrier:CheckyourSIMcard’scarrier.
nData Connection:SelecttheOnicon toenabledataconnection.
lTodisabledataconnection,selecttheOfficon .

Settings Connections Settings 93
nAPN Settings:SetAPNsettingsoptions.
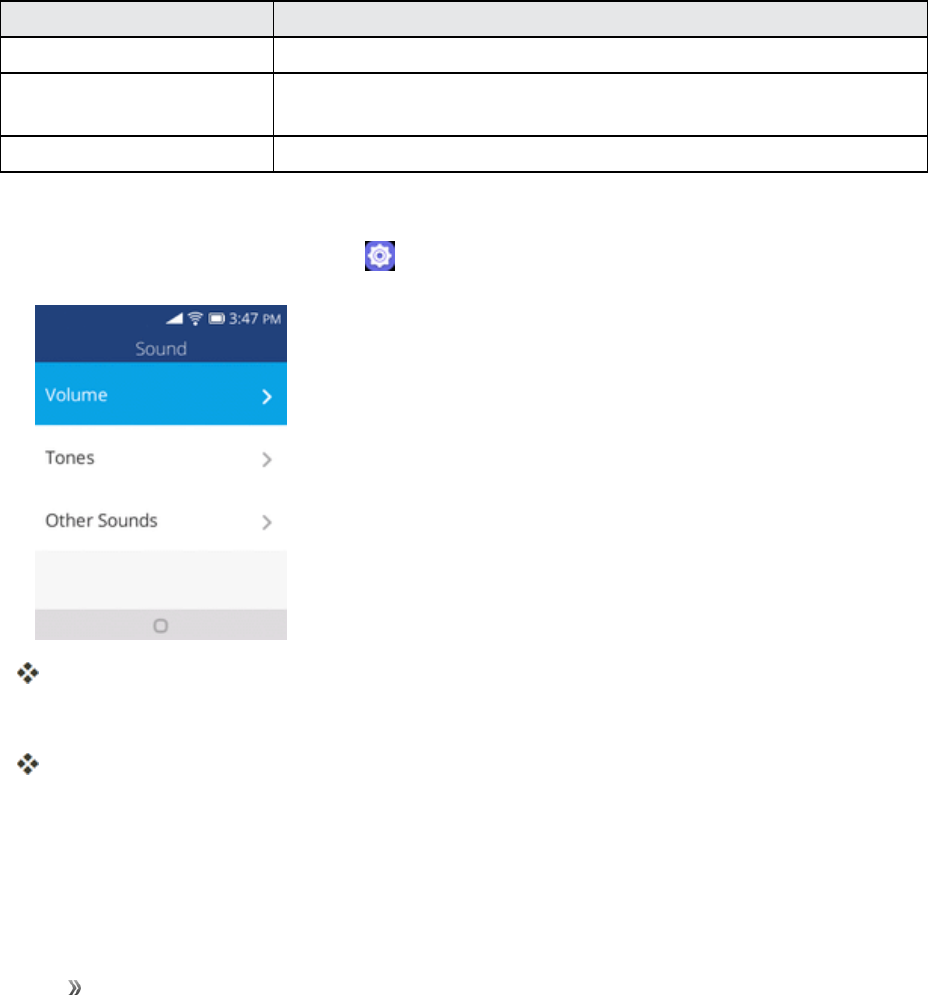
Settings Personalization Settings 94
PERSONALIZATION SETTINGS
Thefollowingtopicsoutlinethedevicesettingsoptionsavailableonyourphone,includingsounds,
display,notices,andmore.
SOUND SETTINGS
Thesoundsettingsmenuletsyoucontrolyourphone’saudio,fromringtonesandalertstotaptones
andnotifications.
Sound Settings Overview
Thesoundsettingsmenuallowsyoutoconfigurethefollowingoptions:
Sound Setting Description
Volume Setvolumeforringtones,alarms,andmedia.
Tones Setyourphone’sdefaultringtone,alertstoneandmanagetones
options.
Other Sounds Setsoundsfordialpad,cameraandsendingmessage.
Access Sound Settings
1. Fromtheappslist,selectSettings > Personalization > Sound.
Thesoundwindowopens.
2. Setyoursoundoptions.
Yoursoundsettingsaresavedandapplied.
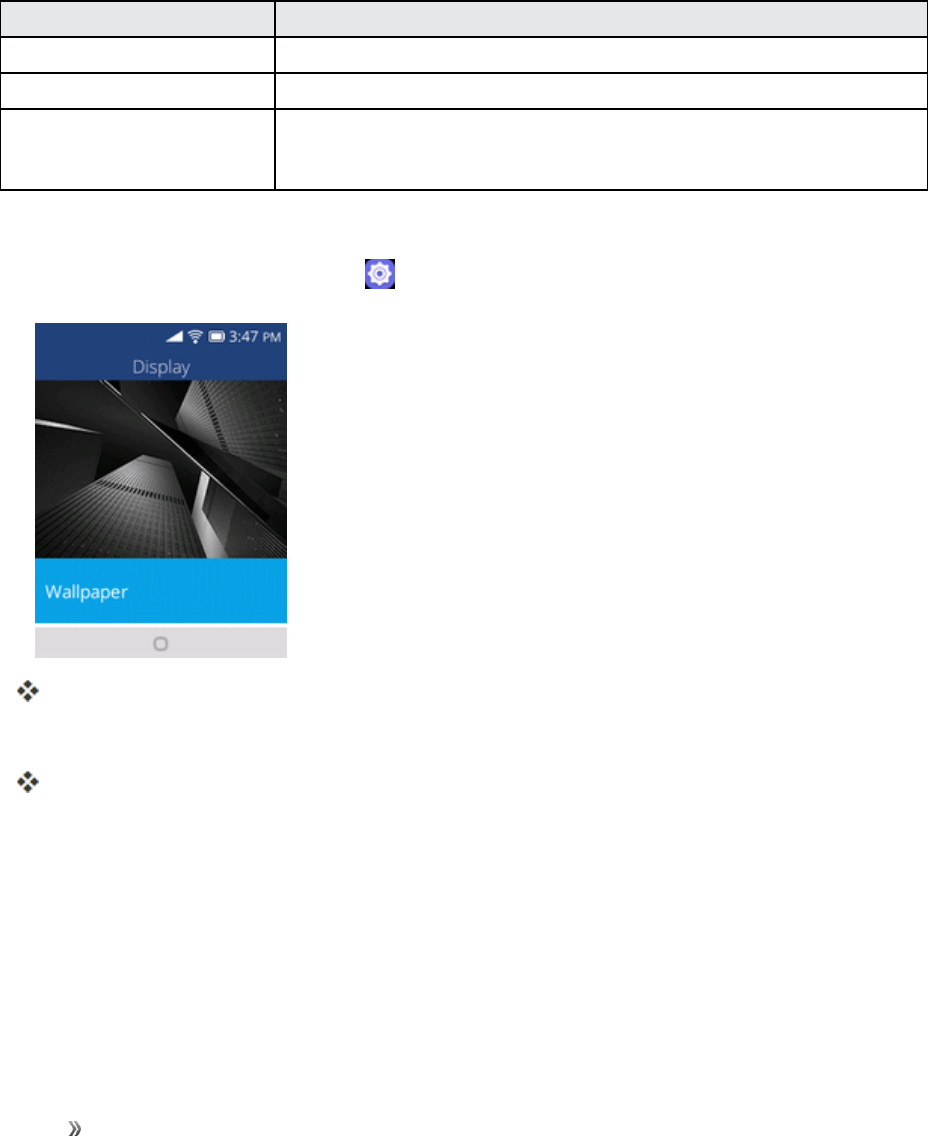
Settings Personalization Settings 95
DISPLAY SETTINGS
Usethephone'sdisplaysettingsmenutoadjustitemssuchaswallpaper,brightness,andscreen
timeout.
Display Settings Overview
Thedisplaysettingsmenuallowsyoutoconfigurethefollowingoptions:
Display Setting Description
Wallpaper Setawallpaper.
Brightness Setthedisplaybrightness.
Screen Timeout Setscreentimeoutduration.
Note:Longerdurationsdischargethebatterymorequickly.
Access Display Settings
1. Fromtheappslist,selectSettings > Personalization>Display.
Thedisplaywindowopens.
2. Setyourdisplayoptions.
Yourdisplaysettingsaresavedandapplied.
SEARCH SETTINGS
Thesearchsettingsmenuletsyoumanagesearchengineandenablesearchsuggestions.
Search Settings Overview
Thesearchsettingsmenuallowsyoutoconfigurethefollowingoptions:
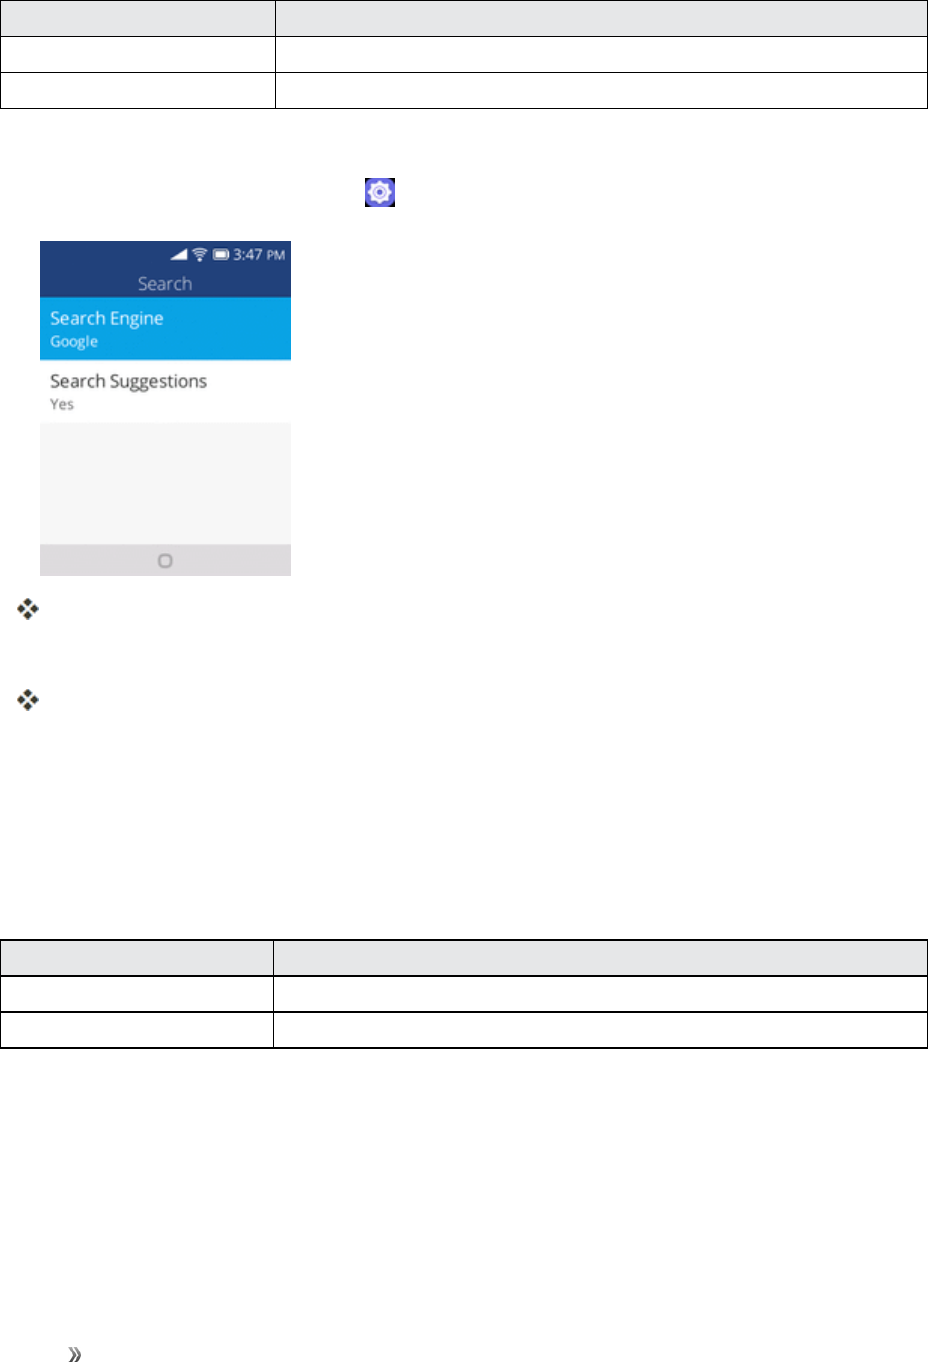
Settings Personalization Settings 96
Search Setting Description
Search Engine Setyourphone’ssearchengine.
Search Suggestions Settoenablesearchsuggestions.
Access Search Settings
1. Fromtheappslist,selectSettings > Personalization>Search.
Thesearchwindowopens.
2. Setyoursearchoptions.
Yoursearchsettingsaresavedandapplied.
NOTICES SETTINGS
Thenoticessettingsmenuletsyouenablenoticesshowonlockscreenorafterreboot.
Notices Settings Overview
Thenoticessettingsmenuallowsyoutoconfigurethefollowingoptions:
Notices Setting Description
Show on lock screen Settoenablenoticesshowonlockscreen.
Show after reboot Settoenablenoticesshowafterreboot.

Settings Personalization Settings 97
Access Notices Settings
1. Fromtheappslist,selectSettings > Personalization>Notices.
Thenoticeswindowopens.
2. Setyournoticesoptions.
Yournoticessettingsaresavedandapplied.
DATE AND TIME SETTINGS
Usethedateandtimesettingsmenutosetdateandtimemanually,aswellasselecttimeformat
options.
Date and Time Overview
Thefollowingdateandtimeoptionsmaybeconfigured:
Date & Time Option Description
Date Setthedatemanually.
Time Setthetimemanually.
Region Setthetimeregion.
City Setthetimecity.
Time format Select12-houror24-hourformat.
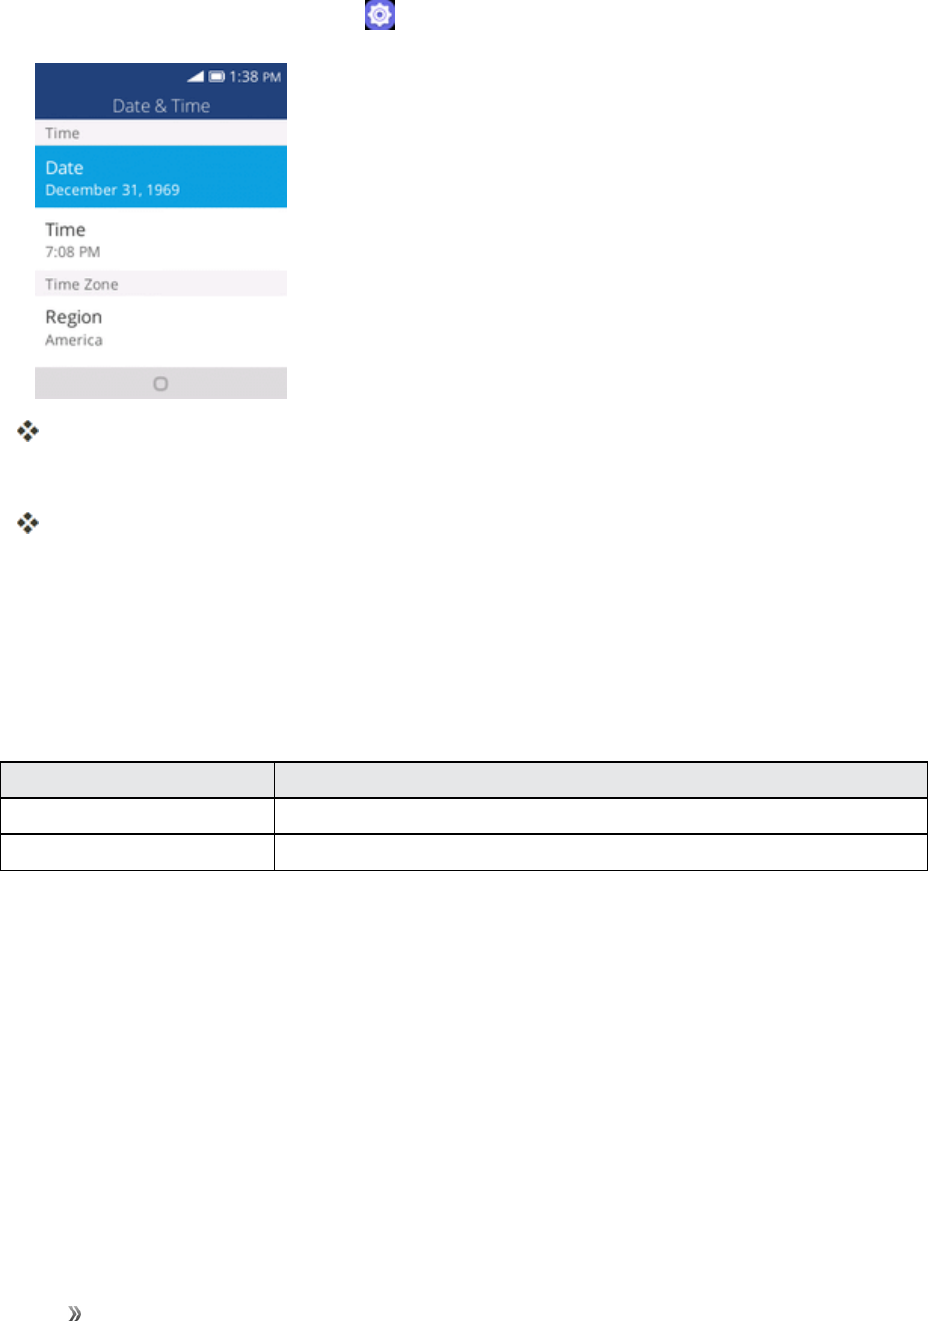
Settings Personalization Settings 98
Access Date & Time Options
1. Fromtheappslist,selectSettings > Personalization>Date & Time.
Thedate&timewindowopens.
2. Setavailabledateandtimeoptions.
Yourdateandtimesettingsareappliedandsaved.
LANGUAGE SETTINGS
Yourphone’slanguagesettingsletyouselectalanguageforthephone’smenusandkeyboards.
Language Settings Overview
YoucansetthefollowingoptionsintheLanguagesettingsmenu:
Language Setting Description
Language Setthelanguageforyourdisplayandmenus.
Sample Format Checklanguagesampleformat.

Settings Personalization Settings 99
Access Language Setting Options
1. Fromtheappslist,selectSettings > Personalization>Language.
TheLanguagesettingsmenuopens.
2. Setoptions.
Thelanguagesettingsareappliedandsaved.
INPUT METHODS SETTINGS
Yourphone’sinputsettingsletyouselectandconfigurekeyboardsettings,andsetyourphone’s
inputlanguages.
Input Methods Settings Overview
Youcansetthefollowingoptionsininputmethodssettingsmenu:
Input Methods Setting Description
Use T9 SettoenableT9inputmethods.
Select Input languages Settheinputlanguage.

Settings Personalization Settings 100
Access Input Languages Setting Options
1. Fromtheappslist,selectSettings > Personalization>Input Method.
Theinputsettingsmenuopens.
2. Setoptions.
Theinputsettingsareappliedandsaved.
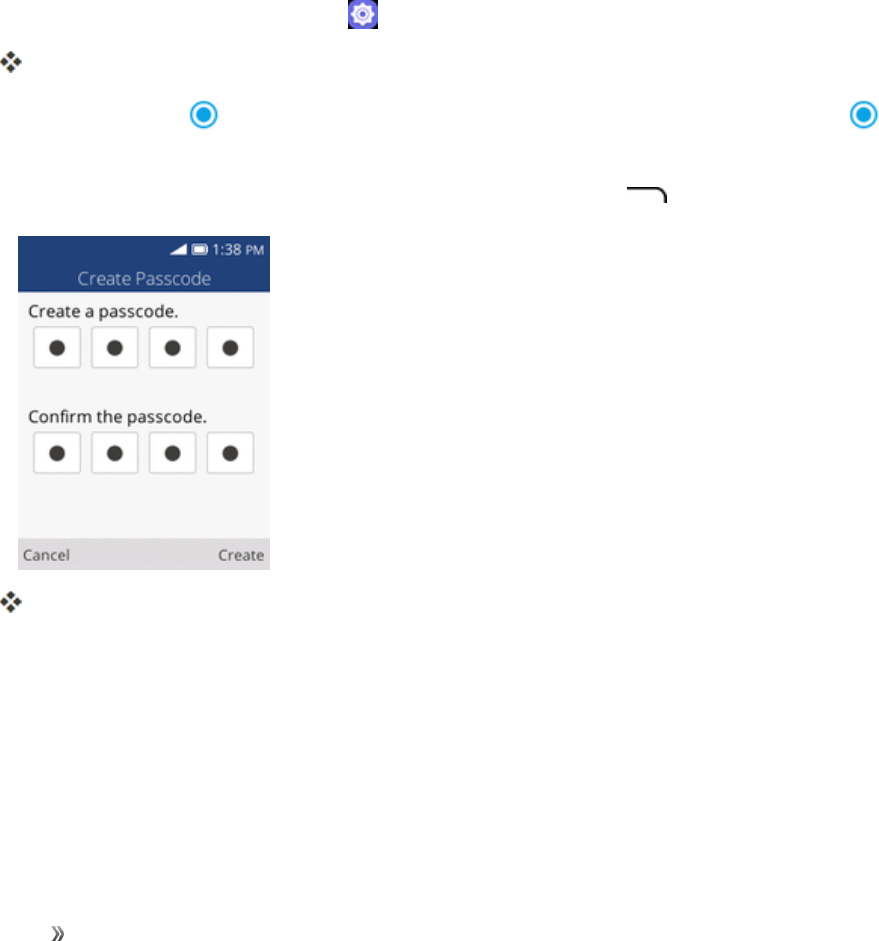
Settings Privacy and Security Settings 101
PRIVACY AND SECURITY SETTINGS
Thefollowingtopicscoveryourphone’sprivacy&securitysettings,includingscreenlocksettings,
apppermissions,DoNotTrack,andbrowsingprivacy.
SCREEN LOCK SETTINGS
Youcanincreasethesecurityofyourphonebycreatingascreenlock.Whenenabled,youhaveto
enterthecorrectpasswordtounlockthephone’scontrolbuttonsandscreen.
Important:Toprotectyourphoneanddatafromunauthorizedaccess,itisrecommendedthatyou
usethePasswordprotection.Itisalsorecommendedyoufrequentlychangeyourpasswordto
ensurethesafetyofyourphoneandpersonaldata.
Access Screen Lock Options
1. Fromtheappslist,selectSettings > Privacy & Security>Screen Lock.
Thescreenlocksettingsmenuopens.
2. SelecttheOnicon toenabledataconnection.Todisabledataconnection,selecttheOff
icon.
3. Enterandre-enteryourpasscode,andpresstheRight soft key tosavethesetting.
Thescreenlockareappliedandsaved.
APP PERMISSION SETTINGS
Setinstalledapplications’permissions.
App Permissions Settings Overview
ItemsthatcanbecheckedintheApppermissionssettingsmenuarethefollowing.
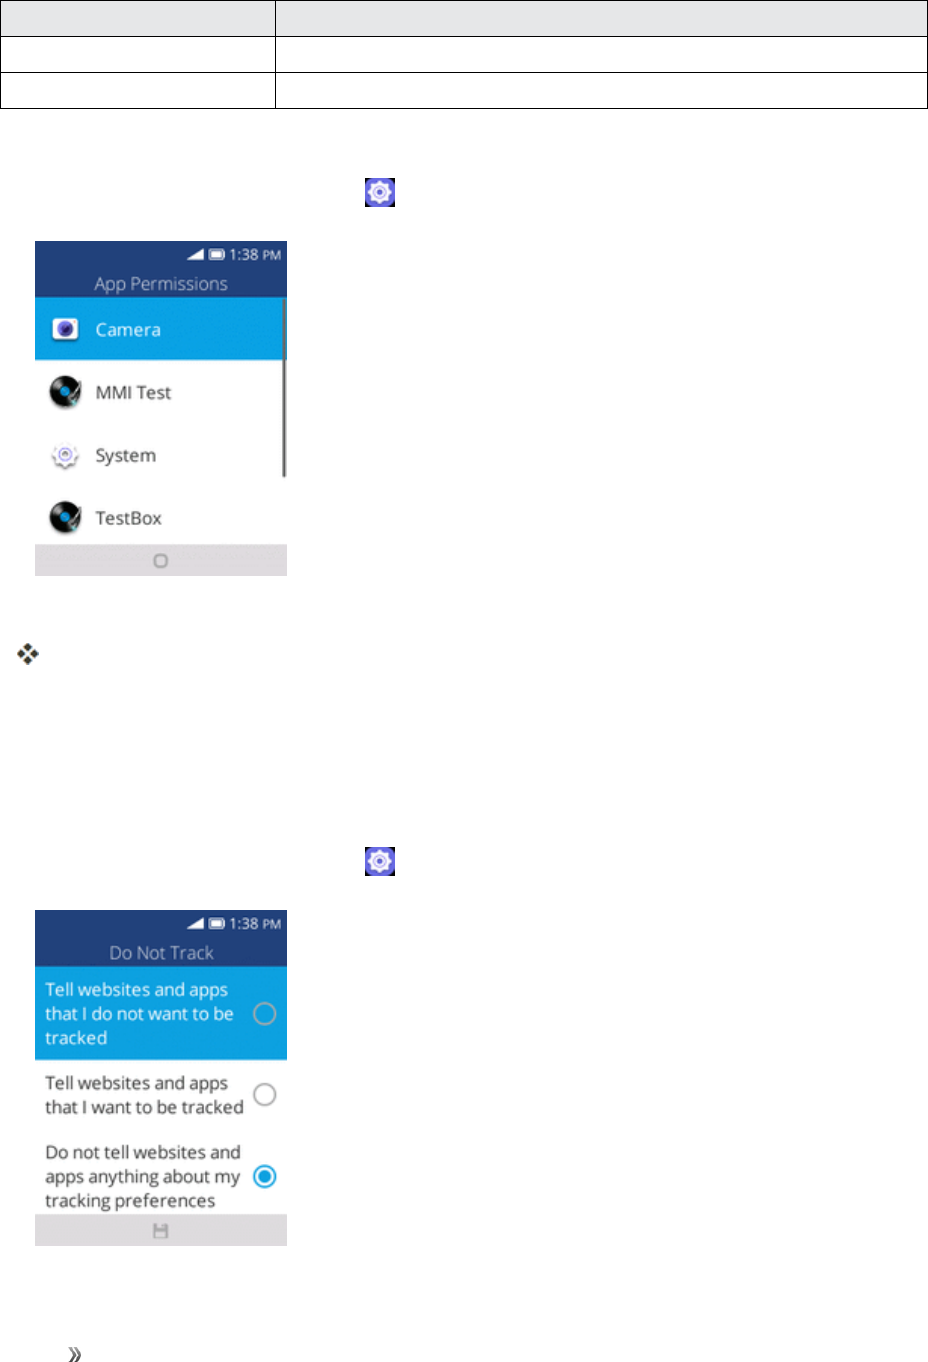
Settings Privacy and Security Settings 102
App Permissions Setting Description
Camera Setthecamera’sgeolocationpermission.
System Setthesystem’sgeolocationpermission.
Access App Permissions Settings
1. Fromtheappslist,selectSettings > Privacy & Security>App Permissions.
2. Setoptions.
Theapppermissionssettingsareappliedandsaved.
DO NOT TRACK SETTINGS
SetyourpreferenceforDoNotTrack.
Access Do Not Track Settings
1. Fromtheappslist,selectSettings > Privacy & Security>Do Not Track.
2. Selectoptions.

Settings Privacy and Security Settings 103
Thedonottracksettingsareappliedandsaved.
BROWSING PRIVACY SETTINGS
Setyourbrowsingprivacysettings.
Access Browsing Privacy Settings
1. Fromtheappslist,selectSettings > Privacy & Security>Browsing Privacy.
2. Selectoptions.
Thebrowsingprivacysettingsareappliedandsaved.
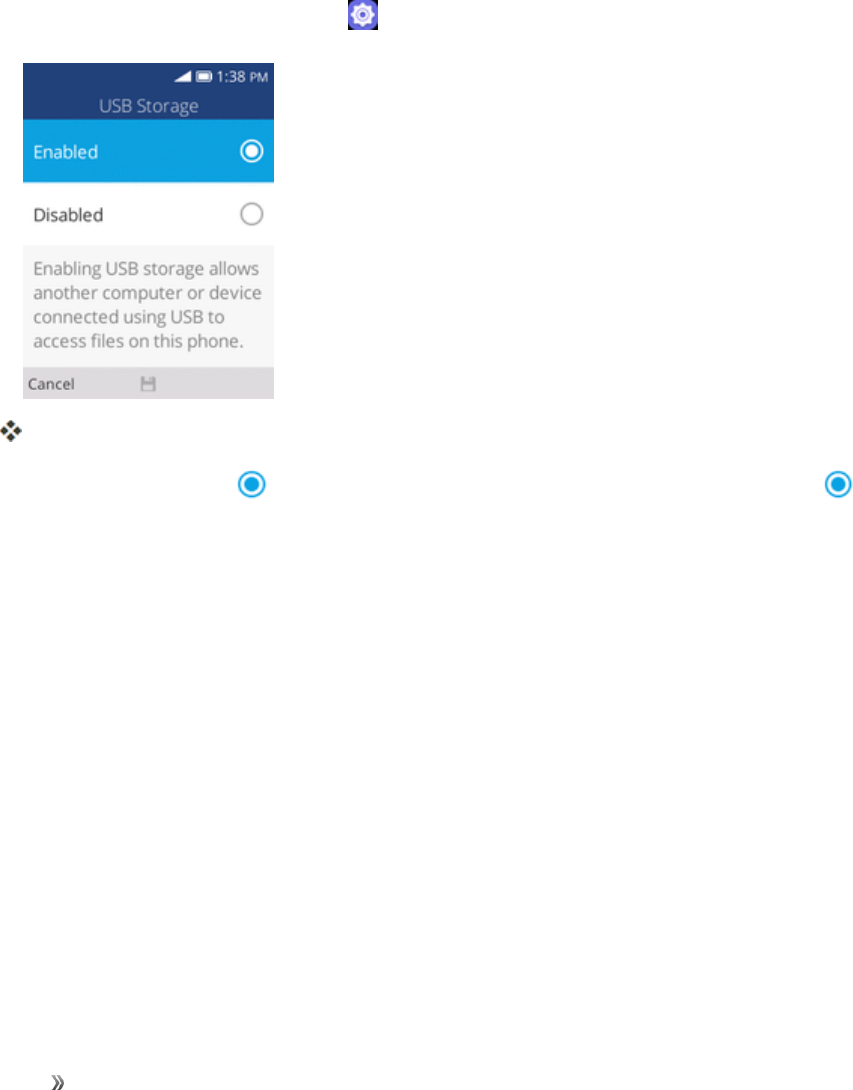
Settings Storage Settings 104
STORAGE SETTINGS
Thestoragesettingsmenuletsyoumanageinternalstorageonyourphoneandprovidesmenu
choicesforanoptionalSDcard(notincluded).
USB STORAGE SETTINGS
Thefollowingtopicsaddressyourphone’sconnectivityoptions,includingUSBfiletransfer,Wi-Fi,
Bluetooth,andmore.
1. Fromtheappslist,selectSettings > Storage>USB Storage.
TheUSBstoragesettingsmenuopens.
2. SelecttheEnableicon toenableUSBstorage.Todisable,selecttheDisableicon .
MEDIA STORAGE SETTINGS
Viewthetotalspace/freespaceofmediafilesinyourphonememoryandinanoptionalinstalledSD
card.

Settings Storage Settings 105
1. Fromtheappslist,selectSettings > Storage>Media Storage.
Themediastoragewindowopens.

Settings Device Settings 106
DEVICE SETTINGS
Thefollowingtopicsincludingdeviceinformation,downloads,battery,accessibility,etc.
DEVICE INFORMATION SETTINGS
Thedeviceinformationmenuletsyouaccessimportantphoneinformation,andviewlegaland
safetyinformation.
Device Information Overview
Thefollowingdeviceinformationitemsmaybereviewedorset:
Device Information Item Description
Phone Number Checkyourphonenumber.
Model Checkthephone’smodel.
Software version Checkthephone’ssoftwareversion.
Hardware Checkthephone’shardwareversion.
More Information Checkmoreinformationaboutyourphone:
nOSVersion
nHardwareRevision
nIPAddress
nPlatformVersion
nBluetoothAddress
nMACAddress
nMEID
nIMEI
nIMSI
nICCID
nBuildNumber
Legal information CheckHealth&Safetyinformation,opensourcenotices,etc.
Factory Reset Resetallsettingsanddeletealldataonphone.
Tip:Beforeperformingafactorydataresetonyourphone,youmaywanttounmountaninstalled
SDmemorycardtoavoidlosinganydatayoumayhavestoredonit.
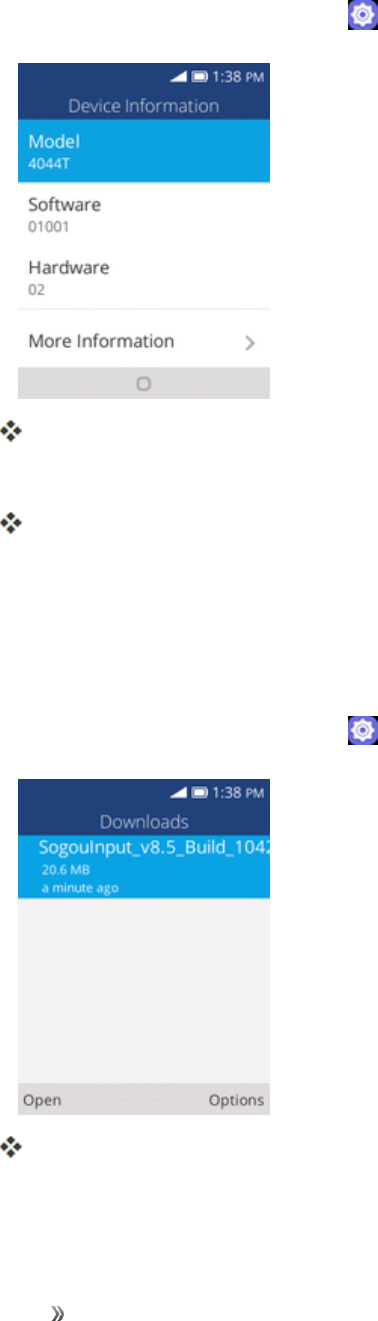
Settings Device Settings 107
Access Device Information Options
1. Fromtheappslist,selectSettings >Device>Device Information.
Thedeviceinformationwindowopens.
2. Selectorviewavailableoptions.
Yourphoneinformationisdisplayed.
DOWNLOADS SETTINGS
YoucancheckyourdownloadedfileinDownloads.
Access Device Information Options
1. Fromtheappslist,selectSettings > Device>Downloads.
Thedownloadswindowopens.
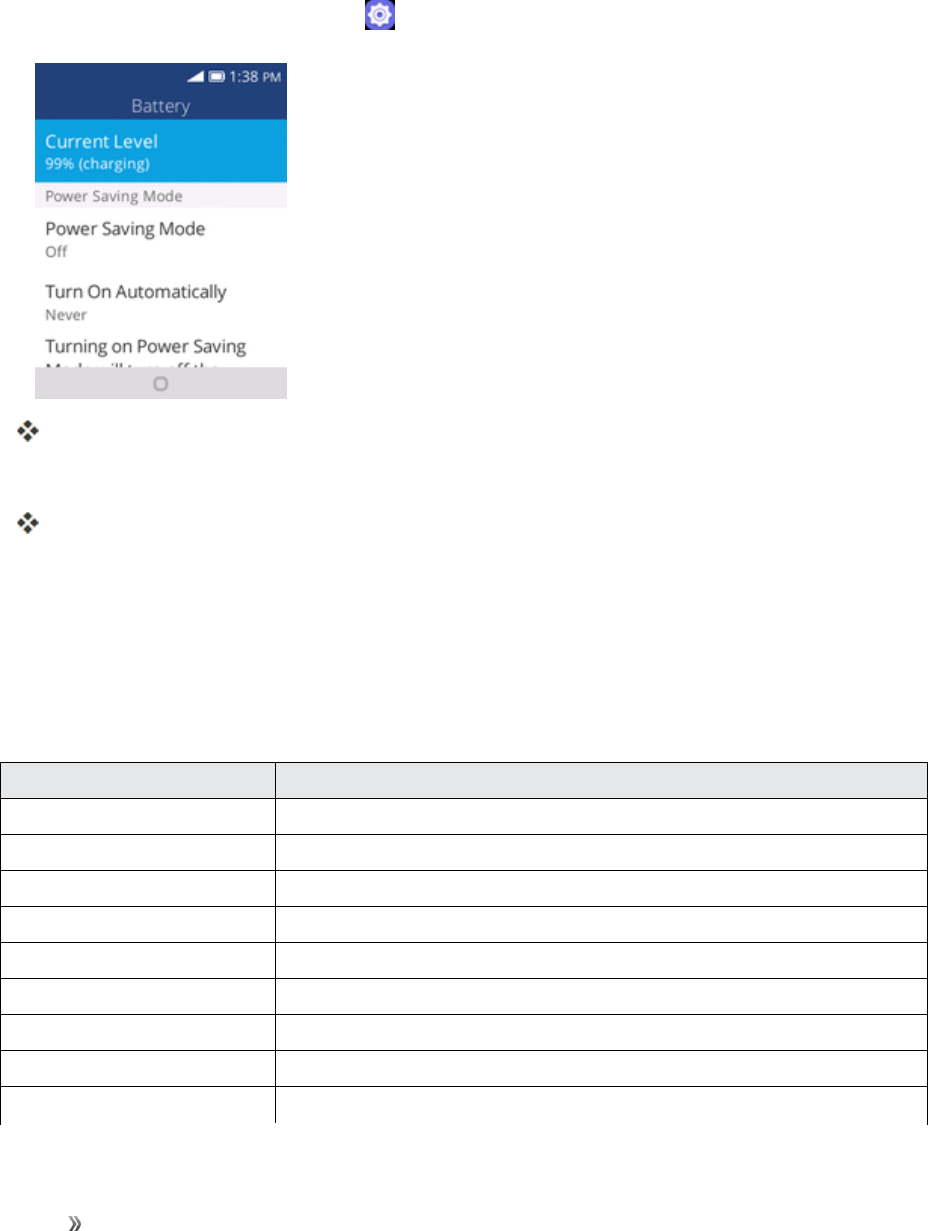
Settings Device Settings 108
BATTERY SETTINGS
Monitoryourphone’sbatteryusagethroughthissettingsmenu.Checkthebatteryconsumptionand
percentage.
1. Fromtheappslist,selectSettings > Device>Battery.
TheBatterywindowopens.
2. Selectitemstoviewdetails.
Checkyourbatteryconditionandaccessadditionaloptions.
ACCESSIBILITY SETTINGS
Theaccessibilitymenuletsyouenableandmanageaccessibility-relatedapplications.
Accessibility Settings Overview
Thefollowingaccessibilityoptionsmaybeconfigured:
Accessibility Option Description
Invert Colors Setcolorinversion(mayaffectperformance).
Backlight Settoenablebacklight.
Large text Settoenlargethescreentext.
Captions Settoenablecaptionssettings.
Readout Mode Settoenablereadoutmode.
Mono Audio Settoenablemonoaudio.
Volume Balance Setvolumebalance.
Keypad Vibration Settoenablekeypadvibration.
TTY SelecttoenableTTYmode.

Settings Device Settings 109
Accessibility Option Description
Hearing Aid
Compatibility (HAC)
Settoenablehearingaidcompatibility.
Access Accessibility Options
1. Fromtheappslist,selectSettings > Device>Accessibility.
Theaccessibilitysettingsmenuopens.
2. Setavailableaccessibilityoptions.
Youraccessibilitysettingsareappliedandsaved.
SYSTEM UPDATES SETTINGS
Fromtimetotime,updatesmaybecomeavailableforyourphone.Youcandownloadandapply
updatesthroughtheSettings>System Updatesmenu.
System Updates Settings Overview
Thefollowingsystemupdatesoptionsmaybeconfigured:
Accessibility Option Description
UICC Unlock SettounlockUICC.
Update PRL SettoupdatePRL.
Update Profile Settoupdateprofile.
Update Firmware Settoupdatefirmware.
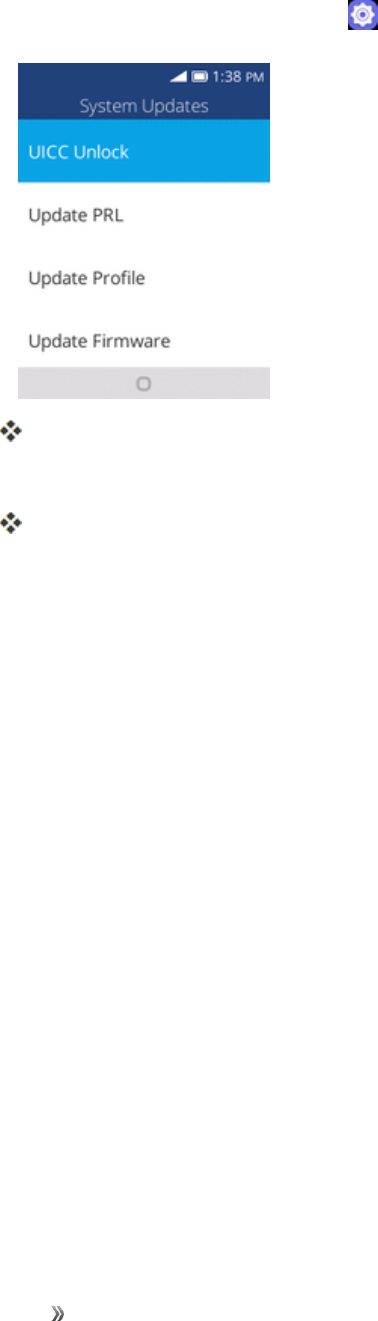
Settings Device Settings 110
Access Accessibility Options
1. Fromtheappslist,selectSettings > Device>System Updates.
Thesystemupdateswindowopens.
2. Selecttheitemyouwanttoupdate.
Yourphonewillupdateautomatically.

Getting Help 111
GETTING HELP
Thetopicsinthissectionwillcovertroubleshootingtips,phonespecifications,andhowtocontact
Virginandmanageyourwirelessservice.

Getting Help For Assistance 112
FOR ASSISTANCE
Thefollowingtopicsaddressareasofsupportforyourphone,includingtroubleshooting,
specifications,accountinformation,warrantyinformation,andcustomerservicecontactinformation.
TROUBLESHOOTING
Checkthequestionsandanswersbelowfortroubleshootingsolutionsforcommonphoneissues.
Check Here First
Problem:Phonefreezes/operationisunstable.
Answer:Turnthephoneonagain.Ifyouareunabletoturnthephoneoff,removeandreplace
theBattery,andthenturnthephoneonagain.Datathatwasbeingeditediserasedafteryour
phoneispoweredonagain.
Problem:Cannotusephone,mail,orInternet.
Answer 1:Checkwhetheryouarewheresignalisweakoroutofservicearea.
Answer 2:Powerthephoneonagain.
Answer 3:IsthephoneinAirplanemode?TocheckthatAirplanemodeiscanceled:
lFromtheappslist,selectSettings >Network & Connectivity>Airplane Mode.
Answer 4:Isdatacommunicationdisabled?Tocheckthatdatacommunicationisenabled:
lFromtheappslist,selectSettings >Network & Connectivity>Mobile network &
Data>Data Connection.
Problem:Batterylevelgoesdownquickly.
Answer:Areyouwheresignalisweakorhavebeenoutofserviceareaforalongperiod?
CallingwheresignalisweakorbeingoutofserviceareausesalotofBattery.
Problem:Cannotunlockscreen.
Answer:Powerthephoneonagain.Ifyouareunabletoturnthephoneoff,removeand
replacetheBattery,andthenpowerthephoneonagain.Datathatwasbeingeditediserased
afterthephoneispoweredonagain.
SPECIFICATIONS
Thefollowingtableslistyourphone’sandbattery’sspecifications.

Getting Help For Assistance 113
Phone Specifications
Item Description
Weight Batteryinstalled:Approx.118g
Continuous Talk Time GSM:Approx.6hours
3G:Approx.8hours
Continuous Standby Time Approx.280hours
Charging Time Approx.3hours
Dimensions Approx.105x52.8x18.7mm
Battery Specifications
Item Description
Type Hardpack
Capacity 1350mAh
VIRGIN ACCOUNT INFORMATION AND HELP
Findoutaboutmanagingyouraccountonlineandonyourphone,buyingadditionalminutesforyour
plan,andgettinghelp.
FormoreinformationaboutyourVirginaccount,aswellasotherVirginservices,visitusat:
Virginmobileusa.com.
Manage Your Account
Accessinformationaboutyouraccount.Youcan:
nCheckyourminutes.
nRe-Virgin®(addmoneytoyouraccount).
nChangesplans.
nAndmore
From Your Phone
Accessaccountinformationandotherself-servicetoolsfromVirginZone.
nFromhome,selectVirgin Zone .
Youcanalsodialdirectlyforaccesstocertaininformation:

Getting Help For Assistance 114
nDial#225(#BAL)tocheckaccountbalance.
nDial#233(#ADD)tomakeapayment.
nDial#611tolaunchVirginZoneorcallVirginCustomerCare(dependingonyourSettings)to
getanswerstootherquestions.
From Your Computer
nLoginwithyourphonenumberandaccountPINatVirginmobileusa.com.
From Any Other Phone
nVirginCustomerCare:1-888-VIRGIN-4U(1-888-266-7848).
Re-Virgin
VirginMobilemakesiteasytoaddmoneytoyouraccount.Youdecideexactlyhowandwhereyou
wanttopay.Keepyouraccountactivebyusingyourphoneandaddingmoneytoyouraccount.
Pay with Cash
FindanAuthorizedRe-VirginRetailernearyou.PickupaRe-VirginCardorrechargeforaslowas
$10attheregister,whereavailable.
Pay Anytime with a Credit/Debit Card
Dial#233(#ADD)toaddmoneyfromyourphoneorvisitMy AccountatVirginmobileusa.comto
doitonline.Securelyregisteryourcredit/debitcardwithVirginformoreconvenientone-time
paymentsortosetupeasyAutoRe-Virginpayments.
Set Up Worry-Free Payments with Auto Re-Virgin℠
It’stheeasiestwaytomakesureyouraccountstaysonandactive.Useacreditcard,debitcardor
bankaccount—whatever’sbestforyou.
VisitVirginmobileusa.com/reVirgintogetthedetailsonallyourRe-Virginoptions.
COPYRIGHT INFORMATION
©2017VirginWorldwide,Inc.Allrightsreserved.Othermarksarethepropertyoftheirrespective
owners.
Index 115
3
3-wayCalling34
A
AccessibilitySettings108
AccessoryJack4
ActivationandService13
AirplaneMode18
Alarm82
AnsweraCall30
AppPermissionSettings101
Applications16
Launch16
Apps
List17
B
BackKey4
BasicOperations15
Battery
Charge6
Insert4
Remove5
Settings108
BatteryUse4
Bluetooth61
Connect64
Information62
PairDevices63
Receiveinformation66
Sendinformation65
Settings91
Turnonoroff62
Brightness95
Browser56
Options57
Use56
BrowsingPrivacySettings103
C
Calculator81
Calendar78
Addevent78
Sync80
Viewevents79
CallForwarding35
CallLog
Makecallfrom32
CallSettings36
CallWaiting34
Camera
SetFunctions76
Settings76
Switchbetweencameraandvideo
mode76
Takeapicture69
Viewfinder68
CameraandVideo68
CaptureScreenshots16
CarKit
Connect64
Charger/AccessoryJack4
Clock81
AdditionalFeatures83
Alarm82
Stopwatch83
Timer83
ConferenceCalling34
ConnectionsSettings88
Connectivity59
Contacts38
Addcontact38
BackUp45
Delete42
Edit42
Import44
Makecallfrom31
Saveaphonenumber39
Share43
View40
D
DataServices
Statusindicators56
DataUsageSettings92
DateandTime97
DeviceInformationSettings106
DeviceSettings106
DisplaySettings95
INDEX
Index 116
DoNotTrackSettings102
DownloadsSettings107
E
E-mail50
AddAnotherAccount50
Deleteaccount54
SendGmail51
SetUpAccount50
Viewandreply52
Email
Manageinbox54
Sharepictures74
EmergencyNumbers29
Enhanced9-1-1(E9-1-1)29
EnterText19
EntertainmentandActivities85
F
ForAssistance112
G
Gallery71
Viewpicturesandvideos71
Gmail
Sendmessage51
Sharepictures74
H
Headset
Connect64
HeadsetJack4
HomeScreen23
Customize24
Layout23
HomeScreenandAppsList15
I
ImportContacts44
In-CallScreenLayoutandOperations30
IncomingCall
Answer30
Reject30
InputSettings98-99
Internet56
L
Language98-99
LanguageSettings98-99
M
ManageYourAccount113
MediaStorageSettings104
Memory96
Messaging46
MMS
Options49
Sendmessages47
N
NoticesSettings96
NotificationIcons24
Notifications24
O
OptionalCallingServices34
P
PartsandFunctions3
PersonalizationSettings94
Phone
Dialer27
PhoneCalls
Answer29
Emergencynumbers29
UsingCallLog32
Usingcontacts31
Usingphonekeypad27
PhoneCallsandVoicemail27
PhoneLayout(illustration)3
PhoneNumber18
Savetocontacts39
PhoneSettingsMenu15
PhoneStatus106
PhoneUpdate20
PRL22
Profile21
Software20
Pictures
Crop73
Edit72
Rotate72
Shareviaemail74
Index 117
Takewithcamera69
View71
PlaceandAnswerCalls27
PlayMusic85
PowerOff12
PowerOn12
PrivacyandSecuritySettings101
PRLUpdate22
Productivity78
R
Re-Virgin114
RejectIncomingCall30
Ringtone94
S
SaveaPhoneNumber39
ScreenLockSettings101
ScreenTimeout95
SDCard9
Insert10
Remove10
SearchSettings95
SetUpYourPhone3
Settings
Overview88
SetupScreens13
Share
Contacts43
SIMCard8
SoundSettings94
Specifications112
StatusBar23
StatusIcons24
Stopwatch83
StorageSettings104
SystemUpdatesSettings109
T
TakePicturesandRecordVideos69
TextandMultimediaMessaging46
TextEntry19
TextMessaging
Conversations48
Draftmessages48
Notifications48
Options49
Sendmessages46
Timer83
Touchscreen
Turnoff20
Turnon20
Troubleshooting112
TTYMode36
TurnDeviceOff12
TurnDeviceOn12
Typing19
U
USBStorageSettings104
V
VideoCamera
Recordvideo70
Videos
Record70
View71
VirginAccountInformationandHelp113
Voicemail33
Setup33
Volume94
Key4
W
Wallpaper95
Wi-Fi59
Settings60,89
TurnOnandConnect59
Y
YourPhone'sHomeScreen23
