Philips Consumer Lifestyle CEM250 CD Player/Tuner With Bluetooth In-Car Entertainment User Manual
Philips Consumer Lifestyle CD Player/Tuner With Bluetooth In-Car Entertainment Users Manual
UserManual.wiki
>
Philips Consumer Lifestyle
>
CEM250 User Manual
Users Manual
Navigation menu
Upload a User Manual
Namespaces
Wiki Guide
HTML
PDF
Info
Views
User Manual
Discussion / Help
Navigation
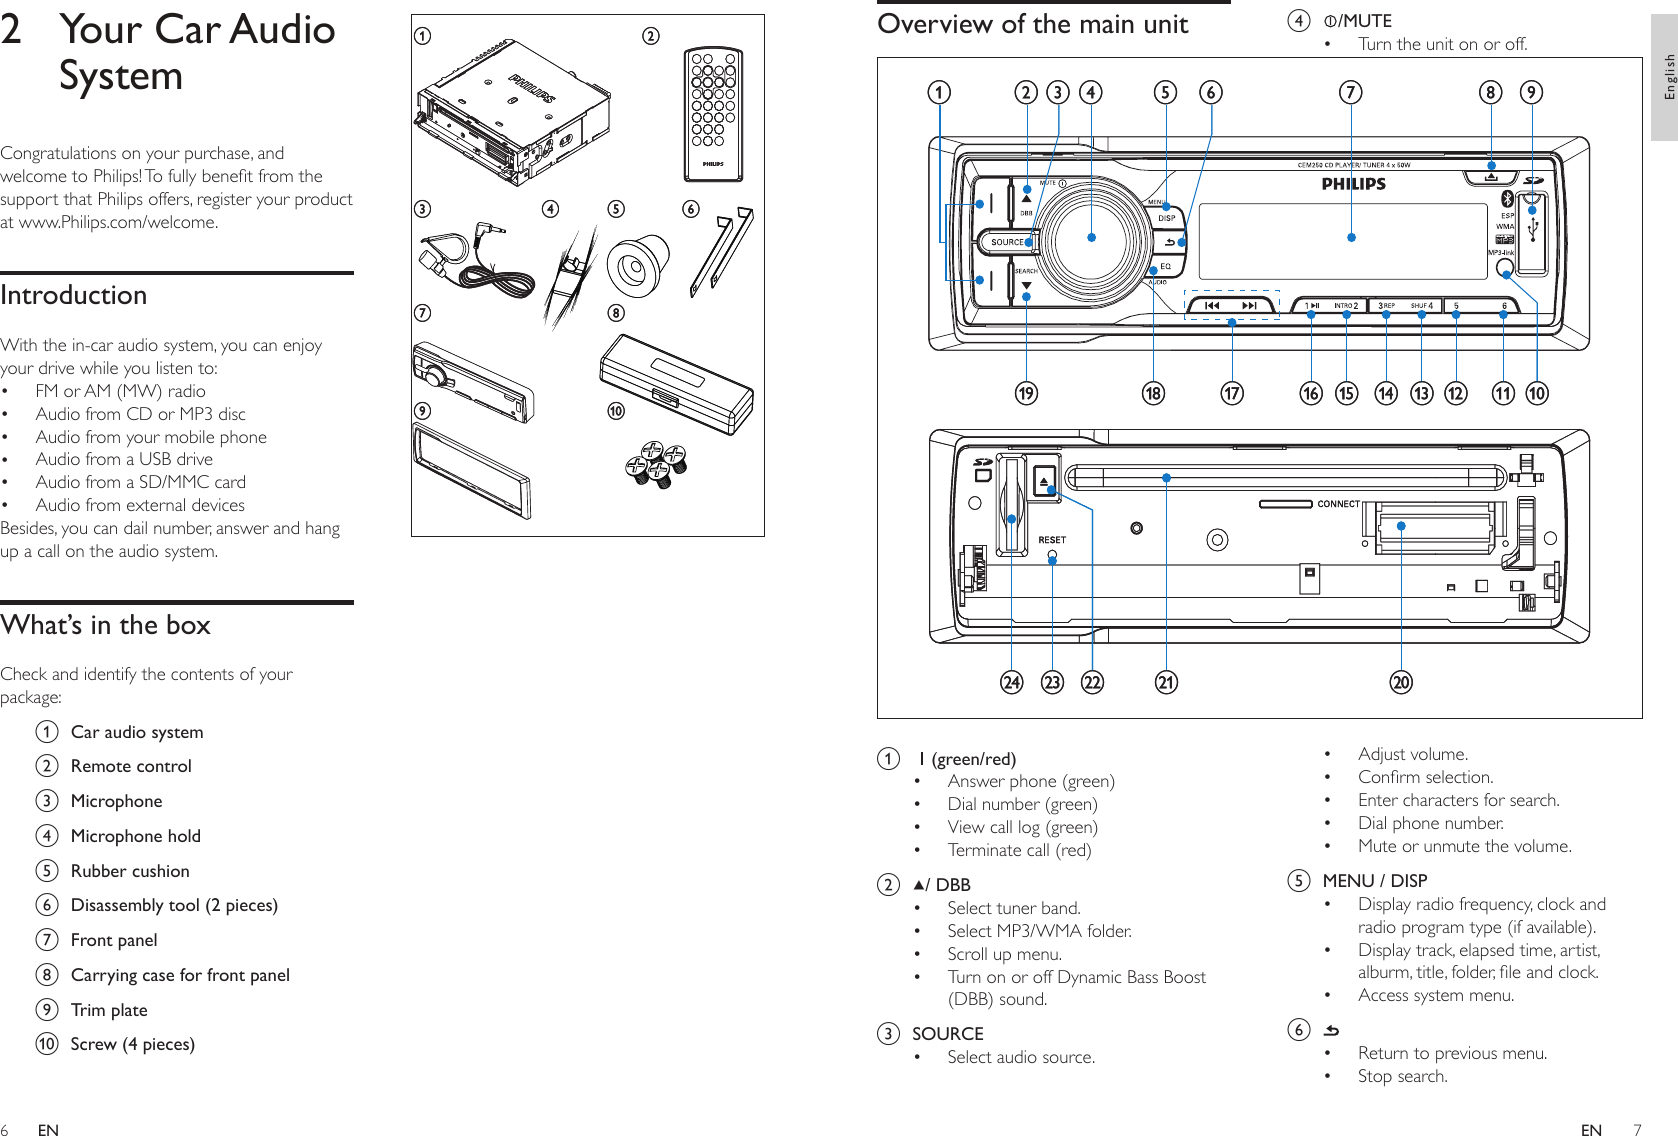
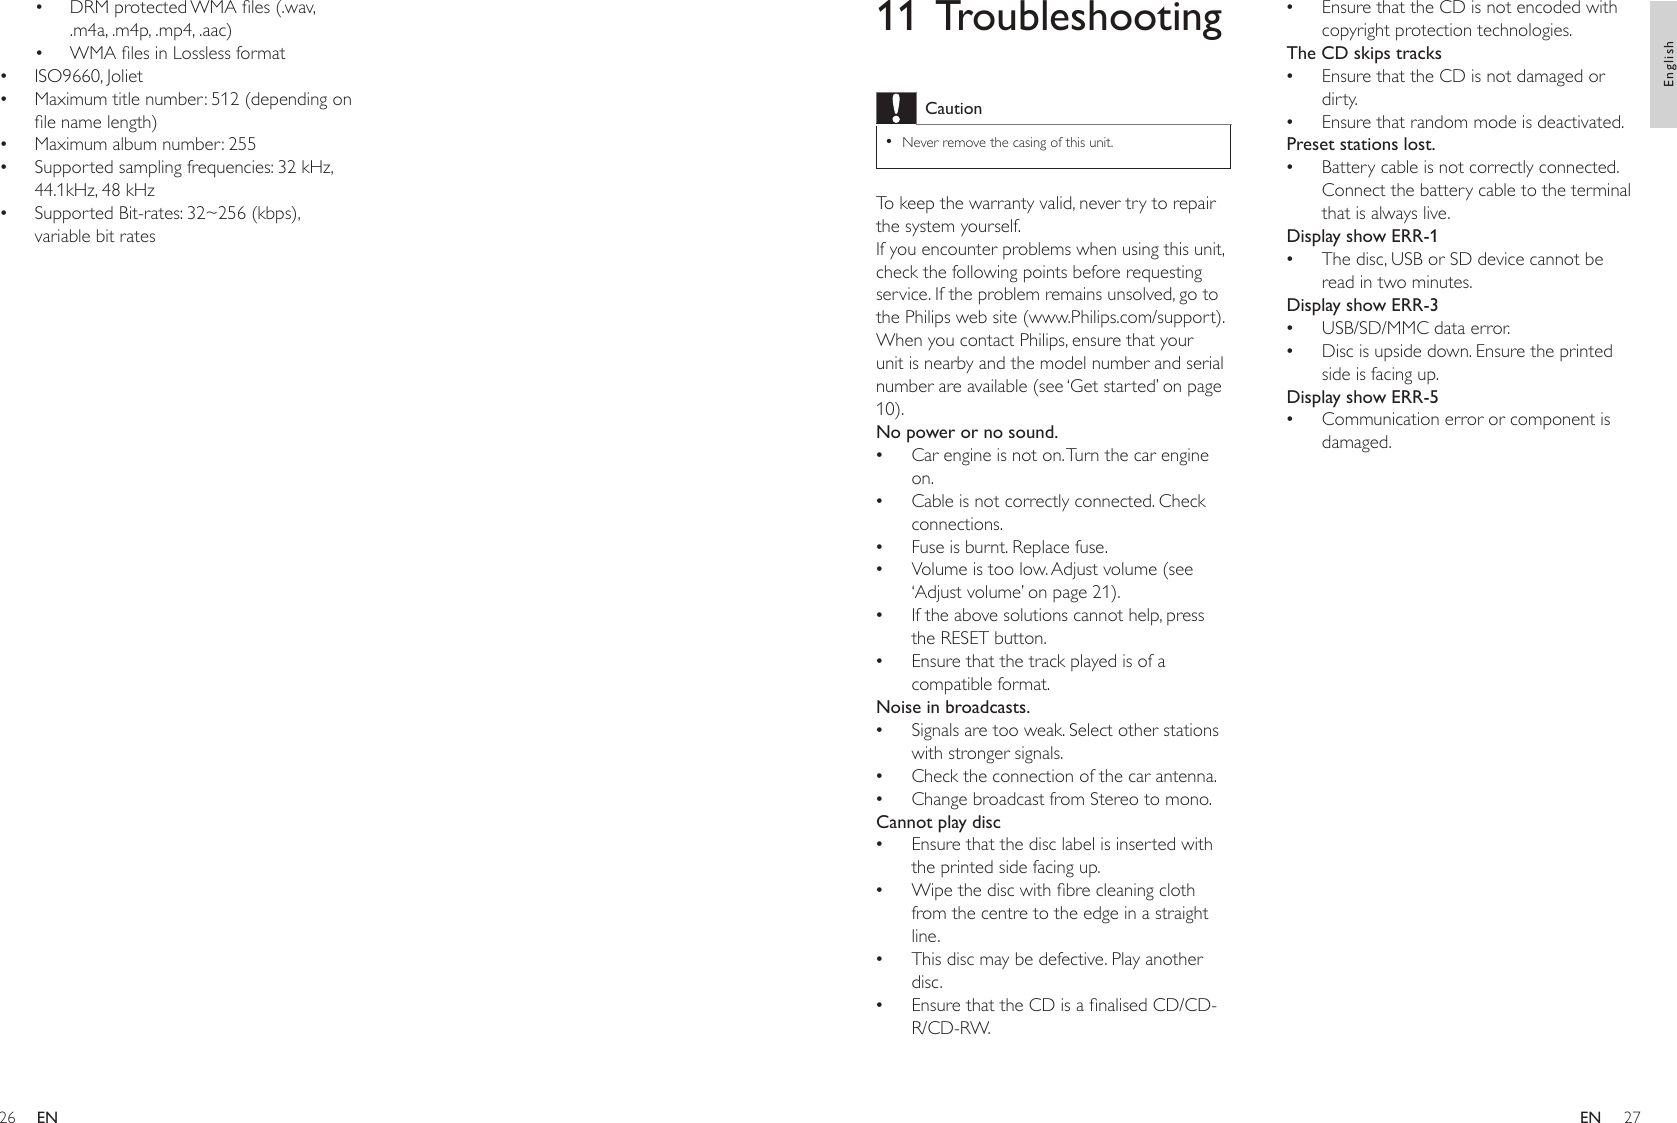
![1617Store radio stations in memoryYou can store up to 6 stations in each band.Store staions automatically1 Press SEARCH for 3 seconds.The six strongest stations of the selected band are saved in preset channels 1-6 automatically.Store staions manually1 Tune to a station that you want to store. (see ‘Tune to a radio station’ on page 16)2 Press one of the numbered buttons 1 to 6 for 3 seconds.The station is saved in the selected channel.Tune to a preset station1 Press or to select band.2 Press the number button 1 to 6 to select the preset station.»»4 Listen to radioTune to a radio station1 Press SOURCE repeatedly to select Tuner.2 Press or to select band: [FM1], [FM2], [FM3], [AM1], or [AM2] .3 Press or to tune to a radio station manually.The radio station is broadcast.To search for a radio station automatically, press or for 3 seconds.Select tuner sensitivityYou can adjust the tuner sensitivity if you want to receive more radio stations or only stations with strong signal.1 Press MENU/DISP for over 2 seconds.2 Press or repeatedly until [LOCAL] or [DX] is displayed.3 Rotate to select a setting: [LOCAL] (local): Only stations with strong signal can be broadcast. [DX] (distance): Stations with strong and weak signals can be broadcast. 4 Press to conrm the selection.Select stereo/mono broadcastingFor stations with weak signals: to improve the reception, change to monoaural sound.1 Press MENU/DISP for 3 seconds.2 Press or repeatedly until [STEREO] or [MONO] is displayed.3 Turn to select a setting:[STEREO]: stereo broadcast.[MONO]: mono broadcast.4 Press to conrm the selection.»»••••2 Speak a name stored in contact list stored in the phone.The unit repeats the number and calls out.[NO MATCH] is displayed if the unit does not recognize a number.Make a call1 Press .2 Press 0-9 to enter phone number.Press / to change a number.Press to reset entered numbers.3 Press to dial.Call waitingIf there is another incoming call during call, [CALL WAITING] ashes on the display panel.1 Press to terminate the present call.The other call is automatically answered.The rst call is terminated.Call transferYou can transfer voice from loudspeaker to mobile phones during call.1 Press .[TRANSFER] is displayed.Terminate calla Press to terminate call.»»••»»»5 Use bluetooth devicesWith this car audio system, you can listen to audio les from a player or make a call if bluetooth connection is available on your phone or player.Pairing bluetooth devicesYou can pair your bluetooth device with the unit as follows:1 Turn on bluetooth function on the device.2 Setup bluetooth fuction on your device.3 Select “CEM250” in the pairing list.4 Enter default password “0000”.“[PAIR OK]” is displayed on the panel if pairing succeeds.Otherwise, “[PAIR ERR]” is displayed.“[CONNECT]” is displayed when connection is established.PlayaudiolesYou can listen to audio from a bluetooth device and control playback with the unit.1 Press SOURCE repeatedly to select [BT MUSIC].To play, press 1, .To pause, press 1, again.Voice dialingYou can dial a number by voice if your mobile phone supports voice dialing.1 Press for 3 seconds.[VOIC DIAL] is displayed.»»»••»ENEnglishEN](https://usermanual.wiki/Philips-Consumer-Lifestyle/CEM250/User-Guide-1005633-Page-10.png)
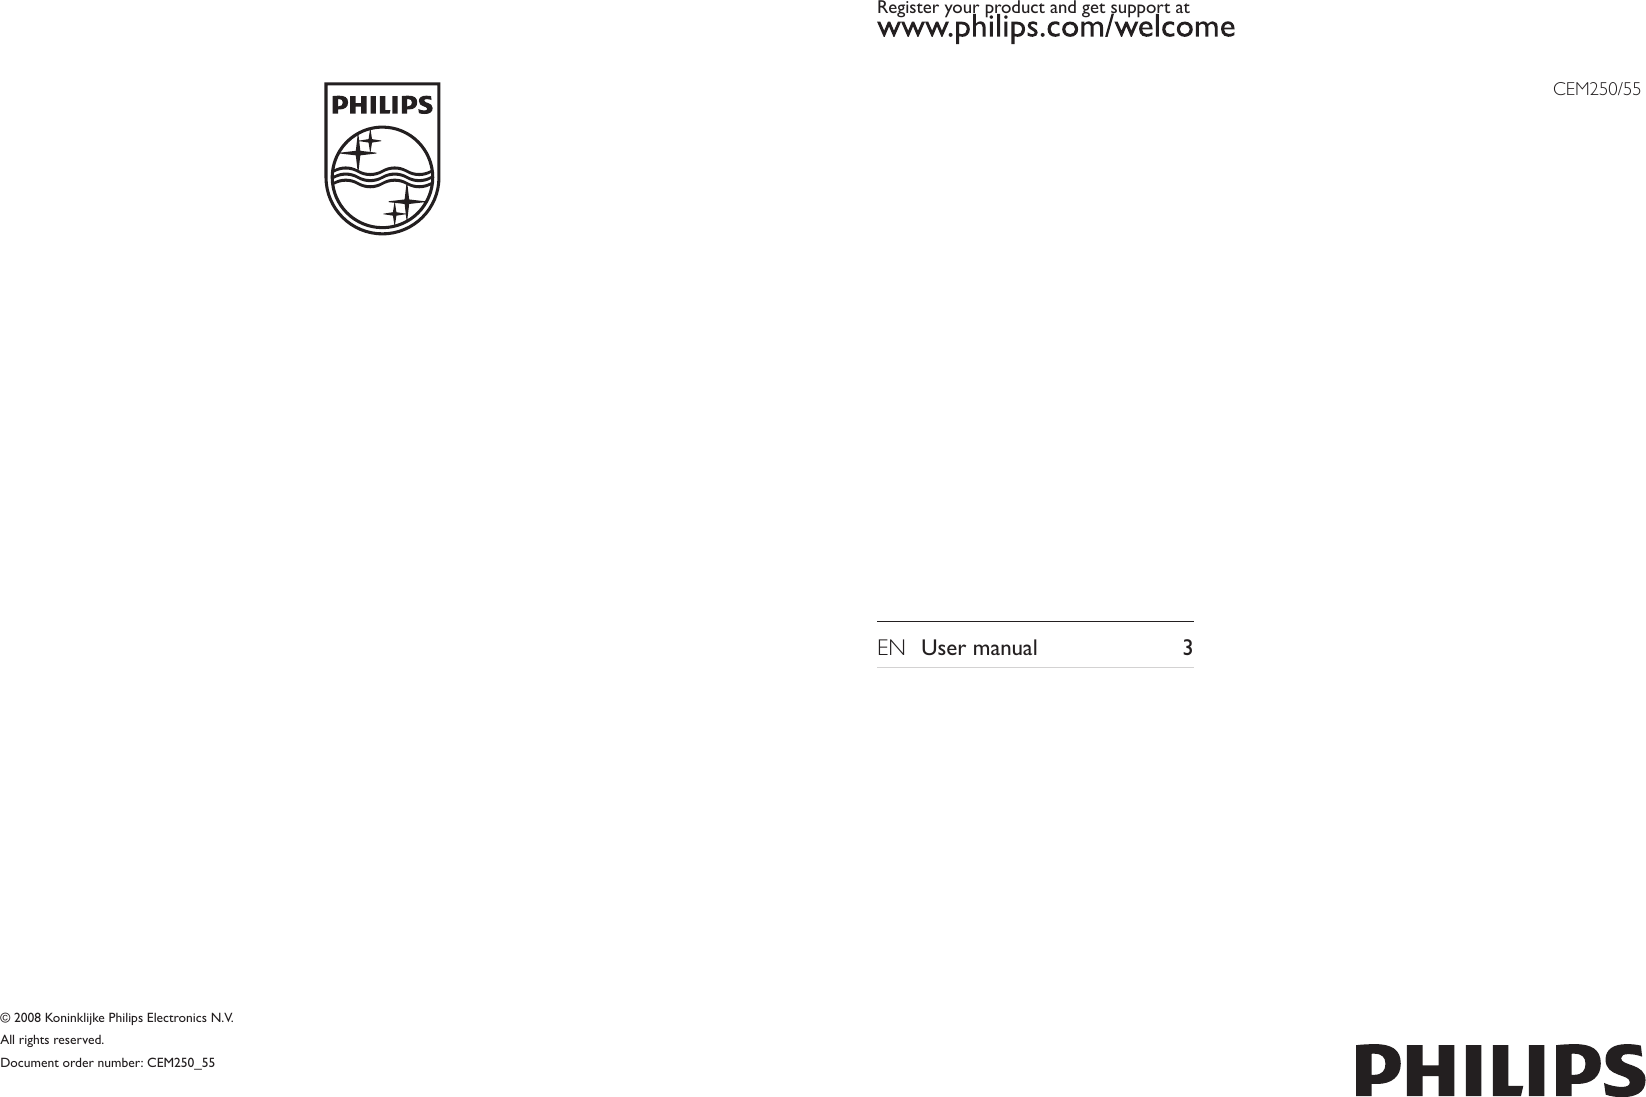
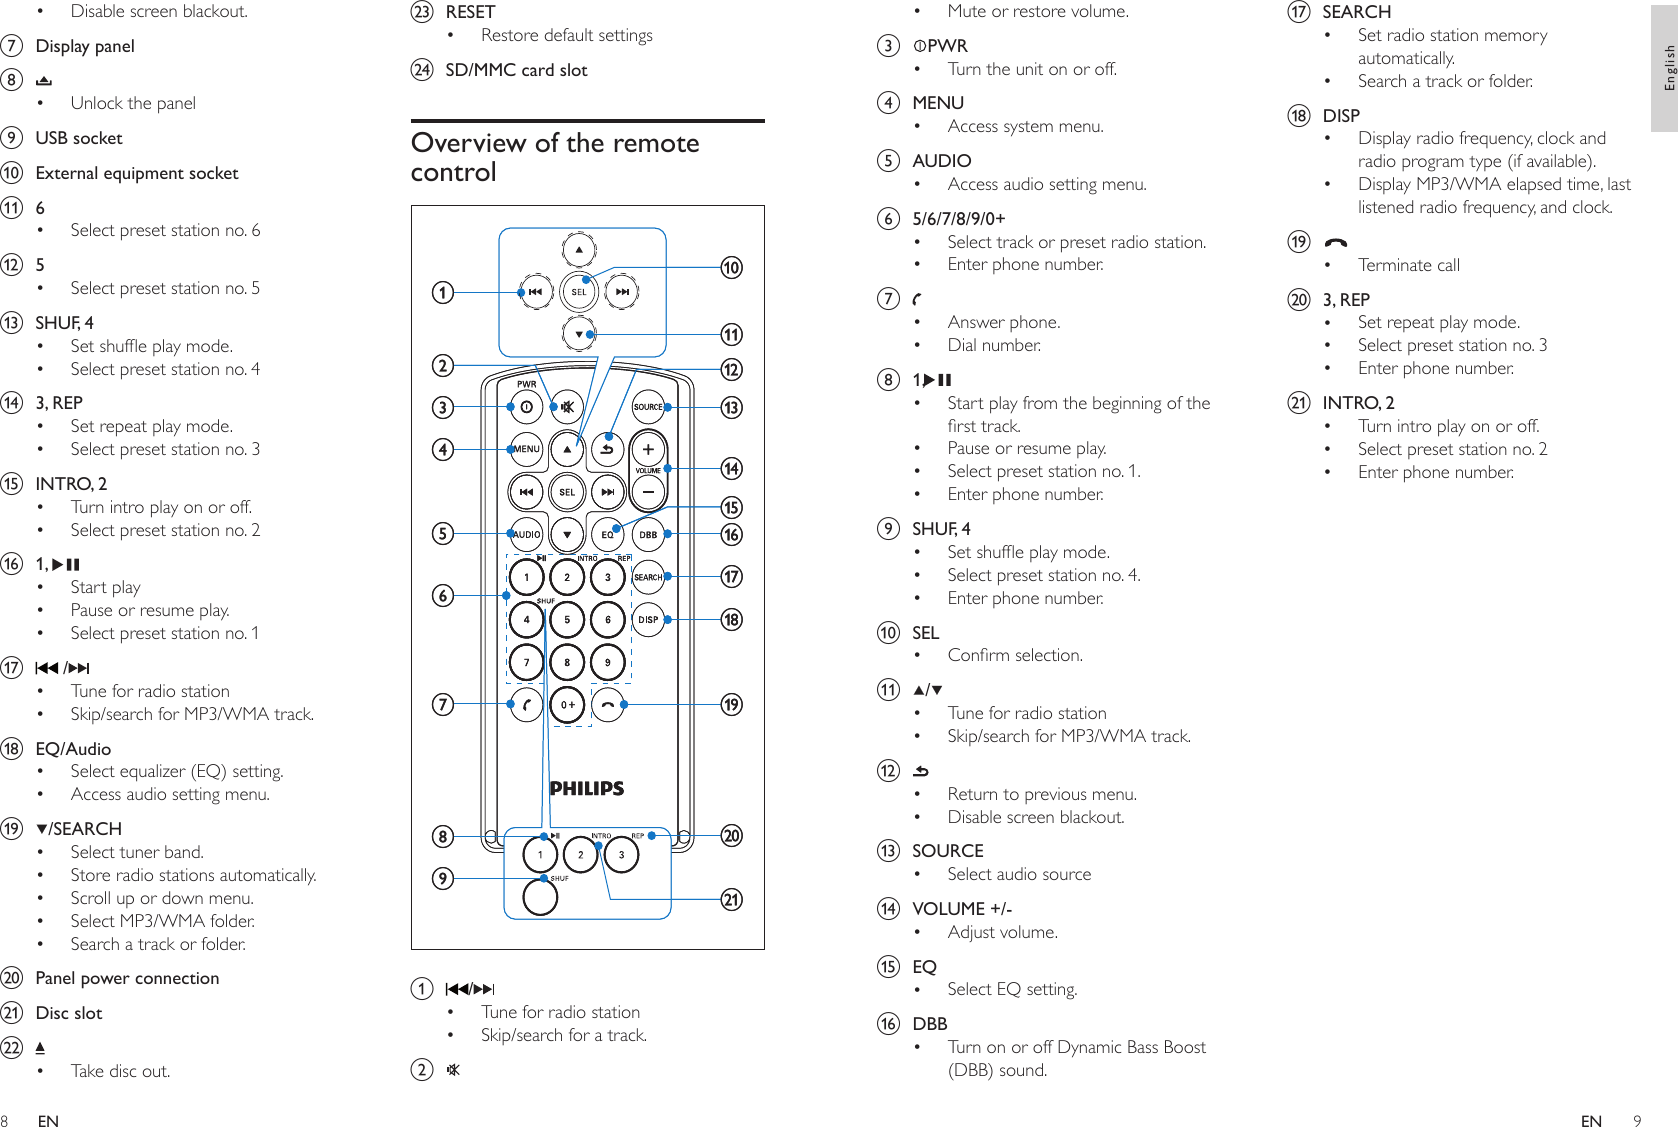
![1819Play from USB/SD/MMC deviceNoteEnsure that the USB or SD/MMC device contains playable music.•Insert the USB device1 Open the cover marked on the front panel. 2 Insert the USB device into the USB socket.The unit starts playing from the USB device automatically.Remove the USB device1 Press and hold to turn off the unit.2 Remove the USB device.»6 Play audio filesNoteEnsure that the disc or device contains playable les.•Play a discNoteYou cannot play CDs encoded with copyright protection technologies.•You can play commercially available audio CDs and these discs: CD-Recordables (CD-R)CD-Re-writables (CD-RW)MP3 CDsWMA CDs1 Press on the front panel to release the panel.2 Insert a CD with the printed side facing up.3 Close the panel.4 Press 1, to start play.To pause CD play, press 1 .To resume CD play, press 1 again.Remove the CDTo take out the CD,1 Press .2 Press beside the disc slot.••••••Search for an MP3/WMA track1 Press SEARCH for 3 seconds.Search menu is displayed.[FILE]: search by track name.[FOLDER]: search by folder sequence.2 Turn to select [FILE] and then press to conrm.3 Turn to enter a character and then press .4 Repeat steps 3 until the search term is complete.5 Press for 3 seconds to start search.When search is nished, a list of matching tracks are displayed.6 Turn to skip over the list.7 Press to select a track.View play information1 During play USB/SD/MMC device, press MENU/DISP repeatedly to view:Track number and elapsed play timeArtist Album Title Folder File ClockRandom playYou can play the tracks in random order.1 During play, press SHUF, 4 to select:[RDM FOLD] : start random play in the current folder.[RDM ALL] : start random play for all tracks.[RDM OFF] : cancel random play.»»»»••••••••••Insert SD/MMC card1 Press to release the panel.2 Insert the SD or MMC card into the card slot.The unit starts playing from the SD/MMC card automatically. Remove the SD/MMC card1 Press and hold to turn off the unit.2 Press the card until you hear a click sound. The card is now disengaged.3 Remove the SD or MMC card.Control playTo select a folder, press or .To skip to the previous/next track, press or .To search backward/forward rapidly within the current track, press or for 3 seconds.To pause, press 1, . To resume play, press 1, again.»»•••••ENEnglishEN](https://usermanual.wiki/Philips-Consumer-Lifestyle/CEM250/User-Guide-1005633-Page-11.png)
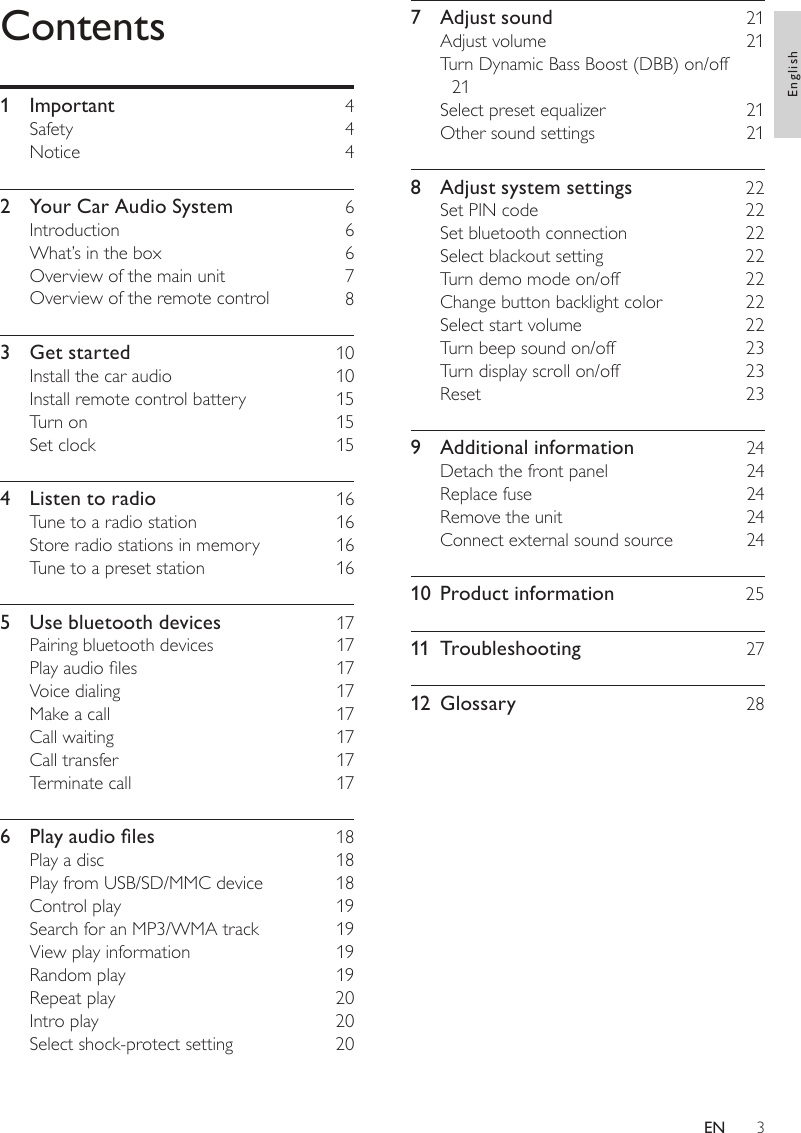
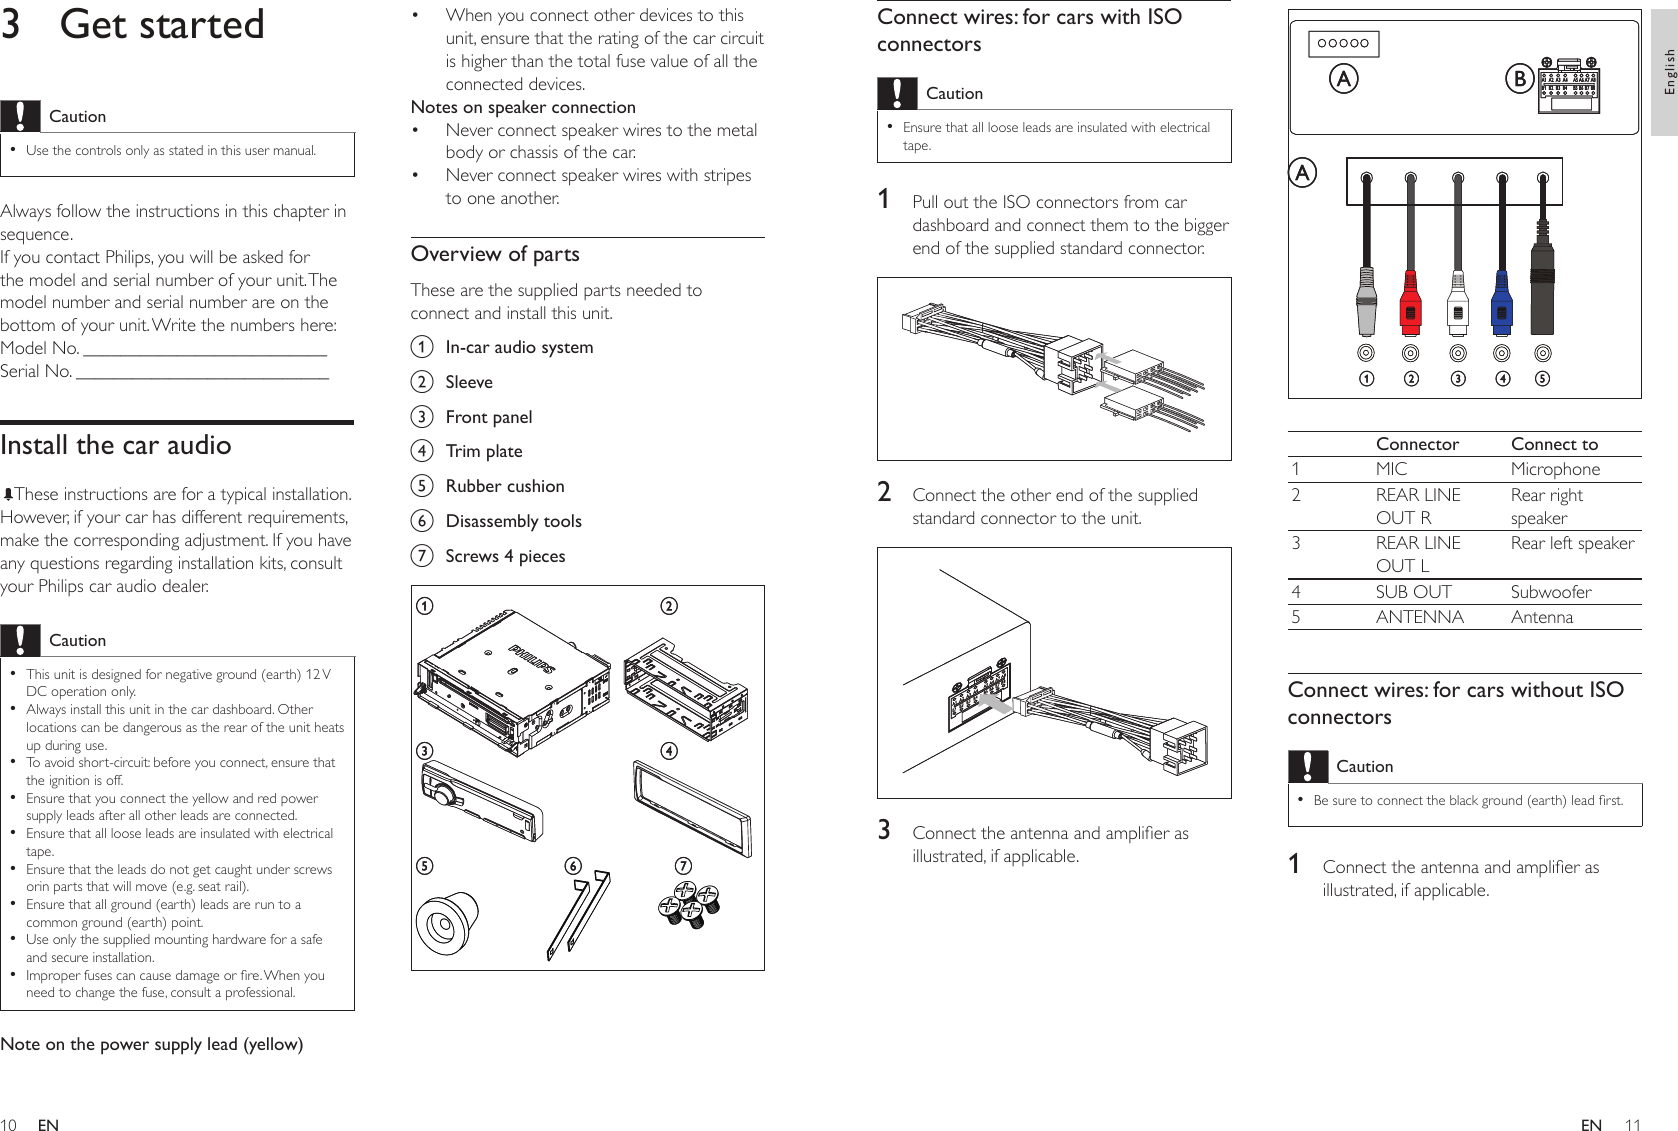
![2021Repeat playDuring play, press 3, REP repeatedly to select:[REP 1] (repeat one track): play the current track repeatedly.[REP FOLD] (repeat one folder): play all tracks in the current folder repeatedly.[REP ALL] (repeat all tracks): play all tracks repeatedly.[REP OFF] (repeat off): cancel repeat play.Intro playYou can play the rst 10 seconds of each track.1 During play, press INTRO, 2 to select:[INT ON] : After the rst 10 seconds of each track have been played, play stops.[INT OFF] : Cancel intro play and start normal play.Select shock-protect settingYou can select the shock protection setting, depending on the stability of your car and the condition of the road.1 Press MENU/DISP for 3 seconds.2 Press or repeatedly until [ESP] is displayed.3 Turn to select a setting:[ESP 12]: select this when the road is smooth and there are few bumps.[ESP 45] select this when the road is bumpy and unstable.4 Press to conrm the selection.••••••••2 Press or repeatedly to select the item to be adjusted:[BAS] (bass) range: -7 to +7.[MID] (bass) range: -7 to +7. [TRE] (treble) range: -7 to +7.[BAL] (balance) range: 12L to 12R. (L = left speaker, R = right speaker)[FAD] (fader) range: 12R to 12F. (R = rear speaker, F = front speaker)[LPF] (low pass lter) range: 60, 80, 100, 200.[MPF] (mid pass lter) range: 500, 1K, 1.5K, 2.5K.[HPF] (high pass lter) range:10K, 12.5K, 15K, 17.5K.[SW ON]/[SW OFF] (subwoofer volume on or off)[SW VOL] (subwoofer volume) range: 0 to 20.3 Turn to select a value. 4 Press to conrm.••••••••••7 Adjust soundAdjust volume1 Turn clockwise/anticlockwise to increase/decrease volume.Turn Dynamic Bass Boost (DBB) on/off1 Press DBB for 3 seconds, the current setting is displayed:[DBB ON] : The Dynamic Bass Boost (DBB) function is on.[DBB OFF] : The DBB function is off.2 Press DBB again for 3 seconds to change the DBB setting.Select preset equalizer1 Press EQ/Audio.The current Equalizer setting is displayed.2 Press EQ/Audio again repeatedly to select a preset EQ:[USER] (user)[FLAT] (at)[POP] (pop)[TECHNO] (techno)[ROCK] (rock)[CLASSIC] (classic)[JAZZ] (jazz)[OPTIMAL] (optimal)Other sound settingsYou can also edit user preset EQ.1 Press EQ/Audio for 3 seconds.»»»••••••••ENEnglishEN](https://usermanual.wiki/Philips-Consumer-Lifestyle/CEM250/User-Guide-1005633-Page-12.png)
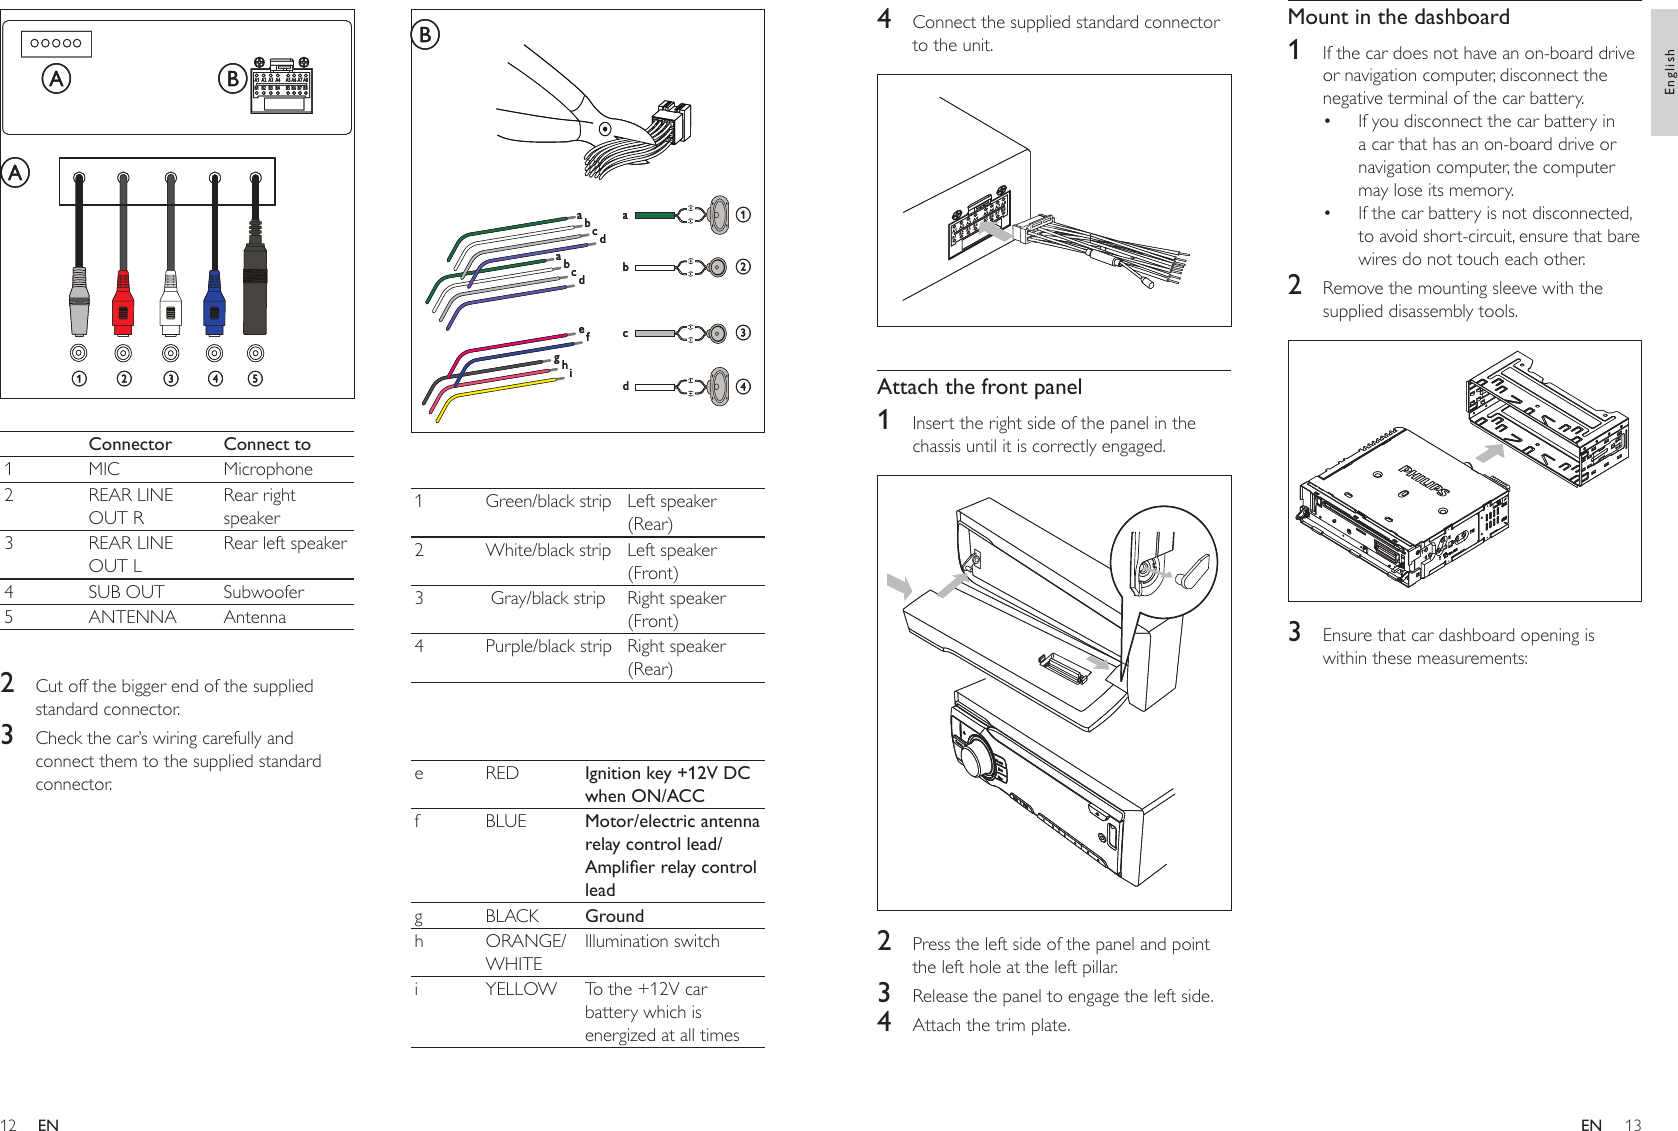
![2223[BKO 20 S] : Turn off the screen automatically 20 seconds after last operation.[BKO OFF] : Never turn off the screen.3 Press to conrm.Turn demo mode on/offWhen demo mode is on, when the unit is idle for more than 2 minutes, all functions are displayed.1 Press MENU/DISP for 3 seconds.2 Press or repeatedly to until [DEMO] is displayed.The screen shows current Demo mode setting.3 Turn to select a setting:[DEMO ON] : Turn on the demo mode. [DEMO OFF] : Turn off the demo mode.4 Press to conrm.Change button backlight colorYou can change button backlight color from blue to red or vice versa.1 Press MENU/DISP for 3 seconds.2 Press or repeatedly to until [KEY BLUE] or [KEY RED] is displayed.3 Turn to select a setting:[KEY BLUE]: Backlight turns blue.[KEY RED]: Backlight turns red. Select start volumeEach time you turn on the unit, it can play at the last listened volume or at the preset volume. ••»••••8 Adjust system settingsSet PIN codeYou can set a password for bluetooth connection.1 Press MENU/DISP for 3 seconds.2 Press or repeatedly to until [PIN CODE] is displayed.3 Press to conrm selection.4 Turn and then press to enter a digit.5 Repeat step 4 to enter other three digits.Set bluetooth connectionYou can set whether the set connects to last bluetooth device automatically.1 Press MENU/DISP for 3 seconds.2 Press or repeatedly to until [AUTO ON] or [AUTO OFF] is displayed.[AUTO ON]: The unit connects to last bluetooth device automatically.[AUTO OFF]: does not connect automatically3 Press to conrm selection.Select blackout settingYou can set the screen to turn off automatically after the unit is idle for 10 or 20 seconds.1 Press MENU/DISP for 3 seconds.2 Turn to select a setting:[BKO 10 S] : Turn off the screen automatically 10 seconds after last operation.•••NoteIf any special characters are present in the MP3 track name or album name, it may not display correctly on the screen because these characters are not supported. Some WMA is protected by Digital Rights Management (DRM), it cannot be played on the unit.Folders/les exceed the supported limit of the unit are not displayed or played.•••1 Press MENU/DISP for 3 seconds.2 Press or repeatedly to until [ROLL ON] or [ROLL OFF] is displayed.3 Turn to select a setting:[ROLL ON] (scroll on): Auto scroll during play.[ROLL OFF] (scroll off): No auto scroll display.4 Press to conrm.ResetYou can reset the unit to its default setting.1 Detach the front panel (see ‘Detach the front panel’ on page 24).2 Press the reset button by using a ball-point pen or a similar tool.Preset adjustments such as preset channels and sound adjustments are erased. ••»1 Press MENU/DISP for 3 seconds.2 Press or repeatedly to until [V - LAST] or [V - ADJ] is displayed.3 Turn to select a setting:[V - LAST] : Each time you turn on the unit, the volume remains from its previous use.[V - ADJ] : Each time you turn on the unit, the volume is at the preset level. 4 Press to conrm.Store preset volumeYou can turn on the unit at a preset volume. 1 Select 2 Press MENU/DISP for 3 seconds.3 Press or repeatedly to until [A-VOL] is displayed.4 Turn to select a value: 0 - 47.5 Press to conrm.Turn beep sound on/offEach time you press a button, the unit beeps. You can turn off/on this beep sound. 1 Press MENU/DISP for3 seconds.2 Press or repeatedly to until [BEEP ON] or [BEEP OFF] is displayed.3 Rotate to select a setting:[BEEP ON]: Turn on the beep sound.[BEEP OFF]: Turn off the beep sound.4 Press to conrm.Turn display scroll on/offFor track information that is longer than the display panel: you can select to cut off the remainder of the text, or scroll to display the full text.••••ENEnglishEN](https://usermanual.wiki/Philips-Consumer-Lifestyle/CEM250/User-Guide-1005633-Page-13.png)
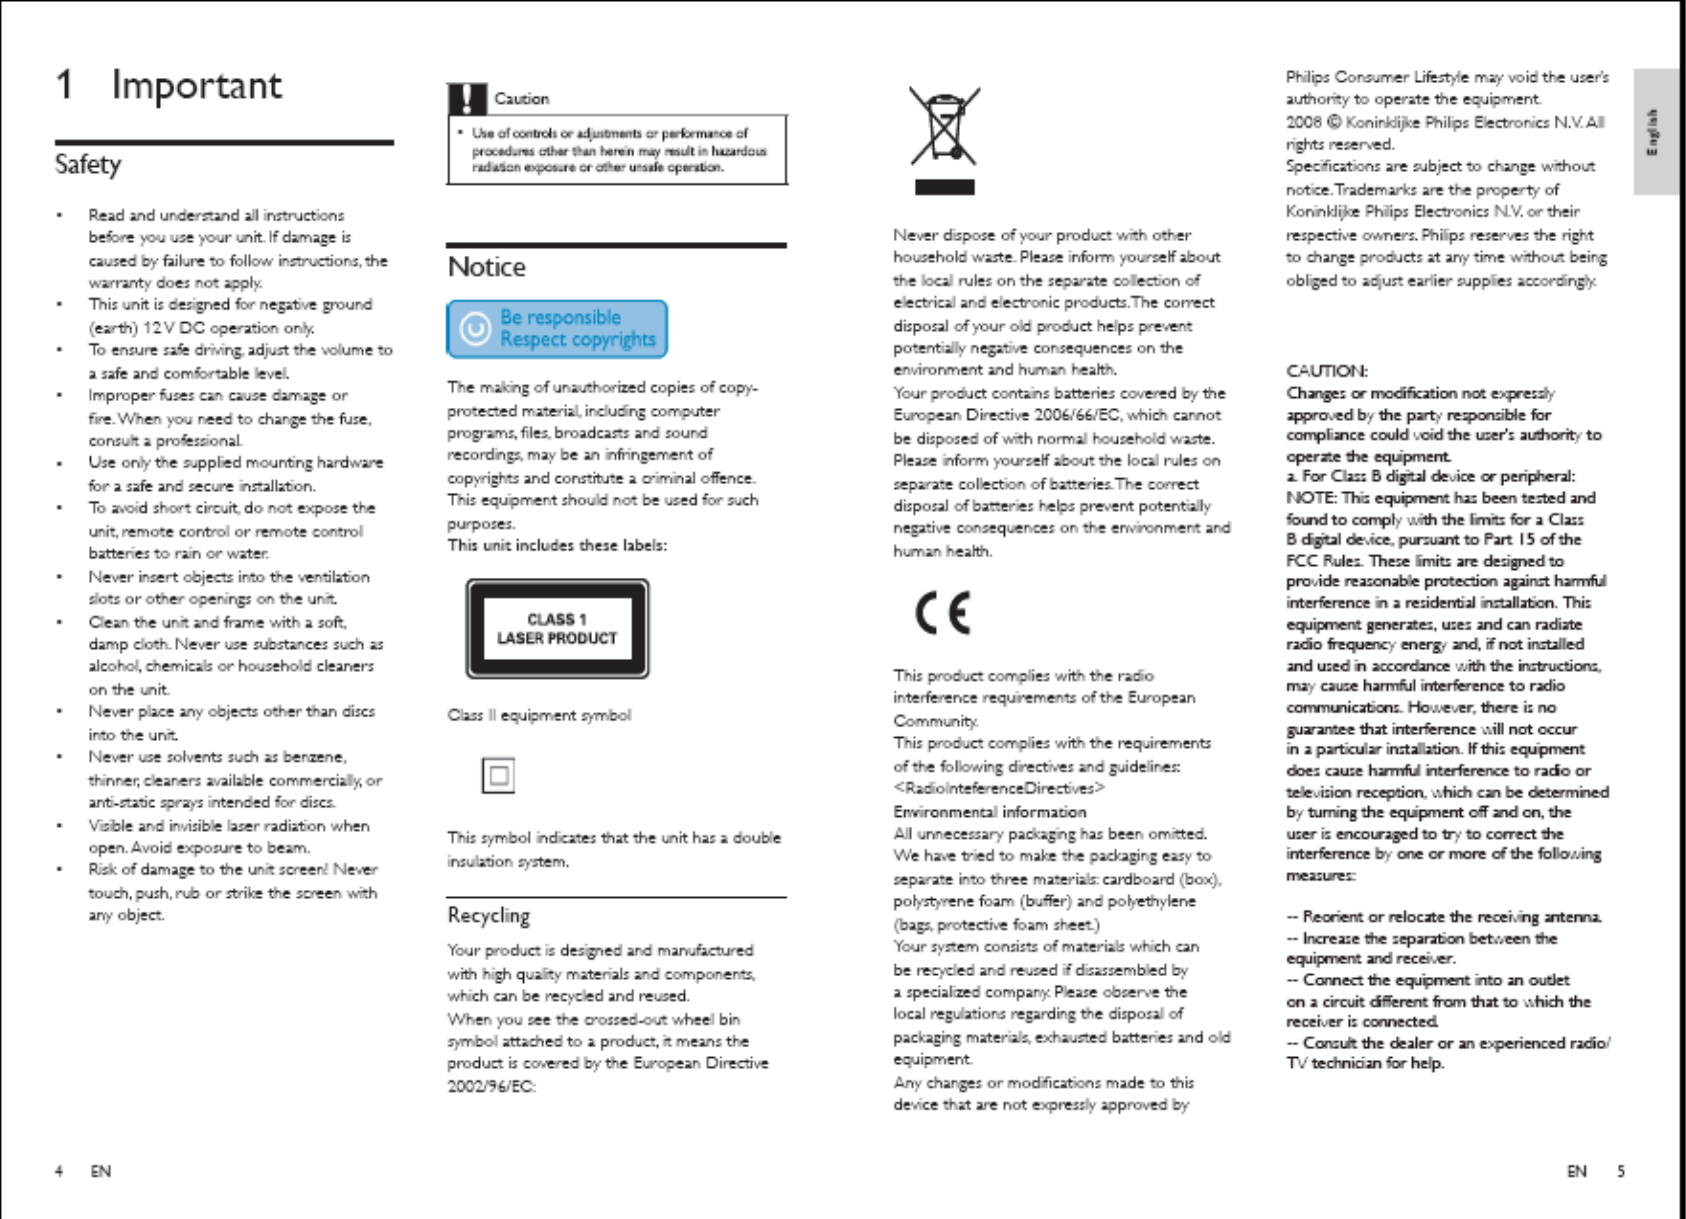
![2425 Note If the new fuse gets damaged again, there may be an internal malfunction. Consult your Philips dealer. •Remove the unitYou can remove the unit from the dashboard.1 Detach the front panel.2 Pull out the unit by using the removal keys.Connect external sound source1 Connect the external sound source to MP3 LINK socket by using a 3.5 mm cable.2 Press SOURCE repeatedly until [MP3 LINK] is displayed.3 Operate the external component (refer to the instructions supplied with the external component)A1 A2 A3 A4 A5 A6 A7 A8B1 B2 B3 B4 B5 B6 B7 B8FUSE 15AA1 A2 A3 A4 A5 A6 A7 A8B1 B2 B3 B4 B5 B6 B7 B8FUSE 15A9 Additional informationDetach the front panelYou can detach the front panel to deter theft.1 Press to release the panel.2 Press the left side of the panel rightward. 3 Pull the panel towards you to detach it from the chassis.4 Store the panel in the supplied carry case to protect it from dirt or damage.Replace fuseIf the fuse is damaged,1 Check the electric connection.2 Buy a fuse that matches the voltage of the damaged fuse.3 Replace the fuse.Frequency range - FM87.5 - 108.0 MHz (Europe)87.5 - 107.9 MHz (American)Frequency range - AM(MW)522 - 1620 KHz (Europe)530 - 1710 HKz (American)Usable sensitivity - FM8 uVUsable sensitivity - AM(MW) (S/N = 20 dB)30 uVFrequency response30 Hz - 15 KHzStereo separation 30 db (1 kHz)Signal/noise ratio >55 dBCompatible USB devices:USB ash memory (USB 2.0 or USB1.1)USB ash players (USB 2.0 or USB1.1)memory cardsSupported formats:USB or memory le format FAT12, FAT16, FAT32 (sector size: 512 bytes)MP3 bit rate (data rate): 32-320 Kbps and variable bit rateWMA v9 or earlierDirectory nesting up to a maximum of 8 levelsNumber of albums/ folders: maximum 99Number of tracks/titles: maximum 999ID3 tag v2.0 or laterFile name in Unicode UTF8 (maximum length: 128 bytes)Unsupported formats:Empty albums: an empty album is an album that does not contain MP3/WMA les, and is not be shown in the display.Unsupported le formats are skipped. For example, Word documents (.doc) or MP3 les with extension .dlf are ignored and not played.AAC, WAV, PCM audio les••••••••••••••10 Product informationNoteProduct information is subject to change without prior notice.•Power supply 12 V DC (11 V - 16 V), negative groundFuse 15 ASuitable speaker impedance4 - 8 Maximum power output50 W x 4 channelsContinuous power output22 W x 4 channels (4 10% T.H.D.)Pre-Amp output voltage2.0 V ( USB play mode; 1 kHz, 0 dB, 10 k load)Subwoofer output voltage2.0 V (USB play mode: 61 Hz, 0 dB, 10 k load)Aux-in level 300 mVDimensions (W x H x D)182 x 53 x 112 MMWeight 1.0 kgRadioENEnglishEN](https://usermanual.wiki/Philips-Consumer-Lifestyle/CEM250/User-Guide-1005633-Page-14.png)