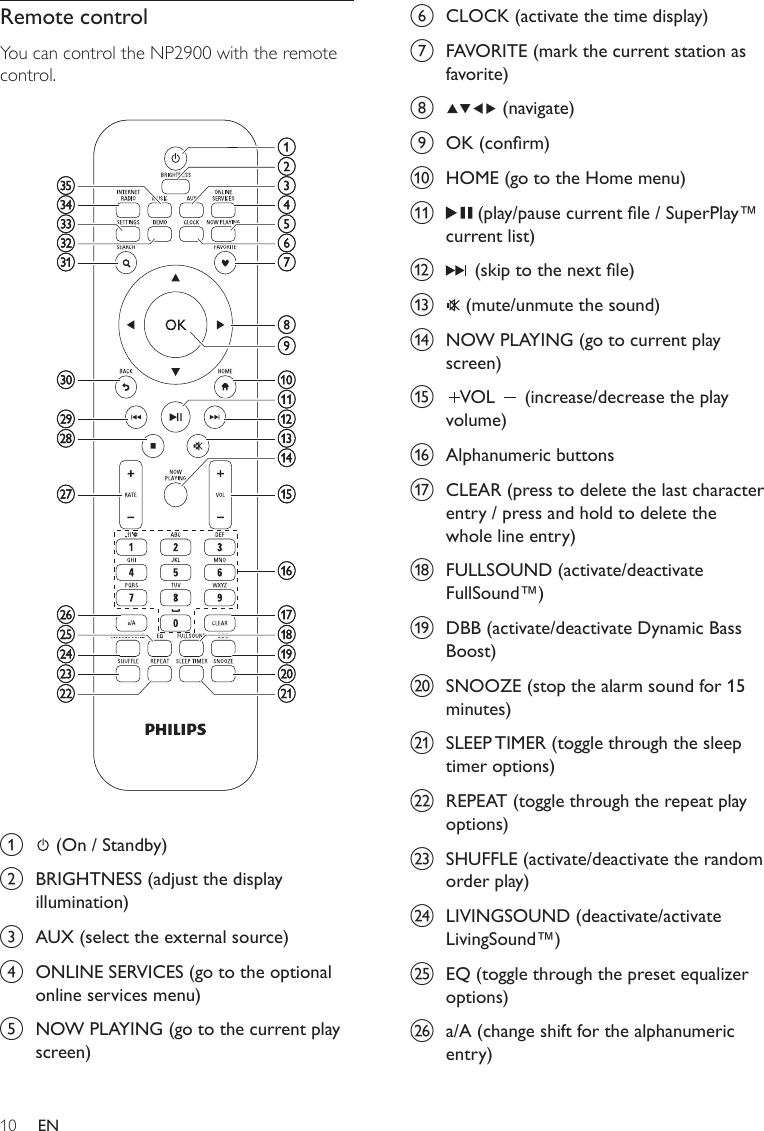
Philips Consumer Lifestyle NP2900 Network Player User Manual NP2900 English
Philips Consumer Lifestyle Network Player NP2900 English
UserManual.wiki
>
Philips Consumer Lifestyle
>
NP2900 User Manual
user manual
Navigation menu
Upload a User Manual
Namespaces
Wiki Guide
HTML
PDF
Info
Views
User Manual
Discussion / Help
Navigation


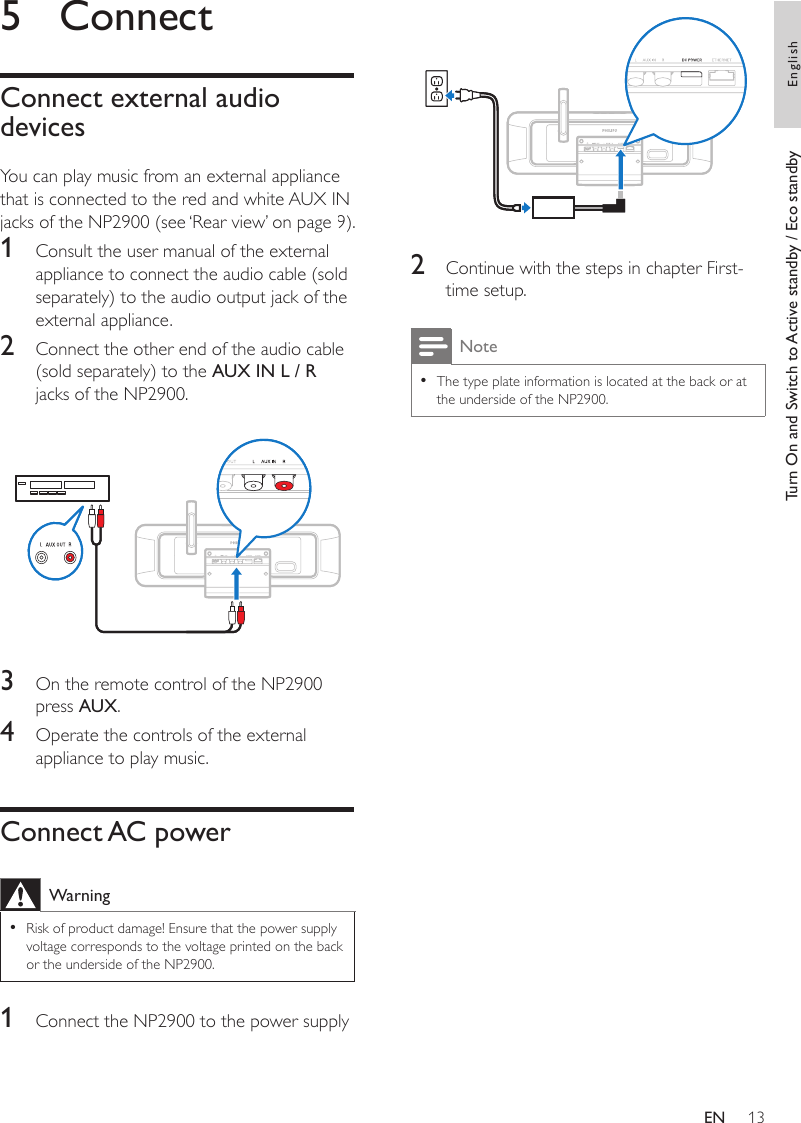
![15NoteThe NP2900 remains in rst-time setup status until you select [No] to decline the demo play.You can start the demo play again with the DEMO button on the remote control or in the Settings menu of the NP2900.••First-time connection to home networkAfter you select [No] to decline to view the demo, the NP2900 reminds you to select your location / time zone. The NP2900 also reminds you to register the NP2900 at www.philips.com/welcome and to install the PC software. This is how to navigate and select with the remote control:Press or to select a menu option.Press OK to conrm a selection.Press BACK to go back to the previous screen.Press HOME to go to the Home menu.1 Select the location / time zone and conrm.The NP2900 shows the prompt for the network connection.2 Select [Yes], to create a connection to the network.The NP2900 shows the prompt for the network setup (if no network has been set up yet). Select [No] to exit the setup and go to the Home menu.3 Continue with one of the following options:First-time setup: Wireless network connection with automatic IP addressThis setup requires the following:A wireless access point or wireless router with broadband Internet access••••»»»•»»7 First-time setupThis is how to navigate and select with the remote control:Press or to select a menu option.Press OK to conrm a selection.Press BACK to go back to the previous screen.Press HOME to go to the Home menu.When you connect the NP2900 to the power supply for the rst time, the NP2900 displays the prompt for the language selection.1 Select the language and conrm.The NP2900 displays the prompt for the optional demo play.You have two options:View the demo. (see ‘View the demo’ on page 15)Complete the rst-time setup. (see ‘First-time connection to home network’ on page 15)TipAfter the rst-time set-up, you can change the language in the Settings menu.•View the demo1 Select “[Yes, show me the demo]”, to view the demo.The demo play starts.To play demo again, repeat step 1.2 To exit the demo play, press .••••»••»»First-time setup EnglishEN](https://usermanual.wiki/Philips-Consumer-Lifestyle/NP2900/User-Guide-1013417-Page-15.png)
![16until you see the number or alphabetic character in the display of the NP2900.To cycle through the alphanumeric characters that are available, press a button repeatedly.To delete the last character entry from the display, press CLEAR.To delete the whole last line entry from the display, press and hold CLEAR. The onscreen display guides you through the process of connecting the NP2900 to your home network and the Internet. This section describes the typical wireless setup with automatic IP address. You can also follow the onscreen prompts for advanced congurations that are not described in this manual.Ensure that your network name and network password or encryption key are available.1 Turn on your wireless access point or wireless router with broadband Internet access.2 Follow the steps in chapter First-time connection to home network until the NP2900 shows the prompt for the network setup.3 Select [Wireless (WiFi)] to start the network setup process.The NP2900 searches for networks.4 Select your network from the list of found networks and conrm.Enter the encryption key (if required) and conrm.The NP2900 acquires the automatic IP address.The NP2900 shows the conrmation for the connection to the network.The NP2900 shows the prompt for the connection to the Internet.5 Select [Yes] to connect to the Internet.The NP2900 shows the conrmation for the connection to the Internet.••••»••••»Manual entry of your encryption key (for encrypted network connections only)First-time setup: Wireless network connection with static IP addressThis setup requires the following:A wireless access point or wireless router with broadband Internet accessManual entry of your IP address.Manual entry of your encryption key (for encrypted network connections only)First-time setup: Wired (Ethernet) network connection with automatic IP addressThis setup requires the following:A wired access point or wired router with broadband Internet access and a free Ethernet port An Ethernet cable (sold separately).First-time setup: Wired (Ethernet) network connection with static IP addressThis setup requires the following:A wired access point or wired router with broadband Internet access and a free Ethernet port Manual entry of your IP address.An Ethernet cable (sold separately).First-time setup: Wireless connection with automatic IP addressThis is how to navigate and select with the remote control:Press or to select a menu option.Press OK to conrm a selection.Press BACK to go back to the previous screen.Press HOME to go to the Home menu.The alphanumeric buttons of the remote control are multi-function buttons:To select a number or an alphanumeric character, press a button once or more »•»»»»•»»»•»»»»•••••EN](https://usermanual.wiki/Philips-Consumer-Lifestyle/NP2900/User-Guide-1013417-Page-16.png)
![171 Turn on your wireless access point or wireless router with broadband Internet access.2 Follow the steps in chapter First-time connection to home network until the NP2900 shows the prompt for the network setup.3 Select [Wireless (WiFi)] to start the network setup process.The NP2900 searches for networks.4 Select your network from the list of found networks and conrm.Enter the encryption key (if required) and conrm.The NP2900 tries to acquire an automatic IP address.5 Press BACK to enter your IP address manually.6 Enter your static IP address and conrm.The NP2900 shows the conrmation for the connection to the network.The NP2900 shows the prompt for the connection to the Internet.7 Select [Yes] to connect to the Internet.The NP2900 shows the conrmation for the connection to the Internet.NoteYou can enter more than one encryption key. In this case, the NP2900 prompts you to select the default encryption key.•First-time setup: Wired connection with automatic IP addressThis is how to navigate and select with the remote control:Press or to select a menu option.Press OK to conrm a selection.Press BACK to go back to the previous screen.Press HOME to go to the Home menu.»••»»»••••NoteYou can enter more than one encryption key. In this case, the NP2900 prompts you to select the default encryption key.•First-time setup: Wireless connection with static IP addressThis is how to navigate and select with the remote control:Press or to select a menu option.Press OK to conrm a selection.Press BACK to go back to the previous screen.Press HOME to go to the Home menu.The alphanumeric buttons of the remote control are multi-function buttons:To select a number or an alphanumeric character, press a button once or more until you see the number or alphabetic character in the display of the NP2900.To cycle through the alphanumeric characters that are available, press a button repeatedly.To delete the last character entry from the display, press CLEAR.To delete the whole last line entry from the display, press and hold CLEAR. The onscreen display guides you through the process of connecting the NP2900 to your home network and the Internet. This section describes the typical wireless setup with static IP address. You can also follow the onscreen prompts for advanced congurations that are not described in this manual.Ensure that your network name and network password or encryption key are available.•••••••••First-time setup EnglishEN](https://usermanual.wiki/Philips-Consumer-Lifestyle/NP2900/User-Guide-1013417-Page-17.png)
![18The NP2900 shows the conrmation for the connection to the Internet.First-time setup: Wired connection with static IP addressThis is how to navigate and select with the remote control:Press or to select a menu option.Press OK to conrm a selection.Press BACK to go back to the previous screen.Press HOME to go to the Home menu.The alphanumeric buttons of the remote control are multi-function buttons:To select a number or an alphanumeric character, press a button once or more until you see the number or alphabetic character in the display of the NP2900.To cycle through the alphanumeric characters that are available, press a button repeatedly.To delete the last character entry from the display, press CLEAR.To delete the whole last line entry from the display, press and hold CLEAR. The onscreen display guides you through the process of connecting the NP2900 to your home network and the Internet. This section describes the typical wired setup with static IP address. You can also follow the onscreen prompts for advanced congurations that are not described in this manual.1 Connect an Ethernet cable (sold separately) to the ETHERNET jack of the NP2900 and the Ethernet jack of the wired router.2 Ensure that the wired router is turned on and has broadband Internet access.3 Follow the steps in chapter First-time connection to home network until the »••••••••The alphanumeric buttons of the remote control are multi-function buttons:To select a number or an alphanumeric character, press a button once or more until you see the number or alphabetic character in the display of the NP2900.To cycle through the alphanumeric characters that are available, press a button repeatedly.To delete the last character entry from the display, press CLEAR.To delete the whole last line entry from the display, press and hold CLEAR. The onscreen display guides you through the process of connecting the NP2900 to your home network and the Internet. This section describes the typical wired setup with automatic IP address. You can also follow the onscreen prompts for advanced congurations that are not described in this manual.1 Connect an Ethernet cable (sold separately) to the ETHERNET jack of the NP2900 and the Ethernet jack of the wired router.2 Ensure that the wired router is turned on and has broadband Internet access.3 Follow the steps in chapter First-time connection to home network until the NP2900 shows the prompt for the network setup.4 Select [Wired (Ethernet)] to start the network setup process.The NP2900 acquires the automatic IP address.The NP2900 shows the conrmation for the connection to the network.The NP2900 shows the prompt for the connection to the Internet.5 Select [Yes] to connect to the Internet.••••»»»EN](https://usermanual.wiki/Philips-Consumer-Lifestyle/NP2900/User-Guide-1013417-Page-18.png)
![19NP2900 shows the prompt for the network setup.4 Select [Wired (Ethernet)] to start the network setup process.The NP2900 tries to acquire an automatic IP address.Press BACK to enter your IP address manually.5 Enter your static IP address and conrm.The NP2900 shows the conrmation for the connection to the network.The NP2900 shows the prompt for the connection to the Internet.6 Select [Yes] to connect to the Internet.The NP2900 shows the conrmation for the connection to the Internet.»»»»»Play EnglishEN](https://usermanual.wiki/Philips-Consumer-Lifestyle/NP2900/User-Guide-1013417-Page-19.png)
![20Shufe playYou can play the audio les of the current selection in random order (shufed).1 During play, press SHUFFLE to toggle the shufe function on and off.Repeat playYou can repeat one or all audio les of the current selection.1 In play mode, press REPEAT to toggle the repeat function as follows:[Repeat 1]The current audio le is continuously repeated until another mode or setting is selected.[Repeat all]All audio les of the current selection are continuously repeated until another mode or setting is selected.[Off] (default)Audio les are played once (normal play).Wirelessly stream music from a computerYou can wirelessly stream music to the NP2900 from a connected computer, if you install TwonkyMedia™ on the computer and congure the computer to share your music. (If TwonkyMedia™ is already installed on the computer, you can skip the installation section and continue with the conguration. For any other media players, refer to the instructions supplied with the player.)TwonkyMedia™ is a registered trademark of Packet Video™ Corporation. All rights reserved. © Packet Video Corporation, 10350 Science Center Drive, San Diego, California, USA.••••••8 PlayYou need the remote control to play music.This is how to navigate and select with the remote control:Press or to select a menu option.Press OK to conrm a selection.Press BACK to go back to the previous screen.Press HOME to go to the Home menu.The play and pause operations on the remote control of the NP2900 are the same for any music source that you choose:1 Press HOME.2 Select the source.3 Select the options.4 Press to play.5 Press to play.Press to toggle between pause and play.6 Press to stop.TipThe following chapters explain the play options and music sources that are available.•Adjust volume1 During play, press VOL to adjust the volume.Mute the sound1 During play, press MUTE to toggle the sound off and on.•••••EN](https://usermanual.wiki/Philips-Consumer-Lifestyle/NP2900/User-Guide-1013417-Page-20.png)
![21TipThe TwonkyMedia™ sharing page lets you set the rescan behavior of the server. The default setting is -1 minute, which ensures auto-scan.•Congure a MAC to share musicYou can share music from a MAC with the NP2900. This chapter shows you how to congure the MAC to share music.1 Follow the instructions to install the TwonkyMedia™ Server.2 On the MAC, click Go > Applications > TwonkyMedia™ Server.3 Click the TwonkyMedia™ Server icon in the task bar.4 Choose TwonkyMedia™ Settings.5 In the Basic Setup of the Conguration Page, click on Sharing.The content directories are scanned.To manually locate the music, click Browse.To manually add a new content directory, click Add new content directory.To save the changes, press Save Changes. 6 On the remote control of the NP2900, press HOME.7 Select [Music] and conrm with OK.The display shows [Searching for UPnP music servers…], followed by the list of media servers.8 Press to select the server name and conrm with OK.TipThe TwonkyMedia™ sharing page lets you set the rescan behavior of the server. The default setting is -1 minute, which ensures auto-scan.•»»»»»Install Twonky Media Server1 On the computer, insert the supplied software CD.Installation starts.2 Follow the instructions on the computer to install the TwonkyMedia™ Server.Congure a PC to share musicYou can share music from a PC with the NP2900. This chapter shows you how to congure the PC to share music.1 Follow the instructions to install the TwonkyMedia™ Server.2 On the PC, click Start > Programs > TwonkyMedia™ Server > Run TwonkyMedia™ Server. 3 Click the TwonkyMedia™ Server icon in the task bar.4 Choose TwonkyMedia™ Settings.5 In the Basic Setup of the Conguration Page, click on Sharing.The content directories are scanned.To manually locate the music, click Browse.To manually add a new content directory, click Add new content directory.To save the changes, press Save Changes. 6 On the remote control of the NP2900, press HOME.7 Select [Music] and conrm with OK.The display shows [Searching for UPnP music servers…], followed by the list of media servers.8 Press to select the server name and conrm with OK.»»»»»»Install Twonky Media Server EnglishEN](https://usermanual.wiki/Philips-Consumer-Lifestyle/NP2900/User-Guide-1013417-Page-21.png)
![22Press HOME to go to the Home menu.Internet radioNoteInternet radio features require broadband Internet access.•Listen to Internet radio1 Turn on the NP2900.2 Ensure that the NP2900 is connected to broadband Internet.3 Press INTERNET RADIO to view the options menu[Favorite stations] (lists the Internet radio stations that you have marked as Favorite Station)[Recently played] (lists the most recently played Internet radio stations)[Recommended stations] (lists recommended Internet radio services stations)[Search] (lets you search for Internet radio stations)[All stations] (lists all Internet radio stations, categorized by genres)[Recorded shows] (lists all recorded Internet radio shows) [My Media] (lists the Internet radio stations that you have entered at Club Philips under Streamium Management)4 Press or , then to select the option.To listen to a specic Internet radio station, select option [Search], then use the alphanumeric buttons to enter the radio station name.Press HOME to go to the Home menu.••••••••••Alphanumeric searchYou can perform an alphanumeric search for specic audio les on a connected UPnP device.This is how to navigate and select with the remote control:Press or to select a menu option.Press OK to conrm a selection.Press BACK to go back to the previous screen.Press HOME to go to the Home menu.The alphanumeric buttons of the remote control are multi-function buttons:To select a number or an alphanumeric character, press a button once or more until you see the number or alphabetic character in the display of the NP2900.To cycle through the alphanumeric characters that are available, press a button repeatedly.To delete the last character entry from the display, press CLEAR.To delete the whole last line entry from the display, press and hold CLEAR. This is how to use the alphanumeric search feature:1 Turn on the NP2900.2 Press MUSIC.The display shows the available servers.3 Select the server.The display shows the available lists.4 Select the list.5 Press SEARCH.The display shows a text box.6 Press the alphanumeric buttons on the remote control to enter the search word.7 Press OK to start the search.The NP2900 shows the closest alphabetical match.8 To stop the search, press .••••••••»»»»EN](https://usermanual.wiki/Philips-Consumer-Lifestyle/NP2900/User-Guide-1013417-Page-22.png)
![234 Select [Favorite stations]. 5 Select the station.Press HOME to go to the Home menu.NoteInternet radio features require broadband Internet access.•Remove a Favorite StationYou can remove Internet radio stations from your Favorites:1 While listening to an Internet radio station that is bookmarked as a Favorite, press CLEAR.The current station is no longer bookmarked as a Favorite.NoteInternet radio features require broadband Internet access.•Manually add Internet radio stationsThis chapter explains how to register with Philips and add individual URL addresses for Internet radio stations on the PC.1 Ensure that the NP2900 is turned on.2 Ensure that the NP2900 is connected to the Internet.3 On the NP2900, select [Settings] > [Registration information] > [User registration].The registration display is shown.4 Press alphanumeric buttons on the remote control to enter your valid email address.5 Press OK.The display conrms the automated email dispatch to your mailbox.•»»»NoteInternet radio features require broadband Internet access.•Mark radio stations as FavoritesYou can mark Internet radio stations as your Favourites so next time you want to listen to a station, it is easy to nd.1 Turn on the NP2900.2 Ensure that the NP2900 is connected to broadband Internet.3 When you listen to Internet radio, press FAVORITE to mark the station.Press HOME to go to the Home menu.The next time you connect to the Internet radio, the radio station is shown in the Favorite Stations menu.NoteInternet radio features require broadband Internet access.•TipYou can also place bookmarks for Internet radio stations when you log on at www.philips.com/welcome and on the registered product site click the link Streamium Management.•Listen to Favorite StationsWhen you place bookmarks for Internet radio stations (see ‘Mark radio stations as Favorites’ on page 23), you can nd them under Favorite Stations.1 Turn on the NP2900.2 Ensure that the NP2900 is connected to broadband Internet.3 Press INTERNET RADIO.••Install Twonky Media Server EnglishEN](https://usermanual.wiki/Philips-Consumer-Lifestyle/NP2900/User-Guide-1013417-Page-23.png)
![24To return to the Home menu, press HOME.NoteThe feature My Media requires registration with Club Philips.Internet radio features require broadband Internet access.••Listen to Rhapsody® music servicesNoteThis feature requires broadband Internet access.This feature requires a Rhapsody® account.This feature is only available in some regions.•••Rhapsody® is an on-line music service that offers streaming on-demand access to its library of digital music. You can use this online service with your NP2900.Available features can include:[My Library] (built from your Rhapsody Music Library)[Channels] (lets you select virtual Internet radio channels with different genre options and other features)[Search] (lets you search for music in the Rhapsody Music Library)[Music guide] (guides you through the Rhapsody Music Services)[My Rhapsody] (lets you create and select your albums, dynamic playlists, ratings)[Account management] (helps you manage your Rhapsody Account)1 Turn on the NP2900.2 Ensure that the NP2900 is connected to broadband Internet.3 Press HOME.4 Select [Rhapsody].5 Follow the instructions that are displayed:Rhapsody® instructions to select the services available to you.••••••••6 Check the email inbox for a message from ConsumerCare@Philips.com with the subject Your Streamium Registration....7 Follow the instructions in the email to complete your registration process on the Philips website.8 On the registered product site, click the link Streamium Management.9 Select My Media.10 Click on the tab Music.11 Enter the URL address of Internet radio station in the rst column.12 Enter a nickname in the second column.The nickname is the Internet radio stations identication that is displayed the NP2900.13 Enter a description in the third column.14 Click on Save to conrm your entries.NoteIf the manually added Internet radio station is available and broadcast in a compatible format, you can listen to it on the NP2900. You can nd the manually added Internet radio stations in the My Media list on the NP2900.Internet radio features require broadband Internet access.•••Listen to My MediaWhen you manually add an Internet radio station, the Internet radio station is found under [My Media]. 1 Turn on the NP2900.2 Ensure that the NP2900 is connected to broadband Internet.3 Press INTERNET RADIO.4 Select [My Media].The display shows the list of Internet radio stations stored under [My Media].5 Press OK to start play.»»EN](https://usermanual.wiki/Philips-Consumer-Lifestyle/NP2900/User-Guide-1013417-Page-24.png)
![262 Select [Repeat] or[Shufe].3 Select your option and conm.Sound settingsThe sound settings of the NP2900 offer the following options:LivingSound™ (see ‘LivingSound’ on page 26)Equalizer (see ‘Equalizer settings’ on page 26)LivingSoundThe NP2900 offers a pre-congured sound setting called LivingSound™. The LivingSound™ feature enlarges the area in which stereo sound is heard, so that the listener need not sit directly in front of the NP2900 to hear stereo sound. 1 Press LIVINGSOUND to toggle the LivingSound™ feature off and on (default).NoteThe LivingSound™ feature is not supported with the use of headphones.•Equalizer settingsYou can choose between the following equalizer options:[FullSound][Dynamic Bass Boost][Rock][Pop][Jazz][Classic][Off]1 Press SETTINGS, to go to the Settings menu.2 Select [Sound settings] > [Equalizer].•••••••••••9 SettingsThe following settings are available to you:[Play mode][Sound settings][Display settings][Album art][Clicker sound][Alarm clock settings][Network settings][Location and time zone][Language][User registration][Check for software upgrades][Demo mode][Information][Call centre numbers][Restore factory settings]This is how to navigate and select with the remote control:Press or to select a menu option.Press OK to conrm a selection.Press BACK to go back to the previous screen.Press HOME to go to the Home menu.This is how you change settings:1 Turn on the NP2900.2 Press SETTINGS.3 Select menu option and conrm.Play modeThe NP2900 offers play mode options that can be toggled with buttons on the remote control.Shufe play (see ‘Shufe play’ on page 20)Repeat play (see ‘Repeat play’ on page 20)You can also change the play mode options in the Settings menu:1 Press SETTINGS, to go to the Settings menu.•••••••••••••••••••••EN](https://usermanual.wiki/Philips-Consumer-Lifestyle/NP2900/User-Guide-1013417-Page-26.png)
![27Clicker soundThe NP2900 can give you an audible feedback (clicker sound) every time you press a button on the remote control. You can toggle the clicker sound on or off:1 Press SETTINGS, to go to the Settings menu.2 Select [Clicker sound].3 Highlight the option, then press OK.Album artThe NP2900 can display album art as a background or as a thumbnail in the music play screen. Album art must be available to be displayed. For albums without available album art, the NP2900 displays a default icon. You can toggle the album art display on or off:1 Press SETTINGS, to go to the Settings menu.2 Select [Album art].3 Highlight the option, then press OK.Clock settingsThe NP2900 has a clock with alarm functions. The clock must be set for the alarm function to be functional. This is how to set the clock:1 Press SETTINGS, to go to the Settings menu.2 Select [Clock settings] > [Date and time], to enter the date and time settings.3 You can select the following options:[Current date and time] > [Automatic (Internet)], to sync the time automatically via the Internet (requires Internet connection).[Current date and time] > [Manual], to set the time manually.To set the date and time manually:••3 Select a menu option and conrm.Display settingsThe display settings of the NP2900 offer the following display illumination options:Brightness when the NP2900 is turned on. (see ‘Brightness settings when the NP2900 is turned on’ on page 27)Brightness when when the NP2900 is switched to standby. (see ‘Brightness settings when the NP2900 is switched to standby’ on page 27)Brightness settings when the NP2900 is turned onYou can choose between the following brightness ‘when on’ settings:[Bright][DIM]1 Press SETTINGS, to go to the Settings menu.2 Select [Brightness when on].3 Select a menu option and conrm.Brightness settings when the NP2900 is switched to standbyYou can choose between the following brightness ‘when standby’ settings:[Bright][DIM][Off]1 Press SETTINGS, to go to the Settings menu.2 Select [Brightness when standby].3 Select a menu option and conrm.•••••••Settings EnglishEN](https://usermanual.wiki/Philips-Consumer-Lifestyle/NP2900/User-Guide-1013417-Page-27.png)
![28Manual entry of your encryption key (for encrypted network connections only)Wireless network connection with static IP address (see ‘Wireless connection with static IP address’ on page 29)This setup requires the following:A wireless access point or wireless router with broadband Internet accessManual entry of your IP address.Manual entry of your encryption key (for encrypted network connections only)Wired (Ethernet) network connection with automatic IP address (see ‘Wired connection with automatic IP address’ on page 30)This setup requires the following:A cable modem or PC with broadband Internet access and a free Ethernet portAn Ethernet cable (sold separately).Wired (Ethernet) network connection with static IP address (see ‘Wired connection with static IP address’ on page 31)This setup requires the following:A cable modem or PC with broadband Internet access and a free Ethernet portAn Ethernet cable (sold separately).Manual entry of your IP address.Wireless connection with automatic IP addressThis is how to navigate and select with the remote control:Press or to select a menu option.Press OK to conrm a selection.Press BACK to go back to the previous screen.Press HOME to go to the Home menu.»•»»»»•»»»•»»»»••••1 Press or to adjust the setting.2 Press OK to conrm.In the date and time settings, you can set the following formats:[Time format] - Set your option in the time format sub-menu.[Date format] - Set your option in the date format sub-menu. [Daylight saving time] - Mark the box to select this option.Alarm settingsThe NP2900 has an alarm function. The clock must be set for the alarm function to be functional. This is how to set the alarm:1 Press SETTINGS, to go to the Settings menu.2 Select [Clock settings] > [Alarm], to enter the alarm settings.3 You can select the following options:[Alarm off] (default)[Music][Buzzer]To set the alarm time:1 Press or to adjust the setting.2 Press OK to conrm.Network settingsYou can choose between different setups. This manual explains the following options:Wireless network connection with automatic IP address (see ‘Wireless connection with automatic IP address’ on page 28)This is the most common network setup.This setup requires the following:A wireless access point or wireless router with broadband Internet access•••••••»»»EN](https://usermanual.wiki/Philips-Consumer-Lifestyle/NP2900/User-Guide-1013417-Page-28.png)
![29The NP2900 shows the prompt for the connection to the Internet.7 Select [Yes] to connect to the Internet.The NP2900 shows the conrmation for the connection to the Internet.NoteYou can enter more than one encryption key. In this case, the NP2900 prompts you to select the default encryption key.•Wireless connection with static IP addressThis is how to navigate and select with the remote control:Press or to select a menu option.Press OK to conrm a selection.Press BACK to go back to the previous screen.Press HOME to go to the Home menu.The alphanumeric buttons of the remote control are multi-function buttons:To select a number or an alphanumeric character, press a button once or more until you see the number or alphabetic character in the display of the NP2900.To cycle through the alphanumeric characters that are available, press a button repeatedly.To delete the last character entry from the display, press CLEAR.To delete the whole last line entry from the display, press and hold CLEAR. The onscreen display guides you through the process of connecting the NP2900 to your home network and the Internet. This section describes the typical wireless setup with static IP address. You can also follow the onscreen prompts for advanced •»••••••••The alphanumeric buttons of the remote control are multi-function buttons:To select a number or an alphanumeric character, press a button once or more until you see the number or alphabetic character in the display of the NP2900.To cycle through the alphanumeric characters that are available, press a button repeatedly.To delete the last character entry from the display, press CLEAR.To delete the whole last line entry from the display, press and hold CLEAR. The onscreen display guides you through the process of connecting the NP2900 to your home network and the Internet. This section describes the typical wireless setup with automatic IP address. You can also follow the onscreen prompts for advanced congurations that are not described in this manual.1 Ensure that your network name and network password or encryption key are available.2 Turn on your wireless access point or wireless router with broadband Internet access.3 Turn on the NP2900.4 Press SETTINGS, to go to the Settings menu.5 Select [Wireless (WiFi)] to start the network setup process.The NP2900 searches for networks.6 Select your network from the list of found networks and conrm.Enter the encryption key (if required) and conrm.The NP2900 acquires the automatic IP address.The NP2900 shows the conrmation for the connection to the network.••••»•••Settings EnglishEN](https://usermanual.wiki/Philips-Consumer-Lifestyle/NP2900/User-Guide-1013417-Page-29.png)
![30Press OK to conrm a selection.Press BACK to go back to the previous screen.Press HOME to go to the Home menu.The alphanumeric buttons of the remote control are multi-function buttons:To select a number or an alphanumeric character, press a button once or more until you see the number or alphabetic character in the display of the NP2900.To cycle through the alphanumeric characters that are available, press a button repeatedly.To delete the last character entry from the display, press CLEAR.To delete the whole last line entry from the display, press and hold CLEAR. The onscreen display guides you through the process of connecting the NP2900 to your home network and the Internet. This section describes the typical wired setup with automatic IP address. You can also follow the onscreen prompts for advanced congurations that are not described in this manual.1 Connect an Ethernet cable (sold separately) to the ETHERNET jack of the NP2900 and the Ethernet jack of the wired router.2 Ensure that the wired router is turned on and has broadband Internet access.3 Turn on the NP2900.4 Press SETTINGS, to go to the Settings menu.5 Select [Wired (Ethernet)] to start the network setup process.The NP2900 acquires the automatic IP address.The NP2900 shows the conrmation for the connection to the network.•••••••»»congurations that are not described in this manual.1 Ensure that your network name and network password or encryption key are available.2 Turn on your wireless access point or wireless router with broadband Internet access.3 Turn on the NP2900.4 Press SETTINGS, to go to the Settings menu.5 Select [Wireless (WiFi)] to start the network setup process.The NP2900 searches for networks.6 Select your network from the list of found networks and conrm.Enter the encryption key (if required) and conrm.The NP2900 tries to acquire an automatic IP address.7 Press BACK to enter your IP address manually.8 Enter your static IP address and conrm.The NP2900 shows the conrmation for the connection to the network.The NP2900 shows the prompt for the connection to the Internet.9 Select [Yes] to connect to the Internet.The NP2900 shows the conrmation for the connection to the Internet.NoteYou can enter more than one encryption key. In this case, the NP2900 prompts you to select the default encryption key.•Wired connection with automatic IP addressThis is how to navigate and select with the remote control:Press or to select a menu option.»••»»»•EN](https://usermanual.wiki/Philips-Consumer-Lifestyle/NP2900/User-Guide-1013417-Page-30.png)
![312 Ensure that the wired router is turned on and has broadband Internet access.3 Turn on the NP2900.4 Press SETTINGS, to go to the Settings menu.5 Select [Wired (Ethernet)] to start the network setup process.The NP2900 tries to acquire an automatic IP address.Press BACK to enter your IP address manually.6 Enter your static IP address and conrm.The NP2900 shows the conrmation for the connection to the network.The NP2900 shows the prompt for the connection to the Internet.7 Select [Yes] to connect to the Internet.The NP2900 shows the conrmation for the connection to the Internet.Location and time zoneThis is how you can change the location and time zone settings of the NP2900:1 Press SETTINGS, to go to the Settings menu.2 Select [Location and time zone].3 Select a menu option and conrm.The NP2900 applies the new location and time zone settings.Press BACK to go back to the previous screen.Press HOME to go to the Home menu.LanguageThis is how you can change the language of the display:»»»»»»»»The NP2900 shows the prompt for the connection to the Internet.6 Select [Yes] to connect to the Internet.The NP2900 shows the conrmation for the connection to the Internet.Wired connection with static IP addressThis is how to navigate and select with the remote control:Press or to select a menu option.Press OK to conrm a selection.Press BACK to go back to the previous screen.Press HOME to go to the Home menu.The alphanumeric buttons of the remote control are multi-function buttons:To select a number or an alphanumeric character, press a button once or more until you see the number or alphabetic character in the display of the NP2900.To cycle through the alphanumeric characters that are available, press a button repeatedly.To delete the last character entry from the display, press CLEAR.To delete the whole last line entry from the display, press and hold CLEAR. The onscreen display guides you through the process of connecting the NP2900 to your home network and the Internet. This section describes the typical wired setup with static IP address. You can also follow the onscreen prompts for advanced congurations that are not described in this manual.1 Connect an Ethernet cable (sold separately) to the ETHERNET jack of the NP2900 and the Ethernet jack of the wired router.»»••••••••Settings EnglishEN](https://usermanual.wiki/Philips-Consumer-Lifestyle/NP2900/User-Guide-1013417-Page-31.png)
![32The item prompts you to enter a valid email address.3 Enter your email address and conrm.The item shows a conrmation and prompts you to check the inbox of your email account.Unregister the NP2900This is how to navigate and select with the remote control:Press or to select a menu option.Press OK to conrm a selection.Press BACK to go back to the previous screen.Press HOME to go to the Home menu.This is how you can unregister the NP2900 with Philips:1 Press SETTINGS, to go to the Settings menu.2 Select [Unregister].The NP2900 prompts you to conrm.3 Conrm to unregister.The item shows a conrmation that the NP2900 is unregistered with your email account.Registration informationThis is how you can check the registration status of the NP2900:1 Press SETTINGS, to go to the Settings menu.2 Select [Registration information].The NP2900 shows the registration information.Press BACK to go back to the previous screen.Press HOME to go to the Home menu.»»••••»»»»»1 Press SETTINGS, to go to the Settings menu.2 Select [Language].3 Select a menu option and conrm.The display language changes to the new setting.Press BACK to go back to the previous screen.Press HOME to go to the Home menu.Register the NP2900Registration of the NP2900 requires a valid email address and mailbox access.This is how to navigate and select with the remote control:Press or to select a menu option.Press OK to conrm a selection.Press BACK to go back to the previous screen.Press HOME to go to the Home menu.The alphanumeric buttons of the remote control are multi-function buttons:To select a number or an alphanumeric character, press a button once or more until you see the number or alphabetic character in the display of the NP2900.To cycle through the alphanumeric characters that are available, press a button repeatedly.To delete the last character entry from the display, press CLEAR.To delete the whole last line entry from the display, press and hold CLEAR. This is how you can register the NP2900 with Philips:1 Press SETTINGS, to go to the Settings menu.2 Select [Register now].»»»••••••••EN](https://usermanual.wiki/Philips-Consumer-Lifestyle/NP2900/User-Guide-1013417-Page-32.png)
![33InformationThis is how you can nd information about the NP2900:1 Press SETTINGS, to go to the Settings menu.2 Select [Information].3 Press OK to conrm.The device information is shown on the display of the NP2900.Press BACK to go back to the previous screen.Press HOME to go to the Home menu.Demo modeYou can access the demo mode in the Settings menu:1 Press SETTINGS, to go to the Settings menu.2 Select [Demo mode].The demo plays continuously until you exit the demo play.3 To exit the demo play, press .TipYou can start the demo play more quickly with the DEMO button on the remote control.•Call center numbersThis is how you can nd the call center numbers:1 Press SETTINGS, to go to the Settings menu.2 Select [Call centre numbers].3 Press OK to conrm.»»»»Check for SW upgradesThis is how to navigate and select with the remote control:Press or to select a menu option.Press to conrm a selection.Press OK to conrm an alphanumeric entry.Press HOME to go to the Home menu.This is how you can check for software updates for the NP2900:1 Ensure that the NP2900 is connected to the Internet.2 Press SETTINGS, to go to the Settings menu.3 Select [Check for software upgrades] and conrm.The NP2900 checks for a new software version.4 Read the information shown in the display of the NP2900.New software is available for the NP2900:1 Follow the instructions shown in the display to complete the update.The NP2900 prompts you to accept the conditions and download of the software.The NP2900 restarts after the update.NoteMandatory updates do not require your acceptance or conrmation.•The NP2900 already has the latest software installed:Press BACK to go back to the previous screen.Press HOME to go to the Home menu.••••»»»••Check for SW upgrades EnglishEN](https://usermanual.wiki/Philips-Consumer-Lifestyle/NP2900/User-Guide-1013417-Page-33.png)
![34The call center numbers are shown on the display of the NP2900.Press BACK to go back to the previous screen.Press HOME to go to the Home menu.Restore factory settingsCautionThe following procedure erases all custom settings and resets the NP2900 to the original status as set by the factory.•This is how to restore the factory settings of the NP2900:1 Press SETTINGS, to go to the Settings menu.2 Select [Restore factory settings].3 Select [Yes] to reconrm.The NP2900 restarts.The factory settings of the NP2900 are restored.»»»»»EN](https://usermanual.wiki/Philips-Consumer-Lifestyle/NP2900/User-Guide-1013417-Page-34.png)