Philips Electronics Singapore DSS1005 2 way RF Docking Station User Manual SJM3152 manual GM singles 20081010
Philips Electronics Singapore Pte Ltd 2 way RF Docking Station SJM3152 manual GM singles 20081010
User manual
SJM3152
DSS1005/01
EN Universal remote and
docking cradle for iPod™ 3
DE Universalfernbedienung und
Dockingstation für iPod™ 26
FR Télécommande universelle et
station d’accueil pour iPod™ 49
NL Universele afstandsbediening
en basisstation voor de iPod™ 72
ES Mando a distancia universal
y estación base para iPod™ 95
IT Telecomando universal e base
de suporte para iPod™ 118
PT Universal remote and
docking cradle for iPod™ 141
www.philips.com/welcome
SV Universalfjärrkontroll och
dockningsstation för iPod™ 164
ELƔƧƫƥƷƥƩƱƩƳƴƞƱƩƯƣƥƭƩƪƞƲƷƱƞƳƧƲ
ƪơƩƢƜƳƧƳƽƭƤƥƳƧƲƣƩơL3RG 187
PL
Pilot uniwersalny i podstawka
GRNXMĀFDdo odtwarzacza iPod™
210
ǠǺǵǯDzǽǾǭǸȉǺȈǶǼȀǸȉǿ
RU DZǵǾǿǭǺȃǵǻǺǺǻǰǻȀǼǽǭǯǸDzǺǵȌ
ǵDZǻǷȀǾǿǽǻǶǾǿǯǻDZǸȌL3RG 233
8QLYHU]iOQtGiONRYîRYODGDĈD
CS GRNRYDFtNROpENDSUR]Dŏt]HQt
iPod™ 256
HU Univerzális távirányító és dokkoló
az iPod™ használatához 279
TR iPod™ için evrensel uzaktan
NXPDQGDYHEDĚODQW×FLKD]× 302

3
ENGLISH
Table of Contents
1. Important 4
2. Your universal remote and
docking cradle for iPod™ 6
2.1 What’s in the box 7
2.2 What you’ll also need 7
2.3 Universal remote and docking
cradle for iPod™ overview 8
2.4 Main menu overview 8
3. Getting Started 9
3.1 Prepare 9
3.2 Connect 9
3.3 Install 10
4. Using your universal remote and
docking cradle for iPod™ 12
4.1 Using your universal remote for
iPod™ as a controller for your iPod™ 12
4.2 Browsing and playing music from
your iPod™ 12
4.3 Using your universal remote for
iPod™ as a universal remote control 14
4.4 Starting up an activity 15
4.5 Replacing the batteries 15
5. Use more of your universal
remote and docking cradle
for iPod™ 16
5.1 Adding a device 16
5.2 Deleting a device 17
5.3 Fixing a key 17
5.4 Adding a function 18
5.5 Adding an activity 18
5.6 Deleting an activity 19
5.7 About RF Settings 19
5.8 Changing language 20
5.9 Copying volume 20
5.10 Changing display time out 21
5.11 Performing a full reset 21
6. Warranty and service 22
7. Technical data 23
8. Frequently asked questions 24
Table of contents

4
1 Important
Take time to read this manual before you use
your universal remote and docking cradle for
iPod™. It contains important information and
notes regarding operating your universal remote
and docking cradle for iPod™.
© 2008 Koninklijke Philips Electronics N.V.
All rights reserved. Reproduction in whole or in
part is prohibited without the written consent of
the copyright owner. Trademarks are the
property of Koninklijke Philips Electronics N.V.
or their respective owners.
FCC Compliance
This device complies with Part 15 of the FCC
Rules. Operation is subject to the following two
conditions :
1 This device may not cause harmful
interference ; and
2) This device must accept any
interference received, including interference that
may cause undesired operation.
D Note
This equipment has been tested and found
to comply with the limits for a Class B digital
device, pursuant to Part 15 of the FCC Rules.
These limits are designed to provide reasonable
protection against harmful interference in a
residential installation. This equipment generates,
uses and can radiate radio frequency energy
and, if not installed and used in accordance with
the instructions, may cause harmful interference
to radio communications. However, there is no
guarantee that interference will not occur in
a particular installation. If this equipment does
cause harmful interference to radio or television
reception, which can be determined by turning
the equipment off and on, the user is
encouraged to try to correct the interference by
one or more of the following measures :
s2EORIENTORRELOCATETHERECEIVING
antenna.
s)NCREASETHESEPARATIONBETWEENTHE
equipment and the receiver.
s#ONNECTTHEEQUIPMENTTOANOUTLETON
a circuit different from that to which the
receiver is connected.
s#ONSULTTHEDEALERORANEXPERIENCED
radio/TV technician for help.
Any unauthorized modification to this
equipment could result in the revocation of the
authorization to operate the equipment.
Industry Canada Statement
This Class B digital apparatus
complies with Canadian ICES-003.
Important

5
ENGLISH
Disposal of your old product:
Your product is designed and manufactured with
high quality materials and components, which
can be recycled and reused.
When this crossed-out wheeled bin
symbol is attached to a product it
means the product is covered by the
European Directive 2002/96/EC
Please inform yourself about the local separate
collection system for electrical and electronic
products.
Please act according to your local rules
and do not dispose of your old products
with your normal household waste. The
correct disposal of your old product
will help prevent potential negative
consequences for the environment and
human health.
BWarnings
s $ONOTEXPOSETHEPRODUCTTORAIN
or water.
s +EEPAWAYFROMSUNLIGHTTOPREVENTHEAT
build-up.
s $ONOTDISASSEMBLEORREPAIR
s +EEPAWAYFROMHIGHVOLTAGEDEVICES
s 7HENYOUREPLACETHEBATTERIESDONOT
mix different brands of batteries or
place zinc carbon batteries in the
remote. This can trigger unpredictable
behavior.
Take the package to your local recycling center.
Your product contains batteries covered by the
European Directive 2006/66/EC, which cannot
be disposed with normal household waste.
Please inform yourself about the local rules
on separate collection of batteries because
the correct disposal will help prevent negative
consequences for the environmental and human
health.
Important
6
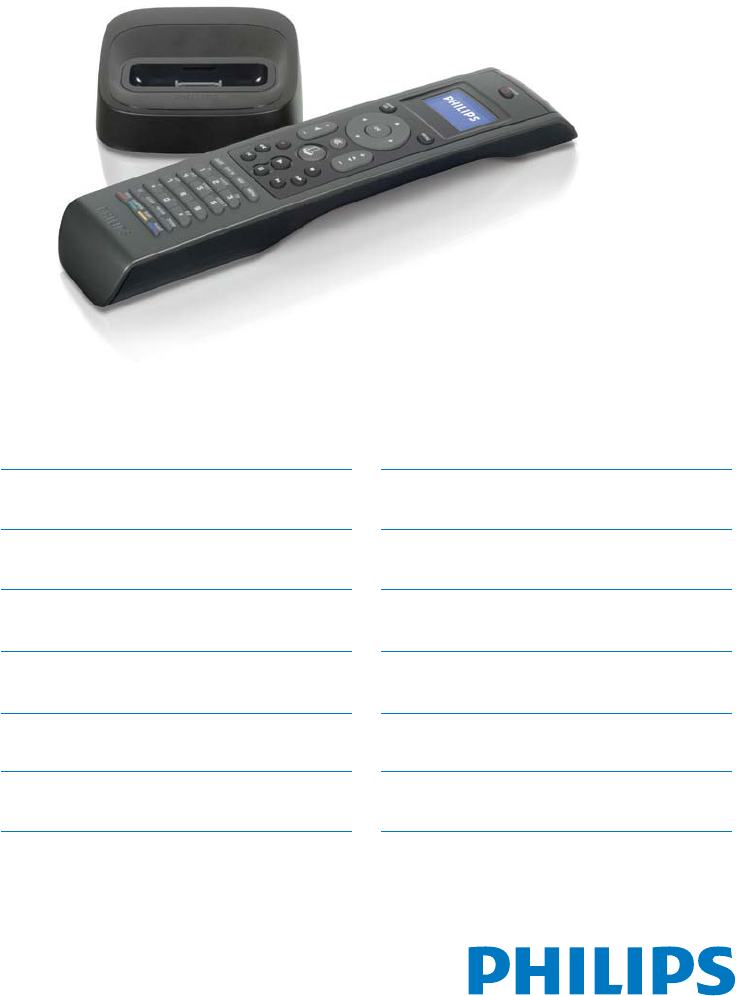
2 Your universal remote and
docking cradle for iPod™
Congratulations on your purchase and welcome
to Philips!
To fully benefit from the support that Philips
offers, register your product at
www.philips.com/welcome.
Your universal remote and docking cradle for
iPod™ allows you to control your iPod™
remotely while simultaneously charging your
iPod™. It also allows you to control up to 6
other AV devices. Philips offers an entire line of
products to enhance your iPod™ experience.
Your universal remote and docking cradle for
iPod™ works with all iPod™ models that have
a dock connector. For the best connection, use
the dock adapter that came packaged with your
iPod™ or choose the appropriate adapter from
the 5 included with your universal remote and
docking cradle for iPod™.
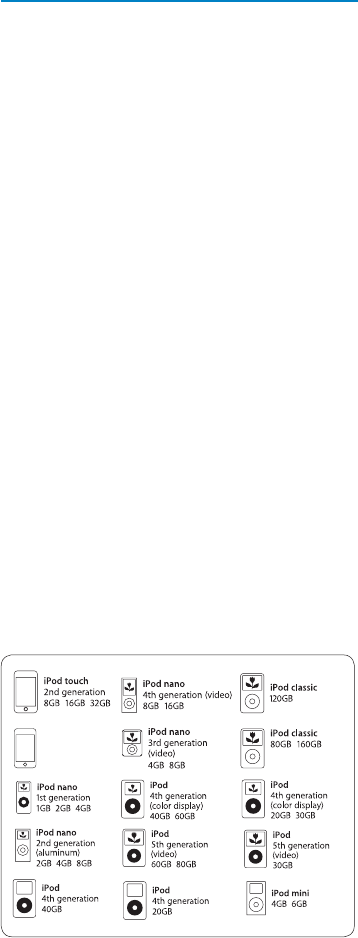
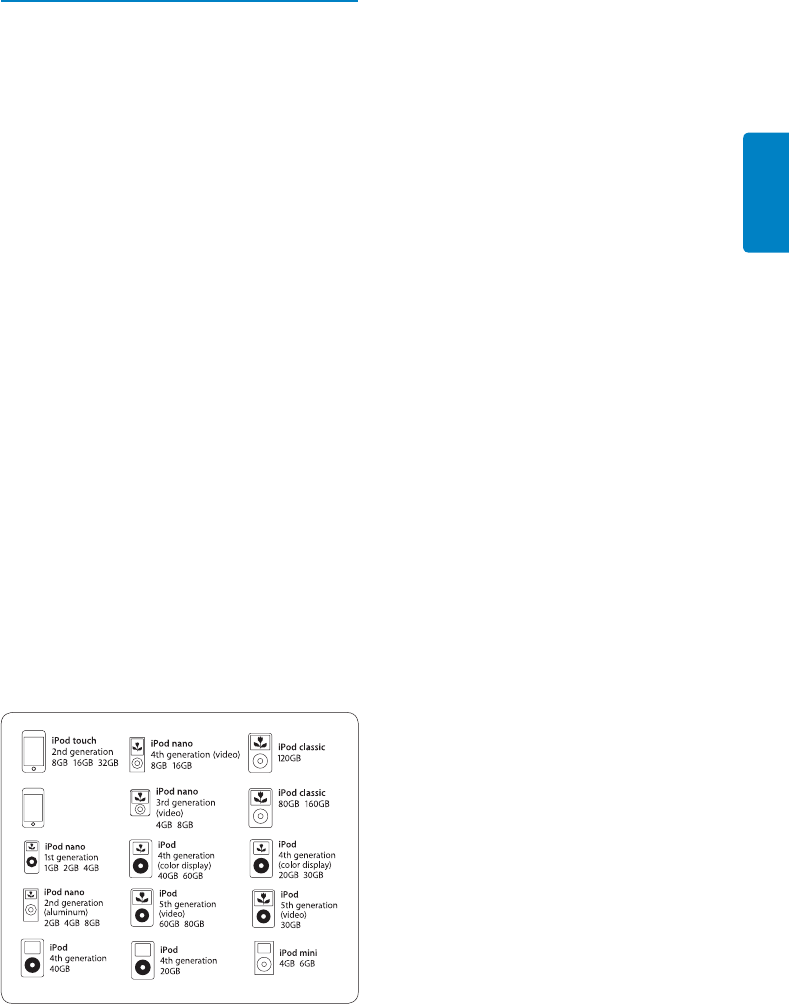
DNote
Philips SJM3152 is compatible with the following
iPod models:
iPod touch
8GB 16GB 32GB
DNote
Stereo and A/V equipment can only be
controlled via Infra Red, or “line of sight”
operation. Distance for controlling these devices
is limited to 30 feet and the remote must be
in the line of sight of the IR port on your AV
equipment. Only devices with an IR sensor can
be controlled by the remote.
This section gives you an overview of the
controls and functions of this universal remote
with docking cradle for iPod™.
Product highlights
s #ONTROLSI0OD©466#2$6$PLAYER
cable and satellite system
s #ONTROLYOURI0OD©ANDHOME
entertainment system.
s "ACKLIT,#$SCREEN
s 0ROVIDESANEASYVIEWOFI0OD©MENU
playlists and libraries, even under darker
lighting conditions.
s 0LAYYOURI0OD©THROUGHYOURHOME
entertainment system
s ,EAVEYOURI0OD©INTHEDOCKTHEN
connect to home stereo via the AV cable
provided.
s #ONTROLI0OD©THROUGHWALLSmOORS
doors, ceilings and windows with 2-way RF
technology.
s 0ROVIDESCONTROLOVERI0OD©MENU
features, playlists and libraries from
virtually anywhere at home.
s $OCKINGCRADLE
s !LLOWSYOUTOPLAYANDCHARGEI0OD©
simultaneously.
s 3HAREYOURVIDEOLIBRARYONALARGERSCREEN
s 36IDEOOUTCABLEORYELLOW2#!OF!6
cable allows you to easily connect to a TV.
Your universal remote and docking cradle for IPod™
7
ENGLISH
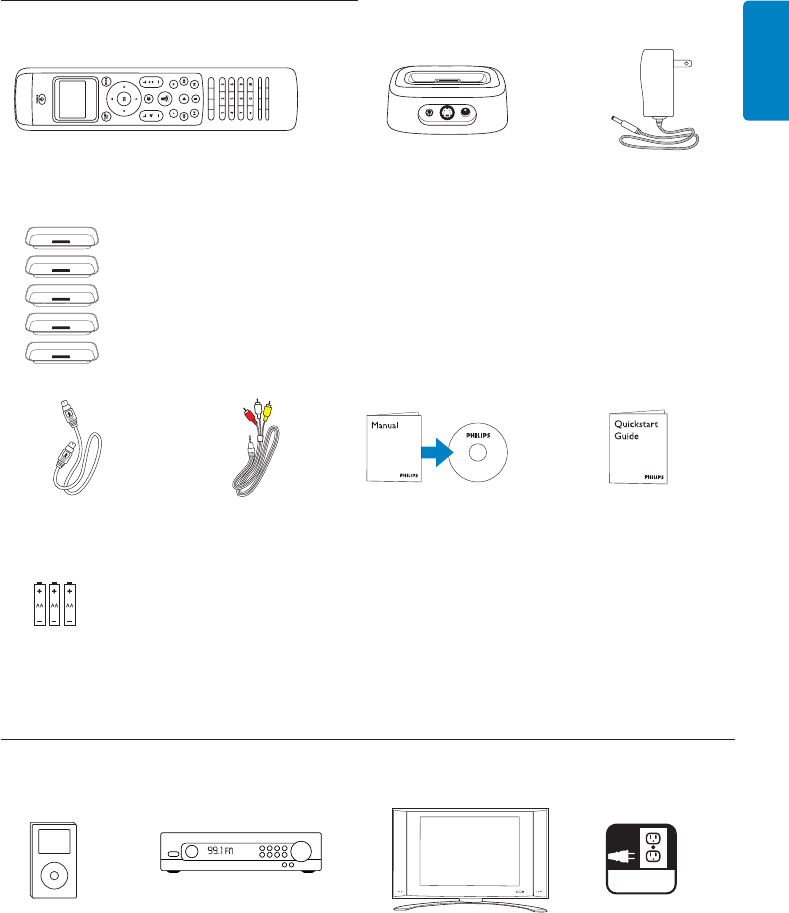
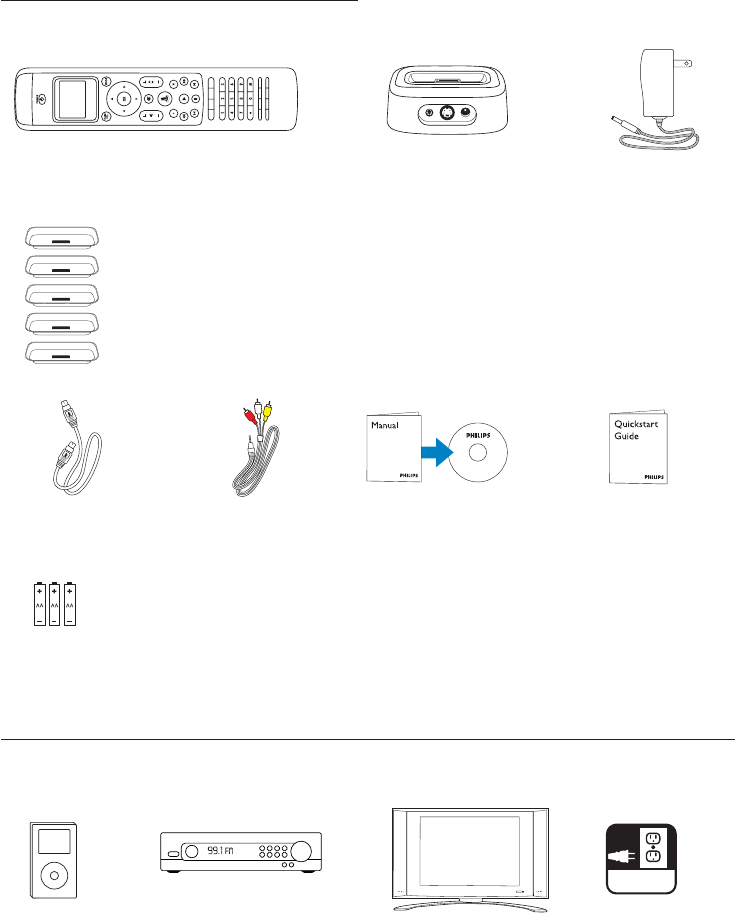
2.1 What’s in the box.
Universal remote control Docking cradle for iPod™ Power adapter
S - Video cable 3.5mm-to-RCA AV cable CD ROM with Quick Start guide
instruction manual
(3) AA batteries
*For newer iPod™ versions, please use the adapter that shipped with your iPod™.
2.2 What you’ll also need.
or
iPod™ with Stereo receiver TV Electric outlet
dock connector
Your universal remote and docking cradle for IPod™
5 iPod™ dock adapters: *
sTYPEFORMINI
sTYPEFOR''"
sTYPEFOR''"
sTYPEFORI0OD©WITHCOLORDISPLAY
'"'"
sTYPEFORI0OD©WITHCOLORDISPLAY'
AC
8
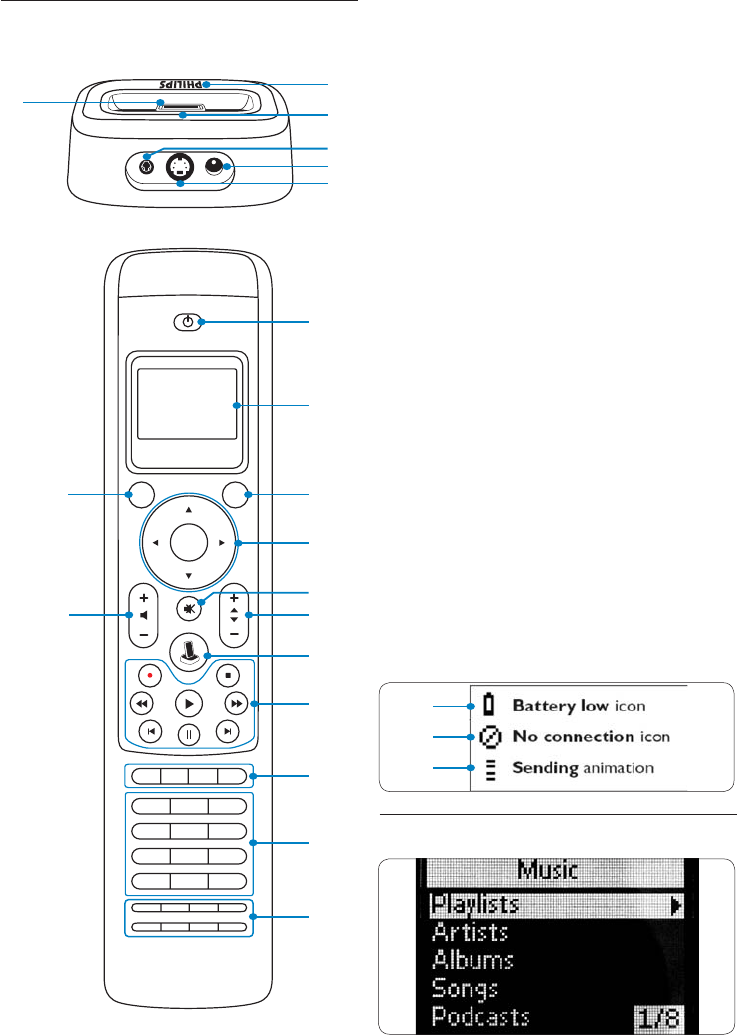
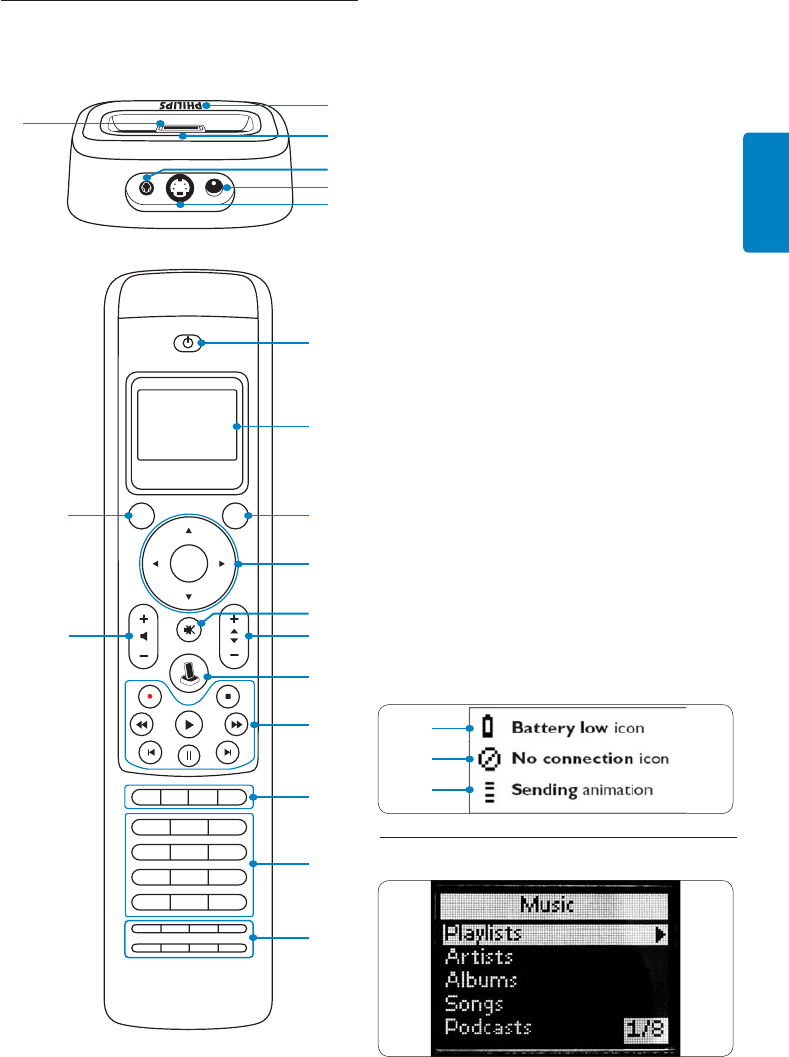
2.3 Universal remote and docking
cradle for iPod™ overview
Cradle:
,%$)NDICATOR
2. Slots for removing dock adapter
3. 3.5mm A/V Out Jack
4. DC Power Jack
5. S-Video Out Jack
6. iPod™connector
Remote:
1. Power key
,#$3CREEN
3. Mode key
4. Cursor keys ( Navigation) and OK key
5. Mute key
6. Volume Up/Down key
I0OD©,AUNCHKEY
8. Playback keys
(Play, Rec, Stop, Rew, FF, Pause, Skip, Next)
9. Device specific keys
'UIDE,IVE46($$-ENU
10. Digit keys
11. Device specific keys (CC/Text, Clear,
Enter, Zoom/16:9, Title, Chapter, SUBT,
CC & Zoom for /27 Text & 16:9
for /10, Audio)
12. Channel Up/Down key
13. Main Volume Key
14. Battery low icon (See below)
15. No connection icon (See below)
16. IR Transmission icon (See below)
2.4 Main menu overview
1
6
2
3
4
5
123
456
789
*0#
OK
MAIN
VOL MODE
POWER
1
2
3
4
13
5
612
7
8
9
10
11
Universal remote and Docking cradle for IPod™ overview
14
15
16
9
ENGLISH
3 Getting Started
BWarning
Carefully read the safety precautions in section
1.1 Important, before connecting your
universal remote and docking cradle for iPod™.
This section helps you with the first time
installation of your universal remote and docking
cradle for iPod™.
3.1 Prepare
1. Remove all package contents
2. Position your dock near your home
entertainment system, stereo or TV.
3. Turn off power on all your home
entertainment components.
,OCATETHENEARESTELECTRICALWALLOUTLET
5. Remove the protective screen cover from
your universal remote for iPod™.
6. Remove iPod™ connector protective
cover on the docking cradle.
7. Select the correct dock adapter for your
specific iPod™ model.
8. Insert the correct dock adapter into the
universal well on your docking cradle.
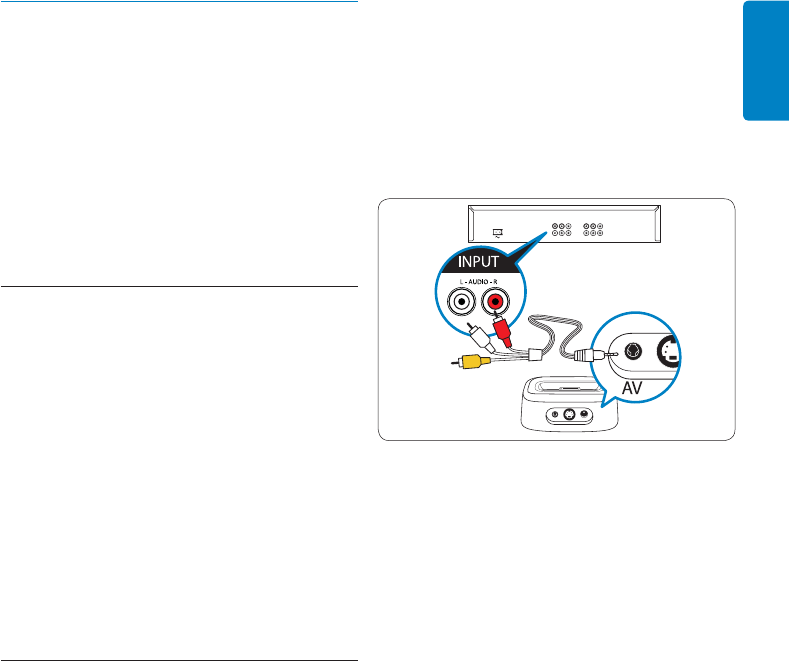
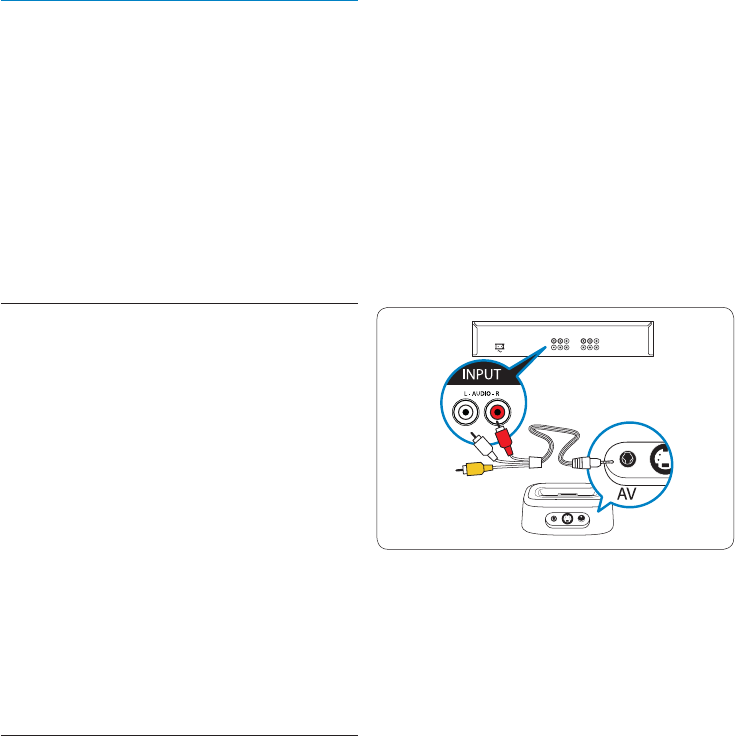
3.2 Connect
For stereo playback:
1. Connect the red and white RCA
connectors on one end of the supplied AV
cable to the Audio In RCA jacks on your
home entertainment system or stereo.
DNote
If you are not using the device with video, or you
plan on connecting to video via the S-Video
connection, leave the yellow RCA connector
end unplugged.
2. Connect the other end of the supplied AV
cable with 3.5mm plug to the jack labeled
“AV” on your docking cradle.
3. Connect one end of the power cord to
an electrical outlet and the other end
to the DC 12V jack on the back of your
docking cradle.
4. Install the 3 supplied AA batteries into the
battery compartment on the remote.
Follow the proper polarity markings in
the compartment.
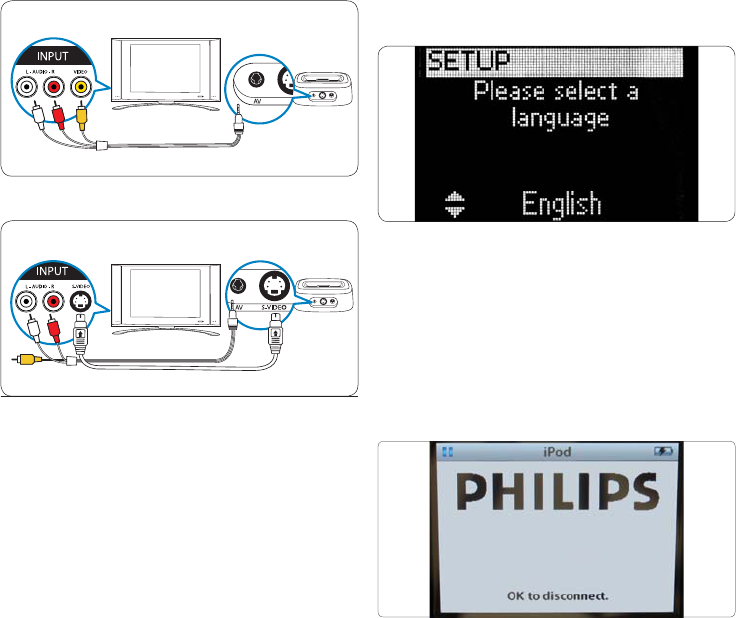
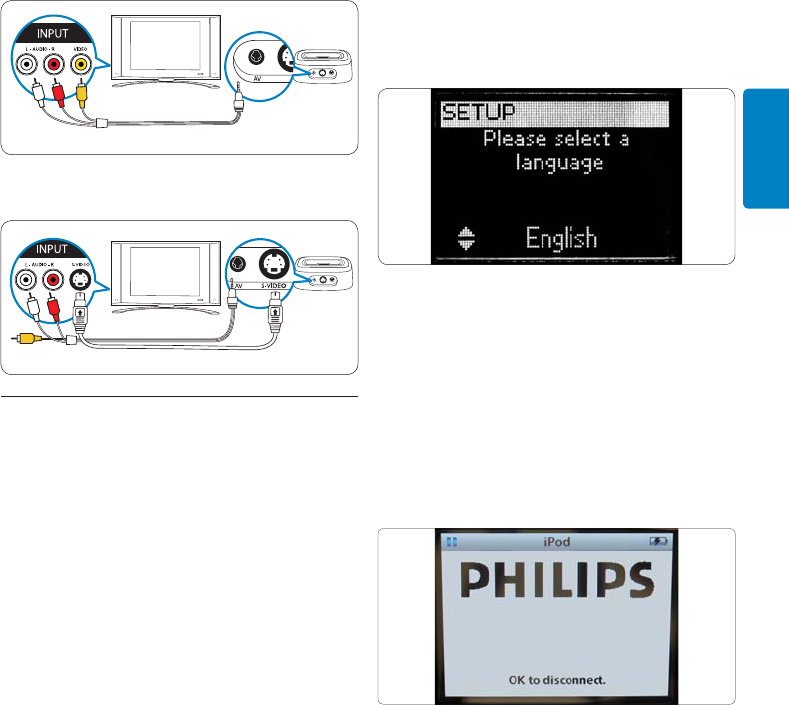
For video playback:
1. Connect one end of the supplied S -Video
cable to the Video In jack on your home
entertainment system or TV.
2. Connect the other end of the supplied
S-Video cable to the jack labeled “S-Video”
on your docking cradle. If you are using the
composite video jacks, plug the yellow
RCA plug into the RCA video jack on
your TV.
3. Connect one end of the power cord to an
electrical outlet. Connect the other end
to the DC 12V jack on the back of your
docking cradle.
4. Install the 3 supplied AA batteries into
the battery compartment on the remote.
Follow the proper polarity markings in
the compartment.
'ETTING3TARTED
10
RCA Connection
S-Video Connection
3.3 Install
Once you have installed the batteries in the
remote and connected all of the appropriate
cables, you will need to do a quick “pairing” of
the dock with the remote.
DNote
It is recommended to complete the initial set-up,
including the “pairing” sequence before docking
your iPod™ in the docking cradle.
Pairing the dock with the remote for
the first time:
1. Press the POWER Button on the remote.
2. Position the remote within 1m of the
dock for this duration of this procedure.
3. Follow the easy on-screen set-up wizard
screen prompts.
The easy on-screen set up wizard will guide you
through the different steps on the initial set-up
of your universal remote for iPod™.
Initial set-up of your universal remote for
iPod™:
1. Select the language for your instructions
on the remote using the cursor keys.
Press OK.
While pairing the remote to the docking cradle,
position the remote within 1m of the dock for
the duration of the procedure.
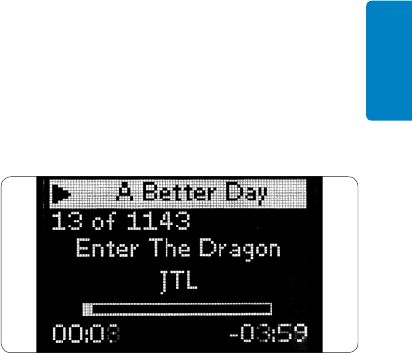
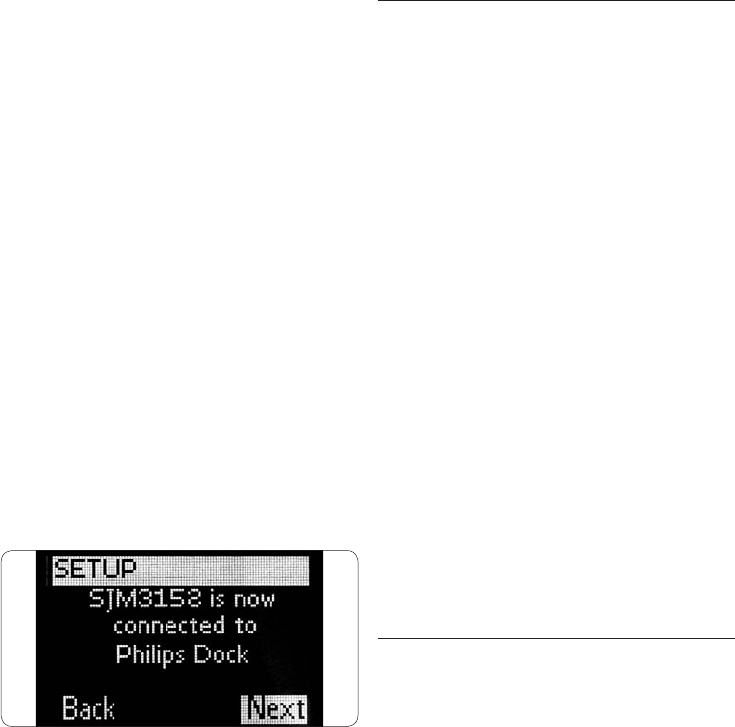
DNote
While your iPod™ is docked in the cradle, your
iPod™ screen will show the message below.
This is normal operation.
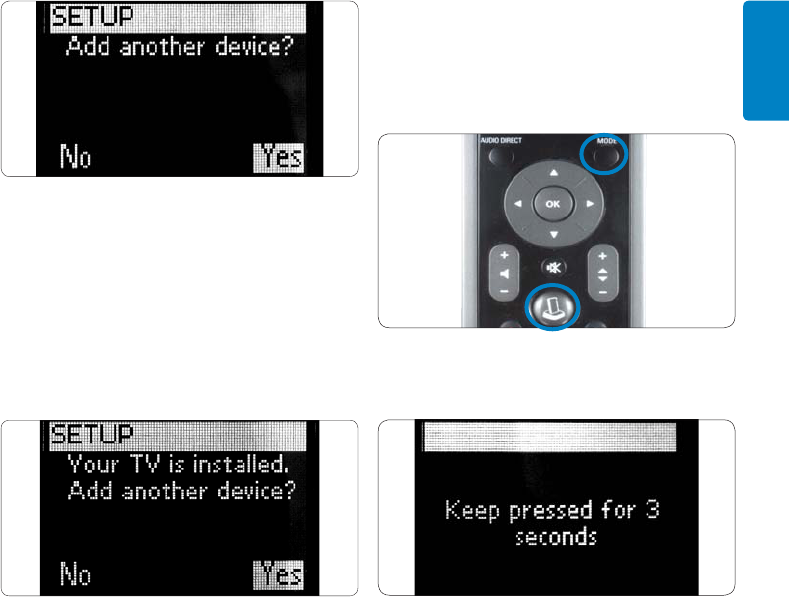
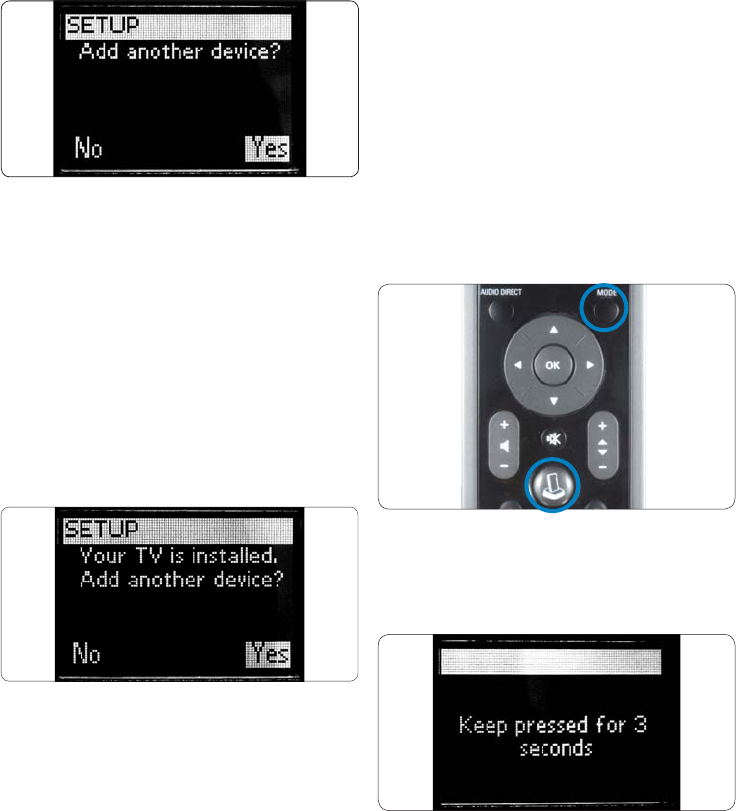
2. Select “Next” and press OK.
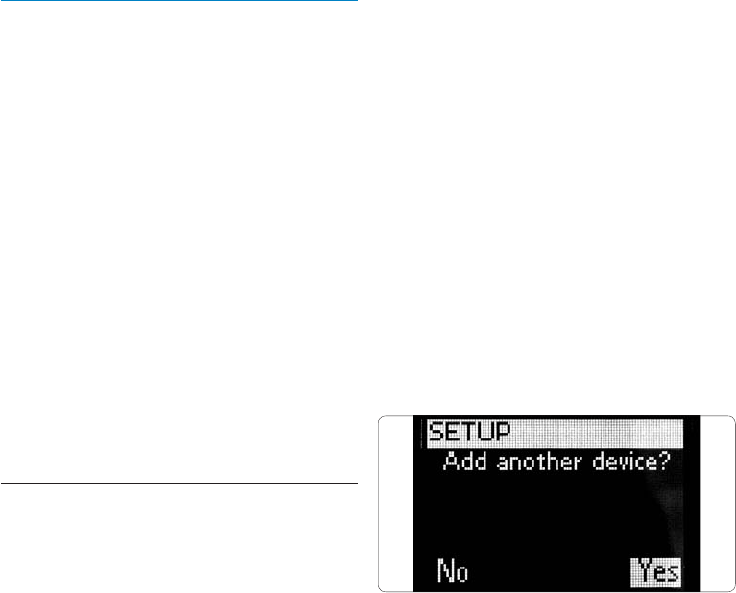
3. Confirm if you want to add other devices,
like your TV or DVD player, by selecting
“Yes”. Press OK. This replaces the devices’
original remote controls with the universal
remote for iPod™.
'ETTING3TARTED
11
ENGLISH
4. Select the device and brand of the device
you want to add by using the cursor keys.
Press OK. The remote will search the
database for available code sets.
5. Follow the on-screen instructions to test
the codes. When a working code set is
found, your device is correctly installed.
When the device is correctly installed, the
following screen appears:
If no working code set is found:
s9OUCANPERFORMAFULLDATABASESEARCHTO
find a correct code set. This can take up to
25 minutes.
s9OUCANLEARNCODESFROMTHEORIGINAL
remote device.
To add an additional device:
1. Select “Yes”, Press OK.
2. Repeat this process for each
additional device.
3. When you are finished adding devices,
select “No”. Press OK. Exit the wizard.
DNote
You can adjust the settings of your universal
remote for iPod™ anytime after initial install
via the set-up menu. Press the MODE and IPOD™
LAUNCH keys simultaneously for 3 seconds.
The screen will ask you to press and hold the 2
keys for 3 seconds to enter set-up mode.
'ETTING3TARTED
12
4. Using your universal remote
and docking cradle
for iPod™
,EARNHOWTOOPERATEYOURUNIVERSALREMOTE
and docking cradle for iPod™.
4.1 Using the universal remote for
iPod™ as a controller for iPod™
Control your iPod™ menus, playlists, music and
video libraries.
1. Position the correct dock adapter for your
specific iPod™ model in the
docking cradle.
2. Position your iPod™ in the docking cradle
Charging begins automatically.
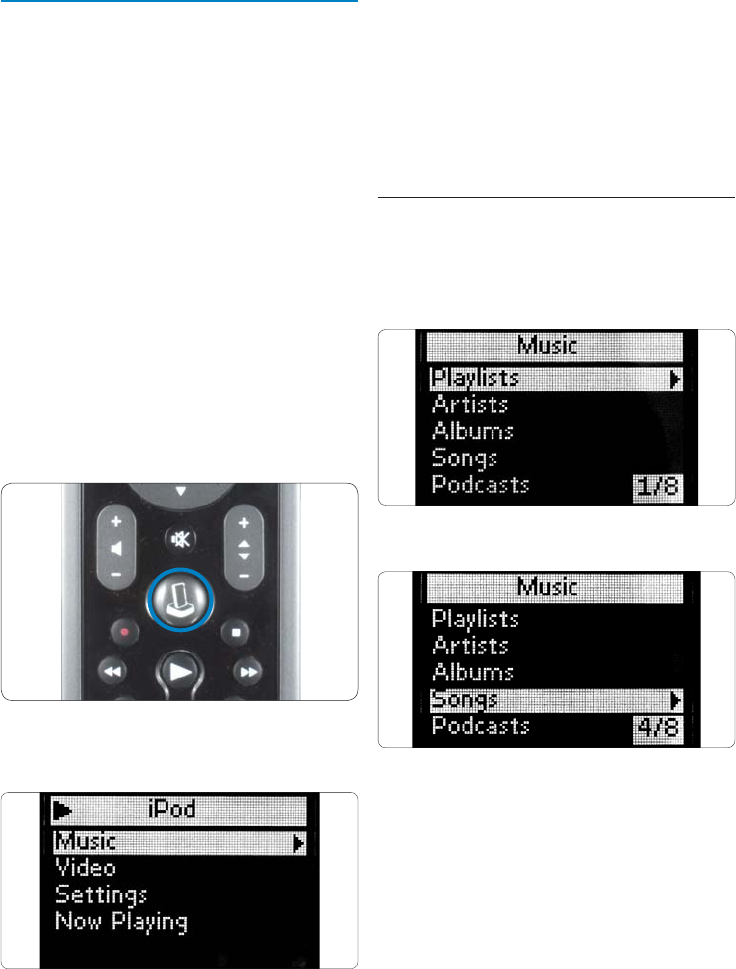
3. Press the IPOD™ LAUNCH key.
The remote connects to your docked iPod™
and displays your iPod™ menu playlists.
DNote
If the No Connection icon begins blinking in
the upper right-hand corner of the screen,
the universal remote for iPod™ is not able to
connect to the docking cradle for iPod™. See
Section 8 Frequently Asked Questions to
solve the problem.
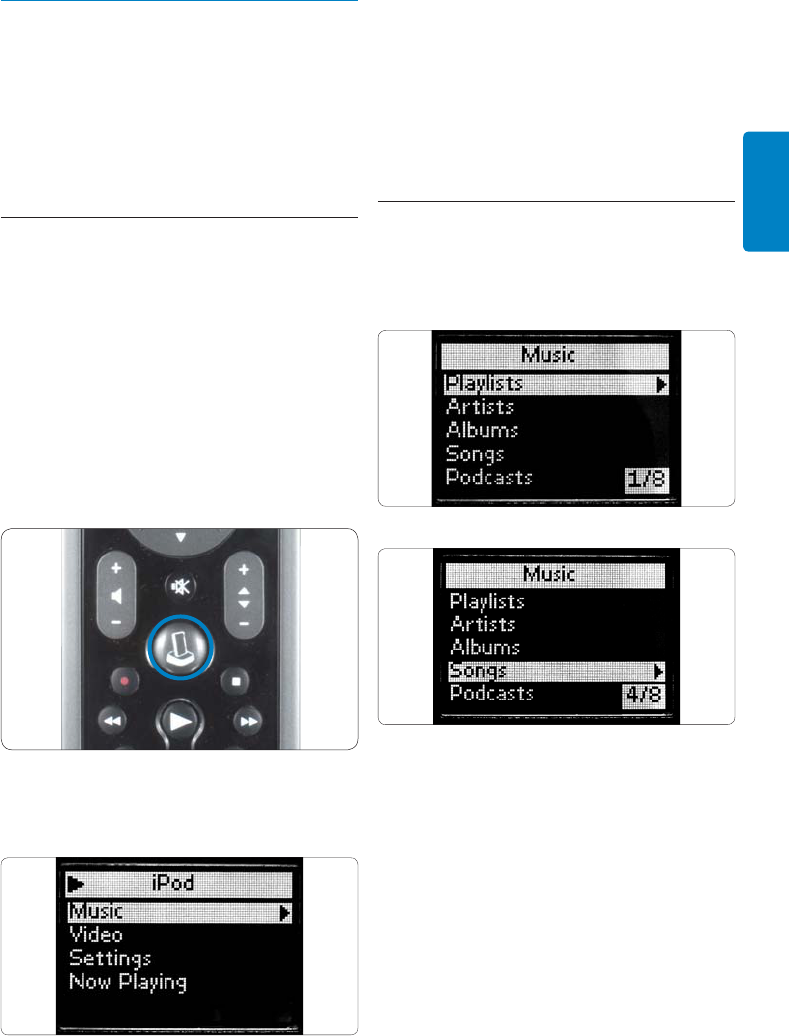
4.2 Browsing and playing music from
your iPod™
The menu on the universal remote for iPod™ is
similar to the menu on your iPod™.
Navigating in iPod™ mode:
1. Scroll to Music,Settings,Now Playing.
Press OK to select.
DNote
If the iPod™ is not Video capable, the Video
option will not appear on your screen.
DNote
“Now Playing” is only viewable when a song is
playing.
'ETTING3TARTED
13
ENGLISH
2. Press > or OK on the navigation dial to
go to the next screen.
3. Selecting “Music” presents the following
screens:
Playlists
Artists
Albums
Songs
Podcasts
'ENRES
Composers
Audio Books
a. To select one of the menu items and
go to the next screen, press > or
OK on the navigation dial.
b. Press < to return to the previous
screen or press OK to move to the
next screen.
c. Repeat until you have made your
listening selection.
DNote
While in iPod™ Mode, press < cursor key to
return to the previous screen / Menu item. Press
OK to make a selection and move to the next
screen.
4. Selecting settings will present the
following screens:
3HUFmE
3HUFmE/PTIONSARE
Off, Songs, and Albums.
Default for this option is
OFF>
Repeat
Repeat Options are:
Off, One, and All.
Default for this option
is OFF>
a. To select one of the menu items and
go to the next screen, press > or OK
on the navigation dial
b. Press < to return to the previous
screen. Press OK to move to the next
screen.
c. Repeat until you have made the
selection you want to use.
5. Selecting “Now Playing” will display the
most recently played song:
a. Press
< to return to the
previous screen.
DNote
Your universal remote and dock for iPod™ does
NOTALLOWBROWSINGORCONTROLOF0HOTO,IBRARY
on your iPod™.
Controlling the volume of your docked iPod™
and connected AV devices, such as a home
theater system, stereo system or TV:
1. To adjust the audio output level of the
iPod™ docking cradle, press the Volume
Up or Volume Down keys. A volume bar
will be shown on the remote’s display
screen.
2. If the sound level of playback is still too
loud or too soft, press the MAIN VOL key
to switch to the AV device and change
the master volume.
DNote
Controlling AV devices requires that the
components have an IR receiver and that your
universal remote for iPod™ is within 30 feet of
the component in line of sight.
3. To return to iPod™ control, press the
IPOD™ LAUNCH key.
'ETTING3TARTED

14
DNote
The Main Volume works like a short cut key to
switch to either TV or AMP or RECEIVER mode.
If more than one of these devices is installed, the
priority will be: AMP, RECEIVER, TV.
4.3 Using your universal remote for
iPod™ as a universal remote control
You can add up to 6 AV devices and your iPod™
docking cradle, if available, to your universal
remote for iPod™.
1. Press MODE key. The device icon of your
last selected device will appear on the
screen. Repeat MODE press until the
device you want to control appears on the
display screen.
2. Control the device using the hard keys
on your universal remote for iPod™.
They will access the same function as the
corresponding keys of the original remote
of the selected device.
DNote
Music that was started while using the remote as
an iPod™ controller, will continue to play
even when you change Modes.
DNote
Some specific keys that are available on the
original remote will not be available on your
universal remote for iPod™. Check your original
remote for the available functions.
DNote
When you awaken the remote after a time out,
the last device selected before the time out will
be active.
Device specific keys
The device specific keys on your universal
remote for iPod™ can have different functions,
depending on the device you select via the
MODE key.
Below you can find a complete overview of the
functions for all device specific keys listed for
the IPod™ docking cradle, TV, cable/satellite and
your audio set.
CC CLEAR ENTER ZOOM
GUIDE LIVE TV HDD MENU
TITLE CHAPTER SUBT. AUDIO
123
TV TUNER CD
DVD VIDEO 1VIDEO 2
-/- - - AV
AUX
456
789
*0#
1 2 3 4
12 13 14 15
8910 11
TV Sat/Cable Audio set
'UIDE 'UIDE "AND
2. Exit 2ETURNTO,IVE46 3CAN
3. - Exit -
4. Menu Menu Menu
5. Digit Keys Digit keys Input Sources
6. -/-- -/-- Surround
7. AV Input TV/SAT input Surround Mode
8. cc/text Favorite RDS
9. - Help Clear
10. PIP Enter Enter
:OOM (OME '%1
12. Color key Color key Front
13. Color key Color key Center
14. Color key Color key Rear
15. Color key Color key Test
'ETTING3TARTED
CC CLEAR ENTER ZOOM
GUIDE LIVE TV HDD MENU
123
TV TUNER CD
DVD VIDEO 1VIDEO 2
-/- - - AV
AUX
456
789
*0#
67
5

15
ENGLISH
DNote
Other installed devices use the functions that
are labeled on the remote. Check your original
remote when you are not sure.
To switch back to your iPod™ playlist after
controlling another device with your universal
remote for iPod™, press the IPOD™ LAUNCH
key.
4.4 Starting Up an Activity
An activity is a sequence of key presses that you
can program. For example, for watching a
DVD you normally would have to:
1. Turn on the TV;
2. Turn on the DVD;
3. Turn on the surround sound system;
4. Select the right input on your TV and
surround sound system;
5. Press the PLAY key to start the DVD.
By selecting the activity “Watch DVD” on the
universal remote for iPod™, all the actions are
automatically executed in the predefined
sequence.
Starting up an activity:
1. Press MODE key repeatedly until the
activity name appears in the header
of the display screen.
2. Confirm your selection by pressing OK.
The activity will begin immediately.
You can add up to 8 activities to your universal
remote for iPod™. For more information about
adding and deleting activities, see section
5.5, Adding an activity and section
5.6, Deleting an activity.
Selecting extra functions
Devices may have extra functions that are not
covered by the hard keys on your universal
remote for iPod™. You can select these extra
functions in the display.
1. While in any device mode, Press MAIN
VOL key. Extra functions for the selected
device appear in the display screen.
2. To scroll through all the extra functions,
press the cursor up or cursor down key.
3. When you find the selection you want,
press OK. The remote sends out an
IR signal.
For adding extra functions to your universal
remote for iPod™, see section 5.4, Adding a
function.
ETip
If you cannot find the extra function you are
looking for, you can exit the Extra menu by
pressing the MAIN VOL key again.
DNote
Some devices do not have any extra functions
available in the remote’s data base. However,
you can easily copy additional functions from
your original remote by learning keys. See
section 5.4, Adding a function.
4.5 Replacing the batteries
BWarning
When you replace the batteries, do not mix
different brands of batteries or place zinc carbon
batteries in the remote. This can trigger
unpredictable behavior.
When the batteries are almost empty, the
h"ATTERY,OWvICONAPPEARS2EPLACETHE
BATTERIESWITHNEW,2OR!!TYPEALKALINE
batteries. Follow the local regulations for
disposal of the empty batteries.
'ETTING3TARTED
16
5 Use more of your universal
remote and docking cradle
for iPod™
To access the advanced features of your
universal remote and dock for iPod™, you must
use the Set-up menu.
To open the Set-up menu, press and hold the
MODE and IPOD™ LAUNCH keys simultaneously
for 3 seconds.
To exit the Set-up menu and go directly to your
iPod™ menu, press the IPOD™ LAUNCH key
again.
To switch to your last selected device, press the
MODE key.
5.1 Adding a device
To be able to operate your devices with your
universal remote for iPod™, you first have to
add these devices to the remote control. You can
add up to 6 devices from the list of devices
below. Examples of available devices include ( but
are not limited to):
s$6$
s#ABLE
s$333ATELLITE
s4UNER
s#$
s46
Please check the Remote menu for the complete
listing of device labels that can be added.
You cannot add a device twice. Once you have
added a device to your Universal remote for
iPod™, it disappears from the list. However, the
list of devices includes ‘TV-2’ or ‘VCR-2’ for use
when you want to program a second TV or
second VCR.
To add a device:
1. Select the option “Add a Device” in the
Set-up menu by using the cursor keys
Press OK.
DNote
If you have already added 6 devices on the
remote, besides your iPod™ docking cradle, you
will be asked to delete a device.
2. Select the device and brand you want to
add. Press OK. The remote will search for
available codes for the brand.
3. Follow the on-screen instructions to test
the codes. When a working code set is
found, your device is correctly installed
When the device is correctly installed, the
following screen appears:
If no working code set is found:
s9OUCANPERFORMAFULLDATABASESEARCHTO
find a correct code set. This means that
the remote will send out all codes available
in the database until a working code is
found. This can take up to 25 minutes.
s9OUCANLEARNCODESFROMTHEORIGINAL
remote device.
When you want to add another device, select
“Yes”. Press OK and repeat steps 2 and 3.
When you have added all your devices, select
“No”. Press OK to return to the Set-up menu.
Use more of your universal remote and docking cradle for iPod
17
ENGLISH
5.2 Deleting a device
You can delete a programmed device from your
universal remote for iPod™.
To delete a device:
1. Select the option “Delete a Device” in
the set-up MENU by using the cursor keys
Press OK.
2. Select the device you want to delete from
the list. Press OK.
3. Confirm you want to delete that device by
selecting “Yes”. Press OK.
The device is now deleted and becomes
available again in the list of devices you
can add.
4. To return to the Set-up menu, select “Exit”.
Press OK.
DNote
Keys of the deleted device that are used
elsewhere, e.g. in an activity or the volume keys
you copied, will be deleted as well. Check the
activities you programmed and volume keys for
your devices and reprogram them, if necessary.
5.3 Fixing a Key
If a hard key is not working properly with your
device, you can fix the key by learning it from
your original remote control. Your universal
remote for iPod™ can store up to 200 learned
keys. You can fix all keys on your universal
remote for iPod™ except the MODE key, the
MAIN VOL key and IPOD™ LAUNCH key.
To fix a key:
1. Select the option “Fix a Key” in the Set-up
menu by using the cursor keys. Press OK.
2. Select the device for which you want to fix
a key. Press OK.
3. Confirm you have a working original
remote control available to learn from by
selecting “Yes”. Press OK.
DNote
If your universal remote for iPod™ has already
learned 200 keys, a screen will alert you that the
memory is full and automatically return you to
the Set-up menu. You will have to delete a device
with fixed keys to clear memory.
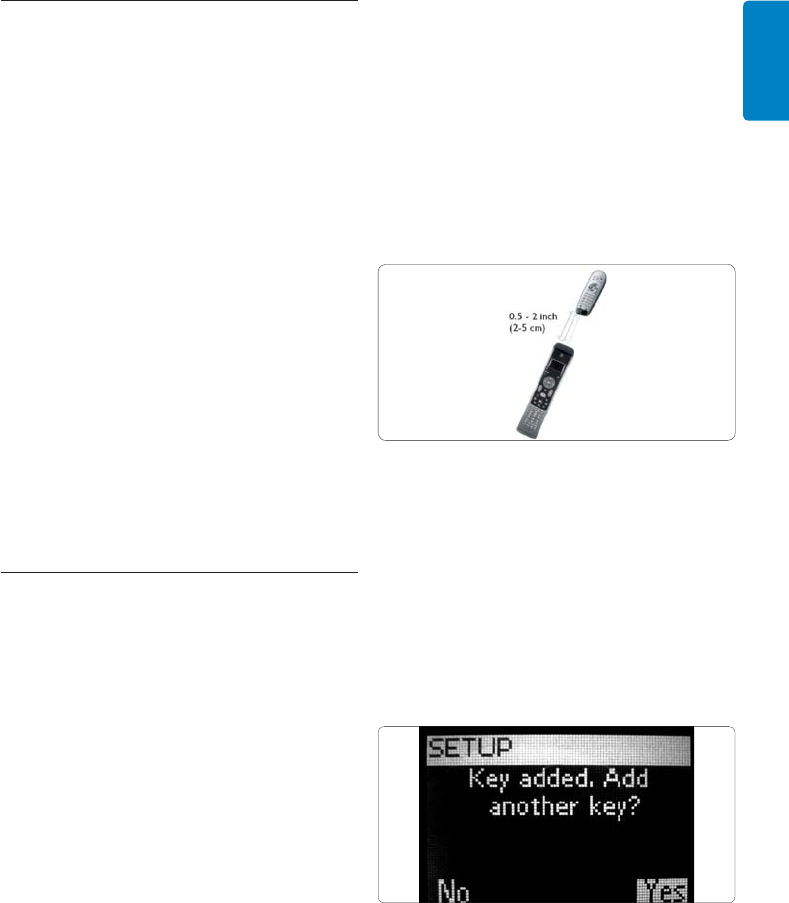
4. Follow the on-screen instructions to fix
the key: Point the 2 remotes towards each
other at a distance of 0.5 - 2 inches
(2-5 cm).
5. Select the hard key or extra function you
want to fix on your universal remote for
iPod™. To select an extra function press
MAIN VOL. Select the function with the
Cursor Up or Cursor Down key. Press OK.
6. Press the corresponding key on the
original remote until you see confirmation
on-screen.
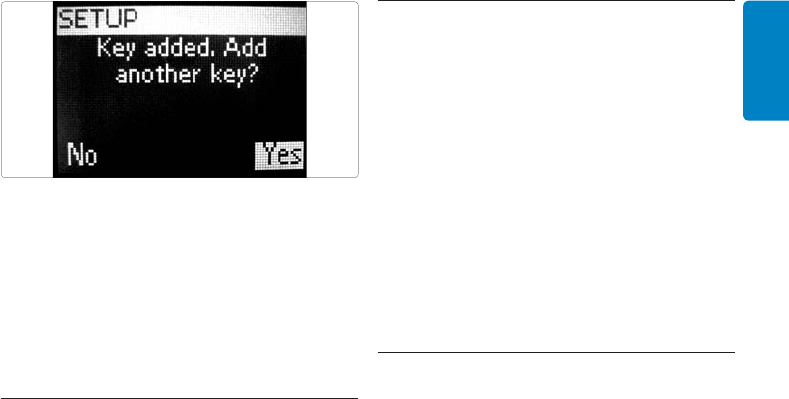
After the key is learned and fixed. The following
screen appears:
7. When you would like to fix other keys for
this device, select “Yes”. Press OK.
Repeat step 3.
Use more of your universal remote and docking cradle for iPod

18
When all keys are fixed and you want to return
to the Set-up menu, select “No”. Press OK.
DNote
Fixing a key overwrites the key’s data that was
stored in your universal remote for iPod™.
This means that if this key is used in an activity
this will also change.
5.4 Adding a function
You can add extra functions to your universal
remote for iPod™.
To add a function:
1. Select the option “Add a Function” in the
Set-up menu. Press OK.
2. Select the device you want to add a
function to.
3. Select the label you want to use for the
extra function.
,EARNTHEFUNCTIONFROMYOUR
original remote.
The extra function is added to your universal
remote for iPod™.
To access the extra function:
1. Press the MAIN VOL key to access
the Functions menu.
2. Select the function you want by using the
cursor keys. Press OK.
DNote
Extra functions are device-specific. They can only
be selected when in the desired AV device’s
specific mode. For example, if you want to
access a TV function, the remote must be in the
TV mode.
5.5 Adding an Activity
An activity consists of several key presses that
will be sent out by your universal remote for
iPod™ when you select the activity. You can
add up to 8 activities. One activity can contain a
maximum of 25 steps.
By default, your universal remote for iPod™
inserts a delay of 0.6 sec between every key
press to make sure your devices are responding
correctly to the signals.
You can overwrite this default delay:
s)FONEOFYOURDEVICESNEEDSALONGERDELAY
before receiving the next IR signal, you can
insert a delay of 1 or 3 seconds. Replacing the
default delay counts as a step in the activity.
s)FANACTIVITYNEEDSNODELAYBETWEENTHE
different key presses to simulate a long key
press, you can add the option “no delay”.
For example: When you would like to turn the
VOLUMEUPDURINGANACTIVITYBYPRESSING6/,
Up key four times, you do not need to insert
delays between these 4 key presses.Between
each step you add the option “no delay”.
To add an activity:
1. Select the option “Add an Activity” in
the Set-up menu by using the cursor keys.
Press OK.
DNote
If you already have added 8 activities, you will
be asked to delete an activity. See section 5.6,
Deleting an activity.
2. Select the label from the list of activities
Press OK.
3. Follow the on-screen instructions to
create an activity.
s5SETHECURSORKEYSTOSELECTTHE
device. Press OK. Press the required key
to insert a key press.
s $ECIDEIFYOUWANTTOADDANADDITIONAL
key or key delay, select YES by pressing
OK.
If you do not wish to add an additional
activity, select NO. Press OK.
Use more of your universal remote and docking cradle for iPod
19
ENGLISH
s3ELECTTHEDELAYYOUWANTTOADD
Press OK. See instructions at the end of
this procedure, “To select the delay you
want”.
Keep in mind that an activity contains a
maximum of 25 steps.
When you have added all key presses and delays,
select “No”. Press OK. The activity is installed on
your universal remote for iPod™.
4. To return to the Set-up menu, select “Exit”.
Press OK.
To select the delay you want:
1. Use the cursor keys to scroll through the
list of possible delays.
2. Press OK on desired delay. You’ll see
confirmation screen.
3. Press YES to add another key or delay.
Press NO to exit activity set-up.
ETip
Start up the activity by pressing the Mode key
repeatedly until the activity name appears in
the header of the universal remote for iPod™
display screen. Press OK .
5.6 Deleting an activity
To delete an activity from your remote control:
1. Select the option “Delete an Activity” in
the Set-up menu by using the cursor keys
Press OK.
2. Select the activity you want to delete.
Press OK.
3. Confirm you want to delete the activity
by selecting “Yes”. Press OK. The activity is
deleted and becomes available again in the
list of activities you can add.
4. To return to the Set-up menu, select “Exit”
and press OK.
5.7 About RF Settings
Show details:
You can check the status of the connection
between the docking cradle and remote:
1. Select the option “RF Settings” in the Set-
up menu by using the cursor keys. Press
OK.
2. Select “Show details.” Press OK The name
of the connected docking cradle and the
strength of the signal appear.
3. To return to the Set-up menu, select
“Next”. Press OK.
DNote
When the details of the RF Settings show “No
Connection”, the remote is unable to connect to
the docking cradle. If this occurs, you must
reconnect to the dock.
Reconnect to dock
When you want to use your universal remote
for iPod™ with another docking cradle, or in
case of technical problems, you will have to pair
the remote to the docking cradle again.
1. Press and release reconnect button at the
bottom of the iPod™ docking cradle
Use more of your universal remote and docking cradle for iPod
20
2. Select the option “RF Settings” in the Set-
up menu by using the cursor keys.
Press OK.
3. Select “Reconnect to Dock”. Press OK.
You are now pairing the remote to the
docking cradle. Be sure to position the
remote within 1m of the dock for the
duration of this procedure.
4. To return to the Set-up menu, select
“Next” and press.
When the details of the RF Settings show
“Cannot connect to dock. Try again”, you must
reconnect to the dock using the following
procedure:
1. Press the RECONNECT button on the
bottom of the dock. After 5 seconds, the
0HILIPSLOGOONTHEDOCKWILLBEGINmASHING
2. Select “Yes” on remote. Press OK.
Remote and dock will reconnect. When the
process is completed, the screen below will
appear:
3. Select “Next”. Press OK.
5.8 Changing language
You can change the language of the instructions
on your universal remote for iPod™.
Models purchased in North America offer the
following languages:
s%NGLISH
s&RANCÉIS
s%SPANOL
Models purchased in Europe offer the following
languages:
s%NGLISH
s%SPANOL
s&RANCÉIS
s$EUTSCH
s.EDERLANDS
s)TALIANO
To change the language:
1. Select the option “Change language” in
the Set-up menu by using the cursor keys.
Press OK.
2. Select your preferred language. Press OK.
The Set-up menu appears on the screen in
your preferred language.
5.9 Copying Volume
After adding devices, your universal remote for
iPod™ automatically copies the Volume keys
and Mute key, as follows:
s6IDEODEVICESLIKE$6$$6$26#2AND
Satellite box, use the Volume keys of the
TV (provided that you have programmed a TV).
s!UDIODEVICESLIKE#$$-2AND4UNERUSE
the Volume keys of the Amplifier or Receiver
(provided that you have programmed an
Amplifier or Receiver).
When no TV or amplifier is installed, the Volume
keys will not send codes. When the source
device is added later on, the Volume keys will
be automatically updated. You can change which
Volume keys are used. For example, when you
Use more of your universal remote and docking cradle for iPod

21
ENGLISH
want to use the Volume keys of the Amplifier for
the DVD.
To change the volume keys:
1 . Select the option Copy volume in the Set-
up menu by using the cursor Keys. Press
OK.
2. Select the device you want to copy the
Volume keys from (e.g. TV or AMP or
RECEIVER). Press OK.
3. Select the device you want to copy the
Volume keys to (e.g. DVD or SAT).
Press OK.
4. Confirm you want to copy the Volume
keys from one device to the other by
selecting “Yes”. Press OK. The Volume keys
and Mute key are copied.
5. To return to the Set-up menu, select “Exit”.
Press OK.
5.10 Changing display time out
To save power, your universal remote for iPod™
will switch off when it is not used for a while.
This is the display time out. You can change this
time out to one of the following:
s3HORT
s-EDIUMDEFAULT
s,ONG
To change the display time out:
1. Select the option “Display Time Out” in
the Set-up menu by using the cursor keys.
Press OK.
2. Select your preferred display time out
Press OK. The time out is changed for
your universal remote for iPod™.
The Set-up menu appears on the screen.
DNote
The display time out has an impact on the life of
the batteries. The longer the backlight stays on,
the faster the batteries will be drained.
5.11 Performing a full reset
You can reset your universal remote for iPod™
completely, deleting all programmed devices,
activities, learned keys and other settings. After
the reset, you will have to configure your remote
again.
To perform a full reset:
1. Select the option “Full Reset” in the Set-up
menu by using the cursor Keys. Press OK.
2. Confirm you want to perform a full reset
by selecting “Yes”. Press OK.
3. Press OK to reconfirm. The remote control
deletes all settings. When the full reset
is ended, the remote automatically re-
initializes. You now have to configure your
remote again. See section 3.3, Install, and
follow the directions for pairing the dock
with the remote to repeat this procedure.
Warranty & Service

22
6 Warranty & Service
This universal remote and dock for iPod™
carries a limited one-year warranty.
Philips warrants that this product shall be free
from defects in material, workmanship and
assembly, under normal use, in accordance with
the specifications and warnings, for one year
from the date of your purchase of this product.
This warranty extends only to the original
purchaser of the product, and is not
transferable. To exercise your rights under this
warranty, you must provide proof of purchase in
the form of an original sales receipt that shows
the product name and the date of purchase.
For customer support or to obtain warranty
service, please call 919-573-7863. THERE
!2%.//4(%2%802%33/2)-0,)%$
WARRANTIES. Philips’ liability is limited to
repair or, at its sole option, replacement of the
product. Incidental, special and consequential
damages are disclaimed where permitted by law.
This warranty gives you specific legal rights. You
may also have other rights that vary from state
to state.
For customer support or to obtain warranty
service, please call 919-573-7854 in North
America or visit www.philips.com/support
for global support.
Warranty & Service

23
ENGLISH
7 Technical data
Mechanical Specifications
Size
Docking Station:
s /VERALL,ENGTHMM
s /VERALL7IDTHMM
s /VERALL4HICKNESSMM
Remote Control :
s /VERALL,ENGTHMM
s /VERALL7IDTHMM
s /VERALL4HICKNESSMM
Power
s $OCKV$#
s 2EMOTE!!!LKALINE"ATTERIES
s !PPROXIMATE"ATTERY,IFEMONTHS
Screen
s 4YPE$OT-ATRIX
s 3IZEPIXELSBYPIXELS
s ,IGHTING"ACKLIGHTING
s #OLOURBLACKWHITE
Connectors
s )0OD©#ONNECTOR
s 36IDEO*ACK
s !UDIOINJACK
s $#0OWER*ACK
Communication and Interface
Transmission Medium
IR AND RF Carrier Frequency
s )2K(Z
s 2&'(Z
General Operating Voltage
s MINTYPICAL6TO6
Ambient Operating Temperature Range
s #TO#
Certifications
s &##
s )#
s 5,#5,
s #%
s 3WISS-ARK
s #4ICK
Technical data

24
8 Frequently asked questions
Here you will find the most frequently asked
questions and answers about your universal
remote and dock for iPod™. For further help,
visit www.philips.com/support or call
919-573-7854 in North America.
To keep the warranty valid, never try to repair
the system yourself. If you encounter problems
when you use your universal remote and dock
for iPod™, check the following points before
you contact Philips. If the problem remains
unsolved, go to the Philips website
www.philips.com/support or contact Philips
at 919-575-7854 in North America. When you
contact Philips, make sure that your universal
remote and dock for iPod™ is nearby and the
model number and serial number are available.
What should I do if “Cannot connect to
IPod™ DOCKING CRADLE” appears on
the screen?
This means the docking cradle is not configured
to connect to the remote. Reconnect the
remote to the docking cradle.
What should I do if “No IPod™
DOCKING
CRADLE found” appears on the screen?
This means the docking cradle is not within
range of the remote. Move closer, up to 3 feet
(1m) of the docking cradle. Press OK to try
again.
What if I cannot find my brand in the list
of the selected devices?
The brands are divided by device and you could
be looking in the wrong device.
s 34"CONTAINSTHEDIFFERENTSETTOPBOXES
for Satellite and DVB-T
s !5$)/3%4CONTAINSTHETUNERAMPLIlER
combination and CD or DVD in
some cases
s (43CONTAINSTHEHOMETHEATERSYSTEMS
s 062CONTAINPERSONALVIDEORECORDERS
and hard disc recorders
s $-2CONTAINS$IGITAL-EDIARECEIVERS
s 466#246$6$$6$6#2$6$($$
contain combination devices
s '!-%CONTAINSTHE$6$PLAYBACK
functions of the game consoles e.g.
Xbox and Play Station.
Not all brands are available in the database. If
your brand is not in the list, select “Not in list”
and perform a full database search. The remote
will test all codes that are available. This can take
up to 25 minutes.
How do I quit the installation wizard?
To quit the installation wizard, press the IPOD™
LAUNCH key.
What do I do if the “No Connection” icon
blinks in the upper right-hand corner of
the screen?
This could mean:
s 4HEDOCKISDISCONNECTED-AKESURE
the power adapter is connected to a
live electrical outlet and that the cables
are connected properly.
s 4HEREMOTEISTOOFARFROMTHEDOCKING
cradle to set up a connection.
The remote should be no farther than
a maximum distance of 130 ft (40m)
from the docking cradle.
Obstructions in the path from the
remote to the docking cradle can
reduce this distance. Move the remote
closer to the docking cradle.
Another radiant device, e.g. a
microwave oven, is positioned too close to
the docking cradle and is interfering with
the signals of the remote.
Turn off the devices placed near the
docking cradle that could be causing the
interference and try connecting again.
What should I do if the universal remote
for iPod™ is not powered?
Make sure the power adapter is connected to
a live electrical outlet and that the cables are
connected properly. Your universal remote for
Frequently asked questions

25
ENGLISH
iPod™ could be in standby mode. It may take
some time for start-up after standby mode.
Ensure that 3 fresh AA batteries are installed in
the remote.
What should I do if one or more keys are
not working correctly?
This usually means the specific function is not
available on the original remote control. Keep
in mind that your universal remote for iPod™
only has hard keys, so only the hard keys on the
remote that have a function in the device will
work. It may also mean that the code behind
the key is defective. You can fix keys from your
original remote control. Some keys have device
specific functions.
What should I do if the Volume keys are
not working properly?
This means the default source device for your
device is not installed. After adding devices, the
SJM3152 automatically copies the Volume keys
and Mute key, as follows:
s 6IDEODEVICESLIKE$6$$6$26#2
and Satellite box, use the Volume keys
of the TV.
s !UDIODEVICESLIKE#$$-2AND
Tuner, use the Volume keys of the
Amplifier or Receiver. If you did not
install the source device, the Volume
keys and the Mute key will not work.
You can choose to install the source
device on your remote.
What do I do if I cannot see all the music
available on my iTunes on my universal
remote for iPod™ screen?
Only music that is available in the library of your
iPod™ is shown on the remote. Save the music
available on your iTunes library in the library of
your selected iPod™.
What do I do if I cannot wake-up the
universal remote for iPod™?
This means the battery level is too low. Take out
the batteries and insert new batteries.
Frequently asked questions

26
Inhaltsverzeichnis
1. Wichtig 27
2. Universalfernbedienung und
Dockingstation für iPod™ 29
2.1 Verpackungsinhalt 30
2.2 Zusätzlich benötigt 30
2.3 Universalfernbedienung und
Dockingstation für iPod™ – Übersicht 31
2.4 Hauptmenü – Übersicht 31
3. Erste Schritte 32
3.1 Vorbereiten 32
3.2 Anschließen 32
3.3 Installieren 33
4. Verwenden der
Universalfernbedienung und
Dockingstation für iPod™ 35
4.1 Verwenden der Universalfernbedienung
für iPod™ als Steuerung für Ihren iPod™35
4.2 Suchen und Wiedergeben von Musik
von Ihrem iPod™ 35
4.3 Verwenden der Universalfernbedienung
für iPod™ als Universalfernbedienung 37
4.4 Starten einer Aktivität 38
4.5 Wechseln der Batterien 38
5. Weitere Verwendungen der
Universalfernbedienung und
Dockingstation für iPod™ 39
(INZUFàGENVON'ERËTEN
,ÚSCHENVON'ERËTEN
,ERNENVON4ASTENCODES
5.4 Hinzufügen von Funktionen 41
5.5 Hinzufügen von Aktivitäten 41
,ÚSCHENVON!KTIVITËTEN
5.7 Funkeinstellungen 42
5.8 Ändern der Sprache 43
+OPIERENDER,AUTSTËRKETASTE
5.10 Ändern der Displayabschaltzeit 44
5.11 Vollständiges Zurücksetzen 44
6. Garantie und Kundendienst 45
7. Technische Daten 46
8. Häufig gestellte Fragen (FAQ) 47
Inhaltsverzeichnis

27
GERMAN
1 Wichtig
Nehmen Sie sich vor Verwendung der
Universalfernbedienung und Dockingstation für
iPod™ die Zeit, dieses Benutzerhandbuch zu lesen.
Es enthält wichtige Informationen und Hinweise
zum Betrieb der Universalfernbedienung und
Dockingstation für iPod™.
© 2008 Koninklijke Philips Electronics N.V.
Alle Rechte vorbehalten. Die Vervielfältigung
ALS'ANZESODERIN4EILENOHNESCHRIFTLICHE
'ENEHMIGUNGDES5RHEBERRECHTSINHABERS
ist verboten. Die Marken sind Eigentum von
Koninklijke Philips Electronics N.V. oder der
jeweiligen Inhaber.
FCC-Konformitätserklärung
$IESES'ERËTENTSPRICHTDEN&##6ORSCHRIFTEN
Abschnitt 15. Der Betrieb unterliegt den folgenden
zwei Bedingungen:
$IESES'ERËTDARFKEINENACHTEILIGEN3TÚRUNGEN
verursachen, und
DIESES'ERËTMUSSALLEEMPFANGENEN3TÚRUNGEN
annehmen, einschließlich solcher Störungen, die
einen unerwünschten Betrieb verursachen.
DHinweis
$IESES'ERËTWURDEGETESTETUNDERFàLLTDIE
Bestimmungen für Digitalgeräte der Klasse
B gemäß Abschnitt 15 der FCC-Vorschriften.
Diese Bestimmungen sehen einen angemessenen
Schutz vor Störungen und Interferenzen bei der
)NSTALLATIONIN7OHNANLAGENVOR$IESES'ERËT
erzeugt und nutzt Hochfrequenzenergie und kann
solche abstrahlen. Wenn es nicht vorschriftsmäßig
installiert und verwendet wird, kann es Störungen
des Radio- und Fernsehempfangs verursachen. Es
kann jedoch nicht ausgeschlossen werden, dass bei
einer bestimmten Installation Störungen auftreten.
7ENNDIESES'ERËT3TÚRUNGENBEIM2ADIOODER
Fernsehempfang verursacht, was durch Ein- und
!USSCHALTENDES'ERËTESFESTGESTELLTWERDENKANN
können Sie versuchen, diese Störungen durch
eine oder mehrere der folgenden Maßnahmen zu
beheben:
s 2ICHTEN3IEDIE%MPFANGSANTENNENEUAUS
oder verändern Sie ihre Position.
s 6ERGRÚERN3IEDEN!BSTANDZWISCHENDEM
'ERËTUNDDEM%MPFËNGER
s 3CHLIEEN3IEDAS'ERËTUNDDEN
Empfänger an zwei unterschiedliche
Stromkreise an.
s 7ENDEN3IESICHAN)HREN(ËNDLER
oder einen erfahrenen Radio- und
Fernsehtechniker.
Jegliche nicht autorisierte Modifikation an diesem
'ERËTKANNDEN7IDERRUFDER"ERECHTIGUNGZUM
"ETRIEBDES'ERËTESZUR&OLGEHABEN
ICES-Erklärung (Kanada)
This Class B digital apparatus complies with
Canadian ICES-003.
Wichtig

28
0HILIPS#ONSUMER%LECTRONICS"'(#ERKLËRT
hiermit, dass diese Universalfernbedienung
SJM3152 den grundlegenden Anforderungen und
anderen relevanten Bestimmungen der Direktive
1999/5/EC entspricht.
%NTSORGUNG)HRESALTEN'ERËTS
)HR'ERËTWURDEUNTER6ERWENDUNG
hochwertiger Materialien und Komponenten
entwickelt und hergestellt, die recycelt und
wieder verwendet werden können.
Befindet sich dieses Symbol
(durchgestrichene Abfalltonne auf
2ËDERNAUFDEM'ERËTBEDEUTETDIES
DASSFàRDIESES'ERËTDIE%UROPËISCHE
2ICHTLINIE%'GILT
Informieren Sie sich über die geltenden
Bestimmungen zur getrennten Sammlung von
%LEKTROUND%LEKTRONIK!LTGERËTENIN)HREM,AND
Richten Sie sich bitte nach den geltenden
Bestimmungen in Ihrem Land, und
entsorgen Sie Altgeräte nicht über Ihren
Haushaltsabfall. Durch die korrekte
Entsorgung Ihrer Altgeräte werden
Umwelt und Menschen vor möglichen
negativen Folgen geschützt.
BWarnungen
s3ETZEN3IEDAS'ERËTWEDER2EGENNOCH
Wasser aus.
s3ETZEN3IEDAS'ERËTKEINEMDIREKTEM
Sonnenlicht aus, um einen Wärmestau
zu vermeiden.
s6ERSUCHEN3IENICHTDAS'ERËTZU
demontieren oder zu reparieren.
s3ETZEN3IEDAS'ERËTKEINENHOHEN
Spannungen aus.
s!CHTEN3IEBEIM"ATTERIEWECHSELDARAUF
nicht verschiedene Batterietypen zu
kombinieren oder Zink-Kohle-Batterien
in die Fernbedienung einzusetzen. Dies
kann undefinierte Betriebszustände zur
Folge haben.
Entsorgen Sie die Verpackung vorschriftgemäß.
Wichtig
29
GERMAN
2 Universalfernbedienung und
Dockingstation für iPod™
'lückwunsch zum Kauf eines Qualitätsprodukts
von Philips!
Um den von Philips bereitgestellten
Kundendienst in vollem Umfang nutzen zu
können, registrieren Sie Ihr Produkt unter
www.philips.com/welcome.
Mit der Universalfernbedienung und
Dockingstation für iPod™ können Sie Ihren
I0OD©FERNBEDIENENUNDGLEICHZEITIGAUmADEN
Außerdem können Sie damit bis zu 6 weitere
!6'ERËTESTEUERN0HILIPSBIETETEINEGANZE
Produktlinie an, mit der Sie Ihren iPod™
erweitern können.
Die Universalfernbedienung und Dockingstation
für iPod™ ist für alle iPod™-Modelle mit
Dock-Anschluss geeignet. Um eine optimale
Verbindung herzustellen, verwenden Sie den mit
Ihrem iPod™ mitgelieferten Dockingadapter,
oder wählen Sie aus den 5 mit der
Universalfernbedienung und Dockingstation für
iPod™ mitgelieferten Adaptern die geeignete
Ausführung aus.
DHinweis
Philips SJM3152 ist mit folgenden iPod-Modellen
kompatibel:
iPod touch
8GB 16GB 32GB
DHinweis
3TEREOUND!6'ERËTEKÚNNENNURàBER
Infrarot, d. h. über eine optische Sichtverbindung
gesteuert werden. Die Reichweite zum Steuern
DIESER'ERËTEISTAUFMBEGRENZTUNDDIE
Fernbedienung muss eine Sichtverbindung
ZUM)2!NSCHLUSSDER!6'ERËTEHABEN$IE
&ERNBEDIENUNGKANNNUR'ERËTESTEUERNDIE
über einen IR-Sensor verfügen.
In diesem Abschnitt finden Sie eine Übersicht
der Bedienelemente und Funktionen der
Universalfernbedienung und Dockingstation für
iPod™.
Wichtige Produktinfos
s 3TEUERUNGVONI0OD©&ERNSEHGERËT
Videorecorder, DVD-Player,
Kabel- und Satellitensystemen
s 3TEUERUNGVONI0OD©UND(OME
Entertainment-Systemen.
s ,#$"ILDSCHIRMMIT
Hintergrundbeleuchtung
s +OMFORTABLE!NZEIGEDESI0OD©-ENàS
der Wiedergabelisten und Bibliotheken,
AUCHBEISCHLECHTEN,ICHTVERHËLTNISSEN
s 7IEDERGABEVON)HREMI0OD©àBER)HR
Home-Entertainment-System
s !UmADENDESI0OD©INDER$OCKINGSTATION
an die die Stereoanlage über das
mitgelieferte AV-Kabel angeschlossen ist.
s 3TEUERNDESI0OD©DURCH7ËNDE
Stockwerke und Türen, Zimmerdecken und
Fenster mit der 2-Weg- HF-Technologie.
s "EDIENENDES-ENàSDER&UNKTIONENDER
Wiedergabelisten und Bibliotheken des
iPod™ an praktisch jedem Ort im Haus.
s $OCKINGSTATION
s 'LEICHZEITIGES!UmADENDESI0OD©UND
Wiedergabe.
s !NZEIGENDER6IDEOBIBLIOTHEKAUFEINEM
größeren Bildschirm
s %INFACHER!NSCHLUSSAM&ERNSEHGERËTMIT
dem S-Video-Ausgangskabel oder dem
Cinch-AV-Kabel (gelber Cinch-Stecker).
Universalfernbedienung und Dockingstation für iPod™
30
2.1 Verpackungsinhalt
Universalfernbedienung Dockingstation für iPod™ Netzgerät
S-Video-Kabel 3,5-mm/Cinch-AV-Kabel CD-ROM mit Kurzanleitung
Bedienungsanleitung
(3) AA-Batterien
*Verwenden Sie für neuere iPod™-Modelle den mit dem iPod™ mitgelieferten Adapter.
2.2 Zusätzlich benötigt
oder
iPod™ mit Stereo-Receiver Fernsehgerät Netzsteckdose
Dock-Anschluss
Universalfernbedienung und Dockingstation für iPod™
5 iPod™-Dock-Adapter: *
s4YPFàRMINI
s4YPFàR''"
s4YPFàR''"
s4YPFàRI0OD©MIT&ARBDISPLAY'"'"
s4YPFàRI0OD©MIT&ARBDISPLAY'"
AC
31
GERMAN
2.3 Universalfernbedienung und
Dockingstation für iPod™ –
Übersicht
Dockingstation:
,%$3IGNALLEUCHTE
3CHLITZEZUM%NTFERNENDES,ADEADAPTERS
3. 3,5-mm-AV-Ausgangsbuchse
'LEICHSPANNUNGSBUCHSE
5. S-Video-Ausgangsbuchse
6. iPod™-Anschluss
Fernbedienung:
1. Einschalttaste
,#$"ILDSCHIRM
3. MODE-Taste
4. Cursortasten ( Navigation) und OK-Taste
5. Stummschaltungstaste
,AUTSTËRKEERHÚHENVERRINGERN
7. iPod™-Starttaste
8. Wiedergabetasten (Wiedergabe,
Aufnahme, Stopp, Rücklauf, Schnellvorlauf,
Pause, Überspringen, Weiter)
'ERËTESPEZIlSCHE4ASTEN
0ROGRAMMàBERSICHT,IVE46($$-ENà
10. Zifferntasten
'ERËTESPEZIlSCHE4ASTEN##4EXT
,ÚSCHEN%INGABE:OOMEN4ITEL
Kapitel, Untertitel, CC & Zoomen für /
27 Text & 16:9 für /10, Audio)
+ANAL
,AUTSTËRKETASTE
14. Symbol für schwache Batterie (siehe unten)
15. Symbol für keine Verbindung (siehe unten)
16. IR-Übertragungssymbol (siehe unten)
14
15
16
2.4 Hauptmenü – Übersicht
1
6
2
3
4
5
123
456
789
*0#
OK
MAIN
VOL MODE
POWER
1
2
3
4
13
5
612
7
8
9
10
11
Universalfernbedienung und Dockingstation für iPod™ – Übersicht
32
3 Erste Schritte
BWarnung
,ESEN3IEDIE3ICHERHEITSHINWEISEIN!BSCHNITT
1.1, Wichtig sorgfältig durch, bevor Sie die
Universalfernbedienung und Dockingstation für
iPod™ anschließen.
In diesem Abschnitt wird die Erstinstallation der
Universalfernbedienung und Dockingstation für
iPod™ erläutert.
3.1 Vorbereiten
1. Entnehmen Sie den gesamten
Verpackungsinhalt.
2. Stellen Sie die Dockingstation in der Nähe
des Home-Entertainment-Systems, der
Stereoanlage oder des Fernsehgeräts auf.
3. Schalten Sie alle Unterhaltungselektronikgeräte
in Ihrem Haus aus.
4. Suchen Sie eine nahe gelegene, freie
Netzsteckdose.
5. Entfernen Sie die Bildschirm-Schutzabdeckung
von der Universalfernbedienung für iPod™.
6. Entfernen Sie die Schutzabdeckung des
iPod™-Anschlusses von der Dockingstation.
7. Wählen Sie den richtigen Dock-Adapter für
Ihr spezifisches iPod™-Modell aus.
8. Setzen Sie den richtigen Dock-Adapter in die
Dockingstation ein.
3.2 Anschließen
Für Stereo-Wiedergabe:
1. Schließen Sie die roten und weißen
Cinch-Stecker des mitgelieferten AV-Kabels
an die Cinch-Audioeingangsbuchsen Ihres
Home-Entertainment-Systems oder Ihrer
Stereoanlage an.
DHinweis
7ENN3IEDAS'ERËTNICHTMITEINEM6IDEOGERËT
verbinden oder es über den S-Video-Anschluss mit
einem Videogerät verbinden möchten, lassen Sie
den gelben Cinch-Stecker am Kabelende frei.
2. Verbinden Sie den 3,5-mm-Klinkenstecker
des mitgelieferten AV-Kabels mit der
mit „AV“ beschrifteten Buchse der
Dockingstation.
3. Verbinden Sie ein Ende des
Stromversorgungskabels mit einer
Netzsteckdose und das andere Ende mit
der Buchse „DC 12V“ an der Rückseite der
Dockingstation.
,EGEN3IEDIEMITGELIEFERTEN!!"ATTERIEN
in das Batteriefach der Fernbedienung
ein. Beachten Sie die Polaritätssymbole im
Batteriefach.
Für Videowiedergabe:
1. Verbinden Sie ein Ende des mitgelieferten
S-Video-Kabels an der Videoeingangsbuchse
Ihres Home-Entertainment-Systems oder
Fernsehgeräts an.
2. Schließen Sie das andere Ende des
mitgelieferten S-Video-Kabels an die
mit „S-Video“ beschrifteten Buchse der
Dockingstation an. Wenn Sie die Composite-
Video-Buchsen verwenden (FBAS), verbinden
Sie den gelben Cinch-Stecker mit der Cinch-
Videobuchse am Fernsehgerät.
3. Verbinden Sie ein Ende des
Stromversorgungskabels mit einer
Netzsteckdose. Verbinden Sie das andere
Ende mit der Buchse „DC 12V“ an der
Rückseite der Dockingstation.
,EGEN3IEDIEMITGELIEFERTEN!!"ATTERIEN
in das Batteriefach der Fernbedienung
ein. Beachten Sie die Polaritätssymbole im
Batteriefach.
Erste Schritte
33
GERMAN
S-Video-Verbindung
S-Video-Verbindung
3.3 Installieren
Nach dem Einlegen der Batterien in die
Fernbedienung und dem Anschließen aller
entsprechenden Kabel müssen Sie eine
„Paarung“ der Dockingstation mit der
Fernbedienung vornehmen.
DHinweis
Es wird empfohlen, die Ersteinrichtung
einschließlich der „Paarung“ auszuführen, bevor
Sie den iPod™ in die Dockingstation einsetzen.
Paarung von Dockingstation und Fernbedienung
bei der ersten Inbetriebnahme:
1. Drücken Sie auf der Fernbedienung die
Taste POWER.
2. Während dieses Vorgangs muss sich die
Fernbedienung in einem Abstand von
1 m zur Dockingstation befinden.
3. Befolgen Sie die Eingabeaufforderungen
des Einrichtungsassistenten auf dem
Bildschirm.
Der Einrichtungsassistent führt Sie durch die
einzelnen Schritte der Ersteinrichtung der
Universalfernbedienung für iPod™.
Ersteinrichtung der Universalfernbedienung für
iPod™:
1. Wählen Sie mit den Cursortasten die
Sprache für die Anweisungen auf der
Fernbedienung aus. Drücken Sie auf OK.
Während der Paarung der Fernbedienung mit
der Dockingstation muss sich die Fernbedienung
in einem Abstand von 1 m zur Dockingstation
befinden.
DHinweis
Während sich der iPod™ in der Dockingstation
befindet, wird auf dem Bildschirm des iPod™ die
nachfolgende Meldung angezeigt. Dies verweist
auf eine ordnungsgemäße Funktion.
2. Wählen Sie „Next“ (Weiter), und drücken
Sie auf OK.
"ESTËTIGEN3IEDASS3IEWEITERE'ERËTE
hinzufügen möchten, wie z B. ein
Fernsehgerät oder einen DVD-Player,
indem Sie die Option „Yes“ (Ja) auswählen.
Drücken Sie auf OK. Hierdurch werden die
/RIGINALFERNBEDIENUNGENDER'ERËTEDURCH
die Universalfernbedienung für iPod™ ersetzt.
Erste Schritte
34
4. Wählen Sie mit den Cursortasten den
4YPUNDDIE-ARKEDES'ERËTSAUSDAS3IE
hinzufügen möchten. Drücken Sie auf OK.
Die Fernbedienung durchsucht jetzt die
Datenbank nach verfügbaren Codesätzen.
5. Folgen Sie den Anweisungen am Bildschirm,
um die Codes zu testen. Wenn ein
funktionierender Codesatz gefunden
WURDEISTDAS'ERËTKORREKTINSTALLIERT
7ENNDAS'ERËTKORREKTINSTALLIERTIST
wird der folgende Bildschirm angezeigt:
Wenn kein funktionierender Codesatz gefunden
wurde:
s3IEKÚNNENEINEVOLLSTËNDIGE$ATENBANKSUCHE
durchführen, um einen richtigen Codesatz zu
finden. Dieser Vorgang kann bis zu 25 Minuten
dauern.
s3IEKÚNNEN#ODESVONDERRIGINALFERNBEDIENUNG
lernen.
3OFàGEN3IEEINZUSËTZLICHES'ERËTHINZU
1. Wählen Sie die Option „Yes“ (Ja) aus, und
drücken Sie auf OK.
2. Wiederholen Sie diesen Vorgang für jedes
ZUSËTZLICHE'ERËT
7ENN3IEDAS(INZUFàGENVON'ERËTEN
abgeschlossen haben, wählen Sie die
Option „No“ (Nein) aus. Drücken Sie auf
OK. Beenden Sie den Assistenten.
DHinweis
Anpassen können Sie die Einstellungen der
Universalfernbedienung für iPod™ auch
nach der Erstinstallation jederzeit über das
Einrichtungsmenü. Drücken Sie die MODE-Taste
und die IPOD™-STARTTASTE 3 Sekunden lang
gleichzeitig.
Auf dem Bildschirm wird die Aufforderung
angezeigt, die beiden Tasten 3 Sekunden lang
gedrückt zu halten, um den Einrichtungsmodus
aufzurufen.
Erste Schritte
35
GERMAN
4. Verwenden der
Universalfernbedienung und
Dockingstation für iPod™
,ERNEN3IEDIE"EDIENUNGDERUniversal-
fernbedienung und Dockingstation für iPod™ kennen.
4.1 Verwenden der Universal-
fernbedienung für iPod™ als
Steuerung für Ihren iPod™
Steuern der Menüs, Wiedergabelisten und Musik-
und Videobibliotheken des iPod™.
1. Setzen Sie den richtigen Dock-Adapter
für Ihr spezifisches iPod™-Modell in die
Dockingstation ein.
2. Setzen Sie den iPod™ in die
$OCKINGSTATIONEIN$ER,ADEVORGANG
beginnt automatisch.
3. Drücken Sie die IPOD™-STARTTASTE.
Die Fernbedienung stellt eine Verbindung zum
iPod™ in der Dockingstation her und zeigt die
Wiedergabelisten des iPod™-Menüs an.
DHinweis
Wenn in der oberen rechten Ecke des Bildschirms
das Symbol für keine Verbindung zu blinken
beginnt, kann die Universalfernbedienung für
iPod™ keine Verbindung zur Dockingstation für
iPod™ herstellen. Zur Problembehebung siehe
Abschnitt 8,Häufig gestellte Fragen (FAQ).
4.2 Suchen und Wiedergeben von Musik
von Ihrem iPod™
Das Menü der Universalfernbedienung für
iPod™ ist dem Menü des iPod™ ähnlich.
Navigieren im iPod™-Modus:
1. Navigieren Sie zu „Music“,„Settings,„Now
Playing“ (Musik, Einstellungen, Sie hören).
Drücken Sie auf OK, um die gewünschte
Option auszuwählen.
DHinweis
Wenn der iPod™ nicht über Videofunktionen
verfügt, wird die Videooption nicht auf dem
Bildschirm angezeigt.
DHinweis
„Now Playing“ (Sie hören) wird nur während
der Wiedergabe eines Musiktitels angezeigt.
Verwenden der Universalfernbedienung und Dockingstation für iPod™