Philips Electronics Singapore RC2843001 IR/RF Remote Control User Manual DCI401TCH1 draft v2 1 3 2010
Philips Electronics Singapore Pte Ltd IR/RF Remote Control DCI401TCH1 draft v2 1 3 2010
User manual
DTA
Easy Setup Guide
Installation t Operation t Troubleshooting
2
Table of Contents
What’s included in this Install Kit ..................................................4
Items that you may also need .....................................................5
Start Here ......................................................................6
Connecting to a TV (No VCR ) ...................................................8
Connecting to a TV + VCR .....................................................10.
Power Up .......................................................................12
Connecting to the Cable Network and activating your DTA .......................14
Verify your Cable Operator’s Services ............................................15
Programming the new remote ...................................................17
DTA Operation Guide .........................................................22
Using your DTA and VCR .......................................................23
Remote Operation Guide .......................................................25
Troubleshooting Guide .........................................................28
DTA Operation Guide (Two remotes )
...........................................
30
RF Pairing Process.
......................................................
.27
3
What you need to know
+Ƌ.%*#Ƌ5+1Ƌ!00!.Ƌ/!.2%!Ƌ*+3Ƌ* Ƌ%*Ƌ0$!Ƌ"101.!Ƌ5+1.Ƌ(!Ƌ+,!.0+.Ƌ%/Ƌ
1,#. %*#Ƌ0+Ƌ*Ƌ
((ĥ%#%0(Ƌ*!03+.'ƋĦƋ((ĥ%#%0(Ƌ"+.Ƌ!2!.5Ƌ$**!(ċƋ+*Ƌ!2!.5ƋƋ/!0Ċ
Ƌ+Ƌ+*0%*1!Ƌ0+Ƌ.!!%2!Ƌ((Ƌ0$!Ƌ$**!(/Ƌ5+1Ƌ.!Ƌ1/! Ƌ0+ċƋ5+1Ƌ3%((Ƌ*!! Ƌ
0+Ƌ)'!Ƌ/1.!Ƌ0$0Ƌ!2!.5ƋƋ%*Ƌ5+1.Ƌ$+)!Ƌ%/Ƌ!-1%,,! Ƌ3%0$Ƌ
+*!Ƌ+"Ƌ+1.ƋƋ+.Ƌ%#%0(Ƌ(!Ƌ+4!/Ċ
What you need to do

4
What’s included in this Install Kit?
DTA
Each TV will need to be connected to a DTA or a Digital Cable Box,
but not both.
HDMI Cable
5 Foot Coax Cable
Power Cord
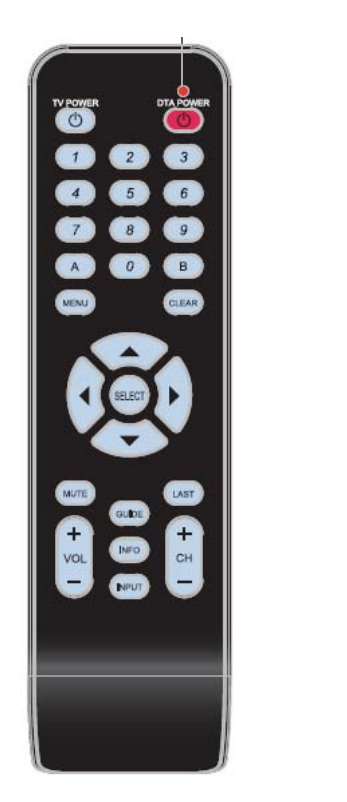
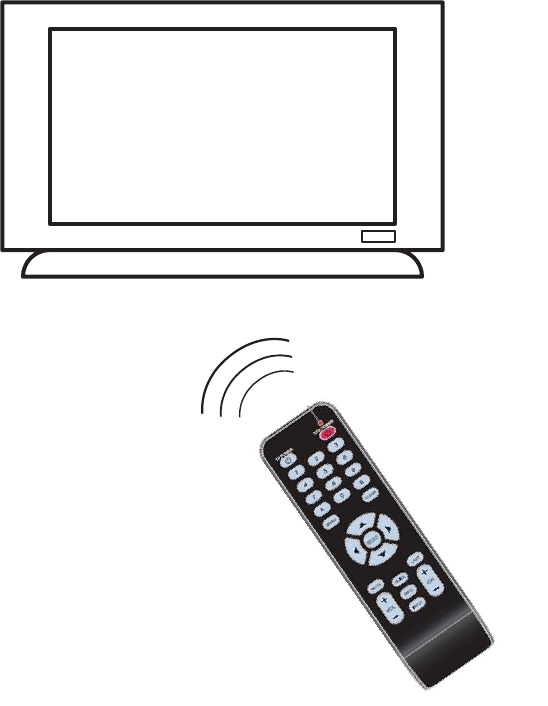
Remote Control
In order to operate the DTA you must use the remote control included
with this kit. Programming instructions for the remote control are
included in this guide.
2 AAA Batteries
Adhesive Fasteners
Use these if you want to stick the DTA to your TV.
Note: Please be careful. Technicolor is not responsible for any damage
done to any surface you stick these to.
5
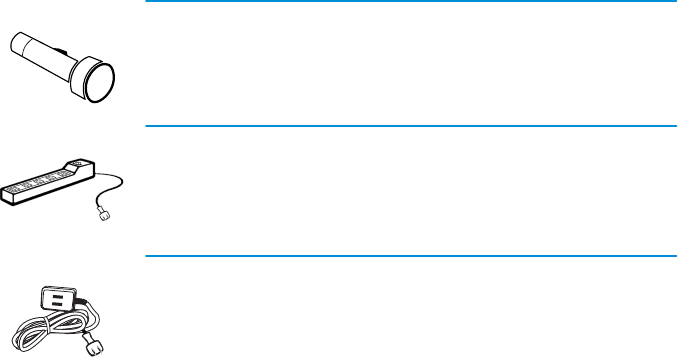
Items that you may also need:
Flashlight
Power Strip
You’ll need a power strip if you already have 2 items plugged into the
electrical outlet that you plan to use.
Extension Cord
You’ll need an extension cord if you already have 2 items plugged into
the electrical outlet closest to your TV.
6
(!/!Ƌ.!"!.Ƌ0+Ƌ0$!Ƌ!(+)!Ƌ!00!.Ƌ0$0Ƌ3/Ƌ !(%2!.! Ƌ
3%0$Ƌ0$%/Ƌ'%0Ƌ0+Ƌ% !*0%"5:
Start Here!
ēƎ $!Ǝ,$+*!Ǝ*1)!.Ǝ//+%0! Ǝ3%0$Ǝ5+1.Ǝ(!Ǝ,!.0+.Ǝ+1*0
ēƎ $!Ǝ$**!(Ǝ3$!.!Ǝ5+1Ǝ*Ǝ2%!3ƎƎ2% !+Ǝ !)+*/0.0%+*Ǝ+"Ǝ0$!/!Ǝ
%*/0.10%+*/
7
$!Ƌ(/0Ƌ"+1.Ƌ %#%0/Ƌ+"Ƌ0$!Ƌ/!.%(Ƌ*1)!.Ƌ+"Ƌ
!$ƋƋ0$0Ƌ5+1Ƌ3%((Ƌ!Ƌ0%20%*#Č
!.%(Ƌ1)!.Ƌ +0%+*Ƌ%*Ƌ5+1.Ƌ$+)!Ƌ 10,10Ƌ$**!(
Note: The serial number can be found on the bottom of the DTA
itself and is also printed on the outside of the DTA package.
8
A
Turn o your TV.
B
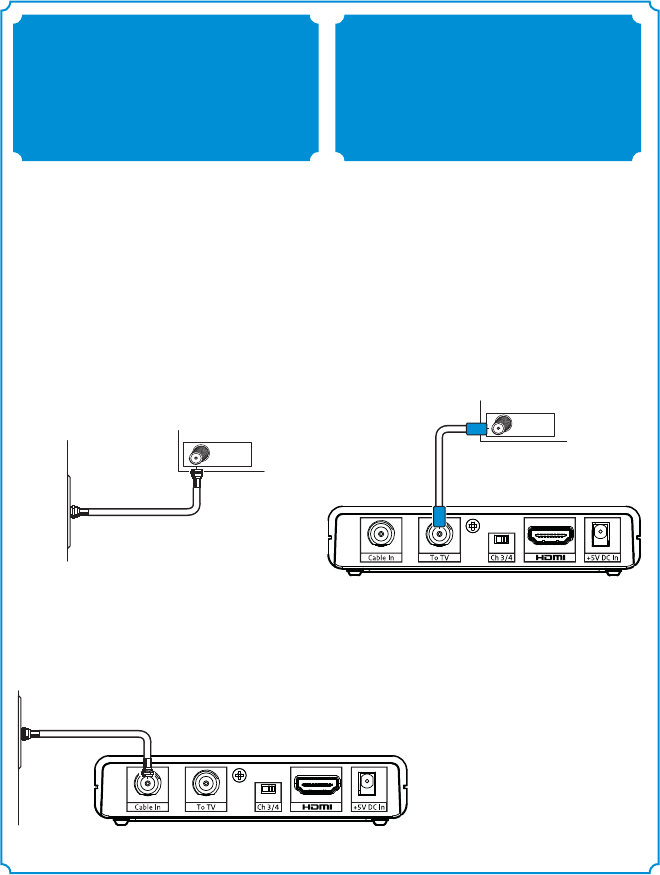
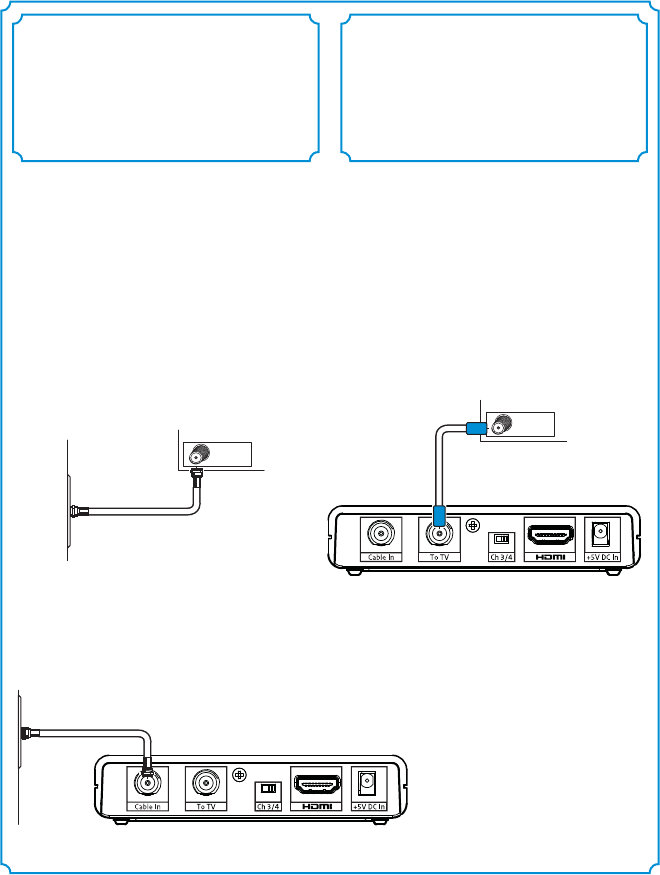
Locate the cable that currently runs from
the cable wall outlet to the back of your
TV. Leave one end of the cable connected
to the wall, but disconnect
the other end from the back of your TV.
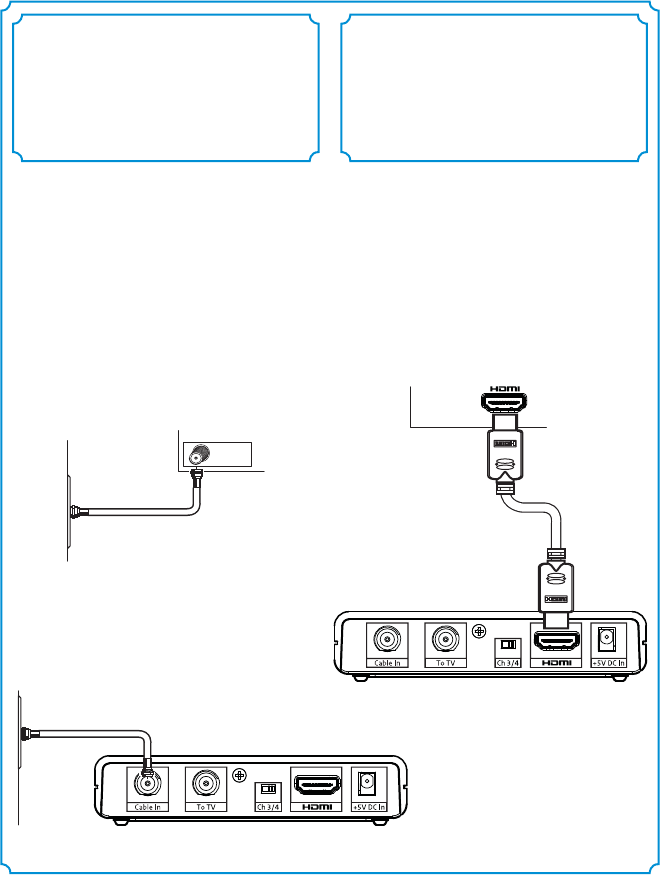
C
Reconnect this end of the cable to the
“Cable In” input on the back of the DTA.
Cable Outlet
Wall
B
TV
If you have a VCR, follow the directions on page 9.
If you do not have a VCR, follow the directions on this page.
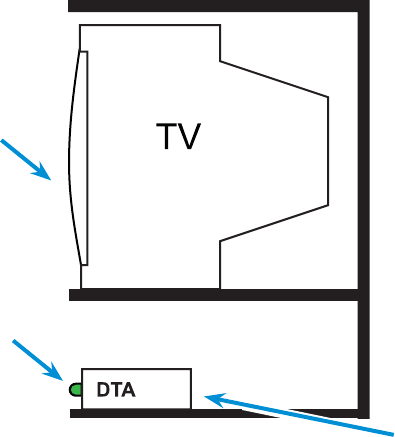
Connecting to a TV
with HDMI Cable (No VCR)
A
Find the HDMI cable included in this
kit. Connect one end of the cable to the
“HDMI” input on the back of the DTA.
B
Connect the other end to the “HDMI”
input on the back of your TV.
Connect the DTA
to the Cable Outlet
Connect the DTA
to the TV
12
Wall
Cable Outlet C
A
B
TV
9
If you do not have a VCR, follow the directions on page 8.
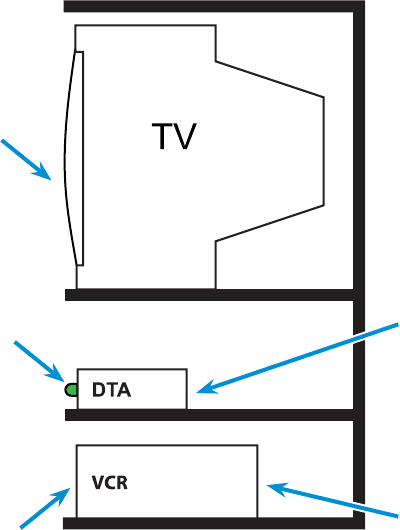
If you have a VCR, follow the directions on this page.
Connecting to a TV+VCR
with Coax cable
A
Find the 5-foot coax cable included in this
kit. Connect one end of the cable to the
“To TV” input on the back of the DTA.
B
Connect the other end to the “Cable In/RF
In” input on the back of your VCR.
A
Turn o your TV.
B
Locate the cable that currently runs from
the cable wall outlet to the back of your
VCR (or other recording device). Leave one
end of the cable connected to the wall, but
disconnect the other end from the back of
your VCR.
C
Reconnect this end of the cable to the
“Cable In” input on the back of the DTA.
Cable Outlet
Wall
B
VCR
Connect the DTA
to the Cable Outlet
Connect the DTA
to the VCR
12
Wall
Cable Outlet C
A
B
VCR Input
10
If you have a VCR, follow the directions on this page 9.
Connecting to a TVwith Coax cable
(No VCR)
A
Find the 5-foot coax cable included in this
kit. Connect one end of the cable to the
“To TV” input on the back of the DTA.
B
Connect the other end to the “Cable In/RF
In” input on the back of your TV.
A
Turn o your TV.
B
Locate the cable that currently runs from
the cable wall outlet to the back of your
VCR (or other recording device). Leave one
end of the cable connected to the wall, but
disconnect the other end from the back of
your VCR.
C
Reconnect this end of the cable to the
“Cable In” input on the back of the DTA.
Cable Outlet
Wall
B
VCR
Wall
Cable Outlet C
A
B
Cable IN / RF IN
Connect the DTA
to the Cable Outlet
Connect the DTA
to the TV
12
11
12
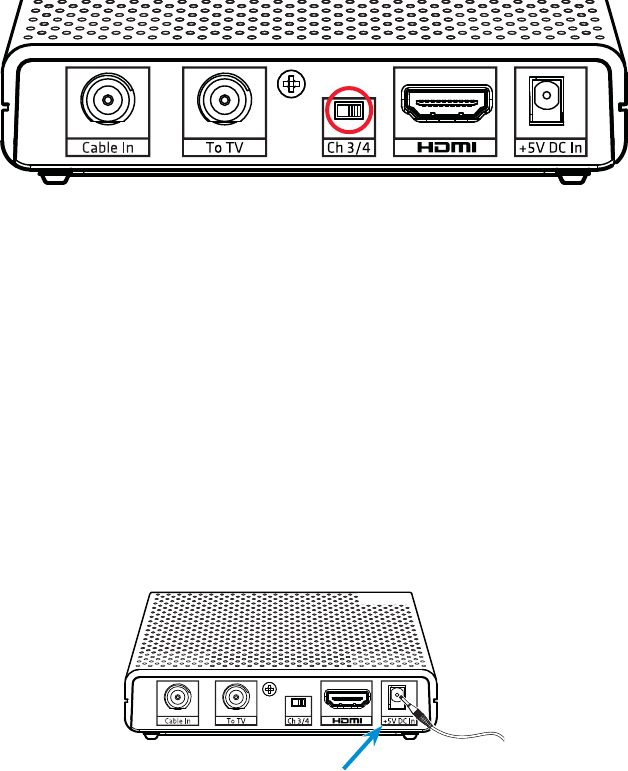
A
Choose which output channel you will use and make sure your television is set to the
selected channel or set to HDMI Input.
Set the switch on the back of the DTA to the proper
output channel (Ch 3 or Ch 4).
B
Find the power cord included in the kit. Plug the end of the
power cord into the power input “+
5V DC In” on the back of the DTA.
Power Up
A
B
13
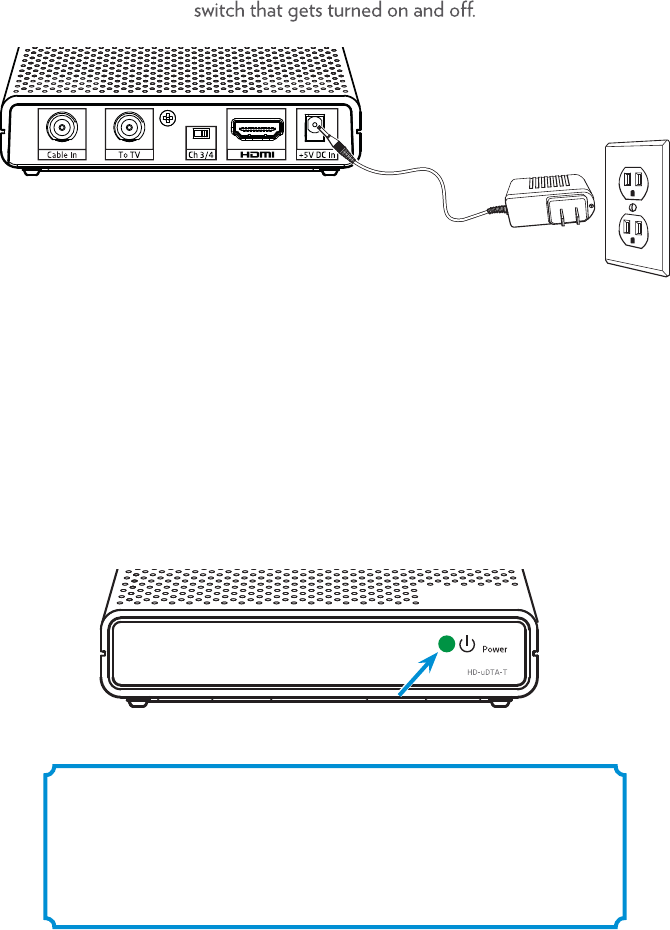
C
Plug the other end into a working electrical outlet or power strip.
Make sure that the outlet is not controlled by a
D
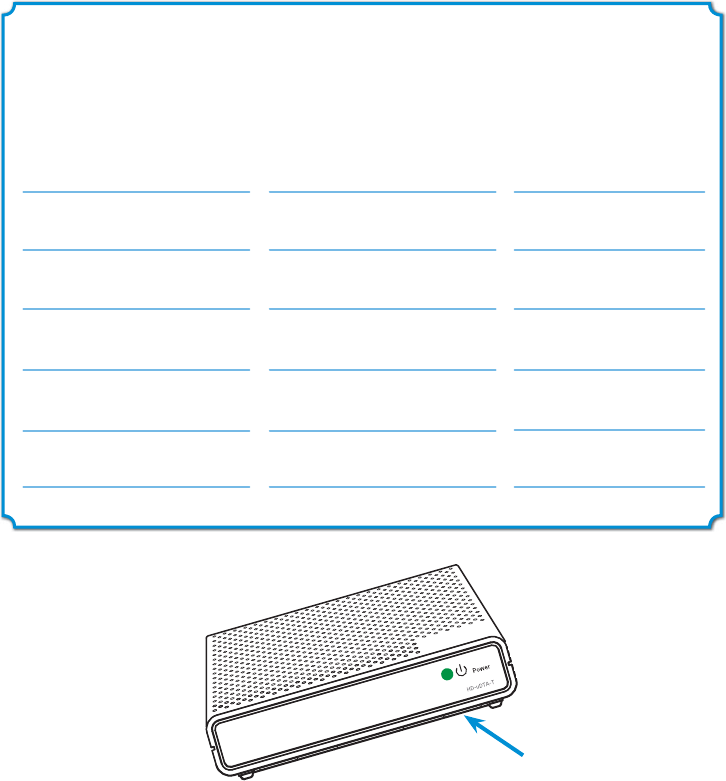
Check the front of the DTA to see if the green light is on and blinking.
If it is not on, check to make sure the power plug was plugged
into the power input “+
5V DC In” and that the other end
is plugged into a working electrical outlet.
Note: After activation, this light will remain on and constantly lit.
B
C
Please wait 20 minutes before calling to activate.
This will allow the DTA to connect to the
network and get the latest updates.
D

14
A
If you received more than one DTA, this would be a good time to
get the others installed so you can activate them all with one call.
Channel 3/4
Connecting to the Network and
activating your DTA
Remember, you must wait 20 minutes before calling to
activate. This will allow the DTA to connect to the network
and get the latest updates.
B
Call your cable operator’s automated activation line
and follow the instructions
C
Turn on your TV and tune it to the proper output channel (Ch 3 or Ch 4).
Note: The serial number can be found on the bottom of the DTA
itself and is also printed on the outside of the DTA package. .
Note: To complete your activation, you will need your account information
and the serial number of each DTA you are activating.
.
15
After completing the activation step, wait a few minutes
for programming to appear.
A
Conrm that the DTA is connected to the power and that
the light on the front is solid (not blinking).
B
Make sure that the TV is on.
C
Using the remote control to operate your DTA, scroll through
your channels and make sure they are all working.
Verify your Services
A
B
C
Note: If the light is blinking, or your channels are not showing up, turn to
the troubleshooting section of this guide.
16
17
Programming the new remote
This is the easiest method for programming your remote control
to operate the volume and power on your TV.
In the next section, you will use the remote to
automatically nd the right code for your TV.
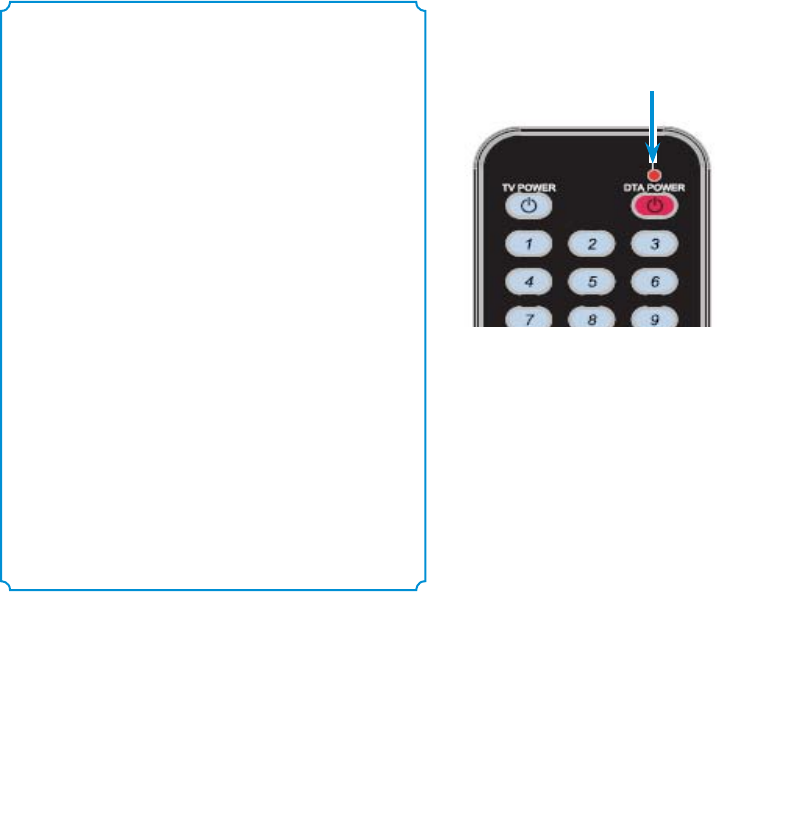
Keys to successfully
programming your remote:
t
Read all instruction carefully before
starting.
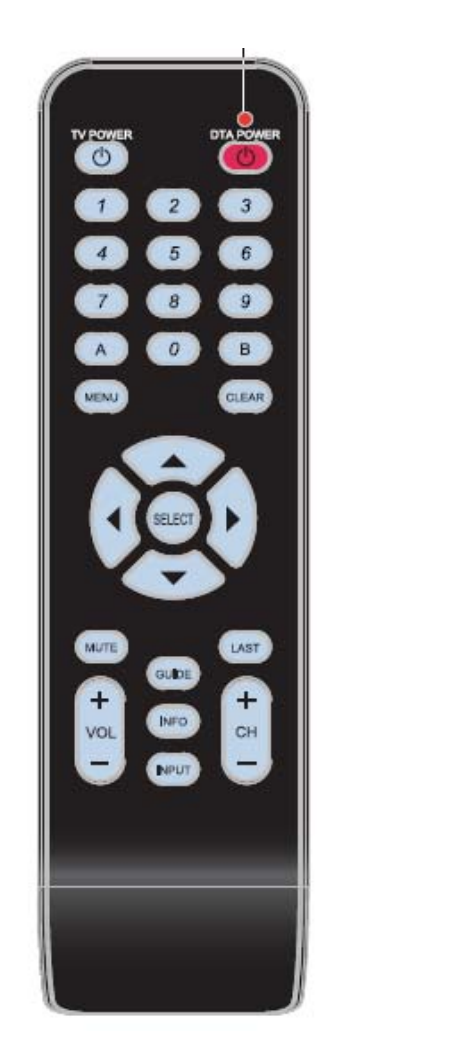
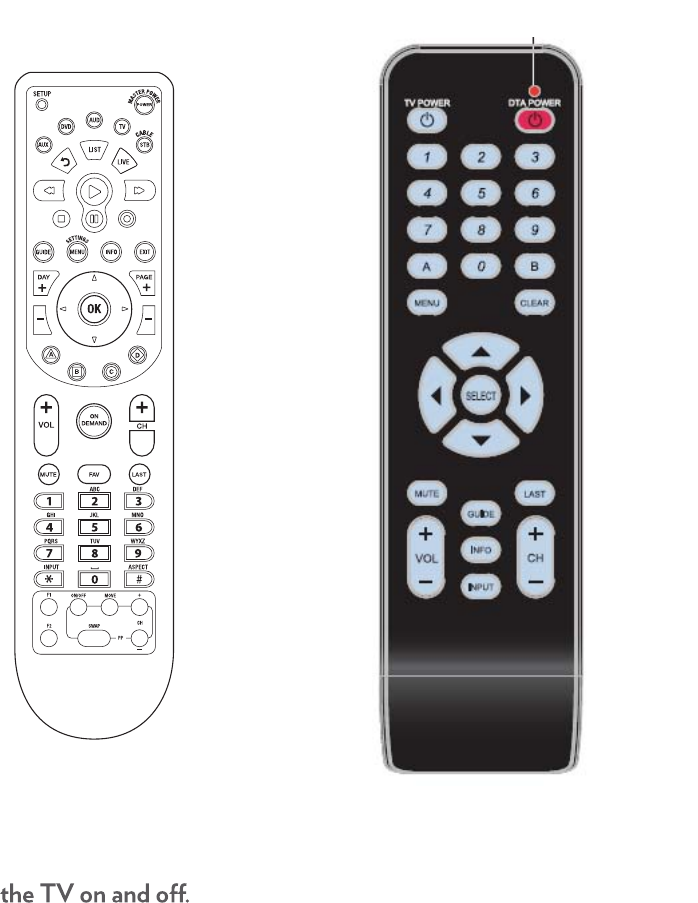
t Pay attention to the red light on the
remote after each step. You’ll need
to watch for blinks in order to tell if
you have completed a step correctly.
t Be patient. It may take a few tries to
get this right.
t Step 3 is critical. Remember to press
and hold well onto TV POWER or
MUTE button while searching for the
right code for your TV. As soon as the
TV turns o or gets muted, you’ll have
to release button within 2 seconds
to lock in the code.
Red light
location
17
18
Step 1
Step 2
Turn on your TV using the buttons on the TV or the TV remote.
Install the batteries (included in your kit) in your new remote control.
Press and hold both Digit 1 and Digit 3 buttons together until the
red light turns on.
Release both buttons.
Keep your eyes on
the remote so you can
watch the
red light.
19
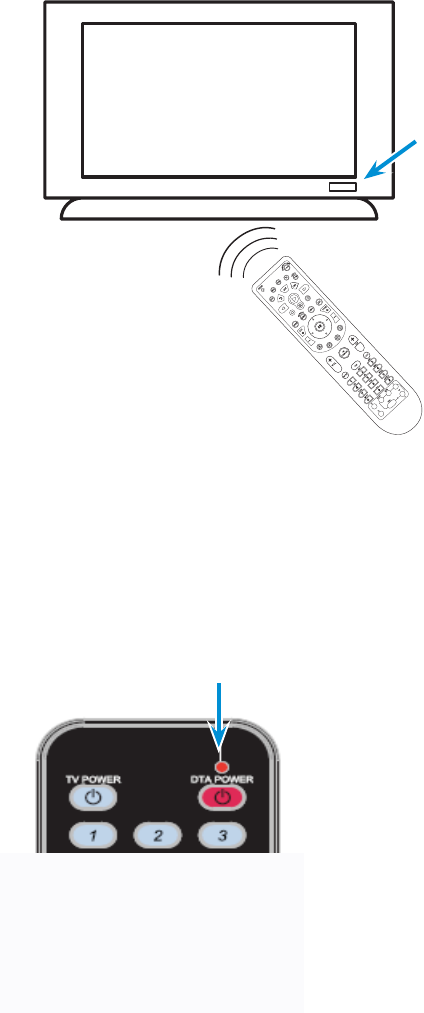
Step 3
Step 4
Point the remote at the TV. Press and hold onto either TV Power
or MUTE button to start searching for the right code. When the TV
turns o or gets muted, release button within 2 seconds to lock in
the code. The red light on the remote will blink twice.
Keys to success:
Carefully carefully all the
steps before attempting.
Be patient and hold well
onto TV POWER or MUTE
button during the search
of right code.
t
t
t
t
Be Ready. You must release
TV POWER or MUTE button
within 2 seconds of the
TV turning o or is muted
to lock in the code.
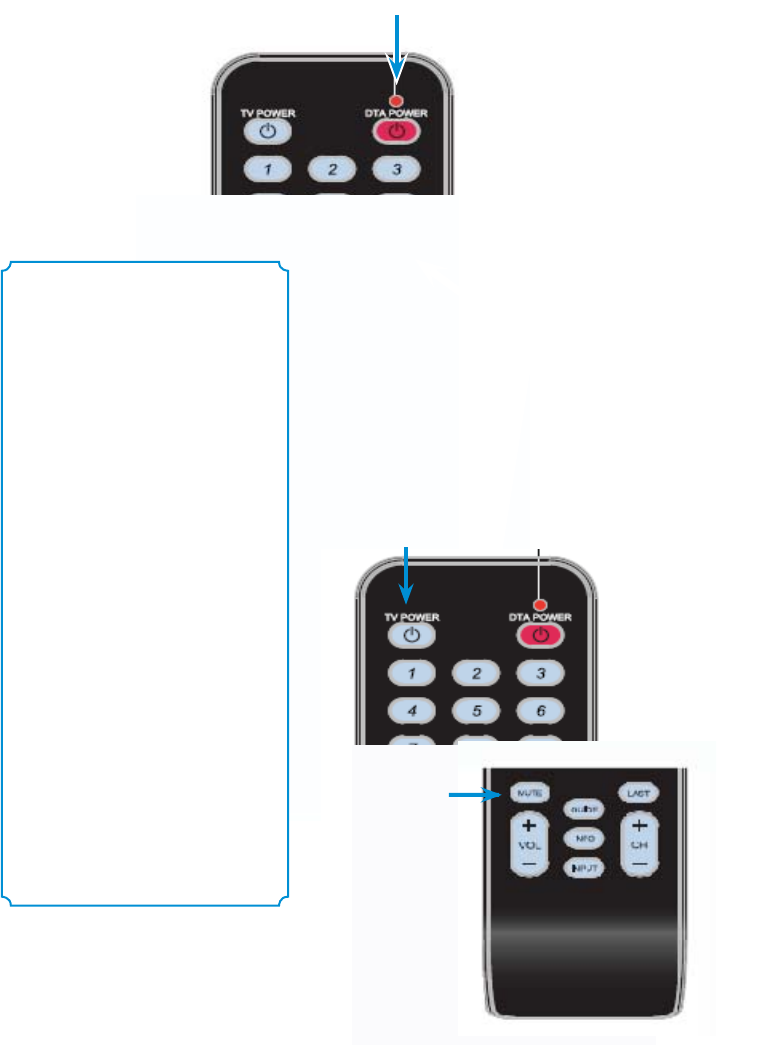
If you hae pressed TV POWER button in Step 3,
press TV POWER on remote to turn on your TV.
If you have pressed MUTE button in Step 3,
press MUTE on remote to restore volume on your
TV. If your TV has responded, then you have
successfully programmed your remote.
20
Step 5
Press the “power” button to turn on your TV.
If your TV comes on, then you have successfully programmed your remote!
21
Find the small instruction booklet that came with the remote.
Use those instructions to look up and enter the 5 digit code
for your TV make and model.
If you are still not successful, turn to page 26 in this booklet.
If you are not successful the first time,
try again.
If you still don’t succeed, try this alternate method:
22
DTA Operation Guide
Quick Troubleshooting Checklist
ēƎ Ǝ/!0Ǝ+*Ǝ0$!Ǝ,.+,!.Ǝ+10,10Ǝ$**!(ƎĴ$Ƌ÷Ƌ+.Ƌ$ƋøĵƎ+.ƎƎ*,10
ēƎ Ǝ(%#$0Ǝ%/Ǝ+*
Be sure that the
DTA is on.
You should see a
solid green light.
Be sure that the
DTA is set to the proper
output channel (Ch 3 or Ch 4).
Be sure that the TV
is on the proper
channel
(Ch 3 or Ch 4).
Always use the remote that came with the DTA to
change channels and for volume control.
23
Using your DTA and VCR
Quick Troubleshooting Checklist
ēƎ Ǝ/!0Ǝ+*Ǝ0$!Ǝ,.+,!.Ǝ+10,10Ǝ$**!(ƎĴ$Ƌ÷Ƌ+.Ƌ$ƋøĵƎ+.Ǝ
ēƎ Ǝ/!0Ǝ+*Ǝ0$!Ǝ,.+,!.Ǝ+10,10Ǝ$**!(ƎĴ$Ƌ÷Ƌ+.Ƌ$Ƌø)
ēƎ 1*!ƎƎ0+Ǝ0$!Ǝ/)!Ǝ$**!(
ēƎ Ǝ(%#$0Ǝ%/Ǝ+*
ēƎ 1*!ƎƎ0+Ǝ$**!(Ǝ0$0Ǝ5+1Ǝ3*0Ǝ0+Ǝ.!+.
Use your DTA
remote to tune the
DTA to the channel
that you want to
record.
Be sure that the TV
is on the proper channel
(Ch 3 or Ch 4) or HDMI.
Be sure that the DTA
is set to the proper
output channel
(Ch 3 or Ch 4).
Be sure that the VCR
is set on the
proper output channel
(Ch 3 or Ch 4).
Be sure that
the VCR tuner
is set to the
proper channel
(Ch 3 or Ch 4).
Recording with your VCR:
TV on 3 and VCR on 3 if you selected 3 for your DTA output channel
or
TV on 4 and VCR on 4 if you selected 4 for your DTA output channel
Use your DTA remote to tune the DTA to the channel to be recorded.
If you are scheduling a recording you must leave your
DTA tuned to the channel that you want to record.
24
25
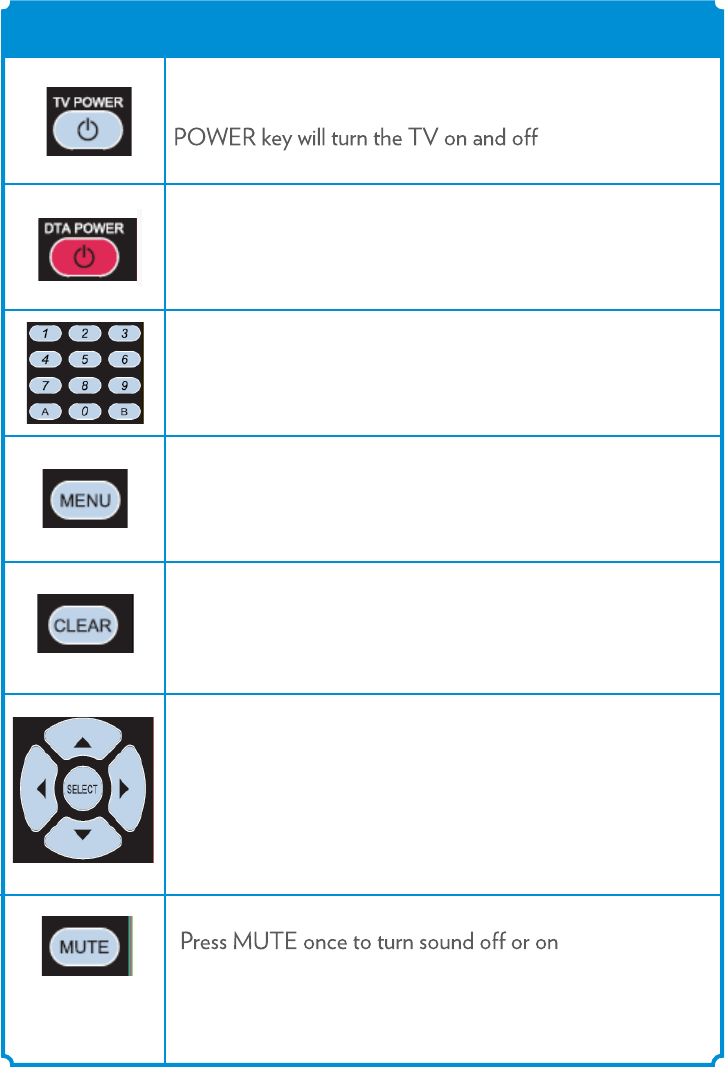
When the remote has been programmed to the TV, the
Use the key pad ( ) to directly select the channels
MENU Key to display the Menu screen.
Use CLEAR to clear the last digit you had entered.
FUNCTIONKEY
Remote Operation Guide
0-9
POWER key to turn the DTA on and o.
Nagivation Keys to move the cursor UP, DOWN, LEFT,
RIGHT.
SELECT Key to select the item the cursor is pointed to.
26
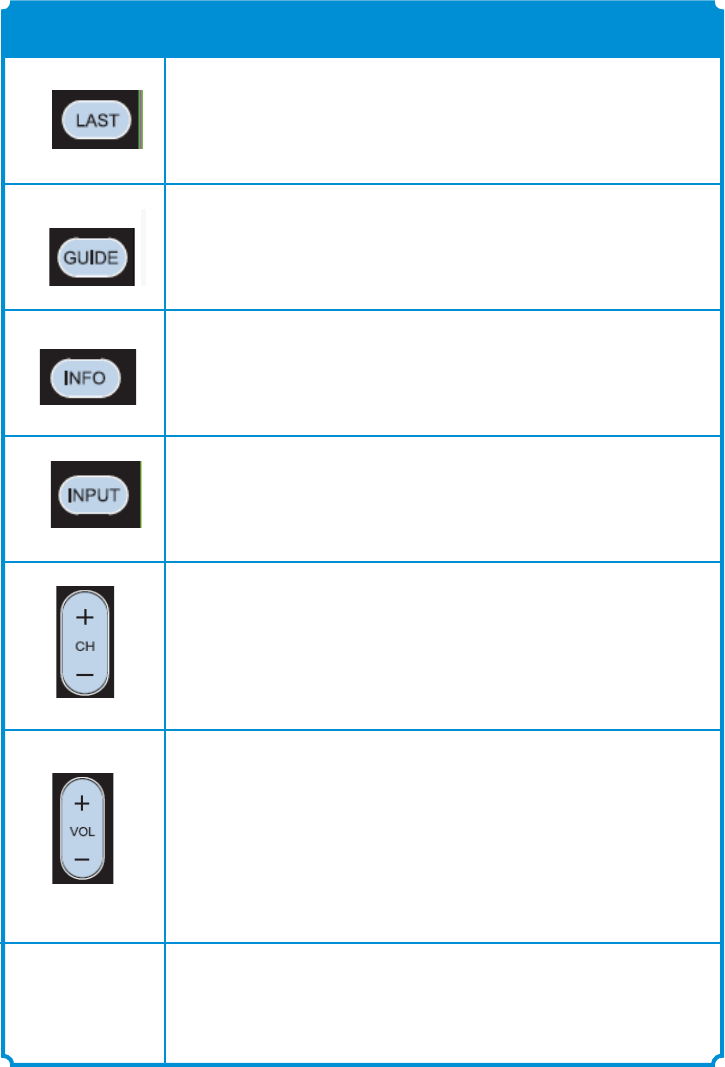
Use INPUT button to switch between TV input signal.
Use LAST to recall the last channel
Use CH+ (or CH-) to select the next higher ( or lower )
channel
Use VOL+ ( or VOL- ) to raise (or lower) the volume
FUNCTIONKEY
GUIDE key to display the Electronic Program Guide.
INFO Key to display information relating to current
contents.

27
RF Remote Pairing Process
When there is more than one Technicolor remote working
in a near distance, interference may occur.
In order to overcome such interference, the remote has
to be paired with the DTA.
You can follow the following steps to pair with the DTA.
1. Turn on your DTA.
2. Turn on your TV using the buttons on the TV or the TV remote.
3. Make sure there is no other Technicolor remote present.
4. Press and hold both DTA POWER and SELECT buttons together
until your TV screen display a 3 digit validation code.
Release both buttons.
5. Enter the 3 digits validation code as shown on the TV sceen.
6. When remote is successfully paired with the DTA,
the red light will blink twice.
RED Light will
Blink Twice
28
Troubleshooting Guide
If the remote control does not work:
ēƎ $!'Ǝ0$0Ǝ0$!Ǝ00!.%!/Ǝ/0%((Ǝ$2!Ǝ$.#!Ǝ* Ǝ.!Ǝ%*/!.0! Ǝ+..!0(5č
ēƎ '!Ǝ/1.!Ǝ5+1.Ǝ.!)+0!Ǝ*ƎĚ/!!ěƎ0$!Ǝ".+*0Ǝ+"Ǝ0$!Ǝč
If there is no picture on the TV and the light on the DTA is blinking:
ēƎ $!'Ǝ5+1.Ǝ+4%(Ǝ(!/Ǝ* Ǝ)'!Ǝ/1.!Ǝ0$0Ǝ0$!5Ǝ.!Ǝ00$! Ǝ
+..!0(5č
ēƎ *,(1#Ǝ0$!ƎĎƎ,(1#Ǝ%0Ǝ'Ǝ%*ĎƎ0$!*Ǝ3%0ƎüƎ)%*10!/Ǝ"+.Ǝ%0Ǝ0+Ǝ.!/!0čƎ
If there is no picture on the TV and the light on the DTA is solid (not
blinking):
ēƎ $!'ƎƎ0$0Ǝ0$!ƎƎ%/Ǝ01*! Ǝ0+Ǝ0$!Ǝ,.+,!.Ǝ$**!(ƎĴ$Ƌ÷Ƌ+.Ƌ$Ƌøĵč
ēƎ "Ǝ5+1Ǝ.!Ǝ(/+Ǝ+**!0! Ǝ0+ƎƎĎƎ0.5Ǝ01.*%*#Ǝ0$!ƎƎ+ôčƎƎ
ēƎ $!'Ǝ0$0Ǝ0$!ƎƎ%/Ǝ+**!0! Ǝ %.!0(5Ǝ0+Ǝ0$!Ǝ(!Ǝ,.+2% !.Ǝ+10(!0Ǝ%*Ǝ
5+1.Ǝ3((č
ēƎ '!Ǝ/1.!Ǝ0$0Ǝ((Ǝ(!/Ǝ.!Ǝõ.)(5Ǝ+**!0! č
ēƎ $!'Ǝ0$!Ǝ%*,10Ǝ/!00%*#Ǝ+*Ǝ5+1.ƎĎƎ)'!Ǝ/1.!Ǝ0$0Ǝ%0Ǝ%/Ǝ/!0Ǝ+*Ǝ
Ǝ+.ƎčƎ
29
Troubleshooting Guide
If the audio is in a language that you did not expect to hear:
ēƎ +1Ǝ)5Ǝ$2!Ǝ$*#! Ǝ0+Ǝ*Ǝ(0!.*0!Ǝ(*#1#!Ǝ/!00%*#ƎĩƎ.!//Ǝ0$!ƎĚěƎ100+*Ǝ
+*Ǝ5+1.Ǝ.!)+0!Ǝ+*0.+(Ǝ+*!Ǝ+.Ǝ03+Ǝ0%)!/č
If the remote is turning the TV o and on and changing the channels
but not changing the volume:
ēƎ +1.ƎƎ2+(1)!Ǝ)5Ǝ$2!Ǝ!!*Ǝ01.*! Ǝ((Ǝ0$!Ǝ35Ǝ +3*Ǝ+.Ǝ)10! Ǝ3%0$Ǝ0$!Ǝ+( ƎƎ
.!)+0!čƎ!"!.Ǝ0+Ǝ,#!Ǝùýč
If your DTA is not coming on:
ēƎ '!Ǝ/1.!Ǝ0$0Ǝ0$!Ǝ,+3!.Ǝ+. Ǝ%/Ǝ/!1.!(5Ǝ+**!0! Ǝ0+Ǝ0$!Ǝ'Ǝ+"Ǝ0$!Ǝč
ēƎ '!Ǝ/1.!Ǝ0$0Ǝ0$!ƎƎ,+3!.Ǝ+. Ǝ%/Ǝ,(1##! Ǝ%*0+ƎƎ3+.'%*#Ǝ,+3!.Ǝ+10(!0č
If you cannot get the DTA remote programmed to your TV:
ēƎ +1Ǝ)5Ǝ*+0Ǝ!Ǝ$%00%*#Ǝ0$!ƎŧƎ!*+1#$Ǝ0%)!/čƎƎ
ēƎ !Ǝ/1.!Ǝ0+Ǝ,1/$Ǝ0$!ƎĚ/!0ěƎ100+*Ǝ3%0$%*ƎüƎ/!+* /Ǝ+*!Ǝ5+1.ƎƎ01.*/Ǝ+ôčƎ
ēƎ +1Ǝ)5Ǝ!Ǝ$%00%*#Ǝ0$!ƎŧƎ+*!Ǝ0$!ƎƎ$/Ǝ(.! 5Ǝ01.*! Ǝ+ôčƎ0.0Ǝ+2!.Ǝ* Ǝ,.!//Ǝ
0$!Ǝ100+*Ǝ/(+3(5čƎ
ēƎ .5Ǝ0$!Ǝ(0!.*0!Ǝ,.+#.))%*#Ǝ)!0$+ Ǝ+*Ǝ,#!ƎøĀč
VCR is not recording the right channel:
ēƎ $!ƎƎ3%((Ǝ+*(5Ǝ.!+. Ǝ0$!Ǝ$**!(Ǝ0$0Ǝ0$!ƎƎ%/Ǝ01*! Ǝ0+čƎ!0Ǝ5+1.ƎƎ* Ǝ
Ǝ0+Ǝ0$!Ǝ,.+,!.Ǝ$**!(ƎĴ$Ƌ÷Ƌ+.Ƌ$ƋøĵĎƎ0$!*Ǝ1/!Ǝ0$!ƎƎ.!)+0!Ǝ0+Ǝ01*!Ǝ0$!Ǝ
Ǝ0+Ǝ0$!Ǝ$**!(Ǝ0+Ǝ!Ǝ.!+. ! čƎ

30
DTA Operation Guide
(Two remotes)
If you were unable to program your remote, you will need to use two
remotes to operate your TV:
the DTA remote and the one that came with your TV.
Setting the remote volume
øčƎ /!Ǝ0$!Ǝ.!)+0!Ǝ+*0.+(Ǝ0$0Ǝ)!Ǝ3%0$Ǝ5+1.ƎƎ
0+Ǝ &1/0Ǝ0$!Ǝ2+(1)!Ǝ0+ƎƎ+)"+.0(!Ǝ(!2!(čƎ$%/Ǝ
/$+1( Ǝ!Ǝ0$!Ǝ(/0Ǝ0%)!Ǝ5+1ĝ((Ǝ1/!Ǝ0$%/Ǝ.!)+0!Ǝ"+.Ǝ
2+(1)!Ǝ+*0.+(čƎ
ùčƎ +%*#Ǝ"+.3. Ǝ1/!Ǝ+*(5Ǝ5+1.ƎƎ.!)+0!Ǝ0+Ǝ
&1/0Ǝ2+(1)!Ǝ1,Ǝ+.Ǝ +3*čƎ
Caution:
Don’t use your TV remote to change channels.
Your TV must always be set to the proper
channel (Ch 3 or Ch 4) or you will
see a snowy or blank screen.
31
Using two remotes
Use the remote that came
with your TV to turn
Use your DTA remote
to change channels
and adjust volume.

xxxxxxxxx
T
his equipment has been tested and found to comply with the limits for a Class B digital device, pursuant to part 15 of the FCC
ru
les. These limits are designed to provide reasonable protection against harmful interference in a residential installation. This
e
quipment generates, uses and can radiate radio frequency energy and, if not installed and used in accordance with the
in
structions, may cause harmful interference to radio communications. However, there is no guarantee that interference will not
o
ccur in a particular installation. If this equipment does cause harmful interference to radio or television reception, which can be
d
etermined by turning the equipment off and on, the user is encouraged to try to correct the interference by one or more of the
fo
llowing measures:
-R
eorient or relocate the receiving antenna.
-I
ncrease the separation between the equipment and receiver.
-C
onnect the equipment into an outlet on a circuit different from that to which the receiver is connected.
-C
onsult the dealer or an experienced radio/TV technician for help.
Y
ou are cautioned that changes or modifications not expressly approved by the party responsible for compliance could void your
a
uthority to operate the equipment.
T
his device complies with Part 15 of the FCC Rules. Operation is subject to the following two conditions:
(1
) this device may not cause harmful interference and
(2
) this device must accept any interference received, including interference that may cause undesired operation