Philips Electronics M118 LCD Color Monitor User Manual
Philips Electronics Industries (Taiwan) Ltd LCD Color Monitor
User Manual
Product Information
Product Features • Technical Specifications • Resolution & Preset Modes •
Philips Pixel Defect Policy • Automatic Power Saving • Physical Specification •
Pin Assignment • Product Views • Physical Function
Product Features
170B4MG
z17-inch color LCD monitor with excellent display performance
zDual input - accepts DVI-D digital and VGA analog inputs
zEmbedded AC power supply
zFront firing speakers with 2x2W RMS stereo sound output
zAdvanced AUTO adjustment optimizes picture quality
zRotation for both portrait and landscape display
zLiner height adjustment for best viewing position
zAdjustable tilt and swivel function
zOptional self-powered USB hub
RETURN TO TOP OF THE PAGE
Technical Specifications*
LCD PANEL
• Type TFT LCD
• Screen size 17" / 43.2cm diagonal
• Pixel Pitch 0.264 x 0.264mm
• LCD Panel type 1280 x 1024 pixels
R.G.B. vertical stripe
Anti-glare polarizer, hard coated
• Effective viewing area 337.9 x 270.3 mm
• Display Colors 16M colors
SCANNING
Vertical refresh rate 56Hz-76Hz
Horizontal Frequency 30kHz-82kHz
VIDEO
• Video dot rate 135MHz
• Input impedance
- Video 75 ohm
Installstion and Operating Instructions
Exhibit 3
* These information are subject to change without notice.
RETURN TO TOP OF THE PAGE
Resolution & Preset Modes
- Sync 2.2K ohm
• Input signal levels 0.7 Vpp
• Sync input signal Separate sync
Composite sync
Sync on green
• Sync polarities Positive and negative
• Video interface Dual input: D-Sub (analog) and DVI-D (digital) are
available and user selectable
AUDIO
• Input signal level 0.7 Vpp
• Headphone out signal level 32 ohm 20+20mW
• Input signal connector 3.5mm mini jack
• Loudspeaker 4W Stereo Audio (2W/channel RMS x2, 200 Hz-12 kHz, 8
ohm, THD=10%)
MICROPHONE
• Sensitivity -55dB re 1V/ubar at 1kHz
• Output impedance 2.2K ohm max.
• Directivity -5dB at 180°
• Frequency range 300Hz-3kHz
Optical characteristics
• Contrast ratio: 400 (typ.)
• Brightness: 260 cd/m2 (typ.)
• Peak contrast angle 6 o'clock
• White Chromatcity: x: 0.283 y: 0.297 (at 9300°K)
x: 0.313 y: 0.329 (at 6500°K)
• Viewing Angle:
(C/R>5)
Upper >80° (typ.)
Lower >80° (typ.)
Left >80 ° (typ.)
Right >80 ° (typ.)
• Response time <25ms (typ.)
• Maximum 1280 x 1024 at 75Hz
• Recommended 1280 x 1024 at 60Hz

RETURN TO TOP OF THE PAGE
Automatic Power Saving
If you have VESA's DPMS compliance display card or software installed in your PC, the
monitor can automatically reduce its power consumption when not in use. And if an input from
a keyboard, mouse or other input device is detected, the monitor will automatically "wake up".
The following table shows the power consumption and signaling of this automatic power saving
features:
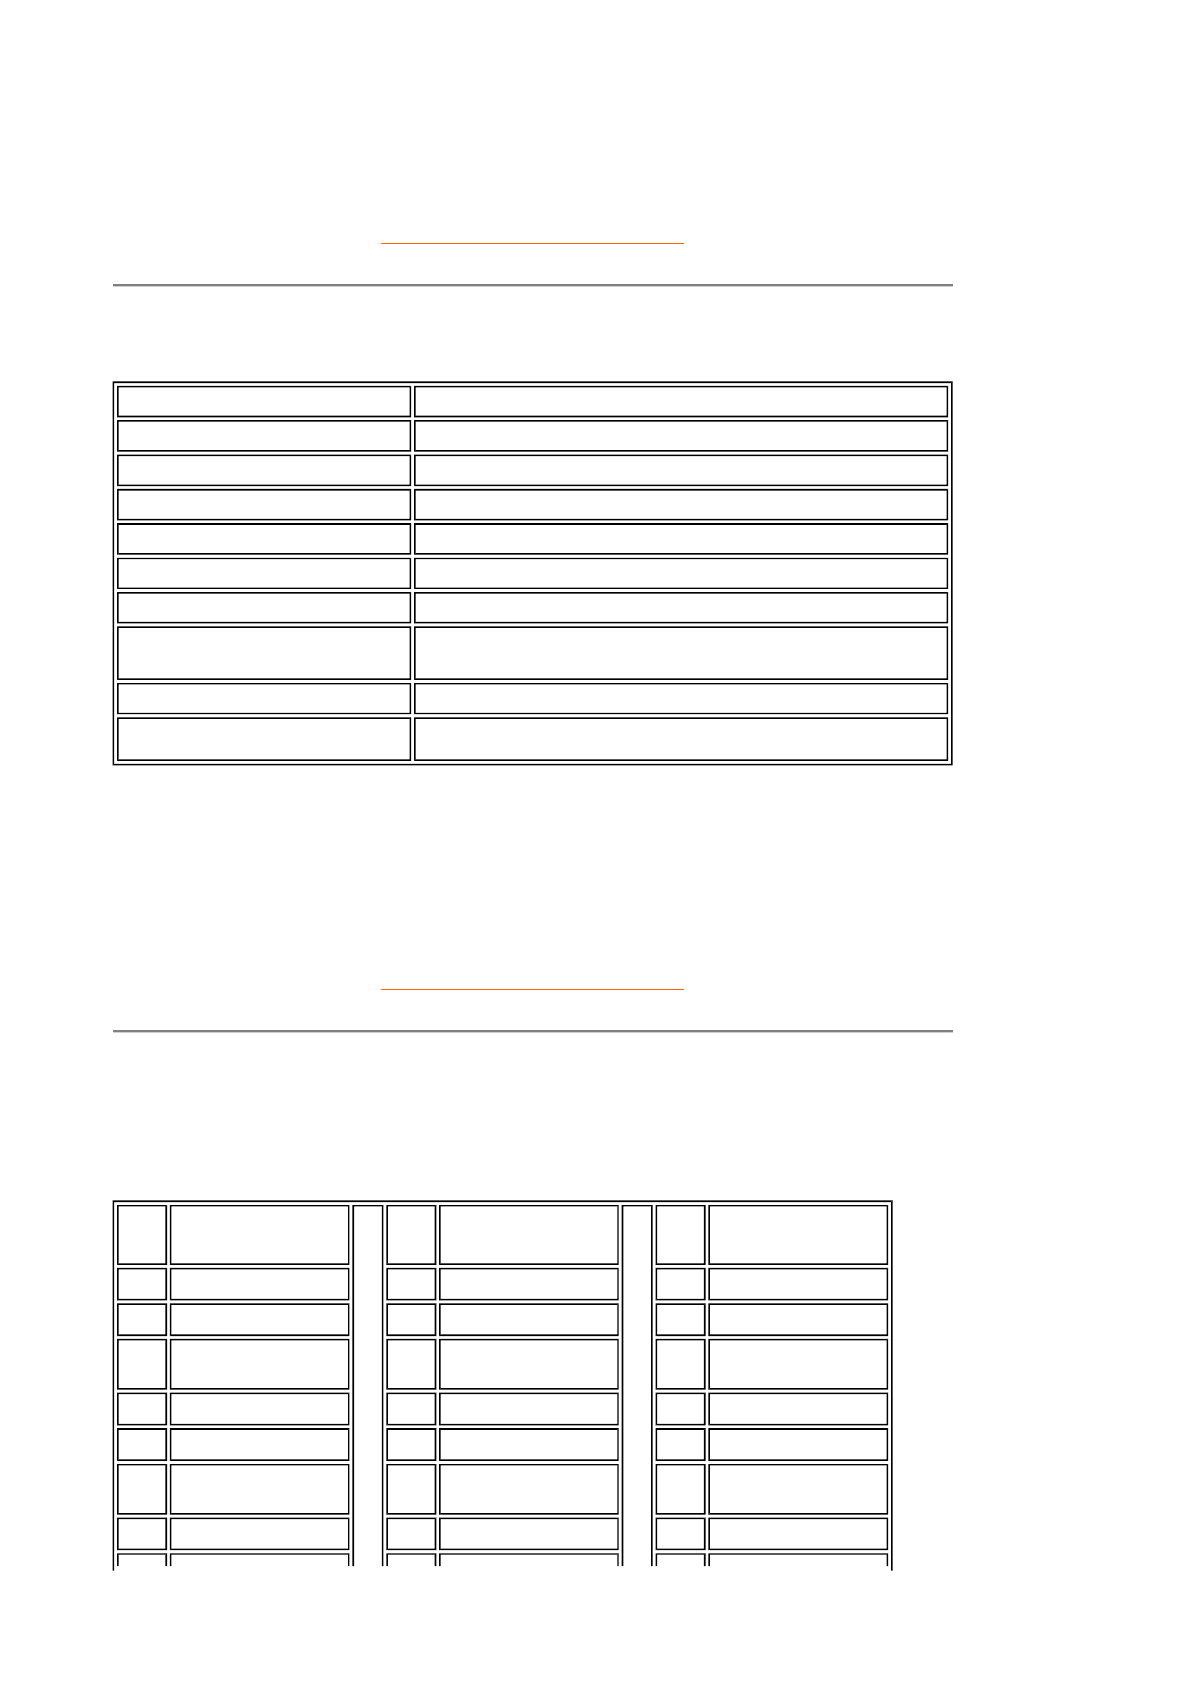
33 user definable modes
15 factory preset modes:
H. freq (kHz) Resolution V. freq (Hz)
31.5 640*350 70
31.5 720*400 70
31.5 640*480 60
35.0 640*480 67
37.5 640*480 75
35.2 800*600 56
37.9 800*600 60
46.9 800*600 75
49.7 832*624 75
48.4 1024*768 60
60.0 1024*768 75
69.0 1152*870 75
71.8 1152*900 76
63.9 1280*1024 60
80 1280*1024 75
Power Management Definition
VESA Mode Video H-sync V-sync Power
Used LED
color
ON Active Yes Yes < 40 W
(typ.) Green
OFF Blanked No No < 1 W Amber
This monitor is ENERGY STAR® compliant. As an ENERGY STAR® Partner, PHILIPS
has determined that this product meets the ENERGY STAR® guidelines for energy
RETURN TO TOP OF THE PAGE
Physical Specifications
* These information are subject to change without notice.
* Resolution 1280x1024, standard size, contrast max., brightness 50%, 9300° K, full white
pattern, without audio/USB.
RETURN TO TOP OF THE PAGE
Pin Assignment
1. The digital only connector contains 24 signal contacts organized in three rows of eight
contacts. Signal pin assignments are listed in the following table:
efficiency.
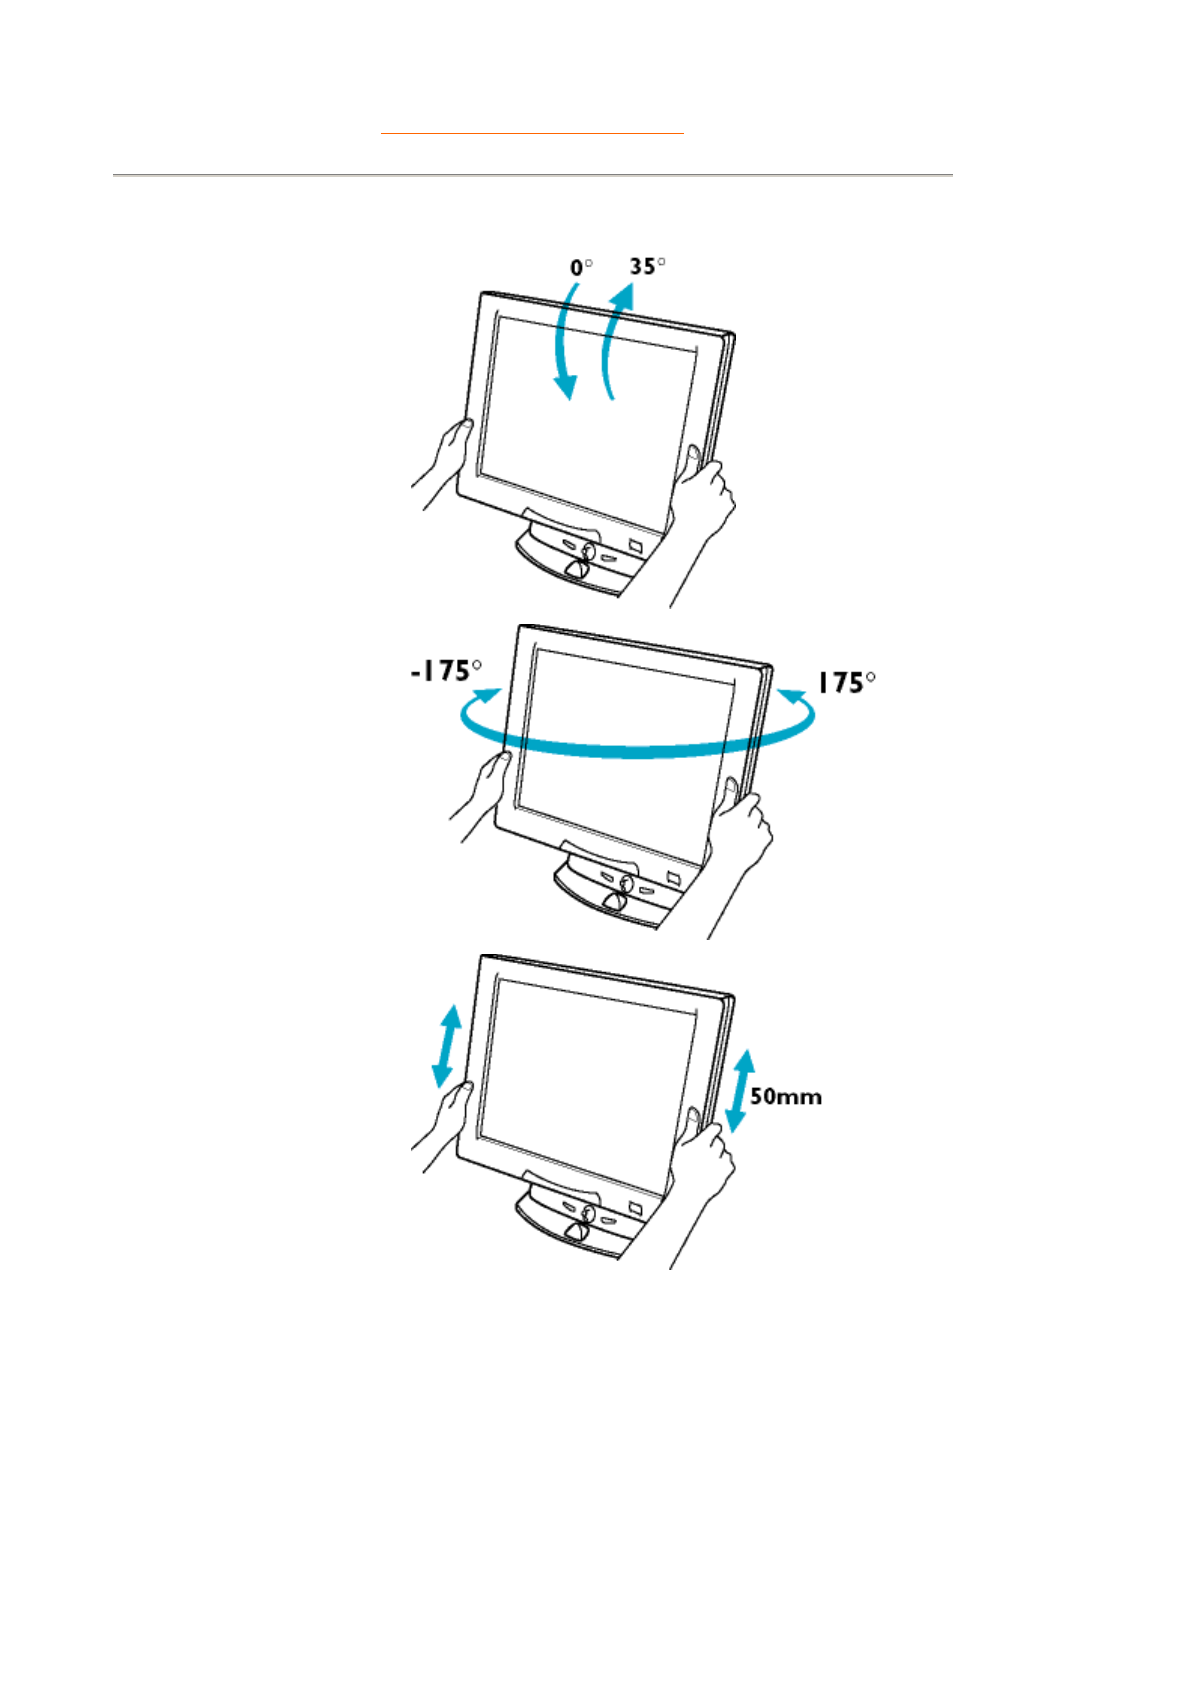
• Dimension (WxHxD) 375 x 413 x 184 mm (incl. Pedestal)
• Weight 6.3 Kg
• Tilt / Swivel 0° ~ 35° / + - 175°
• Height adjustment rang 50mm
• Portrait display 90° rotation counter clockwise
• Power supply 100 — 240 VAC, 50/60 Hz
• Power consumption 40 W* (typ.)
• Temperature 5° C to 35° C (operating)
-20° C to 60° C (storage)
• Relative humidity 20% to 80%
• System MTBF 50K hrs (including CCFL 40K hrs)
Pin
No. Signal
Assignment
Pin
No. Signal
Assignment
Pin
No. Signal
Assignment
1 T.M.D.S. Data2- 9 T.M.D.S. Data1- 17 T.M.D.S. Data0-
2 T.M.D.S. Data2+ 10 T.M.D.S. Data1+ 18 T.M.D.S. Data0+
3 T.M.D.S. Data2/4
Shield 11 T.M.D.S. Data1/3
Shield 19 T.M.D.S. Data0/5
Shield
4 No connect 12 No connect 20 No connect
5 No connect 13 No connect 21 No connect
6 DDC Clock 14 +5V Power 22 T.M.D.S. Clock
Shield
7 DDC Data 15 Ground (for +5V) 23 T.M.D.S. Clock+
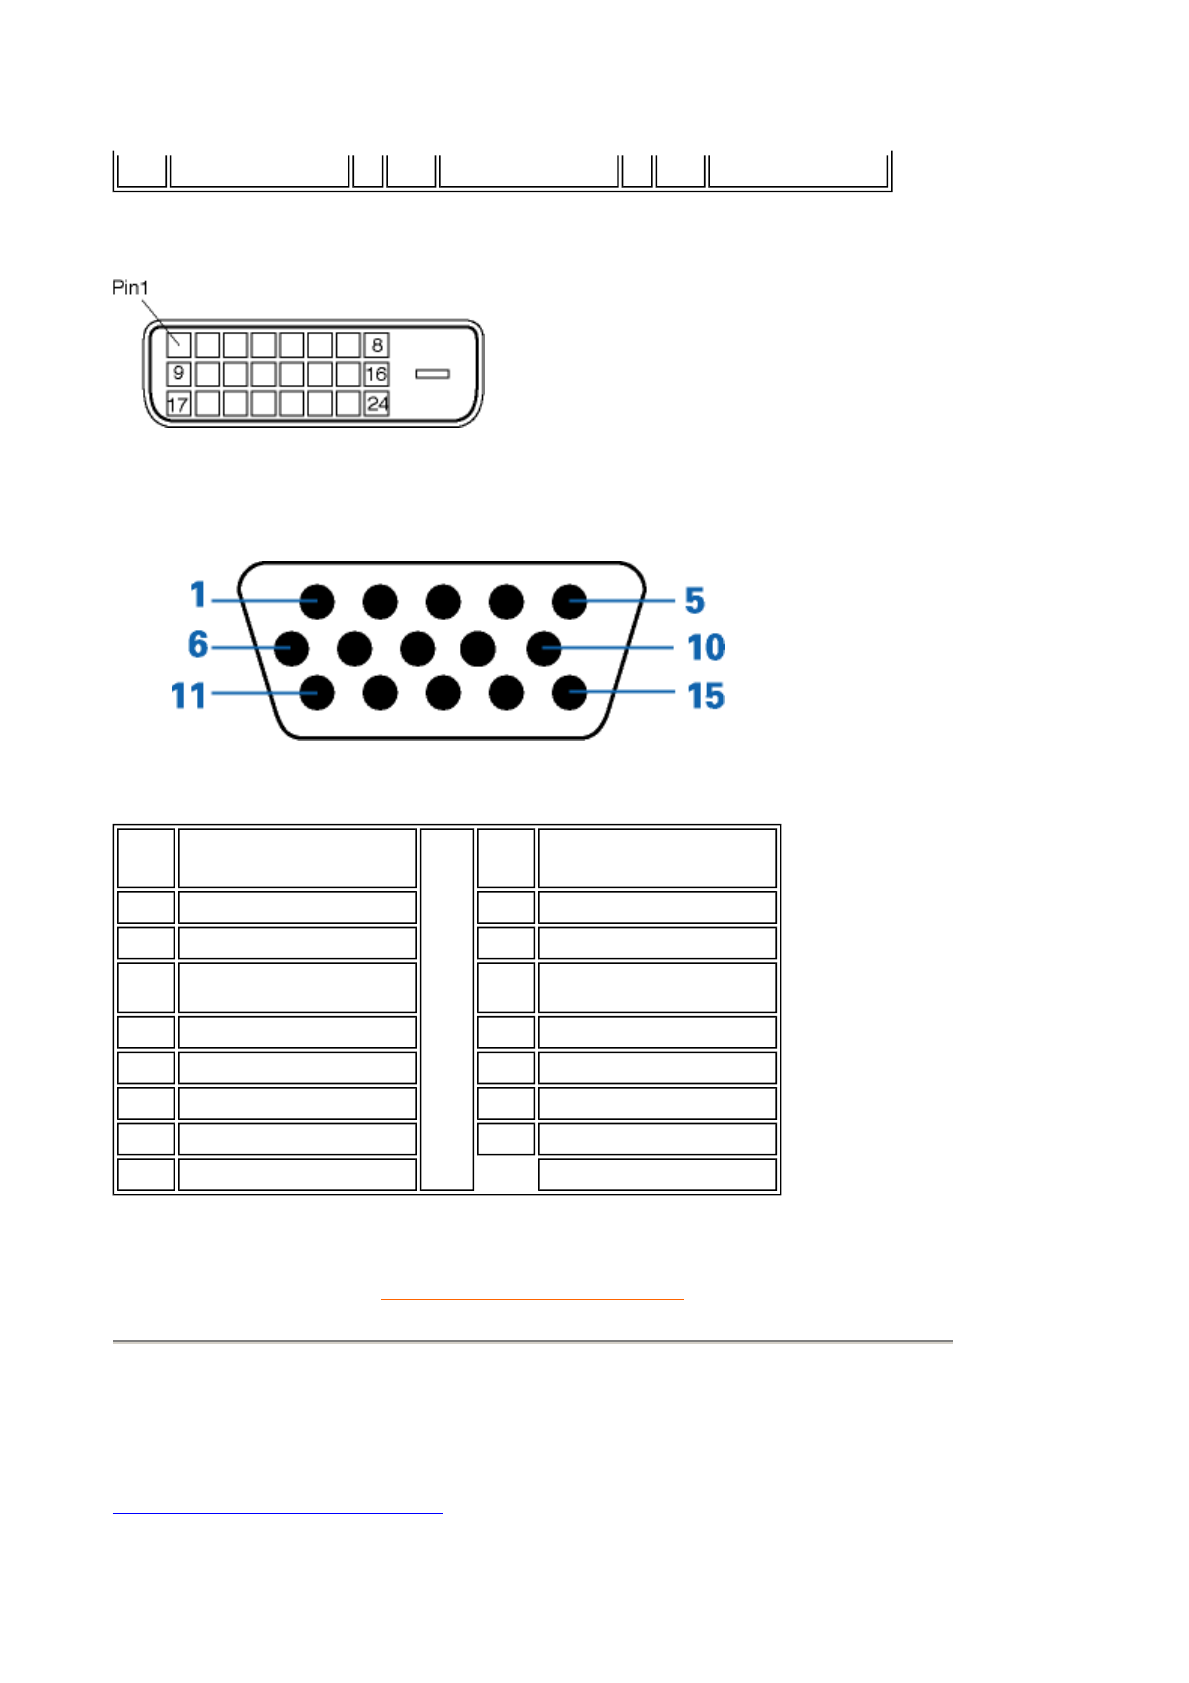
2. The 15-pin D-sub connector (male) of the signal cable:
RETURN TO TOP OF THE PAGE
Product Views
Follow the links to see various views of the monitor and its components.
Front View Product Description
8 No connect 16 Hot Plug Detect 24 T.M.D.S. Clock-
Pin
No. Assignment
Pin
No. Assignment
1 Red video input 9 +5V
2 Green video input/SOG 10 Logic ground
3 Blue video input 11 Identical output -
connected to pin 10
4 Sense (GND) 12 Serial data line (SDA)
5 Not connected 13 H. Sync / H+V
6 Red video ground 14 V. Sync (VCLK for DDC)
7 Green video ground 15 Data clock line (SCL)
8 Blue video ground
RETURN TO TOP OF THE PAGE
Physical Function
1) Tilt
2) Swivel
3) Height adjustment
4) Portrait display
Turn monitor from landscape view to portrait view
4.1) Tilt the monitor body at an angle
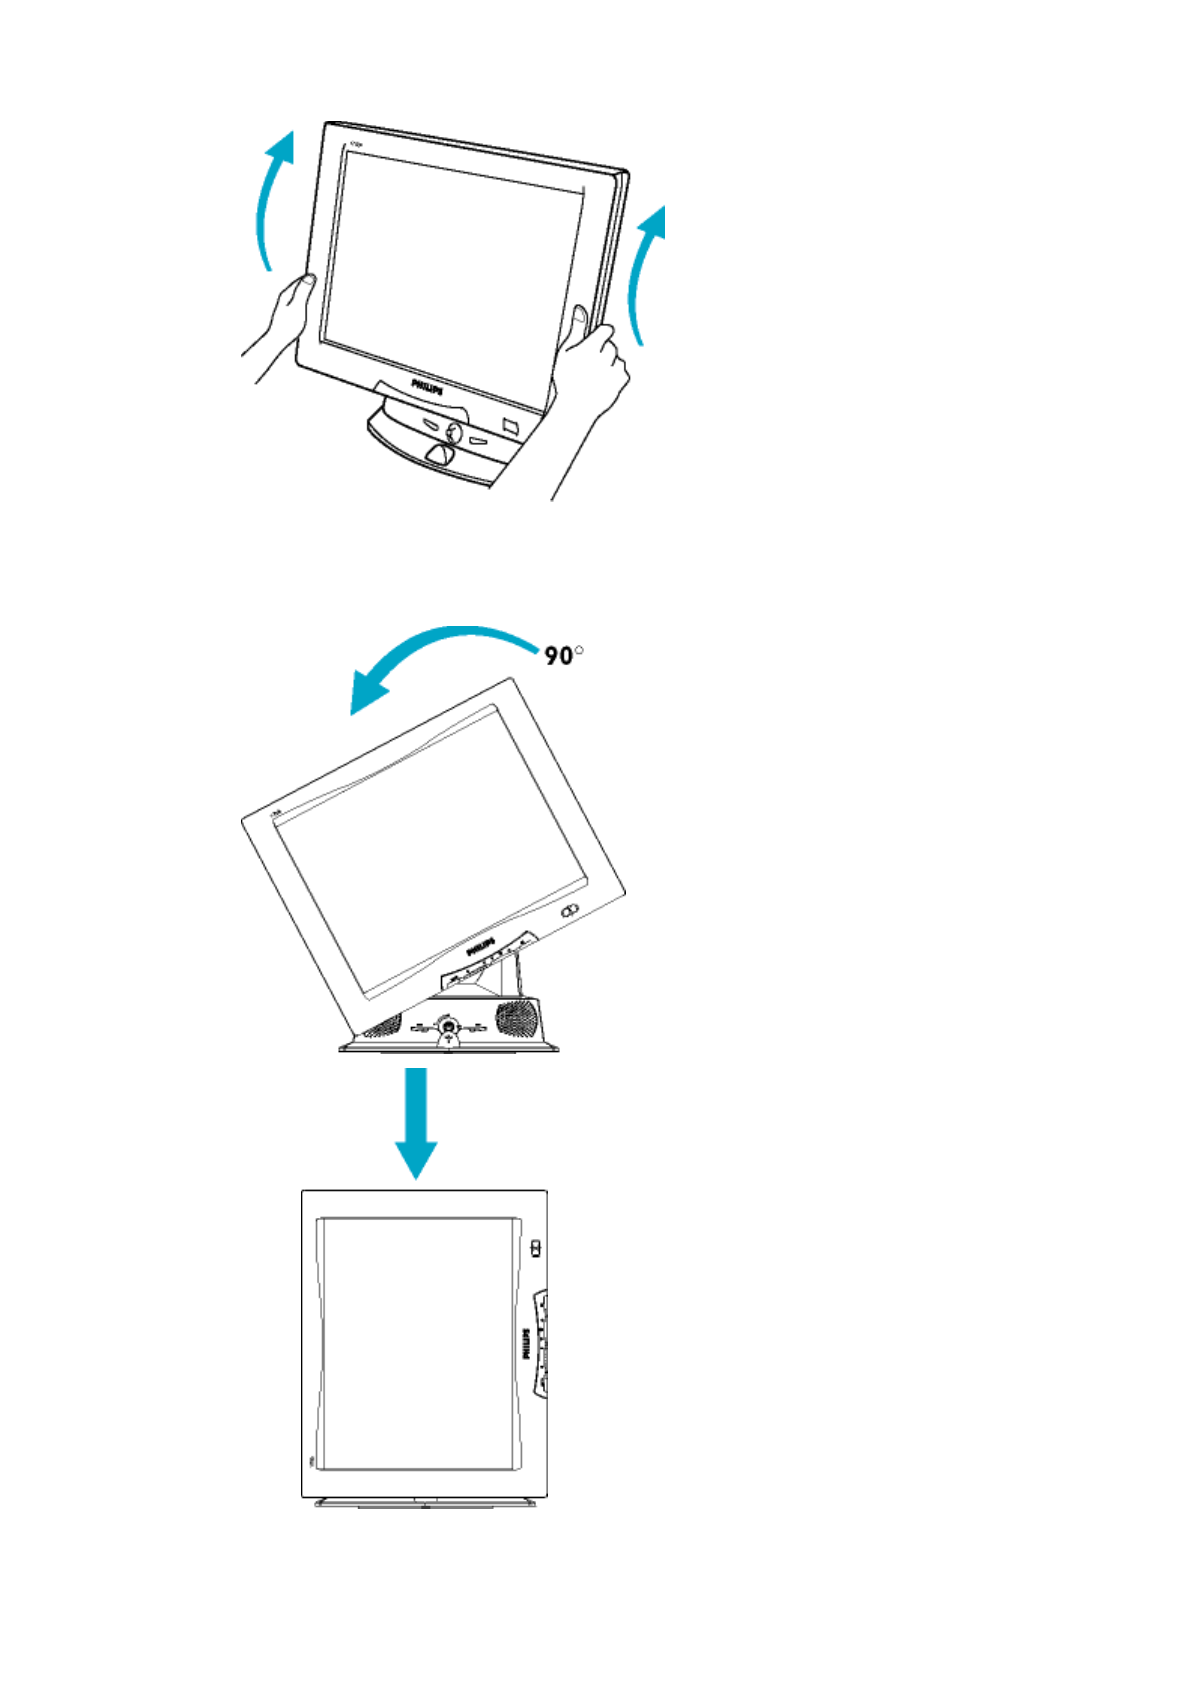
4.2) Rotate the monitor body 90 degrees counter clockwise.
Installing your LCD Monitor
Your LCD Monitor : Front View Product Description • Connecting to Your PC •
Remove and re-install the base • Getting Started • Optimizing Performance •
Accessories (optional)
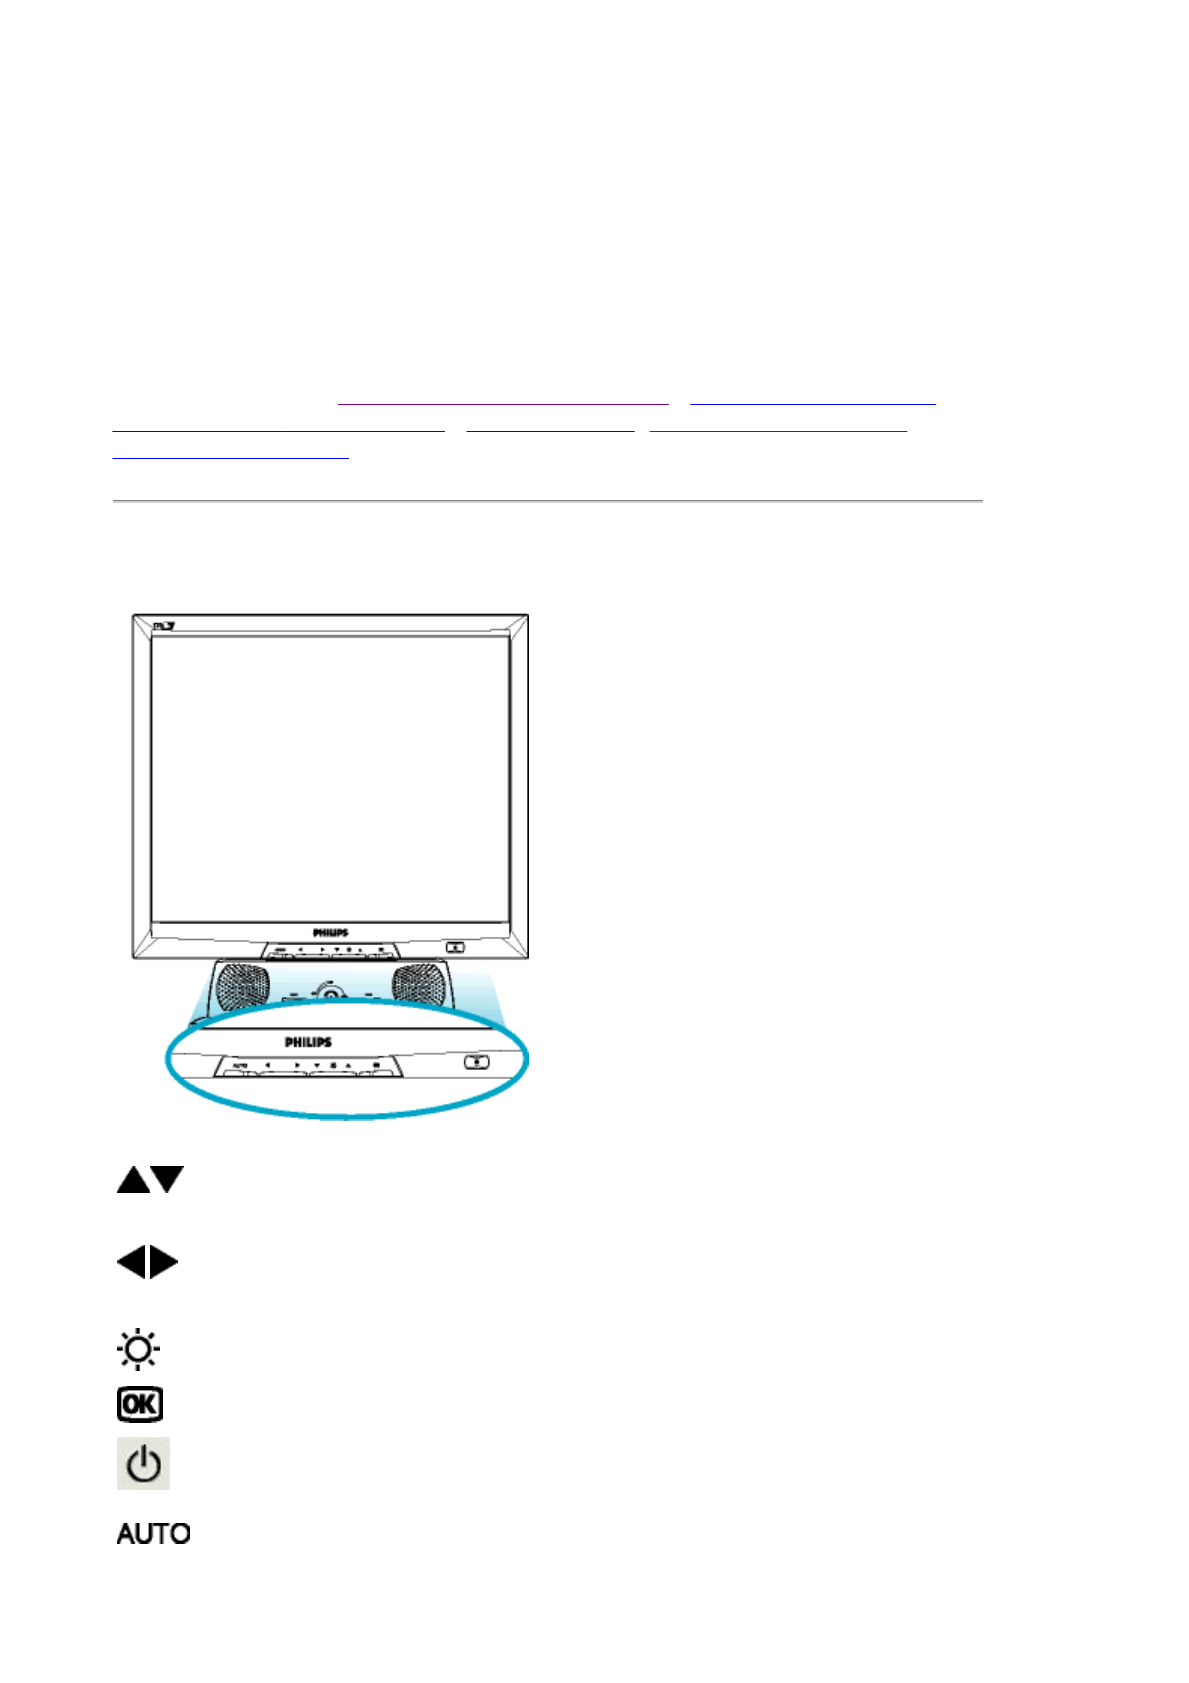
Front View Product Description
UP and DOWN buttons are used when adjusting the OSD of your
monitor
LEFT and RIGHT buttons, like the UP and DOWN buttons, are also used
in adjusting the OSD of your monitor.
Signal inputs selective hotkeys. Allows user to switch between two video
connectors (D-Sub & DVI-D)
BRIGHTNESS hotkey. When the UP and DOWN arrow buttons are
pressed, the adjustment controls for the BRIGHTNESS will show up.
OK button which when pressed will take you to the OSD controls
POWER button switches your monitor on
Automatically adjust the horizontal position, vertical position, phase and
clock setting.
RETURN TO TOP OF THE PAGE
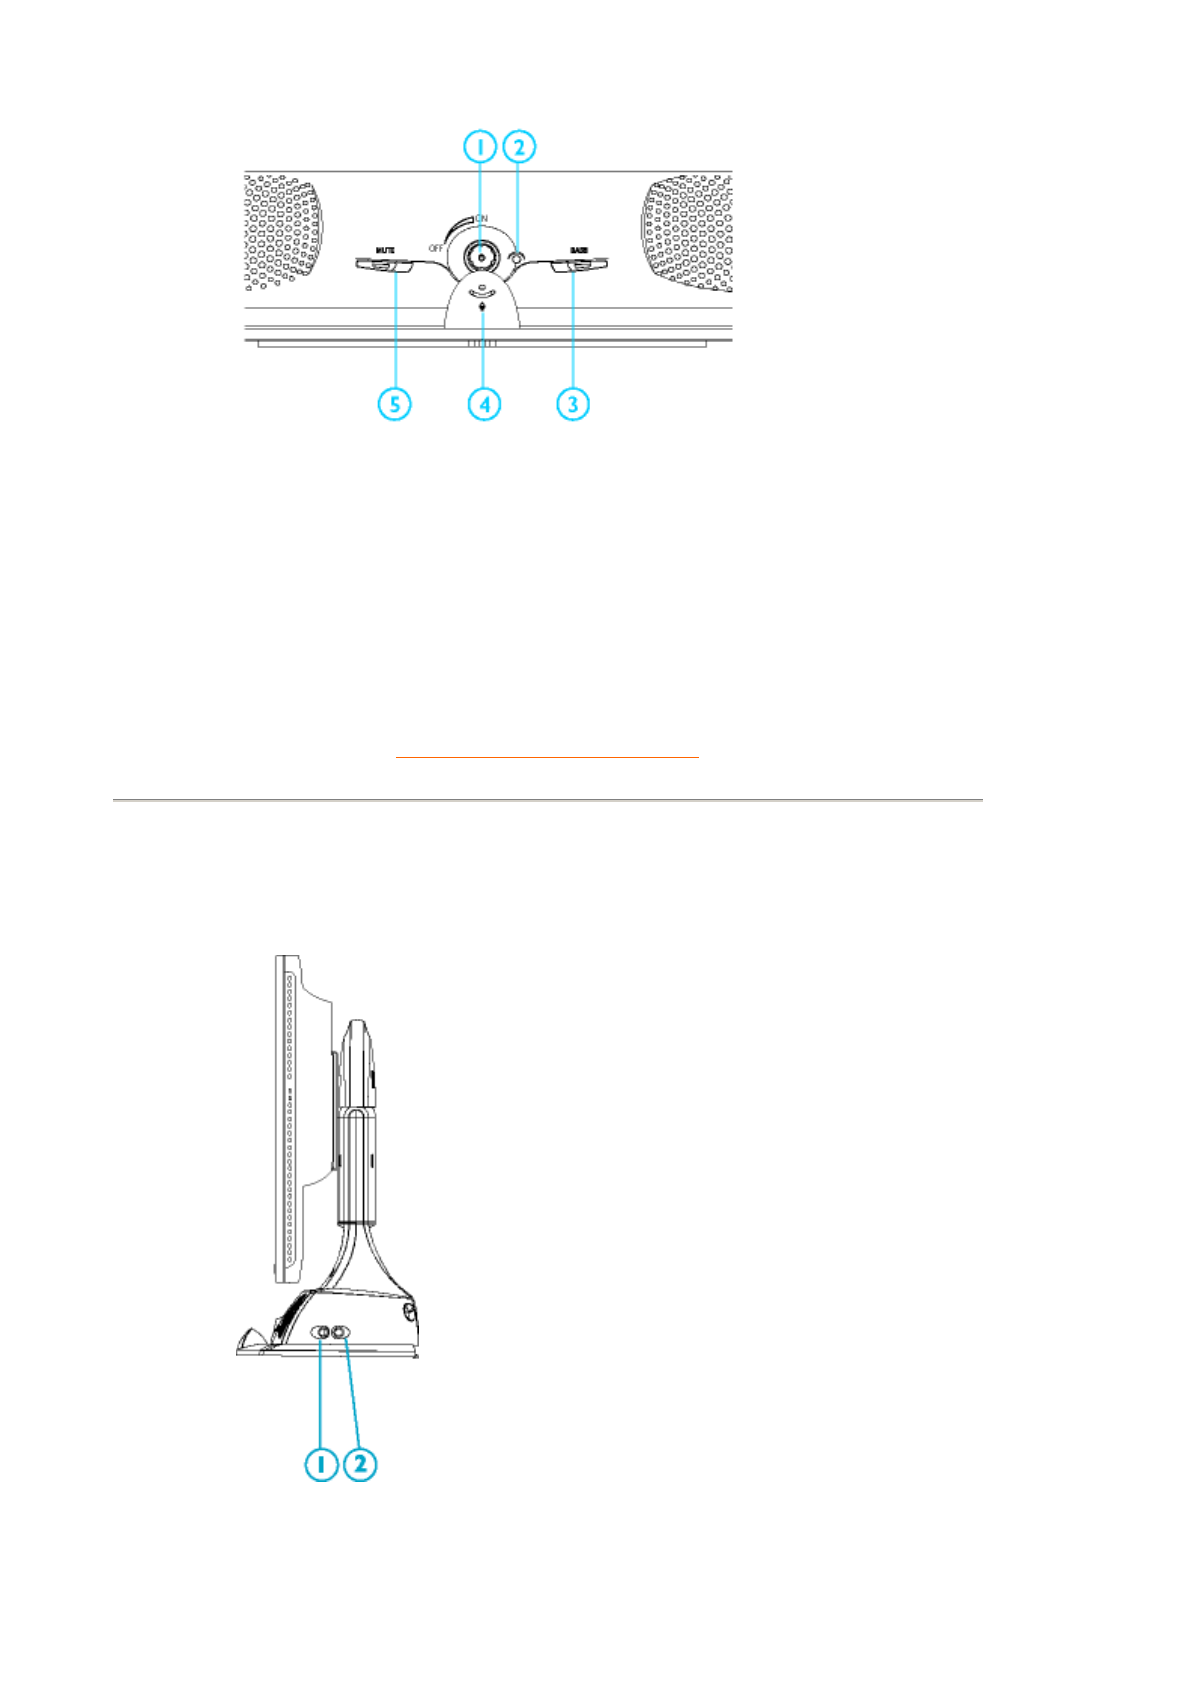
Side View
1. Audio power on/off and volulme adjustment
2. Audio power LED
3. BASS on/off
4. Built-in Mic
5. Mute on/off
1. Headphone Jack
2. Microphone Jack
RETURN TO TOP OF THE PAGE
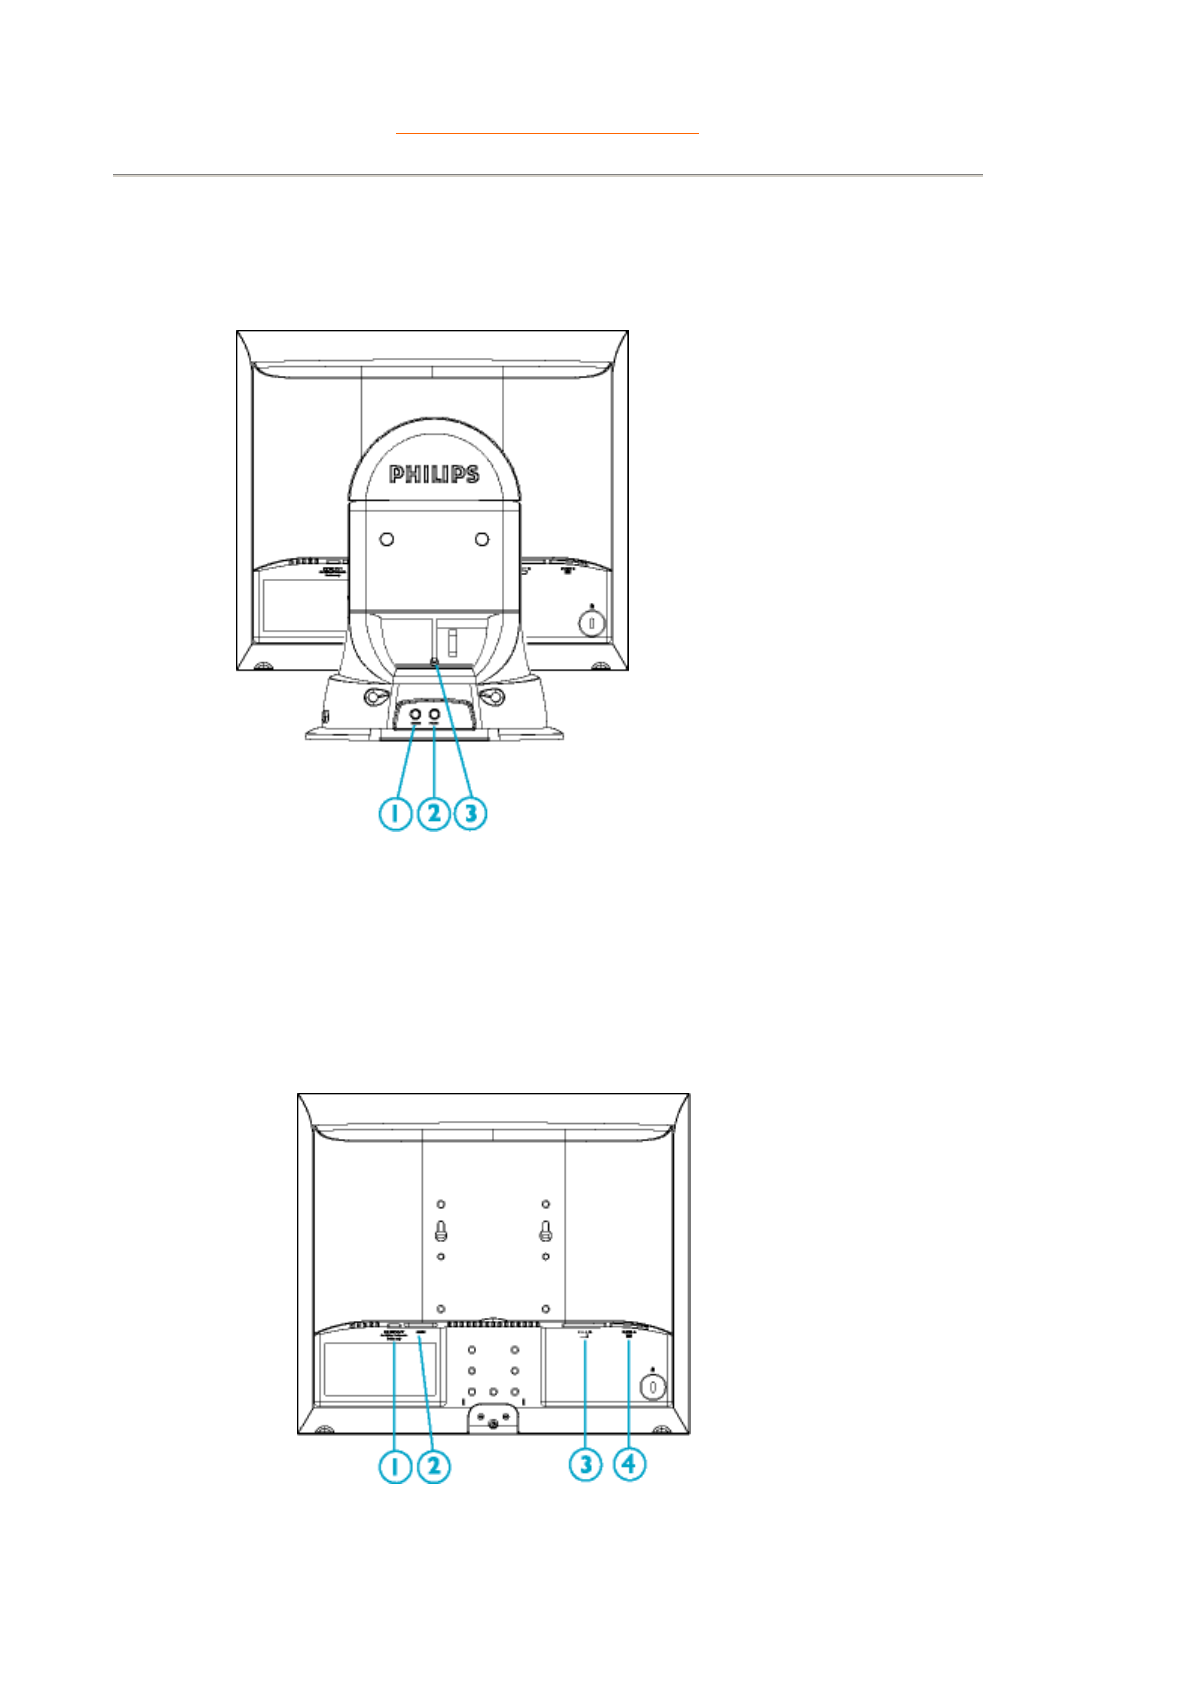
Rear View
1. Audio in
2. Mic out
3. DC 12V in
1. DC 12V out for Philips Multimedia Base only
RETURN TO TOP OF THE PAGE
Optimizing Performance
zFor best performance, ensure that your display settings are set at 1024x768@60Hz (for
14"/15") or 1280x1024, 60Hz (for 17"/18").
zYou can also install the Flat Panel Adjust (FP Adjust) program, a program for getting the
best performance out of your monitor. This included on this CD. Step-by-step instructions
are provided to guide you through the installtion process. Click on the link to know more
about this program.
More about FP_setup03.exe
RETURN TO TOP OF THE PAGE
2. AC power in
3. DVI-D Connector
4. D-SUB Connector
Note: You can check the current display settings by pressing the 'OK'
button once. Go into the Product Information. The current display mode is
shown on the item called RESOLUTION.
Connecting to Your PC
Your LCD Monitor : Front View Product Description • Accessory Pack •
Connecting to Your PC • Remove and re-install the base • Getting Started •
Optimizing Performance • Accessories (optional)
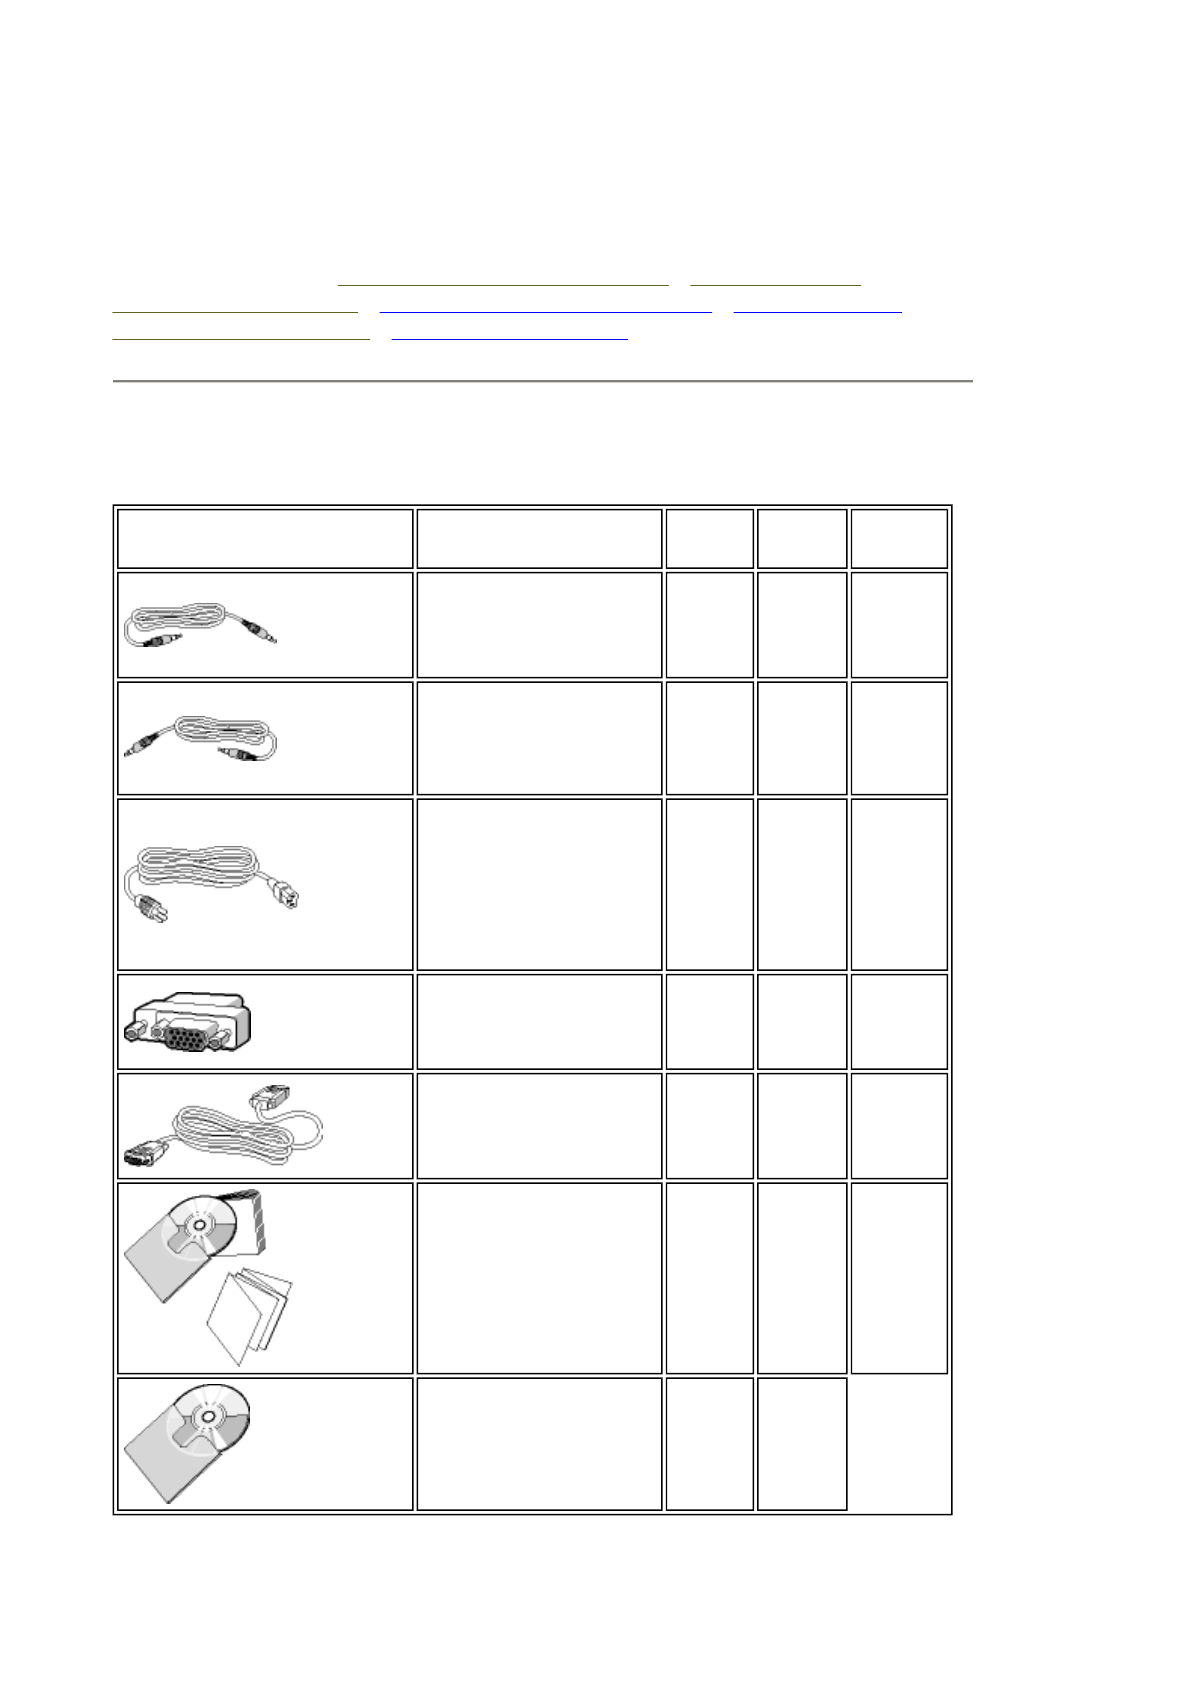
Accessory Pack
Unpack all the parts.
Item Description 170B4B 170B4M 170S4F
1) Audio in Cable (Option
only available for Audio
version)(color lime) v
2) Microphone out Cable
(Option only available for
Audio version)(color pink) v
3) Power Cord (socket
may differ for different
countries) v v v
4) Macintosh Adapter
(optional) v v v
5) VGA Signal Cable v v v
6) E-DFU package with
Quick Setup Guide, Using
Your Monitor Manual, and
CD-ROM.
v v v
7) Pivot CD-ROM v
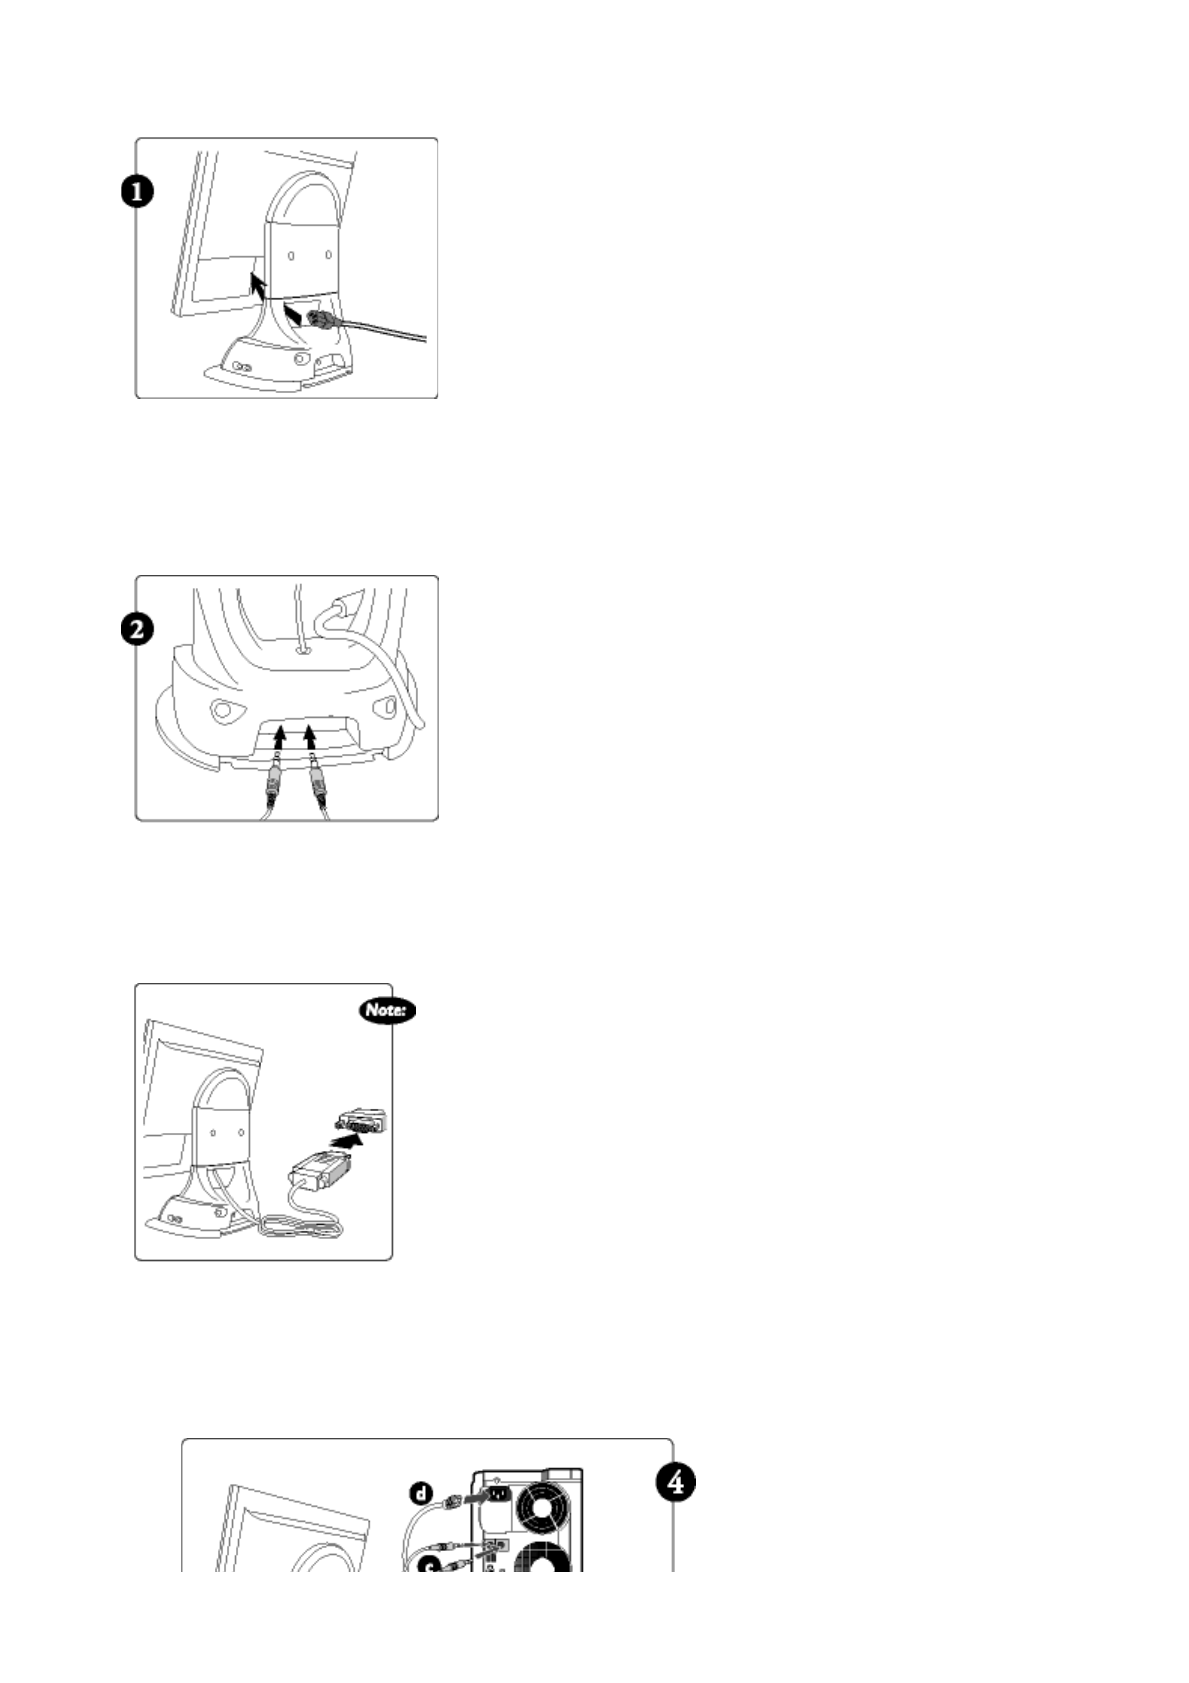
1) Thread power cable through the hole at
the bottom of the base, and plug onto
monitor firmly.
2) Connect microphone and audio cables
onto the rear side of base if any
3) Double check all cables' connection
closely. Make sure they are all connected
well.
Note: If you use an Apple Macintosh, you
need to connect the special Mac adapter to
one end of the monitor signal cable
4) Connect to PC

RETURN TO TOP OF THE PAGE
(a) Turn off your computer and unplug its power cable.
(b) Connect the monitor signal cable to the video connector on the back
of your computer.
(c) Connect the audio and microphone cables to the audio and mic
connectors on the back of your computer.
(d) Plug the power cord of your computer and your monitor into a
nearby outlet.
(e) Turn on your computer and monitor. If the monitor displays an
image, installation is complete.
Remove and Re-install the Base
Your LCD Monitor : Front View Product Description • Accessory Pack •
Connecting to Your PC • Getting Started • Optimizing Performance • Accessories
(optional)
Remove and Re-install the Base : Remove the base • Re-install the base
Condition:
zfor VESA standard mounting applications
zfor optional base replacement
Remove the Base
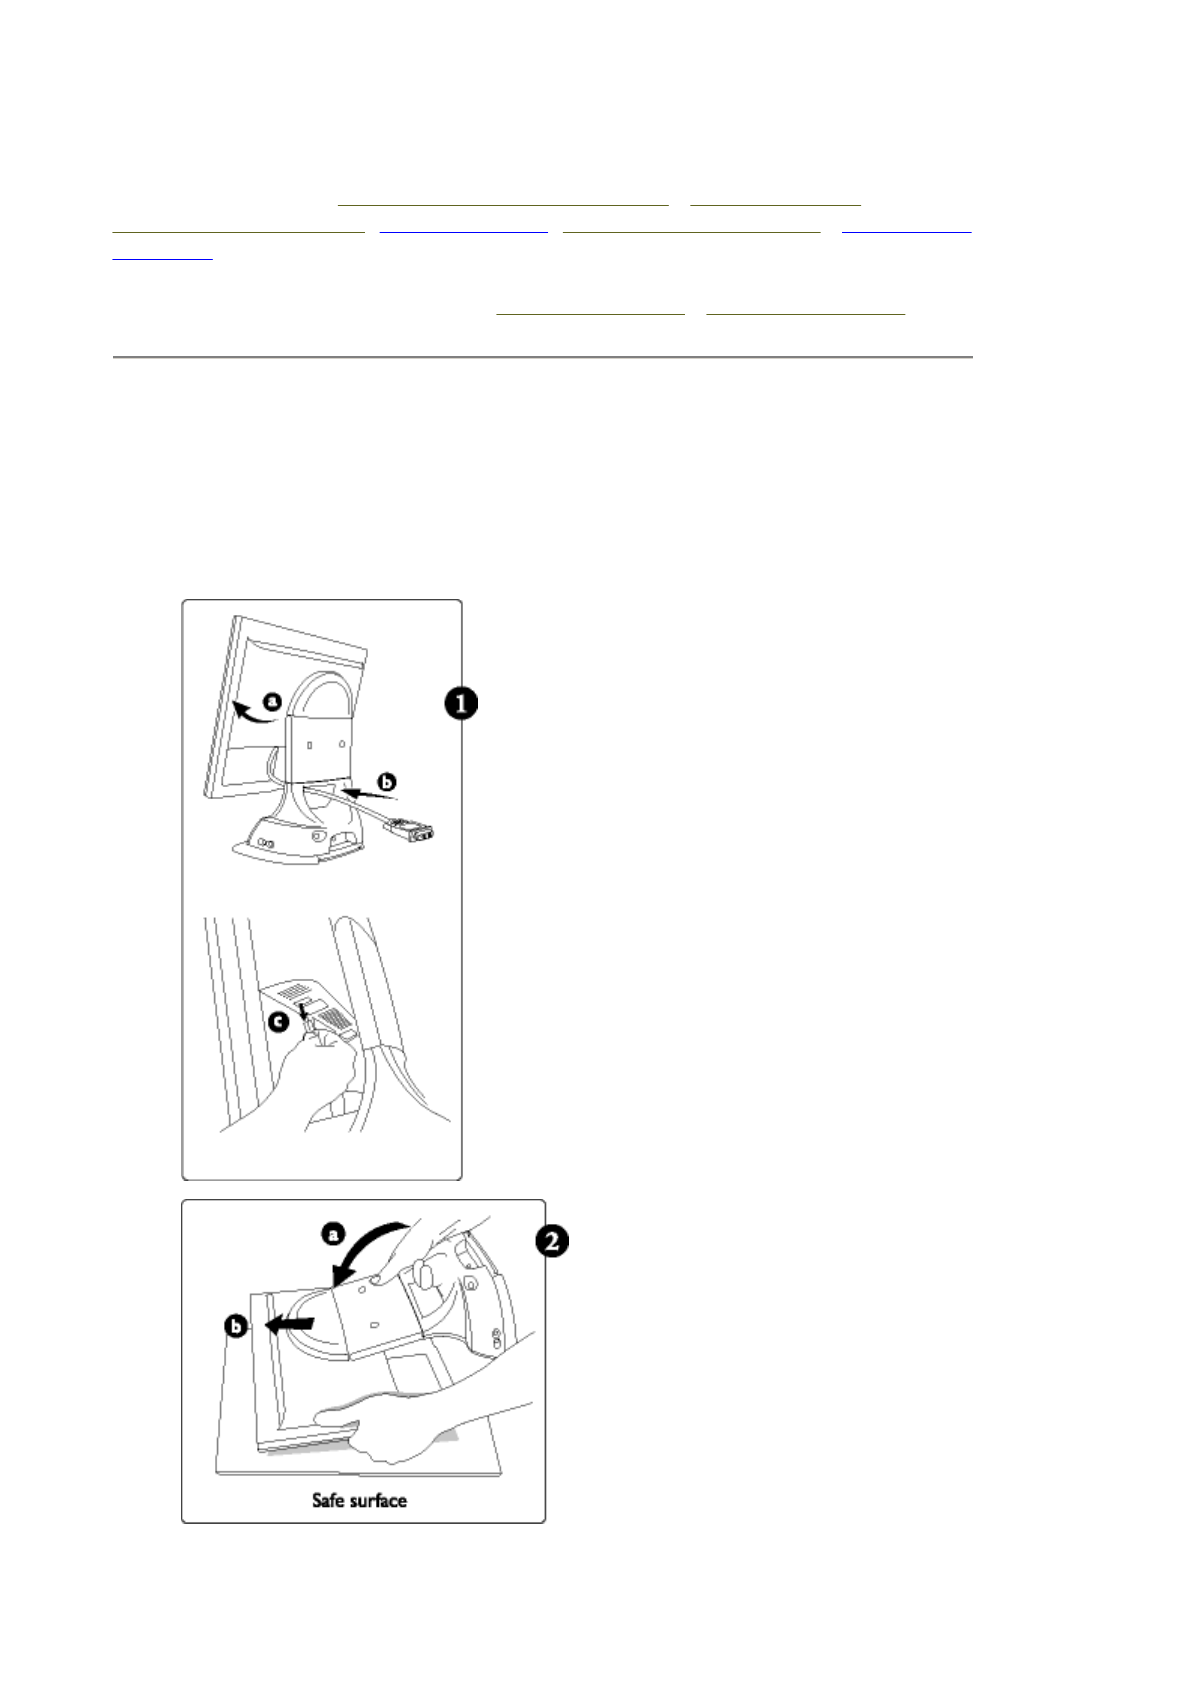
1)
(a) Tilt monitor
on certain angle.
(b) Pull cables
out of the hole at
the bottom of
base.
(c) For
Multimedia base,
disconnect the
DC flying cable
from monitor
body also.
2)
(a) Put monitor
face down on the
safe surface.
(b) Take off the
cap of base
RETURN TO TOP OF THE PAGE
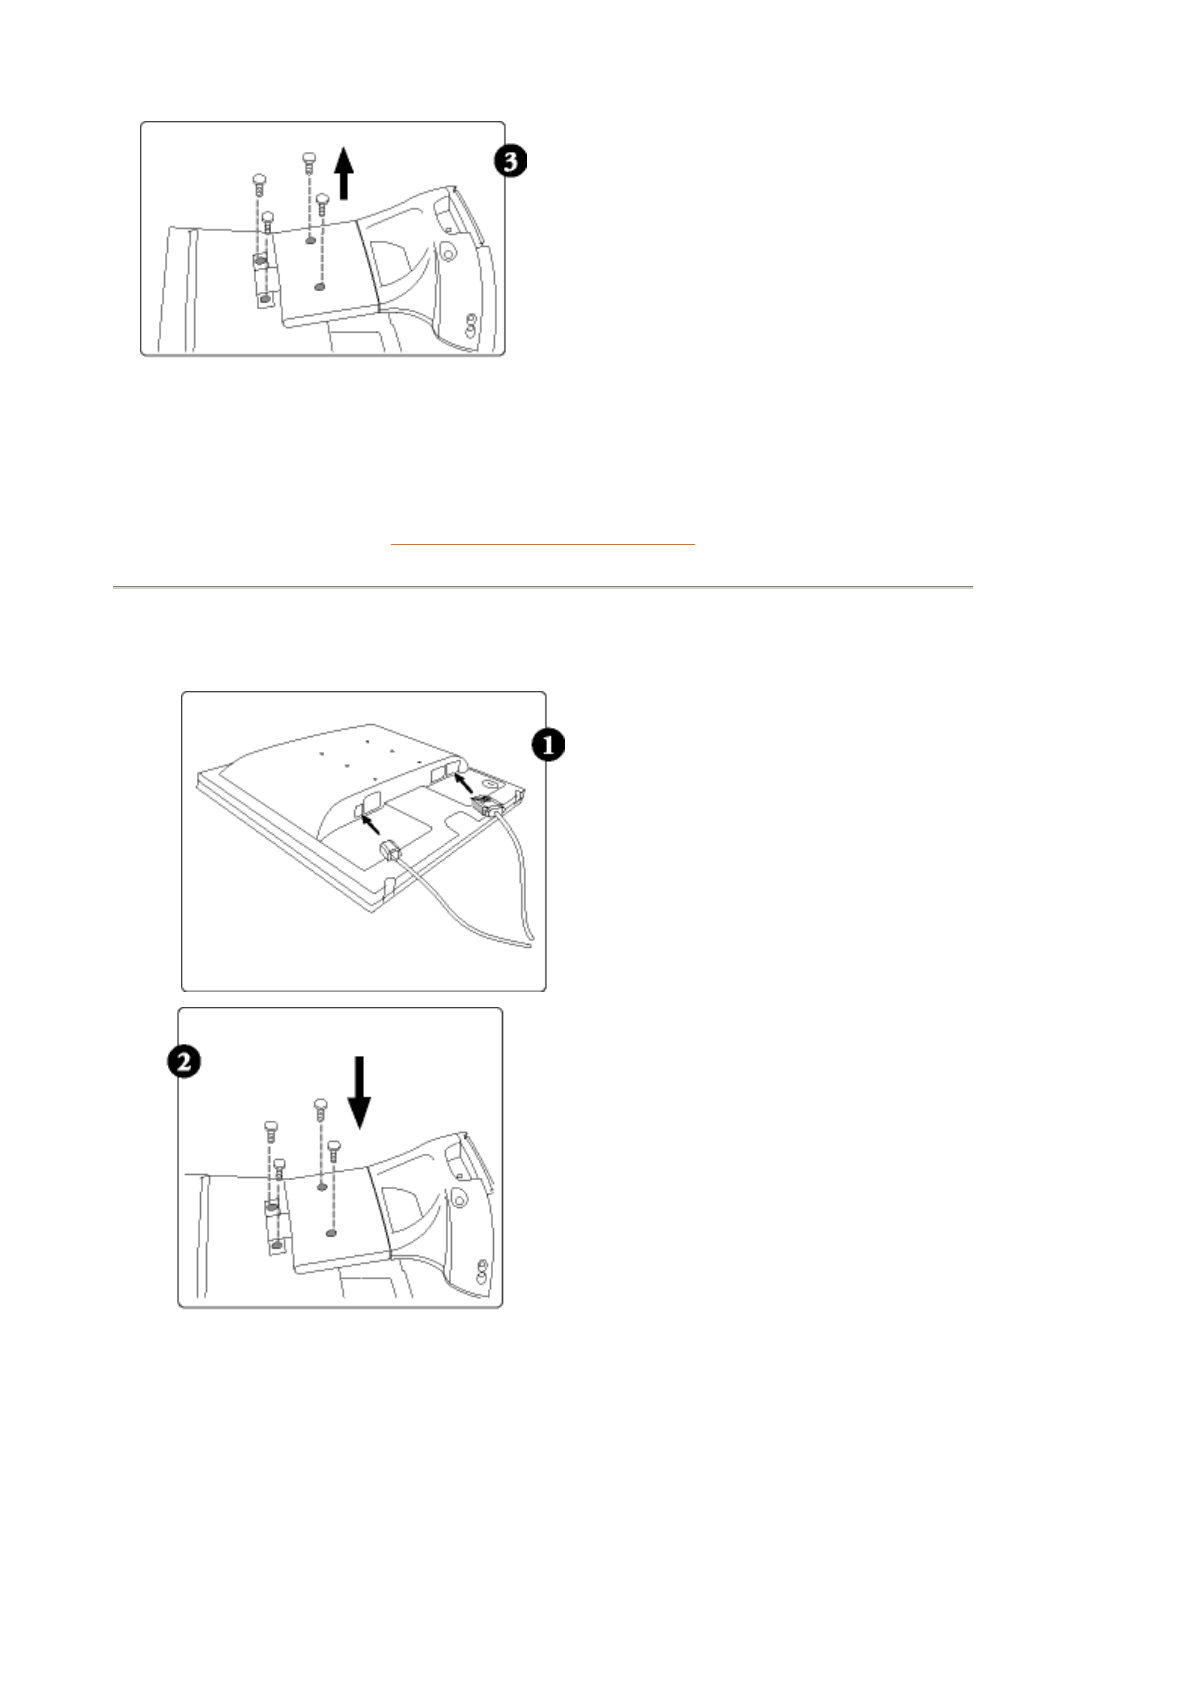
Re-install the Base
3) Unscrew the four screws
of the base
1) Put monitor face down on
the safe surface and plug in
the cables into connectors.
2) Mount the base onto the
monitor body and fix four
screws securely.
3) Lift the monitor body and
thread all cables through the
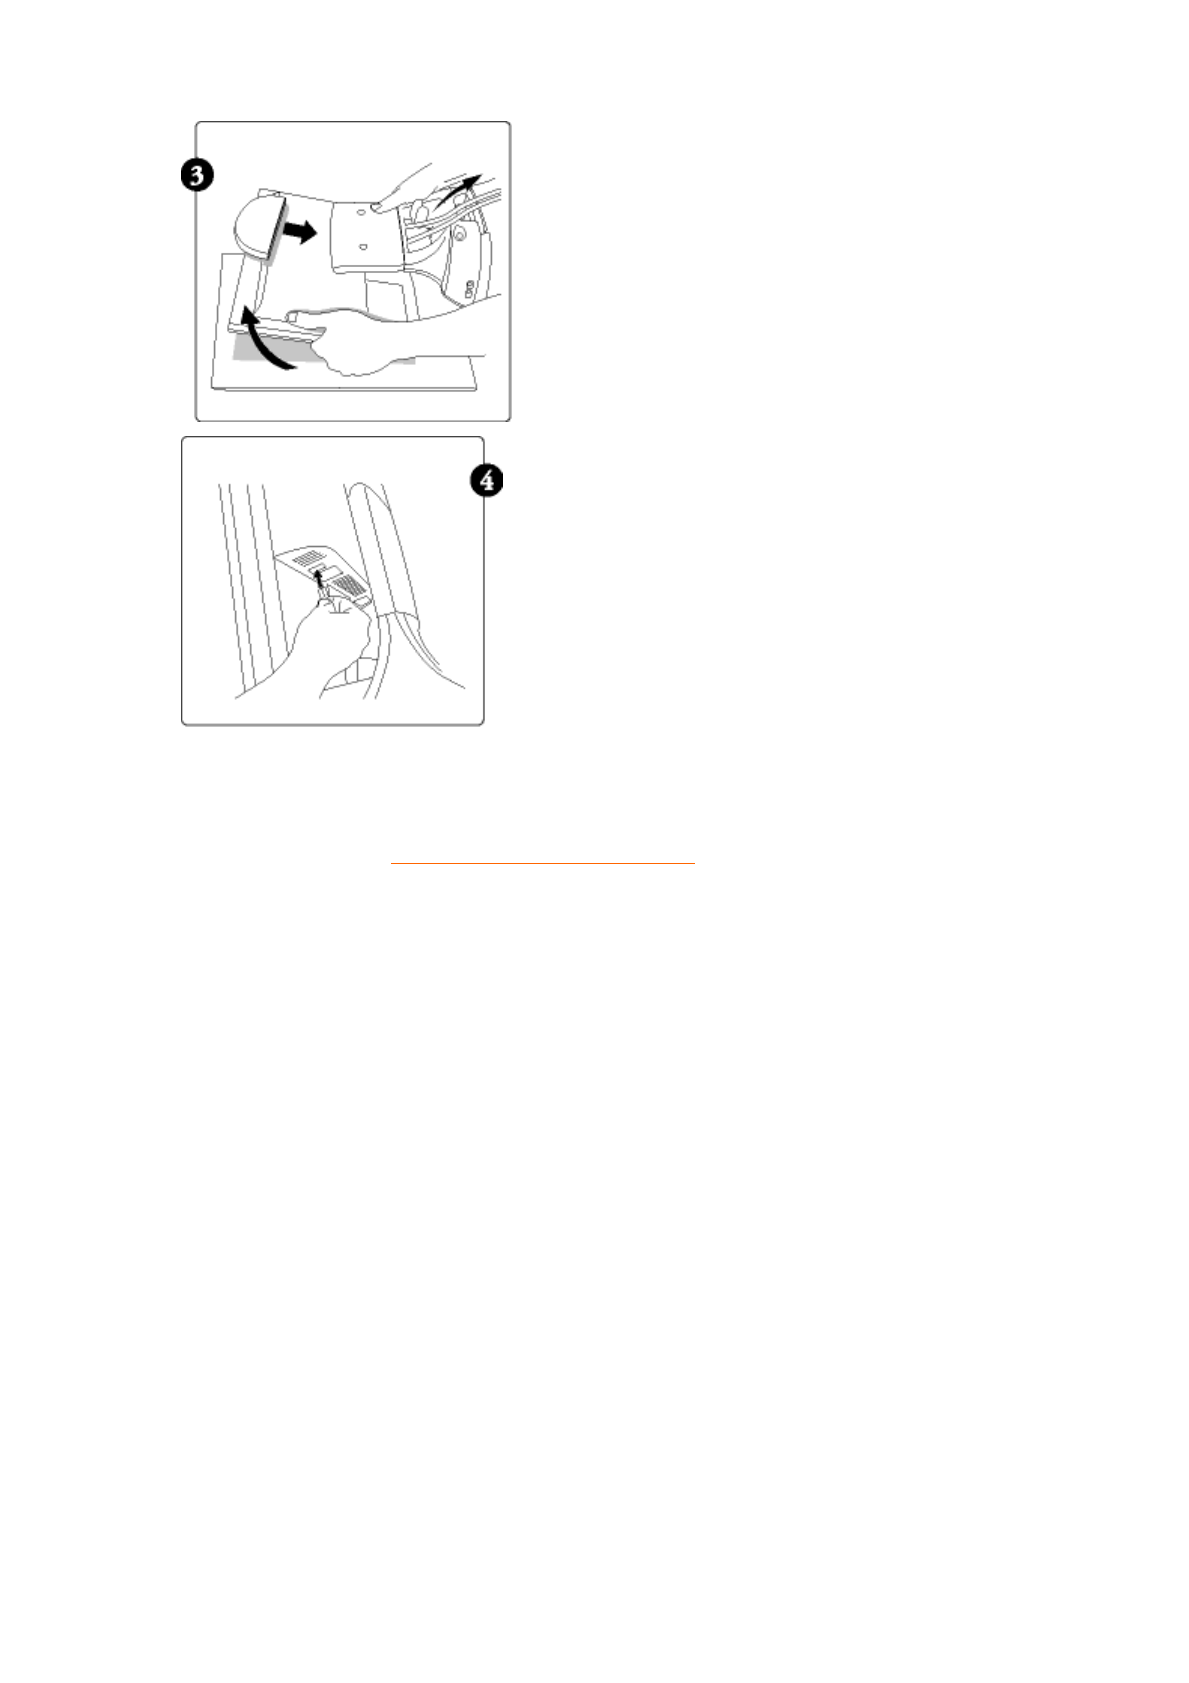
RETURN TO TOP OF THE PAGE
hole at the bottom of the
base.
4) For Multimedia base, plug
the flying DC power cable of
base onto monitor.

Regulatory Information
TCO '95 Information • TCO '95 Environmental Requirements • TCO '99
Information • TCO '99 Environmental Requirements • CE Declaration of
Conformity • Energy Star Declaration • Federal Communications Commission
(FCC) Notice (U.S. Only) • Commission Federale de la Communication (FCC
Declaration) • EN 55022 Compliance (Czech Republic Only) • VCCI Class 2
Notice (Japan Only) • MIC Notice (South Korea Only) • Polish Center for Testing
and Certification Notice • North Europe (Nordic Countries) Information • BSMI
Notice (Taiwan Only) • Ergonomie Hinweis (nur Deutschland) • Philips End-of-Life
Disposal • Information for UK only
Safety and Troubleshooting • Troubleshooting • Other Related Information •
Frequently Asked Questions (FAQs)
TCO '95 Information
(For 170B4BB, 170S4FB)
Congratulations!
You have just purchased a TCO'95 approved and labelled product! Your choice has provided
you with a product developed for professional use. Your purchase has also contributed to
reducing the burden on the environment and also, to the further development of
environmentally adapted electronics products.
Why do we have environmentally labelled computers?
In many countries, environmental labelling has become an established method for
encouraging the adaptation of goods and services to the environment. The main problem, as
far as computers and other electronics equipment are concerned, is that environmentally
harmful substances are used both in the products and during the manufacturing. Since it has
not been possible for the majority of electronics equipment to be recycled in a satisfactory
way, most of these potentially damaging substances sooner or later enter Nature. There are
also other characteristics of a computer, such as energy consumption levels, that are
important from the viewpoints of both the work (internal) and natural (external) environments.
Since all methods of conventional electricity generation have a negative effect on the
environment (acidic and climate-influencing emissions, radioactive waste, etc.), it is vital to
conserve energy. Electronics equipment in offices consume an enormous amount of energy
since they are often left running continuously.
What does labelling involve?
This product meets the requirements for the TCO'95 scheme which provides for international
and environmental labelling of personal computers. The labelling scheme was developed as a
joint effort by the TCO (The Swedish Confederation of Professional Employees),

- EN55022:1998 (Radio Disturbance requirement of Information Technology Equipment)
- EN55024:1998 (Immunity requirement of Information Technology Equipment)
- EN61000-3-2:1995 (Limits for Harmonic Current Emission)
- EN61000-3-3:1995 (Limitation of Voltage Fluctuation and Flicker)
following provisions of directives applicable
- 73/23/EEC (Low Voltage Directive)
- 89/336/EEC (EMC Directive)
- 93/68/EEC (Amendment of EMC and Low Voltage Directive)
and is produced by a manufacturing organization on ISO9000 level.
The product also comply with the following standards
- ISO9241-3, ISO9241-7, ISO9241-8 (Ergonomic requirement for Visual Display)
- ISO13406-2 (Ergonomic requirement for Flat panels)
- GS EK1-2000 (GS specification)
- prEN50279:1998 (Low Frequency Electric and Magnetic fields for Visual Display)
- MPR-II (MPR:1990:8/1990:10 Low Frequency Electric and Magnetic fields)
- TCO95, TCO99 (Requirement for Environment Labelling of Ergonomics, Energy, Ecology and
Emission,
TCO: Swedish Confederation of Professional Employees) for TCO versions
RETURN TO TOP OF THE PAGE
Energy Star Declaration
PHILIPS
170B4MG
RETURN TO TOP OF THE PAGE
Federal Communications Commission (FCC) Notice (U.S. Only)
This monitor is equipped with a function for saving energy which supports the VESA Display
Power Management Signaling (DPMS) standard. This means that the monitor must be
connected to a computer which supports VESA DPMS to fulfill the requirements in the
NUTEK specification 803299/94. Time settings are adjusted from the system unit by
software.
NUTEK VESA State LED Indicator Power Consumption
Normal operation ON Green < 40 W (typ.)
Power Saving
Alternative 2
One step
OFF Amber < 1 W
As an ENERGY STAR® Partner, PHILIPS has determined that this
product meets the ENERGY STAR® guidelines for energy efficiency.
We recommend you switch off the monitor when it is not in use for quite a long
time.
zReorient or relocate the receiving antenna.
zIncrease the separation between the equipment and receiver.
zConnect the equipment into an outlet on a circuit different from that to which the receiver is
connected.
zConsult the dealer or an experienced radio/TV technician for help.
Use only RF shielded cable that was supplied with the monitor when connecting this monitor to a
computer device.
To prevent damage which may result in fire or shock hazard, do not expose this appliance to rain
or excessive moisture.
THIS CLASS B DIGITAL APPARATUS MEETS ALL REQUIREMENTS OF THE CANADIAN
INTERFERENCE-CAUSING EQUIPMENT REGULATIONS.
RETURN TO TOP OF THE PAGE
Commission Federale de la Communication (FCC Declaration)
zRéorienter ou déplacer l'antenne de réception.
zAugmenter la distance entre l'équipement et le récepteur.
zBrancher l'équipement sur un autre circuit que celui utilisé par le récepteur.
zDemander l'aide du marchand ou d'un technicien chevronné en radio/télévision.
Thi
s equ
i
pmen
t
h
as
b
een
t
es
t
e
d
an
d
f
oun
d
t
o comp
l
y w
ith
th
e
li
m
it
s
f
or a
Cl
ass
B
digital device, pursuant to Part 15 of the FCC Rules. These limits are designed to
provide reasonable protection against harmful interference in a residential
installation. This equipment generates, uses and can radiate radio frequency
energy and, if not installed and used in accordance with the instructions, may
cause harmful interference to radio communications. However, there is no
guarantee that interference will not occur in a particular installation. If this
equipment does cause harmful interference to radio or television reception, which
can be determined by turning the equipment off and on, the user is encouraged to
try to correct the interference by one or more of the following measures:
Changes or modifications not expressly approved by the party responsible for
compliance could void the user's authority to operate the equipment.
Cet équipement a été testé et déclaré conforme auxlimites des appareils
numériques de class B,aux termes de l'article 15 Des règles de la FCC. Ces
limites sont conçues de façon à fourir une protection raisonnable contre les
interférences nuisibles dans le cadre d'une installation résidentielle. CET appareil
produit, utilise et peut émettre des hyperfréquences qui, si l'appareil n'est pas
installé et utilisé selon les consignes données, peuvent causer des interférences
nuisibles aux communications radio. Cependant, rien ne peut garantir l'absence
d'interférences dans le cadre d'une installation particulière. Si cet appareil est la
cause d'interférences nuisibles pour la réception des signaux de radio ou de
télévision, ce qui peut être décelé en fermant l'équipement, puis en le remettant
en fonction, l'utilisateur pourrait essayer de corriger la situation en prenant les
mesures suivantes:
N'utiliser que des câbles RF armés pour les connections avec des ordinateurs ou périphériques.
CET APPAREIL NUMERIQUE DE LA CLASSE B RESPECTE TOUTES LES EXIGENCES DU
REGLEMENT SUR LE MATERIEL BROUILLEUR DU CANADA.
RETURN TO TOP OF THE PAGE
EN 55022 Compliance (Czech Republic Only)
RETURN TO TOP OF THE PAGE
VCCI Notice (Japan Only)
This is a Class B product based on the standard of the Voluntary Control Council for Interference
(VCCI) for Information technology equipment. If this equipment is used near a radio or television
receiver in a domestic environment, it may cause radio Interference. Install and use the equipment
according to the instruction manual.
Class B ITE
RETURN TO TOP OF THE PAGE
Toutes modifications n'ayant pas reçu l'approbation des services compétents en
matière de conformité est susceptible d'interdire à l'utilisateur l'usage du présent
équipement.