Philips Medical Systems North America M3814A HOME SP02 / PULSE MONITOR User Manual M3814 90003 Rev 4
Philips Medical Systems North America Co. HOME SP02 / PULSE MONITOR M3814 90003 Rev 4
USERS MANUAL
Pulse Oximeter
2
Notice
Proprietary Information
This document contains proprietary
information that is protected by
copyright. Reproduction,
adaptation, or translation without
prior written permission is
prohibited, except as allowed under
the copyright laws.
Philips Medical Systems
3000 Minuteman Road
Andover, MA 01810-1085
(978) 687-1501
Publication number
M3814-90003 Rev A
Printed in USA
Warranty
The information contained in this
document is subject to change
without notice.
Philips Medical Systems makes no
warranty of any kind with regard to
this material, including, but not
limited to, the implied warranties or
merchantability and fitness for a
particular purpose.
Philips Medical Systems shall not
be liable for errors contained herein
or for incidental or consequential
damages in connection with the
furnishing, performance, or use of
this material.
Printing History
New editions of this document will
incorporate all material updated
since the previous edition. The
documentation printing date and
part number indicate its current
edition. The printing date changes
when a new edition is printed.
(Minor corrections and updates
which are incorporated at reprint
do not cause the date to change.)
The document part number
changes when extensive technical
changes are incorporated.
Revision A August 2004
Copyright
Copyright August 2004 Koninklijke
Philips Electronics N.V.
All Rights Reserved.
3
Table of Contents
Introduction . . . . . . . . . . . . . . . . . . . . . . . . . . . . . . 4
WELCOME . . . . . . . . . . . . . . . . . . . . . . . . . . . . . . . . . . . . . . . . . 4
How the System Works . . . . . . . . . . . . . . . . . . . . . . . . . . . . . . . 4
Keeping the System Working . . . . . . . . . . . . . . . . . . . . . . . . . . . 4
Thank You! . . . . . . . . . . . . . . . . . . . . . . . . . . . . . . . . . . . . . . . . . 4
Safety and Precautions . . . . . . . . . . . . . . . . . . . . . . 5
Follow Instructions . . . . . . . . . . . . . . . . . . . . . . . . . . . . . . . . . . . 5
Warnings . . . . . . . . . . . . . . . . . . . . . . . . . . . . . . . . . . . . . . . . . . . 5
Cautions . . . . . . . . . . . . . . . . . . . . . . . . . . . . . . . . . . . . . . . . . . . 5
Pulse Oximeter Components . . . . . . . . . . . . . . . . 7
Measurement . . . . . . . . . . . . . . . . . . . . . . . . . . . . . 8
Maintenance . . . . . . . . . . . . . . . . . . . . . . . . . . . . . 10
Cleaning . . . . . . . . . . . . . . . . . . . . . . . . . . . . . . . . . . . . . . . . . . . 10
Storing . . . . . . . . . . . . . . . . . . . . . . . . . . . . . . . . . . . . . . . . . . . . 10
Replacing Batteries . . . . . . . . . . . . . . . . . . . . . . . . . . . . . . . . . . 11
Troubleshooting . . . . . . . . . . . . . . . . . . . . . . . . . . 12
Specifications . . . . . . . . . . . . . . . . . . . . . . . . . . . . 13
Electromagnetic Compatibility . . . . . . . . . . . . . . . 14
Electromagnetic Compatibility . . . . . . . . . . . . . . . . . . . . . . . . . 14
EMC Testing . . . . . . . . . . . . . . . . . . . . . . . . . . . . . . . . . . . . . . . 14
Avoiding Electromagnetic Interference Problems 1 . . . . . . . . . . 5
FCC Regulations . . . . . . . . . . . . . . . . . . . . . . . . . . . . . . . . . . . . 16
4
Introduction
WELCOME
Welcome to Philips Telemonitoring
Services.
This Pulse Oximeter Instructions for
Use explains how to use the Pulse
Oximeter to measure your blood
oxygen level (%SpO2) and pulse
rate from the comfort and
convenience of your home. It also
explains how to maintain, clean,
and troubleshoot the Pulse
Oximeter and gives a number of
safety precautions you should
follow to assure safe, reliable and
accurate measurements.
In only a few minutes every day
you can provide these
measurements to your healthcare
provider so that he/she can make
better decisions about your care. In
this way, you are providing
information that can help improve
your health care and quality of life.
How the System Works
With this system, the Pulse
Oximeter measurements are
immediately sent to your Home
Hub or TeleStation, which then
automatically transmits them over
your telephone line to your
healthcare provider’s computer.
While the system uses your
telephone to transmit the
measurement, feel free to talk on
you phone at any time -- the system
is “smart” enough to know when
the phone line is open. It will wait
and then send the information after
you hang up.
Keeping the System
Working
If at any time you suspect
something is wrong with the Pulse
Oximeter or any part of the
Telemonitoring System,
immediately contact your
healthcare provider. Philips will
replace any defective device. You
can also cross-check your results
with another Pulse Oximeter if
additional measurement devices of
the same type are available to you.
Thank You!
Thank you for taking an active role
in your home healthcare plan.
Philips and your healthcare
provider applaud your efforts to
actively participate in you health
care plan.

5
Safety and Precautions
Safety
Follow Instructions
Follow your doctor’s instructions
about symptoms that require you to
contact your healthcare provider.
This system does not take the place
of medical care. Remember, only
your healthcare provider is trained
to interpret the results. He or she
will tell you when and how often to
take your vital signs. Please read all
of the instructions in this guide
before using the Pulse Oximeter
and follow the instructions
carefully.
Symbols
Type B Patient Applied
Parts as defined in IEC
60601-1-1. Not suitable for
direct cardiac application.
Attention: Consult
accompanying documents.
Meets IEC-
60950 standards
Meets Class B standards.
Meets Part 15 standards.
Precautions
Warnings
The word Warning is used for a
hazard that could result in severe
injury or death.
Observe the following Warnings:
The Pulse Oximeter is provided for
your use only.
•Do not let anyone else use it.
•Do not swap devices with a
neighbor or family member
who has the same or similar
system.
These devices are not intended to
be used to call for emergency
medical attention or response.
Cautions
The word Caution is used for a
hazard that could result in personal
injury or property damage.
Observe the following Cautions:
• Read this guide carefully
before using this device.
• Use this device only as
directed by your healthcare
provider.
• Follow your physician’s
instructions regarding
symptoms that require direct
contact with your healthcare
provider.
6
• This device is not intended
for continuous monitoring.
• This device may not work
properly on all patients. If
you are unable to achieve
stable readings within 3 or 4
attempts, discontinue use and
contact your healthcare
provider.
• Use of this device is not a
substitute for medical care.
• If you have any questions
regarding how to use your
Pulse Oximeter, please
contact your healthcare
provider.
• Dysfunctional hemoglobin,
such as carboxyhemoglobin
or methemoglobin may affect
accuracy.
7
Pulse Oximeter Components
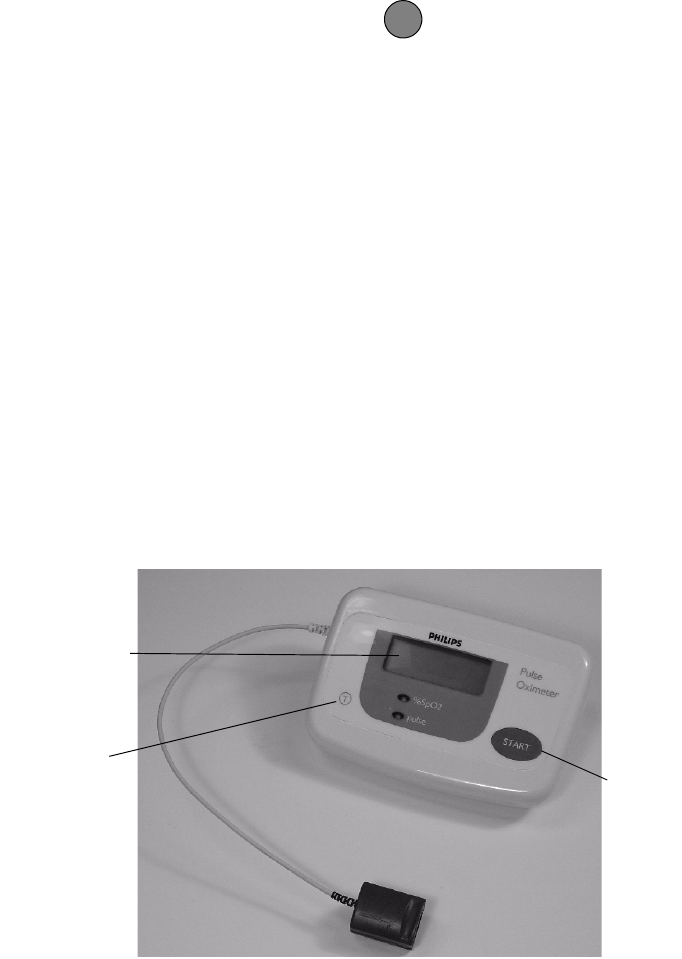
The Pulse Oximeter is a plastic
display case with a finger-clip
sensor attached to it. The front of
the case has the following elements,
as shown in the figure below. The
rear of the case has a compartment
for batteries that power the device.
Display: an LED display window
shows the blood oxygen level
(%SpO2) and pulse rate (in beats
per minute) measured from the end
of your finger. LEDs below the
display window light to indicate
which measurement is being
displayed -- %SpO2 or pulse.
START button: pushing this
button causes the Pulse Oximeter
to begin taking a measurement.
Radio Test button: this
button is used to test the
transmission of measurements
from the Pulse Oximeter to the
Home Hub or TeleStation.
Finger-clip sensor: This sensor
is used to measure your blood
oxygen level and pulse rate. The
sensor is clipped on the end of one
of your fingers.
The Finger-clip contains an LED
light source that shines light on
your finger. Light transmitted
through the blood in your finger is
received by a photo sensitive
element and electronics in the
display case uses the transmitted
light to determine your blood
oxygen level and pulse rate.
T
Display
START
button
Radio Test
button
Finger-clip
sensor
8
Measurement
The following steps describe how
to use the Pulse Oximeter to
measure your blood oxygen level
(%SpO2) and pulse rate.
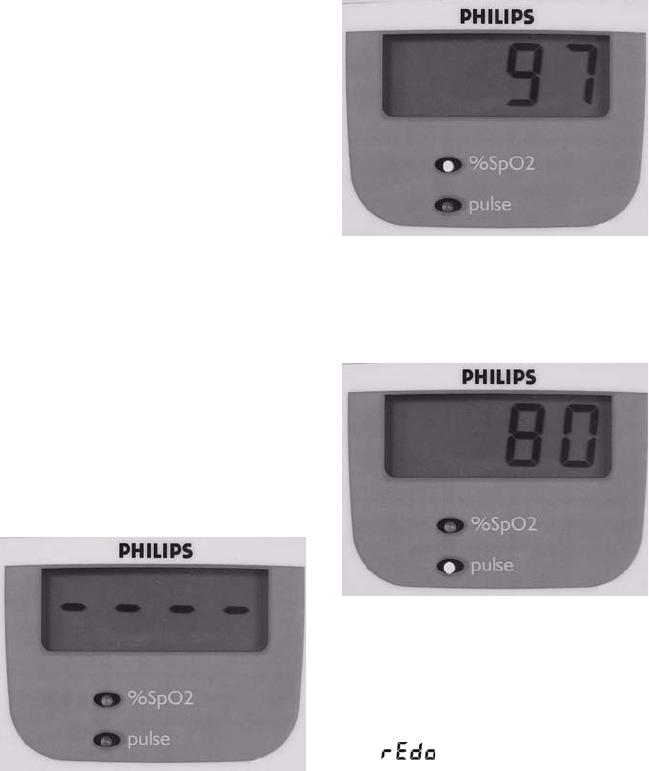
1. Sit within 20 ft. of the Home
Hub or TeleStation with your
hand resting on a flat surface and
the Pulse Oximeter in front of
you.
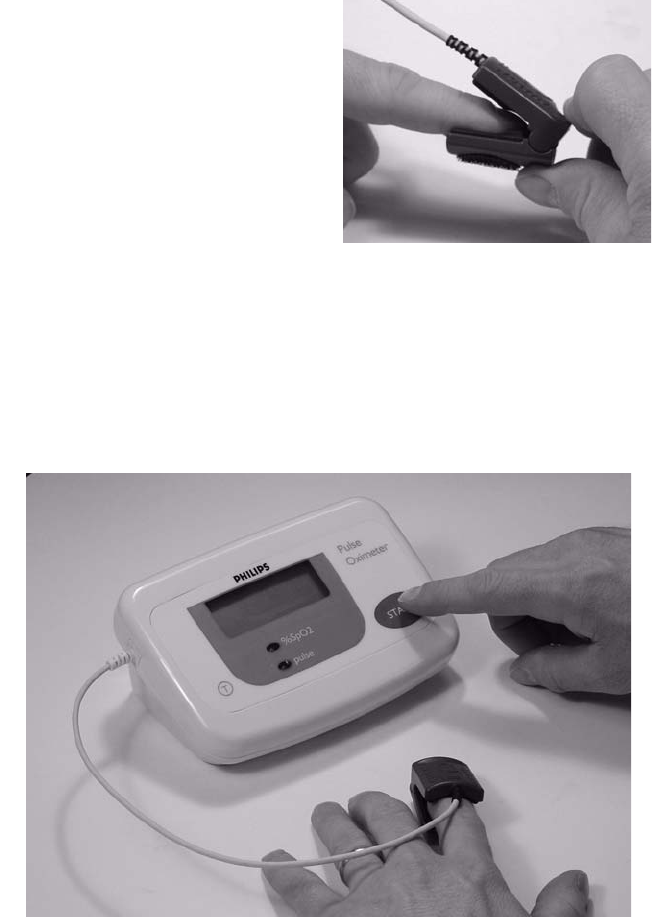
2. Open the sensor and fully insert
your finger (index, middle, or
ring, but not your thumb) until
the end of your finger reaches the
finger stop. The cable should
extend over your finger toward
your wrist as shown in the figure.
3. Sit comfortably with your hand
resting on the surface so that it
can remain still.
4. Press the START button and
hold your hand still during the
measurement.
9
Notes:
• Use the same finger each time
you make a measurement
unless your health care
provider instructs otherwise.
• Do not use the sensor on a
finger that has chronic poor
circulation or is injured.
• Avoid wearing dark fingernail
polish (particularly blues and
blacks) that may reduce light
transmission and affect
measurement accuracy.
• Avoid using the sensor in
sunlight or bright lights.
• Do not use the Pulse Oximeter
with the battery door open
The measurement process is as
follows:
- Dashes move across the display
during measurement.
- A double beep sounds after a
few seconds indicating that the
measurement is complete.
- A tick sounds as the % SpO2
measurement displays and the
yellow light next to % SpO2
illuminates.
- A tock sounds as the pulse rate
displays and the green light next
to pulse illuminates.
- The tick-tock sequence repeats
several times and then turns off.
Note: If the measurement was not
made, a long beep sounds
and displays.
Warm your hand or use a different
finger and try again.
10
Maintenance
This section gives guidelines on
how to maintain the Pulse
Oximeter, including how to clean
and store it and how to replace the
batteries. Taking proper care of the
devices will help keep it in good
working order.
Cleaning
You generally need to clean the
Pulse Oximeter only when it
appears to be dirty. However, it is
very important to keep the inside of
the Finger-clip sensor clean,
especially where the light shines
through your finger.
Caution:
• Avoid spilling liquids on the
device.
• Do not immerse this device in
liquids to clean.
• Do not use harsh chemicals,
caustic, or abrasive cleaning
agents to clean the device.
The following steps describe how
to clean the Pulse Oximeter and
sensor.
1. Unplug the Home Hub or
TeleStation from power and
phone lines.
2.Remove the batteries from the
Pulse Oximeter. For battery
removal see the next section
on Replacing Batteries.
3. Clean the case of the Pulse
Oximeter with a dry, soft cloth.
Note: If there are any bodily
fluids, such as blood or mucus,
use a cloth dampened with
plain tap water (no soap).
4. Open the Finger-clip sensor
and carefully wipe its inside
surfaces with a cloth dampened
with a mild detergent or
rubbing alcohol.
Note: Allow the sensor to dry
thoroughly before using.
5. Replace the batteries in the
Pulse Oximeter.
6. Plug the Home Hub or
TeleStation into the power
outlet and phone line.
Storing
The Pulse Oximeter must be stored
within 20 feet of the Home Hub or
TeleStation because it periodically
sends updates to it. When storing
the Pulse Oximeter, use the
following precautions.
• Store the Pulse Oximeter so
that the sensor cable is not
twisted or kinked.
• Avoid tugging at the sensor
cable or carrying the Pulse
Oximeter by the sensor cable.
11
• Avoid storing the Pulse
Oximeter where children or
pets have access to it.
• Do not store the device
inside a metal container or
drawer, such as a file cabinet.
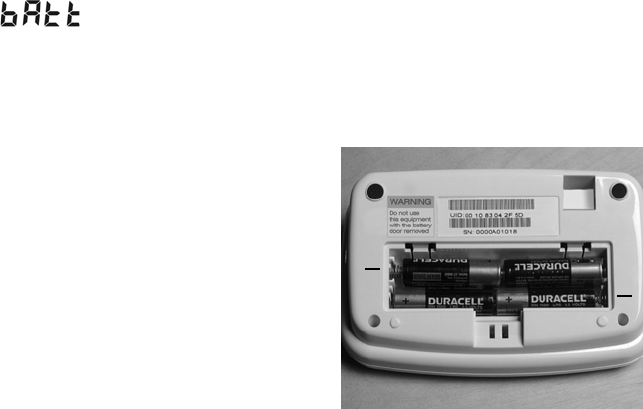
Replacing Batteries
The batteries should be replaced
when the Low Battery indicator
flashes on the Pulse
Oximeter display.
Caution:
• Replace all 4 batteries with new
ones at the same time.
• Only use Type AA (1.5 volt)
Alkaline batteries.
• Do not use rechargeable
batteries.
The following steps describe how
to replace the batteries in the Pulse
Oximeter.
1. Turn the Pulse Oximeter case
over to expose the battery
compartment.
2. Remove the battery cover by
gently pushing in the direction
of the arrow symbol to release
the retaining tab and then
remove the cover.
3. Remove the old batteries and
dispose of them properly.
Note: Check with local authorities
to determine the proper way to
dispose of alkaline batteries.
4. Place new batteries into the
compartment so that the
positive (+) and negative (-)
terminals match the diagram in
the compartment. Make certain
that the battery terminals make
contact with the compartment
terminals.
Note: To prevent the batteries
from popping out, insert the
bottom row first.
5. Replace the cover by inserting
its tabs into the slots and firmly
pressing the cover tab into
place.
Caution: Do not use the Pulse
Oximeter with the battery cover
removed.
+
+

12
Troubleshooting
The only user-serviceable parts of
the Pulse Oximeter are the
batteries.
Caution: Do not attempt to service
or repair the Pulse Oximeter
yourself. If a mechanical problem
occurs, contact your healthcare
provider for further instructions.
If an error message appears, check
your equipment and retake your
%SpO2 before contacting your
healthcare provider. Remember to
remain still during the
measurement. Try reducing the
surrounding light, try a different
finger, warming you ahnds, and/or
removing any dark nail polish.
You may be able to perform minor
troubleshooting when one of the
error messages below appears on
the display.
If you are unabale to troubleshoot
these error messages by following
these corrective actions, contact
your healthcare provider for further
instructions.
Display
Symbol Condition or Cause Corrective Action
Appears when a
malfunction is detected
Contact your healthcare
provider if the condition
persists.
Appears if a reading was
not obtained.
Warm finger,
keep hand still,
reduce light,
and try again.
Contact your healthcare
provider if the condition
persists.
Flashes during
measurement when the
batteries are too low for
the Pulse Oximeter to
work properly.
Replace all 4 batteries and
perform a Radio Test.

13
Specifications
Model • M3814A
Type • Internally-powered equipment
• Type B applied part
• IPXO Ordinary Equipment
• Continuous operation
(does not imply continuous monitoring
Display • Digital 0.7 in. (1.8 cm) character height
• SpO2/pulse displayed alternately
Measurement Range • SpO2: 70 - 100%
• Pulse: 18 to 300 pulses per minute
Power source • 4 type AA (1.5 volt) alkaline batteries
connected in series (6.0 volts), included
Battery life • Approximately 6 months with 1 daily
measurement
Operating environment •50
o to 104 oF (10o - 40 oC)
• Less than 85% relative humidity
• Atmospheric altitude pressure: 700 - 1060 kPa
(0 - 15,000 ft. or 0 - 4,600 meters altitude)
•Warning: This equipment is not suitable
for use in the presence of flammable
anaesthetic mixture with air or with
oxygen or nitrous oxide.
Transport and Storage
environment (with
batteries removed)
•15
o to 122 oF (-9o - 50 oC)
• Less than 85% relative humidity
• Atmospheric altitude pressure: 700 - 1060 kPa
(0 - 15,000 ft. or 0 - 4,600 meters altitude)
Dimension (approx.) • Length: 6.5 in. (16.5 cm)
• Width: 4.4 in. (11.2 cm)
• Height: 2.7 in. (6.9 cm)
Weight (approx.) • 13 oz. (370 gm)

14
Electromagnetic Compatibility
Electromagnetic
Compatibility
Electromagnetic compatibility
(EMC) is the ability of equipment
to function satisfactorily in the
presence of radio frequency (RF)
energy from devices such as
cordless and cellular telephones or
other RF transmitting equipment.
The Pulse Oximeter was tested
according to the international safety
standards for EMC of medical
electrical equipment. See the
Manufacturer’s Declaration for
details.
EMC Testing
The M3814 Pulse Oximeter was
subjected to both international
standard and Philips proprietary
tests. During the testing to the
requirements of the medical safety
standard IEC/EN 60601-1-2 (first
edition), some anomalies were
observed as described below. If you
observe any abnormal operation of
the devices, please see Avoiding
Electromagnetic Interference
Problems later in this section.
The M3814A Pulse Oximeter may
also exhibit sensitivity to
electrostatic discharges as low as
+ x.xx kV to nearby objects or
interconnecting cables.
Electrostatic sensitivity does not
put critical patient data at risk and
normal operation is restored after
approximately xxx minutes without
user interaction. Measurements
stored in the M3814A are retrieved
following device recovery.
Telemonitoring
Device
Interference
Level
(Volts per
meter*)
Observed Performance
Degradation Caused by the
Stated Interference Level
Pulse Oximeter
M3814A
* Interference levels are measured in Volts per meter. A cellular telephone
operating at a typical transmitting power of 0.1 watts will produce an interference
level of 1 Volt per meter at a distance of 1 meter from the cellular telephone’s
antenna. Please see Avoiding Electromagnetic Interference Problems later
in this section.

15
Avoiding Electromagnetic
Interference Problems
Possible sources of interfering
radio frequency energy are cellular
telephones, cordless telephones,
and other products containing
radio transmitters.
The M3814A has a Radio Test
button that sends a reduced
strength radio test signal to the
M3184A Home Hub or the
M3812B TeleStation and sounds an
audio tone if the test signal is
successfully received. This test can
be used to determine whether
sources of interference are present.
These sources can be turned off or
moved away to reduce their
interference to your Pulse
Oximeter.
In addition, the Pulse Oximeter and
M3812A Home Hub or M3812B
TeleStation can be placed closer to
each other so that the radio
transmission from the Pulse
Oximeter to the M3812A Home
Hub or M3812B TeleStation has
less distance to travel and
interfering radio signals have less
effect. The radio transmissions
from the Pulse Oximeter are
repeated periodically, so an
intermittent source of interference
should only delay reception.
Recommended separation distances between portable and mobile RF
communications equipment and the Philips Telemonitoring System
The Philips Telemonitoring System is intended for use in an electromagnetic
environment in which radiated RF disturbances are controlled. The customer or
the user of the Philips Telemonitoring System can help prevent electromagnetic
interference by maintaining a minimum distance between portable and mobile RF
communications equipment (transmitters) and the Philips Telemonitoring System
as recommended below, according to maximum output power of the
communications equipment.
Rated maximum output
power of transmitter
Separation distance (in meters) according to
frequency of transmitter
Watts 26 to 800 MHz 800 MHz to 2.5 GHz
0.01 3.5 7
0.1 11 22
13570
10 110 220
100 350 700
These guidelines may not always apply. Electromagnetic propagation is affected
by absorption and reflection from structures, objects, and people
16
FCC Regulations
The M3814A Pulse Oximeter has
been tested and found to comply
with the limits for a Class B digital
device, pursuant to Part 15 of the
FCC Rules. These limits provide
reasonable protection against
harmful interference in a residential
installation. The M3814A Pulse
Oximeter generates, uses, and can
radiate radio frequency energy. If
not installed and used according to
instructions, it may interfere with
radio communications. However,
there is no guarantee that
interference will not occur if the
equipment is properly installed.
If the M3814A Pulse Oximeter
causes interference to radio or
television reception, which can be
determined by turning the
equipment off and on, the user is
encouraged to try to correct it by:
• relocating the Home Hub or
TeleStation,
• increasing the separation
between the Pulse Oximeter
or the Home Hub or
TeleStation and the device
being interfered with, for
example, a TV,
• consulting your healthcare
provider.
Note: Any changes or
modifications to the equipment not
expressly approved by Philips could
void the user’s authority to operate
it.