Philips Medical Systems North America M3815B M3815B Home Blood Pressure Monitor User Manual
Philips Medical Systems North America Co. M3815B Home Blood Pressure Monitor Users Manual
Users Manual
2

Notice
3
Notice
Proprietary
Information
Published by Philips Medical Systems, a division of Philips Electronics
North America Corporation.
Philips Medical Systems reserves the right to make changes to both this
Instructions for Use and to the product it describes. Product
specifications are subject to change without notice. Nothing contained
within this Instructions for Use is intended as any offer, warranty,
promise or contractual condition, and must not be taken as such.
© Koninklijke Philips Electronics N.V. 2008
All Rights are reserved. Reproduction in whole or in part in any form or
by any means, electrical, mechanical or otherwise, is prohibited without
the written consent of the copyright holder.
Document number:
M3810-90096
Issue number 4, May 2008
Philips Medical Systems
3000 Minuteman Road
Andover, MA 01810-1085
USA
Unauthorized copying of this publication is a copyright infringement and
will reduce the ability of Philips Medical Systems to provide accurate
and up-to-date information to users. Non-Philips product names may be
trademarks of their respective owners.
Published in the United States of America
Notice
4
Printing
History
New editions of this document will incorporate all material updated since
the previous edition. Update packages may be issued between editions
and contain replacement and additional pages to be merged by a revision
date at the bottom of the page. Note that pages which are rearranged due
to changes on a previous page are not considered revised.
The documentation printing date and part number indicate its current
edition. The printing date changes when a new edition is printed. (Minor
corrections and updates which are incorporated at reprint do not cause
the date to change.) The document part number changes when extensive
technical changes are incorporated.
All Editions and Updates of this manual and their publication dates are
listed below.
First Edition. . . . . . . . . . . . . . . . . . . . . . . . . . . . October 2002
Second Edition . . . . . . . . . . . . . . . . . . . . . . . . . . . . July 2006
Third Edition. . . . . . . . . . . . . . . . . . . . . . . . . . . . . .May 2007
Fourth Edition . . . . . . . . . . . . . . . . . . . . . . . . . . . . .May 2008

Contents/Tabla de contenidos
Contents/Tabla de contenidos 1
Aviso
Notice . . . . . . . . . . . . . . . . . . . . . . . . . . . . . . . . . . . . . . . . . . . . . . . . . . . . . . . . . . . . . . .1-3
Proprietary Information. . . . . . . . . . . . . . . . . . . . . . . . . . . . . . . . . . . . . . . . . . . . . . .1-3
Printing History . . . . . . . . . . . . . . . . . . . . . . . . . . . . . . . . . . . . . . . . . . . . . . . . . . . . .1-4
1. Introduction. . . . . . . . . . . . . . . . . . . . . . . . . . . . . . . . . . . . . . . . . . . . . . .1-1
Welcome. . . . . . . . . . . . . . . . . . . . . . . . . . . . . . . . . . . . . . . . . . . . . . . . . . . . . . . . . . . . .1-1
How the System Works . . . . . . . . . . . . . . . . . . . . . . . . . . . . . . . . . . . . . . . . . . . . . .1-1
Keeping the System Working . . . . . . . . . . . . . . . . . . . . . . . . . . . . . . . . . . . . . . . . . .1-1
Thank You! . . . . . . . . . . . . . . . . . . . . . . . . . . . . . . . . . . . . . . . . . . . . . . . . . . . . . . . .1-1
Philips Telemonitoring Services System. . . . . . . . . . . . . . . . . . . . . . . . . . . . . . . . . . . . .1-2
Safety and Precautions. . . . . . . . . . . . . . . . . . . . . . . . . . . . . . . . . . . . . . . . . . . . . . . . . .1-3
Follow Instructions . . . . . . . . . . . . . . . . . . . . . . . . . . . . . . . . . . . . . . . . . . . . . . . . . .1-3
Document Conventions . . . . . . . . . . . . . . . . . . . . . . . . . . . . . . . . . . . . . . . . . . . . . .1-3
Display Symbols . . . . . . . . . . . . . . . . . . . . . . . . . . . . . . . . . . . . . . . . . . . . . . . . . . . . . . .1-5
2. Philips Telemonitoring Set . . . . . . . . . . . . . . . . . . . . . . . . . . . . . . . . . .2-1
Overview. . . . . . . . . . . . . . . . . . . . . . . . . . . . . . . . . . . . . . . . . . . . . . . . . . . . . . . . . . . . .2-1
Device Descriptions . . . . . . . . . . . . . . . . . . . . . . . . . . . . . . . . . . . . . . . . . . . . . . . . . . . .2-2
Home Hub/TeleStation . . . . . . . . . . . . . . . . . . . . . . . . . . . . . . . . . . . . . . . . . . . . . . .2-2
Scale . . . . . . . . . . . . . . . . . . . . . . . . . . . . . . . . . . . . . . . . . . . . . . . . . . . . . . . . . . . .2-5
Blood Pressure Monitor . . . . . . . . . . . . . . . . . . . . . . . . . . . . . . . . . . . . . . . . . . . . . .2-7
Rhythm Strip Recorder. . . . . . . . . . . . . . . . . . . . . . . . . . . . . . . . . . . . . . . . . . . . . . .2-9
Pulse Oximeter. . . . . . . . . . . . . . . . . . . . . . . . . . . . . . . . . . . . . . . . . . . . . . . . . . . .2-11
Glucose Meter Cable . . . . . . . . . . . . . . . . . . . . . . . . . . . . . . . . . . . . . . . . . . . . . . .2-13
Device Usage . . . . . . . . . . . . . . . . . . . . . . . . . . . . . . . . . . . . . . . . . . . . . . . . . . . . . . . .2-14
Home Hub/TeleStation . . . . . . . . . . . . . . . . . . . . . . . . . . . . . . . . . . . . . . . . . . . . . .2-14
Scale . . . . . . . . . . . . . . . . . . . . . . . . . . . . . . . . . . . . . . . . . . . . . . . . . . . . . . . . . . .2-20
Blood Pressure Monitor . . . . . . . . . . . . . . . . . . . . . . . . . . . . . . . . . . . . . . . . . . . . .2-29
Rhythm Strip Recorder. . . . . . . . . . . . . . . . . . . . . . . . . . . . . . . . . . . . . . . . . . . . . .2-37
Pulse Oximeter. . . . . . . . . . . . . . . . . . . . . . . . . . . . . . . . . . . . . . . . . . . . . . . . . . . .2-39
2 Contents/Tabla de contenidos
Glucose Meter . . . . . . . . . . . . . . . . . . . . . . . . . . . . . . . . . . . . . . . . . . . . . . . . . . . . 2-42
3. Maintenance . . . . . . . . . . . . . . . . . . . . . . . . . . . . . . . . . . . . . . . . . . . . . .3-1
Overview . . . . . . . . . . . . . . . . . . . . . . . . . . . . . . . . . . . . . . . . . . . . . . . . . . . . . . . . . . . .3-1
Cleaning Devices . . . . . . . . . . . . . . . . . . . . . . . . . . . . . . . . . . . . . . . . . . . . . . . . . . . . . . 3-2
Storing Devices . . . . . . . . . . . . . . . . . . . . . . . . . . . . . . . . . . . . . . . . . . . . . . . . . . . . . . . 3-3
Blood Pressure Monitor . . . . . . . . . . . . . . . . . . . . . . . . . . . . . . . . . . . . . . . . . . . . . . 3-3
Rhythm Strip Recorder . . . . . . . . . . . . . . . . . . . . . . . . . . . . . . . . . . . . . . . . . . . . . . 3-3
Pulse Oximeter . . . . . . . . . . . . . . . . . . . . . . . . . . . . . . . . . . . . . . . . . . . . . . . . . . . . 3-3
Replacing Batteries . . . . . . . . . . . . . . . . . . . . . . . . . . . . . . . . . . . . . . . . . . . . . . . . . . . . 3-4
Scale . . . . . . . . . . . . . . . . . . . . . . . . . . . . . . . . . . . . . . . . . . . . . . . . . . . . . . . . . . . . 3-4
Blood Pressure Monitor . . . . . . . . . . . . . . . . . . . . . . . . . . . . . . . . . . . . . . . . . . . . . . 3-9
Rhythm Strip Recorder . . . . . . . . . . . . . . . . . . . . . . . . . . . . . . . . . . . . . . . . . . . . . 3-11
Pulse Oximeter . . . . . . . . . . . . . . . . . . . . . . . . . . . . . . . . . . . . . . . . . . . . . . . . . . . 3-12
4. Troubleshooting . . . . . . . . . . . . . . . . . . . . . . . . . . . . . . . . . . . . . . . . . . .4-1
Overview . . . . . . . . . . . . . . . . . . . . . . . . . . . . . . . . . . . . . . . . . . . . . . . . . . . . . . . . . . . .4-1
Radio Test . . . . . . . . . . . . . . . . . . . . . . . . . . . . . . . . . . . . . . . . . . . . . . . . . . . . . . . . 4-2
Troubleshooting Tables . . . . . . . . . . . . . . . . . . . . . . . . . . . . . . . . . . . . . . . . . . . . . . . . . 4-3
Home Hub/Telestation. . . . . . . . . . . . . . . . . . . . . . . . . . . . . . . . . . . . . . . . . . . . . . . 4-3
Scale . . . . . . . . . . . . . . . . . . . . . . . . . . . . . . . . . . . . . . . . . . . . . . . . . . . . . . . . . . . . 4-8
Rhythm Strip Recorder . . . . . . . . . . . . . . . . . . . . . . . . . . . . . . . . . . . . . . . . . . . . . 4-10
Blood Pressure Monitor . . . . . . . . . . . . . . . . . . . . . . . . . . . . . . . . . . . . . . . . . . . . . 4-11
Pulse Oximeter . . . . . . . . . . . . . . . . . . . . . . . . . . . . . . . . . . . . . . . . . . . . . . . . . . . 4-13
5. Specifications and Regulatory . . . . . . . . . . . . . . . . . . . . . . . . . . . . . . .5-1
Overview . . . . . . . . . . . . . . . . . . . . . . . . . . . . . . . . . . . . . . . . . . . . . . . . . . . . . . . . . . . .5-1
Intended Use/Indications for Use . . . . . . . . . . . . . . . . . . . . . . . . . . . . . . . . . . . . . . . . . . 5-2
Indications for Use. . . . . . . . . . . . . . . . . . . . . . . . . . . . . . . . . . . . . . . . . . . . . . . . . . 5-2
Contra-indications . . . . . . . . . . . . . . . . . . . . . . . . . . . . . . . . . . . . . . . . . . . . . . . . . . 5-2
Specifications. . . . . . . . . . . . . . . . . . . . . . . . . . . . . . . . . . . . . . . . . . . . . . . . . . . . . . . . . 5-3
Description. . . . . . . . . . . . . . . . . . . . . . . . . . . . . . . . . . . . . . . . . . . . . . . . . . . . . . . . 5-3
Technical Specifications . . . . . . . . . . . . . . . . . . . . . . . . . . . . . . . . . . . . . . . . . . . . . 5-8
Electromagnetic Compatibility (except M3813B Scale) . . . . . . . . . . . . . . . . . . . . . . . . 5-10
Emissions and Immunity . . . . . . . . . . . . . . . . . . . . . . . . . . . . . . . . . . . . . . . . . . . . 5-11
Contents/Tabla de Contenidos 3
Electromagnetic Compatibility (M3813B Scale) . . . . . . . . . . . . . . . . . . . . . . . . . . . . . 5-13
Emissions and Immunity . . . . . . . . . . . . . . . . . . . . . . . . . . . . . . . . . . . . . . . . . . . . 5-14
Regulatory Information . . . . . . . . . . . . . . . . . . . . . . . . . . . . . . . . . . . . . . . . . . . . . . . . 5-19
FCC Regulations. . . . . . . . . . . . . . . . . . . . . . . . . . . . . . . . . . . . . . . . . . . . . . . . . . 5-19
Telephone Regulatory Notice . . . . . . . . . . . . . . . . . . . . . . . . . . . . . . . . . . . . . . . . 5-20
Aviso . . . . . . . . . . . . . . . . . . . . . . . . . . . . . . . . . . . . . . . . . . . . . . . . . . . . . . . . . . . . . . . . . -i
Información propiedad del titular. . . . . . . . . . . . . . . . . . . . . . . . . . . . . . . . . . . . . . . . . -i
Historia de la publicación . . . . . . . . . . . . . . . . . . . . . . . . . . . . . . . . . . . . . . . . . . . . . -ii
6. Introducción. . . . . . . . . . . . . . . . . . . . . . . . . . . . . . . . . . . . . . . . . . . . . . 6-1
Bienvenido. . . . . . . . . . . . . . . . . . . . . . . . . . . . . . . . . . . . . . . . . . . . . . . . . . . . . . . . . . . 6-1
Cómo funciona el sistema. . . . . . . . . . . . . . . . . . . . . . . . . . . . . . . . . . . . . . . . . . . . 6-1
Funciona-miento continuo del sistema . . . . . . . . . . . . . . . . . . . . . . . . . . . . . . . . . . 6-1
¡Gracias! . . . . . . . . . . . . . . . . . . . . . . . . . . . . . . . . . . . . . . . . . . . . . . . . . . . . . . . . . 6-1
Sistema de Servicios de Telemonitorización Philips . . . . . . . . . . . . . . . . . . . . . . . . . . . 6-2
Seguridad y precauciones . . . . . . . . . . . . . . . . . . . . . . . . . . . . . . . . . . . . . . . . . . . . . . . 6-3
Siga las instrucciones . . . . . . . . . . . . . . . . . . . . . . . . . . . . . . . . . . . . . . . . . . . . . . . 6-3
Convenciones seguidas en este documento . . . . . . . . . . . . . . . . . . . . . . . . . . . . . 6-3
Símbolos en pantalla . . . . . . . . . . . . . . . . . . . . . . . . . . . . . . . . . . . . . . . . . . . . . . . . . . . 6-5
7. Conjunto de dispositivos para telemonitorización Philips . . . . . . . . 7-1
Generalidades . . . . . . . . . . . . . . . . . . . . . . . . . . . . . . . . . . . . . . . . . . . . . . . . . . . . . . . . 7-1
Descripción de los dispositivos . . . . . . . . . . . . . . . . . . . . . . . . . . . . . . . . . . . . . . . . . . . 7-2
CDD/TeleEstación. . . . . . . . . . . . . . . . . . . . . . . . . . . . . . . . . . . . . . . . . . . . . . . . . . 7-2
Báscula . . . . . . . . . . . . . . . . . . . . . . . . . . . . . . . . . . . . . . . . . . . . . . . . . . . . . . . . . . 7-5
Monitor de tensión arterial (MTA) . . . . . . . . . . . . . . . . . . . . . . . . . . . . . . . . . . . . . . 7-7
Registrador del ritmo en tiras (RRT) . . . . . . . . . . . . . . . . . . . . . . . . . . . . . . . . . . . 7-10
Oxímetro de pulso. . . . . . . . . . . . . . . . . . . . . . . . . . . . . . . . . . . . . . . . . . . . . . . . . 7-12
Cable del glucómetro . . . . . . . . . . . . . . . . . . . . . . . . . . . . . . . . . . . . . . . . . . . . . . 7-14
Uso de los dispositivos . . . . . . . . . . . . . . . . . . . . . . . . . . . . . . . . . . . . . . . . . . . . . . . . 7-15
CDD/TeleEstación. . . . . . . . . . . . . . . . . . . . . . . . . . . . . . . . . . . . . . . . . . . . . . . . . 7-15
Báscula . . . . . . . . . . . . . . . . . . . . . . . . . . . . . . . . . . . . . . . . . . . . . . . . . . . . . . . . . 7-21
Monitor de tensión arterial (MTA) . . . . . . . . . . . . . . . . . . . . . . . . . . . . . . . . . . . . . 7-30
Registrador del ritmo en tiras (RRT) . . . . . . . . . . . . . . . . . . . . . . . . . . . . . . . . . . . 7-39
4 Contents/Tabla de contenidos
Oxímetro de pulso . . . . . . . . . . . . . . . . . . . . . . . . . . . . . . . . . . . . . . . . . . . . . . . . . 7-41
Glucómetro . . . . . . . . . . . . . . . . . . . . . . . . . . . . . . . . . . . . . . . . . . . . . . . . . . . . . . 7-44
8. Mantenimiento . . . . . . . . . . . . . . . . . . . . . . . . . . . . . . . . . . . . . . . . . . . .8-1
Generalidades . . . . . . . . . . . . . . . . . . . . . . . . . . . . . . . . . . . . . . . . . . . . . . . . . . . . . . . . 8-1
Limpieza de dispositivos . . . . . . . . . . . . . . . . . . . . . . . . . . . . . . . . . . . . . . . . . . . . . . . . 8-2
Almacenamiento . . . . . . . . . . . . . . . . . . . . . . . . . . . . . . . . . . . . . . . . . . . . . . . . . . . . . . 8-3
Monitor de tensión arterial . . . . . . . . . . . . . . . . . . . . . . . . . . . . . . . . . . . . . . . . . . . . 8-3
Registrador del ritmo en tiras (RRT) . . . . . . . . . . . . . . . . . . . . . . . . . . . . . . . . . . . . 8-3
Oxímetro de pulso . . . . . . . . . . . . . . . . . . . . . . . . . . . . . . . . . . . . . . . . . . . . . . . . . . 8-3
Sustitución de las baterías . . . . . . . . . . . . . . . . . . . . . . . . . . . . . . . . . . . . . . . . . . . . . . . 8-4
Báscula . . . . . . . . . . . . . . . . . . . . . . . . . . . . . . . . . . . . . . . . . . . . . . . . . . . . . . . . . . 8-4
Monitor de tensión arterial (MTA) . . . . . . . . . . . . . . . . . . . . . . . . . . . . . . . . . . . . . . 8-9
Registrador del ritmo en tiras (RRT) . . . . . . . . . . . . . . . . . . . . . . . . . . . . . . . . . . . 8-10
Oxímetro de pulso . . . . . . . . . . . . . . . . . . . . . . . . . . . . . . . . . . . . . . . . . . . . . . . . . 8-12
9. Solución de problemas . . . . . . . . . . . . . . . . . . . . . . . . . . . . . . . . . . . . .9-1
Generalidades . . . . . . . . . . . . . . . . . . . . . . . . . . . . . . . . . . . . . . . . . . . . . . . . . . . . . . . . 9-1
Prueba de radio . . . . . . . . . . . . . . . . . . . . . . . . . . . . . . . . . . . . . . . . . . . . . . . . . . . . 9-2
Tablas de solución de problemas . . . . . . . . . . . . . . . . . . . . . . . . . . . . . . . . . . . . . . . . . 9-3
CDD/TeleEstación . . . . . . . . . . . . . . . . . . . . . . . . . . . . . . . . . . . . . . . . . . . . . . . . . . 9-3
Báscula . . . . . . . . . . . . . . . . . . . . . . . . . . . . . . . . . . . . . . . . . . . . . . . . . . . . . . . . . . 9-8
Registrador del ritmo en tiras (RRT) . . . . . . . . . . . . . . . . . . . . . . . . . . . . . . . . . . . 9-12
Monitor de tensión arterial . . . . . . . . . . . . . . . . . . . . . . . . . . . . . . . . . . . . . . . . . . . 9-13
Oxímetro de pulso . . . . . . . . . . . . . . . . . . . . . . . . . . . . . . . . . . . . . . . . . . . . . . . . . 9-15
10. Especificaciones e información normativa . . . . . . . . . . . . . . . . . . .10-1
Generalidades . . . . . . . . . . . . . . . . . . . . . . . . . . . . . . . . . . . . . . . . . . . . . . . . . . . . . . . 10-1
Intención de uso/Indicaciones . . . . . . . . . . . . . . . . . . . . . . . . . . . . . . . . . . . . . . . . . . . 10-2
Indicaciones. . . . . . . . . . . . . . . . . . . . . . . . . . . . . . . . . . . . . . . . . . . . . . . . . . . . . . 10-2
Contraindicaciones . . . . . . . . . . . . . . . . . . . . . . . . . . . . . . . . . . . . . . . . . . . . . . . . 10-2
Especificaciones . . . . . . . . . . . . . . . . . . . . . . . . . . . . . . . . . . . . . . . . . . . . . . . . . . . . . 10-3
Descripción . . . . . . . . . . . . . . . . . . . . . . . . . . . . . . . . . . . . . . . . . . . . . . . . . . . . . . 10-3
Especificaciones técnicas . . . . . . . . . . . . . . . . . . . . . . . . . . . . . . . . . . . . . . . . . . . 10-9
Compatibilidad electromagnética (excepto el M3813B y el M3815B) . . . . . . . . . . . . 10-11
Contents/Tabla de Contenidos 5
Emisiones e inmunidad . . . . . . . . . . . . . . . . . . . . . . . . . . . . . . . . . . . . . . . . . . . . 10-12
Compatibilidad electromagnética (M3813B y M3815B) . . . . . . . . . . . . . . . . . . . . . . 10-14
Emisiones e inmunidad . . . . . . . . . . . . . . . . . . . . . . . . . . . . . . . . . . . . . . . . . . . . 10-15
Información normativa . . . . . . . . . . . . . . . . . . . . . . . . . . . . . . . . . . . . . . . . . . . . . . . . 10-20
Normativa de la FCC. . . . . . . . . . . . . . . . . . . . . . . . . . . . . . . . . . . . . . . . . . . . . . 10-20
Aviso de normativa telefónica . . . . . . . . . . . . . . . . . . . . . . . . . . . . . . . . . . . . . . . 10-21
6 Contents/Tabla de contenidos

Introduction 1-1
Introduction
1
Introduction
Welcome
Welcome to Philips Telemonitoring Services.
When you use this product, you’ll take a few minutes every day to
measure your weight, vital signs, and/or glucose.
These measurements will help you and your healthcare provider make
better decisions about your care. You are providing information that can
help improve you quality of life.
How the
System
Works
With this system, it’s easy to take your measurements from the comfort
of you home. The measurements are sent over your phone line to your
healthcare provider’s computer
Feel free to talk on your phone at any time -- the system is “smart”
enough to know when the phone line is open. It will wait and then send
the information after you hang up.
Keeping the
System
Working
If at any time you suspect something is wrong with any of the devices,
immediately contact your healthcare provider. Philips will replace any
defective device. You can also cross-check your results with another
device if additional measurement devices of the same type are available
to you.
This Guide contains easy-to-follow steps for taking your measurements.
It also shows you how to maintain the devices so that they will continue
to take true readings.
Thank You! Thank you for taking an active role in your home healthcare plan. Philips
and your healthcare provider applaud your efforts to actively participate
in you health care plan.
Philips Telemonitoring Services System
1-2 Introduction
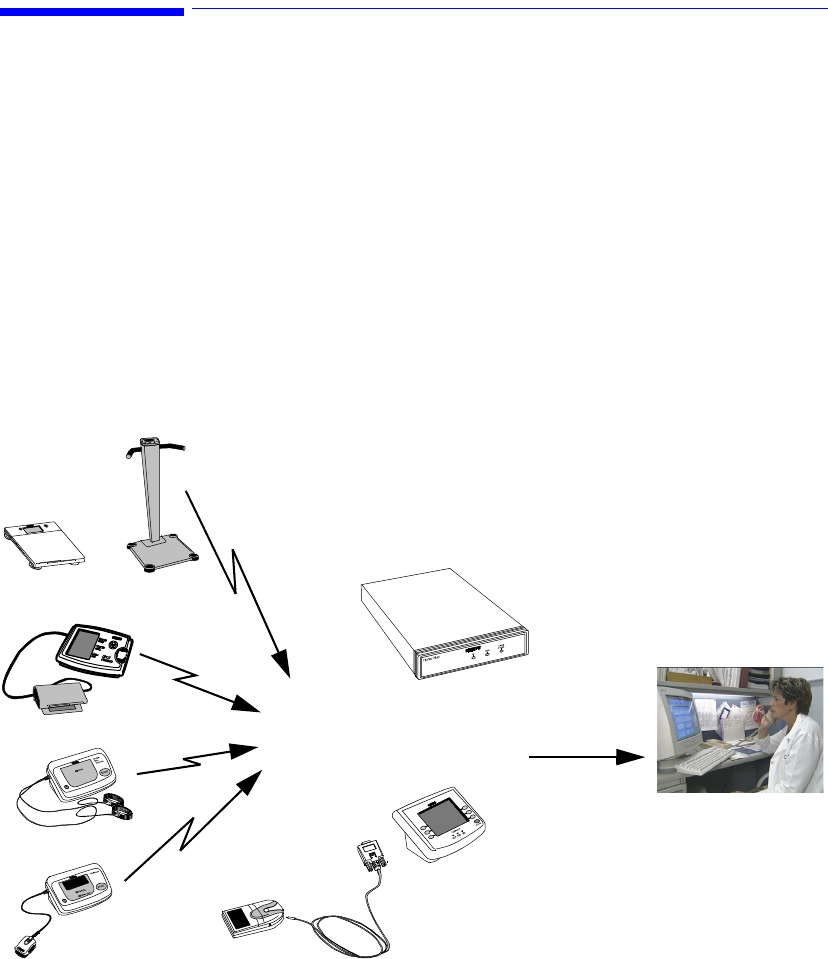
Philips Telemonitoring Services System
Your Philips Telemonitoring Services system includes a set of
measurement devices known as the Patient Telemonitoring Set. Each
device takes an important measurement -- such as weight, blood
pressure and pulse, heart rhythm, %SpO2 -- and then wirelessly sends
that measurement to the Home Hub or TeleStation. A patient’s glucose
meter can also send glucose measurements to a TeleStation using a
special cable.
Your healthcare provider decides whether you will use one or all of the
measurement devices below. The HomeHub/TeleStation is the
"communications center." It receives your measurements from the
devices and sends them over your phone line to your healthcare
provider’s computer. The computer keeps a record of all of your vital
sign measurements for review by your healthcare provider.
Patient Telemonitoring Set
Scale
Blood Pressure Monitor
Rhythm Strip Recorder
Pulse Oximeter
Radio Telephone
Home Hub
or
TeleStation
Healthcare
TransmissionTransmission
Provider
SteadyStandard or
Glucose Meter

Safety and Precautions
Introduction 1-3
Safety and Precautions
Follow
Instructions
Follow your doctor’s instructions about symptoms that require you to
contact your healthcare provider. Use of this device is not intended to
replace your existing therapy or drug administration. Remember, only
your healthcare provider is trained to interpret the results. He or she will
tell you when and how often to take your vital signs. Please read all of
the instructions in this guide before using the Philips Telemonitoring
System and follow the instructions carefully.
Document
Conventions
The following conventions will be used in this Guide to alert you to
special or important information in the text.
Warnings Warnings are information you should know to avoid a hazard that
could result in severe injury or death.
Observe the following Warnings with all devices of the Philips
Telemonitoring System.
Warning •Do not let anyone else use these devices. They are provided for
your use only.
•Do not swap devices with a neighbor or family member who has
the same or similar system.
• These devices are not intended to be used to call for emergency
medical attention or response.
•Do not try to fix a device yourself. If there’s a problem, call your
healthcare provider.
•Do not use a device with the battery door removed.
• Avoid exposing the devices to extremes in temperature, humidity,
direct sunlight, shock, dust spill, or standing water.
•Do not let children use the device.
• Throw away packing materials and plastic bags right away. They
are a hazard for children.

Safety and Precautions
1-4 Introduction
• Small parts that can be removed from a device and swallowed --
such as the Home Hub rubber feet and Home Hub power adapter
clip -- are hazards for children and pets.
• To prevent shock, connect cables only as described in this Guide.
•Do not connect anything to this system other than Philips
Telemonitoring Services devices or glucose meters approved by
your healthcare provider.
• To prevent shock, do not use devices during a lightning storm.
• Call your healthcare provider if you are inured using any of these
devices.
Cautions Cautions are information you should know to avoid a hazard that could
result in personal injury or property damage.
Observe the following Cautions with all devices of the Philips
Telemonitoring System.
Caution • Read this Guide carefully before using these devices.
• Use these devices only as directed by your healthcare provider.
• Follow your physician’s instructions regarding symptoms that
require direct contact with your healthcare provider.
• Use of these device is not a substitute for medical care.
Notes Notes contain additional information on usage of the Patient
Telemonitoring System and its devices.
Note
Bold
Typeface
Objects of actions in procedures appear in bold typeface, as shown in the
following example:
Step 1. Select the Update button.
Display Symbols
Introduction 1-5
Display Symbols
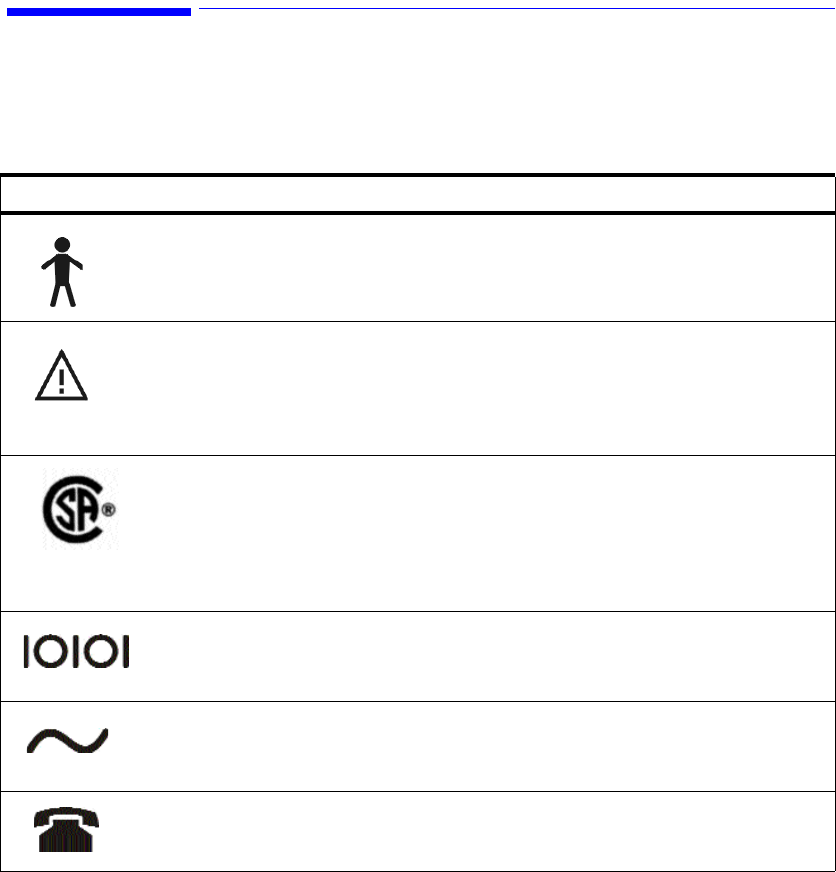
A number of symbols are displayed on various devices or in
documentation of the Philips Telemonitoring System. Their meaning and
the devices on which they may appear are given in the following table.
Symbol Description Applicable Devices
Type B Patient Applied Parts as defined in
IEC 60601-1.
Not suitable for direct cardiac application.
Scale (M3813A, M3813B)
Blood Pressure Monitor
Rhythm Strip Recorder
Pulse Oximeter
Attention: Consult accompanying documents. Home Hub/TeleStation
Scale (M3813A, M3813B)
Blood Pressure Monitor
Rhythm Strip Recorder
Pulse Oximeter
Meets UL-1950, CSA-950, IEC-60950 standards
Meets CSA IEC-60950-1 standards
Home Hub/TeleStation
TeleStation
Scale (M3813A)
Blood Pressure Monitor
Rhythm Strip Recorder
Pulse Oximeter
In TelePort serial data port for connection to
Philips devices only
TeleStation
AC Power adapter connection (9.0VAC/500mA
Use Philips-supplied adapter only)
TeleStation
Telephone or telephone line TeleStation

Display Symbols
1-6 Introduction
Meets standards CSA 60601-1, UL 60601-1
Scale (M3813B)
Meets Class B standards. Home Hub/TeleStation
Standard Scale
Steady Scale
Blood Pressure Monitor
Rhythm Strip Recorder
Pulse Oximeter
Meets Part 15 standards. Standard Scale
Steady Scale
Blood Pressure Monitor
Rhythm Strip Recorder
Pulse Oximeter
Meets Part 68 standards Home Hub/TeleStation
Symbol Description Applicable Devices
US

Philips Telemonitoring Set 2-1
Introduction
2
Philips Telemonitoring Set
Overview
Chapter 2 provides a detailed description of the devices of the Philips
Telemonitoring Set and how to use them. It includes the following.
Page
Device Descriptions . . . . . . . . . . . . . . . . . . . . . . . . . . 2-2
Home Hub/TeleStation . . . . . . . . . . . . . . . . . . . . . 2-2
Scale . . . . . . . . . . . . . . . . . . . . . . . . . . . . . . . . . . . 2-5
Blood Pressure Monitor. . . . . . . . . . . . . . . . . . . . . 2-7
Rhythm Strip Recorder . . . . . . . . . . . . . . . . . . . . . 2-9
Pulse Oximeter . . . . . . . . . . . . . . . . . . . . . . . . . . 2-11
Glucose Meter Cable. . . . . . . . . . . . . . . . . . . . . . 2-13
Device Usage . . . . . . . . . . . . . . . . . . . . . . . . . . . . . . 2-14
Home Hub/TeleStation . . . . . . . . . . . . . . . . . . . . 2-14
Home Hub . . . . . . . . . . . . . . . . . . . . . . . . . . . . . . . 2-14
TeleStation . . . . . . . . . . . . . . . . . . . . . . . . . . . . . . 2-14
Answering Survey Questions . . . . . . . . . . . . . . . . . . 2-15
Entering Measurements Manually . . . . . . . . . . . . . . 2-17
Scale . . . . . . . . . . . . . . . . . . . . . . . . . . . . . . . . . . 2-20
Measuring Weight . . . . . . . . . . . . . . . . . . . . . . . . . 2-20
Measuring Weight with a Walker . . . . . . . . . . . . . . 2-22
Changing Voice Volume . . . . . . . . . . . . . . . . . . . . 2-25
Changing Language . . . . . . . . . . . . . . . . . . . . . . . 2-26
Changing Weight Units . . . . . . . . . . . . . . . . . . . . . 2-27
Blood Pressure Monitor. . . . . . . . . . . . . . . . . . . . 2-29
Measuring Blood Pressure . . . . . . . . . . . . . . 2-30
Procedure for M3815A Blood Pressure Monitor 2-34
Procedure for M3815B Blood Pressure Monitor 2-34
Rhythm Strip Recorder . . . . . . . . . . . . . . . . . . . . 2-37
Measuring Heart Rhythm . . . . . . . . . . . . . . . . . 2-37
Pulse Oximeter . . . . . . . . . . . . . . . . . . . . . . . . . . 2-39
Measuring Blood Oxygen and Pulse Rate . . . . . . 2-40
Glucose Meter . . . . . . . . . . . . . . . . . . . . . . . . . . 2-42
Recording Glucose Measurements . . . . . . . . . . . . 2-42
Device Descriptions
2-2 Philips Telemonitoring Set
Device Descriptions
The Philips Telemonitoring Set consists of a Home Hub or
TeleStation, which serves as the "communications center" of the system,
and devices that measure important healthcare parameters -- Scale
(weight), Blood Pressure Monitor (blood pressure), Rhythm Strip
Recorder (heart rhythm), Pulse Oximeter (%SpO2, pulse rate), Glucose
Meter (glucose level).
Note: The PTS system provides only a cable for connecting the
patient’s glucose meter to the system.
This section provides a brief description of each of these devices. More
detailed descriptions of how to use each device to make its measurement
are given in the sections that follow.
Home Hub/
TeleStation
You will have either a Home Hub or a TeleStation, depending on the
home healthcare plan designed for you.
After you take a measurement, such as weight, the Home Hub/
TeleStation receives the result. It then sends the result to your healthcare
provider’s computer when both telephone lines (yours and the
computer’s) are free.
If you pick up your telephone while the Home Hub/TeleStation is
dialing or sending the result, you will not hear a dial tone. Hang up the
phone and wait for 5 seconds. Then make your call. The Home Hub/
TeleStation will send the result when the phone line is open. Your
healthcare provider will call you if your results are not received.
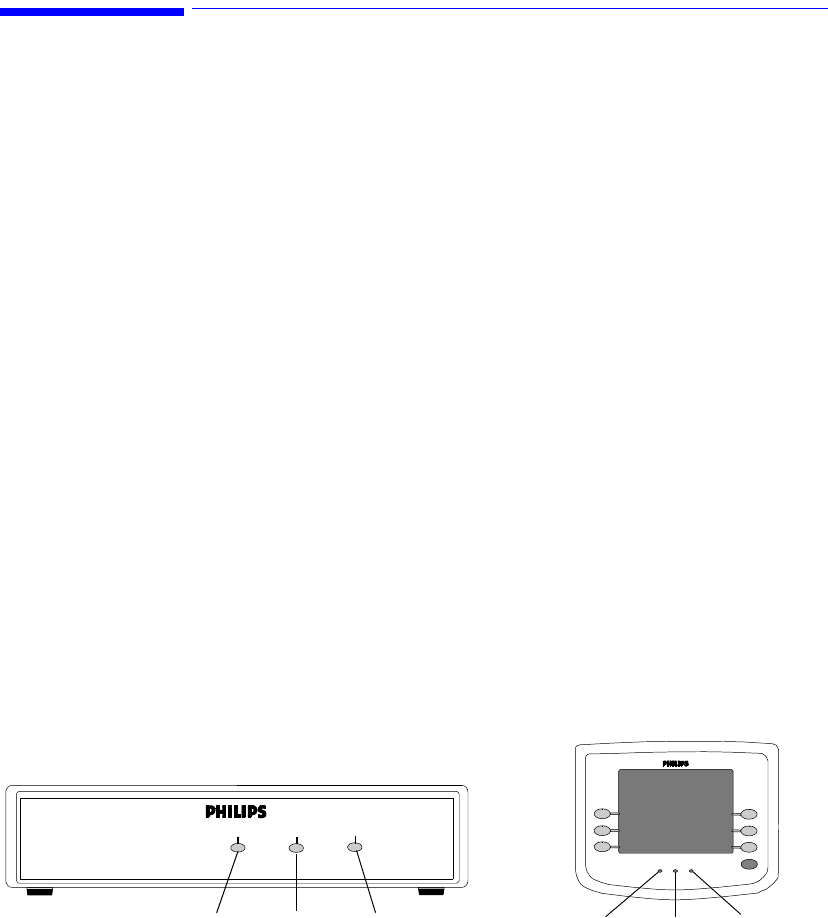
Home Hub
on data
using
phone
Home Hub (M3812A)
TeleStation (M3812B)
on data using
phone
on/survey
waiting using
phone
holding
results
TeleStation
on/survey
waiting
go back
holding
results using
phone

Device Descriptions
Philips Telemonitoring Set 2-3
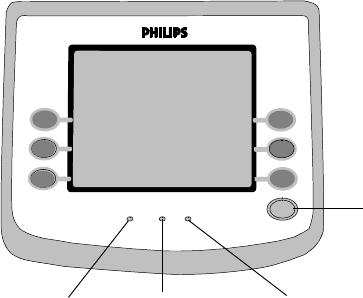
Indicators The Home Hub and TeleStation have lights on the front that indicate
what it is currently doing.
The on or on/survey waiting light stays lit as long as the Home Hub/
TeleStation is plugged in.
If you have the TeleStation and the on/survey waiting light is
flashing, you have questions to answer.
Your healthcare provider may activate the TeleStation to beep every 60
seconds to alert you that a survey is waiting.
The data or holding results light comes on when the Home Hub or
TeleStation receives your measurement results and stays on until those
results have been sent over the telephone.
The using phone light comes on when the Home Hub or TeleStation
is sending your results to your healthcare provider’s computer.
Warnings The following Warnings apply to the use of Home Hub/TeleStations.
Warning •Use only the Philips-supplied power adapter for the Home Hub/
TeleStation.
–Do not place anything on top of the adapter.
– Plug the adapter into an outlet near the Home/Hub Telestation for
easy access.
–Unplug the adapter from the outlet to disconnect.
•Do not place the Home Hub/TeleStation where anyone, especially
children, can step on, trip over or get tangled in phone or power
adapter cords.
•Do not place the Home Hub/TeleStation near running water or
where liquids (for example, a cup of coffee or water in a vase of
flowers) might spill onto it.
•Unplug power and phone cords before cleaning the Home Hub/
TeleStation.and prior to an impending lightning storm
•Do not put lighted tobacco products or candles on Home Hub/
TeleStations.
•Do not overload circuits where Home Hub/TeleStation are
installed.

Device Descriptions
2-4 Philips Telemonitoring Set
• If you have a personal response service (except for LifeLine®
Systems), it must be installed on its own phone line (not just a
separate telephone jack).
If you have a LifeLine® System telephone, ensure that the Home
Hub/Telestation is plugged into the phone jack labeled AUX on the
back of the LifeLine® unit.
•Do not touch, use, clean, or handle the Home Hub/TeleStation or
your connected glucose meter during a thunderstorm.
Cautions The following Cautions apply to using the HomeHub or TeleStation.
Caution • Avoid placing the Home Hub/TeleStation on a metal surface or
inside a metal enclosure as it can interfere with the radio signal.
•Do not use electronic devices, such as cordless and cellular phones
and computers, near the Home Hub/TeleStation
• Avoid placing large appliances or metal furniture near the Home
Hub/TeleStation as they can block radio signals from the
measurement devices.
• High temperatures can affect the LCD screen of your TeleStation.
– Choose a location away from direct sunlight.
– Operate the TeleStation at room temperature.
• Make sure that the Home Hub/TeleStation is plugged into its
telephone jack and electrical outlet at all times, except when
cleaning or prior to an impending lightning storm.
• Make sure that a light switch or power strip does not turn off power
to the Home Hub/TeleStation.
• Clear voice mail messages. Telephone services that modify the dial
tone, such as voice mail, can interfere with transmissions made by
the Home Hub/TeleStation.
• If you are using a glucose meter connected to your TeleStation:
– Follow the glucose meter manufacturer’s instructions.
– Follow any additional instructions from your healthcare provider.
–Do not take glucose measurements while your glucose meter is
connected to your TeleStation.
Device Descriptions
Philips Telemonitoring Set 2-5
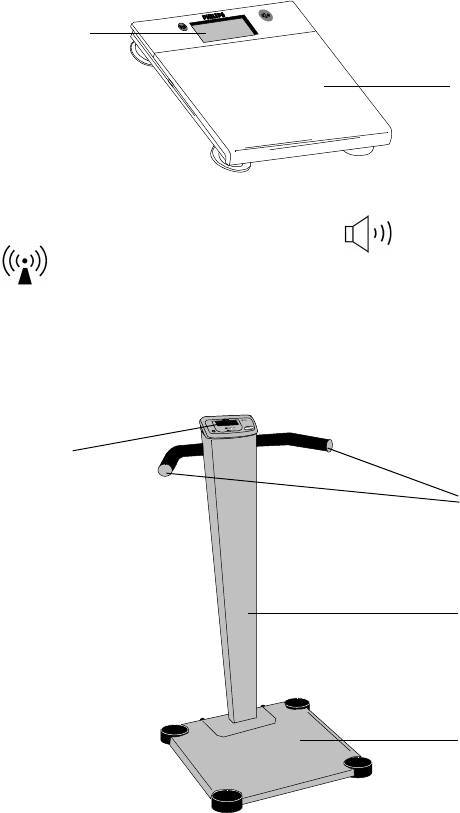
Scale You may have either a Standard Scale or a Steady Scale. Both scales
speak your weight.
Standard
Scale
The Standard Scale is for people who can get on and off the Scale
without help. It has a maximum weight limit of 440 lbs (200 kgs).
The scale announces your weight (in English or Spanish).
The front panel has a Volume control button and a Radio Test
button .
Batteries are stored underneath the platform.
Steady Scale The Steady Scale has a column with grab bars to help people keep their
balance when using the Scale. It has a maximum weight limit of 365 lbs
(166 kgs).
Display
Platform
Grab Bars
Column
Display
Platform

Device Descriptions
2-6 Philips Telemonitoring Set
The Steady Scale announces your weight in English only.
The front panel has a Volume control and a Radio Test button .
Batteries are stored underneath the display case.
Warnings The following Warnings apply to use of the Scale.
Warning •Do not use the Scale in standing water.
•Do not store the Scale where children or pets could get hurt by
playing with the grab bars and knocking the Scale over.
Cautions The following Cautions apply to use of the Scale.
Caution •Do not use the Standard Scale if you weigh over 440 pounds
(200 kilograms).
•Do not use the Steady Scale if you weigh over 365 pounds
(166 kilograms).
• Keep the Scale in a dry, temperature controlled place,
not in the bathroom.
• Position the Scale away from metal objects, such as a refrigerator,
as they can block transmission to your Home Hub/TeleStation.
• Place the Scale on the floor between 1 to 3 inches (2.5 to 7.5 cm)
from a wall and facing it.
• Only one person should use the Scale.
•Do not use the Scale to measure anything other than yourself, such
as a package or pet, because all measurements are sent to your
healthcare provider.
•Do not drop or drag the Scale.
•Do not step on the Scale’s corners.
• The scale should be used on a flat, hard surface if at all possible.
• If the scale is used on carpet, carpet feet may have to be installed.
• Traveling with the Scale is not recommended.
Note If you don’t feel comfortable taking your weight using the Standard Scale,
contact your healthcare provider.
T
Device Descriptions
Philips Telemonitoring Set 2-7
Blood
Pressure
Monitor
You may have a Blood Pressure Monitor if your home healthcare plan
includes measuring your blood pressure and pulse.
The Blood Pressure Monitor (also called a BP Monitor) is a plastic
display case with a removable blood pressure cuff. The BP Monitor
displays your blood pressure and pulse.
The BP Monitor has an air hose connector on the left side. The blood
pressure cuff has a metal D-ring (a metal bar that the cuff slides through
and loops over), an air hose, and an air connector. Batteries are stored
underneath the display case.
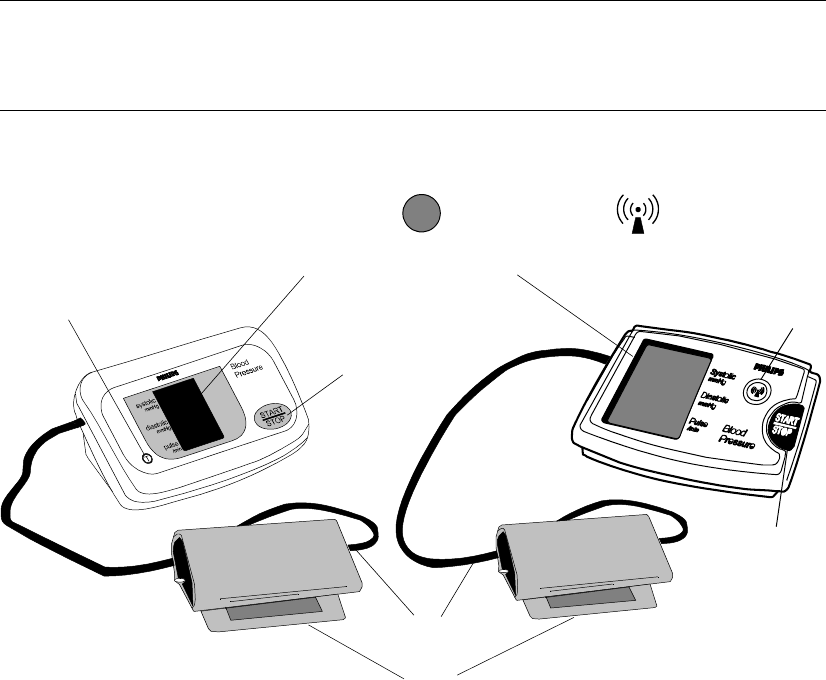
Note Two models of BP Monitor are available (M3815A and M3815B) and
are shown below. Check your BP Monitor to determine which one you
have. The part numbers are shown on the rear of the monitor.
BP Monitor
Display Case
Both monitors have a display window that shows the systolic and
diastolic blood pressure and pulse rate, a START/STOP button and a
RADIO TEST button -- . (on M3815A) or (on M3815B).
T
START/
STOP
button
RADIO
TEST
button
BP Display Window
Air Hose
Cuff
START/
STOP
button
RADIO
TEST
button M3815A M3815B

Device Descriptions
2-8 Philips Telemonitoring Set
Warnings The following Warnings apply to use of the BP Monitor.
Warning • Avoid storing the BP Monitor where children or pets can get at it.
There is a risk of injury if they get tangled in the air hose or if the
cuff inflates.
Cautions The following Cautions apply to use of the BP Monitor.
Caution • If you get an error message when taking your blood pressure or
think the reading may be wrong, take it again.
•Do not store the BP Monitor inside a metal drawer or container,
such as a file cabinet. It will interfere with the radio signal to the
Home Hub/TeleStation.
•Do not store the BP Monitor with the cuff assembly twisted or
folded tightly.
• Avoid tugging at the air hose or using it to carry the BP Monitor.
• Watch the display when taking your blood pressure.
– If the numbers go up to 330 mmHg,
press the START/STOP button immediately.
– If the numbers drop down to 15 mmHg and stay that way for
more than 3 minutes,
press the START/STOP button again.
– Contact your healthcare provider.
Device Descriptions
Philips Telemonitoring Set 2-9
Rhythm
Strip
Recorder
You may have a Rhythm Strip Recorder if your healthcare plan includes
recording your heart rhythm.
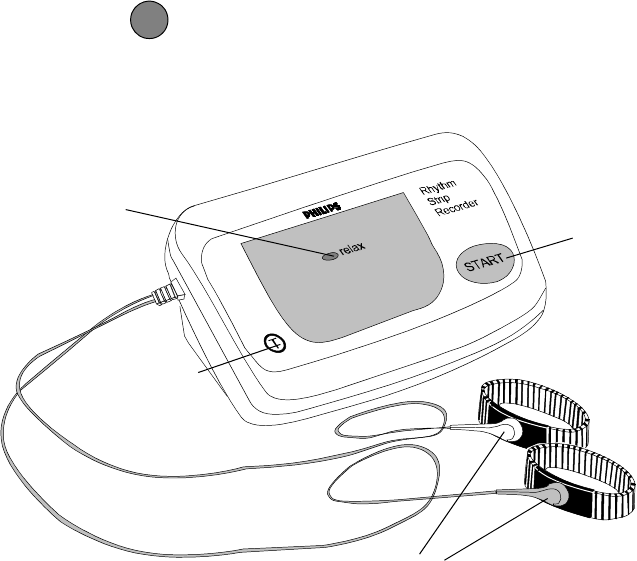
The Rhythm Strip Recorder is a plastic display case with an attached
dual cable with snap-on connectors. Each of the two metal wristbands
has a black plastic pad. One side of the pad has a metal snap and the
other side has a flat piece of metal. Batteries are stored underneath the
display case
Rhythm Strip
Recorder
Display Case
The display case has a START button, a RELAX light, and a RADIO
TEST button .
T
START
Button
RADIO
TEST
Button
Rhythm Strip Recorder Display Unit
Relax
Light
Wristbands
Snap-on
Connectors
Dual Cable

Device Descriptions
2-10 Philips Telemonitoring Set
Warnings The following Warnings apply to use of the Rhythm Strip Recorder.
Warning •Do not store the Recorder where children or pets can get tangled in
the cables and the wristband.
• The wristbands may cause skin irritation, injury or an allergic
reaction to metal.
– Stop using the recorder if you have redness, rash, or other skin
problems.
– Contact your healthcare provider.
Cautions The following Cautions apply to use of the Rhythm Strip Recorder.
Caution •Do not store the Recorder inside a metal drawer or container, such
as a file cabinet. It will interfere with the radio signal to the Home
Hub/TeleStation.
• Store the Recorder so that the dual cable is not twisted or kinked.
• Avoid tugging at the dual cable or carrying the Recorder by the
cable.
Device Descriptions
Philips Telemonitoring Set 2-11
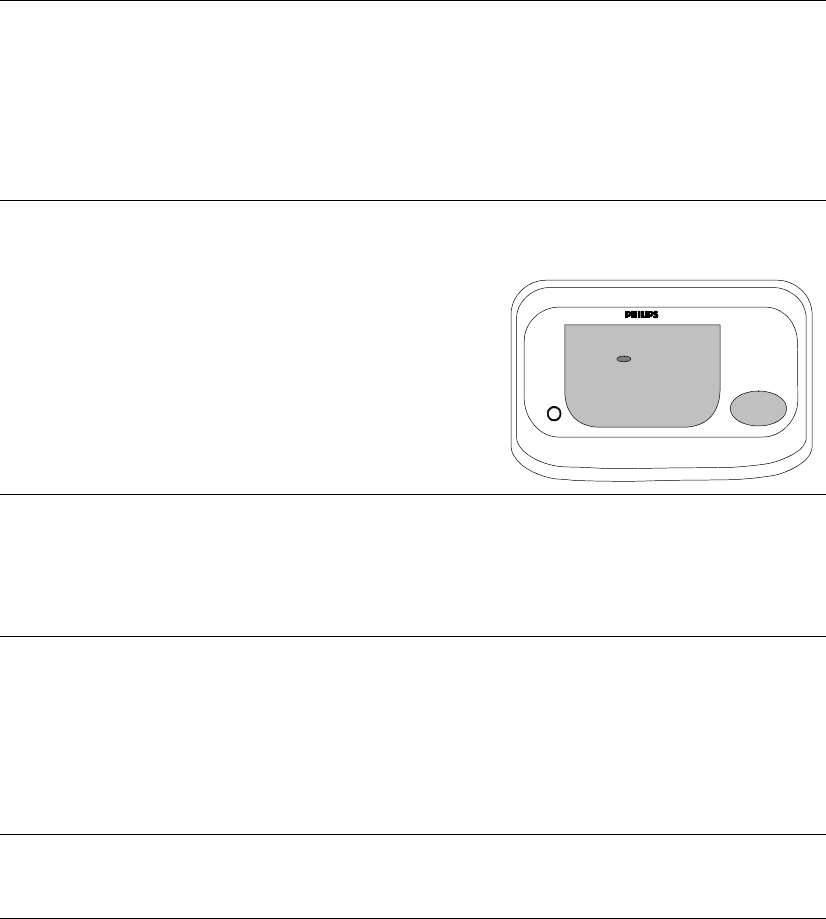
Pulse
Oximeter
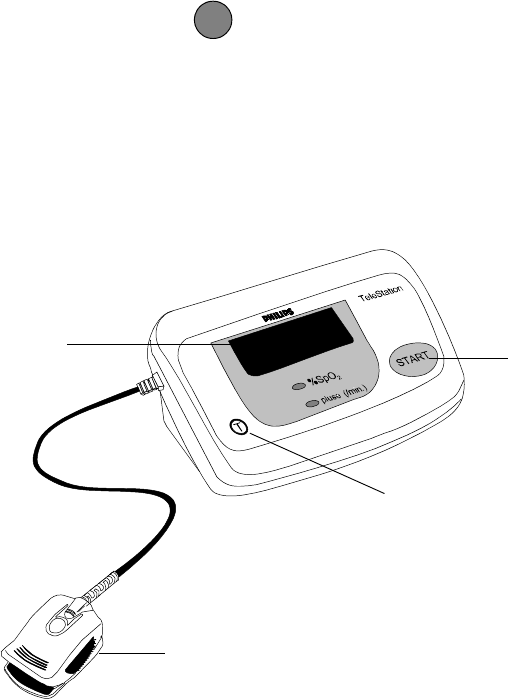
The Pulse Oximeter is a plastic display case with a finger-clip sensor
attached to it. The front of the case has the following elements, as shown
in the figure below. The rear of the case has a compartment for batteries
that power the device.
Pulse
Oximeter
Display Case
An LED display window shows the blood oxygen level (%SpO2) and
pulse rate (in beats per minute) measured from the end of your finger.
LEDs below the display window light to indicate which measurement is
being displayed -- %SpO2 or pulse (/min.).
Pushing the START button causes the Pulse Oximeter to begin taking a
measurement.
The Radio Test button is used to test the transmission of
measurements from the Pulse Oximeter to the Home Hub or TeleStation.
The Finger-clip sensor is used to measure your blood oxygen level
and pulse rate. The sensor is clipped on the end of one of your fingers.
The Finger-clip contains an LED light source that shines light on your
finger. Light transmitted through the blood in your finger is received by a
photo sensitive element and electronics in the display case uses the
transmitted light to determine your blood oxygen level and pulse rate.
T
START
button
Finger-clip
sensor
Display
Radio Test
button

Device Descriptions
2-12 Philips Telemonitoring Set
Warnings The following Warnings apply to use of the Pulse Oximeter.
Warning •Do not use a damaged sensor.
•Do not let children use the device.
• Avoid exposing the devices to extremes in temperature, humidity,
direct sunlight, shock, dust spill, or standing water.
• The sensor may cause skin irritation, injury or an allergic reaction.
•Do not use the device with the battery door removed.
• Stop using the Pulse Oximeter if you have redness, rash, or other
skin problems.
• Discontinue use if skin tear or damage occurs. Contact your
healthcare provider.
• To prevent shock, do not use devices during a lightning storm.
Cautions The following Cautions apply to use of the Pulse Oximeter.
Caution • Read the procedures carefully before using this device.
• Use this device only as directed by your healthcare provider.
• Follow your physician’s instructions regarding symptoms that
require direct contact with your healthcare provider.
• This device is not intended for continuous monitoring.
• This device may not work properly on all people. If you are unable
to achieve stable readings within 3 or 4 attempts, discontinue use
and contact your healthcare provider.
• Use of this device is not a substitute for medical care.
• If you have any questions regarding how to use your Pulse
Oximeter, please contact your healthcare provider.
• Abnormal hemoglobin may affect accuracy.
Device Descriptions
Philips Telemonitoring Set 2-13
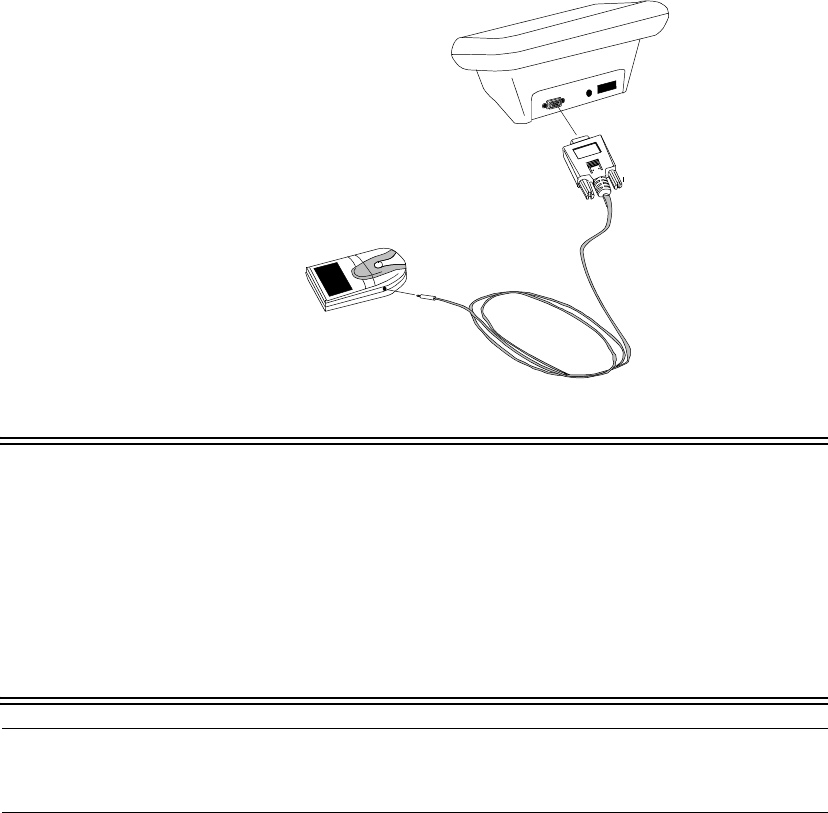
Glucose
Meter Cable
The PTS system also provides a Glucose Meter Cable for connecting
your Glucose Meter to a TeleStation to record your glucose
measurements. One end of the Glucose Meter Cable plugs into the
connector on your Glucose Meter and the other end plugs into a mating
connector on the rear of the TeleStation.
Warnings The following Warnings apply to the use of a Glucose Meter Cable.
Warning Glucose Meter readings can only be recorded on a TeleStation. They
cannot be recorded on a Home Hub.
The PTS System operates only with the OneTouch Basic and
OneTouch Profile glucose meters. No other glucose meters should be
connected to a TeleStation.
Do not measure your glucose while your Glucose Meter is connected
to the TeleStation.
Clean your finger of blood before using the TeleStation.
Note For procedures on how to measure your glucose with your Glucose Meter
refer to its Instructions for Use manual.
TeleStation
Glucose Meter Cable
Glucose
Meter

Device Usage
2-14 Philips Telemonitoring Set
Device Usage
This section describes how to use each of the devices of the Philips
Telemonitoring Set -- HomeHub/TeleStation, Scale, Blood Pressure
Monitor, Rhythm Strip Recorder, and Pulse Oximeter.
Home Hub/
TeleStation
The Home Hub or TeleStation is the communications center for your
Patient Telemonitoring Set. You may have a Home Hub or a TeleStation
depending on your healthcare plan.
Once the Home Hub/TeleStation is hooked up to your telephone and
plugged into the wall, it will send your measurements to your provider
when your phone line is free.
Note The Home Hub and TeleStation depend on your phone number to transmit
results. They are not made to travel.
Home Hub The Home Hub receives your measurement results from your
measurement devices by radio signals and automatically sends the results
to your healthcare provider’s computer. No actions are required by you
after you have made your measurement.
TeleStation TeleStations also have the capability of asking you questions about your
health and sending your answers to your healthcare provider. Some
TeleStations also have the ability to let you enter your measurements
manually and to receive results for some Glucose Meters. Procedures for
using these features are given in the following sections
Device Usage
Philips Telemonitoring Set 2-15
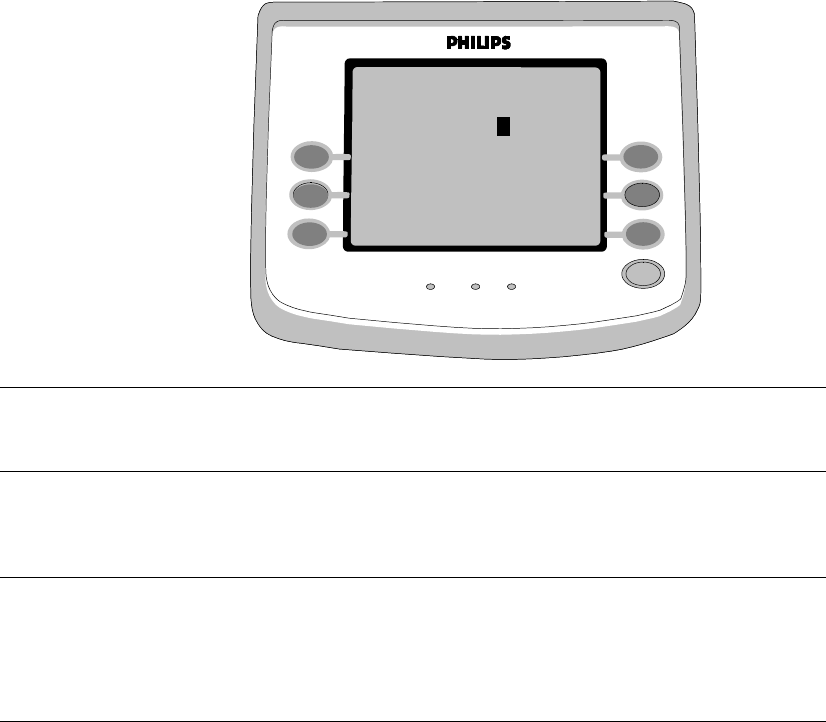
Answering Survey Questions
The front panel of the TeleStation has a number of buttons to assist you
in answering questions and lights to indicate when questions have been
sent as shown in the following figure.
If the on/survey waiting light flashes on the front of your TeleStation,
there are questions, chosen by your healthcare provider, waiting to be
answered.
Your healthcare provider may activate the TeleStation to beep every 60
seconds to alert you that a survey is waiting.
To answer survey questions, use the following procedure
Step 1. Questions are shown on the screen with answer choices:
– Push the button next to the best answer.
– Choose only one. The answer will be highlighted.
If you make a mistake:
– Select the go back button and choose your answer again.
Step 2. After you select an answer, the next question is displayed.
– Answer it by pushing a button.
– Answer all of the questions.
TeleStation
on/survey
waiting
holding
results
using
phone
go back
go back
button
on/survey
waiting light
using
phone light
holding
results light
Hello! Welcome to Philips Automated
Interactions. To adjust the contrast
push the Go Back button. Push
Continue to go to the questions.
Continue

Device Usage
2-16 Philips Telemonitoring Set
Step 3. If you want to change your answer to an earlier question:
–Push the go back button until you see that question again.
– Then push the button next to the correct answer.
Note If you go back to change an answer to an earlier question, you will then
need to answer all of the questions that follow again. The last question
will confirm that your responses are complete.
Step 4. When you have finished the survey, the holding results light
will come on followed in a few minutes by the using phone light,
showing that your results are being sent to your healthcare
provider’s computer.

Device Usage
Philips Telemonitoring Set 2-17
Entering Measurements Manually
For TeleStations that permit manual entry of your measurements, the
procedure is as follows.
Note Your TeleStation may not have this feature. Consult your healthcare
provider if you want to use this feature.
Step 1. Take your measurements as directed by your healthcare provider
and write down the results.
Step 2. Press any button – except go back.
A menu screen appears showing the measurements you might take
Step 3. Press the button next to the measurement you want to enter,
or, press the More button to see other measurements.
TeleStation
go back
Please select a
Blood PressureWeight
Blood Sugar Temperature
Oxygen Level More
measurement to enter
do not
press
go back
on/survey
waiting
holding
results
using
phone
Device Usage
2-18 Philips Telemonitoring Set
The measurement entry screen appears, for example WEIGHT as shown
below.
Note If you make a mistake, press the go back button before you press the All
Finished button.
Step 4. Use the More and Less button to set the number on the screen
to match the measurement that you wrote down earlier.
Note To make big changes to a number, press the Next Number button one or
more times, then use the More or Less buttons.
When entering Blood Pressure and Oxygen Level measurements,
press Continue to move to the next part of the entry.
When you have finished entering your measurement:
Step 5. Press the All Finished button to store your measurement.
Step 6. Repeat Steps 3-5 to enter your other measurements.
TeleStation
on/survey
waiting
holding
results
using
phone
go back
Please enter your
More
All Finished
WT 167. LBS
Less
Next Number
WEIGHT
3
TeleStation
on/survey
waiting
holding
results
using
phone
go back
Please enter your
More
All Finished
WT 167.3 LBS
Less
Next Number
WEIGHT
3

Device Usage
Philips Telemonitoring Set 2-19
Several minutes after you store your last measurement, the screen will go
blank and the using phone light will turn on indicating that you
measurements are being sent to your healthcare provider’s computer.
Note If you get an invalid reading on your measurement device, do not enter it
in the TeleStation.
If you accidently turn on the measurement screen, do not press any
buttons. After a few minutes the screen will go blank.

Device Usage
2-20 Philips Telemonitoring Set
Scale Two types of scale are available:
Standard Scale for people who can get on and off without help
Steady Scale with a column and grab bar to help keep your balance.
Notes If you have been given a Standard Scale and are having balance problems
standing on it, contact your healthcare provider. A Standard Scale can be
converted to a Steady Scale.
If you need the support of a walker, refer to the following section
Measuring Weight with a Walker.
Measuring
Weight
Procedures for measuring your weight on both the Standard and Steady
Scales are as follows. Choose the procedure for your type of Scale.
Standard Scale
Step 1. Step on the Scale and stand on it without holding onto anything.
– Stand as much in the center of the platform as possible.
– Try not to step on the corners; you might damage the Scale.
Step 2. The Scale will say, “Please stand still”. Do not move.
Walking "-" will show on the display during the measurement.
Notes You will not hear the voice prompt if the volume is set to 0.
After several seconds, the Scale will say “Please step off the Scale”.
Step 3. Step off the Scale.
About 5 seconds after you step off the Scale, the Scale will say your final
weight (unless the volume is set to 0).
The Scale then turns off by itself.
Notes If the batteries in the Scale are weak, the Scale’s display will alternately
flash Lo and batt and announce "Please replace the scale batteries" for
3 measurements and then the voice turns off.
If this message appears on the display or the voice is silent even though it
is not set to 0, change the Scale’s batteries following the Replacing
Batteries procedure on page 3-4.

Device Usage
Philips Telemonitoring Set 2-21
Steady Scale
Step 1. Step on the Scale and stand on it holding the
grab bars as shown opposite. You can continue
holding the grab bars while taking your weight.
– Stand as much in the center of the platform
as possible.
– Try not to step on the corners; you might
damage the Scale.
Step 2. The Scale will say, “Please stand still”,
and the Stand Still light will come on.
Do not move.
Changing weight values will show on the
display.
The final weight displayed is the correct weight.
Notes You will not hear the voice prompt if the volume is set to 0.
After several seconds, the Scale will say “Please step off the Scale”,
(unless the volume is set to 0) and the Step Off light will come on.
Step 3. Step off the Scale.
About 5 seconds after you step off the Scale, the Scale will say (unless
the volume is set to 0) and display your final weight.
The Scale then turns off by itself.
Notes If the batteries in the Scale are weak, the Scale’s Stand Still light will
flash instead of remaining on.
If this message appears on the display or the voice is silent even though it
is not set to 0, change the Scale’s batteries following the Replacing
Batteries procedure on page 3-4.

Device Usage
2-22 Philips Telemonitoring Set
Measuring
Weight with a
Walker
If it is necessary to use a walker to steady yourself on the Scale, use the
following procedure for either the Standard Scale or Steady Scale.
Standard Scale
Step 1. Place the walker so its legs are on either
side of the Scale platform as shown opposite.
Step 1. Step on the Scale and stand using the walker
arms for balance.
– Stand as much in the center of the platform as
possible.
– Try not to step on the corners; you might
damage the Scale.
Step 2. Remove your hands from the walker arms.
Note You must remove your hands from your walker for the Scale to take your
true weight.
Step 3. The Scale will say, “Please stand still”. Do not move.
Walking "-" will show on the display during the measurement.
Notes You will not hear the voice prompt if the volume is set to 0.
After several seconds, the Scale will say “Please step off the Scale”.
Step 4. Grasp the walker arms.
Step 5. Step off the Scale.
About 5 seconds after you step off the Scale, the Scale will say your final
weight (unless the volume is set to 0).
The Scale then turns off by itself.
Notes If the batteries in the Scale are weak, the Scale’s display will flash Lo
and batt alternately instead of Walking "-".
If this message appears on the display or the voice is silent even though it
is not set to 0, change the Scale’s batteries following the Replacing
Batteries procedure on page 3-4.

Device Usage
Philips Telemonitoring Set 2-23
Steady Scale
Step 1. Place the walker so its legs are on either
side of the Scale platform as shown opposite.
Step 2. Step on the Scale and stand using the walker arms for balance.
– Stand as much in the center of the
platform as possible.
– Try not to step on the corners; you might
damage the Scale.
Step 3. Move your hands from the walker arms
to the Scale’s grab bars. You can continue
to use the Scale’s grab bars for balance
while you are taking your weight.
Note You must remove your hands from your walker for the Scale to take your
true weight.
Step 4. The Scale will say, “Please stand still” and the Stand Still light
will come on.
Do not move.
Changing weight values will show on the display. The final weight
displayed is the correct weight.
Notes You will not hear the voice prompt if the volume is set to 0.
After several seconds, the Scale will say “Please step off the Scale”,
(unless the volume is set to 0) and the Step Off light will come on.
Step 5. Move your hands from Scale’s grab bars to the walker arms.
Step 6. Step off the Scale.
About 5 seconds after you step off the Scale, the Scale will say (unless
the volume is set to 0) and display your final weight.
The Scale then turns off by itself.

Device Usage
2-24 Philips Telemonitoring Set
Notes If the batteries in the Scale are weak, the Scale’s Stand Still light will
flash instead of remaining on and the voice prompt is quiet even though
the volume is not set to 0.
If this message appears on the display or the voice is silent even though it
is not set to 0, change the Scale’s batteries following the Replacing
Batteries procedure on page 3-4.

Device Usage
Philips Telemonitoring Set 2-25
Changing
Voice Volume
The Scale’s voice has 4 volume settings, as follows:
Setting Volume
0 Silent
1Low
2 Medium
3High
The volume of the Scale’s voice can be changed as follows:
Note The procedure for changing the volume is identical for both scales.
The only difference is the label on the Volume button.
The Standard Scale has a speaker icon .
The Steady Scale has the word Volume.
Step 1. Step off the Scale when changing the volume.
Step 2. Firmly press and release the Volume button. The volume will
move to the next setting. For example, the Scale may say “one”
and display 1 for Low.
Step 3. Firmly press and release the Volume button again. The volume
moves to the next setting. In this example, the Scale will say “two”
and display 2 for Medium.
Each time your press the Volume button, the volume moves to the next
setting.
Step 4. Stop the procedure when you reach the desired voice volume.
Note If you set the volume to 0, there will be no voice prompt and you must
watch the Scale’s display for instruction lights and your weight
measurement.
Device Usage
2-26 Philips Telemonitoring Set
Changing
Language
The Standard Scale (only) can speak your weight in either English or
Spanish.
Standard Scale
The procedure for changing the language on the Standard Scale is as
follows:
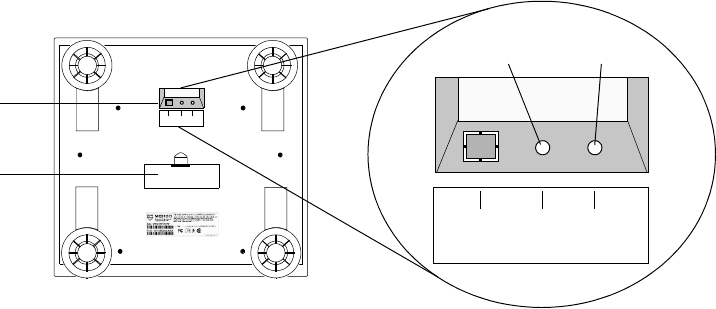
Step 1. Turn the Scale over to expose its under side, shown in the
following figure.
Step 2. Locate the Language Select button in the opening above the
Battery Compartment.
Step 3. Press and release the Language Select button to change the
language.
The Scale will speak the next language -- English or Spanish. .
Step 4. Repeat the press and release procedure until the desired language
is spoken.
When the desired language is spoken, the procedure is completed and
that language will be spoken by the scale during weight measurements.
RJ11 Language
Select
KG/LB
RJ11 Language
Select KG/ LB
Battery
Compartment
Buttons
Units
button
Language
button
(Espanol)
~

Device Usage
Philips Telemonitoring Set 2-27
Changing
Weight Units
The Scale can measure your weight in either pounds or kilograms. The
procedure for changing the weight units is different for the Standard
Scale and the Steady Scale.
Standard Scale
The procedure for changing the Weight Units on the Standard Scale is
as follows:
Step 1. Turn the Scale over to expose its under side, shown in the
following figure.
Step 2. Locate the KG/LB Units button in the opening above the
Battery Compartment.
Step 3. Press and release the KG/LB Units button to change the weight
units.
The Scale will speak the next unit -- Kilograms or Pounds.
[Kilogrammas or Libras in Spanish. ].
Step 4. Repeat the press and release procedure until the desired unit is
spoken.
Step 5. When the desired unit is spoken, the procedure is completed and
that unit will be spoken by the scale during weight measurements.
RJ11 Language
Select
KG/LB
RJ11 Language
Select KG/ LB
Battery
Compartment
Buttons
Units
button
Language
button
(Espanol)
~

Device Usage
2-28 Philips Telemonitoring Set
Steady Scale
The procedure for changing the Weight Units on the Steady Scale is as
follows:
Step 1. Step off the Scale when changing the weight units.
Step 2. Firmly press both the Volume button and the Radio Test
button at the same time.
Hold both buttons down for at least 3 seconds.
If the Scale had been measuring pounds, the display will now show
Kgs. (for kilograms).
If the Scale was measuring kilograms, the scale will now show
Lbs. (for pounds).
The voice will also say the new weight units (unless the volume is set to
0).
T

Device Usage
Philips Telemonitoring Set 2-29
Blood
Pressure
Monitor
To get the most accurate and reliable readings from you Blood Pressure
Monitor observe the following guidelines.
• Check the cuff size.
Small cuff fits upper arms 6.3 to 9.4 inches (16 to 24 cm) around.
Standard cuff fits upper arms 9.4 to 14.2 inches (24 to 36 cm)
around
Large cuff fits upper arms 14.2 to 17.7 inches (36 to 45 cm)
around.
• Take your blood pressure at the same time or times each day in a
quiet place.
• Rest 10 minutes before taking your blood pressure.
• Do not take your blood pressure after exertion or drinking coffee or
during conversation.
•Sit within 20 feet of the Home Hub/TeleStation.
• Sit comfortably with uncrossed legs.
• Use the same arm each time.
• Remove any tight clothing on the arm you will use to measure your
blood pressure or roll up a loose garment sleeve.
Do not measure with the cuff over clothing.
• Place the cuff 1 inch above the elbow with the air hose on the
inside of your arm.
• Leave room for two fingers under the cuff.
• Sit still and do not move your arm during the measurement.
Notes You can lie down while someone else takes your blood pressure, but it is
important to take your blood pressure the same way every time (either
sitting or lying down).
Report any changes in how you take your blood pressure to your
healthcare provider.
If you travel with the BP Monitor, the M3815A will store up to 19
readings for up to 11 days with good batteries that remain in the device.
The M3815B will store up to 25 readings. When you return home to your
Home Hub/TeleStation, the readings will be sent automatically to your
healthcare provider’s computer.
Device Usage
2-30 Philips Telemonitoring Set
Measuring
Blood
Pressure
Two procedures for measuring your blood pressure follow, one for each
of the two Blood Pressure Monitor models available -- M3815A and
M3815B. Select the procedure that matches your BP Monitor.
Note The BP’s Model number is given on the back side of the monitor.
•M3815A - BP Monitor with the Radio Test button symbol
on the front of the display.
•M3815B - BP Monitor with the Radio Test button symbol
on the front of the display.
Procedure for M3815A Blood Pressure Monitor
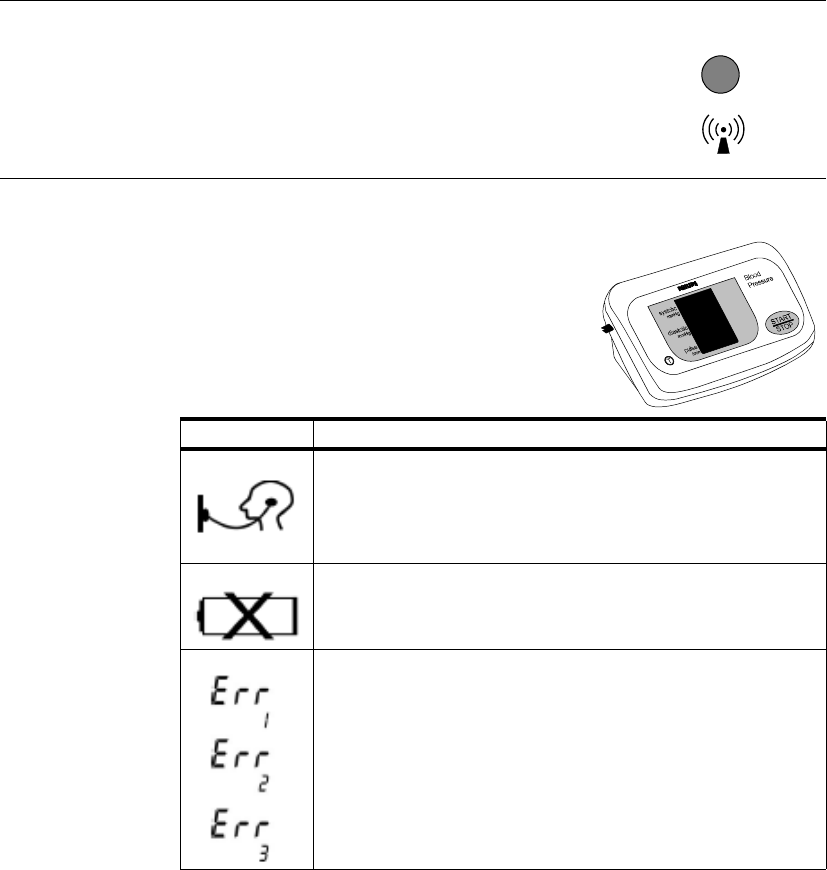
The following table describes symbols
you may see on the M3815A BP
Monitor display during the measurement.
T
Symbol Meaning
The blood pressure measurement is taking place.
The symbol blinks and beeps with each pulse beat.
The symbol may also appear briefly at the start of your
blood pressure measurement.
The batteries need to be replaced.
The symbol may also appear briefly at the start of your
measurement.
There may be a problem with your equipment.
Take your blood pressure again.
If there is still a problem, you may be able to fix the
problem by looking in the Troubleshooting section.
If not, call your healthcare provider.
Device Usage
Philips Telemonitoring Set 2-31
The procedure for measuring your blood pressure with the M3815A
Blood Pressure Monitor is as follows:
Step 1. Sit comfortably with your forearm resting on a flat surface and
your legs uncrossed. The center of your upper arm should be at
about the same height as your heart.
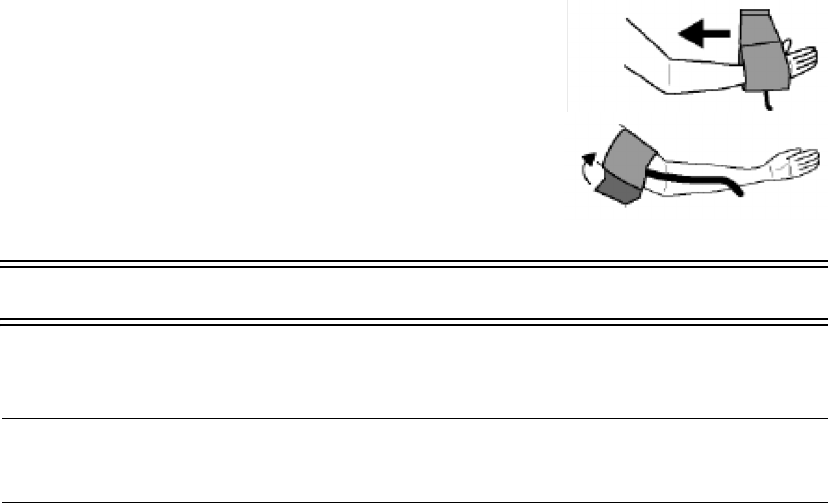
Step 2. Put your hand through the
cuff and slide the cuff up your
forearm.
Step 3. Move the cuff so it is on your upper
arm and the bottom of the cuff is about
1 inch above your elbow
Step 4. Position the air hose so it dangles
on the inside of your arm.
Warning Do not allow the air hose to kink or twist.
Step 5. Pull on the end of the cuff to tighten it.
Then fold the cuff end back over the metal D-ring.
Note The cuff should be snug but not too tight. Leave room for two fingers to
fit under the cuff.
Step 6. Fasten the end of the cuff to the Velcro® closure.
Step 7. Make sure that your hand is open and relaxed with the palm up.
Step 8. Press the START/STOP button. The cuff will inflate and feel
tight.
Sit still and do not move your arm during the measurement.

Device Usage
2-32 Philips Telemonitoring Set
Note If it feels too tight or to stop the measurement at any time:
– Press the START/STOP button.
– Take your blood pressure again.
If you are concerned at any time about the measurement, contact your
healthcare provider.
The BP Monitor will display numbers that go up to just beyond 150
mmHg for the initial pump. It may then resume pumping to higher
pressures.
Warning Watch the display. If the numbers go up to 330 mmHg, press the
START/STOP button to immediately stop the measurement.
Contact your healthcare provider.
Step 9. As the cuff pressure slowly decreases, watch the display window.
The BP Monitor will beep as the pressure decreases.
Warning Watch the display. If the numbers drop down to 15 mmHg and stay
there for more than 3 minutes, press the START/STOP button to stop
the measurement.
Contact your healthcare provider.
A long beep indicates that your blood pressure has been taken. The cuff
will deflate. The display window shows your final blood pressure and
pulse.
Note If an error message was displayed, you stopped the reading, or you feel
that the reading may be incorrect, take your blood pressure again.
If this happens a second time, contact your healthcare provider.

Device Usage
Philips Telemonitoring Set 2-33
Step 10. Slide the cuff off you arm. The BP Monitor will turn off by
itself.
Note Once properly adjusted, the cuff can be slid off without undoing the
Velcro.
Step 11. Store the BP Monitor within 20 feet of the Home Hub/
TeleStation so it can send your readings to the Home Hub/
TeleStation.
Note Refer to the Maintenance section for proper storage of your BP
Monitor.
Device Usage
2-34 Philips Telemonitoring Set
Procedure for M3815B Blood Pressure Monitor
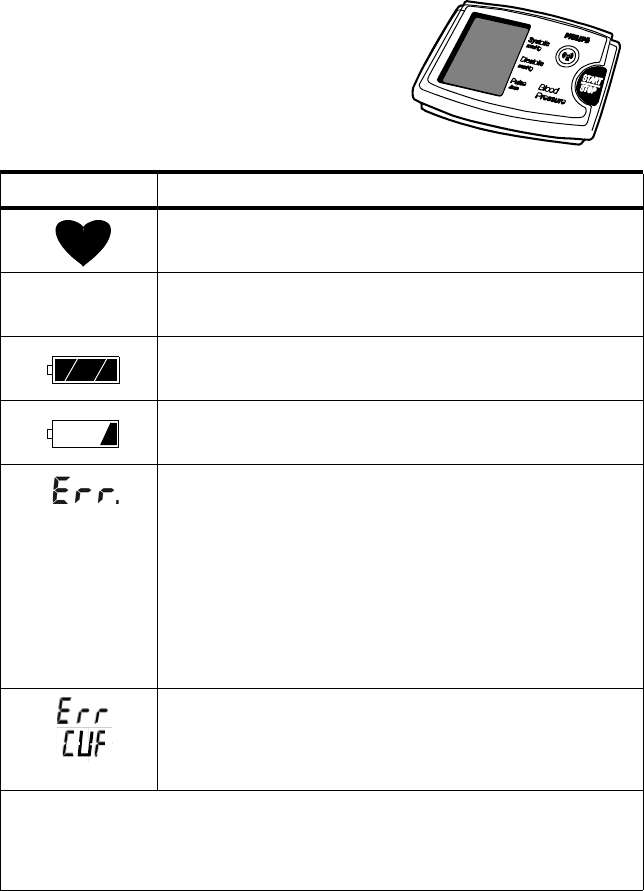
The following table describes symbols
that you may see on the M3815B BP
Monitor display during the measurement.
.
Symbol Meaning
Indicator when measurement is in progress.
It blinks when detecting the pulse
MPrevious measurements stored in Memory
Battery power full indicator
Battery power low indicator. If it blinks, the batteries
should be replaced
There was a problem with the measurement, such as:
– Unstable blood pressure due to excessive body
movement.
– Pulse not detected correctly.
– Systolic and diastolic values within 10 mmHG
of each other.
Take your blood pressure again, being sure to remain
very still during the measurement.
Cuff is not fastened correctly.
– Refasten the cuff
– Take your blood pressure again.
If there is still a problem, consult the Troubleshooting section for
corrective actions.
If this does not resolve the problem, call your healthcare provider.
Device Usage
Philips Telemonitoring Set 2-35
The procedure for measuring your blood pressure with the M3815B
Blood Pressure Monitor is as follows:
Step 1. Sit comfortably with your left arm resting on a flat surface and
your legs uncrossed. The center of your upper arm should be at
about the same height as your heart.
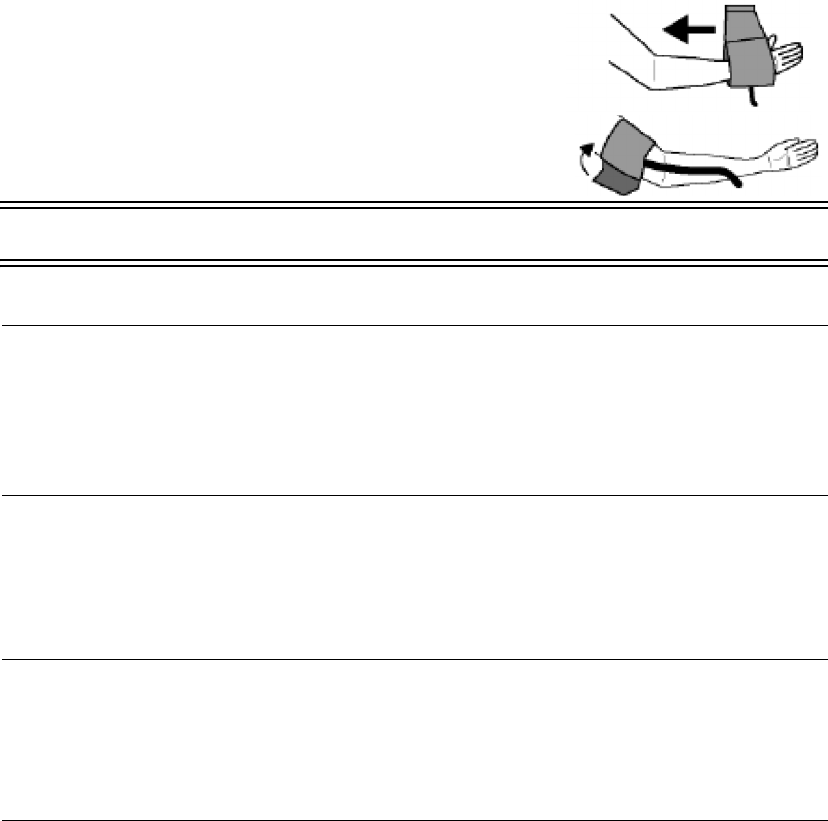
Step 2. Put your hand through the cuff
and slide the cuff up your forearm.
Step 3. Position the cuff on your upper
arm with the tube facing
downward and toward the inside
of your arm.
Warning Do not allow the air hose to kink or twist.
Step 4. Fasten the cuff securely with the hook and loop fastener strap.
Note The cuff should be snug but not too tight. You should be able to insert
two fingers between the cuff and your arm.
Make sure that your hand is open and relaxed with the palm up.
Remain still and do not talk or move your arm during the
measurement.
Step 5. Press the START/STOP button.
All display symbols appear briefly and the display then changes as
the measurement begins.
The cuff starts to inflate to the correct level. It is normal for the
cuff to feel very tight.
Note If it feels too tight or to stop the measurement at any time:
– Press the START/STOP button.
– Take your blood pressure again.
If you are concerned at any time about the measurement, contact your
healthcare provider.

Device Usage
2-36 Philips Telemonitoring Set
When the inflation is complete, the deflation starts automatically and the
heart icon blinks, indicating that the measurement is in progress.
Once the pulse is detected, the symbol flashes with each pulse beat.
Note If an appropriate pressure is not obtained, the device automatically stars
to inflate again.
When the measurement is complete, the systolic and diastolic pressure
reading and pulse rate are displayed. The cuff will then deflate and the
BP Monitor automatically shuts off after 45 seconds, or you can turn it
off by pressing the START/STOP button.
Note If an error message was displayed, you stopped the reading, or you feel
that the reading may be incorrect, take your blood pressure again.
If this happens a second time, contact your healthcare provider.
Step 6. Remove the cuff.
Step 7. Store the BP Monitor within 20 feet of the Home Hub/
TeleStation so it can send your readings to the Home Hub/
TeleStation.
Note Refer to the Maintenance section for proper storage of your BP
Monitor.

Device Usage
Philips Telemonitoring Set 2-37
Rhythm
Strip
Recorder
The following guidelines should be followed before you take your heart
rhythm to assure an accurate reading.
•Sit down within 20 feet of the Home Hub/TeleStation.
•Relax.
Notes It is important to be still and relaxed during the rhythm measurement.
You can lie down while you take your heart rhythm.
It is important to take your heart rhythm the same way every time (either
sitting or lying down).
Report any changes in how you take your heart rhythm to your healthcare
provider.
If you travel with your Recorder, it will store the most recent reading for
up to 11 days with good batteries that remain in the device. When you
return home to your Home Hub/TeleStation, the most recent reading will
be sent automatically to your healthcare provider’s computer.
Caution Do not talk or move during the measurement.
Measuring
Heart Rhythm
The procedure for measuring your Heart Rhythm is as follows:
Step 1. Sit back in a chair with your arms at your sides or on the chair
arms. Do not cross your legs. Keep your feet flat on the floor.
Step 2. Place the Recorder on the table next to you so you can see it and
listen to it without moving. If you have to move to see or hear the
Recorder, place the Recorder in your lap.
Step 3. Place the wristband with the white snap-on connector on your
right wrist. Make sure that the flat metal inside of the wristband
(on the other side of the black plastic pad) firmly touches the inside
of your wrist.
Step 4. Place the wristband with the red snap-on connector on your left
wrist. Make sure that the flat metal inside the wristband (on the
other side of the black plastic pad) firmly touches the inside of your
wrist.
Device Usage
2-38 Philips Telemonitoring Set
Notes If the wristbands are loose, push them up each forearm until they feel
snug.
Be careful not to snag the hair on your arms.
Do not put the wristbands over clothing, bandages, or jewelry.
If you cannot fit the wristband on your arm, contact your healthcare
provider.
Step 5. Let your hands rest on the tabletop or your chair’s arms so that
your hands are open relaxed, and palms up.
Step 6. Press the START button.
The relax light will flash on and
off, and the Recorder will beep for
about 20 seconds as the
measurement is being made.
Notes If the Recorder beeps twice quickly before beginning the normal beeping,
this means that the batteries are low. Replace the batteries within a week.
The beeps do not reflect your heart rate. They indicate that the Recorder is
working.
After another short pause, the relax light flashes on and off twice and
the Recorder will quickly beep twice. The Recorder has finished taking
your heart rhythm.
Step 7. Remove the wristbands. The Recorder will turn off by itself.
Step 8. Store the Recorder within 20 feet of the Home Hub/TeleStation
so it can send you measurements to the Home Hub/TeleStation.
Note Refer to the Maintenance section for proper storage of your Rhythm
Strip Recorder.
Rhythm
relax
T
START
Strip
Recorder

Device Usage
Philips Telemonitoring Set 2-39
Pulse
Oximeter
To get the most accurate readings from you Pulse Oximeter, observe the
following guidelines:
• The Pulse Oximeter may not work properly with a finger thickness
of less than 5/16 inches (0.8 cm) or more than 1 inch (2.5 cm).
• Dark colored nail polish or artificial nails will prevent the Pulse
Oximeter from making accurate measurements. Remove dark nail
polish and artificial nails from the finger you use to take your
measurement.
• Avoid exposing the finger sensor to very bright or changing light
while taking your measurement.
• Do not use your Pulse Oximeter on the same arm during or
immediately after taking your blood pressure. Use your other arm
or take your Pulse Oximeter measurement first.
• Use the same finger each time you make a measurement unless
your healthcare provider instructs otherwise.
• Do not use the sensor on a finger that has chronically poor
circulation or is injured.
• Be sure the inside of the finger sensor is dry before taking your
measurement.
• Be sure your finger is warm when you take your measurement. If
your finger is cold, warm or rub it before taking your
measurement.
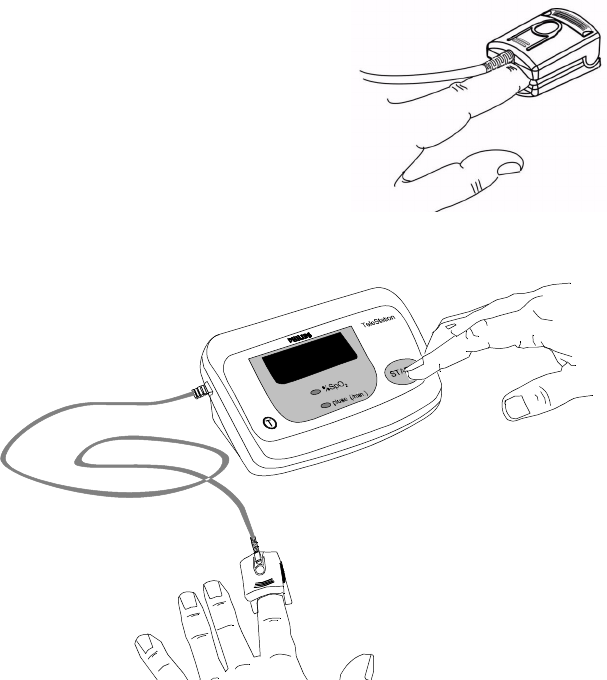
• Carefully place your finger in the sensor as far as it will
comfortably go. Do not press in so far that you can feel your finger
throbbing.
• Keep you finger relaxed and still while taking your measurement.
• If you have anemia, a low hemoglobin count, or arrhythmias, you
may not be able to get a correct reading. Contact your healthcare
provider.
Caution Do not use the Pulse Oximeter with the battery door open.
Device Usage
2-40 Philips Telemonitoring Set
Measuring
Blood
Oxygen and
Pulse Rate
The following steps describe how to use the Pulse Oximeter to measure
your blood oxygen level (%SpO2) and pulse rate. By default, pulse rate is
turned off. If you want to turn pulse on, press and hold both the START
and Test buttons (T in circle) for more than 3 seconds. Repeating this
step will turn pulse off again.
Step 1. Sit within 20 ft. of the Home Hub or TeleStation with your hand
resting on a flat surface and the Pulse Oximeter in front of you.
Step 2. Open the sensor and fully insert
your finger (index, middle, or ring,
but not your thumb) until the end of
your finger reaches the finger stop.
The cable should extend over your
finger toward your wrist as shown
in the figure.
Step 3. Sit comfortably with your hand
resting on the surface so that it
can remain still.
Step 4. Press the START button and hold your hand still during the
measurement.
Press Start button
Hold hand still
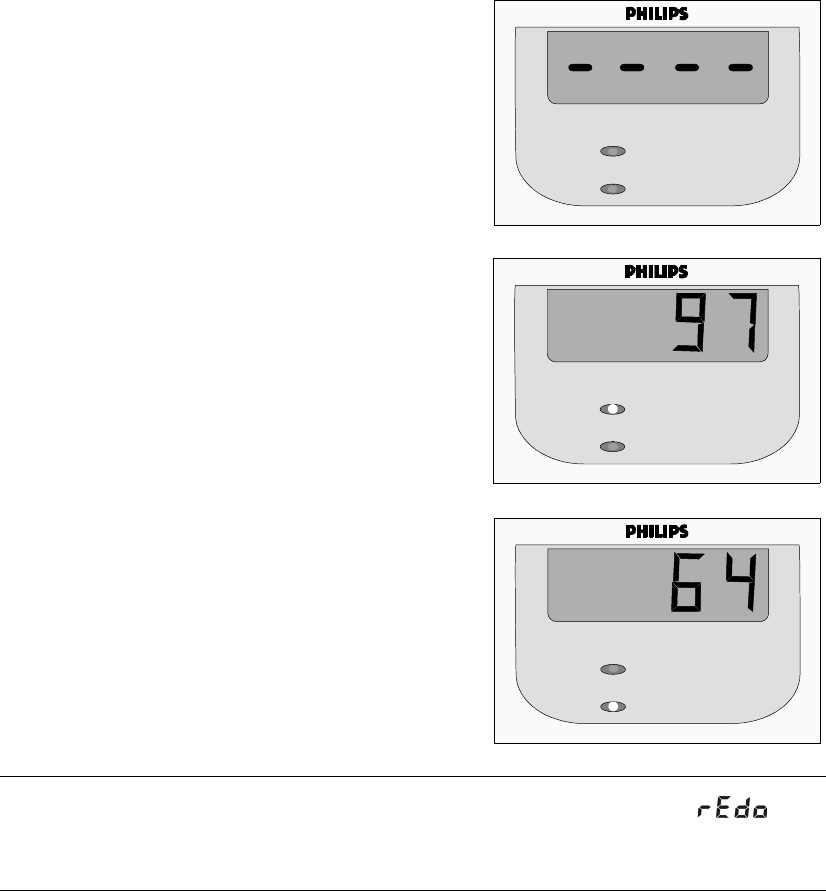
Device Usage
Philips Telemonitoring Set 2-41
The measurement process is as follows:
- Dashes move across the display
during measurement.
- A double beep sounds after a
few seconds indicating that the
measurement is complete
- A tick sounds as the
% SpO2 measurement
displays and the yellow
light next to % SpO2
illuminates.
- A tock sounds as the pulse
rate displays and the green
light next to pulse (/min.)
illuminates.
- The tick-tock sequence repeats
several times and then turns off.
Note If the measurement was not made, a long beep sounds and
displays:
Warm your hand or use a different finger and try again.
%SpO
2
pulse (/min)
%SpO
2
pulse (/min)
%SpO
2
pulse (/min)

Device Usage
2-42 Philips Telemonitoring Set
Glucose
Meter
The TeleStation can record results from some Glucose Meters. Glucose
Meter readings cannot be made with a HomeHub. The following Glucose
Meters are approved for use with the TeleStation:
• OneTouch Basic
• OneTouch Profile
Warning Glucose Meter readings can only be recorded on a TeleStation. It is
not available for use with a Home Hub.
The PTS System operates only with the OneTouch Basic and
OneTouch Profile glucose meters. No other glucose meters should be
connected to a TeleStation.
Do not measure your glucose while your Glucose Meter is connected
to the TeleStation.
Clean your finger of blood before using the TeleStation.
Note For procedures on how to measure your glucose with your Glucose Meter
refer to its Instructions for Use manual.
Recording
Glucose
Measurements
Follow these steps to send your Glucose Meter results to your healthcare
provider’s computer via the TeleStation:
Step 1. Measure your glucose with your Glucose Meter following the
procedures given in its Instructions for Use manual.
Step 2. Clean your finger of any residual blood before taking the next
steps.
Step 3. Connect the large end of the Glucose Meter Cable to the.mating
connector on the back of the TeleStation as shown in the following
figure. There is only one port where it will fit, marked | 0 | 0 |.
Step 4. Firmly connect the small plug end of the Glucose Meter Cable
into the data port on the Glucose Meter as shown in the following
figure.
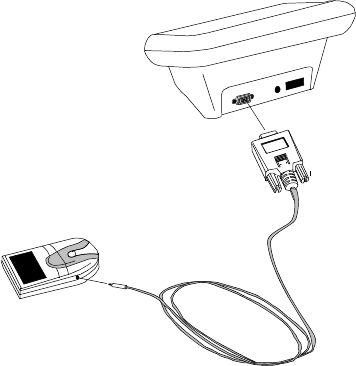
Device Usage
Philips Telemonitoring Set 2-43
Step 5. Turn the Glucose Meter on.
The Glucose Meter will automatically send the results to the Telestation
and then turn off. When the Glucose Meter turns off:
Step 6. Disconnect your meter from the cable. You can leave the cable
connected to the TeleStation.
The PTS System relies on the date and time set in the Glucose Meter as
the actual date and time of the glucose reading. This gives the clinician
the most accurate date and time of measurement. Therefore it is important
for the Glucose Meter’s date and time to be set correctly.
Changing Glucose Meter Time and Date
If it is necessary to correct the date or time in your Glucose Meter, follow
the steps below to ensure that the date and time of your glucose
measurements are accurate when you transmit them via the TeleStation.
Step 1. Connect your Glucose Meter to the TeleStation and transmit the
results as described above.
Step 2. Clear the Glucose Meter’s memory of all readings.
Step 3. Change the time and/or date on your Glucose Meter following the
procedure described for the unit.
TeleStation
Glucose Meter
Glucose
Meter
Cable
Device Usage
2-44 Philips Telemonitoring Set

Maintenance 3-1
Introduction
3
Maintenance
Overview
Chapter 3 provides steps for cleaning and storing Patient
Telemonitoring devices, replacing batteries, and general maintenance of
the Patient Telemonitoring Set. You can help keep your devices in
working order by taking good care of them.
This chapter includes the following sections:
Page
Cleaning Devices . . . . . . . . . . . . . . . . . . . . . . 3-2
Storing Devices . . . . . . . . . . . . . . . . . . . . . . . 3-3
Blood Pressure Monitor. . . . . . . . . . . . . . . 3-3
Rhythm Strip Recorder . . . . . . . . . . . . . . . 3-3
Pulse Oximeter . . . . . . . . . . . . . . . . . . . . . 3-3
Replacing Batteries . . . . . . . . . . . . . . . . . . . . 3-4
Scale . . . . . . . . . . . . . . . . . . . . . . . . . . . . . 3-4
Standard Scale . . . . . . . . . . . . . . . . . . . . . . . . 3-5
Steady Scale. . . . . . . . . . . . . . . . . . . . . . . . . . 3-7
Blood Pressure Monitor. . . . . . . . . . . . . . . 3-9
Rhythm Strip Recorder . . . . . . . . . . . . . . 3-11
Pulse Oximeter . . . . . . . . . . . . . . . . . . . . 3-12

Cleaning Devices
3-2 Maintenance
Cleaning Devices
Telemonitoring devices should be cleaned only when necessary. The
following procedure should be followed to clean the devices.
Note Body fluids, such as blood or mucus, should be promptly removed using
a cloth dampened with plain tap water (no soap).
Caution Avoid spilling liquids on the devices.
Do not immerse devices in liquids to clean.
Do not use alcohol. harsh chemicals, caustic, or abrasive cleaning
agents to clean devices.
Step 1. Unplug the Home Hub/TeleStation from power and phone lines.
Step 2. Remove batteries from the measurement devices following
procedures given in the Replacing Batteries section.
Step 3. Clean all exposed device surfaces with a dry, soft cloth.
Note When cleaning the Pules Oximeter:
– Open the Finger-clip sensor and carefully wipe its inside surfaces
with a cloth dampened with a mild detergent.
– Allow the sensor to dry thoroughly before using.
Step 4. Plug the Home Hub/TeleStation back into power and phone
lines.
Step 5. Reinstall batteries into the measurement devices following
procedures given in the Replacing Batteries section.

Storing Devices
Maintenance 3-3
Storing Devices
All measurement devices should be stored within 20 feet of the Home
Hub or TeleStation so they can send their results to the Home Hub or
TeleStation.
Caution Do not store devices inside or next to a metal drawer or container, such
as a file cabinet.
Do not store devices where children or pets could get tangled in the
hoses, dual cables. or wristband assemblies.
Blood
Pressure
Monitor
• Store the BP Monitor so that the hose and cuff assembly are not
bent, twisted, or folded tightly.
• Do not wrap the hose around the display case.
Rhythm Strip
Recorder
• Store the Rhythm Strip Recorder so that the cable is not twisted or
folded tightly.
• The Recorder can be stored with its connectors attached to the
wristbands.
Pulse
Oximeter
• Store the Pulse Oximeter so that its sensor cable is not twisted or
kinked.
• Avoid tugging at the sensor cable or carrying the Pulse Oximeter
by the sensor cable.

Replacing Batteries
3-4 Maintenance
Replacing Batteries
Batteries in devices should be replaced as soon as the device indicates
that they are low or need to be replaced.
Caution When replacing batteries, replace all of the batteries with new ones
at the same time.
Use only Type AA (1.5 volt) alkaline batteries
Do not use rechargeable batteries.
Warning Do not use any device with its battery door removed.
Scale Replace the batteries in the Standard Scale every 12 months
or sooner if:
• the voice prompt is absent even though the volume was not set to 0
• the display screen alternately displays Lo and batt during a
measurement
• the Scale announces "Please replace the scale batteries" during
a measurement.
Replace the batteries in the Steady Scale every 6 months
or sooner if:
• the voice prompt is absent even though the volume was not set to 0
• the normally steady Stand Still light display flashes.
Both Scales use 4 AA alkaline batteries.
Procedures Procedures for replacing batteries in the Standard Scale and Steady Scale
are as follows. Use the procedure for your type of scale.

Replacing Batteries
Maintenance 3-5
Standard Scale
Step 1. Lift and gently turn the scale upside down on a flat surface to
expose the Battery Compartment.
Step 2. Remove the cover of the Battery Compartment by lifting the tab.
Step 3. Remove the old batteries and properly dispose of them.
Note Check with your local authorities for the proper way to dispose of
batteries.
Step 4. Place the new batteries in the Battery Compartment so that the
positive (+) and negative (-) terminals match the diagram in the
compartment.
Notes Make sure that battery terminals are touching compartment terminals.
RJ11 Language
Select KG/ LB
Battery
Compartment
Lift tab and
remove cover
+
+

Replacing Batteries
3-6 Maintenance
Step 5. Replace the cover by inserting its tabs into the slots and gently
pressing the cover into place.
Step 6. Return the Scale to its original spot following proper lifting
techniques given below.
Note Lifting the Scale requires good balance, the ability to grasp and lift up to
10 pounds, and safe lifting techniques.
Do not lift the Scale if you are unsteady or unable to follow proper
lifting techniques. Ask for assistance or contact your healthcare
provider for help.
When you lift or lower the Scale:
– Wear shoes with nonslip soles.
– Keep your feet apart and one foot a bit in front of the other, if
possible.
– Squat to lift and lower the Scale. Never bend at the waist.
– Keep the Scale close to your body.
– Lift with your legs, not your back.
– If you must turn, turn with your feet not your body.
Step 7. Perform the Radio Test described in the Troubleshooting
section.
Step 8. Step on the Scale and verify that it is working properly.
Note If the Scale does not seem to be operating properly or the Radio Test
fails, contact your healthcare provider.
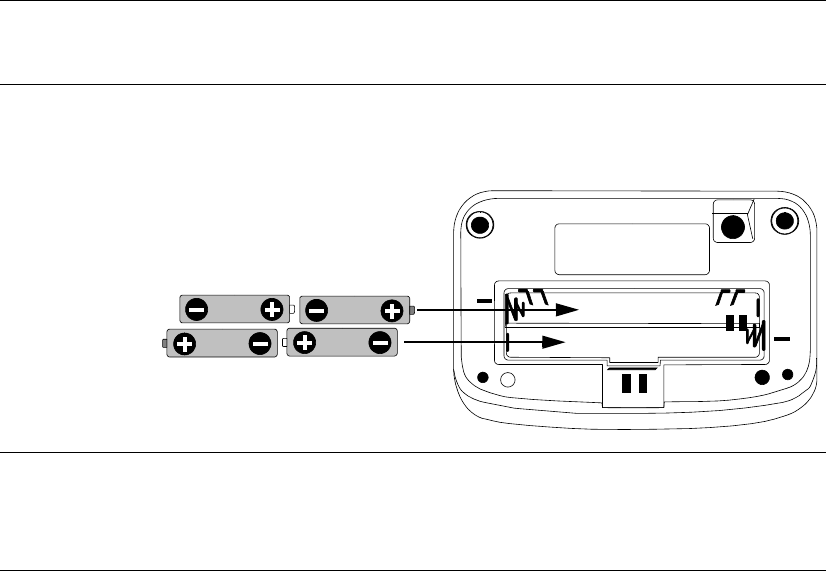
Replacing Batteries
Maintenance 3-7
Steady Scale
Step 1. Firmly hold the display and pull it from the Scale to release it
from the plastic fastener strips that hold it in place.
Step 2. Turn the display over and unplug the cord inside the top of the
column.
Step 3. Gently push the Battery Compartment cover in the direction of
the arrow symbol and lift it off.
Step 4. Remove the old batteries and properly dispose of them.
Note Check with your local authorities on the proper way to dispose of
batteries.
Step 5. Place the new batteries in the Battery Compartment so that the
positive (+) and negative (-) terminals match the diagram in the
compartment.
Notes To keep the batteries from popping out, insert the bottom row first.
Make sure that the battery terminals are touching the compartment
terminals.
Step 6. Replace the cover by inserting its tabs into the slots and gently
pressing the cover into place.
The Stand Still and Step Off lights will turn on for about 6 seconds,
then turn off. If the device is face down, you may not see these lights.
2. Insert top row second
1. Insert bottom row first
+
+
-

Replacing Batteries
3-8 Maintenance
The display will then show briefly, and the Step Off light will
flash slowly.
Step 7. Replace the display as follows:
– Place the connection cord through the display cutout.
– Hold the scale display above the top of the column with the
display facing you.
– Plug the cord into the adapter inside the top of the column.
– Center the display over the top of the column so that the plastic
fastener strips on the display and the column match.
– Press down on the display. The back of the display should rest
against the rim on the top of the column.
When the display is properly connected to the Scale:
–the Step Off light stops flashing.
– the Scale will say “zero pounds”, display 0.0, and then turn off.
Note Important: Do not step on the Scale while doing this step.
If the Step Off light does not stop flashing, check the cord connections
by unplugging the cord and replugging it in until it snaps into place.
Also check that the batteries are inserted the right way.
Step 8. Return the Scale to its original spot.
Caution Do not lift the Steady Scale.
If the Steady Scale must be moved, ask for assistance or call your
healthcare provider for help.
Step 9. Perform the Radio Test described in the Troubleshooting
section.
Step 10. Step on the Scale and verify that it is working properly.
Note If the Scale does not seem to be operating properly or the Radio Test
fails, contact your healthcare provider.

Replacing Batteries
Maintenance 3-9
Blood
Pressure
Monitor
• Replace the batteries in the Blood Pressure Monitor every 3
months or sooner if required. The expected battery life for the BP
Monitor is approximately 3 months with 1 daily reading.
• Replace the batteries in the BP Monitor when you see the Low
Battery symbol on the BP Monitor display.
• The Blood Pressure Monitor uses 4 AA alkaline batteries.
Procedure To replace the batteries in the BP Monitor :
Step 1. Turn the display over.
Step 2. Gently push the Battery Compartment cover in the direction of
the arrow symbol and lift it off.
Step 3. Remove the old batteries and throw them away.
Note Check with your local authorities on the best way to recycle or throw
away batteries.
Step 4. Place the new batteries in the Battery Compartment so that the
positive (+) and negative (-) terminals match the diagram in the
compartment. Diagrams for both the M3815A and M3815B units
are shown following.
Notes To keep the batteries from popping out, insert the bottom row first.
Make sure that the battery terminals are touching the compartment
terminals.
2. Insert top row second
1. Insert bottom row first
+
+
-
M3815A
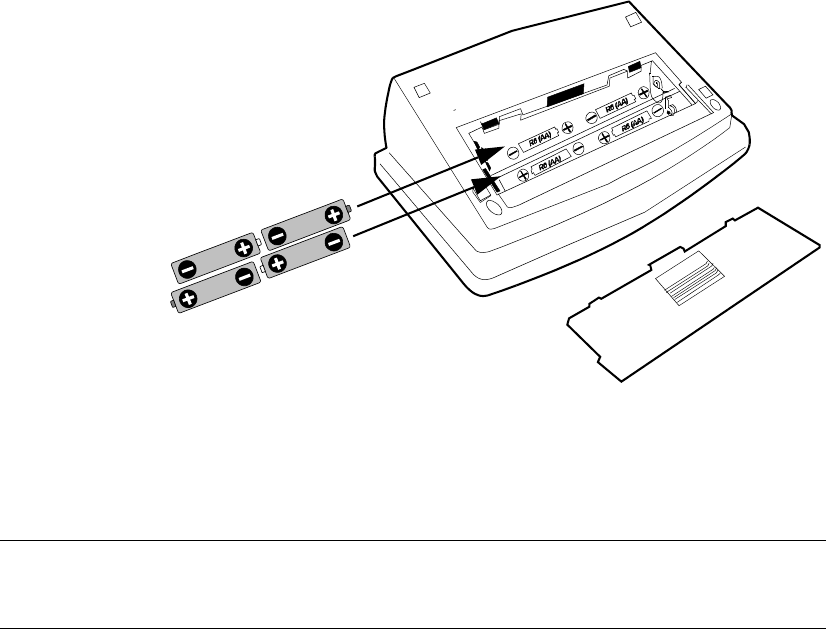
Replacing Batteries
3-10 Maintenance
Step 5. Replace the cover by inserting its tabs into the slots and gently
pressing the cover into place.
Step 6. Perform the Radio Test described in Troubleshooting.
Step 7. Take your Blood Pressure and verify that it is working properly.
Note If the Blood Pressure Monitor does not seem to be operating properly or
the Radio Test fails, contact your healthcare provider.
2. Insert top row second
1. Insert bottom row first
M3815B

Replacing Batteries
Maintenance 3-11
Rhythm
Strip
Recorder
• Replace the batteries in the Rhythm Strip Recorder every 6 months
or sooner if required.
• If the Rhythm Strip Recorder beeps twice quickly before beginning
normal on and off beeping, the batteries are low and should be
replaced within a week.
• The Rhythm Strip Recorder uses 4 AA alkaline batteries.
Procedure To replace the batteries in the Rhythm Strip Recorder, follow the
procedure for the Blood Pressure Monitor on page 3-9, except for Step 7.
The Recorder will make a series of beeps.
If the series ends with a rising tone, the batteries have been inserted
correctly.
If the series ends with a falling tone or no tone, the batteries have
been inserted the wrong way. Repeat the battery insertion steps.
After Step 6:
Step 7. Measure your heart rhythm with the Rhythm Strip Recorder to
verify that it is working properly.
Note If the Rhythm Strip Recorder does not seem to be operating properly or
the Radio Test fails, contact your healthcare provider.

Replacing Batteries
3-12 Maintenance
Pulse
Oximeter
• Replace the batteries in the Pulse Oximeter every 6 months or
sooner if required.
• The batteries should be replaced when the Low Battery indicator
flashes on the Pulse Oximeter display.
• The Rhythm Strip Recorder uses 4 AA alkaline batteries.
Procedure To replace the batteries in the Rhythm Strip Recorder, follow Step 1
through Step 5 of the procedure for the Blood Pressure Monitor on
page 3-9.
After successful battery replacement, the message should
appear.
If the message appears, replace the batteries with known good
batteries and try again.
After Step 5:
Step 6. Take your Pulse Oximeter measurement and verify that it is
working properly.
Note If the Pulse Oximeter does not seem to be operating properly, contact your
healthcare provider.

Troubleshooting 4-1
Introduction
4
Troubleshooting
Overview
Chapter 4 describes procedure to follow if you have problems with any
of the Philips Telemonitoring Set. The tables on the following pages can
serve as a guide to help resolve problems that may occur.
Caution Do not try to repair any device yourself.
If a problem cannot be resolved using the procedures given in this
chapter, contact your healthcare provider.
Each device provides an error message when some part of the system is
not working properly. If you see an error message on a device, the first
thing to do is to check the device and try the measurement again. Be sure
to follow the voice and light prompts provided by the device to assure
that the measurement is being made properly.
This chapter includes the following sections:
Page
Radio Test . . . . . . . . . . . . . . . . . . . . . . . . . . . . 4-2
Troubleshooting Tables. . . . . . . . . . . . . . . . . 4-3
Home Hub/Telestation. . . . . . . . . . . . . . . . 4-3
Scale . . . . . . . . . . . . . . . . . . . . . . . . . . . . . 4-8
Standard Scale . . . . . . . . . . . . . . . . . . . . . . 4-8
Steady Scale . . . . . . . . . . . . . . . . . . . . . . . . 4-9
Rhythm Strip Recorder . . . . . . . . . . . . . . 4-10
Blood Pressure Monitor. . . . . . . . . . . . . . 4-11
Pulse Oximeter . . . . . . . . . . . . . . . . . . . . 4-13

Overview
4-2 Troubleshooting
Radio Test If the data/holding results light does not come on after you take a
measurement, another step that can be taken is to perform a Radio Test.
The Radio Test makes sure that your measurements are being properly
sent from the measurement device to the Home Hub/TeleStation. The
RADIO TEST button, { or }, is on the front of the device.
To perform the Radio Test, follow these steps:
Step 1. 1. Press and hold down the RADIO TEST button on the
measurement device for 3 to 5 seconds or until the Home Hub/
TeleStation starts beeping.
Note If the using phone light on the Home Hub/TeleStation lights, stop and
wait until it turns off before performing the Radio Test.
The following messages will appear on the indicated device.
The Scale and Pulse Oximeter will display rF.
The Rhythm Strip Recorder’s RELAX light will flash once per
second.
The Home Hub/TeleStation should beep:
If the Home Hub/TeleStation does not beep, do the following:
– Make sure the measurement device has fresh batteries
– see if there are any large objects between the measurement
device and the Home Hub/TeleStation.
If there are large objects, move the measurement device to a
different location.
If there are no large objects, move the measurement device
closer to the Home Hub/TeleStation.
– Make sure there are no cordless or cellular telephones or
computers in use near the Home Hub/TeleStation.
– Repeat the Radio Test
If the Radio Test is still not successful, refer to the following
Troubleshooting tables to try to further resolve the problem
T

Troubleshooting Tables
Troubleshooting 4-3
Troubleshooting Tables
The following tables gives possible Problems that can occur,
Reasons why they may have occurred, and Possible Solutions that
should be tried to resolve the problem.
Find the Problem entry that seems to describe what you observe, and
then try the various Possible Solutions. If none of the solutions seem
to be successful, contact your healthcare provider for additional
suggestions.
Caution Do not try to repair any device yourself.
If a problem cannot be resolved using the procedures given in this
section, contact your healthcare provider.
Home Hub/
Telestation
The following table describes problems that may occur with the Home
Hub or TeleStation.
Problem Reason Possible Solutions
The screen is
unreadable
The Home Hub/TeleStation
may be hot from sitting in
sunlight or storage at a high
temperature
Let the Home Hub/TeleStation cool to room
temperature and the screen display may be
restored.
When taking a
measurement, the
data/holding
results light does
not turn on
There may be interference
from electronic devices, such
as cordless or cell phones or
computers.
Move any electronic devices away from the
Home Hub/TeleStation
The measurement device may
be too far from the Home
Hub/TeleStation
Move the measurement device closer to the
Home Hub/TeleStation.
Perform the Radio Test to determine if the
device signals are being received by the
Home Hub/TeleStation

Troubleshooting Tables
4-4 Troubleshooting
When you take a
measurement, the
data/holding results
light remains on
There may be a problem with
your telephone service or
your healthcare provider’s
connection
Perform the CALL button test as follows:
- Find the CALL button on the far right of
the back panel of the Home Hub/
TeleStation
- Press the CALL button for less than 2
seconds. The Home Hub/TeleStation
should beep once.
(For some Home Hubs, you may need to
use a pen or other pointed object to depress
the CALL button)
- Release the CALL button.
- In 10 seconds, the using phone light
should turn on and the Home Hub/
TeleStation will dial your healthcare
provider.
- After a few minutes, the using phone
light and the data/holding results light
should turn off.
- If the data/holding results light turns
off, the Home Hub/TeleStation is operating
correctly. (It may take a few minutes for it
to turn off.)
- If the results above do not occur, contact
your healthcare provider.
Problem Reason Possible Solutions

Troubleshooting Tables
Troubleshooting 4-5
When you take a
measurement, the
data/holding
results light
remains on
and you have a
special phone service
such as voice mail
There may be a conflict
between your special phone
service and the Home Hub/
TeleStation connection,
or a problem with your
telephone line or your
healthcare provider’s
connection.
- Have someone call and leave a message on
your special telephone service
Perform the CALL button test as follows:
Note: Keep your phone on the hook for
the following steps unless told otherwise.
- Find the CALL button on the far right of
the back panel of the Home Hub/
TeleStation
- Press the CALL button for less than 2
seconds. The Home Hub/TeleStation
should beep.
(For some Home Hubs, you may need to
use a pen or other pointed object to depress
the CALL button)
- Release the CALL button.
- In 10 seconds, the using phone light
should turn on and the Home Hub/
TeleStation will dial your healthcare
provider.
- After a few minutes, the using phone
light and the data/holding results light
should turn off.
- If the data/holding results light is still
on, listen to the saved message and then
delete it.
- Press the CALL button for less than 2
seconds. The Home Hub/TeleStation
should beep once.
- Release the CALL button.
- In 10 seconds, the using phone light
should turn on and the Home Hub/
TeleStation will dial your healthcare
provider.
Problem Reason Possible Solutions

Troubleshooting Tables
4-6 Troubleshooting
Continued from
previous page
- After a few minutes, the using phone
light and the data/holding results light
should turn off.
- If the data/holding results light turns
off, the Home Hub/TeleStation is operating
correctly. (It may take a few minutes for it
to turn off.)
However, your special phone service may
be interfering with the Home Hub/
TeleStation
- If the data/holding results light stays
on, there is probably not a conflict with
your special phone service.
However, there may be a problem with
your phone line or your healthcare
provider’s connection.
- If the results above suggest a problem,
contact your healthcare provider.
Problem Reason Possible Solutions

Troubleshooting Tables
Troubleshooting 4-7
Liquid spilled onto
the Home Hub/
TeleStation
(for example, where
the wires connect to
the back)
The Home Hub/TeleStation
should be placed far from
liquids (especially a sink or
anywhere liquids might spill
onto the unit.)
For liquid spills, do the following:
- Unplug the Home Hub/TeleStation power
adapter from the wall or power strip.
- Unplug the phone connection cord from the
wall jack.
- Use a towel to dry off the Home Hub/
TeleStation, paying special attention to
connection points.
- Wait 3 hours for the unit to completely dry.
- Plug the connection cords back into the
Home Hub/TeleStation and the electrical
and phone lines. Make sure they snap into
place.
- Pick up your telephone receiver and listen
for a dial tone.
- If you do not hear a dial tone, hang up and
try again.
- If you still do not hear a dial tone, unplug
the Home Hub/TeleSTation.
- Connect your telephone directly to the
phone jack.
- Contact your healthcare provider.
Problem Reason Possible Solutions

Troubleshooting Tables
4-8 Troubleshooting
Scale The following table describes problems that may occur with the each of
the two types of Scale -- Standard Scale and Steady Scale. Use the table
for your type of Scale.
Standard
Scale
The following troubleshooting table applies to the Standard Scale.
Problem Reason Possible Solutions
Err.1 appears on the display
and it says "Please try again."
You may have stepped off
the Scale too soon.
Take your weight again and wait for the
voice prompt before stepping off the
Scale.
Err.2 appears on the display
and it says "Please try again."
You may have moved
during the measurement
Take your weight again and do not move
while the scale measures your weight
Err.3 appears on the display
and it says "Please try again."
You may have stayed on the
scale too long.
Take your weight again and step off the
scale as soon as you hear the voice
prompt.
Err.4 appears on the display
and it says "The maximum
weight was exceeded."
Your may have exceeded
the maximums weight of
440 lbs (200 kgs)
Use a regular scale to see if your weight
exceeded 440 lbs (200 Kg).
No voice prompt when you
stand on the Scale and it is not
set to 0
The Scale’s batteries are
low.
Replace all 4 batteries in the Scale as
described in Chapter 3
The display alternately flashes
Lo and batt
The Scale announces "Please
replace the scale batteries"
Scale does not turn on. The Scale is not properly
installed or the batteries are
low.
- Replace all 4 Scale batteries following
the procedure in Chapter 3.
- Move the Scale to a hard, flat surface.
- If it still des not turn on, contact your
healthcare provider.
The final weight reading keeps
changing or is incorrect.
The Scale is on a carpeted
or irregular surface, or the
Scale is broken.
- Move the Scale to a hard, flat surface
and take your weight again.
- If this does not resolve the problem,
contact your healthcare provider.

Troubleshooting Tables
Troubleshooting 4-9
Steady Scale The following troubleshooting table applies to the Steady Scale.
Problem Reason Possible Solutions
Err. appears on the
display
You stepped off the Scale too
soon.
Take your weight again and wait for the Step
Off light and voice prompts before stepping
off the Scale.
Err.1 or
Err.2 or
Err.6 appears on the
display
The Scale display is not
connected to the Scale
or there is a problem with the
Scale
Check the connection of the display to the
Scale.
If this does not resolve the problem, contact
your healthcare provider.
Err.3 appears on the
display
You moved the scale
immediately after stepping off.
Take your weight again and wait for the Step
Off light and voice prompt before stepping off
the Scale and do not touch the Scale.
Err.4 appears on the
display
You moved during the weight
measurement.
Take your weight again and remain still
during the measurement.
Err.5 appears on the
display
The Scale was unable to read
the measurement.
Use a regular scale to see if your weight
exceeded 365 lbs (166 Kg)
Err.6 appears on the
display
You did not step off the Scale
when prompted.
Take your weight again and when the Step
Off light and voice prompt occur, step off the
Scale.
Stand Still light
blinks when you stand
on the Scale.
The Scale’s batteries are low. Replace all 4 batters in the Scale as described
in Chapter.3
Stand Still light
blinks and there is no
voice prompt when
you stand on the
Scale and it is not set
to 0.
The Scale’s batteries are low. Replace all 4 batters in the Scale as described
in Chapter.3
Step Off light
flashes slowly
The Scale display is not
connected to the Scale.
- Check the cord connection between the
platform and the display
- Unplug and replug the cord until it snaps
into place

Troubleshooting Tables
4-10 Troubleshooting
Rhythm
Strip
Recorder
The following table describes problems that may occur with the Rhythm
Strip Recorder.
Scale does not turn
on.
The Scale is not properly
installed or the batteries are
low.
- Check the cord connection between the
platform and the display.
- Replace all 4 Scale batteries following the
procedure in Chapter 3.
- Move the Scale to a hard, flat surface.
- If it still des not turn on, contact your
healthcare provider.
The final weight
reading keeps
changing or is
incorrect.
The Scale is on a carpeted or
irregular surface, or the Scale
is broken.
- Move the Scale to a hard, flat surface and
take your weight again.
- If this does not resolve the problem, contact
your healthcare provider.
Problem Reason Possible Solutions
Problem Reason Possible Solutions
Poor heart rhythm
measurement, or
the Home Hub/
TeleStation is not
receiving the heart
rhythm
measurement.
The wrist bands are too loose
or not properly positioned.
Push the wristbands up you arms until there
is a smooth, snug fit against the skin or you
inner wrists or arms.
The measurement device may
be too far from the Home
Hub/TeleStation
- Move the measurement device closer to the
Home Hub/TeleStation.
- Perform the Radio Test to determine if the
device signals are being received by the
Home Hub/TeleStation.
- If the Recorder is still not operating
properly, contact your healthcare provider.

Troubleshooting Tables
Troubleshooting 4-11
Blood
Pressure
Monitor
The following tables describes problems that may occur with the Blood
Pressure Monitor The first table is for the M3815A and the second
table is for the M3815B .
M3815A
Problem Reason Possible Solutions
Inaccurate blood
pressure readings.
Improper blood measurement
procedure.
Review the blood pressure tips in Chapter 2
and repeat the measurement.
appears on
the display
The systolic and diastolic
measurements are within
10 mm Hg of each other.
There may be air leakage in
the air hose connections.
- Check that the air hose is properly
connected to the BP Monitor and cuff by
unplugging it and then plug it back in,
pushing and twisting until it snaps into
place.
appears on
the display
You moved during the
reading.
- Take your blood pressure again, remaining
very still during the reading.
appears on
the display
The pressure measurement
did not increase during cuff
inflation or the cuff is not
securely fastened.
- Check that the air hose is properly
connected to the BP Monitor and cuff by
unplugging it and then plug it back in,
pushing and twisting until it snaps into
place.
- Make sure the cuff is securely fastened
appears
on the
display
The BP Monitor batteries are
low.
- Replace all 4 batteries in the BP Monitor
following the procedure in Chapter 3.
Note: If the batteries need frequent
replacement, check the initial snugness of
the cuff. A loose cuff requires longer
pumping times and will shorten battery life.

Troubleshooting Tables
4-12 Troubleshooting
.
M3815B
Display Symbol Reason Possible Solutions
Battery power full indicator No action required.
Battery power low indicator When battery power indicator blinks, replace
all batteries with new ones.
Unstable blood pressure due
to excessive body movement.
Repeat the measurement and remain very still
during the measurement.
Pulse is not detected
correctly.
Repeat the measurement and remain very still
during the measurement.
Systolic and diastolic values
are within 10 mmHG of each
other.
Refasten the cuff and repeat the
measurement remaining very still during the
measurement.
Pressure value did not
increase during inflation.
Check for air leaks along the tube and around
the air socket.
Cuff is not fastened correctly. Refasten the cuff and repeat the
measurement.

Troubleshooting Tables
Troubleshooting 4-13
Pulse
Oximeter
The following table describes problems that may occur with the Pulse
Oximeter.
Problem Reason Possible Solutions
appears on
the display A hardware malfunction is
detected. If condition persists, contact your healthcare
provider.
appears
on the
display
A reading was not obtained. - Reduce the light.
- Warm your finger.
- Keep your hand still.
- Repeat the measurement.
- If the condition persists, contact your
healthcare provider.
appears
on the
display
and flashes.
Batteries are too low for the
Pulse Oximeter to work
properly.
- Replace all 4 batteries following the
procedure in Chapter 3.
- Perform a Radio Test.
appears
on the
display
along with a rising
audio tone after
battery replacement
Indicates that the batteries are
good. No action required. Proceed with Pulse
Oximeter measurement.
appears
on the
display
along with a low
audio tone after
battery replacement.
There is a hardware
malfunction. - Replace all 4 batteries following the
procedure in Chapter 3.
- Perform a Radio Test.
- If condition persists, contact your
healthcare provider.
Troubleshooting Tables
4-14 Troubleshooting

Specifications and Regulatory 5-1
Introduction
5
Specifications and Regulatory
Overview
Chapter 5 provides information about the Philips Telemonitoring Set of
devices that is required by law to completely describe their
characteristics, performance and compliance with regulatory
requirements. It includes the following sections.
Page
Intended Use/Indications for Use . . . . . . . . . . . . . . . . . . 5-2
Specifications . . . . . . . . . . . . . . . . . . . . . . . . . . . . . . . . . . 5-3
Description . . . . . . . . . . . . . . . . . . . . . . . . . . . . . . . . . 5-3
Home Hub . . . . . . . . . . . . . . . . . . . . . . . . . . . . . . . 5-3
Standard Scale . . . . . . . . . . . . . . . . . . . . . . . . . . . 5-4
Steady Scale . . . . . . . . . . . . . . . . . . . . . . . . . . . . . 5-5
Blood Pressure Monitor . . . . . . . . . . . . . . . . . . . . . 5-6
Rhythm Strip Recorder . . . . . . . . . . . . . . . . . . . . . 5-7
Pulse Oximeter . . . . . . . . . . . . . . . . . . . . . . . . . . . 5-7
Technical Specifications . . . . . . . . . . . . . . . . . . . . . . . 5-8
Physical . . . . . . . . . . . . . . . . . . . . . . . . . . . . . . . . . 5-8
Electrical . . . . . . . . . . . . . . . . . . . . . . . . . . . . . . . . 5-8
Environmental . . . . . . . . . . . . . . . . . . . . . . . . . . . . 5-9
Electromagnetic Compatibility (except M3813B Scale)5-10
Emissions and Immunity . . . . . . . . . . . . . . . . . . . . . . 5-11
Avoiding Electro-magnetic Interference. . . . . . . . 5-11
Avoiding Static Electrical Discharges . . . . . . . . . 5-12
Electromagnetic Compatibility (M3813B Scale) . . . . . 5-13
Emissions and Immunity . . . . . . . . . . . . . . . . . . . . . . 5-14
Reducing Electro-magnetic Interference . . . . . . . 5-14
Regulatory Information . . . . . . . . . . . . . . . . . . . . . . . . . 5-19
FCC Regulations . . . . . . . . . . . . . . . . . . . . . . . . . . . . 5-19
Telephone Regulatory Notice . . . . . . . . . . . . . . . . . . 5-20

Intended Use/Indications for Use
5-2 Specifications and Regulatory
Intended Use/Indications for Use
The Model 3810A is intended to be used upon prescription of a licensed
physician or authorized healthcare provider by patients as a means to
automatically collect and transmit medical information, such as weight,
blood pressure, and non-diagnostic ECG, over normal residential
telephone lines, between a patient, typically at home, and a healthcare
professional at the authorized provider.
Indications
for Use
The M3810A is indicated for patients at home, who are capable and
willing to self-administrate this device, upon prescription of their
healthcare provider, to collect and transmit medical information, such as
weight, blood pressure (including pulse rate) and non-diagnostic ECG
rhythm strip to the healthcare provider at another location. The patient
takes these measurements, typically once per day, and the information is
transmitted automatically via normal telephone time to the healthcare
provider. The device does not send any real-time alarms. Clinical
judgement and experiences are required to check and interpret the
information delivered.
Contra-
indications
The device is not intended as a substitute for medical care. The device is
contraindicated for patients with uncompensated heart failure, patients
at high risk of life threatening arrhythmias, patients with recent
myocardial infarctions, or patients requiring direct medical supervision
or emergency interventions.
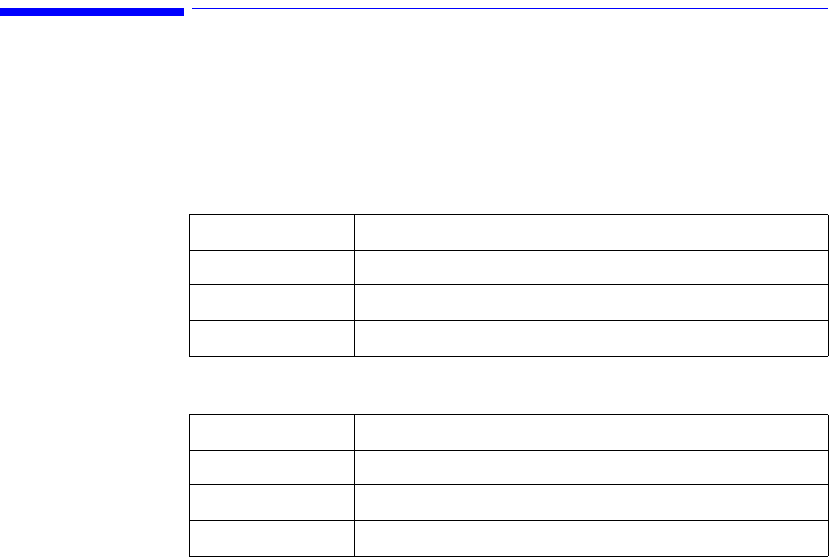
Specifications
Specifications and Regulatory 5-3
Specifications
This section gives technical descriptions and specifications of the Philips
Telemonitoring Set devices, including physical, electrical, and
environmental.
Description Home Hub
TeleStation
Model M3812A
Type Class II equipment, continuous operation
Display LED panel
Ports Serial Modem
Model M3812B
Type Class II equipment, continuous operation
Display LCD panel
Ports Serial Modem

Specifications
5-4 Specifications and Regulatory
Standard Scale
Model M3813B
Type
- Type B applied part
- IPXO ordinary equipment
- Internally powered continuous operation
Display - Digital, 2.0 in (51 mm) character height
- Weights displayed and announced simultaneously
Language English or Spanish
Audio Volume Voice readout of weight, prompts, and 4 settings
Measurement
Range
66 to 440lbs (30 to 200 kg)
Accuracya
a. Scale accuracy testing was performed on polyester carpet with a weight of 80 oz., twist
of 4.8 x 3.3, and density of 4,000. A standard 8 lb. pad was used as
underlayment.
+ 0.5% of loading
at maximum patient weight + 2.2 lbs (1.0 kg)
Display Units pounds (lbs) or kilograms (kg), user selectable
Maximum
Allowed Weight
440 lbs (200 kg)
Grab Bar and
Post
check for availability

Specifications
Specifications and Regulatory 5-5
Steady Scale
Model M3813A
Type
- Type B applied part
- IPXO ordinary equipment
- Internally powered continuous operation
Display - Digital, 0.71 in (18 mm) character height
- Weights displayed and announced simultaneously
Language English only
Audio Volume Voice readout of weight, prompts, and 4 settings
Measurement
Range
66 to 365lbs (30 to 166 kg)
Accuracy + 1% of loading + 1.1 lbs (0.5 kg)
at maximum patient weight + 4.8 lbs (2.2 kg)
Display Units pounds (lbs) or kilograms (kg), user selectable
Maximum
Allowed Weight
365 lbs (166 kg)
Grab Bar and
Post
Removable attachment
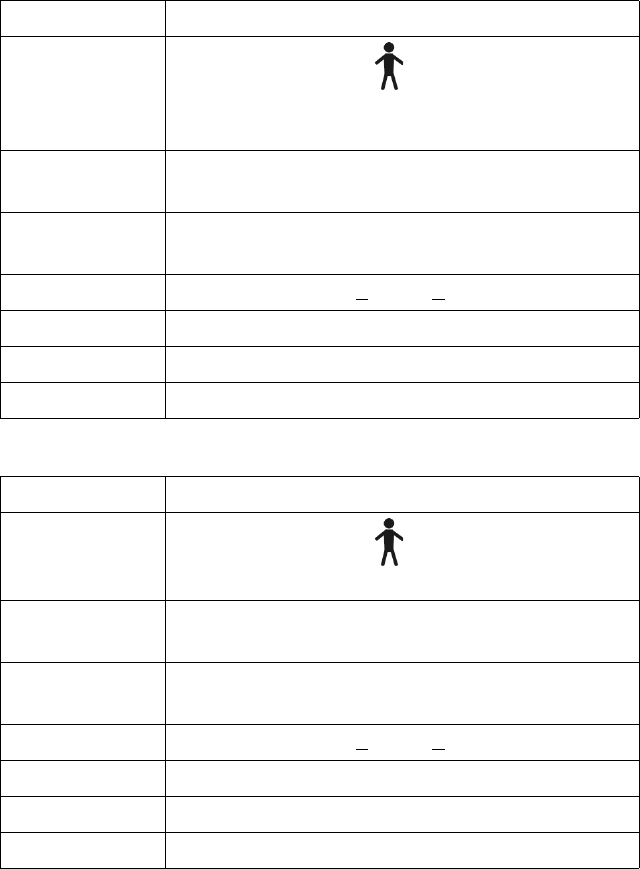
Specifications
5-6 Specifications and Regulatory
Blood Pressure Monitor
M3815A
M3815B
Model M3815A
Type
- Type B applied part oscillometric
- IPXO ordinary equipment
- Internally powered continuous operation
Display - Digital, 0.63 in (16 mm) character height
- Pressure and pulse displayed simultaneously
Measurement
Range
- Pressure: 20 to 280 mm Hg
- Pulse: 40 to 200 pulses per minute
Accuracy Pressure transducer: + 2% or + 3 mm Hg
Pressurization Automatic, using micropump
Depressurization Constant-air release-valve system
Deflation Automatic exhaust
Model M3815B
Type
- Type B applied part oscillometric
- Internally powered continuous operation
Display - Digital, 0.79 in (20 mm) character height
- Pressure and pulse displayed simultaneously
Measurement
Range
- Pressure: 20 to 280 mm Hg
- Pulse: 40 to 200 pulses per minute
Accuracy Pressure transducer: + 2% or + 3 mm Hg
Pressurization Automatic, using micropump
Depressurization Constant-air release-valve system
Deflation Active exhaust valve

Specifications
Specifications and Regulatory 5-7
Rhythm Strip Recorder
Pulse Oximeter
Model M3816A
Type - 1-channel lead
- Oscillometric, Type B applied part
- IPXO ordinary equipment
- Internally powered continuous operation
Display LED light
Model M3814A
Type
- Type B applied part
- IPXO ordinary equipment
- internally powered continuous operation
(does not imply continuous monitoring
Display - Digital 0.7 in. (1.8 cm) character height
- SpO2 - Pulse displayed alternately
- SpO2 display range: 0 - 100%
Measurement
Range
- SpO2: 70 - 100% (functional hemoglobin)
- Pulse: 18 to 300 beats per minute
Measurement
Accuracy
-S pO2: 70 - 100%, + 2 digits (+ 1 Standard
Deviation a statistical measure)
- (SpO2 calibration range: 70 - 100% determined by
arterial blood measurement on a Co-oximeter
Test methods available upon request.)
- Pulse: + 3%, + 1 digit
Measurement
Wavelengths
- 660 nanometers, 3 milliwatts (nominal)
- 910 nanometers, 3 milliwatts (nominal)
Biocompatibility Suitable for surface device, skin contact,
limited contact duration (up to 24 hours)

Specifications
5-8 Specifications and Regulatory
Technical
Specifications
Physical
Electrical
Philips Device Product
Part #
Height
cm (in.)
Width
cm (in.)
Depth
cm (in.)
Weight
kg. (lbs.)
Home Hub M3812A 3.8 (1.5) 20.0 (7.9) 27.9 (11.0) 0.93 (2.05)a
TeleStation M3812B 12.7 (5.0) 21.8 (8.6) 15.9 (6.3) 0.77 (1.70)a
Standard Scale M3813B 5.7 (2.3) 38.1 (15.0) 38.1 (15.0) 3.8 (8.4)b
Steady Scale M3813A 5.1 (2.0) 48.8 (19.2) 48.8 (19.2) 6.8 (15)b
Blood Pressure Monitor M3815A 6.9 (2.7) 16.5 (6.5) 11.2 (4.4) 0.57 (1.25)b
M3185B 6.2 (2.4) 16.3 (6.4) 11.2 (4.4) 0.35 (0.77)
Rhythm Strip Recorder M3816A 6.9 (2.7) 16.5 (6.5) 11.2 (4.4) 0.34 (0.75)b
Pulse Oximeter M3814A 6.9 (2.7) 16.5 (6.5) 11.2 (4.4) 037 (0.81)b
a. Net weight, without power module
b. Net weight, with batteries
Philips Device Product
Part # Power Source Battery Life
Home Hub M3812A 9.0VAC/ 500mA
(Use Philips-supplied power
adapter only)
n/a
TeleStation M3812B
Standard Scale M3813B 4 AA (1.5V) alkaline batteries
connected in series
for a total of 6 V
~ 12 months with
1 daily measurement
Steady Scale M3813A ~ 6 months with
1 daily measurement
Blood Pressure Monitor M3815A
M3815B
~ 3 months with
1 daily measurement
Rhythm Strip Recorder M3816A ~ 12 months with
1 daily measurement
Pulse Oximeter M3814A ~ 6 months with
1 daily measurement

Specifications
Specifications and Regulatory 5-9
Environmental
Warning These devices are not suitable for use in the presence of flammable
anesthetic mixture with air or with oxygen or nitrous oxide.
Temperature Atmospheric
Pressure Altitude Relative
Humidity
Philips Device Product
Part # Operating Storage
Operating and
Storage
(hPa)
Operating and
Storage
(hPa)
(Non-
condensing)
Home Hub M3812A 10 - 40oC
(50 - 104oF)
-9 - 54oC
(15 - 130oF)
572-1013 0-4600m
(0-15,000ft)
less than
85%
TeleStation M3812B
Standard Scale M3813B
Steady Scale M3813A
Blood Pressure
Monitor
M3815A
M3815B
Rhythm Strip
Recorder
M3816A
Pulse Oximeter M3814A
Electromagnetic Compatibility (except M3813B Scale)
5-10 Specifications and Regulatory
Electromagnetic Compatibility (except M3813B Scale)
Note The section applies to all Telemonitoring Set devices except the
M3813B Scale. See the following section for Electromagnetic
Compatibility information for that device.
When using the Philips Telemonitoring System, electromagnetic
compatibility with surrounding devices should be assessed.
A medical device can either generate or receive electromagnetic
interference. Testing for electromagnetic compatibility (EMC) has been
performed according to international medical device standards EN
60601-1-2.
These EMC standards describe tests for both emitted and received
interference. Emission tests deal with interference generated by the
device itself, whereas Immunity tests deal with determining
electromagnetic compatibility of the device while used in the presence
of surrounding electronic equipment or other external sources that may
generate interference.
Warning Radio frequency (RF) interference from nearby transmitting
devices may degrade performance of Philips Telemonitoring Set
devices. Electromagnetic compatibility with surrounding devices
should be assessed prior to using this equipment.
Philips Telemonitoring Set devices should not be used next to or
stacked with other equipment. If you must stack the device, check
that normal operation is possible.
Electromagnetic Compatibility (except M3813B Scale)
Specifications and Regulatory 5-11
Emissions
and
Immunity
The EMC standards state that manufacturers of patient-coupled
equipment must specify immunity levels for their devices when there is
reduced performance.
During the EN 61000-4-3 Radiated Immunity test, some reduced
performance was observed.
EN 61000-4-3 specifies that devices be subjected to a field of 3 Volts/
meter over a frequency range of 26 to 1000 MHz with no degradation of
performance or loss of function below the performance level specified
when equipment is operated as intended. Radio communication from the
Philips Telemonitoring Set devices may occasionally be interrupted when
subjected to frequencies in the 800 MHz - 942 MHz range at field
strength levels as low as 0.05 V/m. The phenomena discussed above are
not unique to this unit but are characteristic of radio instrumentation in
use today. The M3812A Home Hub and M3812B TeleStation are radio
receivers and their reception of Philips Telemonitoring Set device signals
can be degraded by electromagnetic interference.
Avoiding
Electro-
magnetic
Interference
The Philips Telemonitoring System is intended for use in an
electromagnetic environment in which radiated RF disturbances are
controlled. The customer or the user of the Philips Telemonitoring
System can help prevent electromagnetic interference by maintaining a
minimum distance between portable and mobile RF communications
equipment (transmitters) and the Philips Telemonitoring System as
recommended below, according to maximum output power of the
communications equipment.
The M3812A Home Hub and M3812B TeleStation contain a sensitive
radio receiver that is intended to receive radio signals from the
measurement devices and can be degraded by electromagnetic energy in
the frequency range of 870 MHz to 960 MHz. Avoid the use of any radio
frequency device operating in this frequency range when using the
Philips Telemonitoring System. Possible sources of interfering radio
frequency radiation are cellular telephones, cordless telephones, and
other products that contain radio transmitters. The following table gives
safe distances to keep radio frequency transmitters away from your
Philips Telemonitoring Set devices.

Electromagnetic Compatibility (except M3813B Scale)
5-12 Specifications and Regulatory
Note These guidelines may not always apply. Electromagnetic propagation is
affected by absorption and reflection from structures, objects, and people.
Philips Telemonitoring Set devices have a Radio Test button that sends a
reduced strength test radio signal to the Home Hub or TeleStation, which
sounds an audio tone if the test signal is successfully received. This test
can be used to determine whether sources of interference are present.
These sources can be turned off or moved away to reduce their strength
and reduce interference. In addition, Philips Telemonitoring Set devices
and Home Hub or TeleStation can be placed closer to each other so that
the radio transmission from the Philips Telemonitoring Set devices to the
Home Hub or TeleStation has less distance to travel and interfering radio
signals have less effect. The radio transmission from the Philips
Telemonitoring Set devices is repeated periodically so that an
intermittent source of interference should only delay reception.
Avoiding
Static
Electrical
Discharges
Static discharges to Philips Telemonitoring Set devices may cause
temporary, unusual behavior. If a static discharge causes a temporary
malfunction, simply restart the measurement.
Recommended separation distances between
portable and mobile RF communications equipment
and Philips Telemonitoring Set devices
Rated maximum
output power of
transmitter (Watts)
Recommended separation distance for
various transmitter frequencies
26 to 800 MHz 800 MHz to 2.5 GHz
feet. meters feet meters
0.01 11.5 3.5 23 7
0.1 36117222
1 115 35 230 70
10 361 110 720 220
100 1150 350 2300 700

Electromagnetic Compatibility (M3813B Scale)
Specifications and Regulatory 5-13
Electromagnetic Compatibility (M3813B Scale)
The electromagnetic compatibility (EMC) validation of the Philips
M3813B Scale included testing performed according to the
international standard for EMC for medical devices. See the
Manufacturer’s Declaration for details.
Electronic devices can either generate or receive electromagnetic
interference. The M3813B Scale has been evaluated for electromagnetic
compatibility (EMC) with the appropriate accessories according to IEC
60601-1-2:2001, the international standard for EMC for medical
electrical equipment. This IEC standard has been adopted in the
European Union as the European Norm, EN 60601-1-2:2001.
Radio frequency (RF) interference from nearby transmitting devices can
degrade performance of the electronic equipment. Electromagnetic
compatibility with surrounding devices should be assessed prior to
using the equipment.
Fixed, portable, and mobile radio frequency communications equipment
can also affect the performance of electronic equipment. See your
Service Provider for assistance with the minimum recommended
separation distance between RF communications equipment and the
M3813B system.
Warning The use of accessories, transducers and cables other than those
specified in the Philips Telemonitoring system service and user
documentation can result in increased emissions or decreased
immunity of the system.
The products should not be used next to or stacked with other
equipment. If you must stack the product, you must check that
normal operation is possible in the necessary configuration before
the product is used.

Electromagnetic Compatibility (M3813B Scale)
5-14 Specifications and Regulatory
Emissions
and
Immunity
The M3813B Scale may be susceptible to interference from other RF
energy sources. Examples of other sources of RF interference are other
medical electrical devices, cellular products, information technology
equipment, and radio/television transmission. If interference is
encountered, as demonstrated by anomalous product behavior, attempt to
locate the source. Assess the following:
• Is the interference intermittent or constant?
• Does the interference occur only in certain locations?
• Does the interference occur only when in close proximity to certain
equipment?
Reducing
Electro-
magnetic
Interference
Once the source is located, attempt to attenuate the interference by
distancing the product from the source as much as possible. If assistance
is needed, contact your local Service Provider.
Note The M3813B Scale is intended for use in the electromagnetic
environment specified above. The customer or the user of the M3813B
Scale should assure that it is used in such an environment.
Electromagnetic Emissions
Emissions Test Compliance Electromagnetic Environment Guidance
RF emissions
CISPR 11
Group 1 The M3813B Scale uses RF energy only for its internal
function. Therefore, its RF emissions are very low and not
likely to cause interference in nearby electronic equipment.
RF emissions
CISPR 11
Class B The M3813B Scale is suitable for use in all establishments,
including domestic and those directly connected to the
public low-voltage power supply network that supplies
buildings used for domestic purposes.
Harmonic Emissions
IEC 61000-3-2
Not Applicable
Voltage fluctuations /
flicker emissions
IEC 61000-3-3
Not Applicable

Electromagnetic Compatibility (M3813B Scale)
Specifications and Regulatory 5-15
Electromagnetic Immunity - General
Immunity Test IEC 60601-1-2 Test Level Compliance
Level
Electromagnetic
Environment Guidance
Electrostatic
discharge (ESD)
IEC 61000-4-2
+ 6 kV contact
+ 8 kV air
+ 6 kV contact
+ 8 kV air
Floors should be wood,
concrete, or ceramic tile.
If floors are covered with
synthetic material, the
relative humidity should be at
least 30%.
Electrical fast
transient/burst
IEC 61000-4-4
+ 2 kV for power supply lines
+1 kV for input/output lines
Not Applicable
Surge
IEC 61000-4-5
+ 1 kV differential mode + 2
kV common mode
Not Applicable
Voltage dips, short
interruptions, and
voltage variations
on power supply
input lines
IEC 61000-4-11
< 5% UT (> 95% dip in UT)
for 0.5 cycle
40% UT (60% dip in UT)
for 5 cycles
70% UT (30% dip in UT)
for 25 cycles
< 5% UT (> 95% dip in UT)
for 5 sec.
Not Applicable
Power frequency
(50/60 Hz)
magnetic field
IEC 61000-4-8
3 A/m 3 A/m Power frequency magnetic
fields should be at levels
characteristic of a typical
location in a typical
commercial or hospital
environment.
Note: UT is the AC mains voltage prior to application of the test level.
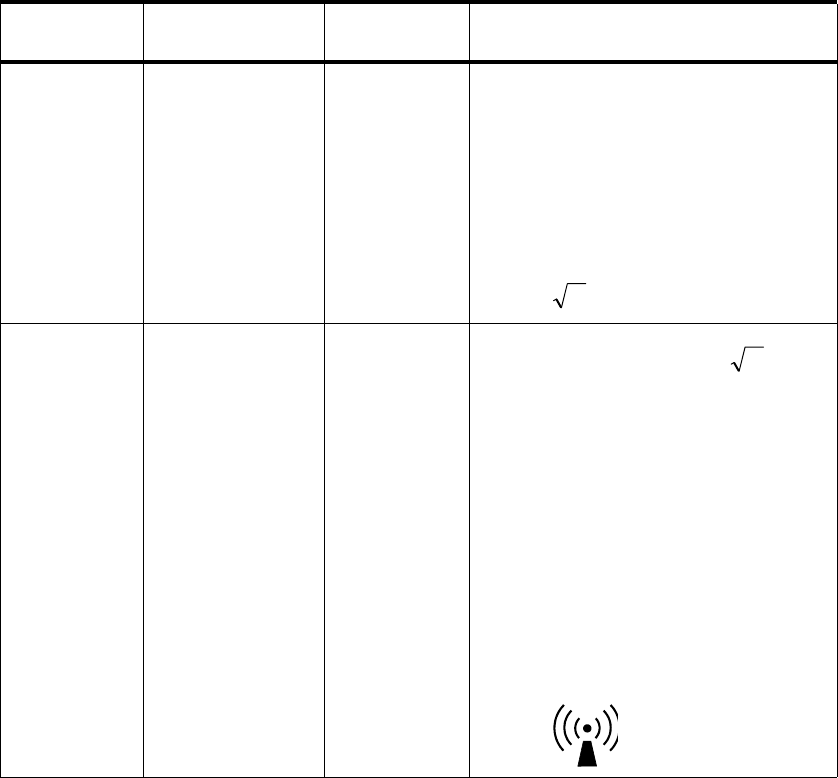
Electromagnetic Compatibility (M3813B Scale)
5-16 Specifications and Regulatory
Electromagnetic Immunity
Immunity
Test
IEC 60601Test
Level
Compliance
Level
Electromagnetic Environment
Guidance
Conducted RF
IEC 61000-4-6
3 Vrms
150 kHz to 80 MHz
Not Applicable Portable and mobile RF communications
equipment should be used no closer to any
part of the M3813B Scale, including
cables, than the recommended separation
distance calculated from the equation
applicable to the frequency of the
transmitter.
Recommended Separation Distance
Radiated RF
IEC 61000-4-3
3 V/m
80 MHz to 2.5 GHz
3 V/m 80 MHz to 800 MHz
800 MHz to 2.5 GHz
where P is the maximum output power
rating of the transmitter in watts (W)
according to the transmitter’s specified
output power and d is the recommended
separation distance in meters (m).
Field strengths from fixed RF transmitters,
as determined by an electromagnetic site
survey,a should be less than the compliance
level in each frequency range.b
Interference may occur in the vicinity of
equipment marked with the following
symbol :
P=d 2.1
P=d 3.2
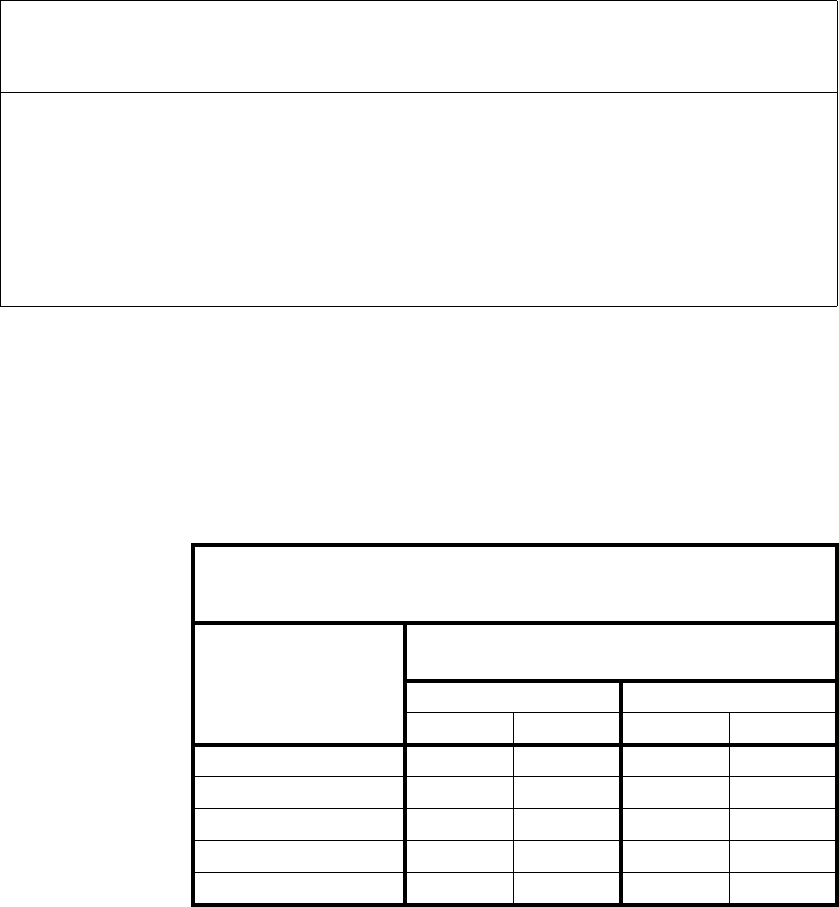
Electromagnetic Compatibility (M3813B Scale)
Specifications and Regulatory 5-17
The M3813B Scale is intended for use in an electromagnetic
environment in which radiated RF disturbances are controlled. The
customer or the user of the M3813B Scale can help prevent
electromagnetic interference by maintaining a minimum distance
between portable and mobile RF communications equipment
(transmitters) and the M3813B Scale as recommended below, according
to the maximum output power of the communications equipment.
Note 1: At 80 MHz and 800 MHz, the higher frequency range applies.
Note 2: These guidelines may not apply in all situations. Electromagnetic propagation is affected by
absorption and reflection from structures, objects and people.
aField strengths from fixed transmitters, such as base stations for radio (cellular/cordless) telephones
and land mobile radios, amateur radio, AM and FM radio broadcast and TV broadcast cannot be
predicted theoretically with accuracy. To assess the electromagnetic environment due to fixed RF
transmitters, an electromagnetic site survey should be considered. If the measured field strength in the
location in which the M3813B Scale is used exceeds the applicable RF compliance level above, the
M3813B Scale should be observed to verify normal operation. If abnormal performance is observed,
additional measures may be necessary, such as re-orienting or relocating the Scale device.
bOver the frequency range 150 kHz to 80 MHz, field strengths should be less than 3 V/m.
Electromagnetic Immunity
Recommended separation distances between
portable and mobile RF communications equipment
and the M3813B Scale
Rated maximum
output power of
transmitter (Watts)
Recommended separation distance for
various transmitter frequencies
150 to 800 MHz 800 MHz to 2.5 GHz
feet. meters feet meters
0.01 0.32 0.1 0.66 0.2
0.1 1.3 0.4 2.3 0.7
1 3.9 1.2 7.5 2.3
10 13 4 23 7.0
100 39 12.0 75 23.0

Electromagnetic Compatibility (M3813B Scale)
5-18 Specifications and Regulatory
For transmitters rated at a maximum output power not listed above, the
recommended separation distance d in meters (m) can be determined
using the equation applicable to the frequency of the transmitter, where P
is the maximum output power rating of the transmitter in watts (W)
according to the transmitter’s manufacturer.
Note At 80 MHz and 800 MHz, the higher frequency range applies.
These guidelines may not apply in all situations. Electromagnetic
propagation is affected by absorption and reflection from structures,
objects and people.

Regulatory Information
Specifications and Regulatory 5-19
Regulatory Information
FCC
Regulations
This equipment has been tested and found to comply with the limits for a
Class B digital device, pursuant to Part 15 of the FCC Rules. These limits
provide reasonable protection against harmful interference in a
residential installation. Philips Telemonitoring Set devices generate, use,
and can radiate radio frequency energy. If not installed and used
according to instructions, it may interfere with radio communications.
However, there is no guarantee that interference will not occur if the
equipment is properly installed.
If this equipment causes interference to radio or television reception,
which can be determined by turning the equipment off and on, the user is
encouraged to try to correct it by:
• relocating the Home Hub or TeleStation,
• increasing the separation between the Philips Telemonitoring Set
devices or the Home Hub or TeleStation and the device being
interfered with, for example, a TV,
• consulting your healthcare provider.
Notes Any changes or modifications to the equipment not expressly approved
by Philips could void the user’s authority to operate it.
The possibility of hazards arising from errors in the software and
hardware design are minimized by Philips’ use of a risk analysis and risk
management process as defined in Philips’ document CMS RISK
ANALYSIS PROCESS, document number A-Q2920-00126.
Regulatory Information
5-20 Specifications and Regulatory
Telephone
Regulatory
Notice
Your Philips Home Hub is registered with the Federal Communications
Commission (FCC) and is in compliance with part 68 of the FCC Rules
and Regulations. The FCC requires Philips to provide you with the
following information. The Home Hub contains a 14.4 Kbps modem.
You must, upon request, provide the following information to your local
telephone company (this information is also printed on the bottom of the
device): FCC Part 68 ID Number: 2M6USA-33569-DT-E and Ringer
Equivalence Number (REN): 0.3A.
Your Philips TeleStation complies with Part 68 of the FCC rules and the
requirements adopted by the Administrative Council for Terminal
Attachments (ACTA). ACTA requires Philips to provide you with the
following information. The TeleStation contains a 14.4 Kbps modem.
You must, upon request, provide this information to your local telephone
company.
On the bottom of the device is a label that contains, among other
information, a product identifier in the format
US: AAAEQ##TXXXXX.
For products approved after July 23, 2001, the digits in the product
identifier represented by ## are the REN without a decimal point (for
example, 03 is a REN of 0.3). If requested, this number must be provided
to the telephone company.
The REN is useful to determine the number of devices you can connect
to your telephone line and still have all of these devices ring when your
telephone number is called. In most (but not all) areas, the sum of the
RENs of all devices connected to one line should not exceed 5. To be
certain of the number of devices connected to your line as determined by
the REN, contact your local telephone company.
Note: (a) The Home Hub or TeleStation may not be used on coin service
phones provided by the telephone company. (b) Party lines are subject to
state tariffs and, therefore, you may not be able to use your own
telephone equipment if you are on a party line. Check with your local
telephone company. (c) Notice must be given to the telephone company
upon permanent disconnection of your telephone from your line.
Regulatory Information
Specifications and Regulatory 5-21
Rights of the Telephone Company: Should your Home Hub or
TeleStation cause trouble on your line that may harm the telephone
network, the telephone company shall, if possible, notify you that
temporary discontinuation of service may be required. If advance notice
is not practical, the telephone company may discontinue service
immediately, but temporarily. In such case of discontinuance, the
telephone company must (1) promptly notify you of such temporary
discontinuance, (2) afford you the opportunity to correct the situation,
and (3) inform you of your right to bring a complaint to the FCC
pursuant to the procedures in Subpart E of Part 68, FCC Rules and
Regulations.
The telephone company may make changes in its communications
facilities, equipment, operations, or procedures where such action is
required in the operation of its business and not consistent with FCC
Rules and Regulations. If these changes are expected to affect the use or
performance of your Home Hub or TeleStation, the telephone company
must give you adequate notice, in writing, to allow you to maintain
uninterrupted service.
A plug and jack used to connect the TeleStation must comply with
applicable FCC Part 68 rules and requirements adopted by the ACTA. A
compliant telephone cord with a modular plug is provided with the
TeleStation. It is designed to be connected to a compatible modular jack
that is also compliant. See installation instructions for details.
Consult your telephone company or qualified installer if you are using a
TeleStation and have specially wired alarm equipment connected to your
telephone line.
Contact Philips Medical Systems at (866) 246-7316 for repair or
warranty information.
Regulatory Information
5-22 Specifications and Regulatory

Aviso
i
Aviso
Información
propiedad
del titular
Una publicación de Philips Medical Systems, una división de Philips
Electronics North America Corporation.
Philips Medical Systems se reserva el derecho de efectuar
modificaciones tanto a estas Instrucciones de uso como al producto
que se describe. Las especificaciones de este producto están sujetas a
cambio sin aviso previo. Nada de lo incluido en estas Instrucciones de
uso pretende representar una oferta, garantía, promesa o condición
contractual, y no deberá interpretarse como tal.
© Koninklijke Philips Electronics N.V. 2008
Todos los derechos reservados. Se prohíbe la reproducción parcial o
total, en cualquier forma o modo, eléctrico, mecánico o de cualquier otra
manera, sin el permiso por escrito del propietario del copyright.
Número de documento:
M3810-90096
Volumen número 4, Mayo de 2008
Philips Medical Systems
3000 Minuteman Road
Andover, MA 01810-1085
EE.UU.
Cualquier copia no autorizada de esta publicación significa una
infracción del copyright y podría afectar la capacidad de Philips Medical
Systems de suministrar información exacta y actualizada a los usuarios.
Todos los nombres de productos que no son de Philips podrían ser
marcas registradas de sus propietarios respectivos.
Publicado en los Estados Unidos de América
Aviso
ii
Historia de
la
publicación
Las nuevas ediciones de este documento incorporarán todo el material
actualizado desde la edición anterior. Pueden enviarse paquetes de
actualización entre ediciones, que contengan páginas de repuesto y
adicionales a incluirse por la fecha de revisión al final de la página.
Tenga en cuenta que no se consideran revisadas las páginas que se
reacomodaron debido a los cambios en una página anterior.
La fecha de impresión y el número de parte de la documentación indican
su edición actual. La fecha de impresión cambia al imprimirse una
edición nueva. (Las correcciones y actualizaciones menores incorporadas
en la reimpresión no provocarán un cambio de fecha.) El número de parte
del documento cambia cuando se realizan cambios técnicos de
consideración.
Todas las ediciones y actualizaciones de este manual y sus fechas de
publicación se enumeran a continuación.
Primera edición . . . . . . . . . . . . . . . . . . . . . .Octubre de 2002
Segunda edición . . . . . . . . . . . . . . . . . . . . . . . . Julio de 2006
Tercera edición . . . . . . . . . . . . . . . . . . . . . . . . Mayo de 2007
Quarta edición . . . . . . . . . . . . . . . . . . . . . . . . Mayo de 2008

Introducción 6-1
Introduction
6
Introducción
Bienvenido
Bienvenido a los servicios de telemonitorización Philips Telemonitoring
Services.
Cuando use este producto, le tomará unos minutos al día pesarse, medir
sus signos vitales y/o su glucosa.
Estas mediciones lo ayudarán a usted y a su personal médico a tomar
mejores decisiones respecto a sus cuidados. La información
proporcionada puede ayudarlo a mejorar su calidad de vida.
Cómo
funciona el
sistema
Usando este sistema le será más fácil tomar sus mediciones desde la
comodidad de su hogar. Las medidas se envían por teléfono a la
computadora de su personal médico.
Cuando lo desee puede hablar por teléfono, ya que el sistema es lo
bastante “inteligente” como para saber cuando está libre la línea.
Esperará y enviará la información cuando usted cuelgue.
Funciona-
miento
continuo del
sistema
Si en algún momento sospecha que hay una falla en alguno de los
dispositivos, póngase en contacto con su personal médico. Philips
sustituirá todo dispositivo defectuoso. También puede comparar sus
resultados con algún otro dispositivo, si dispone de dispositivos de
medición similares.
Esta guía incluye pasos sencillos para llevar a cabo sus mediciones.
También le muestra cómo mantener los dispositivos, de manera que
sigan realizando lecturas correctas.
¡Gracias! Gracias por adoptar un papel activo en el plan de salud en el hogar.
Philips y su personal médico aplauden sus esfuerzos para participar
activamente en su plan de cuidados médicos.
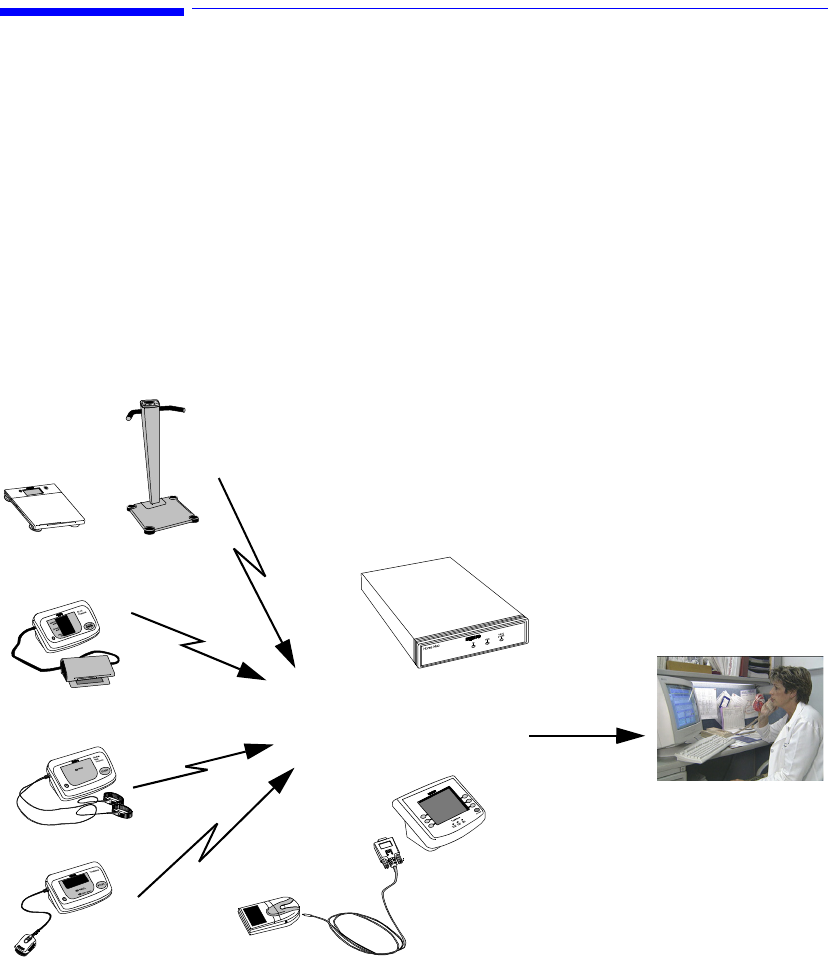
Sistema de Servicios de Telemonitorización Philips
6-2 Introducción
Sistema de Servicios de Telemonitorización Philips
Su sistema de Servicios de Telemonitorización Philips incluye un conjunto de
dispositivos de medición denominado
Patient Telemonitoring Set
(conjunto
de dispositivos para la telemonitorización de pacientes). Cada dispositivo
realiza una medición importante, como es el peso, la tensión arterial, el pulso
y el ritmo cardiaco, %SpO
2
, y después transmite dicha medición a la CDD o
TeleEstación. El glucómetro del paciente también puede enviar mediciones
de glucosa a la TeleEstación mediante un cable especial.
El personal médico decidirá si debe usar todos o uno de los dispositivos
que se mencionan a continuación. La CDD/TeleEstación es el “centro de
comunicaciones”. Recibe las mediciones de los dispositivos mediante la
transmisión por radio y las envía a la computadora de su personal médico
por la línea telefónica. La computadora mantiene un registro de todas las
mediciones de sus signos vitales para que el personal médico lo revise.
Conjunto de dispositivos
Báscula
Monitor de tensión
Registrador del ritmo en tiras (RRT)
Oxímetro de pulso
Radio Teléfono
CDD
o
TeleEstación
Transmisión
Transmisión
Fija
Estándar o
para la telemonitorización
de pacientes (CTP)
arterial (MTA)
Personal médico
Glucómetro

Seguridad y precauciones
Introducción 6-3
Seguridad y precauciones
Siga las
instrucciones
Siga las instrucciones del médico respecto a los síntomas que requieren
que se ponga en contacto con su personal médico. El uso de este
dispositivo no pretende sustituir la terapia o medicamentos que se
suministran actualmente. Recuerde que solamente su personal médico
está calificado para interpretar los resultados. Él le indicará cuándo y
con qué frecuencia deberá medir sus signos vitales. Lea todas las
instrucciones de esta guía y sígalas cuidadosamente antes de utilizar el
Philips Telemonitoring System.
Convenciones
seguidas en
este
documento
En esta Guía se siguen las siguientes convenciones para advertirle acerca
de cualquier información especial o importante en el texto.
Advertencias Las Advertencias indican información que debe conocer para evitar
algún riesgo que pudiera resultar en lesiones graves o incluso la muerte.
Atienda las siguientes Advertencias con todos los dispositivos del
Philips Telemonitoring System.
Advertencia •No permita que nadie más use los dispositivos. Se suministran para
su uso exclusivamente.
•No intercambie dispositivos con un vecino o familiar que tenga el
mismo sistema o uno similar.
• La finalidad de estos dispositivos no es utilizarlos para recibir
respuesta o atención médica urgente.
•Nunca intente reparar usted mismo un dispositivo. Si se suscita
algún problema, póngase en contacto con su personal médico.
•Nunca use un dispositivo sin la tapa de las baterías.
• Evite exponer los dispositivos a temperaturas extremas, humedad,
luz solar directa, golpes, polvo o agua estancada.
•Nunca deje que los niños jueguen con los dispositivos.
• Tire de inmediato el material de embalaje y las bolsas de plástico.
Son peligrosas para los niños.

Seguridad y precauciones
6-4 Introducción
• Las piezas pequeñas desmontables, como las patas de goma y el
sujetador del adaptador de la CDD, podrían ingerirse y son
peligrosas para niños y mascotas.
• Para evitar choques eléctricos, conecte los cables solamente como
se describe en esta Guía.
•No conecte nada a este sistema salvo los dispositivos Philips
Telemonitoring Services o medidores de glucosa aprobados por su
personal médico.
• Para evitar choques eléctricos, no use los dispositivos durante una
tormenta eléctrica.
• Póngase en contacto con su personal médico si se lesionó al usar
cualquiera de estos dispositivos.
Precauciones
Las
Precauciones
indican información que debe conocer para evitar
algún riesgo que pudiera resultar en lesiones graves o daño a la propiedad
.
Atienda las siguientes Precauciones con todos los dispositivos del
Philips Telemonitoring System.
Precaución • Lea todas las instrucciones de esta Guía cuidadosamente antes de
usar estos dispositivos.
• Use estos dispositivos solamente como se lo indicó su personal médico.
• Siga las instrucciones de su médico respecto a los síntomas que
requieren que se ponga en contacto directo con su personal médico.
• El uso de este dispositivo no sustituye la atención médica.
Notas
Las
Notas incluyen información adicional del uso del Patient
Telemonitoring System y de sus dispositivos.
Nota
En negrita El objeto de las acciones en los procedimientos aparecen en negrita,
como se muestra en el ejemplo siguiente:
Paso 1. Seleccione el botón Actualizar.

Símbolos en pantalla
Introducción 6-5
Símbolos en pantalla
Se muestran ciertos símbolos en varios de los dispositivos o en la
documentación del Philips Telemonitoring System. En la tabla que
aparece a continuación se describe su significado y los dispositivos en los
cuales podrían mostrarse.
Símbolo Descripción
Dispositivo correspondiente
Componentes Tipo B aplicados al paciente
como se define en
IEC 60601-1. No son adecuados para
aplicación cardiaca directa.
Báscula (M3813A, M3813B)
Monitor de tensión arterial (MTA)
Registrador del ritmo en tiras
(RRT)
Oxímetro de pulso
Atención: Consulte los documentos
adjuntos.
CDD/TeleEstación
Báscula (M3813A, M3813B)
Monitor de tensión arterial (MTA)
Registrador del ritmo en tiras
(RRT)
Oxímetro de pulso
Cumple las normas UL-1950, CSA-950,
IEC-60950
Cumple las normas CSA IEC-60950-1
CDD/TeleEstación
TeleEstación
Báscula (M3813A)
Monitor de tensión arterial (MTA)
Registrador del ritmo en tiras
(RRT)
Oxímetro de pulso
Puerto de datos en serie entrante TelePort
sólo para conectar con dispositivos Philips TeleEstación
Conexión con el adaptador de CA
(9.0VCA/500mA
Use sólo el adaptador que suministra
Philips)
TeleEstación
Símbolos en pantalla
6-6 Introducción
Teléfono o línea telefónica TeleEstación
Cumple las normas CSA 60601-1
UL 60601-1
Báscula (M3813B)
Cumple las normas Clase B. CDD/TeleEstación
Báscula estándar
Báscula fija
Monitor de tensión arterial (MTA)
Registrador del ritmo en tiras
(RRT)
Oxímetro de pulso
Cumple las normas del Apartado 15. Báscula estándar
Báscula fija
Monitor de tensión arterial (MTA)
Registrador del ritmo en tiras
(RRT)
Oxímetro de pulso
Cumpla las normas del Apartado 68. CDD/TeleEstación
Símbolo Descripción
Dispositivo correspondiente
US

Conjunto de dispositivos para telemonitorización Philips 7-1
Introduction
7
Conjunto de dispositivos para
telemonitorización Philips
Generalidades
El Capítulo 7 proporciona una descripción detallada de los dispositivos
del Conjunto de dispositivos para telemonitorización Philips y la manera
de usarlo. En él se incluye lo siguiente. Página
Descripción de los dispositivos . . . . . . . . . . . . . . . . . .7-2
CDD/TeleEstación . . . . . . . . . . . . . . . . . . . . . . . . . . .7-2
Báscula . . . . . . . . . . . . . . . . . . . . . . . . . . . . . . . . . . .7-5
Monitor de tensión arterial (MTA) . . . . . . . . . . . . . . .7-7
Registrador del ritmo en tiras (RRT) . . . . . . . . . . . .7-10
Oxímetro de pulso . . . . . . . . . . . . . . . . . . . . . . . . . .7-12
Cable del glucómetro. . . . . . . . . . . . . . . . . . . . . . . .7-14
Uso de los dispositivos . . . . . . . . . . . . . . . . . . . . . . . .7-15
CDD/TeleEstación . . . . . . . . . . . . . . . . . . . . . . . . . .7-15
CDD. . . . . . . . . . . . . . . . . . . . . . . . . . . . . . . . . . . . . . 7-15
TeleEstación . . . . . . . . . . . . . . . . . . . . . . . . . . . . . . . 7-15
Cómo responder a las preguntas . . . . . . . . . . . . . . . . . 7-16
Ingreso manual de mediciones. . . . . . . . . . . . . . . . . . .7-18
Báscula . . . . . . . . . . . . . . . . . . . . . . . . . . . . . . . . . .7-21
Cómo pesarse . . . . . . . . . . . . . . . . . . . . . . . . . . . . . . 7-21
Cómo pesarse con andador . . . . . . . . . . . . . . . . . . . 7-23
Cómo modificar el volumen . . . . . . . . . . . . . . . . . . . . 7-26
Cambio de idioma . . . . . . . . . . . . . . . . . . . . . . . . . . . 7-27
Cómo cambiar la unidad de medida del peso . . . . . . 7-28
Monitor de tensión arterial (MTA) . . . . . . . . . . . . . .7-30
Cómo medir la tensión aterial . . . . . . . . . . . . . . . . 7-31
Procedimiento para el Monitor de tensión
arterial M3815A . . . . . . . . . . . . . . . . . . . . . . . . . . . . . . 7-31
Procedimiento para el monitor de tensión
arterial M3815B . . . . . . . . . . . . . . . . . . . . . . . . . . . . . . 7-36
Registrador del ritmo en tiras (RRT). . . . . . . . . . . .7-39
Cómo medir el ritmo cardiaco . . . . . . . . . . . . . . . . . . 7-39
Oxímetro de pulso . . . . . . . . . . . . . . . . . . . . . . . . .7-41
Cómo medir el oxígeno en la sangre y el pulso . . . . 7-42
Glucómetro . . . . . . . . . . . . . . . . . . . . . . . . . . . . . . .7-44
Cómo registrar las mediciones de glucosa . . . . . . . . 7-44

Descripción de los dispositivos
7-2 Conjunto de dispositivos para telemonitorización Philips
Descripción de los dispositivos
El Conjunto de dispositivos para telemonitorización Philips incluye
una CDD o TeleEstación que sirve como “centro de comunicaciones”
del sistema, y dispositivos que miden algún parámetro importante para
sus cuidados médicos: báscula (peso), MTA (tensión arterial),
registrador del ritmo en tiras (ritmo cardiaco), oxímetro de pulso
(%SpO2, pulso) y glucómetro (nivel de glucosa).
Nota: El sistema CTP proporciona sólo un cable para conectar el
glucómetro del paciente al sistema.
Esta sección le ofrece una descripción breve de cada uno de estos
dispositivos. Las descripciones más detalladas del uso de cada
dispositivo para llevar a cabo las mediciones están incluidas en las
secciones que aparecen más adelante.
CDD/
TeleEstación
Dispondrá de una CCD o una TeleEstación, dependiendo del plan de
salud doméstico diseñado para usted.
Tras realizar una medición, como el peso, la CDD/TeleEstación recibe
los resultados. Luego los envía a la computadora de su personal médico
cuando ambas líneas telefónicas están libres (la suya y la de la
computadora).
Si descuelga el teléfono mientras la CDD/TeleEstación está marcando o
enviando los resultados, no oirá el tono de marcado. Cuelgue y espere
5 segundos. Después realice su llamada. La CDD/TeleEstación enviará
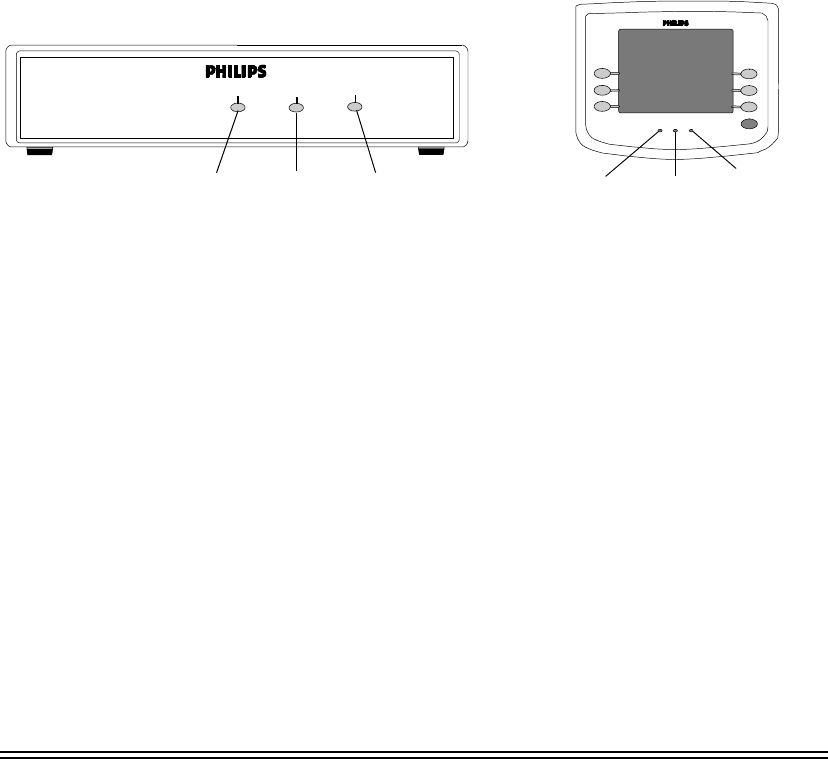
Descripción de los dispositivos
Conjunto de dispositivos para telemonitorización Philips 7-3
los resultados más tarde, cuando la línea telefónica esté libre. Su
personal médico lo llamará si no recibe los resultados.
Indicadores La CDD/TeleEstación incluye luces en la parte delantera que indican
qué está haciendo en ese momento.
La luz ON (encendido) o ON /SURVEY WAITING (encendido/
preguntas en espera) permanece encendida mientras la CDD/
TeleEstación esté conectada.
Si tiene la TeleEstación y la luz ON/SURVEY WAITING (encendido/
preguntas en espera) está parpadeando, le indica que tiene preguntas
por contestar.
Su personal médico puede hacer que la TeleEstación pite cada
60 segundos para avisarle que tiene una pregunta en espera.
La luz de DATA (datos) o HOLDING RESULTS (resultados en espera)
se enciende cuando la CDD/TeleEstación recibe los resultados de las
mediciones y permanece encendida hasta que éstos se envían por
teléfono.
La luz USING PHONE (línea ocupada) se enciende cuando la CDD o
la TeleEstación están enviando los resultados a la computadora de su
personal médico.
Advertencias Las siguientes Advertencias son pertinentes para el uso de CDD/
TeleEstaciones.
Advertencia •Use sólo el adaptador de alimentación de Philips para la CDD/
TeleEstación.
– No coloque nada sobre el adaptador.
CDD
encendido datos
línea
ocupada
CDD M3812A
TeleEstación (M3812B)
encendido datos línea
ocupada
encendido/ línea
ocupada
resultados
en espera
TeleEstación
encendido/preguntas en espera
en espera
atrás
resultados
resultados
línea
ocupada
preguntas
en espera

Descripción de los dispositivos
7-4 Conjunto de dispositivos para telemonitorización Philips
– Enchufe el adaptador a un tomacorriente cercano a la CDD/
TeleEstación para facilitar el acceso.
– Desenchufe el adaptador del tomacorriente para desconectar la
alimentación.
•Nunca coloque la CDD/TeleEstación donde alguien, sobre todo
niños, pueda pisarla, tropezar o enredarse en el cable telefónico o
del adaptador.
•Nunca coloque la CDD/TeleEstación cerca de agua corriente o
donde puedan derramarse líquidos sobre ella (p.ej. , una taza de
café o un jarrón de flores).
• Desenchufe el cable telefónico y de alimentación para limpiar la
CDD/TeleEstación y antes de una tormenta eléctrica.
•Nunca ponga tabaco o velas encendidos sobre la CDD/TeleEstación.
•Nunca sobrecargue los circuitos donde está instalada la CDD/
TeleEstación.
• Si tiene un servicio de respuesta personal (a excepción de
LifeLine® Systems), deberá disponer de su propia línea telefónica
(no solamente de una toma de teléfono independiente).
Si tiene un teléfono para LifeLine® System, asegúrese de que la
CDD/TeleEstación está enchufada en la toma de teléfono con la
etiqueta AUX en la parte trasera de la unidad LifeLine®.
•Nunca toque, use, limpie ni manipule la CDD/TeleEstación ni el
medidor de glucosa conectado durante una tormenta.
Precauciones Las siguientes Precauciones son pertinentes para el uso de la CDD/
TeleEstación.
Precaución • Evite colocar la CDD/TeleEstación sobre una superficie metálica o
dentro de un armario metálico ya que interferirá con la señal de radio.
•Nunca use dispositivos electrónicos como teléfonos celulares o
inalámbricos y computadoras cerca de la CDD/TeleEstación
• No coloque electrodomésticos ni muebles metálicos cerca de la
CDD/TeleEstación ya que podrían bloquear la señal de radio de los
dispositivos de medición.
• Las temperaturas altas pueden afectar la pantalla LCD de la
TeleEstación.
– Elija un lugar alejado de la luz solar directa.
– Use la TeleEstación a la temperatura ambiente.
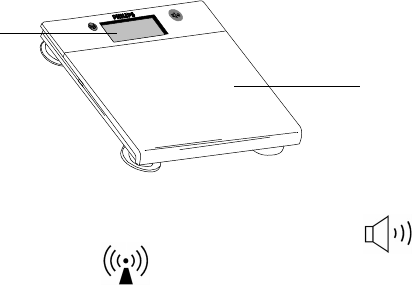
Descripción de los dispositivos
Conjunto de dispositivos para telemonitorización Philips 7-5
• Asegúrese de que la CDD/TeleEstación esté siempre conectada a la
toma del teléfono y al tomacorriente eléctrico, excepto al limpiarla
o si es inminente una tormenta eléctrica.
• Asegúrese de que ningún interruptor de luz o extensión eléctrica de
varios contactos corte la alimentación de la CDD/TeleEstación.
• Borre los mensajes de voz. Los servicios telefónicos que modifican
el tono de marcado, como el correo de voz, pueden interferir con
las transmisiones de la CDD/TeleEstación.
• Si usa un medidor de glucosa conectado a la TeleEstación:
– Siga las instrucciones del fabricante del medidor de glucosa.
– Siga toda instrucción adicional de su personal médico.
–Nunca tome mediciones de glucosa mientras su medidor de
glucosa esté conectado a la CDD/TeleEstación.
Báscula Puede disponer de una báscula estándar o fija. Ambas básculas le dicen
su peso.
Báscula
estándar
La báscula estándar es para personas que pueden subirse y bajarse de
ella sin ayuda. Tiene un límite de peso máximo de 440 lbs. (200 kg).
La báscula le dice su peso (en inglés o en español).
El panel delantero tiene un botón de control de Volumen y un
botón de Prueba de radio .
Las baterías se alojan bajo la plataforma.
Pantalla
Plataforma
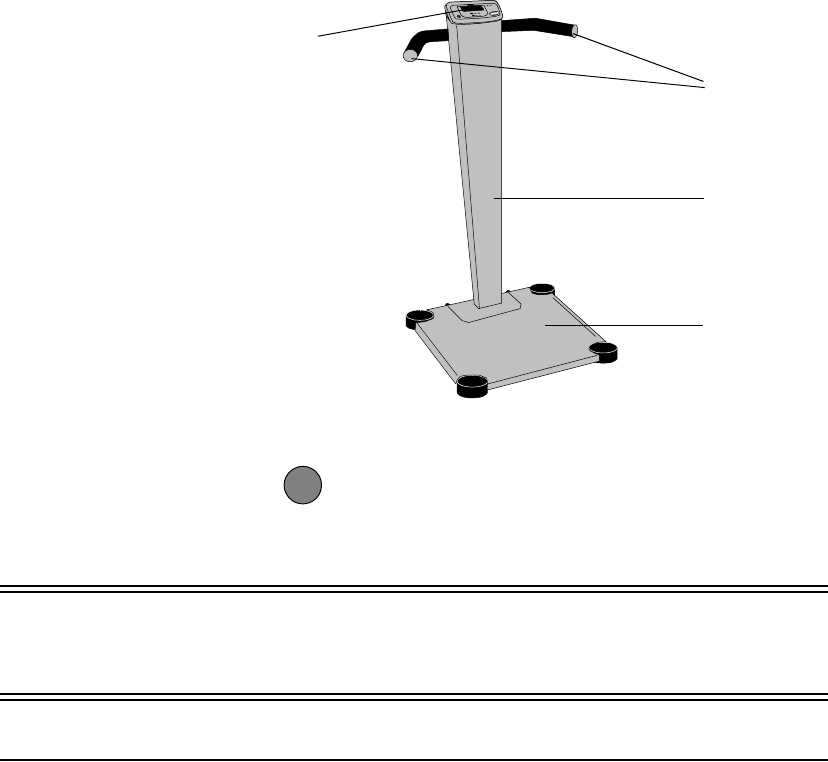
Descripción de los dispositivos
7-6 Conjunto de dispositivos para telemonitorización Philips
Báscula fija La báscula fija tiene una columna con asideros que ayudan a mantener el
equilibrio al usarla. Tiene un límite de peso máximo de 365 lbs. (166 kg).
La báscula fija le dice su peso en inglés solamente.
El panel delantero tiene un control de Volumen y un botón de Prueba
de radio .
Las baterías se alojan bajo la caja de la pantalla.
Advertencias Las siguientes Advertencias son pertinentes para el uso de la báscula.
Advertencia •Nunca use la báscula en agua estancada.
•Nunca guarde la báscula donde niños o mascotas pueden lesionarse
jugando con los asideros y tirar la báscula al suelo.
Precauciones Las siguientes Precauciones son pertinentes para el uso de la báscula.
Precaución •Nunca use la báscula estándar si pesa más de 440 libras
(200 kilos).
•Nunca use la báscula estándar si pesa más de 365 libras
(166 kilos).
• Guarde la báscula en un sitio seco y con temperatura controlada,
no en el cuarto de baño.
Asideros
Columna
Pantalla
Plataforma
T

Descripción de los dispositivos
Conjunto de dispositivos para telemonitorización Philips 7-7
• Coloque la báscula alejada de objetos metálicos, como refrigeradores,
que podrían bloquear la transmisión de su CDD/TeleEstación.
• Coloque la báscula en el suelo, entre 1 y 3 pulgadas (2,5 a 7,5 cm)
de una pared y viendo hacia la pared.
• Sólo una persona debe usar la báscula.
•Nunca use la báscula para medir cualquier otra cosa que no sea
usted mismo, como un paquete o una mascota, ya que todas las
mediciones se envían a su personal médico.
•Nunca deje caer ni arrastre la báscula.
•Nunca pise las esquinas de la báscula.
• De ser posible, la báscula debe usarse sobre una
superficie plana y dura
.
• Si la báscula se usa sobre una alfombra, puede que haya que
instalar patas para alfombra.
• No se recomienda llevar la báscula de viaje.
Nota Si no se siente cómodo pesándose en la báscula estándar, póngase en
contacto con su personal médico.
Monitor de
tensión
arterial
(MTA)
Puede disponer de un Monitor de tensión arterial (MTA) si es que su plan de
atención médica doméstica incluye la medición de la tensión arterial y del pulso.
El Monitor de tensión arterial (conocido también como MTA) es una
caja de plástico con un pantalla y una manguito de tensión extraíble. El
MTA muestra la tensión arterial y el pulso.
El MTA tiene un conector para manguera de aire del lado izquierdo. El
manguito tiene un anillo metálico en forma de D (una barra metálica por
el que se desliza y enlaza), una manguera y un conector de aire. Las
baterías se alojan bajo la caja de plástico de la pantalla.
Nota Existen dos modelos de Monitor de tensión arterial (M3815A y
M3815B), los que se muestran a continuación. Verifique su Monitor de
tensión arterial para determinar cuál tiene usted. Los números de partes se
encuentran en la parte trasera del monitor.
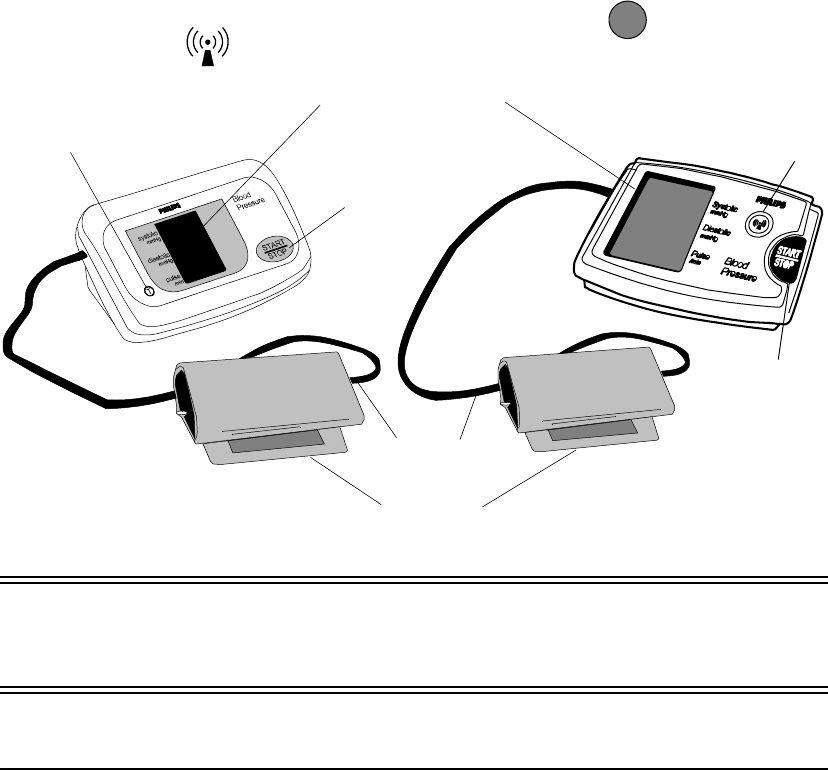
Descripción de los dispositivos
7-8 Conjunto de dispositivos para telemonitorización Philips
Caja de la
pantalla del
MTA
Ambos monitores tienen una pantalla que muestra la tensión arterial
sistólica y diastólica, y el pulso, un botón START/STOP (iniciar/parar)
y un botón de RADIO TEST (prueba de radio) . (en el M3815A) o
(en el M3815B).
Advertencias Las siguientes Advertencias son pertinentes para el uso del MTA.
Advertencia • Guarde el MTA fuera del alcance de niños y mascotas. Existe el
riesgo de lesiones si se enredan en la manguera de aire o si se infla
el manguito.
Precauciones Las siguientes Precauciones son pertinentes para el uso del MTA.
Precaución • Si aparece un mensaje de error al tomarse la tensión o el pulso,
o piensa que la lectura es incorrecta, espere 5 minutos y vuelva
atomarla.
•Nunca guarde el MTA dentro de un recipiente o cajón metálico,
T
Pantalla de la TA
Manguera
Manguito
START/
STOP
RADIO
TEST
Botón
M3815A M3815B
Botón
RADIO
TEST
Botón
START/START/
STOP
Botón
START/
de aire

Descripción de los dispositivos
Conjunto de dispositivos para telemonitorización Philips 7-9
como un archivero. Interferirá con la señal de radio a la CDD/
TeleEstación.
•Nunca guarde el MTA con las piezas del manguito retorcidas o
plegadas con fuerza.
• Evite tirar de la manguera de aire o usarla para transportar el MTA.
• Mire la pantalla cuando se toma la tensión arterial.
– Si se superan los 330 mmHg,
presione el botón START/STOP (iniciar/parar) inmediatamente.
– Si las cifras bajan hasta 15 mmHg y permanecen así por más de
3 minutos, presione el botón START/STOP nuevamente.
– Póngase en contacto con su personal médico.
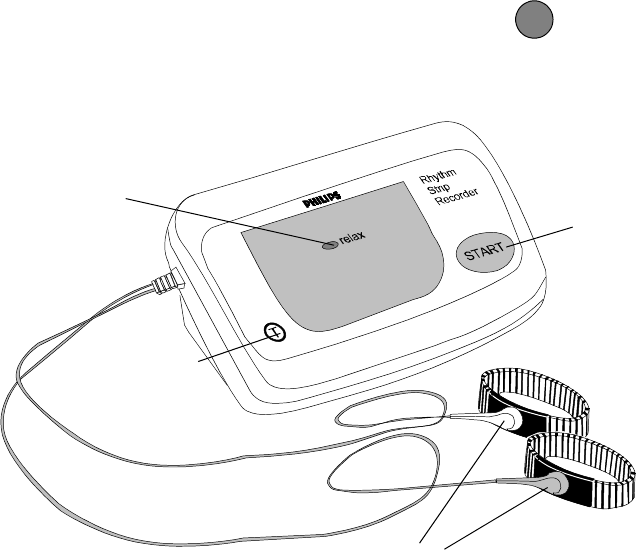
Descripción de los dispositivos
7-10 Conjunto de dispositivos para telemonitorización Philips
Registrador
del ritmo en
tiras (RRT)
Puede disponer de un Registrador del ritmo en tiras si es que su plan de
atención médica doméstica incluye la medición del ritmo cardiaco.
El Registrador del ritmo en tiras es una caja de plástico con pantalla,
con un cable doble con conectores tipo broche. Cada muñequera metálica
tiene un electrodo negro de plástico. Un lado del electrodo tiene un
broche metálico y el otro lado una pieza plana de metal. Las baterías se
alojan bajo la caja de plástico de la pantalla.
Caja de
pantalla del
registrador
del ritmo en
tiras
La caja de pantalla tiene un botón START (iniciar), una luz RELAX
(relájese) y un botón de RADIO TEST (prueba de radio) .
T
INICIAR
Botón
de prueba
de radio
Botón
Caja de plástico con pantalla del
"relájese"
Luz
Muñequeras
Conectores
tipo broche
Cable doble
registrador del ritmo en tiras

Descripción de los dispositivos
Conjunto de dispositivos para telemonitorización Philips 7-11
Advertencias Las siguientes Advertencias son pertinentes para el uso del registrador
del ritmo en tiras.
Advertencia •Nunca guarde el RRT donde niños o mascotas puedan enredarse
con los cables y la muñequera.
• Las muñequeras pueden causar irritaciones de la piel, lesiones o
una reacción alérgica al metal.
– Deje de usar el RRT si sufre enrojecimiento, picazón u otros
problemas de la piel.
– Póngase en contacto con su personal médico.
Precauciones Las siguientes Precauciones son pertinentes para el uso del registrador
del ritmo en tiras.
Precaución •Nunca guarde la RRT dentro de un recipiente o cajón metálico,
como un archivero. Interferirá con la señal de radio a la CDD/
TeleEstación.
• Guarde la RRT de manera que el cable doble no se retuerza ni
enrosque.
• Evite tirar del cable doble o transportar el RRT sujetándolo por el
mismo.
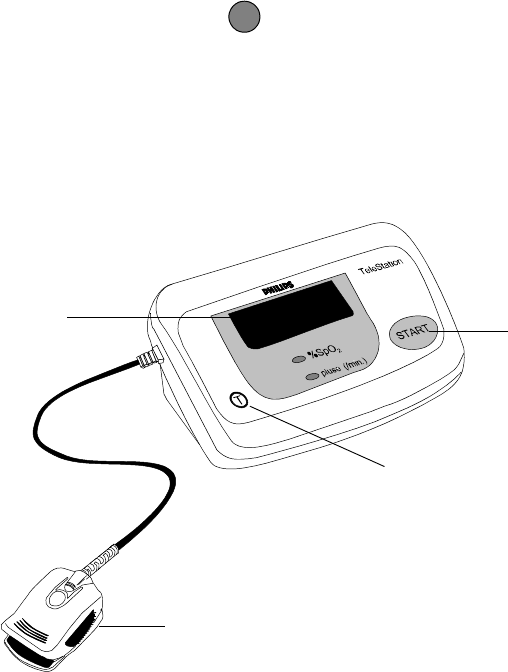
Descripción de los dispositivos
7-12 Conjunto de dispositivos para telemonitorización Philips
Oxímetro de
pulso
El oxímetro de pulso es una caja de plástico con pantalla con un sensor
digital unido a la misma. El frente de la caja cuenta con los elementos
siguientes, como se muestra en la figura que aparece a continuación. La
parte trasera del la caja tiene un compartimiento para las baterías que
alimentan el dispositivo.
Caja con
pantalla del
oxímetro de
pulso
Una pantalla LED muestra el nivel de oxígeno en la sangre (%SpO2) y el
pulso (en pulsaciones por minuto) medido en la punta de su dedo. Unos
LED debajo de la pantalla se iluminan para indicar qué medición es la
que aparece -- %SpO2 o pulsaciones (/min.).
Con presionar el botón START (iniciar) se hace que el oxímetro de
pulso comience a tomar la medición.
El botón prueba de radio se usa para probar la transmisión de
las mediciones del oxímetro de pulso a la CDD/TeleEstación.
El sensor digital se usa para medir el nivel de oxígeno en la sangre y
el pulso. El sensor se sujeta a la punta de uno de sus dedos.
El sensor digital incluye una fuente de luz LED que se proyecta sobre su
dedo. La luz se transmite por la sangre del dedo y se recibe en un elemento
fotosensible, y unos componentes electrónicos en la caja de la pantalla usan
la luz transmitida para determinar el nivel de oxígeno en la sangre y el pulso.
T
INICIAR
Botón
Sensor
digital
Pantalla
prueba de radio
Botón

Descripción de los dispositivos
Conjunto de dispositivos para telemonitorización Philips 7-13
Advertencias Las siguientes Advertencias son pertinentes para el uso del oxímetro
de pulso.
Advertencia •Nunca use un sensor dañado.
•Nunca deje que los niños usen el dispositivo.
• Evite exponer los dispositivos a temperaturas extremas, humedad,
luz solar directa, golpes, polvo o agua estancada.
• El sensor puede causar irritaciones de la piel, lesiones o una
reacción alérgica.
•Nunca use un dispositivo sin la tapa de las baterías.
• Deje de usar el oxímetro de pulso si sufre enrojecimiento, picazón
u otros problemas de la piel.
• Deje de usarlo si ocurren desgarraduras o daños a la piel. Póngase
en contacto con su personal médico.
• Para evitar choques eléctricos, no use los dispositivos durante una
tormenta eléctrica.
Precauciones Las siguientes Precauciones son pertinentes para el uso del oxímetro
de pulso.
Precaución • Lea los procedimientos cuidadosamente antes de usar este dispositivo.
• Use este dispositivo solamente como se lo indicó su personal médico.
• Siga las instrucciones de su médico respecto a los síntomas que
requieren que se ponga en contacto directo con su personal médico.
• Este dispositivo no tiene la finalidad de monitoreo continuo.
• Este dispositivo puede no funcionar correctamente con todas las
personas. Si después de 3 o 4 intentos no le es posible lograr lecturas
estables, deje de usarlo y póngase en contacto con su personal médico.
• El uso de este dispositivo no sustituye la atención médica.
• Si tiene alguna duda acerca de cómo usar el oxímetro de pulso,
póngase en contacto con su personal médico.
• La hemoglobina anormal podría afectar la exactitud.
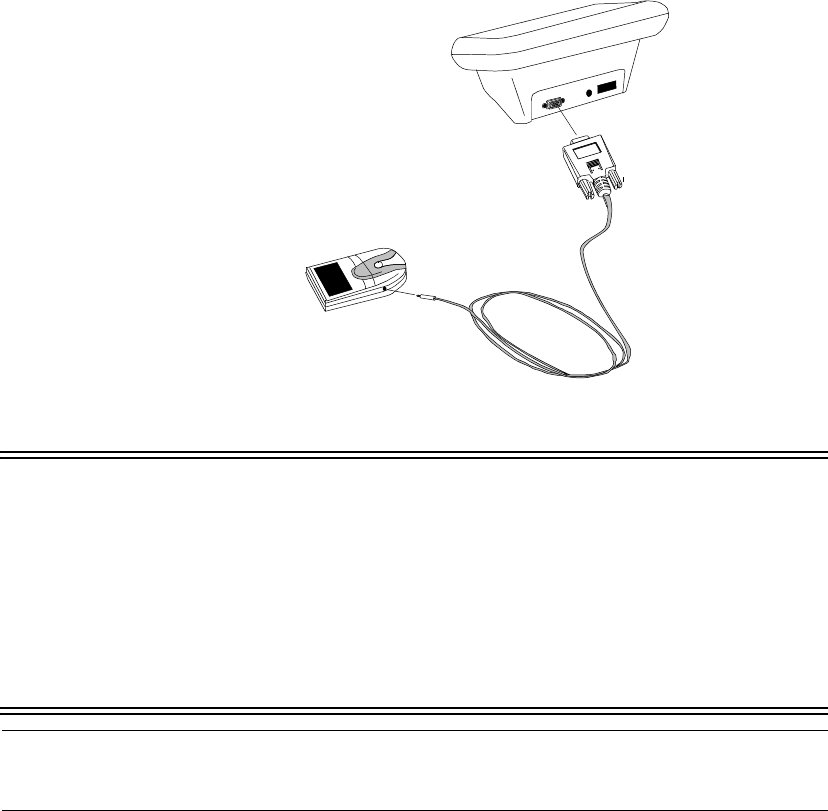
Descripción de los dispositivos
7-14 Conjunto de dispositivos para telemonitorización Philips
Cable del
glucómetro
El sistema CTP también incluye un Cable de glucómetro para conectar
su glucómetro a la TeleEstación para registrar sus mediciones de glucosa.
Uno de los extremos del cable del glucómetro se enchufa al conector de
su glucómetro mientras que el otro extremo se enchufa al conector
macho en la parte trasera de la TeleEstación.
Advertencias Se deben tener en cuenta las siguientes advertencias al usar el cable
del glucómetro.
Warning Las lecturas del glucómetro pueden registrarse únicamente en una
TeleEstación. No pueden registrarse en un CDD.
El Sistema CTP sólo funciona con los glucómetros OneTouch Basic y
OneTouch Profile. No se deben conectar otros glucómetros a la
TeleEstación.
No mida su glucosa mientras el glucómetro está conectado a la
Tel eEstación.
Elimine la sangre de su dedo antes de usar la TeleEstación.
Nota Para conocer los procedimientos para medir su glucosa con el
glucómetro, lea el manual de Instrucciones para el uso del glucómetro.
TeleEstación
Cable del glucómetro
Glucómetro

Uso de los dispositivos
Conjunto de dispositivos para telemonitorización Philips 7-15
Uso de los dispositivos
Esta sección incluye la manera de usar cada uno de los dispositivos del
Conjunto de dispositivos para telemonitorización Philips: la Central de
distribución de datos (CDD)/TeleEstación, báscula, monitor de tensión
arterial, registrador del ritmo en tiras y oxímetro de pulso.
CDD/
TeleEstación
La CDD o TeleEstación es el centro de comunicaciones del Conjunto de
dispositivos para telemonitoreo de pacientes. Dispondrá de una CDD o
una TeleEstación dependiendo de su plan de salud.
Cuando la CDD/TeleEstación está conectada a su teléfono y al
tomacorriente, enviará las mediciones a su personal médico cuando la
línea telefónica esté libre.
Nota La CDD y la TeleEstación dependen de su número de teléfono para
transmitir los resultados. No son portátiles.
CDD La CDD recibe los resultados de las mediciones de los dispositivos y los
envía automáticamente a la computadora de su personal médico. No debe
hacer nada una vez que se tomó la medición.
TeleEstación Las TeleEstaciones también pueden hacer preguntas acerca de su salud y
enviar las respuestas a su personal médico. Algunas TeleEstaciones tienen
la posibilidad de permitirle ingresar las mediciones manualmente y recibir
los resultados de algunos medidores de glucosa. Los procedimientos para
usar estas funciones aparecen en las secciones siguientes.

Uso de los dispositivos
7-16 Conjunto de dispositivos para telemonitorización Philips
Cómo responder a las preguntas
El panel delantero de la TeleEstación tiene varios botones que le ayudan
a responder preguntas y luces que indican que las respuestas se han
enviado, como se muestra en la ilustración siguiente.
Si la luz on/survey waiting (encendido/preguntas en espera) parpadea
en la parte delantera de la TeleEstación, hay preguntas elegidas por su
personal médico y a las que debe responder.
Su personal médico puede hacer que la TeleEstación pite cada
60 segundos para avisarle que tiene una pregunta en espera.
Siga los pasos siguientes para responder a las preguntas.
Paso 1. Las preguntas se muestran en pantalla con respuestas opcionales:
– Presione el botón junto a su respuesta.
– Elija sólo una. Se resaltará la respuesta.
Si comete un error,
– Presione el botón go back (atrás) y vuelva a elegir su respuesta.
Paso 2. Tras elegir una respuesta aparecerá la siguiente pregunta.
– Responda presionando un botón.
– Responda a todas las preguntas.
TeleEstación
encendido/preguntas en espera
en espera
resultados
resultados
línea
ocupada
atrás
atrás
Botón
Luz encendido luz resultados
preguntas en luz línea
ocupada
en espera
¡Hola! Bienvenido a Philips Automated
Interactions. Para ajustar el contraste
presione el botón Go Back (atrás).
ir a las preguntas.
Continue
Presione Continue (continuar) para
es
p
era

Uso de los dispositivos
Conjunto de dispositivos para telemonitorización Philips 7-17
Paso 3. Si desea cambiar su respuesta a una pregunta anterior:
– Presione el botón go back hasta que vea esa pregunta de nuevo.
– Después presione el botón junto a la respuesta correcta.
Nota Si desea volver a responder una pregunta previa, tendrá que responder
otra vez a todas las preguntas restantes. La última pregunta confirmará
que ha respondido a todo.
Paso 4. Cuando haya terminado el estudio, se encenderá la luz holding
results (resultados en espera), y a los pocos minutos se encenderá
la luz using phone (línea ocupada) que indica el envío de los
resultados a la computadora de su personal médico.
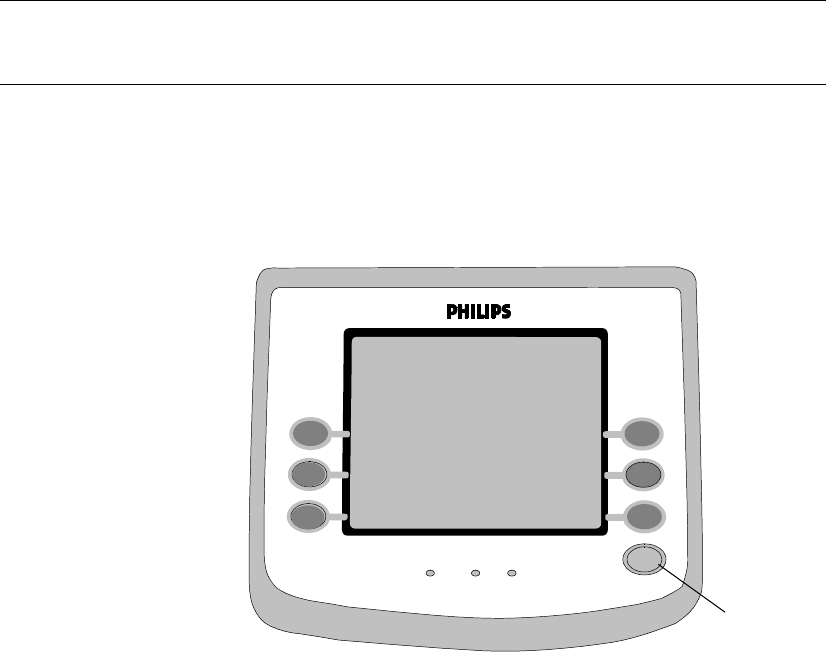
Uso de los dispositivos
7-18 Conjunto de dispositivos para telemonitorización Philips
Ingreso manual de mediciones
Siga los pasos siguientes con aquellas TeleEstaciones que permiten el
ingreso manual de las mediciones.
Nota Es posible que su TeleEstación no tenga esta función. Si desea usar esta
función póngase en contacto con su personal médico.
Paso 1. Tome las mediciones siguiendo las indicaciones de su personal
médico y anote los resultados.
Paso 2. Presione cualquier botón, salvo go back (atrás).
Aparece un menú en la pantalla que muestra las mediciones que se
pueden tomar.
Paso 3. Presione el botón junto a la medición que desea ingresar,
o, presione el botón More (más) para ver otras mediciones.
TeleEstación
atrás
Seleccione una
Tensión arterialPeso
Azúcar en Temp eratu ra
Nivel de oxígeno Más
medición para ingresar
nunca
presione
atrás
encendido/preguntas en espera
en espera
resultados
resultados
línea
ocupada
la sangre
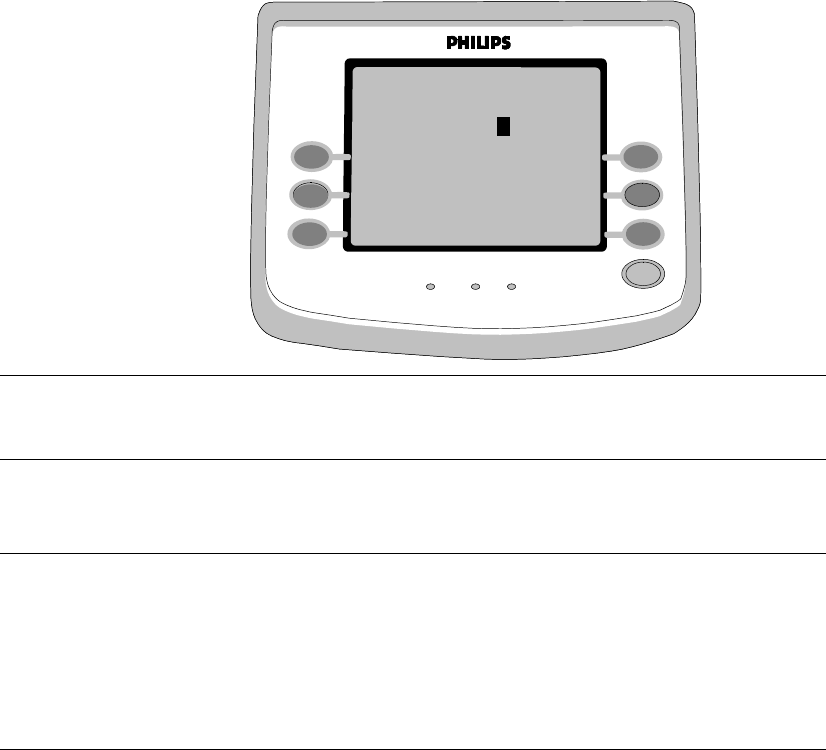
Uso de los dispositivos
Conjunto de dispositivos para telemonitorización Philips 7-19
Aparece la pantalla de ingreso de mediciones, como por ejemplo
WEIGHT (peso) como se muestra a continuación.
Nota Si cometió un error, presione el botón go back (atrás) antes de presionar
el botón All Finished (finalizado).
Paso 4. Use los botones More (más) y Less (menos) para que las cifras
en pantalla sean iguales a la medición que anotó previamente.
Nota Si desea hacer cambios de consideración a cualquier cifra, presione el
botón Next number (cifra siguiente) una o más veces, y luego use los
botones More o Less.
Cuando ingresa las mediciones de Blood Pressure (tensión arterial) y
Oxygen Level (nivel de oxígeno), presione Continue (continuar) para
pasar a la sección siguiente del ingreso.
Luego de ingresar su medición:
Paso 5. Presione el botón All Finished con el fin de guardar su medición.
Paso 6. Repita los pasos 3 a 5 para ingresar otras mediciones.
TeleEstación
encendido/preguntas en espera
en espera
resultados
resultados
línea
ocupada
atrás
Por favor, ingrese su
Más
Finalizado
PS 167. LBS
Menos
Cifra siguiente
PESO
3
TeleEstación
encendido/en espera
en espera
resultados
resultados
línea
ocupada
atrás
Por favor, ingrese su
Más
Finalizado
PS 167.3 LBS
Menos
Cifra siguiente
PESO
3

Uso de los dispositivos
7-20 Conjunto de dispositivos para telemonitorización Philips
Unos minutos después de haber guardado la última medición, la pantalla
queda en blanco y se enciende la luz using phone (línea ocupada)
como indicación de que sus mediciones se están enviando a la
computadora de su personal médico.
Nota Si en su dispositivo de medición aparece una lectura inválida, no la
ingrese en la TeleEstación.
Si encendió la pantalla de mediciones accidentalmente no presione
ningún botón. La pantalla quedará en blanco después de unos minutos.

Uso de los dispositivos
Conjunto de dispositivos para telemonitorización Philips 7-21
Báscula Se dispone de dos tipos de báscula:
La báscula estándar es para personas que pueden subirse y bajarse
de ella sin ayuda.
La báscula fija tiene una columna con asideros que ayudan a
mantener el equilibrio al usarla.
Notas Si tiene una báscula estándar y tiene problemas para mantenerse de pie,
consulte con su personal médico. Una báscula estándar puede convertirse
en una fija.
Si necesita apoyarse en un andador, consulte la sección siguiente Cómo
pesarse con andador.
Cómo
pesarse
Los pasos a seguir para pesarse en cualquiera de las básculas (estándar o
fija) son los siguientes. Elija los pasos correspondientes al tipo de báscula.
Báscula estándar
Paso 1. Súbase a la báscula y permanezca sobre ella sin agarrarse a nada.
– Párese lo más cerca posible del centro de la plataforma.
– Intente no pisar las esquinas; podría dañar la báscula.
Paso 2. Oirá “No se mueva (Please stand still)”. No se mueva.Durante la
medición, aparecerá Walking "-" (caminando) en la pantalla.
Notas No oirá la voz si el volumen se ajustó a 0.
Tras unos segundos oirá “Please step off the Scale” (bájese de la báscula).
Paso 3. Bájese de la báscula.
A los 5 segundos de haber bajado de la báscula, ésta anuncia su peso
final (salvo que el volumen se haya fijado en 0).
La báscula se apaga automáticamente.
Notas Si se han agotado las baterías de la báscula, en la pantalla va a parpadear Lo y
batt y anunciará "Please replace the scale batteries" (sustituya las baterías de
la báscula) alternativamente por tres mediciones y luego se apaga la voz.
Si aparece este mensaje en la pantalla o el volumen está silenciado, a
pesar de no haberlo ajustado en 0, sustituya las baterías de la báscula
siguiendo los pasos Sustitución de las baterías en la página 8-4.
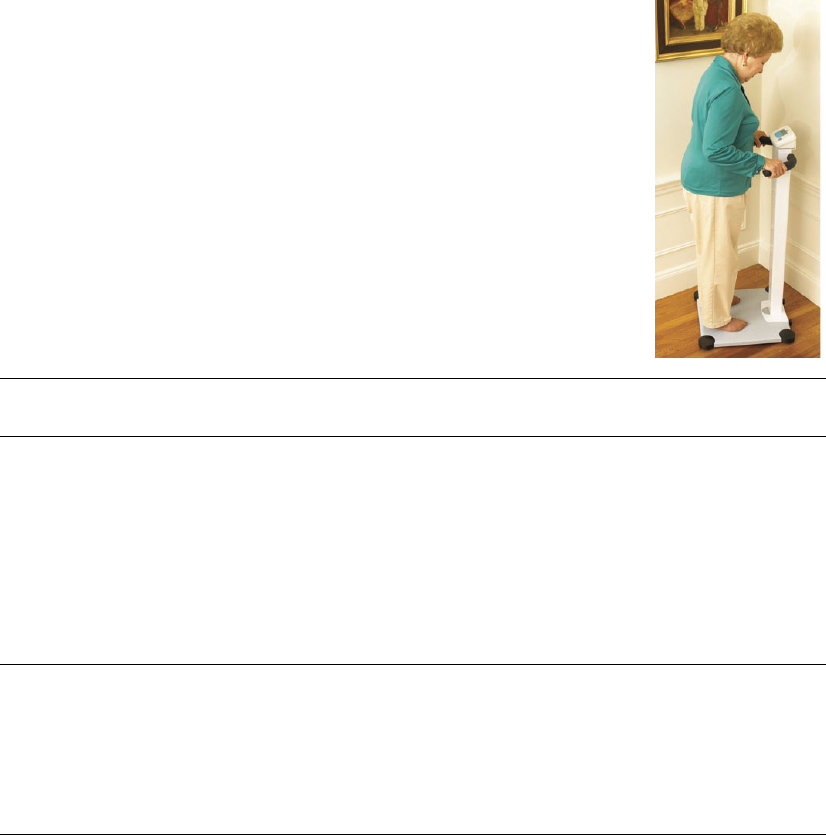
Uso de los dispositivos
7-22 Conjunto de dispositivos para telemonitorización Philips
Báscula fija
Paso 1. Súbase a la báscula y quédese parado
agarrando los asideros como se muestra del
lado opuesto. Mientras se pesa puede seguir
agarrando los asideros.
– Párese lo más cerca posible del centro de la
plataforma.
– Intente no pisar las esquinas; podría dañar
la báscula.
Paso 2. Oirá “Please stand still” (no se mueva) .
y se encenderá la luz Please stand still
(no se mueva). No se mueva.
Pueden aparecer varios pesos en la
pantalla.
El peso final que se muestra es el correcto.
Notas No oirá la voz si el volumen se ajustó a 0.
Luego de varios segundos se oirá “Please step off the Scale” (bájese de
la báscula), (salvo si el volumen se ajustó a 0) y se enciende la luz Step
Off (bájese).
Paso 3. Bájese de la báscula.
A los 5 segundos de haber bajado de la báscula, ésta anuncia su peso
final (salvo que el volumen se haya fijado en 0).
La báscula se apaga automáticamente.
Notas Si se han agotado las baterías, la luz Stand Still parpadea en lugar de
permanecer encendida.
Si aparece este mensaje en la pantalla o el volumen está silenciado, a
pesar de no haberse ajustado a 0, sustituya las baterías de la báscula
siguiendo los pasos Sustitución de las baterías en la página 8-4.

Uso de los dispositivos
Conjunto de dispositivos para telemonitorización Philips 7-23
Cómo
pesarse con
andador
Si es necesario usar un andador para guardar el equilibrio en la báscula,
siga los pasos siguientes, tanto para la báscula estándar como para la fija.
Báscula estándar
Paso 1. Coloque el andador con las patas a ambos
lados de la plataforma de la báscula como se muestra
del lado opuesto.
Paso 1. Súbase a la báscula y use el andador para
guardar el equilibrio.
– Párese lo más cerca posible del centro de la
plataforma.
– Intente no pisar las esquinas; podría dañar la
báscula.
Paso 2. Quite sus manos de los brazos del andador.
Nota Debe retirar las manos del andador para que la báscula le pese
correctamente.
Paso 3. Oirá “No se mueva (Please stand still)”. No se mueva. Durante
la medición, aparecerá Walking "-" (caminando) en la pantalla.
Notas No oirá la voz si el volumen se ajustó a 0.
Tras unos segundos oirá “Please step off the Scale” (bájese de la báscula).
Paso 4. Agarre los brazos del andador.
Paso 5. Bájese de la báscula.
A los 5 segundos de haber bajado de la báscula, ésta anuncia su peso
final (salvo que el volumen se haya fijado en 0).
La báscula se apaga automáticamente.
Notas Si se han agotado las baterías de la báscula, en la pantalla va a parpadear
Lo y batt alternativamente en lugar de Walking "-". (caminando).
Si aparece este mensaje en la pantalla o el volumen está silenciado, a
pesar de no haberse ajustado a 0, sustituya las baterías de la báscula
siguiendo los pasos Sustitución de las baterías en la página 8-4.

Uso de los dispositivos
7-24 Conjunto de dispositivos para telemonitorización Philips
Báscula fija
Paso 1. Coloque el andador con las patas a ambos
lados de la plataforma de la báscula como se
muestra del lado opuesto.
Paso 2. Súbase a la báscula y use el andador para
guardar el equilibrio.
– Párese lo más cerca posible del centro de
la plataforma.
– Intente no pisar las esquinas; podría dañar
la báscula.
Paso 3. Mueva sus manos del andador a los
asideros de la báscula. Mientras se pesa
puede continuar agarrando los asideros
para conservar el equilibrio.
Nota Debe retirar las manos del andador para que la báscula lo pese correctamente.
Paso 4. Se oirá, “Please stand still” (no se mueva) y se encenderá
Stand still (no se mueva).
No se mueva.
Pueden aparecer varios pesos en la pantalla. El peso final que se
muestra es el correcto.
Notas No oirá la voz si el volumen se ajustó a 0.
Luego de varios segundos se oirá “Please step off the Scale” (bájese de
la báscula), (salvo si el volumen se ajustó a 0) y se enciende la luz Step
Off (bájese).
Paso 5. Mueva sus manos de los asideros de la báscula a los brazos del
andador.
Paso 6. Bájese de la báscula.
A los 5 segundos de haber bajado de la báscula, ésta anuncia su peso
final (salvo que el volumen se haya fijado en 0).
La báscula se apaga automáticamente.

Uso de los dispositivos
Conjunto de dispositivos para telemonitorización Philips 7-25
Notas Si las baterías de la báscula se han agotado, la luz Stand Still (no se
mueva) va a parpadear en lugar de permanecer fija y no se oye la voz aún
cuando el volumen no se ajustó a 0.
Si aparece este mensaje en la pantalla o el volumen está silenciado, a
pesar de no haberse ajustado a 0, sustituya las baterías de la báscula
siguiendo los pasos Sustitución de las baterías en la página 8-4.

Uso de los dispositivos
7-26 Conjunto de dispositivos para telemonitorización Philips
Cómo
modificar el
volumen
La voz de la báscula tiene 4 ajustes de volumen:
Ajuste Volumen
0 Silencio
1Bajo
2 Medio
3Alto
Se puede modificar la voz de la báscula como se indica a continuación:
Nota El procedimiento para modificar el volumen es igual para ambas básculas.
La única diferencia radica en la etiqueta del botón Volume (volumen).
La báscula estándar tiene el icono de un altavoz .
La báscula fija muestra la palabra Volume.
Paso 1. Baje de la báscula mientras cambia el volumen.
Paso 2. Presione con firmeza y suelte el botón Volume (volumen). Se
pasará al siguiente ajuste. Por ejemplo, la báscula puede decir
“uno” y mostrar 1 para Bajo.
Paso 3. Presione con firmeza y suelte el botón Volume nuevamente. Se
pasará al siguiente ajuste. Por ejemplo, la báscula puede decir
“dos” y mostrar 2 para Medio.
Cada vez que presione el botón Volume, pasará al siguiente ajuste.
Paso 4. Deténgase cuando alcance el volumen deseado.
Nota Si se ajusta el volumen a 0, debe mirar la pantalla para ver los indicadores
de instrucciones y su peso.
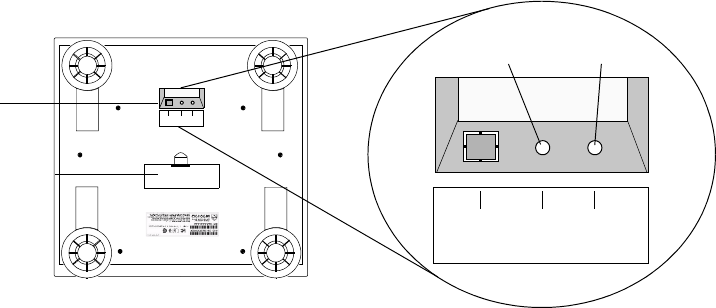
Uso de los dispositivos
Conjunto de dispositivos para telemonitorización Philips 7-27
Cambio de
idioma
La báscula estándar es la única que puede decir su peso en inglés o en español.
Báscula estándar
El procedimiento para cambiar el idioma en la báscula estándar es el
siguiente:
Paso 1. Voltee la báscula para exponer el fondo, como se muestra en la
ilustración siguiente:
Paso 2. Ubique el botón Language Select (selección de idioma) en la
abertura sobre el Compartimiento de baterías.
Paso 3. Presione y suelte el botón Language Select para cambiar el
idioma.
La voz de la báscula se oirá en el idioma que sigue, sea inglés o
español. .
Paso 4. Vuelva a presionar y soltar hasta que se oiga el idioma deseado.
Luego de oírse el idioma deseado, se completa el procedimiento y las
medidas de peso se escucharán en el idioma que eligió.
RJ11 Seleccionar
idioma
KG/LB
RJ11 Idioma
Seleccionar
KG/LB
Compartimiento
de las baterías
Botones
Botón de
unidades
Botón de
idiomas
(Español)
~

Uso de los dispositivos
7-28 Conjunto de dispositivos para telemonitorización Philips
Cómo
cambiar la
unidad de
medida del
peso
La báscula puede pesar en libras o kilogramos. El procedimiento para
cambiar las unidades de peso es diferente para ambas básculas, estándar o fija.
Báscula estándar
El procedimiento para cambiar las unidades de peso en la báscula
estándar es el siguiente:
Paso 1. Voltee la báscula para exponer el fondo, como se muestra en la
ilustración siguiente:
Paso 2. Ubique el botón KG/LB en la abertura sobre el
Compartimiento de baterías.
Paso 3. Presione y suelte el botón KG/LB Units (unidades KG/LB) para
cambiar las unidades de peso.
Se oirá la unidad que sigue, sea kilogramos o libras.
[Kilogramos o libras en español. ].
Paso 4. Vuelva a presionar y soltar hasta que se oiga la unidad deseada.
Paso 5. Luego de oírse la unidad deseada, se completa el procedimiento y
las unidades de peso se escucharán en el idioma que eligió.
RJ11 Seleccionar
idiomas
KG/LB
RJ11 Idioma
Seleccionar
KG/LB
Compartimiento
de las baterías
Botones
Botón de
unidades
Botón de
idioma
(Español)
~

Uso de los dispositivos
Conjunto de dispositivos para telemonitorización Philips 7-29
Báscula fija
El procedimiento para cambiar las unidades de peso en la báscula fija es
el siguiente:
Paso 1. Baje de la báscula mientras cambia las unidades de peso.
Paso 2. Presione con firmeza los botones Volume (volumen) y Prueba
de radio a la vez.
Presione ambos botones al menos durante 3 segundos.
Si la báscula pesaba en libras, la pantalla mostrará ahora
kg (por kilogramos).
Si la báscula pesaba en kilogramos, la pantalla mostrará ahora
lbs.. (por libras).
La voz también dirá ahora las nuevas unidades (salvo si el volumen se
ajustó a 0).
T

Uso de los dispositivos
7-30 Conjunto de dispositivos para telemonitorización Philips
Monitor de
tensión
arterial
(MTA)
Con el fin de obtener las lecturas más exactas y confiables de su Unidad
Monitor de tensión arterial (MTA), atienda las pautas siguientes.
• Verifique el tamaño del manguito.
El manguito pequeño se ajusta a brazos de 6.3 a 9.4 pulgadas
(16 a 24 cm) de circunferencia.
El manguito estándar se ajusta a brazos de 9.4 a 14.2 pulgadas
(24 a 36 cm) de circunferencia.
El manguito grande se ajusta a brazos de 14.2 a 17.7 pulgadas
(36 a 45 cm) de circunferencia.
• Tómese la tensión arterial a la misma hora cada día y en un sitio tranquilo.
• Antes de medir su tensión arterial, relájese unos 10 minutos.
• Nunca se tome la tensión arterial si está haciendo ejercicio o
bebiendo café ni durante una conversación.
• Siéntese a no más de 6 metros de la CDD/TeleEstación.
• Siéntese cómodamente y sin cruzar las piernas.
• Use siempre el mismo brazo.
• Quítese la ropa que oprima el brazo en el que se tomará la tensión
o súbase la manga.
Nunca use el manguito sobre la ropa.
• Coloque el manguito a unos 2 cm por encima del codo con la
manguera de aire por la parte interior del brazo.
• Deje espacio para dos dedos debajo del manguito.
• Permanezca sentado y no se mueva durante la medición.
Notas Puede recostarse mientras alguien le toma la tensión, pero es importante
tomarla siempre del mismo modo (sentado o recostado).
Informe a su personal médico sobre cualquier cambio en la forma de
tomar su tensión arterial.
Si viaja con el MTA, el M3815A guardará hasta 19 lecturas durante
11 días con baterías en buen estado de carga y que permanecen en el
dispositivo. El M3815B guardará hasta 25 lecturas. Cuando vuelva a su
domicilio, la CDD/TeleEstación enviará automáticamente las lecturas a la
computadora de su personal médico.
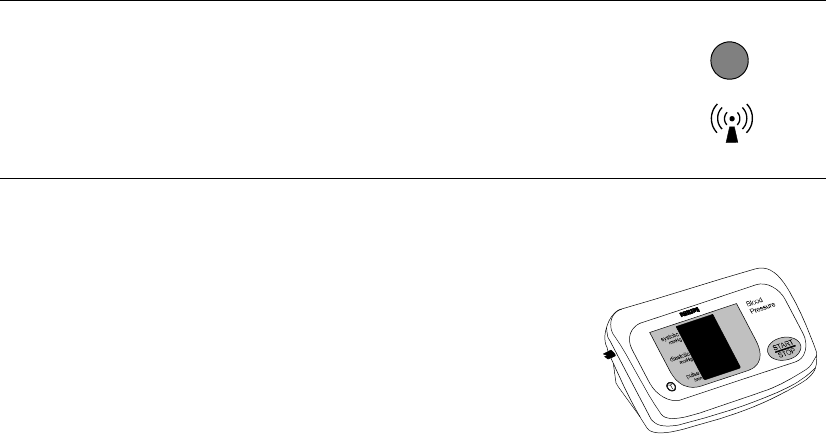
Uso de los dispositivos
Conjunto de dispositivos para telemonitorización Philips 7-31
Cómo medir
la tensión
aterial
A continuación se describen dos procedimientos para medir la tensión
arterial, uno para cada uno de los modelos de monitores de tensión
arterial disponibles: el M3815A y el M3815B. Seleccione el
procedimiento que corresponde a su modelo de MTA.
Nota
El número de modelo de MTA se encuentra en la parte trasera del monitor.
•M3815A - Monitor de tensión arterial con el símbolo del
botón Radio Test en la parte de delante de la pantalla.
•M3815B - Monitor de tensión arterial con el símbolo del
botón Radio Test en la parte de delante de la pantalla.
Procedimiento para el Monitor de tensión arterial M3815A
El cuadro incluido a continuación
describe los símbolos que podrá ver
en la pantalla del MTA M3815A
durante la medición.
T
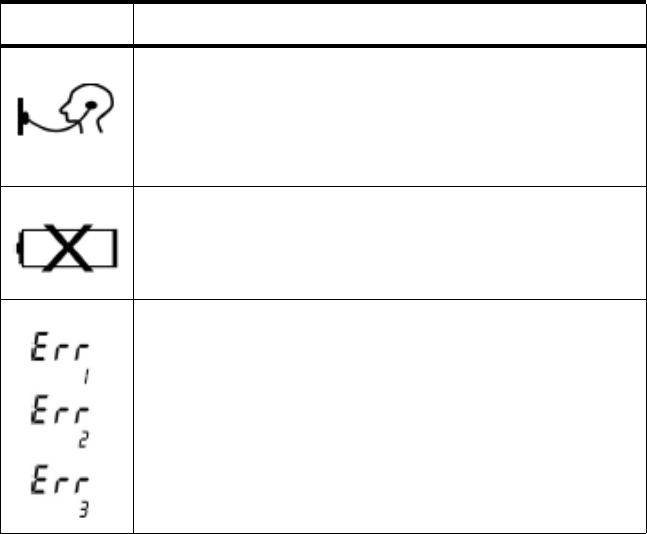
Uso de los dispositivos
7-32 Conjunto de dispositivos para telemonitorización Philips
Símbolo Significado
Se está tomando la presión arterial.
El símbolo parpadea y emite un pitido con cada latido.
El símbolo también puede aparecer brevemente al
inicio de la medición de la tensión arterial.
Es necesario sustituir las baterías.
El símbolo también puede aparecer brevemente al inicio
de la medición.
Puede haber un problema con el equipo.
Vuelva a tomar la tensión arterial.
Si el problema persiste, puede solucionarlo consultando
la sección Solución de problemas.
De lo contrario, póngase en contacto con su personal
médico.
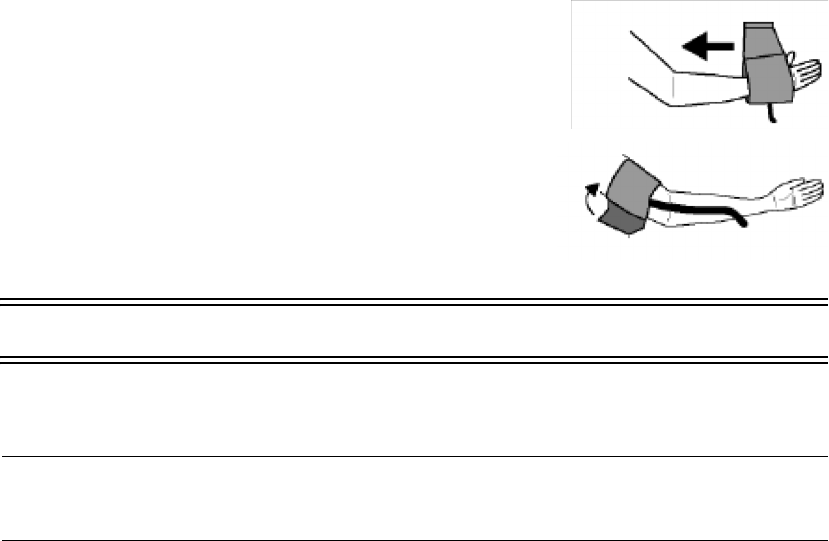
Uso de los dispositivos
Conjunto de dispositivos para telemonitorización Philips 7-33
El procedimiento para medir la tensión arterial con el M3815A es el
siguiente:
Paso 1. Siéntese cómodamente con el antebrazo apoyado en una
superficie plana y sin cruzar las piernas. El centro del brazo deberá
estar más o menos a la misma altura que el corazón.
Paso 2. Introduzca la mano por el
manguito y deslice éste por el
antebrazo.
Paso 3. Coloque el manguito en el brazo,
con la parte inferior de dicho
manguito a unos 2 cm por encima
del codo.
Paso 4. La manguera de aire debe colgar
por la parte interior del brazo.
Advertencia No deje que la manguera se retuerza ni se doble.
Paso 5. Tire del extremo del manguito para ajustarlo.
Luego dóblelo hacia atrás sobre el anillo metálico en forma de D.
Nota El manguito no debe estar muy ajustado. Deje espacio para dos dedos
bajo del manguito.
Paso 6. Pegue el extremo del manguito al cierre de Velcro®.
Paso 7. La mano debe estar abierta, relajada y con la palma hacia arriba.
Paso 8. Presione el botón START/STOP (iniciar/parar). Al inflarse el
manguito puede apretar.
Permanezca sentado y no se mueva durante la medición.

Uso de los dispositivos
7-34 Conjunto de dispositivos para telemonitorización Philips
Nota Si le aprieta demasiado o para detener la medición en cualquier momento:
– Presione el botón START/STOP (iniciar/parar).
– Tome la tensión arterial nuevamente.
Si en cualquier momento le preocupa la medición, póngase en contacto
con su personal médico.
El MTA muestra números que suben por encima de 150 mmHg para el
inflado inicial. Para obtener presiones más altas, puede seguir bombeando.
Advertencia Mire la pantalla. Si se superan los 330 mmHg, presione el botón
START/STOP para detener inmediatamente la medición.
Póngase en contacto con su personal médico.
Paso 9. Mire la pantalla mientras baja lentamente la presión del
manguito. El MTA emite pitidos mientras baja la presión.
Advertencia Mire la pantalla. Si los números caen por debajo de 15 mmHg
durante más de 3 minutos, presione el botón START/STOP para
detener la medición.
Póngase en contacto con su personal médico.
Un pitido largo indica que se ha tomado la tensión arterial. El manguito
se desinfla. La pantalla muestra la tensión arterial y el pulso finales.
Nota Si recibe un mensaje de error, se detiene la lectura o piensa que ésta puede
ser incorrecta, vuelva a tomarse la tensión.
Si eso sucede por segunda vez, póngase en contacto con su personal
médico.
Paso 10. Quítese el manguito. El MTA se apaga automáticamente.

Uso de los dispositivos
Conjunto de dispositivos para telemonitorización Philips 7-35
Nota Una vez ajustado correctamente, el manguito puede retirarse sin
despegar el Velcro.
Paso 11. Guarde el MTA a menos de 6 m de la CDD/TeleEstación para
que pueda enviarle las lecturas.
Nota Lea la sección Mantenimiento para guardar correctamente el MTA.
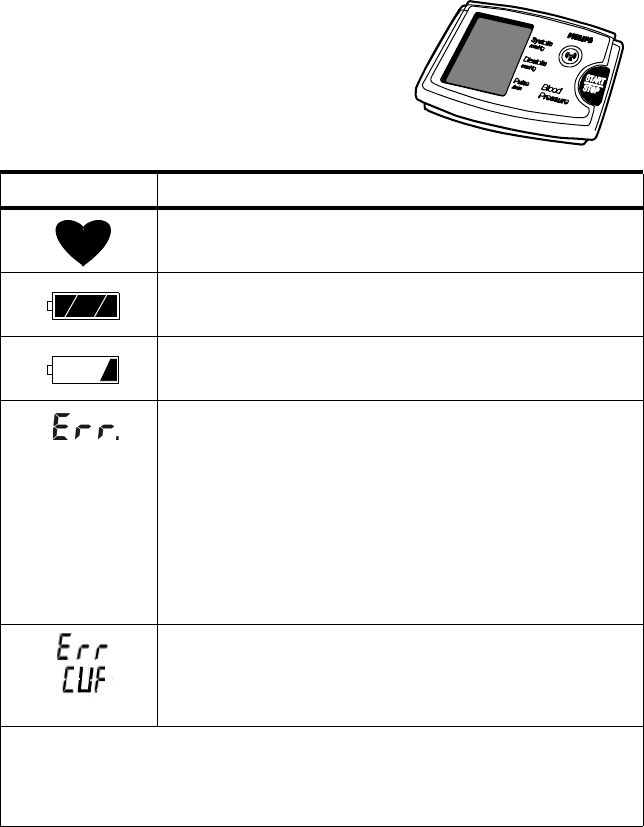
Uso de los dispositivos
7-36 Conjunto de dispositivos para telemonitorización Philips
Procedimiento para el monitor de tensión arterial M3815B
El cuadro incluido a continuación describe
los símbolos que puede ver en el monitor de
ten sión arterial M3815B durante la medición.
.
Símbolo Significado
Indicador de que se está realizando la medición
Parpadea cuando detecta el pulso
Indicador de que la carga de la batería está completa
Indicador de que la carga de la batería es baja.
Si parpada significa que hay que cambiar las baterías.
Se produjo un problema en la medición, tal como:
– Tensión arterial inestable debido a un
movimiento excesivo del cuerpo.
– No se detectó correctamente el pulso.
– Valores sistólicos y diastólicos con una
diferencia inferior a 10 mmHG entre sí.
Vuelva a tomarse la tensión arterial, asegurándose
de permanecer muy quieto durante la medición.
El manguito no se encuentra bien ajustado.
– Vuelva a ajustar el manguito.
– Vuelva a tomarse la tensión.
Si el problema persiste, consulte la sección de Solución de problemas
para ver las acciones correctivas.
Si el problema no se resuelve, llame al personal médico.
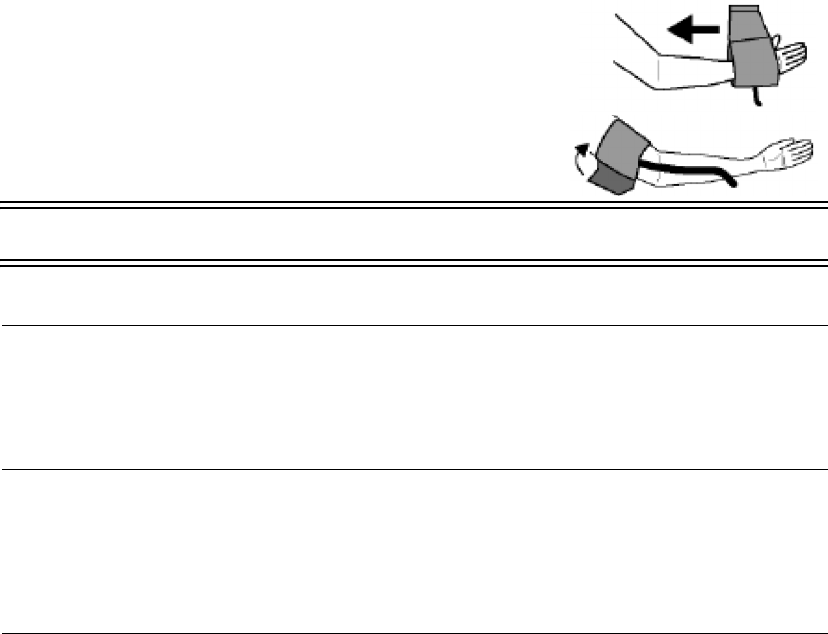
Uso de los dispositivos
Conjunto de dispositivos para telemonitorización Philips 7-37
El procedimiento para medir la tensión arterial con el M3815B es el
siguiente:
Paso 1. Siéntese cómodamente con el antebrazo apoyado en una
superficie plana y sin cruzar las piernas. El centro del brazo deberá
estar más o menos a la misma altura que el corazón.
Paso 2. Introduzca la mano por el manguito
y deslice éste por el antebrazo.
Paso 3. Coloque el manguito en el antebrazo,
con el tubo mirando hacia abajo
y hacia la parte interna de su brazo.
Advertencia No deje que la manguera se retuerza ni se doble.
Paso 4. Ajuste bien el manguito con la banda y el gancho de ajuste.
Nota El manguito debe estar bien colocado pero no muy ajustado. Debe quedar
espacio para colocar dos dedos entre el manguito y su brazo.
Asegúrese de que su mano esté abierta y relajada, con la palma hacia arriba.
Permanezca quieto y no hable ni mueva el brazo durante la medición.
Paso 5. Presione el botón START/STOP (iniciar/parar).
Todos los símbolos de la pantalla aparecerán brevemente,
y a continuación la pantalla cambiará cuando comience la medición.
El manguito comienza a inflarse hasta alcanzar el nivel correcto.
Es normal que lo sienta ajustado.
Nota Si lo siente demasiado ajustado o para detener la medición en cualquier
momento:
– Presione el botón START/STOP.
– Vuelva a medir la tensión arterial
Si en cualquier momento de la medición le preocupa algo, comuníquese
con su personal médico.

Uso de los dispositivos
7-38 Conjunto de dispositivos para telemonitorización Philips
Al finalizar el inflado, automáticamente comienza a desinflarse, y el
ícono del corazón parpadea, indicando que se está realizando
la medición.
Una vez que detecta el pulso, el símbolo destella con cada latido.
Nota Si no se obtiene una tensión apropiada, el dispositivo comienza a inflarse
nuevamente en forma automática.
Cuando finaliza la medición, aparece en la pantalla la lectura de la
presión sistólica y diastólica, y el pulso. A continuación, se desinfla el
manguito y el monitor de tensión arterial se desconecta tras 45 segundos,
o bien puede apagarlo presionando el botón START/STOP.
Nota Si aparece un mensaje de error, usted detuvo la lectura o piensa que
la lectura puede no ser correcta, vuelva a medir la tensión arterial.
Si pasa esto por segunda vez, comuníquese con su personal médico.
Paso 6. Quítese el manguito.
Paso 7. Guarde el monitor de tensión arterial a 6 metros de la
CDD/TeleEstación para que pueda enviarle sus lecturas.
Nota Consulte la sección Mantenimiento para obtener información sobre
cómo guardar correctamente su MTA.

Uso de los dispositivos
Conjunto de dispositivos para telemonitorización Philips 7-39
Registrador
del ritmo en
tiras (RRT)
Para asegurarse de una lectura exacta deberá seguir las siguientes pautas
antes de medir su ritmo cardiaco.
• Siéntese a no más de 6 metros de la CDD/TeleEstación.
• Relájese
Notas Es importante que permanezca inmóvil y relajado durante la medición del
ritmo.
Puede recostarse mientras mide su ritmo cardiaco.
Es importante que mida su ritmo cardiaco siempre del mismo modo
(sentado o recostado).
Informe a su personal médico sobre cualquier cambio en la forma de
medir su ritmo cardiaco.
Si viaja con el RRT, éste guardará la lectura más reciente durante 11 días
con baterías en buen estado de carga y que permanecen dentro del
dispositivo. Cuando vuelva a su domicilio, la CDD/TeleEstación enviará
automáticamente la lectura más reciente a la computadora de su personal
médico.
Precaución No hable ni se mueva durante la medición.
Cómo medir
el ritmo
cardiaco
El procedimiento para medir su ritmo cardiaco es el siguiente:
Paso 1. Siéntese en una silla con sus brazos a los lados o sobre los brazos
de la silla. No cruce las piernas. Mantenga los pies apoyados en el
suelo.
Paso 2. Coloque el RRT sobre una mesa cercana para poder verlo y oírlo
sin necesidad de moverse. Si tiene que moverse para verlo u oírlo,
colóquelo sobre su regazo.
Paso 3. Coloque la muñequera con el conector de broche blanco en la
muñeca derecha. Asegúrese de que el lado metálico plano (en el
lado opuesto al electrodo negro de plástico) toque la parte interna
de la muñeca.
Paso 4. Coloque la muñequera con el conector de broche rojo en la
muñeca izquierda. Asegúrese de que el lado metálico plano (en el
lado opuesto al electrodo negro de plástico) toque la parte interna
de la muñeca.
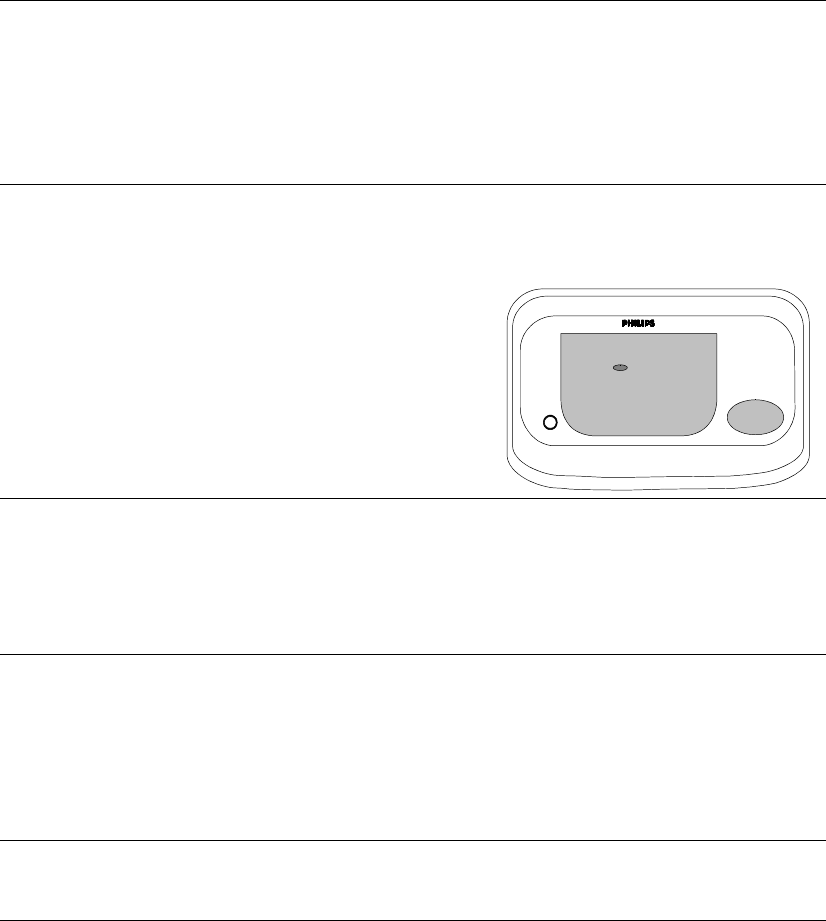
Uso de los dispositivos
7-40 Conjunto de dispositivos para telemonitorización Philips
Notas Si las muñequeras están sueltas, súbalas por el antebrazo hasta sentirlas
bien ajustadas.
Tenga cuidado de no enredarse con el vello de sus brazos.
No coloque las muñequeras sobre la ropa, vendajes ni joyas.
Si no puede ajustar la muñequera en su brazo, póngase en contacto con su
personal médico.
Paso 5. Apoye las manos sobre la mesa o sobre los brazos de su silla de
forma que queden abiertas, relajadas y con las palmas hacia arriba.
Paso 6. Presione el botón START
(iniciar).
La luz relax (relájese) parpadea, y
la Registradora emite pitidos
durante unos 20 segundos mientras
se toma la medición.
Notas Si el RRT pita dos veces rápidamente antes de emitir pitidos normales,
significa que las baterías están bajas. Sustituya las baterías antes de una
semana.
Los pitidos no reflejan su frecuencia cardiaca. Sólo indican que el RRT
está funcionando.
Tras otra breve pausa, la luz relax parpadea dos veces y el RRT emite
dos pitidos rápidos. El registrador finalizó la medición del ritmo cardiaco.
Paso 7. Quítese las muñequeras. El registrador se apaga
automáticamente.
Paso 8. Guarde el registrador a menos de 6 m de la CDD/TeleEstación
para que pueda enviarle las lecturas.
Nota Lea la sección Mantenimiento para guardar correctamente el registrador
del ritmo en tiras.
ritmo
relájese
T
INICIAR
cinta
Registradora

Uso de los dispositivos
Conjunto de dispositivos para telemonitorización Philips 7-41
Oxímetro de
pulso
Con el fin de obtener las lecturas más exactas de su oxímetro de pulso
atienda las pautas siguientes:
• El oxímetro de pulso no podrá funcionar correctamente con dedos
de un grosor menor de 5/16 pulgadas (0,8 cm) o mayor de 1
pulgada (2,5 cm).
• El barniz de uñas de color oscuro o uñas artificiales impiden que el
oxímetro de pulso tome medidas exactas. Quite el barniz de uñas
oscuro y las uñas artificiales del dedo que usará para la medición.
• No exponga el sensor digital a una luz muy intensa o cambiante
durante la medición.
• No use el oxímetro de pulso en la misma mano durante o
inmediatamente después de haber medido su tensión arterial. Use la
otra mano o mida primero con el oxímetro de pulso.
• Use siempre el mismo dedo para la medición salvo que su personal
médico le haya indicado lo contrario.
• Nunca use el sensor en un dedo con mala circulación crónica o que
esté lesionado.
• Asegúrese que el sensor digital está seco antes de la medición.
• Asegúrese que su dedo no está frío antes de la medición. Si su dedo
está frío, caliéntelo o frótelo antes de la medición.
• Introduzca con cuidado el dedo en el sensor todo lo que pueda
cómodamente. No lo introduzca al grado de sentir que el dedo
palpita.
• Mantenga el dedo relajado e inmóvil durante la medición.
• Es posible que no pueda obtener una medición correcta si sufre de
anemia, bajo recuento de hemoglobina o arritmias. Póngase en
contacto con su personal médico.
Precaución Nunca use el oxímetro de pulso con la puerta del compartimiento de
baterías abierta.
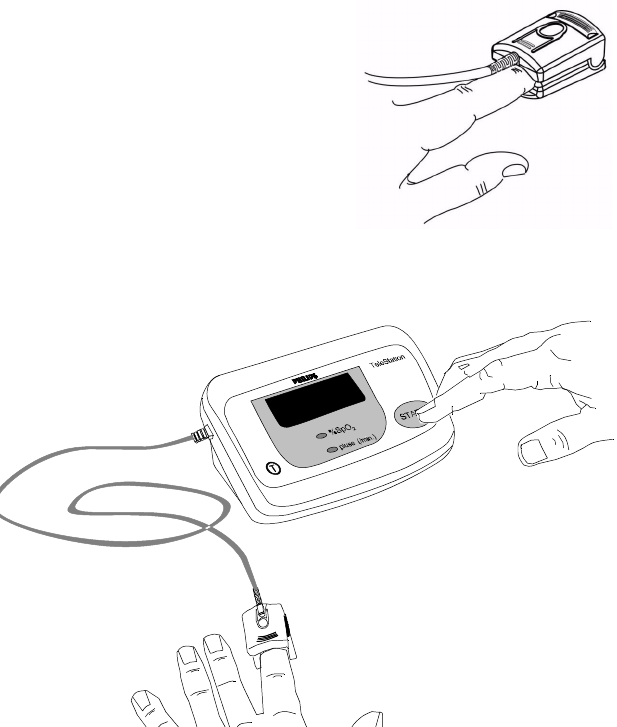
Uso de los dispositivos
7-42 Conjunto de dispositivos para telemonitorización Philips
Cómo medir
el oxígeno en
la sangre y el
pulso
A continuación se describe la manera de usar el oxímetro de pulso para la
medición del oxígeno en la sangre (%SpO2) y el pulso. Automáticamente
el sistema mantiene el botón del ritmo de pulsación encendido. Si
prefiere, se apaga cuanto oprimas y sugetes el botón de Start y Test (T en
círculo) simultanemente por más de tres segundos.
Paso 1. Siéntese a no más de 6 metros de la CDD/TeleEstación, con la
mano apoyada sobre una superficie plana y con el oxímetro de
pulso frente a usted.
Paso 2. Abra el sensor e introduzca
completamente su dedo (índice,
medio o anular, pero no el pulgar)
hasta que la punta de su dedo
alcanza el retén del dedo. El cable
deberá tenderse sobre su dedo hacia
la muñeca tal como se muestra
en la ilustración.
Paso 3. Siéntese cómodamente con su
mano apoyada en la superficie
para que pueda mantenerla
inmóvil.
Paso 4. Presione el botón START (iniciar) y mantenga su mano inmóvil
durante la medición.
Presione el botón de inicio
Mantenga su mano inmóvil
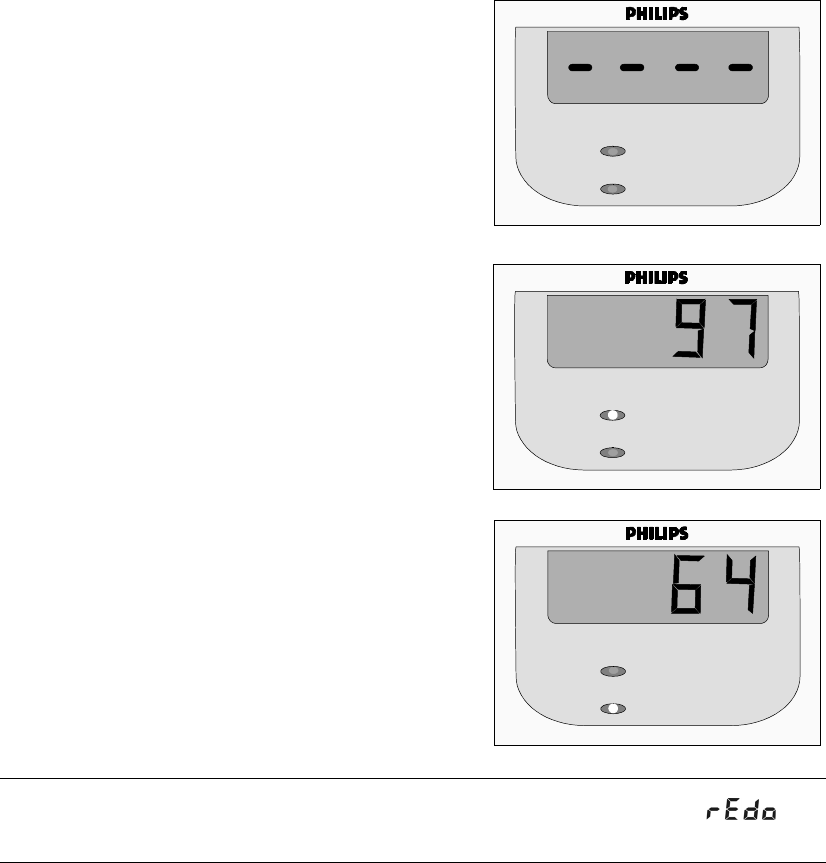
Uso de los dispositivos
Conjunto de dispositivos para telemonitorización Philips 7-43
El procedimiento de medición es el siguiente:
- Se desplazan unos guiones por la
pantalla durante la medición.
- Se escuchará un pitido doble
después de algunos segundos
para indicar que la medición
ha finalizado.
- Se escucha un tic mientras
que el % SpO2 medido
aparece en la pantalla y se
enciende la luz amarilla
junto a % SpO2 .
- Se escucha un toc mientras
que el pulso aparece en la
pantalla y se enciende la luz
verde junto a pulso (/min.).
- La secuencia de tic y toc se
repite varias veces y luego se
apaga.
Nota Si no se tomó la medición, sonará un pitido largo y aparece :
Caliente su mano o use otro dedo y trate de nuevo.
%SpO2
pulso (/min)
%SpO2
pulso (/min)
%SpO2
pulso (/min)

Uso de los dispositivos
7-44 Conjunto de dispositivos para telemonitorización Philips
Glucómetro La TeleEstación puede registrar los resultados de algunos glucómetros.
No se pueden realizar lecturas de un glucómetro con una CDD. Estos son
los glucómetros aprobados para su uso con la TeleEstación:
• OneTouch Basic
• OneTouch Profile
Advertencia Las lecturas del glucómetro sólo pueden grabarse en una
TeleEstación. No pueden usarse con una CDD.
El sistema CTP funciona únicamente con los glucómetros OneTouch
Basic y OneTouch Profile. No se deben conectar otros glucómetros a
la TeleEstación.
No mida su glucosa mientras su Glucómetro esté conectado a la
Tel eEstación.
Limpie la sangre de su dedo antes de utilizar la TeleEstación.
Nota Si desea consultar los procedimientos sobre cómo medir la glucosa con su
Glucómetro, lea el manual de Instrucciones para el uso.
Cómo
registrar las
mediciones
de glucosa
Siga estos pasos para enviar los resultados del Glucómetro a la
computadora de su personal médico por medio de la TeleEstación:
Paso 1. Mídase la glucosa con su Glucómetro siguiendo los
procedimientos del manual de Instrucciones para el uso.
Paso 2. Limpie cualquier rastro de sangre que haya quedado en su dedo
antes de continuar con el paso siguiente.
Paso 3. Conecte el extremo más grande del Cable del glucómetro al
conector macho en la parte trasera de la TeleEstación tal como se
muestra en la figura siguiente. Existe un solo puerto en el que se
podrá conectar, marcado con | 0 | 0 |.
Paso 4. Conecte firmemente el extremo con el enchufe pequeño de cable
del glucómetro en el puerto de datos del glucómetro, tal como se
muestra en la figura a continuación.

Uso de los dispositivos
Conjunto de dispositivos para telemonitorización Philips 7-45
Paso 5. Encienda el glucómetro.
El glucómetro enviará automáticamente los resultados a la TeleEstación
y luego se apagará. Cuando el glucómetro se apague:
Paso 6. Desconecte el medidor del cable. Puede dejar el cable conectado
a la TeleEstación.
El Sistema CTP acepta la fecha y la hora fijadas en el glucómetro como la
fecha y la hora reales de la lectura de la glucosa. De ese modo, el médico
clínico obtiene la fecha y la hora de medición más exactas. Por lo tanto, es
importante que la fecha y la hora del glucómetro se encuentren
configuradas correctamente.
Cómo cambiar el día y la hora del glucómetro
Si es necesario cambiar la fecha o la hora de su Glucómetro, siga los pasos
siguientes para asegurarse de que el día y la hora de sus mediciones de
glucosa sean exactos cuando se transmitan a través de la TeleEstación.
Paso 1. Conecte su glucómetro a la TeleEstación y transmita los
resultados, tal como se describe más arriba.
Paso 2. Limpie todas las lecturas de la memoria del glucómetro.
Paso 3. Cambie el día y/o la hora de su glucómetro siguiendo el
procedimiento descripto para el dispositivo.
TeleEstación
Cable del
Glucómetro
glucómetro
Uso de los dispositivos
7-46 Conjunto de dispositivos para telemonitorización Philips

Mantenimiento 8-1
Introduction
8
Mantenimiento
Generalidades
El Capítulo 8 le proporciona las instrucciones para limpiar y guardar los
dispositivos para telemonitorización de pacientes de Philips, sustituir las
baterías, y el mantenimiento general del Conjunto de dispositivos para
telemonitorización de pacientes. Puede hacer que sus dispositivos sigan
funcionando correctamente si los cuida.
En este capítulo se incluyen las secciones siguientes:
Página
Limpieza de dispositivos. . . . . . . . . . . . . . . . 8-2
Almacenamiento. . . . . . . . . . . . . . . . . . . . . . . 8-3
Monitor de tensión arterial. . . . . . . . . . . . . 8-3
Registrador del ritmo en tiras (RRT) . . . . . 8-3
Oxímetro de pulso . . . . . . . . . . . . . . . . . . . 8-3
Sustitución de las baterías . . . . . . . . . . . . . . 8-4
Báscula . . . . . . . . . . . . . . . . . . . . . . . . . . . 8-4
Báscula estándar . . . . . . . . . . . . . . . . . . . . . . 8-5
Báscula fija . . . . . . . . . . . . . . . . . . . . . . . . . . . 8-7
Monitor de tensión arterial (MTA) . . . . . . . 8-9
Registrador del ritmo en tiras (RRT) . . . . 8-10
Oxímetro de pulso . . . . . . . . . . . . . . . . . . 8-12

Limpieza de dispositivos
8-2 Mantenimiento
Limpieza de dispositivos
Limpie los dispositivos de telemonitorización sólo cuando sea
necesario. Para limpiar los dispositivos siga los pasos siguientes.
Nota Los fluidos corporales, como sangre y mucosidades deben eliminarse
inmediatamente con un paño humedecido con agua del grifo (sin jabón).
Precaución Evite derramar líquidos en los dispositivos.
Nunca sumerja los dispositivos en líquidos para limpiarlos.
Nunca use alcohol ni otros productos químicos abrasivos, agresivos
o cáusticos para limpiar los dispositivos.
Paso 1. Desenchufe el cable de alimentación y el cable telefónico de la
CDD/TeleEstación.
Paso 2. Extraiga las baterías de los dispositivos de medición siguiendo
los procedimientos provistos en la sección Sustitución de las
baterías.
Paso 3. Limpie todas las superficies expuestas de los dispositivos con
un paño seco y suave.
Nota Para limpiar el oxímetro de pulso:
– Abra el sensor digital y limpie cuidadosamente las superficies
internas usando un paño humedecido con un detergente suave.
– Deje que el sensor se seque completamente antes de volverlo a usar.
Paso 4. Enchufe el cable de alimentación y el cable telefónico de la
CDD/TeleEstación.
Paso 5. Reinstale las baterías de los dispositivos de medición
siguiendo los pasos suministrados en la sección Sustitución de
las baterías.

Almacenamiento
Mantenimiento 8-3
Almacenamiento
Guarde los dispositivos de medición a menos de 6 metros de la CDD/
TeleEstación para que puedan enviarle los resultados.
Precaución Nunca guarde los dispositivos dentro de un recipiente o cajón metálico,
como un archivador.
Nunca guarde los dispositivos donde niños o mascotas puedan enredarse
en las mangueras, cables dobles o muñequeras.
Monitor de
tensión
arterial
• Guarde el MTA de modo que la manguera y las piezas del
manguito no se retuerzan ni doblen con fuerza.
• No enrolle la manguera alrededor de la caja de la pantalla.
Registrador
del ritmo en
tiras (RRT)
• Guarde el RRT de manera que el cable no se retuerza ni se doble
con fuerza.
• El registrador puede guardarse con los conectores fijados a las
muñequeras.
Oxímetro de
pulso
• Guarde el oxímetro de pulso de manera que el cable del sensor no
se retuerza ni se doble.
• Evite tirar del cable del sensor o transportar el oxímetro de pulso
sujetándolo por el mismo.
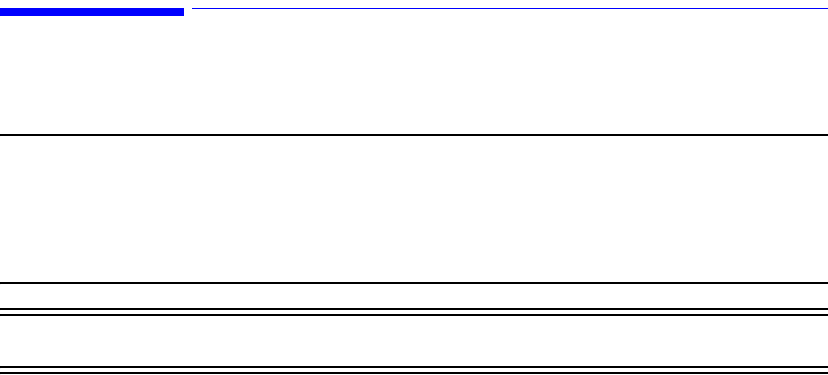
Sustitución de las baterías
8-4 Mantenimiento
Sustitución de las baterías
Sustituya las baterías cuando vea la indicación del dispositivo de que las
baterías están bajas o deben sustituirse.
Precaución Al hacerlo, siempre sustituya todas las baterías a la vez y use
baterías nuevas.
Use solamente baterías alcalinas tipo AA (1.5 voltios)
No use baterías recargables.
Advertencia Nunca use un dispositivo sin la tapa de las baterías.
Báscula Sustituya las baterías en la báscula estándar cada 12 meses
o antes si:
• no se escucha la voz aunque el volumen no se ajustó a 0
• la pantalla muestra, de manera alternativa, Lo y batt durante una
medición
• la báscula anuncia"Please replace the scale batteries" (sustituya
las baterías de la báscula) durante una medición.
Sustituya las baterías en la báscula estándar cada 6 meses
o antes si:
• no se escucha la voz aunque el volumen no se ajustó a 0
• la luz Stand Still (no se mueva) normalmente fija, está parpadeando.
Ambas básculas usan 4 baterías alcalinas AA.
Procedimientos Sigas los pasos siguientes para sustituir las baterías en la báscula estándar
y en la fija. Siga los pasos correspondientes al tipo de báscula.
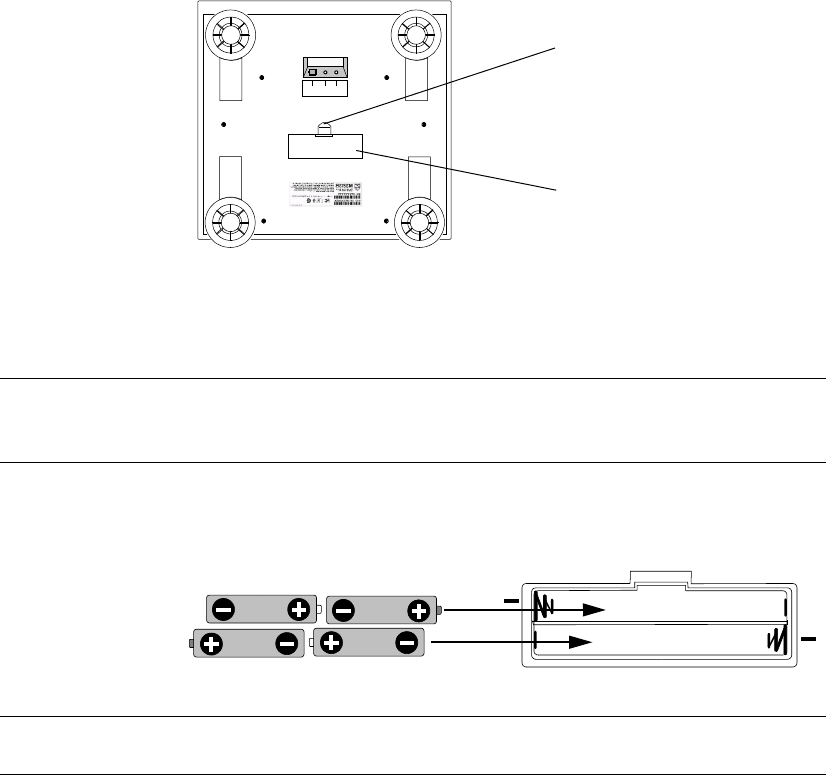
Sustitución de las baterías
Mantenimiento 8-5
Báscula estándar
Paso 1. Dé vuelta la báscula con cuidado y colóquela sobre una
superficie plana para exponer el Compartimiento de baterías.
Paso 2. Retire la tapa del compartimiento de baterías levantando la
lengüeta.
Paso 3. Extraiga las baterías gastadas y tírelas.
Nota Pregunte a las autoridades locales cuál es el mejor modo de desechar las
baterías.
Paso 4. Inserte las baterías nuevas de modo que los polos positivo (+) y
negativo (-) coincidan con las del diagrama del compartimiento.
Notas Asegúrese de que los polos de las baterías toquen los del compartimiento.
Paso 5. Vuelva a colocar la tapa insertando las lengüetas en las ranuras y
presionando la tapa hasta que encaje.
RJ11 Idioma
Seleccionar
KG/LB
Compartimiento de
las baterías
Levante la lengüeta y
retire la tapa
+
+

Sustitución de las baterías
8-6 Mantenimiento
Paso 6. Coloque la báscula en su lugar original y siga las técnicas
adecuadas para levantarla que aparecen a continuación.
Nota Para levantar la báscula es necesario tener buen equilibrio, capacidad para
agarrar y levantar 5 kg y una técnica segura.
No levante la báscula si no puede guardar el equilibrio o si no puede
seguir las técnicas adecuadas. Pida ayuda o póngase en contacto con
su personal médico.
Cuando levante o baje la báscula:
– Use zapatos con suela antideslizante.
– Mantenga los pies separados, uno algo más adelante que el otro.
– Póngase en cuclillas y baje la báscula. Nunca doble la cintura.
– Mantenga la báscula junto a su cuerpo.
– Levántela con las piernas, no con la espalda.
– Si debe girar, hágalo con los pies, no con todo el cuerpo.
Paso 7. Realice la Prueba de radio descrita en la sección Solución
de problemas.
Paso 8. Súbase a la báscula para ver si funciona correctamente.
Nota Si la báscula no funciona o la Prueba de radio falla, póngase en
contacto con su personal médico.
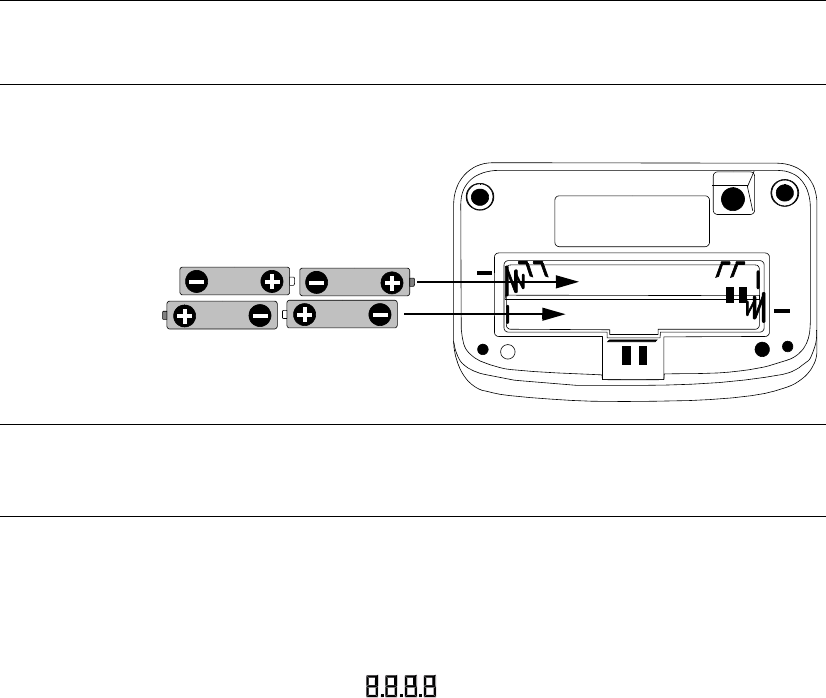
Sustitución de las baterías
Mantenimiento 8-7
Báscula fija
Paso 1. Sujete con firmeza la pantalla y tire de ella para soltarla de las
tiras de cierre de plástico que la sujetan en su lugar.
Paso 2. Dele la vuelta a la pantalla y desconecte el cable de la parte
superior de la columna.
Paso 3. Empuje con cuidado la tapa del compartimiento de baterías en la
dirección del símbolo de la flecha y levántela.
Paso 4. Extraiga las baterías gastadas y tírelas.
Nota Pregunte a las autoridades locales cuál es el mejor modo de desechar las
baterías.
Paso 5. Inserte las baterías nuevas de modo que los polos positivo (+) y
negativo (-) coincidan con las del diagrama del compartimiento.
Notas Para evitar que las baterías se salgan, inserte primero las de la fila inferior.
Asegúrese de que los polos de las baterías toquen los del compartimiento.
Paso 6. Vuelva a colocar la tapa insertando las lengüetas en las ranuras y
presionando la tapa hasta que encaje.
Las luces Stand Still (no se mueva) y Step Off (bájese) se encenderán
durante 6 segundos y se apagarán. Puede que no vea encenderse estas
luces si el dispositivo está aún boca abajo.
La pantalla mostrará brevemente, y la luz Step Off parpadeará
lentamente.
2. Inserte la fila superior en
1. Inserte primero las de
+
+
-
segundo lugar
la fila inferior

Sustitución de las baterías
8-8 Mantenimiento
Paso 7. Para volver a colocar la pantalla:
– Pase el cable de conexión por la abertura de la pantalla.
– Sujete la pantalla de la báscula hacia usted sobre la parte superior
de la columna.
– Conecte el cable al adaptador en el interior de la columna.
– Centre la pantalla sobre la columna de modo que coincidan las
tiras de cierre de ambas.
– Presione sobre la pantalla. La parte posterior de la pantalla debe
descansar sobre el borde de la parte superior de la columna.
Cuando la pantalla está conectada correctamente a la báscula:
–la luz Step Off (bájese) deja de parpadear.
– la báscula anunciará “zero pounds” (cero libras), mostrará 0.0 y
se apagará.
Nota Importante: No se suba a la báscula mientras realiza este paso.
Si la luz Step Off (bájese) sigue parpadeando, desenchufe y vuelva a
enchufar el cable hasta que encaje en su lugar.
Compruebe también que las baterías están insertadas correctamente.
Paso 8. Coloque la báscula en su lugar original.
Precaución No levante la báscula fija.
Si es necesario mover la báscula fija, pida ayuda o póngase en
contacto con su personal médico para solicitar su ayuda.
Paso 9. Realice la Prueba de radio descrita en la sección Solución
de problemas.
Paso 10. Súbase a la báscula para ver si funciona correctamente.
Nota Si la báscula no funciona o la Prueba de radio falla, póngase en
contacto con su personal médico.
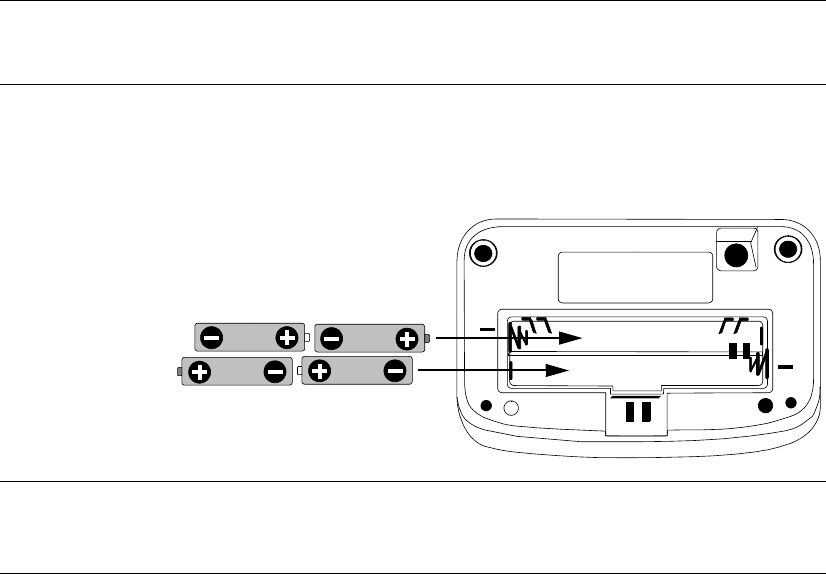
Sustitución de las baterías
Mantenimiento 8-9
Monitor de
tensión
arterial
(MTA)
• Sustituya las baterías en la unidad de tensión arterial cada 3 meses
o antes si fuera necesario. La vida útil esperada de las baterías del
MTA es de 3 meses con una lectura diaria.
• Sustituya las baterías del MTA en cuanto vea el símbolo Low
Battery (baterías bajas) en la pantalla de la unidad.
• La unidad de tensión arterial usa 4 baterías alcalinas AA.
Pasos a
seguir
Para sustituir las baterías del MTA:
Paso 1. De vuelta la pantalla.
Paso 2. Empuje con cuidado la tapa del compartimiento de baterías en la
dirección del símbolo de la flecha y levántela.
Paso 3. Extraiga las baterías gastadas y tírelas.
Nota Pregunte a las autoridades locales cuál es el mejor modo de desechar las
baterías.
Paso 4. Inserte las baterías nuevas en el compartimento de las baterías, de
modo que los polos positivo (+) y negativo (-) coincidan con las del
diagrama del compartimiento. A continuación se presentan los
diagramas de las unidades M3815A y M3815B.
Notas Para evitar que las baterías se salgan, inserte primero las de la fila inferior.
Asegúrese de que los polos de las baterías toquen los del compartimiento.
2. Inserte la fila superior
1. Inserte primero las de
+
+
-
en segundo lugar
la fila inferior
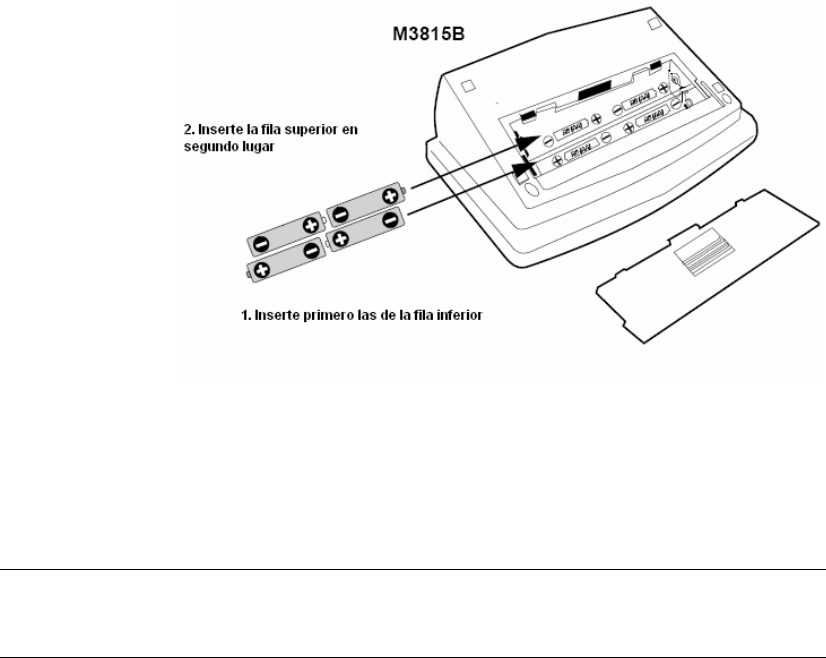
Sustitución de las baterías
8-10 Mantenimiento
Paso 5. Vuelva a colocar la tapa insertando las lengüetas en las ranuras y
presionando la tapa hasta que encaje.
Paso 6. Realice la Prueba de radio descrita en la sección Solución
de problemas.
Paso 7. Tome la tensión arterial para ver si funciona correctamente.
Nota Si la unidad de tensión arterial no funciona o la Prueba de radio falla,
póngase en contacto con su personal médico.
Registrador
del ritmo en
tiras (RRT)
• Sustituya las baterías en el registrador del ritmo en tiras cada 6
meses o antes si fuera necesario.
• Si el registrador del ritmo en tiras emite dos pitidos rápidamente
antes de comenzar la secuencia normal de pitidos, las baterías están
gastadas y deben sustituirse antes de una semana.
• El registrador del ritmo en tiras usa 4 baterías alcalinas AA.
Pasos a
seguir
Para sustituir las baterías en el registrador del ritmo en tiras, siga los pasos
de la sustitución del MTA, en la página 8-9, a excepción del paso 7.

Sustitución de las baterías
Mantenimiento 8-11
El registrador emitirá una serie de pitidos.
Si la serie termina con un tono más alto, las baterías se han insertado
correctamente.
Si la serie termina con un tono más bajo o sin tono, las baterías se
han insertado incorrectamente. Repita los pasos para insertar las
baterías.
Después del paso 6:
Paso 7. Mida su ritmo cardiaco con el registrador del ritmo en tiras para
ver si funciona correctamente.
Nota Si el registrador del ritmo en tiras no funciona o la Prueba de radio
falla, póngase en contacto con su personal médico.
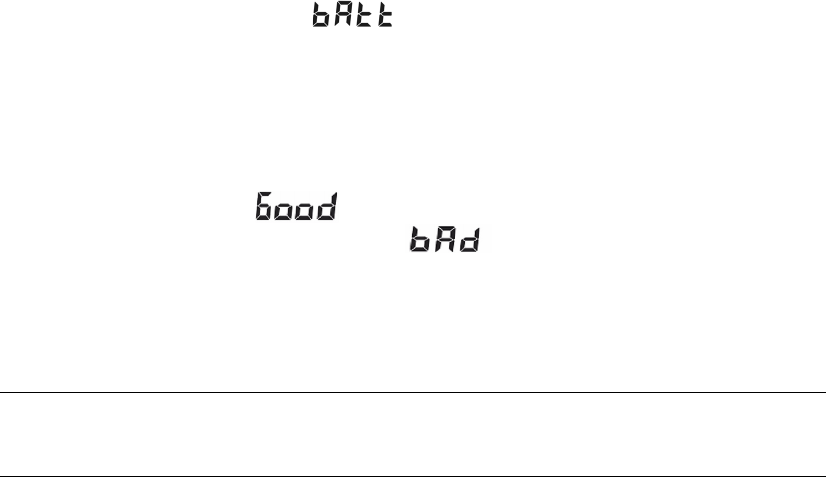
Sustitución de las baterías
8-12 Mantenimiento
Oxímetro de
pulso
• Sustituya las baterías del oxímetro de pulso cada 6 meses o antes si
fuera necesario.
• Sustituya las baterías cuando el indicador Baterías bajas (Low
Battery) parpadee en la pantalla del oxímetro de pulso.
• El registrador del ritmo en tiras usa 4 baterías alcalinas AA.
Pasos a
seguir
Para sustituir las baterías del registrador del ritmo en tiras, siga del Paso
1 al Paso 5 del procedimiento de la Unidad de tensión arterial en
página 8-9.
Después de sustituir las baterías correctamente, deberá mostrarse el
mensaje .
Si se muestra el mensaje , sustituya las baterías con algunas de
calidad conocida e intente de nuevo.
Después del paso 5:
Paso 6. Tome la medición con el oxímetro de pulso para ver si funciona
correctamente.
Nota Si el oxímetro de pulso no funciona, póngase en contacto con su personal
médico.

Solución de problemas 9-1
Introduction
9
Solución de problemas
Generalidades
El Capítulo 9 describe los pasos a seguir si tiene problemas con
cualquiera de los dispositivos del Conjunto de dispositivos para
telemonitorización Philips. Las tablas a continuación le orientarán para
resolver los problemas que pudieran presentarse.
Precaución Nunca intente reparar usted mismo un dispositivo.
Si no puede solucionarse algún problema siguiendo los pasos descritos
en este capítulo, póngase en contacto con su personal médico.
Cada dispositivo muestra un mensaje de error cuando algún componente
no funciona correctamente. Cuando vea un mensaje de error, compruebe
el dispositivo y vuelva a intentar la medición. Recuerde que debe seguir
los indicadores anunciados y las luces para cerciorarse que la medición
se llevó a cabo correctamente.
En este capítulo se incluyen las secciones siguientes:
Página
Prueba de radio . . . . . . . . . . . . . . . . . . . . . . . 9-2
Tablas de solución de problemas. . . . . . . . . 9-3
CDD/TeleEstación. . . . . . . . . . . . . . . . . . . 9-3
Báscula . . . . . . . . . . . . . . . . . . . . . . . . . . . 9-8
Báscula estándar . . . . . . . . . . . . . . . . . . . . . 9-8
Báscula fija . . . . . . . . . . . . . . . . . . . . . . . . 9-10
Registrador del ritmo en tiras (RRT) . . . . 9-12
Monitor de tensión arterial. . . . . . . . . . . . 9-13
Oxímetro de pulso . . . . . . . . . . . . . . . . . . 9-15

Generalidades
9-2 Solución de problemas
Prueba de
radio
Si la luz data/holding results (datos/resultados en espera) no se
enciende después de tomar una medición, la otra opción disponible es
realizar la Prueba de radio.
La Prueba de radio garantiza que sus mediciones se envíen a la CDD/
TeleEstación correctamente desde el dispositivo de medición. El botón
PRUEBA DE RADIO , { o }, aparece en la parte delantera
del dispositivo.
Para realizar la Prueba de radio, siga los pasos siguientes:
Paso 1. 1. Presione y mantenga presionado el botón PRUEBA DE
RADIO del dispositivo de medición durante 3 a 5 segundos o
hasta que la CDD/TeleEstación empiece a emitir pitidos.
Nota Si la luz using phone (línea ocupada) de la CDD/TeleEstación se
enciende, pare y espere hasta que se apague para realizar la Prueba de radio.
Los mensajes siguientes se mostrarán en el dispositivo indicado.
En la báscula y el oxímetro de pulso la pantalla mostrará rF.
En el registrador del ritmo en tiras, la luz RELAX (relájese)
comienza a parpadear una vez por segundo.
La CDD/TeleEstación debe emitir un pitido:
Si la CDD/TeleEstación no emite ningún pitido, haga lo siguiente:
– Asegúrese de que el dispositivo de medición tengas baterías nuevas
– Compruebe si existen obstáculos entre el dispositivo de medición y
la CDD/TeleEstación.
Si los hay, traslade el dispositivo a otro lugar.
Si no los hay, acerque el dispositivo a la CDD/TeleEstación.
– Asegúrese de que no haya teléfonos celulares o inalámbricos ni
computadoras en uso cerca de la CDD/TeleEstación.
– Repita la Prueba de radio
Si la Prueba de radio no tuvo éxito, consulte las tablas de Solución de problemas
que aparecen a continuación para seguir intentando resolver el problema.
T

Tablas de solución de problemas
Solución de problemas 9-3
Tablas de solución de problemas
Las tablas siguientes describen ciertos Problemas que pueden ocurrir,
Razones por las que ocurrieron, y Soluciones posibles que podrían
ayudar a resolver el problema.
Encuentre la descripción del Problema que mejor define lo que se
observó, luego intente las diferentes Soluciones posibles. Si ninguna
de las soluciones tiene éxito, póngase en contacto con su personal
médico para obtener sugerencias adicionales.
Precaución Nunca intente reparar usted mismo un dispositivo.
Si no puede solucionarse algún problema siguiendo los pasos descritos
en esta sección, póngase en contacto con su personal médico.
CDD/
TeleEstación
En la tabla siguiente se describen los problemas que podrían ocurrir con
la CDD/TeleEstación.
Problema Razón Solución posible
La pantalla está
ilegible.
La CDD/TeleEstación está bajo la luz
directa del sol o se guardó a
temperaturas muy altas.
Deje que se enfríe a la temperatura ambiente
y se restaurará la pantalla.
Al realizar una
medición, la luz
data/holding
results (datos/
resultados en
espera) no se
enciende.
Puede haber interferencias por
dispositivos electrónicos, como
teléfonos celulares o inalámbricos
o computadoras.
Aleje los dispositivos electrónicos de la
CDD/TeleEstación.
El dispositivo de medición puede
estar demasiado lejos de la CDD/
TeleEstación.
Acerque el dispositivo de medición a la
CDD/TeleEstación.
Realice la Prueba de radio para determinar si
la CDD/TeleEstación recibe las señales del
dispositivo.

Tablas de solución de problemas
9-4 Solución de problemas
Al realizar una
medición, la luz
de datos/
resultados en
espera sigue
encendida.
Puede haber un problema con el
teléfono o la conexión con su
personal médico.
Realice la prueba del botón CALL (llamar)
como sigue:
- Busque el botón CALL a la derecha del
panel posterior de la CDD/TeleEstación.
- Presione el botón CALL durante menos de
2 segundos. La CDD/TeleEstación debe
emitir un pitido solamente.
(En algunas CDD necesitará usar un
bolígrafo u otro objeto punzante para
presionar el botón CALL).
- Suelte el botón CALL.
- En 10 segundos, la luz using phone
(línea ocupada) se encenderá y la CDD/
TeleEstación llamará al personal médico.
- Tras unos minutos, la luz using phone
(línea ocupada) y la luz data/holding
results (using phone) se apagarán.
- Si la luz data/holding results se apaga,
la CDD/TeleEstación funciona
correctamente. (Puede tardar unos minutos
en apagarse).
- Si no sucede nada de esto, póngase en
contacto con su personal médico.
Problema Razón Solución posible

Tablas de solución de problemas
Solución de problemas 9-5
Al realizar una
medición, la luz
data/holding
results (datos/
resultados en
espera) sigue
encendida
y tiene un
servicio
telefónico
especial como
correo de voz.
Puede haber un conflicto entre el
servicio telefónico especial y la
conexión de la CDD/
TeleEstación,
o puede haber un problema con el
teléfono o la conexión con su
personal médico.
- Pida que alguien le llame y le deje un
mensaje en su servicio telefónico especial.
Realice la prueba del botón CALL
(llamar) como sigue:
Nota: Mantenga colgado el teléfono por
los siguientes pasos, salvo que se indique
lo contrario.
- Busque el botón CALL (llamar) a la
derecha del panel posterior de la CDD/
TeleEstación.
- Presione el botón CALL durante menos de
2 segundos. La CDD/TeleEstación debe
emitir un pitido.
(En algunas CDD necesitará usar un
bolígrafo u otro objeto punzante para
presionar el botón CALL).
- Suelte el botón CALL.
- En 10 segundos, la luz using phone
(línea ocupada) se encenderá y la CDD/
TeleEstación llamará al personal médico.
- Tras unos minutos, la luz using phone
(línea ocupada) y la luz data/holding
results (using phone) se apagarán.
- Si la luz data/holding results sigue
encendida, escuche el mensaje guardado y
bórrelo.
- Presione el botón CALL durante menos de
2 segundos. La CDD/TeleEstación debe
emitir un pitido solamente.
- Suelte el botón CALL.
- En 10 segundos, la luz using phone
(línea ocupada) se encenderá y la CDD/
TeleEstación llamará al personal médico.
Problema Razón Solución posible

Tablas de solución de problemas
9-6 Solución de problemas
Continuación
de la página
anterior
- Tras unos minutos, la luz using phone
(línea ocupada) y la luz data/holding
results (datos/resultados en espera) se
apagarán.
- Si la luz data/holding results se apaga,
la CDD/TeleEstación funciona
correctamente. (Puede tardar unos minutos
en apagarse).
Sin embargo, su servicio telefónico
especial podría interferir con CDD/
TeleEstación
- Si la luz data/holding results se queda
encendida, probablemente no hay
conflicto con su servicio telefónico
especial.
Sin embargo, puede haber un problema
con el teléfono o la conexión con su
personal médico.
- Si esos resultados indican algún problema,
póngase en contacto con su personal
médico.
Problema Razón Solución posible

Tablas de solución de problemas
Solución de problemas 9-7
Se derramó
líquido sobre la
CDD/
TeleEstación
(por ejemplo,
donde se
conectan cables
a la parte
posterior).
Coloque la CDD/TeleEstación lejos
de los líquidos (sobre todo
fregaderos o donde puedan
derramarse líquidos sobre la unidad).
Si se derraman líquidos, proceda de la
manera siguiente:
- Desenchufe el adaptador de la CDD/
TeleEstación del toma corriente o de la
extensión eléctrica de varios contactos.
- Desconecte el cable telefónico de la toma
de la pared.
- Use una toalla para secar la CDD/
TeleEstación, prestando atención especial a
los puntos de conexión.
- Espere 3 horas para que la unidad seque
completamente.
- Vuelva a enchufar los cables de conexión a
la CDD/TeleEstación y las líneas eléctrica
y telefónica. Asegúrese de que quedan bien
conectadas.
- Descuelgue el auricular del teléfono y
compruebe si escucha el tono de marcado.
- Si no oye ningún tono de marcado, cuelgue
y vuelva a intentarlo.
- Si sigue sin oír tono de marcado,
desconecte la CDD/TeleEstación.
- Conecte el teléfono directamente a la toma
del teléfono.
- Póngase en contacto con su personal
médico.
Problema Razón Solución posible

Tablas de solución de problemas
9-8 Solución de problemas
Báscula En la tabla siguiente se describen los problemas que podrían ocurrir con
los dos tipos de báscula, la estándar y la fija. Use la tabla correspondiente
al tipo de báscula.
Báscula
estándar
La tabla siguiente se aplica a la báscula estándar.
Problema Razón Solución posible
Err.1 aparece en la pantalla y
se anuncia "Please try again"
(vuelva a intentarlo).
Se puede haber bajado de la
báscula muy pronto.
Vuelva a pesarse y espere el anuncio de la
indicación antes de bajarse.
Err.2 aparece en la pantalla y
se anuncia "Please try again"
(vuelva a intentarlo).
Se puede haber movido
mientras se pesaba.
Súbase a la báscula y permanezca inmóvil
mientras se pesa.
Err.3 aparece en la pantalla y
se anuncia "Please try again"
(vuelva a intentarlo).
Se quedó demasiado tiempo
en la báscula.
Súbase a la báscula y bájese al momento
de escuchar el anuncio de la indicación.
Err.4 aparece en la pantalla y
se anuncia "The maximum
weight was exceeded" (se
sobrepasó el peso máximo).
Pudo haberse sobrepasado
el peso máximo aceptable
de 440 lbs (200 kg).
Use una báscula normal para ver si su
peso supera 440 lbs (200 kg).
Al subirse a la báscula no se
oye la voz y no se ajustó a 0.
Las baterías de la báscula
están bajas.
Sustituya las 4 baterías de la báscula
como se describe en el Capítulo 8.
La pantalla muestra, de manera
alternativa, Lo y batt.
La báscula anuncia"Please
replace the scale batteries"
(sustituya las baterías de la
báscula).

Tablas de solución de problemas
Solución de problemas 9-9
La báscula no se enciende. La báscula no está instalada
correctamente o las baterías
están bajas.
- Sustituya las 4 baterías de la báscula
como se describe en el Capítulo 8.
- Coloque la báscula sobre una superficie
firme y plana.
- Si sigue sin encenderse, póngase en
contacto con su personal médico.
La lectura del peso final
cambia o es incorrecta.
La báscula está sobre una
superficie irregular o está
defectuosa.
- Coloque la báscula sobre una superficie
firme y plana y vuelva a pesarse.
- Si eso no resuelve el problema, póngase
en contacto con su personal médico.
Problema Razón Solución posible

Tablas de solución de problemas
9-10 Solución de problemas
Báscula fija La tabla siguiente se aplica a la báscula fija.
Problema Razón Solución posible
Err. aparece en la
pantalla.
Se bajó de la báscula
demasiado pronto.
Vuelva a pesarse y espere a que se encienda la luz
Step Off (bájese) y se lo indique la voz antes de
bajarse de la báscula.
Err.1 o
Err.2 o
Err.6 aparece en la
pantalla.
La pantalla de la báscula
no está conectada a la
misma.
o existe un problema con
la báscula.
Asegúrese de que la pantalla esté conectada
correctamente a la báscula.
Si eso no resuelve el problema, póngase en contacto
con su personal médico.
Err.3 aparece en la
pantalla.
Movió la báscula
inmediatamente después
de bajarse.
Vuelva a pesarse y espere a que se encienda la luz
Step Off (bájese) y se lo indique la voz antes de
bajarse de la báscula.
Err.4 aparece en la
pantalla.
Se movió mientras se
pesaba.
Súbase a la báscula y permanezca inmóvil.
Err.5 aparece en la
pantalla.
La báscula no pudo leer
la medición.
Use una báscula normal para ver si su peso supera
365 lbs (166 kg).
Err.6 aparece en la
pantalla.
No se bajó de la báscula
cuando se le indicó.
Vuelva a pesarse y espere a que se encienda la luz
Step Off (bájese) y se lo indique la voz antes de
bajarse de la báscula.
La luz Stand Still
(no se mueva)
parpadea cuando está
sobre la báscula.
Las baterías de la
báscula están bajas.
Sustituya las 4 baterías de la báscula como se
describe en el Capítulo 8.
La luz Stand Still
(no se mueva)
parpadea y no se oye
la voz aunque no se
ajustó a 0.
Las baterías de la
báscula están bajas.
Sustituya las 4 baterías de la báscula como se
describe en el Capítulo 8.
La luz Step Off
(bájese) parpadea
lentamente.
La pantalla de la báscula
no está conectada a la
misma.
- Compruebe las conexiones entre la plataforma y la
pantalla.
- Desenchufe el cable y vuelva a enchufarlo
correctamente.

Tablas de solución de problemas
Solución de problemas 9-11
La báscula no se
enciende.
La báscula no está
instalada correctamente
o las baterías están bajas.
- Compruebe las conexiones entre la plataforma y la
pantalla.
- Sustituya las 4 baterías de la báscula como se
describe en el Capítulo 8.
- Coloque la báscula sobre una superficie firme y plana.
- Si sigue sin encenderse, póngase en contacto con
su personal médico.
La lectura del peso
final cambia o es
incorrecta.
La báscula está sobre
una superficie irregular o
está defectuosa.
- Coloque la báscula sobre una superficie firme y
plana y vuelva a pesarse.
- Si eso no resuelve el problema, póngase en
contacto con su personal médico.
Problema Razón Solución posible

Tablas de solución de problemas
9-12 Solución de problemas
Registrador
del ritmo en
tiras (RRT)
En la tabla siguiente se describen los problemas que podrían ocurrir con
el registrador del ritmo en tiras.
Problema Razón Solución posible
Mediciones
defectuosas del
ritmo cardiaco, o
la CDD/
TeleEstación no
recibe
mediciones del
ritmo cardiaco.
Las muñequeras están
sueltas o mal colocadas.
Suba las muñequeras por el brazo hasta
que presionen suavemente la piel de la
zona interior de muñecas o brazos.
El dispositivo de
medición puede estar
demasiado lejos de la
CDD/TeleEstación.
- Acerque el dispositivo de medición a la
CDD/TeleEstación.
- Realice la Prueba de radio para
determinar si la CDD/TeleEstación
recibe las señales del dispositivo.
- Si el registrador aún no funciona
correctamente, póngase en contacto
con su personal médico.

Tablas de solución de problemas
Solución de problemas 9-13
Monitor de
tensión
arterial
En la tabla siguiente se describen los problemas que podrían ocurrir con
el monitor de tensión arterial. La primera tabla es para el M3815A y la
segunda es para el M3815B.
M3815A
Problema Razón Solución posible
Lecturas de tensión
arterial imprecisas.
El procedimiento para la toma
de tensión es incorrecto.
Revise las sugerencias de toma de tensión en
el Capítulo 7 y vuelva a tomar la medición.
aparece en
la pantalla.
Las mediciones sistólica y
diastólica están a
10 mm Hg una de otra.
Compruebe si hay fugas de
aire en la conexión de la
manguera.
- Compruebe que la manguera de aire esté
conectada correctamente al MTA y al
manguito: desconéctelo y conéctelo
empujando y enroscándolo hasta que quede
bien sujeto.
aparece en
la pantalla.
Se movió durante la lectura. - Vuelva a tomarse la tensión. Permanezca
inmóvil durante el procedimiento.
aparece en
la pantalla.
La medición de tensión no
aumentó durante el inflado
del manguito o éste no está
ajustado.
- Compruebe que la manguera de aire esté
conectada correctamente al MTA y al
manguito: desconéctelo y conéctelo
empujando y enroscándolo hasta que quede
bien sujeto.
- Asegúrese de que el manguito esté bien
ajustado.
aparece
en la
pantalla.
Las baterías del MTA están
bajas.
- Sustituya las 4 baterías del MTA como se
describe en el Capítulo 8.
Nota: si tiene que sustituir las baterías con
frecuencia, compruebe el ajuste inicial del
manguito. Un manguito suelto requiere un
tiempo de inflado mayor y reduce la
duración de la batería.

Tablas de solución de problemas
9-14 Solución de problemas
M3815B
Problema Razón Solución posible
Indicador de batería
completamente cargada.
No es necesario tomar acción.
Indicador de carga de batería
baja.
Cuando el indicador de cara de batería
parpadea, reemplace todas las baterías.
Tensión arterial inestable
debido a movimiento corporal
excesivo.
Repita la medición y permanezca muy quieto
durante la misma.
El pulso no se detectó
correctamente.
Repita la medición y permanezca muy quieto
durante la misma.
Los valores sistólicos
y diastólicos tienen una
diferencia de 10 mmHG
entre sí.
Vuelva a ajustar el manguito, y repita la
medición permaneciendo muy quieto durante
la misma.
El valor de la tensión no
aumentó durante el inflado.
Verifique si existen escapes de aire del tubo y
alrededor de la toma de aire.
El manguito no está bien
ajustado.
Vuelva a ajustar el manguito y repita la
medición.

Tablas de solución de problemas
Solución de problemas 9-15
Oxímetro de
pulso
En la tabla siguiente se describen los problemas que podrían ocurrir con
el oxímetro de pulso.
Problema Razón Solución posible
aparece en
la pantalla. Se detectó una anomalía del
hardware. Si la condición persiste, póngase en contacto
con su personal médico.
aparece
en la
pantalla.
No se obtuvo una lectura. - Baje la intensidad de la luz.
- Caliente su dedo.
- Mantenga la mano inmóvil.
- Vuelva a tomar la medición.
- Si la condición persiste, póngase en
contacto con su personal médico.
aparece
en la
pantalla
y parpadea.
El oxímetro de pulso no
puede funcionar
correctamente porque las
baterías están bajas.
- Sustituya las 4 baterías como se describe en
el Capítulo 8.
- Realice una Prueba de radio.
aparece
en la
pantalla
junto con un tono de
audio ascendente
después de sustituir
las baterías.
Indica que las baterías están
en buen estado. No se requiere ninguna acción. Prosiga con la
medición con el oxímetro de pulso.
aparece
en la
pantalla
junto con un tono de
audio descendente
después de sustituir
las baterías.
El hardware funciona mal. - Sustituya las 4 baterías como se describe en
el Capítulo 8.
- Realice una Prueba de radio.
- Si la condición persiste, póngase en
contacto con su personal médico.
Tablas de solución de problemas
9-16 Solución de problemas

Especificaciones e información normativa 10-1
Introduction
10
Especificaciones e información
normativa
Generalidades
El Capítulo 10 proporciona la información sobre los dispositivos del
Conjunto de dispositivos para telemonitorización de pacientes Philips
requerida legalmente y que describe completamente sus características,
desempeño y cumplimiento con los requisitos normativos. En él se
incluyen las secciones siguientes:
Página
Intención de uso/Indicaciones . . . . . . . . . . . . . . . . . . . . . . . . . .10-2
Especificaciones . . . . . . . . . . . . . . . . . . . . . . . . . . . . . . . . . . . . .10-3
Descripción . . . . . . . . . . . . . . . . . . . . . . . . . . . . . . . . . . . . 10-3
CDD. . . . . . . . . . . . . . . . . . . . . . . . . . . . . . . . . . . . . . . 10-3
Báscula estándar. . . . . . . . . . . . . . . . . . . . . . . . . . . . . 10-4
Báscula fija . . . . . . . . . . . . . . . . . . . . . . . . . . . . . . . . . 10-5
Monitor de tensión arterial (MTA) . . . . . . . . . . . . . . . . 10-6
Registrador del ritmo en tiras (RRT) . . . . . . . . . . . . . . 10-7
Oxímetro de pulso . . . . . . . . . . . . . . . . . . . . . . . . . . . . 10-7
Especificaciones técnicas . . . . . . . . . . . . . . . . . . . . . . . . . 10-9
Físicas . . . . . . . . . . . . . . . . . . . . . . . . . . . . . . . . . . . . . 10-9
Eléctricas. . . . . . . . . . . . . . . . . . . . . . . . . . . . . . . . . . . 10-9
Medio ambiente. . . . . . . . . . . . . . . . . . . . . . . . . . . . . 10-10
Compatibilidad electromagnética (excepto el M3813B
y el M3815B) . . . . . . . . . . . . . . . . . . . . . . . . . . . . . . . . . . . . . . . .10-11
Emisiones e inmunidad . . . . . . . . . . . . . . . . . . . . . . . . . . 10-12
Cómo evitar interferencia electromagnética . . . . . . . . . . 10-12
Cómo evitar descargas de electricidad estática. . . . . . . . . .10-13
Compatibilidad electromagnética (M3813B y M3815B) . . . . . . . . . .10-14
Emisiones e inmunidad . . . . . . . . . . . . . . . . . . . . . . . . . . . . . . . . .10-15
Cómo evitar interferencia electromagnética . . . . . . . . . . . . .10-15
Información normativa . . . . . . . . . . . . . . . . . . . . . . . . . . . . . . .10-20
Normativa de la FCC . . . . . . . . . . . . . . . . . . . . . . . . . . . . 10-20
Aviso de normativa telefónica . . . . . . . . . . . . . . . . . . . . 10-21

Intención de uso/Indicaciones
10-2 Especificaciones e información normativa
Intención de uso/Indicaciones
El modelo 3810A se diseñó para que lo usen los pacientes bajo
prescripción de un médico matriculado o personal médico autorizado
como un medio para recolectar y transmitir automáticamente
información médica, como por ejemplo el peso, la tensión arterial y
ECG no diagnósticos, a través de líneas telefónicas residenciales, entre
un paciente, comúnmente en su hogar, y un profesional de la salud en un
prestador autorizado.
Indicaciones El M3810A está indicado para pacientes en sus hogares, que son
capaces y quieren administrar ellos mismos este dispositivo, bajo
prescripción de su personal médico, para recolectar y transmitir
información médica, tal como peso, tensión arterial (incluyendo el
pulso) y tiras del ritmo ECG no diagnóstico al personal médico que se
encuentra en otro lugar. El paciente realiza las mediciones, normalmente
una vez por día, y la información se transmite automáticamente a través
de una línea normal de teléfono al personal médico. El dispositivo no
envía alarmas en tiempo real. Es preciso el criterio y la experiencia
clínica para controlar e interpretar la información enviada.
Contraindi-
caciones
Este dispositivo no se diseñó para sustituir la atención médica. El
dispositivo está contraindicado en pacientes con insuficiencia cardíaca
descompensada, pacientes con alto riesgo de arritmias que ponen en
peligro la vida, pacientes con infartos de miocardio recientes, o
pacientes que exigen una supervisión médica directa o intervenciones
de emergencia.

Especificaciones
Especificaciones e información normativa 10-3
Especificaciones
Esta sección proporciona la descripción técnica y las especificaciones de
los dispositivos del Conjunto de dispositivos para telemonitorización
Philips, incluyendo la información física, eléctrica y ambiental.
Descripción CDD
TeleEstación
Modelo M3812A
Tipo Equipo Clase II, operación continua
Pantalla Panel LED
Puertos Modem serial
Modelo M3812B
Tipo Equipo Clase II, operación continua
Pantalla Panel LCD
Puertos Modem serial

Especificaciones
10-4 Especificaciones e información normativa
Báscula estándar
Modelo M3813B
Tipo
- Componente aplicado Tipo B
- Equipo IPXO normal
- Funcionamiento continuo con alimentación interna
Pantalla - Digital, caracteres de 2,0 pulgadas (51 mm) de
altura
- Peso mostrado y anunciado simultáneamente
Idioma Inglés o español
Volumen de
sonido
Lectura por voz del peso, indicaciones y 4 ajustes.
Rango de
medición
66 a 440 lbs (30 a 200 kg)
Precisióna
a. La comprobación de la precisión de la báscula se efectuó sobre alfombra de poliéster,
de 80 oz. de peso, torzal de 4,8 x 3,3 y densidad de 4.000. Se usó como bajo
alfombra un subyacente de 8 lb.
+ 0,5% de carga
al peso máximo del paciente + 2,2 lbs (1,0 kg)
Unidades de
pantalla
libras (lbs) o kilogramos (kg), seleccionado por el
usuario
Peso máximo
permitido
440 lbs (200 kg)
Asidero y
columna
sujeto a disponibilidad

Especificaciones
Especificaciones e información normativa 10-5
Báscula fija
Modelo M3813A
Tipo
- Componente aplicado Tipo B
- Equipo IPXO normal
- Funcionamiento continuo con alimentación interna
Pantalla - Digital, caracteres de 0,71 pulgadas (18 mm) de
altura
- Peso mostrado y anunciado simultáneamente
Idioma Inglés solamente
Volumen de
sonido
Lectura por voz del peso, indicaciones y 4 ajustes.
Rango de
medición
66 a 365 lbs (30 a 166 kg)
Precisión + 1% de carga + 1,1 lbs (0,5 kg)
al peso máximo del paciente + 4,8 lbs (2,2 kg)
Unidades de
pantalla
libras (lbs) o kilogramos (kg), seleccionado por el
usuario
Peso máximo
permitido
365 lbs (166 kg)
Asidero y
columna
Accesorio extraíble

Especificaciones
10-6 Especificaciones e información normativa
Monitor de tensión arterial (MTA)
M3815A
M3815B
Modelo M3815A
Tipo
- Componente aplicado Tipo B oscilométrico
- Equipo IPXO normal
- Funcionamiento continuo con alimentación interna
Pantalla - Digital, caracteres de 0.63 pulgadas (16 mm) de
altura
- Tensión/pulso mostrados simultáneamente
Rango de
medición
- Tensión: 20 a 280 mm Hg
- Pulso: 40 a 200 pulsaciones por minuto
Precisión Transductor de tensión; + 2% o + 3 mmHg
Presurización Automática, usando microbomba
Despresurización Sistema con válvula de liberación de aire constante
Desinflado Escape automático
Modelo M3815B
Tipo
- Componente aplicado Tipo B oscilométrico
- Funcionamiento continuo con alimentación interna
Pantalla
- Digital, caracteres de 0.79 pulgadas (20 mm) de altura
- Tensión/pulso mostrados simultáneamente
Rango de
medición
- Tensión: 20 a 280 mmHg
- Pulso: 40 a 200 pulsaciones por minuto
Precisión Transductor de tensión; + 2% o + 3 mmHg
Presurización Automática, usando microbomba
Despresurización Sistema con válvula de liberación de aire constante
Desinflado Válvula de escape activa
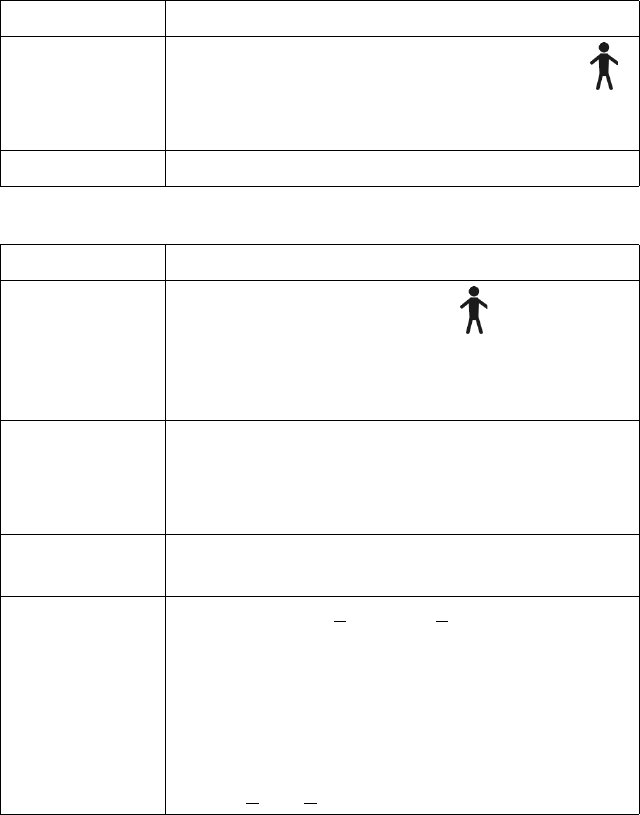
Especificaciones
Especificaciones e información normativa 10-7
Registrador del ritmo en tiras (RRT)
Oxímetro de pulso
Modelo M3816A
Tipo - Derivación de 1 canal
- Oscilométrico, componente aplicado Tipo B
- Equipo IPXO normal
- Funcionamiento continuo con alimentación interna
Pantalla Luz LED
Modelo M3814A
Tipo
- Componente aplicado Tipo B
- Equipo IPXO normal
- Funcionamiento continuo con alimentación interna
(no se implica el monitoreo continuo
Pantalla - Digital, caracteres de 0,7 pulgadas (1,8 cm) de
altura
- SpO2 - Pulso se muestran de manera alternada
- SpO2 rango de visualización: 0 - 100%
Rango de
medición
-SpO2: 70 - 100% (hemoglobina funcional)
- Pulso: 18 a 300 pulsaciones por minuto
Precisión de la
medición
-SpO2: 70 - 100%, + 2 dígitos (+ 1 Desviación
Estándar, una medida estadística)
- (SpO2 rango de calibración: 70 - 100%
determinado por la medición de sangre arterial en
un Co-oxímetro
Los métodos de comprobación están disponibles
a solicitud.)
- Pulso: + 3%, + 1 dígito

Especificaciones
10-8 Especificaciones e información normativa
Longitudes de
onda de
mediciones
- 660 nanómetros, 3 milivatios (nominal)
- 910 nanómetros, 3 milivatios (nominal)
Biocompatibilidad Idóneo para dispositivo de superficie, contacto con
la piel duración de contacto limitada (hasta 24
horas)
Modelo M3814A

Especificaciones
Especificaciones e información normativa 10-9
Especifica-
ciones técni-
cas Físicas
Eléctricas
Dispositivo Philips
Producto
Núm. de
pieza
Altura
cm (pulg.)
Ancho
cm (pulg.)
Profundidad
cm (pulg.)
Peso
kg (lbs.)
CDD M3812A 3,8 (1,5) 20,0 (7,9) 27,9 (11,0) 0,93 (2,05)a
TeleEstación M3812B 12,7 (5,0) 21,8 (8,6) 15,9 (6,3) 0,77 (1,70)a
Báscula estándar M3813B 5,7 (2,3) 38,1 (15,0) 38,1 (15,0) 3,8 (8,4)b
Báscula fija M3813A 5,1 (2,0) 48,8 (19,2) 48,8 (19,2) 6,8 (15)b
Monitor de tensión
arterial
M3815A 6,9 (2,7) 16,5 (6,5) 11,2 (4,4) 0,57 (1,25)b
M3185B 6,2 (2,4) 16,3 (6,4) 11,2 (4,4) 0,35 (0,77)
Registrador del ritmo en
tiras
M3816A 6,9 (2,7) 16,5 (6,5) 11,2 (4,4) 0,34 (0,75)b
Oxímetro de pulso M3814A 6,9 (2,7) 16,5 (6,5) 11,2 (4,4) 037 (0,81)b
a. Peso neto, sin el módulo de alimentación
b. Peso neto, con baterías
Dispositivo Philips
Producto
Núm. de
pieza
Fuente de alimentación Vida de las
baterías
CDD M3812A 9,0VCA/500mA
(Use sólo el adaptador
proporcionado por Philips)
n/d
TeleEstación M3812B
Báscula estándar M3813B 4 baterías alcalinas AA (1,5V)
conectadas en serie
para obtener un total de 6 V
~ 12 meses con
1 medición diaria
Báscula fija M3813A ~ 6 meses con
1 medición diaria
Monitor de tensión arterial M3815A ~ 3 meses con
1 medición diaria
M3815B
Registrador del ritmo en
tiras
M3816A ~ 12 meses con
1 medición diaria
Oxímetro de pulso M3814A ~ 6 meses con
1 medición diaria

Especificaciones
10-10 Especificaciones e información normativa
Medio ambiente
Advertencia El uso de estos dispositivos no es adecuado en presencia de mezclas
anestésicas inflamables con aire o con oxígeno o con óxido nitroso.
Temperatura Presión
atmosférica Altitud Humedad
relativa
Dispositivo
Philips
Producto
Núm. de
pieza
Funciona-
miento
Almacenaje
Funcionamiento
y almacenaje
(hPa)
Funcionamiento
y almacenaje
(hPa)
(no
condensable)
CDD M3812A 10 - 40oC
(50 - 104oF)
-9 - 54oC
(15 - 130oF)
572-1013 0-4600 m
(0-15.000 pies)
menos de
85%
TeleEstación M3812B
Báscula estándar M3813B
Báscula fija M3813A
Monitor de tensión
arterial
M3815A
M3815B
Registrador del
ritmo en tiras
M3816A
Oxímetro de pulso M3814A

Compatibilidad electromagnética (excepto el M3813B y el M3815B)
Especificaciones e información normativa 10-11
Compatibilidad electromagnética
(excepto el M3813B y el M3815B)
Nota Esta sección se aplica a todos los Conjuntos de dispositivos para la
telemonitorización a excepción de la báscula M3813B y del MTA
M3815B. Consulte la sección siguiente para obtener información sobre
la Compatibilidad electromagnética para estos dispositivos.
Cuando se usa el Sistema de telemonitorización Philips, debe evaluarse
la compatibilidad electromagnética con los dispositivos cercanos.
Un dispositivo médico puede generar o recibir interferencia
electromagnética. Las pruebas de compatibilidad electromagnética
(EMC) se efectuaron de acuerdo con la normativa internacional de
dispositivos médicos EN 60601-1-2.
Esta normativa EMC describe las pruebas tanto para la emisión como para la
recepción de interferencia. Las pruebas de emisión tienen que ver con la
interferencia generada por el dispositivo mismo, mientras que las pruebas de
inmunidad tienen que ver con la determinación de compatibilidad
electromagnética del dispositivo en presencia de equipos electrónicos cercanos
u otras fuentes externas que pueden generar interferencias.
Advertencia La interferencia de radio frecuencia (RF) generada por dispositivos
transmisores cercanos puede degradar el desempeño de los
dispositivos del Conjunto de dispositivos para telemonitorización
Philips. Debe evaluarse la compatibilidad electromagnética con los
dispositivos cercanos antes de usar estos equipos.
No deberán usarse los dispositivos del Conjunto para
telemonitorización Philips cerca o apilados junto con otros equipos.
Si es necesario apilar el dispositivo, compruebe que el
funcionamiento normal sea posible.
Compatibilidad electromagnética (excepto el M3813B y el M3815B)
10-12 Especificaciones e información normativa
Emisiones e
inmunidad
La normativa EMC estipula que los fabricantes de equipos acoplados a
los pacientes están obligados a especificar niveles de inmunidad a los
cuales se reduce el rendimiento de esos dispositivos.
Durante la prueba correspondiente a la normativa EN 61000-4-3 de
Inmunidad radiada, se observó una reducción del rendimiento.
EN 61000-4-3 estipula que los dispositivos podrán verse expuestos a un
campo de 3 voltios/metro, a un rango de frecuencia de 26 a 1000 MHz, sin
degradación del rendimiento o pérdida de funciones por debajo del nivel de
rendimiento especificado cuando el equipo funciona tal como se desea. La
comunicación por radio de los dispositivos del Conjunto para
telemonitorización Philips puede ser interrumpida ocasionalmente si éstos
están sujetos a frecuencias en el rango de 800 MHz a 942 MHz, a niveles de
intensidad de campo tan bajos como 0.05 V/m. Los fenómenos expuestos
anteriormente no son individuales de esta unidad, sino que son
característicos de la instrumentación de radio en uso en la actualidad. La
CDD M3812A y la TeleEstación M3812B son receptores de radio y su
recepción de las señales del dispositivo del Conjunto para telemonitorización
Philips podría degradarse por la interferencia electromagnética.
Cómo evitar
interferencia
electromagné-
tica
El Sistema de telemonitorización Philips está diseñado para usarse en
entornos electromagnéticos en los que las alteraciones de RF radiadas
están controladas. El cliente o usuario del Sistema de telemonitorización
Philips puede ayudar a evitar interferencias electromagnéticas
manteniendo una distancia mínima entre los equipos (transmisores)
portátiles y móviles de comunicaciones por RF y el Sistema de
telemonitorización Philips como se recomienda a continuación, según
una potencia de salida máxima del equipo de comunicaciones.
La CDD M3812A y la TeleEstación M3812B contienen un receptor de
radio sensible diseñado para recibir señales de radio de los dispositivos
de medición, que pueden degradarse por energía electromagnética en un
rango de frecuencia de 870 MHz a 960 MHz. Evite el uso de dispositivos
de radiofrecuencia en este rango de frecuencias cuando use el Sistema de
telemonitorización Philips. Las posibles fuentes de interferencia de
radiofrecuencia son los teléfonos celulares, teléfonos inalámbricos y
otros productos que contengan radiotransmisores. La tabla siguiente
muestra distancias de seguridad entre los transmisores de radiofrecuencia
y los dispositivos del Sistema de telemonitorización Philips.

Compatibilidad electromagnética (excepto el M3813B y el M3815B)
Especificaciones e información normativa 10-13
Nota Estas pautas no siempre pueden aplicarse. La propagación
electromagnética se ve afectada por la absorción y reflexión de
estructuras, objetos y personas.
Los dispositivos del Conjunto para telemonitorización Philips tienen un botón
de Prueba de radio que envía una señal de radio de prueba de potencia reducida
a la CDD o la TeleEstación, las que emiten un sonido si reciben dicha señal
correctamente. Esta prueba puede utilizarse para determinar si existen fuentes
de interferencia. Esas fuentes pueden apagarse o alejarse par reducir su potencia
y la interferencia. Además, los dispositivos del Conjunto para
telemonitorización Philips y la CDD y la TeleEstación pueden situarse más
cerca una de la otra, de manera que la transmisión de radio desde los
dispositivos del Conjunto para telemonitorización Philips a la CDD o la
TeleEstación tengan que recorrer menos distancia y se reduzca el efecto de las
señales de radio que interfieren. Las transmisiones de radio desde los
dispositivos del Conjunto para telemonitorización Philips se repiten
periódicamente, por lo que una fuente de interferencia intermitente sólo
retrasaría la recepción.
Cómo evitar
descargas de
electricidad
estática
Las descargas electrostáticas pueden causar un comportamiento
anormal temporal de los dispositivos del Conjunto para
telemonitorización Philips. Si una descarga electrostática causa una
anomalía temporal, simplemente reinicie la medición.
Distancias de separación recomendadas entre
equipos portátiles y móviles de comunicaciones por RF
y los dispositivos del Conjunto para telemonitorización Philips
Potencia nominal de
salida máxima del
transmisor (Vatios)
Distancia de separación recomendada
según las frecuencias del transmisor
26 a 800 MHz 800 MHz a 2,5 GHz
pies metros pies metros
0,01 11,5 3,5 23 7
0,1 36117222
1 115 35 230 70
10 361 110 720 220
100 1150 350 2300 700

Compatibilidad electromagnética (M3813B y M3815B)
10-14 Especificaciones e información normativa
Compatibilidad electromagnética (M3813B y M3815B)
La validación de compatibilidad electromagnética (EMC) de la báscula
M3813B y del MTA M3815B incluyó la comprobación llevada a cabo
según las normas internacionales de EMC para dispositivos médicos.
Para más detalles, consulte la Declaración del Fabricante.
Los dispositivos electrónicos pueden generar interferencia
electromagnética o recibirla. Se ha evaluado la compatibilidad
electromagnética (EMC) del M3813B y del M3815B con los accesorios
correspondientes, según IEC 60601-1-2:2001, la norma internacional
para EMC de equipo médico eléctrico. Esta norma IEC fue adoptada por
la Unión Europea como la Norma Europea EN 60601-1-2:2001.
La interferencia de radio frecuencia (RF) generada por dispositivos
transmisores cercanos puede degradar el desempeño del equipo
electrónico. Debe evaluarse la compatibilidad electromagnética con los
dispositivos circunvecinos antes de usar el equipo.
El equipo de comunicaciones de radiofrecuencia fijo, portátil y móvil
también puede afectar el desempeño de equipo electrónico. Solicite
información a su Proveedor de servicio sobre la mínima distancia de
separación recomendada entre equipos de comunicaciones de RF y estos
dispositivos.
Advertencia El uso de accesorios, transductores y cables distintos a los
especificados en la documentación de servicio y de los usuarios del
sistema de telemonitorización de Philips podría dar lugar a un
aumento en las emisiones o una inmunidad disminuida del sistema.
Los productos no deben utilizarse contiguos a otros equipos o
apilados con los mismos. Si es necesario apilar el producto, deberá
comprobarse que el funcionamiento normal es posible con la
configuración necesaria antes de utilizar el producto.

Compatibilidad electromagnética (M3813B y M3815B)
Especificaciones e información normativa 10-15
Emisiones e
inmunidad
El M3813B y el M3815B puede ser susceptible a la interferencia de otras
fuentes de energía de RF. Algunos ejemplos de otras fuentes de
interferencia de RF son otros dispositivos eléctricos médicos, productos
celulares, equipo de tecnología informática y transmisiones de radio y
televisión. Si se encuentra interferencia, demostrada por el
comportamiento anormal del producto, se debe intentar localizar la
fuente. Evalúe lo siguiente:
• ¿Es la interferencia intermitente o constante?
• ¿La interferencia se presenta en ciertas ubicaciones solamente?
• ¿La interferencia se presenta solamente en la cercanía estrecha con
cierto equipo?
Cómo evitar
interferencia
electromagné-
tica
Después de haber ubicado la fuente, intente atenuar la interferencia
alejando tanto como sea posible el producto de la fuente. Si necesita
asistencia, contacte a su Proveedor de servicio local.
Nota El M3813B y el M3815B se diseñaron para ser usados en el entorno
electromagnético especificado anteriormente. El cliente o usuario de estos
dispositivos deberá cerciorarse de que se utiliza en tal entorno.
Emisiones Electromagnéticas
Prueba de Emisiones Cumplimiento Lineamientos del Entorno Electromagnético
Emisiones de RF
CISPR 11
Grupo 1 El M3813B y el M3815B usan energía de RF
solamente para sus funciones internas
En consecuencia, sus emisiones de RF son muy
bajas y poco factibles de interferir con el equipo
electrónico cercano.
Emisiones de RF
CISPR 11
Clase B El M3813B y el M3815B son adecuados para su
uso en todos los sitios, incluyendo los domésticos
y todos aquellos conectados directamente a la red
de alimentación pública de bajo voltaje que alimenta
los edificios que se usan con propósitos domésticos.
Emisiones armónicas
IEC 61000-3-2
No es pertinente
Emisiones por fluctuaciones
o titilaciones de voltaje
IEC 61000-3-3
No es pertinente

Compatibilidad electromagnética (M3813B y M3815B)
10-16 Especificaciones e información normativa
Inmunidad electromagnética -- General
Prueba de
Inmunidad
Nivel de Prueba
IEC 60601-1-2
Nivel de
Cumplimiento
Lineamientos del Entorno
Electromagnético
Descargas
electroestáticas
(ESD)
IEC 61000-4-2
Contacto, + 6 kV
Aire, + 8 kV
Contacto, + 6 kV
Aire + 8 kV
Los pisos deberán ser de
madera, hormigón o mosaico
cerámico. Si los pisos están
recubiertos con material
sintético, la humedad relativa
deberá ser del 30% cuando
menos.
Sobretensiones
rápidas o
ráfagas de
impulsos
eléctricos
IEC 61000-4-4
+ 2 kV para líneas de
alimen-tación +1 kV para
líneas de entrada y salida
No es pertinente
Sobretensiones
transitorias
IEC 61000-4-5
+ 1 kV modo diferencial + 2
kV modo común
No es pertinente
Caídas de
voltaje,
interrupciones
breves y
variaciones de
tensión en las
líneas de entrada
de alimentación
IEC 61000-4-11
< 5% UT (> 95% de caída
en UT) por 0.5 ciclo
40% UT (60% de caída en
UT) por 5 ciclos
70% UT (30% de caída en
UT) por 25 ciclos
< 5% UT (> 95% de caída en
UT) por 5 seg.
No es pertinente

Compatibilidad electromagnética (M3813B y M3815B)
Especificaciones e información normativa 10-17
Frecuencia de la
alimentación
Campo
magnético
(50/60 Hz)
IEC 61000-4-8
3 A/m 3 A/m Los campos magnéticos de la
frecuencia de la alimentación
deberán hallarse en los niveles
característicos de una
ubicación típica en un entrono
comercial u hospitalario
típico.
Nota: UT es el voltaje del suministro de CA municipal antes de la aplicación del
nivel de prueba.
Inmunidad electromagnética -- General
Inmunidad electromagnética
Prueba de
inmunidad
Nivel de prueba
IEC 60601
Nivel de
cumplimiento
Lineamientos del entorno
electromagnético
RF conducida
IEC 61000-4-6
3 Vrms
150 kHz a 80 MHz
No es pertinente El equipo de comunicaciones por RF
portátil y móvil deberá utilizarse no más
cerca de cualquier parte de la báscula
M3813B y del MTA M3815B, cables
incluidos, que la distancia de separación
reco-mendada, calculada de la ecuación
aplicable a la frecuencia del transmisor.
Distancia de separación recomendada
P=d 2.1
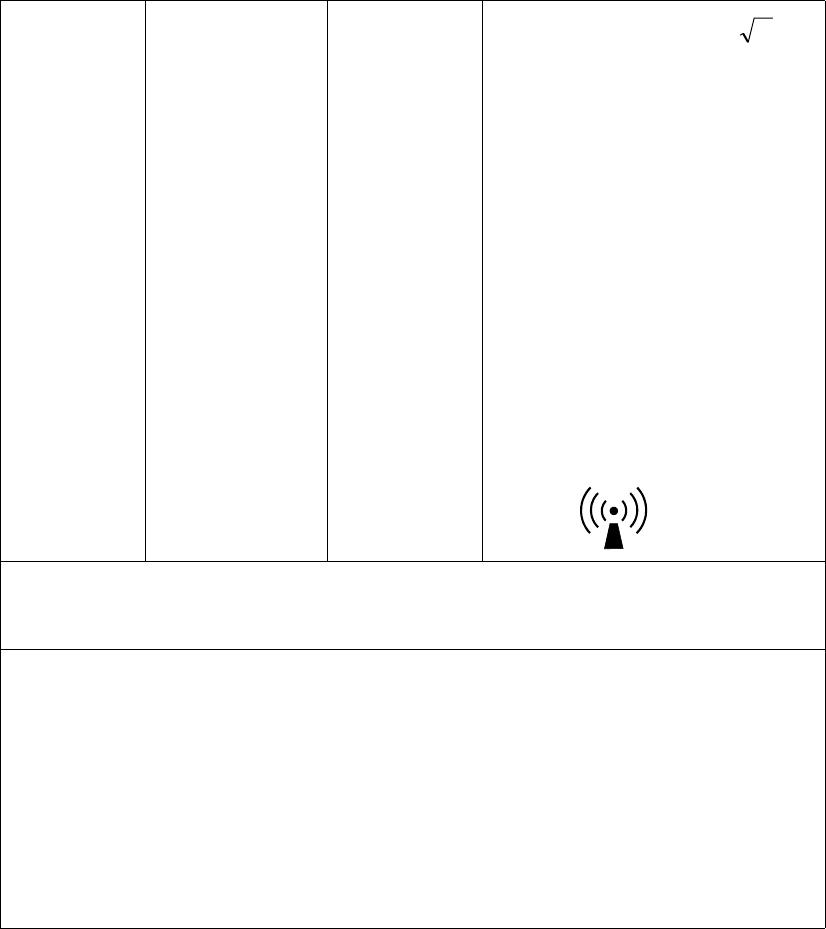
Compatibilidad electromagnética (M3813B y M3815B)
10-18 Especificaciones e información normativa
RF irradiada
IEC 61000-4-3
3 V/m
80 MHz a 2.5 GHz
3 V/m 80 MHz a 800 MHz
800 MHz a 2.5 GHz
En donde P es la potencia de salida
máxima nominal del transmisor en
vatios (W), según la potencia de salida
especificada del transmisor y d es la
distancia de separación recomendada en
metros (m).
La intensidad de los campos de
transmisores fijos de RF, tal como se
determinó con un análisis Electromag-
nético del sitio,a deberá ser menor al
nivel de cumplimiento en cada rango de
frecuencias.b
La interferencia podría ocurrir cerca de
equipo marcado con el símbolo
siguiente:
Nota 1: A 80 MHz y 800 MHz, se aplica el rango de frecuencias más alto.
Nota 2: Estos lineamientos pueden no aplicarse en todas las situaciones. La propagación
electromagnética se ve afectada por la absorción y reflexión de estructuras, objetos y personas.
aLas intensidades de los campos de transmisores fijos, tal como estaciones de base para
radioteléfonos (celulares o inalámbricos) y radios móviles terrestres, radioaficionados,
radiodifusoras de AM y FM y teledifusoras no es predecible teóricamente con exactitud. Para
evaluar el entorno electromagnético debido a transmisores de RF fijos, se deberá considerar un
análisis electromagnético del sitio. Si la intensidad de campo medida en la ubicación en la que se usa
la báscula M3813B o del MTA M3815B sobrepasa el nivel aplicable de cumplimiento de RF
mencionado anteriormente, se deberá vigilar al dispositivo para comprobar que está funcionando
normalmente. Si se llegara a observar un funcionamiento anormal, es posible que sean necesarias
otras medidas, tales como la reorientación o reubicación del dispositivo.
bEn el rango de frecuencias de 150 kHz a 80 MHz, las intensidades de campo deberán ser menores
de 3 V/m.
Inmunidad electromagnética
P=d 3.2

Compatibilidad electromagnética (M3813B y M3815B)
Especificaciones e información normativa 10-19
La báscula M3813B y el MTA M3815B se diseñaron para usarse en
entornos electromagnéticos en los que las alteraciones de RF irradiadas
están controladas. El cliente o usuario de estos dispositivos puede ayudar
a evitar interferencias electromagnéticas manteniendo una distancia
mínima entre los equipos (transmisores) portátiles y móviles de
comunicaciones por RF y estos dispositivos como se recomienda a
continuación, según la potencia de salida máxima del equipo de
comunicaciones.
Para aquellos transmisores clasificados a una potencia de salida máxima no
enumerada anteriormente, la distancia de separación recomendada
d
en metros
(m) podrá determinarse usando la ecuación aplicable a la frecuencia del
transmisor, donde
P
representa la potencia de salida máxima nominal del
transmisor en vatios (W) según el fabricante del transmisor.
Nota A 80 MHz y 800 MHz, se aplica el rango de frecuencias más alto.
Estos lineamientos pueden no aplicarse en todas las situaciones. La
propagación electromagnética se ve afectada por la absorción y reflexión
de estructuras, objetos y personas.
Distancias de separación recomendadas entre equipos portátiles
y móviles de comunicaciones por RF y la báscula M3813B y el
MTA M3815B
Potencia nominal de salida
máxima del transmisor (W)
Distancia de separación según la frecuencia
del transmisor (m)
150 kHz
a 800 MHz
800 MHz
a 2.5 GHz
0.01 0.1 m 0.2 m
0.1 0.4 m 0.7 m
1 1.2 m 2.3 m
10 4.0 m 7.0 m
100 12.0 m 23.0 m

Información normativa
10-20 Especificaciones e información normativa
Información normativa
Normativa
de la FCC
Este equipo se ha probado y demostrado que cumple con las limitaciones
para un dispositivo digital Clase B, según el Apartado 15 de las normas
de la FCC. Estas limitaciones proporcionan una protección razonable
contra interferencias dañinas en una instalación doméstica. Los
dispositivos del Conjunto para telemonitorización Philips generan, usan y
pueden irradiar energía de radiofrecuencia. Si no se instalan y usan según
las instrucciones, pueden interferir en las comunicaciones por radio. Sin
embargo, no hay garantía de que no se presenten interferencias incluso si
el equipo está instalado correctamente.
Si el equipo causa interferencia en la recepción de radio o televisión, que
puede determinarse apagando y encendiendo el equipo, se recomienda al
usuario que intente corregirlas:
• cambiando de lugar la CDD o TeleEstación,
• aumentando la separación entre los dispositivos del Conjunto para
telemonitorización Philips o la CDD/TeleEstación y el dispositivo
con el que interfiere, por ejemplo, una televisión, o
• poniéndose en contacto con su personal médico.
Notas Los cambios o modificaciones en el equipo no aprobados expresamente
por Philips pueden anular la autorización del usuario a utilizarlo.
La posibilidad de que se presenten riesgos debido a errores en el diseño
del software y del hardware se ha minimizado con el uso por parte de
Philips de un procedimiento de análisis y gestión de riesgos que se define
en el documento CMS RISK ANALYSIS PROCESS (Procedimiento de
análisis de riesgos CMS), como consta en el documento número
A-Q2920-00126 de Philips.
Información normativa
Especificaciones e información normativa 10-21
Aviso de
normativa
telefónica
La CDD de Philips se ha registrado con la Federal Communications
Commission (FCC) y cumple con el Apartado 68 de la Normativa y
Reglamentación de la FCC. La FCC exige que Philips le suministre la
información siguiente. La CDD contiene un módem de 14.4 Kbps. Si se le
solicita, suministre la información siguiente a su compañía telefónica local
(esta información también aparece impresa en la parte inferior del
dispositivo): FCC Apartado 68 Número ID: 2M6USA-33569-DT-E y Ringer
Equivalence Number (número de equivalencia del timbre (REN)): 0.3A.
La TeleEstación Philips cumple con el Apartado 68 de las normas de la
FCC y los requisitos adoptados por el Administrative Council for
Terminal Attachments (ACTA). El ACTA exige que Philips le
suministre la información siguiente. La TeleEstación contiene un módem
de 14.4 Kbps. Si se le solicita, suministre la información siguiente a su
compañía telefónica local.
Hay una etiqueta en la parte inferior del dispositivo que contiene
información, incluyendo un identificador del producto con el formato
US: AAAEQ##TXXXXX.
En los productos aprobados después del 23 de julio de 2001, los dígitos
del identificador representados por ## son el REN sin punto decimal (por
ejemplo, 03 es un REN de 0.3). Si se le solicita, proporcione este número
a la compañía telefónica.
El REN es útil para determinar cuántos dispositivos puede conectar a la línea
telefónica y que todos esos dispositivos suenen al llamar a su número de
teléfono. En la mayoría de las áreas (no en todas), la suma de REN de todos
los dispositivos conectados a una línea no debe ser superior a 5. Para conocer
el número de dispositivos conectados y determinados por el REN, póngase
en contacto con su compañía telefónica local.
Nota: (a) la CDD/TeleEstación no puede utilizarse en teléfonos públicos
de la compañía telefónica que funcionen con monedas. (b) Las líneas
compartidas están sujetas a tarifas estatales, por tanto, no podrá utilizar
en ellas su propio equipo telefónico. Consulte a su compañía telefónica
local. (c) En caso de que vaya a desconectar permanentemente el teléfono
de la línea, notifíquelo a la compañía telefónica.
Información normativa
10-22 Especificaciones e información normativa
Derechos de la compañía telefónica: en caso de que la CDD/
TeleEstación provoque problemas en la línea que pudieran dañar la red
telefónica, la compañía telefónica le notificará, si es posible, que será
necesasrio desconectar el servicio temporalmente. Si no puede
notificárselo por adelantado, la compañía telefónica podrá desconectar
inmediatamente el servicio, pero de manera temporal. En caso de
desconexión, la compañía telefónica deberá (1) notificarle lo antes
posible dicha suspensión temporal, (2) ofrecer la oportunidad de corregir
la situación e (3) informarle acerca de su derecho a reclamar a la FCC
con arreglo a los procedimientos establecidos en el Sub-apartado E del
Apartado 68, Normativa y Regulación de la FCC.
La compañía telefónica puede realizar cambios en sus instalaciones,
equipo, operaciones o procedimientos de comunicación donde tal acción
sea necesaria para el funcionamiento de su empresa aunque no cumpla
con las normas de la FCC. Si se supone que estos cambios pueden afectar
el uso o desempeño de su CDD/TeleEstación, la compañía telefónica
deberá notificarlo correctamente, por escrito, a fin de evitar tener que
interrumpir el servicio.
El conector y el enchufe utilizados para conectar la TeleEstación deben
cumplir con las normas correspondientes del Apartado 68 de la FCC y los
requisitos adoptados por el ACTA. Con la TeleEstación se incluye un cable
telefónico compatible con un conector modular. Está diseñado para
conectarlo a un enchufe modular compatible que también cumple con estas
normas. Vea las instrucciones de instalación para obtener más detalles.
Consulte a la compañía telefónica o a un instalador autorizado si va a
utilizar una TeleEstación y dispone de un equipo de alarma conectado a
la línea telefónica.
Póngase en contacto con Philips Medical Systems, al teléfono
(866) 246-7316 para obtener información sobre reparación y garantía.

© Koninklijke Philips Electronics N. V.
Número de pieza M3810-90096, Versión 4
Impreso en EE.UU.
Mayo de 2008
*M3810-90096*