Philips AC1215/20 User Manual Ac1215 20 Dfu Ind
AC1215/20 User manual ac1215_20_dfu_zht Series 1000 Air Purifier AC1215/20 | PhilipsAC1215/20
User manual ac1211_20_dfu_zht AC1211/20 | Philips
AC1215/20 User manual ac1215_20_dfu_aen Series 1000 Air Purifier AC1215/20 | PhilipsAC1215/20
AC1215/20 User manual ac1215_20_dfu_tha Series 1000 Air Purifier AC1215/20 | PhilipsAC1215/20
Contents ac1215_20_dfu_zht
User Manual: Philips AC1215/20 User manual Series 1000 Air Purifier AC1215/20 | PhilipsAC1215/20
Open the PDF directly: View PDF ![]() .
.
Page Count: 66

AC1215
AC1211
EN User manual 1
ID Buku Petunjuk Pengguna 17
TH คู่มือผู้ใช้ 35
ZH-T 使用手冊 51
© 2016 Koninklijke Philips N.V.
All rights reserved.
4241 210 91811
1 2
A B C D E
E
F
G
A
B
D
C
AC1211
EFG
H
I
A
B
D
C
AC1215
3s
3s

Contents
1 Important 2
2 Your air purier 5
Product overview 5
Controls overview 5
3 Getting started 6
Installing the lter 6
4 Using the air purier 7
Understanding the air quality light 7
Turning on and o 7
Changing the fan speed 8
Light sensor 8
NightSense mode 8
Set the child lock 9
5 Cleaning 10
Cleaning the body of the air
purier 10
Cleaning the air quality sensor 10
Cleaning the pre-lter 11
6 Replacing the lter 12
Filter replacement indicator 12
Replacing the lters 12
7 Storage 13
8 Troubleshooting 14
1EN
English
9 Guarantee and service 16
Order parts or accessories 16
10 Notices 16
Electromagnetic elds (EMF) 16
Recycling 16

2EN
service center authorized
by Philips, or similarly
qualified persons in order
to avoid a hazard.
• Do not use the appliance
if the plug, the power
cord, or the appliance
itself is damaged.
• This appliance can be
used by children aged
from 8 years and above
and persons with reduced
physical, sensory or
mental capabilities or
lack of experience and
knowledge if they have
been given supervision or
instruction concerning use
of the appliance in a safe
way and understand the
hazards involved. Child
shall not play with the
appliance. Cleaning and
maintenance shall not be
made by children without
supervision.
• Do not block the air inlet
and outlet, e.g. by placing
items on the air outlet or
in front of the air inlet.
• Make sure that foreign
objects do not fall into the
appliance through the air
outlet.
1 Important
Read this user manual carefully before
you use the appliance, and save it for
future reference.
Danger
• Do not let water or any
other liquid or flammable
detergent enter the
appliance to avoid electric
shock and/or a fire
hazard.
• Do not clean the
appliance with water,
any other liquid, or a
(flammable) detergent to
avoid electric shock and/
or a fire hazard.
• Do not spray any
flammable materials
such as insecticides or
fragrance around the
appliance.
Warning
• Check if the voltage
indicated on the
appliance corresponds to
the local power voltage
before you connect the
appliance.
• If the power cord is
damaged, you must have
it replaced by Philips, a

an air conditioner to
prevent condensation
from dripping onto the
appliance.
• Make sure all filters
are properly installed
before you switch on the
appliance.
• Only use the original
Philips filters specially
intended for this
appliance. Do not use any
other filters.
• Combustion of the filter
may cause inreversible
human hazard and/or
jeopardize other lives. Do
not use the filter as fuel or
for similar purpose.
• Avoid knocking against
the appliance (the air inlet
and outlet in particular)
with hard objects.
• Always lift or move the
appliance by the handle
on back side of the
appliance.
• Do not insert your fingers
or objects into the air
outlet or the air inlet to
prevent physical injury
or malfunctioning of the
appliance.
Caution
• This appliance is not
a substitute for proper
ventilation, regular
vacuum cleaning, or use
of an extractor hood or
fan while cooking.
• If the power socket used
to power the appliance
has poor connections,
the plug of the appliance
becomes hot. Make
sure that you plug the
appliance into a properly
connected power socket.
• Always place and use
the appliance on a
dry, stable, level, and
horizontal surface.
• Leave at least 20cm
free space behind and
on both sides of the
appliance and leave at
least 30cm free space
above the appliance.
• Do not place anything on
top of the appliance.
• Do not sit or stand on
the appliance. Sitting or
standing on the appliance
may lead to potential
injuiry.
• Do not place the
appliance directly below
3EN
English

• Do not use the appliance
in wet surroundings or in
surroundings with high
ambient temperatures,
such as the bathroom,
toilet, or kitchen.
• The appliance does
not remove carbon
monoxide (CO) or radon
(Rn). It cannot be used
as a safety device in
case of accidents with
combustion processes
and hazardous chemicals.
• If you need to move the
appliance, disconnect the
appliance from the power
supply first.
• Do not move the
appliance by pulling its
power cord.
• Always wash your hands
thoroughly after changing
or cleaning a filter.
• Always keep the particle
sensor cover closed
during the application.
• Do not use this appliance
when you have used
indoor smoke-type insect
repellents or in places
with oily residues, burning
incense, or chemical
fumes.
• Do not use the appliance
near gas appliances,
heating devices or
fireplaces.
• Always unplug the
appliance after use
and before cleaning,
or carrying out other
maintenance or replacing
the filters.
• Do not use the appliance
in a room with major
temperature changes,
as this may cause
condensation inside the
appliance.
• To prevent interference,
place the appliance at
least 2 meters away from
electrical appliances that
use airborne radio waves
such as TVs, radios, and
radio-controlled clocks.
• The appliance is only
intended for household
use under normal
operating conditions.
4EN

For AC1211:
AControl panel
BAir quality light
CAir outlet
DAir quality sensor
ENanoProtect filter HEPA Series 1
(FY1400)
FAir inlet
GFront panel
Controls overview
AOn/Off button
BNightSense mode button
CDisplay screen
DFan speed button
EChild lock button
2 Your air purifier
Congratulations on your purchase, and
welcome to Philips!
To fully benefit from the support that
Philips offers, register your product at
www.philips.com/welcome.
Product overview
For AC1215:
AControl panel
BAir quality light
CAir outlet
DAir quality sensor
ENanoProtect filter HEPA Series 3
(FY1410)
FNanoProtect filter AC (FY1413)
GPre-filter
HAir inlet
IFront panel
5EN
English
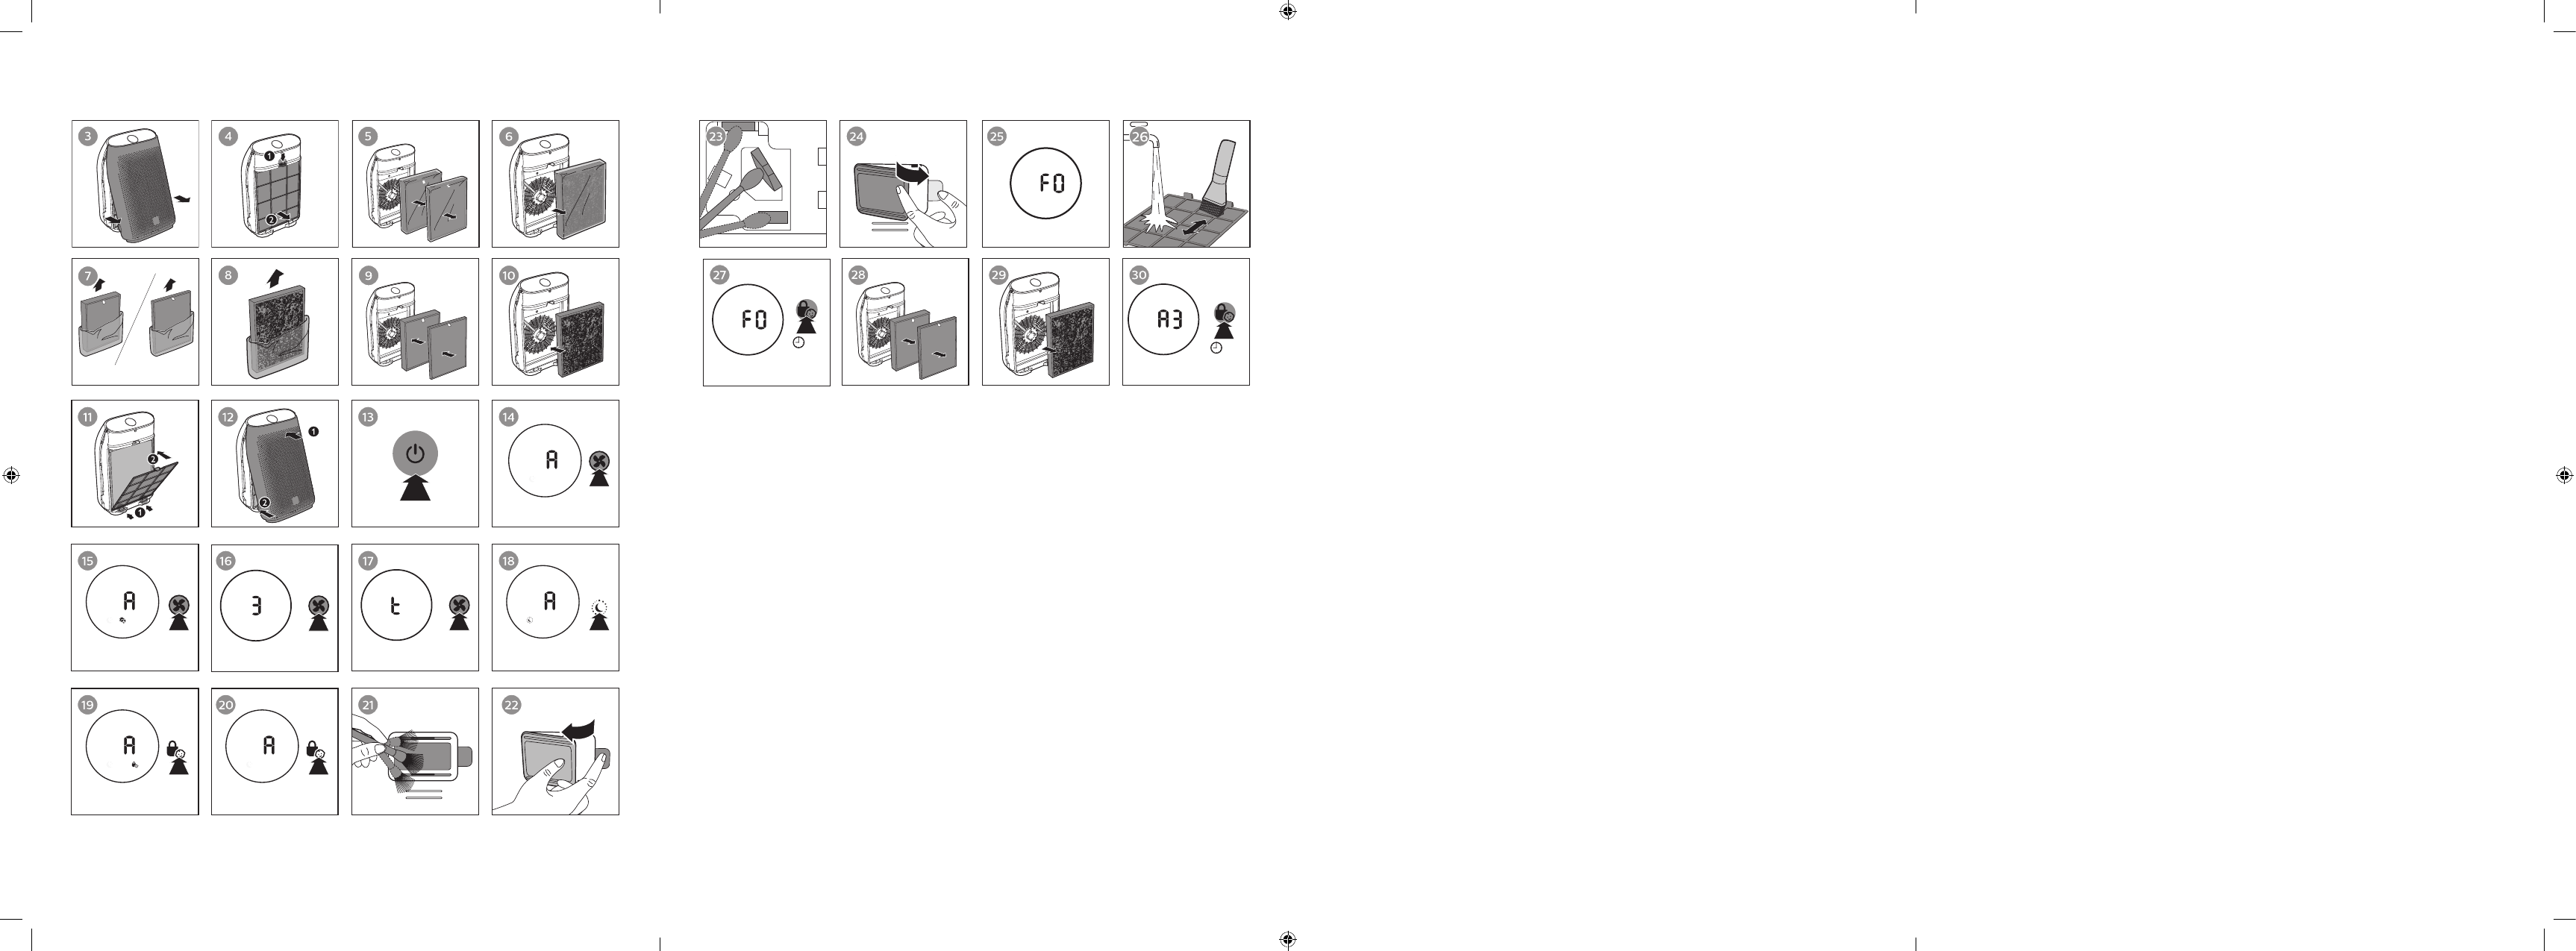
7 Reattach the front panel by
pressing the top part of the panel
onto the top of the air purifier (1).
Then, gently push the panel against
the body of the air purifier (2)
(Fig.l).
8 Wash your hands thoroughly after
installing filters.
3 Getting started
Installing the lter
Note
• Make sure the air purifier is
unplugged from the electrical
outlet before installing the filter.
• Make sure the side of the filter with
the tag is pointing towards you.
1 Pull the bottom part of the front
panel and then gently lift to remove
it from the air purifier (Fig.c).
2 Press the clip down (1) and pull the
pre-filter towards you (2) (Fig.d ,
for AC1215 only).
3 Take out all filters (Fig.e for AC1215,
Fig.f for AC1211).
4 Remove all packaging materials
from the filter(Fig.g for AC1215,
Fig.h for AC1211).
5 For AC1215, place the thick filter
(FY1410) into the air purifier and
then the thin AC filter (FY1413)
(Fig.i). The model numbers are
shown on each filter. For AC1211,
place the filter (FY1400) into the air
purifier(Fig.j).
6 Attach the pre-filter back into the
air purifier (Fig.k, for AC1215 only).
Note
• Make sure the side with the clip is
pointing towards you, and that all
hooks of the pre-filter are properly
attached to the purifier.
6EN
1 Put the plug of the air purifier in the
wall outlet.
2 Touch to switch on the air purifier
(Fig.m).
»The air purifier beeps.
»The air purifier operates under
the auto mode by default.
»After measuring the air
quality for approximately
30 seconds, the air quality
sensor automatically selects
the appropriate air quality light
color.
3 Touch for 3 seconds to switch off
the air purifier.
Note
• If the air purifier stays connected
to the electrical outlet after turning
OFF, the air purifier will operate
under the previous settings when
turned ON again.
• If the air purifier accidentally
shuts off during running, it restarts
automatically and operates under
previous settings when the power
supply is resumed.
4 Using the air
purifier
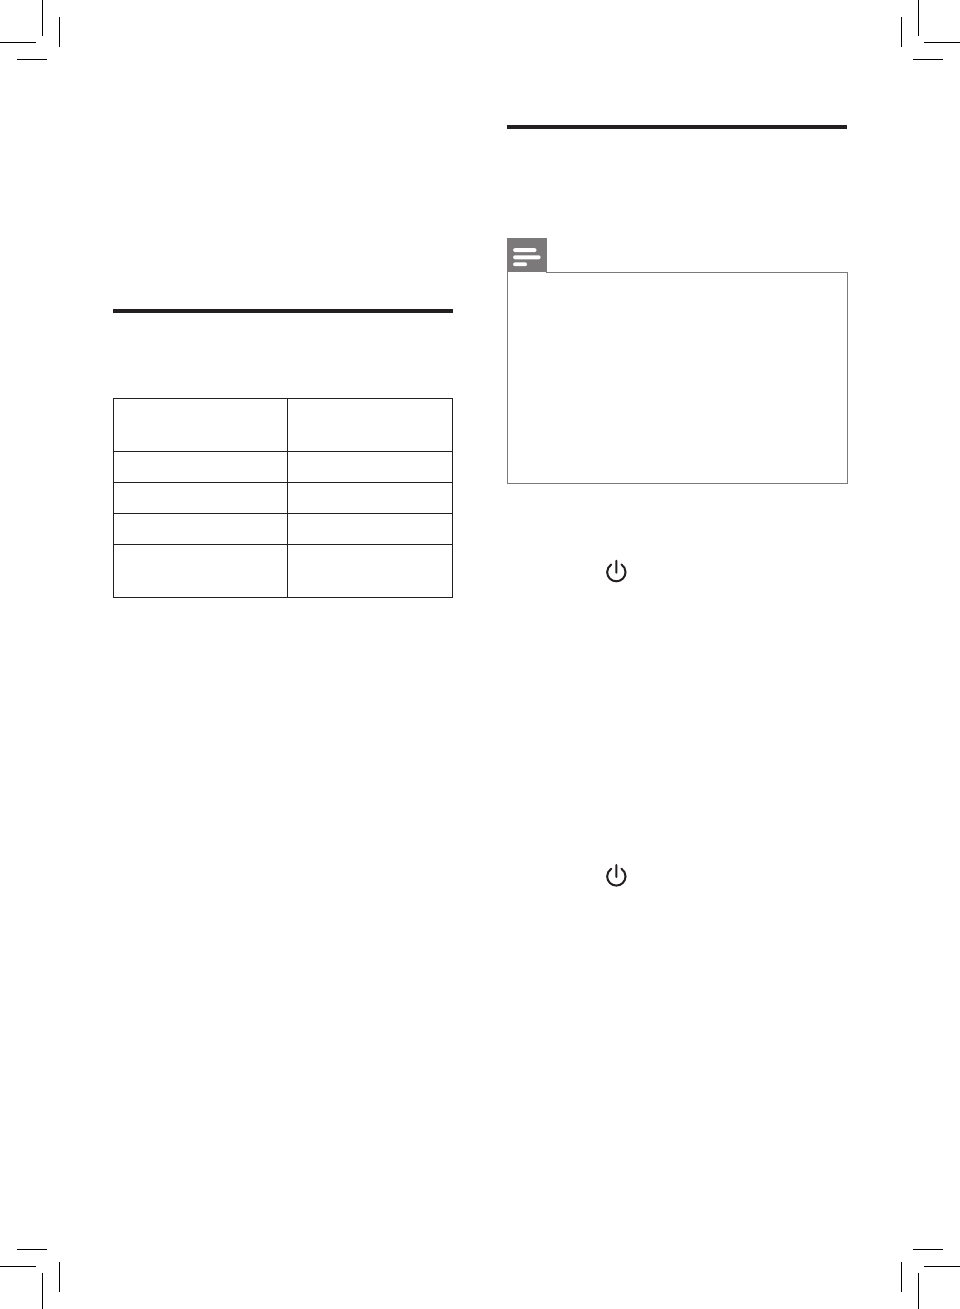
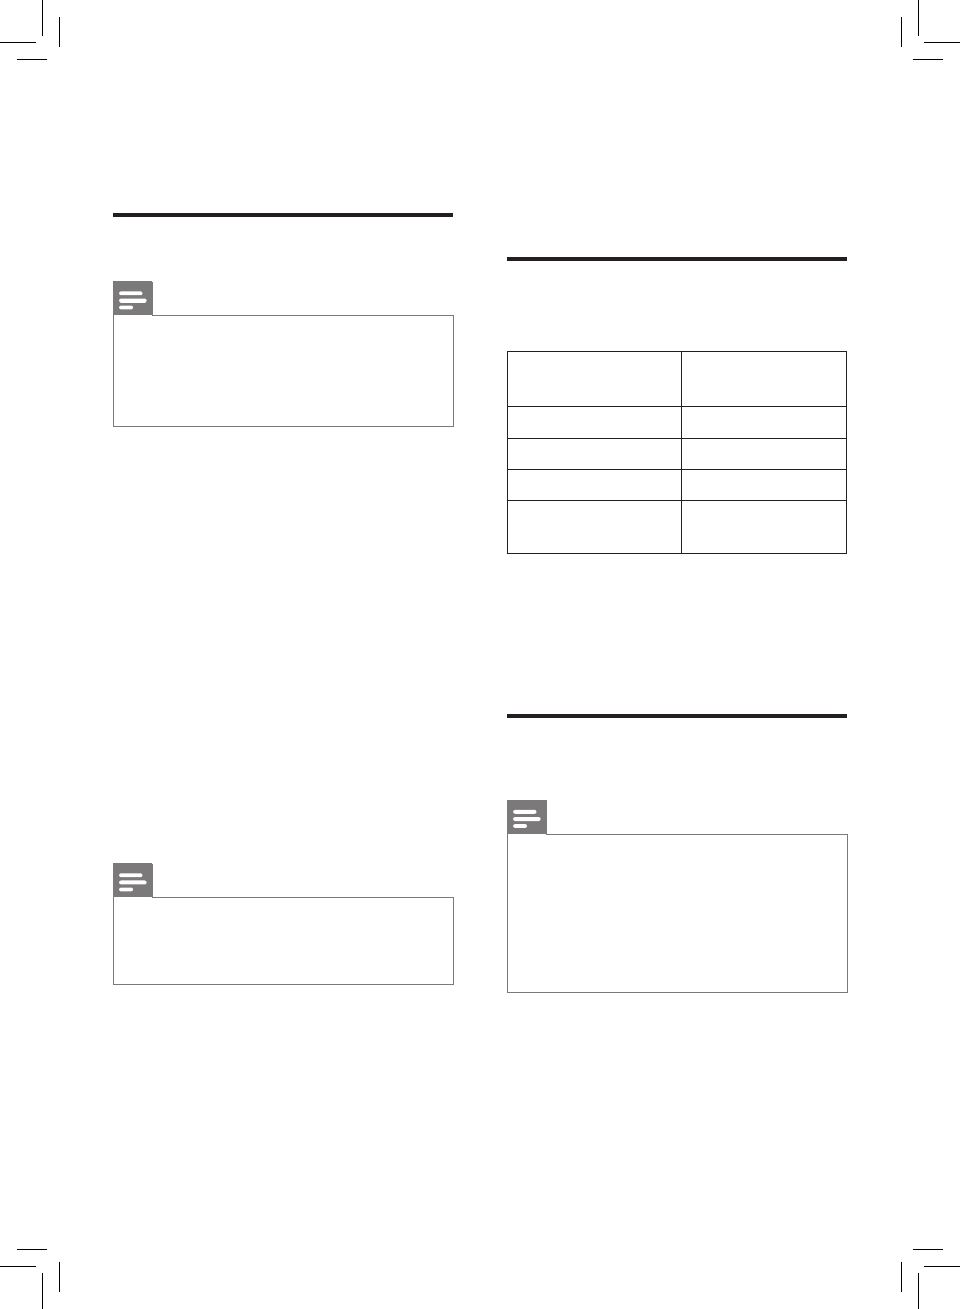
Understanding the air
quality light
Air quality light
color
Air quality level
Blue Good
Blue-violet Moderate
Red-purple Unhealthy
Red Very unhealthy
The air quality light automatically goes
on when the air purifier is switched on,
and lights up all colors in sequence.
After approximately 30 seconds, the
air quality sensors select the color that
corresponds to the surrounding air
quality of airborne particles.
Turning on and o
Note
• Always place the air purifier on a
stable, horizontal, and level surface
with the front of the unit facing
away from walls or furniture.
• For optimum purification
performance, close doors and
windows.
• Keep curtains away from the air
inlet or air outlet.
7EN
English
Light sensor
With the light sensor, the air purifier can
work according to the ambient light.
When the ambient light dims for
10 seconds, all the lights on the control
panel will be off slowly. During this
period, you can touch any of the
buttons, all lights will be on again. If you
don't perform other operations within
10 seconds, all lights will be off.
After the ambient light becomes bright
and lasts at least for 10 seconds, all
lights will be on again.
NightSense mode
You can activate the NightSensor mode
in two ways.
Activating the NightSense mode
manually
• Before you go to sleep, touch
manually to activate the NightSense
mode (Fig.r).
»If the air quality light is blue,
the air purifier directly goes
to the NightSense mode. The
air purifier operates quietely
and the air quality light will be
dimmed.
»If the air quality light is not blue,
the air purifier operates under
turbo mode for a maximum of
10 minutes, the air quality light
blinks slow during this time, and
then goes to the NightSense
mode.
Changing the fan speed
There are several fan speeds available.
You can choose the auto mode (A),
speed 1, 2, 3 or turbo mode (t).
Auto(A)
• Touch the fan speed button
repeatedly to select the auto mode
(Fig.n).
Allergen mode
The specially designed allergen
mode can effectively reduce common
allergens such as pollen and pet
dander.
• Touch the fan speed button to
select the Allergen mode (Fig.o).
»Auto (A) and display on the
screen.
Manual
• Touch the fan speed button
repeatedly to select the fan speed
you need (Fig.p).
Turbo (t)
In turbo mode, the air purifier operates
on the highest speed.
• Touch the fan speed button to
select the turbo mode (t) (Fig.q).
8EN
Set the child lock
1 Touch the child lock button for
3 seconds to activate child lock
(Fig.s).
»The child lock icon displays
on the screen.
»When the child lock is on,
all the other buttons are not
responsive, only the child lock
icon blinks.
2 Touch the child lock button for
3 seconds again to deactivate child
lock (Fig.t).
»The child lock icon
disappears.
Note
• The child lock function is
automatically unlocked when the
pre-filter cleaning code or the filter
replacement code displays on the
screen.
Auto activating the NightSense
mode
When the air purifier operates in auto
mode or allergen mode, if the light
sensor detects the lights in your room
are turned off, the air purifier goes to
the NightSense mode automatically.
The air purifier will adjust the fan speed
in real-time to make sure the air in your
room is clean. The air quality light will
be dimmed.
Note
• The light sensor detects the lights
in your room after 11 hours in the
NightSense mode.
• If the lights in your room are turned
on, the air purifier will quit the
NightSense mode and operate
under the previous mode. The air
quality light and the display will be
on again.
• To exit the NightSense mode
manualy, touch or button.
9EN
English
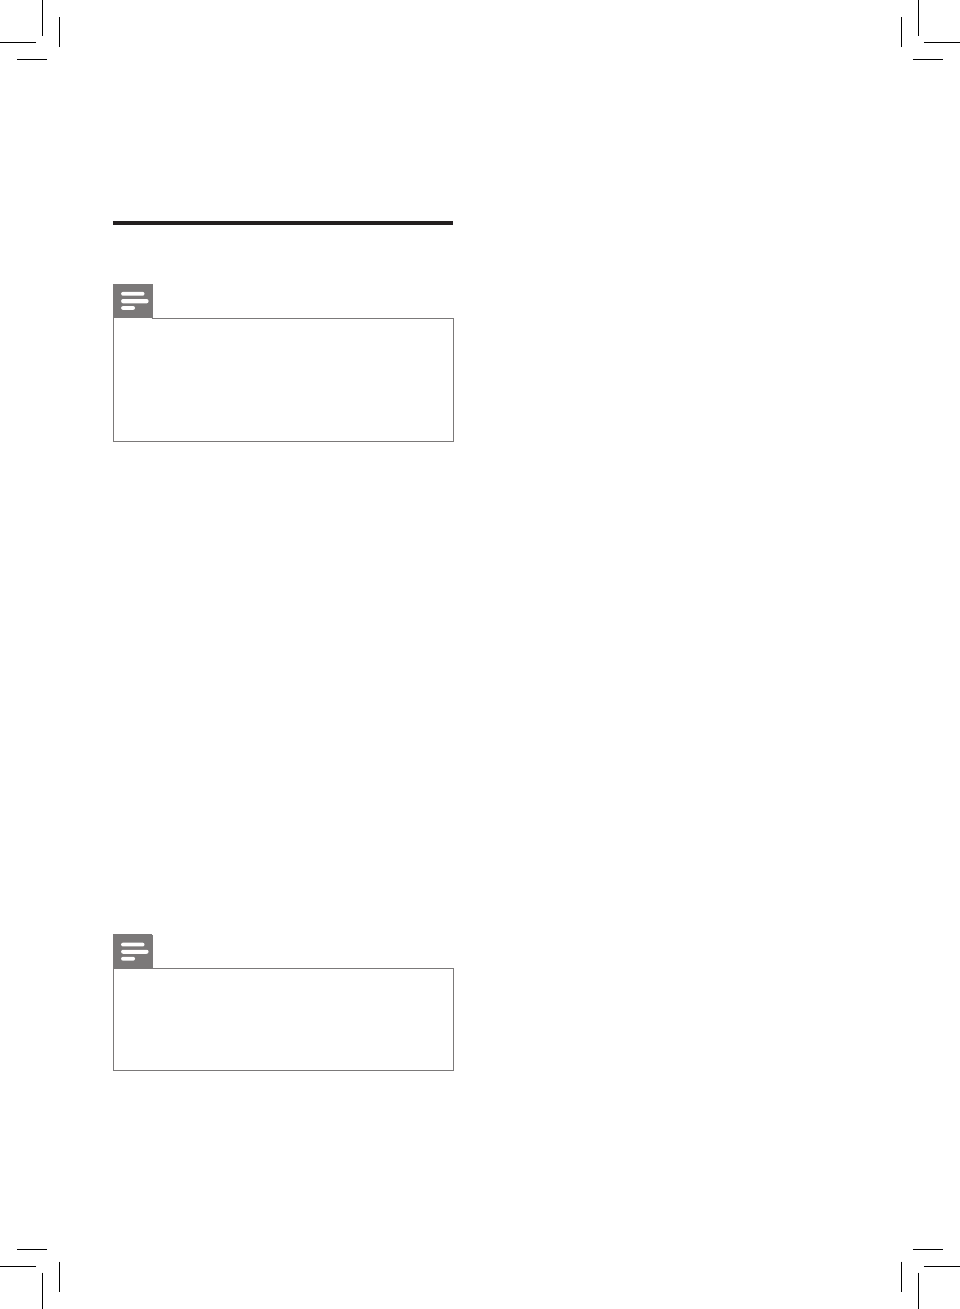
Cleaning the air quality
sensor
Clean the air quality sensor every
2 months for optimal functioning of the
purifier.
Note
• If the air purifier is used in a dusty
environment, it may need to be
cleaned more often.
• If the humidity level in the room
is very high, condensation may
develop on the air quality sensor
and the air quality light may
indicate a more poor air quality
even though the air quality is
actually good. If this occurs, clean
the air quality sensor or use the air
purifier on a manual speed setting.
1 Switch off the air purifier and
unplug from the wall outlet.
2 Clean the air quality sensor inlet
and outlet with a soft brush (Fig.u).
3 Remove the air quality sensor cover
(Fig.v).
4 Clean the air quality sensor, the
dust inlet and the dust outlet with a
damp cotton swab (Fig.w).
5 Dry all parts thoroughly with a dry
cotton swab.
6 Reattach the air quality sensor
cover (Fig.x).
Note
• Always keep air quality sensor
cover close during the air purifier is
working.
5 Cleaning
Note
• Always turn the air purifier off and
unplug the air purifier from the
electrical outlet before cleaning.
• Never immerse the air purifier in
water or any other liquid.
• Never use abrasive, aggressive, or
flammable cleaning agents such as
bleach or alcohol to clean any part
of the air purifier.
• Only the pre-filter is washable. The
air filter is not washable.
• Do not attempt to clean the filters
or air quality sensor with a vacuum.
Cleaning the body of the
air purier
Regularly clean the inside and outside
of the air purifier to prevent dust from
collecting.
1 Use a soft, dry cloth to clean both
the interior and exterior of the air
purifier (Especially for the front
cover).
2 The air outlet can also be cleaned
with a dry, soft cloth.
3 Detach the front cover from the air
purifier and wash it under running
tap water.
10 EN
7 To reattach the front panel, press
the top part of the panel onto the
top of the air purifier (1). Then,
gently push the panel against the
body of the air purifier (2) (Fig.l).
8 Put the plug of the air purifier in the
electrical outlet.
9 Touch the for 3 seconds to reset
the pre-filter cleaning time (Fig.{).
10 Wash your hands thoroughly after
installing filters.
Cleaning the pre-lter
Note
• This is for AC1215 only.
Clean the pre-filter when F0 is displayed
on the screen (Fig.y).
1 Switch off the air purifier and
unplug from the wall outlet.
2 Pull the bottom part of the front
panel and then gently lift to remove
it from the air purifier (Fig.c).
3 Press the clip down (1) and pull the
pre-filter towards you (2) (Fig.d).
4 If the pre-filter is very dirty, use a
soft brush to brush away the dust.
Then wash the pre-filter under
running tap water (Fig.z).
5 Allow the pre-filter to air dry
thoroughly before placing back in
the air purifier.
Note
• To optimize the lifetime of the pre-
filter, make sure it dries completely
after cleaning.
• Wash your hands after handling the
filter.
6 Put the pre-filter back into the air
purifier (Fig.k).
Note
• Make sure the side with the clip is
pointing towards you, and that all
hooks of the pre-filter are properly
attached to the air purifier.
11EN
English
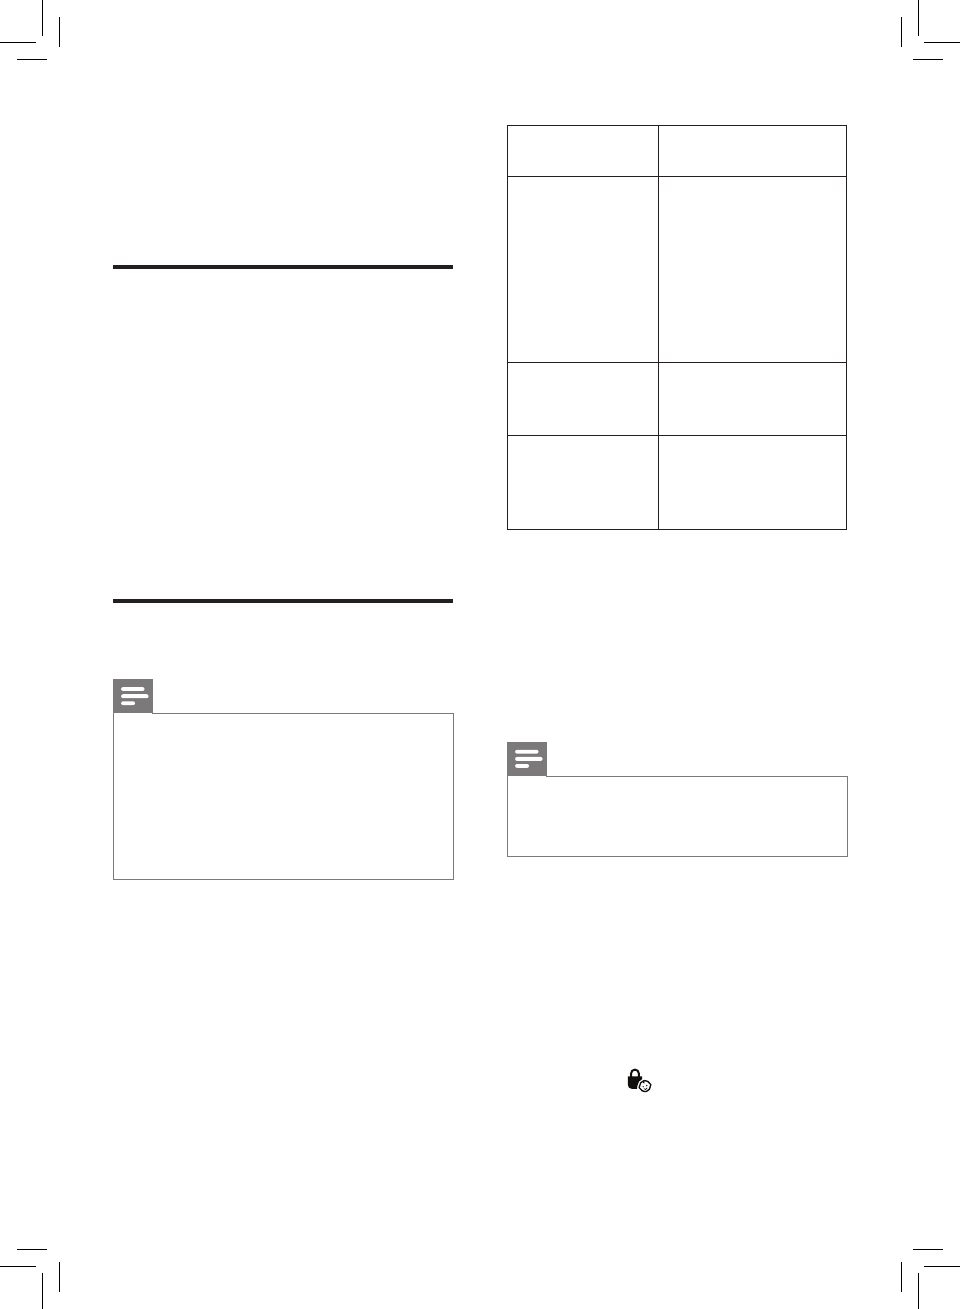
Filter alert light
status
Action
A3 displays on
the screen
For AC1215: Replace
NanoProtect filter
HEPA Series 3
(FY1410)
For AC1211: Replace
NanoProtect filter
HEPA Series 1
(FY1400)
C7 displays on
the screen
For AC1215: Replace
the NanoProtect filter
AC (FY1413)
A3 and C7
display on
the screen
alternately
For AC1215: Replace
both filters
1 Turn off the air purifier and unplug
from the wall outlet.
2 Take out the used air filter according
to the filter alert light status
displayed on the screen (Fig.| for
AC1215, Fig.} for AC1211). Discard
used filter.
Note
• Do not touch the pleated filter
surface, or smell the filter as it has
collected pollutants from the air.
3 Remove all packaging material from
the new filter (Fig.g for AC1215,
Fig.h for AC1211).
4 Place the new filters into the air
purifier (Fig.i for AC1215, Fig.j for
AC1211).
5 Put the plug of the air purifier in the
wall outlet.
6 Touch the for 3 seconds to reset
the filter lifetime counter (Fig.~).
7 Wash your hands after changing a
filter.
6 Replacing the
filter
Filter replacement
indicator
This air purifier is equipped with a
filter replacement indicator to make
sure that the air purification filter is in
optimal condition when the air purifier
is operating. When the filters need to be
replaced, the filter code displays on the
screen.
If the filters are not replaced in 14 days,
the air purifier will stop operating and
automatically lock.
Replacing the lters
Note
• The air filters are not washable or
reusable.
• Always turn off the air purifier and
unplug from the electrical outlet
before replacing the filters.
• Do not clean the filter with a
vacuum.
12 EN

7 Storage
1 Turn off the air purifier and unplug
from the wall outlet.
2 Clean the air purifier, air quality
sensor and pre-filter (see chapter
‘Cleaning’).
3 Let all parts dry thoroughly before
storing.
4 Wrap the filter and pre-filter
separately in air tight plastic bags.
5 Store the air purifier, the filter and
pre-filter in a cool, dry location.
6 Always thoroughly wash hands
after handling filters.
13EN
English

8 Troubleshooting
This chapter summarizes the most common problems you could encounter with the air
purifier. If you are unable to solve the problem with the information below, visit
www.philips.com/support or contact the Consumer Care Center in your country.
Problem Possible solution
The air purier
does not work
even though it is
plugged in to the
wall outlet and
switched on.
• Try a different electrical outlet or check the wall switch.
• The filter alert status is displaying the filter code. Replace
the corresponding filter and reset the filter lifetime counter
(see chapter "Replacing the filter").
• If the problem persists, contact the Consumer Care Center
in your country.
The air purier
does not work
even though it is
switched on.
• The filter replacement indicator has been on continuously
but you have not replaced the corresponding filter, and the
air purifier is now locked. In this case, replace the filter and
reset the filter lifetime counter.
The air purier
accidentally
powers o.
• The air purifier restarts automatically and goes to the
previous mode when the power resumes.
The airow that
comes out of
the air outlet
is signicantly
weaker than
before.
• The pre-filter is dirty. Clean the pre-filter (see chapter
"Cleaning", for AC1215 only).
The air quality
does not improve,
even though the air
purier has been
operating for a
long time.
• One of the filters has not been placed in the air purifier or
the filter is not placed properly. Make sure that all filters
are properly installed in the following order, starting with
the innermost filter:
For AC1215:
1) NanoProtect filter HEPA Series 3 (FY1410); 2)
NanoProtect filter AC (FY1413) 3) pre-filter.
For AC1210:
1) NanoProtect filter HEPA Series 1 (FY1400).
• The air quality sensor is wet. Make sure that the air quality
sensor is clean and dry (see chapter "Cleaning").
14 EN
Problem Possible solution
The color of the air
quality light always
stays the same.
• The air quality sensor is dirty. Clean the air quality sensor
(see chapter "Cleaning").
The air purier
produces a
unpleasant smell.
• The first few times you use the air purifier, it may produce
a plastic smell. This is normal. The air purifier may also
produce an unpleasant smell when the filter is dirty. In this
case, clean or replace the appropriate filter.
• If the air purifier produces a burnt odor, switch OFF and
unplug from the electrical outlet. Contact the Consumer
Care Center in your country.
The air purier is
loud.
• If the air purifier is too loud, change the fan speed to a
lower fan speed level. When using the air purifier in a
bedroom at night, choose the NightSense mode or select a
lower fan speed level.
The air purier still
indicates that I
need to replace a
lter, but I already
did.
• Perhaps you did not reset the filter lifetime counter. Plug
in the air purifier, touch to switch on the air purifier, and
touch the for 3 seconds.
Error codes "E1",
"E2", "E3" or "E4"
displays on the
screen.
• The air purifier has malfunctions. Contact the Consumer
Care Center in your country.
15EN
English

9 Guarantee and
service
If you need information or if you have a
problem, please visit the Philips website
at www.philips.com or contact the
Philips Consumer Care Center in your
country (you find its phone number
in the worldwide guarantee leaflet). If
there is no Consumer Care Centre in
your country, go to your local Philips
dealer.
Order parts or
accessories
If you have to replace a part or want to
purchase an additional part, go to your
Philips dealer or visit www.philips.com/
support.
If you have problems obtaining the
parts, please contact the Philips
Consumer Care Center in your country
(you can find its phone number in the
worldwide guarantee leaflet).
10 Notices
Electromagnetic elds
(EMF)
This Philips appliance complies with all
applicable standards and regulations
regarding exposure to electromagnetic
fields.
16 EN
Compliance with EMF
Koninklijke Philips N.V. manufactures
and sells many products targeted at
consumers, which, like any electronic
apparatus, in general have the ability
to emit and receive electromagnetic
signals.
One of Philips' leading Business
Principles is to take all necessary health
and safety measures for our products,
to comply with all applicable legal
requirements and to stay well within the
EMF standards applicable at the time of
producing the products.
Philips is committed to develop,
produce and market products that
cause no adverse health effects. Philips
confirms that if its products are handled
properly for their intended use, they
are safe to use according to scientific
evidence available today.
Philips plays an active role in the
development of international EMF
and safety standards, enabling Philips
to anticipate further developments in
standardization for early integration in
its products.
Recycling
Do not throw away the product with
the normal household waste at the
end of its life, but hand it in at an
official collection point for recycling.
By doing this, you help to preserve the
environment.

Daftar Isi
1 Penting 18
2 Alat pemurni udara Anda 22
Tinjauan umum produk 22
Ikhtisar kontrol 22
3 Memulai 23
Memasang lter 23
4 Menggunakan alat pemurni
udara 24
Memahami lampu kualitas udara 24
Menghidupkan dan mematikan 24
Mengubah kecepatan kipas 25
Sensor cahaya 25
Mode NightSense 26
Menyetel kunci anak 26
5 Membersihkan 27
Membersihkan badan alat
pemurni udara 27
Membersihkan sensor kualitas
udara 27
Membersihkan pra-lter 28
6 Mengganti pra lter 29
Indikator penggantian lter 29
Mengganti lter 29
7 Penyimpanan 30
17ID
Indonesia
8 Troubleshooting 31
9 Garansi dan servis 33
Memesan komponen atau
aksesori 33
10 Pemberitahuan 34
Medan elektromagnet (EMF) 34
Mendaur ulang 34

18 ID
Peringatan
• Periksa apakah voltase
pada alat sesuai
dengan voltase listrik di
rumah Anda sebelum
menghubungkan alat.
• Jika kabel listrik rusak,
Anda harus membawanya
ke ke Philips untuk diganti,
pusat layanan resmi
Philips atau orang yang
mempunyai keahlian
sejenis agar terhindar dari
bahaya.
• Jangan gunakan alat ini
jika steker, kabel listrik,
atau alat ini rusak.
• Alat ini dapat digunakan
oleh anak-anak di atas
8 tahun dan orang
dengan cacat sik,
indera atau kecakapan
mental yang kurang atau
kurang pengalaman dan
pengetahuan jika mereka
diberi pengawasan atau
petunjuk mengenai cara
penggunaan alat yang
aman dan mengerti
bahayanya. Anak
dilarang memainkan alat
ini. Pembersihan dan
perawatan tidak boleh
dilakukan oleh anak-anak
tanpa pengawasan.
1 Penting
Baca petunjuk pengguna ini dengan
saksama sebelum Anda menggunakan
alat dan simpanlah sebagai referensi
nanti.
Bahaya
• Jangan memasukkan
air atau cairan lain atau
deterjen yang mudah
terbakar ke dalam alat
untuk menghindari
kejutan listrik dan/atau
bahaya kebakaran.
• Jangan membersihkan
alat dengan air, cairan apa
pun atau deterjen (yang
mudah terbakar) untuk
menghindari kejutan
listrik dan/atau bahaya
kebakaran.
• Jangan menyemprotkan
bahan yang mudah
terbakar seperti
insektisida atau minyak
wangi di sekeliling alat.

• Selalu simpan dan
gunakan alat pada
permukaan yang kering,
stabil, rata dan datar.
• Sisakan ruang kosong
setidaknya 20 cm di
belakang dan pada kedua
sisi alat dan sisakan ruang
kosong setidaknya 30 cm
di atas alat.
• Jangan meletakkan apa
pun di atas alat.
• Jangan duduk atau berdiri
di atas alat. Duduk atau
berdiri di atas alat dapat
menimbulkan potensi
cedera.
• Jangan letakkan alat
langsung di bawah
penyejuk udara untuk
untuk mencegah
kondensasi menetes pada
alat.
• Pastikan semua lter
sudah dipasang dengan
benar sebelum Anda
menghidupkan alat.
• Hanya gunakan lter
asli Philips yang khusus
dimaksudkan untuk alat
ini. Jangan gunakan lter
lainnya.
• Jangan menyumbat
saluran masuk dan
saluran keluar udara,
misalnya dengan
menempatkan benda
pada jalan keluaran udara
atau di depan saluran
masuk udara.
• Pastikan tidak ada benda
asing yang masuk ke
dalam alat lewat saluran
keluar udara.
Perhatian
• Alat ini bukan sebagai
pengganti ventilasi yang
baik, penyedot debu
reguler atau digunakan
pada tudung ekstraktor
atau kipas angin selama
memasak.
• Jika sambungan soket
daya yang digunakan
untuk mengalirkan listrik
ke alat tidak bagus, steker
alat menjadi panas.
Pastikan bahwa Anda
memasukkan steker
alat ke soket daya yang
terhubung dengan benar.
19ID
Indonesia

menggunakan gas,
perangkat pemanas, atau
perapian.
• Selalu cabut alat setelah
digunakan dan sebelum
membersihkan atau
melakukan pemeliharaan
lainnya atau mengganti
lter.
• Jangan gunakan alat di
ruangan yang perubahan
suhunya besar, karena hal
ini dapat menyebabkan
pengembunan di dalam
alat.
• Untuk mencegah
interferensi, tempatkan
alat pada jarak sedikitnya
2 meter dari peralatan
listrik yang menggunakan
gelombang radio lewat
udara, seperti TV, radio,
dan jam yang dikontrol
melalui gelombang radio.
• Alat ini hanya untuk
penggunaan rumah-
tangga pada kondisi
pengoperasian normal.
• Jangan gunakan alat di
lingkungan yang basah
atau di lingkungan yang
suhu sekitarnya tinggi,
seperti di kamar mandi,
toilet, atau dapur.
• Pembakaran lter dapat
menyebabkan bahaya
kepada manusia dan/
atau membahayakan
nyawa orang lain. Jangan
menggunakan lter
sebagai bahan bakar atau
tujuan serupa lainnya.
• Hindari alat terbentur
(terutama di saluran
masuk udara dan saluran
keluar udara) oleh benda
keras.
• Selalu angkat atau
pindahkan alat
menggunakan gagang di
bagian belakang alat.
• Jangan masukkan jari
Anda atau benda ke
dalam keluaran udara
atau masukan udara
untuk mencegah cedera
sik atau kegagalan fungsi
pada alat.
• Jangan gunakan alat
ini bila Anda sudah
menggunakan obat
nyamuk jenis-asap dalam
ruangan atau di tempat
yang terdapat residu
minyak, dupa bakar, atau
uap kimia.
• Jangan gunakan
alat dekat alat yang
20 ID

• Alat ini tidak
menghilangkan karbon
monoksida (CO) atau
radon (Rn). Alat ini tidak
dapat digunakan sebagai
perangkat pengaman jika
terjadi kecelakaan pada
proses pembakaran dan
bahan kimia berbahaya.
• Jika Anda perlu
memindah alat, lepaskan
alat dari catu daya
terlebih dahulu.
• Jangan memindahkan
alat dengan menarik
kabel dayanya.
• Selalu cuci tangan
Anda dengan saksama
setelah mengganti atau
membersihkan lter.
• Selalu tutup sensor
partikel selama
penggunaan.
21ID
Indonesia

Untuk AC1211:
APanel kontrol
BLampu kualitas udara
CKeluaran udara
DSensor kualitas udara
EFilter NanoProtect HEPA Seri 1
(FY1400)
FMasukan udara
GPanel depan
Ikhtisar kontrol
ATombol On/O
BTombol mode NightSense
CLayar tampilan
DTombol kecepatan kipas
ETombol Penguncian untuk anak-
anak
2 Alat pemurni
udara Anda
Selamat atas pembelian Anda dan
selamat datang di Philips!
Untuk memanfaatkan sepenuhnya
dukungan yang ditawarkan Philips,
daftarkan produk Anda di
www.philips.com/welcome.
Tinjauan umum produk
Untuk AC1215:
APanel kontrol
BLampu kualitas udara
CKeluaran udara
DSensor kualitas udara
EFilter NanoProtect HEPA Seri 3
(FY1410)
FFilter NanoProtect AC(FY1413)
GPra-lter
HMasukan udara
IPanel depan
22 ID
Catatan
• Pastikan bahwa sisi dengan klip
mengarah ke Anda dan semua kait
pra-lter telah dipasang dengan
benar ke alat pemurni.
7 Pasang kembali panel depan
dengan menekan bagian atas
panel ke atas pemurni udara (1).
Kemudian, pelan-pelan dorong
panel ke badan pemurni udara (2)
(Gbr.l).
8 Cuci tangan Anda dengan saksama
setelah memasang lter.
3 Memulai
Memasang lter
Catatan
• Pastikan alat pemurni udara telah
dicabut dari stopkontak listrik
sebelum memasang lter.
• Pastikan bahwa sisi lter dengan
tag mengarah ke Anda.
1 Tarik bagian bawah panel depan,
kemudian angkat perlahan untuk
melepaskannya dari alat pemurni
udara (Gbr.c).
2 Tekan klip ke bawah (1) dan tarik
pra-lter ke arah Anda (2) (Gbr.d,
hanya untuk AC1215).
3 Keluarkan semua lter (Gbr.e
untuk AC1215, Gbr.f untuk AC1211).
4 Lepaskan semua bahan kemasan
dari lter(Gbr.g untuk AC1215,
Gbr.h untuk AC1211).
5 Untuk AC1215, letakkan lter tebal
(FY1410) ke dalam alat pemurni
udara dan lter AC tipis (FY1413)
(Gbr.i). Nomor model ditunjukkan
di masing-masing filter. Untuk
AC1211, letakkan filter (FY1400) ke
dalam alat pemurni udara (Gbr.j).
6 Pasang kembali pra-lter ke dalam
alat pemurni udara (Gbr.k, hanya
untuk AC1215).
23ID
Indonesia
Menghidupkan dan
mematikan
Catatan
• Selalu letakkan alat pemurni
udara di permukaan yang stabil,
horizontal, dan rata dengan bagian
depan unit tidak menghadap
dinding atau perabot.
• Untuk kinerja pemurnian optimal,
tutup pintu dan jendela.
• Jauhkan tirai dari masukan atau
keluaran udara.
1 Colokkan steker alat pemurni udara
ke dalam stopkontak.
2 Sentuh untuk menghidupkan
alat pemurni udara (Gbr.m).
»Alat pemurni udara berbunyi
bip.
»Alat pemurni udara beroperasi
dalam mode otomatis secara
default.
»Setelah mengukur kualitas
udara selama kurang lebih
30 detik, sensor kualitas udara
akan secara otomatis memilih
warna lampu kualitas udara
yang sesuai.
3 Sentuh selama 3 detik untuk
mematikan alat pemurni udara.
4 Menggunakan
alat pemurni
udara
Memahami lampu
kualitas udara
Warna lampu
kualitas udara
Tingkat kualitas
udara
Biru Baik
Biru-violet Menengah
Merah-ungu Tidak sehat
Merah Sangat tidak
sehat
Lampu kualitas udara hidup secara
otomatis saat alat pemurni udara
dihidupkan, dan semua warna menyala
secara berurutan. Dalam waktu kurang
lebih 30 detik, sensor kualitas udara
akan memilih warna yang sesuai
dengan kualitas udara di sekitar.
24 ID
Manual
• Sentuh tombol kecepatan kipas
secara berulang untuk memilih
kecepatan kipas yang Anda perlukan
(Gbr.p).
Turbo (t)
Dalam mode turbo, alat pemurni udara
beroperasi pada kecepatan tertinggi.
• Sentuh tombol kecepatan kipas
untuk memilih mode turbo (t)
(Gbr.q).
Sensor cahaya
Dengan sensor cahaya, alat pemurni
udara dapat bekerja sesuai dengan
cahaya di sekitarnya.
Bila cahaya sekitar redup selama
10 detik, semua lampu di panel kontrol
akan mati secara perlahan. Selama
periode ini, Anda dapat menyentuh
tombol mana pun, maka semua lampu
akan menyala kembali. Jika Anda tidak
melakukan operasi lain dalam 10 detik,
semua lampu akan mati.
Setelah lampu menjadi terang dan
bertahan selama 10 detik, semua lampu
akan menyala kembali.
Catatan
• Jika alat pemurni udara tetap
terhubung ke stopkontak listrik
setelah dimatikan, alat akan
beroperasi dalam setelan
sebelumnya saat dihidupkan
kembali.
• Jika alat pemurni udara tidak
sengaja dimatikan saat sedang
berfungsi, alat memulai otomatis
dan beroperasi dalam setelan
sebelumnya saat alat hidup
kembali.
Mengubah kecepatan
kipas
Ada beberapa kecepatan kipas.
Anda dapat memilih antara mode
otomatis (A), kecepatan 1, 2, 3 atau
mode turbo (t).
Otomatis (A)
• Sentuh tombol kecepatan kipas
secara berulang untuk memilih
mode otomatis (Gbr.n).
Mode alergen
Mode alergen yang didesain secara
khusus ini dapat mengurangi alergen
umum secara efektif seperti serbuk sari
dan rontokan kulit kering hewan.
• Sentuh tombol kecepatan kipas
untuk memilih mode Alergen
(Gbr.o).
»Otomatis (A) dan
ditampilkan di layar.
25ID
Indonesia
Catatan
• Sensor cahaya mendeteksi cahaya
di kamar Anda setelah 11 jam dalam
mode NightSense.
• Jika lampu di kamar Anda
menyala, alat pemurni udara akan
menghentikan mode NightSense
dan akan beroperasi dalam mode
sebelumnya. Lampu kualitas udara
dan tampilannya akan menyala
kembali.
• Untuk keluar dari mode NightSense
secara manual, sentuh tombol
atau .
Menyetel kunci anak
1 Sentuh dan tahan tombol kunci
anak selama 3 detik untuk
mengaktifkan kunci anak (Gbr.s).
»Ikon kunci anak ditampilkan
di layar.
»Saat kunci anak aktif, semua
tombol lain akan tidak
responsif, hanya ikon kunci
anak yang berkedip.
2 Sentuh tombol kunci anak
selama 3 detik lagi untuk
menonaktifkan kunci anak (Gbr.t).
»Ikon kunci anak menghilang.
Catatan
• Fungsi kunci akan otomatis terbuka
saat kode pembersihan pra-lter
atau kode penggantian lter
ditampilkan di layar.
Mode NightSense
Anda dapat mengaktifkan mode
NightSense dengan dua cara.
Mengaktifkan mode NightSense
secara manual
• Sebelum Anda tidur, sentuh
secara manual untuk mengaktifkan
mode NightSense (Gbr.r).
»Jika lampu kualitas udara
berwarna biru, alat pemurni
udara akan langsung masuk ke
mode NightSense. Alat pemurni
udara beroperasi tanpa suara
bising dan lampu kualitas udara
akan meredup.
»Jika lampu kualitas udara tidak
berwarna biru, alat pemurni
udara beroperasi dalam
mode turbo selama maksimal
10 menit, lampu kualitas udara
berkedip pelan selama waktu
ini, kemudian menjadi mode
NightSense.
Mengaktifkan mode NightSense
secara otomatis
Saat alat pemurni udara beroperasi
dalam mode otomatis atau mode
alergen, jika sensor cahaya mendeteksi
lampu kamar Anda mati, alat pemurni
udara akan masuk ke mode NightSense
secara otomatis. Alat pemurni udara
akan menyesuaikan kecepatan kipas
secara real-time untuk memastikan
udara di kamar Anda bersih. Lampu
kualitas udara akan meredup.
26 ID
Membersihkan sensor
kualitas udara
Bersihkan sensor kualitas udara setiap
2 bulan agar alat pemurni berfungsi
secara optimal.
Catatan
• Jika alat pemurni udara digunakan
dalam lingkungan berdebu,
sensor mungkin harus lebih sering
dibersihkan.
• Jika tingkat kelembapan di kamar
sangat tinggi, dapat terbentuk
kondensasi pada sensor kualitas
udara dan lampu kualitas udara
mungkin menunjukkan kualitas
udara yang lebih buruk meskipun
kualitas udara sebenarnya baik.
Jika ini terjadi, bersihkan sensor
kualitas udara atau gunakan alat
pemurni udara pada setelan
kecepatan manual.
1 Matikan alat pemurni udara dan
cabut dari stopkontak.
2 Bersihkan saluran masuk dan
saluran keluar sensor kualitas udara
dengan sikat lembut (Gbr.u).
3 Lepaskan penutup sensor kualitas
udara (Gbr.v).
4 Bersihkan sensor kualitas udara,
saluran masuk debu, dan saluran
keluar debu dengan kapas telinga
yang lembap (Gbr.w).
5 Keringkan semua bagian secara
saksama dengan kapas telinga yang
kering.
6 Pasang kembali penutup sensor
kualitas udara (Gbr.x).
5 Membersihkan
Catatan
• Selalu matikan alat pemurni udara
dan cabut alat dari stopkontak
listrik sebelum membersihkan.
• Jangan sekali-kali merendam alat
pemurni udara di dalam air atau
cairan lainnya.
• Jangan sekali-kali menggunakan
bahan pembersih yang abrasif,
agresif, atau yang mudah terbakar
seperti bahan pemutih atau
alkohol untuk membersihkan
bagian apa pun pada alat pemurni
udara.
• Hanya pra-lter yang dapat dicuci.
Filter udara tidak dapat dicuci.
• Jangan mencoba membersihkan
lter atau sensor kualitas udara
dengan penyedot debu.
Membersihkan badan
alat pemurni udara
Bersihkan bagian dalam dan bagian
luar alat pemurni udara secara teratur
untuk mencegah menumpuknya debu.
1 Gunakan kain kering yang halus
untuk membersihkan interior
dan eksterior alat pemurni udara
(Khususnya untuk bagian penutup
depan).
2 Keluaran udara juga dapat
dibersihkan dengan kain kering
yang halus.
3 Lepaskan penutup depan dari alat
pemurni udara dan cuci di bawah
air keran yang mengalir.
27ID
Indonesia
Catatan
• Pastikan bahwa sisi dengan klip
mengarah ke Anda, dan semua kait
pra-lter telah dipasang dengan
benar ke alat pemurni udara.
7 Untuk memasang kembali panel
depan, tekan bagian atas panel
ke atas alat pemurni udara (1).
Kemudian, pelan-pelan dorong
panel ke badan pemurni udara (2)
(Gbr.l).
8 Colokkan steker alat pemurni udara
ke dalam stopkontak listrik.
9 Sentuh dan tahan tombol reset
selama 3 detik untuk menyetel
ulang waktu pembersihan pra-lter
(Gbr.{).
10 Cuci tangan Anda dengan saksama
setelah memasang lter.
Catatan
• Selalu pasang penutup sensor
kualitas udara selama alat pemurni
udara bekerja.
Membersihkan pra-lter
Catatan
• Ini hanya untuk AC1215.
Bersihkan pra-lter bila F0 ditampilkan
di layar (Gbr.y).
1 Matikan alat pemurni udara dan
cabut dari stopkontak.
2 Tarik bagian bawah panel depan,
kemudian angkat perlahan untuk
melepaskannya dari alat pemurni
udara (Gbr.c).
3 Tekan klip ke bawah (1) dan tarik
pra-lter ke arah Anda (2) (Gbr.d).
4 Jika pra-lter sangat kotor,
gunakan sikat halus untuk menyikat
debunya. Kemudian cuci pra-lter
di bawah keran air yang mengalir
(Gbr.z).
5 Angin-anginkan pra-lter sebelum
dipasang kembali ke alat pemurni
udara.
Catatan
• Untuk mengoptimalkan masa
pakai pra-lter, pastikan kering
sepenuhnya setelah permbersihan.
• Bersihkan tangan Anda setelah
memegang lter.
6 Pasang kembali pra-lter ke dalam
alat pemurni udara (Gbr.k).
28 ID
Status lampu
tanda lter
Tindakan
A3 ditampilkan
pada layar
Untuk AC1215: Ganti
lter NanoProtect
HEPA Seri 3 (FY1410)
Untuk AC1211: Ganti
Filter NanoProtect
HEPA Seri 1 (FY1400)
C7 ditampilkan
pada layar
Untuk AC1215: Ganti
lter NanoProtect AC
(FY1413)
A3 dan C7
tampil di
layar secara
bergantian
Untuk AC1215: Ganti
kedua lter
1 Matikan alat pemurni udara dan
cabut dari stopkontak.
2 Keluarkan lter udara yang sudah
digunakan sesuai dengan status
lampu peringatan lter di layar
(Gbr.| untuk AC1215, Gbr.} untuk
AC1211). Buang filter bekas.
Catatan
• Jangan menyentuh permukaan
lter yang terlipat, atau mengendus
lter karena lter berisi polutan dari
udara.
3 Lepaskan semua bahan kemasan
dari lter baru (Gbr.g untuk AC1215,
Gbr.h untuk AC1211).
4 Pasang lter baru ke dalam alat
pemurni udara (Gbr.i untuk
AC1215, Gbr.j untuk AC1211).
5 Colokkan steker alat pemurni udara
ke dalam stopkontak.
6 Sentuh selama 3 detik untuk
mereset penghitung masa pakai
lter (Gbr.~).
7 Cuci tangan Anda setelah
mengganti lter.
6 Mengganti pra
filter
Indikator penggantian
lter
Alat pemurni udara ini dilengkapi
dengan indikator penggantian lter
untuk memastikan bahwa lter pemurni
udara selalu dalam kondisi optimal
selama alat beroperasi. Saat lter perlu
diganti, kode lter akan ditampilkan di
layar.
Apabila lter tidak diganti dalam
waktu 14 hari, alat pemurni udara akan
berhenti beroperasi dan terkunci secara
otomatis.
Mengganti lter
Catatan
• Filter udara tidak dapat dicuci atau
digunakan kembali.
• Selalu matikan alat pemurni udara
dan cabut dari stopkontak listrik
sebelum mengganti lter.
• Jangan bersihkan lter dengan
penyedot debu.
29ID
Indonesia

7 Penyimpanan
1 Matikan alat pemurni udara dan
cabut dari stopkontak.
2 Bersihkan alat pemurni udara,
sensor kualitas udara,dan pra-lter
(lihat bab ‘Membersihkan’).
3 Keringkan semua bagian sebelum
disimpan.
4 Bungkus lter dan pra-lter secara
terpisah dalam kantong plastik
kedap udara.
5 Simpan alat pemurni udara, lter,
dan pra-lter di tempat yang kering
dan sejuk.
6 Selalu cuci tangan Anda dengan
saksama setelah menangani lter.
30 ID
8 Troubleshooting
Bab ini merangkum masalah umum yang mungkin Anda temukan pada alat pemurni
udara. Jika Anda tidak dapat mengatasi masalah dengan informasi di bawah, kunjungi
www.philips.com/support atau hubungi Pusat Layanan Konsumen di negara Anda.
Masalah Solusi yang memungkinkan
Alat pemurni udara
tidak bekerja
meskipun telah
dicolokkan ke
stopkontak dan
dihidupkan.
• Cobalah stopkontak listrik lain atau periksa saklar dinding.
• Status peringatan lter menampilkan kode lter. Ganti lter
tersebut dan reset penghitung masa pakai lter (lihat bab
“Mengganti lter”).
• Jika masalah berlanjut, hubungi Pusat Layanan
Konsumen di negara Anda.
Alat pemurni udara
tidak bekerja
sekalipun telah
dihidupkan.
• Indikator penggantian lter terus menerus aktif namun
Anda belum mengganti lter tersebut, dan alat sekarang
terkunci. Dalam kasus ini, ganti lter tersebut dan reset
masa pakai lter.
Alat pemurni udara
tidak sengaja
dimatikan.
• Alat pemurni udara akan memulai ulang secara otomatis
dan masuk ke mode sebelumnya saat alat hidup kembali.
Aliran udara
yang keluar dari
saluran keluar
udara jauh lebih
lemah daripada
sebelumnya.
• Pra-lter sudah kotor. Bersihkan pra-lter (lihat bab
"Membersihkan", hanya untuk AC1215).
Kualitas udara
tidak meningkat,
sekalipun alat
pemurni udara
telah beroperasi
lama.
• Salah satu lter belum diganti di alat pemurni udara atau
lter tidak dipasang dengan benar. Pastikan bahwa semua
lter telah dipasang dengan benar dalam urutan berikut,
mulai dengan lter paling dalam:
Untuk AC1215:
1) Filter NanoProtect HEPA Seri 3 (FY1410); 2) Filter
NanoProtect AC (FY1413) 3) pra-lter.
Untuk AC1210:
1) Filter NanoProtect HEPA Seri 1 (FY1400).
• Sensor kualitas udara basah. Pastikan sensor kualitas
udara bersih dan kering (lihat bab "Membersihkan").
31ID
Indonesia
Masalah Solusi yang memungkinkan
Warna lampu
kualitas udara
selalu sama.
• Sensor kualitas udara kotor. Bersihkan sensor kualitas
udara (lihat bab "Membersihkan").
Alat pemurni udara
mengeluarkan bau
tak sedap.
• Beberapa kali pertama Anda menggunakan alat pemurni
udara, alat mungkin akan mengeluarkan bau plastik. Hal ini
normal. Alat pemurni udara juga mungkin mengeluarkan
bau tidak sedap bila lternya kotor. Dalam hal ini,
bersihkan atau ganti lter tersebut.
• Jika alat pemurni udara mengeluarkan bau terbakar,
matikan dan cabut dari stopkontak. Hubungi Pusat
Layanan Konsumen di negara Anda.
Alat pemurni udara
sangat berisik.
• Jika bunyi alat pemurni udara terlalu berisik, Anda dapat
mengubah kecepatan kipas ke tingkat kecepatan kipas
yang lebih rendah. Saat menggunakan alat pemurni udara
di kamar pada malam hari, pilih mode NightSense atau
pilih tingkat kecepatan kipas yang lebih rendah.
Alat pemurni udara
tetap menandakan
bahwa saya
perlu mengganti
lter, padahal
saya sudah
menggantinya.
• Mungkin Anda tidak mereset penghitung masa pakai
lter. Colokkan alat pemurni udara, sentuh untuk
menghidupkan alat pemurni udara, dan sentuh selama
3 detik.
Kode kesalahan
"E1", "E2",
"E3", atau "E4"
ditampilkan di
layar.
• Alat pemurni udara mengalami kerusakan. Hubungi Pusat
Layanan Konsumen di negara Anda.
32 ID

9 Garansi dan
servis
Jika Anda memerlukan informasi
atau jika Anda mengalami masalah,
harap kunjungi situs web Philips
di www.philips.com atau hubungi
Pusat Layanan Konsumen Philips di
negara Anda (nomor teleponnya bisa
Anda temukan di pamet garansi
internasional). Jika di negara Anda tidak
terdapat Pusat Layanan Pelanggan,
kunjungi dealer Philips setempat.
Memesan komponen
atau aksesori
Jika Anda harus mengganti komponen
atau ingin membeli komponen
tambahan, kunjungi dealer Philips Anda
atau kunjungi www.philips.com/support.
Jika Anda mengalami kesulitan dalam
memperoleh komponen tersebut, harap
hubungi Pusat Layanan Konsumen
Philips di negara Anda (nomor
teleponnya bisa Anda temukan di
pamet garansi internasional).
33ID
Indonesia

34 ID
Mendaur ulang
Jangan membuang alat bersama
limbah rumah tangga biasa jika alat
sudah tidak bisa dipakai lagi, tetapi
serahkan ke titik pengumpulan atau
daur ulang resmi. Dengan melakukan
hal ini, Anda ikut membantu
melestarikan lingkungan.
10 Pemberitahuan
Medan elektromagnet
(EMF)
Alat Philips ini mematuhi semua
standar dan peraturan yang berlaku
terkait paparan terhadap medan
elektromagnet.
Kesesuaian dengan EMF
Koninklijke Philips N.V. memproduksi
dan menjual berbagai produk yang
ditargetkan untuk konsumen, seperti
peralatan elektronik, yang secara umum
dapat mengirim dan menerima sinyal
elektromagnetik.
Salah satu Prinsip Bisnis utama Philips
adalah mengambil semua tindakan
kesehatan dan keselamatan yang
diperlukan bagi berbagai produk kami,
agar sesuai dengan semua persyaratan
hukum yang berlaku dan agar tetap
mematuhi berbagai standar EMF yang
berlaku pada saat pembuatan produk.
Philips berkomitmen mengembangkan,
memproduksi, dan memasarkan
berbagai produk yang tidak
menimbulkan dampak buruk pada
kesehatan. Philips memastikan bahwa
jika produknya ditangani dengan benar
sesuai tujuan penggunaannya, produk
tersebut aman digunakan sesuai
dengan bukti ilmiah yang ada saat ini.
Philips berperan aktif dalam
pengembangan berbagai standar
internasional EMF dan keselamatan,
yang memungkinkan Philips
mengantisipasi pengembangan
standarisasi sehingga dapat
mengintegrasikannya lebih awal dalam
produknya.

1 36
2 39
39
39
3 40
40
4 40
40
40
41
41
NightSense 42
42
5 43
43
43
44
6 45
45
45
7 46
35TH
ภาษาไทย
8 47
9 49
49
10 50
(EMF) 50
50

36 TH
• 8
•
•
•
•
•
1
•
/
•
()
/
•
•
•
Philips,
Philips
•

•
•
•
•
•
•
2
•
•
20 .
30 .
•
•
•
•
•
Philips
•
/
• (
)
•
37TH
ภาษาไทย

•
•
(CO) (Rn)
•
•
•
•
38 TH

AC1211:
A
B
C
D
E NanoProtect HEPA 1
(FY1400)
G
H
A/
B NightSense
C
D
E
2
Philips
Philips
www.philips.com/welcome
AC1215:
A
B
C
D
E NanoProtect HEPA 3
(FY1410)
F NanoProtect AC (FY1413)
G
H
I
39TH
ภาษาไทย
4
30
•
•
•
3
•
•
1
( c)
2 (1)
(2) ( d, AC1215 )
3 ( e
AC1215, f AC1211)
4 ( g
AC1215, h AC1211)
5 AC1215
(FY1410) AC
(FY1413) ( i)
AC1211 (FY1400)
( j)
6
( k AC1215 )
•
7
(1)
(2) ( i)
8
40 TH
•
( o)
» (A)
•
( p)
(t)
•
(t) ( q)
10
10
10
1
2
( m)
»
»
»
30
3 3
•
•
(A) 1, 2, 3
(t)
(A)
•
( n)
41TH
ภาษาไทย

1 3
( s)
»
»
2 3
( t)
»
•
NightSense
NightSensor
NightSense
•
NightSense
( r)
»
NightSense
»
10
NightSense
NightSense
NightSense
•
11
NightSense
•
NightSense
• NightSense
42 TH
2
•
•
1
2
( u)
3
( v)
4
( w)
5
6
( x)
•
5
•
•
•
•
•
1
(
)
2
3
43TH
ภาษาไทย
7
(1)
(2) ( i)
8
9 3
( {)
10
• AC1215
F0 ( y)
1
2
( c)
3 (1)
(2) ( d)
4
( z)
5
•
•
6
( k)
•
44 TH

Action
A3
AC1215:
NanoProtect HEPA
3 (FY1410)
AC1211:
NanoProtect HEPA
1 (FY1400)
C7
AC1215:
NanoProtect AC
(FY1413)
A3 C7
AC1215:
1
2
( | AC1215, }
AC1211)
•
3
( g AC1215 h
AC1211)
4
( i AC1215, j
AC1211)
5
6 3
( ~)
7
6
14
•
•
•
45TH
ภาษาไทย

7
1
2
(
‘’)
3
4
5
6
46 TH

8
www.philips.com/support
•
•
( "
")
• Philips
•
•
• ( "
" AC1215 )
• 1
:
AC1215:
1) NanoProtect HEPA 3 (FY1410), 2)
NanoProtect AC (FY1413) 3)
AC1210:
1) NanoProtect HEPA 1 (FY1400)
•
( "")
•
( "")
47TH
ภาษาไทย
• 2 3
•
•
NightSense
•
3
"E1",
"E2", "E3" "E4"
•
48 TH

9
Philips
www.philips.com
Philips (
)
Philips
Philips
www.philips.com/support
Philips (
)
49TH
ภาษาไทย

10
(EMF)
Philips
EMF
Koninklijke Philips N.V.
Philips
EMF
Philips
Philips
Philips EMF
Philips
50 TH

內容
1 重要事項 52
2 您的空氣淨化器 54
產品概要 54
控制鍵概覽 54
3 使用入門 55
安裝濾網 55
4 使用空氣淨化器 56
瞭解空氣質素燈 56
開關 56
改變風扇速度 56
光源感應器 57
NightSense 模式 57
設定兒童安全鎖 57
5 清潔 58
清潔空氣淨化器機身 58
清潔空氣質素感應器 58
清潔預過濾網 58
6 更換濾網 60
過濾網替換指示燈 60
替換過濾網 60
7 存放 61
8 疑難排解 62
51ZH-T
繁體中文
9 保養及服務 64
訂購零件或配件 64
10 注意 64
電磁場(EMF) 64
環保 64

52 ZH-T
監督情況下對產品進行清潔
及維護。
• 請勿阻塞進氣口和排氣口,
例如在排氣口上面或進氣口
前面放置物件。
• 確保異物不會通過排氣口掉
入裝置內部。
注意
• 本產品並不是適當通風設
備、正規吸塵器或煮食時
使用的抽油煙機或風扇的代
替品。
• 若為本產品提供電力的電源
插座沒有妥善連接,本產品
的插頭便會發熱。請確保您
已妥善連接電源插座。
• 在乾燥、穩定、平滑和水平
表面上使用產品。
• 在本產品的後面和兩側至少
留出 20 厘米的自由空間,
本產品上方至少留出 30 厘
米空間。
• 請勿在裝置上放置任何物
品。
• 請勿坐或站立在裝置上。坐
在或站立在裝置上可能會導
致損傷。
• 請勿在冷氣機正下方放置
產品,以避免冷凝滴水到
產品上。
• 在開啟產品前,確保已正確
安裝所有濾網。
1 重要事項
使用本產品前請先閱讀本用戶手冊,並保
管以作將來參考。
危險事項
• 請勿讓水或任何液體或易燃
清潔劑進入此產品,以避免
觸電和/或火災的危險。
• 請勿用水或任何液體或(易
燃)清潔劑清潔此產品,以
避免觸電和/或火災的危險。
• 請勿在本產品周圍噴射殺蟲
劑或芳香劑等易燃物品。
警告
• 在連接本產品前,請檢查產
品註明的指示電壓與當地電
源電壓是否對應。
• 如果電源軟線損壞,為避免
危險,必須由製造廠或其
維修部或類似的專職人員來
更換。
• 若插頭、電線或產品本身已
受損,請勿使用。
• 此產品可供八歲及以上兒
童,體能、感官或心智能力
低下人仕,或缺乏知識及經
驗人仕使用,如該等人仕已
就使用本產品給予監督或有
關安全使用本產品的指導及
明白本產品的使用所涉及的
危險。請勿讓孩童將本產品
當成玩具。兒童不應於沒有

• 請勿在洗手間或廚房等
濕潤環境或高溫環境使用
本產品。
• 本產品不會去除一氧化碳
(CO) 或氡 (Rn)。在發生燃
燒過程和危險化學物質的事
故中,不能將本產品作為安
全裝置使用。
• 如果您需要移動本產品,
請先拔除其電源供應。
• 不要拉扯電源線來移動
裝置。
• 更換或清潔濾網後,必須徹
底洗淨雙手。
• 使用時,粒子感應器護蓋必
須保持關閉。
• 僅使用專門針對本產品的原
裝 Philips 濾網。請勿使用
任何其他濾網。
• 燃燒過濾器可能造成對健康
無可挽回的危害及/或危及
他人生命。不要使用濾網作
為燃料或類似用途。
• 避免以硬物碰撞產品(尤其
是產品的通風口和排氣口)
• 請使用裝置背面的手柄來提
起或移動裝置。
• 請勿將您的手指或其他物件
放入通風口或排氣口,以免
造成身體傷害或產品故障。
• 若您使用室內煙型驅蚊劑,
或該地方有油跡、香火或化
學煙霧,請勿使用本產品。
• 請勿在煤氣用具、暖氣設備
或壁爐旁邊使用本產品。
• 使用後,清潔或進行其他保
養或更換濾網前,務必拔除
本產品的插頭。
• 請勿在溫度變化較大的房間
內使用本產品,這可能導致
產品內產生冷凝物。
• 為了防止干擾,放置產品的
地方應與使用空中無線電波
電器(如電視、收音機及無
線電控制的時鐘)距離兩米
以外。
• 本產品只適合一般操作環境
下的家居使用。
53ZH-T
繁體中文

AC1211:
A控制面板
B空氣質素燈
C排氣口
D空氣質素感應器
ENanoProtect 濾網 HEPA 系列 1
(FY1400)
F進氣口
G前面板
控制鍵概覽
A開/關按鈕
BNightSense 模式按鈕
C顯示屏幕
D風扇速度按鈕
E兒童安全鎖按鈕
2 您的空氣淨化器
感謝您購買 Philips 產品,歡迎來到
Philips 世界!
要享受 Philips 為您提供的全面支援,請在
以下網站 www.philips.com/welcome 註
冊您的產品。
產品概要
AC1215:
A控制面板
B空氣質素燈
C排氣口
D空氣質素感應器
ENanoProtect 濾網 HEPA 系列 3
(FY1410)
FNanoProtect 濾網 AC(FY1413)
G預過濾網
H進氣口
I前面板
54 ZH-T
3 使用入門
安裝濾網
提示
• 安裝濾網前,請確保空氣淨化器已經
從電源插座拔除。
• 確保濾網有標籤的一面是向著您。
1 拉動前面板的底部,然後輕輕從空氣淨
化器中移除(圖 c)。
2 按下夾子(1),再將預過濾網向您
的方向拉動(2)(圖 d,僅適用於
AC1215)。
3 取出所有濾網(圖 e 適用於 AC1215
圖 f 適用於 AC1211)。
4 移除濾網的所有包裝物料(圖 g 適用
於 AC1215,圖 h 適用於 AC1211)。
5 如型號為 AC1215,請先將較厚的濾網
裝入(FY1410)空氣淨化器內,然後
再安裝較薄的 AC 濾網(FY1413)
(圖 i)。型號已在各個濾網上
列明。如型號為 AC1211,請將濾網
(FY1400)裝入空氣淨化器
(圖 j)。
6 將預過濾網裝回空氣淨化器上
(圖 k,僅適用於 AC1215 )。
提示
• 確保向著您的是有夾子的一邊,且所
有預過濾網的鉤已妥當安裝到空氣淨
化器上。
7 將前面板的上方往空氣淨化器(1)的
上方按壓即可重新安裝。然後輕輕將
面板往空氣淨化器的機身按壓(2)
(圖 l)。
8 安裝濾網後,必須徹底洗淨雙手。
55ZH-T
繁體中文
提示
• 如空氣淨化器在「關閉」後繼續連接
至電源插座,空氣淨化器在再次「啟
動」時,將按之前的設定操作。
• 如空氣淨化器在運作期間意外關閉,
它會在電源恢復後自動重新啟動,並
按之前的設定操作。
改變風扇速度
設有多個風扇速度 可選擇自動模式(A)、
風速 1、2、3 或 加速模式(t)。
自動(A)
• 重複按下風扇速度按鈕 以選擇自動
模式(圖 n)。
過濾致敏原模式
特別設計的過濾致敏原模式能有效減少普
遍的致敏原,如花粉及寵物毛屑。
• 按下風扇速度按鈕 以選擇過濾致敏
原模式(圖.o)。
»Auto(自動) (A) 及 將會顯示
在螢幕上。
手提式
• 重複按下風扇速度按鈕 以選擇您所
需的風扇速度(圖 p)。
加速模式 (t)
在加速模式中,空氣淨化器以最高速度
運作。
• 按下風扇速度按鈕 以選擇加速模式
(t)(圖 q)。
4 使用空氣淨化器
瞭解空氣質素燈
空氣質素指示燈的
顏色
空氣質素水平
藍色 良好
藍紫色 適中
紅紫色 不健康
紅色 非常不健康
開啟空氣淨化器時,空氣質素燈將自動亮
起,並順序顯示所有顏色。約 30 秒後,空
氣質素感應器會根據周遭空中粒子的空氣
質素,選擇相應的顏色。
開關
提示
• 空氣淨化器必須放置在穩定、平坦及
水平的表面上,淨化器前方不得面向
牆壁或家具。
• 請關閉門窗,以獲得最佳的空氣淨化
效果。
• 窗簾必須遠離進氣口或排氣口。
1 將空氣淨化器的插頭插入牆身插座。
2 按下 以啟動空氣淨化器(圖 m)
»空氣淨化器發出嗶聲。
»空氣淨化器默認以自動模式運行。
»在測量空氣質素約 30 秒後,空氣
質素感應器會自動選擇適合的空氣
質素燈顏色。
3 按 3 秒即可關閉空氣淨化器。
56 ZH-T

提示
• 進入 NightSense 模式 11 小時後,
光線感應器會偵測房間內的光線。
• 如房間內的燈光亮著,空氣淨化器便
會離開 NightSense 模式,並以之前
的模式運作。空氣質素燈和顯示屏將
會重新亮起。
• 如要手動離開 NightSense 模式,按
下 或 按鈕。
設定兒童安全鎖
1 按住兒童安全鎖按鈕 3 秒,即可啟
動兒童安全鎖(圖 s)。
»兒童安全鎖圖示 顯示在
屏幕上。
»啟動兒童安全鎖後,所有其他按
鈕將不能操作,僅兒童安全鎖圖示
閃爍。
2 再次按住兒童安全鎖按鈕 3 秒,即
可關閉兒童安全鎖(圖 t)。
»兒童安全鎖圖示 便會消失。
提示
• 螢幕顯示預過濾網清潔代碼或濾網更
換代碼時,兒童安全鎖功能便會自動
解除。
光源感應器
透過光源感應器, 本空氣淨化器便可按環
境光線操作。
環境光線變暗 10 秒後,控制面板上的所
有指示燈都會慢慢熄滅。在此期間,若按
下任何按鈕,所有指示燈便會再亮起。如
在 10 秒內不作任何操作,所有指示燈都會
熄滅。
環境光線變亮並持續最少 10 秒後,所有指
示燈將會重新亮起。
NightSense 模式
您可透過兩個方法啟動 NightSensor
模式。
人手啟動 NightSense 模式
• 睡覺前,自行按下 以啟動
NightSense 模式(圖 r)。
»如空氣質素燈為藍色,空氣淨化器
便直接進入 NightSense 模式。空
氣淨化器安靜地運作,而空氣質素
燈將會變暗。
»如空氣質素燈不是藍色,空氣淨
化器會以加速模式運行最多 10 分
鐘,期間空氣質素燈會慢慢閃爍,
然後進入 NightSense mode
模式。
自動啟動 NightSense 模式
當 空氣淨化器以自動模式或過濾致敏原
模式運作時,如光源感應器偵測到房間
燈光已經關閉,空氣淨化器便會自動啟動
NightSense 模式。空氣淨化器將實時調整
風扇速度,以確保房間內的空氣潔淨。空
氣質素燈將會變暗。
57ZH-T
繁體中文
1 關閉空氣淨化器,並將其從牆身插座
拔出。
2 使用柔軟毛刷清潔空氣質素感應器進氣
口及排氣口(圖 u)。
3 拆下空氣質素感應器護蓋(圖 v)。
4 使用稍為濕潤的棉花棒清潔空氣質素感
應器和塵埃的出入口(圖 w)。
5 使用乾爽的棉花棒徹底擦乾所有部件。
6 重新裝上空氣質素感應器護蓋
(圖 x)。
提示
• 空氣淨化器運作時,空氣質素感應器護
蓋必須保持關閉。
清潔預過濾網
提示
• 僅適用於 AC1215 。
當 F0 在螢幕顯示時,請清潔預過濾網
(圖 y)。
1 關閉空氣淨化器,並將其從牆身插座
拔出。
2 拉動前面板的底部,然後輕輕從空氣淨
化器中移除(圖 c)。
3 按下夾子 (1),將預過濾網向您的方向
拉動 (2)(圖 d)。
4 如果預過濾網內部十分骯髒,可用軟刷
將塵埃刷走。然後利用自來水沖洗預過
濾網(圖 z)。
5 先徹底風乾預過濾網,然後將其裝回空
氣淨化器內。
提示
• 確保預過濾網在清潔後徹底風乾,這
有助延長其使用壽命。
• 清潔濾網後,必須洗手。
5 清潔
提示
• 進行清潔前,必須關閉空氣淨化器,
並將空氣淨化器從電源插座拔除。
• 請勿將空氣淨化器浸入水中或任何液
體中。
• 請勿使用磨蝕性、刺激性或易燃清潔
劑(如漂白劑或酒精)清洗空氣淨化
器的任何一部分。
• 只有預過濾網是可清洗的。空氣濾網
並不可以清洗。
• 請勿以吸塵機清潔濾網或空氣質素感
應器。
清潔空氣淨化器機身
請定時清潔本空氣淨化器的內部和外部,
以避免積聚塵埃。
1 使用柔軟乾爽的抹布清潔空氣淨化器的
內部和外部(特別是前蓋)。
2 排氣口亦可以柔軟乾爽的抹布清潔。
3 從空氣淨化器拆下前蓋,並利用自來
水沖洗。
清潔空氣質素感應器
每兩個月清潔空氣質素感應器,讓本產品
發揮出最佳功能。
提示
• 如在多塵的環境內使用空氣淨化器,
則可能需要更常清潔。
• 如房間濕度非常高,水滴便會凝結在
空氣質素感應器上,即使實際空氣質
素良好,空氣質素燈仍可能會顯示較
差的空氣質素。在此情況下,請清潔
空氣質素感應器或以人手設置空氣淨
化器的速度。
58 ZH-T
6 將預過濾網裝回空氣淨化器上
(圖 k )。
提示
• 確保向著您的是有夾子的一邊,
且所有預過濾網的鉤已妥善扣上空氣
淨化器。
7 將前面板的上方往空氣淨化器 (1) 的上
方按壓即可重新安裝。然後輕輕將面板
往空氣淨化器的機身按壓 (2)
(圖 l)。
8 將空氣淨化器的插頭插入電源插座。
9 按下 3 秒,以重設預過濾網的清潔
時間(圖 {)。
10 安裝濾網後,必須徹底洗淨雙手。
59ZH-T
繁體中文
1 關閉空氣淨化器,並將其從牆身插座
拔出。
2 根據螢幕上的濾網警示燈狀態,
取出舊的空氣濾網(圖 | 適用於
AC1215,圖 } 適用於 AC1211)。
棄置舊的濾網。
提示
• 請勿觸摸折叠的過濾網表面,或去聞
過濾網上的氣味,因為過濾網上聚集
了空氣中的污染物。
3 移除新濾網的所有包裝物料
(圖 g 適用於 AC1215,圖 h 適
用於 AC1211)。
4 將新濾網裝入空氣淨化器內(圖 i
適用於 AC1215,圖 j 適用於
AC1211)。
5 將空氣淨化器的插頭插入牆身插座。
6 按下 3 秒,以重設濾網的使用時間
(圖 ~)。
7 更換濾網後,必須洗手。
6 更換濾網
過濾網替換指示燈
空氣淨化器設有過濾網替換指示燈,以確
保空氣淨化濾網在空氣淨化器運作時處於
良好狀態。需要更換濾網時,顯示屏會顯
示濾網代碼。
如果 14 天內不更換濾網,空氣淨化器將會
停止運作並自動鎖上。
替換過濾網
提示
• 空氣濾網並不可以清洗或再用。
• 更換濾網前,必須關閉空氣淨化器,
並將其從電源插座拔除。
• 請勿以吸塵機清潔濾網。
過濾網警示燈
狀態
動作
當 A3 顯示在螢
幕上時
如型號為 AC1215:
更換 NanoProtect
濾網 HEPA 系列 3
(FY1410)
如型號為 AC1211:
更換 NanoProtect
濾網 HEPA 系列 1
(FY1400)
當 C7 顯示在螢
幕上時
如型號為 AC1215:
更換 NanoProtect 濾
網 AC(FY1413)
A3 及 C7 交替顯
示在螢幕上
如型號為 AC1215:
更換全部兩個濾網
60 ZH-T

7 存放
1 關閉空氣淨化器,並將其從牆身插座
拔出。
2 清潔空氣淨化器、空氣質素感應器和預
過濾網(請參閱「清潔」章節)。
3 必須讓所有部件乾透方可儲存。
4 以不透氣的膠袋將濾網和預過濾網分開
包裝好。
5 將空氣淨化器、濾網和預過濾網儲存於
陰涼乾爽的地方。
6 處理濾網後,必須徹底洗淨雙手。
61ZH-T
繁體中文
本配備日光感應器的空氣淨化器設有專業的 NightSensor 模式,適合
睡房或兒童房使用。在您入睡後,空氣淨化器會持續監察空氣質素,
並按此調節風扇速度,為您帶來清新的空氣。專業技術為您和您的家
人提供更寧靜環境、更清新的空氣和更高的睡眠質素。
8 疑難排解
本章節總結一些您在本空氣淨化器上最常見的問題。若您無法透過以下資訊解決問題,請瀏
覽 www.philips.com/support 或聯絡您所在國家/地區的顧客服務中心。
問題 可行解決方案
空氣淨化器在插入牆
身插座並開啟後不能
運作。
• 嘗試其他電源插座或檢查牆身開關。
• 濾網警示狀態顯示濾網代碼。更換相關濾網,並重設濾網的使
用時間(請參閱「更換濾網」章節)。
• 如果問題仍然持續,請聯絡您所在國家的客戶服務中心。
空氣淨化器即使開啟
了也沒有正常運作。
• 濾網替換指示燈持續亮起,但您沒有更換相關濾網,空氣淨化
器現已鎖上。在這情況,請更換該濾網並重設濾網使用時間。
空氣淨化器的電源意
外關閉。
• 空氣淨化器會自動重新啟動,當恢復電源後會繼續之前的
模式。
從排氣口排出的氣流
比以前顯著減弱。
• 預過濾網處於骯髒的狀態。清潔預過濾網(請參閱「清潔」章
節,僅適用於 AC1215)。
本空氣淨化器經過長
時間運作,空氣質素
仍沒有改善。
• 其中一個濾網沒有安裝到空氣淨化器中,或濾網沒有安裝妥
當。確保已按以下次序,正確安裝所有濾網,由最內部的濾網
開始安裝:
適用於 AC1215:
1)NanoProtect 濾網 HEPA 系列 3(FY1410);
2)NanoProtect 濾網 AC(FY1413);3)預過濾網。
適用於 AC1210:
1)NanoProtect 濾網 HEPA 系列 1(FY1400)。
• 空氣質素感應器變濕。確保空氣質素感應器清潔和保持乾燥
(請參閱「清潔」一章)。
空氣質素光環的顏色
永遠保持同一顏色。
• 空氣質素感應器處於骯髒的狀態。清潔空氣質素感應器(請參
閱「清潔」一章)。
空氣淨化器發出
異味。
• 在您最初數次使用本空氣淨化器時,它可能會發出一點塑膠氣
味。此為正常。本空氣淨化器亦可能會在過濾網變得骯髒時發
出難聞氣味。在此情況下,請清潔或更換相關濾網。
• 如空氣淨化器產生燒焦的氣味,請「關閉」電源,並將插頭從
電源插座拔出。請聯絡你所在國家/地區的客戶服務中心。
62 ZH-T

問題 可行解決方案
空氣淨化器聲浪
太大。
• 如果空氣淨化器太吵,可調低風扇速度。在夜晚於睡房內使用
空氣淨化器時,選擇 NightSense 模式或調低風扇速度。
即使我已更換過濾
網,空氣淨化器仍表
示需要更換。
• 可能你沒有重置濾網的使用時間。為空氣淨化器接上電源,
按下 啟動空氣淨化器,然後按下 3 秒。
錯誤代碼 「E1」、
「E2」、「E3」
或「E4」 顯示在
螢幕上。
• 空氣淨化器故障。請聯絡你所在國家/地區的客戶服務中心。
63ZH-T
繁體中文

9 保養及服務
如果您需要資料或有疑問,請前往 Philips
網站 www.philips.com 或聯絡您的國家的
Philips 顧客服務中心(您會在全球保障小
冊子上找到其電話號碼)。如果您的國家
沒有顧客服務中心,請前往當地的 Philips
經銷商。
訂購零件或配件
如果您需要更換零件或想訂購額外配件,
請前往您的 Philips 經銷商或瀏覽
www.philips.com/support。
如果您索取有關零件時遇上問題,請聯絡
您的國家/地區 Philips 顧客服務中心(您
可在全球保障小冊子上找到其電話號碼)
64 ZH-T
10 注意
電磁場(EMF)
這款 Philips 產品符合一切有關電磁場暴露
的適用安全標準及條例。
符合 EMF 標準
Koninklijke Philips N.V. 專為消費者製造及
銷售許多產品 (例如任何電器用品),而這
些產品都能發出與接收電磁訊號。
Philips 貫徹執行的一項主要商業準則是對
我們的產品採取所有必要的健康和安全措
施,遵循一切可行的法律規定,並在產品
生產期間嚴格遵守 EMF 標準。
Philips 致力於開發、生產及銷售對健康無
害的產品。Philips 確認如果產品在目標用
途中操作得當,根據當今權威科學論證,
將不會存在任何安全隱患。
Philips 在開發國際 EMF 和安全標準中扮
演著積極作用,有助其預見未來標準化的
發展趨勢以便盡早融入至產品中。
環保
請勿在本產品使用壽命結束後當作一般家
庭垃圾廢棄,應交給官方回收站作循環再
用。這樣做有助保護環境。
