Philips MMS321/05 MMS 321.pmd User Manual Používateľská Príručka Mms321 05 Dfu Rus
MMS321/00 Používateľská príručka mms321_00_dfu_eng Multimediálne reproduktory 2.0 MMS321/00 | PhilipsMMS321/00
MMS321/00 Používateľská príručka mms321_00_dfu_deu Multimediálne reproduktory 2.0 MMS321/00 | PhilipsMMS321/00
MMS321/00 Používateľská príručka mms321_00_dfu_fra Multimediálne reproduktory 2.0 MMS321/00 | PhilipsMMS321/00
MMS321/00 Používateľská príručka mms321_00_dfu_nor Multimediálne reproduktory 2.0 MMS321/00 | PhilipsMMS321/00
MMS321/00 Používateľská príručka mms321_00_dfu_slv Multimediálne reproduktory 2.0 MMS321/00 | PhilipsMMS321/00
User Manual: Philips MMS321/05 Používateľská príručka Multimediálne reproduktory 2.0 MMS321/05 | PhilipsMMS321/05
Open the PDF directly: View PDF ![]() .
.
Page Count: 2
~ EXPLANATION ~
4399 294 61698
IMPORTANT SAFETY INSTRUCTIONS - Read before operating equipment
For US/Canada only
This product was designed and manufactured to meet
strict quality and safety standards. There are, however,
some installation and operation precautions which
you should be particularly aware of.
1. Read these instructions - All the safety and
operating instructions should be read before
the appliance is operated.
2. Keep these instructions - The safety and
operating instructions should be retained for
future reference.
3. Heed all warnings - All warnings on the
appliance and in the operating instructions
should be adhered to.
4. Follow all instructions - All operating and use
instructions should be followed.
5. Do not use this apparatus near water - for
example, near a bathtub, washbowl, kitchen
sink, laundry tub, in a wet basement or near a
swimming pool, etc.
6. Clean only with a damp cloth. The appliance
should be cleaned only as recommended by
the manufacturer.
7. Install in accordance with the manufacturers
Instructions. Do not block any of the ventilation
openings. For example, the appliance should
not be situated on a bed, sofa, rug, or similar
surface or placed in a built-in installation, such
as a bookcase or cabinet that may impede the
flow of air through the ventilation openings.
8. Do not Install near any heat sources such as
radiators, heat registers, stoves, or other apparatus
(including amplifiers) that produce heat.
9. Do not defeat the safety purpose of
the polarized or grounding-type plug.
A polarized plug has two blades with
one wider than the other. Match wide
blade of Plug to wide slot, fully insert. A grounding
type plug has two blades and a third grounding prong.
The wide blade or the third prong are provided for
your safety.When the provided plug does not fit into
your outlet, consult an electrician for replacement of
the obsolete outlet.
10.Protect the power cord from being walked on or
pinched particulary at plugs, convenience
receptacles, and the point where they exit from
the apparatus.
11. Only use attachments/accessories specified by
the manufacturer.
12. Use only with a cart, stand, tripod, bracket,
or table specified by the manufacturer, or
sold with the apparatus. When a cart is used,
use caution when moving the cart/apparatus
combination to avoid injury from tip-over.
13.Unplug this apparatus during lightning storms or
when unused for long periods of time.
14.Refer all servicing to qualified service personnel.
Servicing is required when the apparatus has
been damaged in any way, such as power-supply
cord or plug is damaged, liquid has been spilled
or objects have fallen into the apparatus, the
apparatus has been exposed to rain or moisture,
does not operate normally, or has been dropped.
15.Warning! To reduce the risk of fire or electric shock,
do not expose this appliance to rain or moisture.
EL 4562-E004: 99/3
AC
Polarized Plug
http://www.philips.com/pcstuff
The socket-outlet shall be installed near the equipment and shall be easily accessible.
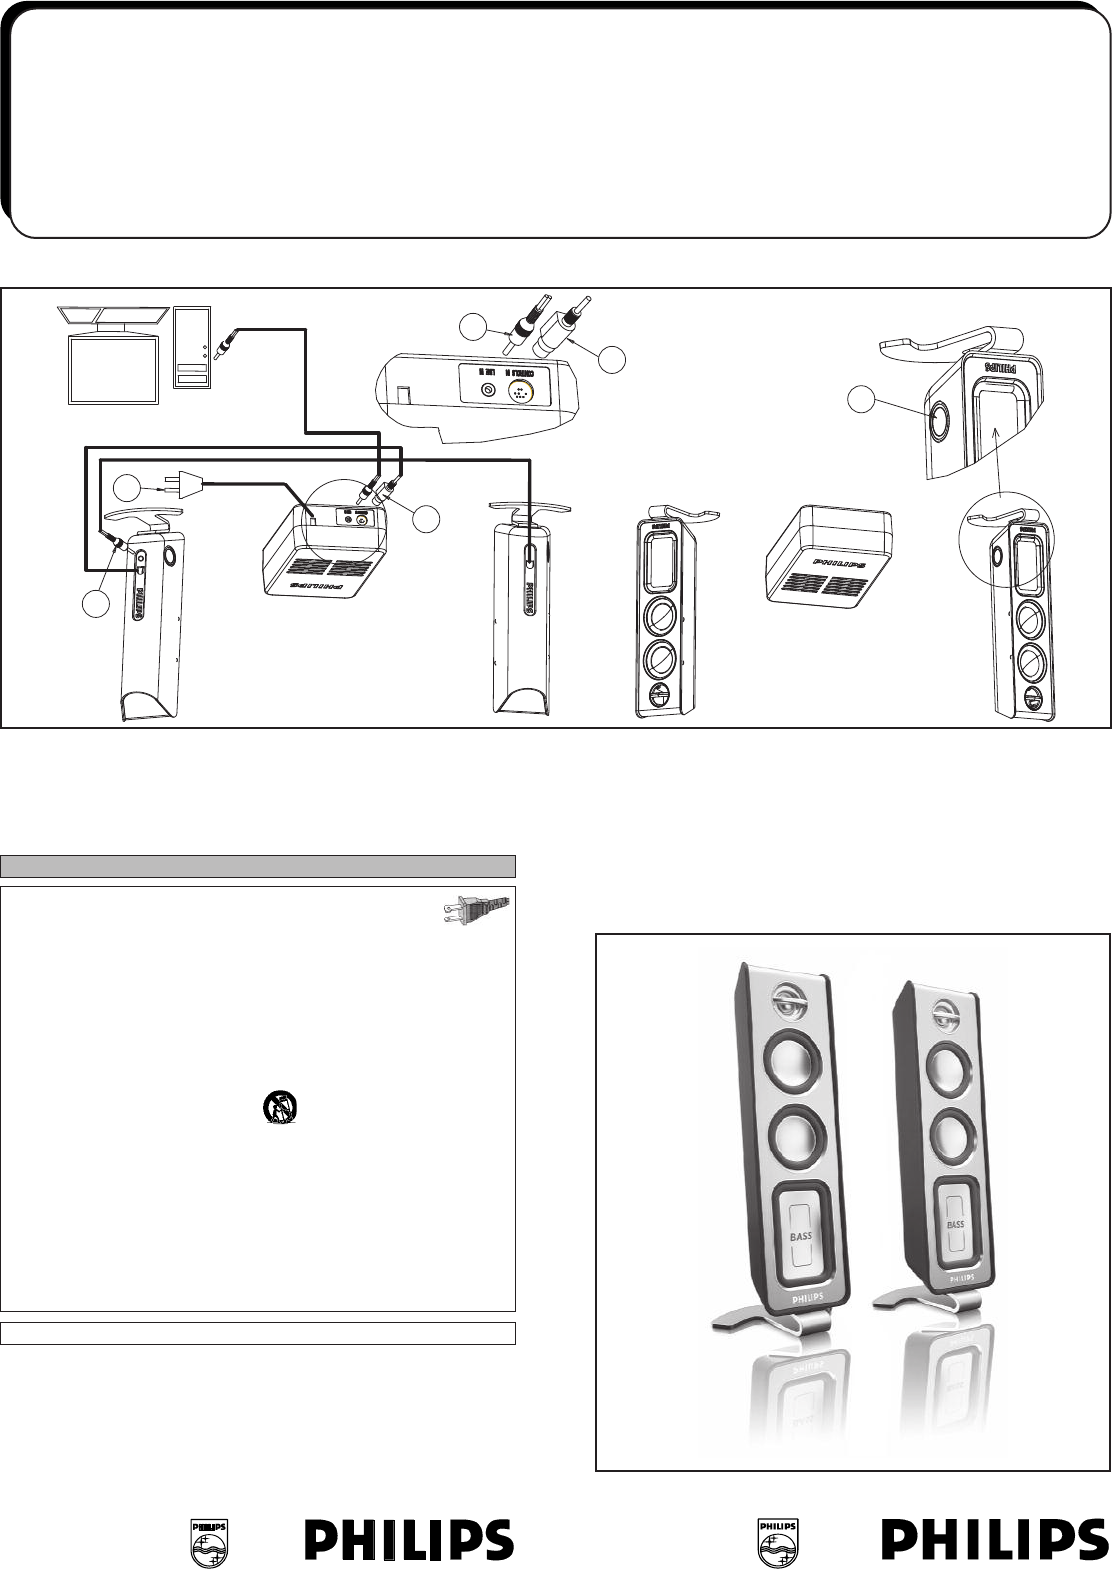
Multimedia High Quality Speaker System
MMS 321
1. POWER ON/OFF AND ROTARY
VOLUME CONTROL
TOSWITCH POWER ON AND OFF
(BLUE LED INDICATES THATTHE POWER
IS ON) TO ADJUST THE VOLUME LOWER
OR HIGHER
2. RIGHT SPEAKER CABLE (FIX) AT
SATELLITE ACTIVE
MINI DIN PLUG WITH CONTROLS AND
SIGNALS COMING FROM AMPLIFIER TO
(RIGHT) SATELLITE ACTIVE.
3. LINE IN
3.5MM STEREO JACK INPUT TO
CONNECT SOUND SOURCE (VIA LIME
GREEN CABLE).
4. LEFT SPEAKER CABLE (FIX) AT
SATELLITE PASSIVE
3.5MM STEREO JACK INPUT TO
CONNECT THE SATELLITE PASSIVE
5. AC MAINS PLUG
TOCONNECT AMPLIFIER CONSOLE TO
MAINS OUTLET. THIS TO POWER
COMPLETE SYSTEM.
1
2
4
5
2
3
English
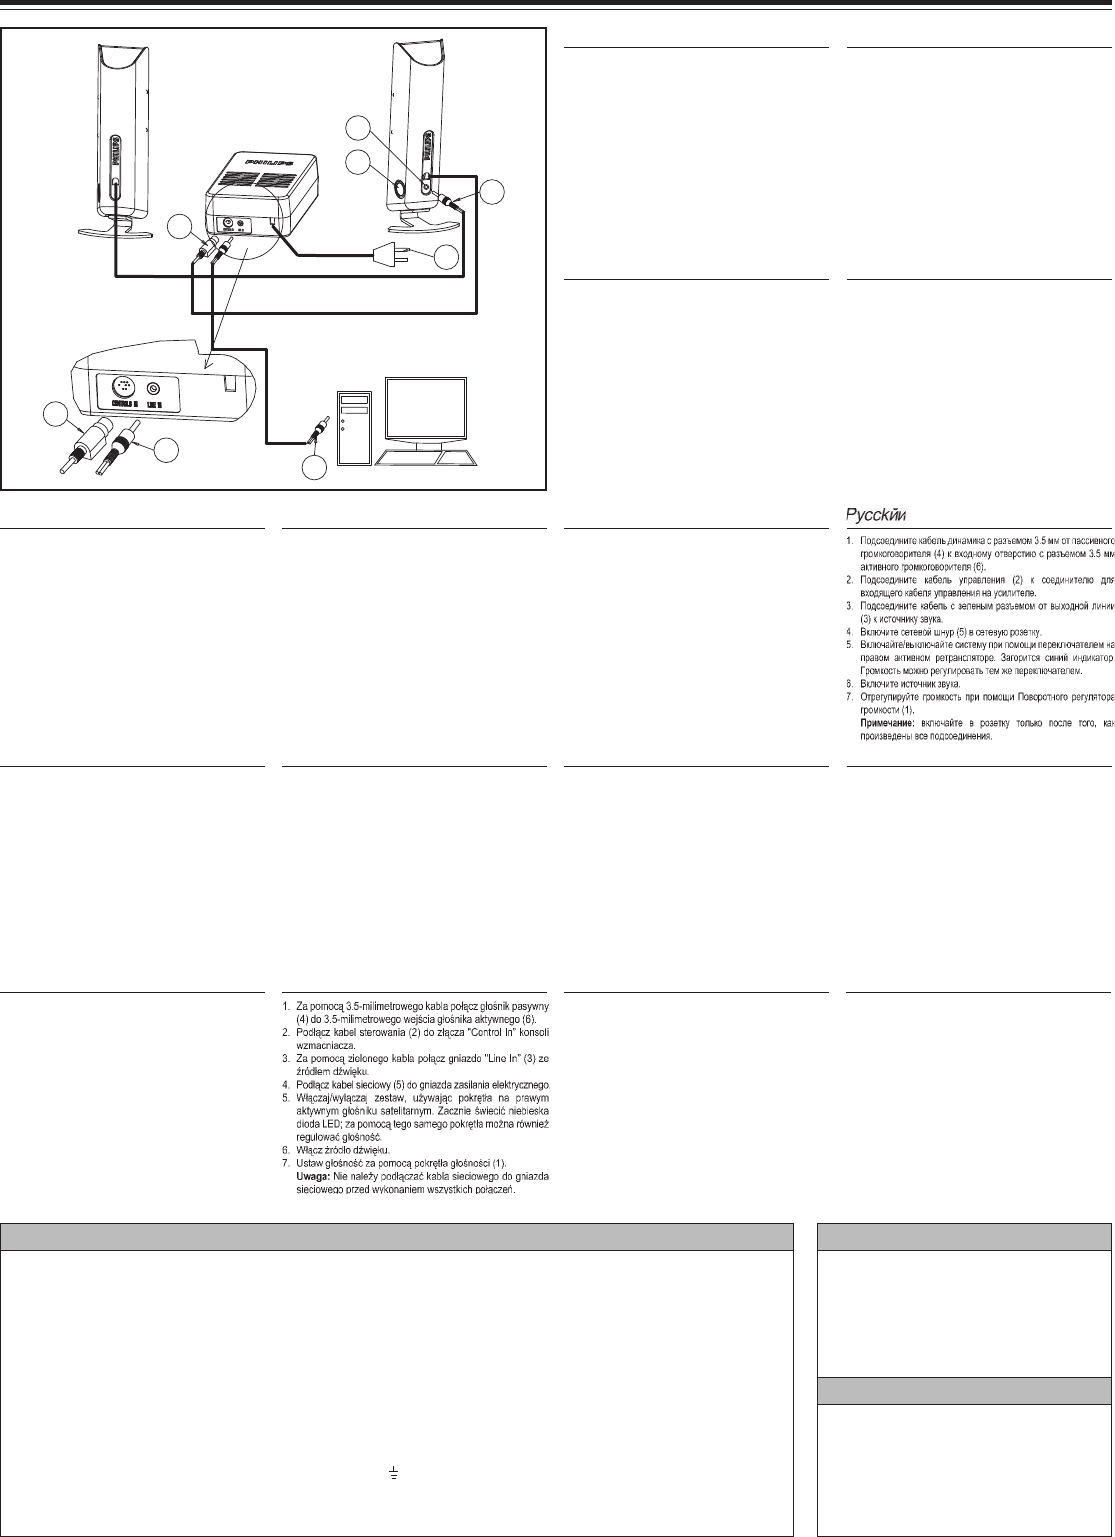
1. Connect 3.5 mm stereo jack speaker cable from
passive loudspeaker (4) to 3.5 mm stereo jack speaker
input from active loudspeaker (6).
2. Connect Control cable (2) to “Control In” connector
for amplifier console.
3. Connect Green jack cable from “Line In” (3) to sound
source.
4. Plug mains connector (5) into main outlet.
5. Switch on/off the system by using the knob (1) on the
right active satellite. Blue LED will light up and volume
can be adjusted by same knob (1).
6. Turn on the sound source.
7. Adjust volume via Rotary volume knob (1).
Note: Do not plug the main into the power outlet
before all connection is made.
Installation
Important notes for users in the U.K.
Mains plug
This apparatus is fitted with an approved 13 Amp plug.
To change a fuse inthis type of plug proceed as follows:
1Remove fuse cover and fuse.
2Fix new fuse which should be a BS1362 5 Amp, A.S.T.A. or BSI approved type.
3Refit the fuse cover.
If the fitted plug is not suitable for your socket outlets, it should be cut off and an appropriate plug fitted in its place. If the mains plug containsa fuse, this should
have a value of 5 Amp. If a plug without a fuse is used, the fuse at the distribution board should not be greater than 5 Amp.
Note: The severed plug must be disposed of to avoid a possible shock hazard should it be inserted intoa 13 Amp socket elsewhere.
How to connect a plug
The wires in the mains lead are coloured with the following code: blue = neutral (N), brown = live (L). As these colours may not correspond with the
colour markings identifying the terminals in your plug, proceed as follows:
•Connect the blue wire to the terminal marked N or coloured black.
•Connect the brown wire to the terminal marked L or coloured red.
•Do not connect either wire to the earth terminal in the plug, marked E (or ) or coloured green (or green and yellow).
Before replacing the plugcover,makecertainthatthecordgripisclampedoverthesheathofthelead- notsimplyover thetwowires.
Copyright in the U.K.
Recording andplaybackofmaterial mayrequireconsent.SeeCopyright Act1956andThePerformer'sProtectionActs1958 to1972.
NorgeNorge
NorgeNorge
Norge
Typeskilt finnes på apparatens underside.
Observer: Nettbryteren er sekundert innkoplet.
Den innebygde netdelen er derfor ikke frakoplet
nettet så lenge apparatet er tilsluttet nettkontakten.
For å redusere faren for brann eller elektrisk støt,
skal apparatet ikke utsettes for regn eller fuktighet.
Deutschland
Hiermit wird bescheinigt, daß dieses Gerät in
Übereinstimmung mit den Bestimmungen der
Amtsblattverfügung1046/1984funkentstörtist.
Der Deutschen Bundespost wurde das
Inverkehrbringen dieses Gerätes angezeigt und
die Berechtigung zur Überprüfung der Serie auf
Einhaltung der Bestimmungen eingeräumt.
Français
1. Branchez la fiche 3.5 mm du câble du haut-parleur
passif (4) sur l’entrée 3.5 mm du haut-parleur actif (6).
2. Connectez le câble de contrôle (2) au connecteur
“Control In” de l’amplificateur.
3. Reliez l’entrée “Line In” (3) à la source sonore à l’aide
du câble doté d’une fiche verte.
4. Branchez le connecteur d’alimentation (5) sur la prise
secteur.
5. Utilisez le bouton situé sur le haut-parleur satellite
actif droit pour allumer/éteindre le système. Une fois
le voyant bleu allumé, vous pouvez régler le volume
du système à l’aide de ce même bouton.
6. Allumez la source sonore.
7. Réglez le volume via le bouton rotatif (1).
Remarque: effectuez toutes les connexions requises
avant de brancher le système sur le secteur.
Svenska
1. Koppla 3.5 mm-högtalarkabeln från den passiva
högta laren (4) till högtalaringången / 3.5 mm-
högtalaruttaget på den aktiva högtalaren (6).
2. Koppla kontrollkabeln (2) till “Control In” - anslutningen
på förstärkaren.
3. Koppla den gröna uttagskabeln från “Line In” (3) till
ljudkällan.
4. Anslut nätkabeln (5) till vägguttaget.
5. Slå på och av systemet med vredet som sitter på den
högra aktiva satelliten. En blå lysdiod tänds. Du kan
justera volymen med samma vred.
6. Sätt på ljudkällan.
7. Justera volymen med den vridbara volymknappen (1).
Obs: Anslut inte nätkabeln till vägguttaget innan du
har gjort övriga anslutningar.
Deutsch
1. Schließen Sie das Lautsprecherkabel des passiven
Lautsprechers (4) mit einem 3.5 mm-Stecker an den
Lautsprechereingang des aktiven Lautsprechers (6) an.
2. Verbinden Sie das Control-Kabel (2) m it dem
Anschluss “Control In” für die Verstärkerkonsole.
3. Verbinden Sie das Kabel mit dem grünen Stecker
mit dem Anschluss “Line In” (3) und der Tonquelle.
4. Schließen Sie den Netzstecker (5) an eine Steckdose an.
5. Schalten Sie das System mit dem Knopf am rechten
aktiven Satelliten ein/aus. Die blaue LED-Anzeige
leuchtet auf; die Lautstärke kann mit dem selben
Knopf eingestellt werden.
6. Schalten Sie die Tonquelle ein.
7. Stellen Sie die Lautstärke mit dem Drehknopf (1) ein.
Hinweis: Stellen Sie keine Verbindung mit der Steckdose
her, bevor alle Anschlüsse vorgenommen wurden.
Español
1. Conecte el cable de altavoces con clavija de 3.5 mm
del altavoz pasivo (4) a la entrada de altavoz con clavija
de 3.5 mm del altavoz activo (6).
2. Conecte el cable de control (2) a la entrada de control
del controlador de la consola del amplificador.
3. Conecte el cable de clavija verde desde la entrada de
línea (3) a la fuente de sonido.
4. Enchufe el conector de alimentación (5) a una salida
de corriente.
5. Encienda o apague el sistema mediante el mando del
satélite activo derecho. El indicador LED azul se encenderá
y puede utilizar el mismo mando para ajustar el volumen.
6. Encienda la fuente de sonido.
7. Ajuste el volumen mediante el mando giratorio de volumen (1).
Nota: No conecte la alimentación hasta haber realizado
todas las conexiones.
Italiano
1. Collegare il cavo dell’altoparlante con jack da 3.5
mm dall’altoparlante passivo (4) all’ingresso da 3.5
mm dell’altoparlante attivo (6).
2. Collegare il cavo di controllo (2) al connettore “control
in” sulla console dell’amplificatore.
3. Collegare il jack verde da “Line In” (3) alla sorgente
audio.
4. Inserire la spina (5) nella presa di alimentazione.
5. Accendere / s pegnere il sistema mediante la
manopola del satellite attivo destro. Il LED blue si
accende ed è possibile regolare il volume mediante
la manopola.
6. Accendere la sorgente audio.
7. Regolare il volume mediante l’apposita manopola(1).
Nota: effettuare tutti i collegamenti prima di inserire
la spina nella presa di alimentazione.
Russian
Suomi
1. Liitä passiivikaiuttimen (4) kaiutinjohdon 3.5 mm:n
liitin aktiivikaiuttimen (6) 3.5 mm:n tuloliitäntään.
2. Liitä ohjausjohto (2) kaiutinkonsolin “Control In” -
liitäntään.
3. Liitä vihreä “Line In” -liitinjohto (3) äänilähteeseen.
4. Kytke virtajohto (5) pistorasiaan.
5. Virta kytketään järjestelmään ja katkaistaan siitä
oik ean aktiivikai ut tim en säätön apista. Sini nen
LED-merkkivalo syttyy ja äänenvoi makkuutta voi
säätää samasta napista.
6. Kytke virta äänilähteeseen.
7. Säädä äänenvoimakkuus pyörivästä valitsimesta (1).
Huomautus: älä kytke virta johtoa pistorasiaan,
ennen kuin kaikki liitännät on tehty.
Norsk
1. Koble høyttalerkabel fra passiv høyttaler (4) til
høyttalerinngangen for aktiv høyttaler (6), med 3.5 mm
kontakt.
2. Koble kontrollkabelen (2) til “Control In”-kontakten for
forsterkerkonsollen.
3. Koble den grønne kontaktkabelen fra “Line In” (linje inn)
(3) til lydkilden.
4. Koble strømkontakten (5) til strømuttaket.
5. Slå systemet på/av ved å bruke bryteren på den høyre
aktive satellitthøyttaleren. Den blå LED-lampen begynner
å lyse og volumet kan justeres med samme bryter.
6. Slå på lydkilden.
7. Juster volumet med roteringsbryteren (1).
Merk: Ikke koble til strømmen før alle tilkoblingene er
gjort.
Turkçe
1. Pasif hoparlörden (4) gelen kabloyu aktif hoparlörden
(6) gelen hoqarlör giri_ine, bir adet 3.5 mm’lik fi_li
konektör ile balay1n.
2. Kontrol kablosunu (2), amplifikatör konsolunun “Kontrol
Giri_i” konektörüne balay1n.
3. “Hat giri_i” konektöründen (3) gelen Ye_il fi_li kabloyu
ses kayna1na balay1n.
4. Ana _ebeke konektörünü (5) ana _ebeke prizine tak1n.
5. Sa aktif uydu kumandas1 üzerindeki dümeyi kullanarak
sistemi aç1n/kapat1n. Mavi LED lambas1 yanacak ve
ayn1 düme ile ses düzeyi ayarlanabilecektir.
6. Ses kayna1n1 aç1n.
7. Döner ses düzeyi dümesini (1) kullanarak ses düzeyini
ayarlay1n.
Not: Tüm balant1lar1 yapmadan ana _ebeke
balant1s1n1 prize takmay1n.
Português
1. Ligue o cabo com ficha de 3.5 mm do altifalante
passivo (4) à entrada com ficha de 3.5 mm do
altifalante activo (6).
2. Ligue o Cabo de controlo (2) ao conector da “entrada
de controlo” da consola do amplificador.
3. Ligue o Cabo da ficha verde entre “Line in” (3) e a
fonte de som.
4. Ligue o cabo de alimentação (5) à tomada eléctrica.
5. Ligue/desligue o sistema utilizando o botão do
satélite activo correcto. O LED azul acende-se e o
volume pode ser ajustado no mesmo botão.
6. Ligue a fonte de som.
7. Ajuste o volume através do Botão rotativo de volume
(1).
Nota: não ligue o cabo de alimentação à tomada
eléctrica antes de ter feito todas as ligações.
Magyar
1. Csatlakoztassa a passzív hangszóró (4) 3.5 mm–es
hangszórócsatlakózóját az aktív hangszóró 3.5 mm–
es hangszóró bemeneti csatlakozójához (6).
2. Csatlakoztassa a Control vezetéket (2) az erQsítQ
készülék “Control In” csatlakozójához.
3. Csatlakoztassa a Zöld hangszórócsatlakozót a “Line
In” bemenetbQl (3) a hangforráshoz.
4. Csatlakoztassa a hálózati ká belt (5 ) a fali
csatlakozóaljzathoz.
5. A jobb oldali ak tív szatelit hangfal gombjával
kapcsolja be/ki a rendszert. Egy kék LED világítani
kezd, a hangerQt pedig ugyanezzel a gombbal lehet
állítani.
6. Kapcsolja be a hangforrást.
7. Állítsa be a hangerQt a Forgatható gombbal (1).
Megjegyzés: Ne dugja be a hálózati kábelt a fali
csatlakozóaljzatba, amíg össze nem szerelte az
összes csatlakozást.
Polski
Slovenský
1. Spojte káblom s 3.5 mm konektorom pasívny
reproduktor so vstupom (4) a aktívny reproduktor (6).
2. Pripojte Ovládací kábel (2) do konektora “Vstup
ovládania” pre konzolu zosilHovaa.
3. Zapojte zelený konektor kábla z “Vstupu” (3) do
zvukového zdroja.
4. Zapojte konektor napájania (5) do zásuvky.
5. Systém zapnite/vypnite pomocou gombíka na pravej
strane aktívneho satelitu. Rozsvieti sa modrá LED
dióda. Hlasitose mo•no nastavie tým istým gombíkom.
6. Zapnite zdroj zvuku.
7. Na stavte hlasitose pomocou oto ného gombíka
hlasitosti (1).
Poznámka: Do zásuvky pripájajte a• po zapojení
všetkých ostatných káblov.
Nederlands
1. Sluit de luidsprekerkabel van de passieve luidspreker
(4) met een 3.5 -mm stekker aan op de
luidsprekeringang van de actieve luidspreker (6).
2. Sluit de controlekabel (2) aan op de controle-ingang
van de versterker.
3. Sluit de kabel met de groene stekker van de lijningang
(3) aan op de geluidsbron.
4. Plaats de netstekker (5) in het stopcontact.
5. Schakel het systeem in/uit met de knop op de rechtse
actieve satelliet. De blauwe LED gaat branden. Het
volume kan met dezelfde knop worden geregeld.
6. Zet de geluidsbron aan.
7. Regel het volume met de draaiknop (1).
Opmerking: plaats de netstekker pas in het stopcontact
wanneer alle verbindingen tot stand zijn gebracht.
Èesky
1. Propojte kab elem pasivní reproduktor (4) s
reproduktorovým vstupem aktivního reproduktoru (6)
pomocí 3,5mm konektoru jack.
2. Zapojte ovládací kabel (2) do zdíøky “control in” pro
konzoli zesilovaèe
3. Propojte zdroj zvuku zeleným kabelem s konektorem
se vstupem “Line in” (3)
4. Pøipojte napájecí šòùru (5) do elektrické zásuvky
5. Systém zapnete nebo vypnete pomocí knoflíku na
pravém aktivním satelitním reproduktoru. Rozsvítí se
modrá kontrolka a stejným knoflíkem mù•ete regulovat
hlasitost.
6. Zapnìte zdroj zvuku
7. Hlasitost lze ovládat otoèným knoflíkem (1)
Poznám ka: Pøed pøipojením napájecí šòùry do
elektrické zásuvky propojte všechny èásti.
2
1
6
2
4
5
3
3
