Philips User Manual Htd5520 55 Dfu Eng
User manual htd5520_55_dfu_aen
User Manual: Philips User manual
Open the PDF directly: View PDF ![]() .
.
Page Count: 40

www.philips.com/welcome
User manual
Always there to help you
Register your product and get support at
HTD5520
HTD5550
HTD5580
Question?
Contact
Philips

1EN
Contents
1 Important 2
Safety 2
Care for your product 3
Care of the environment 3
2 Your home theater 4
Main unit 4
Remote control 4
Connectors 5
3 Connect and set up 6
Connect speakers 6
Connect to TV 7
Connect audio from TV and other devices 8
Set up speakers 9
Set up EasyLink (HDMI-CEC control) 9
4 Use your home theater 11
Discs 11
Data les 12
Play audio through Bluetooth 12
USB storage devices 13
Audio, video, and picture options 13
Radio 14
MP3 player 15
Karaoke 15
Choose sound 16
5 Change settings 17
Language settings 17
Picture and video settings 17
Audio settings 18
Parental control settings 18
Display settings 18
Energy saving settings 18
Restore default settings 19
6 Update software 19
Check software version 19
Update software through USB 19
7 Productspecications 20
8 Troubleshooting 22
9 Notice 24
Copyright 24
Trademarks 24
10 Language code 26
11 Index 27

2EN
1 Important
Read and understand all instructions before you
use your home theater. If damage is caused by
failure to follow instructions, the warranty does
not apply.
Safety
Riskofelectricshockorre!
• Never expose the product and accessories
to rain or water. Never place liquid
containers, such as vases, near the product.
If liquids are spilt on or into the product,
disconnect it from the power outlet
immediately. Contact Philips Consumer
Care to have the product checked before
use.
• Never place the product and accessories
near naked ames or other heat sources,
including direct sunlight.
• Never insert objects into the ventilation
slots or other openings on the product.
• Where the mains plug or an appliance
coupler is used as the disconnect device,
the disconnect device shall remain readily
operable.
• Batteries (battery pack or batteries
installed) shall not be exposed to excessive
heat such as sunshine, re or the like.
• Disconnect the product from the power
outlet before lightning storms.
• When you disconnect the power cord,
always pull the plug, never the cable.
Riskofshortcircuitorre!
• Before you connect the product to the
power outlet, ensure that the power
voltage matches the value printed on the
back or bottom of the product. Never
connect the product to the power outlet if
the voltage is different.
Riskofinjuryordamagetothehometheater!
• For wall-mountable products, use only the
supplied wall mount bracket. Secure the
wall mount to a wall that can support the
combined weight of the product and the
wall mount. Koninklijke Philips Electronics
N.V. bears no responsibility for improper
wall mounting that results in accident,
injury or damage.
• For speakers with stands, use only the
supplied stands. Secure the stands to the
speakers tightly. Place the assembled stands
on at, level surfaces that can support the
combined weight of the speaker and stand.
• Never place the product or any objects
on power cords or on other electrical
equipment.
• If the product is transported in
temperatures below 5°C, unpack the
product and wait until its temperature
matches room temperature before
connecting it to the power outlet.
• Visible and invisible laser radiation when
open. Avoid exposure to beam.
• Do not touch the disc optical lens inside
the disc compartment.
• Parts of this product can be made of
glass. Handle with care to avoid injury and
damage.
Riskofoverheating!
• Never install this product in a conned
space. Always leave a space of at least four
inches around the product for ventilation.
Ensure curtains or other objects never
cover the ventilation slots on the product.
Riskofcontamination!
• Do not mix batteries (old and new or
carbon and alkaine, etc.).
• Danger of explosion if batteries are
incorrectly replaced. Replace only with the
same or equivalent type.
• Remove batteries if they are exhausted or
if the remote control is not to be used for
a long time.
• Batteries contain chemical substances, they
should be disposed of properly.

3EN
Riskofswallowingbatteries!
• The product/remote control may contain
a coin/button type battery, which can be
swallowed. Keep the battery out of reach
of children at all times! If swallowed, the
battery can cause serious injury or death.
Severe internal burns can occur within two
hours of ingestion.
• If you suspect that a battery has been
swallowed or placed inside any part of the
body, seek immediate medical attention.
• When you change the batteries, always
keep all new and used batteries out of
reach of children. Ensure that the battery
compartment is completely secure after
you replace the battery.
• If the battery compartment cannot be
completely secured, discontinue use of the
product. Keep out of reach of children and
contact the manufacturer.
This is CLASS II apparatus with double
insulation, and no protective earth provided.
Care for your product
• Do not insert any objects other than discs
into the disc compartment.
• Do not insert warped or cracked discs into
the disc compartment.
• Remove discs from the disc compartment
if you are not using the product for an
extended period of time.
• Use only microber cloth to clean the
product.
Care of the environment
Your product is designed and manufactured
with high quality materials and components,
which can be recycled and reused.
Never dispose of your product with other
household waste. Please inform yourself about
the local rules on the separate collection of
electrical and electronic products and batteries.
The correct disposal of these products helps
prevent potentially negative consequences on
the environment and human health.
Your product contains batteries, which cannot
be disposed of with normal household waste.
Please inform yourself about the local rules on
separate collection of batteries. The correct
disposal of batteries helps prevent potentially
negative consequences on the environment and
human health.
Please visit www.recycle.philips.com for
additional information on a recycling center in
your area.
4EN
2 Your home
theater
Congratulations on your purchase, and
welcome to Philips! To fully benet from the
support that Philips offers, register your home
theater at www.philips.com/welcome.
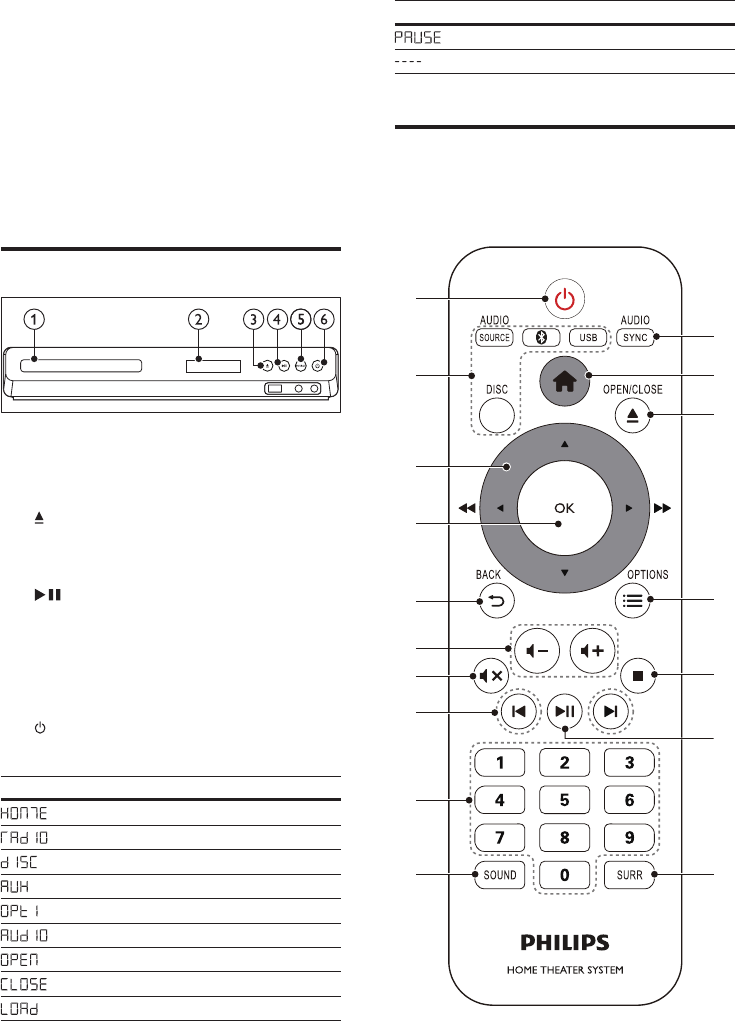
Main unit
a Disc compartment
b Display panel
c (Open/Close)
Open or close the disc compartment, or
eject the disc.
d (Play/Pause)
Start, pause or resume play.
e SOURCE
Select an audio or video source for the
home theater.
f (Standby-On)
Switch the home theater on or to standby.
Front panel display Indication
Home
Radio
Disc
Aux In
Optical In
Audio In
Open
Close
Load
Front panel display Indication
Pause
Mute
Remote control
This section includes an overview of the
remote control.
a
b
c
d
e
f
g
h
i
j k
l
m
n
o
q
p
5EN
a (Standby-On)
• Switch the home theater on or to
standby.
• When EasyLink is enabled, press
and hold for at least three seconds
to switch all connected HDMI CEC
compliant devices to standby.
b Source buttons
• DISC: Switch to disc source.Access
or exit the disc menu when you play
a disc.
• AUDIO SOURCE: Select an audio
input source, or radio.
• : Switch to Bluetooth
• USB: Switch to USB storage device.
c Navigation buttons
• Navigate menus.
• In video mode, press left or right to
fast backward or fast forward; press
up or down to slow forward or slow
backward (for DVD video only).
• In radio mode, press left or right to
search a radio station; press up or
down to ne tune a radio frequency.
d OK
Conrm an entry.
e BACK
Return to a previous menu screen.
f +/-
Increase or decrease volume.
g (Mute)
Mute or restore volume.
h / (Previous/Next)
• Skip to the previous or next track,
chapter or le.
• In radio mode, select a preset radio
station.
i Numeric buttons
Select an item to play.
j SOUND
Select a sound mode.
k SURR
Select surround sound or stereo sound.
l (Play/Pause)
Start, pause or resume play.
m (Stop)
Stop play.
n OPTIONS
• Access more play options while playing
a disc or a USB storage device.
• In radio mode, auto install the radio
stations.
o (Open/Close)
Open or close the disc compartment.
p (Home)
Access or exit the home menu.
q AUDIO SYNC
• Select an audio language or channel.
• Press and hold to access audio delay
setting, then press Navigation buttons
to delay the audio to match the video.
Connectors
This section includes an overview of the
connectors available on your home theater.
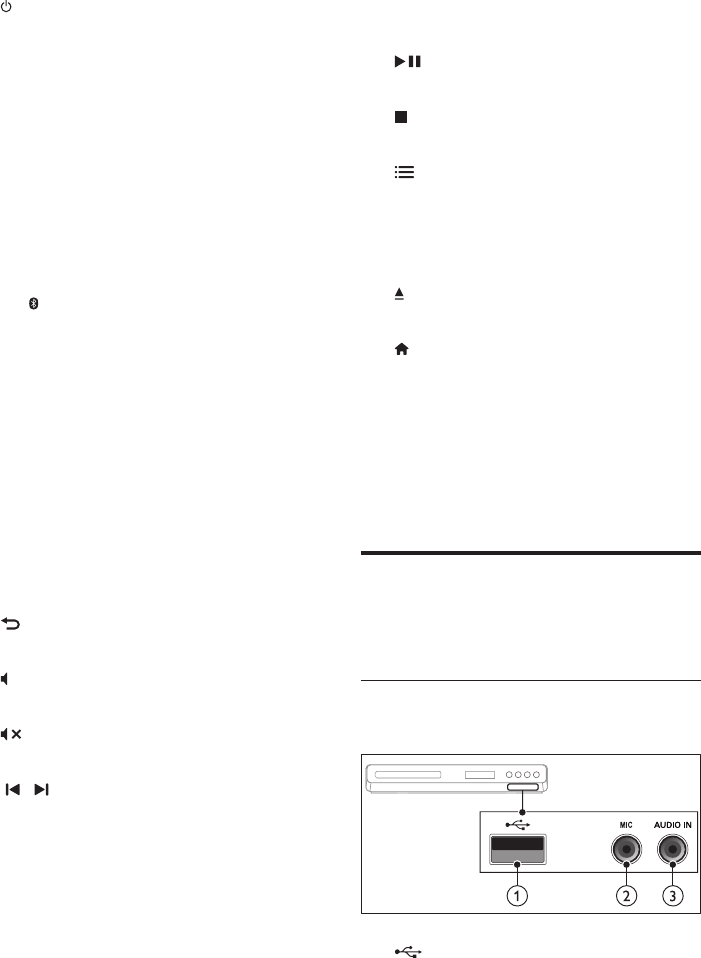
Front
Front connectors
a (USB)
Audio, video or picture input from a USB
storage device.
6EN
b MIC
Audio input from a microphone.
c AUDIO IN
Audio input from an MP3 player (3.5mm
jack).
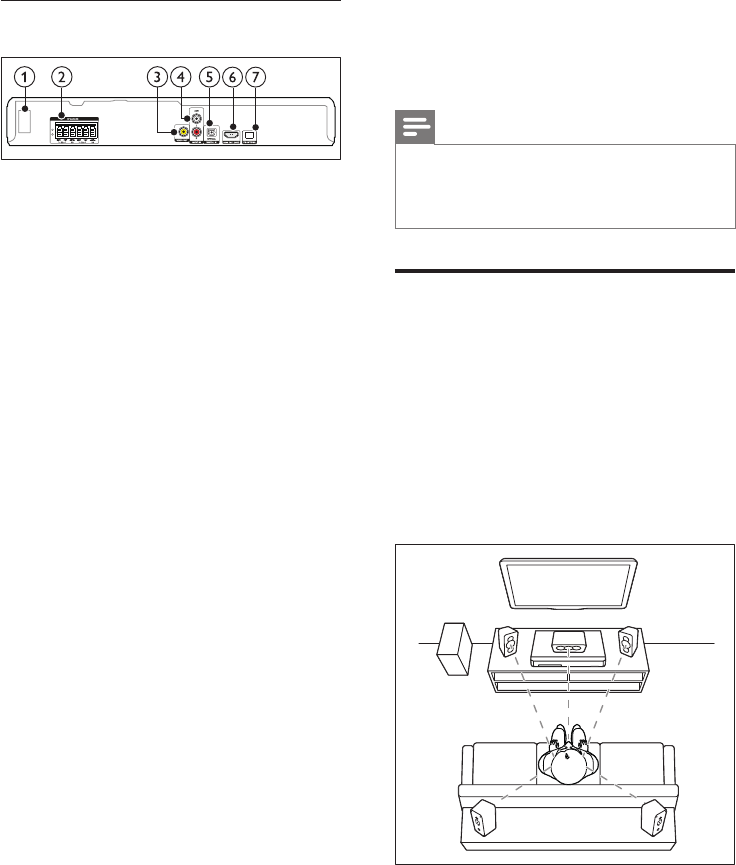
Back connectors
a AC MAINS
Connect the supplied AC power cable.
b SPEAKERS
Connect to the supplied speakers and
subwoofer.
c VIDEO OUT
Connect to the composite video input on
the TV.
d AUDIO IN-AUX
Connect to an analog audio output on the
TV or an analog device.
e DIGITAL IN-OPTICAL
Connect to an optical audio output on the
TV or a digital device.
f HDMI OUT (ARC)
Connect to the HDMI input on the TV.
g FM ANTENNA
Connect the supplied antenna for radio
reception.
3 Connect and set
up
This section helps you connect your home theater
to a TV and other devices, and then set it up.
For information about the basic connections
of your home theater and accessories, see the
quick start guide.
Note
•For identication and supply ratings, see the type plate
at the back or bottom of the product.
•Before you make or change any connections, make sure
that all devices are disconnected from the power outlet.
Connect speakers
The speaker cables are color-coded for easy
connection. To connect a speaker to your home
theater, match the color on the speaker cable to
the color on the connector.
Speaker position plays a critical role in setting up
a surround sound effect. For best effect, position
all the speakers towards the seating position and
place them close to your ear level (seated).
* The actual speaker shapes may vary from the
illustration above.
REAR
RIGHT
FRONT
LEFT
FRONT
CENTER
FRONT
RIGHT
REAR
LEFT
SUB
WOOFER

7EN
Note
•Surround sound depends on factors such as room
shape and size, type of wall and ceiling, windows and
reective surfaces, and speaker acoustics. Experiment
with the speaker positions to nd the optimum setting
for you.
Follow these general guidelines for speakers
placement.
1 Seating position:
This is the center of your listening area.
2 FRONT CENTER (front center) speaker:
Place the center speaker directly in front of
the seating position, either above or below
your TV.
3 FRONT LEFT (front left) and FRONT
RIGHT (front right) speakers:
Place the left and right speakers in the
front, and at equal distance from the center
speaker. Make sure that the left, right, and
the center speakers are at equal distance
from your seating position.
4 REAR LEFT (rear left) and REAR RIGHT
(rear right) speakers:
Place the rear surround speakers to the
left and right side of your seating position,
either in line with it or slightly behind it.
5 SUBWOOFER (subwoofer):
Place the subwoofer at least one meter
to the left or right of the TV. Leave about
10-centimeter clearance from the wall.
Connect to TV
Connect your home theater to a TV to watch
videos. You can listen to the TV audio through
your home theater speakers.
Use the best quality connection available on
your home theater and TV.
Option 1: Connect to TV through
HDMI (ARC)
Best quality video
Your home theater supports HDMI version
with Audio Return Channel (ARC). If your TV
is HDMI ARC compliant, you can hear the TV
audio through your home theater by using a
single HDMI cable.
1 Using a High Speed HDMI cable, connect
the HDMI OUT (ARC) connector on
your home theater to the HDMI ARC
connector on the TV.
• The HDMI ARC connector on the TV
might be labeled differently. For details,
see the TV user manual.
2 On your TV, turn on HDMI-CEC
operations. For details, see the TV user
manual.
• HDMI-CEC is a feature that enables
CEC compliant devices that are
connected through HDMI to be
controlled by a single remote control,
such as volume control for both the
TV and the home theater. (see 'Set
up EasyLink (HDMI-CEC control)' on
page 9)
3 If you cannot hear the TV audio through
your home theater, set up the audio
manually. (see 'Set up the audio' on page
10)
TV
8EN
Option 2: Connect to TV through
standard HDMI
Best quality video
If your TV is not HDMI ARC compliant, connect
your home theater to the TV through a
standard HDMI connection.
1 Using a High Speed HDMI cable, connect
the HDMI OUT (ARC) connector on your
home theater to the HDMI connector on
the TV.
2 Connect an audio cable to hear the TV
audio through your home theater (see
'Connect audio from TV and other devices'
on page 8).
3 On your TV, turn on HDMI-CEC
operations. For details, see the TV user
manual.
• HDMI-CEC is a feature that enables
CEC compliant devices that are
connected through HDMI to be
controlled by a single remote control,
such as volume control for both the
TV and the home theater. (see 'Set
up EasyLink (HDMI-CEC control)' on
page 9)
4 If you cannot hear the TV audio through
your home theater, set up the audio
manually. (see 'Set up the audio' on page
10)
Note
•If your TV has a DVI connector, you can use an HDMI/
DVI adapter to connect to TV. However, some of the
features may not be available.
TV
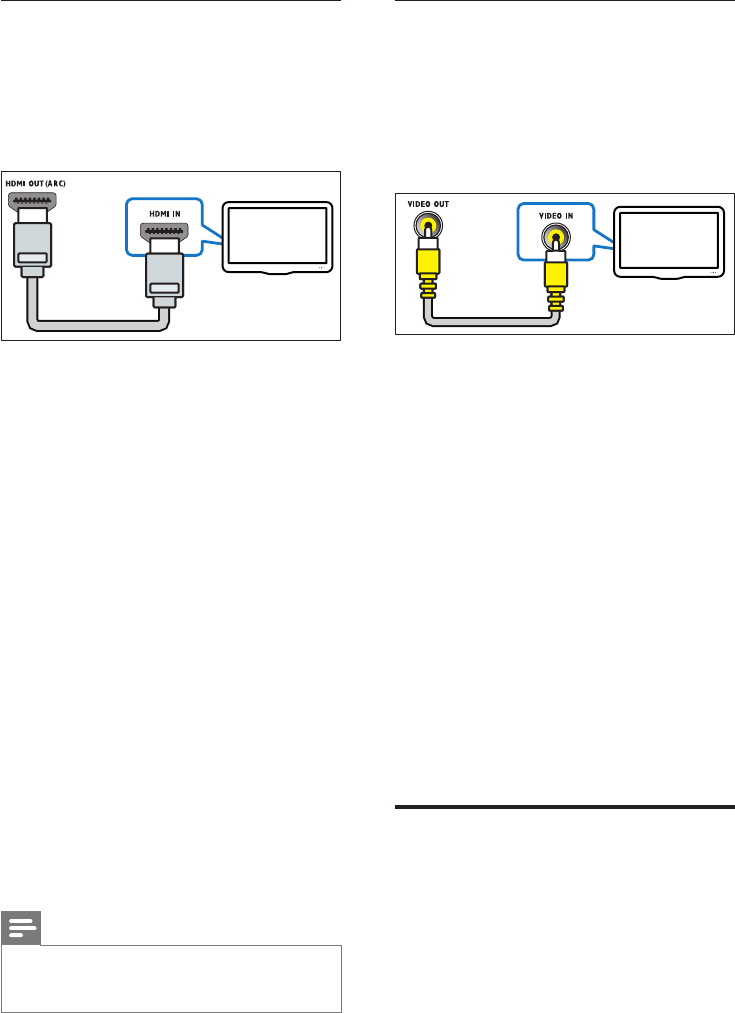
Option 3: Connect to the TV through
composite video
Basic quality video
If your TV does not have HDMI connectors, use
a composite video connection. A composite
connection does not support high-denition
video.
1 Using a composite video cable, connect
the VIDEO OUT connector on your
home theater to the VIDEO IN connector
on the TV.
• The composite video connector might
be labeled AV IN, COMPOSITE, or
BASEBAND.
2 Connect an audio cable to hear the TV
audio through your home theater (see
'Connect audio from TV and other devices'
on page 8).
3 When you watch TV programs, press
SOURCE on your home theater
repeatedly to select the correct audio
input.
4 When you watch videos, switch your TV to
the correct video input. For details, see the
TV user manual.
Connect audio from TV and
other devices
Play audio from TV or other devices through
your home theater speakers.
Use the best quality connection available on
your TV, home theater, and other devices.
TV
9EN
Note
•When your home theater and TV are connected
through HDMI ARC, an audio connection is not
required (see 'Option 1: Connect to TV through HDMI
(ARC)' on page 7).
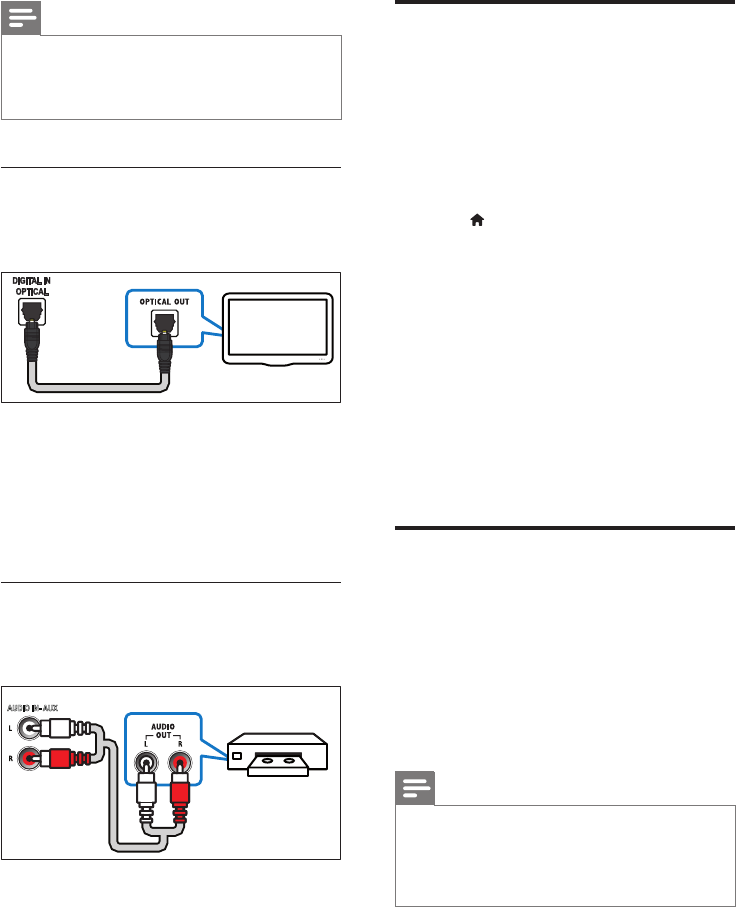
Option 1: Connect audio through a
digital optical cable
Best quality audio
1 Using an optical cable, connect the
OPTICAL connector on your home
theater to the OPTICAL OUT connector
on the TV or other device.
• The digital optical connector might be
labeled SPDIF or SPDIF OUT.
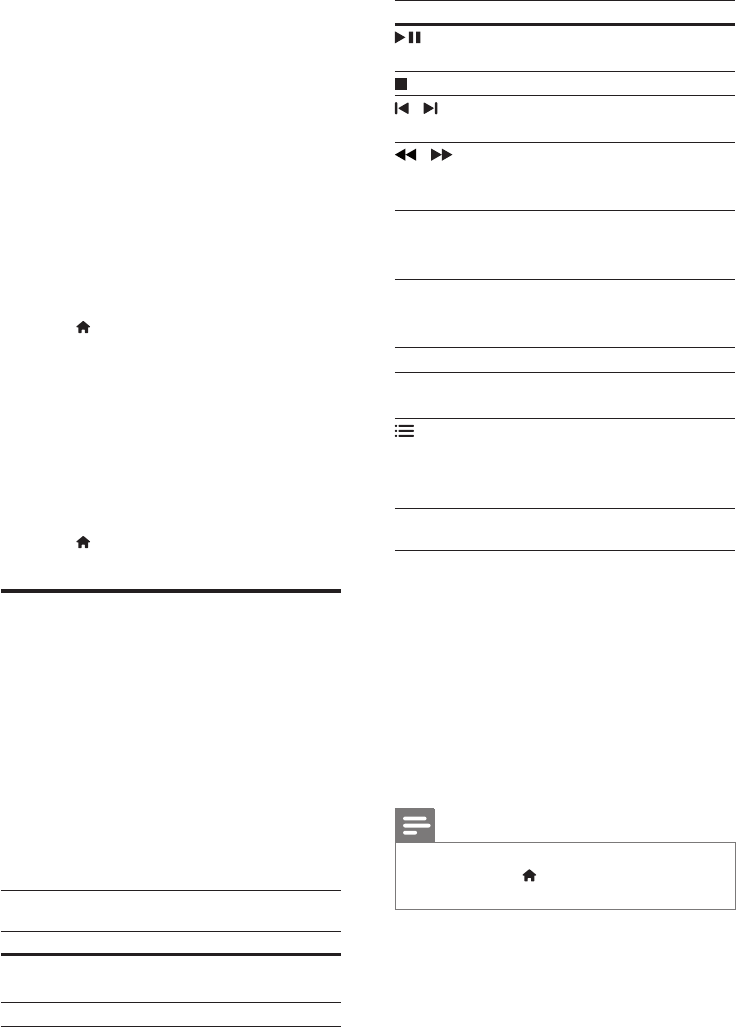
Option 2: Connect audio through
analog audio cables
Basic quality audio
1 Using an analog cable, connect the AUX
connectors on your home theater to the
AUDIO OUT connectors on the TV or
other device.
TV
VCR
AUDIO IN- AUX
Set up speakers
Set up the speakers manually to experience
customized surround sound.
Before you start
Make the necessary connections described in
the quick start guide, and then switch the TV to
the correct source for your home theater.
1 Press (Home).
2 Select [Setup], and then press OK.
3 Select [Audio] > [Speaker Setup].
4 Press the Navigation buttons and OK to
select and change:
• [Speakers Volume]: Set the volume
level of each speaker.
• [Speakers Delay]: Set the delay time
for speakers which are placed closer to
the seating position in order to obtain
equal audio transmission from all the
speakers.
Set up EasyLink (HDMI-CEC
control)
This home theater supports Philips EasyLink,
which uses the HDMI-CEC (Consumer
Electronics Control) protocol. EasyLink-
compliant devices that are connected through
HDMI can be controlled by a single remote
control.
Note
•Depending on the manufacturer, HDMI-CEC is known
by many names. For information on your device, see
the user manual of the device.
•Philips does not guarantee 100% interoperability with
all HDMI-CEC devices.
Before you start
• Connect your home theater to the HDMI-
CEC compliant device through HDMI
connection.

10 EN
• Make the necessary connections described
in the quick start guide, and then switch
the TV to the correct source for your
home theater.
Enable EasyLink
1 Press (Home).
2 Select [Setup], and then press OK.
3 Select [Video], and then press OK.
4 Select [HDMI Setup] > [EasyLink Setup]
> [EasyLink] > [On].
5 On your TV and other connected devices,
turn on HDMI-CEC control. For details, see
the user manual of the TV or other devices.
• On your TV, set the audio output to
'Amplier' (instead of TV speakers).
For details, see the TV user manual.
EasyLink controls
With EasyLink, you can control your home
theater, TV, and other connected HDMI-CEC
compliant devices with a single remote control.
• [1 Touch Play] (One-touch play): If one-
touch play is enabled, press (Standby-
On) on the remote control of your home
theater to wake up the TV from standby.
• [1 Touch Standby] (One-touch standby): If
one-touch standby is enabled, your home
theater can switch to standby with the
remote control of the TV or other HDMI-
CEC devices.
• [Sys Audio Control] (System audio
control): If system audio control is enabled,
the audio of the connected device is
output through your home theater
speakers automatically when you play the
device.
• [Audio Mapping] (Audio input mapping):If
system audio control does not work, map
the connected device to the correct audio
input connector on your home theater
(see 'Set up the audio' on page 10).
Note
•To change the EasyLink control settings, press
(Home), select [Setup] > [Video] > [HDMI Setup] >
[EasyLink Setup] > [EasyLink].
Set up the audio
If you cannot hear the audio output of a
connected device through your home theater
speakers, do the following:
• Check that you have enabled EasyLink
on all the devices, (see 'Set up EasyLink
(HDMI-CEC control)' on page 9) and
• on your TV, set the audio output to
"Amplier" (instead of TV speakers). For
details, see the TV user manual, and
• setup the EasyLink audio control.
1 Press (Home).
2 Select [Setup], and then press OK.
3 Select [Video], and then press OK.
4 Select [HDMI Setup] > [EasyLink Setup]
> [Sys Audio Control] > [On].
• To play the audio from the TV
speakers, select [Off], and skip the
following steps.
5 Select [HDMI Setup] > [EasyLink Setup]
> [Audio Mapping].
6 Follow the onscreen instructions to map
the connected device to the audio inputs
on your home theater.
• If you connect your home theater
to the TV through an HDMI ARC
connection, make sure that the TV
audio is mapped to the ARC input on
your home theater.
11EN
4 Use your home
theater
This section helps you use the home theater to
play media from a wide range of sources.
Before you start
• Make the necessary connections described
in the Quick start guide and the user
manual.
• Switch the TV to the correct source for
the home theater.
1 Press (Home).
» The home menu is displayed.
2 Press the Navigation buttons and OK to
select the following:
• [DISC]: Start disc play.
• [USB]: Access the USB content
browser.
• [Setup]: Access menus to change video,
audio and other settings.
3 Press (Home) to exit.
Discs
Your home theater can play DVDs, VCDs, and
CDs. It can also play discs that you’ve made at
home, such as CD-R discs of photos and music.
1 Insert a disc into the home theater.
2 If the disc does not play automatically, press
DISC or select [DISC] from the home
menu.
3 Press the play buttons to control play (see
'Play buttons' on page 11).
Play buttons
Button Action
Navigation
buttons
Navigate menus.
OK Conrm an entry.
Button Action
(Play/
Pause)
Start, pause or resume play.
Stop play.
/ Skip to the previous or next
track, chapter or le.
/ Fast backwards or fast forwards.
Press repeatedly to change the
search speed.
Navigation
buttons
(left/right)
Rotate the picture clockwise or
counter-clockwise.
Navigation
buttons
(up/down)
Flip the picture vertically or
horizontally.
DISC Access or exit the disc menu.
AUDIO
SYNC
Select an audio language or
channel.
OPTIONS
Access more options when you
play your audio, video, or media
les. (see 'Audio, video, and
picture options' on page 13)
Synchronize video and sound
If the audio and video are not synchronized,
delay the audio to match the video.
1 While playing video, press and hold
AUDIO SYNC.
» Audio sync menu is displayed.
2 Press the Navigation buttons to
synchronize the audio with the video, and
then press OK.
Note
•Picture and sound can be synchronized through the
setup menu, press (Home), select [Setup] > [Audio]
> [Audio Sync].
12 EN
Display menu for VCD and SVCD
Display the content menu on VCD and SVCD
discs.
1 Press (Home).
2 Select [Setup], and then press OK.
3 Select [Preference] > [PBC].
• [PBC]: Enable or disable the content
menu navigation of VCD and SVCD
discs with Play Back Control feature.
Datales
Your home theater can play pictures, audio and
video les contained in a disc or a USB storage
device. Before you play a le, check that the le
format is supported by your home theater.
1 Play the les from a disc or USB storage
device.
2 To stop play, press .
• To resume the video from where you
stopped, press .
• To play the video from the start, press
OK.
Note
•To play DivX DRM protected les, connect your home
theater to a TV through an HDMI cable.
Subtitles
If your video has subtitles in multiple languages,
select a subtitle language.
Note
•Make sure that the subtitle le has the exact same
name as the video le. For example, if the video le is
named 'movie.avi', name the subtitle le as 'movie.srt'
or 'movie.sub'.
•Your home theater supports the following le formats:
.srt, .sub, .txt, .ssa, .ass, smi, and .sami. If the subtitles do
not appear correctly, change the character set.
1 Press OPTIONS, and select a subtitle
language under SUBTITLE option.
2 For DivX videos, if the subtitles do not
appear correctly, continue the following
steps to change the character set.
3 Press (Home).
4 Select [Setup], and then press OK.
5 Select [Preference] > [DivX Subtitle].
6 Select a character set that supports the
subtitle.
Character
Set
Language
[Standard] English, Albanian, Danish, Dutch,
Finnish, French, Gaelic, German,
Italian, Kurdish (Latin), Norwegian,
Portuguese, Spanish, Swedish and
Turkish
VOD code for DivX
Before you purchase DivX videos and play
them on your home theater, register the home
theater on www.divx.com using the DivX VOD
code.
1 Press (Home).
2 Select [Setup], and then press OK.
3 Select [General] > [DivX(R) VOD Code].
» The DivX VOD registration code for
your home theater is displayed.
Play audio through Bluetooth
Through Bluetooth, connect this product with
your Bluetooth device (such as an iPad, iPhone,
iPod touch, Android phone, or laptop), and then
you can listen to the audio les stored on the
device through this product.
What you need
• A Bluetooth device which supports
Bluetooth prole A2DP, AVRCP and with
Bluetooth version as 2.1 + EDR.
13EN
• The operational range between this
product and a Bluetooth device is
approximately 10 meters (30 feet).
1 Press to select Bluetooth mode.
» [bt] is displayed on the display panel.
2 On the Bluetooth device, switch on
Bluetooth, search for and select the name
of this product to start connection (see
the user manual of the Bluetooth device
on how to enable Bluetooth).
• If prompted for a password, enter
"0000".
3 Wait until you hear a beep sound from this
product.
» The beep sound from this product
indicates that the connection succeeds.
[bt_rd] on the display panel is
displayed for 2 seconds, and then the
display comes back to [bt].
» If the connection fails, a beep sound
does not emit from this product.
4 Select and play audio les or music on
your Bluetooth device.
• During play, if a call is coming, music
play is paused.
• If music streaming is interrupted, place
the Bluetooth device closer to this
product.
5 To exit Bluetooth, select other source.
• When you switch back to Bluetooth
mode, Bluetooth connection remains
active.
Note
•The music streaming may be interrupted by obstacles
between the device and this product, such as wall,
metallic casing that covers the device, or other devices
nearby that operate in the same frequency.
•If you want to connect this product with another
Bluetooth device, press and hold on the remote
control to disconnect the currently connected
Bluetooth device.
USB storage devices
Enjoy pictures, audio, and video stored on a
USB storage device such as an MP4 player.
What you need
• A USB storage device that is formatted
for FAT or NTFS le system, and complies
with the Mass Storage Class.
• A media le in one of the supported le
formats.
Note
•If you use a USB extension cable, USB HUB or USB
multi-reader, the USB storage device may not be
recognized.
1 Connect a USB storage device to the
(USB) connector on your home theater.
2 Press USB.
» A content browser is displayed.
3 Select a le and then press OK.
4 Use the play buttons to control play.
Audio, video, and picture
options
Use advanced features when you play audio,
video, or media les from a disc or a USB
storage device.
Audio options
1 While playing audio, press OPTIONS
repeatedly to select a repeat mode.
Video options
1 While viewing video, press OPTIONS.
» The video options menu is displayed.
Depending on the video source, some
options are not available.
14 EN
2 Press the Navigation buttons buttons and
OK to select and change:
• [Info]: Display the play information.
• [PBC]: Enable or disable the content
menu navigation of VCD and SVCD
discs with Play Back Control feature.
• [Aspect ratio]: Select a display ratio of
picture that matches your TV screen.
• [Repeat]: Select a repeat play mode.
• [Zoom]: Zoom into a video scene or
picture. Press the Navigation buttons
(left/right) to select a zoom factor.
• [Subtitle]: Select subtitle language for
video.
• [Angle]: Select video scenes recorded
in different camera angels.
• [Microphone]: Turn the microphone
on or off.
• [Karaoke setup]: Access the Karaoke
setup menu.
• [Vocal]: Select a Karaoke audio mode,
or turn off original vocals.
Picture options
1 While viewing pictures, press
OPTIONS.
2 Press the Navigation buttons and OK to
select and change:
• [Color]: Turn on or off the color mode.
• [Photo preview]: Display the thumbnail
of photos.
• [Repeat]: Select a repeat mode for
slideshow.
• [Zoom]: Zoom into a video scene or
picture. Press the Navigation buttons
(left/right) to select a zoom factor.
3 Press / to go to previous or next
preview page.
4 Press the Navigation buttons and OK to
select a picture.
Musical slideshow
If the picture and audio les are from the same
disc or USB storage device, you can create a
musical slideshow.
1 Select an audio track and then press OK.
2 Press BACK and then go to the picture
folder.
3 Select a picture and then press OK to
start the slideshow.
4 Press to stop slideshow.
5 Press again to stop music.
Radio
Listen to FM radio on your home theater, and
store up to 40 radio stations.
Note
•AM and digital radio are not supported.
•If no stereo signal is detected, you are prompted to
install the radio stations again.
1 Connect the FM antenna to the FM
ANTENNA on your home theater.
• For the best reception, place the
antenna away from your TV or other
sources of radiation.
2 Press SOURCE repeatedly to select radio
source.
» If you have already installed the radio
stations, the last channel that you
listened to is played.
» If you have not installed any radio
stations, the message AUTO
INSTALL...PRESS PLAY appears on
the display panel. Press to install
radio stations.
3 Use the remote control to listen or to
change radio stations.
15EN
Play buttons
Button Action
/
or
Alphanumeric
buttons
Select a preset radio station.
Navigation
buttons
Left/Right: Search for a radio
station.
Up/Down: Fine tune a radio
frequency.
Press to stop the installation
of radio stations.
Press and hold to erase the
preset radio station.
SOURCE
button to
access radio
Manual:
1) In radio mode, press
OPTIONS.
2) When a radio frequency
blinks, press OK to store
the radio station.
3) Repeat step 1 and 2 to
store other stations.
Automatic:
In radio mode, press and
hold OPTIONS for three
seconds to reinstall all the
available radio station.
Tuning grid
In some countries, you can toggle the FM tuning
grid between 50 kHz and 100 kHz.
1 Press SOURCE repeatedly to select radio
source.
2 Press .
3 Press and hold to toggle between
50 kHz or 100 kHz.
MP3 player
Connect a MP3 player to play audio les.
What you need
• An MP3 player.
• A 3.5mm stereo audio cable.
1 Using the 3.5mm stereo audio cable,
connect the MP3 player to the AUDIO IN
connector on your home theater.
• If you use 6.5mm stereo audio cable,
connect the MP3 player to your
home theater using a 3.5mm - 6.5mm
converter jack.
2 Press AUDIO SOURCE repeatedly until
(Audio In) appears on the display
panel.
3 Press the buttons on the MP3 player to
select and play audio les.
Karaoke
Play a Karaoke disc on your home theater and
sing along with the music.
What you need
• A Karaoke microphone.
• Karaoke discs.
Note
•To prevent loud feedback or unexpected noise, turn
the microphone volume to the minimum before you
connect the microphone to your home theater.
Play karaoke music
1 While playing a karaoke disc, press
(Home).
» The home menu is displayed.
2 Select [Karaoke], and then press OK.
» The karaoke setup menu is displayed.

16 EN
3 Press the Navigation buttons (up/down)
and OK to change the following settings:
• [Microphone]: Turn the microphone
on or off.
• [Mic Volume]: Change the microphone
volume.
• [Echo Level]: Change the echo level.
• [Karaoke Scoring]: Select a difculty
level to score your singing. After a song
ends, a score is given.
• [Karaoke Idol]: Have a Karaoke
contest with your friends. Follow the
on-screen instructions to start the
contest.
• [Key Shift]: Change the pitch to match
your voice.
• [Vocal]: Select a Karaoke audio mode,
or turn off original vocals.
Choose sound
This section helps you choose the ideal sound
for your video or music.
Sound mode
Select predened sound modes to suit your
video or music.
1 Press SOUND repeatedly to select a
sound mode.
• [Movie Mode]: Enjoy a cinematic audio
experience, specially enhanced for
movies.
• [Music Mode]: Recreate the original
recording environment of your music,
in the studio or at a concert.
• [Original]: Experience the original
sound of your movies and music,
without added sound effects.
• [News]: Hear every word with
optimized speech and clear vocals.
• [Gaming]: Enjoy thrilling arcade sounds,
ideal for action-packed video games or
loud parties.
Surround sound mode
Experience an immersive audio experience with
surround sound modes.
1 Press SURR repeatedly to select a
surround mode.
• [Multi Channel]: Traditional 5.1 channel
for a more relaxing cinematic
experience.
• [Stereo]: Two-channel stereo sound.
Ideal for listening to music.
Note
•If the audio source is a 2.1 channel, multi-channel mode
will output 5-channel stereo sound.
17EN
5 Change settings
The home theater settings are already
congured for optimal performance. Unless
you have a reason to change a setting, we
recommend that you keep the default setting.
Note
•You cannot change a setting that is grayed out.
•To return to the previous menu, press BACK. To
exit the menu, press (Home).
Language settings
Onscreen display language
1 Press (Home).
2 Select [Setup] and then press OK.
3 Select [General] and then press OK.
• [OSD Language]: Select a display
language for menu.
Disc language
1 Press (Home).
2 Select [Setup] and then press OK.
3 Select [Preference] and then press OK.
• [Audio]: Select an audio language for
discs.
• [Subtitle]: Select a subtitle language
for discs.
• [Disc Menu]: Select a menu language
for discs.
Note
•If your preferred disc language is not available, select
[Others] from the list, and enter the 4-digit language
code found at the end of this user manual (see
'Language code' on page 26).
•If you select a language that is not available on a disc,
the home theater uses the default language of the disc.
Picture and video settings
1 Press (Home).
2 Select [Setup] and then press OK.
3 Select [Video] and then press OK.
• [TV System]: Select a video format
supported by the TV.
• [TV Display]: Select a picture format
to t the TV screen.
• [Picture Setting]: Select animation for
the slide show.
• [HD JPEG]: Enable this feature to view
high-denition JPEG pictures through
HDMI connection.
• [HDMI Setup]: Access the following
setup through HDMI connection.
* [Resolution]: Select a resolution for
high denition videos.
* [HDMI Deep Color]: Recreate the
natural world on your TV screen by
displaying vivid images using billion
colors. Your home theater must be
connected to a Deep Color enabled
TV through an HDMI cable.
* [Wide Screen]: Select a display
format for wide screen videos.
* [EasyLink Setup]: Set up EasyLink
control (see 'Set up EasyLink (HDMI-
CEC control)' on page 9).
Note
•If you change a setting, make sure that the TV supports
the new setting.

18 EN
Audio settings
1 Press (Home).
2 Select [Setup] and then press OK.
3 Select [Audio] and then press OK.
• [HDMI Audio]: Set the HDMI audio
output from your TV, or disable HDMI
audio output from the TV.
• [Audio Sync]: Set audio delay if audio
and video cannot be matched.
• [Speaker Setup]: Set up speakers for
best surround sound experience.
• [Sound Mode]: Select a predened
sound mode to suit your video and
music.
• [Treble/Bass]: Set the high frequency
(treble) and low frequency (bass)
settings of the home theater.
• [Night Mode]: Select quiet or full
dynamic sound. Night mode decreases
the volume of loud sounds and
increases volume of sounds such as
speech. Applicable to Dolby Digital
encoded DVD discs only.
Parental control settings
Password and Ratings
1 Press (Home).
2 Select [Setup] and then press OK.
3 Select [Preference] and then press OK.
• [Password]: Set or change your
password for parental control access.
If you do not have a password or
have forgotten your password, enter
000000.
• [Parental Control]: Enable maturity-
based restricted access for playback
of DVD-video that are recorded with
ratings. To play discs irrespective of the
rating, select [8 Adult].
Lock disc
1 Press (Home).
2 Select [Setup] and then press OK.
3 Select [General] and then press OK.
• [Disc Lock]: Lock the disc to restrict
play. You can lock up to 20 discs on
your home theater.
Note
•To play a locked disc, follow the onscreen instructions
to enter the password, and then press OK.
Display settings
1 Press (Home).
2 Select [Setup] and then press OK.
3 Select [Preference] and then press OK.
• [PBC]: Enable or disable the content
menu navigation of VCD and SVCD
discs with Play Back Control feature.
Energy saving settings
1 Press (Home).
2 Select [Setup] and then press OK.
3 Select [General] and then press OK.
• [Display Dim]: Set the brightness of
the home theater front panel display.
• [Sleep Timer]: Switch the home
theater to standby mode after the
elapsed time.
• [Auto Standby]: Switch the home
theater to standby mode after
15 minutes of no activity when in disc
or USB mode.

19EN
Restore default settings
1 Press (Home).
2 Select [Setup] and then press OK.
3 Select [Preference] > [Default], and then
press OK.
4 Follow the onscreen message to restore
default setting.
» Your home theater is reset to its
default settings, except for password,
parental control and disc lock settings.
6 Update software
Philips continually tries to improve its products.
To get the best features and support, update
your home theater with the latest software.
Compare the version of your current
software with the latest version on
www.philips.com/support. If the current version
is lower than the latest version available on the
Philips support website, upgrade your home
theater with the latest software.
Caution
•Do not install a lower version of software than the
current version installed on your product. Philips is not
liable for problems caused due to software downgrade.
Check software version
Check the version of the current software
installed on your home theater.
1 Press (Home).
2 Select [Setup] and then press OK.
3 Select [Preference] > [Version Info].
» The software version is displayed.
Update software through
USB
What you need
• A USB ash drive that is FAT or NTFS-
formatted, with at least 75MB of memory.
Do not use a USB hard drive.
• A computer with Internet access.
• An archive utility that supports the ZIP le
format.
20 EN
Step 1: Download the latest software
1 Connect a USB ash drive to your
computer.
2 In your web browser, go to
www.philips.com/support.
3 At the Philips Support website, nd your
product and locate the Software and
drivers.
» The software update is available as a
zip le.
4 Save the zip le in the root directory of
your USB ash drive.
5 Use the archive utility to extract the
software update le in the root directory.
6 Disconnect the USB ash drive from your
computer.
Step 2: Update the software
Caution
•Do not switch off the home theater or remove the
USB ash drive during the update.
1 Connect the USB ash drive containing the
downloaded le to your home theater.
• Make sure that the disc compartment
is closed and there is no disc inside.
2 Switch your TV to the correct source for
your home theater.
3 Follow the onscreen instructions to
conrm the update.
» Once complete, the home theater
automatically switches off and restarts.
If it does not, disconnect the power
cord for a few seconds and then
reconnect it.
7 Product
specifications
Note
•Specications and design are subject to change without
notice.
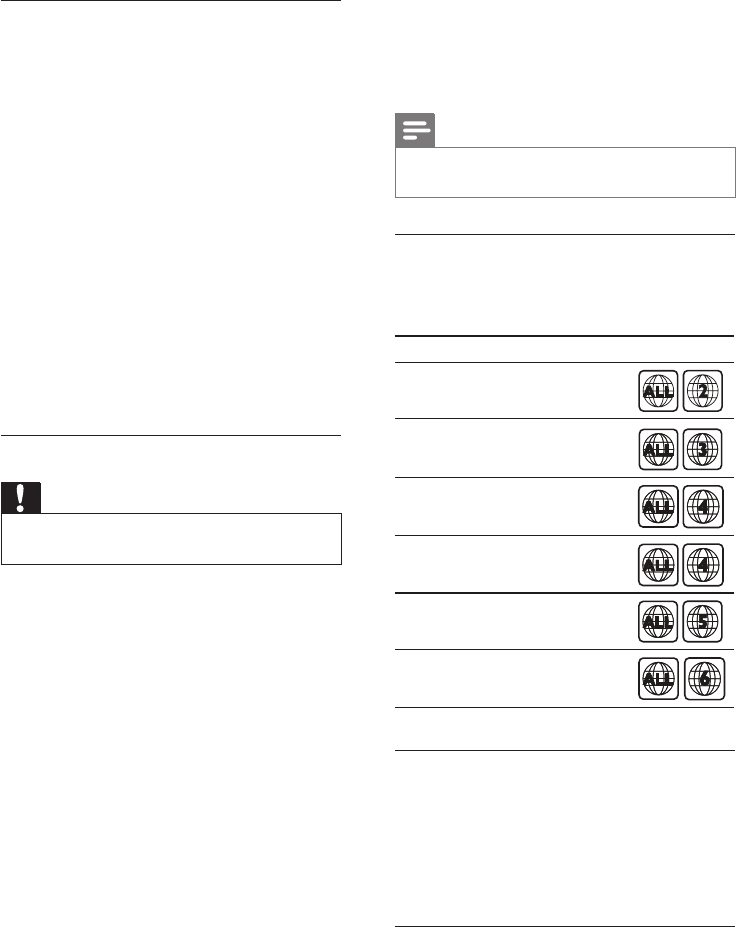
Region codes
The type plate on the back or bottom of the
home theater shows which regions it supports.
Media formats
• DVD-Video, DVD+R/+RW, DVD-R/-RW,
DVD+R/-R DL, CD-R/CD-RW, Audio CD,
Video CD/SVCD, Picture les, MP3 media,
WMA media, DivX media, USB storage
device
Supportedleformats
• Video: .avi, .divx, .mpg, .mpeg
• Audio: .mp3, .wma
• Picture: .jpg, .jpeg
Country
DVD
Europe, United Kingdom
Latin America
Australia, New Zealand
Russia, India
China
Asia Pacific, Taiwan, Korea

21EN
Playablevideoles
• Resolution size: 720 x 576 pixels
• Video codec:
• .avi, .divx: DivX3.11, DivX4.x, DivX5.x,
MPEG 1, MPEG 2, Xvid
• .mpg, .mpeg: MPEG 1, MPEG 2
• Audio codec:
• .avi, .divx: PCM, AC-3, MP3, WMA
• .mpg, .mpeg: PCM, MPEG, MP3
• Maximum Bit rate: 8Mbps
Playableaudioles
• Playable audio codec:
• .mp3: MP3
• .wma: WMA
• Maximum Bit rate:
• .mp3: 320kbps
• .wma: 192kbps
Bluetooth
•Bluetooth proles: A2DP, AVRCP
•Bluetooth version: 2.1 + EDR
Amplier
• Total output power: 1000W RMS
(+/- 0.5 dB, 10% THD)
• Frequency response: 20 Hz-20 kHz / ±3 dB
• Signal-to-noise ratio: > 65 dB (CCIR) /
(A-weighted)
• Input sensitivity:
• AUX: 2 V
• AUDIO IN: 1 V
Video
• Signal system: PAL / NTSC/Multi
• HDMI output: 480i/576i, 480p/576p, 720p,
1080i, 1080p
Audio
• S/PDIF Digital audio input:
• Optical: TOSLINK
• Sampling frequency:
• MP3: 32 kHz, 44.1 kHz, 48 kHz
• WMA: 44.1 kHz, 48 kHz
• Constant bit rate:
• MP3: 32 kbps - 320 kbps
• WMA: 64 kbps - 192 kbps
Radio
• Tuning range:
• Europe/Russia/China:
FM 87.5-108 MHz (50 kHz)
• Asia Pacic/Latin America:
FM 87.5-108 MHz (50/100 kHz)
• Signal-to-noise ratio: FM 50 dB
• Frequency response: FM 200 Hz-12.5 kHz
/ ±6 dB
USB
• Compatibility: Hi-Speed USB (2.0)
• Class support: USB Mass Storage Class
(MSC)
• File system: FAT16, FAT32, NTFS
• USB port: 5V , 500mA
Main unit
• Power supply:
• Europe/China/Russia/India:
220-240V~, 50 Hz
• Latin America/Asia Pacic:
110-127 V/220-240 V~, 50-60 Hz
• Power consumption: 140 W
• Standby power consumption: ≤ 0.5 W
• Dimensions (WxHxD):
360 x 58 x 325 mm
• Weight: 2.3 kg
Subwoofer
• Output power:
166 W RMS (+/- 0.5 dB, 10% THD)
• Impedance: 3 ohm
• Speaker drivers: 203 mm (8") woofer
• Dimensions (WxHxD):
178 x 300 x 343 mm

22 EN
• Weight: 4.1 kg
• Cable length: 3.3 m
Speakers
Center speaker:
• 166W RMS (+/- 0.5 dB, 10% THD)
• Speaker impedance: 3 ohm
• Speaker drivers: 1 x 78 mm (3") full range
• Dimensions (WxHxD):
223 x 100 x 80 mm
• Weight: 0.77 kg
• Cable length: 2.25 m
Front/Rear speaker:
• 4 x 166W RMS (+/- 0.5 dB, 10% THD)
• Speaker impedance: 3 ohm
• Speaker drivers: 1 x 78 mm (3") full range
• Dimensions (WxHxD):
• HTD5520: 90 x 185 x 82 mm
(front/rear)
• HTD5550: 90 x 185 x 82 mm (front);
247 x 1090 x 242 mm (rear)
• HTD5580: 247 x 1090 x 242 mm
(front/rear)
• Weight (front):
• HTD5520: 0.63 kg/each
• HTD5550: 0.63 kg/each
• HTD5580: 3.03 kg/each
• Weight (rear):
• HTD5520: 0.63 kg/each
• HTD5550/HTD5580: 3.03 kg/each
• Cable length (front): 3.25 m
• Cable length (rear): 10.25 m
Remote control batteries
• 1 x AAA-R03-1.5 V
Laser
• Type: Semiconductor laser GaAIAs (CD)
• Wave length: 650-662 nm (DVD),
785-795 nm (CD)
• Output power: 6 mW (DVD),
7 mW (VCD/CD)
• Beam divergence: 60 degrees.
8 Troubleshooting
Warning
•Risk of electric shock. Never remove the casing of the
product.
To keep the warranty valid, never try to repair
the product yourself.
If you have problems using this product, check
the following points before you request service.
If you still have a problem, get support at
www.philips.com/support.
Main unit
The buttons on the home theater do not
work.
• Disconnect the home theater from the
power supply for a few minutes, then
reconnect.
Picture
No picture.
• Make sure that the TV is switched to the
correct source for the home theater.
No picture on a TV connected through HDMI.
• Make sure that the HDMI cable is not
faulty. If it is faulty, replace it with a new
cable.
• Wait for 10 seconds for auto recovery,
or change the HDMI video setting (see
'Picture and video settings' on page 17).
Discdoesnotplayhigh-denitionvideo.
• Make sure that the disc contains high-
denition video.
• Make sure that the TV supports high-
denition video.
• Use an HDMI cable to connect to the TV.

23EN
Sound
No sound from home theater speakers.
• Connect the audio cable from your home
theater to your TV or other devices.
However, you do not need a separate
audio connection when the home theater
and TV are connected through an HDMI
ARC connection.
• Set up the audio for the connected device
(see 'Set up the audio' on page 10).
• Reset your home theater to its factory
settings (see 'Restore default settings' on
page 19), and then switch it off and switch
on again.
• On your home theater, press SOURCE
repeatedly to select the correct audio
input.
Distorted sound or echo.
• If you play audio from the TV through the
home theater, make sure that the TV is
muted.
Audio and video are not synchronized.
• 1) Press and hold AUDIO SYNC.
2) Press the Navigation buttons within ve
seconds to synchronize the audio with the
video.
Play
Cannot play a disc.
• Clean the disc.
• Make sure that the home theater supports
the type of disc (see 'Media formats' on
page 20).
• Make sure that the home theater supports
the region code of the disc (see 'Region
codes' on page 20).
• If the disc is a DVD±RW or DVD±R disc,
make sure that it is nalized.
CannotplayaDivXle.
• Make sure that the DivX le is encoded
according to the 'Home Theater Prole'
with the DivX encoder.
• Make sure that the DivX le is complete.
DivX subtitles do not display correctly.
• Make sure that the subtitle le name is
the same as the movie le name (see
'Subtitles' on page 12).
• Select the correct character set (see
'Subtitles' on page 12).
Cannot read the contents of a USB storage
device.
• Make sure that the format of the USB
storage device is compatible with the
home theater.
• Make sure that the le system on the USB
storage device is supported by the home
theater.
'input invalid' or 'x' sign appears on the TV.
• The operation is not possible.
EasyLink does not work.
• Make sure that the home theater is
connected to a Philips brand EasyLink TV,
and the EasyLink option is turned on (see
'Set up EasyLink (HDMI-CEC control)' on
page 9).
• For TVs from different manufacturers, the
HDMI CEC could be called differently.
Check theTV user manual on how to
enable it.
When you switch on the TV, the home theater
automatically switches on.
• This behavior is normal when you are using
Philips EasyLink (HDMI-CEC). To make the
home theater work independently, switch
off EasyLink.
Bluetooth
A device cannot connect with this product.
• The device does not support the
compatible proles required for this
product.
• You have not enabled the Bluetooth
function of the device. See the user manual
of the device on how to enable the
function.

24 EN
• The device is not correctly connected.
Connect the device correctly (see 'Play
audio through Bluetooth' on page 12).
• This product is already connected with
another Bluetooth device. Disconnect the
connected device, then try again.
Quality of audio play from a connected
Bluetooth device is poor.
• The Bluetooth reception is poor. Move the
device closer to this product, or remove
any obstacle between the device and this
product.
The connected Bluetooth device connects and
disconnects constantly.
• The Bluetooth reception is poor. Move the
device closer to this product, or remove
any obstacle between the device and this
product.
• Turn off Wi-Fi function on the Bluetooth
device to avoid interference.
• For some Bluetooth, the Bluetooth
connection can be deactivated
automatically to save power. This does not
indicate any malfunction of this product.
9 Notice
This section contains the legal and trademark
notices.
Copyright
This item incorporates copy protection
technology that is protected by U.S. patents
and other intellectual property rights of
Rovi Corporation. Reverse engineering and
disassembly are prohibited.
Trademarks
Manufactured under license from Dolby
Laboratories. Dolby and the double-D symbol
are trademarks of Dolby Laboratories.
DivX , DivX Ultra , DivX Certied and
associated logos are trademarks of Rovi
Corporation or its subsidiaries and are used
under license.
DivX Ultra Certied to play DivX video
with advanced features and premium content.
ABOUT DIVX VIDEO: DivX is a digital video
format created by DivX, LLC, a subsidiary
of Rovi Corporation. This is an ofcial DivX
Certied device that plays DivX video. Visit
divx.com for more information and software
tools to convert your les into DivX videos.
ABOUT DIVX VIDEO-ON-DEMAND: This
DivX Certied device must be registered
in order to play purchased DivX Video-on-
Demand (VOD) movies. To obtain your

25EN
registration code, locate the DivX VOD section
in your device setup menu. Go to vod.divx.com
for more information on how to complete your
registration.
The terms HDMI and HDMI High-Denition
Multimedia Interface, and the HDMI Logo are
trademarks or registered trademarks of HDMI
Licensing LLC in the United States and other
countries.
The Bluetooth word mark and logos are
registered trademarks owned by Bluetooth
SIG, Inc. and any use of such marks by Philips
is under license. Other trademarks and trade
names are those of their respective owners.
CLASS 1
LASER PRODUCT

26 EN
10 Language code
Abkhazian 6566
Afar 6565
Afrikaans 6570
Amharic 6577
Arabic 6582
Armenian 7289
Assamese 6583
Avestan 6569
Aymara 6589
Azerhaijani 6590
Bahasa Melayu 7783
Bashkir 6665
Belarusian 6669
Bengali 6678
Bihari 6672
Bislama 6673
Bokmål, Norwegian 7866
Bosanski 6683
Brezhoneg 6682
Bulgarian 6671
Burmese 7789
Castellano, Español 6983
Catalán 6765
Chamorro 6772
Chechen 6769
Chewa; Chichewa; Nyanja 7889
9072
Chuang; Zhuang 9065
Church Slavic; Slavonic 6785
Chuvash 6786
Corsican 6779
Česky 6783
Dansk 6865
Deutsch 6869
Dzongkha 6890
English 6978
Esperanto 6979
Estonian 6984
Euskara 6985
6976
Faroese 7079
Français 7082
Frysk 7089
Fijian 7074
Gaelic; Scottish Gaelic 7168
Gallegan 7176
Georgian 7565
Gikuyu; Kikuyu 7573
Guarani 7178
Gujarati 7185
Hausa 7265
Herero 7290
Hindi 7273
Hiri Motu 7279
Hrwatski 6779
Ido 7379
Interlingua (International)7365
Interlingue 7365
Inuktitut 7385
Inupiaq 7375
Irish 7165
Íslenska 7383
Italiano 7384
Ivrit 7269
Japanese 7465
Javanese 7486
Kalaallisut 7576
Kannada 7578
Kashmiri 7583
Kazakh 7575
Kernewek 7587
Khmer 7577
Kinyarwanda 8287
Kirghiz 7589
Komi 7586
Korean 7579
Kuanyama; Kwanyama 7574
Kurdish 7585
Lao 7679
Latina 7665
Latvian 7686
Letzeburgesch; 7666
Limburgan; Limburger 7673
Lingala 7678
Lithuanian 7684
Luxembourgish; 7666
Macedonian 7775
Malagasy 7771
Magyar 7285
Malayalam 7776
Maltese 7784
Manx 7186
Maori 7773
Marathi 7782
Marshallese 7772
Moldavian 7779
Mongolian 7778
Nauru 7865
Navaho; Navajo 7886
Ndebele, North 7868
Ndebele, South 7882
Ndonga 7871
Nederlands 7876
Nepali 7869
Norsk 7879
Northern Sami 8369
North Ndebele 7868
Norwegian Nynorsk; 7878
Occitan; Provencal 7967
Old Bulgarian; Old Slavonic 6785
Oriya 7982
Oromo 7977
Ossetian; Ossetic 7983
Pali 8073
Panjabi 8065
Persian 7065
Polski 8076
Português 8084
Pushto 8083
Russian 8285
Quechua 8185
Raeto-Romance 8277
Romanian 8279
Rundi 8278
Samoan 8377
Sango 8371
Sanskrit 8365
Sardinian 8367
Serbian 8382
Shona 8378
Shqip 8381
Sindhi 8368
Sinhalese 8373
Slovensky 8373
Slovenian 8376
Somali 8379
Sotho; Southern 8384
South Ndebele 7882
Sundanese 8385
Suomi 7073
Swahili 8387
Swati 8383
Svenska 8386
Tagalog 8476
Tahitian 8489
Tajik 8471
Tamil 8465
Tatar 8484
Telugu 8469
Thai 8472
Tibetan 6679
Tigrinya 8473
To nga (Tonga Islands) 8479
Tsonga 8483
Tswana 8478
Türkçe 8482
Tu rkmen 8475
Tw i 8487
Uighur 8571
Ukrainian 8575
Urdu 8582
Uzbek 8590
Vietnamese 8673
Volapuk 8679
Walloon 8765
Welsh 6789
Wolof 8779
Xhosa 8872
Yiddish 8973
Yo ruba 8979
Zulu 9085
Ё᭛

27EN
11 Index
A
amplier 21
audio
predened modes 16
specications 21
audio options 13
C
care
product 3
connectors
front connectors 5
control
disc play 11
main unit 4
D
discs
audio options 13
control buttons 11
options 13
play 11
synchronize picture and sound 11
time search 13
titles 13
display
VCD/SVCD menu 12
display panel 4
F
FM antenna 6
H
HDMI
K
karaoke 15
L
language
language code 26
M
main unit
overview 4
specications 21
troubleshooting 22
media formats 20
MP3
connector 5
O
options
picture 14
overview
main unit 4
remote control 4
P
picture
options 14
troubleshooting 22
picture options 14
play
discs 11
radio 21
troubleshooting 23
productspecications 20
R
radio
FM antenna 6
specications 21
tuning grid 15
region codes 20
remote control
batteries 22
overview 4
repeat 13

28 EN
S
safety
use of the product 2
sound
predened sound mode 16
surround sound 16
synchronize picture and sound 11
troubleshooting 23
sound mode 16
speakers
specications 22
surround sound 16
subwoofer
specications 21
synchronize picture and sound 11
T
time search 13
titles 13
trademarks 24
troubleshooting
connection 22
main unit 22
picture 22
play 23
sound 23
tuning grid 15
U
USB
format 21
USB storage device
options 13
specications 21
V
video
synchronize picture and sound 11
video formats 21
video options 13
36
Colombia: 01 800 700 7445
www.philips.com.co
Costa Rica: 0800 507 7445
www.centralamerica.philips.com
Ecuador: 1-800-10-1045
www.centralamerica.philips.com
El Salvador: 800 6024
www.centralamerica.philips.com
Guatemala: 1 800 299 0007
www.centralamerica.philips.com
Honduras
www.centralamerica.philips.com
Nicaragua
www.centralamerica.philips.com
Panamá: 800 8300
www.centralamerica.philips.com
Perú: 0800-00100
www.philips.com.pe
República Dominicana: 1 800 751 2673
www.centralamerica.philips.com
Venezuela: 0800 100 4888
www.philips.com.ve
Certificado de Garantía válido para:
Colombia-Costa Rica-Ecuador-El Salvador-Guatemala-
Honduras-Nicaragua-Panamá-Perú-República Dominicana-Venezuela

29
CERTIFICADO DE GARANTÍA EN ARGENTINA
IMPORTANTE
El presente certificado de garantía es válido únicamente en la República Argentina.
Para que el mismo tenga validez, es imprescindible que esté completado por la casa vendedora y ser presentado por el usuario
conjuntamente con la factura original de compra.
Producto: Modelo:
Nro. De Serie: Fecha de Venta:
Firma y sello de la casa vendedora:
Fabricante/Importador: Philips Argentina S.A.
y/o Fábrica Austral de Productos Eléctricos S.A.
Dirección: Vedia 3892 – Buenos Aires, Argentina.
PHILIPS ARGENTINA S.A. en adelante denominada “la empresa”, garantiza al comprador de este producto, a partir de la fecha
de adquisición y por el término de:
• 6 (seis) meses para los siguientes productos: Mini Sistemas Hi Fi, Micro Sistemas Hi Fi, Parlantes para iPhone & iPod Hi Fi, Repro-
ductores de CD Portátiles, Stereos para automóvil, Parlantes y Potencias para automóvil, Reproductores de audio digital, Radio relojes,
Radios portátiles, Cámaras fotográficas digitales y Marcos digitales para fotos, Auriculares / audífonos, accesorios para aplicaciones
•1 (un) año para los siguientes productos: Home Theaters, Reproductores de Blu-ray, Reproductores de DVD, Micro Theaters / Micro
Sistemas con DVD, Mini Sistemas Hi Fi con reproducción de DVD, Reproductores de DVD Portátiles, Teléfonos,MP3 y MP4
el normal funcionamiento contra cualquier defecto de fabricación y/o vicio de material, y se compromete a reparar el mismo
–sin cargo alguno para el adquiriente- cuando el mismo fallare en situaciones normales de uso y bajo las condiciones que
a continuación se detallan:
1. Este certificado de garantía es válido únicamente en la República Argentina.
2. El certificado debe ser completado por la casa vendedora y ser presentado por el usuario conjuntamente con la factura original de
compra.
3. Serán causas de anulación de esta garantía, en los casos que corresponda:
3.1. Uso impropio o distinto del uso doméstico.
3.2. Exceso o caídas de tensión eléctrica que implique uso en condiciones anormales.
3.3. Instalación y/o uso en condiciones distintas a las marcadas en el “Manual de instalación y uso” que se adjunta al producto.
3.4. Cualquier intervención al artefacto por terceros no autorizados por la empresa.
4. La garantía carecerá de validez si se observare lo siguiente:
4.1. Enmiendas o raspaduras en los datos incluidos en la etiqueta del artefacto, certificado de garantía o factura.
4.2. Falta de factura original de compra que detalle tipo de artefacto, modelo, número de serie y fecha que coincida con los del
encabezamiento del presente certificado.
5. No están cubiertos por esta garantía los siguientes casos:
5.1. Los daños ocasionados al exterior del gabinete.
5.2. Las roturas, golpes, caídas o rayaduras causadas por traslados.
5.3. Los daños o fallas ocasionados por deficiencias, sobretensiones, descargas o interrupciones del circuito de conexión del arte-
facto a fuentes de energía (Red eléctrica, pilas, baterías, etc) que no sean las especificadas en el Manual de uso del mismo.
5.4. Las fallas, daños, roturas o desgastes producidos por el maltrato o uso indebido del artefacto y/o causadas por inundaciones,
incendios, terremotos, tormentas eléctricas, golpes o accidentes de cualquier naturaleza.
5.5. Las fallas o daños ocasionados en desperfectos en la línea telefónica.
5.6. Las fallas producidas por una mala recepción ocasionada en el uso de una antena deficiente o en señales de transmisión débiles.
6. Las condiciones de instalación y uso del artefacto se encuentran detalladas en el Manual de Uso del mismo.
7. La empresa no asume responsabilidad alguna por los daños personales o a la propiedad al usuario o a terceros que pudieran causar
la mala instalación o uso indebido del artefacto, incluyendo en este último caso a la falta de mantenimiento.

30
GRAN BUENOS AIRES
Florencio Varela Casa Torres S.A. San Martín 2574 (011) 4255-5854
(011) 4467-7140
Lomas de Zamora Attendance S.A. Av. Hipólito Yrigoyen 9228 (011) 4292-8900
(011) 4239-2115
Lomas de Zamora Electarg S.R.L. Italia 78 (011) 4244-0397
(011) 4224-6640
Moreno Argentronica Teniente Camilli 102 (0237) 463-9500
Morón Servotronic Ntra. Sra. Buen Viaje 1222 (011) 4627-5656
Olivos Electarg S.R.L. D F Sarmiento 3562 (011) 4799-1945
(011) 4794-7117
Quilmes Casa Torres S.A. Pellegrini 140 (011) 4255-5854
(011) 4253-6700
(011) 4654-8003
Ramos Mejía Electarg S.R.L. Belgrano 224 (011) 4656-0619
San Isidro MC Zona Nort SRL Av. Centenario 899 (011) 4747-4040
San Miguel TecnoSanMiguel Belgrano 999 (011) 4664-4131
Tigre Pantronic Almirante Brown 529 (011) 4749-4040
Villa Ballester Servotronic José Hernandez 3064 (011) 4767-2515
(011) 4768-5249
8. En caso de falla, el usuario deberá requerir la reparación a la empresa a través del Service Oficial y/o Talleres Autorizados más próxi-
mos a su domicilio y cuyo listado se acompaña al presente. La empresa asegura al usuario la reparación y/o reposición de piezas
para su correcto funcionamiento en un plazo no mayor a 30 días contados a partir de la fecha de solicitud de reparación, salvo caso
fortuito, fuerza mayor.
9. Toda intervención del servicio técnico realizada a pedido del usuario dentro del plazo de garantía, que no fuera originada por falla o
defecto alguno cubierto por este certificado, deberá ser abonada por el interesado de acuerdo a la tarifa vigente.
10.El presente certificado anula cualquier otra garantía implícita o explícita, por la cual y expresamente no autorizamos a ninguna otra
persona, sociedad o asociación a asumir por nuestra cuenta ninguna responsabilidad con respecto a nuestros productos.
11.En caso de que durante el período de vigencia de esta garantía el artefacto deba ser trasladado a las Delegaciones Oficiales y/o
Talleres Autorizados de Service para su reparación, el transporte será realizado por la empresa y serán a su cargo los gastos de flete
y seguros y cualquier otro que deba realizarse para su ejecución.
Centros de Atención al Cliente
CAPITAL FEDERAL
ELECTARG S.R.L.
Centro: Av. Córdoba 1357 - Tel.: (011) 4811-0084/9/1050
Caballito: J. M. Moreno 287 - Tel.: (011) 4903-6967/ 6854/8983
Saladillo: Saladillo 2527 - Tel.: (011) 5554-9400
ARGENTINA
Tel.: 0800-888-7532
(Número gratuito)
(011) 4544-2047
Para más Información visite nuestra web: www.philips.com.ar
ATTENDANCE S.A.
Av. Monroe 3351 | Tel.: (011) 4545-5574 - 4545-4700
DIG TRONIC
Av San Martín 1762 | Tel.: (011) 4583-1501
GATTUSO DEMETRIO
Juan Bautista Alberdi 3425 | Tel.: (011) 4619-1631
BUENOS AIRES
Azul Herlein Raúl Horacio Av. 25 de Mayo 1227 (02281) 42-8719
Bahía Blanca Neutron Soler 535 (0291)453-5329
Baradero
Juan Francisco Mazzarella
Araoz 847 (03329) 48-4321
Berisso Electrónica Bander Calle 158 n°107 (0221) 46-14984
(03489) 42-0372
Junín José Capurzio Primera Junta 436 (02346) 42-4235
Junín Junin Service Alsina 537 (02346) 44-2754
La Plata Highvision Calle 60 n°1033 (0221) 45-20180
Luján
Electro Hogar - Scamardella
25 de Mayo 280 (02323) 43-8931
Mar de Ajó Tauro Electrónica Jorge Newbery 1434 (02257) 42-1750
Mar del Plata
Central Service – Tonelli
Olazabal 2249 (0223) 472-1639
(0223) 472-9367
Mar del Plata Service Integral Salta 3519 (0223) 476-0108
(0223) 476-4918
Marcos Paz Tecnicentro – Leiva Monteagudo 208 (0220) 477-0334
Necochea Electrónica Camejo Calle 63 1745 (02262) 42-6134
Pehuajó Calcagni Carlos Alberto Zubiria 794 (02396) 47-2665
Pergamino ACVSistemas Dr. Alem 758 (02477) 42-1177
San Nicolás Servitec Av. Alvarez 148 (03461) 45-4729
San Pedro Electrónica Menisale Mitre 1695 (03329) 42-5523
Tandil Lazzarini Oscar Rafael Pelegrini 524 (02293) 44-2167
Tres Arroyos Saini Fabian y Sergio Av. Belgrano 562 (02983) 42-7369
Zárate Electrónica Spinozzi Ituzaingo 1030 (03487) 42-7353

31
CATAMARCA
S. F. del Valle de Catamarca
Omicron Central de Servicios
San Martin 225 (03833) 45-1498
CHACO
Resistencia Freschi Jorge Oscar Av. Hernandarias 431 (03722) 42-6030
CHUBUT
Comodoro Rivadavia
C.A.S. SRL Alem 145 (0297) 444-2629
(0297) 15-625-0555
Esquel Laboratorio Electronico Mitre 738 (02945) 45-1457
Pto. Madryn Center Electrónica Sarmiento 588 (02965) 45-8439
Trelew Fagtron Electrónica Brasil 253 (02965) 42-7073
CORDOBA
Alta Gracia
Serv. Téc. Especializado – Bisciglia
Velez Sarsfield 19 (03547) 15-45-9936
(03547) 43-0848
Córdoba Electarg S.R.L. Avenida Colón 544 (0351) 425-5999
(0351) 15-670-0070
Córdoba Servelco SRL Pje. E. Marsilla 635 (0351) 472-4008
(0351) 473-2024
Río Cuarto Capaldi Abel Paunero 832 (0358) 462-3003
Río Tercero Service Omega Homero Manzi 149 (03571) 42-3330
Villa María Grasso Electrónica Bv. Alvear 541 (0353) 452-1366
Villa María
Vanguard Sistemas Electrónicos
México 421 (0353) 453-2951
CORRIENTES
Corrientes Los Magos San Martin 589 (03783) 46-6791
ENTRE RIOS
C. del Uruguay LTV Service 9 de Julio 1442 (03442) 43-3026
Concordia El Taller – Mavric San Martin 297 (0345) 421-7069
Gualeguaychú
Centro de Servicios Electrónicos
Santiago Diaz 22 (03446) 42-8380
Paraná Laser Electrónica Pascual Palma 382 (0343) 431-3056
(0343) 432-0636
FORMOSA
Formosa Vallejos Televisión Mitre 276 (03717) 43-5985
JUJUY
Perico
Electrónica Pal-Color – Porfidio
Escolastico Zegada 47 (0388) 49-11696
S. S. de Jujuy Total Service Jujuy Urdininea 233 (0388) 431-0911
LA PAMPA
Gral. Pico Electrónica M.D. Calle 20 N° 370 (02302) 42-5047
Santa Rosa Tecnocyf Centro de Servicios Av. Roca 179 (02954) 42-6602
(02954) 42-6836
LA RIOJA
La Rioja Telecolor Vásquez España 450 – B° Evita (03822) 46-5354
MENDOZA
Godoy Cruz Video Sistemas
Fray Luis Beltrán 1729
(0261) 424-1111/37
(0261) 424-9601
San Rafael Diger Service Técnico Chile 314 (02627) 42-5620
MISIONES
El Dorado Teleson Polonia 24 (03751) 42-4014
(03751) 42-3043
Leandro N. Alem Megatones C. de Obligado 247 (03754) 42-1236
Posadas Electrónica Cejo Av. Lopez Torres 2623 (03752) 42-5921
(03752) 46-7953
NEUQUEN
Cutral-Có Servitran Di Paolo 570 (0299) 496-1957
Neuquén Gatti Electrónica J.A. Roca 1124 (0299) 443-4855
(0299) 443-1489
Neuquén Tevesur Fotheringham 110 (0299) 443-0679
S. Martín de los Andes
Zener Electrónica Elordi 614 (02972) 42-5155
RIO NEGRO
Río Colorado A.V.C Electronica Saenz Peña 297 (02931) 43-2688
Bariloche
HC Electronica - Socolovky
Av. 12 de Octubre 1575 (02944) 43-0219
SA LTA
Salta Service Salta Alvarado 1066 (0387) 431-7256
SAN JUAN
San Juan King Electrónica Mendoza 802 (Sur) (0264) 422-8918
(0264) 422-2720
SAN LUIS
San Luis Rizzotto Carlos Antonio Junin 679 (02652) 42-8747
Villa Mercedes Electrónica Ciancia León Guillet 380 (02657) 42-3990
SANTA CRUZ
Rio Gallegos Cosmos Video Mariano Moreno 46 (02966) 42-0456
(02966) 43-7902
SANTA FE
Rafaela Francesconi Reparaciones Bv. Roca 475 (03492) 42-2292
(03492) 50-2292
Reconquista Sponton Alfredo Habbergger 1516 (03482) 42-1523
Rosario Electarg S.R.L. Italia 1320 (0341) 421-7700
Rosario
Imagen y Sonido – Allaria
Pte. Roca 371 (0341) 440-1598
Rosario SIP. S.R.L. España 470 (0341) 425-2625
(0341) 425-8180
San Jorge Mandrile Alcides H.Yrigoyen 1543 (03406) 44-0513
Santa Fé Electro TV Talcachuano 7301 (0342) 46-03248
Santa Fé Litoral Service SRL 9 de Julio 2785 (0342) 453-3563
Santa Fé Litoral Service SRL 9 de Julio 2785 (0342) 453-3563
Santa Fé Siglo XXI Aristóbulo del valle 4554 (0342) 457-2827
Santo Tome Siglo XXI Falucho 2201 (0342) 475-1528
Venado Tuerto
Degiovanni Adalberto Juan
Av. Hipolito Yrigoyen 1289 (03462) 42-4613
(03462) 46-3548
SANTIAGO DEL ESTERO
Stgo. del Estero Barchini Raúl Enrique Rivadavia 833 (0385) 421-3872
TUCUMAN
S.M. De Tucumán Edu Mag SRL Marco Avellaneda 129 (0381) 422-9078
AP/11/13

32
CERTIFICADODEGARANTÍAVALIDOEN
BOLIVIA,CHILE,PARAGUAYYURUGUAY
¡Felicitaciones!AcabadeadquirirunproductoPhilips‐LifestyleEntertainment.
Parasutotaltranquilidad,garantizamoselperfectofuncionamientodesuproductoduranteelperíododegarantíaestipulado
enestedocumento,yantecualquieremergenciaponemosasudisposiciónnuestraReddeServiciosTécnicosAutorizados
encadapaís.
Philipsgarantizaalcompradordeesteproducto,elnormalfuncionamientocontracualquierdefectodefabricacióny/ovicio
dematerial,ysecomprometearepararelmismo,incluyendolamanodeobranecesaria,componentesypiezasque
necesitenserreemplazadas‐sincargoalgunoparaeladquiriente‐cuandoelmismofallareensituacionesnormalesdeusoy
bajolascondicionesqueacontinuaciónsedetallan.
IMPORTANTE
1. Elpresentecertificadodegarantíaesválidoúnicamenteenlossiguientespaíses:
1.1. EstadoPlurinacionaldeBolivia,
1.2. RepúblicadeChile,
1.3. RepúblicadelParaguay,
1.4. RepúblicaOrientaldelUruguay.
2. Paraqueelmismotengavalidez,asegúresedequelossiguientesdatosseencuentrencompletosporlacasavendedora
ypresénteloconjuntamenteconelcomprobanteoriginaldecompra,facturaoboleta.
Producto:
Modelo:
Nro.DeSerie:
FechadeCompra:
LugardeCompra:
Firmaysellodelacasavendedoraodistribuidor:
Datosdelcomprador:
Nombre:
Céduladeidentidad/RUT:
Dirección:
Teléfono:

33
3. Lavalidezdeestagarantía,rigeapartirdelafechadeadquisiciónyporeltérminodelosplazosmencionadosenel
siguientecuadro,paracadatipodeproducto:
PRODUCTOGARANTIA PRODUCTO GARANTIA
AUDIOPARAELHOGARENTRETENIMIENTOPORTÁTIL
MiniSistemas1AÑO Radiosportátiles 1AÑO
MicroSistemas1AÑO Parlantesportátiles 6MESES
ParlantesconDockAndroid/Apple 1AÑO ParlantesBluetooth 6MESES
Radiorelojes(conosindock)1AÑO ReproductoresdeCDportátiles6MESES
ParlantesparaPC6MESES Cámarasfotográficasdigitales1AÑO
VIDEOPARAELHOGARReproductoresdeMP3yMP41AÑO
HomeTheatersySoundBars 1AÑO ReproductoresdeDVDPortátiles1AÑO
ReproductoresdeBluray1AÑO Tablets 1AÑO
ReproductoresdeDVD 1AÑO ACCESORIOS
MiniSistemasconDVD1AÑO Marcosparafotos 1AÑO
MicroSistemasconDVD1AÑO Teléfonosinalámbricos 1AÑO
ENTRETENIMIENTOPARAAUTOMOVILESCámarasdemonitoreoporWifi6MESES
Autoradios1AÑO Auriculares/Audífonos 6MESES
Parlantesypotencias1AÑO Accesoriosparaaplicaciones 6MESES
4. Seráncausasdeanulacióndeestagarantía,enloscasosquecorresponda:
4.1. Elusoinadecuadodelproductoodistintodelusodoméstico.
4.2. Excesoocaídasdetensióneléctricaqueimpliquensuusoencondicionesanormales.
4.3. Lainstalacióny/ousoencondicionesincorrectasy/odistintasalasindicadasenel“Manualdeuso”quese
adjuntaalproducto.
4.4. CualquierintervencióndelproductoportercerosopersonasajenasalosServiciosTécnicosAutorizadosde
Philips,quienessonlosúnicosparacalificaryrepararlasaveríasdelosproductos.
4.5. Enmiendasoraspadurasenlosdatosincluidosenlaetiquetadelartefacto,certificadodegarantíaofactura.
4.6. Faltadecomprobanteoriginaldecompraquedetalletipodeartefacto,modelo,númerodeserieyfechaque
coincidaconlosdelencabezamientodelpresentecertificado.
5. Noestáncubiertosporestagarantíalossiguientescasos:
5.1. Losdañosocasionadosalexteriordelgabinete.
5.2. Lasroturas,golpes,caídasorayadurascausadasportrasladosodescuidosdelusuario.
5.3. Losdañosofallasocasionadospordeficiencias,sobretensiones/sobrevoltaje,descargasointerrupcionesdel
circuitodeconexióndelartefactoafuentesdeenergíaeléctrica(Redeléctrica,pilas,baterías,etc).
5.4. Lasfallas,daños,roturasodesgastesproducidosporelmaltratoousoindebidodelartefactoy/ocausadas
porinundaciones,incendios,terremotos,tormentaseléctricas,golpesoaccidentesdecualquiernaturaleza.
5.5. Lasfallasproducidasporunamalarecepciónocasionadaenelusodeunaantenadeficienteoenseñalesde
transmisióndébiles.
5.6. Lasfallasodañosocasionadosendesperfectosenlalíneatelefónica.
6. LascondicionesdeinstalaciónyusodelartefactoseencuentrandetalladasenelManualdeUsodelmismo.
7. Laempresanoasumeresponsabilidadalgunaporlosdañospersonalesoalapropiedaddelusuariooatercerosque
pudierancausarlamalainstalaciónousoindebidodelartefacto,incluyendoenesteúltimocasoalafaltade
mantenimiento.
8. Encasodefalla,elusuariodeberárequerirlareparaciónalaempresaatravésdelServicioTécnicoAutorizadomás
próximoasudomicilioycuyolistadoacompañaelpresentedocumento.Laempresaaseguraalusuariolareparacióny/o
reposicióndepiezasparasucorrectofuncionamientoenunplazonomayora30díascontadosapartirdelafechade
solicituddereparación,salvocasofortuitoodefuerzamayor.
9. Todaintervencióndelserviciotécnicorealizadaapedidodelusuariodentrodelplazodegarantía,quenofueraoriginada
porfallaodefectoalgunocubiertoporestecertificado,deberáserabonadaporelinteresadodeacuerdoalatarifa
vigente.
10. Elpresentecertificadoanulacualquierotragarantíaimplícitaoexplícita,porlacualyexpresamentenoautorizamosa
ningunaotrapersona,sociedadoasociaciónaasumirpornuestracuentaningunaresponsabilidadconrespectoa
nuestrosproductos.

34
CENTROSDEATENCIÓNALCLIENTE
BOLIVIACHILEPARAGUAYURUGUAY
Tel.:800100664
(Númerogratuito)
Tel.:6007445477
www.philips.cl
Tel.:0098005410004
(Númerogratuito)
Tel.:0004054176
(Númerogratuito)
CENTROSDESERVICIOTÉCNICOAUTORIZADOS
CENTROSDESERVICIOTÉCNICOAUTORIZADOSENBOLIVIA
CESER–BOLIVIASRL
GerenteGeneralIng.JuanPasacheC.Jpasache@entelnet.bo(02)212‐4913
LaPazSrJoséLuisMamaniCalleVillalobosN.100esq.Busch,
Miraflores(02)222‐4924
LaPaz
(SoloTalleres)Sr.JoséLuisMamaniCalleVillalobosN.1337,entreAv.Saavedra
yAv.Busch,Miraflores._
ElAltoSr.HeribertoVeraCalle4N.444,entreDemetrioMoscosoy
FranciscoCarbajal,VillaDoloresCel775‐44269
CochabambaSr.RolandoRochaA.
CalleUruguayN.211esq.NatanielAguirre(04)450‐1894
(04)412‐6762
CochabambaSr.RembertoRocha
Sr.AmilcarDelgado
CalleArqueN.1904,entreAngosturayAv.
Ayacucho,ZonaSudfrentearielesestación(04)412‐4724
QuillacolloSr.FernandoRochaAv.BlancoGalindoN.410Km13,5,al
costadodelaResidencialReyna(04)436–7513
SantaCruzSr.AntonioAle.CalleColónN.321,enterPariyMercado(03)330‐3292
(03)311‐4649
SantaCruz
(Líneablanca)Sr.DavidParedes.Av.Paragua2415‐A,entre2doy3eranillo
entrandoporcalleSocoris(03)390‐1672
OruroSr.JuanCarlosCampos.CallePagadorN.5779,entreAyacuchoy
Cochabamba(02)511‐1866
SucreSr.AmaelCochaCallePandoN.10,ZonaMercado
Campesino(04)64‐65089
TarijaSr.RubenMontoyaCalleJunin767,entreBolivareIngavi,
Cercado(04)66‐58267
MonteroCentrodeAcopio
(noatiendeclientes)
Av.CircunvalaciónN.800esq.BuenosAires,
Barrio25deDiciembre(03)92‐27523
PotosiSr.AmaelCochaCalle1erodeAbrilN.700,entreCalle
BustillosyChayanta,ZonaCentralCel604‐74537
CENTROSDESERVICIOTÉCNICOAUTORIZADOSENCHILE
IIquiqueServitecHernánFuenzalida1030 57‐ 2575139
IIAntofagastaCasaDeltaPrat78955‐ 2268883
55‐2261788
CalamaServicioTécnicoCarvajal Latorre1452 55‐ 2361046
IIICopiapóElectrónicaElPalomarSalitreraRosario2192,ElPalomar52 ‐2233328
52‐2364767
IV
LaSerenaCentroTécnicoAcuarelaBalmaceda37351‐ 2222729
51‐2225229
LaSerenaElectrónicaNuevaZenerO”Higgins 701B51 ‐2224576
CoquimboElectronicaBelenLosClarines870Psindempart 51 ‐2261052
V
SanFelipeElectronicaMaxEcheverriaAv.BernardoO´Higgins279‐A34‐ 2505064
34‐2535433
LimacheElenaÁlvarezUrmeneta365 33‐ 2412553
ValparaisoServicioTec.ViñadelMar Huito572 32‐ 2253925
ViñadelMarServicioTec.ViñadelMar Quinta209 32‐ 2882691
VI
RancaguaMultivisiónIbieta223 72‐ 2228429
SanFernandoElectrónicaColchaguaEspaña711 72‐ 2717207
SantaCruzElectronicaLivajAv.Errázuriz1096–A 72‐ 2821322

35
VII
CuricóAudioVideoSistemasLtda. Vidal671 75‐ 2311561
TalcaAudiovisión9Oriente112171‐ 2225974
71‐2233540
TalcaServital7Norte3060 (movil)9‐5491620
TalcaCentrodeAtenciónTécnica
Ltda.2Sur1667,entre9y10Oriente71 ‐2212576
71‐2210729
LinaresTecnihogarLautaro533 73‐ 2213031
VIII
ChillánTelestereo5deAbril336
42‐ 2224155
42‐2329272
42‐2231515
ConcepciónCristinaC.AvelloMLasHeras259,2°piso.41‐ 2232641
41‐2981508
LosÁngelesJulioQuirozGalvarino420 43‐ 2313161
IX
AngolABTElectronicaCovadonga1475 (movil)7‐4564738
TemucoEsina(Temuco)ManuelMontt19845‐ 2261885
45‐2242727
CastroBRADIServiciosde
IngenieriaSpASargentoAldea58965‐2534647
PuconMarceloAlejandroCiraulo Brasil445 45 ‐2441823
X
OsornoServitodoElectrónicaPerez559 64‐ 2232874
PuertoMonttFullServiceAntonioVaras70B65‐ 2717720
65‐2254867
XICoyhaiqueServitelcoGeneralParra220,Loc267‐ 2231149
XIIPuntaArenasElectrónicaMTBelisarioGarcia0781 61‐ 2218841
RM
ProvidenciaPlusServiceAv.SantaMaría0858‐ Providencia 2‐ 24840800
LaFloridaINSELAvenida LaFlorida9039 2‐ 22873808
MaipúPCElectrónicaChacabuco271‐ Maipu 2‐ 25340927
MelipillaJaimeOsorioyCia.Ortuzar164Melipilla 2‐ 28323153
XIVValdiviaEsina(Valdivia)Arauco842 63‐ 2253505
XVAricaCentroTecnicoIntegralJuanNoe123358‐ 2231981
58‐2314026
CENTROSDESERVICIOTÉCNICOAUTORIZADOSENPARAGUAY
AsunciónUmesysSRLR.I.6Boquerón1559,c/SerafinaDávalos(021)623835
AsunciónSirioSRLIturbe470e/cerroCoráy25deMayo(021)449753
(021)447333
AsunciónSCJServiceAv.Gral.ArtigasN°1295c/Av.Gral.Santos(021)203465
(021)226583
CiudaddelEsteAudio&VideoPasodePatriac/Av.Gral.BernardinoCaballero(061)502962
ConcepciónElectrónicaConcepciónProf.HernanApontec/AntonioCaba (Bo.
Primavera)(0331)240960
CoronelOviedoElectrónicaTotalGral.EugenioA.GarayNº148C/Tte.Fariña(0521)205466
EncarnaciónMakotoServicioTécnicoVillarrica472c/CarlosAntonioLópez(071)202616
(071)202516
PedroJuan
CaballeroVICSAElectrónicaBrasilc/TeresaRoaCaballero(0336)273399
SanEstanislaoServimasElectrónicaCoronelZoiloGonzálezc/Antequera (0981)977654
VillarricaNéstorElectrónicaRepúblicaArgentinac/ItaYbate(0541)40803
(0981)631619
CENTROSDESERVICIOTÉCNICOAUTORIZADOSENURUGUAY
MontevideoCKLUruguayS.R.L. Gaboto1550esquinaMercedes(598)2402‐3951
(598)2400‐8735

Specifications are subject to change without notice
© 2014 Koninklijke Philips N.V. All rights reserved.
Trademarks are the property of Koninklijke Philips N.V. or their respective owners.
HTD5520/5550/5580_55_UM_V1.0
